Embed Size (px)
Citation preview
Getting Started with
AstroImager 2.6
AstroTelescope 1.12
AstroGuider 1.7
AstroDSLR 1.4
INDI Control Panel 2.2
AstroImager, AstroTelescope, AstroGuider and AstroDSLR are powerful, but still easy to use astrophotography applications for Apple Mac computers built around INDI standard.
Even if they can be used separately, they are meant to work together and with other astronomy and astrophotography tools for OSX or iOS provided by CloudMakers like INDI Server for OSX, INDI Control Panel, FITS Preview, iINDI or NightSky Toolbox.

Now you can purchase AstroImager, AstroTelescope, AstroGuider and INDI Control Panel directly from CloudMakers (PayPal payment) and register applications purchased in AppStore to allow faster updates and more flexible installation options. AstroDSLR is available only directly from CloudMakers.
If you purchased any of the applications in Apple AppStore, select “Register AppStore purchase” from the menu and enter your e-mail address. If you started to use any of the application as a trial version, select “Buy License” from the menu (you will be redirected to EULA with the option to continue to PayPal). Once you have PayPal transaction-id, you can select “Enter License” and register the application with your e-mail address and transaction-id on any number of the computers you own.
Copyright © 2015-2016 by CloudMakers, s. r. o. All rights reserved. Information in this document is subject to change without notice. 2
AstroImager AstroImager is an image capture application for the astrophotography. It can preview images in the infinite loop or capture and save a batch of images to a selected folder with any file name prefix, count, duration and time lapse, browse captured images and show them in Finder, zoom and stretch them automatically or manually. It can measure FWHM and HFD and the drift of selected stars to help easier and faster focus and align of an equatorial telescope mount. It can also control motorized filter wheels and focusers and focus automatically.
Its built-in drivers support the following hardware:
● ATIK Titan Mono & Colour, ● ATIK 3xx/4xx family CCDs, ● ATIK One 6 & 9 (and its internal filter wheel), ● ATIK 11000/4000, ● ATIK GP Mono (1280x960 and 640x480 8-bit modes only), ● ATIK VS/Infinity, ● ATIK EFW2 filter wheel, ● Starlight Xpress CCDs (all USB 2.0 cameras), ● Starlight Xpress filter wheel, ● ZWO ASI USB 3.0 cameras, ● QSI CCD cameras (and internal filter wheels), ● FLI CCD cameras and filter wheels, ● Shoestring Astronomy FCUSB focuser controller.
but it can be used as a client to any remote or local INDI server with any supported CCD, filter wheel or focuser controller as well.
AstroImager also controls the set point cooling and the mechanical shutter of attached cameras (if available). Images are stored in FITS format using CFITSIO library with user defined keywords and can be debayered automatically during preview with custom offsets. Two separate filter name sets can be used for easier change of carousels.
To run AstroImager you need Apple Mac running OS X 10.9 or later.
Running AstroImager for the first time…
When executed for the first time, the application shows the preference sheet to set up your personal settings. There are five tabs on the sheet – Camera , Filter Wheel , Focuser, FITS , Built-in Drivers and INDI . Please visit all of them before clicking on OK button.
On Camera tab you can control information encoded to image file name, enable or disable options affecting an image preview. When Debayer captured images option is turned on, the application assumes, that the camera you are using is an one-shoot colour (OSC) camera with bayer mask on its CCD chip. Even if captured images are always saved in the raw format to allow a correct image calibration and post-processing, it will be shown in colour in the application. You can set Offset X and Offset Y values to 0 or 1 to interpret RGBG, GRGB or RGGB patterns correctly.
When Show crosshair reticle option is turned on, a green reticle will be drawn over a captured image preview to help the precise telescope mount alignment. To keep utility panels visible and on
Copyright © 2015-2016 by CloudMakers, s. r. o. All rights reserved. Information in this document is subject to change without notice. 3

top while AstroImager is not active turn off Hide utility panels when main windows is not active checkbox. To generate single filename sequence for multiple batches turn off Reset image index counter for each batch checkbox.
On Filter Wheel tab you can choose the active filter set (there are two of them to make the change of the filter carousels easier, e.g. colour and narrow band sets) and set the names of the filters in each set. The names are used both for a filter selection in the main application window, FITS metadata and for the saved image name.
Please note, that you may need to reselect your filter wheel in the main application window to reflect the change on this tab.
On Focuser tab you can set interval for focuser speed slider, focuser backlash (used in stepper mode only) and set, whether time based focusers (e.g. those controlled by Shoestring FC USB) should work in simulated relative stepper mode (moves by specified steps inward or outward each time button is pressed) or continuous mode (moves inward or outward while button is pressed).
On FITS tab you can set your custom keywords and their values to be saved with each captured image in the FITS image header.
Please note, that even if you can choose whatever keyword you want, for the FITS image compatibility is better to use only well-known names defined in one of existing dictionaries (e.g. NASA, NOAO or MaxIm DL).
Do not use keywords added automatically (e.g. image size, temperature or filter name).
On Built-in Drivers tab you can select drivers to be loaded on application startup. When executed for the first time, all drivers are selected, but you can uncheck drivers for the hardware you don’t actually have (or simulator driver if you don’t want to use it) to reduce memory footprint and increase overall application stability.
Please note, that you have to restart AstroImager to actually enable or disable the driver. Driver can’t be unloaded while application is running.
On INDI tab you can view detected INDI servers (if you are using INDI Server for OS X it can be located using Bonjour service) and add or remove them manually. Devices from the servers shown on this page will be available to choose from in the main application window.
To add a server, enter a hostname and a port number into Host and Port fields and click [+] button in the lower left corner of the Available INDI servers list. To remove the server, select it in Available INDI servers list and click [-]
Copyright © 2015-2016 by CloudMakers, s. r. o. All rights reserved. Information in this document is subject to change without notice. 4

button. Please note, that you can remove only a manually added server.
The semaphore icon on the left of the server name indicates a connection status. Gray colour means not connected, yellow means connection in progress and green means connection established.
The number on the right of the server name is the port number. It is usually 7624 (IANA assigned port number for INDI) but some special use servers (like integrated INDI in AstroImager or AstroTelescope) are using ephemeral ports with high port numbers.
If you have INDI Server for OS X or INDI Control panel installed on your machine, you can start them by clicking on one of the buttons in the lower right corner of the sheet.
The main application window
When you are happy with the settings, click OK button to save them (you can change them anytime later) and you will see the main application window.
It has the toolbar, status bar and four panels (the numbers in the red callouts correspond to the number in the following list):
1. The toolbar on the top with toolbar buttons and sliders for the fast access to the following common operations (from left to right): ● open the preference sheet, ● start the image preview infinite loop (for focusing and/or telescope alignment), ● start the autofocus procedure, ● start the image capture batch, ● abort the preview loop or the capture batch, ● set/reset subframe (select or clear subframe in image preview by mouse first), ● move focuser in, ● stop focuser, ● move focuser out,
Copyright © 2015-2016 by CloudMakers, s. r. o. All rights reserved. Information in this document is subject to change without notice. 5

● zoom in the preview, ● zoom in the preview to 100%, ● zoom out the preview to fit the window, ● zoom out, ● set the black point, ● set the automatic black and white point (automatic mode can be turned on by clicking the
button and turned off by moving the black or white point slider thumbs), ● set the white point, ● show the previous captured image in the batch, ● show the current image in Finder, ● show the next captured image in the batch, ● open the Drift, Bahtinov mask, sequencer and plate solver helper panels.
All operations are also available from the application menu.
2. The camera control panel with the following parameter fields (top down): ● active camera (the combo box contains all available local or remote devices), ● active binning (only available values are shown), ● checkbox for controlling mechanical shutter (when available), ● set point cooler temperature (when available, you can choose from the list or enter any
value), ● image exposure duration (you can choose from the list or enter any value),
3. The filter wheel control panel with the following parameter fields (top down): ● active filter wheel (the combo box contains all available local or remote devices), ● active filter position (only available values are shown).
4. The batch control panel with the following parameter fields (top down): ● time lapse between image captures (you can choose from the list or enter any value), ● image count in the batch, ● image file base name (will be suffixed with the filter name and the image index).
5. The image histogram and image statistics panel.
6. The focuser control panel with the following parameters (top down): ● active focuser (the combo box contains all available local or remote devices), ● focuser speed slider (limits can be set in preference panel on Focuser tab). ● step size (read-only if focuser doesn’t support move to relative position) for manual control
by buttons in toolbar, ● initial step size (for automatic focusing), ● final step size (for automatic focusing), ● backlash for inward movement, ● backlash for outward movement.
7. PSF panel with FWHM, HFD, peak and background values for selected star.
8. The status bar with the following fields (left to right): ● last operation result (descriptive text), ● current mouse position and the pixel value (when mouse cursor is positioned over the
image), ● current image index (when capturing the image batch), ● current focuser position and ambient temperature (when available), ● current temperature of CCD chip (when available).
9. The image preview panel with the zoomed and stretched image itself and ● image capture progress bar on the bottom and
Copyright © 2015-2016 by CloudMakers, s. r. o. All rights reserved. Information in this document is subject to change without notice. 6

● image capture status semaphore in the bottom right corner (gray colour means idle, yellow colour means capture in progress, red colour means download in progress and green colour means capture done).
Please note, that not every button, slider or field is enabled in every situation or context. For the most of the operations some of available cameras have to be selected and some image have to be captured.
Autofocus procedure
To start autofocus procedure, select camera and focuser (time based focuser should be used in stepper mode), set focuser parameters, start preview and select bright, but not oversaturated star, click autofocus button and wait until procedure will finish.
This is how autofocus routine works:
1. every time 4 images are averaged before further processing, quality of focus is computed as peak/HFD/FWHM,
2. in the first step it try to move focuser out by initial step, if quality is worse than the last time, it will switch direction immediately and use initial step again,
3. it will start with initial step and moves focuser out or in while quality is better than in previous step, otherwise it will switch direction (with backlash), divide step by 2 and repeat until step is bigger or equal to final step,
4. finally it just make one step + backlash back and switch to preview.
The drift info panel
When the image preview loop or the image capture batch is in progress you can select the star in the image preview and open Drift info panel by clicking Drift toolbar button.
Drift panel shows the graphs of the current position of the centroid of the selected star in respect to its initial position.
Please note, that the graphs are cleared every time you selected the star in the preview image.
You can use the drift graphs for the telescope mount alignment using the drift method.
Bahtinov mask helper panel
AstroImager can help you to focus faster and more reliably with Bahtinov mask focusing aid.
To use it just point your telescope to some bright star, put the mask on, open helper panel and select rectangle by the mouse over the captured image to center the diffraction pattern in the panel view. Once centered, two blue and one red (not properly focused) or green (properly focused) line will appear and show the intersection of diffraction spikes. Telescope is properly centered when the focus error is within critical focus zone.
Copyright © 2015-2016 by CloudMakers, s. r. o. All rights reserved. Information in this document is subject to change without notice. 7

Due to limitation of the line detection algorithm make sure, that each diffraction spike is always crossing the opposite sides of the frame.
Please note, that CCD resolution and telescope focal length and ratio is needed to calculate the focus error and the critical focus zone, so these figures are available only in case that AstroImager is connected to AstroTelescope providing correct values. Absolute values in pixels are shown instead if AstroImager is running alone.
The sequencer panel
AstroImager can be used to capture sophisticated sequences of images, each batch with different duration, time lapse time, image count, base file name, binning and filter. Whole sequence can be repeated to allow both RRRGGGBBB and RGBRGBRGB approaches.
To use it, open Sequencer panel enter required parameters (or leave them empty for use the values from the previous batch or current settings, only selected lines of the table will be used) and click Execute button.
Sequence execution will continue in the background even if panel is hidden until aborted from Sequencer panel or toolbar.
The plate solver panel
AstroImager is using astrometry.net package for the plate solving. You can use either the public one on the http://nova.astrometry.net over web services (the easy way) or your private installation of Astrometry for OS X (GUI and web service wrapper around OS X astrometry.net port available from our web).
Copyright © 2015-2016 by CloudMakers, s. r. o. All rights reserved. Information in this document is subject to change without notice. 8

Please note, that Use local astrometry.net package option is available only if Astrometry for OS X is installed and running. Make sure, that you have correct indexes downloaded for your imaging setup resolution.
To use public service, open Image solver panel by clicking Solve toolbar button while some image preview is shown. Enter the service URL (e.g. http://nova.astrometry.net) and API key (both are remembered and need not to be entered every time) and click Solve button.
If your API key is successfully authenticated, image is uploaded and solving job successfully finished, the lower four fields contains RA and Dec coordinates of the center of the image, the image orientation and the image pixel scale. If you are running also AstroTelescope on the same machine or somewhere in the local network, you can use Sync button to sync the telescope mount with the computed image center position.
Plate solving job will continue even if Image solver panel is hidden until aborted.
Please note, that unless you have your own Astrometry for OS X installation, this function is using 3rd party service, needs the Internet connection and its availability is out of our control.
Integration with other applications
AstroImager has integrated INDI server providing access to shared data (basically metadata used in FITS headers of image files) and common operation. If running instance of AstroTelescope is detected on local network, AstroImager can sync position of telescope with plate solver results automatically. If running instance of AstroGuider is detected, Use Dithering and Suspend Guiding During Download items are enabled in Camera menu and if selected, DITHER and/or SUSPEND/RESUME commands are sent to AstroGuider between image captures (DITHER commands are not sent in preview mode).
Configurable application defaults
You can set graph, crosshair, marker color and marker size from the command line by the commands like this (examples only, red, green and blue components of color in 0.0-1.0 interval):
$ defaults write eu.cloudmakers.AstroImager xGraphColor "1.0 1.0 0.0" $ defaults write eu.cloudmakers.AstroImager yGraphColor "0.0 1.0 1.0" $ defaults write eu.cloudmakers.AstroImager crosshairColor "1.0 0.0 1.0" $ defaults write eu.cloudmakers.AstroImager markerColor "1.0 0.5 0.5" $ defaults write eu.cloudmakers.AstroImager markerSize 20 You can set exposure time threshold and time advance to suspend guiding with INDI imager:
$ defaults write eu.cloudmakers.AstroImager indiSuspendThreshold 5.0 $ defaults write eu.cloudmakers.AstroImager indiSuspendAdvance 2.0
Copyright © 2015-2016 by CloudMakers, s. r. o. All rights reserved. Information in this document is subject to change without notice. 9

AstroTelescope AstroTelescope is a simple planetarium application for the astrophotography. Star map can be displayed in any scale and rotated by any angle, with selectable star density and with or without star names. Hipparcos Catalogue and selected NGC and IC DSO object are available from the application locally, but any object can be searched online by calling public SIMBAD service on Strasbourg Astronomical Data Center.
An application can control connected mount both by selecting object on the star map or manually, mount position can be synced automatically from solved image in AstroImager application.
Its built-in drivers support Meade LX and Celestron NexStar protocols both over serial line and TCP/IP (with many version limitation in case of NexStar protocol). Application can be used as a client to any remote or local INDI server with any supported telescope mount and it can also control EQMac application over TCP/IP connection and LX protocol or any Meade or Synta mount with SkyFi network controller.
To run AstroTelescope you need Apple Mac running OS X 10.9 or later.
Running AstroTelescope for the first time…
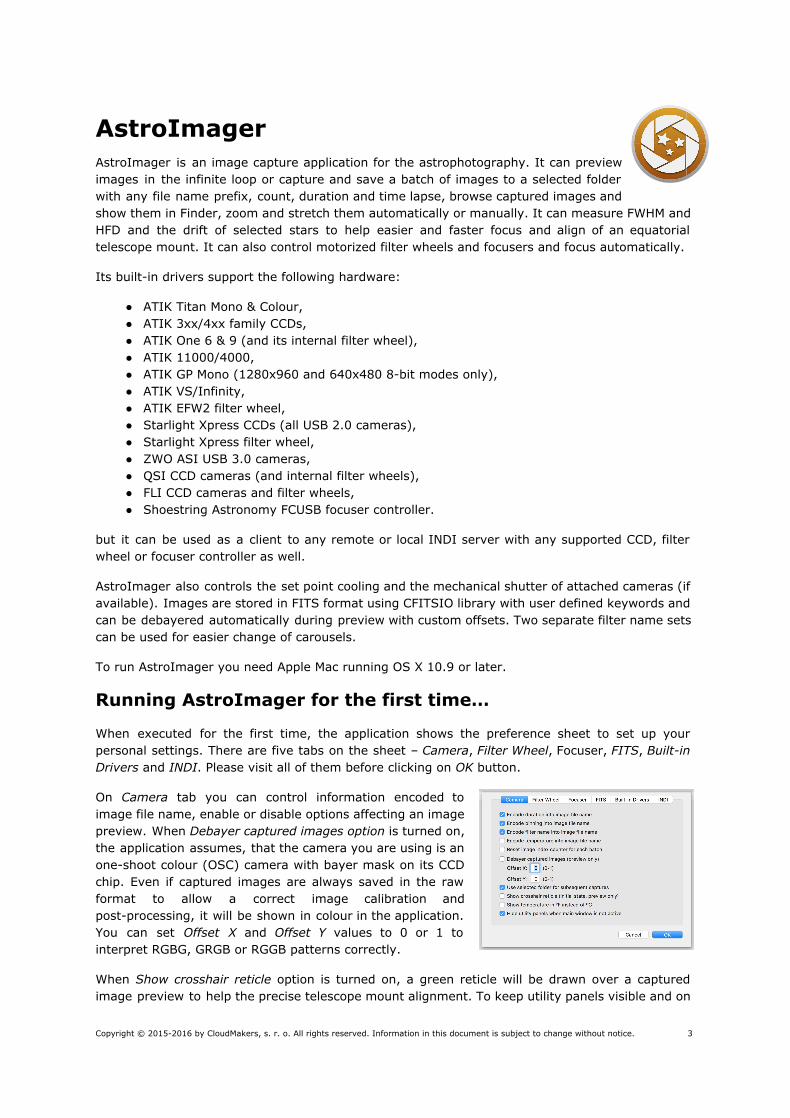
When executed for the first time, the application shows the preference sheet to set up your personal settings. There are five tabs on the sheet - Telescope , Observatory , Star Map , Built-in Drivers and INDI . Please visit all of them before clicking on OK button.
On Telescope tab you can set focal length and aperture of your telescope, axes and direction swapping. Please make sure that those values are entered before you continue, as they are required by some INDI drivers. You can start LX200 protocol server to control AstroTelescope e.g. from SkySafari. To keep utility panels visible and on top while
AstroTelescope is not active turn off Hide utility panels when main windows is not active checkbox.
On Observatory tab you can set the latitude, longitude and elevation of your observatory. Those values are required to render the star map correctly and are also transferred to connected telescope mount. You can use Apple geocoding service, just enter the observatory address in the search
box below and wait couple of seconds. Place description and geographical coordinates will be filled into all four fields automatically.
Please note, that you have to be connected to Internet to use geocoding service.
Copyright © 2015-2016 by CloudMakers, s. r. o. All rights reserved. Information in this document is subject to change without notice. 10
On Star Map tab you can set all parameters of the rendered map. You can choose limiting star magnitude (and effectively the number of the stars rendered on the map) and refresh interval.
Please note, that choosing too high limiting star magnitude or too short refresh interval will increase the CPU usage and thus the energy impact. It is specifically important when running on battery.
On this tab you can also set the size and orientation of field-of-view of your camera. This value can be also set automatically from solved image in AstroImager application.
On Built-in Drivers tab you can select drivers to be loaded on application startup. You can also select if driver should use serial line or TCP/IP connection to communicate with the mount. When executed for the first time, all drivers are loaded, but you can uncheck drivers for the hardware you don’t actually have (or simulator driver if you don’t want to use it) to reduce memory footprint and increase overall application stability.
Please note, that you have to restart AstroTelescope to actually enable or disable the driver. Driver can’t be unloaded while application is running.
On INDI tab you can view detected INDI servers (if you are using INDI Server for OS X, it can be located using Bonjour service) and add or remove them manually. Devices from the servers shown on this page will be available to choose from in the main application window.
To add the server, enter hostname and port number into Host and Port fields and click [+] button in the lower left corner of the available INDI servers list. To remove the server, select it in the Available INDI servers list and click [-] button. Please note, that you can remove only a manually added server.
The semaphore icon on the left of the server name indicates a connection status. Grey colour means not connected, yellow means connection in progress and green means connection established.
The number on the right of the server name is the port number. It is usually 7624 (IANA assigned port number for INDI) but some special use servers (like integrated INDI in AstroImager or AstroTelescope) are using ephemeral ports with high port numbers.
If you have INDI Server for OS X or INDI Control panel installed on your machine, you can start them by clicking on one of the buttons in the lower right corner of the sheet.
AstroTelescope main window
When you are happy with the settings, click OK button to save them (changes are possible anytime later) and you will see the main application window.
It has the toolbar, status bar and three panels - the number in the red callouts correspond to the number in the following list:
1. The toolbar on the top with toolbar buttons and sliders for the fast access to the following common operations (from left to the right)
Copyright © 2015-2016 by CloudMakers, s. r. o. All rights reserved. Information in this document is subject to change without notice. 11
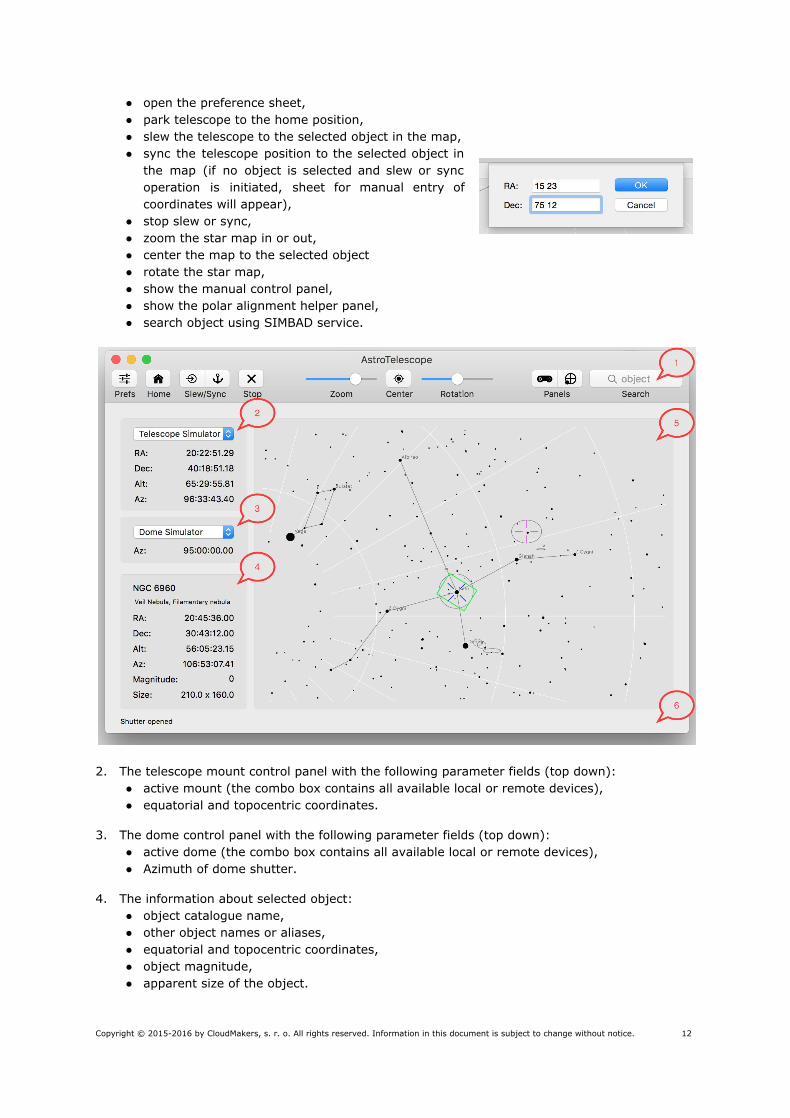
● open the preference sheet, ● park telescope to the home position, ● slew the telescope to the selected object in the map, ● sync the telescope position to the selected object in
the map (if no object is selected and slew or sync operation is initiated, sheet for manual entry of coordinates will appear),
● stop slew or sync, ● zoom the star map in or out, ● center the map to the selected object ● rotate the star map, ● show the manual control panel, ● show the polar alignment helper panel, ● search object using SIMBAD service.
2. The telescope mount control panel with the following parameter fields (top down): ● active mount (the combo box contains all available local or remote devices), ● equatorial and topocentric coordinates.
3. The dome control panel with the following parameter fields (top down): ● active dome (the combo box contains all available local or remote devices), ● Azimuth of dome shutter.
4. The information about selected object: ● object catalogue name, ● other object names or aliases, ● equatorial and topocentric coordinates, ● object magnitude, ● apparent size of the object.
Copyright © 2015-2016 by CloudMakers, s. r. o. All rights reserved. Information in this document is subject to change without notice. 12

5. The star map. Currently selected object is marked by red and current position of the mount by blue marker. Field-of-View is shown as green rectangle.
6. The status bar with the last operation status.
Manual control panel
By clicking on Manual Control toolbar button you can show manual control panel. You can stop or start tracking (with tracking speed selected on Telescope tab on preference sheet), select one of four slew rates and slew telescope manually in all directions.
Polar alignment helper panel
By clicking on Polar Alignment Helper toolbar button you can show panel with polar scope reticle animation and local sidereal time, Polaris hour angle and Polaris clock position values (the last one is specific for new SkyWatcher mounts).
Integration with other applications
AstroTelescope has integrated INDI server providing access to shared data (equatorial coordinates of the current position, telescope focal length and aperture, etc.) and common operations. If running instance of AstroImager is detected on local network, metadata used in FITS headers are set by AstroTelescope. If running instance of AstroGuider is detected, guiding is aborted automatically once telescope is parked or slewed.
Built-in drivers limitation
Celestron NexStar driver:
● driver supports protocol version 1.2+ ● manual RA/Dec slew is supported only for version 1.6+ ● SYNC operation is supported only for version 4.10+ ● PARK operation is not supported
Meade LX driver:
● when used with EQMac, only version 2.0.0 beta2 or newer is supported
Configurable application defaults
You can set markers color from the command line by the commands like this (examples only, red, green and blue components of color in 0.0-1.0 interval):
$ defaults write eu.cloudmakers.AstroTelescope positionMarkerColor "1.0 1.0 0.0" $ defaults write eu.cloudmakers.AstroTelescope selectionMarkerColor "0.0 1.0 1.0" $ defaults write eu.cloudmakers.AstroTelescope fovMarkerColor "1.0 0.0 1.0"
Copyright © 2015-2016 by CloudMakers, s. r. o. All rights reserved. Information in this document is subject to change without notice. 13

AstroGuider AstroGuider is a simple to use guiding application for your telescope mount. It can be calibrated semi-automatically or manually, you do not need to take care about camera orientation or pixel scale.
Application is integrated with AstroImager (it can initiate random kick to allow dithering) and AstroTelescope (guiding is automatically stopped, if telescope is slewed or parked).
AstroGuider has all camera controls known from AstroImager (image zoom, subframe selection or manual and automatic black and white point setting).
Its built-in drivers support StarlightXpress, Atik cameras and ZWO ASI USB 3.0 cameras (and also their ST4 port), CGUSB ST4 device, local EQMac and Meade LX protocols both over serial line and TCP/IP (please note, that nor LX200 and the current version of EQMac doesn’t support guiding over LX protocol). Application can be used as a client to any remote or local INDI server with any supported camera or telescope mount.
To run AstroGuider you need Apple Mac running OS X 10.9 or later.
Running AstroGuider for the first time…
When executed for the first time, the application shows the preference sheet to set up your personal settings. There are three tabs on the sheet - Guider , Built-in Drivers and INDI . Please visit both before clicking on OK button.
On Guider tab you can set interval for aggressivity, min. error and max. pulse sliders in the main window and number of stacked images for averaging. You can also switch AstroGuider to Solar/Lunar guiding mode. To keep
utility panels visible and on top while AstroGuider is not active turn off Hide utility panels when main windows is not active checkbox.
On Built-in Drivers tab you can select drivers to be loaded on application startup. You can also select if driver should use serial line or TCP/IP connection to communicate with the mount. When executed for the first time, all drivers are loaded, but you can uncheck drivers for the hardware you don’t actually have (or simulator driver if you don’t want to
use it) to reduce memory footprint and increase overall application stability.
Please note, that you have to restart AstroGuider to actually enable or disable the driver. Driver can’t be unloaded while application is running.
On INDI tab you can view detected INDI servers (if you are using INDI Server for OS X, it can be located using Bonjour
Copyright © 2015-2016 by CloudMakers, s. r. o. All rights reserved. Information in this document is subject to change without notice. 14

service) and add or remove them manually. Devices from the servers shown on this page will be available to choose from in the main application window.
To add the server, enter hostname and port number into Host and Port fields and click [+] button in the lower left corner of the available INDI servers list. To remove the server, select it in the Available INDI servers list and click [-] button. Please note, that you can remove only a manually added server.
The semaphore icon on the left of the server name indicates a connection status. Grey colour means not connected, yellow means connection in progress and green means connection established.
The number on the right of the server name is the port number. It is usually 7624 (IANA assigned port number for INDI) but some special use servers (like integrated INDI in AstroImager or AstroTelescope) are using ephemeral ports with high port numbers.
If you have INDI Server for OS X or INDI Control panel installed on your machine, you can start them by clicking on one of the buttons in the lower right corner of the sheet.
AstroGuider main window
When you are happy with the settings, click OK button to save them (changes are possible anytime later) and you will see the main application window.
It has the toolbar, status bar and four panels (the numbers in the red callouts correspond to the number in the following list):
1. The toolbar on the top with toolbar buttons and sliders for the fast access to the following common operations (from left to right): ● open the preference sheet, ● start the image preview infinite loop (e.g. for focusing), ● start the automatic calibration,
Copyright © 2015-2016 by CloudMakers, s. r. o. All rights reserved. Information in this document is subject to change without notice. 15
● start guiding with given calibration, ● abort the preview loop, calibration or guiding, ● set/reset subframe (select or clear subframe in image preview by mouse first), ● zoom in the preview, ● zoom in the preview to 100%, ● zoom out the preview to fit the window, ● zoom out, ● set the black point, ● set the automatic black and white point (automatic mode can be turned on by clicking the
button and turned off by moving the black or white point slider thumbs), ● set the white point, ● start/stop guiding information recording to CSV file (timestamp, x/y difference, ra/dec
difference and ra/dec correction pulse), ● show the manual control panel, ● show large graphs panel, ● set mode for both graphs (𝚫X/𝚫Y, 𝚫RA/𝚫Dec, RA/Dec correction pulse), ● clear both graphs.
All operations are also available from the application menu. In addition to common operation found in toolbar you can also find the following items in Guide menu:
● Make Darks which can be used to capture and build master dark frame for current setup, ● Use Darks which can be used to apply master dark on each captured light frame and ● Dither which can be used to make a virtual kick to the telescope mount. This function can
be used by AstroImager to make a small move (dithering to allow drizzle and similar techniques during postprocessing) between image captures.
2. The camera control panel with the following parameter fields (top down): ● active camera (the combo box contains all available local or remote devices), ● active binning (only available values are shown), ● image exposure duration (you can choose from the list or enter any value), ● gain, ● gamma.
3. The X and Y difference graph (scaled automatically, blue line for horizontal and red for vertical axe).
4. The X and Y difference target graph (scaled automatically).
5. The image histogram panel.
6. The image preview panel with the zoomed and stretched image itself and ● image capture progress bar on the bottom and ● image capture status semaphore in the bottom right corner (grey colour means idle, yellow
colour means capture in progress, red colour means download in progress and green colour means capture done).
7. The guider device control panel: ● active guider device (the combo box contains all available local or remote devices, CCD
cameras with ST4 port, mounts and other devices), ● Dec guiding mode (north & south, north only, south only and disabled), ● calibration step (pulse length used to calibrate the mount; enter this value manually, start
with values like 0.100 and increase if mount doesn’t move fast enough), ● RA and Dec aggressivity (limit how much of correction is applied in single step; set these
values manually, it is always better to use lower values than overshoot each correction),
Copyright © 2015-2016 by CloudMakers, s. r. o. All rights reserved. Information in this document is subject to change without notice. 16
● RA and Dec minimal error (if actual difference in given axe is smaller than this value, no correction is done; enter these values manually and keep them big enough to avoid seeing chasing),
● RA and Dec maximal pulse length (limit guiding correction pulse to this value for given axe; enter these values manually and keep them small enough to avoid losing the guiding star on random situation).
The numeric values for sliders are shown in the status bar when some of them is adjusted.
8. The calibration data (top down): ● RA Angle (relative position of the guiding camera to RA axe; this value is determined
automatically during calibration), ● Dec Backlash (mount backlash determined as the difference between north and south
calibration move, but note than it is always better to set it to 0 manually then keep automatically detected incorrect and too high value),
● RA and Dec guiding speed (pixels per second guiding pulse; this value is determined automatically during calibration).
9. The status bar with (from left to right) ● the last operation status, ● RA and Dec RMS error (in fraction of pixels), ● average frame rate.
Please note, that not every button, slider or field is enabled in every situation or context. For the most of the operations some of available cameras have to be selected and some image have to be captured. Unlike AstroImager in AstroGuider you can change image exposure duration during capture but you can’t select different star if calibration or guiding is in progress to avoid change of selection by mistake.
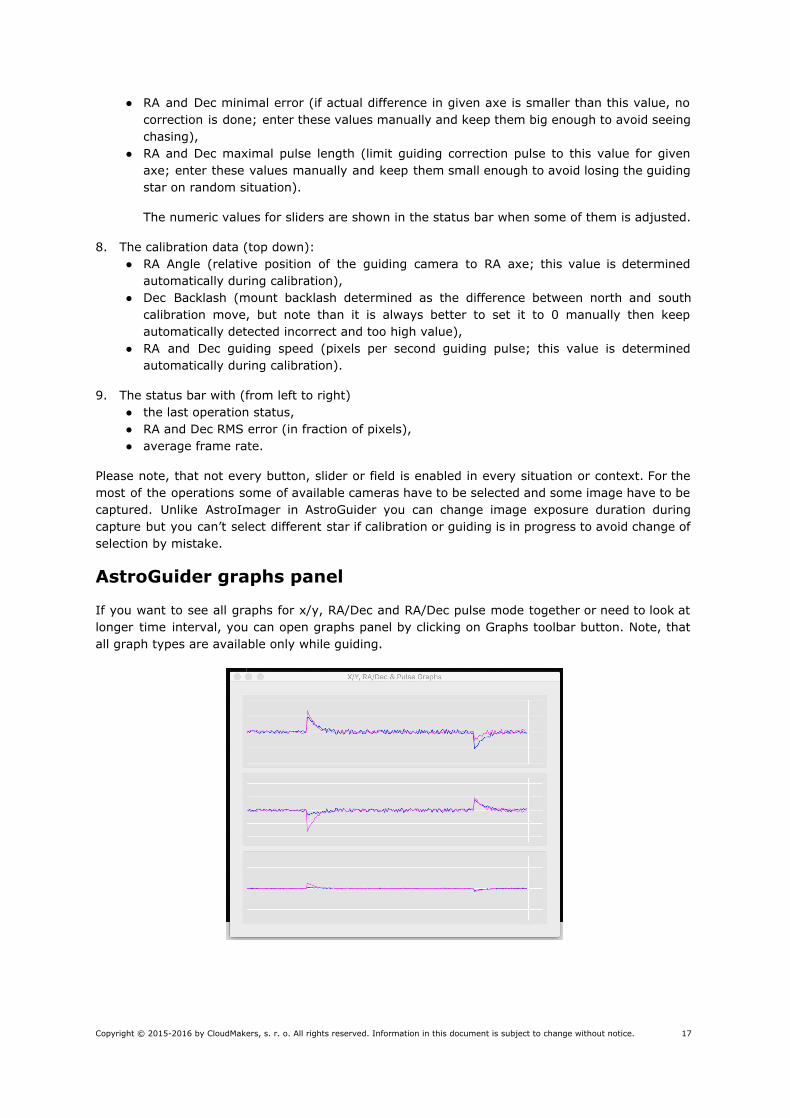
AstroGuider graphs panel
If you want to see all graphs for x/y, RA/Dec and RA/Dec pulse mode together or need to look at longer time interval, you can open graphs panel by clicking on Graphs toolbar button. Note, that all graph types are available only while guiding.
Copyright © 2015-2016 by CloudMakers, s. r. o. All rights reserved. Information in this document is subject to change without notice. 17

AstroGuider manual control panel
By clicking on Control toolbar button you can show manual control panel. You can set pulse length by slider and slew telescope manually in all directions. Pulse guides are sent between image captures so buttons are enabled in preview mode only.
Solar/Lunar mode
AstroGuider can be used for solar or lunar guiding (and imaging) as well. To enable it open Preferences , navigate to Guider tab and check Solar/Lunar guiding mode . Subsequently guider panel will appear on the right side of the main window. Typical scenario for solar guiding is as follow:
1. align your guiding scope to have sun (or moon) disc approximately in the middle of the image and select exposure duration large enough to have bright disc image.
2. select Centroid mode in disc detection mode combo. 3. click image preview button in the toolbar. 4. drag Noise threshold slider, while sun disc is detected by the algorithm (orange circle
drawn over the image). 5. click automatic calibration button . 6. when finished, disc size is filled into Sun disc diameter size field and guiding is started
automatically.
In case you want to guiding during solar eclipse, calibrate first in Centroid mode and then switch to Shape detecting mode . AstroGuider will use value in Sun disc diameter size field to detect even partially obscured disc.
Copyright © 2015-2016 by CloudMakers, s. r. o. All rights reserved. Information in this document is subject to change without notice. 18

Integration with other applications
AstroGuider has integrated INDI server providing access to shared data and common operations used by AstroImager and AstroTelescope.
Built-in drivers limitation
EQMac:
● EQMac supports guiding only over RPS, LX protocol can’t be used.
Meade LX driver:
● LX200 and EQMac doesn’t support guiding over LX protocol.
Configurable application defaults
You can set graph and marker color and marker size from the command line by the commands like this (examples only, red, green and blue components of color in 0.0-1.0 interval):
$ defaults write eu.cloudmakers.AstroGuider xGraphColor "1.0 1.0 0.0" $ defaults write eu.cloudmakers.AstroGuider yGraphColor "0.0 1.0 1.0" $ defaults write eu.cloudmakers.AstroGuider targetGraphColor "1.0 0.0 1.0" $ defaults write eu.cloudmakers.AstroGuider markerColor "1.0 0.5 0.5" $ defaults write eu.cloudmakers.AstroGuider markerSize 20
You can set enable or disable eclipse simulation with the following commands:
$ defaults write eu.cloudmakers.AstroGuider eclipseSimulation -bool yes $ defaults write eu.cloudmakers.AstroGuider eclipseSimulation -bool no
Copyright © 2015-2016 by CloudMakers, s. r. o. All rights reserved. Information in this document is subject to change without notice. 19

AstroDSLR AstroDSLR is a version of AstroImager intended for use with DSLR. Thus only the differences between AstroImager and AstroDSLR are described in this chapter.
Due to technical reson package contains two executables, one with built-in Canon driver and one with built-in Nikon driver.
Canon driver works with cameras supported by Canon EDSDK 3.4:
EOS 1D Mark III, EOS 1Ds Mark III, EOS 1D Mark IV, EOS 1D C, EOS 1D X, EOS 1D X Mark II, EOS 5D Mark II, EOS 5D Mark III, EOS 5DS, EOS 5DS R, EOS 6D, EOS 7D, EOS 7D Mark II, EOS 40D, EOS 50D, EOS 60D, EOS 70D, EOS 80D, EOS 100D/Digital Rebel SL1/Kiss X7, EOS 450D/Digital Rebel Xsi/Kiss X2, EOS 500D/Digital Rebel T1i/Kiss X3, EOS 550D/Digital Rebel T2i/Kiss X4, EOS 600D/Digital Rebel T3i/Kiss X5, EOS 650D/Digital Rebel T4i/Kiss X6i, EOS 700D/Digital Rebel T5i/Kiss X7i, EOS 750D/Digital Rebel T6i/Kiss X8i EOS 760D/Digital Rebel T6s/EOS 8000D, EOS 1000D/Digital Rebel XS/Kiss F, EOS 1100D/Digital Rebel T3/Kiss X50, EOS 1200D/Digital Rebel T5/Kiss X70, EOS 1300D/Digital Rebel T6/Kiss X80, EOS M, EOS M2, EOS M3, EOS M10.
Nikon driver works with the following cameras:
D3, D3S, D300, D300S, D700, D3X, D90, D5000, D7000, D5100, D800, D800E, D4, D600, D610, D5200, D7100, D5300, Df, D4S, D810, D810A, D750, D5500, D7200, D5, Nikon1 V3, D500.
In case you have another camera which is supported by Apple ICA (Image Capture Architecture), you can use it as well, but only in very basic tethering mode (all settings should be set on camera itself).
There is no support for INDI cameras yet, but you can use remote or local focuser with INDI driver.
To run AstroDSLR you need Apple Mac running OS X 10.9 or later.
Running AstroDSLR for the first time…
When executed for the first time, the application shows the preference sheet to set up your personal settings. There are five tabs on the sheet – Camera , Focuser, FITS , Built-in Drivers and INDI . Please visit all of them before clicking on OK button. Focuser, FITS and INDI tabs have the same content as in AstroImager.
On Camera tab there are the same controls as on the same tab in AstroImager with exception of Save images in original format and Use LiveView for preview options with self-descriptive meaning. There is also LiveView recording frame rate field for setting video framerate (not actual recording frame rate).
On Built-in Drivers tab you can select drivers to be loaded on application startup. When executed for the first time, all
Copyright © 2015-2016 by CloudMakers, s. r. o. All rights reserved. Information in this document is subject to change without notice. 20

drivers are selected, but you can uncheck drivers for the hardware you don’t actually have (or simulator driver if you don’t want to use it) to reduce memory footprint and increase overall application stability.
Please note, that you have to restart AstroDSLR to actually enable or disable the driver. Driver can’t be unloaded while application is running.
The main application window
When you are happy with the settings, click OK button to save them (you can change them anytime later) and you will see the main application window. There are a few differences compared to main windows of AstroImager - no Frame button in toolbar (subframing is not supported by DSLRs), no filter wheel controller panel and slightly different camera controller panel.
It has the toolbar, status bar and four panels (the numbers in the red callouts correspond to the number in the following list):
1. The toolbar on the top with toolbar buttons and sliders for the fast access to the following common operations (from left to right): ● open the preference sheet, ● start the image preview infinite loop (for focusing and/or telescope alignment), ● start the autofocus procedure, ● start the image capture batch, ● start LiveView preview recording in infinite loop (if LiveView is available), ● abort the preview loop or the capture batch, ● toggle zoom in LiveView mode, ● move focuser in, ● stop focuser, ● move focuser out, ● zoom in the preview, ● zoom in the preview to 100%,
Copyright © 2015-2016 by CloudMakers, s. r. o. All rights reserved. Information in this document is subject to change without notice. 21

● zoom out the preview to fit the window, ● zoom out, ● set the black point, ● set the automatic black and white point (automatic mode can be turned on by clicking the
button and turned off by moving the black or white point slider thumbs), ● set the white point, ● show the previous captured image in the batch, ● show the current image in Finder, ● show the next captured image in the batch, ● open the Drift, Bahtinov mask, sequencer and plate solver helper panels.
All operations are also available from the application menu.
2. The camera control panel with the following parameter fields (top down): ● active camera (the combo box contains all available local or remote devices), ● active camera mode (read only text, mode is actually changed by camera mode dial), ● ISO control, ● shutter control, ● aperture control (only available values are present), ● exposure compensation control, ● metering mode control, ● focusing mode control, ● white balance mode control, ● image quality control.
Not all controls are available in all camera modes.
3. The second camera control panel with the following parameter fields (top down): ● image exposure duration in BULB camera mode (you can choose from the list or enter any
value), ● time lapse between image captures (you can choose from the list or enter any value), ● image count in the batch, ● image file base name (will be suffixed with the filter name and the image index)..
4. The image histogram and image statistics panel.
5. The focuser control panel with the following parameters (top down):
● active focuser (the combo box contains all available local or remote devices), ● focuser speed slider (limits can be set in preference panel on Focuser tab). ● step size (read-only if focuser doesn’t support move to relative position) for manual control
by buttons in toolbar, ● initial step size (for automatic focusing), ● final step size (for automatic focusing), ● backlash for inward movement, ● backlash for outward movement.
6. PSF panel with FWHM, HFD, peak and background values for selected star.
7. The status bar with the following fields (left to right):
● last operation result (descriptive text), ● current mouse position and the pixel value (when mouse cursor is positioned over the
image), ● current image index (when capturing the image batch), ● current focuser position and ambient temperature (when available), ● current temperature of CCD chip (when available),
Copyright © 2015-2016 by CloudMakers, s. r. o. All rights reserved. Information in this document is subject to change without notice. 22

● current camera battery status.
8. The image preview panel with the zoomed and stretched image itself and ● image capture progress bar on the bottom and ● image capture status semaphore in the bottom right corner (gray colour means idle, yellow
colour means capture in progress, red colour means download in progress and green colour means capture done).
Please note, that not every button, slider or field is enabled in every situation or context. For the most of the operations some of available cameras have to be selected and some image have to be captured.
The autofocus procedure works the same way as in AstroImager (red channel is used).
The drift and PSF info panels and Bahtinov mask helper panel
The drift, PSF info and Bahtinov mask helper panels work exactly the same way as in AstroImager.
The sequencer panel
The sequencer panel in AstroDSLR has slightly different camera controls, but otherwise works the same way as in AstroImager.
The plate solver panel
The plate solver panel works exactly the same way as in AstroImager.
Integration with other applications
AstroDSLR has the same integration options as AstroImager.
Configurable application defaults
AstroDSLR has the same configuration options as AstroImager.
Copyright © 2015-2016 by CloudMakers, s. r. o. All rights reserved. Information in this document is subject to change without notice. 23

INDI Control Panel INDI Control Panel is a generic INDI client. It can be used to connect to the remote or local INDI server and read or set any of the device driver properties including BLOBs and images.
Main window contains three panels - server/device/property tree, property items form and list of received messages.
1. server/device/property tree contains on the top level all servers discovered with Bonjour and also all servers added manually (button with + sign in bottom left corner of the panel). Manually added servers can be also removed manually (button with - sign). All servers can be manually connected or disconnected (button with socket sign in bottom right corner of the panel).
Traffic lights in front of each item represents connection status (for servers), connection status (for devices) or INDI property status (OK, busy, alert or idle).
2. Property items form contains all items of the property selected in the tree. Items of text and number read/write properties are locked whenever you change value (not changed by set messages, displayed in red colour) until property is set or reset.
3. List in the bottom of the window contains last 100 messages received from the servers scrolled automatically to the last one.
Copyright © 2015-2016 by CloudMakers, s. r. o. All rights reserved. Information in this document is subject to change without notice. 24


![Skaffold - storage.googleapis.com · [getting-started getting-started] Hello world! [getting-started getting-started] Hello world! [getting-started getting-started] Hello world! 5](https://img.pdfslide.us/doc/110x75/5ec939f2a76a033f091c5ac7/skaffold-getting-started-getting-started-hello-world-getting-started-getting-started.jpg)