Embed Size (px)
Citation preview
IF ANY PARTS ARE MISSING OR DAMAGED, PLEASE CALL THE NUMBER BELOW BEFORE RE-
TURNING AQUARIUM TO STORE.
FOR QUESTIONS OR COMMENTS CALL:
800-545-1344 OR VISIT US AT:
WWW.HAWKEYEAQUARIUM.COM
HAWKEYE #AQT002 AQUAVIEW 1 GALLON AQUARIUM KIT ASSEMBLY INSTRUCTIONS
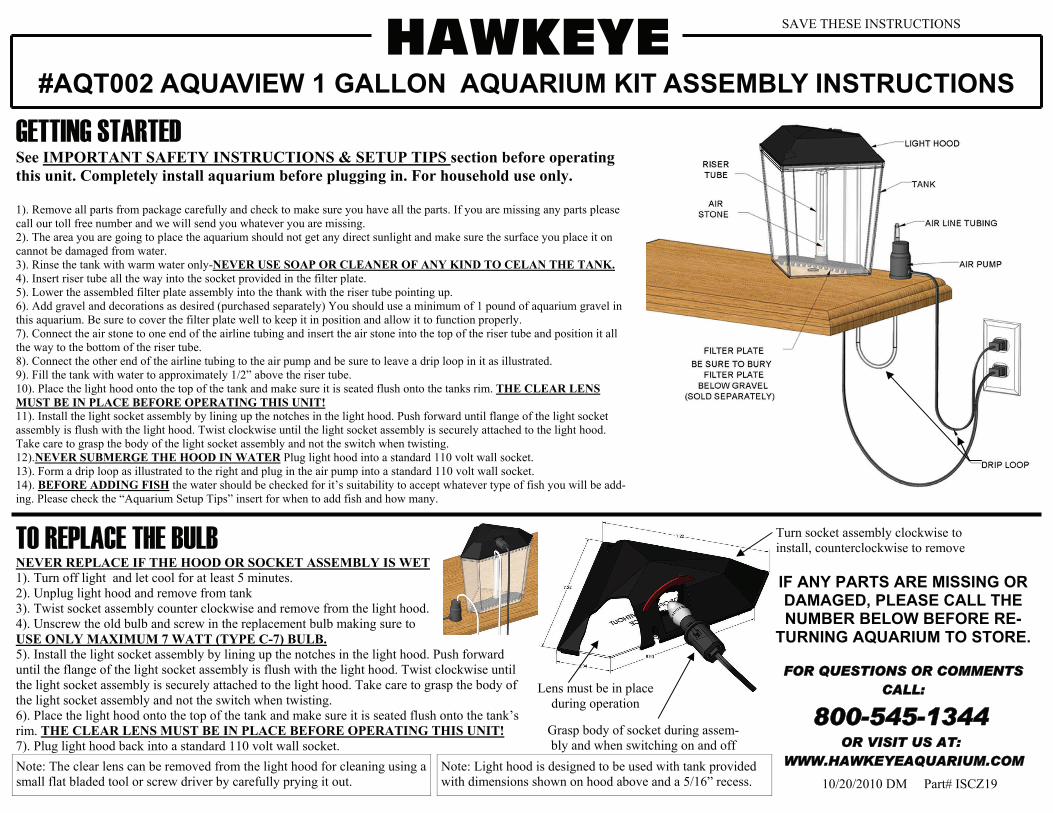
GETTING STARTED See IMPORTANT SAFETY INSTRUCTIONS & SETUP TIPS section before operating this unit. Completely install aquarium before plugging in. For household use only. 1). Remove all parts from package carefully and check to make sure you have all the parts. If you are missing any parts please call our toll free number and we will send you whatever you are missing. 2). The area you are going to place the aquarium should not get any direct sunlight and make sure the surface you place it on cannot be damaged from water. 3). Rinse the tank with warm water only-NEVER USE SOAP OR CLEANER OF ANY KIND TO CELAN THE TANK. 4). Insert riser tube all the way into the socket provided in the filter plate. 5). Lower the assembled filter plate assembly into the thank with the riser tube pointing up. 6). Add gravel and decorations as desired (purchased separately) You should use a minimum of 1 pound of aquarium gravel in this aquarium. Be sure to cover the filter plate well to keep it in position and allow it to function properly. 7). Connect the air stone to one end of the airline tubing and insert the air stone into the top of the riser tube and position it all the way to the bottom of the riser tube. 8). Connect the other end of the airline tubing to the air pump and be sure to leave a drip loop in it as illustrated. 9). Fill the tank with water to approximately 1/2” above the riser tube. 10). Place the light hood onto the top of the tank and make sure it is seated flush onto the tanks rim. THE CLEAR LENS MUST BE IN PLACE BEFORE OPERATING THIS UNIT! 11). Install the light socket assembly by lining up the notches in the light hood. Push forward until flange of the light socket assembly is flush with the light hood. Twist clockwise until the light socket assembly is securely attached to the light hood. Take care to grasp the body of the light socket assembly and not the switch when twisting. 12).NEVER SUBMERGE THE HOOD IN WATER Plug light hood into a standard 110 volt wall socket. 13). Form a drip loop as illustrated to the right and plug in the air pump into a standard 110 volt wall socket. 14). BEFORE ADDING FISH the water should be checked for it’s suitability to accept whatever type of fish you will be add-ing. Please check the “Aquarium Setup Tips” insert for when to add fish and how many.
NEVER REPLACE IF THE HOOD OR SOCKET ASSEMBLY IS WET 1). Turn off light and let cool for at least 5 minutes. 2). Unplug light hood and remove from tank 3). Twist socket assembly counter clockwise and remove from the light hood. 4). Unscrew the old bulb and screw in the replacement bulb making sure to USE ONLY MAXIMUM 7 WATT (TYPE C-7) BULB. 5). Install the light socket assembly by lining up the notches in the light hood. Push forward until the flange of the light socket assembly is flush with the light hood. Twist clockwise until the light socket assembly is securely attached to the light hood. Take care to grasp the body of the light socket assembly and not the switch when twisting. 6). Place the light hood onto the top of the tank and make sure it is seated flush onto the tank’s rim. THE CLEAR LENS MUST BE IN PLACE BEFORE OPERATING THIS UNIT! 7). Plug light hood back into a standard 110 volt wall socket.
TO REPLACE THE BULB
SAVE THESE INSTRUCTIONS
10/20/2010 DM Part# ISCZ19
Lens must be in place during operation
Grasp body of socket during assem-bly and when switching on and off
Note: Light hood is designed to be used with tank provided with dimensions shown on hood above and a 5/16” recess.
Note: The clear lens can be removed from the light hood for cleaning using a small flat bladed tool or screw driver by carefully prying it out.
Turn socket assembly clockwise to install, counterclockwise to remove

COMMONLY ASKED QUESTIONS ABOUT AQUARIUMS Q: Is the plastic used in Hawkeye's Aquariums as good as glass? A: Yes, the acrylic used in our tanks is as safe for your fish as the glass aquariums, and its seamless construction eliminates the risks associated with aquariums that have glued seams. However, all tanks should be tested for cracks that may have occurred during transportation. Fill the tank with water and let it stand for an hour before beginning the set up procedures. Q: Why are there bubbles on top of my tank? A: This is generally a result of water imbalance. Once your tank has cycled and is brought into balance, the bubbling should end. An aquarium usually takes a month or so to completely cycle, and during this time, make sure that the food for your fish isn't sitting on top of the bubbles where the fish can't get to it. Another common cause for foaming is the decorative gravel that has not been rinsed as thoroughly as necessary to clean it completely. Q: My water gets very cloudy in just a few days. Why? A: This is another common condition in new tanks. Just leave the tank alone, keeping everything in operation. DO NOT EMPTY THE TANK AND REPLACE THE WATER. It should disappear in a few days and is not harmful to your fish, but if you prefer there are chemicals available to speed up the clearing process. Q: How often should I clean my aquarium? A: The frequency depends on the number and kinds of fish, but usually once every week or two is sufficient. Replace 20%-25% of the water with fresh, treated water. If you use a gravel cleaner to siphon debris and uneaten food from the bottom of the tank while removing old water, the job will go quickly. There are almost no circumstances where you should completely empty the tank and start over. If you have a problem with your aquarium, consult a reliable pet or aquarium dealer to test your water and help you determine the best remedy for your problem. By draining a tank completely, the bacteria colonies established within the first few weeks will be wiped out. These bacteria break down the ammonia produced by fishes and convert it into harmless nitrates. With-out it, the ammonia can be toxic to the fishes. Q: How long after setting up the aquarium should I wait before adding fish? A: If you have thoroughly rinsed all non-electrical parts of your aquarium, as well as your gravel and ornamentation, fill your tank with water and aerate it a few days (or a week if you have the patience). By allowing the wa-ter to stabilize, you reduce the stress on the new fishes. In fact, most pet and aquarium specialty dealers will test your water as a service to their customers to ensure a balanced tank. It is our strongest recommendation that you follow their advice; their expertise will provide you with invaluable information and assistance along the way. Additionally, there are easy-to-understand books available at most pet stores that will answer most of your questions. You will be anxious to introduce fish to your new aquarium, but first be sure that the environment you have created is a healthy one for them.


![Skaffold - storage.googleapis.com · [getting-started getting-started] Hello world! [getting-started getting-started] Hello world! [getting-started getting-started] Hello world! 5](https://img.pdfslide.us/doc/110x75/5ec939f2a76a033f091c5ac7/skaffold-getting-started-getting-started-hello-world-getting-started-getting-started.jpg)


