Embed Size (px)
Citation preview
Orbweb ME: Getting Started
Information in this document is subject to change without notice.Companies, names, and data used in examples herein are fictitious unless otherwise noted. No part of this document may be reproduced or transmitted in any form or by any means, electronic or mechanical,for any purpose, without express written permission.
Version 3.1 – Last updated 2014/3/10
Getting Started
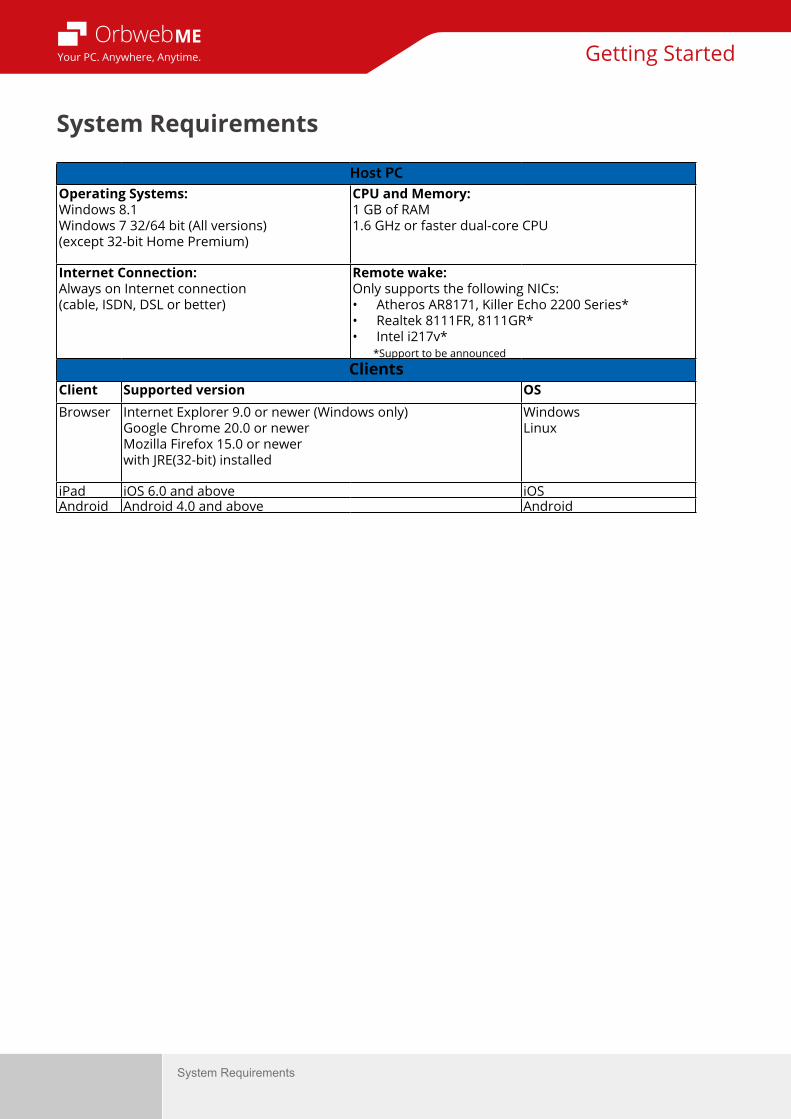
System Requirements
Getting StartedYour PC. Anywhere, Anytime.
Host PCOperating Systems:Windows 8.1Windows 7 32/64 bit (All versions) (except 32-bit Home Premium)
CPU and Memory:1 GB of RAM1.6 GHz or faster dual-core CPU
Internet Connection:Always on Internet connection (cable, ISDN, DSL or better)
Remote wake:Only supports the following NICs:• Atheros AR8171, Killer Echo 2200 Series* • Realtek 8111FR, 8111GR*• Intel i217v* *Support to be announcedClients
Client Supported version OSBrowser Internet Explorer 9.0 or newer (Windows only)
Google Chrome 20.0 or newer Mozilla Firefox 15.0 or newerwith JRE(32-bit) installed
Windows Linux
iPad iOS 6.0 and above iOSAndroid Android 4.0 and above Android
System Requirements
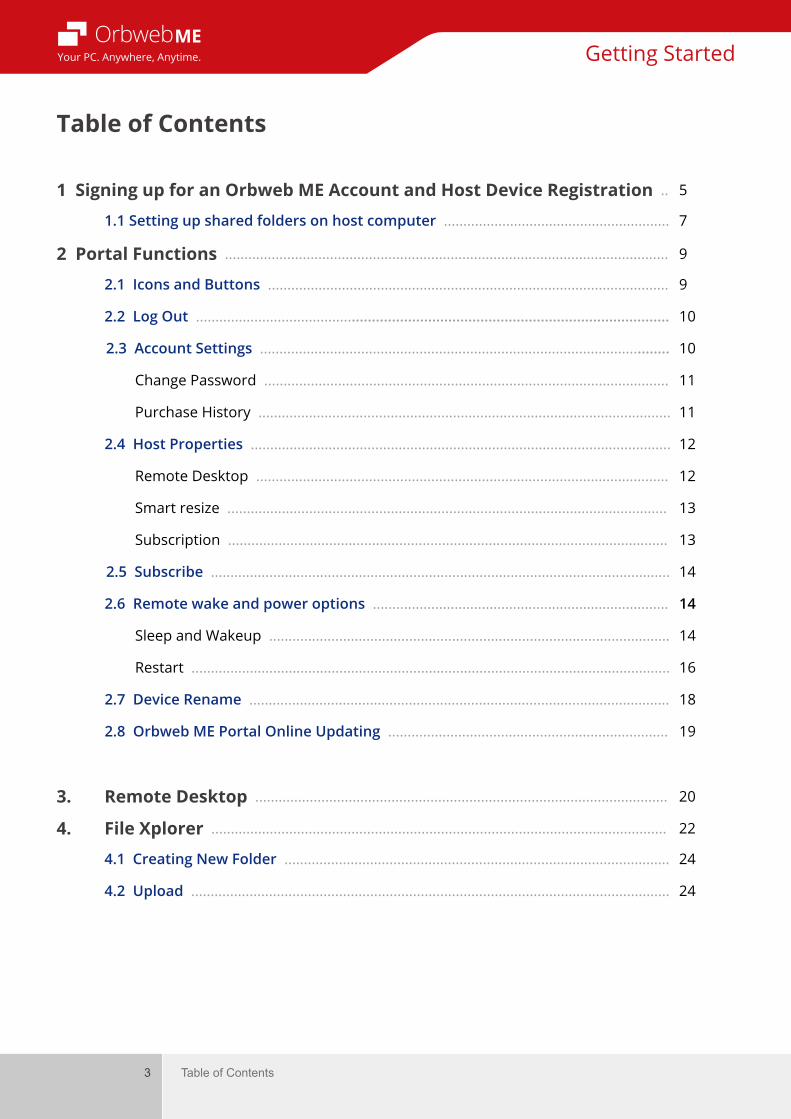
3 Table of Contents
Getting StartedYour PC. Anywhere, Anytime.
Table of Contents
1 Signing up for an Orbweb ME Account and Host Device Registration .. 5
1.1 Setting up shared folders on host computer .......................................................... 7
2 Portal Functions .................................................................................................................. 9
2.1 Icons and Buttons ....................................................................................................... 9
2.2 Log Out ....................................................................................................................... 10
2.3 Account Settings ......................................................................................................... 10
Change Password ........................................................................................................ 11
Purchase History .......................................................................................................... 11
2.4 Host Properties ............................................................................................................ 12
Remote Desktop .......................................................................................................... 12
Smart resize ................................................................................................................. 13
Subscription ................................................................................................................. 13
2.5 Subscribe ...................................................................................................................... 14
2.6 Remote wake and power options ............................................................................ 14
Sleep and Wakeup ....................................................................................................... 14
Restart ........................................................................................................................... 16
2.7 Device Rename ............................................................................................................ 18
2.8 Orbweb ME Portal Online Updating ........................................................................ 19
3. Remote Desktop .......................................................................................................... 20
4. File Xplorer ..................................................................................................................... 22
4.1 Creating New Folder ................................................................................................... 24
4.2 Upload ........................................................................................................................... 24
4 Table of Contents
Getting StartedYour PC. Anywhere, Anytime.
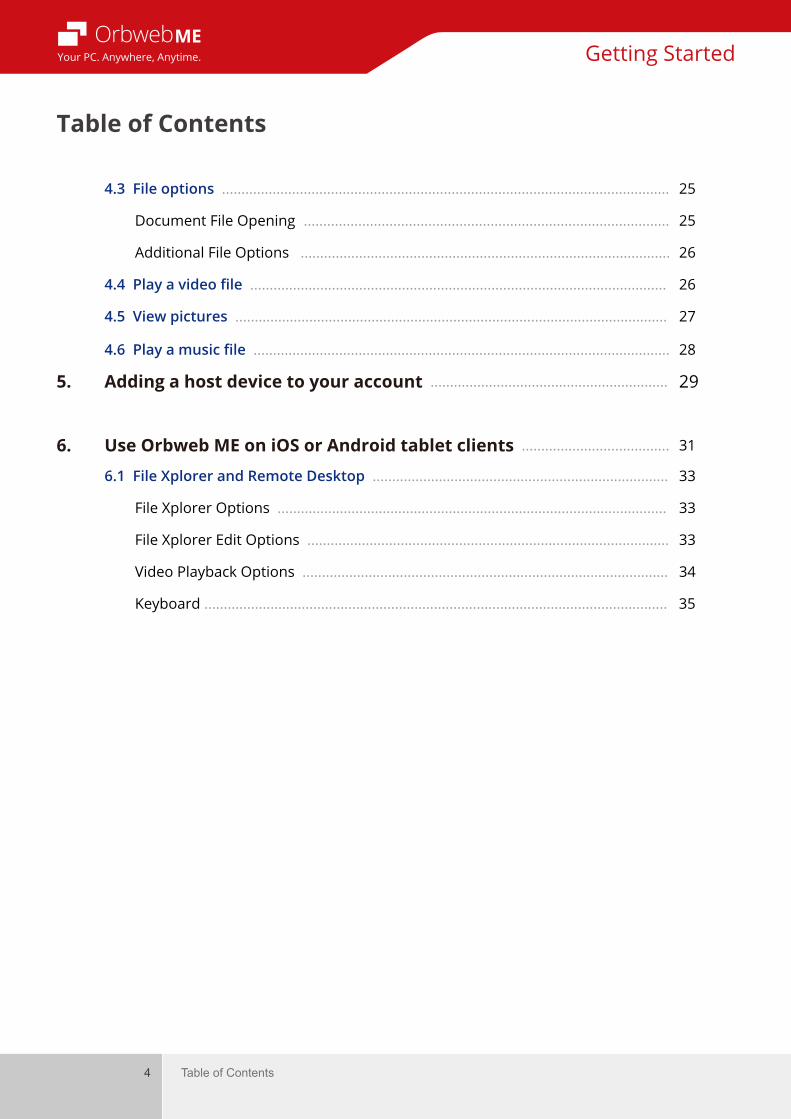
Table of Contents
4.3 File options ................................................................................................................... 25
Document File Opening .............................................................................................. 25
Additional File Options ............................................................................................... 26
4.4 Play a video file ........................................................................................................... 26
4.5 View pictures ............................................................................................................... 27
4.6 Play a music file ........................................................................................................... 28
5. Adding a host device to your account ............................................................. 29
6. Use Orbweb ME on iOS or Android tablet clients ...................................... 31
6.1 File Xplorer and Remote Desktop ............................................................................ 33
File Xplorer Options .................................................................................................... 33
File Xplorer Edit Options ............................................................................................. 33
Video Playback Options .............................................................................................. 34
Keyboard ....................................................................................................................... 35

5 1. Signing up for an Orbweb ME Account and Host Device Registration
Getting StartedYour PC. Anywhere, Anytime.
PAGE
1. Signing up for an Orbweb ME Account and Host Device Registration
1. Double-click on the Orbweb browser client on your desktop.
2. Click on Sign Up.
3. Enter valid Email and confirm it. Enter Password and confirm it. Enter First Name and Last Name. Enter a desired name for host device in the Computer Name field. Click on Sign up.
1
2
6 1. Signing up for an Orbweb ME Account and Host Device Registration
Getting StartedYour PC. Anywhere, Anytime.
PAGE
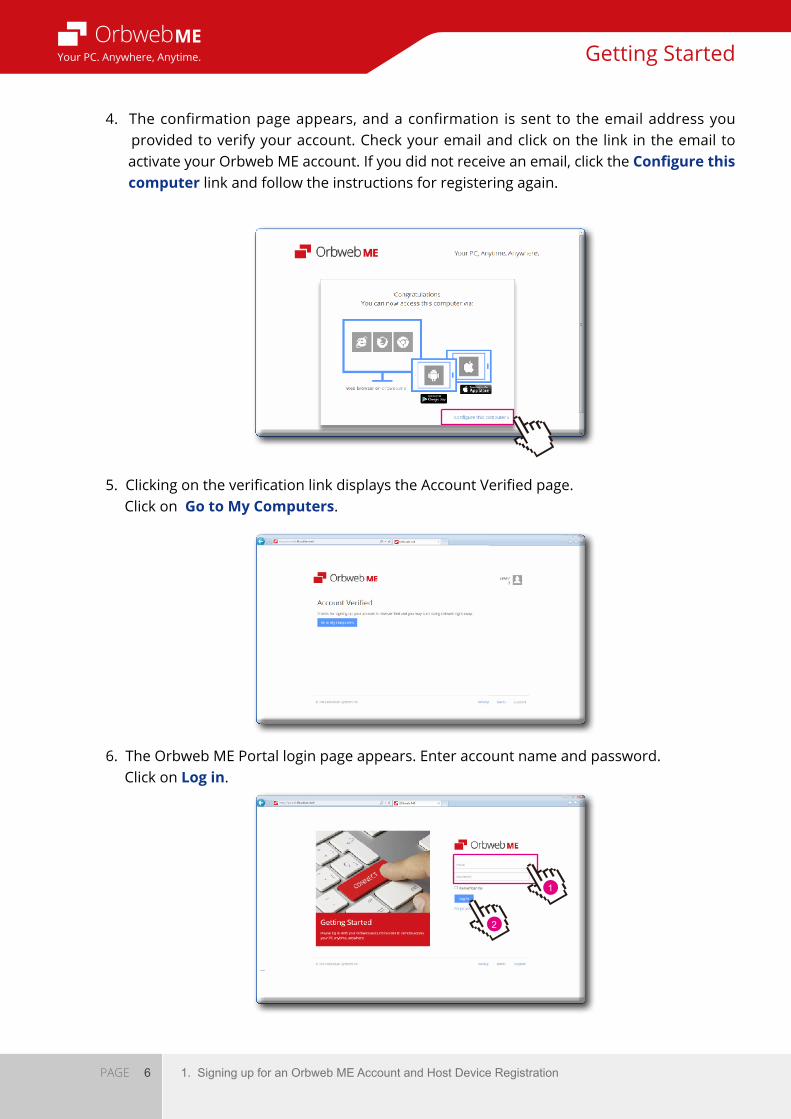
4. The confirmation page appears, and a confirmation is sent to the email address you provided to verify your account. Check your email and click on the link in the email to activate your Orbweb ME account. If you did not receive an email, click the Configure this computer link and follow the instructions for registering again.
5. Clicking on the verification link displays the Account Verified page. Click on Go to My Computers.
6. The Orbweb ME Portal login page appears. Enter account name and password. Click on Log in.
1
2
7 1. Signing up for an Orbweb ME Account and Host Device Registration
Getting StartedYour PC. Anywhere, Anytime.
PAGE
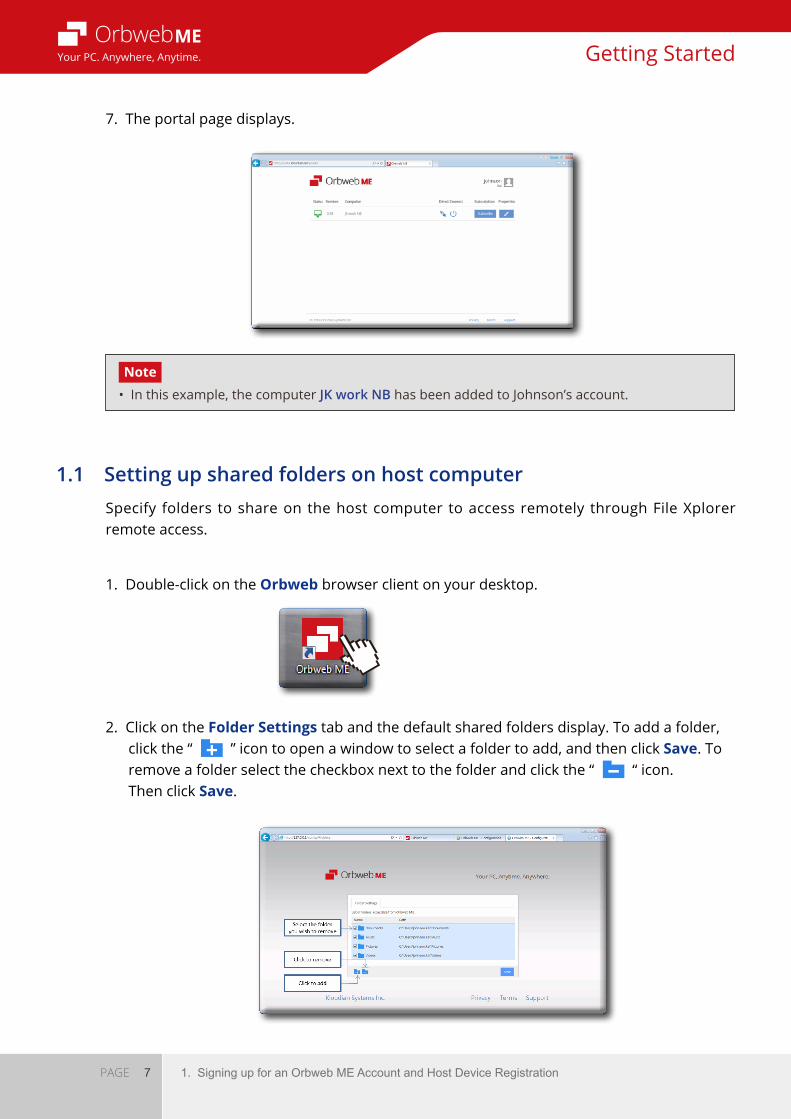
7. The portal page displays.
Specify folders to share on the host computer to access remotely through File Xplorer remote access.
1. Double-click on the Orbweb browser client on your desktop.
2. Click on the Folder Settings tab and the default shared folders display. To add a folder, click the “ ” icon to open a window to select a folder to add, and then click Save. To remove a folder select the checkbox next to the folder and click the “ “ icon. Then click Save.
1.1 Setting up shared folders on host computer
Note•Inthisexample,thecomputerJK work NB has been added to Johnson’s account.
8 1. Signing up for an Orbweb ME Account and Host Device Registration
Getting StartedYour PC. Anywhere, Anytime.
PAGE
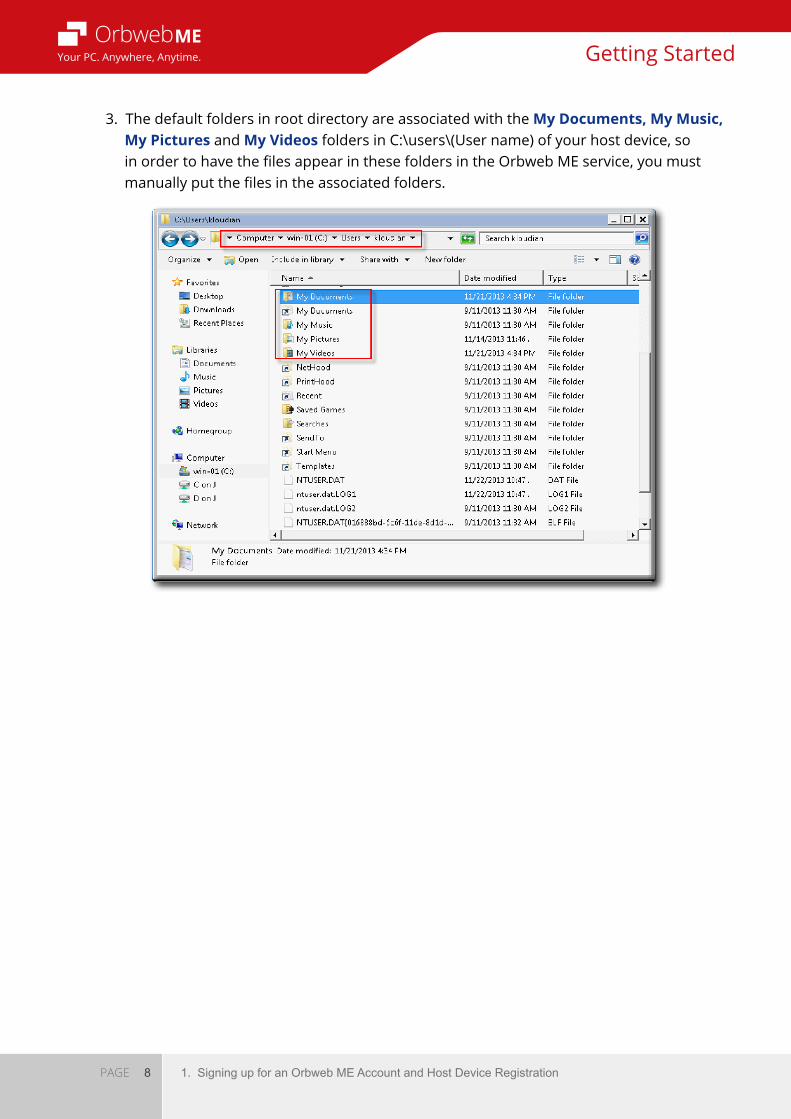
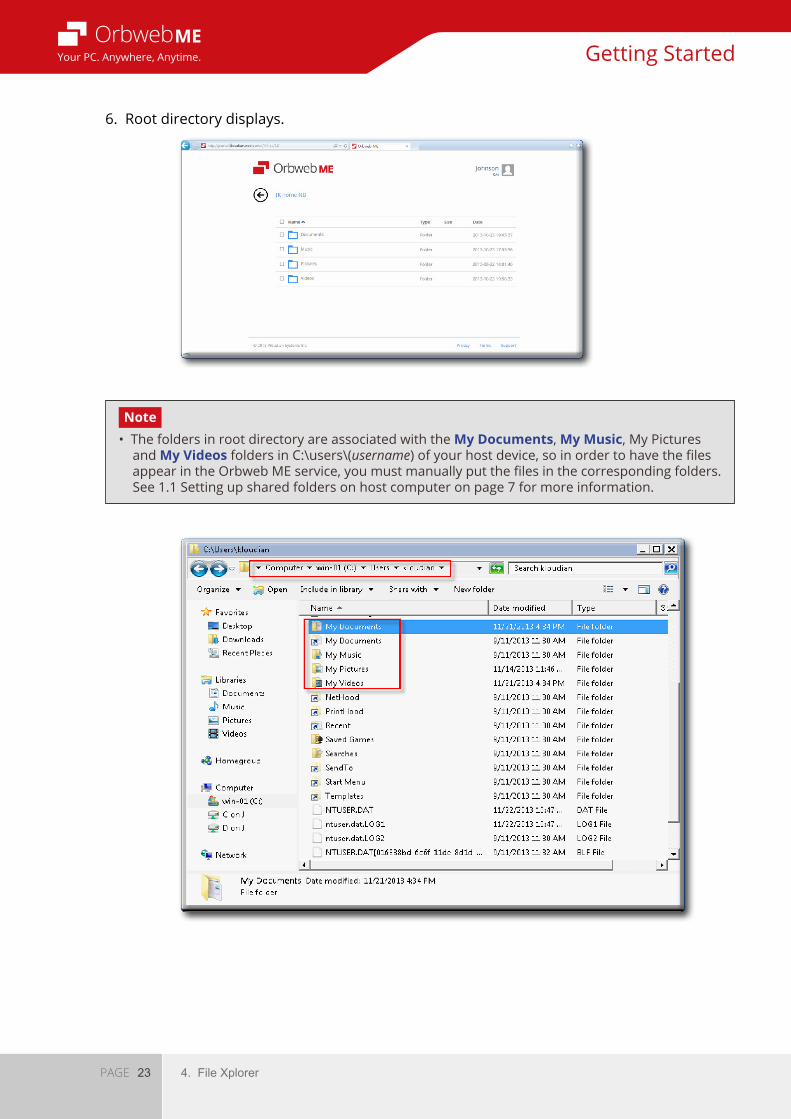
3. The default folders in root directory are associated with the My Documents, My Music, My Pictures and My Videos folders in C:\users\(User name) of your host device, so in order to have the files appear in these folders in the Orbweb ME service, you must manually put the files in the associated folders.
9 2. Portal Functions
Getting StartedYour PC. Anywhere, Anytime.
PAGE
2. Portal Functions
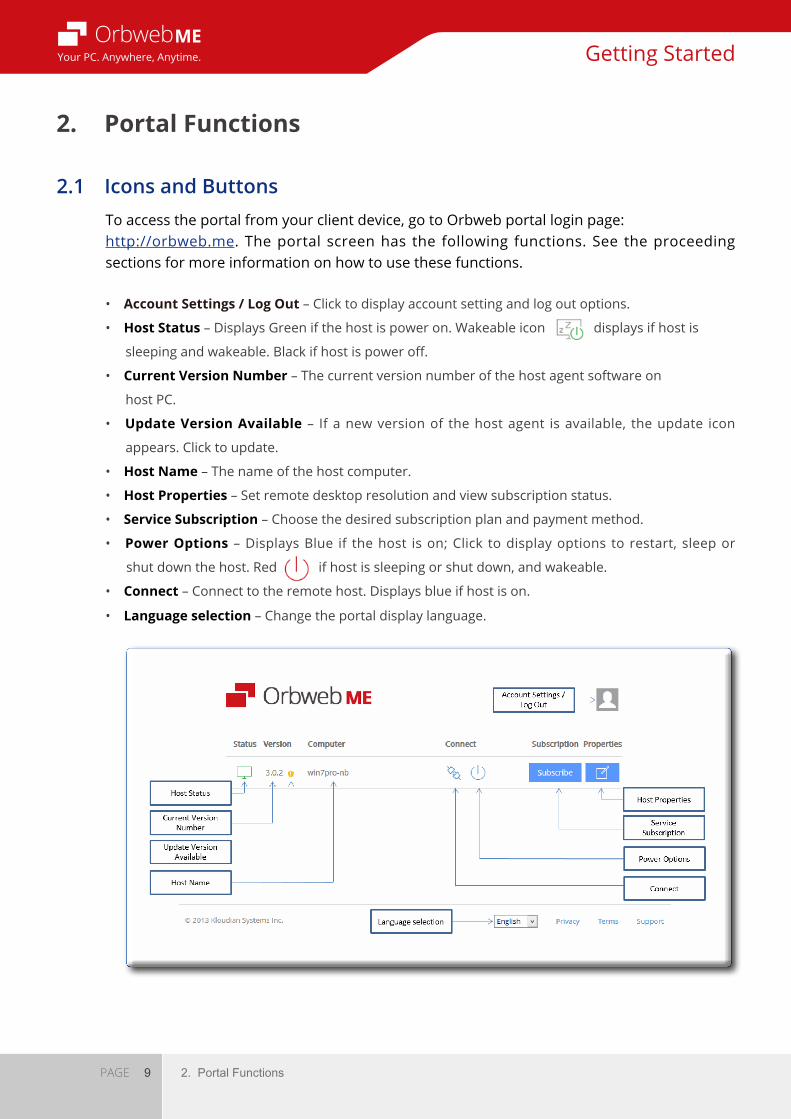
• Account Settings / Log Out – Click to display account setting and log out options.
• Host Status – Displays Green if the host is power on. Wakeable icon displays if host is
sleeping and wakeable. Black if host is power off.
• Current Version Number – The current version number of the host agent software on
host PC.
• Update Version Available – If a new version of the host agent is available, the update icon
appears. Click to update.
• Host Name – The name of the host computer.
• Host Properties – Set remote desktop resolution and view subscription status.
• Service Subscription – Choose the desired subscription plan and payment method.
• Power Options – Displays Blue if the host is on; Click to display options to restart, sleep or
shut down the host. Red if host is sleeping or shut down, and wakeable.
• Connect – Connect to the remote host. Displays blue if host is on.
• Language selection – Change the portal display language.
To access the portal from your client device, go to Orbweb portal login page: http://orbweb.me. The portal screen has the following functions. See the proceeding sections for more information on how to use these functions.
2.1 Icons and Buttons
10 2. Portal Functions
Getting StartedYour PC. Anywhere, Anytime.
PAGE
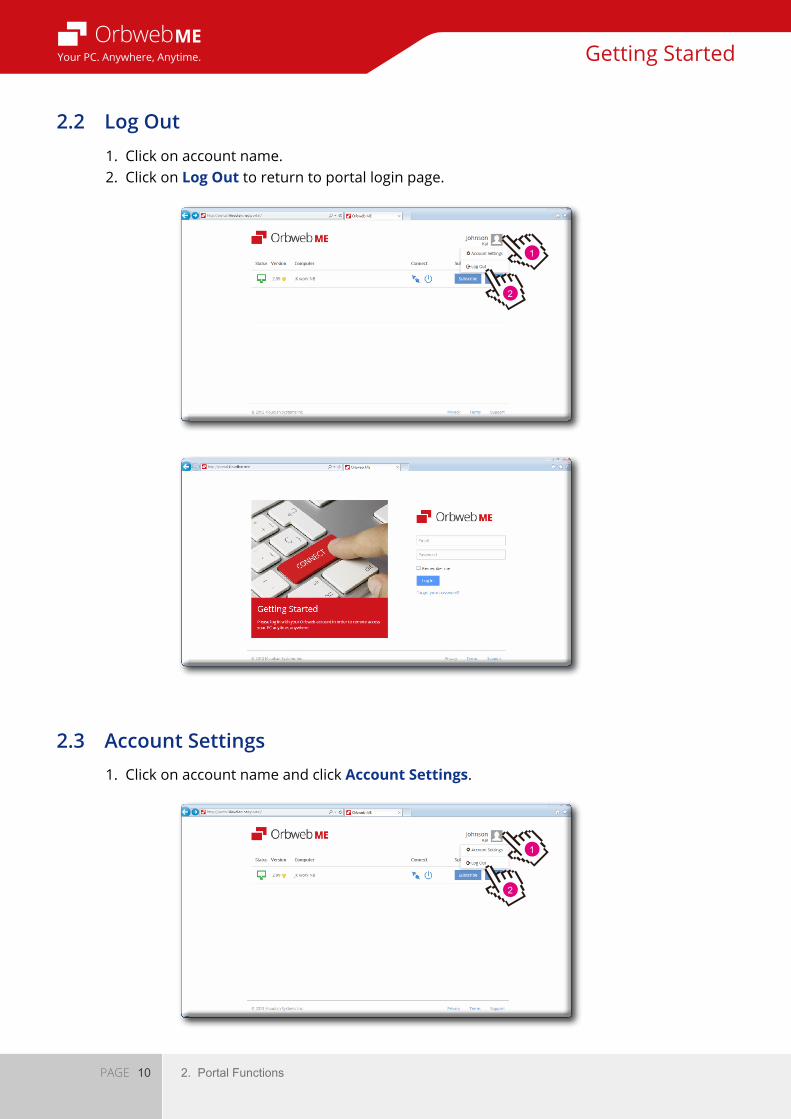
2.2 Log Out
2.3 Account Settings
1. Click on account name.2. Click on Log Out to return to portal login page.
1. Click on account name and click Account Settings.
1
1
2
2
11 2. Portal Functions
Getting StartedYour PC. Anywhere, Anytime.
PAGE
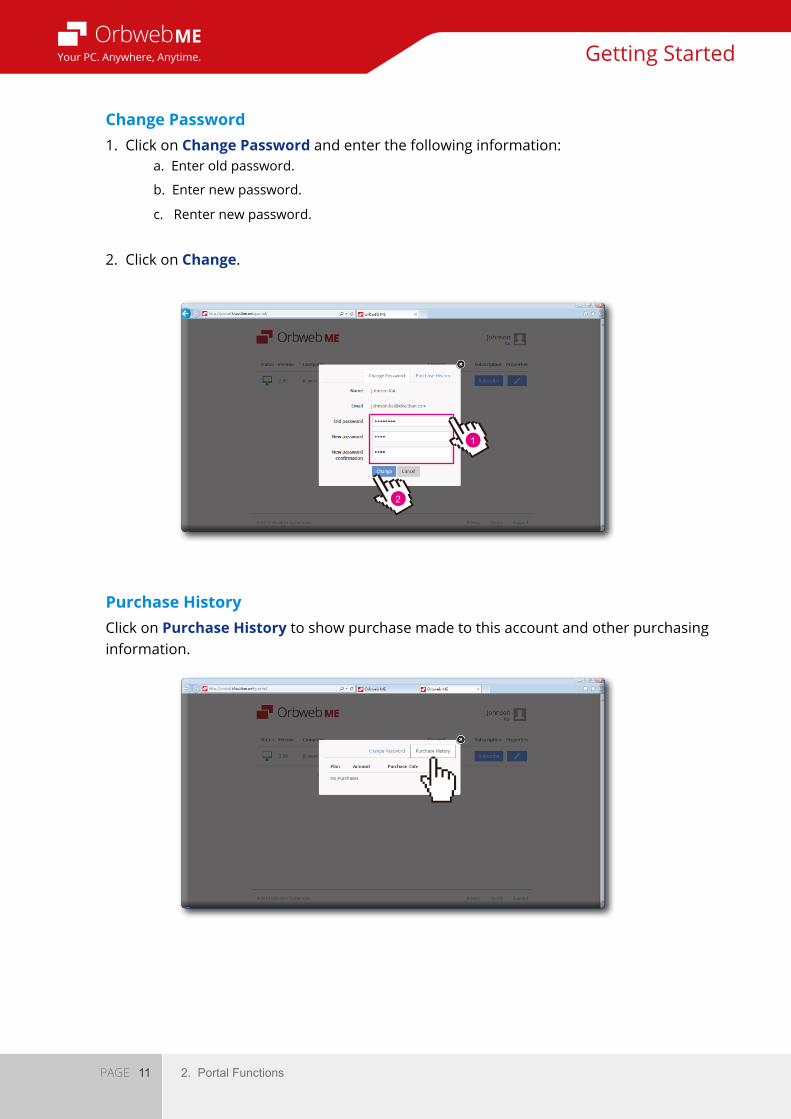
Change Password
Purchase History
1. Click on Change Password and enter the following information: a. Enter old password.
b. Enter new password.
c. Renter new password.
2. Click on Change.
Click on Purchase History to show purchase made to this account and other purchasing information.
2
1
12 2. Portal Functions
Getting StartedYour PC. Anywhere, Anytime.
PAGE
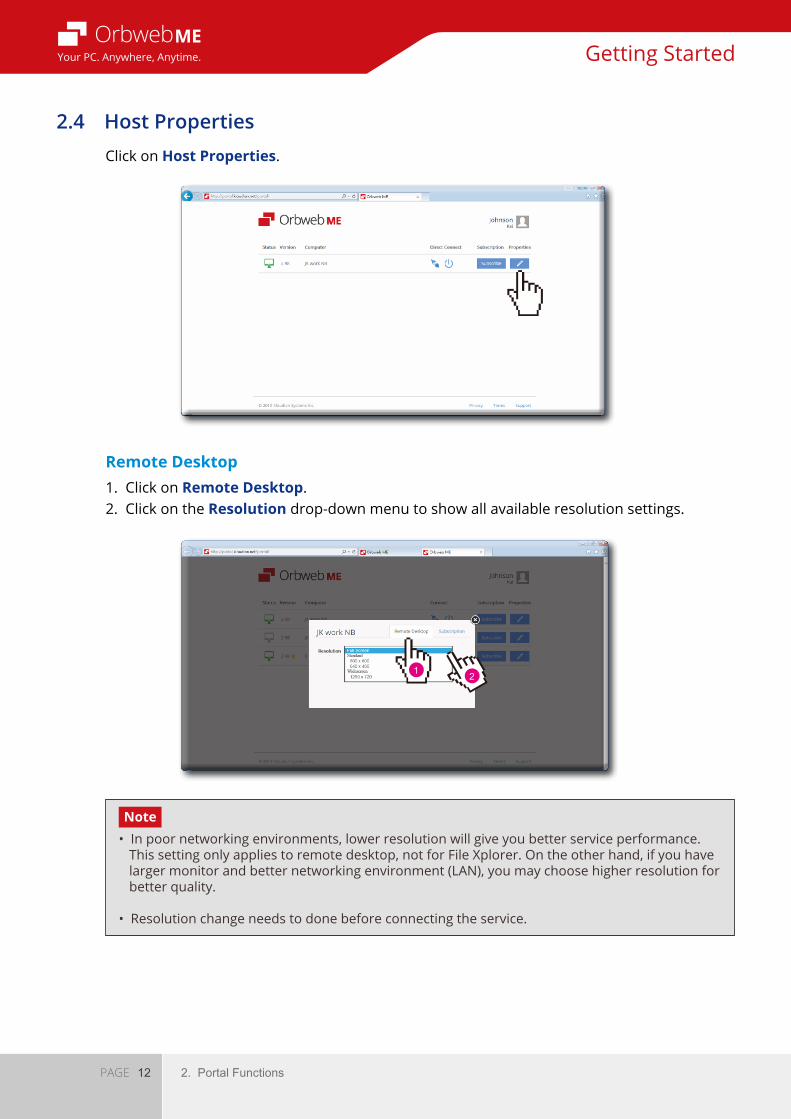
2.4 Host PropertiesClick on Host Properties.
Remote Desktop1. Click on Remote Desktop.2. Click on the Resolution drop-down menu to show all available resolution settings.
Note•Inpoornetworkingenvironments,lowerresolutionwillgiveyoubetterserviceperformance. This setting only applies to remote desktop, not for File Xplorer. On the other hand, if you have larger monitor and better networking environment (LAN), you may choose higher resolution for better quality.
•Resolutionchangeneedstodonebeforeconnectingtheservice.
21
13 2. Portal Functions
Getting StartedYour PC. Anywhere, Anytime.
PAGE
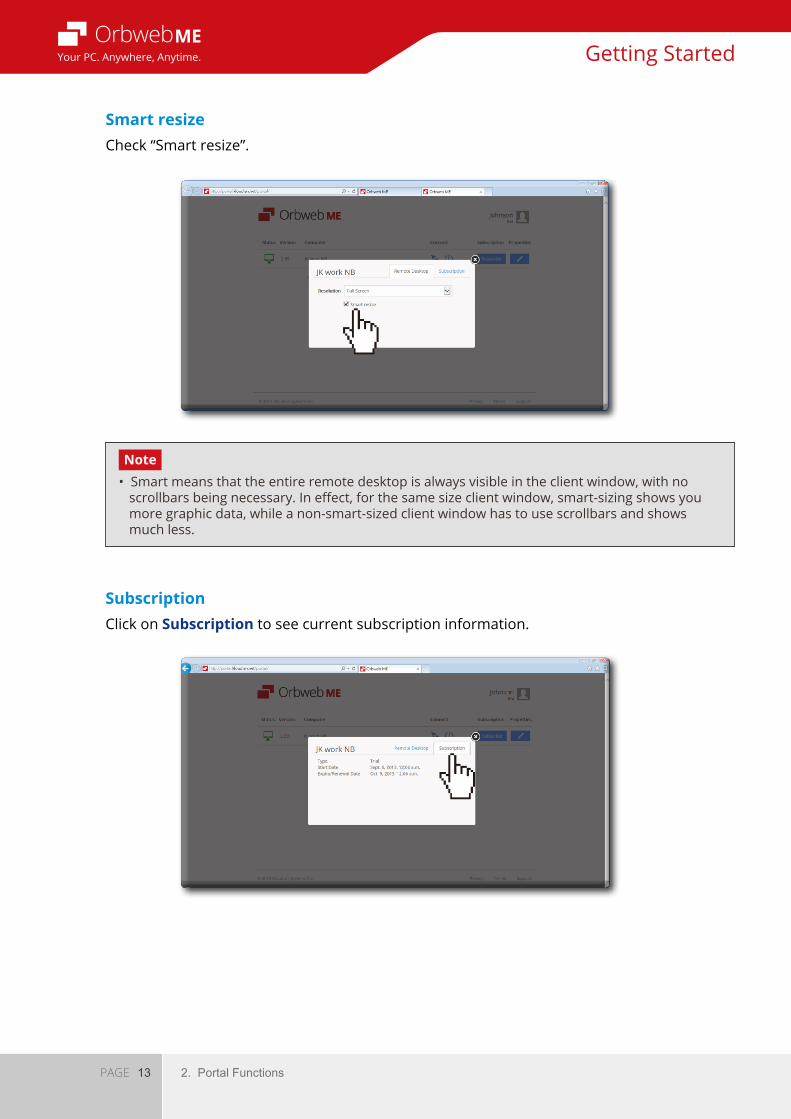
Note•Smartmeansthattheentireremotedesktopisalwaysvisibleintheclientwindow,withno scrollbars being necessary. In effect, for the same size client window, smart-sizing shows you more graphic data, while a non-smart-sized client window has to use scrollbars and shows much less.
SubscriptionClick on Subscription to see current subscription information.
Smart resizeCheck “Smart resize”.
14 2. Portal Functions
Getting StartedYour PC. Anywhere, Anytime.
PAGE
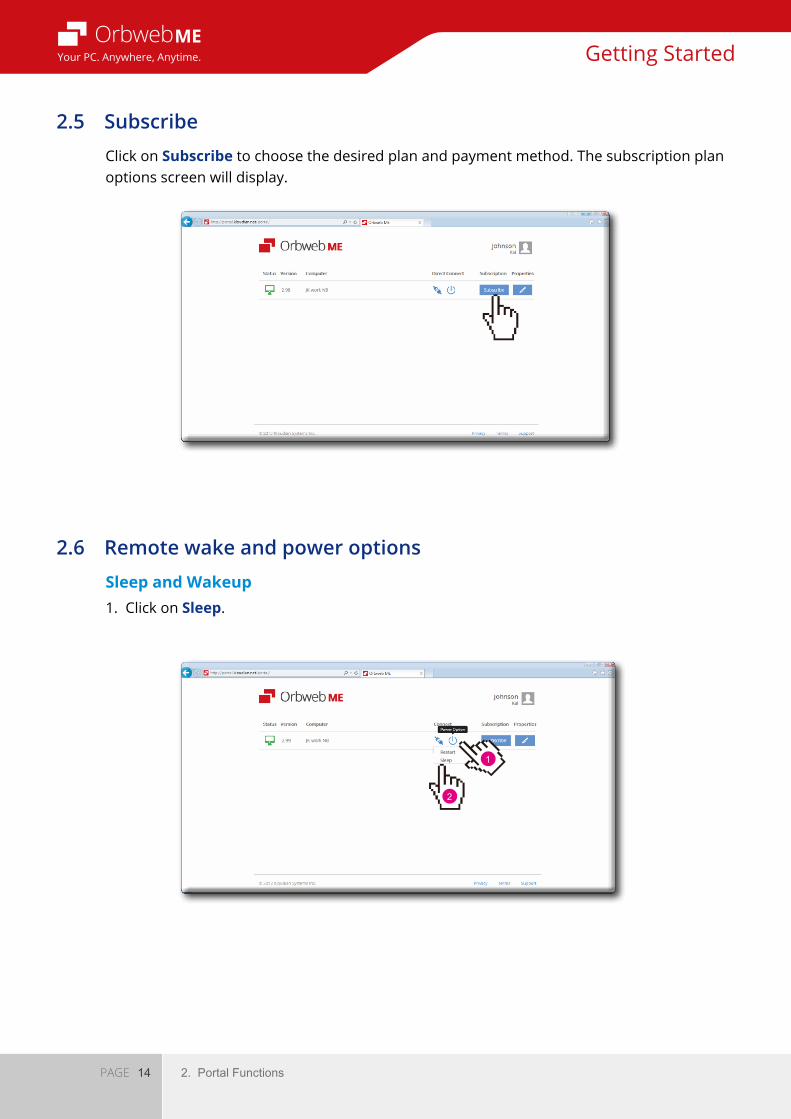
2.5 Subscribe
2.6 Remote wake and power options
Click on Subscribe to choose the desired plan and payment method. The subscription plan options screen will display.
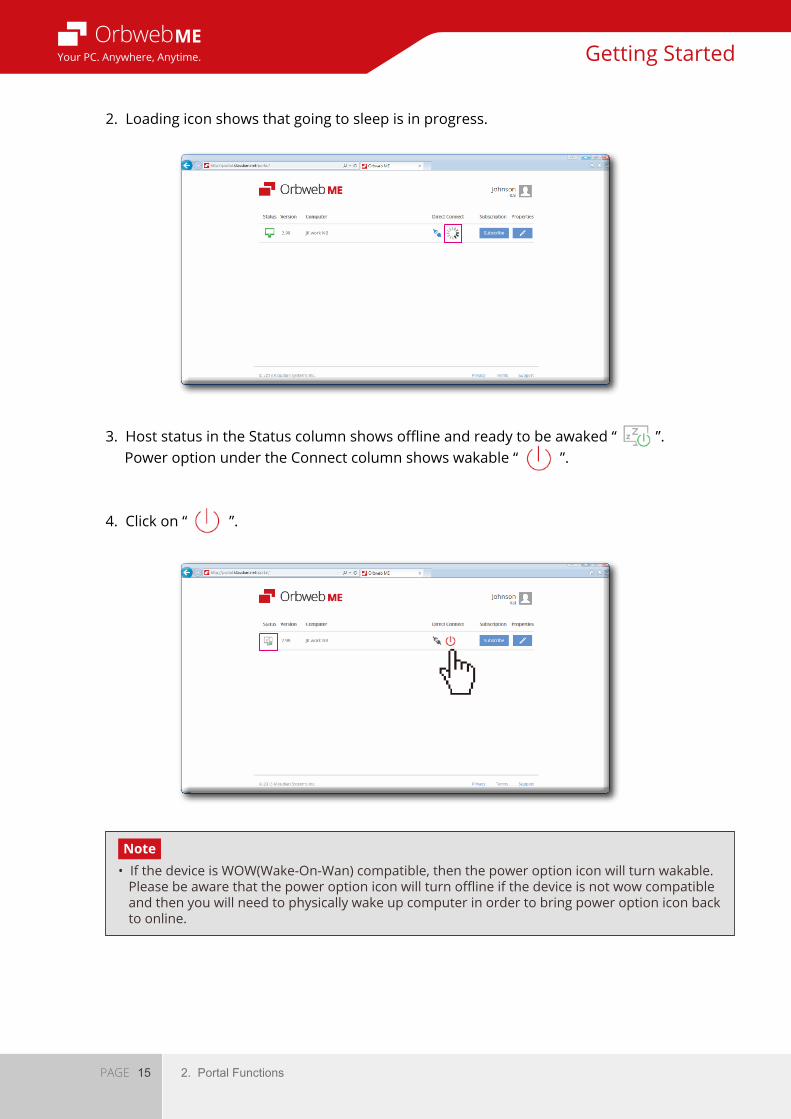
Sleep and Wakeup1. Click on Sleep.
1
2
15 2. Portal Functions
Getting StartedYour PC. Anywhere, Anytime.
PAGE
Note•IfthedeviceisWOW(Wake-On-Wan)compatible,thenthepoweroptioniconwillturnwakable. Please be aware that the power option icon will turn offline if the device is not wow compatible and then you will need to physically wake up computer in order to bring power option icon back to online.
2. Loading icon shows that going to sleep is in progress.
4. Click on “ ”.
3. Host status in the Status column shows offline and ready to be awaked “ ”. Power option under the Connect column shows wakable “ ”.
16 2. Portal Functions
Getting StartedYour PC. Anywhere, Anytime.
PAGE
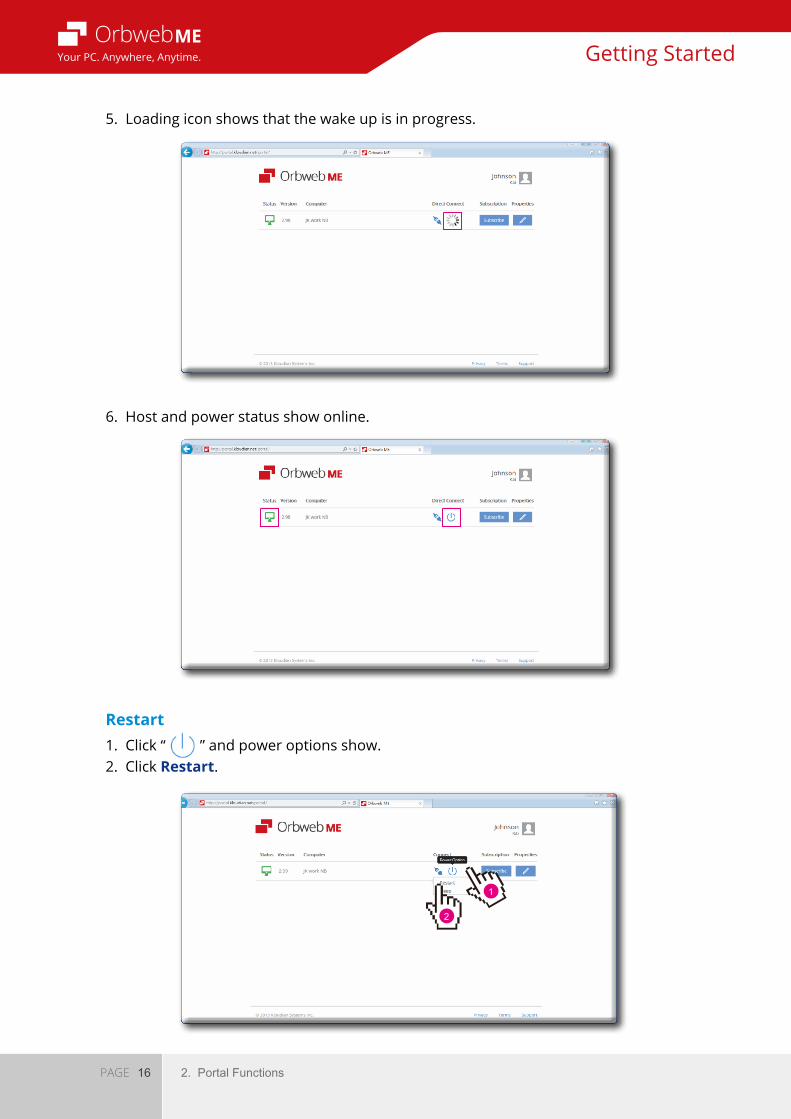
5. Loading icon shows that the wake up is in progress.
6. Host and power status show online.
Restart1. Click “ ” and power options show.2. Click Restart.
1
2

17 2. Portal Functions
Getting StartedYour PC. Anywhere, Anytime.
PAGE
3. Loading icon shows that the restart is in progress.
4. Host and power status show online.
18 2. Portal Functions
Getting StartedYour PC. Anywhere, Anytime.
PAGE
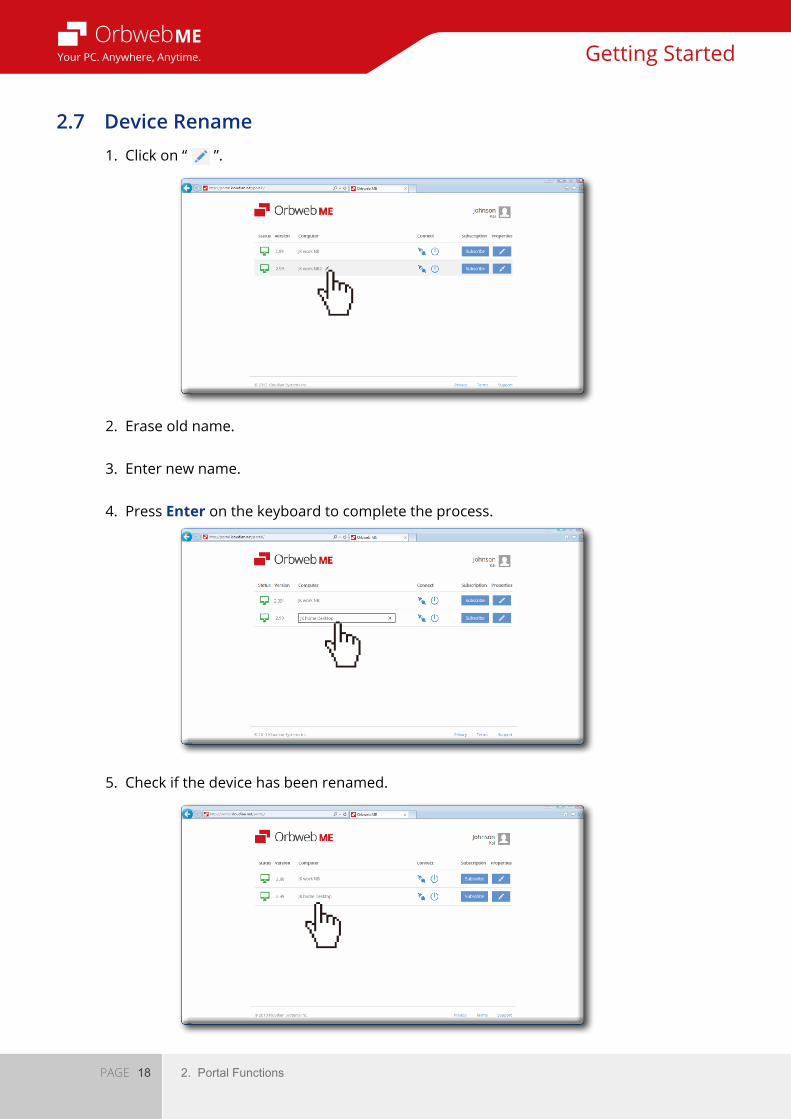
2. Erase old name.
3. Enter new name.
4. Press Enter on the keyboard to complete the process.
5. Check if the device has been renamed.
2.7 Device Rename1. Click on “ ”.
19 2. Portal Functions
Getting StartedYour PC. Anywhere, Anytime.
PAGE
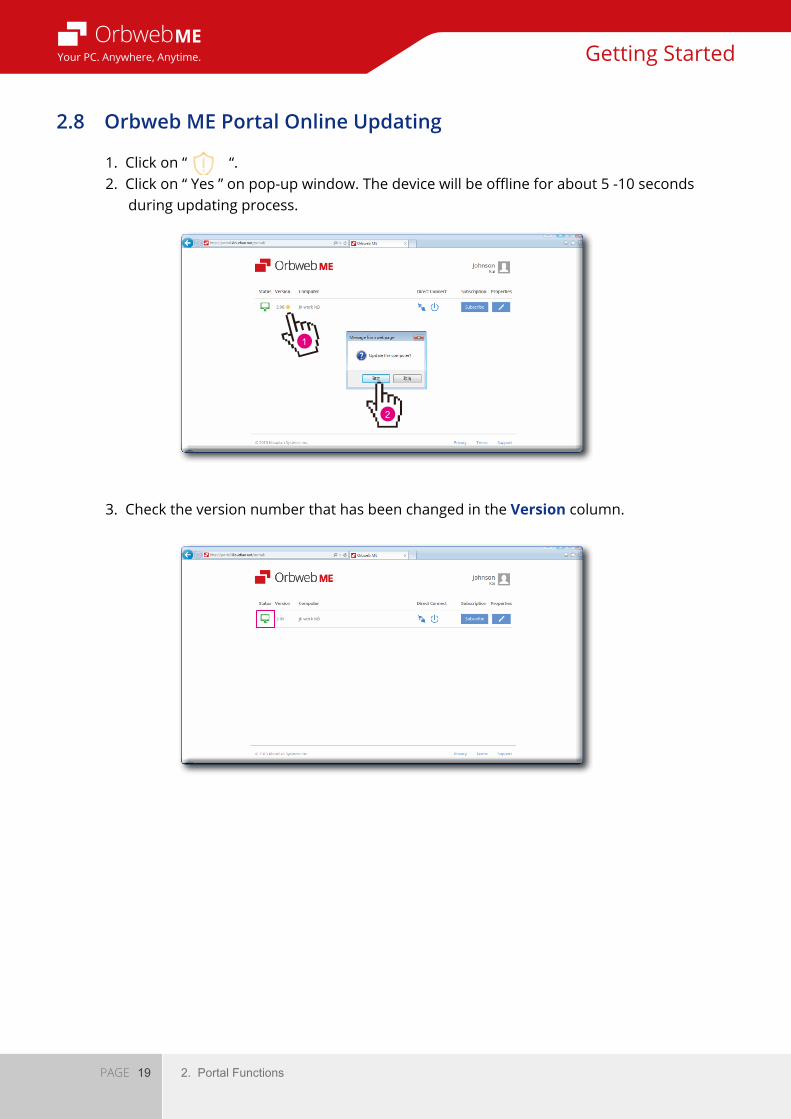
2.8 Orbweb ME Portal Online Updating
1. Click on “ “.2. Click on “ Yes ” on pop-up window. The device will be offline for about 5 -10 seconds during updating process.
3. Check the version number that has been changed in the Version column.
1
2
Getting StartedYour PC. Anywhere, Anytime.
20 3. Remote DesktopPAGE
3. Remote Desktop
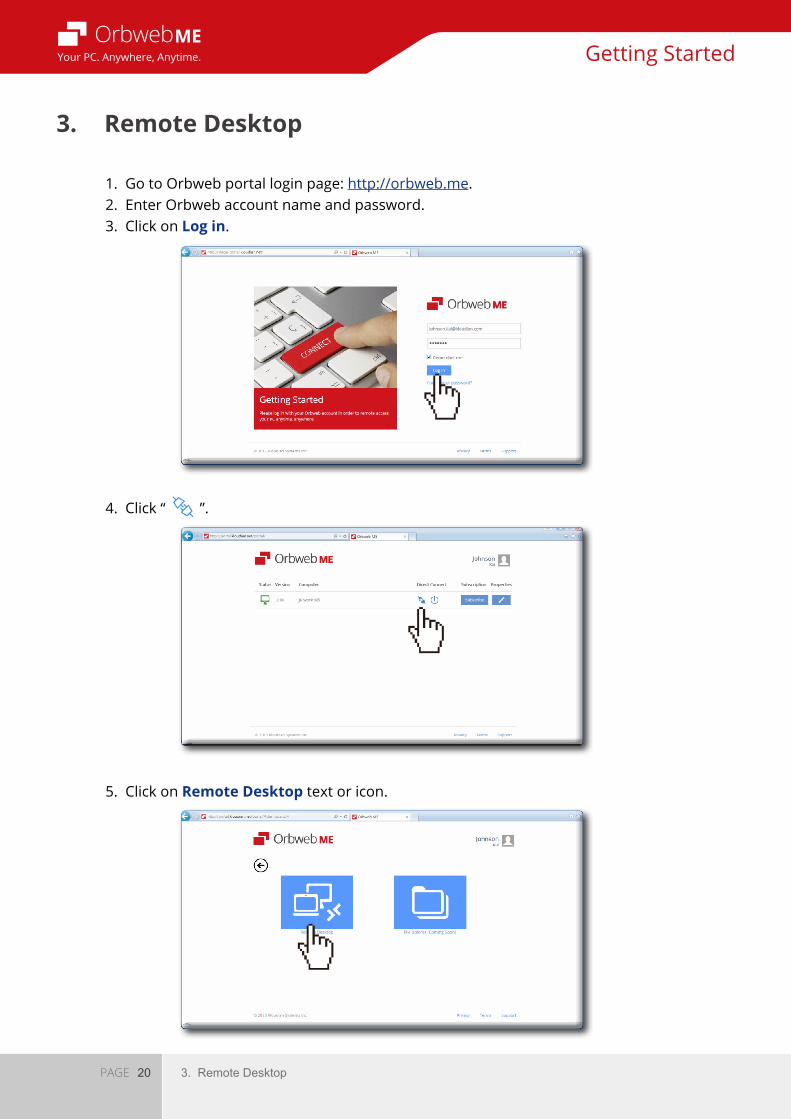
1. Go to Orbweb portal login page: http://orbweb.me.2. Enter Orbweb account name and password.3. Click on Log in.
4. Click “ ”.
5. Click on Remote Desktop text or icon.
Getting StartedYour PC. Anywhere, Anytime.
21 3. Remote DesktopPAGE
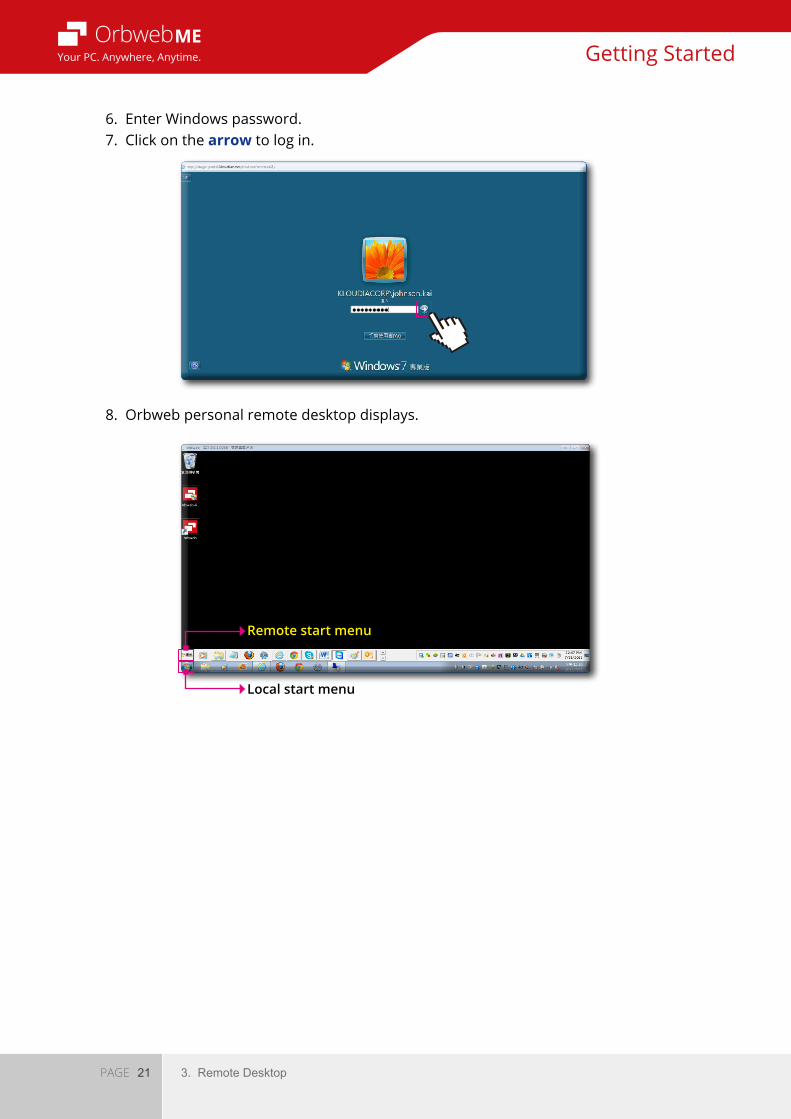
6. Enter Windows password.7. Click on the arrow to log in.
8. Orbweb personal remote desktop displays.
Remote start menu
Local start menu
Getting StartedYour PC. Anywhere, Anytime.
22 4. File XplorerPAGE
4. File Xplorer
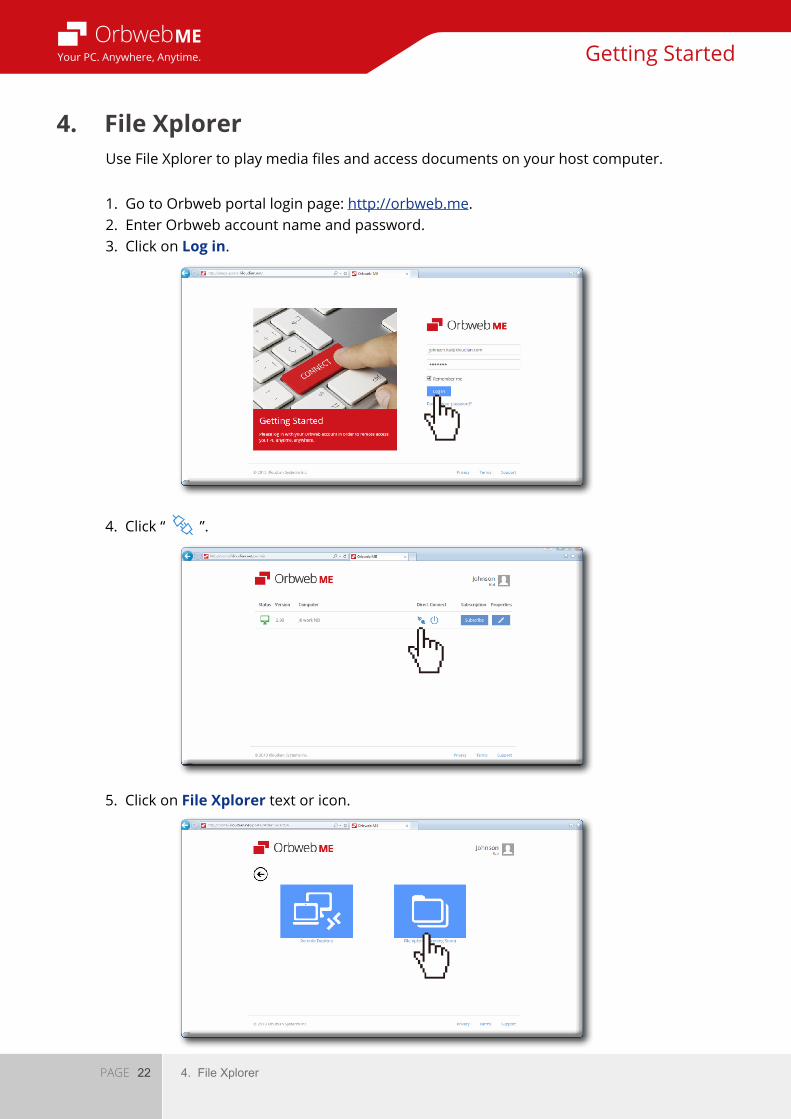
1. Go to Orbweb portal login page: http://orbweb.me.2. Enter Orbweb account name and password.3. Click on Log in.
Use File Xplorer to play media files and access documents on your host computer.
4. Click “ ”.
5. Click on File Xplorer text or icon.
Getting StartedYour PC. Anywhere, Anytime.
23 4. File XplorerPAGE
Note•ThefoldersinrootdirectoryareassociatedwiththeMy Documents, My Music, My Pictures and My Videos folders in C:\users\(username) of your host device, so in order to have the files appear in the Orbweb ME service, you must manually put the files in the corresponding folders. See 1.1 Setting up shared folders on host computer on page 7 for more information.
6. Root directory displays.
Getting StartedYour PC. Anywhere, Anytime.
24 4. File XplorerPAGE
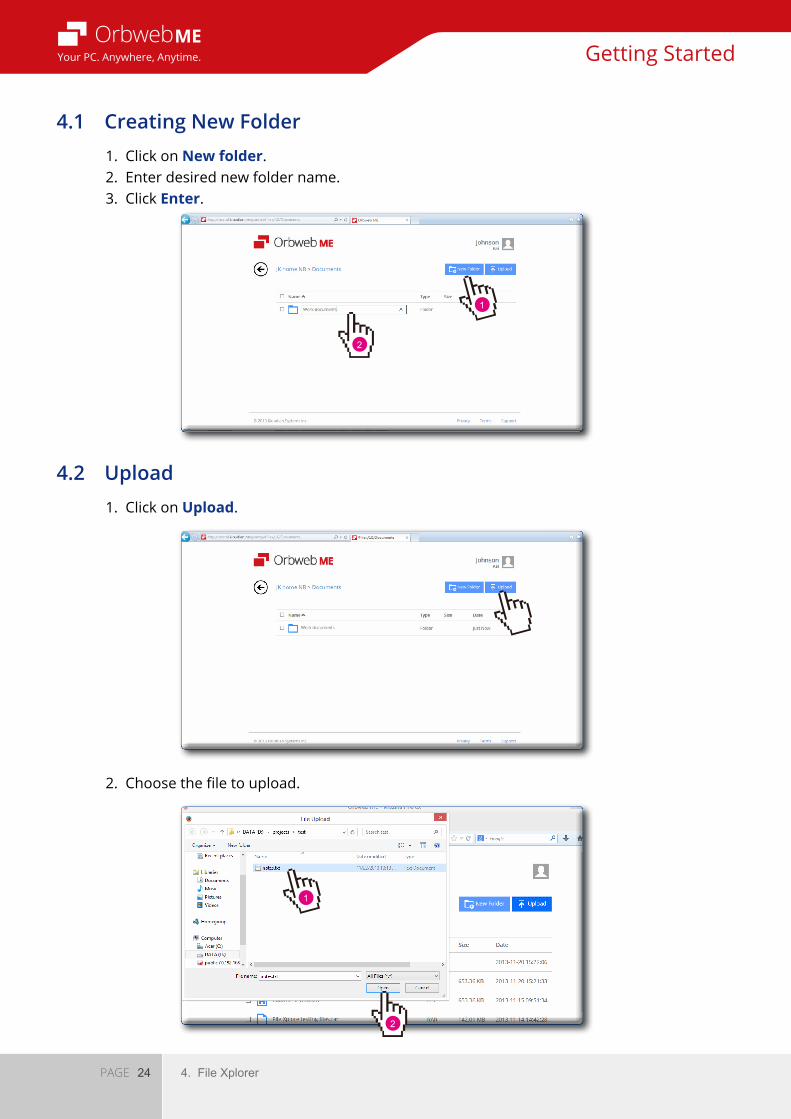
4.1 Creating New Folder
4.2 Upload
1. Click on New folder.2. Enter desired new folder name.3. Click Enter.
1. Click on Upload.
2. Choose the file to upload.
1
1
2
2
Getting StartedYour PC. Anywhere, Anytime.
25 4. File XplorerPAGE
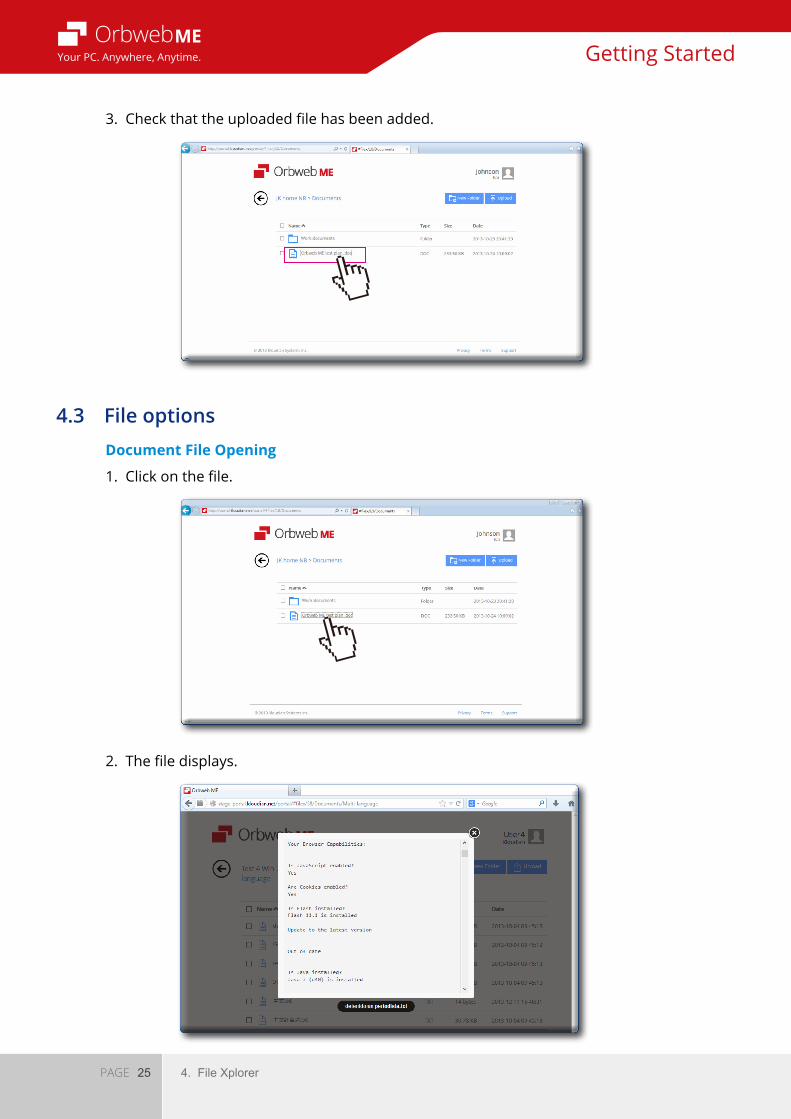
3. Check that the uploaded file has been added.
4.3 File options
1. Click on the file.
2. The file displays.
Document File Opening
Getting StartedYour PC. Anywhere, Anytime.
26 4. File XplorerPAGE
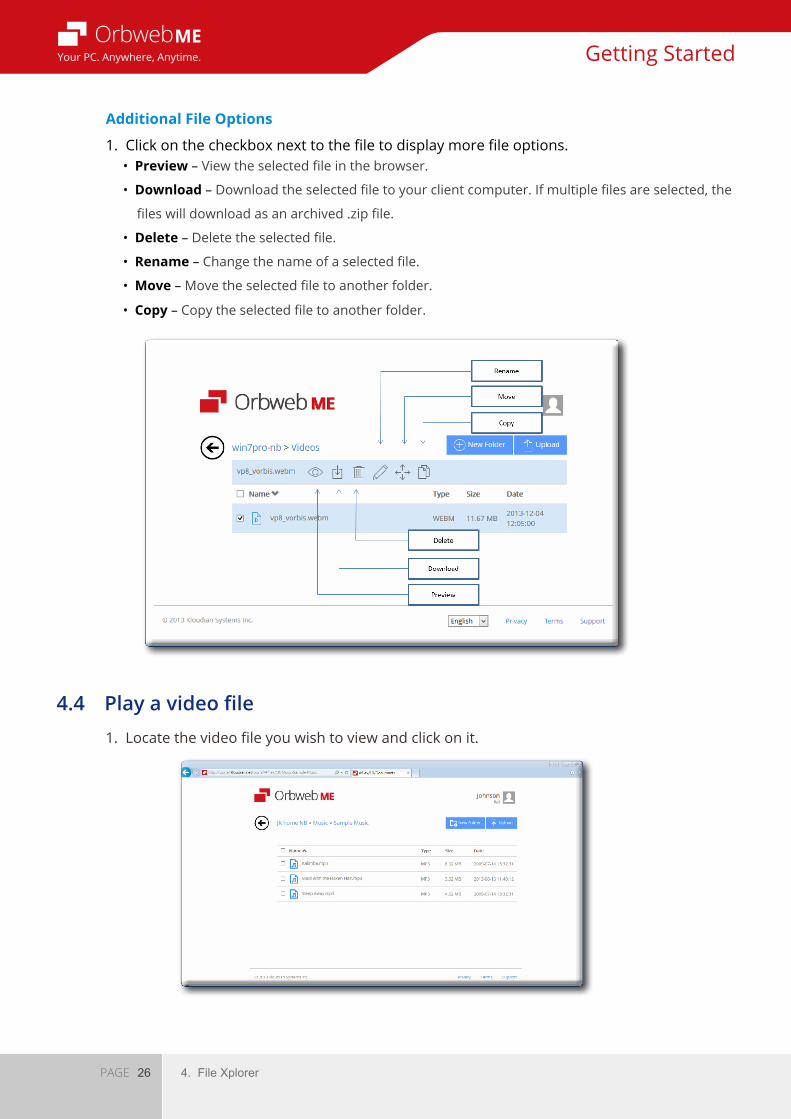
1. Click on the checkbox next to the file to display more file options.•Preview – View the selected file in the browser.
•Download – Download the selected file to your client computer. If multiple files are selected, the
files will download as an archived .zip file.
•Delete – Delete the selected file.
•Rename – Change the name of a selected file.
•Move – Move the selected file to another folder.
•Copy – Copy the selected file to another folder.
4.4 Play a video file1. Locate the video file you wish to view and click on it.
Additional File Options
Getting StartedYour PC. Anywhere, Anytime.
27 4. File XplorerPAGE
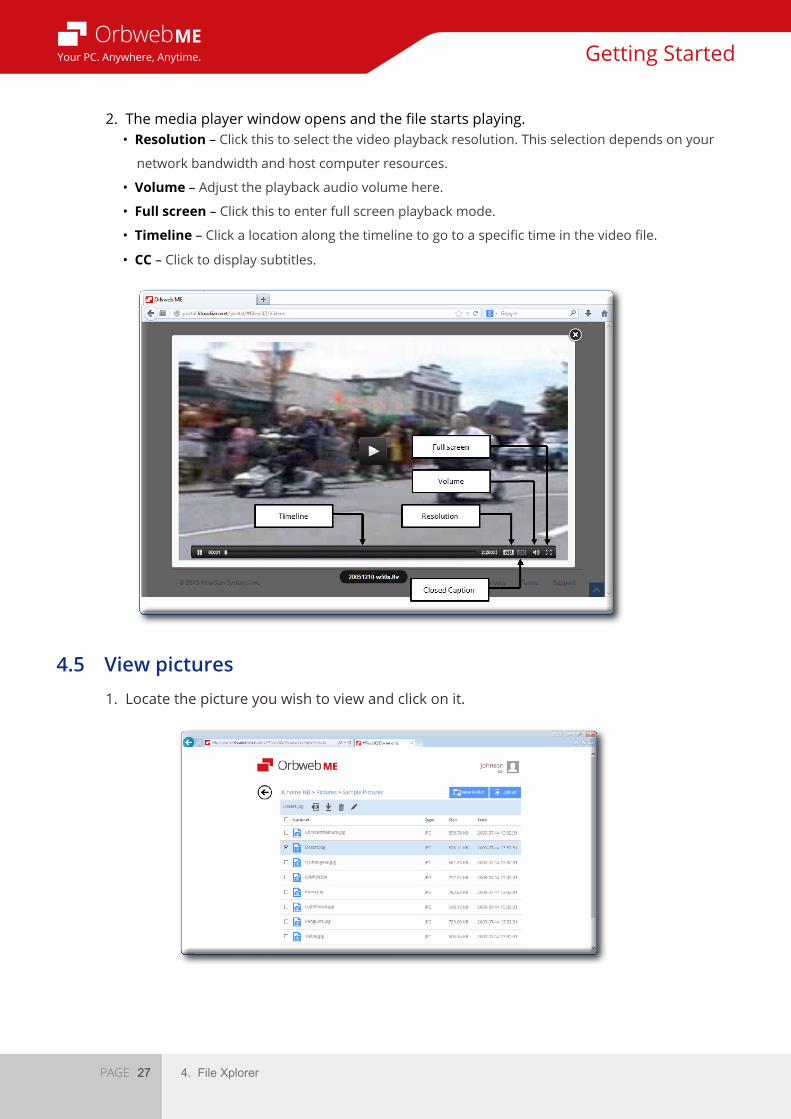
2. The media player window opens and the file starts playing.•Resolution – Click this to select the video playback resolution. This selection depends on your
network bandwidth and host computer resources.
•Volume – Adjust the playback audio volume here.
•Full screen – Click this to enter full screen playback mode.
•Timeline – Click a location along the timeline to go to a specific time in the video file.
•CC – Click to display subtitles.
4.5 View pictures1. Locate the picture you wish to view and click on it.
Getting StartedYour PC. Anywhere, Anytime.
28 4. File XplorerPAGE
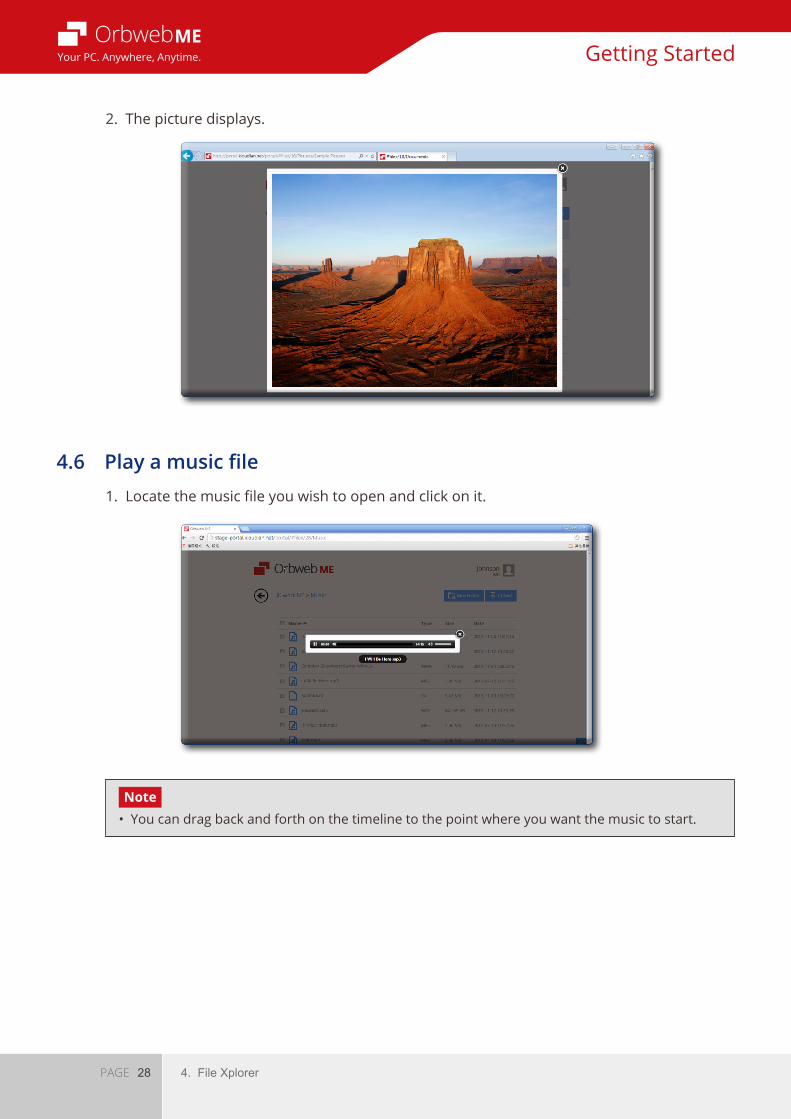
2. The picture displays.
4.6 Play a music file1. Locate the music file you wish to open and click on it.
Note•Youcandragbackandforthonthetimelinetothepointwhereyouwantthemusictostart.
Getting StartedYour PC. Anywhere, Anytime.
29 5. Adding a host device to your accountPAGE
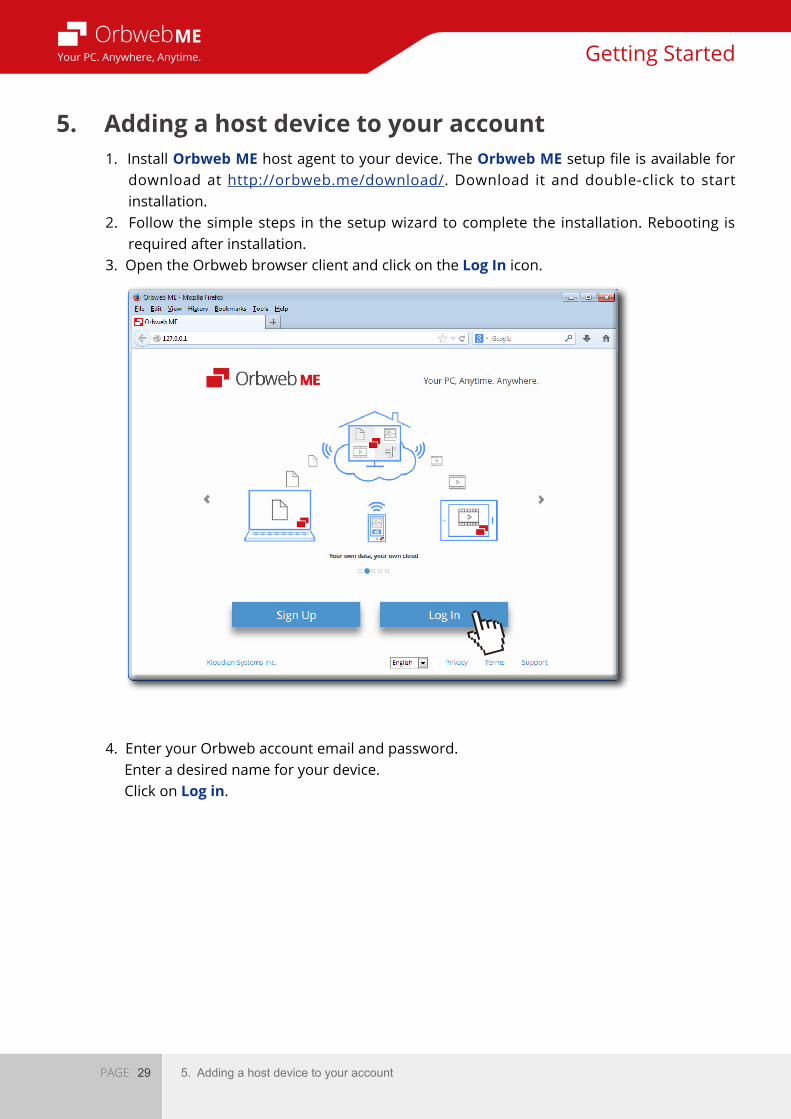
5. Adding a host device to your account1. Install Orbweb ME host agent to your device. The Orbweb ME setup file is available for download at http://orbweb.me/download/. Download it and double-click to start installation.2. Follow the simple steps in the setup wizard to complete the installation. Rebooting is required after installation.3. Open the Orbweb browser client and click on the Log In icon.
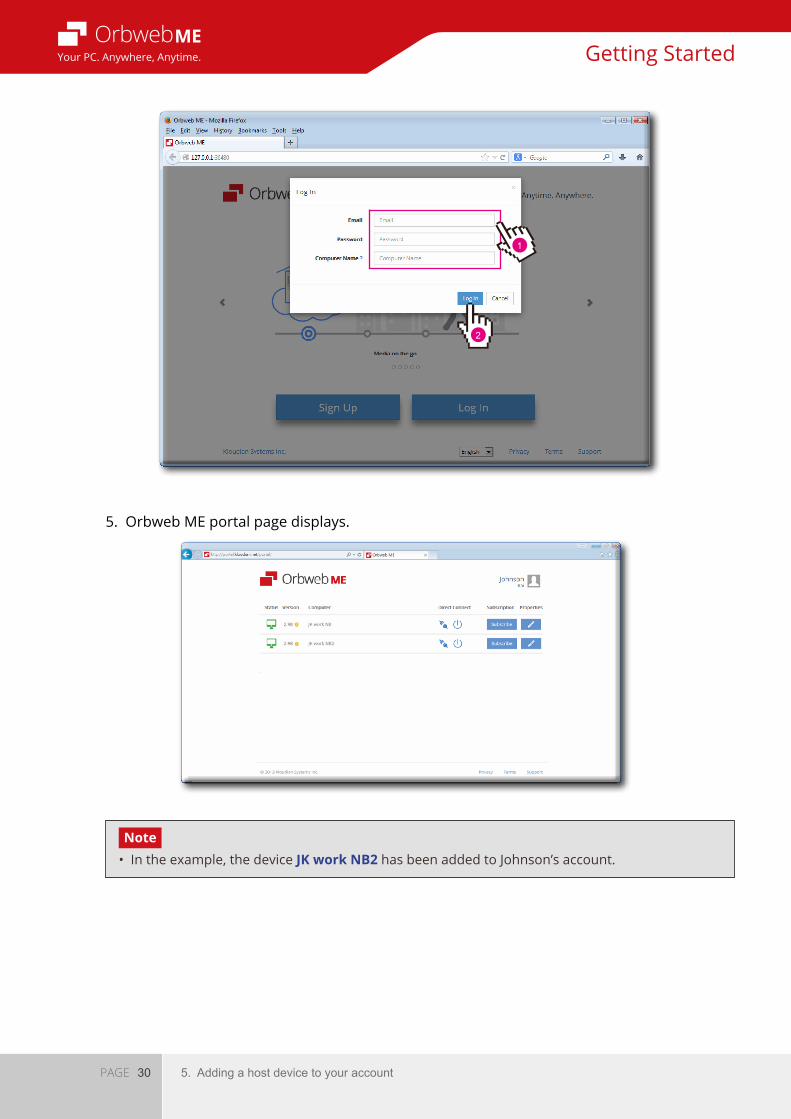
4. Enter your Orbweb account email and password. Enter a desired name for your device. Click on Log in.
Getting StartedYour PC. Anywhere, Anytime.
30 5. Adding a host device to your accountPAGE
5. Orbweb ME portal page displays.
Note•Intheexample,thedeviceJK work NB2 has been added to Johnson’s account.
1
2
Getting StartedYour PC. Anywhere, Anytime.
31 6. Use Orbweb ME on iOS or Android tablet clientsPAGE
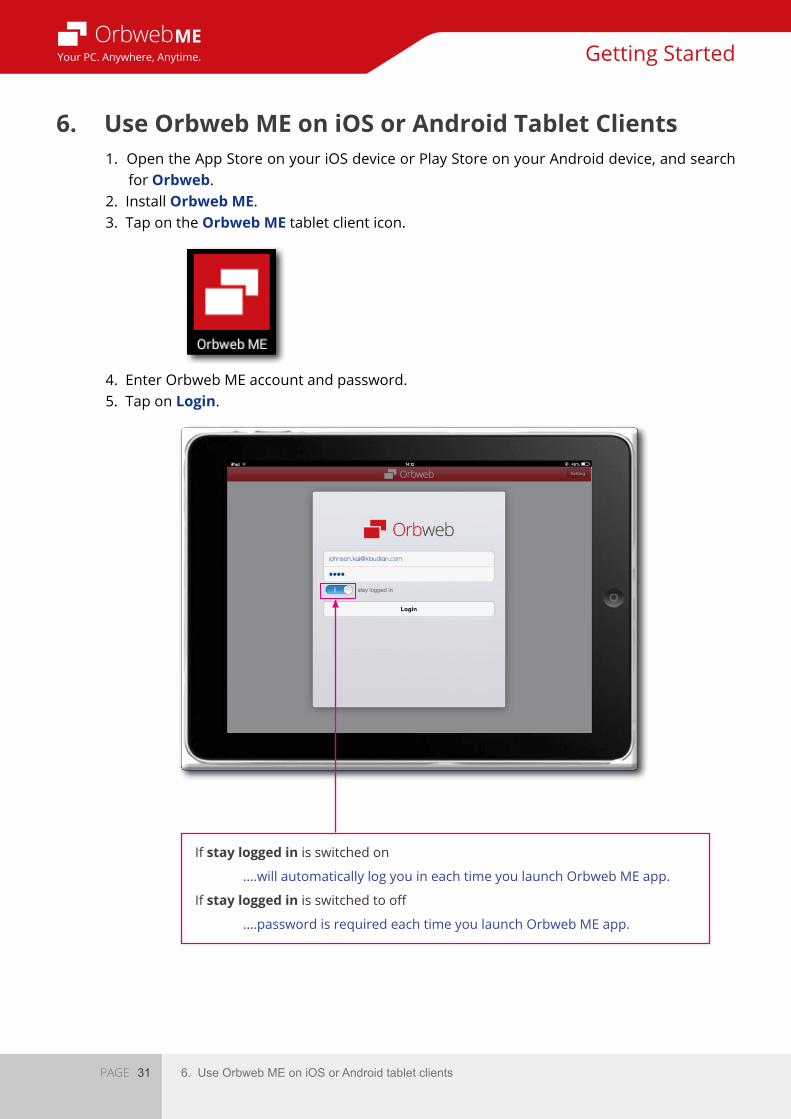
6. Use Orbweb ME on iOS or Android Tablet Clients1. Open the App Store on your iOS device or Play Store on your Android device, and search for Orbweb. 2. Install Orbweb ME.3. Tap on the Orbweb ME tablet client icon.
4. Enter Orbweb ME account and password.5. Tap on Login.
If stay logged in is switched on
….will automatically log you in each time you launch Orbweb ME app.
If stay logged in is switched to off
….password is required each time you launch Orbweb ME app.
Getting StartedYour PC. Anywhere, Anytime.
32 6. Use Orbweb ME on iOS or Android tablet clientsPAGE
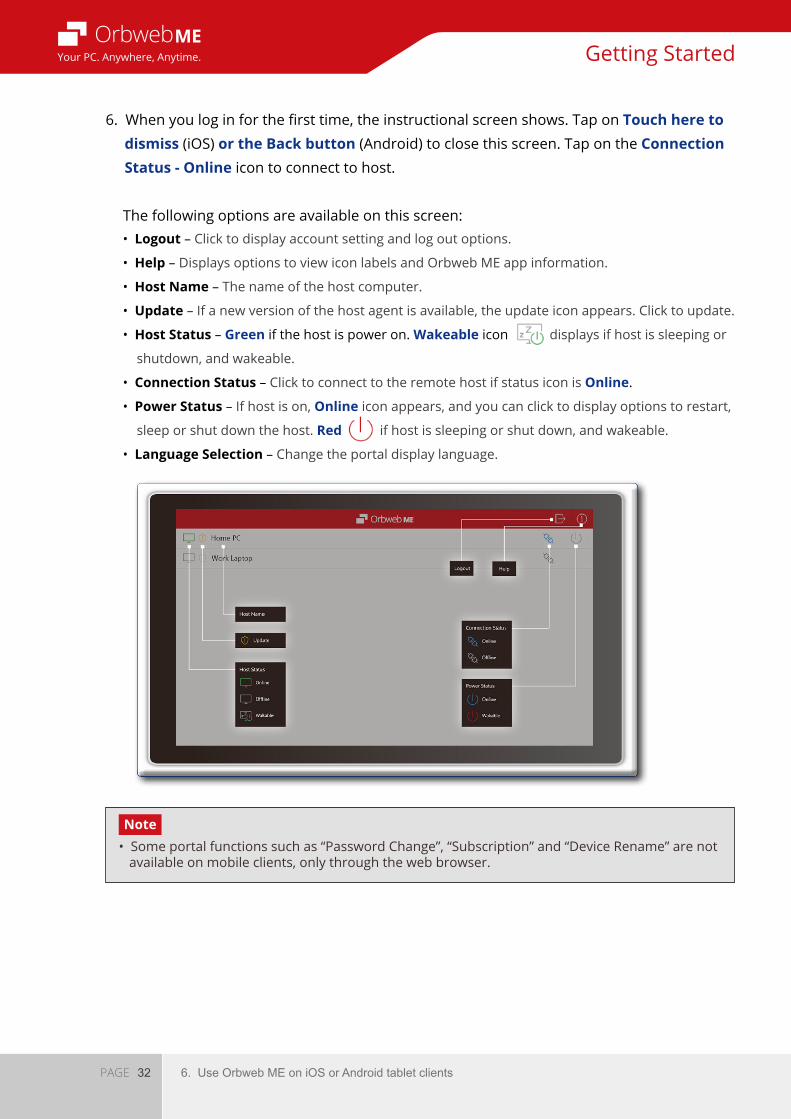
6. When you log in for the first time, the instructional screen shows. Tap on Touch here to dismiss (iOS) or the Back button (Android) to close this screen. Tap on the Connection Status - Online icon to connect to host.
The following options are available on this screen:•Logout – Click to display account setting and log out options.
•Help – Displays options to view icon labels and Orbweb ME app information.
•Host Name – The name of the host computer.
•Update – If a new version of the host agent is available, the update icon appears. Click to update.
•Host Status – Green if the host is power on. Wakeable icon displays if host is sleeping or
shutdown, and wakeable.
•Connection Status – Click to connect to the remote host if status icon is Online.
•Power Status – If host is on, Online icon appears, and you can click to display options to restart,
sleep or shut down the host. Red if host is sleeping or shut down, and wakeable.
•Language Selection – Change the portal display language.
Note•Someportalfunctionssuchas“PasswordChange”,“Subscription”and“DeviceRename”arenot available on mobile clients, only through the web browser.
Getting StartedYour PC. Anywhere, Anytime.
33 6. Use Orbweb ME on iOS or Android tablet clientsPAGE
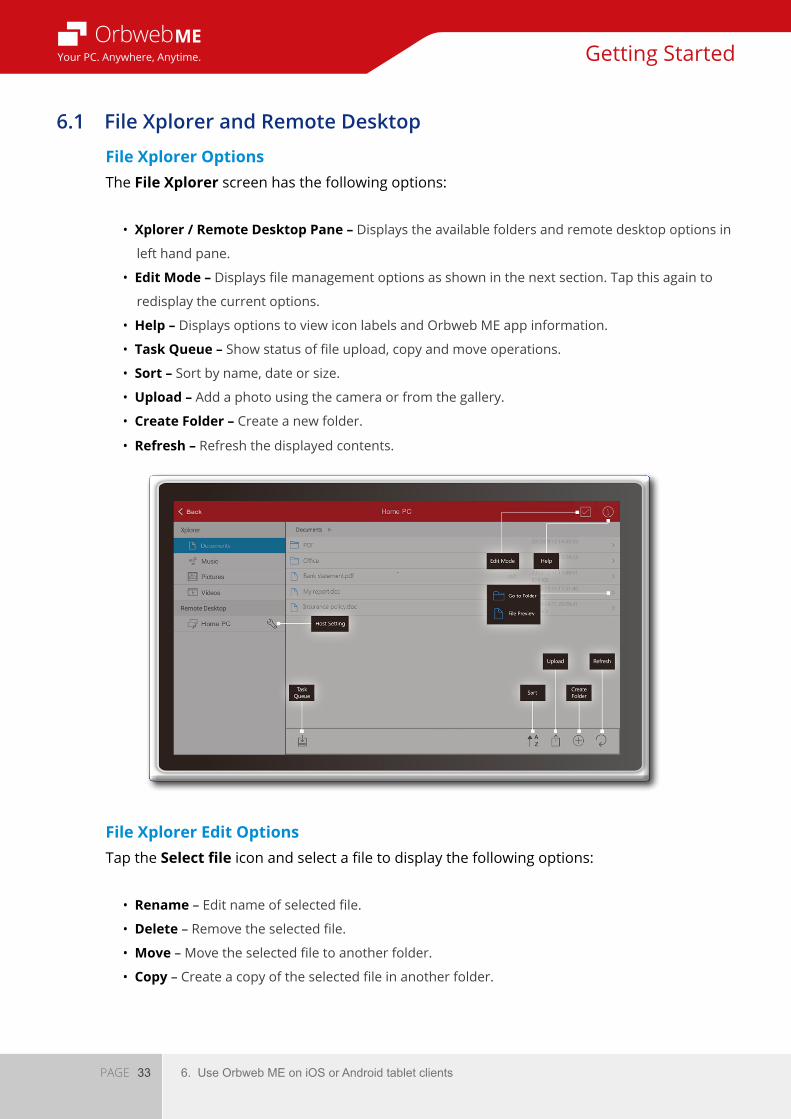
6.1 File Xplorer and Remote Desktop
The File Xplorer screen has the following options:
•Xplorer / Remote Desktop Pane – Displays the available folders and remote desktop options in
left hand pane.
•Edit Mode – Displays file management options as shown in the next section. Tap this again to
redisplay the current options.
•Help – Displays options to view icon labels and Orbweb ME app information.
•Task Queue – Show status of file upload, copy and move operations.
•Sort – Sort by name, date or size.
•Upload – Add a photo using the camera or from the gallery.
•Create Folder – Create a new folder.
•Refresh – Refresh the displayed contents.
Tap the Select file icon and select a file to display the following options:
•Rename – Edit name of selected file.
•Delete – Remove the selected file.
•Move – Move the selected file to another folder.
•Copy – Create a copy of the selected file in another folder.
File Xplorer Options
File Xplorer Edit Options

Getting StartedYour PC. Anywhere, Anytime.
34 6. Use Orbweb ME on iOS or Android tablet clientsPAGE
Click on a video file to open it. In full screen mode, the playback options display as below for iOS. To display subtitles on iOS, click on the subtitles icon to open a screen to select available subtitle files. Supported subtitle formats are .ssa, .ass, .srt and .vtt.
Video Playback Options
Getting StartedYour PC. Anywhere, Anytime.
35 6. Use Orbweb ME on iOS or Android tablet clientsPAGE
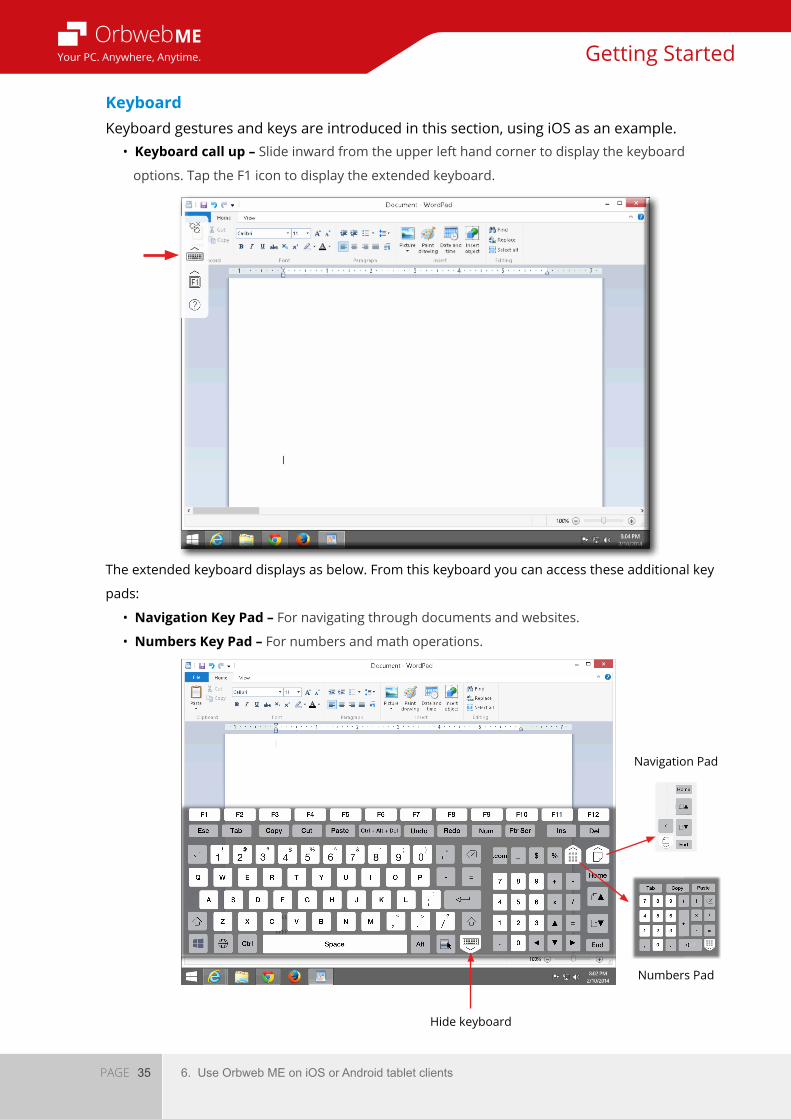
The extended keyboard displays as below. From this keyboard you can access these additional key
pads:
•Navigation Key Pad – For navigating through documents and websites.
•Numbers Key Pad – For numbers and math operations.
Keyboard gestures and keys are introduced in this section, using iOS as an example. •Keyboard call up – Slide inward from the upper left hand corner to display the keyboard
options. Tap the F1 icon to display the extended keyboard.
Keyboard
Hide keyboard
Navigation Pad
Numbers Pad
Getting StartedYour PC. Anywhere, Anytime.
36 6. Use Orbweb ME on iOS or Android tablet clientsPAGE
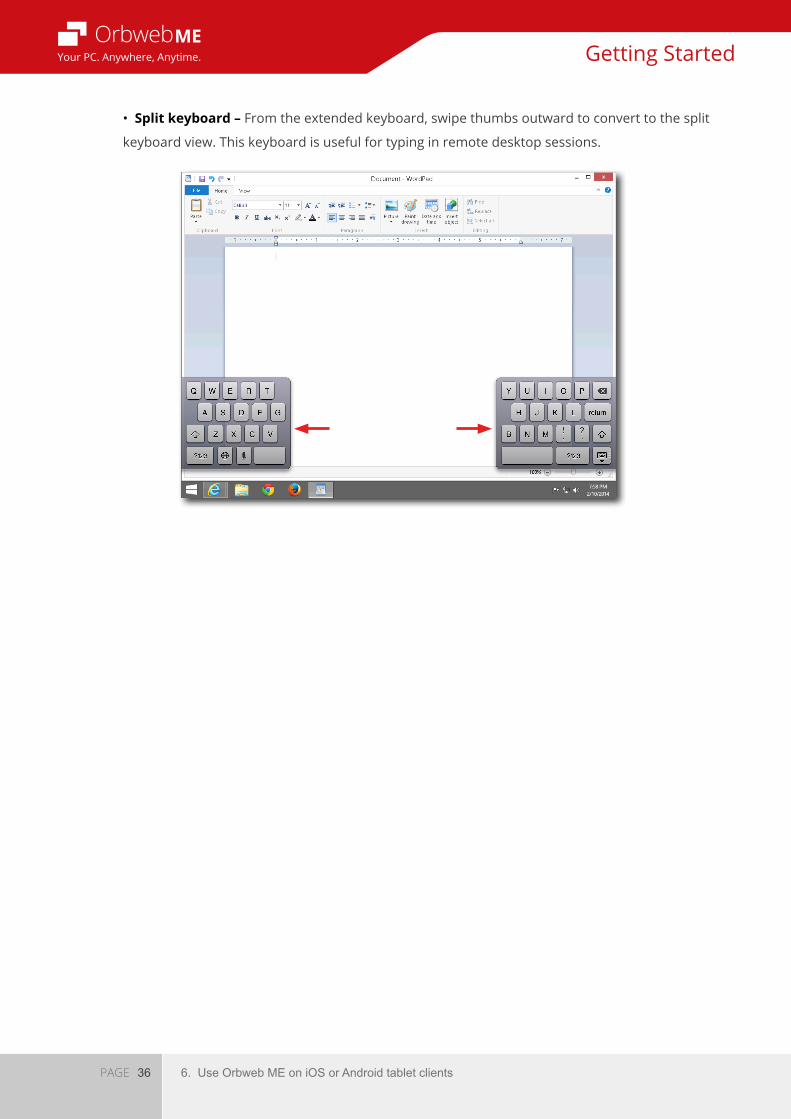
•Split keyboard – From the extended keyboard, swipe thumbs outward to convert to the split
keyboard view. This keyboard is useful for typing in remote desktop sessions.