Embed Size (px)
Citation preview
Growing world-class procurement
eVALUA Pty Ltd. ACN 096 164 313 ABN 33 096 164 313 sales @evalua.com.au www.evalua.com.au
66B Maryborough Street PO Box 353 Fyshwick ACT 2609 Australia t +61 2 6228 1904 f +61 2 6228 1131
Government Electronic Tenders Service (GETS)
User Manual (eGETS-UM-01)
Version 1.01.01, 18 Jul 2014
© Copyright eVALUA Pty Ltd Confidential i
GETS User Manual Version: 1.01.01, Date: 18 Jul 2014
Government Electronic Tenders Service (GETS) GETS is a free service designed to promote open and fair competition in the New Zealand Government
market and meet international trade agreement commitments to provide information about New
Zealand Government business opportunities.
More information is available at www.procurement.govt.nz.
Further assistance is available at: 0508 GETS HELP (0508 438 743).
For government agencies 2014
This is a controlled document. Information in this manual is subject to change without notice and
does not represent a commitment on the part of eVALUA Pty Ltd. The software described in this
manual and the manual are furnished under a licensing agreement. The software may be used or
copied only in accordance with the terms of such agreement. No part of this manual may be
reproduced or transmitted in any form or by any means, electronic or mechanical, including
photocopying, recording, or information storage and retrieval systems, or translated into
another language, for any purpose other than the licensee’s own use and as specifically allowed
in the licensing agreement, without the express written permission of eVALUA Pty Ltd.
© Copyright eVALUA Pty Ltd Confidential ii
GETS User Manual Version: 1.01.01, Date: 18 Jul 2014
Document Issue Approval
Project and Document No: GETS - eGETS-UM-01
Document Version 1.01.01
Date 18 Jul 2014
Title GETS User Manual
Client Ministry of Business, Innovation and Employment
Name Position
Prepared by: D. Appleby Senior Consultant, eVALUA
Approved by: H. Howell Director, eVALUA
Approved by: A. Woodwark Business Owner, MBIE
DOCUMENT ABSTRACT: This document provides guidance to Agency users on how to use GETS.
Copyright eVALUA Pty Ltd
This document is the property of eVALUA Pty Ltd. This document contains information proprietary to eVALUA Pty Ltd. Subject to the express terms of any Contract between eVALUA Pty Ltd and the party to which this document is revealed, any disclosure, use or duplication of this document or any of the information contained herein, for other than the specific purpose for which it was disclosed is expressly forbidden, except as eVALUA Pty Ltd may otherwise agree in writing.
© Copyright eVALUA Pty Ltd Confidential iii
GETS User Manual Version: 1.01.01, Date: 18 Jul 2014
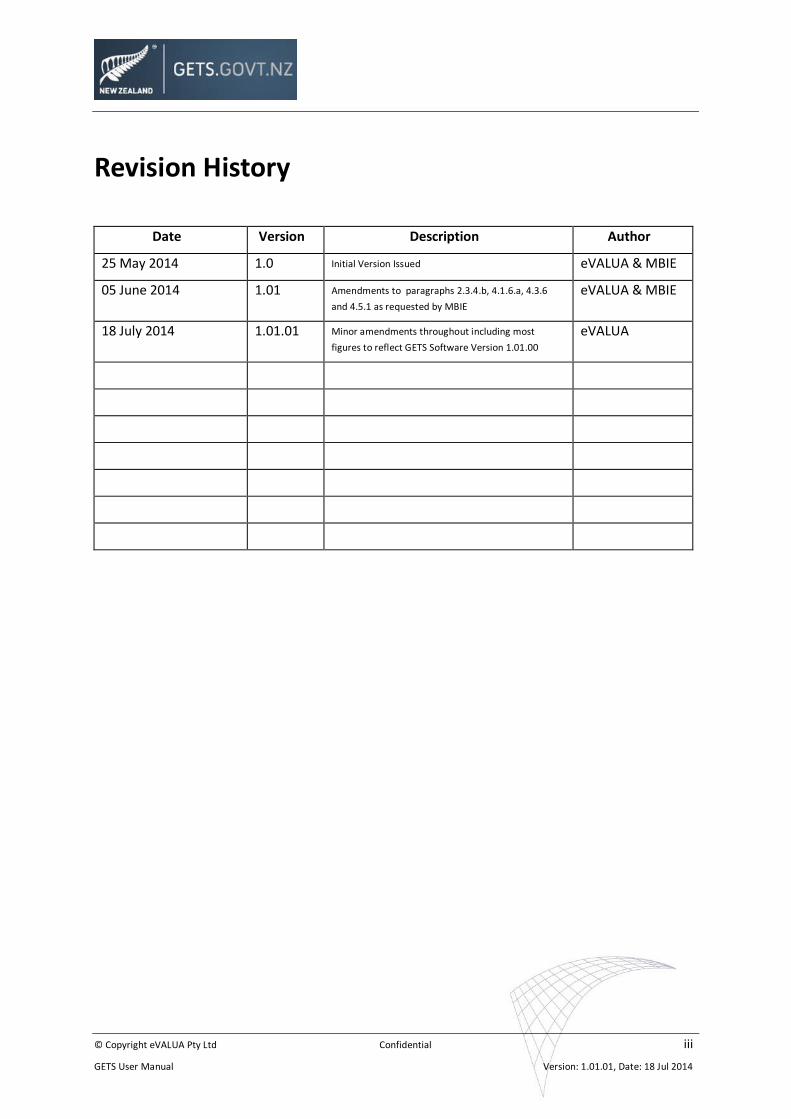
Revision History
Date Version Description Author
25 May 2014 1.0 Initial Version Issued eVALUA & MBIE
05 June 2014 1.01 Amendments to paragraphs 2.3.4.b, 4.1.6.a, 4.3.6
and 4.5.1 as requested by MBIE
eVALUA & MBIE
18 July 2014 1.01.01 Minor amendments throughout including most
figures to reflect GETS Software Version 1.01.00
eVALUA
© Copyright eVALUA Pty Ltd Confidential iv
GETS User Manual Version: 1.01.01, Date: 18 Jul 2014
Table of Contents Page Number
1. Introduction ............................................................................................... 1
1.1. General ................................................................................................................ 1
1.2. RFx ....................................................................................................................... 1
1.3. RFx Controls ......................................................................................................... 1
1.4. RFx Types ............................................................................................................. 2
1.5. System Overview .................................................................................................. 3
1.6. Navigating GETS ................................................................................................... 3
1.6.1. Information Area ................................................................................................ 4
1.6.2. GETS Command Bar ............................................................................................ 4
1.6.3. Overview Pane ................................................................................................... 4
1.6.4. Main Content Pane ............................................................................................. 4
2. Functions of GETS ...................................................................................... 5
2.1. RFx Lifecycle ......................................................................................................... 5
2.2. RFx Lifecycle Phases ............................................................................................. 5
2.2.1. Assignment ........................................................................................................ 5
2.2.2. Detailing ............................................................................................................. 6
2.2.3. Published ........................................................................................................... 6
2.2.4. Closed ................................................................................................................ 6
2.2.5. Evaluation .......................................................................................................... 6
2.2.6. Contract Award .................................................................................................. 6
2.2.7. Cancelled or Deleted Tenders ............................................................................. 6
2.3. Private Keys .......................................................................................................... 6
2.3.1. Assignment ........................................................................................................ 6
2.3.2. Function ............................................................................................................. 8
2.3.3. Private Key Security - General ............................................................................. 8
2.3.4. Super ETCO Private Key ...................................................................................... 8
2.3.5. ETCO and Procurement Officer Private Keys ....................................................... 8
© Copyright eVALUA Pty Ltd Confidential v
GETS User Manual Version: 1.01.01, Date: 18 Jul 2014
3. Users of GETS ............................................................................................. 9
3.1. Super Electronic Tender Coordination Officer ...................................................... 9
3.2. Electronic Tender Coordination Officer ................................................................ 9
3.3. Procurement Officer............................................................................................. 9
4. The RFx management process ................................................................. 10
4.1. General RFx Management and Search ................................................................ 10
4.1.1. Login ................................................................................................................ 10
4.1.2. Notification ...................................................................................................... 12
4.1.3. Home Screen .................................................................................................... 13
4.1.4. RFx Search ........................................................................................................ 15
4.1.5. Advanced Search .............................................................................................. 15
4.1.6. Search Results .................................................................................................. 16
4.2. Display RFx Details ............................................................................................. 16
4.2.1. RFx Details Screen ............................................................................................ 17
4.3. RFx Grouping ...................................................................................................... 17
4.3.1. My RFxs ............................................................................................................ 18
4.3.2. My RFxs > Proc. Detailing.................................................................................. 18
4.3.3. My RFxs > Published ......................................................................................... 18
4.3.4. My RFxs > Closed .............................................................................................. 18
4.3.5. My RFxs > Evaluation ........................................................................................ 18
4.3.6. My RFxs > Awarded .......................................................................................... 18
4.3.7. My RFxs > Cancelled ......................................................................................... 18
4.3.8. My RFxs > Deleted ............................................................................................ 18
4.3.9. All RFxs ............................................................................................................. 18
4.3.10. All RFxs sub-folders .......................................................................................... 18
4.4. Add an RFx ......................................................................................................... 19
4.5. Detail an RFx ...................................................................................................... 19
4.5.1. Mandatory Details. ........................................................................................... 19
4.5.2. Basic Details. .................................................................................................... 19
4.5.3. RFx Contact Information ................................................................................... 24
4.5.4. Site Information ............................................................................................... 25
4.5.5. Supply of Goods Information ............................................................................ 25
© Copyright eVALUA Pty Ltd Confidential vi
GETS User Manual Version: 1.01.01, Date: 18 Jul 2014
4.5.6. Timetable Information...................................................................................... 26
4.5.7. Contract Information and Requirements .......................................................... 26
4.6. Comments .......................................................................................................... 27
4.6.1. View Comments ............................................................................................... 27
4.6.2. Add a Comment ............................................................................................... 27
4.7. Attachments....................................................................................................... 28
4.7.1. Attaching Files .................................................................................................. 28
4.7.2. Edit Attachments .............................................................................................. 28
4.8. Select Suppliers .................................................................................................. 28
4.8.1. Suppliers .......................................................................................................... 28
4.8.2. Panel of Suppliers ............................................................................................. 29
4.8.3. Supplier Database ............................................................................................ 30
4.8.4. New Supplier .................................................................................................... 31
4.8.5. Parent RFx Respondents ................................................................................... 32
4.8.6. Action After Publishing ..................................................................................... 33
4.9. Delete Unpublished RFx ..................................................................................... 33
4.9.1. Related RFx ...................................................................................................... 33
4.9.2. Deletion ........................................................................................................... 33
4.9.3. Action on Deletion ............................................................................................ 33
4.10. Publish RFx ......................................................................................................... 33
4.10.1. Procurement Officer Action .............................................................................. 33
4.10.2. GETS Action ...................................................................................................... 33
4.10.3. ETCO Action ..................................................................................................... 33
4.11. Cancel RFx .......................................................................................................... 34
4.11.1. Related RFx ...................................................................................................... 34
4.11.2. Cancellation ..................................................................................................... 34
4.11.3. Action on Cancellation ...................................................................................... 34
4.12. Add Addendum .................................................................................................. 34
4.12.1. Addendum Title ................................................................................................ 34
4.12.2. Addendum Comment ....................................................................................... 34
4.12.3. Action on Creation of Addendum ..................................................................... 34
4.12.4. Publish an Addendum....................................................................................... 35
© Copyright eVALUA Pty Ltd Confidential vii
GETS User Manual Version: 1.01.01, Date: 18 Jul 2014
4.13. Questions and Answers ...................................................................................... 36
4.13.1. General ............................................................................................................ 36
4.13.2. Source of Questions ......................................................................................... 36
4.13.3. Accessing questions .......................................................................................... 36
4.13.4. Manual creation of questions ........................................................................... 37
4.13.5. Answering questions ........................................................................................ 38
4.13.6. Need to Issue an Addendum ............................................................................. 38
4.14. Responses .......................................................................................................... 39
4.14.1. Unlock RFx ....................................................................................................... 39
4.14.2. Manual Responses ........................................................................................... 40
4.14.3. View Responses ................................................................................................ 41
4.14.4. Response Detail ................................................................................................ 42
4.14.5. Download Response Files ................................................................................. 42
4.15. Award Contract .................................................................................................. 43
5. RFx reports............................................................................................... 45
5.1. The Prospective Tenderers Report ..................................................................... 45
5.1.1. Use of the Report ............................................................................................. 45
5.1.2. View the Report ............................................................................................... 45
5.1.3. Content ............................................................................................................ 45
5.2. Uncommitted Responses Report ........................................................................ 46
5.2.1. Purpose ............................................................................................................ 46
5.2.2. Use of the Report ............................................................................................. 46
5.2.3. View the Report ............................................................................................... 47
5.2.4. Content ............................................................................................................ 47
5.3. RFx Report.......................................................................................................... 48
5.3.1. Purpose ............................................................................................................ 48
5.3.2. View the Report ............................................................................................... 48
5.3.3. Content ............................................................................................................ 48
6. System reports ......................................................................................... 51
6.1. General .............................................................................................................. 51
6.2. Record Count Report .......................................................................................... 52
6.2.1. Purpose ............................................................................................................ 52
© Copyright eVALUA Pty Ltd Confidential viii
GETS User Manual Version: 1.01.01, Date: 18 Jul 2014
6.2.2. Content ............................................................................................................ 53
6.3. Awarded RFx by Contract Value Report .............................................................. 53
6.3.1. Purpose ............................................................................................................ 53
6.3.2. View the Report ............................................................................................... 54
6.3.3. Content ............................................................................................................ 55
6.4. Client Organisation/Agency Usage Report .......................................................... 56
6.4.1. Purpose ............................................................................................................ 56
6.4.2. Content ............................................................................................................ 57
6.5. Supplier Organisation Report ............................................................................. 57
6.5.1. Purpose ............................................................................................................ 57
6.5.2. View the Report ............................................................................................... 57
6.5.3. Content ............................................................................................................ 58
6.6. Outstanding Actions and Exceptions Report ....................................................... 60
6.6.1. Purpose ............................................................................................................ 60
6.6.2. Content ............................................................................................................ 60
6.7. UNSPSC Category Supplier List Report ................................................................ 62
6.7.1. Purpose ............................................................................................................ 62
6.7.2. Content ............................................................................................................ 62
6.8. Agency List Report.............................................................................................. 63
6.8.1. Purpose ............................................................................................................ 63
6.8.2. Content ............................................................................................................ 63
6.9. Agency User List Report ..................................................................................... 64
6.9.1. Purpose ............................................................................................................ 64
6.9.2. Content ............................................................................................................ 64
7. Client organisation configuration ............................................................ 66
7.1. User Accounts .................................................................................................... 67
7.1.1. General ............................................................................................................ 67
7.1.2. Search Users..................................................................................................... 67
7.1.3. Add a User ........................................................................................................ 68
7.1.4. Edit a User Account .......................................................................................... 68
7.1.5. Change a User Account Password ..................................................................... 69
7.1.6. Reset a Private Key ........................................................................................... 69
7.1.7. Inactivate a User Account ................................................................................. 71
© Copyright eVALUA Pty Ltd Confidential ix
GETS User Manual Version: 1.01.01, Date: 18 Jul 2014
7.2. Department/Business Units ................................................................................ 72
7.2.1. Add a New Department .................................................................................... 73
7.2.2. Edit a Department ............................................................................................ 73
7.2.3. Delete a Department ........................................................................................ 73
7.3. Supplier Panels ................................................................................................... 73
7.3.1. Create a New Supplier Panel............................................................................. 74
7.3.2. Source of Suppliers ........................................................................................... 74
7.3.3. Add Registered Suppliers .................................................................................. 74
7.3.4. Add Unregistered Suppliers .............................................................................. 75
7.3.5. Remove a Supplier From a Panel ...................................................................... 76
7.3.6. Delete a Supplier Panel..................................................................................... 77
7.4. Prequalifications ................................................................................................ 77
7.4.1. The Prequalifications Screen ............................................................................. 77
7.4.2. Create a Prequalification .................................................................................. 78
7.4.3. Prequalification Documents.............................................................................. 78
7.4.4. Prequalification Manager ................................................................................. 78
7.4.5. Supplier Applications ........................................................................................ 79
7.4.6. Supplier Prequalification Management ............................................................. 79
7.4.7. Edit a Prequalification ...................................................................................... 80
7.4.8. Delete a Prequalification .................................................................................. 80
8. Additional Super ETCO configurations .................................................... 81
8.1. Supplier Organisation Administration ................................................................. 81
8.1.1. Accessing the Supplier Organisation Setting Panel ............................................ 81
8.1.2. Supplier Organisation Setting Panel Functions .................................................. 83
8.2. Supplier Organisation Tab .................................................................................. 83
8.2.1. Update Supplier Business Information .............................................................. 83
8.2.2. Deactivate a Supplier Organisation ................................................................... 83
8.2.3. Reactivate a Supplier Organisation ................................................................... 84
8.3. Supplier User Tab ............................................................................................... 84
8.3.1. List of Supplier Users ........................................................................................ 85
8.3.2. Supplier Account Ownership ............................................................................ 85
8.3.3. Reassign Supplier Account Ownership .............................................................. 85
8.3.4. Deactivate a Supplier User ................................................................................ 85
© Copyright eVALUA Pty Ltd Confidential x
GETS User Manual Version: 1.01.01, Date: 18 Jul 2014
8.3.5. Deactivating An Account Owner ....................................................................... 86
8.3.6. Approve a Supplier User Account ..................................................................... 87
8.3.7. Update Supplier User Information .................................................................... 87
8.4. Add/Edit Client Organisation .............................................................................. 87
8.4.1. Accessing the Add/Edit Client Organisations Panel ........................................... 87
8.4.2. Create a New Client Organisation/Agency ........................................................ 88
8.4.3. Update Client Organisation/Agency Details ...................................................... 89
9. Glossary ................................................................................................... 90
9.1. Acronyms and Abbreviations .............................................................................. 90
9.2. Definitions .......................................................................................................... 90
© Copyright eVALUA Pty Ltd Confidential xi
GETS User Manual Version: 1.01.01, Date: 18 Jul 2014
Figures Figure 1 – Navigating the GETS Screen .................................................................................................... 3
Figure 2 – RFx Lifecycle ........................................................................................................................... 5
Figure 3 – Generate Key Notice (Enlarged) .............................................................................................. 7
Figure 4 – Downloading a Key File ........................................................................................................... 7
Figure 5 – Re-login Prompt (Enlarged) ..................................................................................................... 7
Figure 6 – Log In .................................................................................................................................... 10
Figure 7 – First Time Login Change Password Prompt ............................................................................ 10
Figure 8 – Agree Terms and Conditions Prompt..................................................................................... 11
Figure 9 – Update Keyring Notification .................................................................................................. 11
Figure 10 - Notification ......................................................................................................................... 12
Figure 11 – Notification Screen (Enlarged) ............................................................................................ 12
Figure 12 – Procurement Officer Home Screen ..................................................................................... 13
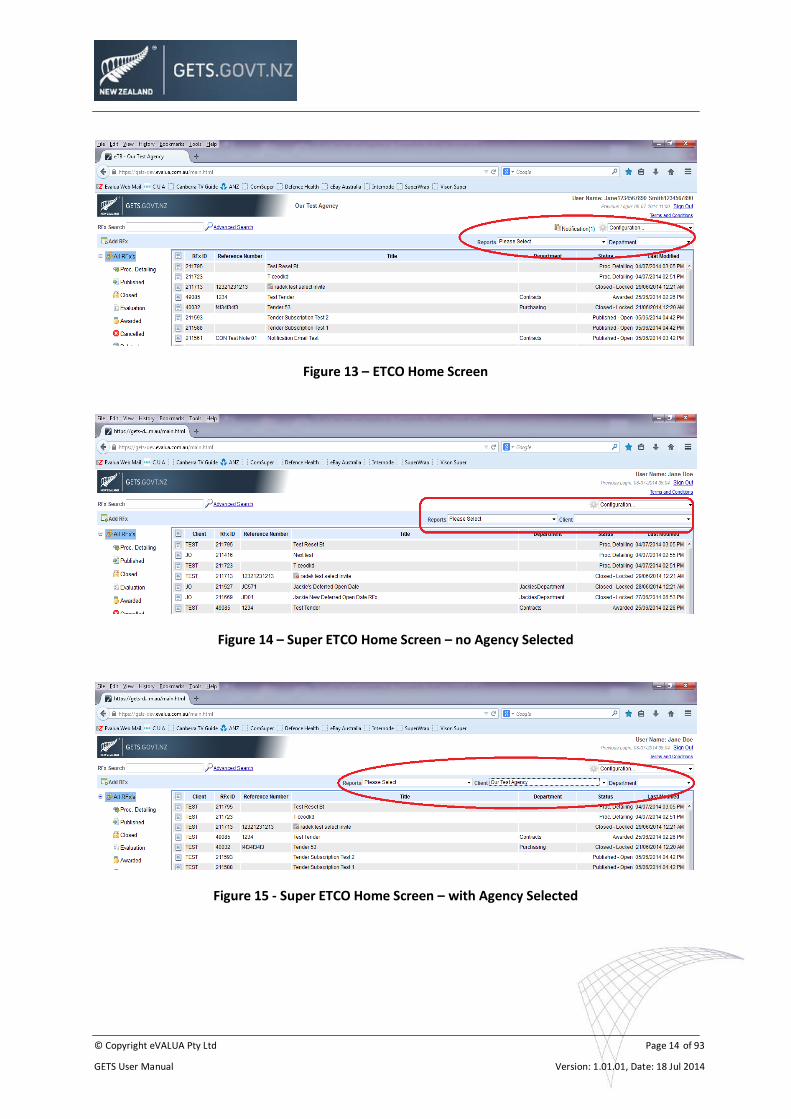
Figure 13 – ETCO Home Screen ............................................................................................................. 14
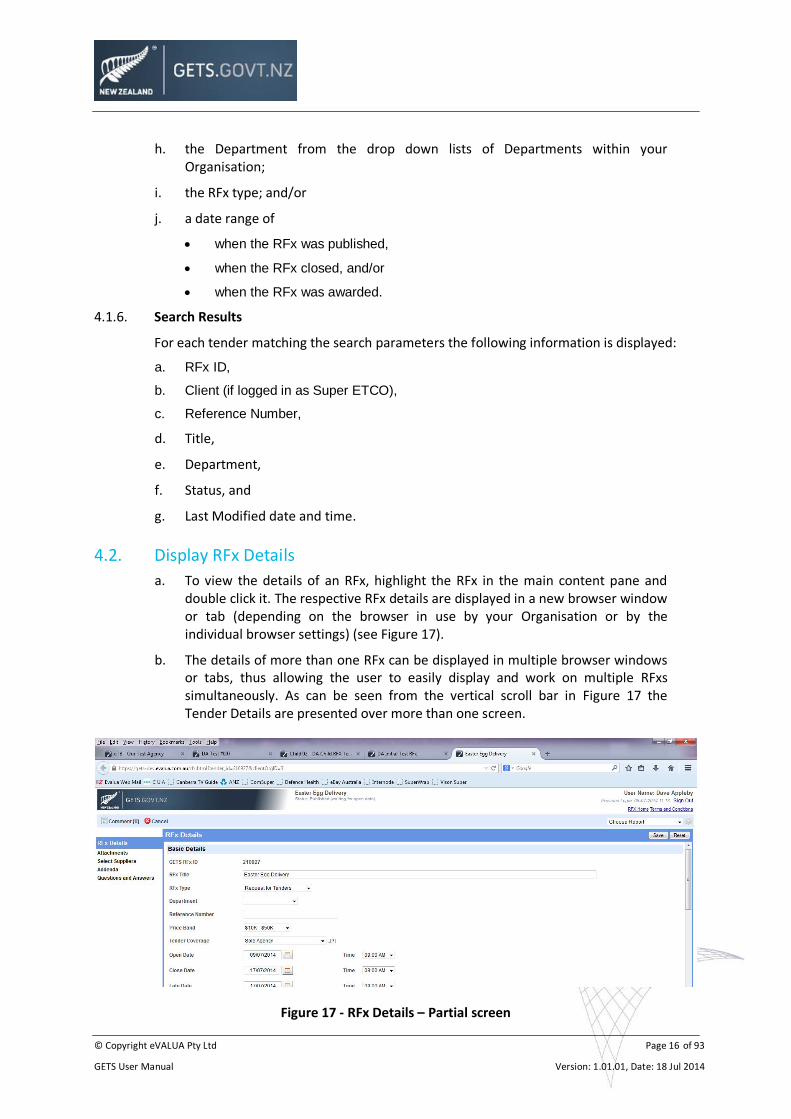
Figure 14 – Super ETCO Home Screen – no Agency Selected ................................................................. 14
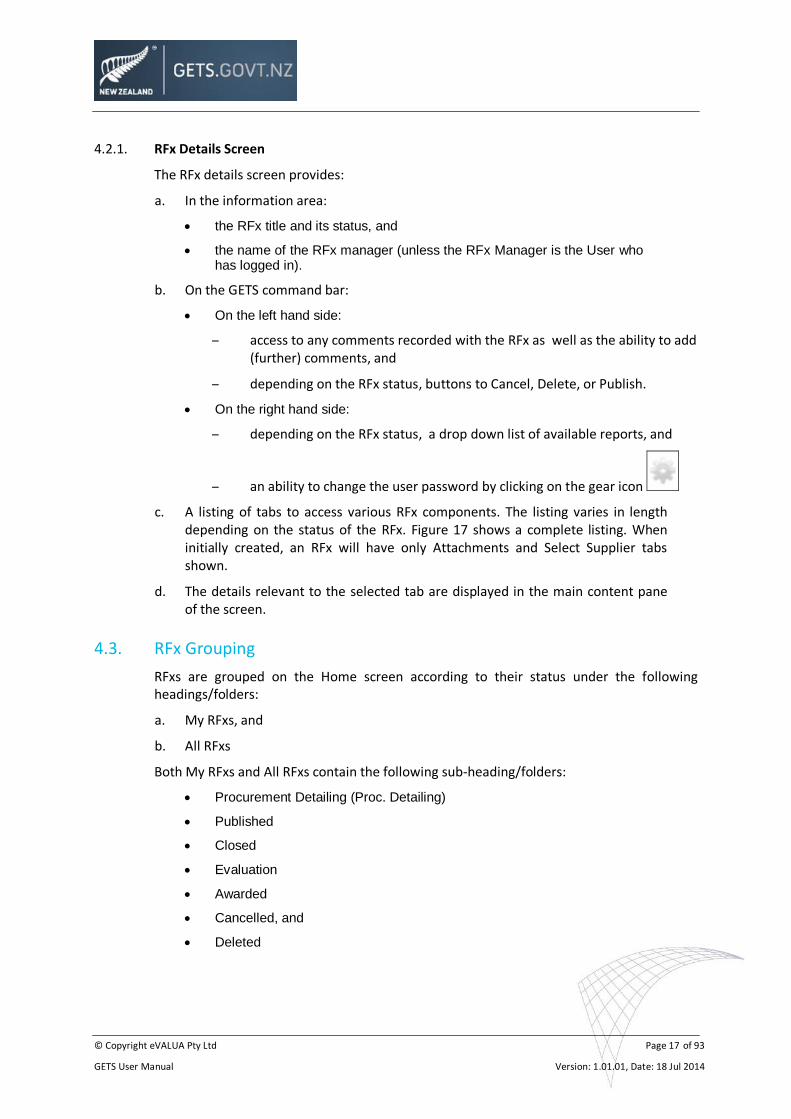
Figure 15 - Super ETCO Home Screen – with Agency Selected ............................................................... 14
Figure 16 - Advanced Search ................................................................................................................. 15
Figure 17 - RFx Details – Partial screen .................................................................................................. 16
Figure 18 – Choose Parent RFx .............................................................................................................. 21
Figure 19 – RFx Categories .................................................................................................................... 22
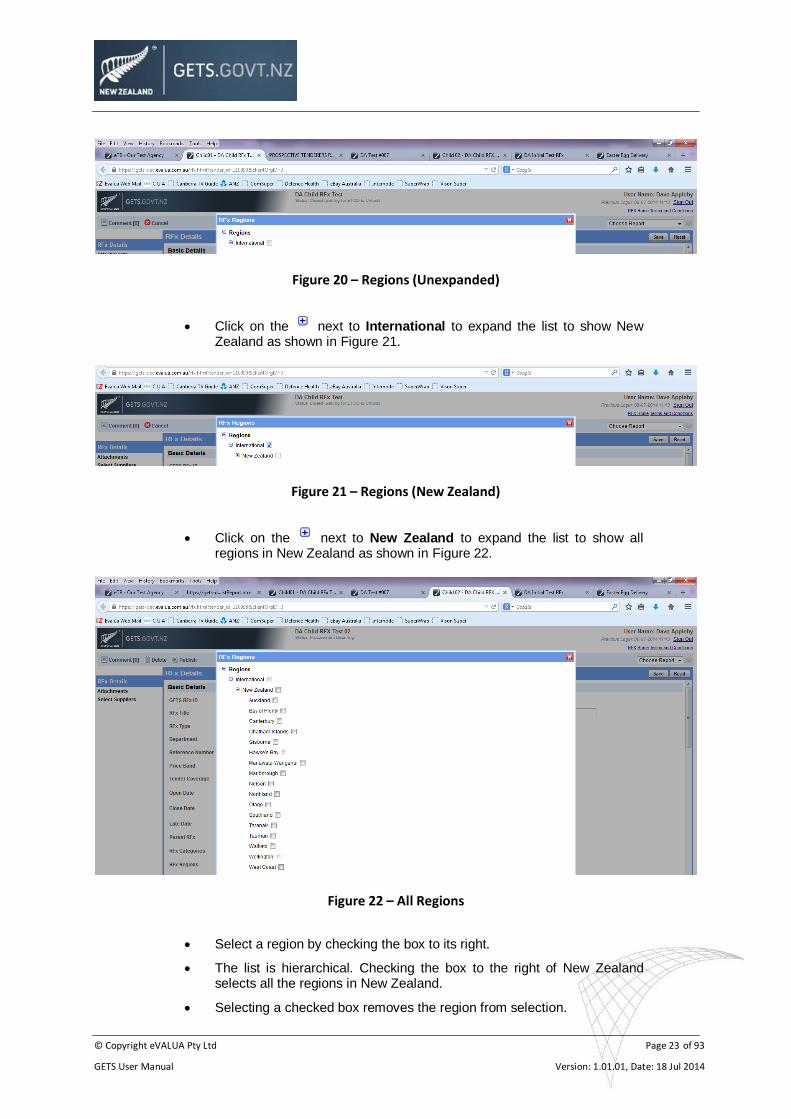
Figure 20 – Regions (Unexpanded) ........................................................................................................ 23
Figure 21 – Regions (New Zealand) ....................................................................................................... 23
Figure 22 – All Regions .......................................................................................................................... 23
Figure 23 - Comments Icon in RFx List ................................................................................................... 27
Figure 24 - Comments Dialogue Box ...................................................................................................... 27
Figure 25 – Attachments Screen ............................................................................................................ 28
Figure 26 - Select Suppliers Screen ........................................................................................................ 28
Figure 27 – Select Suppliers Screen (with Parent RFx)............................................................................ 29
Figure 28 – Supplier Panels Search Pane ............................................................................................... 29
Figure 29 – Supplier Organisation Details .............................................................................................. 30
Figure 30 – Search and Add Supplier ..................................................................................................... 30
Figure 31 – Supplier Search Result ........................................................................................................ 31
Figure 32 – Add New Supplier ............................................................................................................... 32

© Copyright eVALUA Pty Ltd Confidential xii
GETS User Manual Version: 1.01.01, Date: 18 Jul 2014
Figure 33 – List of Respondents to Parent RFx ....................................................................................... 32
Figure 34 - Addenda .............................................................................................................................. 35
Figure 35 – Publishing an Addendum .................................................................................................... 35
Figure 36 - Notification Screen. ............................................................................................................. 36
Figure 37 - Question List ....................................................................................................................... 37
Figure 38 – New Question Screen ......................................................................................................... 37
Figure 39 - Update Question Screen ...................................................................................................... 38
Figure 40 - Unlock an RFx ...................................................................................................................... 39
Figure 41 – Add Manual Response ........................................................................................................ 40
Figure 42 – Adding a Manual Response ................................................................................................. 40
Figure 43 – Edit Manual Response ........................................................................................................ 41
Figure 44 – View Responses .................................................................................................................. 41
Figure 45 - Award Contract ................................................................................................................... 43
Figure 46 – Sending Notifications .......................................................................................................... 44
Figure 47 - Prospective Tenderers Report ............................................................................................. 46
Figure 48 – Uncommitted Responses Report ......................................................................................... 47
Figure 49 – RFx Report (Partial) ............................................................................................................. 50
Figure 50 – Accessing System Reports – Super ETCO ............................................................................. 51
Figure 51 – Accessing System Reports – ETCO ....................................................................................... 51
Figure 52 – Accessing System Reports – Procurement Officer ............................................................... 51
Figure 53 – Record Count Report .......................................................................................................... 52
Figure 54 – Awarded Tenders by Contract Value Report ........................................................................ 55
Figure 55 – Client Organisation/Agency Usage Report ........................................................................... 56
Figure 56 – Supplier Organisation Report .............................................................................................. 59
Figure 57 – Outstanding Actions and Exceptions Report – Outstanding Actions ..................................... 61
Figure 58 – Outstanding Actions and Exceptions Report – Exceptions ................................................... 61
Figure 59 – UNSPSC Category Supplier List Report................................................................................. 62
Figure 60 – Client Organisation / Agency List Report - Partial ................................................................ 63
Figure 61 – Agency User List Report ...................................................................................................... 65
Figure 62 – Accessing the Organisation Configuration Screen ................................................................ 66
Figure 63 – Organisation Configuration Screen ...................................................................................... 66
Figure 64 – User Details ........................................................................................................................ 67
Figure 65 – Reset Key Button ................................................................................................................ 69
Figure 66 – Reset Key Warning .............................................................................................................. 69
© Copyright eVALUA Pty Ltd Confidential xiii
GETS User Manual Version: 1.01.01, Date: 18 Jul 2014
Figure 67 – Reset Key Successful ........................................................................................................... 70
Figure 68 – Update Keyring – Waiting for User Login ............................................................................. 70
Figure 69 – Update Keyring – Step One ................................................................................................. 70
Figure 70 – Successful Keyring Update .................................................................................................. 71
Figure 71 – Inactivate User Warning ..................................................................................................... 71
Figure 72 – Inactivate User Failure ........................................................................................................ 72
Figure 73 - Departments screen ............................................................................................................ 72
Figure 74 - Supplier Panels Screen ......................................................................................................... 73
Figure 75 – Supplier Search Screen........................................................................................................ 74
Figure 76 – Supplier Search Results Screen............................................................................................ 75
Figure 77 – Add Manually Registered Supplier to Panel Screen ............................................................. 75
Figure 78 – Remove a Supplier from a Panel ......................................................................................... 76
Figure 79 – Prequalifications Screen ...................................................................................................... 77
Figure 80 – Supplier Organisation Prequalification Detail Screen ........................................................... 79
Figure 81 – Super ETCO Configuration List............................................................................................. 81
Figure 82 - Search Supplier Organisation ............................................................................................... 81
Figure 83 – Supplier Organisation Search Result .................................................................................... 82
Figure 84 – Supplier Organisation Setting Panel .................................................................................... 82
Figure 85 – Supplier Deactivation Warning ............................................................................................ 83
Figure 86 – Supplier reactivation Confirmation ..................................................................................... 84
Figure 87 – Supplier User Tab screen .................................................................................................... 84
Figure 88 – Supplier User Deactivation Warning.................................................................................... 86
Figure 89 – Lack of Supplier Account Owner Warning ........................................................................... 86
Figure 90 - Add/Edit Client Organisations Panel .................................................................................... 87
Figure 91 – Logo Too Large Advice ........................................................................................................ 89
© Copyright eVALUA Pty Ltd Page 1 of 93
GETS User Manual Version: 1.01.01, Date: 18 Jul 2014
GETS User Manual
1. Introduction
1.1. General
1.1.1. This document describes how to use GETS for Agencies (GETS software version 1.01.00 released July 2014) which is accessed at www.gets.govt.nz/main.html or by selecting “Purchaser Login” at www.gets.govt.nz.
1.1.2. GETS enables an Organisation to create and release approaches to the market (including restricted solicitations), accept subscriptions to notices, automate addenda notification and receive responses electronically. The responses are then evaluated externally to GETS; however the details of subsequent awarded contracts are then recorded in the GETS system. The activities, from approaching the market to award of a commercial arrangement, have been streamlined and standardised.
1.2. RFx
1.2.1. Approaches to market are known by various terms and have different meanings depending on the cultural environment in which they are used. Example terms used for approaches include:
a. Disposal (DIS)
b. Invitation to Participate (Competitive Dialogue) (ITP)
c. Invitation to Qualify (Prequalified Supplier List) (ITQ)
d. Invitation to Register (Registered Supplier) (ITR)
e. Notice of Information (NOI)
f. Registration of Interest (ROI)
g. Request for Comment (RFC)
h. Request for Information (Market research) (RFI)
i. Request for Proposals
j. Request for Quotations (RFQ),
k. Request for Tenders (RFT),
1.2.2. For ease of reference within GETS and in this manual, any approach to market is referred to as an RFx.
1.3. RFx Controls
1.3.1. Within GETS an RFx type can have the following controls applied:
a. Standard Not PO Publishable - two key unlock (i.e. Electronic Tender Control Officer (ETCO) key applied followed by the key of the assigned Procurement Officer (PO)) to enable responses to be viewed and requires the responsible PO

© Copyright eVALUA Pty Ltd Page 2 of 93
GETS User Manual Version: 1.01.01, Date: 18 Jul 2014
to request an ETCO to publish (or release) the set of approach to market documents to the public or a select group of suppliers.
b. Standard PO Publishable - two key unlock to view responses and the PO is able to publish the RFx without ETCO assistance.
c. Streamline Not PO Publishable - single key unlock (PO key only applied) to view responses and requires the PO to request an ETCO to publish the RFx.
d. Streamline PO Publishable - single key unlock (PO) to view responses and the PO is able to publish the RFx without ETCO assistance.
1.4. RFx Types
1.4.1. GETS has a globally defined set of RFx as described below:
Description Relationship Comment Control
RFI - Request for Information (Market Research)
Stand alone Used as a market research tool and is NOT a Notice of Procurement as defined in the Rules of Sourcing - Rule 31
Streamline PO Publishable
ROI - Registration of Interest
May be preceded by APP / NOI May precede closed RFP
Notice of Procurement defined in Rules of Sourcing - Rule 31, 34-5
Standard PO Publishable
RFQ - Request for Quotations
May be preceded by APP / NOI
Notice of Procurement defined in Rules of Sourcing - Rule 31, 34-5
Standard PO Publishable
RFT - Request for Tenders May be preceded by APP / NOI
Notice of Procurement defined in Rules of Sourcing - Rule 31, 34-5
Standard PO Publishable
RFP - Request for Proposals
May be preceded by APP / NOI
Notice of Procurement defined in Rules of Sourcing - Rule 31, 34-5
Standard Not PO Publishable
ITP - Invitation to Participate (Competitive Dialogue)
May be preceded by APP / NOI Will precede closed RFP or RFT
Competitive Dialogue is a specific process used in complex procurements - Rule 31
Standard Not PO Publishable
DIS - Disposal May be preceded by APP / NOI
Self explanatory Standard Not PO Publishable
NOI - Notice of Information
May be preceded by APP General notice which may or may not relate to a procurement
Streamline PO Publishable
ITR - Invitation to Register (Registered Supplier)
Stand alone Registered Supplier is a defined term in Rules of Sourcing - Rule 52
Streamline PO Publishable
ITQ - Invitation to Qualify (Prequalified Supplier List)
Stand alone Registered Supplier is a defined term in Rules of Sourcing - Rule 53
Streamline PO Publishable
RFC - Request for Comment
Stand alone Agencies use GETS as a means for publicising documents released for public consultation
Streamline PO Publishable
1.4.2. More information, guidance, tools and templates are available on the Government Procurement website: www.procurement.govt.nz.
© Copyright eVALUA Pty Ltd Page 3 of 93
GETS User Manual Version: 1.01.01, Date: 18 Jul 2014
1.5. System Overview
GETS provides the following benefits:
a. higher automation of the procurement processes surrounding an RFx and its management – including elimination of paper-based responses except where a Supplier has no electronic capability;
b. electronic distribution of an RFx and electronic receipt of responses from Suppliers;
c. Procurement Officers can elect to send automated award/not-awarded notification to Suppliers;
d. management of Questions and Answers (Q&A) from Suppliers;
e. automation of the addendum process;
f. a Supplier database that is self-managed; and
g. a centralised repository of all responses and associated Supplier engagement with audit trails.
Planned further development of GETS includes an ability to create Annual Procurement Plans (APPs) and relate these to RFxs
1.6. Navigating GETS
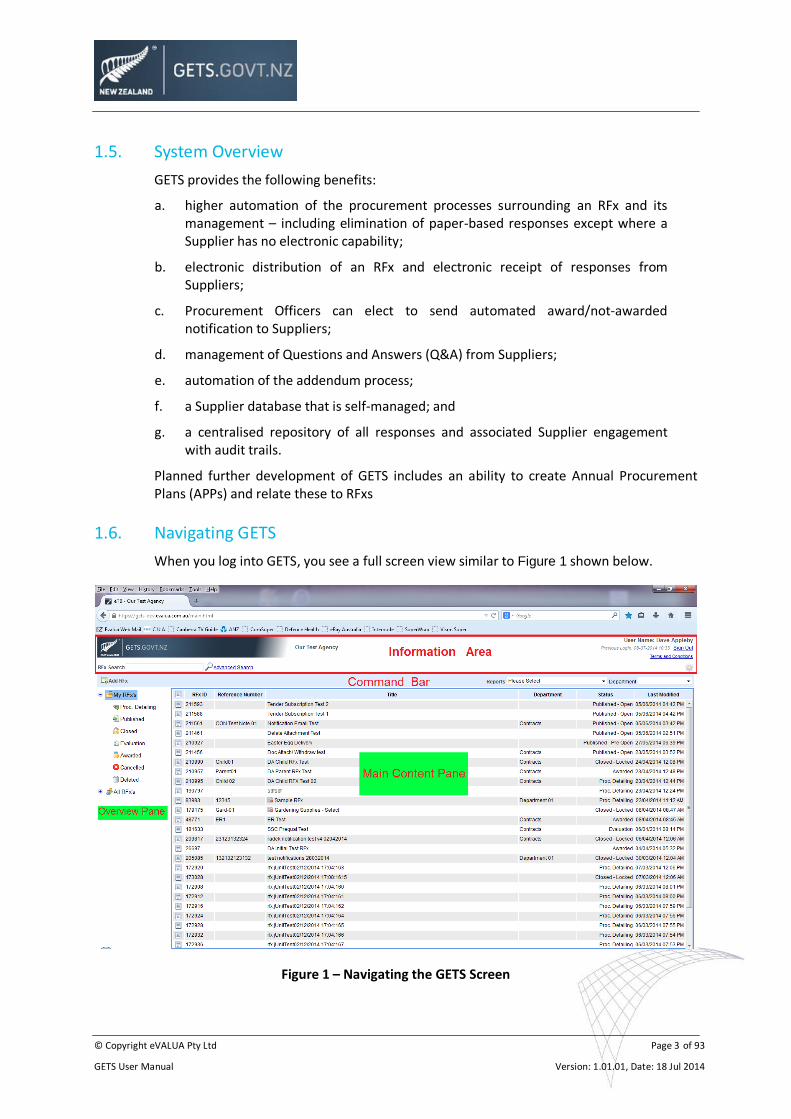
When you log into GETS, you see a full screen view similar to Figure 1 shown below.
Figure 1 – Navigating the GETS Screen
© Copyright eVALUA Pty Ltd Page 4 of 93
GETS User Manual Version: 1.01.01, Date: 18 Jul 2014
1.6.1. Information Area
The Organisation Name, the RFx Search and Advanced Search are displayed on the left. On the right is the name under which you logged in and Sign Out button. Underneath these is the Configuration drop down list.
1.6.2. GETS Command Bar
Shows actions available for the screen you are currently using. In this RFx listing the Add RFx button is displayed on the left, the Department filter drop down list is on the right.
1.6.3. Overview Pane
Displays RFxs, including the groupings of My RFxs and All RFxs. When an RFx’s details are displayed the tabs relate to relevant aspects of an individual RFx.
1.6.4. Main Content Pane
The content of this area includes a list of RFxs or details relating to a particular RFx. To view the details, select an RFx in the list and double click it to take you to a new window or tab (depending on the browser in use by your Organisation or by the individual browser settings).
© Copyright eVALUA Pty Ltd Page 5 of 93
GETS User Manual Version: 1.01.01, Date: 18 Jul 2014
2. Functions of GETS
2.1. RFx Lifecycle
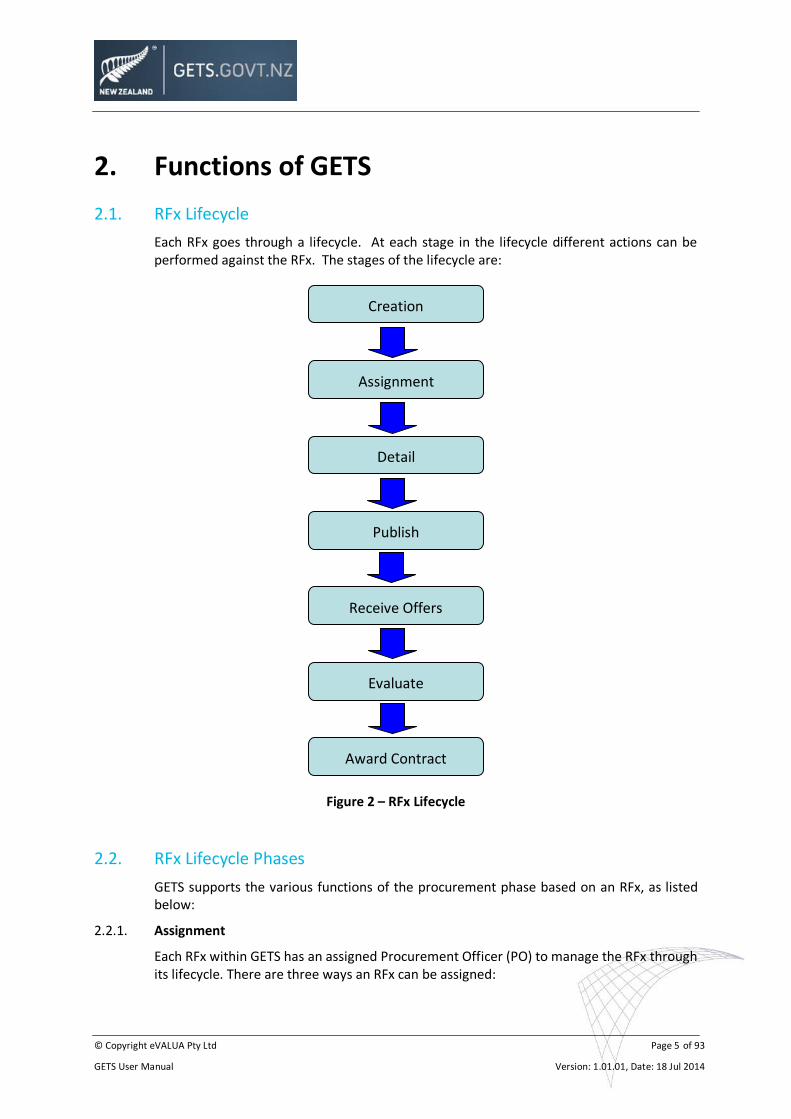
Each RFx goes through a lifecycle. At each stage in the lifecycle different actions can be performed against the RFx. The stages of the lifecycle are:
Figure 2 – RFx Lifecycle
2.2. RFx Lifecycle Phases
GETS supports the various functions of the procurement phase based on an RFx, as listed below:
2.2.1. Assignment
Each RFx within GETS has an assigned Procurement Officer (PO) to manage the RFx through its lifecycle. There are three ways an RFx can be assigned:
Creation
Award Contract
Publish
Detail
Assignment
Receive Offers
Evaluate
© Copyright eVALUA Pty Ltd Page 6 of 93
GETS User Manual Version: 1.01.01, Date: 18 Jul 2014
a. If an RFx is created by a Super Electronic Tender Coordination Officer (Super ETCO), a Client Organisation and a Procurement Officer (PO) must be selected to be responsible for the RFx before any details can be saved.
b. If an RFx is created by an Electronic Tender Coordination Officer (ETCO), a Procurement Officer must be selected to be responsible for the RFx before any details can be saved.
c. If an RFx is created by a Procurement Officer, the RFx is automatically assigned to that Procurement Officer.
2.2.2. Detailing
Detailing enables the creation of a new RFx, by a Procurement Officer. Details of a new or existing RFx that has been assigned to a Procurement Officer may be added as they become available.
2.2.3. Published
A function carried out by a Procurement Officer or the ETCO, that is dependent on the type of RFx involved, which makes an RFx available to Suppliers and the system able to receive responses.
2.2.4. Closed
The RFx is locked, so no more responses can be received unless there is a late date and the supplier has previously subscribed to the RFx, and submitted responses cannot be viewed by anybody until the RFx is unlocked.
2.2.5. Evaluation
The responses to the RFx are assessed externally to GETS.
2.2.6. Contract Award
The decision to award a contract to a Supplier (or Suppliers) is recorded in GETS. Details of the relevant Purchase Order can also be recorded. Suppliers who have responded to the RFx are notified whether they have been successful or otherwise automatically by GETS once the details of the awarded contracted have been saved to the system.
2.2.7. Cancelled or Deleted Tenders
Provided an RFx is not the parent of another RFx, GETS allows RFxs to be cancelled or deleted prior to publishing or after they have been made public. Such RFxs are grouped under the following tabs:
a. Deleted (RFx removed before publishing)
b. Cancelled (RFx removed after publishing)
2.3. Private Keys
2.3.1. Assignment
a. Each Super ETCO, ETCO and Procurement Officer who has an account in GETS is assigned a Private Key. Super ETCOs are assigned a Private Key when GETS is configured for a Client Organisation. ETCOs and Procurement Officers are issued a Private Key when they first login to GETS.
© Copyright eVALUA Pty Ltd Page 7 of 93
GETS User Manual Version: 1.01.01, Date: 18 Jul 2014
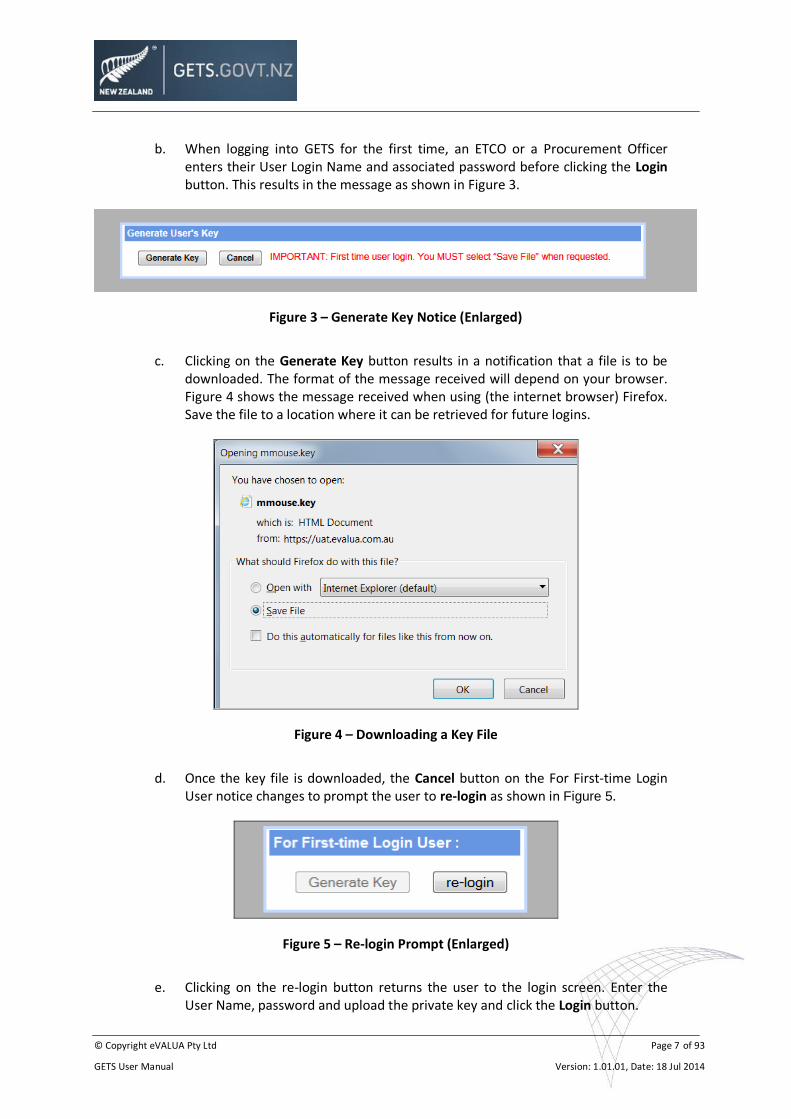
b. When logging into GETS for the first time, an ETCO or a Procurement Officer enters their User Login Name and associated password before clicking the Login button. This results in the message as shown in Figure 3.
Figure 3 – Generate Key Notice (Enlarged)
c. Clicking on the Generate Key button results in a notification that a file is to be downloaded. The format of the message received will depend on your browser. Figure 4 shows the message received when using (the internet browser) Firefox. Save the file to a location where it can be retrieved for future logins.
Figure 4 – Downloading a Key File
d. Once the key file is downloaded, the Cancel button on the For First-time Login User notice changes to prompt the user to re-login as shown in Figure 5.
Figure 5 – Re-login Prompt (Enlarged)
e. Clicking on the re-login button returns the user to the login screen. Enter the User Name, password and upload the private key and click the Login button.
© Copyright eVALUA Pty Ltd Page 8 of 93
GETS User Manual Version: 1.01.01, Date: 18 Jul 2014
2.3.2. Function
The Private Keys are used to unlock the RFx in GETS. RFxs can be configured to require either the ETCO to apply their key to initiate the unlocking process, followed by the Procurement Officer’s key; or just the Procurement Officer’s key. Application of the relevant keys unlocks the RFx within GETS and these same keys are then required to decrypt and download the response files.
2.3.3. Private Key Security - General
Private Keys need to be treated in a fashion that minimises the potential for compromise (loss of effective control) and/or corruption. A Super ETCO Private Key needs maximum protection against corruption or loss as the GETS operation is entirely dependent on the availability of the valid key. The corruption or loss of an ETCO or Procurement Officer Private Key is not quite so catastrophic (apart from the potential for compromise if control is lost) as new keys can be issued, but this action involves a significant administrative effort. Consequently, GETS User appointments need to be formalised and controlled, and procedures established for the security of Private Keys. To protect against compromise, Super ETCOs, ETCOs and Procurement Officers should ideally each have a password-protected network directory/folder for their Private Key.
2.3.4. Super ETCO Private Key
a. Copy the Private Key file to a password-protected network directory/folder:
to which access is limited to the Super ETCO, and
that is routinely backed up.
b. If a Super ETCO private key becomes corrupt, misplaced or suspected of being compromised contact 0508 GETS HELP (0508 438 743) as soon as possible.
2.3.5. ETCO and Procurement Officer Private Keys
a. Copy the Private Key file to a password-protected network directory/folder:
to which access is limited to the User (ETCO or Procurement Officer), and
that is routinely backed up.
b. If a password is forgotten or compromised contact the ETCO who can reset the password (Refer Paragraph 7.1.5).
c. If a private key becomes corrupt, misplaced or compromised, contact the ETCO who can reset the key (Refer paragraph 7.1.6). (ETCOs should contact a Super ETCO). The next time the user logs in; it will be as if the user is logging in for the first time (Refer Paragraph 2.3.1).
© Copyright eVALUA Pty Ltd Page 9 of 93
GETS User Manual Version: 1.01.01, Date: 18 Jul 2014
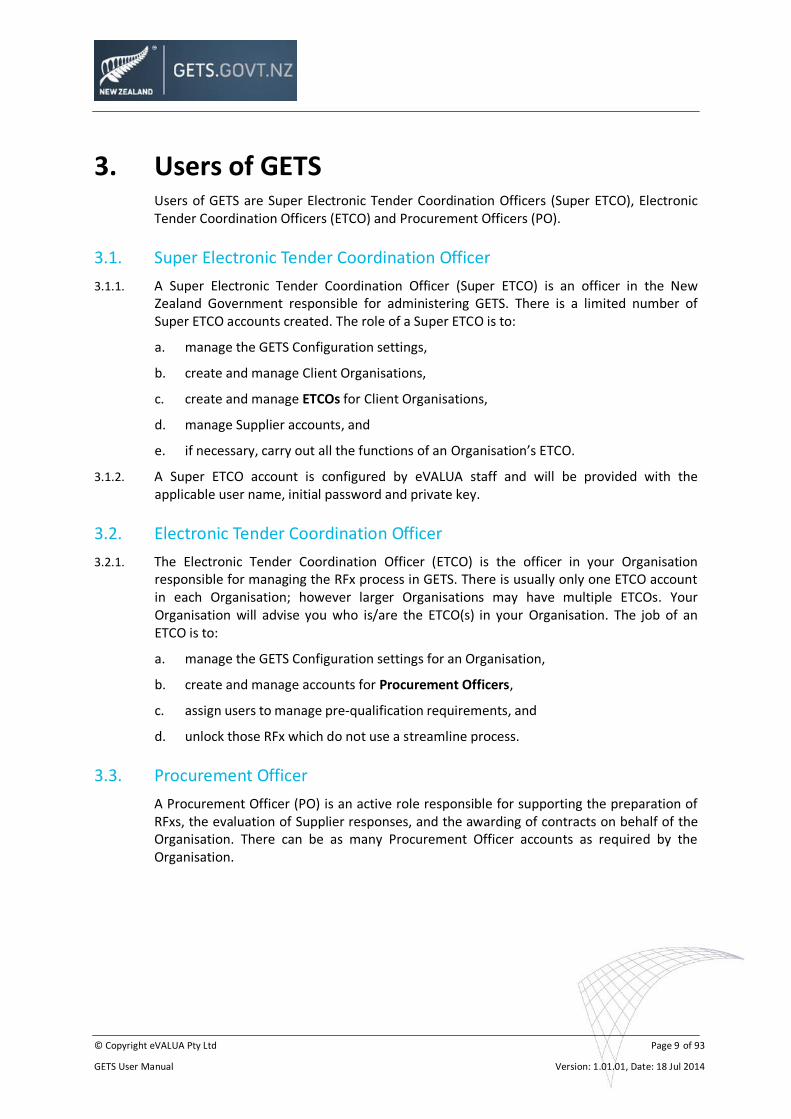
3. Users of GETS Users of GETS are Super Electronic Tender Coordination Officers (Super ETCO), Electronic Tender Coordination Officers (ETCO) and Procurement Officers (PO).
3.1. Super Electronic Tender Coordination Officer
3.1.1. A Super Electronic Tender Coordination Officer (Super ETCO) is an officer in the New Zealand Government responsible for administering GETS. There is a limited number of Super ETCO accounts created. The role of a Super ETCO is to:
a. manage the GETS Configuration settings,
b. create and manage Client Organisations,
c. create and manage ETCOs for Client Organisations,
d. manage Supplier accounts, and
e. if necessary, carry out all the functions of an Organisation’s ETCO.
3.1.2. A Super ETCO account is configured by eVALUA staff and will be provided with the applicable user name, initial password and private key.
3.2. Electronic Tender Coordination Officer
3.2.1. The Electronic Tender Coordination Officer (ETCO) is the officer in your Organisation responsible for managing the RFx process in GETS. There is usually only one ETCO account in each Organisation; however larger Organisations may have multiple ETCOs. Your Organisation will advise you who is/are the ETCO(s) in your Organisation. The job of an ETCO is to:
a. manage the GETS Configuration settings for an Organisation,
b. create and manage accounts for Procurement Officers,
c. assign users to manage pre-qualification requirements, and
d. unlock those RFx which do not use a streamline process.
3.3. Procurement Officer
A Procurement Officer (PO) is an active role responsible for supporting the preparation of RFxs, the evaluation of Supplier responses, and the awarding of contracts on behalf of the Organisation. There can be as many Procurement Officer accounts as required by the Organisation.

© Copyright eVALUA Pty Ltd Page 10 of 93
GETS User Manual Version: 1.01.01, Date: 18 Jul 2014
4. The RFx management process
4.1. General RFx Management and Search
4.1.1. Login
a. To access the system a Super ETCO, ETCO or a Procurement Officer (PO) must log in to GETS using their allocated User Login Name, associated Password and private key file as shown in Figure 6.
Figure 6 – Log In
b. Users logging in for the first time are required to change their allocated password to one of their own choosing and to subsequently accept GETS Terms and Conditions before they can proceed further.
c. After logging in, users will receive the prompt as shown in Figure 7. The password is case sensitive and is current for 1 year must be:
at least eight characters long;
contain three or four types of characters: uppercase (A-Z) and lowercase (a-z) letters, numbers (0-9) and symbols (#, $, !, @, ^, &, *, etc); and
different to the last 6 passwords used.
Figure 7 – First Time Login Change Password Prompt
© Copyright eVALUA Pty Ltd Page 11 of 93
GETS User Manual Version: 1.01.01, Date: 18 Jul 2014
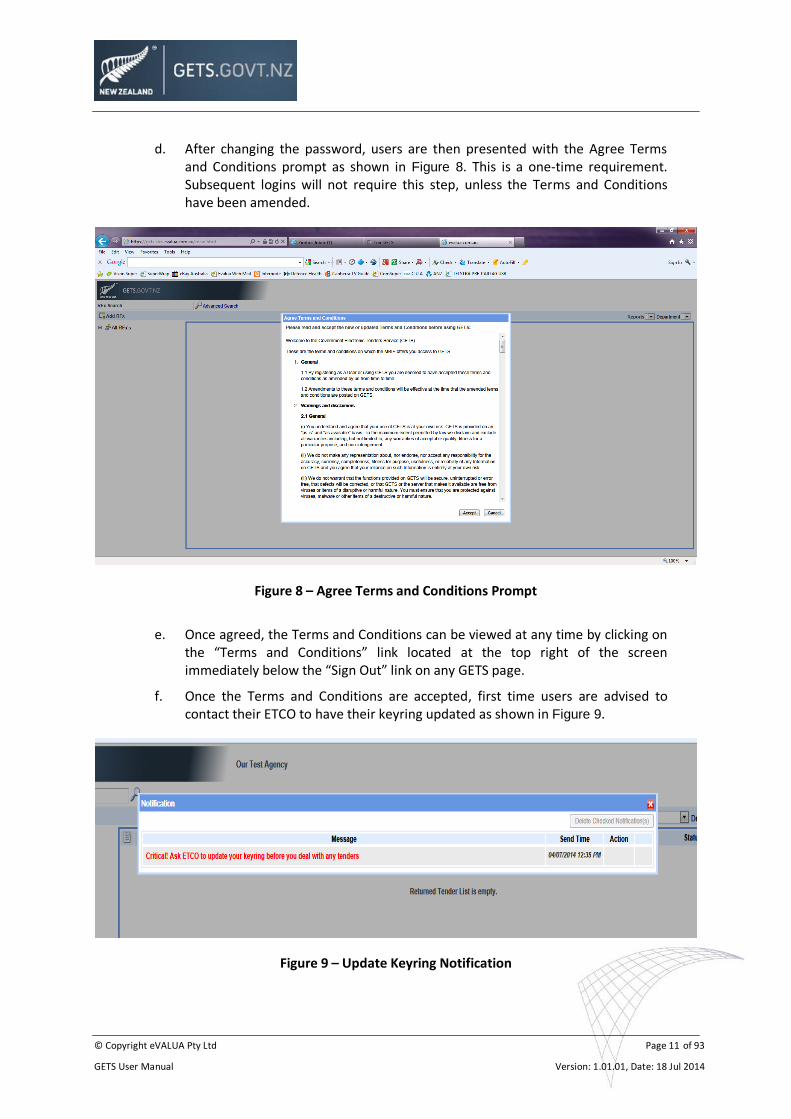
d. After changing the password, users are then presented with the Agree Terms and Conditions prompt as shown in Figure 8. This is a one-time requirement. Subsequent logins will not require this step, unless the Terms and Conditions have been amended.
Figure 8 – Agree Terms and Conditions Prompt
e. Once agreed, the Terms and Conditions can be viewed at any time by clicking on the “Terms and Conditions” link located at the top right of the screen immediately below the “Sign Out” link on any GETS page.
f. Once the Terms and Conditions are accepted, first time users are advised to contact their ETCO to have their keyring updated as shown in Figure 9.
Figure 9 – Update Keyring Notification
© Copyright eVALUA Pty Ltd Page 12 of 93
GETS User Manual Version: 1.01.01, Date: 18 Jul 2014
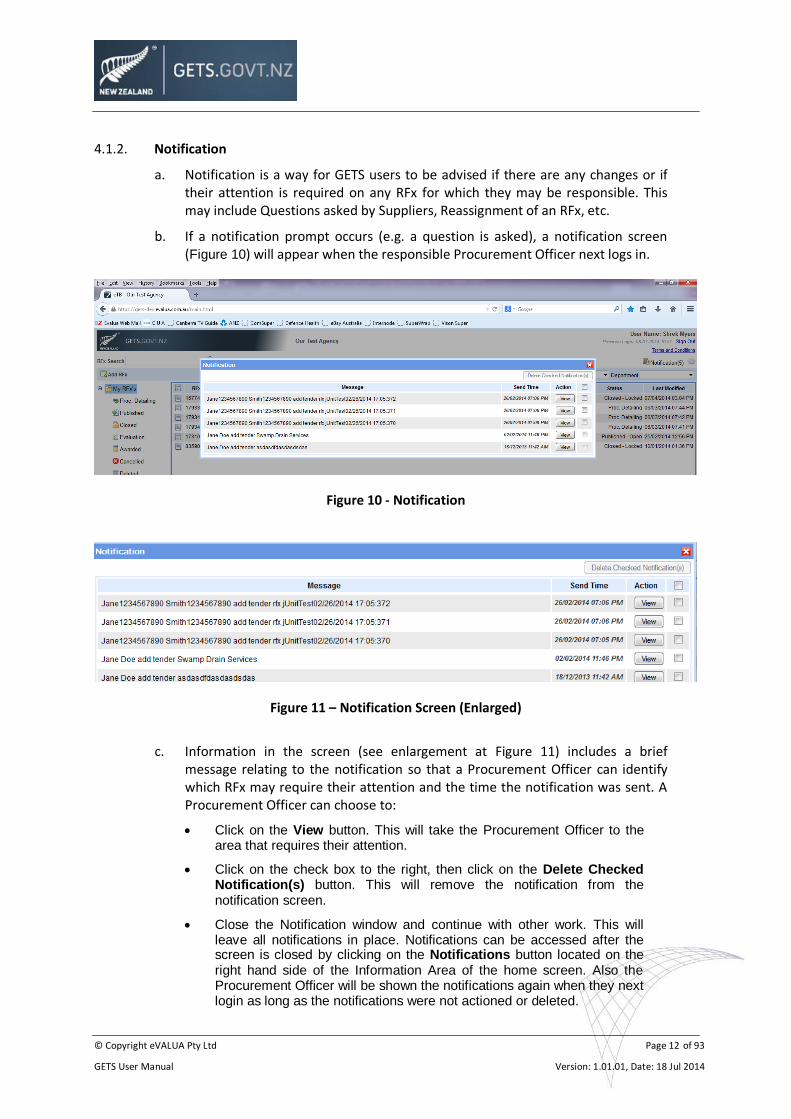
4.1.2. Notification
a. Notification is a way for GETS users to be advised if there are any changes or if their attention is required on any RFx for which they may be responsible. This may include Questions asked by Suppliers, Reassignment of an RFx, etc.
b. If a notification prompt occurs (e.g. a question is asked), a notification screen (Figure 10) will appear when the responsible Procurement Officer next logs in.
Figure 10 - Notification
Figure 11 – Notification Screen (Enlarged)
c. Information in the screen (see enlargement at Figure 11) includes a brief message relating to the notification so that a Procurement Officer can identify which RFx may require their attention and the time the notification was sent. A Procurement Officer can choose to:
Click on the View button. This will take the Procurement Officer to the area that requires their attention.
Click on the check box to the right, then click on the Delete Checked Notification(s) button. This will remove the notification from the notification screen.
Close the Notification window and continue with other work. This will leave all notifications in place. Notifications can be accessed after the screen is closed by clicking on the Notifications button located on the right hand side of the Information Area of the home screen. Also the Procurement Officer will be shown the notifications again when they next login as long as the notifications were not actioned or deleted.
© Copyright eVALUA Pty Ltd Page 13 of 93
GETS User Manual Version: 1.01.01, Date: 18 Jul 2014
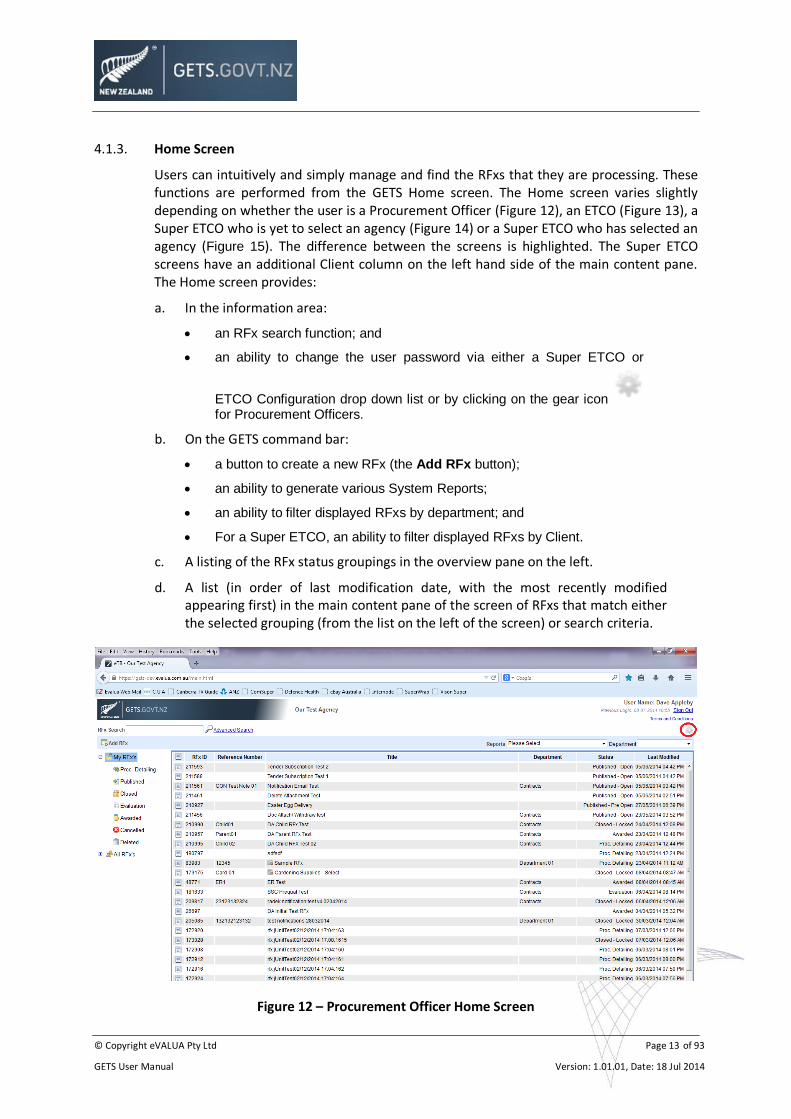
4.1.3. Home Screen
Users can intuitively and simply manage and find the RFxs that they are processing. These functions are performed from the GETS Home screen. The Home screen varies slightly depending on whether the user is a Procurement Officer (Figure 12), an ETCO (Figure 13), a Super ETCO who is yet to select an agency (Figure 14) or a Super ETCO who has selected an agency (Figure 15). The difference between the screens is highlighted. The Super ETCO screens have an additional Client column on the left hand side of the main content pane. The Home screen provides:
a. In the information area:
an RFx search function; and
an ability to change the user password via either a Super ETCO or
ETCO Configuration drop down list or by clicking on the gear icon for Procurement Officers.
b. On the GETS command bar:
a button to create a new RFx (the Add RFx button);
an ability to generate various System Reports;
an ability to filter displayed RFxs by department; and
For a Super ETCO, an ability to filter displayed RFxs by Client.
c. A listing of the RFx status groupings in the overview pane on the left.
d. A list (in order of last modification date, with the most recently modified appearing first) in the main content pane of the screen of RFxs that match either the selected grouping (from the list on the left of the screen) or search criteria.
Figure 12 – Procurement Officer Home Screen
© Copyright eVALUA Pty Ltd Page 14 of 93
GETS User Manual Version: 1.01.01, Date: 18 Jul 2014
Figure 13 – ETCO Home Screen
Figure 14 – Super ETCO Home Screen – no Agency Selected
Figure 15 - Super ETCO Home Screen – with Agency Selected

© Copyright eVALUA Pty Ltd Page 15 of 93
GETS User Manual Version: 1.01.01, Date: 18 Jul 2014
4.1.4. RFx Search
RFxs can be located by entering the RFx title, RFx ID or reference number. It is also possible to search for an RFx when the title or reference number is not known completely, however a whole word or a reference number string between white spaces must be known.
4.1.5. Advanced Search
Figure 16 - Advanced Search
Within the advanced search function (See Figure 16) the user is able to specify:
a. keywords –for an RFx when the title or reference number is not known completely enter a partial or whole word of the title or a reference number string between white spaces;
b. GETS RFx ID;
c. the RFx status;
d. the United Nations Standard Products and Services Code (UNSPSC) category;
e. the Region;
f. if a Super ETCO is conducting the search, Client Organisation;
g. whether to search your own RFx only or select another Procurement Officer from the drop down list of Procurement Officers within your Organisation;
© Copyright eVALUA Pty Ltd Page 16 of 93
GETS User Manual Version: 1.01.01, Date: 18 Jul 2014
h. the Department from the drop down lists of Departments within your Organisation;
i. the RFx type; and/or
j. a date range of
when the RFx was published,
when the RFx closed, and/or
when the RFx was awarded.
4.1.6. Search Results
For each tender matching the search parameters the following information is displayed:
a. RFx ID,
b. Client (if logged in as Super ETCO),
c. Reference Number,
d. Title,
e. Department,
f. Status, and
g. Last Modified date and time.
4.2. Display RFx Details
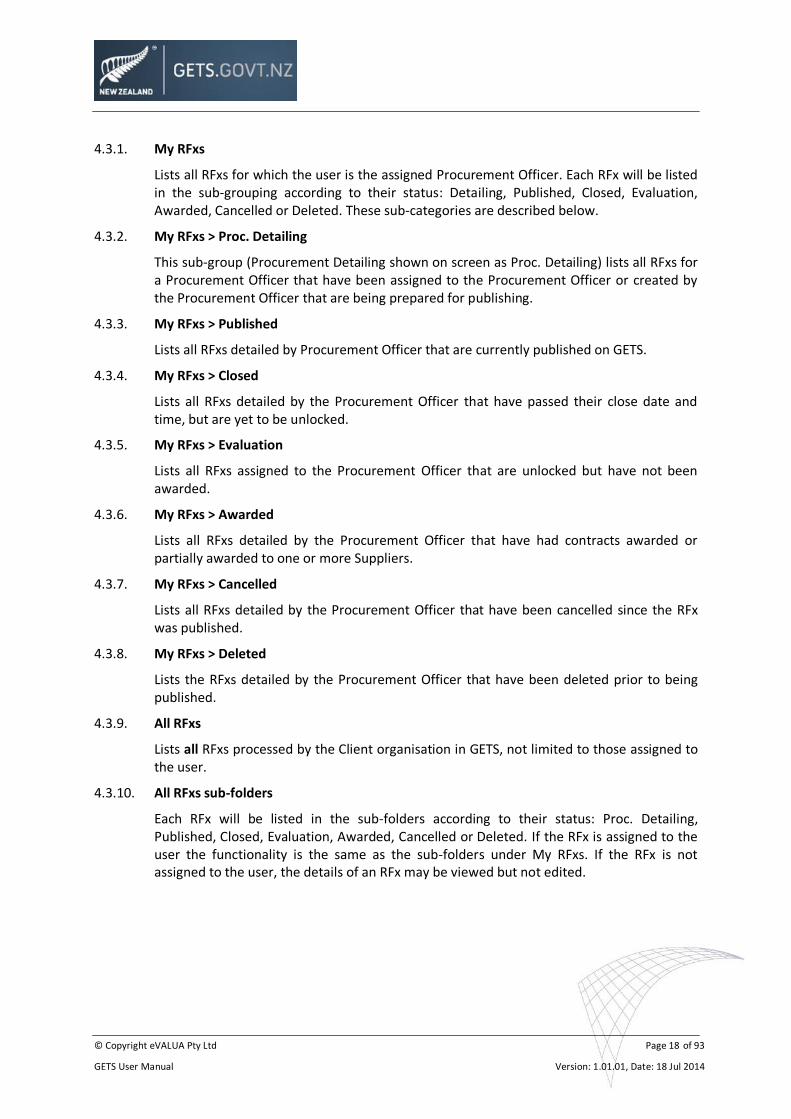
a. To view the details of an RFx, highlight the RFx in the main content pane and double click it. The respective RFx details are displayed in a new browser window or tab (depending on the browser in use by your Organisation or by the individual browser settings) (see Figure 17).
b. The details of more than one RFx can be displayed in multiple browser windows or tabs, thus allowing the user to easily display and work on multiple RFxs simultaneously. As can be seen from the vertical scroll bar in Figure 17 the Tender Details are presented over more than one screen.
Figure 17 - RFx Details – Partial screen
© Copyright eVALUA Pty Ltd Page 17 of 93
GETS User Manual Version: 1.01.01, Date: 18 Jul 2014
4.2.1. RFx Details Screen
The RFx details screen provides:
a. In the information area:
the RFx title and its status, and
the name of the RFx manager (unless the RFx Manager is the User who has logged in).
b. On the GETS command bar:
On the left hand side:
– access to any comments recorded with the RFx as well as the ability to add (further) comments, and
– depending on the RFx status, buttons to Cancel, Delete, or Publish.
On the right hand side:
– depending on the RFx status, a drop down list of available reports, and
– an ability to change the user password by clicking on the gear icon
c. A listing of tabs to access various RFx components. The listing varies in length depending on the status of the RFx. Figure 17 shows a complete listing. When initially created, an RFx will have only Attachments and Select Supplier tabs shown.
d. The details relevant to the selected tab are displayed in the main content pane of the screen.
4.3. RFx Grouping
RFxs are grouped on the Home screen according to their status under the following headings/folders:
a. My RFxs, and
b. All RFxs
Both My RFxs and All RFxs contain the following sub-heading/folders:
Procurement Detailing (Proc. Detailing)
Published
Closed
Evaluation
Awarded
Cancelled, and
Deleted
© Copyright eVALUA Pty Ltd Page 18 of 93
GETS User Manual Version: 1.01.01, Date: 18 Jul 2014
4.3.1. My RFxs
Lists all RFxs for which the user is the assigned Procurement Officer. Each RFx will be listed in the sub-grouping according to their status: Detailing, Published, Closed, Evaluation, Awarded, Cancelled or Deleted. These sub-categories are described below.
4.3.2. My RFxs > Proc. Detailing
This sub-group (Procurement Detailing shown on screen as Proc. Detailing) lists all RFxs for a Procurement Officer that have been assigned to the Procurement Officer or created by the Procurement Officer that are being prepared for publishing.
4.3.3. My RFxs > Published
Lists all RFxs detailed by Procurement Officer that are currently published on GETS.
4.3.4. My RFxs > Closed
Lists all RFxs detailed by the Procurement Officer that have passed their close date and time, but are yet to be unlocked.
4.3.5. My RFxs > Evaluation
Lists all RFxs assigned to the Procurement Officer that are unlocked but have not been awarded.
4.3.6. My RFxs > Awarded
Lists all RFxs detailed by the Procurement Officer that have had contracts awarded or partially awarded to one or more Suppliers.
4.3.7. My RFxs > Cancelled
Lists all RFxs detailed by the Procurement Officer that have been cancelled since the RFx was published.
4.3.8. My RFxs > Deleted
Lists the RFxs detailed by the Procurement Officer that have been deleted prior to being published.
4.3.9. All RFxs
Lists all RFxs processed by the Client organisation in GETS, not limited to those assigned to the user.
4.3.10. All RFxs sub-folders
Each RFx will be listed in the sub-folders according to their status: Proc. Detailing, Published, Closed, Evaluation, Awarded, Cancelled or Deleted. If the RFx is assigned to the user the functionality is the same as the sub-folders under My RFxs. If the RFx is not assigned to the user, the details of an RFx may be viewed but not edited.
© Copyright eVALUA Pty Ltd Page 19 of 93
GETS User Manual Version: 1.01.01, Date: 18 Jul 2014
4.4. Add an RFx
To add an RFx, select the Add RFx button on the GETS command bar. This will open the Add an RFx screen.
a. If you are a PO. Enter a title and type and select Save.
b. If you are an ETCO. Enter a title, type and PO and select Save.
c. If you are a Super ETCO. Enter an Organisation, title, type and PO and select Save.
This adds the RFx to the My RFxs > Proc. Detailing list.
d. Title (Mandatory). A short title that succinctly describes the objective of the RFx. Without a title the RFx cannot be saved.
e. RFx Type (Mandatory). Select a value from the drop down list. The values have been pre-defined within GETS. (See paragraph 1.4) Unless a type of RFx is selected an RFx cannot be saved.
f. GETS RFx Id. Once the new RFx is saved, GETS allocates a unique identifier - RFx ID. This will display when the RFx details screen is accessed.
4.5. Detail an RFx
4.5.1. Mandatory Details.
In addition to the RFx title and RFx type, to publish an RFx the open, close and late date/times; price band; RFx category; and RFx region must be nominated. To be useful to Suppliers other details will be needed but these are optional.
a. RFx details may be added or edited during the Proc. Detailing state. Details can also be changed after the RFx is published by the Procurement Officer but these changes will generate an addendum.
b. The details to be added vary depending on the RFx type. In addition some details are required to be completed before the RFx can be published. Guidance on the content of the details required is shown below.
4.5.2. Basic Details.
a. Department. Select a Department from the pre-configured list. This is optional. When a Department is selected, the RFxs listed on the Home screen can be filtered by that particular department.
b. Reference Number. Enter a number that meets the business rules of your organisation.
c. Price Band (required to publish). An estimate of the expected value of the contract (or totals for multiple contracts), expressed as a New Zealand dollar range. The drop down lists presents the following bands:
$0-10K
$10K – 50K
$50K – 100K
© Copyright eVALUA Pty Ltd Page 20 of 93
GETS User Manual Version: 1.01.01, Date: 18 Jul 2014
$100K – 250K
$250K – 500K
$500K - $1M
$1M - $5M
$5M - $10M
$10M - $25M
$25M - $50M
$50M - $100M
$100M +
d. Tender Coverage. To aid potential Suppliers in the decision process as to whether to subscribe to an RFx, the Tender Coverage value is displayed to Suppliers in the RFx summary information presented in the Supplier’s view. Hovering the mouse over the entries in the drop down list will display a definition of each Tender Coverage option. Select the coverage that applies from the following entries displayed in the drop down list:
Sole Agency (default): an individual agency purchasing on its own behalf.
All of Government: an “All of Government” opportunity managed by a recognised Centre of Expertise.
Cluster: a procurement on behalf of a cluster of purchasers for a similar requirement.
Syndicated Opportunity: a procurement with a Common User Provision which allows other agencies to join the contract later.
On behalf of procurement agent: a procurement carried out by an authorised agent on behalf of an eligible purchaser. Any resulting contract MUST be between the purchaser and the successful supplier(s).
e. Open Date (required to publish).
Enter the date and time that the RFx will be published on GETS and made available to the public or select Suppliers. Invitation emails will be sent to selected Suppliers (if any).
A default open time has been configured by MBIE.
f. Close Date (required to publish).
The date and time by which Suppliers are notified they must submit their responses. No new subscriptions to the RFx will be accepted after the close date and time.
The close date and time is clearly displayed to Suppliers in the Suppliers view in both the Client Organisation and Supplier time zones.
A default close time has been configured by MBIE.
© Copyright eVALUA Pty Ltd Page 21 of 93
GETS User Manual Version: 1.01.01, Date: 18 Jul 2014
g. Late Date (required to publish).
The latest date and time by which Suppliers must submit their responses. For the duration between the close and late dates GETS will continue to accept Supplier responses, but will flag those responses as being late. However no new subscriptions are accepted.
Suppliers are not notified of this time and date.
The Late Date may be set to the same value as the close date and time, in which case there is no late period and therefore no responses will be accepted after the official close date.
A default late time has been configured by MBIE
h. Parent RFx.
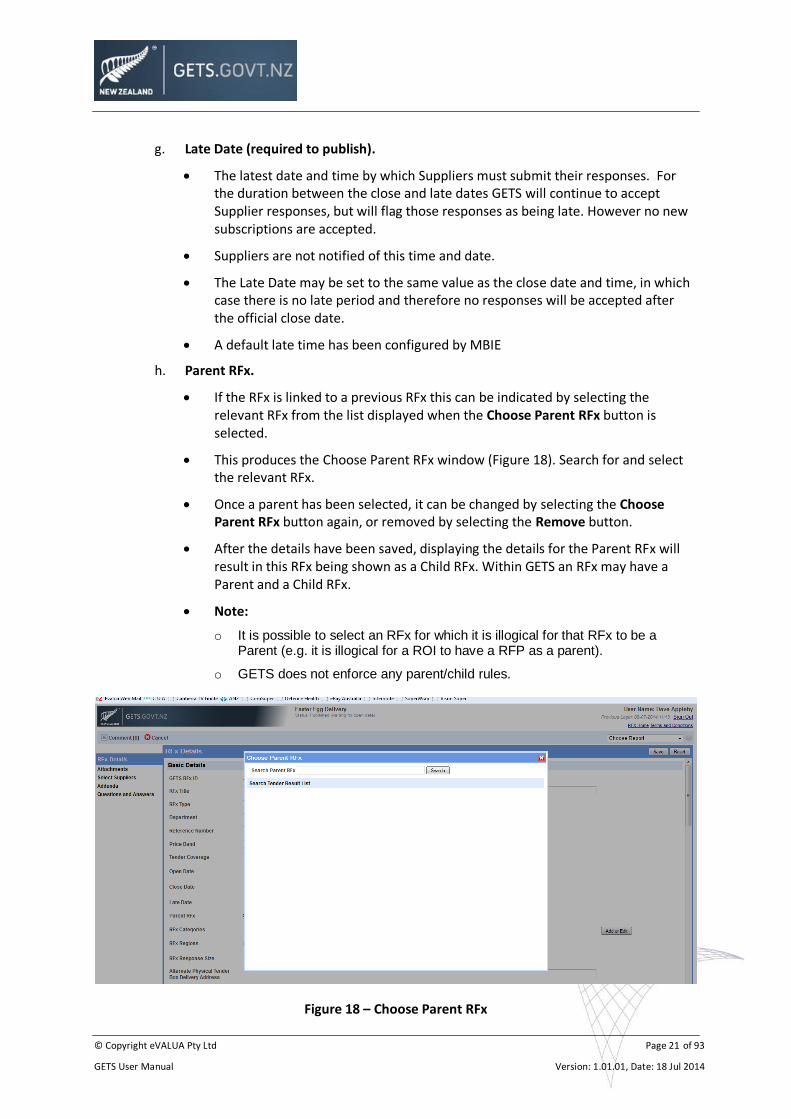
If the RFx is linked to a previous RFx this can be indicated by selecting the relevant RFx from the list displayed when the Choose Parent RFx button is selected.
This produces the Choose Parent RFx window (Figure 18). Search for and select the relevant RFx.
Once a parent has been selected, it can be changed by selecting the Choose Parent RFx button again, or removed by selecting the Remove button.
After the details have been saved, displaying the details for the Parent RFx will result in this RFx being shown as a Child RFx. Within GETS an RFx may have a Parent and a Child RFx.
Note:
o It is possible to select an RFx for which it is illogical for that RFx to be a Parent (e.g. it is illogical for a ROI to have a RFP as a parent).
o GETS does not enforce any parent/child rules.
Figure 18 – Choose Parent RFx
© Copyright eVALUA Pty Ltd Page 22 of 93
GETS User Manual Version: 1.01.01, Date: 18 Jul 2014
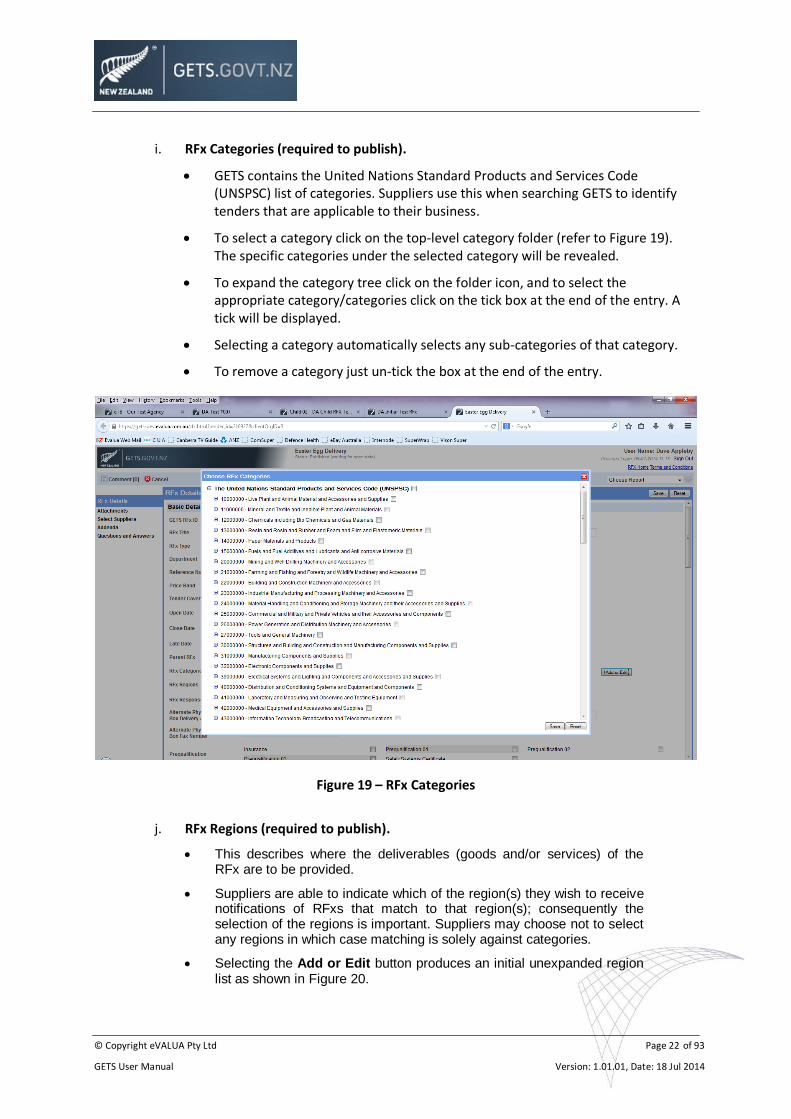
i. RFx Categories (required to publish).
GETS contains the United Nations Standard Products and Services Code (UNSPSC) list of categories. Suppliers use this when searching GETS to identify tenders that are applicable to their business.
To select a category click on the top-level category folder (refer to Figure 19). The specific categories under the selected category will be revealed.
To expand the category tree click on the folder icon, and to select the appropriate category/categories click on the tick box at the end of the entry. A tick will be displayed.
Selecting a category automatically selects any sub-categories of that category.
To remove a category just un-tick the box at the end of the entry.
Figure 19 – RFx Categories
j. RFx Regions (required to publish).
This describes where the deliverables (goods and/or services) of the RFx are to be provided.
Suppliers are able to indicate which of the region(s) they wish to receive notifications of RFxs that match to that region(s); consequently the selection of the regions is important. Suppliers may choose not to select any regions in which case matching is solely against categories.
Selecting the Add or Edit button produces an initial unexpanded region list as shown in Figure 20.
© Copyright eVALUA Pty Ltd Page 23 of 93
GETS User Manual Version: 1.01.01, Date: 18 Jul 2014
Figure 20 – Regions (Unexpanded)
Click on the next to International to expand the list to show New Zealand as shown in Figure 21.
Figure 21 – Regions (New Zealand)
Click on the next to New Zealand to expand the list to show all regions in New Zealand as shown in Figure 22.
Figure 22 – All Regions
Select a region by checking the box to its right.
The list is hierarchical. Checking the box to the right of New Zealand selects all the regions in New Zealand.
Selecting a checked box removes the region from selection.
© Copyright eVALUA Pty Ltd Page 24 of 93
GETS User Manual Version: 1.01.01, Date: 18 Jul 2014
k. RFx Response Size.
The Response Size is the maximum amount of space a single Supplier's response may use. The default is 10 megabytes.
If you anticipate receiving large files adjust the size to the appropriate level, up to a maximum of 50 megabytes.
l. Alternate Physical Tender Box Delivery Address.
Address for posting/couriering physical copies of the Supplier’s response.
Only used where selected Supplier(s) cannot access the GETS website.
m. Alternate Physical Tender Box Fax Number.
Fax telephone number where physical copies of the Supplier’s response can be faxed.
Only used where selected Supplier(s) cannot access the GETS website.
n. Prequalification. Select any prequalification requirements that apply to the RFx.
o. Sole Source Exception.
The Default selection is “No”.
Select “Yes” if a decision has been made to only invite a response to the RFx from a single Supplier.
p. Sole Source Exception Justification.
A text box appears if “Yes” has been selected for Sole Source Exception.
Provide a description of the reason justifying the decision to sole source.
q. Overview (Not required to publish – but recommended).
The overview is a succinct description of the RFx.
It is published in any RFx advertisement placed by your Organisation and on the GETS website.
Any other information that is not covered by the RFx details fields or included in the RFx attachments, which is to be presented to Suppliers, can be entered here.
4.5.3. RFx Contact Information
If left blank, GETS will provide the assigned Procurement Officer’s details when the RFx is published. However, note that the contact details (whether specified or those belonging to
the assigned Procurement Officer) will be publicly available when the RFx is published.
© Copyright eVALUA Pty Ltd Page 25 of 93
GETS User Manual Version: 1.01.01, Date: 18 Jul 2014
4.5.4. Site Information
The site information is used to provide readily accessible instructions to Suppliers in the case where it is expected that the Suppliers will need to come on-site in order to prepare their response to the RFx (e.g. to measure up when preparing a quote for small scale construction work). All site information, if provided, is only available to Suppliers who have subscribed to the RFx.
a. Site Contact Name
Name of contact, if applicable.
b. Site Contact Phone
If a Site Contact name is provided, provide the telephone number.
c. Site Location
Address of site, if applicable.
d. Site Building
If applicable, provide specific building identification at a particular site.
e. Site visit
The Default selection is “No – not applicable”.
Other values that may be selected are:
o “Yes – ring to arrange”, where potential Suppliers call the Site Contact to arrange a site visit, or
o “Yes – set date and time”, where a date and time is nominated in the relevant text boxes for all potential Suppliers to attend.
f. Site Visit Date and Time
If applicable, enter the relevant date and time for the site visit.
These are only available for completion if the Site Visit field is “Yes – set date and time”.
g. Site Visit Instructions
The textbox is only available for completion if the Site Visit field is “Yes – set date and time”.
Enter any special instructions regarding the site visit (e.g. certifications, insurance that must be held by the Supplier in order to be granted access to the site).
4.5.5. Supply of Goods Information
a. Supply Method
The default selection is “Not applicable”.
Other values that may be selected are:
o “Collect”, or
o “Deliver”.
© Copyright eVALUA Pty Ltd Page 26 of 93
GETS User Manual Version: 1.01.01, Date: 18 Jul 2014
b. Delivery/Collect Date
If Supply Method is either Collect or Deliver, provide date if known.
c. Delivery/Collect Address
If Supply Method is either Collect or Deliver, provide address if known.
d. Delivery/Collect Instructions
If Supply Method is either Collect or Deliver, provide instructions if applicable.
4.5.6. Timetable Information
The timetable information is used to provide readily accessible details regarding the time schedule for the project. All timetable information, if provided, is only available to Suppliers who have subscribed to the RFx.
a. Commencement Date
If known enter a date indicating the commencement of work; or the number of days, weeks or months after contract is awarded that work is to commence.
The default value is “Unknown or not set”.
b. Practical Completion Date
If known, enter a date indicating the expected completion/delivery date; or the number of days, weeks or month after commencement completion is expected.
The default value is “Unknown or not set”.
4.5.7. Contract Information and Requirements
a. Offer Validity
If required, select a number of days from the RFx close date that the offer is required to be valid.
There are pre-set option values of 30, 60 or 90 days.
The default value is blank.
b. Defect Liability Period
If required, enter a number and then select the appropriate time period (days, months or years).
c. Period for payment of claims
If required, select a value from the pre-set options of:
o Fortnightly,
o Monthly, or
o On Completion.
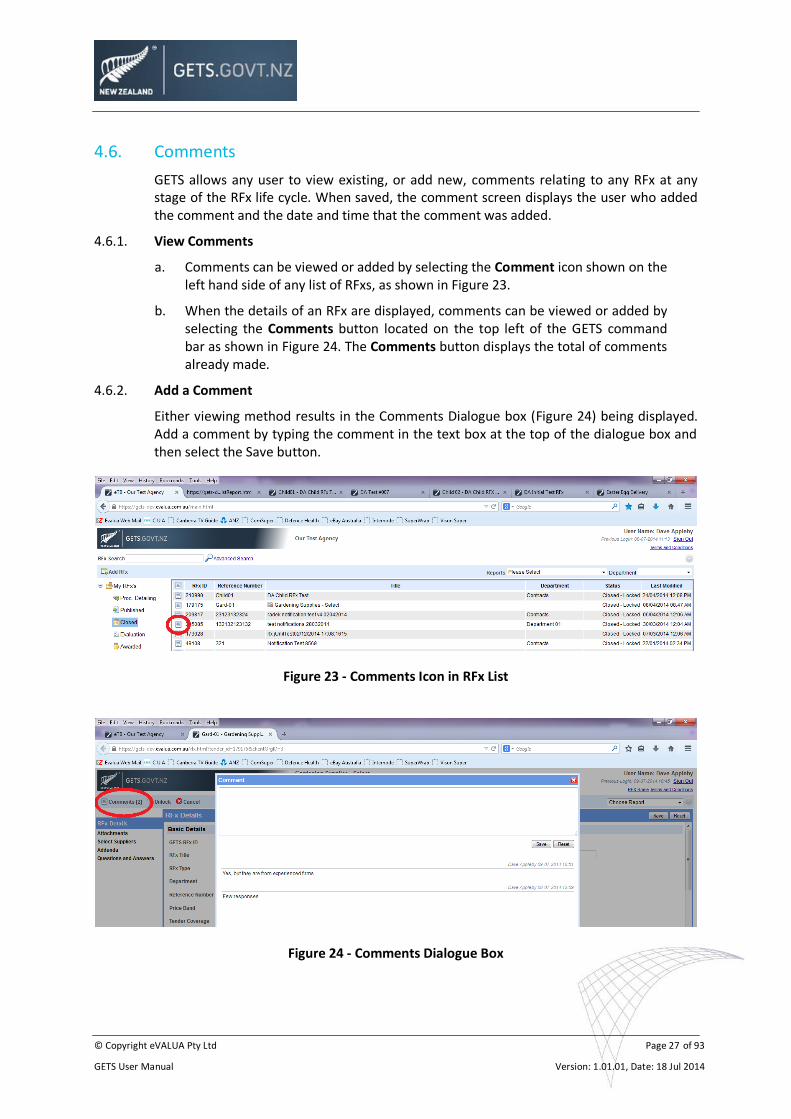
© Copyright eVALUA Pty Ltd Page 27 of 93
GETS User Manual Version: 1.01.01, Date: 18 Jul 2014
4.6. Comments
GETS allows any user to view existing, or add new, comments relating to any RFx at any stage of the RFx life cycle. When saved, the comment screen displays the user who added the comment and the date and time that the comment was added.
4.6.1. View Comments
a. Comments can be viewed or added by selecting the Comment icon shown on the left hand side of any list of RFxs, as shown in Figure 23.
b. When the details of an RFx are displayed, comments can be viewed or added by selecting the Comments button located on the top left of the GETS command bar as shown in Figure 24. The Comments button displays the total of comments already made.
4.6.2. Add a Comment
Either viewing method results in the Comments Dialogue box (Figure 24) being displayed. Add a comment by typing the comment in the text box at the top of the dialogue box and then select the Save button.
Figure 23 - Comments Icon in RFx List
Figure 24 - Comments Dialogue Box
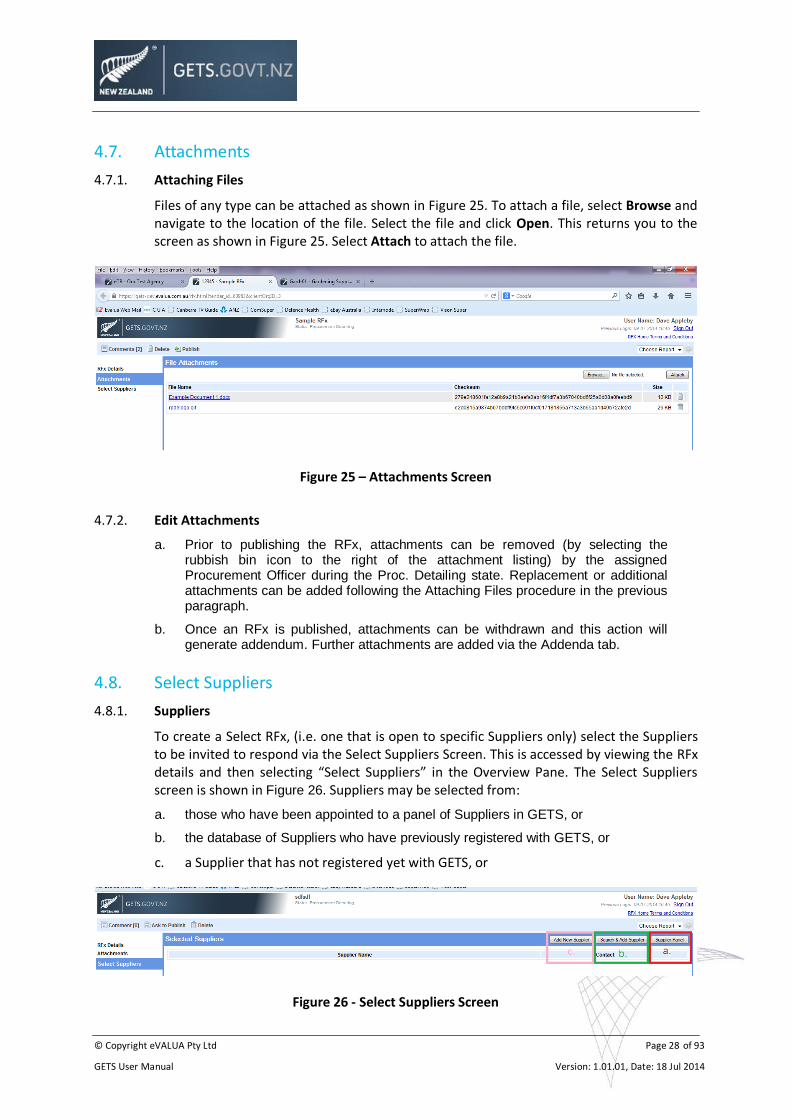
© Copyright eVALUA Pty Ltd Page 28 of 93
GETS User Manual Version: 1.01.01, Date: 18 Jul 2014
4.7. Attachments
4.7.1. Attaching Files
Files of any type can be attached as shown in Figure 25. To attach a file, select Browse and navigate to the location of the file. Select the file and click Open. This returns you to the screen as shown in Figure 25. Select Attach to attach the file.
Figure 25 – Attachments Screen
4.7.2. Edit Attachments
a. Prior to publishing the RFx, attachments can be removed (by selecting the rubbish bin icon to the right of the attachment listing) by the assigned Procurement Officer during the Proc. Detailing state. Replacement or additional attachments can be added following the Attaching Files procedure in the previous paragraph.
b. Once an RFx is published, attachments can be withdrawn and this action will generate addendum. Further attachments are added via the Addenda tab.
4.8. Select Suppliers
4.8.1. Suppliers
To create a Select RFx, (i.e. one that is open to specific Suppliers only) select the Suppliers to be invited to respond via the Select Suppliers Screen. This is accessed by viewing the RFx details and then selecting “Select Suppliers” in the Overview Pane. The Select Suppliers screen is shown in Figure 26. Suppliers may be selected from:
a. those who have been appointed to a panel of Suppliers in GETS, or
b. the database of Suppliers who have previously registered with GETS, or
c. a Supplier that has not registered yet with GETS, or
Figure 26 - Select Suppliers Screen
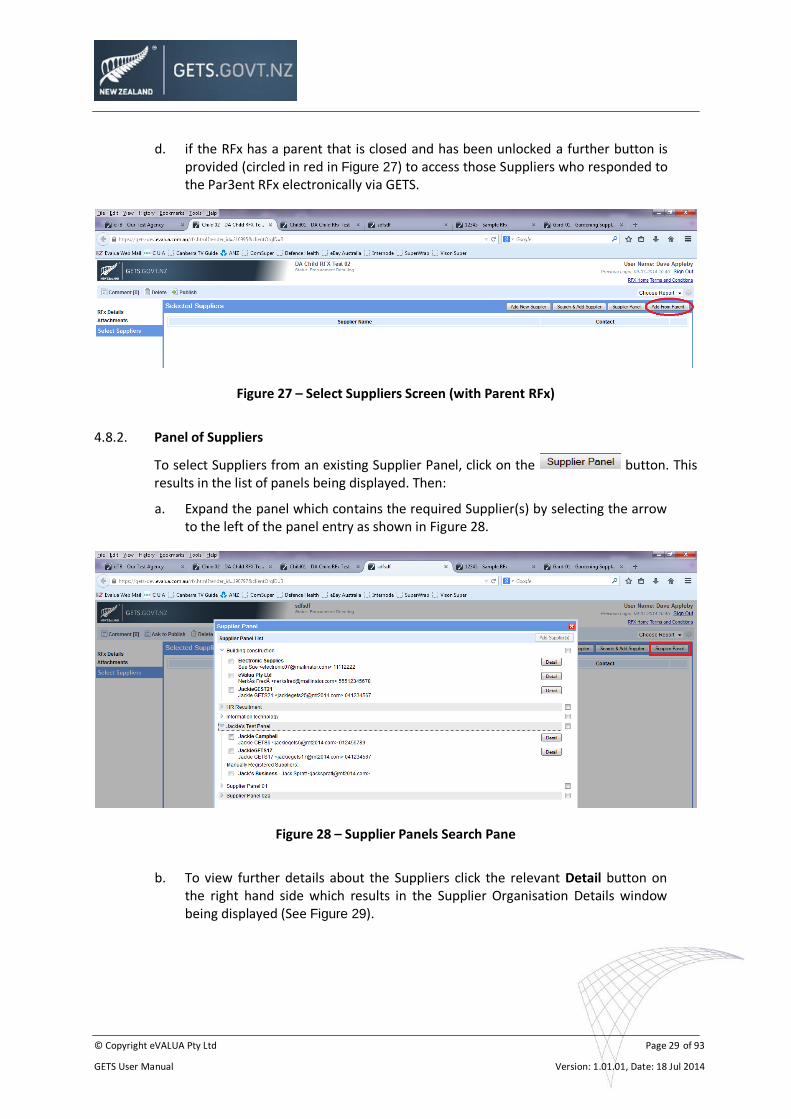
© Copyright eVALUA Pty Ltd Page 29 of 93
GETS User Manual Version: 1.01.01, Date: 18 Jul 2014
d. if the RFx has a parent that is closed and has been unlocked a further button is provided (circled in red in Figure 27) to access those Suppliers who responded to the Par3ent RFx electronically via GETS.
Figure 27 – Select Suppliers Screen (with Parent RFx)
4.8.2. Panel of Suppliers
To select Suppliers from an existing Supplier Panel, click on the button. This results in the list of panels being displayed. Then:
a. Expand the panel which contains the required Supplier(s) by selecting the arrow to the left of the panel entry as shown in Figure 28.
Figure 28 – Supplier Panels Search Pane
b. To view further details about the Suppliers click the relevant Detail button on the right hand side which results in the Supplier Organisation Details window being displayed (See Figure 29).
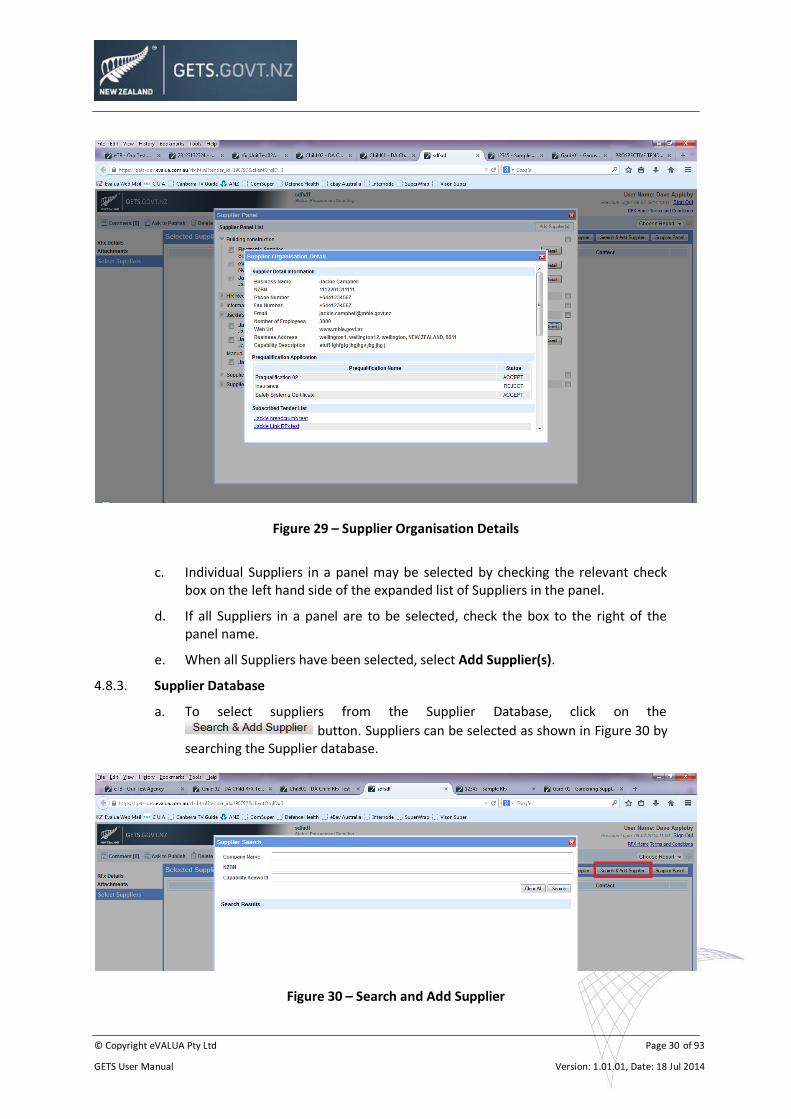
© Copyright eVALUA Pty Ltd Page 30 of 93
GETS User Manual Version: 1.01.01, Date: 18 Jul 2014
Figure 29 – Supplier Organisation Details
c. Individual Suppliers in a panel may be selected by checking the relevant check box on the left hand side of the expanded list of Suppliers in the panel.
d. If all Suppliers in a panel are to be selected, check the box to the right of the panel name.
e. When all Suppliers have been selected, select Add Supplier(s).
4.8.3. Supplier Database
a. To select suppliers from the Supplier Database, click on the
button. Suppliers can be selected as shown in Figure 30 by searching the Supplier database.
Figure 30 – Search and Add Supplier
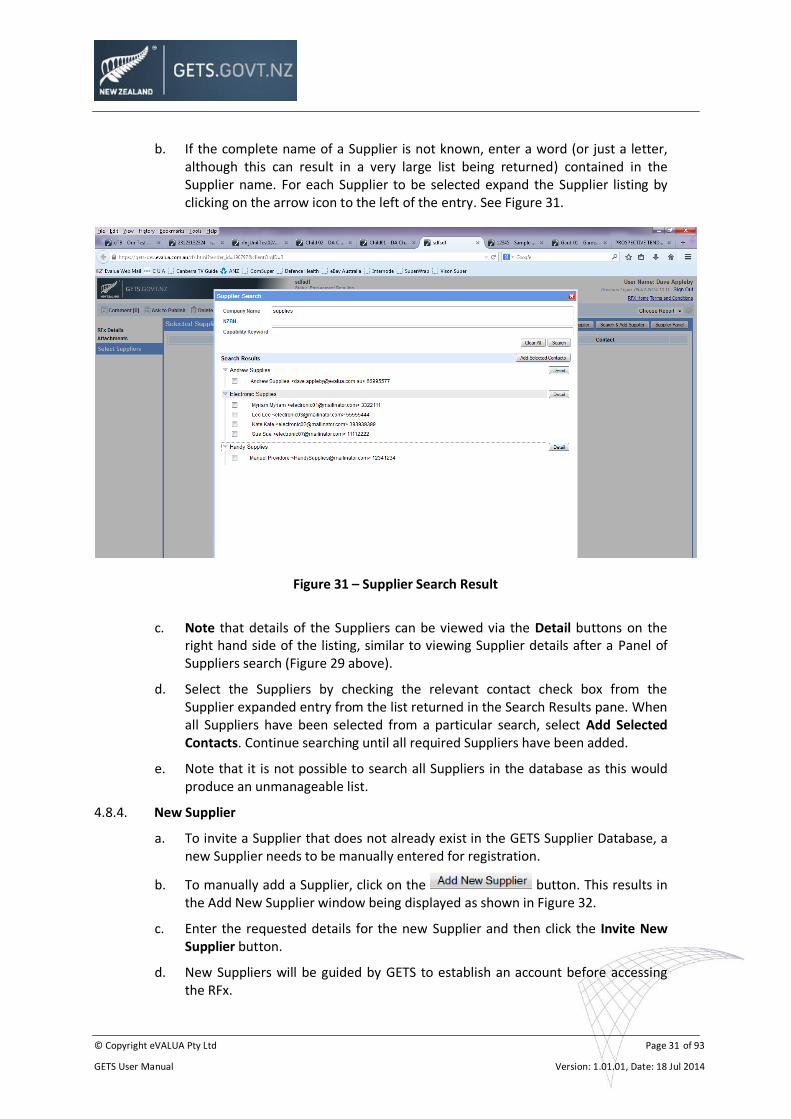
© Copyright eVALUA Pty Ltd Page 31 of 93
GETS User Manual Version: 1.01.01, Date: 18 Jul 2014
b. If the complete name of a Supplier is not known, enter a word (or just a letter, although this can result in a very large list being returned) contained in the Supplier name. For each Supplier to be selected expand the Supplier listing by clicking on the arrow icon to the left of the entry. See Figure 31.
Figure 31 – Supplier Search Result
c. Note that details of the Suppliers can be viewed via the Detail buttons on the right hand side of the listing, similar to viewing Supplier details after a Panel of Suppliers search (Figure 29 above).
d. Select the Suppliers by checking the relevant contact check box from the Supplier expanded entry from the list returned in the Search Results pane. When all Suppliers have been selected from a particular search, select Add Selected Contacts. Continue searching until all required Suppliers have been added.
e. Note that it is not possible to search all Suppliers in the database as this would produce an unmanageable list.
4.8.4. New Supplier
a. To invite a Supplier that does not already exist in the GETS Supplier Database, a new Supplier needs to be manually entered for registration.
b. To manually add a Supplier, click on the button. This results in the Add New Supplier window being displayed as shown in Figure 32.
c. Enter the requested details for the new Supplier and then click the Invite New Supplier button.
d. New Suppliers will be guided by GETS to establish an account before accessing the RFx.
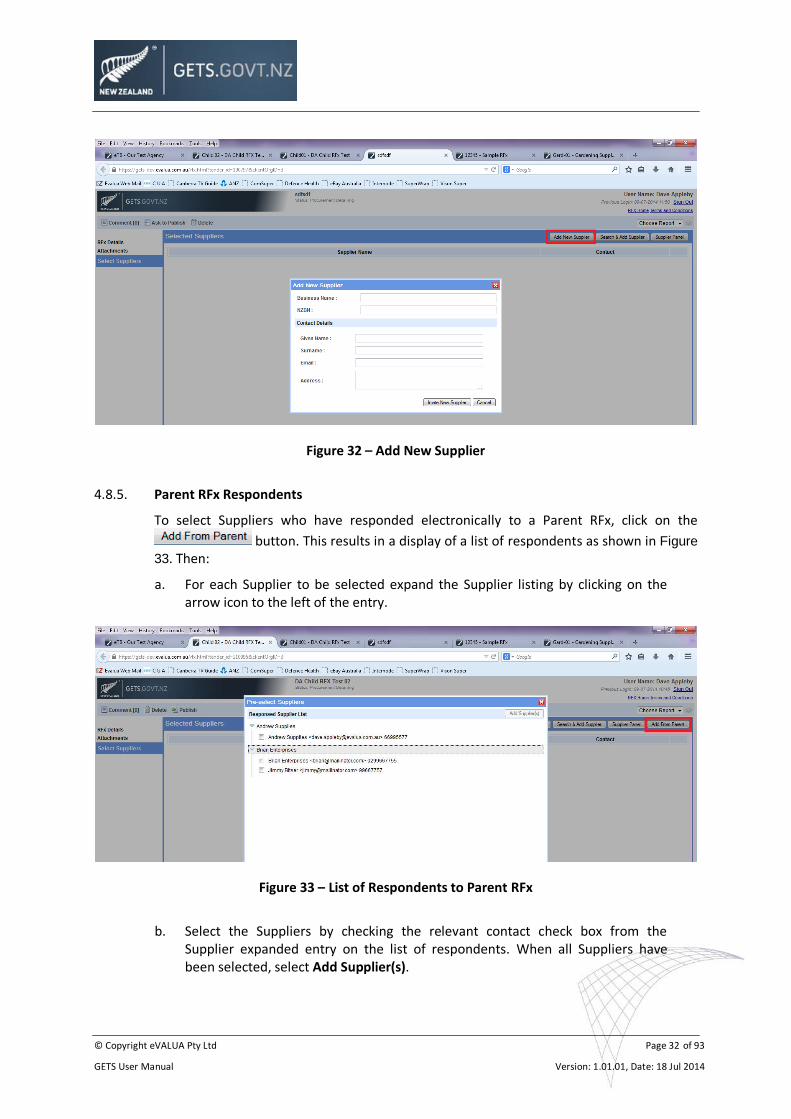
© Copyright eVALUA Pty Ltd Page 32 of 93
GETS User Manual Version: 1.01.01, Date: 18 Jul 2014
Figure 32 – Add New Supplier
4.8.5. Parent RFx Respondents
To select Suppliers who have responded electronically to a Parent RFx, click on the
button. This results in a display of a list of respondents as shown in Figure
33. Then:
a. For each Supplier to be selected expand the Supplier listing by clicking on the arrow icon to the left of the entry.
Figure 33 – List of Respondents to Parent RFx
b. Select the Suppliers by checking the relevant contact check box from the Supplier expanded entry on the list of respondents. When all Suppliers have been selected, select Add Supplier(s).
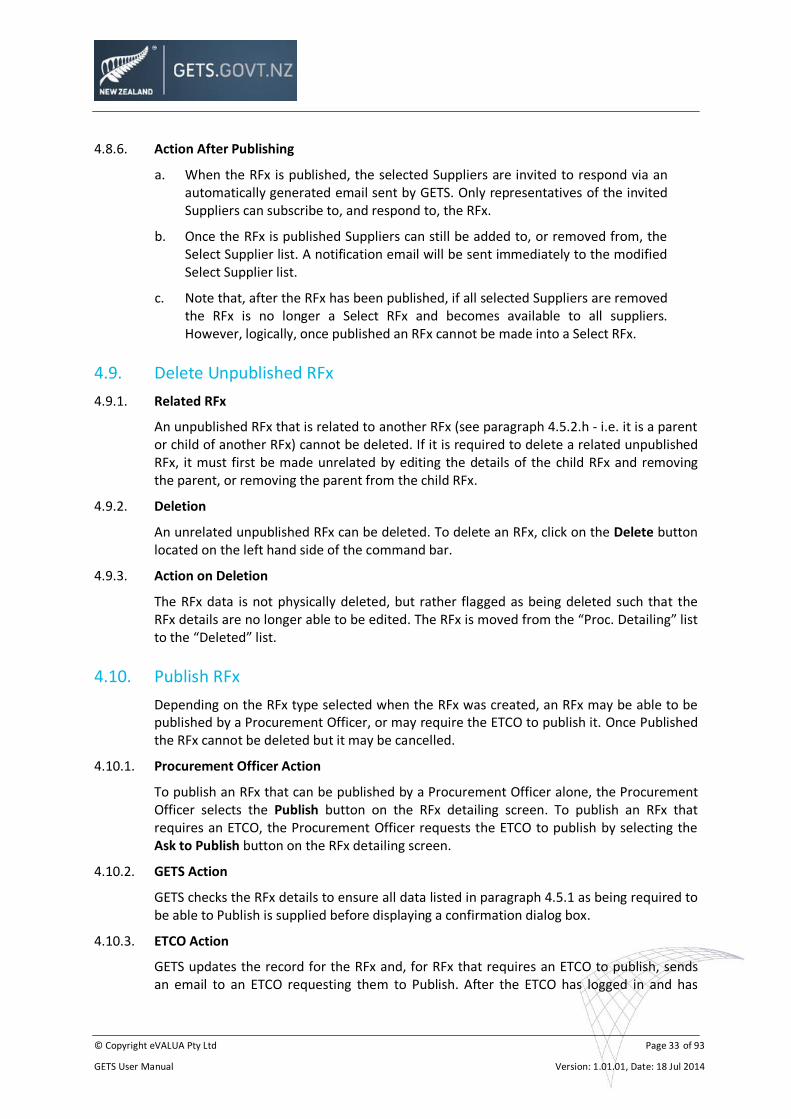
© Copyright eVALUA Pty Ltd Page 33 of 93
GETS User Manual Version: 1.01.01, Date: 18 Jul 2014
4.8.6. Action After Publishing
a. When the RFx is published, the selected Suppliers are invited to respond via an automatically generated email sent by GETS. Only representatives of the invited Suppliers can subscribe to, and respond to, the RFx.
b. Once the RFx is published Suppliers can still be added to, or removed from, the Select Supplier list. A notification email will be sent immediately to the modified Select Supplier list.
c. Note that, after the RFx has been published, if all selected Suppliers are removed the RFx is no longer a Select RFx and becomes available to all suppliers. However, logically, once published an RFx cannot be made into a Select RFx.
4.9. Delete Unpublished RFx
4.9.1. Related RFx
An unpublished RFx that is related to another RFx (see paragraph 4.5.2.h - i.e. it is a parent or child of another RFx) cannot be deleted. If it is required to delete a related unpublished RFx, it must first be made unrelated by editing the details of the child RFx and removing the parent, or removing the parent from the child RFx.
4.9.2. Deletion
An unrelated unpublished RFx can be deleted. To delete an RFx, click on the Delete button located on the left hand side of the command bar.
4.9.3. Action on Deletion
The RFx data is not physically deleted, but rather flagged as being deleted such that the RFx details are no longer able to be edited. The RFx is moved from the “Proc. Detailing” list to the “Deleted” list.
4.10. Publish RFx
Depending on the RFx type selected when the RFx was created, an RFx may be able to be published by a Procurement Officer, or may require the ETCO to publish it. Once Published the RFx cannot be deleted but it may be cancelled.
4.10.1. Procurement Officer Action
To publish an RFx that can be published by a Procurement Officer alone, the Procurement Officer selects the Publish button on the RFx detailing screen. To publish an RFx that requires an ETCO, the Procurement Officer requests the ETCO to publish by selecting the Ask to Publish button on the RFx detailing screen.
4.10.2. GETS Action
GETS checks the RFx details to ensure all data listed in paragraph 4.5.1 as being required to be able to Publish is supplied before displaying a confirmation dialog box.
4.10.3. ETCO Action
GETS updates the record for the RFx and, for RFx that requires an ETCO to publish, sends an email to an ETCO requesting them to Publish. After the ETCO has logged in and has
© Copyright eVALUA Pty Ltd Page 34 of 93
GETS User Manual Version: 1.01.01, Date: 18 Jul 2014
selected the Publish button on the RFx detailing screen, the RFx appears in the Published list on the Home screen.
4.11. Cancel RFx
4.11.1. Related RFx
A published RFx that is related to another RFx (see paragraph 4.5.2 h - i.e. it is a parent or child of another RFx) cannot be cancelled. If it is required to cancel a related RFx, it must first be made unrelated by editing the details of the child RFx and removing the parent, or removing the parent from the child RFx.
4.11.2. Cancellation
An unrelated published RFx may be cancelled by the Procurement Officer or the ETCO. To cancel a published RFx, click on the Cancel button located on the left hand side of the command bar. The Procurement Officer or ETCO must provide a justification comment explaining why the RFx has been cancelled.
4.11.3. Action on Cancellation
The Procurement Officer and all Suppliers who have subscribed to the RFx or, if a select RFx, have been invited to respond to the RFx, are sent an email notifying them of the cancellation. The justification comment is included in this email notification. A cancelled RFx is no longer accessible by Suppliers nor are any of the RFx details able to be edited by the Procurement Officer. The RFx is moved to the “Cancelled” list.
4.12. Add Addendum
To add an addendum, the Procurement Officer to whom the RFx is allocated, selects the “Addenda” section of the RFx screen which is only displayed once an RFx is published, as shown in Figure 34. Note that addenda to an RFx can be released at any time after the RFx is published, even after the RFx has closed, been unlocked or evaluated.
4.12.1. Addendum Title
Each addendum must be given a title. By default GETS gives an addendum the title of: “Addendum - <n> of <RFx Title>” where '<n>' is a count + 1 of the number of addenda already released for the RFx.
4.12.2. Addendum Comment
An addendum normally has a comment, which may be of several paragraphs, to describe the purpose of the addendum.
4.12.3. Action on Creation of Addendum
After the Addendum has been created, the Create and Cancel buttons are replaced by Save and Publish and Delete buttons. In addition the Attachments section becomes active. An addendum may have one or more file attachments.
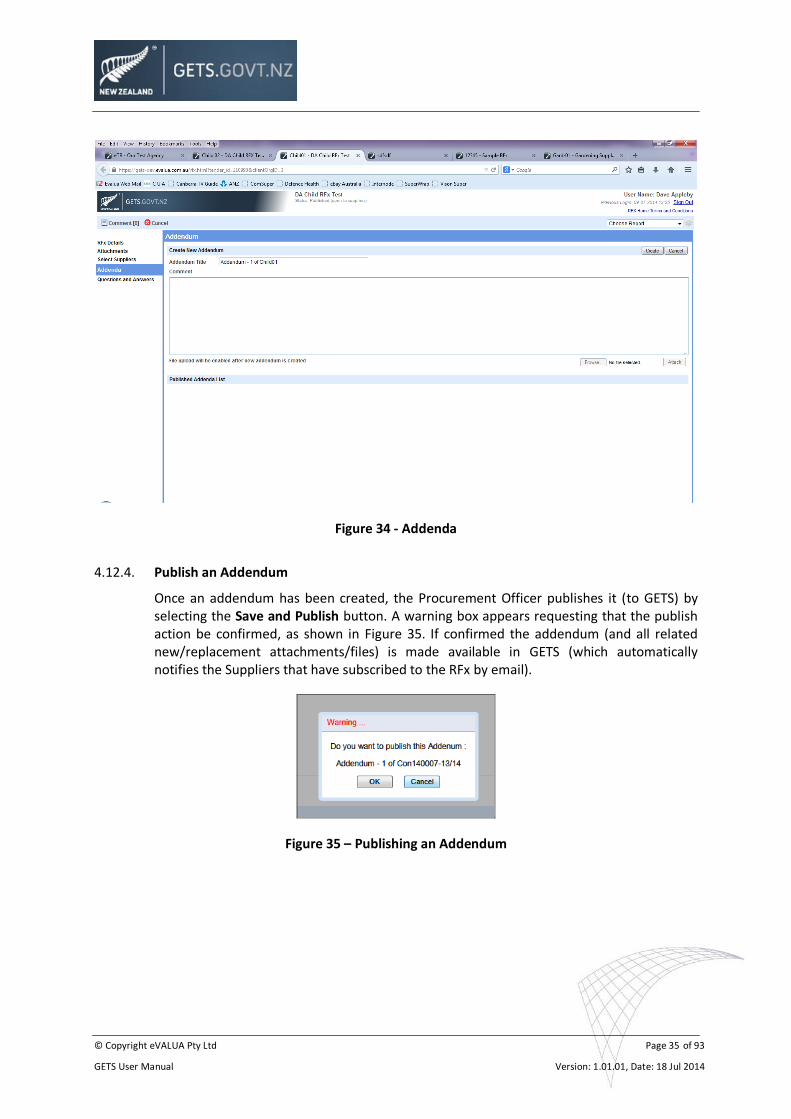
© Copyright eVALUA Pty Ltd Page 35 of 93
GETS User Manual Version: 1.01.01, Date: 18 Jul 2014
Figure 34 - Addenda
4.12.4. Publish an Addendum
Once an addendum has been created, the Procurement Officer publishes it (to GETS) by selecting the Save and Publish button. A warning box appears requesting that the publish action be confirmed, as shown in Figure 35. If confirmed the addendum (and all related new/replacement attachments/files) is made available in GETS (which automatically notifies the Suppliers that have subscribed to the RFx by email).
Figure 35 – Publishing an Addendum
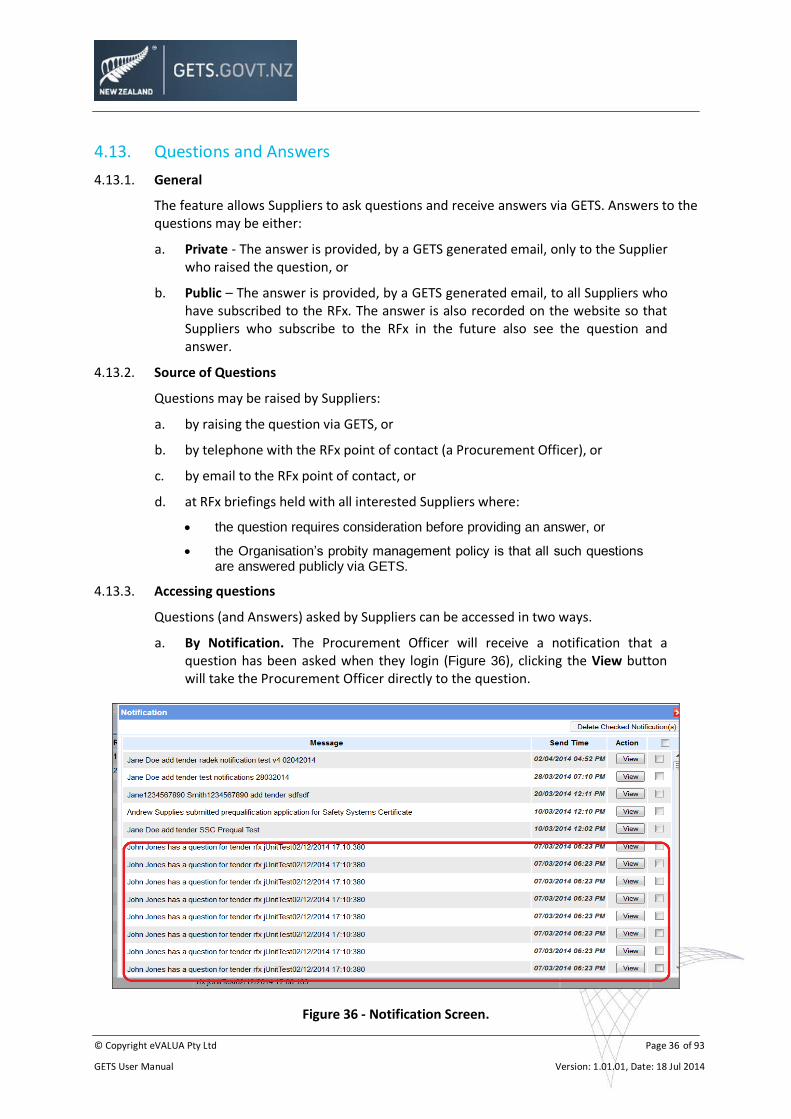
© Copyright eVALUA Pty Ltd Page 36 of 93
GETS User Manual Version: 1.01.01, Date: 18 Jul 2014
4.13. Questions and Answers
4.13.1. General
The feature allows Suppliers to ask questions and receive answers via GETS. Answers to the questions may be either:
a. Private - The answer is provided, by a GETS generated email, only to the Supplier who raised the question, or
b. Public – The answer is provided, by a GETS generated email, to all Suppliers who have subscribed to the RFx. The answer is also recorded on the website so that Suppliers who subscribe to the RFx in the future also see the question and answer.
4.13.2. Source of Questions
Questions may be raised by Suppliers:
a. by raising the question via GETS, or
b. by telephone with the RFx point of contact (a Procurement Officer), or
c. by email to the RFx point of contact, or
d. at RFx briefings held with all interested Suppliers where:
the question requires consideration before providing an answer, or
the Organisation’s probity management policy is that all such questions are answered publicly via GETS.
4.13.3. Accessing questions
Questions (and Answers) asked by Suppliers can be accessed in two ways.
a. By Notification. The Procurement Officer will receive a notification that a question has been asked when they login (Figure 36), clicking the View button will take the Procurement Officer directly to the question.
Figure 36 - Notification Screen.
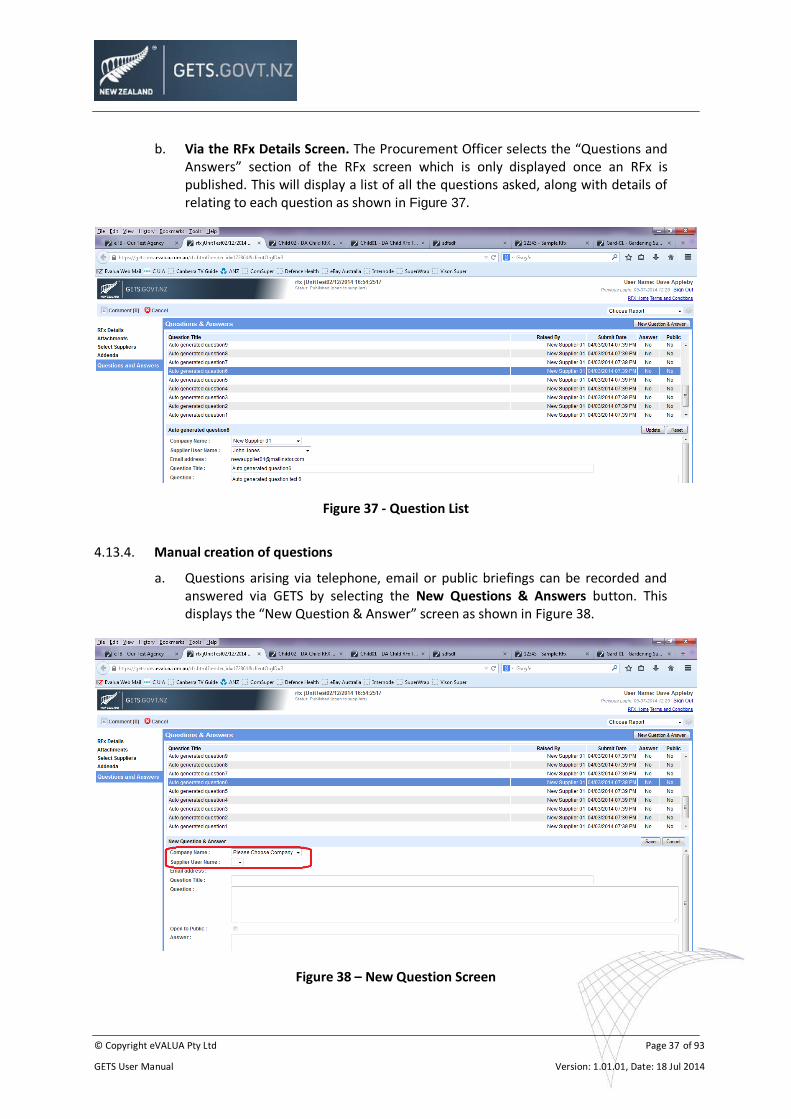
© Copyright eVALUA Pty Ltd Page 37 of 93
GETS User Manual Version: 1.01.01, Date: 18 Jul 2014
b. Via the RFx Details Screen. The Procurement Officer selects the “Questions and Answers” section of the RFx screen which is only displayed once an RFx is published. This will display a list of all the questions asked, along with details of relating to each question as shown in Figure 37.
Figure 37 - Question List
4.13.4. Manual creation of questions
a. Questions arising via telephone, email or public briefings can be recorded and answered via GETS by selecting the New Questions & Answers button. This displays the “New Question & Answer” screen as shown in Figure 38.
Figure 38 – New Question Screen
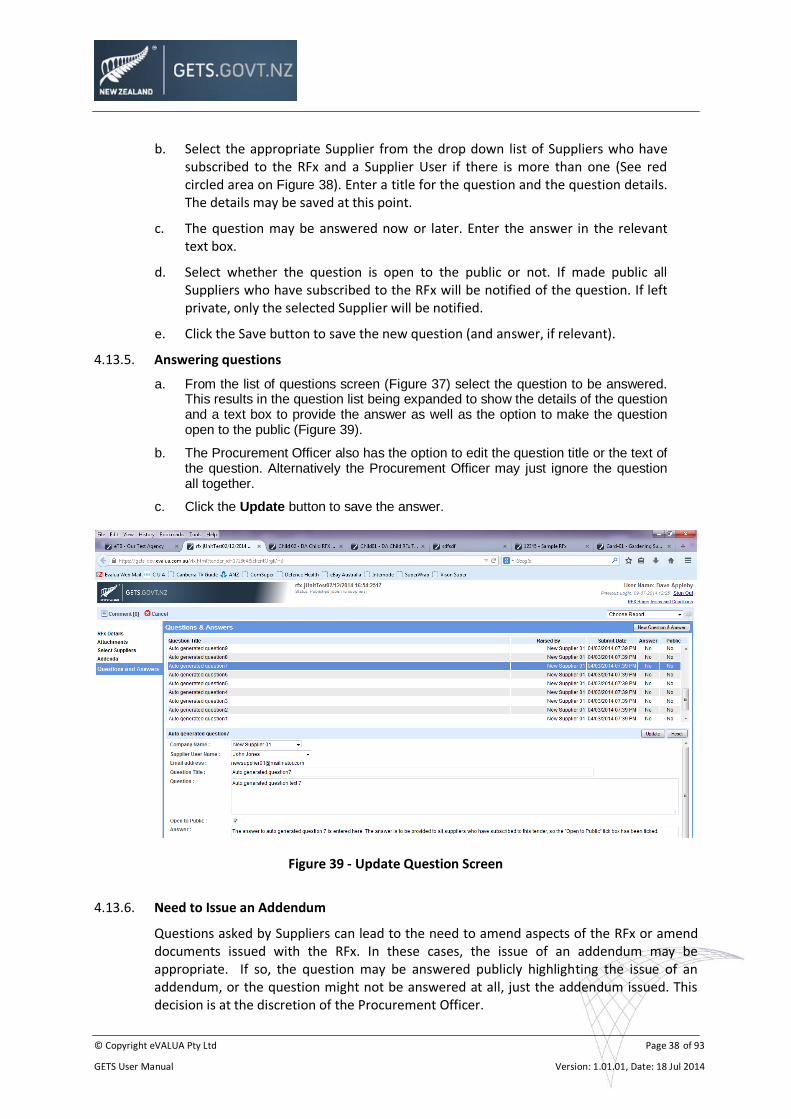
© Copyright eVALUA Pty Ltd Page 38 of 93
GETS User Manual Version: 1.01.01, Date: 18 Jul 2014
b. Select the appropriate Supplier from the drop down list of Suppliers who have subscribed to the RFx and a Supplier User if there is more than one (See red circled area on Figure 38). Enter a title for the question and the question details. The details may be saved at this point.
c. The question may be answered now or later. Enter the answer in the relevant text box.
d. Select whether the question is open to the public or not. If made public all Suppliers who have subscribed to the RFx will be notified of the question. If left private, only the selected Supplier will be notified.
e. Click the Save button to save the new question (and answer, if relevant).
4.13.5. Answering questions
a. From the list of questions screen (Figure 37) select the question to be answered. This results in the question list being expanded to show the details of the question and a text box to provide the answer as well as the option to make the question open to the public (Figure 39).
b. The Procurement Officer also has the option to edit the question title or the text of the question. Alternatively the Procurement Officer may just ignore the question all together.
c. Click the Update button to save the answer.
Figure 39 - Update Question Screen
4.13.6. Need to Issue an Addendum
Questions asked by Suppliers can lead to the need to amend aspects of the RFx or amend documents issued with the RFx. In these cases, the issue of an addendum may be appropriate. If so, the question may be answered publicly highlighting the issue of an addendum, or the question might not be answered at all, just the addendum issued. This decision is at the discretion of the Procurement Officer.
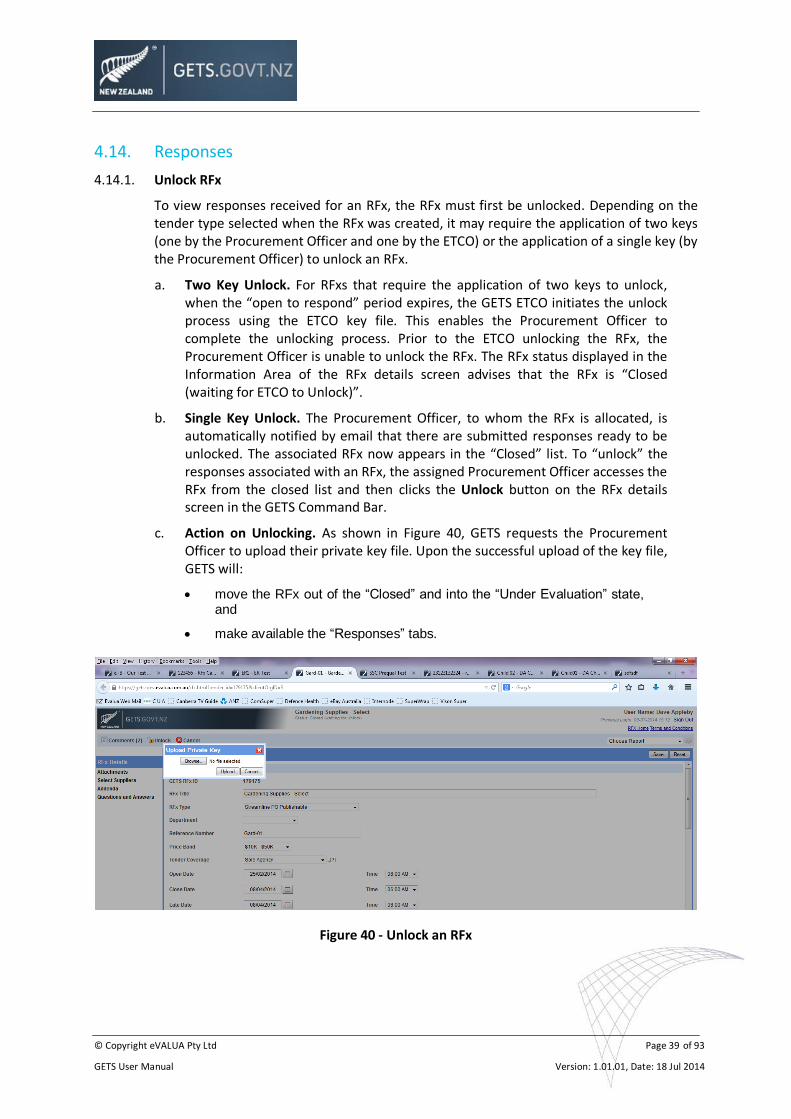
© Copyright eVALUA Pty Ltd Page 39 of 93
GETS User Manual Version: 1.01.01, Date: 18 Jul 2014
4.14. Responses
4.14.1. Unlock RFx
To view responses received for an RFx, the RFx must first be unlocked. Depending on the tender type selected when the RFx was created, it may require the application of two keys (one by the Procurement Officer and one by the ETCO) or the application of a single key (by the Procurement Officer) to unlock an RFx.
a. Two Key Unlock. For RFxs that require the application of two keys to unlock, when the “open to respond” period expires, the GETS ETCO initiates the unlock process using the ETCO key file. This enables the Procurement Officer to complete the unlocking process. Prior to the ETCO unlocking the RFx, the Procurement Officer is unable to unlock the RFx. The RFx status displayed in the Information Area of the RFx details screen advises that the RFx is “Closed (waiting for ETCO to Unlock)”.
b. Single Key Unlock. The Procurement Officer, to whom the RFx is allocated, is automatically notified by email that there are submitted responses ready to be unlocked. The associated RFx now appears in the “Closed” list. To “unlock” the responses associated with an RFx, the assigned Procurement Officer accesses the RFx from the closed list and then clicks the Unlock button on the RFx details screen in the GETS Command Bar.
c. Action on Unlocking. As shown in Figure 40, GETS requests the Procurement Officer to upload their private key file. Upon the successful upload of the key file, GETS will:
move the RFx out of the “Closed” and into the “Under Evaluation” state, and
make available the “Responses” tabs.
Figure 40 - Unlock an RFx
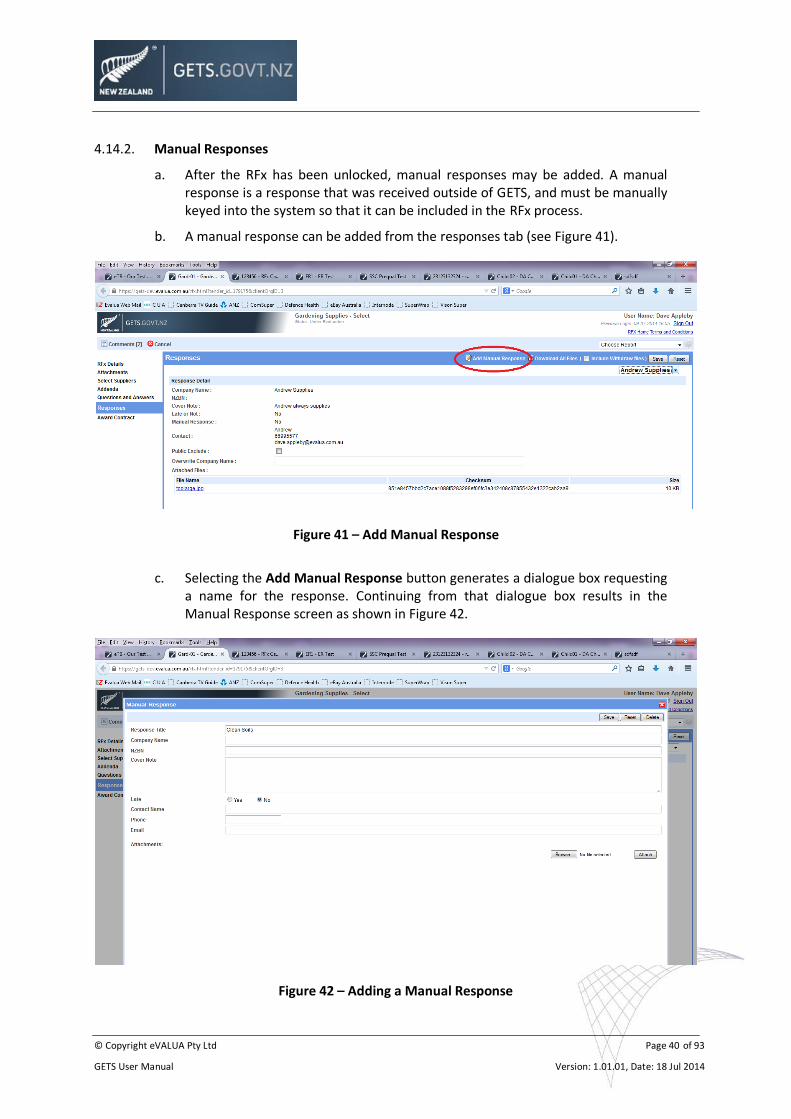
© Copyright eVALUA Pty Ltd Page 40 of 93
GETS User Manual Version: 1.01.01, Date: 18 Jul 2014
4.14.2. Manual Responses
a. After the RFx has been unlocked, manual responses may be added. A manual response is a response that was received outside of GETS, and must be manually keyed into the system so that it can be included in the RFx process.
b. A manual response can be added from the responses tab (see Figure 41).
Figure 41 – Add Manual Response
c. Selecting the Add Manual Response button generates a dialogue box requesting a name for the response. Continuing from that dialogue box results in the Manual Response screen as shown in Figure 42.
Figure 42 – Adding a Manual Response
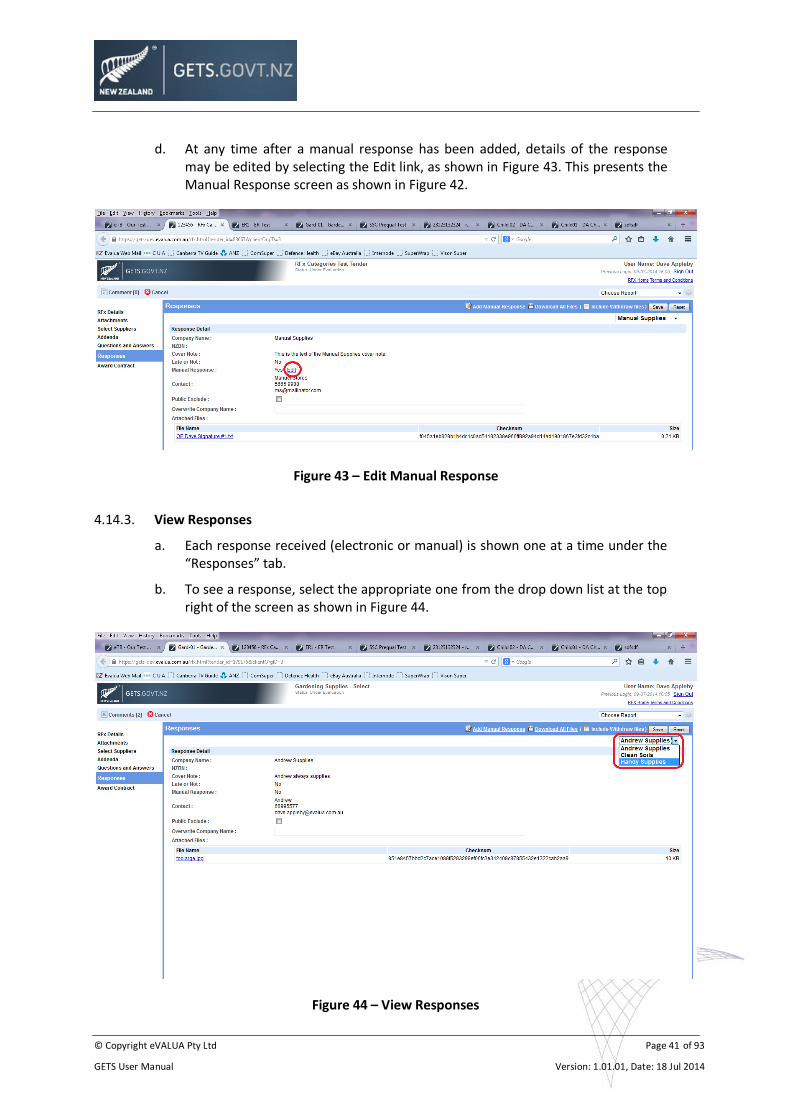
© Copyright eVALUA Pty Ltd Page 41 of 93
GETS User Manual Version: 1.01.01, Date: 18 Jul 2014
d. At any time after a manual response has been added, details of the response may be edited by selecting the Edit link, as shown in Figure 43. This presents the Manual Response screen as shown in Figure 42.
Figure 43 – Edit Manual Response
4.14.3. View Responses
a. Each response received (electronic or manual) is shown one at a time under the “Responses” tab.
b. To see a response, select the appropriate one from the drop down list at the top right of the screen as shown in Figure 44.
Figure 44 – View Responses

© Copyright eVALUA Pty Ltd Page 42 of 93
GETS User Manual Version: 1.01.01, Date: 18 Jul 2014
4.14.4. Response Detail
The Response Detail shows:
a. The Supplier’s company name.
b. The Supplier’s New Zealand Business Number (NZBN),
c. The response’s cover note if attached by the Supplier.
d. If the response was submitted late.
e. If the response is a manual response.
f. The Supplier nominated contact for the response.
g. A Public Exclude option – when GETS is configured to publish the names of businesses who have responded to the RFx and this option allows that configuration to be overridden for individual businesses.
h. An ability to overwrite the business name if desired.
i. Any files submitted by the Supplier as part of their response and provides download access to them.
4.14.5. Download Response Files
In the Responses screen header, adjacent to the Add Manual Response button is the Download All Files button (refer to Figure 44). Once all responses have been received or entered (in the case of manual responses) selecting this button provides the responses as well as a record of details and activity associated with the project. When the Procurement Officer selects this button GETS requests the Procurement Officer to upload their private key file. Upon the successful upload of the key file GETS will generate the downloading of a zip file. The zip file contains:
a. A summary report of:
the project details,
RFx Relationship to Parent and/or Child RFx,
project manager details,
project contact details,
project files, and
responses and any associated files.
b. Addendum Files Folder. This folder contains text files of the details of any addenda issued.
c. Auditlog Files Folder. This file contains an audit log of all activity associated with the creation, publication, receipt of responses and evaluation of the RFx. This file would be used to resolve any possible future disputes or challenges relating to the probity management of the project.
d. Project Files Folder. This folder contains a text file of the details screen of the RFx.
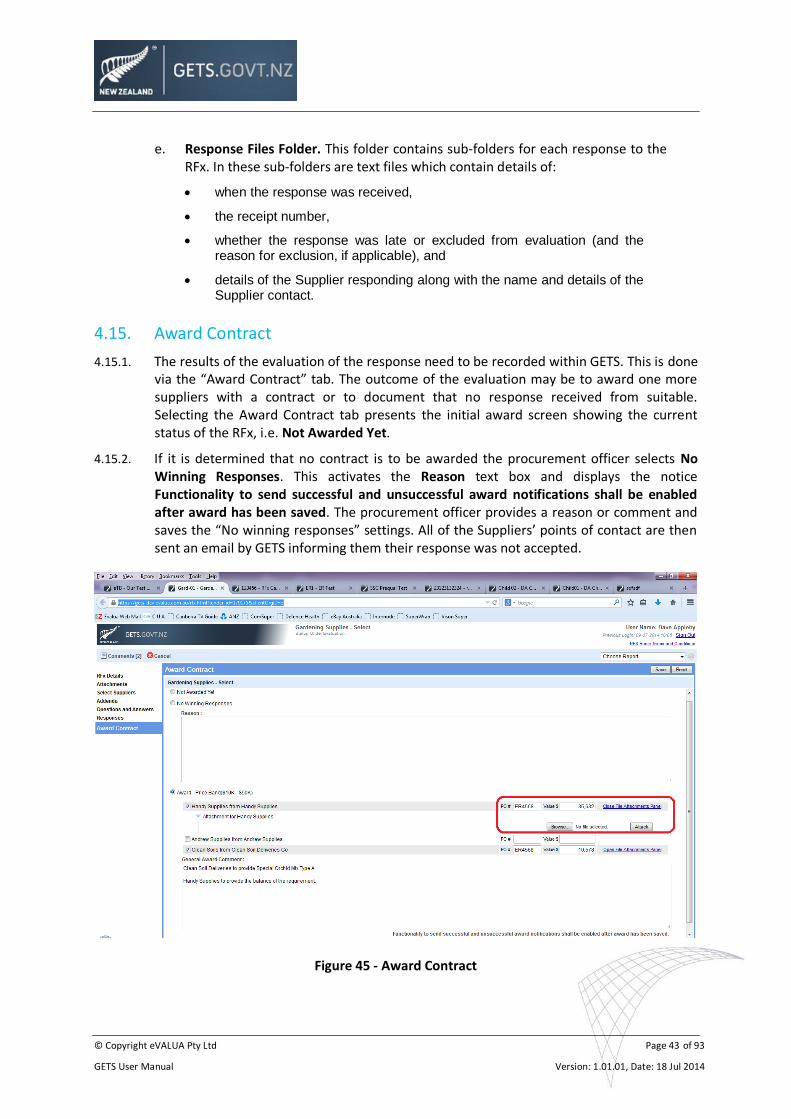
© Copyright eVALUA Pty Ltd Page 43 of 93
GETS User Manual Version: 1.01.01, Date: 18 Jul 2014
e. Response Files Folder. This folder contains sub-folders for each response to the RFx. In these sub-folders are text files which contain details of:
when the response was received,
the receipt number,
whether the response was late or excluded from evaluation (and the reason for exclusion, if applicable), and
details of the Supplier responding along with the name and details of the Supplier contact.
4.15. Award Contract
4.15.1. The results of the evaluation of the response need to be recorded within GETS. This is done via the “Award Contract” tab. The outcome of the evaluation may be to award one more suppliers with a contract or to document that no response received from suitable. Selecting the Award Contract tab presents the initial award screen showing the current status of the RFx, i.e. Not Awarded Yet.
4.15.2. If it is determined that no contract is to be awarded the procurement officer selects No Winning Responses. This activates the Reason text box and displays the notice Functionality to send successful and unsuccessful award notifications shall be enabled after award has been saved. The procurement officer provides a reason or comment and saves the “No winning responses” settings. All of the Suppliers’ points of contact are then sent an email by GETS informing them their response was not accepted.
Figure 45 - Award Contract
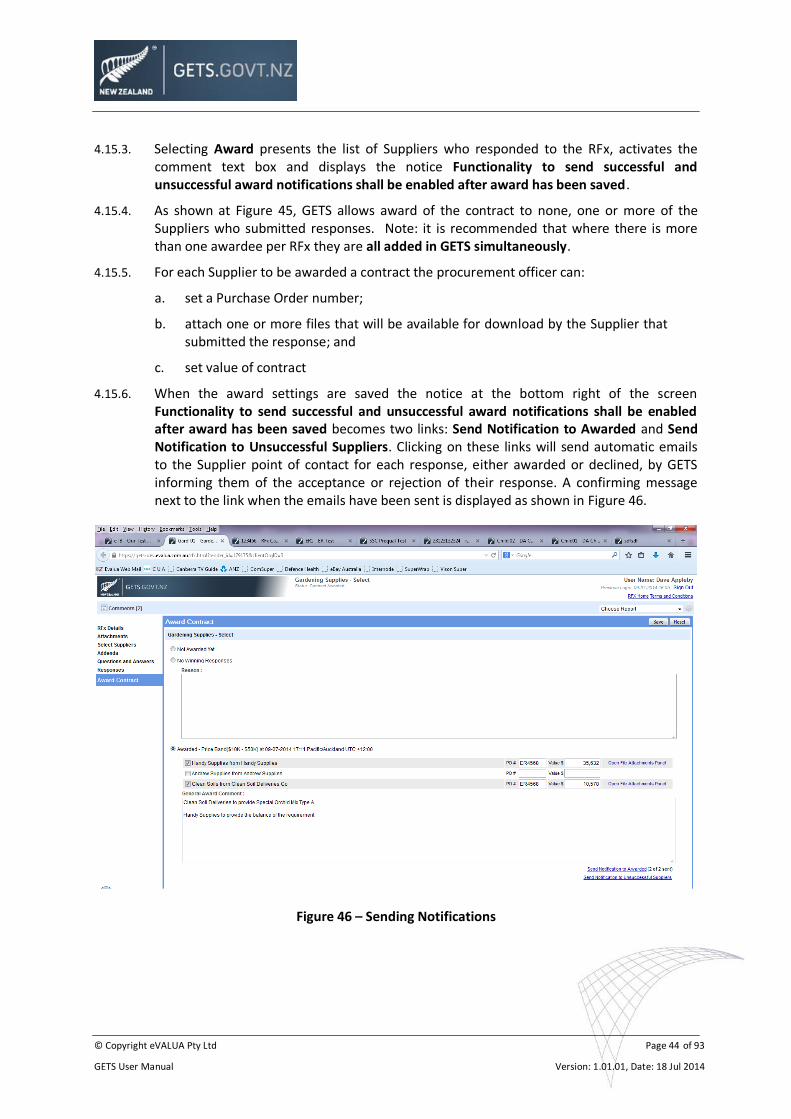
© Copyright eVALUA Pty Ltd Page 44 of 93
GETS User Manual Version: 1.01.01, Date: 18 Jul 2014
4.15.3. Selecting Award presents the list of Suppliers who responded to the RFx, activates the comment text box and displays the notice Functionality to send successful and unsuccessful award notifications shall be enabled after award has been saved.
4.15.4. As shown at Figure 45, GETS allows award of the contract to none, one or more of the Suppliers who submitted responses. Note: it is recommended that where there is more than one awardee per RFx they are all added in GETS simultaneously.
4.15.5. For each Supplier to be awarded a contract the procurement officer can:
a. set a Purchase Order number;
b. attach one or more files that will be available for download by the Supplier that submitted the response; and
c. set value of contract
4.15.6. When the award settings are saved the notice at the bottom right of the screen Functionality to send successful and unsuccessful award notifications shall be enabled after award has been saved becomes two links: Send Notification to Awarded and Send Notification to Unsuccessful Suppliers. Clicking on these links will send automatic emails to the Supplier point of contact for each response, either awarded or declined, by GETS informing them of the acceptance or rejection of their response. A confirming message next to the link when the emails have been sent is displayed as shown in Figure 46.
Figure 46 – Sending Notifications
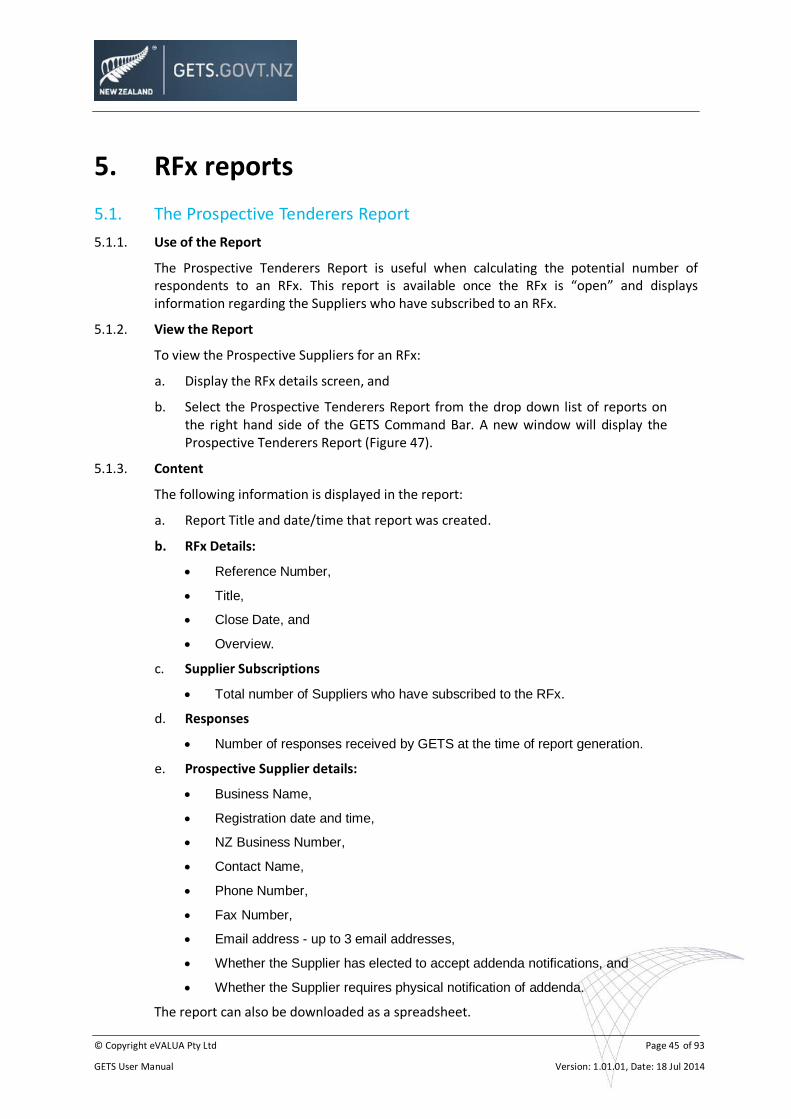
© Copyright eVALUA Pty Ltd Page 45 of 93
GETS User Manual Version: 1.01.01, Date: 18 Jul 2014
5. RFx reports
5.1. The Prospective Tenderers Report
5.1.1. Use of the Report
The Prospective Tenderers Report is useful when calculating the potential number of respondents to an RFx. This report is available once the RFx is “open” and displays information regarding the Suppliers who have subscribed to an RFx.
5.1.2. View the Report
To view the Prospective Suppliers for an RFx:
a. Display the RFx details screen, and
b. Select the Prospective Tenderers Report from the drop down list of reports on the right hand side of the GETS Command Bar. A new window will display the Prospective Tenderers Report (Figure 47).
5.1.3. Content
The following information is displayed in the report:
a. Report Title and date/time that report was created.
b. RFx Details:
Reference Number,
Title,
Close Date, and
Overview.
c. Supplier Subscriptions
Total number of Suppliers who have subscribed to the RFx.
d. Responses
Number of responses received by GETS at the time of report generation.
e. Prospective Supplier details:
Business Name,
Registration date and time,
NZ Business Number,
Contact Name,
Phone Number,
Fax Number,
Email address - up to 3 email addresses,
Whether the Supplier has elected to accept addenda notifications, and
Whether the Supplier requires physical notification of addenda.
The report can also be downloaded as a spreadsheet.
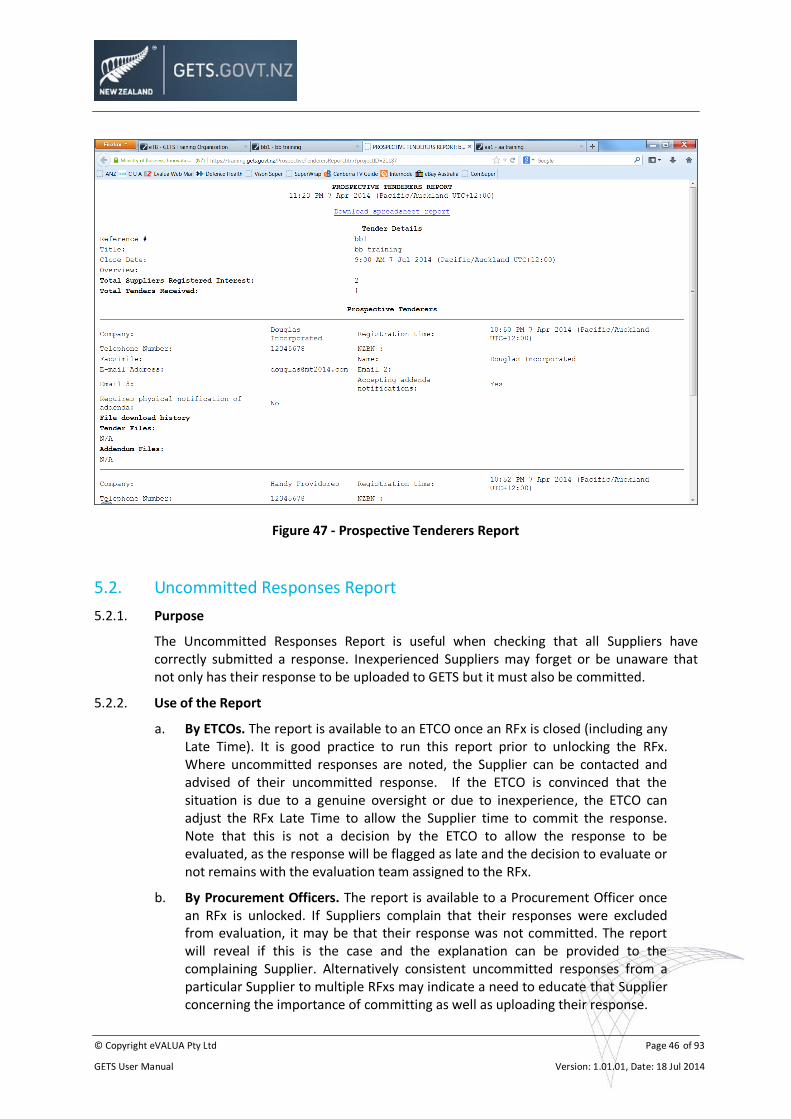
© Copyright eVALUA Pty Ltd Page 46 of 93
GETS User Manual Version: 1.01.01, Date: 18 Jul 2014
Figure 47 - Prospective Tenderers Report
5.2. Uncommitted Responses Report
5.2.1. Purpose
The Uncommitted Responses Report is useful when checking that all Suppliers have correctly submitted a response. Inexperienced Suppliers may forget or be unaware that not only has their response to be uploaded to GETS but it must also be committed.
5.2.2. Use of the Report
a. By ETCOs. The report is available to an ETCO once an RFx is closed (including any Late Time). It is good practice to run this report prior to unlocking the RFx. Where uncommitted responses are noted, the Supplier can be contacted and advised of their uncommitted response. If the ETCO is convinced that the situation is due to a genuine oversight or due to inexperience, the ETCO can adjust the RFx Late Time to allow the Supplier time to commit the response. Note that this is not a decision by the ETCO to allow the response to be evaluated, as the response will be flagged as late and the decision to evaluate or not remains with the evaluation team assigned to the RFx.
b. By Procurement Officers. The report is available to a Procurement Officer once an RFx is unlocked. If Suppliers complain that their responses were excluded from evaluation, it may be that their response was not committed. The report will reveal if this is the case and the explanation can be provided to the complaining Supplier. Alternatively consistent uncommitted responses from a particular Supplier to multiple RFxs may indicate a need to educate that Supplier concerning the importance of committing as well as uploading their response.
© Copyright eVALUA Pty Ltd Page 47 of 93
GETS User Manual Version: 1.01.01, Date: 18 Jul 2014
5.2.3. View the Report
To view the Uncommitted Responses Report for an RFx:
a. Display the RFx details screen, and
b. Select the Uncommitted Responses Report from the drop down list of reports on the right hand side of the GETS Command Bar. A new window will display the Uncommitted Responses Report (Figure 48).
Figure 48 – Uncommitted Responses Report
5.2.4. Content
The following information is displayed in the report:
a. Report Title and date/time that report was created.
b. RFx Details:
Reference Number,
Title,
Close Date, and
Overview.
c. Responses
Total number of responses received.
Total number of uncommitted responses.
© Copyright eVALUA Pty Ltd Page 48 of 93
GETS User Manual Version: 1.01.01, Date: 18 Jul 2014
d. Supplier details. For each uncommitted response:
Business Name,
Subscription date and time,
Phone Number,
NZ Business Number,
Email address - up to 3 email addresses,
Whether the Supplier has elected to accept addenda notifications,
Whether the Supplier requires physical notification of addenda,
The title and time of any committed response(s), and
The title and time of any uncommitted response(s), as well as the name, telephone number and email address of the Supplier contact.
5.3. RFx Report
5.3.1. Purpose
The detailed RFx Report lists all details pertaining to a specified RFx. The content varies as the RFx progresses through the RFx’s Life Cycle (Figure 2). For example, if the RFx has not been unlocked at the time of viewing the report then no response details are included.
5.3.2. View the Report
To view the RFx Report:
a. Display the RFx details screen, and
b. Select the RFx Report from the drop down list of reports on the right hand side of the GETS Command Bar. A new window will display the RFx Report (Figure 49).
5.3.3. Content
The report includes the following details:
a. Report Header
Report title
GETS RFx ID
b. RFx Details
RFx title and reference numbers,
GETS RFx ID,
RFx type,
Open, Close and Late dates,
current RFx Status,
Department,
expected price band value,
RFx coverage,
© Copyright eVALUA Pty Ltd Page 49 of 93
GETS User Manual Version: 1.01.01, Date: 18 Jul 2014
Alternate tender box address and fax number,
Sole source exception status and justification comment,
UNSPSC categories associated with the RFx,
Regions associated with the RFx,
Pre-qualifications required, and
the RFx Overview.
c. Comments on the RFx.
d. RFx Relationships
if linked to a parent RFx, the Parent RFx’s reference number, title and expected price band value.
if the RFx has linked child RFxs, the child RFxs’ reference numbers (including the GETS RFx ID), titles and expected price band values;
e. Procurement Officer and Contact Officer Details:
Name,
Telephone and fax numbers,
Email address.
f. Site Information:
Site Contact Name and Phone
Site Location and Building
Site visit instructions
g. Supply of Goods Information
Supply Method
Delivery/Collect information and instructions
h. Timetable Information
Commencement or practical Completion Date
i. Contract Information and Requirements
Offer Validity
Defect Liability Period
Period for payment of claims
j. Attached files
details of any attached files
k. Addenda
details of any Addenda, including details of files attached to the addenda
l. Questions and Answers
the content of Questions (including the original question, if it was amended) and Answers provided and whether the answer was private or public;
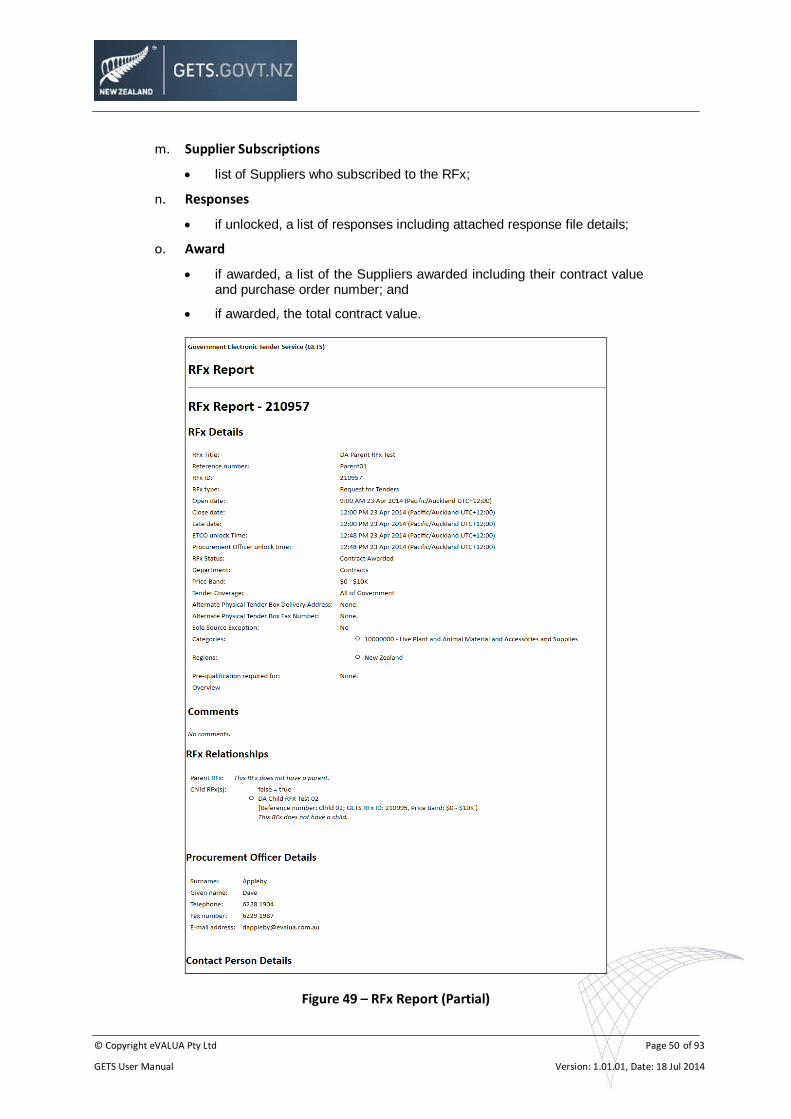
© Copyright eVALUA Pty Ltd Page 50 of 93
GETS User Manual Version: 1.01.01, Date: 18 Jul 2014
m. Supplier Subscriptions
list of Suppliers who subscribed to the RFx;
n. Responses
if unlocked, a list of responses including attached response file details;
o. Award
if awarded, a list of the Suppliers awarded including their contract value and purchase order number; and
if awarded, the total contract value.
Figure 49 – RFx Report (Partial)
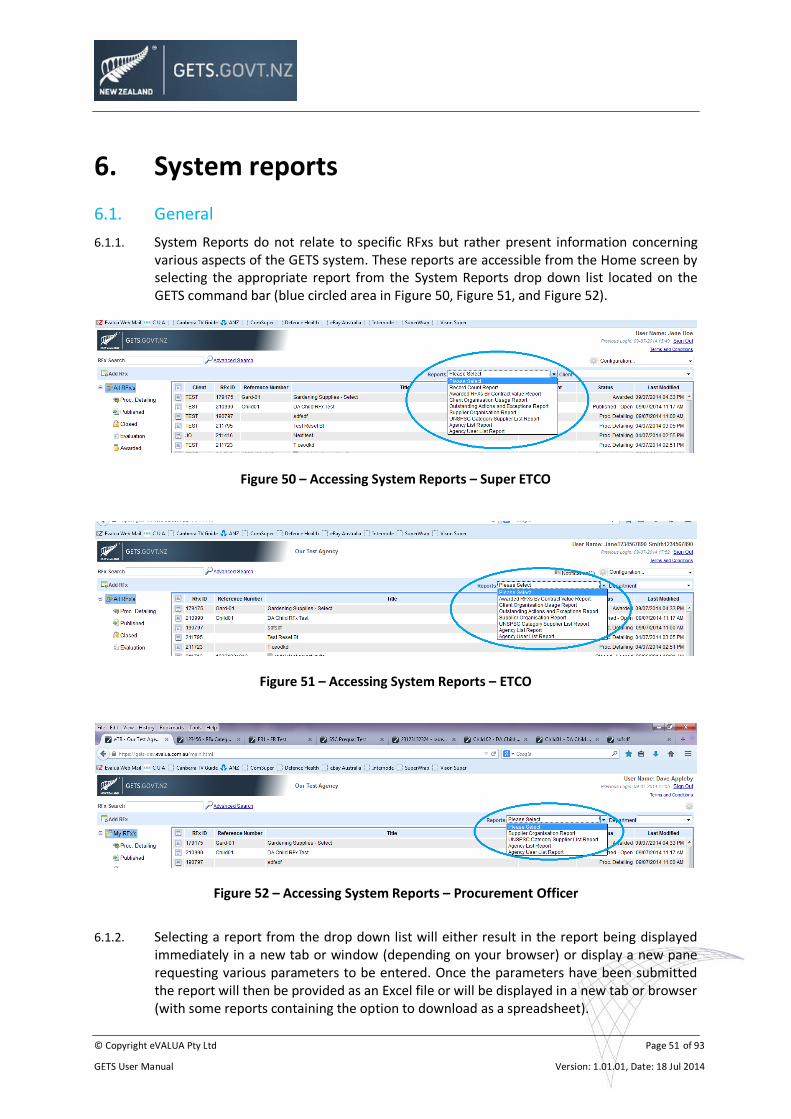
© Copyright eVALUA Pty Ltd Page 51 of 93
GETS User Manual Version: 1.01.01, Date: 18 Jul 2014
6. System reports
6.1. General
6.1.1. System Reports do not relate to specific RFxs but rather present information concerning various aspects of the GETS system. These reports are accessible from the Home screen by selecting the appropriate report from the System Reports drop down list located on the GETS command bar (blue circled area in Figure 50, Figure 51, and Figure 52).
Figure 50 – Accessing System Reports – Super ETCO
Figure 51 – Accessing System Reports – ETCO
Figure 52 – Accessing System Reports – Procurement Officer
6.1.2. Selecting a report from the drop down list will either result in the report being displayed immediately in a new tab or window (depending on your browser) or display a new pane requesting various parameters to be entered. Once the parameters have been submitted the report will then be provided as an Excel file or will be displayed in a new tab or browser (with some reports containing the option to download as a spreadsheet).
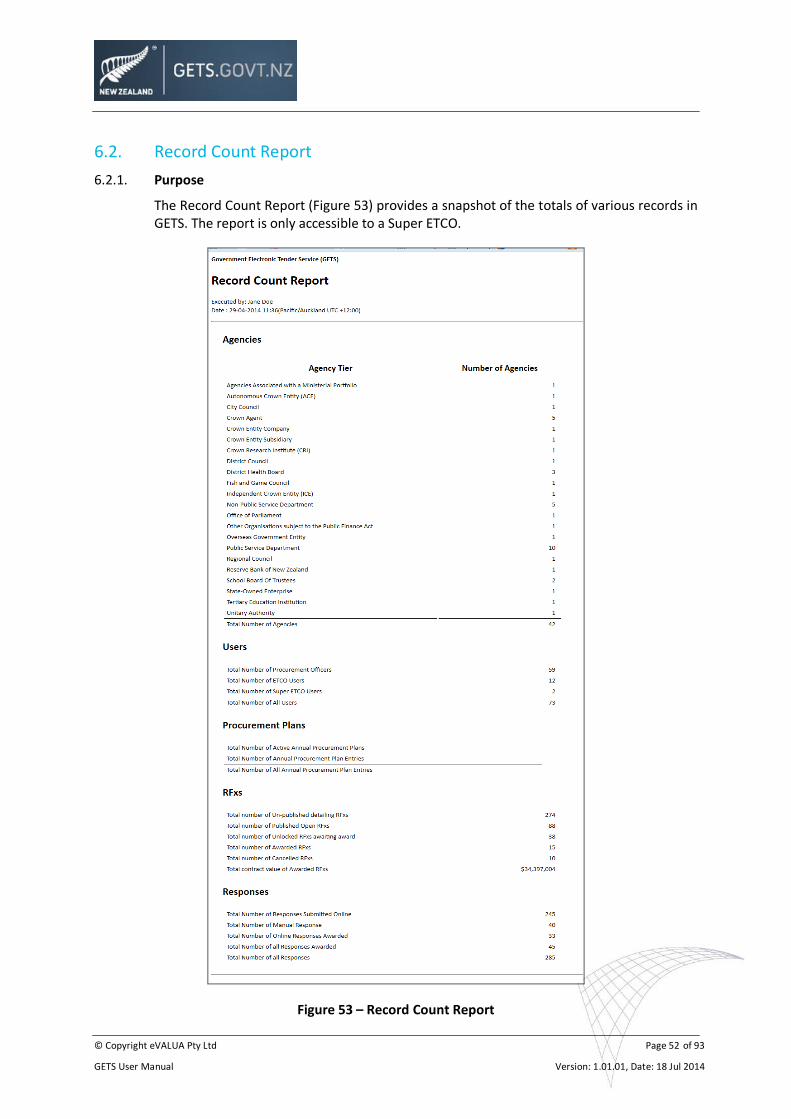
© Copyright eVALUA Pty Ltd Page 52 of 93
GETS User Manual Version: 1.01.01, Date: 18 Jul 2014
6.2. Record Count Report
6.2.1. Purpose
The Record Count Report (Figure 53) provides a snapshot of the totals of various records in GETS. The report is only accessible to a Super ETCO.
Figure 53 – Record Count Report
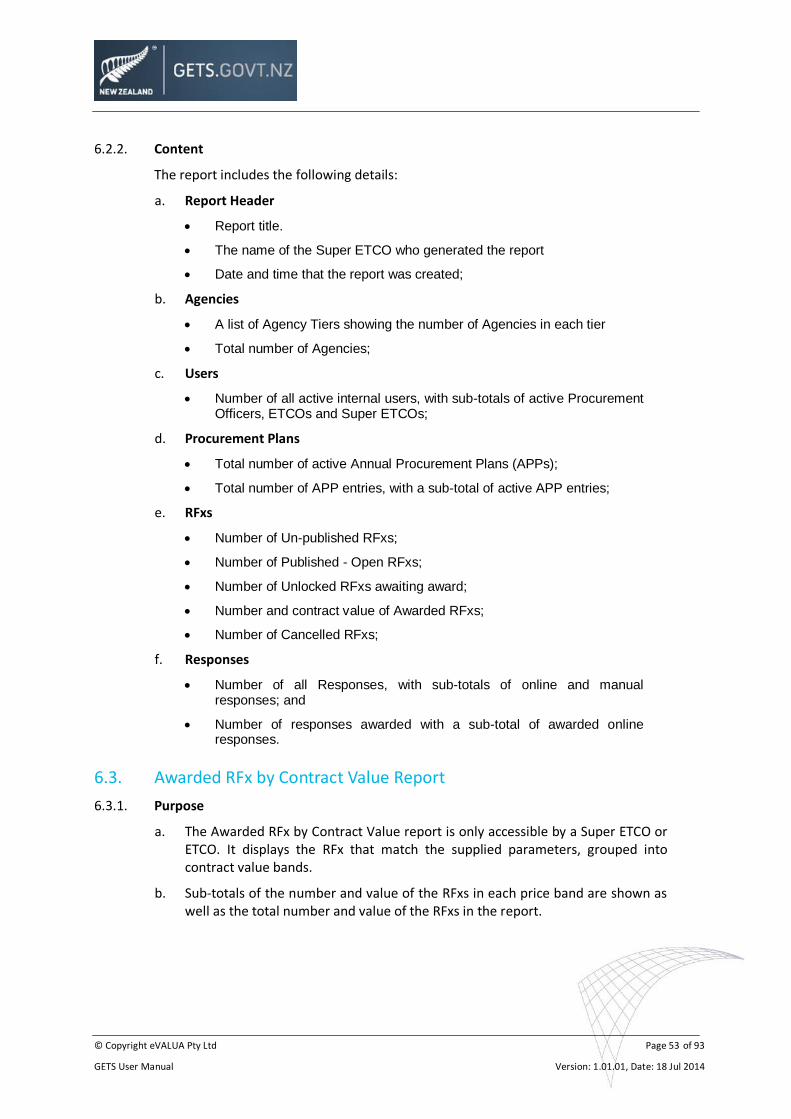
© Copyright eVALUA Pty Ltd Page 53 of 93
GETS User Manual Version: 1.01.01, Date: 18 Jul 2014
6.2.2. Content
The report includes the following details:
a. Report Header
Report title.
The name of the Super ETCO who generated the report
Date and time that the report was created;
b. Agencies
A list of Agency Tiers showing the number of Agencies in each tier
Total number of Agencies;
c. Users
Number of all active internal users, with sub-totals of active Procurement Officers, ETCOs and Super ETCOs;
d. Procurement Plans
Total number of active Annual Procurement Plans (APPs);
Total number of APP entries, with a sub-total of active APP entries;
e. RFxs
Number of Un-published RFxs;
Number of Published - Open RFxs;
Number of Unlocked RFxs awaiting award;
Number and contract value of Awarded RFxs;
Number of Cancelled RFxs;
f. Responses
Number of all Responses, with sub-totals of online and manual responses; and
Number of responses awarded with a sub-total of awarded online responses.
6.3. Awarded RFx by Contract Value Report
6.3.1. Purpose
a. The Awarded RFx by Contract Value report is only accessible by a Super ETCO or ETCO. It displays the RFx that match the supplied parameters, grouped into contract value bands.
b. Sub-totals of the number and value of the RFxs in each price band are shown as well as the total number and value of the RFxs in the report.
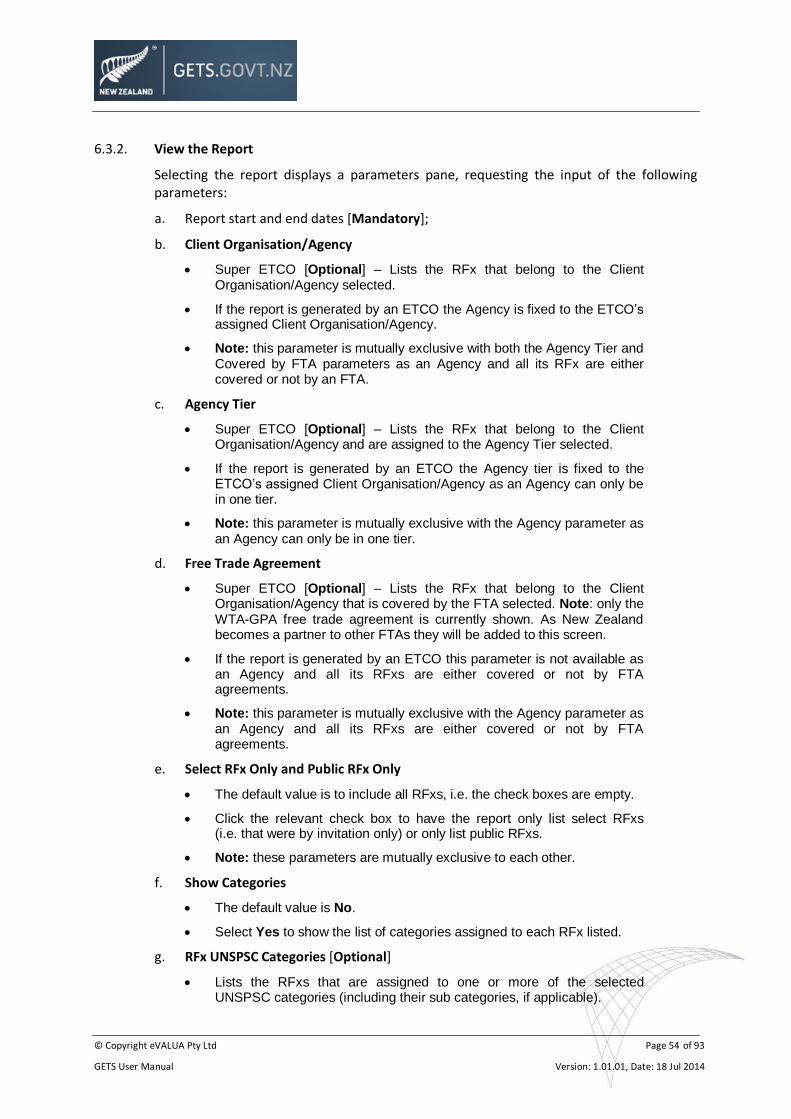
© Copyright eVALUA Pty Ltd Page 54 of 93
GETS User Manual Version: 1.01.01, Date: 18 Jul 2014
6.3.2. View the Report
Selecting the report displays a parameters pane, requesting the input of the following parameters:
a. Report start and end dates [Mandatory];
b. Client Organisation/Agency
Super ETCO [Optional] – Lists the RFx that belong to the Client Organisation/Agency selected.
If the report is generated by an ETCO the Agency is fixed to the ETCO’s assigned Client Organisation/Agency.
Note: this parameter is mutually exclusive with both the Agency Tier and Covered by FTA parameters as an Agency and all its RFx are either covered or not by an FTA.
c. Agency Tier
Super ETCO [Optional] – Lists the RFx that belong to the Client Organisation/Agency and are assigned to the Agency Tier selected.
If the report is generated by an ETCO the Agency tier is fixed to the ETCO’s assigned Client Organisation/Agency as an Agency can only be in one tier.
Note: this parameter is mutually exclusive with the Agency parameter as an Agency can only be in one tier.
d. Free Trade Agreement
Super ETCO [Optional] – Lists the RFx that belong to the Client Organisation/Agency that is covered by the FTA selected. Note: only the WTA-GPA free trade agreement is currently shown. As New Zealand becomes a partner to other FTAs they will be added to this screen.
If the report is generated by an ETCO this parameter is not available as an Agency and all its RFxs are either covered or not by FTA agreements.
Note: this parameter is mutually exclusive with the Agency parameter as an Agency and all its RFxs are either covered or not by FTA agreements.
e. Select RFx Only and Public RFx Only
The default value is to include all RFxs, i.e. the check boxes are empty.
Click the relevant check box to have the report only list select RFxs (i.e. that were by invitation only) or only list public RFxs.
Note: these parameters are mutually exclusive to each other.
f. Show Categories
The default value is No.
Select Yes to show the list of categories assigned to each RFx listed.
g. RFx UNSPSC Categories [Optional]
Lists the RFxs that are assigned to one or more of the selected UNSPSC categories (including their sub categories, if applicable).
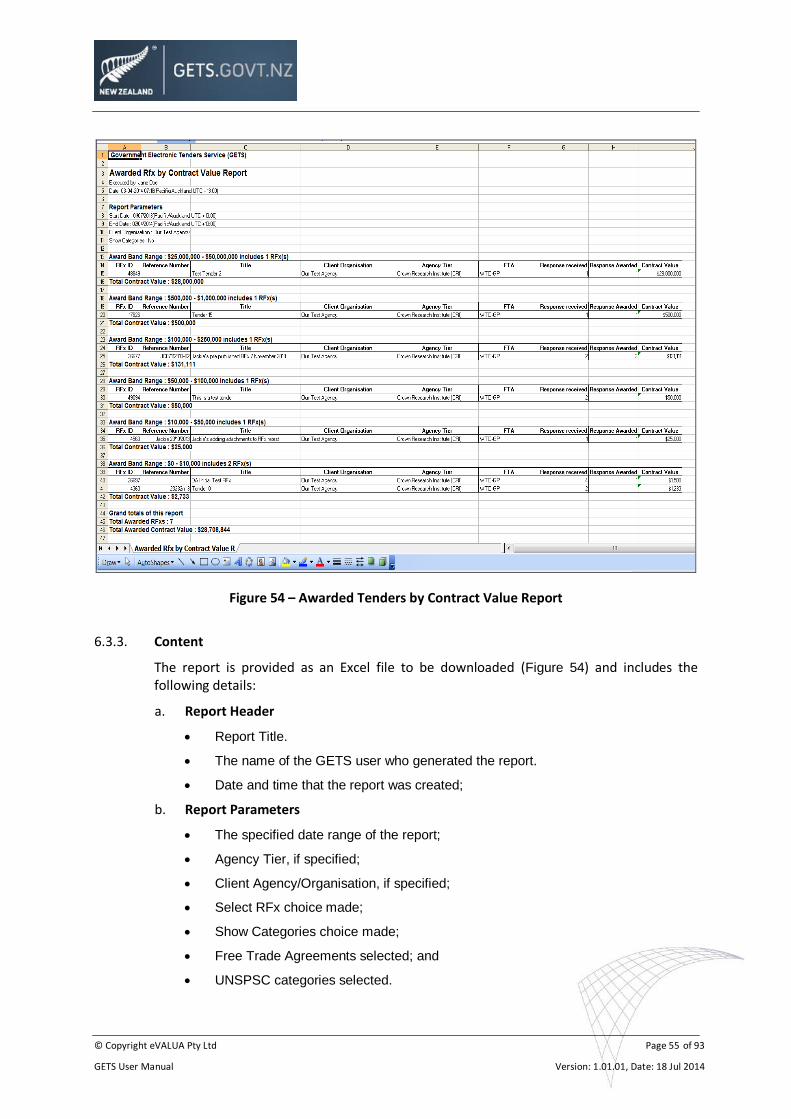
© Copyright eVALUA Pty Ltd Page 55 of 93
GETS User Manual Version: 1.01.01, Date: 18 Jul 2014
Figure 54 – Awarded Tenders by Contract Value Report
6.3.3. Content
The report is provided as an Excel file to be downloaded (Figure 54) and includes the following details:
a. Report Header
Report Title.
The name of the GETS user who generated the report.
Date and time that the report was created;
b. Report Parameters
The specified date range of the report;
Agency Tier, if specified;
Client Agency/Organisation, if specified;
Select RFx choice made;
Show Categories choice made;
Free Trade Agreements selected; and
UNSPSC categories selected.
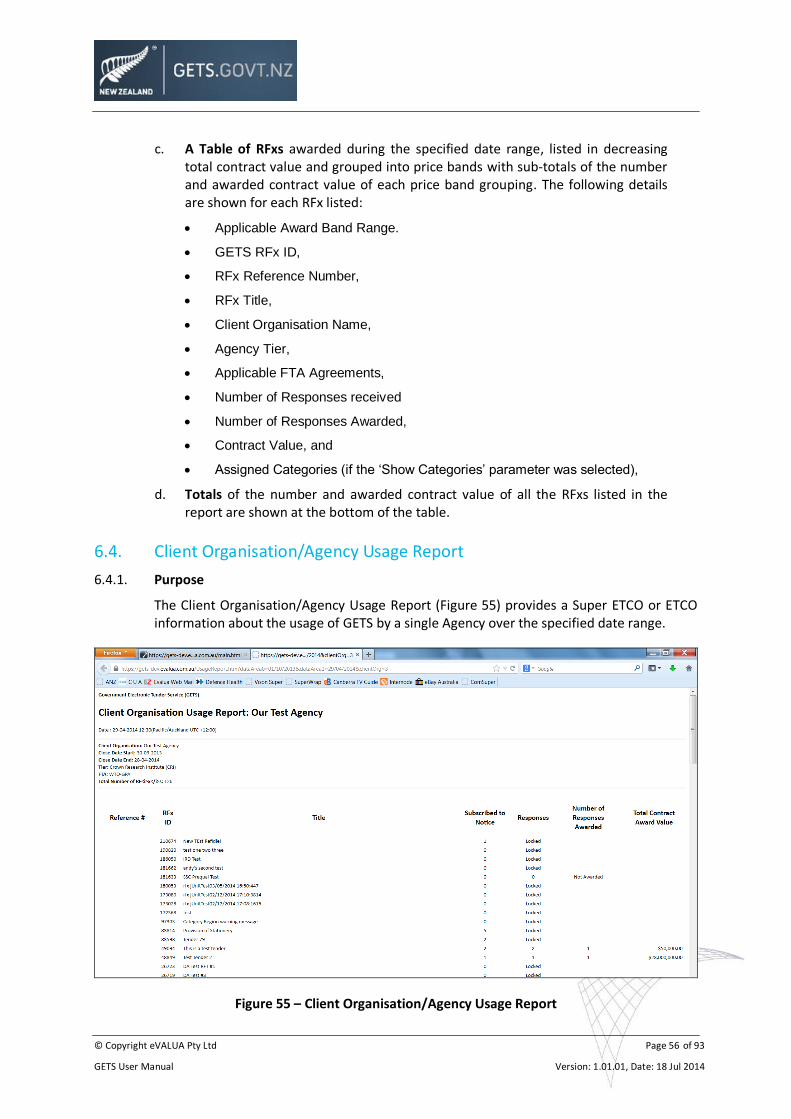
© Copyright eVALUA Pty Ltd Page 56 of 93
GETS User Manual Version: 1.01.01, Date: 18 Jul 2014
c. A Table of RFxs awarded during the specified date range, listed in decreasing total contract value and grouped into price bands with sub-totals of the number and awarded contract value of each price band grouping. The following details are shown for each RFx listed:
Applicable Award Band Range.
GETS RFx ID,
RFx Reference Number,
RFx Title,
Client Organisation Name,
Agency Tier,
Applicable FTA Agreements,
Number of Responses received
Number of Responses Awarded,
Contract Value, and
Assigned Categories (if the ‘Show Categories’ parameter was selected),
d. Totals of the number and awarded contract value of all the RFxs listed in the report are shown at the bottom of the table.
6.4. Client Organisation/Agency Usage Report
6.4.1. Purpose
The Client Organisation/Agency Usage Report (Figure 55) provides a Super ETCO or ETCO information about the usage of GETS by a single Agency over the specified date range.
Figure 55 – Client Organisation/Agency Usage Report
© Copyright eVALUA Pty Ltd Page 57 of 93
GETS User Manual Version: 1.01.01, Date: 18 Jul 2014
6.4.2. Content
Once the Agency and date range has been specified, the report includes the following details:
e. Report Header
Report Title, which includes the name of the specified Agency.
Date and time that the report was created;
The specified date range of the report.
The Tier of the Agency.
The Free Trade Agreements applicable to the Agency.
Number of RFxs included in the report
f. A Table of RFxs published during the specified date range, showing the following details for each RFx listed:
RFx Reference Number,
GETS RFx ID,
RFx Title,
Number of Suppliers who have subscribed to the RFx,
Number of Responses received for the RFx if it is unlocked; otherwise an entry indicating the RFx is still locked at the time the report was run,
Number of Responses awarded if the RFx is unlocked, and
Contract Award Value
g. Totals of the following at the bottom of the table:
Number of Prospective Suppliers (i.e. total number of subscriptions).
Number of Responses received to unlocked RFx.
Number of Responses that have had contracts awarded.
Value of all Contracts Awarded against the unlocked RFxs in the report.
6.5. Supplier Organisation Report
6.5.1. Purpose
The Supplier Organisation (Figure 56) Report provides details about a specific Supplier organisation.
6.5.2. View the Report
In addition to selecting the report from the System Reports drop down list on the Home screen, a SUPERETCO can access the report when carrying out Supplier Organisation administration, as described in paragraph 8.1. Once a supplier organisation has been selected, the report is accessible by clicking the Supplier Organisation link located in the top left of the screen immediately beneath the Supplier Organisation tab, as shown in Figure 84.
© Copyright eVALUA Pty Ltd Page 58 of 93
GETS User Manual Version: 1.01.01, Date: 18 Jul 2014
6.5.3. Content
Once the Supplier organisation has been nominated, the report includes the following details:
a. Report Header
Report Title, which includes the name of the Supplier subject of the report and the status of the supplier account.
The name of the GETS user who generated the report.
Date and time that the report was created;
b. Business Details
The name, NZBN and address of the Supplier.
Telephone and fax numbers
The website URL.
The number of employees of the Supplier.
The capability description of the Supplier.
c. Subscriptions to RFxs. A list of RFxs that the supplier has subscribed to, ordered by most recent first, showing the following detail:
GETS RFx ID,
RFx Title,
Reference Number, and
Registration Date and Time,
d. Committed Responses
response ID,
GETS reference
date and time the response was committed, and
number of attachments with each response.
e. Supplier Users: Details of nominated contacts of the Supplier, showing:
User Name,
Email address, and
Phone number.
f. UNSPSC: List of UNSPSC categories selected by the Supplier.
g. Regions: List of regions selected by the Supplier.
h. Supplier Panels: List of Supplier panels associated with the Supplier.
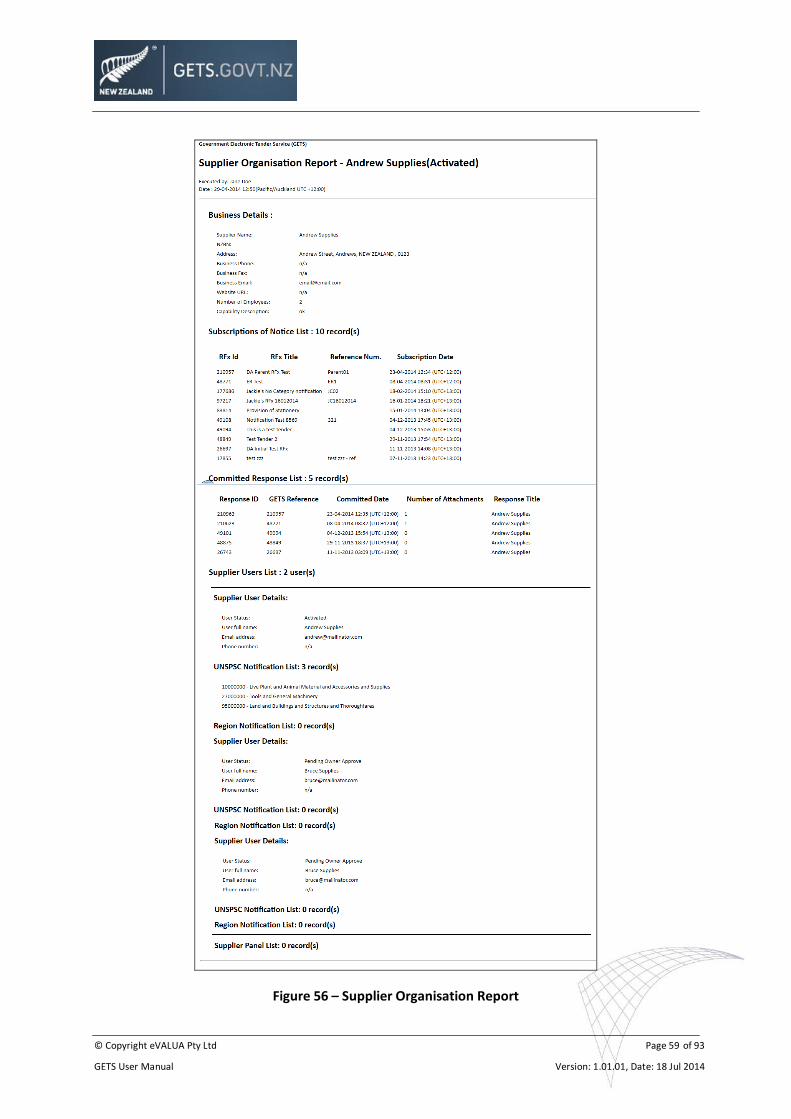
© Copyright eVALUA Pty Ltd Page 59 of 93
GETS User Manual Version: 1.01.01, Date: 18 Jul 2014
Figure 56 – Supplier Organisation Report
© Copyright eVALUA Pty Ltd Page 60 of 93
GETS User Manual Version: 1.01.01, Date: 18 Jul 2014
6.6. Outstanding Actions and Exceptions Report
6.6.1. Purpose
a. The Outstanding Actions and Exceptions report (Figure 57 and Figure 58) provides details about RFxs that have:
actions outstanding greater than 7 days, or
been Cancelled or Deleted (exceptions) in the last 30 days.
b. The information is provided to:
Super ETCOs concerning RFxs for all Client Organisations.
ETCOs concerning RFxs that are owned by their Client Organisation/Agency.
c. By utilising the hyperlinks to the outstanding item they may be efficiently actioned.
6.6.2. Content
The report includes the following details:
a. Report Header
Report Title.
The name of the GETS user who generated the report.
Date and time that the report was created.
b. Actions – outstanding for at least seven days, ordered by client organisation (for Super ETCO generated reports) listed from the most to least overdue actions:
‘Ask to Publish’ requests from Procurement Officers;
RFxs with Unanswered Supplier Questions;
Closed RFxs that have not been unlocked; and
Unlocked RFxs that have not been awarded.
c. Exceptions - occurred in the past 30 days, ordered by client organisation (for Super ETCO generated reports) listed from earliest occurrence to most recent:
RFxs that have been cancelled or deleted, and
RFxs that have had their close or late date(s) changed.
d. Outstanding Actions and Exceptions Detail. Each list of actions or exceptions shows the following detail:
RFx Title,
Relevant action or exception date, and
Client Organisation owning the RFx.

© Copyright eVALUA Pty Ltd Page 61 of 93
GETS User Manual Version: 1.01.01, Date: 18 Jul 2014
Figure 57 – Outstanding Actions and Exceptions Report – Outstanding Actions
Figure 58 – Outstanding Actions and Exceptions Report – Exceptions
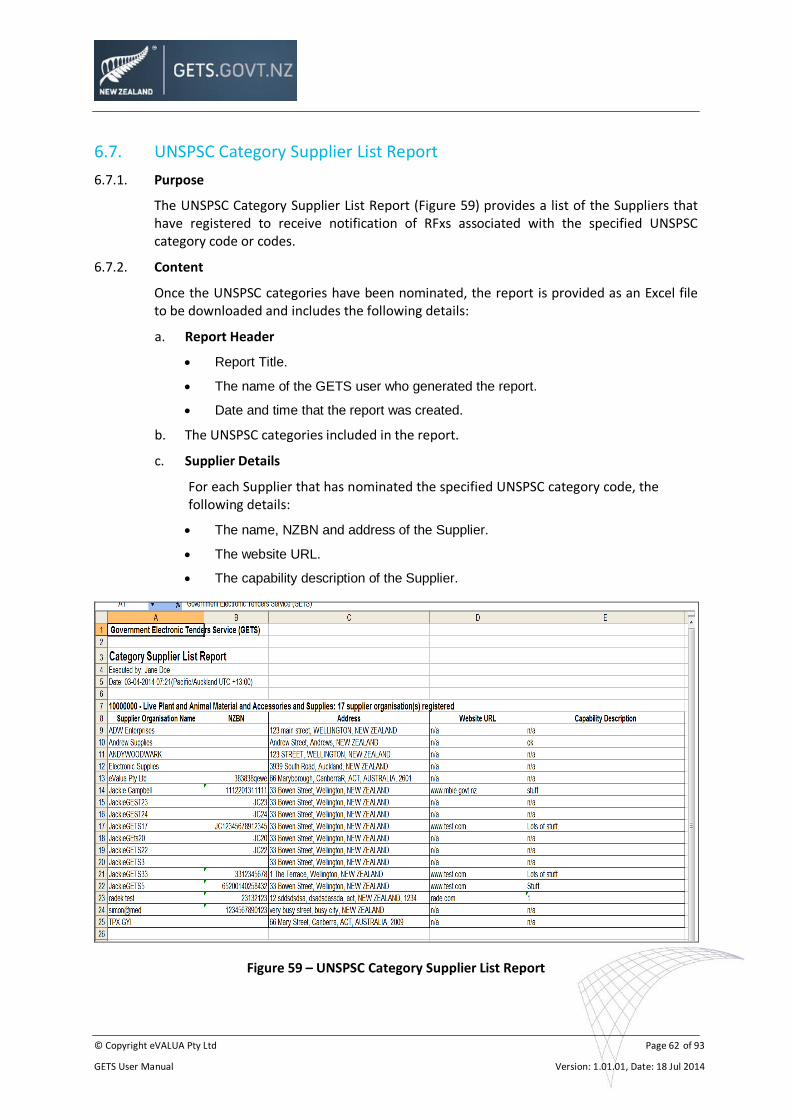
© Copyright eVALUA Pty Ltd Page 62 of 93
GETS User Manual Version: 1.01.01, Date: 18 Jul 2014
6.7. UNSPSC Category Supplier List Report
6.7.1. Purpose
The UNSPSC Category Supplier List Report (Figure 59) provides a list of the Suppliers that have registered to receive notification of RFxs associated with the specified UNSPSC category code or codes.
6.7.2. Content
Once the UNSPSC categories have been nominated, the report is provided as an Excel file to be downloaded and includes the following details:
a. Report Header
Report Title.
The name of the GETS user who generated the report.
Date and time that the report was created.
b. The UNSPSC categories included in the report.
c. Supplier Details
For each Supplier that has nominated the specified UNSPSC category code, the following details:
The name, NZBN and address of the Supplier.
The website URL.
The capability description of the Supplier.
Figure 59 – UNSPSC Category Supplier List Report
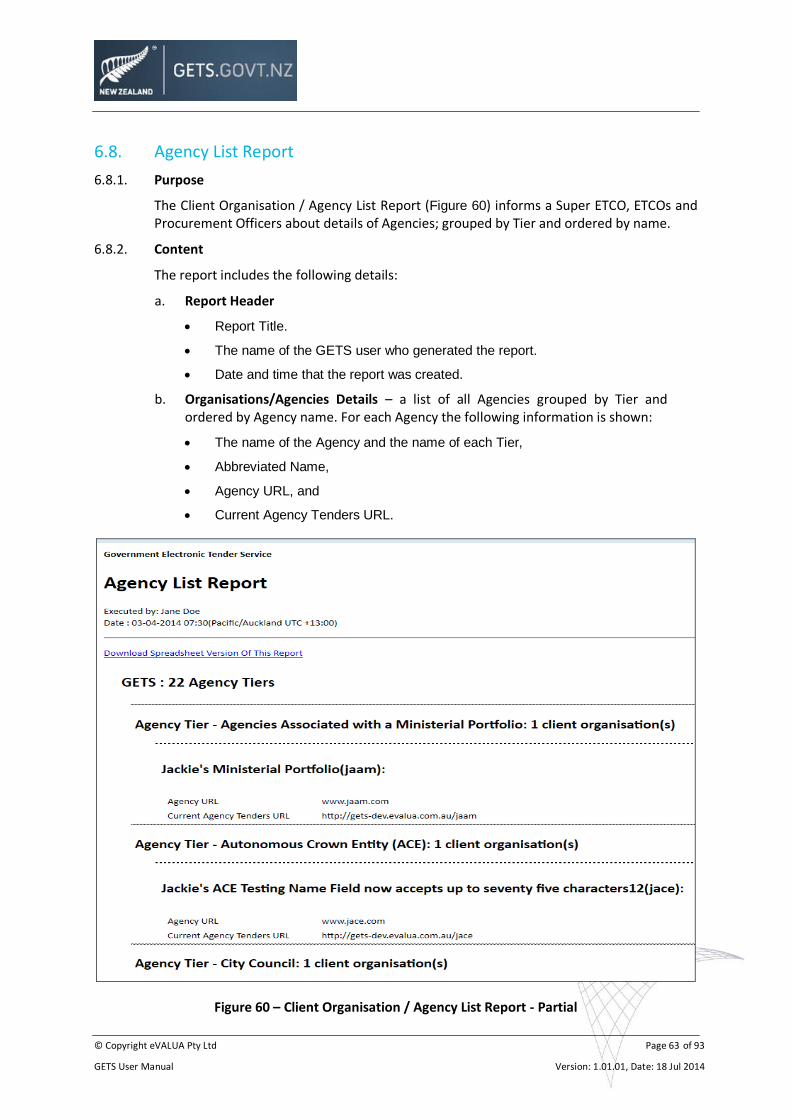
© Copyright eVALUA Pty Ltd Page 63 of 93
GETS User Manual Version: 1.01.01, Date: 18 Jul 2014
6.8. Agency List Report
6.8.1. Purpose
The Client Organisation / Agency List Report (Figure 60) informs a Super ETCO, ETCOs and Procurement Officers about details of Agencies; grouped by Tier and ordered by name.
6.8.2. Content
The report includes the following details:
a. Report Header
Report Title.
The name of the GETS user who generated the report.
Date and time that the report was created.
b. Organisations/Agencies Details – a list of all Agencies grouped by Tier and ordered by Agency name. For each Agency the following information is shown:
The name of the Agency and the name of each Tier,
Abbreviated Name,
Agency URL, and
Current Agency Tenders URL.
Figure 60 – Client Organisation / Agency List Report - Partial
© Copyright eVALUA Pty Ltd Page 64 of 93
GETS User Manual Version: 1.01.01, Date: 18 Jul 2014
6.9. Agency User List Report
6.9.1. Purpose
The Agency User List Report (Figure 61) provides details about internal users. The information is provided to:
a. Super ETCOs showing users for all Agencies to which they are assigned.
b. ETCOs and Procurement Officers concerning users that are belong to their Client Organisation/Agency.
6.9.2. Content
By default only current active users are listed (unless the option to ‘Include Deactivated Users’ is selected.
The report includes the following details:
a. Report Header
Report Title.
The name of the GETS user who generated the report.
Date and time that the report was created.
b. Users – a list of Users grouped by their Agency and ordered by their surname, with the following details displayed for each user listed:
Username,
Surname;
First Name;
E-mail address;
User Status,
User Role (ETCO or Procurement Officer); and
Any Special Permissions (e.g. Prequalification Manager or Annual Procurement Plan Edit).
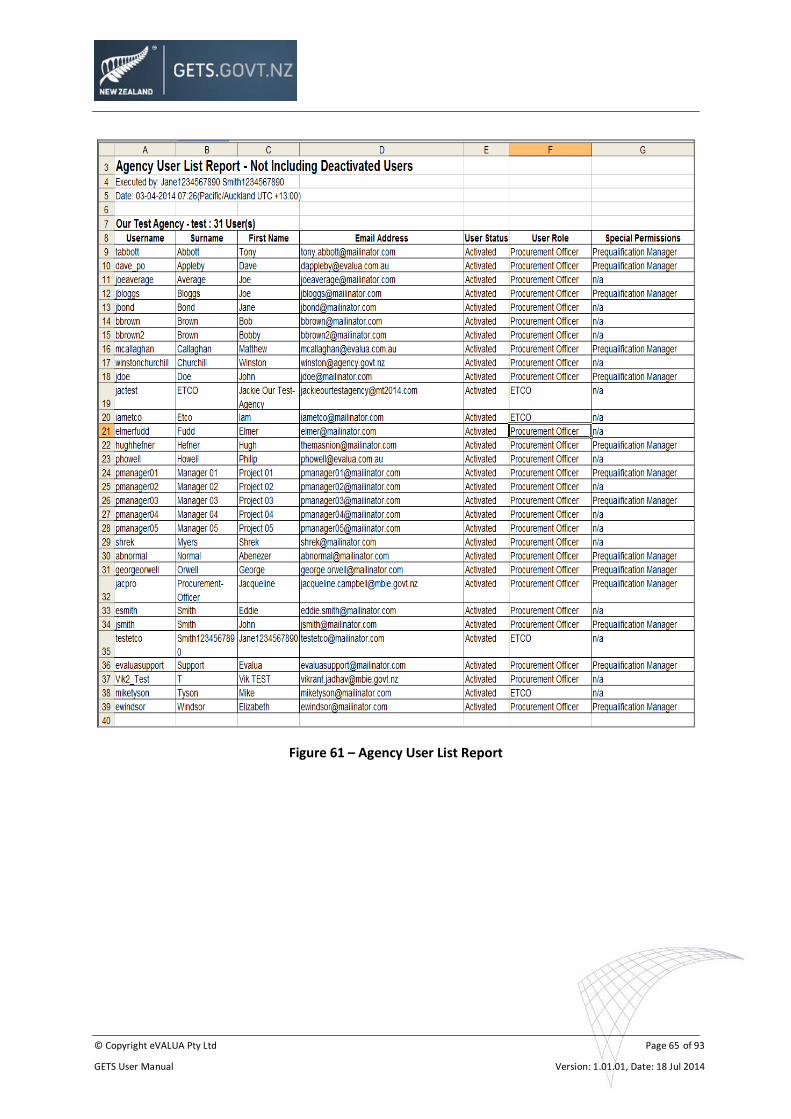
© Copyright eVALUA Pty Ltd Page 65 of 93
GETS User Manual Version: 1.01.01, Date: 18 Jul 2014
Figure 61 – Agency User List Report
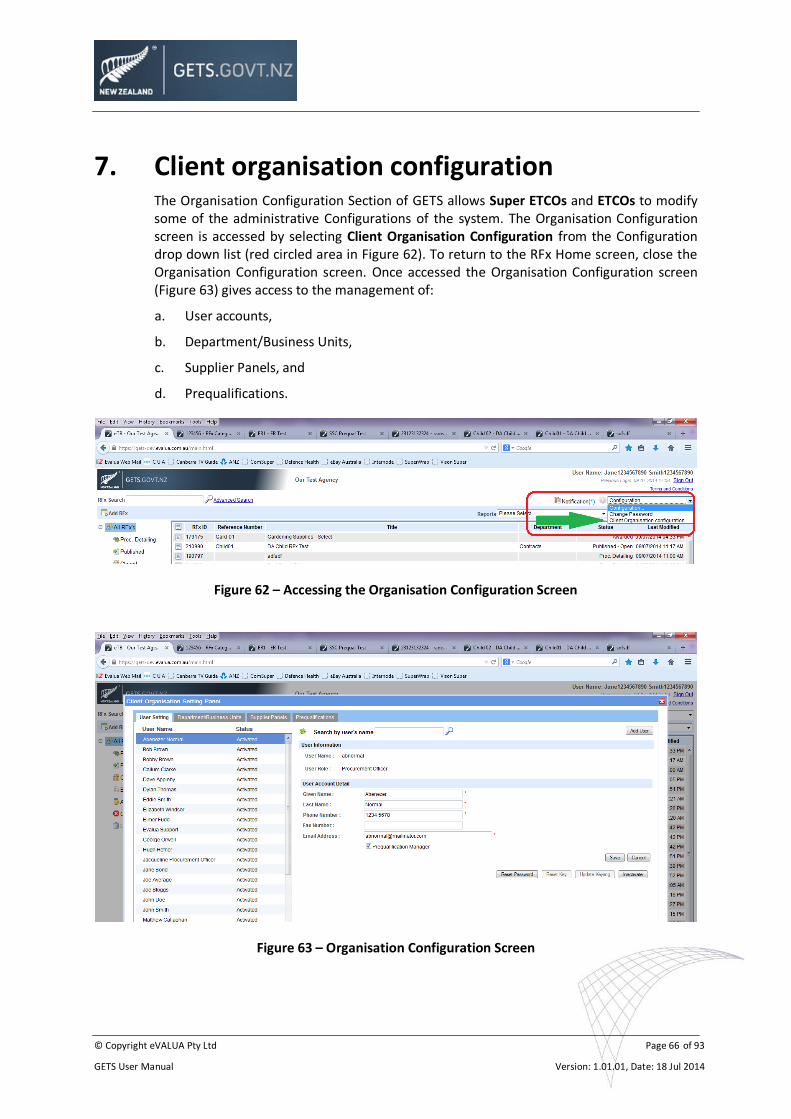
© Copyright eVALUA Pty Ltd Page 66 of 93
GETS User Manual Version: 1.01.01, Date: 18 Jul 2014
7. Client organisation configuration The Organisation Configuration Section of GETS allows Super ETCOs and ETCOs to modify some of the administrative Configurations of the system. The Organisation Configuration screen is accessed by selecting Client Organisation Configuration from the Configuration drop down list (red circled area in Figure 62). To return to the RFx Home screen, close the Organisation Configuration screen. Once accessed the Organisation Configuration screen (Figure 63) gives access to the management of:
a. User accounts,
b. Department/Business Units,
c. Supplier Panels, and
d. Prequalifications.
Figure 62 – Accessing the Organisation Configuration Screen
Figure 63 – Organisation Configuration Screen
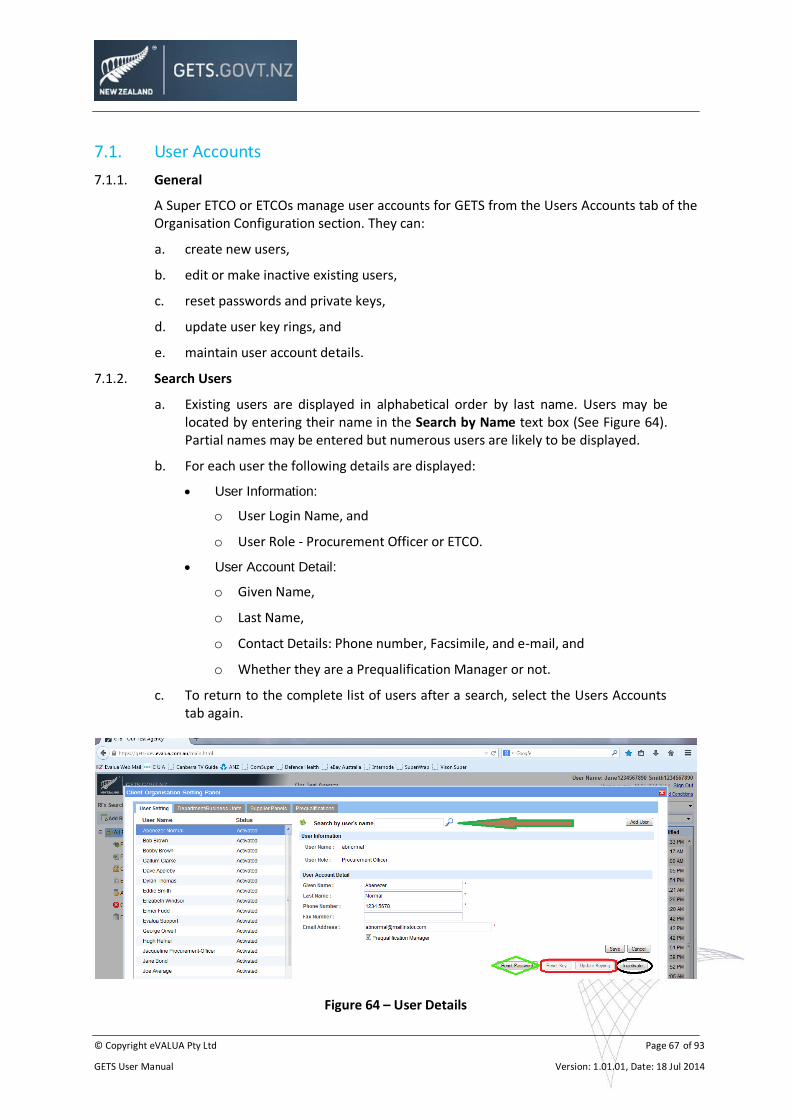
© Copyright eVALUA Pty Ltd Page 67 of 93
GETS User Manual Version: 1.01.01, Date: 18 Jul 2014
7.1. User Accounts
7.1.1. General
A Super ETCO or ETCOs manage user accounts for GETS from the Users Accounts tab of the Organisation Configuration section. They can:
a. create new users,
b. edit or make inactive existing users,
c. reset passwords and private keys,
d. update user key rings, and
e. maintain user account details.
7.1.2. Search Users
a. Existing users are displayed in alphabetical order by last name. Users may be located by entering their name in the Search by Name text box (See Figure 64). Partial names may be entered but numerous users are likely to be displayed.
b. For each user the following details are displayed:
User Information:
o User Login Name, and
o User Role - Procurement Officer or ETCO.
User Account Detail:
o Given Name,
o Last Name,
o Contact Details: Phone number, Facsimile, and e-mail, and
o Whether they are a Prequalification Manager or not.
c. To return to the complete list of users after a search, select the Users Accounts tab again.
Figure 64 – User Details
© Copyright eVALUA Pty Ltd Page 68 of 93
GETS User Manual Version: 1.01.01, Date: 18 Jul 2014
7.1.3. Add a User
a. To add a new user to GETS, click on the Add User button located in the top right corner of the User Accounts screen. The User Account Detail fields will become blank. Note that when saving the details for a new user none of the fields can be blank, with the exception of the Fax Number field. Enter the relevant details about the new user into their respective text fields as follows:
Given Name;
Last Name;
Phone No (used by Suppliers when the user is the nominated contact for an RFx);
Fax No, if desired· (used by Suppliers when the user is the RFx contact);
Email Address (used by Suppliers when the user is the nominated RFx contact);
User Login Name, which must be 4-30 characters long and not contain a space. The characters may only be any of a-z, A-Z, 0-9, a full stop or an underscore (_);
Password, which is case sensitive and is current for 1 year and must:
– be at least eight characters long;
– contain three or four types of characters: uppercase (A-Z) and lowercase (a-z) letters, numbers (0-9) and symbols (#, $, !, @, ^, &, *, etc); and
– be different to the last 6 passwords used.
User Role – the default is “Procurement Officer”, the alternate is “ETCO”; and
If the user is to be a Prequalification Manager check the Prequalification Manager box (for more information about prequalification management refer to paragraph 7.4.4).
b. To create the new user, click Save.
c. GETS requires the new user to login to acquire their private key before the new user account can be assigned to any RFx.
7.1.4. Edit a User Account
a. The User Account Detail fields may be edited after the user has been initially created. To edit any of these fields for a User, select the relevant user from the User list (or search, if necessary) and make the relevant changes. Click the Save button when finished.
b. Note that the User Name and User Role cannot be changed. (However the Given and Last names may be edited.)
c. Where a user has changed their name and does not want to continue using their original User Name (used to log in), create a new user with a new User Name. Once they have their new private Key, have any existing RFx that were the responsibility of the old user assigned to the new user and then deactivate the old user.
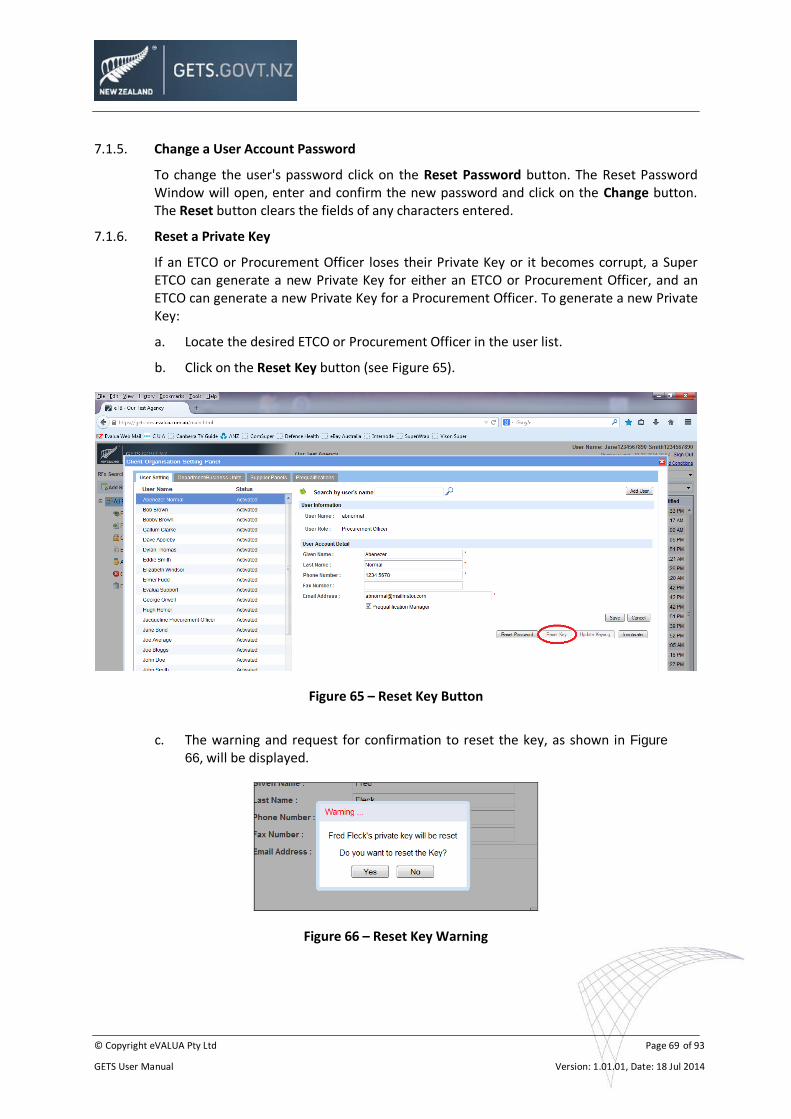
© Copyright eVALUA Pty Ltd Page 69 of 93
GETS User Manual Version: 1.01.01, Date: 18 Jul 2014
7.1.5. Change a User Account Password
To change the user's password click on the Reset Password button. The Reset Password Window will open, enter and confirm the new password and click on the Change button. The Reset button clears the fields of any characters entered.
7.1.6. Reset a Private Key
If an ETCO or Procurement Officer loses their Private Key or it becomes corrupt, a Super ETCO can generate a new Private Key for either an ETCO or Procurement Officer, and an ETCO can generate a new Private Key for a Procurement Officer. To generate a new Private Key:
a. Locate the desired ETCO or Procurement Officer in the user list.
b. Click on the Reset Key button (see Figure 65).
Figure 65 – Reset Key Button
c. The warning and request for confirmation to reset the key, as shown in Figure
66, will be displayed.
Figure 66 – Reset Key Warning
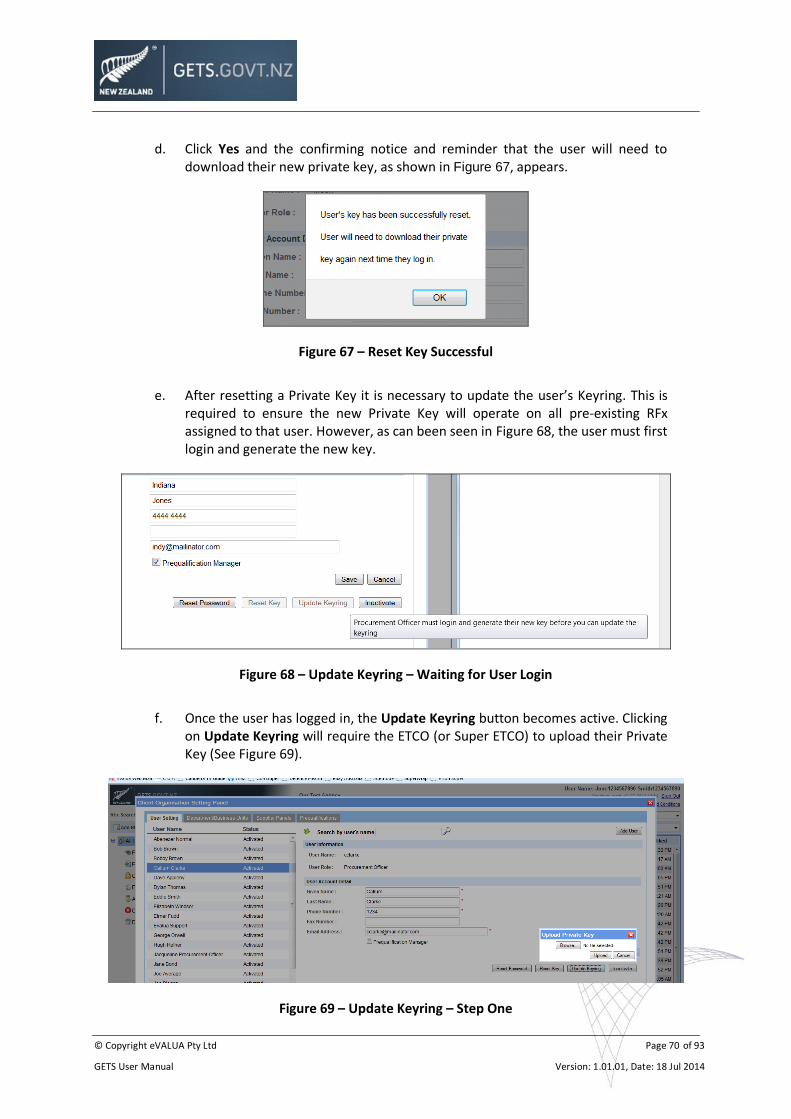
© Copyright eVALUA Pty Ltd Page 70 of 93
GETS User Manual Version: 1.01.01, Date: 18 Jul 2014
d. Click Yes and the confirming notice and reminder that the user will need to download their new private key, as shown in Figure 67, appears.
Figure 67 – Reset Key Successful
e. After resetting a Private Key it is necessary to update the user’s Keyring. This is required to ensure the new Private Key will operate on all pre-existing RFx assigned to that user. However, as can been seen in Figure 68, the user must first login and generate the new key.
Figure 68 – Update Keyring – Waiting for User Login
f. Once the user has logged in, the Update Keyring button becomes active. Clicking on Update Keyring will require the ETCO (or Super ETCO) to upload their Private Key (See Figure 69).
Figure 69 – Update Keyring – Step One
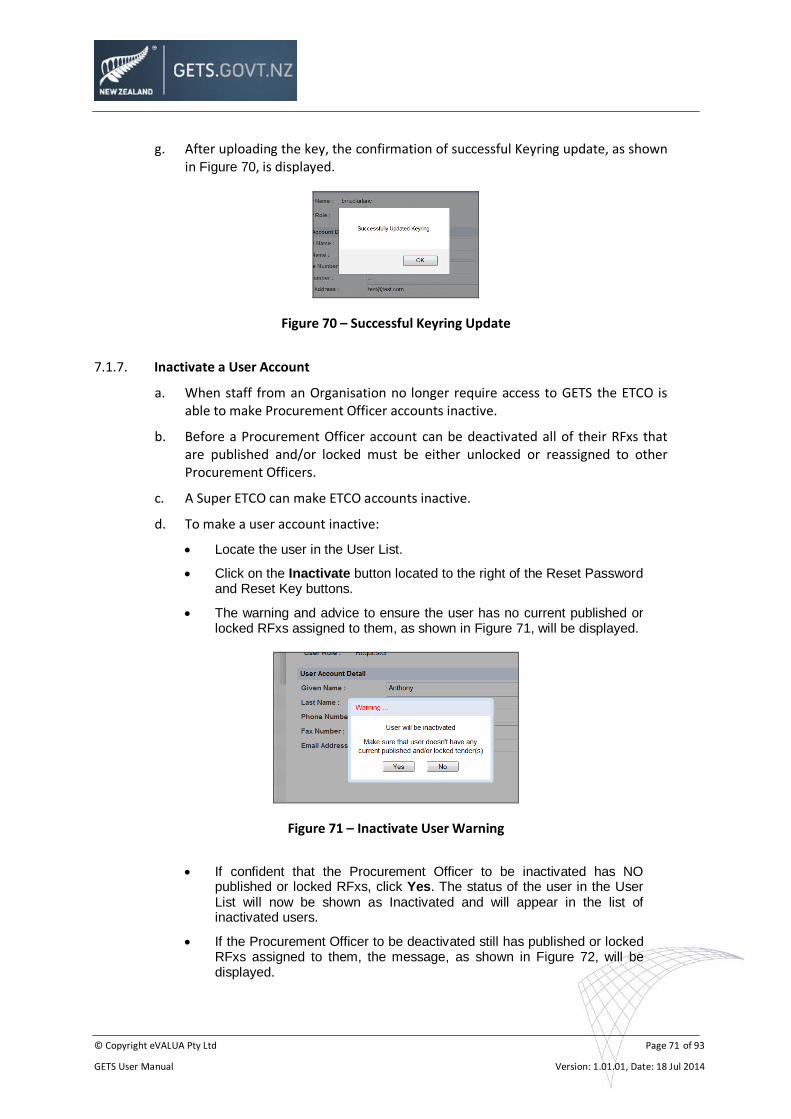
© Copyright eVALUA Pty Ltd Page 71 of 93
GETS User Manual Version: 1.01.01, Date: 18 Jul 2014
g. After uploading the key, the confirmation of successful Keyring update, as shown in Figure 70, is displayed.
Figure 70 – Successful Keyring Update
7.1.7. Inactivate a User Account
a. When staff from an Organisation no longer require access to GETS the ETCO is able to make Procurement Officer accounts inactive.
b. Before a Procurement Officer account can be deactivated all of their RFxs that are published and/or locked must be either unlocked or reassigned to other Procurement Officers.
c. A Super ETCO can make ETCO accounts inactive.
d. To make a user account inactive:
Locate the user in the User List.
Click on the Inactivate button located to the right of the Reset Password and Reset Key buttons.
The warning and advice to ensure the user has no current published or locked RFxs assigned to them, as shown in Figure 71, will be displayed.
Figure 71 – Inactivate User Warning
If confident that the Procurement Officer to be inactivated has NO published or locked RFxs, click Yes. The status of the user in the User List will now be shown as Inactivated and will appear in the list of inactivated users.
If the Procurement Officer to be deactivated still has published or locked RFxs assigned to them, the message, as shown in Figure 72, will be displayed.
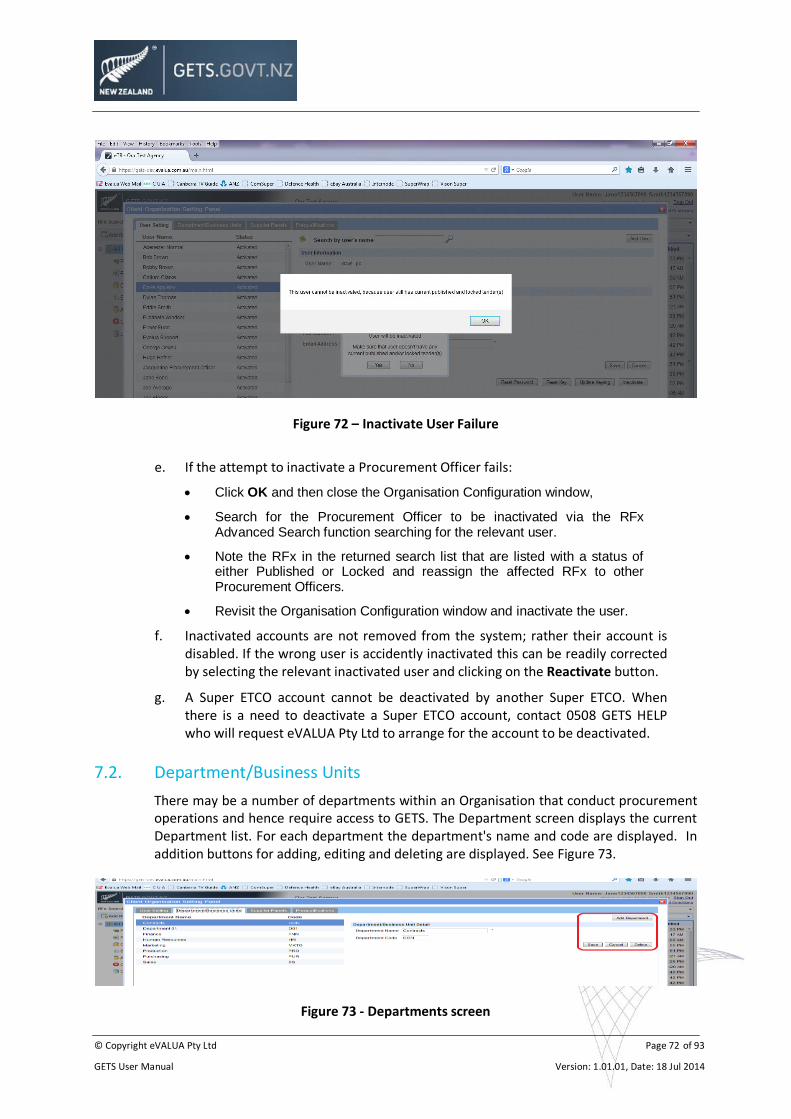
© Copyright eVALUA Pty Ltd Page 72 of 93
GETS User Manual Version: 1.01.01, Date: 18 Jul 2014
Figure 72 – Inactivate User Failure
e. If the attempt to inactivate a Procurement Officer fails:
Click OK and then close the Organisation Configuration window,
Search for the Procurement Officer to be inactivated via the RFx Advanced Search function searching for the relevant user.
Note the RFx in the returned search list that are listed with a status of either Published or Locked and reassign the affected RFx to other Procurement Officers.
Revisit the Organisation Configuration window and inactivate the user.
f. Inactivated accounts are not removed from the system; rather their account is disabled. If the wrong user is accidently inactivated this can be readily corrected by selecting the relevant inactivated user and clicking on the Reactivate button.
g. A Super ETCO account cannot be deactivated by another Super ETCO. When there is a need to deactivate a Super ETCO account, contact 0508 GETS HELP who will request eVALUA Pty Ltd to arrange for the account to be deactivated.
7.2. Department/Business Units
There may be a number of departments within an Organisation that conduct procurement operations and hence require access to GETS. The Department screen displays the current Department list. For each department the department's name and code are displayed. In addition buttons for adding, editing and deleting are displayed. See Figure 73.
Figure 73 - Departments screen
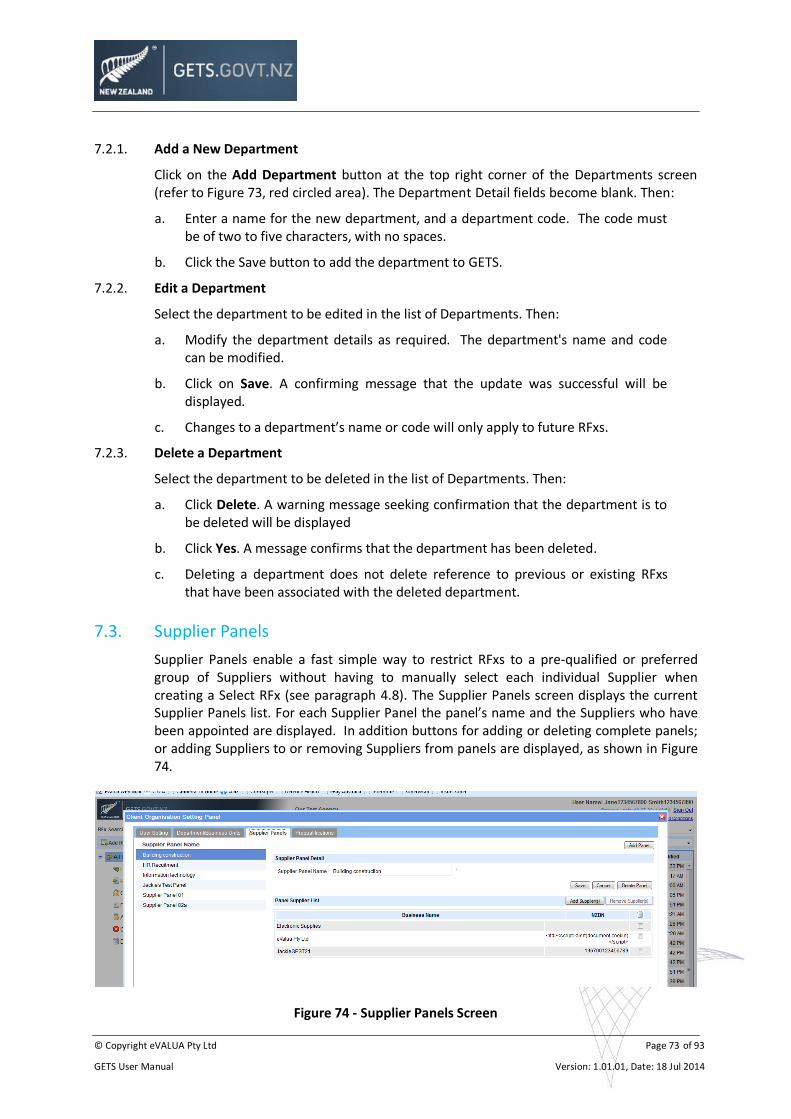
© Copyright eVALUA Pty Ltd Page 73 of 93
GETS User Manual Version: 1.01.01, Date: 18 Jul 2014
7.2.1. Add a New Department
Click on the Add Department button at the top right corner of the Departments screen (refer to Figure 73, red circled area). The Department Detail fields become blank. Then:
a. Enter a name for the new department, and a department code. The code must be of two to five characters, with no spaces.
b. Click the Save button to add the department to GETS.
7.2.2. Edit a Department
Select the department to be edited in the list of Departments. Then:
a. Modify the department details as required. The department's name and code can be modified.
b. Click on Save. A confirming message that the update was successful will be displayed.
c. Changes to a department’s name or code will only apply to future RFxs.
7.2.3. Delete a Department
Select the department to be deleted in the list of Departments. Then:
a. Click Delete. A warning message seeking confirmation that the department is to be deleted will be displayed
b. Click Yes. A message confirms that the department has been deleted.
c. Deleting a department does not delete reference to previous or existing RFxs that have been associated with the deleted department.
7.3. Supplier Panels
Supplier Panels enable a fast simple way to restrict RFxs to a pre-qualified or preferred group of Suppliers without having to manually select each individual Supplier when creating a Select RFx (see paragraph 4.8). The Supplier Panels screen displays the current Supplier Panels list. For each Supplier Panel the panel’s name and the Suppliers who have been appointed are displayed. In addition buttons for adding or deleting complete panels; or adding Suppliers to or removing Suppliers from panels are displayed, as shown in Figure 74.
Figure 74 - Supplier Panels Screen
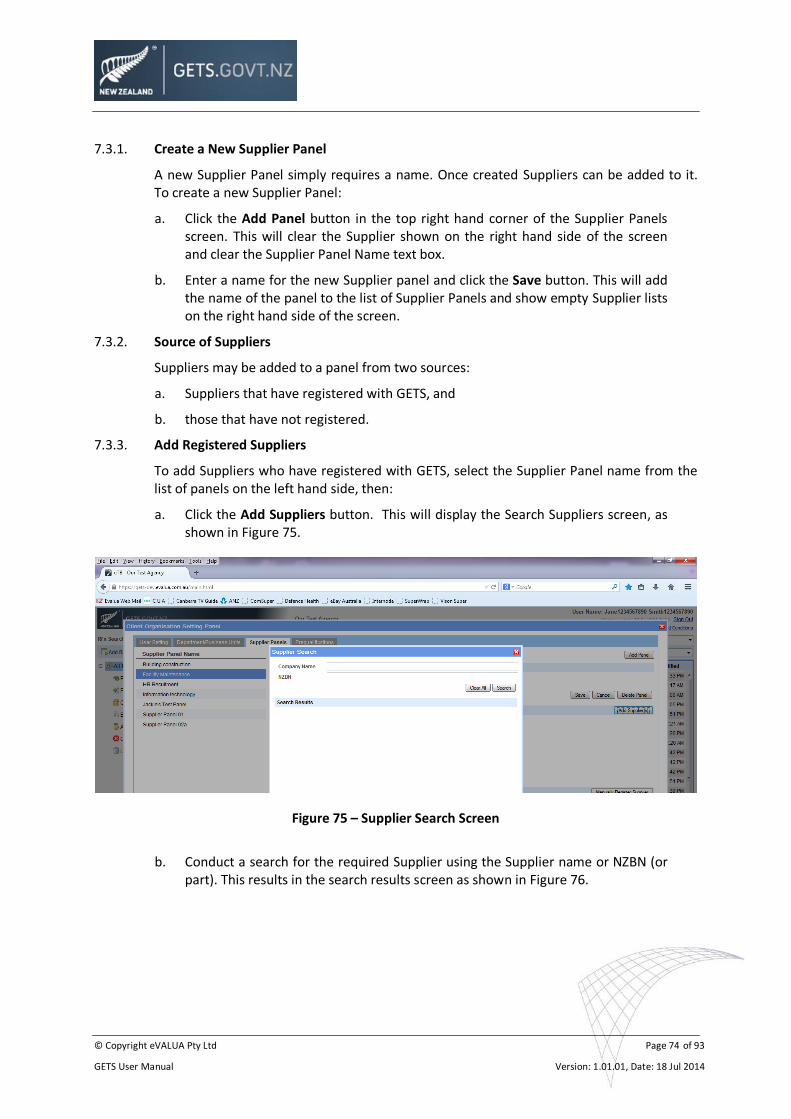
© Copyright eVALUA Pty Ltd Page 74 of 93
GETS User Manual Version: 1.01.01, Date: 18 Jul 2014
7.3.1. Create a New Supplier Panel
A new Supplier Panel simply requires a name. Once created Suppliers can be added to it. To create a new Supplier Panel:
a. Click the Add Panel button in the top right hand corner of the Supplier Panels screen. This will clear the Supplier shown on the right hand side of the screen and clear the Supplier Panel Name text box.
b. Enter a name for the new Supplier panel and click the Save button. This will add the name of the panel to the list of Supplier Panels and show empty Supplier lists on the right hand side of the screen.
7.3.2. Source of Suppliers
Suppliers may be added to a panel from two sources:
a. Suppliers that have registered with GETS, and
b. those that have not registered.
7.3.3. Add Registered Suppliers
To add Suppliers who have registered with GETS, select the Supplier Panel name from the list of panels on the left hand side, then:
a. Click the Add Suppliers button. This will display the Search Suppliers screen, as shown in Figure 75.
Figure 75 – Supplier Search Screen
b. Conduct a search for the required Supplier using the Supplier name or NZBN (or part). This results in the search results screen as shown in Figure 76.

© Copyright eVALUA Pty Ltd Page 75 of 93
GETS User Manual Version: 1.01.01, Date: 18 Jul 2014
Figure 76 – Supplier Search Results Screen
c. Clicking on the Supplier Organisation Name reveals the Supplier Organisation Detail screen. This enables the business address to be confirmed if there is any confusion between similarly named suppliers. Close the Supplier Organisation Detail screen by clicking the X at the top right of the screen.
d. Check the tick box next to the Supplier to select the desired Supplier. Multiple Suppliers can be selected as shown within the red circles in Figure 76.
e. To add the selected Suppliers to the panel, click the Add Panel Supplier(s) button, circled in green in Figure 76.
7.3.4. Add Unregistered Suppliers
To add Suppliers who have not registered with GETS, select the Supplier Panel name from the list of panels on the left hand side, then:
a. Click the Manually Register Supplier button on the middle right of the screen. The Add Manually Registered Supplier to Panel screen is displayed, as shown in Figure 77.
Figure 77 – Add Manually Registered Supplier to Panel Screen

© Copyright eVALUA Pty Ltd Page 76 of 93
GETS User Manual Version: 1.01.01, Date: 18 Jul 2014
b. Enter the Supplier's information. The business name and email are mandatory fields.
c. Click the Add Manually Registered Supplier button and the Supplier will be assigned to the new panel.
d. When a panel of Suppliers containing a manually registered Supplier is assigned to an RFx, the manually registered Supplier will receive an automatically generated email inviting them to:
Create an account (i.e. register) on GETS, and
Subscribe to the RFx.
7.3.5. Remove a Supplier From a Panel
Select, in the list of panels on the left, the Supplier Panel containing the Supplier (registered or unregistered) to be removed from the panel. Then:
a. Find the relevant Supplier and check the box to the right of the Supplier entry (circled in blue). This activates the Remove Supplier(s) or the Remove Manually Registered Supplier(s) button, as appropriate, circled in red in Figure 78. Do this for all Suppliers to be removed from the panel.
b. Click the Remove Supplier(s) or the Remove Manually Registered Supplier(s) button, as appropriate, to remove the Supplier(s) from the panel.
Figure 78 – Remove a Supplier from a Panel
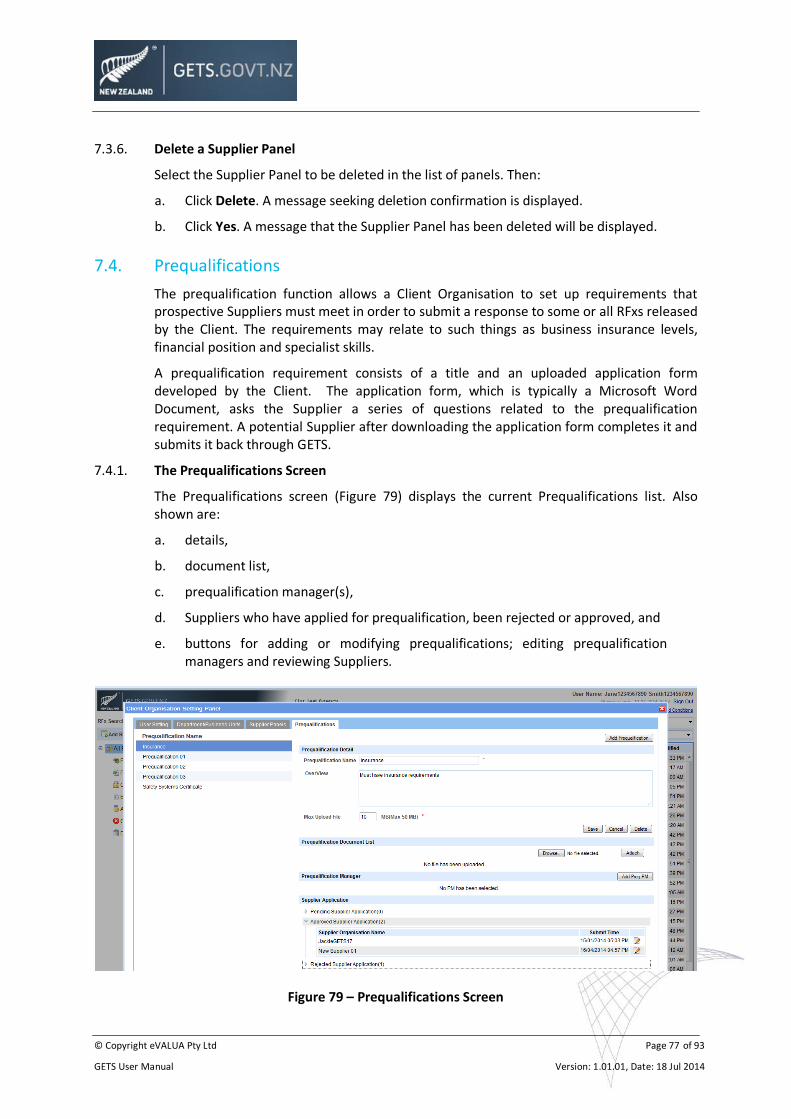
© Copyright eVALUA Pty Ltd Page 77 of 93
GETS User Manual Version: 1.01.01, Date: 18 Jul 2014
7.3.6. Delete a Supplier Panel
Select the Supplier Panel to be deleted in the list of panels. Then:
a. Click Delete. A message seeking deletion confirmation is displayed.
b. Click Yes. A message that the Supplier Panel has been deleted will be displayed.
7.4. Prequalifications
The prequalification function allows a Client Organisation to set up requirements that prospective Suppliers must meet in order to submit a response to some or all RFxs released by the Client. The requirements may relate to such things as business insurance levels, financial position and specialist skills.
A prequalification requirement consists of a title and an uploaded application form developed by the Client. The application form, which is typically a Microsoft Word Document, asks the Supplier a series of questions related to the prequalification requirement. A potential Supplier after downloading the application form completes it and submits it back through GETS.
7.4.1. The Prequalifications Screen
The Prequalifications screen (Figure 79) displays the current Prequalifications list. Also shown are:
a. details,
b. document list,
c. prequalification manager(s),
d. Suppliers who have applied for prequalification, been rejected or approved, and
e. buttons for adding or modifying prequalifications; editing prequalification managers and reviewing Suppliers.
Figure 79 – Prequalifications Screen
© Copyright eVALUA Pty Ltd Page 78 of 93
GETS User Manual Version: 1.01.01, Date: 18 Jul 2014
7.4.2. Create a Prequalification
To add a new prequalification:
a. Click the Add Prequalification button at the top right of the screen. This will clear the screen and present the Prequalification Detail fields ready for completion.
Prequalification Name. It is mandatory that a name for the prequalification be entered.
Overview. A brief description of the prequalification (optional).
File upload limit. This sets the maximum size of the completed prequalification application document that a Supplier will be able to upload. A typical size is 10 MB with a maximum of 50 MB. Enter a whole number between 1 and 50.
b. Then click the Save button. This will present the Document List, Manager and Supplier Application areas of the screen ready for completion.
7.4.3. Prequalification Documents
A prequalification application needs to be designed and uploaded to GETS. Other documents such as conditions of applying, descriptions of the qualifying attributes or skills needed can also be uploaded. Note: a Supplier can only upload a single document when applying to be prequalified.
a. Attach Prequalification Documents. To attach a document:
Click the Browse button and navigate to the file to be attached and then click the Open button. This results in the selected file name being displayed next to the Browse button.
Click the Attach button. When the file is attached the document name and size appears in the file list. To attach further documents, repeat these steps.
The prequalification can now be added to new or existing RFxs. If added to a published RFx, GETS will prompt for an addendum to the RFx to be issued.
b. Delete Prequalification Documents. To delete attached documents:
Check the box to the right of the document name. This activates the Delete Document(s) button. Do this for all documents to be removed.
Click the Delete Document(s) button to remove the documents.
7.4.4. Prequalification Manager
Prequalification managers are notified when a prequalification application is received. A prequalification manager can be any of the Procurement Officers who have been enabled as a potential prequalification manager (see paragraph 7.1.3.a last dot point). A prequalification may have more than one Procurement Officer manage applications for a particular prequalification.
a. Nominate a Manager. To nominate a manager:
Click the Add Preq PM button. This displays the Add Prequalification Manager window.

© Copyright eVALUA Pty Ltd Page 79 of 93
GETS User Manual Version: 1.01.01, Date: 18 Jul 2014
Locate the relevant procurement officer and check the box to the right of the entry. This activates the Save and Unselect All buttons.
Click the Save button to add the procurement officer to the list of prequalification managers.
b. Delete a Manager. To delete a nominated manager:
Check the box to the right of the manager name. This activates the Delete PM(s) button. Do this for all managers to be removed.
Click the Delete PM(s) button to remove the managers.
7.4.5. Supplier Applications
c. The Supplier Application panel displays applications in three categories, along with the number of applications in each category:
Pending applications,
Approved Applications, and
Rejected applications.
d. Initially the categories are displayed as headings only. Click on the blue triangle to the left of the category heading to expand the list and view the applications..
e. To view the details of an application, click on the pencil icon to the right of the Supplier organisation name. This opens the Supplier Organisation Prequalification Detail window (See Figure 80).
Figure 80 – Supplier Organisation Prequalification Detail Screen
7.4.6. Supplier Prequalification Management
a. A Super ETCO or ETCO or prequalification manager reviews Supplier applications and records the following in relation to the applicant:
Accept or Reject the application,
Allow Re-Submit, and
Comments.
© Copyright eVALUA Pty Ltd Page 80 of 93
GETS User Manual Version: 1.01.01, Date: 18 Jul 2014
b. Once the assessment is submitted the applicant is notified of the assessment and any comments made are included in the notification.
c. Assessments can be:
Accepted. The applicant is notified and granted prequalification in the associated prequalification requirement.
Rejected. The applicant is not accepted as a prequalified Supplier in relation to the associated pre-qualification requirement and the applicant is banned from re-submitting an application in relation to the prequalification requirement. (In this case the Allow Re-Submit box - blue circled area in Figure 80 - is left unchecked.)
Rejected but Allow Re-Submit. The applicant is not accepted as a prequalified Supplier in the associated prequalification, however a further application will be allowed to be submitted and assessed. (In this case the Allow Re-Submit box IS checked.)
7.4.7. Edit a Prequalification
Select the Prequalification to be edited in the list of Prequalifications. Then:
a. Prequalification Detail. To edit the Name, Overview or Upload File size, modify the details as required. All fields of the Prequalification detail can be modified. Click the Save button.
b. Prequalification Document List. To add or delete attached documents follow the procedure described at paragraph 7.4.3 above.
c. Prequalification Manager. To add or delete prequalification managers follow the procedure described at paragraph 7.4.4 above.
d. Supplier Applications. To re-manage Supplier applications, re-visit the relevant Supplier application detail and re-manage in accordance with paragraph 7.4.6 above.
Note: Changes made to existing prequalifications only apply to future RFxs that have the prequalification associated with the RFx.
7.4.8. Delete a Prequalification
Select the Prequalification to be deleted in the list of prequalifications. Then:
a. Click Delete. A warning message seeking confirmation that the Prequalification is to be deleted will be displayed.
b. Click Yes. The Prequalification is deleted from the list of prequalifications.
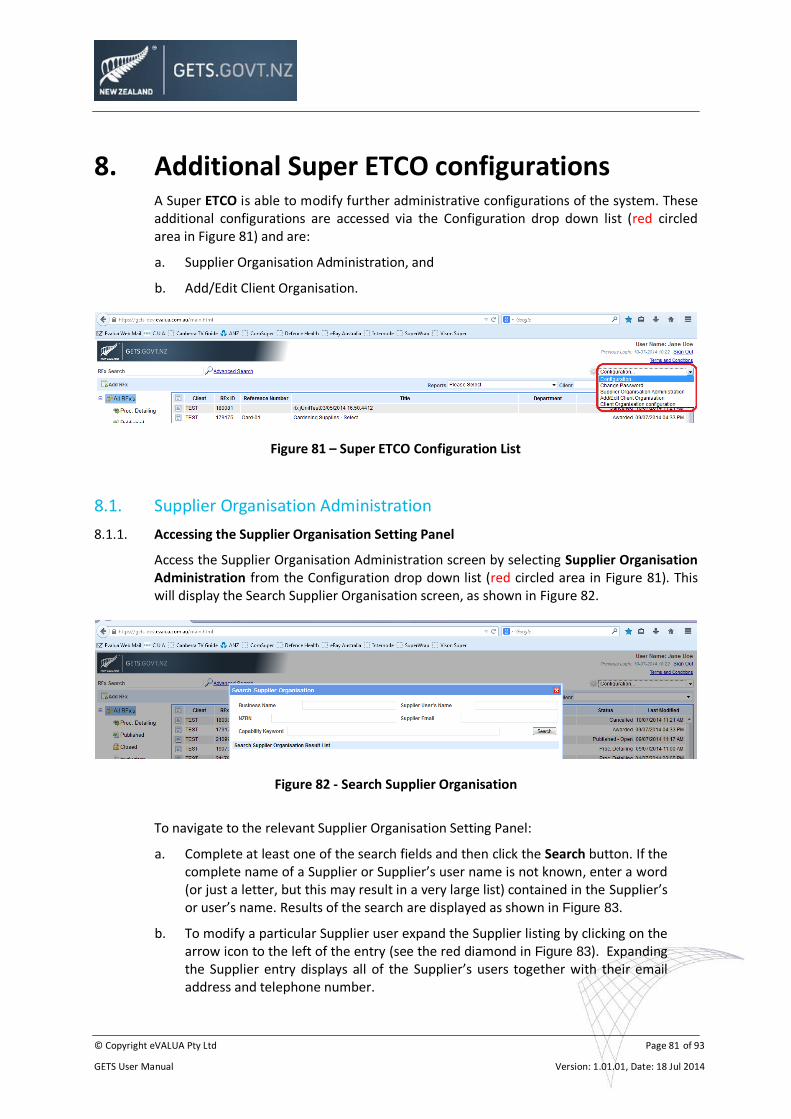
© Copyright eVALUA Pty Ltd Page 81 of 93
GETS User Manual Version: 1.01.01, Date: 18 Jul 2014
8. Additional Super ETCO configurations A Super ETCO is able to modify further administrative configurations of the system. These additional configurations are accessed via the Configuration drop down list (red circled area in Figure 81) and are:
a. Supplier Organisation Administration, and
b. Add/Edit Client Organisation.
Figure 81 – Super ETCO Configuration List
8.1. Supplier Organisation Administration
8.1.1. Accessing the Supplier Organisation Setting Panel
Access the Supplier Organisation Administration screen by selecting Supplier Organisation Administration from the Configuration drop down list (red circled area in Figure 81). This will display the Search Supplier Organisation screen, as shown in Figure 82.
Figure 82 - Search Supplier Organisation
To navigate to the relevant Supplier Organisation Setting Panel:
a. Complete at least one of the search fields and then click the Search button. If the complete name of a Supplier or Supplier’s user name is not known, enter a word (or just a letter, but this may result in a very large list) contained in the Supplier’s or user’s name. Results of the search are displayed as shown in Figure 83.
b. To modify a particular Supplier user expand the Supplier listing by clicking on the arrow icon to the left of the entry (see the red diamond in Figure 83). Expanding the Supplier entry displays all of the Supplier’s users together with their email address and telephone number.
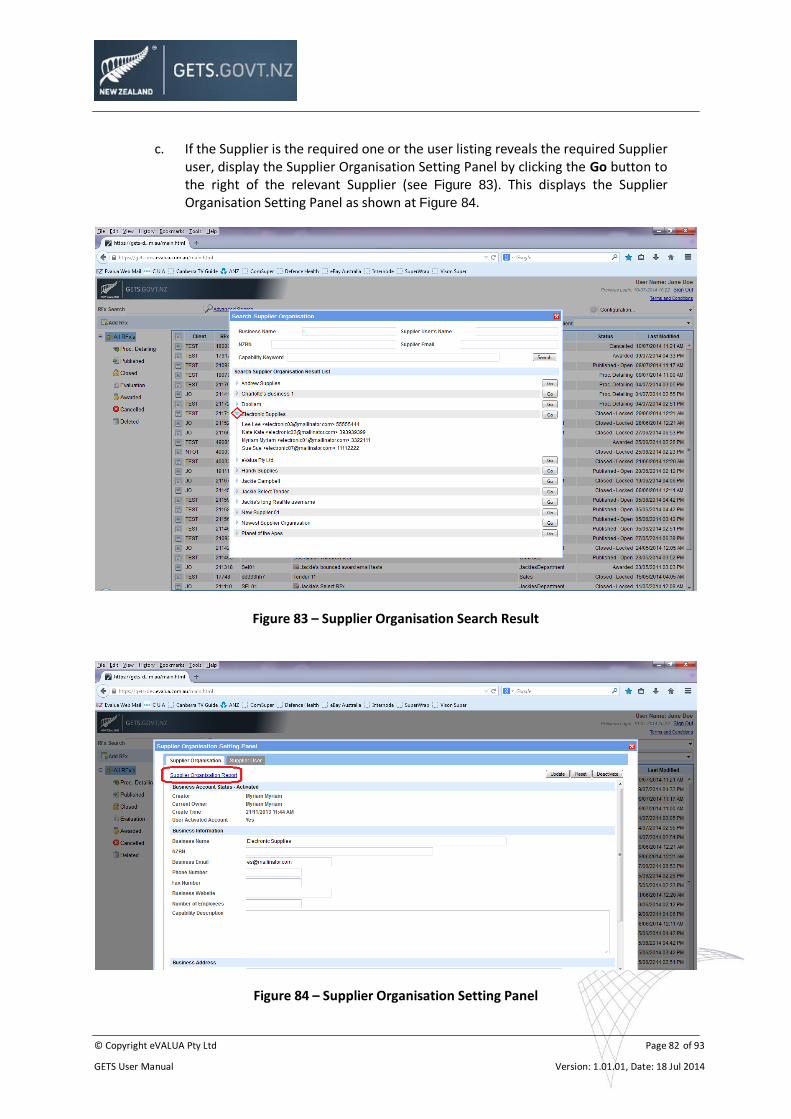
© Copyright eVALUA Pty Ltd Page 82 of 93
GETS User Manual Version: 1.01.01, Date: 18 Jul 2014
c. If the Supplier is the required one or the user listing reveals the required Supplier user, display the Supplier Organisation Setting Panel by clicking the Go button to the right of the relevant Supplier (see Figure 83). This displays the Supplier Organisation Setting Panel as shown at Figure 84.
Figure 83 – Supplier Organisation Search Result
Figure 84 – Supplier Organisation Setting Panel
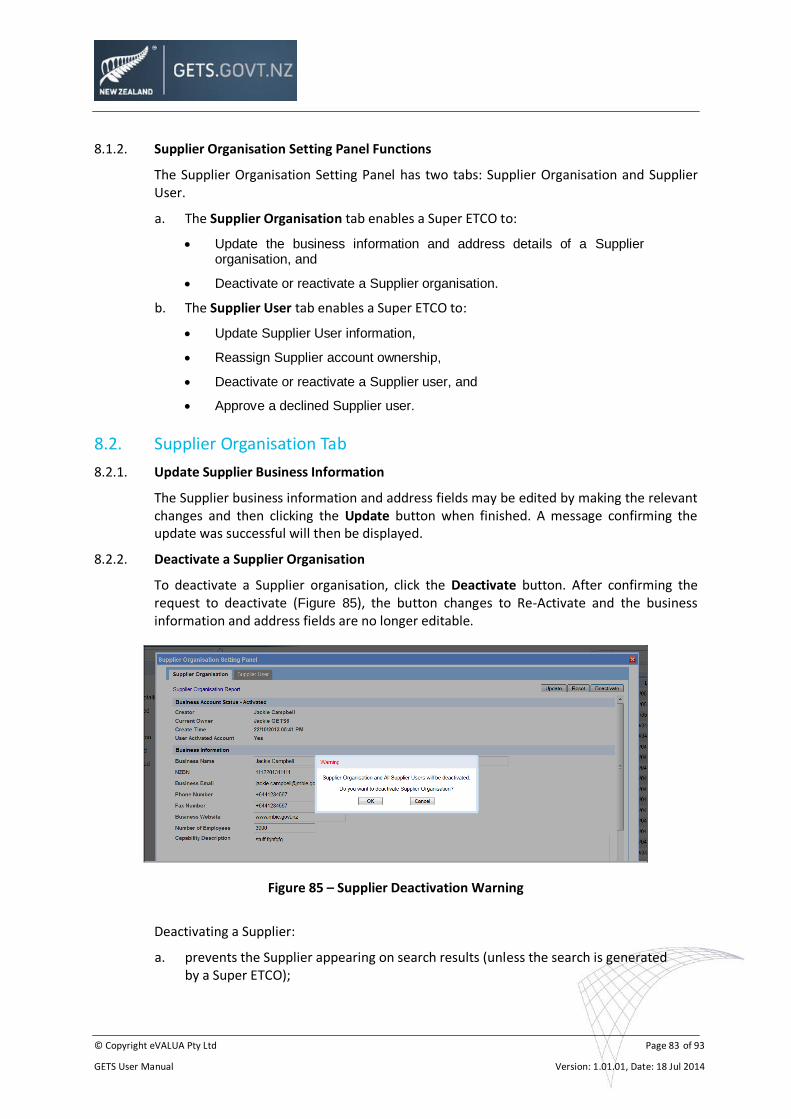
© Copyright eVALUA Pty Ltd Page 83 of 93
GETS User Manual Version: 1.01.01, Date: 18 Jul 2014
8.1.2. Supplier Organisation Setting Panel Functions
The Supplier Organisation Setting Panel has two tabs: Supplier Organisation and Supplier User.
a. The Supplier Organisation tab enables a Super ETCO to:
Update the business information and address details of a Supplier organisation, and
Deactivate or reactivate a Supplier organisation.
b. The Supplier User tab enables a Super ETCO to:
Update Supplier User information,
Reassign Supplier account ownership,
Deactivate or reactivate a Supplier user, and
Approve a declined Supplier user.
8.2. Supplier Organisation Tab
8.2.1. Update Supplier Business Information
The Supplier business information and address fields may be edited by making the relevant changes and then clicking the Update button when finished. A message confirming the update was successful will then be displayed.
8.2.2. Deactivate a Supplier Organisation
To deactivate a Supplier organisation, click the Deactivate button. After confirming the request to deactivate (Figure 85), the button changes to Re-Activate and the business information and address fields are no longer editable.
Figure 85 – Supplier Deactivation Warning
Deactivating a Supplier:
a. prevents the Supplier appearing on search results (unless the search is generated by a Super ETCO);
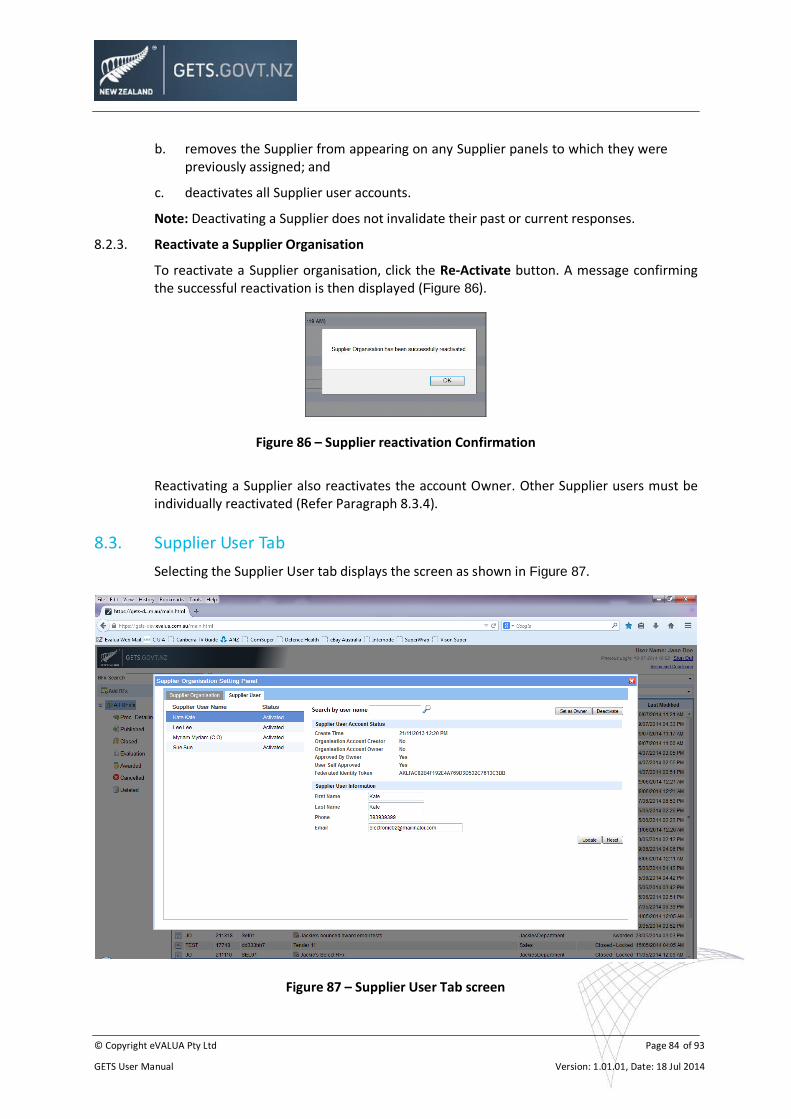
© Copyright eVALUA Pty Ltd Page 84 of 93
GETS User Manual Version: 1.01.01, Date: 18 Jul 2014
b. removes the Supplier from appearing on any Supplier panels to which they were previously assigned; and
c. deactivates all Supplier user accounts.
Note: Deactivating a Supplier does not invalidate their past or current responses.
8.2.3. Reactivate a Supplier Organisation
To reactivate a Supplier organisation, click the Re-Activate button. A message confirming the successful reactivation is then displayed (Figure 86).
Figure 86 – Supplier reactivation Confirmation
Reactivating a Supplier also reactivates the account Owner. Other Supplier users must be individually reactivated (Refer Paragraph 8.3.4).
8.3. Supplier User Tab
Selecting the Supplier User tab displays the screen as shown in Figure 87.
Figure 87 – Supplier User Tab screen
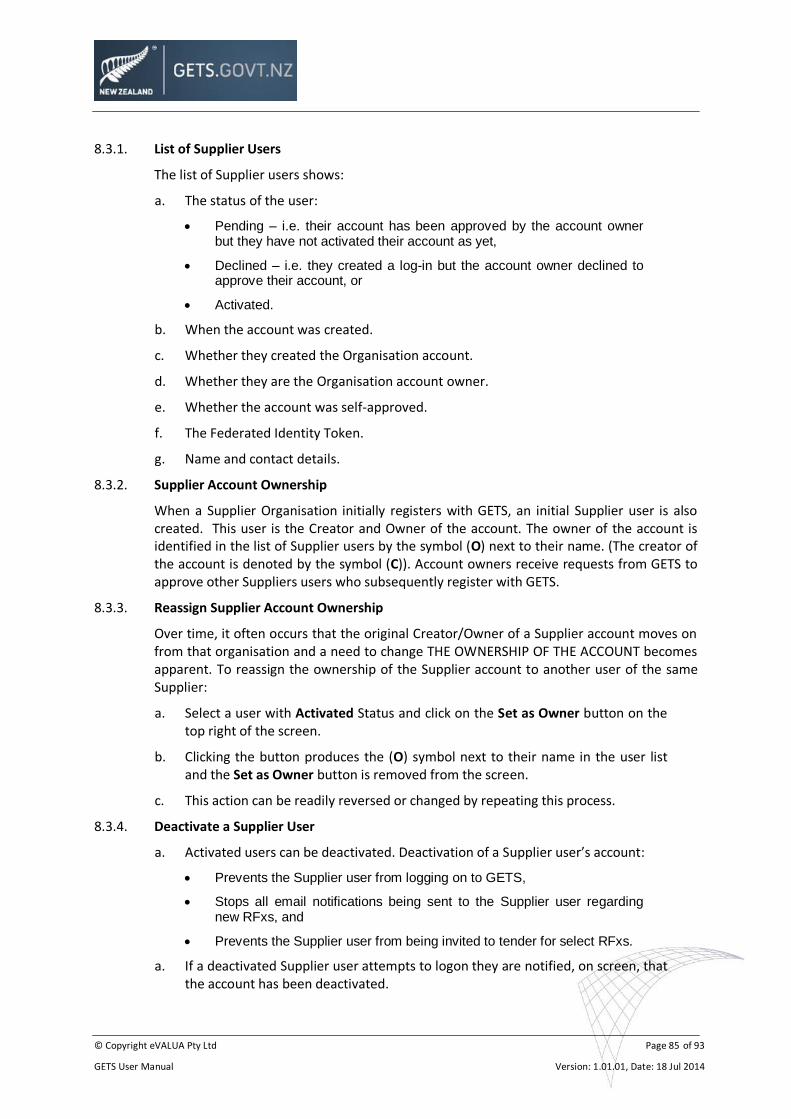
© Copyright eVALUA Pty Ltd Page 85 of 93
GETS User Manual Version: 1.01.01, Date: 18 Jul 2014
8.3.1. List of Supplier Users
The list of Supplier users shows:
a. The status of the user:
Pending – i.e. their account has been approved by the account owner but they have not activated their account as yet,
Declined – i.e. they created a log-in but the account owner declined to approve their account, or
Activated.
b. When the account was created.
c. Whether they created the Organisation account.
d. Whether they are the Organisation account owner.
e. Whether the account was self-approved.
f. The Federated Identity Token.
g. Name and contact details.
8.3.2. Supplier Account Ownership
When a Supplier Organisation initially registers with GETS, an initial Supplier user is also created. This user is the Creator and Owner of the account. The owner of the account is identified in the list of Supplier users by the symbol (O) next to their name. (The creator of the account is denoted by the symbol (C)). Account owners receive requests from GETS to approve other Suppliers users who subsequently register with GETS.
8.3.3. Reassign Supplier Account Ownership
Over time, it often occurs that the original Creator/Owner of a Supplier account moves on from that organisation and a need to change THE OWNERSHIP OF THE ACCOUNT becomes apparent. To reassign the ownership of the Supplier account to another user of the same Supplier:
a. Select a user with Activated Status and click on the Set as Owner button on the top right of the screen.
b. Clicking the button produces the (O) symbol next to their name in the user list and the Set as Owner button is removed from the screen.
c. This action can be readily reversed or changed by repeating this process.
8.3.4. Deactivate a Supplier User
a. Activated users can be deactivated. Deactivation of a Supplier user’s account:
Prevents the Supplier user from logging on to GETS,
Stops all email notifications being sent to the Supplier user regarding new RFxs, and
Prevents the Supplier user from being invited to tender for select RFxs.
a. If a deactivated Supplier user attempts to logon they are notified, on screen, that the account has been deactivated.
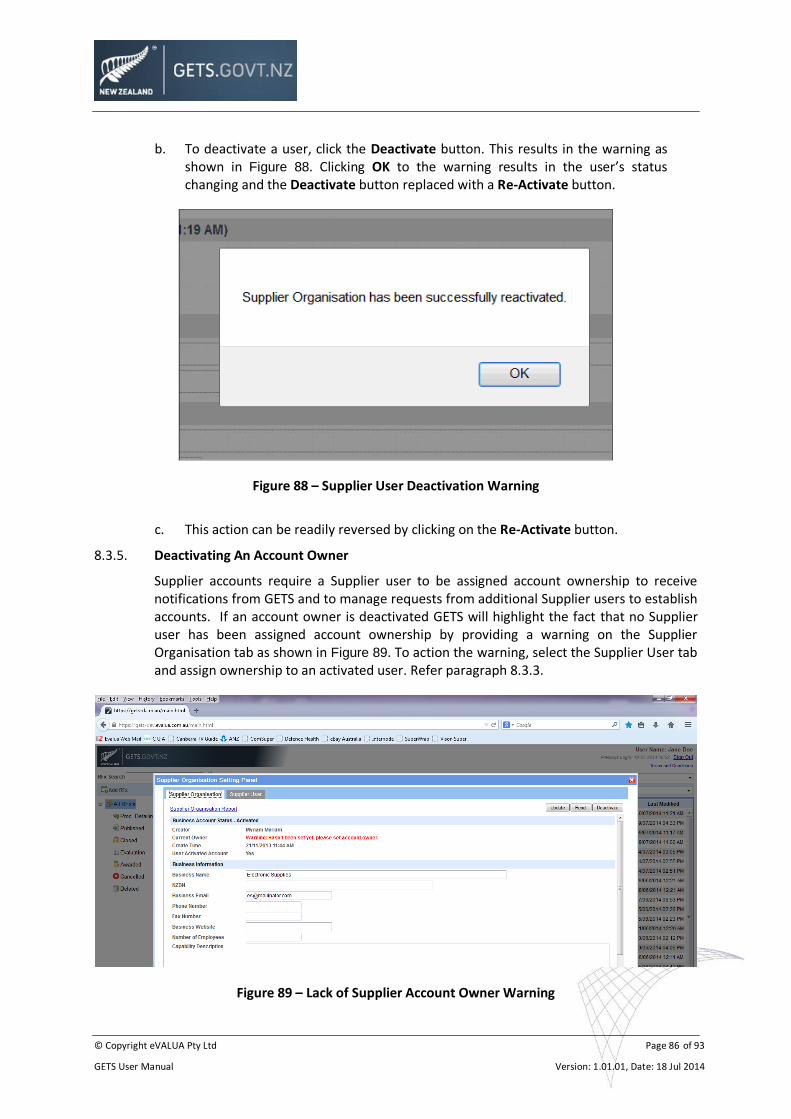
© Copyright eVALUA Pty Ltd Page 86 of 93
GETS User Manual Version: 1.01.01, Date: 18 Jul 2014
b. To deactivate a user, click the Deactivate button. This results in the warning as shown in Figure 88. Clicking OK to the warning results in the user’s status changing and the Deactivate button replaced with a Re-Activate button.
Figure 88 – Supplier User Deactivation Warning
c. This action can be readily reversed by clicking on the Re-Activate button.
8.3.5. Deactivating An Account Owner
Supplier accounts require a Supplier user to be assigned account ownership to receive notifications from GETS and to manage requests from additional Supplier users to establish accounts. If an account owner is deactivated GETS will highlight the fact that no Supplier user has been assigned account ownership by providing a warning on the Supplier Organisation tab as shown in Figure 89. To action the warning, select the Supplier User tab and assign ownership to an activated user. Refer paragraph 8.3.3.
Figure 89 – Lack of Supplier Account Owner Warning
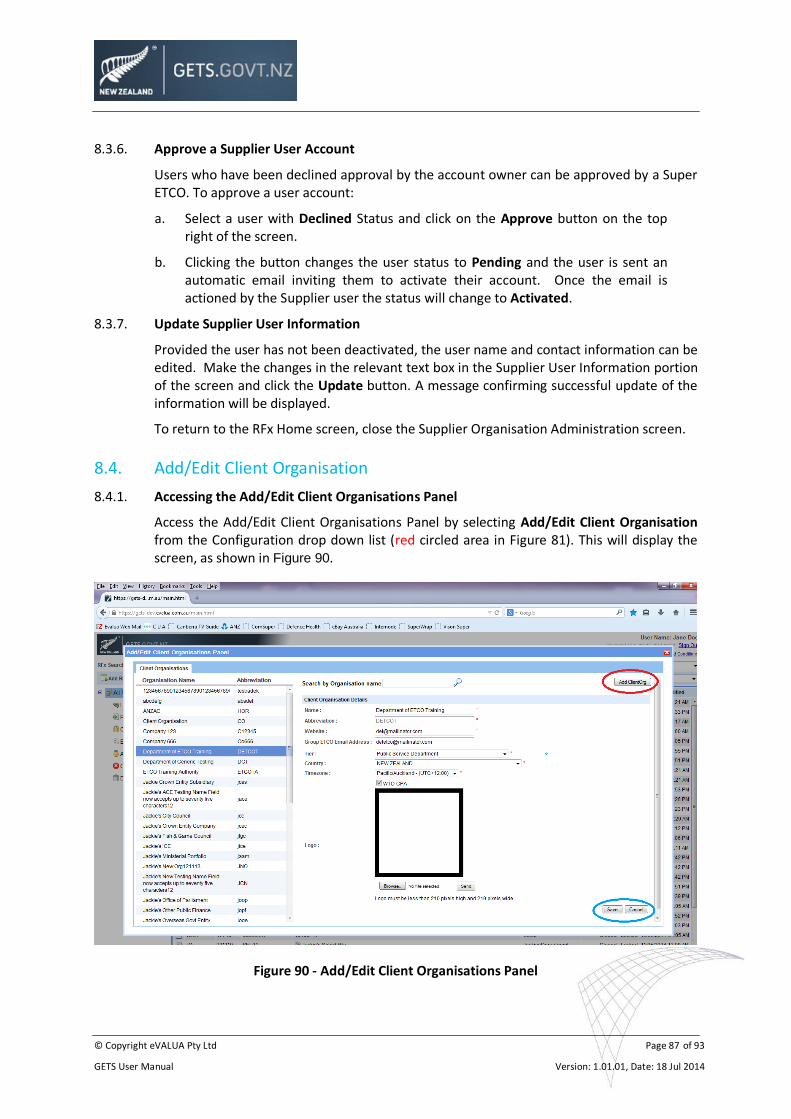
© Copyright eVALUA Pty Ltd Page 87 of 93
GETS User Manual Version: 1.01.01, Date: 18 Jul 2014
8.3.6. Approve a Supplier User Account
Users who have been declined approval by the account owner can be approved by a Super ETCO. To approve a user account:
a. Select a user with Declined Status and click on the Approve button on the top right of the screen.
b. Clicking the button changes the user status to Pending and the user is sent an automatic email inviting them to activate their account. Once the email is actioned by the Supplier user the status will change to Activated.
8.3.7. Update Supplier User Information
Provided the user has not been deactivated, the user name and contact information can be edited. Make the changes in the relevant text box in the Supplier User Information portion of the screen and click the Update button. A message confirming successful update of the information will be displayed.
To return to the RFx Home screen, close the Supplier Organisation Administration screen.
8.4. Add/Edit Client Organisation
8.4.1. Accessing the Add/Edit Client Organisations Panel
Access the Add/Edit Client Organisations Panel by selecting Add/Edit Client Organisation from the Configuration drop down list (red circled area in Figure 81). This will display the screen, as shown in Figure 90.
Figure 90 - Add/Edit Client Organisations Panel
© Copyright eVALUA Pty Ltd Page 88 of 93
GETS User Manual Version: 1.01.01, Date: 18 Jul 2014
8.4.2. Create a New Client Organisation/Agency
To add a new Client Organisation to GETS, click on the Add ClientOrg button (red circled area in Figure 90) located in the top right corner of the Add/Edit Client Organisations Panel. The Client Organisation Details fields will become blank.
Note that when saving the details for a new Client Organisation, with the exception of the Free Trade Agreement choice and the logo, none of the fields can be blank.
Enter the relevant details about the new Client Organisation into their respective text fields as follows:
a. Name.
b. Abbreviation for the Client Organisation. This should be carefully considered as it:
must be 2-30 characters long and not contain a space. The characters may only be any of a-z, A-Z, 0-9, a full stop or an underscore (_);
cannot be changed once saved;
forms part of the Organisation’s GETS landing page URL and is therefore exposed to public view; and
is used in the file structure of GETS for this Client Organisation.
c. Website URL of the new Client Organisation.
d. Tier. Select the appropriate Tier from the following drop down list:
Public Service Department
Non-Public Service Department
Crown Agent
District Health Board
Autonomous Crown Entity (ACE)
Independent Crown Entity (ICE)
Crown Research Institute (CRI)
Crown Entity Subsidiary
Crown Entity Company
School Board Of Trustees
Tertiary Education Institution
Fish And Game Council
Other Organisations subject to the Public Finance Act
Reserve Bank Of New Zealand
Office Of Parliament
State-Owned Enterprise
Regional Council
City Council
District Council
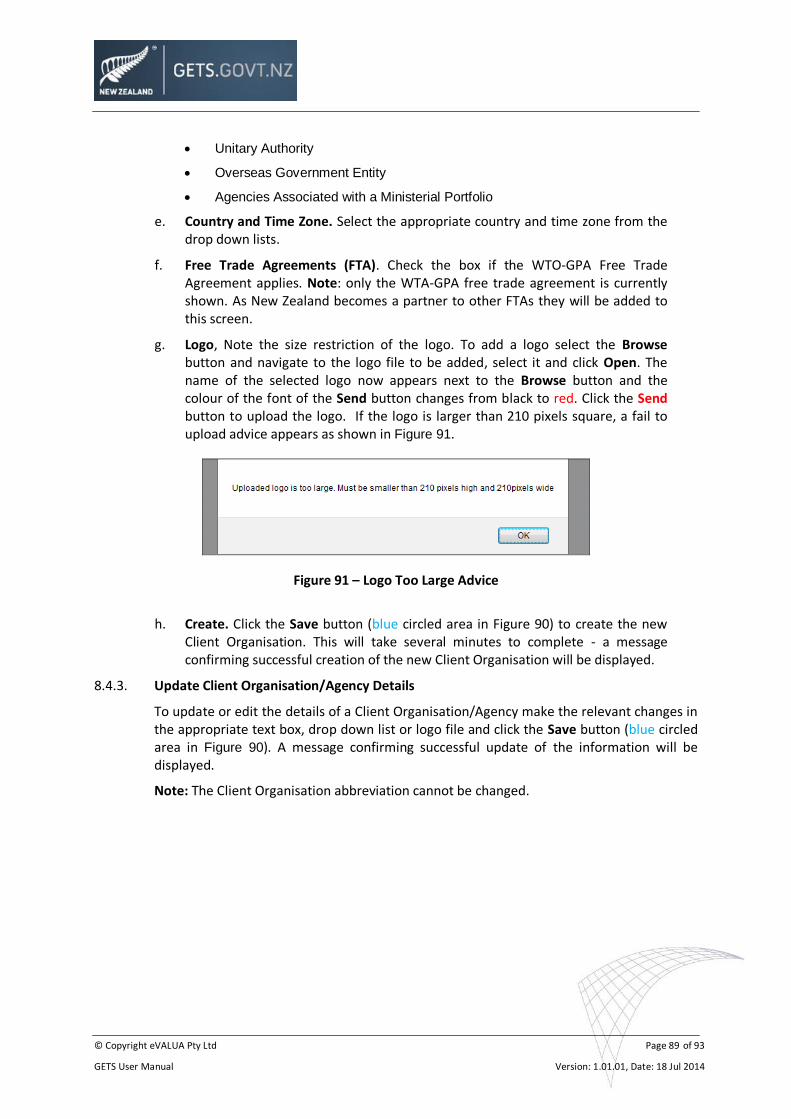
© Copyright eVALUA Pty Ltd Page 89 of 93
GETS User Manual Version: 1.01.01, Date: 18 Jul 2014
Unitary Authority
Overseas Government Entity
Agencies Associated with a Ministerial Portfolio
e. Country and Time Zone. Select the appropriate country and time zone from the drop down lists.
f. Free Trade Agreements (FTA). Check the box if the WTO-GPA Free Trade Agreement applies. Note: only the WTA-GPA free trade agreement is currently shown. As New Zealand becomes a partner to other FTAs they will be added to this screen.
g. Logo, Note the size restriction of the logo. To add a logo select the Browse button and navigate to the logo file to be added, select it and click Open. The name of the selected logo now appears next to the Browse button and the colour of the font of the Send button changes from black to red. Click the Send button to upload the logo. If the logo is larger than 210 pixels square, a fail to upload advice appears as shown in Figure 91.
Figure 91 – Logo Too Large Advice
h. Create. Click the Save button (blue circled area in Figure 90) to create the new Client Organisation. This will take several minutes to complete - a message confirming successful creation of the new Client Organisation will be displayed.
8.4.3. Update Client Organisation/Agency Details
To update or edit the details of a Client Organisation/Agency make the relevant changes in the appropriate text box, drop down list or logo file and click the Save button (blue circled area in Figure 90). A message confirming successful update of the information will be displayed.
Note: The Client Organisation abbreviation cannot be changed.
© Copyright eVALUA Pty Ltd Page 90 of 93
GETS User Manual Version: 1.01.01, Date: 18 Jul 2014
9. Glossary
9.1. Acronyms and Abbreviations
Abbreviation Description
ACE Autonomous Crown Entity
APP Annual Procurement Plan
CRI Crown Research Institute
DIS Disposal
ETCO Electronic Tender Coordination Officer
GETS Government Electronic Tenders Service
ICE Independent Crown Entity
ITP Invitation to Participate (Competitive Dialogue)
ITQ Invitation to Qualify (Prequalified Supplier List)
ITR Invitation to Register (Registered Supplier)
NOI Notice of Information
NZBN New Zealand Business Number
PO Procurement Officer
Q&A Questions and Answers (See paragraph 4.13)
RFC Request for Comment
RFI Request for Information (Market Research)
RFP Request for Proposals
RFQ Request for Quotations
RFT Request for Tenders
ROI Registration of Interest
UNSPSC United Nations Standard Products and Services Classification
9.2. Definitions
Term Definition
Child RFx An RFx which has a previous RFx in the same project flagged as a Parent RFx (See below).
Close Date The date and time by which Suppliers are notified they must submit their responses. No new subscriptions will be accepted after the close date.
© Copyright eVALUA Pty Ltd Page 91 of 93
GETS User Manual Version: 1.01.01, Date: 18 Jul 2014
Term Definition
Electronic Tender Coordination Officer
The officer in your Organisation responsible for managing the RFx process in GETS. There is usually only one ETCO account in each Organisation, however larger Organisations may have multiple ETCOs. Your Organisation will advise you who is/are the ETCO(s). (See paragraph 3.2)
GETS RFx ID A unique reference RFx number allocated by the GETS system.
Invitation to Participate (Competitive Dialogue)
An RFx type which is used as a Competitive Dialogue and is a specific process used in complex procurements - Rule 31.
The system controls applied to this type are:
Standard
Not PO Publishable
Invitation to Qualify (Prequalified Supplier List)
An RFx type which is an invitation to suppliers to apply to be included in an agency’s Pre-Qualified Supplier List as defined in the Rules of Sourcing - Rule 53.
The system controls applied to this type are:
Streamline
PO Publishable
Invitation to Register (Registered Supplier)
An RFx type which is an invitation to suppliers published on GETS, to register their interest in supplying a specific type of good or service. Suppliers who register their interest are included in a Registered Suppliers List. This is a defined term in the Rules of Sourcing - Rule 52.
The system controls applied to this type are:
Streamline
PO Publishable
Late Date The latest date and time by which Suppliers must submit their responses. For the duration between the close and late dates GETS will continue to accept Supplier responses, but will flag those responses as being late. However no new subscriptions are accepted. Suppliers are not notified of this time and date.
Notice of Information
An RFx type which is used as a general notice which may or may not relate to a procurement.
The system controls applied to this type are:
Streamline
PO Publishable
Open Date The date and time that the RFx will be published on GETS and made available to the public or select Suppliers.
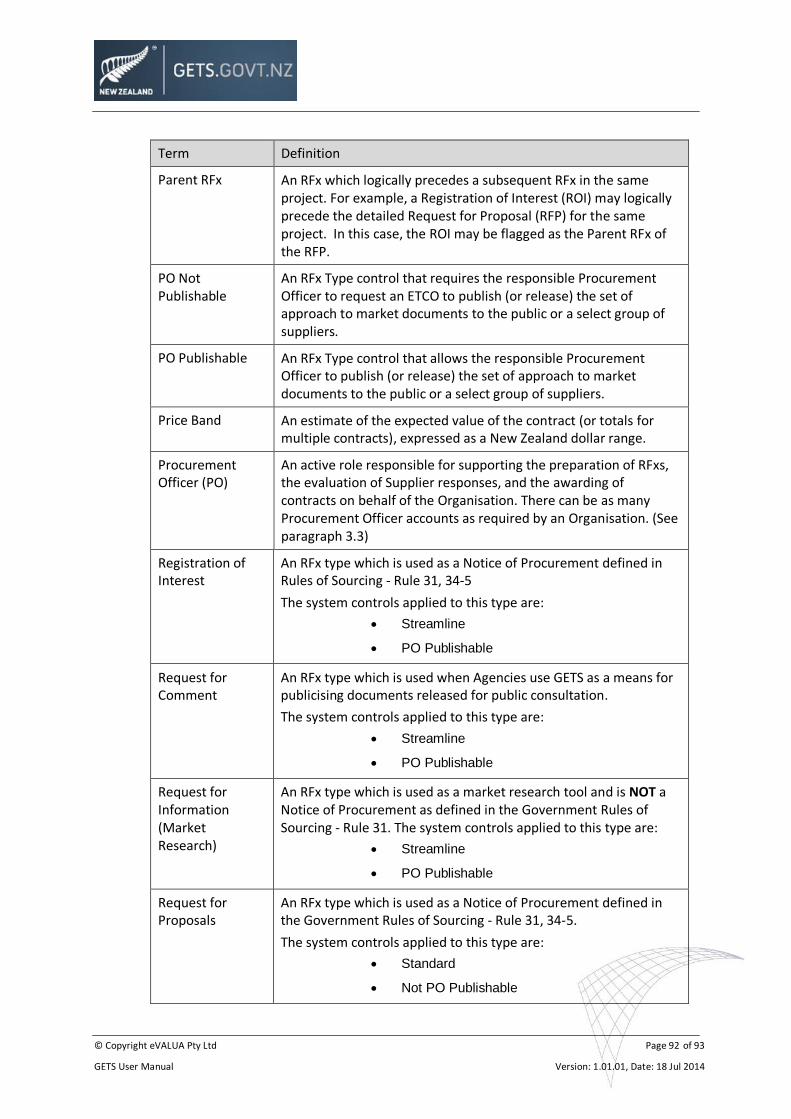
© Copyright eVALUA Pty Ltd Page 92 of 93
GETS User Manual Version: 1.01.01, Date: 18 Jul 2014
Term Definition
Parent RFx An RFx which logically precedes a subsequent RFx in the same project. For example, a Registration of Interest (ROI) may logically precede the detailed Request for Proposal (RFP) for the same project. In this case, the ROI may be flagged as the Parent RFx of the RFP.
PO Not Publishable
An RFx Type control that requires the responsible Procurement Officer to request an ETCO to publish (or release) the set of approach to market documents to the public or a select group of suppliers.
PO Publishable An RFx Type control that allows the responsible Procurement Officer to publish (or release) the set of approach to market documents to the public or a select group of suppliers.
Price Band An estimate of the expected value of the contract (or totals for multiple contracts), expressed as a New Zealand dollar range.
Procurement Officer (PO)
An active role responsible for supporting the preparation of RFxs, the evaluation of Supplier responses, and the awarding of contracts on behalf of the Organisation. There can be as many Procurement Officer accounts as required by an Organisation. (See paragraph 3.3)
Registration of Interest
An RFx type which is used as a Notice of Procurement defined in Rules of Sourcing - Rule 31, 34-5
The system controls applied to this type are:
Streamline
PO Publishable
Request for Comment
An RFx type which is used when Agencies use GETS as a means for publicising documents released for public consultation.
The system controls applied to this type are:
Streamline
PO Publishable
Request for Information (Market Research)
An RFx type which is used as a market research tool and is NOT a Notice of Procurement as defined in the Government Rules of Sourcing - Rule 31. The system controls applied to this type are:
Streamline
PO Publishable
Request for Proposals
An RFx type which is used as a Notice of Procurement defined in the Government Rules of Sourcing - Rule 31, 34-5.
The system controls applied to this type are:
Standard
Not PO Publishable
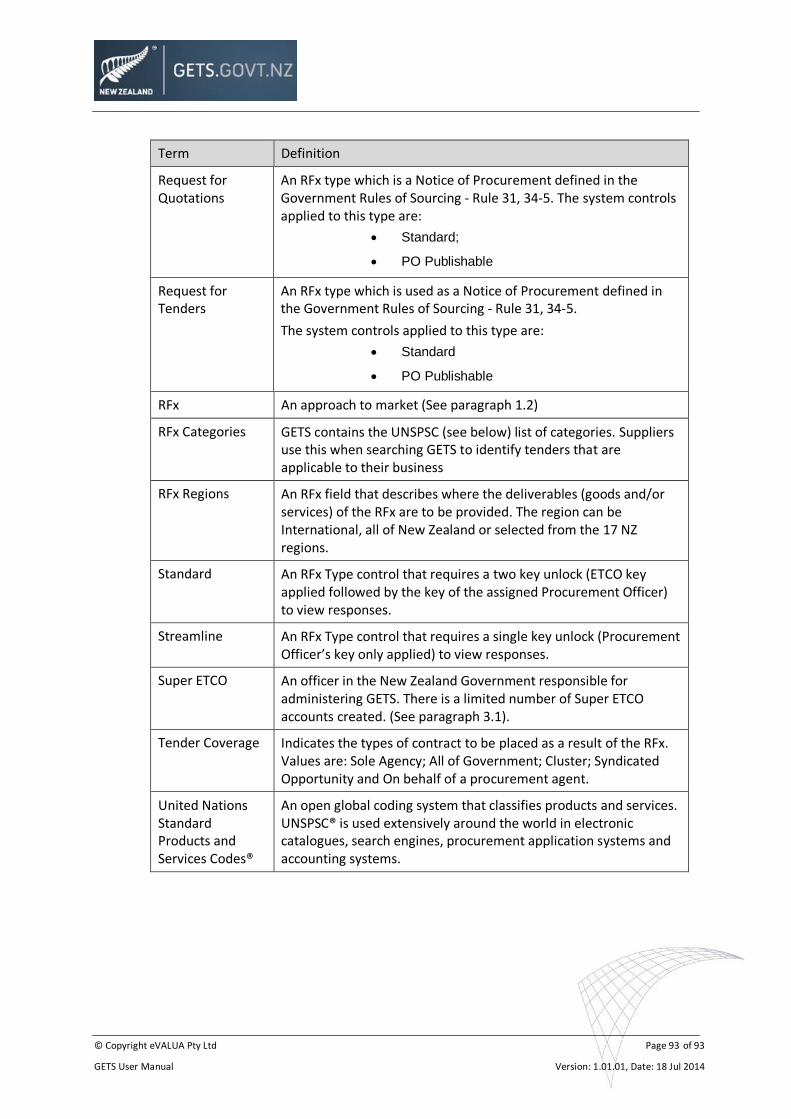
© Copyright eVALUA Pty Ltd Page 93 of 93
GETS User Manual Version: 1.01.01, Date: 18 Jul 2014
Term Definition
Request for Quotations
An RFx type which is a Notice of Procurement defined in the Government Rules of Sourcing - Rule 31, 34-5. The system controls applied to this type are:
Standard;
PO Publishable
Request for Tenders
An RFx type which is used as a Notice of Procurement defined in the Government Rules of Sourcing - Rule 31, 34-5.
The system controls applied to this type are:
Standard
PO Publishable
RFx An approach to market (See paragraph 1.2)
RFx Categories GETS contains the UNSPSC (see below) list of categories. Suppliers use this when searching GETS to identify tenders that are applicable to their business
RFx Regions An RFx field that describes where the deliverables (goods and/or services) of the RFx are to be provided. The region can be International, all of New Zealand or selected from the 17 NZ regions.
Standard An RFx Type control that requires a two key unlock (ETCO key applied followed by the key of the assigned Procurement Officer) to view responses.
Streamline An RFx Type control that requires a single key unlock (Procurement Officer’s key only applied) to view responses.
Super ETCO An officer in the New Zealand Government responsible for administering GETS. There is a limited number of Super ETCO accounts created. (See paragraph 3.1).
Tender Coverage Indicates the types of contract to be placed as a result of the RFx. Values are: Sole Agency; All of Government; Cluster; Syndicated Opportunity and On behalf of a procurement agent.
United Nations Standard Products and Services Codes®
An open global coding system that classifies products and services. UNSPSC® is used extensively around the world in electronic catalogues, search engines, procurement application systems and accounting systems.


![[Shinobi] Claymore 096](https://img.pdfslide.us/doc/110x75/568c485e1a28ab49168fdf2e/shinobi-claymore-096.jpg)