Embed Size (px)
Citation preview
Get started with NarratorContent provided by MicrosoftApplies to: Windows 10
Narrator is a screen-reading app built into Windows 10. This guide describes how to use Narrator with the Windows 10 April 2018 Update on desktop PCs, providing you with enough info to start exploring Windows, using apps, and browsing the web. It’s written for those who use a screen reader regularly.
To use this guide, choose a link from the following table of contents. When you’re done reading a chapter or appendix, select the Back button in your browser to return to this page and select another chapter. There are also links at the end of each chapter and appendix to go to the next chapter or return to this table of contents.
Following the table of contents on this page, there is a section about what's new in Narrator in the Windows 10 April 2018 Update.
NoteThis content is available online. This document was up to date as of July 17, 2018. You can also download a previous version in braille (US English non-UEB grade 2 braille). To obtain additional languages or grades, contact the Disability Answer Desk.
Table of contentsChapter What's in itChapter 1: Introducing Narrator
An overview of Narrator including how to start and stop it.
Chapter 2: Learning Narrator basics
How to get around the screen, find and open apps, change what Narrator reads, and adjust speech rate and volume.
Chapter 3: Using scan mode
How to use scan mode to navigate apps, email, and the web.
Chapter 4: Reading text How to read and get info about text, such as font, text color, and punctuation.
Chapter 5: Using Narrator with touch
How to use Narrator with touch, including basic gestures.
Chapter 6: Customizing Narrator
How to change how Narrator starts, determine how much feedback you hear when typing, change Narrator commands, and use third-party text-to-speech (TTS) software.
Chapter 7: Using How to use Narrator with a refreshable braille display.
Chapter What's in itNarrator with brailleAppendix A: Supported languages A list of supported languages in Narrator.
Appendix B: Narrator keyboard commands and touch gestures
A list of Narrator keyboard commands and touch gestures.
Appendix C: TTS voices A list of the text-to-speech (TTS) voices available in Narrator.
Appendix D: Supported braille displays A list of braille displays supported by Narrator.
What's newWe've made several improvements to Narrator in the Windows 10 April 2018 Update.
A fresh look for settingsEase of Access settings in Windows are now easier to discover, learn and use. Settings are grouped by ability (vision, hearing, and interaction), with the most frequently used settings listed first. To get directly to Narrator settings, press Windows logo key + Ctrl + N.
To learn more about customizing Narrator, see Chapter 6: Customizing Narrator.
Easier navigation in Windows appsHeading and landmark navigation is available in some Windows 10 apps, such as the Settings app and the Weather app, with more apps coming soon.
For more info about heading and landmark navigation, see Chapter 2: Learning Narrator basics and Chapter 3: Using scan mode.
Better reading by characterWhen reading by character, Narrator now includes the ICAO phonetic alphabet pronunciation to help differentiate between letter such as “b” and “p” by saying words like “bravo” and “papa.”
For more info about reading text, see Chapter 4: Reading text.
New audio settingsYou can now choose your audio output device with Narrator. Press Windows logo key + Ctrl + N to open Narrator settings, and then choose your device under Select Narrator audio output device.
To learn more about customizing Narrator, see Chapter 6: Customizing Narrator.
Improved responsivenessNarrator is more responsive in the latest update. When you press any key on your keyboard, Narrator will now immediately silence speech. Narrator also no longer announces navigational keys as you type, but only announces alphanumeric keys and punctuation.
To learn more about customizing Narrator, see Chapter 6: Customizing Narrator.
Braille improvementsIt’s now easier to switch between different braille drivers if you use more than one screen reader. To do this, press Windows logo key + Ctrl + N to open Narrator settings, and select an option under Change your braille display driver.
You can now also use your serial braille display before you sign in to your PC. To do this, select the Use current settings before sign-in option in Narrator settings after you’ve installed braille and selected your preferred settings.
For more info, see Chapter 7: Using Narrator with braille.
Safe mode and Narrator cursor supportNarrator now works when in safe mode. For additional assistance working in safe mode, contact the Disability Answer Desk.
The Narrator cursor and system focus are now synced by default.
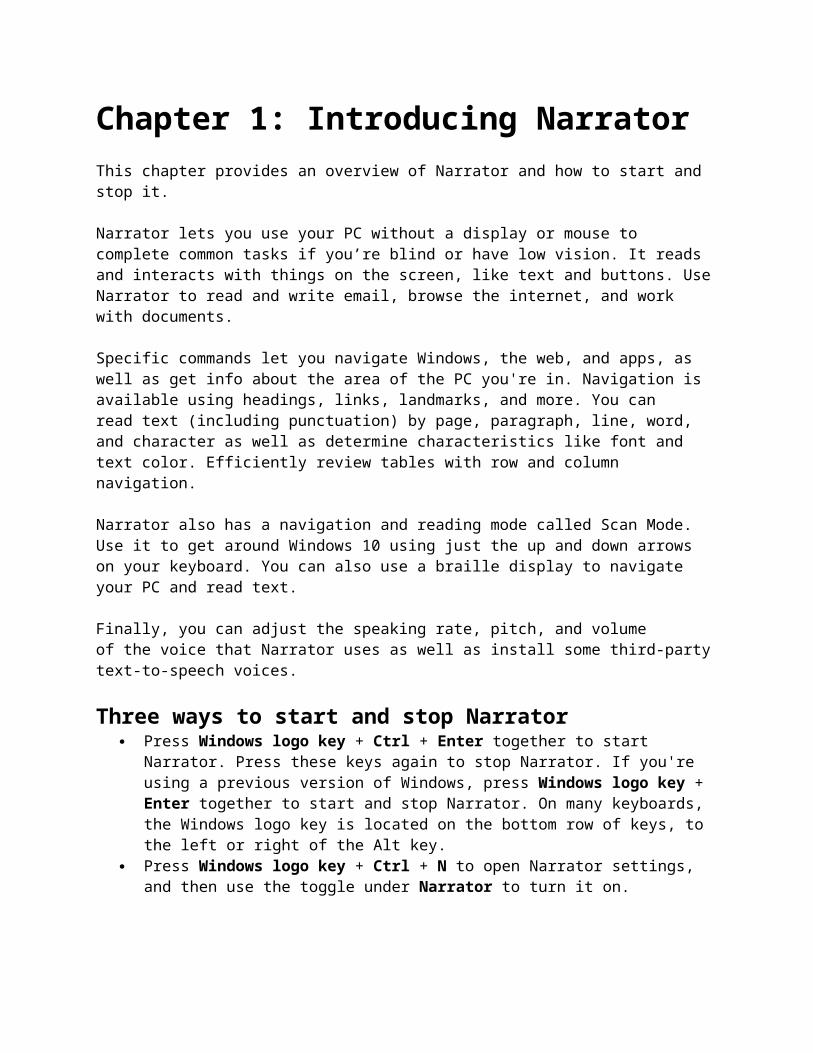
Chapter 1: Introducing NarratorThis chapter provides an overview of Narrator and how to start and stop it.
Narrator lets you use your PC without a display or mouse to complete common tasks if you’re blind or have low vision. It reads and interacts with things on the screen, like text and buttons. Use Narrator to read and write email, browse the internet, and work with documents.
Specific commands let you navigate Windows, the web, and apps, as well as get info about the area of the PC you're in. Navigation is available using headings, links, landmarks, and more. You can read text (including punctuation) by page, paragraph, line, word, and character as well as determine characteristics like font and text color. Efficiently review tables with row and column navigation.
Narrator also has a navigation and reading mode called Scan Mode. Use it to get around Windows 10 using just the up and down arrows on your keyboard. You can also use a braille display to navigate your PC and read text.
Finally, you can adjust the speaking rate, pitch, and volume of the voice that Narrator uses as well as install some third-party text-to-speech voices.
Three ways to start and stop Narrator Press Windows logo key + Ctrl + Enter together to start Narrator.
Press these keys again to stop Narrator. If you're using a previous version of Windows, press Windows logo key + Enter together to start and stop Narrator. On many keyboards, the Windows logo key is located on the bottom row of keys, to the left or right of the Alt key.
Press Windows logo key + Ctrl + N to open Narrator settings, and then use the toggle under Narrator to turn it on.
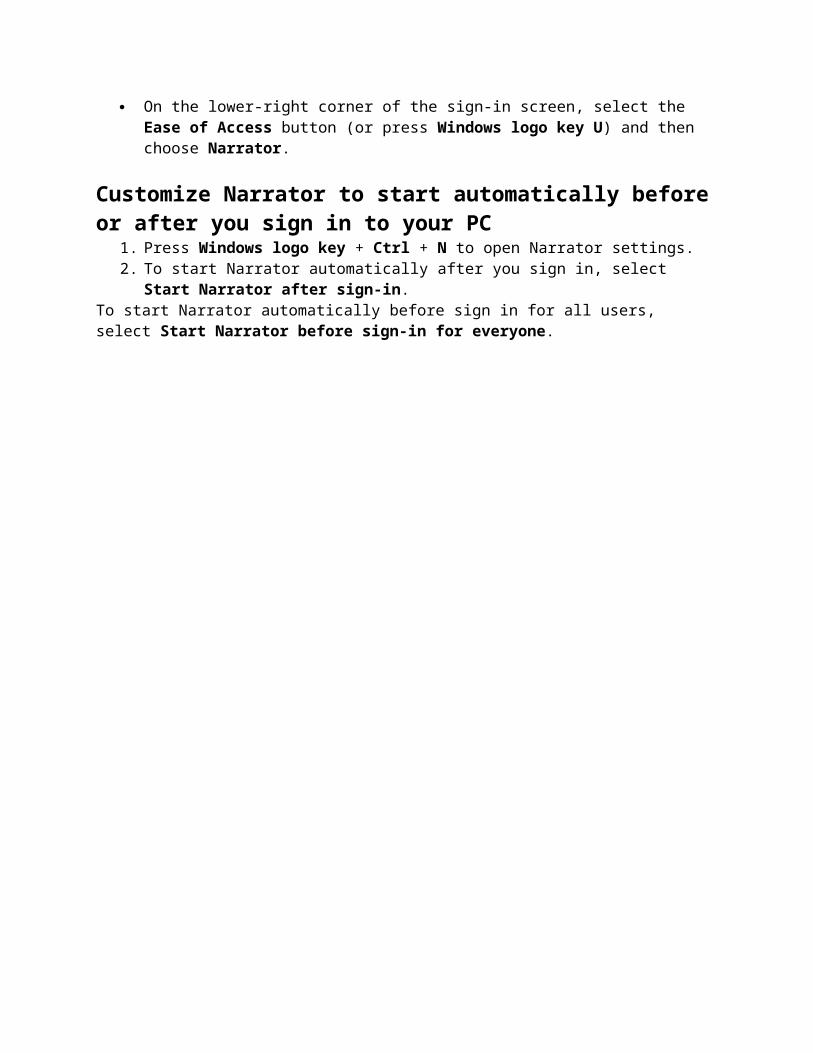
On the lower-right corner of the sign-in screen, select the Ease of Access button (or press Windows logo key U) and then choose Narrator.
Customize Narrator to start automatically before or after you sign in to your PC
1. Press Windows logo key + Ctrl + N to open Narrator settings.2. To start Narrator automatically after you sign in, select Start Narrator
after sign-in.To start Narrator automatically before sign in for all users, select Start Narrator before sign-in for everyone.
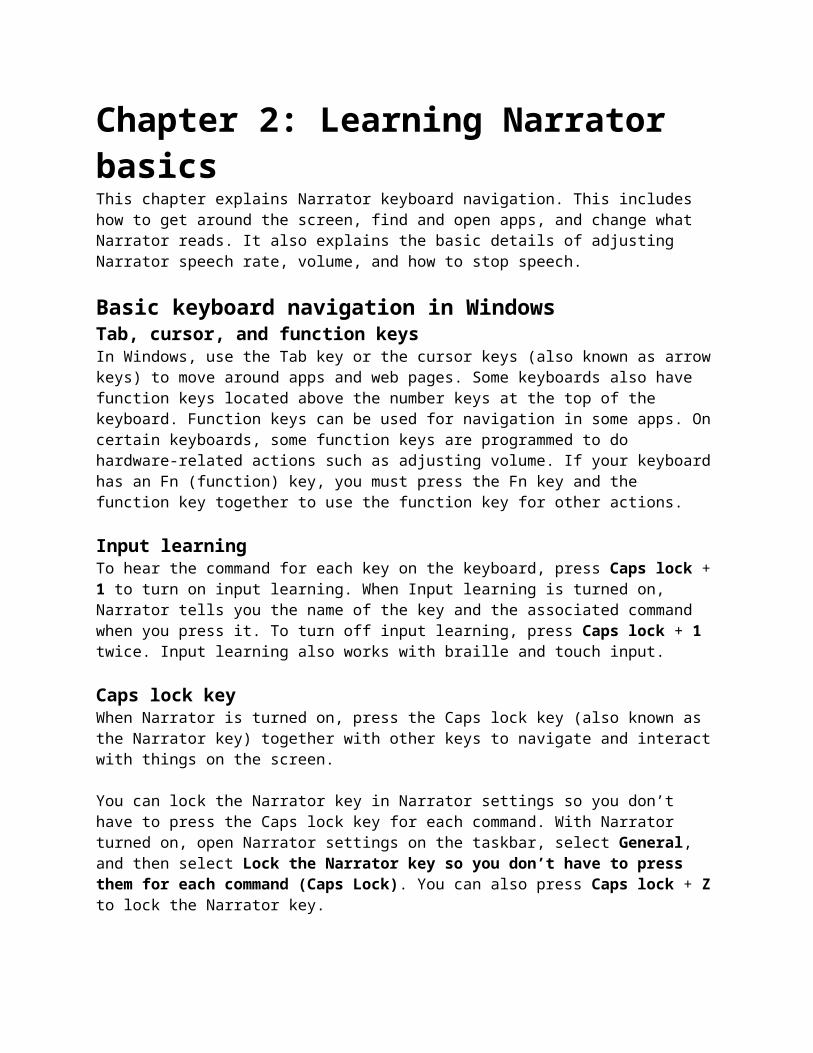
Chapter 2: Learning Narrator basicsThis chapter explains Narrator keyboard navigation. This includes how to get around the screen, find and open apps, and change what Narrator reads. It also explains the basic details of adjusting Narrator speech rate, volume, and how to stop speech.
Basic keyboard navigation in WindowsTab, cursor, and function keysIn Windows, use the Tab key or the cursor keys (also known as arrow keys) to move around apps and web pages. Some keyboards also have function keys located above the number keys at the top of the keyboard. Function keys can be used for navigation in some apps. On certain keyboards, some function keys are programmed to do hardware-related actions such as adjusting volume. If your keyboard has an Fn (function) key, you must press the Fn key and the function key together to use the function key for other actions.
Input learningTo hear the command for each key on the keyboard, press Caps lock + 1 to turn on input learning. When Input learning is turned on, Narrator tells you the name of the key and the associated command when you press it. To turn off input learning, press Caps lock + 1 twice. Input learning also works with braille and touch input.
Caps lock keyWhen Narrator is turned on, press the Caps lock key (also known as the Narrator key) together with other keys to navigate and interact with things on the screen.
You can lock the Narrator key in Narrator settings so you don’t have to press the Caps lock key for each command. With Narrator turned on, open Narrator settings on the taskbar, select General, and then select Lock the Narrator key so you don’t have to press them for each command (Caps Lock). You can also press Caps lock + Z to lock the Narrator key.
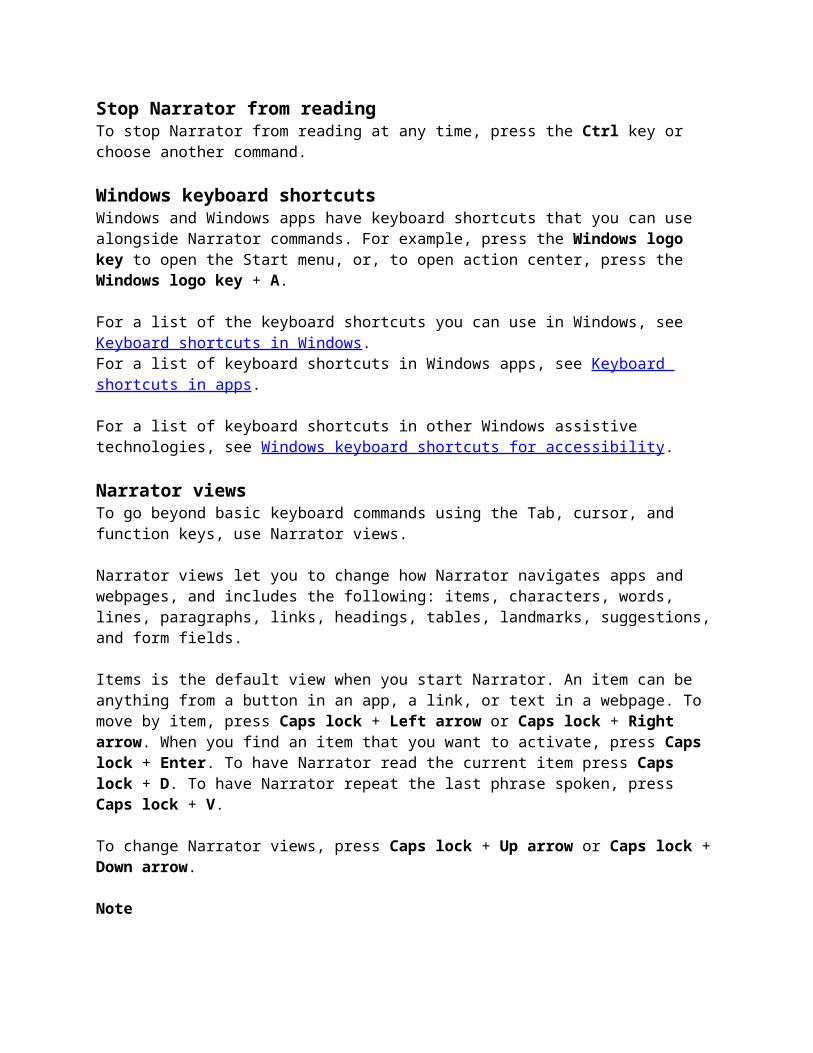
Stop Narrator from readingTo stop Narrator from reading at any time, press the Ctrl key or choose another command.
Windows keyboard shortcutsWindows and Windows apps have keyboard shortcuts that you can use alongside Narrator commands. For example, press the Windows logo key to open the Start menu, or, to open action center, press the Windows logo key + A.
For a list of the keyboard shortcuts you can use in Windows, see Keyboard shortcuts in Windows.For a list of keyboard shortcuts in Windows apps, see Keyboard shortcuts in apps.
For a list of keyboard shortcuts in other Windows assistive technologies, see Windows keyboard shortcuts for accessibility.
Narrator viewsTo go beyond basic keyboard commands using the Tab, cursor, and function keys, use Narrator views.
Narrator views let you to change how Narrator navigates apps and webpages, and includes the following: items, characters, words, lines, paragraphs, links, headings, tables, landmarks, suggestions, and form fields.
Items is the default view when you start Narrator. An item can be anything from a button in an app, a link, or text in a webpage. To move by item, press Caps lock + Left arrow or Caps lock + Right arrow. When you find an item that you want to activate, press Caps lock + Enter. To have Narrator read the current item press Caps lock + D. To have Narrator repeat the last phrase spoken, press Caps lock + V.
To change Narrator views, press Caps lock + Up arrow or Caps lock + Down arrow.
NoteNot all views are always available. For example, views such as lines, paragraphs, and tables are typically available only when text is available to read, such as in webpages or emails. SuggestionsSuggestions are available when you enter information in a text box in some apps and parts of Windows. For example, when you enter text in the search box after pressing the Windows logo key, suggestions are provided as you type. When a suggestion is available, Narrator indicates it by playing a sound and voice message.
When a suggestion is available, press Caps lock + Down arrow to change to Suggestions view, and then Caps lock + Left arrow or Caps lock + Right arrow to move to the suggestion, and then Caps Lock + Enter to select it. Or, press the Up arrow key and Down arrow key to move through suggestions and press Enter to select one.
LandmarksLandmarks are groups of items that are available in some apps and webpages. In Windows 10, Microsoft Store and Weather apps also have landmarks. Some
Windows features like the Start menu also have landmarks. To see if a landmark is available, press Caps lock + Up arrow to switch to landmarks view, and then use Caps lock + Left arrow or Caps lock + Right arrow to move through landmarks.
Get around apps and web pagesFind and open appsTo quickly find an app in Windows 10, press the Windows logo key on your keyboard to open the Start menu and place focus in the search box. Type the name of the app that you’re looking for and press the Enter key to open it.
Switch between appsTo switch between open apps on your PC, hold down the Alt key and then press the Tab key. Narrator will speak the name of open apps as you cycle through them. When you find the app that you want to use, release both keys.
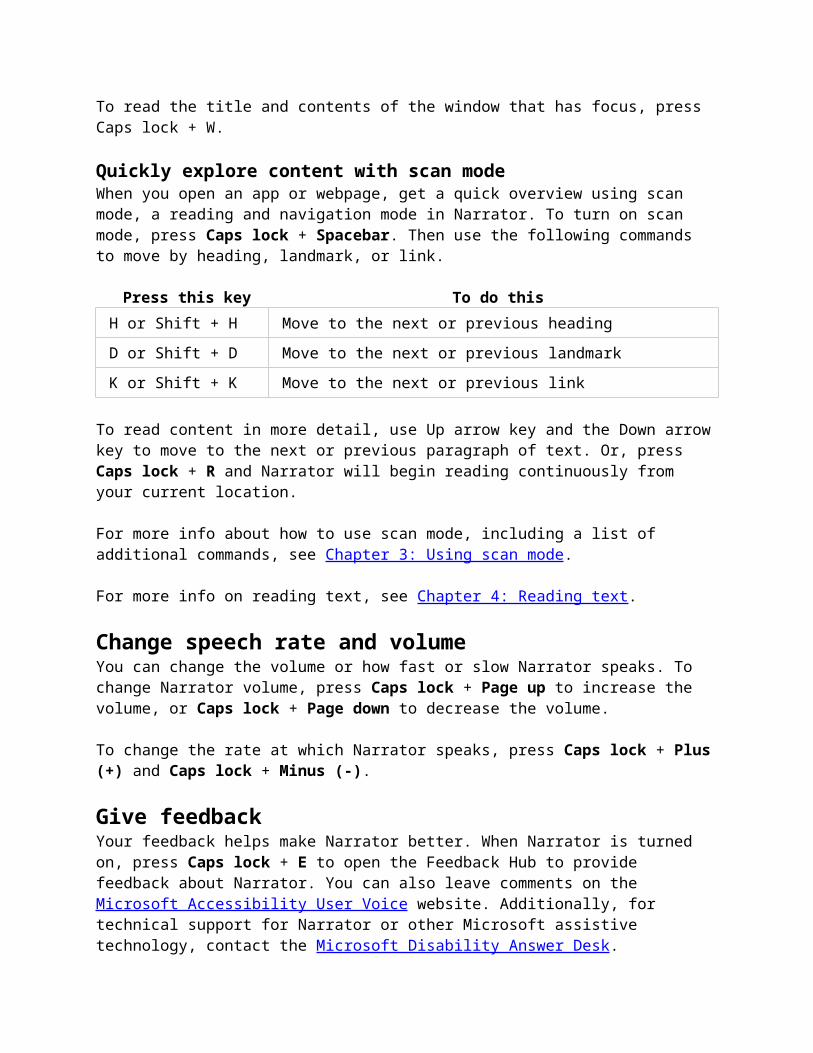
If at any time you need to know which app or Window has focus, press Caps lock + T to read the title of the window that has focus. To read the title and contents of the window that has focus, press Caps lock + W.
Quickly explore content with scan modeWhen you open an app or webpage, get a quick overview using scan mode, a reading and navigation mode in Narrator. To turn on scan mode, press Caps lock + Spacebar. Then use the following commands to move by heading, landmark, or link.
Press this key To do this H or Shift + H Move to the next or previous heading D or Shift + D Move to the next or previous landmark K or Shift + K Move to the next or previous link To read content in more detail, use Up arrow key and the Down arrow key to move to the next or previous paragraph of text. Or, press Caps lock + R and Narrator will begin reading continuously from your current location.
For more info about how to use scan mode, including a list of additional commands, see Chapter 3: Using scan mode.
For more info on reading text, see Chapter 4: Reading text.
Change speech rate and volumeYou can change the volume or how fast or slow Narrator speaks. To change Narrator volume, press Caps lock + Page up to increase the volume, or Caps lock + Page down to decrease the volume.
To change the rate at which Narrator speaks, press Caps lock + Plus (+) and Caps lock + Minus (-).
Give feedbackYour feedback helps make Narrator better. When Narrator is turned on, press Caps lock + E to open the Feedback Hub to provide feedback about Narrator. You can also leave comments on the Microsoft Accessibility User Voice website. Additionally, for technical support for Narrator or other Microsoft assistive technology, contact the Microsoft Disability Answer Desk.
If you want to provide Microsoft with additional diagnostic and performance data when you press Caps lock + E, press Windows logo key + Ctrl + N to open Narrator settings, and then select the toggle under Help make Narrator better and then restart Narrator.

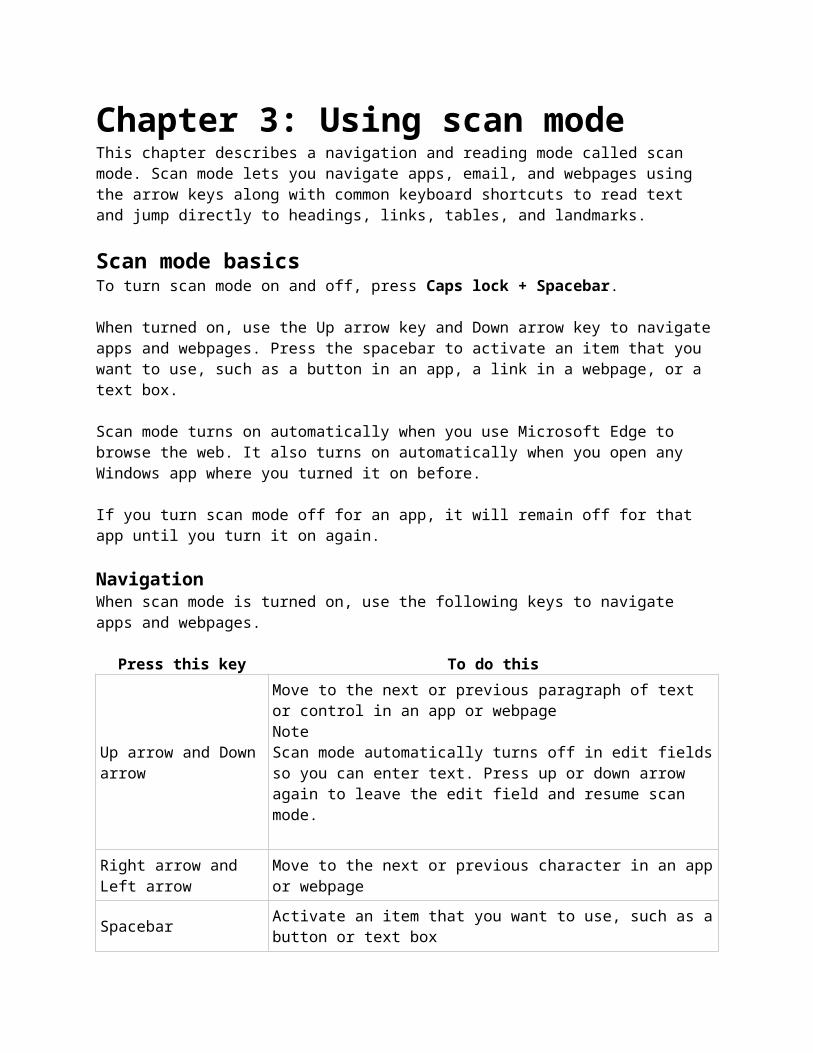
Chapter 3: Using scan modeThis chapter describes a navigation and reading mode called scan mode. Scan mode lets you navigate apps, email, and webpages using the arrow keys along with common keyboard shortcuts to read text and jump directly to headings, links, tables, and landmarks.
Scan mode basicsTo turn scan mode on and off, press Caps lock + Spacebar.
When turned on, use the Up arrow key and Down arrow key to navigate apps and webpages. Press the spacebar to activate an item that you want to use, such as a button in an app, a link in a webpage, or a text box.
Scan mode turns on automatically when you use Microsoft Edge to browse the web. It also turns on automatically when you open any Windows app where you turned it on before.
If you turn scan mode off for an app, it will remain off for that app until you turn it on again.
NavigationWhen scan mode is turned on, use the following keys to navigate apps and webpages.
Press this key To do this
Up arrow and Down arrow
Move to the next or previous paragraph of text or control in an app or webpageNoteScan mode automatically turns off in edit fields so you can enter text. Press up or down arrow again to leave the edit field and resume scan mode.
Right arrow and Left arrow
Move to the next or previous character in an app or webpage
Spacebar Activate an item that you want to use, such as a button or text box
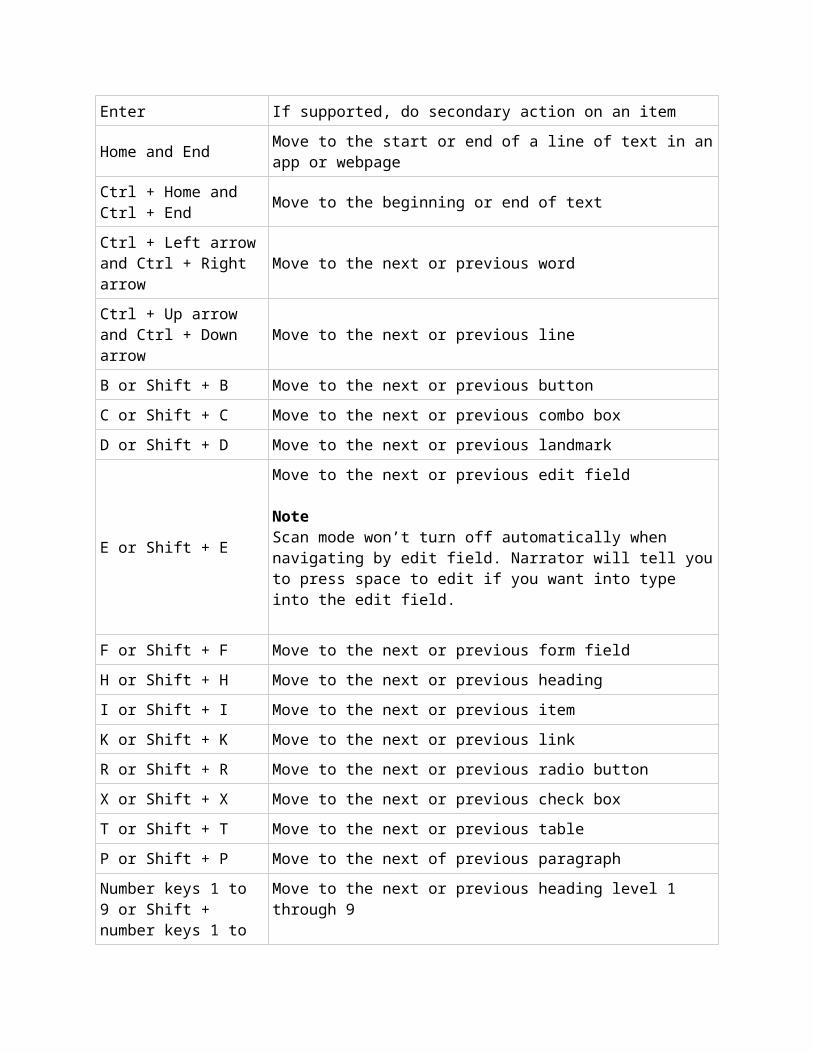
Enter If supported, do secondary action on an item
Home and End Move to the start or end of a line of text in an app or webpage
Ctrl + Home and Ctrl + End Move to the beginning or end of text
Ctrl + Left arrow and Move to the next or previous word
Ctrl + Right arrowCtrl + Up arrow and Ctrl + Down arrow Move to the next or previous line
B or Shift + B Move to the next or previous buttonC or Shift + C Move to the next or previous combo boxD or Shift + D Move to the next or previous landmark
E or Shift + E
Move to the next or previous edit field
NoteScan mode won’t turn off automatically when navigating by edit field. Narrator will tell you to press space to edit if you want into type into the edit field.
F or Shift + F Move to the next or previous form fieldH or Shift + H Move to the next or previous headingI or Shift + I Move to the next or previous itemK or Shift + K Move to the next or previous linkR or Shift + R Move to the next or previous radio buttonX or Shift + X Move to the next or previous check boxT or Shift + T Move to the next or previous tableP or Shift + P Move to the next of previous paragraphNumber keys 1 to 9 or Shift + number keys 1 to 9
Move to the next or previous heading level 1 through 9
Scan mode will turn off when you switch to a different app. You'll hear a sound from your PC indicating that scan mode is turned off. Press Caps lock + Spacebar to turn it on again.
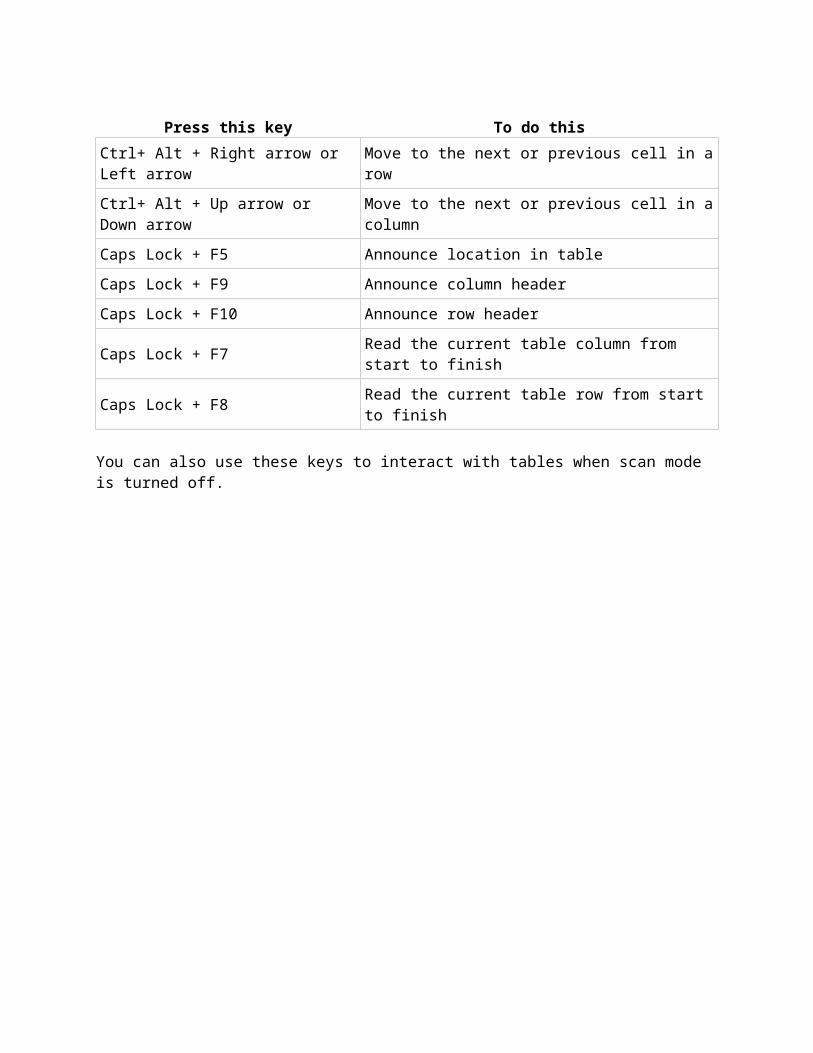
Working with tablesScan mode can help make moving through tables easier and supports common keys found in other screen readers for table navigation. Press T or Shift + T to locate a table using scan mode and then use the following keys to interact with the table.

Press this key To do thisCtrl+ Alt + Right arrow or Left arrow Move to the next or previous cell in a row
Ctrl+ Alt + Up arrow or Down arrow Move to the next or previous cell in a column
Caps Lock + F5 Announce location in tableCaps Lock + F9 Announce column headerCaps Lock + F10 Announce row header
Caps Lock + F7 Read the current table column from start to finish
Caps Lock + F8 Read the current table row from start to finish
You can also use these keys to interact with tables when scan mode is turned off.
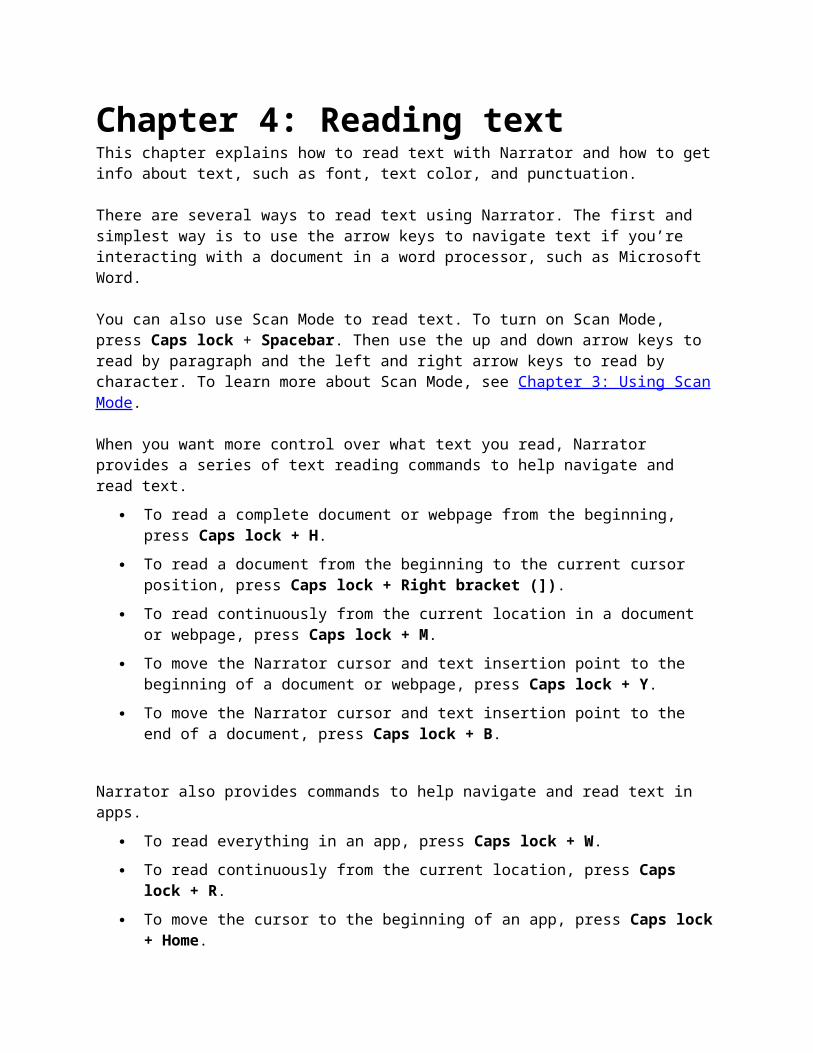
Chapter 4: Reading textThis chapter explains how to read text with Narrator and how to get info about text, such as font, text color, and punctuation.
There are several ways to read text using Narrator. The first and simplest way is to use the arrow keys to navigate text if you’re interacting with a document in a word processor, such as Microsoft Word.
You can also use Scan Mode to read text. To turn on Scan Mode, press Caps lock + Spacebar. Then use the up and down arrow keys to read by paragraph and the left and right arrow keys to read by character. To learn more about Scan Mode, see Chapter 3: Using Scan Mode.
When you want more control over what text you read, Narrator provides a series of text reading commands to help navigate and read text.
To read a complete document or webpage from the beginning, press Caps lock + H.
To read a document from the beginning to the current cursor position, press Caps lock + Right bracket (]).
To read continuously from the current location in a document or webpage, press Caps lock + M.
To move the Narrator cursor and text insertion point to the beginning of a document or webpage, press Caps lock + Y.
To move the Narrator cursor and text insertion point to the end of a document, press Caps lock + B.
Narrator also provides commands to help navigate and read text in apps. To read everything in an app, press Caps lock + W. To read continuously from the current location, press Caps lock + R. To move the cursor to the beginning of an app, press Caps lock + Home. To move the cursor to the end of an app, press Caps lock + End.
Work with paragraphs, lines, words, and charactersNarrator provides ways to read text by page, paragraph, line, word, and character.
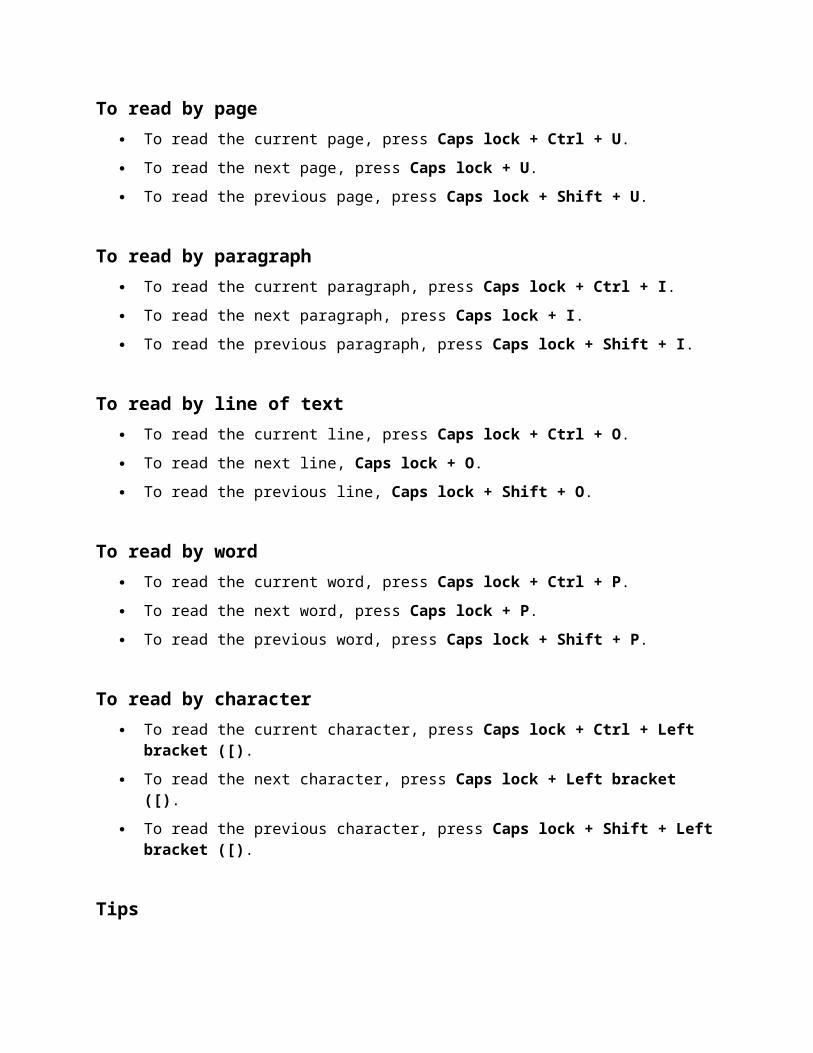
To read by page To read the current page, press Caps lock + Ctrl + U. To read the next page, press Caps lock + U. To read the previous page, press Caps lock + Shift + U.
To read by paragraph To read the current paragraph, press Caps lock + Ctrl + I. To read the next paragraph, press Caps lock + I. To read the previous paragraph, press Caps lock + Shift + I.
To read by line of text To read the current line, press Caps lock + Ctrl + O. To read the next line, Caps lock + O. To read the previous line, Caps lock + Shift + O.
To read by word To read the current word, press Caps lock + Ctrl + P. To read the next word, press Caps lock + P. To read the previous word, press Caps lock + Shift + P.
To read by character To read the current character, press Caps lock + Ctrl + Left bracket
([). To read the next character, press Caps lock + Left bracket ([). To read the previous character, press Caps lock + Shift + Left bracket
([).
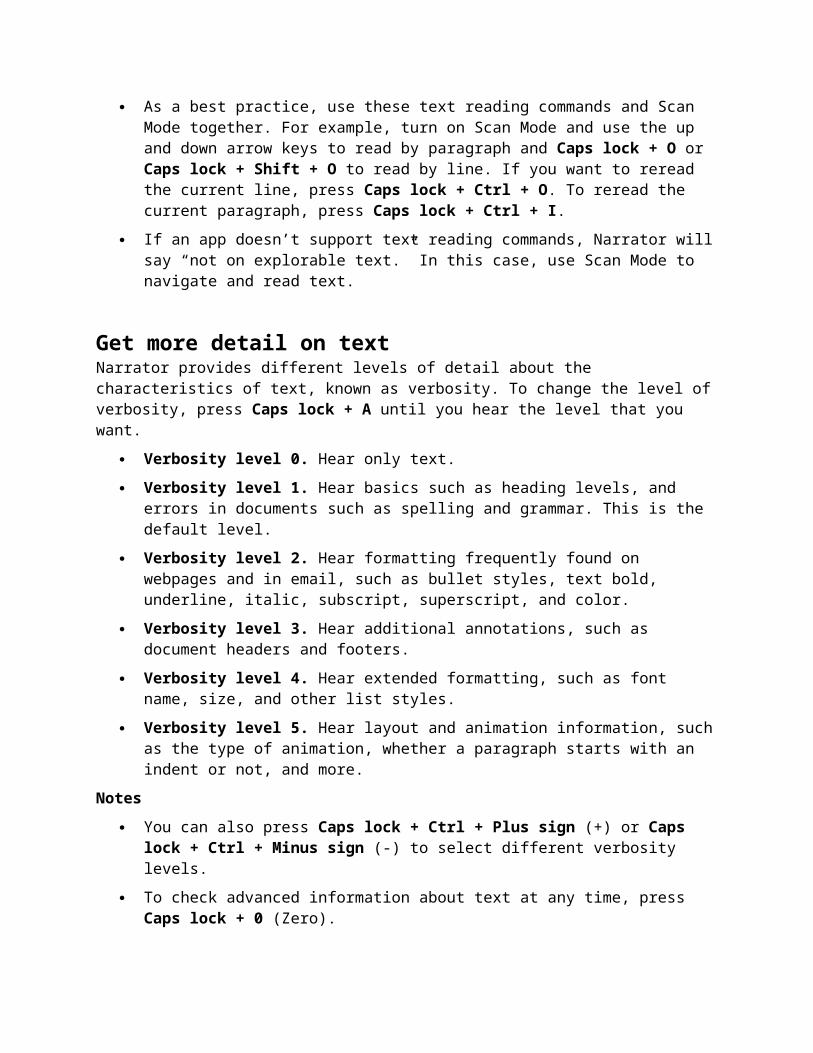
Tips As a best practice, use these text reading commands and Scan Mode
together. For example, turn on Scan Mode and use the up and down arrow keys to read by paragraph and Caps lock + O or Caps lock + Shift + O to read by line. If you want to reread the current line, press Caps lock + Ctrl + O. To reread the current paragraph, press Caps lock + Ctrl + I.

If an app doesn’t support text reading commands, Narrator will say “not on explorable text.” In this case, use Scan Mode to navigate and read text.
Get more detail on textNarrator provides different levels of detail about the characteristics of text, known as verbosity. To change the level of verbosity, press Caps lock + A until you hear the level that you want.
Verbosity level 0. Hear only text. Verbosity level 1. Hear basics such as heading levels, and errors in
documents such as spelling and grammar. This is the default level. Verbosity level 2. Hear formatting frequently found on webpages and in
email, such as bullet styles, text bold, underline, italic, subscript, superscript, and color.
Verbosity level 3. Hear additional annotations, such as document headers and footers.
Verbosity level 4. Hear extended formatting, such as font name, size, and other list styles.
Verbosity level 5. Hear layout and animation information, such as the type of animation, whether a paragraph starts with an indent or not, and more.
Notes You can also press Caps lock + Ctrl + Plus sign (+) or Caps lock +
Ctrl + Minus sign (-) to select different verbosity levels. To check advanced information about text at any time, press Caps lock +
0 (Zero).
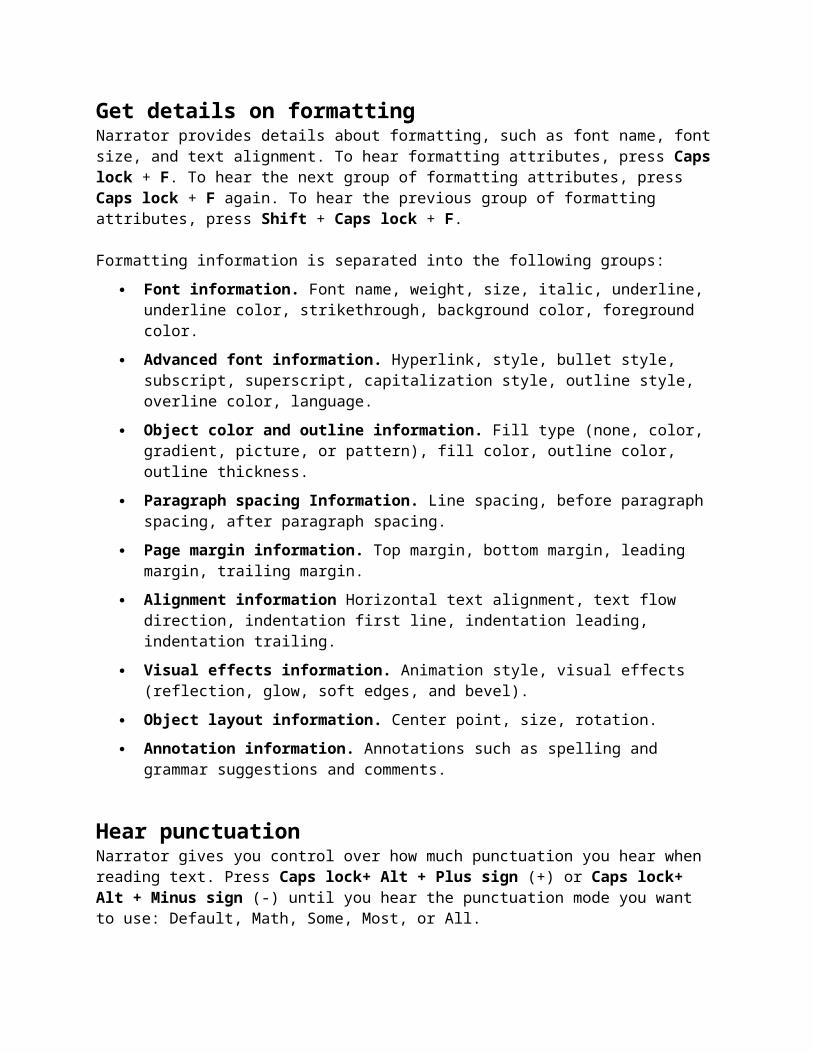
Get details on formattingNarrator provides details about formatting, such as font name, font size, and text alignment. To hear formatting attributes, press Caps lock + F. To hear the next group of formatting attributes, press Caps lock + F again. To hear the previous group of formatting attributes, press Shift + Caps lock + F.
Formatting information is separated into the following groups: Font information. Font name, weight, size, italic, underline, underline
color, strikethrough, background color, foreground color. Advanced font information. Hyperlink, style, bullet style, subscript,
superscript, capitalization style, outline style, overline color, language. Object color and outline information. Fill type (none, color, gradient,
picture, or pattern), fill color, outline color, outline thickness.
Paragraph spacing Information. Line spacing, before paragraph spacing, after paragraph spacing.
Page margin information. Top margin, bottom margin, leading margin, trailing margin.
Alignment information Horizontal text alignment, text flow direction, indentation first line, indentation leading, indentation trailing.
Visual effects information. Animation style, visual effects (reflection, glow, soft edges, and bevel).
Object layout information. Center point, size, rotation. Annotation information. Annotations such as spelling and grammar
suggestions and comments.
Hear punctuationNarrator gives you control over how much punctuation you hear when reading text. Press Caps lock+ Alt + Plus sign (+) or Caps lock+ Alt + Minus sign (-) until you hear the punctuation mode you want to use: Default, Math, Some, Most, or All.
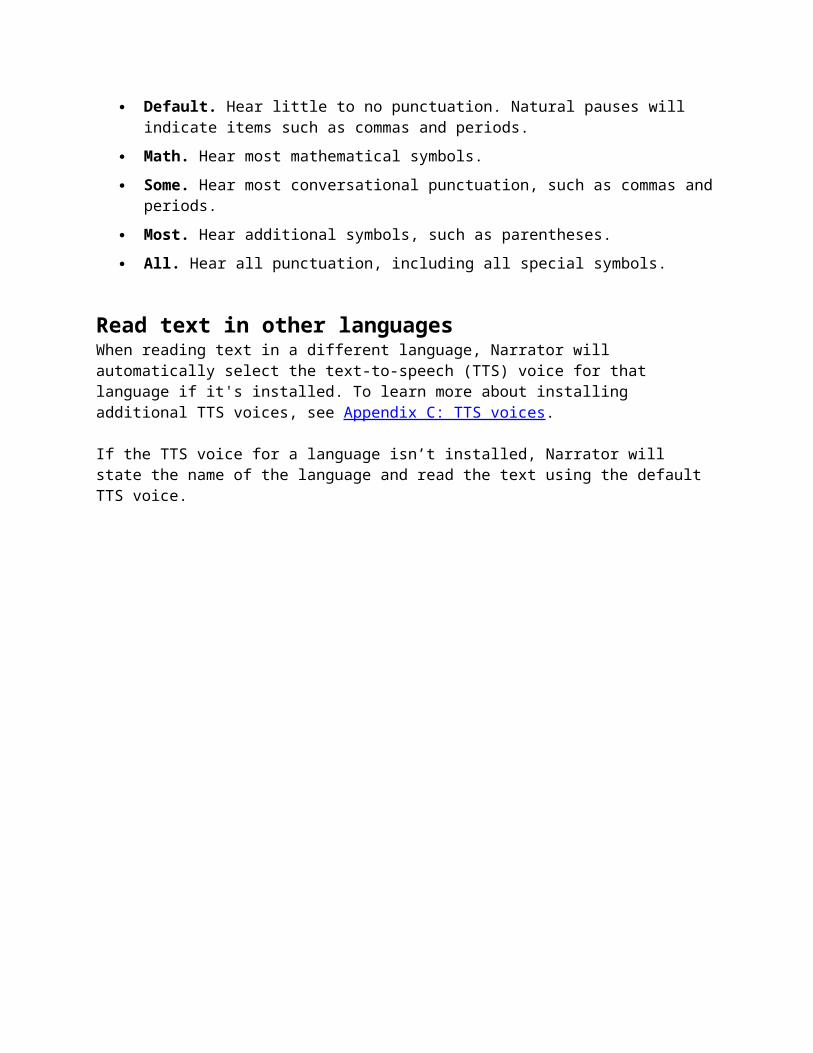
Default. Hear little to no punctuation. Natural pauses will indicate items such as commas and periods.
Math. Hear most mathematical symbols. Some. Hear most conversational punctuation, such as commas and
periods. Most. Hear additional symbols, such as parentheses. All. Hear all punctuation, including all special symbols.
Read text in other languagesWhen reading text in a different language, Narrator will automatically select the text-to-speech (TTS) voice for that language if it's installed. To learn more about installing additional TTS voices, see Appendix C: TTS voices.
If the TTS voice for a language isn’t installed, Narrator will state the name of the language and read the text using the default TTS voice.
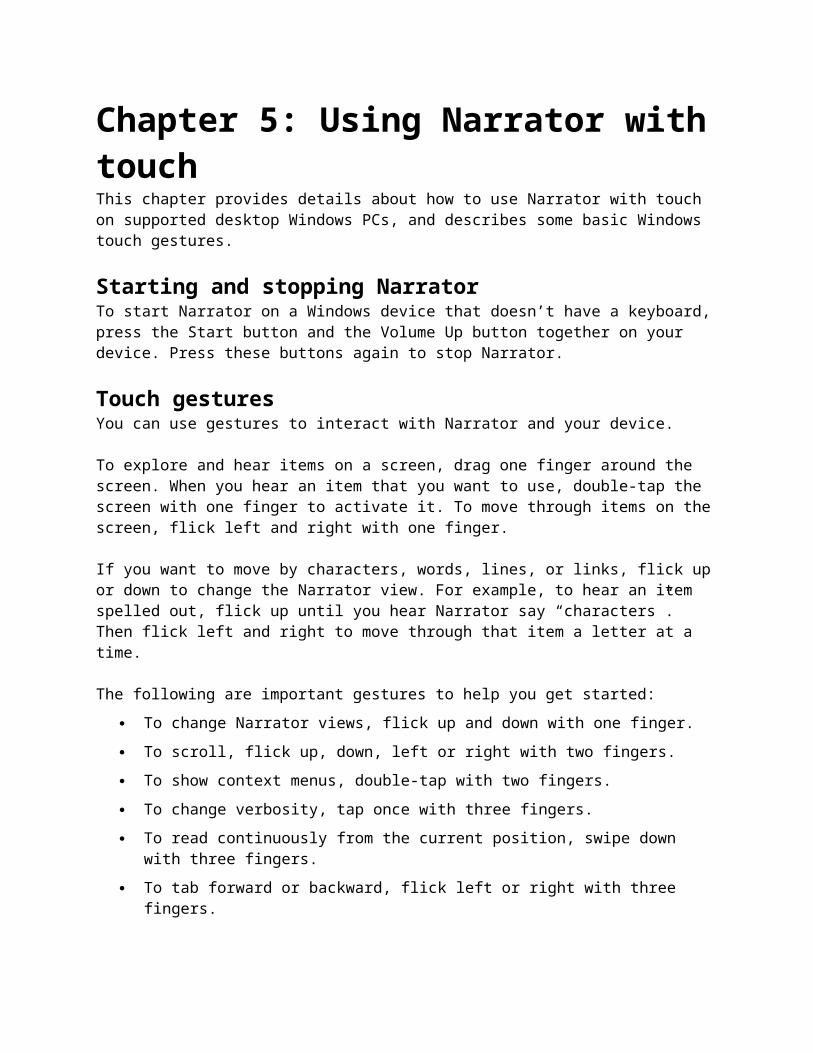
Chapter 5: Using Narrator with touchThis chapter provides details about how to use Narrator with touch on supported desktop Windows PCs, and describes some basic Windows touch gestures.
Starting and stopping NarratorTo start Narrator on a Windows device that doesn’t have a keyboard, press the Start button and the Volume Up button together on your device. Press these buttons again to stop Narrator.
Touch gesturesYou can use gestures to interact with Narrator and your device.
To explore and hear items on a screen, drag one finger around the screen. When you hear an item that you want to use, double-tap the screen with one finger to activate it. To move through items on the screen, flick left and right with one finger.
If you want to move by characters, words, lines, or links, flick up or down to change the Narrator view. For example, to hear an item spelled out, flick up until you hear Narrator say “characters”. Then flick left and right to move through that item a letter at a time.
The following are important gestures to help you get started: To change Narrator views, flick up and down with one finger. To scroll, flick up, down, left or right with two fingers. To show context menus, double-tap with two fingers. To change verbosity, tap once with three fingers. To read continuously from the current position, swipe down with three
fingers. To tab forward or backward, flick left or right with three fingers. To show the Narrator command list, triple tap with four fingers.
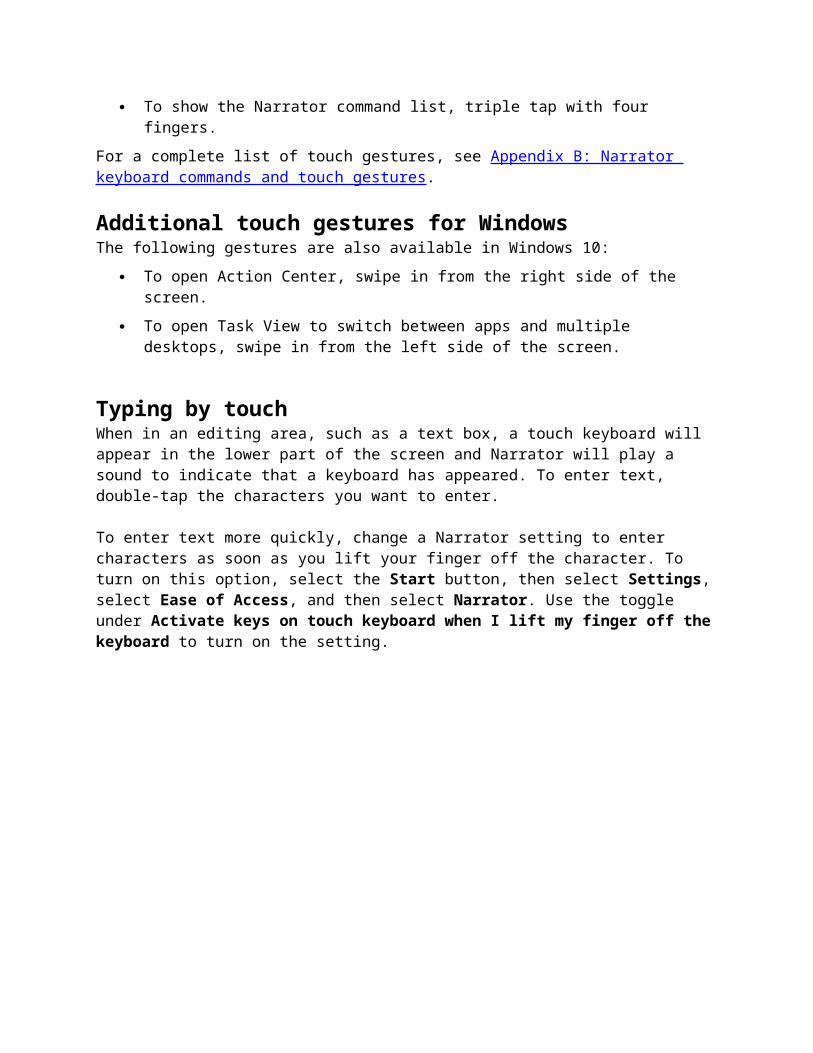
For a complete list of touch gestures, see Appendix B: Narrator keyboard commands and touch gestures.
Additional touch gestures for WindowsThe following gestures are also available in Windows 10:
To open Action Center, swipe in from the right side of the screen. To open Task View to switch between apps and multiple desktops, swipe
in from the left side of the screen.
Typing by touchWhen in an editing area, such as a text box, a touch keyboard will appear in the lower part of the screen and Narrator will play a sound to indicate that a keyboard has appeared. To enter text, double-tap the characters you want to enter.
To enter text more quickly, change a Narrator setting to enter characters as soon as you lift your finger off the character. To turn on this option, select the Start button, then select Settings, select Ease of Access, and then select Narrator. Use the toggle under Activate keys on touch keyboard when I lift my finger off the keyboard to turn on the setting.
Chapter 6: Customizing NarratorThis chapter outlines how to customize Narrator to best meet your needs, including changing how Narrator starts, how much feedback you hear when typing, whether the audio from other apps is decreased when Narrator is running, and changing Narrator commands to keyboard shortcuts of your choice. The chapter also provides details about how to use third-party text-to-speech (TTS) software to add more voices to Narrator.
Most options are in Narrator settings. To find them, open Narrator settings on the taskbar when Narrator is turned on.
Settings are separated into four categories: general settings, navigation settings, voice settings, and command settings.
Note Some settings are also available in Windows 10 Settings—press the
Windows logo key + Ctrl + N to see them. If you want everyone to use your settings before sign-in, press the
Windows logo key + Ctrl + N to open Narrator settings and then select Use current settings before sign-in. This is recommended if you want to use a serial braille display before sign-in.
General settings
Turn on the shortcut to launch Narrator. Start and stop Narrator using the Windows logo key + Ctrl + Enter on a keyboard, or the Windows button + Volume up button on a touch device.
Lock the Narrator key (Caps lock). You don’t have to press the Narrator key (Caps lock) to enter a command. For example, to move to the next link, press L instead of Caps lock + L.
Hear characters as you type. Characters are announced immediately after you type them. This setting can be toggled by pressing Caps lock + F12.
Hear words you type. Typed words are announced immediately after you type them.
Read out voiced Narrator errors. Narrator announces errors such as “no next landmark” or “no next item.”
Highlight cursor. The Narrator cursor is highlighted with a blue focus box.
Play audio cues. Narrator plays a sound when you do things like perform a Narrator command or when suggestions are available.
Read UI hints. Narrator announces how to interact with items.
Lower the volume of other apps. The audio volume from other apps is lowered so that you can hear Narrator.
Retain notifications. Notifications can be retained from 30 seconds to 10 minutes.
Navigation settings Read and interact with the screen using the mouse. When this is
turned on, Narrator reads what is under the mouse cursor. Use Numeric keypad to move the mouse.
Activate keys on the touch keyboard when you lift your finger. Characters are entered as soon as you lift your finger off the touch keyboard.
Narrator cursor follows keyboard focus. When this is turned on, the Narrator cursor and the system cursor will be synchronized when possible.
Enable the text insertion point to follow the Narrator cursor. When this is turned on, Narrator will move the text insertion point when navigating by views such as characters and words.
Select the Narrator cursor movement mode. Two modes are available: normal and advanced. Normal mode allows Narrator to move between various items such as links, tables, and other elements. Advanced mode lets you use the four arrow keys to move the Narrator cursor through a programmatic representation of an application.
Voice settings Speed. Control the speed at which Narrator speaks. Volume. Adjust the volume at which Narrator speaks. Pitch. Adjust the pitch of Narrator voice. Select a different voice. Choose from different available Narrator voices
in your language.
Faster voicesNarrator voices average a maximum of approximately 400 words per minute. However, the following voices offer a rate of approximately 800 words per minute:
Microsoft David Microsoft Zira Microsoft Mark
Additional voicesNarrator can be used with SAPI 5-based speech synthesizers. Once installed, voices will appear in the list of voices for you to choose.Here are some available options from third-party providers:
Harpo Software CereProc NextUp Eloquence Vocalizer Expressive
NoteThese options are provided for informational purposes only. Microsoft does not endorse any particular third-party software, nor can it offer any support for their installation and use. For help with any of these products, please contact the original manufacturer.
Audio settingsNarrator also lets you choose your audio output device. Press Windows logo key + Ctrl + N to open Narrator settings, and then choose your device under Select Narrator audio output device.
Command settingsCustomize Narrator keyboard shortcuts to allow for improved control and usability:
Customize a Narrator keyboard shortcut1. Choose the command to customize.2. Select Change command keyboard shortcut.3. In the Type a keyboard shortcut window, type the keyboard shortcut
you want to use on your keyboard. Use any combination of modifier keys (Control, Shift, Alt, Caps lock, or the Windows logo key) together with a non-modifier key. Use function and numeric keypad keys without any modifiers.
Select Restore default to return all commands back to their default settings.
Hear different levels of contextNarrator can provide different levels of context as you navigate your PC. You control how much context is heard, and if context is read before or after the current item.
To change the amount of context you hear, and whether context is heard before or after the current item, select the Start button, then select Settings, select
Ease of Access, and select Narrator. Under Amount of contextual reading for controls and buttons, choose from the following options:
No context reading Play sounds only Read only immediate context Read immediate context name and type Read full context of new control Read full context of both the old control and the new control
Under Order of contextual reading for controls and buttons, choose whether you want to hear context before or after the current item.
You can also use the following keyboard shortcuts: To hear the current context at any time, press Caps lock + forward
slash (/). To change the level of context that’s read, press Caps lock + Alt +
forward slash (/). To change whether context is read before or after the current item, press
Caps lock + Ctrl + forward slash (/).
Chapter 7: Using Narrator with brailleThis chapter provides information about how to use a braille display with Narrator. It includes info about how to install braille on your PC, navigate your PC, and read text.Narrator supports braille displays from several manufacturers. To learn more about what braille displays are supported, including specific key commands for each display, see Appendix D: Supported Braille Displays.
NoteNarrator braille is currently in beta, and your feedback can help make it better. When Narrator is running, press Caps lock + E to open the Feedback Hub. You can also leave comments on the Microsoft Accessibility User Voice website. For help with Narrator braille, contact the Disability Answer Desk.
Install brailleNarrator works with braille displays that use a USB or serial port. To use your braille display with Narrator, download and install braille:
1. Press the Windows logo key + Ctrl + N to open Narrator settings.2. Under Braille (beta), select Download and install braille. (This will
take some time. Windows will also ask if you’re sure that you want to allow Windows to make changes to your PC.)
3. When download and installation is complete, select Enable braille.4. Next, add your braille display. Select Add a braille display and then
choose your braille display manufacturer and connection type (USB or serial port).
Using your braille display with other screen readersIf you already use your braille display with another screen reader, or Narrator doesn’t work immediately with your braille display, you may need to change the driver Windows uses to communicate with your display. To do this, press Windows logo key + Ctrl + N to open Narrator settings, and select an option under Change your braille display driver. The driver used by Narrator is preceded by "(Narrator)."
NoteYou only need to change your driver if a different driver is installed for your braille display. If you’re not sure, contact your braille display manufacturer.
Uninstalling brailleTo remove Narrator braille from your PC:
1. Press Windows logo key + I to open Settings.2. Select Apps, choose Apps & features, and then select Manage
optional features.3. Select Accessibility – Braille support, and then choose Uninstall.
Change braille settingsDifferent settings let you customize how you use braille with Narrator. To get to them, press the Windows logo key + Ctrl + N to open Narrator settings. Then, under Braille (beta) choose from the following options:
Language for input and output Table type for input and output (grade 1, grade 2, or 8 dot computer
braille) Notification timeout How the cursor is displayed and if you want the cursor to blink on your
braille displayIf you want to use a serial braille display before you sign-in to your PC, select Use current settings before sign-in after choosing your preferred settings.
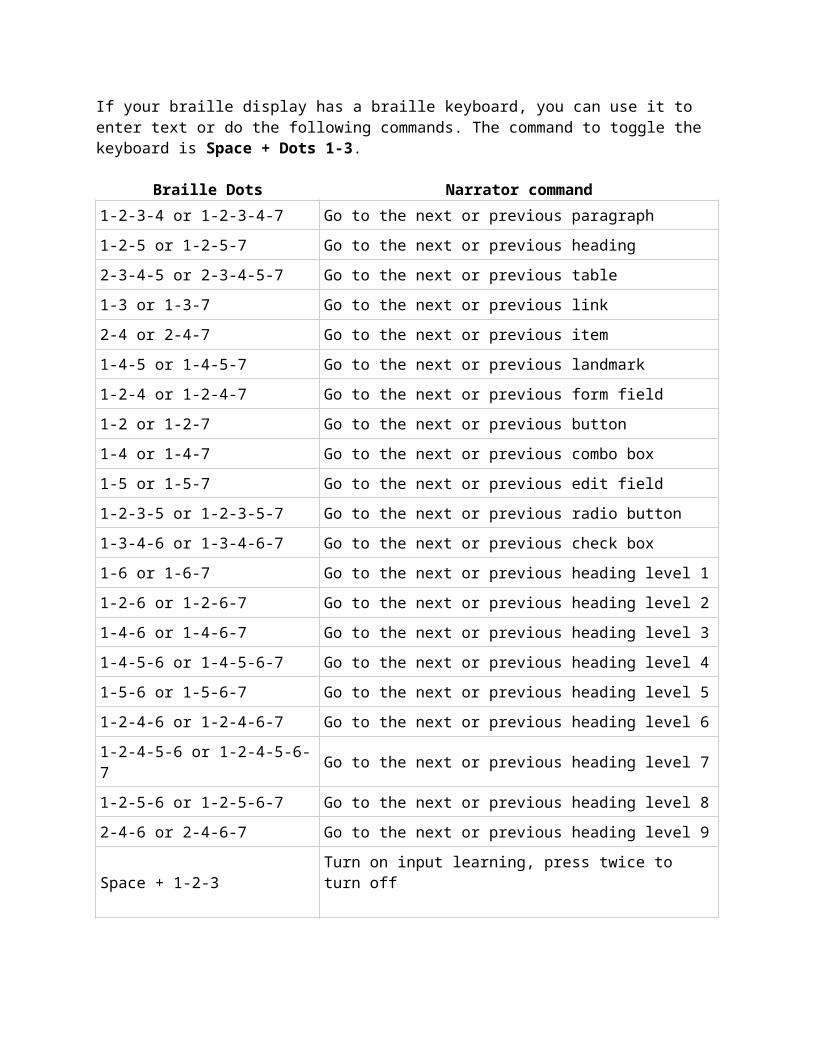
Braille keyboard commandsIf your braille display has a braille keyboard, you can use it to enter text or do the following commands. The command to toggle the keyboard is Space + Dots 1-3.
Braille Dots Narrator command1-2-3-4 or 1-2-3-4-7 Go to the next or previous paragraph1-2-5 or 1-2-5-7 Go to the next or previous heading2-3-4-5 or 2-3-4-5-7 Go to the next or previous table1-3 or 1-3-7 Go to the next or previous link2-4 or 2-4-7 Go to the next or previous item1-4-5 or 1-4-5-7 Go to the next or previous landmark1-2-4 or 1-2-4-7 Go to the next or previous form field1-2 or 1-2-7 Go to the next or previous button1-4 or 1-4-7 Go to the next or previous combo box1-5 or 1-5-7 Go to the next or previous edit field1-2-3-5 or 1-2-3-5-7 Go to the next or previous radio button1-3-4-6 or 1-3-4-6-7 Go to the next or previous check box
Braille Dots Narrator command1-6 or 1-6-7 Go to the next or previous heading level 11-2-6 or 1-2-6-7 Go to the next or previous heading level 21-4-6 or 1-4-6-7 Go to the next or previous heading level 31-4-5-6 or 1-4-5-6-7 Go to the next or previous heading level 41-5-6 or 1-5-6-7 Go to the next or previous heading level 51-2-4-6 or 1-2-4-6-7 Go to the next or previous heading level 61-2-4-5-6 or 1-2-4-5-6-7 Go to the next or previous heading level 71-2-5-6 or 1-2-5-6-7 Go to the next or previous heading level 82-4-6 or 2-4-6-7 Go to the next or previous heading level 9
Space + 1-2-3 Turn on input learning, press twice to turn off
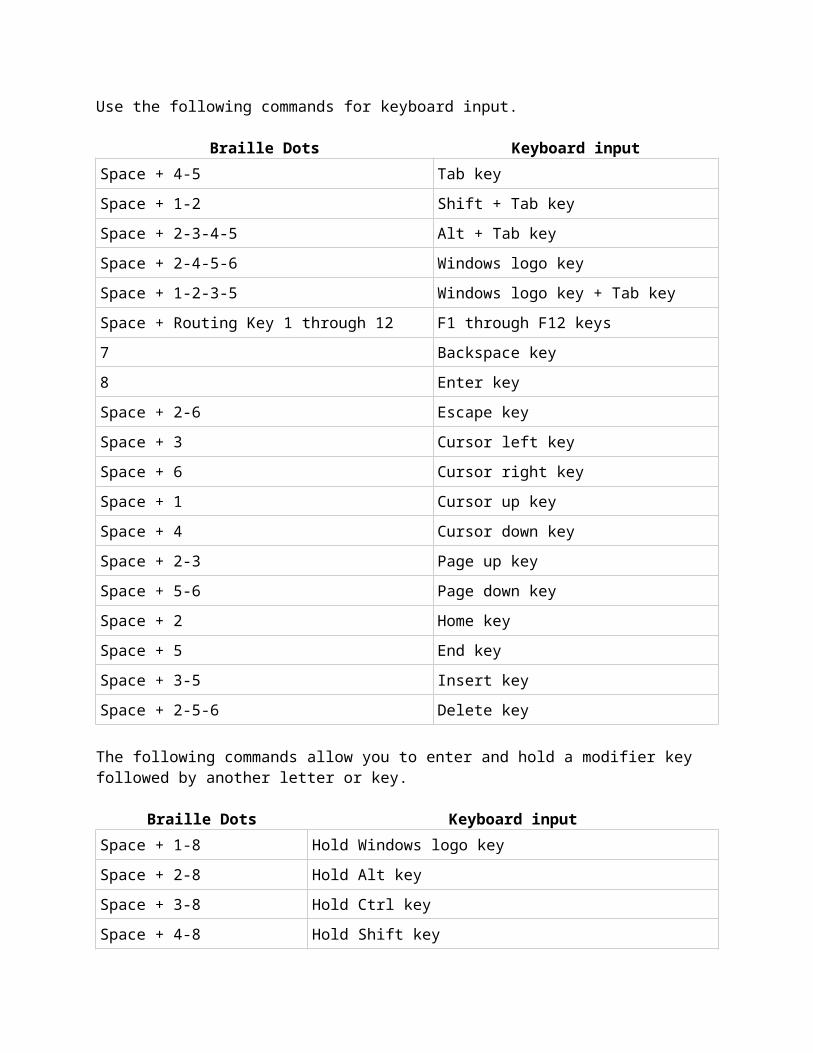
Use the following commands for keyboard input.
Braille Dots Keyboard inputSpace + 4-5 Tab keySpace + 1-2 Shift + Tab keySpace + 2-3-4-5 Alt + Tab keySpace + 2-4-5-6 Windows logo key Space + 1-2-3-5 Windows logo key + Tab keySpace + Routing Key 1 through 12 F1 through F12 keys7 Backspace key8 Enter keySpace + 2-6 Escape keySpace + 3 Cursor left keySpace + 6 Cursor right keySpace + 1 Cursor up keySpace + 4 Cursor down keySpace + 2-3 Page up keySpace + 5-6 Page down keySpace + 2 Home keySpace + 5 End keySpace + 3-5 Insert key

Braille Dots Keyboard inputSpace + 2-5-6 Delete key
The following commands allow you to enter and hold a modifier key followed by another letter or key.
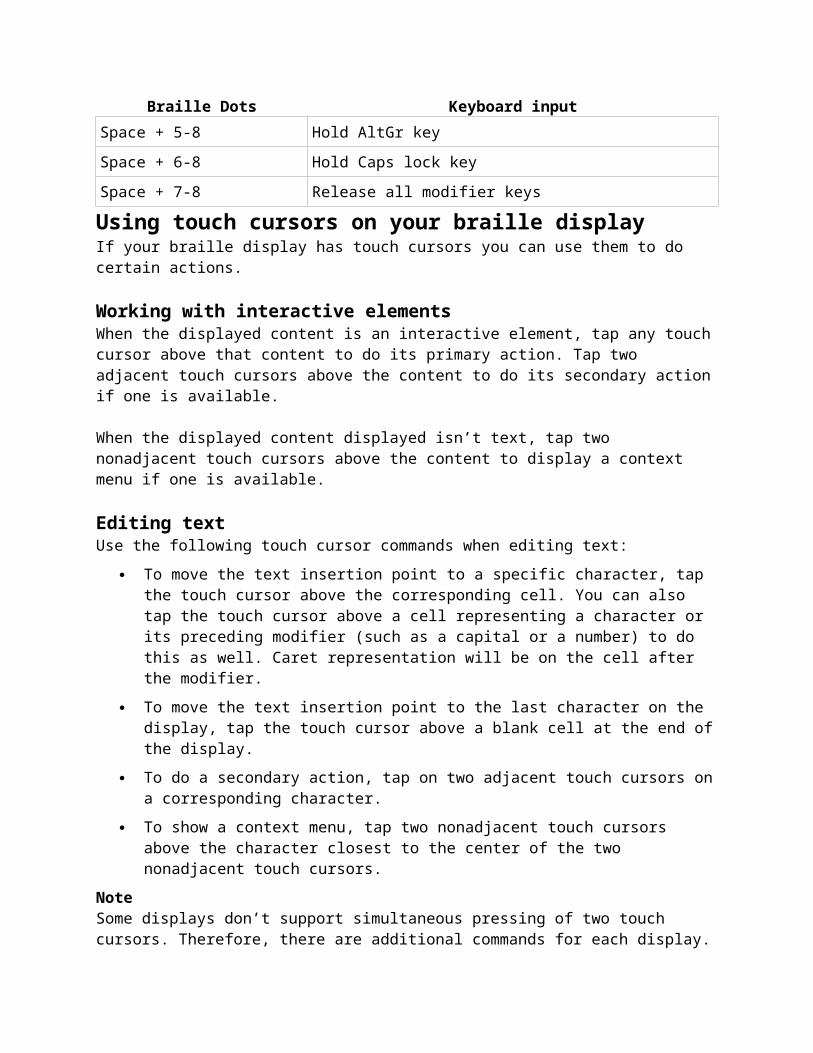
Braille Dots Keyboard inputSpace + 1-8 Hold Windows logo key Space + 2-8 Hold Alt keySpace + 3-8 Hold Ctrl keySpace + 4-8 Hold Shift keySpace + 5-8 Hold AltGr keySpace + 6-8 Hold Caps lock keySpace + 7-8 Release all modifier keysUsing touch cursors on your braille displayIf your braille display has touch cursors you can use them to do certain actions.
Working with interactive elementsWhen the displayed content is an interactive element, tap any touch cursor above that content to do its primary action. Tap two adjacent touch cursors above the content to do its secondary action if one is available.
When the displayed content displayed isn’t text, tap two nonadjacent touch cursors above the content to display a context menu if one is available.
Editing textUse the following touch cursor commands when editing text:
To move the text insertion point to a specific character, tap the touch cursor above the corresponding cell. You can also tap the touch cursor above a cell representing a character or its preceding modifier (such as a capital or a number) to do this as well. Caret representation will be on the cell after the modifier.
To move the text insertion point to the last character on the display, tap the touch cursor above a blank cell at the end of the display.
To do a secondary action, tap on two adjacent touch cursors on a corresponding character.
To show a context menu, tap two nonadjacent touch cursors above the character closest to the center of the two nonadjacent touch cursors.
NoteSome displays don’t support simultaneous pressing of two touch cursors. Therefore, there are additional commands for each display. To learn more about
specific key commands for each display, see Appendix D: Supported Braille Displays.
Appendix A: Supported languagesNarrator supports the following languages in the Windows 10 April 2018 Update:
Arabic (Egypt, Saudi Arabia) Bulgarian Catalan Cantonese (Traditional) Chinese (Simplified and Traditional) Croatian Czech Danish (Denmark) Dutch (Netherlands and Belgium) English (United States, United Kingdom, India, and Ireland) Finnish (Finland) French (France, Canada, Switzerland) Italian German (Germany, Austria, and Switzerland) Greek Hebrew Hindi Hungarian Indonesian Japanese Korean Malay Norwegian (Norway) Polish Portuguese (Brazil, Portugal) Romanian Russian Slovak Slovenian Spanish (Spain and Mexico) Swedish (Sweden)
Tamil Thai Turkish (Turkey) Vietnamese
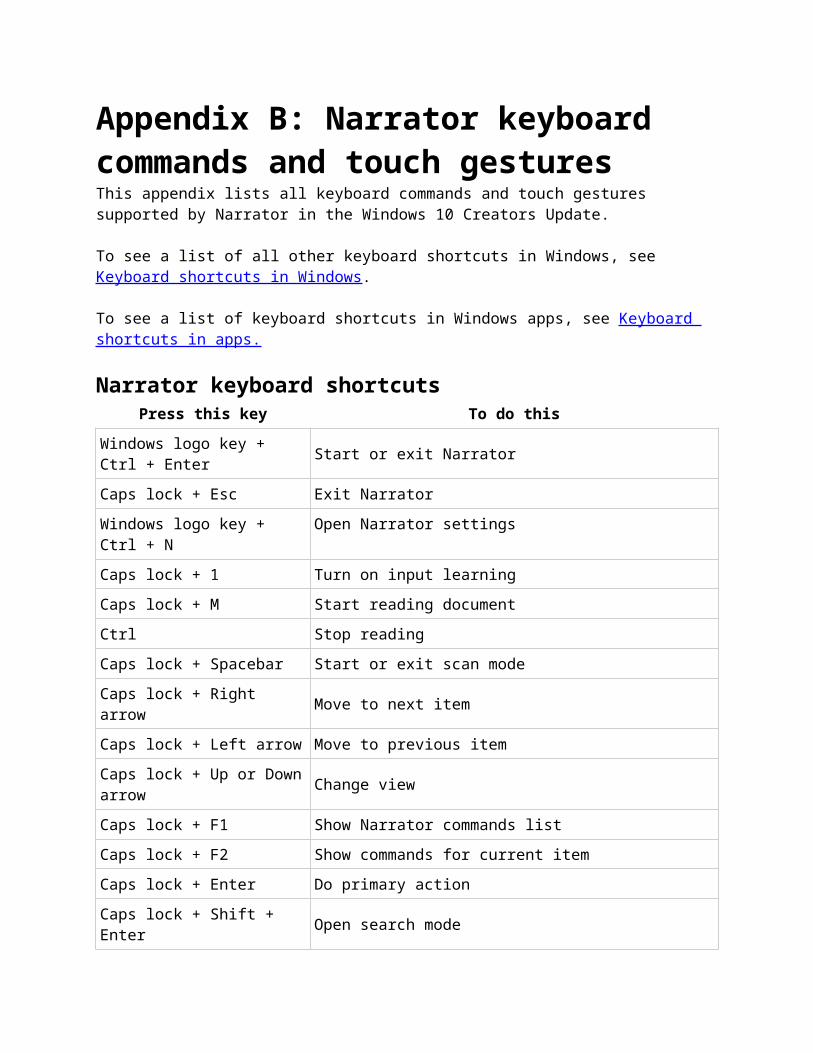
Appendix B: Narrator keyboard commands and touch gesturesThis appendix lists all keyboard commands and touch gestures supported by Narrator in the Windows 10 Creators Update.
To see a list of all other keyboard shortcuts in Windows, see Keyboard shortcuts in Windows.
To see a list of keyboard shortcuts in Windows apps, see Keyboard shortcuts in apps.
Narrator keyboard shortcutsPress this key To do this
Windows logo key + Ctrl + Enter Start or exit Narrator
Caps lock + Esc Exit NarratorWindows logo key + Ctrl + N
Open Narrator settings
Caps lock + 1 Turn on input learningCaps lock + M Start reading documentCtrl Stop readingCaps lock + Spacebar Start or exit scan modeCaps lock + Right arrow Move to next itemCaps lock + Left arrow Move to previous itemCaps lock + Up or Down arrow Change view
Caps lock + F1 Show Narrator commands listCaps lock + F2 Show commands for current itemCaps lock + Enter Do primary actionCaps lock + Shift + Enter Open search modeCaps lock + A Change verbosity modeCaps lock + Ctrl + Plus (+) Increase verbosity
Caps lock + Ctrl + Minus (-) Decrease verbosity
Caps lock + Alt + Plus (+) Change punctuation mode
or Minus (-)
Caps lock + Z Lock the Narrator key (Caps Lock) so you don't have to press it for every keyboard shortcut
Caps lock + X Have Narrator ignore the next keyboard shortcut you use
Caps lock + F12 Turn keystroke reading off or onCaps lock + Shift + F12 Turn on developer modeCaps lock + V Repeat phraseCaps lock + Page up or Page down Increase or decrease voice volume
Caps lock + Plus (+) or Minus (-) Increase or decrease voice speed
Caps lock + D Read itemCaps lock + Shift + D Describe an image using an online serviceCaps lock + F or Caps lock + Shift + F Read next or previous group of formatting info
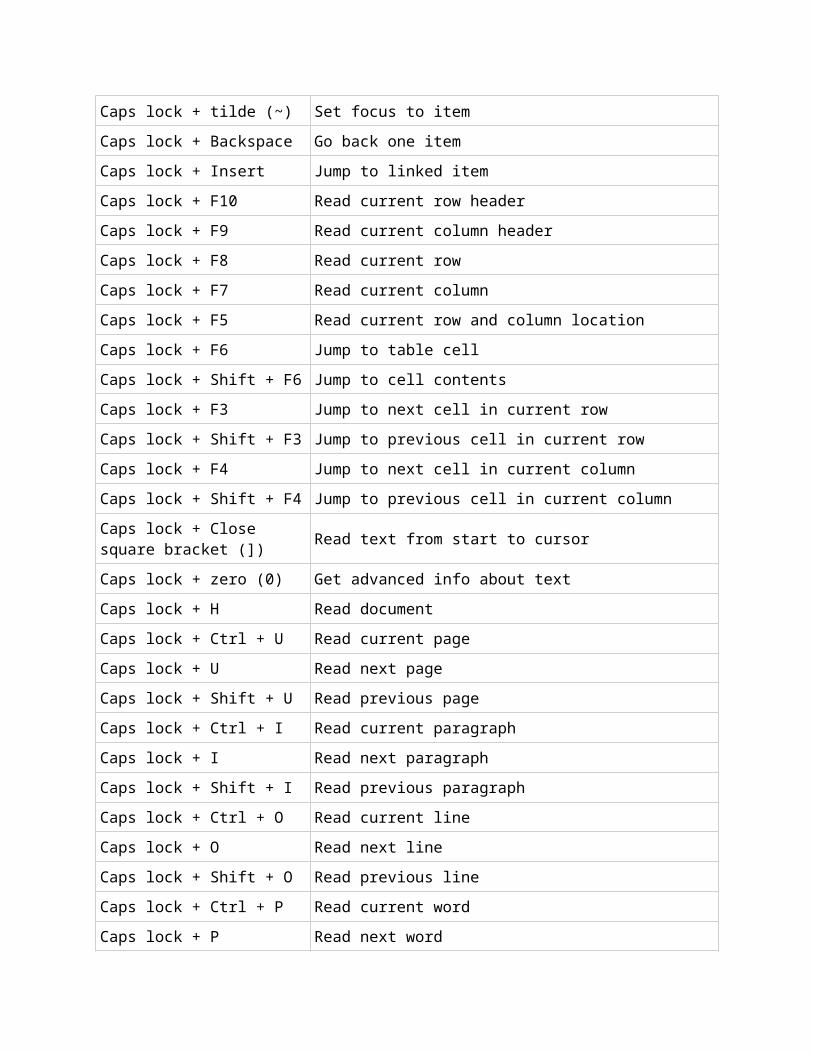
Caps lock + S Read item spelled outCaps lock + W Read windowCaps lock + R Start readingCaps lock + Num lock Turn mouse mode on or offCaps lock + Q Move to last item in the containing areaCaps lock + G Move Narrator cursor to system cursorCaps lock + T Read current window titleCaps lock + tilde (~) Set focus to itemCaps lock + Backspace Go back one itemCaps lock + Insert Jump to linked itemCaps lock + F10 Read current row headerCaps lock + F9 Read current column headerCaps lock + F8 Read current rowCaps lock + F7 Read current columnCaps lock + F5 Read current row and column locationCaps lock + F6 Jump to table cellCaps lock + Shift + F6 Jump to cell contents
Caps lock + F3 Jump to next cell in current rowCaps lock + Shift + F3 Jump to previous cell in current rowCaps lock + F4 Jump to next cell in current columnCaps lock + Shift + F4 Jump to previous cell in current columnCaps lock + Close square bracket (]) Read text from start to cursor
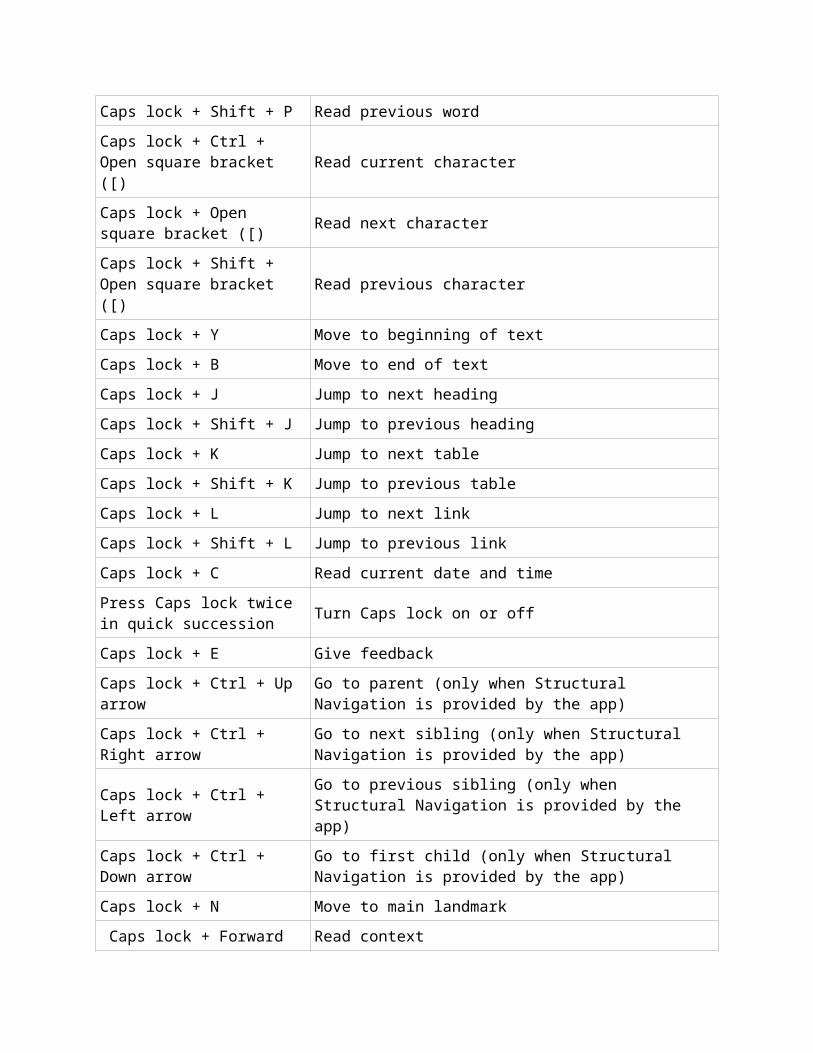
Caps lock + zero (0) Get advanced info about textCaps lock + H Read documentCaps lock + Ctrl + U Read current pageCaps lock + U Read next pageCaps lock + Shift + U Read previous pageCaps lock + Ctrl + I Read current paragraphCaps lock + I Read next paragraphCaps lock + Shift + I Read previous paragraphCaps lock + Ctrl + O Read current lineCaps lock + O Read next lineCaps lock + Shift + O Read previous lineCaps lock + Ctrl + P Read current wordCaps lock + P Read next wordCaps lock + Shift + P Read previous wordCaps lock + Ctrl + Open square bracket ([) Read current character
Caps lock + Open square bracket ([) Read next character
Caps lock + Shift + Open square bracket ([) Read previous character
Caps lock + Y Move to beginning of textCaps lock + B Move to end of textCaps lock + J Jump to next headingCaps lock + Shift + J Jump to previous headingCaps lock + K Jump to next tableCaps lock + Shift + K Jump to previous tableCaps lock + L Jump to next link
Caps lock + Shift + L Jump to previous linkCaps lock + C Read current date and timePress Caps lock twice in quick succession Turn Caps lock on or off
Caps lock + E Give feedbackCaps lock + Ctrl + Up arrow
Go to parent (only when Structural Navigation is provided by the app)
Caps lock + Ctrl + Right arrow
Go to next sibling (only when Structural Navigation is provided by the app)
Caps lock + Ctrl + Left arrow
Go to previous sibling (only when Structural Navigation is provided by the app)
Caps lock + Ctrl + Down arrow
Go to first child (only when Structural Navigation is provided by the app)
Caps lock + N Move to main landmark Caps lock + Forward slash (/) Read context
Caps lock + Ctrl + Forward slash (/)
Change whether context is read before or after the current item
Caps lock + Alt + Forward slash (/) Change how much context is read
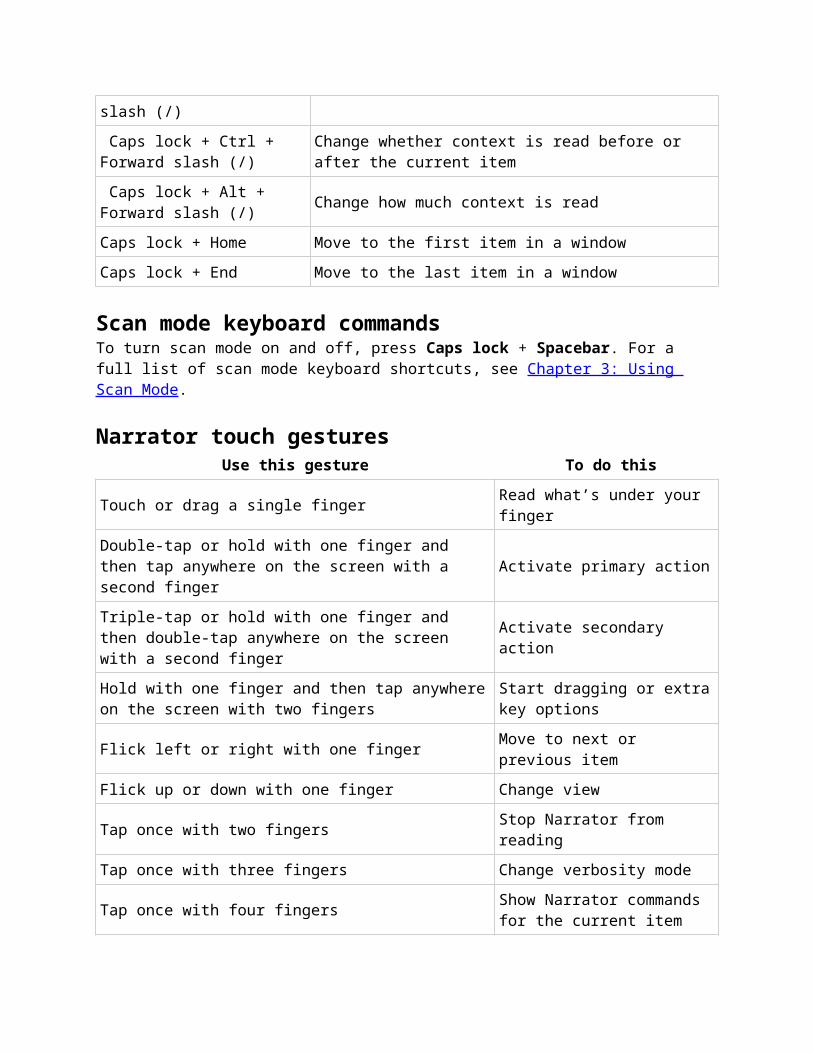
Caps lock + Home Move to the first item in a windowCaps lock + End Move to the last item in a window Scan mode keyboard commandsTo turn scan mode on and off, press Caps lock + Spacebar. For a full list of scan mode keyboard shortcuts, see Chapter 3: Using Scan Mode.
Narrator touch gesturesUse this gesture To do this
Touch or drag a single finger Read what’s under your finger
Double-tap or hold with one finger and then tap anywhere on the screen with a second finger Activate primary action
Triple-tap or hold with one finger and then double-tap anywhere on the screen with a second finger Activate secondary action
Hold with one finger and then tap anywhere on the screen with two fingers
Start dragging or extra key options
Flick left or right with one finger Move to next or previous item
Flick up or down with one finger Change viewTap once with two fingers Stop Narrator from readingTap once with three fingers Change verbosity mode
Tap once with four fingers Show Narrator commands for the current item
Double-tap with two fingers Show context menuDouble-tap with three fingers Read text attributesDouble-tap with four fingers Open search mode
Tap three times with four fingers Show all Narrator commands
Swipe left, right, up, or down with two fingers ScrollSwipe left or right with three fingers Tab forward or backwardSwipe up with three fingers Read current window
Swipe down with three fingers Start reading on explorable text
Swipe up or down with four fingers Turn semantic zoom on or off where supported
Swipe left or right with four fingers Move Narrator cursor to beginning or end of unit

Appendix C: TTS voicesThe following text-to-speech (TTS) voices are available in the Windows 10 April 2018 Update.
Add a TTS voice to your PCTo use one of these voices, add it to your PC:
1. Select the Start button, then select Settings, choose Time & language, and then select Region & language.
2. Select Add a language and search for the language you want to add. Choose the language you want to add from the list of search results. When you choose a language, you’ll be taken back to the Region & language settings page.
3. Select the language you just added, and select Options.4. Under Download language pack, select Download. Then, under
Speech, select Download.When both downloads are done, go to Settings , choose Ease of Access, and select Narrator. Under Choose a voice, select the voice you want to use.
TTS voices in the Windows 10 April 2018 UpdateLanguage, country, or region Male voice
nameFemale voice
nameArabic Not applicable HodaArabic (Saudi Arabia) Naayf Not applicableBulgarian Ivan Not applicableCatalan Not applicable HerenaChinese (Simplified) Kangkang Huihui, YaoyaoCantonese (Traditional, Hong Kong SAR) Danny TracyChinese (Traditional, Taiwan) Zhiwei Yating, HanhanCroatian Matej Not applicableCzech (Czech Republic) Vit Not applicableDanish Not applicable HelleDutch Frank Not applicableEnglish (Australia) James CatherineEnglish (Canada) Richard LindaEnglish (Great Britain) George Hazel, SusanEnglish (India) Ravi Heera

English (Ireland) Shaun Not applicableEnglish (United States) David, Mark ZiraFinnish Not applicable HeidiFlemish (Belgian Dutch) Bart Not applicableFrench (Canada) Claude CarolineFrench (France) Paul Hortence, JulieGerman (Germany) Stefan Hedda, KatjaGerman (Switzerland) Karsten Not applicableGreek Stefanos Not applicableHebrew Asaf Not applicableHindi (India) Hemant KalpanaHungarian (Hungary) Szabolcs Not applicableIndonesian (Indonesia) Andika Not applicableItalian Cosimo ElsaJapanese Ichiro Ayumi, HarukaMalay Rizwan Not applicableNorwegian Jon Not applicablePolish (Poland) Adam PaulinaPortuguese (Brazil) Daniel MariaPortuguese (Portugal) Not applicable HeliaRomanian (Romania) Andrei Not applicableRussian (Russia) Pavel IrinaSlovak (Slovakia) Filip Not applicableSlovenian Lado Not applicableKorean Not applicable HeamiSpanish (Spain) Pablo Helena, LauraSpanish (Mexico) Raul SabinaSwedish Bengt Not applicableTamil Valluvar Not applicableThai (Thailand) Pattara Not applicableTurkish Tolga Not applicableVietnamese An Not applicable

Appendix D: Supported braille displaysNarrator supports the following braille displays. To learn more about braille support in Narrator, see Chapter 7: Using Narrator with braille .
Choose a link in the table below to see supported commands for supported displays.
Manufacturer Supported displays
Albatross All models
Alva
ABT [3nn] and Delphi [4nn] (large) ABT [3nn] and Delphi [4nn] (small) BC640, BC624 Optelec Easylink 12 Touch Satellite [5nn] (large) Satellite [5nn] (small) Voyager Protocol Converter
B2G All models
Baum All models (default) All models (with Vario keys) VarioConnect / HWG BrailleConnect Conny DM 80 Plus Inka Orbit Reader Vario Pro Pronto! PocketVario APH Refreshabraille SuperVario / HWG Brailliant VarioUltra Vario 40

Vario 80
BrailleLite BrailleLite 18 BrailleLite 40, M20, and M40
BrailleMemo BrailleMemo Pocket BrailleMemo Smart
BrailleNote All models
Cebra All models
CombiBraille All models
EcoBraille All models
EuroBraille
AzerBraille, Clio, NoteBraille, PupiBraille, Scriba Esys 80 Esys 40, 64 Esys 12, 24 Esytime Iris
Freedom Scientific
Focus 1 and Focus 2 40 Focus 2 80 Focus Blue PAC Mate
HandyTech Active Braille 40 Actilino Active Star 40 Basic Braille Bookworm Braillino Braille Star 40
Braille Star 80 Connect Braille 40 Easy Braille Modular Connect 88 Modular Modular Evolution 64 Modular Evolution 88 Braille Wave
Hedo MobiLine ProfiLine
HIMS
Smart Beetle Braille Edge Braille Sense with Two Scroll Keys Braille Sense with QWERTY keyboard Braille Sense with Four Scroll Keys SyncBraille
HumanWare Brailliant BI (32, 40) Brailliant B 80
Iris With braille keyboard With PC keyboard
MDV
Unrecognized Model (all keys defined) Models with Function Keys Models with Function Keys and Status Cells Models with a Keyboard
Metec
All models BD I with 3 Keys and Status Cells BD I with 6 Keys BD I with 6 Keys and Status Cells
MiniBraille All models
MultiBraille All models
NinePoint All models
Papenmeier
BrailleX 2D Lite (plus) BrailleX 2D Screen Soft BrailleX Compact 486 BrailleX Compact/Tiny BrailleX EL2D-40 BrailleX EL2D-66 BrailleX EL2D-80 BrailleX EL2D-80s BrailleX EL40c BrailleX EL40 P BrailleX EL40s BrailleX EL60c BrailleX EL66s BrailleX EL70s BrailleX EL80c BrailleX EL80-II BrailleX EL 80 BrailleX EL80s BrailleX Elba 20 BrailleX Elba 32 BrailleX Elba (Trio 20) BrailleX Elba (Trio 32) BrailleX IB 80 CR Soft BrailleX Live BrailleX Trio
Pegasus All models
Seika Braille Displays Note Takers
TSI
Navigator 20 Navigator 40 Navigator 80 Power Braille 40 Power Braille 65 Power Braille 80
Voyager All models Braille Pen 2