Embed Size (px)
Citation preview
Smart Locks Control
USERMANUAL
Team 5
Vaibhav VishalMohammadreza BarazeshHao-Yun YangZhe WangKatarzyna RuszowskaDiego BrandaoAlejandro Monroy Reyes
University of Southern CaliforniaCS 577
December, 2017
Smart Locks Control USER MANUALPage 1
Revision Sheet
Release No.
Date Revision Description Editor
Rev. 0 12/03/17
User Manual first draft Mohammadreza Barazesh
Rev. 1 12/03/17
Added section 4.0 instructions Alejandro Monroy
Rev.2 12/04/17
Adding section 1Adding section 2
Hao-Yun Yang
Rev.3 12/04/17
Review of correctness and minor modifications to finalize document for submission
Katarzyna Ruszowska
Smart Locks Control USER MANUALPage 2
USER MANUAL
TABLE OF CONTENTS
Page #
1.0 GENERAL INFORMATION 5-6
1.1 System Overview 61.2 Organization of the Manual 61.3 Acronyms and Abbreviations 7
2.0 SYSTEM SUMMARY 8-10
2.1 System Configuration 92.2 Data Flows 92.3 User Access Levels 10
3.0 GETTING STARTED 11-16
3.1 Setting up the hardware 113.2 Setting up the server
3.2.1 Installing the prerequisites 133.2.2 Setting up the database 133.2.3 Deploying the Docker Image 14
3.3 Logging In 153.4 Navigation Menu 153.5 Exit System 16
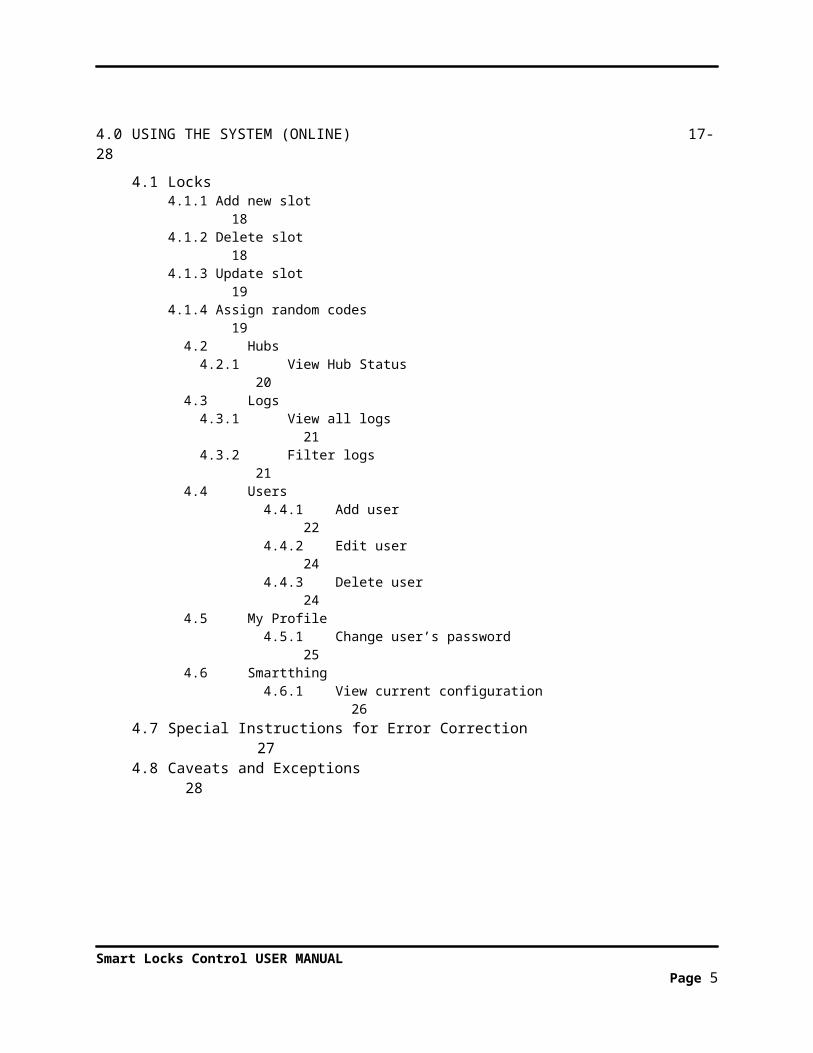
4.0 USING THE SYSTEM (ONLINE) 17-28
4.1 Locks4.1.1 Add new slot 184.1.2 Delete slot 184.1.3 Update slot 194.1.4 Assign random codes 19
4.2 Hubs 4.2.1 View Hub Status 20
4.3 Logs 4.3.1 View all logs 21 4.3.2 Filter logs 21
4.4 Users 4.4.1 Add user 22 4.4.2 Edit user 24 4.4.3 Delete user 24 4.5 My Profile 4.5.1 Change user’s password 25 4.6 Smartthing 4.6.1 View current configuration 26
4.7 Special Instructions for Error Correction 274.8 Caveats and Exceptions 28
Smart Locks Control USER MANUALPage 3
1.0 GENERAL INFORMATION
1.0 GENERAL INFORMATION In this section, we will provide a brief system overview and explain the organization of the manual.
Smart Locks Control USER MANUALPage 4
1.1 System Overview
This system is designed to help customers save time and money by allowing them to remotely manage their smart locks. In addition, this system provides a user hierarchy that enables customers to assign separate house managers for different houses who can help manage locks and house staff users associated with their assigned house. Furthermore, this system also allows the system administrator and house manager to create users with lower permission levels and assign temporary passwords to specific lock slots and users. Finally, this system improves security by providing a log system through which the system administrator and house managers can view and filter records of lock status changes.
1.2 Organization of the Manual
The user manual consists of four major sections: General Information, System Summary, Getting Started, Using The System (Online).
The General Information section explains the system and its purpose in general terms.
The System Summary section provides a general overview of the system. The summary includes the uses of the system’s hardware and software, system configuration, data flows, and user access levels.
The Getting Started section explains how to install Smart Locks Control on the server, and how the user should set up the hardware before using the system.
The Using The System (Online) section provides a detailed description of system functions with screenshots.
1.3 Acronyms and Abbreviations
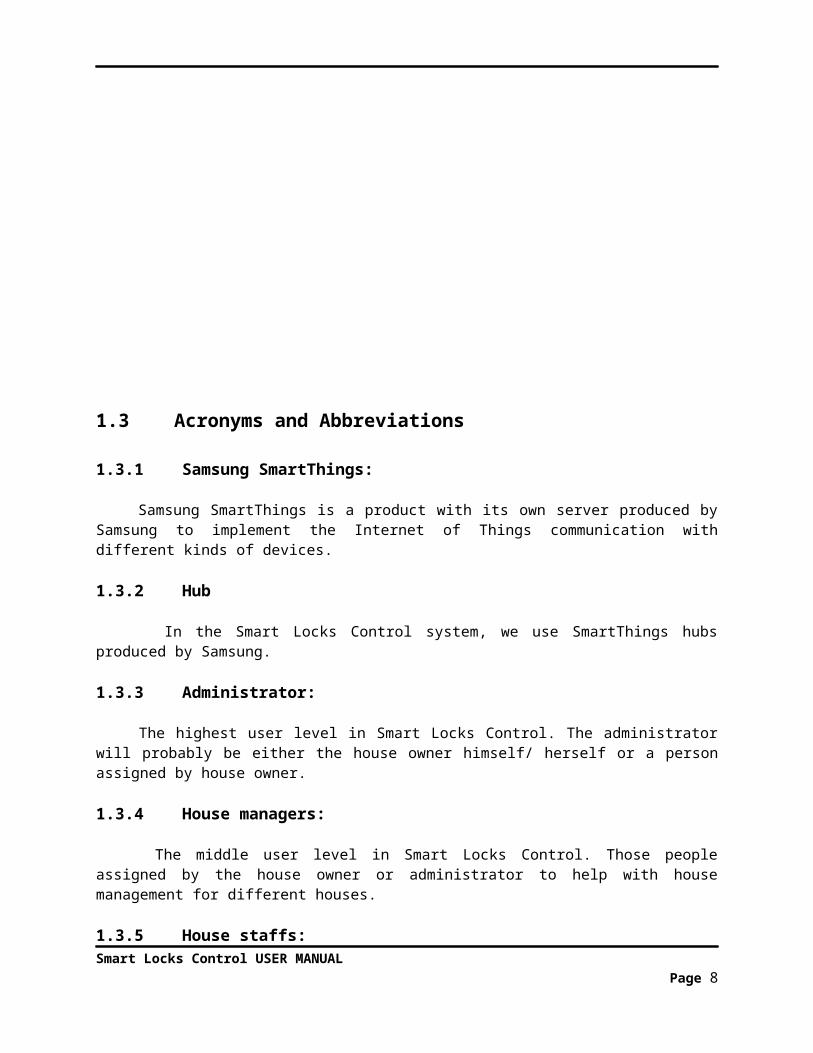
1.3.1 Samsung SmartThings:
Samsung SmartThings is a product with its own server produced by Samsung to implement the Internet of Things communication with different kinds of devices.
Smart Locks Control USER MANUALPage 5
1.3.2 Hub
In the Smart Locks Control system, we use SmartThings hubs produced by Samsung.
1.3.3 Administrator:
The highest user level in Smart Locks Control. The administrator will probably be either the house owner himself/ herself or a person assigned by house owner.
1.3.4 House managers:
The middle user level in Smart Locks Control. Those people assigned by the house owner or administrator to help with house management for different houses.
1.3.5 House staffs:
The lowest user level in Smart Locks Control. Those people who do menial tasks to maintain the houses, such as cleaning or gardening.
1.3.6 Slots:
Each lock allows for multiple access code to be associated with it, each of those code is stored in a specific “slot”.
Smart Locks Control USER MANUALPage 6
2.0 SYSTEM SUMMARY
Smart Locks Control USER MANUALPage 7
2.0 SYSTEM SUMMARY The System Summary section provides a brief overview of the Smart Locks Control system. The summary points out the requirements in terms of system hardware and software, system configuration, data flows, and user access levels.
2.1 System Configuration
Smart Locks Control is a web-based management system for lock control. So far, this system supports use with Google Chrome and Firefox web browsers. Before installing Smart Locks Control on a server, the user must have a Samsung SmartThings account, and connect all locks to appropriate hubs and all hubs to the SmartThings account. For the software application part, the system requires connection to the Internet in order to retrieve data from the server. After preparation of the hardware and installation of the software on the server, Smart Locks Control is ready to fulfill the needs of its users from any web browser.
2.2 Data Flows
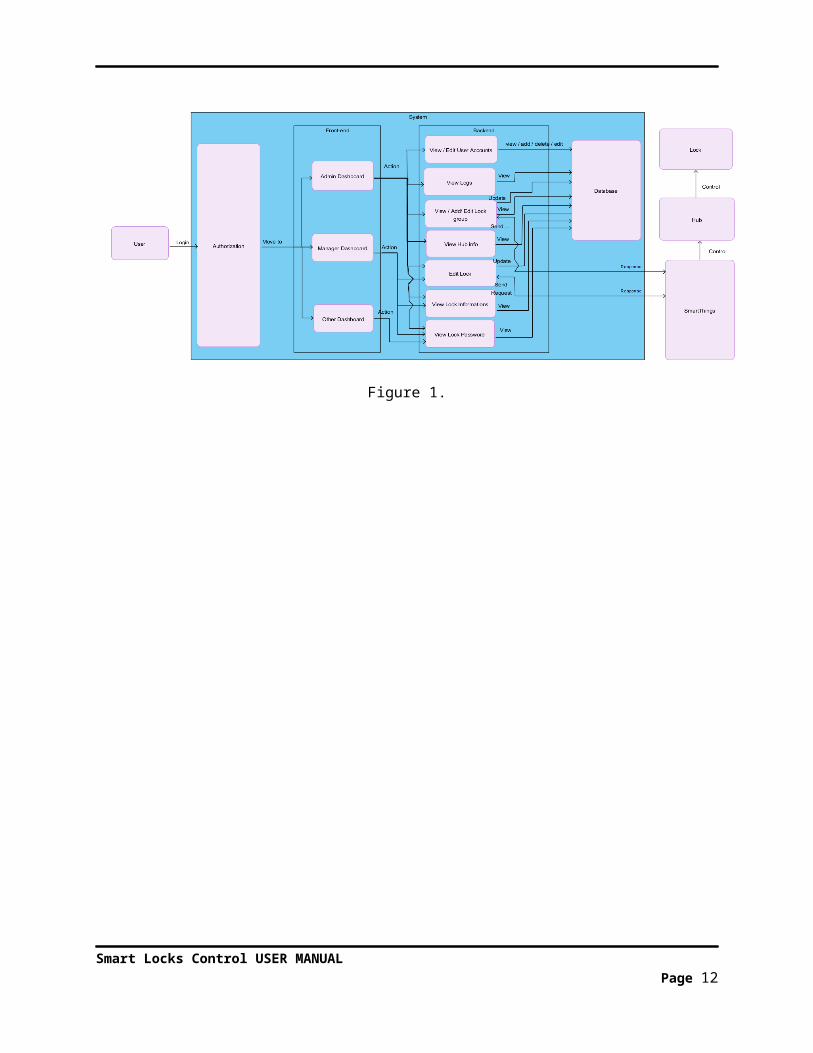
Figure 1 shows the flow of data in Smart Locks Control system. When users open the website in a browser, they will see the login page first. After login, the web page will show a specific dashboard based on the permission level of the logged in user. Based on user’s action, the system sends a request to the back-end. The back-end communicates with the database and Samsung SmartThings server, based on the user request. Finally, the Samsung SmartThings server sends the data to the hub if the user made any change to a lock, and the hub will update the lock with the change.
Figure 1.
Smart Locks Control USER MANUALPage 8
2.3 User Access Levels
This system separates users into three levels of access.
For the highest level, we have a user called the administrator and created during initialization of the Smart Locks Control system. The current system supports exactly one system administrator for each local server. This user will have the ability to view/add/delete second and third level users, view/add/delete/modify/assign lock slots, and view all system logs for all locks.
The middle level consists of users created by the administrator called house managers. Smart Locks Control allows the administrator to create multiple house manager accounts to help with management of third level users and locks. House managers have a lower permission level than the administrator; they can only create third level user accounts, view/add/delete/modify/assign lock slots of locks or hubs assigned to them, and view system logs of locks assigned to them or to the house staff users associated with them.
The lowest level includes users called house staff, which the administrator or house managers can create. Smart Locks Control allows the administrator or house managers to assign locks to house staff users. The house staff users can only view all slots assigned to them and modify their own passwords. House staff can have lock slots assigned to them by the administrator or house managers of any building at which they work.
Smart Locks Control USER MANUALPage 9
3.0 GETTING STARTED
Smart Locks Control USER MANUALPage 10
3.0 GETTING STARTED
This section provides a general walkthrough of the system from initiation through exit. The logical arrangement of the information shall enable the functional personnel to easily understand the sequence and flow of the system.
3.1 Setting up the hardware
To set up the hardware you need to make sure you have the following items ready:● Samsung SmartThings hubs● Compatible locks● LAN Internet access for the hubs
Next, you need to make sure that all the locks are paired with their respective hubs. To do so, please refer to the instruction manual of each chosen lock.
After pairing all the locks, you can now set up the device handler and the SmartApp.Follow these steps carefully:
1- Log in to your SmartThings IDE at https://graph.api.smartthings.com (create a login if you don't have one AND don't forget to opt in for the developer account). To verify that you're logged in to the correct location, after logging in at the above link, click on "My Locations" and then click on the name of the location at which you want to install the SmartApp. Note: You may be asked to log in to your account again when you click on your location; if so, log in again.
2- Click on "My Device Handlers".
3- Click on "+New Device Handler" on the top right.
4- Click "From Code".
5- Paste the code (Ctrl + V) into the editor and click "Create". You can find the code for the device handler in the “.\devicetypes\rboy\universal-zwave-lock-with-alarms.src” project folder.
6- Click "Publish" and then "For me" on the top right .
7- Click on "My Devices" on top.
8- Click on your existing device (thermostat/lock etc which you want to change) .
9- Scroll down and click on "Edit".
10- Under "Type *" select the new device handler you just created (it will show up at the bottom of the list).
11- Scroll to the bottom of the page and click "Update".
12- Open the SmartThings App on your phone and under "My Home" look for your new device.
Smart Locks Control USER MANUALPage 11
Next, you will need to install the provided SmartApp. To do so please follow the following steps:
1- After logging in to the SmartThings website, click on “MySmartApps”.
2- Click on “+ New SmartApp”.
3- Click on “From code” tab.
4- Copy and paste the code. you can find the code for the SmartApp in the “.\smartapps\vaibhavx\smart-locks-control.src” folder.
Finally, you will need to write down the “Client ID” and “Client Secret” parameter as you will need them in the next section. To do so:
1- Click on “My Smart Apps”.2- Click on “Smart Locks Control”.3- Click on “App Settings”.4- Scroll down and click on “OAuth”
You will find the Client ID and Client Secret here.
3.2 Setting up the server
3.2.1 Installing the prerequisites
For the system to work, it needs to be set up on a linux server alongside the following required softwares:● MySQL Server● Node.js● NPM● Docker
You can install the mentioned applications using the “apt” package manager with the following commands :
sudo apt-get updatesudo apt-get install nodejs mysql-server mysql-client docker
3.2.2 Setting up the database
After carrying out the necessary installations, the system requires the creation of a mysql database. The database needs to be created using the default credentials unless they are overridden:
Database name : smart_locks_controlRoot password: diversity05
You can override these credentials in the “./webapp/server/db/config.json” file.
3.2.3 Deploying the Docker Image
Smart Locks Control USER MANUALPage 12
Finally, the setup can be completed by deploying the docker image. To do so, first docker needs to be started which can be achieved by running the following command in the linux shell:
sudo systemctl start docker
Next, you need to log in to the docker repository and retrieve and deploy the latest version of the system.
When asked for username and password, make sure to use the following credentials:
Username: softwarediversity05Password: diversity05
sudo docker loginsudo docker pull softwarediversity05/smart-locks-control:latestsudo docker run -d -e DATABASE_URL=mysql://root:[email protected]:3306/smart_locks_control -p 3000:3000 -p 3306 --net=host softwarediversity05/smart-locks-control:latest
After running these commands, the website should be running on http://<IP ADDRESS>:3000.
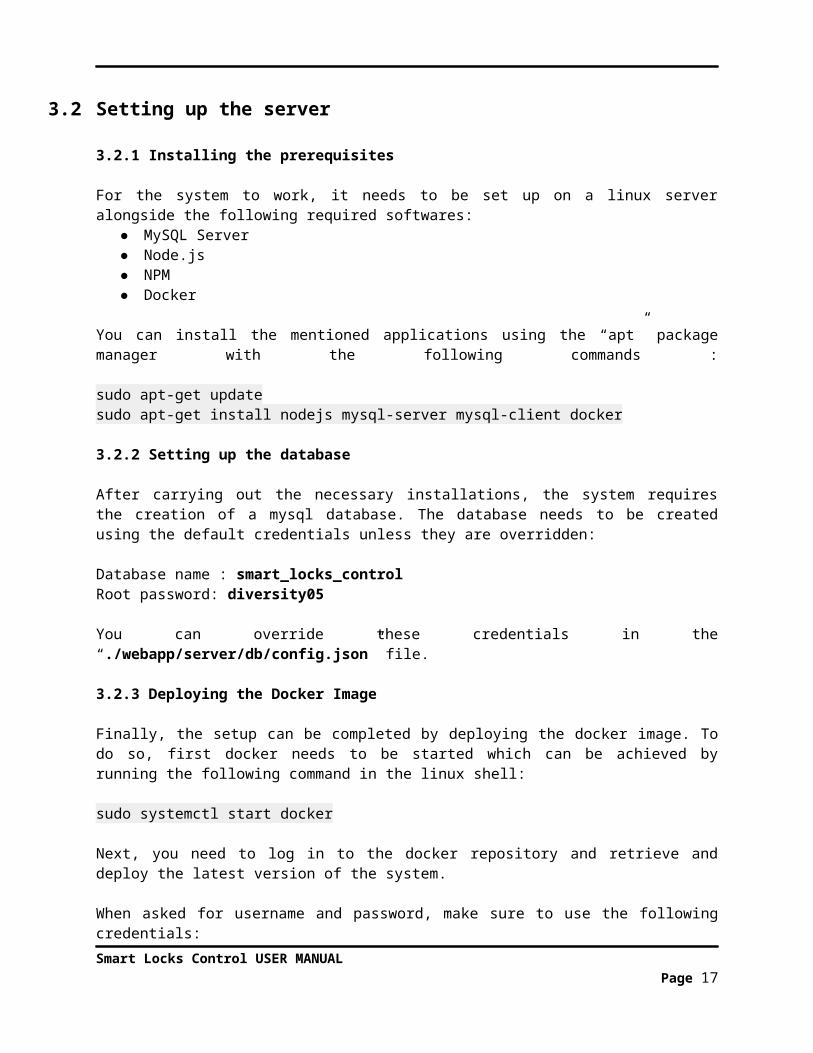
Next you will need to connect the website to the SmartThings platform. To do so, use the above address to log in to the website. Use the default administrator credentials ( provided separately ) to access the administrator dashboard.
Click on the “SmartThings” button in the left sidebar. In the opened page, enter your Client ID and Client Secret. You may obtain them by following the instructions in section [3.1]. Next click on the “Update Settings” button.
Finally, click on “Log in to SmartThings” button. You will then be redirected to the Samsung SmartThings website where you might need to login if necessary. After logging in, you will be shown a new page similar to the following picture.
Smart Locks Control USER MANUALPage 13
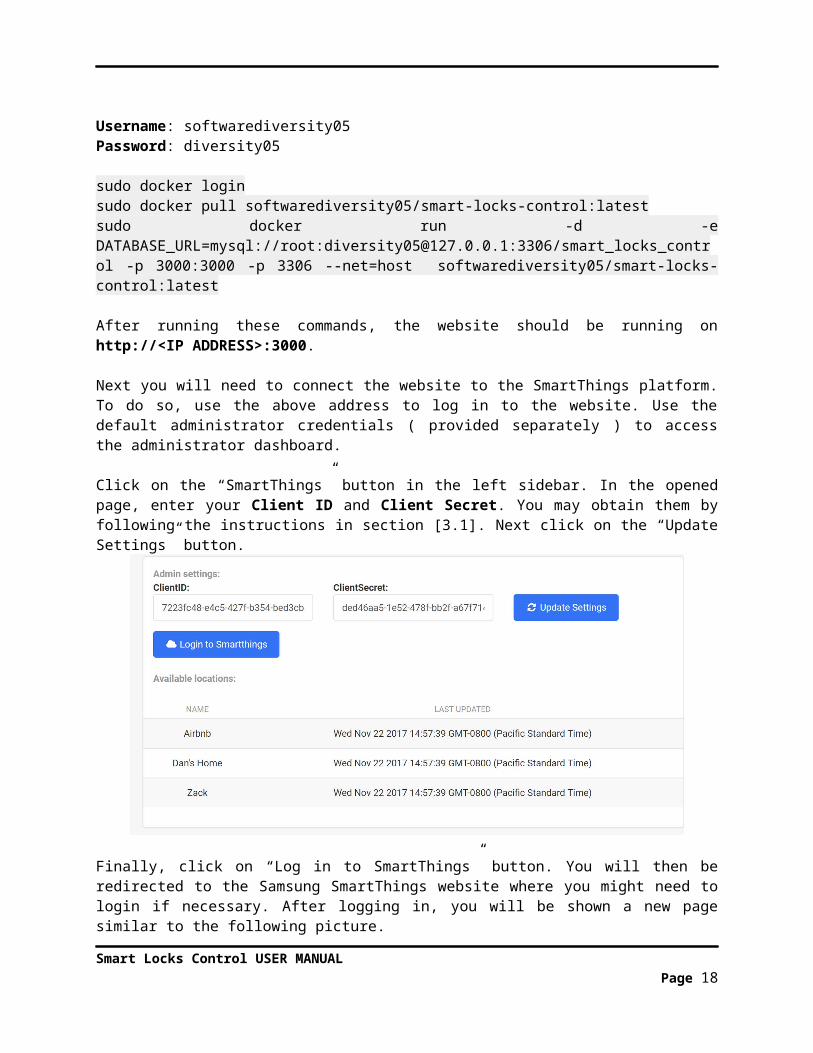
Choose any of the available options in the “From:” select field, and then click on the “Authorize” button. If authorization is successful, you will be brought back to the administrator dashboard.
Now the system is completely configured and ready to be used.
3.3 Logging In
After opening the website, the user will be greeted with a login page where they can enter their username and password to enter their personal dashboard in order to use the website.
3.4 Navigation Menu
The navigation menu is located at the left side of the screen and allows the user to access the different parts of the system by simply clicking on the related button. We will discuss each of the options briefly here and in depth in section [4].
3.4.1 Locks
This page allows the users to access all the locks that they are assigned to, and to add or modify new slots if they are authorized to do so.
3.4.2 Hubs
Smart Locks Control USER MANUALPage 14
This page will allow users to view the status of the hubs and their associated locks. Information such as lock battery percentage and whether the locks are locked/unlocked can be retrieved by viewing this page.
3.4.3 Users
This page contains a list of all the users. The administrator and managers can use this page to add new users to the system or edit/delete the existing ones.
3.4.4 Logs
This page provides the administrator and the managers with logs of all the events related to the locks. This data can then be sorted and filtered by user, lock and date.
3.4.5 My Profile
This page provides users the ability to view their basic information such as name and username and to change their passwords.
3.4.6 SmartThings
This page will allow the Administrator to view or update the current configuration, and to link the system with a SmartThings account as part of the initial setup of the system.
3.5 Exit System
Smart Locks Control USER MANUALPage 15
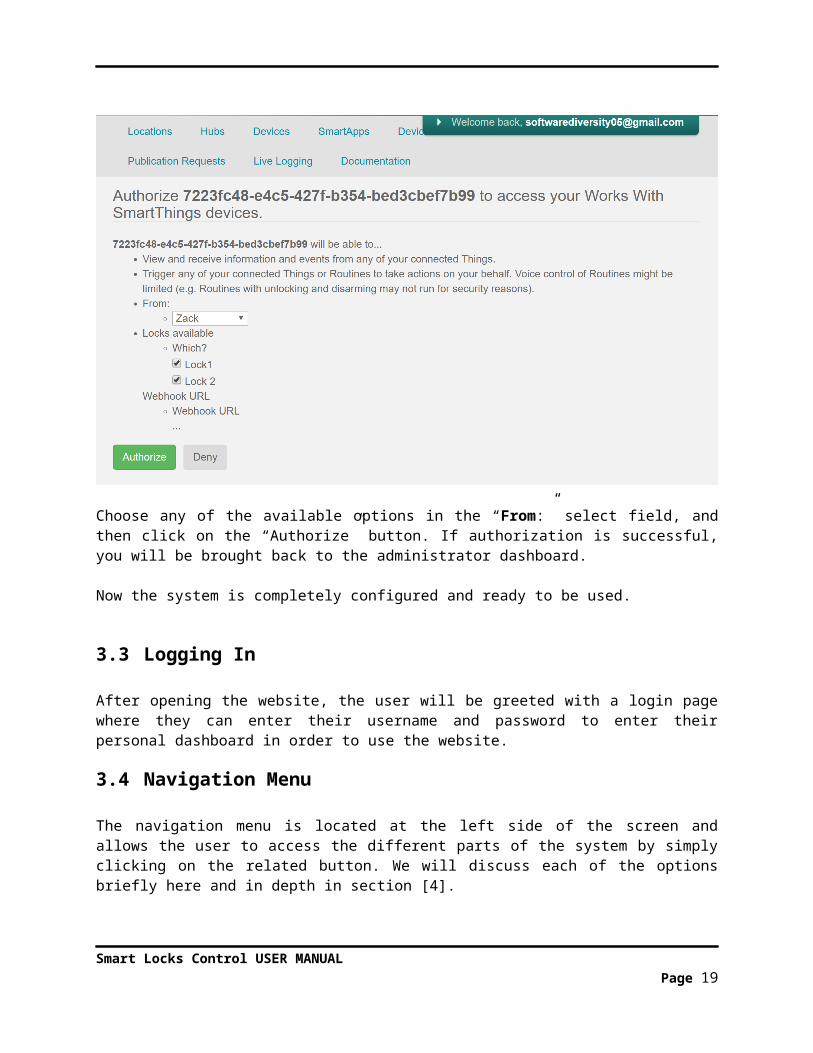
After 30 minutes of inactivity the user will be signed out of the system for security reasons. However they can choose to do so manually if they desire by clicking on the sign out button at the top-right corner of the screen as shown in the picture below.
4.0 USING THE SYSTEM
Smart Locks Control USER MANUALPage 16
4.0 USING THE SYSTEM This section provides a detailed description of the Smart Locks Control system from initiation through exit, explaining in detail the characteristics of the required input and system-produced output.
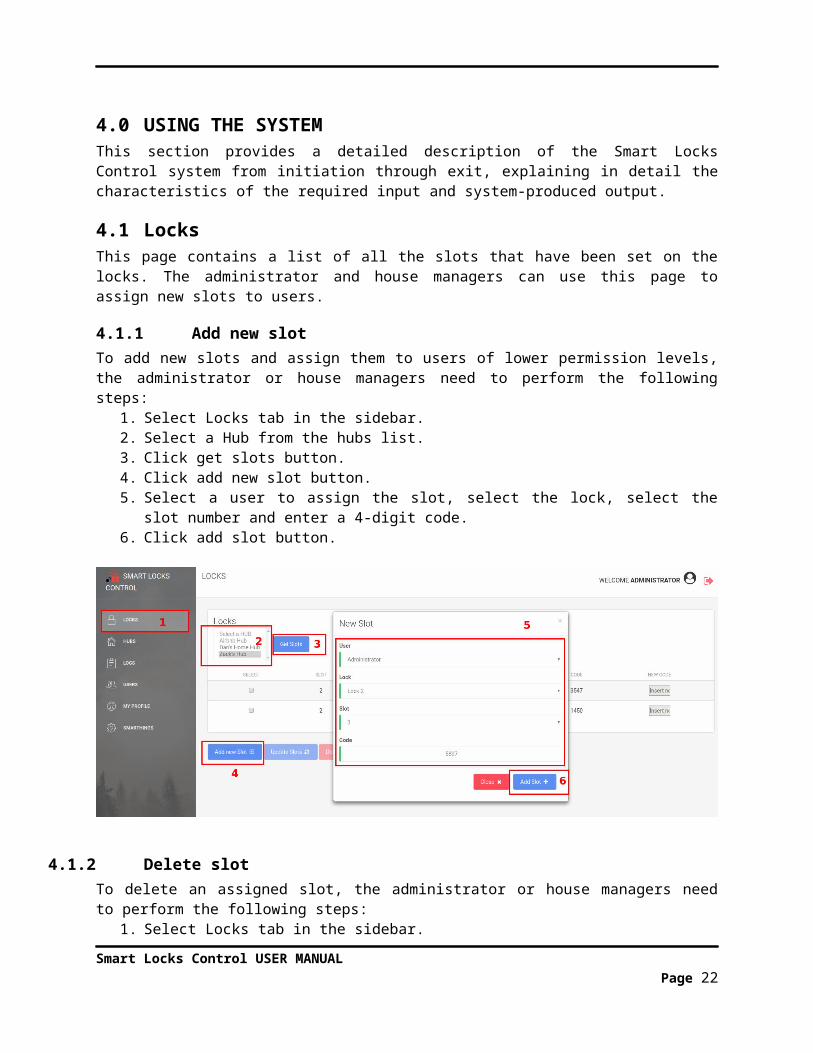
4.1 LocksThis page contains a list of all the slots that have been set on the locks. The administrator and house managers can use this page to assign new slots to users.
4.1.1 Add new slotTo add new slots and assign them to users of lower permission levels, the administrator or house managers need to perform the following steps:
1. Select Locks tab in the sidebar.2. Select a Hub from the hubs list. 3. Click get slots button.4. Click add new slot button.5. Select a user to assign the slot, select the lock, select the slot number and enter a 4-digit code. 6. Click add slot button.
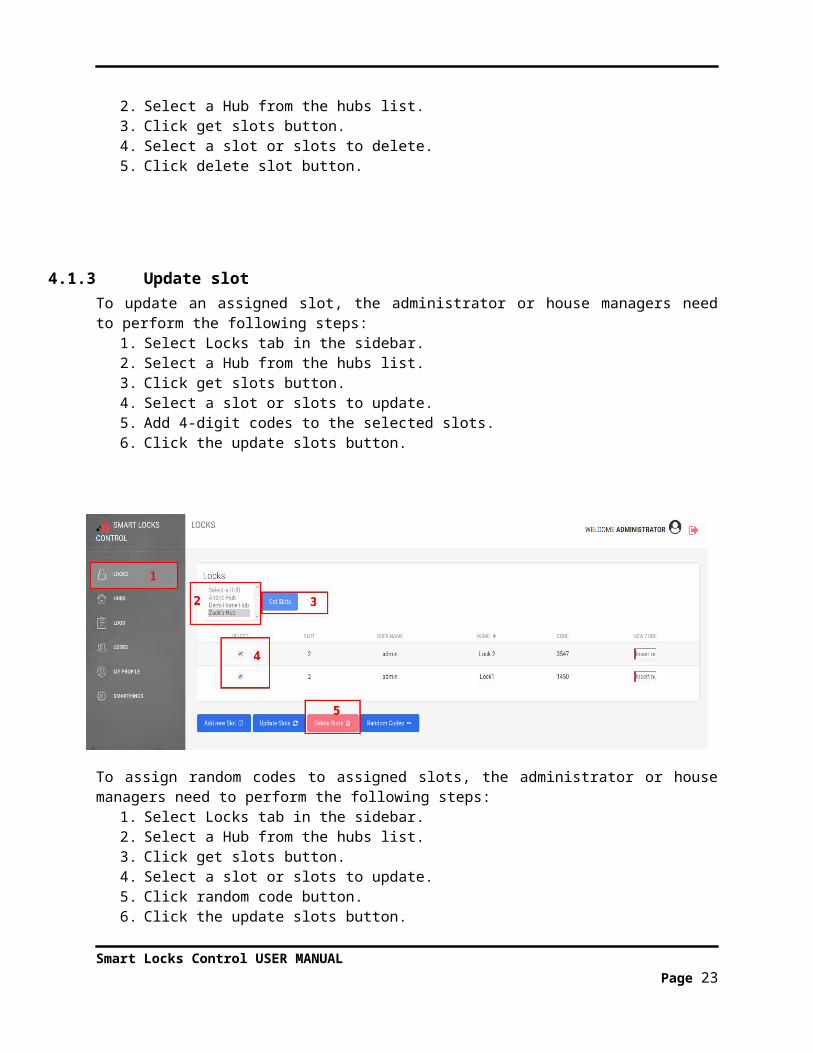
4.1.2 Delete slotTo delete an assigned slot, the administrator or house managers need to perform the following steps:
1. Select Locks tab in the sidebar.2. Select a Hub from the hubs list. 3. Click get slots button.4. Select a slot or slots to delete.5. Click delete slot button.
Smart Locks Control USER MANUALPage 17
4.1.3 Update slotTo update an assigned slot, the administrator or house managers need to perform the following steps:
1. Select Locks tab in the sidebar.2. Select a Hub from the hubs list. 3. Click get slots button.4. Select a slot or slots to update.5. Add 4-digit codes to the selected slots.6. Click the update slots button.
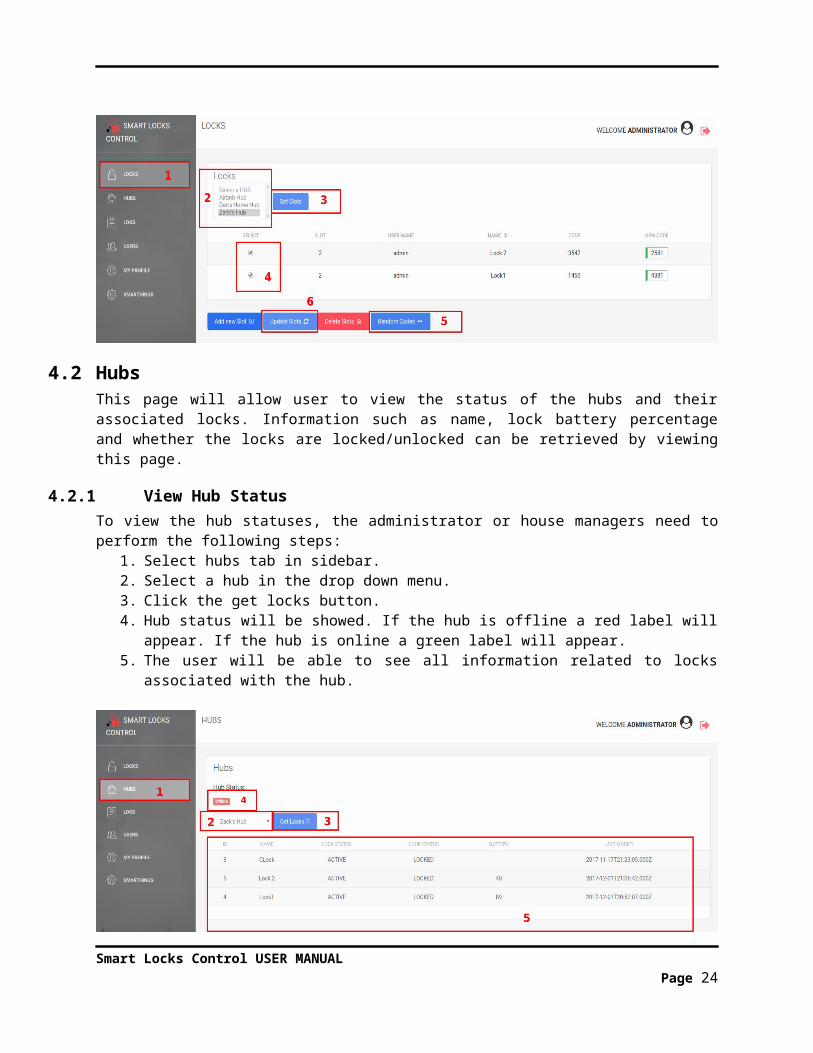
4.1.4 Assign random codesTo assign random codes to assigned slots, the administrator or house managers need to perform the following steps:
1. Select Locks tab in the sidebar.2. Select a Hub from the hubs list. 3. Click get slots button.4. Select a slot or slots to update.5. Click random code button.6. Click the update slots button.
Smart Locks Control USER MANUALPage 18
4.2 HubsThis page will allow user to view the status of the hubs and their associated locks. Information such as name, lock battery percentage and whether the locks are locked/unlocked can be retrieved by viewing this page.
4.2.1 View Hub StatusTo view the hub statuses, the administrator or house managers need to perform the following steps:
1. Select hubs tab in sidebar.2. Select a hub in the drop down menu.3. Click the get locks button. 4. Hub status will be showed. If the hub is offline a red label will appear. If the hub is online a green
label will appear.5. The user will be able to see all information related to locks associated with the hub.
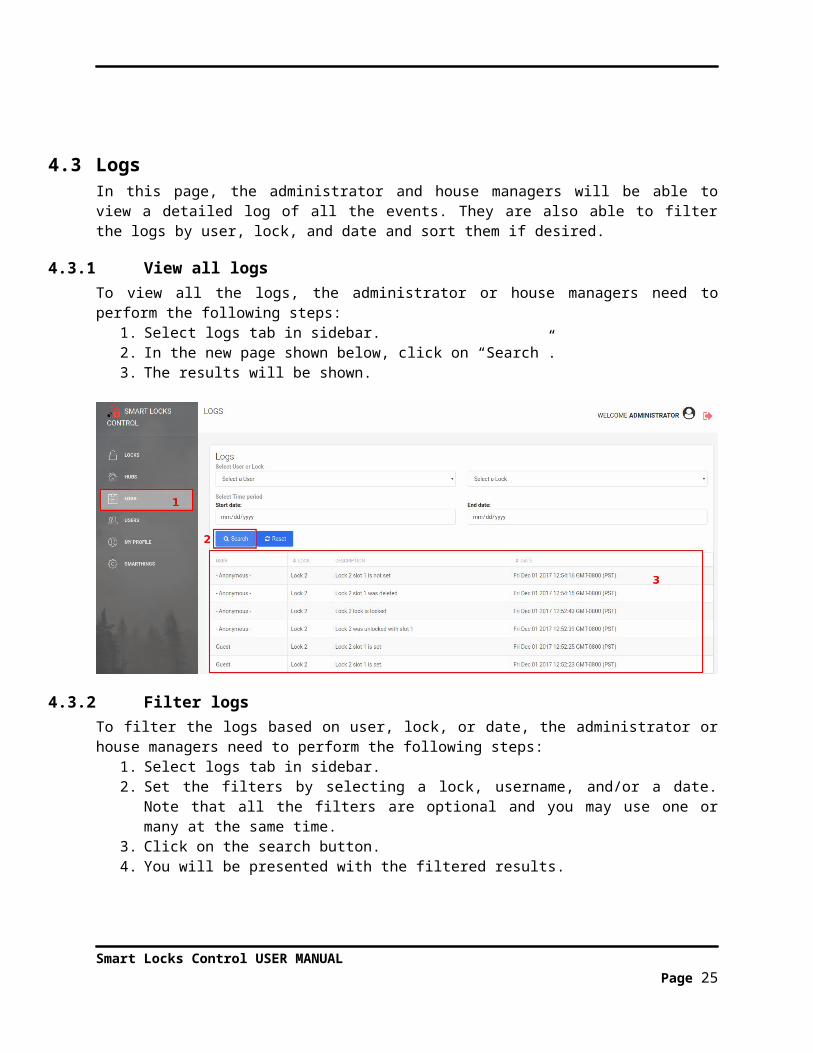
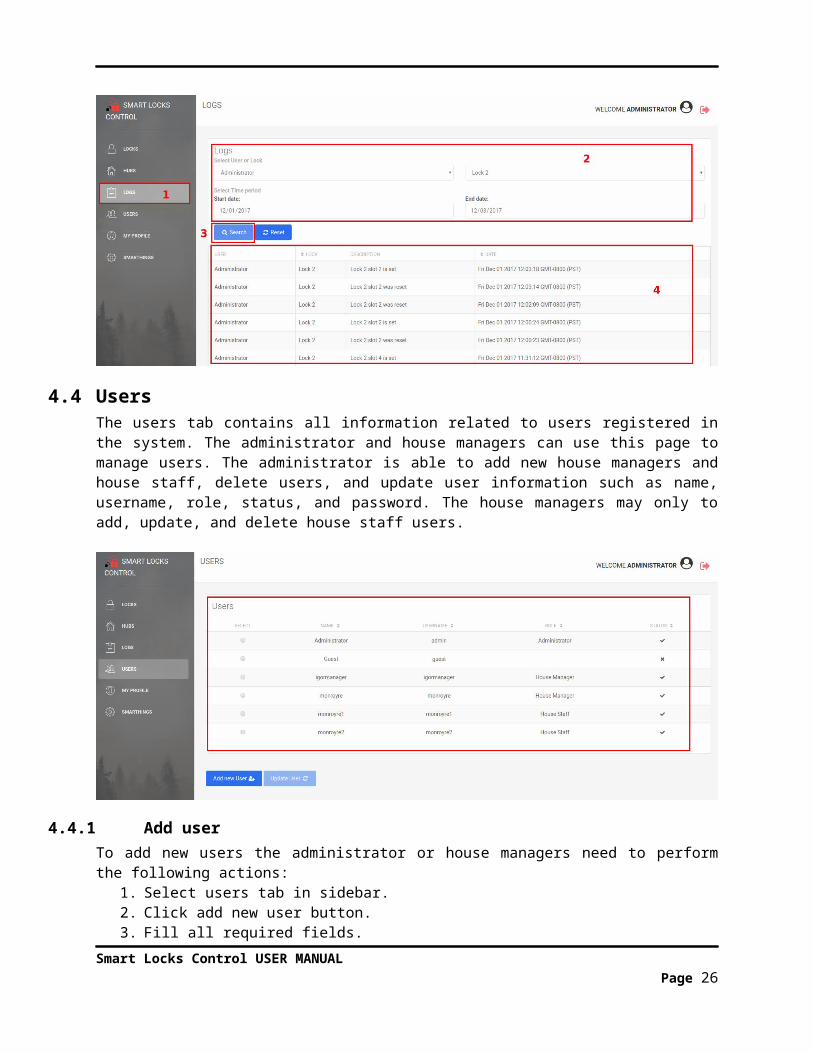
4.3 LogsIn this page, the administrator and house managers will be able to view a detailed log of all the events. They are also able to filter the logs by user, lock, and date and sort them if desired.
Smart Locks Control USER MANUALPage 19

4.3.1 View all logsTo view all the logs, the administrator or house managers need to perform the following steps:
1. Select logs tab in sidebar.2. In the new page shown below, click on “Search”.3. The results will be shown.
4.3.2 Filter logsTo filter the logs based on user, lock, or date, the administrator or house managers need to perform the following steps:
1. Select logs tab in sidebar.2. Set the filters by selecting a lock, username, and/or a date. Note that all the filters are optional and
you may use one or many at the same time.3. Click on the search button.4. You will be presented with the filtered results.
Smart Locks Control USER MANUALPage 20
4.4 UsersThe users tab contains all information related to users registered in the system. The administrator and house managers can use this page to manage users. The administrator is able to add new house managers and house staff, delete users, and update user information such as name, username, role, status, and password. The house managers may only to add, update, and delete house staff users.
4.4.1 Add userTo add new users the administrator or house managers need to perform the following actions:
1. Select users tab in sidebar. 2. Click add new user button. 3. Fill all required fields.
a. Name: Must be 6 characters minimum. b. Username: Must be 6 characters minimum. c. Role: Select from dropdown list.d. Password: Must be at least 6 characters and contain at least 1 lowercase letter, 1
uppercase letter and 1 number. e. Active user: Activate or deactivate user.
4. Click add user
Smart Locks Control USER MANUALPage 21
All fields are validated before adding a user. The new name, username, role and password must meet the requirements.
1. Every field is validated to ensure data consistency. 2. Add user button is disabled if data is not correct and complete.
4.4.2 Edit userTo edit existing users the administrator or house managers need to perform the following actions:
6. Select users tab in sidebar.7. Select a user by clicking the radio button. 8. Click update user button. 9. Update information to update. 10. Click update user button.
Smart Locks Control USER MANUALPage 22
4.4.3 Delete userTo delete existing users the administrator or house managers need to perform the following actions:
1. Select users tab in sidebar. 2. Select a user by clicking the radio button. 3. Click update user button. 4. Click delete user button. 5. Confirm user deletion by clicking “OK” in the alert box.
4.5 My ProfileThis page provides the users the ability to view their basic information such as name and username, as well as to change their password.
Smart Locks Control USER MANUALPage 23
4.5.1 Change passwordEvery user can change his own password by performing the following steps:
1. Select my profile tab in the sidebar.2. Add a new password.3. Confirm the new password. 4. Click update password button.
Password should meet the following requirements:1. Password must be at least 6 characters and must include at least one uppercase letter, one
lowercase letter and one numeric digit. 2. If the requirements are not met the update password button will be disabled.
Smart Locks Control USER MANUALPage 24
4.6 SmartThingsThis page will allow the administrator to view/update the current configuration or link the system to a SmartThings account as part of the initial setup.
4.6.1 View current configurationWhat follow is the instructions to view the current configuration:
1. Select SmartThings tab in the sidebar.2. In the opened page, you can see your current Client ID and Client Secret.3. At the bottom of the page you will be able to see all the available locations that are linked to this
account.
4.6.2 Update configurationTo update the current configuration the next steps need to be performed:
1. From the navigation panel at the left side of the screen, click on the “Smartthings” tab.2. Update Client ID field.3. Update Client Secret field.4. Click update settings button.
Smart Locks Control USER MANUALPage 25
4.6.3 Link to SmartThings accountPlease refer to section [3.2.3].
4.7 Special Instructions for Error CorrectionThe application itself handles error properly. When an action is performed correctly the user will
receive a success alert on top of the page. On the other hand, if an action was not performed correctly the user will receive a warning indicating the error.
4.8 Caveats and ExceptionsDue to the asynchronous nature of all the requests made to the SmartThings server there are some exceptions that need to be taken in consideration:
1. When adding or updating a new slot there is a probability of 1/5000 which is equal to .02% that the code that has been set is equal to the master code of the lock. In this case there will be an error while setting the code and it will not work properly.
2. If the information in the Samsung server is inconsistent or not up to date, the system may fail when setting codes. E.g. When the user tries to modify a slot in a lock that Samsung reports as active but the lock is not actually active the lock will not be set correctly.
In this case the guest should contact the house manager or administrator to obtain a new code.
Smart Locks Control USER MANUALPage 26


![Untitled-1 [lsamichigan.org] · 2012-10-27 · how locks work. Terminology: When keying two locks alike, you are actually changing the pin-tumblers in one of the locks so that it](https://img.pdfslide.us/doc/110x75/5ec5b4c55f865f25e17906b2/untitled-1-2012-10-27-how-locks-work-terminology-when-keying-two-locks-alike.jpg)