Embed Size (px)
Citation preview
General Assistance Program (GAP) Online
Tribal User Guide
Version 2.3.5
Document: GAP Online Tribal User Guide
Version 2.3.5
Page 2
Doc. No.: EDS-AIEO-MAN-0267
TABLE OF CONTENTS
1 INT R ODUC T ION 4 1.1 GENERAL ASSISTANCE PROGRAM (GAP) ONLINE SYSTEM 5 1.2 SYSTEM REQUIREMENTS FOR GAP ONLINE 5 1.3 INTERNET EXPLORER 8 AND INTERNET EXPLORER 9 COMPATIBILITY 5 1.4 MAC OPERATING SYSTEM SUPPORT 5 1.5 GAP ONLINE TRIBAL USER GUIDE 6
2 WHAT ’S NE W IN G AP ONL INE 2.3.5 7 2.1 NEW FEATURES FOR THE TRIBAL USER IN GAP ONLINE 2.3.5 7
3 T HE B AS IC S 8 3.1 LOG INTO GAP ONLINE 8 3.2 REQUESTING A FORGOTTEN PASSWORD 9 3.3 CHANGING YOUR PASSWORD 10 3.4 UPDATING USER PROFILE FOR FIRST TIME USERS 13 3.5 LOG OUT OF GAP ONLINE 15 3.6 MENU BAR 16 3.7 GAP FUNCTIONALITY SELECTIONS 16
4 WOR K P L AN 18 4.1 CREATE A WORK PLAN 18 4.2 ADDING NARRATIVE BACKGROUND INFORMATION 20 4.3 DELETING NARRATIVE BACKGROUND INFORMATION 22 4.4 ADDING BUDGET INFORMATION 22 4.5 DELETING BUDGET INFORMATION 25 4.6 DETAILED BUDGET WORKSHEET 26 4.7 ADDING POSITION INFORMATION 27 4.8 DELETING POSITION INFORMATION 29 4.9 ADDING ATTACHMENTS 29 4.10 DELETING ATTACHMENTS 31 4.11 CREATE A WORK PLAN COMPONENT 32 4.12 REORDERING WORK PLAN COMPONENTS 36 4.13 CREATE A WORK PLAN COMMITMENT 36 4.14 REORDERING WORK PLAN COMMITMENTS 38 4.15 SUBMITTING A WORK PLAN 39
5 E DIT WOR K P L AN 41 5.1 VIEW A WORK PLAN 42 5.2 UPDATE A WORK PLAN 43 5.3 DELETE WORK PLAN COMPONENT 45 5.4 DELETE WORK PLAN COMMITMENT 46 5.5 NEXT STEPS AFTER WORK PLAN SUBMISSION 47
Document: GAP Online Tribal User Guide
Version 2.3.5
Page 3
Doc. No.: EDS-AIEO-MAN-0267
5.6 RECALL A WORK PLAN 48 5.7 VIEW CHANGE HISTORY 50 5.8 PRINT CHANGE HISTORY 50 5.9 VIEW WORK PLAN AS PDF 52 5.10 VIEW WORK PLAN WITH OPEN OFFICE 54 5.11 ARCHIVE 56
6 C R E AT E / E DIT P R OG R E S S R E P OR T 58 6.1 CREATE A PROGRESS REPORT 59 6.2 UPDATE A PROGRESS REPORT 62 6.3 VIEW A COMMENT 64 6.4 RESPOND TO A COMMENT 65 6.5 SUBMIT A PROGRESS REPORT 66 6.6 DELETE A PROGRESS REPORT 68
7 S UMMAR Y R E P OR T S 69 7.1 GENERATE AN END OF YEAR SUMMARY REPORT 70 7.2 GENERATING NATIONAL AND REGIONAL SUMMARY REPORTS 72 7.3 TYPES OF SUMMARY REPORTS 75 7.3.1 NUMBER OF GRANTS BY REGIONS 76 7.3.2 TOTAL COSTS BY REGIONS 76 7.3.3 TOTAL COSTS BY STRATEGIC GOAL 77 7.3.4 TOTAL COSTS BY CAPACITY AREA 77 7.3.5 NUMBER OF TRIBES BY CAPACITY AREA 78 7.3.6 NUMBER OF CAPACITY AREA BY STRATEGIC GOAL 78 7.3.7 LIST OF LONG-TERM OUTCOMES BY STRATEGIC GOAL 79
8 AC R ONY MS AND DE F INIT IONS 80 8.1 ACRONYMS 80 8.2 DEFINITIONS 80
Document: GAP Online Tribal User Guide
Version 2.3.5
Page 4
Doc. No.: EDS-AIEO-MAN-0267
1 INT R ODUC T ION
The Indian Environmental General Assistance Program Act of 1992 provides programmatic authorization for the General Assistance Program (GAP). GAP provides an opportunity for tribes to build capacity and management capability to develop environmental programs and is administered by the Environmental Protection Agency (EPA). Under the Program, tribes can tailor capacity-building to address their environmental priorities. GAP provides the opportunity for a tribe to plan, develop, and establish an integrated environmental management program including the capability to manage specific regulatory programs.
GAP is one part of the continuing effort of the EPA to facilitate tribal establishment of environmental programs. GAP has become both a core tribal environmental program and a core EPA program, representing the largest single source of funding for Tribal environmental programs awarded by EPA. GAP has increased from an original funding of $8.4 million in 1994 to $57 million for the year 2007. As of FY 2008, the total dispersals of overall funds expended for the GAP program total over $695 million.
GAP provides financial resources in the form of direct funding to federally recognized tribes and intertribal consortia. In its administration of GAP, EPA also provides technical assistance to tribal governments and intertribal consortia to develop multimedia programs that address environmental issues in Indian Country.
GAP enables tribes and intertribal consortia to:
• Identify baseline environmental needs in order to build capacity to administer an environmental program or develop a tribal environmental program that is tailored to individual tribal needs.
• Establish the administrative, legal, technical, and enforcement capability of tribes to develop and implement a tribal environmental program, including the capacity to manage EPA-delegated programs.
• Foster compliance with federal environmental statues by developing appropriate tribal environmental programs, ordinances, and public education and outreach programs.
• Establish a tribal communications capability to work with Federal, State, Local, Tribal, and other environmental officials.
• Establish the tribal capacity to develop and implement management programs through program-specific assistance.
Source: American Indian Environmental Office
Document: GAP Online Tribal User Guide
Version 2.3.5
Page 5
Doc. No.: EDS-AIEO-MAN-0267
1.1 General Assistance Program (GAP) Online System
The GAP Online System provides EPA Grantees and Regional Project Officers with a centralized tool for creating work plans and reporting progress. The designs are based on the format of the most current EPA GAP Guidance Guideline (GAP Guidance for 2006).
1.2 System Requirements for GAP Online
GAP Online 2.3.5 has the following system requirements:
• Microsoft Windows XP, Microsoft Windows Vista, or Microsoft Windows 7
• Microsoft Internet Explorer 7 or later
• Adobe Portable Document Reader (PDF) Reader
• JavaScript and cookies enabled
• Popup blockers disabled
1.3 Internet Explorer 8 and Internet Explorer 9 Compatibility
GAP Online may not display correctly in Windows Internet Explorer 8 and 9. Portions of a Web page may be missing, information in a table may appear in the wrong location, or colors and text may be incorrect.
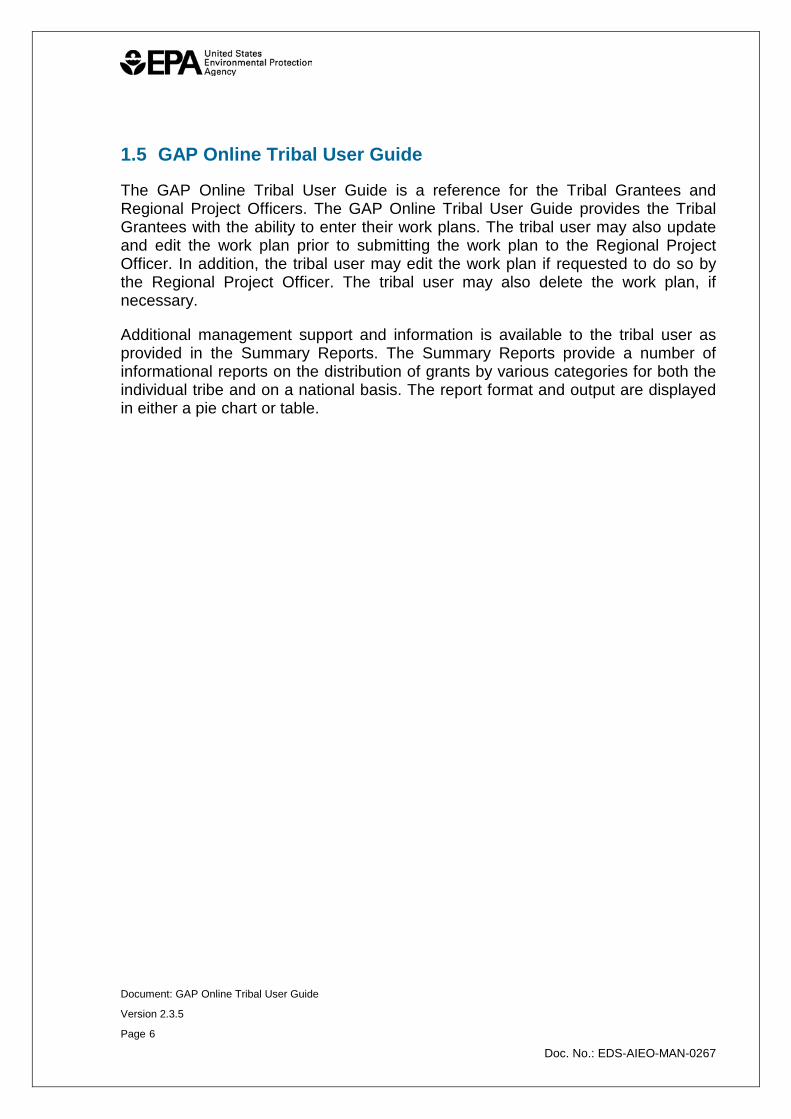
If a portion of a Web page is blank or doesn’t display correctly, enable Compatibility View by selecting the Compatibility View button on the Address bar (Figure 1). The Web page will reload with Compatibility View turned on. The Compatibility View button does not need to be selected again for GAP Online once it has been selected. The next visit to GAP Online will automatically display in Compatibility View.
Figure 1 –Compatibility View Button
1.4 Mac Operating System Support
GAP Online is not compatible with Apple Safari and Mozilla Firefox for Mac OS X, and is only supported by Microsoft Internet Explorer for Microsoft Windows.
Document: GAP Online Tribal User Guide
Version 2.3.5
Page 6
Doc. No.: EDS-AIEO-MAN-0267
1.5 GAP Online Tribal User Guide
The GAP Online Tribal User Guide is a reference for the Tribal Grantees and Regional Project Officers. The GAP Online Tribal User Guide provides the Tribal Grantees with the ability to enter their work plans. The tribal user may also update and edit the work plan prior to submitting the work plan to the Regional Project Officer. In addition, the tribal user may edit the work plan if requested to do so by the Regional Project Officer. The tribal user may also delete the work plan, if necessary.
Additional management support and information is available to the tribal user as provided in the Summary Reports. The Summary Reports provide a number of informational reports on the distribution of grants by various categories for both the individual tribe and on a national basis. The report format and output are displayed in either a pie chart or table.
Document: GAP Online Tribal User Guide
Version 2.3.5
Page 7
Doc. No.: EDS-AIEO-MAN-0267
2 WHAT ’S NE W IN G AP ONL INE 2.3.5
GAP Online 2.3.5 has many new features and functions for the tribal user, as well as the Regional Project Officer. The new features and functionalities emerged from the various training sessions American Indian Environmental Office (AIEO) conducted and monthly GAP Online Steering Committee meetings. As GAP Online continues to evolve, AIEO looks to the tribes in addressing how GAP Online can be improved to facilitate the development and negotiation of work plans to best serve the tribal community.
2.1 New Features for the Tribal User in GAP Online 2.3.5
• Simplified layout for the Create New Progress Report and Edit Progress Report pages
• Improved Adobe Portable Document Format (PDF) and Rich Text Format (RTF) for work plans and progress reports
• Replaced EPA Strategic Goals with EPA Program Codes for components
• Removed the Primary Capacity Area (PCA) field from work plan components and commitments
• Increased the character limit for the Work Accomplished field for progress reports
• Added the Change Password field on the User Profile page for the Regional Project Officer and the EPA Headquarters User
• Improved data validation for the Edit Position and Create New Position pages
Document: GAP Online Tribal User Guide
Version 2.3.5
Page 8
Doc. No.: EDS-AIEO-MAN-0267
3 T HE B AS IC S
The GAP Online is a web-based application created with a standard interface to provide a consistent look and feel. GAP Online uses a commonly recognized window design for the ease of the tribal user.
The following section provides an overview of the common design and use functionality.
3.1 Log into GAP Online
To log into GAP Online:
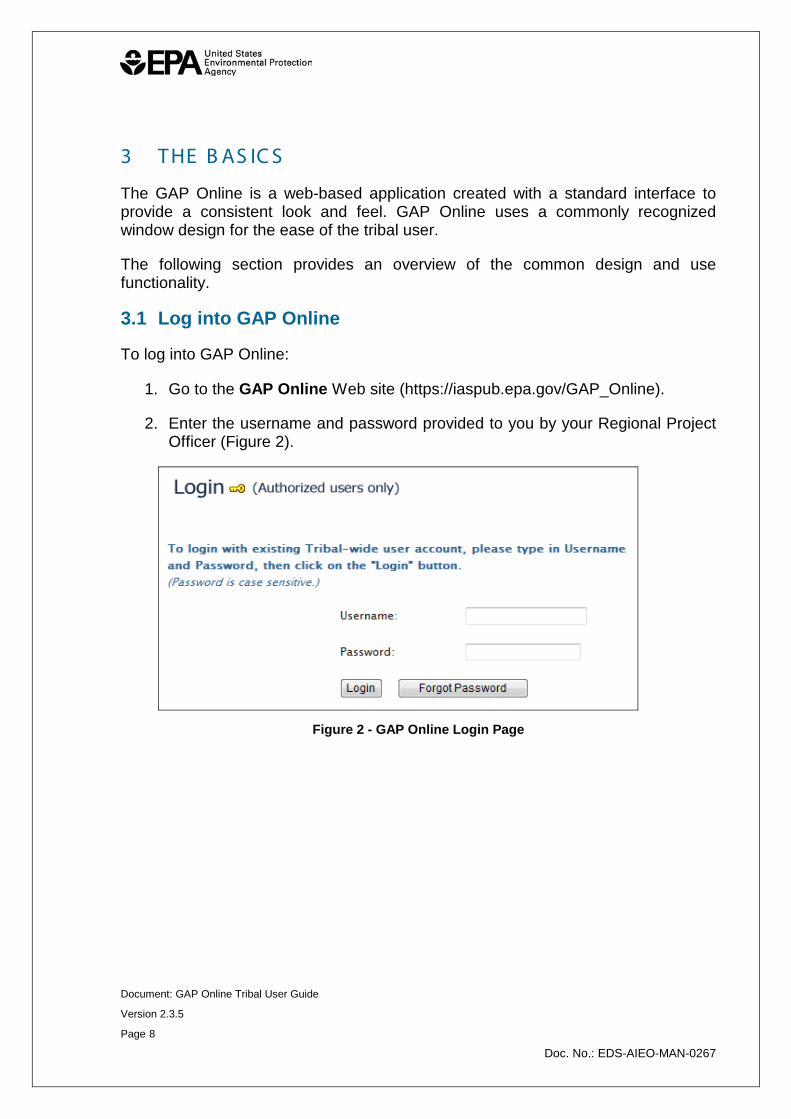
1. Go to the GAP Online Web site (https://iaspub.epa.gov/GAP_Online).
2. Enter the username and password provided to you by your Regional Project Officer (Figure 2).
Figure 2 - GAP Online Login Page
Document: GAP Online Tribal User Guide
Version 2.3.5
Page 9
Doc. No.: EDS-AIEO-MAN-0267
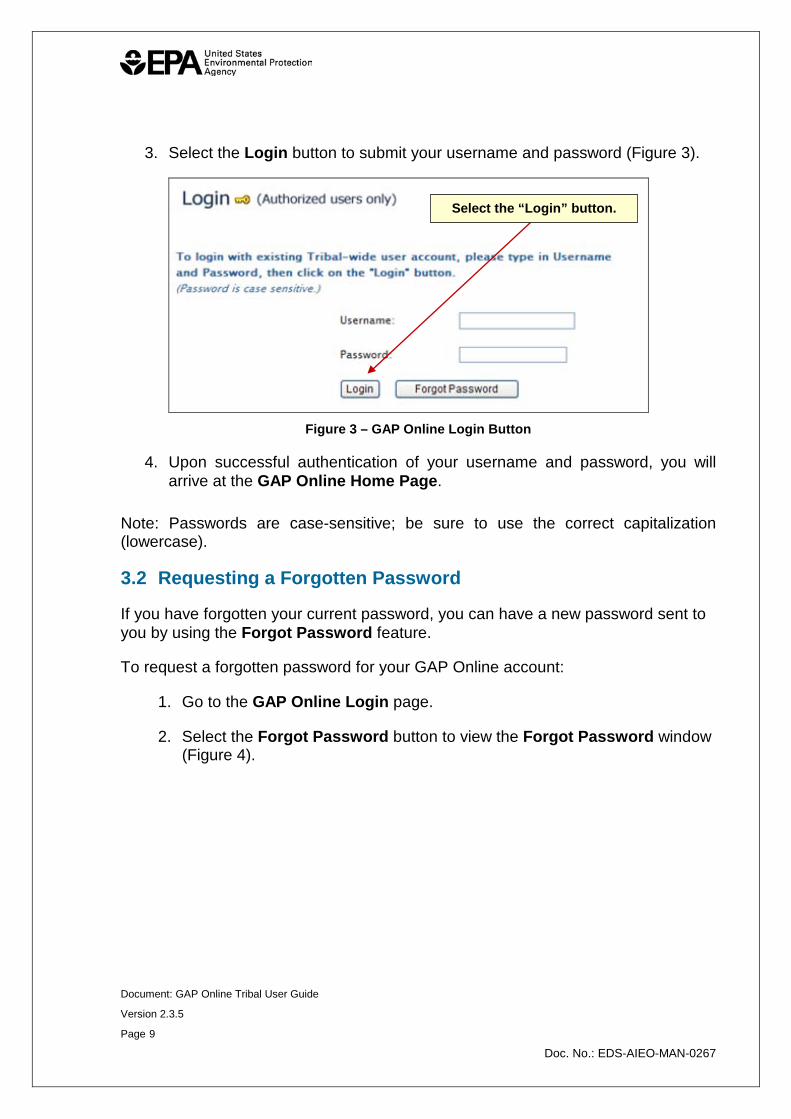
3. Select the Login button to submit your username and password (Figure 3).
Figure 3 – GAP Online Login Button
4. Upon successful authentication of your username and password, you will arrive at the GAP Online Home Page.
Note: Passwords are case-sensitive; be sure to use the correct capitalization (lowercase).
3.2 Requesting a Forgotten Password
If you have forgotten your current password, you can have a new password sent to you by using the Forgot Password feature.
To request a forgotten password for your GAP Online account:
1. Go to the GAP Online Login page.
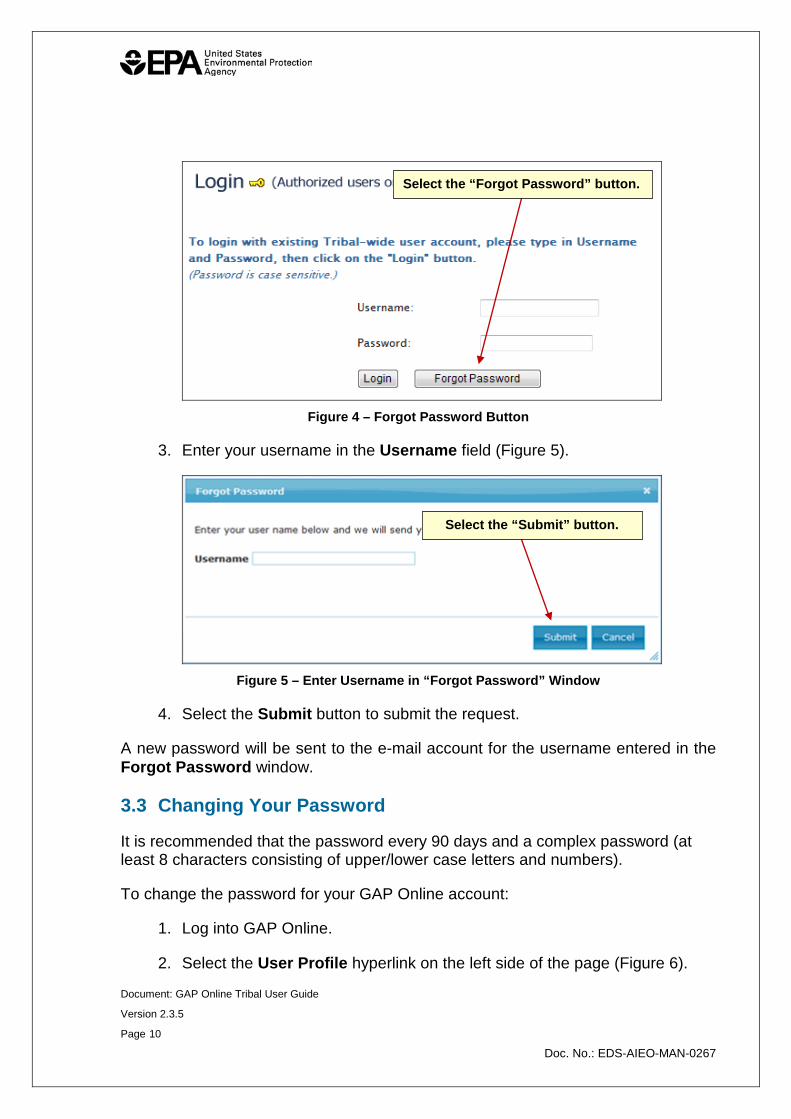
2. Select the Forgot Password button to view the Forgot Password window (Figure 4).
Select the “Login” button.
Document: GAP Online Tribal User Guide
Version 2.3.5
Page 10
Doc. No.: EDS-AIEO-MAN-0267
Figure 4 – Forgot Password Button
3. Enter your username in the Username field (Figure 5).
Figure 5 – Enter Username in “Forgot Password” Window
4. Select the Submit button to submit the request.
A new password will be sent to the e-mail account for the username entered in the Forgot Password window.
3.3 Changing Your Password
It is recommended that the password every 90 days and a complex password (at least 8 characters consisting of upper/lower case letters and numbers).
To change the password for your GAP Online account:
1. Log into GAP Online.
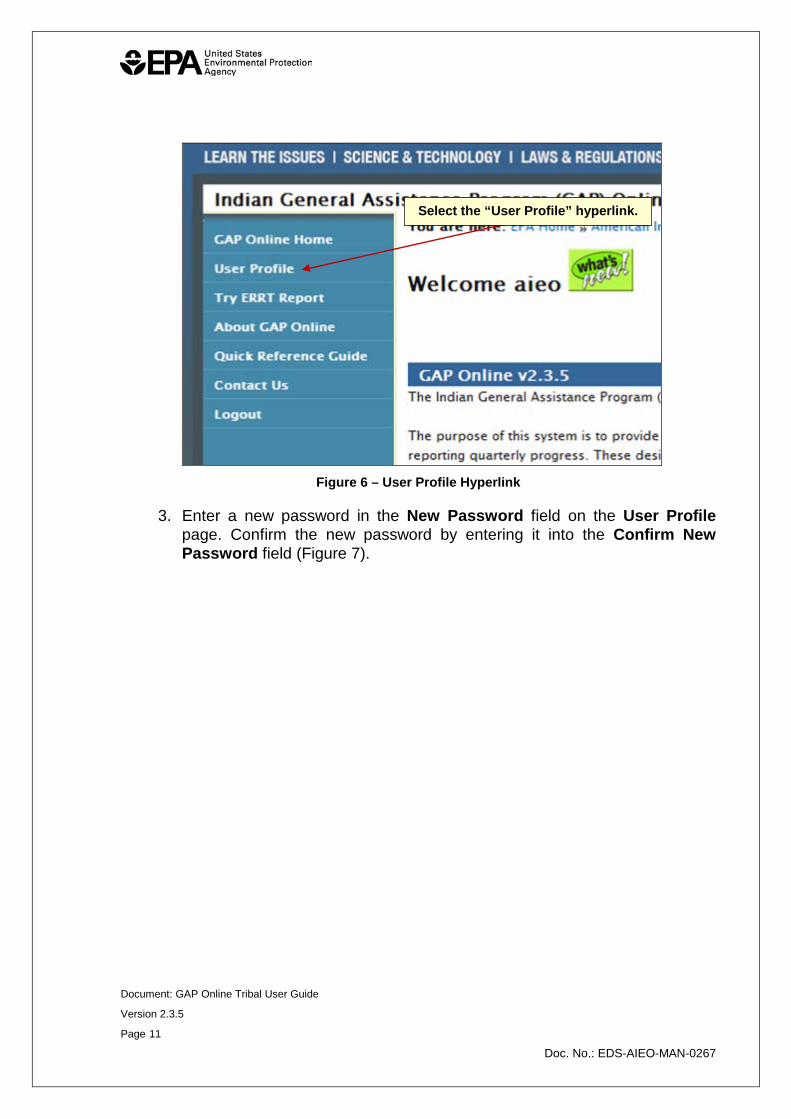
2. Select the User Profile hyperlink on the left side of the page (Figure 6).
Select the “Submit” button.
Select the “Forgot Password” button.
Document: GAP Online Tribal User Guide
Version 2.3.5
Page 11
Doc. No.: EDS-AIEO-MAN-0267
Figure 6 – User Profile Hyperlink
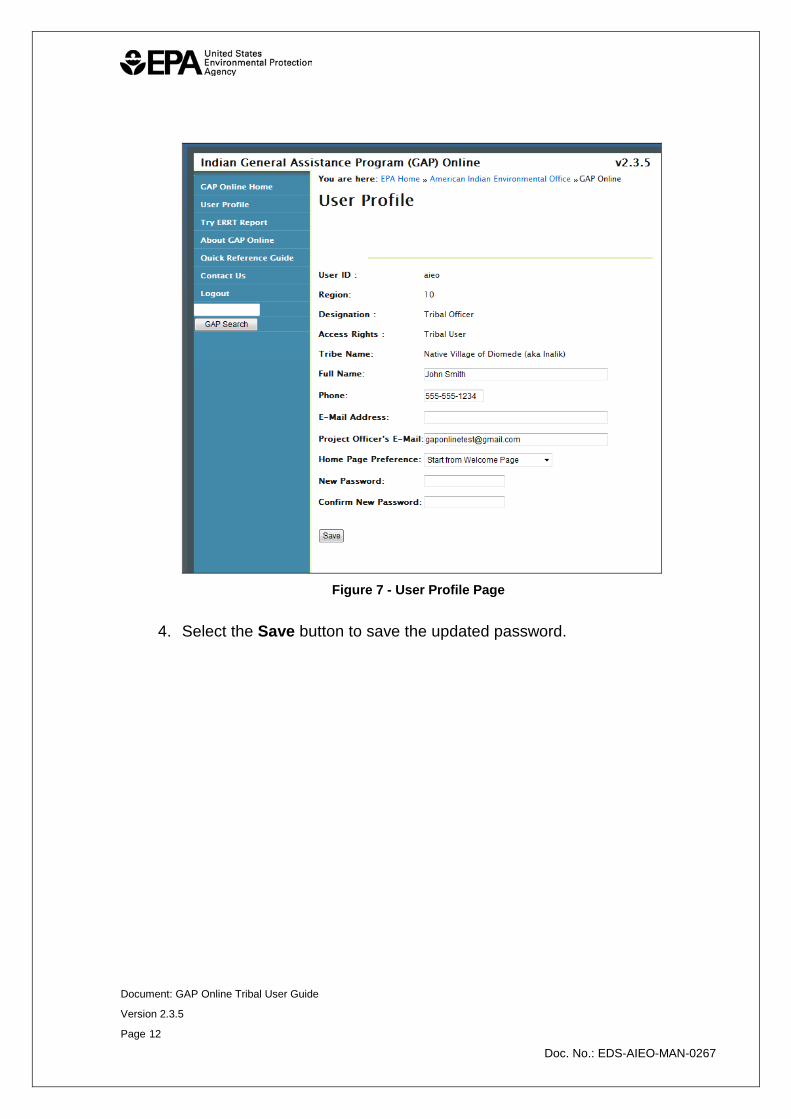
3. Enter a new password in the New Password field on the User Profile page. Confirm the new password by entering it into the Confirm New Password field (Figure 7).
Select the “User Profile” hyperlink.
Document: GAP Online Tribal User Guide
Version 2.3.5
Page 12
Doc. No.: EDS-AIEO-MAN-0267
Figure 7 - User Profile Page
4. Select the Save button to save the updated password.
Document: GAP Online Tribal User Guide
Version 2.3.5
Page 13
Doc. No.: EDS-AIEO-MAN-0267
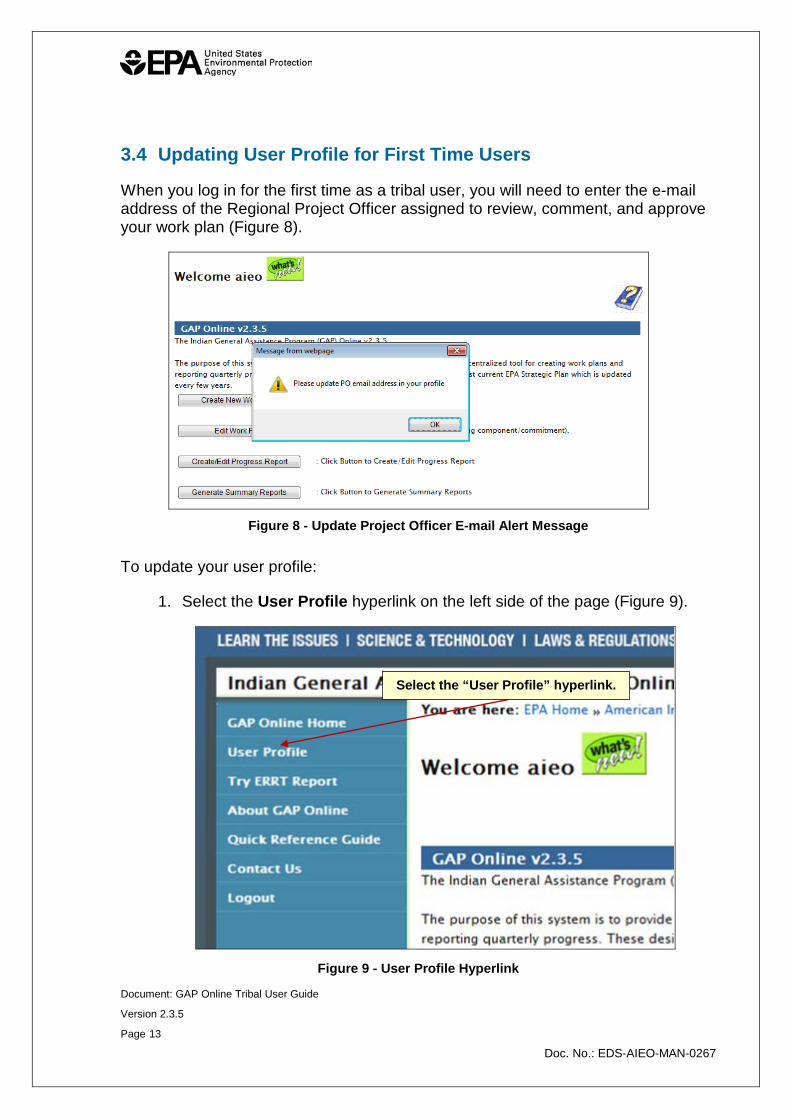
3.4 Updating User Profile for First Time Users
When you log in for the first time as a tribal user, you will need to enter the e-mail address of the Regional Project Officer assigned to review, comment, and approve your work plan (Figure 8).
Figure 8 - Update Project Officer E-mail Alert Message
To update your user profile:
1. Select the User Profile hyperlink on the left side of the page (Figure 9).
Figure 9 - User Profile Hyperlink
Select the “User Profile” hyperlink.
Document: GAP Online Tribal User Guide
Version 2.3.5
Page 14
Doc. No.: EDS-AIEO-MAN-0267
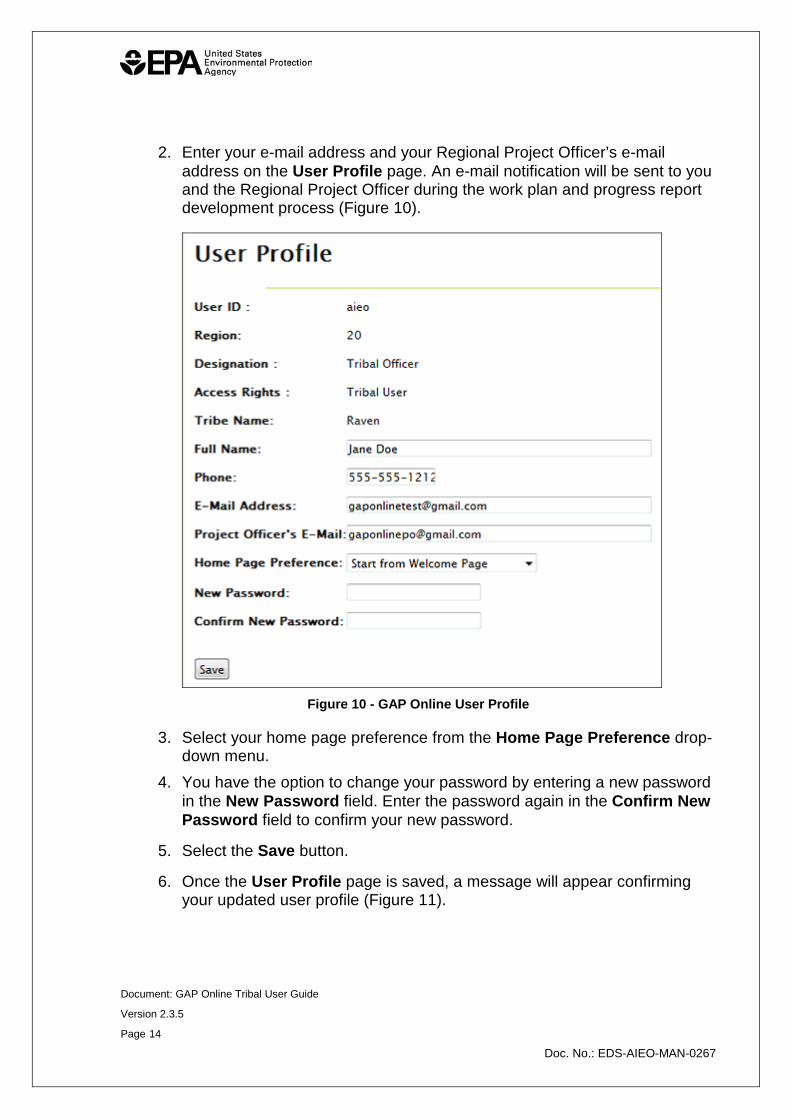
2. Enter your e-mail address and your Regional Project Officer’s e-mail address on the User Profile page. An e-mail notification will be sent to you and the Regional Project Officer during the work plan and progress report development process (Figure 10).
Figure 10 - GAP Online User Profile
3. Select your home page preference from the Home Page Preference drop-down menu.
4. You have the option to change your password by entering a new password in the New Password field. Enter the password again in the Confirm New Password field to confirm your new password.
5. Select the Save button.
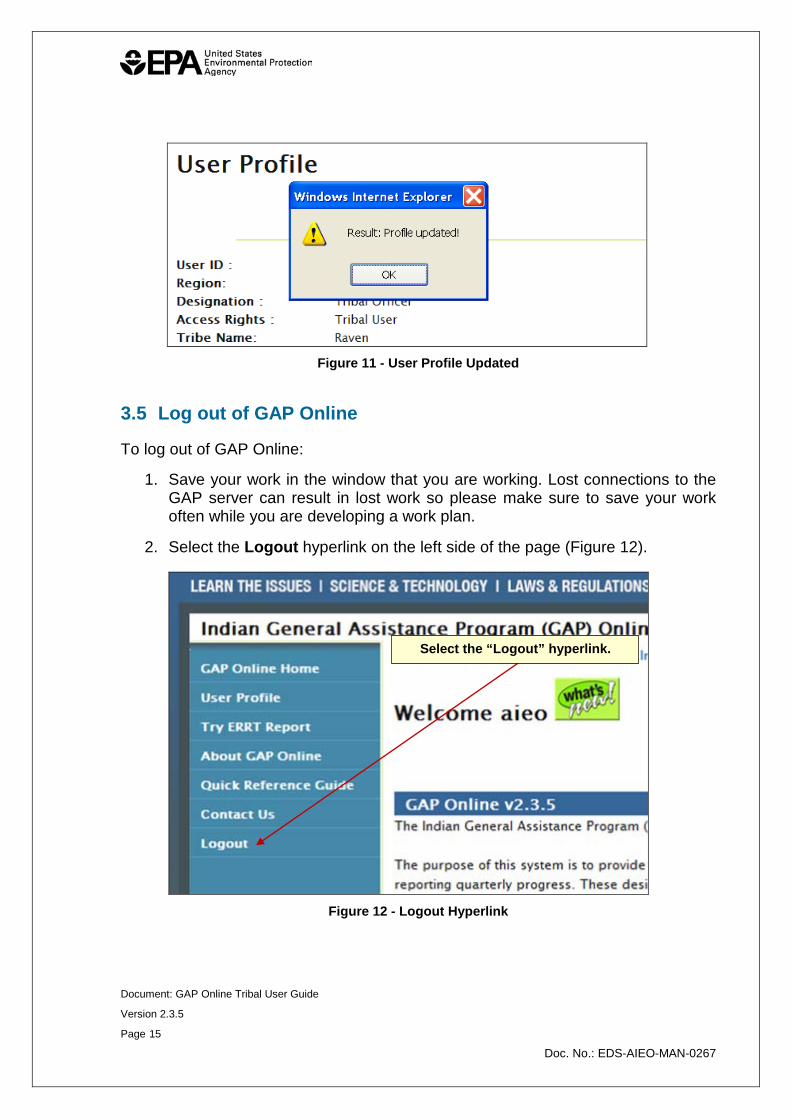
6. Once the User Profile page is saved, a message will appear confirming your updated user profile (Figure 11).
Document: GAP Online Tribal User Guide
Version 2.3.5
Page 15
Doc. No.: EDS-AIEO-MAN-0267
Figure 11 - User Profile Updated
3.5 Log out of GAP Online
To log out of GAP Online:
1. Save your work in the window that you are working. Lost connections to the GAP server can result in lost work so please make sure to save your work often while you are developing a work plan.
2. Select the Logout hyperlink on the left side of the page (Figure 12).
Figure 12 - Logout Hyperlink
Select the “Logout” hyperlink.
Document: GAP Online Tribal User Guide
Version 2.3.5
Page 16
Doc. No.: EDS-AIEO-MAN-0267
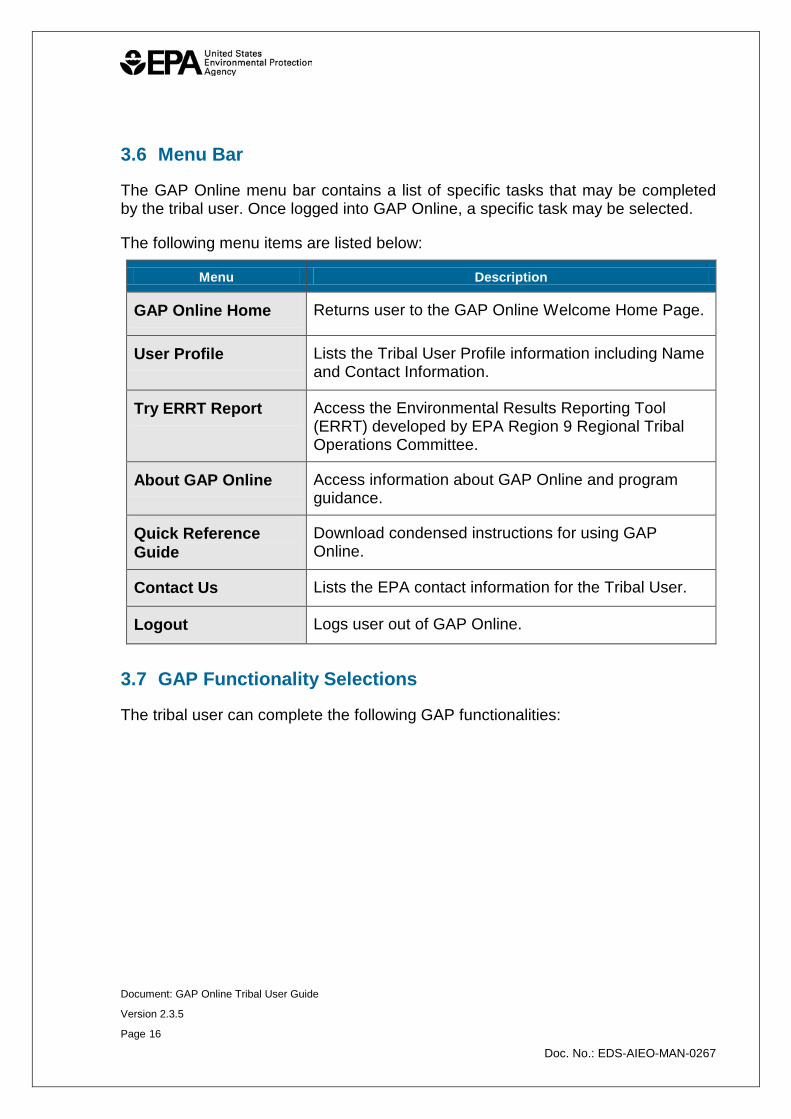
3.6 Menu Bar
The GAP Online menu bar contains a list of specific tasks that may be completed by the tribal user. Once logged into GAP Online, a specific task may be selected.
The following menu items are listed below:
Menu Description
GAP Online Home Returns user to the GAP Online Welcome Home Page.
User Profile Lists the Tribal User Profile information including Name and Contact Information.
Try ERRT Report Access the Environmental Results Reporting Tool (ERRT) developed by EPA Region 9 Regional Tribal Operations Committee.
About GAP Online Access information about GAP Online and program guidance.
Quick Reference Guide
Download condensed instructions for using GAP Online.
Contact Us Lists the EPA contact information for the Tribal User.
Logout Logs user out of GAP Online.
3.7 GAP Functionality Selections
The tribal user can complete the following GAP functionalities:
Document: GAP Online Tribal User Guide
Version 2.3.5
Page 17
Doc. No.: EDS-AIEO-MAN-0267
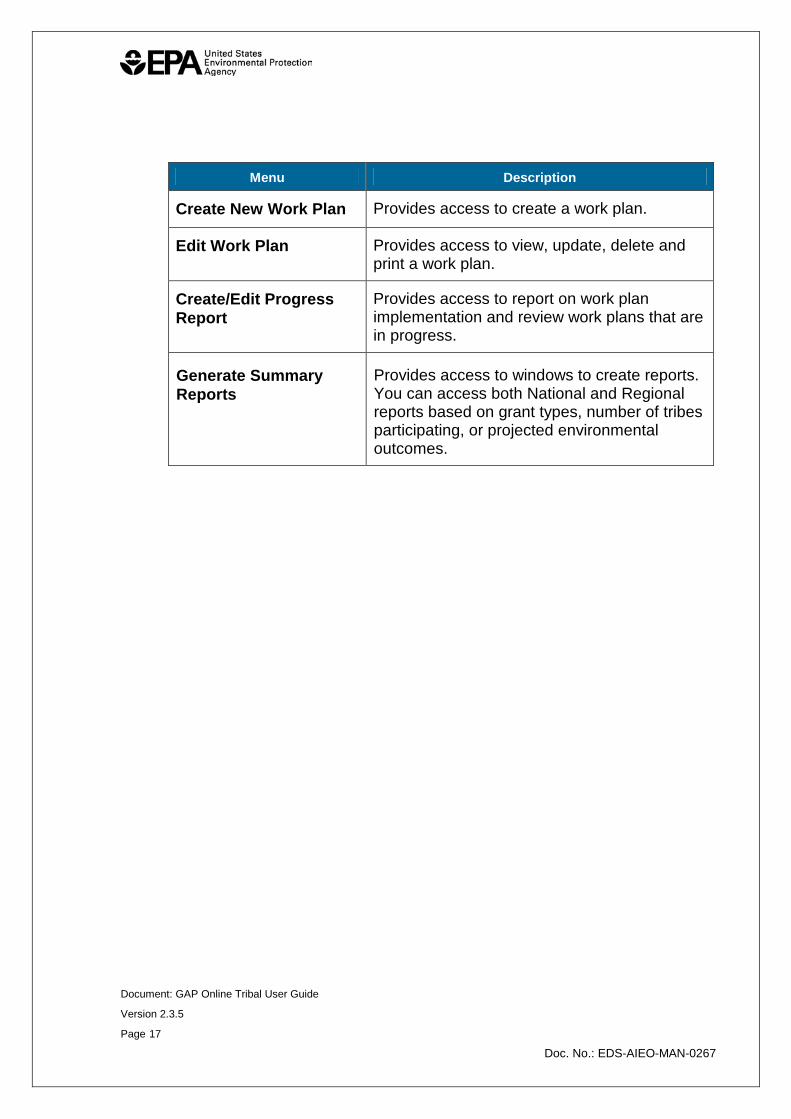
Menu Description
Create New Work Plan Provides access to create a work plan.
Edit Work Plan Provides access to view, update, delete and print a work plan.
Create/Edit Progress Report
Provides access to report on work plan implementation and review work plans that are in progress.
Generate Summary Reports
Provides access to windows to create reports. You can access both National and Regional reports based on grant types, number of tribes participating, or projected environmental outcomes.
Document: GAP Online Tribal User Guide
Version 2.3.5
Page 18
Doc. No.: EDS-AIEO-MAN-0267
4 WOR K P L AN
The work plan is created by the tribe. A work plan is composed of tribal specific data, composed of the work plan components, descriptors, financial attributes, descriptive information, and additional attachments. The work plan is managed in a cooperative effort between the tribe, the EPA Regional office in which the tribe is located, and EPA Headquarters.
4.1 Create a Work Plan
A tribe can create new work plans and maintain existing work in GAP Online. A work plan can include any number of components. Each component can include any number of commitments.
The tribe will create a work plan to submit to the Regional Project Officer assigned to the tribe by the EPA Region. The Regional Project Officer will review, negotiate, and approve each submitted work plan. The work plan must be completed to the fullest extent possible (all required fields are populated with information) prior to the submission to the EPA Region.
To create a new work plan:
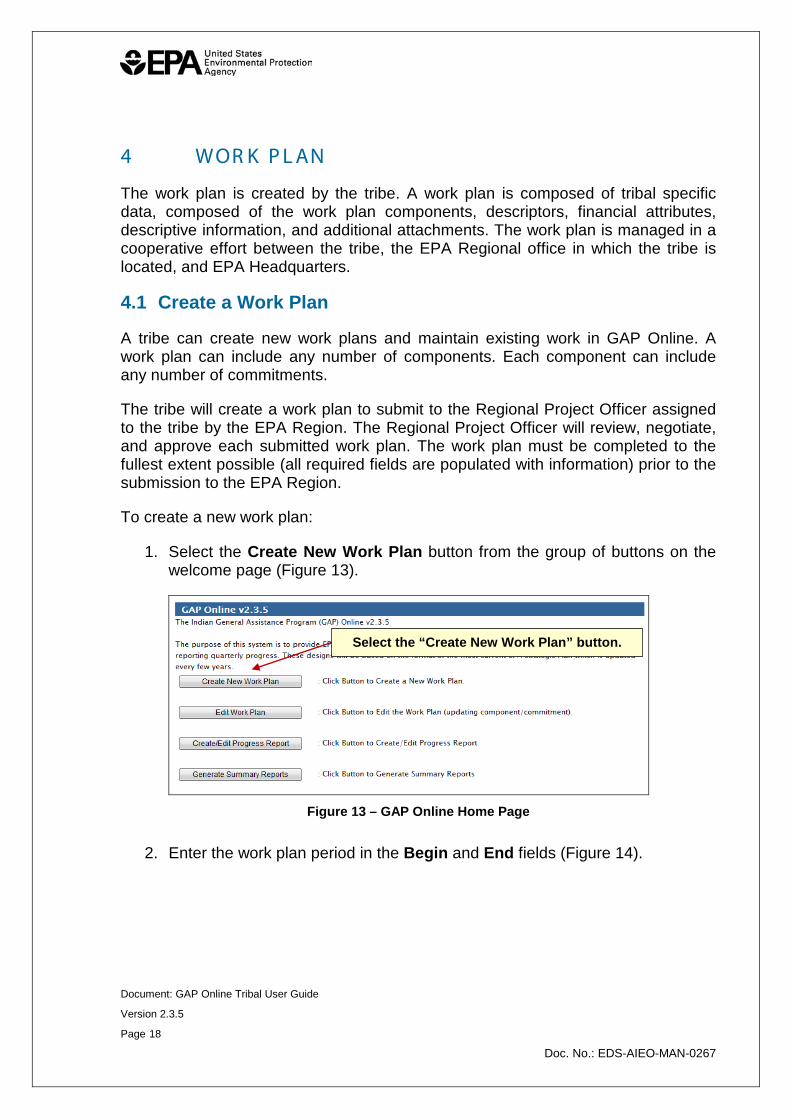
1. Select the Create New Work Plan button from the group of buttons on the welcome page (Figure 13).
Figure 13 – GAP Online Home Page
2. Enter the work plan period in the Begin and End fields (Figure 14).
Select the “Create New Work Plan” button.
Document: GAP Online Tribal User Guide
Version 2.3.5
Page 19
Doc. No.: EDS-AIEO-MAN-0267
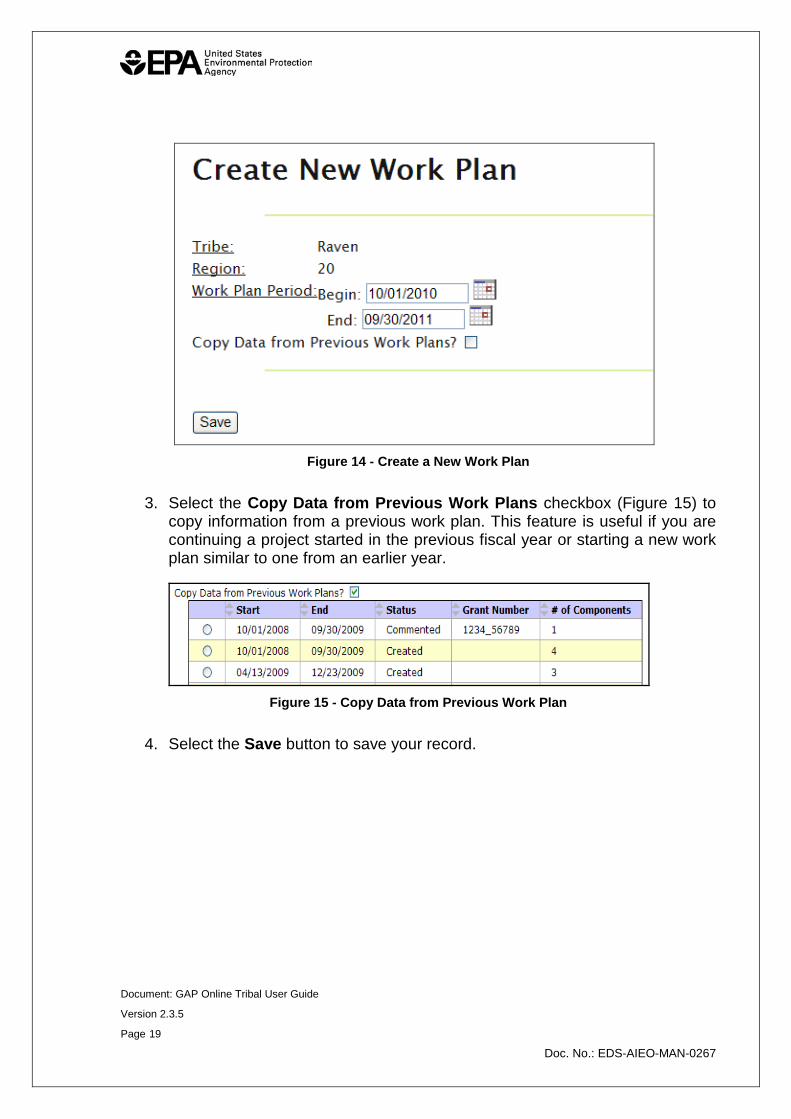
Figure 14 - Create a New Work Plan
3. Select the Copy Data from Previous Work Plans checkbox (Figure 15) to copy information from a previous work plan. This feature is useful if you are continuing a project started in the previous fiscal year or starting a new work plan similar to one from an earlier year.
Figure 15 - Copy Data from Previous Work Plan
4. Select the Save button to save your record.
Document: GAP Online Tribal User Guide
Version 2.3.5
Page 20
Doc. No.: EDS-AIEO-MAN-0267
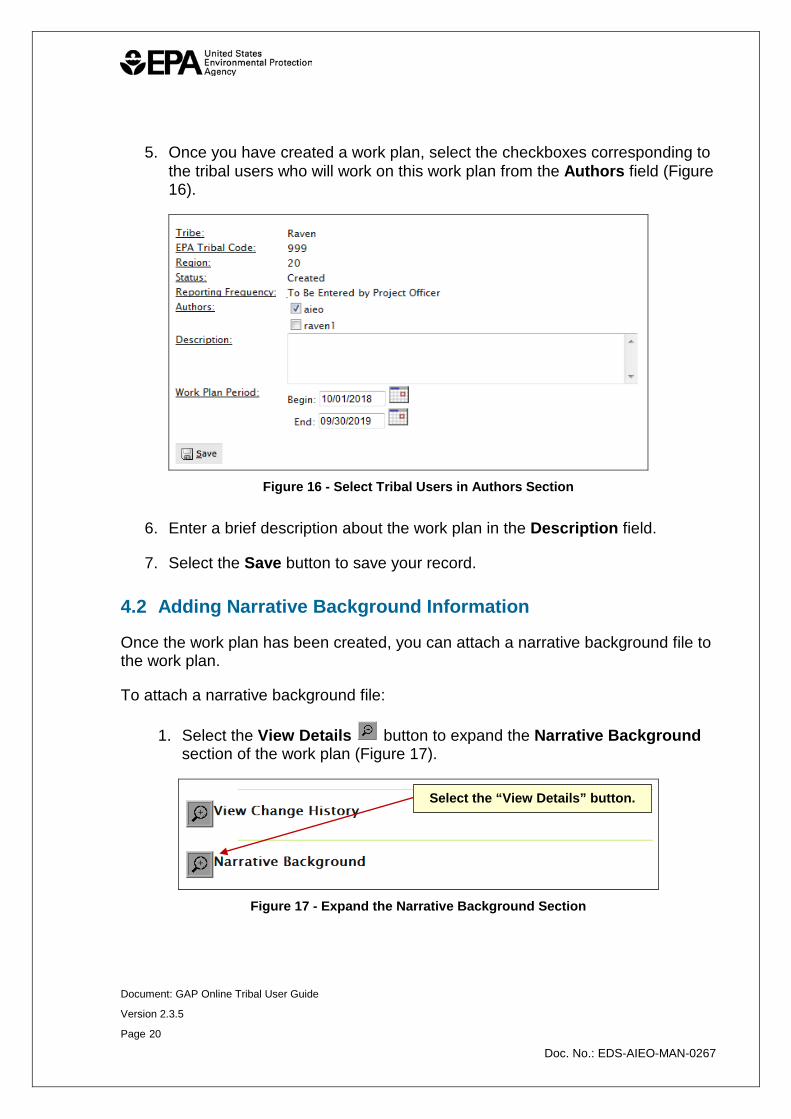
5. Once you have created a work plan, select the checkboxes corresponding to the tribal users who will work on this work plan from the Authors field (Figure 16).
Figure 16 - Select Tribal Users in Authors Section
6. Enter a brief description about the work plan in the Description field.
7. Select the Save button to save your record.
4.2 Adding Narrative Background Information
Once the work plan has been created, you can attach a narrative background file to the work plan.
To attach a narrative background file:
1. Select the View Details button to expand the Narrative Background section of the work plan (Figure 17).
Figure 17 - Expand the Narrative Background Section
Select the “View Details” button.
Document: GAP Online Tribal User Guide
Version 2.3.5
Page 21
Doc. No.: EDS-AIEO-MAN-0267
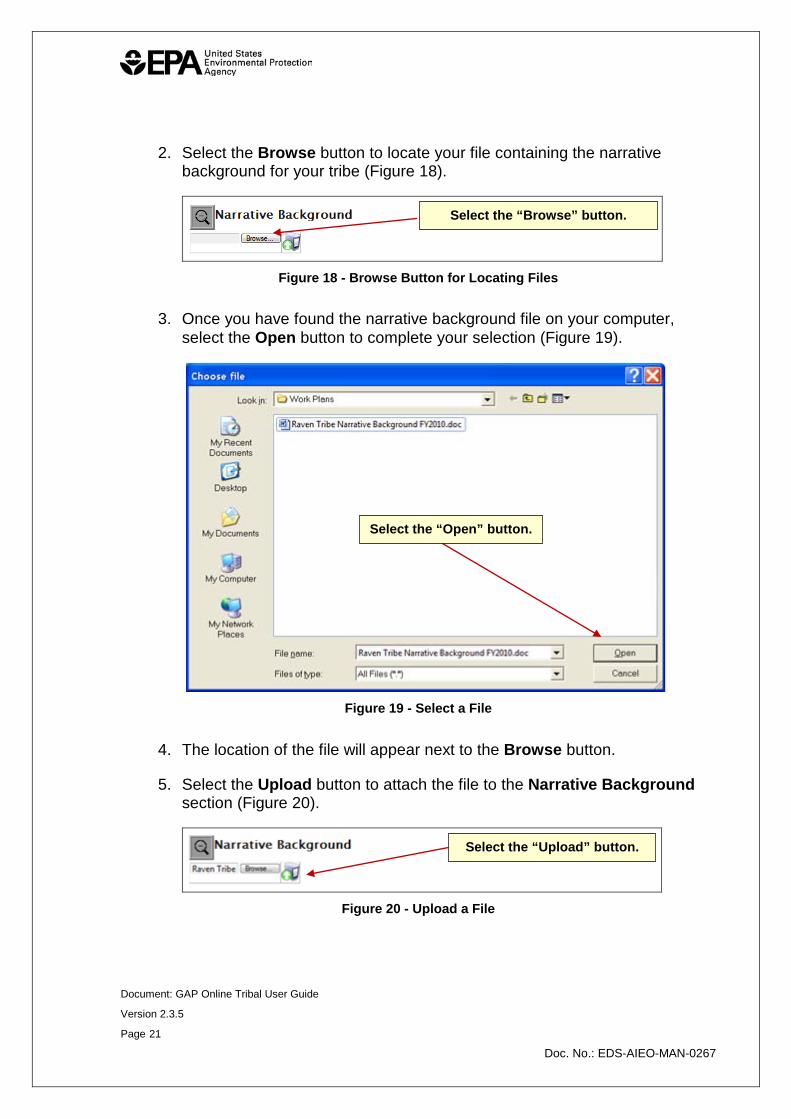
2. Select the Browse button to locate your file containing the narrative background for your tribe (Figure 18).
Figure 18 - Browse Button for Locating Files
3. Once you have found the narrative background file on your computer, select the Open button to complete your selection (Figure 19).
Figure 19 - Select a File
4. The location of the file will appear next to the Browse button.
5. Select the Upload button to attach the file to the Narrative Background section (Figure 20).
Figure 20 - Upload a File
Select the “Browse” button.
Select the “Open” button.
Select the “Upload” button.

Document: GAP Online Tribal User Guide
Version 2.3.5
Page 22
Doc. No.: EDS-AIEO-MAN-0267
6. The narrative background document will appear as an attached document (Figure 21).
Figure 21 - Attached File
4.3 Deleting Narrative Background Information
To delete a narrative background file:
1. Select the Delete button corresponding to a narrative background file (Figure 22).
Figure 22 - Delete Narrative Background File
2. Select the OK button on the confirmation message to delete the file (Figure 23). Warning: Once the file is deleted, it cannot be retrieved.
Figure 23 - Delete Confirmation Message
4.4 Adding Budget Information
Once the work plan has been created, you can attach a budget file to the work plan.
Select the “Delete” button.
Document: GAP Online Tribal User Guide
Version 2.3.5
Page 23
Doc. No.: EDS-AIEO-MAN-0267
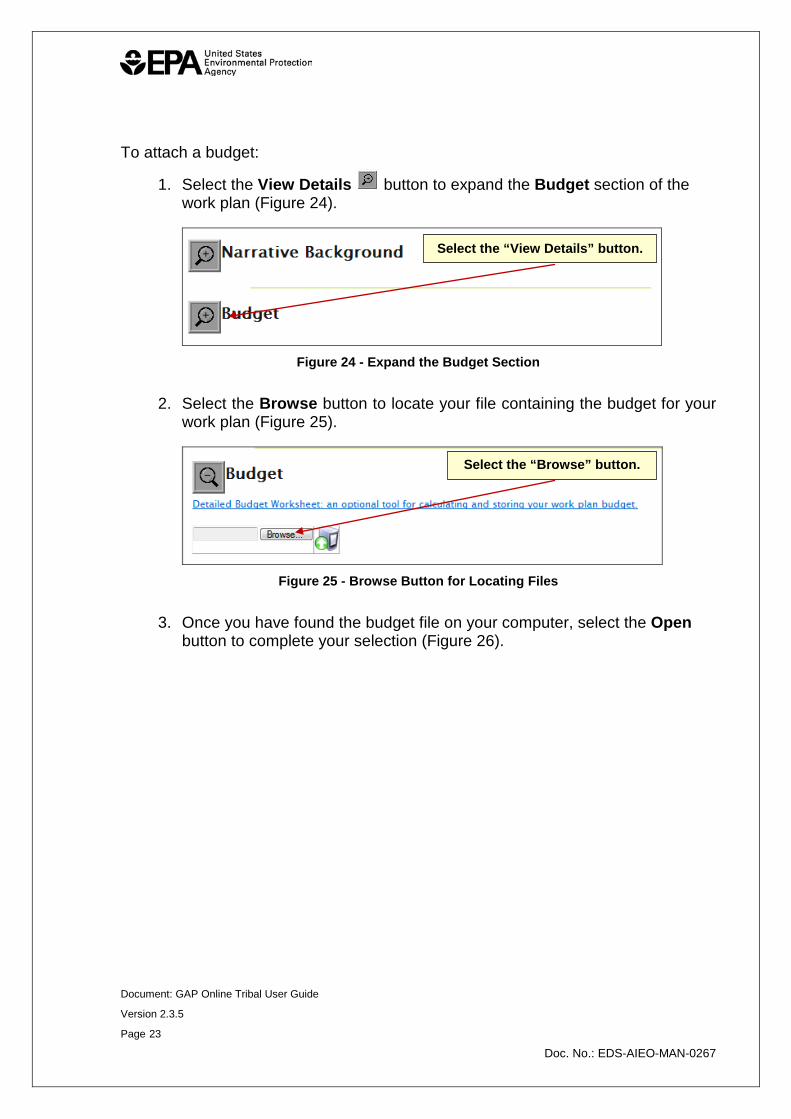
To attach a budget:
1. Select the View Details button to expand the Budget section of the work plan (Figure 24).
Figure 24 - Expand the Budget Section
2. Select the Browse button to locate your file containing the budget for your work plan (Figure 25).
Figure 25 - Browse Button for Locating Files
3. Once you have found the budget file on your computer, select the Open button to complete your selection (Figure 26).
Select the “View Details” button.
Select the “Browse” button.
Document: GAP Online Tribal User Guide
Version 2.3.5
Page 24
Doc. No.: EDS-AIEO-MAN-0267
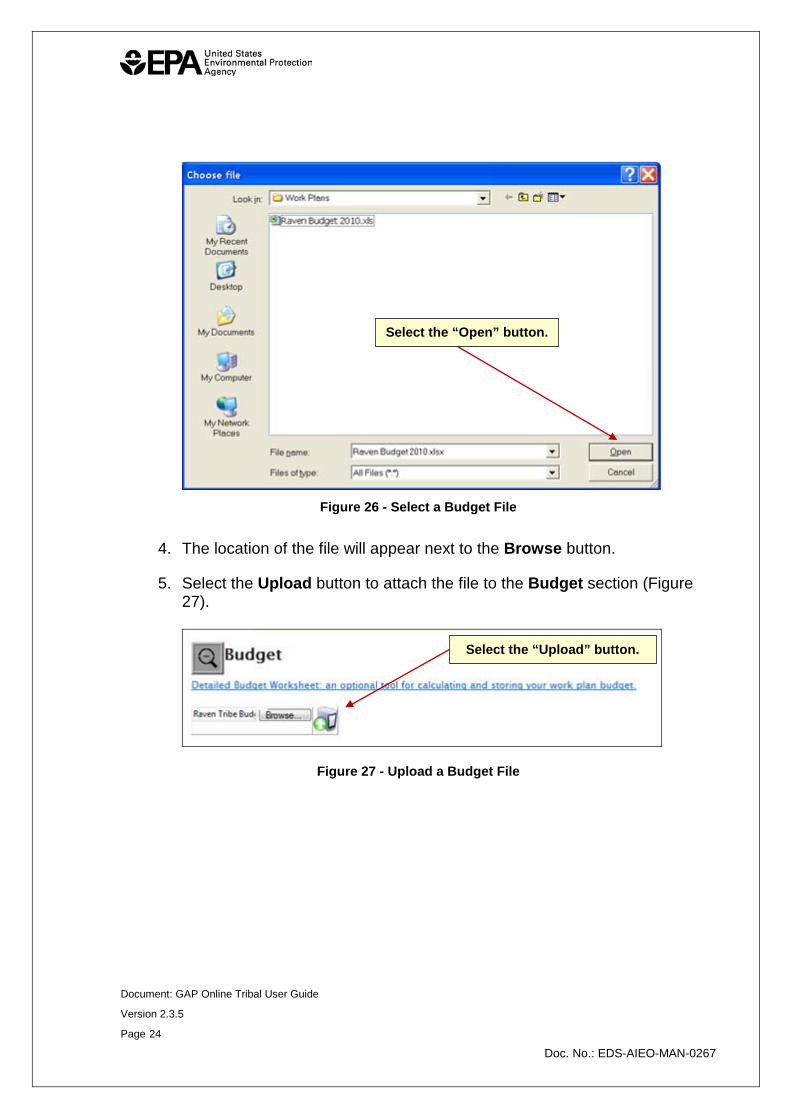
Figure 26 - Select a Budget File
4. The location of the file will appear next to the Browse button.
5. Select the Upload button to attach the file to the Budget section (Figure 27).
Figure 27 - Upload a Budget File
Select the “Open” button.
Select the “Upload” button.
Document: GAP Online Tribal User Guide
Version 2.3.5
Page 25
Doc. No.: EDS-AIEO-MAN-0267
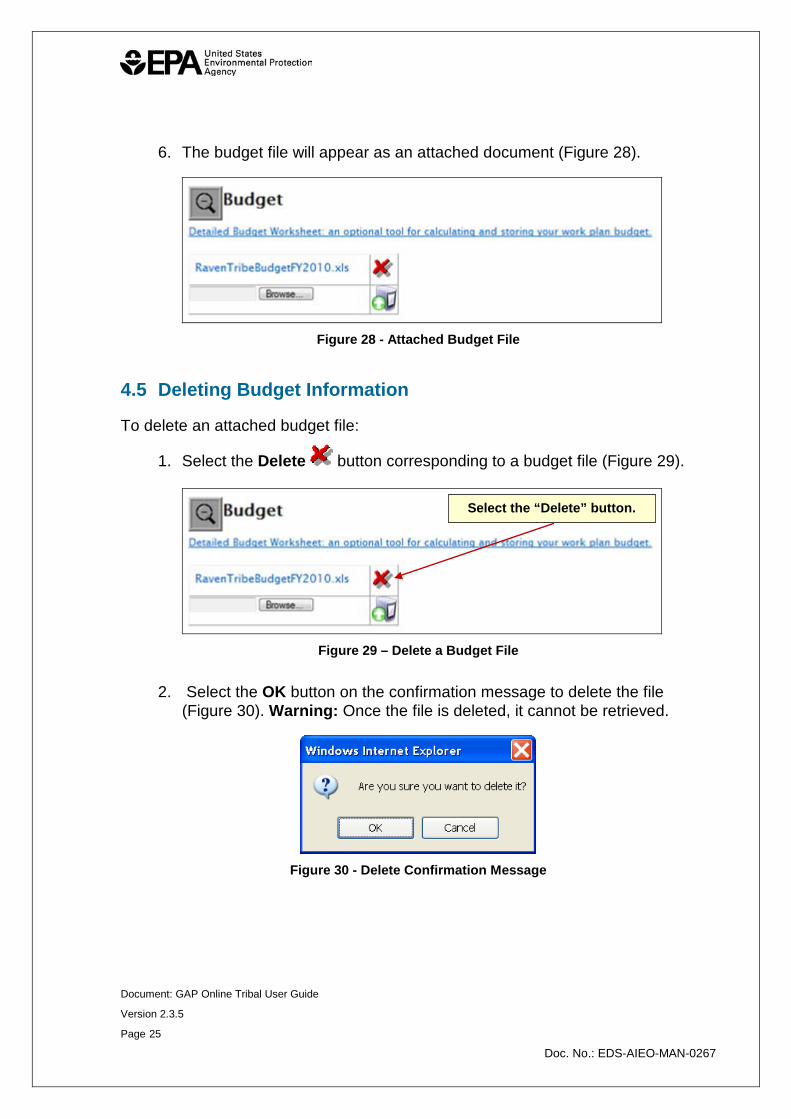
6. The budget file will appear as an attached document (Figure 28).
Figure 28 - Attached Budget File
4.5 Deleting Budget Information
To delete an attached budget file:
1. Select the Delete button corresponding to a budget file (Figure 29).
Figure 29 – Delete a Budget File
2. Select the OK button on the confirmation message to delete the file (Figure 30). Warning: Once the file is deleted, it cannot be retrieved.
Figure 30 - Delete Confirmation Message
Select the “Delete” button.
Document: GAP Online Tribal User Guide
Version 2.3.5
Page 26
Doc. No.: EDS-AIEO-MAN-0267
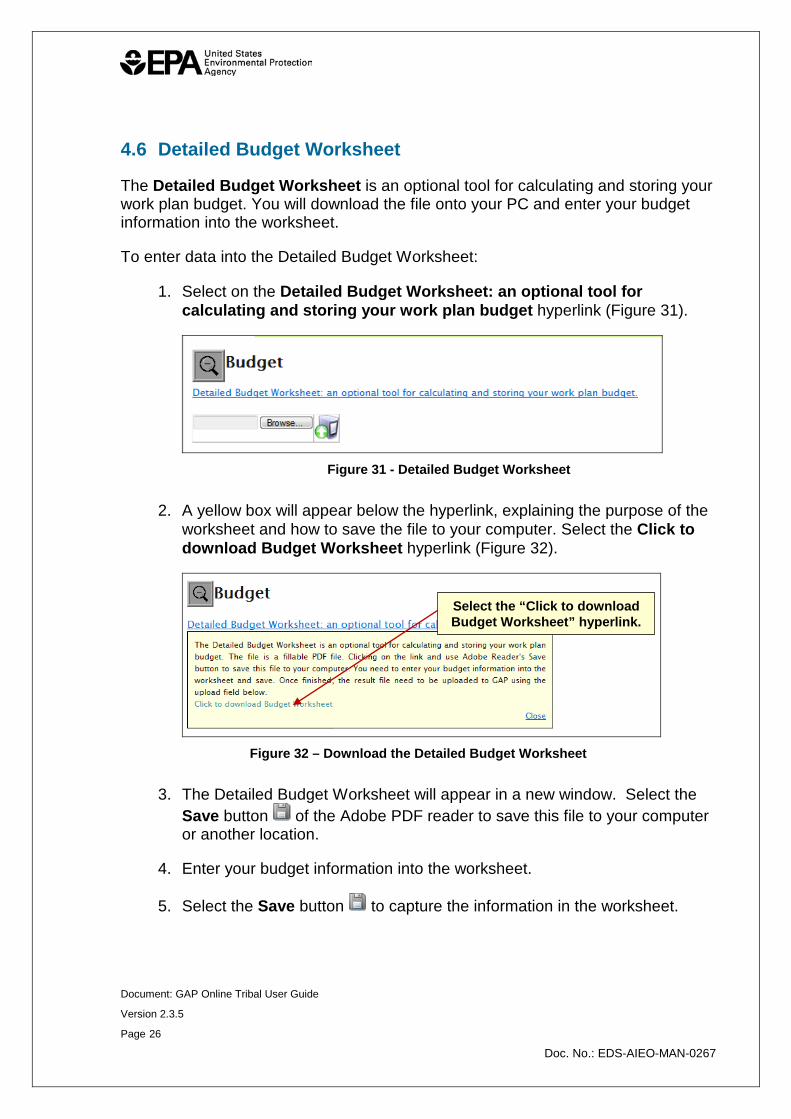
4.6 Detailed Budget Worksheet
The Detailed Budget Worksheet is an optional tool for calculating and storing your work plan budget. You will download the file onto your PC and enter your budget information into the worksheet.
To enter data into the Detailed Budget Worksheet:
1. Select on the Detailed Budget Worksheet: an optional tool for calculating and storing your work plan budget hyperlink (Figure 31).
Figure 31 - Detailed Budget Worksheet
2. A yellow box will appear below the hyperlink, explaining the purpose of the worksheet and how to save the file to your computer. Select the Click to download Budget Worksheet hyperlink (Figure 32).
Figure 32 – Download the Detailed Budget Worksheet
3. The Detailed Budget Worksheet will appear in a new window. Select the Save button of the Adobe PDF reader to save this file to your computer or another location.
4. Enter your budget information into the worksheet.
5. Select the Save button to capture the information in the worksheet.
Select the “Click to download Budget Worksheet” hyperlink.

Document: GAP Online Tribal User Guide
Version 2.3.5
Page 27
Doc. No.: EDS-AIEO-MAN-0267
6. Once the worksheet has been completed, follow the steps of 4.4 Adding Budget Information to upload the Detailed Budget Worksheet into the Budget section of the work plan.
Note: The Detailed Budget Worksheet requires the Adobe PDF reader software (http://get.adobe.com/reader/) installed on the user’s PC.
4.7 Adding Position Information
The Position Information section allows you to identify the people who will perform the work identified in the work plan, as well as the percentage of the GAP funding that will be used to support them. The personnel entered will be referenced during the creation of commitments (see Section 4.13).
To add a new position:
1. Select the View Details button to expand the Position Information section of the work plan (Figure 33).
Figure 33 – Position Information Section
2. Select the Add New Position button to view the Create New Position screen (Figure 34).
Figure 34 - Add New Position Button
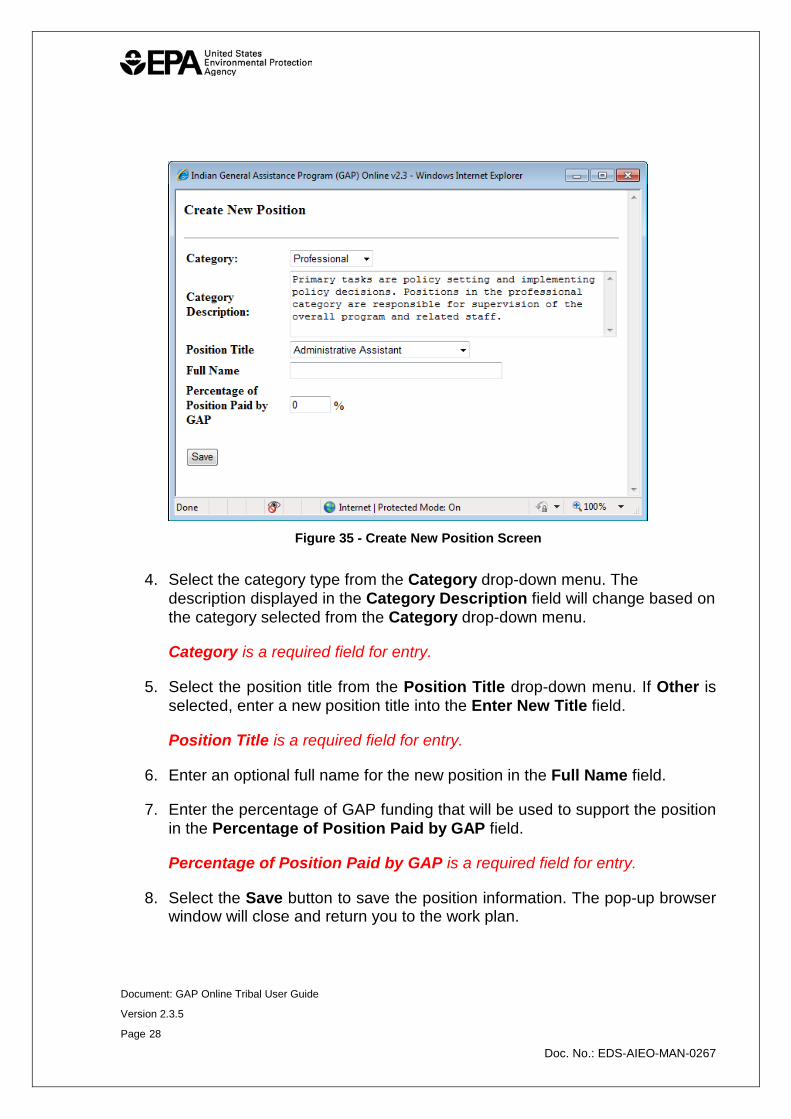
3. The Create New Position screen appears in a new browser window (Figure 35).
Select the “View Details” button.
Select the “Add New Position” button.
Document: GAP Online Tribal User Guide
Version 2.3.5
Page 28
Doc. No.: EDS-AIEO-MAN-0267
Figure 35 - Create New Position Screen
4. Select the category type from the Category drop-down menu. The description displayed in the Category Description field will change based on the category selected from the Category drop-down menu.
Category is a required field for entry.
5. Select the position title from the Position Title drop-down menu. If Other is selected, enter a new position title into the Enter New Title field.
Position Title is a required field for entry.
6. Enter an optional full name for the new position in the Full Name field.
7. Enter the percentage of GAP funding that will be used to support the position in the Percentage of Position Paid by GAP field.
Percentage of Position Paid by GAP is a required field for entry.
8. Select the Save button to save the position information. The pop-up browser window will close and return you to the work plan.
Document: GAP Online Tribal User Guide
Version 2.3.5
Page 29
Doc. No.: EDS-AIEO-MAN-0267
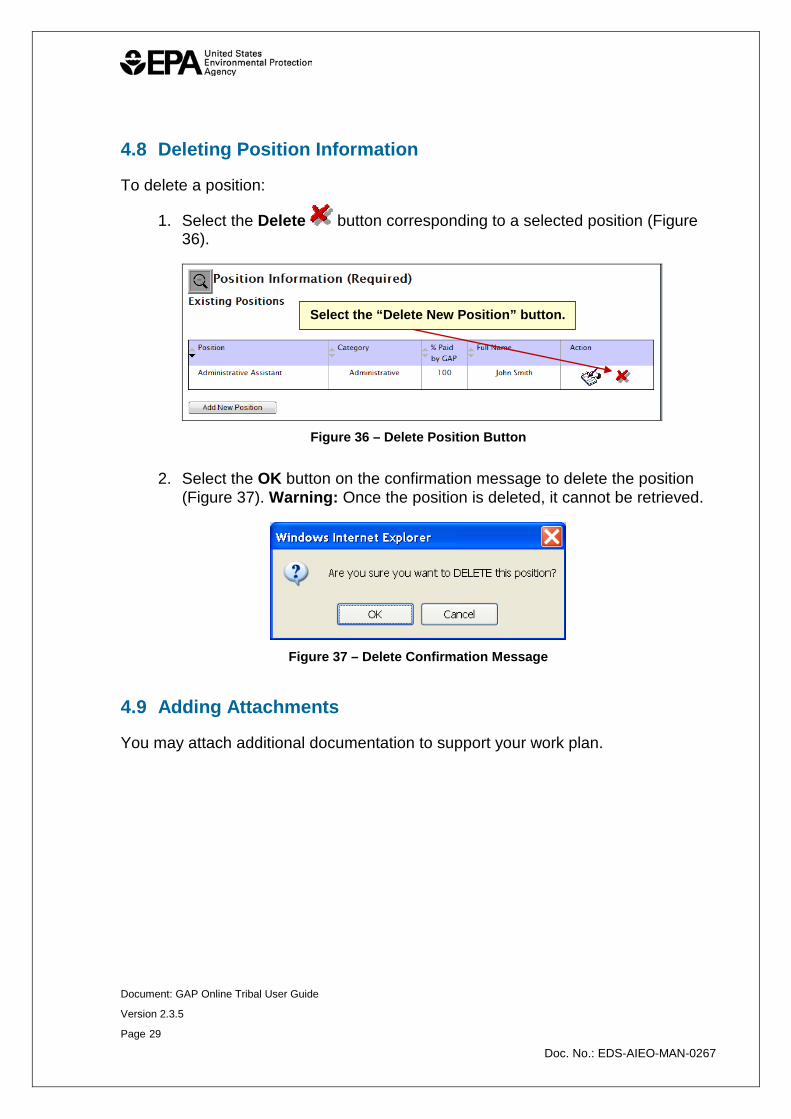
4.8 Deleting Position Information
To delete a position:
1. Select the Delete button corresponding to a selected position (Figure 36).
Figure 36 – Delete Position Button
2. Select the OK button on the confirmation message to delete the position (Figure 37). Warning: Once the position is deleted, it cannot be retrieved.
Figure 37 – Delete Confirmation Message
4.9 Adding Attachments
You may attach additional documentation to support your work plan.
Select the “Delete New Position” button.

Document: GAP Online Tribal User Guide
Version 2.3.5
Page 30
Doc. No.: EDS-AIEO-MAN-0267
To add an attachment:
1. Select the View Details button to expand the Attachment section of the work plan (Figure 38).
Figure 38 – Expand the Attachment Section
2. Select the Browse button to locate the file you want to upload (Figure 39).
Figure 39 – Browse Button for Locating Documents
3. Once you have found the file on your computer, select the Open button to complete your selection (Figure 40).
Figure 40 – Select a File
Select the “View Details” button.
Select the “Browse” button.
Select the “Open” button.
Document: GAP Online Tribal User Guide
Version 2.3.5
Page 31
Doc. No.: EDS-AIEO-MAN-0267
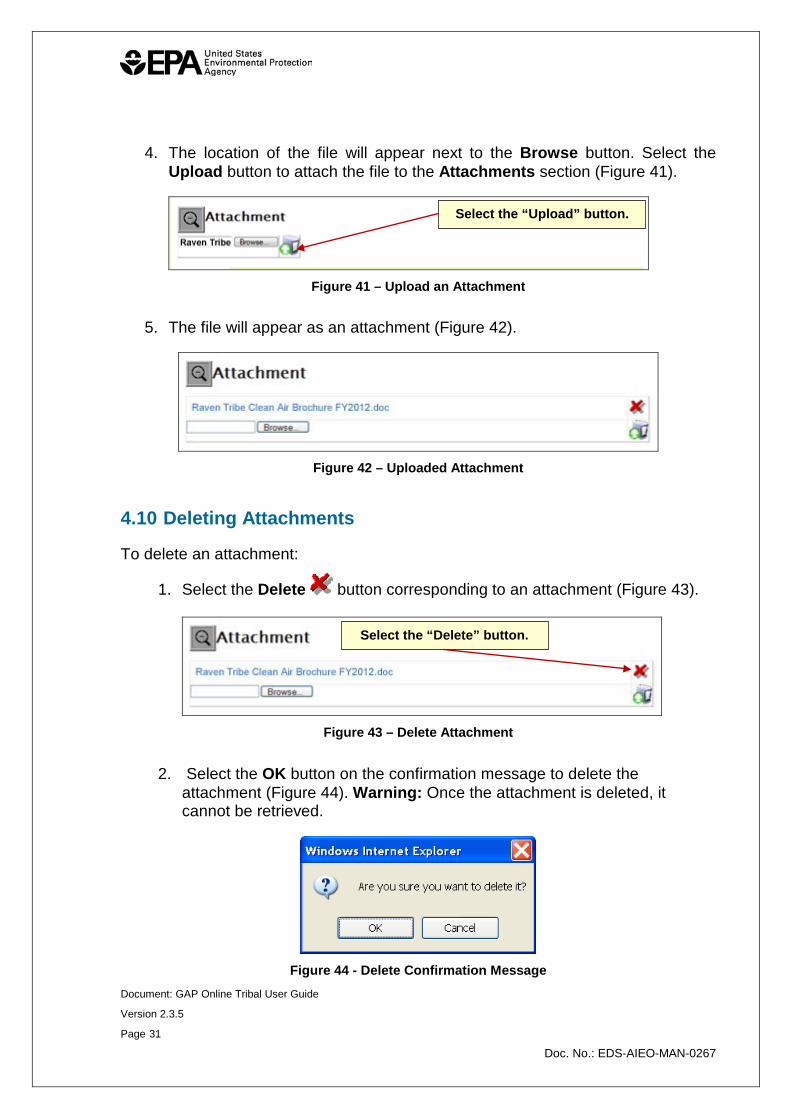
4. The location of the file will appear next to the Browse button. Select the Upload button to attach the file to the Attachments section (Figure 41).
Figure 41 – Upload an Attachment
5. The file will appear as an attachment (Figure 42).
Figure 42 – Uploaded Attachment
4.10 Deleting Attachments
To delete an attachment:
1. Select the Delete button corresponding to an attachment (Figure 43).
Figure 43 – Delete Attachment
2. Select the OK button on the confirmation message to delete the attachment (Figure 44). Warning: Once the attachment is deleted, it cannot be retrieved.
Figure 44 - Delete Confirmation Message
Select the “Upload” button.
Select the “Delete” button.
Document: GAP Online Tribal User Guide
Version 2.3.5
Page 32
Doc. No.: EDS-AIEO-MAN-0267
4.11 Create a Work Plan Component
Once you have created a new work plan and entered the necessary tribal background information (narrative background, budget, and position information), you may add the work plan components as necessary.
To create a work plan component:
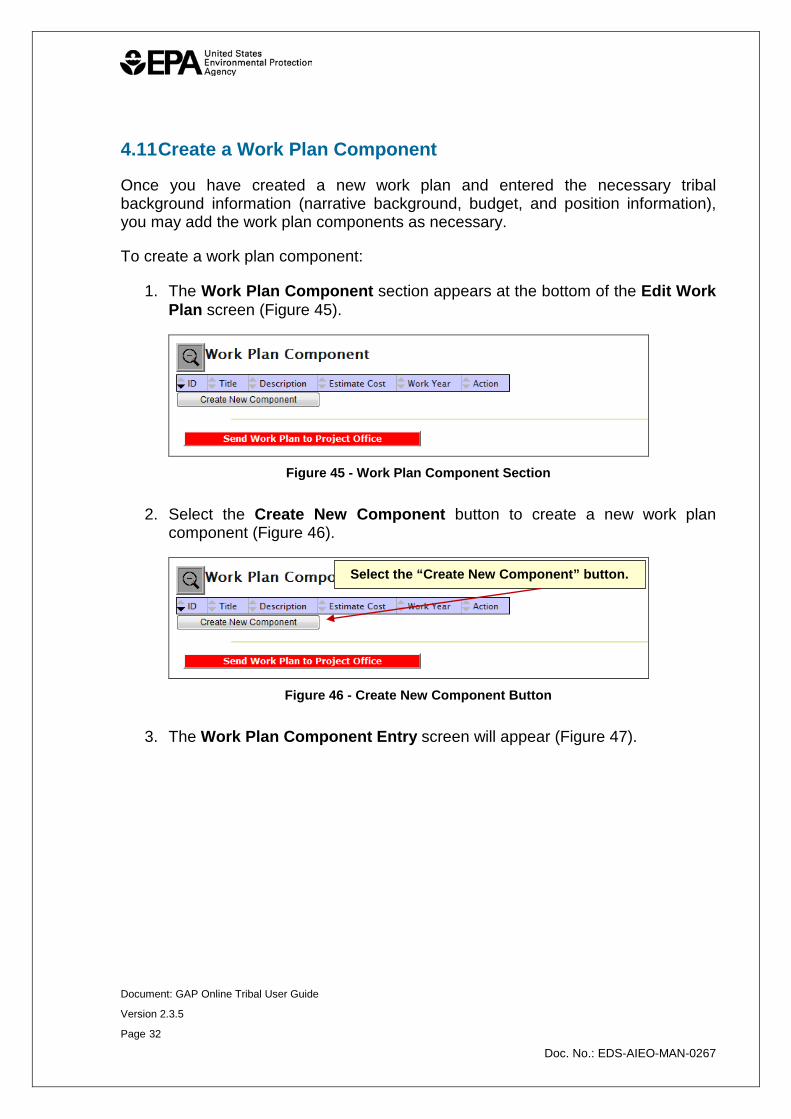
1. The Work Plan Component section appears at the bottom of the Edit Work Plan screen (Figure 45).
Figure 45 - Work Plan Component Section
2. Select the Create New Component button to create a new work plan component (Figure 46).
Figure 46 - Create New Component Button
3. The Work Plan Component Entry screen will appear (Figure 47).
Select the “Create New Component” button.
Document: GAP Online Tribal User Guide
Version 2.3.5
Page 33
Doc. No.: EDS-AIEO-MAN-0267
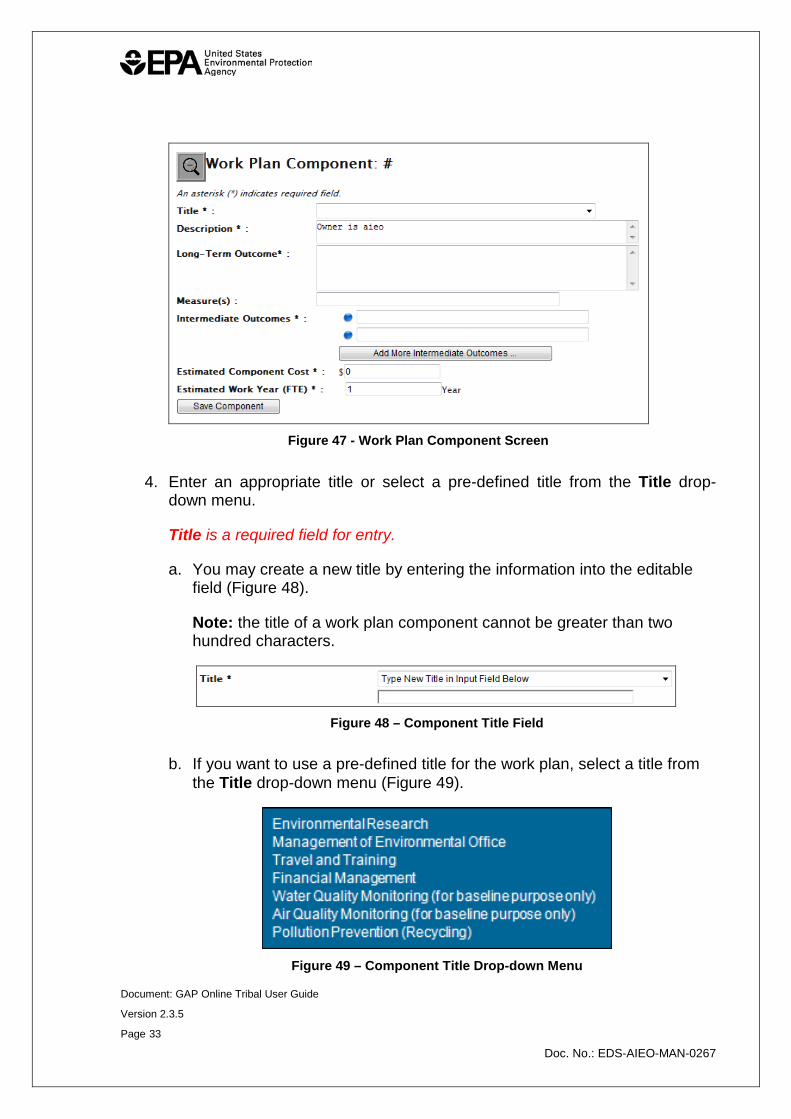
Figure 47 - Work Plan Component Screen
4. Enter an appropriate title or select a pre-defined title from the Title drop-down menu.
Title is a required field for entry.
a. You may create a new title by entering the information into the editable field (Figure 48).
Note: the title of a work plan component cannot be greater than two hundred characters.
Figure 48 – Component Title Field
b. If you want to use a pre-defined title for the work plan, select a title from the Title drop-down menu (Figure 49).
Figure 49 – Component Title Drop-down Menu

Document: GAP Online Tribal User Guide
Version 2.3.5
Page 34
Doc. No.: EDS-AIEO-MAN-0267
5. Enter a description of the work component associated with the work plan in the Description field (Figure 50). The description gives an overview of what environmental activities the component will address.
Description is a required field for entry.
Figure 50 – Description Field
6. Enter the description of the long-term outcome for the component into the Long-Term Outcome field (Figure 51).
Long-Term Outcome is a required field for entry.
Figure 51 – Long-Term Outcome Field
7. Enter a measure related to this work plan component into the Measures field (Figure 52).
Figure 52 – Measures Field
8. Enter descriptions of the intermediate outcomes related to this work plan component into the Intermediate Outcomes fields. The Intermediate Outcomes are in bulleted format. If you want to include more than two (2) Intermediate Outcomes, select the Add More Intermediate Outcomes button (Figure 53).
Intermediate Outcomes is a required field for entry.
Figure 53 - Intermediate Options Fields
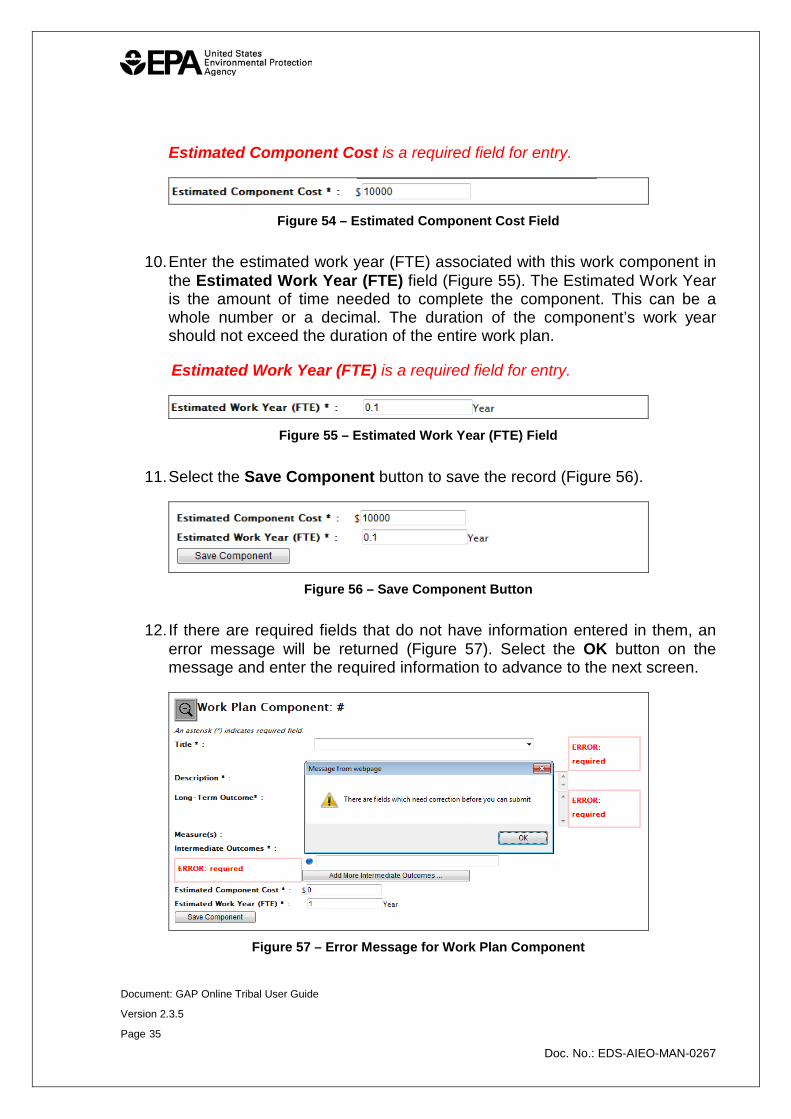
9. Enter the estimated component cost in the Estimated Component Cost field (Figure 54).
Document: GAP Online Tribal User Guide
Version 2.3.5
Page 35
Doc. No.: EDS-AIEO-MAN-0267
Estimated Component Cost is a required field for entry.
Figure 54 – Estimated Component Cost Field
10. Enter the estimated work year (FTE) associated with this work component in the Estimated Work Year (FTE) field (Figure 55). The Estimated Work Year is the amount of time needed to complete the component. This can be a whole number or a decimal. The duration of the component’s work year should not exceed the duration of the entire work plan.
Estimated Work Year (FTE) is a required field for entry.
Figure 55 – Estimated Work Year (FTE) Field
11. Select the Save Component button to save the record (Figure 56).
Figure 56 – Save Component Button
12. If there are required fields that do not have information entered in them, an error message will be returned (Figure 57). Select the OK button on the message and enter the required information to advance to the next screen.
Figure 57 – Error Message for Work Plan Component
Document: GAP Online Tribal User Guide
Version 2.3.5
Page 36
Doc. No.: EDS-AIEO-MAN-0267
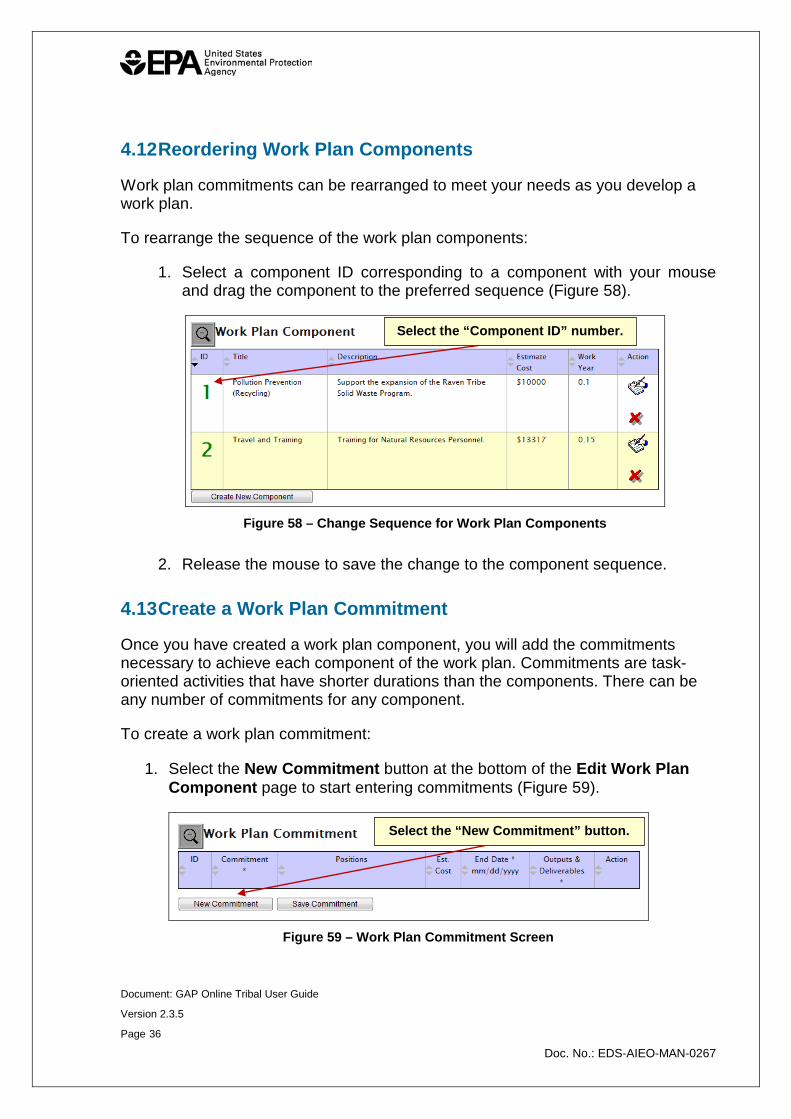
4.12 Reordering Work Plan Components
Work plan commitments can be rearranged to meet your needs as you develop a work plan.
To rearrange the sequence of the work plan components:
1. Select a component ID corresponding to a component with your mouse and drag the component to the preferred sequence (Figure 58).
Figure 58 – Change Sequence for Work Plan Components
2. Release the mouse to save the change to the component sequence.
4.13 Create a Work Plan Commitment
Once you have created a work plan component, you will add the commitments necessary to achieve each component of the work plan. Commitments are task-oriented activities that have shorter durations than the components. There can be any number of commitments for any component.
To create a work plan commitment:
1. Select the New Commitment button at the bottom of the Edit Work Plan Component page to start entering commitments (Figure 59).
Figure 59 – Work Plan Commitment Screen
Select the “Component ID” number.
Select the “New Commitment” button.
Document: GAP Online Tribal User Guide
Version 2.3.5
Page 37
Doc. No.: EDS-AIEO-MAN-0267
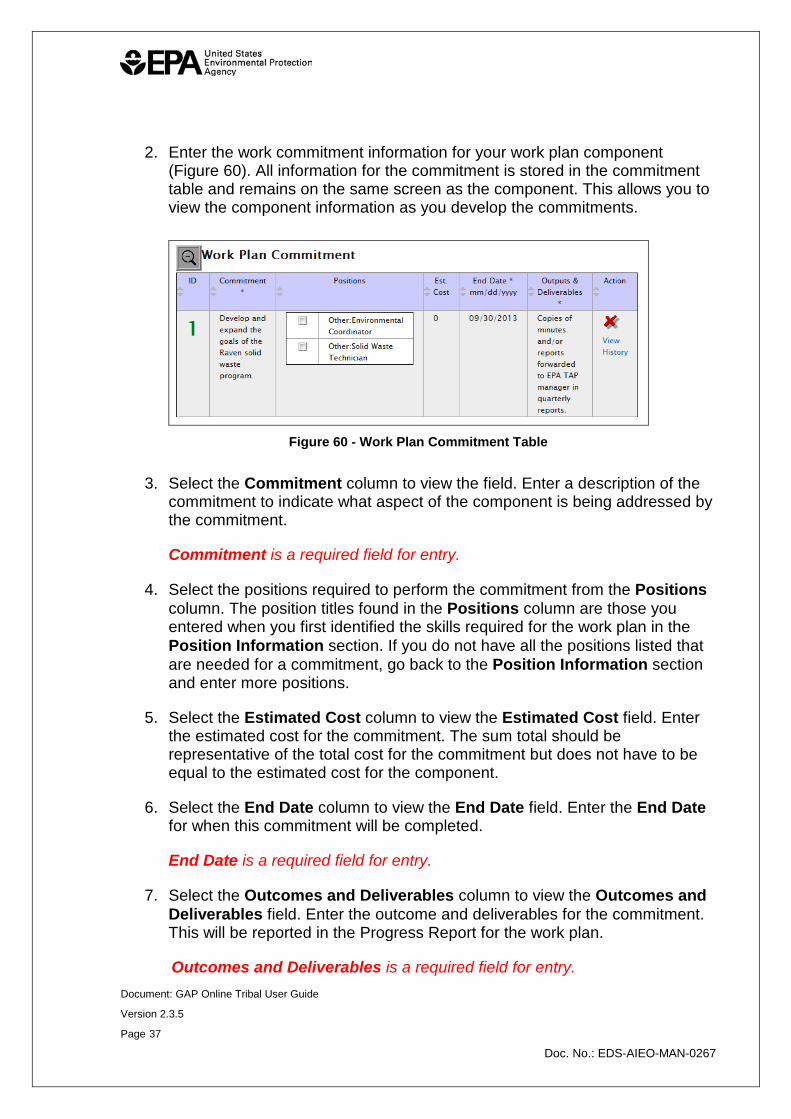
2. Enter the work commitment information for your work plan component (Figure 60). All information for the commitment is stored in the commitment table and remains on the same screen as the component. This allows you to view the component information as you develop the commitments.
Figure 60 - Work Plan Commitment Table
3. Select the Commitment column to view the field. Enter a description of the commitment to indicate what aspect of the component is being addressed by the commitment.
Commitment is a required field for entry.
4. Select the positions required to perform the commitment from the Positions column. The position titles found in the Positions column are those you entered when you first identified the skills required for the work plan in the Position Information section. If you do not have all the positions listed that are needed for a commitment, go back to the Position Information section and enter more positions.
5. Select the Estimated Cost column to view the Estimated Cost field. Enter the estimated cost for the commitment. The sum total should be representative of the total cost for the commitment but does not have to be equal to the estimated cost for the component.
6. Select the End Date column to view the End Date field. Enter the End Date for when this commitment will be completed.
End Date is a required field for entry.
7. Select the Outcomes and Deliverables column to view the Outcomes and Deliverables field. Enter the outcome and deliverables for the commitment. This will be reported in the Progress Report for the work plan.
Outcomes and Deliverables is a required field for entry.
Document: GAP Online Tribal User Guide
Version 2.3.5
Page 38
Doc. No.: EDS-AIEO-MAN-0267
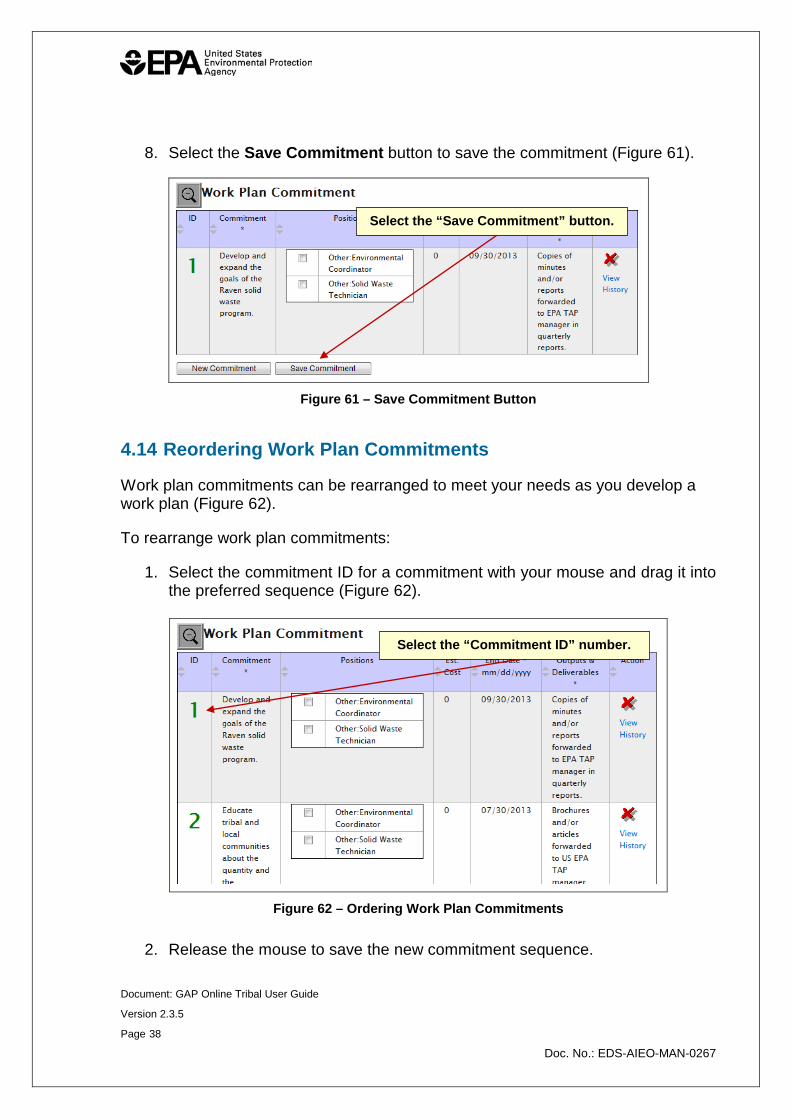
8. Select the Save Commitment button to save the commitment (Figure 61).
Figure 61 – Save Commitment Button
4.14 Reordering Work Plan Commitments
Work plan commitments can be rearranged to meet your needs as you develop a work plan (Figure 62).
To rearrange work plan commitments:
1. Select the commitment ID for a commitment with your mouse and drag it into the preferred sequence (Figure 62).
Figure 62 – Ordering Work Plan Commitments
2. Release the mouse to save the new commitment sequence.
Select the “Save Commitment” button.
Select the “Commitment ID” number.
Document: GAP Online Tribal User Guide
Version 2.3.5
Page 39
Doc. No.: EDS-AIEO-MAN-0267
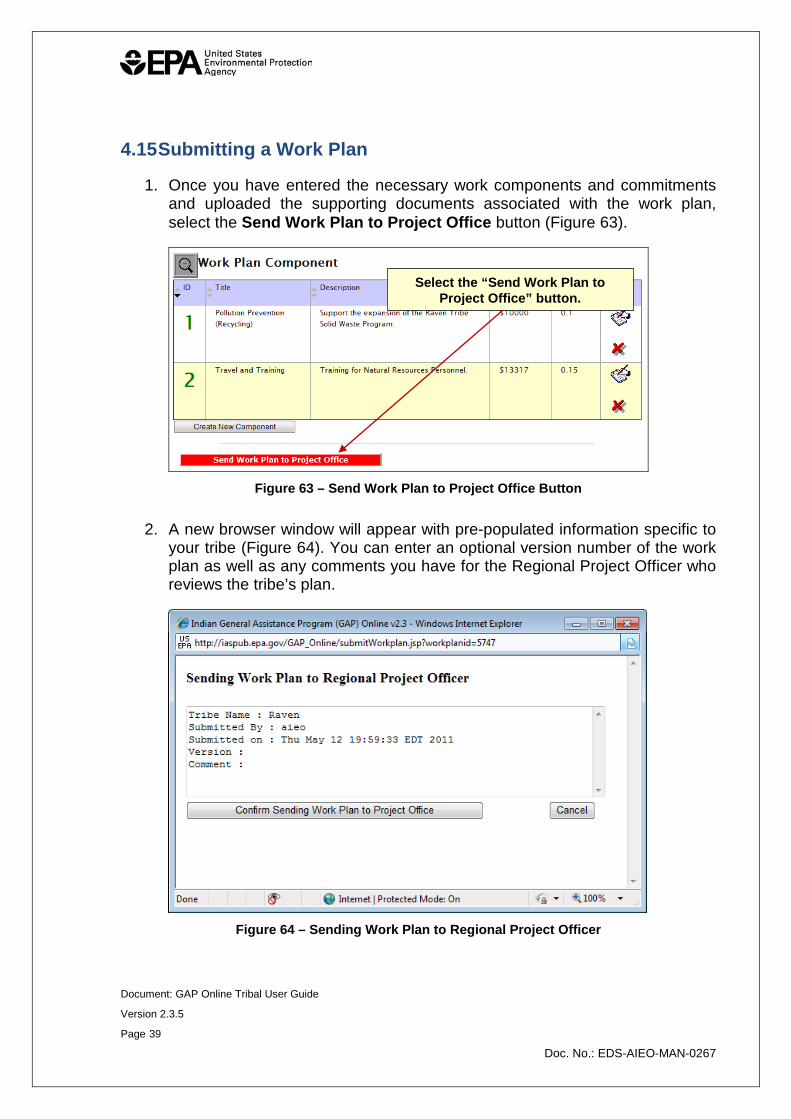
4.15 Submitting a Work Plan
1. Once you have entered the necessary work components and commitments and uploaded the supporting documents associated with the work plan, select the Send Work Plan to Project Office button (Figure 63).
Figure 63 – Send Work Plan to Project Office Button
2. A new browser window will appear with pre-populated information specific to your tribe (Figure 64). You can enter an optional version number of the work plan as well as any comments you have for the Regional Project Officer who reviews the tribe’s plan.
Figure 64 – Sending Work Plan to Regional Project Officer
Select the “Send Work Plan to Project Office” button.
Document: GAP Online Tribal User Guide
Version 2.3.5
Page 40
Doc. No.: EDS-AIEO-MAN-0267
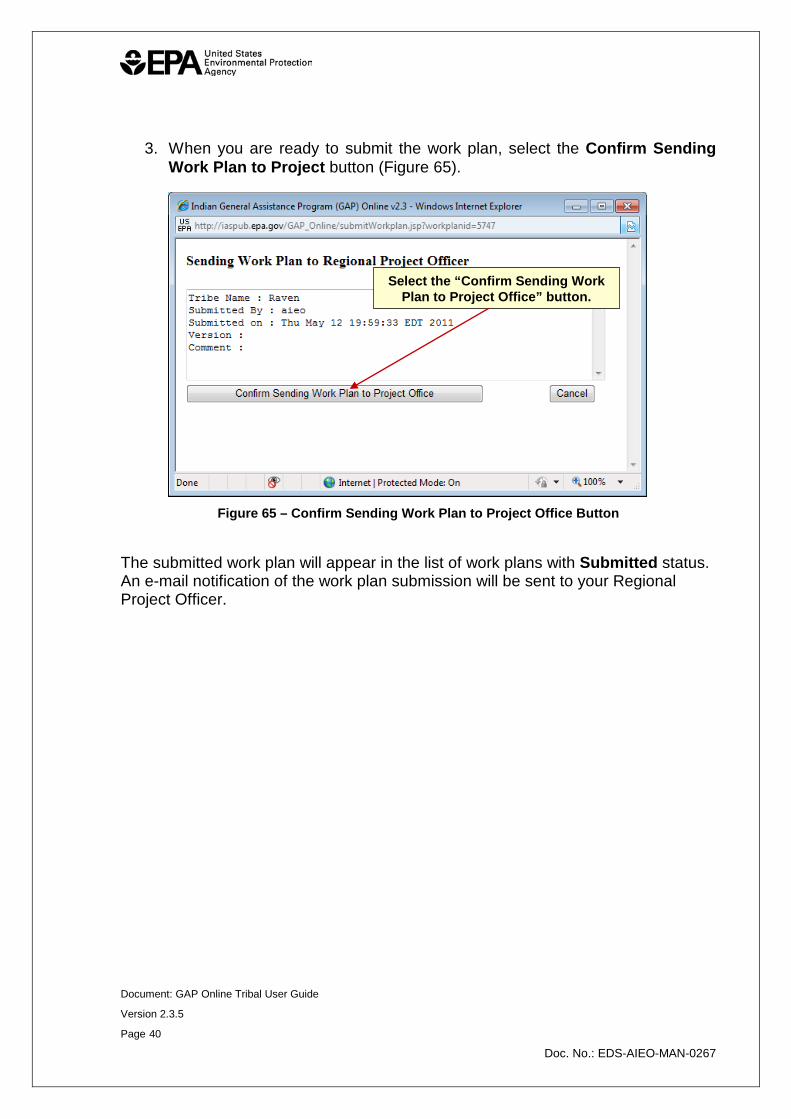
3. When you are ready to submit the work plan, select the Confirm Sending Work Plan to Project button (Figure 65).
Figure 65 – Confirm Sending Work Plan to Project Office Button
The submitted work plan will appear in the list of work plans with Submitted status. An e-mail notification of the work plan submission will be sent to your Regional Project Officer.
Select the “Confirm Sending Work Plan to Project Office” button.
Document: GAP Online Tribal User Guide
Version 2.3.5
Page 41
Doc. No.: EDS-AIEO-MAN-0267
5 E DIT WOR K P L AN
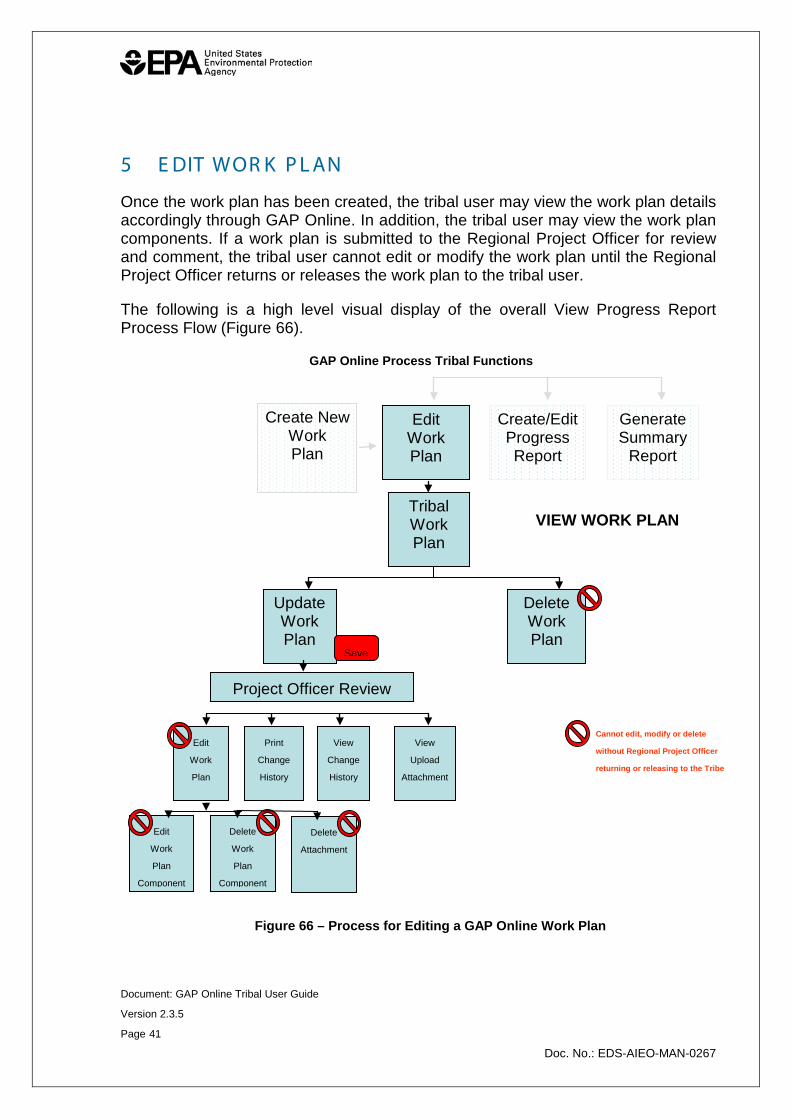
Once the work plan has been created, the tribal user may view the work plan details accordingly through GAP Online. In addition, the tribal user may view the work plan components. If a work plan is submitted to the Regional Project Officer for review and comment, the tribal user cannot edit or modify the work plan until the Regional Project Officer returns or releases the work plan to the tribal user.
The following is a high level visual display of the overall View Progress Report Process Flow (Figure 66).
Edit Work Plan
Create/Edit Progress Report
Generate Summary
Report
GAP Online Process Tribal Functions
Create New Work Plan
Tribal Work Plan
Update Work Plan
Edit
Work
Plan
VIEW WORK PLAN
Delete Work Plan
Change
History
View
Change
History
View
Upload
Attachment
Edit
Work
Plan
Component
Delete
Work
Plan
Component
Save
Cannot edit, modify or delete
without Regional Project Officer
returning or releasing to the Tribe
Delete
Attachment
Project Officer Review
Figure 66 – Process for Editing a GAP Online Work Plan
Document: GAP Online Tribal User Guide
Version 2.3.5
Page 42
Doc. No.: EDS-AIEO-MAN-0267
5.1 View a Work Plan
A tribal user can view a work plan once the information has been entered and submitted to the Regional Project Officer; however, the tribe cannot edit the document or modify it unless the document has been returned or released by the Project Officer.
A work plan can be in one of the following states during its lifecycle:
• Created: the tribal user created the work plan, which can be edited in this state.
• Submitted: the tribal user submitted the work plan to the Regional Project Officer for approval. The work plan is non-editable by tribal user. The Regional Project Officer can either approve or comment.
• Reviewed: the Regional Project Officer has opened the work plan and is in the process of reviewing its content. The work plan cannot be edited while it is in review.
• Commented: the tribal user can read comments and modify the work plan. After the modification, the work plan must be re-submitted to the Regional Project Officer.
• Accepted: the work plan is accepted. In this status, the Regional Project Officer can unlock it if the tribal user has additional information to include. If the work plan is unlocked, it reverts to the Commented status.
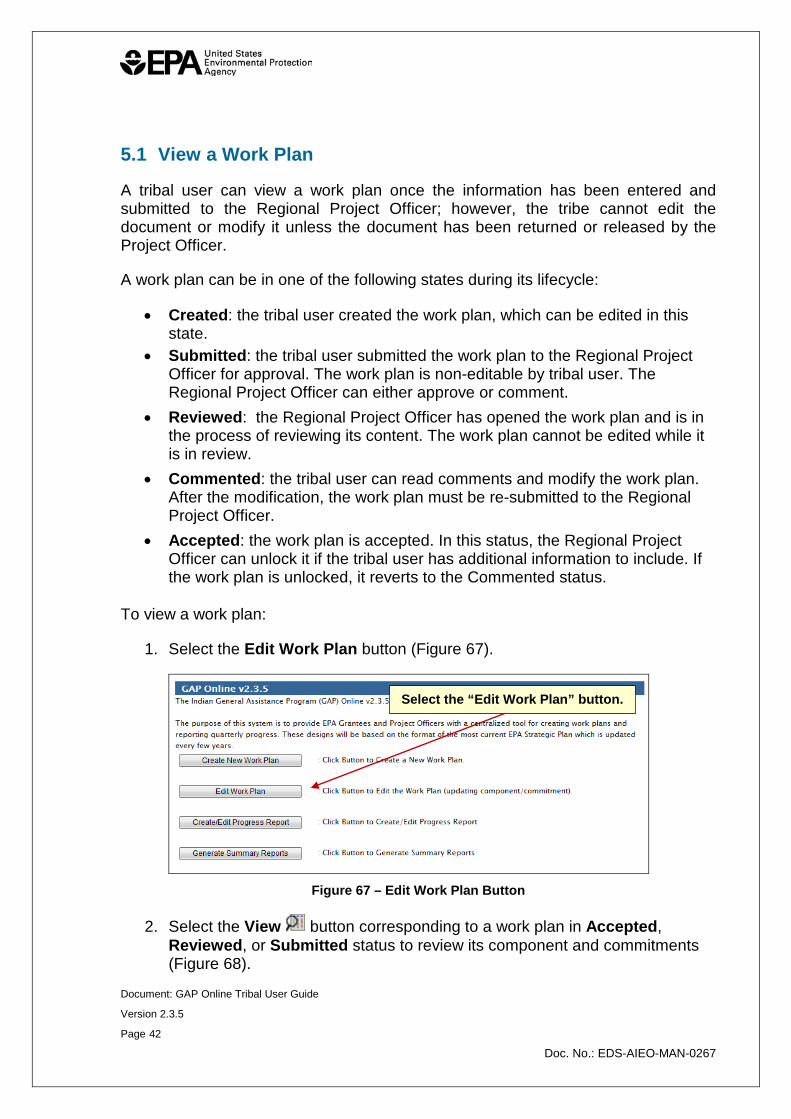
To view a work plan:
1. Select the Edit Work Plan button (Figure 67).
Figure 67 – Edit Work Plan Button
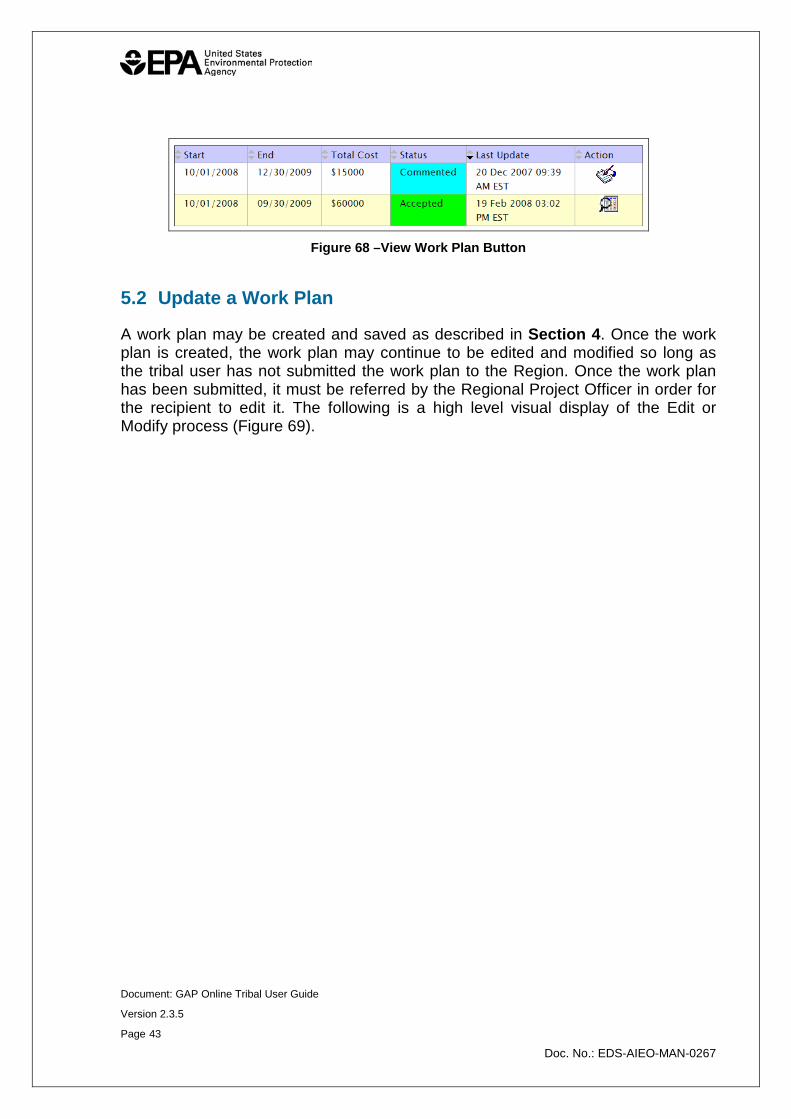
2. Select the View button corresponding to a work plan in Accepted, Reviewed, or Submitted status to review its component and commitments (Figure 68).
Select the “Edit Work Plan” button.
Document: GAP Online Tribal User Guide
Version 2.3.5
Page 43
Doc. No.: EDS-AIEO-MAN-0267
Figure 68 –View Work Plan Button
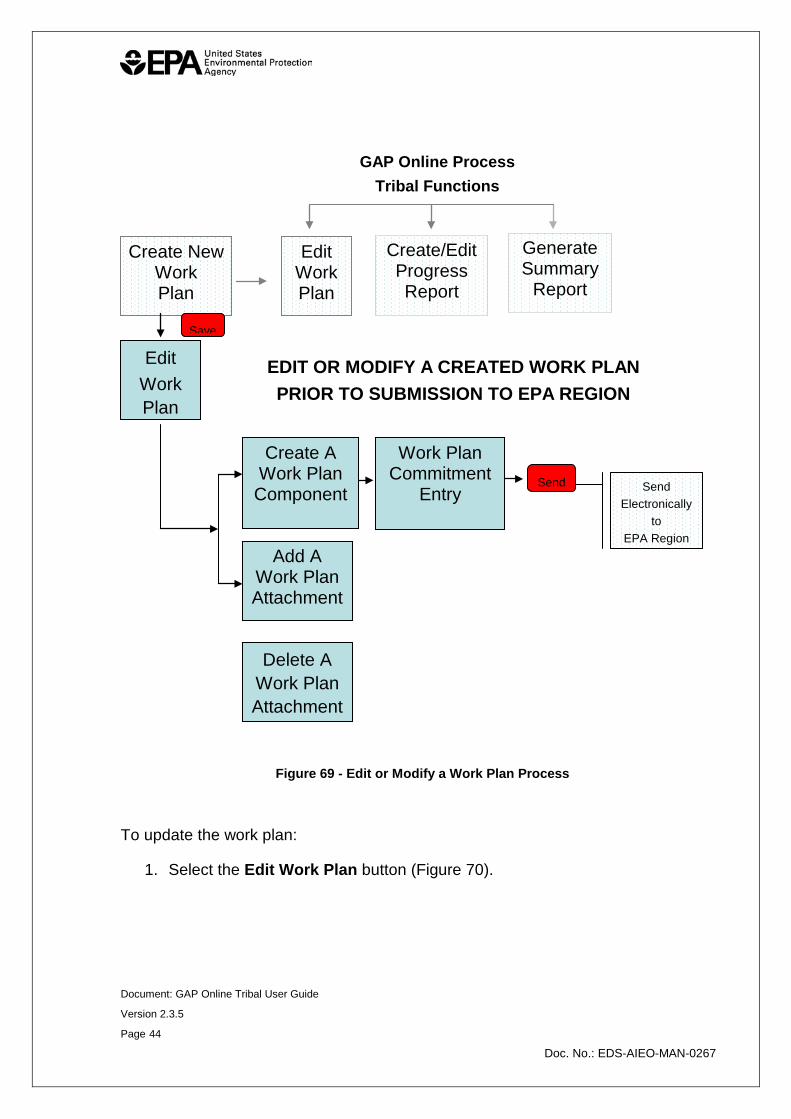
5.2 Update a Work Plan
A work plan may be created and saved as described in Section 4. Once the work plan is created, the work plan may continue to be edited and modified so long as the tribal user has not submitted the work plan to the Region. Once the work plan has been submitted, it must be referred by the Regional Project Officer in order for the recipient to edit it. The following is a high level visual display of the Edit or Modify process (Figure 69).
Document: GAP Online Tribal User Guide
Version 2.3.5
Page 44
Doc. No.: EDS-AIEO-MAN-0267
Figure 47 – Edit or Modify a Work Plan
To update the work plan:
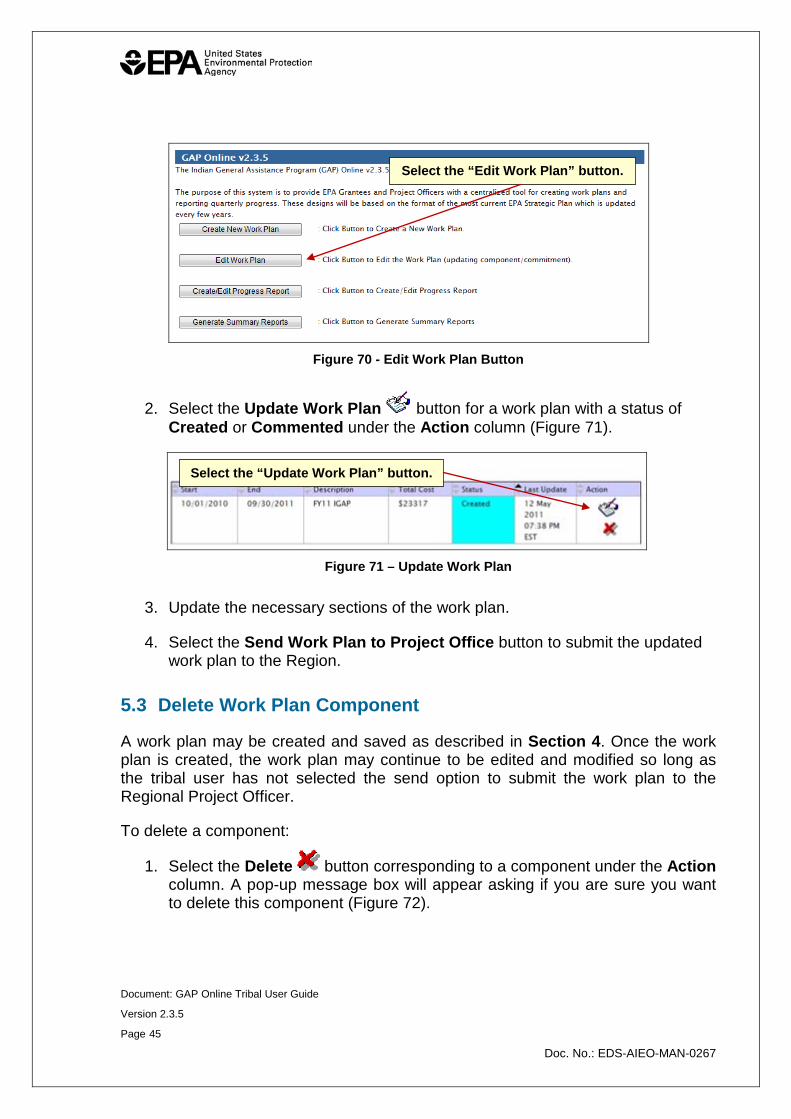
1. Select the Edit Work Plan button (Figure 70).
Edit Work Plan
Create/Edit Progress Report
Generate Summary
Report
GAP Online Process Tribal Functions
Create New Work Plan
Edit Work Plan
Create A Work Plan Component
Add A Work Plan Attachment
Work Plan Commitment
Entry
EDIT OR MODIFY A CREATED WORK PLAN PRIOR TO SUBMISSION TO EPA REGION
Save
Send Electronically
to EPA Region
Send
Delete A Work Plan Attachment
Figure 69 - Edit or Modify a Work Plan Process
Document: GAP Online Tribal User Guide
Version 2.3.5
Page 45
Doc. No.: EDS-AIEO-MAN-0267
Figure 70 - Edit Work Plan Button
2. Select the Update Work Plan button for a work plan with a status of Created or Commented under the Action column (Figure 71).
Figure 71 – Update Work Plan
3. Update the necessary sections of the work plan.
4. Select the Send Work Plan to Project Office button to submit the updated work plan to the Region.
5.3 Delete Work Plan Component
A work plan may be created and saved as described in Section 4. Once the work plan is created, the work plan may continue to be edited and modified so long as the tribal user has not selected the send option to submit the work plan to the Regional Project Officer.
To delete a component:
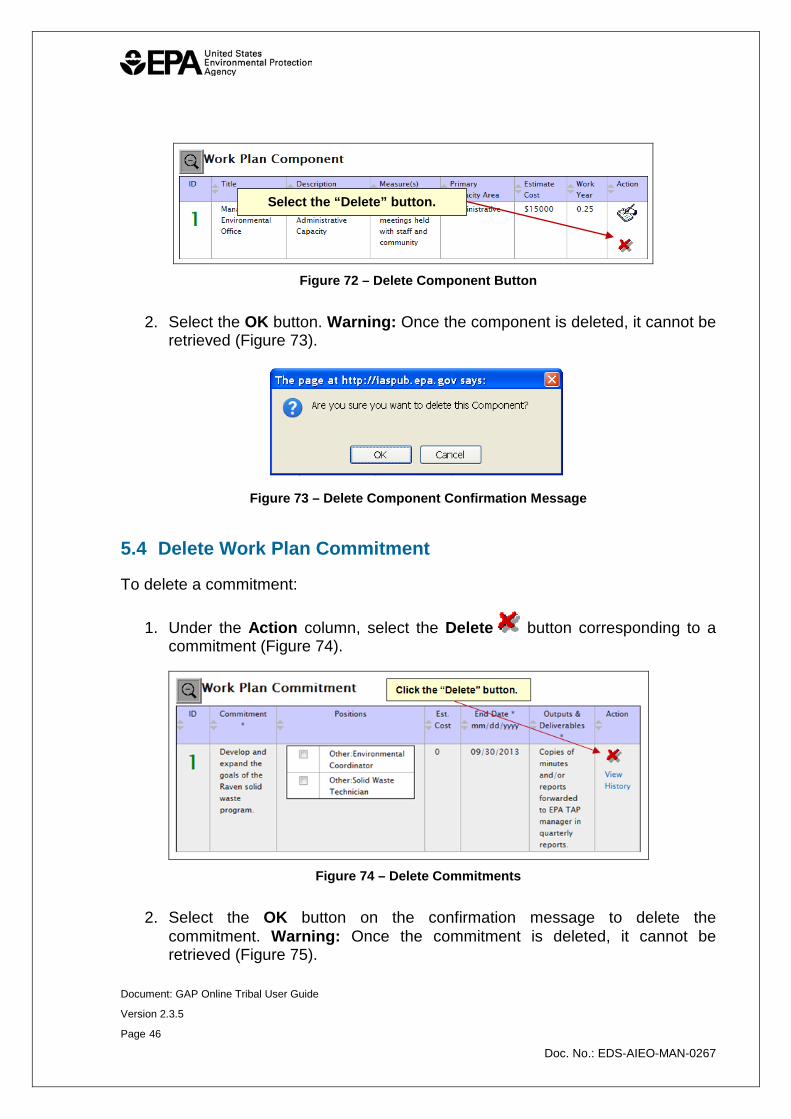
1. Select the Delete button corresponding to a component under the Action column. A pop-up message box will appear asking if you are sure you want to delete this component (Figure 72).
Select the “Edit Work Plan” button.
Select the “Update Work Plan” button.
Document: GAP Online Tribal User Guide
Version 2.3.5
Page 46
Doc. No.: EDS-AIEO-MAN-0267
Figure 72 – Delete Component Button
2. Select the OK button. Warning: Once the component is deleted, it cannot be retrieved (Figure 73).
Figure 73 – Delete Component Confirmation Message
5.4 Delete Work Plan Commitment
To delete a commitment:
1. Under the Action column, select the Delete button corresponding to a commitment (Figure 74).
Figure 74 – Delete Commitments
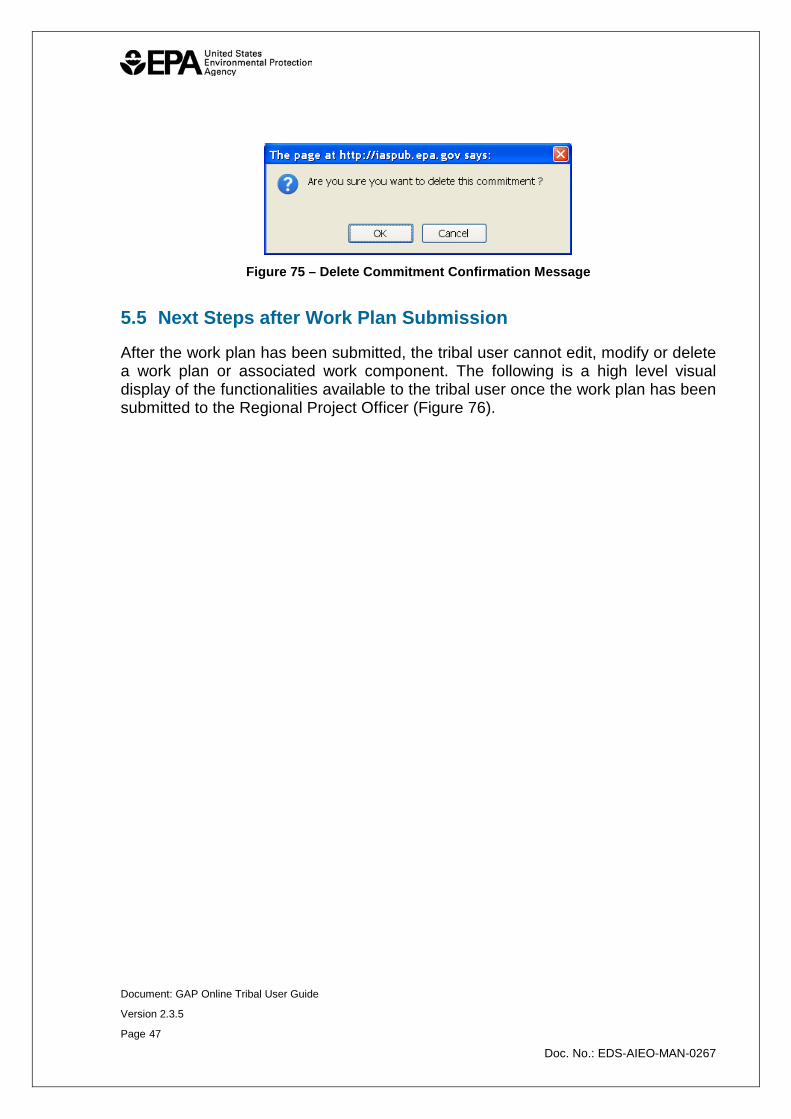
2. Select the OK button on the confirmation message to delete the commitment. Warning: Once the commitment is deleted, it cannot be retrieved (Figure 75).
Select the “Delete” button.
Document: GAP Online Tribal User Guide
Version 2.3.5
Page 47
Doc. No.: EDS-AIEO-MAN-0267
Figure 75 – Delete Commitment Confirmation Message
5.5 Next Steps after Work Plan Submission
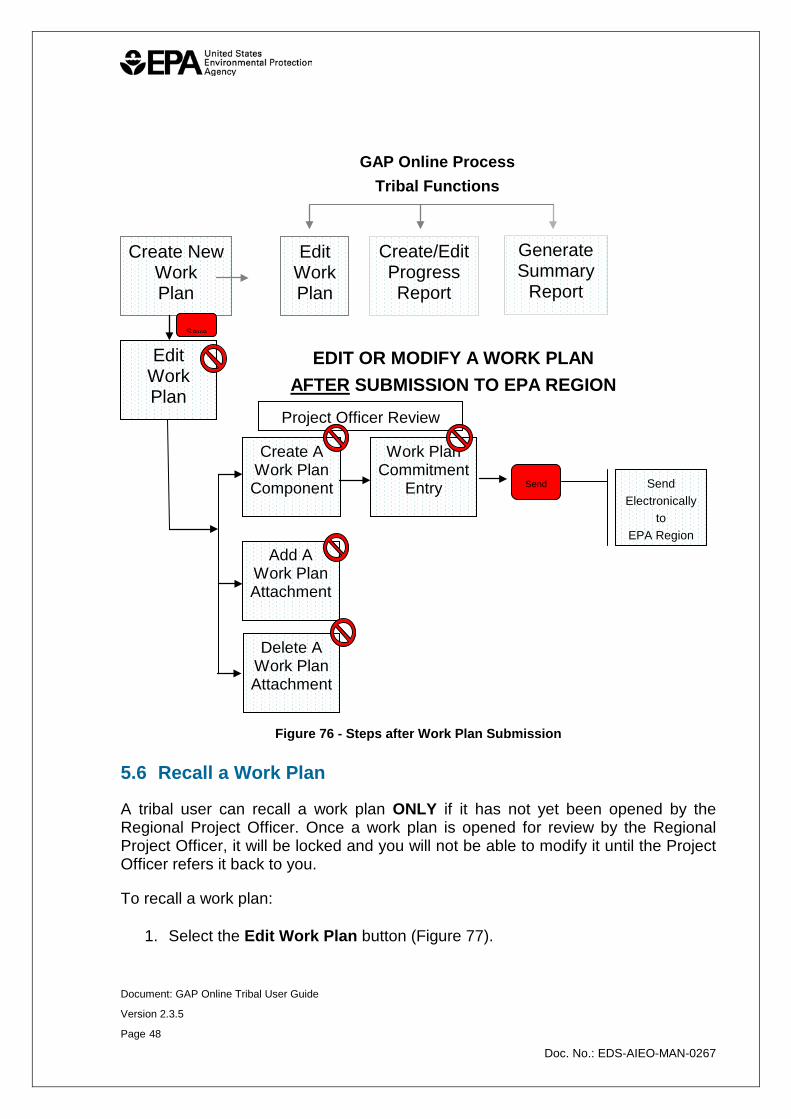
After the work plan has been submitted, the tribal user cannot edit, modify or delete a work plan or associated work component. The following is a high level visual display of the functionalities available to the tribal user once the work plan has been submitted to the Regional Project Officer (Figure 76).
Document: GAP Online Tribal User Guide
Version 2.3.5
Page 48
Doc. No.: EDS-AIEO-MAN-0267
5.6 Recall a Work Plan
A tribal user can recall a work plan ONLY if it has not yet been opened by the Regional Project Officer. Once a work plan is opened for review by the Regional Project Officer, it will be locked and you will not be able to modify it until the Project Officer refers it back to you.
To recall a work plan:
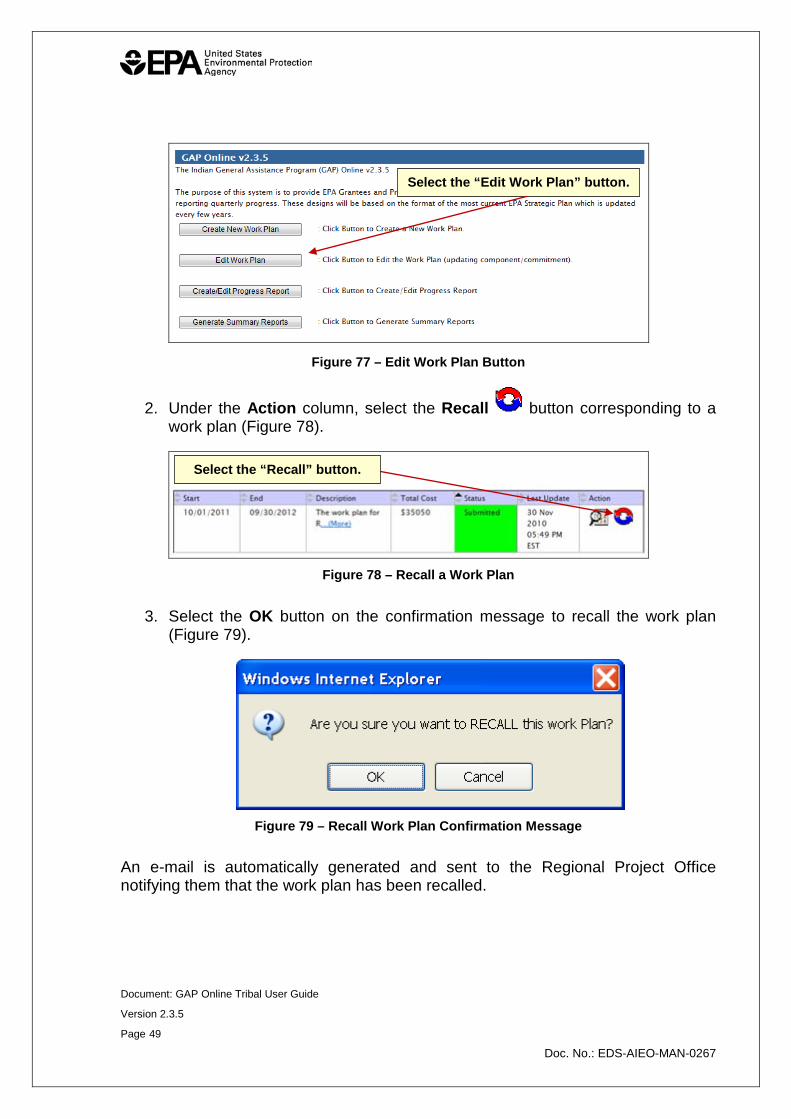
1. Select the Edit Work Plan button (Figure 77).
Project Officer Review
Edit Work Plan
Create/Edit Progress Report
Generate Summary
Report
GAP Online Process Tribal Functions
Create New Work Plan
Edit Work Plan
Create A Work Plan Component
Add A Work Plan Attachment
Work Plan Commitment
Entry
EDIT OR MODIFY A WORK PLAN AFTER SUBMISSION TO EPA REGION
Save
Send Electronically
to EPA Region
Send
Delete A Work Plan Attachment
Figure 76 - Steps after Work Plan Submission
Document: GAP Online Tribal User Guide
Version 2.3.5
Page 49
Doc. No.: EDS-AIEO-MAN-0267
Figure 77 – Edit Work Plan Button
2. Under the Action column, select the Recall button corresponding to a work plan (Figure 78).
Figure 78 – Recall a Work Plan
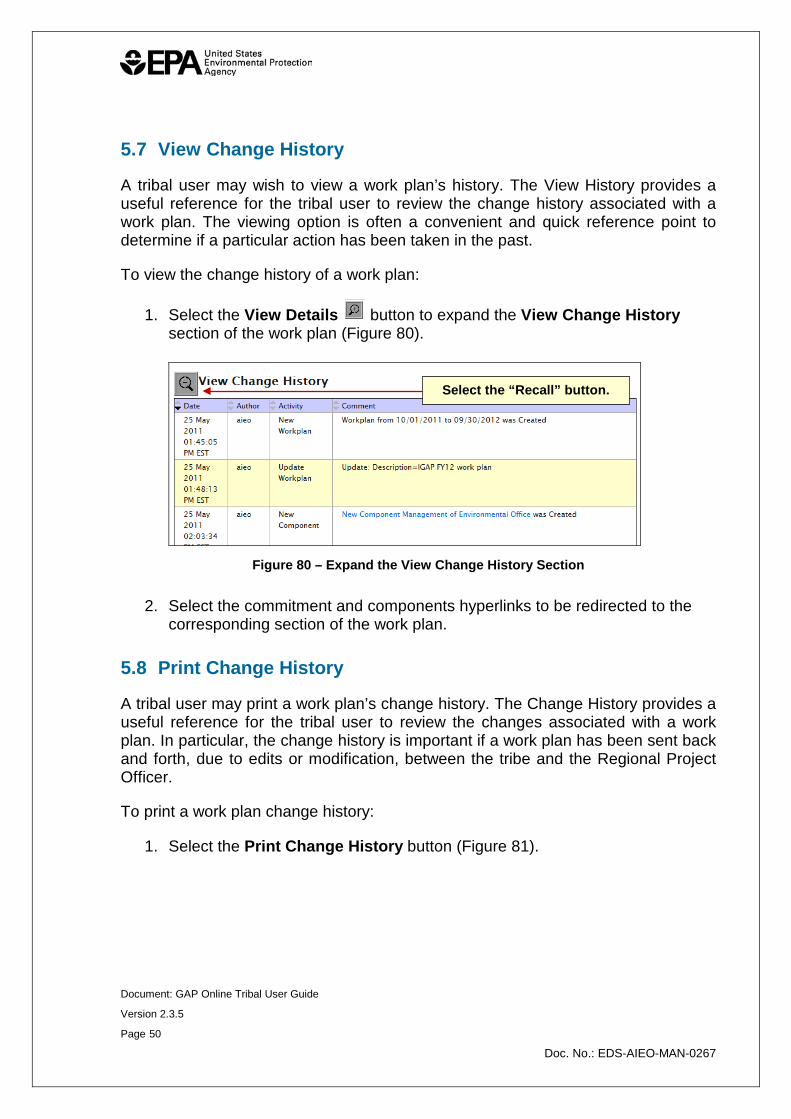
3. Select the OK button on the confirmation message to recall the work plan (Figure 79).
Figure 79 – Recall Work Plan Confirmation Message
An e-mail is automatically generated and sent to the Regional Project Office notifying them that the work plan has been recalled.
Select the “Edit Work Plan” button.
Select the “Recall” button.
Document: GAP Online Tribal User Guide
Version 2.3.5
Page 50
Doc. No.: EDS-AIEO-MAN-0267
5.7 View Change History
A tribal user may wish to view a work plan’s history. The View History provides a useful reference for the tribal user to review the change history associated with a work plan. The viewing option is often a convenient and quick reference point to determine if a particular action has been taken in the past.
To view the change history of a work plan:
1. Select the View Details button to expand the View Change History section of the work plan (Figure 80).
Figure 80 – Expand the View Change History Section
2. Select the commitment and components hyperlinks to be redirected to the corresponding section of the work plan.
5.8 Print Change History
A tribal user may print a work plan’s change history. The Change History provides a useful reference for the tribal user to review the changes associated with a work plan. In particular, the change history is important if a work plan has been sent back and forth, due to edits or modification, between the tribe and the Regional Project Officer.
To print a work plan change history:
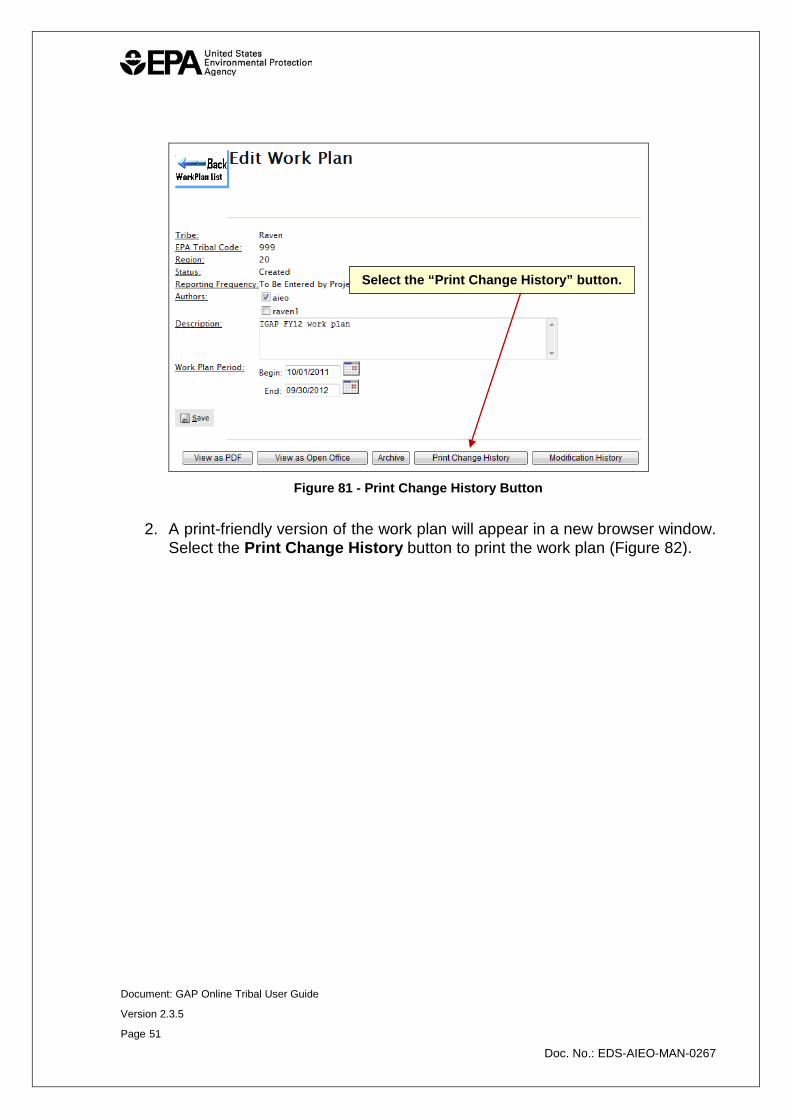
1. Select the Print Change History button (Figure 81).
Select the “Recall” button.
Document: GAP Online Tribal User Guide
Version 2.3.5
Page 51
Doc. No.: EDS-AIEO-MAN-0267
Figure 81 - Print Change History Button
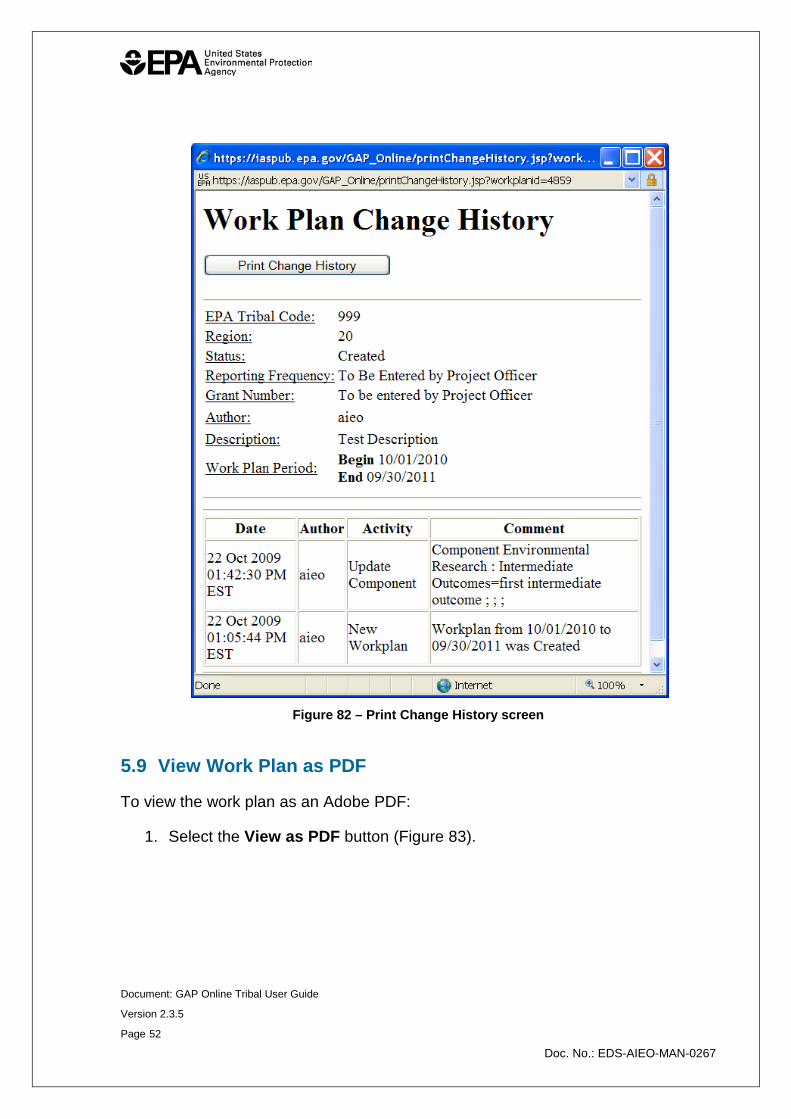
2. A print-friendly version of the work plan will appear in a new browser window. Select the Print Change History button to print the work plan (Figure 82).
Select the “Print Change History” button.
Document: GAP Online Tribal User Guide
Version 2.3.5
Page 52
Doc. No.: EDS-AIEO-MAN-0267
Figure 82 – Print Change History screen
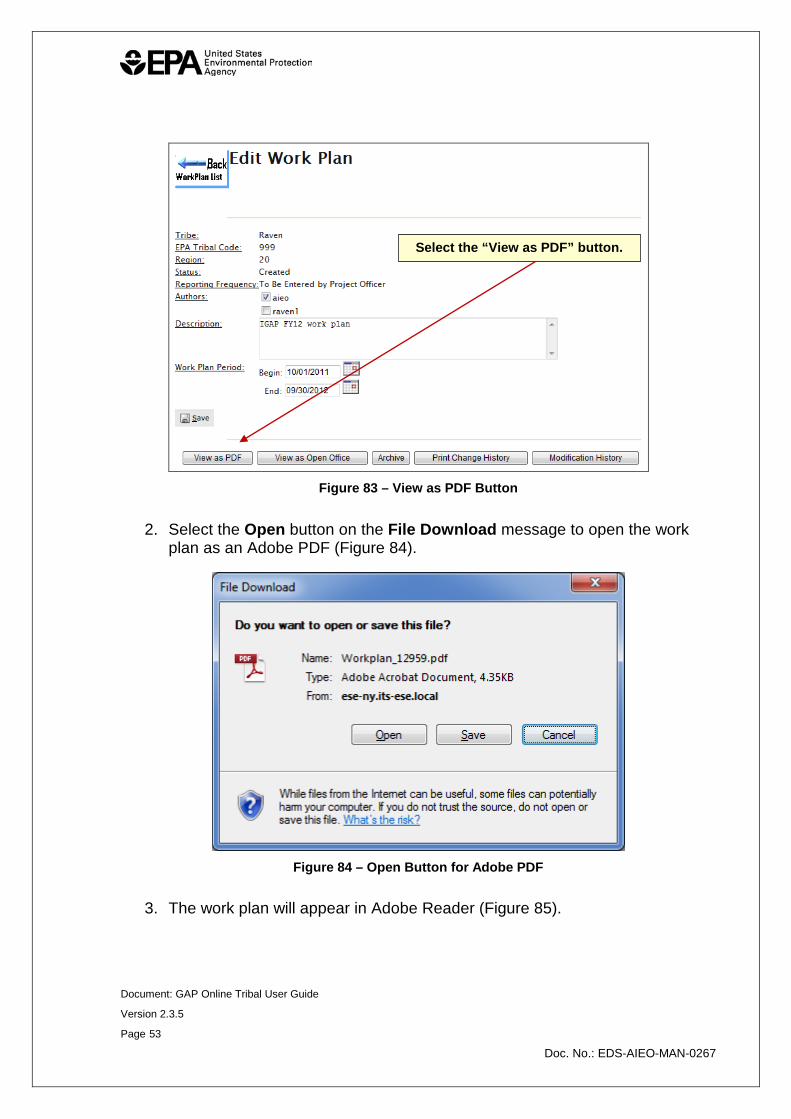
5.9 View Work Plan as PDF
To view the work plan as an Adobe PDF:
1. Select the View as PDF button (Figure 83).
Document: GAP Online Tribal User Guide
Version 2.3.5
Page 53
Doc. No.: EDS-AIEO-MAN-0267
Figure 83 – View as PDF Button
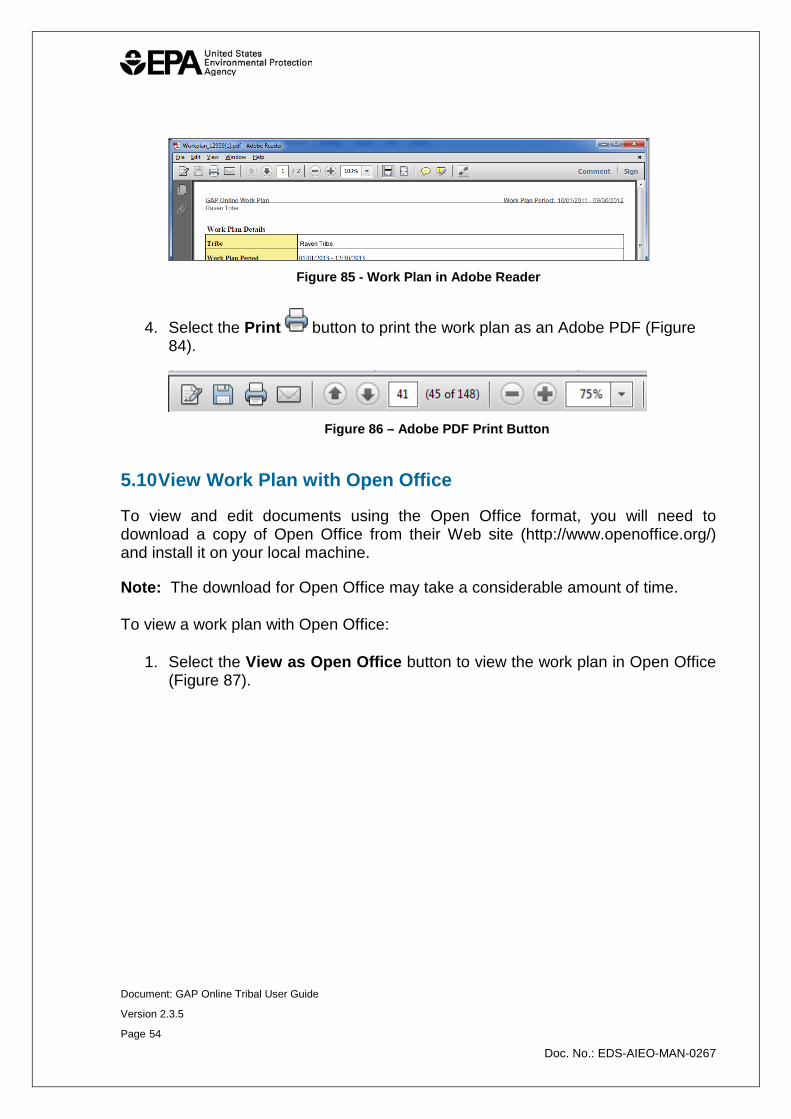
2. Select the Open button on the File Download message to open the work plan as an Adobe PDF (Figure 84).
Figure 84 – Open Button for Adobe PDF
3. The work plan will appear in Adobe Reader (Figure 85).
Select the “View as PDF” button.
Document: GAP Online Tribal User Guide
Version 2.3.5
Page 54
Doc. No.: EDS-AIEO-MAN-0267
Figure 85 - Work Plan in Adobe Reader
4. Select the Print button to print the work plan as an Adobe PDF (Figure 84).
Figure 86 – Adobe PDF Print Button
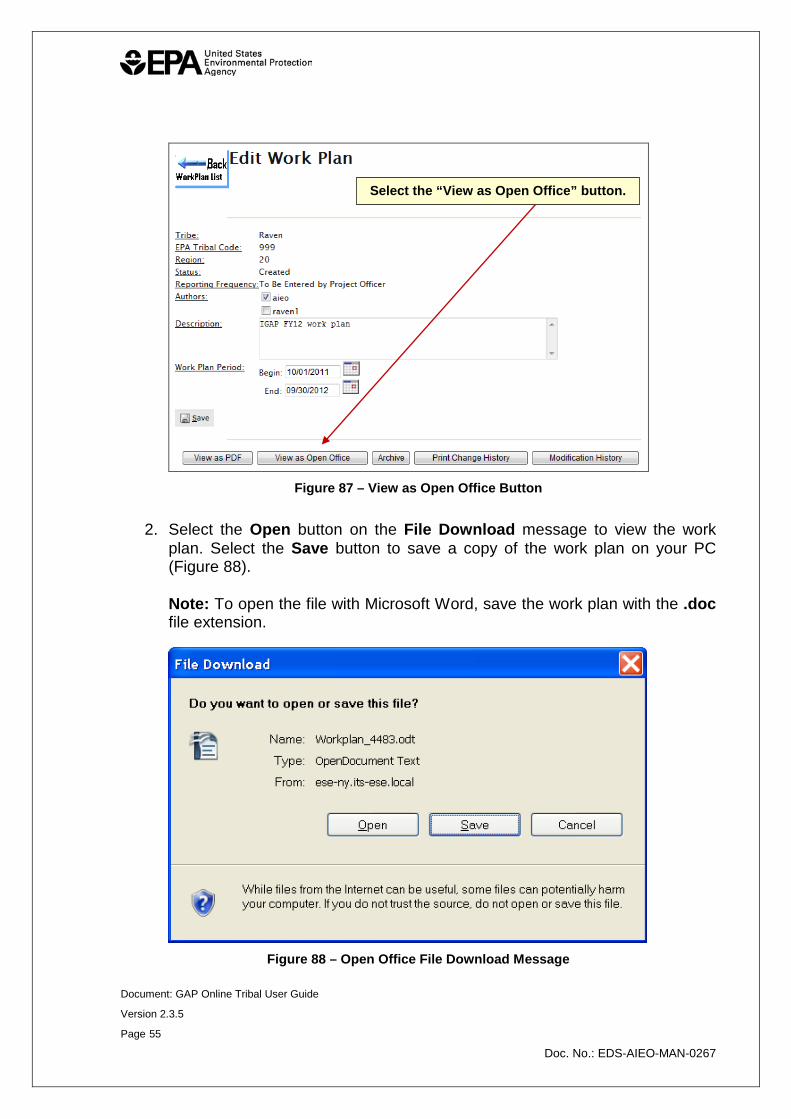
5.10 View Work Plan with Open Office
To view and edit documents using the Open Office format, you will need to download a copy of Open Office from their Web site (http://www.openoffice.org/) and install it on your local machine.
Note: The download for Open Office may take a considerable amount of time.
To view a work plan with Open Office:
1. Select the View as Open Office button to view the work plan in Open Office (Figure 87).
Document: GAP Online Tribal User Guide
Version 2.3.5
Page 55
Doc. No.: EDS-AIEO-MAN-0267
Figure 87 – View as Open Office Button
2. Select the Open button on the File Download message to view the work plan. Select the Save button to save a copy of the work plan on your PC (Figure 88). Note: To open the file with Microsoft Word, save the work plan with the .doc file extension.
Figure 88 – Open Office File Download Message
Select the “View as Open Office” button.

Document: GAP Online Tribal User Guide
Version 2.3.5
Page 56
Doc. No.: EDS-AIEO-MAN-0267
5.11 Archive
To archive a work plan:
1. Select the Archive button to see the Work Plan Archive History page (Figure 89).
Figure 89 – Archive Button
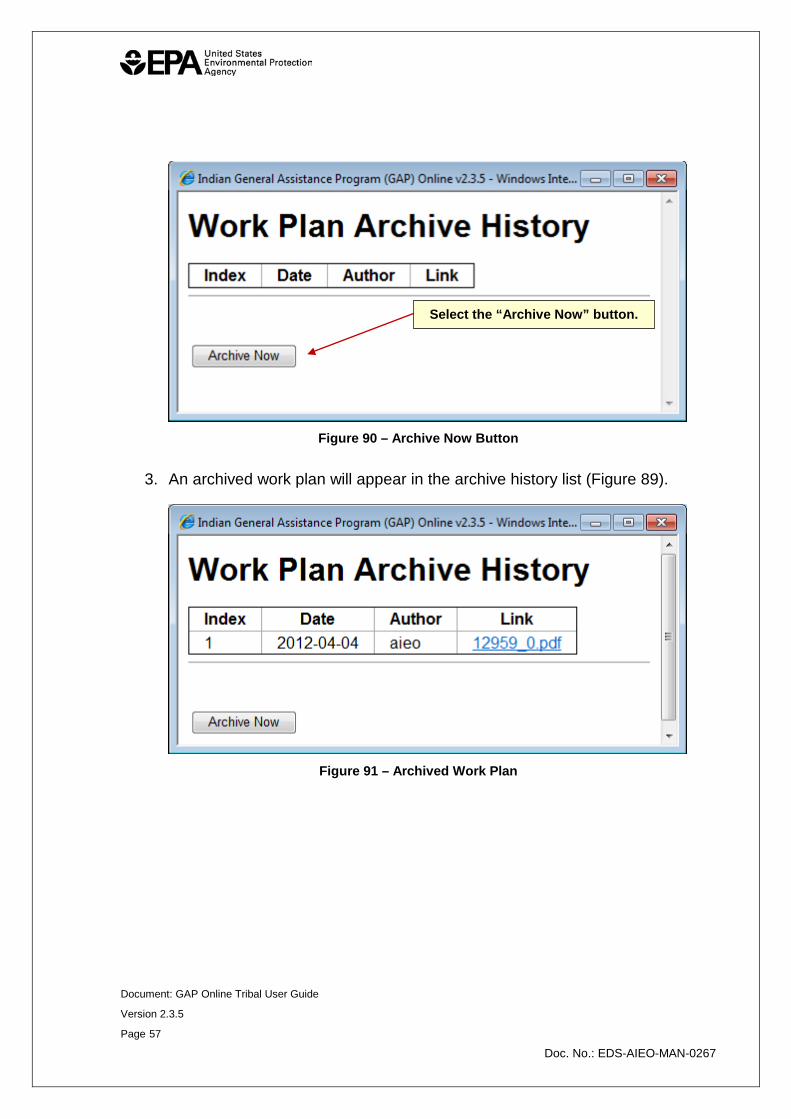
2. Select the Archive Now button on the Work Plan Archive History page to archive a copy of the work plan (Figure 90).
Select the “Archive” button.
Document: GAP Online Tribal User Guide
Version 2.3.5
Page 57
Doc. No.: EDS-AIEO-MAN-0267
Figure 90 – Archive Now Button
3. An archived work plan will appear in the archive history list (Figure 89).
Figure 91 – Archived Work Plan
Select the “Archive Now” button.
Document: GAP Online Tribal User Guide
Version 2.3.5
Page 58
Doc. No.: EDS-AIEO-MAN-0267
6 C R E AT E / E DIT P R OG R E S S R E P OR T
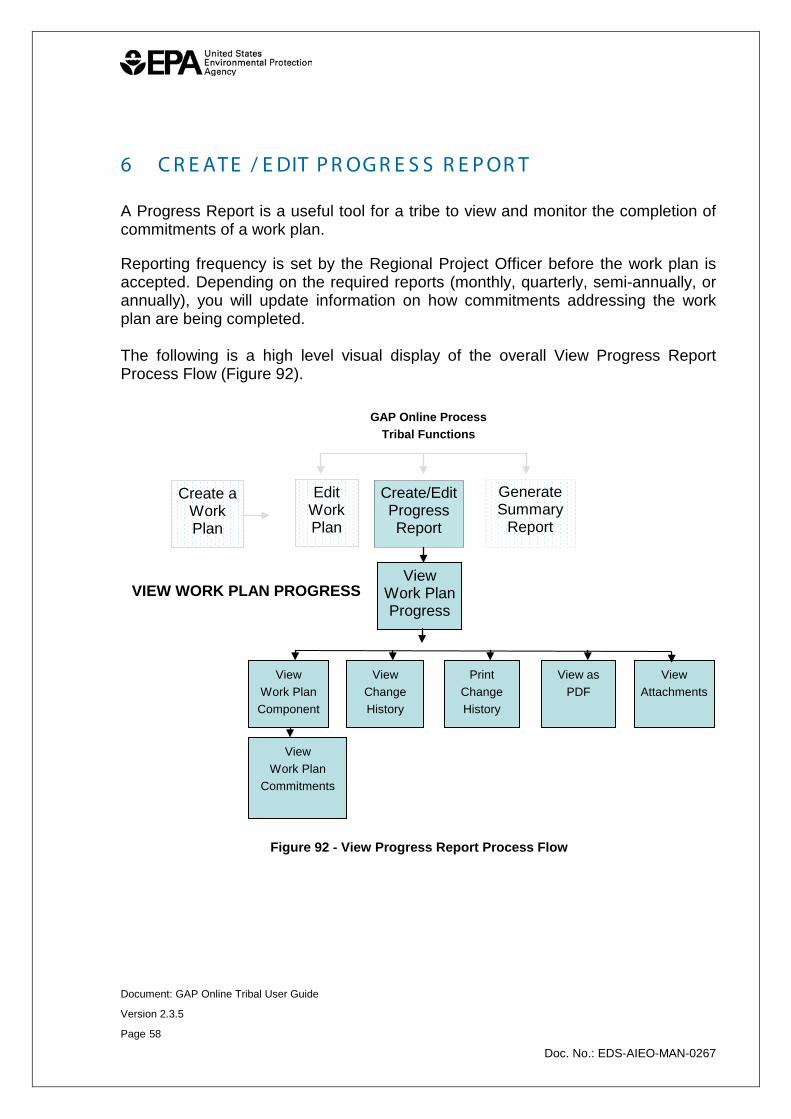
A Progress Report is a useful tool for a tribe to view and monitor the completion of commitments of a work plan.
Reporting frequency is set by the Regional Project Officer before the work plan is accepted. Depending on the required reports (monthly, quarterly, semi-annually, or annually), you will update information on how commitments addressing the work plan are being completed. The following is a high level visual display of the overall View Progress Report Process Flow (Figure 92).
Edit Work Plan
Create/Edit Progress Report
Generate Summary
Report
GAP Online Process Tribal Functions
Create a Work Plan
View Work Plan Progress
VIEW WORK PLAN PROGRESS
View as PDF
Print Change History
View Change History
View Work Plan Component
View Attachments
View Work Plan
Commitments
Figure 92 - View Progress Report Process Flow

Document: GAP Online Tribal User Guide
Version 2.3.5
Page 59
Doc. No.: EDS-AIEO-MAN-0267
6.1 Create a Progress Report
You can create a new progress report at any time on any of the commitments during an active reporting period. After a new progress report is saved, it will be labelled as Created and can be updated until the Regional Project Officer accepts or returns it. A progress report returned by your Regional Project Officer will be labelled as Returned and will require editing based on their comments. A progress report with Returned status will be relabelled as In Negotiation after you update it, and will require another review by the Regional Project Officer. Once a progress report is accepted by the Regional Project Officer, it will be labelled as Accepted and cannot be edited unless it is unlocked by the Regional Project Officer.
To create a progress report:
1. Select the Create/Edit Progress Report button in the GAP Online Home page (Figure 93).
Figure 93 – Create/Edit Progress Report Button
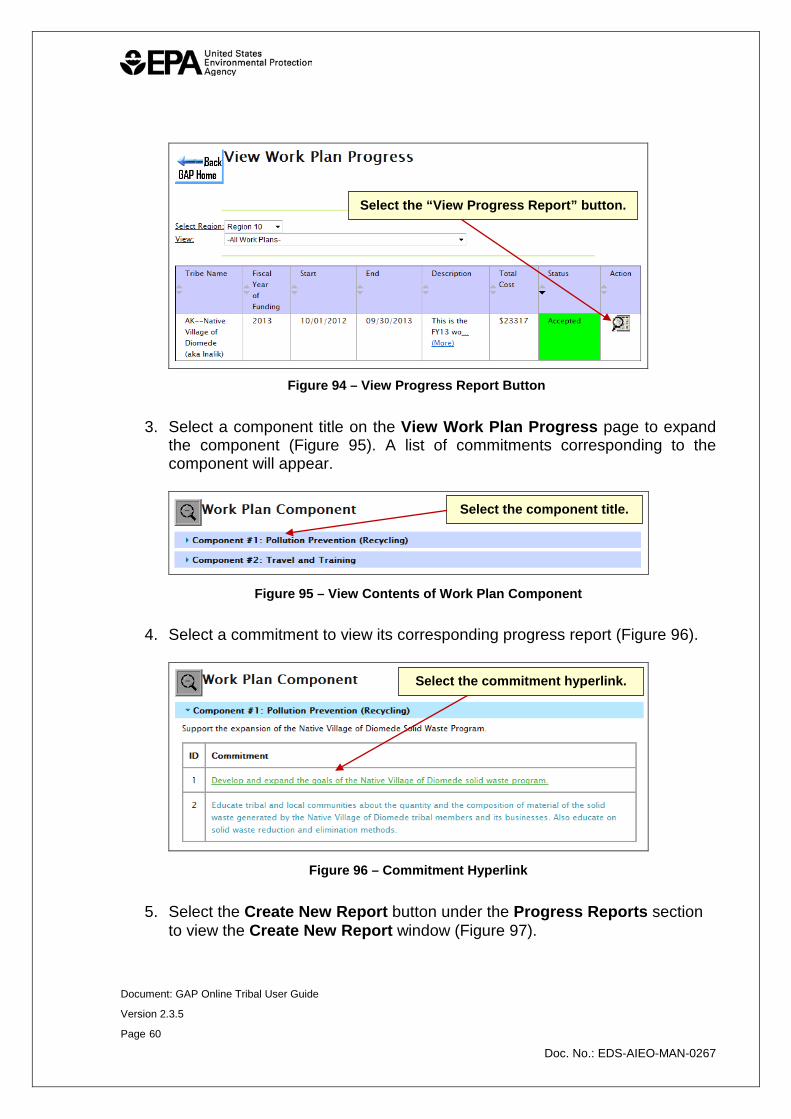
2. Select the View Progress Report button corresponding to an Accepted work plan (Figure 94).
Select the “Create/Edit Progress Report” button.
Document: GAP Online Tribal User Guide
Version 2.3.5
Page 60
Doc. No.: EDS-AIEO-MAN-0267
Figure 94 – View Progress Report Button
3. Select a component title on the View Work Plan Progress page to expand the component (Figure 95). A list of commitments corresponding to the component will appear.
Figure 95 – View Contents of Work Plan Component
4. Select a commitment to view its corresponding progress report (Figure 96).
Figure 96 – Commitment Hyperlink
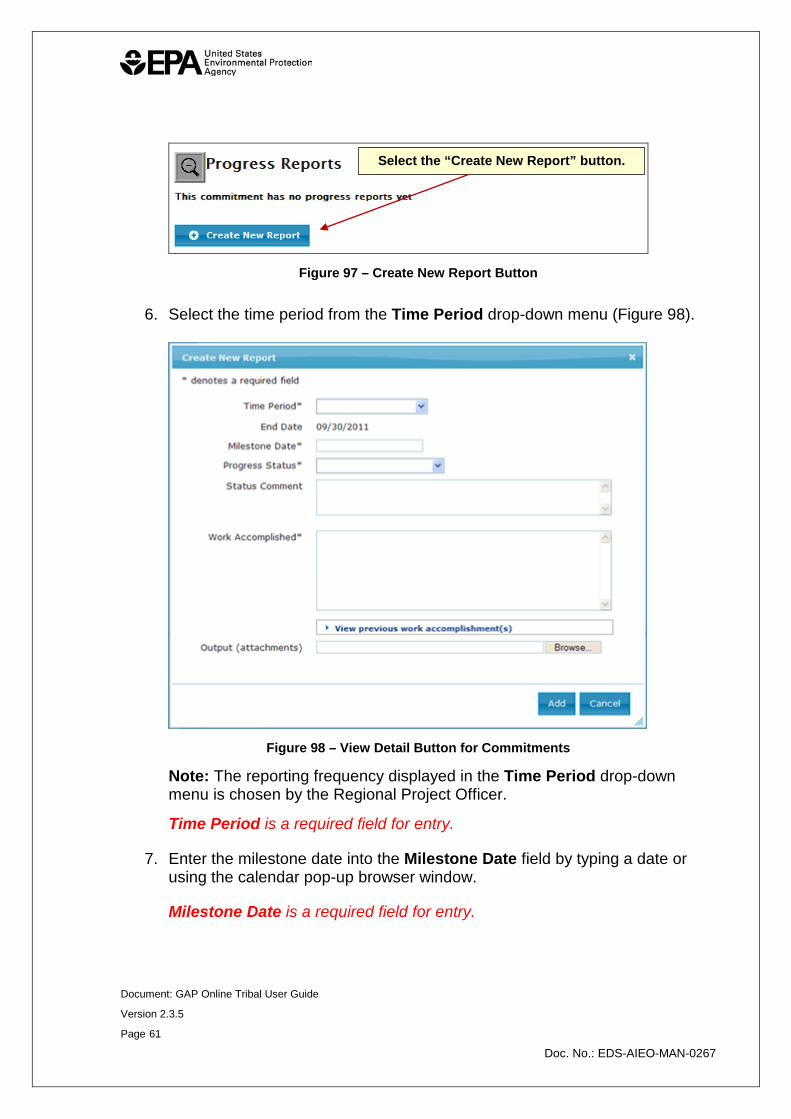
5. Select the Create New Report button under the Progress Reports section to view the Create New Report window (Figure 97).
Select the “View Progress Report” button.
Select the commitment hyperlink.
Select the component title.
Document: GAP Online Tribal User Guide
Version 2.3.5
Page 61
Doc. No.: EDS-AIEO-MAN-0267
Figure 97 – Create New Report Button
6. Select the time period from the Time Period drop-down menu (Figure 98).
Figure 98 – View Detail Button for Commitments
Note: The reporting frequency displayed in the Time Period drop-down menu is chosen by the Regional Project Officer.
Time Period is a required field for entry.
7. Enter the milestone date into the Milestone Date field by typing a date or using the calendar pop-up browser window.
Milestone Date is a required field for entry.
Select the “Create New Report” button.
Document: GAP Online Tribal User Guide
Version 2.3.5
Page 62
Doc. No.: EDS-AIEO-MAN-0267
8. Select the status of the work plan commitment from the Progress Status drop-down menu.
Progress Status is a required field.
9. Enter an optional comment about the progress status into the Status Comment field.
10. Enter the status of the commitment and additional requirements for the commitment into the Work Accomplished field.
Work Accomplished is a required field for entry.
11. Select the View previous work accomplishment(s) hyperlink to view the work accomplished from previous progress reports.
12. Select the Browse button corresponding to the Output (attachments) field to upload a file.
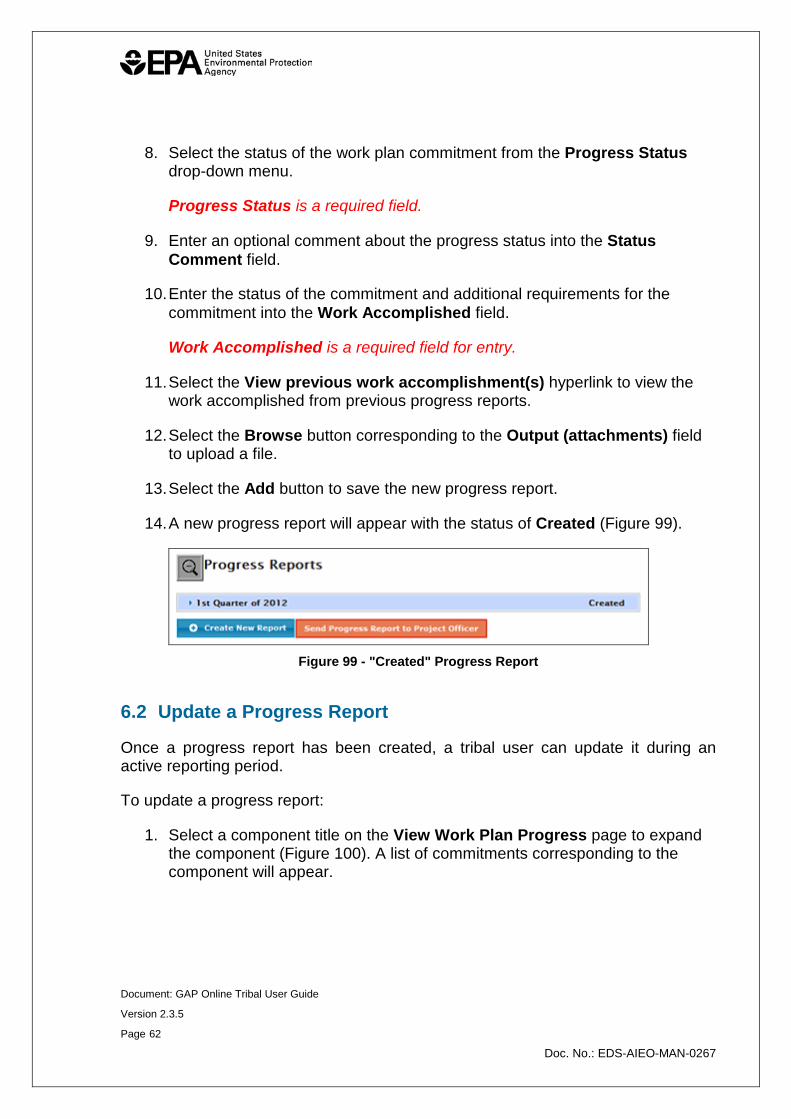
13. Select the Add button to save the new progress report.
14. A new progress report will appear with the status of Created (Figure 99).
Figure 99 - "Created" Progress Report
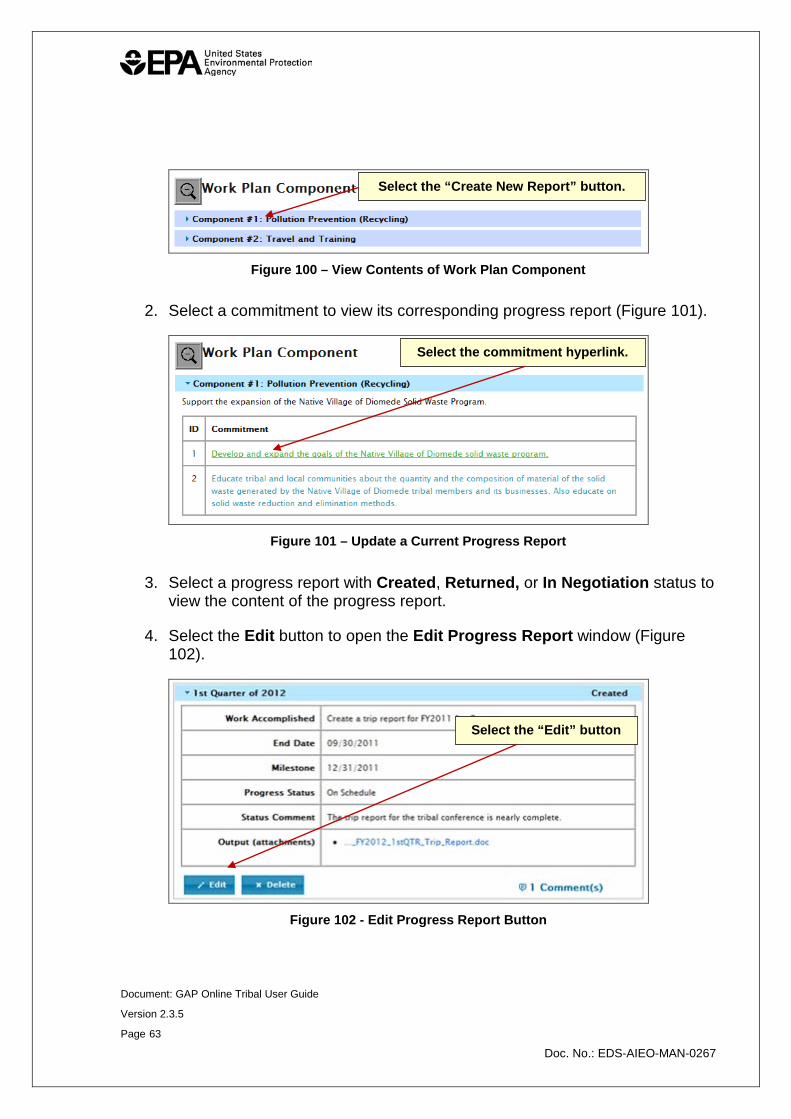
6.2 Update a Progress Report
Once a progress report has been created, a tribal user can update it during an active reporting period.
To update a progress report:
1. Select a component title on the View Work Plan Progress page to expand the component (Figure 100). A list of commitments corresponding to the component will appear.
Document: GAP Online Tribal User Guide
Version 2.3.5
Page 63
Doc. No.: EDS-AIEO-MAN-0267
Figure 100 – View Contents of Work Plan Component
2. Select a commitment to view its corresponding progress report (Figure 101).
Figure 101 – Update a Current Progress Report
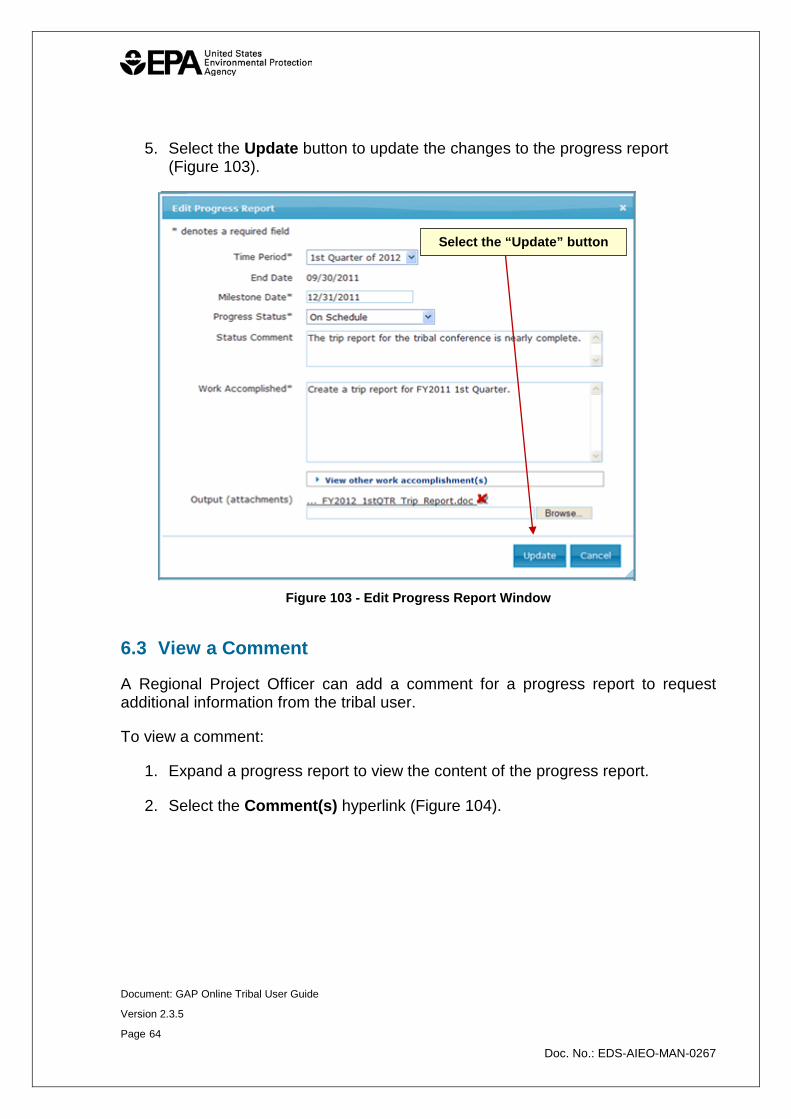
3. Select a progress report with Created, Returned, or In Negotiation status to view the content of the progress report.
4. Select the Edit button to open the Edit Progress Report window (Figure 102).
Figure 102 - Edit Progress Report Button
Select the “Create New Report” button.
Select the commitment hyperlink.
Select the “Edit” button
Document: GAP Online Tribal User Guide
Version 2.3.5
Page 64
Doc. No.: EDS-AIEO-MAN-0267
5. Select the Update button to update the changes to the progress report (Figure 103).
Figure 103 - Edit Progress Report Window
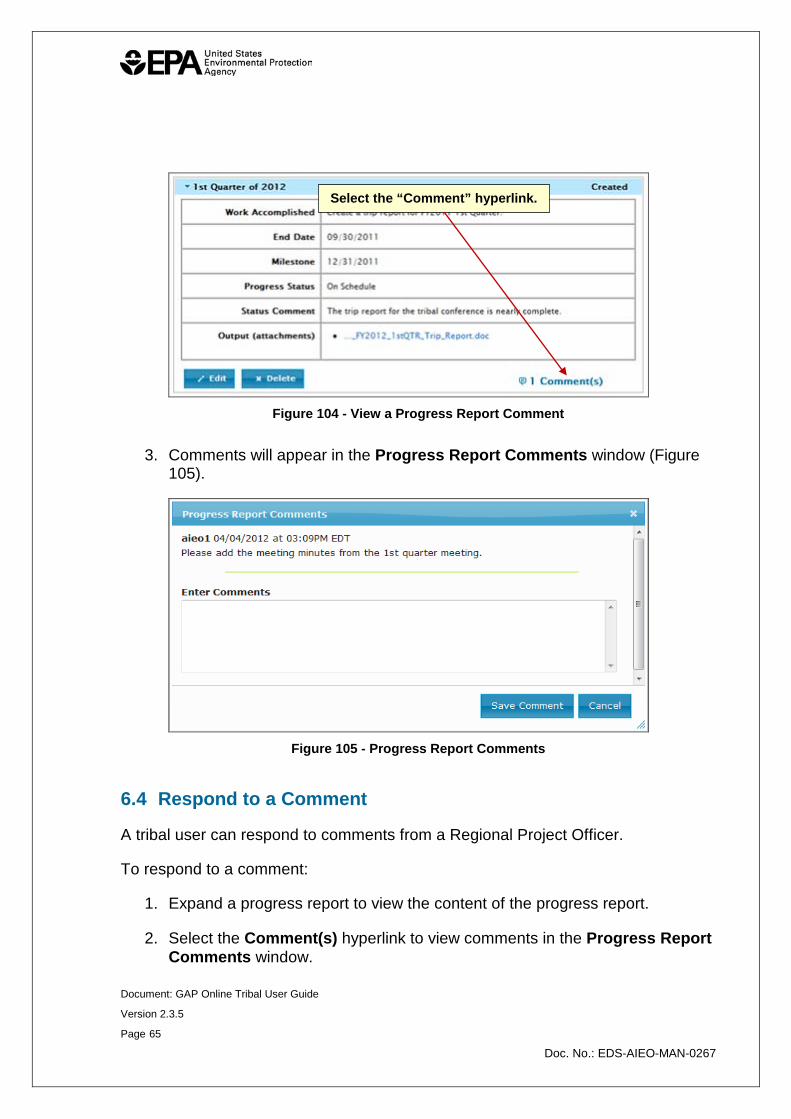
6.3 View a Comment
A Regional Project Officer can add a comment for a progress report to request additional information from the tribal user.
To view a comment:
1. Expand a progress report to view the content of the progress report.
2. Select the Comment(s) hyperlink (Figure 104).
Select the “Update” button
Document: GAP Online Tribal User Guide
Version 2.3.5
Page 65
Doc. No.: EDS-AIEO-MAN-0267
Figure 104 - View a Progress Report Comment
3. Comments will appear in the Progress Report Comments window (Figure 105).
Figure 105 - Progress Report Comments
6.4 Respond to a Comment
A tribal user can respond to comments from a Regional Project Officer.
To respond to a comment:
1. Expand a progress report to view the content of the progress report.
2. Select the Comment(s) hyperlink to view comments in the Progress Report Comments window.
Select the “Comment” hyperlink.
Document: GAP Online Tribal User Guide
Version 2.3.5
Page 66
Doc. No.: EDS-AIEO-MAN-0267
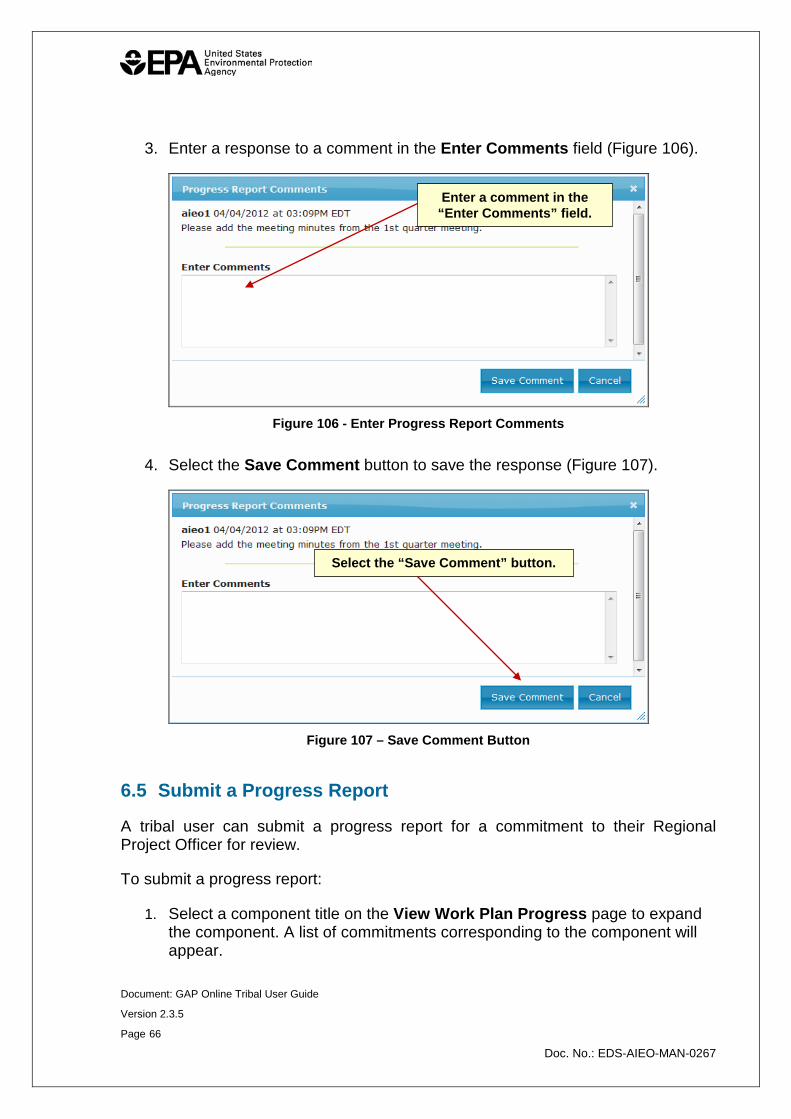
3. Enter a response to a comment in the Enter Comments field (Figure 106).
Figure 106 - Enter Progress Report Comments
4. Select the Save Comment button to save the response (Figure 107).
Figure 107 – Save Comment Button
6.5 Submit a Progress Report
A tribal user can submit a progress report for a commitment to their Regional Project Officer for review.
To submit a progress report:
1. Select a component title on the View Work Plan Progress page to expand the component. A list of commitments corresponding to the component will appear.
Enter a comment in the “Enter Comments” field.
Select the “Save Comment” button.
Document: GAP Online Tribal User Guide
Version 2.3.5
Page 67
Doc. No.: EDS-AIEO-MAN-0267
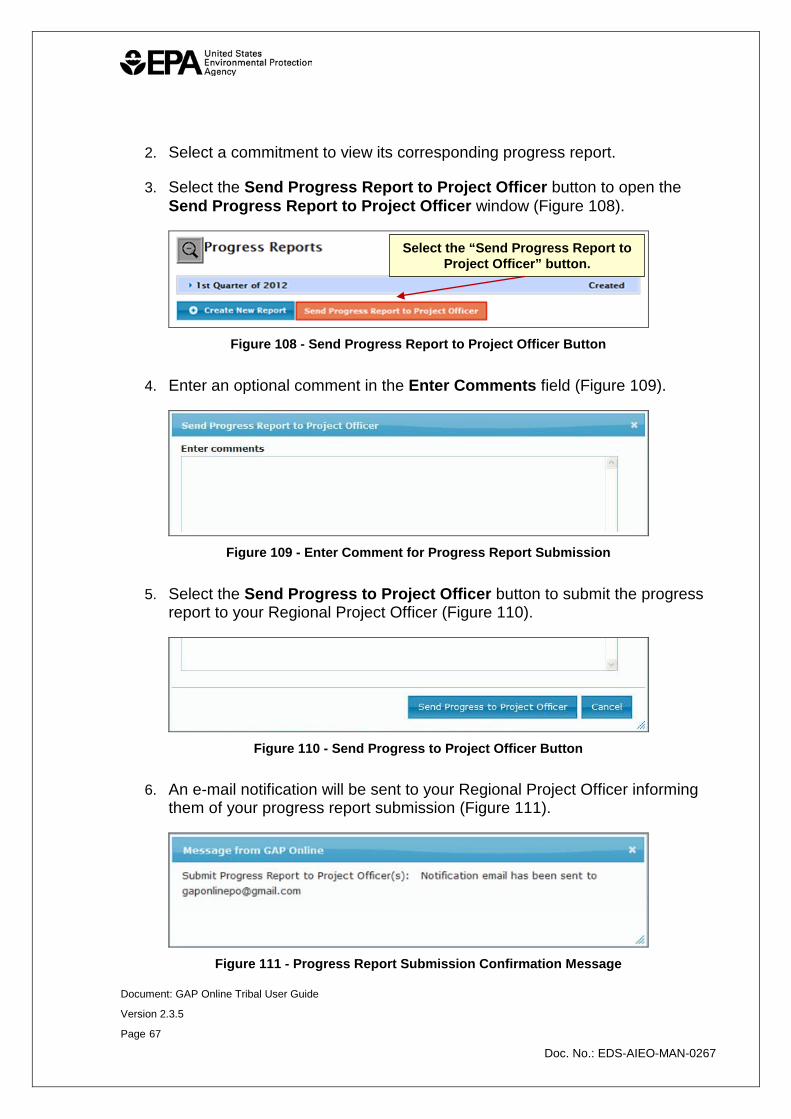
2. Select a commitment to view its corresponding progress report.
3. Select the Send Progress Report to Project Officer button to open the Send Progress Report to Project Officer window (Figure 108).
Figure 108 - Send Progress Report to Project Officer Button
4. Enter an optional comment in the Enter Comments field (Figure 109).
Figure 109 - Enter Comment for Progress Report Submission
5. Select the Send Progress to Project Officer button to submit the progress report to your Regional Project Officer (Figure 110).
Figure 110 - Send Progress to Project Officer Button
6. An e-mail notification will be sent to your Regional Project Officer informing them of your progress report submission (Figure 111).
Figure 111 - Progress Report Submission Confirmation Message
Select the “Send Progress Report to Project Officer” button.
Document: GAP Online Tribal User Guide
Version 2.3.5
Page 68
Doc. No.: EDS-AIEO-MAN-0267
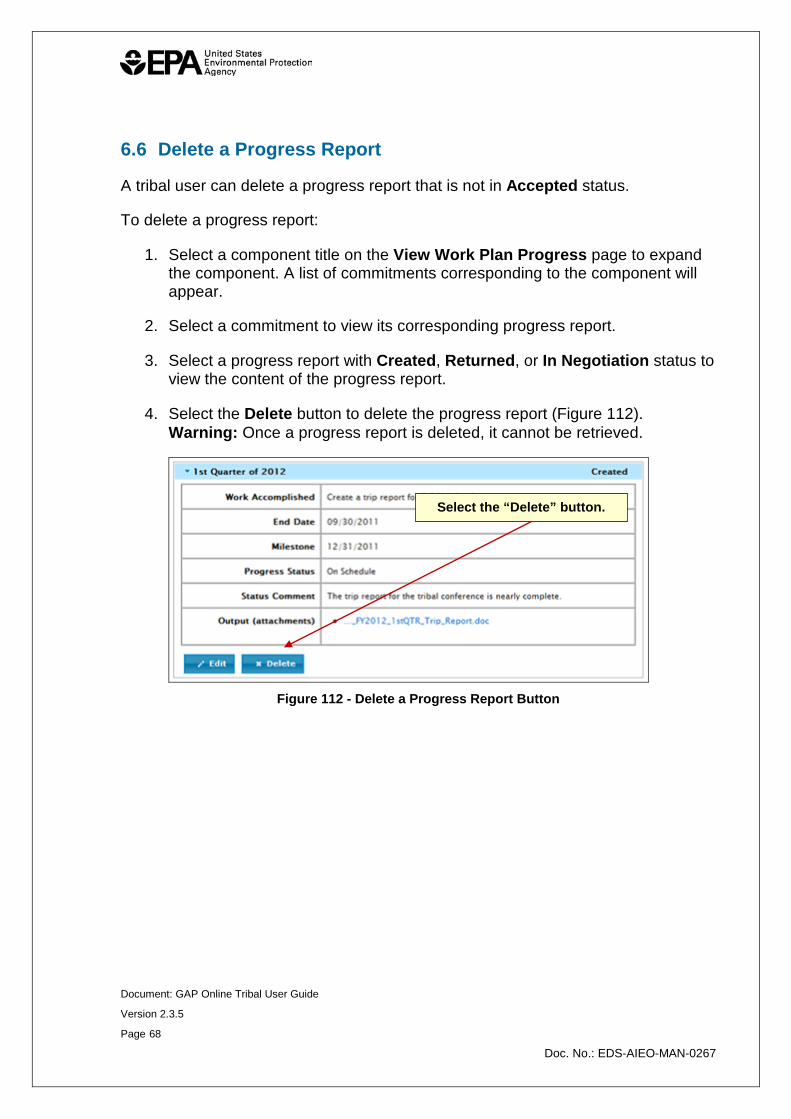
6.6 Delete a Progress Report
A tribal user can delete a progress report that is not in Accepted status.
To delete a progress report:
1. Select a component title on the View Work Plan Progress page to expand the component. A list of commitments corresponding to the component will appear.
2. Select a commitment to view its corresponding progress report.
3. Select a progress report with Created, Returned, or In Negotiation status to view the content of the progress report.
4. Select the Delete button to delete the progress report (Figure 112). Warning: Once a progress report is deleted, it cannot be retrieved.
Figure 112 - Delete a Progress Report Button
Select the “Delete” button.
Document: GAP Online Tribal User Guide
Version 2.3.5
Page 69
Doc. No.: EDS-AIEO-MAN-0267
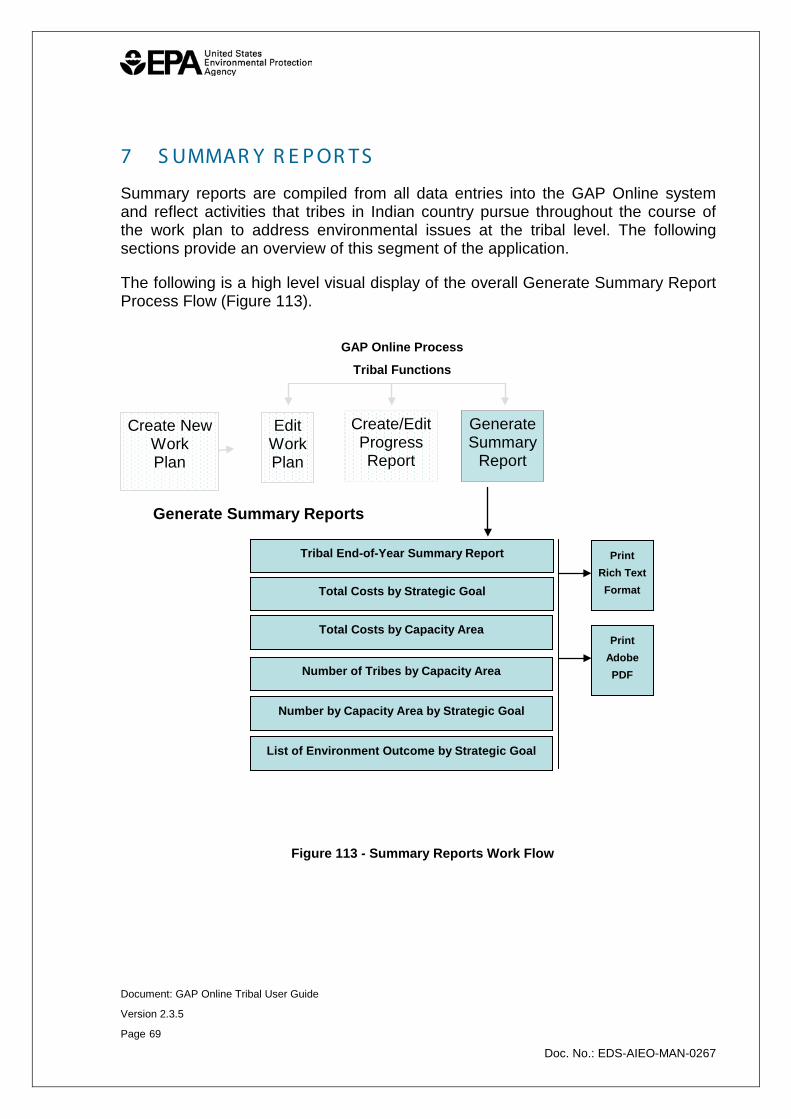
7 S UMMAR Y R E P OR T S
Summary reports are compiled from all data entries into the GAP Online system and reflect activities that tribes in Indian country pursue throughout the course of the work plan to address environmental issues at the tribal level. The following sections provide an overview of this segment of the application.
The following is a high level visual display of the overall Generate Summary Report Process Flow (Figure 113).
Figure 77 – Summary Reports Work Flow
Edit Work Plan
Create/Edit Progress Report
Generate Summary
Report
GAP Online Process
Tribal Functions
Create New Work Plan
Generate Summary Reports
Number of Tribes by Capacity Area
Number by Capacity Area by Strategic Goal
List of Environment Outcome by Strategic Goal
Tribal End-of-Year Summary Report
Total Costs by Capacity Area
Print Rich Text Format Total Costs by Strategic Goal
Print Adobe PDF
Figure 113 - Summary Reports Work Flow

Document: GAP Online Tribal User Guide
Version 2.3.5
Page 70
Doc. No.: EDS-AIEO-MAN-0267
7.1 Generate an End of Year Summary Report
The End-of-Year Summary Report allows the tribe to highlight its accomplishments and all the work accomplished, as well as address circumstances that arose during the year that caused delays or in other ways hindered the completion of any part of the work plan within the work plans timeframe.
To generate an End of Year Summary Report:
1. Select the Generate Summary Reports button from the menu selections on the GAP Online Home Page (Figure 114).
Figure 114 – Generate Summary Reports Button
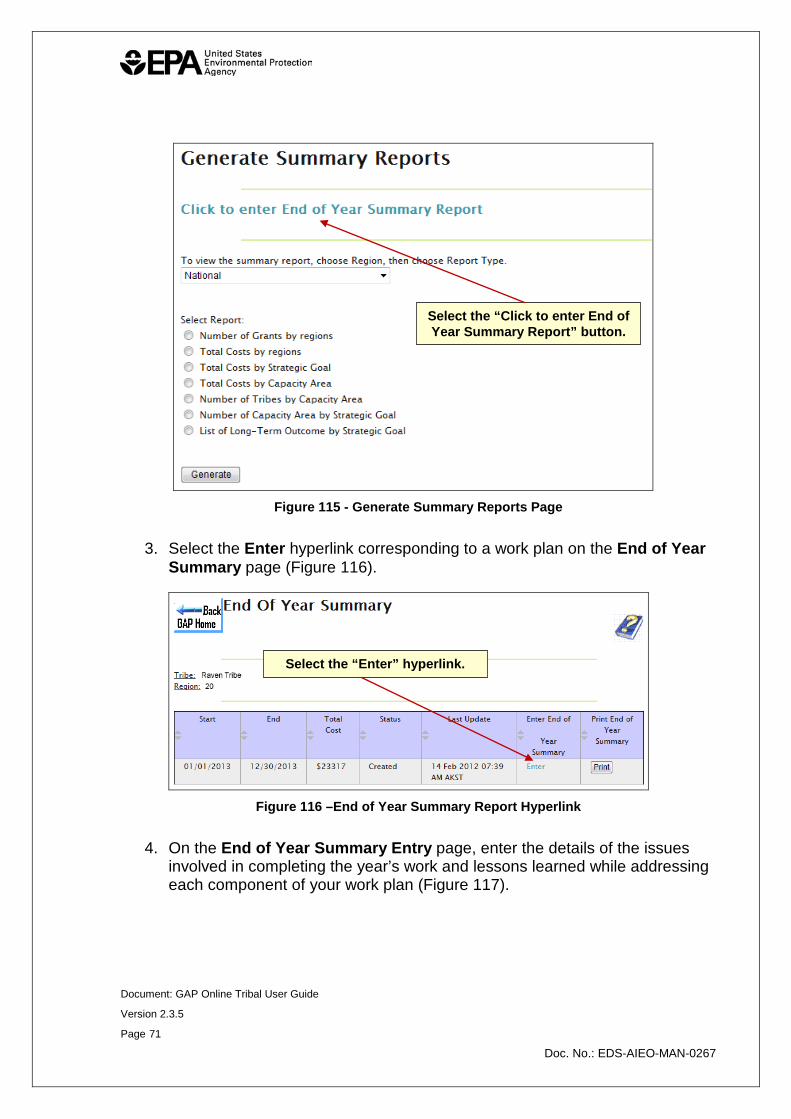
2. Select the Click to enter End of Year Summary Report hyperlink on the Generate Summary Report page (Figure 115).
Select the “Generate Summary Reports” button.
Document: GAP Online Tribal User Guide
Version 2.3.5
Page 71
Doc. No.: EDS-AIEO-MAN-0267
Figure 115 - Generate Summary Reports Page
3. Select the Enter hyperlink corresponding to a work plan on the End of Year Summary page (Figure 116).
Figure 116 –End of Year Summary Report Hyperlink
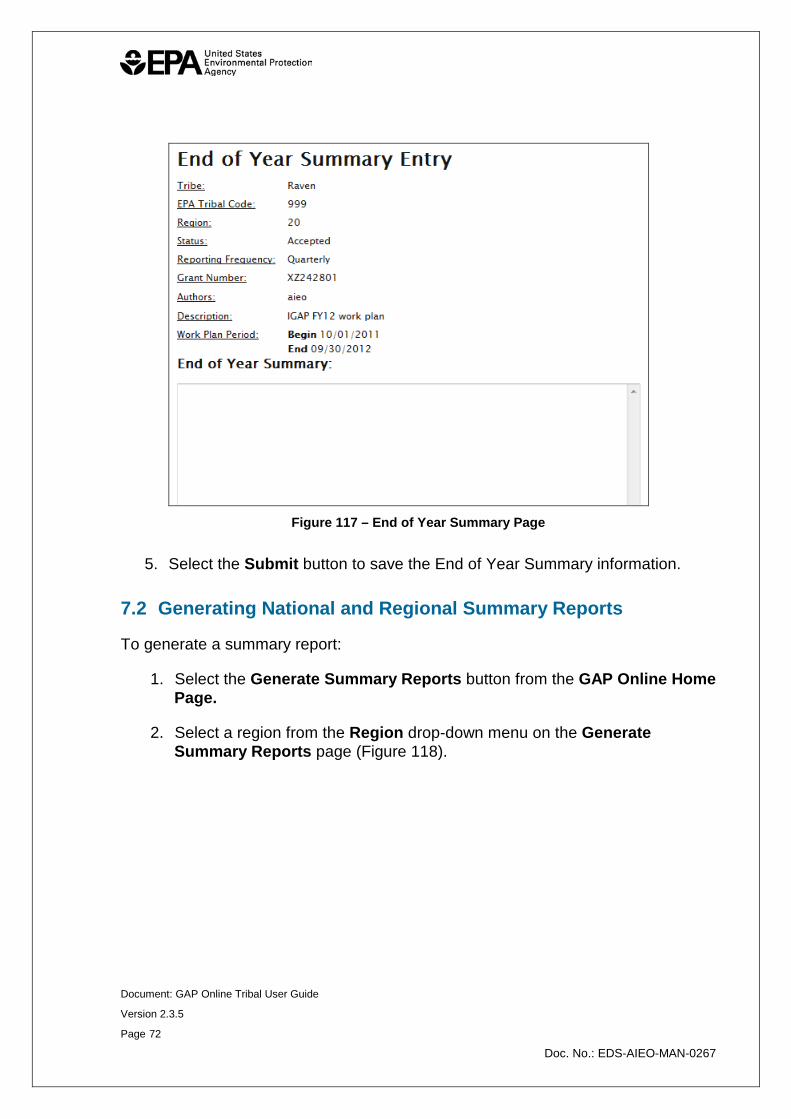
4. On the End of Year Summary Entry page, enter the details of the issues involved in completing the year’s work and lessons learned while addressing each component of your work plan (Figure 117).
Select the “Click to enter End of Year Summary Report” button.
Select the “Enter” hyperlink.
Document: GAP Online Tribal User Guide
Version 2.3.5
Page 72
Doc. No.: EDS-AIEO-MAN-0267
Figure 117 – End of Year Summary Page
5. Select the Submit button to save the End of Year Summary information.
7.2 Generating National and Regional Summary Reports
To generate a summary report:
1. Select the Generate Summary Reports button from the GAP Online Home Page.
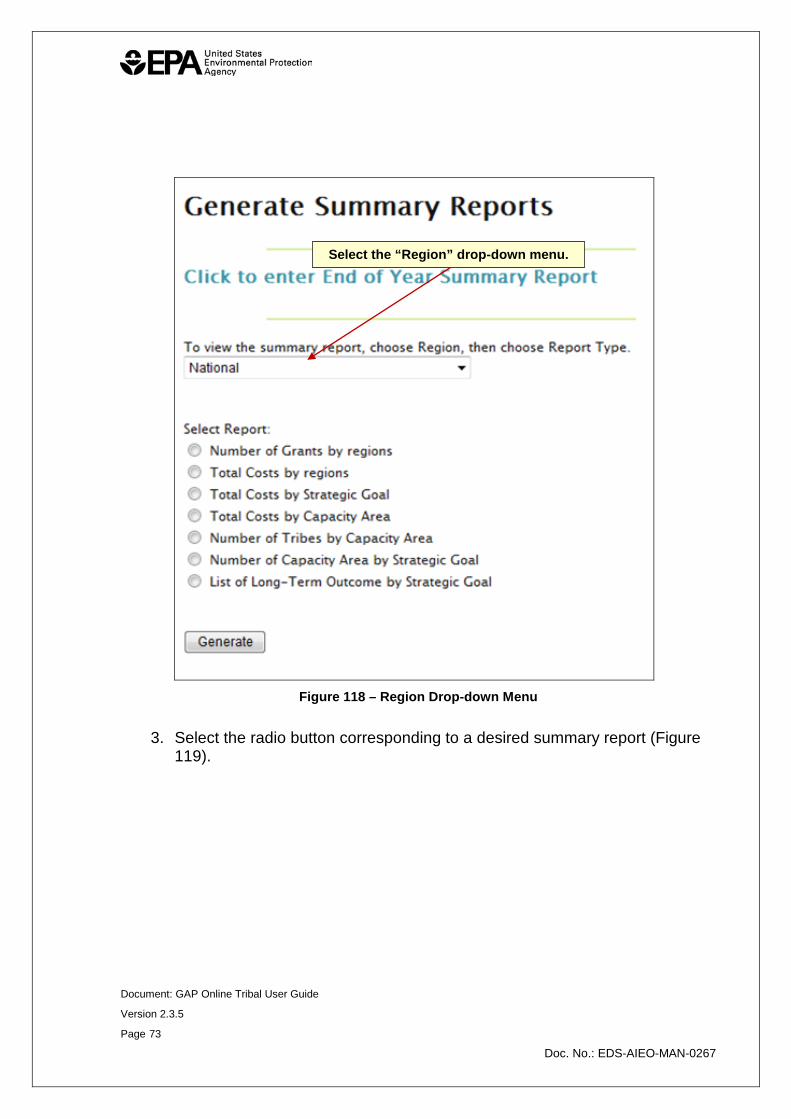
2. Select a region from the Region drop-down menu on the Generate Summary Reports page (Figure 118).
Document: GAP Online Tribal User Guide
Version 2.3.5
Page 73
Doc. No.: EDS-AIEO-MAN-0267
Figure 118 – Region Drop-down Menu
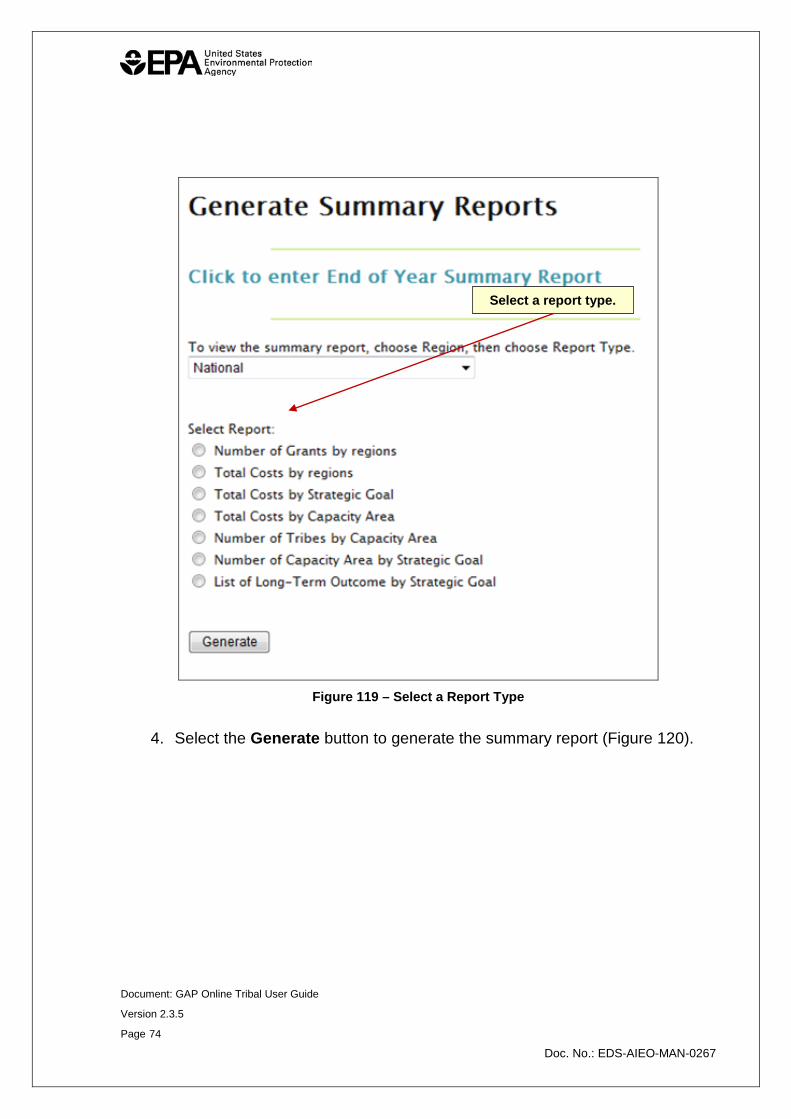
3. Select the radio button corresponding to a desired summary report (Figure 119).
Select the “Region” drop-down menu.
Document: GAP Online Tribal User Guide
Version 2.3.5
Page 74
Doc. No.: EDS-AIEO-MAN-0267
Figure 119 – Select a Report Type
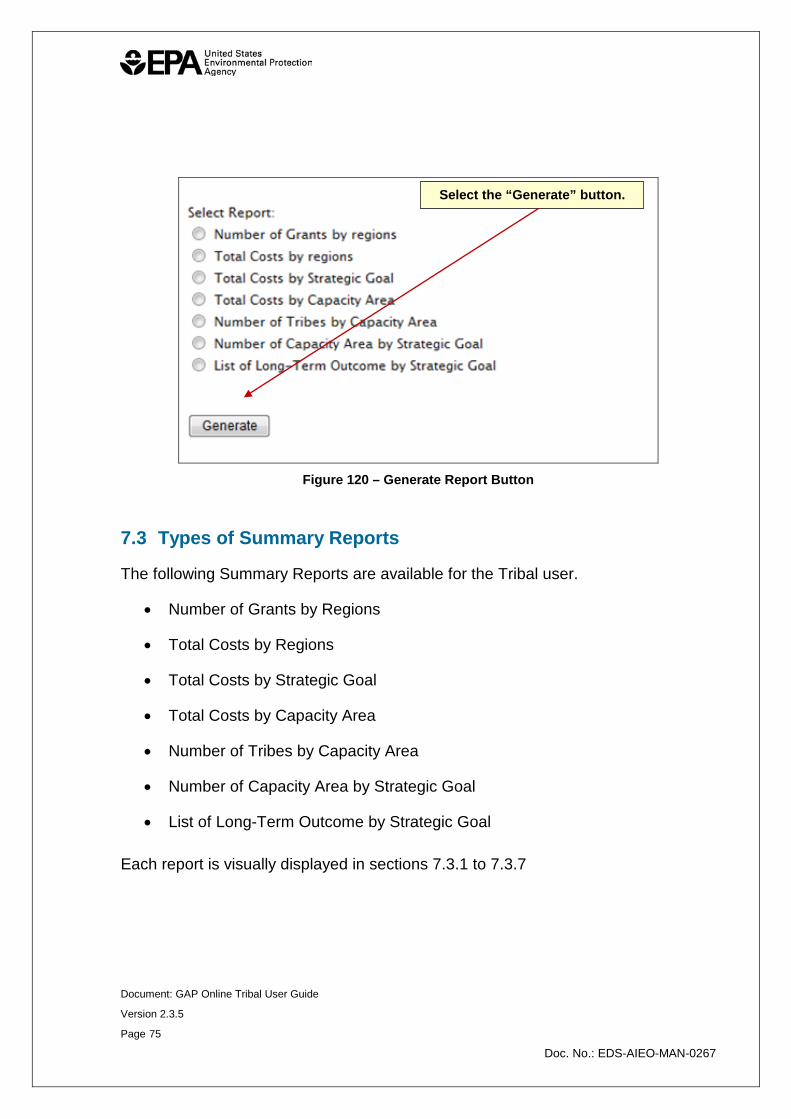
4. Select the Generate button to generate the summary report (Figure 120).
Select a report type.
Document: GAP Online Tribal User Guide
Version 2.3.5
Page 75
Doc. No.: EDS-AIEO-MAN-0267
Figure 120 – Generate Report Button
7.3 Types of Summary Reports
The following Summary Reports are available for the Tribal user.
• Number of Grants by Regions
• Total Costs by Regions
• Total Costs by Strategic Goal
• Total Costs by Capacity Area
• Number of Tribes by Capacity Area
• Number of Capacity Area by Strategic Goal
• List of Long-Term Outcome by Strategic Goal
Each report is visually displayed in sections 7.3.1 to 7.3.7
Select the “Generate” button.
Document: GAP Online Tribal User Guide
Version 2.3.5
Page 76
Doc. No.: EDS-AIEO-MAN-0267
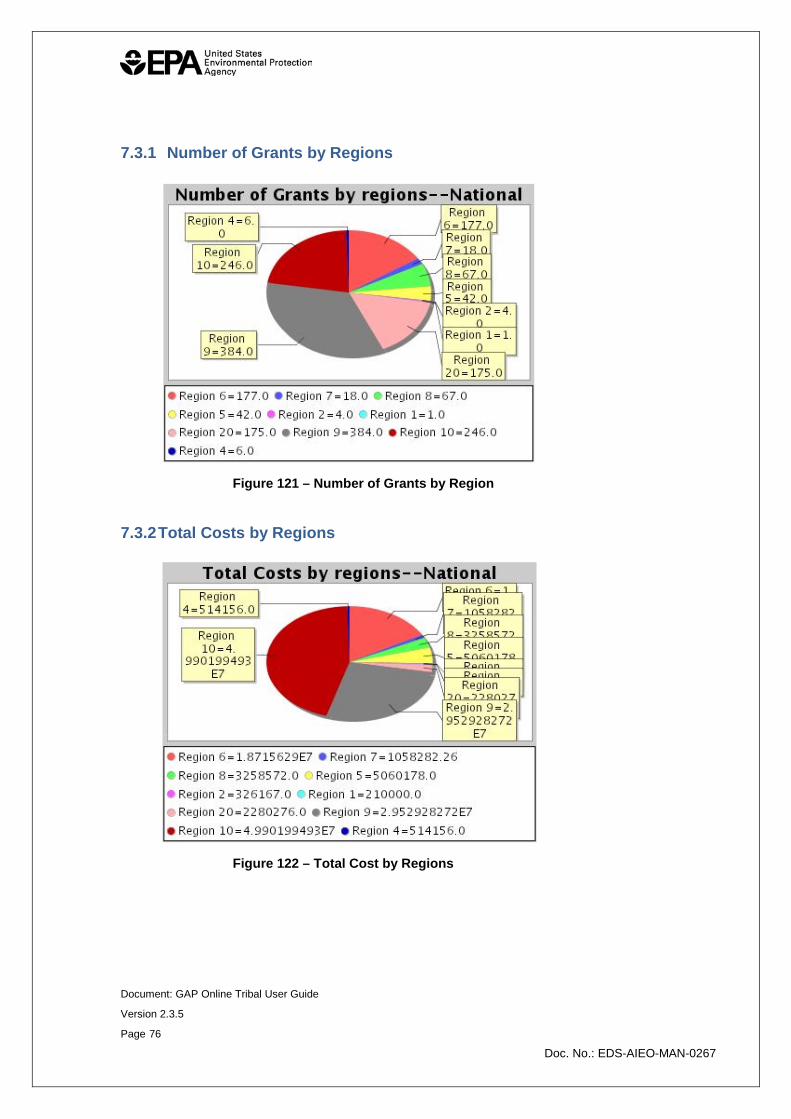
7.3.1 Number of Grants by Regions
Figure 121 – Number of Grants by Region
7.3.2 Total Costs by Regions
Figure 122 – Total Cost by Regions
Document: GAP Online Tribal User Guide
Version 2.3.5
Page 77
Doc. No.: EDS-AIEO-MAN-0267
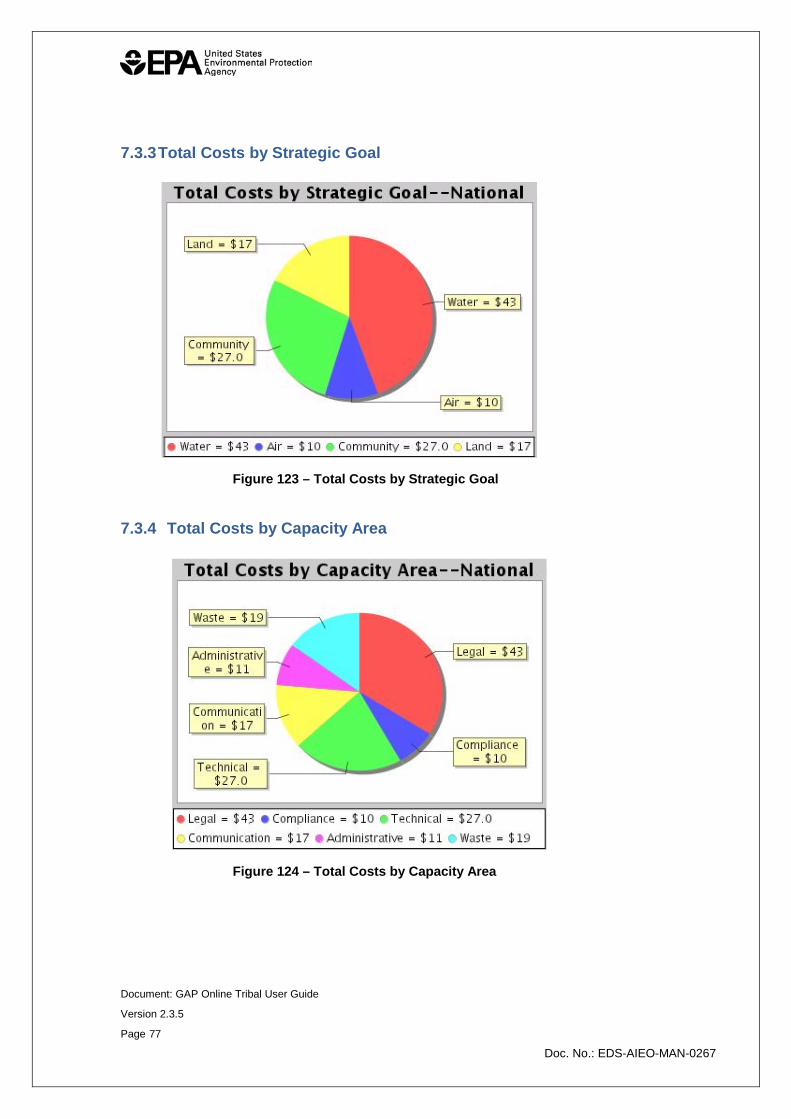
7.3.3 Total Costs by Strategic Goal
Figure 123 – Total Costs by Strategic Goal
7.3.4 Total Costs by Capacity Area
Figure 124 – Total Costs by Capacity Area
Document: GAP Online Tribal User Guide
Version 2.3.5
Page 78
Doc. No.: EDS-AIEO-MAN-0267
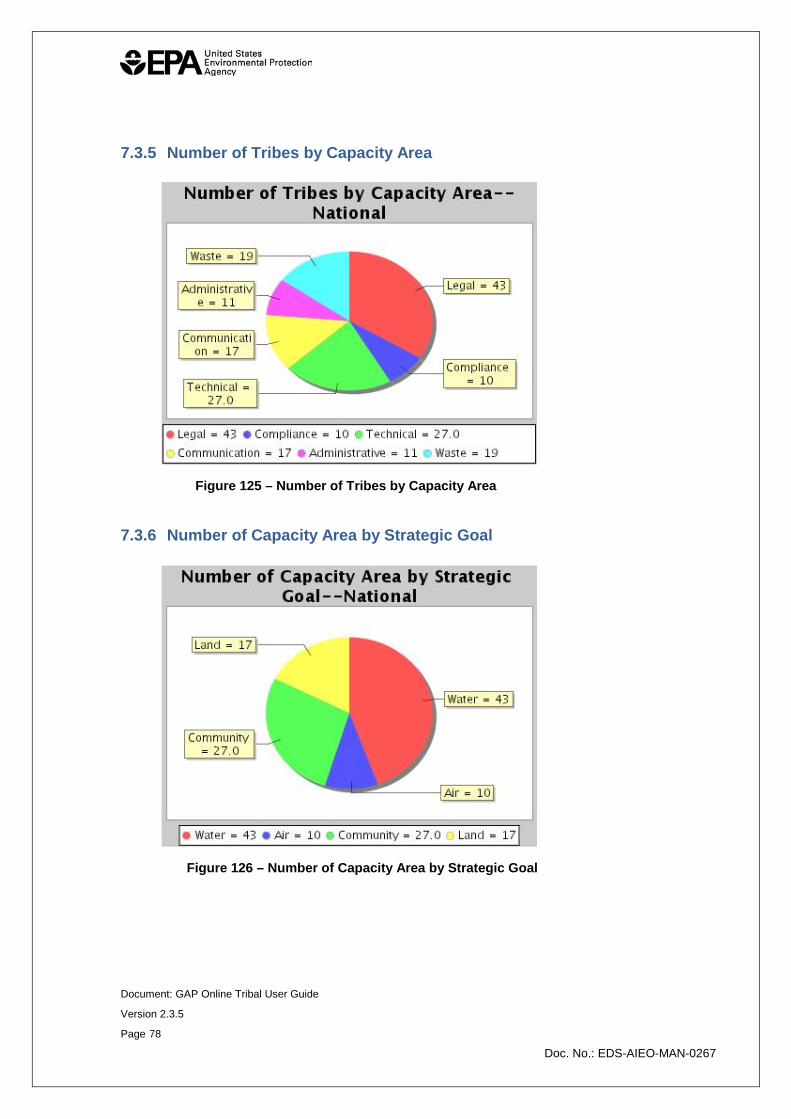
7.3.5 Number of Tribes by Capacity Area
Figure 125 – Number of Tribes by Capacity Area
7.3.6 Number of Capacity Area by Strategic Goal
Figure 126 – Number of Capacity Area by Strategic Goal
Document: GAP Online Tribal User Guide
Version 2.3.5
Page 79
Doc. No.: EDS-AIEO-MAN-0267
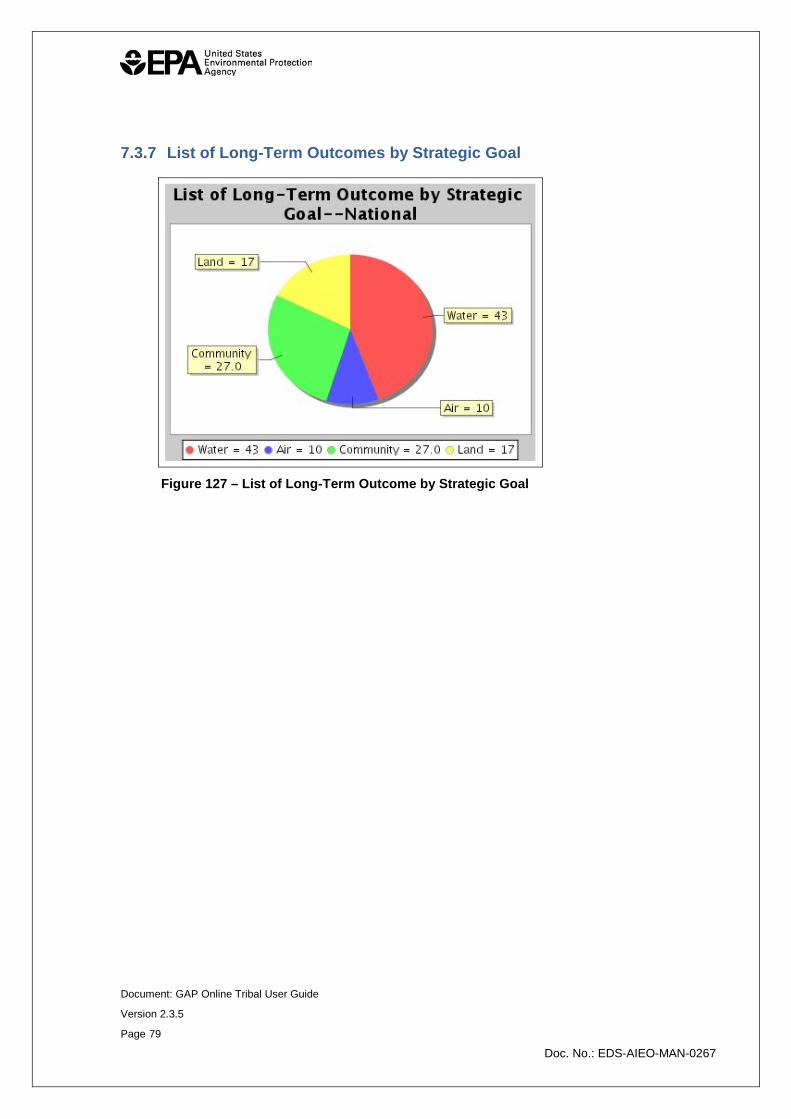
7.3.7 List of Long-Term Outcomes by Strategic Goal
Figure 127 – List of Long-Term Outcome by Strategic Goal
Document: GAP Online Tribal User Guide
Version 2.3.5
Page 80
Doc. No.: EDS-AIEO-MAN-0267
8 AC R ONY MS AND DE F INIT IONS
8.1 Acronyms
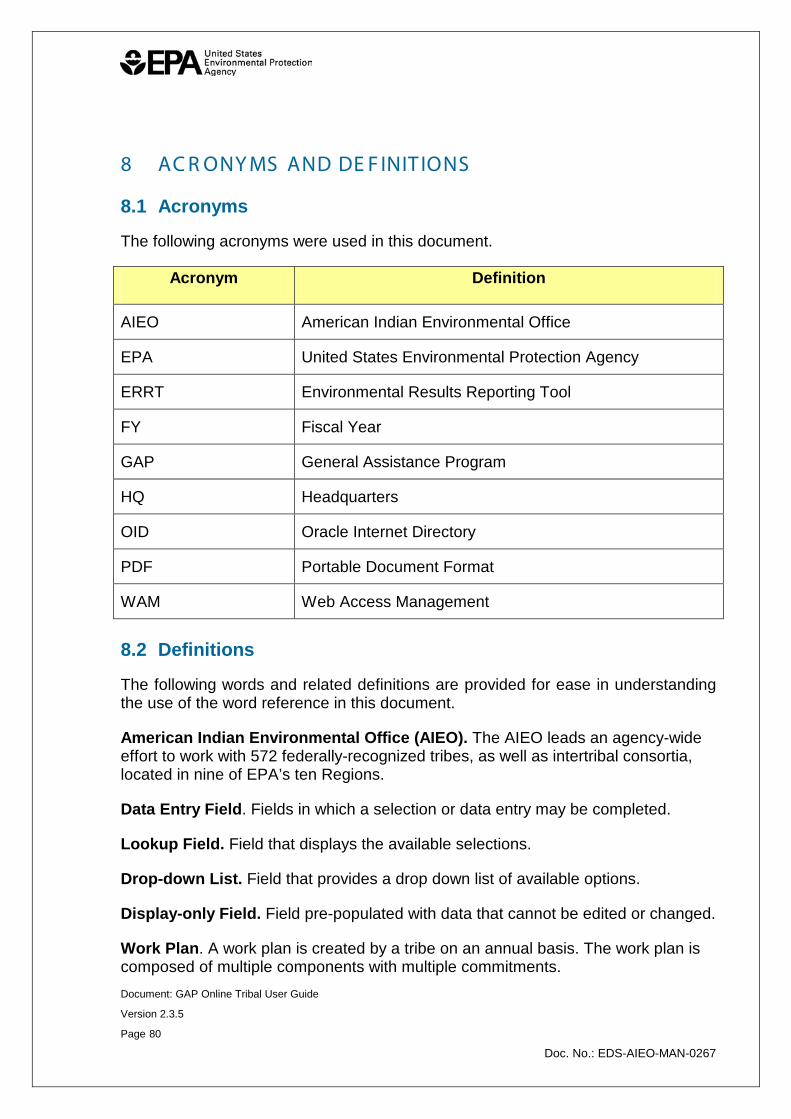
The following acronyms were used in this document.
Acronym Definition
AIEO American Indian Environmental Office
EPA United States Environmental Protection Agency
ERRT Environmental Results Reporting Tool
FY Fiscal Year
GAP General Assistance Program
HQ Headquarters
OID Oracle Internet Directory
PDF Portable Document Format
WAM Web Access Management
8.2 Definitions
The following words and related definitions are provided for ease in understanding the use of the word reference in this document.
American Indian Environmental Office (AIEO). The AIEO leads an agency-wide effort to work with 572 federally-recognized tribes, as well as intertribal consortia, located in nine of EPA’s ten Regions.
Data Entry Field. Fields in which a selection or data entry may be completed.
Lookup Field. Field that displays the available selections.
Drop-down List. Field that provides a drop down list of available options.
Display-only Field. Field pre-populated with data that cannot be edited or changed.
Work Plan. A work plan is created by a tribe on an annual basis. The work plan is composed of multiple components with multiple commitments.
Document: GAP Online Tribal User Guide
Version 2.3.5
Page 81
Doc. No.: EDS-AIEO-MAN-0267