Embed Size (px)
Citation preview
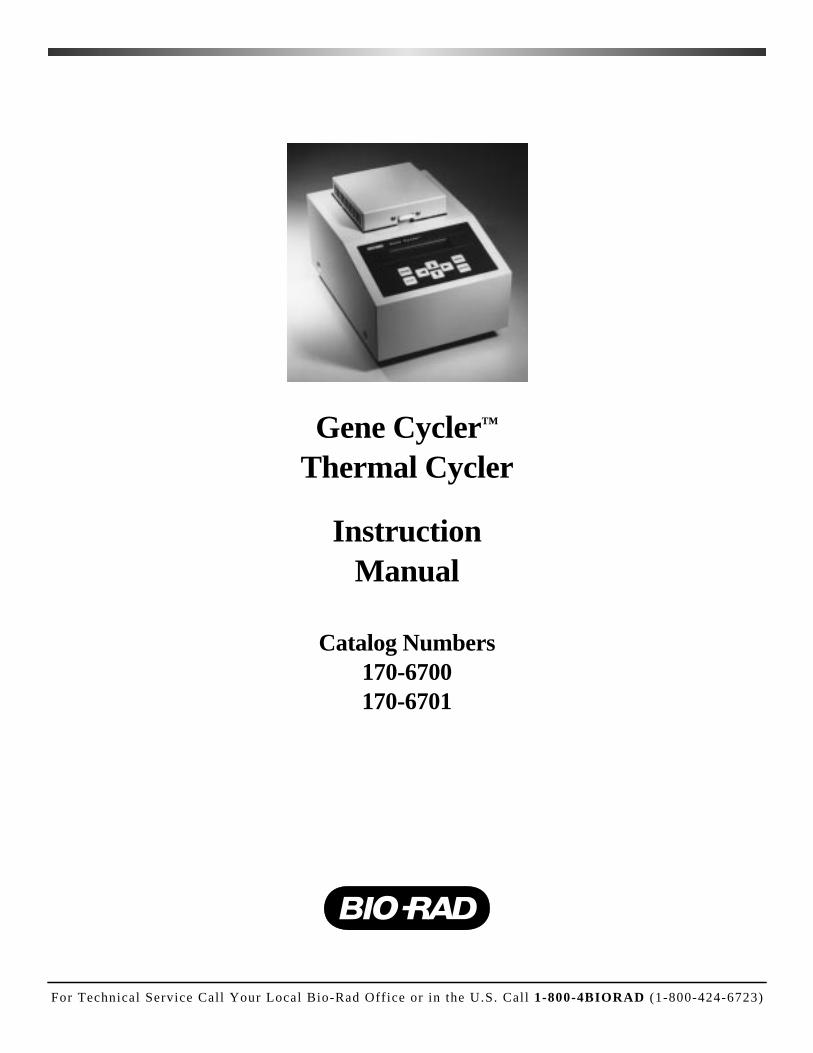
Gene Cycler™
Thermal Cycler
Instruction Manual
Catalog Numbers170-6700170-6701
For Technical Service Call Your Local Bio-Rad Off ice or in the U.S. Call 1-800-4BIORAD (1-800-424-6723)
Authorized Thermal Cycler
This instrument, Serial Number _____________________________________________________,is an Authorized Thermal Cycler. Its purchase price includes the up-front fee component of a licenseunder the patents on the Polymerase Chain Reaction (PCR) process, which are owned by Hoffmann-LaRoche Inc. and F. Hoffmann-La Roche Ltd, to practice the PCR process for internal research and devel-opment using this instrument. The running royalty component of that license may be purchased fromPerkin-Elmer or obtained by purchasing Authorized Reagents. This instrument is also an AuthorizedThermal Cycler for use with applications licenses available from Perkin-Elmer. Its use with AuthorizedReagents also provides a limited PCR license in accordance with the label rights accompanying suchreagents. Purchase of this product does not itself convey to the purchaser a complete license or right toperform the PCR process. Further information on purchasing licenses to practice the PCR process maybe obtained by contacting the Director of Licensing at The Perkin-Elmer Corporation, 850 Lincoln Center Drive, Foster City, California 94404.
Perkin-Elmer does not guarantee the performance of this instrument.
Gene Cycler Instruction ManualRead this manual carefully before installing and operating the Gene Cycler thermal cycler. This
instrument contains an aluminum thermal block which is very hot during routine use and may cause skinburns if not operated properly. Read the safety section before using the Gene Cycler thermal cycler.
Warranty InformationThe Gene Cycler thermal cycler is warranted for 1 year against defects in materials and work-
manship. If any defects should occur during this warranty period, Bio-Rad Laboratories will replacethe defective parts without charge. However, the following defects are specifically excluded:
Defects caused by improper operation.
Repair or modification performed by anyone other than Bio-Rad Laboratories or an authorizedagent.
Deliberate or accidental misuse.
Damage caused by disaster.

Table of ContentsPage
Safety Information.......................................................................................1
Section 1 Introduction ..................................................................................................21.1 Operating Features .....................................................................................................21.2 Operating Precautions ................................................................................................3
Section 2 Gene Cycler Overview.................................................................................42.1 Installation ..................................................................................................................42.2 Instruction Manual Conventions................................................................................42.3 Control Features .........................................................................................................5
Section 3 Gene Cycler Operation................................................................................63.1 Creating New Programs.............................................................................................6
Instrument Key Use ............................................................................................6Creating Standard Programs...............................................................................7Creating Auto Increment/Decrement Programs.................................................9Using the MENU key for Quick Exits .............................................................14Creating Linked Programs................................................................................14
3.2 Reviewing Existing Programs..................................................................................163.3 Editing Existing Programs .......................................................................................173.4 Running Gene Cycler Programs ..............................................................................22
Section 4 Specifications ..............................................................................................244.1 Unit Specifications ...................................................................................................244.2 Operational Specifications .......................................................................................244.3 Electrical Specifications...........................................................................................244.4 Software Specifications............................................................................................24
Section 5 Troubleshooting..........................................................................................255.1 Troubleshooting Guide ............................................................................................25
Section 6 Care And Maintenance .............................................................................266.1 General .....................................................................................................................266.2 Replacing a Fuse ......................................................................................................266.3 Instrument Service....................................................................................................26
Section 7 Product Information..................................................................................277.1 Gene Cycler Products...............................................................................................277.2 Xcluda Tip Selection Guide.....................................................................................27

iii

Safety Information
Cautions/Warnings The aluminum sample block of the Gene Cycler thermal cycler can reach temperatures of
100 ˚C and the heated sample block cover in the sample block lid maintains a temperature of105 ˚C during thermal cycler operation. The sample block lid should remain closed at alltimes during instrument use to prevent accidental skin burns. Always allow the sample blocktemperature to return to room temperature before opening the sample block lid and removingthe samples from the sample block.
Always connect the power supply to a 3-prong, grounded AC outlet, using the 3-prong ACpower cord provided with the Gene Cycler thermal cycler. Do not use an adaptor to a two-ter-minal output. If an extension cord is used, use only an extension cord rated for 10 amps.
Never remove the instrument outer casing. There are no user-serviceable parts for thisinstrument. Call your local Bio-Rad office for instrument service.
To insure adequate cooling of the Gene Cycler thermal cycler, be sure that there is atleast 15 cm clearance around the thermal cycler. Do not block the fan vents at the top or bot-tom of the unit.
Do not operate the Gene Cycler thermal cycler in extreme humidity (> 80%) or where con-densation can short the internal electrical circuits of the thermal cycler.
Notice
This Bio-Rad instrument is designed and certified to meet I.E.C. 1010-1* safety stan-dards. I.E.C. 1010-1 certified products are safe to use when operated in accordance with theinstruction manual. This instrument should not be modified in any way. Alteration of thisinstrument will:
• Void the manufacturer’s warranty
• Void the I.E.C. 1010-1 safety certification
• Create a potential safety hazard
Bio-Rad is not responsible for any injury or damage caused by the use of this instrumentfor purposes other than those for which it is intended, or by modifications of the instrumentnot performed by Bio-Rad or an authorized agent.
Definition of Symbols
Caution : Risk of electrical shock Caution: Refer to accompanying documents
1
*I.E.C. 1010 is an internationally accepted electrical safety standard for laboratory instruments.

Section 1 Introduction
1.1 Operating FeaturesThe Gene Cycler thermal cycler is a microprocessor-controlled, aluminum thermal block instru-
ment which performs rapid and reproducible heating and cooling (temperature cycling) of biochemicaltest samples. Multiple temperature cycles are generated through the user-programmable computer soft-ware and membrane keypad. The aluminum thermal block is rapidly, precisely, and uniformly heat-ed using reliable, long-lasting resistors and cooled via fan-blown air. See Section 4, Specifications,for detailed information concerning thermal block temperature uniformity and accuracy, and heatingand cooling rates. Rigorous testing of thermal block temperature precision, uniformity, consistency,and heating/cooling rates was conducted to insure reliable and reproducible experimental results.
The Gene Cycler thermal cycler was developed for oil-free operation. Oil is not neededin the thermal block wells or in the sample tubes. The sample wells are shaped to provideuniform contact with most standard 200 µl thin wall micro test tubes. The heated sampleblock cover maintains a higher temperature than the sample block at all times during a thermal cycling program. This higher temperature keeps water vapor from condensing on thetop of the sample tube, thereby reducing the amount of sample evaporation and eliminatingthe need for oil overlays in the sample tubes. For the most uniform heat transfer from thethermal block to the sample tube, Bio-Rad’s 200 µl thin wall micro test tube (catalog number223-9473) is recommended.
The Gene Cycler thermal cycler does not require a sample temperature probe to monitor theinternal temperature of the sample in order to determine when the steps of a cycle begin. The temperature displayed on the screen during a program run is the sample temperature. Compensation for temperature differences between the block and samples with volumes from10–150 µl has been determined empirically and embedded in the Gene Cycler control software.The Gene Cycler thermal cycler begins counting the time of any step in a cycle when thesample temperature reaches ± 1.2 ˚C from the set step temperature. To insure the most accu-rate sample temperatures, you must specify the sample volume before a thermal cycling pro-gram run is initiated.
The user-programmable software offers simple step-by-step instructions to guide the userthrough temperature cycling program set-up. A total of 100 temperature cycling programs,with a maximum of 5 temperature steps per program, can be created and stored. Each programis capable of 300 cycle repeats. In addition, the programming power and flexibility areincreased with the capability to create 50 Link Programs. Each Link Program can contain amaximum of 10 previously stored programs. Each program in a Link Program will automat-ically be run in succession. All programs are easily created and entered using the 8 mem-brane keypad. All programming instructions and program run conditions are displayed onthe 40 character LCD display window.
A unique programming feature of the Gene Cycler thermal cycler is the Auto Incre-ment/Decrement capability. This feature allows an incremental increase or decrease of tem-perature and/or time for any step of a particular cycle. This incremental increase or decreasein temperature over each iteration (cycle repeat) of a particular cycle is calculated by the GeneCycler thermal cycler after the user enters the start and finish temperatures. For example, thisfeature may be useful for extending the activity of an enzyme or for optimizing the primer/tem-plate annealing conditions over the length of a cycle sequencing program.
2

1.2 Operating PrecautionsTwo configurations of the Gene Cycler thermal cycler are available, one for 100–120
volt power requirements and the other for 200–240 volt operation. To verify that the unit youreceived is of the correct line voltage, check the fuse and serial number labels on the back ofthe Gene Cycler thermal cycler.
Always operate the Gene Cycler thermal cycler with the thermal block lid closed. The GeneCycler thermal cycler performs optimally when the lid is closed. Thermal block temperatureuniformity, precision, and heating/cooling rate specifications were developed with the lid closed.Operating the instrument with the lid open may lead to sub-optimal experimental results.
Avoid spilling liquids onto the stainless steel wire mesh surrounding the thermal block.If any liquids should drip or run down through the stainless steel wire mesh into the appara-tus, wait for the liquid to evaporate and dry before operating the Gene Cycler thermal cycler.
Do not cover the air vents in the top or bottom of the instrument. Thermal block temper-ature uniformity, precision, and heating/cooling rate specifications were developed based onunblocked air vents. Blocked air vents may result in slower thermal block cooling rates, or non-uniform block temperatures.
The thermal block temperature uniformity, precision, and heating/cooling rate specifica-tions were developed based on a room temperature between 15–30 ˚C and humidity between20–80%. Operating the thermal cycler outside of these temperature and humidity parametersmay provide less than optimal results.
All programs are conserved in the memory during a power failure. However, if a programis running during a power failure, when the power returns the program will not automaticallycontinue. All thermal cycling run information is lost. You must restart the program when powerhas returned.
1.3 Safety
This instrument is intended for laboratory use only.
This product conforms to the “Class A” standards for electromagnetic emissions intended for laboratory equipment applications. It is possible that emissions from this product may interfer with some sensitive appliances when placed nearby or in the same circuit as those appliances. The user should be aware of this potential and take appropriate mea-sures to avoid interference.
3

Section 2 Gene Cycler Overview
2.1 Installation
Unpacking
Upon product arrival, inspect for any damage to the Gene Cycler thermal cycler and asso-ciated parts during shipping. Contact your local Bio-Rad office if any damage has occurred.Severe damage to the container may indicate damage to the Gene Cycler thermal cycler. If yoususpect damage to the unit, immediately file a claim with the carrier in accordance with itsinstructions before contacting Bio-Rad Laboratories.
Each Gene Cycler shipment includes:
• Gene Cycler thermal cycler• Power cord• Instruction manual• Spare fuses, 2• 200 µl thin wall micro test tubes, 100
Instrument Location
Place the unit in a location free of direct sunlight, and of extreme temperature variation,that maintains an ambient temperature between 15–30 ˚C and relative humidity between20–80%. Free air flow to the unit is required. Allow 15 cm of unobstructed space surroundingall sides of the instrument. Place the unit on a flat and level surface capable of indefinitely supporting 5 kg.
Power Requirements and Set-up
The Gene Cycler thermal cycler’s maximum power consumption is 550 watts. The unitoperates at either 100–120, or 200–240 volts, 50/60 Hz and a maximum current of 7 amp for100–120 V operation, and 3.5 amp for 200–240 V operation. A three-prong cord, with inlet andoutlet plugs, is provided.
1. Insert the three-prong inlet plug into the power inlet receptacle on the back of the GeneCycler thermal cycler.
2. The three-prong outlet plug on the cord should be inserted into a three-terminal power out-let. (For instrument protection and user safety, never bypass the three-terminal with atwo-prong adaptor.) The third-prong is used to ground the instrument to earth.
3. Power is supplied to the instrument when the red toggle power switch is flipped to the on position.
2.2 Instruction Manual ConventionsThe following conventions for referring to Gene Cycler thermal cycler software are used
in this manual.
• A screen display will follow all instructions for programming.
• References to screen displays in the text will appear in BOLD . Actual display screenmessages will appear in “BOLD ” with quotations.
• References to instrument function keys (other than arrow keys) will appear in upper case letters.
• The cursor position will be indicated by a box (❚❚) around the character. The instrument display indicates cursor position by flashing and underlining the chosen character.
4

2.3 Control Features
Power Switch
Turn on the red power switch on the rear panel on the Gene Cycler thermal cycler. Thescreen below will display for approximately 1 second, followed by the main menu.
Control Panel
The Gene Cycler control panel consists of a 40-character instrument display, four arrowkeys for positioning the cursor, scrolling through menus, or designating number values for ther-mocycler program parameters, and four function keys; PAUSE, STOP, MENU, and ENTER(see Figure 2.1). The function keys are used as described below.
• Pressing PAUSE will cause a running program to pause and hold the block at the cur-rent set temperature. If the key is pressed while the block is heating or cooling toward aprogrammed set temperature, the set temperature will be reached, and then the program(and set temperature) will hold. Pressing PAUSE again will cause the program to resume.PAUSE functions only during a program run.
• Pressing STOP will cause the program to abort. The cooling fan will return the block toambient room temperature. STOP functions only during a program run.
• Pressing MENU will return the display to the main menu. This key does not functionduring a program run. For a detailed explanation of the use of MENU, see Section 3.1.
• Pressing ENTER will enable a display screen to accept modifications, accept user entriesduring the creation or editing of programs, or advance to the next screen. ENTER does notfunction during a program run.
Fig. 2.1. Gene Cycler control panel.
Gene Cycler™
Version 1.5
5
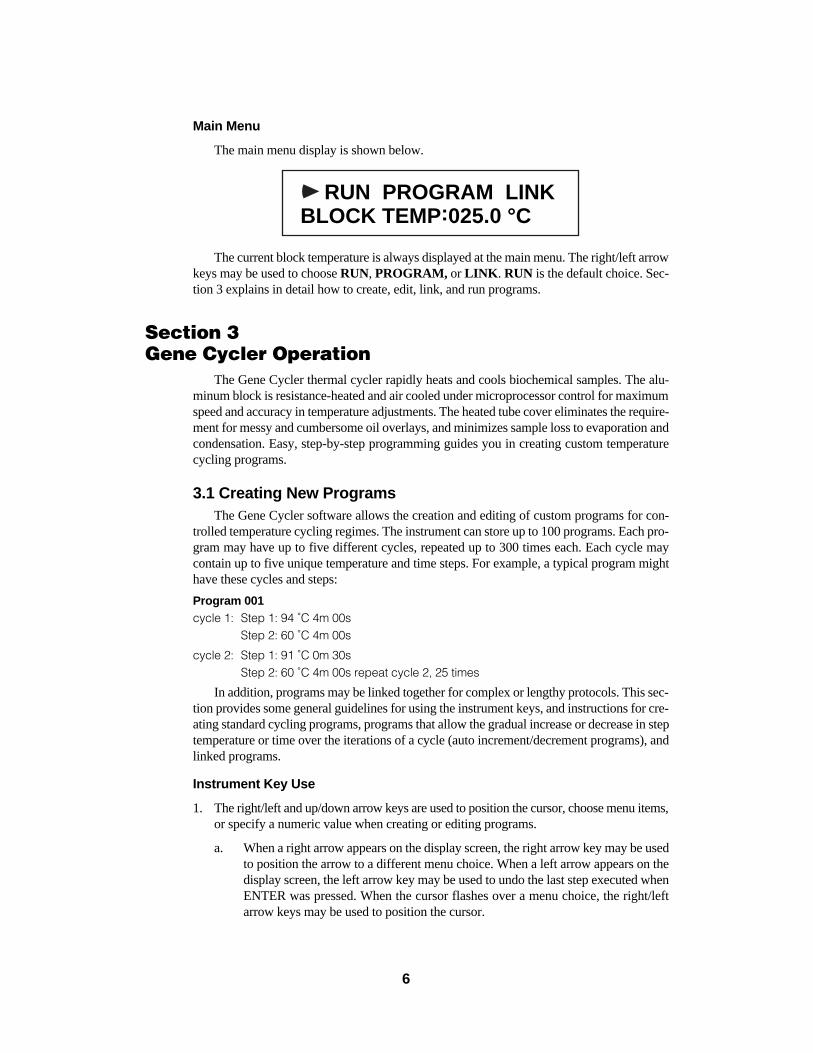
Main Menu
The main menu display is shown below.
The current block temperature is always displayed at the main menu. The right/left arrowkeys may be used to choose RUN, PROGRAM, or LINK . RUN is the default choice. Sec-tion 3 explains in detail how to create, edit, link, and run programs.
Section 3 Gene Cycler Operation
The Gene Cycler thermal cycler rapidly heats and cools biochemical samples. The alu-minum block is resistance-heated and air cooled under microprocessor control for maximumspeed and accuracy in temperature adjustments. The heated tube cover eliminates the require-ment for messy and cumbersome oil overlays, and minimizes sample loss to evaporation andcondensation. Easy, step-by-step programming guides you in creating custom temperaturecycling programs.
3.1 Creating New ProgramsThe Gene Cycler software allows the creation and editing of custom programs for con-
trolled temperature cycling regimes. The instrument can store up to 100 programs. Each pro-gram may have up to five different cycles, repeated up to 300 times each. Each cycle maycontain up to five unique temperature and time steps. For example, a typical program mighthave these cycles and steps:
Program 001cycle 1: Step 1: 94 ˚C 4m 00s
Step 2: 60 ˚C 4m 00s
cycle 2: Step 1: 91 ˚C 0m 30sStep 2: 60 ˚C 4m 00s repeat cycle 2, 25 times
In addition, programs may be linked together for complex or lengthy protocols. This sec-tion provides some general guidelines for using the instrument keys, and instructions for cre-ating standard cycling programs, programs that allow the gradual increase or decrease in steptemperature or time over the iterations of a cycle (auto increment/decrement programs), andlinked programs.
Instrument Key Use
1. The right/left and up/down arrow keys are used to position the cursor, choose menu items,or specify a numeric value when creating or editing programs.
a. When a right arrow appears on the display screen, the right arrow key may be usedto position the arrow to a different menu choice. When a left arrow appears on thedisplay screen, the left arrow key may be used to undo the last step executed whenENTER was pressed. When the cursor flashes over a menu choice, the right/leftarrow keys may be used to position the cursor.
RUN PROGRAM LINK BLOCK TEMP:025.0 °C
6
b. When the up/down arrows appear on the display screen, the corresponding arrowkeys may be used to scroll between screens. When the cursor flashes over a numer-ical value, the up/down arrow keys may be used to specify a particular value; the upkey increases the number and the down key decreases the number.
3. ENTER is used to accept menu choices, to advance to the next screen, and to accept num-ber entries such as step temperature or time. ENTER may also be used to move a flash-ing cursor to the right (in the same fashion as the right arrow key).
4. When ENTER is pressed at the “PREVIOUS SCREEN” display, the screen returns tothe previous level. For example, if ENTER is pressed at the “PREVIOUS SCREEN” dis-play under the step entry menus, the screen will return to the cycle entry level.
5. MENU returns the display to the main menu. It also may be used as a “quick exit” key dur-ing the creation or editing of programs. See Section 3.1 for detailed instructions on the useof MENU to exit programming.
Creating Standard Programs
To create a new program, follow the instructions below:
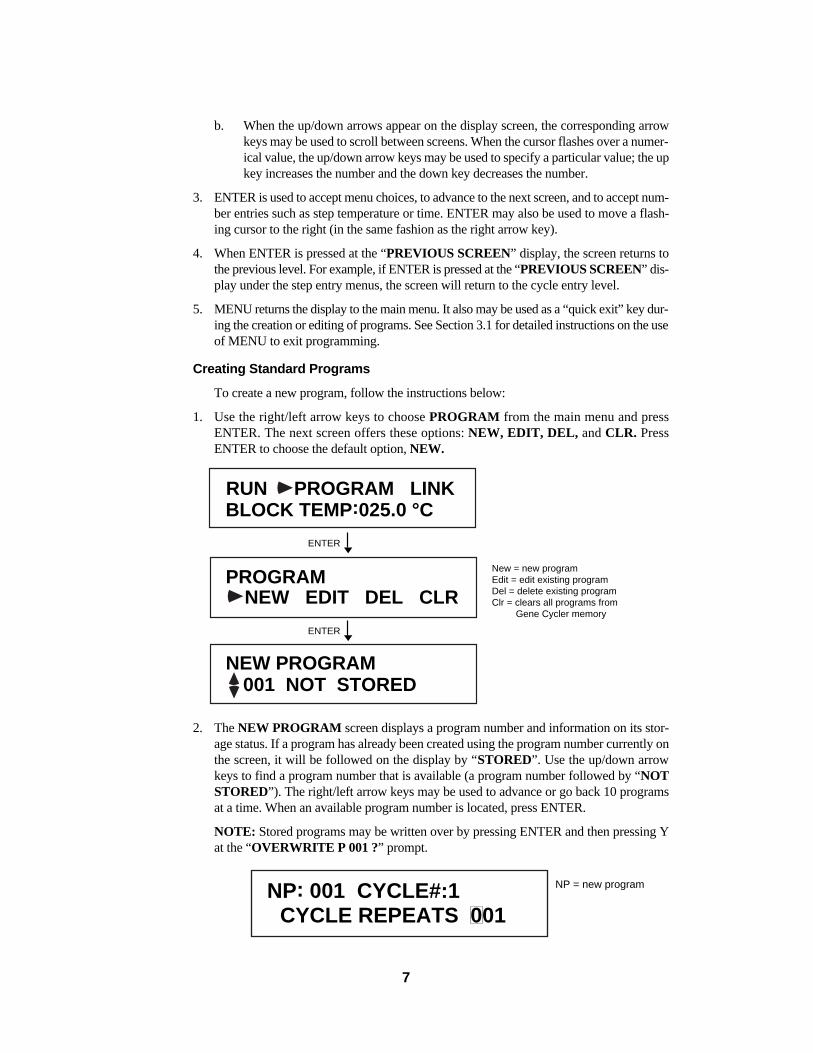
1. Use the right/left arrow keys to choose PROGRAM from the main menu and pressENTER. The next screen offers these options: NEW, EDIT, DEL, and CLR. PressENTER to choose the default option, NEW.
2. The NEW PROGRAM screen displays a program number and information on its stor-age status. If a program has already been created using the program number currently onthe screen, it will be followed on the display by “STORED”. Use the up/down arrowkeys to find a program number that is available (a program number followed by “NOTSTORED”). The right/left arrow keys may be used to advance or go back 10 programsat a time. When an available program number is located, press ENTER.
NOTE: Stored programs may be written over by pressing ENTER and then pressing Yat the “OVERWRITE P 001 ?” prompt.
NP = new programNP: 001 CYCLE#:1CYCLE REPEATS 001
New = new programEdit = edit existing programDel = delete existing programClr = clears all programs from Gene Cycler memory
ENTER
ENTER
RUN PROGRAM LINK BLOCK TEMP:025.0 °C
PROGRAM NEW EDIT DEL CLR
NEW PROGRAM001 NOT STORED
7

3. Press ENTER to begin entering the number of cycle repeats for cycle 1. Use the right/leftarrow keys to position the cursor. Use the up/down arrow keys to enter the correct num-ber value.
4. After entering the cycle repeats, move the cursor to the rightmost number and pressENTER to advance to the first step temperature and step time screen.
The up/down arrow keys may be used to scroll between Steps 1-5 , and to move to the "PREVI-OUS SCREEN" or "AUTO INC/DEC" screen before ENTER is pressed and the step temperature andtime are entered. The AUTO increment/decrement feature is described in detail in Creating AutoIncrement/Decrement Programs.
5. Press ENTER to begin entering temperature and time values for step 1 in cycle 1. The cur-sor will move to the E (for enter or edit). Press ENTER again to move to the leftmostdigit of the step temperature. Use the right arrow key to position the cursor and enter thedesired temperature by using the up/down arrow keys. When finished specifying the tem-perature, move the cursor to the rightmost temperature position and press ENTER. Thecursor will now flash on the step time entry portion of the screen. Use the arrow keys asdescribed above to enter the desired step time. Use the right arrow key to move the cur-sor to the rightmost time position.
6. Press ENTER to proceed to step 2 in cycle 1. Up to five steps can be created. Follow step5 to specify temperatures and times for the desired number of steps. If all the requiredsteps have been created, use the up arrow key to scroll past Step 5 (S:5) to the AUTOINC/DEC screen.
NP:001 C: 1 CR: 20 S:2EID 000.0 °C 00m00s
NP:001AUTO INC/DEC Y/N
NP:001 C: 1 CR: 20 S:1EID 094.0 °C 00m30s
C = cycleCR = cycle repeatsS = stepE = enter or editI = insert (used primarily under Edit menu)D = delete (used primarily under Edit menu)
NP:001 C: 1 CR: 020 S:1EID 000.0 °C 00m00s
NP: 001 CYCLE#:1CYCLE REPEATS 020
8
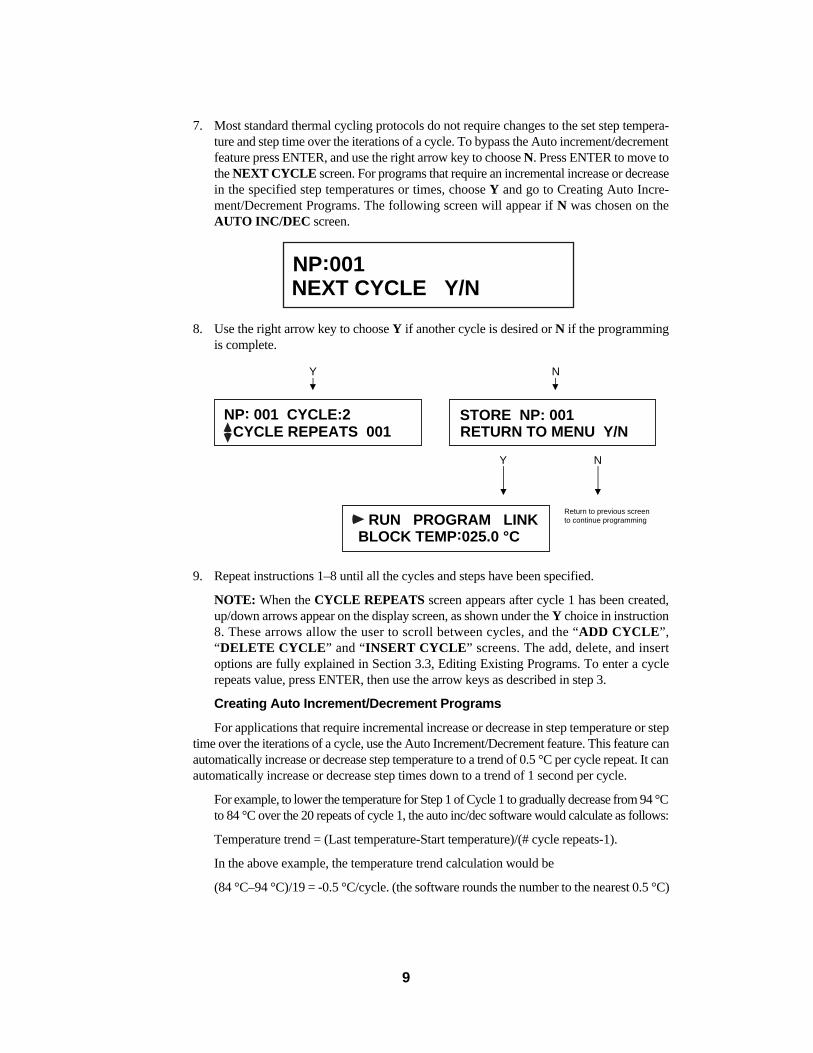
7. Most standard thermal cycling protocols do not require changes to the set step tempera-ture and step time over the iterations of a cycle. To bypass the Auto increment/decrementfeature press ENTER, and use the right arrow key to choose N. Press ENTER to move tothe NEXT CYCLE screen. For programs that require an incremental increase or decreasein the specified step temperatures or times, choose Y and go to Creating Auto Incre-ment/Decrement Programs. The following screen will appear if N was chosen on theAUTO INC/DEC screen.
8. Use the right arrow key to choose Y if another cycle is desired or N if the programmingis complete.
9. Repeat instructions 1–8 until all the cycles and steps have been specified.
NOTE: When the CYCLE REPEATS screen appears after cycle 1 has been created,up/down arrows appear on the display screen, as shown under the Y choice in instruction8. These arrows allow the user to scroll between cycles, and the “ADD CYCLE ”,“DELETE CYCLE ” and “INSERT CYCLE ” screens. The add, delete, and insertoptions are fully explained in Section 3.3, Editing Existing Programs. To enter a cyclerepeats value, press ENTER, then use the arrow keys as described in step 3.
Creating Auto Increment/Decrement Programs
For applications that require incremental increase or decrease in step temperature or steptime over the iterations of a cycle, use the Auto Increment/Decrement feature. This feature canautomatically increase or decrease step temperature to a trend of 0.5 °C per cycle repeat. It canautomatically increase or decrease step times down to a trend of 1 second per cycle.
For example, to lower the temperature for Step 1 of Cycle 1 to gradually decrease from 94 °Cto 84 °C over the 20 repeats of cycle 1, the auto inc/dec software would calculate as follows:
Temperature trend = (Last temperature-Start temperature)/(# cycle repeats-1).
In the above example, the temperature trend calculation would be
(84 °C–94 °C)/19 = -0.5 °C/cycle. (the software rounds the number to the nearest 0.5 °C)
Y N
NY
Return to previous screento continue programming
NP: 001 CYCLE:2CYCLE REPEATS 001
STORE NP: 001RETURN TO MENU Y/N
RUN PROGRAM LINK BLOCK TEMP:025.0 °C
NP:001NEXT CYCLE Y/N
9
To create an Auto increment/decrement program, follow these instructions.
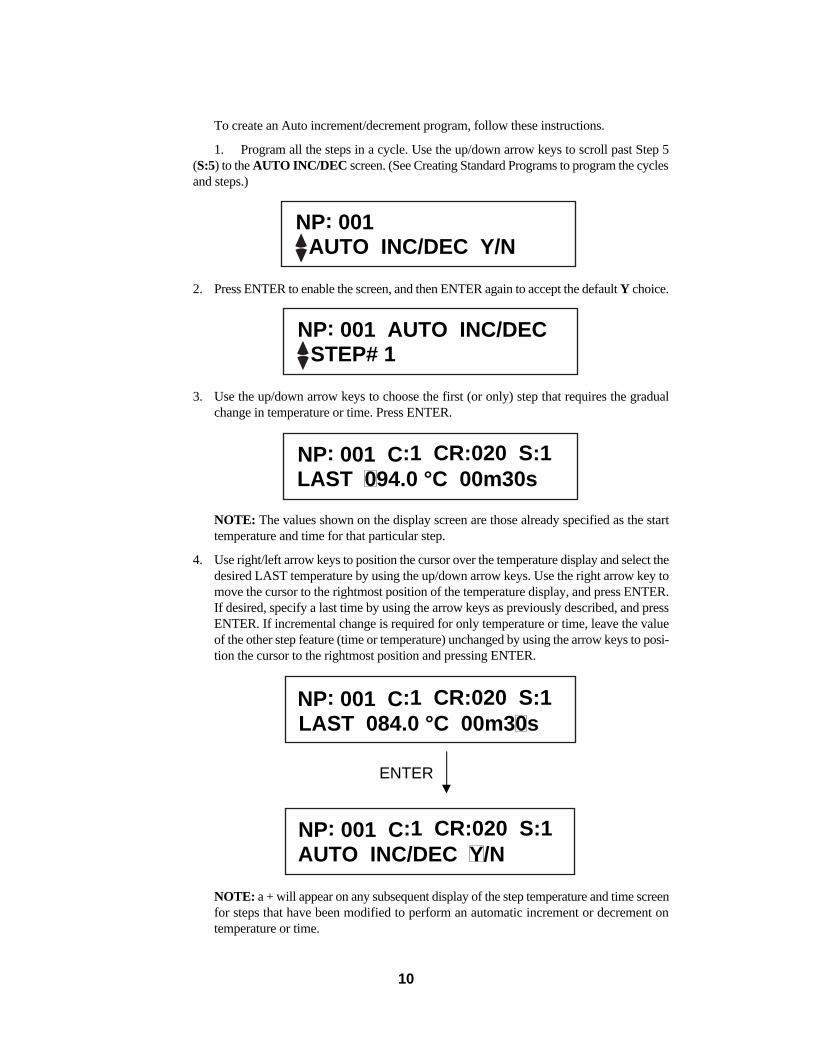
1. Program all the steps in a cycle. Use the up/down arrow keys to scroll past Step 5(S:5) to the AUTO INC/DEC screen. (See Creating Standard Programs to program the cyclesand steps.)
2. Press ENTER to enable the screen, and then ENTER again to accept the default Y choice.
3. Use the up/down arrow keys to choose the first (or only) step that requires the gradualchange in temperature or time. Press ENTER.
NOTE: The values shown on the display screen are those already specified as the starttemperature and time for that particular step.
4. Use right/left arrow keys to position the cursor over the temperature display and select thedesired LAST temperature by using the up/down arrow keys. Use the right arrow key tomove the cursor to the rightmost position of the temperature display, and press ENTER.If desired, specify a last time by using the arrow keys as previously described, and pressENTER. If incremental change is required for only temperature or time, leave the valueof the other step feature (time or temperature) unchanged by using the arrow keys to posi-tion the cursor to the rightmost position and pressing ENTER.
NOTE: a + will appear on any subsequent display of the step temperature and time screenfor steps that have been modified to perform an automatic increment or decrement ontemperature or time.
ENTER
NP: 001 C:1 CR:020 S:1LAST 084.0 °C 00m30s
NP: 001 C:1 CR:020 S:1AUTO INC/DEC Y/N
NP: 001 C:1 CR:020 S:1LAST 094.0 °C 00m30s
NP: 001 AUTO INC/DECSTEP# 1
NP: 001AUTO INC/DEC Y/N
10

5. If the Auto inc/dec feature is required for additional steps in a cycle, use the arrow key tochoose Y and press ENTER. Repeat instructions 3–4 to choose the step number and tospecify the last temperature or time. If the Auto inc/dec feature is not required for othersteps, use the arrow keys to choose N and press ENTER.
NOTE: If the LAST temperature or time specified at the auto inc/dec step results in atrend error (that is an increase or decrease in less than 0.5 °C per cycle, or less than 1 secondper cycle), an error screen will appear prompting the user to correct the value causing theerror. If only one cycle repeat is specified, an error screen will prompt the user to exit theAUTO INC/DEC program and return to the CYCLE REPEATS screen. These screen dis-plays are illustrated in the examples below.
Example 1
In this example, the user specified a “LAST” temperature one degree less than the start temperature of 94 °C.Since 20 cycle repeats were defined, this caused a temperature decrease trend of less than the minimum0.5 °C per cycle. The trend error screen appeared, and the user was returned to the previous screen, with theoriginal start temperature displayed, and the cursor flashing on the temperature. A new last temperature shouldbe entered.
ENTER
NP: 001 C:1 CR:020 S:1LAST 093.0 °C 00m30s
NP: 001 TREND <0.5 °CLAST 093.0 °C 00m30s
ENTER
NP: 001 C:1 CR:020 S:1LAST 094.0 °C 00m30s
NY
NP: 001AUTO INC/DEC Y/N
NP: 001 AUTO INC/DECSTEP# 1
NP:001NEXT CYCLE Y/N
11

Example 2
In this example, the user specified a “LAST” time one second longer than the start time of 30 seconds. Since20 cycle repeats were defined, this caused a cycle time increase trend of less than the minimum secondper cycle. The trend error screen appeared, and the user was returned to the previous screen, with theoriginal start time displayed, and the cursor flashing on the time. A new last time should be entered.
ENTER
NP: 001 C:1 CR:020 S:1LAST 094.0 °C 00m31s
NP: 001 TREND < 1 secLAST 094.0 °C 00m31s
ENTER
NP: 001 C:1 CR:020 S:1LAST 094.0 °C 00m30s
12

Example 3
In this case, the user tried to create an AUTO INC/DEC step when only one cycle repeat was specified. The errorscreen indicating less than one CR (cycle repeat) appeared. After ENTER is pressed, the up arrow key may beused to scroll to the PREVIOUS SCREEN display. Pressing ENTER here will allow the user to return to theCYCLE REPEATS screen and increase the # of cycle repeats. Alternatively, the user can choose N at theAUTO INC/DEC screen and proceed to a new cycle, or scroll back to the previous cycle.
ENTER
NP: 001 C:1 CR:01 S:1LAST 094.0 °C 00m30s
ERROR < 2 CRPRESS ENTER
ENTER
NP: 001 AUTO INC/DEC Y/N
NP:001NEXT CYCLE Y/N
ENTER
ENTER
NP: 001 CYCLE #1 CYCLE REPEATS 001
NP: 001 CYCLE #1 CYCLE REPEATS 001
or choose N
and press ENTER
A new value for cycle repeatsmay be entered
Use up arrowto scroll to "Previous Screen"
NP: 001 PREVIOUS SCREEN
13

Using the MENU Key for Quick Exits
At any time after at least one step in one cycle has been defined, a program may be storedas follows:
1. If the Auto increment /decrement program is not required, press MENU after the last stepof the last cycle has been programmed. It is not necessary to scroll past Step 5 (S:5).Choosing Y at the “RETURN TO MENU ” screen prompt will store the program andreturn to the main menu.
2. If the Auto increment/decrement program is required, press MENU after the final Autoinc/dec entries are made. The same screen displays illustrated in the above instructionwill appear.
Creating Linked Programs
The LINK program feature allows the user to join two or more programs for automaticsequential runs. The link feature is particularly useful when complex programs consisting ofmore than five cycles per program are required. In addition, it may be used to link programsthat are occasionally used in combination, for example:
Program 008 cycle 1: Step 1: 80 °C 10m 00sProgram 001cycle 1: Step 1: 94 ˚C 4m 00s
Step 2: 60 ˚C 4m 00s
cycle 2: Step 1: 91 ˚C 0m 30sStep 2: 60 ˚C 4m 00s repeat cycle 2, 25 times
Up to 50 Link programs may be created. Each Link program may contain up to 10 Stan-dard or Auto Inc/Dec programs. To create linked programs, follow the instructions listedbelow.
1. Use the right arrow key to choose LINK from the main menu and press ENTER. Thenext screen offers these options: NEW, EDIT, and DEL . Press ENTER to choose thedefault option, NEW.
NY
Return to previous screento continue programming RUN PROGRAM LINK
BLOCK TEMP:025.0 °C
STORE P 0001RETURN TO MENU Y/N
14

2. The NEW LINK screen displays a program number and information on its storage sta-tus. If a link program has already been created using the link program number currentlyon the screen, it will be followed on the display by “STORED”. Use the up/down arrowkeys to find a program number that is available (a program number followed by “NOTSTORED”). The right/left arrow keys may be used to advance or go back 10 programsat a time. When an available program number is located, press ENTER.
NOTE: Stored programs may be written over by pressing ENTER and then pressing Yat the “OVERWRITE P 001 ?” prompt.
3. Press ENTER and use the right arrow key to position the cursor and the up/down arrowkeys to enter the number for the first program to be linked. Press ENTER twice and usethe arrow keys to position the cursor and to enter the number for the second program tobe linked. Repeat this step until all the programs to be linked are entered.
NOTE: Linked programs are run sequentially in the order (from left to right) in which theyare entered. If a program slot is left blank, e.g.001 015 000 085 001, the Gene Cycler ther-mal cycler will run the programs sequentially from left to right, ignoring the blank slot.
NEW LINK:001 [P1-5] 010 002 008 035 010
NEW LINK:001 [P6-10] 040 009 028 035 000
[P1-5] refers to the first of two link program screens with 5 possible program number entries per screen. [P6-10] refers to the second LINK screen.
NEW LINK:001 [P1-5] 000 000 000 000 000
New = new linked programEdit = edit existing programDel = delete existing program
ENTER
ENTER
RUN PROGRAM LINKBLOCK TEMP:025.0 °C
LINK NEW EDIT DEL
NEW LINK001 NOT STORED
15

In the this example, the Gene Cycler thermal cycler would run programs 1, 15, 85, and 1in sequence.
4. To exit and store the Link program, press MENU, then choose Y and press ENTER.
3.2 Reviewing Existing ProgramsExisting programs may be reviewed without making any changes. This section describes
how to do this. If program changes are desired, follow the instructions in Section 3.3, EditingExisting Programs.
1. Use the right arrow key to choose PROGRAM from the main menu and press ENTER.Next, use the right arrow key to choose EDIT and press ENTER.
2. Use the up/down arrow keys to scroll to the desired stored program number. The right/leftarrow keys may be used to advance or go back 10 programs at a time. The display screenwill show "NOT STORED" beside program numbers that have no stored programs.Attempts to edit programs that are "NOT STORED" is not permitted. When the programto be reviewed is displayed, press ENTER.
ENTER
ENTER
EDIT PROGRAM001 STORED
RUN PROGRAM LINKBLOCK TEMP:025.0 °C
PROGRAM NEW EDIT DEL CLR
NY
Return to previous screento continue programming RUN PROGRAM LINK
BLOCK TEMP:025.0 °C
STORE LINK:001RETURN TO MENU Y/N
16

3. Reviewing pre-existing Cycles and Steps
To review a particular cycle (or steps within a cycle), use the up/down arrow keys toscroll to the desired cycle number. To view the steps comprising a particular cycle, pressENTER at that cycle. Use the right arrow key to position the cursor to the rightmost posi-tion and press ENTER. The up/down arrow keys may be used to scroll through individ-ual steps for review. If changes are desired, follow the instructions in Section 3.3 forediting existing programs.
up/down arrow keys may be used to scroll between Steps 1-5 before ENTER ispressed.
4. To return to the main menu after reviewing the program, press MENU after the last stepof the last cycle has been programmed. It is not necessary to scroll past Step 5 (S:5).Choosing Y at the "RETURN TO MENU" screen prompt will store the program andreturn to the main menu.
3.3 Editing Existing ProgramsExisting programs may be modified under the Edit menus. All user-defined parameters
can be changed. See Section 3.3, Editing Auto Increment/Decrement Programs for specialconsiderations necessary when editing an Auto increment/decrement program.
Editing Standard Gene Cycler Programs
To edit an existing standard program, follow the instructions listed below. Instructions 1and 2 guide you to the CYCLE REPEATS screen for the desired program. This is the start-ing point from which all edits can be made. Instructions 3a–3e describe how to make editingchanges to an existing cycle, or to steps within that cycle. Instructions 4a–4c describe how toadd or insert new cycles, or delete existing cycles.
NY
Return to previous screento continue programming RUN PROGRAM LINK
BLOCK TEMP:025.0 °C
STORE LINK:001RETURN TO MENU Y/N
C = cycleCR = cycle repeatsS = stepE = editI = insert D = delete
ENTER
EP: 001 CYCLE#1CYCLE REPEATS 020
EP: 001 C:1 CR:020 S:1EID 094.0 °C 00m30s
17

1. Use the right arrow key to choose PROGRAM from the main menu and press ENTER.Next, use the right arrow key to choose EDIT and press ENTER.
2. Use the up/down arrow keys to scroll to the desired program number. The right/left arrowkeys may be used to advance or go back 10 programs at a time. The display screen willshow “NOT STORED” beside program numbers that have no stored programs. When theprogram to be edited is displayed, press ENTER.
3. Editing pre-existing cycles and steps
a. To edit a particular cycle (or steps within a cycle), use the up/down arrow keys to scroll to the desired cycle number. Press ENTER to edit the number of cycle repeats. Use the right arrow key to position the cursor and the up/down arrow keys to enter the correct number value. If no change in the number of cycle repeats is required, use the right arrow key to position the cursor over the rightmost number and pressENTER.
up/down arrow keys may be used to scroll between Steps 1-5 before ENTER ispressed.
b. To edit step temperatures or step times, use the up/down arrow keys to scroll to thestep number requiring the change and press ENTER. Follow instructions 4–9 inSection 3.1 (Creating Standard Programs) to make desired changes.
c. To insert a step into a cycle, follow instructions 1–3a above. Use the up/down arrowkey to choose the desired step number and press ENTER. Use the right arrow keyto position the cursor over the I on the display screen and press ENTER.
C = cycleCR = cycle repeatsS = stepE = editI = insert D = delete
ENTER
EP: 001 CYCLE#1CYCLE REPEATS 020
EP: 001 C:1 CR:020 S:1EID 094.0 °C 00m30s
ENTER
ENTER
EDIT PROGRAM001 STORED
RUN PROGRAM LINKBLOCK TEMP:025.0 °C
PROGRAM NEW EDIT DEL CLR
18

NOTE: The step that was on screen when the I command was given will follow theinserted step.
d. Press ENTER and the cursor will flash over the E (for edit). Press ENTER again and usethe arrow keys to position the cursor and enter a value for the new step temperature. Movethe cursor to the rightmost temperature position and press ENTER. Use the arrow keys asdescribed above to position the cursor and to specify the new step time and press ENTER.MENU may be pressed to store changes and return to the main menu. To continue edit-ing, the up/down arrow keys may be used to scroll to other steps or return to the CYCLEREPEATS screen (by pressing ENTER at the PREVIOUS SCREEN prompt). Thescreen displays below illustrate the inserted step (now S:1), followed by the step on screenwhen the I command was given (now S:2).
NOTE: The I (insert) function is disabled until step temperature and time are entered.
e. To delete a cycle step, follow instructions 1–3a above. Use the up/down arrow keysto choose the desired step number and press ENTER. Use the right arrow key toposition the cursor over the D on the display screen and press ENTER.The deletedstep will be replaced by the cycle step that followed it (i.e., if S:1 is deleted, S:2will become S:1). MENU may be pressed to store changes and return to the mainmenu. To continue editing, the up/down arrow keys may be used to scroll to othersteps or return to the CYCLE REPEATS screen (by pressing ENTER at the PRE-VIOUS SCREEN prompt).
Delete step
Previous step 2, now step 1
ENTER
EP: 001 C:1 CR:020 S:1EID 094.0 °C 01m30s
EP: 001 C:1 CR:020 S:1EID 072.0 °C 01m30s
New inserted step
Previous step 1, now step 2
EP: 001 C:1 CR:020 S:1EID 094.0 °C 00m30s
EP: 001 C:1 CR:020 S:1EID 072.0 °C 01m30s
ENTER
EP: 001 C:1 CR:020 S:1EID 000.0 °C 00m00s
EP: 001 C:1 CR:020 S:1EID 094.0 °C 00m30s
19

4. Deleting, Inserting, and Adding Cycles
a. To DELETE an existing cycle, follow instructions 1 and 2 in this section to get to theCYCLE REPEATS screen for the desired program. Use the up arrow key to scroll to theDELETE CYCLE screen. Press ENTER. The cursor will flash on the cycle # value, andthe left arrow UNDO command will appear on screen.
b. Use the up/down arrow key to scroll to the desired cycle # and press ENTER. Thecycle will be deleted. If the left arrow key is pressed instead of ENTER, the cursorwill stop flashing over the DELETE CYCLE # value, and the up/down arrow keysmay be used for scrolling between cycles, or the add, insert or delete cycles options.
c. To INSERT a cycle, follow instructions 1 and 2 in this section to get to the CYCLEREPEATS screen for the desired program. Use the up arrow key to scroll to theINSERT CYCLE screen. Press ENTER. The cursor will flash on the cycle # value,and the left arrow UNDO command will appear on screen.
d. Use the up/down arrow key to scroll to the desired cycle # and press ENTER. Anew cycle will be inserted before the cycle number on screen when ENTER waspressed. If the left arrow key is pressed instead of ENTER, the cursor will stopflashing over the INSERT CYCLE # value, and the up/down arrow keys may beused for scroll between cycles, or the add, insert or delete cycles options.
ENTER
EP: 001INSERT CYCLE #1
EP: 001 UNDOINSERT CYCLE #1
ENTER
EP: 001DELETE CYCLE #1
EP: 001 UNDODELETE CYCLE #1
20

e. To add a cycle, follow instructions 1 and 2 in this section to get to the CYCLEREPEATS screen for the desired program. Use the up arrow key to scroll to theADD CYCLE screen. Press ENTER. The new cycle will follow the existing cycles.
Editing Auto Increment/Decrement Programs
When editing Auto inc/dec programs, some special considerations should be made. Chang-ing the number of cycle repeats or the starting temperature or starting time, i.e. the values setfor the first iteration of the cycle repeats, will change the trend for incremental increase ordecrease in cycle temperature and/or time. (see Section 3.1, Creating Standard Programs, for“trend” definition). The Gene Cycler thermal cycler will automatically calculate the newtrend. If an error arises, such as only one cycle repeat is specified, or the trend is outside of thelimits, an error message will be given. Editing Auto inc/dec programs is done exactly asdescribed in 3.2, Reviewing Existing Programs, instructions 1–4. The special screens thatappear when editing Auto inc/dec programs are illustrated below.
NOTE: When editing AUTO INC/DEC programs, it is best to clear the Auto inc/decprogram at the “AUTO INC/DEC EXISTS, CLEARED Y/N ” screen prompt, and enternew parameters after cycle and step edits are made.
If the number of cycle repeats is changed for a cycle that has an Auto inc/dec step, the fol-lowing screens appear:
Y N
The AUTO INC/DEC program for the step or steps in that cycle are cleared, and the screen goes to the first step of that cycle for continued edits.
If new cycle repeats value does not cause a trend error, the AUTO INC/DEC program is retained, and the new trend is calculated. The screen goes to the first step in the cycle for continued edits
Y N
The AUTO INC/DEC program for the step (in the above example S:1), and the screen goes to the first step for continued edits.
The screen returns to CYCLE REPEATS and the value for the maximum number of cycle repeats for the given AUTO INC/DEC program is automatically entered
N (If the new cycle repeats value causes a trend error)
AUTO INC/DEC EXISTSCLEARED Y/N
AUTO P/TREND ERRORSTEP: 1 CLEARED Y/N
ENTER
EP: 001ADD CYCLE
EP: 001 CYCLE #3CYCLE REPEATS 001
21

3.4 Running Gene Cycler ProgramsTo run Gene Cycler programs, place 0.2 ml thin-walled tubes (Bio-Rad catalog number
223-9473) containing samples into the sample block. Close the Gene Cycler lid and follow thesteps below.
1. The main menu options are : RUN, PROGRAM, and LINK. Press ENTER to choose thedefault option, RUN. Next use the right arrow key to choose either PROGRAM or LINKand press ENTER. Choose PROGRAM to run stored standard or Auto inc/dec programs.Choose LINK to run a series of linked programs stored as a Link program.
2. Use the up/down arrow keys to scroll to the desired stored program and press ENTER. Theright/left arrow keys can be used to advance or go back 10 program numbers at a time.
SAMPLE VOLUME50µl
001 STORED
RUN PROGRAM LINKBLOCK TEMP:025.0 °C
RUN PROGRAM
RUN PROGRAM LINK
RUN PROGRAM LINK
001 STORED RUN LINK
22

3. Use the up/down arrow keys to specify the sample volume and press ENTER. The ther-mocycling program begins immediately. Use the up/down arrow keys to view the RUNscreens illustrated below:
Run Screen #1
This screen displays information on the program and cycle status
L/P = Link/Program, the number to the left of the “/” refers to the Link program number, ifany, the number to the right of the “/” refers to the standard program number.
C = cycle number
TC = the total number of cycles completed thus far in the program
CR = cycle repeats, in this example, cycle repeat #1 of 20 is running
The ■■ around RUN is shown to indicate that RUN is flashing on the display screen
Run Screen #2
This screen displays information about thecurrent and set temperature, and the elapsedand set time.
The current temperature, and the time elapsed in the step appear to the left of the “/”. Theset temperature and set time appear to the right of the “/”.
Run Screen #3
This screen displays information about thesteps completed and the specified samplevolume.
S = step, in this example, step 1 of 3 is running
4. The Gene Cycler thermal cycler automatically cools the sample block to ambient roomtemperature when the program is complete.
5. PAUSE may be pressed at any time during the thermocycling program run. The programwill pause until PAUSE is pressed again, at which time the program resumes. If PAUSEis pressed while the sample block is approaching a set temperature, the Gene Cycler pro-gram will continue until the set temperature is reached, and then pause.
6. STOP may be pressed at any time during a program. The program will immediately stop,and the block will cool to room temperature.
RUN L/P /001S:1/3 SAMPLE V:050
RUN 000.0 °C/000.0 °C00m00s/00m00s
RUN L/P /001 C:1TC:0001 CR:001/020
23
Section 4 Specifications
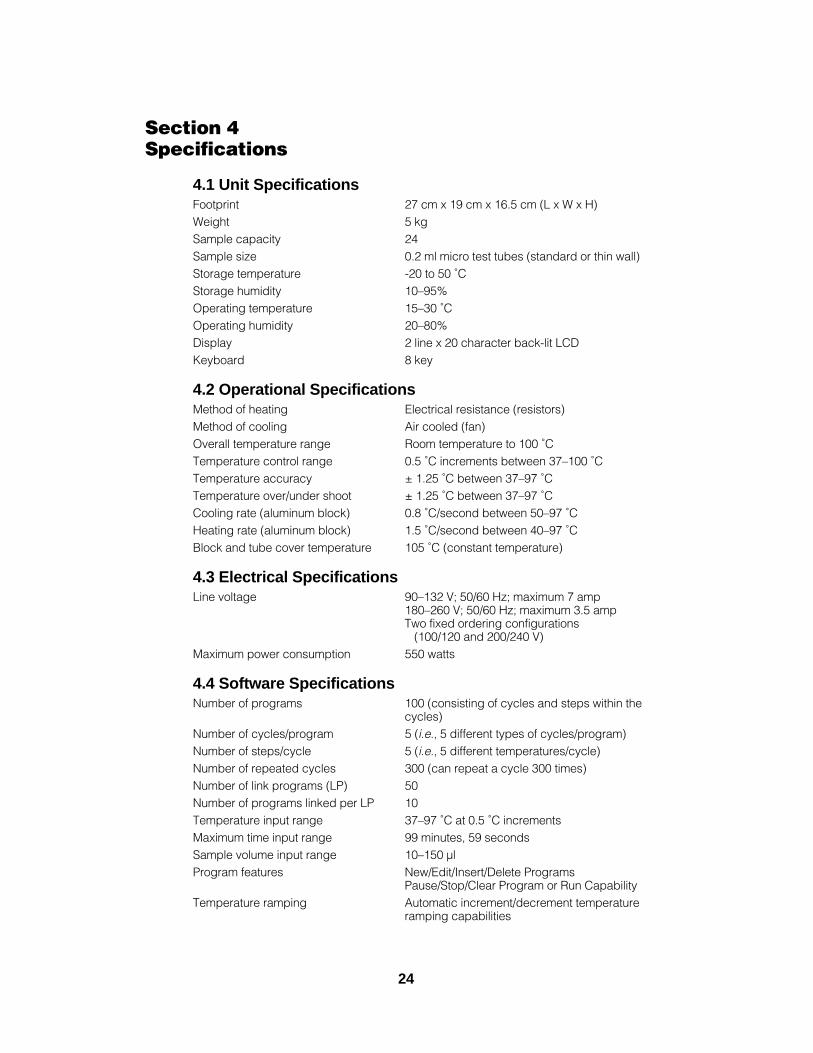
4.1 Unit SpecificationsFootprint 27 cm x 19 cm x 16.5 cm (L x W x H)Weight 5 kgSample capacity 24Sample size 0.2 ml micro test tubes (standard or thin wall)Storage temperature -20 to 50 ˚CStorage humidity 10–95% Operating temperature 15–30 ˚COperating humidity 20–80%Display 2 line x 20 character back-lit LCDKeyboard 8 key
4.2 Operational SpecificationsMethod of heating Electrical resistance (resistors)Method of cooling Air cooled (fan)Overall temperature range Room temperature to 100 ˚CTemperature control range 0.5 ˚C increments between 37–100 ˚CTemperature accuracy ± 1.25 ˚C between 37–97 ˚CTemperature over/under shoot ± 1.25 ˚C between 37–97 ˚CCooling rate (aluminum block) 0.8 ˚C/second between 50–97 ˚CHeating rate (aluminum block) 1.5 ˚C/second between 40–97 ˚CBlock and tube cover temperature 105 ˚C (constant temperature)
4.3 Electrical SpecificationsLine voltage 90–132 V; 50/60 Hz; maximum 7 amp
180–260 V; 50/60 Hz; maximum 3.5 ampTwo fixed ordering configurations
(100/120 and 200/240 V)Maximum power consumption 550 watts
4.4 Software SpecificationsNumber of programs 100 (consisting of cycles and steps within the
cycles)Number of cycles/program 5 (i.e., 5 different types of cycles/program)Number of steps/cycle 5 (i.e., 5 different temperatures/cycle)Number of repeated cycles 300 (can repeat a cycle 300 times)Number of link programs (LP) 50Number of programs linked per LP 10Temperature input range 37–97 ˚C at 0.5 ˚C incrementsMaximum time input range 99 minutes, 59 secondsSample volume input range 10–150 µl Program features New/Edit/Insert/Delete Programs
Pause/Stop/Clear Program or Run CapabilityTemperature ramping Automatic increment/decrement temperature
ramping capabilities
24

Section 5 Troubleshooting
5.1 Troubleshooting GuideProblem Possible Cause SolutionPower switch is on, but Power cord is not Plug in the power cord into no characters are shown correctly plugged in the GeneCycler thermal on the LCD display. (inlet or outlet) cycler and the power outlet.
Power failure After power returns restartyour program
Fuse is blown Replace fuse (see Replacing a Fuse at the end of this section)
The cooling of the Air vent(s) blocked Remove obstructionsamples is too slow or closed from air vent(s)
Machine turns off during a Power failure After power returnsprogrammed run restart your program
Fuse is blown Replace fuse (see Replacing a Fuse at the end of this section)
Power cord is unplugged Plug in the power cord intothe Gene Cycler thermalcycler and the power outlet
NOTE: All programs are conserved in the memory in theevent of a power failure. However, if a program is runningduring a power failure, when the power returns the programwill not automatically continue. All thermal cycling runinformation is lost. You must restart the program whenpower has returned.
SRAM error Battery failure with Turn off the Gene Cycler SRAM contents uncleared RAM thermal cycler and restartare not correct the instrument
If problems arise that are not described in the Troubleshooting Section, please contact yourlocal Bio-Rad Technical Services Department.
25

Section 6 Gene Cycler Thermal Cycler Care And Maintenance
6.1 General
The Gene Cycler thermal cycler should be cleaned monthly or as needed. To clean the
outer casing, always unplug the unit. Use a damp cloth soaked in water to wipe down the
outer case. Use only water to clean the outside surfaces of the Gene Cycler apparatus.
To clean the inside (sample thermal block), always unplug the instrument and allow thethermal block to return to room temperature before attempting to clean. Use only water to cleanthe inside surfaces of the Gene Cycler. Dampen a cloth to clean the sample block. A damp cot-ton swab can be used to clean the inside of the sample wells.
If the outer casing, sample block, or heated sample cover of the Gene Cycler thermalcycler become contaminated, use three different treatments of isopropanol, and water with acloth or cotton swab to remove the contamination.
Avoid spilling any liquids onto the apparatus. Important: If any liquids should drip or rundown through the stainless steel wire mesh and into the apparatus, wait for the liquid to evap-orate and dry before operating the Gene Cycler thermal cycler.
Keep the instrument from direct sunlight and free from extreme humidity (> 80% relativehumidity) during instrument use.
6.2 Replacing a Fuse1. Disconnect the power cord
2. Remove the fuse holder by inserting a flat head screwdriver or similar tool and turn the fuseholder counterclockwise until the fuse holder pops out or is loose enough to be removed.
3. Pull out the fuse from its fuse holder. Replace with the appropriate fuse:
100/120 V units: 5 A/250 V/5 mm x 15 mm/AR Fast Blo
200/240 V units: 3.15 A/250 V/5 mm x 15 mm/AR Fast Blo
4. Re-insert the fuse holder and turn the fuse holder clockwise until it is secure. The unit isready for use.
6.3 Instrument ServiceThere are no user serviceable parts for this instrument. Call your local Bio-Rad technical
service department if your Gene Cycler thermal cycler needs repair.
26

Section 7 Product Information
7.1 Gene Cycler Products
Catalog Number Product Description
Gene Cycler Thermal Cycler
170-6700 Gene Cycler Thermal Cycler, 100/120 V170-6701 Gene Cycler Thermal Cycler, 220/240 V
Gene Cycler Accessories
223-9473 Thin Wall Micro Test Tubes, 200 µl polypropylene, natural, 1,000/box2112001 Xcluda Aerosol Barrier Pipet Tips, Style A, 96/rack, 960/box2112006 Xcluda Aerosol Barrier Pipet Tips, Style B, 96/rack, 960/box2112011 Xcluda Aerosol Barrier Pipet Tips, Style C, 96/rack, 960/box2112016 Xcluda Aerosol Barrier Pipet Tips, Style D, 96/rack, 960/box2112021 Xcluda Aerosol Barrier Pipet Tips, Style E, 96/rack, 960/box2112026 Xcluda Aerosol Barrier Pipet Tips, Style F, 100/rack, 1,000/box2112031 Xcluda Aerosol Barrier Pipet Tips, Style G, 200/rack, 1,000/box2112036 Xcluda Aerosol Barrier Pipet Tips, Style H, 100/rack, 1,000/box2112041 Xcluda Aerosol Barrier Pipet Tips, Style J, 96/rack, 960/box
7.2 Xcluda Tip Selection GuideSelect Xcluda Style (A-J) based on pipet and µl range:
RecommendedPipet Type Range (µl) Xcluda Style
Benchmate 10–50 J40–200 C/D/G200–1,000 E
Eppendorf 0.5–10 F2–20 B10–100 C/G100–1,000 H
Finnpipette 5–40 B/C/G40–200 D/G200–1,000 E
Oxford 0.5–10 A/F
Pipetman: P-2/P-10 AP-20 BP-100 C/GP-200 DP-1000 E
Titertek 5–50 J50–300 D
Xcluda tips also fit pipets and volumes not listed above. Contact your local Bio-Rad repre-sentative for more information.
27

Life ScienceGroup
2000 Alfred Nobel DriveHercules, California 94547Telephone (510) 741-1000Fax: (510) 741-5800www.bio-rad.com
Australia, Bio-Rad Laboratories Pty. Ltd., Block Y, Unit 1, Regents Park Industrial Estate, 391 Park Road, Regents Park, NSW 2143Phone 02 9914 2800 • Fax 02 9914 2889Austria, Bio-Rad Laboratories Ges.m.b.H., Auhofstraße 78D, A-1130 Wien • Phone (01)-877 89 01 • Fax (01)-876 56 29Belgium, Bio-Rad Laboratories S.A.-N.V., Begoniastraat 5, B-9810 Nazareth • Phone 09-385 55 11 • Free Phone 0800/97032 • Fax 09-385 65 54Brazil, Bio-Rad Laboratories (Brazil), Rua dos Invalidos 212 - 5 andar, Lapa - Rio de Janeiro - RJ, CEP 20331-020 • Phone 55 21 507 6191Canada, Bio-Rad Laboratories (Canada) Ltd., 5671 McAdam Road, Mississauga, Ontario L4Z 1N9 • Phone (905) 712-2771 • Fax (905) 712-2990China, Bio-Rad China (Beijing), Rm 615, Shang Fang Plaza, No. 27, North Third Round Center Road, West District, Beijing 100029 Phone 86-10-8201-1366/68 • Fax 86-10-8201-1367Denmark, Bio-Rad Laboratories, Generatorvej 8 C, 2730 Herlev • Phone 45 44 52-1000 • Fax 45 44 52-1001 Finland, Bio-Rad Laboratories, Pihatörmä 1A, FIN-02240 Espoo • Phone 358 (0)9 804 2200 • Fax 358 (0)9 804 1110France, Bio-Rad Laboratories, 3, Boulevard Raymond Poincaré, 92430 Marnes-la-Coquette • Phone 01 47 95 69 65 • Fax 01 47 41 9133Germany, Bio-Rad Laboratories GmbH, Heidemannstraße 164, D-80939 München, Postfach 45 01 33, D-80901 MünchenPhone 089 318 84-177 • Fax 089 318 84-123Hong Kong, Bio-Rad Pacific Ltd., Unit 1111, 11/F, New Kowloon Plaza, 38 Tai Kok Tsui Road, Tai Kok Tsui, KowloonPhone 852-2789-3300 • Fax 852-2789-1257India, Bio-Rad Laboratories (India) Pvt. Ltd., B&B1, Enkay Towers Vanijyanikunj, Udhyog Vihar Phase V, Gurgaon, Haryana 122016 Phone (91-124)-6398112/113/114 • Fax (91-124)-6398115Israel, Bio-Rad Laboratories, Ltd., 14 Homa Street, P.O. Box 5044, Rishon Le Zion 75150 • Phone 03 951 4124 • Fax 03 951 4129Italy, Bio-Rad Laboratories S.r.l., Via M. Peroglio 23, 00144 Rome • Phone 34 91 590 5200 • Fax 34 91 590 5211Japan, Nippon Bio-Rad Laboratories KK, 7-18 Higashi-Nippori 5-chome, Arakawa-ku Tokyo 116-0014 • Phone 03-5811-6270 • Fax 03-5811-6272Korea, Bio-Rad Korea Ltd., Cambridge Building, 1461-15 Seocho-Dong Seocho-Ku, Seoul 137-070 • Phone 82-2-3473-4460 • Fax 82-2-3472-7003Latin America, Bio-Rad Latin America, 14100 Palmetto Frontage Road, Suite 101, Miami Lakes, Florida USA 33016 • Phone 305-894-5950 • Fax 305-894-5960 Mexico, Bio-Rad Laboratorios Mexico, Adolfo Prieto No. 1653, Col. De Valle, CP. 03100, Mexico D.F. • Phone 52 5 534 2552 to 54 • Fax 52 5 524 5971 The Netherlands, Bio-Rad Laboratories B.V., Fokkerstraat 10, 3905 KV Veenendaal • Phone 0318-540666 • Fax 0318-542216New Zealand, Bio-Rad Laboratories Pty Ltd., PO Box 300-571, Albany, Auckland • Phone 64-9-4152280 • Fax 64-9-443 3097Norway, Bio-Rad Laboratories, Johan Scharffenbergs vei 91, N-0694 Oslo • Phone 47-23-38-41-30 • Fax 47-23-38-41-39Russia, Bio-Rad Laboratorii, ul. Butirskaya 79 "B", office 156 RF-125015 Moscow • Phone 7 095 979 98 00 • Fax 7 095 979 98 56 Singapore, Bio-Rad Laboratories, Singapore, 211 Henderson Rd. #03-02, Henderson Industrial Park, 159552 • Phone 65-2729877 • Fax 65-2734835Spain, Bio-Rad Laboratories, S.A., Lopez de Hoyos, 245-247, 28043 Madrid • Phone 34-91-590-5200 • Fax 34-91-590-5211Sweden, Bio-Rad Laboratories AB, Vintergatan 1, Box 1097, S-172 22 Sundbyberg • Phone 46 (0)8-55 51 27 00 • Fax 46 (0)8-55 51 27 80Switzerland, Bio-Rad Laboratories AG, Nenzlingerweg 2, CH-4153 Reinach • Phone 061-717-9555 • Fax 061-717-9550United Kingdom, Bio-Rad Laboratories Ltd., Bio-Rad House, Maylands Avenue, Hemel Hempstead, Hertfordshire HP2 7TDPhone 0181 328 2000 • Free Phone 0800-181134 • Fax 01442-259118
00-000 0000 Sig 1200Bulletin 0000 US/EG Rev A
Bio-RadLaboratories
M1706700 Rev D