Embed Size (px)
Citation preview
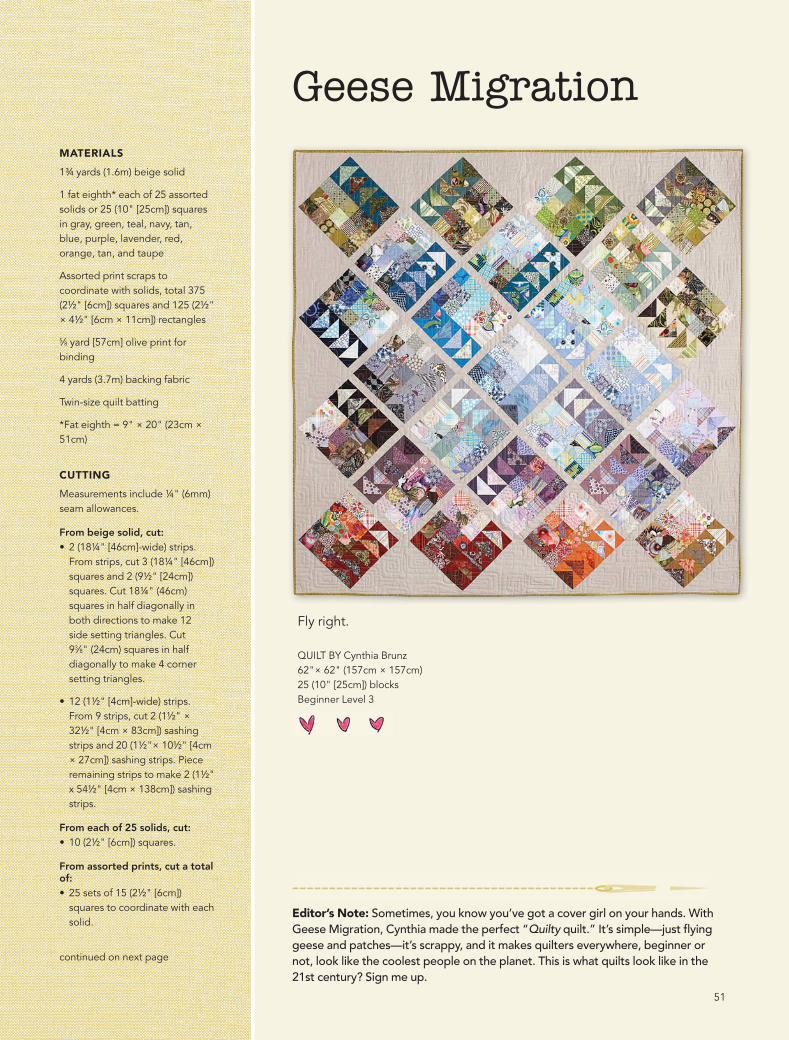
Editor’s Note: Sometimes, you know you’ve got a cover girl on your hands. With Geese Migration, Cynthia made the perfect “Quilty quilt.” It’s simple—just fl ying geese and patches—it’s scrappy, and it makes quilters everywhere, beginner or not, look like the coolest people on the planet. This is what quilts look like in the 21st century? Sign me up.
Geese MigrationMATERIALS
1¾ yards (1.6m) beige solid
1 fat eighth* each of 25 assorted solids or 25 (10" [25cm]) squares in gray, green, teal, navy, tan, blue, purple, lavender, red, orange, tan, and taupe
Assorted print scraps to coordinate with solids, total 375 (2½" [6cm]) squares and 125 (2½" × 4½" [6cm × 11cm]) rectangles
5⁄8 yard [57cm] olive print for binding
4 yards (3.7m) backing fabric
Twin-size quilt batting
*Fat eighth = 9" × 20" (23cm × 51cm)
CUTTING
Measurements include ¼" (6mm) seam allowances.
From beige solid, cut:• 2 (18¼" [46cm]-wide) strips.
From strips, cut 3 (18¼" [46cm]) squares and 2 (9½" [24cm]) squares. Cut 18¼" (46cm) squares in half diagonally in both directions to make 12 side setting triangles. Cut 93⁄8" (24cm) squares in half diagonally to make 4 corner setting triangles.
• 12 (1½" [4cm]-wide) strips. From 9 strips, cut 2 (1½" × 32½" [4cm × 83cm]) sashing strips and 20 (1½"× 10½" [4cm × 27cm]) sashing strips. Piece remaining strips to make 2 (1½" x 54½" [4cm × 138cm]) sashing strips.
From each of 25 solids, cut:• 10 (2½" [6cm]) squares.
From assorted prints, cut a total of:• 25 sets of 15 (2½" [6cm])
squares to coordinate with each solid.
Fly right.
QUILT BY Cynthia Brunz62"× 62" (157cm × 157cm)25 (10" [25cm]) blocksBeginner Level 3
continued on next page
51
050-055_T4985.indd 51 11/18/14 10:29 AM
Designer Profi leCynthia Brunz loves color and fabric. She favors making scrappy quilts and writes about quilting with scraps on her blog QuiltingIsMoreFunThan-Housework.blogspot.com.
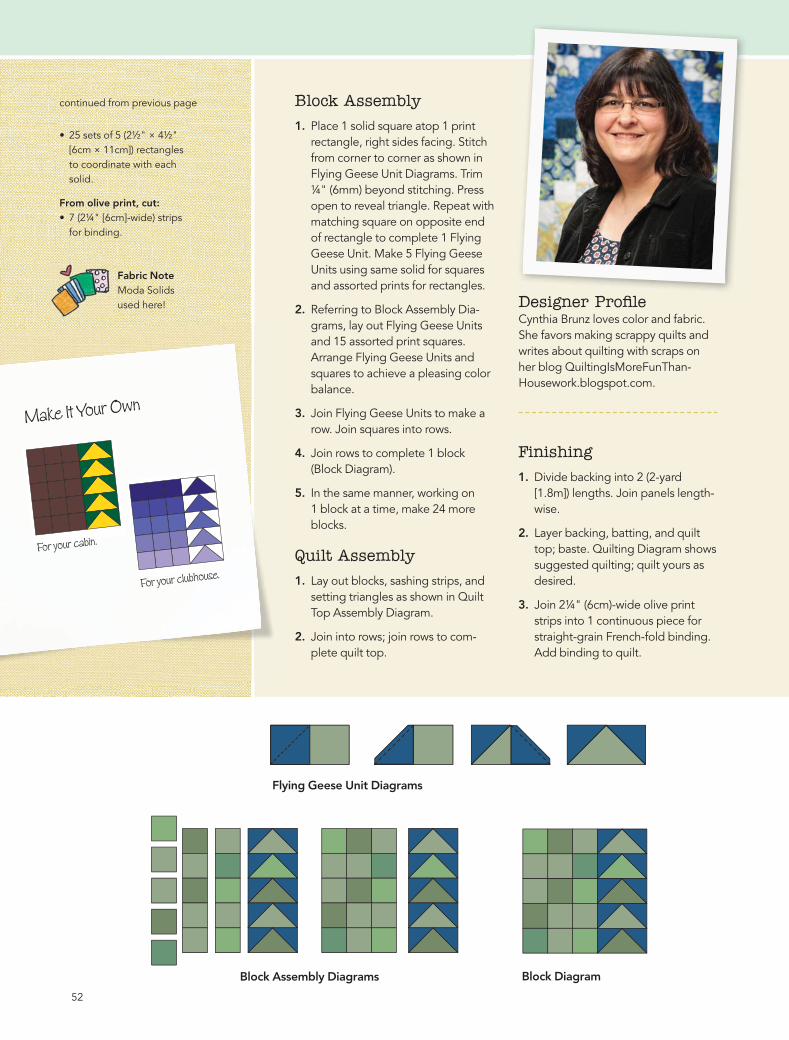
Flying Geese Unit Diagrams
Block Assembly Diagrams Block Diagram
Block Assembly
1. Place 1 solid square atop 1 print rectangle, right sides facing. Stitch from corner to corner as shown in Flying Geese Unit Diagrams. Trim ¼" (6mm) beyond stitching. Press open to reveal triangle. Repeat with matching square on opposite end of rectangle to complete 1 Flying Geese Unit. Make 5 Flying Geese Units using same solid for squares and assorted prints for rectangles.
2. Referring to Block Assembly Dia-grams, lay out Flying Geese Units and 15 assorted print squares. Arrange Flying Geese Units and squares to achieve a pleasing color balance.
3. Join Flying Geese Units to make a row. Join squares into rows.
4. Join rows to complete 1 block (Block Diagram).
5. In the same manner, working on 1 block at a time, make 24 more blocks.
Quilt Assembly
1. Lay out blocks, sashing strips, and setting triangles as shown in Quilt Top Assembly Diagram.
2. Join into rows; join rows to com-plete quilt top.
• 25 sets of 5 (2½" × 4½" [6cm × 11cm]) rectangles to coordinate with each solid.
From olive print, cut:• 7 (2¼" [6cm]-wide) strips
for binding.
Finishing
1. Divide backing into 2 (2-yard [1.8m]) lengths. Join panels length-wise.
2. Layer backing, batting, and quilt top; baste. Quilting Diagram shows suggested quilting; quilt yours as desired.
3. Join 2¼" (6cm)-wide olive print strips into 1 continuous piece for straight-grain French-fold binding. Add binding to quilt.
continued from previous page
Fabric NoteModa Solidsused here!
Make It Your Own
For your cabin.
For your clubhouse.
52
050-055_T4985.indd 52 11/18/14 10:29 AM

NoteRefer to quilt photo for fabric placement guidance.
Quilt Top Assembly Diagram
Quilting Diagram Doodle your own quilting design here.
This quilt uses lots of colors, no? Get tips on building your personal stash in this must-see episode: HeyQuilty.com/StashTips.
53
050-055_T4985.indd 53 11/18/14 10:29 AM
T I P T O P T I P
Flying Geese
The Fons & Porter Flying Geese Ruler is super handy for cutting triangles for Flying Geese units. Both the large quarter-square triangles and the smaller half-square triangles can be cut from the same width strips.
1. To cut the large quarter-square tri-angle, select black line on ruler that corresponds to the desired fi nished size of your Flying Geese Unit.
2. Follow across black line to right edge of ruler. Cut a fabric strip the width indicated. For example, to cut the large triangle for a 3" × 6" (8cm × 15cm) fi nished size Flying Geese Unit, cut a 3½" (9cm)-wide strip.
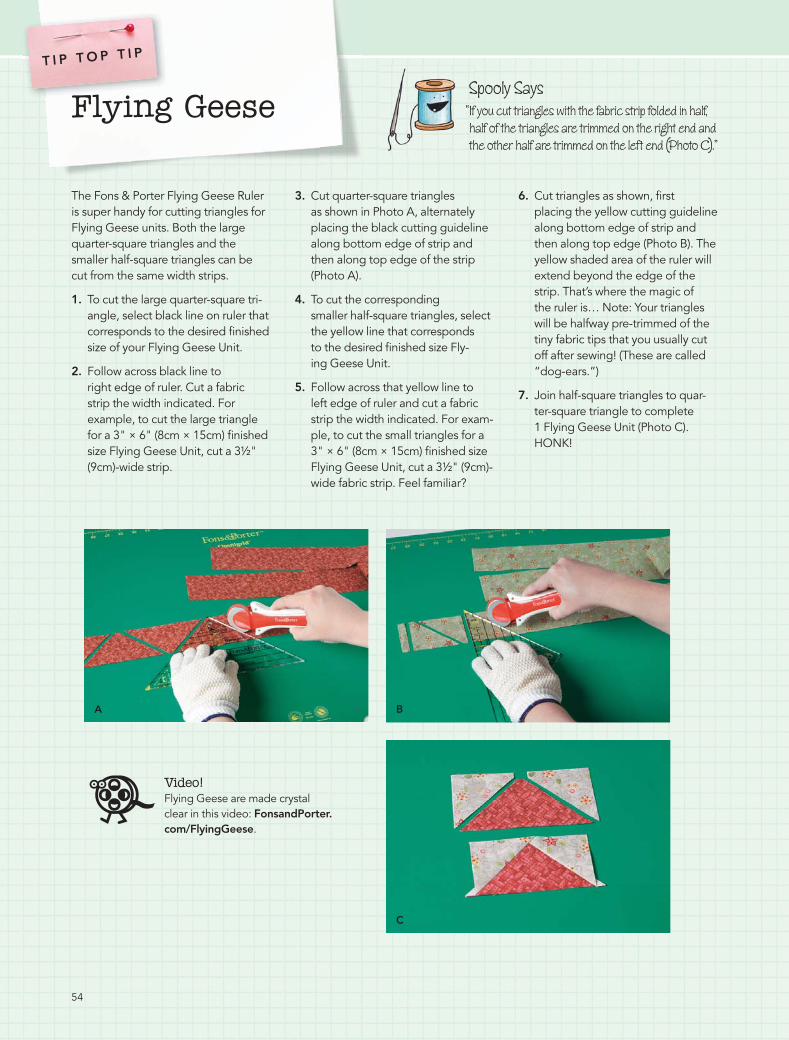
3. Cut quarter-square triangles as shown in Photo A, alternately placing the black cutting guideline along bottom edge of strip and then along top edge of the strip (Photo A).
4. To cut the corresponding smaller half-square triangles, select the yellow line that corresponds to the desired fi nished size Fly-ing Geese Unit.
5. Follow across that yellow line to left edge of ruler and cut a fabric strip the width indicated. For exam-ple, to cut the small triangles for a 3" × 6" (8cm × 15cm) fi nished size Flying Geese Unit, cut a 3½" (9cm)-wide fabric strip. Feel familiar?
Spooly Says“If you cut triangles with the fabric strip folded in half,
half of the triangles are trimmed on the right end and
the other half are trimmed on the left end (Photo C).”
SS“I“If f
hhh
ththth
6. Cut triangles as shown, fi rstplacing the yellow cutting guideline along bottom edge of strip and then along top edge (Photo B). The yellow shaded area of the ruler will extend beyond the edge of the strip. That’s where the magic of the ruler is… Note: Your triangles will be halfway pre-trimmed of the tiny fabric tips that you usually cut off after sewing! (These are called “dog-ears.”)
7. Join half-square triangles to quar-ter-square triangle to complete 1 Flying Geese Unit (Photo C). HONK!
Video! Flying Geese are made crystal clear in this video: FonsandPorter.com/FlyingGeese.
A B
C
54
050-055_T4985.indd 54 11/18/14 10:29 AM