Embed Size (px)
Citation preview

War
min
g D
raw
erE
lect
ric
ge.com
PKD915PTD915
49-80507 03-07 JR
Safety Instructions . . . . . . . . . . . 2, 3
Operating InstructionsControl Knob . . . . . . . . . . . . . . . . . .5Crisping Stale Items . . . . . . . . . . . . .7Drawer . . . . . . . . . . . . . . . . . . . . . . .6Features . . . . . . . . . . . . . . . . . . . . . .4Moisture Selector . . . . . . . . . . . . . . .5ON Signal Light . . . . . . . . . . . . . . . .5Pans . . . . . . . . . . . . . . . . . . . . . . . . . 5Proofing Yeast Bread and Dough . . . . . . . . . . . . . . . . . . . .7Rack . . . . . . . . . . . . . . . . . . . . . . . . .6Temperature Selection Charts . . .7, 8Warming Serving Bowl and Plates . . . . . . . . . . . . . . . . . . . . .6
Care and Cleaning . . . . . . . . . . . . 9
Installation Instructions . . . . 10–15
Troubleshooting Tips . . . . . . . . . 16
Consumer SupportConsumer Support . . . . .Back CoverProduct Registration . . . . . . . . 19, 20Warranty for Customers in Canada . . . . . . . . . . . . . . . . . . . .23Warranty for Customers in the U.S.A. . . . . . . . . . . . . . . . . . .22
Write the model and serialnumbers here:
Model # ____________________
Serial # ____________________
You can find them on a label locatedon the backside of the lower drawerfront.
In Canada, contact us at: www.GEAppliances.ca
Owner’s Manual andInstallation Instructions
IMPORTANT SAFETY INFORMATION.READ ALL INSTRUCTIONS BEFORE USING.
WARNING!For your safety, the information in this manual must be followed to minimize the risk of fire orexplosion, electric shock, or to prevent property damage, personal injury, or loss of life.
When using electrical appliances, basic safety precautions should be followed, including the following:
� Use this appliance only for its intendedpurpose as described in this Owner’sManual.
� Be sure your appliance is properlyinstalled and grounded by a qualifiedtechnician in accordance with theprovided installation instructions.
� Do not attempt to repair or replace anypart of your warming drawer unless it isspecifically recommended in this manual.All other servicing should be referred to a qualified technician.
� Have the installer show you the location of the circuit breaker or fuse. Mark it foreasy reference.
� Before performing any service, unplug or disconnect the power supply at thehousehold distribution panel by removingthe fuse or switching off the circuitbreaker.
� Do not leave children alone—childrenshould not be left alone or unattended in an area where an appliance is in use.They should never be allowed to sit orstand on any part of the appliance.
� Do not allow anyone to climb, stand orhang on the drawer. They could damagethe warming drawer, or cause severepersonal injury.
� Be sure the warming drawer is securelyinstalled in a cabinet that is firmly attachedto the house structure.
� Never leave the drawer open when you are not watching the warming drawer.
� Always keep combustible wall covering,curtains or drapes a safe distance from your warming drawer.
� Always keep wooden and plastic utensils and canned food a safe distance away from your warming drawer.
� Teach children not to play with thecontrols or any other part of the warmingdrawer.
� Do not place more than 50 pounds intothe drawer.
� For your safety, never use your appliancefor warming or heating the room.
SAFETY PRECAUTIONS
All warming drawers can tip and injury could result if not properly installed.
To prevent accidental tipping of the warming drawer, attach it to the wall with an anti-tip brace as described in the Installation Instructions.
WARNING ANTI-TIP BRACE REQUIRED
2
Cons
umer
Sup
port
Trou
bles
hoot
ing
Tips
Inst
alla
tion
Inst
ruct
ions
Care
and
Cle
anin
gOp
erat
ing
Inst
ruct
ions
Safe
ty In
stru
ctio
ns
Safety InstructionsOperating Instructions
Care and CleaningInstallation Instructions
Troubleshooting TipsConsum
er Support
3
ge.com
The purpose of the warming drawer is to hold hot cooked foods at serving temperature. Always start with hot food; cold food cannot be heated or cooked in the warming drawer.
� Do not warm food in the warming drawerfor more than two hours.
� CAUTION: Items of interest tochildren should not be stored in cabinetsabove the warming drawer; childrenclimbing on the drawer to reach itemscould be seriously injured.
� Use only dry pot holders—moist or damppot holders on hot surfaces may result inburns from steam. Do not let pot holderstouch hot heating elements. Do not use a towel or other bulky cloth.
� Do not let cooking grease or otherflammable materials accumulate in or near the warming drawer.
� Do not use water on grease fires. Never pick up a flaming pan. Turn the controls off.
� Flame in the warming drawer can besmothered by closing the drawer or using a multi-purpose dry chemical orfoam-type fire extinguisher.
� Do not touch the heating element or the interior surface of the warming drawer. These surfaces may be hot enough to burn.
� REMEMBER: The inside surface of thewarming drawer may be hot when thedrawer is opened.
� Do not store or use combustible materials,gasoline or other flammable vapors andliquids in the vicinity of this or any otherappliance.
� Never leave jars or cans of fat drippings in or near your warming drawer.
� Use care when opening the drawer. Openthe drawer a crack and let hot air or steamescape before removing or replacing food.Hot air or steam which escapes can causeburns to hands, face and/or eyes.
� Do not heat unopened food containers.Pressure could build up and the containercould burst, causing an injury.
� Keep the vent unobstructed.
� Do not use the warming drawer to drynewspapers. If overheated, they can catchon fire.
� Do not use the warming drawer for astorage area. Items stored in the warmingdrawer can ignite.
� Do not leave paper products, cookingutensils or food in the warming drawerwhen not in use.
� Clean only parts listed in the Care andcleaning of the warming drawer section.
� Do not use aluminum foil to line thedrawer. Foil is an excellent heat insulatorand will trap heat beneath it. This willupset the performance of the drawer andit could damage the interior finish.
� Wear proper apparel. Loose fitting orhanging garments should never be wornwhile using this appliance.
WARNING!SAFETY PRECAUTIONS
READ AND FOLLOW THIS SAFETY INFORMATION CAREFULLY.SAVE THESE INSTRUCTIONS
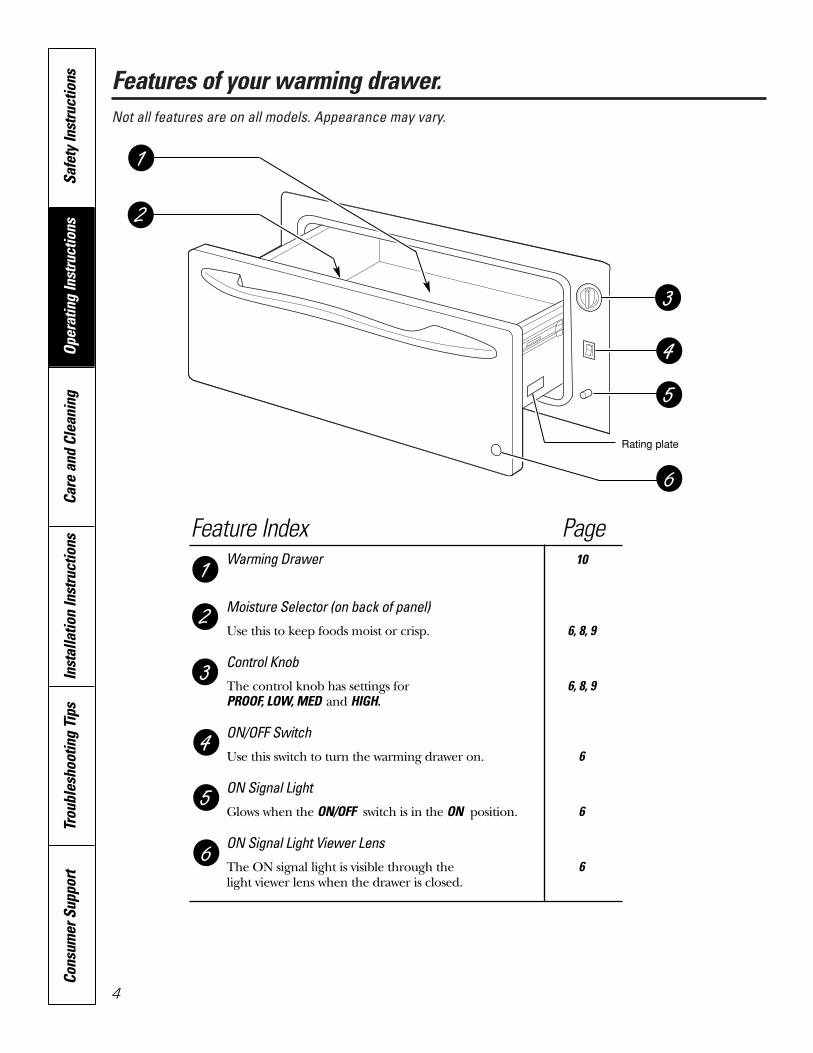
Features of your warming drawer.Not all features are on all models. Appearance may vary.
Feature Index PageWarming Drawer 10
Moisture Selector (on back of panel)
Use this to keep foods moist or crisp. 6, 8, 9
Control Knob
The control knob has settings for 6, 8, 9PROOF, LOW, MED and HIGH.
ON/OFF Switch
Use this switch to turn the warming drawer on. 6
ON Signal Light
Glows when the ON/OFF switch is in the ON position. 6
ON Signal Light Viewer Lens
The ON signal light is visible through the 6light viewer lens when the drawer is closed.
Cons
umer
Sup
port
Trou
bles
hoot
ing
Tips
Inst
alla
tion
Inst
ruct
ions
Care
and
Cle
anin
gOp
erat
ing
Inst
ruct
ions
Safe
ty In
stru
ctio
ns
4
Rating plate

5
Safety InstructionsOperating Instructions
Care and CleaningInstallation Instructions
Troubleshooting TipsConsum
er SupportUsing the warming drawer. ge.com
The warming drawer will keep hot, cooked foods at serving temperature. Always start with hot food. Do notuse to heat cold food other than proofing yeast dough, crisping crackers, chips or dry cereal.
Control KnobThe warming drawer controls are hiddenwith the drawer shut. Open the drawer.The controls are on the right side of thefront frame.
To use the warming drawer, press theON/OFF switch to the ON position.
Slide the moisture selector control to theopen or closed setting. (See the MoistureSelector section.)
Turn the control knob to the desiredsetting.
PROOF . . . . . . . . . . . . . . . . 75–95°F
LOW . . . . . . . . . . . . . . . . . 140–160°F
MED . . . . . . . . . . . . . . . . . 160–195°F
HIGH . . . . . . . . . . . . . . . . . 195–230°F
PROOF
HIMED
LO
MoistClosedVent CrispOpenVent
ON Signal LightThe ON signal light is located below the ON/OFF switch and glows when theON/OFF switch is in the ON position. It stays on until the ON/OFF switch ismoved to the OFF position.
The ON signal light is visible through thelight viewer in the drawer front panelwhen the drawer is closed. This is areminder that the heat is on.
Additional Pans
An accessory pan kit JXPN2 is availablefrom GE at extra cost.
Two pans with lids (4” deep)
� One large pan (14 quarts)
� One medium pan (6 quarts)
Moisture SelectorThe moisture selector is located on theinside front of the drawer.
To keep foods moist, slide the moistureselector control away from the controlknob. This closes the vent and seals themoisture inside the drawer. With the ventclosed hot foods stay moist and soft.
In this setting condensation may occur around the inside edge of the drawer.
To keep foods crisp, slide the moistureselector control to the right towards thecontrol knob. This opens the vents andallows the moisture to escape.
With the vents open, it is normal for moisture tocollect on surfaces above the warming drawer.
Using the warming drawer.
To Warm Serving Bowl and PlatesTo warm serving bowls and plates set the control on LOW.
� Use only heat-safe dishes.
� Place the empty dishes on the rack to raise them off the bottom of thedrawer. If you want hotter dishes orwant to heat fine china, please checkwith the manufacturer of the dishes for their maximum heat tolerance.
� Preheat empty serving dish whilepreheating the drawer.
� When holding hot, cooked foods andwarming empty serving dishes at thesame time, place the serving dishes onthe high rack position and the food onthe bottom of the drawer.
CAUTION: Dishes may be hot. Use pot holders or mitts when removing hot dishes.
When using the warming drawer…Do not line the warming drawer with aluminum foil.
� Allow time for the drawer to bepreheated:LOW 8 minutesMED 15 minutesHIGH 20 minutes
NOTE: It is not necessary to preheat the drawerfor proofing.
Food in heat-safe glass and glass ceramicpans may need higher thermostat settingas compared to food in metal pans.
� Repeated opening of the drawer allowsthe hot air to escape and the food tocool. Allow extra time for temperatureinside the drawer to stabilize afteradding items.
� With large loads it may be necessary touse a higher thermostat setting andcover some of the cooked food items.
� Food should be kept hot in its cookingcontainer or transferred to a heat-safeserving dish.
� Aluminum foil may be used to coverfood to prevent it from drying out.
CAUTION: Plastic containersor plastic wrap will melt if in direct contactwith the drawer. Melted plastic may not beremovable and is not covered under yourwarranty.
� Remove serving spoons, etc., beforeplacing containers in warming drawer.
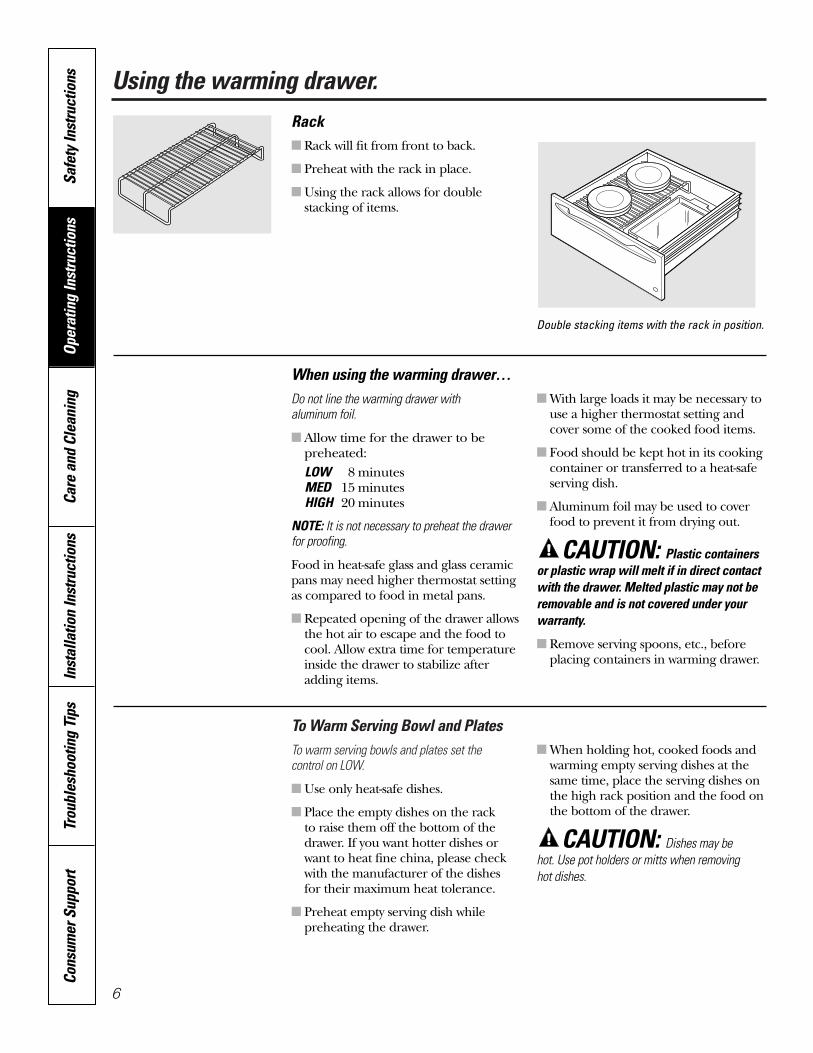
Rack� Rack will fit from front to back.
� Preheat with the rack in place.
� Using the rack allows for doublestacking of items.
Double stacking items with the rack in position.
Cons
umer
Sup
port
Trou
bles
hoot
ing
Tips
Inst
alla
tion
Inst
ruct
ions
Care
and
Cle
anin
gOp
erat
ing
Inst
ruct
ions
Safe
ty In
stru
ctio
ns
6
7
Safety InstructionsOperating Instructions
Care and CleaningInstallation Instructions
Troubleshooting TipsConsum
er Supportge.com
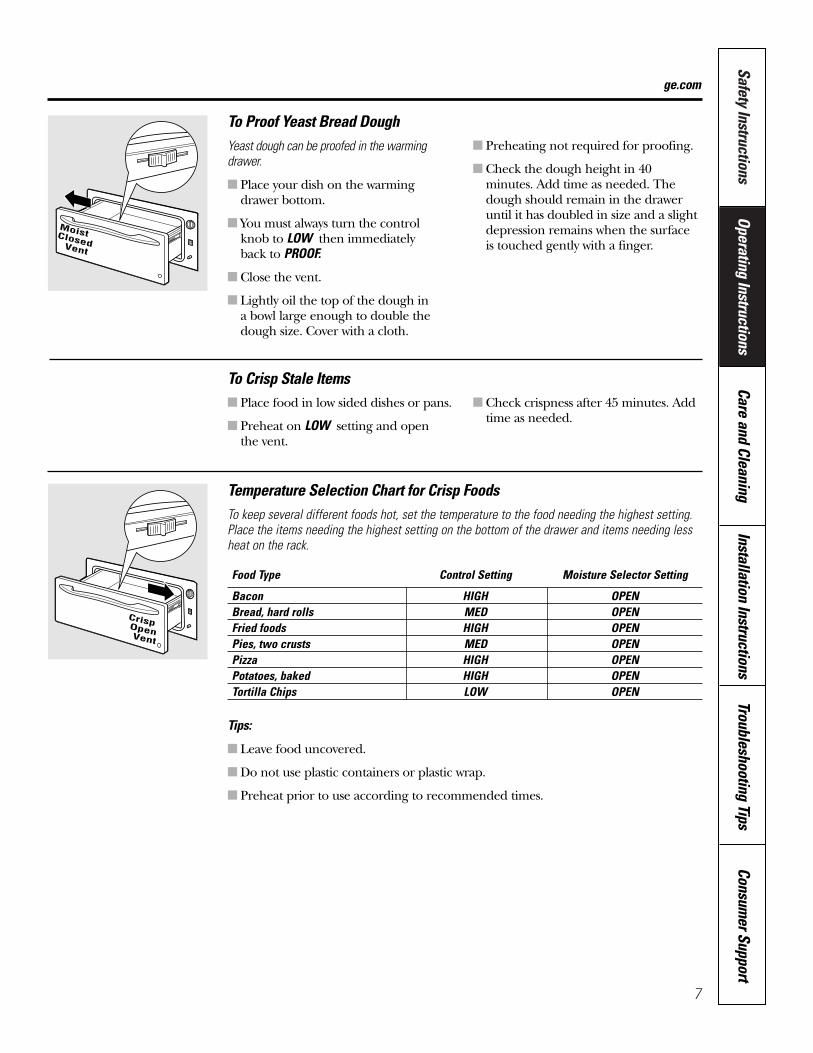
To Proof Yeast Bread DoughYeast dough can be proofed in the warmingdrawer.
� Place your dish on the warming drawer bottom.
� You must always turn the control knob to LOW then immediately back to PROOF.
� Close the vent.
� Lightly oil the top of the dough in a bowl large enough to double thedough size. Cover with a cloth.
� Preheating not required for proofing.
� Check the dough height in 40minutes. Add time as needed. Thedough should remain in the draweruntil it has doubled in size and a slightdepression remains when the surface is touched gently with a finger.
To Crisp Stale Items� Place food in low sided dishes or pans.
� Preheat on LOW setting and open the vent.
� Check crispness after 45 minutes. Addtime as needed.
Temperature Selection Chart for Crisp FoodsTo keep several different foods hot, set the temperature to the food needing the highest setting. Place the items needing the highest setting on the bottom of the drawer and items needing less heat on the rack.
Food Type Control Setting Moisture Selector Setting
Bacon HIGH OPENBread, hard rolls MED OPENFried foods HIGH OPENPies, two crusts MED OPENPizza HIGH OPENPotatoes, baked HIGH OPENTortilla Chips LOW OPEN
Tips:
� Leave food uncovered.
� Do not use plastic containers or plastic wrap.
� Preheat prior to use according to recommended times.
MoistClosedVent
CrispOpenVent
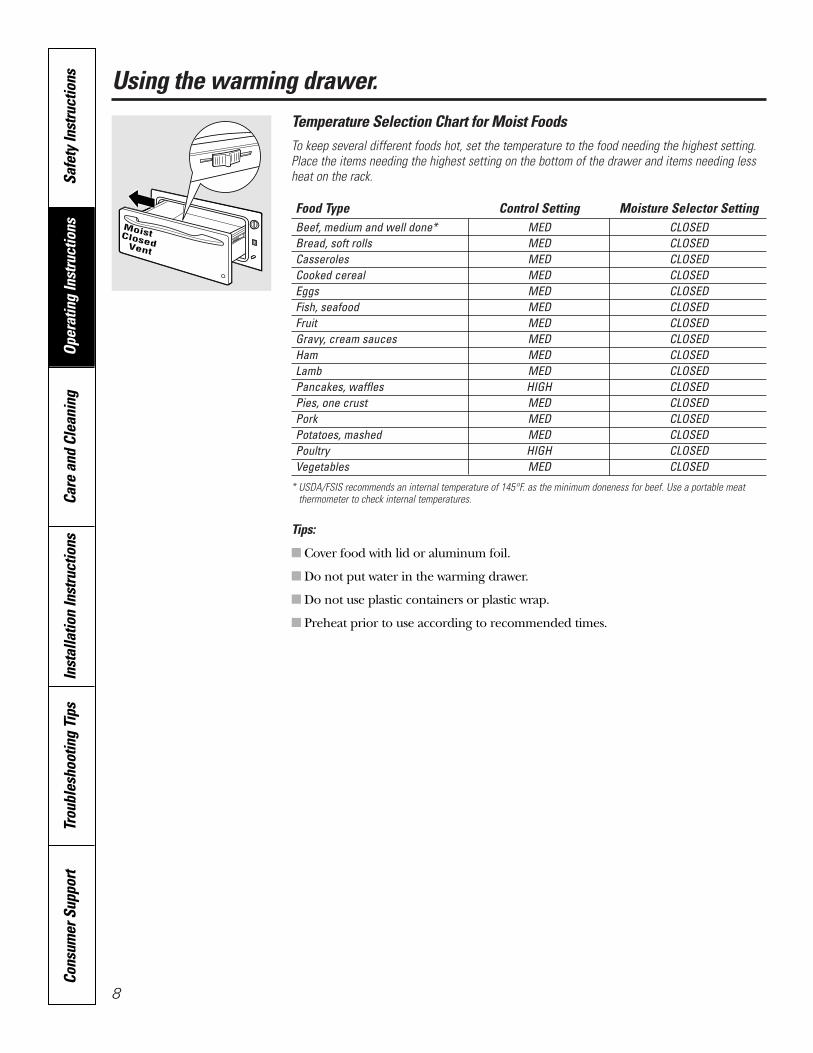
Using the warming drawer.Temperature Selection Chart for Moist FoodsTo keep several different foods hot, set the temperature to the food needing the highest setting. Place the items needing the highest setting on the bottom of the drawer and items needing less heat on the rack.
Food Type Control Setting Moisture Selector SettingBeef, medium and well done* MED CLOSEDBread, soft rolls MED CLOSEDCasseroles MED CLOSEDCooked cereal MED CLOSEDEggs MED CLOSEDFish, seafood MED CLOSEDFruit MED CLOSEDGravy, cream sauces MED CLOSEDHam MED CLOSEDLamb MED CLOSEDPancakes, waffles HIGH CLOSEDPies, one crust MED CLOSEDPork MED CLOSEDPotatoes, mashed MED CLOSEDPoultry HIGH CLOSEDVegetables MED CLOSED
* USDA/FSIS recommends an internal temperature of 145°F. as the minimum doneness for beef. Use a portable meatthermometer to check internal temperatures.
Tips:
� Cover food with lid or aluminum foil.
� Do not put water in the warming drawer.
� Do not use plastic containers or plastic wrap.
� Preheat prior to use according to recommended times.
MoistClosedVent
Cons
umer
Sup
port
Trou
bles
hoot
ing
Tips
Inst
alla
tion
Inst
ruct
ions
Care
and
Cle
anin
gOp
erat
ing
Inst
ruct
ions
Safe
ty In
stru
ctio
ns
8
9
Safety InstructionsOperating Instructions
Care and CleaningInstallation Instructions
Troubleshooting TipsConsum
er SupportCare and cleaning of the warming drawer. ge.com
Be sure the controls are in the OFF position and all surfaces are cool before cleaning any part of the warming drawer.
Warming Drawer Use soap and warm water to thoroughlyclean.
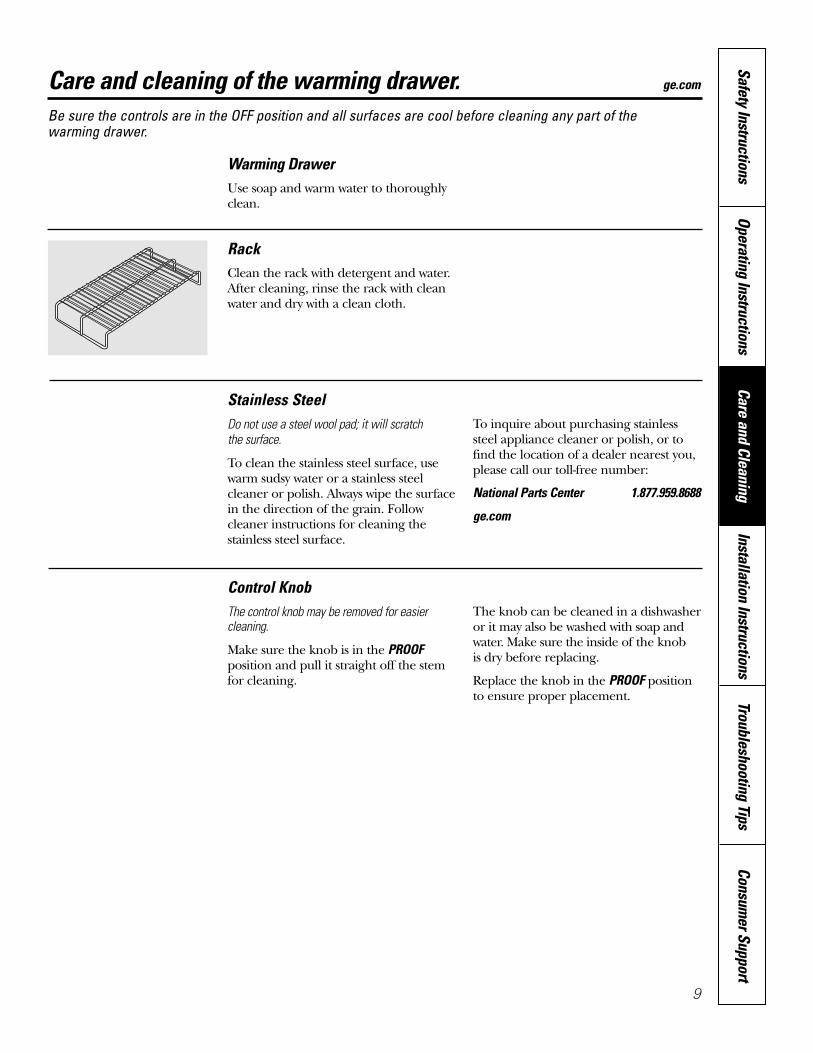
RackClean the rack with detergent and water.After cleaning, rinse the rack with cleanwater and dry with a clean cloth.
Stainless SteelDo not use a steel wool pad; it will scratch the surface.
To clean the stainless steel surface, usewarm sudsy water or a stainless steelcleaner or polish. Always wipe the surfacein the direction of the grain. Followcleaner instructions for cleaning thestainless steel surface.
To inquire about purchasing stainlesssteel appliance cleaner or polish, or tofind the location of a dealer nearest you,please call our toll-free number:
National Parts Center 1.877.959.8688
ge.com
Control KnobThe control knob may be removed for easiercleaning.
Make sure the knob is in the PROOFposition and pull it straight off the stemfor cleaning.
The knob can be cleaned in a dishwasheror it may also be washed with soap andwater. Make sure the inside of the knob is dry before replacing.
Replace the knob in the PROOF position to ensure proper placement.
10
Before You BeginIMPORTANT: Save these instructions for thelocal electrical inspector’s use.
IMPORTANT: OBSERVE ALL GOVERNING CODESAND ORDINANCES.
NOTE TO INSTALLER: Leave these instructionswith the appliance after installation is completed.
NOTE TO CONSUMER: Keep this Owner’sManual and Installation Instructions for future use.
NOTE: This appliance must be properlygrounded.
NOTE: Insure that the power cord does notcontact the hot surfaces on the bottom of ovens, cooktops, or any other appliance.
Tools Needed� 2 x4 or 2 x 2 lumber for runners and brace
� Wood screws and adhesive or other hardwarefor installing runners or shelf to supportwarmer drawer.
Runners must be level, rigidly mounted and capable ofsupporting 150 pounds.
� Saw
� Level
� Drill and 1/16″ bit
� Phillips screwdriver
Custom Panel KitsZXD27B—This kit provides for the installation of a custom front panel on 27″ wide models.
ZXD30B—This kit provides for the installation of a custom front panel on 30″ wide models.
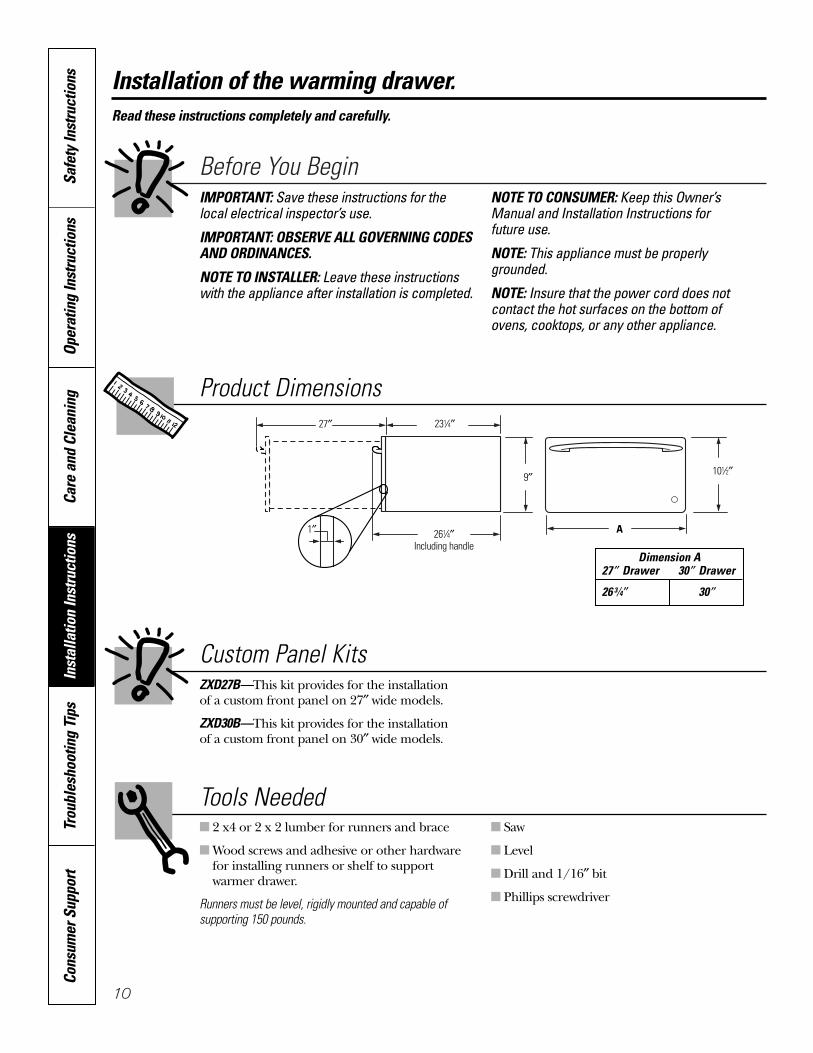
Product Dimensions27″ 231⁄4″
9″
1″ A
101⁄2″
261⁄4″Including handle
Dimension A27 ″ Drawer 30 ″ Drawer
26 3⁄4″ 30 ″
Cons
umer
Sup
port
Trou
bles
hoot
ing
Tips
Inst
alla
tion
Inst
ruct
ions
Care
and
Cle
anin
gOp
erat
ing
Inst
ruct
ions
Safe
ty In
stru
ctio
ns Installation of the warming drawer.Read these instructions completely and carefully.
Safety InstructionsOperating Instructions
Care and CleaningInstallation Instructions
Troubleshooting TipsConsum
er Support
11
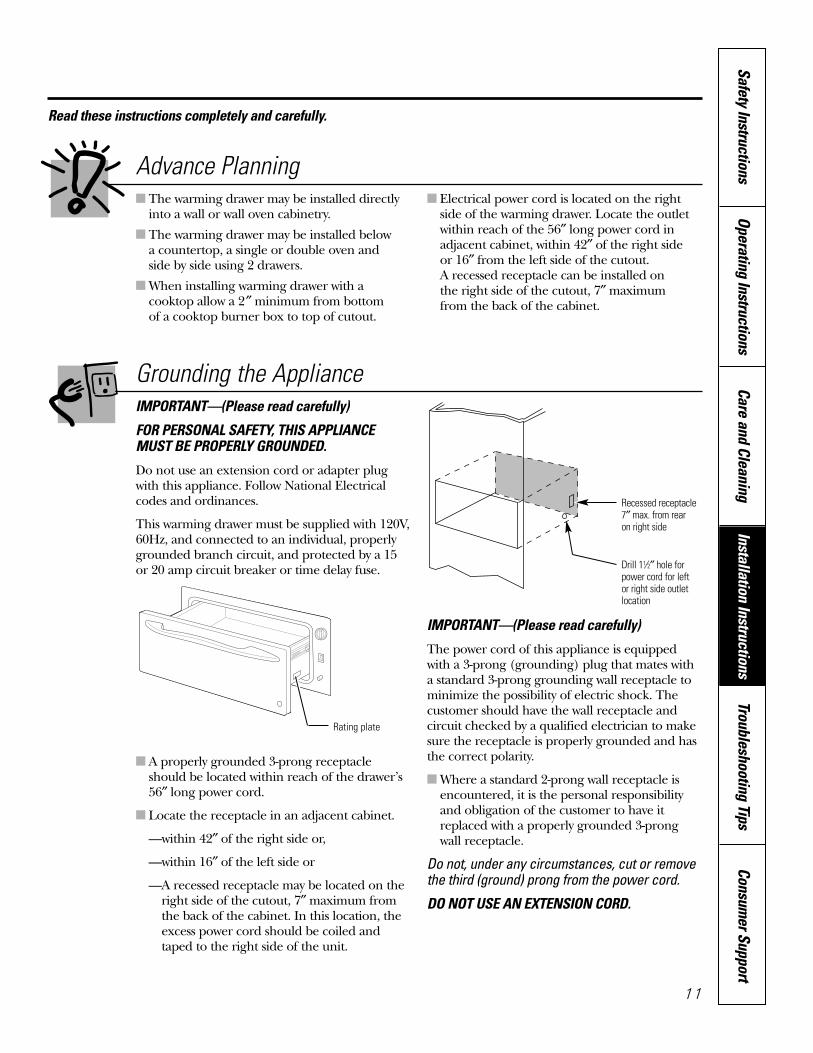
Advance Planning� The warming drawer may be installed directly
into a wall or wall oven cabinetry.
� The warming drawer may be installed below a countertop, a single or double oven and side by side using 2 drawers.
� When installing warming drawer with acooktop allow a 2″ minimum from bottom of a cooktop burner box to top of cutout.
� Electrical power cord is located on the rightside of the warming drawer. Locate the outletwithin reach of the 56″ long power cord inadjacent cabinet, within 42″ of the right side or 16″ from the left side of the cutout. A recessed receptacle can be installed on the right side of the cutout, 7″ maximum from the back of the cabinet.
Grounding the ApplianceIMPORTANT—(Please read carefully)
FOR PERSONAL SAFETY, THIS APPLIANCEMUST BE PROPERLY GROUNDED.
Do not use an extension cord or adapter plugwith this appliance. Follow National Electricalcodes and ordinances.
This warming drawer must be supplied with 120V,60Hz, and connected to an individual, properlygrounded branch circuit, and protected by a 15 or 20 amp circuit breaker or time delay fuse.
� A properly grounded 3-prong receptacleshould be located within reach of the drawer’s56″ long power cord.
� Locate the receptacle in an adjacent cabinet.
� —within 42″ of the right side or,
� —within 16″ of the left side or
� —A recessed receptacle may be located on theright side of the cutout, 7″ maximum fromthe back of the cabinet. In this location, theexcess power cord should be coiled andtaped to the right side of the unit.
IMPORTANT—(Please read carefully)
The power cord of this appliance is equippedwith a 3-prong (grounding) plug that mates witha standard 3-prong grounding wall receptacle tominimize the possibility of electric shock. Thecustomer should have the wall receptacle andcircuit checked by a qualified electrician to makesure the receptacle is properly grounded and hasthe correct polarity.
� Where a standard 2-prong wall receptacle isencountered, it is the personal responsibilityand obligation of the customer to have itreplaced with a properly grounded 3-prong wall receptacle.
Do not, under any circumstances, cut or removethe third (ground) prong from the power cord.
DO NOT USE AN EXTENSION CORD.
Recessed receptacle7″ max. from rear on right side
Drill 11⁄2″ hole forpower cord for leftor right side outletlocation
Read these instructions completely and carefully.
Rating plate
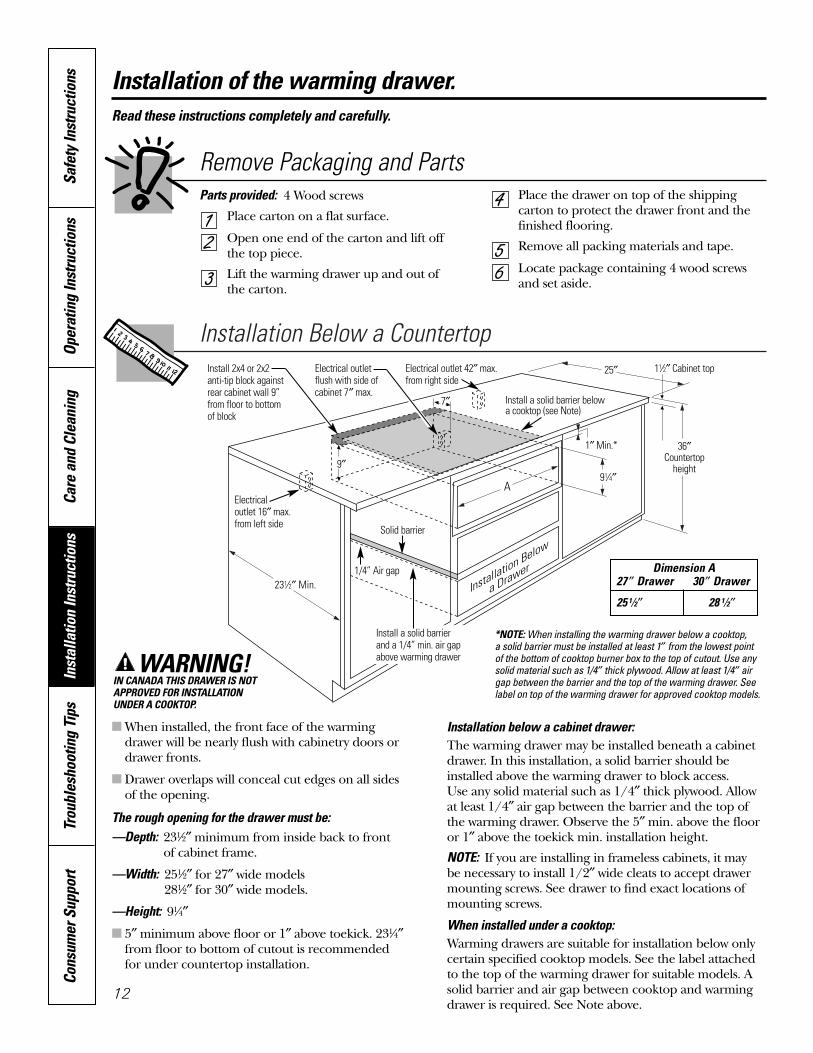
Installation Below a Countertop
� When installed, the front face of the warming drawer will be nearly flush with cabinetry doors ordrawer fronts.
� Drawer overlaps will conceal cut edges on all sides of the opening.
The rough opening for the drawer must be:—Depth: 231⁄2″ minimum from inside back to front
of cabinet frame.
—Width: 251⁄2″ for 27″ wide models281⁄2″ for 30″ wide models.
—Height: 91⁄4″
� 5″ minimum above floor or 1″ above toekick. 231⁄4″from floor to bottom of cutout is recommended for under countertop installation.
Installation below a cabinet drawer:The warming drawer may be installed beneath a cabinetdrawer. In this installation, a solid barrier should beinstalled above the warming drawer to block access. Use any solid material such as 1/4″ thick plywood. Allowat least 1/4″ air gap between the barrier and the top ofthe warming drawer. Observe the 5″ min. above the flooror 1″ above the toekick min. installation height.
NOTE: If you are installing in frameless cabinets, it may be necessary to install 1/2″ wide cleats to accept drawermounting screws. See drawer to find exact locations ofmounting screws.
When installed under a cooktop:Warming drawers are suitable for installation below onlycertain specified cooktop models. See the label attachedto the top of the warming drawer for suitable models. Asolid barrier and air gap between cooktop and warmingdrawer is required. See Note above.
Electrical outlet 16″ max.from left side
Electrical outlet 42″ max.from right side
1″ Min.*
25″
9″91⁄4″
231⁄2″ Min.
36″Countertop
height
Electrical outlet flush with side ofcabinet 7″ max.
Install 2x4 or 2x2anti-tip block againstrear cabinet wall 9”from floor to bottomof block
*NOTE: When installing the warming drawer below a cooktop, a solid barrier must be installed at least 1″ from the lowest point of the bottom of cooktop burner box to the top of cutout. Use anysolid material such as 1/4″ thick plywood. Allow at least 1/4″ airgap between the barrier and the top of the warming drawer. Seelabel on top of the warming drawer for approved cooktop models.
Cons
umer
Sup
port
Trou
bles
hoot
ing
Tips
Inst
alla
tion
Inst
ruct
ions
Care
and
Cle
anin
gOp
erat
ing
Inst
ruct
ions
Safe
ty In
stru
ctio
ns
12
Installation of the warming drawer.Read these instructions completely and carefully.
Remove Packaging and PartsParts provided: 4 Wood screws
Place carton on a flat surface.
Open one end of the carton and lift off the top piece.
Lift the warming drawer up and out of the carton.
Place the drawer on top of the shippingcarton to protect the drawer front and thefinished flooring.
Remove all packing materials and tape.
Locate package containing 4 wood screwsand set aside.
7″
11⁄2″ Cabinet top
Install a solid barrier and a 1/4” min. air gapabove warming drawer
1/4” Air gap
Solid barrier
Dimension A27 ″ Drawer 30 ″ Drawer
25 1⁄2″ 28 1⁄2″
Install a solid barrier belowa cooktop (see Note)
WARNING!IN CANADA THIS DRAWER IS NOTAPPROVED FOR INSTALLATIONUNDER A COOKTOP.

13
Safety InstructionsOperating Instructions
Care and CleaningInstallation Instructions
Troubleshooting TipsConsum
er Support
� When installed, the front face of the warmingdrawer will be nearly flush with cabinetry doorsor drawer fronts.
� Drawer overlaps will conceal cut edges on all sides of the opening.
The rough opening for the drawer must be:
—Depth: 231⁄2″ minimum from inside back to front of cabinet frame.
—Width: 251⁄2″ for 27″ wide models281⁄2″ for 30″ wide models.
—Height: 91⁄4″
—Allow 2″ minimum between oven and drawercutouts for clearance of overlaps.
NOTE: If you are installing in frameless cabinets, it may be necessary to install 1/2″ wide cleats toaccept drawer mounting screws. See drawer tofind exact locations of mounting screws.
When installed under a wall oven:
Warming drawers are suitable for installationbelow only certain specified wall oven models. See the label attached to the top of the warmingdrawer for suitable models.
NOTE: Electrical receptacle can be installed as shown for countertop installations. Do notinstall receptacle above the top of the warmingdrawer cutout.
231⁄2″Min.
2x2 or 2x4 anti-tipblock against rearwall 9” from floorto bottom of block
1″ Min. above toekick or adjustto oven installation height
A
NOTE: Additional clearance between cutouts maybe required. Check to be sure that oven supportsabove the warming drawer location do not obstructthe required interior 231⁄2″ depth and 91⁄4″ height.
Installation below a single oven
2″ Min
1″ Min. above toekick
NOTE: Additional clearance between cutouts maybe required. Check to be sure that oven supportsabove the warming drawer location do not obstructthe required interior 231⁄2″ depth and 91⁄4″ height.
Installation below a double oven
Dimension A Dimension B
27 ″ Drawer 25 1⁄2″ 26 3⁄4″
30 ″ Drawer 28 1⁄2″ 30 ″
2x2 or 2x4 anti-tipblock against rearwall 9” from floorto bottom of block
2″ Min.
Allow 5/8”overlap onall sides
101⁄2″
231⁄2″Min.
Allow 5/8″ overlapon all sides
A
231⁄4″
101⁄2″
9″91⁄4″
231⁄4″
Installation Below Wall Ovens
Read these instructions completely and carefully.
9″91⁄4″
B
Ovencutout
Ovencutout
B
WARNING!IN CANADA THE WALL OVEN IS ONLY APPROVED FORINSTALLATION WITH A BOTTOMCUTOUT AT A MINIMUM OF 32.5"FROM THE FLOOR.
WARNING!IN CANADA THIS DRAWER IS NOT APPROVEDFOR INSTALLATION UNDER A DOUBLE OVEN.
Cons
umer
Sup
port
Trou
bles
hoot
ing
Tips
Inst
alla
tion
Inst
ruct
ions
Care
and
Cle
anin
gOp
erat
ing
Inst
ruct
ions
Safe
ty In
stru
ctio
ns
14
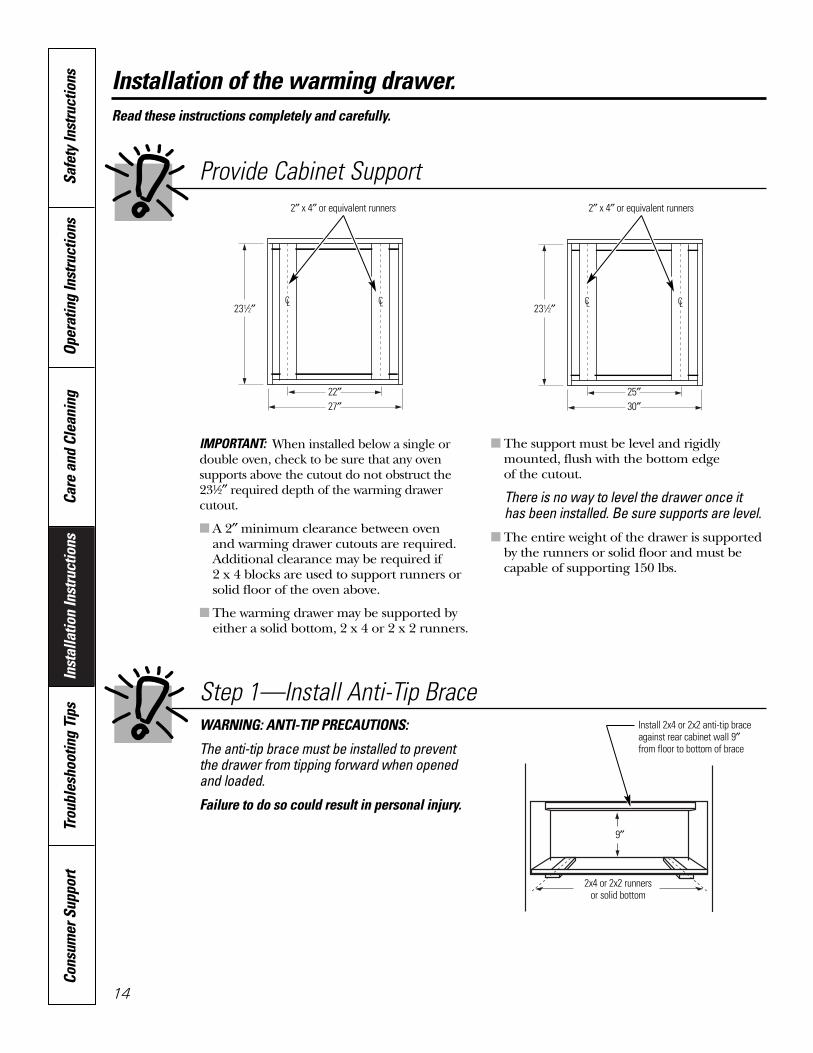
Step 1—Install Anti-Tip BraceWARNING: ANTI-TIP PRECAUTIONS:
The anti-tip brace must be installed to preventthe drawer from tipping forward when openedand loaded.
Failure to do so could result in personal injury.
Install 2x4 or 2x2 anti-tip braceagainst rear cabinet wall 9″from floor to bottom of brace
2x4 or 2x2 runnersor solid bottom
9″
Provide Cabinet Support
IMPORTANT: When installed below a single ordouble oven, check to be sure that any ovensupports above the cutout do not obstruct the231⁄2″ required depth of the warming drawercutout.
� A 2″ minimum clearance between oven and warming drawer cutouts are required.Additional clearance may be required if 2 x 4 blocks are used to support runners orsolid floor of the oven above.
� The warming drawer may be supported byeither a solid bottom, 2 x 4 or 2 x 2 runners.
� The support must be level and rigidlymounted, flush with the bottom edge of the cutout.
� There is no way to level the drawer once ithas been installed. Be sure supports are level.
� The entire weight of the drawer is supportedby the runners or solid floor and must becapable of supporting 150 lbs.
231⁄2″
22″27″
2″ x 4″ or equivalent runners
231⁄2″
25″30″
2″ x 4″ or equivalent runners
Installation of the warming drawer.Read these instructions completely and carefully.
Safety InstructionsOperating Instructions
Care and CleaningInstallation Instructions
Troubleshooting TipsConsum
er Support
15
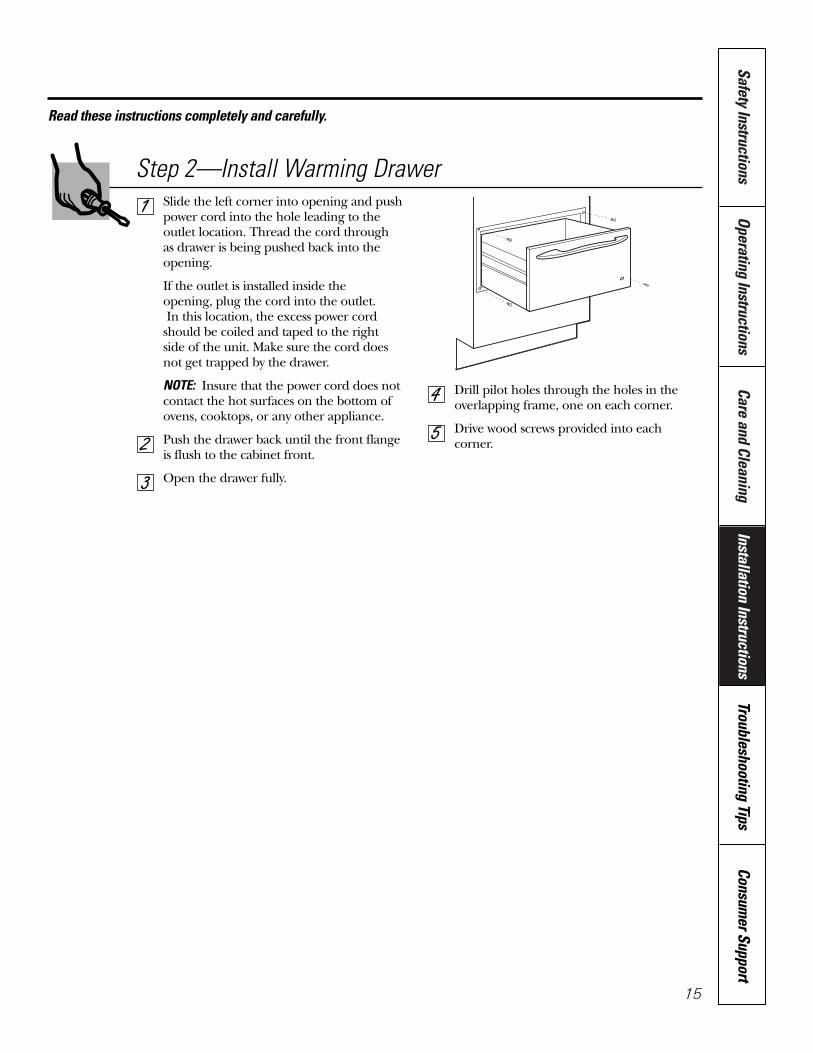
Step 2—Install Warming DrawerSlide the left corner into opening and pushpower cord into the hole leading to theoutlet location. Thread the cord through as drawer is being pushed back into theopening.
If the outlet is installed inside the opening, plug the cord into the outlet.In this location, the excess power cordshould be coiled and taped to the rightside of the unit. Make sure the cord does not get trapped by the drawer.
NOTE: Insure that the power cord does notcontact the hot surfaces on the bottom ofovens, cooktops, or any other appliance.
Push the drawer back until the front flange is flush to the cabinet front.
Open the drawer fully.
Drill pilot holes through the holes in the overlapping frame, one on each corner.
Drive wood screws provided into eachcorner.
Read these instructions completely and carefully.
Cons
umer
Sup
port
Trou
bles
hoot
ing
Tips
Inst
alla
tion
Inst
ruct
ions
Care
and
Cle
anin
gOp
erat
ing
Inst
ruct
ions
Safe
ty In
stru
ctio
ns
16
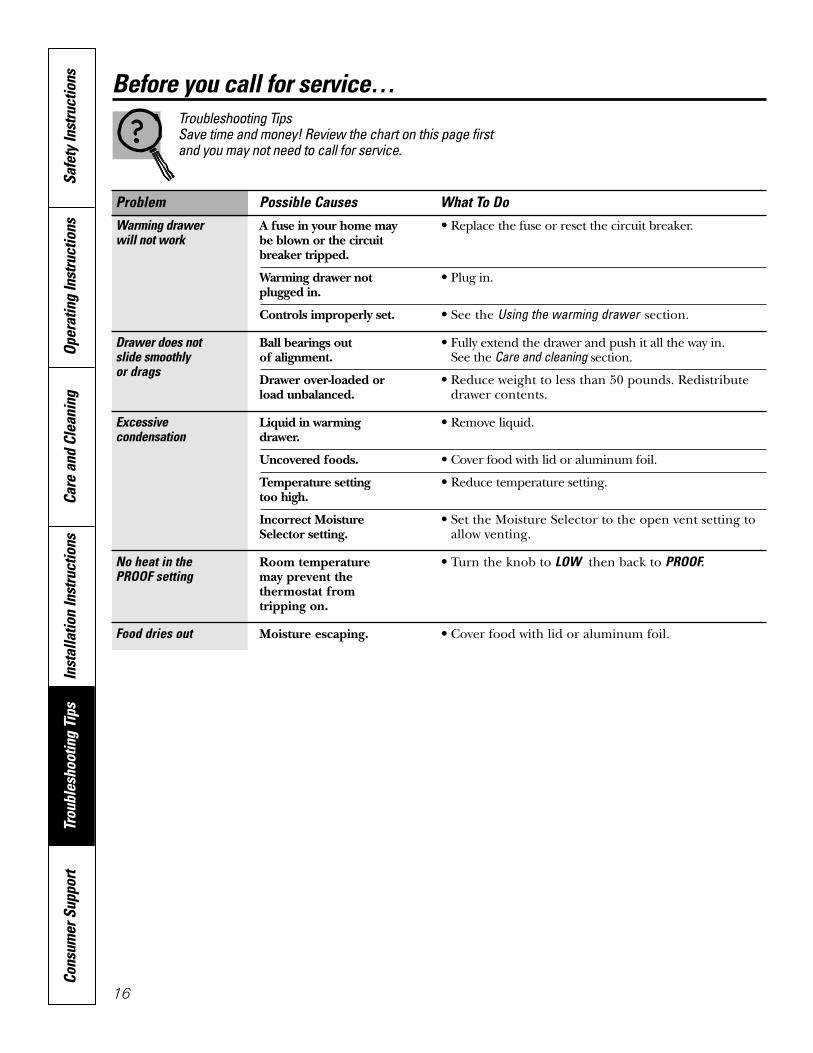
Troubleshooting Tips Save time and money! Review the chart on this page firstand you may not need to call for service.
Problem Possible Causes What To Do
Warming drawer A fuse in your home may • Replace the fuse or reset the circuit breaker.will not work be blown or the circuit
breaker tripped.
Warming drawer not • Plug in.plugged in.
Controls improperly set. • See the Using the warming drawer section.
Drawer does not Ball bearings out • Fully extend the drawer and push it all the way in. slide smoothly of alignment. See the Care and cleaning section.or drags
Drawer over-loaded or • Reduce weight to less than 50 pounds. Redistributeload unbalanced. drawer contents.
Excessive Liquid in warming • Remove liquid.condensation drawer.
Uncovered foods. • Cover food with lid or aluminum foil.
Temperature setting • Reduce temperature setting.too high.
Incorrect Moisture • Set the Moisture Selector to the open vent setting toSelector setting. allow venting.
No heat in the Room temperature • Turn the knob to LOW then back to PROOF.PROOF setting may prevent the
thermostat from tripping on.
Food dries out Moisture escaping. • Cover food with lid or aluminum foil.
Before you call for service…

Safety InstructionsOperating Instructions
Care and CleaningInstallation Instructions
Troubleshooting TipsConsum
er Support
17
Notes.
Cons
umer
Sup
port
Trou
bles
hoot
ing
Tips
Inst
alla
tion
Inst
ruct
ions
Care
and
Cle
anin
gOp
erat
ing
Inst
ruct
ions
Safe
ty In
stru
ctio
ns
18
Notes.
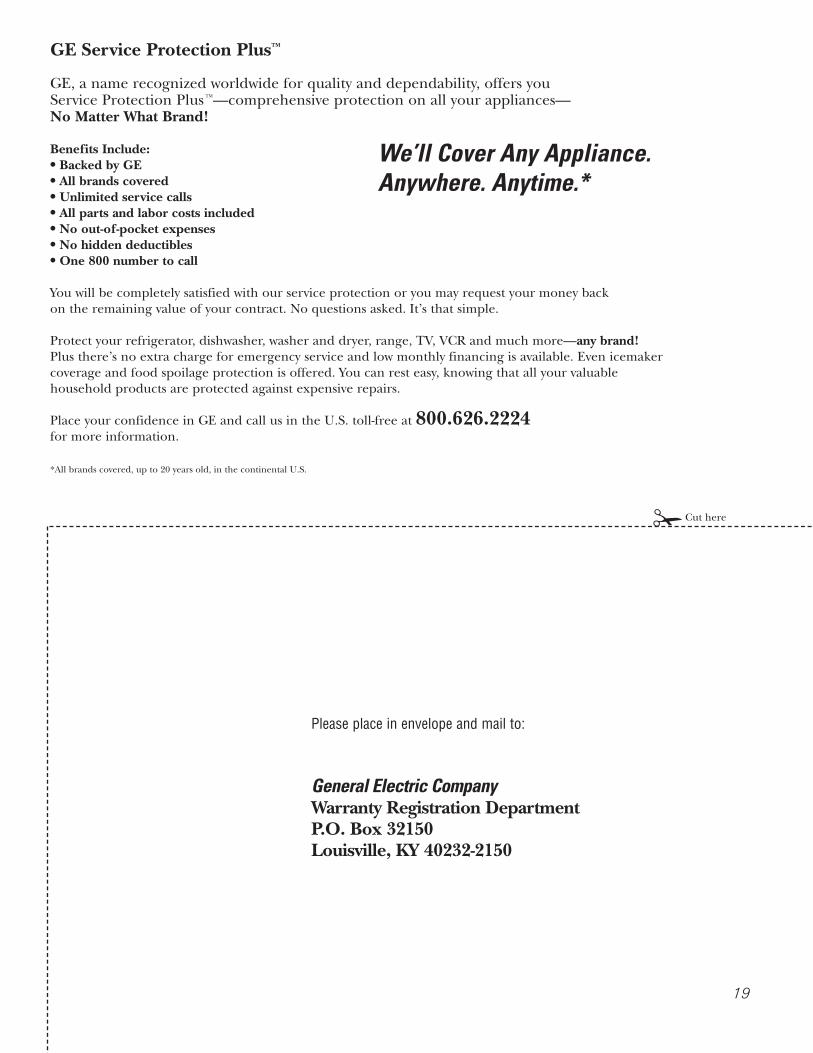
General Electric CompanyWarranty Registration DepartmentP.O. Box 32150Louisville, KY 40232-2150
GE Service Protection Plus™
GE, a name recognized worldwide for quality and dependability, offers you Service Protection Plus ™—comprehensive protection on all your appliances—No Matter What Brand!
Benefits Include:• Backed by GE• All brands covered• Unlimited service calls• All parts and labor costs included• No out-of-pocket expenses• No hidden deductibles• One 800 number to call
You will be completely satisfied with our service protection or you may request your money back on the remaining value of your contract. No questions asked. It’s that simple.
Protect your refrigerator, dishwasher, washer and dryer, range, TV, VCR and much more—any brand! Plus there’s no extra charge for emergency service and low monthly financing is available. Even icemakercoverage and food spoilage protection is offered. You can rest easy, knowing that all your valuablehousehold products are protected against expensive repairs.
Place your confidence in GE and call us in the U.S. toll-free at 800.626.2224for more information.
*All brands covered, up to 20 years old, in the continental U.S.
We’ll Cover Any Appliance.Anywhere. Anytime.*
Please place in envelope and mail to:
✁Cut here
19
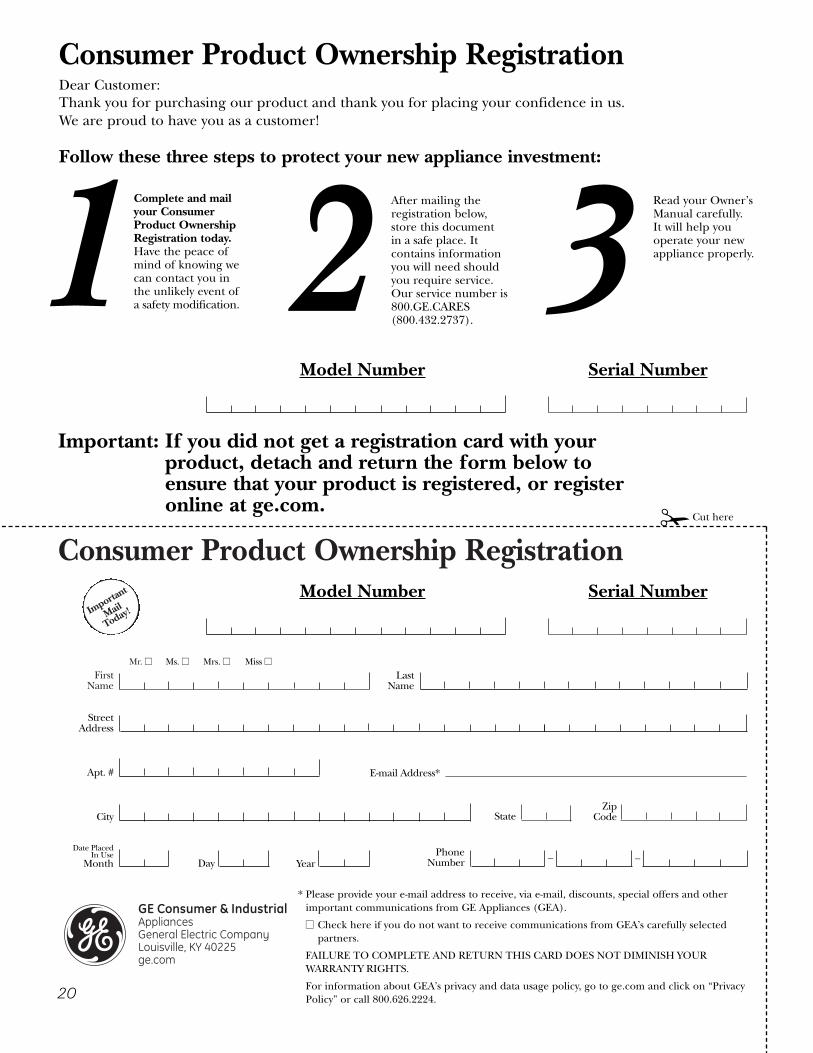
Consumer Product Ownership Registration
Important
Today!
FirstName
Mr. �� Ms. �� Mrs. �� Miss ��
StreetAddress
City State
Date PlacedIn Use
Month Day Year
ZipCode
Apt. #
LastName
PhoneNumber
_ _
Consumer Product Ownership RegistrationDear Customer:Thank you for purchasing our product and thank you for placing your confidence in us. We are proud to have you as a customer!
Follow these three steps to protect your new appliance investment:
Important: If you did not get a registration card with your product, detach and return the form below to ensure that your product is registered, or registeronline at ge.com.
1 2 3Model Number Serial Number
✁Cut here
Complete and mailyour ConsumerProduct OwnershipRegistration today.Have the peace ofmind of knowing wecan contact you inthe unlikely event ofa safety modification.
After mailing theregistration below, store this document in a safe place. Itcontains informationyou will need should you require service. Our service number is800.GE.CARES (800.432.2737).
Read your Owner’sManual carefully.It will help youoperate your newappliance properly.
Model Number Serial Number
E-mail Address*
20
GE Consumer & IndustrialAppliances General Electric Company Louisville, KY 40225ge.com
* Please provide your e-mail address to receive, via e-mail, discounts, special offers and otherimportant communications from GE Appliances (GEA).
�� Check here if you do not want to receive communications from GEA’s carefully selectedpartners.
FAILURE TO COMPLETE AND RETURN THIS CARD DOES NOT DIMINISH YOURWARRANTY RIGHTS.
For information about GEA’s privacy and data usage policy, go to ge.com and click on “PrivacyPolicy” or call 800.626.2224.
Safety InstructionsOperating Instructions
Care and CleaningInstallation Instructions
Troubleshooting TipsConsum
er Support
21
Notes.
Cons
umer
Sup
port
Trou
bles
hoot
ing
Tips
Inst
alla
tion
Inst
ruct
ions
Care
and
Cle
anin
gOp
erat
ing
Inst
ruct
ions
Safe
ty In
stru
ctio
ns
For The Period Of: GE Will Replace:
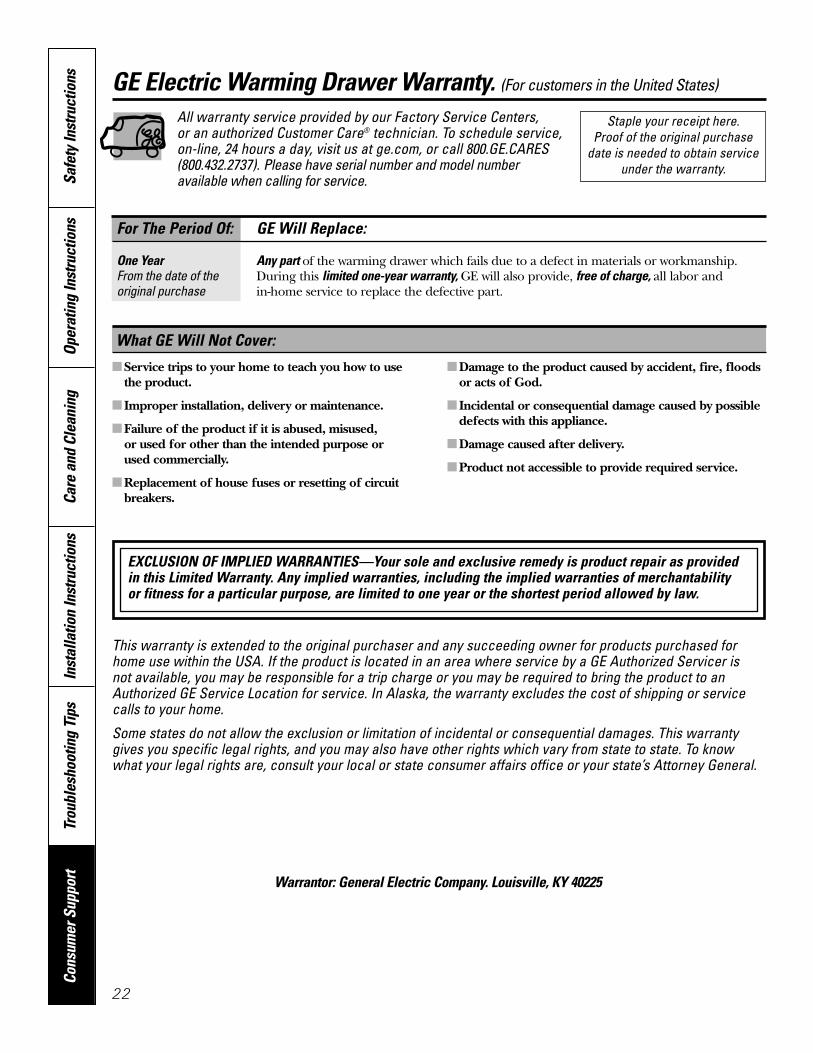
One Year Any part of the warming drawer which fails due to a defect in materials or workmanship. From the date of the During this limited one-year warranty, GE will also provide, free of charge, all labor andoriginal purchase in-home service to replace the defective part.
22
GE Electric Warming Drawer Warranty. (For customers in the United States)
� Service trips to your home to teach you how to use the product.
� Improper installation, delivery or maintenance.
� Failure of the product if it is abused, misused, or used for other than the intended purpose or used commercially.
� Replacement of house fuses or resetting of circuitbreakers.
� Damage to the product caused by accident, fire, floods or acts of God.
� Incidental or consequential damage caused by possibledefects with this appliance.
� Damage caused after delivery.
� Product not accessible to provide required service.
What GE Will Not Cover:
This warranty is extended to the original purchaser and any succeeding owner for products purchased forhome use within the USA. If the product is located in an area where service by a GE Authorized Servicer is not available, you may be responsible for a trip charge or you may be required to bring the product to anAuthorized GE Service Location for service. In Alaska, the warranty excludes the cost of shipping or servicecalls to your home.
Some states do not allow the exclusion or limitation of incidental or consequential damages. This warrantygives you specific legal rights, and you may also have other rights which vary from state to state. To knowwhat your legal rights are, consult your local or state consumer affairs office or your state’s Attorney General.
Warrantor: General Electric Company. Louisville, KY 40225
All warranty service provided by our Factory Service Centers, or an authorized Customer Care® technician. To schedule service,on-line, 24 hours a day, visit us at ge.com, or call 800.GE.CARES(800.432.2737). Please have serial number and model number available when calling for service.
Staple your receipt here. Proof of the original purchase
date is needed to obtain serviceunder the warranty.
EXCLUSION OF IMPLIED WARRANTIES—Your sole and exclusive remedy is product repair as provided in this Limited Warranty. Any implied warranties, including the implied warranties of merchantability or fitness for a particular purpose, are limited to one year or the shortest period allowed by law.
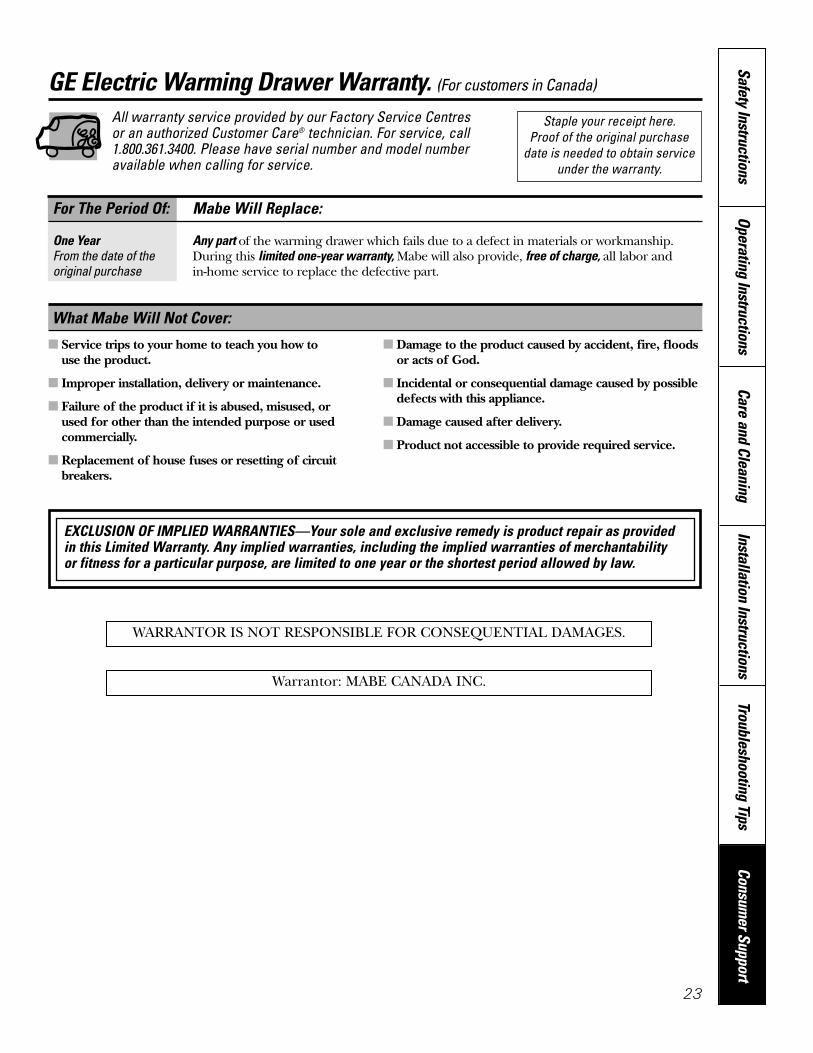
For The Period Of: Mabe Will Replace:
One Year Any part of the warming drawer which fails due to a defect in materials or workmanship. From the date of the During this limited one-year warranty, Mabe will also provide, free of charge, all labor andoriginal purchase in-home service to replace the defective part.
23
Safety InstructionsOperating Instructions
Care and CleaningInstallation Instructions
Troubleshooting TipsConsum
er SupportGE Electric Warming Drawer Warranty. (For customers in Canada)
� Service trips to your home to teach you how touse the product.
� Improper installation, delivery or maintenance.
� Failure of the product if it is abused, misused, or used for other than the intended purpose or usedcommercially.
� Replacement of house fuses or resetting of circuitbreakers.
� Damage to the product caused by accident, fire, floodsor acts of God.
� Incidental or consequential damage caused by possibledefects with this appliance.
� Damage caused after delivery.
� Product not accessible to provide required service.
What Mabe Will Not Cover:
All warranty service provided by our Factory Service Centres or an authorized Customer Care® technician. For service, call1.800.361.3400. Please have serial number and model number available when calling for service.
Staple your receipt here. Proof of the original purchase
date is needed to obtain serviceunder the warranty.
WARRANTOR IS NOT RESPONSIBLE FOR CONSEQUENTIAL DAMAGES.
Warrantor: MABE CANADA INC.
EXCLUSION OF IMPLIED WARRANTIES—Your sole and exclusive remedy is product repair as provided in this Limited Warranty. Any implied warranties, including the implied warranties of merchantability or fitness for a particular purpose, are limited to one year or the shortest period allowed by law.
Consumer Support.
GE Appliances Website In the U.S.: ge.comHave a question or need assistance with your appliance? Try the GE Appliances Website 24 hours a day, any day of the year! For greater convenience and faster service, you can now download Owner’s Manuals, order parts or even schedule service on-line. In Canada: www.geappliances.ca
Schedule Service In the U.S.: ge.comExpert GE repair service is only one step away from your door. Get on-line and schedule your service at yourconvenience 24 hours any day of the year! Or call 800.GE.CARES (800.432.2737) during normal business hours.In Canada, call 1.800.361.3400
Real Life Design Studio In the U.S.: ge.comGE supports the Universal Design concept—products, services and environments that can be used by people of all ages, sizes and capabilities. We recognize the need to design for a wide range of physical and mental abilitiesand impairments. For details of GE’s Universal Design applications, including kitchen design ideas for people withdisabilities, check out our Website today. For the hearing impaired, please call 800.TDD.GEAC (800.833.4322).In Canada, contact: Manager, Consumer Relations, Mabe Canada Inc.
Suite 310, 1 Factory LaneMoncton, N.B. E1C 9M3
Extended Warranties In the U.S.: ge.comPurchase a GE extended warranty and learn about special discounts that are available while your warranty is still in effect. You can purchase it on-line anytime, or call 800.626.2224 during normal business hours. GE ConsumerHome Services will still be there after your warranty expires. In Canada, call 1.888.261.2133
Parts and Accessories In the U.S.: ge.comIndividuals qualified to service their own appliances can have parts or accessories sent directly to their homes(VISA, MasterCard and Discover cards are accepted). Order on-line today, 24 hours every day or by phone at 800.626.2002 during normal business hours.Instructions contained in this manual cover procedures to be performed by any user. Other servicing generally should bereferred to qualified service personnel. Caution must be exercised, since improper servicing may cause unsafe operation. Customers in Canada should consult the yellow pages for the nearest Mabe service centre, or call 1.888.261.3055.
Contact Us In the U.S.: ge.comIf you are not satisfied with the service you receive from GE, contact us on our Website with all the detailsincluding your phone number, or write to: General Manager, Customer Relations
GE Appliances, Appliance ParkLouisville, KY 40225
In Canada: www.geappliances.ca, or write to: Director, Consumer Relations, Mabe Canada Inc.Suite 310, 1 Factory LaneMoncton, N.B. E1C 9M3
Register Your Appliance In the U.S.: ge.comRegister your new appliance on-line–at your convenience! Timely product registration will allow for enhancedcommunication and prompt service under the terms of your warranty, should the need arise. You may also mail in the pre-printed registration card included in the packing material. In Canada: www.geappliances.ca
Printed in the United States