Embed Size (px)
DESCRIPTION
GE Skype Phone User Manual
Citation preview
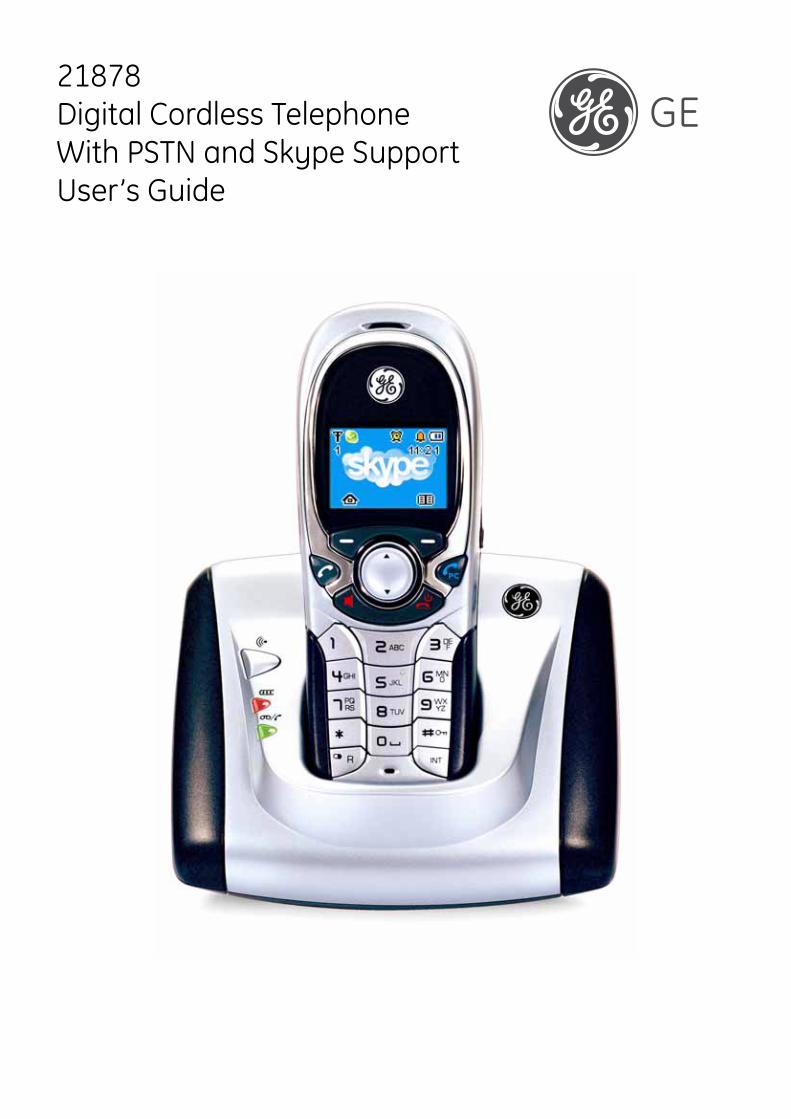
21878 Digital Cordless Telephone With PSTN and Skype Support User’s Guide
2
CONTENTS
PRECAUTIONS OF USE............................................................................................................................................................4
SAFETY........................................................................................................................................................................................4
BATTERY SAFETY PRECAUTIONS.......................................................................................................................................5
INSTALLATION..........................................................................................................................................................................5
PACKAGING CONTENTS ...............................................................................................................................................................5 CONNECTING THE BASE STATION AND POWER PLUG...................................................................................................................5 GETTING STARTED ......................................................................................................................................................................6
Minimum System Requirements: ...........................................................................................................................................................6 Recommended System Requirements: ...................................................................................................................................................6
FEATURES.................................................................................................................................................................................13
MENU STRUCTURE (HANDSET) .........................................................................................................................................14
HANDSET AND BASE LAYOUTS..........................................................................................................................................16
HANDSET AND BASE LAYOUTS..........................................................................................................................................17
LCD DISPLAY ...........................................................................................................................................................................18
USING THE HANDSET TELEPHONE ..................................................................................................................................19
BASIC OPERATION ....................................................................................................................................................................19 Post-dialing...........................................................................................................................................................................................20 Pre-dialing: ...........................................................................................................................................................................................20 Make a SkypeOut Call..........................................................................................................................................................................20
Direct dialing ...................................................................................................................................................................................20 Dialing from IP contracts list ...........................................................................................................................................................20
Make a Skype Call................................................................................................................................................................................20 Make an IP call during an Ongoing Call...............................................................................................................................................21 Handset is in the base station................................................................................................................................................................21 Hand is not in the base station ..............................................................................................................................................................21 Local 3-way Conference Call ...............................................................................................................................................................22 Skype Conference Call .........................................................................................................................................................................22
Conference Call with a PSTN Line and a Skype Contact ................................................................................................................22 Incoming ordinary telephone call during a PSTN call..........................................................................................................................23 Incoming PSTN call during IP call or incoming IP call during PSTN call ...........................................................................................23 Incoming PSTN call during intercom...................................................................................................................................................23 Incoming IP call during intercom .........................................................................................................................................................23 Browse, Delete, Save............................................................................................................................................................................24 Missed Calls, Answered Calls, Dialed Calls.........................................................................................................................................24 Delete ...................................................................................................................................................................................................25
PHONE BOOK...........................................................................................................................................................................25
SEARCH.....................................................................................................................................................................................25 STORE ENTRIES.........................................................................................................................................................................25 GROUP IN PHONE BOOK.............................................................................................................................................................26 SPEED DIAL...............................................................................................................................................................................26 CHECK PHONE BOOK ................................................................................................................................................................26 EMERGENCY CALL....................................................................................................................................................................26 AREA CODE...............................................................................................................................................................................26
HANDSET SETTINGS..............................................................................................................................................................27
RINGER TYPE ............................................................................................................................................................................27 RINGER VOLUME ......................................................................................................................................................................27 RINGER ON/OFF........................................................................................................................................................................27 PREFIX ......................................................................................................................................................................................27 CALL BARRING .........................................................................................................................................................................28 MESSAGE WAITING ...................................................................................................................................................................28 WALLPAPER...............................................................................................................................................................................28 CONTRAST ................................................................................................................................................................................28 KEY TONES ...............................................................................................................................................................................28 AUTO ANSWER..........................................................................................................................................................................28 HANDSET NAME........................................................................................................................................................................29 MENU STYLE ............................................................................................................................................................................29 BACKLIGHT...............................................................................................................................................................................29 IP CONTACTS ............................................................................................................................................................................29
3
REGISTRATION ..........................................................................................................................................................................29 DE-REGISTRATION ....................................................................................................................................................................30 SELECT BASE ............................................................................................................................................................................30 DEFAULT HANDSET SETTINGS...................................................................................................................................................30
BASE SETTINGS ......................................................................................................................................................................30
BASE RINGER............................................................................................................................................................................30 BASE RINGER ON/OFF ..............................................................................................................................................................30 RING PRIORITY .........................................................................................................................................................................30 DIAL MODE...............................................................................................................................................................................31 SYSTEM PIN..............................................................................................................................................................................31 FLASH TIME ..............................................................................................................................................................................31 NET STATUS .............................................................................................................................................................................31 DEFAULT BASE SETTINGS..........................................................................................................................................................31
FUNCTION ................................................................................................................................................................................31
GAME........................................................................................................................................................................................31 WALKIE TALKIE ........................................................................................................................................................................32
TIMER ........................................................................................................................................................................................32
SET DATE/TIME.........................................................................................................................................................................32 ALARM......................................................................................................................................................................................32
TECHNICAL SPECIFICATIONS ...........................................................................................................................................33
GENERAL PRODUCT CARE .................................................................................................................................................33
TROUBLESHOOTING GUIDE...............................................................................................................................................33
ENVIRONMENT.......................................................................................................................................................................35
4
Precautions of Use The quality of communication depends on the location and environment of the base and the handset. The 21878 must be kept away from sources of excessive heat (radiators, direct sunlight, etc.) and protected against vibrations and dust. Never allow your telephone to come into contact with water or other liquids or with aerosols. To reduce the risk of interference and optimize reception, take particular care to keep it away from the immediate vicinity of windows, large metal objects, reinforced concrete, televisions, music centers, halogen lamps or heating devices, fluorescent lighting, burglar alarms, microwave ovens, computers, etc. To clean the 21878, use a lightly moistened antistatic cloth Information for DECT product: The 21878 telephone is compliant with the DECTTM* standard. It is designed to transmit and receive telephone calls and be connected to the public telephone “Country” network. *DECT is a trademark registered by ETSI.
Safety In the event of danger, the mains adapter acts as 230V power isolating device. It should therefore, as a precaution, be installed close to the appliance and be easily accessible. If the mains adapter fails, it must be replaced by an identical model. If not connected to the mains power or if there is a mains power failure, installations with cordless handsets will no longer work. You will then be unable to make or receive calls in the event of an emergency. This is why we recommend that you also have a conventional telephone as a backup. The appliance is designed for connection to an analogue telephone line class TRT3 (telecommunications network voltage). ! Do not use your telephone to notify a gas leak when you are in the vicinity of the leak. It is recommended that you avoid using this device during electrical storms. Thomson Telecom hereby declares that the 21878 conforms to the essential requirements and other applicable provisions of European directive 1999/5/CE.
IMPORTANT: Because cordless phones operate on electricity, you should have one phone in your home that isn’t cordless, in case the power in your home goes out. WARNING: TO PREVENT FIRE OR ELECTRICAL SHOCK HAZARD, DO NOT EXPOSE THIS PROCUCT TO RAIN OR MOISTURE.
THE LIGHTING FLASH AND ARROW HEAD WITHIN THE TRIANGLE IS A WARNING SIGN ALERTING YOU OF “DANGEROUS VOLTAGE” INSINDE THE PRODUCT.
CAUTION: TO REDUCE THE RISK OF ELECTRICAL SHOCK, DO NOT REMOVE
COVER (OR BACK). NO USER SERVICEABLE PARTS INSIDE. REFER SERVICING TO
QUALIFIED SERVICE PERSONNEL.
THE EXCLAMATION WITHIN THE TRIANGLE IS WARNING SIGN ALERTING
YOU OF IMPORTANT INSTRUCTIONS ACCOMPANYING THE PRODUCT.
SEE MARKING ON BOTTOM / BACK OF PRODUCT
5
Battery Safety Precautions
Do not burn, disassemble, mutilate, or puncture. Like other batteries of this type, toxic materials could be released which can cause injury.
To reduce the risk of fire or personal injury, use only the battery listed in User’s Guide. Keep batteries out of children. Remove batteries if storing over 30 days.
CAUTION: Danger of explosion if battery is incorrectly replaced. Replace only with GP60AAAHC – NiMH 1.2V 600mAh
rechargeable battery or equivalent. Only use rechargeable batteries with exactly the same specifications as those supplied with the product. Using non-rechargeable or non-conforming batteries can damage the product. The batteries could split or leak if incorrectly inserted, opened or exposed to heat. Never dispose of batteries in a fire: the cell could explode. Check with local code for possible special disposal instruction.
Installation
Packaging Contents Model name: 21878
Packaging contents Solo pack Due pack
Base stations 1 Handsets 1 Power plugs 1 Telephone line 1 Batteries, type AAA, “1.2V 600mAh” 2
Charging station 0 CD ROM 1 Operating instructions 1 + optional Please check the contents of the package carefully. If anything is missing or shows signs of transport damage, do NOT put the telephone into service! In such a case, contact either your sales outlet with the purchase receipt. Note: Keep the equipment package so that it will not be damaged in the event of transport.
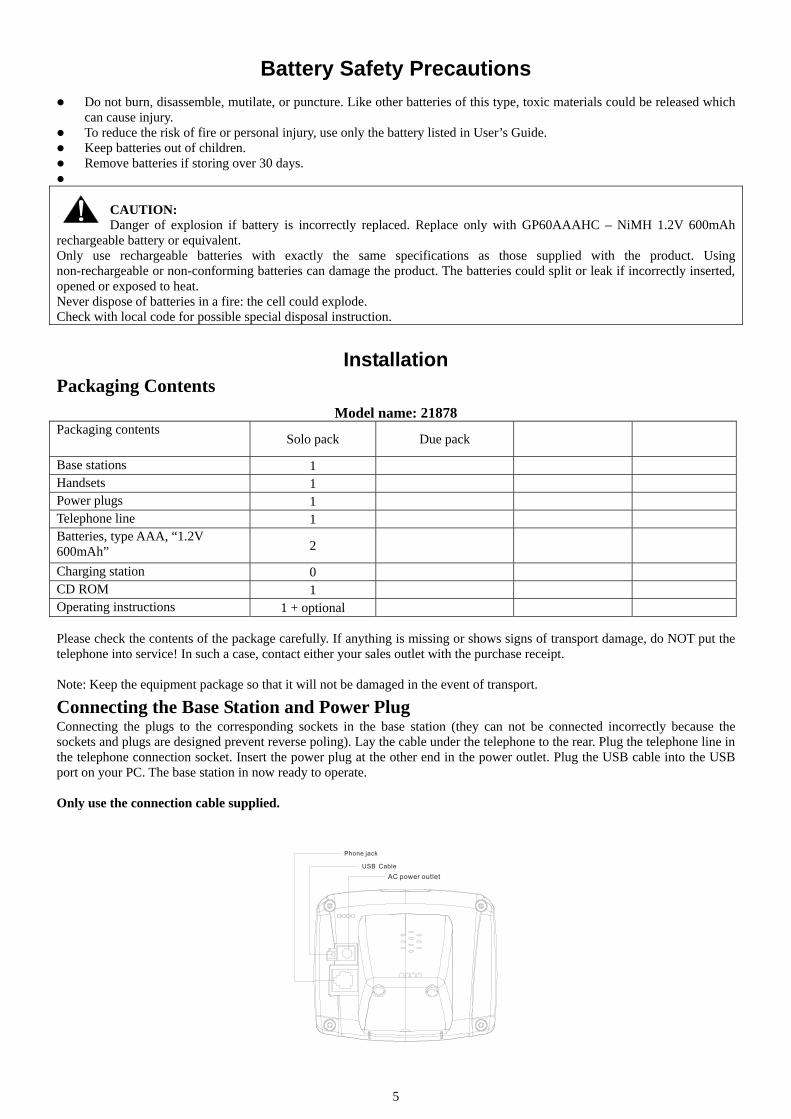
Connecting the Base Station and Power Plug Connecting the plugs to the corresponding sockets in the base station (they can not be connected incorrectly because the sockets and plugs are designed prevent reverse poling). Lay the cable under the telephone to the rear. Plug the telephone line in the telephone connection socket. Insert the power plug at the other end in the power outlet. Plug the USB cable into the USB port on your PC. The base station in now ready to operate. Only use the connection cable supplied.

6
CAUTION: Plug the adapter to the socket outlet that near the equipment and shall be easily accessible. Use only the Thomson Telecom power supply that came with this unit. Using other power supplies may damage the unit.
Getting Started Install and Charge the Battery Pack Insert two pieces AAA batteries in the compartment, ensuring correct polarity and close the compartment. Place the handset in the base station to charge for 14 hours prior for first use. If you don’t properly charge the phone, battery performance will be compromised. Warning: The handset does not work and damaged if the wrong batteries are inserted. System Requirements: Minimum System Requirements:
PC running Windows 2000 or XP 400 MHz processor 128 MB RAM 10M free disk space on your hard drive Internet Connection (either dial-up: minimum 33.6 Kbps modem, or any broadband: cable, DSL, etc.)
Recommended System Requirements:
PC running Windows 2000 or XP 1 GHz processor 256 MB RAM 30 MB free space on your hard drive Cable, DSL or equivalent broadband connection to Internet Standard PSTN line (RJ-11)
Software installation Double click the SKYLINK Setup.exe to go into the installing procedure. First, choose the language that you wish to use, and click [Next]. Then it will prepare for setup, and now click [Cancel] can stop setting
up the software.
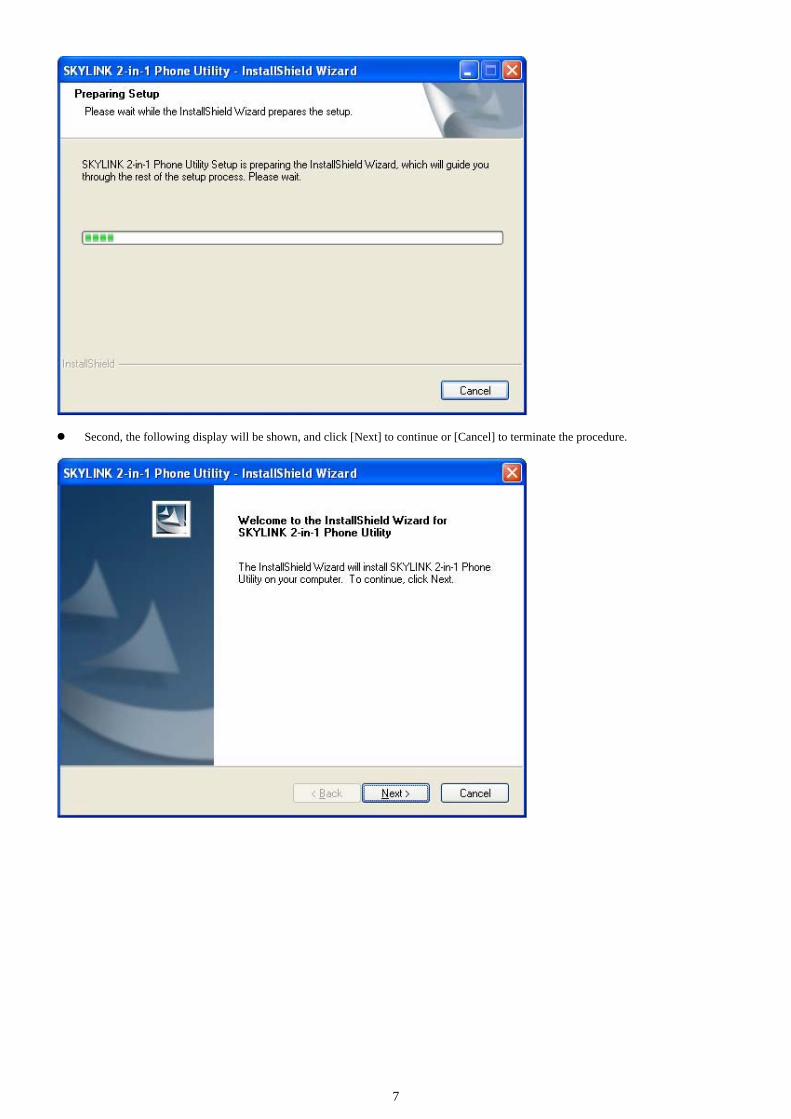
7
Second, the following display will be shown, and click [Next] to continue or [Cancel] to terminate the procedure.
8
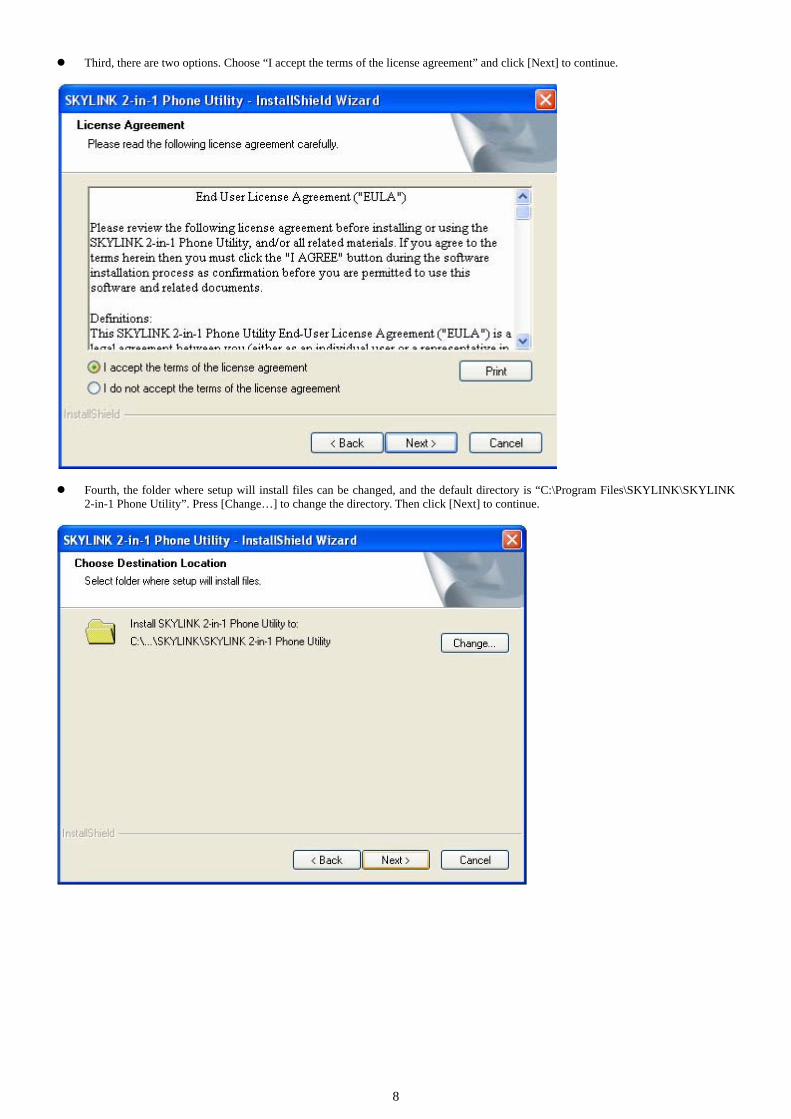
Third, there are two options. Choose “I accept the terms of the license agreement” and click [Next] to continue.
Fourth, the folder where setup will install files can be changed, and the default directory is “C:\Program Files\SKYLINK\SKYLINK 2-in-1 Phone Utility”. Press [Change…] to change the directory. Then click [Next] to continue.
9
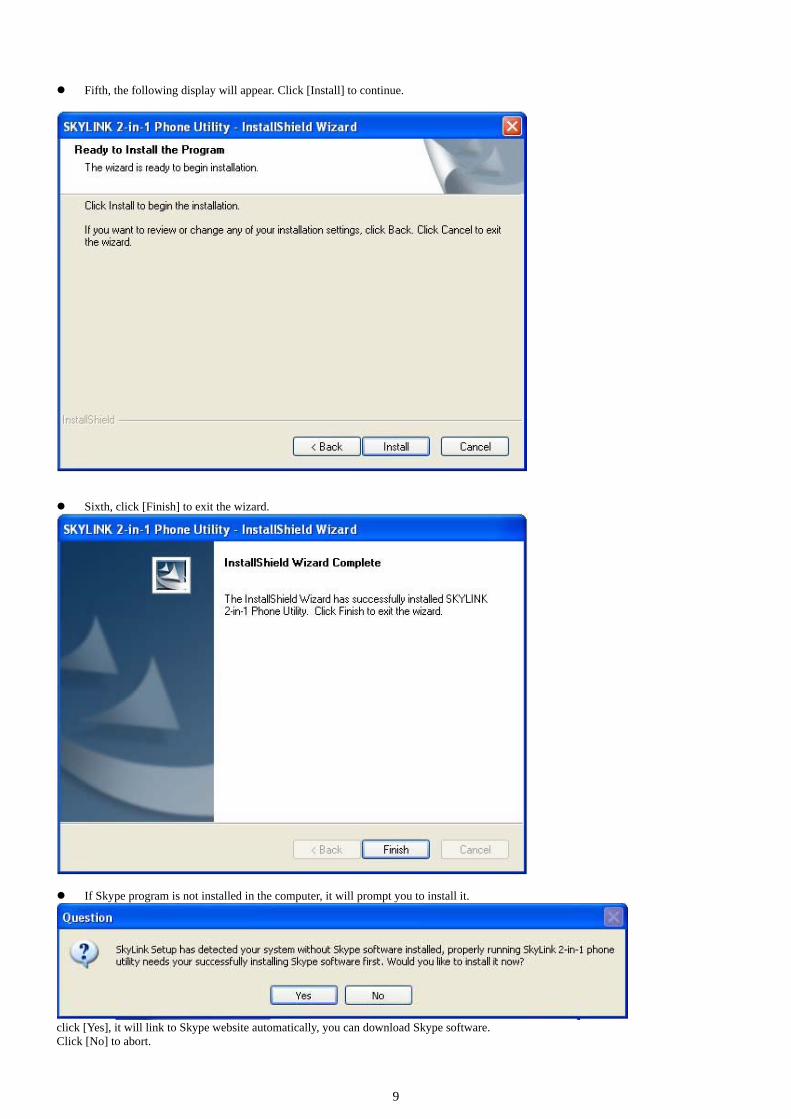
Fifth, the following display will appear. Click [Install] to continue.
Sixth, click [Finish] to exit the wizard.
If Skype program is not installed in the computer, it will prompt you to install it.
click [Yes], it will link to Skype website automatically, you can download Skype software. Click [No] to abort.
10
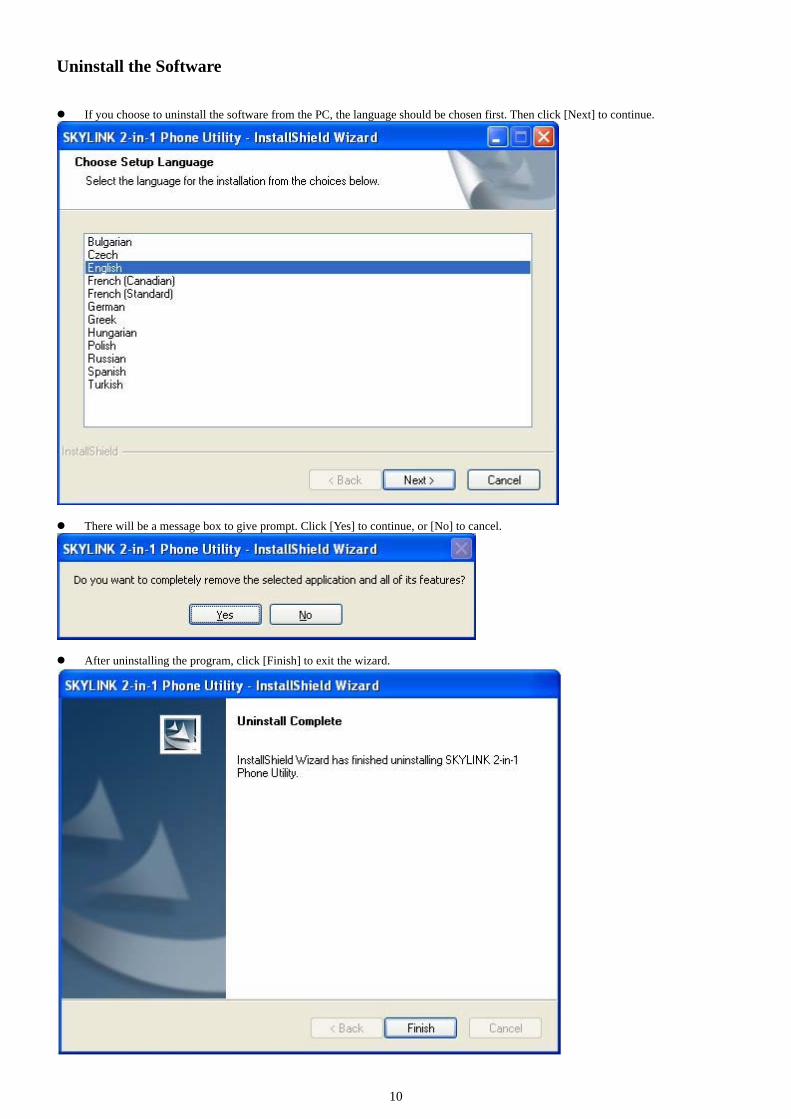
Uninstall the Software
If you choose to uninstall the software from the PC, the language should be chosen first. Then click [Next] to continue.
There will be a message box to give prompt. Click [Yes] to continue, or [No] to cancel.
After uninstalling the program, click [Finish] to exit the wizard.
11
Operation Guide
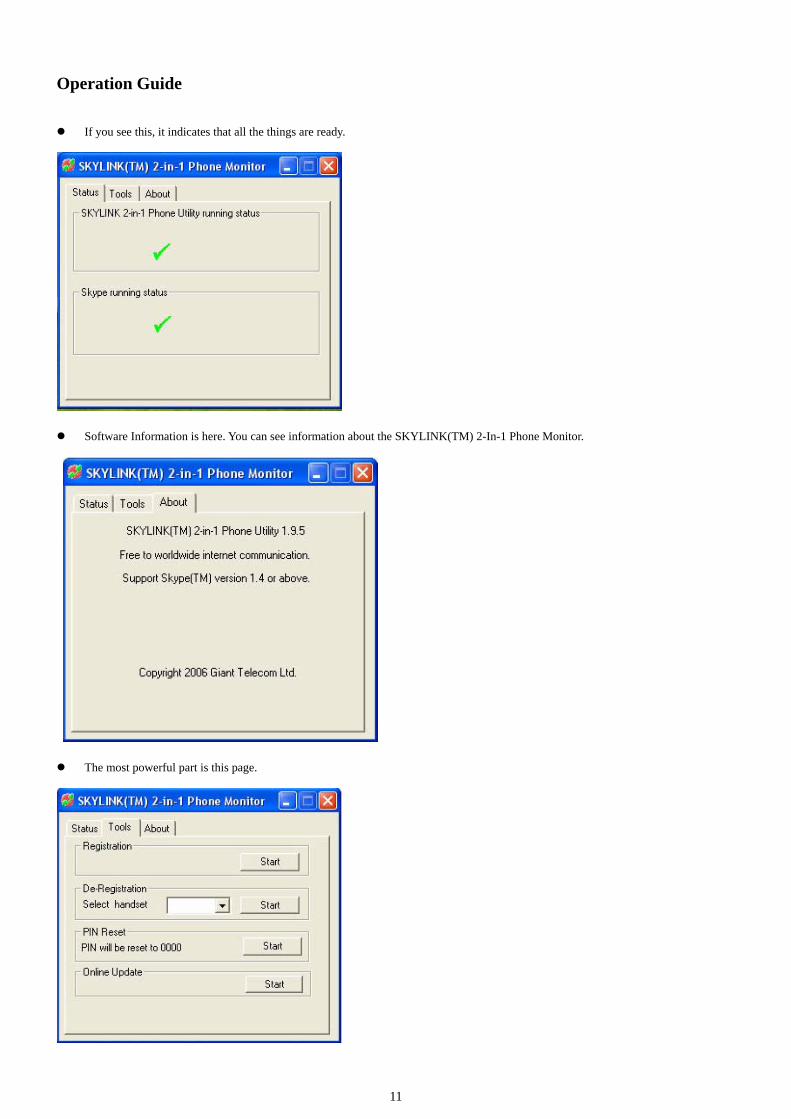
If you see this, it indicates that all the things are ready.
Software Information is here. You can see information about the SKYLINK(TM) 2-In-1 Phone Monitor.
The most powerful part is this page.
12
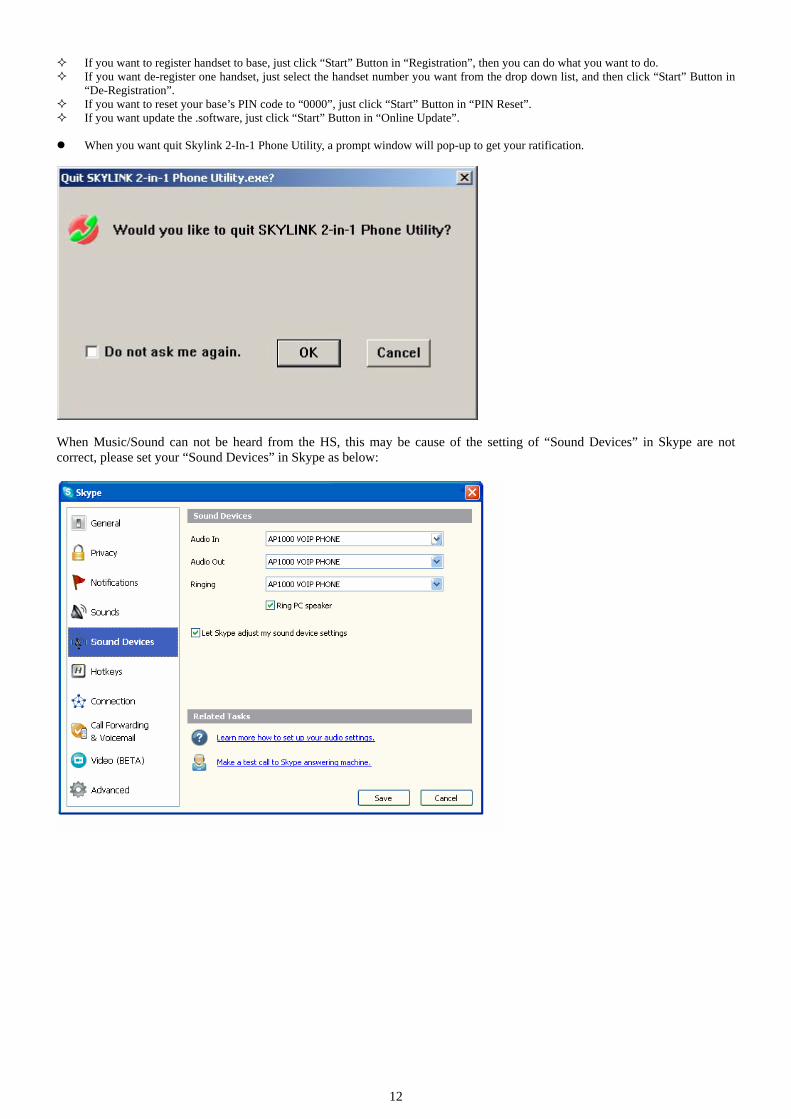
If you want to register handset to base, just click “Start” Button in “Registration”, then you can do what you want to do. If you want de-register one handset, just select the handset number you want from the drop down list, and then click “Start” Button in
“De-Registration”. If you want to reset your base’s PIN code to “0000”, just click “Start” Button in “PIN Reset”. If you want update the .software, just click “Start” Button in “Online Update”.
When you want quit Skylink 2-In-1 Phone Utility, a prompt window will pop-up to get your ratification.
When Music/Sound can not be heard from the HS, this may be cause of the setting of “Sound Devices” in Skype are not correct, please set your “Sound Devices” in Skype as below:
13
Features We are very pleased that you have purchased this highly sophisticated, cordless telephone which is equipped with the following features:
Digital cordless telephone complying to DECT standards Call free of charge worldwide via SkypeTM . 2-in-1 cordless telephone-Internet telephone and standard telephone in one. Operation instruction in 4 languages Teleconference Call transfer/forwarding Internal, free communication between handsets Prefix dialing Automatic call answering on/off Phone book group function (6 groups) Color display with icon driven menu Phone book for 100 entries with 3 numbers each name Unlimited IP contacts and Call Log memory.(due to computer’s free disk space) Extended redialing for 20 call numbers Microphone and ringer muting function Low battery and out of range indicators Key lock Key tone on/off 10 incoming call ringing melodies Ringing volume control (5 levels) 10 call separate ring tones. Internal/External/Net individual ringer off Tone/Pulse dialing Two games: snake and guess number Walkie talkie 3 selectable wallpaper(one is Skype logo) 10 visual notifications for Skype user status Caller ID (CLIP) (requires service from your telephone operator). Emergency call. Priority call alert. Programmable call barring. Speed dial. Clock and alarm. Operation of up to 6 handsets with CE21878 base, use CE21878 handset on up to 4 bases. Paging function from base station to handset Up to 92 hours standby Up to 10 hours continuous call time Operation with 2 standard AAA batteries (NiMH) Adjustable flash time
* DECT = Digital Enhanced Cordless Telecommunication = Standard for Cordless Telephones.
14
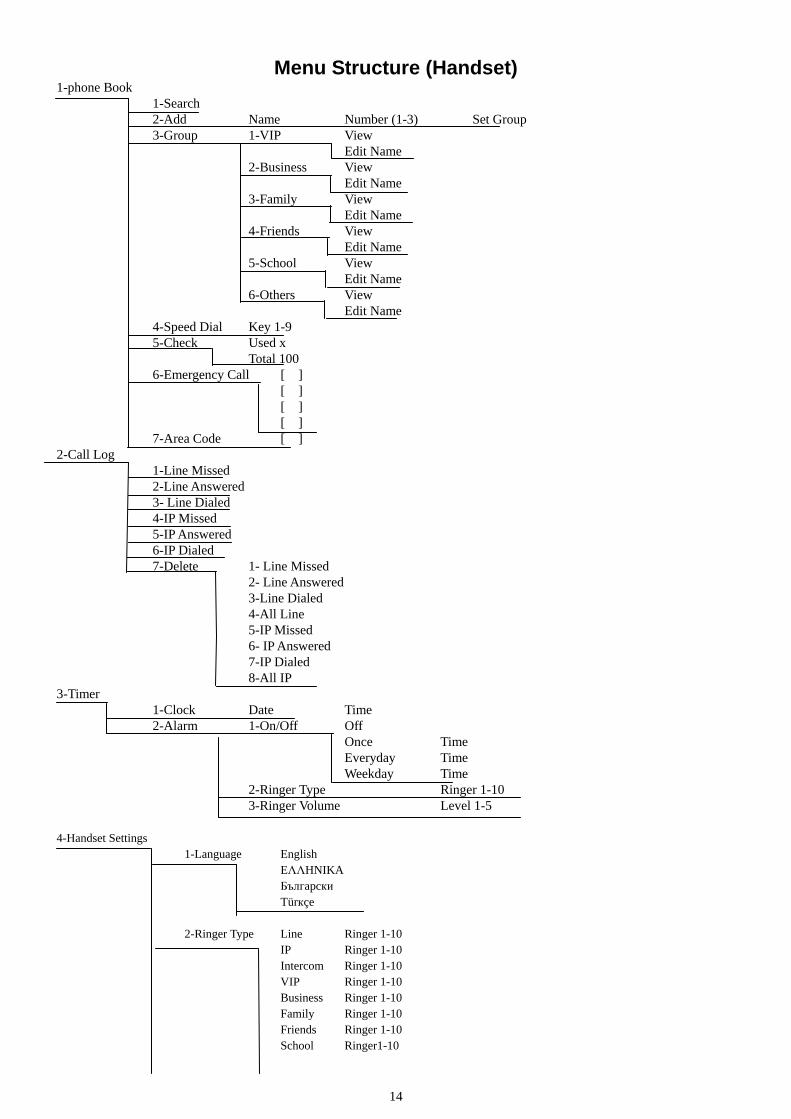
Menu Structure (Handset) 1-phone Book 1-Search 2-Add Name Number (1-3) Set Group 3-Group 1-VIP View Edit Name 2-Business View Edit Name 3-Family View Edit Name 4-Friends View Edit Name 5-School View Edit Name 6-Others View Edit Name 4-Speed Dial Key 1-9 5-Check Used x Total 100 6-Emergency Call [ ] [ ] [ ] [ ] 7-Area Code [ ] 2-Call Log 1-Line Missed 2-Line Answered 3- Line Dialed 4-IP Missed 5-IP Answered 6-IP Dialed 7-Delete 1- Line Missed 2- Line Answered 3-Line Dialed 4-All Line 5-IP Missed 6- IP Answered 7-IP Dialed 8-All IP 3-Timer 1-Clock Date Time 2-Alarm 1-On/Off Off Once Time Everyday Time Weekday Time 2-Ringer Type Ringer 1-10 3-Ringer Volume Level 1-5 4-Handset Settings 1-Language English EΛΛHNIKA Бългapcки Türкçe 2-Ringer Type Line Ringer 1-10 IP Ringer 1-10 Intercom Ringer 1-10 VIP Ringer 1-10 Business Ringer 1-10 Family Ringer 1-10 Friends Ringer 1-10 School Ringer1-10
15
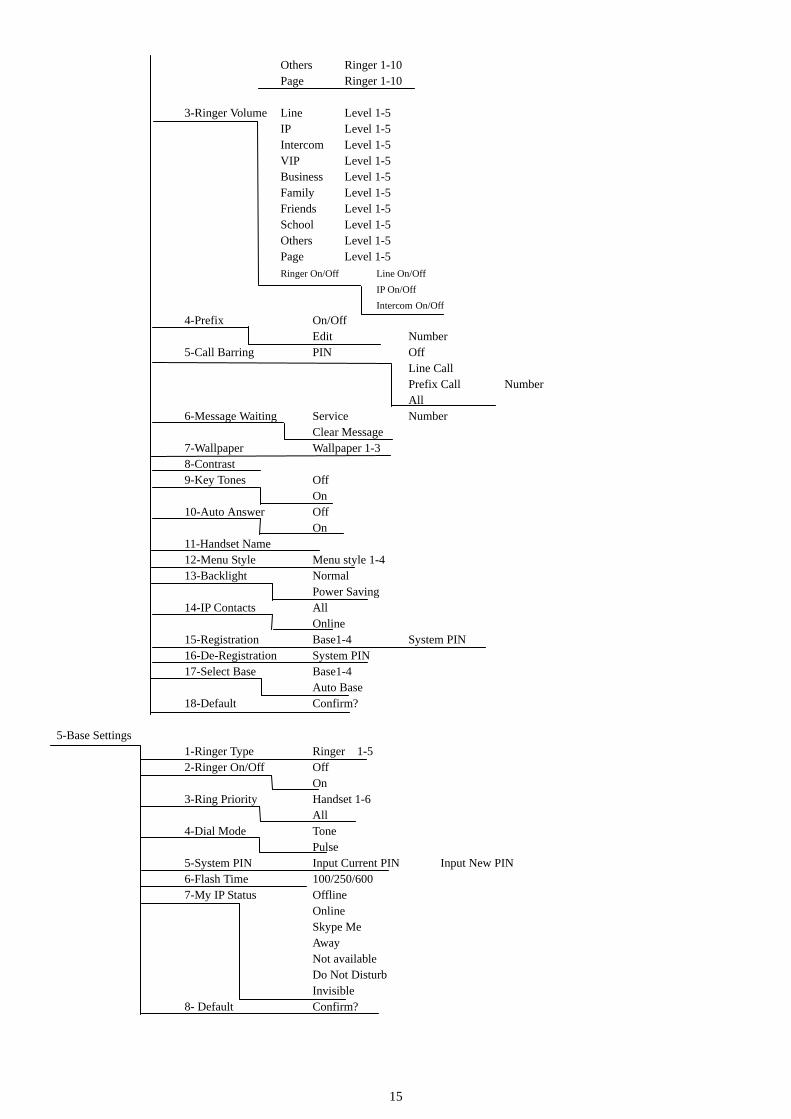
Others Ringer 1-10 Page Ringer 1-10 3-Ringer Volume Line Level 1-5 IP Level 1-5 Intercom Level 1-5 VIP Level 1-5 Business Level 1-5 Family Level 1-5 Friends Level 1-5 School Level 1-5 Others Level 1-5 Page Level 1-5 Ringer On/Off Line On/Off IP On/Off Intercom On/Off 4-Prefix On/Off Edit Number 5-Call Barring PIN Off Line Call Prefix Call Number All 6-Message Waiting Service Number Clear Message 7-Wallpaper Wallpaper 1-3 8-Contrast 9-Key Tones Off On 10-Auto Answer Off On 11-Handset Name 12-Menu Style Menu style 1-4 13-Backlight Normal Power Saving 14-IP Contacts All Online 15-Registration Base1-4 System PIN 16-De-Registration System PIN 17-Select Base Base1-4
Auto Base 18-Default Confirm? 5-Base Settings 1-Ringer Type Ringer 1-5 2-Ringer On/Off Off On 3-Ring Priority Handset 1-6 All 4-Dial Mode Tone Pulse 5-System PIN Input Current PIN Input New PIN
6-Flash Time 100/250/600 7-My IP Status Offline Online Skype Me Away Not available Do Not Disturb Invisible 8- Default Confirm?

16
6-Function 1-Games 1-Snake Play Set speed Highest Score Help 2-Guess Number Start Game Level Highest Score Help 2-Walkie Talkie Enable Input Group ID Disable
17
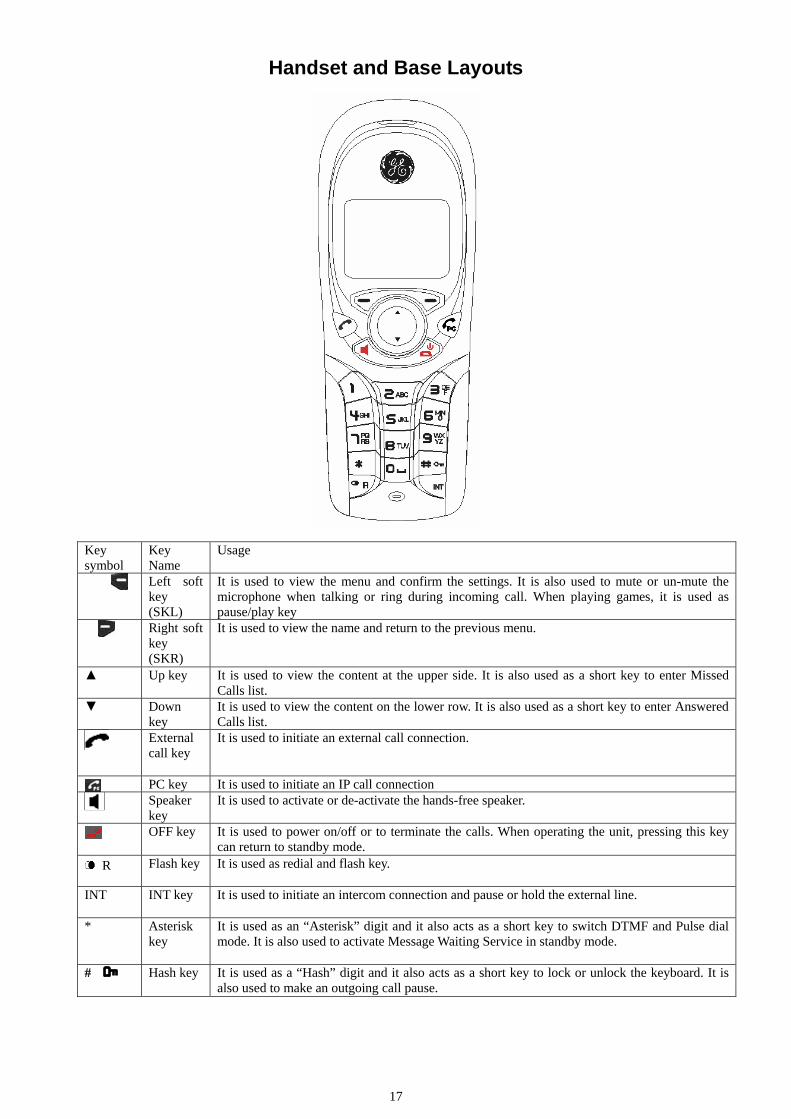
Handset and Base Layouts
Key symbol
Key Name
Usage
Left soft key (SKL)
It is used to view the menu and confirm the settings. It is also used to mute or un-mute the microphone when talking or ring during incoming call. When playing games, it is used as pause/play key
Right soft key (SKR)
It is used to view the name and return to the previous menu.
▲ Up key It is used to view the content at the upper side. It is also used as a short key to enter Missed Calls list.
▼ Down key
It is used to view the content on the lower row. It is also used as a short key to enter Answered Calls list.
External call key
It is used to initiate an external call connection.
PC key It is used to initiate an IP call connection Speaker
key It is used to activate or de-activate the hands-free speaker.
OFF key It is used to power on/off or to terminate the calls. When operating the unit, pressing this key can return to standby mode.
R Flash key It is used as redial and flash key.
INT INT key It is used to initiate an intercom connection and pause or hold the external line.
* Asterisk key
It is used as an “Asterisk” digit and it also acts as a short key to switch DTMF and Pulse dial mode. It is also used to activate Message Waiting Service in standby mode.
# Hash key It is used as a “Hash” digit and it also acts as a short key to lock or unlock the keyboard. It is also used to make an outgoing call pause.
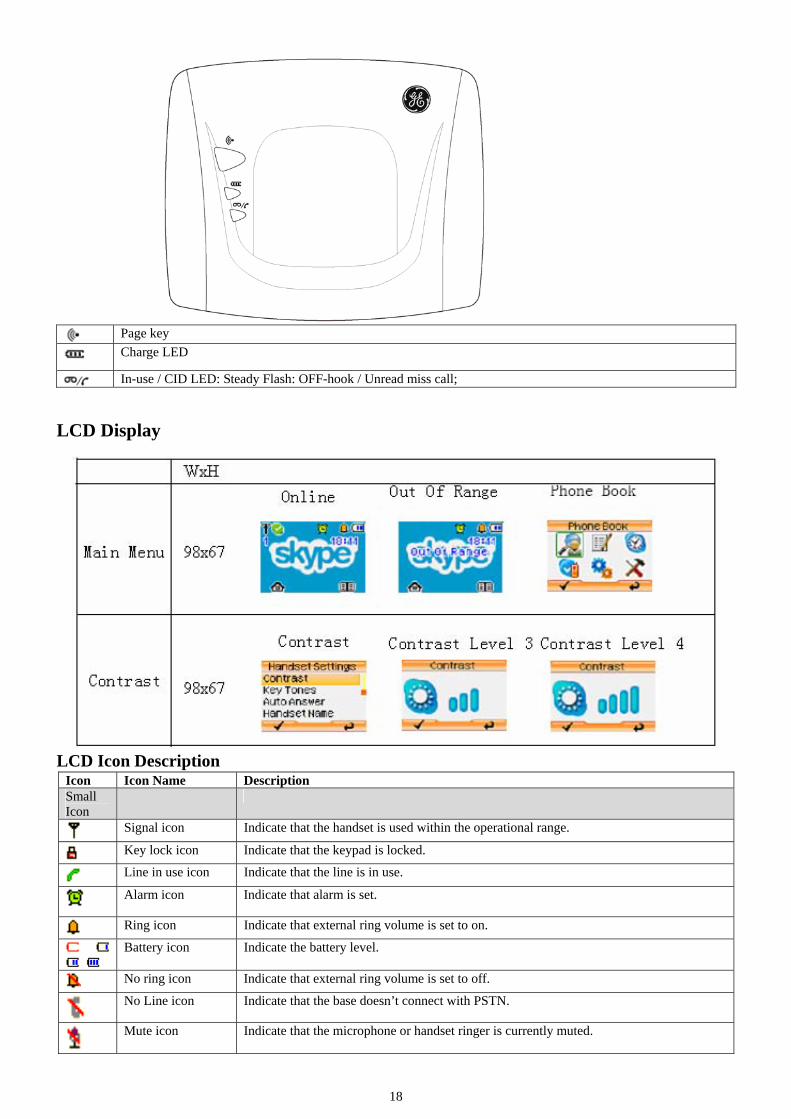
18
Page key
Charge LED
In-use / CID LED: Steady Flash: OFF-hook / Unread miss call;
LCD Display
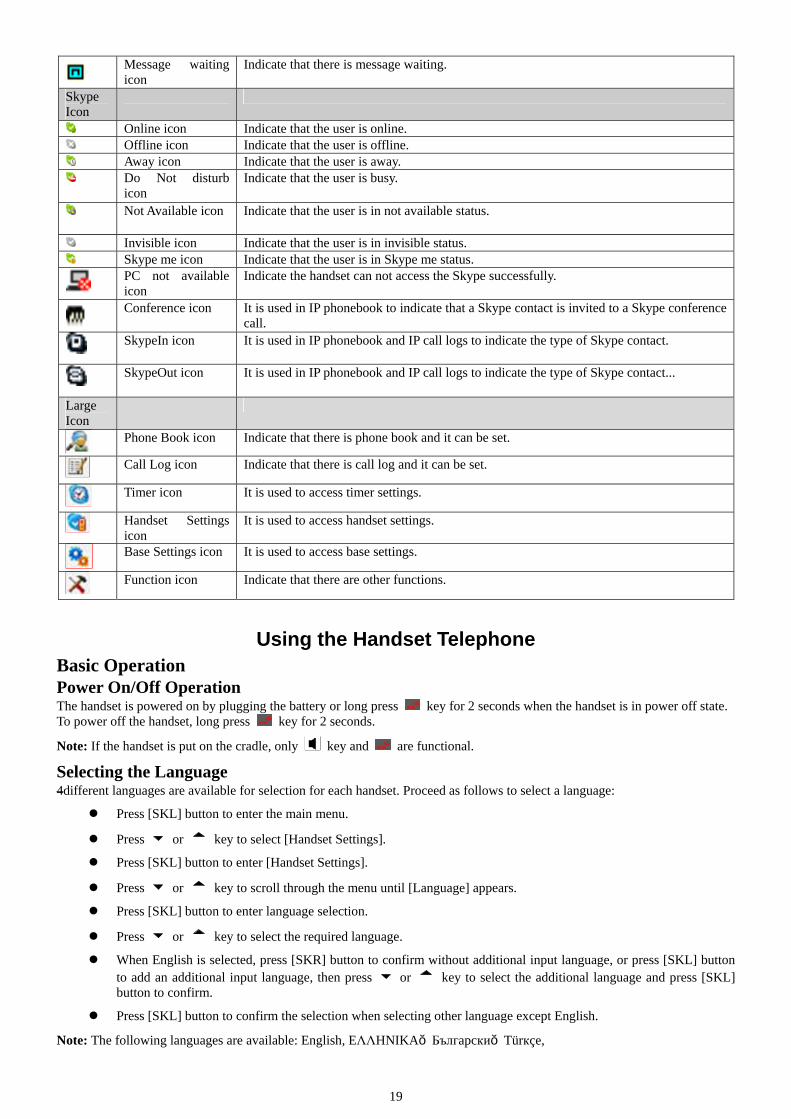
LCD Icon Description
Icon Icon Name Description Small Icon
Signal icon Indicate that the handset is used within the operational range.
Key lock icon Indicate that the keypad is locked.
Line in use icon Indicate that the line is in use.
Alarm icon Indicate that alarm is set.
Ring icon Indicate that external ring volume is set to on.
Battery icon Indicate the battery level.
No ring icon Indicate that external ring volume is set to off.
No Line icon Indicate that the base doesn’t connect with PSTN.
Mute icon Indicate that the microphone or handset ringer is currently muted.
19
Message waiting icon
Indicate that there is message waiting.
Skype Icon
Online icon Indicate that the user is online. Offline icon Indicate that the user is offline. Away icon Indicate that the user is away. Do Not disturb
icon Indicate that the user is busy.
Not Available icon Indicate that the user is in not available status.
Invisible icon Indicate that the user is in invisible status. Skype me icon Indicate that the user is in Skype me status.
PC not available icon
Indicate the handset can not access the Skype successfully.
Conference icon It is used in IP phonebook to indicate that a Skype contact is invited to a Skype conference
call.
SkypeIn icon It is used in IP phonebook and IP call logs to indicate the type of Skype contact.
SkypeOut icon It is used in IP phonebook and IP call logs to indicate the type of Skype contact...
Large Icon
Phone Book icon Indicate that there is phone book and it can be set.
Call Log icon Indicate that there is call log and it can be set.
Timer icon It is used to access timer settings.
Handset Settings icon
It is used to access handset settings.
Base Settings icon It is used to access base settings.
Function icon Indicate that there are other functions.
Using the Handset Telephone Basic Operation Power On/Off Operation The handset is powered on by plugging the battery or long press key for 2 seconds when the handset is in power off state. To power off the handset, long press key for 2 seconds.
Note: If the handset is put on the cradle, only key and are functional.
Selecting the Language 4different languages are available for selection for each handset. Proceed as follows to select a language:
Press [SKL] button to enter the main menu.
Press or key to select [Handset Settings].
Press [SKL] button to enter [Handset Settings].
Press or key to scroll through the menu until [Language] appears.
Press [SKL] button to enter language selection.
Press or key to select the required language.
When English is selected, press [SKR] button to confirm without additional input language, or press [SKL] button to add an additional input language, then press or key to select the additional language and press [SKL] button to confirm.
Press [SKL] button to confirm the selection when selecting other language except English.
Note: The following languages are available: English, EΛΛHNIKA,Бългapcки,Türкçe,
20
Making Internal Calls If more than one handset is registered on the base station, internal calls can be made free of charge.
Press [INT] key.
Press or key to select the required handset (1..6).
Press key , or to carry out the conversation.
Press key to end the call.
Note: 1.If the called handset is unregistered, and then the call will be ended directly.
2.During the conversation, you can use or key to adjust the speaking volume (5 levels).
Making Line External Calls (PSTN) Post-dialing
Press key or key and wait for a dialing tone.
Dial the telephone number and complete the call.
Press key to end the call.
Pre-dialing: Dial the telephone number (up to 24 digits).
Delete any incorrect entries by pressing [SKR] button.
Press or key. The number entered is dialed and a connection established.
Press key to end the call.
Note: 1.If call barring is enabled and the dialed number matched with the barring conditions, it will prompt user that the call is barred.
2. During the conversation, you can use or key to adjust the speaking volume (5 levels).
3.It will start counting when the call is connected, the call timer format is HH:MM:SS.
4. After the connection is established, user can view phone book by pressing [SKR] button.
Making IP External Call (Skype VOIP Call) Make a SkypeOut Call SkypeOut allows you to use your Internet connection to call ordinary telephone and mobile telephones worldwide.
There are two ways to make a SkypeOut call:
Direct dialing Dial the number with format”00/011+country code + telephone number”.
Press key to dial out the number.
Press key to end the call.
Dialing from IP contracts list
Press the key, the first entry in the IP contacts list appears, and then press or key to select the required subscriber from the list. Alternatively, enter the first letter of the name required.
Press the or key to dial out the selected SkypeOut number.
Press key to end the call.
Make a Skype Call Make sure that SkypeTM is installed and activated on your computer.
Press the key, the first entry in the IP contacts list appears.
Press ▲ or ▼to browse the contacts (online or all) or enter the first letter of the name required to select a Skype contact.
21
Press or key to carry out the conversation.
press key to end the call.
Make an IP call during an Ongoing Call During an ongoing call you can always start a new call.
When you have an ongoing ordinary telephone call:
Press to make the PSTN call on hold.
Press again to enter into the IP contacts list.
Press ▲ or ▼to browse the contacts (online or all) or enter the first letter of the name required to select a Skype contact.
Press or key to carry out the conversation.
Toggle between the two calls by pressing key to select IP call or key to select the PSTN call.
Note: If neither call is ended, you can press to terminate the ongoing IP call and turn to the PSTN call or press key to release the PSTN line and turn to the IP call.
Press to end both calls.
Note: If one call is ended, the other ongoing call can be terminated by press key.
Taking Calls When an external Line call is received, if configured, the telephone number of the caller appears (network depended). If the caller has been entered in your phone book, the name appears.
When an IP Call is received, the incoming Skype username or SkypeIn number will be shown on the LCD.
When an internal call is received, the caller’s handset number will appear.
When receiving a line or IP call, all handsets registered to special base will ring and base green LED will flash according to the ring cadence.
Handset is in the base station Take the handset from the base station, a connection is automatically established (when the AUTO ANS function is
active). Otherwise press , , or [INT].
Carry out the conversation.
Press key to end the call.
Hand is not in the base station Press , , or [INT] to carry out the conversation.
Press key to end the call.
Note: you can reject the call by simply pressing the .
Redialing The phone stores up to 20 last dialed PSTN numbers in the Line Dialed Log and unlimited dialed Skype username or SkypeOut number in the IP Dialed log.
Press [R] key to view the dialed calls.
Or
Through the user menu.(see “Call Log” for detail)
Note: If there is no record in the Dialed Call Log, empty information will display and it will automatically return to the main menu.
Press or key to select desired type of dialed call.
Press [SKL] key to confirm your selection.
Press or key to select desired record.
22
Press or key to redial the desired record. If IP Dialed is selected, key is available too.
Press key to end the call.
Dialing from the Phone Book Press [SKR] button, the first entry in the phone book appears.(Or “No Records” if no entry)
Or
you can access Phone Book through user menu. (see “Phone Book” for detail).
Press or key to view the name list or enter the first letter of the name to quick search an entry.
Press [SKL] button to view the details.
Press or key to select the required number.
Press key or key to dial the number.
Press key to end the call.
Muting the Microphone and Ringer Press the [SKL] button to switch the microphone on or off during a call.
Press the [SKL] button to switch the ringer on or off during ringing.
Call Transfer / Forwarding If the telephone is connected to a PBX network, it is possible to put external PSTN call or IP call on hold and call other subscribers or to forward calls.
Press [INT] key to hold the external call and initiate an internal call.
Press or to view and then press [SKL], key, key or to select the desired handset.
Press key to transfer the external call to the handset before or after it answers the call.
Note: 1. There must be more than two handsets registered to the base, otherwise the call transfer/forwarding function will be invalid;
2. If the internal call is not answered in 30 seconds after the call transfer, it will call back.
Party Conference Local 3-way Conference Call After have received an external line/IP call, it is possible to include a second handset in the conversation.
Press [INT] key to hold the external call and initiate an internal call.
Press or to view and then press SKL, key, key or to select the desired handset.
Press [3] key to establish the conference call after the other handset answered the internal call.
Press key to disconnect from the conference call and the other handset continues with the external call.
Skype Conference Call Press key to enter the IP contacts list.
Press or key to view the contacts and press SKL to select participants one by one. (Up to 4 Skype users can be chosen to join the conference at one time)
Note: Press SKL again to cancel a selected party from the conference group.
Press key to start the conference call.
Note: Up to 6 people (2 local with 4 external Skype lines) can join into conference call.(see “Local 3-way Conference Call” to add a second handset into the conference call.)
Press key to disconnect from the conference call and the other handset continues with the external call
Conference Call with a PSTN Line and a Skype Contact
23
After making a line call and a IP call with one handset, you can make conference call with the two lines .
Press [INT] key to enter conference call.
Press key to disconnect from the conference call.
Call Waiting During an ongoing call you can always start a new call by pressing corresponding button.
Incoming ordinary telephone call during a PSTN call Press R key to hold the ongoing call and connect to the incoming ordinary telephone call.
Toggle between the two calls by pressing R key.
Press to end both calls.
Incoming PSTN call during IP call or incoming IP call during PSTN call Press the or key to hold the ongoing call and connect to the incoming call.
Toggle between the two calls by pressing key to select IP call or key to select the PSTN call.
Note: You can press to terminate the ongoing IP call and turn to the PSTN call or press key to release the PSTN line and turn to the IP call.
Press to end both calls.
Note: If one call is ended, the other ongoing call can be terminated by press key.
Incoming PSTN call during intercom Press the or key to hold the intercom call and connect to the incoming call.
Toggle between the two calls by pressing INT key.
Press to end both calls.
Incoming IP call during intercom Press the or key to hold the ongoing call and connect to the incoming call.
Toggle between the two calls by pressing INT key
Press to end both calls.
Changing the Earpiece and Ring Volume Press or key as often as necessary to change the earpiece and ring volume during a call.
Paging the Handset If a handset has been misplaced, it is possible to call all the registered handsets by pressing [page] key on the base station. The handset page ring can be stopped until any key is pressed.
Handset Speaker Phone Press key to activate or deactivate the handset speaker.
Key Lock It is possible to lock / unlock the Handset keypad by holding key for 2 seconds.
Note:1.Incoming calls can still be received and alarm can be turned off by press any key.
2.Only and key are functional when keypad is locked.
Warning Signals, Confirmation Signals
24
Key tone: Acoustic signal when a key pressed. Can be switched off (refer to Handset Settings). Low battery charge: If the low battery condition is detected, the handset will beep every 30 seconds and the empty
battery icon will display on LCD. Out of range: When a handset is too far away from the base, “Out of Range” will display on LCD. PC Not Available When Skype can not be accessed successfully, “PC Not Available” icon will displayed and
bring out an error tone. Short Key Definition There are six short key: , [INT] R and [SKR].
In standby mode, press key to access missed call log.
In standby mode, press key to access received call log.
In standby mode, press key to access IP Contracts list.
In standby mode, press [INT] key to access Intercom menu.
In standby mode, press R key to access dialed call log.
In standby mode, press SKR key to access PSTN phone book list.
Call Log Browse, Delete, Save IMPORTANT: To use the “Call Log” function, you must subscribe to your network operator’s Caller Line Identification (CLI) service.
Missed Calls, Answered Calls, Dialed Calls There are six types of call log: Line missed, Line Answered, and Line dialed, IP missed, IP Answered ,IP dialed. Each Line log can contain up to 20 records but each IP log is unlimited.
Press [SKL] button to enter the main menu.
Press or key to select [Call Log].
Press [SKL] button to enter [Call Log].
Note: If there is no record in call log, empty information will display and it will automatically return to the main menu.
Press or key to select the desired call log type.
Press [SKL] button to confirm the selection.
Press or key to find the desired record.
Press [SKL] button to view the detailed information (date/time).
Press [SKL] button.
In Line call logs, operate as follows: (Note: In IP call logs, just press SKL to delete the selected entry.)
Press or key to choose the selection [Save] or [Delete].
Press [SKL] button to confirm the selection or press [SKR] button to back up.
If choose [Save]:
Press or key to select a location to store the number
Press [SKL] button to confirm your choose.
Input user name by pressing CCITT key.
Press [SKL] button to confirm.
Press or key to select a group and then press [SKL] button to confirm.
If choose [Delete]:
Simply press [SKL] key to confirm.
Note: 1.Short keys are available in standby mode to access, press key to access missed call log; press key to access received call log; press [R] key to access dialed calls log.
25
2. CCITT: International Telephone and Telegraph Consultative Committee.
Delete Press or key to select [Delete] through the submenu [Call Log].
Press [SKL] button.
Press or key to select one type of calls or all calls.
Press [SKL] button to delete the desired records or press [SKR] button to back up.
Note: When viewing the records, press key the highlight record will be recalled immediately.
Phone Book The telephone can store up to 100 entries in the phone book with three numbers each name. Store numbers frequently used in order to be able to dial them quickly and easily. When the function is supported by the telephone provider service and the caller, the handset displays the name of the caller (when stored in the phone book).
User can access Phone Book directly from standby mode by pressing [SKR].
Search Press or key to choose [Phone Book] through the main menu.
Press [SKL] button to access [Phone Book].
Note: If there is no record in phone book, empty information will display and it will automatically return to the main menu.
Press or key to choose the selection [Search].
Press [SKL] button.
Enter the index character or the desired name.
Press [SKL] button.
Press or key to select the desired name.
Press [SKL] button.
Press or key to view the name and numbers.
Press [SKL] button to edit the name and numbers, delete the entry or change the group.
Store Entries Press or key to choose the selection [Add] through the submenu [Phone Book].
Press [SKL] button.
Enter the name (max. 16 characters).
Note: To enter the characters, press the relevant key the corresponding number of times, 1, 2, 3 or 4 times, according to the position on the key. For example, press the [5] key three times for an L. Delete incorrect entries by pressing the [SKR] button. Press [*] key to switch number, lowercase and capital letter.
Press [SKL] button to confirm the input.
Enter the number (max. 24 digits).
Press [SKL] button to confirm the input.
Enter the second number.
Press [SKL] button to confirm the input.
Enter the third number.
Press [SKL] button to confirm the input.
Press or key to select the group.
Press [SKL] button to confirm the selection and complete storing the entry.
Note: If all the memories are occupied, “Memory Full” appears in the display.
There are other ways to store entries into phone book. Press digits keys to enter a number in standby mode, and then press
26
[SKL] button to save the number. The following procedure is as same as above. User can also save number into phone book through call log (refer to chapter “Call Log Operation”).
Group in Phone book Press or key to choose the selection [Group] through the submenu [Phone Book].
Press [SKL] button.
Press or key to select one of the groups.
Press [SKL] button to access the group.
Press or key to choose the selection [View], [Edit Name].
Press [SKL] button to view the details of the group or edit the group name .
Note: When view the details of the group, user can edit the name and number in the group, and change the group and delete entries.
Speed Dial Press or key to choose the selection [Speed Dial] through the submenu [Phone Book].
Press [SKL] button.
Press or key to choose the speed dial key (key 1 to key 9).
Press [SKL] button to confirm.
Press or key to choose the selection [Phone Book] or [Delete].
Press [SKL] button to confirm the selection.
In the selection [Phone Book], Press or key to choose a number to set as speed dial number.
Press [SKL] button to confirm the setting.
In the selection [Delete], press [SKL] to delete the speed dial number.
To dial the defined speed dial number, press and hold the corresponding speed dial key in standby mode until the dial number appears on the LCD.
Check Phone Book Press or key to choose the selection [Check] through the submenu [Phone Book].
Press [SKL] button to view the used memories and total memories.
Emergency Call Press or key to choose the selection [Emergency Call] through the submenu [Phone Book].
Press [SKL] button.
Press or key to select the location of the emergency call.
Press [SKL] button.
Enter the emergency call number.
Press [SKL] button to confirm the setting.
Note: The emergency call number can be edited and dialed out even when keypad is locked.
Area Code Press SKL in standby mode to view the submenus in [Phone Book]
Press 【▲】/【▼】 to select menu [Area Code].
Press SKL, then input the digits, and press SKL again to confirm.(Max. 5 digits)
The area code can also be edited just as the above procedure.
27
Handset Settings Ringer Type
Press or key to select [Handset Settings] through the main menu.
Press [SKL] button to access the [Handset Settings].
Press or key to choose the selection [Ringer Type].
Press [SKL] button.
Press or key to choose the desired selection
Press [SKL] button.
Press or key to select one type of ringers (10 ring melodies).
Press [SKL] button to confirm the ring type.
Ringer Volume Press or key to choose the selection [Ringer Volume] through the submenu [Handset Settings].
Press [SKL] button.
Press or key to choose the desired selection.
Press [SKL] button.
Press or key to adjust the ringer volume (5 levels).
Press [SKL] button to confirm the ring volume.
Ringer On/Off Press or key to choose the selection [Ringer Volume] through the submenu [Handset Settings].
Press [SKL] button.
Press or key to choose the selection [Ringer On/Off]
Press [SKL] button
Press or key to choose the selection [Line On/Off], [IP On/Off] or [Intercom On/Off].
Press [SKL] button.
Press or key to select on or off.
Press [SKL] button to confirm the setting.
Prefix Prefix On/Off
Press or key to choose the selection [Prefix] through the submenu [Handset Settings].
Press [SKL] button.
Press or key to choose the selection [On/Off].
Press [SKL] button.
Press or key to select on or off.
Press [SKL] button to confirm the selection.
Prefix Edit Press or key to choose the selection [Edit] through the submenu [Prefix].
Press [SKL] button.
Enter the pre-fix number (max. 5 digits).
Press [SKL] button to confirm the input.
Note: If prefix number is exist and prefix function set to on, the entered prefix number must be dialed first when making an external call.
28
Call Barring Press or key to choose the selection [Call Barring] through the submenu [Handset Settings].
Press [SKL] button.
Enter the PIN (default setting = 0000).
Press [SKL] button.
Press or key to choose the selection [Off], [Line Call], [Prefix Call] or [All].
Press [SKL] button to confirm the setting.
Note: [Off] = all outgoing calls are allowed; [Line Call] = all outgoing external calls are barred; [Prefix Call] = all outgoing calls matched with pre-fix number are barred; [All] = all outgoing calls are barred.
Message Waiting If you have subscribed to a voice messaging service, the green message light on the base will flash to alert you if you have message waiting. To hear your messages, contact your voice messaging service provider. Note: For quick dialing you can store the voice messaging service number on you phone. To store/dial the voice messaging service number In the handset setting menu:
Press the or key to display Message Waiting and press the SKL key to select. Press the or key to display Service and press the SKL key to confirm. Enter the number of your messaging service provider and press the SKL key to confirm. Press the to dial the number. Press the to return to standby mode.
To clear messages When you have listened to you messages, to turn off the flashing message light: In the handset setting menu:
Press the or key to display Message Waiting and press the SKL key to select. Press the key to display clear Message and press the SKL key to confirm. Press the to return to standby mode.
Wallpaper Press or key to choose the selection [Wallpaper] through the submenu [Handset Settings].
Press [SKL] button.
Press or key to select [Wallpaper 1], [Wallpaper 2] or [Wallpaper 3].
Press [SKL] button to view the wallpaper.
Press [SKL] button to confirm the selection.
Contrast Press or key to choose the selection [Contrast] through the submenu [Handset Settings].
Press [SKL] button.
Press or key to adjust the contrast level.
Press [SKL] button to confirm the setting.
Key Tones Press or key to choose the selection [Key Tones] through the submenu [Handset Settings].
Press [SKL] button.
Press or key to select [Off] or [On].
Press [SKL] button to confirm the selection.
Auto Answer Press or key to choose the selection [Auto Answer] through the submenu [Handset Settings].
29
Press [SKL] button.
Press or key to select [Off] or [On].
Press [SKL] button to confirm the selection.
Handset Name Press or key to choose the selection [Handset Name] through the submenu [Handset Settings].
Press [SKL] button.
Enter the handset name.
Press [SKL] button to confirm the input.
Note: Key assignment Overview
1 [1] [-?!,.&=:#"$] 7 [7] [p q r s] [P Q R S] 2 [2] [a b c] [A B C] 8 [8] [t u v] [T U V] 3 [3] [d e f] [D E F] 9 [9] [w x y z] [W X Y Z] 4 [4] [g h I] [G H I] 0 [0] [space] 5 [5] [j k l] [J K L] * Switch key 6 [6] [m n o] [M N O] # [*+%@()/[]; _'^]
** Press [*] key can switch number, lowercase and capital letter.
Menu Style Press or key to choose the selection [Menu Style] through the submenu [Handset Settings].
Press [SKL] button.
Press or key to choose the selection [Menu Style 1], [Menu Style 2], [Menu Style 3] or [Menu Style 4].
Press [SKL] button to confirm the selection.
Note: When a specific color scheme is selected, the background color will be changed to the corresponding color.
Backlight Press or key to choose the selection [Backlight] through the submenu [Handset Settings].
Press [SKL] button.
Press or key to select [Normal] or [Power saving].
Press [SKL] button to confirm the selection.
Note: 1.If Power Saving mode is chosen, the backlight will be on for 15s.If Normal mode is selected, it will be on for 30s.
2. When during an incoming ring, the backlight will always be on.
3. When alarm rings, the backlight will be on for 5s.
4. After a call ended, the backlight will be on for 3s.
IP Contacts Press or key to choose the selection [IP Contacts] through the submenu [Handset Settings].
Press [SKL] button.
Press or key to select [All] or [Online].(If “All” mode is chosen, all contacts will be displayed. If Online is chosen, only online users can be displayed.)
Press [SKL] button to confirm the selection.
Registration Press or key to choose the selection [Registration] through the submenu [Handset Settings].
Press [SKL] button.
Press or key to select a specific base (1...4).
Press [SKL] button.
30
Enter the System PIN (default setting = 0000).
Press [SKL] button to register the handset.
Press and hold the page key on the base station for 2 seconds.
De-Registration Press or key to choose the selection [De-Registration] through the submenu [Base Settings].
Press [SKL] button.
Enter the System PIN (default setting = 0000).
Press or key to select a specific handset(1..6)
Press [SKL] button.
Press [SKL] button to confirm the selection.
Select Base Press or key to choose the selection [Select Base] through the submenu [Handset Settings].
Press [SKL] button.
Press or key to select a specific base.
Press [SKL] button to confirm the selection.
Default Handset Settings Press or key to choose the selection [Default] through the submenu [Handset Settings].
Press [SKL] button.
Press [SKL] button to reset to the default settings or press [SKR] button to cancel.
Base Settings Base Ringer
Press or key to select [Base Settings] through the main menu.
Press [SKL] button to confirm.
Press or key to choose the selection [Ringer Type].
Press [SKL] button.
Press or key to choose the selection [Ringer 1], [Ringer 2], [Ringer 3], [Ringer 4] or [Ringer 5]
Press [SKL] button to confirm the selection.
Base Ringer On/Off Press or key to choose the selection [Ringer On/Off] through the submenu [Base Settings].
Press [SKL] button.
Press or key to select [Off] or [On].
Press [SKL] button to confirm the selection.
Ring Priority Press or key to choose the selection [Ring Priority] through the submenu [Base Settings].
Press [SKL] button.
Press or key to select a specific handset or all handsets to ring first.
Press [SKL] button to confirm the selection.
31
Dial Mode Press or key to choose the selection [Dial Mode] through the submenu [Base Settings].
Press [SKL] button.
Press or key to select [Tone] or [Pulse].
Press [SKL] button to confirm the selection.
System PIN Press or key to choose the selection [System PIN] through the submenu [Base Settings].
Press [SKL] button.
Enter the Current PIN (default setting = 0000).
Press [SKL] button.
Enter the new PIN.
Press [SKL] button.
Enter the new PIN again.
Press [SKL] button to confirm the input.
Flash Time Press or key to choose the selection [Flash Time] through the submenu [Base Settings]. Press [SKL] button. Press or key to select [100], [250] or [600]. Press [SKL] button to confirm the selection.
NET Status Press or key to choose the selection [My IP Status] through the submenu [Base Settings]. Press [SKL] button. Press or key to select desired status. Press [SKL] button to confirm the input.
Default Base Settings Press or key to choose the selection [Default] through the submenu [Base Settings].
Press [SKL] button to reset to the default settings or press [SKR] button to cancel.
Function Game There are two games:
Snake: Press or key to choose the selection [Game] through the submenu [Function]
Press [SKL] button to confirm.
Press or key to choose the selection [Snake]
Press [SKL] button to confirm.
Enter [Play] to start the game;
Enter [Set speed] to choose from five speed levels, use or key to adjust and press [SKL] to confirm, [SKR] to cancel setting;
Enter [Highest Score] to view historic highest score. It will be clear after power off;
Enter [Help] to get operation helps for this game;
32
Guess Number Press or key to choose the selection [Game] through the submenu [Function]
Press [SKL] button to confirm.
Press or key to choose the selection [Guess Number]
Press [SKL] button to confirm.
Enter [Start Game] to start the game;
Enter [Level] to choose difficulty levels, use or key to choose from [High], [Medium], [Low] levels and press [SKL] to confirm, [SKR] to cancel setting;
Enter [Highest Score] to view historic highest score. It will be clear after power off;
Enter [Help] to get operation helps for this game;
Walkie Talkie Press or key to choose the selection [Walkie Talkie] through the submenu [Function].
Press [SKL] button.
Press or key to select [Enable].
Press [SKL] button to confirm the selection.
Enter the group ID.
Press [SKL] button.
Enter the WT ID (walkie-talkie ID).
Press [SKL] button to activate walkie-talkie function.
Or
Press or key to select [Disable].
Press [SKL] button to deactivate walkie-talkie function.
Note:
1. Press , or [INT] key, then press a digit for a WT ID, the called party will ring (internal ring) and the calling WT ID will highlight;
2. The called party press button to accept the calling WT, then the calling party and the called party can communicate;
3. The called party can press [SKR] or key to reject the calling WT; during communication, the called party or the calling party can press [SKR] or key to end the communication;
4. Press , or [INT] key, then press [*] key, all the other handsets in the same group will ring and display the calling WT ID; 5. If walkie-talkie is not disabled, user can press / / [INT] key and then WT ID of other handsets in standby mode to call the corresponding handsets in the same group.
Timer Set Date/Time
Press or key to choose the selection [Clock] through the submenu [Timer].
Press [SKL] button.
Enter the date.
Press [SKL] button.
Enter the time.
Press [SKL] button to confirm the date/time setting.
Alarm Press or key to choose the selection [Alarm] through the submenu [Timer].
33
Press [SKL] button.
Press or key to select [Alarm].
Press [SKL] button.
Press or key to choose the selection [On/Off], [Ringer Type] or [Ringer Volume].
Press [SKL] button to confirm the relevant settings.
If choose [On/Off]
there are four options: Off, Once, Everyday, and Weekday.
If set off, simply press [SKL] button to confirm.
If set other three items, users need to set the time (see Set Date/Time for detail)
If choose [Ringer Type] or [Ringer Volume] Press or key to choose your desired selection, and then press [SKL] button to confirm.
Note: Once the alarm is set, the alarm icon will appear in the top icon bar.
Technical Specifications Handset Operating Time: (average values*) Approx. 10 hours talk time
Approx. 92 hours standby AC / DC Adapter VD075032D
Input: 230V AC / 50 Hz Output: 7.5V DC, 320mA Single-phase AC excluding IT installations defined by the EN 60950 standard. Caution: the network voltage is classified as a hazard by the criteria of this standard.
Telephone connection Appliance designed for connection to an analogue telephone line class TRT3 (telecommunications network voltage) as defined by the EN 60950 standard.
Rechargeable Battery GP60AAAHC, 1.2V / 600mAh / Ni-MH, AAA x 2 or equivalent * For guidance only, depends on initial battery charge.
General Product Care Simply wipe the base station with a damp cloth or an antistatic wipe. Never use a dry cloth as this can cause static discharge.
Troubleshooting Guide When you forget base PIN, following the procedure to Reset the units. ALL MEMORY AND SETTING WILL BE LOST. Disconnect the line cord and AC power supply. Hold “PAGE” button and plug in the AC power supply (in-use LED will be on). Release “PAGE” button and long press it three times. The In-Use LED will turn Off and then turn On again. The unit will return to its default setting a PIN code (0000). Following “Registering Additional Handsets” to register all handsets again.
PROBLEMS CAUSES SOLUTIONS GENERAL Registration not work. The battery is not sufficiently charged.
Handset and base station were not prepared for registration.
Charge the battery for 16 hours (see Battery Charging). Unplug and then plug in the power adapter.
No display. The battery has not been charged. Charge the battery or replace them (see Battery Charging)
No reactions to keystroke.
The keypad is locked.
Press * key longer than 2 seconds. Move closer to the base station.

34
No radio connection to the base station: blinking!
The handset is outside the base station range. The handset is not registered. The base station does not work.
Register the handset (see Registering Handset). Unplug and then plug the power adapter to the power outlet (220-230V AC / 50 Hz) and the other end into the power jack on base bottom.
No dial tone when pressing the “Talk” button.
The base unit is not powered on; The Handset is too far from the base unit,
Check the connection Move the handset closer to the base
No signal icon Handset is not registered the handset is out of range
Register the handset Move the handset closer to the base
When the handset is placed on the charger, no beep is heard.
The handset is not placed properly on the charger Charging contacts are dirty The charger is not powered on
Take the handset off the charger and put it back again. Clear charging contacts with a clear and dry cloth. Verify the charger is powered on.
Battery icon remains empty although the handset has charged for 16 hours.
The Handset’s battery is defective The Handset is not placed properly on the base unit or charger.
To purchase new rechargeable battery. Check to make sure the battery icon is scrolling
Cannot hear the other party clearly/ speaker too loud/quiet
The volume on handset is too low
Adjust the volume
The phone does not ring when a call comes in.
The ringer may be set off
Verify the ringer is on.
IP Contact list/ User status returns PC Not Available message
Please check as follows: If the base is powered on; .If the USB driver is functioning properly and the USB plug is connected successfully; If start and log into Skype; If the PC suit is running and shows that the connections are successfully.
Start and log into Skype. Make sure the PC suit is installed and is running. Verify that the USB driver is functioning properly and the USB plug is properly connected. Verify that the setting of Skype can allow PC suit to access it
Cannot call ordinary phone number
00/011 or country code is omitted Skype account has too little of no credit Handset loses its link
Enter 00/011 and country code before the number dialed Purchase more credit Verify the link is successful
Bad audio quality There may be interference from nearby electrical appliances The base station is installed in room with thick walls The handset is too far from the base unit. The quality of net is not good The audio device is not good enough
Move the PC to a different location Move the handset closer to the base unit. To get the net with higher quality To get the audio device with higher quality
Music/Sound can be heard on the phone; or no sound can be heard from PC Speakers while USB base station is plugged in to the PC.
When the USB base station is plugged in to USB port of your PC, all audio streams will be routed to the phone, and no audio is heard on the PC speakers.
Change the setting of your PC audio as below: Win 2000: Control Panel-->Audio and Multimedia-->Audio--> Enable "Use only default devices". Win XP: Control Panel -->Sounds and Audio Device-->Audio--> Enable "Use only default devices".

35
Environment
Used equipment and used handset batteries must be disposed of in compliance with current environmental protection regulations. You should return them to your reseller or dispose of them at an approved recycling centre. Do not attempt to open the batteries, as they contain chemical substance. In the event of leakage, avoid contact with the skin, eyes and mouth. In the event of contact, rinse the affected part for several minutes in running water. Clean the product with absorbent paper or a dry cloth and contact your reseller for replacement batteries.

36
is a trademark of General Electric company used under license to Thomson Inc. Indianapolis, IN 46290.
Model: CE21878GEX-A 00014098 (Rev. 0 E) 06-20 Printed in China
Thomson Telecom46, Quai Alphonse Le Gallo,
92648 Boulogne Cedex France


![Configuring the Cisco SPA ATA Family with Skype for SIP · PDF fileTroubleshooting: LED for Phone is off [Skype for SIP Trunk] _____8 Troubleshooting: LED for Phone ... Configuring](https://img.pdfslide.us/doc/110x75/5aa1624f7f8b9aa0108bbb53/configuring-the-cisco-spa-ata-family-with-skype-for-sip-led-for-phone-is-off-skype.jpg)