Embed Size (px)
Citation preview
1
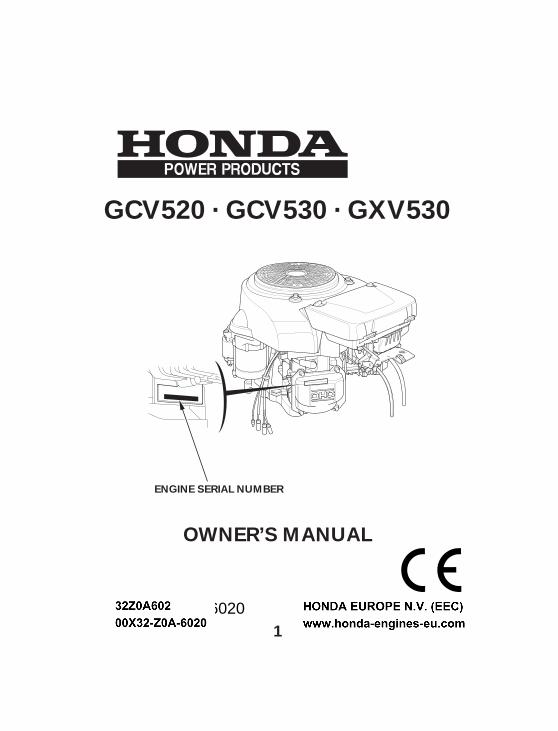
OWNER’S MANUAL
ENGINE SERIAL NUMBER
GCV520 · GCV530 · GXV530
00X32-Z0A-6020
2
Indicates a strong possibility of severe personalinjury or death if instructions are not followed.
Indicates a possibility of personal injury or equipmentdamage if instructions are not followed.
The Honda engine is designed to give safe and dependable serviceif operated according to instructions. Read and understand theOwner’s Manual before operating the engine. Failure to do socould result in personal injury or equipment damage.
Thank you for purchasing a Honda engine.
All information in this publication is based on the latest productinformation available at the time of printing.
Honda Motor Co., Ltd. reserves the right to make changes at anytime without notice and without incurring any obligation.
No part of this publication may be reproduced without writtenpermission.
This manual should be considered a permanent part of the engineand should remain with it if it is resold.
Pay special attention to statements preceded by the followingwords:
Gives helpful information.
If a problem should arise, or if you have any questions about yourengine, consult an authorized Honda dealer.
This manual covers the operation and maintenance of your engine:GCV520, GCV530 and GXV530 engines.
-
3
SAFETY INSTRUCTIONS
To ensure safe operation
Always make a pre-operation inspection (page ) before youstart the engine. You may prevent an accident or equipmentdamage.
Make sure that the filler cap is closed securely.
Do not overfill the fuel tank. There should be no fuel in the fillerneck.
Refuel in a well-ventilated area with the engine stopped.Gasoline is highly flammable and explosive under certainconditions.
Do not place flammable objects such as gasoline, matches, etc.,close to the engine while it is running.
Know how to stop the engine quickly, and understand theoperation of all controls. Never permit anyone to operate theengine without proper instructions.
Children and pets must be kept away from the area ofoperation due to a possibility of burns from hot enginecomponents or injury from any equipment the engine may beused to operate.
To prevent fire hazards and to provide adequate ventilation,keep the engine at least 1 meter (3 feet) away from buildingsand other equipment during operation. Do not place flammableobjects close to the engine.
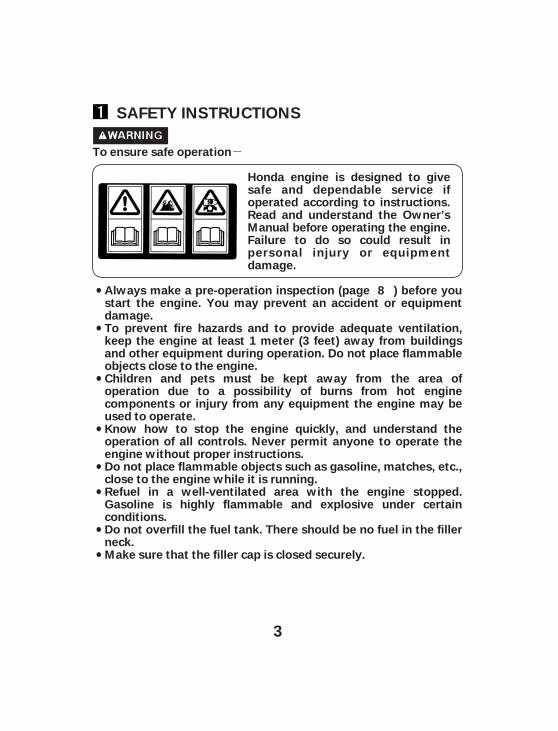
Honda engine is designed to givesafe and dependable service ifoperated according to instructions.Read and understand the Owner’sManual before operating the engine.Failure to do so could result inpersonal injury or equipmentdamage.
8
-
4
SAFETY INSTRUCTIONS
SAFETY LABEL LOCATION
To ensure safe operation
The muffler becomes very hot during operation and remainshot for a while after stopping the engine. Be careful not totouch the muffler while it is hot. To avoid severe burns or firehazards, let the engine cool before transporting it or storing itindoors.
A spark arrester is available as an optional part for this engine.It is illegal in some areas to operate an engine without a sparkarrester. Check local laws and regulations before operating.
Do not place anything on the engine, as it may create a firehazard.
Place the engine on a stable surface. Do not tilt the engine morethan 20° from horizontal. Operating at excessive angles mayresult in fuel spillage.
Exhaust gas contains poisonous carbon monoxide. Avoidinhalation of exhaust gases. Never run the engine in a closedgarage or confined area.
If any fuel is spilled, clean it up completely and allow petroleumvapours to dissipate before starting the engine.Do not smoke or allow flames or sparks where the engine isrefueled or where gasoline is stored.
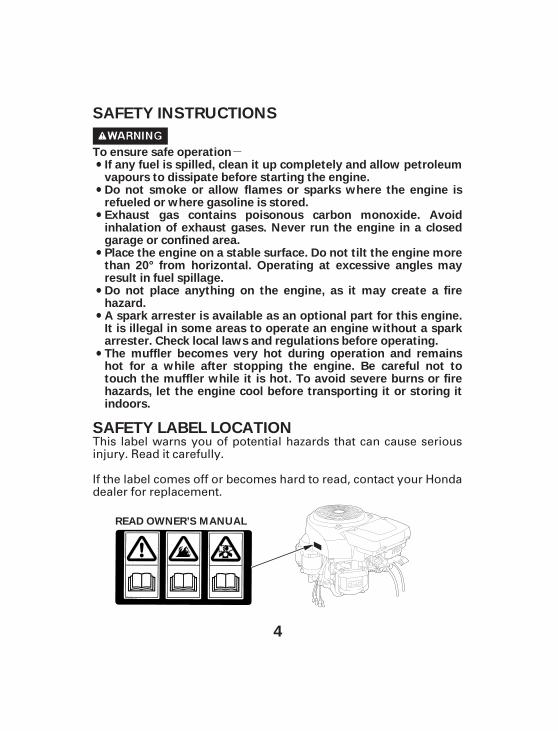
READ OWNER’S MANUAL
If the label comes off or becomes hard to read, contact your Hondadealer for replacement.
This label warns you of potential hazards that can cause seriousinjury. Read it carefully.
×
×
5
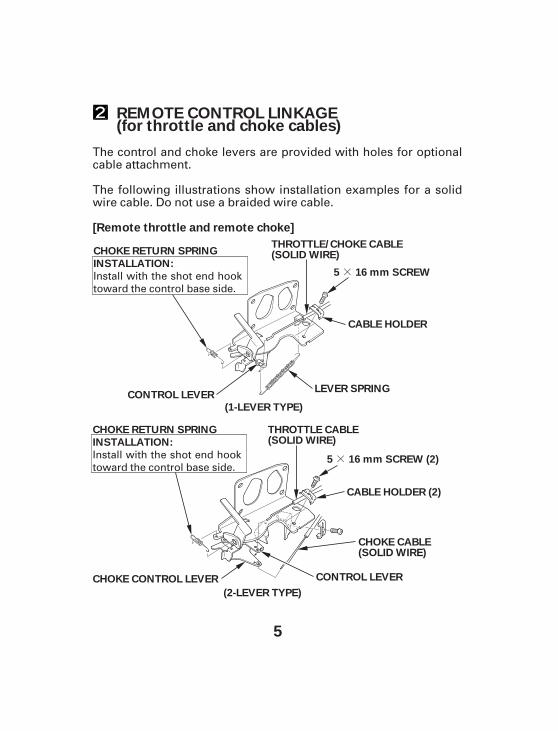
REMOTE CONTROL LINKAGE(for throttle and choke cables)
[Remote throttle and remote choke]
CONTROL LEVER
CABLE HOLDER
LEVER SPRING
5 16 mm SCREW (2)
5 16 mm SCREW
(1-LEVER TYPE)
(2-LEVER TYPE)
CABLE HOLDER (2)
CONTROL LEVERCHOKE CONTROL LEVER
CHOKE RETURN SPRING
INSTALLATION:
CHOKE RETURN SPRING
INSTALLATION:
THROTTLE CABLE(SOLID WIRE)
CHOKE CABLE(SOLID WIRE)
THROTTLE/CHOKE CABLE(SOLID WIRE)
The control and choke levers are provided with holes for optionalcable attachment.
The following illustrations show installation examples for a solidwire cable. Do not use a braided wire cable.
Install with the shot end hooktoward the control base side.
Install with the shot end hooktoward the control base side.
+
-
-
+
↓
6
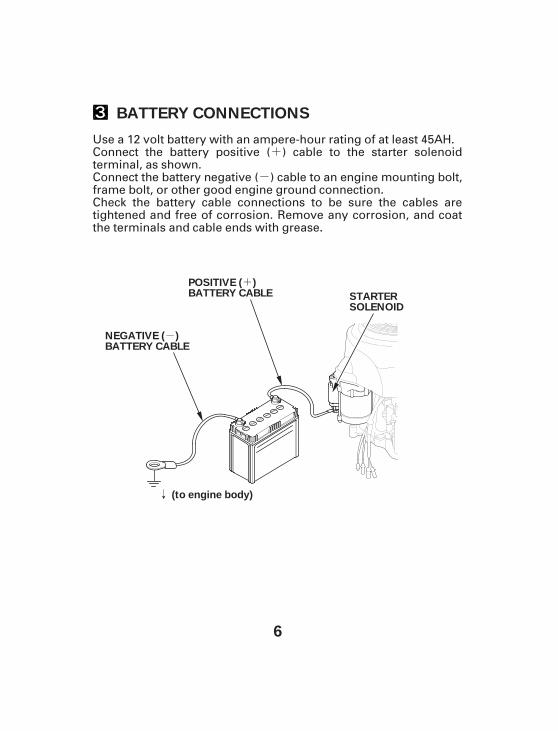
BATTERY CONNECTIONS
NEGATIVE ( )BATTERY CABLE
POSITIVE ( )BATTERY CABLE STARTER
SOLENOID
(to engine body)
Connect the battery positive ( ) cable to the starter solenoidterminal, as shown.Connect the battery negative ( ) cable to an engine mounting bolt,frame bolt, or other good engine ground connection.Check the battery cable connections to be sure the cables aretightened and free of corrosion. Remove any corrosion, and coatthe terminals and cable ends with grease.
Use a 12 volt battery with an ampere-hour rating of at least 45AH.
--
-
7
The battery gives off explosive gases; keep sparks, flames andcigarettes away. Provide adequate ventilation when chargingor using batteries in an enclosed space.The battery contains sulfuric acid (electrolyte). Contact withskin or eyes may cause severe burns. Wear protective clothingand a face shield.
If electrolyte gets on your skin, flush with water.If electrolyte gets in your eyes, flush with water for at least 15minutes and call a physician immediately.
Electrolyte is poisonous.If swallowed, drink large quantities of water or milk andfollow with milk of magnesia or vegetable oil and call aphysician immediately.
KEEP OUT OF REACH OF CHILDREN.
Use only distilled water in the battery. Tap water will shortenthe service life of the battery.Filling the battery above the UPPER LEVEL line may cause theelectrolyte to overflow, resulting in corrosion to engine ornearby parts. Immediately wash off any spilled electrolyte.Be careful not to connect the battery in reverse polarity, as thiswill short circuit the battery charging system and trip the circuitbreaker.

8
PRE-OPERATION CHECK
Engine oil level
Be sure to check the engine on a level surface with the enginestopped.
Running the engine with insufficient oil can cause seriousengine damage.
Using nondetergent oil or 2-stroke engine oil could shorten theengine’s service life.
1.
AMBIENT TEMPERATURE
SAE Viscosity GradesSAE
TEMP
Use Honda 4-stroke, or an equivalenthigh detergent, premium quality mo-tor oil certified to meet or exceed U.S.automobile manufacturer’s require-ments for service classification SG, SH.Motor oils classified SG, SH will showthis designation on the container.SAE 10W-30 is recommended for gen-eral, all temperature use.

9
UPPER LIMIT
LOWER LIMIT
OIL FILLER CAP/DIPSTICK
OIL FILLER CAP/DIPSTICK
Place the engine horizontally on a level surface.Remove the oil filler cap/dipstick and wipe it clean.Fully insert the dipstick without screwing it in, then remove it tocheck the oil level.If the oil level is near or below the lower limit mark on thedipstick, and fill with the recommended oil to the upper limitmark.Reinstall the oil filler cap/dipstick.
1.2.3.
4.
5.
10
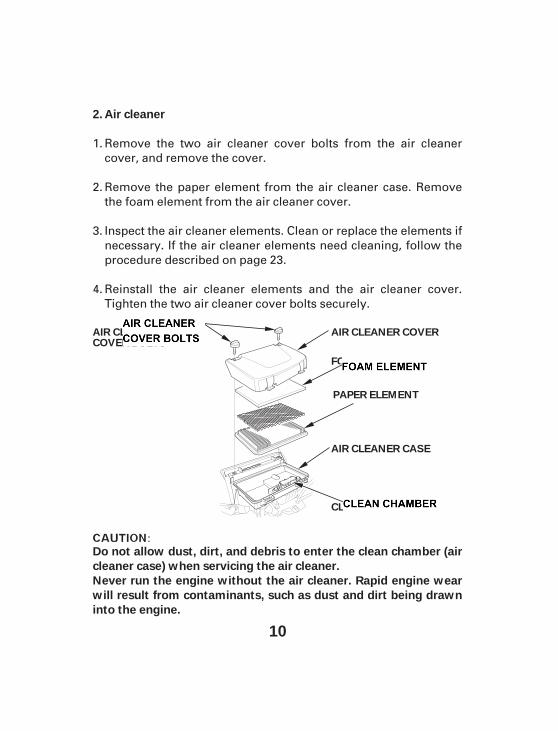
Air cleaner
Never run the engine without the air cleaner. Rapid engine wear
will result from contaminants, such as dust and dirt being drawn
into the engine.
Do not allow dust, dirt, and debris to enter the clean chamber (air
cleaner case) when servicing the air cleaner.
2.
AIR CLEANER COVER
FOAM ELEMENT
PAPER ELEMENT
AIR CLEANER CASE
CLEAN CHAMBER
AIR CLEANERCOVER BOLTS
Remove the two air cleaner cover bolts from the air cleanercover, and remove the cover.
Remove the paper element from the air cleaner case. Removethe foam element from the air cleaner cover.
Inspect the air cleaner elements. Clean or replace the elements ifnecessary. If the air cleaner elements need cleaning, follow theprocedure described on page 23.
Reinstall the air cleaner elements and the air cleaner cover.Tighten the two air cleaner cover bolts securely.
1.
2.
3.
4.
11
Fuel
Gasoline is extremely flammable and is explosive under certainconditions.Refuel in a well-ventilated area with the engine stopped. Do notsmoke or allow flames or sparks in the area where the engine isrefueled or where gasoline is stored.
Be careful not to spill fuel when refueling. Spilled fuel or fuelvapor may ignite. If any fuel is spilled, make sure the area is drybefore starting the engine.Avoid repeated or prolonged contact with skin or breathing ofvapor.KEEP OUT OF REACH OF CHILDREN.
Do not overfill the fuel tank (there should be no fuel in the fillerneck). After refueling, make sure the tank cap is closed properlyand securely.
3.
Use automotive gasoline (Unleaded or lowleaded is preferred tominimize combustion chamber deposits).FOR NEW SOUTH WALES ONLY:Use unleaded fuel only.Never use an oil/gasoline mixture or dirty gasoline. Avoid gettingdirt, dust or water in the fuel tank.

12
GASOLINES CONTAINING ALCOHOL
If you decide to use a gasoline containing alcohol (gasohol), besure it’s octane rating is at least as high as that recommended byHonda. There are two types of ‘‘gasohol’’: one containing ethanol,and the other containing methanol. Do not use gasohol thatcontains more than 10% ethanol. Do not use gasoline containingmethanol (methyl or wood alcohol) that does not also containcosolvents and corrosion inhibitors for methanol. Never usegasoline containing more than 5% methanol, even if it hascosolvents and corrosion inhibitors.
Before buying fuel from an unfamiliar station, try to find out ifthe fuel contains alcohol, if it does, confirm the type andpercentage of alcohol used. If you notice any undesirableoperating symptoms while using a gasoline that containsalcohol, or one that you think contains alcohol, switch to agasoline that you know does not contain alcohol.
Fuel system damage or engine performance problems resultingfrom the use of fuels that contain alcohol is not covered underthe warranty. Honda cannot endorse the use of fuels containingmethanol since evidence of their suitability is as yet incomplete.
13
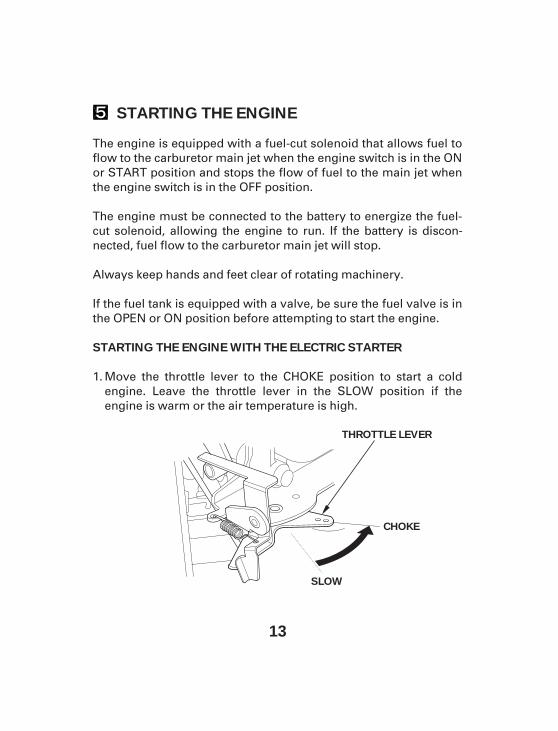
STARTING THE ENGINE
STARTING THE ENGINE WITH THE ELECTRIC STARTER
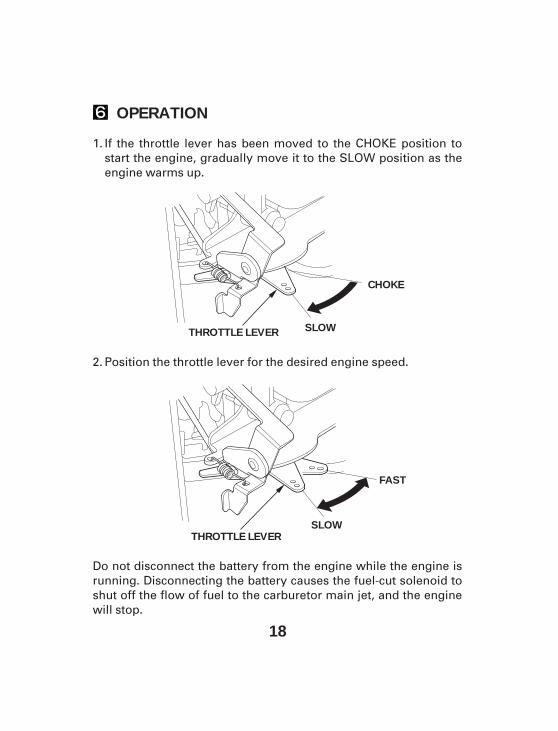
THROTTLE LEVER
SLOW
CHOKE
The engine is equipped with a fuel-cut solenoid that allows fuel toflow to the carburetor main jet when the engine switch is in the ONor START position and stops the flow of fuel to the main jet whenthe engine switch is in the OFF position.
The engine must be connected to the battery to energize the fuel-cut solenoid, allowing the engine to run. If the battery is discon-nected, fuel flow to the carburetor main jet will stop.
Always keep hands and feet clear of rotating machinery.
If the fuel tank is equipped with a valve, be sure the fuel valve is inthe OPEN or ON position before attempting to start the engine.
Move the throttle lever to the CHOKE position to start a coldengine. Leave the throttle lever in the SLOW position if theengine is warm or the air temperature is high.
1.
14
Turn the key to the START position and hold it there until theengine starts. If the engine fails to start within 5 seconds, releasethe key and wait about 10 seconds before operating the starteragain.
Operating the starter motor for more than 5 seconds can dam-age the motor. If the engine fails to start, release the switch andwait 10 seconds before operating the starter again.If the speed of the starter motor drops after a period of time, it isan indication that the battery should be recharged.
2.
15
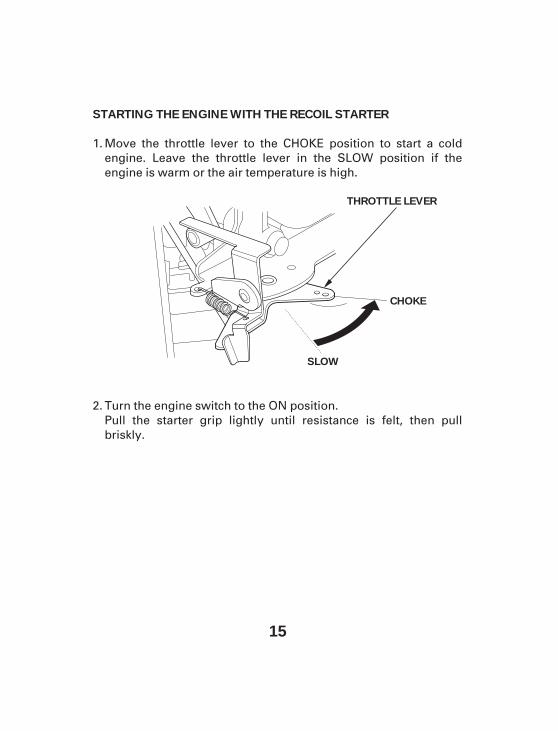
STARTING THE ENGINE WITH THE RECOIL STARTER
THROTTLE LEVER
SLOW
CHOKE
Move the throttle lever to the CHOKE position to start a coldengine. Leave the throttle lever in the SLOW position if theengine is warm or the air temperature is high.
Turn the engine switch to the ON position.Pull the starter grip lightly until resistance is felt, then pullbriskly.
1.
2.
16
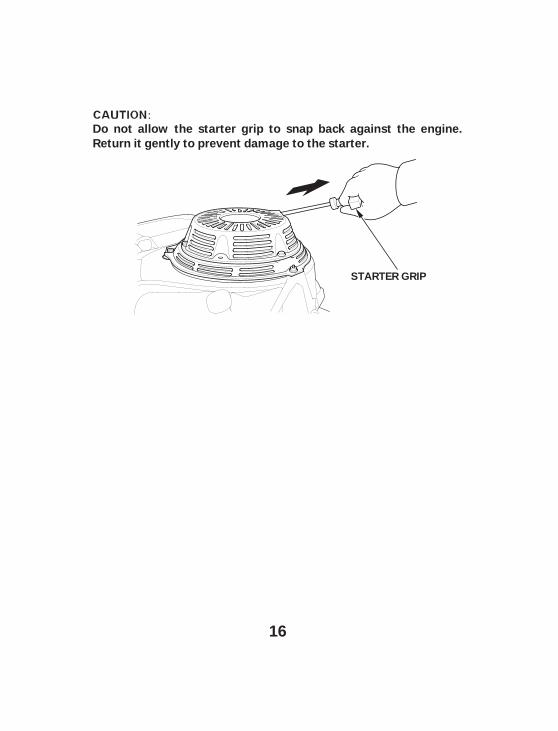
Do not allow the starter grip to snap back against the engine.
Return it gently to prevent damage to the starter.
STARTER GRIP
17
High altitude operation
Operation of the engine at an altitude lower than the carburetor is
jetted for may result in reduced performance, overheating, and
serious engine damage caused by an excessively lean air/fuel
mixture.
At high altitude, the standard carburetor air-fuel mixture will be ex-cessively rich. Performance will decrease, and fuel consumptionwill increase.
High altitude performance can be improved by installing a smallerdiameter main fuel jet in the carburetor and readjusting the pilotscrew. If you always operate the engine at altitudes higher than1,830 m (6,000 feet) above sea level, have your authorized Hondadealer perform these carburetor modifications.
Even with suitable carburetor jetting, engine horsepower willdecrease approximately 3.5% for each 305 m (1,000 feet) increasein altitude. The affect of altitude on horsepower will be greaterthan this if no carburetor modification is made.
18
OPERATION
SLOW
FAST
SLOW
CHOKE
THROTTLE LEVER
THROTTLE LEVER
Do not disconnect the battery from the engine while the engine isrunning. Disconnecting the battery causes the fuel-cut solenoid toshut off the flow of fuel to the carburetor main jet, and the enginewill stop.
If the throttle lever has been moved to the CHOKE position tostart the engine, gradually move it to the SLOW position as theengine warms up.
Position the throttle lever for the desired engine speed.2.
1.
19
STOPPING THE ENGINE
MAINTENANCE
The engine should be serviced by an authorized Honda dealer
unless the owner has proper tools and service data and feels he
is mechanically qualifired.
To prevent accidental start-up, turn OFF the engine switch key
and disconnect the spark plug caps.
Shut off the engine before performing any maintenance.
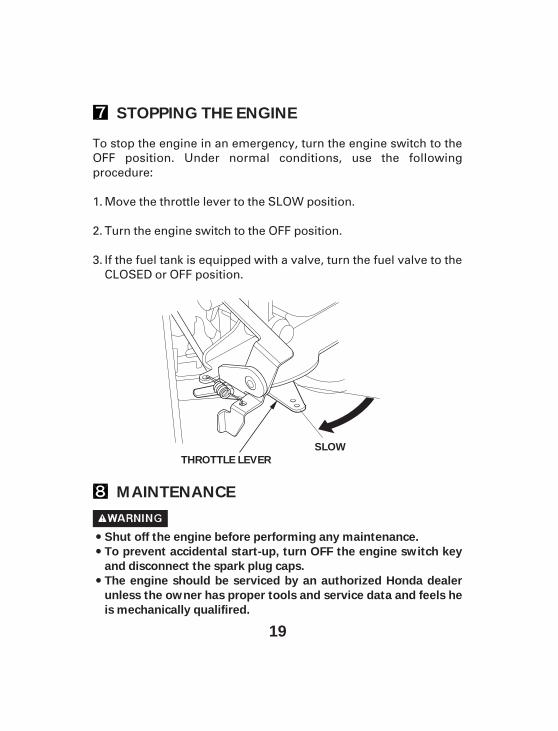
SLOW
THROTTLE LEVER
To stop the engine in an emergency, turn the engine switch to theOFF position. Under normal conditions, use the followingprocedure:
Turn the engine switch to the OFF position.
If the fuel tank is equipped with a valve, turn the fuel valve to theCLOSED or OFF position.
Move the throttle lever to the SLOW position.
2.
1.
3.
○
○
○
○
○○
○
○
○
○
○○
○
20
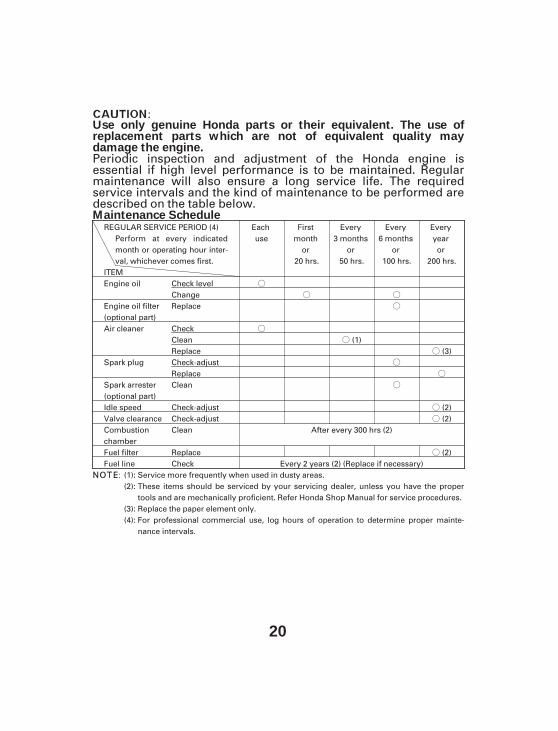
Use only genuine Honda parts or their equivalent. The use ofreplacement parts which are not of equivalent quality maydamage the engine.
Maintenance Schedule
Periodic inspection and adjustment of the Honda engine isessential if high level performance is to be maintained. Regularmaintenance will also ensure a long service life. The requiredservice intervals and the kind of maintenance to be performed aredescribed on the table below.
REGULAR SERVICE PERIOD (4)Perform at every indicatedmonth or operating hour inter-val, whichever comes first.
ITEM
Eachuse
Engine oil
Engine oil filter(optional part)Air cleaner
Spark plug
Spark arrester(optional part)Idle speedValve clearanceCombustionchamberFuel filterFuel line Every 2 years (2) (Replace if necessary)
Service more frequently when used in dusty areas.
Replace the paper element only.For professional commercial use, log hours of operation to determine proper mainte-nance intervals.
Firstmonth
or20 hrs.
Every3 months
or50 hrs.
(1)
Every6 months
or100 hrs.
Everyyearor
200 hrs.
(3)
(2)(2)
(2)
Check levelChangeReplace
CheckCleanReplaceCheck-adjustReplaceClean
Check-adjustCheck-adjustClean
ReplaceCheck
These items should be serviced by your servicing dealer, unless you have the propertools and are mechanically proficient. Refer Honda Shop Manual for service procedures.
(1):(2):
(3):(4):
After every 300 hrs (2)
21
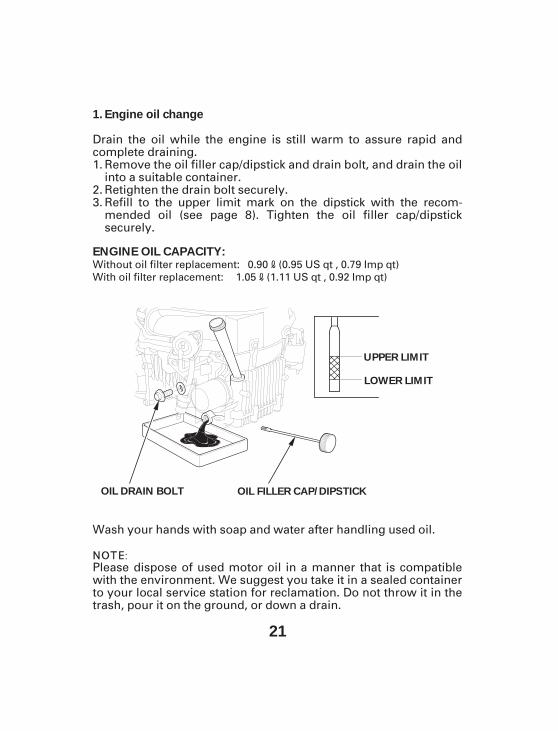
Engine oil change
ENGINE OIL CAPACITY:
1.
OIL DRAIN BOLT
UPPER LIMIT
LOWER LIMIT
OIL FILLER CAP/DIPSTICK
Drain the oil while the engine is still warm to assure rapid andcomplete draining.
Remove the oil filler cap/dipstick and drain bolt, and drain the oilinto a suitable container.Retighten the drain bolt securely.Refill to the upper limit mark on the dipstick with the recom-mended oil (see page 8). Tighten the oil filler cap/dipsticksecurely.
Please dispose of used motor oil in a manner that is compatiblewith the environment. We suggest you take it in a sealed containerto your local service station for reclamation. Do not throw it in thetrash, pour it on the ground, or down a drain.
Wash your hands with soap and water after handling used oil.
1.
2.3.
0.90 (0.95 US qt , 0.79 Imp qt)1.05 (1.11 US qt , 0.92 Imp qt)
Without oil filter replacement:With oil filter replacement:
22
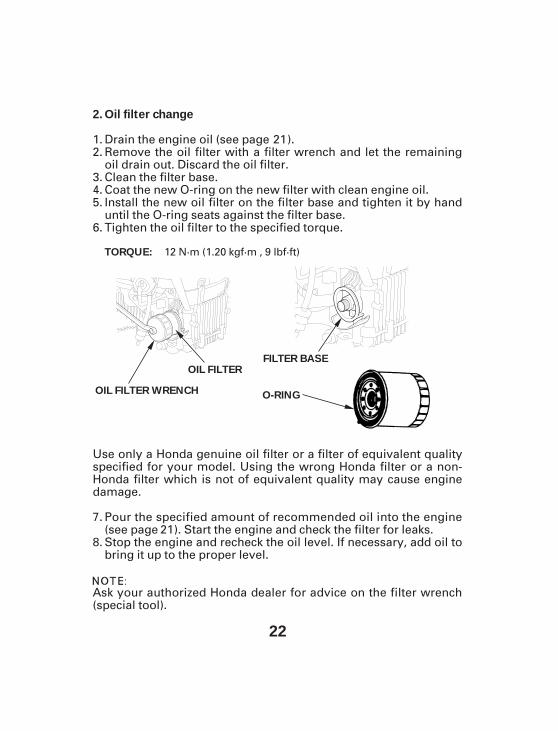
Oil filter change2.
O-RING
FILTER BASE
OIL FILTER WRENCH
OIL FILTER
TORQUE:
Drain the engine oil (see page ).Remove the oil filter with a filter wrench and let the remainingoil drain out. Discard the oil filter.Clean the filter base.
Tighten the oil filter to the specified torque.
Coat the new O-ring on the new filter with clean engine oil.
Ask your authorized Honda dealer for advice on the filter wrench(special tool).
Use only a Honda genuine oil filter or a filter of equivalent qualityspecified for your model. Using the wrong Honda filter or a non-Honda filter which is not of equivalent quality may cause enginedamage.
Pour the specified amount of recommended oil into the engine(see page ). Start the engine and check the filter for leaks.Stop the engine and recheck the oil level. If necessary, add oil tobring it up to the proper level.
Install the new oil filter on the filter base and tighten it by handuntil the O-ring seats against the filter base.
1.2.
3.4.5.
6.
21
7.
8.21
12 N·m (1.20 kgf·m , 9 lbf·ft)
23
Air cleaner service
Never use gasoline or low flash point solvents for cleaning the aircleaner element. A fire or explosion could result.
Never run the engine without the air cleaner. Rapid engine wearwill result from contaminants, such as dust and dirt being drawninto the engine.
3.
A dirty air cleaner will restrict air flow to the carburetor. To preventcarburetor malfunction, service the air cleaner regularly. Servicemore frequently when operating the engine in extremely dustyareas.
Remove the two air cleaner cover bolts from the air cleanercover, and remove the cover.
Remove the paper element from the air cleaner case. Removethe foam element from the air cleaner cover.
Clean the air filter elements if they are to be reused.Foam element: Clean in warm soapy water, rinse and dry thor-oughly. Or clean in non-flammable solvent and dry.
Paper element: Tap the element lightly several times on a hardsurface to remove excess dirt, or blow compressed air (not ex-ceeding 2.1 kg/cm (30 psi)) through the filter from the aircleaner case side. Never try to brush the dirt off; brushing willforce dirt into the fibers. Replace the paper element if it isexcessively dirty.
Wipe dirt from the inside of the air cleaner case and cover, usinga moist rag. Be careful to prevent dirt from entering the cleanchamber that leads to the carburetor.
1.
2.
3.
4.

- - --
25
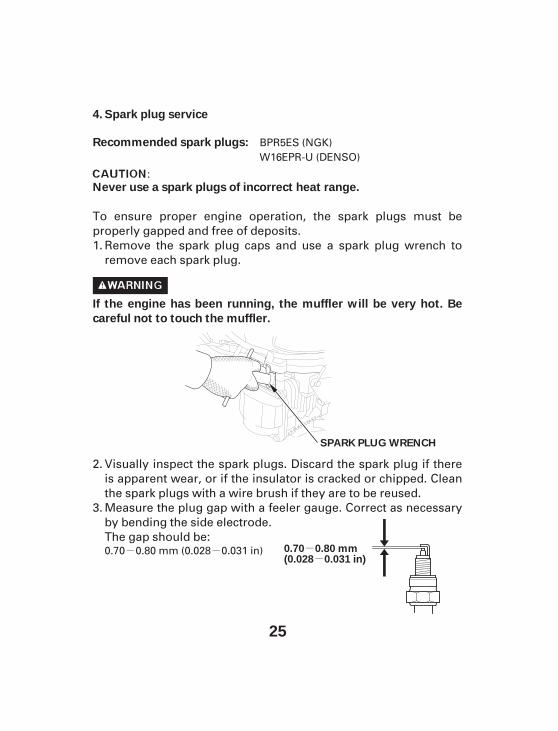
Spark plug service
If the engine has been running, the muffler will be very hot. Be
careful not to touch the muffler.
Recommended spark plugs:
Never use a spark plugs of incorrect heat range.
4.
SPARK PLUG WRENCH
0.70 0.80 mm(0.028 0.031 in)
Measure the plug gap with a feeler gauge. Correct as necessaryby bending the side electrode.The gap should be:
To ensure proper engine operation, the spark plugs must beproperly gapped and free of deposits.
Remove the spark plug caps and use a spark plug wrench toremove each spark plug.
Visually inspect the spark plugs. Discard the spark plug if thereis apparent wear, or if the insulator is cracked or chipped. Cleanthe spark plugs with a wire brush if they are to be reused.
1.
2.
3.
BPR5ES (NGK)W16EPR-U (DENSO)
0.70 0.80 mm (0.028 0.031 in)
-
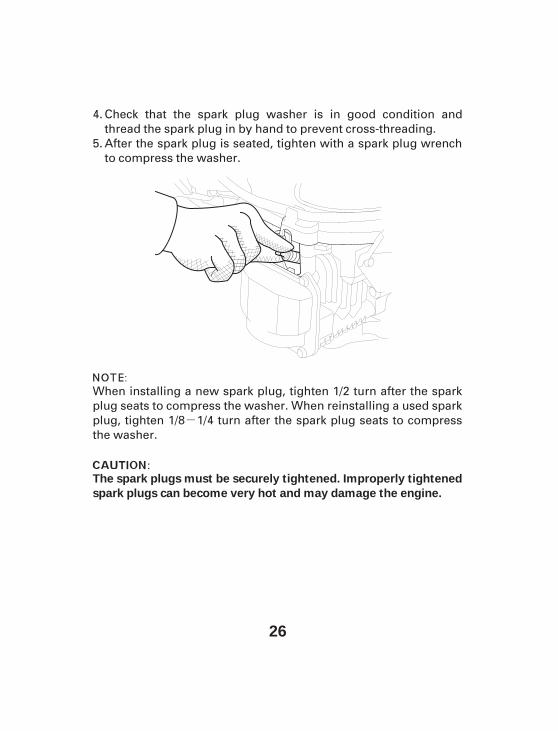
26
The spark plugs must be securely tightened. Improperly tightened
spark plugs can become very hot and may damage the engine.
Check that the spark plug washer is in good condition andthread the spark plug in by hand to prevent cross-threading.After the spark plug is seated, tighten with a spark plug wrenchto compress the washer.
When installing a new spark plug, tighten 1/2 turn after the sparkplug seats to compress the washer. When reinstalling a used sparkplug, tighten 1/8 1/4 turn after the spark plug seats to compressthe washer.
4.
5.
27
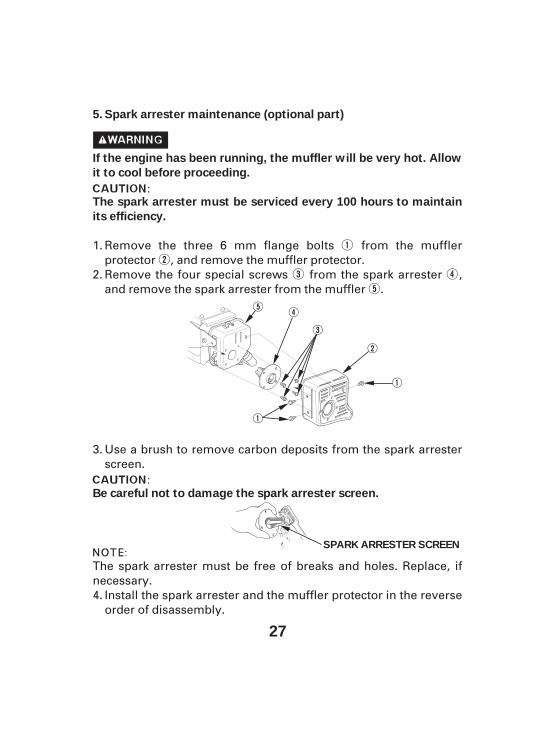
Spark arrester maintenance (optional part)
If the engine has been running, the muffler will be very hot. Allow
it to cool before proceeding.
Be careful not to damage the spark arrester screen.
The spark arrester must be serviced every 100 hours to maintain
its efficiency.
5.
SPARK ARRESTER SCREEN
The spark arrester must be free of breaks and holes. Replace, ifnecessary.
Use a brush to remove carbon deposits from the spark arresterscreen.
Install the spark arrester and the muffler protector in the reverseorder of disassembly.
Remove the three 6 mm flange bolts from the mufflerprotector , and remove the muffler protector.Remove the four special screws from the spark arrester ,and remove the spark arrester from the muffler .
1.
2.
3.
4.
28
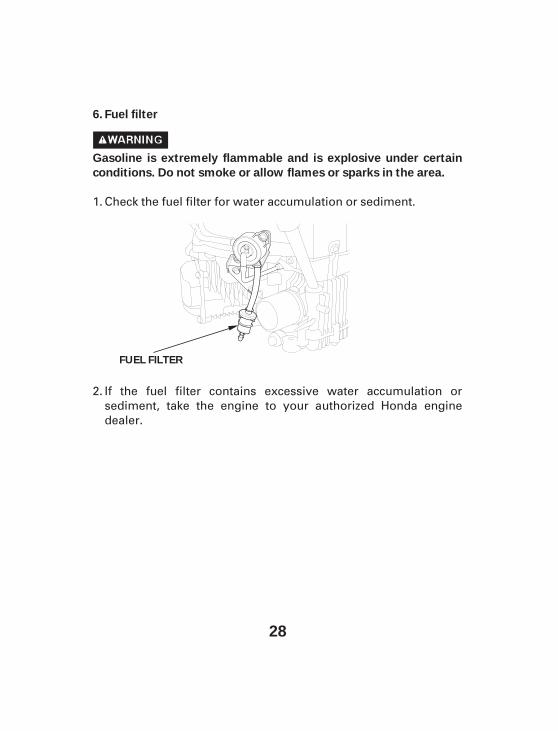
Fuel filter
Gasoline is extremely flammable and is explosive under certain
conditions. Do not smoke or allow flames or sparks in the area.
6.
FUEL FILTER
Check the fuel filter for water accumulation or sediment.
If the fuel filter contains excessive water accumulation orsediment, take the engine to your authorized Honda enginedealer.
1.
2.
29
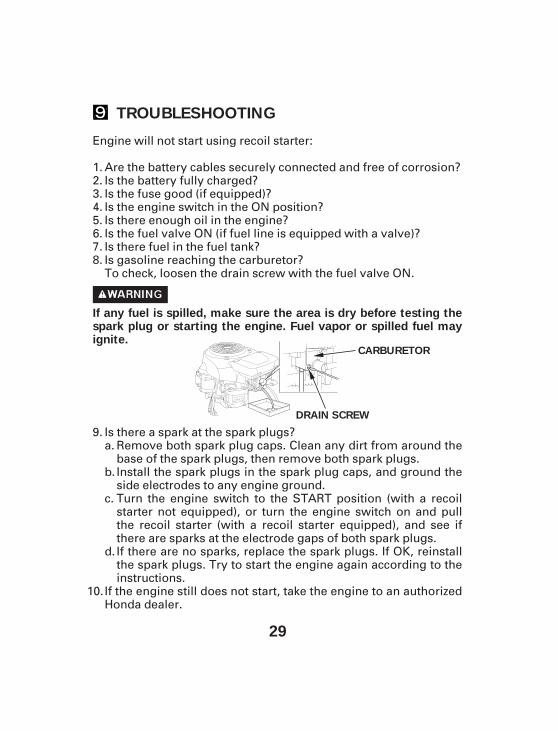
TROUBLESHOOTING
If any fuel is spilled, make sure the area is dry before testing thespark plug or starting the engine. Fuel vapor or spilled fuel mayignite.
CARBURETOR
DRAIN SCREW
Engine will not start using recoil starter:
If the engine still does not start, take the engine to an authorizedHonda dealer.
Are the battery cables securely connected and free of corrosion?Is the battery fully charged?Is the fuse good (if equipped)?Is the engine switch in the ON position?Is there enough oil in the engine?Is the fuel valve ON (if fuel line is equipped with a valve)?Is there fuel in the fuel tank?Is gasoline reaching the carburetor?To check, loosen the drain screw with the fuel valve ON.
Remove both spark plug caps. Clean any dirt from around thebase of the spark plugs, then remove both spark plugs.Install the spark plugs in the spark plug caps, and ground theside electrodes to any engine ground.Turn the engine switch to the START position (with a recoilstarter not equipped), or turn the engine switch on and pullthe recoil starter (with a recoil starter equipped), and see ifthere are sparks at the electrode gaps of both spark plugs.If there are no sparks, replace the spark plugs. If OK, reinstallthe spark plugs. Try to start the engine again according to theinstructions.
Is there a spark at the spark plugs?9.
1.2.3.4.5.6.7.8.
10.
a.
b.
c.
d.

30
TRANSPORTING/STORAGE
To avoid severe burns or fire hazards, let the engine cool beforetransporting it or storing it indoors.When transporting the engine, turn the fuel valve OFF and keepthe engine level to prevent fuel spillage. Fuel vapor or spilledfuel may ignite.
Gasoline is extremely flammable and is explosive under certainconditions. Do not smoke or allow flames or sparks in the area.
DRAIN SCREW
CARBURETOR
Before storing the unit for an extended period;Be sure the storage area is free of excessive humidity and dust.Drain the fuel.
Keep the engine level to reduce the possibility of fuel leakage,when transporting. If the fuel tank is equipped with a valve, turnthe fuel valve to the CLOSED or OFF position.
Disconnect the fuel line to the engine, and drain the fuel tankinto an approved gasoline container. If the fuel tank isequipped with a valve, turn the fuel valve to the OPEN or ONposition to enable draining. After draining is completed,reconnect the fuel line.
Loosen the carburetor drain screw, and drain the carburetorinto an approved gasoline container. After draining iscompleted, tighten the carburetor drain screw.
1.2.
a.
b.
31
Change the engine oil (see page 21).Remove the two spark plugs and pour about a tablespoon ofclean engine oil into the cylinders. Crank the engine severalrevolutions to distribute the oil, then reinstall the spark plugs.Remove the battery and store it in a cool, dry place. Recharge itonce a month.Cover the engine to keep out dust.
3.4.
5.
6.
*
*
*
*
*
× ×
32
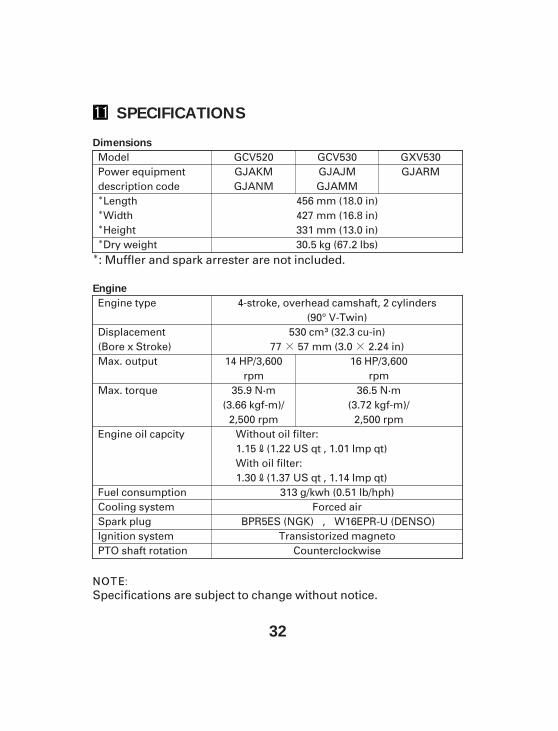
SPECIFICATIONS
Dimensions
Engine
: Muffler and spark arrester are not included.
Specifications are subject to change without notice.
ModelPower equipmentdescription codeLengthWidthHeightDry weight
GCV520GJAKMGJANM
GCV530GJAJMGJAMM
Engine type
Displacement(Bore x Stroke)Max. output
Max. torque
Engine oil capcity
Fuel consumptionCooling systemSpark plugIgnition systemPTO shaft rotation Counterclockwise
Transistorized magnetoW16EPR-U (DENSO)BPR5ES (NGK)
Forced air313 g/kwh (0.51 lb/hph)
1.30 (1.37 US qt , 1.14 Imp qt)
1.15 (1.22 US qt , 1.01 Imp qt)
35.9 N·m(3.66 kgf-m)/
2,500 rpm
14 HP/3,600rpm
36.5 N·m(3.72 kgf-m)/
2,500 rpm
16 HP/3,600rpm
GXV530GJARM
4-stroke, overhead camshaft, 2 cylinders(90° V-Twin)
530 cm (32.3 cu-in)77 57 mm (3.0 2.24 in)
456 mm (18.0 in)427 mm (16.8 in)331 mm (13.0 in)30.5 kg (67.2 lbs)
Without oil filter:
With oil filter:
,
33