Embed Size (px)
Citation preview
Gaming Keypad Manual
MANUAL V4.4
Page | 1 GAMING KEYPAD | Manual
Contents TABLE OF CONTENTS ................................................................................................................. 1
INTRODUCTION ......................................................................................................................... 2
1. FEATURES .......................................................................................................................... 3
PACKAGE CONTENTS ................................................................................................................ 3
2. DEVICE LAYOUT ................................................................................................................. 4
3. ADJUST YOUR AZERON KEYPAD ....................................................................................... 5
4. INSTALLING SOFTWARE .................................................................................................... 6
5. HOW TO USE AZERON SOFTWARE ................................................................................. 14
5.1. CALIBRATING THUMBSTICK ......................................................................................... 14
5.2. INTERFACE OVERVIEW ................................................................................................. 15
5.3. BUTTON SETUP ............................................................................................................ 16
5.3.1. Keyboard mode .................................................................................................... 16
5.3.2. Xinput button and Xinput trigger ......................................................................... 17
5.3.3. Mouse mode ......................................................................................................... 17
5.3.4. Joystick button ...................................................................................................... 17
5.3.6. Toggle analog stick mode ..................................................................................... 18
5.3.7. Macro .................................................................................................................... 19
5.3.8. Button layering ..................................................................................................... 20
5.3.9. No action mode .................................................................................................... 21
5.3.10. Button labels ....................................................................................................... 22
5.4. THUMBSTICK SETUP .................................................................................................... 23
5.5 PROFILES ....................................................................................................................... 26
5.6 SETTINGS ....................................................................................................................... 29
6. HOW TO UPDATE FIRMWARE MANUALLY .................................................................... 32
7. TIPS AND TRICKS ............................................................................................................. 34
Page | 2 GAMING KEYPAD | Manual
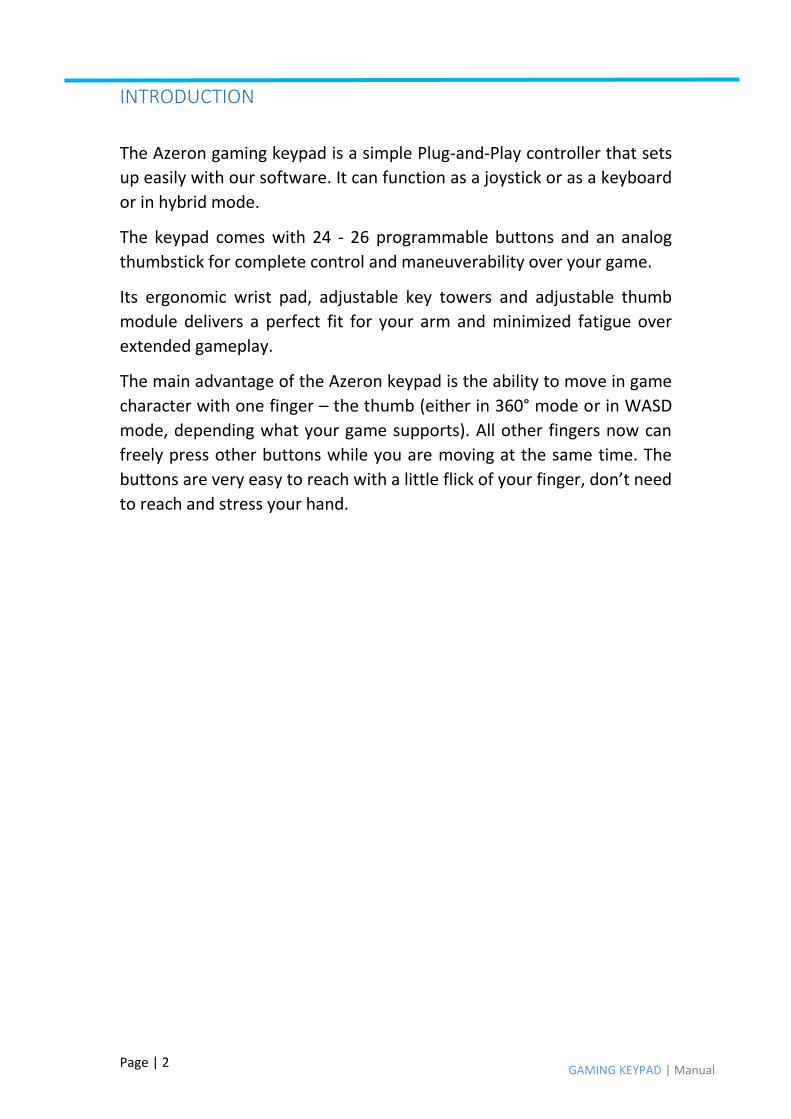
INTRODUCTION
The Azeron gaming keypad is a simple Plug-and-Play controller that sets
up easily with our software. It can function as a joystick or as a keyboard
or in hybrid mode.
The keypad comes with 24 - 26 programmable buttons and an analog
thumbstick for complete control and maneuverability over your game.
Its ergonomic wrist pad, adjustable key towers and adjustable thumb
module delivers a perfect fit for your arm and minimized fatigue over
extended gameplay.
The main advantage of the Azeron keypad is the ability to move in game
character with one finger – the thumb (either in 360° mode or in WASD
mode, depending what your game supports). All other fingers now can
freely press other buttons while you are moving at the same time. The
buttons are very easy to reach with a little flick of your finger, don’t need
to reach and stress your hand.

Page | 3 GAMING KEYPAD | Manual
1. FEATURES
19 programmable buttons on towers
7 programmable thumb buttons
A programmable full size analog thumbstick
Adjustable button positions to fit your hand
Stable metal base with antislip silicon pads
Braided cables
2 meter (6.5 feet) braided USB cable
Programmable Teensy++ 2.0 brain
Easy accessible reset button
Omron switches with mechanical durability 10 million keypresses
On-board memory for your favorite keybinds
PACKAGE CONTENTS
Page | 4 GAMING KEYPAD | Manual
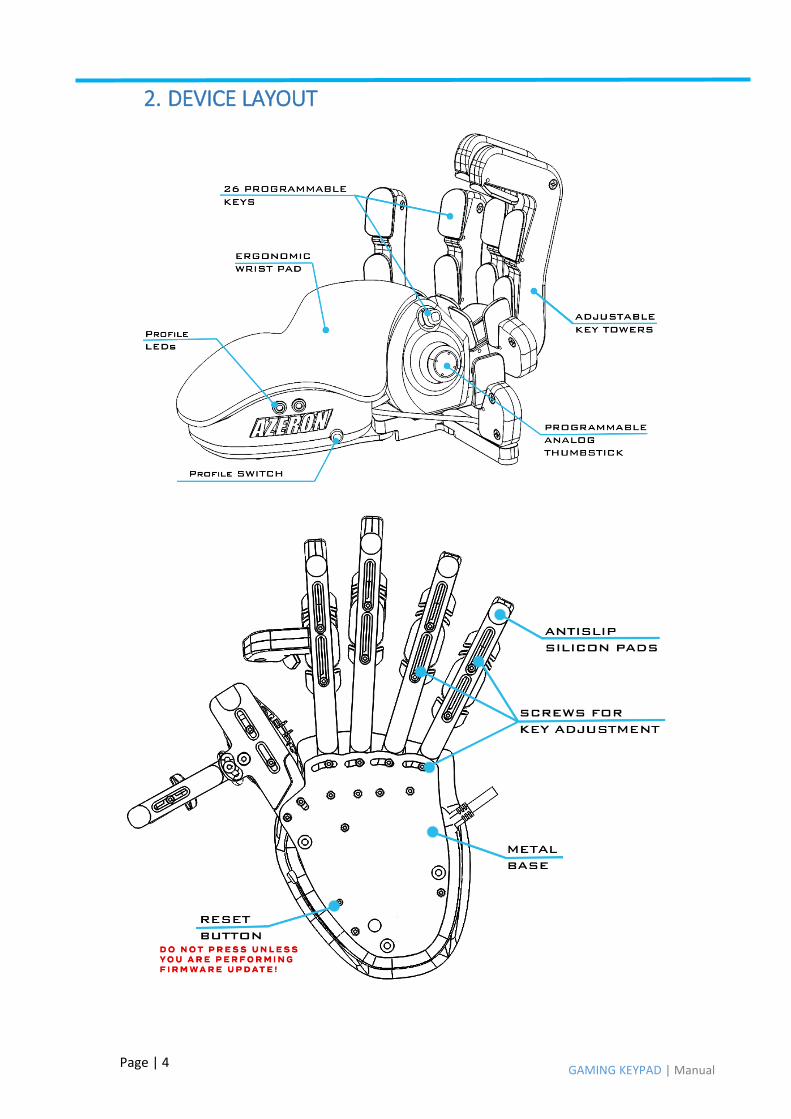
2. DEVICE LAYOUT
Page | 5 GAMING KEYPAD | Manual
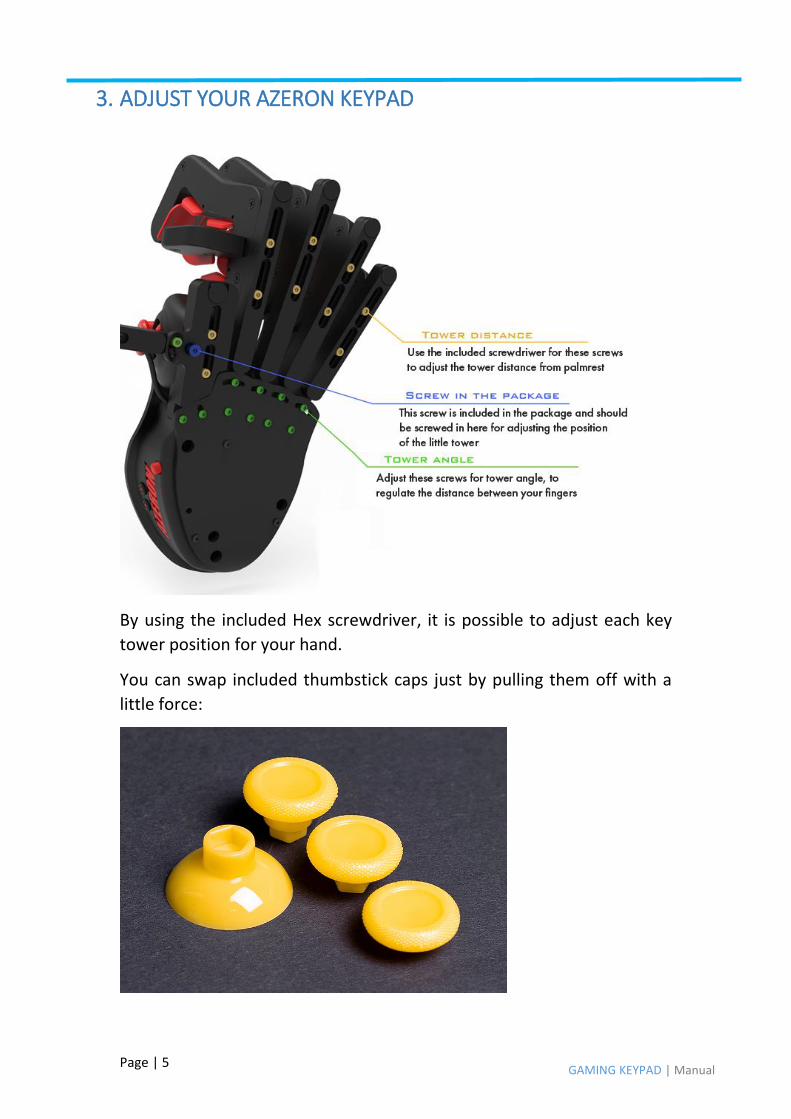
3. ADJUST YOUR AZERON KEYPAD
By using the included Hex screwdriver, it is possible to adjust each key
tower position for your hand.
You can swap included thumbstick caps just by pulling them off with a
little force:
Page | 6 GAMING KEYPAD | Manual
4. INSTALLING SOFTWARE
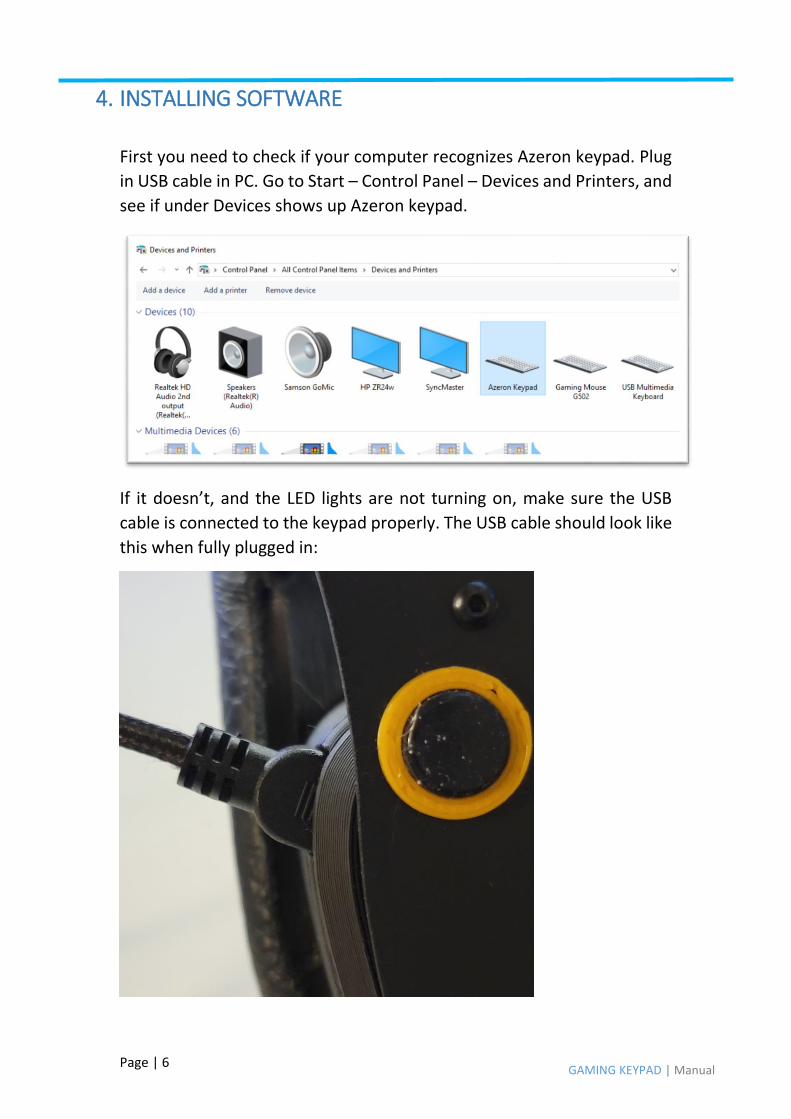
First you need to check if your computer recognizes Azeron keypad. Plug
in USB cable in PC. Go to Start – Control Panel – Devices and Printers, and
see if under Devices shows up Azeron keypad.
If it doesn’t, and the LED lights are not turning on, make sure the USB
cable is connected to the keypad properly. The USB cable should look like
this when fully plugged in:
Page | 7 GAMING KEYPAD | Manual
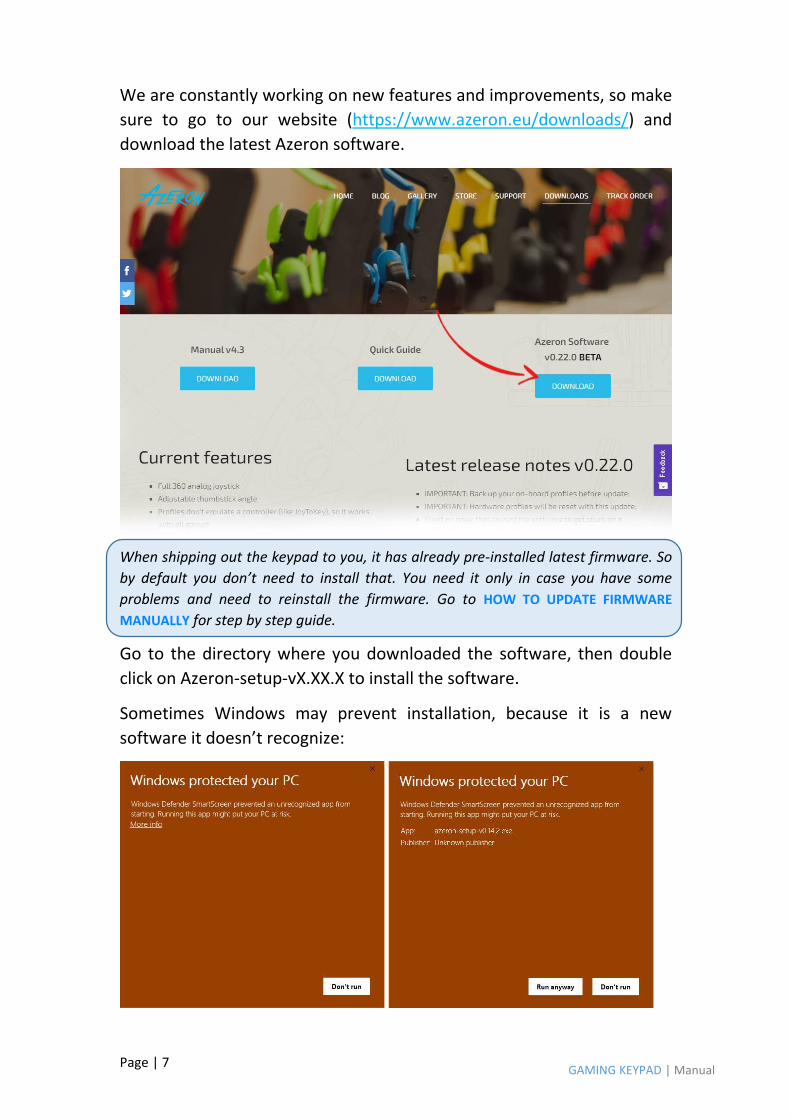
We are constantly working on new features and improvements, so make
sure to go to our website (https://www.azeron.eu/downloads/) and
download the latest Azeron software.
When shipping out the keypad to you, it has already pre-installed latest firmware. So
by default you don’t need to install that. You need it only in case you have some
problems and need to reinstall the firmware. Go to HOW TO UPDATE FIRMWARE
MANUALLY for step by step guide.
Go to the directory where you downloaded the software, then double
click on Azeron-setup-vX.XX.X to install the software.
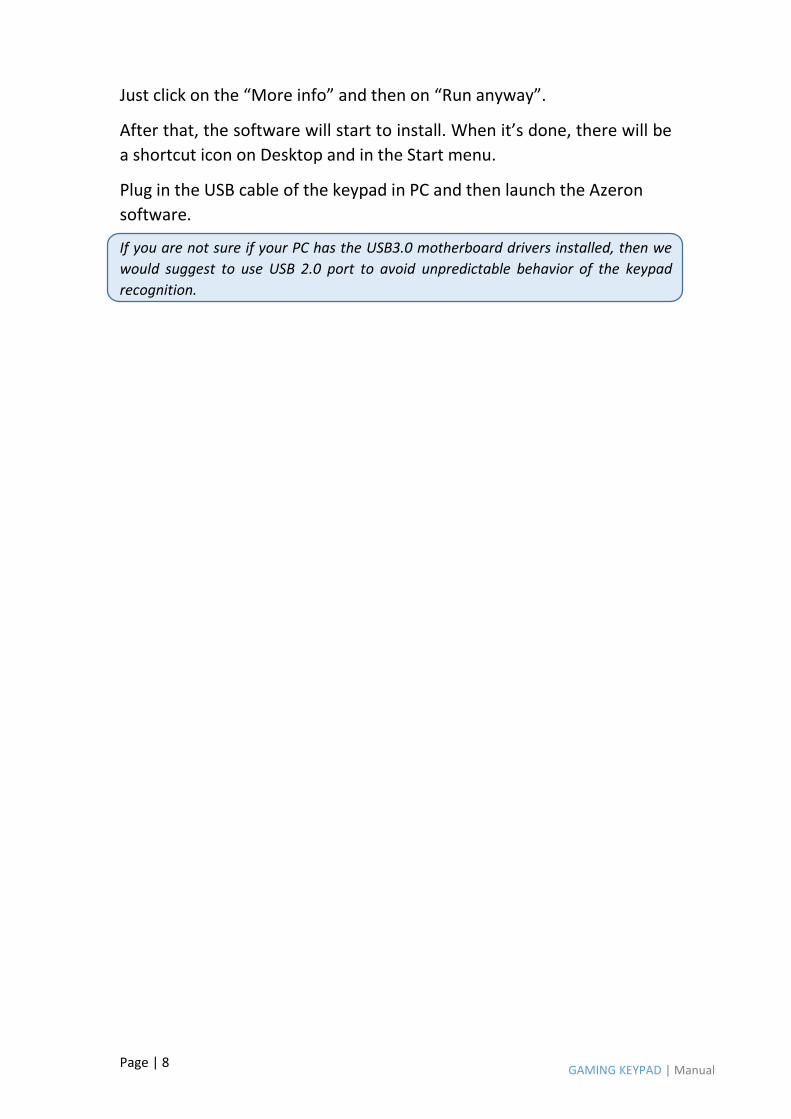
Sometimes Windows may prevent installation, because it is a new
software it doesn’t recognize:
Page | 8 GAMING KEYPAD | Manual
Just click on the “More info” and then on “Run anyway”.
After that, the software will start to install. When it’s done, there will be
a shortcut icon on Desktop and in the Start menu.
Plug in the USB cable of the keypad in PC and then launch the Azeron
software.
If you are not sure if your PC has the USB3.0 motherboard drivers installed, then we
would suggest to use USB 2.0 port to avoid unpredictable behavior of the keypad
recognition.

Page | 9 GAMING KEYPAD | Manual
When opening Azeron software, there are 3 options what could show up:
A) When opening software, it may show this screen:
It means that the keypad requires firmware update. At the “Firmware
type” dropdown choose “PC (Base)”.
PC (Base) means that it will install the latest ‘normal’ firmware version. The other
option is XIM, which is a stripped down version of normal firmware for people who use
the Azeron keypad only on consoles via XIM device.
Click on “Update” at the bottom right corner.
There will be a loading animation as it downloads the newest version, wait until you see the following screen:
Page | 10 GAMING KEYPAD | Manual
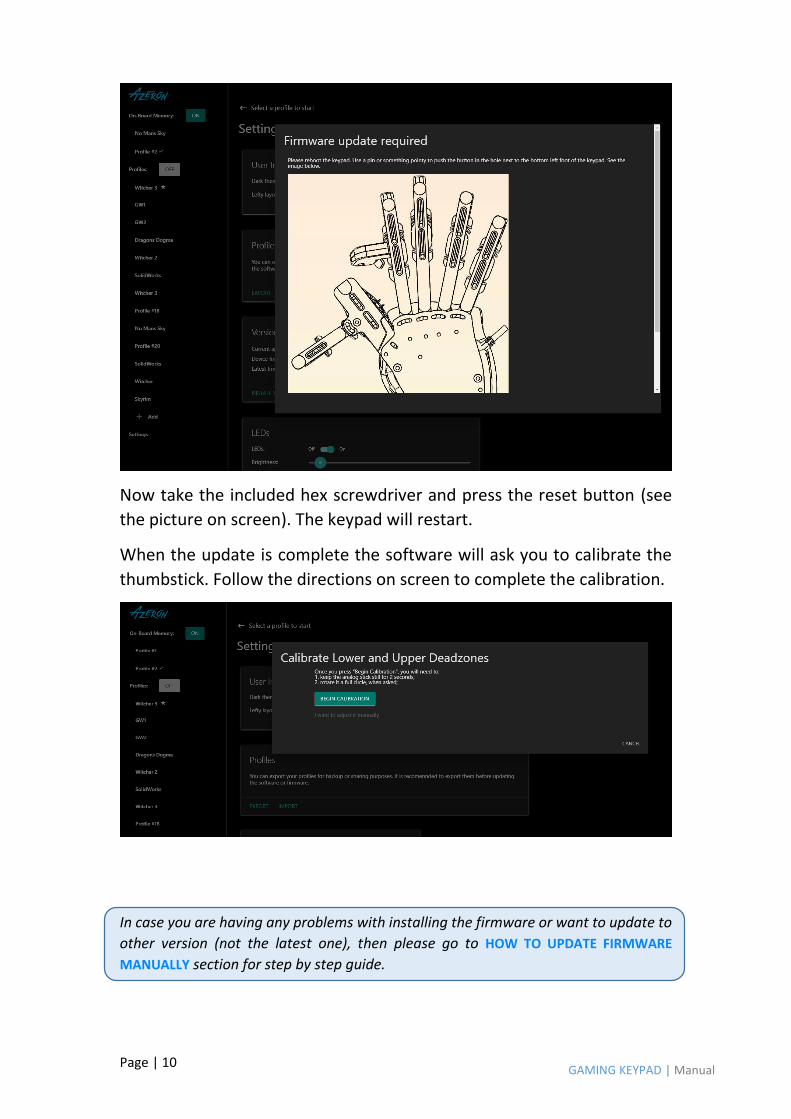
Now take the included hex screwdriver and press the reset button (see
the picture on screen). The keypad will restart.
When the update is complete the software will ask you to calibrate the
thumbstick. Follow the directions on screen to complete the calibration.
In case you are having any problems with installing the firmware or want to update to
other version (not the latest one), then please go to HOW TO UPDATE FIRMWARE
MANUALLY section for step by step guide.

Page | 11 GAMING KEYPAD | Manual
B) The second possible option when software opens up will look like this:
That means that everything is ready, the software and PC recognize the
keypad and everything is up to date. You are ready to configure your
keypad to your liking and start gaming.
Page | 12 GAMING KEYPAD | Manual
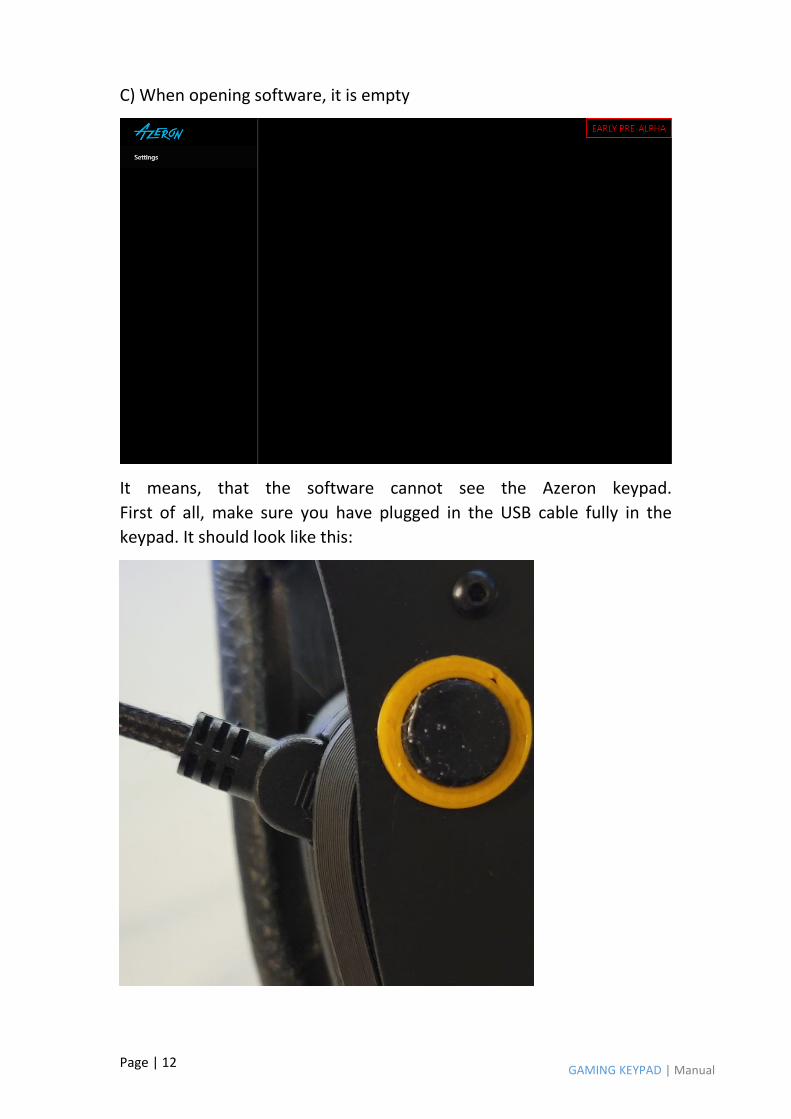
C) When opening software, it is empty
It means, that the software cannot see the Azeron keypad.
First of all, make sure you have plugged in the USB cable fully in the
keypad. It should look like this:
Page | 13 GAMING KEYPAD | Manual
Another possible solution is to close the software, unplug USB cable, wait
until Windows no longer see the keypad, then plug in back the USB cable
(make sure you are plugging in the USB directly in PC and not via USB
hub!), turn on software again.
If that doesn’t work, you may need to do the clean reset process. You can
find an unofficial guide here:
https://docs.google.com/document/d/136Ae743B7PmARTqDiwALLPVQ
Mr1rXPrGygxB-BZPNuE/edit?usp=sharing
Page | 14 GAMING KEYPAD | Manual
5. HOW TO USE AZERON SOFTWARE
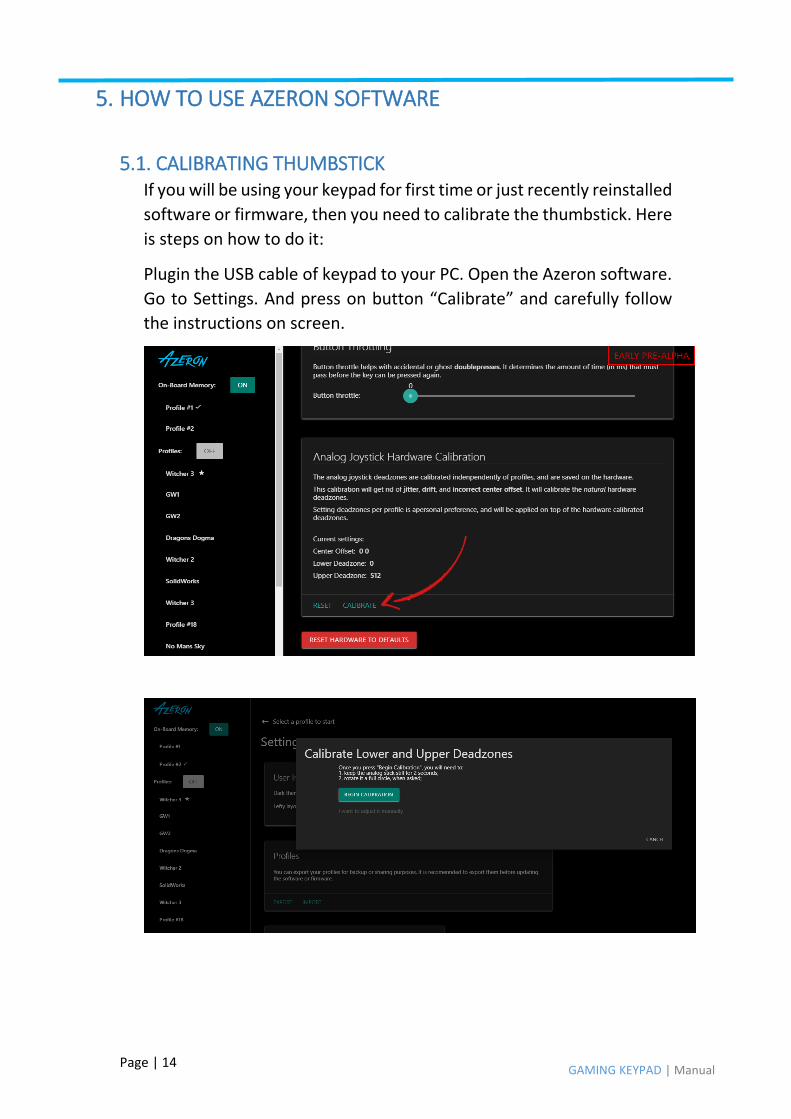
5.1. CALIBRATING THUMBSTICK If you will be using your keypad for first time or just recently reinstalled
software or firmware, then you need to calibrate the thumbstick. Here
is steps on how to do it:
Plugin the USB cable of keypad to your PC. Open the Azeron software.
Go to Settings. And press on button “Calibrate” and carefully follow
the instructions on screen.
Page | 15 GAMING KEYPAD | Manual
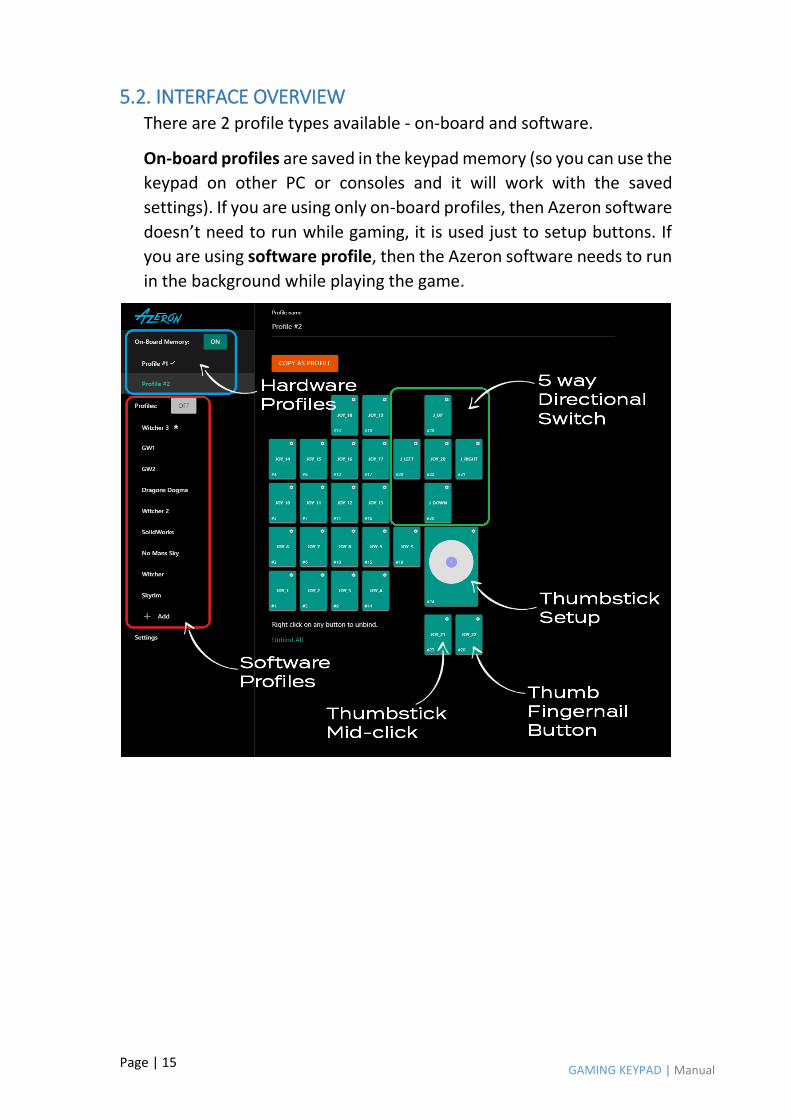
5.2. INTERFACE OVERVIEW There are 2 profile types available - on-board and software.
On-board profiles are saved in the keypad memory (so you can use the
keypad on other PC or consoles and it will work with the saved
settings). If you are using only on-board profiles, then Azeron software
doesn’t need to run while gaming, it is used just to setup buttons. If
you are using software profile, then the Azeron software needs to run
in the background while playing the game.
Page | 16 GAMING KEYPAD | Manual
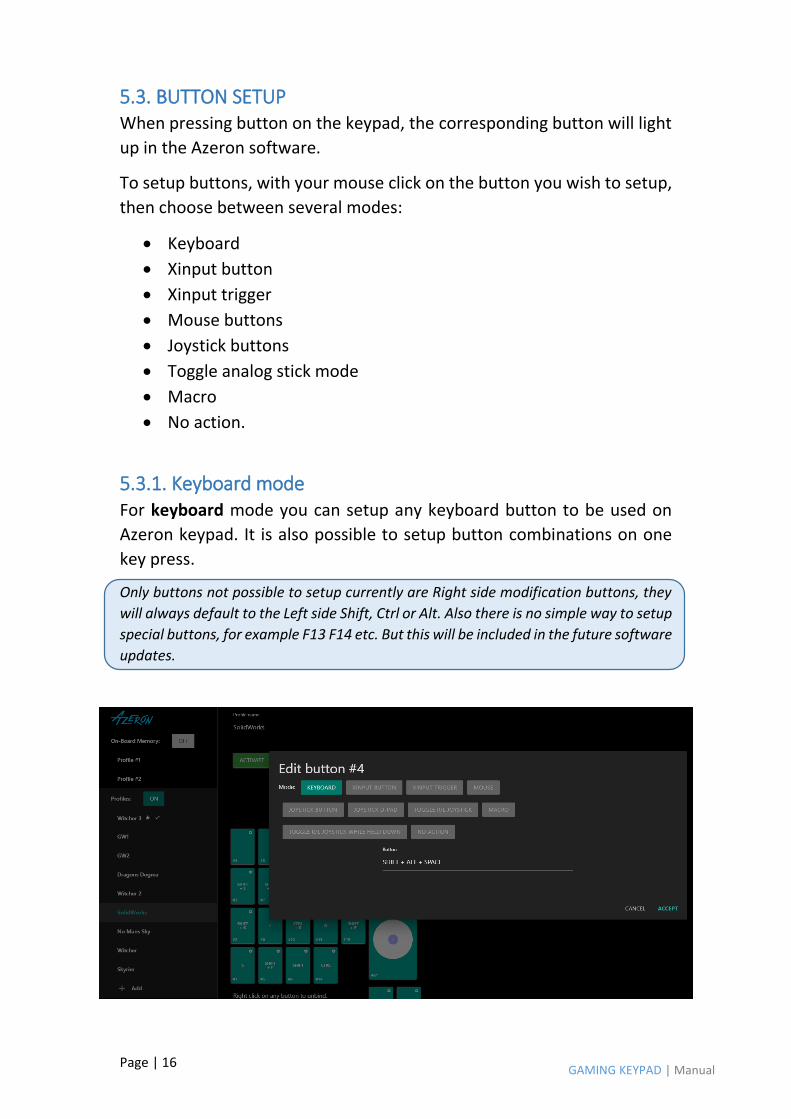
5.3. BUTTON SETUP When pressing button on the keypad, the corresponding button will light
up in the Azeron software.
To setup buttons, with your mouse click on the button you wish to setup,
then choose between several modes:
Keyboard
Xinput button
Xinput trigger
Mouse buttons
Joystick buttons
Toggle analog stick mode
Macro
No action.
5.3.1. Keyboard mode For keyboard mode you can setup any keyboard button to be used on
Azeron keypad. It is also possible to setup button combinations on one
key press.
Only buttons not possible to setup currently are Right side modification buttons, they
will always default to the Left side Shift, Ctrl or Alt. Also there is no simple way to setup
special buttons, for example F13 F14 etc. But this will be included in the future software
updates.
Page | 17 GAMING KEYPAD | Manual
5.3.2. Xinput button and Xinput trigger Xinput allows the Azeron keypad button to act as an Xbox controller
button or trigger.
Under Xinput button it is possible to setup:
Home
Start
X, Y, A, B
Right Bumper, Left Bumper
Push Right analog stick
Push Left analog stick
Back
D-pad right, left, down and up
Under Xinput trigger it is possible to setup:
Right trigger
Left trigger
5.3.3. Mouse mode Under mouse mode the Azeron keypad button can act as a mouse
buttons:
Left click
Right click
Middle click
Back
Forward
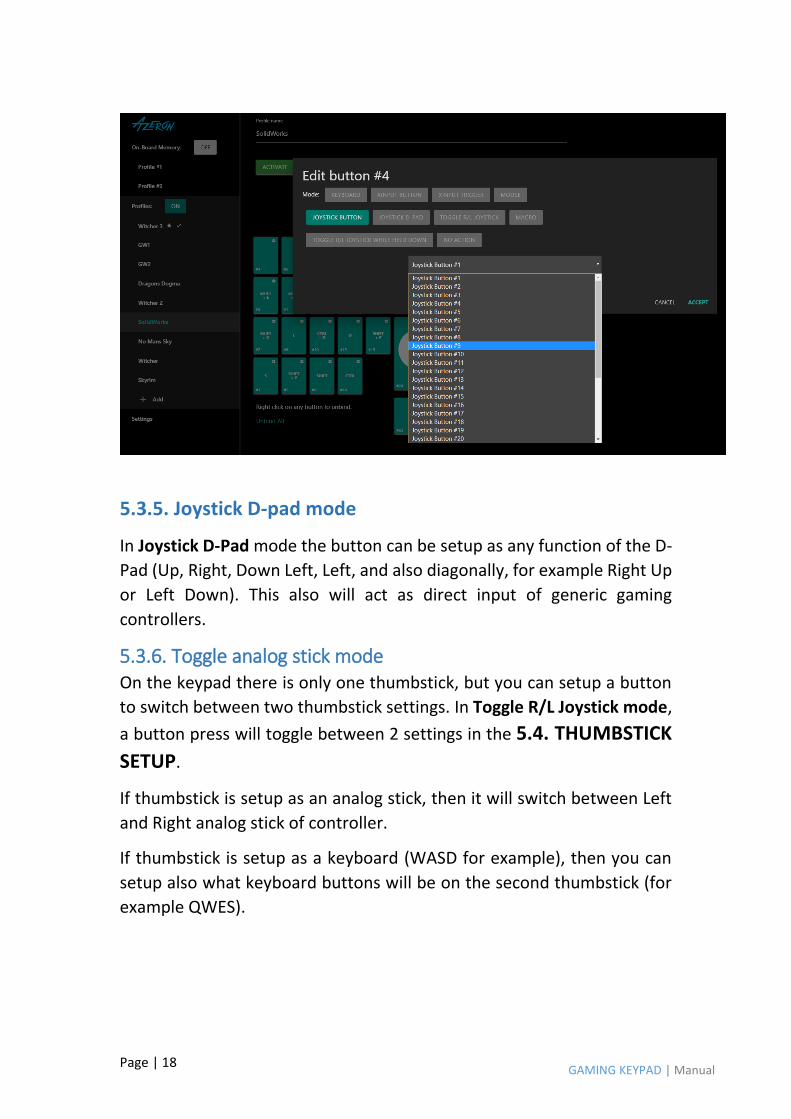
5.3.4. Joystick button In joystick button mode the keypad will act as a joystick button (direct
input of generic gaming controllers). If you are using Azeron keypad on
consoles through XIM device, then you need to setup all buttons as
joystick buttons.
Upon receiving your Azeron keypad or after reinstalling firmware by default the second
profile in on-board memory will have all buttons setup as joystick buttons. So you can
use Azeron on console via XIM adapter straight out of box.
Page | 18 GAMING KEYPAD | Manual
5.3.5. Joystick D-pad mode
In Joystick D-Pad mode the button can be setup as any function of the D-
Pad (Up, Right, Down Left, Left, and also diagonally, for example Right Up
or Left Down). This also will act as direct input of generic gaming
controllers.
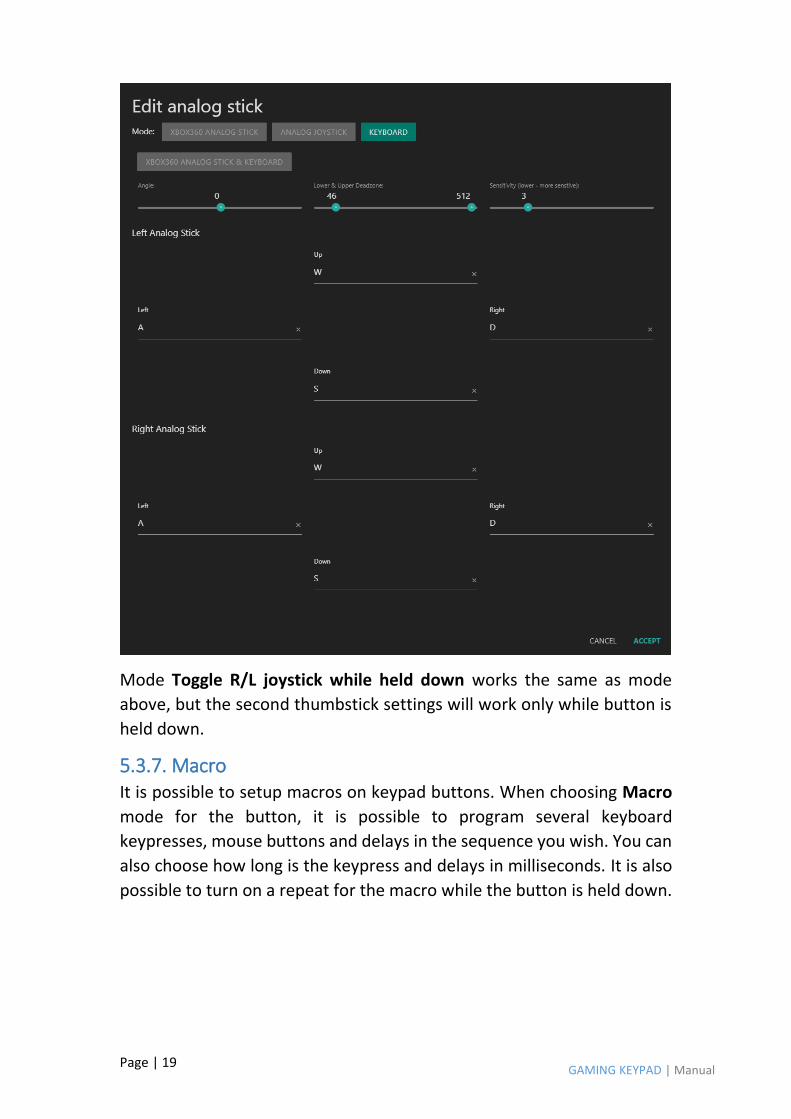
5.3.6. Toggle analog stick mode On the keypad there is only one thumbstick, but you can setup a button
to switch between two thumbstick settings. In Toggle R/L Joystick mode,
a button press will toggle between 2 settings in the 5.4. THUMBSTICK
SETUP.
If thumbstick is setup as an analog stick, then it will switch between Left
and Right analog stick of controller.
If thumbstick is setup as a keyboard (WASD for example), then you can
setup also what keyboard buttons will be on the second thumbstick (for
example QWES).
Page | 19 GAMING KEYPAD | Manual
Mode Toggle R/L joystick while held down works the same as mode
above, but the second thumbstick settings will work only while button is
held down.
5.3.7. Macro It is possible to setup macros on keypad buttons. When choosing Macro
mode for the button, it is possible to program several keyboard
keypresses, mouse buttons and delays in the sequence you wish. You can
also choose how long is the keypress and delays in milliseconds. It is also
possible to turn on a repeat for the macro while the button is held down.

Page | 20 GAMING KEYPAD | Manual
Macro function is available only in software profiles! Currently it is not possible to save
Macro in on-board memory due to the Teensy PCB limitations.
We are planning to add more advanced macro functionality in future software
updates.
5.3.8. Button layering Any of the buttons can be programmed as a shift button to switch
between several button layers on the fly thus increasing the number of
functions that can be programmed into the other buttons by several
times.
Page | 21 GAMING KEYPAD | Manual
For example, in the picture above, we are editing button #8 as a shift
button and we will set it up to switch to another software profile, which
is called “Profile #41”. Now when pressing button #8 on the keypad, the
keypad will switch to Profile #41 and will use the keybinds that are
stored there.
If we want that by releasing button #8 we switch back to the previous
profile, then we need to choose YES at the option “Set Profile #41 button
#8 to switch back to current profile”, otherwise you will not be able to
switch back to previous layer of buttons and will be stuck in Profile #41.
If we choose YES at the option “Belkin Nostromo 52 mode” then the held
keys from the current profile binds will be released and the new profile
binds for the pressed keys will automatically be pressed on profile
change.
5.3.9. No action mode In No action mode the button will be “empty” and do nothing. You can
also remove the keybind by right clicking on the button.
Page | 22 GAMING KEYPAD | Manual
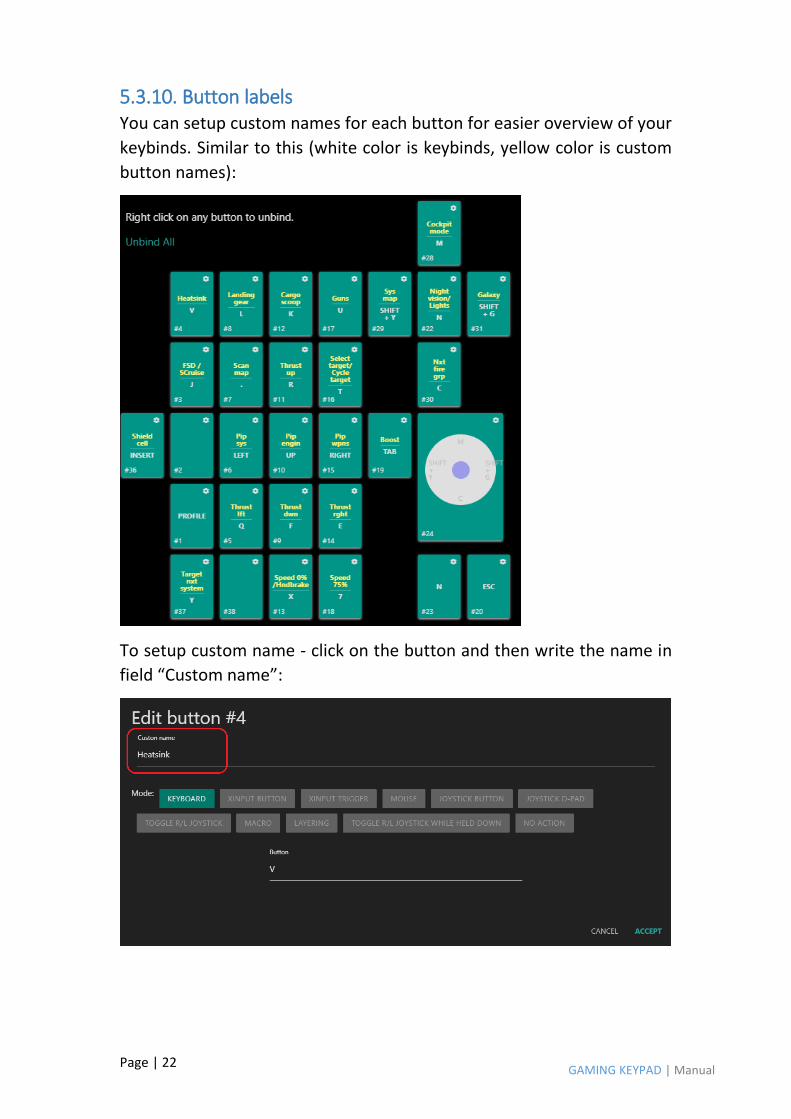
5.3.10. Button labels You can setup custom names for each button for easier overview of your
keybinds. Similar to this (white color is keybinds, yellow color is custom
button names):
To setup custom name - click on the button and then write the name in
field “Custom name”:
Page | 23 GAMING KEYPAD | Manual
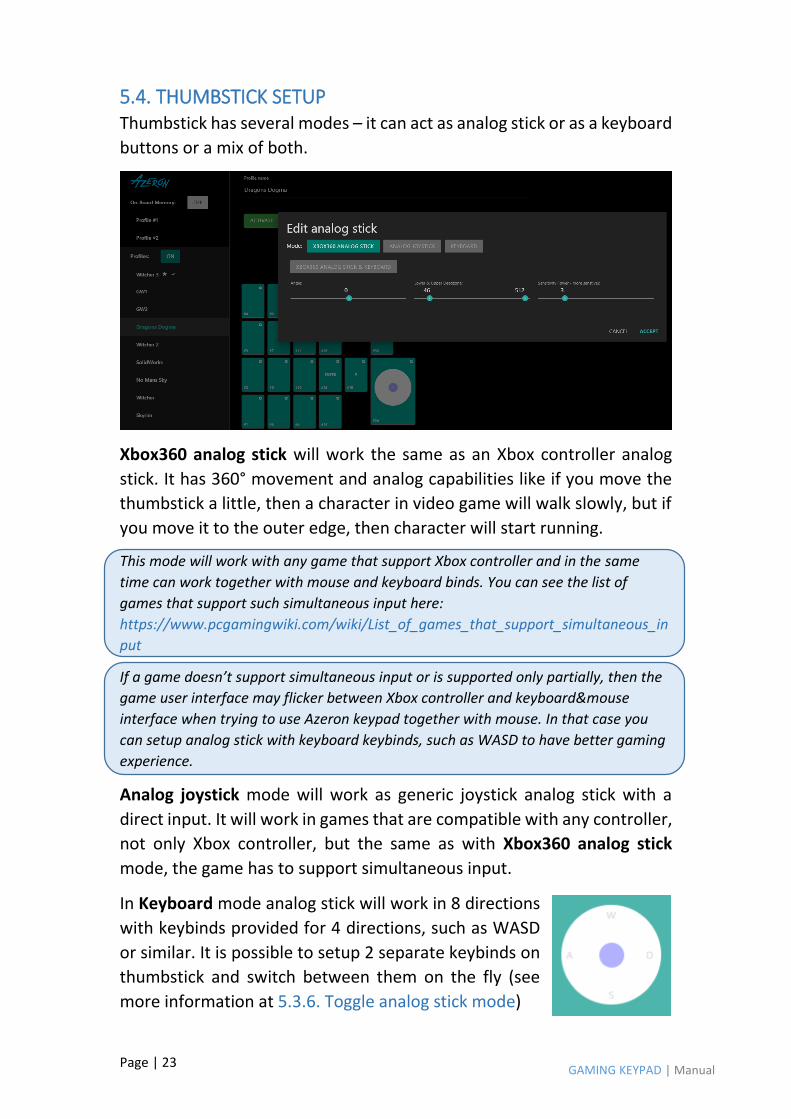
5.4. THUMBSTICK SETUP Thumbstick has several modes – it can act as analog stick or as a keyboard
buttons or a mix of both.
Xbox360 analog stick will work the same as an Xbox controller analog
stick. It has 360° movement and analog capabilities like if you move the
thumbstick a little, then a character in video game will walk slowly, but if
you move it to the outer edge, then character will start running.
This mode will work with any game that support Xbox controller and in the same
time can work together with mouse and keyboard binds. You can see the list of
games that support such simultaneous input here:
https://www.pcgamingwiki.com/wiki/List_of_games_that_support_simultaneous_in
put
If a game doesn’t support simultaneous input or is supported only partially, then the
game user interface may flicker between Xbox controller and keyboard&mouse
interface when trying to use Azeron keypad together with mouse. In that case you
can setup analog stick with keyboard keybinds, such as WASD to have better gaming
experience.
Analog joystick mode will work as generic joystick analog stick with a
direct input. It will work in games that are compatible with any controller,
not only Xbox controller, but the same as with Xbox360 analog stick
mode, the game has to support simultaneous input.
In Keyboard mode analog stick will work in 8 directions
with keybinds provided for 4 directions, such as WASD
or similar. It is possible to setup 2 separate keybinds on
thumbstick and switch between them on the fly (see
more information at 5.3.6. Toggle analog stick mode)
Page | 24 GAMING KEYPAD | Manual
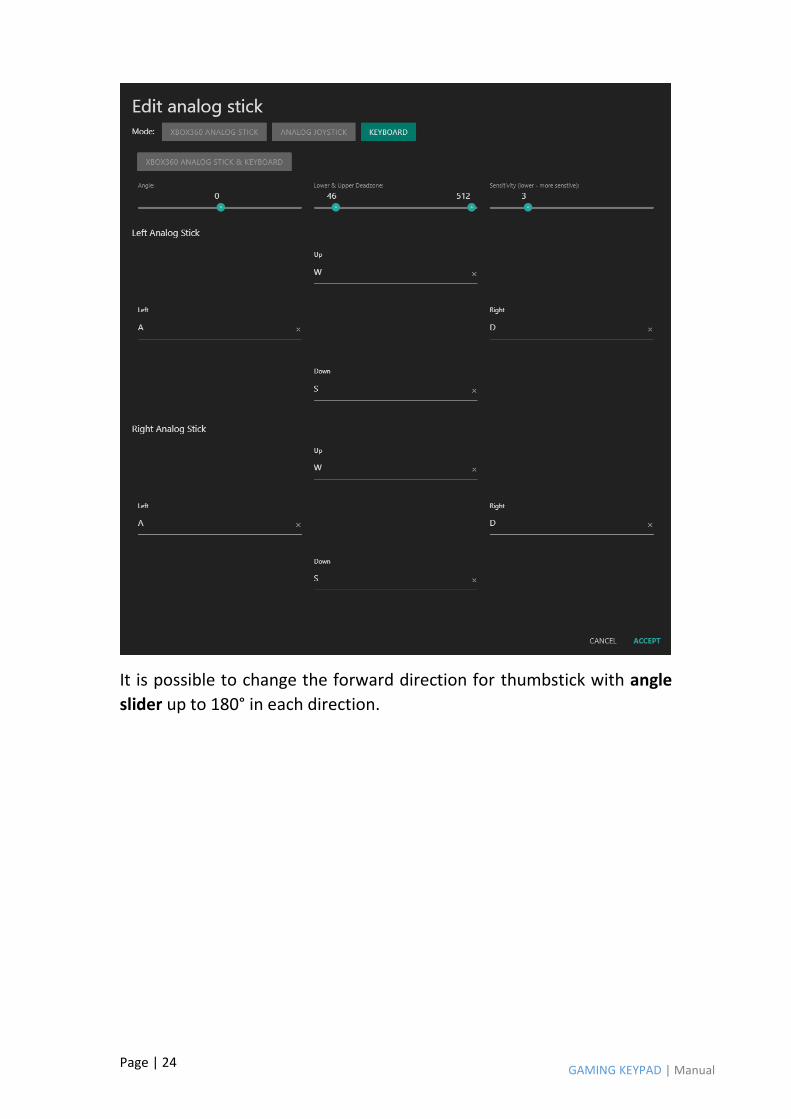
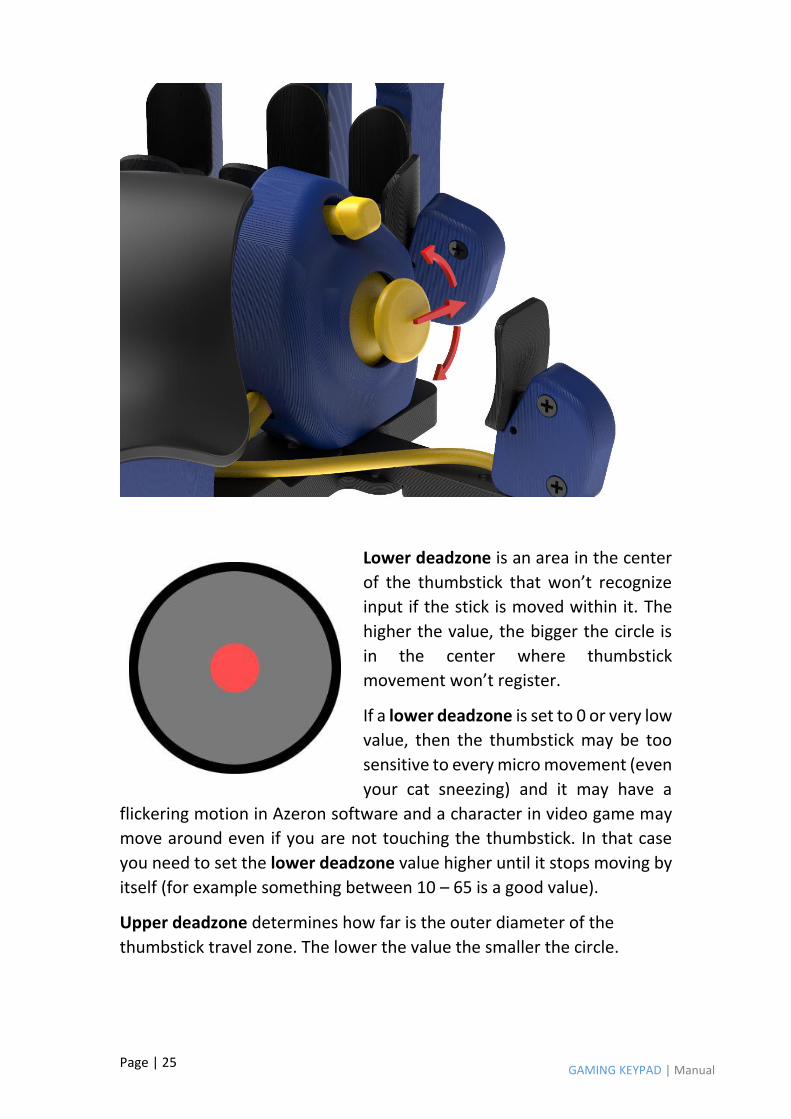
It is possible to change the forward direction for thumbstick with angle
slider up to 180° in each direction.
Page | 25 GAMING KEYPAD | Manual
Lower deadzone is an area in the center
of the thumbstick that won’t recognize
input if the stick is moved within it. The
higher the value, the bigger the circle is
in the center where thumbstick
movement won’t register.
If a lower deadzone is set to 0 or very low
value, then the thumbstick may be too
sensitive to every micro movement (even
your cat sneezing) and it may have a
flickering motion in Azeron software and a character in video game may
move around even if you are not touching the thumbstick. In that case
you need to set the lower deadzone value higher until it stops moving by
itself (for example something between 10 – 65 is a good value).
Upper deadzone determines how far is the outer diameter of the
thumbstick travel zone. The lower the value the smaller the circle.
Page | 26 GAMING KEYPAD | Manual
If you are not sure what deadzone settings you should use, just go through
the Calibrate Deadzones wizard, and the software will choose the best
settings for your thumbstick. See 5.1. CALIBRATING THUMBSTICK
Sensitivity setting controls how sensitive thumbstick feels. The lower the
value the more sensitive is the thumbstick. Most of the time good values
are 3-10.
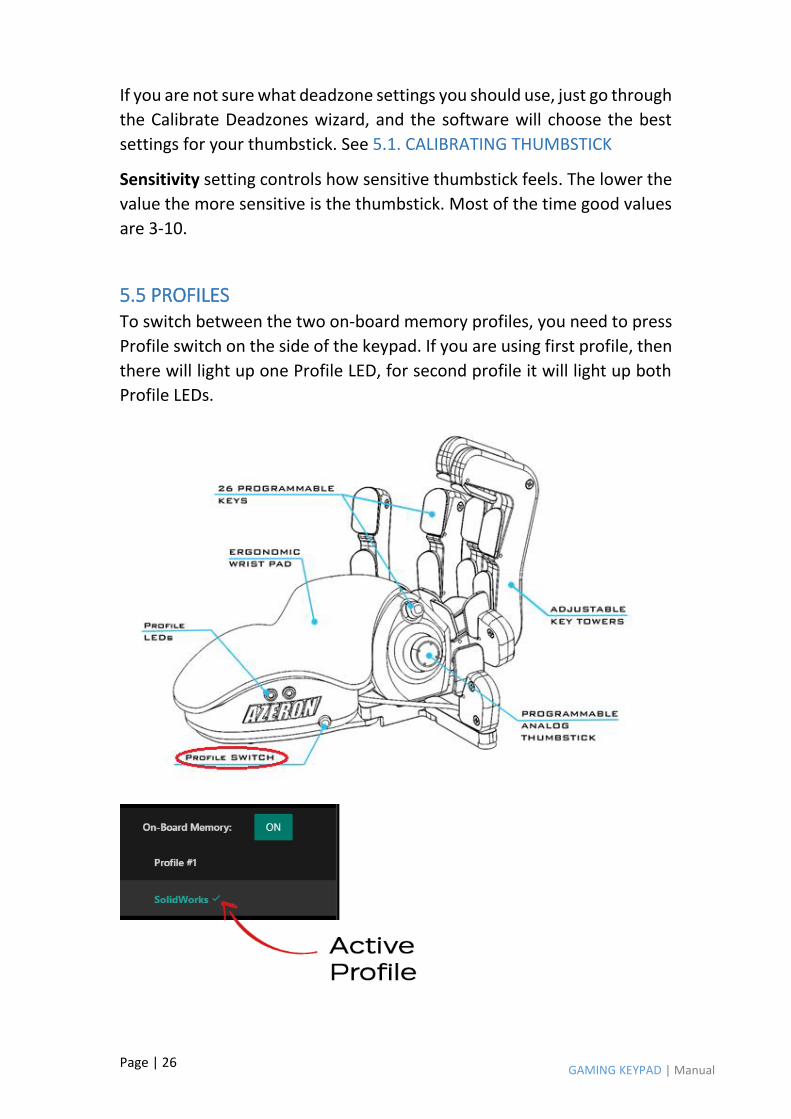
5.5 PROFILES To switch between the two on-board memory profiles, you need to press
Profile switch on the side of the keypad. If you are using first profile, then
there will light up one Profile LED, for second profile it will light up both
Profile LEDs.
Page | 27 GAMING KEYPAD | Manual
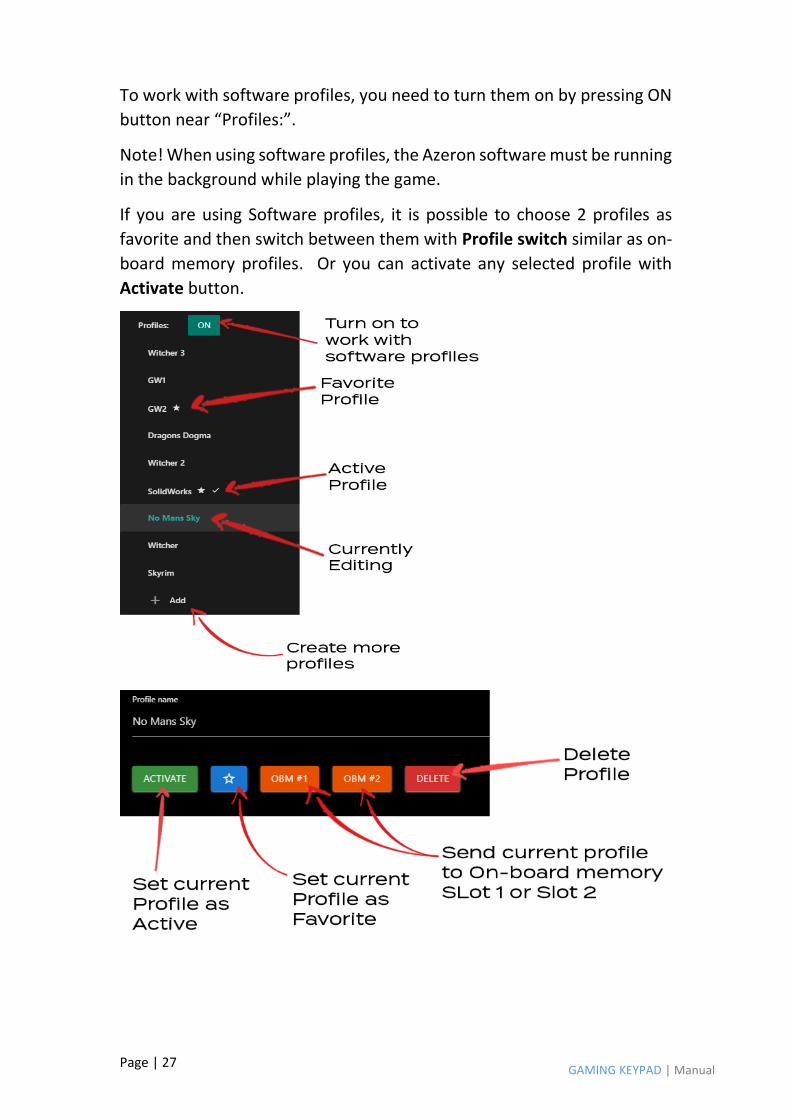
To work with software profiles, you need to turn them on by pressing ON
button near “Profiles:”.
Note! When using software profiles, the Azeron software must be running
in the background while playing the game.
If you are using Software profiles, it is possible to choose 2 profiles as
favorite and then switch between them with Profile switch similar as on-
board memory profiles. Or you can activate any selected profile with
Activate button.
Page | 28 GAMING KEYPAD | Manual
Any software profile can also be sent to On-board memory, by pressing
OBM#1 or OBM#2. Note that Macro will not work in on-board memory
profiles.
At the bottom of the profile list is button + Add, which will create a new
profile by copying already selected profile.
Page | 29 GAMING KEYPAD | Manual
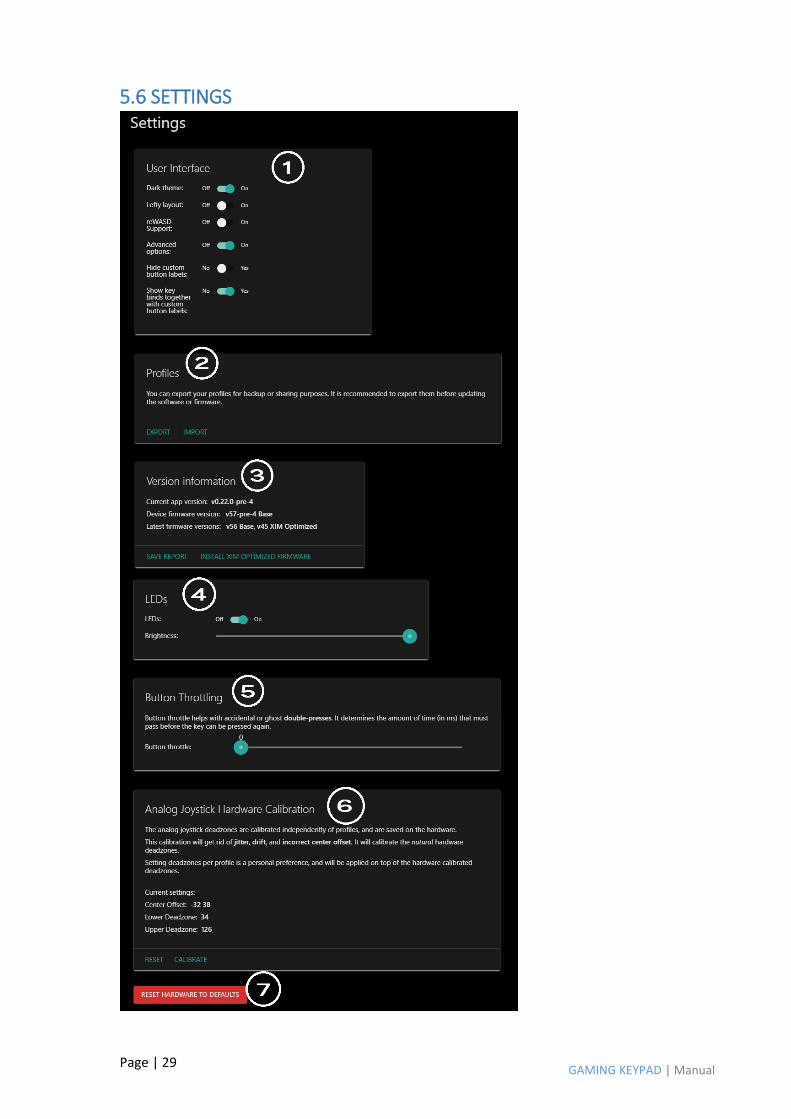
5.6 SETTINGS

Page | 30 GAMING KEYPAD | Manual
(1) At the top of the Settings you can see the interface options:
Dark theme option will turn on dark background for the software. By
default, it’s ON.
Lefty layout will switch the button interface for keypad that is meant for
left handed people (keypad in right hand, mouse in left hand). The button
layout will look like this:
reWASD support allows to use 3rd party software with more advanced
options, called reWASD. By turning this setting ON, Azeron keypad will use
older version communication protocol to be compatible with reWASD.
Advanced options will hide/show more advanced settings.
Hide custom button labels will hide the labels for each button you have
created, only keybinds will be visible.
Show key binds together with custom button labels (visible only if Hide
custom button labels is OFF) will allow to switch between 2 modes –
having visible only button labels or visible labels together with keybinds.
(2) At the Profiles option it is possible to Export and Import your profiles.
You can back up all of your profiles in .JSON file, to prevent any accidental
Page | 31 GAMING KEYPAD | Manual
deletion when reinstalling software or Windows, updating firmware, etc.
Note that it will save only profiles that are in the software and not in the
On-board memory!
(3) Version information. Here you can see what software and firmware
you are using and if there are any updates available. If there will be newer
version available, then Update button will be visible. To update to newer
firmware version, just press the button Update and follow the
instructions on the screen.
(Advanced option) If you are using Azeron keypad on consoles through
XIM device, then it is possible to Install XIM optimized firmware, which
removes all unnecessary features, leaving only one profile in the on-board
memory with joystick settings, but still keeping possibility to adjust
thumbstick angle, deadzones and sensitivity.
(4) Turn LEDs OFF or ON will completely turn off the Profile LEDs on the
side of the keypad. LED brightness slider adjusts the Profile LEDs. The
higher the value, the brighter the LEDs will glow.
(5) Button throttle. In case one or more of the buttons are starting to
make double clicks (switch debounce), you can setup button throttle here
in milliseconds. That is the time that must pass between keypad will
register next keypress on the same button.
Note! The button throttle currently works on all buttons in the same time,
it can’t be setup separately for each button.
(6) Analog joystick hardware calibration. Here you can reset the
deadzones to zero values or Calibrate the thumbstick to optimal settings.
When calibrating, carefully follow the instructions on screen. See more
information at 5.1. CALIBRATING THUMBSTICK
(7) Reset hardware to defaults. This option will delete all on-board
memory profiles, restores everything to default settings. It is the same as
reinstalling firmware in the keypad.
Page | 32 GAMING KEYPAD | Manual
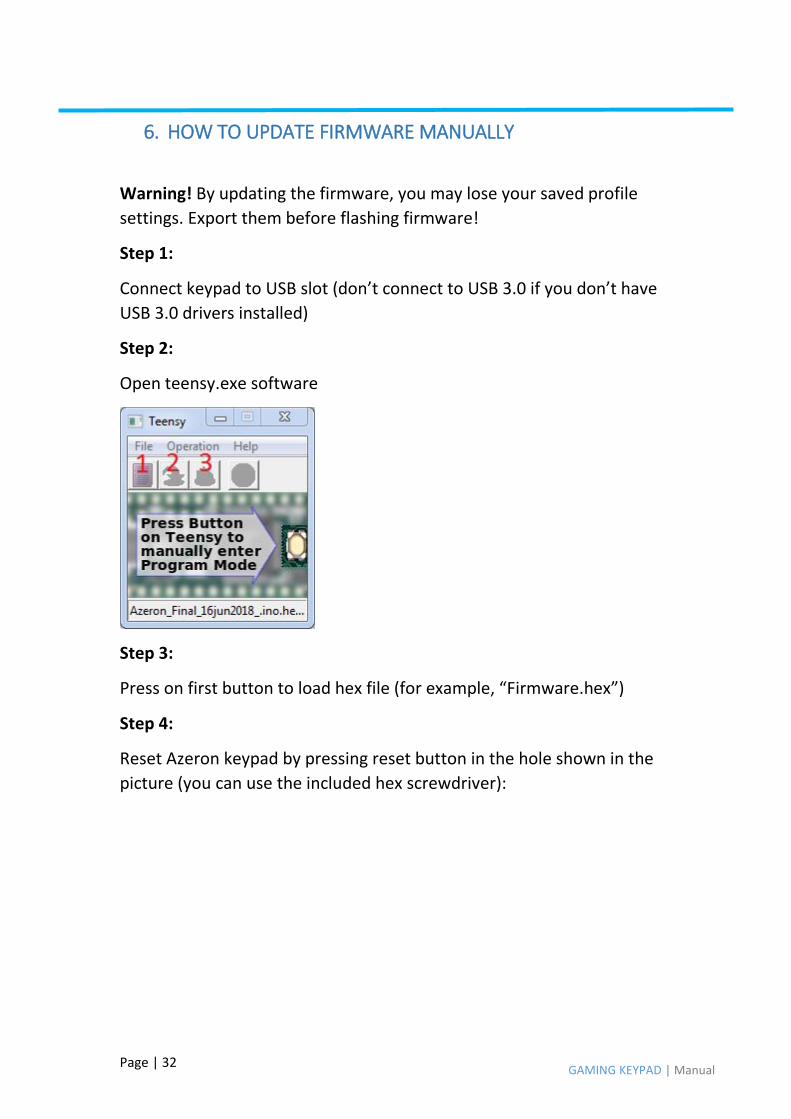
6. HOW TO UPDATE FIRMWARE MANUALLY
Warning! By updating the firmware, you may lose your saved profile
settings. Export them before flashing firmware!
Step 1:
Connect keypad to USB slot (don’t connect to USB 3.0 if you don’t have
USB 3.0 drivers installed)
Step 2:
Open teensy.exe software
Step 3:
Press on first button to load hex file (for example, “Firmware.hex”)
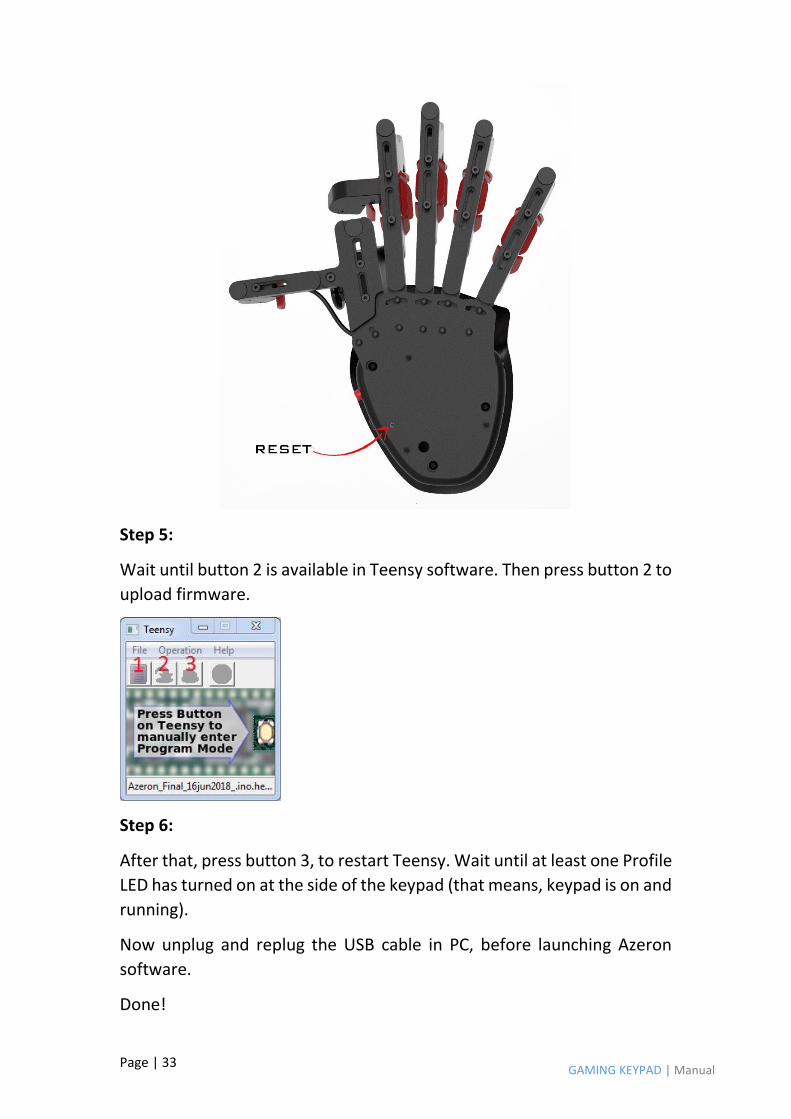
Step 4:
Reset Azeron keypad by pressing reset button in the hole shown in the
picture (you can use the included hex screwdriver):
Page | 33 GAMING KEYPAD | Manual
Step 5:
Wait until button 2 is available in Teensy software. Then press button 2 to
upload firmware.
Step 6:
After that, press button 3, to restart Teensy. Wait until at least one Profile
LED has turned on at the side of the keypad (that means, keypad is on and
running).
Now unplug and replug the USB cable in PC, before launching Azeron
software.
Done!
Page | 34 GAMING KEYPAD | Manual
7. TIPS AND TRICKS
It is recommended to setup space bar button on the mouse, so
the running and jumping in the same time is effortless
It is possible to setup button combinations, by putting Shift (or
Ctrl, or Alt) on the mouse and combine it with buttons on the
keypad, to setup more than 22 commands. For example, Shift + 1,
Shift + A, Ctrl + W etc. Or you can use Layering feature in software
profiles to get more keybinds.
To make it easier to get used to the keybind setup – we
recommend creating a new character in the game and learn new
skills one by one together with your character or start with games
that doesn’t have a lot of keybinds
It is known that using lizard skin grip tape on the buttons feels
premium :) Pick 0.5mm thickness
It is possible to change thumbstick caps to Elite xbox magnetic
caps
Our Discord community is the best place where to solve problems,
search keybinds, get ideas and find likeminded people
To get access to more advanced macros and other options– it is
possible to setup Azeron keypad as generic joystick and then use
3rd party software JoyToKey to setup more advanced macros on
each button.
WARNING! Do not keep the keypad near heat sources or in hot places!
Contact us for more information: [email protected]
Discord community and support: https://discord.gg/9tw9pju
Webpage: azeron.eu