Embed Size (px)
Citation preview


Game Design
Craig BesinqueTom Dalgliesh
Map & Graphics
Eric Hotz
Developers & Playtesters
Charles F. Bryant II
Grant Dalgliesh
Brion Emde
Steve Goodman
Ron Hodwitz
Robert Holzer
Mike Hoyt
David Robert
Cal Stengel
© 1991, 1994, 2000, Craig Besinque & Tom DalglieshEastFront is a trademark of Columbia Games Inc.
COLUMBIA GAMES INC.POB 3457, Blaine, WA 98231, U.S.A.
www.columbiagames.com
EastFrontThe War in Russia, 1941-45

INTRODUCTIONEastFront simulates the largest
military campaign in history: the "Eastern Front" in World War II, 1941-45. One player commands the German forces, the other commands the Soviets.
THE MAPBOARDThe mapboard depicts the main
theater of the war: from the Carpathians east to the Volga, and from Finland south to the Caucasus. The mapboard is divided into hexagons, called "hexes", to determine location and movement. Terrain features affecting play include: rivers, forests, mountains, marshes, cities, ports, and railways.
THE UNITSWooden blocks, called units,
represent German corps (gray) and Soviet armies (red). A die-cut, adhesive label identifying a unit’s type and strength must be attached to each block. Put tan labels on the red (Soviet) blocks, and gray or black labels on gray (German) blocks.
Units in play normally stand upright, with their labels facing the owning player. This provides simple yet elegant Fog of War in that players cannot see the type or strength of opposing units.
The six basic unit-types are: Armor, Mechanized Infantry ("Mech"), Infantry, Shock, Cavalry, and Headquarters. Each unit-type has a given movement rate and firepower rating.
The large numbers surrounding the unit symbol show the unit’s strength, called Combat Value ("CV"). Units gain and lose strength in steps of 1CV. A unit’s current strength is the number along its top edge when standing upright.
GAME SCENARIOSFor game purposes, the Eastern Front
campaign is divided into scenarios, each covering a 6-month period of the war. A scenario can be played in a sitting (4-6 hours), and two or more scenarios can be joined for longer games.
The winner of a scenario is determined by Victory Points (VPs), which are awarded for current Production Levels and HQ steps remaining in play, and subtracted for eliminated friendly units. Each scenario has a VP handicap which is added to or subtracted from German VPs, relating VP totals to historical results.
GAME TURNSA month consists of a Production
segment followed by two Fortnights of play. Production involves adding replacement steps to units in play, and rebuilding destroyed units into 1CV units, or cadres. Control of economic objectives on the map yields Production Points, which are used to "pay" for these builds. Both players perform production simultaneously.
A Fortnight consists of two alternate Player-Turns. The Germans take the first Player-Turn in Dry and Mud weather. The Soviets take the first Player-Turn in Snow weather.
The player taking the current Player-Turn is called the Active Player (the other player is Passive). A Player-Turn usually begins by activating one or more HQ units. Each activated HQ, depending on its current strength, exerts command over all units within a Command Range of 0-3 hexes, enabling these units to move.
COMBATBattles occur when both players have
units in the same hex. During combat, units are revealed to the opponent. Battles are not necessarily settled immediately. They sometimes continue for several months until one side retreats or is destroyed. Combat may occur in any ongoing Battle at the option of the Active player, and must occur on the first turn of a Battle. Any combat occurring outside Command Range is fought by the active player at a disadvantage.
A round of combat consists of an exchange of fire, airpower first, then defensive fire, and finally offensive fire. Enemy fire results in unit attrition. Forced retreats (repulses) may occur in cases of River, Air, or Sea Assaults.
WEATHERWeather exerts a considerable
influence in the game, affecting unit speeds and turn sequence. Mud and Snow weather also alter some terrain, further affecting movement and combat, and can reduce the command range of HQs. During most months the weather is known, but during Spring and Fall it is unpredictable and determined by die roll.
OVERVIEW EASTFRONTTM
CommentaryAlthough it is largely unrecognized in the West, World War II in Europe was won and lost on the Russian Front.
In November 1942 the German tide of expansion was reversed at El Alamein in North Africa and at Stalingrad in Russia. However, while Montgomery chased Rommel’s forces of about three corps westward in North Africa, the Red Army began driving 45-50 German corps back towards Berlin.
In July, 1943, the Red Army crushed Germany’s last eastern offensive at Kursk, a titanic battle involving thousands of tanks and millions of men. In the same month the Allies invaded Sicily and defeated three German units on this scale.
By the time the Allies landed (with five corps) in France on D-Day, Germany had been retreating in the east for 18 months. By then she was fighting to survive, not to win.
The Allies lost around a third of a million men fighting Hitler. Russia lost over 13 million, forty times as many.
ScenariosEastFront scenarios are fine stand-alone games, each with its own personality. The scenarios are designed to be linkable, so that the entire war, or any segment of it may be played. When desired, a game may always be continued into the following scenario.
WeatherIn general, Dry weather provides ideal movement and combat conditions, Mud hinders both sides, and Snow hinders the Germans.
© 2005 Columbia Games Inc. 1 VERSION 3.02

1.1 ORIENTATIONThe German player sits at the
western edge of the board, and the Soviet player opposite. The West mapedge is a home mapedge to the Germans; the East and South (Caucasus) mapedges are home mapedges to the Soviets; the North (Finnish) mapedge is neutral (friendly to neither). Turkey is unplayable.
1.2 HEXESThe mapboard is divided into
"hexes" which determine the location and movement of units. Partial hexes on the map edges and part-land/part-water hexes are playable with some exceptions (see sidebar list). Hexes can be identified by the cities or towns they contain, or by a direction (see compass rose) and distance from a city or town. For example: "Kharkov NE1" is one hex northeast of Kharkov.
1.3 TERRAINTerrain features that affect play
are listed below and summarized on the Terrain Effects Chart. A hex or hexside is considered to be of the terrain type constituting the middle of that hex or hexside (in land/sea hexes, only the land terrain is considered). The terrain of a hex affects movement, combat, and "stacking" (maximum number of units allowed in a hex). Hexside terrain limits movement into (and out of) battles, referred to as the Engagement Limit (6.3).
1.31 CLEAR TERRAINClear terrain allows unimpeded
movement. Engagement limit is two (2) units per hexside, and stacking is four (4) units per hex.
1.32 FORESTForest terrain does not impede
movement. Passive units have double defense: they only lose one step for every two hits in combat. Engagement limit is one (1) unit per hexside, and stacking is four (4) units per hex.
Clarifications: Tbilisi and Grozny are forest hexes.
1.33 MARSHAll units (except cavalry) must stop
upon entering a Marsh hex. Passive units have double defense in combat. Engagement limit is one (1) unit per hexside, and stacking is three (3) units per hex. All units fire offensively at SF. In Snow weather, Marshes freeze, becoming Forest, except that stacking is unchanged.
1.34 MOUNTAINMountains halt movement (except
cavalry), and provide double defense. Engagement limit is one (1) unit per hexside, and stacking is two (2) units per hex. Alpine (High Mountain) hexsides (white) are impassable. Sea invasions and paradrops are prohibited into mountains. Clarifications: Ordzhonikidze and Ploesti NE1 are mountain hexes.
1.35 RIVERSRivers follow hexsides. They do not
impede movement, except Engagement limit is one (1). Attempts to initiate battles across rivers, called River Assaults, are subject to Repulse (see 7.5). Some River hexsides are shown with forest; this is for artistic effect only. Rivers freeze in Snow.
1.36 SEASSeas are impassable except across
Straits or by Sea Movement (see 15.2).
MAP ERRATA: New Sea ZonesGulf of Riga. Controlled by Riga. The
other port is Ventspils. Its boundary runs from Ventspils north through the islands to the Gulf of Finland (Baltic Sea, Gulf of Finland, and Gulf of Riga all adjoin).
Caspian Sea. Controlled by Baku (Exit Zone ‘M’). Other ports are Marach Kala and Astrakhan.
NOTE: Sevastopol borders on both the Eastern and Western Black Seas.
1.37 LAKES Lakes hexes and hexsides are always
impassable; they do not freeze. Sea Movement is prohibited on Lakes.
1.38 STRAITSThe Kerch Straits (between the Sea
of Azov and Eastern Black Sea) is treated as a river, except that units crossing must start on one side, and stop on the other.
Normal 2-hex land supply is traceable across the Straits as across any river, regardless of sea control. Rail Lines do not traverse the Kerch Straits, so Rail Movement and/or Rail Supply across the straits is impossible.
Sea Movement, Sea Invasions, and Sea Supply are prohibited through straits if either adjacent land hex is enemy controlled (though Sea Supply from Kerch to Novorossiysk is possible when the Eastern Black Sea is friendly controlled, see 15.0).
EASTFRONTTM 1.0 THE MAP
© 2005 Columbia Games Inc. 2 VERSION 3.02
MAP CLARIFICATIONSThe map is drawn in a ‘realistic’ style, but is designed to be interpreted in an intuitive manner. In some cases printing has resulted in small misalignments of the hex grid. Use common sense to interpret the map, ignoring small departures from the hex grid (e.g., small land areas in all sea hexes, or miniscule incursions of a rail line into a hex). Hexes with miniscule land areas in them such as the following are not playable.
Baltic Sea coastMemel NW1Riga NW1 (islands)Riga NW2 (islands and mainland)North shore of Tallinn E1 (very tiny)Lake Ladoga/OnegaVolkhov NW2, NW3Leningrad NE4Volkhov NE3Sea of AzovPerekop E1 (long thin peninsula)Black SeaOdessa SE1Batumi SW2 (in Turkey)
Compass Rose
Forest Hex
Marsh Hex
Mountain Hex
NW
SE
NE
SW E
W
Clear Hex

1.4 CITIESCities do not affect movement (this
is governed by the terrain of the hex). There are two types of cities on the map: Major and Minor Cities.
1.41 MAJOR CITIESLarge black dots containing white
numbers are Major Cities. All units defending Major Cities have Double Defense (7.3) and DF firepower or better. Stacking is governed by the terrain in the hex. Major Cities contribute to the Production Level of the controlling player. Reinforcements and newly rebuilt cadre units may arrive in a Major City.
1.42 MINOR CITIESSmall circled dots are Minor Cities.
They provide no production or defensive benefit. One arriving reinforcement or newly rebuilt cadre unit may arrive in a Minor City.
1.43 TOWNS Small black dots indicate towns. They
have no game function except to help name locations.
1.44 HOME CITIESDefined as any Major or Minor City
within friendly territory as of June ‘41. Reinforcements and rebuilt units can only be deployed in Home Cities.
1.45 PORTSCoastal cities or towns with an
anchor symbol are Ports, used for Sea Movement and Sea Supply if using the optional Sea Power rules.
Leningrad, Odessa, and Danzig are Major Ports. All other ports are minor.
1.46 FORTRESSES Cities with a hexagon around
them (Sevastopol and Leningrad) are Fortresses. Combat is always mandatory (except Blitz Combat) when engaging an enemy controlled fortress (see 7.15).
All units defending a fortress have Triple Defense (7.34).
The largest defending unit has Triple Firepower (TF) and receives Fortress Siege Supply (10.5), enabling it to survive indefinitely (at any strength) without a supply line.
LAKE SUPPLY: A second Soviet unit defending Leningrad can receive Fortress Siege Supply, provided the Soviets have Rail Supply to the shore of Lake Ladoga at Volkhov NE1.
1.5 RESOURCE CENTERSThere are six resource-producing
areas in the game: Ploesti, Krivoy-Rog, Stalino, Maikop, Grozny, and Baku (off-map). Each is identified with a pick (mineral) or oil derrick symbol and a production value. Unnumbered resource centers have a value of 1.
When located in the same hex as a Production City, Resource value is added to the city value. German-controlled resource centers produce double their rated production value.
For example: Stalino has a City Production of 2, plus a Mineral value of 1. This would yield 3PPs for the Soviet player, but 4PPs for the German, since the mineral (but not the city) value is doubled.
1.6 RAILROADSPrincipal railroads are indicated by
red-dashed lines. These provide a supply source for units, and allow rapid unit redeployment via Rail Movement (9.2).
SIVASH LAGOON Railroad: The hexside between Melitopol and Perekop (Crimea) can be used for rail movement only: no land movement allowed.
Rail Entry hexes are map edge hexes where rail lines enter the map, labeled A-W for identification.
1.0 THE MAP EASTFRONTTM
Resource CentersThe rated value of Resource Centers are doubled for the German player because they were crucial to the blockaded, resource-starved German economy.
Two important Soviet economic centers: Murmansk (city) and Baku (oil), are off-board to the north and south respectively. These are brought into play by rules outlined in 16.0 Strategic Objectives.
© 2005 Columbia Games Inc. 3 VERSION 3.02
1 Major City
Minor City
Town
Minor Port
Control Port
Fortress
Oil Resource
Mineral Resource

2.1 NATIONALITYOne die-cut adhesive label must
be attached to the face of each block. Examine the blocks carefully and cover any minor imperfections with the label. One or two extra blocks are included.
German units are gray blocks with gray labels (black labels for SS units). The German player also controls four "Axis Satellite" (Rumanian, Hungarian, and Italian) units, which have light gray labels.
Soviet units are red blocks with tan labels.
2.2 UNIT TYPESA unit’s type is shown by the symbol
in the center of its label. There are six basic types of unit: Armor, Mechanized ("Mech"), Infantry (including Coastal, Mountain and Paratroop), Cavalry, Shock, and Headquarters (HQ). A unit's type determines its Speed and Firepower, as shown in the Table.
2.21 ARMORArmor units move three (3) hexes in dry weather and fire DF on offense and defense. Armor units
represent units with large concentrations of tanks.
2.22 MECHANIZEDMech units move three (3) hexes in dry weather and fire SF on offense and DF on defense. Mech units
represent highly motorized units with extra tank support.
2.23 INFANTRYInfantry units move two (2) hexes in dry weather and fire SF on offense and defense. Infantry units
make up the bulk of both the German and Soviet armies.
2.24 CAVALRYCavalry units move three (3) hexes in dry weather and fire SF on offense and defense. Cavalry are
the only units which can move through mountain and marsh hexes and move two (2) hexes in mud. Only the Soviet player has Cavalry.
2.25 SHOCKShock units move one (1) hex in all weather and fire DF on offense and defense. Only the Soviet player has
Shock. "Shock" units are special assault troops with massive artillery support.
2.26 HEADQUARTERSHQ units move two (2) hexes in dry weather and have no firepower. Their purpose is to command the
movement of other units (see 5.0).
2.3 COMBAT VALUE (CV)Around the unit symbol of each
unit label is a series of numbers (usually 4:3:2:1) representing strength or Combat Value (CV) of the unit.
Units normally stand upright with the labels facing the owning player. The current CV of each unit is indicated by the number on the top edge of the unit. When units are engaged in combat, they are tipped forward to lie flat, with the current CV remaining on the "top" edge from the owning player’s point of view.
2.4 STEP REDUCTIONUnits can have 3 or 4 possible levels
(steps) of CV. Units can lose CV in combat and regain CV by production. When units sustain hits, they are rotated counter-clockwise so that their new (lesser) CV is on the "top" edge. Units reduced below their lowest CV step, are removed from play, but can be rebuilt as Cadres (11.5).
EASTFRONTTM 2.0 THE UNITS
SpeedThe maximum number of hexes a unit can move per movement phase in various Weather conditions.
FirepowerThe relative offensive effectiveness of the unit in combat. Units with Double Firepower (DF) cause enemy losses twice as fast as units with Single Firepower (SF).
Combat ValueThe "CV" of a unit not only relates to numbers, but also to morale, leadership, doctrine, etc. An eliminated unit has not been "wiped out to the last man", but has lost military cohesion.
Unit SizeGerman units are corps, each of which had about 50,000 men at full-strength. Axis Satellite units are armies. German units are buildable to 4cv.
Soviet infantry and shock units are armies which varied in size from 30,000 to 80,000 men. All other Soviet units are corps or composites of corps. Most Soviet units build to 3cv. Only "Guard" units and Shock armies are buildable to 4cv.
© 2005 Columbia Games Inc. 4 VERSION 3.02
UNITTYPE
3 1 2
DRY
SPEED
MUD SNOW
3 1 2
2 1 1
3 2 2
1 1 1
2 1 1
DF
SF/DF
SF
SF
DF
•
Infantry 4CV Infantry 3CV
Infantry 2CV Infantry 1CV
FirePower

2.5 IDENTITY CODESIn the lower left-hand corner of each
unit label (at full-strength orientation) is a historical identification number. German units are Corps ("54" means "54th Corps"). Satellite and Soviet units are Armies (or equivalent). "G" stands for Soviet "Guard" units.
In another corner is the unit’s appearance code. This may be a letter, a city abbreviation, or a date ("Fe43" means February 1943). The appearance code is positioned to be oriented upright in one of the upper corners at the unit’s proper CV when it first appears in the game.
German Army Groups
N North
C Center
S South
R Rumania
Soviet Military Districts
B Baltic
W West
K Kiev
O Odessa
Soviet Deployment Cities
(abbreviation in bold)
Bryansk Odessa
Cherkassy Riga
Dnepropetrovsk Rostov
Gomel Smolensk
Kalinin Sevastopol
Kharkov Stalino
Kiev Ternopol
Leningrad Tula
Minsk Vitebsk
Moscow Vinnitsa Yaroslavl
A letter or city appearance code indicates that the unit begins the game in S’41 (see Orders of Battle). Units with date codes are Reinforcements, arriving in the game month and year noted.
LABEL ERRATA
Label CorrectionGerman 3SS Mech Jl43 (not Jl41)German 35 Inf* 59 InfSoviet 27 Inf** 50 Inf* With the appearance code "Oc41’.** With the appearance code "Kal".
2.6 SPECIAL UNITSCoastal, Mountain, and Siege Gun
units are special infantry-type units. They may be deployed as starting forces in place of any infantry unit.
2.61 COASTAL ARMYThe Soviet Coastal unit is an
amphibious unit with special sea movement capabilities if the optional Seapower rules are used (see: 15.5).
2.62 MOUNTAIN CORPSThe German Mountain unit fires DF
in mountains.
2.63 SIEGE GUN CORPSBeginning in the S’42 scenario, the
German 54th Corps (deployed in the Rumania Army Group in S'41) has the 1st and 70th Heavy Mortar Regiments attached. It fires Triple Fire versus Fortresses in all weather after S’42. Replacement costs are unchanged, but it cannot be rebuilt if eliminated.
2.64 PARATROOP CORPSThe Soviet Paratroop unit has special
air movement and combat capabilities if the Paradrop rules are used (see: 14.0).
2.65 SS PANZER & MECHGerman SS units (black labels)
appear in the game in 1943. They have enhanced firepower: the SS Armor unit fires TF; the SS Mech unit fires DF offensively / TF defensively. They have normal building costs for their type.
2.66 SATELLITE UNITSThe German Satellite units (light
gray labels) are Restricted in their movement until Odessa and Sevastopol are conquered (see: 16.13). Restriction applies permanently to any Satellite unit eliminated and rebuilt.
2.0 THE UNITS EASTFRONTTM
German SS CorpsBecause of Hitler’s favoritism, SS units always received the first, most, and best equipment. This is simulated by increasing the firepower of the two SS units, but keeping their building step cost the same as regular units.
German Siege GunThe 1st Heavy Mortar unit included huge rail-borne siege mortars. The largest, called Dora, had a caliber of 31", and could fire a four ton shell 18 miles. This gun had a crew of 1600.
Axis SatellitesRumania, Hungary, and Italy all demonstrated a wisely limited appetite for offensive war in the East. After the huge losses of the first winter, Hitler prevailed upon their leaders for active participants in his crusade against Bolshevism. The proffered troops were slaughtered or captured at Stalingrad, and satellite troops played no further part in the east until their homelands were threatened.
© 2005 Columbia Games Inc. 5 VERSION 3.02
Soviet 3rd ArmyWest Military District(Starts at 3CV)
German 53rd MotorizedReinforcement - May ‘42(Starts at 3CV)
German Mountain CorpsArmy Group South(Starts at 4CV)
Soviet Paratroop CorpsReinforcement - Dec ‘41(Starts at 1CV)
Soviet Coastal ArmyStarts in/adjacent Odessa(Starts at 1CV)
German SS Panzer CorpsReinforcement - Feb ‘43(Starts at 4CV)
German Siege Gun-Army Group Rumania(Starts at 3CV)

3.1 SCENARIOS3.11 SIX MONTH SCENARIOS
EastFront includes eight individual scenarios, each based on 6-month intervals of the overall war. Summer scenarios run from June through November; Winter scenarios run from December through May. Playing time is 4-6 hours, winter scenarios being shorter. At the end of every scenario, Victory conditions (17.0) are checked for a result.
3.12 ONE YEAR SCENARIOSTwo consecutive scenarios (Summer/
Winter) equalizes the attacking and defending roles for both players. Playing time is 8-12 hours. Simply continue playing the game into the following scenario under the following conditions:
•Ignore starting forces and Startlines given for the next scenario. Instead, continue using current forces and positions.
•Note Reinforcements for the upcoming Scenario and place them on the Time Track in the month of their arrival.
•Note any changes in Basic Production PPs. Changes are shown by the bracketed PP number given. For example, [+10] means add 10 PPs to that player’s Production Level.
•Note any changes in Air Firepower, and also scenario special rules that may apply.
•Do Production for the 1st month of the new scenario.
•Continue play into the new months, checking for Victory as usual at the scenario end.
3.13 EXTENDED GAMESDue to the modular nature of
EastFront scenarios, if a game ends in a Marginal Victory, or is just too interesting to quit, players can always continue the game by following the same procedure as for One Year games.
3.14 CAMPAIGN GAMEThe full campaign can be played out.
Play each Summer and Winter scenario in sequence, and observe the rules noted in 3.12. At the end of each scenario, players calculate Victory Points, and declare a game winner if a Decisive Victory (only) has been scored. Otherwise, continue play.
3.2 STARTING PLAY3.21 INITIATIVE
Unless otherwise specified, in Summer scenarios the Germans set up first and move first, and in Winter the Soviets do the same. To save time, both players should deploy simultaneously, but the player setting up second gets the last adjustment.
3.22 STARTING FORCESConsulting the scenario description,
players select their starting forces from the available countermix. Starting Forces are specified by a number of units and a total CV for each unit-type. That is, if a scenario lists Armor: 12 units/38CV, the player can choose individual armor unit strengths, as long as there are 12 armor units totaling 38CV. Mountain, Coastal, and Siege Gun units are considered "Infantry" re Starting Forces.
Surplus units in the currently available countermix (ie., not future reinforcements) begin the scenario eliminated but available for rebuilding. Such units are counted against VP totals if not rebuilt.
Scenarios may list Reinforcement units that enter the game in a specific month. These should be placed on the correct month of the time track.
IMPORTANT: in the first month of a game, Production is omitted because these PPs are already included in the Starting Forces given.
3.23 STARTLINESStartlines for each scenario (except
Edelweiss) are printed on the mapboard. A mini-map included in the scenario description will direct you to the correct Startline. Note that some Startline segments are used for two or more campaigns; the label "S42-W42-S43", for example, means this segment is used for all three campaigns.
3.24 DEPLOYING FORCESThe hexes immediately east and
west of the applicable Startline are the Soviet and German Frontline hexes, respectively. To begin a scenario, players must occupy each Frontline hex with at least one unit. Players may deploy additional forces in any supplied hexes desired, except that multiple HQs can never be deployed in the same hex nor in adjacent hexes. The Barbarossa (S'41) scenario has an optional historical deployment.
EASTFRONTTM 3.0 STARTING PLAY
Scenario RecommendationsWe recommend that new players familiarize themselves with the system by playing the "Edelweiss" introductory scenario, or Winter '44 solitaire. The former uses only a few units and a small part of the board, but incorporates most of the rules concepts.
Two beginning players might also consider playing Summer ‘43: Kursk. It involves relatively equal forces and straight-forward strategies.
An experienced player teaching a beginner should play the Germans in S’44, or the Soviets in S’41. The rookie will get a lot of instant gratification, but the game will still be challenging for the veteran player.
© 2005 Columbia Games Inc. 6 VERSION 3.02

4.1 GAME MONTHGame scenarios are subdivided
into six Months of play. Each Month begins with Production, followed by two Fortnights of play, each consisting of one Player-Turn per side.
4.2 PRODUCTION Both players execute Production
simultaneously, in the following order:
•Determine Production Level
•Add Replacement steps to units in play
•Build and deploy Cadres
•Deploy any Reinforcements
4.3 WEATHER ROLLSOn the Time Track (see map) Months
are color-coded for weather (Dry, Snow, or Mud). Some months have variable weather. During these months, each Fortnight begins with a random weather roll (12.0). Weather affects initiative (who plays first in the Fortnight), command, movement, and combat.
4.4 PLAYER-TURNThe German player has the first
Player-Turn in Dry or Mud weather. The Soviet player as the first Player-Turn in Snow weather.
The player taking a turn is termed the Active Player; the opponent is the Passive Player. Each Player-Turn is divided into Phases which must be played in sequence.
4.41 COMMAND PHASEThe Active player may activate
(turn flat, face-up) and Deploy (move one hex within friendly territory) any number of HQs desired. HQs may be activated as Blitz HQs, committing them to an expenditure of 2 steps to command during second Blitz Movement and Blitz Combat phases in the current Player-Turn. Blitz HQs must be marked with a Blitz marker upon activation.
4.42 MOVEMENT PHASEAny units within command range
of an active HQ can move one to three hexes, depending on their speed and the terrain covered. Units not under command may not move. All movement must be completed before beginning the Combat Phase. Following movement, HQs may Mobilize (5.41) and Deactivate, or remain active for combat (5.42).
If the Supreme HQ is active, Strategic Rail or Sea Movement (6.53) may occur. The Supreme HQ may also command normal movement of units not otherwise under command (6.52).
4.43 COMBAT PHASEAt the Active Player's option, a
round of combat may occur in any or all existing Battles. Combat must occur in all battles initiated this Movement Phase and in certain other situations. Battles may be fought outside the Command Range of any active HQ, but are fought as Unsupported Combat, only inflicting half losses on passive units, while suffering full losses from enemy fire.
Combat Round steps:
•The Active Player selects Airstrike hexes (combat required), then selects all Battles where combat is desired, indicated this by revealing the upright Defending units in those battles.
•Active Battles are resolved in any order (Active Player’s choice).
•Active Player rolls for Airstrikes (if any). Losses are applied.
•Passive Player rolls for Defensive Fire. Losses are applied.
•Active Player rolls for Offensive Fire. Losses are applied.
•All active HQs (except Blitz HQs) are deactivated. Blitz HQs lose a step and remain activated for the Blitz phases to follow.
4.44 BLITZ MOVE PHASE All units under command of a Blitz
HQ (5.7) can move again up to their normal movement range (except those just moved strategically). The HQ itself may not move. Blitz Movement must be completed before beginning the Blitz Combat Phase. Blitz HQs may now Mobilize and Deactivate if desired.
4.45 BLITZ COMBAT PHASEIn battles within Command Range
of an active Blitz HQ (5.7), another supported Combat Round can be resolved. Unsupported Combat is allowed in any battle during a Blitz Phase. After battles are resolved, Blitz HQs Deactivate in their current hex.
4.46 SUPPLY PHASEThe supply status of enemy units
(only) is examined. Each unsupplied unit is immediately reduced by one step. Friendly units are not affected. See 10.0.
4.0 SEQUENCE OF PLAY EASTFRONTTM
THE GAME MONTHPRODUCTION•Determine Production Level
•Add Replacement steps to units in play
•Build and deploy Cadres
•Deploy any Reinforcements
FORTNIGHT I•Weather Determination
•First Player-Turn (see below)
(German: Dry/Mud Soviet: Snow)
•Second Player-Turn
FORTNIGHT II•Repeat Fortnight I Procedure
THE PLAYER-TURNCOMMAND PHASE•Activate HQs
MOVEMENT PHASE•Move units under command
•Mobilize HQs (optional)
COMBAT PHASE•Target Airstrikes
•Select Active Battles
•Resolve Each Active Battle
•Offensive Airstrike
•Defensive Fire
•Offensive Fire
•Deactivate HQs (reduce Blitz HQs)
BLITZ MOVEMENT PHASE (if any)
•Repeat Movement Phase
•BLITZ COMBAT PHASE (if any)
•Repeat Combat Phase
SUPPLY PHASE•Paradrop Linkup check (if applicable)
•Enemy Supply Attrition
© 2005 Columbia Games Inc. 7 VERSION 3.02

5.1 HEADQUARTERSHQs are specialized units with
the unique ability to mobilize friendly forces and support them in combat. The "strength" of HQ units is called Command Value, denoted in Roman numerals (e.g. III). HQs lose strength by exercising command (they can also take losses in combat), and can be rebuilt by production.
The Germans have 4 "Army Group" HQs, mostly with maximum CV of III. The Soviets have 5 "Front" HQs, mostly with maximum CV of II. Each side also has one Supreme HQ of III CV maximum (see below).
HQs move, defend hexes, and absorb combat losses like other units, but do not fire in normal ground combat. HQs can never voluntarily engage enemy units.
HQs have a "Ø" step. If an HQ falls to Ø strength, it remains in play with a Command Range of zero, meaning it can command only units located in its own hex. If it loses that step, it is eliminated but may be rebuilt as a "Ø" step cadre.
5.2 HQ ACTIVATIONDuring the Command Phase, the
Active player may activate one, some, or all HQs by revealing them (tipping them forward, face-up). HQs engaged in Battle Hexes may activate normally.
Inactive HQs remain upright in hidden mode, and can move like any other unit if under command of another activated HQ.
NOTE: HQs may not activate if they move strategically (the movement is after the command phase).
5.21 DEPLOYING HQSWhen activating, an HQ may Deploy
(move one hex) but only into a Friendly hex (hex control as of the beginning of a Phase determines hex control throughout that Phase, see 8.0).
NOTE: HQs cannot Deploy in Mud weather. They can only activate in their current location.
Deploying HQs cannot Engage. Engaged HQs can Disengage when they deploy, but must take immediate Pursuit Fire if the deploy move is a Retreat (see 6.42).
Deploying HQs can temporarily overstack, but stacking limits must be observed when the current Movement Phase is completed.
5.3 COMMAND RANGEActivated HQs have a Command
Range (in hexes) equal to their Command Value (CV). Command Range cannot be traced through impassable hexes/hexsides or enemy-controlled hexes (hex control as determined at the beginning of a Phase, lasts throughout that phase). Only friendly units within Command Range (termed "under command") are able to move during a Movement Phase.
5.4 HQ ROLESAfter commanding movement, active
HQs may be used in either a Mobile or Combat role, depending on when they deactivate.
5.41 MOBILE HQSAfter commanding movement,
Mobile HQs take their normal move of 1-2 hexes (this is in addition to the one hex moved to Deploy) and then Deactivate. Being deactivated during the Combat Phase, they cannot provide combat support.
5.42 COMBAT HQSCombat HQs forego the option to
mobilize. They remain active through the Combat Phase to provide Airpower and Combat Support to any units within their command range. Units without combat support fight at half-effectiveness (see: 7.4). After combat, Combat HQs deactivate in their current hex.
5.43 DEACTIVATING HQSWhen an HQ has finished
commanding, it is Deactivated by reducing it 1CV and returning to upright (hidden) mode.
EASTFRONTTM 5.0 HEADQUARTERS
GERMAN HQ UNITThe Germans have fewer, but more powerful HQs than the Soviets.
Mobile HQsMobile HQs are most useful in retreats, exploitation, and general advances, where firepower is secondary.
Combat HQsCombat HQs are preferred in pitched battles where causing enemy casualties or obtaining a breakthrough is the object.
Combat HQs need not be the same HQs that commanded the movement of units. Any active HQ within command range of friendly units can provide combat support.
Activating Ø CV HQsActivating an HQ Ø will automatically eliminate the HQ on deactivation. Given the high cost of rebuilding HQ cadres, only a desperate situation would warrant this tactic.
© 2005 Columbia Games Inc. 8 VERSION 3.02
HQ ACTIVATION
The HQ II unit deploys 1 hex and activates. It has Command Range 2 hexes, commanding all units except Unit X (to which command is blocked by the enemy unit at Stalingrad). All friendly units under command may move. If the HQ doesn’t mobilize, it will give combat support to all units within range.
HQ X

5.5 HQ AIRPOWERAll HQs have an Airpower capability,
equal to their current CV. During combat, each active HQ can conduct one Airstrike into an Active Battle within Air Range (equal to the HQs Command Range, but unaffected by terrain or hex control). See 13.0, Airpower, for details.
5.6 SUPREME HQSEach side has one Supreme HQ
(SHQ): OKH for the Axis, and STAVKA for the Soviets. They do not function like other HQs.
5.61 SUPREME MOVESSupreme HQs have two Supreme
Moves per CV, hence a SHQ III has six (6) Supreme Moves. These moves can be used to move units that are located anywhere on the mapboard or to move units strategically by Rail or Sea (see 6.5).
5.62 SHQ MOBILIZATIONAfter commanding movement,
Supreme HQs may Mobilize or remain active to command an Airstrike. SHQs can mobilize using normal or strategic (rail or sea) movement (this does not count against their quota of "supreme moves"). Mobilizing a SHQ additional Rail or Sea moves is possible by reserving “supreme moves”.
5.63 SHQ AIRSTRIKESSupreme HQs that forego
Mobilization can initiate a "Strategic Airstrike" at double Air Range. That is, a Supreme HQ III has Air Range of six (6) hexes. Airstrike firepower (13.15) is the same as other HQs.
5.64 SHQ COMBAT SUPPORTSupreme HQs cannot provide
combat support. Units they move must receive support from other Active HQs or fight unsupported in combat.
5.7 BLITZ COMMANDAn HQ can be activated for Blitz
Command, identified with a Blitz HQ marker. Blitz HQs are committed to expending two steps in order to command a second movement and combat phase in the same Player-Turn.
A Blitz HQ functions like any other HQ, except it must remain active (no mobilization) throughout the first Movement and Combat phases, so as to be active for the upcoming Blitz phases.
IMPORTANT: Supreme HQs cannot Blitz.
After the first Movement and Combat Phases are completed, a Blitz HQ is reduced one step and the Blitz marker is removed. The HQ may not move at this time. It remains active at reduced strength to command during the Blitz Movement Phase. All units within its (now reduced) Command Range are eligible to move again.
Blitz HQs may Mobilize after Blitz Movement, or remain active to provide Airpower and Combat Support during a Blitz Combat Phase.
Unsupported Combat is allowed in any battle during a Blitz Phase (but at least one Blitz HQ must be activated for Blitz Phases to occur).
Blitz HQs are deactivated by reducing them a second step and returning them to upright (hidden) mode.
5.8 HQ DISRUPTIONIn Mud weather, all HQs are
Disrupted. In Snow weather, only German HQs are Disrupted.
Disrupted HQs function at one CV less than their actual value. That is, a disrupted HQ III has an effective Command Range of 2 hexes, and only 2CV of Airpower. A disrupted HQ Ø has no command ability at all.
5.0 HEADQUARTERS EASTFRONTTM
HQ AirpowerThe attached Airpower of HQs gives them powerful offensive capability, but only when employed in a Combat Role.
Supreme HQs
Supreme HQs are useful for commanding "oddball" movement of units in remote fronts or rear areas and are essential for strategic movement of units by rail or sea.
BlitzingBlitz HQs allow any breakthroughs obtained in combat to be exploited before the opponent can react. If no breakthrough is obtained, a second combat phase may still be obtained, so all is not lost.
It is important to remember that while an HQ can be worn down rapidly (expending up to 4 command steps per month by Blitzing in each turn), it can only be rebuilt one step per month, like any other unit.
© 2005 Columbia Games Inc. 9 VERSION 3.02
Stavka OKH
6.1 MOVEMENT PROCEDUREAll movement is commanded by
activated HQs. All units under command (within Command Range of an active HQ) can move. Other units may not move, unless they are commanded by the Supreme HQ.
Units are moved individually, one hex at a time, for 1-3 hexes, depending on their Speed, weather conditions, and terrain crossed. All units except cavalry must stop upon entering a mountain or marsh hex.
Units can only move once per Movement Phase. Units that move strategically cannot move again during the Blitz Movement.
6.2 STACKING LIMITSAny number of units may pass
through a hex during movement, but the Stacking Limits below must be observed at the end of a movement phase.
Any number of units may also pass through a hexside, except when entering or leaving a Battle Hex.
6.21 TERRAIN STACKINGTerrain determines the stacking limit
of a hex.
Clear: 4 units
Major City: 4 units
Forest: 4 units
Marsh: 3 units
Mountain: 2 units
In Battle Hexes, both players may occupy the hex up to the limits noted.
6.22 OVERSTACKINGPlayers may not voluntarily overstack
hexes.
NOTE: HQs may temporarily overstack when deploying, as long as stacking limits are observed after movement
If a hex becomes overstacked at the end of Movement due to a Repulse (7.51), units in excess of stacking limits are Unsupplied (owner’s choice of unit) during the Enemy Supply Phase.
6.3 ENGAGEMENT6.31 ENGAGING
A unit that enters a hex containing enemy units is Engaging. Units that engage must stop movement in the hex. Units that enter a hex containing only enemy units are initiating a new battle, referred to as Attacking.
Attacking units should not be revealed as they engage. This means both Attacking and Defending units will be upright at the beginning of the Combat Phase, serving to identify this as a newly-initiated battle (which requires mandatory combat).
When the Active player merely moves additional units into an existing battle (hexside and stacking limits must be observed), combat is not mandatory.
6.32 DISENGAGINGWhenever a unit voluntarily leaves
a Battle Hex by normal movement, it is Disengaging. Disengaging is never forced by combat (but see repulses, 7.51).
Disengaging units may only move from the Battle Hex directly into an adjacent Friendly hex, never into an Enemy hex or a Disputed hex. Units are then free to complete their move as usual except they may never re-engage enemy units that same Movement Phase.
If an engaged unit has no adjacent Friendly hexes to disengage into, it must remain in the Battle.
6.33 BATTLE HEXSIDESThere is a limit to the number
of units that can enter or leave a Battle across the same hexside in one Movement Phase (there is no limit on movement across non-battle hexsides).
A maximum of two units may engage/disengage across a Clear terrain hexside per Movement Phase. Only one unit may engage/disengage across any other hexside terrain type in one Movement Phase.
Both engaging and disengaging contribute toward the hexside limits noted. That is, if a unit disengages through a forest hexside, no other unit can engage through the same hexside during that movement phase.
EASTFRONTTM 6.0 MOVEMENT
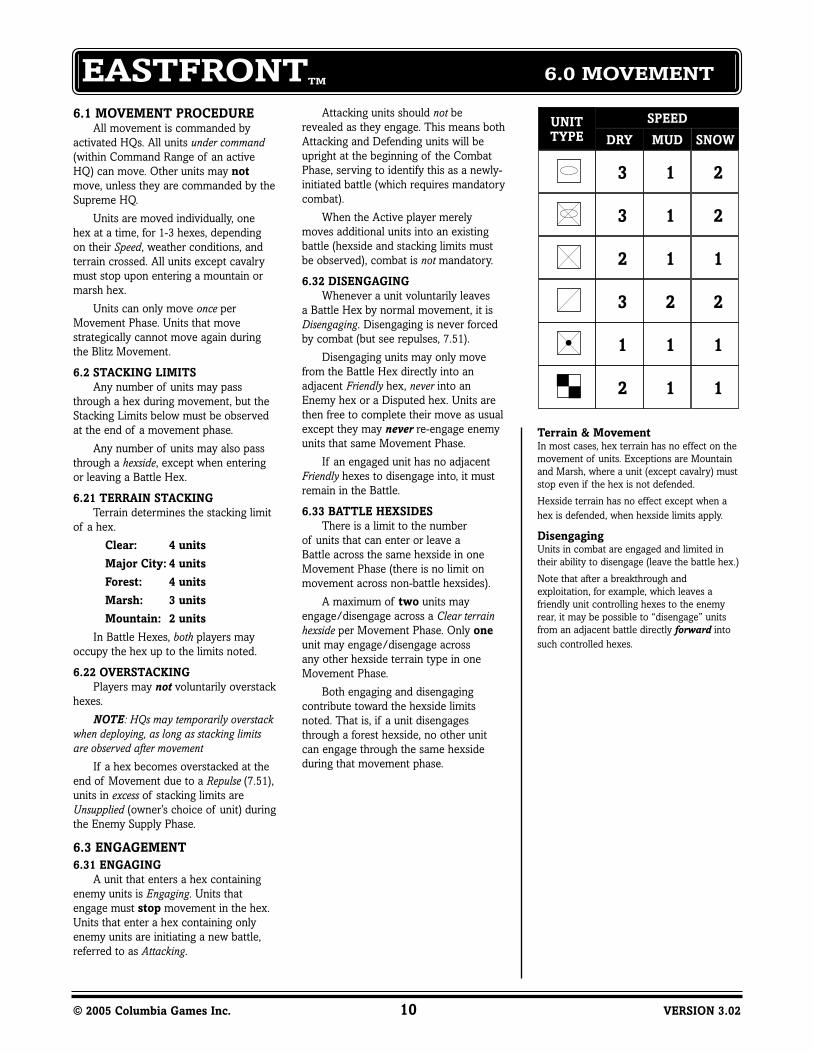
Terrain & MovementIn most cases, hex terrain has no effect on the movement of units. Exceptions are Mountain and Marsh, where a unit (except cavalry) must stop even if the hex is not defended.
Hexside terrain has no effect except when a hex is defended, when hexside limits apply.
DisengagingUnits in combat are engaged and limited in their ability to disengage (leave the battle hex.)
Note that after a breakthrough and exploitation, for example, which leaves a friendly unit controlling hexes to the enemy rear, it may be possible to “disengage” units from an adjacent battle directly forward into such controlled hexes.
© 2005 Columbia Games Inc. 10 VERSION 3.02
UNITTYPE
3 1 2
DRY
SPEED
MUD SNOW
3 1 2
2 1 1
3 2 2
1 1 1
2 1 1

6.4 RETREATS6.41 REARGUARDS
A player wishing to Disengage all friendly units from a battle must designate one unit as the Rearguard, which is then subject to Pursuit Fire from all enemy units in the battle.
The Rearguard must remain in the battle hex during movement, being placed on top of the enemy units to identify it as such. After all other friendly movement is completed, Pursuit Fire is made on the Rearguard by enemy units in the hex. The Rearguard (assuming it survives enemy pursuit) then Disengages and completes its movement normally.
NOTE: at least one unit must remain in a battle throughout a Movement Phase to avoid a Retreat. Disengaging all units from a battle while Engaging with new units constitutes a Retreat and an Attack (newly-initiated battle with forced combat). This may also change who is the Original Defender in the Battle.
6.42 PURSUIT FIRE In Pursuit Fire, each pursuing unit
rolls one die per CV, as for normal combat fire. However, the Firepower of a pursuing unit does not depend on its type, but on its relative speed (under current terrain and weather conditions) when compared to the Rearguard unit.
Faster pursuing units have Double Firepower (DF). Equally-fast pursuing units have Single Firepower (SF). Slower pursuing units do not fire at all. Each ‘hit’ scored reduces the unit by 1CV.
All defensive advantages due to terrain, such as Double Defense in Forests, apply to pursuit fire on the Rearguard. Pursuit firepower is not affected by Weather or Terrain.
Elimination of a Rearguard has no effect other than loss of the unit.
NOTE: Complete all other movement before resolving pursuit fire die-roll.
6.5 SUPREME COMMAND6.51 SUPREME MOVES
Supreme HQs do not function like other HQs. They do not have Command Range, they cannot provide Combat Support, and they cannot Blitz.
Instead, activated SHQs have two (2) Supreme Moves per CV (e.g., a SHQ III has six such moves), which can be used to move friendly units that are located anywhere on the map The commanded units need not be in supply.
6.52 SUPREME LAND MOVESSupreme Moves can be used to
command units to make normal land moves, including Engaging, Disengaging, and Retreating. As usual, each unit can only be moved once per Movement Phase, but units making Supreme land moves can move again during a Blitz Movement Phase if in Command Range of a Blitz HQ.
6.53 STRATEGIC MOVEMENTStrategic Movement is special high-
speed movement expending one or more Supreme Moves to move a unit by rail or sea.
•RAIL: units can make one Rail Move of up to 10 hexes (9.2) per Supreme Move.
•SEA: units can make one Sea Move within the same sea zone (15.2) per Supreme Move.
Units can make multiple Rail or Sea moves by expending one Supreme Move per Strategic Move, but Rail and Sea moves cannot be combined in the same Turn. Units moved strategically cannot move again that Turn (even under Blitz Command).
Units can never engage by Strategic Movement. They can disengage but not Retreat.
EASTFRONTTM 6.0 MOVEMENT
RearguardsArmor, Mech, and Cavalry units are ideal rearguards, as their superior speed makes them relatively immune to Pursuit Fire. They also make ideal pursuers, for the same reason. In Mud, cavalry excels in pursuit.
Supreme CommandSupreme HQs may command units to move and attack by land movement, but remember they do not provide combat support to ground units (although they do have enhanced airpower range).
Supreme HQs can move Unsupplied units, even units that have been "pocketed". Normal HQs, unless they too are inside the same pocket, are usually unable to trace command to enveloped forces.
A die should be used to record the expenditure of Supreme Moves as they will often be intermixed with normal HQ moves during movement.
Strategic MovementCommanding strategic movement twice per month (in both Fortnights) is possible but expensive. The Supreme HQ must be activated and reduced by1cv each time, but can only be built up one step in the Production turn.
© 2005 Columbia Games Inc. 11 VERSION 3.02

7.1 BATTLES7.11 BATTLE HEXES
Battles begin when the Active player moves units into a hex containing only enemy units. This is termed Attacking. A hex containing friendly and enemy units is defined as a Battle Hex.
7.12 ORIGINAL ATTACKER & DEFENDER
The player who initiates a battle is termed the Original Attacker for as long as it lasts. The other player is the Original Defender. The distinction between Original Attacker and Original Defender is very important because the latter maintains control of a Battle Hex for supply and other purposes until Retreat or elimination. To maintain this distinction, units of the Original Defender are always turned upright in the Battle Hex after combat, while those of the Original Attacker always remain revealed (face-up).
7.13 ASSIGNING AIRSTRIKESHQs have attached airpower (see:
13.0). At the beginning of a Combat Phase, each active HQ can assign one Airstrike to any battle within its Air Range. This must be done before battle activation (while the Original Defender is still upright and hidden). No more than one Airstrike can be allocated per Battle Hex per Combat Phase.
Airstrikes are allocated by placing an Airstrike marker in the desired Battle Hex. The marker must have the same value as the Airstrike CV.
7.14 ACTIVE BATTLES Active Battles are those in which
combat will occur this Combat Phase. The active player indicates which battles are active by tipping forward (face-up) all unrevealed units so that their current CV faces the opposing units (see diagram).
Generally, combat is optional. The Active Player may activate none, some, or all battles, keeping in mind that those fought beyond Command Range of an active HQ are Unsupported Combat. See: 7.4.
7.15 MANDATORY COMBATIn three cases, combat is mandatory,
and such battles must be activated and fought.
•New Battles: where a new battle is initiated by an Attack during the preceding Movement Phase, at least one round of combat must be fought.
Such battles are automatically active. Moving new units into an existing battle does not force combat, but they must be revealed if they belong to the Original Attacker.
•Airstrike Battles: allocating an Airstrike to a battle makes combat mandatory (friendly ground units must be present).
•Fortress Battles: in Sevastopol or Leningrad, combat is mandatory for the Original Attacker (but optional for the Original Defender). Fortress battles must be activated every Player-Turn of the Original Attacker, even if this results in Unsupported Combat (no hits possible).
Exception: Fortress combat is not mandatory during a Blitz Combat Phase.
7.2 COMBAT ROUNDS7.21 COMBAT RESOLUTION
A "round of combat" is executed in each Active Battle, on a battle-by-battle basis, in any order desired by the Active Player (north to south works well). After the Combat Round is completed, the Original Defender’s units in that battle should be turned upright again.
7.22 SEQUENCE OF FIREA round of combat is resolved as
follows for each Active Battle:
•Active player executes an Airstrike (if any), and losses are applied.
•Passive player executes Defensive Fire, and losses are applied.
•Active player executes Offensive Fire, and losses are applied.
•Original Defender's units are returned upright, signaling the end of the Combat Round for that battle. The next Active Battle (if any) is then resolved.
7.23 COUNTER-ATTACKSBattles can continue from one Player-
Turn to another. Each Player-Turn, the Active Player can choose to Activate the battle or not. If the battle is activated, terrain benefits apply to the passive player for that Combat Round.
Exception: Fortress Terrain benefits apply only to the Original Defender.
EASTFRONTTM 7.0 COMBAT
ACTIVE BATTLEInfantry 4cv and Mech 4cv engage an enemy Infantry 4cv unit.
Single Fire/Double Fire/Triple FireThe terms Single Fire, Double Fire and Triple Fire are sometimes confusing. Firepower is not the number of dice rolled (unit cv determines this) but rather the dieroll number(s) which cause hits (SF hits on 6, DF hits on 5 and 6 and TF hits on 4, 5 and 6).
Attacking & EngagingA clear distinction must be drawn between engaging and attacking. Units engage and disengage from existing battles. Attacking is starting a new battle.
Original Attacker & DefenderA clear distinction must be drawn between the Original Attacker and Original Defender and the "attacker" and "defender’ in a combat round.
The Original Defender controls the Battle Hex (for command and supply purposes, etc.) throughout the battle.
When the Active Player, the Original Defender in a battle may wish to counterattack and initiate combat that Turn, but this gives the Original Attacker the benefits of Defensive Fire and terrain defense, as per 7.23.
For example, if the Original Defender in a Major City elects to activate a battle, the Original Attacker gets Defensive Double Fire and has Double Defense. The Original Defender has normal Offensive Fire and sacrifices the benefits of Double Defense for that Combat Round.
Extended BattlesBattles are usually not resolved in one Combat Round. They often extend over several Player Turns, even over several months. Players must learn to manage a succession of battles along the front over time, feeding reinforcements into critical battles, retreating before collapse occurs in others, keeping reserves to plug holes in the front, and counter–attacking where the enemy is weak.
© 2005 Columbia Games Inc. 12 VERSION 3.02

7.3 COMBAT FIRE7.31 EXECUTING FIRE
To execute Airstrike, Defensive, or Offensive Fire, each unit "fires" once, in any order desired by the owning player. To "fire" a unit, roll one die per CV (roll 3 dice for a 3CV unit). Depending on the unit’s Firepower, certain numbers rolled will score "hits", reducing the CV of enemy units in the battle.
7.32 FIREPOWERUnits rated SF (Single Firepower)
score "hits" on 6. Infantry and Cavalry normally fire SF.
Units rated DF (Double Firepower) score "hits" on 5 and 6. Armor and Shock normally fire DF. Hence a 3CV Armor unit rolls three (3) dice and each 5 or 6 rolled would score one hit.
Terrain can modify a unit’s Firepower. All units in Marshes fire just SF on Offensive Fire.
All units in Major Cities fire at least DF on Defensive Fire.
Mountain units always fire DF in Mountain terrain.
The largest (only) unit of the Original Defender in Fortresses has Triple Firepower (TF scoring hits on 4, 5, and 6) on Defensive Fire.
Airstrike firepower can be SF, DF, or TF, depending on the side and scenario (see 13.15).
7.33 APPLYING LOSSESFor every "hit" scored, an enemy unit
is normally reduced by one step (1CV). Active units in combat always apply full losses. Defending (passive) units in combat may only have to apply partial losses because of terrain and other benefits (see: 7.34, Double Defense).
Losses must be applied to the strongest (highest CV) units present at the instant of fire. The owning player may choose which of several units of equal CV will take a loss. When a 1CV unit (or Ø level HQ) takes a hit, it is eliminated and removed from play, but may be rebuilt as a Cadre during Production (11.0).
7.34 DOUBLE DEFENSEIn Forest, Marsh, or Mountain
terrain, and in Major Cities, and in any terrain during Mud turns, defending (passive) units have Double Defense, meaning they take only a 1CV loss for every two hits scored in the Combat Round.
"Half-hits" carry over from Airstrikes to normal combat, and from one unit’s fire to another within the same Combat Round. A unit which has taken a half-hit must take the next half-hit to complete it. Leftover half-hits at the end of a Combat Round are forfeit.
7.35 TRIPLE DEFENSEIn Fortresses, units of the Original
Defender (only) have Triple Defense against Airstrikes and Offensive Fire. This means they take a 1CV loss for every three hits. A unit which has taken a third-hit must take the next third-hit until a full hit is applied. Leftover partial hits at the end of a Combat Round are forfeit. Triple Defense also occurs when defending units with Double Defense are attacked by units with Unsupported Combat (7.4).
7.0 COMBAT EASTFRONTTM
Combat ExampleA battle is initiated in Clear terrain
between three defending Soviet units (Armor 3cv, Infantry 3cv, and Infantry 2cv) and two German units (Armor 4cv and Mech 4cv). Since this is a new battle, combat is mandatory.
Airstrike CombatThe German player has a 2cv Airstrike at TF. This is resolved first. Two dice are rolled, and assuming a roll of <3,5>, one hit is scored. The Soviet player must take that hit from a 3cv unit, and naturally chooses the 3cv Infantry which is reduced to 2cv.
Defensive FireThe Soviet player now fires all three defending units. The Armor 3cv (DF) scores one hit <2,3,6>,and the two Infantry 2cv units score one hit <2,4> and <3,6>. The first hit is taken from the Mech 4cv, and the second from the Armor 4cv.
Offensive FireThe German, who has combat support from an active HQ in range, now fires. The Armor 3cv scores two hits at DF <3,5,5> and the Mech 3cv misses at SF <3,4,5>. The first hit must be taken from the Soviet Armor 3cv (the strongest unit) and the second can be taken from any of the units which are all at 2cv.
This ends the combat phase. The three Soviet units (Armor 2cv, Infantry 2cv, and Infantry 1cv) are now turned upright to signify they are the Original Defenders.
Double DefenseOnly passive units in a Combat Round have the benefit of Double or Triple defense (when applicable).
Example: The German player initiates a battle for the city of Stalingrad. Combat is mandatory that round. The Soviet player has Defensive Fire and Double Defense. In the next Player-Turn, the Soviet player adds two more units to the hex and chooses to counter-attack. In this round, the German player has Defensive Fire and Double Defense (not the Soviet player).
Recording Half-HitsA one-eighth rotation of a unit can serve to temporarily indicate a "half-hit" taken.
© 2005 Columbia Games Inc. 13 VERSION 3.02

7.4 UNSUPPORTED COMBATDuring a Combat Phase the Active
Player may elect to have combat in a battle outside the Command Range of an active HQ. This is termed Unsupported Combat. In such battles, defending (passive) units have Double Defense.
Unsupported Combat versus units which already have Double Defense results in Triple Defense for the defending (passive) units.
Unsupported Combat is allowed during a Blitz Combat Phase, and it is mandatory when Blitzing units attack outside command range.
Unsupported Offensive Combat against Fortresses is ineffective, but still mandatory. No offensive hits can be scored, but the largest defender still has TF for Defensive Fire.
IMPORTANT: A player can engage in Unsupported Combat without activating any HQs in a turn. Obviously, no movement can occur, but a round of unsupported combat in battles of the active player’s choice is still possible and the supply status of enemy units is checked.
7.5 RIVER ASSAULTSWhen all units attack (initiate a
battle) across River hexsides, they are conducting a River Assault.. In the initial combat round, Repulse is possible, forcing the “retreat” of one or more attacking units.
River Assault hexes should be marked during movement, so that a special procedure is followed in combat.
7.51 REPULSESRiver Assaults are resolved during
Defensive Fire. After any Airstrike is resolved, defending units fire and score hits normally, but each '1' or '2' rolled also Repulses one attacking unit, forcing it back across the river to the hex it engaged from. Repulses are not Retreats; no Pursuit Fire is made.
Repulses are applied to the weakest (lowest CV) attacking units (owners choice of equal-CV units). All "hits" are applied to non-repulsed attackers if possible. Non-repulsed attackers now execute Offensive Fire.
Repulse only applies to the initial Combat Round of a River Assault. Attacking units that are not repulsed form a Bridgehead and from that point on the battle is treated like any other.
Simultaneously attacking across river and non-river hexsides is not a River Assault, and there is no possibility of Repulse.
7.52 FROZEN RIVERSIn Snow weather, rivers freeze.
Attacks across frozen rivers are not River Assaults and cannot be repulsed. However, the engagement limit of one unit per hexside still applies.
7.53 COMBINED ASSAULTSCombined River and Air/Sea
Assaults can be made simultaneously into one hex. In a Combined Assault, the lowest Repulse number applies to all assaulting units.
EASTFRONTTM 7.0 COMBAT
Combat SupportCombat support from an active HQ represents logistical support for the attacking units. Such things as artillery and air preparation, and adequate planning and supplies greatly enhance the effectiveness of offensive operations. Without combat support, the attacker can expect high losses for meagre results.
River Crossing (Example)A player makes a River Assault across two river hexsides with a 3cv armor unit and a 4cv infantry. Defending is a 4cv infantry unit. After an Airstrike is conducted scoring one hit, the Defending (passive) player fires the (now) 3cv unit and rolls <1:4:6>, scoring one Hit and one Repulse. The weaker 3cv armor is repulsed, and the hit must be taken by the 4cv infantry. The (now) 3cv attacking infantry would then have Offensive Fire.
Combined AssaultsExample: a 3cv Para makes an Air Assault to support a River Assault by two infantry units of 4cv and 3cv. Normally, River Assaults are repulsed on '1' or '2', but since an Air Assault only involves repulse at '1', the lower repulse of '1' applies to all units. Assuming a defending infantry at 4cv, and a Defensive Fire roll of <6:1:5:2>, only one hit and one repulse are scored instead of one hit and two repulses. The repulse would be taken by the 3cv Para or 3cv Infantry (lowest CV unit of the attacker's choice) and the hit must be taken on the 4cv infantry (the strongest remaining unit).
Hence the attackers succeed in making a Bridgehead with two units when, without the Para support, both infantry units would have been repulsed,
© 2005 Columbia Games Inc. 14 VERSION 3.02

8.1 HEX CONTROLHex control is determined at the
beginning of each phase (Command, Movement, Combat, Supply, Production) and remains unchanged throughout that phase.
Hex control is determined by the position of units (and their ZOCs) at the start of a phase. Movement through a hex does not, in itself, affect its control (to gain control of a hex, units must be in the hex or exert a ZOC over it at the end of a phase, see 8.2).
8.2 ZONES OF CONTROLUnengaged units have a Zone
of Control (ZOC) which projects into unoccupied adjacent hexes. ZOCs do not extend across rivers, nor across impassable hexsides. Unsupplied and Engaged units have no ZOC.
8.3 HEX CONTROL STATUSHexes can be either Friendly, Enemy,
or Disputed.
8.31 FRIENDLY HEXESA hex occupied only by friendly units,
or within the undisputed ZOC of friendly units. Battle Hexes are friendly to the Original Defender.
8.32 ENEMY HEXESDefined as any hex that is “friendly"
to an opponent.
8.33 DISPUTED HEXESAn unoccupied hex into which both
sides exert a ZOC is Disputed.
8.34 PRIOR CONTROLUnoccupied hexes not currently
in any ZOC remain Friendly to the last side to control them. This rule requires memory, but its application is usually obvious in practice.
8.4 CONTROL EFFECTSHex control does not affect normal
movement: units can move freely into and through Disputed hexes and vacant Enemy hexes. However, control of hexes has critical effects as follows:
•Command: HQs can Deploy only into Friendly hexes. Command Range can be traced through Friendly or Disputed hexes, never through Enemy hexes.
•Disengagement: units may only disengage directly into Friendly hexes.
•Strategic Movement: units can move strategically (by Rail or Sea) into/through Friendly hexes only.
•Land Supply: land supply lines can be traced through Friendly or Disputed hexes, but never through Enemy hexes.
•Rail Lines: rail lines can be traced through Friendly hexes, never through Enemy or Disputed hexes.
8.0 HEX CONTROL EASTFRONTTM
Hex ControlSoviet units A and B control their own hexes, as does German unit Z. Hexes S1, S2, and S3 lie within the ZOC of unit A and are Friendly to the Soviet player. Hexes D1 and D2 are Disputed, lying within the ZOCs of units A and Z. Hexes G1 and G2 are Enemy hexes (to the Soviet player (but friendly to the German player). G1 is not a disputed hex because the ZOC of Soviet unit B does not extend across the river.
Command RangeCommand Range can always be traced through any hex containing an upright Friendly unit or a Friendly ZOC.
© 2005 Columbia Games Inc. 15 VERSION 3.02
Units A & Z are engaged and have no ZOC. Unit B at Stalingrad projects a ZOC into 2 adjacent hexes (H1, H2) but not across the rivers or into the occupied (battle) hex.
Units B and Y are the Original Defenders (upright) and control their battle hexes. Units B, D, X, and Y are engaged and have no ZOC. Units A and C control their own and all adjacent unoccupied hexes (except those across rivers). Unit B can disengage into any adjacent hex except Y. Unit X can't disengage. If unit D is absent, unit Y would have a ZOC and H1 and H2 would be disputed but X still could not disengage there.
HEX CONTROL
Z H1
H2 H2
H1
X
D
BB
C
A
Y
A

9.1 RAIL LINES 9.11 RAIL ENTRY HEXES
Defined as a hex where a Rail Line enters the map on a map edge. Rail Entry hexes are labeled "A" through "W".
Errata: rail entry "M" should be one hex south of map location.
9.12 RAIL LINE CONTROLA Rail Line is friendly as far as it
extends within friendly territory from an Ultimate Supply Source (sidebar). Rail Lines are blocked by Enemy or Disputed hexes. In cases of doubt, the Railhead, or furthest extension of a friendly Rail Line, may be marked with a Railhead Marker at the beginning of any phase.
Friendly Rail Lines may be traced into friendly Battle Hexes. They may never be traced through Battle Hexes.
9.2 RAIL MOVEMENTRail Movement is a form of Strategic
Movement, possible only when the Supreme HQ is active. Each Rail Move expends one Supreme Move, see 6.5.
9.21 RAIL MOVESA Rail Move consists of moving one
unit on a friendly Rail Line ten (10) or less hexes along friendly Rail Lines. Units can make multiple Rail Moves (to move further than 10 hexes), but each Rail Move expends one Supreme Move.
Units cannot move strategically and normally in the same movement phase. Hence, to make a Rail Move, a unit must begin the movement phase located in a rail hex, move only through friendly rail hexes, and end its move in a friendly rail hex.
NOTE: units cannot engage by Rail Movement.
9.22 RAIL DISENGAGEMENTS
Although units cannot Engage, they can Disengage by Rail Move from a friendly Battle Hex (friendly rail lines do not extend into enemy Battle hexes). Disengagements by rail do count against the normal hexside limits. A Rearguard unit can never Retreat by Rail Move.
9.3 RAIL/SEA SUPPLYA hex is in Rail/Sea Supply when
a friendly Rail Line runs into the hex. Remember that Rail Lines do run into (but not through) friendly Battle Hexes.
Rail/Sea Supply can also extend across seas between friendly ports (see 15.3).
Cities and Resource Centers require Rail/Sea Supply to produce.
9.4 RAIL HEADSRail Head markers may be placed at
the beginning of any phase to clarify Rail Line control.
EASTFRONTTM 9.0 RAILROADS
Rail SupplyA city in isolation cannot effectively produce war materials. Equipping a combat unit requires a large variety of products and/or resources, supplied in quantity, and usually from multiple sources.
Kerch StraitsNote that a Rail Line does not traverse the Kerch Straits, hence Rail Supply and/or Rail Movement across the straits is impossible.
MAP RAIL CLARIFICATIONSTulchin-Uman RR (North of Odessa) does not enter Tulchin NE1.
© 2005 Columbia Games Inc. 16 VERSION 3.02
ULTIMATE SUPPLY SOURCES
GERMANY: West Map Edge Exit Zones.
SOVIET: East Map Edge and South Map Edge Exit Zones. (If Germany captures Baku the South Map Edge is no longer a Soviet Ultimate Supply source.)
If the VolgaFront map is used, its East Map Edge is the only home map edge for the Soviet player (Caucasus units must trace supply via the Caspian Sea).

10.1 SUPPLY STATUSUnits in play are either Supplied or
Unsupplied. To be Supplied, a unit must be able to trace a Land Supply Line to friendly Rail/Sea Supply at the beginning of the Supply Check. Units that cannot do so are Unsupplied.
10.2 SUPPLY CHECKThe supply status of a unit is
determined during the enemy Supply Phase and continues unchanged until the next enemy Supply Phase (in effect, Supplied units carry enough supplies with them to last until the next supply check).
10.3 LAND SUPPLY LINESLand Supply Lines connect a unit
to friendly Rail/Sea Supply. They can be no more than two (2) hexes in length. Land Supply Lines can be traced through Friendly hexes (including friendly battle hexes) or Disputed hexes. They cannot be traced through Enemy hexes nor through impassable terrain.
10.4 SUPPLY ATTRITIONDuring the Supply Check (friendly
Supply Phase), each Enemy unit determined to have no Land Supply Line becomes Unsupplied and immediately loses one step.
10.5 FORTRESS SUPPLYFortresses provide Fortress Supply
to the largest defending unit (Original Defender only). The owner may choose which of equally strong (cv) units receive Fortress Supply.
Units with Fortress Supply are not subject to Supply Attrition. Steps cannot be added to units dependent on Fortress Supply during Production.
Any additional unsupplied units in the Fortress suffer normal supply attrition.
LAKE SUPPLY: Two Soviet units defending Leningrad can receive Fortress Supply, provided the Soviets have Rail Supply to the shore of Lake Ladoga at Volkhov NE1.
10.6 BEACHHEAD SUPPLYBeachHeads deployed following
Amphibious invasions can also provide a limited Supply Source, even when engaged in offensive Battles. See 15.52.
10.0 SUPPLY EASTFRONTTM
Supply StatusBecause Supply Status is only evaluated
once per Fortnight (enemy Supply Phase) and remains constant otherwise, being Supplied is not the same as having a Supply Line.
Hence a Supplied unit can cut loose from its Supply Line yet maintain Supplied status (has ZOC, no attrition) for a considerable time, right through the friendly Turn and most of the next enemy Turn (until the Supply Check). Thus, supplied units can use their ZOCs to disrupt enemy Supply or Rail lines even when they have no Supply Line of their own!
Contrarily, an Unsupplied unit regaining a Supply Line does not regain Supplied status until the next Supply Check.
Production: to add replacement steps, a unit must have a Supply Line at that time (a special Supply Check must be made to confirm this).
Land Supply LinesLand Supply Lines can always be traced
through hexes with upright friendly units, and through unoccupied hexes in a friendly ZOC.
Supply AttritionActive units which move to an unsupplied
location to cut enemy supply lines are not immediately hurt, but enemy units unsupplied by this maneuver do suffer immediate attrition.
Players must be wary of situations where a few active units can envelop and pocket a large number of passive units, inflicting serious losses on the "bagged" units before they can respond.
© 2005 Columbia Games Inc. 17 VERSION 3.02
SUPPLY EXAMPLE Germans have just moved, advancing unit Z from Cernauti to cut Soviet rail communications through H1 and H2. The Soviet Rail Heads are now at Kiev and Vinnitsa. H1 is a German controlled hex (Soviet unit A is engaged and has no ZOC), H2 is a disputed hex (within the ZOCs of unit Z and unit B), and H3 is a Soviet hex (unit Z has no ZOC across the River Dnestr).
Soviet units C and E can trace supply through H3 to the Vinnitsa Rail Head.
Unit D is too far away and is unsupplied. Unit A cannot trace a supply line to either railhead and is also unsupplied. Both units will lose one step during the upcoming German Supply Phase.
German units W, X, and Y are obviously supplied, being adjacent to their Rail Head. at Luck. Unit Z is unable to trace a supply line through the Soviet defensive battles to Luck. However, since supply is only checked for enemy units, this unit remains supplied until next Soviet Supply Phase.
H1
H2H3
Y
X
WC
A
B
D
E Z

11.1 PRODUCTION PHASEAt the beginning of each month
(except when beginning a game) players independently and simultaneously conduct the Production Phase:
•Determine Production Level
•Add Replacement Steps to units in play
•Build and deploy Cadres
•Deploy Reinforcements (if any)
11.2 PRODUCTION LEVELProduction Level is the sum of Basic,
City, and Resource Production. The initial Production Level for each side is noted in each scenario. As production centers are captured or lost, the current Production Level should be adjusted to reflect the change on the Production Track (on map). Two markers for each side, labeled "10" and "1", are used to record Production Levels.
11.21 BASIC PPsBoth sides receive Basic (automatic)
Production each month, which represents off-board production. Basic Production changes from one scenario to another, as noted on the Basic Production Chart. Basic PPs decrease when Home Exit Zones are enemy occupied (see:16.2).
11.22 CITY PPsMajor Cities have a production value,
(the white number inside the black dot) representing the number of PPs they produce every month. To produce PPs, a Production City must be in Rail/Sea Supply (see: 9.3). Cities that are embattled (but still in rail/sea supply) can produce.
11.23 RESOURCE PPsControlled Resource Centers (oil or
pick symbols) also produce PPs each month. They also may be embattled, but must be in Rail/Sea Supply to produce.
For the resource-starved German economy, Resource Centers produce double their rated amount. Hence, Ploesti, an oil center rated at "4" PPs per month, actually produces 8 PPs per month for the German player.
11.3 PRODUCTION POINTS (PPs)Each month players receive
Production Points (PPs) equal to their current Production Level.
PPs are expended to build up the CV of units (including HQs), either by adding Replacement steps to units in play, or by rebuilding eliminated units into Cadres. PPs unused in Production are forfeit.
EASTFRONTTM 11.0 PRODUCTION
Simultaneous ProductionSimultaneous production speeds play and promotes a desirable level of misinformation – with both players building at once, they can pay only limited attention to what the opponent is doing.
Production SequenceThe production sequence insures that replacement steps cannot immediately be added to newly rebuilt cadres or arriving reinforcements.
Basic ProductionSoviet industry relocated to the Urals was mostly back into production by Winter, 1942. German war production increased through 1943, due to Albert Speer’s nationalization of the German war economy, but fell thereafter due to the Allied bombing campaign.
Economic DataThe production values in EastFront are based on The Economic Geography of the USSR, an English translation of a Soviet university textbook written in 1937. It gives incredibly detailed information on the production of Soviet cities at that time.
In assigning PP values, extra weight was given to iron and steel, metallurgy, energy, and chemical production. The greatest weight was given to ferro-alloy and machinery production.
© 2005 Columbia Games Inc. 18 VERSION 3.02
BASIC PRODUCTION CHART (PPs)Scenario S41 W41 S42 W42 S43 W43 S44 W44
Soviet 18 24 32 32 32 32 32
German 40 40 50 50 60 60 50 40
12

11.4 BUILDING UNITS 11.41 REPLACEMENTS
During Production, players may add one step to any unengaged units on the map, provided they have a Land Supply Line (or Rail/Sea) at that time.
Replacements cannot be added to new cadres or reinforcements in the same month they appear.
NOTE: A maximum of 1 SS step may be rebuilt per month.
11.42 CADRESDuring Production, Cadres (1cv units)
may be formed from eliminated units. The PP cost of a cadre is noted in the Cadre column on the Unit Cost Chart.
Note: Once eliminated, Axis Satellite units are Restricted to their respective countries for the remainder of the game (the Italian 8 Army unit cannot be rebuilt at all as it is restricted to offmap Italy).
If the German 54th Corps (Infantry) is rebuilt it no longer fires TF vs Fortresses.
HQ cadres are treated like other units, except their lowest step is "Ø". Hence, building an eliminated HQ cadre costs 20 PPs, and each additional step is 10 PPs. German HQ costs increase in certain conditions.
11.43 REPLACEMENT COSTSSee: Unit Cost Chart.
11.5 REINFORCEMENTSReinforcements are new units
scheduled to enter the game as noted in each scenario. When the scheduled Production month arrives, they are deployed on the map as noted in 11.6.
11.51 ADVANCED ARRIVALThe arrival month of a reinforce-
ment unit may be advanced one month (per Production) either by reducing it 1CV or by paying its cadre cost in PPs.
11.52 DISBANDING UNITSDuring Production players may
voluntarily eliminate friendly units. These are unavailable for rebuilding until the next Production.
11.6 DEPLOYING CADRES & REINFORCEMENTS
New cadres and scheduled reinforcements may arrive in any Home Cities (1.44) that are in Rail/Sea Supply, but not embattled.
A maximum of one new unit per Production can arrive in a Minor City, and two units per Major City.
One new unit may also be deployed in each Rail Entry hex and Exit Zone on a home mapedge (unless enemy units occupy the corresponding exit zone).
NOTE: Reinforcements with an arrival date for the first month of a scenario must be deployed as above during the initial scenario deployment.
See also 16.27 for deployment of cadres in exit zones.
11.0 PRODUCTION EASTFRONTTM
ReplacementsUnits can only rebuild one step per month because it takes time [training] as well as equipment to build a combat unit.
Cadre CostsHigher cadre costs reflect the price of having a unit completely destroyed in combat. It is much easier to rebuild a unit when its infrastructure (organization, support services, leaders, etc.) remains intact. German cadres are cheaper (relative to step cost) reflecting their superior training and leadership.
© 2005 Columbia Games Inc. 19 VERSION 3.02
8 12 4 8
6 9 3 6
4 6 2 4
• • 3 6
• • 3 6
5 8 • •
• • 6 12
101
201
10 20
CADRE STEP CADRE
UNIT COST CHART (PPs)
SOVIET
1. German HQ costs increase under certain circumstances.
UNITTYPE STEP
GERMAN

12.1 WEATHER DETERMINATION
On the Time Track (mapboard), all Months are color-coded for weather (Dry, Snow, or Mud). The Summer months of June, July, August, and September always have Dry weather. The Winter months of December, January, and February always have Snow weather. April is always Mud weather.
The months of October, November, March, and May have variable weather. During these months, each Turn begins with a Weather die roll. Each player rolls one die; the sum of the dice (even or odd) determines the weather for the upcoming Turn, as indicated in the Weather Table. The weather is re-rolled for the second Turn of the month, and may change.
12.2 WEATHER EFFECTS12.21 INITIATIVE
The German player has the first Player-Turn in Dry and Mud weather Turns. The Soviet player has the first Player-Turn in Snow weather.
12.22 HQ DISRUPTIONDisrupted HQs effectively command
at one level below their nominal Command Value.
MUD: all German and Soviet HQs are Disrupted (see 5.8). HQs may not Deploy one hex to activate.
SNOW: all German HQs (only) are Disrupted. HQs may Deploy.
12.23 UNIT MOBILITYMUD: reduces all unit speeds to
1 hex per Movement Phase (except Cavalry, which can move 2 hexes).
SNOW: reduces all unit speeds by 1 hex per Movement Phase (except Shock which remains at 1).
12.24 TERRAINMUD: Marsh terrain rules (including
hexside limits) apply in Clear and Forest terrain (except stacking remains unchanged at 4).
All units fire SF offensively during mud in all hexes (exceptions: Airpower and Siege Guns).
Airstrike Firepower is not affected by Mud weather.
SNOW: apply Forest terrain rules to all Marsh terrain (except stacking remains unchanged at 3). Snow also freezes rivers, canceling repulses for River Assaults (though the hexside limit remains 1).
EASTFRONTTM 12.0 WEATHER
Weather FateUsing the weather roll system, neither player can affect the weather result: it is pure fate.
Weather SenseWhen the weather changes to Snow, the Soviets get 2 Player-Turns in a row. When the weather changes from Snow to Mud, the Germans get two Player-Turns in a row. This double turn for one player can produce a calamity for an unprepared player, just as it almost did for the Germans at Moscow in 1941. Be prepared!
Stacking ConsiderationsTerrain changes due to weather do not reduce stacking limits.
© 2005 Columbia Games Inc. 20 VERSION 3.02
WEATHER TABLE
MONTH DRY MUD SNOW
OCT EVEN ODD •NOV • ODD EVEN
MAR • ODD EVEN
MAY EVEN ODD •

13.1 HQ AIRPOWERHQs have attached airpower
resources. During Combat, each activated HQ may conduct one Airstrike in a Battle within Air Range. Airpower cannot attack enemy air power, and ground units cannot fire back at Airstrikes.
13.11 AIR RANGEAir Range is equal to Command
Range, except that it is not interrupted by enemy-controlled hexes or impassable terrain.
Supreme HQs active during Combat can initiate a Strategic Airstrike at double Air Range. That is, a Supreme HQ III has an Air Range of six (6) hexes. Airstrike CV (13.14) remains unchanged.
13.12 AIRSTRIKE CVThe CV of the commanding HQ
determines the strength of the Airstrike. One die is rolled per HQ CV. A HQ’s airpower may not be divided into multiple Airstrikes.
13.13 TARGETINGAirstrikes can only be made in Battles
that will be fought this Combat Phase. Only one Airstrike may be applied to any one Battle per Combat Phase.
All Airstrikes must be allocated before defending units in any battle are revealed and combat begins. Place one Airstrike marker of the same strength as the active HQ in the designated battle hex. That is, given an HQ II, place an Airstrike "2" marker in the Battle Hex.
13.14 AIR FIREPOWERThe Airstrike firepower (SF, DF, or
TF) depends on the period of the war (scenario), becoming stronger for the Soviets as time goes on, and weaker for the Germans.
Marsh terrain and mud weather do not affect Airstrike Firepower (but Double Defense does apply).
13.15 EXECUTING AIRSTRIKESAirstrikes are executed before
Defensive fire. One die is rolled per Airstrike CV.
"Hits" are scored based on the current Airstrike Firepower (SF, DF, or TF), and are immediately applied to the passive units in the hex. All terrain and weather defensive benefits (such as double defense in Forest) apply. Partial "hits" from Airstrikes carry forward to normal land combat,
NOTE: Because Air Range can traverse enemy controlled hexes, Airstrikes can be made into battles that are fought as Unsupported Combat, As with attacks by ground units, such airstrikes are only half-effective.
13.17 AIRPOWER DISRUPTIONSoviet and German HQs are
Disrupted (5.8) under certain conditions. HQ Disruption reduces HQ CV (and hence Air Range and Airstrike cv) by one, but Air Firepower (SF, etc) is unchanged.
13.0 AIRPOWER EASTFRONTTM
Air RangeAir range declines with HQ CV because the ability to deliver effective airpower at a given range is more a function of logistics and support than flight range.
© 2005 Columbia Games Inc. 21 VERSION 3.02
AIR FIREPOWER
SCENARIO GERMAN SOVIET
S 41 TF SF
W 41 DF SF
S 42 DF SF
W 42 DF DF
S 43 DF DF
W 43 SF DF
S 44 SF TF
W 44 NONE TF

14.1 PARATROOPSThe Soviet parachute corps has
Paradrop capability. First available as a December 1941 reinforcement, it begins all later scenarios eliminated but available for rebuilding.
14.2 PARADROP HQsAny Soviet HQ may command
a Paradrop by expending all of its command ability (including airpower) for that Player-Turn. A Paradrop HQ marker should be used to identify the commanding HQ. The Paradrop HQ may not Deploy and must already be located in the same hex as the Para unit. A Paradrop HQ may not Blitz.
14.3 PARADROP HEXESDuring the Movement Phase, the
Para unit may airdrop into any hex (except Mountain) within normal Air Range of the Paradrop HQ.
NOTE: when a Paradrop is commanded by the STAVKA HQ, Air Range is doubled.
14.4 AIR ASSAULTSA Paradrop into an enemy-occupied
hex, if this is a new battle, is defined as an Air Assault. These are treated just like River Assaults (7.5) except that the Para is only Repulsed with a die-roll of 1. If Repulsed, the Para unit must take an automatic 1CV step loss (plus any normal losses from defensive fire) and return to the hex it came from.
Paradrops into existing battles, or in combination with normal (non-assault) ground attacks, are not Air Assaults (no repulse).
14.41 COMBINED ASSAULTSWhen a Paradrop is combined with a
River and/or Sea Assault, the Repulse on all assaulting units is reduced to 1. See: 7.53.
14.5 PARA COMBATParas on the ground move and fight
like normal infantry, except they have SF on Offensive Fire, and DF on Defensive Fire. Paras receive no combat support from their Paradrop HQ, but can receive support from another active Combat HQ to which they can trace command.
14.6 PARADROP LINKUPThe Para unit is Dispersed (place face
down to indicate this) when airdropped, meaning it does not alter control of any hex, including the hex if occupies. Dispersal lasts throughout the Player-Turn of the paradrop until the friendly Supply Phase. Dispersal does not affect Para combat, but dispersed paras cannot move (e.g., Blitz Movement).
At the beginning of the friendly Supply Phase (before enemy units are checked for supply) the Linkup status of the Para unit is checked (this is the only time a friendly unit is checked).
During the Paradrop Linkup check, dispersed Paras in a friendly hex, or in a hex with other friendly units or their ZOCs have achieved Linkup. Linkup allows the para to survive and recover from dispersion. The Linkup units may themselves be out of supply.
If Linkup occurs, the para recovers from Dispersal and regains normal control over its hex and a ZOC into adjacent hexes. If not, the Para unit is eliminated.
Linkup is the only way for a para unit to survive an airdrop. Note that getting supply for the paradropped unit is not the issue. For example, dropping into a port behind enemy lines is not sufficient to obtain Linkup since the para does not take control of the port.
EASTFRONTTM 14.0 PARATROOPS (Optional)
© 2005 Columbia Games Inc. 22 VERSION 3.02
Para RepulseOnly 20-30% of a para corps is normally landed by parachute. The parachutists job is to secure airfields to allow the balance of the corps to land in gliders and air transports. A Para repulse indicates the initial wave fails to secure the necessary airfields and the operation is canceled. The 1cv hit upon Repulse reflects loss of the Paras already on the ground.
Combined AssaultsParadrops are useful for supporting River and Sea Assaults because they minimize repulse fire for all assaulting units, plus they add an extra unit to the assault, thereby reducing the chance of total repulse.
Para DispersalBecause of dispersal, Paras do not alter hex control on the turn they airdrop (which might otherwise allow a Blitzing unit to disengage ‘forward’ into a Paradrop hex), nor do they cut enemy rail lines or supply lines, unless they have linked up with other friendly units by the end of the Turn.
Para LinkupPara units are notoriously light on logistics, especially heavy weapons and ammunition. Dropping paratroops into advanced positions to disrupt the enemy, hoping to establish a linkup (on a blitz move or with a simultaneous sea invasion), is a risky venture.
Soviet Paratroops

15.1 SEA CONTROLEach sea area has a Control port.
Only when the Control port is friendly can a player move, supply, or invade by sea. Control ports are noted on the map with a solid black anchor symbol. Major ports are noted below in bold.
•Baltic Sea: controlled by Danzig. Other Baltic ports are Konigsberg, Memel, and Ventspils.
•Gulf of Finland: controlled by Leningrad. Another port is Tallinn.
•Gulf of Riga [new]: See sidebar for boundary lines. Controlled by Riga. Another port is Ventspils.
•Western Black Sea: controlled by Sevastopol. Other ports are Varna, Constanza, Odessa, and Nikolaev.
•Eastern Black Sea: controlled by Batumi. Other ports are Sevastopol, Kerch, and Novorossiysk [the Black Sea boundary should go into the Sevastopol hex].
•Sea of Azov: controlled by Rostov. Other ports are Mariupol and Kerch. Simferopol, Perekop, and Perekop NW1 cannot be invaded by sea (shoals).
•Caspian Sea: controlled by Baku (Exit Zone M). Other ports are Astrakhan and Marach Kala (port symbols missing from the map).
•Kerch Straits: Sea Movement, Sea Supply, and Sea Invasions through the Kerch Straits are prohibited if either adjacent land hex is enemy-controlled.
Note: Kerch and Sevastopol both adjoin two sea areas.
15.2 SEA MOVEMENTSea Movement (like Rail Movement)
is Strategic Movement, only possible when the Supreme HQ is activated. A player may make one Sea Move per Supreme Move.
Units already located in a friendly port can Sea Move across one or more controlled, adjoining sea areas to another friendly port (not embattled). Each sea area crossed expends one Sea Move.
Units cannot Engage by Sea Movement. They may Disengage, but not Retreat (but see 15.6).
15.21 PORT CAPACITYThe capacity of minor ports is 1,
meaning only one unit can enter, or one unit can leave per Player-Turn via Sea Movement. Major port capacity is 2.
15.3 SEA SUPPLYSea Supply lines between friendly
ports connect friendly Rail Lines across controlled seas. Hence, a friendly Rail Line can lead to a friendly port, then via Sea Supply Line to another friendly port, then via another Rail Line to a home mapedge.
The term Rail/Sea Supply means rail supply including such sea connection. Production sources require Rail/Sea Supply to produce.
15.31 SIEGE SEA SUPPLYSea Supply Lines, like Rail Lines,
may be traced into but not through a friendly Battle Hex. Hence, a Sea Supply Line terminates at an engaged port. Engaged ports can only support one unit, at 1CV maximum and the normal 2 hex land supply line is cut. Units defending Sevastopol and Leningrad receive Fortress Supply (10.5) instead of Siege Supply.
15.4 SEA INVASIONSSea Invasions allow movement from
a port across controlled. Sea Areas to any coastal hex (not just into a friendly port). Invasions are not Strategic Movement, requiring a dedicated HQ expenditure.
15.41 INVASION COMMANDDuring the Command Phase, a player
may activate one or more HQs for Sea Invasion. Invasion HQs must be in a port at the start of the Command Phase (they may not Deploy there), and should be marked with an Invasion HQ marker.
Each Invasion HQ commands the movement of one infantry-type unit from the HQ port to any coastal hex (except Mountain or Marsh hexes) within the same Sea Area. The Invasion HQ can command no other movement, but can provide Combat Support to battles within Command Range (which is traceable across sea hexes/hexsides only for Invasion HQs) and Airstrikes.
Invasion HQs can Blitz, allowing them to invade a second unit in the invasion port into the same or another invasion hex. A Blitz Invasion HQ may not elect to command normally in the Blitz phase, but must command as an Invasion HQ throughout the Player-Turn.
IMPORTANT: Invasions to hexes beyond the Command Range of the Invasion HQ are possible, but any battle would be unsupported combat and no airpower support could be provided.
15.0 SEAPOWER (Optional) EASTFRONTTM
© 2005 Columbia Games Inc. 23 VERSION 3.02
SeaPowerSea Power has a minor effect in EastFront, although the Soviets did make modest sea landings in the Crimea in 1943, and the Germans sea supplied the isolated Army Group North in the Courland Peninsula for some time in 1944-45.
These rules are a simplified version of the more complex Seapower system in our companion game, WestFront (which rules may also be used if desired).
Germany had control of the Baltic Sea (except within the Gulf of Finland) throughout the war. The Soviet Black Sea Fleet was based in Sevastopol, but retired to Batumi when this fortress was taken by the Germans in 1942.
Sea MovementExample 1: The Soviets control Sevastopol, Rostov, and Batumi. With STAVKA activated, a Soviet unit in Odessa sea-moves to Rostov. This counts as three Sea Moves since three sea areas are crossed.
Example 2: The Germans wish to move one unit from Danzig to Leningrad by strategic movement, but there is no direct rail link. They control the Baltic Sea and, by occupying Leningrad, the Gulf of Finland. They choose to move via sea across the two controlled seas to Leningrad (two sea moves). Landing a unit at Leningrad would not be possible if this hex was engaged by the Soviets.
Sea SupplyExample 1: The Germans control Sevastopol and Rostov. German units have crossed the Kerch Straits into Novorossiysk. They can trace a Land Supply line to the railhead at Kerch, but they cannot trace a Sea Supply Line from Kerch to Novorossiysk because they do not control the Eastern Black Sea.
Example 2: The Germans begin W’44 with 8 units isolated (no overland supply line) in the Courland Peninsula W of Riga. Since they still control Danzig, they control the Baltic Sea, and can trace Sea Supply to the port of Ventspils.
Gulf of RigaA new sea area has been added to the map. Draw boundary line as shown below.

15.42 INVASION LIMITSSea Invasions are not allowed into
Mountains or Marshes, past uncontrolled straits, nor into shoals (Simferopol, Perekop, Perekop NW1 from within the Sea of Azov).
Although multiple simultaneous Sea Invasions are possible (each commanded by a separate Invasion HQ), only one unit can Sea Invade a defended coastal hex per Movement Phase (simultaneous ground attacks/Paradrops are allowed.) Undefended hexes may be Sea Invaded by more than one unit. Until a port is captured, additional units can only be brought ashore by further Sea Invasions. Once a port has been captured, and is not embattled, units can be landed more efficiently by strategic Sea Movement.
15.43 SEA ASSAULTSSea Invasions that initiate battles are
Sea Assaults and subject to Repulse, as for River and Para Assaults. During the first round of Defensive Fire, one invading unit is repulsed for each a die roll of 1 or 2 (in addition to combat hits scored). A repulsed unit must return to its embarkation port. All for River Assaults, a simultaneous ground attack across a non–river hexside eliminates Repulse, and a Combined Assault (7.53) by Paradrop reduces Repulse to 1.
Note: the Soviet Coastal Army is only repulsed on a roll of 1.
15.5 COASTAL ARMY The Soviet Coastal Army is an
amphibious unit, with enhanced marine ability. It can has an associated Beachhead (BH), which can serve as a supply source in the invaded hex, and can Retreat via Sea Evacuation with a pursuit speed of "2".
NOTE: Unlike WestFront amphibious units, the Soviet Coastal Army does not receive DF firepower on its BH.
15.51 BEACHHEADSWhen the Coastal Army lands by Sea
Invasion, its associated BH marker may be deployed in the invaded hex (even if it is an enemy Battle Hex) during any subsequent Soviet Supply Phase.
The BH can only be deployed if it has "Ready" status. Beginning with W’41, it begins every scenario in "Prep" status (face-down). During Production, it can be converted to "Ready" status (face-up) at a cost of 10 PPs. If eliminated, the BH can be raised to "Prep" status for 10 PPs.
Provided it is not embattled, a deployed BH functions as a temporary minor port. One unit can Sea Move into or out, and Sea Invasions can be launched from a BH hex. However, Rail Lines can never be traced to a BH.
Once deployed, the BH may not be moved. It may be voluntarily disbanded and reduced to "Prep" status during Production, but cannot be made Ready in that same Production. If enemy units enter the BH hex with no friendly units present, it is eliminated.
15.52 BEACHHEAD SUPPLYThe BH provides supply to all Soviet
units in its hex (even if an enemy battle hex). If the the BH hex is friendly (even if embattled). units in all adjacent hexes can trace supply to the BH provided
Units dependent on BH Supply may receive replacements during Production (not if engaged), but at double their normal step cost.
15.6 SEA EVACUATIONSSea Evacuation is the reverse of
Invasion. A unit (engaged or unengaged) can move by sea from any coastal hex to a friendly port, commanded by an "Invasion HQ" in the target port. If Retreating, the unit takes Pursuit Fire based on a speed of ‘1’ (the Soviet Coastal Army has a retreat speed of ‘2’).
16.0 STRATEGIC OBJECTIVES16.1 STRATEGIC OBJECTIVES
Capturing these objectives can have political, economic, or military effects.
16.11 RUMANIAN SURRENDERWith the Red Army rapidly advancing
on Bucharest in 1944, Rumania switched sides and her army blocked the Iron Gates and other mountain passes to the west, trapping the German 6th Army.
RESULT: Soviet control of Bucharest results in Rumania suing for peace. Rumanian units are eliminated and may not be rebuilt.
A spare 1CV Soviet infantry unit is placed in Bucharest to reflect Rumanian recruits. All Rumanian territory (if not in a German ZOC), and Exit Zones I and J (if unoccupied) become Soviet controlled. This may result in German supply attrition. German recapture of Bucharest cancels the effect.
EASTFRONTTM 15.0 SEAPOWER (Optional)
Sea InvasionsExample: The Soviets control Sevastopol,
thus controlling the Western Black Sea. A Soviet HQ II and infantry army are located in Sevastopol. The HQ is activated as an Invasion HQ and the army is moved by sea to invade Constanza which is Axis controlled but currently undefended.
By capturing a port, the Soviets have established a Sea Supply Line, so Constanza (and any rail lines emanating from it) becomes a Soviet supply source, posing a serious threat to Bucharest and Ploesti oil.
Sea AssaultsExample: The Soviets control Batumi, and
have an HQ II and an army in Novorossiysk. The Germans occupy Sevastopol, Kerch, and Simferopol.
Rather than attack Kerch across the straits in a "River" assault, the Soviets (rashly) elect to invade Simferopol by sea. The airstrike from their Invasion HQ scores a hit on the defending German army, reducing it to 2cv. The German unit conducts Defensive Fire and rolls <1,6>, scoring one repulse and one hit. The Soviet army loses a step and returns to Novorossiysk (where the commanding general is promptly shot).
BeachheadsUnits that invade non-port hexes without a BH are unsupplied until a normal land supply line can be established to them. Until then they will be subject to normal supply attrition during the enemy Supply Phase.
Sea EvacuationsA Sea Evacuation is the only way to Disengage or Retreat from a non-port coastal hex. In a friendly port, normal Sea Movement can be used to Disengage, but a Sea Evacuation is necessary to Retreat. Sea Evacuation is required to both Disengage and Retreat from an enemy port, but only the latter involves pursuit fire.
Soviet Coastal ArmyIn May 1942, this amphibious unit escaped relatively unscathed by sea from an embattled and isolated Odessa to Sevastopol. This unit has a speed of ‘2’ when retreating by Sea Evacuation.
© 2005 Columbia Games Inc. 24 VERSION 3.02
16.12 PLOESTI OILGermany’s Achilles’ Heel was
petroleum and roughly 40% of her oil production came from Ploesti. After its overrun by the Soviets in September 1944, the fuel situation deteriorated rapidly, affecting especially the Luftwaffe.
RESULT: If Germany does not control Ploesti (or loses rail supply to it), German HQ step costs are +5 PPs and HQ cadres +10 PPs.
16.13 ODESSA/SEVASTOPOLHitler placed a high priority on the
reduction of Sevastopol, the strongest fortress in the world and the main base for the Soviet Black Sea Fleet. He feared an air and/or seaborne attack into Rumania against the crucial Ploesti oil fields. Considerable garrison forces were allocated to defend against this threat.
RESULT: German capture of Odessa releases the 3rd Rumanian Army (only) from Restriction (must remain within one hex of Rumania 1939).
German capture of Sevastopol releases the other three Axis Satellite units from their Restriction of remaining within one hex of their home countries (Italian 8th Army may appear as a reinforcement). If Sevastopol or Odessa is recaptured by the Soviets, all Satellite units are again Restricted (units outside their restricted areas are unsupplied).
16.2 EXIT ZONESRail Entry hexes (REs) are red-
lettered map-edge hexes where rail lines exit the map.
Exit Zones (EZs) are abstract off-map play areas considered to be 2 hexes from each Rail Entry hex. They are clear terrain and occupy the same front as their connecting RE hex.
Exit Zones have have a stacking of 4 units. A maximum of two (2) units can engage an EZ from an adjacent RE/EZ in a single Movement phase.
16.21 EXIT ZONE CONTROLIf vacant, Home Exit Zones (those
along Home Mapedges, see sidebar) are friendly to that player.
If a Home Exit Zone is solely occupied by enemy forces, control switches to that player. If embattled, the Original Defender retains control.
ZOCs do not extend into or out of Exit Zones.
16.22 EXIT ZONE COMMANDTo activate in an Exit Zone, HQs
must be located in the Exit Zone at the beginning of the Command Phase (they cannot Deploy into or out of Exit Zones).
A 1CV HQ can command movement and support combat only in its own Exit Zone. A 2CV or 3cv HQ can also command units in both adjacent Exit Zones. HQs at 2cv or 3cv in Rail Entry hexes can trace command into the corresponding EZ, and vice-versa.
Exit Zone HQs can activate as a Blitz HQs to command Blitz Movement and Combat Phases. Active Exit Zone HQs can assign airstrikes to Exit Zone battles within Command Range.
HQs can Mobilize into adjacent Exit Zones or Rail Entry hexes (if they forego combat support and an airstrike).
16.23 EXIT ZONE MOVEMENTUnits can enter or leave an Exit Zone
for one normal land move regardless of unit type, commanded by any HQ in range (or the SHQ). Weather and terrain have no effect on EZ movement.
Units can never combine Exit Moves with on-board movement (except by rail, see 16.24 below).
Units may Engage or Disengage by Exit Move. Pursuit Fire applies to Retreats as normal. As usual, units cannot disengage and re-engage on the same move. Exception: units may always Exit Move between Home Exit Zones, even if both are engaged).
Important: HQs may engage into Exit Zones.
16.24 EXIT RAIL MOVESExit Rail Moves allow rapid off-board
rail movement between Exit Zones and/or Rail Entry hexes. Exit Rail Moves may be be combined with normal on-map Rail Moves. EZs are two (2) Rail hexes distant from adjacent REs & EZs. Onboard rail movement can continue off-map (and vice-versa) counting rail hexes in this manner. Units cannot Engage by Exit Rail Movement. Disengaging (but not retreating) by rail is permitted.
Important: Units can Exit Rail Move “around” (through) enemy-occupied Home EZs. Exit Rail Moves are not possible between EZs on different mapedges.
16.0 STRATEGIC OBJECTIVES EASTFRONTTM
Exit ZonesExit Zones simulate the extension of the fighting front off the map, and eliminate the "edge-of-the-world" syndrome that affects play near map edges.
This situation is most likely to occur in S’42 (when the Germans threatened to penetrate deep into Russia), S’44 (when the Soviets overran Rumania) or W’44 (when Poland fell).
Exit moves can be used to Attack enemy occupied Exit Zones. Contesting enemy control of an Exit Zone is voluntary, but remember this not only reduces current Production, but also seriously affects Victory since current Production Levels are a key component of Victory Conditions.
Home MapedgesThe East and South mapedges are home mapedges to the Soviet player, the West mapedge is friendly to the German player, and the North mapedge is Neutral (unfriendly to both).
VolgaFrontA VolgaFront module, including an extension map and rules for play in this region, is available from Columbia Games. Exit Zones on the East mapedge are ignored when this map is in play.
WestFrontOur companion WestFront game similarly eliminates the need for Exit Zones for the West mapedge.
Exit Zone Rules ChangesPlease note the changes to Exit Zones. Supreme Command is no longer required to make Exit Moves or move from EZ to EZ.
A normal land move of 1-3 hexes is all that is needed to move from Exit Zone to Exit Zone or Rail Entry Hex. For example, even a slow moving Shock unit can move from Ivanovo to Exit Zone T or from T to an adjacent Exit Zone. However a faster unit such as Cavalry or Armor still cannot more from Yaroslavl to Ivanovo and continue offmap; the unit must begin the movement phase in Ivanovo.
Because Exit Zones are 2 hexes from their corresponding rail entry hex and 2 hexes apart (i.e. one intervening hex), the abilities of a 2cv and 3cv HQ are very similar. However, airstrike CV still varies according to HQ CV.
© 2005 Columbia Games Inc. 25 VERSION 3.02

16.25 EXIT ZONE COMBATWhen an Exit Zone is contested,
combat may occur, but combat is never mandatory (even when attacking).
Exit Zone HQs need not (but may) take combat hits unless no other friendly units remain in the Exit Zone.
Battles may be fought Unsupported if no Exit Zone HQ commands.
16.26 EXIT ZONE SUPPLYUnits occupying Home Exit Zones
are always Supplied, even if the zone itself is enemy controlled.
Otherwise, units in an Exit Zone must trace Rail Supply, either through the corresponding Rail Entry hex (remember that Rail Supply cannot be traced through Battle Hexes) or via an adjacent Exit Zone (must be friendly controlled).
Unsupplied units are subject to normal supply attrition.
16.27 EZ REPLACEMENTSReplacement steps may be added
to units occupying Exit Zones, provided they have a supply line. Normal step costs apply unless the EZ is embattled in which case steps cost double. During Production, one new Reinforcement or Cadre may arrive in each Home Exit Zone (unless enemy controlled).
16.28 EXIT ZONE VPsFor Victory purposes (see 17.0) units
of both sides occupying Exit Zones are not considered to be eliminated.
16.3 EXIT ZONE PPsWhen a Home Exit Zone is enemy
controlled, a player's Basic Production is modified as noted in 16.31 through 16.35.
Important: If the enemy has captured a Home Exit Zone, contesting it with at least 1 unit halves the number of PPs lost (except for Baku oil where the full effect is always applied).
16.31 FINNISH FRONTGerman control of Exit Zone W
increases German production by 2PPs for Finnish support. German control of Exit Zone V, decreases Soviet production by 2PPs for severing the Murmansk railway.
NOTE: The Soviets cannot enter either Exit Zone W or V.
16.32 VOLGA FRONTGerman control of Exit Zones U
through N reduces Soviet production by 2PPs each. The Germans do not receive any additional PPs for themselves.
16.33 BALKAN FRONTSoviet control of Exit Zones F
through J reduces German production by 2PPs each. The Soviets do not receive any additional PPs for themselves.
16.34 BALTIC FRONTSoviet control of Exit Zones A
through E reduces German production by 6PPs each. The Soviets do not receive any additional PPs for themselves.
16.35 CAUCASUS FRONTGerman control of either Exit Zone
L or M implies capture of Baku, reducing Soviet Production by 10PPs., and increasing German Production by 20PPs.
Also, the South mapedge is no longer a Home mapedge to the Soviets if Baku is German controlled (the Soviets can only re-enter zones L or M from the north).
The Germans have no sea capability in the Caspian Sea.
EASTFRONTTM 16.0 EXIT ZONES
Exit Zone PPsExample: the German player moves one Infantry unit into a vacant Exit Zone "O" near Stalingrad. This reduces Soviet Production by 2PPs. The Soviet player moves units to contest the zone in the next Player-Turn. Since the German unit is now the Original Defender, control remains with that player. Only by eliminating or forcing the German unit to vacate the zone can those 2PPs be recovered.
Contesting (attacking) a captured exit zone, halves the effect.
Finnish FrontThe Finns (not represented in the game) avenged their defeat in the Winter War 1939-40 by attacking into Russia and reclaiming only ceded territory. Despite German pressure to press their advantage, the Finns declined to attack Leningrad from the north and refused to sever the Murmansk railway. Lend-Lease materials, especially trucks and army rations, poured down the railway, contributing about 5% to Russia’s war effort. Only direct German intervention could have altered this situation.
The Volga FrontEast of the map lie the Volga Basin cities of Gorky, Kuibyshev (the provisional capital), Kazan, and Saratov. These contained the bulk of Russia’s off-map industry at the outbreak of the war.
The Balkan FrontA Soviet breakthrough in the West occurred on this front in September 1944 after Rumania surrendered. The Red Army continued west and north through the Balkans and by the end of November had captured Belgrade and were just a few miles short of Budapest.
The Baltic FrontWest of the Vistula lies German Silesia and Pomerania, largely unprotected by defensive barriers. A Soviet breakthrough in this front would threaten Berlin (only 3 hexes off-map to the west), and seriously hamper German supply to the east.
The Caucasus FrontBaku produced 76% of Soviet oil [1937], and Soviet pre-war oil production dwarfed German by 4:1! German occupation of the Trans-Caucasus region might also have resulted in Turkey joining the Axis, enabling a subsequent Turko-German advance into Persia and Iraq (Britain’s oil supply). Hitler’s attraction to the Caucasus was not irrational, just over-ambitious.
© 2005 Columbia Games Inc. 26 VERSION 3.02
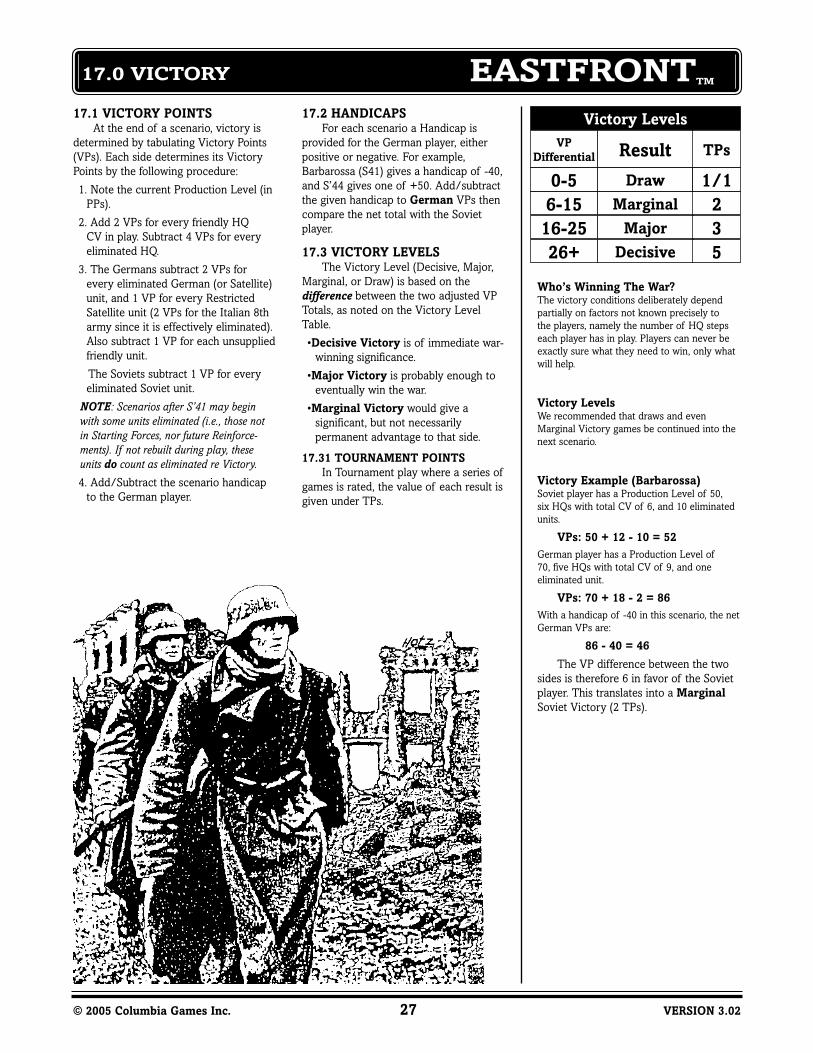
17.1 VICTORY POINTSAt the end of a scenario, victory is
determined by tabulating Victory Points (VPs). Each side determines its Victory Points by the following procedure:
1. Note the current Production Level (in PPs).
2. Add 2 VPs for every friendly HQ CV in play. Subtract 4 VPs for every eliminated HQ.
3. The Germans subtract 2 VPs for every eliminated German (or Satellite) unit, and 1 VP for every Restricted Satellite unit (2 VPs for the Italian 8th army since it is effectively eliminated). Also subtract 1 VP for each unsupplied friendly unit.
The Soviets subtract 1 VP for every eliminated Soviet unit.
NOTE: Scenarios after S’41 may begin with some units eliminated (i.e., those not in Starting Forces, nor future Reinforce-ments). If not rebuilt during play, these units do count as eliminated re Victory.
4. Add/Subtract the scenario handicap to the German player.
17.2 HANDICAPSFor each scenario a Handicap is
provided for the German player, either positive or negative. For example, Barbarossa (S41) gives a handicap of -40, and S’44 gives one of +50. Add/subtract the given handicap to German VPs then compare the net total with the Soviet player.
17.3 VICTORY LEVELSThe Victory Level (Decisive, Major,
Marginal, or Draw) is based on the difference between the two adjusted VP Totals, as noted on the Victory Level Table.
•Decisive Victory is of immediate war-winning significance.
•Major Victory is probably enough to eventually win the war.
•Marginal Victory would give a significant, but not necessarily permanent advantage to that side.
17.31 TOURNAMENT POINTSIn Tournament play where a series of
games is rated, the value of each result is given under TPs.
17.0 VICTORY EASTFRONTTM
Who’s Winning The War?The victory conditions deliberately depend partially on factors not known precisely to the players, namely the number of HQ steps each player has in play. Players can never be exactly sure what they need to win, only what will help.
Victory LevelsWe recommended that draws and even Marginal Victory games be continued into the next scenario.
Victory Example (Barbarossa)Soviet player has a Production Level of 50, six HQs with total CV of 6, and 10 eliminated units.
VPs: 50 + 12 - 10 = 52German player has a Production Level of 70, five HQs with total CV of 9, and one eliminated unit.
VPs: 70 + 18 - 2 = 86With a handicap of -40 in this scenario, the net German VPs are:
86 - 40 = 46
The VP difference between the two sides is therefore 6 in favor of the Soviet player. This translates into a Marginal Soviet Victory (2 TPs).
© 2005 Columbia Games Inc. 27 VERSION 3.02
Victory LevelsVP
Differential Result TPs
0-5 Draw 1/16-15 Marginal 216-25 Major 326+ Decisive 5
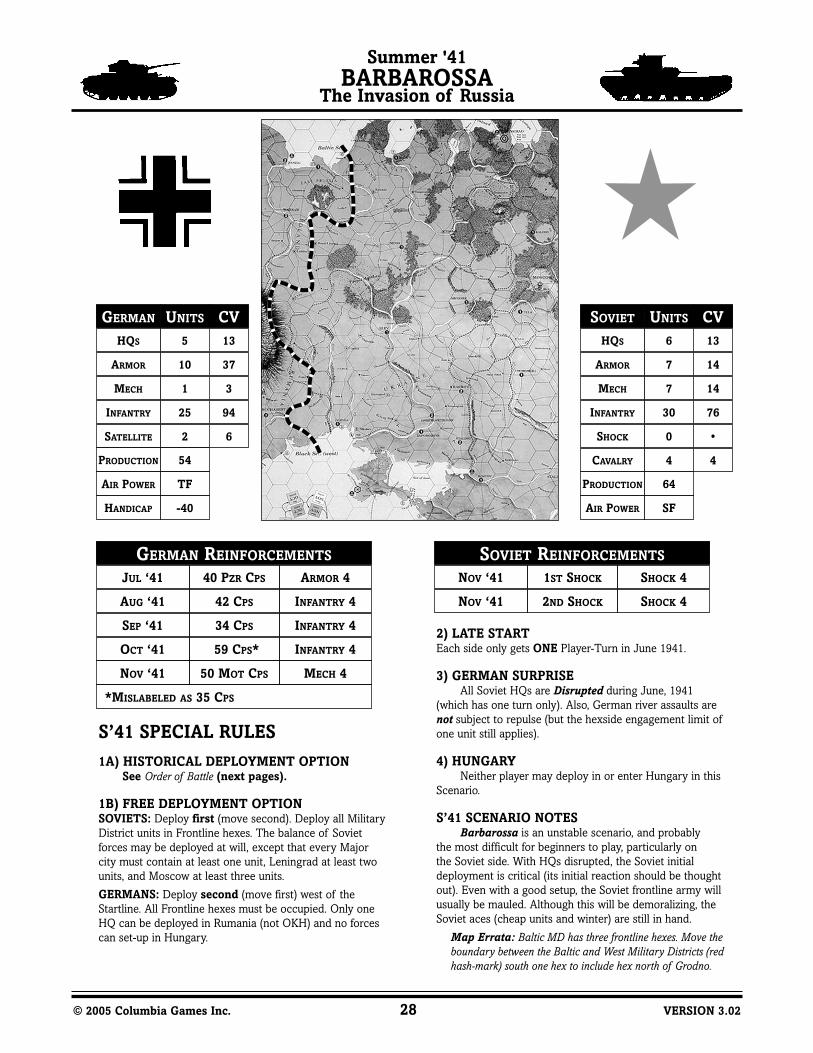
© 2005 Columbia Games Inc. 28 VERSION 3.02
Summer '41BARBAROSSA
The Invasion of Russia
GERMAN UNITS CV
GERMAN REINFORCEMENTS
JUL ‘41 40 PZR CPS ARMOR 4 NOV ‘41 1ST SHOCK SHOCK 4
NOV ‘41 2ND SHOCK SHOCK 4AUG ‘41 42 CPS INFANTRY 4
SEP ‘41 34 CPS INFANTRY 4
OCT ‘41 59 CPS* INFANTRY 4
*MISLABELED AS 35 CPS
NOV ‘41 50 MOT CPS MECH 4
SOVIET REINFORCEMENTS
HQS 5 13
ARMOR 10 37
MECH 1 3
INFANTRY 25 94
SATELLITE 2
PRODUCTION 54
AIR POWER TF
HANDICAP -40
6
SOVIET UNITS CVHQS 6 13
ARMOR 7 14
MECH 7 14
INFANTRY 30 76
SHOCK 0
CAVALRY 4
PRODUCTION 64
AIR POWER SF
•
4
S’41 SPECIAL RULES
1A) HISTORICAL DEPLOYMENT OPTIONSee Order of Battle (next pages).
1B) FREE DEPLOYMENT OPTIONSOVIETS: Deploy first (move second). Deploy all Military District units in Frontline hexes. The balance of Soviet forces may be deployed at will, except that every Major city must contain at least one unit, Leningrad at least two units, and Moscow at least three units.
GERMANS: Deploy second (move first) west of the Startline. All Frontline hexes must be occupied. Only one HQ can be deployed in Rumania (not OKH) and no forces can set-up in Hungary.
2) LATE STARTEach side only gets ONE Player-Turn in June 1941.
3) GERMAN SURPRISEAll Soviet HQs are Disrupted during June, 1941
(which has one turn only). Also, German river assaults are not subject to repulse (but the hexside engagement limit of one unit still applies).
4) HUNGARYNeither player may deploy in or enter Hungary in this
Scenario.
S’41 SCENARIO NOTESBarbarossa is an unstable scenario, and probably
the most difficult for beginners to play, particularly on the Soviet side. With HQs disrupted, the Soviet initial deployment is critical (its initial reaction should be thought out). Even with a good setup, the Soviet frontline army will usually be mauled. Although this will be demoralizing, the Soviet aces (cheap units and winter) are still in hand.
Map Errata: Baltic MD has three frontline hexes. Move the boundary between the Baltic and West Military Districts (red hash-mark) south one hex to include hex north of Grodno.

© 2005 Columbia Games Inc. 29 VERSION 3.02
Winter '41OPERATION ‘TYPHOON’The Moscow Counter-Offensive
GERMAN CV
GERMAN REINFORCEMENTS
JAN ‘42 51 CPS INFANTRY 3 DEC ‘41* 3RD SHOCK SHOCK 4
DEC ‘41* 4TH SHOCK SHOCK 4
DEC ‘41* 4 PARA CPS PARA 1
APR ‘42 1 GDS TANK Gds ARMOR 1
APR ‘42 2 GDS TANK Gds ARMOR 1
MAY ‘42 3 GDS TANK Gds ARMOR 1
*STARTS W ‘41 IN A HOME CITY
MAR ‘42 23 CPS INFANTRY 3
MAY ‘42 53 MOT CPS MECH 3
SOVIET REINFORCEMENTS
HQS 10
ARMOR 30
MECH 6
INFANTRY 96
SATELLITE
PRODUCT [+0]
AIR POWER DF
HANDICAP -30
5
SOVIET UNITS CVHQS 6 10
ARMOR 1 2
MECH 2 4
INFANTRY 28 76
SHOCK 2
CAVALRY 4
PRODUCTION 49
AIR POWER SF
8
12
[+6]
W’41 SPECIAL RULES1) German Winter Paralysis
Throughout this scenario, German HQ steps cost 15PPs each, and HQ cadres cost 30PPs.
During Snow months, all German units are reduced to movement of one hex, and only have SF on Offensive Fire (Defensive Fire is at normal firepower).
REMEMBER: German HQs are also Disrupted in Snow months.
2) GERMAN EXHAUSTION VPSAward 1 bonus Soviet VP for every German HQ step
below maximum strength (14CV) at the end of W’41.
3) LENINGRADNote that Leningrad begins the scenario without Rail
Supply and is not counted in Soviet Production.
W’41 SCENARIO NOTESAfter taking steady punishment all summer, the
Russians get their turn to dish some out. With the Germans paralyzed by winter and the shock armies in play, the Soviet Army turns tiger. The shock units are slow but potent, especially with 4CV guard infantry to protect them, and enough HQ power to exploit their advantage.
The Germans will be hard pressed to pull off any large-scale maneuvering due to HQ costs and disruption. Their mobility is gone, so the Soviets can be bolder. The Germans may be loath to relinquish territory (and their ‘42 prospects), but will find it very costly to defend in open terrain.
5
11
2
27
2
71
UNITS

© 2005 Columbia Games Inc. 30 VERSION 3.02
Summer '42OPERATION ‘BLUE’The Drive on Stalingrad
GERMAN UNITS CV
GERMAN REINFORCEMENTS
JUN ‘41* 27 CPS INFANTRY 3 JUN ‘42* 5 GDS TANK Gds ARMOR 1
*STARTS S ‘42 IN A HOME CITY
JUL ‘42 6 GDS TANK Gds ARMOR 1AUG ‘42 2 HUNG. SATELLITE 4
OCT ‘42 8 ITALIAN SATELLITE 3
*STARTS S ‘42 IN A HOME CITY
SOVIET REINFORCEMENTS
HQS 5 12
ARMOR 11 38
MECH 3 10
INFANTRY 30 92
SATELLITE 2
PRODUCTION 80
AIR POWER DF
HANDICAP -30
8
[+10]
SOVIET UNITS CVHQS 6 11
ARMOR 4 8
MECH 4 8
INFANTRY 28 88
SHOCK 4
CAVALRY 4
PRODUCTION 56
AIR POWER SF
12
10
[+6]
S’42 SPECIAL RULES
1) GERMAN SIEGE ARTILLERYBeginning with this scenario, the German Siege Guns
are attached to 54th Corps. See 2.63.
2) VOLKHOVVolkhov is a German Battle Hex. Both players must
deploy at least one unit there, German Original Defender.
3) LENINGRADNote that Leningrad begins the scenario without Rail
Supply and is not counted in Soviet Production.
S’42 SCENARIO NOTESThe Soviets have an improved army, but their backs
are to the wall: Moscow, Leningrad, the Caucasus, and the east mapedge are all within German striking distance. The German Army is as dangerous as ever, and has a whole summer to win somewhere.
S’42 HISTORICAL COMMENTARYS’42 was crunch time for Germany. The Soviets were
getting stronger and smarter. America was turning England into an armed camp. Germany’s nemesis, the two-front war, loomed. Russia had to be defeated now, and quickly. The German economy was particularly weak in petroleum. The lure of Caucasus oil tempted Hitler to go South, combined with a plan to breach the Volga at Stalingrad and then swing north behind Moscow. This plan surprised the Soviets who were deployed to protect Moscow. The Soviet front evaporated, but they had learned to retire before being bagged.
Hitler fidgeted with the plan, varying the main objective between Stalingrad and the Caucasus. Stalingrad became the eventual focus, where the Germans forswore mobile warfare for street fighting and met their match. Meanwhile, Stalin patiently hoarded his reserves behind the Don and Volga. Those who had lived by the blitzkrieg were about to die by it.

© 2005 Columbia Games Inc. 31 VERSION 3.02
Winter '42OPERATION ‘URANUS’
The Stalingrad Counter-Offensive
GERMAN UNITS CV
GERMAN REINFORCEMENTS
FEB ‘43 2 SSPZR CPS SS ARMOR 4
SOVIET REINFORCEMENTS (NONE)
HQS 5 10
ARMOR 11 35
MECH 3 8
INFANTRY 31 94
SATELLITE 4
PRODUCTION 83
AIR POWER DF
HANDICAP -15
15
[+0]
SOVIET UNITS CVHQS 6 12
ARMOR 7 16
MECH 5 12
INFANTRY 28 84
SHOCK 4
CAVALRY 4
PRODUCTION 62
AIR POWER DF
12
12
[+8]
W’42 SPECIAL RULES
1) SOVIET SURPRISEThe Germans set up first in this scenario. The Soviets
still have their normal first move for snow weather.
2) STALINGRADStalingrad begins the scenario as a Soviet Battle Hex
(Soviets Original Defender). The Germans must deploy four units (including one armor) with a total strength of 12CV or more in Stalingrad (face-up).
3) VOLKHOVVolkhov is a German Battle Hex.
4) LENINGRADNote that Leningrad begins the scenario without Rail
Supply and is not counted in Soviet Production.
REMEMBER: German HQs are Disrupted in Snow months.
W’42 SCENARIO NOTESThe Germans are overextended and hamstrung by
snow-weather command disruption. The German player must avoid a decisive pocketing of Stalingrad.
Rostov is an attractive target because of the number of German units dependent on it for supply. If the German defends the Don tenaciously, a general withdrawal can succeed. The Soviet strategy is to pick a weak spot, blitz, and grind away mercilessly. The Germans don’t have the HQ steps or Command Range for a lot of fancy maneuvering.
W’42 HISTORICAL COMMENTARYEverybody knows about Stalingrad. Cold. Starvation.
Suffering. Germany lost a quarter million men along with its arrogance. Few of the 90,000 German prisoners ever returned home. Hitler sacrificed Sixth Army to extract 1st Panzer Army from the Caucasus and save the southern wing. The Soviets didn’t win the war at Stalingrad, but Germany’s military advantage was erased.

© 2005 Columbia Games Inc. 32 VERSION 3.02
Summer '43OPERATION ‘CITADEL’
The Battle of Kursk
GERMAN UNITS CV
GERMAN REINFORCEMENTS
*MISLABELED AS JUL ‘41
*STARTS S’ 43 IN HOME CITY
JUL ‘43* 3 SSPZR CPS SS MECH 3
SOVIET REINFORCEMENTS (NONE)
HQS 5 12
ARMOR 12* 42
MECH 3 12
INFANTRY 29 90
SATELLITE 3
PRODUCTION 90
AIR POWER DF
HANDICAP -10
3
[+10]
SOVIET UNITS CVHQS 6 14
ARMOR 11 32
MECH 6 18
INFANTRY 29 94
SHOCK 4
CAVALRY 4
PRODUCTION 64
AIR POWER DF
10
8
[+0]
S’43 SPECIAL RULES
1) LATE STARTThis scenario begins in July, not June as usual.
If continuing play from W’42, implement S’43 rules (Airpower, etc.) in June as usual.
2) SATELLITE FORCESAll Satellite units are restricted, and must remain within
or adjacent to Rumania (1939) and Hungary, respectively. This also applies to all future scenarios.
3) VOLKHOVVolkhov is a German Battle Hex.
4) LENINGRADNote that Leningrad begins the scenario without Rail
Supply and is not counted in Soviet Production.
S’43 SCENARIO NOTESKursk is a shoot-out. Both sides are offensively
capable, and roughly equal. There are many different viable strategies. Players will have to master the skills of managing a series of ongoing battle along the front line to be successful. Enjoy.
S’43 HISTORICAL COMMENTARYHitler was a gambler. He gambled at Kursk and lost
badly, his plans betrayed by the Red Choir. They were bad plans anyway, and his new wonder-weapons, Panther and Tiger tanks, proved disappointing in action due to engine breakdowns.
The Soviets were ready, in spades, with the bane of the blitzkrieg: interlocked defense in depth, with adequate reserves. The battle ate up German armor that could have riposted future Soviet offensives. Without it the German line in the south collapsed and the Soviets rolled to the Dnepr, and across.
* includes 1 SS Armor

© 2005 Columbia Games Inc. 33 VERSION 3.02
Winter '43CRISIS IN THE UKRAINE
The Soviet Steamroller
GERMAN UNITS CV
GERMAN REINFORCEMENTS (NONE) SOVIET REINFORCEMENTS (NONE)
HQS 5 10
ARMOR 12* 38
MECH 4** 10
INFANTRY 30 92
SATELLITE 3
PRODUCTION 79
AIR POWER SF
HANDICAP +10
3
[+0]
SOVIET UNITS CVHQS 6 12
ARMOR 11 24
MECH 7 16
INFANTRY 28 90
SHOCK 4
CAVALRY 4
PRODUCTION 74
AIR POWER DF
14
10
[+0]
W’ 43 SPECIAL RULES
1) SATELLITE FORCESAll Satellite units are restricted, and must remain within
or adjacent to Rumania (1939) and Hungary, respectively.
2) VOLKHOV & THE DNEPR BRIDGEHEADVolkhov and Kremenchug W1 are German Battle
Hexes. The Soviets must deploy at least one unit in each hex (face-up).
3) LENINGRADNote that Leningrad begins the scenario without Rail
Supply and is not counted in Soviet Production.
W’43 SCENARIO NOTESThis is a continuation of Kursk under winter conditions.
The Germans know they will be unable to make good their losses. The Russians are slightly stronger, but careless of loss. German command is still disrupted in snow, but at least their HQ steps no longer cost extra. Soviet confidence soars as the Germans fight a stubborn retreat across the frozen Ukraine.
W’43 HISTORICAL COMMENTARYIn the winter of ‘43, the Soviet superiority in men and
machines was becoming obvious. There was no longer any chance the Germans could win the war in the east, and only a faint hope they could still avoid total calamity.
Most action occurred in the south. The Soviets sprang from their bridgeheads over the Dnepr and mauled the retreating and demoralized Germans. They pushed across the Western Ukraine, pocketing German holdouts, but rarely keeping them in the bag. The winter ended with Odessa and Sevastopol liberated, and a front line bulging into northern Rumania, the Carpathian mountains in sight.
In the north, the Soviets finally broke the German pressure on Leningrad, ending a 900 day trauma filled with horror and heroics for two million citizens. After a shaky start, Army Group North managed to regroup and form a new defensive line along Lake Pskov. In the center, things were quiet.
Ominously quiet.
* includes 1 SS Armor
**includes 1 SS Mech

© 2005 Columbia Games Inc. 34 VERSION 3.02
Summer '44OPERATION ‘BAGRATION’Destruction of Army Group Center
GERMAN UNITS CV
GERMAN REINFORCEMENTS (NONE) SOVIET REINFORCEMENTS (NONE)
HQS 5 12
ARMOR 12* 36
MECH 4** 12
INFANTRY 29 86
SATELLITE 3
PRODUCTION 66
AIR POWER SF
HANDICAP +50
11
[-10]
SOVIET UNITS CVHQS 6 14
ARMOR 12 34
MECH 7 22
INFANTRY 30 94
SHOCK 4
CAVALRY 4
PRODUCTION 82
AIR POWER TF
15
12
[+0]
S’44 SPECIAL RULES
1) SATELLITE FORCESSatellite units are Restricted, and must remain within or
adjacent to Rumania (1939) and Hungary.
2) STRATEGIC OBJECTIVESThe strategic objective rules (see 16.0) concerning
Rumania, Ploesti, and Exit Zones may be relevant.
S’44 SCENARIO NOTESThis scenario is a lot of fun. It is in some ways the
mirror image of Barbarossa. Good weather and a decided force imbalance lead to a wide-open game with lots of motion. Just as in Barbarossa, there is no surprise about the strategic outcome, yet considerable game tension. To win the scenario, the Germans must employ a creative mix of defensive tactics, from stonewall to outright flight, from strong crust to defense in depth, from scary stacks to rearguard sacrifices. Any single-minded defensive doctrine will fail. The Soviets learn about problems the Germans would love to have again; the frustrations of overall superiority and unlimited offense on a tight HQ budget.
HISTORICAL COMMENTARYIn June 1944, the Allies had just landed in Normandy.
The Soviet winter drive in the Ukraine left them threatening to push through the Lvov gap to the Baltic, cutting off Army Groups North and Center, or into Rumania.
Instead, the Red Army struck in Belorussia, demolishing Army Group Center and eventually cutting off Army Group North anyway. The northern front finally stabilized near the old Prussian border, leaving AGN in Courland.
In the center, the Soviets made slow, expensive progress to the Vistula. After a repulse near Warsaw, they consolidated the central front. In the south, Uncle Joe had a postwar eye on the Balkans. A mid-summer Soviet offensive slashed into Rumania, which switched sides, trapping German forces there. As German garrisons in Bulgaria and Greece hastily retreated north, the Russians drove northwest across the Hungarian plains to Budapest.
Winter found the Allies on the Rhine and the Russians on the Vistula, with Germany clinging to its last viable lines of defense, east and west. Germany needed a miracle.
None came.
* includes 1 SS Armor
**includes 1 SS Mech

© 2005 Columbia Games Inc. 35 VERSION 3.02
Winter '44THE DRIVE ON BERLIN
The End in the East
GERMAN UNITS CVHQS 4 9
ARMOR 8 14
MECH 3 10
INFANTRY 20 38
SATELLITE 0
PRODUCTION 41
AIR POWER NONE
HANDICAP N/A
•
[-10]
SOVIET UNITS CVHQS 5 10
ARMOR 10 30
MECH 5 16
INFANTRY 23 76
SHOCK 3
CAVALRY 1
PRODUCTION 89
AIR POWER TF
12
3
[+0]
W ‘44 SPECIAL RULES1) COURLAND
The Germans must deploy at least eight units (including the AGN HQ) north of the Courland Peninsula Startline (near Riga). These units are cut off from the main front and supplied by sea via Ventspils as long as Danzig is German controlled.
2) SOVIET STRATEGIC EXITThe Exit Zone rules (16.2) will come into play in this
scenario. Consult them before beginning play. Rumanian Surrender has already occurred.
3) PLOESTIAs Ploesti is already Soviet controlled, German HQs cost
15 PPs per step and 30 PPs per cadre to rebuild.
4) W’44 VICTORY (also applies to campaign game)Ignore the normal VP routine. Victory is determined by the
first month when all German units outside EZs are Unsupplied. Germans cannot trace supply from any Home EZ south of a zone under undisputed Soviet control.
January: Soviet Major February: Soviet Marginal March: Draw April: German Marginal May: German Major
5) THE BALKAN FRONTThe Soviets have exited 16 units into the four southern
Balkan Exit Zones, capturing them. Eight German units are contesting the EZs, which halves the Axis PP reduction from -8PPs to -4PPs. These units are not included in the Starting Forces, and the 4 southern EZs are out of play.
Players may set up the exited units in the EZs. The Soviets control all four zones and should deploy first with four units per zone (1 HQ, 2 armor, 2 mech, 8 infantry, 2 cavalry, all at 1 cv below maximum). The Germans deploy second with at least 1 unit per zone (1 HQ, 2 armor, 6 infantry, at 2 cv below maximum).
W’44 SCENARIO NOTESThis scenario is your basic one-sided walkover. It can
be useful as a solitaire game or to seduce a recruit into the pleasures of wargaming. In an emergency it can be useful to soothe a damaged ego.
As a solitaire game, play the Soviets and take no prisoners. Do what little can be done for the poor Germans in between, and then gloat over the weakness of German play as you stomp, smash, and generally have your way on the plains of Poland. See you in Berlin!
NOTE: The map in Columbia's WestFront game, simulating the war in Western Europe, joins with the EastFront map. Berlin is on the WestFront map, only 3 hexes off-map.
GERMAN REINFORCEMENTS (NONE) SOVIET REINFORCEMENTS (NONE)

© 2005 Columbia Games Inc. 36 VERSION 3.02
Introductory ScenarioOPERATION EDELWEISS
Trapped in the Caucasus
GERMAN UNITS CVHQS 2 6
ARMOR 4 16
MECH 0 •
INFANTRY 6* 21
SATELLITE 1
PRODUCTION 28
AIR POWER DF
HANDICAP N/A
3
[+0
SOVIET UNITS CVHQS 2 5
ARMOR 1 3
MECH 1 3
INFANTRY 7 15
SHOCK 1
CAVALRY 1
PRODUCTION 30
AIR POWER SF
3
--
[+0]
*Includes one Mountain unit
EDELWEISS SPECIAL RULES1) TUTORIAL SCENARIO
This scenario is designed to teach players the majority of the rules of Eastfront quickly and easily. Set up is given by the table below and shown on the diagram on the next page. Soviet units L and M are available as cadres. Stalingrad is a battle hex (Soviets are Original Defenders).
The turn sequence is described, phase by phase with rule references in parentheses. Players are advised to set up the forces and follow the description, moving units as directed. This
scenario has been deliberately set-up to show most of the crucial concepts in the game.
The Germans make an initial breakthrough and drive down into the Caucasus mountains but leave their flank around Stalingrad weak and suffer when the Soviets unleash a punishing blitz attack, trapping a large force.
Staingrad is a Soviet hex but the scenario begins with two German units engaging it. Stalingrad NE1 and Archeda are out of play. The Soviet player sits facing North in the scenario diagrams.
The Scenario begins in the second half of July 1942.
ROSTOVA INF 3CV
ROSTOV E1B INF 2CV
ROSTOV E2C MECH 3CV
ROSTOV SE1D Gds INF 3CV
KOTELNIKOVOE INF 2CV
STALINGRADF INF 2CV
STALINGRAD E1G SHOCK 3CV
STALINGRAD E1H Gds ARMOR 3CV
MAIKOPI HQ 2CV
TBILISIJ INF 3CV
MOSCOWK STAVKA 3CV
CADRE (BUILDABLE)L CAVALRY (1CV)
CADRE (BUILDABLE)M INF (1CV)
SOVIET FORCES
MARIUPOLZ INF 4CV
VOROSHILOVGRADY INF 4CV
KAMENSKOX ARMOR 4
KAMENSKOW ARMOR 4
KAMENSKOV ARMOR 4
KAMENSKOU HQ2 (AG “A”)
KAMENSKO E1T MOUNTAIN 3
KAMENSKO E1S INF 3
KALACHR INF 3
KALACHQ ARMOR 4
STALINOP OKH 3CV
STALINGRADO SAT 3CV
STALINGRADN INF 4CV
GERMAN FORCES

JULY II 1942 GERMAN TURN
Command PhaseThe German player activates
Army Group “A” (HQII) in Kamensko (unit U) planning to launch attacks southward.
Movement PhaseUnits Z, Y, X, W attack
Rostov. Although one of the units is attacking across a river, at least one unit does not, so the attack is not a river assault [7.5].
Units V and T attempt a river assault to Rostov E1. One unit crosses each hexside which is the maximum allowed.
Unit S attempts a river assault from Kamensko E1 to Rostov E2.
Units Q and R attempt a river assault from Kalach to Kotelnikovo. Unit Q moves through Kamensko E1 and then across the river so that one unit crosses each hexside.
The German HQ does not mobilize [5.41] and remains active. Its 2cv airstrike is allocated to Rostov.
Combat PhaseBattle for Rostov
•Airstrike: 2 dice are rolled for DF. Rolls are <4, 5>. The 5 is a hit but since Rostov is a Major City, the defending unit A takes only a half-hit [7.34].
•Defensive Fire: Infantry 3 (unit A) rolls <1, 5, 6>, scoring two hits. Although infantry normally have only SF, they have DF when defending Major Cities [7.32]. The hits are applied to infantry units Z and Y which are reduced to 3CV.
•Offensive Fire: Armor units X and W fire rolling <3, 2, 5, 3> and <1, 4, 3, 6> - one hit each. The Soviet infantry takes two half hits (now at 11/2 CV). The German infantry units (Y and Z) roll <1, 4, 6> and <2, 5, 6>. Infantry attack with SF (6 is a hit). The Soviet infantry takes two half hits (now 1/2 CV). However, since the combat round is over, the Soviet infantry is restored to 1CV.
The Soviet unit is turned upright (original defender); the Germans are not.
Battle for Rostov E1•Defensive Fire: Inf 2 (unit B) rolls
<3, 6>, scoring one hit. The hit is applied to armor unit V, which is the larger unit [7.33]. No repulses were rolled.
•Offensive Fire: The Armor unit V rolls 3 dice <3, 5, 5> eliminating Soviet unit B with two hits. The attacking mountain corps has no need to fire.
Battle for Rostov E2•Defensive Fire: Mech 3 (unit C) rolls
<2, 4, 5>, scoring one hit (Mech defend at DF) and one repulse. The attacking infantry (unit S) is reduced to 2CV and repulsed back [7.51] so there is no offensive fire.
Battle for Kotelnikovo•Defensive Fire: Inf 2 (unit E) rolls
<2, 4>, scoring no hits but repulsing the weaker Infantry (unit R) back to Kalach.
•Offensive Fire: Armor 4CV (Unit Q) rolls <1, 2, 3, 6> scoring one hit which reduces the defender to 1CV.
The German player decides not to activate the battle at Stalingrad. Since battle existed from a previous turn combat is not mandatory [7.15].
The German HQ remains in Kamensko and is turned upright at 1CV.
Supply PhaseAll Soviet units are in supply (no
attrition).
JULY II 1942 SOVIET TURN
Command PhaseThe Soviet player activates Stavka
(off map in Moscow). 6 units anywhere on the map are now able to move [6.5].
Movement PhaseUnit J (Tbilisi) moves 7 hexes
by rail to Armavir. Infantry Unit D moves 2 hexes to Maikop. Mech Unit C moves into Kotelnikovo to reinforce the battle. Shock Unit G moves one hex to Stalingrad SE1. HQ Unit I moves 11 hexes (using 2 Supreme moves) by rail to Stalingrad E1.
The Soviets elect not to have combat in any battles. Combat is not mandatory in battles that exist from a previous turn [7.15]. The combat phase is skipped.
Stavka is turned upright at 2CV.
Supply PhaseAll German units are in supply.
DIAGRAM SHOWS INITIAL SET-UP. UNIT LETTERS CORRESPOND WITH TABLE.
GERMAN JULY II MOVES SHOWN WITH BLACK ARROWS.
SOVIET JULY II MOVES SHOWN WITH WHITE ARROWS.
EASTFRONTTM EDELWEISS SCENARIO
© 2005 Columbia Games Inc. 37 VERSION 3.02
Z
A
B
CD
E F GH
I
J
YX
WV
ST R
Q
P
U
OFFMAP IN TBILISI
K OFFMAP IN MOSCOWHQ Activates
RAIL MOVE
2 RAIL MOVES
N O

AUGUST PRODUCTION PHASE
German ProductionGerman production is 28PPs. 10PPs
are spent on the HQ in Kamensko (unit U) increasing it to 2CV. The infantry at Kalach (unit R) is increased to 4CV costing 4PPs. The infantry at Kamensko E1 (unit S) is increased to 3CV costing 4PPs. The armor at Rostov E1(unit V) is increased to 4CV costing 8PPs. The Germans are unable to use their last 2PPs which are forfeited.
Soviet ProductionSoviet production is 30PPs. 10PPs
are spent on the SHQ (Stavka) in Moscow (unit K) increasing it to 3CV. The shock army at Stalingrad SE1 (unit G) is increased to 4CV costing 3PPs. The Gds Armor at Stalingrad E1 (unit H) is increased to 4CV costing 4PPs. The Gds infantry at Maikop (unit D) is increased to 4CV costing 2PPs. A cavalry cadre costing 6PPs is built at Batumi (unit L). An infantry cadre costing 4PPs is built at Grozny (unit M). The remaining 1PP is wasted.
AUGUST I 1942 GERMAN TURN
Activation PhaseThe German player activates OKH
(unit P in Stalino). 6 units, anywhere on the board, can move.
Movement PhaseArmor unit V advances three hexes
to Maikop (river assault). Mountain unit T advances to Krasnodar. Infantry unit S advances two hexes to Salsk E1. Armor unit W disengages [6.32] from Rostov to Rostov E1 and then advances to Kropotkin. Armor unit X disengages to Kamensko (because Rostov-Rostov E1 river hexside has been used) and advances to Salsk NE1. The HQ (unit U) at Kamensko advances two hexes to Salsk. OKH does not mobilize. Its airstrike is allocated to Maikop [5.63].
Combat PhaseBattle for Maikop (unsupported)
•Airstrike: 3 dice are rolled <4, 5, 6> scoring two half hits (unsupported battle - SHQs cannot provide combat support) on the Gds Infantry which is reduced to 3CV.
•Defensive Fire: Inf 3 (unit D) rolls <3, 5, 6>, scoring one hit which reduces Armor Unit V to 3CV.
•Offensive Fire: Armor unit V misses rolling <3, 2, 4>.
The Soviet unit is turned upright as the Original Defender of the hex. The German remains face-up.
Battle for Kotelnikovo (unsupported)•Defensive Fire: Mech 3 (unit C) rolls
<1, 5, 6>, scoring two hits on the armor unit. Infantry unit E rolls <3> and misses.
•Offensive Fire: Armor unit Q misses rolling <2, 3>.
The Soviet units are turned upright as the Original Defenders of the hex. The German remains face-up.
OKH is turned upright at 2CV.
Supply PhaseThe Soviet unit in Rostov is out of
supply and takes one CV loss which eliminates it [10.4]. Soviet production is also reduced by 1PP and German production increased 1PP as Rostov is in Rail Supply.
EDELWEISS SCENARIO EASTFRONTTM
AUGUST I 1942 SOVIET TURNThe Soviets pass to save HQ steps.
No movement is allowed. The supply status of German units is still checked but they are all supplied since the rail line through Rostov is German controlled.
© 2005 Columbia Games Inc. 38 VERSION 3.02
DIAGRAM SHOWS POSITION AFTER AUGUST PRODUCTION.
GERMAN AUG I MOVES SHOWN WITH BLACK ARROWS.
THE SOVIETS PASS AUG I.
AC
D
E
F
G
HI
J
V
ST
R
P
U
K OFFMAP IN MOSCOW
L OFFMAP IN BATUMI M OFFMAP IN GROZNY
HQ ActivatesN
YZ
Q
X
W
O

AUGUST II 1942
GERMAN TURN
Command PhaseThe German player
activates the 2cv HQ at Salsk (Unit U) and deploys one hex [5.2] to Kropotkin. All units within 2 hexes are under command. The German places at Blitz marker on the HQ.
Movement PhaseMountain Unit T at
Krasnodar moves two hexes to Novorossiysk to secure the port. Armor unit W engages in Maikop. This is not a river assault because there was already a battle. Units X and S attack the unit at Armavir (river assault). Units Y and Z in Rostov advance to Salsk and Salsk NE1 respectively. (ideally unit R would move to engage at Kotelnikovo but it is out of command range). The airstrike is allocated to Maikop.
Combat PhaseBattle for Maikop
•Airstrike: 2 dice are rolled <3, 6> scoring one hit on the infantry (unit D) which is reduced to 2CV.
•Defensive Fire: Inf 2 (unit D) misses rolling <2, 5>.
•Offensive Fire: Armor units V and W roll <3, 1, 6> and <2, 3, 5, 5> eliminating the defending infantry (unit D) and wasting one hit.
Battle for Armavir•Defensive Fire: Infantry 3 (unit J)
rolls <3, 5, 6> scoring one hit (but no repulses) on armor unit X.
•Offensive Fire: Armor unit X rolls <2, 4, 6> scoring one hit on infantry unit J which is reduced to 2CV. Infantry unit S misses, rolling <1, 4, 5>.
Blitz Movement PhaseThe Blitz marker is removed and the
HQ is reduced to 1CV (the HQ may not move). All units with the new command range of 1 hex are now able to move.
Armor unit W moves to Tuapse but must stop upon entering the mountains. Armor unit V advances to Tuapse E1
where it must stop in mountains. Infantry unit S disengages to Stavropol and moves to Armavir E1 to cut the supply of unit J. The HQ allocates its airstrike to Armavir.
The German Blitz allows an advance up into the Caucasus mountains to threaten Batumi (which controls the Eastern Black Sea, Tbilisi (Major City), and Baku (Oil).
Blitz Combat PhaseBattle for Armavir
•Airstrike: 1 die is rolled <6> scoring one hit on the infantry, reducing it to 1CV.
•Defensive Fire: Infantry 1 (unit J) rolls <6> scoring one hit on armor unit X which reduces to 2CV.
•Offensive Fire: Armor unit X rolls <4, 4> and misses.
The HQ is reduced to 0CV and deactivates in Kropotkin.
EASTFRONTTM EDELWEISS SCENARIO
Supply PhaseSoviet unit J is out of supply and
reduced 1CV which eliminates it.
With the capture of Maikop oil, Soviet production is reduced by 1PP and the German increased by 2PPs [1.5].
© 2005 Columbia Games Inc. 39 VERSION 3.02
DIAGRAM SHOWS POSITION BEFORE AUG II TURN.
GERMAN AUG II MOVES SHOWN WITH BLACK ARROWS.
GERMAN BLITZ MOVES SHOWN WITH WHITE ARROWS AND WHITE DOTTED UNITS.
Z
C
D
E
F
G
HI
J
Y
X
W S
WV S
T
R
P
U
K OFFMAP IN MOSCOW
L OFFMAP IN BATUMI M OFFMAP IN GROZNY
HQ Activates (Blitz) and Deploys
N O
V
Q

Supply PhaseMost German units south of the Don
River (units W, V, X, S, U, Y, Z, N, O) are unsupplied (no 2-hex land supply line to a friendly Railhead). All these units are reduced by 1CV, eliminating the 0cv HQ.
The Germans cannot use Sea Supply because Batumi (controlling the E. Black Sea) is Soviet controlled. However unit T at Novorossiysk is supplied (within two hexes of a German railhead at Kerch - not shown). Unit R is also within two hexes of a German railhead at Millerovo.
German forces will be hard pressed to break out of the pocket. A likely German response would be to activate OKH (rebuilt during production) and move 6 units to the hexes adjacent to Novorossiysk where they can receive supply. The offensive drive toward Baku is has been stifled! A hard lesson learned.
AUG II 1942 SOVIET TURN
Command PhaseThe Soviet player
activates the HQ at Stalingrad E1 (unit I) and deploys one hex to Kotelnikovo E1. The Soviet elects to Blitz and places a Blitz marker.
Movement PhaseShock unit G at
Kotelnikovo E1 engages into Kotelnikovo. Armor unit H moves into the battle at Kotelnikovo. The HQ applies its airstrike to Kotelnikovo.
Battle for Kotelnikovo•Airstrike: 2 dice are
rolled <1, 6> scoring one hit on the armor, which is reduced to 1CV.
•Defensive Fire: Armor unit Q rolls <6> scoring one hit on unit shock unit G.
•Offensive Fire: Armor unit H rolls <2, 4, 4, 6> scoring one hit, which destroys the defending unit. The other three units need not fire.
Blitz Movement PhaseThe Blitz marker is
removed and the HQ is reduced to 1CV. Armor unit H moves three hexes to capture Rostov. Mech unit C advances to Rostov E1. These units currently have no supply line (more than 2 hexes to a friendly rail line) but remain supplied for now, and will inflict major damage on the German forces they isolate. Note that unit H still has a Zone of Control, denying the Germans a rail head at Voroshilovgrad.
Shock unit G attacks into Rostov E2. The HQ is reduced to 0CV, deactivates and mobilizes to Stalingrad E1.
Blitz Combat PhaseBattle for Rostov E2 (Unsupported)
•Defensive Fire: Infantry unit Z rolls <1, 2, 6> scoring one hit on unit shock unit G which is reduced to 2CV.
•Offensive Fire: Shock unit G rolls <1, 2> and misses.
EDELWEISS SCENARIO EASTFRONTTM
© 2005 Columbia Games Inc. 40 VERSION 3.02
DIAGRAM SHOWS POSITION AFTER GERMAN BLITZ AUG II.
SOVIET AUG II MOVES SHOWN WITH BLACK ARROWS.
SOVIET BLITZ MOVES SHOWN WITH WHITE ARROWS AND WHITE DOTTED UNITS.
GERMAN RAILHEADS AND UNITS CUT OFF BY SOVIET BLITZ MOVE ARE SHOWN.
Z CE
F
G
HI
Y
XW
V S
T
R
Q
P
U
K OFFMAP IN MOSCOW
L OFFMAP IN BATUMI M OFFMAP IN GROZNY
HQ Activates (Blitz) and Deploys
N O
H
C
G

EASTFRONTTM S’41 HISTORICAL ORDER OF BATTLE
© 2005 Columbia Games Inc. 41 VERSION 3.02
LENINGRAD Military DistrictLeningrad Front HQ-II Leningrad23 Army Infantry 3 Leningrad10 TkCps Armor 2 Leningrad
BALTIC Military District:Baltic Front HQ-II Riga27 Army Infantry 2 Riga12 TkCps Armor 1 Riga8 Army Infantry 3 Front11 Army Gds Inf 4 Front3 Gds MkCps Gds Mech 2 Front
WESTERN Military District:West Front HQ-II Minsk13 Army Infantry 3 Minsk4 Gds MkCps Gds Mech 2 Minsk3 Army Infantry 3 Front10 Army Gds Inf 4 Front4 Army Infantry 2 Front6 CavCps Cavalry 1 Front11 TkCps Armor 2 Front
KIEV Military District:Ukrainian Front HQ-II Ternopol37 Army Infantry 3 Ternopol5 CavCps Cavalry 1 Ternopol16 Army Infantry 3 Kiev6 MkCps Mech 2 Kiev 5 Army Infantry 3 Front6 Army Gds Inf 4 Front26 Army Infantry 2 Front12 Army Infantry 3 Front4 TkCps Armor 3 Front8 TkCps Armor 2 Front9 TkCps Armor 2 Front
ODESSA Military District:South Front HQ-II Vinnitsa7 MkCps Mech 2 VinnitsaCoastal Army Infantry 1 Odessa2 Gds MkCps Gds Mech 2 Front18 Army Infantry 2 Front9 Army Infantry 3 Front2 CavCps Cavalry 1 Front
STRATEGIC RESERVESTAVKA HQ-III Moscow24 Army Gds Inf 4 Moscow7 TkCps Armor 2 Moscow22 Army Gds Inf 4 Vitebsk1 Gds Mk Gds Mech 2 Vitebsk20 Army Gds Inf 4 Smolensk21 Army Gds Inf 4 Gomel5 MkCps Mech 2 Gomel19 Army Gds Inf 4 Cherkassy51 Army Infantry 1 Sevastopol50 Army* Infantry 1 Kalinin28 Army Infantry 1 Tula31 Army Infantry 1 Yaroslavl33 Army Infantry 1 Rostov34 Army Infantry 1 Kharkov38 Army Infantry 1 Dnepropetrovsk40 Army Infantry 1 Bryansk1 CavCps Cavalry 1 Stalino
* Noted on unit label as 27 Army
SOVIET HISTORICAL DEPLOYMENTDeploy First, move Second.
Military Districts are listed north to south. Excluding Leningrad MD, these divide the Soviet Frontline (red hashmarks on map) into sectors. All "Front" units must be deployed within their respective sectors in Frontline hexes. All Frontline hexes must be occupied.
Errata: the Baltic MD is three (3) hexes.
Units given specific City locations must be deployed in or within one hex of that city.
See 2.5 for an explanation of the deployment or city codes that appear on unit labels.
Note: Gds (guards) units are 4-Step units.
DEC ‘41 3RD SHOCK SHOCK 4
NOV ‘41 2ND SHOCK SHOCK 4
NOV ‘41 1ST SHOCK SHOCK 4
DEC ‘41 4TH SHOCK SHOCK 4
DEC ‘41 4 PARA CPS PARA 1
APR ‘42 1 GDS TANK Gds ARMOR 1
APR ‘42 2 GDS TANK Gds ARMOR 1
MAY ‘42 3 GDS TANK Gds ARMOR 1
SOVIET REINFORCEMENTS
JUN ‘42* 5 GDS TANK Gds ARMOR 1
JUL ‘42 6 GDS TANK Gds ARMOR 1

EASTFRONTTM S’41 HISTORICAL ORDER OF BATTLE
© 2005 Columbia Games Inc. 42 VERSION 3.02
Army Group NORTH AG North HQ III 41 Panzer Corps Armor 4 56 Panzer Corps Armor 3 1 Corps Infantry 4 38 Corps Infantry 4 26 Corps Infantry 4 10 Corps Infantry 4 28 Corps Infantry 3 2 Corps Infantry 4
Army Group CENTER OKH HQ III AG Center HQ III 24 Panzer Corps Armor 4 39 Panzer Corps Armor 4 57 Panzer Corps Armor 4 46 Panzer Corps Armor 3 47 Panzer Corps Armor 4 5 Corps Infantry 4 6 Corps Infantry 4 8 Corps Infantry 3 20 Corps Infantry 4 7 Corps Infantry 4 9 Corps Infantry 4 12 Corps Infantry 3 13 Corps Infantry 4 43 Corps Infantry 3
Army Group SOUTH AG South HQ III 14 Panzer Corps Armor 4 48 Panzer Corps Armor 3 3 Panzer Corps Armor 4 55 Motorized Corps Mech 3 17 Corps Infantry 4 29 Corps Infantry 4 35 Corps Infantry 3 44 Corps Infantry 4 4 Corps Infantry 4 52 Corps Infantry 4 49 Mountain Corps Infantry 4
Army Group RUMANIA AG "A" HQ I 11 Corps Infantry 4 30 Corps Infantry 4 54 Corps Infantry 3 3 Rumanian Army Satellite 2 4 Rumanian Army Satellite 4
GERMAN HISTORICAL DEPLOYMENTDeploy Second, move First.
Army Groups (listed north to south) divide the German Frontline (black hashmarks on map) into four sectors.
All German units must be deployed within their respective Army Group sectors, in Frontline or adjacent hexes. All Frontline hexes must be occupied. Exception: no German units may set up in Hungary.
See 2.5 for an explanation of the deployment codes that appear on unit labels.
GERMAN REINFORCEMENTS
JUL ‘41 40 PZR CPS ARMOR 4
AUG ‘41 42 CPS INFANTRY 4
SEP ‘41 34 CPS INFANTRY 4
OCT ‘41 59 CPS* INFANTRY 4
*MISLABELED AS 35 CPS
NOV ‘41 50 MOT CPS MECH 4
JAN ‘42 51 CPS INFANTRY 3
MAR ‘42 23 CPS INFANTRY 3
MAY ‘42 53 MOT CPS MECH 3
JUN ‘42 27 CPS INFANTRY 3
AUG ‘42 2 HUNG. ARMY SATELLITE 4
OCT ‘42 8 ITAL. ARMY SATELLITE 3
FEB ‘43 2 SS PZR CPS SS ARMOR 4
JUL ‘43 3 SS PZR CPS SS MECH 3

AIRPOWER, 13.0Air Range, 13.11Airstrike CV, 13.12Assigning Airstrikes, 7.13Disruption, 13.17Executing, 13.16Firepower, 13.14Strategic Airstrikes, 13.11Targeting, 13.13
ASSAULTS, 7.5Air Assaults, 14.4Combined Assaults, 7.53River Assaults, 7.5Sea Assaults, 15.43
BATTLES, 7.1Active Battle, 7.14Battle Hexes, 7.11Battle Hexsides, 6.33
BEACHHEADS, 10.6, 15.51BLITZ COMMAND, 5.7
Blitz Combat, 4.45Blitz Movement, 4.44
BRIDGEHEADS, 7.51CADRES, 11.42
Deploying, 11.6CAMPAIGN GAME, 3.14CITIES, 1.4
Home Cities, 1.44Major Cities, 1.41Minor Cities, 1.42
CLEAR, 1.31COASTAL ARMY, 2.61, 15.5COMBAT, 7.0
Combat Phase, 4.43Combat Rounds, 7.2Combat Value, 2.3Counter-Attacks, 7.23Firepower, 7.32Firing Units, 7.31Losses, 7.33Mandatory Combat, 7.15Paradrops, 14.0Resolution, 7.21Sequence of Fire, 7.22Step Reduction, 2.4Unsupported Combat, 7.4
COMMAND PHASE, 4.41DEFENSE
Double Defense, 7.34Original Defender, 7.12Triple Defense, 7.35
DISBANDING, 11.52DISENGAGING, 6.32
By Rail, 9.22By Sea, 15.2
ENGAGING, 6.31EXIT ZONES, 16.2
FINLAND, 1.1, 16.31FOREST, 1.32FORTRESSES, 1.46
Fortress Combat, 7.15Fortress Supply, 10.5Siege Guns, 2.63
HANDICAPS, 17.2HEADQUARTERS, 5.1
Activation, 5.2Airpower, 5.5Blitzing, 5.7Combat HQs, 5.42Command Range, 5.3Deactivating, 5.43Deploying HQs, 5.21Deployment Limits, 3.24Disruption, 5.8Mobile HQs, 5.41Supreme HQs, 5.6
HEX CONTROL, 8.1Disputed Hexes, 8.33Effects, 8.4Enemy Hexes, 8.32Friendly Hexes, 8.31Prior Control, 8.34Zones of Control, 8.2
HOME CITIES, 1.44HUNGARY, 2.66, 16.13INVASIONS, 15.4
Beachheads, 15.51Coastal Army, 15.5Command, 15.41Invasion HQs, 15.41Limits, 15.42Sea Assaults, 15.43
ITALY, 2.66, 16.13KERCH STRAITS, 1.38LAKES, 1.37MAP, 1.0
Playable Hexes, 1.2Terrain, 1.3
MARSH, 1.33MOUNTAIN, 1.34
Mountain Corps, 2.62MOVEMENT, 6.0
Command, 6.1Disengaging, 6.32Engaging, 6.31Movement Phase, 4.42Retreats, 6.4Speed, 6.1
MUD, 12.2Defense, 7.34HQ Disruption, 12.22Initiative, 12.21Unit Speed, 12.23
PARADROPS, 14.0Air Assaults, 14.4
Combat, 14.5Dispersal, 14.6Drop Hexes, 14.3Paratroop Corps, 2.64Paradrop HQs, 14.2Linkup, 14.6
PLAYER-TURN, 4.4PLOESTI, 16.12PORTS, 1.45
Control Ports, 15.1Port Capacity, 15.21
PRODUCTION, 11.0Basic Production, 11.21City Production, 11.22Production Level, 11.2Production Phase, 11.1Production Points, 11.3Reinforcements, 11.5Replacements, 11.41Resource Production, 11.23
PURSUIT FIRE, 6.42RAILROADS, 1.6, 9.0
Disengagements, 9.22Control, 9.12Rail Entry Hexes, 9.11Rail Movement, 9.2Rail Supply, 9.3
REINFORCEMENTS, 11.5Deploying, 11.6Schedule, 2.5, 3.22, 11.6
REPLACEMENTS, 11.41Building Units, 11.4Cadres, 11.42Replacement Costs, 11.43
REPULSES, 7.51RESOURCE CENTERS, 1.5RETREATS, 6.4
Pursuit Fire, 6.42Rearguards, 6.41
RIVERS, 1.35River Assaults, 7.5Frozen, 7.52
RUMANIA,Armies, 2.66Surrender, 16.11
S.S. PANZERS & MECH, 2.65SATELLITE, 2.66, 16.13SCENARIOS, 3.1SEAPOWER, 15.0
Control, 15.1Evacuations, 15.6Invasions, 15.4Port Capacity, 15.21Seas, 1.36Sea Movement, 15.2Sea Supply, 15.3
SEQUENCE OF PLAY, 4.0
SEVASTOPOL, 2.66, 16.13SIEGE GUNS, 2.63SNOW, 12.2
HQ Disruption, 12.22Initiative Effect, 12.21Marsh Effect, 12.24Unit Speed, 12.23
STACKINGExit Zones, 16.2Limits, 6.21Overstacking, 6.22
STARTING PLAY, 3.0Deploying, 3.24Forces, 3.22Initiative, 3.21Startlines, 3.23
STRATEGIC MOVEMENT, 6.53
Rail Movement, 9.2Sea Movement, 15.2
SUPPLY, 10.0Attrition, 10.4Fortress Supply, 10.5Rail Supply, 9.3Sea Supply, 15.3Land Supply Lines, 10.3Supply Check, 10.2Supply Phase, 4.46
SUPREME HQS, 5.6Airstrikes, 5.63Combat Support, 5.64Command, 6.5Mobilization, 5.62Supreme Moves, 5.61, 6.51
TURKEY, 1.1UNITS, 2.0
Building, 11.51Combat Value, 2.3Deploying, 3.24Disbanding, 11.52Firepower, 2.2, 7.32Identity Codes, 2.5Nationality, 2.1Speed, 2.2Types, 2.2
UNSUPPORTED COMBAT, 7.4VICTORY, 17.0
Handicaps, 17.2Levels, 17.3Tournament Points, 17.31Victory Points, 17.1
WEATHER, 12.0Determination, 12.1Effects, 12.2Weather Rolls, 4.3
EASTFRONTTM INDEX
© 2005 Columbia Games Inc. 43 VERSION 3.02

THE GAME MONTHPRODUCTION•Determine Production Level•Add Replacement steps to units in play •Build and deploy Cadres•Deploy any Reinforcements
FORTNIGHT I•Weather Determination•First Player-Turn (see below) (German: Dry/Mud Soviet: Snow)•Second Player-Turn
FORTNIGHT II•Repeat Fortnight I Procedure
THE PLAYER-TURNCOMMAND PHASE•Activate HQs
MOVEMENT PHASE•Move units under command•Mobilize HQs (optional)
COMBAT PHASE•Target Airstrikes•Select Active Battles•Resolve Each Active Battle
•Offensive Airstrike•Defensive Fire•Offensive Fire
•Deactivate HQs (reduce Blitz HQs)BLITZ MOVEMENT PHASE (if any)•Repeat Movement Phase
•BLITZ COMBAT PHASE (if any)•Repeat Combat Phase
SUPPLY PHASE•Paradrop Linkup check (if applicable)•Enemy Supply Attrition
EASTFRONTTM GAME CHARTS
PRODUCTION CHART (PPs)
WEATHER EFFECTSWEATHERS TERRAIN COMMAND MOVEMENT COMBAT
DRY Normal Normal Normal Normal
MUD Forest/Clear = Marsh HQ Disrupted, can’t deploy 1 hex (cav. 2 hexes) Offense SF/Defense DD
SNOW Marsh = Forest Rivers freeze (no repulse) German HQs Disrupted 1 hex less than normal Normal
HEX CONTROLACTIVITY Friendly Disputed EnemyDeploy HQs into Hex YES * NO NOMove into Hex YES YES YESEngage into Hex YES YES YESDisengage into Hex YES * NO NOMove By Rail YES * NO NOTrace Rail Supply Line YES * NO NOTrace Land Supply Line YES YES NOTrace Command
* NOT if embattledYES YES NO
UNIT DATA
UNIT TYPE DRY
SPEED German PPs Soviet PPs
MUD SNOWFire
Power STEP CADRE STEP CADRE
ARMOR
MECH
INFANTRY*
CAVALRY
SHOCK
PARA
HQ
*Includes Coastal, Satellite, Mountain, & Siege Gun units.
† 15 in Winter 1941 †† 30 in Winter 1941
3 1 2 DF 8 12 4 8
3 1 2 SF/DF 6 9 3 6
2 1 1 SF 4 6 2 4
3 2 2 SF • • 3 6
1 1 1 DF • • 3 6
2 1 1 SF/DF • • 6 12
2 1 1 • 10† 20†† 10 20
TERRAIN EFFECTSTERRAIN
CLEAR
FOREST
MARSH
MOUNTAIN
RIVER
MAJOR CITY
FORTRESS
STACKING
4
4
3
2N/A
Other Terrain
Other Terrain
HEXSIDE
2
1
1
1
1Other Terrain
Other Terrain
MOVEMENT
NORMAL
NORMAL
STOP
STOP
NORMAL
Other Terrain
Other Terrain
FIREPOWER
NORMAL
NORMAL
OFFENSE SF
NORMAL
N/A
DEFENSE DF (or better)
DEFENSE TF*
* LARGEST UNIT ONLY
** ORIGINAL DEFENDER ONLY
DEFENSE
NORMAL
DOUBLE
DOUBLE
DOUBLE
N/A
DOUBLE
TRIPLE**
S41 W41 S42 W42 S43 W43 S44 W44
12 18 24 32 32 32 32 32
64 49 56 62 64 74 82 89
40 40 50 50 60 60 50 40
54 71 80 83 90 79 66 37
© 2005 Columbia Games Inc. VERSION 3.02
Starting
Basic
Basic
Starting
Scenario