Embed Size (px)
Citation preview
GET SKILLED GET ACTIVE A K-6 resource to support the teaching
of fundamental movement skills
Revised content: NSW Department of Education and Training 2016.
Originally published: NSW Department of Education and Training, 2000
RESTRICTED WAIVER OF COPYRIGHT
The printed material in this publication is subject to a restricted waiver of copyright to allow the
purchaser to make photocopies of the material contained in the publication for use within a school,
subject to the conditions below.
1. All copies of the printed material shall be made without alteration or abridgement and must
retain acknowledgement of the copyright.
2. The school or college shall not sell, hire or otherwise derive revenue from copies of the material,
nor distribute copies of the material for any other purpose.
3. The restricted waiver of copyright is not transferable and may be withdrawn in the case of breach
of any of these conditions.
Curriculum, Learning and Teaching
Introducing fundamental movement skills
The following information has been adapted from Get Skilled Get Active (NSW Department of
Education and Training, 2000).
This article will offer information and advice on:
fundamental movement skills in your PDHPE and sport programs
how students learn and develop fundamental movement skills.
What are fundamental movement skills?
Fundamental movement skills are the building blocks for movement. They are the skills which
children need to participate successfully in all types of games, physical activities and sports.
Examples of these skills can be frequently seen in popular games and activities played by children in
the school playground.
Fundamental movement skills are sometimes categorised under three headings:
• locomotor skills, such as the run, jump, hop, skip, gallop, leap and dodge
• non-locomotor skills, such as the static balance, bend, sway, twist and turn
• object control skills, such as the catch, throw and kick.
Twelve fundamental movement skills are presented in this resource. These twelve skills represent a
solid foundation for the development of specialised skills, enabling students to participate in a wide
range of physical activities. They are:
1. static balance
2. sprint run
3. vertical jump
4. catch
5. hop
6. side gallop
7. skip
8. overarm throw
9. leap
10. kick
11. two-hand strike
12. dodge.

Curriculum, Learning and Teaching
Why teach fundamental movement skills? The development of fundamental movement skills is an important step towards ensuring lifelong
involvement in physical activity. Without proficiency in skills like throwing, catching, kicking, leaping
and balancing, students are less likely to explore the range of options available to them to establish
and maintain active lifestyles.
The development of movement skills occurs sequentially, with proficiency in fundamental movement
skills forming the basis for the development of more advanced sport-specific skills.
Research shows that children who are competent in fundamental movement skills are more likely to
enjoy sports and activities and to develop a lifelong commitment to physical activity. Research also
suggests that children who do not master fundamental movement skills are more likely to drop out of
physical activity in later life.
Students who have achieved proficiency in fundamental movement skills have been found to have
better self-esteem, socialisation skills and a more positive attitude towards physical activity.
Research indicates that the improvement in self esteem and confidence in performing fundamental
movement skills has a flow-on effect to other areas of a child’s education. For example, improvement
in confidence in physical coordination has been found to help develop proficiency in reading and
writing.
How do children develop fundamental movement
skills?
Contrary to popular belief, children do not pick up fundamental movement skills naturally as part of
their normal growth and development. Children need to be explicitly taught these skills and given
opportunities to practise them. Children also need to be provided with:
developmentally appropriate activities and equipment
visual demonstrations of skills
instruction and feedback
a variety of activities, with a focus on fun and challenge
encouragement
a safe and positive learning environment.
It is reasonable to assume that, given instruction, encouragement and the opportunity to practise,
boys and girls can be equally proficient in all twelve fundamental movement skills by the end of
primary schooling. Skills which do show gender differences in levels of proficiency are almost entirely
due to environmental factors. These factors include increased opportunities to participate and greater
exposure to activities that use the underlying fundamental movement skills.
Curriculum, Learning and Teaching
How long does it take to learn fundamental
movement skills?
It is easy to underestimate the amount of time it takes to develop proficiency in fundamental
movement skills. The amount of time it takes to become proficient in a skill is influenced by:
the complexity of the skill
the age of the learner
the instructional methods used.
Research in Victorian schools found that it takes between 240 and 600 minutes of instruction time for
the average student to become proficient in one fundamental movement skill (Fundamental Motor
Skills, Department of Education, Victoria, 1996).
It is recommended that only four skills should be focused on in any one school year to allow for
quality instruction.
When should fundamental movement skills be taught?
The optimal period for introducing fundamental movement skills is in the early years of schooling.
There are several reasons for this.
Early Stage 1 and Stage 1 are a time of relatively slow growth.
Children have plenty of opportunities to practise in structured and unstructured activities during these early years.
Current movement patterns are not entrenched.
As students continue to develop physically, cognitively and emotionally, opportunities to refine and
develop skill proficiency will occur as they move through the stages of primary school.
Curriculum, Learning and Teaching
Fundamental movement skills and their components
The following information has been adapted from Get Skilled Get Active (NSW Department of
Education and Training, 2000).
This article will:
introduce the twelve fundamental movement skills and their components, including a skill description
provide you with background information and strategies which you can refer to when planning for and teaching fundamental movement skills
offer considerations to keep in mind when incorporating fundamental movement skills in your PDHPE and sport programs.
Each skill is presented in two ways.
Section 1: About the skill
This includes:
a brief description and rationale for the inclusion of the skill
a breakdown of the specific components of each skill, illustrated with photographs
some key points to consider about how children’s growth and development influence the development of the skill.
Section 2: Developing the skill
This includes:
teaching cues which can be used as a focus for teaching or as a prompt for your students as they practise the skill
common errors that children display when learning to perform the skill
some suggested activities which can be used to focus your teaching on components of the skill
some suggested practice activities and strategies which can be included when planning for your lessons.
Curriculum, Learning and Teaching
Skill components Each skill has been broken down into 5-7 easily identifiable components. These components are
described as either “introductory” or “fine tuning.”
“Introductory components” are those components which students are most
capable developmentally of demonstrating from Kindergarten to Year 2.
The “fine-tuning” components are those components which will generally be
demonstrated by students after they have reached proficiency in the introductory
components. Most students will not be at a cognitive or physical level of
development in Stage 1 to acquire the fine-tuning components. Fine-tuning will
typically occur from Stages 2 to 3 as students grow and develop.
The ordering of components as introductory or fine-tuning has been based upon studies which
reported the percentage of children at different ages who had mastered each component of a skill. It
has also been based on studies of childhood development which look at how children progressively
develop control of their bodies.
The components of each skill represent the progression that most students will follow in becoming
proficient in that skill. It is important to keep in mind that variations in development will always occur
within and between individuals and skills.
Implications for teaching
Focus your teaching on:
one or two skills at a time
those components of each skill which match the developmental readiness of your students.
The common errors listed for each skill are linked to components. They could be used as a prompt to
draw your attention to a student who may not be performing a skill proficiently. These common errors
can be corrected by demonstrating the correct performance of that component, providing feedback to
the student and allowing time for practice.
Curriculum, Learning and Teaching
Static balance
About the skill
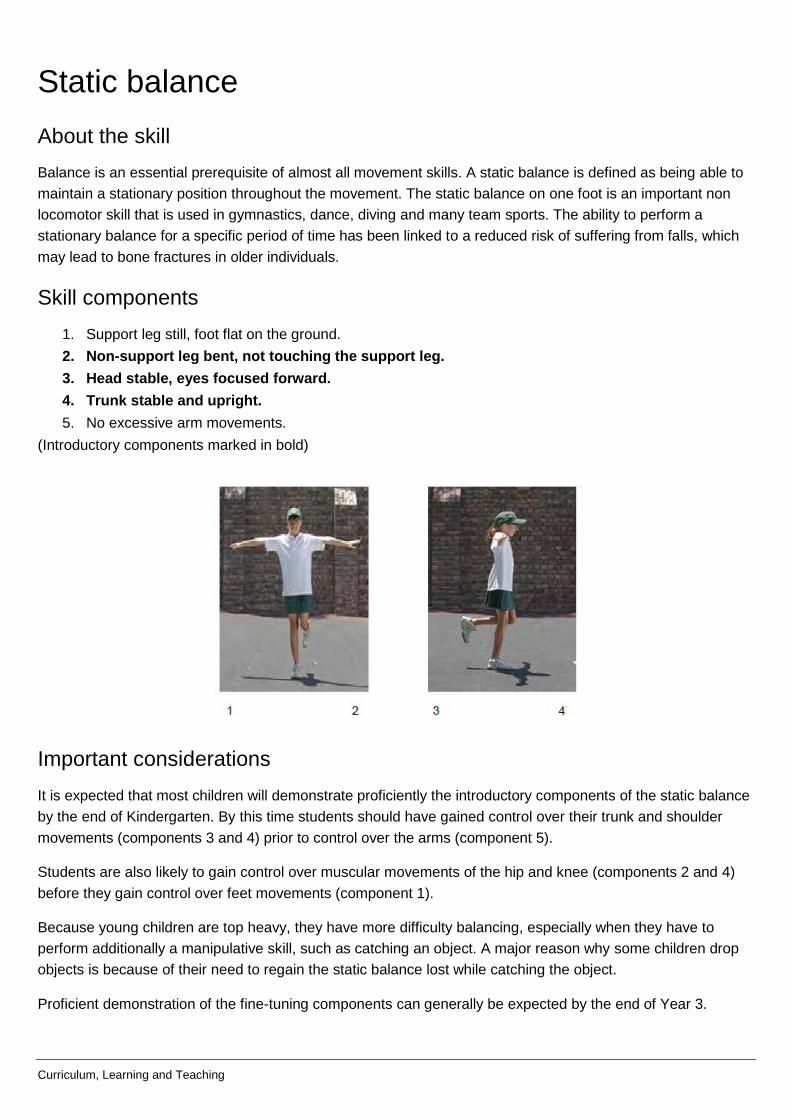
Balance is an essential prerequisite of almost all movement skills. A static balance is defined as being able to
maintain a stationary position throughout the movement. The static balance on one foot is an important non
locomotor skill that is used in gymnastics, dance, diving and many team sports. The ability to perform a
stationary balance for a specific period of time has been linked to a reduced risk of suffering from falls, which
may lead to bone fractures in older individuals.
Skill components
1. Support leg still, foot flat on the ground.
2. Non-support leg bent, not touching the support leg.
3. Head stable, eyes focused forward.
4. Trunk stable and upright.
5. No excessive arm movements.
(Introductory components marked in bold)
Important considerations
It is expected that most children will demonstrate proficiently the introductory components of the static balance
by the end of Kindergarten. By this time students should have gained control over their trunk and shoulder
movements (components 3 and 4) prior to control over the arms (component 5).
Students are also likely to gain control over muscular movements of the hip and knee (components 2 and 4)
before they gain control over feet movements (component 1).
Because young children are top heavy, they have more difficulty balancing, especially when they have to
perform additionally a manipulative skill, such as catching an object. A major reason why some children drop
objects is because of their need to regain the static balance lost while catching the object.
Proficient demonstration of the fine-tuning components can generally be expected by the end of Year 3.
Curriculum, Learning and Teaching
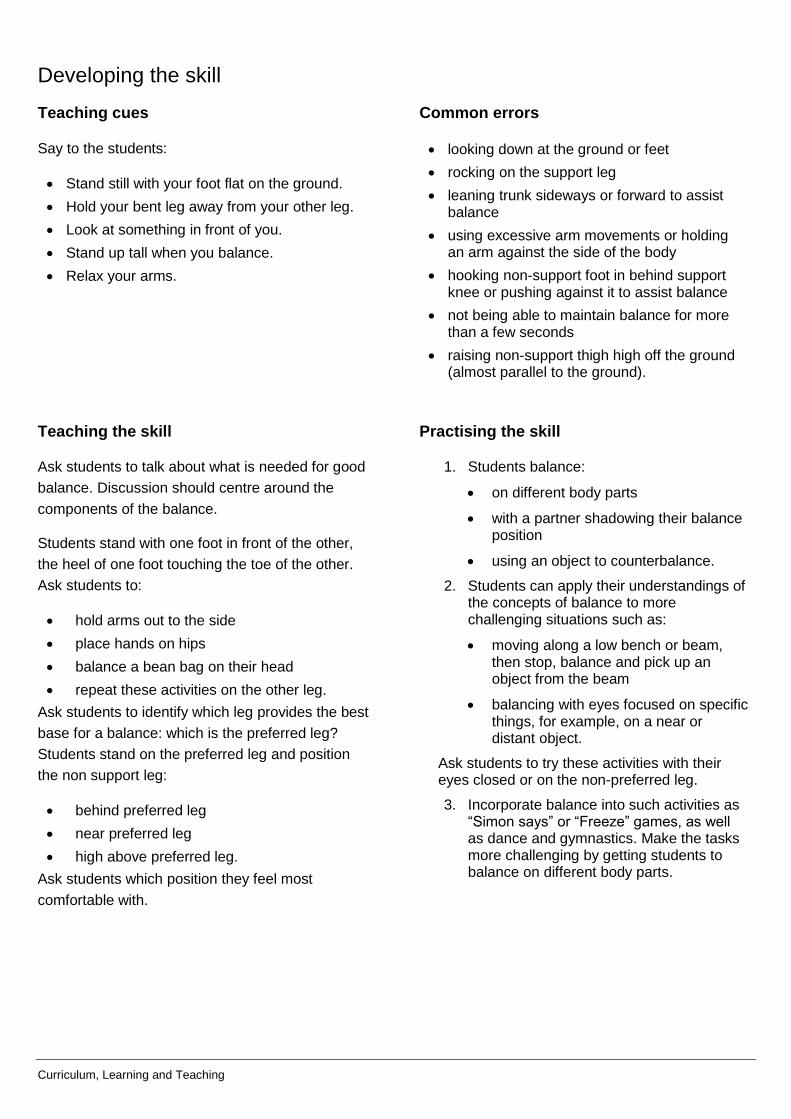
Developing the skill
Teaching cues
Say to the students:
Stand still with your foot flat on the ground.
Hold your bent leg away from your other leg.
Look at something in front of you.
Stand up tall when you balance.
Relax your arms.
Common errors
looking down at the ground or feet
rocking on the support leg
leaning trunk sideways or forward to assist balance
using excessive arm movements or holding an arm against the side of the body
hooking non-support foot in behind support knee or pushing against it to assist balance
not being able to maintain balance for more than a few seconds
raising non-support thigh high off the ground (almost parallel to the ground).
Teaching the skill
Ask students to talk about what is needed for good
balance. Discussion should centre around the
components of the balance.
Students stand with one foot in front of the other,
the heel of one foot touching the toe of the other.
Ask students to:
hold arms out to the side
place hands on hips
balance a bean bag on their head
repeat these activities on the other leg.
Ask students to identify which leg provides the best
base for a balance: which is the preferred leg?
Students stand on the preferred leg and position
the non support leg:
behind preferred leg
near preferred leg
high above preferred leg.
Ask students which position they feel most
comfortable with.
Practising the skill
1. Students balance:
on different body parts
with a partner shadowing their balance position
using an object to counterbalance.
2. Students can apply their understandings of the concepts of balance to more challenging situations such as:
moving along a low bench or beam, then stop, balance and pick up an object from the beam
balancing with eyes focused on specific things, for example, on a near or distant object.
Ask students to try these activities with their eyes closed or on the non-preferred leg.
3. Incorporate balance into such activities as “Simon says” or “Freeze” games, as well as dance and gymnastics. Make the tasks more challenging by getting students to balance on different body parts.
Curriculum, Learning and Teaching
Sprint run
About the skill
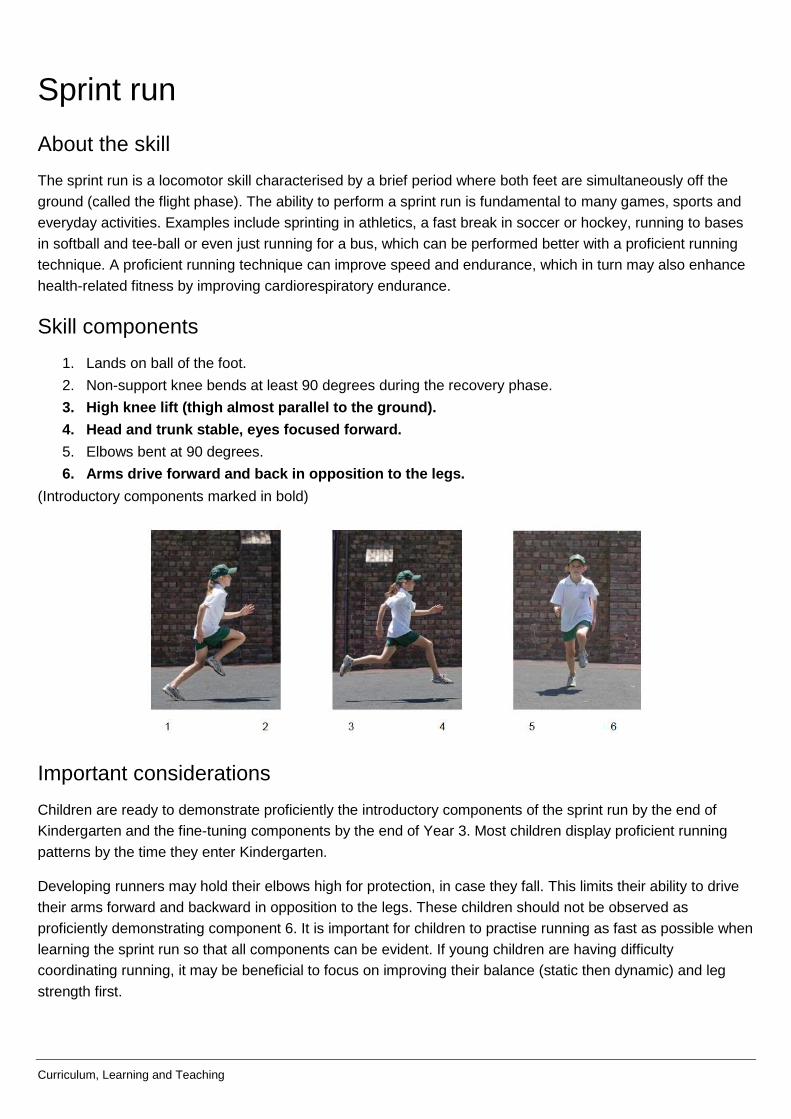
The sprint run is a locomotor skill characterised by a brief period where both feet are simultaneously off the
ground (called the flight phase). The ability to perform a sprint run is fundamental to many games, sports and
everyday activities. Examples include sprinting in athletics, a fast break in soccer or hockey, running to bases
in softball and tee-ball or even just running for a bus, which can be performed better with a proficient running
technique. A proficient running technique can improve speed and endurance, which in turn may also enhance
health-related fitness by improving cardiorespiratory endurance.
Skill components
1. Lands on ball of the foot.
2. Non-support knee bends at least 90 degrees during the recovery phase.
3. High knee lift (thigh almost parallel to the ground).
4. Head and trunk stable, eyes focused forward.
5. Elbows bent at 90 degrees.
6. Arms drive forward and back in opposition to the legs.
(Introductory components marked in bold)
Important considerations
Children are ready to demonstrate proficiently the introductory components of the sprint run by the end of
Kindergarten and the fine-tuning components by the end of Year 3. Most children display proficient running
patterns by the time they enter Kindergarten.
Developing runners may hold their elbows high for protection, in case they fall. This limits their ability to drive
their arms forward and backward in opposition to the legs. These children should not be observed as
proficiently demonstrating component 6. It is important for children to practise running as fast as possible when
learning the sprint run so that all components can be evident. If young children are having difficulty
coordinating running, it may be beneficial to focus on improving their balance (static then dynamic) and leg
strength first.
Curriculum, Learning and Teaching
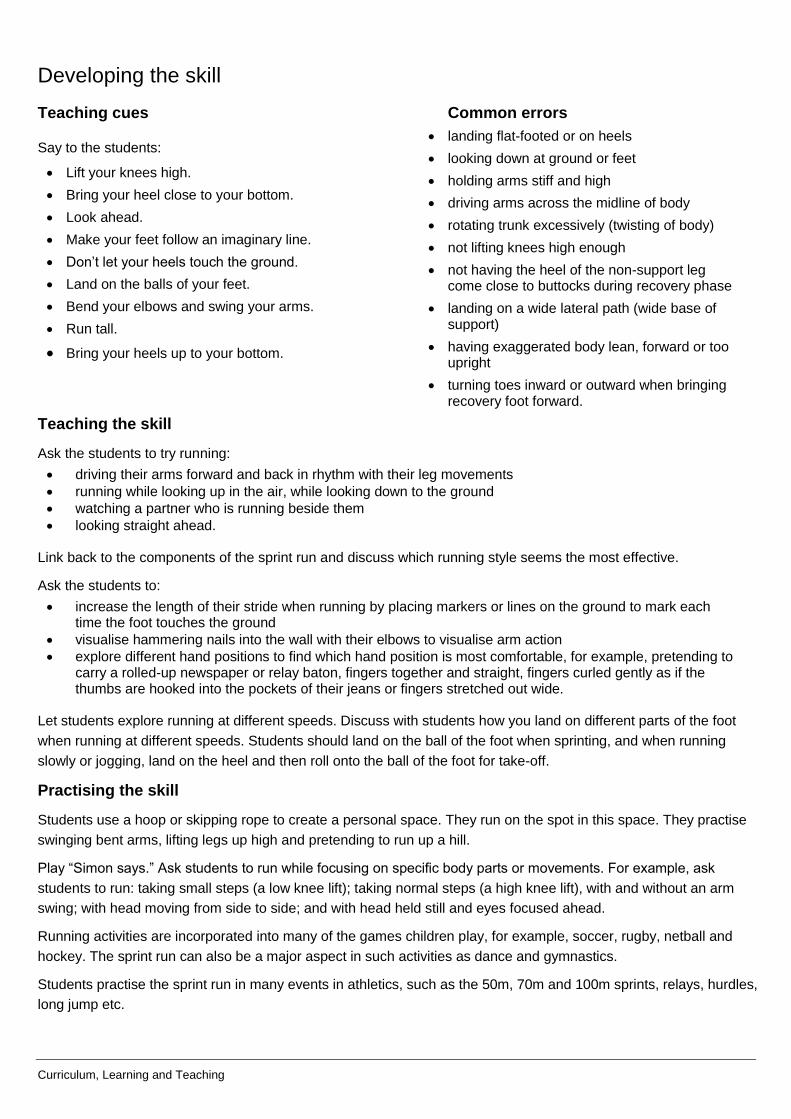
Developing the skill
Teaching cues
Say to the students:
Lift your knees high.
Bring your heel close to your bottom.
Look ahead.
Make your feet follow an imaginary line.
Don’t let your heels touch the ground.
Land on the balls of your feet.
Bend your elbows and swing your arms.
Run tall.
Bring your heels up to your bottom.
Common errors
landing flat-footed or on heels
looking down at ground or feet
holding arms stiff and high
driving arms across the midline of body
rotating trunk excessively (twisting of body)
not lifting knees high enough
not having the heel of the non-support leg come close to buttocks during recovery phase
landing on a wide lateral path (wide base of support)
having exaggerated body lean, forward or too upright
turning toes inward or outward when bringing recovery foot forward.
Teaching the skill
Ask the students to try running:
driving their arms forward and back in rhythm with their leg movements
running while looking up in the air, while looking down to the ground
watching a partner who is running beside them
looking straight ahead.
Link back to the components of the sprint run and discuss which running style seems the most effective.
Ask the students to:
increase the length of their stride when running by placing markers or lines on the ground to mark each time the foot touches the ground
visualise hammering nails into the wall with their elbows to visualise arm action
explore different hand positions to find which hand position is most comfortable, for example, pretending to carry a rolled-up newspaper or relay baton, fingers together and straight, fingers curled gently as if the thumbs are hooked into the pockets of their jeans or fingers stretched out wide.
Let students explore running at different speeds. Discuss with students how you land on different parts of the foot
when running at different speeds. Students should land on the ball of the foot when sprinting, and when running
slowly or jogging, land on the heel and then roll onto the ball of the foot for take-off.
Practising the skill
Students use a hoop or skipping rope to create a personal space. They run on the spot in this space. They practise
swinging bent arms, lifting legs up high and pretending to run up a hill.
Play “Simon says.” Ask students to run while focusing on specific body parts or movements. For example, ask
students to run: taking small steps (a low knee lift); taking normal steps (a high knee lift), with and without an arm
swing; with head moving from side to side; and with head held still and eyes focused ahead.
Running activities are incorporated into many of the games children play, for example, soccer, rugby, netball and
hockey. The sprint run can also be a major aspect in such activities as dance and gymnastics.
Students practise the sprint run in many events in athletics, such as the 50m, 70m and 100m sprints, relays, hurdles,
long jump etc.
Curriculum, Learning and Teaching
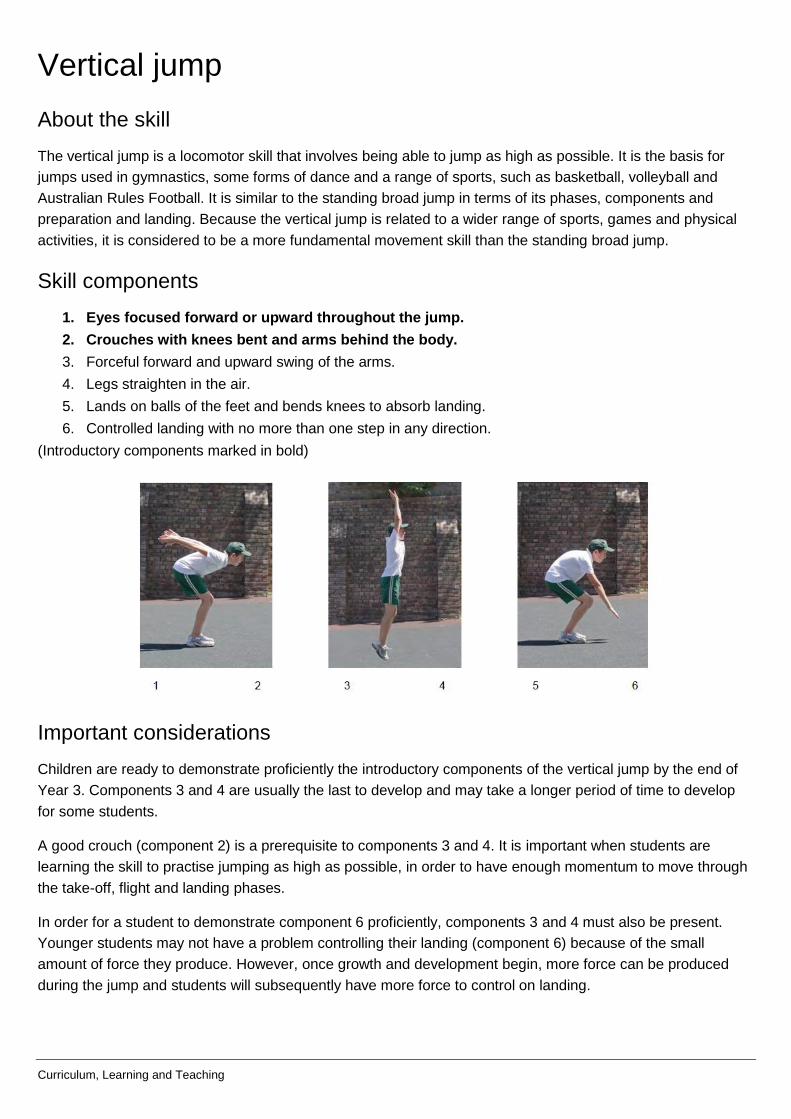
Vertical jump
About the skill
The vertical jump is a locomotor skill that involves being able to jump as high as possible. It is the basis for
jumps used in gymnastics, some forms of dance and a range of sports, such as basketball, volleyball and
Australian Rules Football. It is similar to the standing broad jump in terms of its phases, components and
preparation and landing. Because the vertical jump is related to a wider range of sports, games and physical
activities, it is considered to be a more fundamental movement skill than the standing broad jump.
Skill components
1. Eyes focused forward or upward throughout the jump.
2. Crouches with knees bent and arms behind the body.
3. Forceful forward and upward swing of the arms.
4. Legs straighten in the air.
5. Lands on balls of the feet and bends knees to absorb landing.
6. Controlled landing with no more than one step in any direction.
(Introductory components marked in bold)
Important considerations
Children are ready to demonstrate proficiently the introductory components of the vertical jump by the end of
Year 3. Components 3 and 4 are usually the last to develop and may take a longer period of time to develop
for some students.
A good crouch (component 2) is a prerequisite to components 3 and 4. It is important when students are
learning the skill to practise jumping as high as possible, in order to have enough momentum to move through
the take-off, flight and landing phases.
In order for a student to demonstrate component 6 proficiently, components 3 and 4 must also be present.
Younger students may not have a problem controlling their landing (component 6) because of the small
amount of force they produce. However, once growth and development begin, more force can be produced
during the jump and students will subsequently have more force to control on landing.
Curriculum, Learning and Teaching
Developing the skill
Teaching cues
Say to the students:
Look up.
Focus your eyes on where you want to go.
Get ready to explode up high, get ready to take off.
Swing your arms back and up.
Straighten your legs when in the air.
Bend your knees on landing.
Control your body and balance yourself when landing.
Land with feet the width of your shoulders apart.
Common errors
looking down at the ground or feet
keeping arms by their side or out in front of the body during the preparatory crouch
feet not leaving the ground or not landing simultaneously
pushing arms up in the air during propulsion or having a limited forward and upward swing
tucking legs up during propulsion
landing flat-footed or on heels first
knees, ankles or hips not bending to absorb force on landing (stiff-legged landing)
needing several steps to correct balance on landing.
Teaching the skill
Demonstrate the bend and crouch starting position, using verbal cues such as “swing your arms back and up.”
Ask students to jump:
as high as they can
with their head and eyes turned upwards
looking straight ahead
with their head and eyes looking down at the ground.
Link back to the components of the vertical jump and discuss with students which jump seemed the most effective.
Instruct students to:
land with feet the width of their shoulders apart as a wide base of support. This enhances stability on landing and maximises the height students will be able to jump
land in different ways when they jump. Use questions to focus students’ attention on the components, such as:
o Why did you bend your knees?
o Did you land on the same spot as your take-off? Why or why not?
o Did you get more or less height when you landed in front of your take-off position? Why or why
o not?
Practising the skill
Students practise swinging the arms back above the horizontal position. They jump as high as possible to get maximum momentum.
Incorporate the vertical jump into action songs and simple games, such as “Simon says.”
Students jump and touch the wall with finger tips. Record the height of the jump with chalk.
Students use mini-trampolines or beat boards to gain height. Focus students on landing softly.
Students jump from a range of steps or boxes onto soft mats, aiming for maximum height and a soft landing. They can also jump up onto steps, stable boxes or low benches using legs and arms to gain height.
Incorporate this skill into games: for example, basketball or netball when reaching for a rebound or receiving a pass; or in volleyball or Newcomb ball, when blocking or spiking at the net.
Curriculum, Learning and Teaching
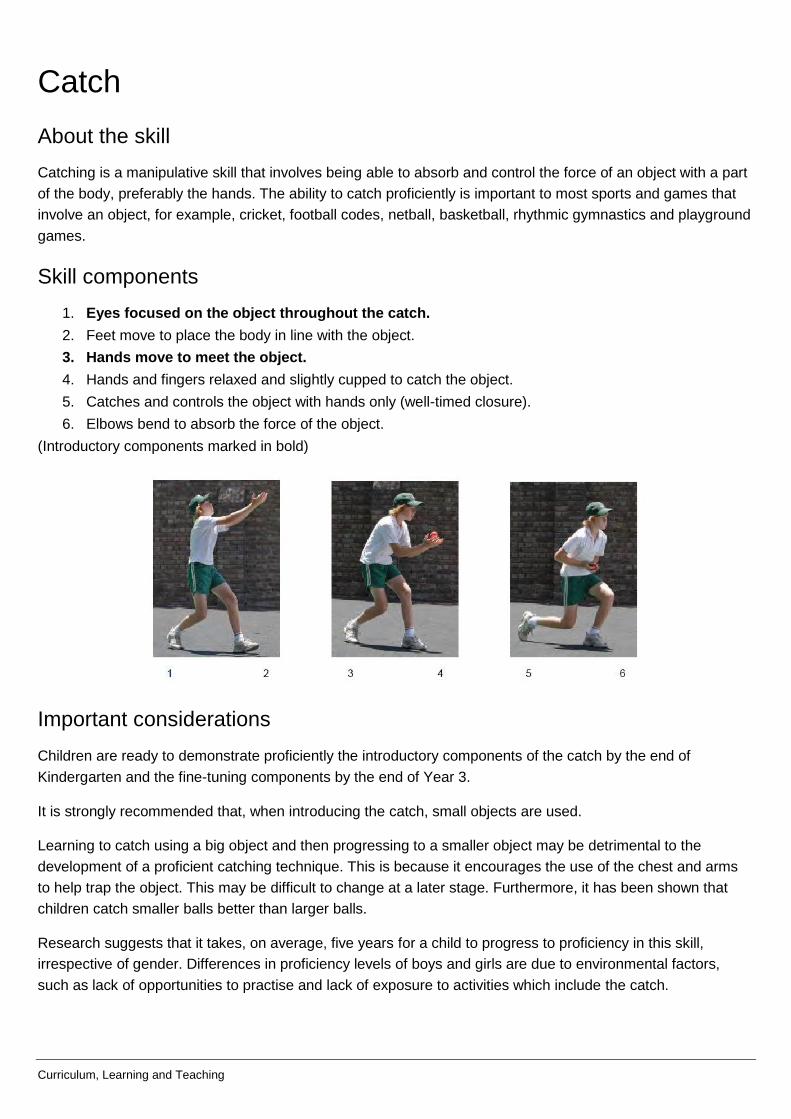
Catch
About the skill
Catching is a manipulative skill that involves being able to absorb and control the force of an object with a part
of the body, preferably the hands. The ability to catch proficiently is important to most sports and games that
involve an object, for example, cricket, football codes, netball, basketball, rhythmic gymnastics and playground
games.
Skill components
1. Eyes focused on the object throughout the catch.
2. Feet move to place the body in line with the object.
3. Hands move to meet the object.
4. Hands and fingers relaxed and slightly cupped to catch the object.
5. Catches and controls the object with hands only (well-timed closure).
6. Elbows bend to absorb the force of the object.
(Introductory components marked in bold)
Important considerations
Children are ready to demonstrate proficiently the introductory components of the catch by the end of
Kindergarten and the fine-tuning components by the end of Year 3.
It is strongly recommended that, when introducing the catch, small objects are used.
Learning to catch using a big object and then progressing to a smaller object may be detrimental to the
development of a proficient catching technique. This is because it encourages the use of the chest and arms
to help trap the object. This may be difficult to change at a later stage. Furthermore, it has been shown that
children catch smaller balls better than larger balls.
Research suggests that it takes, on average, five years for a child to progress to proficiency in this skill,
irrespective of gender. Differences in proficiency levels of boys and girls are due to environmental factors,
such as lack of opportunities to practise and lack of exposure to activities which include the catch.

Curriculum, Learning and Teaching
Developing the skill
Teaching cues
Say to the students:
Watch the object move into your hands.
Cup your hands.
Move to the ball.
Relax your hands.
Point your fingers up for a high ball.
Point your fingers down for a low ball.
Bend elbows to absorb the force of the object.
Common errors
turning head away, closing eyes or leaning backwards away from the object
not moving feet towards the object
not reaching hands out towards the object
having stiff and extended arms when catching
having wrists or heels of hands hinged together to catch (crocodile jaws technique)
using other parts of the body, such as the chest or upper body to catch
closing hands around the object too early or late
having little or no elbow bend or “give” after catching.
Teaching the skill
Instruct students to get into the position ready for
catching:
standing balanced
hands lightly cupped
eyes focused.
To familiarise students with the concept of
approaching objects, begin by getting them to:
experiment with rolling and trapping balls
roll balls at different speeds
roll balls directly towards or slightly to one side of a partner
move towards the rolling ball.
This will allow students to get the idea of focusing on
the object and moving their hands towards the object.
Instruct students to:
toss a ball or object in the air and catch
bounce and catch a ball
try experimenting with different arm positions
catch the ball without letting it touch the body
explore catching small objects using different arm positions to discover that elbows need to bend to absorb the force.
Practising the skill
Students throw balls onto the wall and catch the
rebound. They work with a partner and take turns to
throw and catch.
Students use a container to catch objects. They move
to meet the object and have the bucket “give” as the
object enters, so it won’t bounce out.
Students catch from different positions, for example,
standing or in a sitting position using a variety of
objects, and balls of different sizes.
Students catch balls that are rolling and bouncing at
varying speeds and heights.
Students catch balls not directly in line with the body.
Proficient students can try catching balls or objects
while moving at different angles to the line of flight of
the ball.
The basic concepts of the catch (eyes focused, move
to meet the ball, absorbing the force of the object) can
also be used by proficient students when using the
one-handed catch and when catching using gloves.
Curriculum, Learning and Teaching
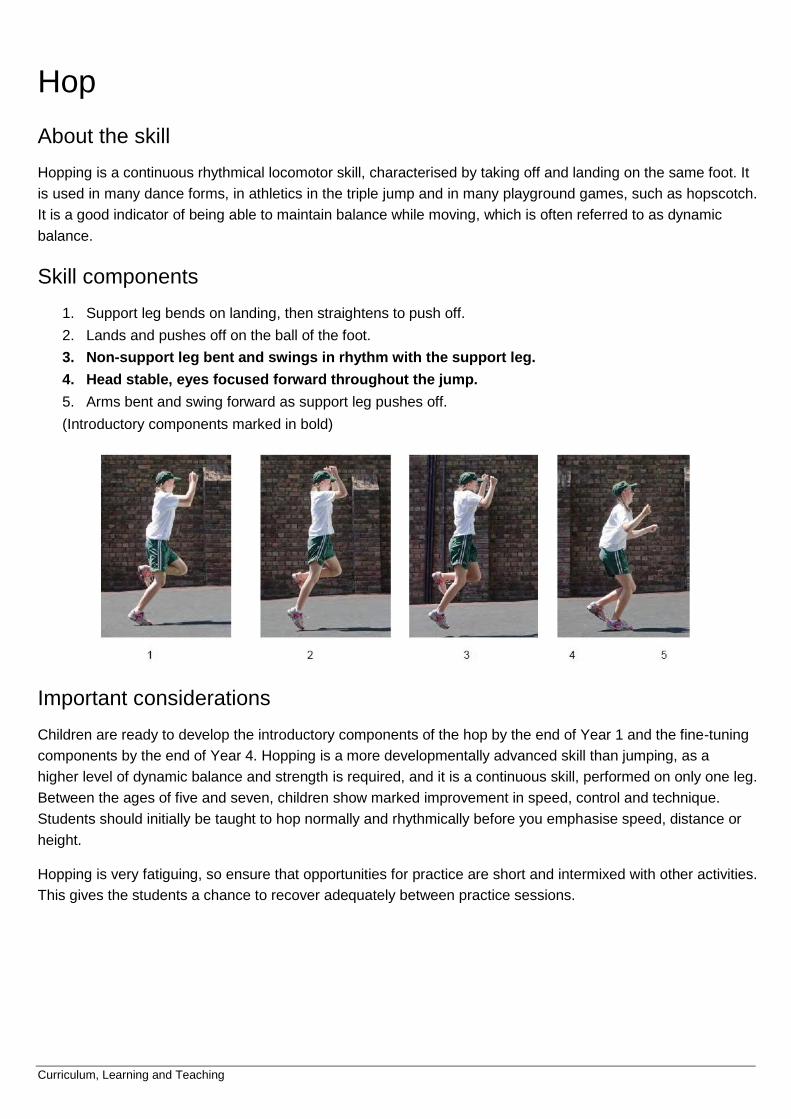
Hop
About the skill
Hopping is a continuous rhythmical locomotor skill, characterised by taking off and landing on the same foot. It
is used in many dance forms, in athletics in the triple jump and in many playground games, such as hopscotch.
It is a good indicator of being able to maintain balance while moving, which is often referred to as dynamic
balance.
Skill components
1. Support leg bends on landing, then straightens to push off.
2. Lands and pushes off on the ball of the foot.
3. Non-support leg bent and swings in rhythm with the support leg.
4. Head stable, eyes focused forward throughout the jump.
5. Arms bent and swing forward as support leg pushes off.
(Introductory components marked in bold)
Important considerations
Children are ready to develop the introductory components of the hop by the end of Year 1 and the fine-tuning
components by the end of Year 4. Hopping is a more developmentally advanced skill than jumping, as a
higher level of dynamic balance and strength is required, and it is a continuous skill, performed on only one leg.
Between the ages of five and seven, children show marked improvement in speed, control and technique.
Students should initially be taught to hop normally and rhythmically before you emphasise speed, distance or
height.
Hopping is very fatiguing, so ensure that opportunities for practice are short and intermixed with other activities.
This gives the students a chance to recover adequately between practice sessions.
Curriculum, Learning and Teaching
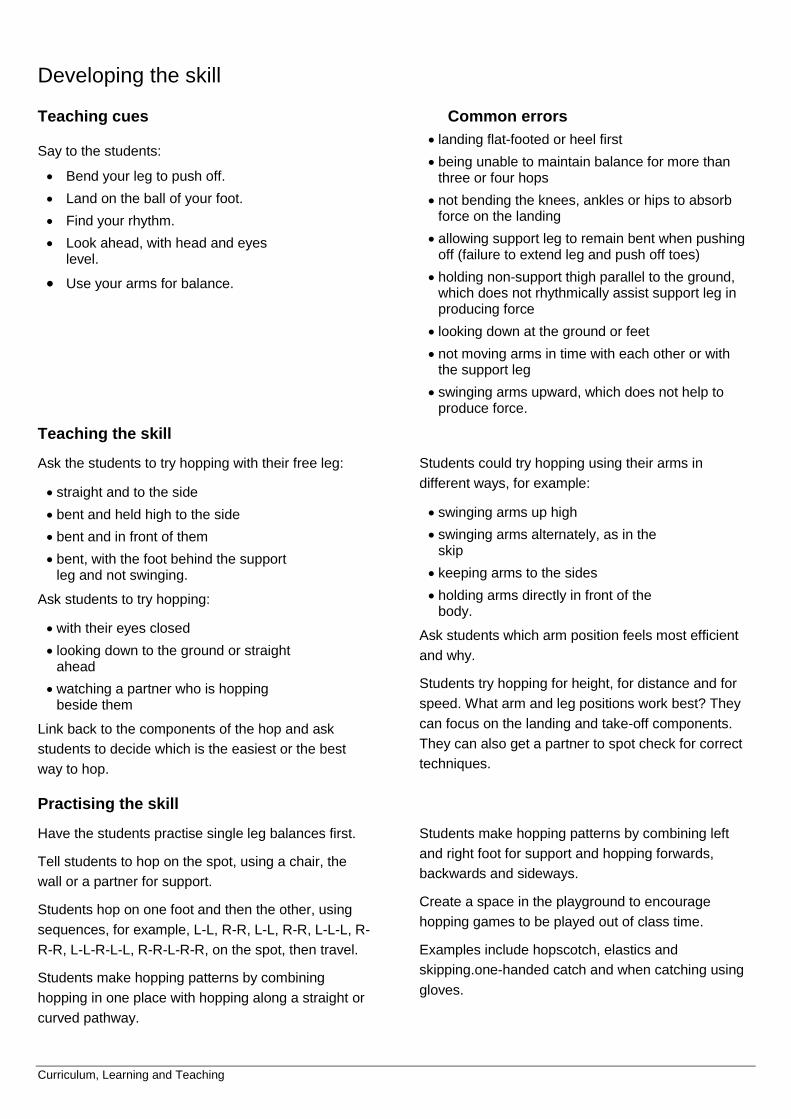
Developing the skill
Teaching cues
Say to the students:
Bend your leg to push off.
Land on the ball of your foot.
Find your rhythm.
Look ahead, with head and eyes level.
Use your arms for balance.
Common errors
landing flat-footed or heel first
being unable to maintain balance for more than three or four hops
not bending the knees, ankles or hips to absorb force on the landing
allowing support leg to remain bent when pushing off (failure to extend leg and push off toes)
holding non-support thigh parallel to the ground, which does not rhythmically assist support leg in producing force
looking down at the ground or feet
not moving arms in time with each other or with the support leg
swinging arms upward, which does not help to produce force.
Teaching the skill
Ask the students to try hopping with their free leg:
straight and to the side
bent and held high to the side
bent and in front of them
bent, with the foot behind the support leg and not swinging.
Ask students to try hopping:
with their eyes closed
looking down to the ground or straight ahead
watching a partner who is hopping beside them
Link back to the components of the hop and ask
students to decide which is the easiest or the best
way to hop.
Students could try hopping using their arms in
different ways, for example:
swinging arms up high
swinging arms alternately, as in the skip
keeping arms to the sides
holding arms directly in front of the body.
Ask students which arm position feels most efficient
and why.
Students try hopping for height, for distance and for
speed. What arm and leg positions work best? They
can focus on the landing and take-off components.
They can also get a partner to spot check for correct
techniques.
Practising the skill
Have the students practise single leg balances first.
Tell students to hop on the spot, using a chair, the
wall or a partner for support.
Students hop on one foot and then the other, using
sequences, for example, L-L, R-R, L-L, R-R, L-L-L, R-
R-R, L-L-R-L-L, R-R-L-R-R, on the spot, then travel.
Students make hopping patterns by combining
hopping in one place with hopping along a straight or
curved pathway.
Students make hopping patterns by combining left
and right foot for support and hopping forwards,
backwards and sideways.
Create a space in the playground to encourage
hopping games to be played out of class time.
Examples include hopscotch, elastics and
skipping.one-handed catch and when catching using
gloves.
Curriculum, Learning and Teaching
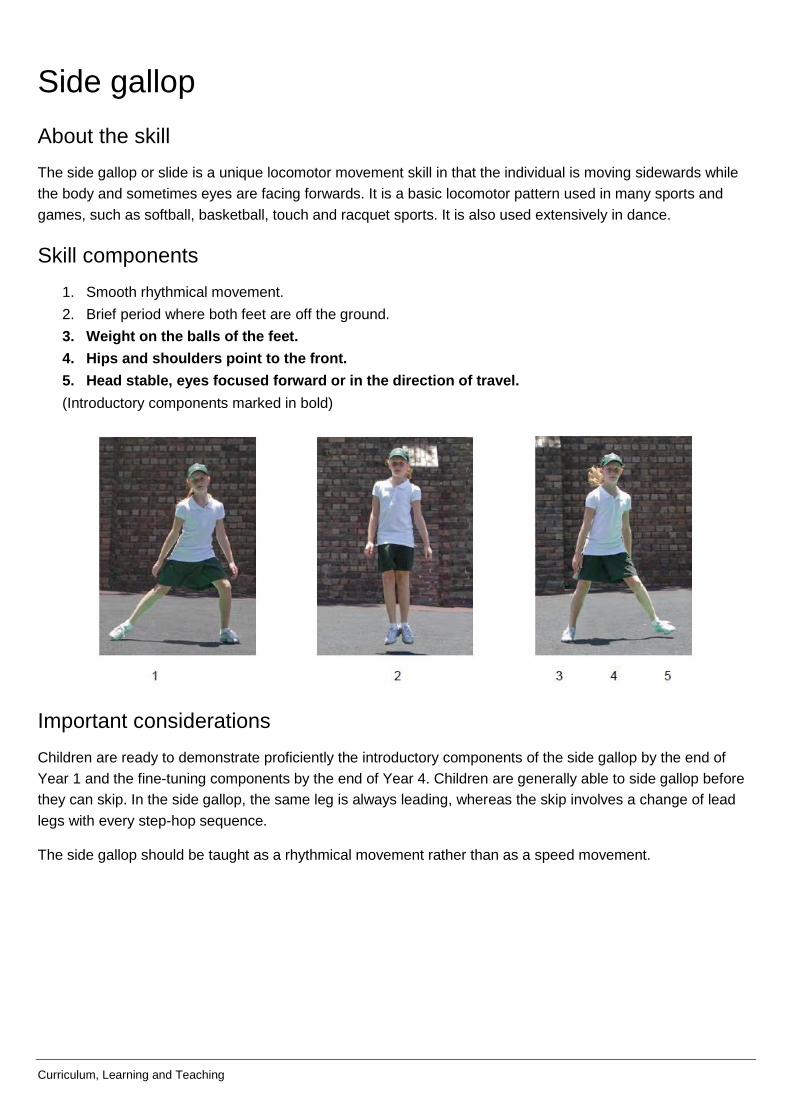
Side gallop
About the skill
The side gallop or slide is a unique locomotor movement skill in that the individual is moving sidewards while
the body and sometimes eyes are facing forwards. It is a basic locomotor pattern used in many sports and
games, such as softball, basketball, touch and racquet sports. It is also used extensively in dance.
Skill components
1. Smooth rhythmical movement.
2. Brief period where both feet are off the ground.
3. Weight on the balls of the feet.
4. Hips and shoulders point to the front.
5. Head stable, eyes focused forward or in the direction of travel.
(Introductory components marked in bold)
Important considerations
Children are ready to demonstrate proficiently the introductory components of the side gallop by the end of
Year 1 and the fine-tuning components by the end of Year 4. Children are generally able to side gallop before
they can skip. In the side gallop, the same leg is always leading, whereas the skip involves a change of lead
legs with every step-hop sequence.
The side gallop should be taught as a rhythmical movement rather than as a speed movement.
Curriculum, Learning and Teaching
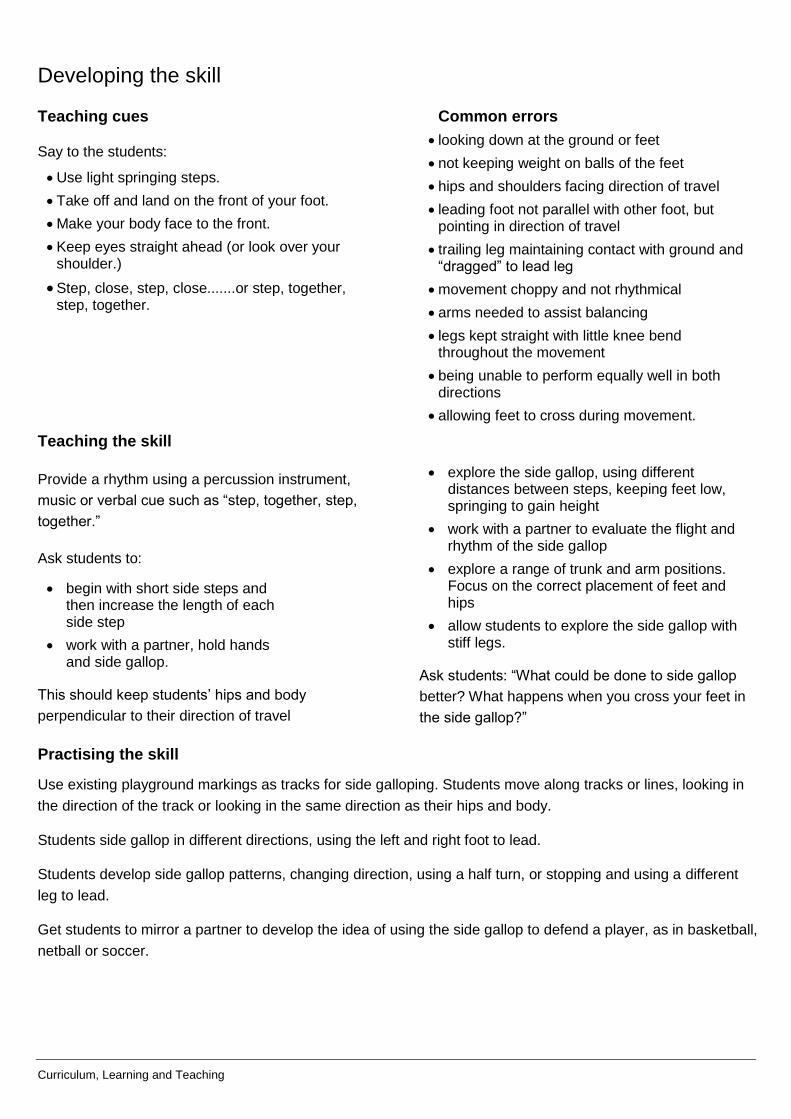
Developing the skill
Teaching cues
Say to the students:
Use light springing steps.
Take off and land on the front of your foot.
Make your body face to the front.
Keep eyes straight ahead (or look over your shoulder.)
Step, close, step, close.......or step, together, step, together.
Common errors
looking down at the ground or feet
not keeping weight on balls of the feet
hips and shoulders facing direction of travel
leading foot not parallel with other foot, but pointing in direction of travel
trailing leg maintaining contact with ground and “dragged” to lead leg
movement choppy and not rhythmical
arms needed to assist balancing
legs kept straight with little knee bend throughout the movement
being unable to perform equally well in both directions
allowing feet to cross during movement.
Teaching the skill
Provide a rhythm using a percussion instrument,
music or verbal cue such as “step, together, step,
together.”
Ask students to:
begin with short side steps and then increase the length of each side step
work with a partner, hold hands and side gallop.
This should keep students’ hips and body
perpendicular to their direction of travel
explore the side gallop, using different distances between steps, keeping feet low, springing to gain height
work with a partner to evaluate the flight and rhythm of the side gallop
explore a range of trunk and arm positions. Focus on the correct placement of feet and hips
allow students to explore the side gallop with stiff legs.
Ask students: “What could be done to side gallop
better? What happens when you cross your feet in
the side gallop?”
Practising the skill
Use existing playground markings as tracks for side galloping. Students move along tracks or lines, looking in
the direction of the track or looking in the same direction as their hips and body.
Students side gallop in different directions, using the left and right foot to lead.
Students develop side gallop patterns, changing direction, using a half turn, or stopping and using a different
leg to lead.
Get students to mirror a partner to develop the idea of using the side gallop to defend a player, as in basketball,
netball or soccer.
Curriculum, Learning and Teaching
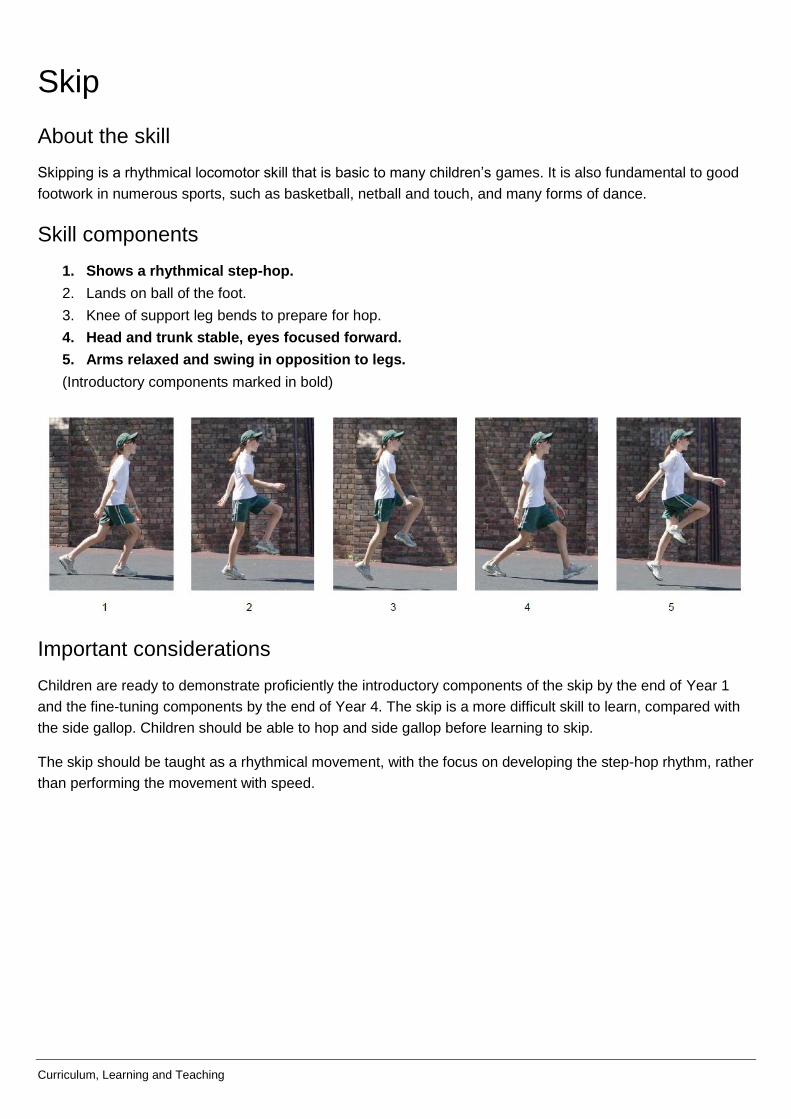
Skip
About the skill
Skipping is a rhythmical locomotor skill that is basic to many children’s games. It is also fundamental to good
footwork in numerous sports, such as basketball, netball and touch, and many forms of dance.
Skill components
1. Shows a rhythmical step-hop.
2. Lands on ball of the foot.
3. Knee of support leg bends to prepare for hop.
4. Head and trunk stable, eyes focused forward.
5. Arms relaxed and swing in opposition to legs.
(Introductory components marked in bold)
Important considerations
Children are ready to demonstrate proficiently the introductory components of the skip by the end of Year 1
and the fine-tuning components by the end of Year 4. The skip is a more difficult skill to learn, compared with
the side gallop. Children should be able to hop and side gallop before learning to skip.
The skip should be taught as a rhythmical movement, with the focus on developing the step-hop rhythm, rather
than performing the movement with speed.
Curriculum, Learning and Teaching
Developing the skill
Teaching cues
Say to the students:
Use light springing steps.
Keep eyes straight ahead.
Step, hop, step, hop.
Take off and land on the front of your foot.
Make sure your body faces to the front.
Common errors
choppy, non-rhythmical movements
inability to perform step-hop on both legs alternately
landing flat-footed or heel first
eyes looking at ground or feet
arms swinging together rather than in opposition to legs
little arm movement to rhythmically support legs
legs stiff with little bend to prepare for hop.
Teaching the skill
Explore the skip by asking students to:
use different distances between steps
keep feet low
spring to gain height
use different arm positions.
Students work with a partner to evaluate flight
and rhythm of the skip.
Ask students to identify which is the best method
to gain flight while keeping the rhythm of the skip?
Provide a rhythm for students to follow, using a
verbal cue such as “Step, hop, step, hop”.
Get the students to:
perform the skip in a stationary position, using the back of a chair for balance
do a step and then a hop on the same leg. Students then perform it on the other leg.
skip holding their hands at waist height in front of them. Tell them: “Try to touch your hand with your knee with each hop”.
try four different ways of moving their arms when they skip. Ask: “What arm movement feels best when you skip?”
Practising the skill
Students skip with exaggerated arm and knee actions. They skip and clap hands up high in front of them.
Students use existing playground markings as tracks for skipping. Encourage students to move along
these tracks, looking in the direction of the track.
Have students develop skipping patterns, changing direction, length of step and height of hop.
Incorporate the skip into dance, gymnastics and simple games.
Curriculum, Learning and Teaching
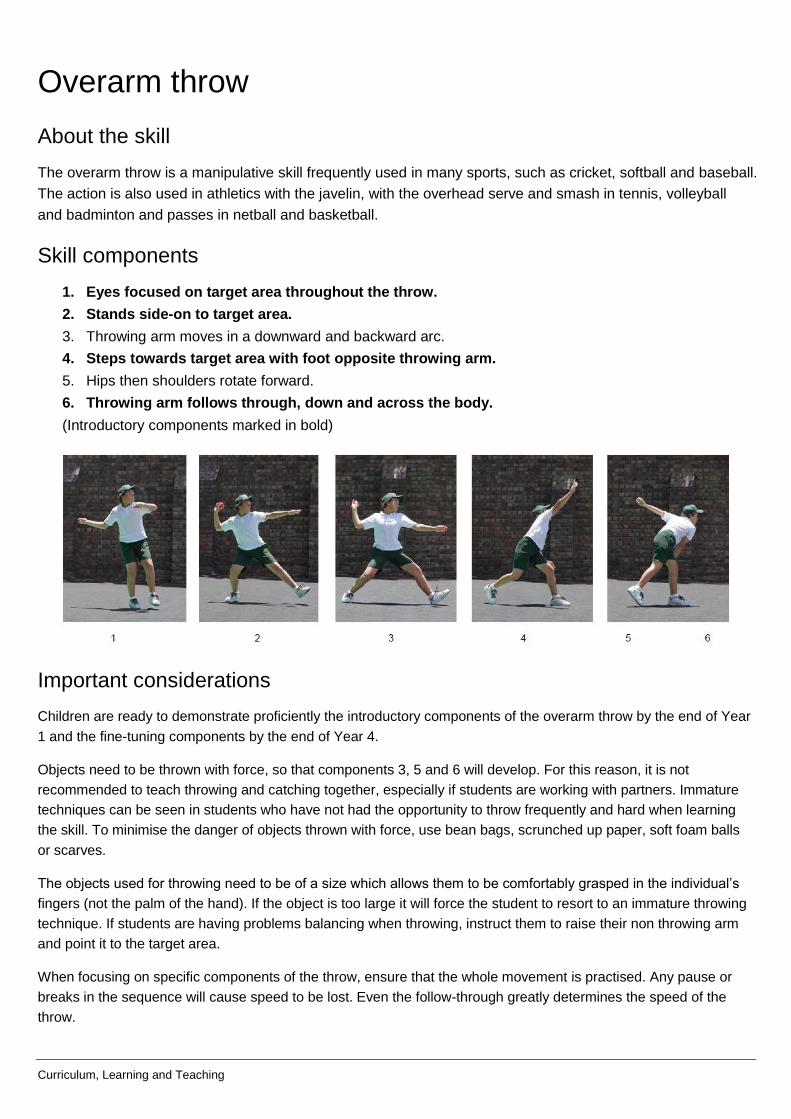
Overarm throw
About the skill
The overarm throw is a manipulative skill frequently used in many sports, such as cricket, softball and baseball.
The action is also used in athletics with the javelin, with the overhead serve and smash in tennis, volleyball
and badminton and passes in netball and basketball.
Skill components
1. Eyes focused on target area throughout the throw.
2. Stands side-on to target area.
3. Throwing arm moves in a downward and backward arc.
4. Steps towards target area with foot opposite throwing arm.
5. Hips then shoulders rotate forward.
6. Throwing arm follows through, down and across the body.
(Introductory components marked in bold)
Important considerations
Children are ready to demonstrate proficiently the introductory components of the overarm throw by the end of Year
1 and the fine-tuning components by the end of Year 4.
Objects need to be thrown with force, so that components 3, 5 and 6 will develop. For this reason, it is not
recommended to teach throwing and catching together, especially if students are working with partners. Immature
techniques can be seen in students who have not had the opportunity to throw frequently and hard when learning
the skill. To minimise the danger of objects thrown with force, use bean bags, scrunched up paper, soft foam balls
or scarves.
The objects used for throwing need to be of a size which allows them to be comfortably grasped in the individual’s
fingers (not the palm of the hand). If the object is too large it will force the student to resort to an immature throwing
technique. If students are having problems balancing when throwing, instruct them to raise their non throwing arm
and point it to the target area.
When focusing on specific components of the throw, ensure that the whole movement is practised. Any pause or
breaks in the sequence will cause speed to be lost. Even the follow-through greatly determines the speed of the
throw.
Curriculum, Learning and Teaching
Developing the skill
Teaching cues
Say to the students:
Look at your target.
Point to the target (with your non-throwing arm).
Stand side-on.
Step forward and throw.
Follow through, down and across your body with your throwing arm.
Swing your arm down and back as you prepare to throw.
Step, throw and follow-through down and across your body.
Common errors
looking down at the ground or feet
standing front on to the target area
standing with throwing shoulder closest to target area (as if throwing a dart)
throwing arm taken straight back, up to beside the head, or forward as if throwing a dart
throwing arm significantly bent at end of back swing
stepping towards target area with same foot as throwing arm
hips do not rotate forward during propulsion
hips and shoulders rotate together (whole upper body twists as one)
throwing arm points to target area after throw, rather than following through down and across body
little or no weight transference on to the back foot during preparation.
Teaching the skill
Use existing playground markings or make lines on the
ground with chalk or masking tape as markers. Use a
verbal cue, such as: “Step forward and throw”. Ask
students to step off these markers towards their target.
Use demonstration and verbal cues such as “follow
through, down and across your body” to focus students’
attention on the follow-through motion of the throwing
arm.
Ask students to:
work with a partner and experiment with different hip, shoulder and feet movements as they throw
stand facing towards the target, keeping their hips and feet still
stand side-on and rotate their shoulders but not their hips
stand side-on and rotate hips and shoulders
take a small step as they throw to transfer their body weight
work with a partner to provide feedback about each of the different positions.
Students identify which position is the most efficient for
distance and speed.
Have the students practise the throw from a sitting,
kneeling and standing position. Ask the students what
difference they notice in the distance of the throw. What
different body parts did they use?
Practising the skill
Provide a range of large targets, e.g. brightly coloured markings on the playground, large hoops or skipping ropes laid out
in different shapes. Make sure the targets are a substantial distance from the students. This encourages them to use
force in their throwing action.
Organise the students to work in two lines 5-7 metres away from their partner. Students stand side-on, with their non-
throwing arm pointing towards their partner. A variety of soft objects should be used. Focus needs to be maintained on
the throw, rather than on the catch.
Incorporate the throw into major games such as cricket and softball or in minor games.
Curriculum, Learning and Teaching
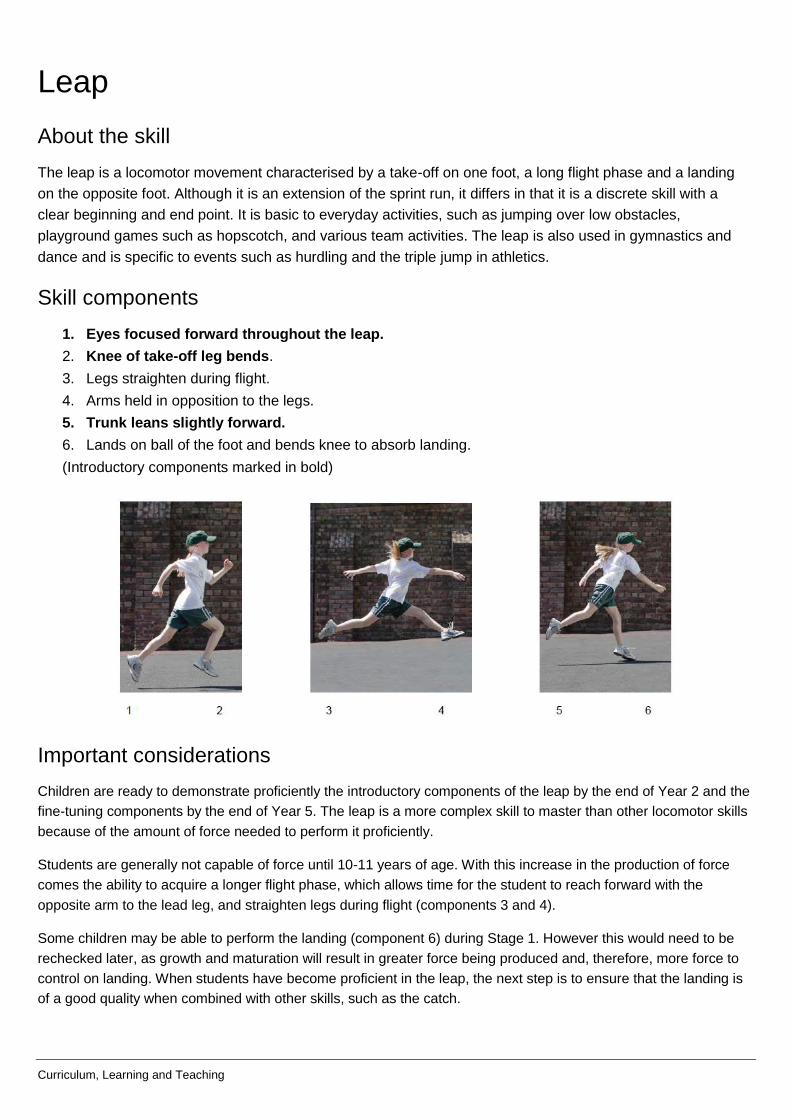
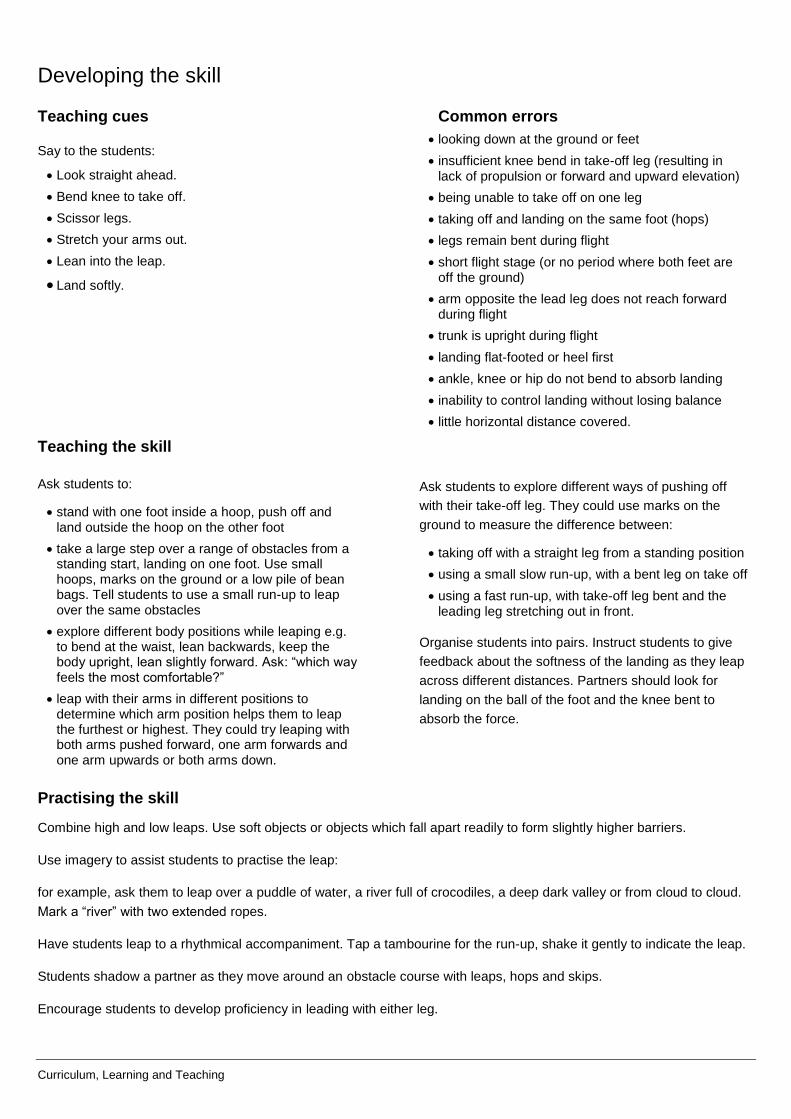
Leap
About the skill
The leap is a locomotor movement characterised by a take-off on one foot, a long flight phase and a landing
on the opposite foot. Although it is an extension of the sprint run, it differs in that it is a discrete skill with a
clear beginning and end point. It is basic to everyday activities, such as jumping over low obstacles,
playground games such as hopscotch, and various team activities. The leap is also used in gymnastics and
dance and is specific to events such as hurdling and the triple jump in athletics.
Skill components
1. Eyes focused forward throughout the leap.
2. Knee of take-off leg bends.
3. Legs straighten during flight.
4. Arms held in opposition to the legs.
5. Trunk leans slightly forward.
6. Lands on ball of the foot and bends knee to absorb landing.
(Introductory components marked in bold)
Important considerations
Children are ready to demonstrate proficiently the introductory components of the leap by the end of Year 2 and the
fine-tuning components by the end of Year 5. The leap is a more complex skill to master than other locomotor skills
because of the amount of force needed to perform it proficiently.
Students are generally not capable of force until 10-11 years of age. With this increase in the production of force
comes the ability to acquire a longer flight phase, which allows time for the student to reach forward with the
opposite arm to the lead leg, and straighten legs during flight (components 3 and 4).
Some children may be able to perform the landing (component 6) during Stage 1. However this would need to be
rechecked later, as growth and maturation will result in greater force being produced and, therefore, more force to
control on landing. When students have become proficient in the leap, the next step is to ensure that the landing is
of a good quality when combined with other skills, such as the catch.
Curriculum, Learning and Teaching
Developing the skill
Teaching cues
Say to the students:
Look straight ahead.
Bend knee to take off.
Scissor legs.
Stretch your arms out.
Lean into the leap.
Land softly.
Common errors
looking down at the ground or feet
insufficient knee bend in take-off leg (resulting in lack of propulsion or forward and upward elevation)
being unable to take off on one leg
taking off and landing on the same foot (hops)
legs remain bent during flight
short flight stage (or no period where both feet are off the ground)
arm opposite the lead leg does not reach forward during flight
trunk is upright during flight
landing flat-footed or heel first
ankle, knee or hip do not bend to absorb landing
inability to control landing without losing balance
little horizontal distance covered.
Teaching the skill
Ask students to:
stand with one foot inside a hoop, push off and land outside the hoop on the other foot
take a large step over a range of obstacles from a standing start, landing on one foot. Use small hoops, marks on the ground or a low pile of bean bags. Tell students to use a small run-up to leap over the same obstacles
explore different body positions while leaping e.g. to bend at the waist, lean backwards, keep the body upright, lean slightly forward. Ask: “which way feels the most comfortable?”
leap with their arms in different positions to determine which arm position helps them to leap the furthest or highest. They could try leaping with both arms pushed forward, one arm forwards and one arm upwards or both arms down.
Ask students to explore different ways of pushing off
with their take-off leg. They could use marks on the
ground to measure the difference between:
taking off with a straight leg from a standing position
using a small slow run-up, with a bent leg on take off
using a fast run-up, with take-off leg bent and the leading leg stretching out in front.
Organise students into pairs. Instruct students to give
feedback about the softness of the landing as they leap
across different distances. Partners should look for
landing on the ball of the foot and the knee bent to
absorb the force.
Practising the skill
Combine high and low leaps. Use soft objects or objects which fall apart readily to form slightly higher barriers.
Use imagery to assist students to practise the leap:
for example, ask them to leap over a puddle of water, a river full of crocodiles, a deep dark valley or from cloud to cloud.
Mark a “river” with two extended ropes.
Have students leap to a rhythmical accompaniment. Tap a tambourine for the run-up, shake it gently to indicate the leap.
Students shadow a partner as they move around an obstacle course with leaps, hops and skips.
Encourage students to develop proficiency in leading with either leg.

Curriculum, Learning and Teaching
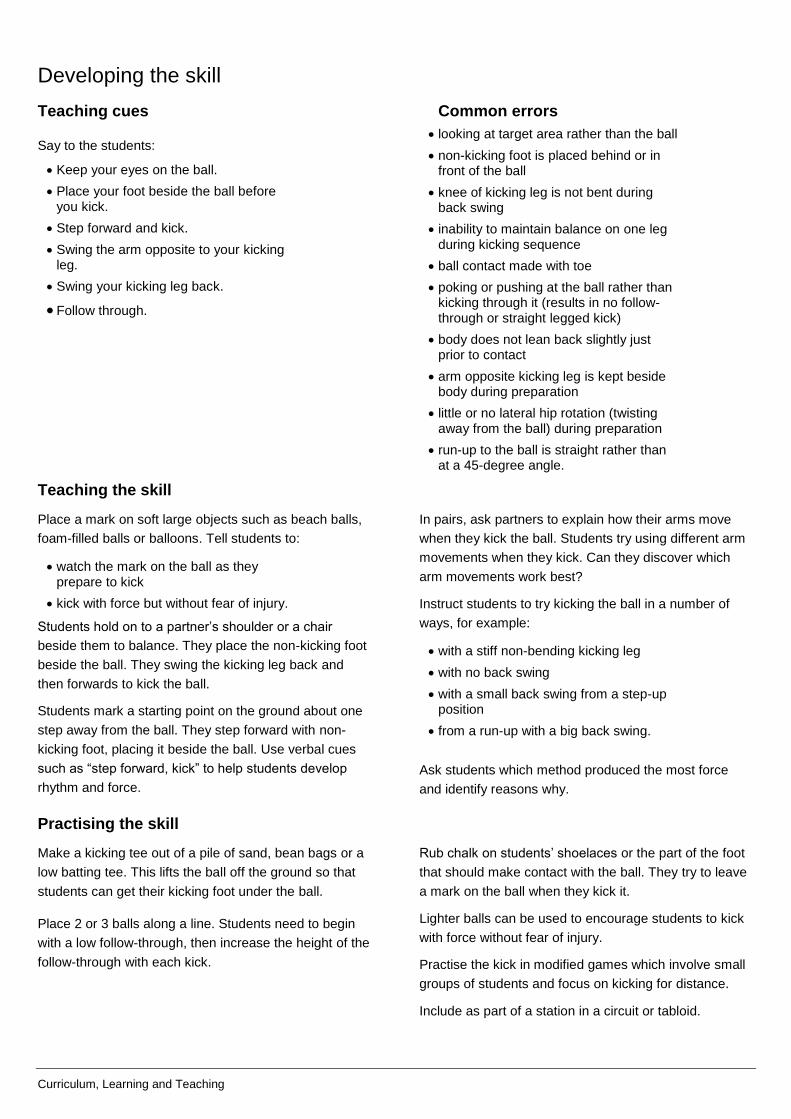
Kick
About the skill
The kick is a manipulative striking skill characterised by producing force from the foot to an object. The
stationary place kick is the focus of this skill and involves kicking an object which is still. It is basic to kicks
used in all football codes. It is also important for foot–eye coordination. The stationary place kick has been
chosen as it is the most widely-used kick by primary school children, is the easiest in which to develop
proficiency, and is more closely related to lead-up activities and modified games than other kicks.
Skill components
1. Eyes focused on the ball throughout the kick.
2. Forward and sideward swing of arm opposite kicking leg.
3. Non-kicking foot placed beside the ball.
4. Bends knee of kicking leg at least 90 degrees during the back-swing.
5. Contacts ball with top of the foot (a “shoelace” kick) or instep.
6. Kicking leg follows through high towards target area.
(Introductory components marked in bold)
Important considerations
Children are ready to demonstrate the introductory components of the kick proficiently by the end of Year 2 and the
fine-tuning components by the end of Year 5. The kick is one of the last fundamental movement skills in which
students will demonstrate proficiency.
Component 6 is largely dependent upon the amount of force being produced during the preparation and propulsion
phases of the kick. Students should be instructed to kick the ball as hard as possible, concentrating more on
velocity than accuracy, and be given plenty of opportunities to practise in order to develop proficiency.
Placing the ball on a low tee or a bean bag can enable students to get their kicking foot under the ball and make
contact with their shoelaces or instep.
Beach balls, balloons or foam-filled balls are ideal to use when introducing the kick. They are large and soft and can
be kicked forcefully without causing injury or travelling a great distance.
Curriculum, Learning and Teaching
Developing the skill
Teaching cues
Say to the students:
Keep your eyes on the ball.
Place your foot beside the ball before you kick.
Step forward and kick.
Swing the arm opposite to your kicking leg.
Swing your kicking leg back.
Follow through.
Common errors
looking at target area rather than the ball
non-kicking foot is placed behind or in front of the ball
knee of kicking leg is not bent during back swing
inability to maintain balance on one leg during kicking sequence
ball contact made with toe
poking or pushing at the ball rather than kicking through it (results in no follow-through or straight legged kick)
body does not lean back slightly just prior to contact
arm opposite kicking leg is kept beside body during preparation
little or no lateral hip rotation (twisting away from the ball) during preparation
run-up to the ball is straight rather than at a 45-degree angle.
Teaching the skill
Place a mark on soft large objects such as beach balls,
foam-filled balls or balloons. Tell students to:
watch the mark on the ball as they prepare to kick
kick with force but without fear of injury.
Students hold on to a partner’s shoulder or a chair
beside them to balance. They place the non-kicking foot
beside the ball. They swing the kicking leg back and
then forwards to kick the ball.
Students mark a starting point on the ground about one
step away from the ball. They step forward with non-
kicking foot, placing it beside the ball. Use verbal cues
such as “step forward, kick” to help students develop
rhythm and force.
In pairs, ask partners to explain how their arms move
when they kick the ball. Students try using different arm
movements when they kick. Can they discover which
arm movements work best?
Instruct students to try kicking the ball in a number of
ways, for example:
with a stiff non-bending kicking leg
with no back swing
with a small back swing from a step-up position
from a run-up with a big back swing.
Ask students which method produced the most force
and identify reasons why.
Practising the skill
Make a kicking tee out of a pile of sand, bean bags or a
low batting tee. This lifts the ball off the ground so that
students can get their kicking foot under the ball.
Place 2 or 3 balls along a line. Students need to begin
with a low follow-through, then increase the height of the
follow-through with each kick.
Rub chalk on students’ shoelaces or the part of the foot
that should make contact with the ball. They try to leave
a mark on the ball when they kick it.
Lighter balls can be used to encourage students to kick
with force without fear of injury.
Practise the kick in modified games which involve small
groups of students and focus on kicking for distance.
Include as part of a station in a circuit or tabloid.
Curriculum, Learning and Teaching
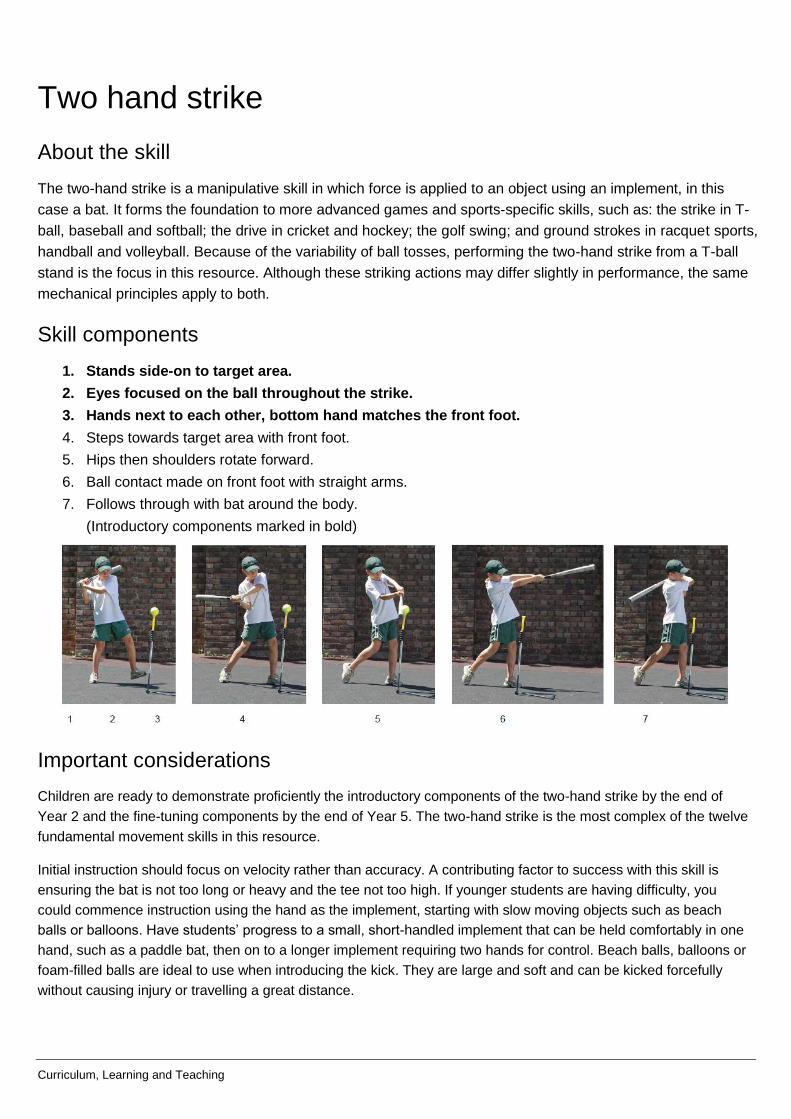
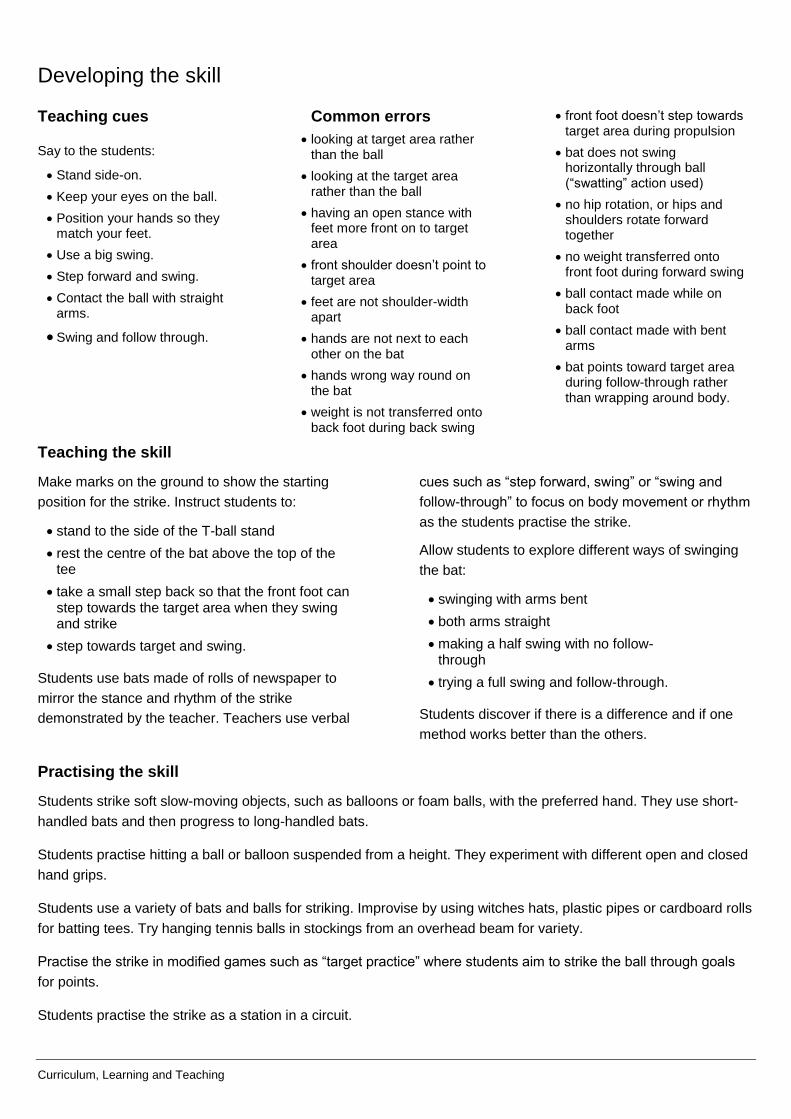
Two hand strike
About the skill
The two-hand strike is a manipulative skill in which force is applied to an object using an implement, in this
case a bat. It forms the foundation to more advanced games and sports-specific skills, such as: the strike in T-
ball, baseball and softball; the drive in cricket and hockey; the golf swing; and ground strokes in racquet sports,
handball and volleyball. Because of the variability of ball tosses, performing the two-hand strike from a T-ball
stand is the focus in this resource. Although these striking actions may differ slightly in performance, the same
mechanical principles apply to both.
Skill components
1. Stands side-on to target area.
2. Eyes focused on the ball throughout the strike.
3. Hands next to each other, bottom hand matches the front foot.
4. Steps towards target area with front foot.
5. Hips then shoulders rotate forward.
6. Ball contact made on front foot with straight arms.
7. Follows through with bat around the body.
(Introductory components marked in bold)
Important considerations
Children are ready to demonstrate proficiently the introductory components of the two-hand strike by the end of
Year 2 and the fine-tuning components by the end of Year 5. The two-hand strike is the most complex of the twelve
fundamental movement skills in this resource.
Initial instruction should focus on velocity rather than accuracy. A contributing factor to success with this skill is
ensuring the bat is not too long or heavy and the tee not too high. If younger students are having difficulty, you
could commence instruction using the hand as the implement, starting with slow moving objects such as beach
balls or balloons. Have students’ progress to a small, short-handled implement that can be held comfortably in one
hand, such as a paddle bat, then on to a longer implement requiring two hands for control. Beach balls, balloons or
foam-filled balls are ideal to use when introducing the kick. They are large and soft and can be kicked forcefully
without causing injury or travelling a great distance.
Curriculum, Learning and Teaching
Developing the skill
Teaching cues
Say to the students:
Stand side-on.
Keep your eyes on the ball.
Position your hands so they match your feet.
Use a big swing.
Step forward and swing.
Contact the ball with straight arms.
Swing and follow through.
Common errors
looking at target area rather than the ball
looking at the target area rather than the ball
having an open stance with feet more front on to target area
front shoulder doesn’t point to target area
feet are not shoulder-width apart
hands are not next to each other on the bat
hands wrong way round on the bat
weight is not transferred onto back foot during back swing
front foot doesn’t step towards target area during propulsion
bat does not swing horizontally through ball (“swatting” action used)
no hip rotation, or hips and shoulders rotate forward together
no weight transferred onto front foot during forward swing
ball contact made while on back foot
ball contact made with bent arms
bat points toward target area during follow-through rather than wrapping around body.
Teaching the skill
Make marks on the ground to show the starting
position for the strike. Instruct students to:
stand to the side of the T-ball stand
rest the centre of the bat above the top of the tee
take a small step back so that the front foot can step towards the target area when they swing and strike
step towards target and swing.
Students use bats made of rolls of newspaper to
mirror the stance and rhythm of the strike
demonstrated by the teacher. Teachers use verbal
cues such as “step forward, swing” or “swing and
follow-through” to focus on body movement or rhythm
as the students practise the strike.
Allow students to explore different ways of swinging
the bat:
swinging with arms bent
both arms straight
making a half swing with no follow-through
trying a full swing and follow-through.
Students discover if there is a difference and if one
method works better than the others.
Practising the skill
Students strike soft slow-moving objects, such as balloons or foam balls, with the preferred hand. They use short-
handled bats and then progress to long-handled bats.
Students practise hitting a ball or balloon suspended from a height. They experiment with different open and closed
hand grips.
Students use a variety of bats and balls for striking. Improvise by using witches hats, plastic pipes or cardboard rolls
for batting tees. Try hanging tennis balls in stockings from an overhead beam for variety.
Practise the strike in modified games such as “target practice” where students aim to strike the ball through goals
for points.
Students practise the strike as a station in a circuit.
Curriculum, Learning and Teaching
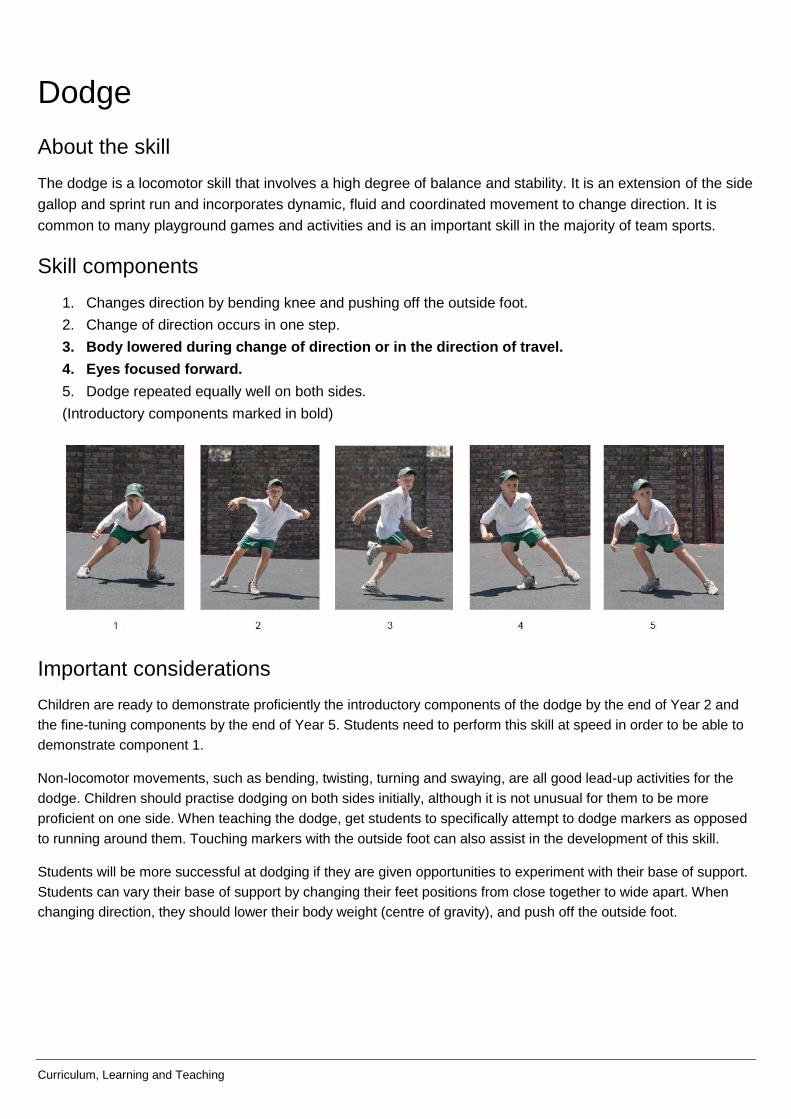
Dodge
About the skill
The dodge is a locomotor skill that involves a high degree of balance and stability. It is an extension of the side
gallop and sprint run and incorporates dynamic, fluid and coordinated movement to change direction. It is
common to many playground games and activities and is an important skill in the majority of team sports.
Skill components
1. Changes direction by bending knee and pushing off the outside foot.
2. Change of direction occurs in one step.
3. Body lowered during change of direction or in the direction of travel.
4. Eyes focused forward.
5. Dodge repeated equally well on both sides.
(Introductory components marked in bold)
Important considerations
Children are ready to demonstrate proficiently the introductory components of the dodge by the end of Year 2 and
the fine-tuning components by the end of Year 5. Students need to perform this skill at speed in order to be able to
demonstrate component 1.
Non-locomotor movements, such as bending, twisting, turning and swaying, are all good lead-up activities for the
dodge. Children should practise dodging on both sides initially, although it is not unusual for them to be more
proficient on one side. When teaching the dodge, get students to specifically attempt to dodge markers as opposed
to running around them. Touching markers with the outside foot can also assist in the development of this skill.
Students will be more successful at dodging if they are given opportunities to experiment with their base of support.
Students can vary their base of support by changing their feet positions from close together to wide apart. When
changing direction, they should lower their body weight (centre of gravity), and push off the outside foot.
Curriculum, Learning and Teaching
Developing the skill
Teaching cues
Say to the students:
Look straight ahead.
Use the outside of your foot.
Lower body height down and then up when changing direction.
Use your knees to change direction.
Use only one step to change direction.
Lower body height and transfer body weight.
Common errors
looking down at the ground or in the direction of travel
little or no knee bend or push off outside foot during change of direction
little or no deception in body movements
inability to perform the dodge on both sides of the body
change of direction is slow and requires numerous small steps
hesitation or pause while changing directions
more than one step is required to complete change of direction
no head or shoulder fake during change of direction.
Teaching the skill
Arrange witches hats or markers in a zigzag pattern.
Ensure students dodge markers by instructing them
to touch the marker with the outside of their foot.
Ask students to run on the spot. On the command
“freeze”, students stop with their feet apart and their
body lowered. On the command “melt”, students
continue running on the spot.
Students play follow-the-leader. The leader starts by
making large zigzag steps and then increases the
number of steps before changing the direction of
travel.
Ask students to change direction:
with their feet close together
with their feet wider apart
with body held upright
with body dropped down low
with arms kept close by their side.
Students determine which way is the most efficient
and why.
Practising the skill
Students run in an open space. On the command
“change”, they push off on the outside foot to change
direction.
Students dodge off and onto a line. Place some
markers about 40 cm either side of a straight line
about 50 metres long every two metres. Students run
along the line and lower their body when they step out
to the marker and push off and back to the centre line.
Place marks on the ground with chalk, masking tape
or pieces of non-slip matting at random. Students run
to a mark, place their foot on the mark, dodge on that
foot to run towards another marker.
Students follow a partner who runs and dodges
through an imaginary paddock full of prickles.
Students can devise their own safe tracks through the
paddock. Encourage students to bend their knee and
push off on their outside foot when changing direction.
Have students play partner tag games and dodgeball
games, modifying the rules to change direction using
only one step, or make students dodge rather than
jump over the ball.
Curriculum, Learning and Teaching
Observing fundamental movement skills and their components
The following information has been adapted from Get Skilled Get Active (NSW Department of
Education and Training, 2000).
This article will:
introduce some ways to help you observe and make judgements about the development of students’ fundamental movement skills
provide a checklist for each of the twelve fundamental movement skills to assist you in observing the skill components
include professional development activities to help you to understand and recognise the components of each fundamental movement skill.
This article can be read in conjunction with the Get Skilled Get Active – Show me how videos which
demonstrate students who are still developing and students who are already proficient in each
fundamental movement skill. These can be located in the NSW PDHPE Curriculum YouTube Get
Skilled Get Active playlist.
Why should you observe fundamental movement skills?
Observation is a valuable tool to make judgements about what students can or can’t do and identify
the point at which you should target your teaching. When observing students’ fundamental movement
skills, you can use the information you collect to:
plan and program lessons or activities for the whole class, small groups or individuals
assist individual students by providing feedback about their performance
evaluate the effectiveness of your teaching program.
Curriculum, Learning and Teaching 2
How and when should you observe fundamental movement skills?
When observing fundamental movement skills, it is useful to keep in mind the following
considerations.
Observation should be part of the natural teaching and learning situation. Observation needs to
be unobtrusive, as some students may alter their movement pattern if they are aware that they
are being observed.
When observing students performing fundamental movement skills, you should focus on how
the movement looks or which components are evident in the performance, rather than on the
final outcome of the movement, such as how fast the student ran or the accuracy of the throw.
Observation should be objective. This will come with practice and discussion with colleagues.
Ask a colleague to observe and make comments on the performance of a small group of
students. Compare your observations with those of your colleague.
Fundamental movement skills need to be observed in a variety of contexts and over a period of
time if you are to make a fair judgement as to whether a skill has been performed proficiently.
Observation should occur in as many situations as possible and in a variety of contexts. This
can include in physical education lessons, in the playground or at sport.
What do you need to observe about fundamental movement skills?
The first step when observing students perform fundamental movement skills, is to look at the overall
performance of a skill. The key to this is to ask: Does it look right?
More detailed observations can be undertaken when you are familiar with the individual components
of the skill and there is a clear purpose for these observations. For example, it may be to provide
feedback to students or to evaluate a unit of work focusing on kicking.
It is not necessary to be a specialist PE teacher or to have a strong background in sports to be able
to observe students and make judgements about their performance of fundamental movement skills.
Most teachers have a good idea of what a proficient performance looks like. It is the ability to explain
why a student doesn’t look right that requires a higher level of observational skill.
Curriculum, Learning and Teaching 3
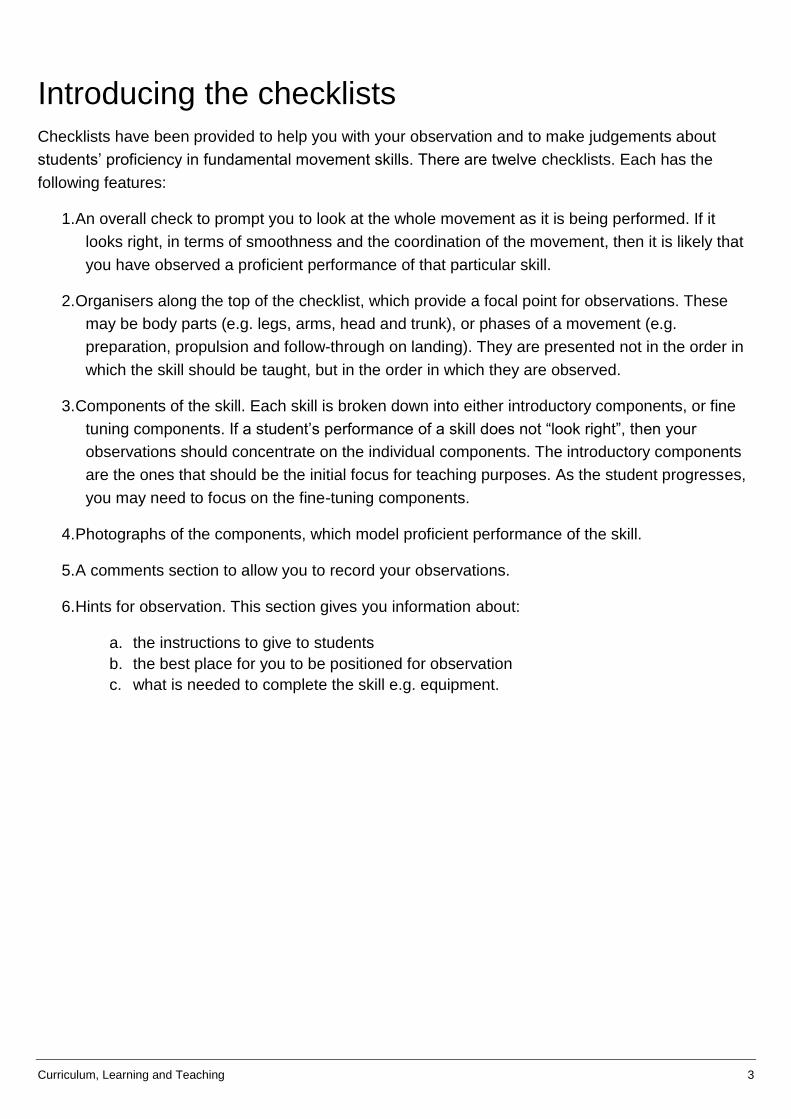
Introducing the checklists
Checklists have been provided to help you with your observation and to make judgements about
students’ proficiency in fundamental movement skills. There are twelve checklists. Each has the
following features:
1. An overall check to prompt you to look at the whole movement as it is being performed. If it
looks right, in terms of smoothness and the coordination of the movement, then it is likely that
you have observed a proficient performance of that particular skill.
2. Organisers along the top of the checklist, which provide a focal point for observations. These
may be body parts (e.g. legs, arms, head and trunk), or phases of a movement (e.g.
preparation, propulsion and follow-through on landing). They are presented not in the order in
which the skill should be taught, but in the order in which they are observed.
3. Components of the skill. Each skill is broken down into either introductory components, or fine
tuning components. If a student’s performance of a skill does not “look right”, then your
observations should concentrate on the individual components. The introductory components
are the ones that should be the initial focus for teaching purposes. As the student progresses,
you may need to focus on the fine-tuning components.
4. Photographs of the components, which model proficient performance of the skill.
5. A comments section to allow you to record your observations.
6. Hints for observation. This section gives you information about:
a. the instructions to give to students
b. the best place for you to be positioned for observation
c. what is needed to complete the skill e.g. equipment.
Curriculum, Learning and Teaching 4
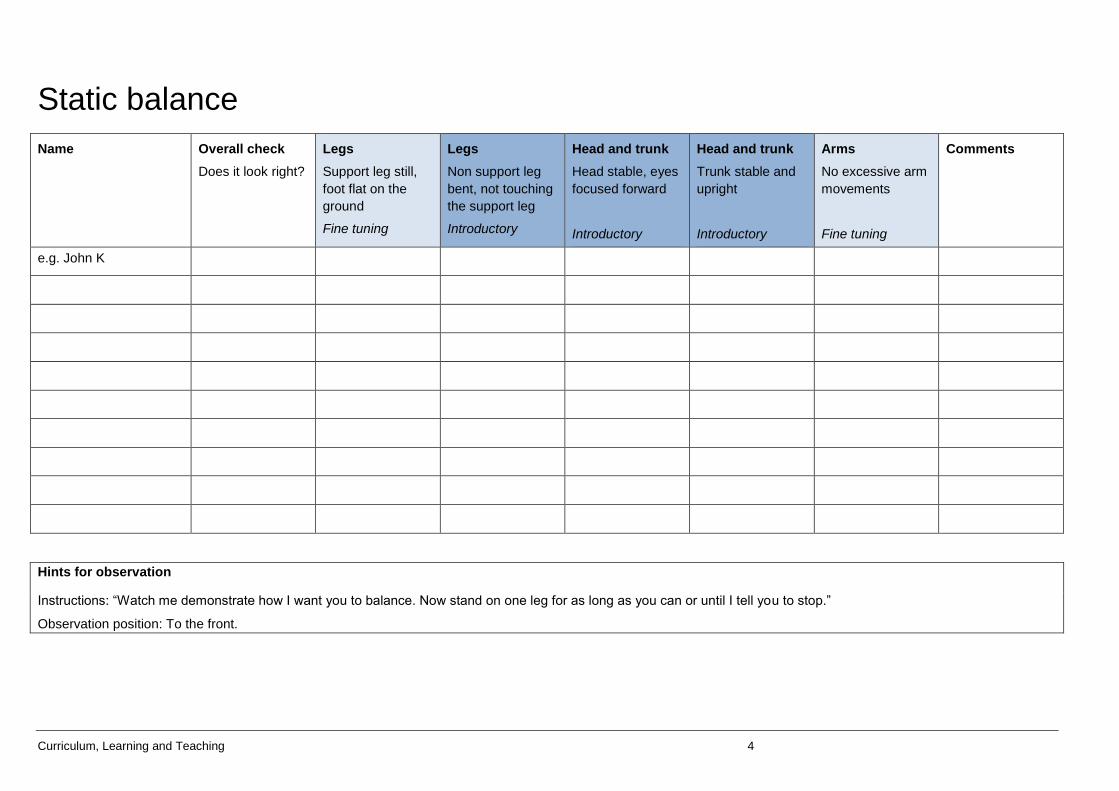
Static balance
Name Overall check
Does it look right?
Legs
Support leg still,
foot flat on the
ground
Fine tuning
Legs
Non support leg
bent, not touching
the support leg
Introductory
Head and trunk
Head stable, eyes
focused forward
Introductory
Head and trunk
Trunk stable and
upright
Introductory
Arms
No excessive arm
movements
Fine tuning
Comments
e.g. John K
Hints for observation
Instructions: “Watch me demonstrate how I want you to balance. Now stand on one leg for as long as you can or until I tell you to stop.”
Observation position: To the front.
Curriculum, Learning and Teaching 5
Sprint run
Name Overall check
Does it look right?
Legs
Lands on ball of the foot
Fine tuning
Legs
Non support knee bends at 90 degrees during the recovery phase
Fine tuning
Legs
High knee lift (thigh almost parallel to the ground)
Introductory
Head and trunk
Head and trunk stable, eyes focussed forward
Introductory
Arms
Elbows bent at 90 degrees
Fine tuning
Arms
Arms drive forward and back in opposition to the legs
Introductory
Comments
e.g. John K
Hints for observation
Instructions: “Run as fast as you can from one end to another.”
Observation position: To the side halfway along, and to the front
Needed: A flat open area, approximately 20 metres long.
Curriculum, Learning and Teaching 6
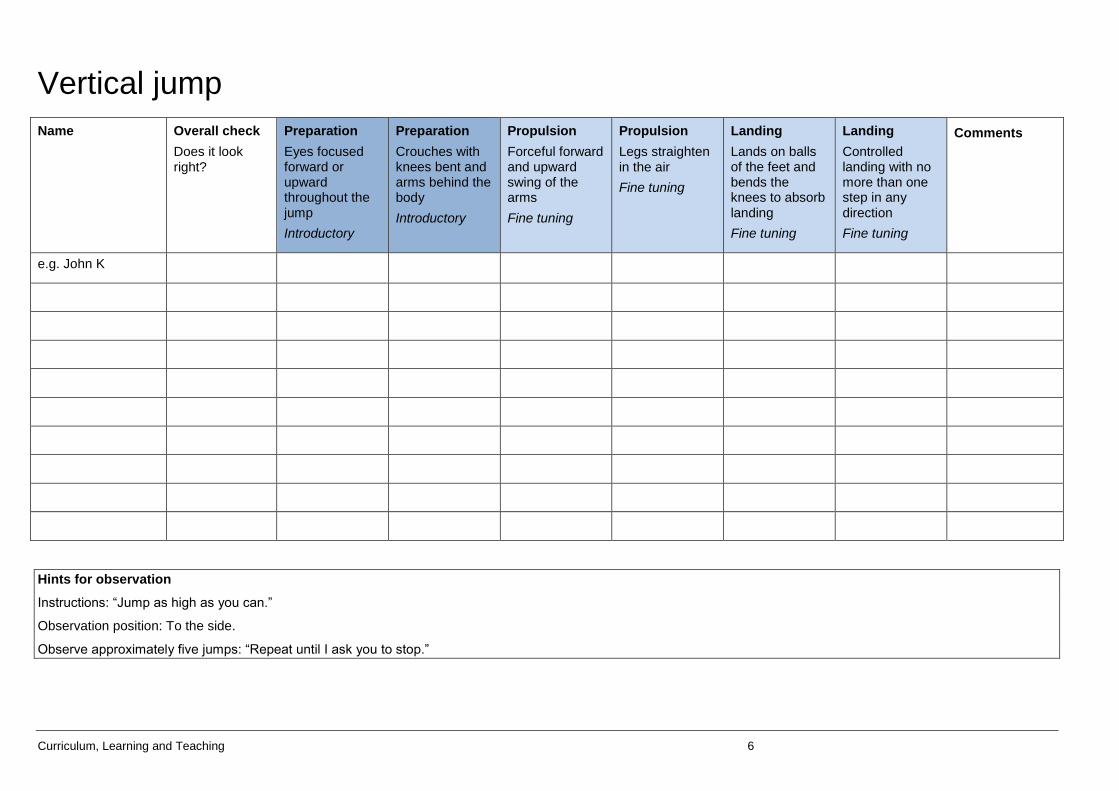
Vertical jump
Name Overall check
Does it look right?
Preparation
Eyes focused forward or upward throughout the jump
Introductory
Preparation
Crouches with knees bent and arms behind the body
Introductory
Propulsion
Forceful forward and upward swing of the arms
Fine tuning
Propulsion
Legs straighten in the air
Fine tuning
Landing
Lands on balls of the feet and bends the knees to absorb landing
Fine tuning
Landing
Controlled landing with no more than one step in any direction
Fine tuning
Comments
e.g. John K
Hints for observation
Instructions: “Jump as high as you can.”
Observation position: To the side.
Observe approximately five jumps: “Repeat until I ask you to stop.”
Curriculum, Learning and Teaching 7
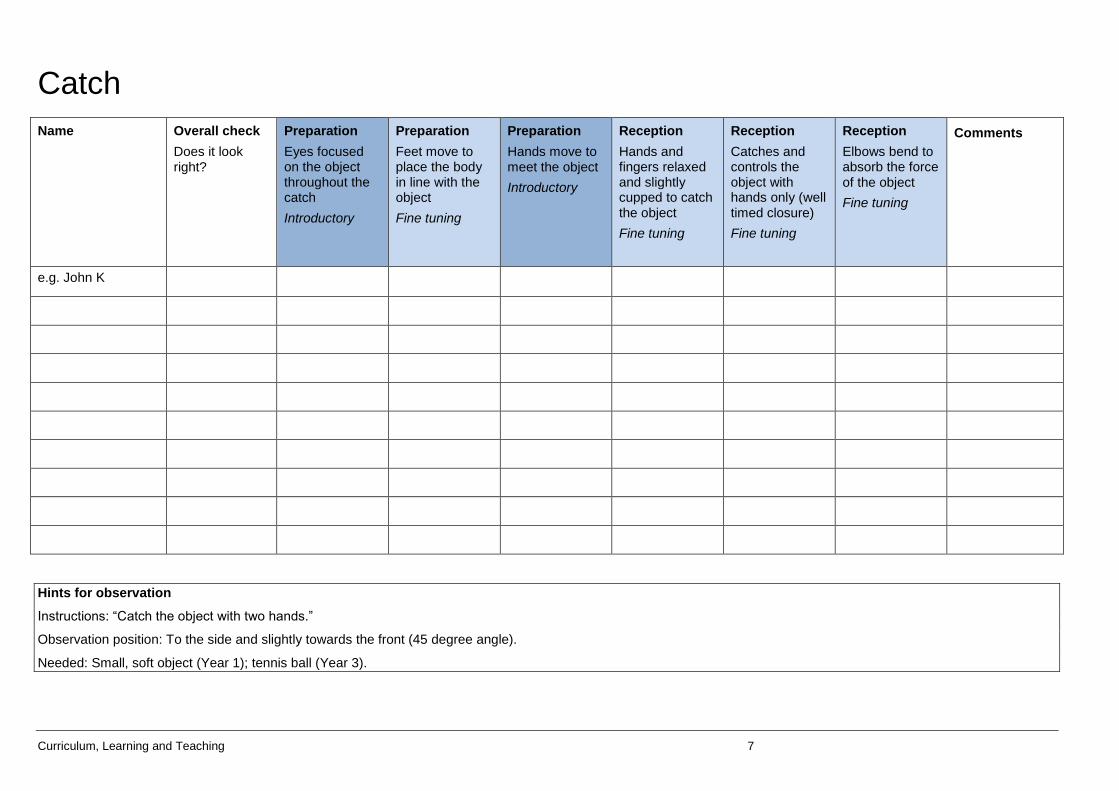
Catch
Name Overall check
Does it look right?
Preparation
Eyes focused on the object throughout the catch
Introductory
Preparation
Feet move to place the body in line with the object
Fine tuning
Preparation
Hands move to meet the object
Introductory
Reception
Hands and fingers relaxed and slightly cupped to catch the object
Fine tuning
Reception
Catches and controls the object with hands only (well timed closure)
Fine tuning
Reception
Elbows bend to absorb the force of the object
Fine tuning
Comments
e.g. John K
Hints for observation
Instructions: “Catch the object with two hands.”
Observation position: To the side and slightly towards the front (45 degree angle).
Needed: Small, soft object (Year 1); tennis ball (Year 3).
Curriculum, Learning and Teaching 8
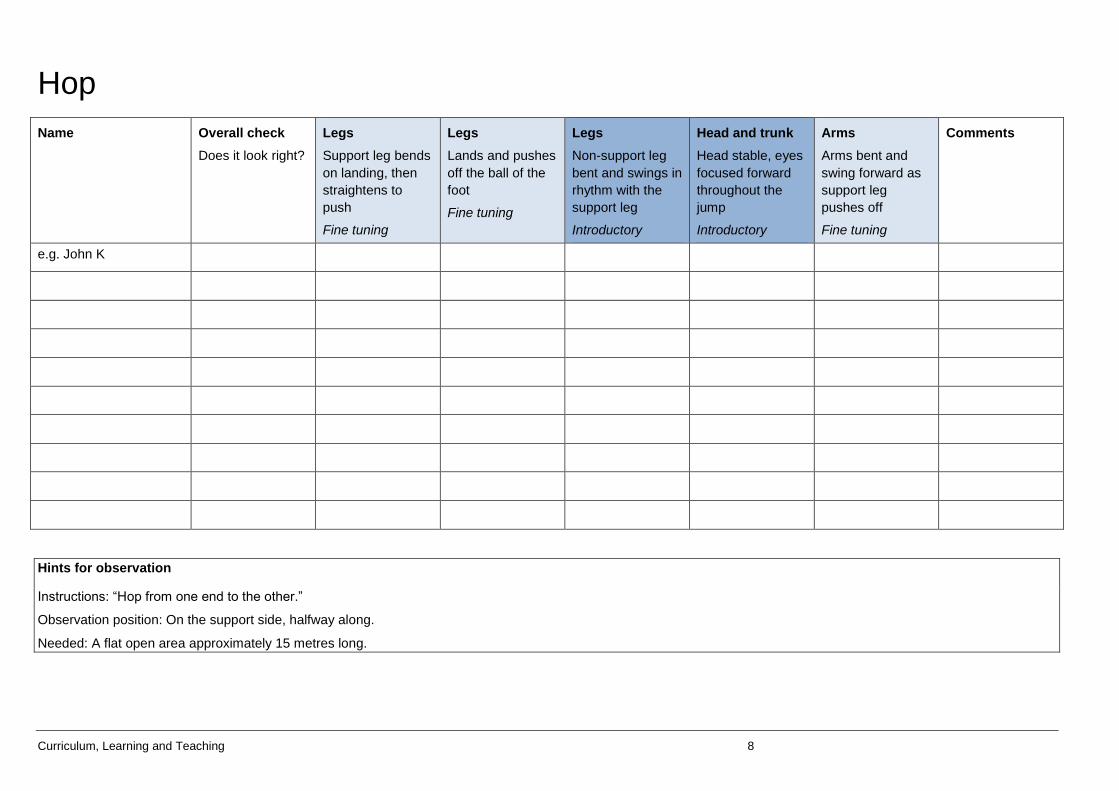
Hop
Name Overall check
Does it look right?
Legs
Support leg bends
on landing, then
straightens to
push
Fine tuning
Legs
Lands and pushes
off the ball of the
foot
Fine tuning
Legs
Non-support leg
bent and swings in
rhythm with the
support leg
Introductory
Head and trunk
Head stable, eyes
focused forward
throughout the
jump
Introductory
Arms
Arms bent and
swing forward as
support leg
pushes off
Fine tuning
Comments
e.g. John K
Hints for observation
Instructions: “Hop from one end to the other.”
Observation position: On the support side, halfway along.
Needed: A flat open area approximately 15 metres long.
Curriculum, Learning and Teaching 9
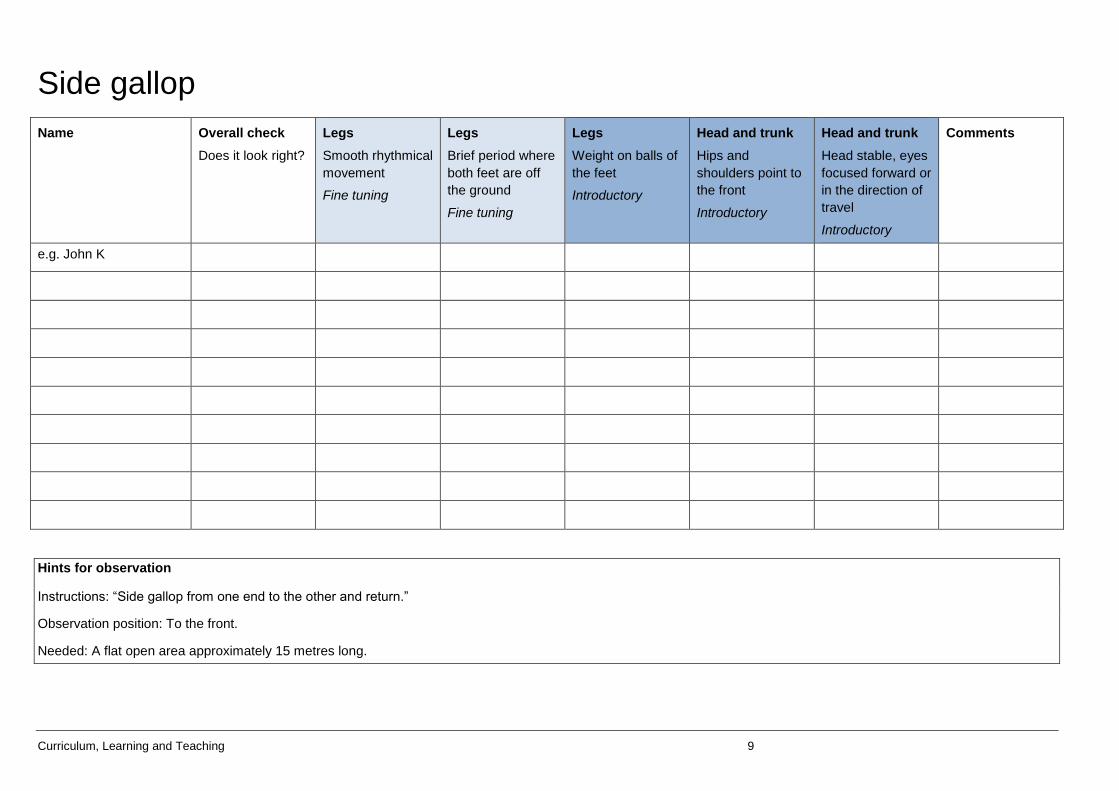
Side gallop
Name Overall check
Does it look right?
Legs
Smooth rhythmical
movement
Fine tuning
Legs
Brief period where
both feet are off
the ground
Fine tuning
Legs
Weight on balls of
the feet
Introductory
Head and trunk
Hips and
shoulders point to
the front
Introductory
Head and trunk
Head stable, eyes
focused forward or
in the direction of
travel
Introductory
Comments
e.g. John K
Hints for observation
Instructions: “Side gallop from one end to the other and return.”
Observation position: To the front.
Needed: A flat open area approximately 15 metres long.
Curriculum, Learning and Teaching 10
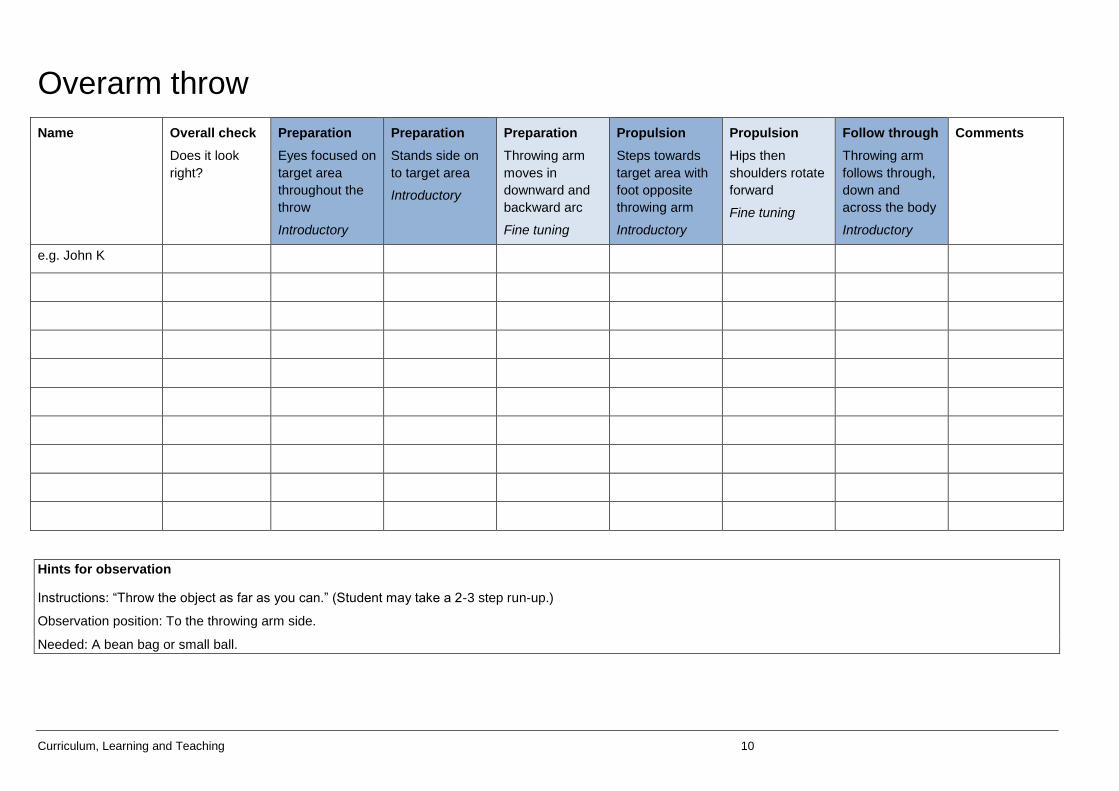
Overarm throw
Name Overall check
Does it look
right?
Preparation
Eyes focused on
target area
throughout the
throw
Introductory
Preparation
Stands side on
to target area
Introductory
Preparation
Throwing arm
moves in
downward and
backward arc
Fine tuning
Propulsion
Steps towards
target area with
foot opposite
throwing arm
Introductory
Propulsion
Hips then
shoulders rotate
forward
Fine tuning
Follow through
Throwing arm
follows through,
down and
across the body
Introductory
Comments
e.g. John K
Hints for observation
Instructions: “Throw the object as far as you can.” (Student may take a 2-3 step run-up.)
Observation position: To the throwing arm side.
Needed: A bean bag or small ball.
Curriculum, Learning and Teaching 11
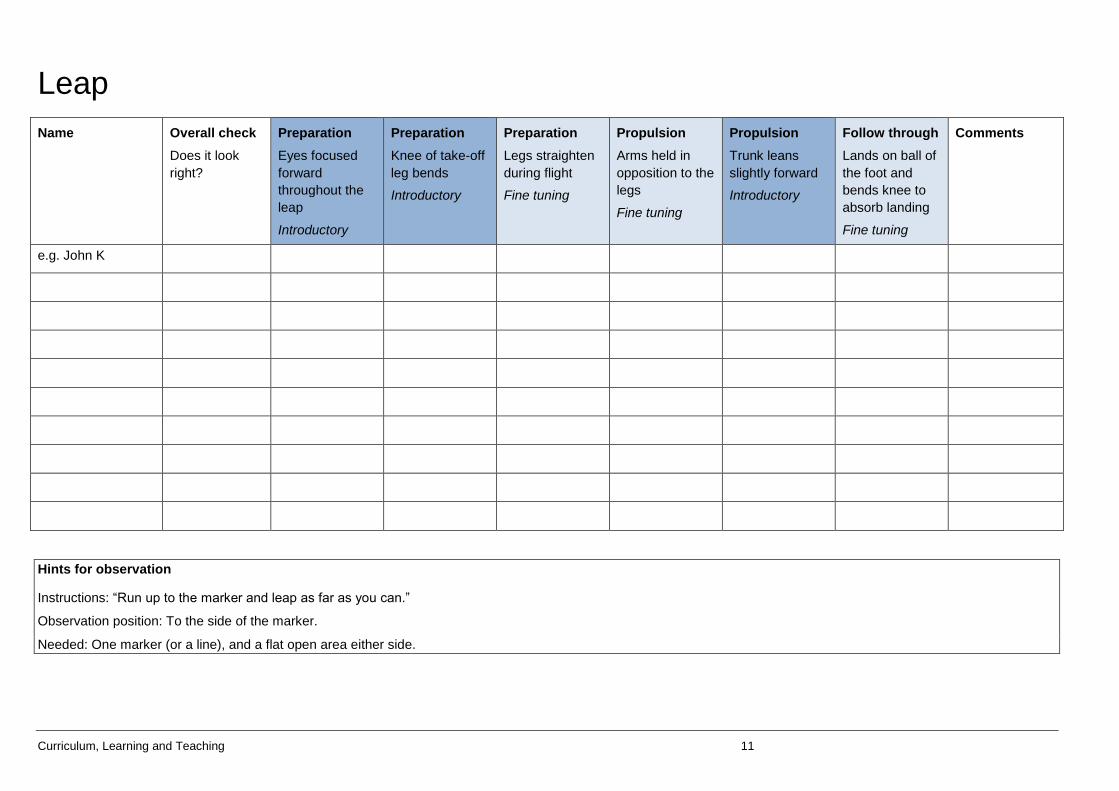
Leap
Name Overall check
Does it look
right?
Preparation
Eyes focused
forward
throughout the
leap
Introductory
Preparation
Knee of take-off
leg bends
Introductory
Preparation
Legs straighten
during flight
Fine tuning
Propulsion
Arms held in
opposition to the
legs
Fine tuning
Propulsion
Trunk leans
slightly forward
Introductory
Follow through
Lands on ball of
the foot and
bends knee to
absorb landing
Fine tuning
Comments
e.g. John K
Hints for observation
Instructions: “Run up to the marker and leap as far as you can.”
Observation position: To the side of the marker.
Needed: One marker (or a line), and a flat open area either side.
Curriculum, Learning and Teaching 12
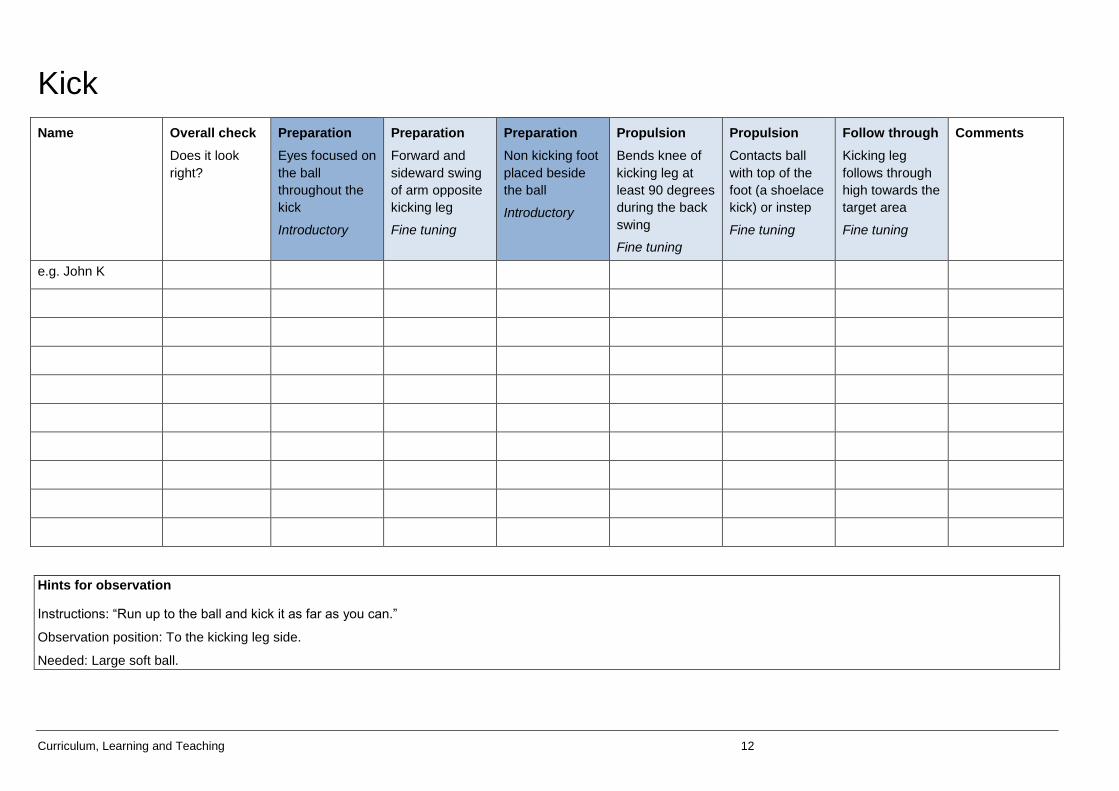
Kick
Name Overall check
Does it look
right?
Preparation
Eyes focused on
the ball
throughout the
kick
Introductory
Preparation
Forward and
sideward swing
of arm opposite
kicking leg
Fine tuning
Preparation
Non kicking foot
placed beside
the ball
Introductory
Propulsion
Bends knee of
kicking leg at
least 90 degrees
during the back
swing
Fine tuning
Propulsion
Contacts ball
with top of the
foot (a shoelace
kick) or instep
Fine tuning
Follow through
Kicking leg
follows through
high towards the
target area
Fine tuning
Comments
e.g. John K
Hints for observation
Instructions: “Run up to the ball and kick it as far as you can.”
Observation position: To the kicking leg side.
Needed: Large soft ball.
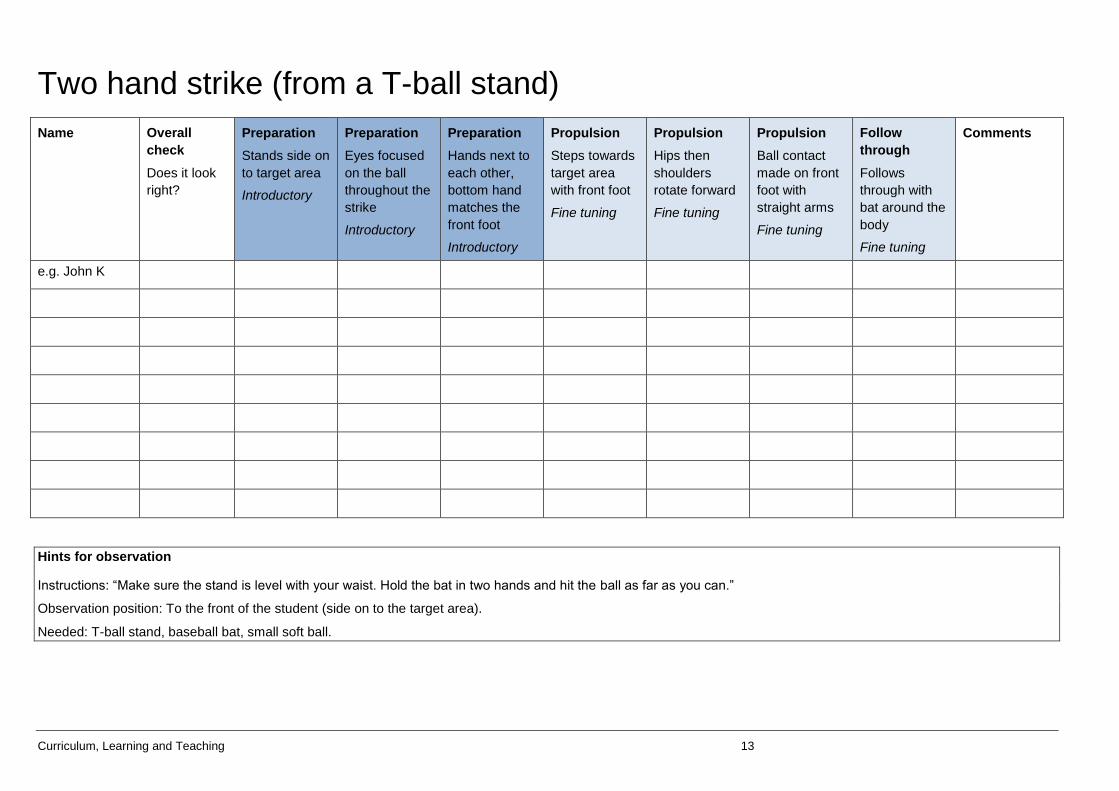
Curriculum, Learning and Teaching 13
Two hand strike (from a T-ball stand)
Name Overall
check
Does it look
right?
Preparation
Stands side on
to target area
Introductory
Preparation
Eyes focused
on the ball
throughout the
strike
Introductory
Preparation
Hands next to
each other,
bottom hand
matches the
front foot
Introductory
Propulsion
Steps towards
target area
with front foot
Fine tuning
Propulsion
Hips then
shoulders
rotate forward
Fine tuning
Propulsion
Ball contact
made on front
foot with
straight arms
Fine tuning
Follow
through
Follows
through with
bat around the
body
Fine tuning
Comments
e.g. John K
Hints for observation
Instructions: “Make sure the stand is level with your waist. Hold the bat in two hands and hit the ball as far as you can.”
Observation position: To the front of the student (side on to the target area).
Needed: T-ball stand, baseball bat, small soft ball.

Curriculum, Learning and Teaching 14
Dodge
Name Overall check
Does it look right?
Legs
Changes direction
by bending knee
and pushing off
the outside foot
Fine tuning
Legs
Change of
direction occurs in
one step.
Fine tuning
Head and trunk
Body lowered
during change of
direction or in the
direction of travel.
Introductory
Head and trunk
Eyes focused
forward.
Introductory
Whole body
Dodge repeated
equally well on
both sides.
Fine tuning
Comments
e.g. John K
Hints for observation
Instructions: “Run up to each marker and dodge from it as fast as you can.”
Observation position: To the front.
Needed: Six to ten markers arranged in a zig-zag formation.
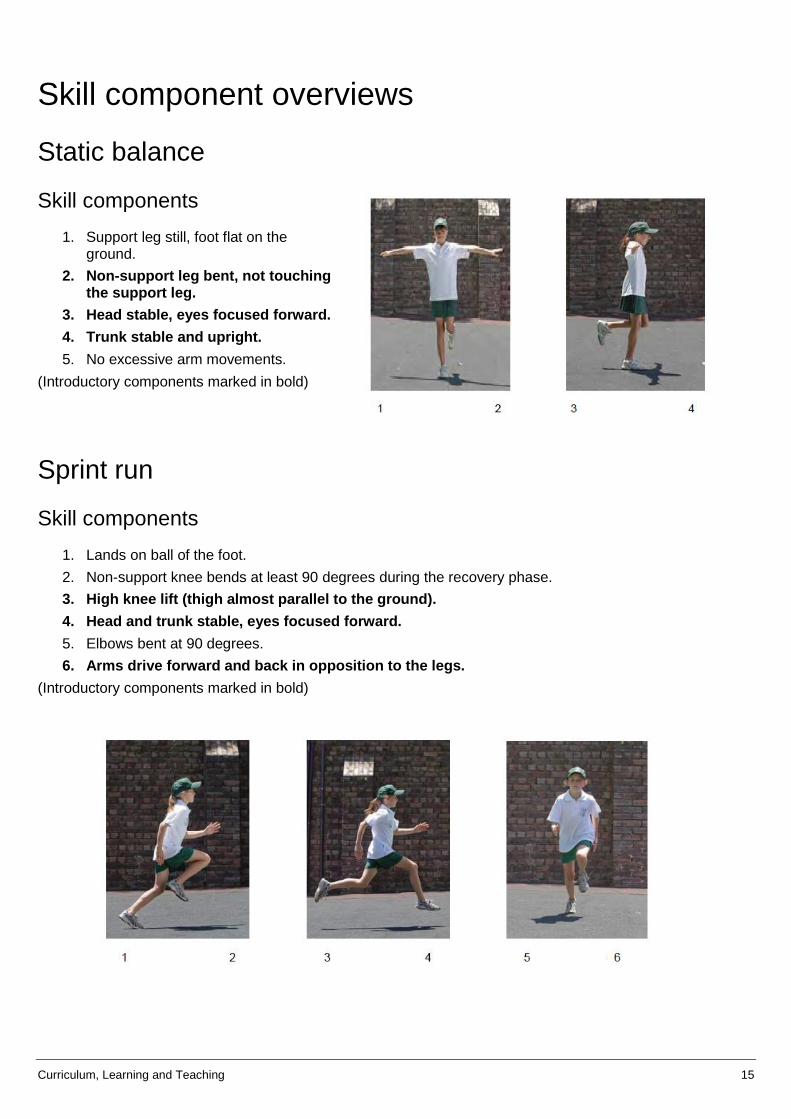
Curriculum, Learning and Teaching 15
Skill component overviews
Static balance
Skill components
1. Support leg still, foot flat on the ground.
2. Non-support leg bent, not touching the support leg.
3. Head stable, eyes focused forward.
4. Trunk stable and upright.
5. No excessive arm movements.
(Introductory components marked in bold)
Sprint run
Skill components
1. Lands on ball of the foot.
2. Non-support knee bends at least 90 degrees during the recovery phase.
3. High knee lift (thigh almost parallel to the ground).
4. Head and trunk stable, eyes focused forward.
5. Elbows bent at 90 degrees.
6. Arms drive forward and back in opposition to the legs.
(Introductory components marked in bold)
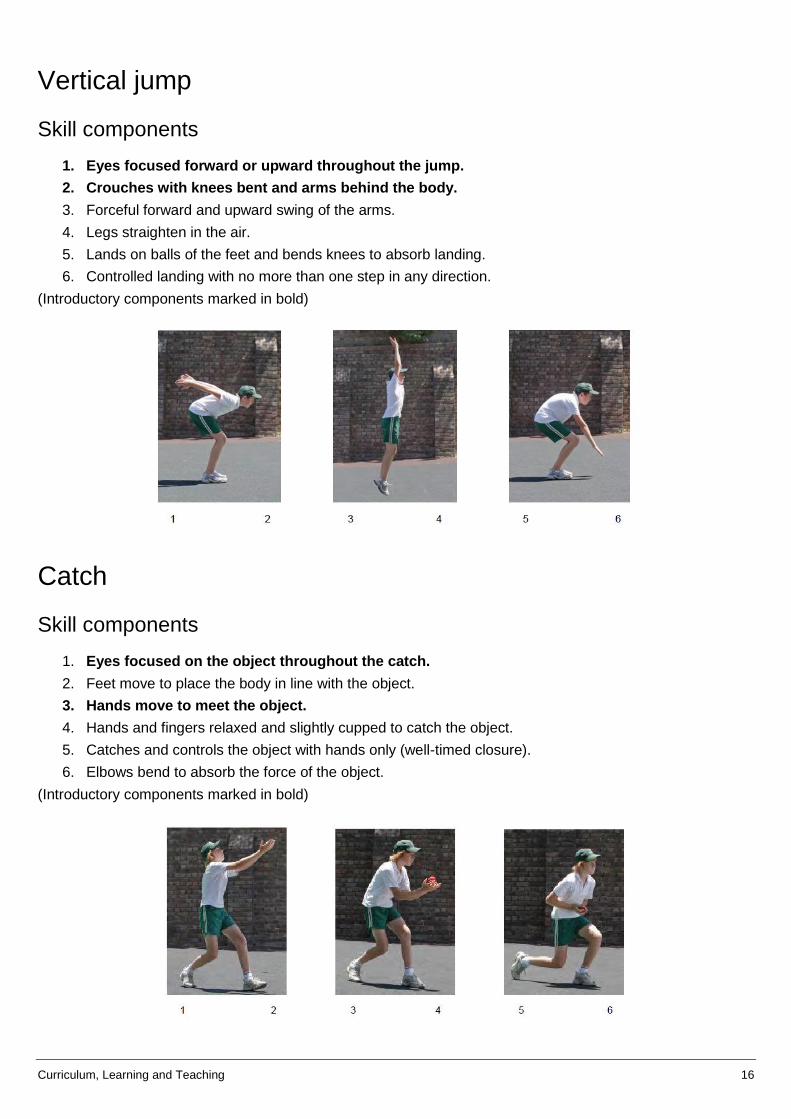
Curriculum, Learning and Teaching 16
Vertical jump
Skill components
1. Eyes focused forward or upward throughout the jump.
2. Crouches with knees bent and arms behind the body.
3. Forceful forward and upward swing of the arms.
4. Legs straighten in the air.
5. Lands on balls of the feet and bends knees to absorb landing.
6. Controlled landing with no more than one step in any direction.
(Introductory components marked in bold)
Catch
Skill components
1. Eyes focused on the object throughout the catch.
2. Feet move to place the body in line with the object.
3. Hands move to meet the object.
4. Hands and fingers relaxed and slightly cupped to catch the object.
5. Catches and controls the object with hands only (well-timed closure).
6. Elbows bend to absorb the force of the object.
(Introductory components marked in bold)
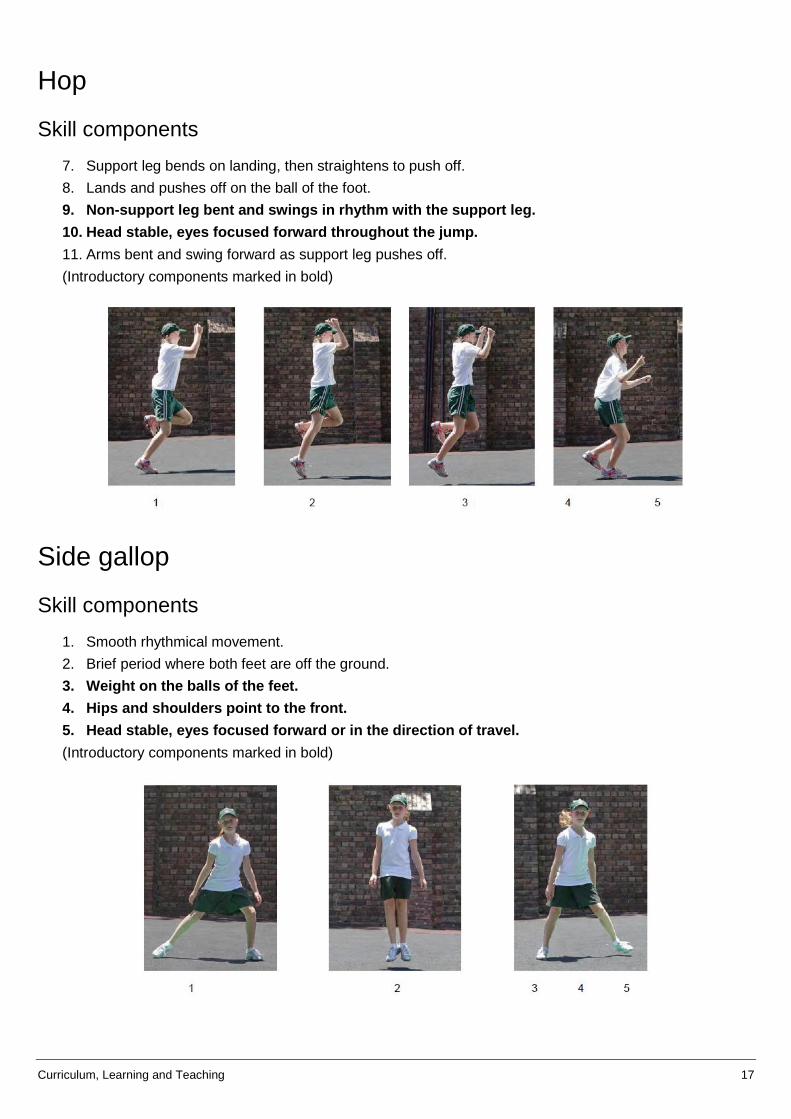
Curriculum, Learning and Teaching 17
Hop
Skill components
7. Support leg bends on landing, then straightens to push off.
8. Lands and pushes off on the ball of the foot.
9. Non-support leg bent and swings in rhythm with the support leg.
10. Head stable, eyes focused forward throughout the jump.
11. Arms bent and swing forward as support leg pushes off.
(Introductory components marked in bold)
Side gallop
Skill components
1. Smooth rhythmical movement.
2. Brief period where both feet are off the ground.
3. Weight on the balls of the feet.
4. Hips and shoulders point to the front.
5. Head stable, eyes focused forward or in the direction of travel.
(Introductory components marked in bold)
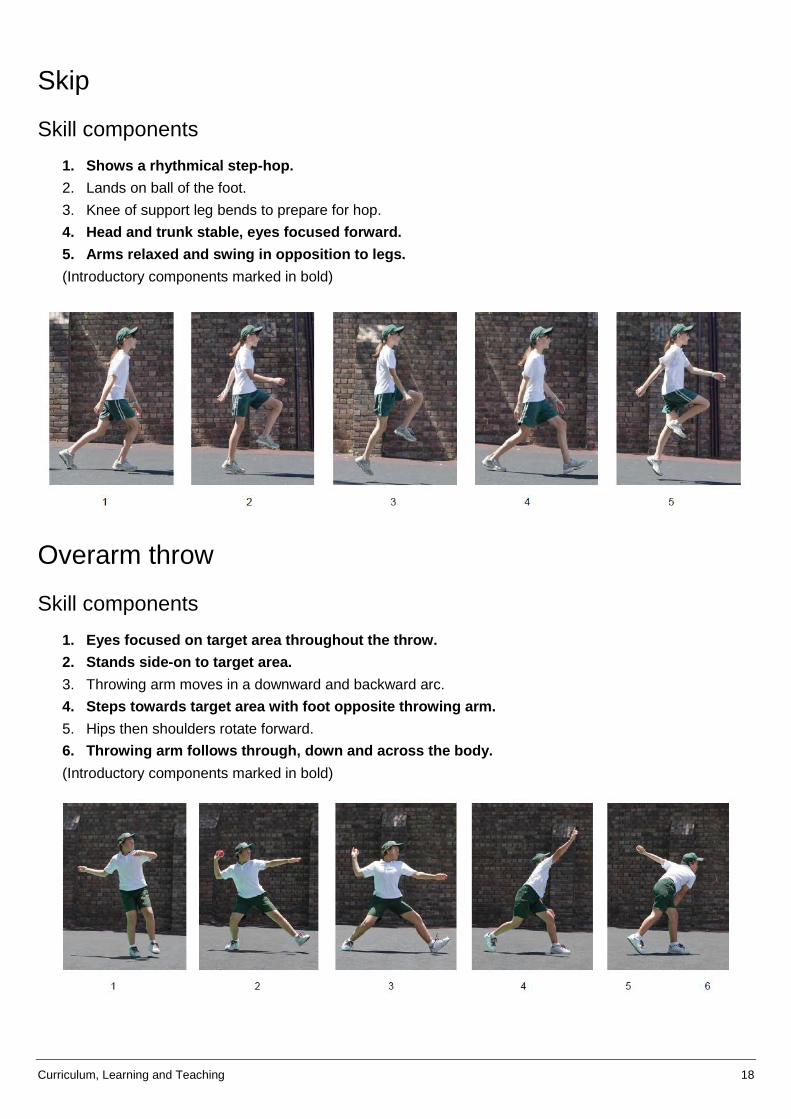
Curriculum, Learning and Teaching 18
Skip
Skill components
1. Shows a rhythmical step-hop.
2. Lands on ball of the foot.
3. Knee of support leg bends to prepare for hop.
4. Head and trunk stable, eyes focused forward.
5. Arms relaxed and swing in opposition to legs.
(Introductory components marked in bold)
Overarm throw
Skill components
1. Eyes focused on target area throughout the throw.
2. Stands side-on to target area.
3. Throwing arm moves in a downward and backward arc.
4. Steps towards target area with foot opposite throwing arm.
5. Hips then shoulders rotate forward.
6. Throwing arm follows through, down and across the body.
(Introductory components marked in bold)
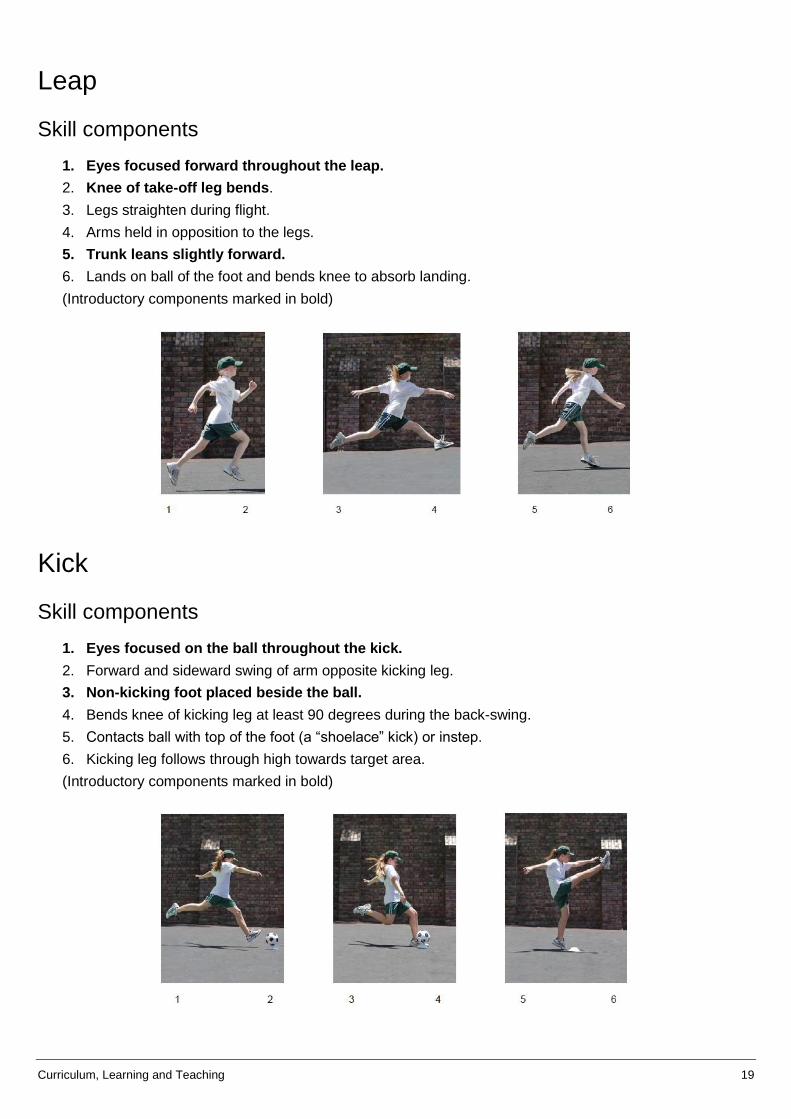
Curriculum, Learning and Teaching 19
Leap
Skill components
1. Eyes focused forward throughout the leap.
2. Knee of take-off leg bends.
3. Legs straighten during flight.
4. Arms held in opposition to the legs.
5. Trunk leans slightly forward.
6. Lands on ball of the foot and bends knee to absorb landing.
(Introductory components marked in bold)
Kick
Skill components
1. Eyes focused on the ball throughout the kick.
2. Forward and sideward swing of arm opposite kicking leg.
3. Non-kicking foot placed beside the ball.
4. Bends knee of kicking leg at least 90 degrees during the back-swing.
5. Contacts ball with top of the foot (a “shoelace” kick) or instep.
6. Kicking leg follows through high towards target area.
(Introductory components marked in bold)
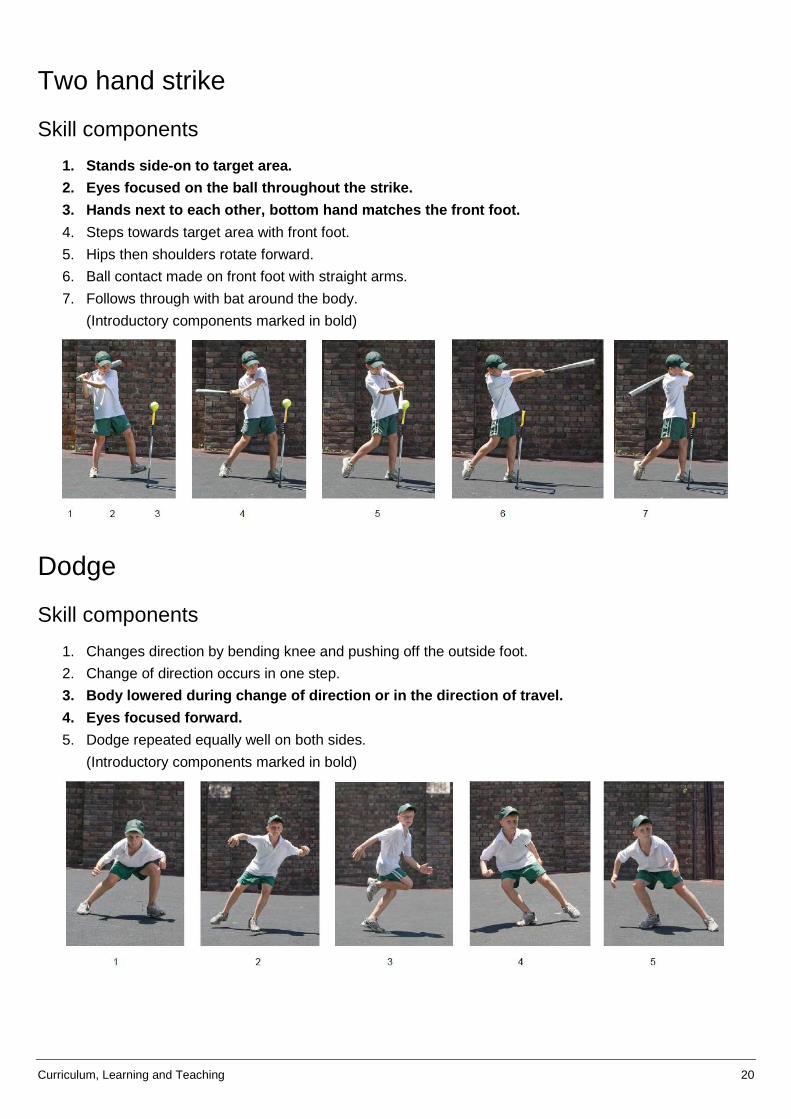
Curriculum, Learning and Teaching 20
Two hand strike
Skill components
1. Stands side-on to target area.
2. Eyes focused on the ball throughout the strike.
3. Hands next to each other, bottom hand matches the front foot.
4. Steps towards target area with front foot.
5. Hips then shoulders rotate forward.
6. Ball contact made on front foot with straight arms.
7. Follows through with bat around the body.
(Introductory components marked in bold)
Dodge
Skill components
1. Changes direction by bending knee and pushing off the outside foot.
2. Change of direction occurs in one step.
3. Body lowered during change of direction or in the direction of travel.
4. Eyes focused forward.
5. Dodge repeated equally well on both sides.
(Introductory components marked in bold)
Curriculum, Learning and Teaching 21
Put it into practice – Professional learning
Introducing the video
The Get skilled: Get active—Show me how
videos have been produced to help you to gain
an understanding of each fundamental
movement skill and its components and
develop your observational skills. On each
video, students from Kindergarten to Year 5
demonstrate the twelve selected fundamental
movement skills. The students are described
as either developing or proficient in their
performance of each skill.
Each skill is presented on the video in the
following way:
a graphic interface indicates the skill that is being featured
a coloured ball identifies the level of performance of the skill (i.e. proficient or developing)
a student performs the skill proficiently. The text and the voice-over are used to highlight each skill’s components
a number of students who have developed a few but not all of the components also perform the skill. The voice-over is used to help focus your observations on these developing components
the skill is demonstrated once again by the proficient student. The text and a freeze frame repeat the components of the skill.
The video should be used with the checklists of
the fundamental movement skills found earlier
in this article and the professional development
activities that follow.
Introducing the professional development activities
The following professional development
activities will help you with your understanding
and observation of fundamental movement
skills.
These activities can be used flexibly depending
on the needs of the different audiences using
the resource.
Some suggestions for using these activities
include:
At a staff development day, develop a PDHPE K-6 scope and sequence with a focused sequential approach to teaching fundamental movement skills.
At staff meetings, introduce three or four skills per meeting and use the video to help teachers come to recognise the components of each skill.
At stage or grade meetings, examine the fundamental movement skills which should be taught in the year or stage. Reflect on your PDHPE programs and identify where fundamental movement skills will be taught. Create a list of activities which enable students to practise their fundamental movement skills.
At PDHPE committee meetings, work through the materials and develop strategies to inform staff about the issues relating to fundamental movement skills.
As an individual or with a colleague, try some of the activities in your own class and discuss the findings with a colleague.
Curriculum, Learning and Teaching 22
ACTIVITY: Looking at the big picture
Purpose:
This activity is designed for a group situation, such as staff meetings, PDHPE committee meetings or
district PDHPE interest groups. It works best if you use a facilitator or presenter to lead the group
through the activity.
What’s needed?
butchers paper or whiteboard
checklists for static balance and sprint run
Get skilled: Get active—Show me how videos.
Steps:
1. Ask the group to list the twelve fundamental movement skills in this resource. When completed,
record them on butchers paper or on a whiteboard.
2. Discuss the following questions:
Why might these skills be considered “fundamental”?
How do they vary from what you may have previously thought to be fundamental movement skills?
What are your concerns about making judgements about students’ proficiency in performing these fundamental movement skills?
What is needed for you to be able to make judgements effectively and confidently?
3. Examine the checklist for the static balance. Discuss the layout and the terminology used to describe the components.
4. Invite each member of the group to work with a partner. Take turns performing the static balance. Use the checklist to evaluate your partner’s performance. Share your findings with your partner.
5. Watch the introduction and the first skill on the video, which is the static balance, to become familiar with the format. Stop the video after the final closing shot of the proficient performance of the static balance (i.e. before the sprint run).
6. Ask the group to locate the “Overall check” column on the static balance checklist. Invite the group to complete the overall check column for the static balance for the students on the video. Ask the group how they identified which was the proficient student. Recall the comments made on the video for the static balance. Direct the group to the links between the student’s performance, the text on screen, the voice-over and the checklists.
7. Now examine the sprint run checklist. Invite a member of the group to perform this skill. As a group, make a decision about the overall check: Does it look right?
Watch the relevant section of the video. Encourage the group to make comments about the students’ performances.
Curriculum, Learning and Teaching 23
Discuss:
What were the observable differences between the performance of the proficient student and the developing students? Encourage the use of language similar to the components when making comments. For example “trunk unstable, lands flatfooted.”
Compare your observations and comments with those on the video.
8. Negotiate with the group how this session is to be continued. For example:
Devote some time now and sometime in the near future to work through a similar process to become familiar with all the skills and their components.
Watch all of the video, with discussion breaks after a number of skills.
ACTIVITY: Focussing on a skill
Purpose:
This activity is designed to enable teachers to become familiar with the components of fundamental
movement skills and to further develop their observation skills. It can be undertaken as a group
activity or on an individual basis.
What’s needed?
a selection of checklists for fundamental movement skills
Get skilled: Get active —Show me how videos
Steps:
1. After reviewing all the fundamental movement skills and their components, choose one or two skills to focus on and observe in more detail.
2. Cue the video to the relevant skill. Play the video with the volume off (so that you cannot hear the voice-over). Use the checklist to record your observations of the students on the video. Replay the video to observe the skill a number of times.
3. Discuss your observations with the rest of the group.
4. Replay the video with the volume up to enable you to hear the voice-over. Compare and discuss your observations with the comments made on the video. Are there any other things you observed?
5. Repeat this process, focusing on other fundamental movement skills.
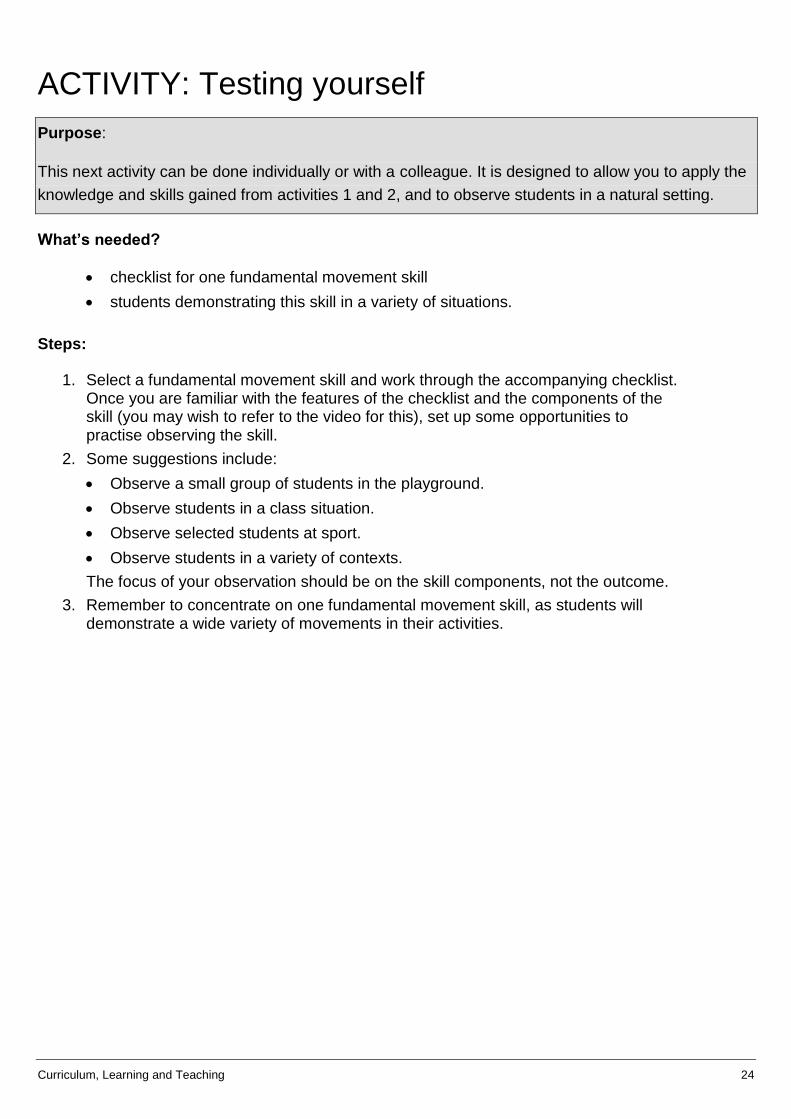
Curriculum, Learning and Teaching 24
ACTIVITY: Testing yourself
Purpose:
This next activity can be done individually or with a colleague. It is designed to allow you to apply the
knowledge and skills gained from activities 1 and 2, and to observe students in a natural setting.
What’s needed?
checklist for one fundamental movement skill
students demonstrating this skill in a variety of situations.
Steps:
1. Select a fundamental movement skill and work through the accompanying checklist. Once you are familiar with the features of the checklist and the components of the skill (you may wish to refer to the video for this), set up some opportunities to practise observing the skill.
2. Some suggestions include:
Observe a small group of students in the playground.
Observe students in a class situation.
Observe selected students at sport.
Observe students in a variety of contexts.
The focus of your observation should be on the skill components, not the outcome.
3. Remember to concentrate on one fundamental movement skill, as students will demonstrate a wide variety of movements in their activities.
Curriculum, Learning and Teaching
Introducing fundamental movement skills The following information has been adapted from Get Skilled Get Active (NSW Department of
Education and Training, 2000).
This article will offer information and advice on:
how to plan and program fundamental movement skills so that all students have the opportunity to become proficient in each skill by the end of primary school.
a developmental approach to introducing and teaching each of the twelve fundamental movement skills from Kindergarten to Year 6
professional learning activities to help with planning and programming fundamental movement skills in your school PDHPE and sport programs.
Considerations when programming fundamental movement skills
When planning and programming for the development of fundamental movement skills, take into
account policies and requirements, as well as the individual circumstances in your school.
The Personal Development, Health and Physical Education K-6 syllabus
Personal Development, Health and Physical Education (PDHPE) is mandatory for all students
Kindergarten to Year 6. Students are required to participate in PDHPE for 1.5 to 2.5 hours each week.
Sport and Physical Activity policy
In NSW government schools, students in Years K-10 are required to participate in a minimum of 150
minutes of planned moderate with some vigorous physical activity across the school week. This time
includes planned PDHPE and weekly sport.
School circumstances, which will impact on decisions, include such aspects as the availability of
facilities and equipment, school structure, staffing and climate.
To program and plan for the development of fundamental movement skills, it is important to
remember the following key points.
Early Stage 1 and Stage 1 are the best times to introduce fundamental movement skills.
240–600 minutes of instruction time are needed to develop a fundamental movement skill to a level of proficiency.
The development and practice of fundamental movement skills should be a significant element of PDHPE and sport programs across all stages.
Teaching programs should focus on a manageable number of fundamental movement skills each year. Four skills each year are suggested.
The growth and development of students have an important influence on which skills and skill components can be learnt.
Curriculum, Learning and Teaching
Fundamental movement skills planning guide
The planning guide takes the previous factors into account.
Introducing skills
It is recommended that:
four skills be introduced for focused teaching each year in Early Stage 1 to Stage 2, to consolidate student learning
students also be exposed to activities that include the other eight fundamental movement skills
the teaching of fundamental movement skills is manageable within the context of a school’s PDHPE program
the introduction and teaching of FMS matches students’ growth and development
students are given adequate opportunities to practise four skills each year, to increase the likelihood that they will develop proficiency in the introductory components of each skill by the end of that year.
Key years for student development of each FMS
Once students have developed the introductory components of a skill:
shift the teaching and learning focus to the development of the fine-tuning components
allow a three-year period of practice and consolidation for each skill to promote proficiency.
Benchmarks for proficiency
Students should demonstrate proficiency in all twelve fundamental movement skills by the end of
Year 6. However, with adequate learning and practice time, most students, given their stage of
growth and development, should be able to demonstrate the fundamental movement skills earlier
than this..
To integrate the development of fundamental movement skills into existing PDHPE and sport
programs:
teach fundamental movement skills in a variety of contexts, such as daily physical activity,
dance, gymnastics, movement exploration, games and sport sessions
plan at a whole school, stage and class level to support integration.
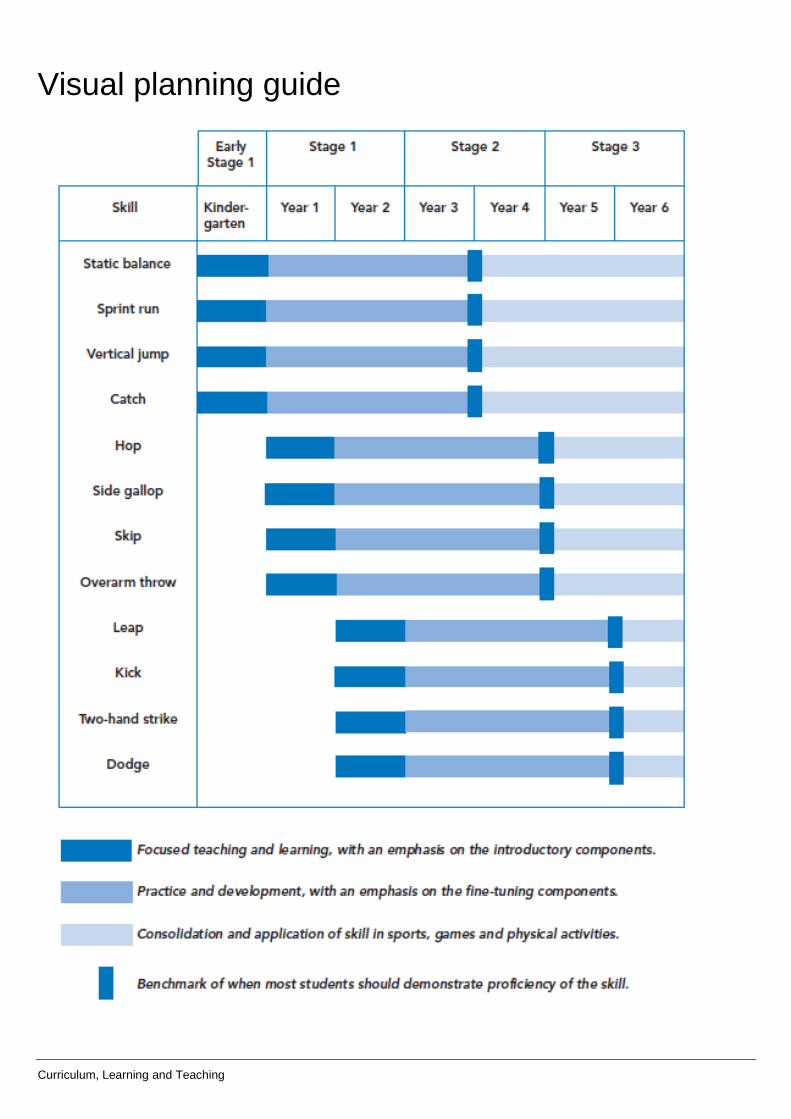
Curriculum, Learning and Teaching
Visual planning guide
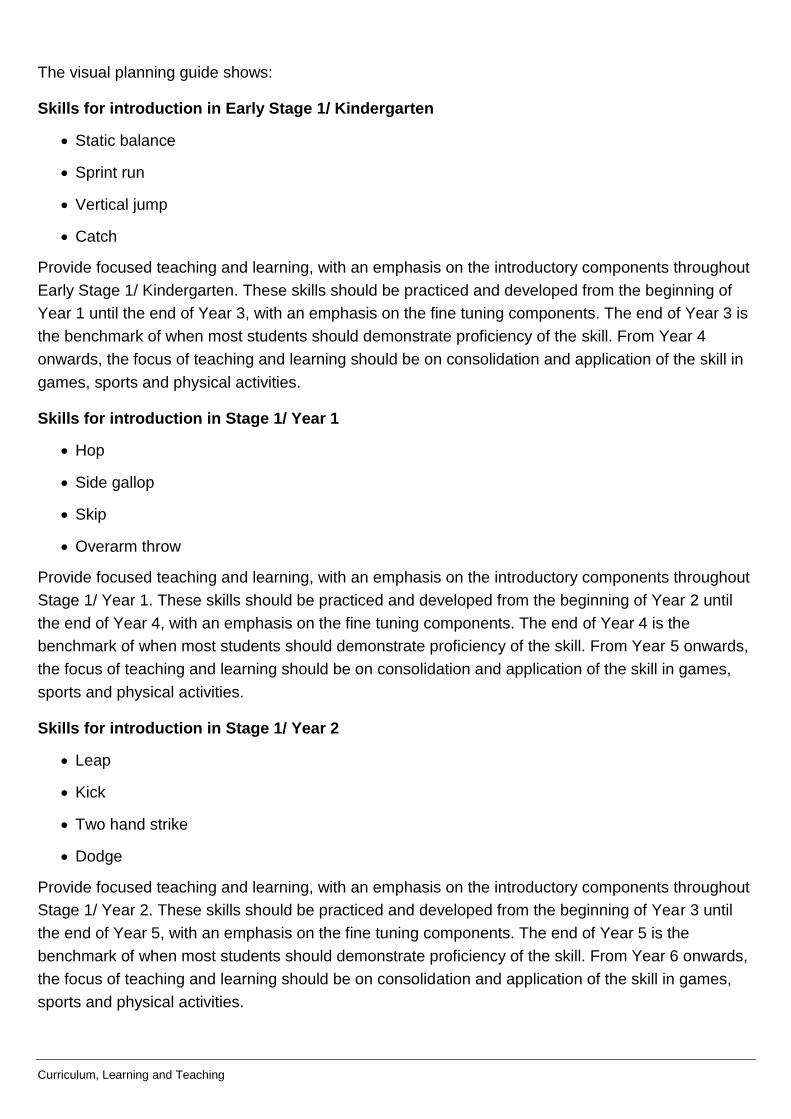
Curriculum, Learning and Teaching
The visual planning guide shows:
Skills for introduction in Early Stage 1/ Kindergarten
Static balance
Sprint run
Vertical jump
Catch
Provide focused teaching and learning, with an emphasis on the introductory components throughout
Early Stage 1/ Kindergarten. These skills should be practiced and developed from the beginning of
Year 1 until the end of Year 3, with an emphasis on the fine tuning components. The end of Year 3 is
the benchmark of when most students should demonstrate proficiency of the skill. From Year 4
onwards, the focus of teaching and learning should be on consolidation and application of the skill in
games, sports and physical activities.
Skills for introduction in Stage 1/ Year 1
Hop
Side gallop
Skip
Overarm throw
Provide focused teaching and learning, with an emphasis on the introductory components throughout
Stage 1/ Year 1. These skills should be practiced and developed from the beginning of Year 2 until
the end of Year 4, with an emphasis on the fine tuning components. The end of Year 4 is the
benchmark of when most students should demonstrate proficiency of the skill. From Year 5 onwards,
the focus of teaching and learning should be on consolidation and application of the skill in games,
sports and physical activities.
Skills for introduction in Stage 1/ Year 2
Leap
Kick
Two hand strike
Dodge
Provide focused teaching and learning, with an emphasis on the introductory components throughout
Stage 1/ Year 2. These skills should be practiced and developed from the beginning of Year 3 until
the end of Year 5, with an emphasis on the fine tuning components. The end of Year 5 is the
benchmark of when most students should demonstrate proficiency of the skill. From Year 6 onwards,
the focus of teaching and learning should be on consolidation and application of the skill in games,
sports and physical activities.
Curriculum, Learning and Teaching
ACTIVITY: Where do fundamental movement skills fit into the PDHPE syllabus?
Purpose:
This activity is designed to explore where fundamental movement skills are addressed in the PDHPE
K-6 syllabus. It can be undertaken as a group activity or on an individual basis.
What’s needed?
PDHPE K-6 syllabus
FMS planning guide
Steps:
1. Focus on the outcomes for one stage in the PDHPE K-6 Syllabus. Which PDHPE outcomes are relevant to the development of fundamental movement skills?
2. Make a list of the sorts of things students would be doing to demonstrate achievement of these outcomes.
3. Refer to the “Stage Statements” in the syllabus to examine some of the expectations about achievements for each particular stage.
4. Examine the content strands. What content is linked to the development of fundamental movement skills?
5. Discuss the implications of the Planning guide for programming and teaching fundamental movement skills at your school.
It is important to note that the development of fundamental movement skills is only one part of the
PDHPE syllabus. There are other important outcomes which also need to be addressed as part of
your PDHPE program.
Curriculum, Learning and Teaching
ACTIVITY: Considerations when programming fundamental movement skills
Purpose:
This activity is designed to explore some of the whole-school issues which need to be addressed
when planning and programming fundamental movement skills.
Steps:
1. Reflect on the implications of the following statements.
Fundamental movement skills in perspective
“From 2015, NSW government schools should aim to provide a minimum of 150 minutes per week to
planned physical activity in each year from Kindergarten to Year 10.” NSW Department of Education,
Sport and Physical Activity policy
Skill development
“A child’s Physical Literacy ‘toolkit’ does not comprise pens and computers, but instead skipping
ropes, bicycles, open spaces and encouragement and guidance from loved ones, friends, coaches
and teachers. These ‘tools’ are developed through the learning that takes place not only in homes
and schools, but also on playing fields, beaches and walking trails with significant others (i.e.,
teachers, coaches, family and friends). (Active Healthy Kids Australia, 2016 Report Card on physical
activity for children and young people, 2016)
2. Consider the implications of these statements.
3. What issues or concerns arise as a result of a focus on the development of fundamental movement skills in your PDHPE or sport program:
at a school level?
at a class or stage level?
at a personal level?
4. Share your responses with other teachers. Make a note of the common issues as they arise. These responses should be considered in future discussions and in the later stages of planning and programming.
Curriculum, Learning and Teaching
ACTIVITY: School analysis
Purpose:
This activity is designed to help you identify the current situation in your school concerning
fundamental movement skills. It also provides an opportunity to develop a whole-school action plan
to address issues or concerns. This activity works best if done with the whole staff or a group of
teachers responsible for PDHPE and sport programs in the school.
Steps:
1. Work with colleagues to reach a consensus about the school’s position for each of the key areas listed in the “What’s happening in our school” checklist.
Tick the box which best describes your school situation.
Yes: If this is happening in your school and you are satisfied with it.
Review: If something is in place but you feel that it could be improved.
No: If it is not happening.
2. Analyse the key issues you have marked “No” or “Review.” Prioritise these key issues as a starting point for an action plan.
3. Discuss what can be done to improve or address the key issues identified in the action plan.
4. Record the actions to be taken and the person or people responsible for each area identified.
Curriculum, Learning and Teaching
What’s happening in our school checklist
Tick the box which best describes your school situation.
Yes: If this is happening in your school and you are satisfied with it.
Review: If something is in place but you feel that it could be improved.
No: If it is not happening.
PDHPE and sport
The school PDHPE and school sport programs are comprehensive, sequentially developed and include opportunities for students to develop fundamental movement skills.
Teachers’ knowledge and expertise in teaching fundamental movement skills are supported through professional development activities.
Students are given maximum opportunities to develop and practise fundamental movement skills.
Staff are actively engaged in teaching fundamental movement skills in the school’s PDHPE and school sport programs.
An adequate amount of curriculum time is allocated to the school’s PDHPE and school sport programs.
School ethos
Students are encouraged to practise fundamental movement skills in games and activities during recess and lunch breaks.
Rosters are devised to give students equal access to equipment.
PDHPE and sport are supported by school policies and practices, such as the school uniform policy, first aid procedures and recognition of both boys and girls.
PDHPE and school sport are components of the school plan.
Home-school-community interface
Development of fundamental movement skills in PDHPE and sport is stated and supported as part of the school’s management plan and shared with the community.
Parents are given opportunities to be involved in programs which support the development of fundamental movement skills.
Parents are provided with information to help them support their child’s skill development and physical activity at home.
Curriculum, Learning and Teaching
ACTIVITY: Curriculum analysis
Purpose:
This activity looks at where fundamental movement skills are currently taught in the school’s PDHPE
and school sport programs. This activity is best carried out as a whole school activity to enable
teachers to appreciate the importance of developing and teaching fundamental movement skills in
each year.
Steps:
1. Watch the developing an effective scope and sequence K-6 PDHPE video
2. Use the K-6 PDHPE scope and sequence evaluation tool as an interactive form to critique your own practice in PDHPE as part of the teaching and learning cycle.
o Map where fundamental movement skills are currently taught in the school’s program for PDHPE and school sport.
o Identify any areas which may need strengthening in the school’s scope and sequence for PDHPE and the school sport program. Discuss how this might be done.
o Identify any issues or concerns which may arise and propose possible solutions to these.
3. Use the K-6 programming section of the PDHPE website to plan for the creation of a school scope and sequence for PDHPE.
o Consider whether the scope and sequence meets requirements?
o Ensure FMS are mapped across Kindergarten to Year 6 in a manner that reflects the planning guide.
o Incorporate a wide range of physical activity contexts.
o Reflect the application of fundamental movement skills and broader movement competencies in various physical activity contexts and situations across Kindergarten to Year 6.
4. Determine which units of work would support the development of fundamental movement skills in each year. Predict the types of skills which may be covered in each unit of work.
5. Access and review the sample units of work in the resources section of the PDHPE website to identify which units could be used or modified for use in the school. Develop additional units using the sample units as a guide.
Curriculum, Learning and Teaching
Assessing fundamental movement skills
The following information has been adapted from Get Skilled Get Active (NSW Department of
Education and Training, 2000).
This article will:
examine ways to assess fundamental movement skills as part of your PDHPE program
identify links to the K-6 PDHPE syllabus
provide ideas for assessing the development of students’ fundamental movement skills.
Links to the K-6 PDHPE syllabus
Fundamental movement skills are an integral component of the K-6 PDHPE syllabus. The overall
description of student achievement which is typically expected by the end of a stage is included as
part of the Stage Statements in the syllabus.
Typically at the end of each stage, i.e. Kindergarten, Year 2, Year 4 and Year 6, teachers need to
make a judgement about student performance. Are students progressing towards, have they
achieved or are they working beyond the outcomes for that stage?
Outcomes are statements of the knowledge and understandings and skills which, it is expected, most
students will gain by the end of a stage.
Exploring assessment
Assessment (as described by the Board of Studies, Teaching and Educational Standards)
provides opportunities for teachers to gather evidence about student achievement in relation to syllabus outcomes
enables students to demonstrate what they know and can do
clarifies student understanding of concepts and promotes deeper understanding
provides evidence that current understanding is a suitable basis for future learning.
Curriculum, Learning and Teaching
Why assess student fundamental movement skills?
The main reasons we need to assess and monitor student performance are:
to enhance student learning. This can help diagnose student needs and will enable you to provide valuable feedback to students.
to evaluate the effectiveness of PDHPE programs. This will assist you in identifying the strengths and weaknesses of your program and help you to select future teaching strategies to achieve the outcomes of the unit.
to provide information for reporting student achievement. This can help you to provide feedback on the quality of student performance and also assist you in providing feedback to parents.
It is important to note that the development of fundamental movement skills is only one part of the
PDHPE syllabus. Other important outcomes also need to be assessed as part of your PDHPE
program.
Fundamental movement skills are also one group of a broader set of movement skills which students
will develop through PDHPE and school sport. When combined with movement concepts and applied
within different physical activity contexts, students will develop movement competency.
The NSW Physical Literacy continuum K-10 provides additional guidance on student progression
across movement competencies and other critical aspects of physical literacy.
How do I make judgements about student performance and achievement of syllabus outcomes?
It is not possible to make a judgement about the achievement of an outcome on the basis of one
performance alone or by using a single assessment strategy. You will need to:
make a judgement based on a range of evidence collected and observations of what the students can demonstrate
give students opportunities to demonstrate achievement of an outcome in a range of contexts
build into your teaching and learning practice ways of monitoring and assessing fundamental movement skills
observe students in the playground and at sporting carnivals, coaching sporting teams or observing students in PE lessons, to recognise any strengths and weaknesses with students’ development of fundamental movement skills
diagnose precisely the nature and extent of the problem
monitor development of these skills over time, recognising that students’ movement skills will be developing at different rates and in different stages.
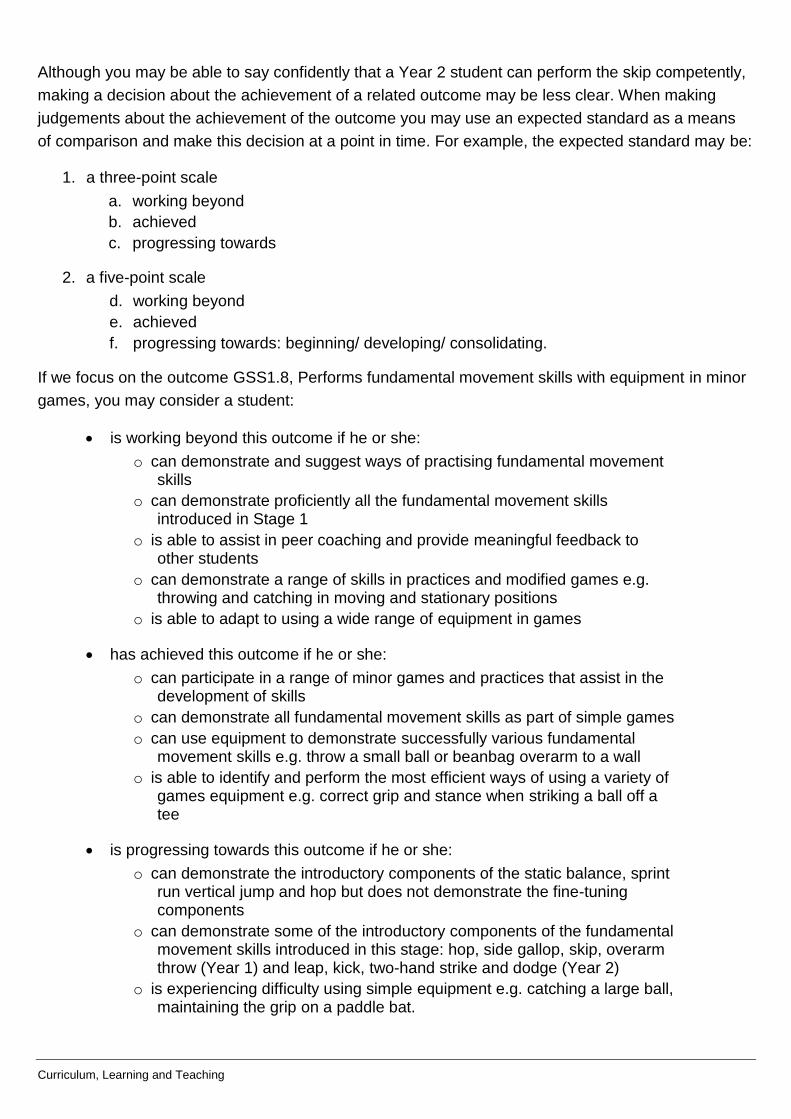
Curriculum, Learning and Teaching
Although you may be able to say confidently that a Year 2 student can perform the skip competently,
making a decision about the achievement of a related outcome may be less clear. When making
judgements about the achievement of the outcome you may use an expected standard as a means
of comparison and make this decision at a point in time. For example, the expected standard may be:
1. a three-point scale
a. working beyond
b. achieved
c. progressing towards
2. a five-point scale
d. working beyond
e. achieved
f. progressing towards: beginning/ developing/ consolidating.
If we focus on the outcome GSS1.8, Performs fundamental movement skills with equipment in minor
games, you may consider a student:
is working beyond this outcome if he or she:
o can demonstrate and suggest ways of practising fundamental movement skills
o can demonstrate proficiently all the fundamental movement skills introduced in Stage 1
o is able to assist in peer coaching and provide meaningful feedback to other students
o can demonstrate a range of skills in practices and modified games e.g. throwing and catching in moving and stationary positions
o is able to adapt to using a wide range of equipment in games
has achieved this outcome if he or she:
o can participate in a range of minor games and practices that assist in the development of skills
o can demonstrate all fundamental movement skills as part of simple games
o can use equipment to demonstrate successfully various fundamental movement skills e.g. throw a small ball or beanbag overarm to a wall
o is able to identify and perform the most efficient ways of using a variety of games equipment e.g. correct grip and stance when striking a ball off a tee
is progressing towards this outcome if he or she:
o can demonstrate the introductory components of the static balance, sprint run vertical jump and hop but does not demonstrate the fine-tuning components
o can demonstrate some of the introductory components of the fundamental movement skills introduced in this stage: hop, side gallop, skip, overarm throw (Year 1) and leap, kick, two-hand strike and dodge (Year 2)
o is experiencing difficulty using simple equipment e.g. catching a large ball, maintaining the grip on a paddle bat.
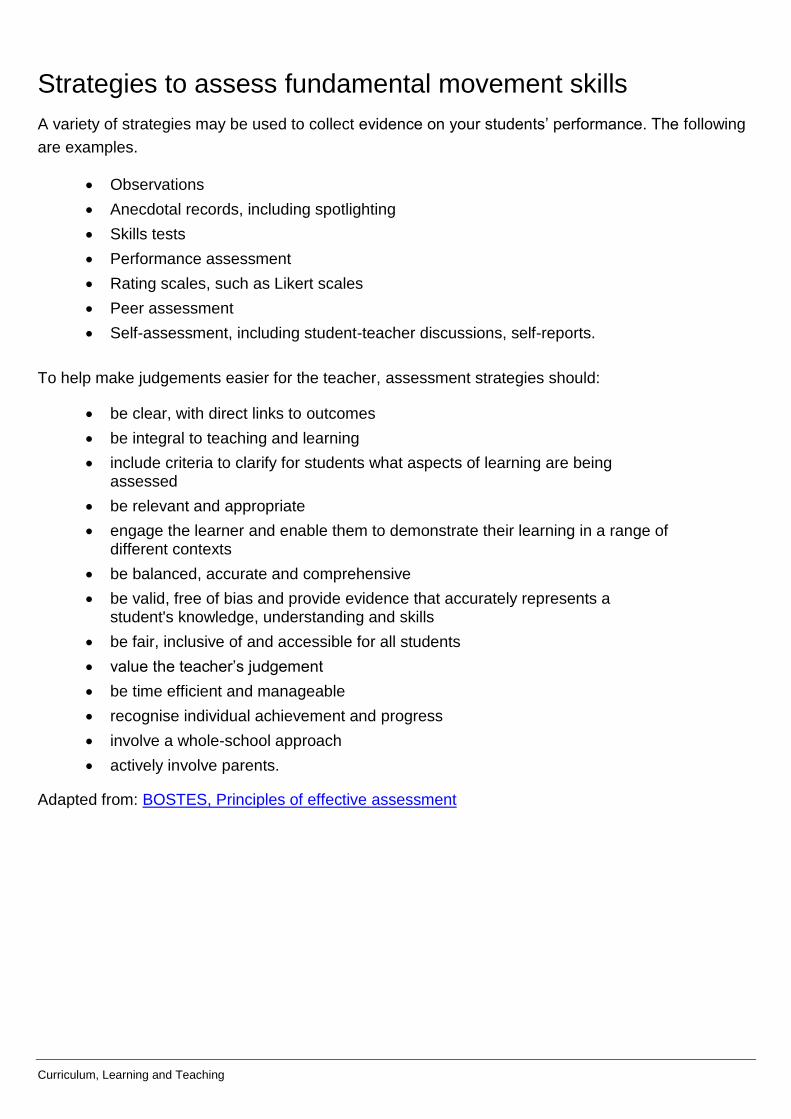
Curriculum, Learning and Teaching
Strategies to assess fundamental movement skills
A variety of strategies may be used to collect evidence on your students’ performance. The following
are examples.
Observations
Anecdotal records, including spotlighting
Skills tests
Performance assessment
Rating scales, such as Likert scales
Peer assessment
Self-assessment, including student-teacher discussions, self-reports.
To help make judgements easier for the teacher, assessment strategies should:
be clear, with direct links to outcomes
be integral to teaching and learning
include criteria to clarify for students what aspects of learning are being assessed
be relevant and appropriate
engage the learner and enable them to demonstrate their learning in a range of different contexts
be balanced, accurate and comprehensive
be valid, free of bias and provide evidence that accurately represents a student's knowledge, understanding and skills
be fair, inclusive of and accessible for all students
value the teacher’s judgement
be time efficient and manageable
recognise individual achievement and progress
involve a whole-school approach
actively involve parents.
Adapted from: BOSTES, Principles of effective assessment
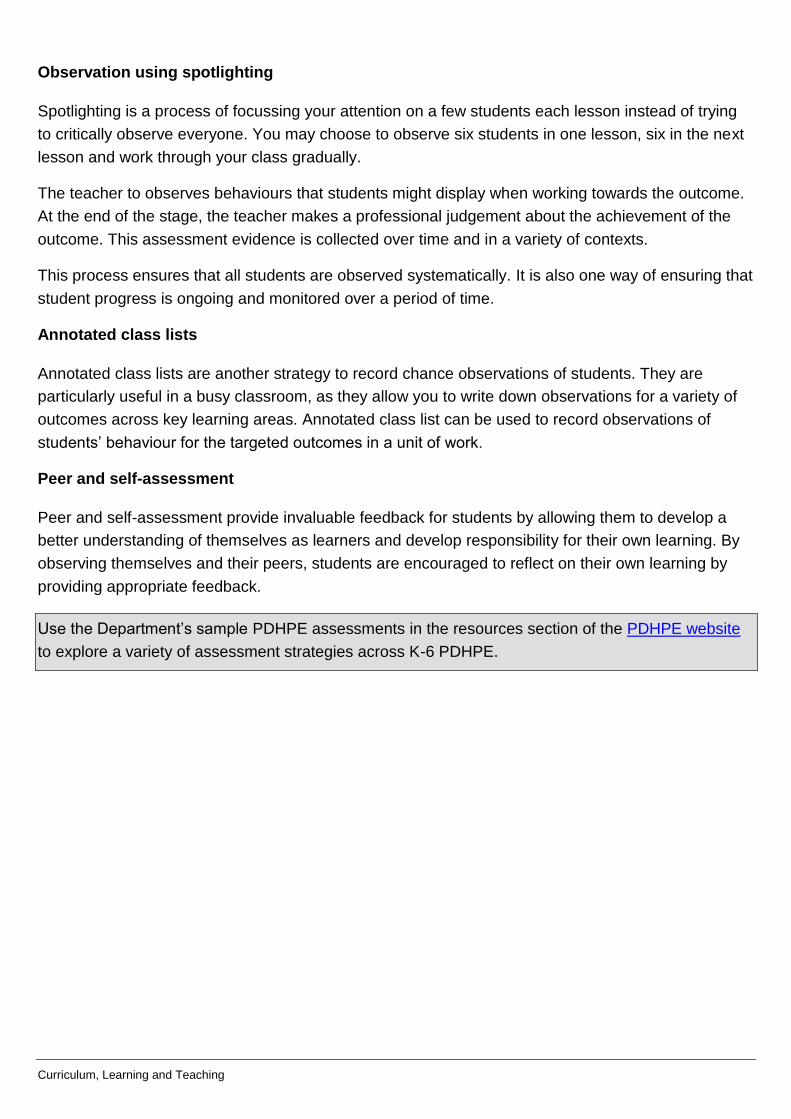
Curriculum, Learning and Teaching
Observation using spotlighting
Spotlighting is a process of focussing your attention on a few students each lesson instead of trying
to critically observe everyone. You may choose to observe six students in one lesson, six in the next
lesson and work through your class gradually.
The teacher to observes behaviours that students might display when working towards the outcome.
At the end of the stage, the teacher makes a professional judgement about the achievement of the
outcome. This assessment evidence is collected over time and in a variety of contexts.
This process ensures that all students are observed systematically. It is also one way of ensuring that
student progress is ongoing and monitored over a period of time.
Annotated class lists
Annotated class lists are another strategy to record chance observations of students. They are
particularly useful in a busy classroom, as they allow you to write down observations for a variety of
outcomes across key learning areas. Annotated class list can be used to record observations of
students’ behaviour for the targeted outcomes in a unit of work.
Peer and self-assessment
Peer and self-assessment provide invaluable feedback for students by allowing them to develop a
better understanding of themselves as learners and develop responsibility for their own learning. By
observing themselves and their peers, students are encouraged to reflect on their own learning by
providing appropriate feedback.
Use the Department’s sample PDHPE assessments in the resources section of the PDHPE website
to explore a variety of assessment strategies across K-6 PDHPE.