Embed Size (px)
Citation preview
Oracle BI Suite EE 10g R3: Build Repositories
Volume 2 - Student Guide
D53149GC11
Edition 1.1
March 2008
D54269
®
Ora
cle
Inte
rnal
& O
racl
e A
cade
my
Use
Onl
y

AuthorJim Sarokin
Technical Contributors and Reviewers
Matt Bedin
Dan Hilldale
Gerry Langton
Sharonda Pettiett
Phillip Scott
Kasturi Shekhar
Krishnan Viswanathan
Kurt Wolff
EditorsAmitha NarayanRichard WallisRaj Kumar
Graphic DesignerSamir Mozumdar
PublishersMichael Sebastian AlmeidaVeena Narasimhan
Copyright © 2008, Oracle. All rights reserved.
Disclaimer
This document contains proprietary information and is protected by copyright and other intellectual property laws. You may copy and print this document solely for your own use in an Oracle training course. The document may not be modified or altered in any way. Except where your use constitutes "fair use" under copyright law, you may not use, share, download, upload, copy, print, display, perform, reproduce, publish, license, post, transmit, or distribute this document in whole or in part without the express authorization of Oracle.
The information contained in this document is subject to change without notice. If you find any problems in the document, please report them in writing to: Oracle University, 500 Oracle Parkway, Redwood Shores, California 94065 USA. This document is not warranted to be error-free.
Restricted Rights Notice
If this documentation is delivered to the United States Government or anyone using the documentation on behalf of the United States Government, the following notice is applicable:
U.S. GOVERNMENT RIGHTSThe U.S. Government’s rights to use, modify, reproduce, release, perform, display, or disclose these training materials are restricted by the terms of the applicable Oracle license agreement and/or the applicable U.S. Government contract.
Trademark Notice
Oracle is a registered trademark of Oracle Corporation and/or its affiliates. Other names may be trademarks of their respective owners.
Ora
cle
Inte
rnal
& O
racl
e A
cade
my
Use
Onl
y

iii
Contents I Course Introduction
Lesson Agenda I-2 Instructor and Class Participants I-3 Training Site Information I-4 Course Audience I-5 Course Prerequisites I-6 Course Goal I-7 Course Objectives I-8 Course Methodology I-12 Course Materials I-13 Course Agenda I-14 Summary I-19
1 Repository Basics
Objectives 1-2 Oracle BI Architecture Components 1-3 Clients 1-4 Oracle BI Presentation Services 1-5 Oracle BI Server 1-6 Oracle BI Repository 1-7 Data Sources 1-8 Sample Request Processing 1-9 Oracle BI Administration Tool 1-10 Physical Layer 1-11 Physical Layer Objects 1-12 Business Model and Mapping Layer 1-13 Business Model and Mapping Layer Objects 1-14 Business Model Mappings 1-15 Measures 1-16 Presentation Layer 1-17 Presentation Layer Mappings 1-18 Presentation Layer Defines User Interface 1-19 Repository Directory 1-20 Repository Modes 1-21 Adding an Entry in NQSConfig.ini 1-22
Ora
cle
Inte
rnal
& O
racl
e A
cade
my
Use
Onl
y
iv
Reloading Server Metadata 1-23 Summary 1-24 Practice 1-1 Overview: Exploring an Oracle BI Repository 1-25
2 Building the Physical Layer of a Repository
Objectives 2-2 Physical Layer 2-3 Physical Layer Objects 2-4 Database Object 2-5 Database Object: General Properties 2-6 Database Object: Features 2-7 Connection Pool 2-9 Schema Folder 2-10 Physical Table 2-11 Physical Table Properties 2-12 Physical Table: Alias 2-13 Physical Table: Select Table Type 2-14 Physical Table: View Deployment 2-15 Physical Column 2-16 Key Column 2-17 Joins 2-18 ABC Scenario 2-19 Implementation Steps 2-20 1. Import the Physical Schema 2-21 2. Select Tables and Columns for Import 2-22 3. Import Keys and Joins 2-23 4. Check the Import 2-24 5. Edit Connection Pool Properties 2-25 6. Define Physical Keys and Joins 2-26 Defining Keys Using the Table Properties Dialog Box 2-27 Using the Physical Diagram 2-28 Defining Foreign Key Joins 2-29 Summary 2-30 Practice 2-1 Overview: ABC Business Scenario 2-31 Practice 2-2 Overview: Gathering Information to Build an Initial Business Model 2-32 Practice 2-3 Overview: Creating a Repository and Importing a Data Source 2-33 Practice 2-4 Overview: Defining Keys and Joins 2-34 Practice 2-5 Overview: Creating Alias and Select Tables 2-35
Ora
cle
Inte
rnal
& O
racl
e A
cade
my
Use
Onl
y
v
3 Building the Business Model and Mapping Layer of a Repository Objectives 3-2 Business Model and Mapping (BMM) Layer 3-3 Business Model and Mapping Layer Objects 3-4 Business Model Mappings 3-5 Business Model and Mapping Layer Objects 3-6 Business Model 3-7 Logical Tables 3-8 Logical Table Sources 3-9 Logical Table Source: Column Mappings 3-10 Logical Columns 3-11 Logical Primary Keys 3-12 Logical Joins 3-13 Logical Complex Join 3-14 Measures 3-15 ABC Example 3-16 Implementation Steps 3-17 1. Create the Logical Business Model 3-18 2. Create the Logical Tables and Columns 3-19 3. Define the Logical Joins 3-20 4. Modify the Logical Tables and Columns 3-21 5. Define the Measures 3-22 Best Practices 3-23 Summary 3-24 Practice 3-1 Overview: Creating the Business Model 3-25 Practice 3-2 Overview: Creating Simple Measures 3-26
4 Building the Presentation Layer of a Repository
Objectives 4-2 Presentation Layer 4-3 Presentation Catalogs 4-4 Presentation Tables 4-5 Presentation Columns 4-6 Presentation Layer Mappings 4-7 Defining User Interface in the Presentation Layer 4-8 Nested Presentation Tables 4-9 Aliases 4-10 ABC Example 4-11 Implementation Steps 4-12 1. Create a New Presentation Catalog 4-13 2. Rename Tables 4-14
Ora
cle
Inte
rnal
& O
racl
e A
cade
my
Use
Onl
y

vi
3. Reorder Tables 4-15 4. Delete Columns 4-16 5. Rename Columns 4-17 6. Reorder Columns 4-18 Considerations 4-19 Best Practices 4-20 Summary 4-21 Practice 4-1 Overview: Creating the Presentation Layer 4-22
5 Testing and Validating a Repository
Objectives 5-2 Validating a Repository 5-3 ABC Example 5-4 Consistency Check 5-5 Checking Consistency 5-6 Consistency Check Manager 5-7 Disabling Consistency Check Messages 5-8 Enabling Logging 5-9 Setting a Logging Level 5-10 Logging Levels 5-11 Adding a Repository Entry to an Initialization File 5-12 Loading the Repository 5-13 Validating by Using Oracle BI Answers 5-14 Inspecting the Query Log 5-15 Oracle BI SELECT Statement Syntax 5-16 Oracle BI SELECT Statement Compared with Standard SQL 5-17 Summary 5-18 Practice 5-1 Overview: Testing the Repository 5-19 Practice 5-2 Overview: Checking Consistency 5-20
6 Adding Multiple Logical Table Sources
Objectives 6-2 Table Structures 6-3 Business Challenge 6-4 Business Solution 6-5 ABC Example: Adding Multiple Sources to a Logical Table Source (LTS) 6-6 Implementation Steps: Adding Multiple Sources to an LTS 6-7 1. Import Additional Product Tables 6-8 2. Define Keys and Joins 6-9 3. Identify Physical Columns for Mappings 6-10 4. Adding Sources to an LTS 6-11
Ora
cle
Inte
rnal
& O
racl
e A
cade
my
Use
Onl
y
vii
4a. Manual: Create New Logical Column 6-12 4a. Manual: Add New Physical Source 6-13 4a. Manual: Create Column Mapping 6-14 4a. Manual: End Result 6-15 4b. Drag Method 6-16 4b. Drag Method: Logical Columns Added 6-17 4b. Drag Method: Physical Tables Added 6-18 4b. Drag Method: Column Mappings Added 6-19 5. Rename Logical Columns 6-20 6. Add Columns to the Presentation Layer 6-21 ABC Example: Adding a New Logical Table Source 6-22 Implementation Steps: Adding a New Logical Table Source 6-23 1. Examine Existing Column Mappings 6-24 2. Identify a Single Table That Stores Both Columns 6-25 3. Add a New Logical Table Source 6-26 4. Define the Content of the Logical Table Source 6-27 Summary 6-28 Practice 6-1 Overview: Enhancing the Product Dimension 6-29 Practice 6-2 Overview: Creating Multiple Sources for a Logical Table Source (Manual) 6-30 Practice 6-3 Overview: Creating Multiple Sources for a Logical Table Source (Automated) 6-31 Practice 6-4 Overview: Adding a New Logical Table Source 6-32
7 Adding Calculations to a Fact
Objectives 7-2 Business Problem 7-3 Business Solution 7-4 ABC Example 7-5 Implementation Methods 7-6 Steps for Using Existing Logical Columns 7-7 1. Create a New Logical Column 7-8 2. Specify Logical Columns as the Source 7-9 3. Build a Formula 7-10 Steps for Using Physical Columns 7-11 1. Create a New Logical Column 7-12 2. Map the New Column 7-13 3. Build the Formula 7-14 4. Specify an Aggregation Rule 7-15 Steps for Using the Calculation Wizard 7-16 1. Open the Calculation Wizard 7-17
Ora
cle
Inte
rnal
& O
racl
e A
cade
my
Use
Onl
y

viii
2. Choose the Columns for Comparison 7-18 3. Select the Calculations 7-19 4. Confirm the Calculation Measures 7-20 5. New Calculation Measures Are Added 7-21 Add New Measures to the Presentation Layer 7-22 Examining a Query Using Physical Columns 7-23 Example: Using Physical Columns 7-24 Examining a Query Using Logical Columns 7-25 Example: Using Logical Columns 7-26 Examining a Query Using the Calculation Wizard 7-27 Summary 7-28 Practice 7-1 Overview: Creating Calculation Measures by Using Logical Columns 7-29 Practice 7-2 Overview: Creating Calculation Measures by Using Physical Columns 7-30 Practice 7-3 Overview: Creating Calculation Measures by Using the Calculation Wizard 7-31
8 Creating Dimension Hierarchies and Level-Based Measures
Objectives 8-2 Dimension Hierarchies 8-3 Level-Based Measures 8-4 Share Measures 8-5 Dimension Hierarchy: Example 8-6 ABC Example 8-7 Steps to Create a Dimension Hierarchy 8-8 1. Create a Dimension Object 8-9 2. Add a Parent-Level Object 8-10 3. Add Child-Level Objects 8-11 4. Determine the Number of Elements 8-12 5. Specify Level Columns 8-13 6. Create Level Keys 8-14 7. Set the Preferred Drill Path 8-15 8. Create Level-Based Measures 8-16 9. Create Additional Level-Based Measures 8-17 10. Create Share Measures 8-18 11. Create Rank Measures 8-19 12. Add Measures to the Presentation Layer 8-20 13. Test Share and Rank Measures 8-21 Summary 8-22 Practice 8-1 Overview: Creating Dimension Hierarchies 8-23
Ora
cle
Inte
rnal
& O
racl
e A
cade
my
Use
Onl
y
ix
Practice 8-2 Overview: Creating Level-Based Measures 8-24 Practice 8-3 Overview: Creating Share and Rank Measures 8-25 Practice 8-4 Overview: Creating Dimension-Specific Aggregation Rules 8-26
9 Using Aggregates
Objectives 9-2 Business Challenge 9-3 Business Solution: Aggregate Tables 9-4 Oracle BI Aggregate Navigation 9-5 Aggregated Facts 9-6 Modeling Aggregates 9-7 ABC Example 9-8 Steps to Implement Aggregate Navigation 9-9 1. Import Tables 9-10 2. Create Joins 9-11 3. Create Fact Logical Table Source and Mappings 9-12 4. Specify Fact Aggregation Content 9-13 5. Specify Content for the Fact Detail Source 9-14 6. Create Dimension Logical Table Source and Mappings 9-15 7. Specify Dimension Aggregation Content 9-16 8. Specify Content for the Dimension Detail Source 9-17 9. Test Results for Levels Stored in Aggregates 9-18 10. Test Results for Data Above or Below Levels 9-19 Aggregate Persistence Wizard 9-20 Aggregate Persistence Wizard Steps 9-21 1. Open Aggregate Persistence Wizard 9-22 2. Specify File Name and Location 9-23 3. Select Business Model and Measures 9-24 4. Select Dimensions and Levels 9-25 5. Select Connection Pool, Container, and Name 9-26 6. Review Aggregate Definition 9-27 7. View Complete Aggregate Script 9-28 8. Verify that the Script Is Created 9-29 9. Create and Run a Batch File 9-30 10. Verify Aggregates in the Physical Layer 9-31 11. Verify Aggregates in the BMM Layer 9-32 12. Verify Aggregates in the Database 9-33 13. Verify Results in Answers 9-34 Troubleshooting Aggregate Navigation 9-35 Considerations 9-36 Summary 9-37
Ora
cle
Inte
rnal
& O
racl
e A
cade
my
Use
Onl
y

x
Practice 9-1 Overview: Using Aggregate Tables 9-38 Practice 9-2 Overview: Using the Aggregate Persistence Wizard 9-39
10 Using Partitions and Fragments
Objectives 10-2 Business Challenge 10-3 Business Solution: Oracle BI Server 10-4 Partition 10-5 Partitioning by Fact 10-6 Partitioning by Value 10-7 Partitioning by Level 10-8 Complex Partitioning 10-9 ABC Example: Value-Based (Customer) 10-10 ABC Example: Fact-Based (Quota) 10-11 ABC Example: Value-Based (Inventory) 10-12 Implementation Steps 10-13 Specify Fragmentation Content 10-14 Summary 10-15 Practice 10-1 Overview: Modeling a Value-Based Partition 10-16 Practice 10-2 Overview: Modeling a Fact-Based Partition 10-17 Practice 10-3 Overview: Using the Calculation Wizard to Create Derived Measures 10-18 Practice 10-4 Overview: Modeling Fragmented Inventory Data 10-19
11 Using Repository Variables
Objectives 11-2 Variables 11-3 Variable Manager 11-4 Variable Types 11-5 Repository Variables 11-6 Static Repository Variables 11-7 Dynamic Repository Variables 11-8 Session Variables 11-9 System Session Variables 11-10 Non-System Session Variables 11-11 Initialization Blocks 11-12 Initialization Block: Example 11-13 Initialization Block Example: Edit Data Source 11-14 Initialization Block Example: Edit Data Target 11-15 ABC Example 11-16 Implementation Steps 11-17
Ora
cle
Inte
rnal
& O
racl
e A
cade
my
Use
Onl
y
xi
1. Open the Variable Manager 11-18 2. Create an Initialization Block 11-19 3. Edit the Data Source 11-20 4. Edit the Data Target 11-21 5. Test the Initialization Block Query 11-22 6. Use the Variable to Determine Content 11-23 7. Verify the Initialization 11-24 Summary 11-25 Practice 11-1 Overview: Creating Dynamic Repository Variables 11-26 Practice 11-2 Overview: Using Dynamic Repository Variables as Filters 11-27
12 Modeling Time Series Data
Objectives 12-2 Time Comparisons 12-3 Business Challenge: Time Comparisons 12-4 Oracle BI Solution: Model Time Comparisons 12-5 Oracle BI Solution: Time Series Functions 12-6 ABC Example 12-7 Steps to Model Time Series Data 12-8 1. Identify Time Dimension and Chronological Keys 12-9 2. Create the Ago Measure 12-10 3. Use Existing Columns to Create Additional Ago Measures 12-11 4. Create the ToDate Measure 12-12 5. Add New Measures to the Presentation Layer 12-13 6. Test the Results in Answers 12-14 Summary 12-15 Practice 12-1 Overview: Creating Time Series Comparison Measures 12-16
13 Modeling Many-to-Many Relationships
Objective 13-2 Business Challenge and Solution 13-3 Bridge Table 13-4 ABC Example 13-5 Steps to Model a Bridge Table 13-6 1. Import Tables 13-7 2. Create the Physical Model 13-8 3. Create the Logical Model 13-9 4. Map the Bridge Table 13-10 5. Create a Calculation Measure 13-11 6. Map Objects to the Presentation Layer 13-12 7. Verify the Results 13-13
Ora
cle
Inte
rnal
& O
racl
e A
cade
my
Use
Onl
y
xii
Helper Tables 13-14 Position Hierarchy: Example 13-15 Position Dimension Table 13-16 Position ID 13-17 Sub-Position ID 13-18 Position Hierarchy Gap 13-19 Position Helper Table 13-20 Using Helper Table to Model Many-to-Many Relationships 13-21 Manager Alias 13-22 ABC Example 13-23 Steps to Model a Helper Table 13-24 1. Create Helper Table 13-25 2. Build Physical Model 13-26 3. Build Logical Model 13-27 4. Map Logical Table Source 13-28 5. Build the Presentation Layer 13-29 6. Verify the Results 13-30 Summary 13-31 Practice 13-1 Overview: Modeling a Bridge Table 13-32 Practice 13-2 Overview: Modeling a Helper Table 13-33
14 Localizing Oracle BI Metadata
Objective 14-2 Business Challenges and Solution 14-3 Oracle BI Multilingual Support 14-4 Configuring Oracle BI Metadata 14-5 WEBLANGUAGE Session Variable 14-6 LOCALE Session Variable 14-7 Changing Localization Preferences 14-8 ABC Example 14-9 Steps to Localize Metadata 14-10 1. Externalize Metadata Objects 14-11 2. Run the Externalize Strings Utility 14-12 3. Create a Translation Table 14-13 4. Import the Translation Table 14-14 5. Create an Initialization Block 14-15 6. Modify My Account Preferences 14-16 7. Verify the Translations 14-17 Summary 14-18 Practice 14-1 Overview: Localizing Repository Metadata 14-19
Ora
cle
Inte
rnal
& O
racl
e A
cade
my
Use
Onl
y

xiii
15 Localizing Oracle BI Data Objective 15-2 Business Challenges and Solution 15-3 Oracle BI Multilingual Support 15-4 Required Translation Tables 15-5 ABC Example 15-6 Steps for Localizing Data 15-7 1. Create a Language Translation Table 15-8 2. Create an Available Language Table 15-9 3. Import Tables to the Physical Layer 15-10 4. Create a Session Variable Initialization Block 15-11 5. Create a Language Translation Table Alias 15-12 6. Create Physical Joins 15-13 7. Map the Logical Table Source 15-14 8. Create Column Mapping 15-15 9. Apply a WHERE Filter 15-16 10. Verify the Results 15-17 Summary 15-18 Practice 15-1 Overview: Localizing Oracle BI Data 15-19
16 Setting an Implicit Fact Column Objectives 16-2 Business Challenge: Dimension-Only Queries 16-3 Business Solution: Implicit Fact Column 16-4 ABC Example 16-5 Steps to Configure an Implicit Fact Column 16-6 1. Set an Implicit Fact Column 16-7 2. Verify the Results 16-8 3. Clear the Implicit Fact Column 16-9 Summary 16-10 Practice 16-1 Overview: Setting an Implicit Fact Column 16-11
17 Integrating Third-Party Reporting Tools Objectives 17-2 Business Challenge 17-3 Business Solution 17-4 Third-Party Reporting Architecture 17-5 ABC Example 17-6 Steps for Third-Party Reporting Tool Integration 17-7 1. Identify the Presentation Catalog 17-8 2. Export Logical Keys 17-9
Ora
cle
Inte
rnal
& O
racl
e A
cade
my
Use
Onl
y
xiv
3. Configure the ODBC Connection 17-10 4. Configure the Third-Party Reporting Tool 17-12 5. Verify the Results 17-13 Summary 17-14 Practice 17-1 Overview: Integrating a Third-Party Reporting Tool 17-15
18 Creating Repositories from Multidimensional Data Sources
Objective 18-2 Overview 18-3 XML for Analysis (XMLA) 18-4 Multidimensional Versus Relational Data Sources 18-5 Overview: Importing Multidimensional Data Sources 18-6 Considerations: Importing Multidimensional Data Sources 18-7 ABC Example 18-8 Creating a Multidimensional Business Model 18-9 1. Import a Physical Schema 18-10 2. Set Up the Connection Pool 18-11 3. Verify the Import 18-12 4. Verify Imported Hierarchies and Levels 18-13 5. Verify Imported Measures 18-14 6. Work with Preaggregated Measures 18-15 7. Update Member Counts 18-16 8. View Members 18-17 9. Add a Hierarchy 18-18 9a. Create a Hierarchy Object 18-19 9b. Add Levels and Columns 18-20 9c. Modify the Hierarchy 18-21 10. Create the Business Model and Mapping Layer 18-22 11. Create the Presentation Layer 18-23 12. Verify the Results 18-24 Summary 18-25 Practice 18-1: Creating a Repository Using a Multidimensional Data Source 18-26
19 Security
Objectives 19-2 Business Challenge 19-3 Business Solution: Oracle BI Security 19-4 Security Manager 19-5 Working with Users 19-6 Adding a User to a Repository 19-7 Setting User Permissions and Logons 19-8
Ora
cle
Inte
rnal
& O
racl
e A
cade
my
Use
Onl
y
xv
Administrator Account 19-9 Working with Groups 19-10 Administrators Group 19-11 Defined Groups 19-12 Group Inheritance 19-13 Group Inheritance: Example 19-14 Adding a New Group 19-15 Viewing Member Hierarchies 19-16 Authentication 19-17 Authentication Options 19-18 Operating System Authentication 19-19 External Table Authentication 19-20 LDAP Authentication 19-21 Database Authentication 19-22 Internal Authentication 19-23 Order of Authentication 19-24 Bypassing Oracle BI Security 19-25 Setting Query Limits 19-26 Setting Timing Restrictions 19-27 Setting Filters 19-28 Summary 19-29 Practice 19-1 Overview: Creating Users and Groups 19-30 Practice 19-2 Overview: Setting Permissions for Users and Groups 19-31 Practice 19-3 Overview: Authenticating Using an External Database 19-32 Practice 19-4 Overview: Authenticating Users with Database Authentication 19-33 Practice 19-5 Overview: Setting Query Limits and Timing Restrictions 19-34 Practice 19-6 Overview: Setting Filters to Personalize Information 19-35
20 Cache Management
Objective 20-2 Business Challenge 20-3 Business Solution: Oracle BI Server Query Cache 20-4 Advantages of Caching 20-5 Costs of Caching 20-6 Oracle BI Query Cache Architecture 20-7 Configuring Query Cache 20-8 Monitoring and Managing the Cache 20-9 Cache Management Techniques 20-10 Configuring the Cache Parameters 20-11 Setting Caching and Cache Persistence for Tables 20-12 Using the Cache Manager 20-13
Ora
cle
Inte
rnal
& O
racl
e A
cade
my
Use
Onl
y
xvi
Inspecting SQL for Cache Entries 20-14 Modifying the Cache Manager Column Display 20-15 Inspecting Cache Reports 20-16 Purging Cache Entries Manually Using the Cache Manager 20-17 Purging Cache Entries Automatically 20-18 Using Event Polling Tables 20-19 Seeding the Cache 20-20 Cache Hit Conditions 20-21 Summary 20-22 Practice 20-1 Overview: Inspecting the Cache Files 20-23 Practice 20-2 Overview: Modifying Cache Parameters 20-24 Practice 20-3 Overview: Seeding the Cache 20-25
21 Enabling Usage Tracking
Objectives 21-2 Business Challenges 21-3 Business Solution: Oracle BI Usage Tracking 21-4 Oracle BI Usage Tracking Methods 21-5 ABC Example 21-6 Steps to Enable Usage Tracking 21-7 1. Create the Usage Tracking Table 21-8 2. Import the Table 21-9 3. Build a Business Model 21-10 4. Enable Usage Tracking 21-11 5. Enable Direct Insertion 21-12 6. Set the Physical Table Parameter 21-13 7. Set the Connection Pool Parameter 21-14 8. Set Additional Parameters 21-15 9. Test the Results 21-16 Analyzing Usage Tracking Data 21-17 Usage Tracking Sample 21-18 Summary 21-19 Practice 21-1 Overview: Enabling Usage Tracking 21-20
22 Multi-User Development
Objectives 22-2 Business Challenge 22-3 Business Solution: Oracle BI MUDE 22-4 Oracle BI Repository Development Process 22-5 SCM Three-Way Merge 22-6 Oracle BI Repository Three-Way Merge 22-7
Ora
cle
Inte
rnal
& O
racl
e A
cade
my
Use
Onl
y
xvii
Multi-User Development Projects 22-8 Overview: Oracle BI Multi-User Development 22-9 ABC Example 22-10 Steps to Set Up an Oracle BI MUDE 22-11 1. Create Projects 22-12 2. Edit Projects 22-13 3. Set Up a Shared Network Directory 22-14 4. Copy the Master Repository to the Shared Directory 22-15 Making Changes in an Oracle BI MUDE 22-16 1. Point to the Multi-User Directory 22-17 2. Check Out Projects 22-18 3. Administration Tool Tasks During Checkout 22-19 4. Change Metadata 22-20 5. Multi-User Options During Development 22-21 6. Administration Tool Tasks During Checkin 22-22 7. Checkin Changes: Lock Information Dialog Box 22-23 8. Checkin Changes: “Merge repositories” Dialog Box 22-24 9. Closing a Repository Before Publishing to Network 22-25 10. Publish to Network 22-26 11. Merge Decisions 22-27 12. Track Project History 22-28 History Menu Options 22-29 Deleting History Items 22-30 Summary 22-31 Practice 22-1 Overview: Setting Up a Multi-User Development Environment 22-32 Practice 22-2 Overview: Using a Multi-User Development Environment 22-33
23 Using Administration Tool Utilities
Objectives 23-2 Wizards and Utilities 23-3 Accessing Wizards and Utilities 23-4 Managing Joins 23-5 Managing Sessions 23-6 Querying Repository Metadata 23-7 Replacing Columns or Tables 23-8 Externalizing Strings 23-9 Renaming Repository Objects 23-10 Documenting a Repository 23-11 Generating a Metadata Dictionary 23-12 Creating an Event Table 23-13 Updating the Physical Layer 23-14
Ora
cle
Inte
rnal
& O
racl
e A
cade
my
Use
Onl
y
xviii
Removing Unused Physical Objects 23-15 Summary 23-16 Practice 23-1 Overview: Exploring Administration Tool Features 23-17
24 Optimizing Query Performance
Objective 24-2 Business Challenge 24-3 Business Solution 24-4 Oracle BI Features That Optimize Performance 24-6 Optimizing Query Performance 24-7 Using Aggregates 24-8 Using Aggregate Navigation 24-9 Constraining Results Using a WHERE Clause 24-10 Caching 24-11 Limiting the Number of Initialization Blocks 24-12 Limiting Select Table Types 24-13 Modeling Dimension Hierarchies Correctly 24-14 Turning Off Logging 24-15 Setting Query Limits 24-16 Pushing Calculations to the Database 24-17 Exposing Materialized Views in the Physical Layer 24-18 Using Database Hints 24-19 Setting the NQSConfig.ini Parameters 24-20 Summary 24-22
25 Oracle BI Repository Design Principles
Objectives 25-2 Lesson Structure 25-3 Physical Layer Design Principles 25-4 Using the File > Import Option 25-5 Creating Aliases for Physical Tables 25-6 Creating Aliases to Avoid Circular Joins 25-7 Creating Canonical Time 25-8 Setting the Physical Table Caching Property 25-9 Setting Connection Pool Properties 25-10 Creating Additional Connection Pools 25-11 BMM Layer Design Principles 25-12 Multi-User Development 25-14 Consistency Check 25-15 Separate Business Models 25-16 Logical Tables 25-17
Ora
cle
Inte
rnal
& O
racl
e A
cade
my
Use
Onl
y
xix
Time Dimension Logical Levels 25-18 Time Dimension Logical Structure 25-19 Logical Dimension Table Columns 25-20 Logical Fact Table Columns 25-21 Logical Joins 25-22 Calculated Measures 25-23 Logical Levels 25-24 WHERE Clause Filters 25-25 Avoiding Snowflaking 25-26 Dimension Hierarchies: General 25-27 Dimension Hierarchies: Levels 25-28 Dimension Hierarchies: Number of Elements 25-29 Dimension Hierarchies: Drilldown 25-30 Aggregates 25-31 Presentation Layer Design Principles 25-32 Subject Areas 25-33 Development with End Users in Mind 25-35 Role-Based Subject Areas 25-36 Presentation Tables 25-37 Rule of Seven 25-38 Fact Tables 25-39 Implicit Fact Columns 25-40 Canonical Time 25-41 Secondary Time Dimension 25-42 Nesting Presentation Tables 25-43 Presentation Object Names 25-44 Presentation Object Descriptions 25-45 Summary 25-46 Practice 25-1: Exploring Applied Design Principles 25-47
A Model First Development Methodology
Model First Development Methodology: Overview A-2 Central Tenets of the Model First Development Methodology A-3 Baseline Performance Analysis A-4 Defining the Business Model: Dimensional Matrix A-6 Dimensional Matrix: Example A-7 Drill to Levels for More-Detailed Performance Requirements A-8 Focus on the Business Model A-9 Leverage Oracle BI “Legless” Applications A-10 Use Oracle BI Data Mart Automation A-11
Ora
cle
Inte
rnal
& O
racl
e A
cade
my
Use
Onl
y

Ora
cle
Inte
rnal
& O
racl
e A
cade
my
Use
Onl
y
Copyright © 2008, Oracle. All rights reserved.
Localizing Oracle BI Data
Ora
cle
Inte
rnal
& O
racl
e A
cade
my
Use
Onl
y
Oracle BI Suite EE 10g R3: Build Repositories 15 - 2
Copyright © 2008, Oracle. All rights reserved.
Objective
After completing this lesson, you should be able to localize Oracle BI data to support multilingual environments.
Ora
cle
Inte
rnal
& O
racl
e A
cade
my
Use
Onl
y
Oracle BI Suite EE 10g R3: Build Repositories 15 - 3
Copyright © 2008, Oracle. All rights reserved.
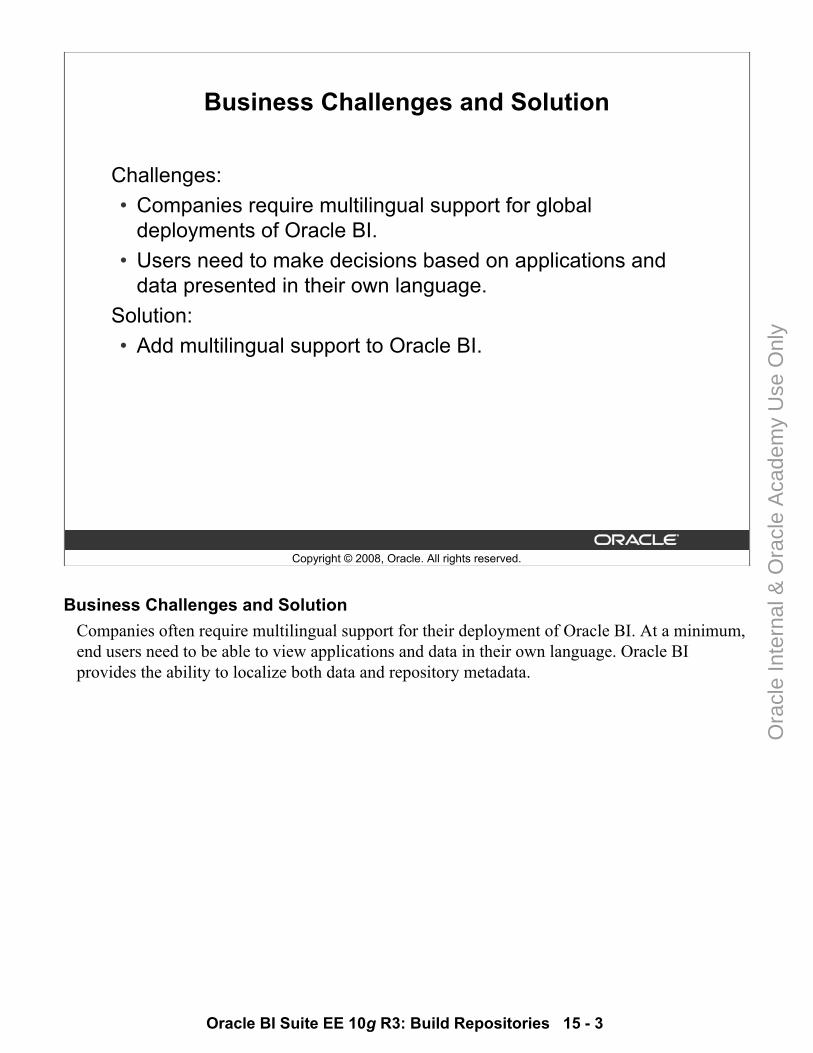
Business Challenges and Solution
Challenges: • Companies require multilingual support for global
deployments of Oracle BI.• Users need to make decisions based on applications and
data presented in their own language.Solution: • Add multilingual support to Oracle BI.
Business Challenges and SolutionCompanies often require multilingual support for their deployment of Oracle BI. At a minimum, end users need to be able to view applications and data in their own language. Oracle BI provides the ability to localize both data and repository metadata.
Ora
cle
Inte
rnal
& O
racl
e A
cade
my
Use
Onl
y
Oracle BI Suite EE 10g R3: Build Repositories 15 - 4
Copyright © 2008, Oracle. All rights reserved.
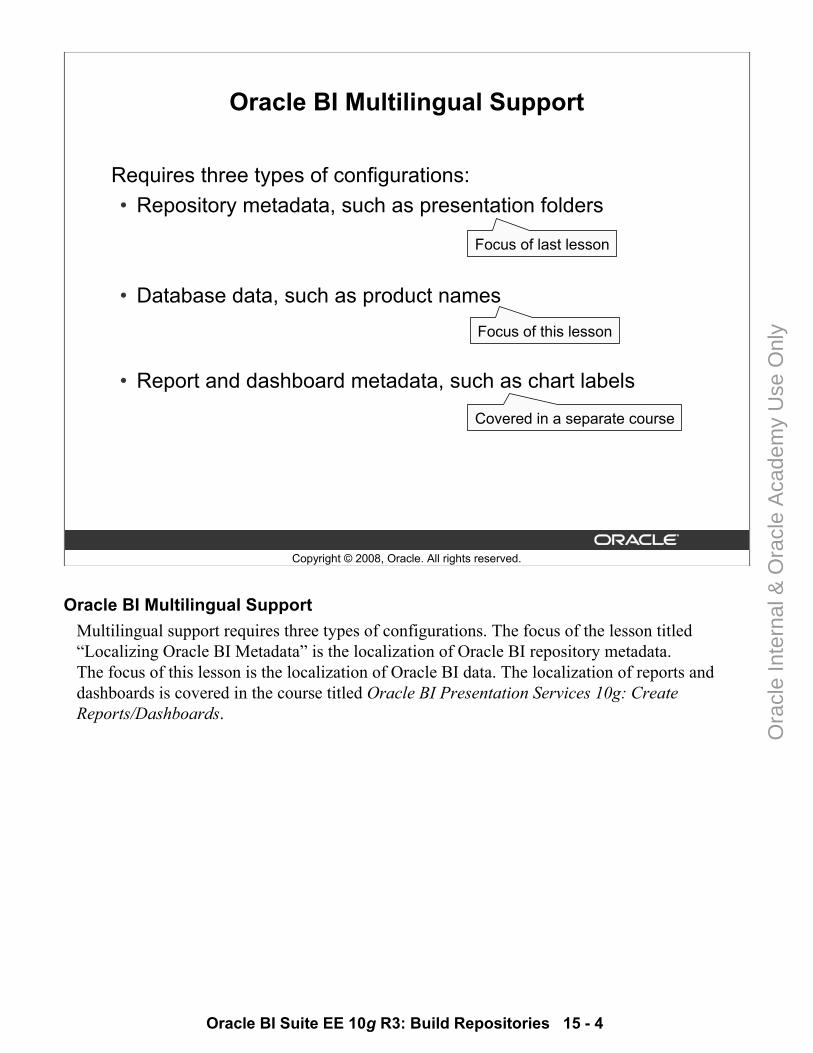
Oracle BI Multilingual Support
Requires three types of configurations:• Repository metadata, such as presentation folders
• Database data, such as product names
• Report and dashboard metadata, such as chart labels
Focus of last lesson
Focus of this lesson
Covered in a separate course
Oracle BI Multilingual SupportMultilingual support requires three types of configurations. The focus of the lesson titled “Localizing Oracle BI Metadata” is the localization of Oracle BI repository metadata. The focus of this lesson is the localization of Oracle BI data. The localization of reports and dashboards is covered in the course titled Oracle BI Presentation Services 10g: Create Reports/Dashboards.
Ora
cle
Inte
rnal
& O
racl
e A
cade
my
Use
Onl
y
Oracle BI Suite EE 10g R3: Build Repositories 15 - 5
Copyright © 2008, Oracle. All rights reserved.
Required Translation Tables
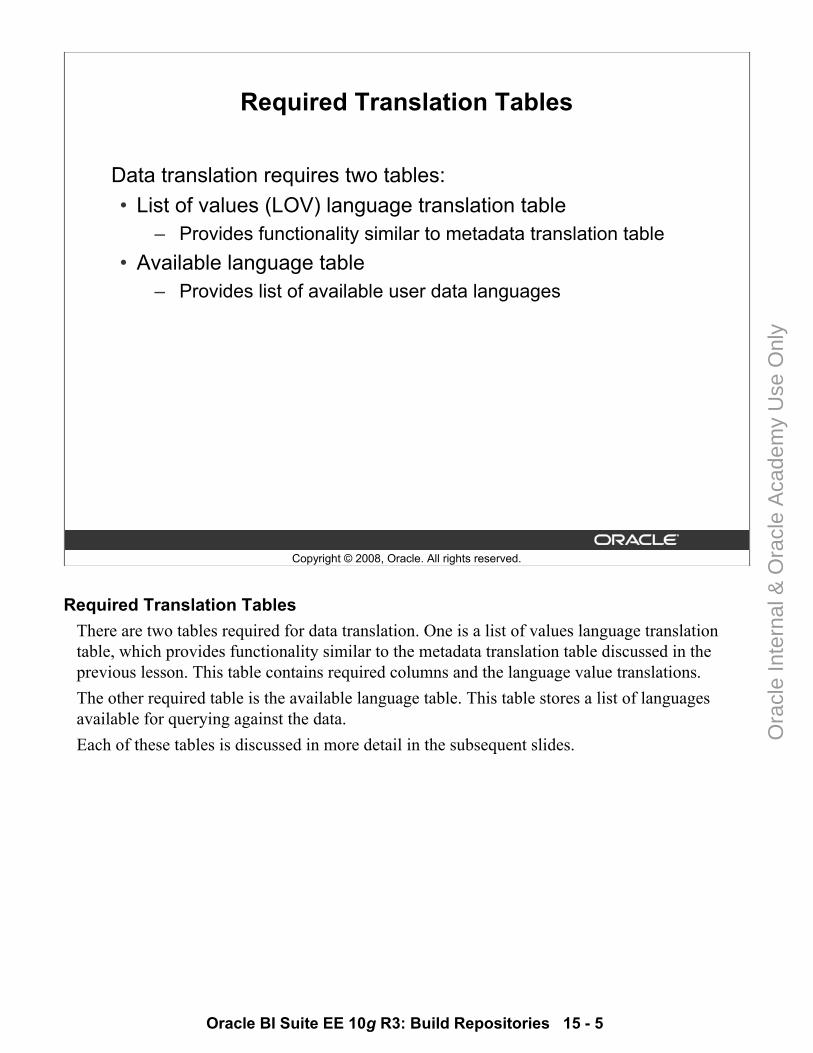
Data translation requires two tables:• List of values (LOV) language translation table
– Provides functionality similar to metadata translation table• Available language table
– Provides list of available user data languages
Required Translation TablesThere are two tables required for data translation. One is a list of values language translation table, which provides functionality similar to the metadata translation table discussed in the previous lesson. This table contains required columns and the language value translations. The other required table is the available language table. This table stores a list of languages available for querying against the data. Each of these tables is discussed in more detail in the subsequent slides.
Ora
cle
Inte
rnal
& O
racl
e A
cade
my
Use
Onl
y
Oracle BI Suite EE 10g R3: Build Repositories 15 - 6
Copyright © 2008, Oracle. All rights reserved.
ABC Example
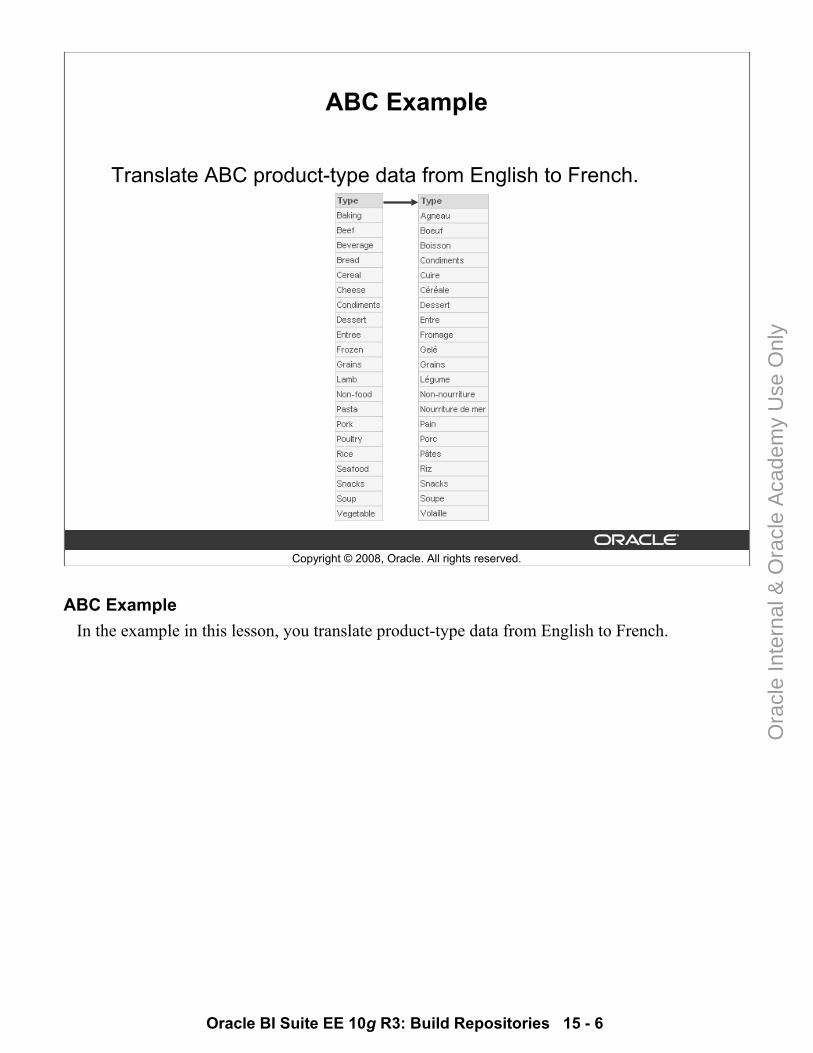
Translate ABC product-type data from English to French.
ABC ExampleIn the example in this lesson, you translate product-type data from English to French.
Ora
cle
Inte
rnal
& O
racl
e A
cade
my
Use
Onl
y
Oracle BI Suite EE 10g R3: Build Repositories 15 - 7
Copyright © 2008, Oracle. All rights reserved.
Steps for Localizing Data
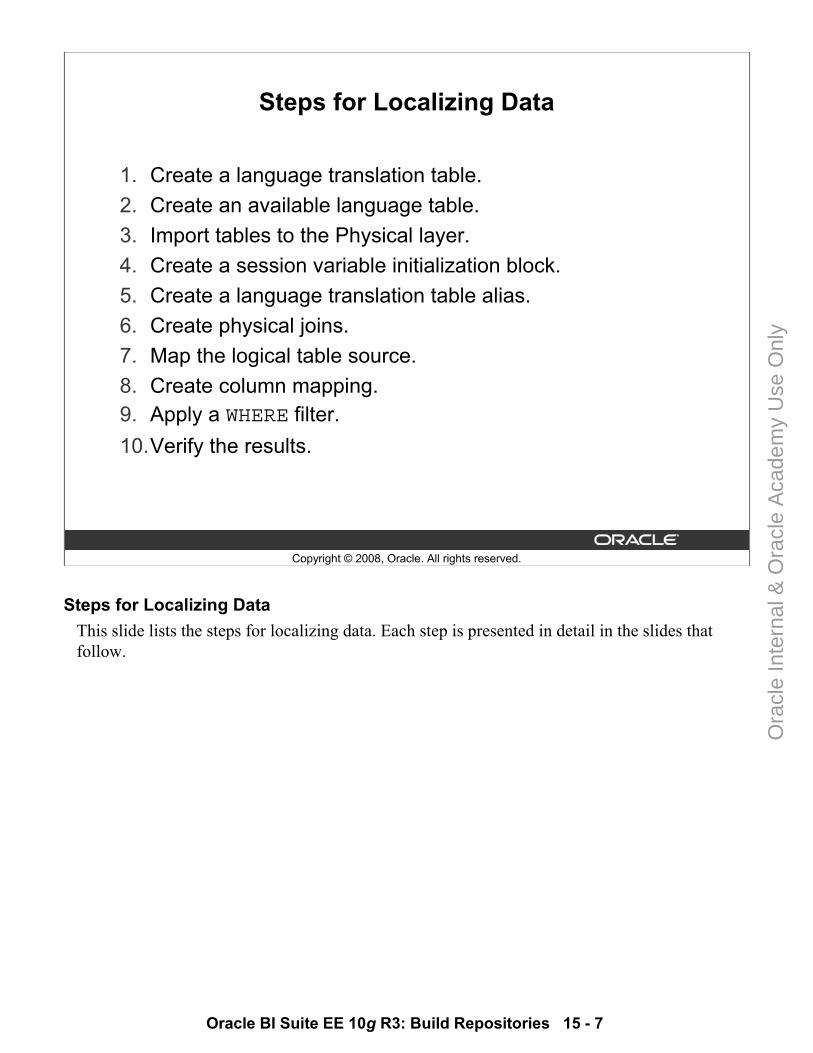
1. Create a language translation table.2. Create an available language table.3. Import tables to the Physical layer.4. Create a session variable initialization block.5. Create a language translation table alias.6. Create physical joins.7. Map the logical table source.8. Create column mapping.9. Apply a WHERE filter.10.Verify the results.
Steps for Localizing DataThis slide lists the steps for localizing data. Each step is presented in detail in the slides that follow.
Ora
cle
Inte
rnal
& O
racl
e A
cade
my
Use
Onl
y
Oracle BI Suite EE 10g R3: Build Repositories 15 - 8
Copyright © 2008, Oracle. All rights reserved.
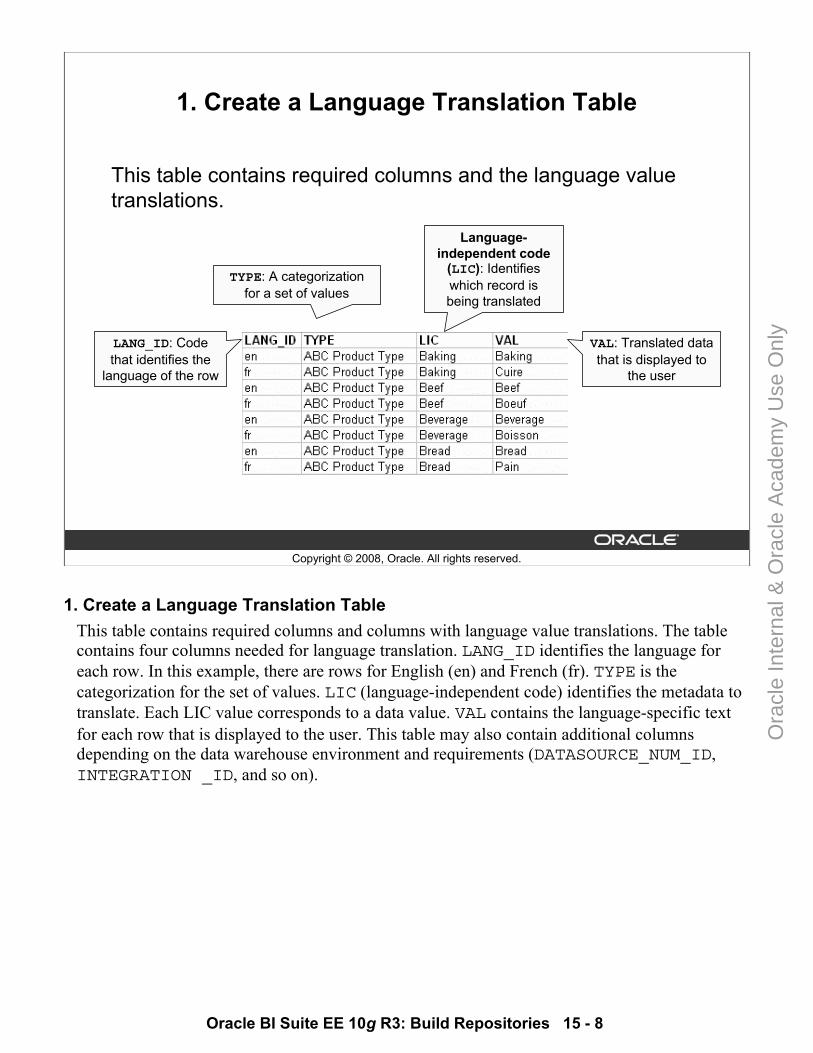
1. Create a Language Translation Table
This table contains required columns and the language value translations.
Language-independent code
(LIC): Identifies which record is being translated
VAL: Translated data that is displayed to
the user
LANG_ID: Code that identifies the
language of the row
TYPE: A categorization for a set of values
1. Create a Language Translation Table This table contains required columns and columns with language value translations. The table contains four columns needed for language translation. LANG_ID identifies the language for each row. In this example, there are rows for English (en) and French (fr). TYPE is the categorization for the set of values. LIC (language-independent code) identifies the metadata to translate. Each LIC value corresponds to a data value. VAL contains the language-specific text for each row that is displayed to the user. This table may also contain additional columns depending on the data warehouse environment and requirements (DATASOURCE_NUM_ID, INTEGRATION _ID, and so on).
Ora
cle
Inte
rnal
& O
racl
e A
cade
my
Use
Onl
y
Oracle BI Suite EE 10g R3: Build Repositories 15 - 9
Copyright © 2008, Oracle. All rights reserved.
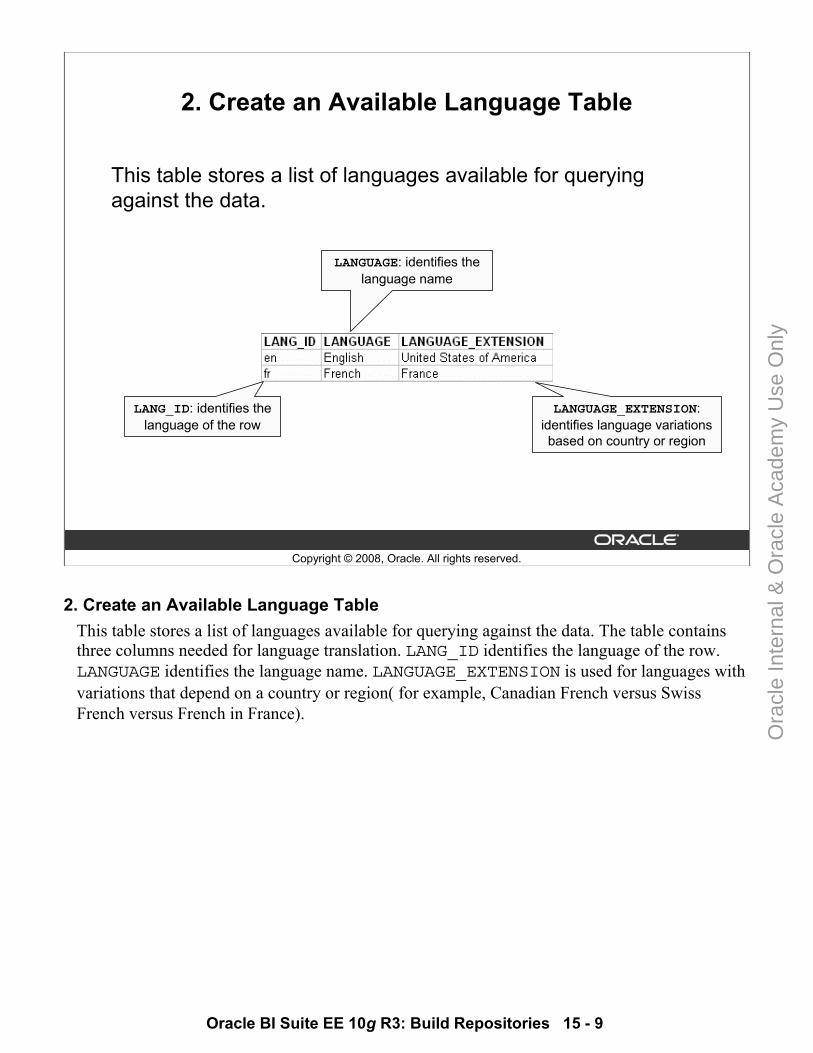
2. Create an Available Language Table
This table stores a list of languages available for querying against the data.
LANGUAGE_EXTENSION: identifies language variations based on country or region
LANG_ID: identifies the language of the row
LANGUAGE: identifies the language name
2. Create an Available Language Table This table stores a list of languages available for querying against the data. The table contains three columns needed for language translation. LANG_ID identifies the language of the row. LANGUAGE identifies the language name. LANGUAGE_EXTENSION is used for languages with variations that depend on a country or region( for example, Canadian French versus Swiss French versus French in France).
Ora
cle
Inte
rnal
& O
racl
e A
cade
my
Use
Onl
y
Oracle BI Suite EE 10g R3: Build Repositories 15 - 10
Copyright © 2008, Oracle. All rights reserved.
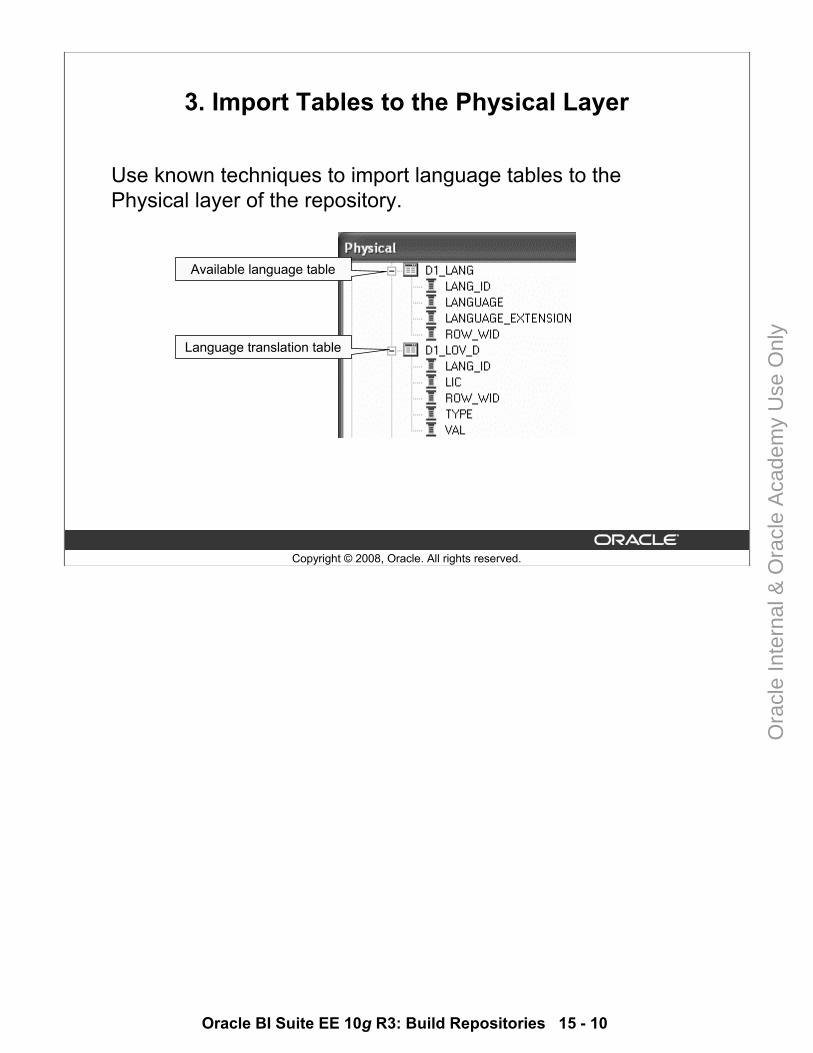
3. Import Tables to the Physical Layer
Use known techniques to import language tables to the Physical layer of the repository.
Language translation table
Available language table
Ora
cle
Inte
rnal
& O
racl
e A
cade
my
Use
Onl
y
Oracle BI Suite EE 10g R3: Build Repositories 15 - 11
Copyright © 2008, Oracle. All rights reserved.
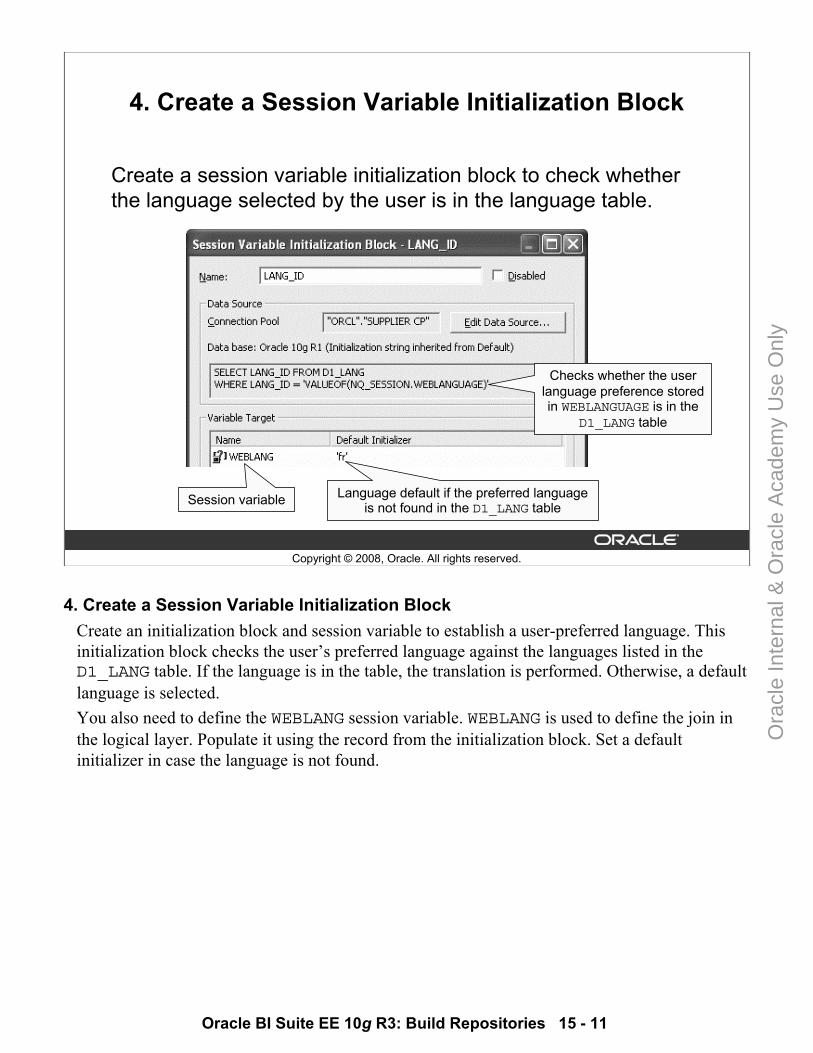
4. Create a Session Variable Initialization Block
Create a session variable initialization block to check whether the language selected by the user is in the language table.
Checks whether the user language preference stored in WEBLANGUAGE is in the
D1_LANG table
Language default if the preferred language is not found in the D1_LANG tableSession variable
4. Create a Session Variable Initialization BlockCreate an initialization block and session variable to establish a user-preferred language. This initialization block checks the user’s preferred language against the languages listed in the D1_LANG table. If the language is in the table, the translation is performed. Otherwise, a default language is selected. You also need to define the WEBLANG session variable. WEBLANG is used to define the join in the logical layer. Populate it using the record from the initialization block. Set a default initializer in case the language is not found.
Ora
cle
Inte
rnal
& O
racl
e A
cade
my
Use
Onl
y
Oracle BI Suite EE 10g R3: Build Repositories 15 - 12
Copyright © 2008, Oracle. All rights reserved.
5. Create a Language Translation Table Alias
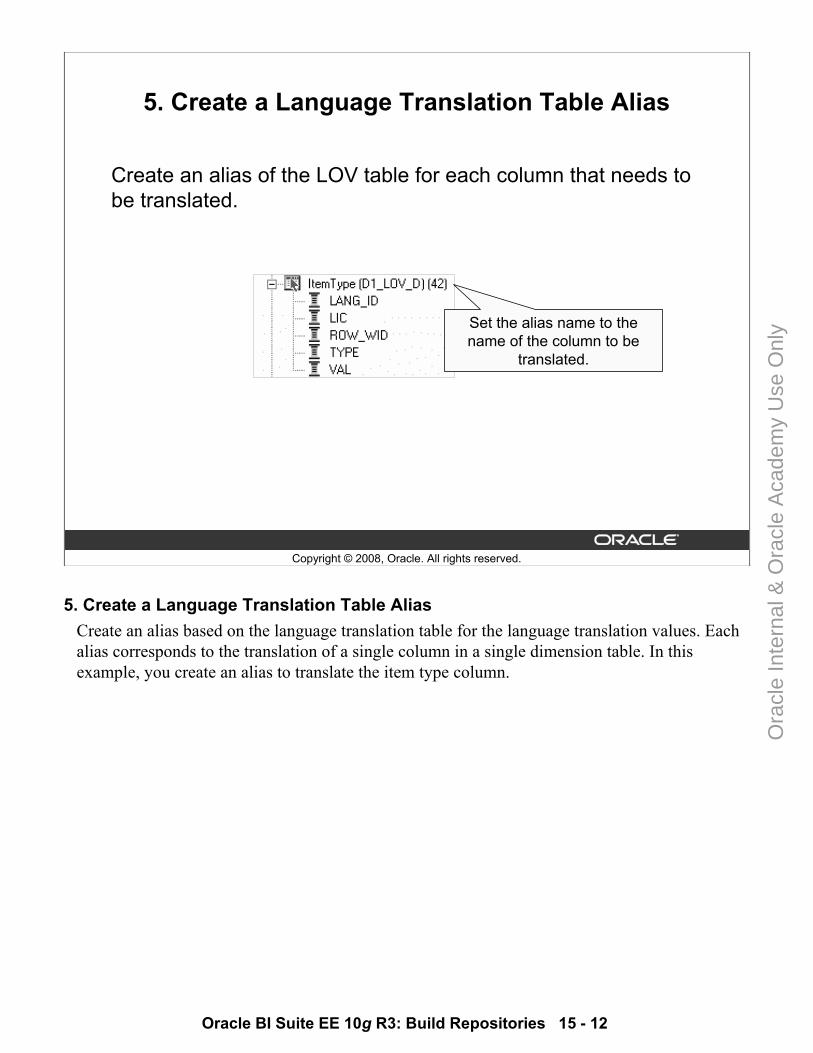
Create an alias of the LOV table for each column that needs to be translated.
Set the alias name to the name of the column to be
translated.
5. Create a Language Translation Table Alias Create an alias based on the language translation table for the language translation values. Each alias corresponds to the translation of a single column in a single dimension table. In this example, you create an alias to translate the item type column.
Ora
cle
Inte
rnal
& O
racl
e A
cade
my
Use
Onl
y
Oracle BI Suite EE 10g R3: Build Repositories 15 - 13
Copyright © 2008, Oracle. All rights reserved.
6. Create Physical Joins
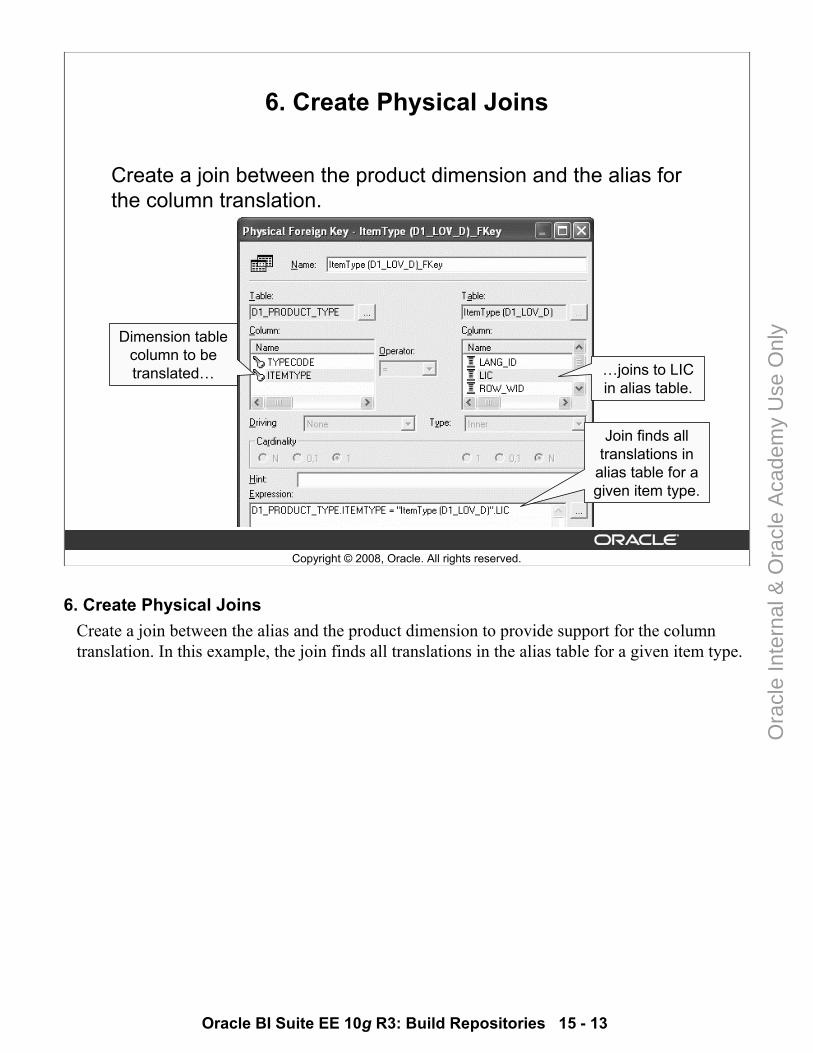
Create a join between the product dimension and the alias for the column translation.
Dimension table column to be translated… …joins to LIC
in alias table.
Join finds all translations in
alias table for a given item type.
6. Create Physical JoinsCreate a join between the alias and the product dimension to provide support for the column translation. In this example, the join finds all translations in the alias table for a given item type.
Ora
cle
Inte
rnal
& O
racl
e A
cade
my
Use
Onl
y
Oracle BI Suite EE 10g R3: Build Repositories 15 - 14
Copyright © 2008, Oracle. All rights reserved.
7. Map the Logical Table Source
Map an existing logical table source to the alias.
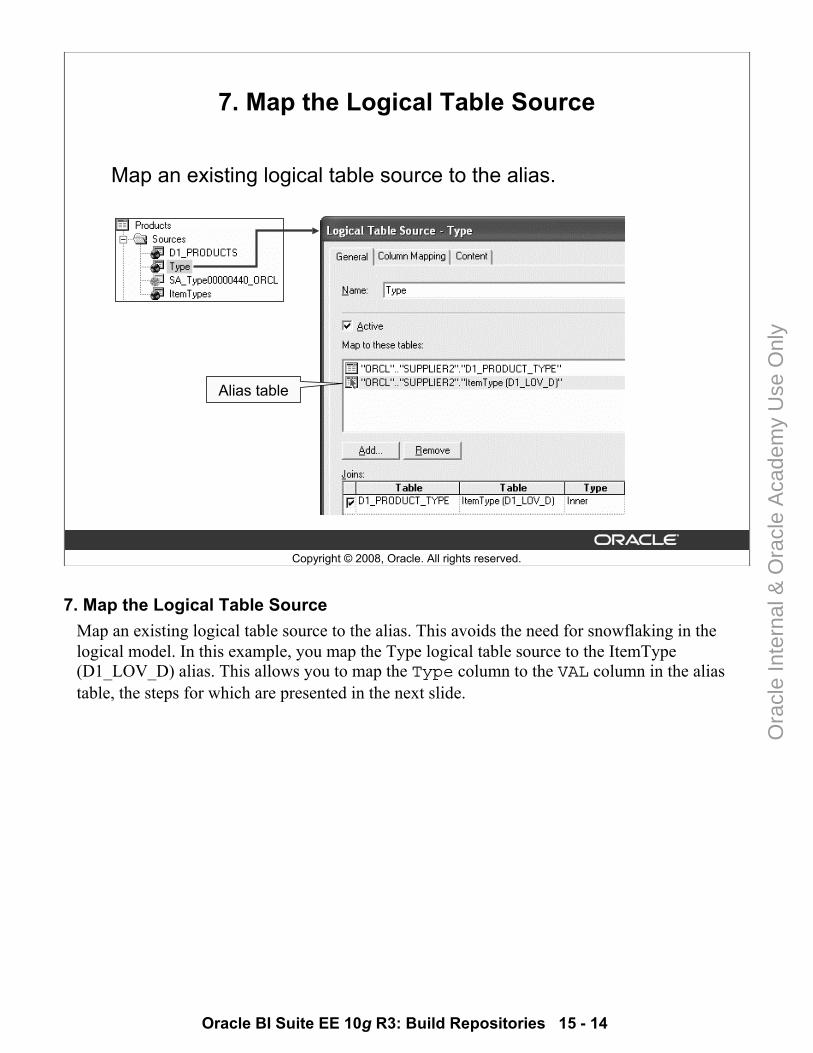
Alias table
7. Map the Logical Table SourceMap an existing logical table source to the alias. This avoids the need for snowflaking in the logical model. In this example, you map the Type logical table source to the ItemType (D1_LOV_D) alias. This allows you to map the Type column to the VAL column in the alias table, the steps for which are presented in the next slide.
Ora
cle
Inte
rnal
& O
racl
e A
cade
my
Use
Onl
y
Oracle BI Suite EE 10g R3: Build Repositories 15 - 15
Copyright © 2008, Oracle. All rights reserved.
8. Create Column Mapping
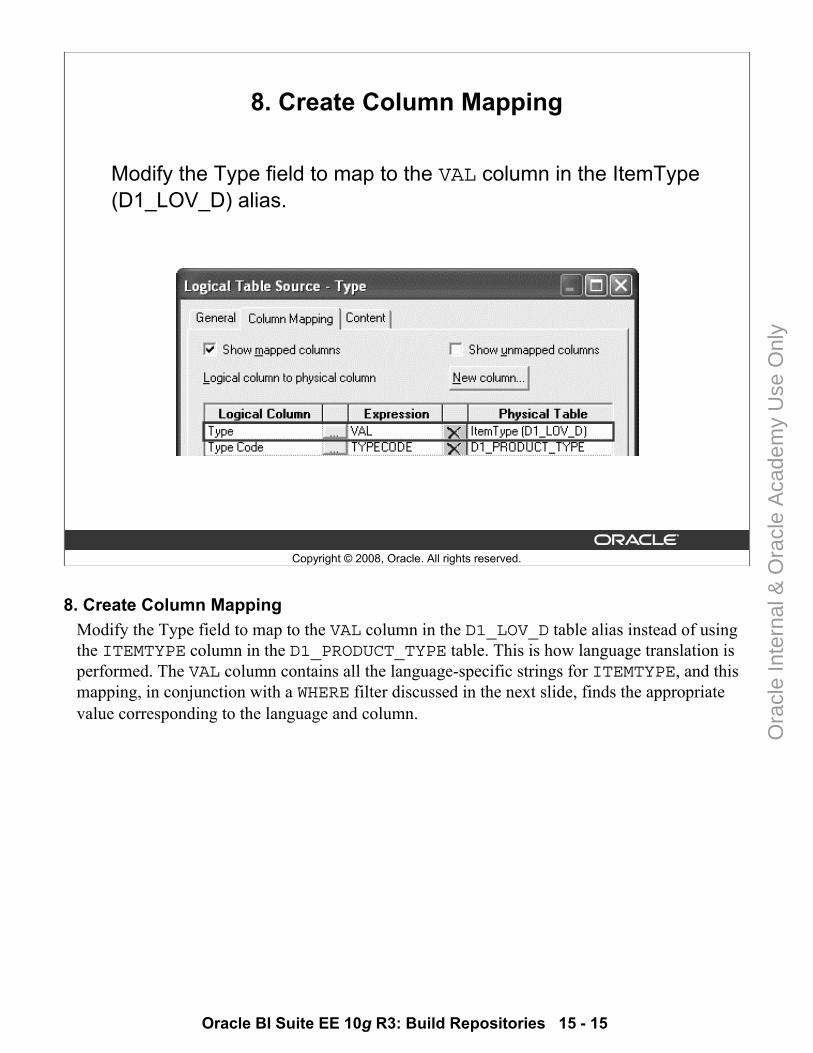
Modify the Type field to map to the VAL column in the ItemType (D1_LOV_D) alias.
8. Create Column Mapping Modify the Type field to map to the VAL column in the D1_LOV_D table alias instead of using the ITEMTYPE column in the D1_PRODUCT_TYPE table. This is how language translation is performed. The VAL column contains all the language-specific strings for ITEMTYPE, and this mapping, in conjunction with a WHERE filter discussed in the next slide, finds the appropriate value corresponding to the language and column.
Ora
cle
Inte
rnal
& O
racl
e A
cade
my
Use
Onl
y
Oracle BI Suite EE 10g R3: Build Repositories 15 - 16
Copyright © 2008, Oracle. All rights reserved.
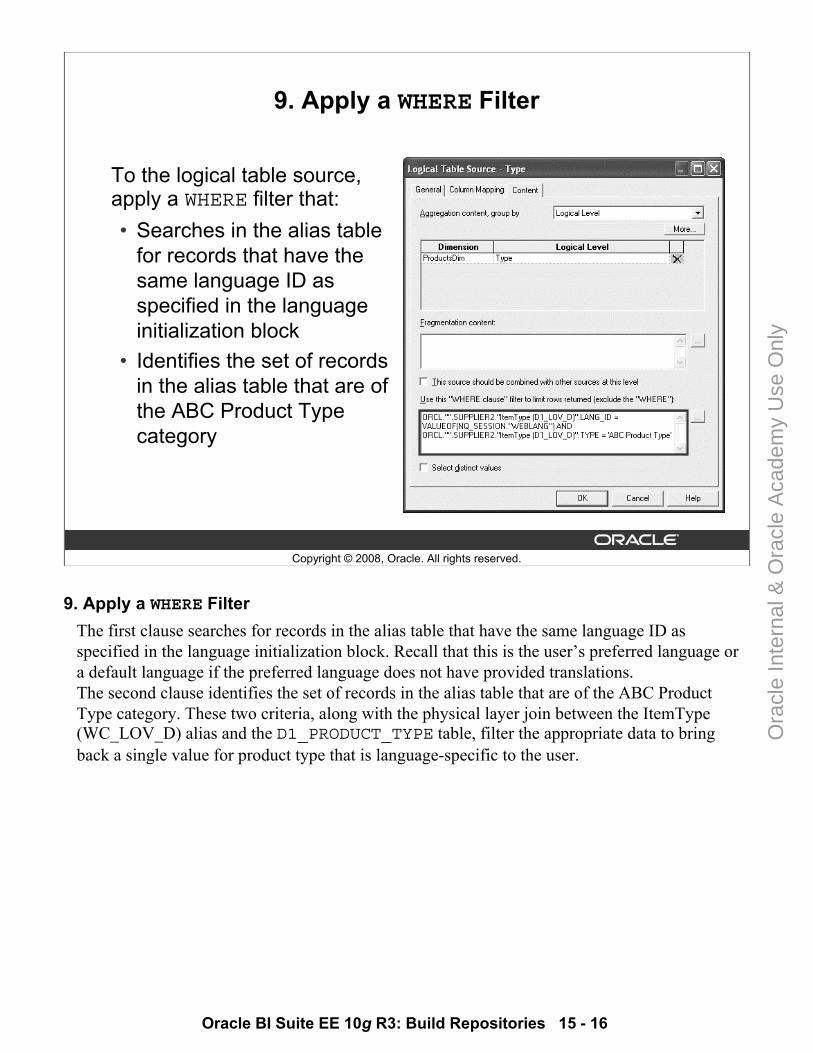
9. Apply a WHERE Filter
To the logical table source, apply a WHERE filter that:• Searches in the alias table
for records that have the same language ID as specified in the language initialization block
• Identifies the set of records in the alias table that are of the ABC Product Type category
9. Apply a WHERE Filter The first clause searches for records in the alias table that have the same language ID as specified in the language initialization block. Recall that this is the user’s preferred language or a default language if the preferred language does not have provided translations. The second clause identifies the set of records in the alias table that are of the ABC Product Type category. These two criteria, along with the physical layer join between the ItemType (WC_LOV_D) alias and the D1_PRODUCT_TYPE table, filter the appropriate data to bring back a single value for product type that is language-specific to the user.
Ora
cle
Inte
rnal
& O
racl
e A
cade
my
Use
Onl
y
Oracle BI Suite EE 10g R3: Build Repositories 15 - 17
Copyright © 2008, Oracle. All rights reserved.
10. Verify the Results
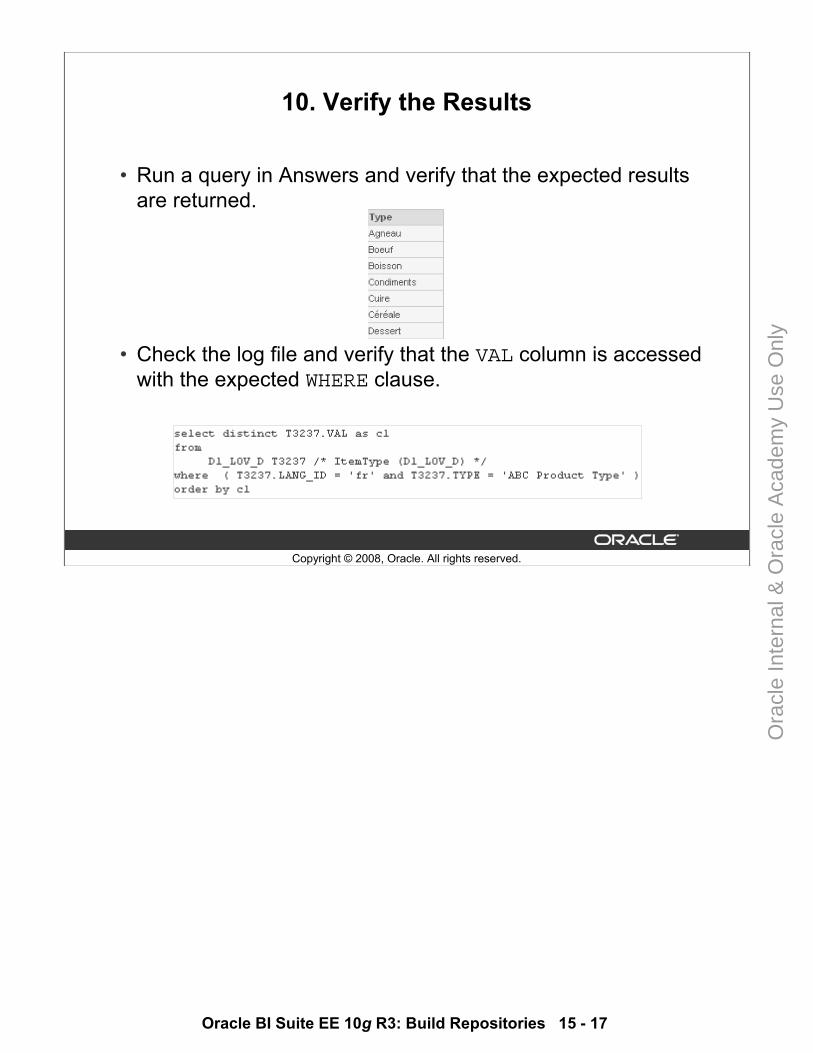
• Run a query in Answers and verify that the expected results are returned.
• Check the log file and verify that the VAL column is accessed with the expected WHERE clause.
Ora
cle
Inte
rnal
& O
racl
e A
cade
my
Use
Onl
y

Oracle BI Suite EE 10g R3: Build Repositories 15 - 18
Copyright © 2008, Oracle. All rights reserved.
Summary
In this lesson, you should have learned how to localize Oracle BI data to support multilingual environments.
Ora
cle
Inte
rnal
& O
racl
e A
cade
my
Use
Onl
y
Oracle BI Suite EE 10g R3: Build Repositories 15 - 19
Copyright © 2008, Oracle. All rights reserved.
Practice 15-1 Overview: Localizing Oracle BI Data
In this practice, you localize product type data from English toFrench.
Practice 15-1 Overview: Localizing Oracle BI DataTo localize product type data from English to French, you import the necessary translation tables, create an initialization block and session variable to establish a user-preferred language, modify the WHERE clause for the column being translated, and verify results in Oracle BI Answers.
Ora
cle
Inte
rnal
& O
racl
e A
cade
my
Use
Onl
y

Ora
cle
Inte
rnal
& O
racl
e A
cade
my
Use
Onl
y
Copyright © 2008, Oracle. All rights reserved.
Setting an Implicit Fact Column
Ora
cle
Inte
rnal
& O
racl
e A
cade
my
Use
Onl
y
Oracle BI Suite EE 10g R3: Build Repositories 16 - 2
Copyright © 2008, Oracle. All rights reserved.
Objectives
After completing this lesson, you should be able to:• Describe the purpose and process of setting an implicit fact
column• Set an implicit fact column for a presentation catalog
Ora
cle
Inte
rnal
& O
racl
e A
cade
my
Use
Onl
y

Oracle BI Suite EE 10g R3: Build Repositories 16 - 3
Copyright © 2008, Oracle. All rights reserved.
Business Challenge: Dimension-Only Queries
Dimension-only queries with columns from more than one dimension may not return the desired results. • In a business model with conforming dimensions, many fact
tables may join to the same dimensions.• For dimension-only queries across multiple dimensions,
Oracle BI Server picks the most economical fact table source based on the number and levels of joined dimensions.
Business Challenge: Dimension-Only QueriesIn this context, dimension-only queries refer to queries that contain columns from more than one dimension. A dimension-only query with columns from the same dimension will not cause aproblem.There may be occasions when users want to build queries with only dimension data. For example, a user might want to see all products purchased by a customer. However, dimension-only queries may not return the desired results. This is because in a business model with conforming dimensions, many fact tables may join to the same dimensions. For example, a sales fact and a service fact both join to the product dimension. When a user runs a dimension-only query, Oracle BI Server picks the most economical fact source based on the number and levels of the joined dimensions. This may not return the desired results.
Ora
cle
Inte
rnal
& O
racl
e A
cade
my
Use
Onl
y
Oracle BI Suite EE 10g R3: Build Repositories 16 - 4
Copyright © 2008, Oracle. All rights reserved.
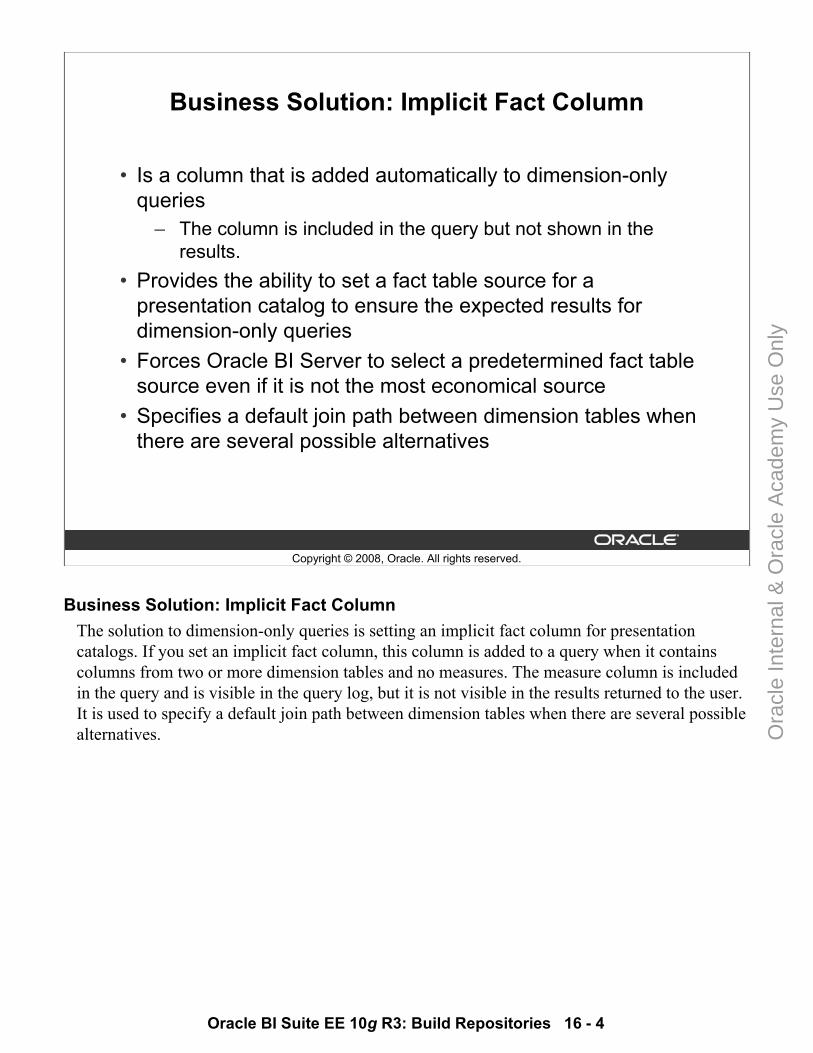
Business Solution: Implicit Fact Column
• Is a column that is added automatically to dimension-only queries
– The column is included in the query but not shown in the results.
• Provides the ability to set a fact table source for a presentation catalog to ensure the expected results for dimension-only queries
• Forces Oracle BI Server to select a predetermined fact table source even if it is not the most economical source
• Specifies a default join path between dimension tables when there are several possible alternatives
Business Solution: Implicit Fact ColumnThe solution to dimension-only queries is setting an implicit fact column for presentationcatalogs. If you set an implicit fact column, this column is added to a query when it contains columns from two or more dimension tables and no measures. The measure column is included in the query and is visible in the query log, but it is not visible in the results returned to the user. It is used to specify a default join path between dimension tables when there are several possible alternatives.
Ora
cle
Inte
rnal
& O
racl
e A
cade
my
Use
Onl
y
Oracle BI Suite EE 10g R3: Build Repositories 16 - 5
Copyright © 2008, Oracle. All rights reserved.
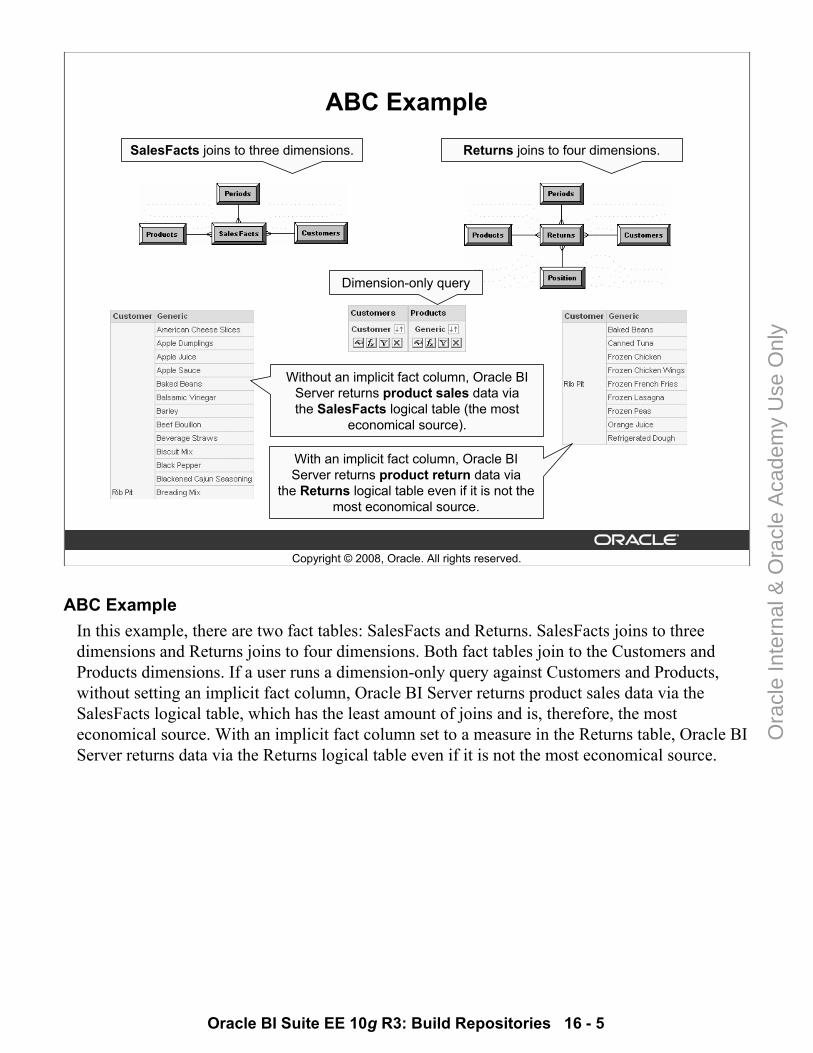
ABC Example
SalesFacts joins to three dimensions. Returns joins to four dimensions.
Dimension-only query
Without an implicit fact column, Oracle BI Server returns product sales data via the SalesFacts logical table (the most
economical source).
With an implicit fact column, Oracle BI Server returns product return data via
the Returns logical table even if it is not the most economical source.
ABC ExampleIn this example, there are two fact tables: SalesFacts and Returns. SalesFacts joins to three dimensions and Returns joins to four dimensions. Both fact tables join to the Customers and Products dimensions. If a user runs a dimension-only query against Customers and Products, without setting an implicit fact column, Oracle BI Server returns product sales data via the SalesFacts logical table, which has the least amount of joins and is, therefore, the most economical source. With an implicit fact column set to a measure in the Returns table, Oracle BI Server returns data via the Returns logical table even if it is not the most economical source.
Ora
cle
Inte
rnal
& O
racl
e A
cade
my
Use
Onl
y
Oracle BI Suite EE 10g R3: Build Repositories 16 - 6
Copyright © 2008, Oracle. All rights reserved.
Steps to Configure an Implicit Fact Column
1. Set an implicit fact column.2. Verify the results.3. Clear the implicit fact column.
Steps to Configure an Implicit Fact ColumnThis slide lists the steps to configure an implicit fact column. Each step is presented in detail in the slides that follow.
Ora
cle
Inte
rnal
& O
racl
e A
cade
my
Use
Onl
y
Oracle BI Suite EE 10g R3: Build Repositories 16 - 7
Copyright © 2008, Oracle. All rights reserved.
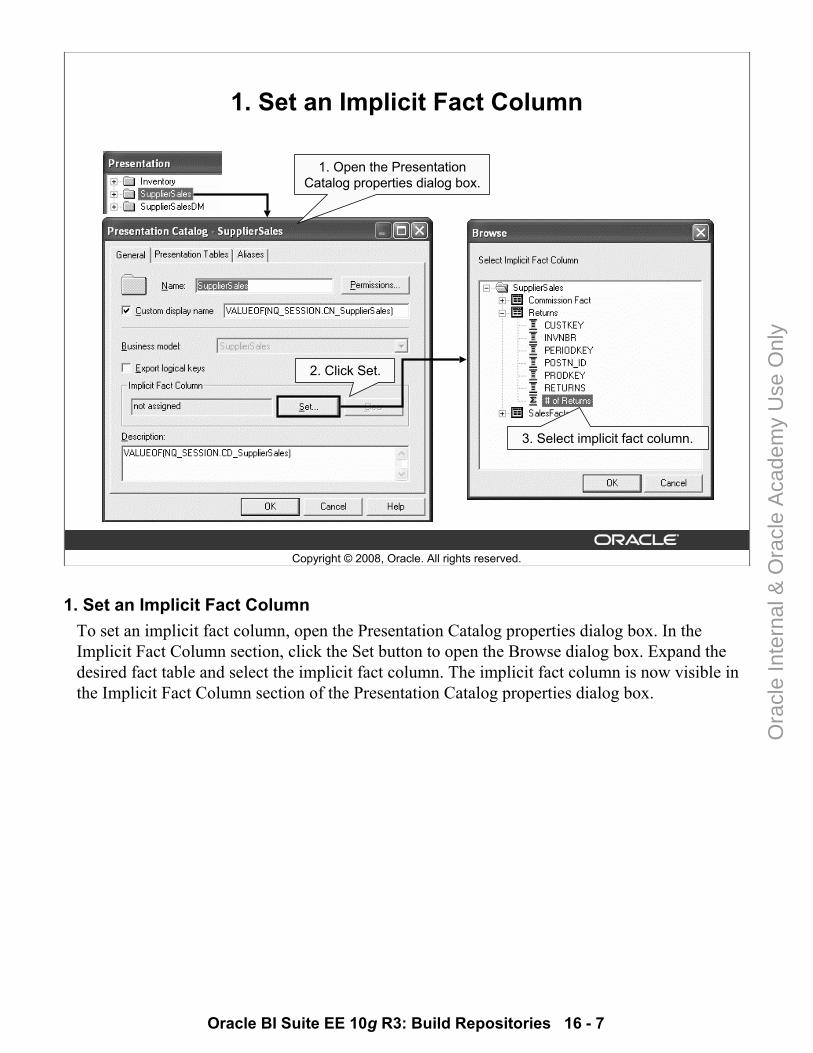
1. Set an Implicit Fact Column
1. Open the Presentation Catalog properties dialog box.
2. Click Set.
3. Select implicit fact column.
1. Set an Implicit Fact ColumnTo set an implicit fact column, open the Presentation Catalog properties dialog box. In the Implicit Fact Column section, click the Set button to open the Browse dialog box. Expand the desired fact table and select the implicit fact column. The implicit fact column is now visible in the Implicit Fact Column section of the Presentation Catalog properties dialog box.
Ora
cle
Inte
rnal
& O
racl
e A
cade
my
Use
Onl
y
Oracle BI Suite EE 10g R3: Build Repositories 16 - 8
Copyright © 2008, Oracle. All rights reserved.
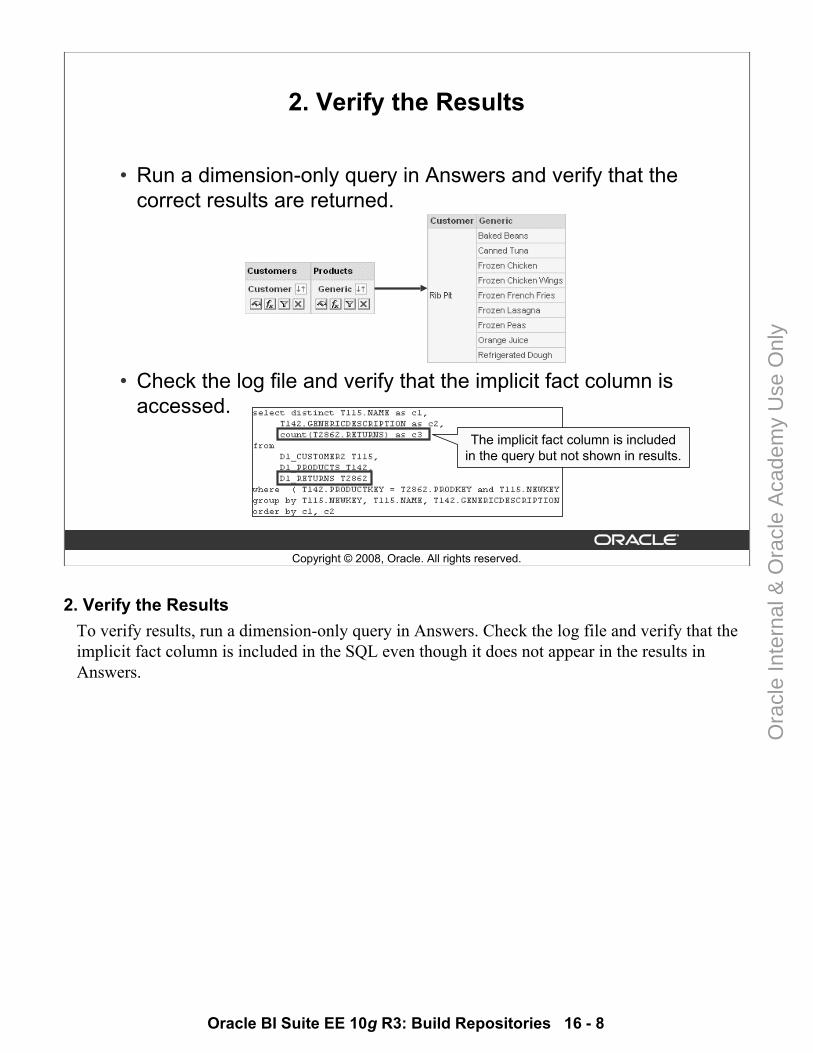
2. Verify the Results
• Run a dimension-only query in Answers and verify that the correct results are returned.
• Check the log file and verify that the implicit fact column is accessed.
The implicit fact column is included in the query but not shown in results.
2. Verify the ResultsTo verify results, run a dimension-only query in Answers. Check the log file and verify that the implicit fact column is included in the SQL even though it does not appear in the results in Answers.
Ora
cle
Inte
rnal
& O
racl
e A
cade
my
Use
Onl
y
Oracle BI Suite EE 10g R3: Build Repositories 16 - 9
Copyright © 2008, Oracle. All rights reserved.
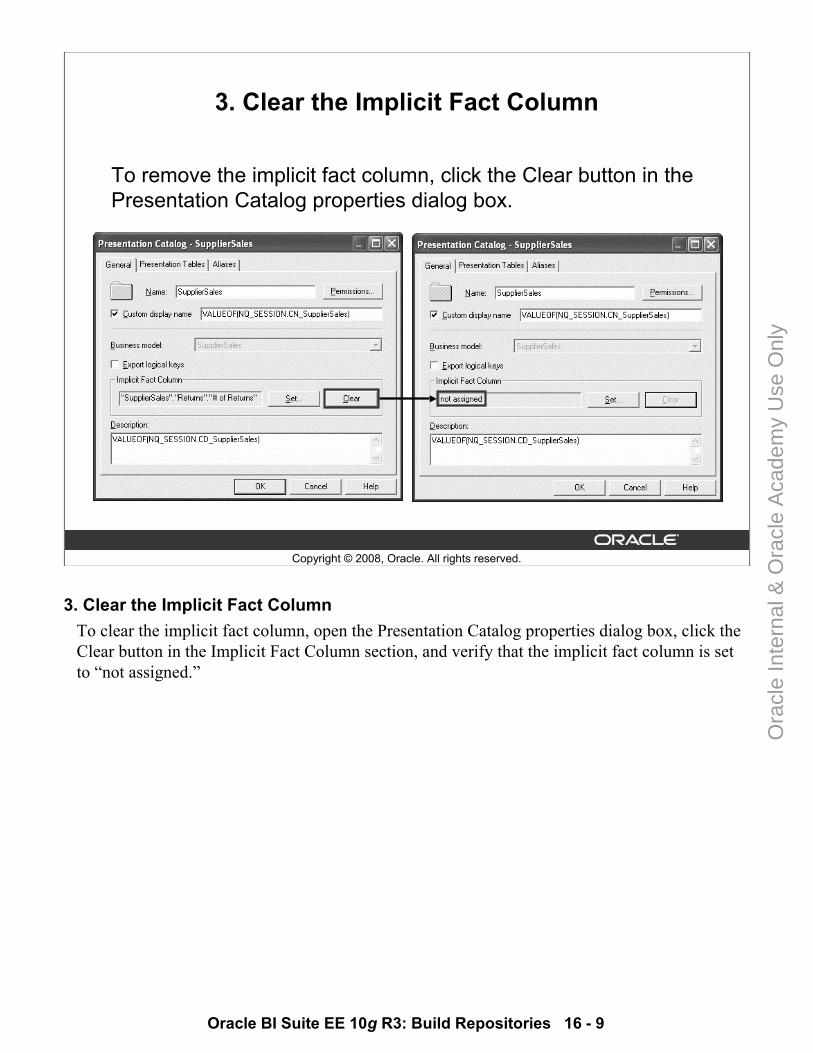
3. Clear the Implicit Fact Column
To remove the implicit fact column, click the Clear button in the Presentation Catalog properties dialog box.
3. Clear the Implicit Fact ColumnTo clear the implicit fact column, open the Presentation Catalog properties dialog box, click the Clear button in the Implicit Fact Column section, and verify that the implicit fact column is set to “not assigned.”
Ora
cle
Inte
rnal
& O
racl
e A
cade
my
Use
Onl
y
Oracle BI Suite EE 10g R3: Build Repositories 16 - 10
Copyright © 2008, Oracle. All rights reserved.
Summary
In this lesson, you should have learned how to:• Describe the purpose and process of configuring an implicit
fact column• Set an implicit fact column for a presentation catalog
Ora
cle
Inte
rnal
& O
racl
e A
cade
my
Use
Onl
y

Oracle BI Suite EE 10g R3: Build Repositories 16 - 11
Copyright © 2008, Oracle. All rights reserved.
Practice 16-1 Overview: Setting an Implicit Fact Column
In the practice, you set an implicit fact column for a presentation catalog.
Practice 16-1 Overview: Setting an Implicit Fact Column ABC tracks both product sales and product return information. ABC wants to ensure that dimension-only queries return the correct results. To ensure the expected results, you test different implicit fact column settings for the SupplierSales presentation catalog.
Ora
cle
Inte
rnal
& O
racl
e A
cade
my
Use
Onl
y

Ora
cle
Inte
rnal
& O
racl
e A
cade
my
Use
Onl
y

Copyright © 2008, Oracle. All rights reserved.
Integrating Third-Party Reporting Tools
Ora
cle
Inte
rnal
& O
racl
e A
cade
my
Use
Onl
y
Oracle BI Suite EE 10g R3: Build Repositories 17 - 2
Copyright © 2008, Oracle. All rights reserved.
Objectives
After completing this lesson, you should be able to:• Identify the business reasons for using third-party reporting
tools with Oracle Business Intelligence (BI) Server• Connect third-party reporting tools to Oracle BI Server
Ora
cle
Inte
rnal
& O
racl
e A
cade
my
Use
Onl
y
Oracle BI Suite EE 10g R3: Build Repositories 17 - 3
Copyright © 2008, Oracle. All rights reserved.
Business Challenge
• End users may resist changing their existing reporting tools.• End-user adoption of new products takes time.• Duplicate business rules may exist across divisions:
– Businesses lack an enterprise view of their data.– Reporting tools and underlying data models are duplicated.
Business ChallengeWhen a new product is implemented, end users are not always eager to adopt the new technology. They may resist changing from familiar tools. End-user adoption of new technologies may, therefore, need to be a gradual process in which old tools are phased out and new tools phased in. Another challenge is that a business may use multiple reporting tools across the enterprise, each with a corresponding set of business processes and rules.
Ora
cle
Inte
rnal
& O
racl
e A
cade
my
Use
Onl
y
Oracle BI Suite EE 10g R3: Build Repositories 17 - 4
Copyright © 2008, Oracle. All rights reserved.
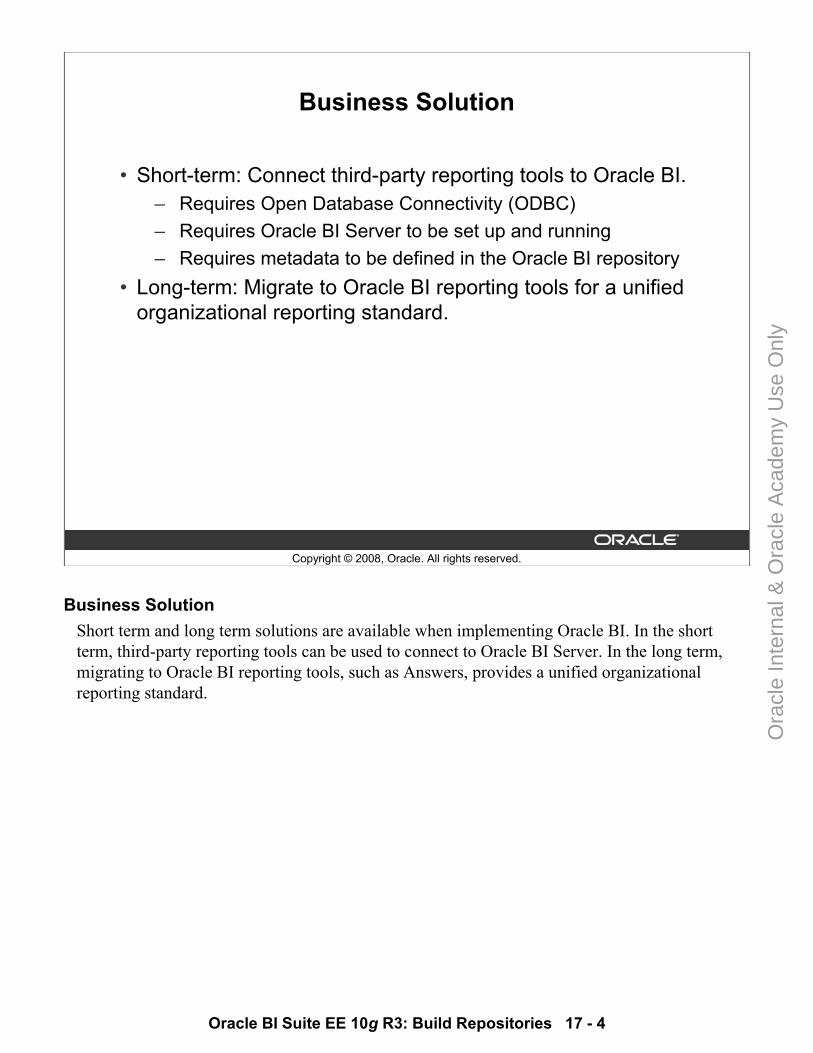
Business Solution
• Short-term: Connect third-party reporting tools to Oracle BI.– Requires Open Database Connectivity (ODBC)– Requires Oracle BI Server to be set up and running– Requires metadata to be defined in the Oracle BI repository
• Long-term: Migrate to Oracle BI reporting tools for a unified organizational reporting standard.
Business SolutionShort term and long term solutions are available when implementing Oracle BI. In the short term, third-party reporting tools can be used to connect to Oracle BI Server. In the long term, migrating to Oracle BI reporting tools, such as Answers, provides a unified organizational reporting standard.
Ora
cle
Inte
rnal
& O
racl
e A
cade
my
Use
Onl
y
Oracle BI Suite EE 10g R3: Build Repositories 17 - 5
Copyright © 2008, Oracle. All rights reserved.
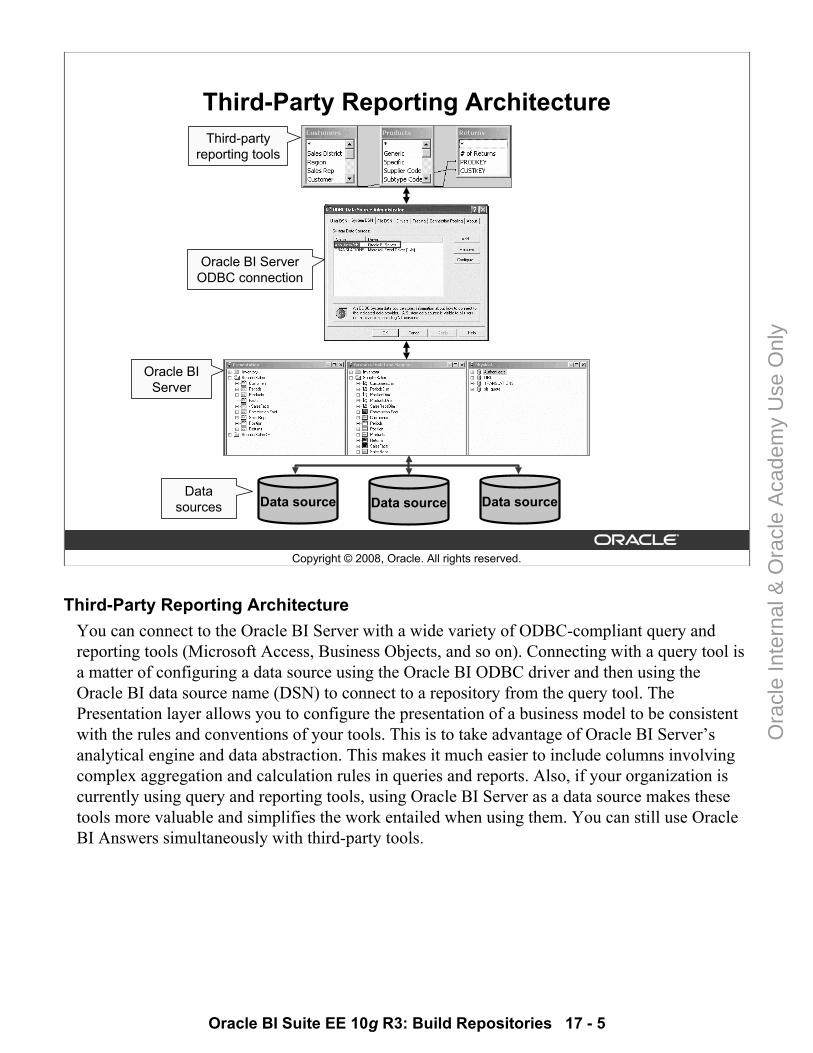
Third-Party Reporting Architecture
Data source Data source Data source
Third-party reporting tools
Oracle BI Server ODBC connection
Oracle BI Server
Data sources
Third-Party Reporting Architecture You can connect to the Oracle BI Server with a wide variety of ODBC-compliant query and reporting tools (Microsoft Access, Business Objects, and so on). Connecting with a query tool is a matter of configuring a data source using the Oracle BI ODBC driver and then using the Oracle BI data source name (DSN) to connect to a repository from the query tool. The Presentation layer allows you to configure the presentation of a business model to be consistent with the rules and conventions of your tools. This is to take advantage of Oracle BI Server’s analytical engine and data abstraction. This makes it much easier to include columns involving complex aggregation and calculation rules in queries and reports. Also, if your organization is currently using query and reporting tools, using Oracle BI Server as a data source makes these tools more valuable and simplifies the work entailed when using them. You can still use Oracle BI Answers simultaneously with third-party tools.
Ora
cle
Inte
rnal
& O
racl
e A
cade
my
Use
Onl
y
Oracle BI Suite EE 10g R3: Build Repositories 17 - 6
Copyright © 2008, Oracle. All rights reserved.
ABC Example
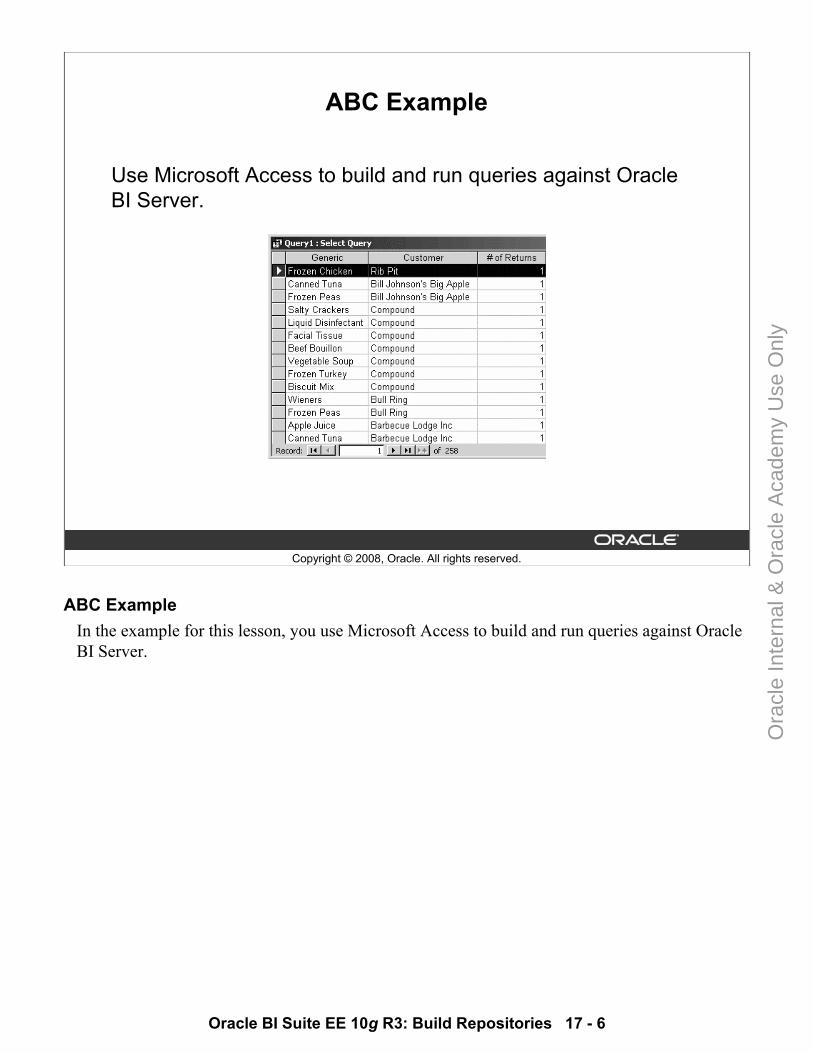
Use Microsoft Access to build and run queries against Oracle BI Server.
ABC ExampleIn the example for this lesson, you use Microsoft Access to build and run queries against Oracle BI Server.
Ora
cle
Inte
rnal
& O
racl
e A
cade
my
Use
Onl
y
Oracle BI Suite EE 10g R3: Build Repositories 17 - 7
Copyright © 2008, Oracle. All rights reserved.
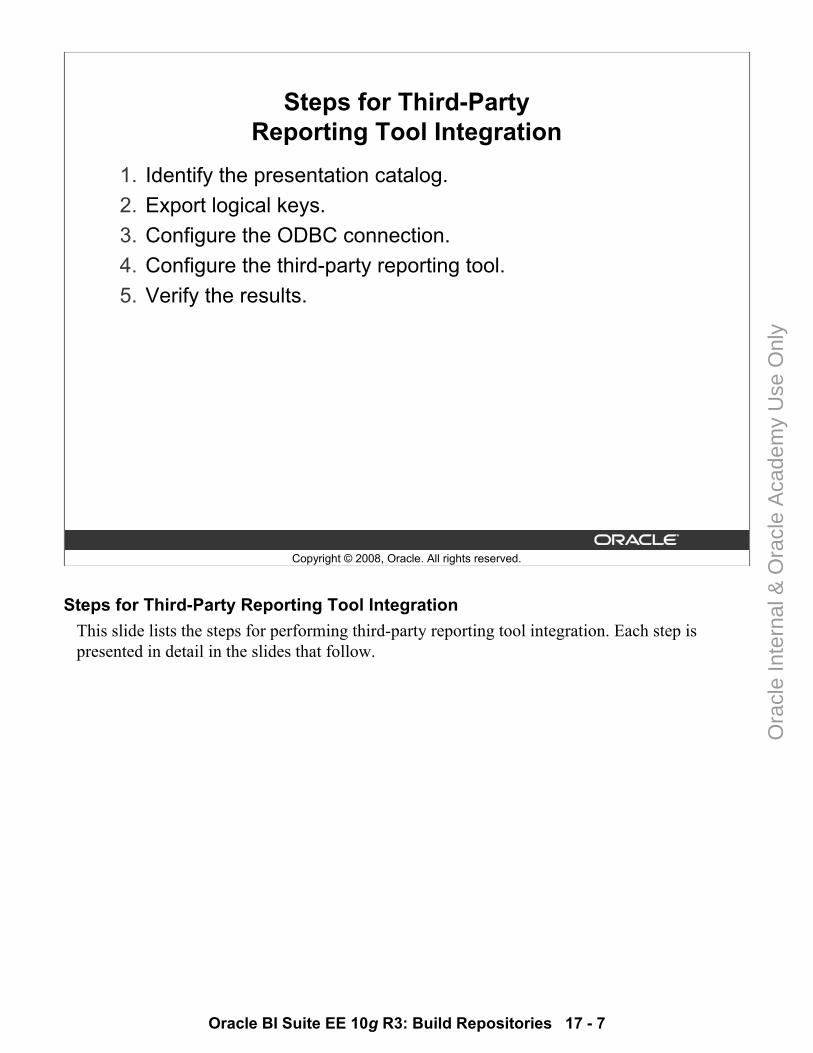
Steps for Third-Party Reporting Tool Integration
1. Identify the presentation catalog.2. Export logical keys.3. Configure the ODBC connection.4. Configure the third-party reporting tool.5. Verify the results.
Steps for Third-Party Reporting Tool IntegrationThis slide lists the steps for performing third-party reporting tool integration. Each step is presented in detail in the slides that follow.
Ora
cle
Inte
rnal
& O
racl
e A
cade
my
Use
Onl
y
Oracle BI Suite EE 10g R3: Build Repositories 17 - 8
Copyright © 2008, Oracle. All rights reserved.
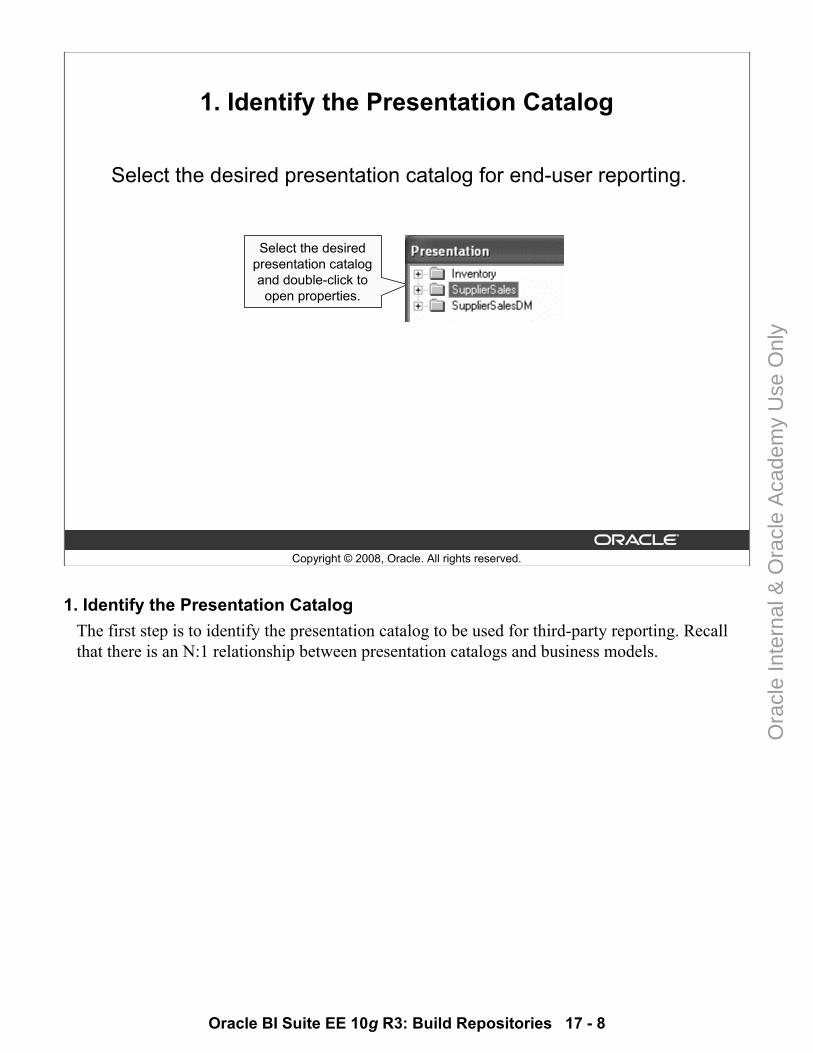
1. Identify the Presentation Catalog
Select the desired presentation catalog for end-user reporting.
Select the desired presentation catalog and double-click to
open properties.
1. Identify the Presentation CatalogThe first step is to identify the presentation catalog to be used for third-party reporting. Recall that there is an N:1 relationship between presentation catalogs and business models.
Ora
cle
Inte
rnal
& O
racl
e A
cade
my
Use
Onl
y
Oracle BI Suite EE 10g R3: Build Repositories 17 - 9
Copyright © 2008, Oracle. All rights reserved.
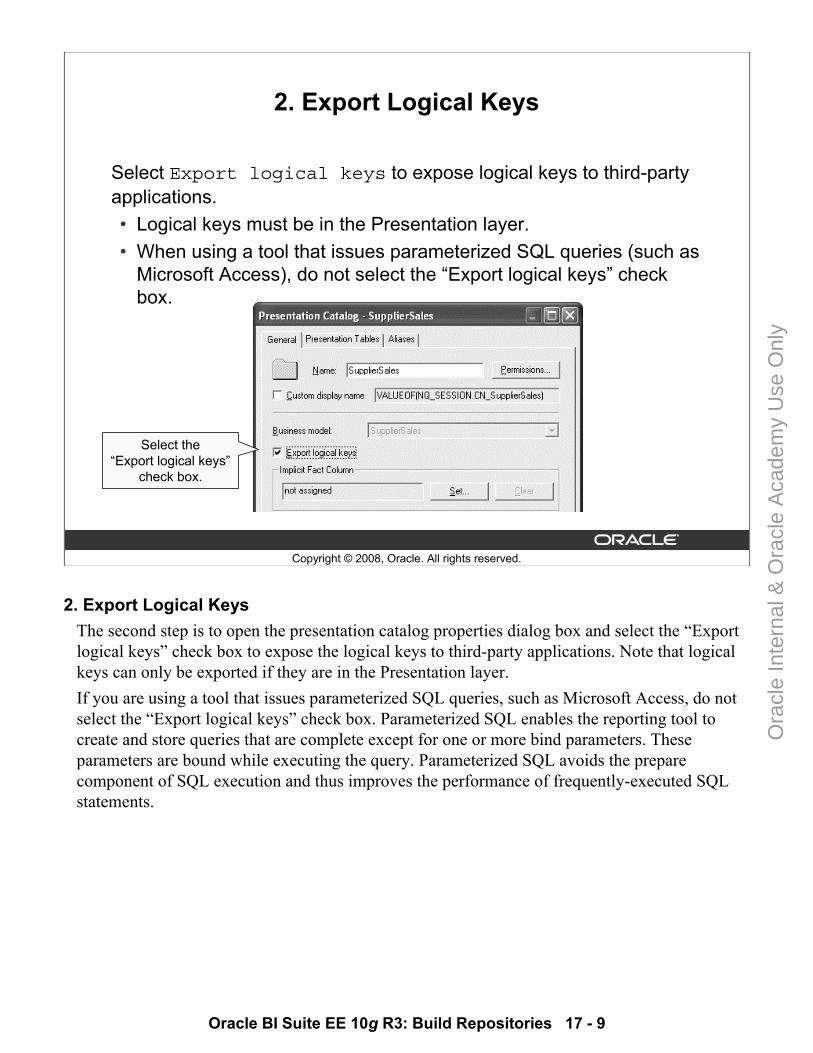
2. Export Logical Keys
Select Export logical keys to expose logical keys to third-party applications.• Logical keys must be in the Presentation layer.• When using a tool that issues parameterized SQL queries (such as
Microsoft Access), do not select the “Export logical keys” checkbox.
Select the“Export logical keys”
check box.
2. Export Logical KeysThe second step is to open the presentation catalog properties dialog box and select the “Export logical keys” check box to expose the logical keys to third-party applications. Note that logical keys can only be exported if they are in the Presentation layer.If you are using a tool that issues parameterized SQL queries, such as Microsoft Access, do not select the “Export logical keys” check box. Parameterized SQL enables the reporting tool to create and store queries that are complete except for one or more bind parameters. These parameters are bound while executing the query. Parameterized SQL avoids the prepare component of SQL execution and thus improves the performance of frequently-executed SQL statements.
Ora
cle
Inte
rnal
& O
racl
e A
cade
my
Use
Onl
y
Oracle BI Suite EE 10g R3: Build Repositories 17 - 10
Copyright © 2008, Oracle. All rights reserved.
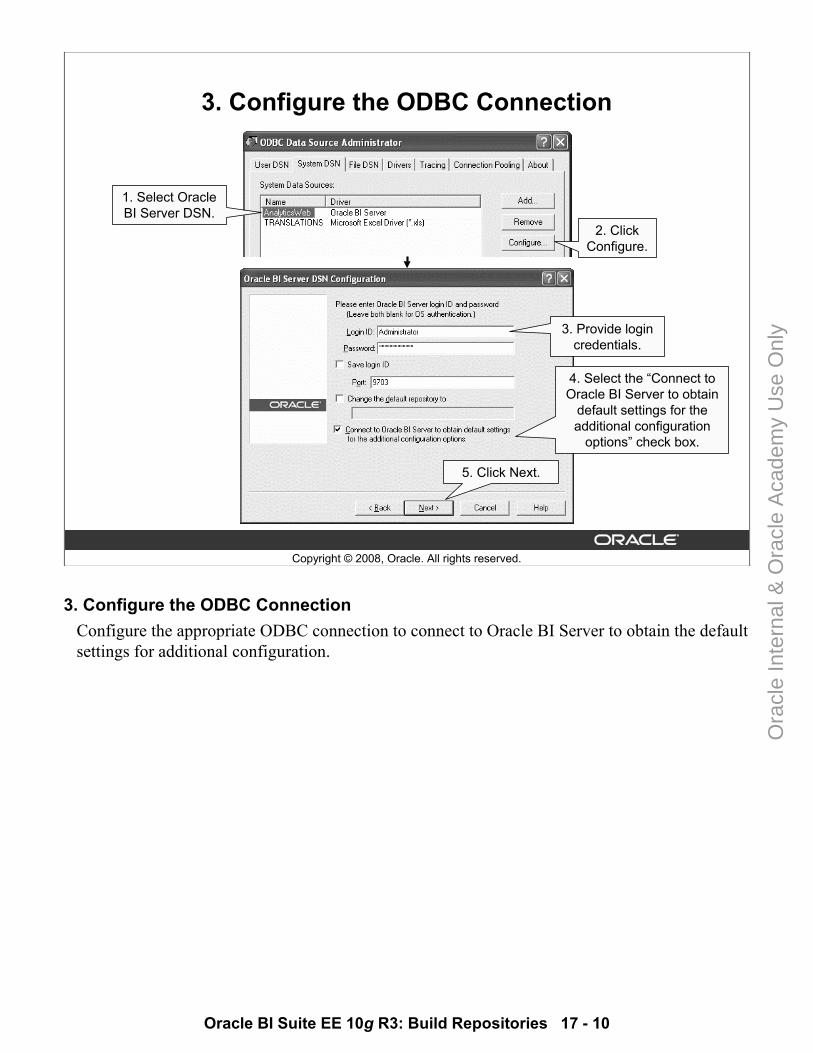
3. Configure the ODBC Connection
1. Select Oracle BI Server DSN.
2. Click Configure.
3. Provide login credentials.
4. Select the “Connect to Oracle BI Server to obtain
default settings for the additional configuration
options” check box.
5. Click Next.
3. Configure the ODBC ConnectionConfigure the appropriate ODBC connection to connect to Oracle BI Server to obtain the default settings for additional configuration.
Ora
cle
Inte
rnal
& O
racl
e A
cade
my
Use
Onl
y
Oracle BI Suite EE 10g R3: Build Repositories 17 - 11
Copyright © 2008, Oracle. All rights reserved.
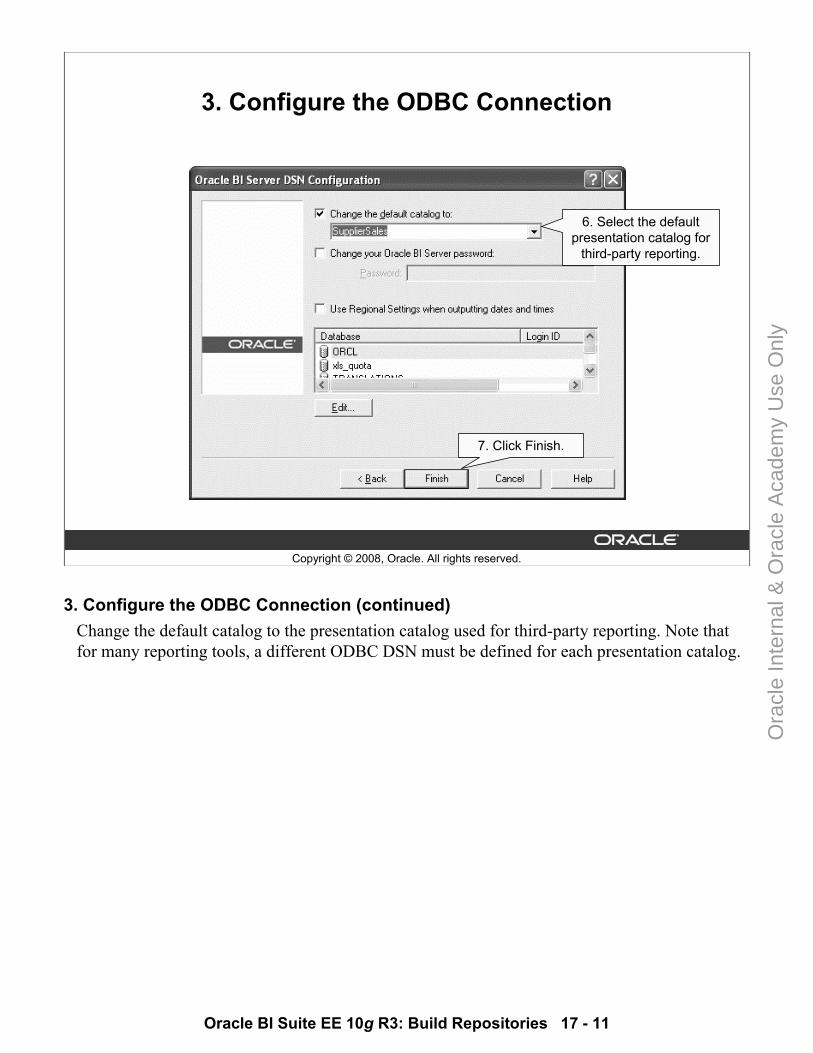
3. Configure the ODBC Connection
6. Select the default presentation catalog for
third-party reporting.
7. Click Finish.
3. Configure the ODBC Connection (continued)Change the default catalog to the presentation catalog used for third-party reporting. Note that for many reporting tools, a different ODBC DSN must be defined for each presentation catalog.
Ora
cle
Inte
rnal
& O
racl
e A
cade
my
Use
Onl
y
Oracle BI Suite EE 10g R3: Build Repositories 17 - 12
Copyright © 2008, Oracle. All rights reserved.
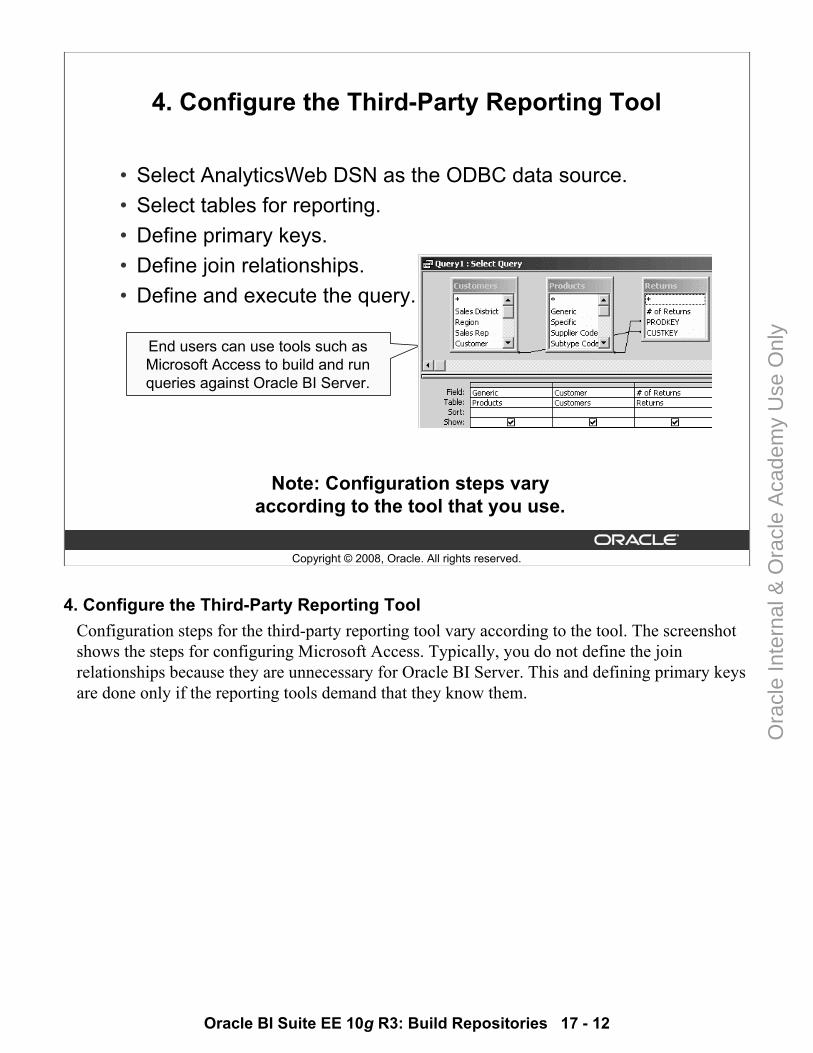
4. Configure the Third-Party Reporting Tool
• Select AnalyticsWeb DSN as the ODBC data source.• Select tables for reporting.• Define primary keys.• Define join relationships.• Define and execute the query.
Note: Configuration steps vary according to the tool that you use.
End users can use tools such as Microsoft Access to build and run queries against Oracle BI Server.
4. Configure the Third-Party Reporting ToolConfiguration steps for the third-party reporting tool vary according to the tool. The screenshot shows the steps for configuring Microsoft Access. Typically, you do not define the join relationships because they are unnecessary for Oracle BI Server. This and defining primary keys are done only if the reporting tools demand that they know them.
Ora
cle
Inte
rnal
& O
racl
e A
cade
my
Use
Onl
y
Oracle BI Suite EE 10g R3: Build Repositories 17 - 13
Copyright © 2008, Oracle. All rights reserved.
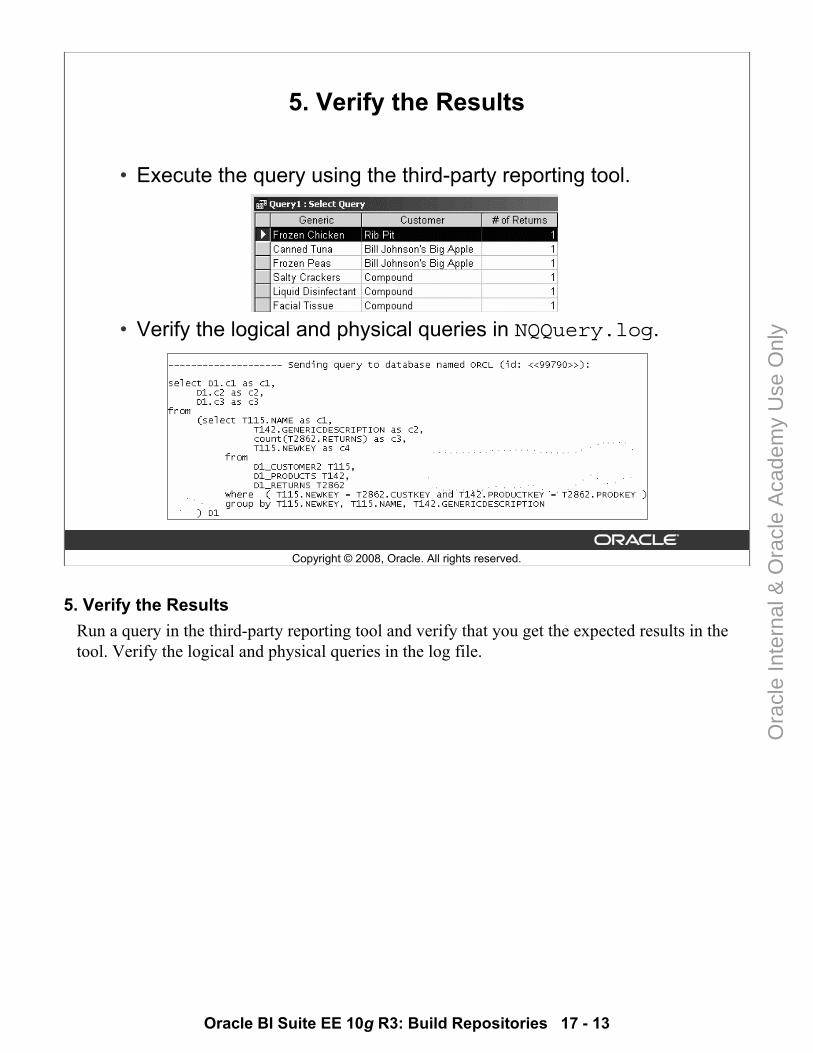
5. Verify the Results
• Execute the query using the third-party reporting tool.
• Verify the logical and physical queries in NQQuery.log.
5. Verify the ResultsRun a query in the third-party reporting tool and verify that you get the expected results in the tool. Verify the logical and physical queries in the log file.
Ora
cle
Inte
rnal
& O
racl
e A
cade
my
Use
Onl
y
Oracle BI Suite EE 10g R3: Build Repositories 17 - 14
Copyright © 2008, Oracle. All rights reserved.
Summary
In this lesson, you should have learned how to:• Identify the business reasons for using third-party reporting
tools with Oracle BI Server• Connect third-party reporting tools to Oracle BI Server
Ora
cle
Inte
rnal
& O
racl
e A
cade
my
Use
Onl
y
Oracle BI Suite EE 10g R3: Build Repositories 17 - 15
Copyright © 2008, Oracle. All rights reserved.
Practice 17-1 Overview: Integrating a Third-Party Reporting Tool
In the practice, you configure Microsoft Access to run queries against Oracle BI Server.
Practice 17-1 Overview: Integrating a Third-Party Reporting Tool ABC wants to integrate third-party reporting tools with Oracle BI. ABC has a history of usingdifferent reporting tools and is concerned that its rate of end user adoption may be affected by the introduction of a new reporting tool. The long-term goal is to use Oracle BI as the corporate reporting tool and phase out the other reporting tools. In the meantime, you demonstrate the ability to run ad hoc queries against Oracle BI Server using a third-party tool.
Ora
cle
Inte
rnal
& O
racl
e A
cade
my
Use
Onl
y

Ora
cle
Inte
rnal
& O
racl
e A
cade
my
Use
Onl
y
Copyright © 2008, Oracle. All rights reserved.
Creating Repositories from Multidimensional Data Sources
Ora
cle
Inte
rnal
& O
racl
e A
cade
my
Use
Onl
y
Oracle BI Suite EE 10g R3: Build Repositories 18 - 2
Copyright © 2008, Oracle. All rights reserved.
Objective
After completing this lesson, you should be able to create a repository using a multidimensional data source.
Ora
cle
Inte
rnal
& O
racl
e A
cade
my
Use
Onl
y
Oracle BI Suite EE 10g R3: Build Repositories 18 - 3
Copyright © 2008, Oracle. All rights reserved.
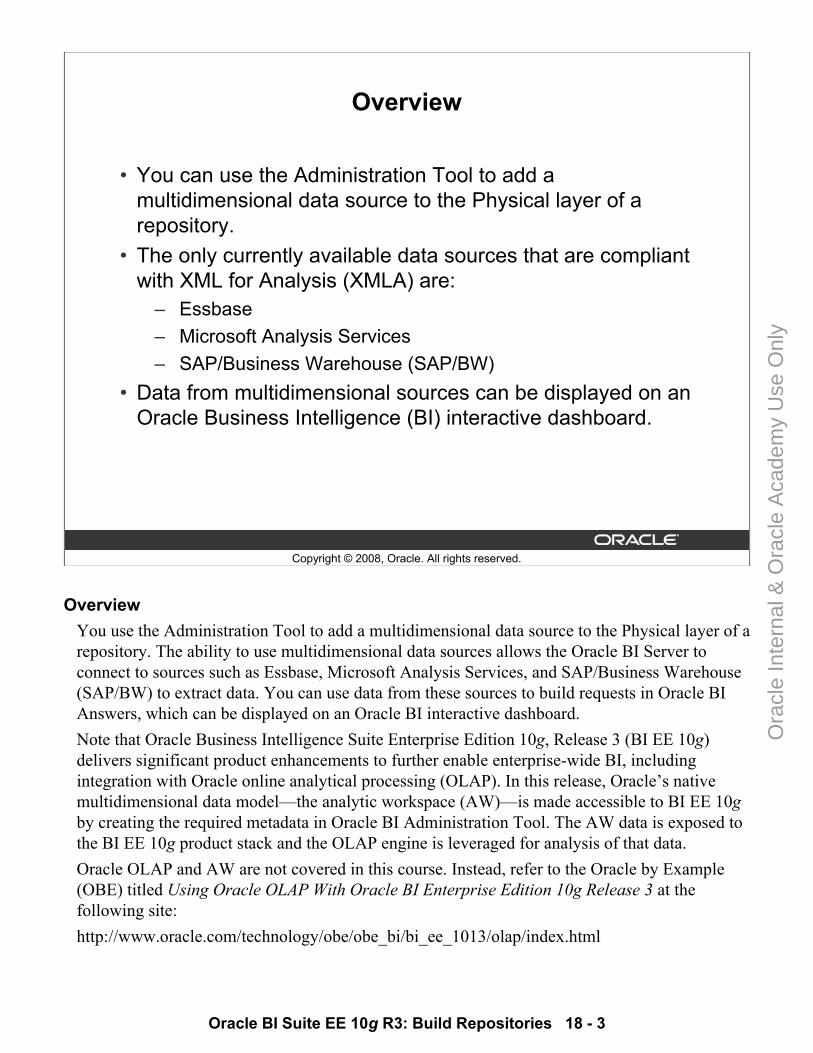
Overview
• You can use the Administration Tool to add a multidimensional data source to the Physical layer of a repository.
• The only currently available data sources that are compliant with XML for Analysis (XMLA) are:
– Essbase– Microsoft Analysis Services– SAP/Business Warehouse (SAP/BW)
• Data from multidimensional sources can be displayed on an Oracle Business Intelligence (BI) interactive dashboard.
OverviewYou use the Administration Tool to add a multidimensional data source to the Physical layer of a repository. The ability to use multidimensional data sources allows the Oracle BI Server to connect to sources such as Essbase, Microsoft Analysis Services, and SAP/Business Warehouse (SAP/BW) to extract data. You can use data from these sources to build requests in Oracle BI Answers, which can be displayed on an Oracle BI interactive dashboard. Note that Oracle Business Intelligence Suite Enterprise Edition 10g, Release 3 (BI EE 10g) delivers significant product enhancements to further enable enterprise-wide BI, including integration with Oracle online analytical processing (OLAP). In this release, Oracle’s native multidimensional data model—the analytic workspace (AW)—is made accessible to BI EE 10gby creating the required metadata in Oracle BI Administration Tool. The AW data is exposed to the BI EE 10g product stack and the OLAP engine is leveraged for analysis of that data.Oracle OLAP and AW are not covered in this course. Instead, refer to the Oracle by Example (OBE) titled Using Oracle OLAP With Oracle BI Enterprise Edition 10g Release 3 at the following site:http://www.oracle.com/technology/obe/obe_bi/bi_ee_1013/olap/index.html
Ora
cle
Inte
rnal
& O
racl
e A
cade
my
Use
Onl
y
Oracle BI Suite EE 10g R3: Build Repositories 18 - 4
Copyright © 2008, Oracle. All rights reserved.
XML for Analysis (XMLA)
Oracle BI Server connects to the multidimensional source using the XMLA-standard protocol:• This requires that a fully functional Web services interface be
available with the target data source.• The standard dictates the various protocols that the Oracle
BI Server can use to connect to the target and query data.
XML for Analysis The Oracle BI Server connects to the multidimensional source using the XMLA-standard protocol. This requires that a fully functional Web services interface is available with the target data source. The standard dictates the various protocols that the Oracle BI Server can use to connect to the target and query data. Importing data from a multidimensional source creates the metadata of the data source in the Oracle BI repository. XMLA is a joint Hyperion and Microsoft specification for an open API that is designed to standardize the data access interaction between a client application and an analytical data provider working on the Web.
Ora
cle
Inte
rnal
& O
racl
e A
cade
my
Use
Onl
y
Oracle BI Suite EE 10g R3: Build Repositories 18 - 5
Copyright © 2008, Oracle. All rights reserved.
Multidimensional Versus Relational Data Sources
• The primary differences between setting up multidimensional data sources and setting up relational data sources are in the Physical layer.
• The setup processes in the business model and presentation layers for multidimensional data sources and relational data sources are almost identical.
Multidimensional Versus Relational Data Sources The primary differences between setting up multidimensional data sources and setting up relational data sources are in the Physical layer. The setup processes in the business model and presentation layers for multidimensional data sources and relational data sources are almost identical.
Ora
cle
Inte
rnal
& O
racl
e A
cade
my
Use
Onl
y
Oracle BI Suite EE 10g R3: Build Repositories 18 - 6
Copyright © 2008, Oracle. All rights reserved.
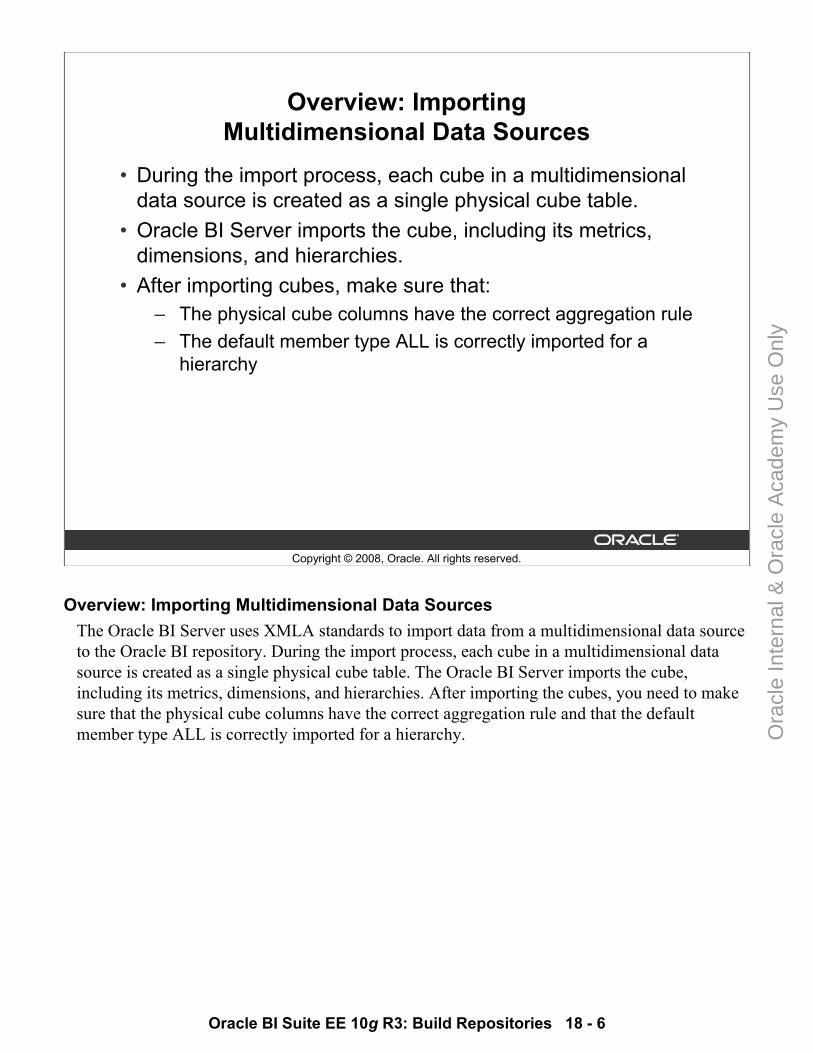
Overview: Importing Multidimensional Data Sources
• During the import process, each cube in a multidimensional data source is created as a single physical cube table.
• Oracle BI Server imports the cube, including its metrics, dimensions, and hierarchies.
• After importing cubes, make sure that: – The physical cube columns have the correct aggregation rule– The default member type ALL is correctly imported for a
hierarchy
Overview: Importing Multidimensional Data Sources The Oracle BI Server uses XMLA standards to import data from a multidimensional data source to the Oracle BI repository. During the import process, each cube in a multidimensional data source is created as a single physical cube table. The Oracle BI Server imports the cube, including its metrics, dimensions, and hierarchies. After importing the cubes, you need to make sure that the physical cube columns have the correct aggregation rule and that the default member type ALL is correctly imported for a hierarchy.
Ora
cle
Inte
rnal
& O
racl
e A
cade
my
Use
Onl
y
Oracle BI Suite EE 10g R3: Build Repositories 18 - 7
Copyright © 2008, Oracle. All rights reserved.
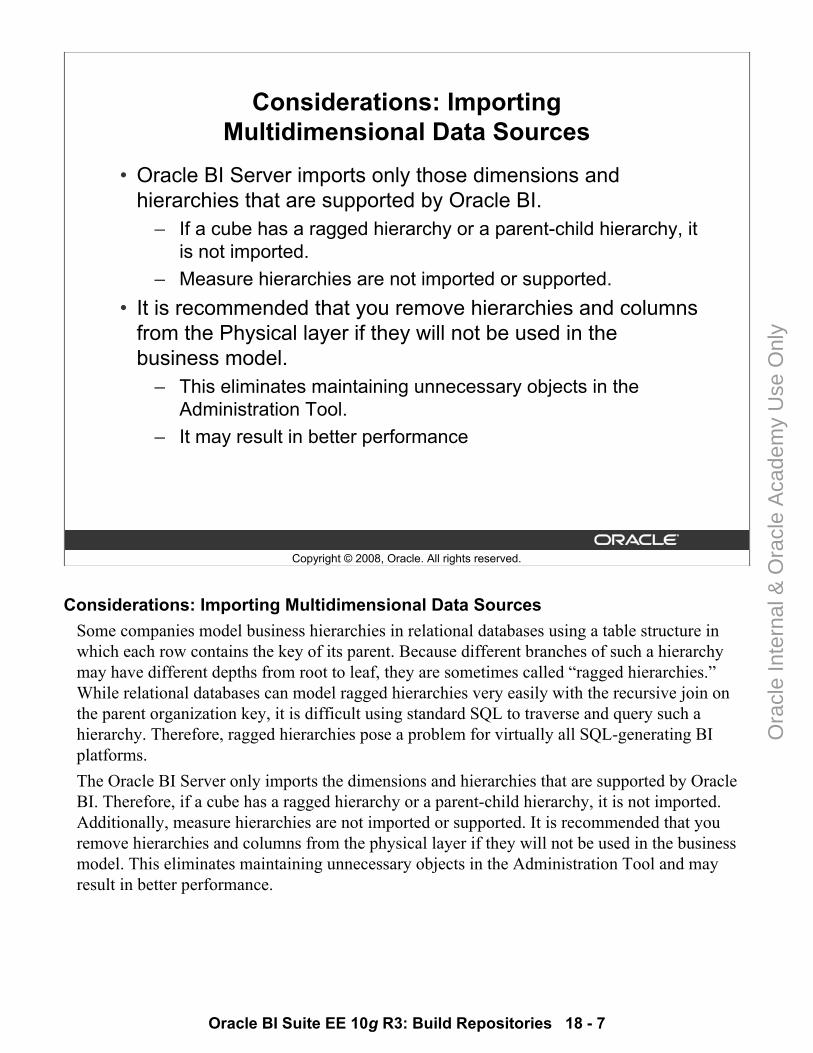
Considerations: Importing Multidimensional Data Sources
• Oracle BI Server imports only those dimensions and hierarchies that are supported by Oracle BI.
– If a cube has a ragged hierarchy or a parent-child hierarchy, it is not imported.
– Measure hierarchies are not imported or supported.• It is recommended that you remove hierarchies and columns
from the Physical layer if they will not be used in the business model.
– This eliminates maintaining unnecessary objects in the Administration Tool.
– It may result in better performance
Considerations: Importing Multidimensional Data SourcesSome companies model business hierarchies in relational databases using a table structure in which each row contains the key of its parent. Because different branches of such a hierarchy may have different depths from root to leaf, they are sometimes called “ragged hierarchies.” While relational databases can model ragged hierarchies very easily with the recursive join on the parent organization key, it is difficult using standard SQL to traverse and query such a hierarchy. Therefore, ragged hierarchies pose a problem for virtually all SQL-generating BI platforms. The Oracle BI Server only imports the dimensions and hierarchies that are supported by Oracle BI. Therefore, if a cube has a ragged hierarchy or a parent-child hierarchy, it is not imported. Additionally, measure hierarchies are not imported or supported. It is recommended that you remove hierarchies and columns from the physical layer if they will not be used in the business model. This eliminates maintaining unnecessary objects in the Administration Tool and may result in better performance.
Ora
cle
Inte
rnal
& O
racl
e A
cade
my
Use
Onl
y
Oracle BI Suite EE 10g R3: Build Repositories 18 - 8
Copyright © 2008, Oracle. All rights reserved.
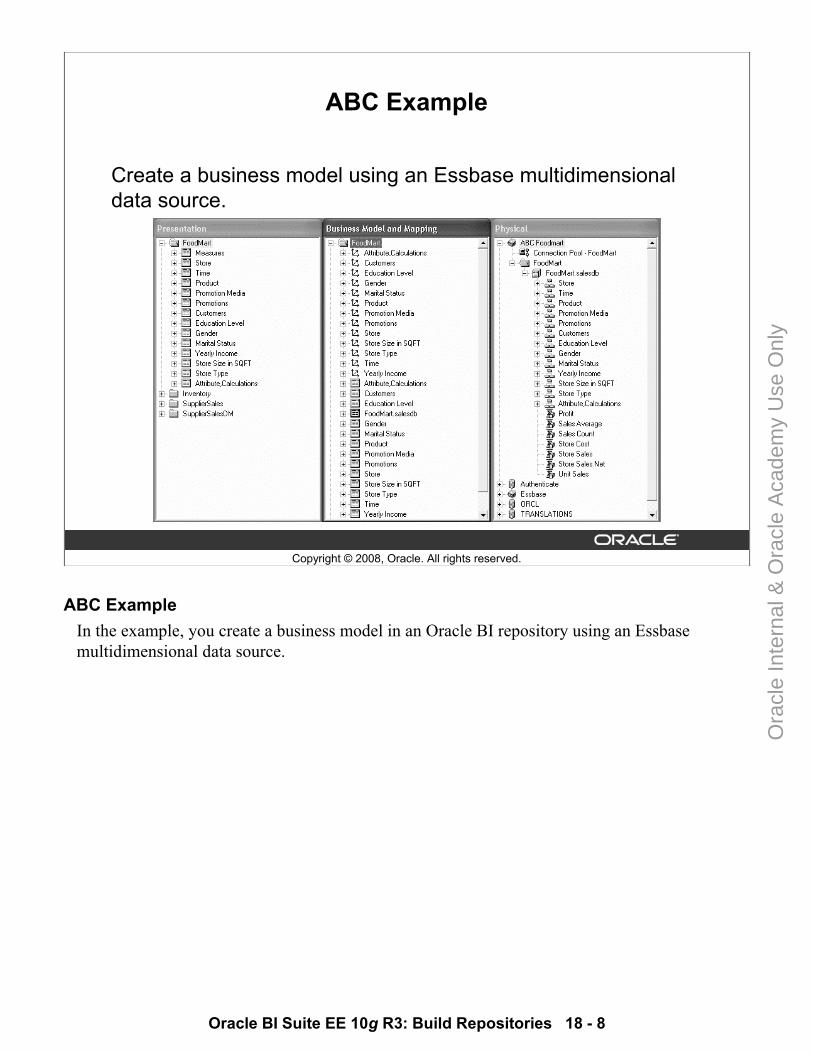
ABC Example
Create a business model using an Essbase multidimensional data source.
ABC ExampleIn the example, you create a business model in an Oracle BI repository using an Essbase multidimensional data source.
Ora
cle
Inte
rnal
& O
racl
e A
cade
my
Use
Onl
y
Oracle BI Suite EE 10g R3: Build Repositories 18 - 9
Copyright © 2008, Oracle. All rights reserved.
Creating a Multidimensional Business Model
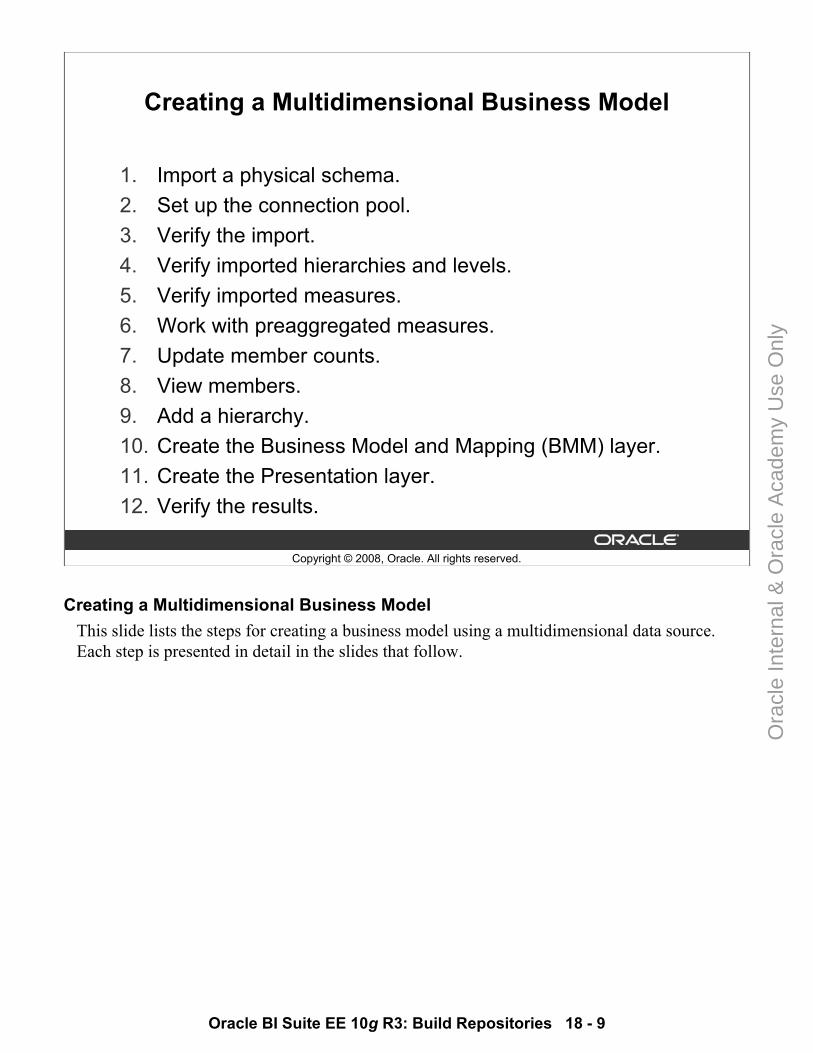
1. Import a physical schema. 2. Set up the connection pool.3. Verify the import.4. Verify imported hierarchies and levels.5. Verify imported measures.6. Work with preaggregated measures.7. Update member counts.8. View members.9. Add a hierarchy.10. Create the Business Model and Mapping (BMM) layer.11. Create the Presentation layer.12. Verify the results.
Creating a Multidimensional Business ModelThis slide lists the steps for creating a business model using a multidimensional data source. Each step is presented in detail in the slides that follow.
Ora
cle
Inte
rnal
& O
racl
e A
cade
my
Use
Onl
y
Oracle BI Suite EE 10g R3: Build Repositories 18 - 10
Copyright © 2008, Oracle. All rights reserved.
1. Import a Physical Schema
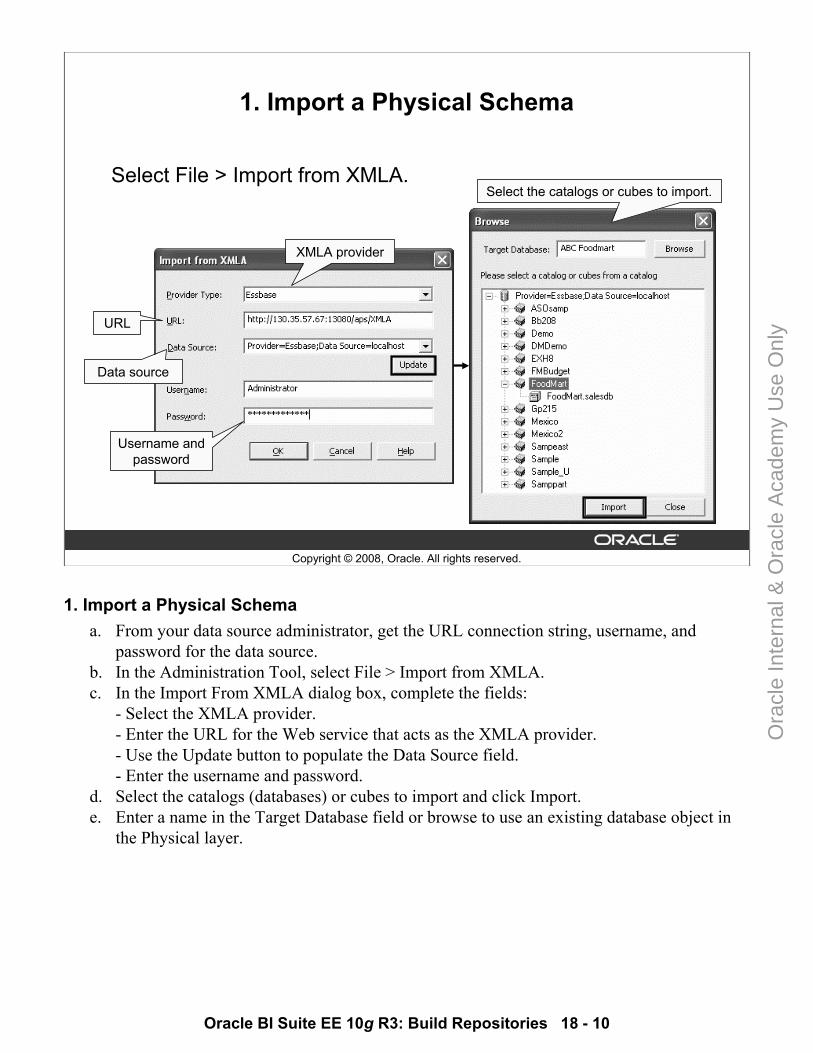
Select File > Import from XMLA.
XMLA provider
URL
Username and password
Select the catalogs or cubes to import.
Data source
1. Import a Physical Schemaa. From your data source administrator, get the URL connection string, username, and
password for the data source. b. In the Administration Tool, select File > Import from XMLA.c. In the Import From XMLA dialog box, complete the fields:
- Select the XMLA provider.- Enter the URL for the Web service that acts as the XMLA provider.- Use the Update button to populate the Data Source field.- Enter the username and password.
d. Select the catalogs (databases) or cubes to import and click Import.e. Enter a name in the Target Database field or browse to use an existing database object in
the Physical layer.
Ora
cle
Inte
rnal
& O
racl
e A
cade
my
Use
Onl
y
Oracle BI Suite EE 10g R3: Build Repositories 18 - 11
Copyright © 2008, Oracle. All rights reserved.
2. Set Up the Connection Pool
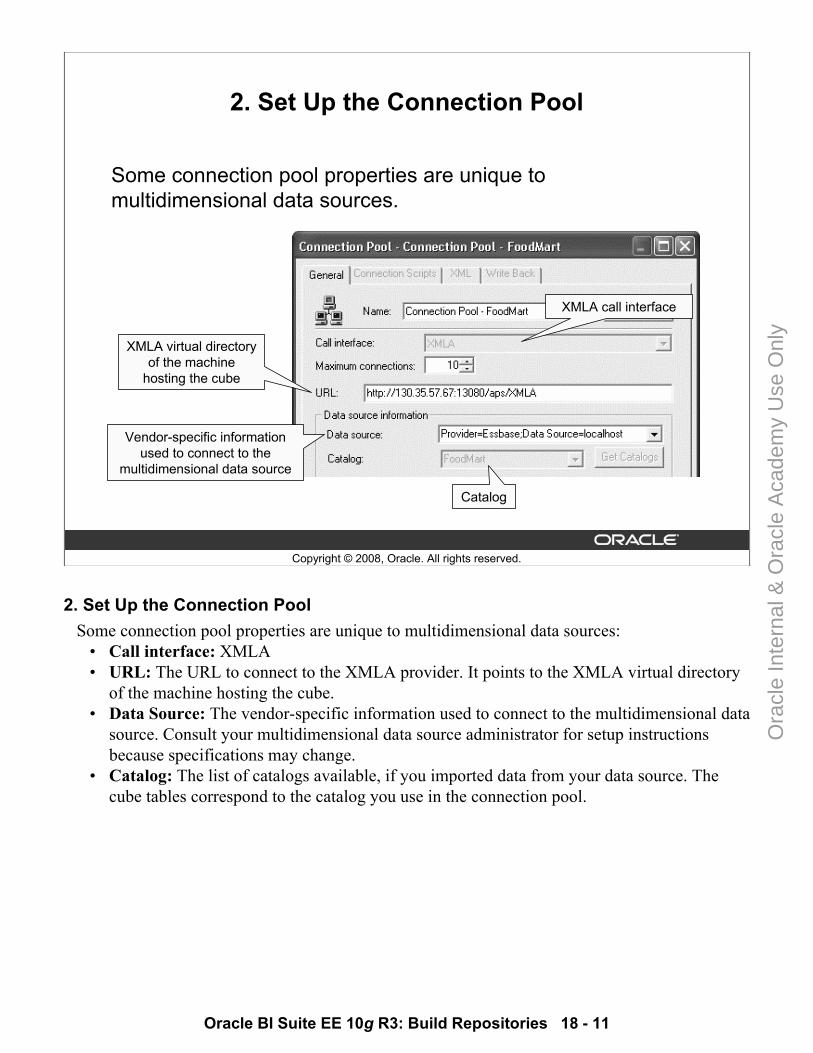
Some connection pool properties are unique to multidimensional data sources.
XMLA virtual directory of the machine
hosting the cube
Vendor-specific information used to connect to the
multidimensional data source
Catalog
XMLA call interface
2. Set Up the Connection Pool Some connection pool properties are unique to multidimensional data sources:
• Call interface: XMLA• URL: The URL to connect to the XMLA provider. It points to the XMLA virtual directory
of the machine hosting the cube. • Data Source: The vendor-specific information used to connect to the multidimensional data
source. Consult your multidimensional data source administrator for setup instructions because specifications may change.
• Catalog: The list of catalogs available, if you imported data from your data source. The cube tables correspond to the catalog you use in the connection pool.
Ora
cle
Inte
rnal
& O
racl
e A
cade
my
Use
Onl
y
Oracle BI Suite EE 10g R3: Build Repositories 18 - 12
Copyright © 2008, Oracle. All rights reserved.
3. Verify the Import
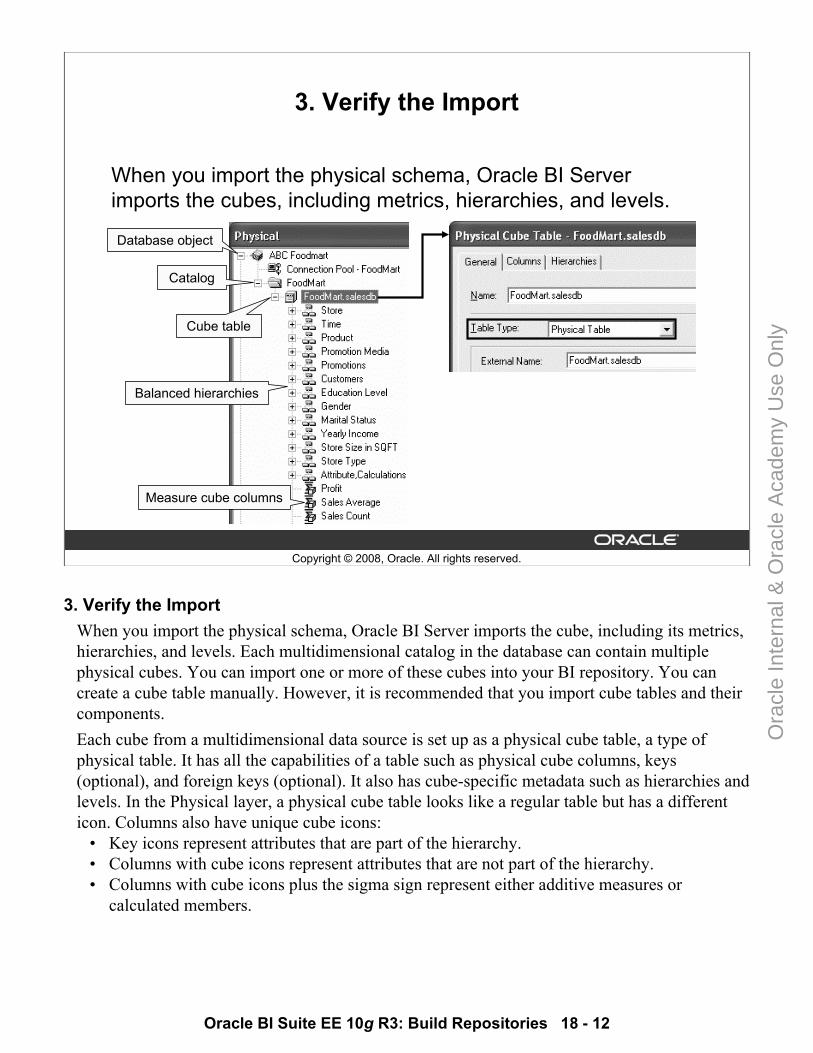
When you import the physical schema, Oracle BI Server imports the cubes, including metrics, hierarchies, and levels.
Catalog
Cube table
Balanced hierarchies
Measure cube columns
Database object
3. Verify the ImportWhen you import the physical schema, Oracle BI Server imports the cube, including its metrics, hierarchies, and levels. Each multidimensional catalog in the database can contain multiple physical cubes. You can import one or more of these cubes into your BI repository. You can create a cube table manually. However, it is recommended that you import cube tables and their components. Each cube from a multidimensional data source is set up as a physical cube table, a type of physical table. It has all the capabilities of a table such as physical cube columns, keys (optional), and foreign keys (optional). It also has cube-specific metadata such as hierarchies and levels. In the Physical layer, a physical cube table looks like a regular table but has a different icon. Columns also have unique cube icons:
• Key icons represent attributes that are part of the hierarchy.• Columns with cube icons represent attributes that are not part of the hierarchy.• Columns with cube icons plus the sigma sign represent either additive measures or
calculated members.
Ora
cle
Inte
rnal
& O
racl
e A
cade
my
Use
Onl
y
Oracle BI Suite EE 10g R3: Build Repositories 18 - 13
Copyright © 2008, Oracle. All rights reserved.
4. Verify Imported Hierarchies and Levels
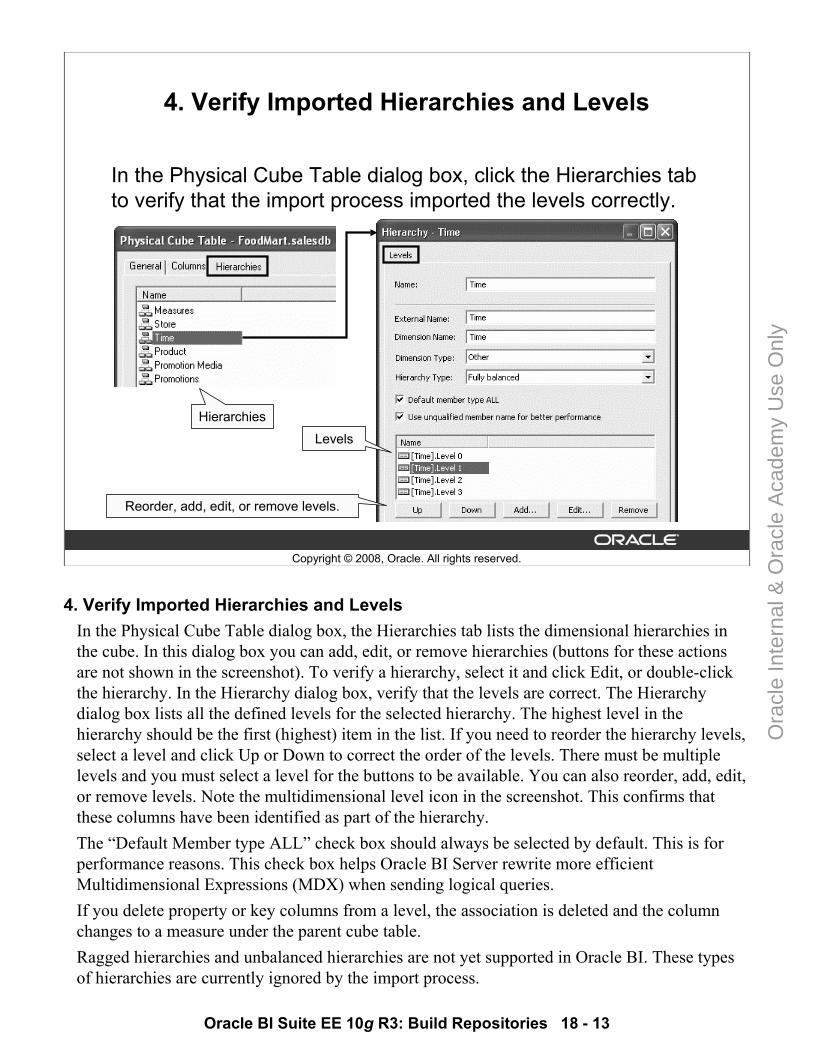
In the Physical Cube Table dialog box, click the Hierarchies tabto verify that the import process imported the levels correctly.
Reorder, add, edit, or remove levels.
Hierarchies
Levels
4. Verify Imported Hierarchies and LevelsIn the Physical Cube Table dialog box, the Hierarchies tab lists the dimensional hierarchies in the cube. In this dialog box you can add, edit, or remove hierarchies (buttons for these actions are not shown in the screenshot). To verify a hierarchy, select it and click Edit, or double-click the hierarchy. In the Hierarchy dialog box, verify that the levels are correct. The Hierarchy dialog box lists all the defined levels for the selected hierarchy. The highest level in the hierarchy should be the first (highest) item in the list. If you need to reorder the hierarchy levels, select a level and click Up or Down to correct the order of the levels. There must be multiple levels and you must select a level for the buttons to be available. You can also reorder, add, edit, or remove levels. Note the multidimensional level icon in the screenshot. This confirms that these columns have been identified as part of the hierarchy. The “Default Member type ALL” check box should always be selected by default. This is for performance reasons. This check box helps Oracle BI Server rewrite more efficient Multidimensional Expressions (MDX) when sending logical queries.If you delete property or key columns from a level, the association is deleted and the column changes to a measure under the parent cube table.Ragged hierarchies and unbalanced hierarchies are not yet supported in Oracle BI. These types of hierarchies are currently ignored by the import process.
Ora
cle
Inte
rnal
& O
racl
e A
cade
my
Use
Onl
y
Oracle BI Suite EE 10g R3: Build Repositories 18 - 14
Copyright © 2008, Oracle. All rights reserved.
5. Verify Imported Measures
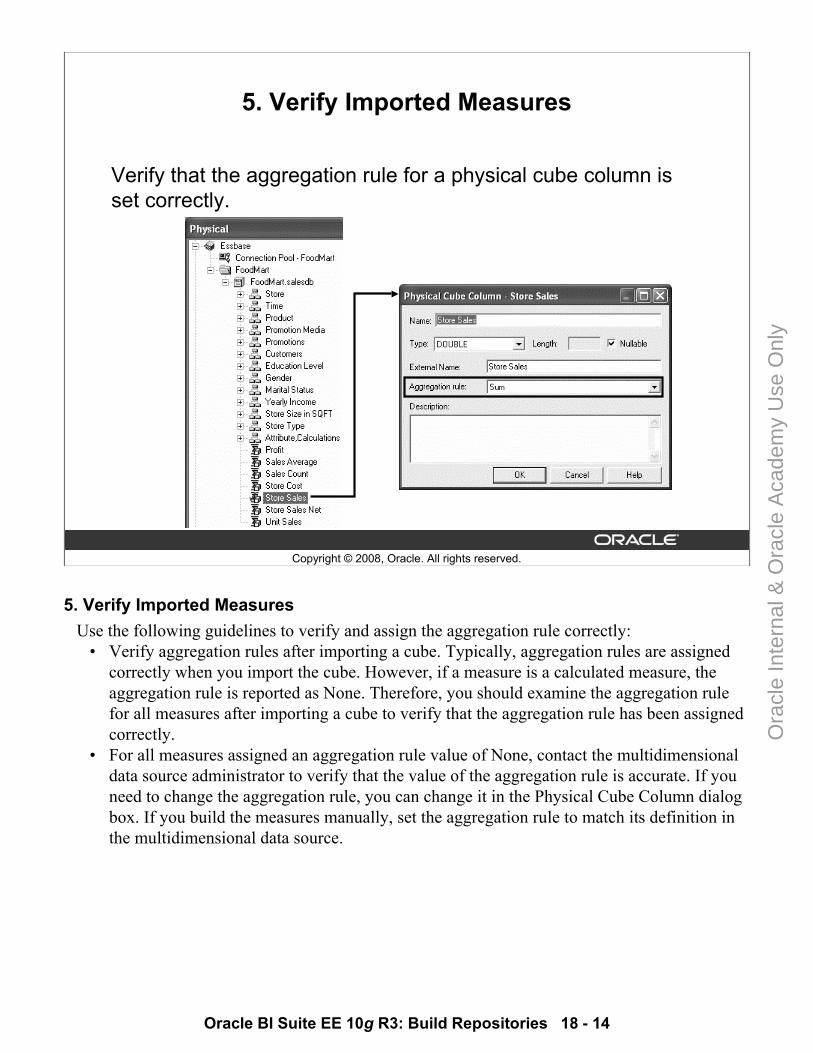
Verify that the aggregation rule for a physical cube column is set correctly.
5. Verify Imported MeasuresUse the following guidelines to verify and assign the aggregation rule correctly:
• Verify aggregation rules after importing a cube. Typically, aggregation rules are assigned correctly when you import the cube. However, if a measure is a calculated measure, the aggregation rule is reported as None. Therefore, you should examine the aggregation rule for all measures after importing a cube to verify that the aggregation rule has been assigned correctly.
• For all measures assigned an aggregation rule value of None, contact the multidimensional data source administrator to verify that the value of the aggregation rule is accurate. If you need to change the aggregation rule, you can change it in the Physical Cube Column dialog box. If you build the measures manually, set the aggregation rule to match its definition in the multidimensional data source.
Ora
cle
Inte
rnal
& O
racl
e A
cade
my
Use
Onl
y

Oracle BI Suite EE 10g R3: Build Repositories 18 - 15
Copyright © 2008, Oracle. All rights reserved.
6. Work with Preaggregated Measures
• In a multidimensional data source, some cubes contain very complex, multilevel-based measures.
• If the Oracle BI Administrator assigns an aggregation rule of Aggr_External, BI Server bypasses its internal aggregation mechanisms and uses the preaggregated measures.
6. Work with Preaggregated MeasuresIn a multidimensional data source, some cubes contain very complex, multilevel-based measures. If the Oracle BI Administrator assigns an aggregation rule of Aggr_External, the BI Server bypasses its internal aggregation mechanisms and uses the preaggregated measures. When imported, these measures are assigned an aggregate value of None. The following are some guidelines for working with preaggregated measures:
• External aggregation applies to only multidimensional data sources that support these complex calculations.
• You cannot assign external aggregation to measures from standard relational data sources. If the measure is supported and can be mapped to a relational database, then it is not complex and does not require external aggregation.
• You cannot mix noncomplex measures from standard data sources (relational) with complex measures from multidimensional data sources.
• You can mix noncomplex measures from standard data sources (relational) with noncomplex measures from multidimensional data sources if they are aggregated through the Oracle BI Server.
Ora
cle
Inte
rnal
& O
racl
e A
cade
my
Use
Onl
y
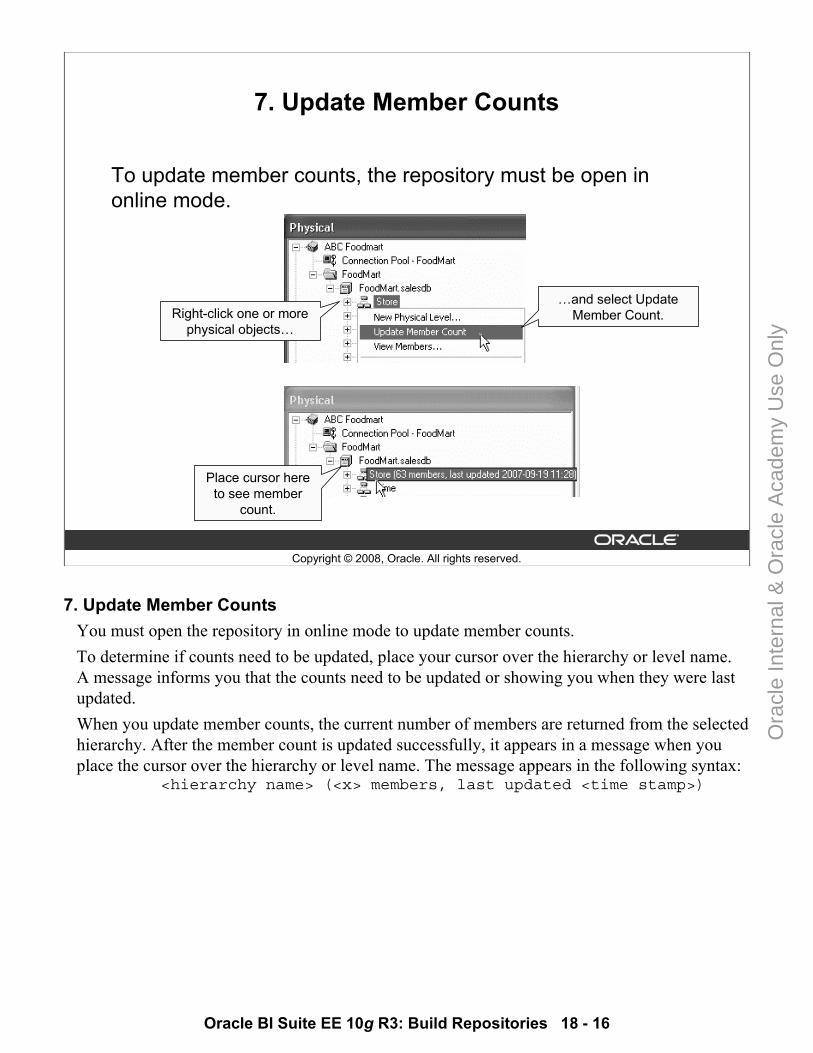
Oracle BI Suite EE 10g R3: Build Repositories 18 - 16
Copyright © 2008, Oracle. All rights reserved.
7. Update Member Counts
To update member counts, the repository must be open in online mode.
Right-click one or more physical objects…
…and select Update Member Count.
Place cursor here to see member
count.
7. Update Member CountsYou must open the repository in online mode to update member counts. To determine if counts need to be updated, place your cursor over the hierarchy or level name. A message informs you that the counts need to be updated or showing you when they were last updated. When you update member counts, the current number of members are returned from the selected hierarchy. After the member count is updated successfully, it appears in a message when you place the cursor over the hierarchy or level name. The message appears in the following syntax:
<hierarchy name> (<x> members, last updated <time stamp>)
Ora
cle
Inte
rnal
& O
racl
e A
cade
my
Use
Onl
y
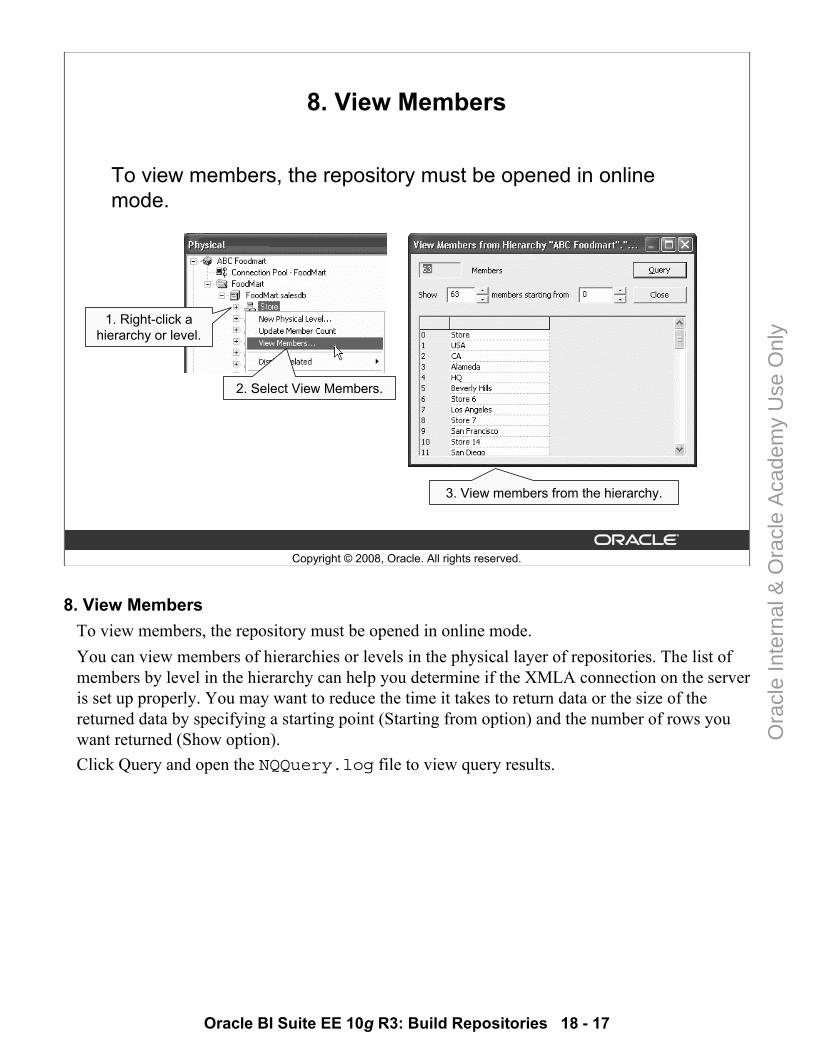
Oracle BI Suite EE 10g R3: Build Repositories 18 - 17
Copyright © 2008, Oracle. All rights reserved.
8. View Members
To view members, the repository must be opened in online mode.
1. Right-click a hierarchy or level.
2. Select View Members.
3. View members from the hierarchy.
8. View MembersTo view members, the repository must be opened in online mode. You can view members of hierarchies or levels in the physical layer of repositories. The list of members by level in the hierarchy can help you determine if the XMLA connection on the server is set up properly. You may want to reduce the time it takes to return data or the size of the returned data by specifying a starting point (Starting from option) and the number of rows you want returned (Show option).Click Query and open the NQQuery.log file to view query results.
Ora
cle
Inte
rnal
& O
racl
e A
cade
my
Use
Onl
y
Oracle BI Suite EE 10g R3: Build Repositories 18 - 18
Copyright © 2008, Oracle. All rights reserved.
9. Add a Hierarchy
a. Create a hierarchy object.b. Add levels and columns.c. Modify the hierarchy.
9. Add a HierarchyThis slide lists the steps for adding a hierarchy in the Physical layer. Each step is presented in detail in the slides that follow.
Ora
cle
Inte
rnal
& O
racl
e A
cade
my
Use
Onl
y
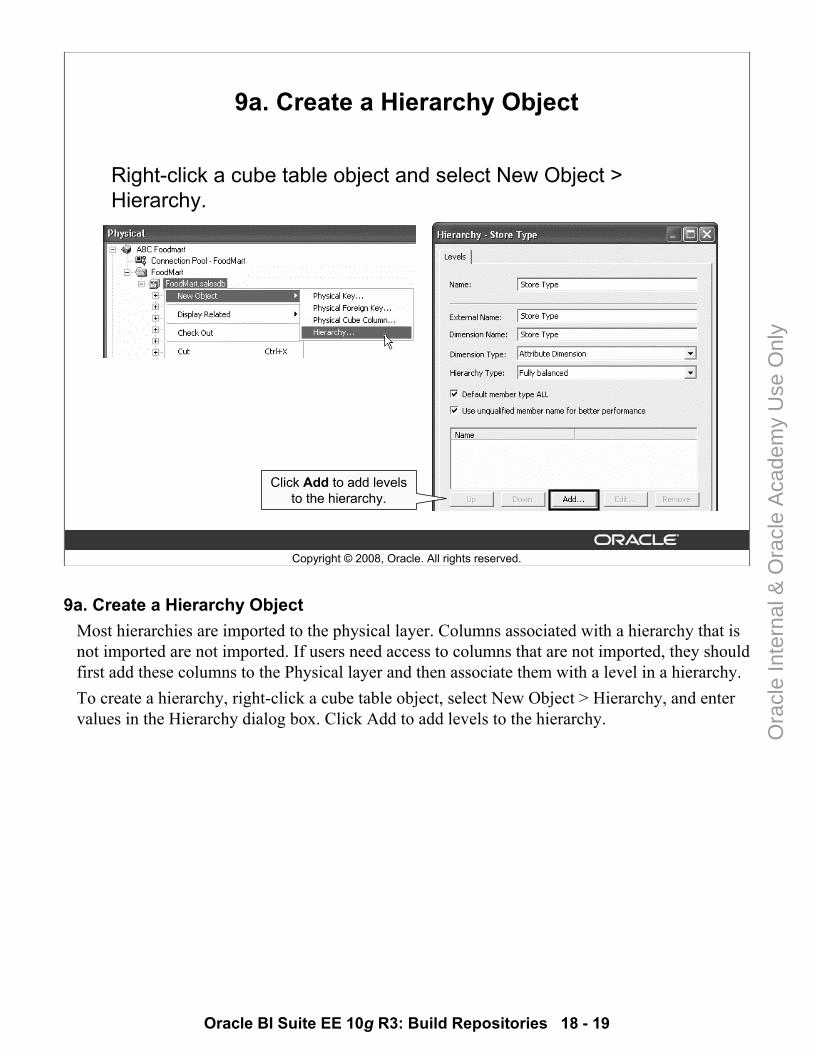
Oracle BI Suite EE 10g R3: Build Repositories 18 - 19
Copyright © 2008, Oracle. All rights reserved.
9a. Create a Hierarchy Object
Right-click a cube table object and select New Object > Hierarchy.
Click Add to add levels to the hierarchy.
9a. Create a Hierarchy ObjectMost hierarchies are imported to the physical layer. Columns associated with a hierarchy that is not imported are not imported. If users need access to columns that are not imported, they should first add these columns to the Physical layer and then associate them with a level in a hierarchy.To create a hierarchy, right-click a cube table object, select New Object > Hierarchy, and enter values in the Hierarchy dialog box. Click Add to add levels to the hierarchy.
Ora
cle
Inte
rnal
& O
racl
e A
cade
my
Use
Onl
y
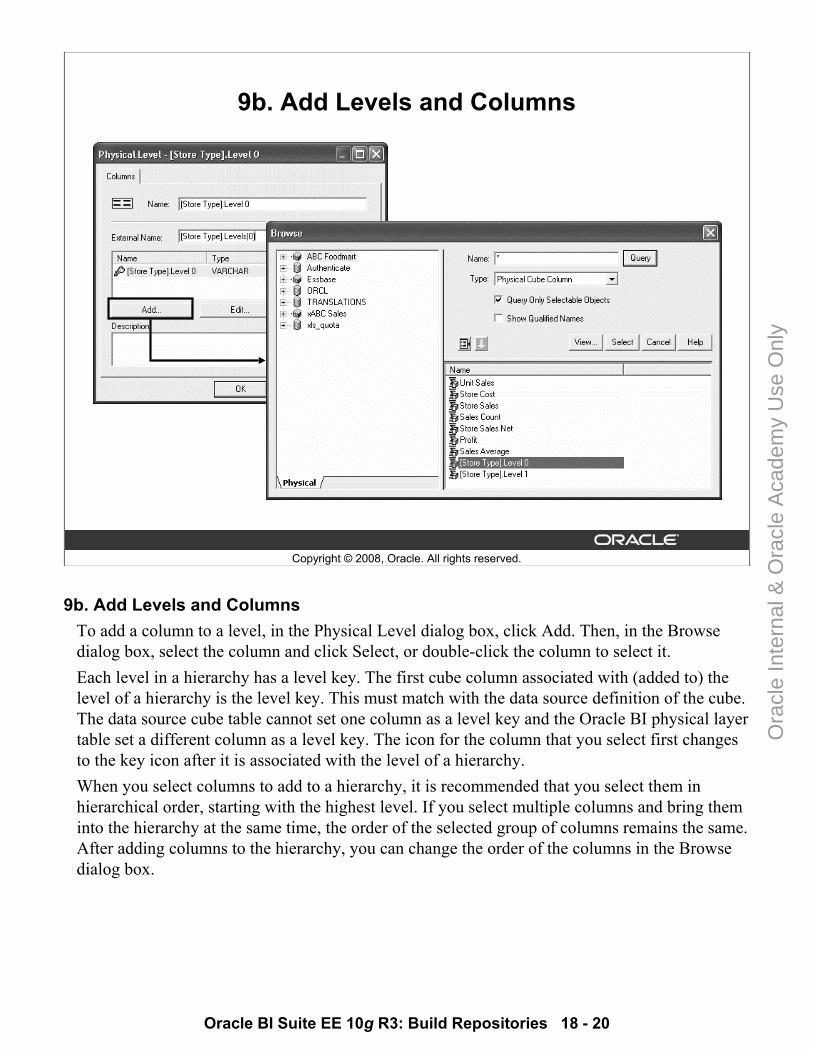
Oracle BI Suite EE 10g R3: Build Repositories 18 - 20
Copyright © 2008, Oracle. All rights reserved.
9b. Add Levels and Columns
9b. Add Levels and ColumnsTo add a column to a level, in the Physical Level dialog box, click Add. Then, in the Browse dialog box, select the column and click Select, or double-click the column to select it.Each level in a hierarchy has a level key. The first cube column associated with (added to) the level of a hierarchy is the level key. This must match with the data source definition of the cube. The data source cube table cannot set one column as a level key and the Oracle BI physical layer table set a different column as a level key. The icon for the column that you select first changes to the key icon after it is associated with the level of a hierarchy. When you select columns to add to a hierarchy, it is recommended that you select them in hierarchical order, starting with the highest level. If you select multiple columns and bring them into the hierarchy at the same time, the order of the selected group of columns remains the same. After adding columns to the hierarchy, you can change the order of the columns in the Browse dialog box.
Ora
cle
Inte
rnal
& O
racl
e A
cade
my
Use
Onl
y
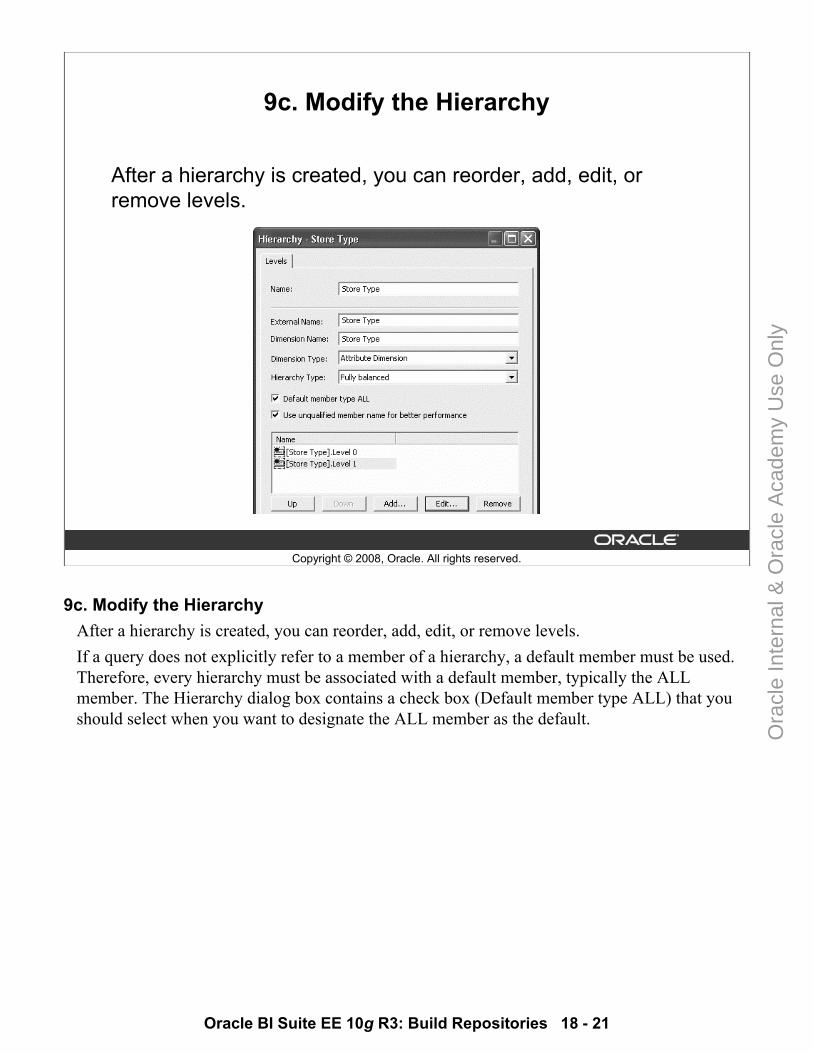
Oracle BI Suite EE 10g R3: Build Repositories 18 - 21
Copyright © 2008, Oracle. All rights reserved.
9c. Modify the Hierarchy
After a hierarchy is created, you can reorder, add, edit, or remove levels.
9c. Modify the HierarchyAfter a hierarchy is created, you can reorder, add, edit, or remove levels.If a query does not explicitly refer to a member of a hierarchy, a default member must be used. Therefore, every hierarchy must be associated with a default member, typically the ALL member. The Hierarchy dialog box contains a check box (Default member type ALL) that you should select when you want to designate the ALL member as the default.
Ora
cle
Inte
rnal
& O
racl
e A
cade
my
Use
Onl
y
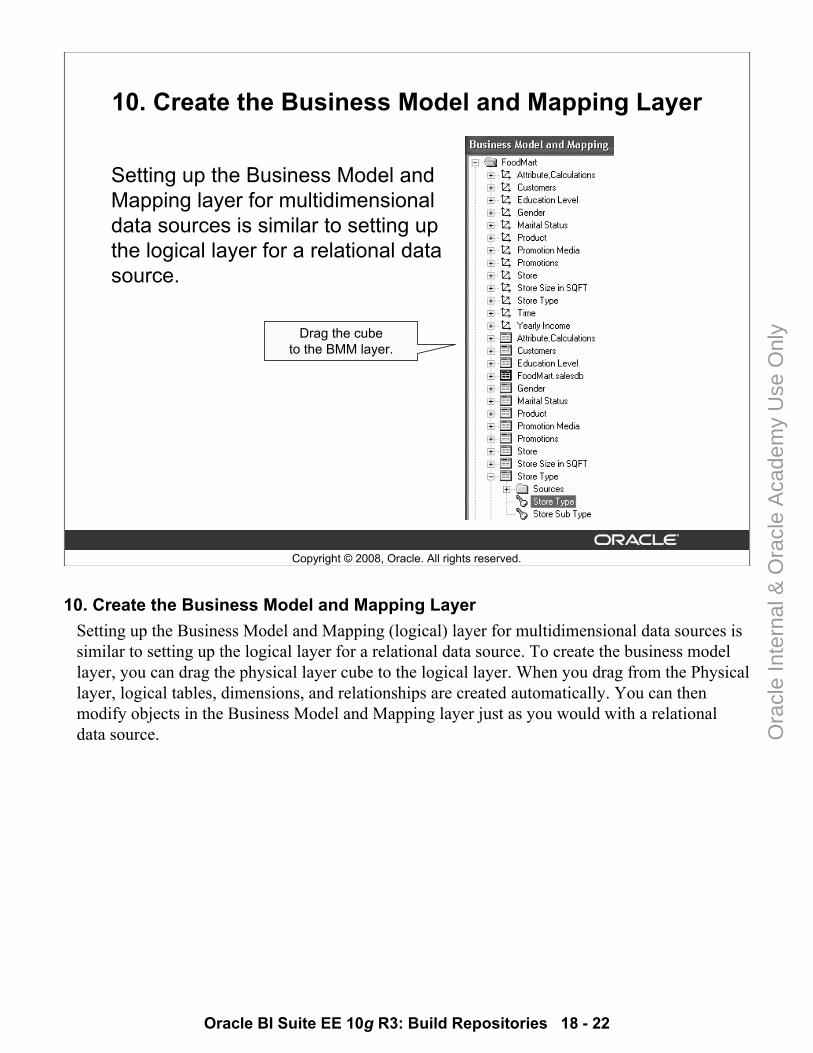
Oracle BI Suite EE 10g R3: Build Repositories 18 - 22
Copyright © 2008, Oracle. All rights reserved.
10. Create the Business Model and Mapping Layer
Setting up the Business Model and Mapping layer for multidimensional data sources is similar to setting up the logical layer for a relational data source.
Drag the cube to the BMM layer.
10. Create the Business Model and Mapping LayerSetting up the Business Model and Mapping (logical) layer for multidimensional data sources is similar to setting up the logical layer for a relational data source. To create the business model layer, you can drag the physical layer cube to the logical layer. When you drag from the Physical layer, logical tables, dimensions, and relationships are created automatically. You can then modify objects in the Business Model and Mapping layer just as you would with a relational data source.
Ora
cle
Inte
rnal
& O
racl
e A
cade
my
Use
Onl
y
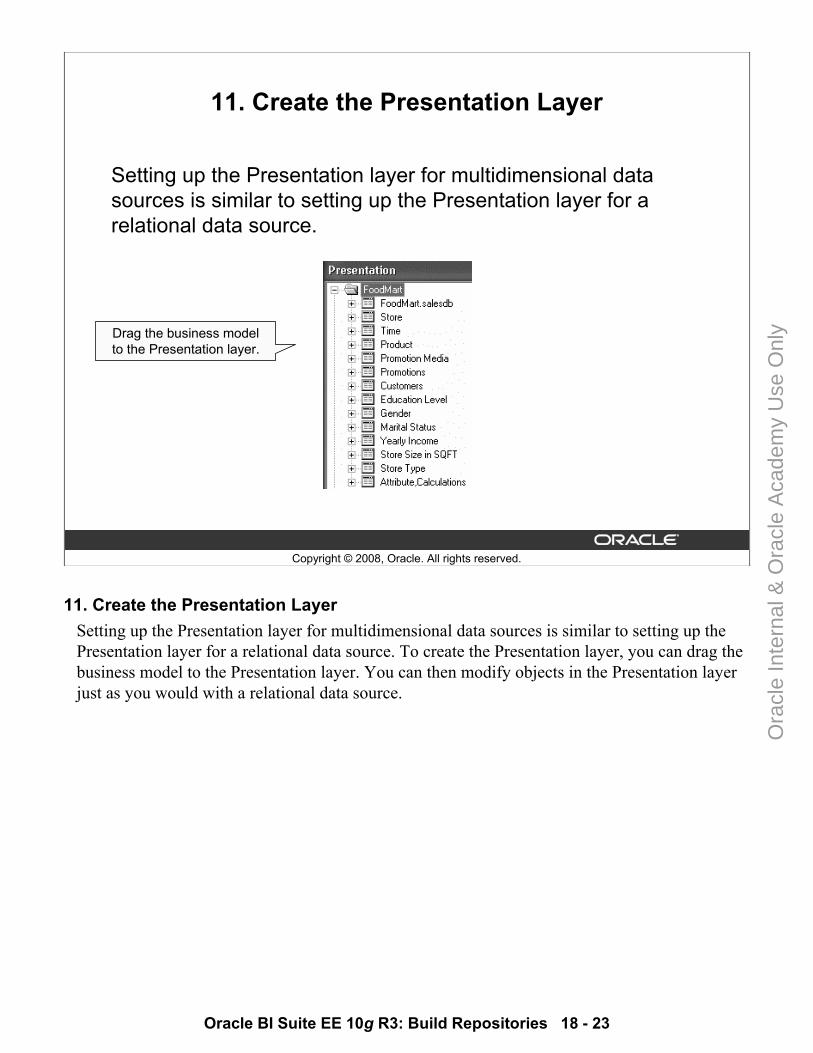
Oracle BI Suite EE 10g R3: Build Repositories 18 - 23
Copyright © 2008, Oracle. All rights reserved.
11. Create the Presentation Layer
Setting up the Presentation layer for multidimensional data sources is similar to setting up the Presentation layer for a relational data source.
Drag the business model to the Presentation layer.
11. Create the Presentation LayerSetting up the Presentation layer for multidimensional data sources is similar to setting up the Presentation layer for a relational data source. To create the Presentation layer, you can drag the business model to the Presentation layer. You can then modify objects in the Presentation layer just as you would with a relational data source.
Ora
cle
Inte
rnal
& O
racl
e A
cade
my
Use
Onl
y
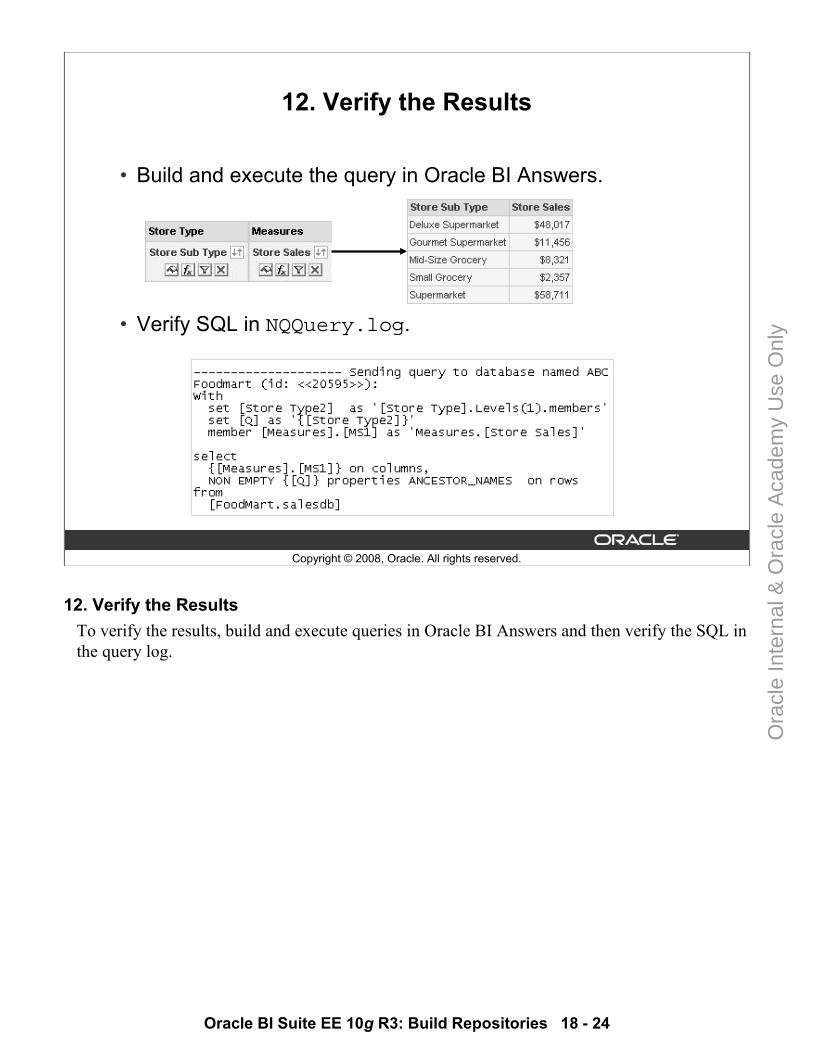
Oracle BI Suite EE 10g R3: Build Repositories 18 - 24
Copyright © 2008, Oracle. All rights reserved.
12. Verify the Results
• Build and execute the query in Oracle BI Answers.
• Verify SQL in NQQuery.log.
12. Verify the ResultsTo verify the results, build and execute queries in Oracle BI Answers and then verify the SQL in the query log.
Ora
cle
Inte
rnal
& O
racl
e A
cade
my
Use
Onl
y

Oracle BI Suite EE 10g R3: Build Repositories 18 - 25
Copyright © 2008, Oracle. All rights reserved.
Summary
In this lesson, you should have learned how to create a repository using a multidimensional data source.
Ora
cle
Inte
rnal
& O
racl
e A
cade
my
Use
Onl
y
Oracle BI Suite EE 10g R3: Build Repositories 18 - 26
Copyright © 2008, Oracle. All rights reserved.
Practice 18-1: Creating a Repository Using a Multidimensional Data Source
This practice covers the following topics:• Importing an Essbase cube to the Physical layer• Building a business model• Verifying the results
Ora
cle
Inte
rnal
& O
racl
e A
cade
my
Use
Onl
y
Copyright © 2008, Oracle. All rights reserved.
Security
Ora
cle
Inte
rnal
& O
racl
e A
cade
my
Use
Onl
y
Oracle BI Suite EE 10g R3: Build Repositories 19 - 2
Copyright © 2008, Oracle. All rights reserved.
Objectives
After completing this lesson, you should be able to:• Define users and groups• Set permissions for users and groups to control access to
repository objects• Explain group inheritance• Identify and describe the authentication methods used by
Oracle BI Server• Use query limits, timing restrictions, and filters to control
access to repository information
Ora
cle
Inte
rnal
& O
racl
e A
cade
my
Use
Onl
y
Oracle BI Suite EE 10g R3: Build Repositories 19 - 3
Copyright © 2008, Oracle. All rights reserved.
Business Challenge
• Only qualified persons should have access rights to applications.
• Data needs to be protected so that only authorized employees can access sensitive information.
• Employees should automatically see the information that is relevant to their roles.
Ora
cle
Inte
rnal
& O
racl
e A
cade
my
Use
Onl
y
Oracle BI Suite EE 10g R3: Build Repositories 19 - 4
Copyright © 2008, Oracle. All rights reserved.
Business Solution: Oracle BI Security
• Provides ability to authenticate users through logon• Controls user access to data• Secures access control on object and data levels
Ora
cle
Inte
rnal
& O
racl
e A
cade
my
Use
Onl
y
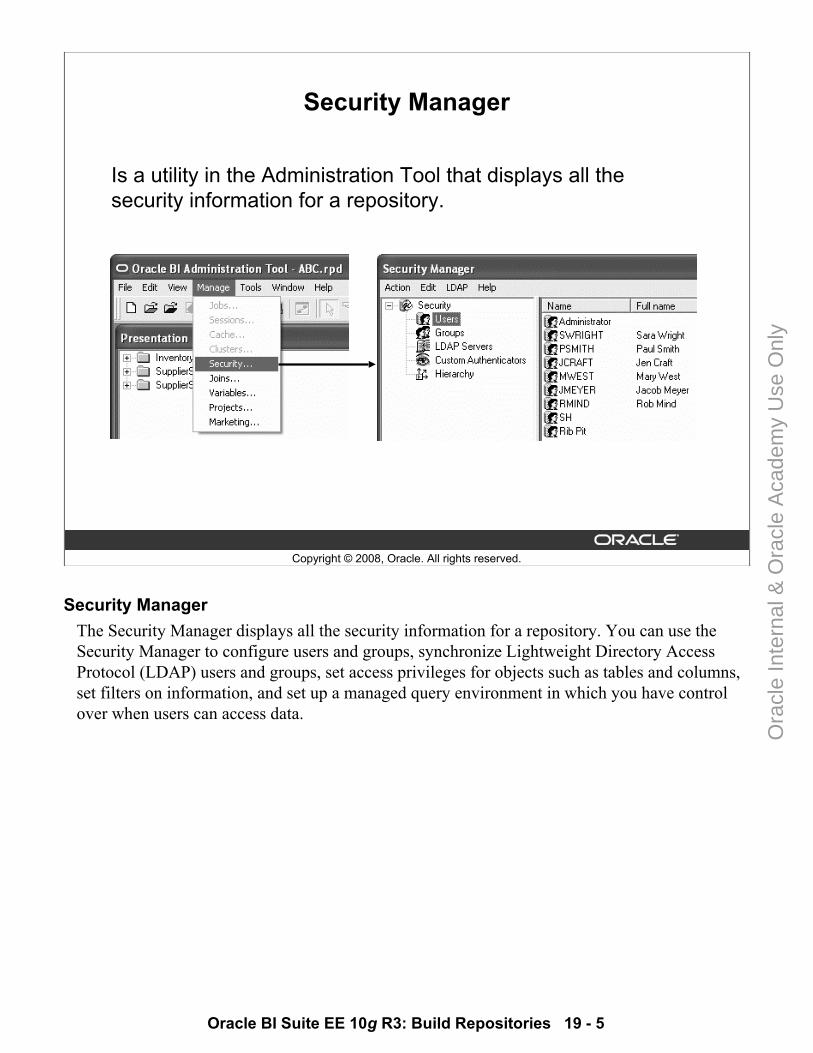
Oracle BI Suite EE 10g R3: Build Repositories 19 - 5
Copyright © 2008, Oracle. All rights reserved.
Security Manager
Is a utility in the Administration Tool that displays all the security information for a repository.
Security Manager The Security Manager displays all the security information for a repository. You can use the Security Manager to configure users and groups, synchronize Lightweight Directory Access Protocol (LDAP) users and groups, set access privileges for objects such as tables and columns, set filters on information, and set up a managed query environment in which you have control over when users can access data.
Ora
cle
Inte
rnal
& O
racl
e A
cade
my
Use
Onl
y
Oracle BI Suite EE 10g R3: Build Repositories 19 - 6
Copyright © 2008, Oracle. All rights reserved.
Working with Users
• User accounts can be defined explicitly in:– An Oracle BI Server repository– An external source (such as a database table or an LDAP
server)• Users must be authenticated by Oracle BI Server for a
session to take place.
Working with Users User accounts can be defined explicitly in an Oracle BI Server repository or in an external source (such as a database table or an LDAP server). Regardless of how user accounts are defined, users need to be authenticated by Oracle BI Server for a session to take place, unless the Oracle BI Server administrator has configured the system to bypass Oracle BI Server security. Users defined explicitly in a repository can access business models in that repository, but they cannot span repositories. The Oracle BI Server Administrator user account is created automatically when a repository is created and cannot be deleted.
Ora
cle
Inte
rnal
& O
racl
e A
cade
my
Use
Onl
y
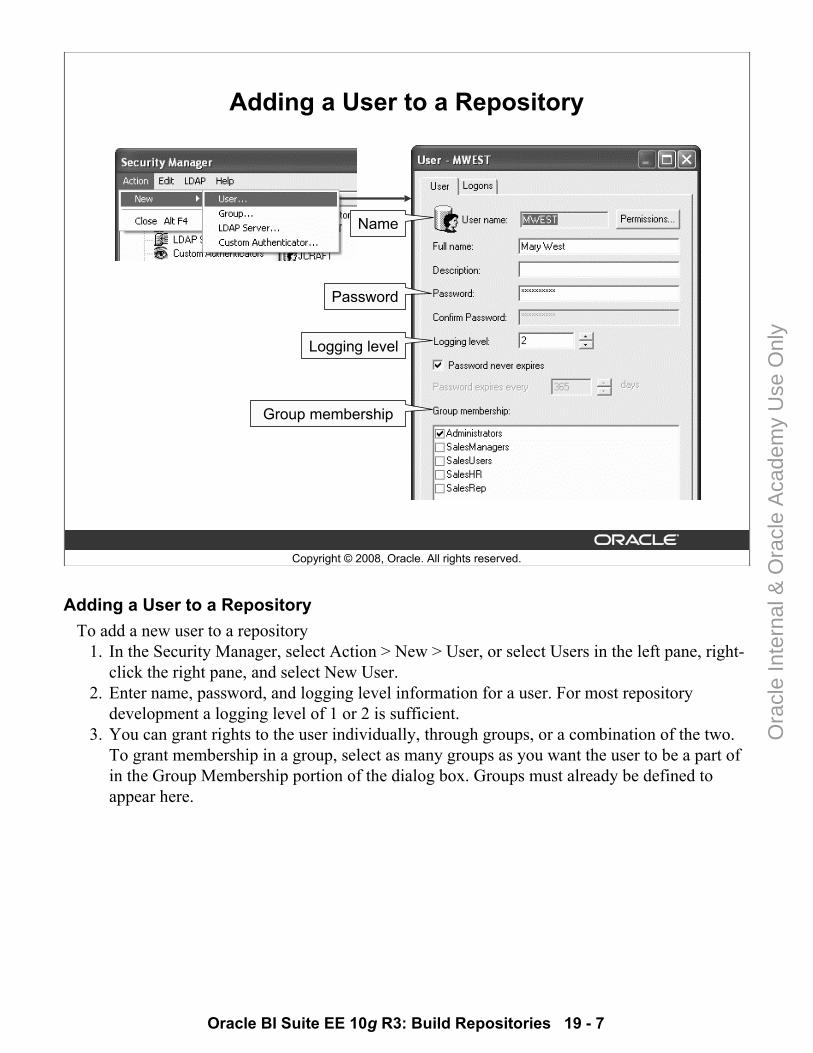
Oracle BI Suite EE 10g R3: Build Repositories 19 - 7
Copyright © 2008, Oracle. All rights reserved.
Adding a User to a Repository
Name
Password
Logging level
Group membership
Adding a User to a RepositoryTo add a new user to a repository
1. In the Security Manager, select Action > New > User, or select Users in the left pane, right-click the right pane, and select New User.
2. Enter name, password, and logging level information for a user. For most repository development a logging level of 1 or 2 is sufficient.
3. You can grant rights to the user individually, through groups, or a combination of the two. To grant membership in a group, select as many groups as you want the user to be a part of in the Group Membership portion of the dialog box. Groups must already be defined to appear here.
Ora
cle
Inte
rnal
& O
racl
e A
cade
my
Use
Onl
y
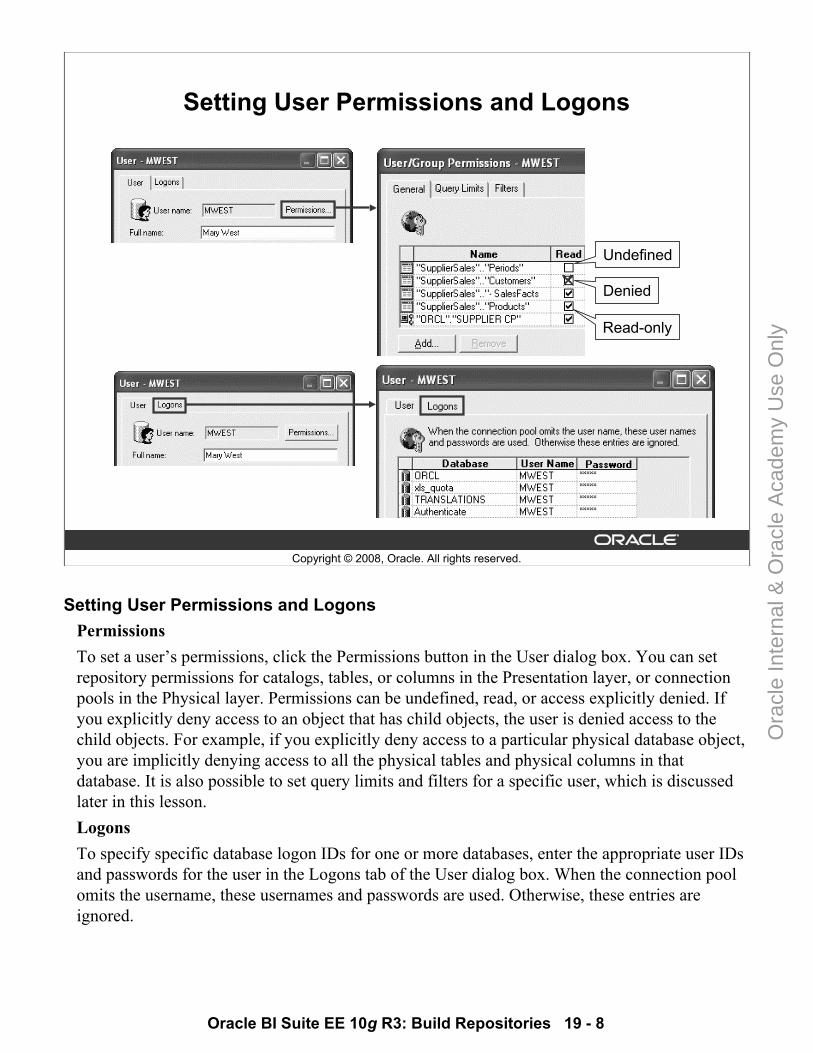
Oracle BI Suite EE 10g R3: Build Repositories 19 - 8
Copyright © 2008, Oracle. All rights reserved.
Setting User Permissions and Logons
Undefined
Denied
Read-only
Setting User Permissions and LogonsPermissionsTo set a user’s permissions, click the Permissions button in the User dialog box. You can set repository permissions for catalogs, tables, or columns in the Presentation layer, or connection pools in the Physical layer. Permissions can be undefined, read, or access explicitly denied. If you explicitly deny access to an object that has child objects, the user is denied access to the child objects. For example, if you explicitly deny access to a particular physical database object, you are implicitly denying access to all the physical tables and physical columns in that database. It is also possible to set query limits and filters for a specific user, which is discussed later in this lesson.LogonsTo specify specific database logon IDs for one or more databases, enter the appropriate user IDs and passwords for the user in the Logons tab of the User dialog box. When the connection pool omits the username, these usernames and passwords are used. Otherwise, these entries are ignored.
Ora
cle
Inte
rnal
& O
racl
e A
cade
my
Use
Onl
y
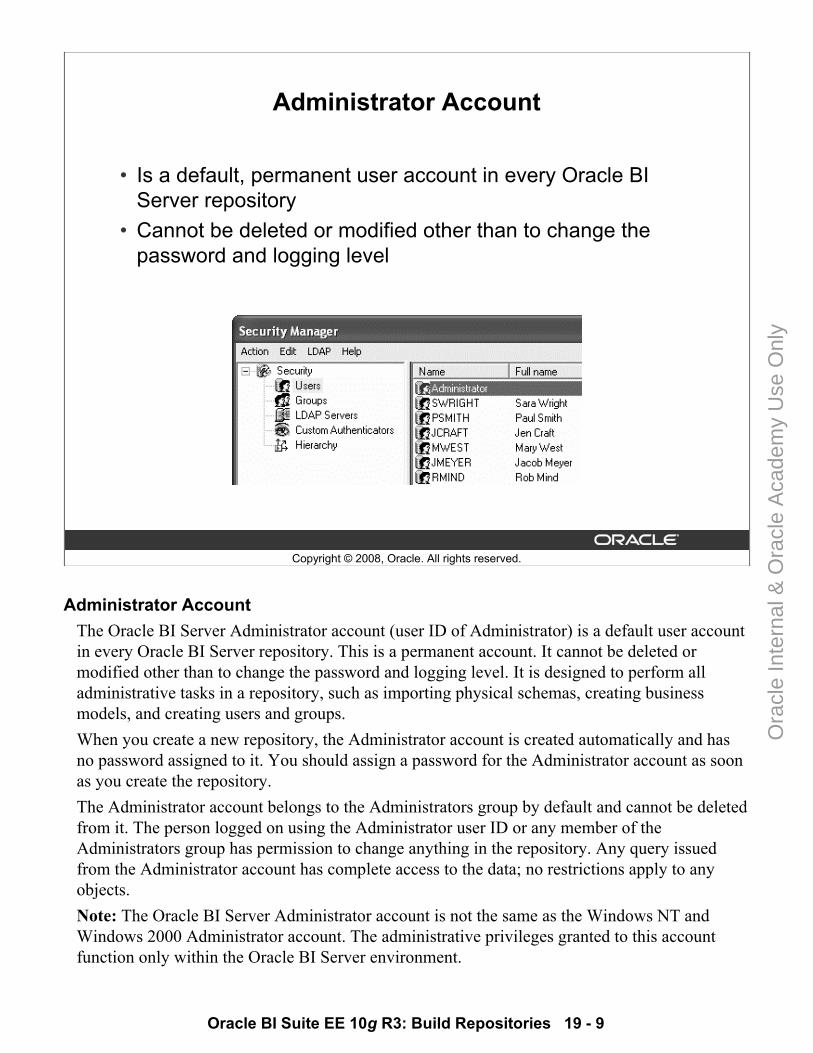
Oracle BI Suite EE 10g R3: Build Repositories 19 - 9
Copyright © 2008, Oracle. All rights reserved.
Administrator Account
• Is a default, permanent user account in every Oracle BI Server repository
• Cannot be deleted or modified other than to change the password and logging level
Administrator Account The Oracle BI Server Administrator account (user ID of Administrator) is a default user account in every Oracle BI Server repository. This is a permanent account. It cannot be deleted or modified other than to change the password and logging level. It is designed to perform all administrative tasks in a repository, such as importing physical schemas, creating business models, and creating users and groups.When you create a new repository, the Administrator account is created automatically and has no password assigned to it. You should assign a password for the Administrator account as soon as you create the repository. The Administrator account belongs to the Administrators group by default and cannot be deleted from it. The person logged on using the Administrator user ID or any member of the Administrators group has permission to change anything in the repository. Any query issued from the Administrator account has complete access to the data; no restrictions apply to any objects.Note: The Oracle BI Server Administrator account is not the same as the Windows NT and Windows 2000 Administrator account. The administrative privileges granted to this account function only within the Oracle BI Server environment.
Ora
cle
Inte
rnal
& O
racl
e A
cade
my
Use
Onl
y
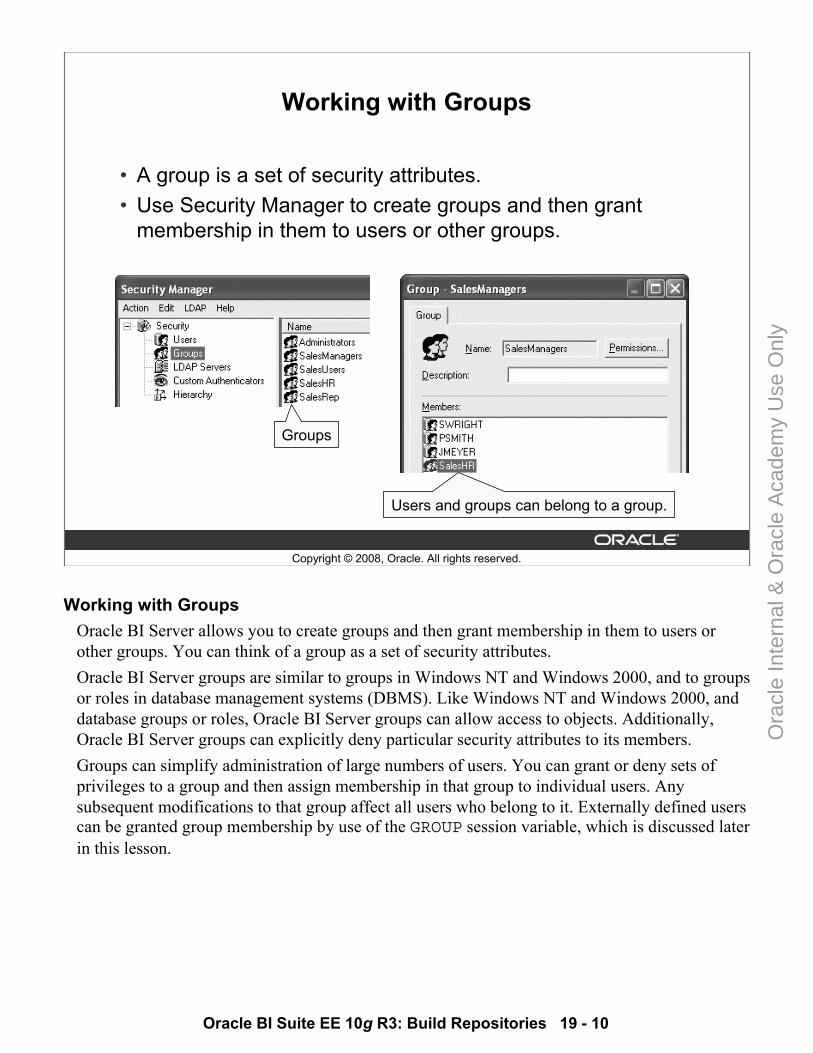
Oracle BI Suite EE 10g R3: Build Repositories 19 - 10
Copyright © 2008, Oracle. All rights reserved.
Working with Groups
• A group is a set of security attributes.• Use Security Manager to create groups and then grant
membership in them to users or other groups.
Groups
Users and groups can belong to a group.
Working with GroupsOracle BI Server allows you to create groups and then grant membership in them to users or other groups. You can think of a group as a set of security attributes. Oracle BI Server groups are similar to groups in Windows NT and Windows 2000, and to groups or roles in database management systems (DBMS). Like Windows NT and Windows 2000, and database groups or roles, Oracle BI Server groups can allow access to objects. Additionally, Oracle BI Server groups can explicitly deny particular security attributes to its members. Groups can simplify administration of large numbers of users. You can grant or deny sets of privileges to a group and then assign membership in that group to individual users. Any subsequent modifications to that group affect all users who belong to it. Externally defined users can be granted group membership by use of the GROUP session variable, which is discussed later in this lesson.
Ora
cle
Inte
rnal
& O
racl
e A
cade
my
Use
Onl
y
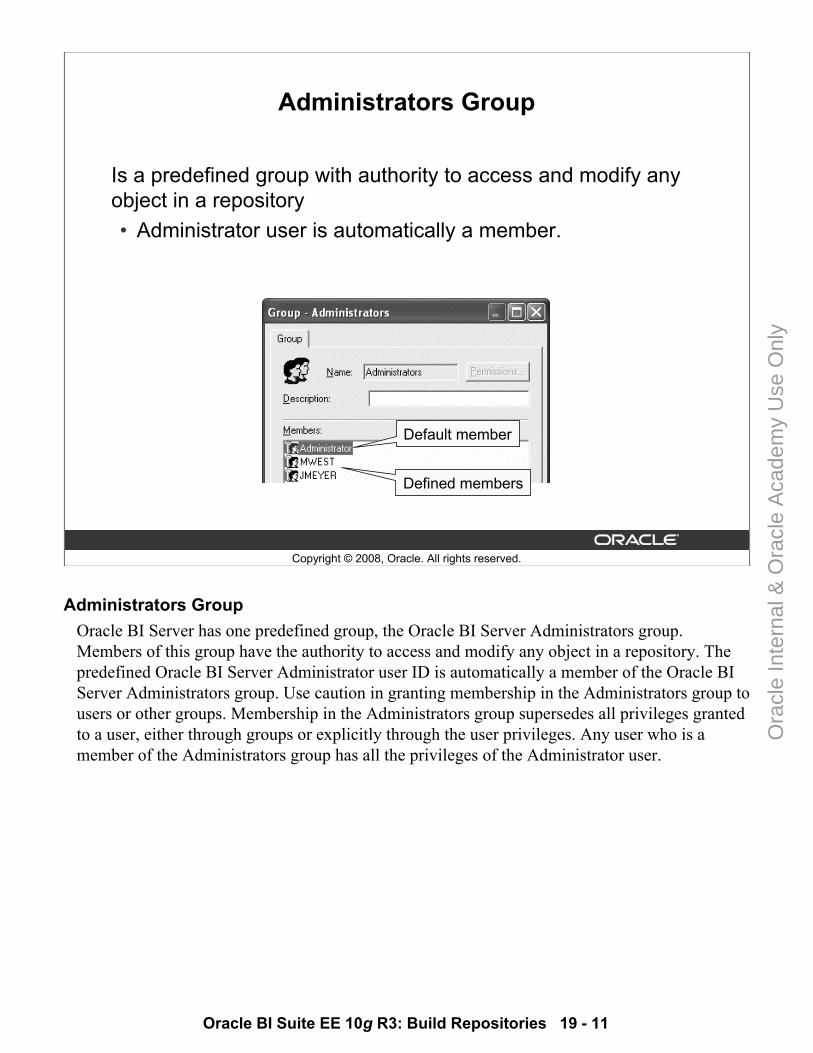
Oracle BI Suite EE 10g R3: Build Repositories 19 - 11
Copyright © 2008, Oracle. All rights reserved.
Administrators Group
Is a predefined group with authority to access and modify any object in a repository• Administrator user is automatically a member.
Default member
Defined members
Administrators Group Oracle BI Server has one predefined group, the Oracle BI Server Administrators group. Members of this group have the authority to access and modify any object in a repository. The predefined Oracle BI Server Administrator user ID is automatically a member of the Oracle BI Server Administrators group. Use caution in granting membership in the Administrators group to users or other groups. Membership in the Administrators group supersedes all privileges granted to a user, either through groups or explicitly through the user privileges. Any user who is a member of the Administrators group has all the privileges of the Administrator user.
Ora
cle
Inte
rnal
& O
racl
e A
cade
my
Use
Onl
y
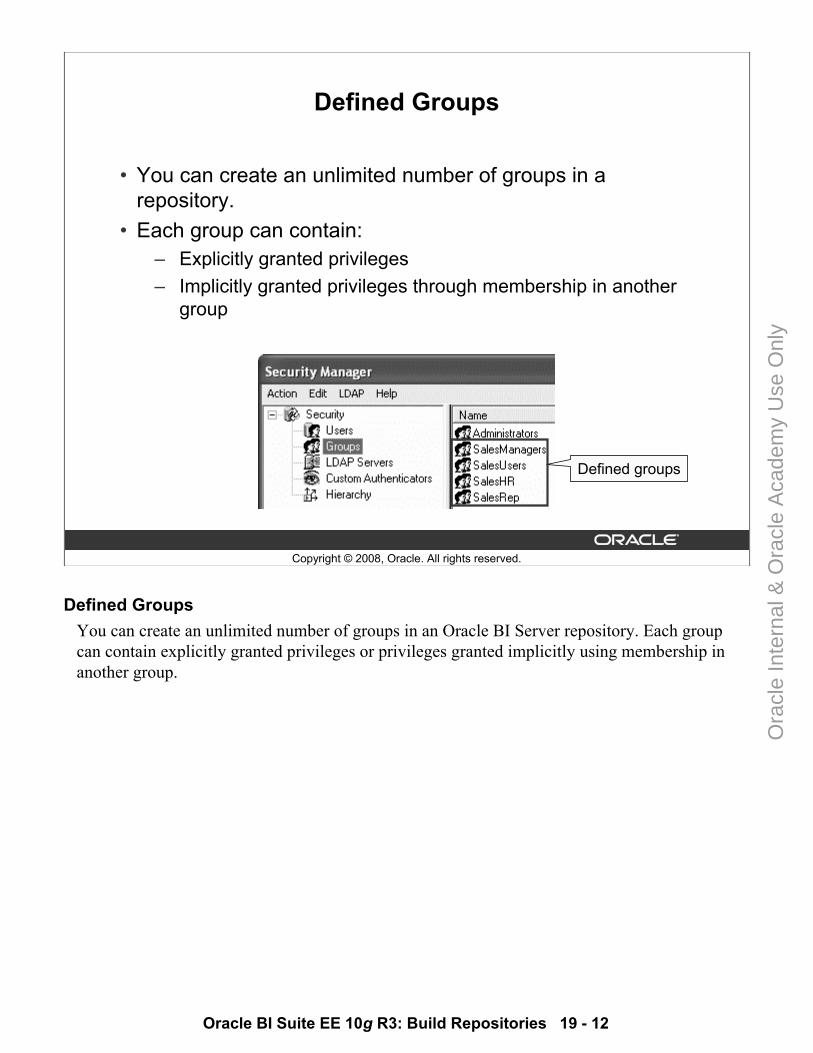
Oracle BI Suite EE 10g R3: Build Repositories 19 - 12
Copyright © 2008, Oracle. All rights reserved.
Defined Groups
• You can create an unlimited number of groups in a repository.
• Each group can contain: – Explicitly granted privileges– Implicitly granted privileges through membership in another
group
Defined groups
Defined GroupsYou can create an unlimited number of groups in an Oracle BI Server repository. Each group can contain explicitly granted privileges or privileges granted implicitly using membership in another group.
Ora
cle
Inte
rnal
& O
racl
e A
cade
my
Use
Onl
y
Oracle BI Suite EE 10g R3: Build Repositories 19 - 13
Copyright © 2008, Oracle. All rights reserved.
Group Inheritance
• Privileges granted explicitly to a user have precedence over privileges granted through groups.
• Privileges granted explicitly to a group take precedence over any privileges granted through other groups.
• If security attributes conflict, a user or group is granted the least restrictive security attribute.
Group Inheritance Users can have explicitly granted privileges. They can also have privileges granted through membership in groups, that in turn can have privileges granted through membership in other groups, and so on. Privileges granted explicitly to a user have precedence over privileges granted through groups, and privileges granted explicitly to the group take precedence over any privileges granted through other groups. If there are multiple groups acting on a user or group at the same level with conflicting security attributes, the user or group is granted the least restrictive security attribute. Any explicit permissions acting on a user take precedence over any privileges on the same objects granted to that user through groups.
Ora
cle
Inte
rnal
& O
racl
e A
cade
my
Use
Onl
y
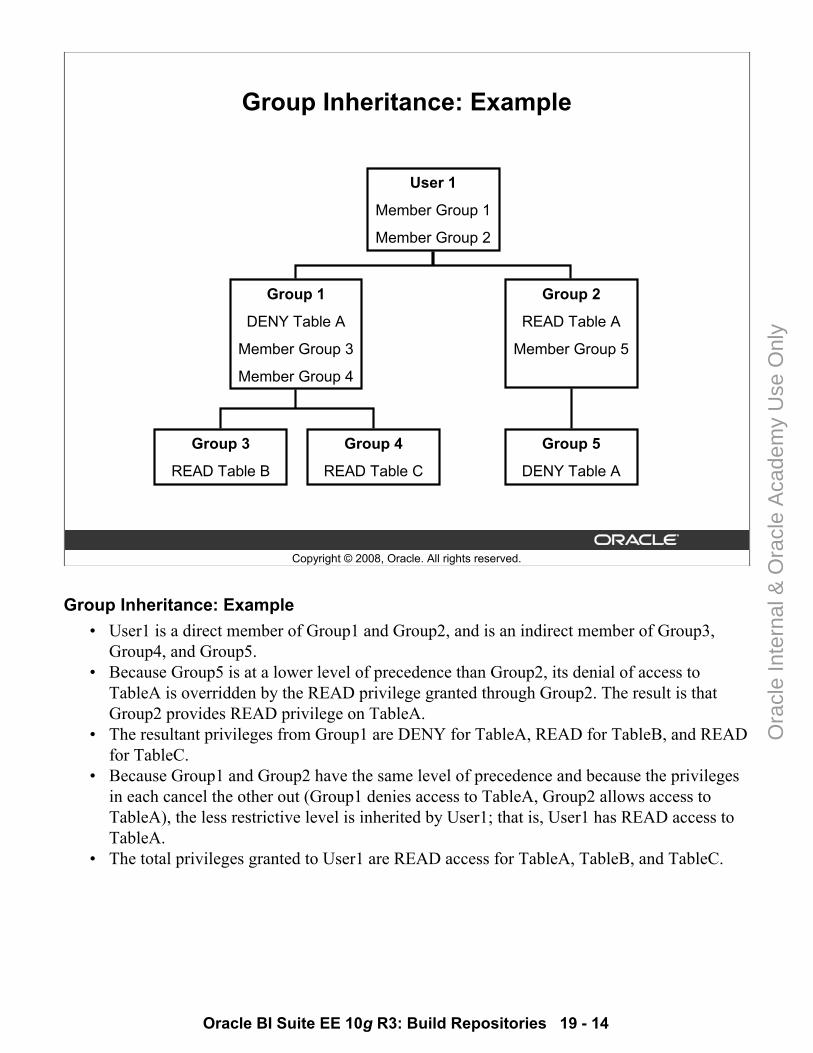
Oracle BI Suite EE 10g R3: Build Repositories 19 - 14
Copyright © 2008, Oracle. All rights reserved.
Group Inheritance: Example
User 1
Member Group 1
Member Group 2
Group 1
DENY Table A
Member Group 3
Member Group 4
Group 2
READ Table A
Member Group 5
Group 3
READ Table B
Group 4
READ Table C
Group 5
DENY Table A
Group Inheritance: Example • User1 is a direct member of Group1 and Group2, and is an indirect member of Group3,
Group4, and Group5.• Because Group5 is at a lower level of precedence than Group2, its denial of access to
TableA is overridden by the READ privilege granted through Group2. The result is that Group2 provides READ privilege on TableA.
• The resultant privileges from Group1 are DENY for TableA, READ for TableB, and READ for TableC.
• Because Group1 and Group2 have the same level of precedence and because the privileges in each cancel the other out (Group1 denies access to TableA, Group2 allows access to TableA), the less restrictive level is inherited by User1; that is, User1 has READ access to TableA.
• The total privileges granted to User1 are READ access for TableA, TableB, and TableC.
Ora
cle
Inte
rnal
& O
racl
e A
cade
my
Use
Onl
y
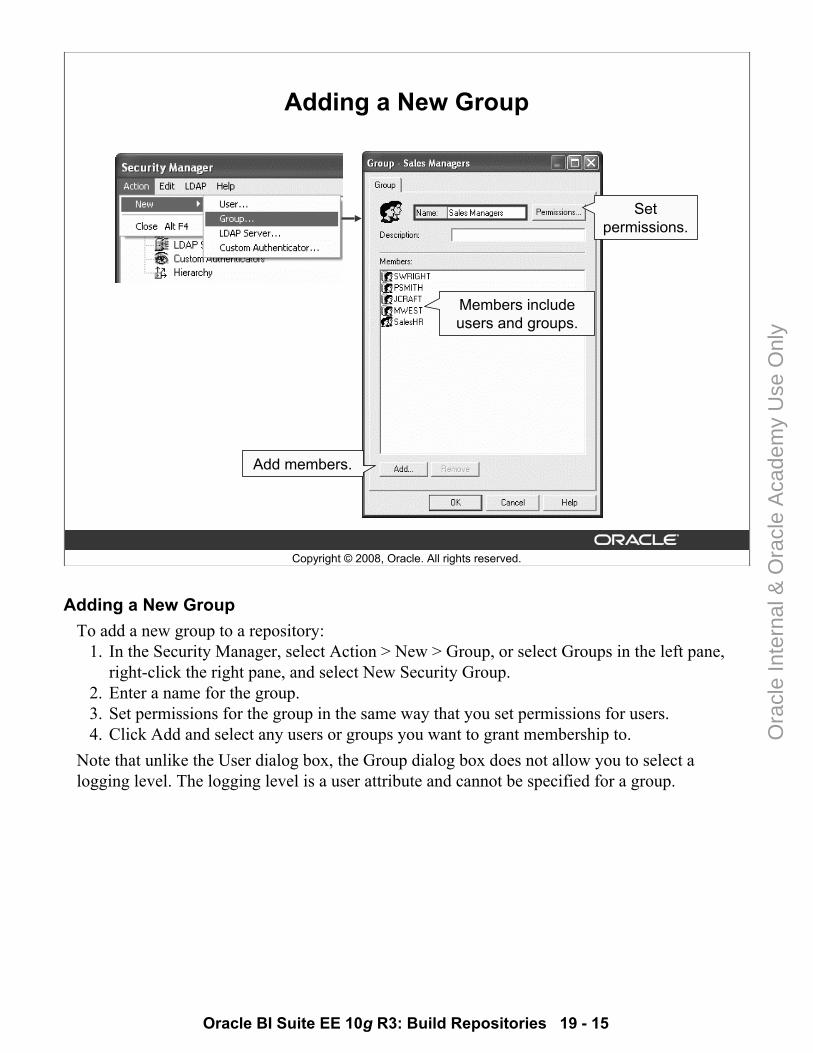
Oracle BI Suite EE 10g R3: Build Repositories 19 - 15
Copyright © 2008, Oracle. All rights reserved.
Adding a New Group
Members include users and groups.
Add members.
Set permissions.
Adding a New GroupTo add a new group to a repository:
1. In the Security Manager, select Action > New > Group, or select Groups in the left pane, right-click the right pane, and select New Security Group.
2. Enter a name for the group.3. Set permissions for the group in the same way that you set permissions for users.4. Click Add and select any users or groups you want to grant membership to.
Note that unlike the User dialog box, the Group dialog box does not allow you to select a logging level. The logging level is a user attribute and cannot be specified for a group.
Ora
cle
Inte
rnal
& O
racl
e A
cade
my
Use
Onl
y

Oracle BI Suite EE 10g R3: Build Repositories 19 - 16
Copyright © 2008, Oracle. All rights reserved.
Viewing Member Hierarchies
Click the hierarchy icon in the left pane of the Security Manager, and then expand the tree in the right pane.
Viewing Member HierarchiesIt is also possible to view security relationships in the Query Repository utility, which is discussed in the lesson titled “Using Administration Tool Utilities.” In this example, JMEYER is a member of the SalesHR group, which is a member of the SalesManagers group. JMEYER is also a member of the SalesManagers group.
Ora
cle
Inte
rnal
& O
racl
e A
cade
my
Use
Onl
y
Oracle BI Suite EE 10g R3: Build Repositories 19 - 17
Copyright © 2008, Oracle. All rights reserved.
Authentication
Is the process by which a system verifies (with a user ID and password) that a user has the necessary permissions and authorizations to log on and access data• Oracle BI Server authenticates each connection request that
it receives.
AuthenticationAuthentication is the process by which a system verifies, using a user ID and password, that a user has the necessary permissions and authorizations to log on and access data. Oracle BI Server authenticates each connection request it receives.
Ora
cle
Inte
rnal
& O
racl
e A
cade
my
Use
Onl
y
Oracle BI Suite EE 10g R3: Build Repositories 19 - 18
Copyright © 2008, Oracle. All rights reserved.
Authentication Options
Oracle BI Server supports the following authentication types:• Operating system• External table• LDAP• Database• Internal
Authentication OptionsOracle BI Server supports the following authentication types:
• Operating system• LDAP• External table• Database• Internal
Each of these options is discussed in detail in the slides that follow.
Ora
cle
Inte
rnal
& O
racl
e A
cade
my
Use
Onl
y
Oracle BI Suite EE 10g R3: Build Repositories 19 - 19
Copyright © 2008, Oracle. All rights reserved.
Operating System Authentication
Oracle BI Server supports Windows Unified Logon.• If a user is configured on a trusted Windows domain, an
Oracle BI Server user of the same name does not need to be authenticated by Oracle BI Server.
• The user ID in the repository must match the user ID in the trusted Windows domain.
Operating System Authentication Oracle BI Server supports Windows NT and Windows 2000 Unified Logon. If a user is configured on a trusted Windows domain, an Oracle BI Server user of the same name does not need to be authenticated by Oracle BI Server; the user has already been authenticated by Windows and so is trusted to log on to Oracle BI Server. When operating system authentication is enabled, users connecting to Oracle BI Server should not type a user ID or password at the logon prompt. If a user enters a user ID and (optionally) a password at the logon prompt, that user ID and password overrides the operating system authentication and Oracle BI Server performs the authentication.To configure operating system authentication:
1. Enable operating system authentication in the NQSConfig.ini file.2. Create a user in your repository named identically to the user ID in the trusted Windows
domain.3. Assign the group membership and rights that you want the user to have.
Ora
cle
Inte
rnal
& O
racl
e A
cade
my
Use
Onl
y
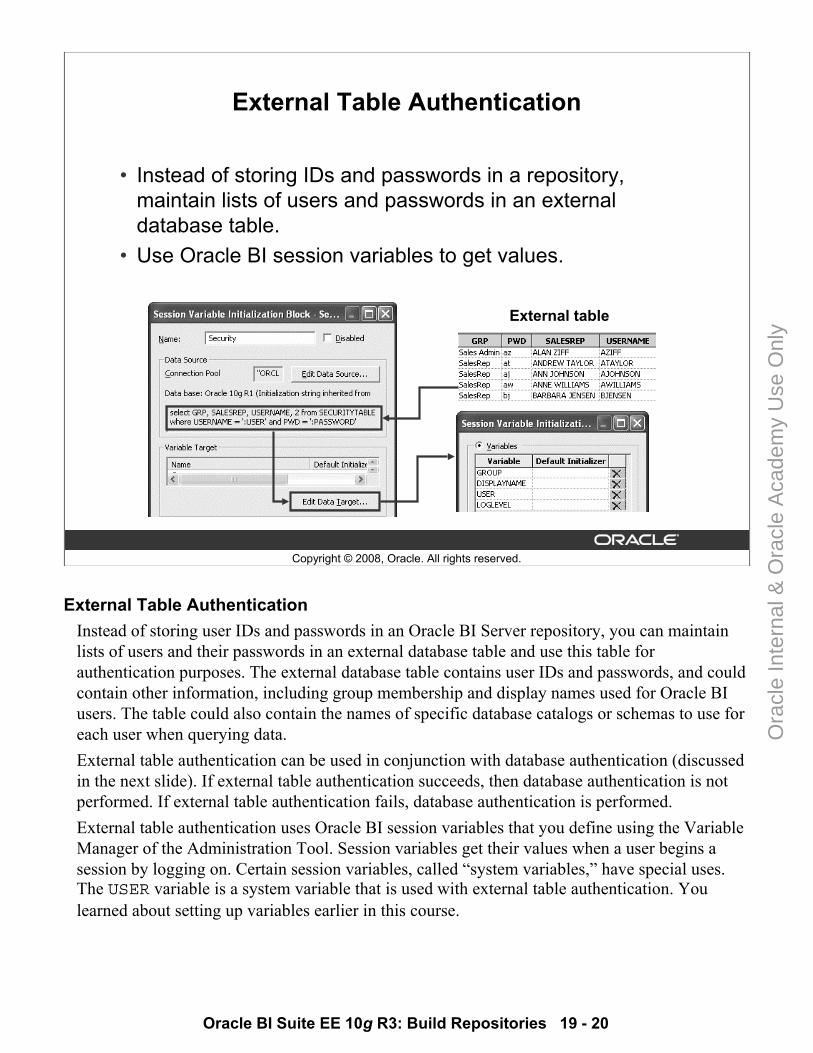
Oracle BI Suite EE 10g R3: Build Repositories 19 - 20
Copyright © 2008, Oracle. All rights reserved.
External Table Authentication
• Instead of storing IDs and passwords in a repository, maintain lists of users and passwords in an external database table.
• Use Oracle BI session variables to get values.
External table
External Table AuthenticationInstead of storing user IDs and passwords in an Oracle BI Server repository, you can maintain lists of users and their passwords in an external database table and use this table for authentication purposes. The external database table contains user IDs and passwords, and could contain other information, including group membership and display names used for Oracle BI users. The table could also contain the names of specific database catalogs or schemas to use for each user when querying data. External table authentication can be used in conjunction with database authentication (discussed in the next slide). If external table authentication succeeds, then database authentication is not performed. If external table authentication fails, database authentication is performed. External table authentication uses Oracle BI session variables that you define using the Variable Manager of the Administration Tool. Session variables get their values when a user begins a session by logging on. Certain session variables, called “system variables,” have special uses. The USER variable is a system variable that is used with external table authentication. You learned about setting up variables earlier in this course.
Ora
cle
Inte
rnal
& O
racl
e A
cade
my
Use
Onl
y
Oracle BI Suite EE 10g R3: Build Repositories 19 - 21
Copyright © 2008, Oracle. All rights reserved.
LDAP Authentication
• Instead of storing IDs and passwords in a repository, Oracle BI Server passes the user ID and password entered by the user to an LDAP server for authentication.
• Use Oracle BI session variables to get authentication values.
LDAP Authentication LDAP is the acronym for Lightweight Directory Access Protocol, a set of protocols for accessing information directories. Similar to external table authentication, instead of storing user IDs and passwords in an Oracle BI Server repository, you can set up Oracle BI Server to pass the user ID and password entered by the user to an LDAP server for authentication. In addition to basic user authentication, the LDAP server can also provide Oracle BI Server with other information, such as the user display name (used by Oracle BI Presentation Service) and the name of any groups to which the user belongs. The LDAP server can also provide the names of specific database catalogs or schemas to use for each user when querying data. This information is contained in LDAP variables that get passed to Oracle BI session variablesduring the process of user authentication. LDAP authentication uses Oracle BI session variables, which you define using the Variable Manager of the Administration Tool. Session variables get their values when a user begins a session by logging on. Certain session variables, called system session variables, have special uses. The USER variable is a system variable that is used with LDAP authentication. Configuring LDAP authentication is beyond the scope of this course. Instead, see the Oracle BI Installation and Configuration Guide.
Ora
cle
Inte
rnal
& O
racl
e A
cade
my
Use
Onl
y
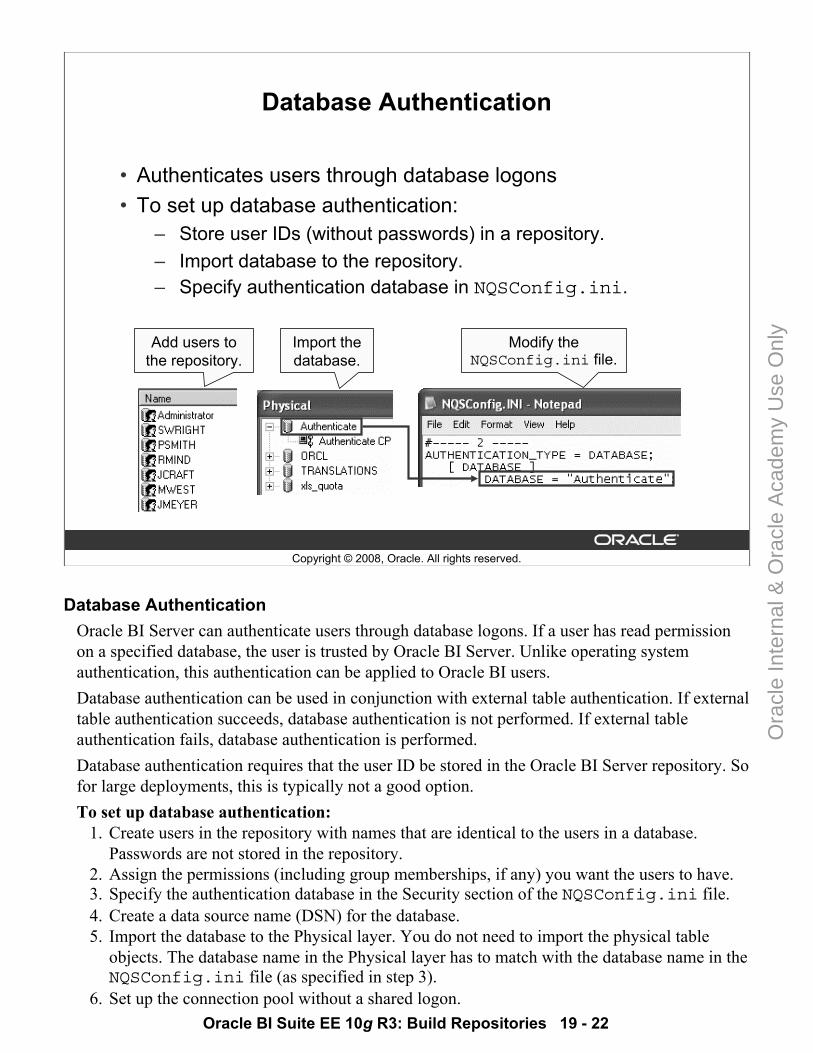
Oracle BI Suite EE 10g R3: Build Repositories 19 - 22
Copyright © 2008, Oracle. All rights reserved.
Database Authentication
• Authenticates users through database logons• To set up database authentication:
– Store user IDs (without passwords) in a repository.– Import database to the repository.– Specify authentication database in NQSConfig.ini.
Add users to the repository.
Import the database.
Modify the NQSConfig.ini file.
Database Authentication Oracle BI Server can authenticate users through database logons. If a user has read permission on a specified database, the user is trusted by Oracle BI Server. Unlike operating system authentication, this authentication can be applied to Oracle BI users.Database authentication can be used in conjunction with external table authentication. If external table authentication succeeds, database authentication is not performed. If external table authentication fails, database authentication is performed. Database authentication requires that the user ID be stored in the Oracle BI Server repository. So for large deployments, this is typically not a good option. To set up database authentication:
1. Create users in the repository with names that are identical to the users in a database. Passwords are not stored in the repository.
2. Assign the permissions (including group memberships, if any) you want the users to have.3. Specify the authentication database in the Security section of the NQSConfig.ini file.4. Create a data source name (DSN) for the database.5. Import the database to the Physical layer. You do not need to import the physical table
objects. The database name in the Physical layer has to match with the database name in the NQSConfig.ini file (as specified in step 3).
6. Set up the connection pool without a shared logon.
Ora
cle
Inte
rnal
& O
racl
e A
cade
my
Use
Onl
y
Oracle BI Suite EE 10g R3: Build Repositories 19 - 23
Copyright © 2008, Oracle. All rights reserved.
Internal Authentication
Maintain lists of users and passwords in the repository using the Administration Tool.• Oracle BI Server authenticates against this list unless:
– Another authentication method has already succeeded– Database authentication is specified in NQSConfig.ini
• User IDs are nonencrypted and non-case-sensitive.• Passwords are encrypted and case-sensitive.• Users can access any business model if they have the
necessary access privileges.• Users do not span repositories.
Internal Authentication You can maintain lists of users and their passwords in Oracle BI Server repository using the Administration Tool. Oracle BI Server attempts to authenticate users against this list when they log on unless another authentication method has already succeeded, or database authentication has been specified in the NQSConfig.ini file. Oracle BI Server user IDs are stored in nonencrypted form in an Oracle BI Server repository and are non-case-sensitive. Passwords are stored in encrypted form and are case-sensitive. Oracle BI Server user IDs can be used to access any business model in a repository provided that the users have the necessary access privileges. User IDs are valid for only the repository in which they are set up. They do not span multiple repositories. Note that if you are using LDAP or external table authentication, passwords are not stored in the Oracle BI Server repository.
Ora
cle
Inte
rnal
& O
racl
e A
cade
my
Use
Onl
y
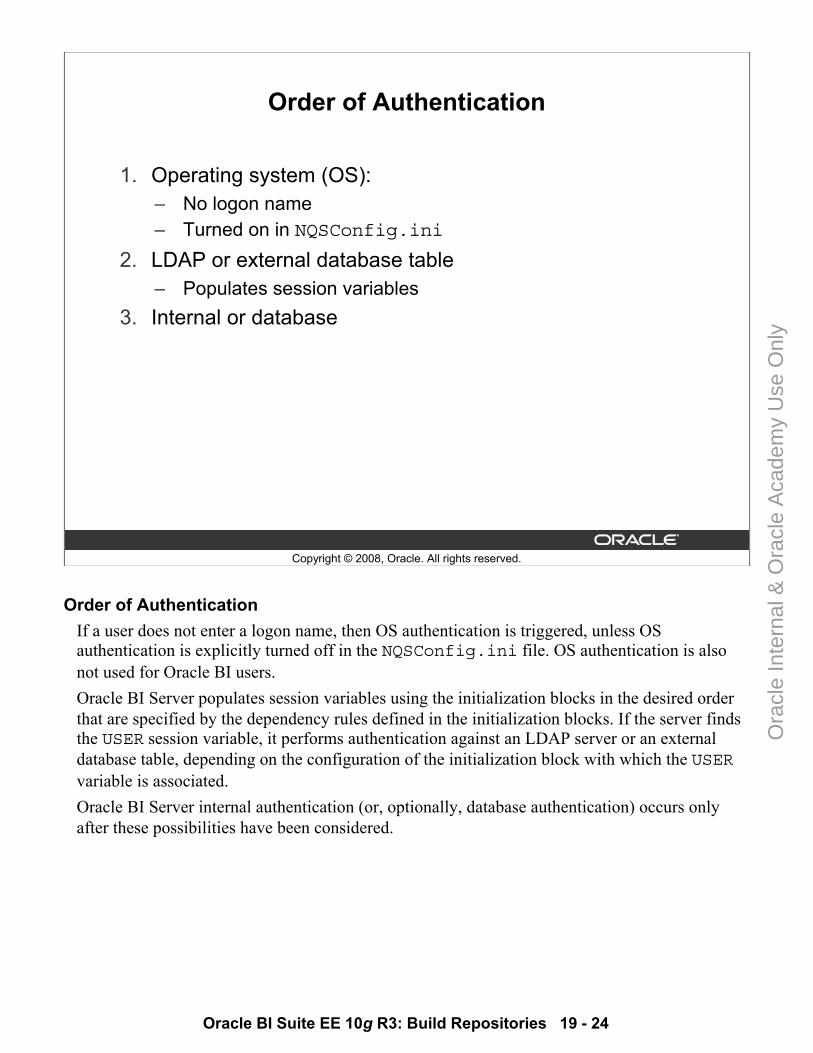
Oracle BI Suite EE 10g R3: Build Repositories 19 - 24
Copyright © 2008, Oracle. All rights reserved.
Order of Authentication
1. Operating system (OS):– No logon name– Turned on in NQSConfig.ini
2. LDAP or external database table– Populates session variables
3. Internal or database
Order of Authentication If a user does not enter a logon name, then OS authentication is triggered, unless OS authentication is explicitly turned off in the NQSConfig.ini file. OS authentication is also not used for Oracle BI users. Oracle BI Server populates session variables using the initialization blocks in the desired order that are specified by the dependency rules defined in the initialization blocks. If the server finds the USER session variable, it performs authentication against an LDAP server or an external database table, depending on the configuration of the initialization block with which the USERvariable is associated.Oracle BI Server internal authentication (or, optionally, database authentication) occurs only after these possibilities have been considered.
Ora
cle
Inte
rnal
& O
racl
e A
cade
my
Use
Onl
y
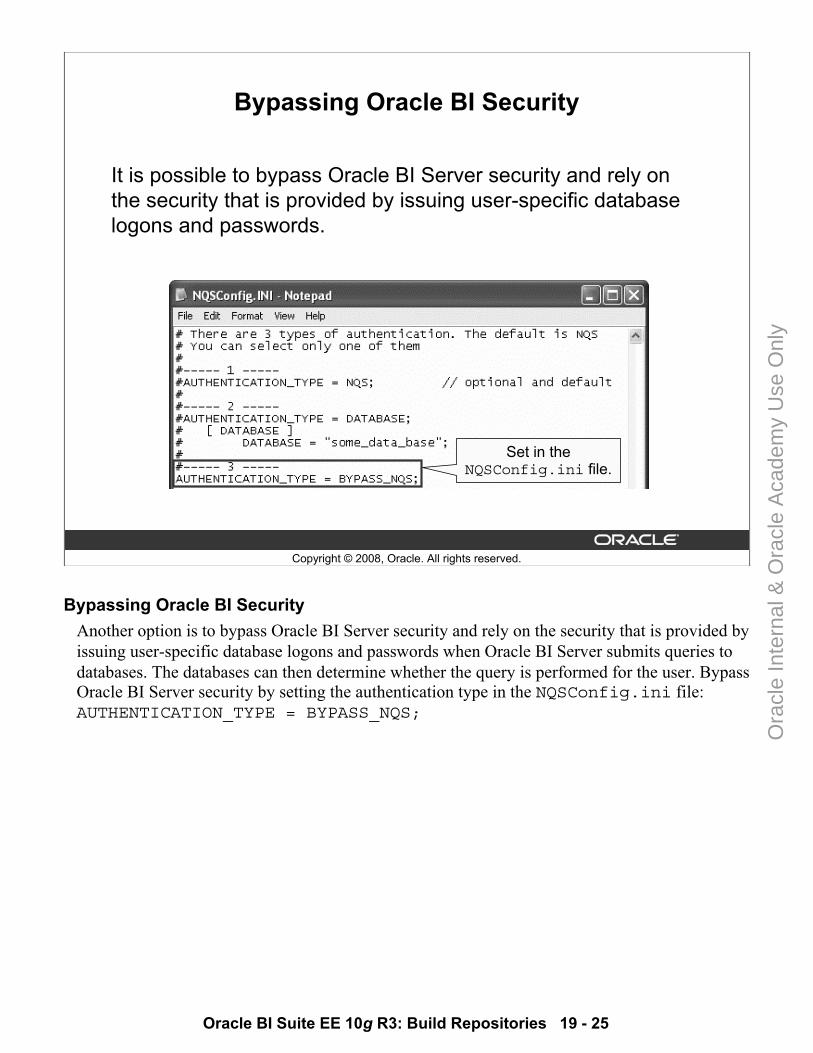
Oracle BI Suite EE 10g R3: Build Repositories 19 - 25
Copyright © 2008, Oracle. All rights reserved.
Bypassing Oracle BI Security
It is possible to bypass Oracle BI Server security and rely on the security that is provided by issuing user-specific database logons and passwords.
Set in the NQSConfig.ini file.
Bypassing Oracle BI SecurityAnother option is to bypass Oracle BI Server security and rely on the security that is provided by issuing user-specific database logons and passwords when Oracle BI Server submits queries to databases. The databases can then determine whether the query is performed for the user. Bypass Oracle BI Server security by setting the authentication type in the NQSConfig.ini file: AUTHENTICATION_TYPE = BYPASS_NQS;
Ora
cle
Inte
rnal
& O
racl
e A
cade
my
Use
Onl
y
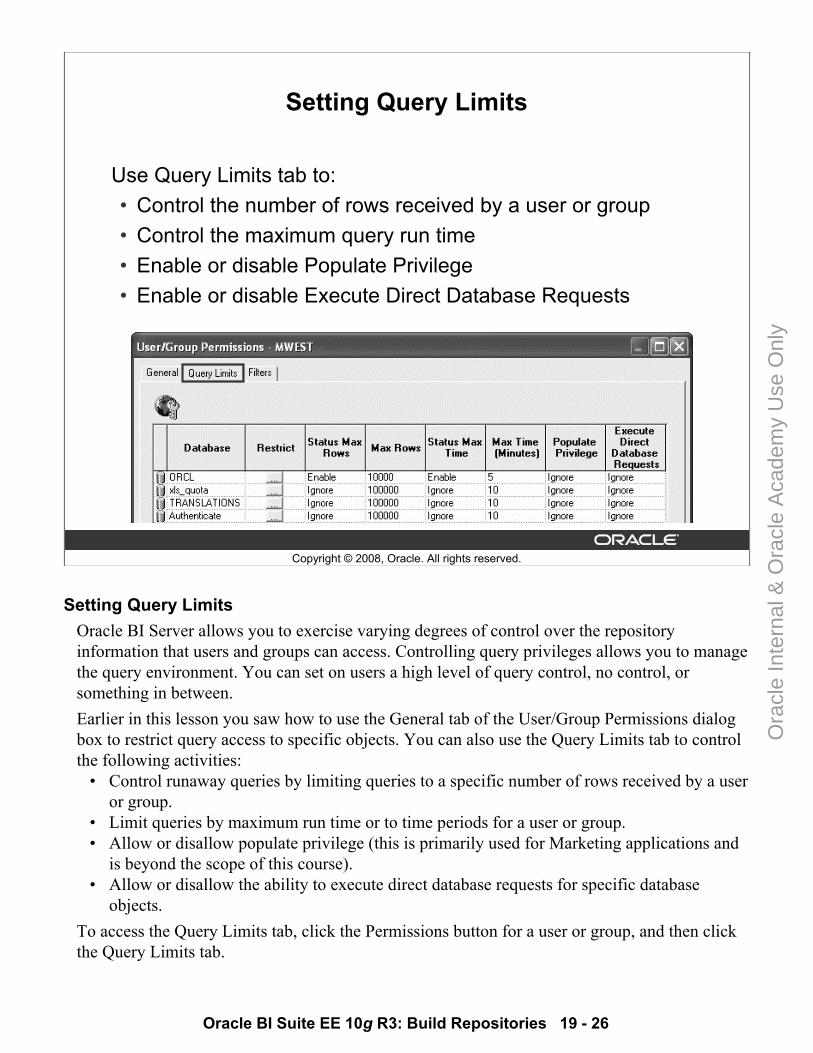
Oracle BI Suite EE 10g R3: Build Repositories 19 - 26
Copyright © 2008, Oracle. All rights reserved.
Setting Query Limits
Use Query Limits tab to:• Control the number of rows received by a user or group• Control the maximum query run time• Enable or disable Populate Privilege• Enable or disable Execute Direct Database Requests
Setting Query Limits Oracle BI Server allows you to exercise varying degrees of control over the repository information that users and groups can access. Controlling query privileges allows you to manage the query environment. You can set on users a high level of query control, no control, or something in between.Earlier in this lesson you saw how to use the General tab of the User/Group Permissions dialog box to restrict query access to specific objects. You can also use the Query Limits tab to control the following activities:
• Control runaway queries by limiting queries to a specific number of rows received by a user or group.
• Limit queries by maximum run time or to time periods for a user or group.• Allow or disallow populate privilege (this is primarily used for Marketing applications and
is beyond the scope of this course).• Allow or disallow the ability to execute direct database requests for specific database
objects.To access the Query Limits tab, click the Permissions button for a user or group, and then click the Query Limits tab.
Ora
cle
Inte
rnal
& O
racl
e A
cade
my
Use
Onl
y

Oracle BI Suite EE 10g R3: Build Repositories 19 - 27
Copyright © 2008, Oracle. All rights reserved.
Setting Timing Restrictions
Restrict access to a database during particular time periods.
Setting Timing RestrictionsTo restrict access to a database during particular time periods, in the Restrict column, click the ellipsis button to open the Restrictions dialog box. In the Restrictions dialog box, perform the following steps:
1. To select a time period, click the start time and drag to the end time.2. Access:
- To explicitly allow access, click Allow.- To explicitly disallow access, click Disallow.
Ora
cle
Inte
rnal
& O
racl
e A
cade
my
Use
Onl
y
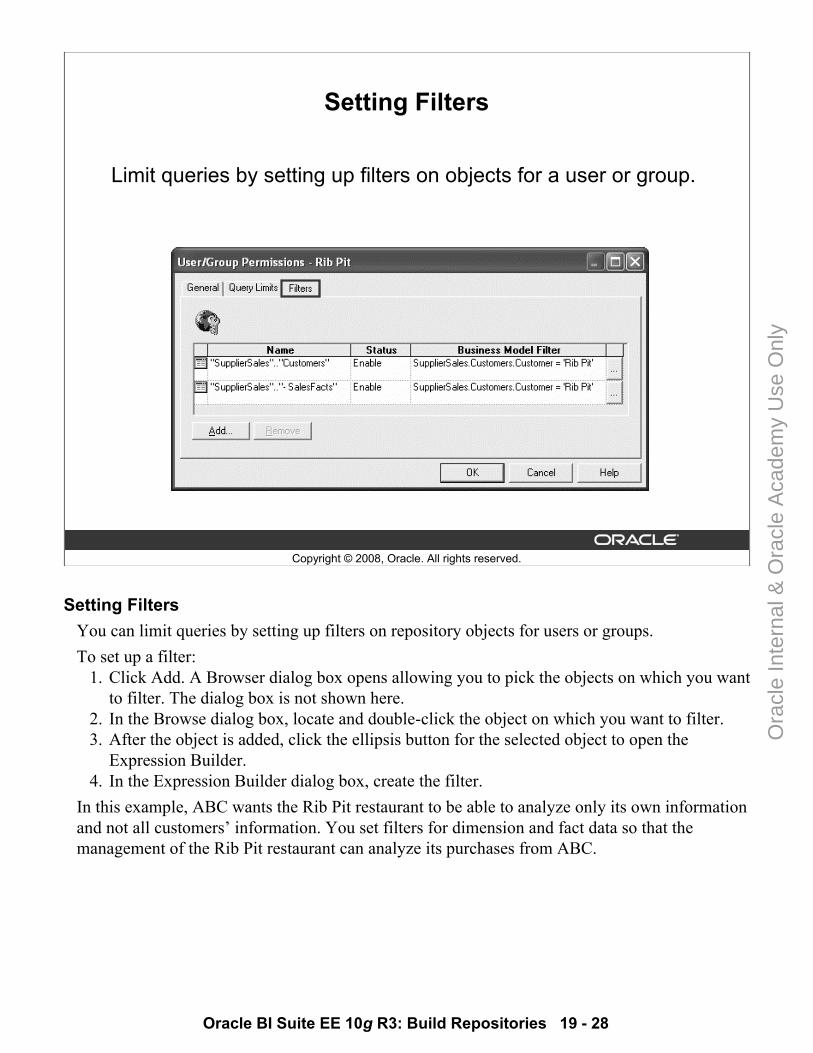
Oracle BI Suite EE 10g R3: Build Repositories 19 - 28
Copyright © 2008, Oracle. All rights reserved.
Setting Filters
Limit queries by setting up filters on objects for a user or group.
Setting FiltersYou can limit queries by setting up filters on repository objects for users or groups. To set up a filter:
1. Click Add. A Browser dialog box opens allowing you to pick the objects on which you want to filter. The dialog box is not shown here.
2. In the Browse dialog box, locate and double-click the object on which you want to filter.3. After the object is added, click the ellipsis button for the selected object to open the
Expression Builder.4. In the Expression Builder dialog box, create the filter.
In this example, ABC wants the Rib Pit restaurant to be able to analyze only its own information and not all customers’ information. You set filters for dimension and fact data so that the management of the Rib Pit restaurant can analyze its purchases from ABC.
Ora
cle
Inte
rnal
& O
racl
e A
cade
my
Use
Onl
y

Oracle BI Suite EE 10g R3: Build Repositories 19 - 29
Copyright © 2008, Oracle. All rights reserved.
Summary
In this lesson, you should have learned how to:• Define users and groups• Set permissions for users and groups to control access to
repository objects• Explain group inheritance• Identify and describe the authentication methods used by
Oracle BI Server• Use query limits, timing restrictions, and filters to control
access to repository information
Ora
cle
Inte
rnal
& O
racl
e A
cade
my
Use
Onl
y
Oracle BI Suite EE 10g R3: Build Repositories 19 - 30
Copyright © 2008, Oracle. All rights reserved.
Practice 19-1 Overview: Creating Users and Groups
This practice covers the following topics:• Using the Security Manager to define users and groups• Setting up group hierarchies• Changing the default permission setting
Practice 19-1 Overview: Creating Users and GroupsYou can maintain a list of users, their passwords, and groups in the Oracle BI repository. When using Oracle BI security, which is the default, Oracle BI Server authenticates users against this list. In this practice, you create new users and groups using the Oracle BI Administration Tool. After you have created these users, you assign them to the appropriate group.
Ora
cle
Inte
rnal
& O
racl
e A
cade
my
Use
Onl
y
Oracle BI Suite EE 10g R3: Build Repositories 19 - 31
Copyright © 2008, Oracle. All rights reserved.
Practice 19-2 Overview: Setting Permissions for Users and Groups
This practice covers setting permissions for users and groups.
Practice 19-2 Overview: Setting Permissions for Users and GroupsYou first modify explicit permissions for Jacob Meyer. You then modify the permission of the group that Meyer is a member of and examine the effect this has on him. Lastly, you add Meyer to another group and examine how this affects his access.
Ora
cle
Inte
rnal
& O
racl
e A
cade
my
Use
Onl
y
Oracle BI Suite EE 10g R3: Build Repositories 19 - 32
Copyright © 2008, Oracle. All rights reserved.
Practice 19-3 Overview: Authenticating Using an External Database
This practice covers the following topics:• Creating an initialization block to populate security session
variables• Verifying external database authentication
Practice 19-3 Overview: Authenticating Using an External DatabaseYou can choose to maintain lists of users and their passwords in an external database rather than in the repository. An external database consisting of user logon information has been provided so that you can import this information into the repository and use it to authenticate users during logon. The table contains a list of users, their logons and passwords, and the group they belong to (only one group can be listed for each user). Optionally, the table could also contain the logging level for each user, Web interface information, and the names of specific database catalogs or schemas to use for each user when querying data. After this information has been successfully imported, you need to create an initialization block that retrieves this data.
Ora
cle
Inte
rnal
& O
racl
e A
cade
my
Use
Onl
y
Oracle BI Suite EE 10g R3: Build Repositories 19 - 33
Copyright © 2008, Oracle. All rights reserved.
Practice 19-4 Overview: Authenticating Users with Database Authentication
This practice covers the following topics:• Importing an authentication database• Adding a database user to the repository• Editing the security section of NQSConfig.ini• Verifying database authentication
Practice 19-4 Overview: Authenticating Users with Database AuthenticationAs an additional option, Oracle BI Server can authenticate users through database logon names. If a user has read permission on a specified database, the user is trusted by Oracle BI Server. To authenticate users with this method, you have to maintain a list of users in the repository. So for large deployments, this is not a good option.
Ora
cle
Inte
rnal
& O
racl
e A
cade
my
Use
Onl
y
Oracle BI Suite EE 10g R3: Build Repositories 19 - 34
Copyright © 2008, Oracle. All rights reserved.
Practice 19-5 Overview: Setting Query Limits and Timing Restrictions
This practice covers the following topics:• Setting query limits for users and groups• Setting timing restrictions for users and groups
Practice 19-5 Overview: Setting Query Limits and Timing Restrictions You want to prevent queries from consuming too many resources by limiting how long a query can run and how many rows a query can retrieve. You also want to regulate when individual users can query databases to prevent users from querying when system resources are tied up with batch reporting, table updates, or other production tasks.
Ora
cle
Inte
rnal
& O
racl
e A
cade
my
Use
Onl
y
Oracle BI Suite EE 10g R3: Build Repositories 19 - 35
Copyright © 2008, Oracle. All rights reserved.
Practice 19-6 Overview: Setting Filters to Personalize Information
This practice covers the following topics:• Setting query filters• Setting a query filter using a variable
Practice 19-6 Overview: Setting Filters to Personalize Information ABC decided that its customers would value the ability to analyze their own purchase records using Oracle BI. However, ABC wants each customer to be able to analyze only his or her own information. In this practice, you set a filter so that the management of the Rib Pit restaurant can analyze its purchases from ABC. ABC also wants to set up a filter so that members of the SalesUsers group see only the data that pertains to them.
Ora
cle
Inte
rnal
& O
racl
e A
cade
my
Use
Onl
y

Ora
cle
Inte
rnal
& O
racl
e A
cade
my
Use
Onl
y
Copyright © 2008, Oracle. All rights reserved.
Cache Management
Ora
cle
Inte
rnal
& O
racl
e A
cade
my
Use
Onl
y
Oracle BI Suite EE 10g R3: Build Repositories 20 - 2
Copyright © 2008, Oracle. All rights reserved.
Objective
After completing this lesson, you should be able to manage Oracle Business Intelligence (BI) cache.
Ora
cle
Inte
rnal
& O
racl
e A
cade
my
Use
Onl
y
Oracle BI Suite EE 10g R3: Build Repositories 20 - 3
Copyright © 2008, Oracle. All rights reserved.
Business Challenge
• Decision support systems require a large amount of database processing.
• Frequent trips to the back-end database to satisfy query requests can result in:
– Increased query response time– Poor performance
Business ChallengeDecision support queries sometimes require a large amount of database processing. Requests for the same information require frequent trips to the back-end databases to retrieve the query results. Such trips can increase query response time and result in poor performance from the user’s perspective.
Ora
cle
Inte
rnal
& O
racl
e A
cade
my
Use
Onl
y
Oracle BI Suite EE 10g R3: Build Repositories 20 - 4
Copyright © 2008, Oracle. All rights reserved.
Business Solution: Oracle BI Server Query Cache
Oracle BI Server can be configured to maintain a disk-based cache of query results sets (query cache):• Saves the results of queries in cache files• Enables Oracle BI Server to satisfy subsequent query
requests without having to access back-end databases• Improves query response time
Business Solution: Oracle BI Server Query CacheOracle BI Server can save the results of a query in cache files and then reuse them later when a similar query is requested. By using the cache, the database only needs to be processed once for the initial time a query is executed. For subsequent times that a similar query is executed, the results are satisfied by the cache and not the database.Oracle BI administrators can configure Oracle BI Server to maintain a local, disk-based cache of query result sets (query cache). The query cache allows Oracle BI Server to satisfy many subsequent query requests without having to access back-end databases. This reduction in communication costs can dramatically decrease query response time.
Ora
cle
Inte
rnal
& O
racl
e A
cade
my
Use
Onl
y
Oracle BI Suite EE 10g R3: Build Repositories 20 - 5
Copyright © 2008, Oracle. All rights reserved.
Advantages of Caching
• Eliminates unnecessary database processing because precomputed results are stored in a local cache
• Improves query performance by fulfilling a query from the cache as opposed to searching through the database
• Conserves network resources by avoiding a connection to the database server
Advantages of CachingThe fastest way to process a query is to skip the bulk of the processing and use a precomputed answer. With query caching, Oracle BI Server stores the precomputed results of queries in a local cache. If another query can use those results, all database processing for that query is eliminated. This can result in dramatic improvements in the average query response time. Not running the query on the database also frees the database server to do other work.In addition to improving performance, being able to answer a query from a local cache conserves network resources and processing time on the database server. Network resources are conserved because the intermediate results do not have to come over the network to Oracle BI Server. Administrators can take additional steps to improve caching performance. Such measures might include tuning and indexing databases, optimizing data source connectivity, leveraging aggregate tables, and constructing metadata efficiently.
Ora
cle
Inte
rnal
& O
racl
e A
cade
my
Use
Onl
y
Oracle BI Suite EE 10g R3: Build Repositories 20 - 6
Copyright © 2008, Oracle. All rights reserved.
Costs of Caching
• Disk space– Query cache requires dedicated disk space.
• Administrative tasks:– Set the cache persistence time appropriately.– Purge the cache when necessary.
• Keeping the cache up-to-date:– Evaluate what level of noncurrent information is acceptable.– Remove stale data.
Costs of CachingDisk SpaceThe query cache requires dedicated disk space. How much space depends on the query volume, the size of the query result sets, and how much disk space you choose to allocate to the cache. For performance purposes, a disk should be used exclusively for caching, and it should be a high-performance, high-reliability disk system.Administrative TasksThere are a few administrative tasks associated with caching. You need to set the cache persistence time for each physical table appropriately, knowing how often data in that table is updated. When the frequency of the update varies, you need to keep track of when changes occur and purge the cache manually when necessary. Keeping the Cache Up-to-DateIf the cache entries are not purged when the data in the underlying databases changes, queries can potentially return results that are out-of-date. You need to evaluate whether this is acceptable. It might be acceptable to allow the cache to contain some stale data. You need to decide what level of stale data is acceptable and then set up (and follow) rules to reflect those levels. For applications where data is updated yearly or quarterly, it may be acceptable to keep stale data in the cache. For applications where data is updated frequently, it may be necessary to purge the cache more often. It is also possible to purge the entire cache as part of the extraction, transformation, and loading (ETL) process for rebuilding the data mart, making sure that there is no stale data in the cache.
Ora
cle
Inte
rnal
& O
racl
e A
cade
my
Use
Onl
y
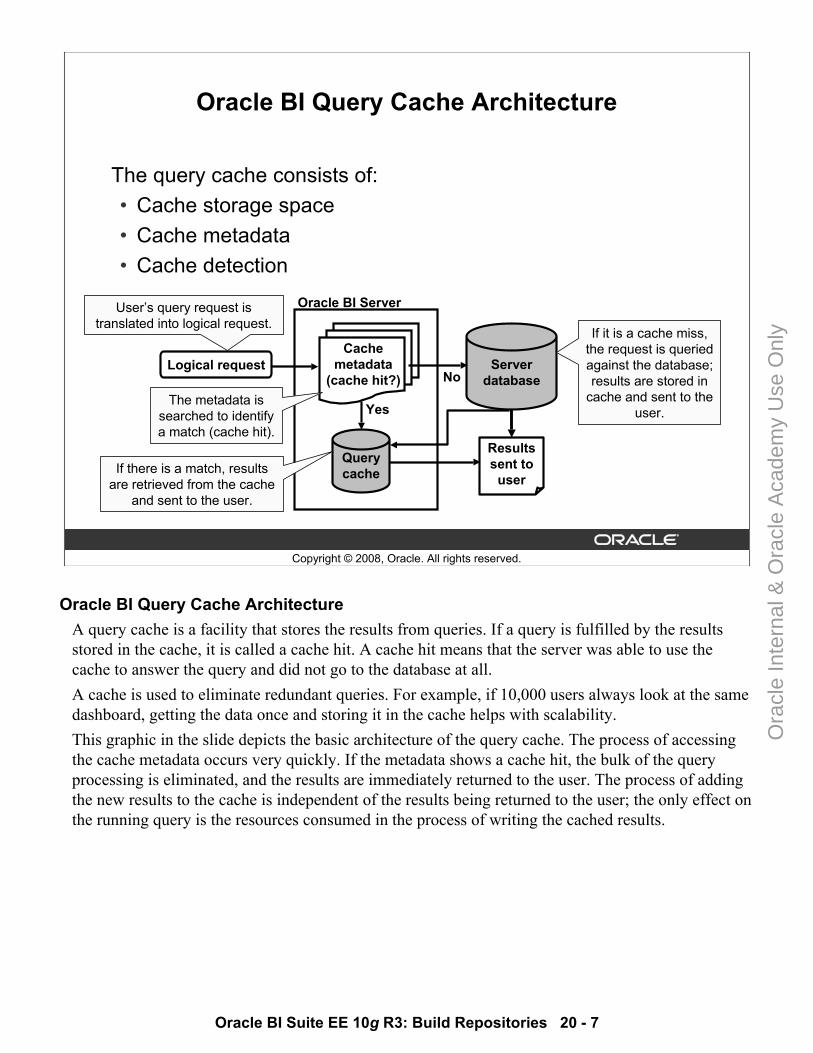
Oracle BI Suite EE 10g R3: Build Repositories 20 - 7
Copyright © 2008, Oracle. All rights reserved.
Oracle BI Query Cache Architecture
The query cache consists of: • Cache storage space• Cache metadata• Cache detection
Querycache
Serverdatabase
Cachemetadata
(cache hit?)Logical request
Yes
No
Resultssent to
user
Oracle BI ServerUser’s query request is translated into logical request.
The metadata is searched to identify a match (cache hit).
If it is a cache miss, the request is queried against the database; results are stored in
cache and sent to the user.
If there is a match, results are retrieved from the cache
and sent to the user.
Oracle BI Query Cache ArchitectureA query cache is a facility that stores the results from queries. If a query is fulfilled by the results stored in the cache, it is called a cache hit. A cache hit means that the server was able to use the cache to answer the query and did not go to the database at all.A cache is used to eliminate redundant queries. For example, if 10,000 users always look at the same dashboard, getting the data once and storing it in the cache helps with scalability.This graphic in the slide depicts the basic architecture of the query cache. The process of accessing the cache metadata occurs very quickly. If the metadata shows a cache hit, the bulk of the query processing is eliminated, and the results are immediately returned to the user. The process of adding the new results to the cache is independent of the results being returned to the user; the only effect on the running query is the resources consumed in the process of writing the cached results.
Ora
cle
Inte
rnal
& O
racl
e A
cade
my
Use
Onl
y
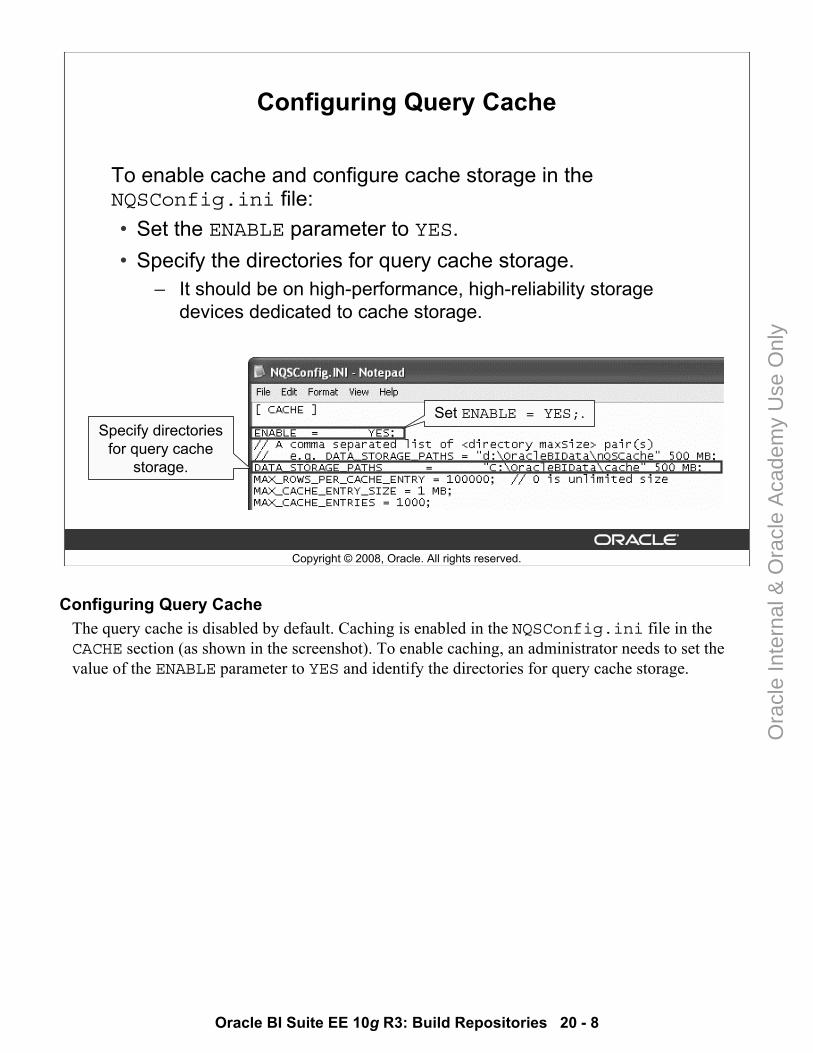
Oracle BI Suite EE 10g R3: Build Repositories 20 - 8
Copyright © 2008, Oracle. All rights reserved.
Configuring Query Cache
To enable cache and configure cache storage in the NQSConfig.ini file:• Set the ENABLE parameter to YES.• Specify the directories for query cache storage.
– It should be on high-performance, high-reliability storage devices dedicated to cache storage.
Set ENABLE = YES;.Specify directories
for query cache storage.
Configuring Query CacheThe query cache is disabled by default. Caching is enabled in the NQSConfig.ini file in the CACHE section (as shown in the screenshot). To enable caching, an administrator needs to set the value of the ENABLE parameter to YES and identify the directories for query cache storage.
Ora
cle
Inte
rnal
& O
racl
e A
cade
my
Use
Onl
y
Oracle BI Suite EE 10g R3: Build Repositories 20 - 9
Copyright © 2008, Oracle. All rights reserved.
Monitoring and Managing the Cache
Requires an overall cache management strategy:• Invalidate the cache entries when underlying data has
changed.• Monitor, identify, and remove any undesirable cache entries.
Monitoring and Managing the Cache Cache files always produce the same results, even after a database has been updated. Issues with retaining cache files may arise. For example, not purging outdated caches (known as “stale caches”) can potentially return inaccurate results over time and consume disk space. Therefore, you need a cache management strategy to manage changes to the underlying databases and to monitor cache entries. The choice of a cache management strategy depends on the volatility of the data in the underlying databases and the predictability of the changes that cause this volatility. It also depends on the number and types of queries that comprise your cache, as well as the usage those queries receive. Cache management techniques are provided in the slides that follow.
Ora
cle
Inte
rnal
& O
racl
e A
cade
my
Use
Onl
y
Oracle BI Suite EE 10g R3: Build Repositories 20 - 10
Copyright © 2008, Oracle. All rights reserved.
Cache Management Techniques
• Configuring the cache parameters• Setting caching and cache persistence for tables• Using the Cache Manager• Inspecting SQL for cache entries• Modifying the Cache Manager column display • Inspecting the cache reports• Purging the cache entries manually using the Cache
Manager• Purging the cache entries automatically• Using event polling tables• Seeding the cache
Cache Management TechniquesThis slide lists some of the techniques you can use to manage the query cache. Each technique is discussed in detail in the slides that follow.
Ora
cle
Inte
rnal
& O
racl
e A
cade
my
Use
Onl
y
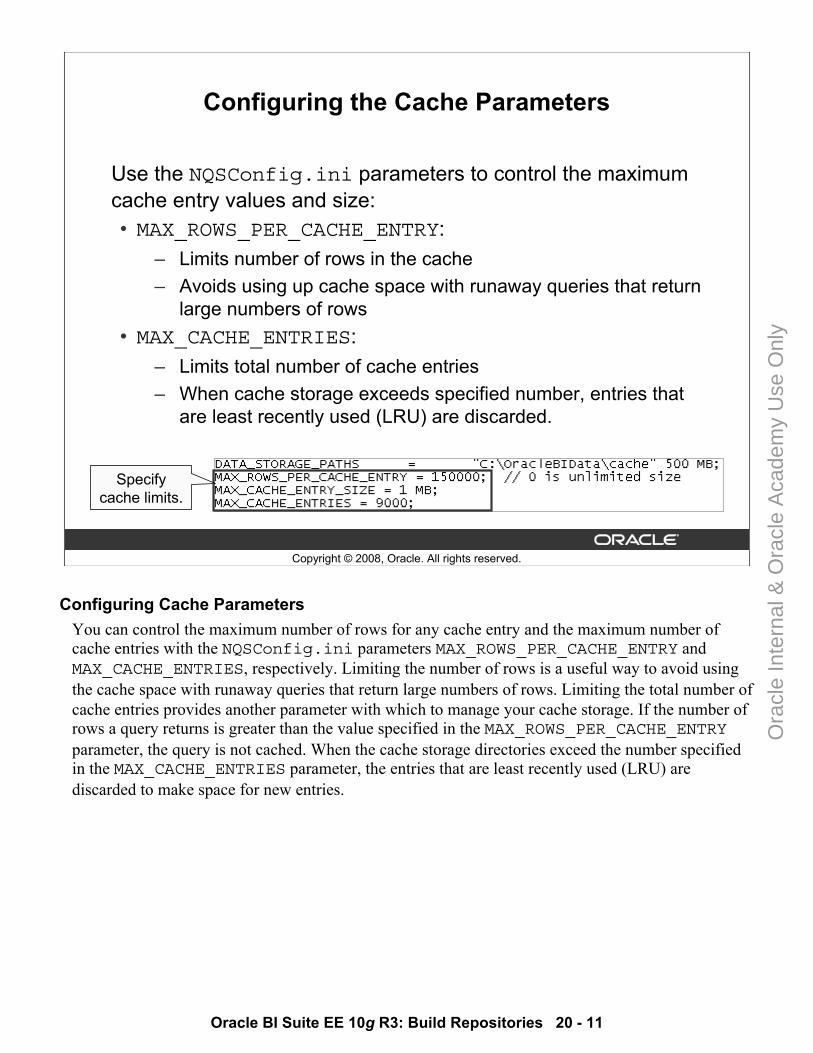
Oracle BI Suite EE 10g R3: Build Repositories 20 - 11
Copyright © 2008, Oracle. All rights reserved.
Configuring the Cache Parameters
Use the NQSConfig.ini parameters to control the maximum cache entry values and size:• MAX_ROWS_PER_CACHE_ENTRY:
– Limits number of rows in the cache– Avoids using up cache space with runaway queries that return
large numbers of rows• MAX_CACHE_ENTRIES:
– Limits total number of cache entries– When cache storage exceeds specified number, entries that
are least recently used (LRU) are discarded.
Specify cache limits.
Configuring Cache Parameters You can control the maximum number of rows for any cache entry and the maximum number of cache entries with the NQSConfig.ini parameters MAX_ROWS_PER_CACHE_ENTRY and MAX_CACHE_ENTRIES, respectively. Limiting the number of rows is a useful way to avoid using the cache space with runaway queries that return large numbers of rows. Limiting the total number of cache entries provides another parameter with which to manage your cache storage. If the number of rows a query returns is greater than the value specified in the MAX_ROWS_PER_CACHE_ENTRYparameter, the query is not cached. When the cache storage directories exceed the number specified in the MAX_CACHE_ENTRIES parameter, the entries that are least recently used (LRU) are discarded to make space for new entries.
Ora
cle
Inte
rnal
& O
racl
e A
cade
my
Use
Onl
y

Oracle BI Suite EE 10g R3: Build Repositories 20 - 12
Copyright © 2008, Oracle. All rights reserved.
Setting Caching and Cache Persistence for Tables
• Enable caching for a table so that any query involving the table is added to the cache.
– All tables are cacheable by default.
• Set cache persistence time to indicate how long entries for this table should be kept in the cache.
Make table cacheable.
Cache persistence
Setting Caching and Cache Persistence for TablesYou can set a cacheable attribute for each physical table, allowing you to specify whether queries for that table will be added to the cache to answer future queries. If you enable caching for a table, any query involving the table is added to the cache. All tables are cacheable by default, but some tables may not be good candidates to include in the cache unless you use the cache persistence time settings. For example, perhaps you have a table that stores stock ticker data, which is updated every minute. You could use the cache persistence time settings to purge the entries for that table every 59 seconds. You can also use the Cache persistence time field to specify how long the entries for this table should be kept in the query cache. This is useful for data sources that are updated frequently.Still, in other cases, it may not make sense to produce a cache at all when a table is being queried against. In this case, an administrator could indicate that a table is “non-cacheable” by deselecting the Cacheable check box. By making a table non-cacheable, any query against that table will not be added to the cache. Defining tables as non-cacheable is generally done only when there are tables that change very frequently, such as a real-time subject area.
Ora
cle
Inte
rnal
& O
racl
e A
cade
my
Use
Onl
y
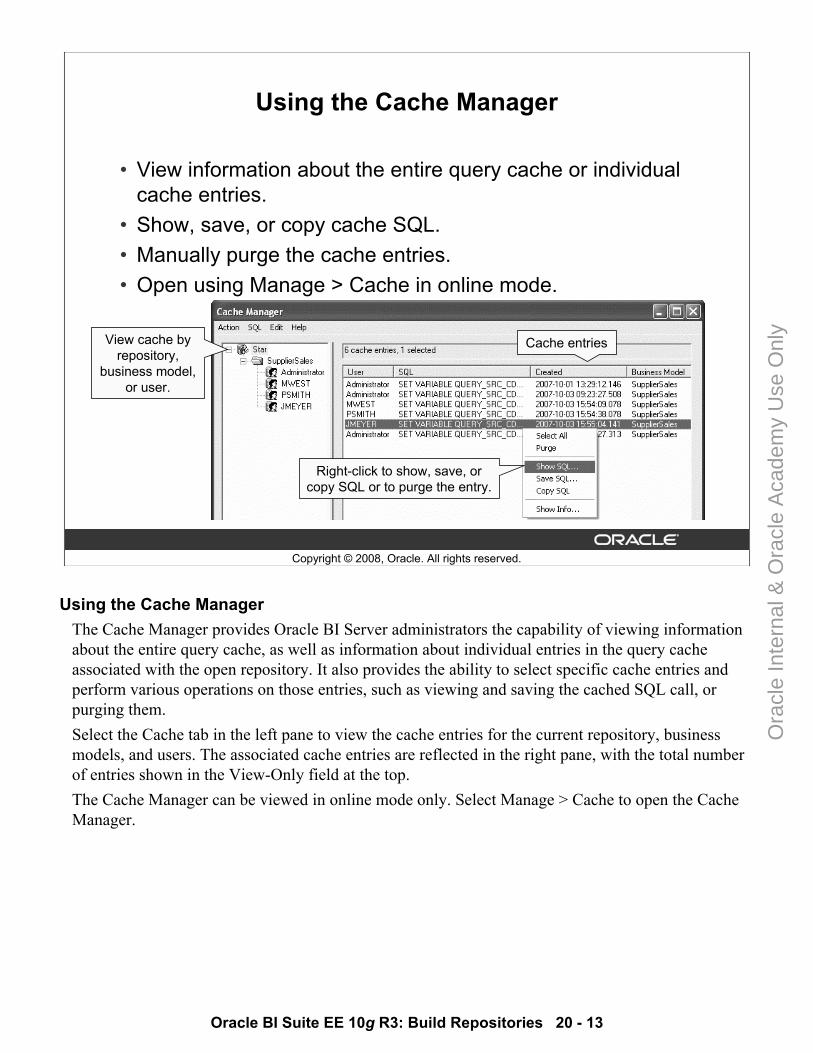
Oracle BI Suite EE 10g R3: Build Repositories 20 - 13
Copyright © 2008, Oracle. All rights reserved.
Using the Cache Manager
• View information about the entire query cache or individual cache entries.
• Show, save, or copy cache SQL.• Manually purge the cache entries.• Open using Manage > Cache in online mode.
Cache entriesView cache by repository,
business model, or user.
Right-click to show, save, or copy SQL or to purge the entry.
Using the Cache Manager The Cache Manager provides Oracle BI Server administrators the capability of viewing information about the entire query cache, as well as information about individual entries in the query cache associated with the open repository. It also provides the ability to select specific cache entries and perform various operations on those entries, such as viewing and saving the cached SQL call, or purging them.Select the Cache tab in the left pane to view the cache entries for the current repository, business models, and users. The associated cache entries are reflected in the right pane, with the total number of entries shown in the View-Only field at the top.The Cache Manager can be viewed in online mode only. Select Manage > Cache to open the Cache Manager.
Ora
cle
Inte
rnal
& O
racl
e A
cade
my
Use
Onl
y
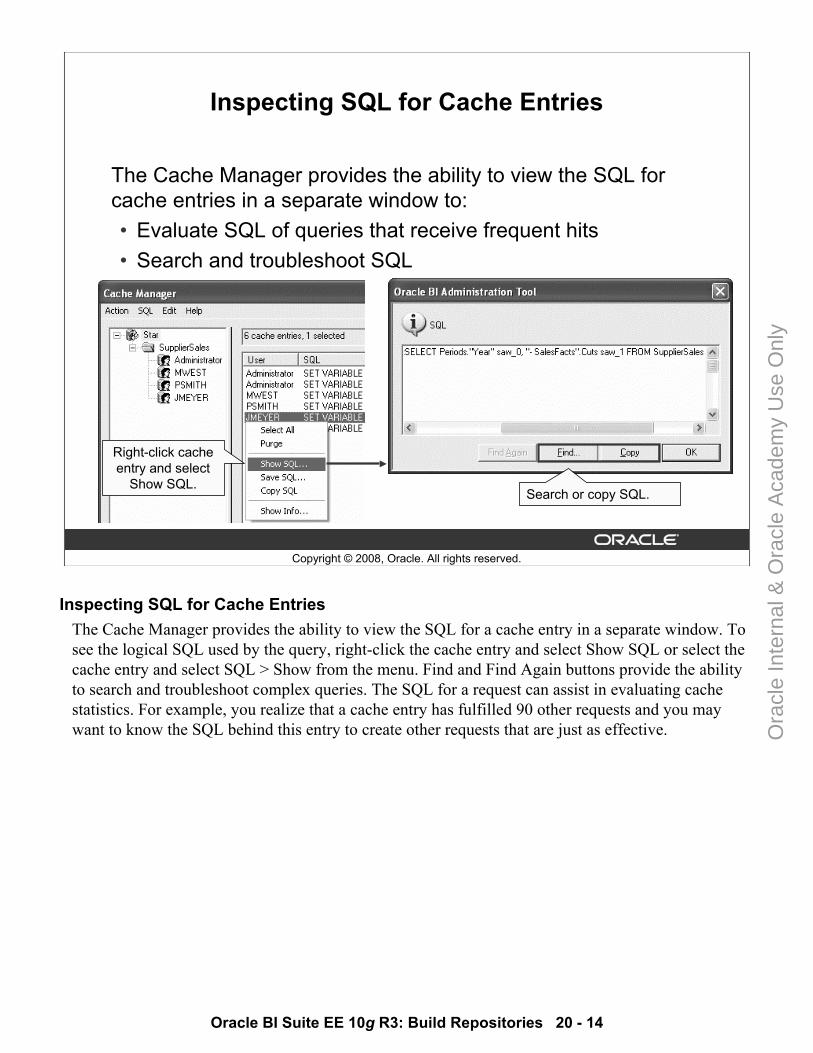
Oracle BI Suite EE 10g R3: Build Repositories 20 - 14
Copyright © 2008, Oracle. All rights reserved.
Inspecting SQL for Cache Entries
The Cache Manager provides the ability to view the SQL for cache entries in a separate window to:• Evaluate SQL of queries that receive frequent hits• Search and troubleshoot SQL
Right-click cache entry and select
Show SQL. Search or copy SQL.
Inspecting SQL for Cache EntriesThe Cache Manager provides the ability to view the SQL for a cache entry in a separate window. To see the logical SQL used by the query, right-click the cache entry and select Show SQL or select the cache entry and select SQL > Show from the menu. Find and Find Again buttons provide the ability to search and troubleshoot complex queries. The SQL for a request can assist in evaluating cache statistics. For example, you realize that a cache entry has fulfilled 90 other requests and you may want to know the SQL behind this entry to create other requests that are just as effective.
Ora
cle
Inte
rnal
& O
racl
e A
cade
my
Use
Onl
y

Oracle BI Suite EE 10g R3: Build Repositories 20 - 15
Copyright © 2008, Oracle. All rights reserved.
Modifying the Cache Manager Column Display
1. Select Edit > Options.2. Deselect a column to remove it from the display.3. Use the Up and Down buttons to change the column order.
Change the column order.
Select or deselect columns.
Modifying the Cache Manager Column DisplayAdministrators can alter how the Cache Manager displays information. The Options window allows the administrators to choose the columns they want the Cache Manager to display by selecting or deselecting the check boxes for the columns. An administrator can use the Up and Down buttons to set the order in which columns are displayed.
Ora
cle
Inte
rnal
& O
racl
e A
cade
my
Use
Onl
y
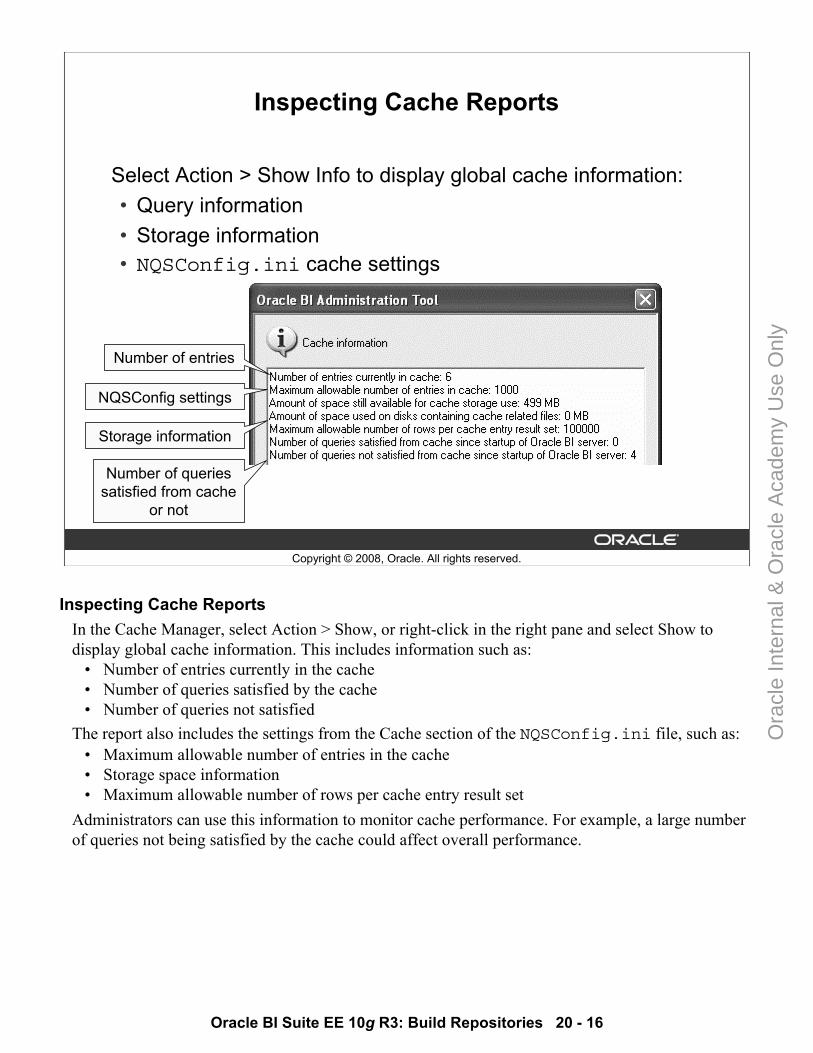
Oracle BI Suite EE 10g R3: Build Repositories 20 - 16
Copyright © 2008, Oracle. All rights reserved.
Inspecting Cache Reports
Select Action > Show Info to display global cache information:• Query information• Storage information• NQSConfig.ini cache settings
Number of queries satisfied from cache
or not
NQSConfig settings
Number of entries
Storage information
Inspecting Cache ReportsIn the Cache Manager, select Action > Show, or right-click in the right pane and select Show to display global cache information. This includes information such as:
• Number of entries currently in the cache• Number of queries satisfied by the cache• Number of queries not satisfied
The report also includes the settings from the Cache section of the NQSConfig.ini file, such as:• Maximum allowable number of entries in the cache• Storage space information• Maximum allowable number of rows per cache entry result set
Administrators can use this information to monitor cache performance. For example, a large number of queries not being satisfied by the cache could affect overall performance.
Ora
cle
Inte
rnal
& O
racl
e A
cade
my
Use
Onl
y
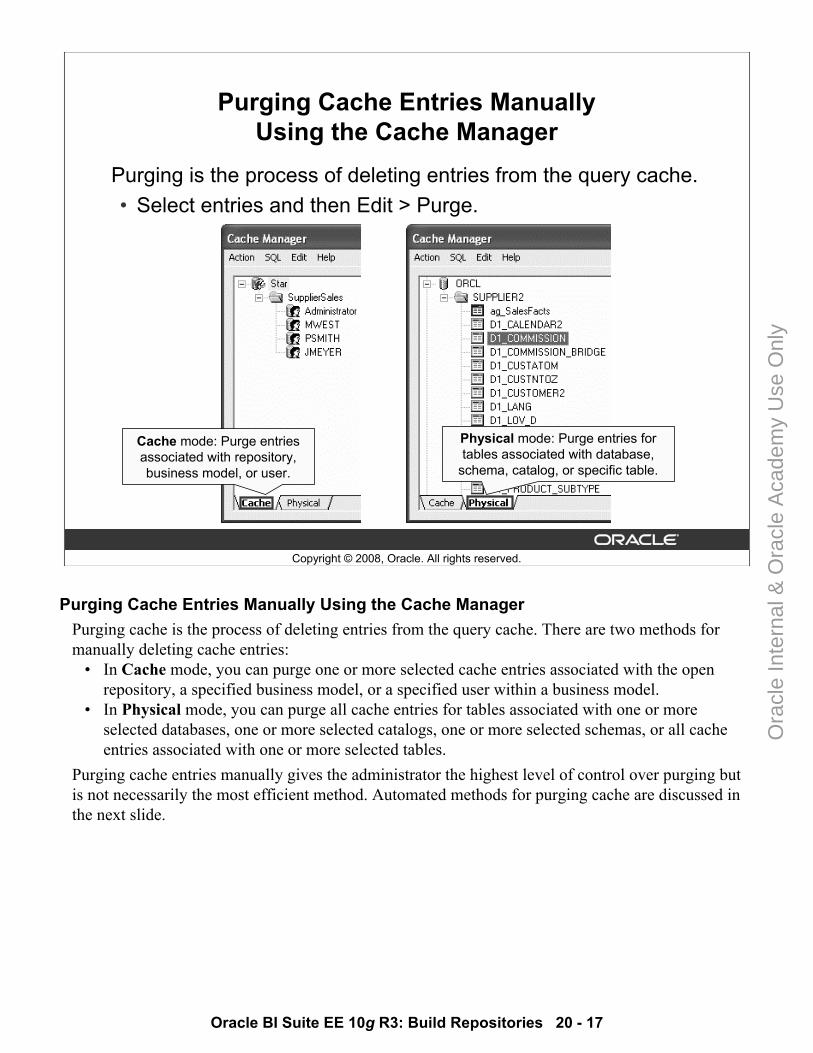
Oracle BI Suite EE 10g R3: Build Repositories 20 - 17
Copyright © 2008, Oracle. All rights reserved.
Purging Cache Entries Manually Using the Cache Manager
Purging is the process of deleting entries from the query cache.• Select entries and then Edit > Purge.
Cache mode: Purge entries associated with repository, business model, or user.
Physical mode: Purge entries for tables associated with database,
schema, catalog, or specific table.
Purging Cache Entries Manually Using the Cache ManagerPurging cache is the process of deleting entries from the query cache. There are two methods for manually deleting cache entries:
• In Cache mode, you can purge one or more selected cache entries associated with the open repository, a specified business model, or a specified user within a business model.
• In Physical mode, you can purge all cache entries for tables associated with one or more selected databases, one or more selected catalogs, one or more selected schemas, or all cache entries associated with one or more selected tables.
Purging cache entries manually gives the administrator the highest level of control over purging but is not necessarily the most efficient method. Automated methods for purging cache are discussed in the next slide.
Ora
cle
Inte
rnal
& O
racl
e A
cade
my
Use
Onl
y
Oracle BI Suite EE 10g R3: Build Repositories 20 - 18
Copyright © 2008, Oracle. All rights reserved.
Purging Cache Entries Automatically
Cache entries can also be purged automatically by:• Setting the Cache persistence time field for a physical table• Filling up the allotted cache storage space• Setting up an event polling table
Purging Cache Entries Automatically As you learned earlier in this lesson, cache is automatically purged if certain conditions are met. You can set cache persistence time to indicate how long entries for this table should be kept in cache. You can also use cache parameters in NQSConfig.ini, such as MAX_CACHE_ENTRIES, to limit the total number of cache entries. When cache storage exceeds the specified number, entries that are least recently used are discarded, which essentially purges the cache.Another technique for automatically purging the cache is the use of event polling tables. This is discussed in more detail in the next slide.
Ora
cle
Inte
rnal
& O
racl
e A
cade
my
Use
Onl
y
Oracle BI Suite EE 10g R3: Build Repositories 20 - 19
Copyright © 2008, Oracle. All rights reserved.
Using Event Polling Tables
• Event polling tables store information about updates in the underlying databases.
• Oracle BI Server polls table at set intervals and purges any stale cache entries that reference the updated tables.
• Using event polling tables can be the sole method of cache management or can be used with other cache-management techniques.
• Event tables require a fixed schema.
Caution: Because there is a polling interval in which the cache is not completely up-to-date, there is always the potential for stale data in the cache.
Using Event Polling TablesOracle BI Server event polling tables store information about updates in the underlying databases. An application (such as an application that loads data into a data mart) could be configured to add rows to an event polling table each time a database table is updated. Oracle BI Server polls this table at set intervals and purges any stale cache entries that reference the tables. The event table is a physical table that resides on a database accessible to Oracle BI Server. Regardless of where it resides—in its own database or in a database with other tables—it requires a fixed schema. It is normally exposed only in the Physical layer of the Administration Tool, where it is identified in the Physical Table dialog box as being an Oracle BI Server event table.The use of event tables is one of the most accurate ways of invalidating stale cache entries, and it is probably the most reliable method. It does, however, require the event table to be populated each time a database table is updated. Also, because there is a polling interval in which the cache is not completely up-to-date, there is always the potential for stale data in the cache.Note: Setting up polling tables is beyond the scope of this course.
Ora
cle
Inte
rnal
& O
racl
e A
cade
my
Use
Onl
y
Oracle BI Suite EE 10g R3: Build Repositories 20 - 20
Copyright © 2008, Oracle. All rights reserved.
Seeding the Cache
Seeding is the process of prepopulating the cache with queries that are known to generate cache hits.• Helps improve query performance
– Use queries that heavily consume database processing and are likely to be reused.
• Is performed by running prebuilt queries during off hours or immediately after purging
– Manually in Answers– Automatically using Oracle BI Delivers to schedule queries to
run at a specified time
Seeding the CacheSeeding the cache is the process of prepopulating the cache with queries that are known to generate cache hits. One of the main advantages of seeding the cache is the improvement of query performance. A good strategy, therefore, is to seed the cache during off hours by running queries and caching their results. A good seeding strategy requires knowing when cache hits occur so that you can seed the cache with the appropriate queries. The best queries to seed the cache with are queries that heavily consume database processing resources or that are likely to be reused. For example, seed the cache with queries that have many joins or a great deal of sorting, or with queries that are used frequently throughout the business day. Be careful not to seed the cache with simple queries that return many rows and require very little database processing.
Ora
cle
Inte
rnal
& O
racl
e A
cade
my
Use
Onl
y
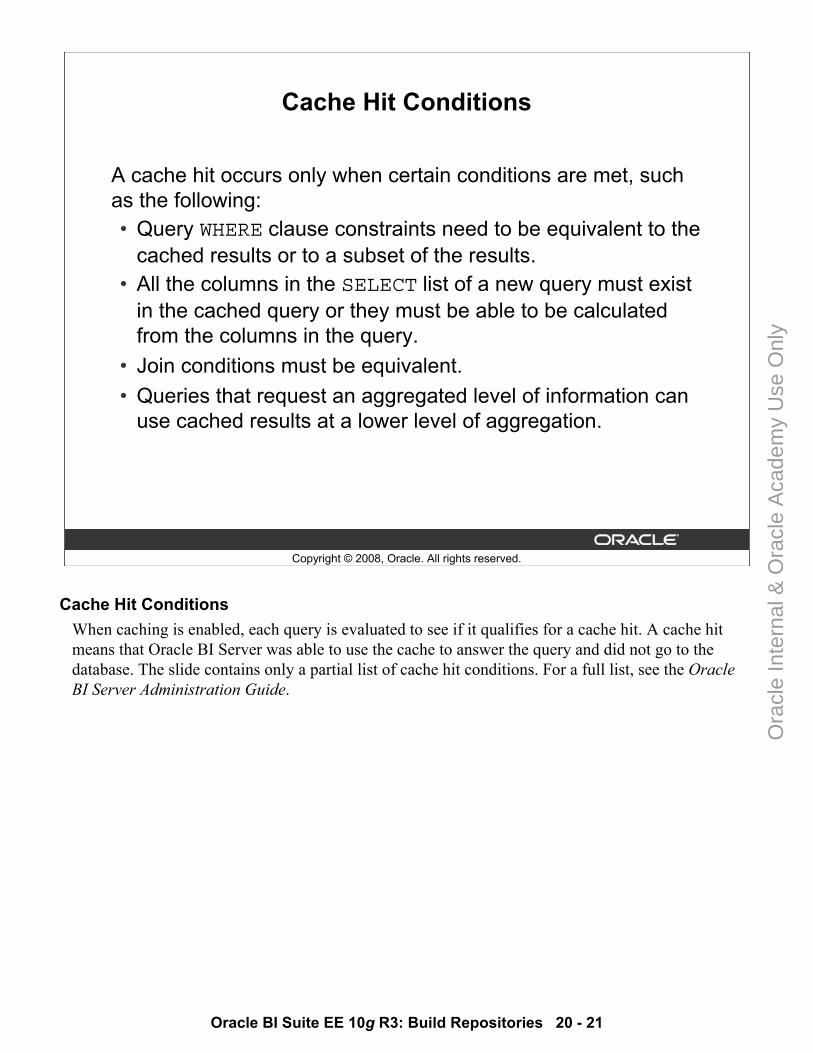
Oracle BI Suite EE 10g R3: Build Repositories 20 - 21
Copyright © 2008, Oracle. All rights reserved.
Cache Hit Conditions
A cache hit occurs only when certain conditions are met, such as the following:• Query WHERE clause constraints need to be equivalent to the
cached results or to a subset of the results.• All the columns in the SELECT list of a new query must exist
in the cached query or they must be able to be calculated from the columns in the query.
• Join conditions must be equivalent.• Queries that request an aggregated level of information can
use cached results at a lower level of aggregation.
Cache Hit ConditionsWhen caching is enabled, each query is evaluated to see if it qualifies for a cache hit. A cache hit means that Oracle BI Server was able to use the cache to answer the query and did not go to the database. The slide contains only a partial list of cache hit conditions. For a full list, see the Oracle BI Server Administration Guide.
Ora
cle
Inte
rnal
& O
racl
e A
cade
my
Use
Onl
y
Oracle BI Suite EE 10g R3: Build Repositories 20 - 22
Copyright © 2008, Oracle. All rights reserved.
Summary
In this lesson, you should have learned how to manage Oracle BI cache.
Ora
cle
Inte
rnal
& O
racl
e A
cade
my
Use
Onl
y
Oracle BI Suite EE 10g R3: Build Repositories 20 - 23
Copyright © 2008, Oracle. All rights reserved.
Practice 20-1 Overview: Inspecting the Cache Files
This practice covers the following topics:• Enabling cache• Using the Cache Manager• Using the query log to verify the cache hits
Practice 20-1 Overview: Inspecting the Cache FilesYou create a request in Answers and verify that a cache entry was created in the Cache Manager and that a cache file was created. You create the same request again and verify that the results were fulfilled by the cache and not the database.
Ora
cle
Inte
rnal
& O
racl
e A
cade
my
Use
Onl
y
Oracle BI Suite EE 10g R3: Build Repositories 20 - 24
Copyright © 2008, Oracle. All rights reserved.
Practice 20-2 Overview: Modifying Cache Parameters
This practice covers the following topics:• Modifying cache parameters• Making tables non-cacheable• Modifying Cache Manager display options• Purging cache entries manually
Practice 20-2 Overview: Modifying Cache Parameters and OptionsYou use the Cache Manager to inspect the cache parameters. You then modify the number of rows per cache as well as the number of cache entries allowed. In addition to modifying cache parameters, you make certain tables non-cacheable.
Ora
cle
Inte
rnal
& O
racl
e A
cade
my
Use
Onl
y
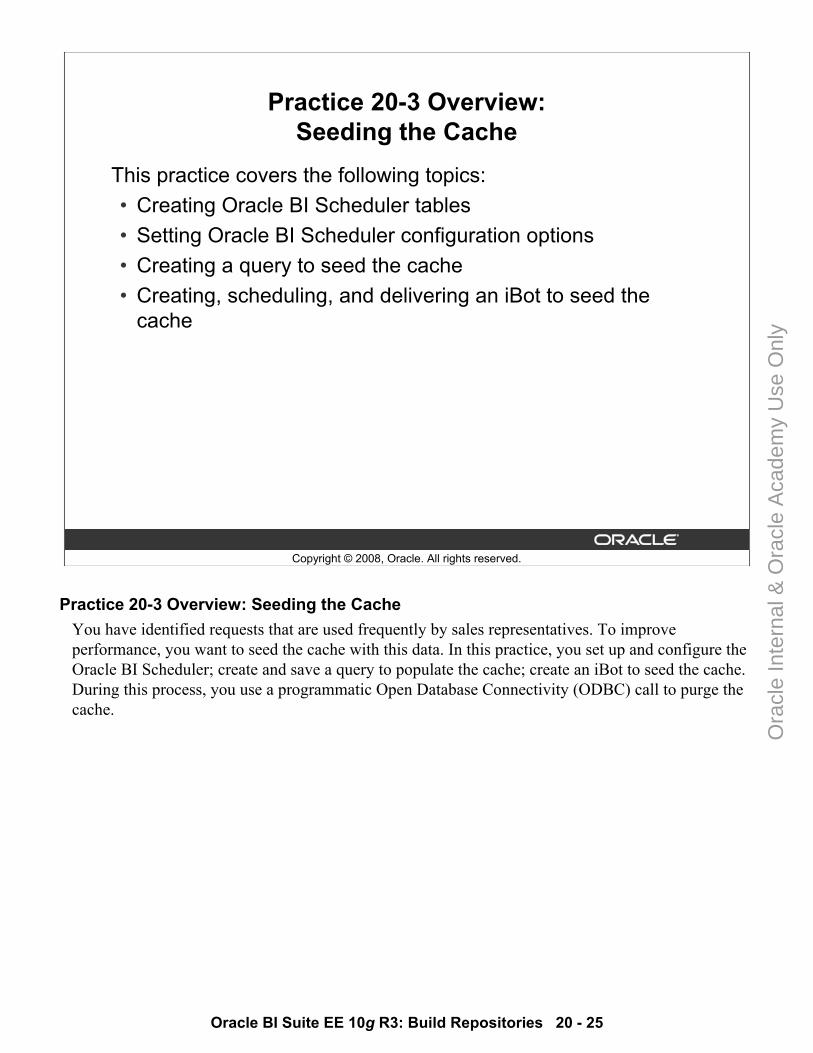
Oracle BI Suite EE 10g R3: Build Repositories 20 - 25
Copyright © 2008, Oracle. All rights reserved.
Practice 20-3 Overview: Seeding the Cache
This practice covers the following topics:• Creating Oracle BI Scheduler tables• Setting Oracle BI Scheduler configuration options• Creating a query to seed the cache• Creating, scheduling, and delivering an iBot to seed the
cache
Practice 20-3 Overview: Seeding the CacheYou have identified requests that are used frequently by sales representatives. To improve performance, you want to seed the cache with this data. In this practice, you set up and configure the Oracle BI Scheduler; create and save a query to populate the cache; create an iBot to seed the cache. During this process, you use a programmatic Open Database Connectivity (ODBC) call to purge the cache.
Ora
cle
Inte
rnal
& O
racl
e A
cade
my
Use
Onl
y

Ora
cle
Inte
rnal
& O
racl
e A
cade
my
Use
Onl
y
Copyright © 2008, Oracle. All rights reserved.
Enabling Usage Tracking
Ora
cle
Inte
rnal
& O
racl
e A
cade
my
Use
Onl
y

Oracle BI Suite EE 10g R3: Build Repositories 21 - 2
Copyright © 2008, Oracle. All rights reserved.
Objectives
After completing this lesson, you should be able to:• Identify the need for usage tracking• Set up and administer Oracle BI usage tracking
Ora
cle
Inte
rnal
& O
racl
e A
cade
my
Use
Onl
y
Oracle BI Suite EE 10g R3: Build Repositories 21 - 3
Copyright © 2008, Oracle. All rights reserved.
Business Challenges
• When deployed first, Oracle BI may not be optimized for the querying that actually occurs:
– End-user queries may not match what is expected, so cache is not seeded with appropriate queries.
– Additional aggregate tables may need to be created to speed up query processing.
• Your company may need to track database usage on a user or departmental level:
– Users may be charged for database use.– Regulatory requirements may require usage tracking.
Ora
cle
Inte
rnal
& O
racl
e A
cade
my
Use
Onl
y
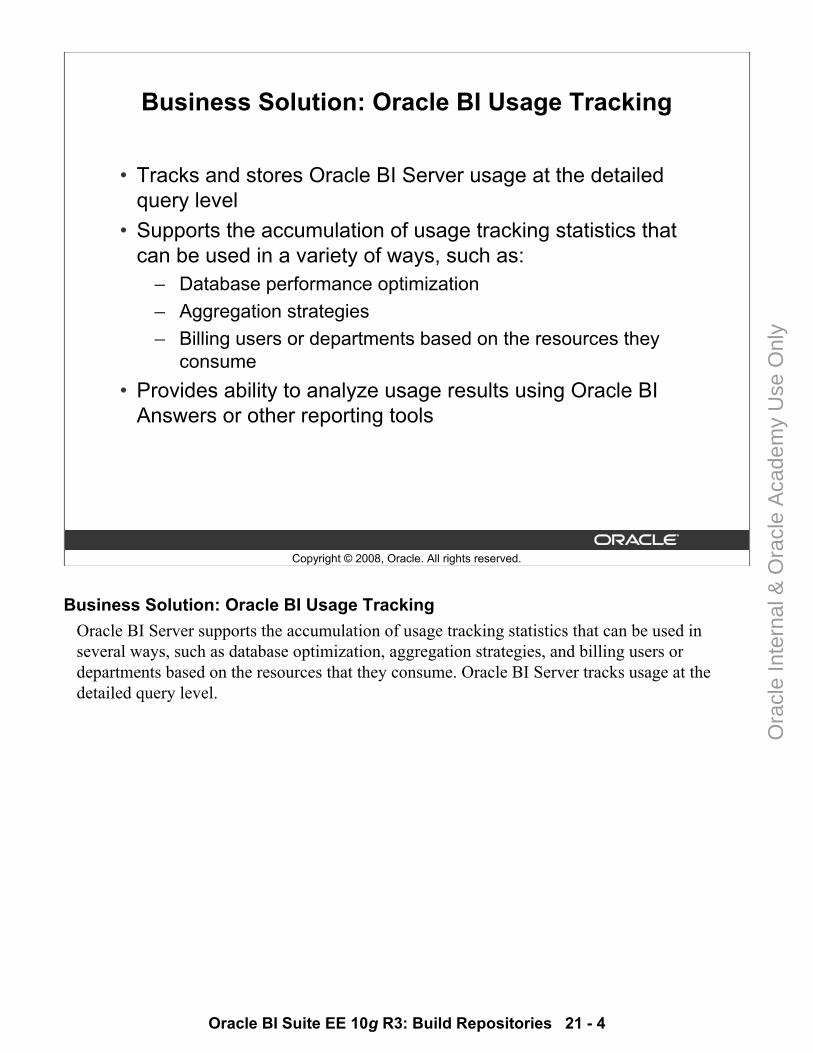
Oracle BI Suite EE 10g R3: Build Repositories 21 - 4
Copyright © 2008, Oracle. All rights reserved.
Business Solution: Oracle BI Usage Tracking
• Tracks and stores Oracle BI Server usage at the detailed query level
• Supports the accumulation of usage tracking statistics that can be used in a variety of ways, such as:
– Database performance optimization– Aggregation strategies– Billing users or departments based on the resources they
consume• Provides ability to analyze usage results using Oracle BI
Answers or other reporting tools
Business Solution: Oracle BI Usage TrackingOracle BI Server supports the accumulation of usage tracking statistics that can be used in several ways, such as database optimization, aggregation strategies, and billing users or departments based on the resources that they consume. Oracle BI Server tracks usage at the detailed query level.
Ora
cle
Inte
rnal
& O
racl
e A
cade
my
Use
Onl
y
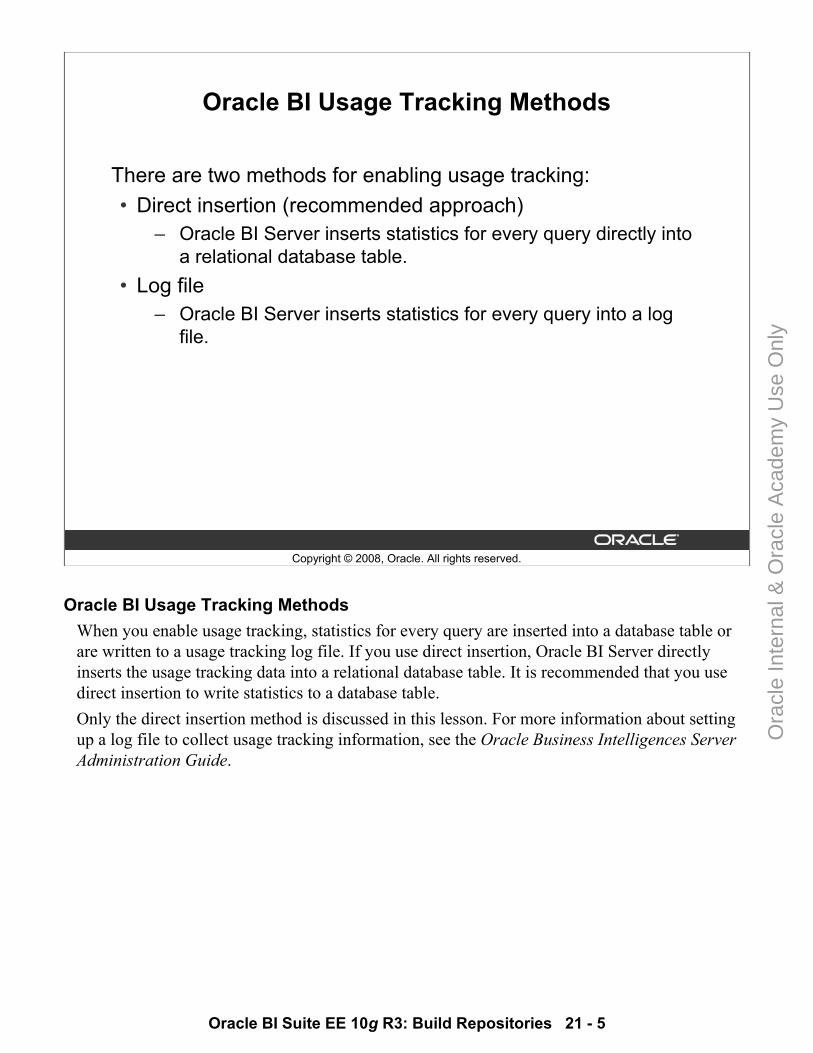
Oracle BI Suite EE 10g R3: Build Repositories 21 - 5
Copyright © 2008, Oracle. All rights reserved.
Oracle BI Usage Tracking Methods
There are two methods for enabling usage tracking:• Direct insertion (recommended approach)
– Oracle BI Server inserts statistics for every query directly into a relational database table.
• Log file– Oracle BI Server inserts statistics for every query into a log
file.
Oracle BI Usage Tracking Methods When you enable usage tracking, statistics for every query are inserted into a database table or are written to a usage tracking log file. If you use direct insertion, Oracle BI Server directly inserts the usage tracking data into a relational database table. It is recommended that you use direct insertion to write statistics to a database table. Only the direct insertion method is discussed in this lesson. For more information about setting up a log file to collect usage tracking information, see the Oracle Business Intelligences Server Administration Guide.
Ora
cle
Inte
rnal
& O
racl
e A
cade
my
Use
Onl
y

Oracle BI Suite EE 10g R3: Build Repositories 21 - 6
Copyright © 2008, Oracle. All rights reserved.
ABC Example
Set up Oracle BI usage tracking to track and store usage statistics at the detailed query level.
Username Start date and time Logical SQL Row count Query run time
ABC ExampleIn the example, you set up Oracle BI usage tracking to track and store usage statistics at the detailed query level.
Ora
cle
Inte
rnal
& O
racl
e A
cade
my
Use
Onl
y
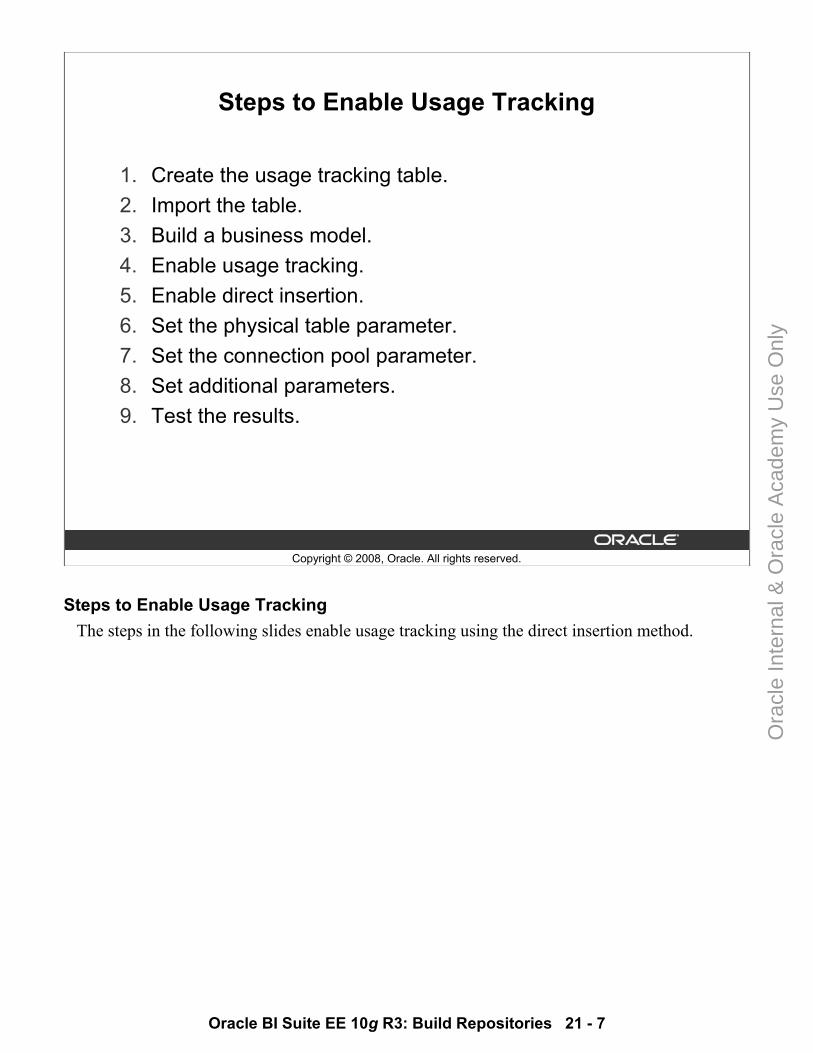
Oracle BI Suite EE 10g R3: Build Repositories 21 - 7
Copyright © 2008, Oracle. All rights reserved.
Steps to Enable Usage Tracking
1. Create the usage tracking table.2. Import the table.3. Build a business model.4. Enable usage tracking.5. Enable direct insertion.6. Set the physical table parameter.7. Set the connection pool parameter.8. Set additional parameters.9. Test the results.
Steps to Enable Usage TrackingThe steps in the following slides enable usage tracking using the direct insertion method.
Ora
cle
Inte
rnal
& O
racl
e A
cade
my
Use
Onl
y
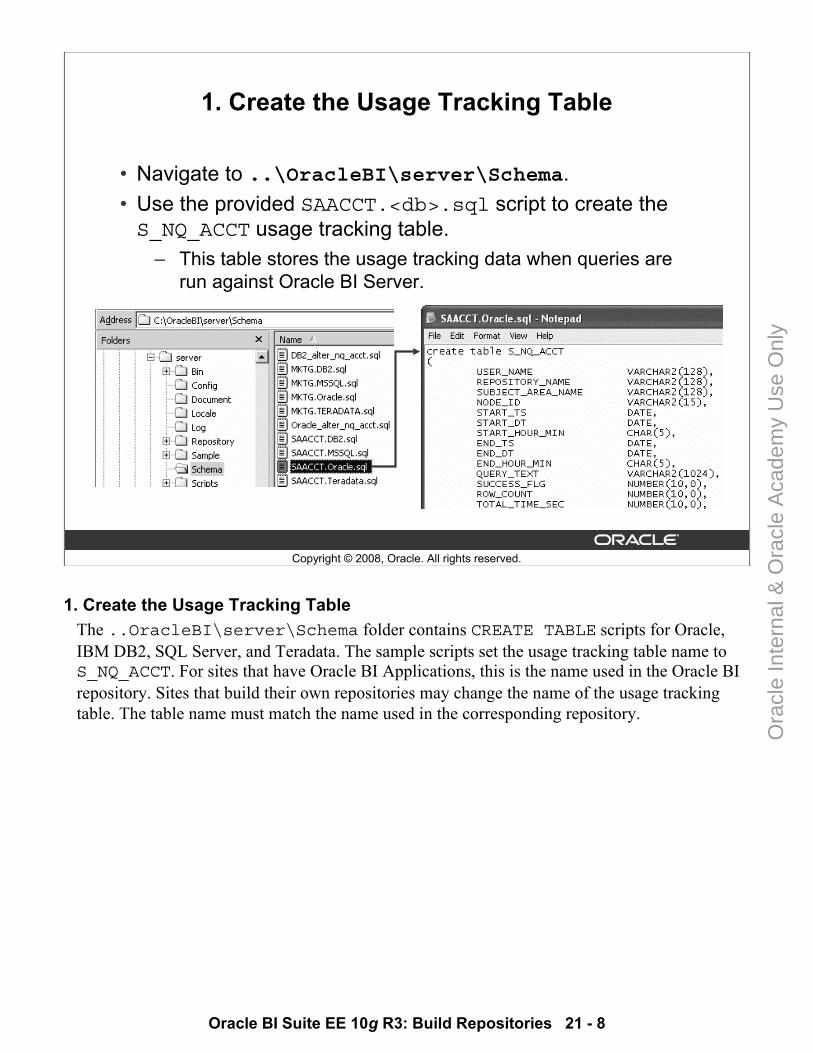
Oracle BI Suite EE 10g R3: Build Repositories 21 - 8
Copyright © 2008, Oracle. All rights reserved.
1. Create the Usage Tracking Table
• Navigate to ..\OracleBI\server\Schema.• Use the provided SAACCT.<db>.sql script to create the S_NQ_ACCT usage tracking table.
– This table stores the usage tracking data when queries are run against Oracle BI Server.
1. Create the Usage Tracking TableThe ..OracleBI\server\Schema folder contains CREATE TABLE scripts for Oracle, IBM DB2, SQL Server, and Teradata. The sample scripts set the usage tracking table name to S_NQ_ACCT. For sites that have Oracle BI Applications, this is the name used in the Oracle BI repository. Sites that build their own repositories may change the name of the usage tracking table. The table name must match the name used in the corresponding repository.
Ora
cle
Inte
rnal
& O
racl
e A
cade
my
Use
Onl
y
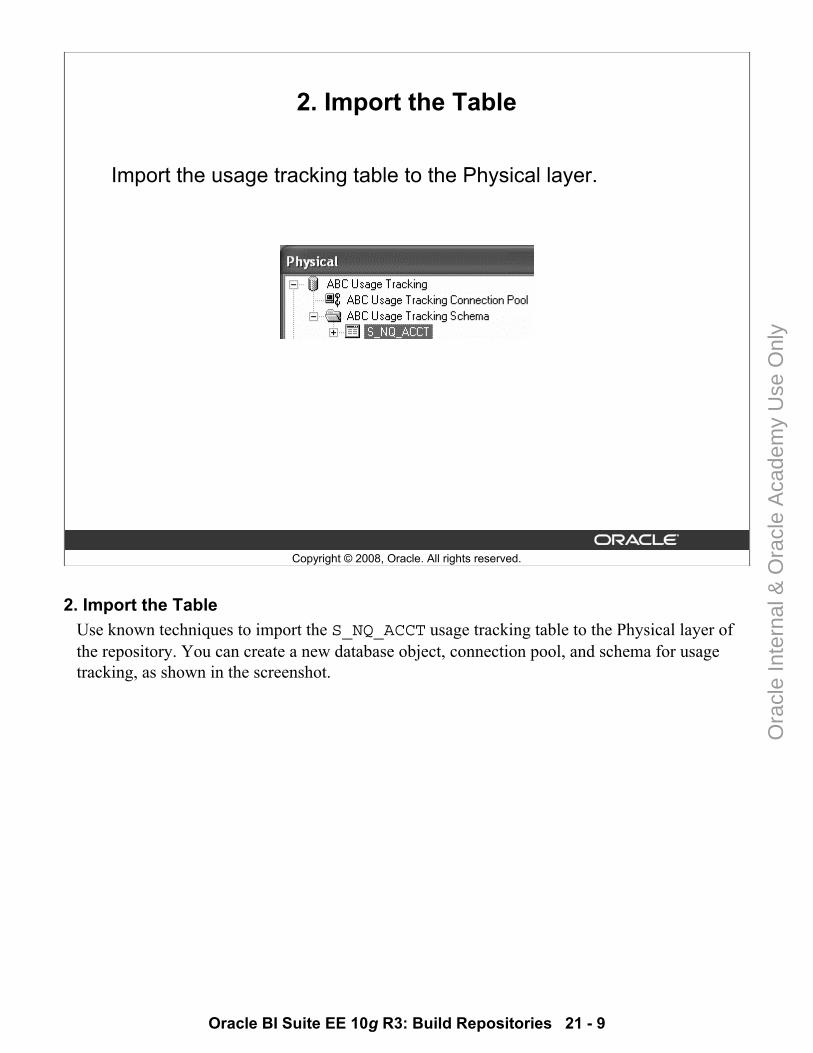
Oracle BI Suite EE 10g R3: Build Repositories 21 - 9
Copyright © 2008, Oracle. All rights reserved.
2. Import the Table
Import the usage tracking table to the Physical layer.
2. Import the TableUse known techniques to import the S_NQ_ACCT usage tracking table to the Physical layer of the repository. You can create a new database object, connection pool, and schema for usage tracking, as shown in the screenshot.
Ora
cle
Inte
rnal
& O
racl
e A
cade
my
Use
Onl
y
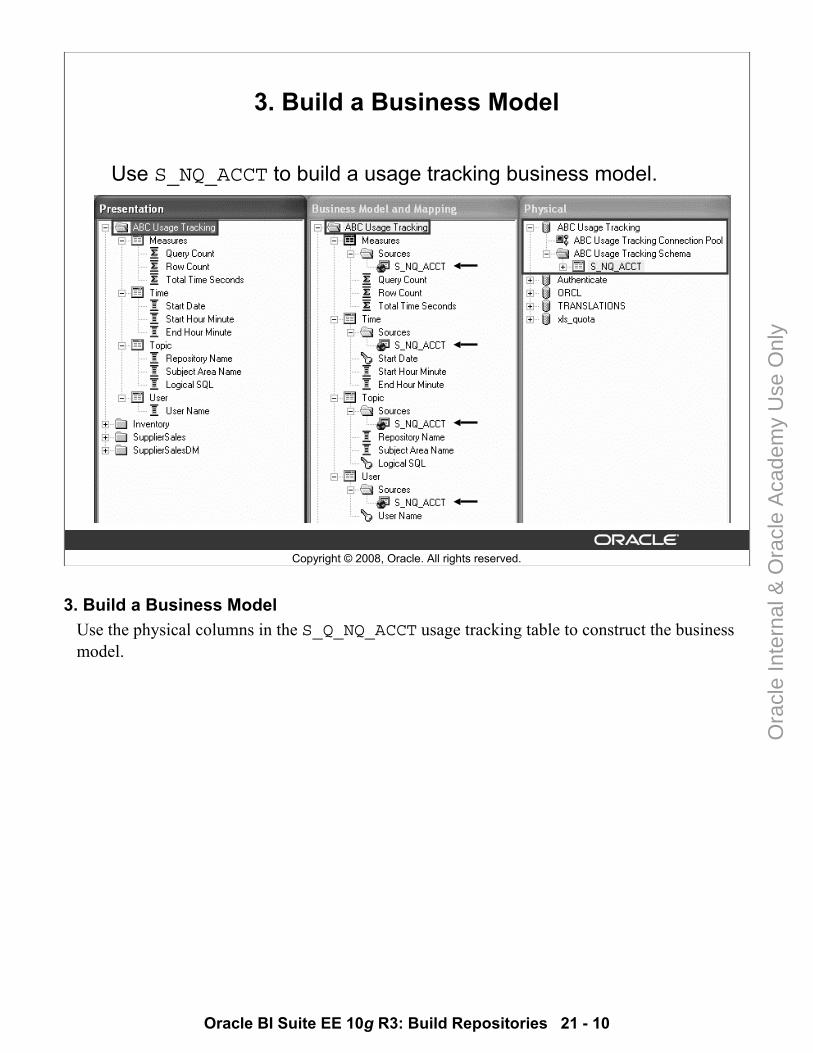
Oracle BI Suite EE 10g R3: Build Repositories 21 - 10
Copyright © 2008, Oracle. All rights reserved.
3. Build a Business Model
Use S_NQ_ACCT to build a usage tracking business model.
3. Build a Business ModelUse the physical columns in the S_Q_NQ_ACCT usage tracking table to construct the business model.
Ora
cle
Inte
rnal
& O
racl
e A
cade
my
Use
Onl
y
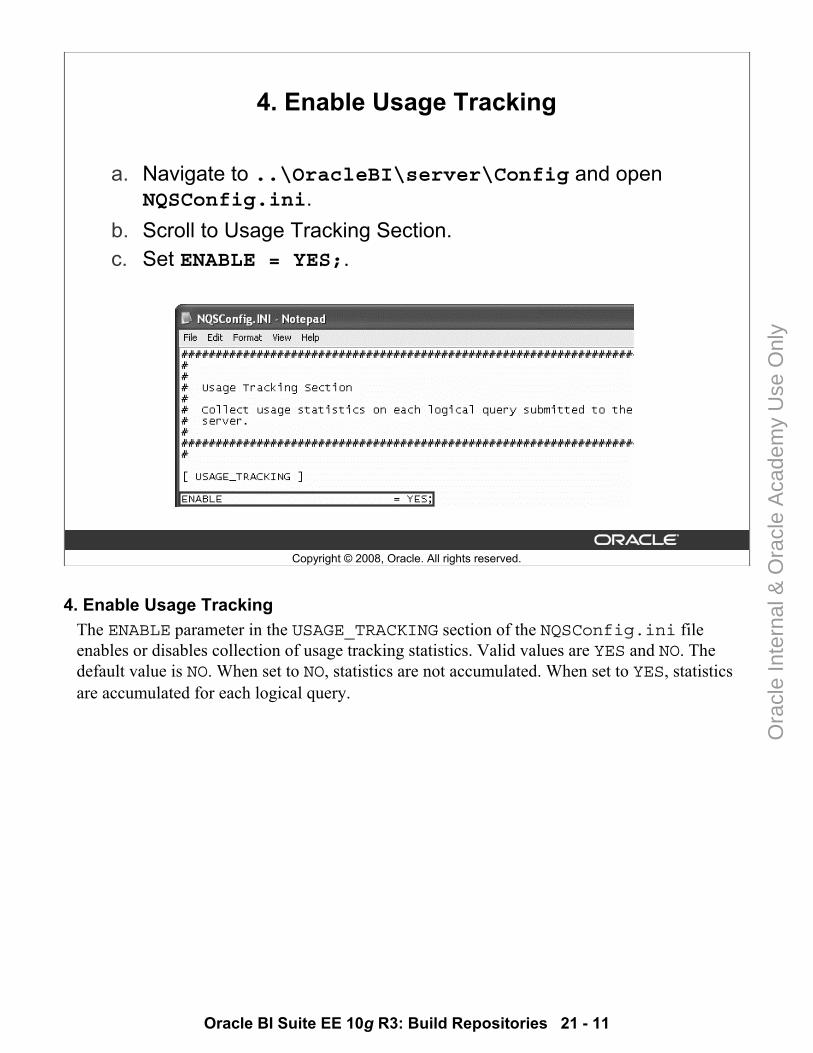
Oracle BI Suite EE 10g R3: Build Repositories 21 - 11
Copyright © 2008, Oracle. All rights reserved.
4. Enable Usage Tracking
a. Navigate to ..\OracleBI\server\Config and open NQSConfig.ini.
b. Scroll to Usage Tracking Section.c. Set ENABLE = YES;.
4. Enable Usage TrackingThe ENABLE parameter in the USAGE_TRACKING section of the NQSConfig.ini file enables or disables collection of usage tracking statistics. Valid values are YES and NO. The default value is NO. When set to NO, statistics are not accumulated. When set to YES, statistics are accumulated for each logical query.
Ora
cle
Inte
rnal
& O
racl
e A
cade
my
Use
Onl
y
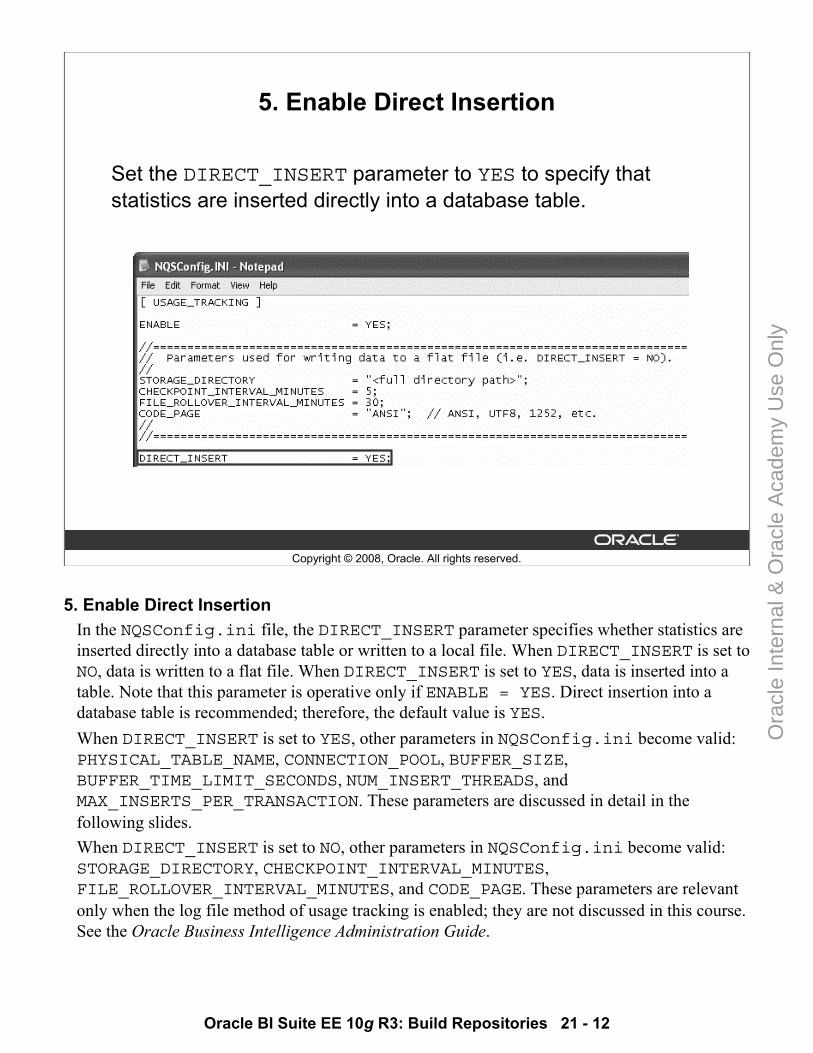
Oracle BI Suite EE 10g R3: Build Repositories 21 - 12
Copyright © 2008, Oracle. All rights reserved.
5. Enable Direct Insertion
Set the DIRECT_INSERT parameter to YES to specify that statistics are inserted directly into a database table.
5. Enable Direct Insertion In the NQSConfig.ini file, the DIRECT_INSERT parameter specifies whether statistics are inserted directly into a database table or written to a local file. When DIRECT_INSERT is set to NO, data is written to a flat file. When DIRECT_INSERT is set to YES, data is inserted into a table. Note that this parameter is operative only if ENABLE = YES. Direct insertion into a database table is recommended; therefore, the default value is YES.When DIRECT_INSERT is set to YES, other parameters in NQSConfig.ini become valid: PHYSICAL_TABLE_NAME, CONNECTION_POOL, BUFFER_SIZE, BUFFER_TIME_LIMIT_SECONDS, NUM_INSERT_THREADS, and MAX_INSERTS_PER_TRANSACTION. These parameters are discussed in detail in the following slides.When DIRECT_INSERT is set to NO, other parameters in NQSConfig.ini become valid: STORAGE_DIRECTORY, CHECKPOINT_INTERVAL_MINUTES, FILE_ROLLOVER_INTERVAL_MINUTES, and CODE_PAGE. These parameters are relevant only when the log file method of usage tracking is enabled; they are not discussed in this course. See the Oracle Business Intelligence Administration Guide.
Ora
cle
Inte
rnal
& O
racl
e A
cade
my
Use
Onl
y
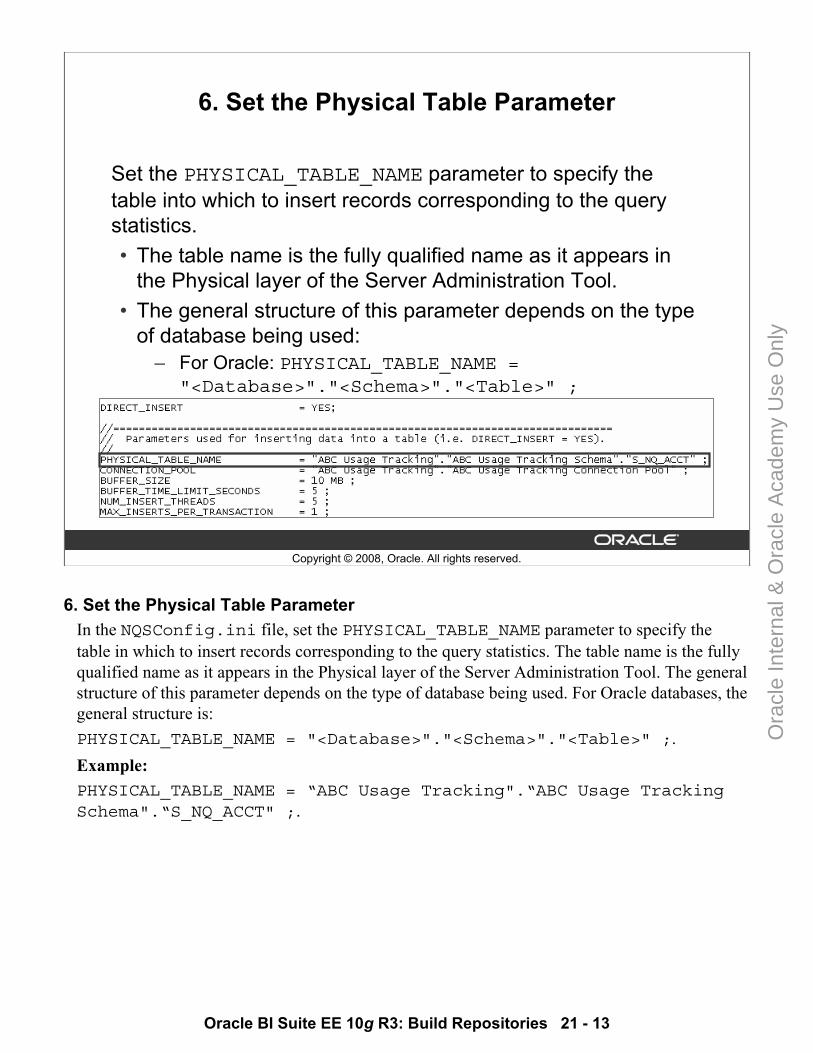
Oracle BI Suite EE 10g R3: Build Repositories 21 - 13
Copyright © 2008, Oracle. All rights reserved.
6. Set the Physical Table Parameter
Set the PHYSICAL_TABLE_NAME parameter to specify the table into which to insert records corresponding to the query statistics.• The table name is the fully qualified name as it appears in
the Physical layer of the Server Administration Tool.• The general structure of this parameter depends on the type
of database being used:– For Oracle: PHYSICAL_TABLE_NAME =
"<Database>"."<Schema>"."<Table>" ;
6. Set the Physical Table ParameterIn the NQSConfig.ini file, set the PHYSICAL_TABLE_NAME parameter to specify the table in which to insert records corresponding to the query statistics. The table name is the fully qualified name as it appears in the Physical layer of the Server Administration Tool. The general structure of this parameter depends on the type of database being used. For Oracle databases, the general structure is: PHYSICAL_TABLE_NAME = "<Database>"."<Schema>"."<Table>" ;. Example:PHYSICAL_TABLE_NAME = “ABC Usage Tracking".“ABC Usage Tracking Schema".“S_NQ_ACCT" ;.
Ora
cle
Inte
rnal
& O
racl
e A
cade
my
Use
Onl
y
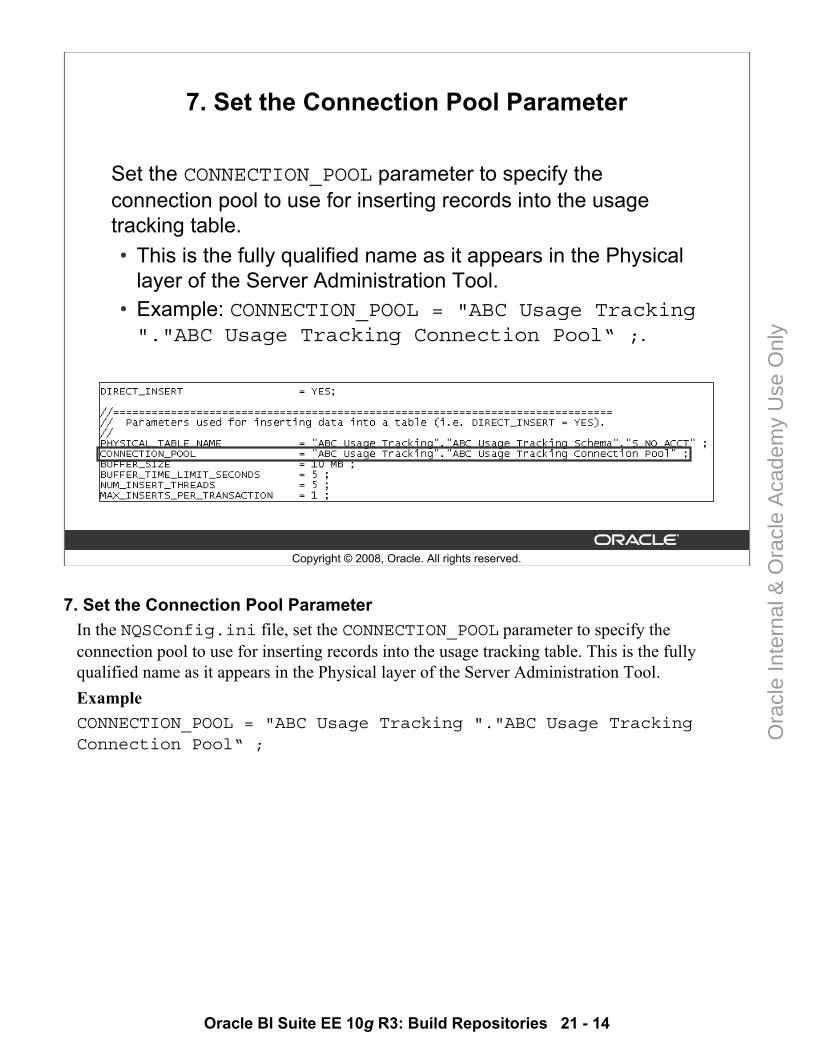
Oracle BI Suite EE 10g R3: Build Repositories 21 - 14
Copyright © 2008, Oracle. All rights reserved.
7. Set the Connection Pool Parameter
Set the CONNECTION_POOL parameter to specify the connection pool to use for inserting records into the usage tracking table. • This is the fully qualified name as it appears in the Physical
layer of the Server Administration Tool. • Example: CONNECTION_POOL = "ABC Usage Tracking "."ABC Usage Tracking Connection Pool“ ;.
7. Set the Connection Pool ParameterIn the NQSConfig.ini file, set the CONNECTION_POOL parameter to specify the connection pool to use for inserting records into the usage tracking table. This is the fully qualified name as it appears in the Physical layer of the Server Administration Tool. ExampleCONNECTION_POOL = "ABC Usage Tracking "."ABC Usage Tracking Connection Pool“ ;
Ora
cle
Inte
rnal
& O
racl
e A
cade
my
Use
Onl
y
Oracle BI Suite EE 10g R3: Build Repositories 21 - 15
Copyright © 2008, Oracle. All rights reserved.
8. Set Additional Parameters
• BUFFER_SIZE– Amount of memory used to store insert statements
temporarily• BUFFER_TIME_LIMIT_SECONDS
– Maximum amount of time that an insert statement remains in the buffer before it is issued to the usage tracking table
• NUM_INSERT_THREADS– Number of threads that remove insert statements from the
buffer and issue them to the usage tracking table• MAX_INSERTS_PER_TRANSACTION
– Number of records to group together as a single transaction when inserting into the usage tracking table
8. Set Additional Parameters• BUFFER_SIZE specifies the amount of memory used to temporarily store insert
statements. The buffer allows the insert statements to be issued to the usage tracking table independently of the query that produced the statistics to be inserted. When the buffer is full, subsequent query statistics are discarded until insert threads service the buffer entries. Example: BUFFER_SIZE = 10 MB ;
• BUFFER_TIME_LIMIT_SECONDS specifies the maximum amount of time that an insert statement remains in the buffer before it is issued to the usage tracking table. This time limit ensures that the Oracle Business Intelligence Server issues the insert statements in a timely manner even during periods of extended quiescence. Example: BUFFER_TIME_LIMIT_SECONDS = 5 ;
• NUM_INSERT_THREADS specifies the number of threads that remove insert statements from the buffer and issues them to the usage tracking table. The number of threads should not exceed the total number of threads assigned to the connection pool. Example: NUM_INSERT_THREADS = 5 ;
• MAX_INSERTS_PER_TRANSACTION specifies the number of records to group together as a single transaction when inserting into the usage tracking table. Increasing the number may slightly increase performance, but also increases the possibility of inserts being rejected due to deadlocks in the database. Example: MAX_INSERTS_PER_TRANSACTION = 1 ;
Ora
cle
Inte
rnal
& O
racl
e A
cade
my
Use
Onl
y
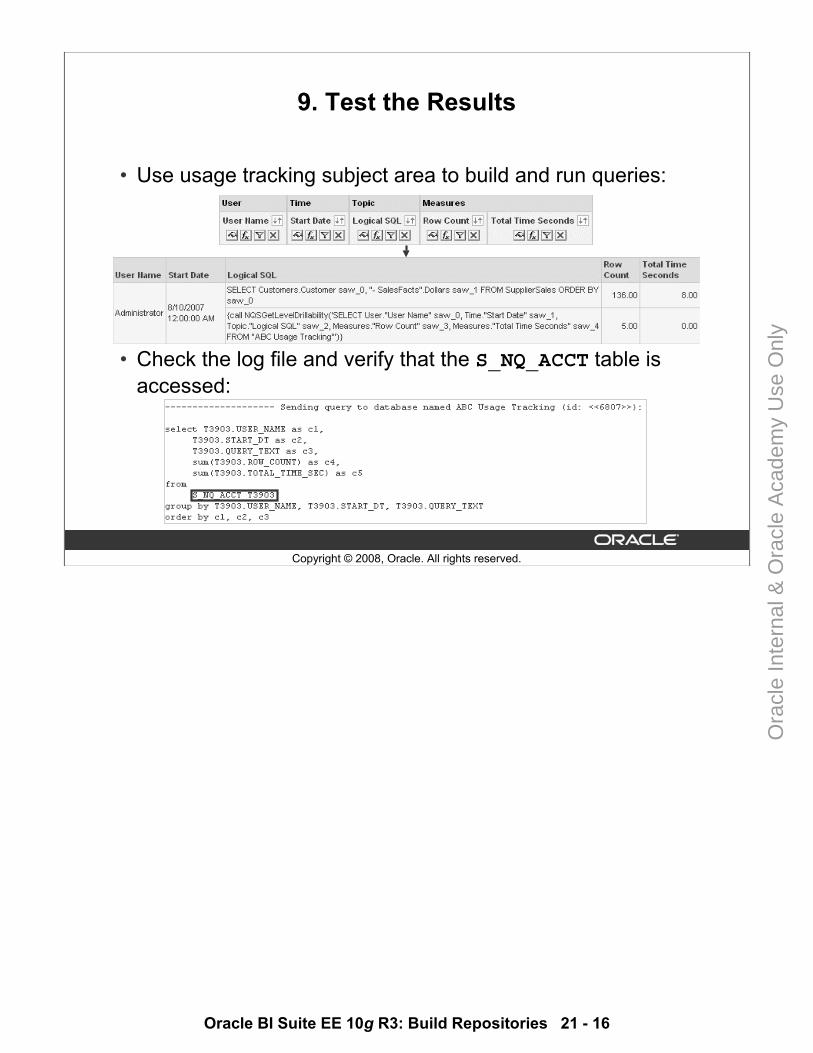
Oracle BI Suite EE 10g R3: Build Repositories 21 - 16
Copyright © 2008, Oracle. All rights reserved.
9. Test the Results
• Use usage tracking subject area to build and run queries:
• Check the log file and verify that the S_NQ_ACCT table is accessed:
Ora
cle
Inte
rnal
& O
racl
e A
cade
my
Use
Onl
y
Oracle BI Suite EE 10g R3: Build Repositories 21 - 17
Copyright © 2008, Oracle. All rights reserved.
Analyzing Usage Tracking Data
• Watch for long-running queries (typically ad hoc):– End user may need training.– May need to assign query blocking/restrictions on how long
queries can run or on number of records returned– Database may require additional indexes or tuning.
• Perform usage audits for:– Regulatory compliance– Security
• Determine whether a query should be used to seed the cache or be removed from the cache-seeding queries.
• Identify aggregation strategies.• Bill users or departments based on the resources that they
consume.
Analyzing Usage Tracking Data Why do you want to track usage?It is helpful from an administrative and maintenance perspective to be able to identify users that may need training, better ways to bullet-proof the use of the application, or candidate columns for indexing.Some organizations have strict security guidelines that require the ability to know who queried data warehouse and when it was queried. In some cases this information can be used to monitor and enforce regulatory compliance.Queries that are being run and rerun may be candidates for cache seeding.
Ora
cle
Inte
rnal
& O
racl
e A
cade
my
Use
Onl
y
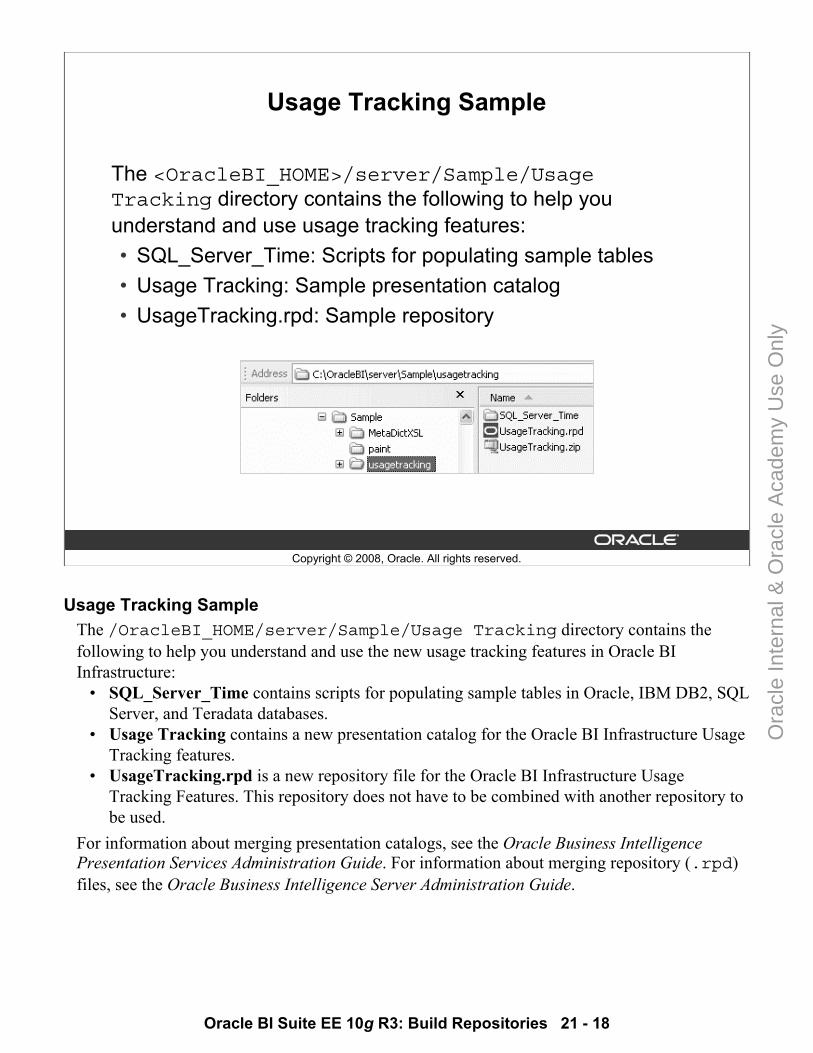
Oracle BI Suite EE 10g R3: Build Repositories 21 - 18
Copyright © 2008, Oracle. All rights reserved.
Usage Tracking Sample
The <OracleBI_HOME>/server/Sample/Usage Tracking directory contains the following to help you understand and use usage tracking features:• SQL_Server_Time: Scripts for populating sample tables• Usage Tracking: Sample presentation catalog• UsageTracking.rpd: Sample repository
Usage Tracking Sample The /OracleBI_HOME/server/Sample/Usage Tracking directory contains the following to help you understand and use the new usage tracking features in Oracle BI Infrastructure:
• SQL_Server_Time contains scripts for populating sample tables in Oracle, IBM DB2, SQL Server, and Teradata databases.
• Usage Tracking contains a new presentation catalog for the Oracle BI Infrastructure Usage Tracking features.
• UsageTracking.rpd is a new repository file for the Oracle BI Infrastructure UsageTracking Features. This repository does not have to be combined with another repository to be used.
For information about merging presentation catalogs, see the Oracle Business Intelligence Presentation Services Administration Guide. For information about merging repository (.rpd) files, see the Oracle Business Intelligence Server Administration Guide.
Ora
cle
Inte
rnal
& O
racl
e A
cade
my
Use
Onl
y
Oracle BI Suite EE 10g R3: Build Repositories 21 - 19
Copyright © 2008, Oracle. All rights reserved.
Summary
In this lesson, you should have learned how to:• Identify the need for usage tracking• Set up and administer Oracle BI usage tracking
Ora
cle
Inte
rnal
& O
racl
e A
cade
my
Use
Onl
y
Oracle BI Suite EE 10g R3: Build Repositories 21 - 20
Copyright © 2008, Oracle. All rights reserved.
Practice 21-1 Overview: Enabling Usage Tracking
This practice covers the following topics:• Setting up Oracle BI to support usage tracking• Building a usage tracking business model• Using usage tracking to monitor queries
Practice 21-1 Overview: Enabling Usage Tracking ABC wants to monitor the ad hoc queries generated by users to help identify performance improvement areas. You use the recommended usage tracking approach, which is to track statistics by loading directly into a database table rather than a flat file. You use a provided script to create the S_NQ_ACCT database table, build the business model, modify the NQSConfig.ini file to support usage tracking, and test the results.
Ora
cle
Inte
rnal
& O
racl
e A
cade
my
Use
Onl
y

Copyright © 2008, Oracle. All rights reserved.
Multi-User Development
Ora
cle
Inte
rnal
& O
racl
e A
cade
my
Use
Onl
y
Oracle BI Suite EE 10g R3: Build Repositories 22 - 2
Copyright © 2008, Oracle. All rights reserved.
Objectives
After completing this lesson, you should be able to:• Set up an Oracle Business Intelligence (BI) multi-user
development environment (MUDE)• Describe the multi-user development environment
functionality• Develop a repository using multiple developers
Ora
cle
Inte
rnal
& O
racl
e A
cade
my
Use
Onl
y

Oracle BI Suite EE 10g R3: Build Repositories 22 - 3
Copyright © 2008, Oracle. All rights reserved.
Business Challenge
By default, the Oracle BI repository development environment is not set up for multiple users.• Multiple developers working in online mode lock each other
out as they check out objects.• This causes inefficiency and potential conflicts while other
developers wait for access to the repository.
Business ChallengeBy default, the Oracle BI repository development environment is not set up for multiple users. Online editing makes it possible for multiple developers to work simultaneously. However, if they are working on the same business model, they lock each other out as they check out objects for editing. This is an inefficient approach to repository development and can result in conflicts as developers may potentially overwrite each other’s work. A more efficient development environment would permit developers to modify a repository simultaneously and then check in changes.
Ora
cle
Inte
rnal
& O
racl
e A
cade
my
Use
Onl
y
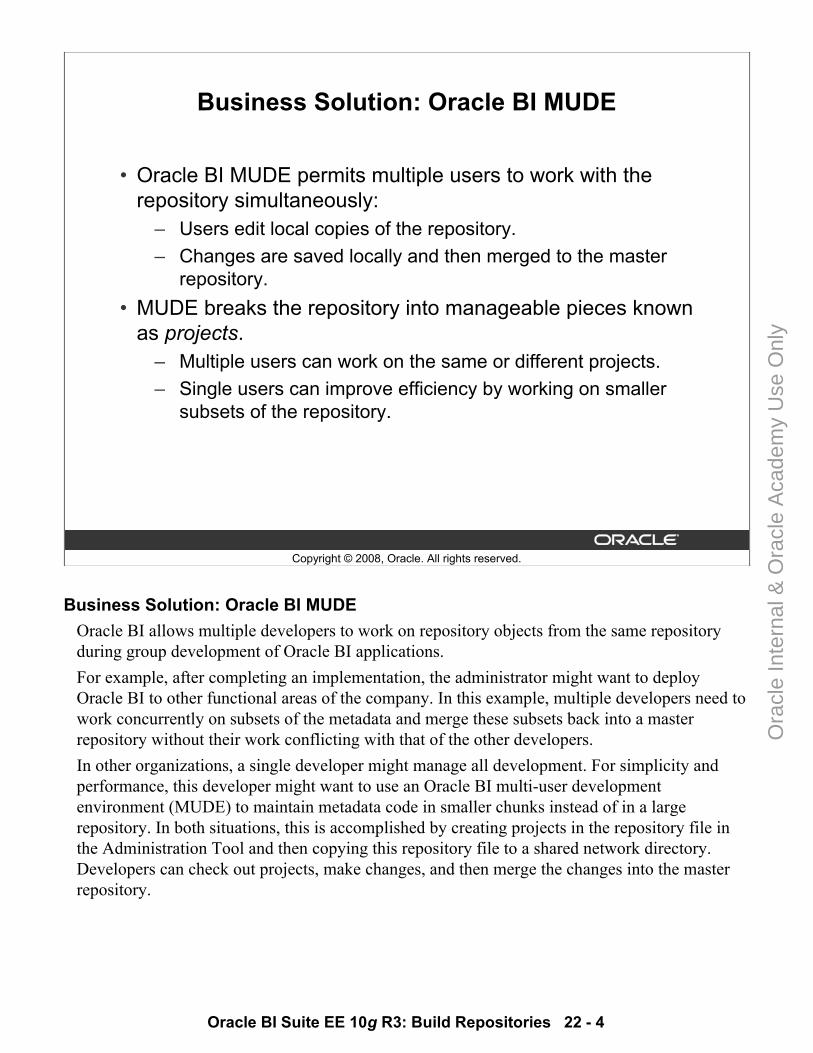
Oracle BI Suite EE 10g R3: Build Repositories 22 - 4
Copyright © 2008, Oracle. All rights reserved.
Business Solution: Oracle BI MUDE
• Oracle BI MUDE permits multiple users to work with the repository simultaneously:
– Users edit local copies of the repository.– Changes are saved locally and then merged to the master
repository.• MUDE breaks the repository into manageable pieces known
as projects.– Multiple users can work on the same or different projects.– Single users can improve efficiency by working on smaller
subsets of the repository.
Business Solution: Oracle BI MUDEOracle BI allows multiple developers to work on repository objects from the same repository during group development of Oracle BI applications. For example, after completing an implementation, the administrator might want to deploy Oracle BI to other functional areas of the company. In this example, multiple developers need to work concurrently on subsets of the metadata and merge these subsets back into a master repository without their work conflicting with that of the other developers. In other organizations, a single developer might manage all development. For simplicity and performance, this developer might want to use an Oracle BI multi-user development environment (MUDE) to maintain metadata code in smaller chunks instead of in a large repository. In both situations, this is accomplished by creating projects in the repository file in the Administration Tool and then copying this repository file to a shared network directory. Developers can check out projects, make changes, and then merge the changes into the master repository.
Ora
cle
Inte
rnal
& O
racl
e A
cade
my
Use
Onl
y
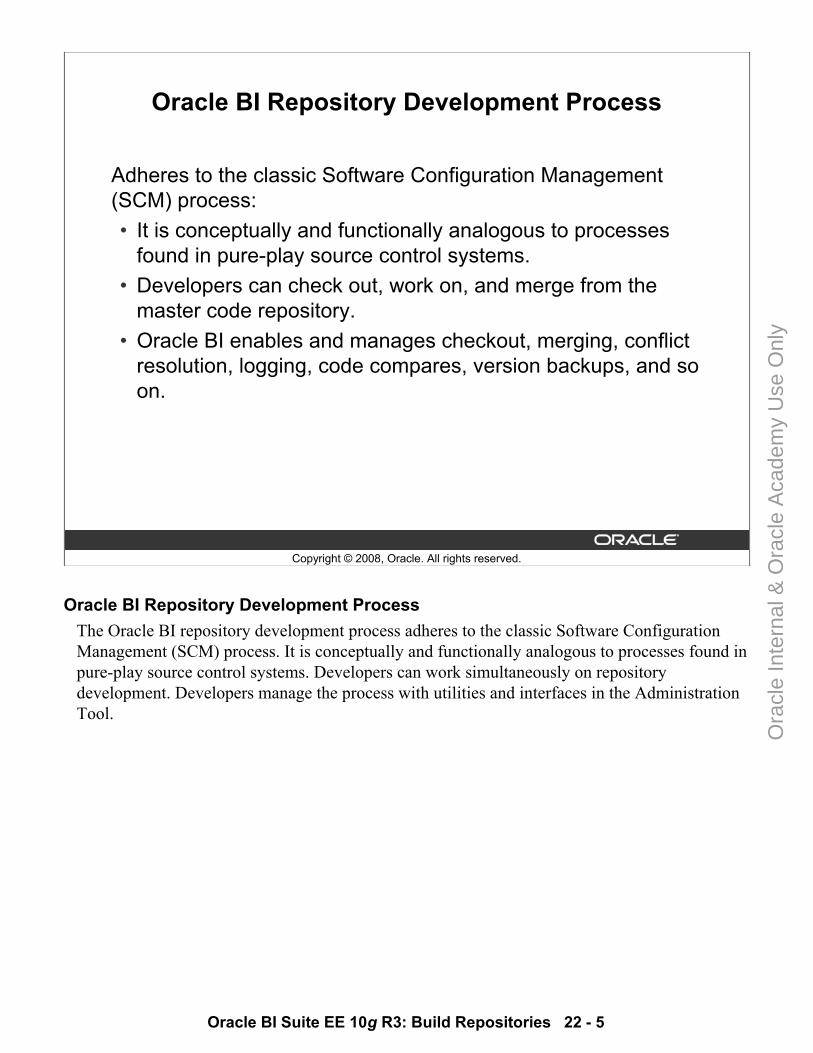
Oracle BI Suite EE 10g R3: Build Repositories 22 - 5
Copyright © 2008, Oracle. All rights reserved.
Oracle BI Repository Development Process
Adheres to the classic Software Configuration Management (SCM) process:• It is conceptually and functionally analogous to processes
found in pure-play source control systems.• Developers can check out, work on, and merge from the
master code repository.• Oracle BI enables and manages checkout, merging, conflict
resolution, logging, code compares, version backups, and so on.
Oracle BI Repository Development ProcessThe Oracle BI repository development process adheres to the classic Software Configuration Management (SCM) process. It is conceptually and functionally analogous to processes found in pure-play source control systems. Developers can work simultaneously on repository development. Developers manage the process with utilities and interfaces in the Administration Tool.
Ora
cle
Inte
rnal
& O
racl
e A
cade
my
Use
Onl
y
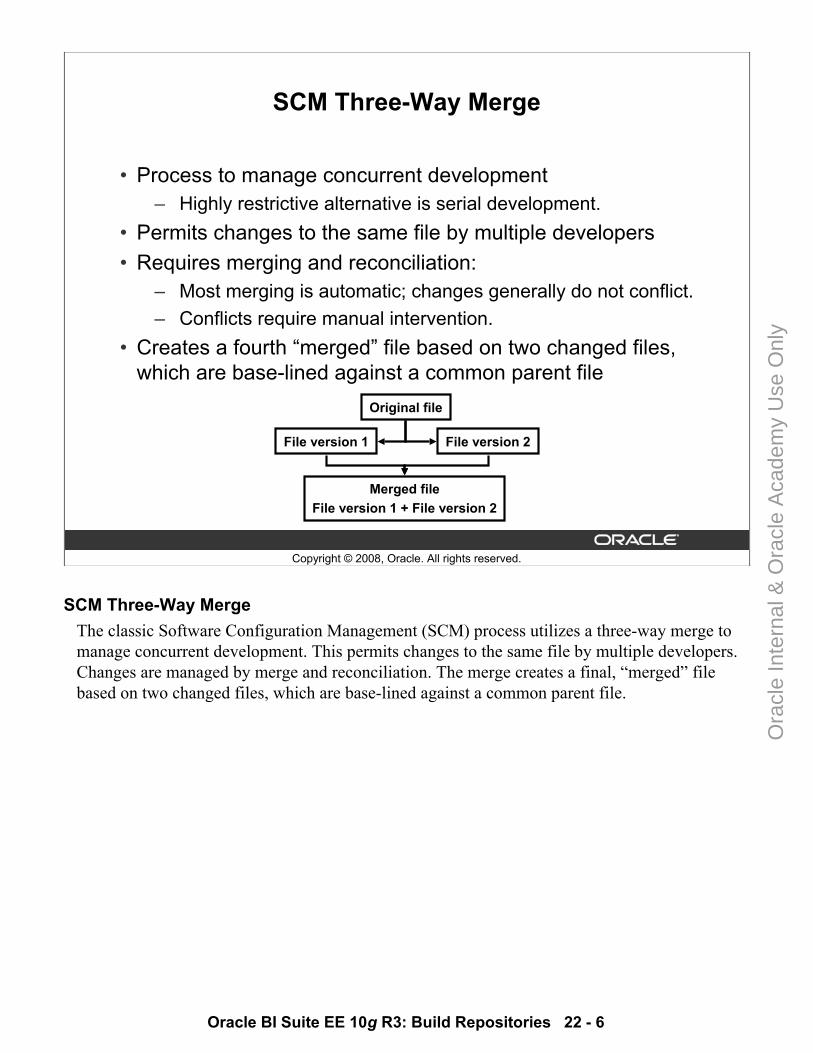
Oracle BI Suite EE 10g R3: Build Repositories 22 - 6
Copyright © 2008, Oracle. All rights reserved.
SCM Three-Way Merge
• Process to manage concurrent development– Highly restrictive alternative is serial development.
• Permits changes to the same file by multiple developers• Requires merging and reconciliation:
– Most merging is automatic; changes generally do not conflict.– Conflicts require manual intervention.
• Creates a fourth “merged” file based on two changed files, which are base-lined against a common parent file
Original file
Merged fileFile version 1 + File version 2
File version 2File version 1
SCM Three-Way MergeThe classic Software Configuration Management (SCM) process utilizes a three-way merge to manage concurrent development. This permits changes to the same file by multiple developers. Changes are managed by merge and reconciliation. The merge creates a final, “merged” file based on two changed files, which are base-lined against a common parent file.
Ora
cle
Inte
rnal
& O
racl
e A
cade
my
Use
Onl
y
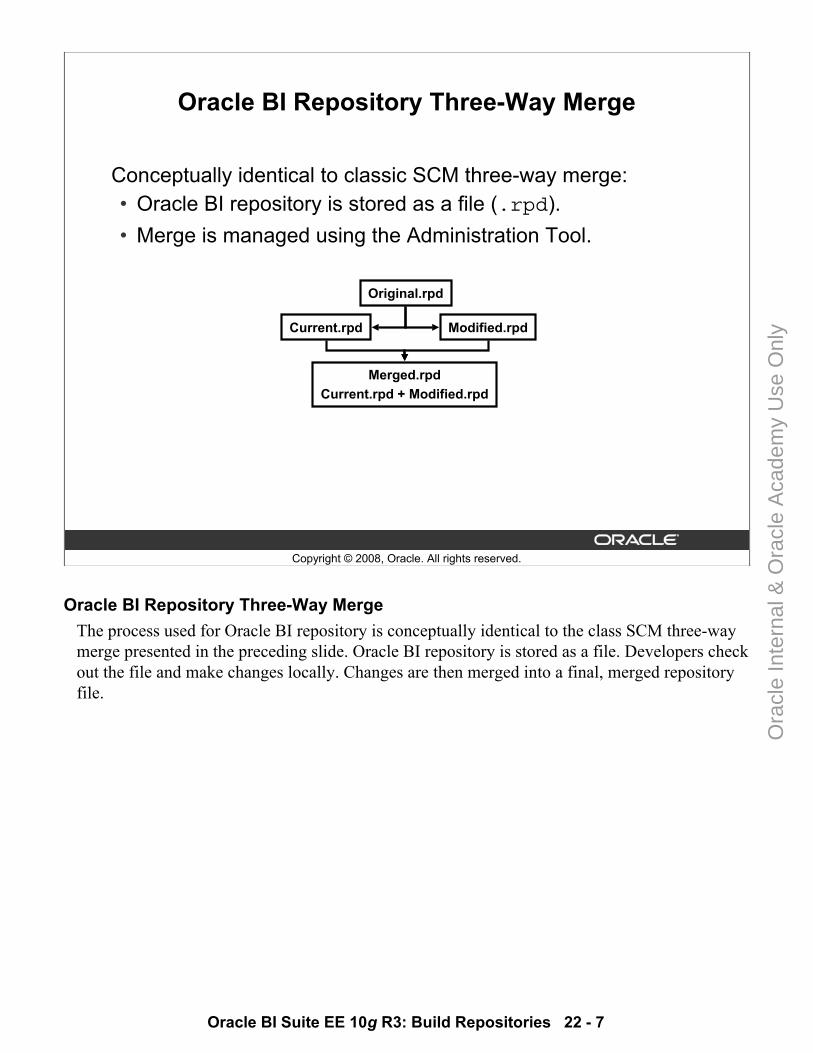
Oracle BI Suite EE 10g R3: Build Repositories 22 - 7
Copyright © 2008, Oracle. All rights reserved.
Oracle BI Repository Three-Way Merge
Conceptually identical to classic SCM three-way merge:• Oracle BI repository is stored as a file (.rpd).• Merge is managed using the Administration Tool.
Original.rpd
Merged.rpdCurrent.rpd + Modified.rpd
Modified.rpdCurrent.rpd
Oracle BI Repository Three-Way MergeThe process used for Oracle BI repository is conceptually identical to the class SCM three-way merge presented in the preceding slide. Oracle BI repository is stored as a file. Developers check out the file and make changes locally. Changes are then merged into a final, merged repository file.
Ora
cle
Inte
rnal
& O
racl
e A
cade
my
Use
Onl
y
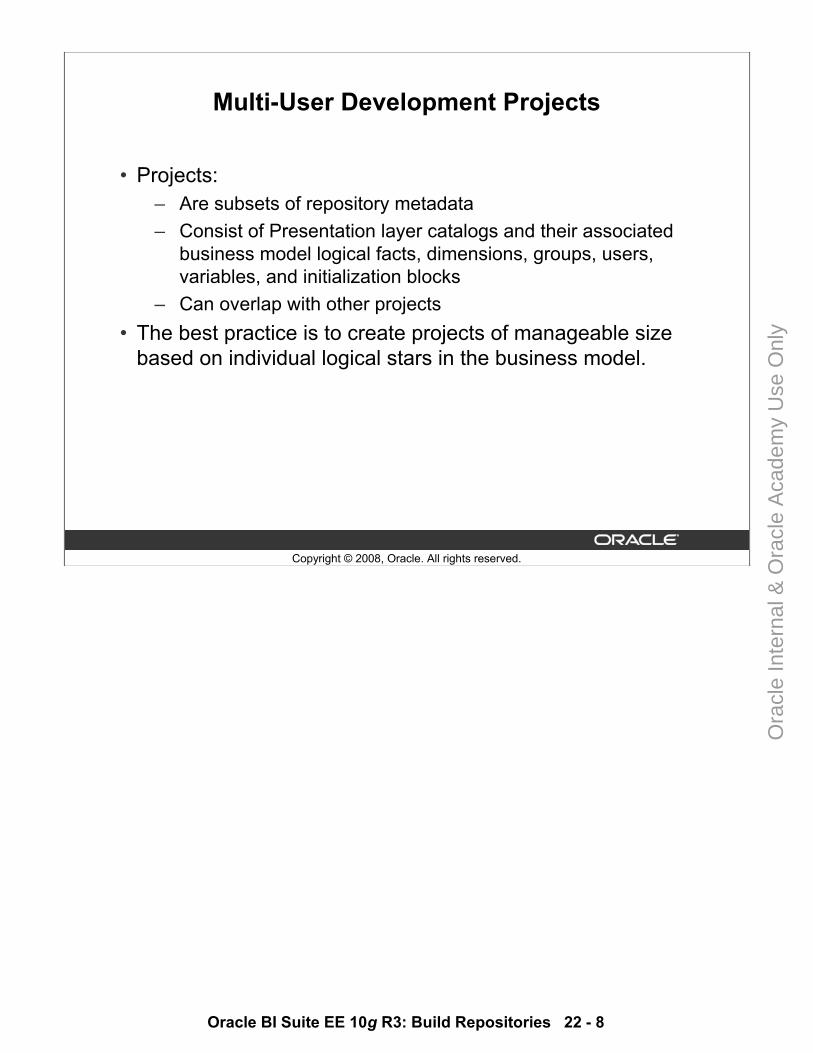
Oracle BI Suite EE 10g R3: Build Repositories 22 - 8
Copyright © 2008, Oracle. All rights reserved.
Multi-User Development Projects
• Projects:– Are subsets of repository metadata– Consist of Presentation layer catalogs and their associated
business model logical facts, dimensions, groups, users, variables, and initialization blocks
– Can overlap with other projects• The best practice is to create projects of manageable size
based on individual logical stars in the business model.
Ora
cle
Inte
rnal
& O
racl
e A
cade
my
Use
Onl
y
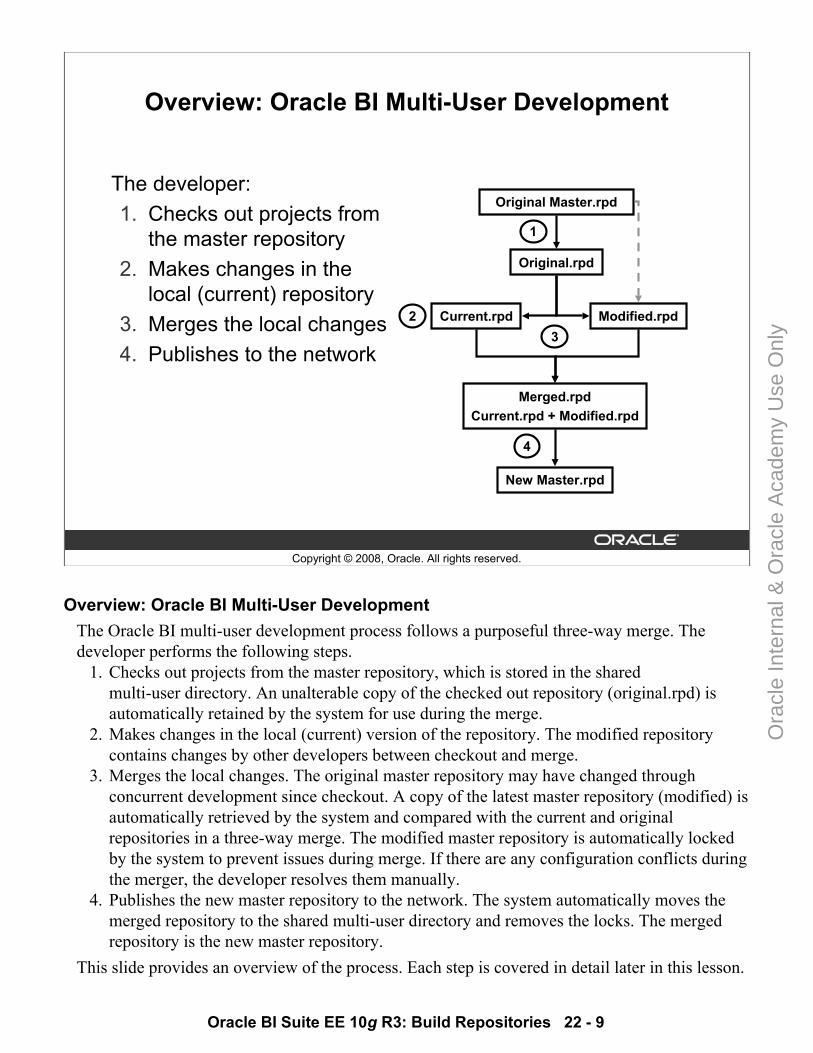
Oracle BI Suite EE 10g R3: Build Repositories 22 - 9
Copyright © 2008, Oracle. All rights reserved.
Overview: Oracle BI Multi-User Development
The developer:1. Checks out projects from
the master repository2. Makes changes in the
local (current) repository3. Merges the local changes4. Publishes to the network
Original.rpd
Merged.rpdCurrent.rpd + Modified.rpd
Modified.rpdCurrent.rpd
Original Master.rpd
New Master.rpd
1
23
4
Overview: Oracle BI Multi-User DevelopmentThe Oracle BI multi-user development process follows a purposeful three-way merge. The developer performs the following steps.
1. Checks out projects from the master repository, which is stored in the sharedmulti-user directory. An unalterable copy of the checked out repository (original.rpd) is automatically retained by the system for use during the merge.
2. Makes changes in the local (current) version of the repository. The modified repository contains changes by other developers between checkout and merge.
3. Merges the local changes. The original master repository may have changed through concurrent development since checkout. A copy of the latest master repository (modified) is automatically retrieved by the system and compared with the current and original repositories in a three-way merge. The modified master repository is automatically locked by the system to prevent issues during merge. If there are any configuration conflicts during the merger, the developer resolves them manually.
4. Publishes the new master repository to the network. The system automatically moves the merged repository to the shared multi-user directory and removes the locks. The merged repository is the new master repository.
This slide provides an overview of the process. Each step is covered in detail later in this lesson.
Ora
cle
Inte
rnal
& O
racl
e A
cade
my
Use
Onl
y
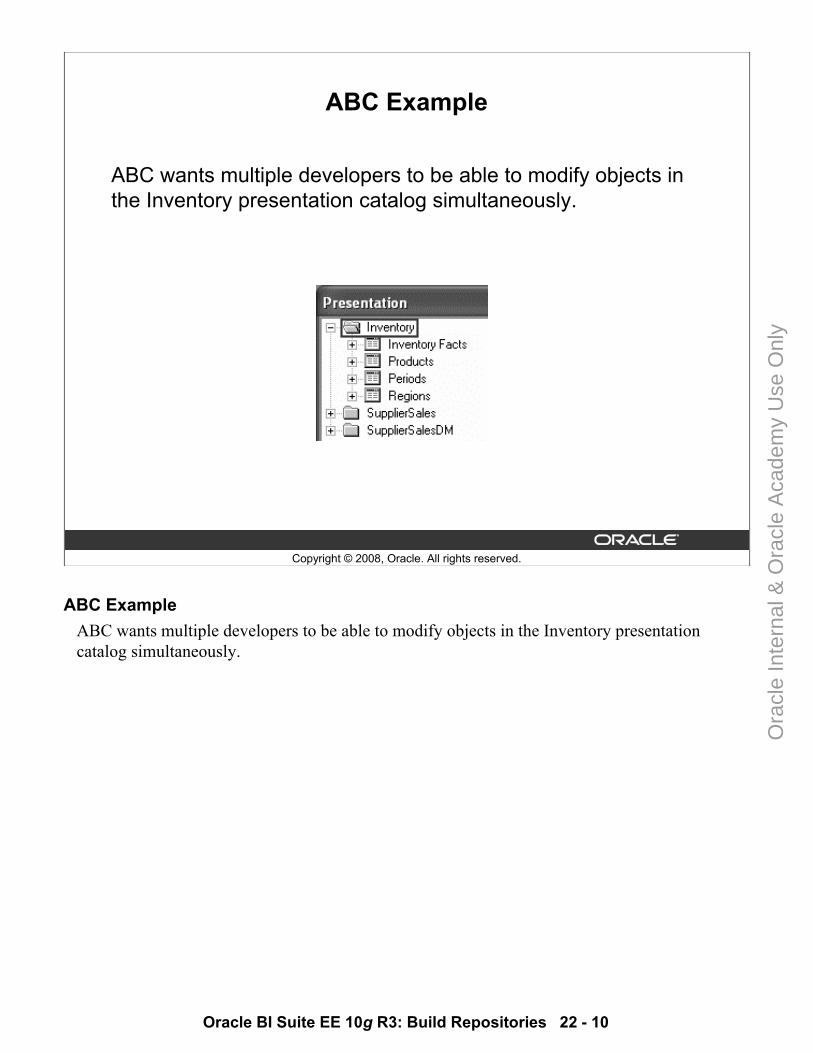
Oracle BI Suite EE 10g R3: Build Repositories 22 - 10
Copyright © 2008, Oracle. All rights reserved.
ABC Example
ABC wants multiple developers to be able to modify objects in the Inventory presentation catalog simultaneously.
ABC ExampleABC wants multiple developers to be able to modify objects in the Inventory presentation catalog simultaneously.
Ora
cle
Inte
rnal
& O
racl
e A
cade
my
Use
Onl
y
Oracle BI Suite EE 10g R3: Build Repositories 22 - 11
Copyright © 2008, Oracle. All rights reserved.
Steps to Set Up an Oracle BI MUDE
1. Create projects.2. Edit projects.3. Set up a shared network directory.4. Copy the master repository to the shared directory.
Steps to Set Up an Oracle BI MUDE This slide identifies the high-level steps for setting up an Oracle BI multi-user development environment. Each step is covered in detail in the following slides.
Ora
cle
Inte
rnal
& O
racl
e A
cade
my
Use
Onl
y
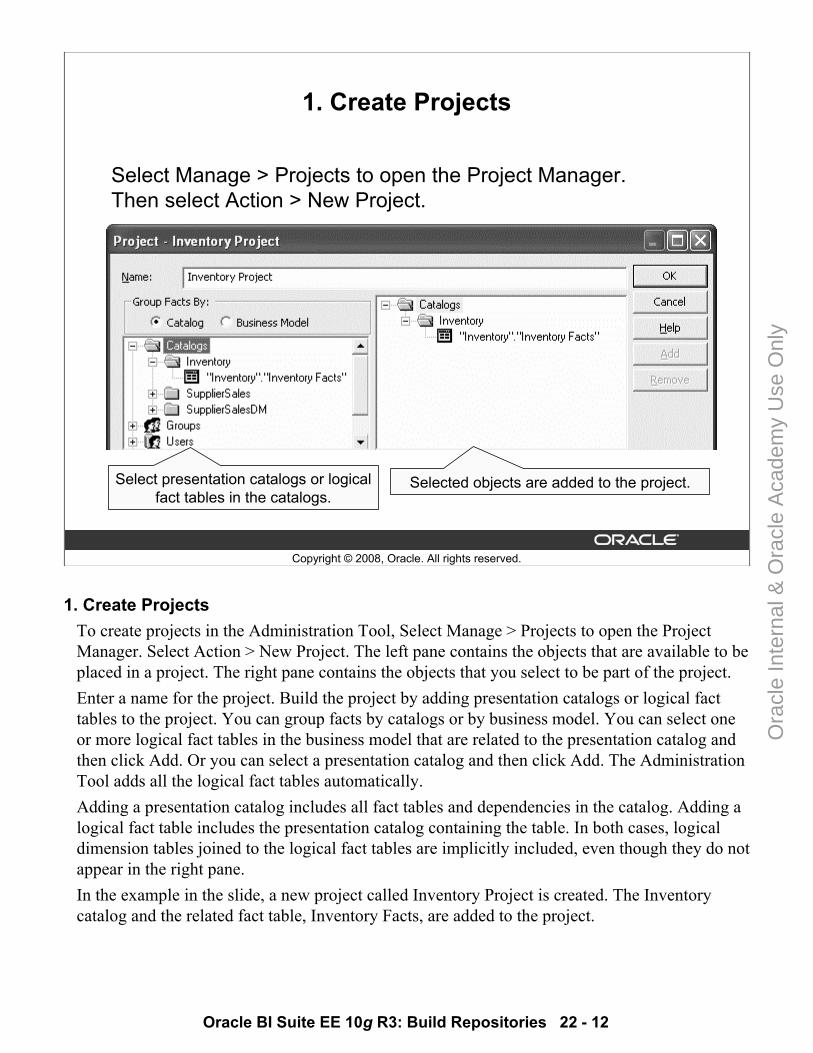
Oracle BI Suite EE 10g R3: Build Repositories 22 - 12
Copyright © 2008, Oracle. All rights reserved.
1. Create Projects
Select Manage > Projects to open the Project Manager. Then select Action > New Project.
Select presentation catalogs or logical fact tables in the catalogs.
Selected objects are added to the project.
1. Create ProjectsTo create projects in the Administration Tool, Select Manage > Projects to open the Project Manager. Select Action > New Project. The left pane contains the objects that are available to be placed in a project. The right pane contains the objects that you select to be part of the project. Enter a name for the project. Build the project by adding presentation catalogs or logical fact tables to the project. You can group facts by catalogs or by business model. You can select one or more logical fact tables in the business model that are related to the presentation catalog and then click Add. Or you can select a presentation catalog and then click Add. The Administration Tool adds all the logical fact tables automatically.Adding a presentation catalog includes all fact tables and dependencies in the catalog. Adding a logical fact table includes the presentation catalog containing the table. In both cases, logical dimension tables joined to the logical fact tables are implicitly included, even though they do not appear in the right pane. In the example in the slide, a new project called Inventory Project is created. The Inventory catalog and the related fact table, Inventory Facts, are added to the project.
Ora
cle
Inte
rnal
& O
racl
e A
cade
my
Use
Onl
y
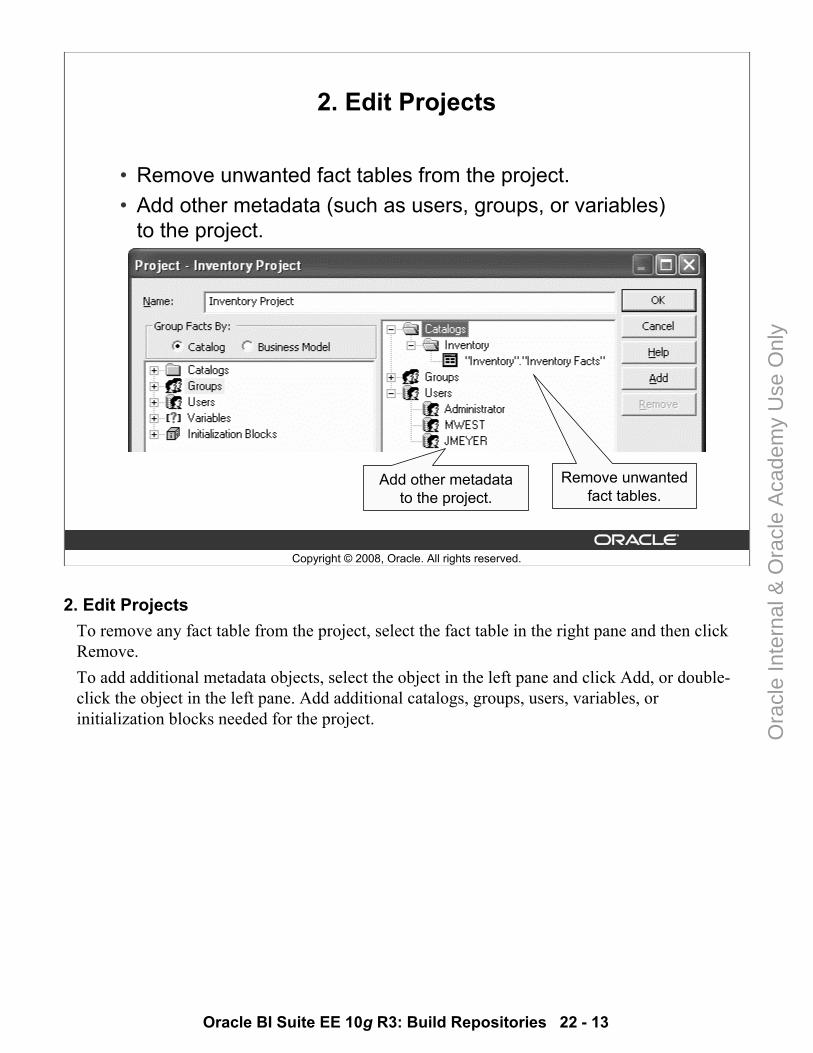
Oracle BI Suite EE 10g R3: Build Repositories 22 - 13
Copyright © 2008, Oracle. All rights reserved.
2. Edit Projects
• Remove unwanted fact tables from the project.• Add other metadata (such as users, groups, or variables)
to the project.
Remove unwanted fact tables.
Add other metadata to the project.
2. Edit ProjectsTo remove any fact table from the project, select the fact table in the right pane and then click Remove. To add additional metadata objects, select the object in the left pane and click Add, or double-click the object in the left pane. Add additional catalogs, groups, users, variables, or initialization blocks needed for the project.
Ora
cle
Inte
rnal
& O
racl
e A
cade
my
Use
Onl
y
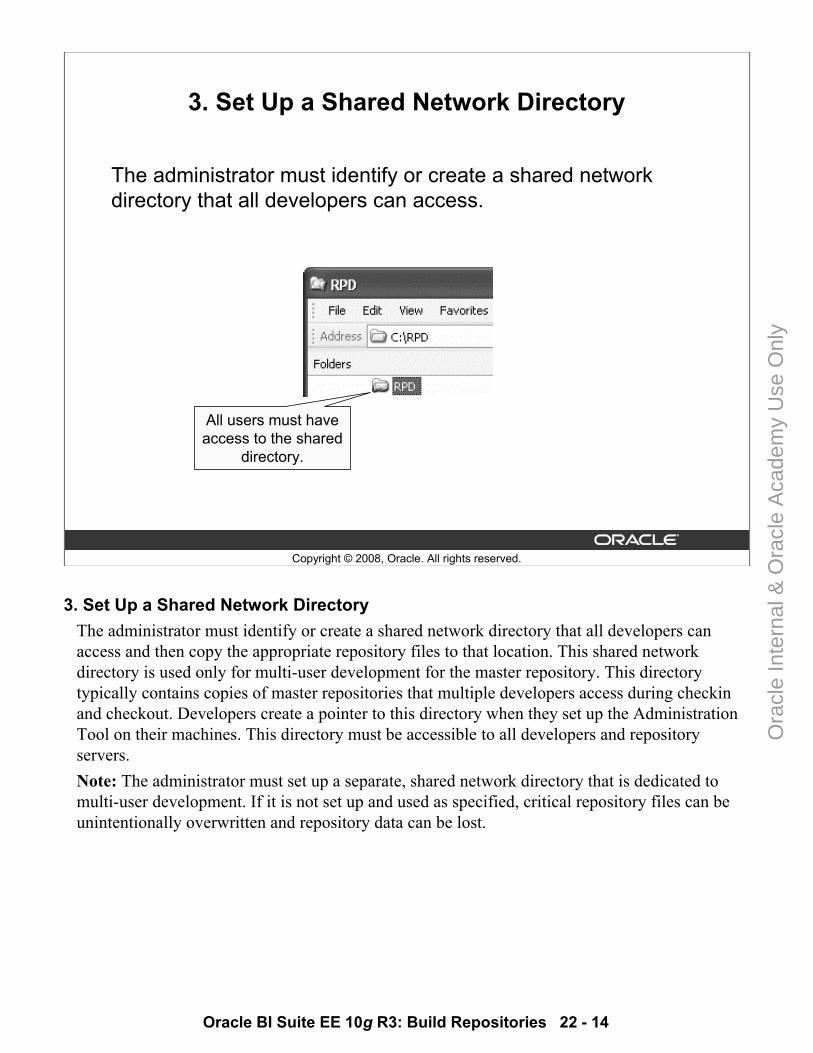
Oracle BI Suite EE 10g R3: Build Repositories 22 - 14
Copyright © 2008, Oracle. All rights reserved.
3. Set Up a Shared Network Directory
The administrator must identify or create a shared network directory that all developers can access.
All users must have access to the shared
directory.
3. Set Up a Shared Network DirectoryThe administrator must identify or create a shared network directory that all developers can access and then copy the appropriate repository files to that location. This shared network directory is used only for multi-user development for the master repository. This directory typically contains copies of master repositories that multiple developers access during checkin and checkout. Developers create a pointer to this directory when they set up the Administration Tool on their machines. This directory must be accessible to all developers and repository servers.Note: The administrator must set up a separate, shared network directory that is dedicated to multi-user development. If it is not set up and used as specified, critical repository files can be unintentionally overwritten and repository data can be lost.
Ora
cle
Inte
rnal
& O
racl
e A
cade
my
Use
Onl
y
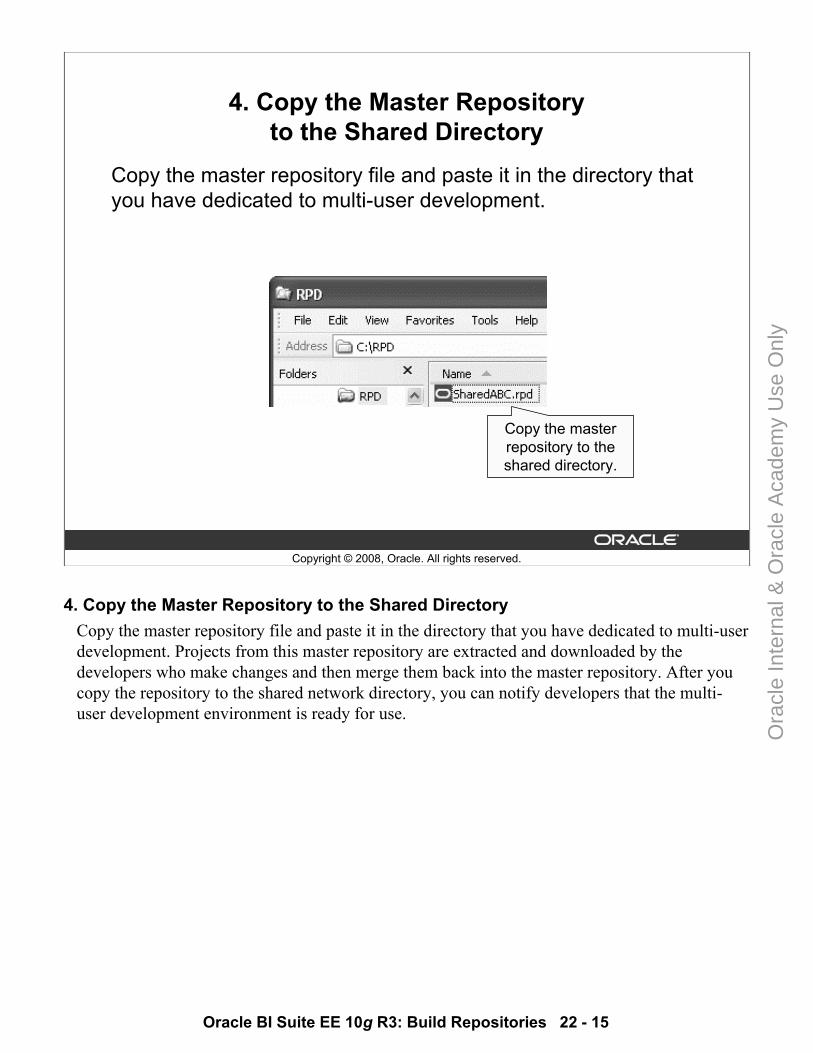
Oracle BI Suite EE 10g R3: Build Repositories 22 - 15
Copyright © 2008, Oracle. All rights reserved.
4. Copy the Master Repository to the Shared Directory
Copy the master repository file and paste it in the directory that you have dedicated to multi-user development.
Copy the master repository to the shared directory.
4. Copy the Master Repository to the Shared DirectoryCopy the master repository file and paste it in the directory that you have dedicated to multi-user development. Projects from this master repository are extracted and downloaded by the developers who make changes and then merge them back into the master repository. After you copy the repository to the shared network directory, you can notify developers that the multi-user development environment is ready for use.
Ora
cle
Inte
rnal
& O
racl
e A
cade
my
Use
Onl
y
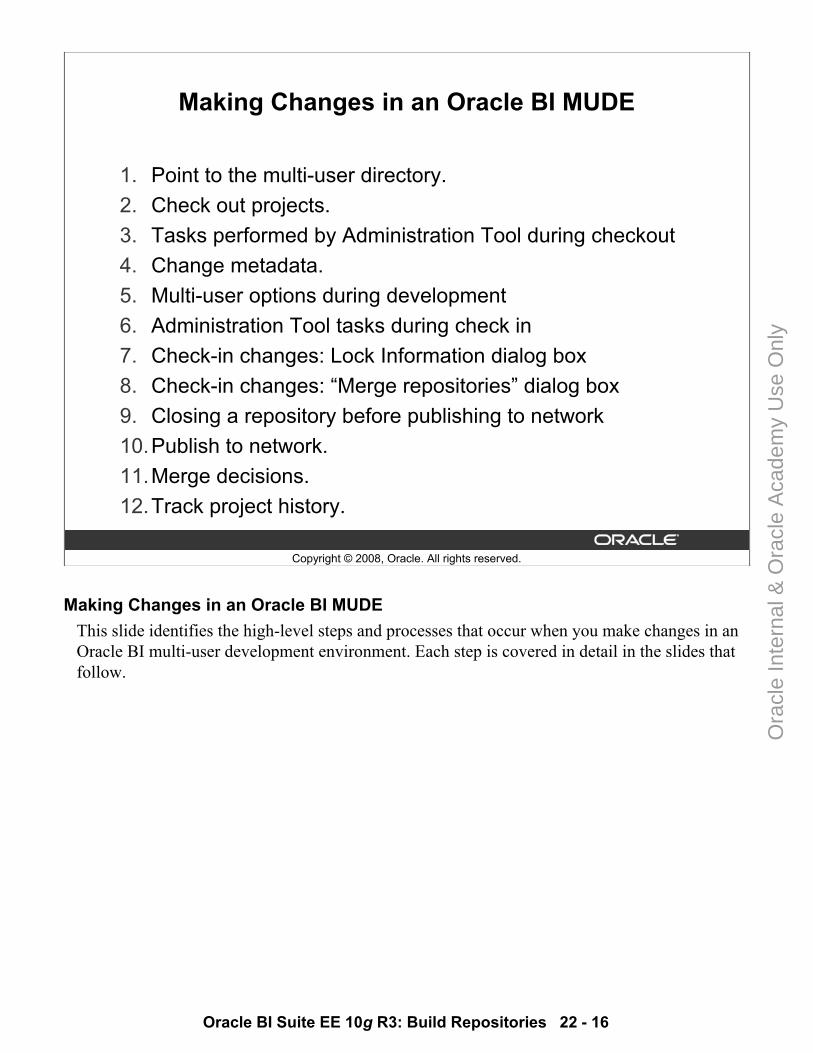
Oracle BI Suite EE 10g R3: Build Repositories 22 - 16
Copyright © 2008, Oracle. All rights reserved.
Making Changes in an Oracle BI MUDE
1. Point to the multi-user directory.2. Check out projects.3. Tasks performed by Administration Tool during checkout4. Change metadata.5. Multi-user options during development6. Administration Tool tasks during check in7. Check-in changes: Lock Information dialog box8. Check-in changes: “Merge repositories” dialog box9. Closing a repository before publishing to network10.Publish to network.11.Merge decisions.12.Track project history.
Making Changes in an Oracle BI MUDE This slide identifies the high-level steps and processes that occur when you make changes in anOracle BI multi-user development environment. Each step is covered in detail in the slides that follow.
Ora
cle
Inte
rnal
& O
racl
e A
cade
my
Use
Onl
y
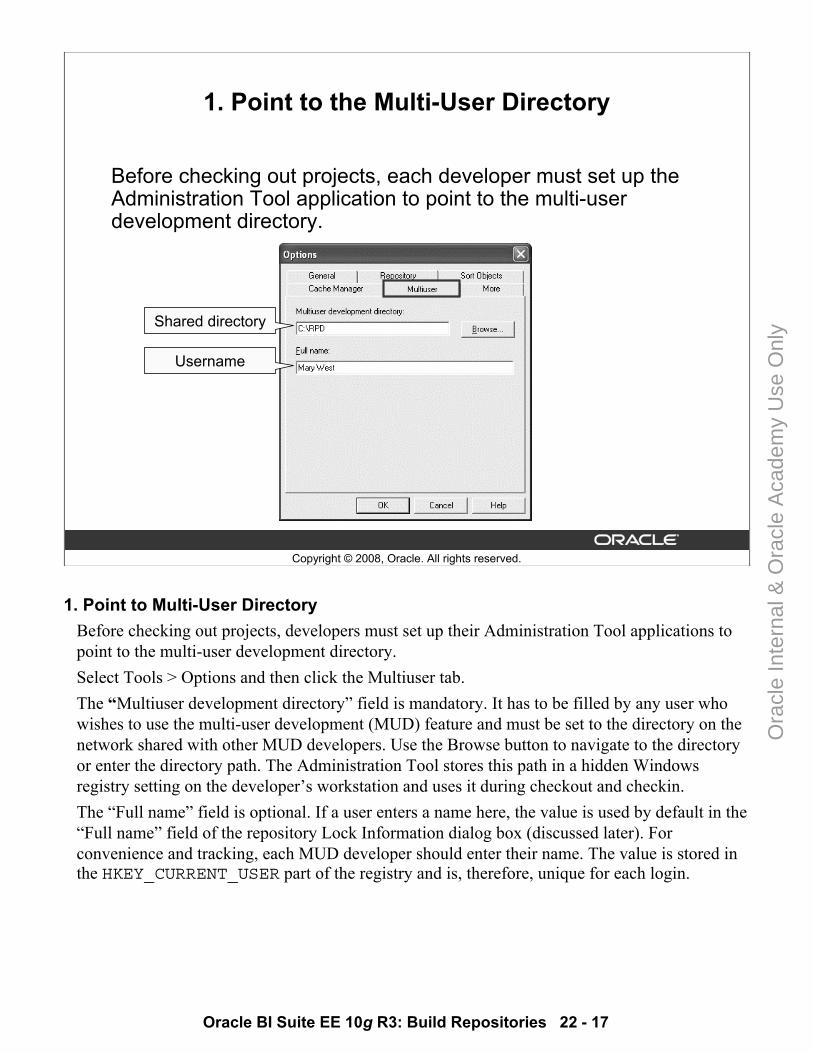
Oracle BI Suite EE 10g R3: Build Repositories 22 - 17
Copyright © 2008, Oracle. All rights reserved.
1. Point to the Multi-User Directory
Before checking out projects, each developer must set up the Administration Tool application to point to the multi-user development directory.
Shared directory
Username
1. Point to Multi-User DirectoryBefore checking out projects, developers must set up their Administration Tool applications to point to the multi-user development directory. Select Tools > Options and then click the Multiuser tab.The “Multiuser development directory” field is mandatory. It has to be filled by any user who wishes to use the multi-user development (MUD) feature and must be set to the directory on the network shared with other MUD developers. Use the Browse button to navigate to the directory or enter the directory path. The Administration Tool stores this path in a hidden Windows registry setting on the developer’s workstation and uses it during checkout and checkin.The “Full name” field is optional. If a user enters a name here, the value is used by default in the “Full name” field of the repository Lock Information dialog box (discussed later). For convenience and tracking, each MUD developer should enter their name. The value is stored in the HKEY_CURRENT_USER part of the registry and is, therefore, unique for each login.
Ora
cle
Inte
rnal
& O
racl
e A
cade
my
Use
Onl
y
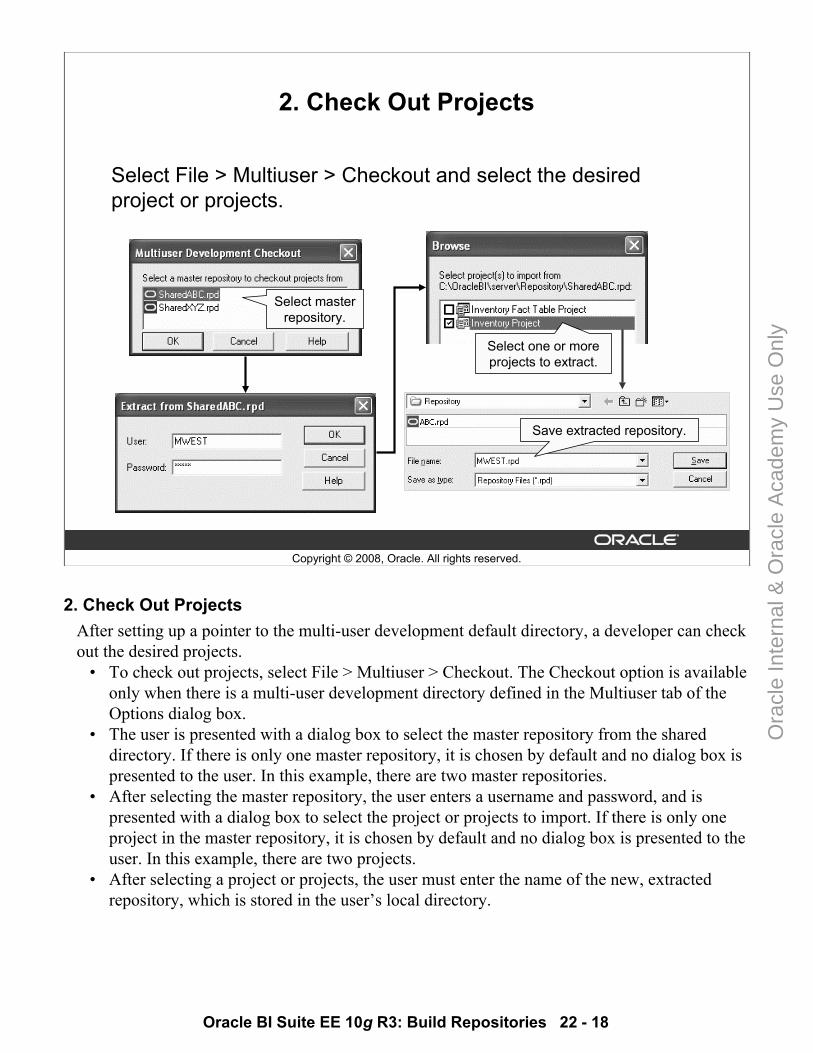
Oracle BI Suite EE 10g R3: Build Repositories 22 - 18
Copyright © 2008, Oracle. All rights reserved.
2. Check Out Projects
Select File > Multiuser > Checkout and select the desired project or projects.
Select one or more projects to extract.
Select master repository.
Save extracted repository.
2. Check Out ProjectsAfter setting up a pointer to the multi-user development default directory, a developer can check out the desired projects.
• To check out projects, select File > Multiuser > Checkout. The Checkout option is available only when there is a multi-user development directory defined in the Multiuser tab of the Options dialog box.
• The user is presented with a dialog box to select the master repository from the shared directory. If there is only one master repository, it is chosen by default and no dialog box is presented to the user. In this example, there are two master repositories.
• After selecting the master repository, the user enters a username and password, and is presented with a dialog box to select the project or projects to import. If there is only one project in the master repository, it is chosen by default and no dialog box is presented to the user. In this example, there are two projects.
• After selecting a project or projects, the user must enter the name of the new, extracted repository, which is stored in the user’s local directory.
Ora
cle
Inte
rnal
& O
racl
e A
cade
my
Use
Onl
y
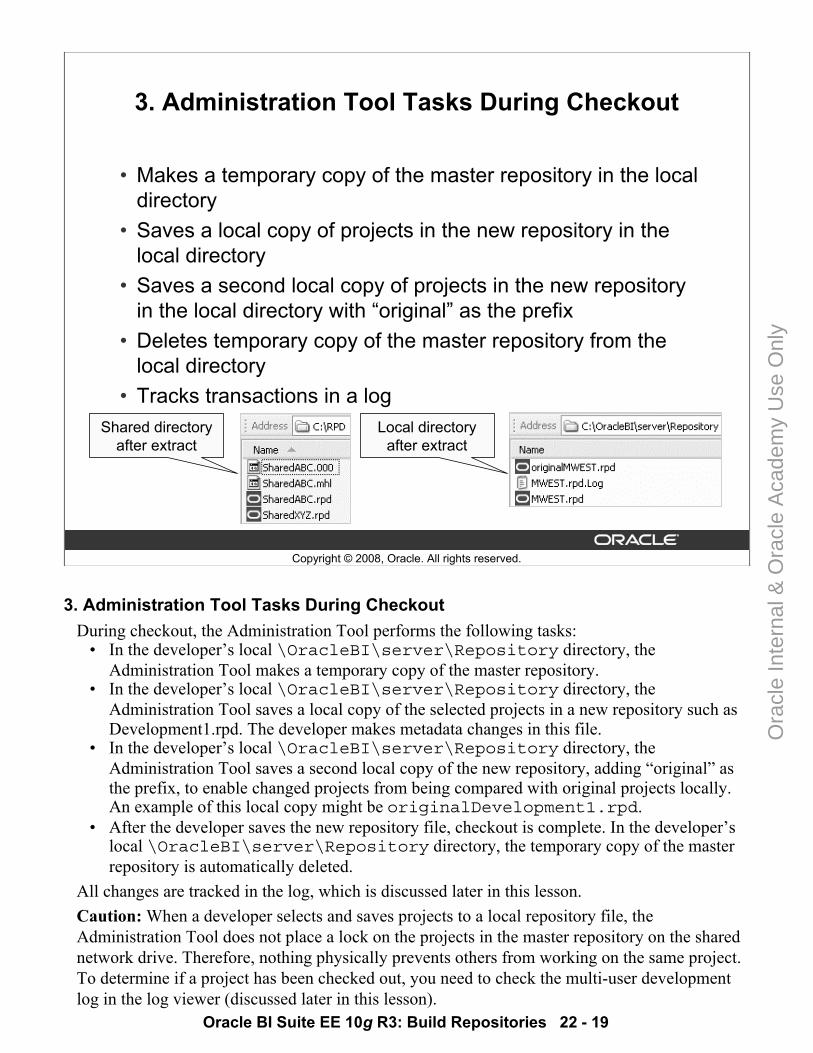
Oracle BI Suite EE 10g R3: Build Repositories 22 - 19
Copyright © 2008, Oracle. All rights reserved.
3. Administration Tool Tasks During Checkout
• Makes a temporary copy of the master repository in the local directory
• Saves a local copy of projects in the new repository in the local directory
• Saves a second local copy of projects in the new repository in the local directory with “original” as the prefix
• Deletes temporary copy of the master repository from the local directory
• Tracks transactions in a logShared directory
after extractLocal directory
after extract
3. Administration Tool Tasks During CheckoutDuring checkout, the Administration Tool performs the following tasks:
• In the developer’s local \OracleBI\server\Repository directory, the Administration Tool makes a temporary copy of the master repository.
• In the developer’s local \OracleBI\server\Repository directory, the Administration Tool saves a local copy of the selected projects in a new repository such as Development1.rpd. The developer makes metadata changes in this file.
• In the developer’s local \OracleBI\server\Repository directory, the Administration Tool saves a second local copy of the new repository, adding “original” as the prefix, to enable changed projects from being compared with original projects locally. An example of this local copy might be originalDevelopment1.rpd.
• After the developer saves the new repository file, checkout is complete. In the developer’s local \OracleBI\server\Repository directory, the temporary copy of the master repository is automatically deleted.
All changes are tracked in the log, which is discussed later in this lesson.Caution: When a developer selects and saves projects to a local repository file, the Administration Tool does not place a lock on the projects in the master repository on the shared network drive. Therefore, nothing physically prevents others from working on the same project. To determine if a project has been checked out, you need to check the multi-user development log in the log viewer (discussed later in this lesson).
Ora
cle
Inte
rnal
& O
racl
e A
cade
my
Use
Onl
y
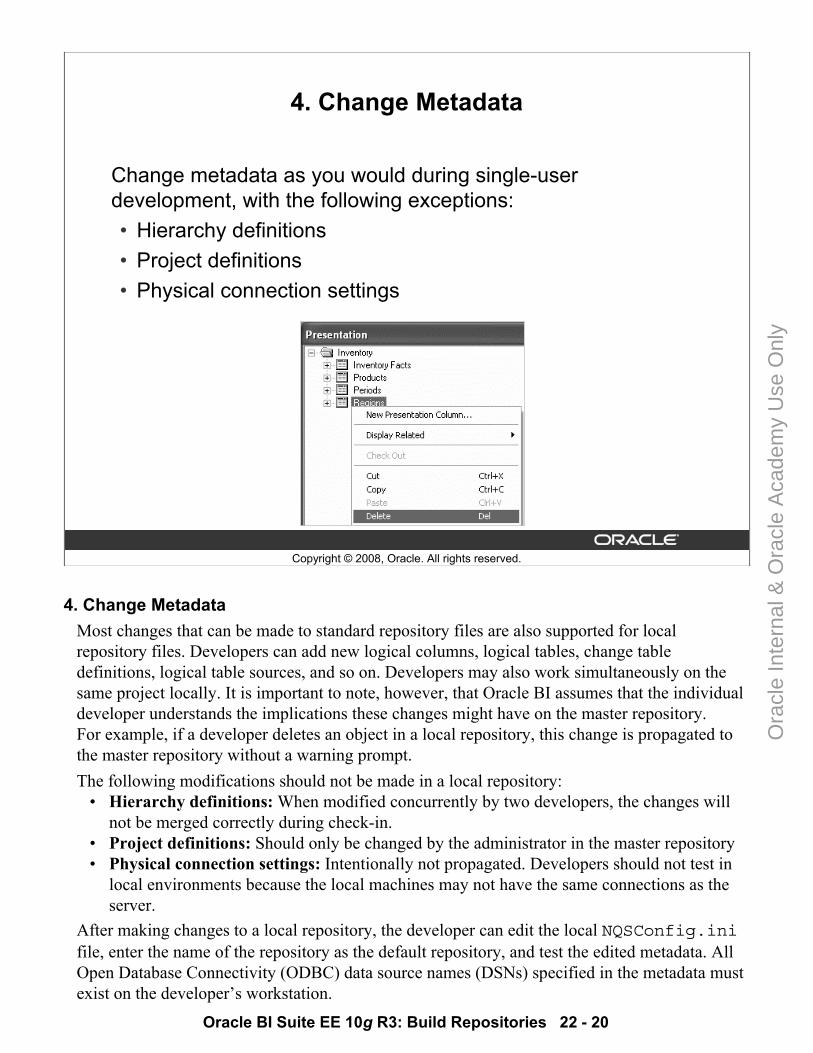
Oracle BI Suite EE 10g R3: Build Repositories 22 - 20
Copyright © 2008, Oracle. All rights reserved.
4. Change Metadata
Change metadata as you would during single-user development, with the following exceptions:• Hierarchy definitions• Project definitions• Physical connection settings
4. Change MetadataMost changes that can be made to standard repository files are also supported for local repository files. Developers can add new logical columns, logical tables, change table definitions, logical table sources, and so on. Developers may also work simultaneously on the same project locally. It is important to note, however, that Oracle BI assumes that the individual developer understands the implications these changes might have on the master repository. For example, if a developer deletes an object in a local repository, this change is propagated to the master repository without a warning prompt.The following modifications should not be made in a local repository:
• Hierarchy definitions: When modified concurrently by two developers, the changes will not be merged correctly during check-in.
• Project definitions: Should only be changed by the administrator in the master repository• Physical connection settings: Intentionally not propagated. Developers should not test in
local environments because the local machines may not have the same connections as the server.
After making changes to a local repository, the developer can edit the local NQSConfig.inifile, enter the name of the repository as the default repository, and test the edited metadata. All Open Database Connectivity (ODBC) data source names (DSNs) specified in the metadata must exist on the developer’s workstation.
Ora
cle
Inte
rnal
& O
racl
e A
cade
my
Use
Onl
y
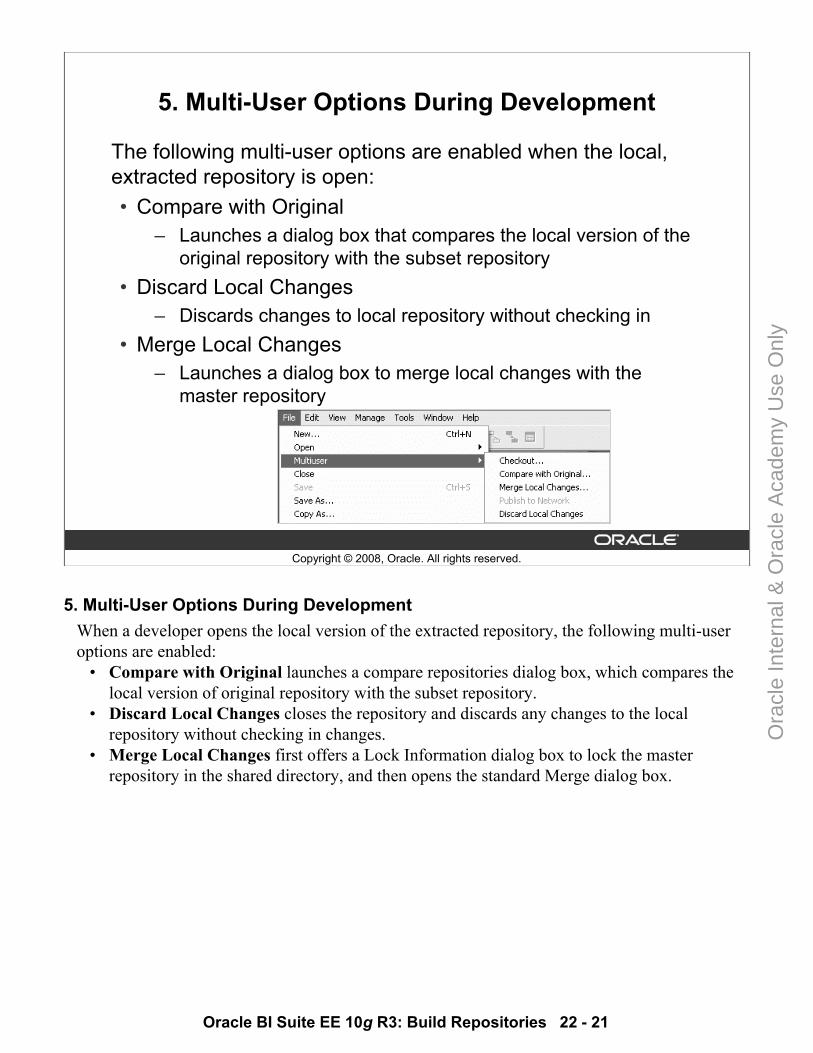
Oracle BI Suite EE 10g R3: Build Repositories 22 - 21
Copyright © 2008, Oracle. All rights reserved.
5. Multi-User Options During Development
The following multi-user options are enabled when the local, extracted repository is open:• Compare with Original
– Launches a dialog box that compares the local version of the original repository with the subset repository
• Discard Local Changes– Discards changes to local repository without checking in
• Merge Local Changes– Launches a dialog box to merge local changes with the
master repository
5. Multi-User Options During DevelopmentWhen a developer opens the local version of the extracted repository, the following multi-user options are enabled:
• Compare with Original launches a compare repositories dialog box, which compares the local version of original repository with the subset repository.
• Discard Local Changes closes the repository and discards any changes to the local repository without checking in changes.
• Merge Local Changes first offers a Lock Information dialog box to lock the master repository in the shared directory, and then opens the standard Merge dialog box.
Ora
cle
Inte
rnal
& O
racl
e A
cade
my
Use
Onl
y
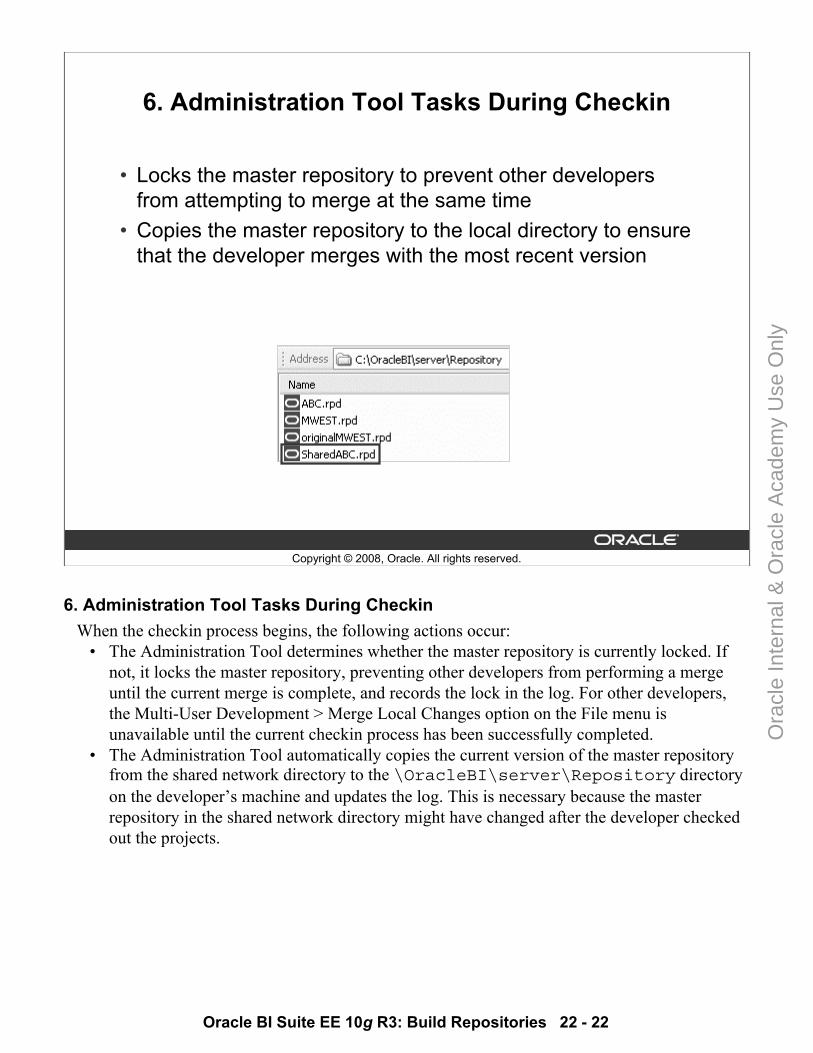
Oracle BI Suite EE 10g R3: Build Repositories 22 - 22
Copyright © 2008, Oracle. All rights reserved.
6. Administration Tool Tasks During Checkin
• Locks the master repository to prevent other developers from attempting to merge at the same time
• Copies the master repository to the local directory to ensure that the developer merges with the most recent version
6. Administration Tool Tasks During CheckinWhen the checkin process begins, the following actions occur:
• The Administration Tool determines whether the master repository is currently locked. If not, it locks the master repository, preventing other developers from performing a merge until the current merge is complete, and records the lock in the log. For other developers, the Multi-User Development > Merge Local Changes option on the File menu is unavailable until the current checkin process has been successfully completed.
• The Administration Tool automatically copies the current version of the master repository from the shared network directory to the \OracleBI\server\Repository directory on the developer’s machine and updates the log. This is necessary because the master repository in the shared network directory might have changed after the developer checked out the projects.
Ora
cle
Inte
rnal
& O
racl
e A
cade
my
Use
Onl
y
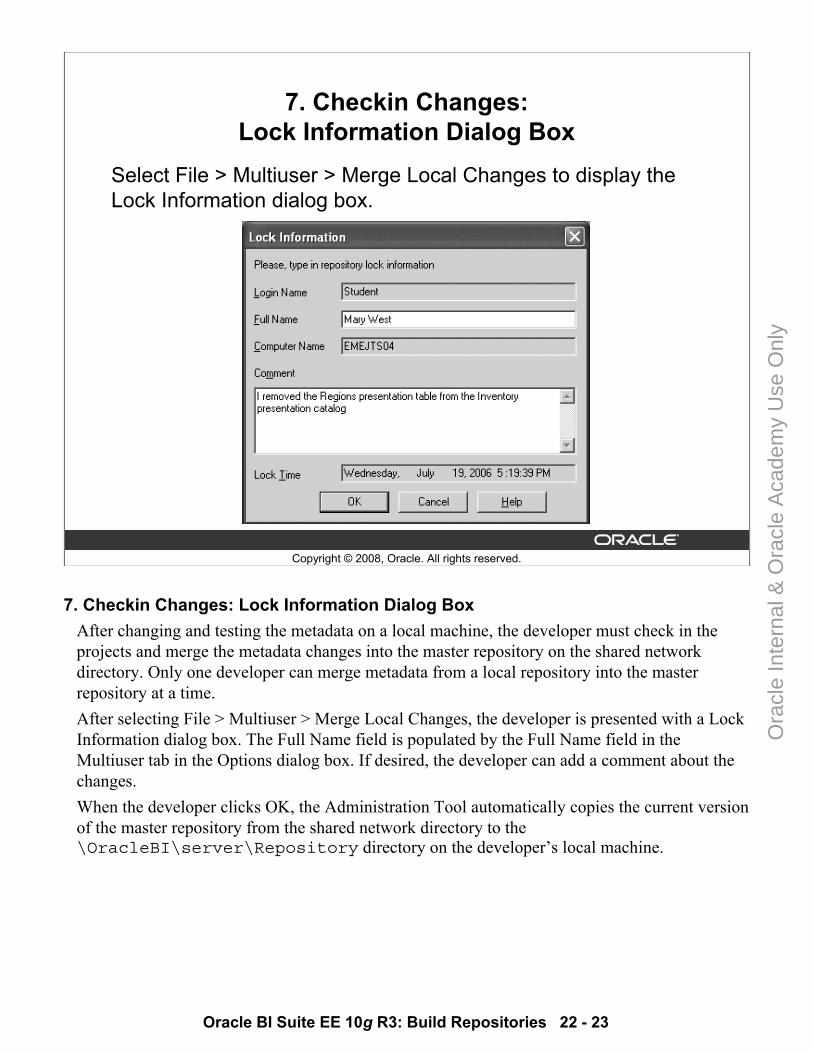
Oracle BI Suite EE 10g R3: Build Repositories 22 - 23
Copyright © 2008, Oracle. All rights reserved.
7. Checkin Changes: Lock Information Dialog Box
Select File > Multiuser > Merge Local Changes to display the Lock Information dialog box.
7. Checkin Changes: Lock Information Dialog BoxAfter changing and testing the metadata on a local machine, the developer must check in the projects and merge the metadata changes into the master repository on the shared network directory. Only one developer can merge metadata from a local repository into the master repository at a time. After selecting File > Multiuser > Merge Local Changes, the developer is presented with a Lock Information dialog box. The Full Name field is populated by the Full Name field in the Multiuser tab in the Options dialog box. If desired, the developer can add a comment about the changes.When the developer clicks OK, the Administration Tool automatically copies the current version of the master repository from the shared network directory to the \OracleBI\server\Repository directory on the developer’s local machine.
Ora
cle
Inte
rnal
& O
racl
e A
cade
my
Use
Onl
y
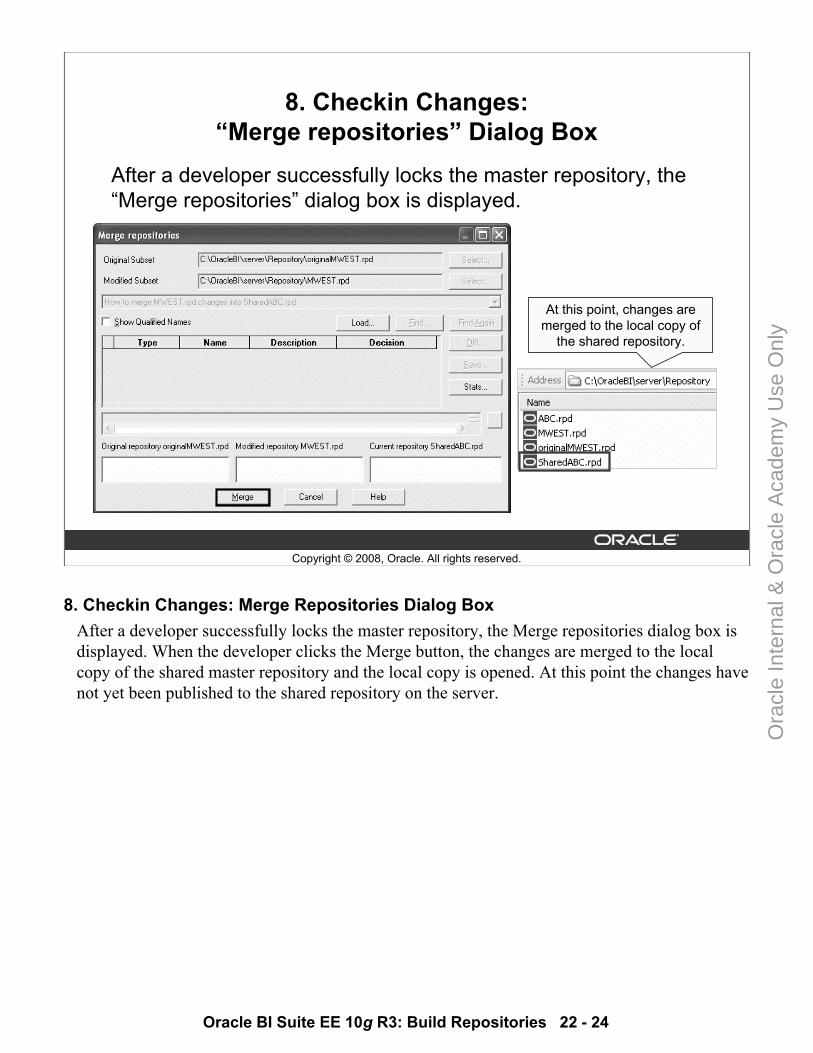
Oracle BI Suite EE 10g R3: Build Repositories 22 - 24
Copyright © 2008, Oracle. All rights reserved.
8. Checkin Changes: “Merge repositories” Dialog Box
After a developer successfully locks the master repository, the “Merge repositories” dialog box is displayed.
At this point, changes are merged to the local copy of
the shared repository.
8. Checkin Changes: Merge Repositories Dialog BoxAfter a developer successfully locks the master repository, the Merge repositories dialog box is displayed. When the developer clicks the Merge button, the changes are merged to the local copy of the shared master repository and the local copy is opened. At this point the changes have not yet been published to the shared repository on the server.
Ora
cle
Inte
rnal
& O
racl
e A
cade
my
Use
Onl
y
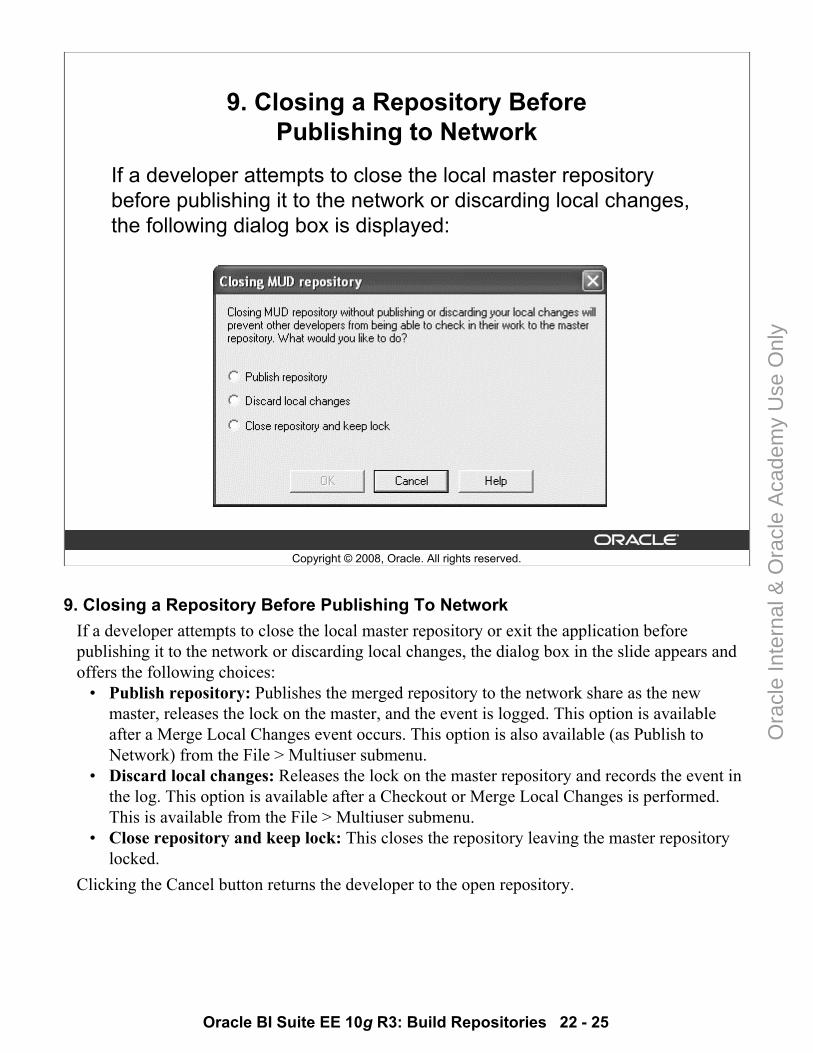
Oracle BI Suite EE 10g R3: Build Repositories 22 - 25
Copyright © 2008, Oracle. All rights reserved.
9. Closing a Repository Before Publishing to Network
If a developer attempts to close the local master repository before publishing it to the network or discarding local changes,the following dialog box is displayed:
9. Closing a Repository Before Publishing To NetworkIf a developer attempts to close the local master repository or exit the application before publishing it to the network or discarding local changes, the dialog box in the slide appears and offers the following choices:
• Publish repository: Publishes the merged repository to the network share as the new master, releases the lock on the master, and the event is logged. This option is available after a Merge Local Changes event occurs. This option is also available (as Publish to Network) from the File > Multiuser submenu.
• Discard local changes: Releases the lock on the master repository and records the event in the log. This option is available after a Checkout or Merge Local Changes is performed. This is available from the File > Multiuser submenu.
• Close repository and keep lock: This closes the repository leaving the master repository locked.
Clicking the Cancel button returns the developer to the open repository.
Ora
cle
Inte
rnal
& O
racl
e A
cade
my
Use
Onl
y
Oracle BI Suite EE 10g R3: Build Repositories 22 - 26
Copyright © 2008, Oracle. All rights reserved.
10. Publish to Network
• Select File > Multiuser > Publish to Network.• This publishes the merged repository to the network share
as the new master, releases the lock on the master, and logs the event.
10. Publish to NetworkSelect File > Multiuser > Publish to Network to merge the local copy of the master repository with the master repository on the network share. This releases the lock on the shared master and logs the event. When the merge is complete, the local repository files are deleted from the developer’s \OracleBI\server\Repository directory.
Ora
cle
Inte
rnal
& O
racl
e A
cade
my
Use
Onl
y
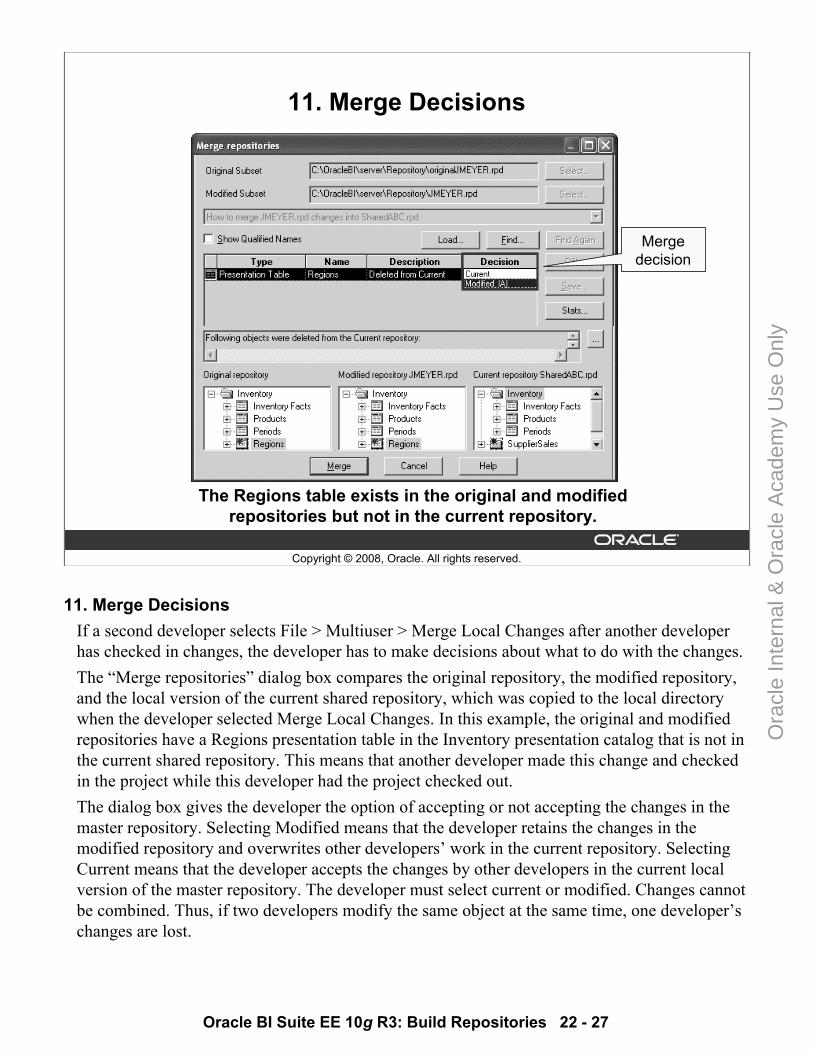
Oracle BI Suite EE 10g R3: Build Repositories 22 - 27
Copyright © 2008, Oracle. All rights reserved.
11. Merge Decisions
The Regions table exists in the original and modified repositories but not in the current repository.
Merge decision
11. Merge DecisionsIf a second developer selects File > Multiuser > Merge Local Changes after another developer has checked in changes, the developer has to make decisions about what to do with the changes.The “Merge repositories” dialog box compares the original repository, the modified repository, and the local version of the current shared repository, which was copied to the local directory when the developer selected Merge Local Changes. In this example, the original and modified repositories have a Regions presentation table in the Inventory presentation catalog that is not in the current shared repository. This means that another developer made this change and checked in the project while this developer had the project checked out.The dialog box gives the developer the option of accepting or not accepting the changes in the master repository. Selecting Modified means that the developer retains the changes in the modified repository and overwrites other developers’ work in the current repository. Selecting Current means that the developer accepts the changes by other developers in the current local version of the master repository. The developer must select current or modified. Changes cannot be combined. Thus, if two developers modify the same object at the same time, one developer’s changes are lost.
Ora
cle
Inte
rnal
& O
racl
e A
cade
my
Use
Onl
y
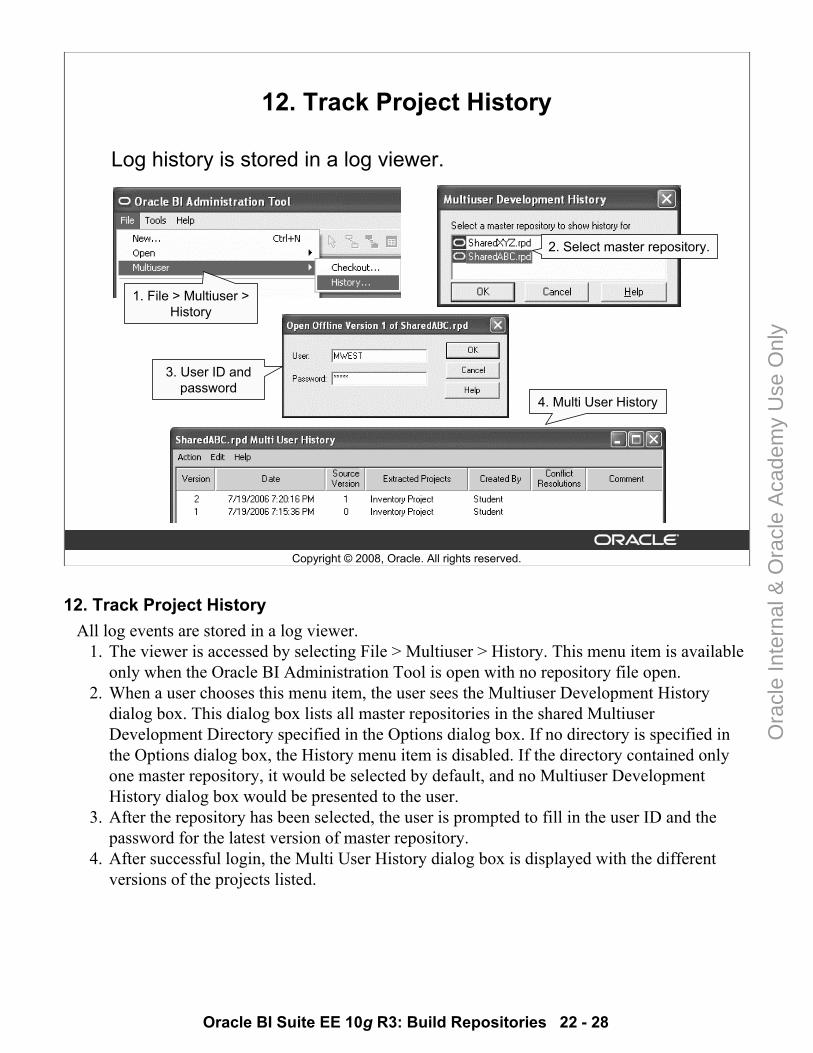
Oracle BI Suite EE 10g R3: Build Repositories 22 - 28
Copyright © 2008, Oracle. All rights reserved.
12. Track Project History
Log history is stored in a log viewer.
1. File > Multiuser > History
2. Select master repository.
3. User ID and password
4. Multi User History
12. Track Project HistoryAll log events are stored in a log viewer.
1. The viewer is accessed by selecting File > Multiuser > History. This menu item is available only when the Oracle BI Administration Tool is open with no repository file open.
2. When a user chooses this menu item, the user sees the Multiuser Development History dialog box. This dialog box lists all master repositories in the shared Multiuser Development Directory specified in the Options dialog box. If no directory is specified in the Options dialog box, the History menu item is disabled. If the directory contained only one master repository, it would be selected by default, and no Multiuser Development History dialog box would be presented to the user.
3. After the repository has been selected, the user is prompted to fill in the user ID and the password for the latest version of master repository.
4. After successful login, the Multi User History dialog box is displayed with the different versions of the projects listed.
Ora
cle
Inte
rnal
& O
racl
e A
cade
my
Use
Onl
y
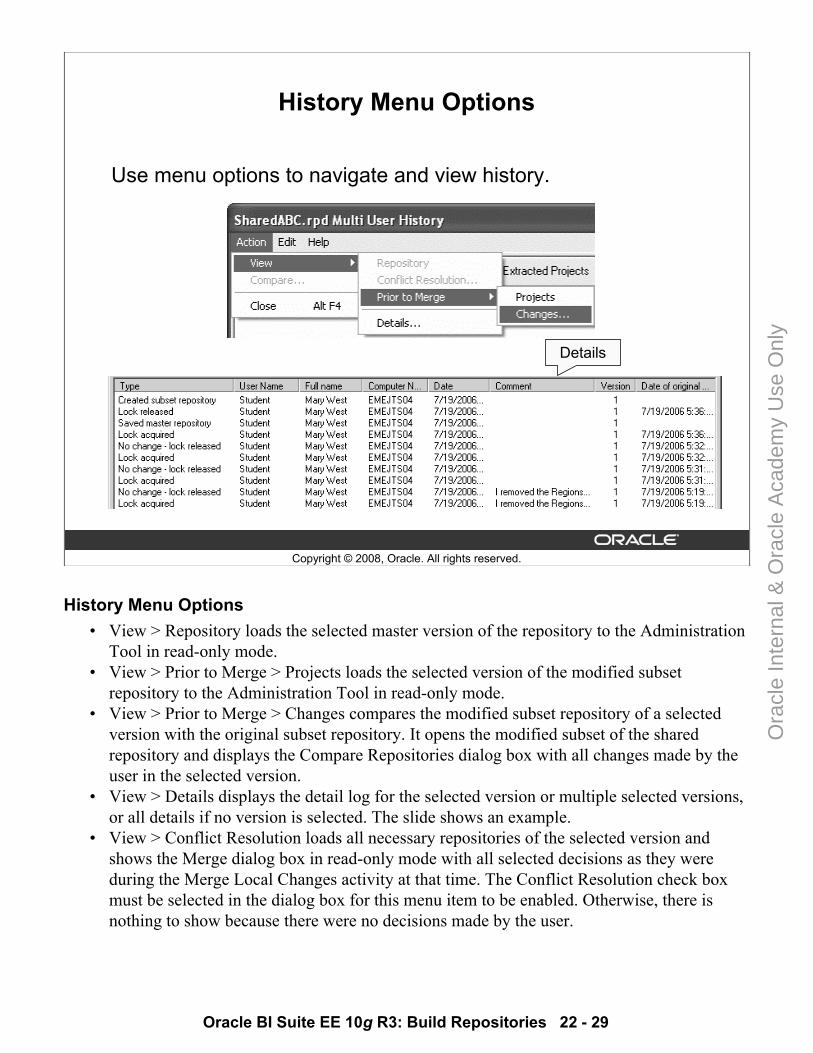
Oracle BI Suite EE 10g R3: Build Repositories 22 - 29
Copyright © 2008, Oracle. All rights reserved.
History Menu Options
Use menu options to navigate and view history.
Details
History Menu Options• View > Repository loads the selected master version of the repository to the Administration
Tool in read-only mode.• View > Prior to Merge > Projects loads the selected version of the modified subset
repository to the Administration Tool in read-only mode.• View > Prior to Merge > Changes compares the modified subset repository of a selected
version with the original subset repository. It opens the modified subset of the shared repository and displays the Compare Repositories dialog box with all changes made by the user in the selected version.
• View > Details displays the detail log for the selected version or multiple selected versions, or all details if no version is selected. The slide shows an example.
• View > Conflict Resolution loads all necessary repositories of the selected version and shows the Merge dialog box in read-only mode with all selected decisions as they were during the Merge Local Changes activity at that time. The Conflict Resolution check box must be selected in the dialog box for this menu item to be enabled. Otherwise, there is nothing to show because there were no decisions made by the user.
Ora
cle
Inte
rnal
& O
racl
e A
cade
my
Use
Onl
y
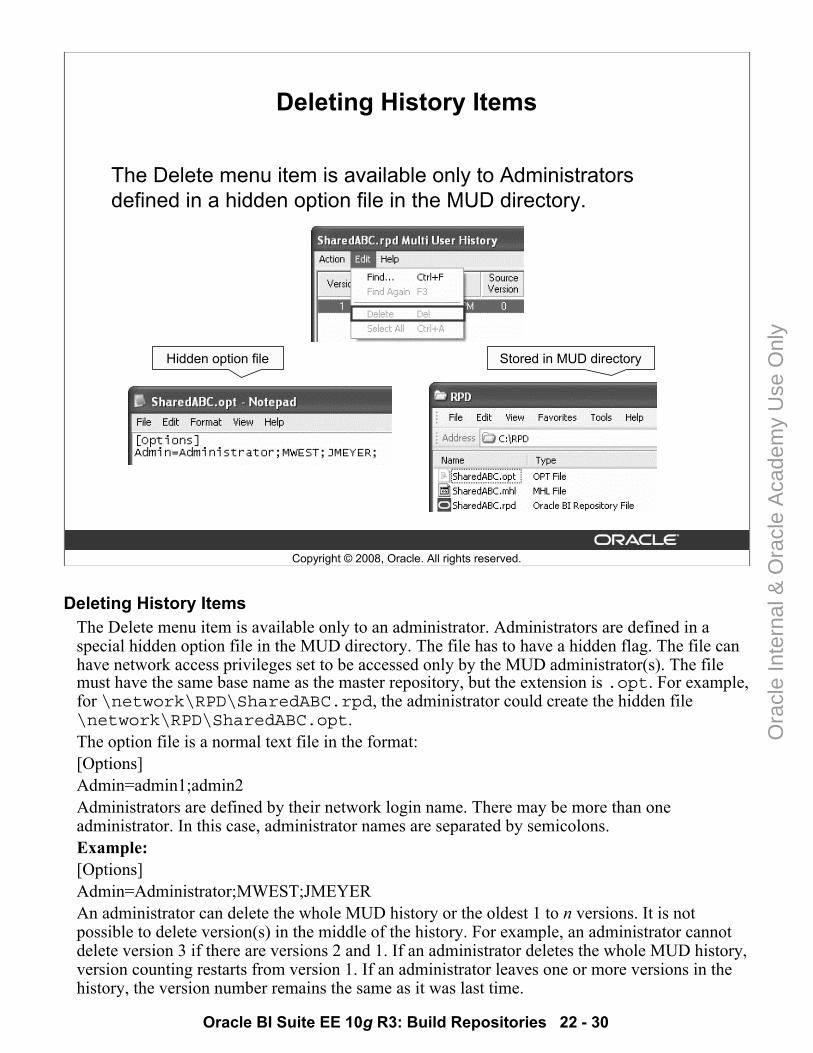
Oracle BI Suite EE 10g R3: Build Repositories 22 - 30
Copyright © 2008, Oracle. All rights reserved.
Deleting History Items
The Delete menu item is available only to Administrators defined in a hidden option file in the MUD directory.
Hidden option file Stored in MUD directory
Deleting History ItemsThe Delete menu item is available only to an administrator. Administrators are defined in a special hidden option file in the MUD directory. The file has to have a hidden flag. The file can have network access privileges set to be accessed only by the MUD administrator(s). The file must have the same base name as the master repository, but the extension is .opt. For example, for \network\RPD\SharedABC.rpd, the administrator could create the hidden file \network\RPD\SharedABC.opt.The option file is a normal text file in the format:[Options]Admin=admin1;admin2Administrators are defined by their network login name. There may be more than one administrator. In this case, administrator names are separated by semicolons.Example:[Options]Admin=Administrator;MWEST;JMEYERAn administrator can delete the whole MUD history or the oldest 1 to n versions. It is not possible to delete version(s) in the middle of the history. For example, an administrator cannot delete version 3 if there are versions 2 and 1. If an administrator deletes the whole MUD history, version counting restarts from version 1. If an administrator leaves one or more versions in the history, the version number remains the same as it was last time.
Ora
cle
Inte
rnal
& O
racl
e A
cade
my
Use
Onl
y

Oracle BI Suite EE 10g R3: Build Repositories 22 - 31
Copyright © 2008, Oracle. All rights reserved.
Summary
In this lesson, you should have learned how to:• Set up an Oracle BI multi-user development environment• Describe multi-user development environment functionality• Develop a repository using multiple developers
Ora
cle
Inte
rnal
& O
racl
e A
cade
my
Use
Onl
y
Oracle BI Suite EE 10g R3: Build Repositories 22 - 32
Copyright © 2008, Oracle. All rights reserved.
Practice 22-1 Overview: Setting Up a Multi-User Development Environment
This practice covers the following topics:• Creating projects• Copying a master repository to a shared directory• Setting a multi-user shared directory
Practice 22-1 Overview: Setting Up a Multi-User Development Environment ABC is accustomed to using multi-user development environments for its developers. You prepare the development platform to support multi-user development and then configure two users to act as developers to test the environment.
Ora
cle
Inte
rnal
& O
racl
e A
cade
my
Use
Onl
y
Oracle BI Suite EE 10g R3: Build Repositories 22 - 33
Copyright © 2008, Oracle. All rights reserved.
Practice 22-2 Overview: Using a Multi-User Development Environment
This practice covers the following topics:• Checking out projects• Modifying project metadata• Checking in projects• Publishing changes to the network• Merging changes• Checking project history
Practice 22-2 Overview: Using a Multi-User Development Environment In this practice, two users, MWEST and JMEYER, work in the multi-user development environment and modify the same project simultaneously. This requires you to have two instances of the Oracle BI Administration Tool running at the same time.
Ora
cle
Inte
rnal
& O
racl
e A
cade
my
Use
Onl
y

Ora
cle
Inte
rnal
& O
racl
e A
cade
my
Use
Onl
y
Copyright © 2008, Oracle. All rights reserved.
Using Administration Tool Utilities
Ora
cle
Inte
rnal
& O
racl
e A
cade
my
Use
Onl
y
Oracle BI Suite EE 10g R3: Build Repositories 23 - 2
Copyright © 2008, Oracle. All rights reserved.
Objectives
After completing this lesson, you should be able to:• Describe the various wizards and utilities in the Oracle
Business Intelligence (BI) Administration Tool• Use the Administration Tool wizards and utilities to manage,
maintain, and enhance repositories
ObjectivesThe Administration Tool provides a number of wizards and utilities to aid in performing various tasks. This lesson shows you how to use the Administration Tool wizards and utilities to manage, maintain, and enhance repositories.
Ora
cle
Inte
rnal
& O
racl
e A
cade
my
Use
Onl
y
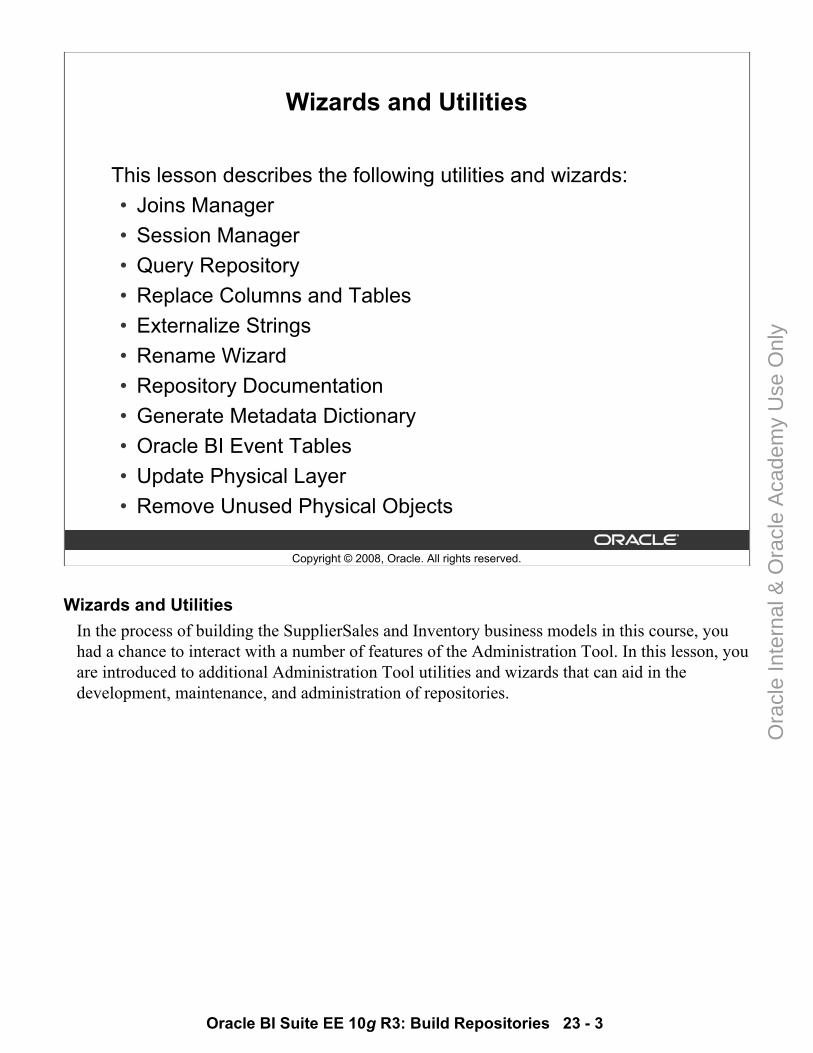
Oracle BI Suite EE 10g R3: Build Repositories 23 - 3
Copyright © 2008, Oracle. All rights reserved.
Wizards and Utilities
This lesson describes the following utilities and wizards:• Joins Manager• Session Manager• Query Repository• Replace Columns and Tables• Externalize Strings• Rename Wizard• Repository Documentation• Generate Metadata Dictionary• Oracle BI Event Tables• Update Physical Layer• Remove Unused Physical Objects
Wizards and UtilitiesIn the process of building the SupplierSales and Inventory business models in this course, you had a chance to interact with a number of features of the Administration Tool. In this lesson, you are introduced to additional Administration Tool utilities and wizards that can aid in the development, maintenance, and administration of repositories.
Ora
cle
Inte
rnal
& O
racl
e A
cade
my
Use
Onl
y
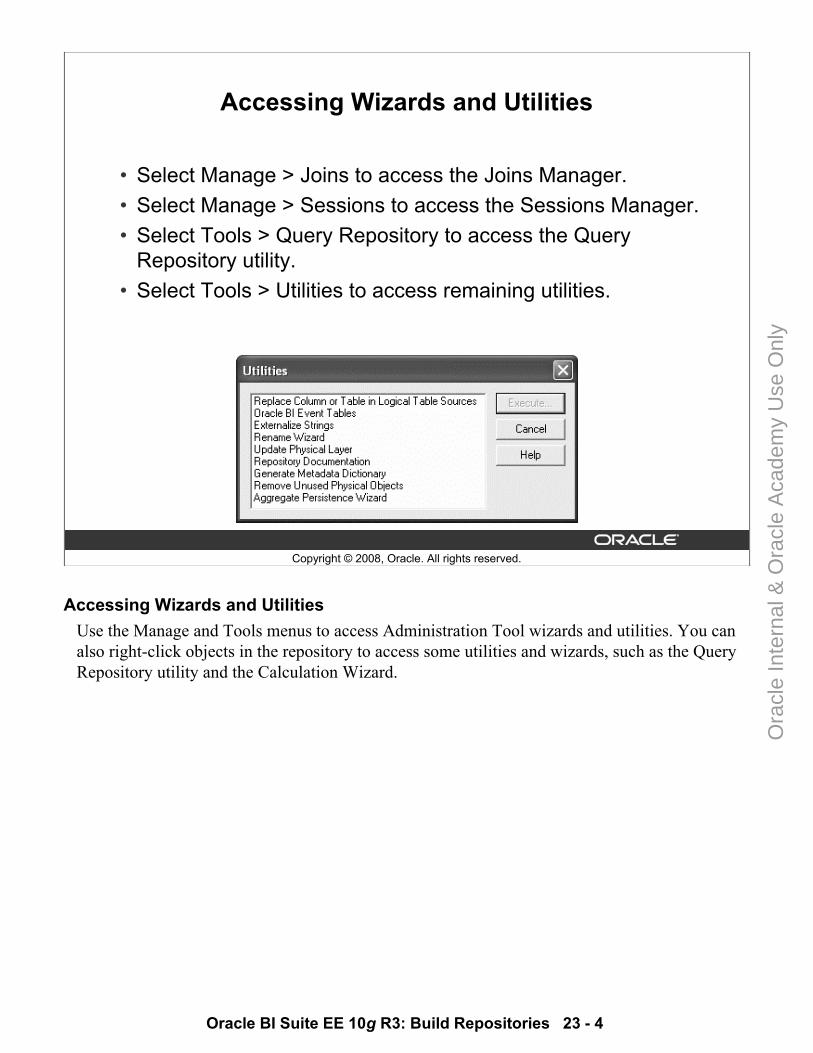
Oracle BI Suite EE 10g R3: Build Repositories 23 - 4
Copyright © 2008, Oracle. All rights reserved.
Accessing Wizards and Utilities
• Select Manage > Joins to access the Joins Manager.• Select Manage > Sessions to access the Sessions Manager.• Select Tools > Query Repository to access the Query
Repository utility.• Select Tools > Utilities to access remaining utilities.
Accessing Wizards and UtilitiesUse the Manage and Tools menus to access Administration Tool wizards and utilities. You can also right-click objects in the repository to access some utilities and wizards, such as the Query Repository utility and the Calculation Wizard.
Ora
cle
Inte
rnal
& O
racl
e A
cade
my
Use
Onl
y
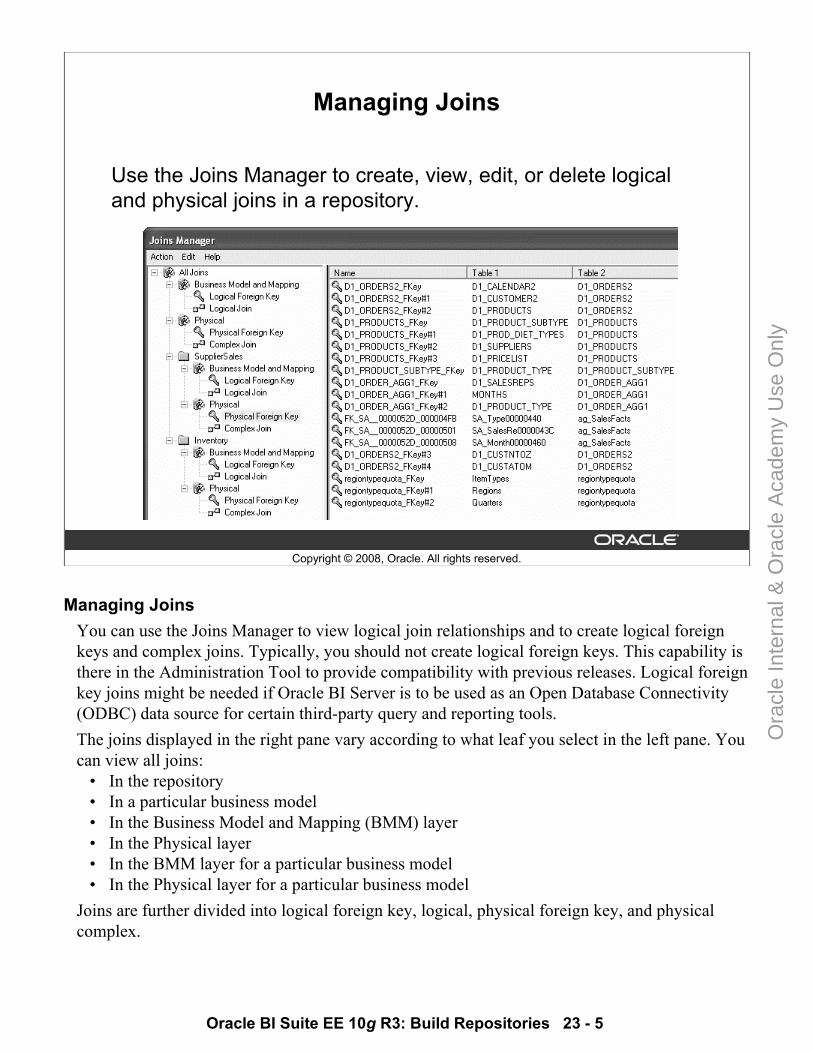
Oracle BI Suite EE 10g R3: Build Repositories 23 - 5
Copyright © 2008, Oracle. All rights reserved.
Managing Joins
Use the Joins Manager to create, view, edit, or delete logical and physical joins in a repository.
Managing JoinsYou can use the Joins Manager to view logical join relationships and to create logical foreign keys and complex joins. Typically, you should not create logical foreign keys. This capability is there in the Administration Tool to provide compatibility with previous releases. Logical foreign key joins might be needed if Oracle BI Server is to be used as an Open Database Connectivity (ODBC) data source for certain third-party query and reporting tools.The joins displayed in the right pane vary according to what leaf you select in the left pane. You can view all joins:
• In the repository• In a particular business model• In the Business Model and Mapping (BMM) layer• In the Physical layer• In the BMM layer for a particular business model• In the Physical layer for a particular business model
Joins are further divided into logical foreign key, logical, physical foreign key, and physical complex.
Ora
cle
Inte
rnal
& O
racl
e A
cade
my
Use
Onl
y
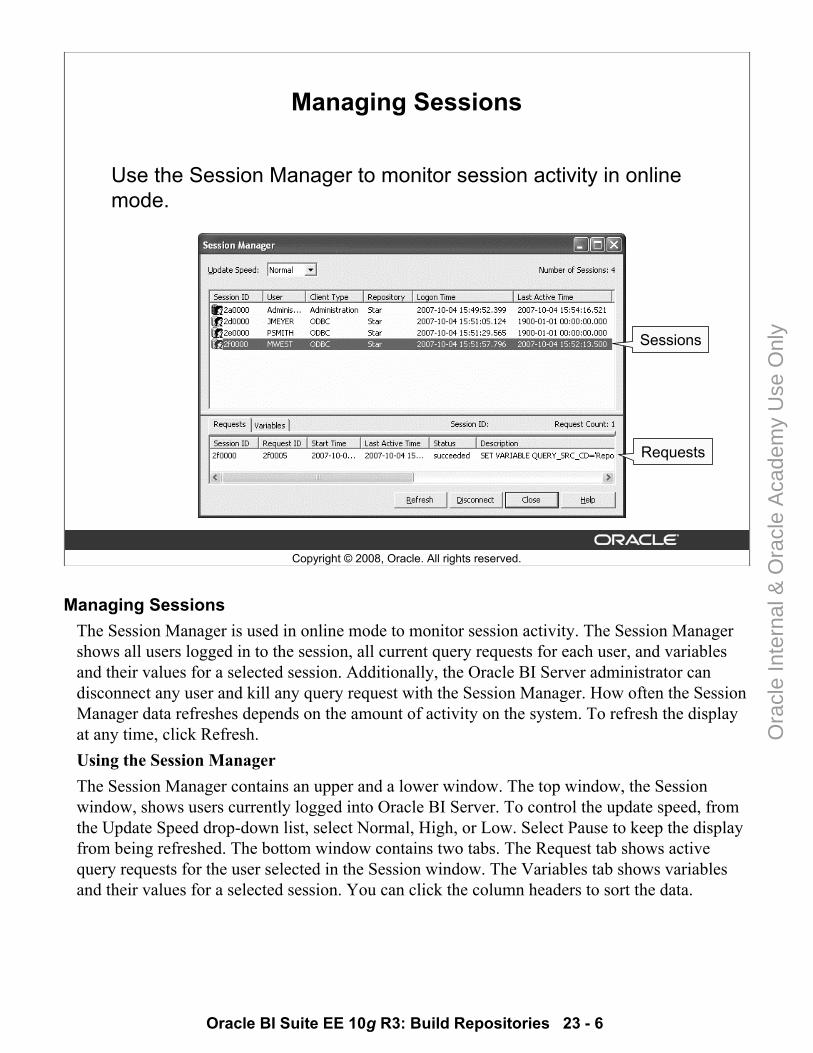
Oracle BI Suite EE 10g R3: Build Repositories 23 - 6
Copyright © 2008, Oracle. All rights reserved.
Managing Sessions
Use the Session Manager to monitor session activity in online mode.
Sessions
Requests
Managing SessionsThe Session Manager is used in online mode to monitor session activity. The Session Manager shows all users logged in to the session, all current query requests for each user, and variables and their values for a selected session. Additionally, the Oracle BI Server administrator can disconnect any user and kill any query request with the Session Manager. How often the Session Manager data refreshes depends on the amount of activity on the system. To refresh the display at any time, click Refresh.Using the Session ManagerThe Session Manager contains an upper and a lower window. The top window, the Session window, shows users currently logged into Oracle BI Server. To control the update speed, from the Update Speed drop-down list, select Normal, High, or Low. Select Pause to keep the display from being refreshed. The bottom window contains two tabs. The Request tab shows active query requests for the user selected in the Session window. The Variables tab shows variables and their values for a selected session. You can click the column headers to sort the data.
Ora
cle
Inte
rnal
& O
racl
e A
cade
my
Use
Onl
y
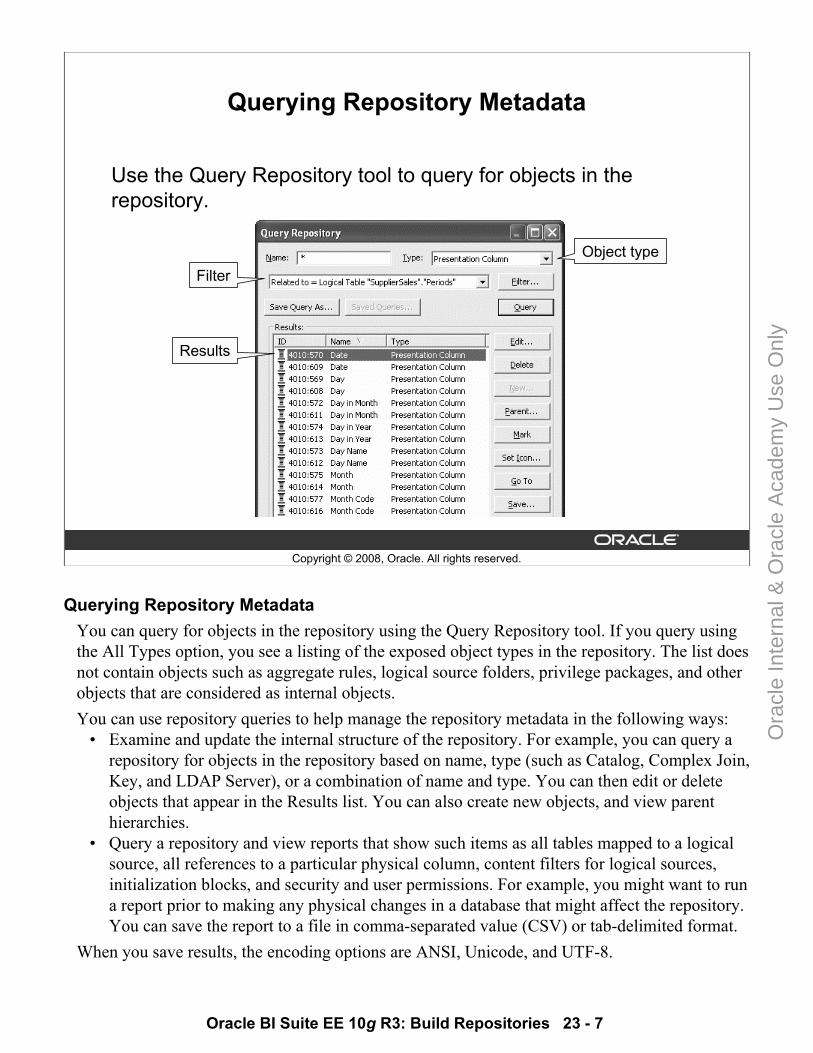
Oracle BI Suite EE 10g R3: Build Repositories 23 - 7
Copyright © 2008, Oracle. All rights reserved.
Querying Repository Metadata
Use the Query Repository tool to query for objects in the repository.
Object typeFilter
Results
Querying Repository MetadataYou can query for objects in the repository using the Query Repository tool. If you query using the All Types option, you see a listing of the exposed object types in the repository. The list does not contain objects such as aggregate rules, logical source folders, privilege packages, and other objects that are considered as internal objects.You can use repository queries to help manage the repository metadata in the following ways:
• Examine and update the internal structure of the repository. For example, you can query a repository for objects in the repository based on name, type (such as Catalog, Complex Join, Key, and LDAP Server), or a combination of name and type. You can then edit or delete objects that appear in the Results list. You can also create new objects, and view parent hierarchies.
• Query a repository and view reports that show such items as all tables mapped to a logical source, all references to a particular physical column, content filters for logical sources, initialization blocks, and security and user permissions. For example, you might want to run a report prior to making any physical changes in a database that might affect the repository. You can save the report to a file in comma-separated value (CSV) or tab-delimited format.
When you save results, the encoding options are ANSI, Unicode, and UTF-8.
Ora
cle
Inte
rnal
& O
racl
e A
cade
my
Use
Onl
y
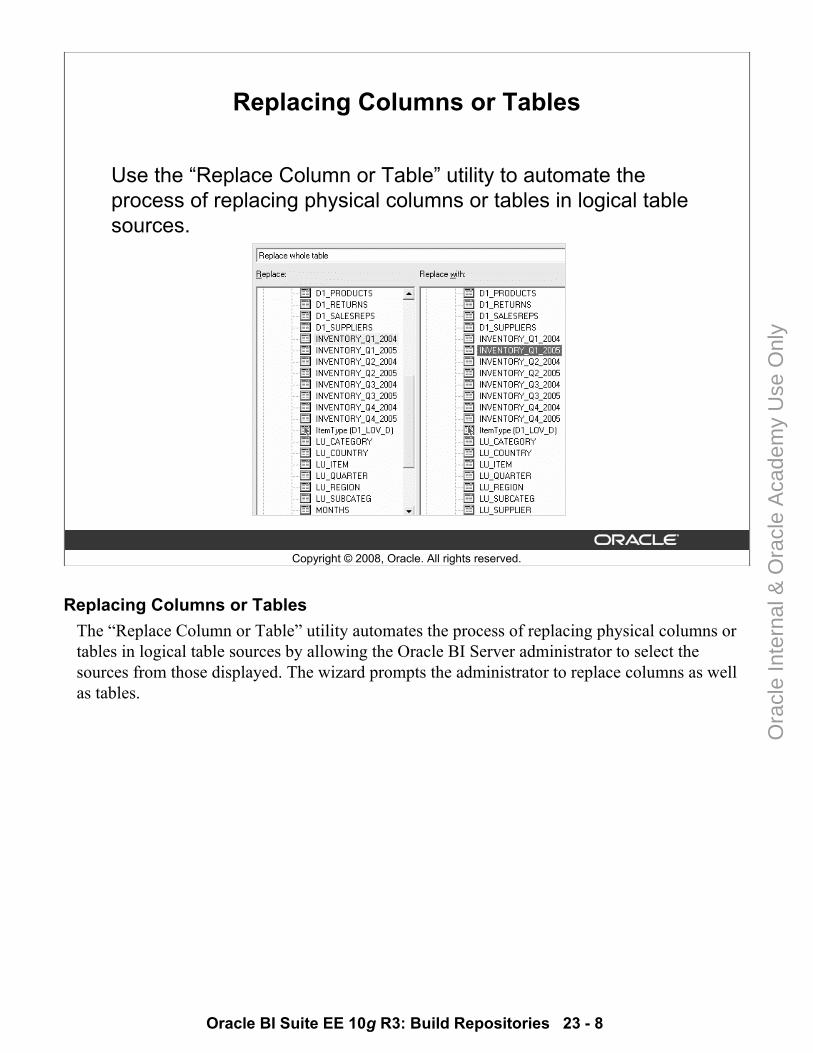
Oracle BI Suite EE 10g R3: Build Repositories 23 - 8
Copyright © 2008, Oracle. All rights reserved.
Replacing Columns or Tables
Use the “Replace Column or Table” utility to automate the process of replacing physical columns or tables in logical tablesources.
Replacing Columns or TablesThe “Replace Column or Table” utility automates the process of replacing physical columns or tables in logical table sources by allowing the Oracle BI Server administrator to select the sources from those displayed. The wizard prompts the administrator to replace columns as well as tables.
Ora
cle
Inte
rnal
& O
racl
e A
cade
my
Use
Onl
y

Oracle BI Suite EE 10g R3: Build Repositories 23 - 9
Copyright © 2008, Oracle. All rights reserved.
Externalizing Strings
Use the Externalize Strings utility to externalize presentation layer strings when setting up local language translations.
Externalizing StringsThe Externalize Strings utility is primarily for use by translators to translate Presentation layer catalogs, tables, columns, and their descriptions into other languages. You can save these text strings to a comma-separated value (CSV), tab-delimited (TXT), or Extensible Markup Language (XML) format external file with ANSI, Unicode, and UTF-8 coding options. To externalize strings, the Presentation layer tables must have their Externalize Display Names property set to On.
Ora
cle
Inte
rnal
& O
racl
e A
cade
my
Use
Onl
y
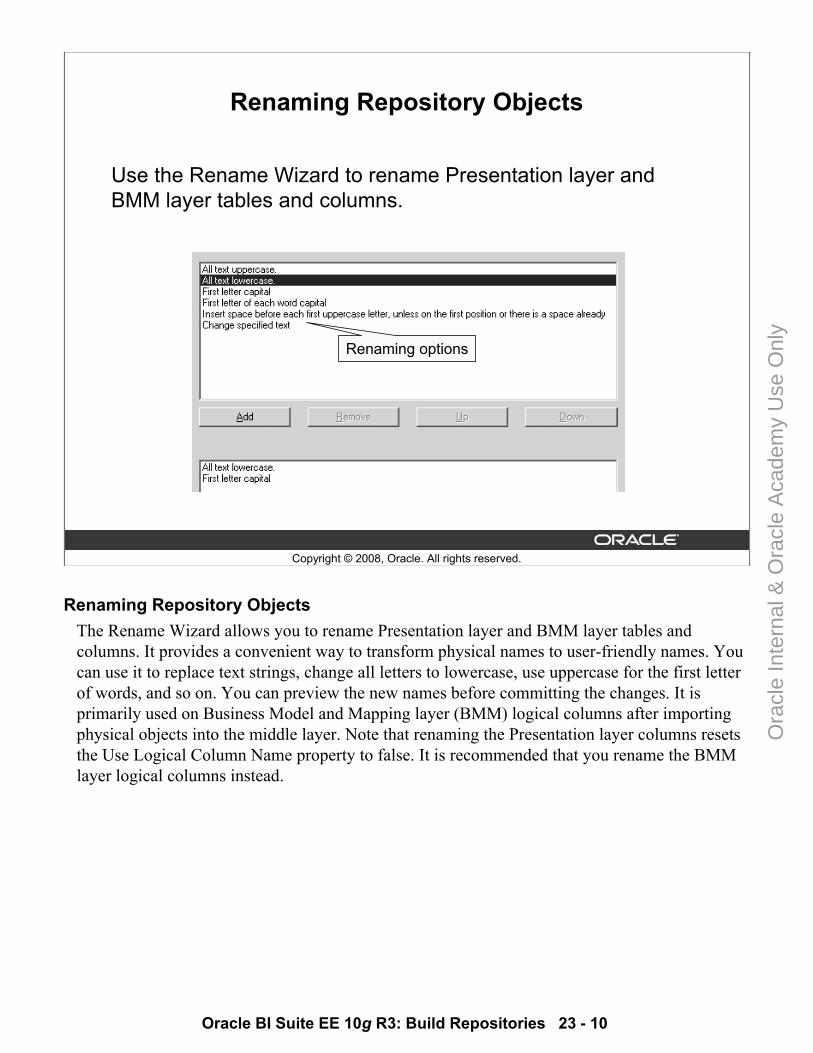
Oracle BI Suite EE 10g R3: Build Repositories 23 - 10
Copyright © 2008, Oracle. All rights reserved.
Renaming Repository Objects
Use the Rename Wizard to rename Presentation layer and BMM layer tables and columns.
Renaming options
Renaming Repository ObjectsThe Rename Wizard allows you to rename Presentation layer and BMM layer tables and columns. It provides a convenient way to transform physical names to user-friendly names. You can use it to replace text strings, change all letters to lowercase, use uppercase for the first letter of words, and so on. You can preview the new names before committing the changes. It is primarily used on Business Model and Mapping layer (BMM) logical columns after importing physical objects into the middle layer. Note that renaming the Presentation layer columns resets the Use Logical Column Name property to false. It is recommended that you rename the BMM layer logical columns instead.
Ora
cle
Inte
rnal
& O
racl
e A
cade
my
Use
Onl
y
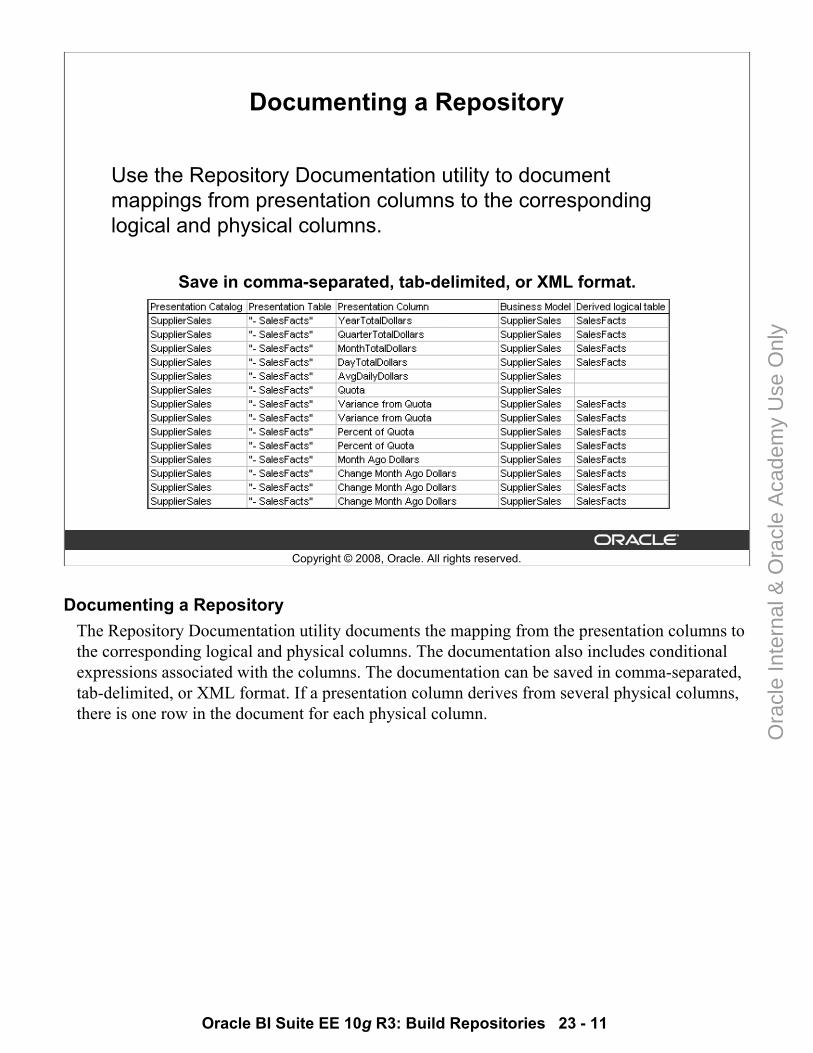
Oracle BI Suite EE 10g R3: Build Repositories 23 - 11
Copyright © 2008, Oracle. All rights reserved.
Documenting a Repository
Use the Repository Documentation utility to document mappings from presentation columns to the corresponding logical and physical columns.
Save in comma-separated, tab-delimited, or XML format.
Documenting a RepositoryThe Repository Documentation utility documents the mapping from the presentation columns to the corresponding logical and physical columns. The documentation also includes conditional expressions associated with the columns. The documentation can be saved in comma-separated, tab-delimited, or XML format. If a presentation column derives from several physical columns, there is one row in the document for each physical column.
Ora
cle
Inte
rnal
& O
racl
e A
cade
my
Use
Onl
y
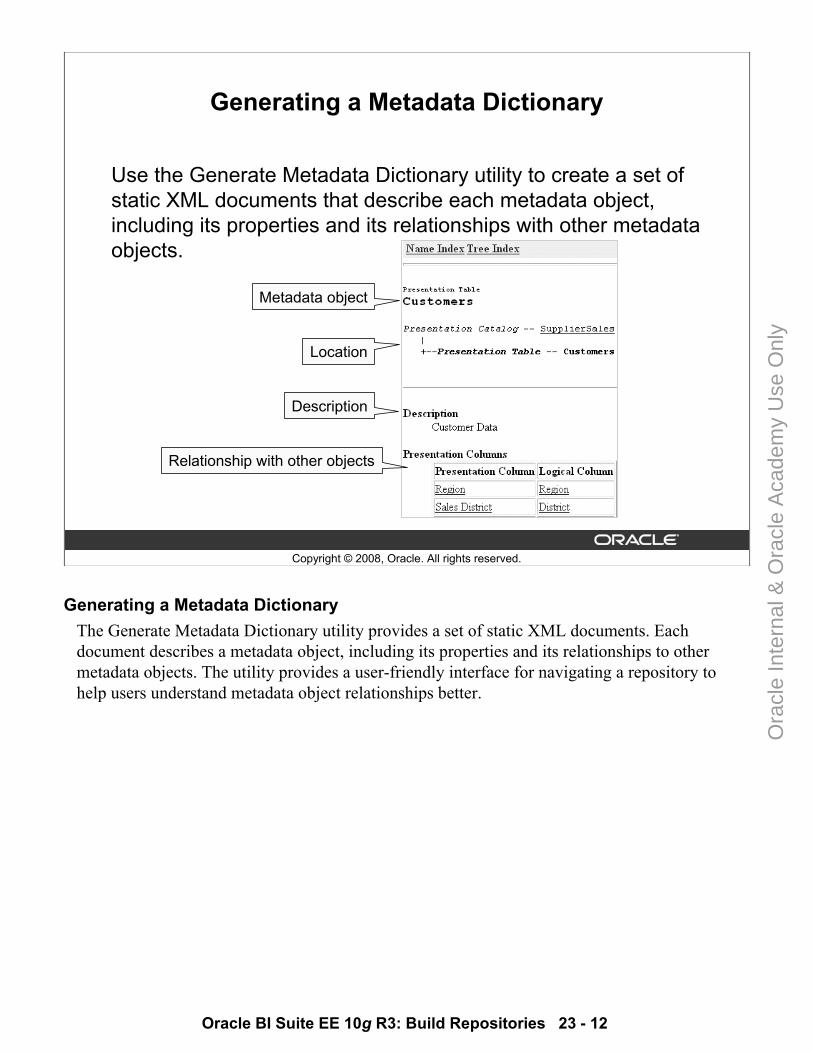
Oracle BI Suite EE 10g R3: Build Repositories 23 - 12
Copyright © 2008, Oracle. All rights reserved.
Generating a Metadata Dictionary
Use the Generate Metadata Dictionary utility to create a set of static XML documents that describe each metadata object, including its properties and its relationships with other metadata objects.
Metadata object
Location
Description
Relationship with other objects
Generating a Metadata DictionaryThe Generate Metadata Dictionary utility provides a set of static XML documents. Each document describes a metadata object, including its properties and its relationships to other metadata objects. The utility provides a user-friendly interface for navigating a repository to help users understand metadata object relationships better.
Ora
cle
Inte
rnal
& O
racl
e A
cade
my
Use
Onl
y
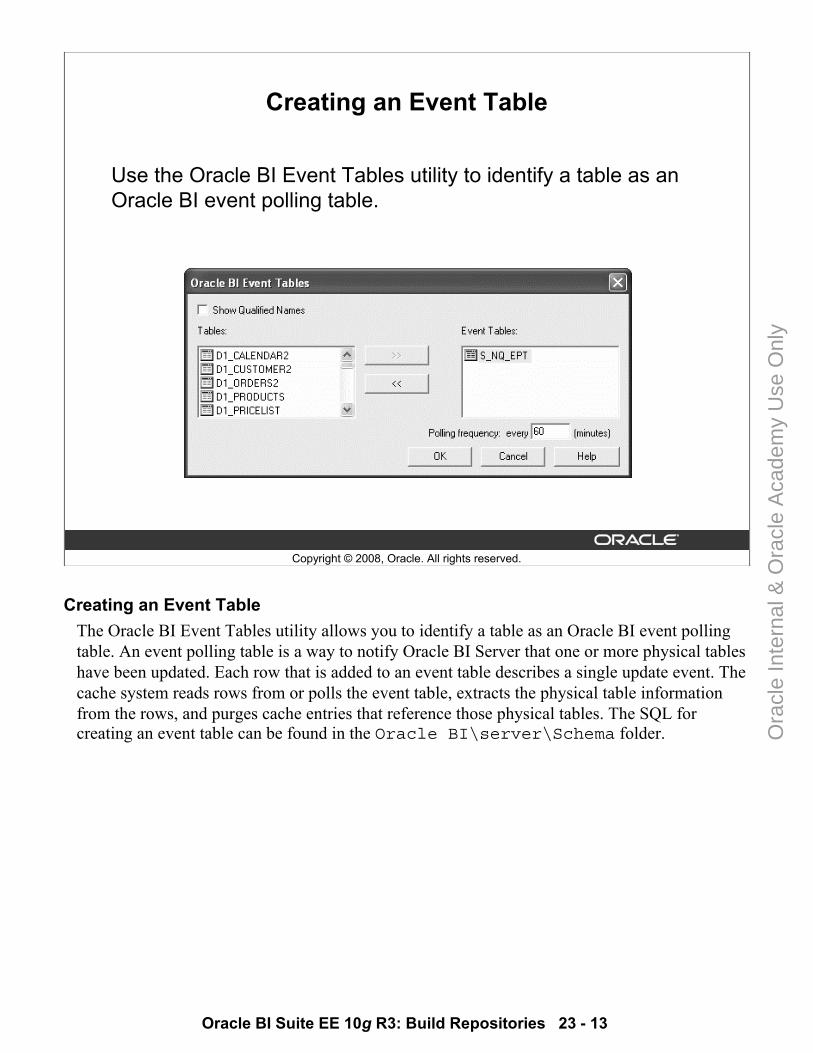
Oracle BI Suite EE 10g R3: Build Repositories 23 - 13
Copyright © 2008, Oracle. All rights reserved.
Creating an Event Table
Use the Oracle BI Event Tables utility to identify a table as anOracle BI event polling table.
Creating an Event TableThe Oracle BI Event Tables utility allows you to identify a table as an Oracle BI event polling table. An event polling table is a way to notify Oracle BI Server that one or more physical tables have been updated. Each row that is added to an event table describes a single update event. The cache system reads rows from or polls the event table, extracts the physical table information from the rows, and purges cache entries that reference those physical tables. The SQL for creating an event table can be found in the Oracle BI\server\Schema folder.
Ora
cle
Inte
rnal
& O
racl
e A
cade
my
Use
Onl
y
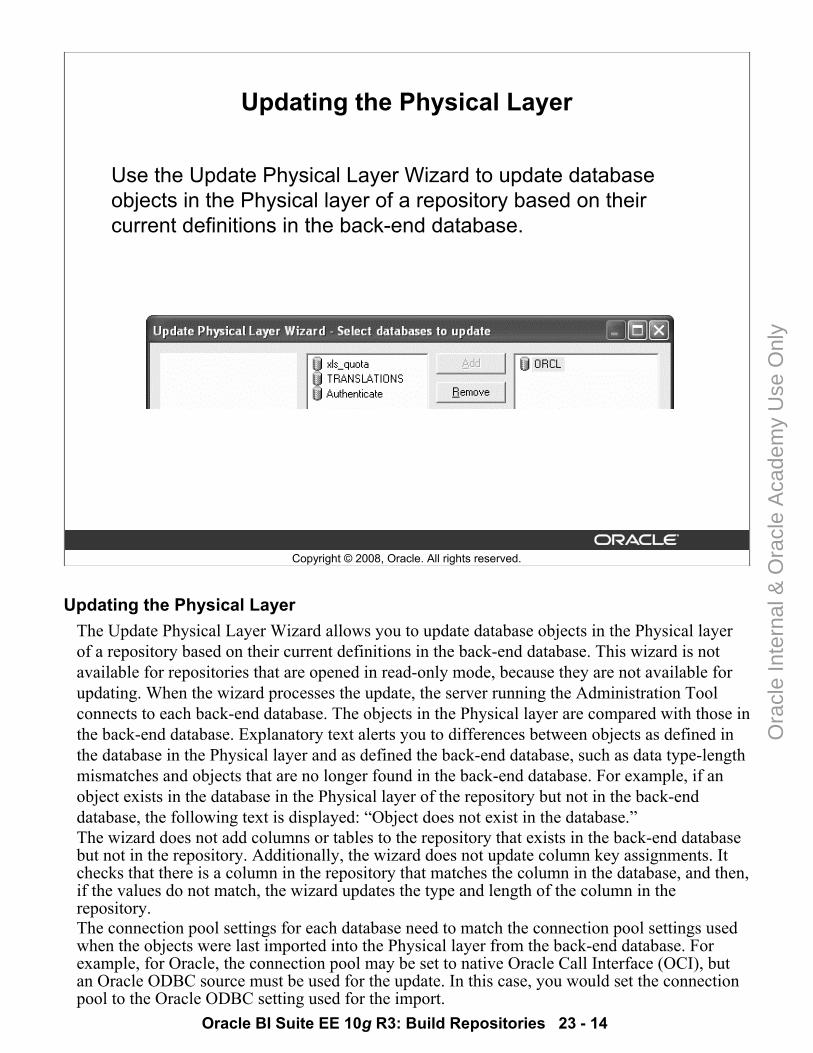
Oracle BI Suite EE 10g R3: Build Repositories 23 - 14
Copyright © 2008, Oracle. All rights reserved.
Updating the Physical Layer
Use the Update Physical Layer Wizard to update database objects in the Physical layer of a repository based on their current definitions in the back-end database.
Updating the Physical LayerThe Update Physical Layer Wizard allows you to update database objects in the Physical layer of a repository based on their current definitions in the back-end database. This wizard is not available for repositories that are opened in read-only mode, because they are not available for updating. When the wizard processes the update, the server running the Administration Tool connects to each back-end database. The objects in the Physical layer are compared with those in the back-end database. Explanatory text alerts you to differences between objects as defined in the database in the Physical layer and as defined the back-end database, such as data type-length mismatches and objects that are no longer found in the back-end database. For example, if an object exists in the database in the Physical layer of the repository but not in the back-end database, the following text is displayed: “Object does not exist in the database.”The wizard does not add columns or tables to the repository that exists in the back-end database but not in the repository. Additionally, the wizard does not update column key assignments. It checks that there is a column in the repository that matches the column in the database, and then, if the values do not match, the wizard updates the type and length of the column in the repository.The connection pool settings for each database need to match the connection pool settings used when the objects were last imported into the Physical layer from the back-end database. For example, for Oracle, the connection pool may be set to native Oracle Call Interface (OCI), but an Oracle ODBC source must be used for the update. In this case, you would set the connection pool to the Oracle ODBC setting used for the import.
Ora
cle
Inte
rnal
& O
racl
e A
cade
my
Use
Onl
y
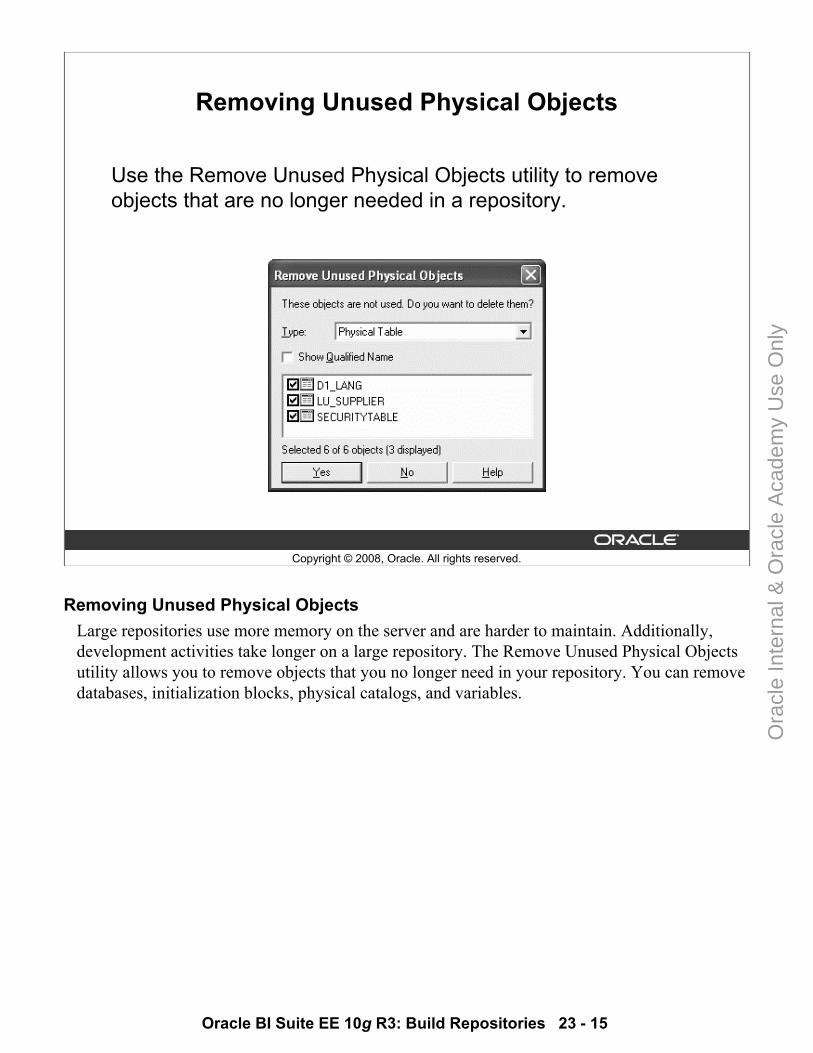
Oracle BI Suite EE 10g R3: Build Repositories 23 - 15
Copyright © 2008, Oracle. All rights reserved.
Removing Unused Physical Objects
Use the Remove Unused Physical Objects utility to remove objects that are no longer needed in a repository.
Removing Unused Physical ObjectsLarge repositories use more memory on the server and are harder to maintain. Additionally, development activities take longer on a large repository. The Remove Unused Physical Objects utility allows you to remove objects that you no longer need in your repository. You can remove databases, initialization blocks, physical catalogs, and variables.
Ora
cle
Inte
rnal
& O
racl
e A
cade
my
Use
Onl
y
Oracle BI Suite EE 10g R3: Build Repositories 23 - 16
Copyright © 2008, Oracle. All rights reserved.
Summary
In this lesson, you should have learned how to:• Describe the various wizards and utilities contained in the
Oracle BI Administration Tool• Use the Administration Tool wizards and utilities to manage,
maintain, and enhance repositories
Ora
cle
Inte
rnal
& O
racl
e A
cade
my
Use
Onl
y
Oracle BI Suite EE 10g R3: Build Repositories 23 - 17
Copyright © 2008, Oracle. All rights reserved.
Practice 23-1 Overview: Exploring Administration Tool Features
This practice covers the following topics:• Exploring Administration Tool utilities• Exploring Administration Tool wizards• Exploring Administration Tool options
Practice 23-1 Overview: Exploring Administration Tool FeaturesIn this practice, you explore Administration Tool utilities, wizards, and options to provide you with an orientation to Administration Tool features that are useful for maintaining and enhancing repositories.
Ora
cle
Inte
rnal
& O
racl
e A
cade
my
Use
Onl
y

Ora
cle
Inte
rnal
& O
racl
e A
cade
my
Use
Onl
y
Copyright © 2008, Oracle. All rights reserved.
Optimizing Query Performance
Ora
cle
Inte
rnal
& O
racl
e A
cade
my
Use
Onl
y
Oracle BI Suite EE 10g R3: Build Repositories 24 - 2
Copyright © 2008, Oracle. All rights reserved.
Objective
After completing this lesson, you should be able to identify techniques to optimize Oracle Business Intelligence (BI) query performance.
Ora
cle
Inte
rnal
& O
racl
e A
cade
my
Use
Onl
y
Oracle BI Suite EE 10g R3: Build Repositories 24 - 3
Copyright © 2008, Oracle. All rights reserved.
Business Challenge
Poor query performance is the biggest obstacle to BIend-user adoption and satisfaction:• Business users expect near-instantaneous query responses. • Users waiting for results for more than 5–10 seconds seek
other alternatives.• Users are more tolerant when results are valuable or rare.• Most users do not overtly complain and silently defect.• Users may defect even if there is no other credible source
and may rely on soft, fallible data, instinct, or best guess.• Exponential growth of data adds to the challenge of
maintaining performance.
Business ChallengeThe biggest obstacle to end-user adoption of any business intelligence (BI) tool deployment is the inability to ensure strong query performance consistently. Business users have high expectations of near-instantaneous query responses and low tolerance when their expectations are not met. Additionally, users are not very sympathetic to the technical challenges inherent in servicing dynamic, ad hoc BI environments.Users are generally more performance tolerant with particularly compelling or exclusive content than with the ordinary. Frustrated users generally do not complain, but they choose not to return over time. This “quiet defection” is particularly apt in BI tool deployments, in which business users tend to be highly creative with multiple back-door channels to information. BI users move quickly and silently to softer, more fallible data when their needs are not being met. This is especially true when query performance expectations are not being met. Compounding the challenge of maintaining performance is the exponential growth of stored data. Some analysts estimate that application data volume will increase by 125% per year. While it is necessary to make this data accessible, the majority of data is not actively used. In fact, as the historical data itself ages, the need for elaborate details diminishes increasingly.
Ora
cle
Inte
rnal
& O
racl
e A
cade
my
Use
Onl
y
Oracle BI Suite EE 10g R3: Build Repositories 24 - 4
Copyright © 2008, Oracle. All rights reserved.
Business Solution
• Establish realistic performance expectations.– Four- to five-second refresh rates are a reasonable
performance cap goal for most BI content.• Monitor end-user query habits.
– Requests returning large numbers of records indicate that users are running “extracts” and building offline information silos.
• Be proactive with performance.– Include an overtly specified, comprehensive performance
optimization stage in every implementation project.
Business SolutionOne key to managing end-user query performance is establishing realistic expectations. Business users will always demand instantaneous query performance. However, the actual difference between subsecond and sub-five-second query response times is often negligible to the majority of end users. Conversely, the perceived difference between five-second and ten-second response times can be profound.BI tools are most effective when supporting “speed of thought” analysis, meaning the performance latency results for one analysis should not negatively impact subsequent analysis accessed via drilling. Business users are generally accustomed to the latency built with refreshing browser pages while surfing the Web. Faster is almost always better, but four- to five-second refresh rates are a reasonable performance cap goal for most BI content.Another important step is to monitor end-user query habits. A warning sign of defection from end-user adoption is an increased use of requests returning large numbers of records. This indicates that users are running “extracts,” building and consolidating offline information silos (spreadsheet applications, departmental data marts, and so on) outside the approved, consistent, and centralized information repository.
Ora
cle
Inte
rnal
& O
racl
e A
cade
my
Use
Onl
y

Oracle BI Suite EE 10g R3: Build Repositories 24 - 5
Business Solution (continued)It is also best to be proactive when addressing performance needs. Perhaps the most effective means of proactively managing query performance is to mandate and budget tasks solely targeted at query performance optimization in all release cycles. Many integrators claim their methodologies seamlessly thread performance tasks throughout requirements, design, and build stages. However, performance issues are too often considered at the end of the process or as an afterthought. In these cases, query performance issues become apparent only after end users have experienced problems. This can cause project slippage and negative first impressions that are difficult to overcome. Project plans without explicitly called out performance optimization tasks should be treated with a great deal of skepticism.
Ora
cle
Inte
rnal
& O
racl
e A
cade
my
Use
Onl
y
Oracle BI Suite EE 10g R3: Build Repositories 24 - 6
Copyright © 2008, Oracle. All rights reserved.
Oracle BI Features That Optimize Performance
Embedded Oracle BI features and functions optimize end-user query performance:• Intelligent query generation• Aggregate navigation• Data source function shipping• Multipass SQL generation• Platform-specific SQL/MDX optimization• Clustering• Query caching
Oracle BI Features That Optimize Performance The Oracle BI Enterprise Edition suite of tools is built with attention given to optimizing end-user query performance. Many performance optimization features and functions exist in the platform, including (but not limited to):
• Intelligent query generation• Aggregate navigation• Data source function shipping• Multipass SQL generation• Platform-specific SQL/MDX optimization• Clustering• Query caching
If Oracle BI EE metadata is configured correctly, end-user query issues are generally bound by the technical limitations of the underlying data sources. Therefore, the most effective means of optimizing end-user query performance is to deploy a comprehensive aggregate summarization process. This and other performance optimization techniques are discussed in the slides that follow.
Ora
cle
Inte
rnal
& O
racl
e A
cade
my
Use
Onl
y
Oracle BI Suite EE 10g R3: Build Repositories 24 - 7
Copyright © 2008, Oracle. All rights reserved.
Optimizing Query Performance
• Using aggregates• Using aggregate navigation• Constraining results using a WHERE clause• Caching• Limiting the number of initialization blocks• Limiting select table types• Modeling dimension hierarchies correctly • Turning off logging• Setting query limits• Pushing calculations to the database• Exposing materialized views in the Physical layer• Using database hints• Setting the NQSConfig.ini parameters
Optimizing Query Performance: RepositoryThere are many query performance optimization steps that can be taken during and after an Oracle BI implementation. Most of these steps have already been covered in this course. The purpose of the remainder of this lesson is to revisit and explain these topics in the context of query performance optimization. Each topic is discussed in this context in the slides that follow.Note that the topics discussed in this lesson concern only those steps that can be taken in Oracle BI EE. They do not address issues related to hardware memory, back-end databases, extraction, transformation, and loading (ETL) software, and network bandwidth, or the impact of various computing architectures, topologies, memory sizes, CPUs, and so on.
Ora
cle
Inte
rnal
& O
racl
e A
cade
my
Use
Onl
y
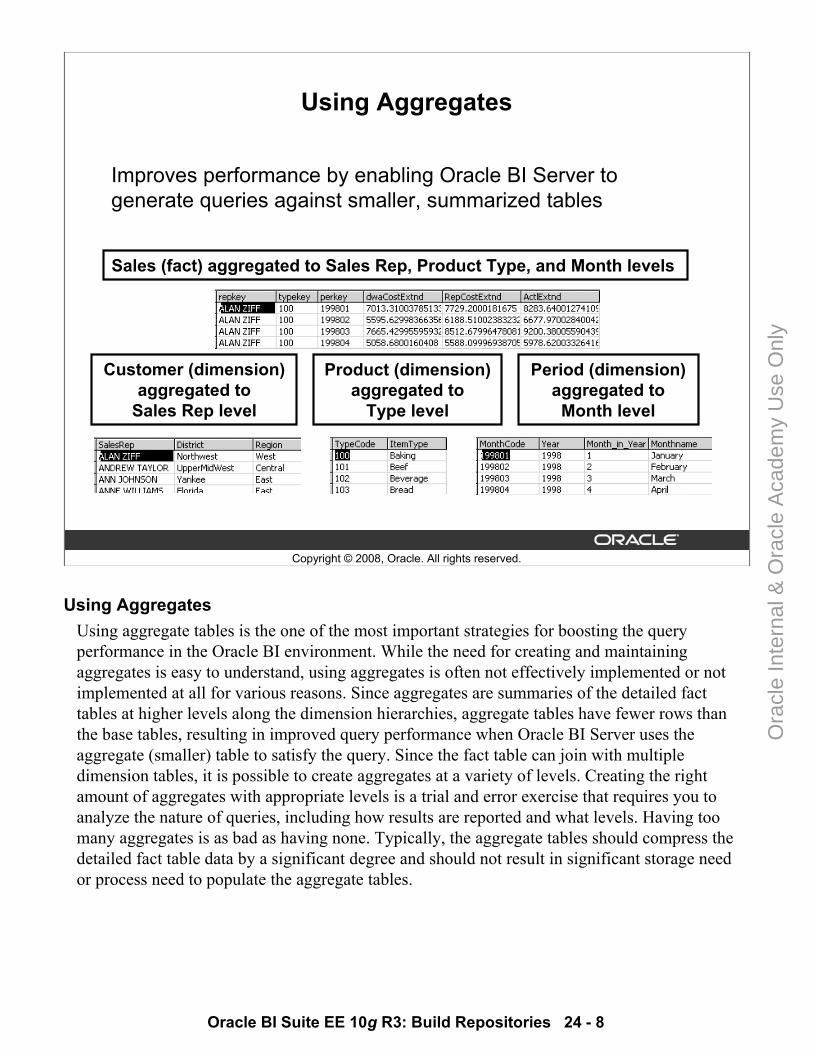
Oracle BI Suite EE 10g R3: Build Repositories 24 - 8
Copyright © 2008, Oracle. All rights reserved.
Using Aggregates
Improves performance by enabling Oracle BI Server to generate queries against smaller, summarized tables
Sales (fact) aggregated to Sales Rep, Product Type, and Month levels
Customer (dimension) aggregated to
Sales Rep level
Product (dimension) aggregated to
Type level
Period (dimension) aggregated to Month level
Using AggregatesUsing aggregate tables is the one of the most important strategies for boosting the query performance in the Oracle BI environment. While the need for creating and maintaining aggregates is easy to understand, using aggregates is often not effectively implemented or not implemented at all for various reasons. Since aggregates are summaries of the detailed fact tables at higher levels along the dimension hierarchies, aggregate tables have fewer rows than the base tables, resulting in improved query performance when Oracle BI Server uses the aggregate (smaller) table to satisfy the query. Since the fact table can join with multiple dimension tables, it is possible to create aggregates at a variety of levels. Creating the right amount of aggregates with appropriate levels is a trial and error exercise that requires you to analyze the nature of queries, including how results are reported and what levels. Having too many aggregates is as bad as having none. Typically, the aggregate tables should compress the detailed fact table data by a significant degree and should not result in significant storage need or process need to populate the aggregate tables.
Ora
cle
Inte
rnal
& O
racl
e A
cade
my
Use
Onl
y
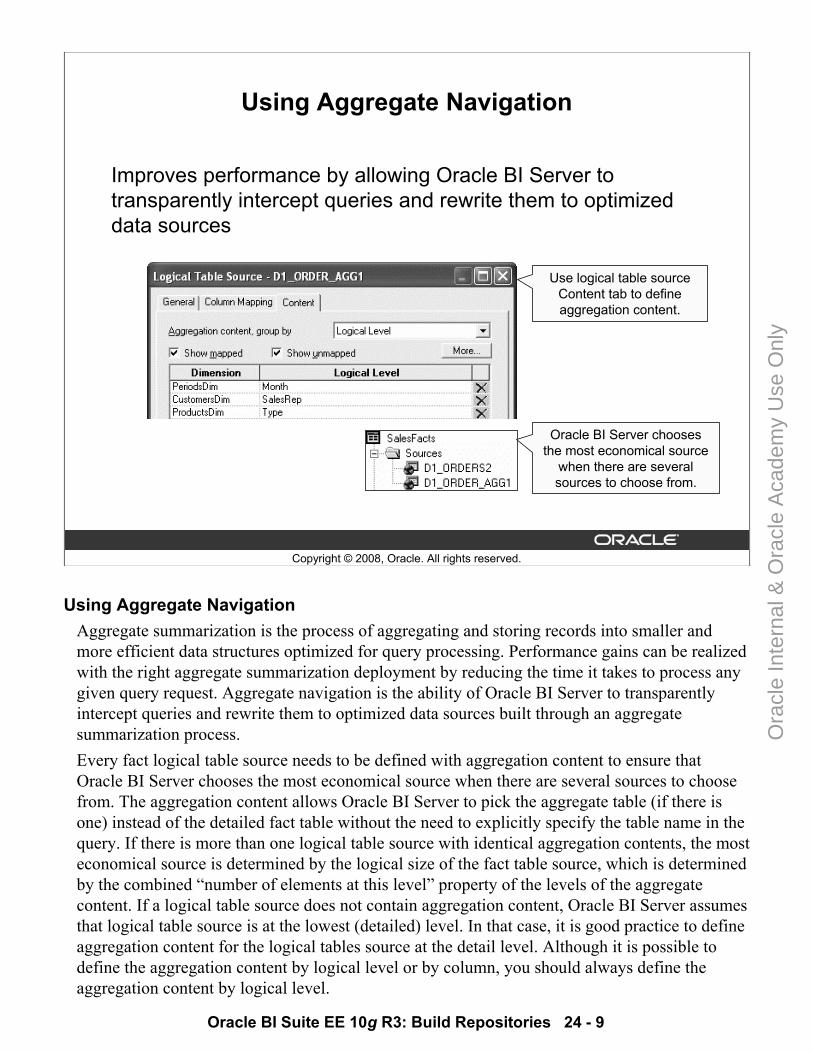
Oracle BI Suite EE 10g R3: Build Repositories 24 - 9
Copyright © 2008, Oracle. All rights reserved.
Using Aggregate Navigation
Improves performance by allowing Oracle BI Server to transparently intercept queries and rewrite them to optimized data sources
Use logical table source Content tab to define aggregation content.
Oracle BI Server chooses the most economical source
when there are several sources to choose from.
Using Aggregate Navigation Aggregate summarization is the process of aggregating and storing records into smaller and more efficient data structures optimized for query processing. Performance gains can be realized with the right aggregate summarization deployment by reducing the time it takes to process any given query request. Aggregate navigation is the ability of Oracle BI Server to transparently intercept queries and rewrite them to optimized data sources built through an aggregate summarization process. Every fact logical table source needs to be defined with aggregation content to ensure that Oracle BI Server chooses the most economical source when there are several sources to choose from. The aggregation content allows Oracle BI Server to pick the aggregate table (if there is one) instead of the detailed fact table without the need to explicitly specify the table name in the query. If there is more than one logical table source with identical aggregation contents, the most economical source is determined by the logical size of the fact table source, which is determined by the combined “number of elements at this level” property of the levels of the aggregate content. If a logical table source does not contain aggregation content, Oracle BI Server assumes that logical table source is at the lowest (detailed) level. In that case, it is good practice to define aggregation content for the logical tables source at the detail level. Although it is possible to define the aggregation content by logical level or by column, you should always define the aggregation content by logical level.
Ora
cle
Inte
rnal
& O
racl
e A
cade
my
Use
Onl
y
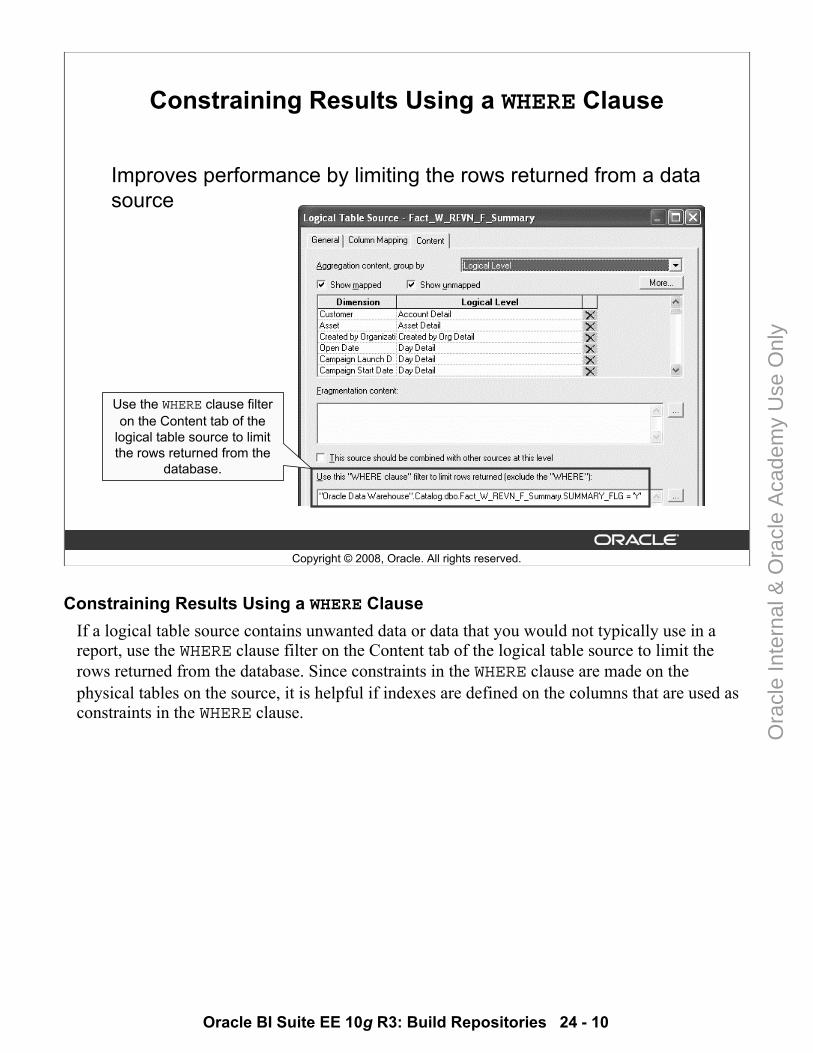
Oracle BI Suite EE 10g R3: Build Repositories 24 - 10
Copyright © 2008, Oracle. All rights reserved.
Constraining Results Using a WHERE Clause
Improves performance by limiting the rows returned from a data source
Use the WHERE clause filter on the Content tab of the
logical table source to limit the rows returned from the
database.
Constraining Results Using a WHERE Clause If a logical table source contains unwanted data or data that you would not typically use in a report, use the WHERE clause filter on the Content tab of the logical table source to limit the rows returned from the database. Since constraints in the WHERE clause are made on the physical tables on the source, it is helpful if indexes are defined on the columns that are used as constraints in the WHERE clause.
Ora
cle
Inte
rnal
& O
racl
e A
cade
my
Use
Onl
y
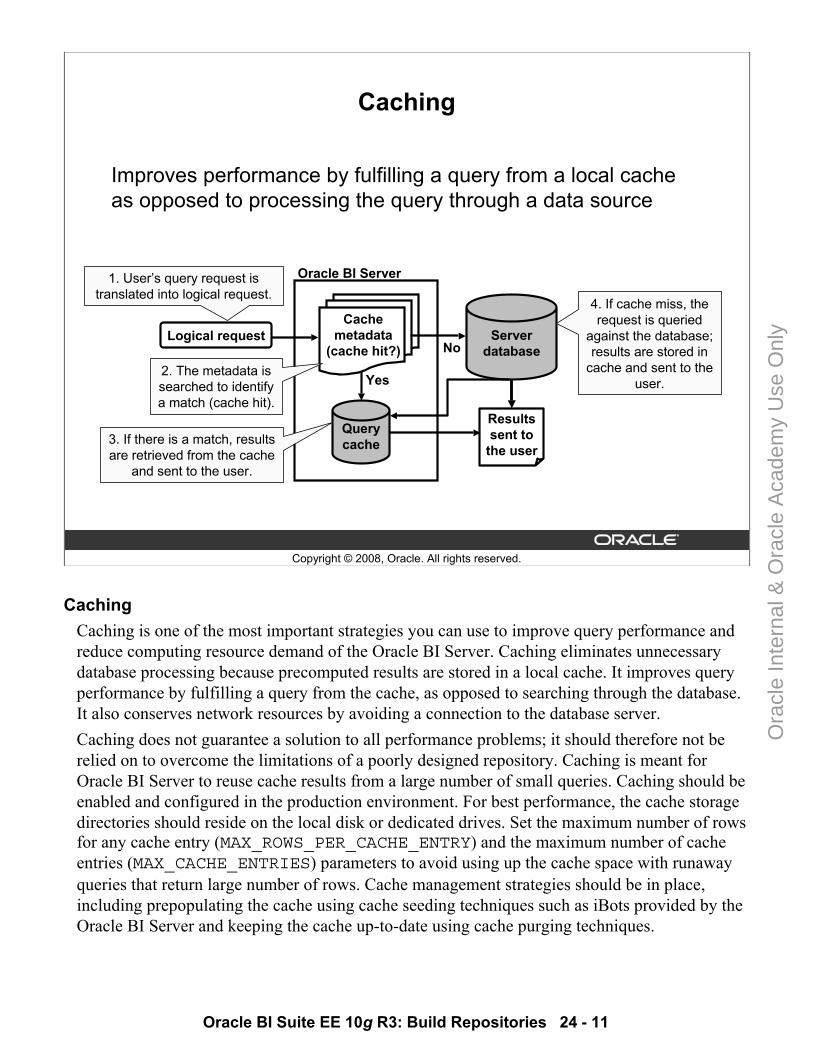
Oracle BI Suite EE 10g R3: Build Repositories 24 - 11
Copyright © 2008, Oracle. All rights reserved.
Caching
Improves performance by fulfilling a query from a local cache as opposed to processing the query through a data source
Querycache
Serverdatabase
Cachemetadata
(cache hit?)Logical request
Yes
No
Resultssent to
the user
Oracle BI Server1. User’s query request is translated into logical request.
2. The metadata is searched to identify a match (cache hit).
4. If cache miss, the request is queried
against the database; results are stored in
cache and sent to the user.
3. If there is a match, results are retrieved from the cache
and sent to the user.
CachingCaching is one of the most important strategies you can use to improve query performance and reduce computing resource demand of the Oracle BI Server. Caching eliminates unnecessary database processing because precomputed results are stored in a local cache. It improves query performance by fulfilling a query from the cache, as opposed to searching through the database. It also conserves network resources by avoiding a connection to the database server.Caching does not guarantee a solution to all performance problems; it should therefore not be relied on to overcome the limitations of a poorly designed repository. Caching is meant for Oracle BI Server to reuse cache results from a large number of small queries. Caching should be enabled and configured in the production environment. For best performance, the cache storage directories should reside on the local disk or dedicated drives. Set the maximum number of rows for any cache entry (MAX_ROWS_PER_CACHE_ENTRY) and the maximum number of cache entries (MAX_CACHE_ENTRIES) parameters to avoid using up the cache space with runaway queries that return large number of rows. Cache management strategies should be in place, including prepopulating the cache using cache seeding techniques such as iBots provided by the Oracle BI Server and keeping the cache up-to-date using cache purging techniques.
Ora
cle
Inte
rnal
& O
racl
e A
cade
my
Use
Onl
y
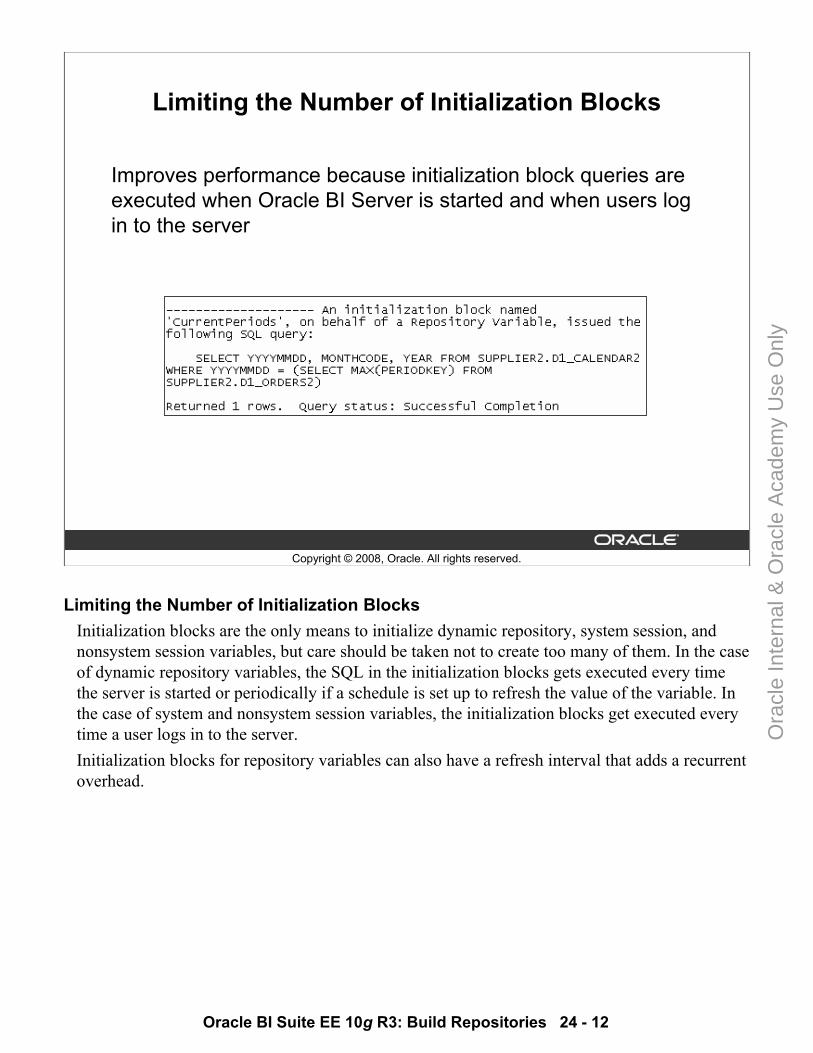
Oracle BI Suite EE 10g R3: Build Repositories 24 - 12
Copyright © 2008, Oracle. All rights reserved.
Limiting the Number of Initialization Blocks
Improves performance because initialization block queries are executed when Oracle BI Server is started and when users log in to the server
Limiting the Number of Initialization BlocksInitialization blocks are the only means to initialize dynamic repository, system session, and nonsystem session variables, but care should be taken not to create too many of them. In the case of dynamic repository variables, the SQL in the initialization blocks gets executed every time the server is started or periodically if a schedule is set up to refresh the value of the variable. In the case of system and nonsystem session variables, the initialization blocks get executed every time a user logs in to the server. Initialization blocks for repository variables can also have a refresh interval that adds a recurrent overhead.
Ora
cle
Inte
rnal
& O
racl
e A
cade
my
Use
Onl
y
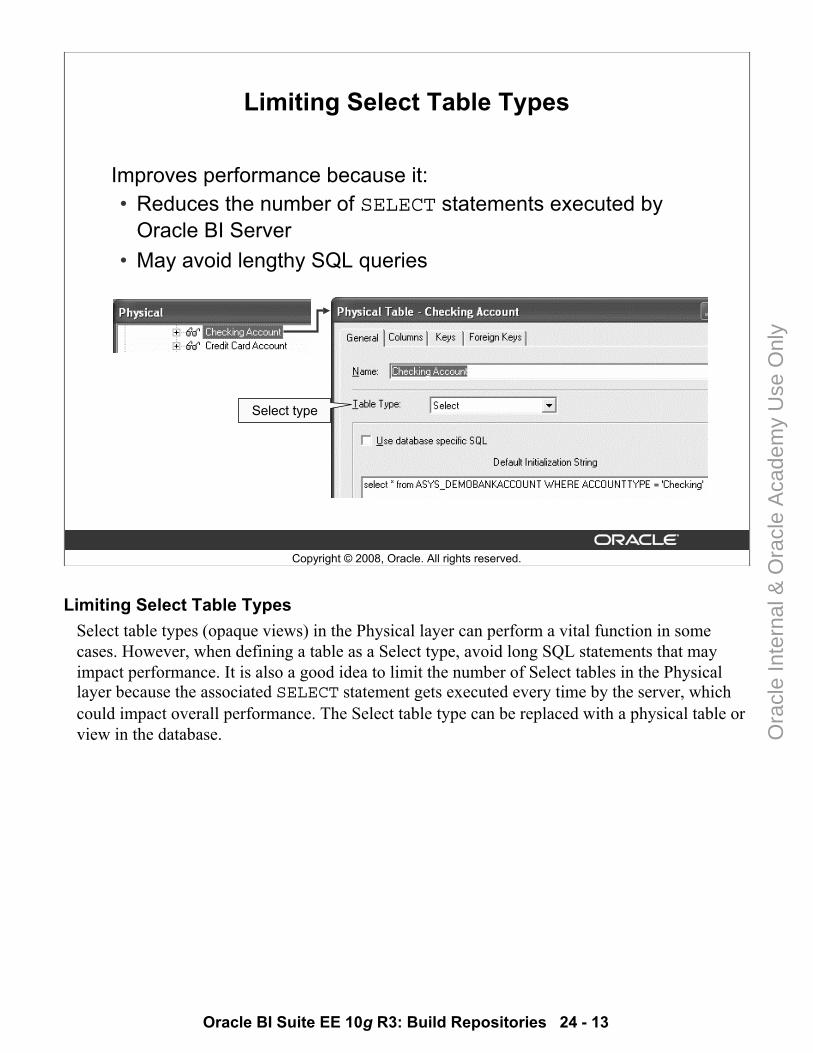
Oracle BI Suite EE 10g R3: Build Repositories 24 - 13
Copyright © 2008, Oracle. All rights reserved.
Limiting Select Table Types
Improves performance because it: • Reduces the number of SELECT statements executed by
Oracle BI Server• May avoid lengthy SQL queries
Select type
Limiting Select Table TypesSelect table types (opaque views) in the Physical layer can perform a vital function in some cases. However, when defining a table as a Select type, avoid long SQL statements that may impact performance. It is also a good idea to limit the number of Select tables in the Physical layer because the associated SELECT statement gets executed every time by the server, which could impact overall performance. The Select table type can be replaced with a physical table or view in the database.
Ora
cle
Inte
rnal
& O
racl
e A
cade
my
Use
Onl
y
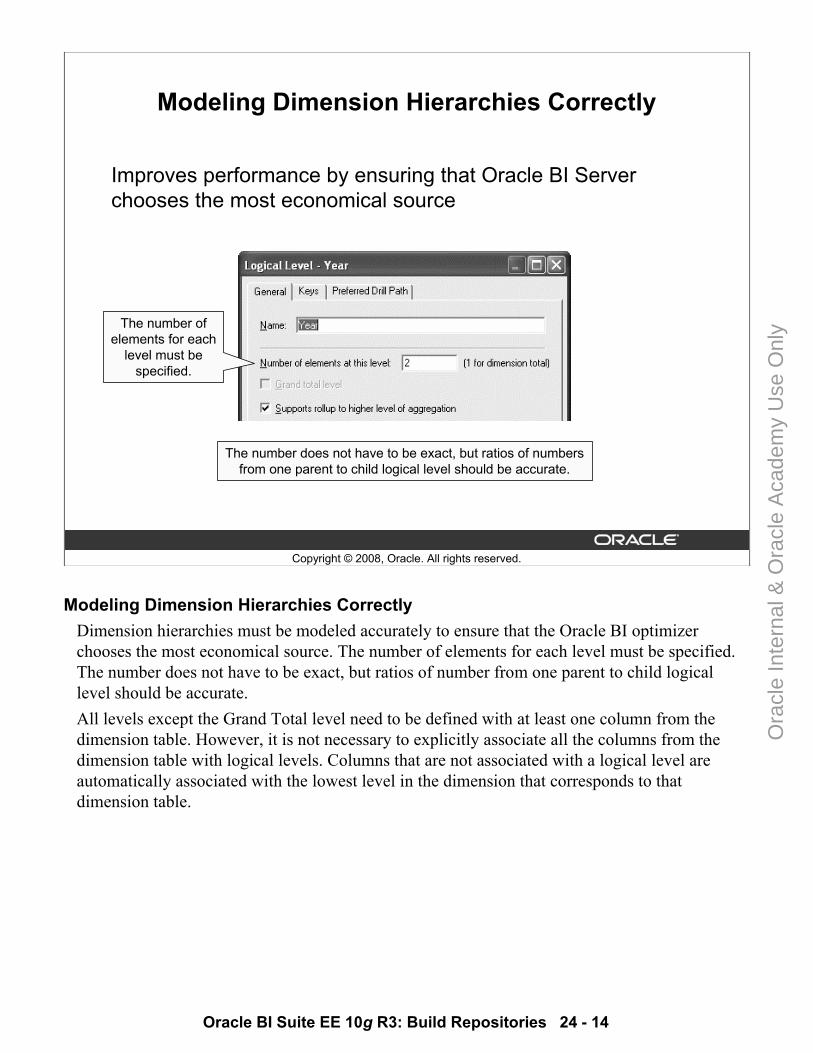
Oracle BI Suite EE 10g R3: Build Repositories 24 - 14
Copyright © 2008, Oracle. All rights reserved.
Modeling Dimension Hierarchies Correctly
Improves performance by ensuring that Oracle BI Server chooses the most economical source
The number of elements for each
level must be specified.
The number does not have to be exact, but ratios of numbers from one parent to child logical level should be accurate.
Modeling Dimension Hierarchies Correctly Dimension hierarchies must be modeled accurately to ensure that the Oracle BI optimizer chooses the most economical source. The number of elements for each level must be specified. The number does not have to be exact, but ratios of number from one parent to child logical level should be accurate. All levels except the Grand Total level need to be defined with at least one column from the dimension table. However, it is not necessary to explicitly associate all the columns from the dimension table with logical levels. Columns that are not associated with a logical level are automatically associated with the lowest level in the dimension that corresponds to that dimension table.
Ora
cle
Inte
rnal
& O
racl
e A
cade
my
Use
Onl
y
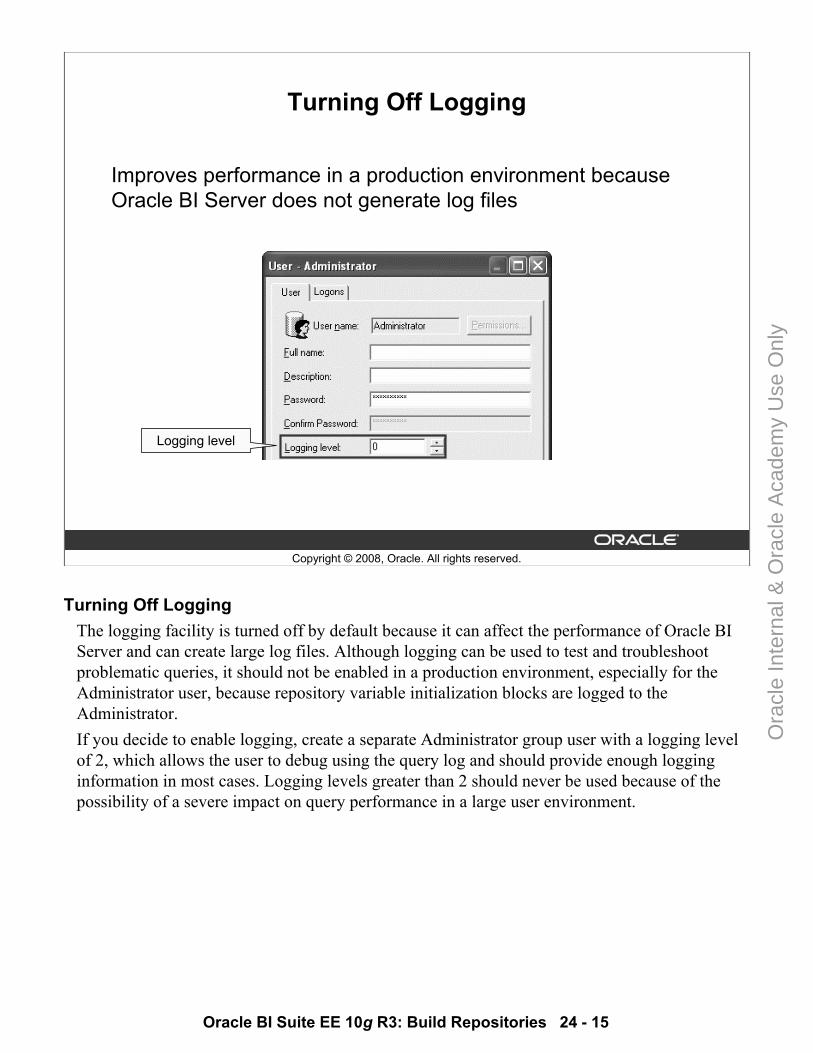
Oracle BI Suite EE 10g R3: Build Repositories 24 - 15
Copyright © 2008, Oracle. All rights reserved.
Turning Off Logging
Improves performance in a production environment because Oracle BI Server does not generate log files
Logging level
Turning Off LoggingThe logging facility is turned off by default because it can affect the performance of Oracle BI Server and can create large log files. Although logging can be used to test and troubleshoot problematic queries, it should not be enabled in a production environment, especially for the Administrator user, because repository variable initialization blocks are logged to the Administrator. If you decide to enable logging, create a separate Administrator group user with a logging level of 2, which allows the user to debug using the query log and should provide enough logging information in most cases. Logging levels greater than 2 should never be used because of the possibility of a severe impact on query performance in a large user environment.
Ora
cle
Inte
rnal
& O
racl
e A
cade
my
Use
Onl
y
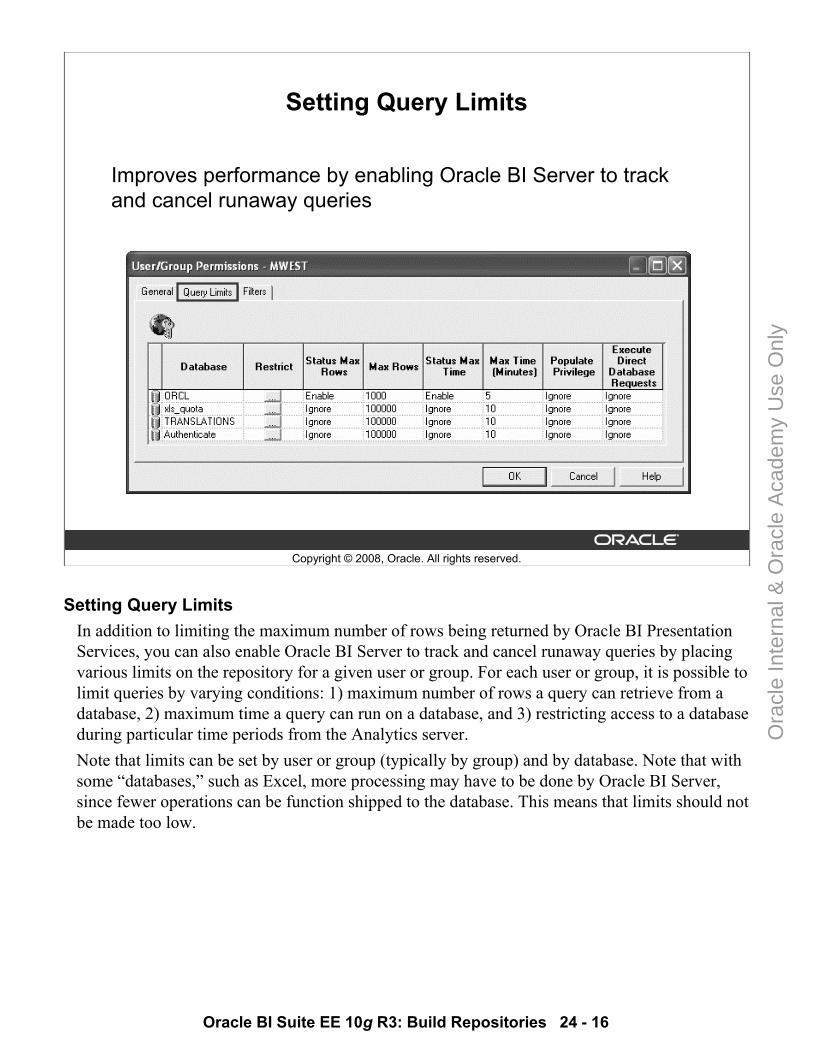
Oracle BI Suite EE 10g R3: Build Repositories 24 - 16
Copyright © 2008, Oracle. All rights reserved.
Setting Query Limits
Improves performance by enabling Oracle BI Server to track and cancel runaway queries
Setting Query LimitsIn addition to limiting the maximum number of rows being returned by Oracle BI Presentation Services, you can also enable Oracle BI Server to track and cancel runaway queries by placing various limits on the repository for a given user or group. For each user or group, it is possible to limit queries by varying conditions: 1) maximum number of rows a query can retrieve from a database, 2) maximum time a query can run on a database, and 3) restricting access to a database during particular time periods from the Analytics server. Note that limits can be set by user or group (typically by group) and by database. Note that with some “databases,” such as Excel, more processing may have to be done by Oracle BI Server, since fewer operations can be function shipped to the database. This means that limits should not be made too low.
Ora
cle
Inte
rnal
& O
racl
e A
cade
my
Use
Onl
y
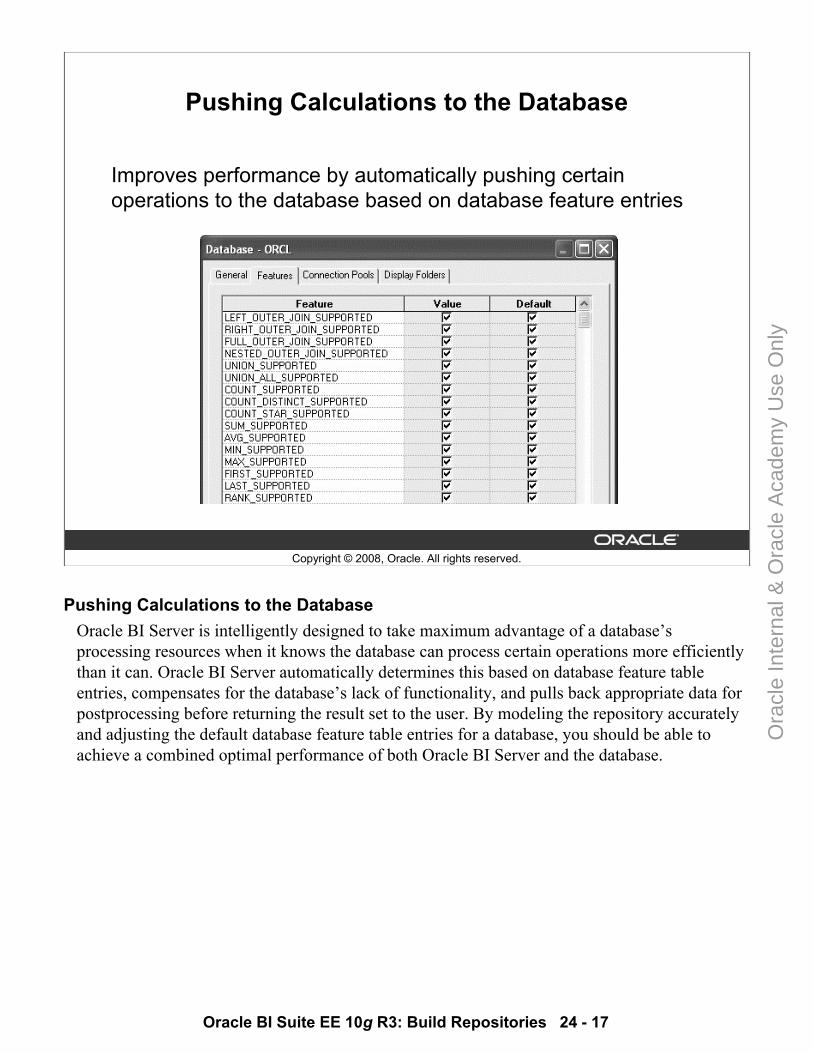
Oracle BI Suite EE 10g R3: Build Repositories 24 - 17
Copyright © 2008, Oracle. All rights reserved.
Pushing Calculations to the Database
Improves performance by automatically pushing certain operations to the database based on database feature entries
Pushing Calculations to the DatabaseOracle BI Server is intelligently designed to take maximum advantage of a database’s processing resources when it knows the database can process certain operations more efficiently than it can. Oracle BI Server automatically determines this based on database feature table entries, compensates for the database’s lack of functionality, and pulls back appropriate data for postprocessing before returning the result set to the user. By modeling the repository accurately and adjusting the default database feature table entries for a database, you should be able to achieve a combined optimal performance of both Oracle BI Server and the database.
Ora
cle
Inte
rnal
& O
racl
e A
cade
my
Use
Onl
y
Oracle BI Suite EE 10g R3: Build Repositories 24 - 18
Copyright © 2008, Oracle. All rights reserved.
Exposing Materialized Views in the Physical Layer
Improves performance because exposing materialized views explicitly guarantees that Oracle BI Server chooses the most economical table source to satisfy a query
Exposing Materialized Views in the Physical LayerMaterialized views are schema objects that are used to compute and store aggregated data such as sums and averages. If materialized views are used in the database, they should be exposed in the Physical layer of the repository and modeled as regular aggregate tables. Since materialized views are hidden objects, Oracle BI Server has to rely on the query optimizer of the database for query rewrites to use correct materialized views. Exposing them explicitly guarantees that Oracle BI Server chooses the most economical table source to satisfy a query.
Ora
cle
Inte
rnal
& O
racl
e A
cade
my
Use
Onl
y
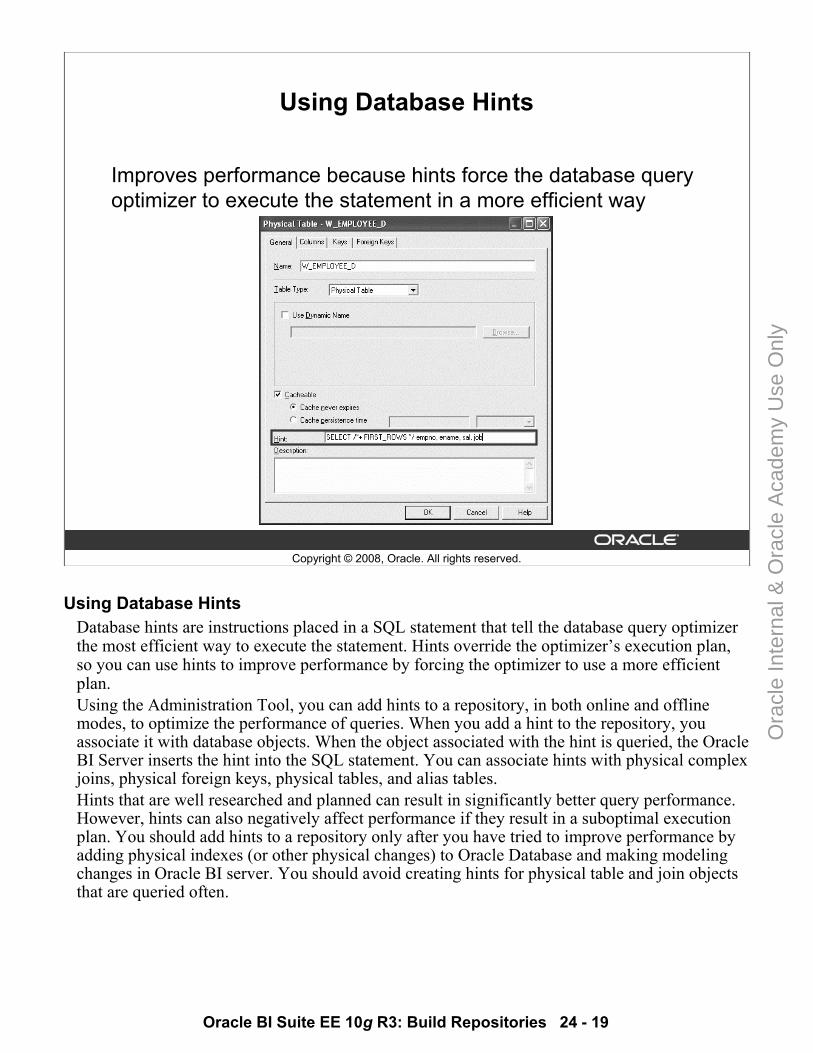
Oracle BI Suite EE 10g R3: Build Repositories 24 - 19
Copyright © 2008, Oracle. All rights reserved.
Using Database Hints
Improves performance because hints force the database query optimizer to execute the statement in a more efficient way
Using Database HintsDatabase hints are instructions placed in a SQL statement that tell the database query optimizer the most efficient way to execute the statement. Hints override the optimizer’s execution plan, so you can use hints to improve performance by forcing the optimizer to use a more efficient plan. Using the Administration Tool, you can add hints to a repository, in both online and offline modes, to optimize the performance of queries. When you add a hint to the repository, you associate it with database objects. When the object associated with the hint is queried, the Oracle BI Server inserts the hint into the SQL statement. You can associate hints with physical complex joins, physical foreign keys, physical tables, and alias tables.Hints that are well researched and planned can result in significantly better query performance. However, hints can also negatively affect performance if they result in a suboptimal execution plan. You should add hints to a repository only after you have tried to improve performance by adding physical indexes (or other physical changes) to Oracle Database and making modeling changes in Oracle BI server. You should avoid creating hints for physical table and join objects that are queried often.
Ora
cle
Inte
rnal
& O
racl
e A
cade
my
Use
Onl
y
Oracle BI Suite EE 10g R3: Build Repositories 24 - 20
Copyright © 2008, Oracle. All rights reserved.
Setting the NQSConfig.ini Parameters
NQSConfig.ini includes parameters that affect Oracle BI performance:• SORT_MEMORY_SIZE
– Specifies the maximum amount of memory to be used for each sort operation
• SORT_BUFFER_INCREMENT_SIZE– Specifies the increment by which the sort memory size is
increased as more memory is needed• VIRTUAL_TABLE_PAGE_SIZE
– Specifies the size of a memory page for Oracle BI Server internal processing
Setting the NQSConfig.ini ParametersThese size parameters affect the performance of Oracle BI. • SORT_MEMORY_SIZE sets the upper limit on how large the sorting buffer can be in the
Oracle Business Intelligence Server. When this limit is exceeded, data is sorted in allotments of the size set by SORT_MEMORY_SIZE and the sorted sets are merged together. For example, suppose SORT_MEMORY_SIZE is set to 4 MB and the size of the data to be sorted is 32 MB. The server performs the sort once per each 4 MB of data, for a total of eight sort operations, and then merges the results into a single result set. This technique allows the Oracle Business Intelligence Server to sort data of indefinite size. The merge process itself is generally not costly in terms of resources, but it does include a read and write of each result set in a temporary file. To reduce the time this takes, increase the SORT_MEMORY_SIZE. This parameter can be tuned over time by taking into consideration the data size of the query and the number of concurrent users.
• SORT_BUFFER_INCREMENT_SIZE defines the increment by which SORT_MEMORY_SIZE should be reached. For example, suppose that SORT_MEMORY_SIZE is set to 4 MB and the data to be sorted is only 1MB. As data is fed into the sort routine, the size of the sort buffer increases only by the increment size, rather than the full size allowed by SORT_MEMORY_SIZE. This mechanism allows the Oracle Business Intelligence Server to sort smaller result sets efficiently without wasting memory.
Ora
cle
Inte
rnal
& O
racl
e A
cade
my
Use
Onl
y

Oracle BI Suite EE 10g R3: Build Repositories 24 - 21
Setting the NQSConfig.ini Parameters (continued)• VIRTUAL_TABLE_PAGE_SIZE: Several operations—sort, join, union, and database
fetch—can require memory resources beyond those available to the Oracle BI Server. To manage this condition, the server uses a virtual table management mechanism that provides a buffering scheme for processing these operations. When the amount of data exceeds the VIRTUAL_TABLE_PAGE_SIZE, the remaining data is buffered in a temporary file and placed in the virtual table as processing continues. This mechanism supports dynamic memory sizes and ensures that any row can be obtained dynamically for processing queries. When VIRTUAL_TABLE_PAGE_SIZE is increased, input/output (I/O) operations are reduced. Complex queries may use 20 to 30 virtual tables, while simple queries may not even require virtual tables. The default size of 128 KB is a reasonable size when one considers that the size for virtual paging in Windows NT is 64 KB. This parameter can be tuned depending on the number of concurrent users and the average query complexity. In general, setting the size higher than 256 KB does not yield a corresponding increase in throughput due to the 64 KB size limit of Windows NT system buffers, because each I/O still goes through the system buffers.
For more information about NQSConfig.ini parameters, see Appendix A in the Oracle BI Infrastructure Installation and Configuration Guide.
Ora
cle
Inte
rnal
& O
racl
e A
cade
my
Use
Onl
y
Oracle BI Suite EE 10g R3: Build Repositories 24 - 22
Copyright © 2008, Oracle. All rights reserved.
Summary
In this lesson, you should have learned how to identify techniques to optimize Oracle BI query performance.
Ora
cle
Inte
rnal
& O
racl
e A
cade
my
Use
Onl
y
Copyright © 2008, Oracle. All rights reserved.
Oracle BI Repository Design Principles
Ora
cle
Inte
rnal
& O
racl
e A
cade
my
Use
Onl
y
Oracle BI Suite EE 10g R3: Build Repositories 25 - 2
Copyright © 2008, Oracle. All rights reserved.
Objectives
After completing this lesson, you should be able to identify and apply Oracle BI repository design principles.
Ora
cle
Inte
rnal
& O
racl
e A
cade
my
Use
Onl
y

Oracle BI Suite EE 10g R3: Build Repositories 25 - 3
Copyright © 2008, Oracle. All rights reserved.
Lesson Structure
This lesson is presented in three sections:• Physical Layer Design Principles• Business Model and Mapping Layer Design Principles• Presentation Layer Design Principles
Lesson StructureThis lesson is divided into three sections. Each section presents best practices and design principles for one of the three layers of an Oracle BI repository. Most of these topics have already been presented in this course. The purpose of this lesson is to revisit and explain these topics within the context of repository design principles and best practices.
Ora
cle
Inte
rnal
& O
racl
e A
cade
my
Use
Onl
y
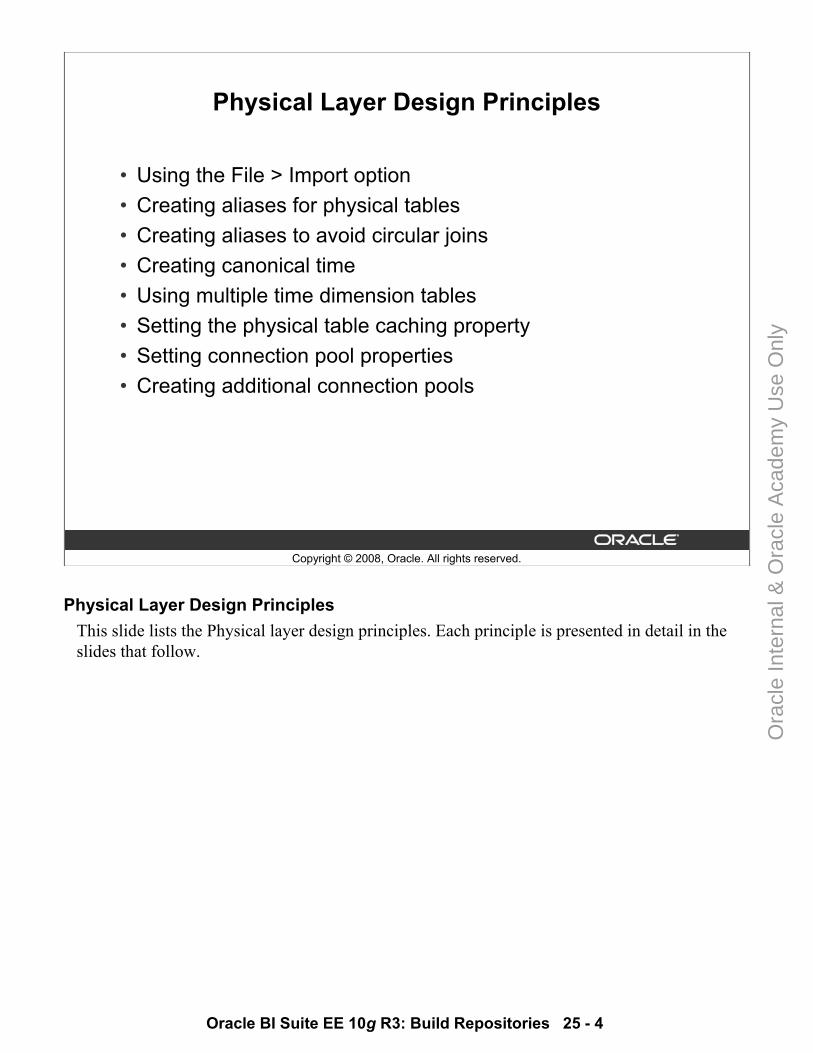
Oracle BI Suite EE 10g R3: Build Repositories 25 - 4
Copyright © 2008, Oracle. All rights reserved.
Physical Layer Design Principles
• Using the File > Import option• Creating aliases for physical tables• Creating aliases to avoid circular joins• Creating canonical time• Using multiple time dimension tables• Setting the physical table caching property• Setting connection pool properties• Creating additional connection pools
Physical Layer Design PrinciplesThis slide lists the Physical layer design principles. Each principle is presented in detail in the slides that follow.
Ora
cle
Inte
rnal
& O
racl
e A
cade
my
Use
Onl
y
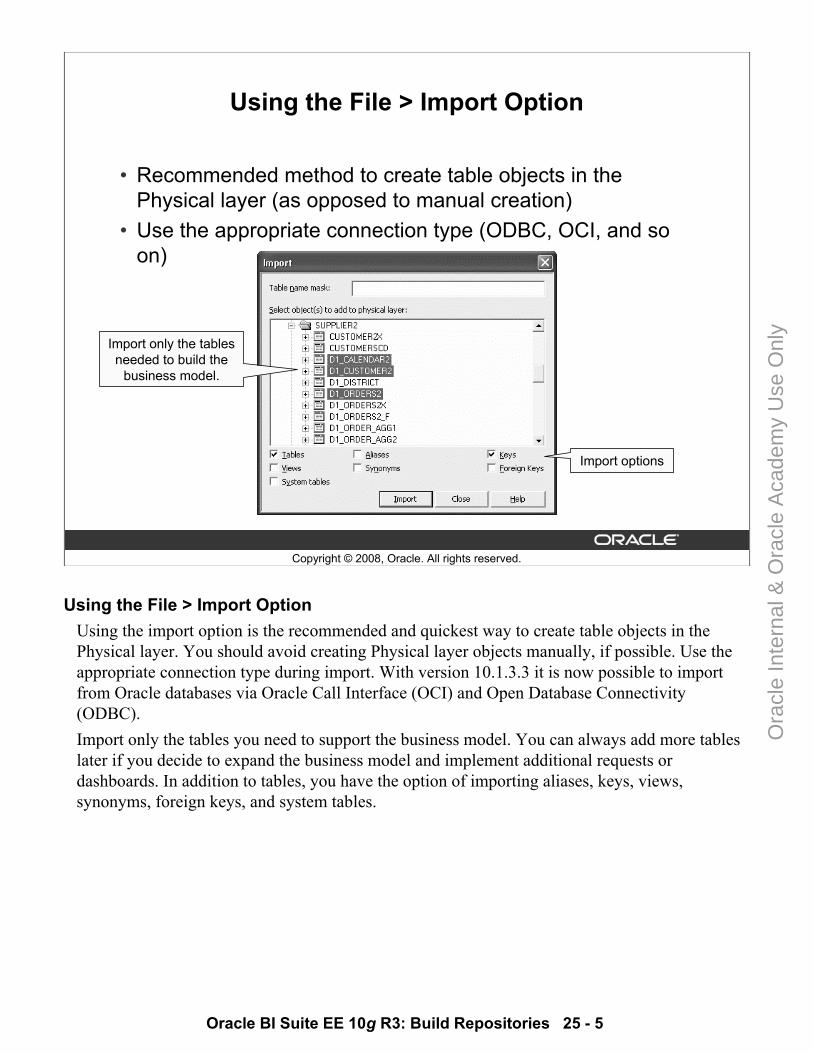
Oracle BI Suite EE 10g R3: Build Repositories 25 - 5
Copyright © 2008, Oracle. All rights reserved.
Using the File > Import Option
• Recommended method to create table objects in the Physical layer (as opposed to manual creation)
• Use the appropriate connection type (ODBC, OCI, and so on)
Import options
Import only the tables needed to build the
business model.
Using the File > Import OptionUsing the import option is the recommended and quickest way to create table objects in the Physical layer. You should avoid creating Physical layer objects manually, if possible. Use the appropriate connection type during import. With version 10.1.3.3 it is now possible to import from Oracle databases via Oracle Call Interface (OCI) and Open Database Connectivity (ODBC). Import only the tables you need to support the business model. You can always add more tables later if you decide to expand the business model and implement additional requests or dashboards. In addition to tables, you have the option of importing aliases, keys, views, synonyms, foreign keys, and system tables.
Ora
cle
Inte
rnal
& O
racl
e A
cade
my
Use
Onl
y
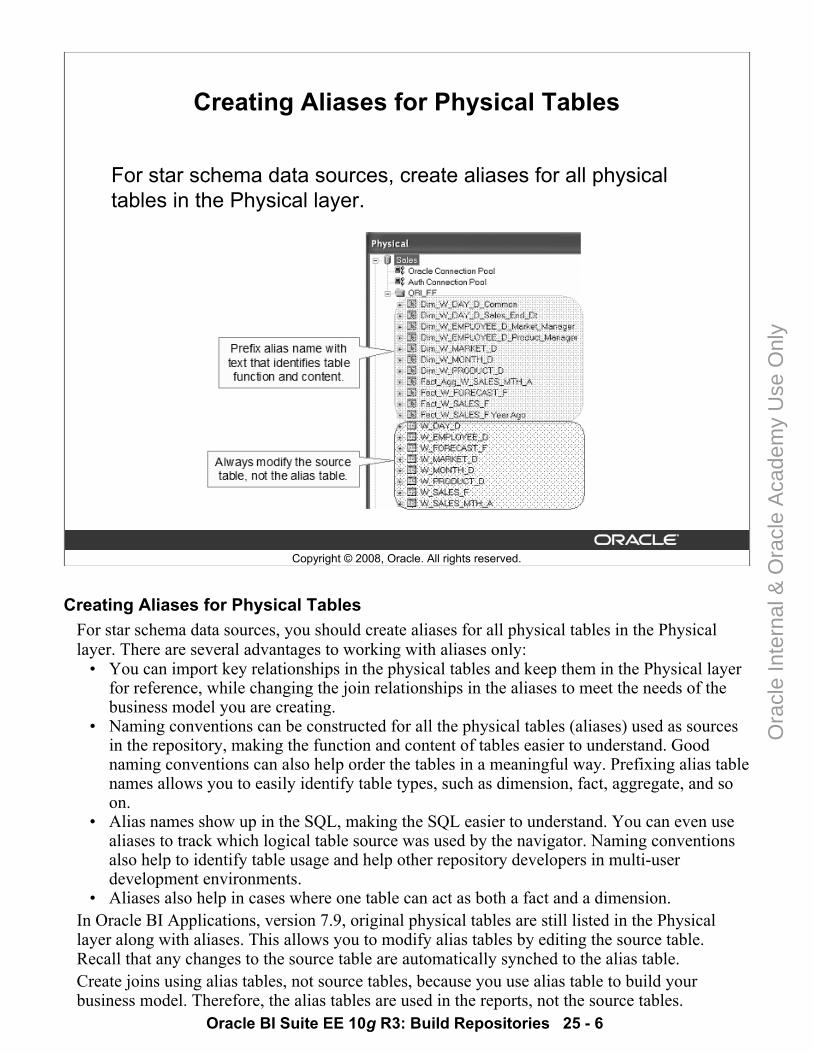
Oracle BI Suite EE 10g R3: Build Repositories 25 - 6
Copyright © 2008, Oracle. All rights reserved.
Creating Aliases for Physical Tables
For star schema data sources, create aliases for all physical tables in the Physical layer.
Creating Aliases for Physical TablesFor star schema data sources, you should create aliases for all physical tables in the Physical layer. There are several advantages to working with aliases only:
• You can import key relationships in the physical tables and keep them in the Physical layer for reference, while changing the join relationships in the aliases to meet the needs of the business model you are creating.
• Naming conventions can be constructed for all the physical tables (aliases) used as sources in the repository, making the function and content of tables easier to understand. Good naming conventions can also help order the tables in a meaningful way. Prefixing alias table names allows you to easily identify table types, such as dimension, fact, aggregate, and so on.
• Alias names show up in the SQL, making the SQL easier to understand. You can even use aliases to track which logical table source was used by the navigator. Naming conventions also help to identify table usage and help other repository developers in multi-user development environments.
• Aliases also help in cases where one table can act as both a fact and a dimension. In Oracle BI Applications, version 7.9, original physical tables are still listed in the Physical layer along with aliases. This allows you to modify alias tables by editing the source table. Recall that any changes to the source table are automatically synched to the alias table.Create joins using alias tables, not source tables, because you use alias table to build your business model. Therefore, the alias tables are used in the reports, not the source tables.
Ora
cle
Inte
rnal
& O
racl
e A
cade
my
Use
Onl
y
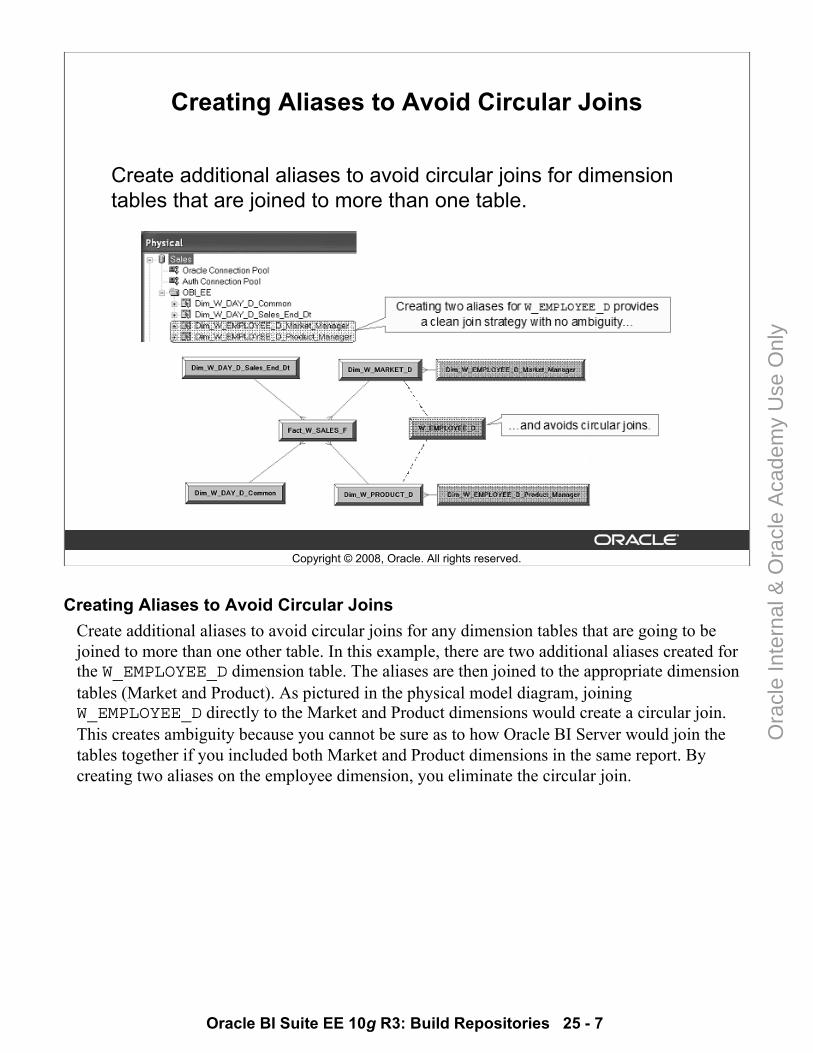
Oracle BI Suite EE 10g R3: Build Repositories 25 - 7
Copyright © 2008, Oracle. All rights reserved.
Creating Aliases to Avoid Circular Joins
Create additional aliases to avoid circular joins for dimension tables that are joined to more than one table.
Creating Aliases to Avoid Circular JoinsCreate additional aliases to avoid circular joins for any dimension tables that are going to be joined to more than one other table. In this example, there are two additional aliases created for the W_EMPLOYEE_D dimension table. The aliases are then joined to the appropriate dimension tables (Market and Product). As pictured in the physical model diagram, joining W_EMPLOYEE_D directly to the Market and Product dimensions would create a circular join. This creates ambiguity because you cannot be sure as to how Oracle BI Server would join the tables together if you included both Market and Product dimensions in the same report. By creating two aliases on the employee dimension, you eliminate the circular join.
Ora
cle
Inte
rnal
& O
racl
e A
cade
my
Use
Onl
y
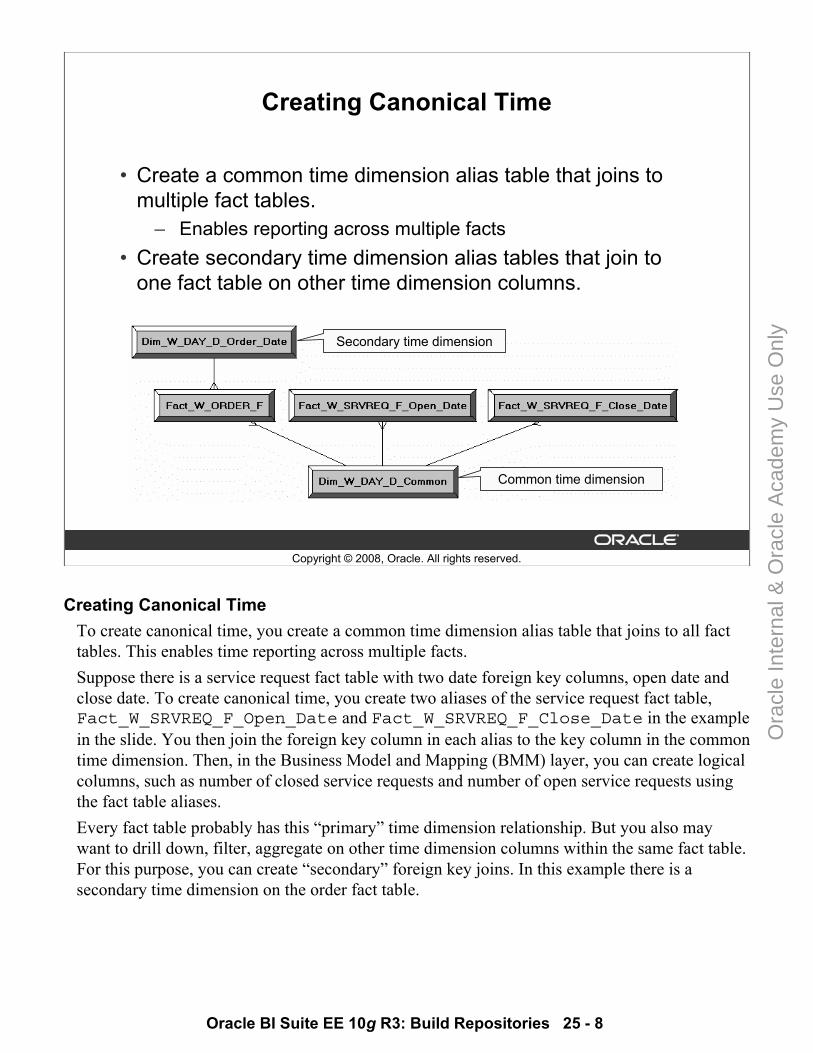
Oracle BI Suite EE 10g R3: Build Repositories 25 - 8
Copyright © 2008, Oracle. All rights reserved.
Creating Canonical Time
• Create a common time dimension alias table that joins to multiple fact tables.
– Enables reporting across multiple facts• Create secondary time dimension alias tables that join to
one fact table on other time dimension columns.
Common time dimension
Secondary time dimension
Creating Canonical TimeTo create canonical time, you create a common time dimension alias table that joins to all fact tables. This enables time reporting across multiple facts. Suppose there is a service request fact table with two date foreign key columns, open date and close date. To create canonical time, you create two aliases of the service request fact table, Fact_W_SRVREQ_F_Open_Date and Fact_W_SRVREQ_F_Close_Date in the example in the slide. You then join the foreign key column in each alias to the key column in the common time dimension. Then, in the Business Model and Mapping (BMM) layer, you can create logical columns, such as number of closed service requests and number of open service requests using the fact table aliases. Every fact table probably has this “primary” time dimension relationship. But you also may want to drill down, filter, aggregate on other time dimension columns within the same fact table. For this purpose, you can create “secondary” foreign key joins. In this example there is a secondary time dimension on the order fact table.
Ora
cle
Inte
rnal
& O
racl
e A
cade
my
Use
Onl
y
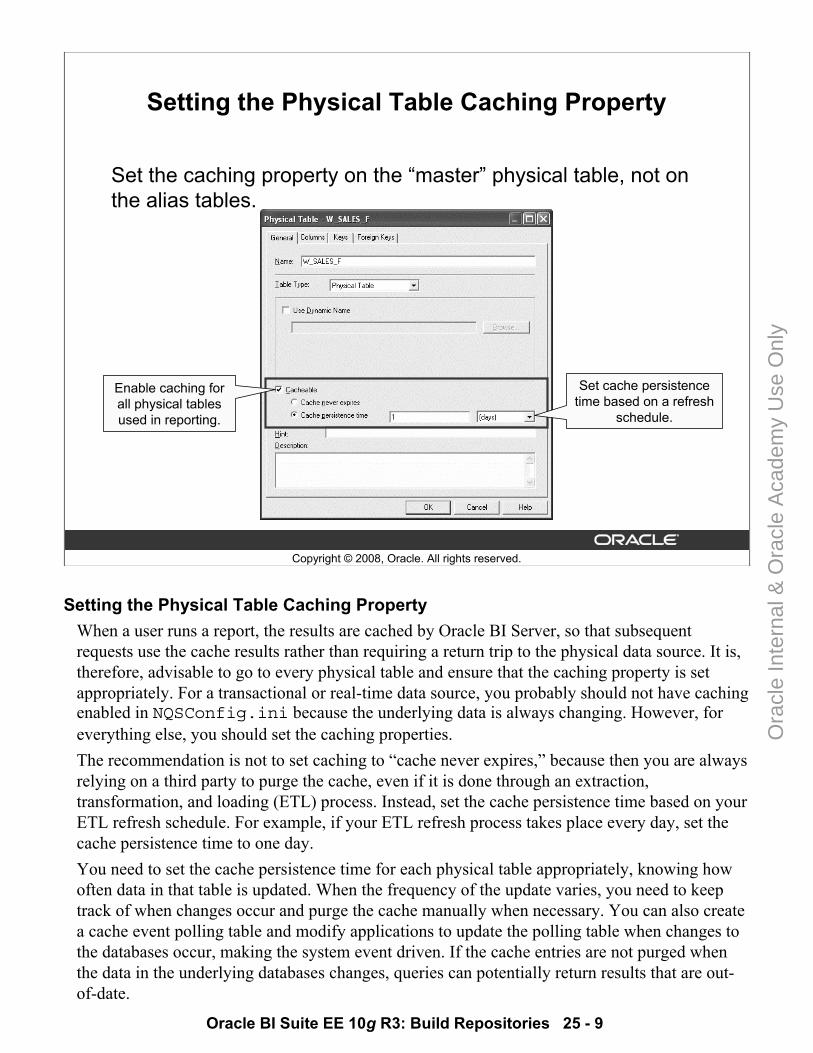
Oracle BI Suite EE 10g R3: Build Repositories 25 - 9
Copyright © 2008, Oracle. All rights reserved.
Setting the Physical Table Caching Property
Set the caching property on the “master” physical table, not on the alias tables.
Enable caching for all physical tables used in reporting.
Set cache persistence time based on a refresh
schedule.
Setting the Physical Table Caching PropertyWhen a user runs a report, the results are cached by Oracle BI Server, so that subsequent requests use the cache results rather than requiring a return trip to the physical data source. It is, therefore, advisable to go to every physical table and ensure that the caching property is set appropriately. For a transactional or real-time data source, you probably should not have caching enabled in NQSConfig.ini because the underlying data is always changing. However, for everything else, you should set the caching properties. The recommendation is not to set caching to “cache never expires,” because then you are always relying on a third party to purge the cache, even if it is done through an extraction, transformation, and loading (ETL) process. Instead, set the cache persistence time based on your ETL refresh schedule. For example, if your ETL refresh process takes place every day, set the cache persistence time to one day. You need to set the cache persistence time for each physical table appropriately, knowing how often data in that table is updated. When the frequency of the update varies, you need to keep track of when changes occur and purge the cache manually when necessary. You can also create a cache event polling table and modify applications to update the polling table when changes to the databases occur, making the system event driven. If the cache entries are not purged when the data in the underlying databases changes, queries can potentially return results that are out-of-date.
Ora
cle
Inte
rnal
& O
racl
e A
cade
my
Use
Onl
y
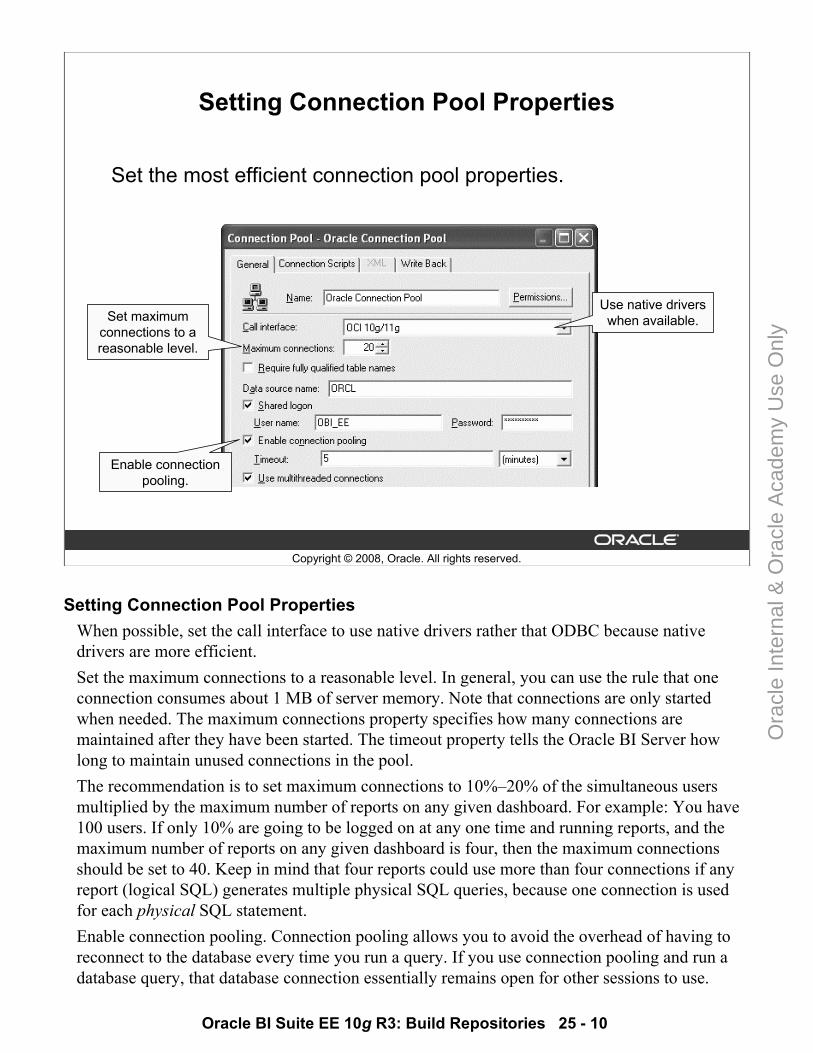
Oracle BI Suite EE 10g R3: Build Repositories 25 - 10
Copyright © 2008, Oracle. All rights reserved.
Setting Connection Pool Properties
Set the most efficient connection pool properties.
Use native drivers when available.Set maximum
connections to a reasonable level.
Enable connection pooling.
Setting Connection Pool PropertiesWhen possible, set the call interface to use native drivers rather that ODBC because native drivers are more efficient. Set the maximum connections to a reasonable level. In general, you can use the rule that one connection consumes about 1 MB of server memory. Note that connections are only started when needed. The maximum connections property specifies how many connections are maintained after they have been started. The timeout property tells the Oracle BI Server how long to maintain unused connections in the pool. The recommendation is to set maximum connections to 10%–20% of the simultaneous users multiplied by the maximum number of reports on any given dashboard. For example: You have 100 users. If only 10% are going to be logged on at any one time and running reports, and the maximum number of reports on any given dashboard is four, then the maximum connections should be set to 40. Keep in mind that four reports could use more than four connections if any report (logical SQL) generates multiple physical SQL queries, because one connection is used for each physical SQL statement.Enable connection pooling. Connection pooling allows you to avoid the overhead of having to reconnect to the database every time you run a query. If you use connection pooling and run a database query, that database connection essentially remains open for other sessions to use.
Ora
cle
Inte
rnal
& O
racl
e A
cade
my
Use
Onl
y
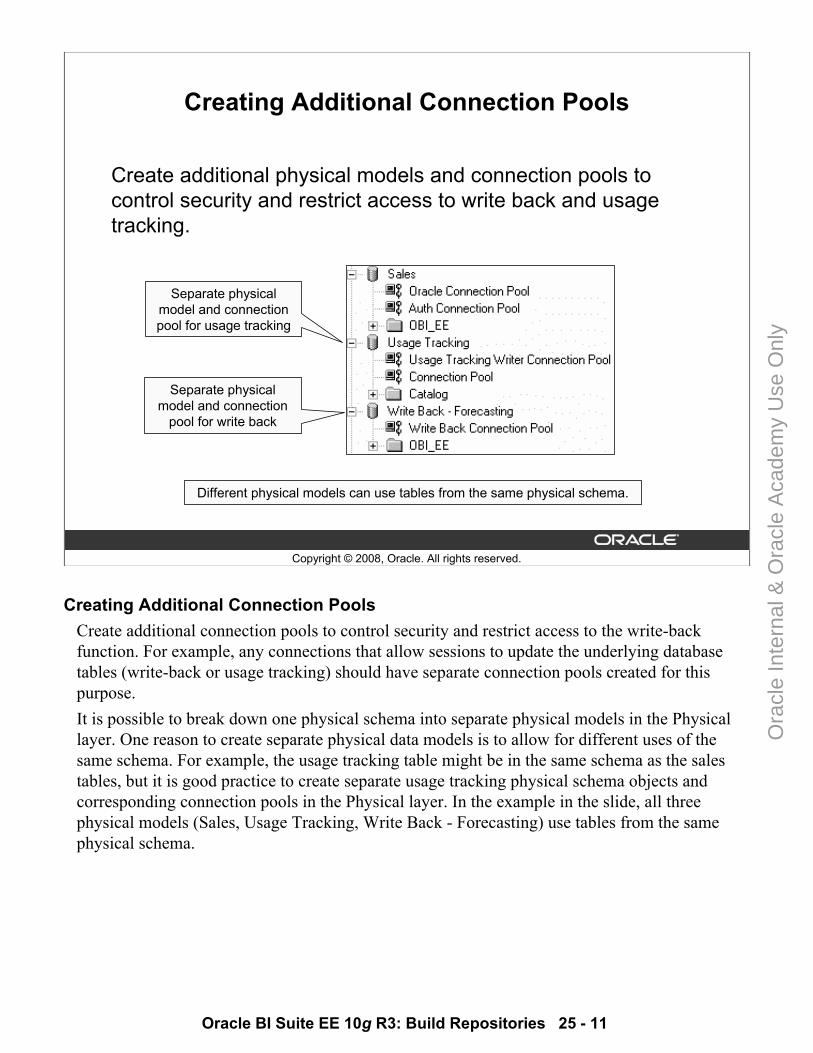
Oracle BI Suite EE 10g R3: Build Repositories 25 - 11
Copyright © 2008, Oracle. All rights reserved.
Creating Additional Connection Pools
Create additional physical models and connection pools to control security and restrict access to write back and usage tracking.
Separate physical model and connection pool for usage tracking
Separate physical model and connection
pool for write back
Different physical models can use tables from the same physical schema.
Creating Additional Connection PoolsCreate additional connection pools to control security and restrict access to the write-back function. For example, any connections that allow sessions to update the underlying database tables (write-back or usage tracking) should have separate connection pools created for this purpose.It is possible to break down one physical schema into separate physical models in the Physical layer. One reason to create separate physical data models is to allow for different uses of the same schema. For example, the usage tracking table might be in the same schema as the sales tables, but it is good practice to create separate usage tracking physical schema objects and corresponding connection pools in the Physical layer. In the example in the slide, all three physical models (Sales, Usage Tracking, Write Back - Forecasting) use tables from the same physical schema.
Ora
cle
Inte
rnal
& O
racl
e A
cade
my
Use
Onl
y
Oracle BI Suite EE 10g R3: Build Repositories 25 - 12
Copyright © 2008, Oracle. All rights reserved.
BMM Layer Design Principles
• Multi-user development• Consistency check• Separate business models• Logical tables• Time dimension logical levels• Time dimension logical structure• Logical dimension table columns• Logical fact table columns• Logical joins• Calculated measures
BMM Layer Design PrinciplesThis slide and the next list the Business Model and Mapping (BMM) layer design principles. Each is presented in detail in the slides that follow.
Ora
cle
Inte
rnal
& O
racl
e A
cade
my
Use
Onl
y
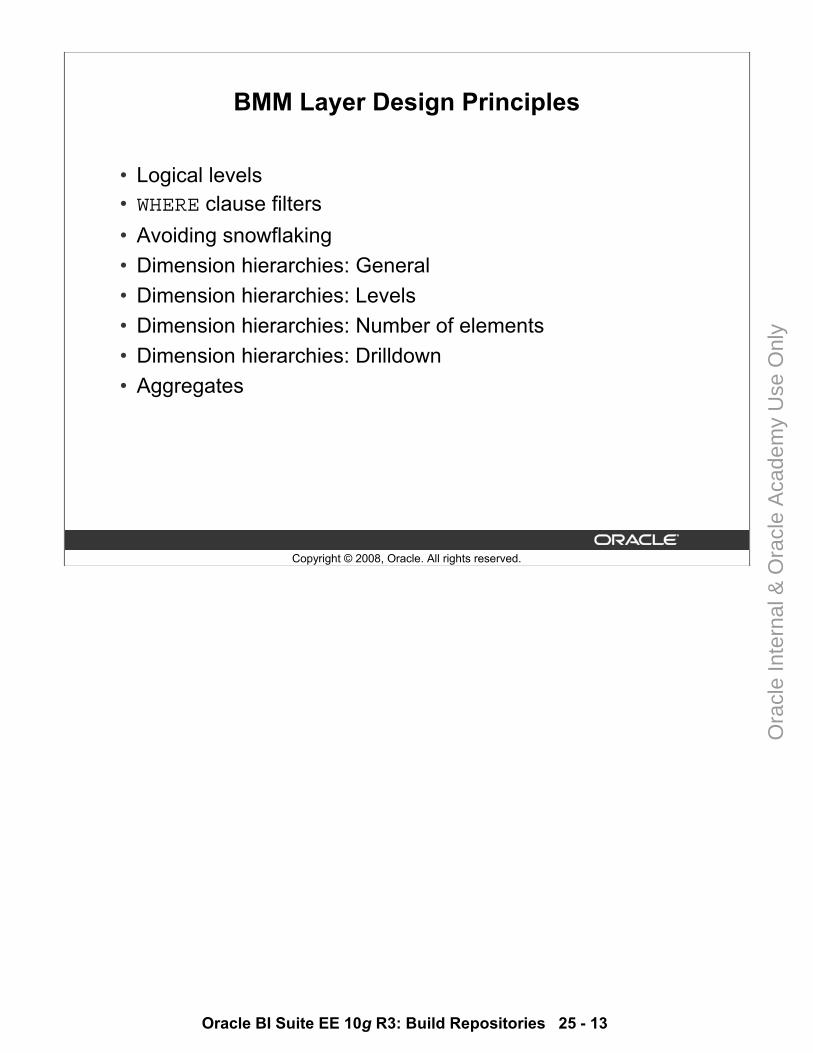
Oracle BI Suite EE 10g R3: Build Repositories 25 - 13
Copyright © 2008, Oracle. All rights reserved.
BMM Layer Design Principles
• Logical levels • WHERE clause filters• Avoiding snowflaking• Dimension hierarchies: General• Dimension hierarchies: Levels• Dimension hierarchies: Number of elements• Dimension hierarchies: Drilldown• Aggregates
Ora
cle
Inte
rnal
& O
racl
e A
cade
my
Use
Onl
y
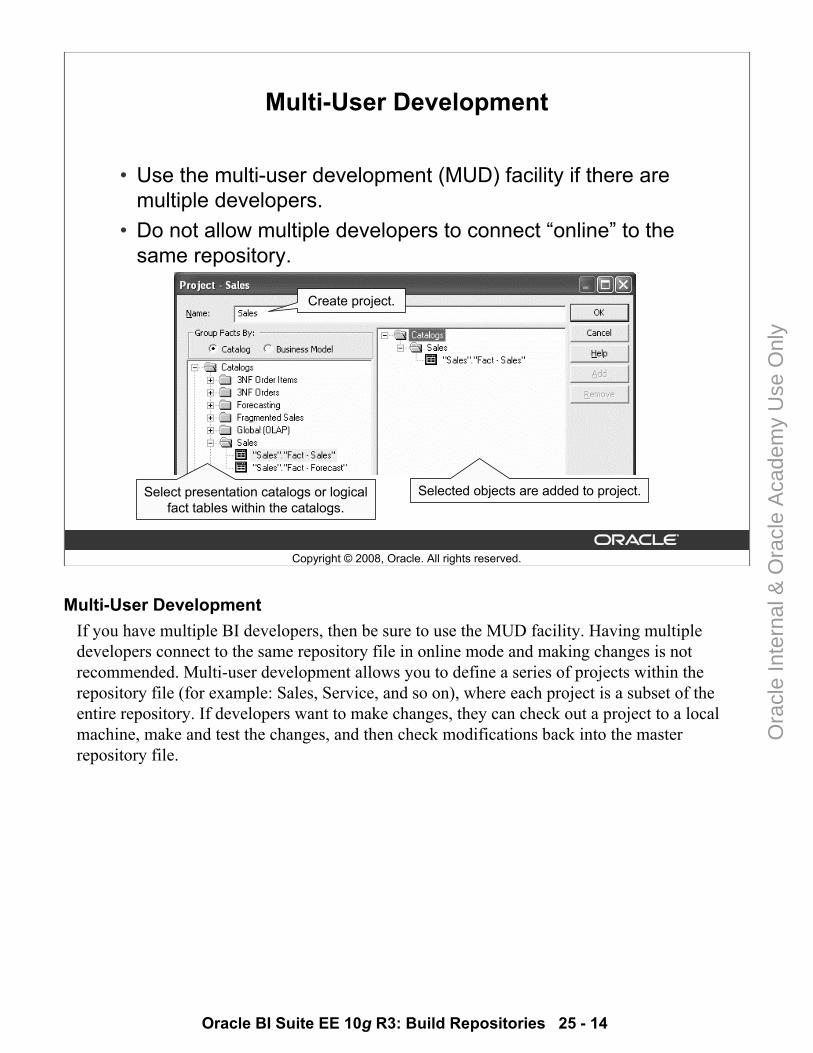
Oracle BI Suite EE 10g R3: Build Repositories 25 - 14
Copyright © 2008, Oracle. All rights reserved.
Multi-User Development
• Use the multi-user development (MUD) facility if there are multiple developers.
• Do not allow multiple developers to connect “online” to the same repository.
Select presentation catalogs or logical fact tables within the catalogs.
Selected objects are added to project.
Create project.
Multi-User DevelopmentIf you have multiple BI developers, then be sure to use the MUD facility. Having multiple developers connect to the same repository file in online mode and making changes is not recommended. Multi-user development allows you to define a series of projects within the repository file (for example: Sales, Service, and so on), where each project is a subset of the entire repository. If developers want to make changes, they can check out a project to a local machine, make and test the changes, and then check modifications back into the master repository file.
Ora
cle
Inte
rnal
& O
racl
e A
cade
my
Use
Onl
y
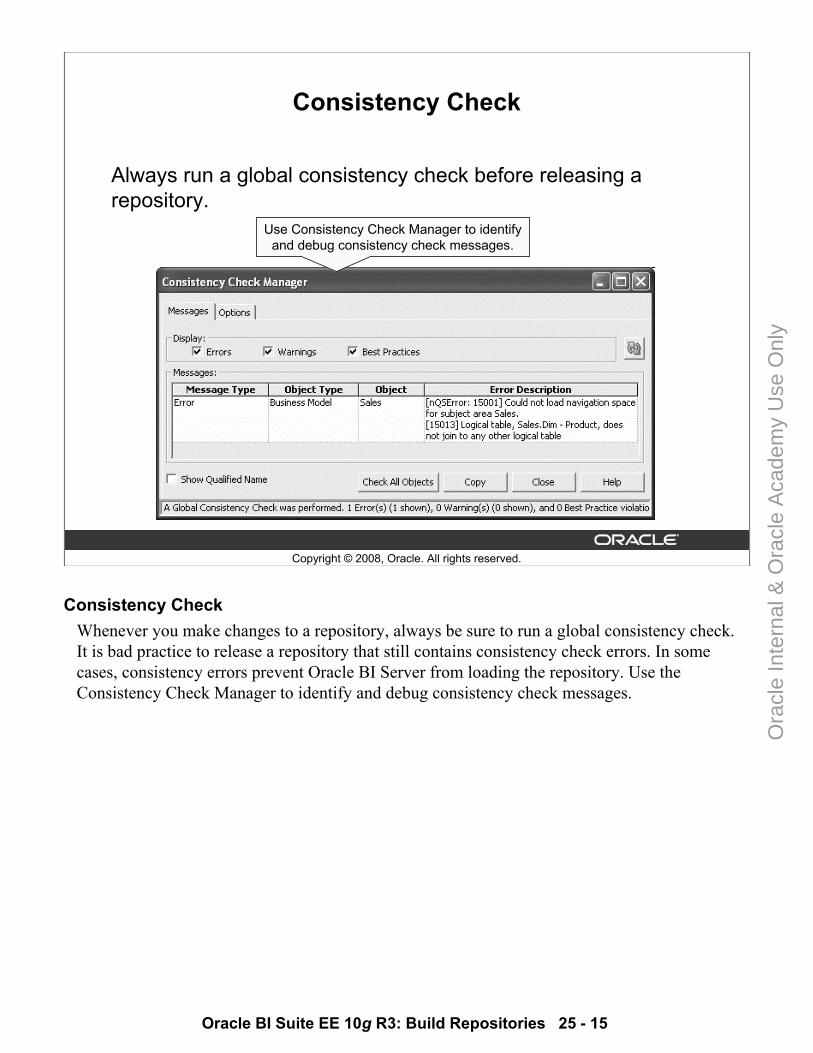
Oracle BI Suite EE 10g R3: Build Repositories 25 - 15
Copyright © 2008, Oracle. All rights reserved.
Consistency Check
Always run a global consistency check before releasing a repository.
Use Consistency Check Manager to identify and debug consistency check messages.
Consistency CheckWhenever you make changes to a repository, always be sure to run a global consistency check. It is bad practice to release a repository that still contains consistency check errors. In some cases, consistency errors prevent Oracle BI Server from loading the repository. Use the Consistency Check Manager to identify and debug consistency check messages.
Ora
cle
Inte
rnal
& O
racl
e A
cade
my
Use
Onl
y
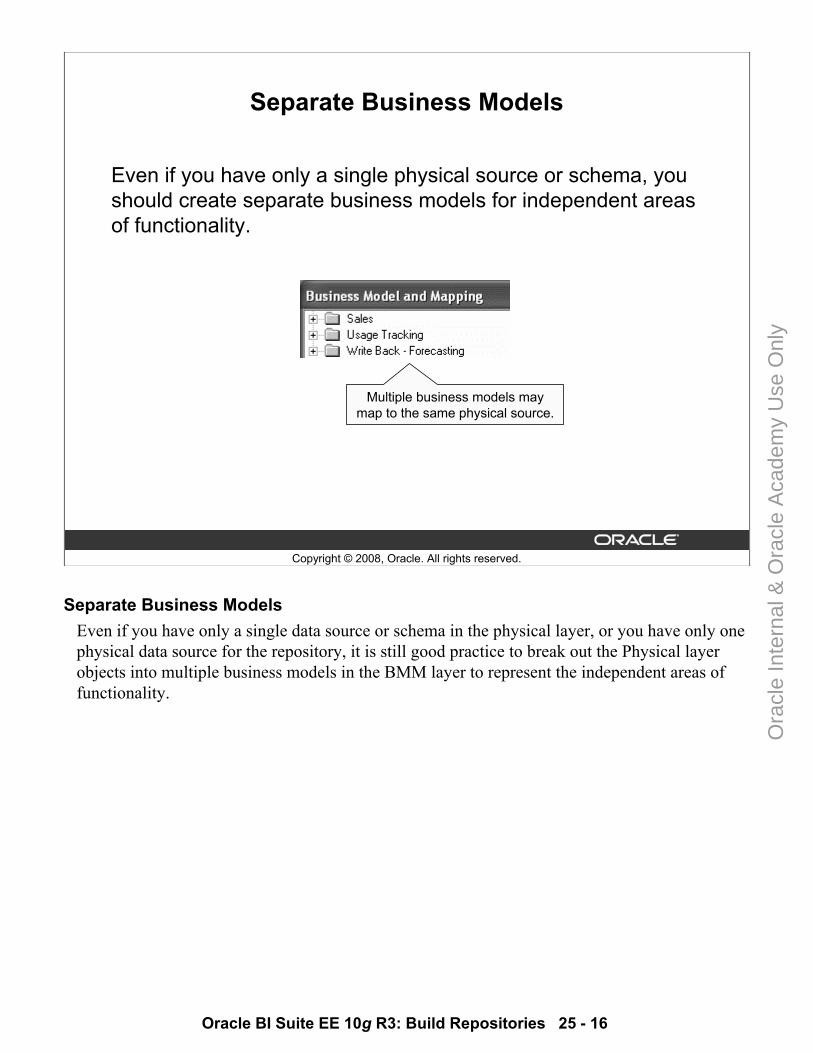
Oracle BI Suite EE 10g R3: Build Repositories 25 - 16
Copyright © 2008, Oracle. All rights reserved.
Separate Business Models
Even if you have only a single physical source or schema, you should create separate business models for independent areas of functionality.
Multiple business models may map to the same physical source.
Separate Business ModelsEven if you have only a single data source or schema in the physical layer, or you have only one physical data source for the repository, it is still good practice to break out the Physical layer objects into multiple business models in the BMM layer to represent the independent areas of functionality.
Ora
cle
Inte
rnal
& O
racl
e A
cade
my
Use
Onl
y
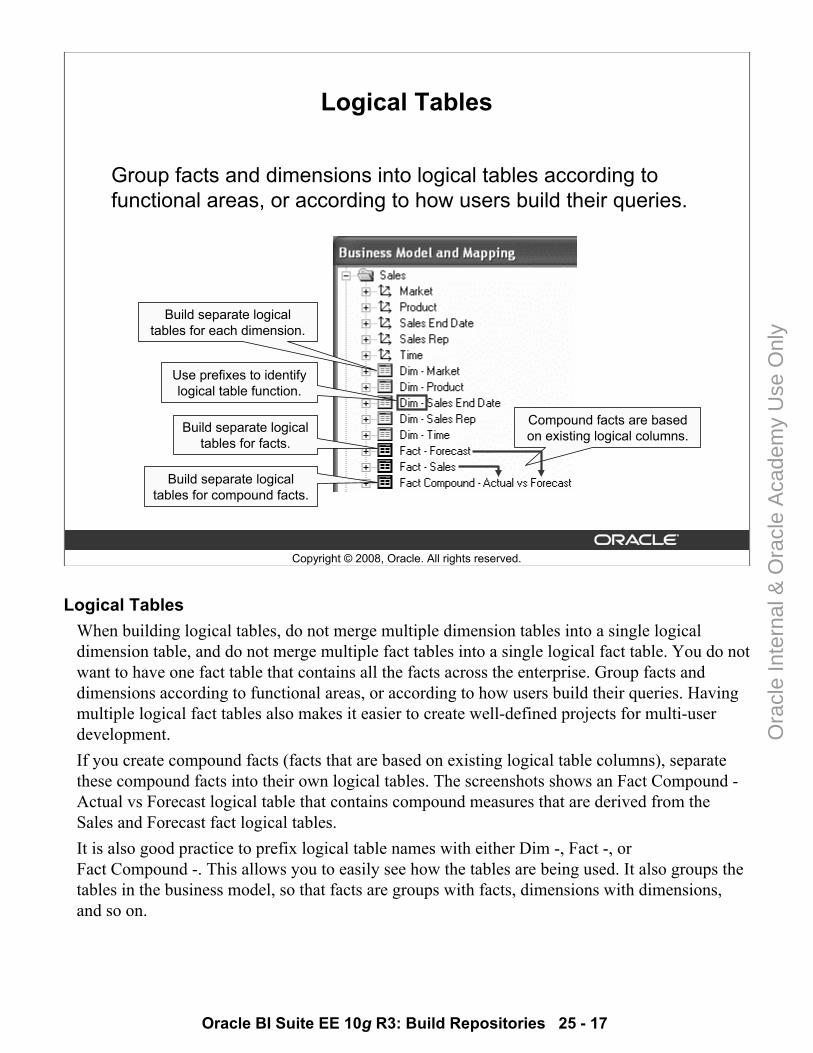
Oracle BI Suite EE 10g R3: Build Repositories 25 - 17
Copyright © 2008, Oracle. All rights reserved.
Logical Tables
Group facts and dimensions into logical tables according to functional areas, or according to how users build their queries.
Build separate logical tables for each dimension.
Build separate logical tables for facts.
Build separate logical tables for compound facts.
Use prefixes to identify logical table function.
Compound facts are based on existing logical columns.
Logical TablesWhen building logical tables, do not merge multiple dimension tables into a single logical dimension table, and do not merge multiple fact tables into a single logical fact table. You do not want to have one fact table that contains all the facts across the enterprise. Group facts and dimensions according to functional areas, or according to how users build their queries. Having multiple logical fact tables also makes it easier to create well-defined projects for multi-user development.If you create compound facts (facts that are based on existing logical table columns), separate these compound facts into their own logical tables. The screenshots shows an Fact Compound -Actual vs Forecast logical table that contains compound measures that are derived from the Sales and Forecast fact logical tables.It is also good practice to prefix logical table names with either Dim -, Fact -, orFact Compound -. This allows you to easily see how the tables are being used. It also groups the tables in the business model, so that facts are groups with facts, dimensions with dimensions, and so on.
Ora
cle
Inte
rnal
& O
racl
e A
cade
my
Use
Onl
y
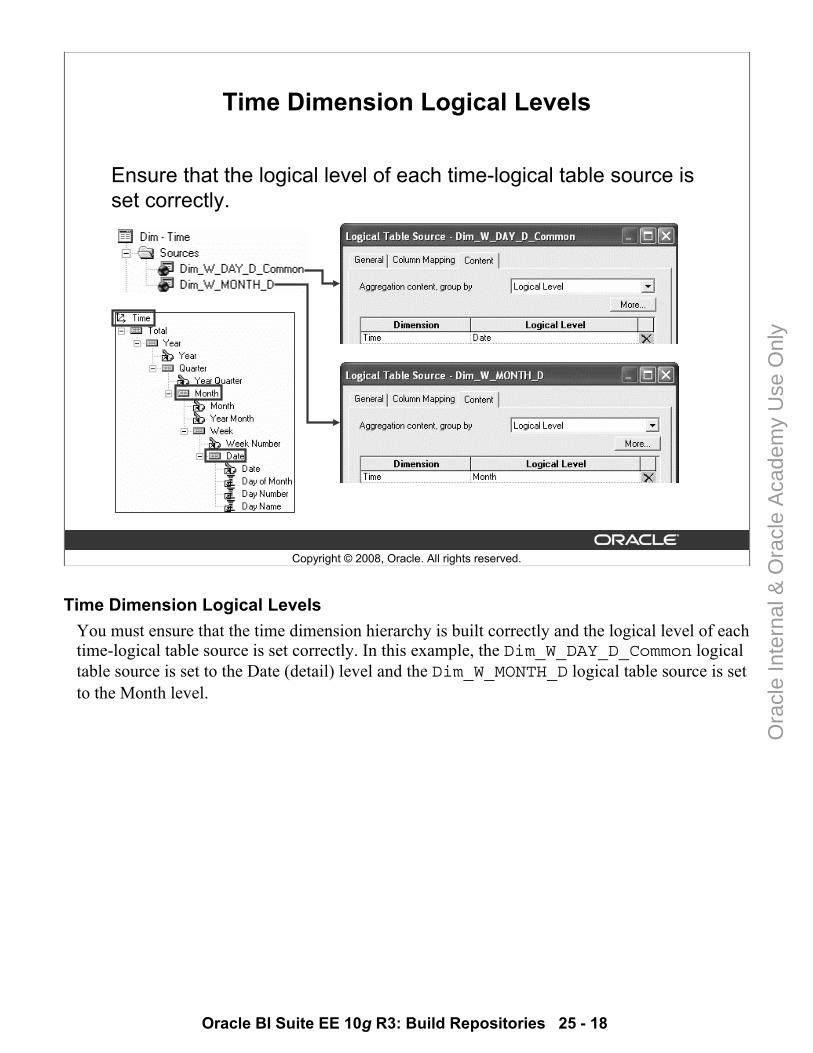
Oracle BI Suite EE 10g R3: Build Repositories 25 - 18
Copyright © 2008, Oracle. All rights reserved.
Time Dimension Logical Levels
Ensure that the logical level of each time-logical table source is set correctly.
Time Dimension Logical LevelsYou must ensure that the time dimension hierarchy is built correctly and the logical level of each time-logical table source is set correctly. In this example, the Dim_W_DAY_D_Common logical table source is set to the Date (detail) level and the Dim_W_MONTH_D logical table source is set to the Month level.
Ora
cle
Inte
rnal
& O
racl
e A
cade
my
Use
Onl
y
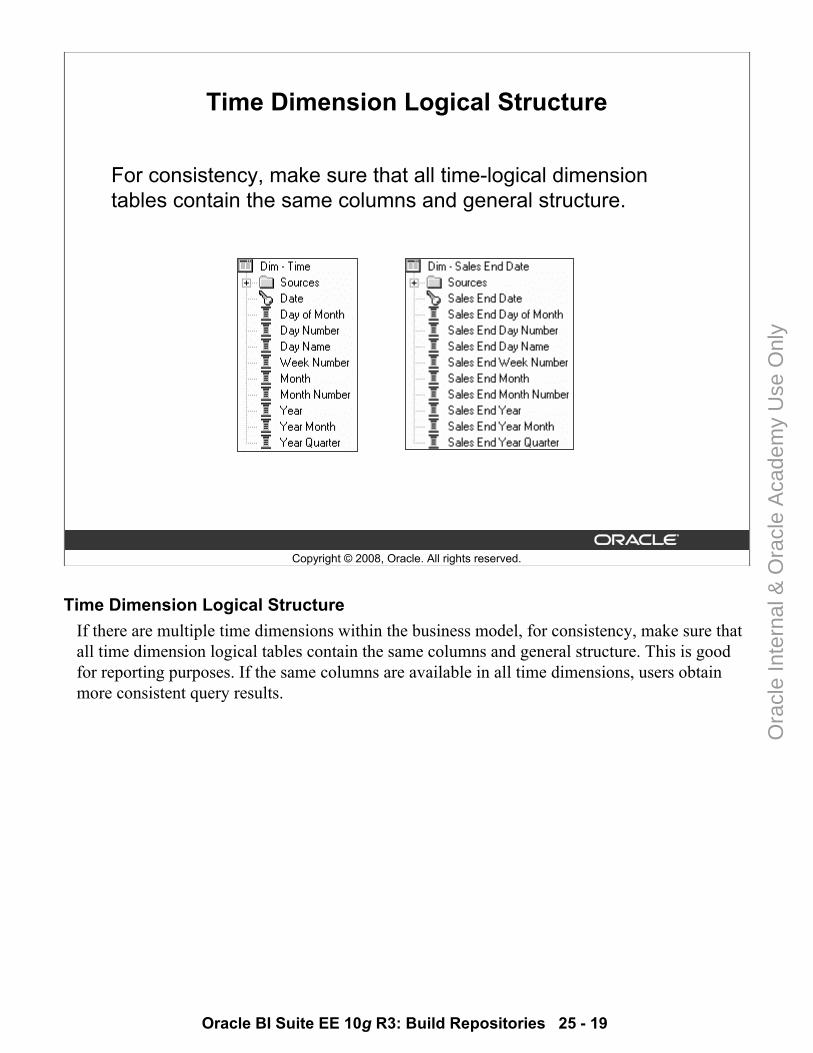
Oracle BI Suite EE 10g R3: Build Repositories 25 - 19
Copyright © 2008, Oracle. All rights reserved.
Time Dimension Logical Structure
For consistency, make sure that all time-logical dimension tables contain the same columns and general structure.
Time Dimension Logical StructureIf there are multiple time dimensions within the business model, for consistency, make sure that all time dimension logical tables contain the same columns and general structure. This is good for reporting purposes. If the same columns are available in all time dimensions, users obtain more consistent query results.
Ora
cle
Inte
rnal
& O
racl
e A
cade
my
Use
Onl
y
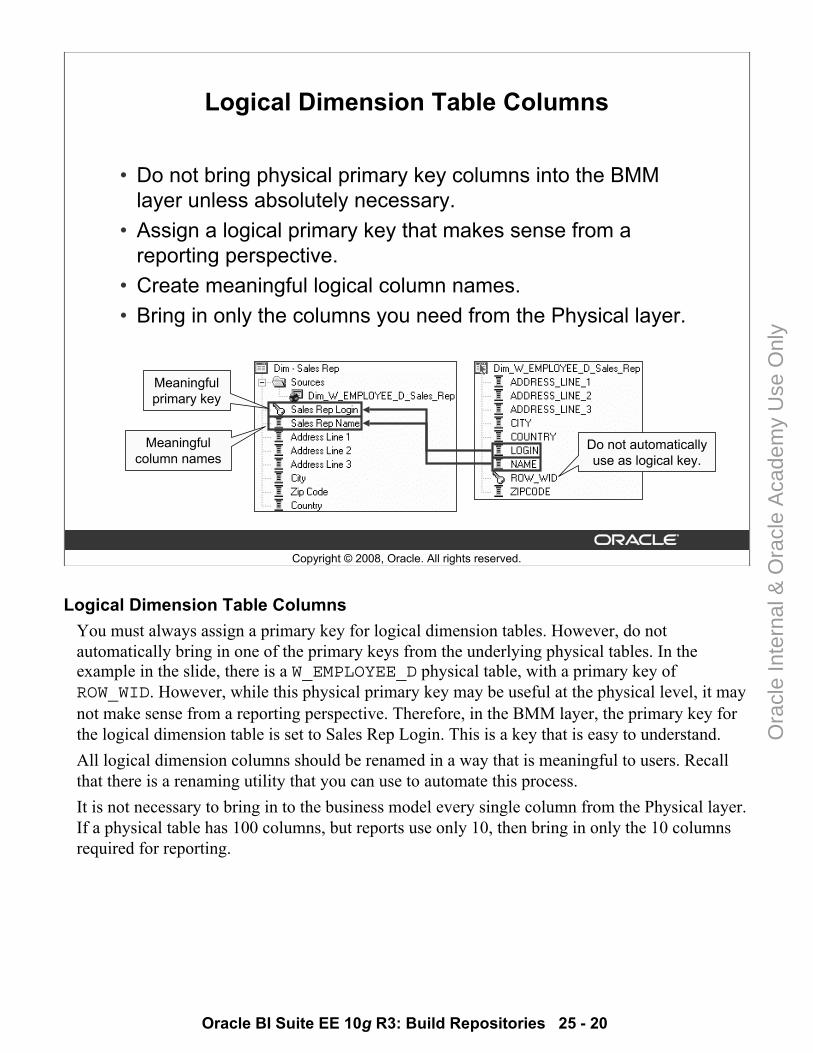
Oracle BI Suite EE 10g R3: Build Repositories 25 - 20
Copyright © 2008, Oracle. All rights reserved.
Logical Dimension Table Columns
• Do not bring physical primary key columns into the BMM layer unless absolutely necessary.
• Assign a logical primary key that makes sense from a reporting perspective.
• Create meaningful logical column names.• Bring in only the columns you need from the Physical layer.
Meaningful primary key
Meaningful column names
Do not automatically use as logical key.
Logical Dimension Table ColumnsYou must always assign a primary key for logical dimension tables. However, do not automatically bring in one of the primary keys from the underlying physical tables. In the example in the slide, there is a W_EMPLOYEE_D physical table, with a primary key of ROW_WID. However, while this physical primary key may be useful at the physical level, it may not make sense from a reporting perspective. Therefore, in the BMM layer, the primary key for the logical dimension table is set to Sales Rep Login. This is a key that is easy to understand. All logical dimension columns should be renamed in a way that is meaningful to users. Recall that there is a renaming utility that you can use to automate this process.It is not necessary to bring in to the business model every single column from the Physical layer. If a physical table has 100 columns, but reports use only 10, then bring in only the 10 columns required for reporting.
Ora
cle
Inte
rnal
& O
racl
e A
cade
my
Use
Onl
y
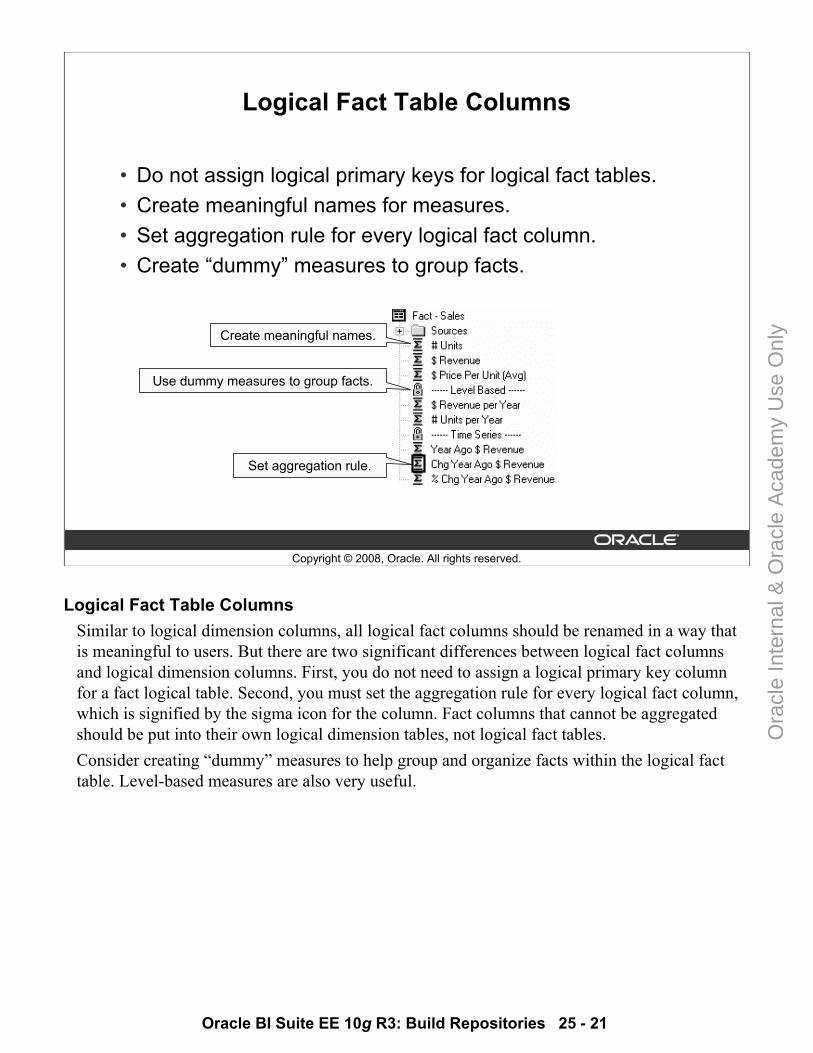
Oracle BI Suite EE 10g R3: Build Repositories 25 - 21
Copyright © 2008, Oracle. All rights reserved.
Logical Fact Table Columns
• Do not assign logical primary keys for logical fact tables.• Create meaningful names for measures.• Set aggregation rule for every logical fact column.• Create “dummy” measures to group facts.
Use dummy measures to group facts.
Set aggregation rule.
Create meaningful names.
Logical Fact Table ColumnsSimilar to logical dimension columns, all logical fact columns should be renamed in a way that is meaningful to users. But there are two significant differences between logical fact columns and logical dimension columns. First, you do not need to assign a logical primary key column for a fact logical table. Second, you must set the aggregation rule for every logical fact column, which is signified by the sigma icon for the column. Fact columns that cannot be aggregated should be put into their own logical dimension tables, not logical fact tables. Consider creating “dummy” measures to help group and organize facts within the logical fact table. Level-based measures are also very useful.
Ora
cle
Inte
rnal
& O
racl
e A
cade
my
Use
Onl
y
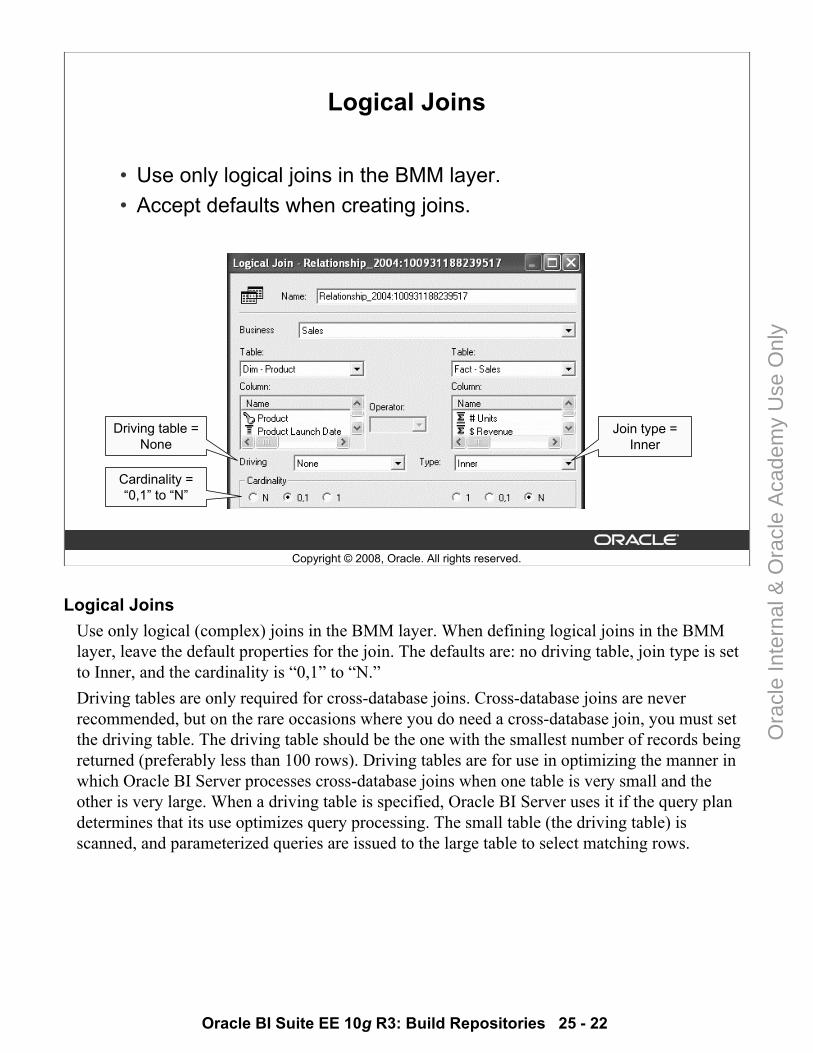
Oracle BI Suite EE 10g R3: Build Repositories 25 - 22
Copyright © 2008, Oracle. All rights reserved.
Logical Joins
• Use only logical joins in the BMM layer.• Accept defaults when creating joins.
Driving table = None
Cardinality = “0,1” to “N”
Join type = Inner
Logical JoinsUse only logical (complex) joins in the BMM layer. When defining logical joins in the BMM layer, leave the default properties for the join. The defaults are: no driving table, join type is set to Inner, and the cardinality is “0,1” to “N.” Driving tables are only required for cross-database joins. Cross-database joins are never recommended, but on the rare occasions where you do need a cross-database join, you must set the driving table. The driving table should be the one with the smallest number of records being returned (preferably less than 100 rows). Driving tables are for use in optimizing the manner in which Oracle BI Server processes cross-database joins when one table is very small and the other is very large. When a driving table is specified, Oracle BI Server uses it if the query plan determines that its use optimizes query processing. The small table (the driving table) is scanned, and parameterized queries are issued to the large table to select matching rows.
Ora
cle
Inte
rnal
& O
racl
e A
cade
my
Use
Onl
y
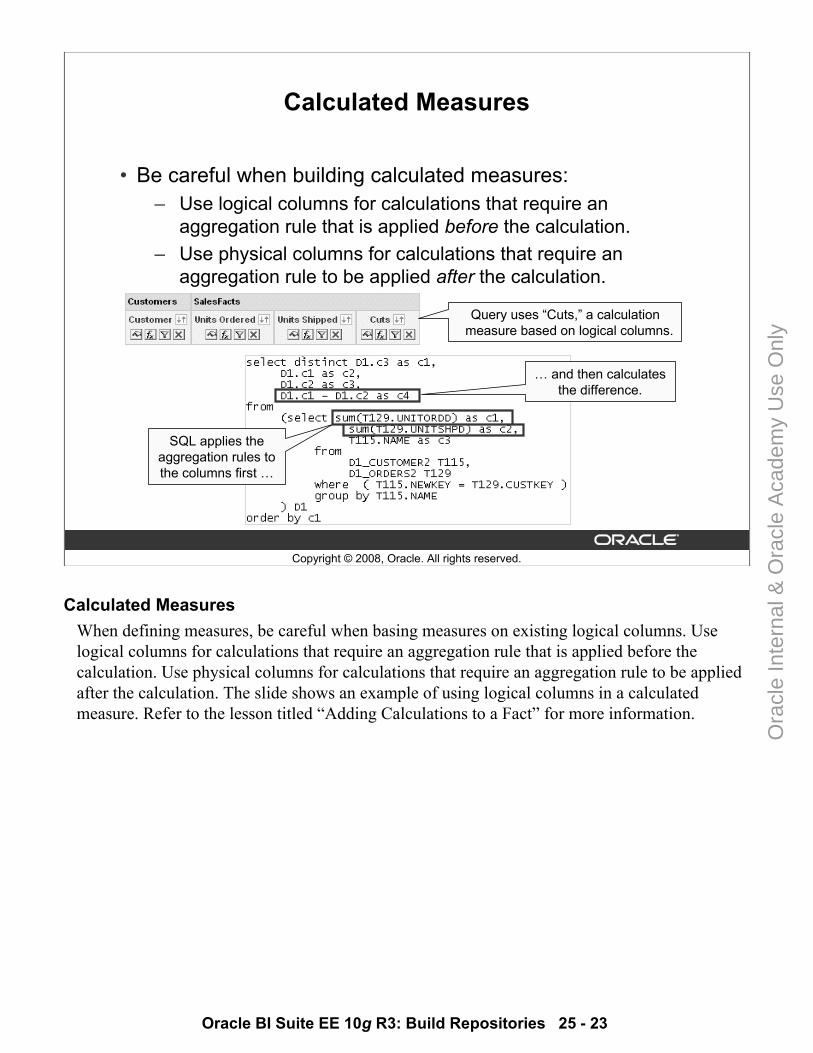
Oracle BI Suite EE 10g R3: Build Repositories 25 - 23
Copyright © 2008, Oracle. All rights reserved.
Calculated Measures
• Be careful when building calculated measures:– Use logical columns for calculations that require an
aggregation rule that is applied before the calculation.– Use physical columns for calculations that require an
aggregation rule to be applied after the calculation.
SQL applies the aggregation rules to the columns first …
… and then calculates the difference.
Query uses “Cuts,” a calculation measure based on logical columns.
Calculated MeasuresWhen defining measures, be careful when basing measures on existing logical columns. Use logical columns for calculations that require an aggregation rule that is applied before the calculation. Use physical columns for calculations that require an aggregation rule to be applied after the calculation. The slide shows an example of using logical columns in a calculated measure. Refer to the lesson titled “Adding Calculations to a Fact” for more information.
Ora
cle
Inte
rnal
& O
racl
e A
cade
my
Use
Onl
y
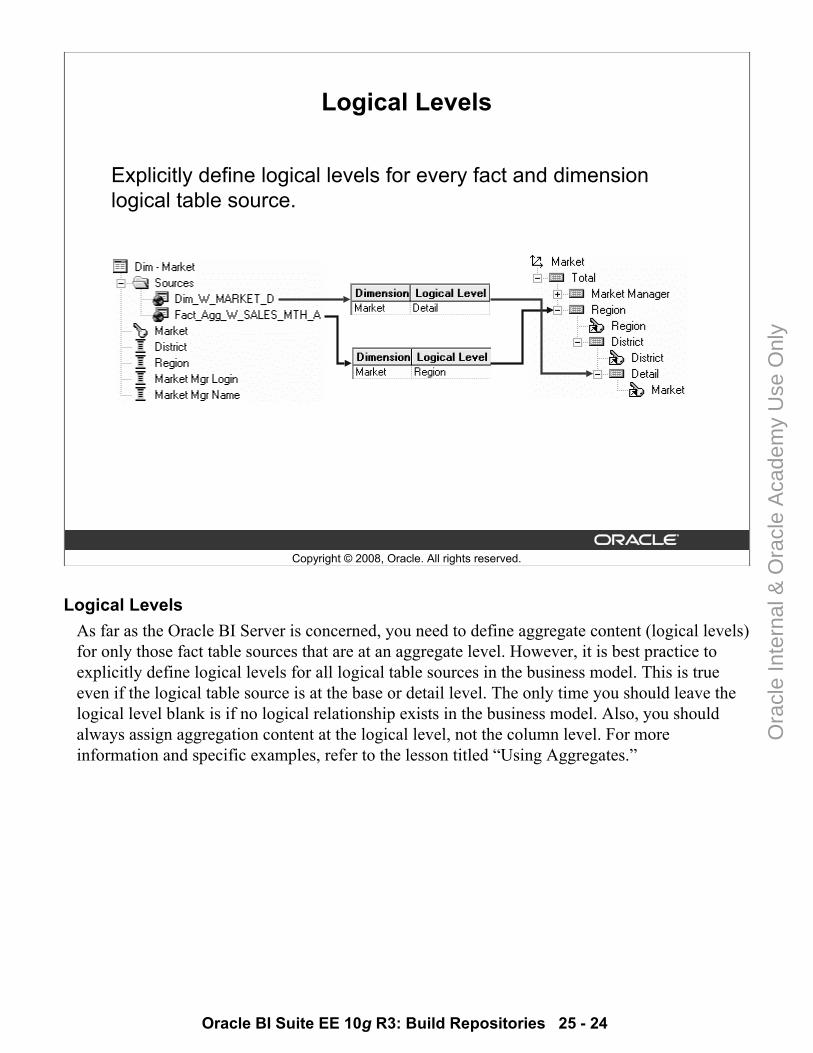
Oracle BI Suite EE 10g R3: Build Repositories 25 - 24
Copyright © 2008, Oracle. All rights reserved.
Logical Levels
Explicitly define logical levels for every fact and dimension logical table source.
Logical LevelsAs far as the Oracle BI Server is concerned, you need to define aggregate content (logical levels) for only those fact table sources that are at an aggregate level. However, it is best practice to explicitly define logical levels for all logical table sources in the business model. This is true even if the logical table source is at the base or detail level. The only time you should leave the logical level blank is if no logical relationship exists in the business model. Also, you should always assign aggregation content at the logical level, not the column level. For more information and specific examples, refer to the lesson titled “Using Aggregates.”
Ora
cle
Inte
rnal
& O
racl
e A
cade
my
Use
Onl
y
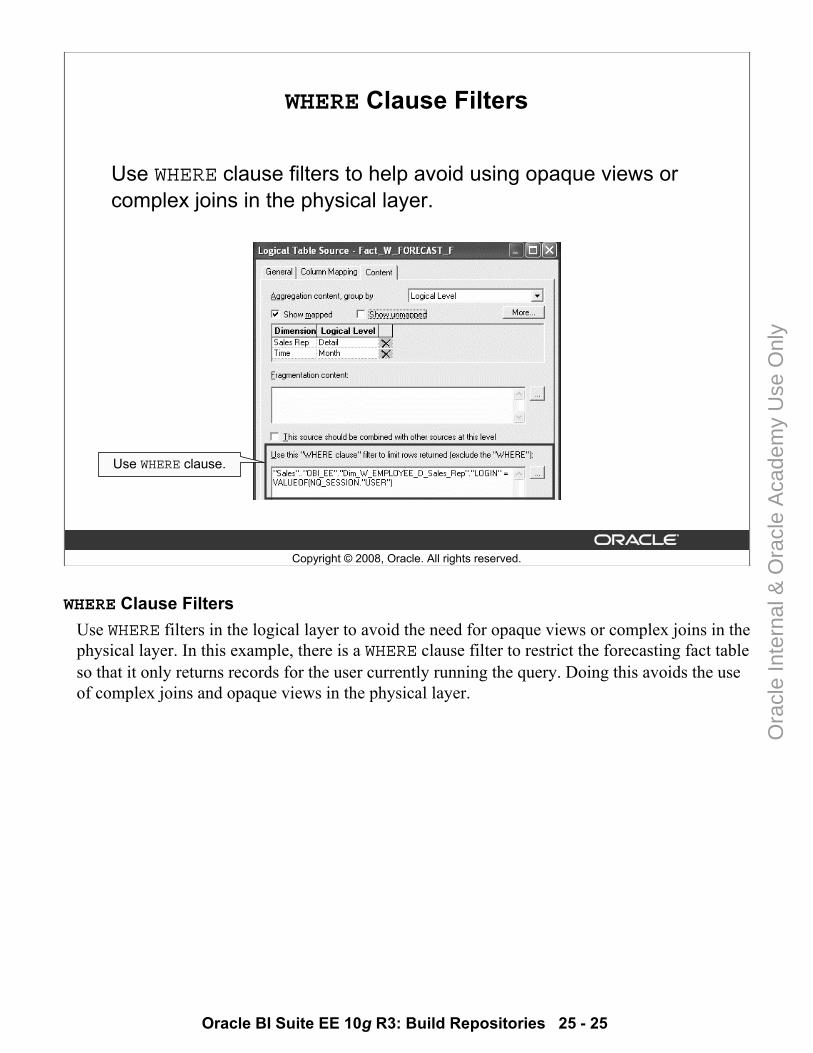
Oracle BI Suite EE 10g R3: Build Repositories 25 - 25
Copyright © 2008, Oracle. All rights reserved.
WHERE Clause Filters
Use WHERE clause filters to help avoid using opaque views or complex joins in the physical layer.
Use WHERE clause.
WHERE Clause FiltersUse WHERE filters in the logical layer to avoid the need for opaque views or complex joins in the physical layer. In this example, there is a WHERE clause filter to restrict the forecasting fact table so that it only returns records for the user currently running the query. Doing this avoids the use of complex joins and opaque views in the physical layer.
Ora
cle
Inte
rnal
& O
racl
e A
cade
my
Use
Onl
y
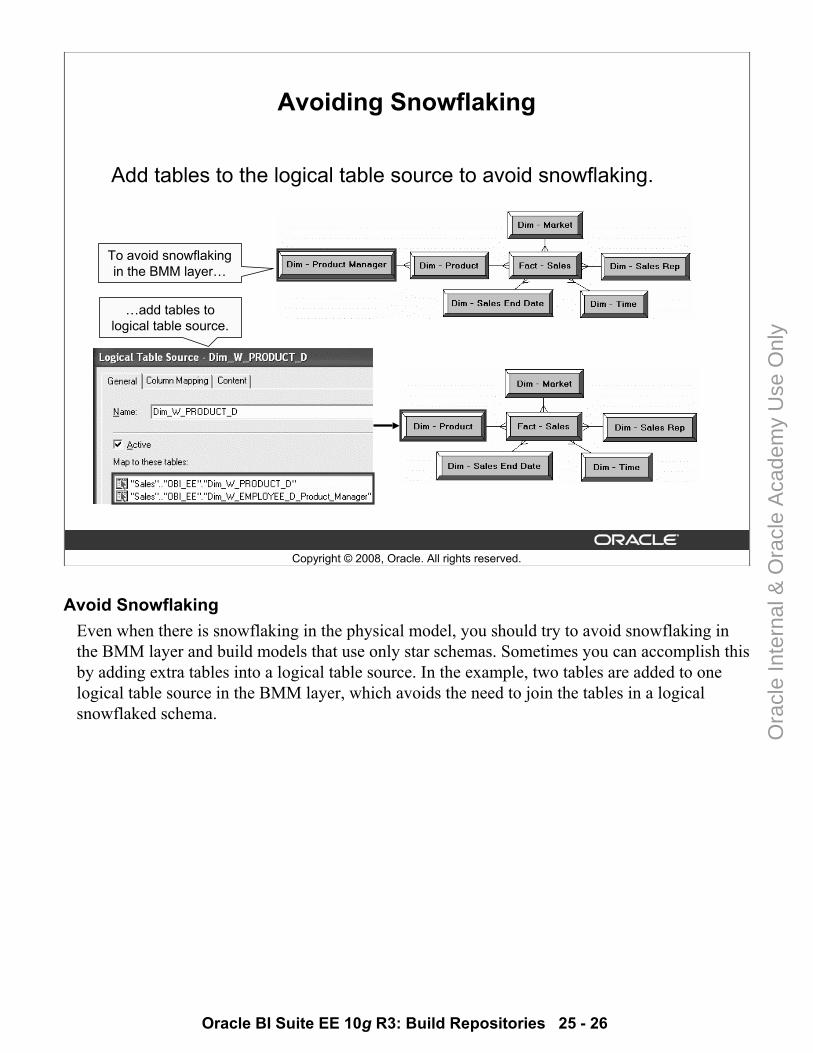
Oracle BI Suite EE 10g R3: Build Repositories 25 - 26
Copyright © 2008, Oracle. All rights reserved.
Avoiding Snowflaking
Add tables to the logical table source to avoid snowflaking.
To avoid snowflaking in the BMM layer…
…add tables to logical table source.
Avoid SnowflakingEven when there is snowflaking in the physical model, you should try to avoid snowflaking in the BMM layer and build models that use only star schemas. Sometimes you can accomplish this by adding extra tables into a logical table source. In the example, two tables are added to one logical table source in the BMM layer, which avoids the need to join the tables in a logical snowflaked schema.
Ora
cle
Inte
rnal
& O
racl
e A
cade
my
Use
Onl
y
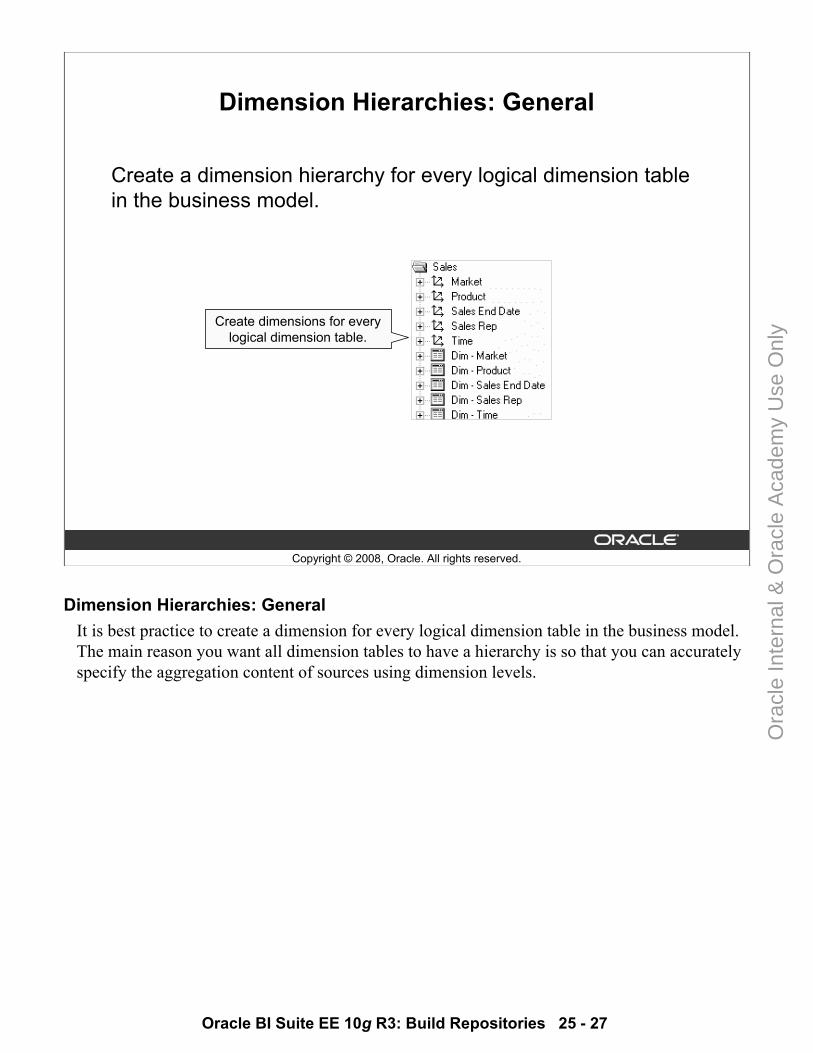
Oracle BI Suite EE 10g R3: Build Repositories 25 - 27
Copyright © 2008, Oracle. All rights reserved.
Dimension Hierarchies: General
Create a dimension hierarchy for every logical dimension table in the business model.
Create dimensions for every logical dimension table.
Dimension Hierarchies: GeneralIt is best practice to create a dimension for every logical dimension table in the business model. The main reason you want all dimension tables to have a hierarchy is so that you can accurately specify the aggregation content of sources using dimension levels.
Ora
cle
Inte
rnal
& O
racl
e A
cade
my
Use
Onl
y
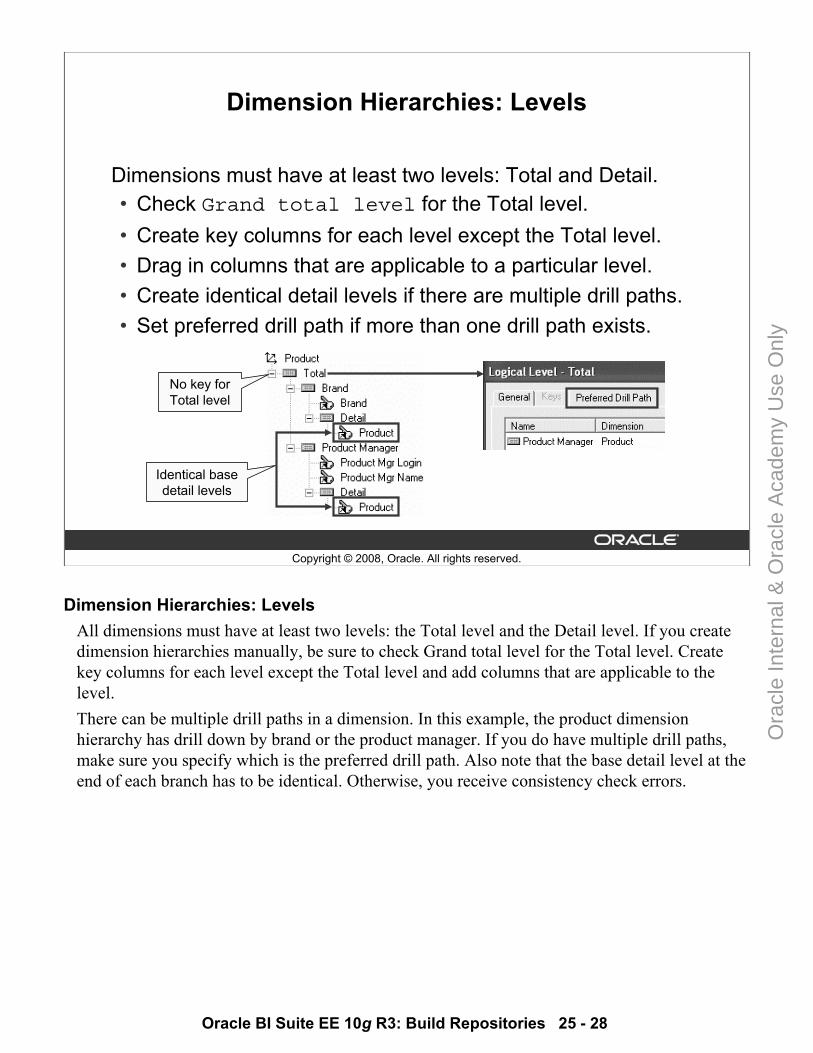
Oracle BI Suite EE 10g R3: Build Repositories 25 - 28
Copyright © 2008, Oracle. All rights reserved.
Dimension Hierarchies: Levels
Dimensions must have at least two levels: Total and Detail.• Check Grand total level for the Total level.• Create key columns for each level except the Total level.• Drag in columns that are applicable to a particular level.• Create identical detail levels if there are multiple drill paths.• Set preferred drill path if more than one drill path exists.
No key for Total level
Identical base detail levels
Dimension Hierarchies: LevelsAll dimensions must have at least two levels: the Total level and the Detail level. If you create dimension hierarchies manually, be sure to check Grand total level for the Total level. Create key columns for each level except the Total level and add columns that are applicable to the level. There can be multiple drill paths in a dimension. In this example, the product dimension hierarchy has drill down by brand or the product manager. If you do have multiple drill paths, make sure you specify which is the preferred drill path. Also note that the base detail level at the end of each branch has to be identical. Otherwise, you receive consistency check errors.
Ora
cle
Inte
rnal
& O
racl
e A
cade
my
Use
Onl
y
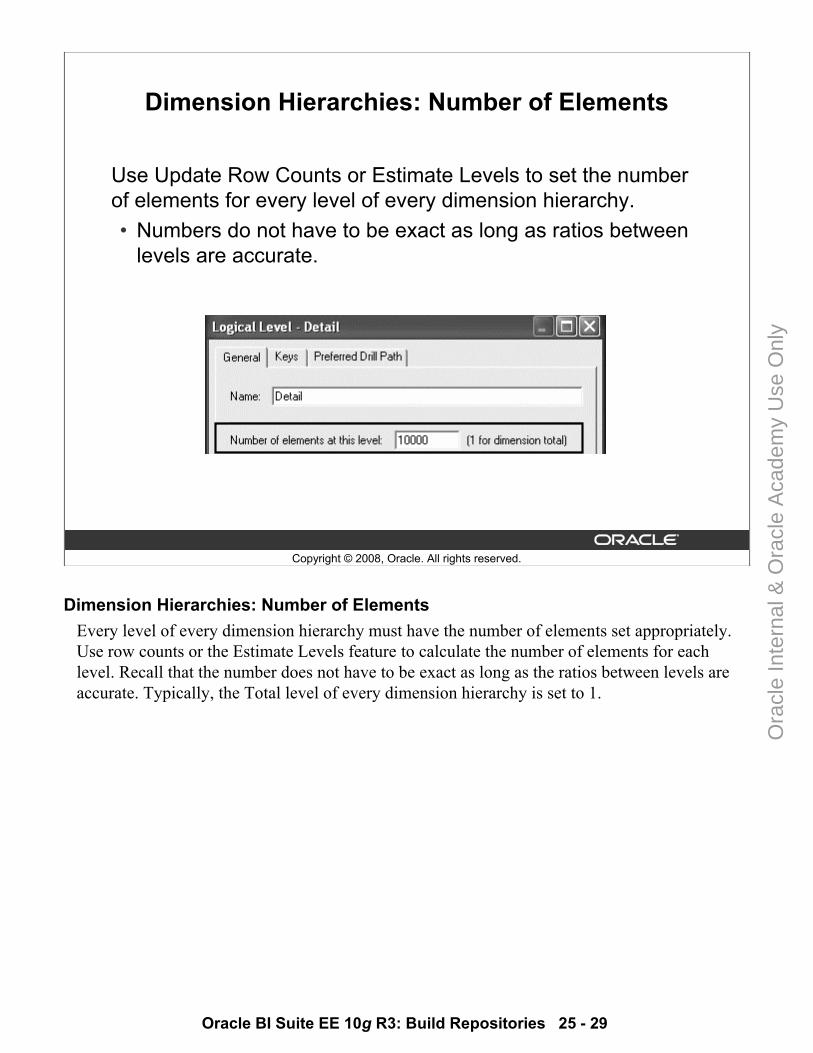
Oracle BI Suite EE 10g R3: Build Repositories 25 - 29
Copyright © 2008, Oracle. All rights reserved.
Dimension Hierarchies: Number of Elements
Use Update Row Counts or Estimate Levels to set the number of elements for every level of every dimension hierarchy.• Numbers do not have to be exact as long as ratios between
levels are accurate.
Dimension Hierarchies: Number of ElementsEvery level of every dimension hierarchy must have the number of elements set appropriately. Use row counts or the Estimate Levels feature to calculate the number of elements for each level. Recall that the number does not have to be exact as long as the ratios between levels are accurate. Typically, the Total level of every dimension hierarchy is set to 1.
Ora
cle
Inte
rnal
& O
racl
e A
cade
my
Use
Onl
y
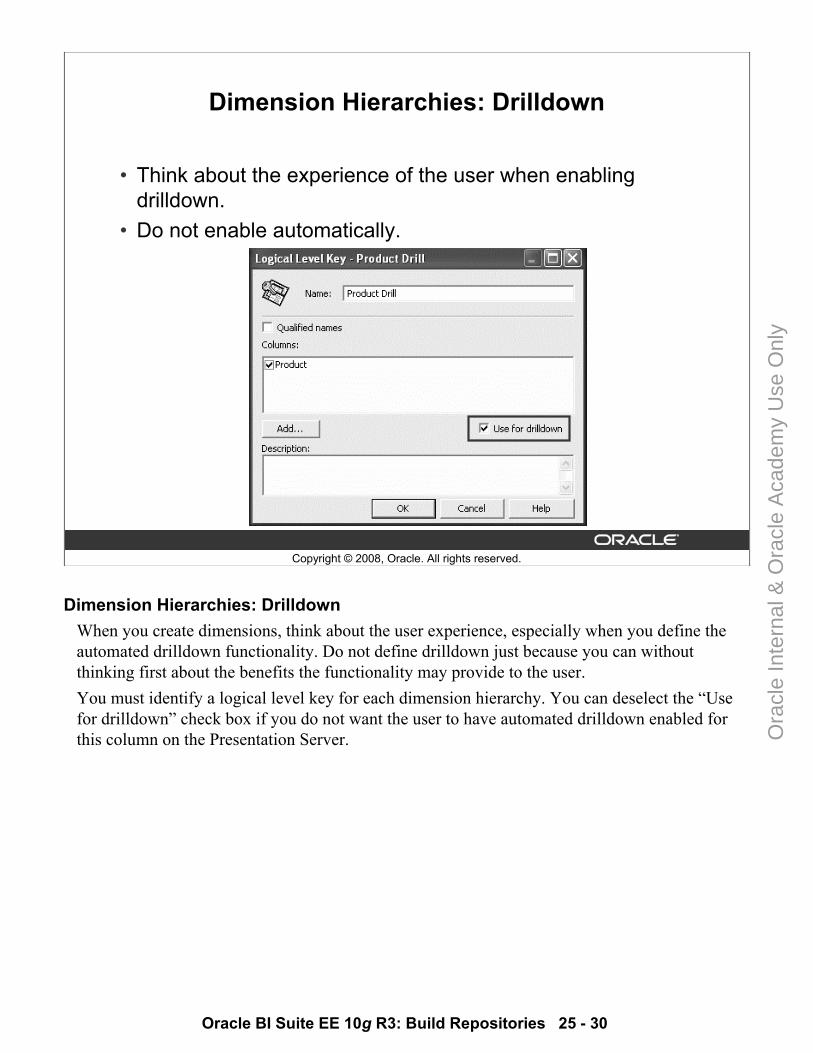
Oracle BI Suite EE 10g R3: Build Repositories 25 - 30
Copyright © 2008, Oracle. All rights reserved.
Dimension Hierarchies: Drilldown
• Think about the experience of the user when enabling drilldown.
• Do not enable automatically.
Dimension Hierarchies: DrilldownWhen you create dimensions, think about the user experience, especially when you define the automated drilldown functionality. Do not define drilldown just because you can without thinking first about the benefits the functionality may provide to the user. You must identify a logical level key for each dimension hierarchy. You can deselect the “Use for drilldown” check box if you do not want the user to have automated drilldown enabled for this column on the Presentation Server.
Ora
cle
Inte
rnal
& O
racl
e A
cade
my
Use
Onl
y
Oracle BI Suite EE 10g R3: Build Repositories 25 - 31
Copyright © 2008, Oracle. All rights reserved.
Aggregates
• Try to ensure that each aggregate table has an effective summary ratio with the underlying detail table.
• Ensure that the logical level of every aggregate logical table source is set correctly.
• Always test to ensure that aggregate tables are being used as expected. (Check the log to see the Physical SQL produced.)
• If an aggregate is not being used, try changing the number of elements on one of the related dimension logical levels.
AggregatesWhen you incorporate aggregate tables into the repository, you need to make sure that the overall efficiency savings are going to benefit the reporting application. Since the creation and storage of aggregates are resource intensive, there are some guidelines for creating aggregates. One is to make sure that there is an effective ratio with the number of records in the detail table to the aggregate table. This ratio varies depending on specific circumstances. You should always test to make sure that the aggregate tables are being used effectively and as expected. Check the log files and make sure no unexpected tables, such as the base detail table, are being accessed in the SQL and that the aggregate tables are being used. In development, results can be misleading, because even when you access a base detail table, the data volumes are so small that the queries run fast. If an aggregate is not used, try changing the number of elements on one of the related logical dimension levels. If there is not a great difference between two levels within a dimension hierarchy, Oracle BI Server might decide that the use of an aggregate table is not efficient enough and just uses the base detail table to satisfy the query. Refer to the lesson titled “Using Aggregates.”
Ora
cle
Inte
rnal
& O
racl
e A
cade
my
Use
Onl
y
Oracle BI Suite EE 10g R3: Build Repositories 25 - 32
Copyright © 2008, Oracle. All rights reserved.
Presentation Layer Design Principles
• Subject areas• Development with end users in mind• Role-based subject areas• Presentation tables• Rule of seven• Fact tables• Implicit fact columns• Canonical time• Secondary time dimensions• Nesting presentation folders• Presentation object names• Presentation object descriptions
Presentation Layer Design PrinciplesThis slide lists the Presentation layer design principles. Each is covered in detail in the slides that follow.
Ora
cle
Inte
rnal
& O
racl
e A
cade
my
Use
Onl
y
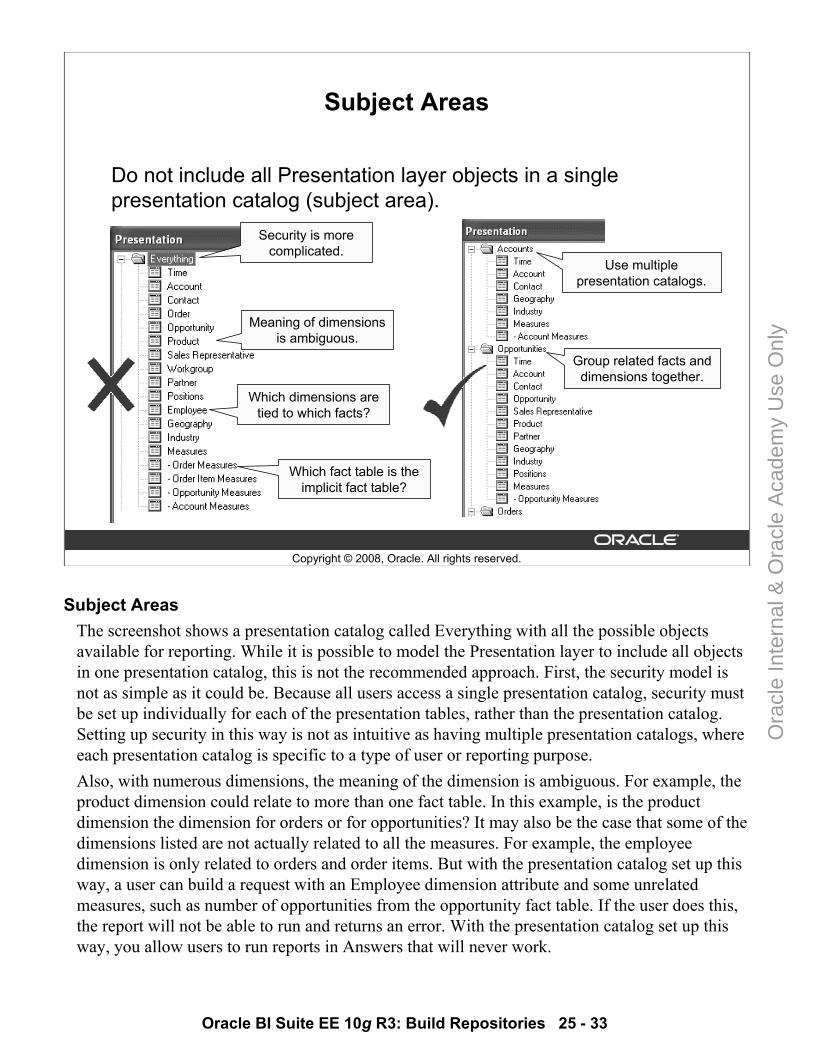
Oracle BI Suite EE 10g R3: Build Repositories 25 - 33
Copyright © 2008, Oracle. All rights reserved.
Subject Areas
Do not include all Presentation layer objects in a single presentation catalog (subject area).
Security is more complicated.
Meaning of dimensions is ambiguous.
Which dimensions are tied to which facts?
Which fact table is the implicit fact table?
Use multiple presentation catalogs.
Group related facts and dimensions together.
Subject AreasThe screenshot shows a presentation catalog called Everything with all the possible objects available for reporting. While it is possible to model the Presentation layer to include all objects in one presentation catalog, this is not the recommended approach. First, the security model is not as simple as it could be. Because all users access a single presentation catalog, security must be set up individually for each of the presentation tables, rather than the presentation catalog. Setting up security in this way is not as intuitive as having multiple presentation catalogs, where each presentation catalog is specific to a type of user or reporting purpose.Also, with numerous dimensions, the meaning of the dimension is ambiguous. For example, the product dimension could relate to more than one fact table. In this example, is the product dimension the dimension for orders or for opportunities? It may also be the case that some of the dimensions listed are not actually related to all the measures. For example, the employee dimension is only related to orders and order items. But with the presentation catalog set up this way, a user can build a request with an Employee dimension attribute and some unrelated measures, such as number of opportunities from the opportunity fact table. If the user does this, the report will not be able to run and returns an error. With the presentation catalog set up this way, you allow users to run reports in Answers that will never work.
Ora
cle
Inte
rnal
& O
racl
e A
cade
my
Use
Onl
y

Oracle BI Suite EE 10g R3: Build Repositories 25 - 34
Subject Areas (continued)On the right is a Presentation layer that is more suitable. For example, there are multiple presentation catalogs. Each catalog is specifically suited to a particular reporting purpose. Within the catalogs, all the dimension tables directly relate to all the fact tables. There is no problem with ambiguity or multiple join paths. This Presentation layer is a lot more usable and intuitive to the user.
Ora
cle
Inte
rnal
& O
racl
e A
cade
my
Use
Onl
y
Oracle BI Suite EE 10g R3: Build Repositories 25 - 35
Copyright © 2008, Oracle. All rights reserved.
Development with End Users in Mind
• Always develop the Presentation layer so that end users are able to understand and use it.
• Even if there is no current requirement for users to run their own reports, users may be asked to do so in the future.
Develop with the End User in MindMake sure to develop the Presentation layer so that any end user is able to understand and use it. If there is no requirement for users to write their own reports, the risk is that the developer produces the Presentation layer in a way that only developers understand. Even if there is no current requirement for end users to create their own reports, they may be asked to do so in the future. If the Presentation layer is too complicated for end users to understand, it may need to be redeveloped at that time at an additional cost.
Ora
cle
Inte
rnal
& O
racl
e A
cade
my
Use
Onl
y
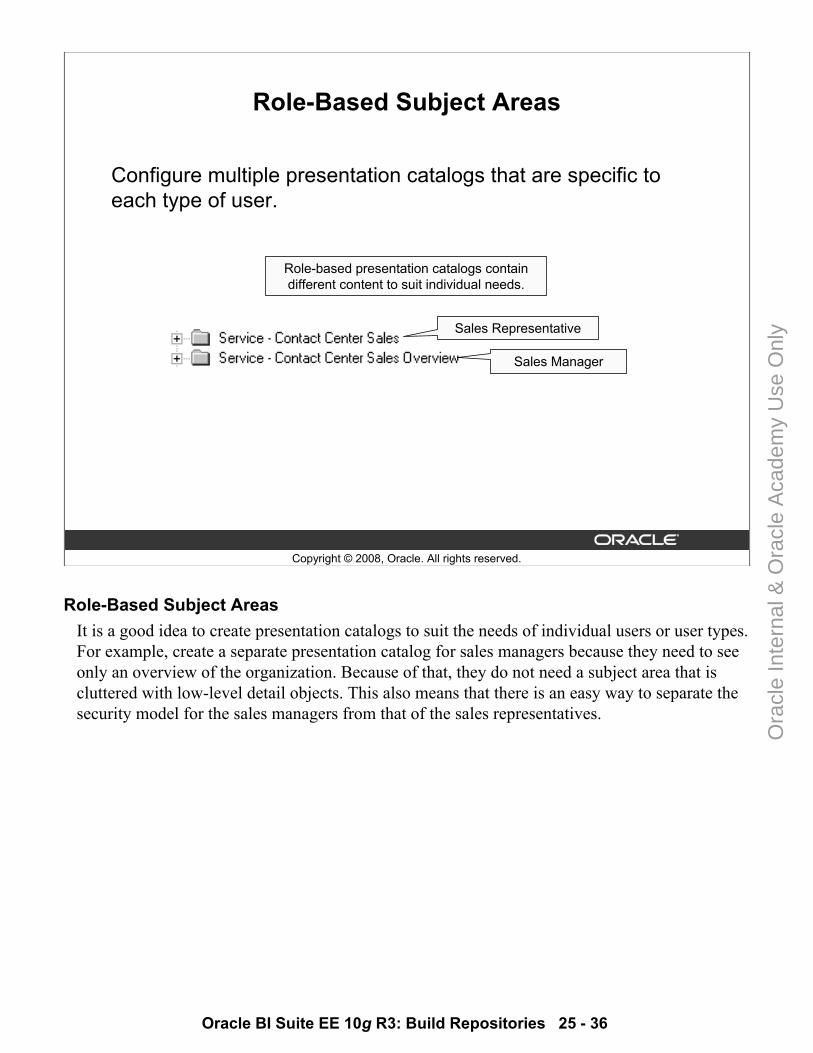
Oracle BI Suite EE 10g R3: Build Repositories 25 - 36
Copyright © 2008, Oracle. All rights reserved.
Role-Based Subject Areas
Configure multiple presentation catalogs that are specific to each type of user.
Role-based presentation catalogs contain different content to suit individual needs.
Sales Representative
Sales Manager
Role-Based Subject AreasIt is a good idea to create presentation catalogs to suit the needs of individual users or user types. For example, create a separate presentation catalog for sales managers because they need to see only an overview of the organization. Because of that, they do not need a subject area that is cluttered with low-level detail objects. This also means that there is an easy way to separate the security model for the sales managers from that of the sales representatives.
Ora
cle
Inte
rnal
& O
racl
e A
cade
my
Use
Onl
y
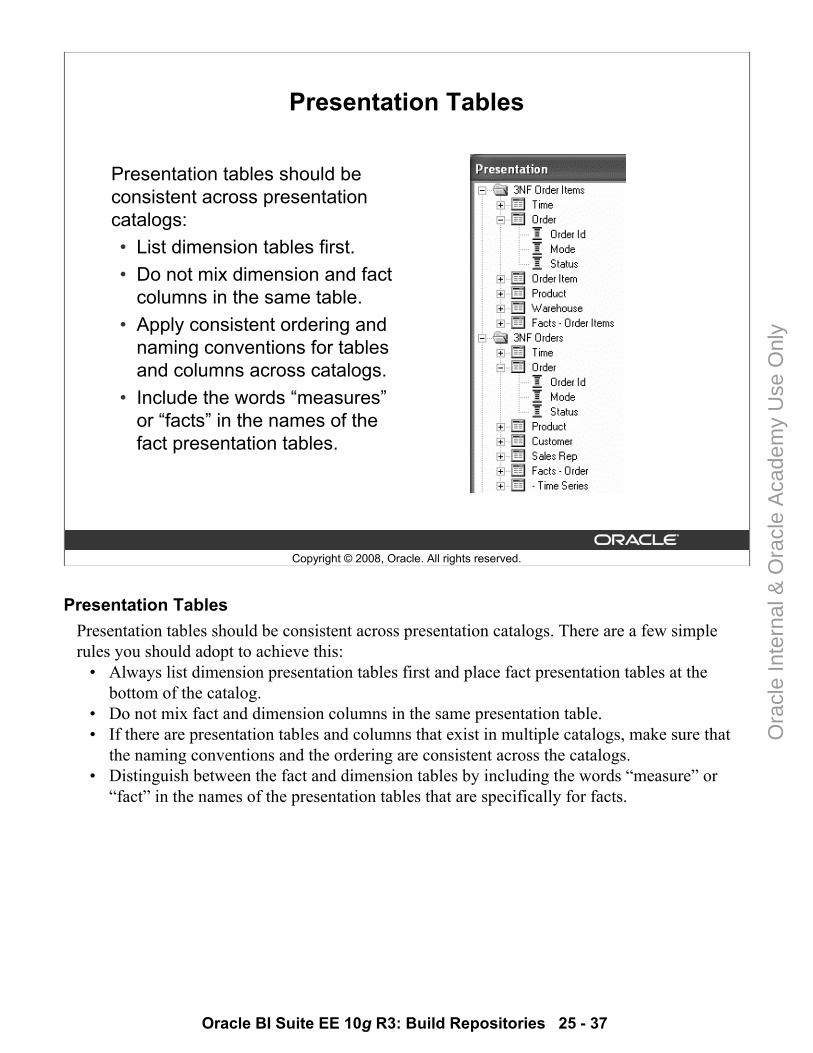
Oracle BI Suite EE 10g R3: Build Repositories 25 - 37
Copyright © 2008, Oracle. All rights reserved.
Presentation Tables
Presentation tables should be consistent across presentation catalogs:• List dimension tables first.• Do not mix dimension and fact
columns in the same table.• Apply consistent ordering and
naming conventions for tables and columns across catalogs.
• Include the words “measures” or “facts” in the names of the fact presentation tables.
Presentation TablesPresentation tables should be consistent across presentation catalogs. There are a few simple rules you should adopt to achieve this:
• Always list dimension presentation tables first and place fact presentation tables at the bottom of the catalog.
• Do not mix fact and dimension columns in the same presentation table.• If there are presentation tables and columns that exist in multiple catalogs, make sure that
the naming conventions and the ordering are consistent across the catalogs.• Distinguish between the fact and dimension tables by including the words “measure” or
“fact” in the names of the presentation tables that are specifically for facts.
Ora
cle
Inte
rnal
& O
racl
e A
cade
my
Use
Onl
y
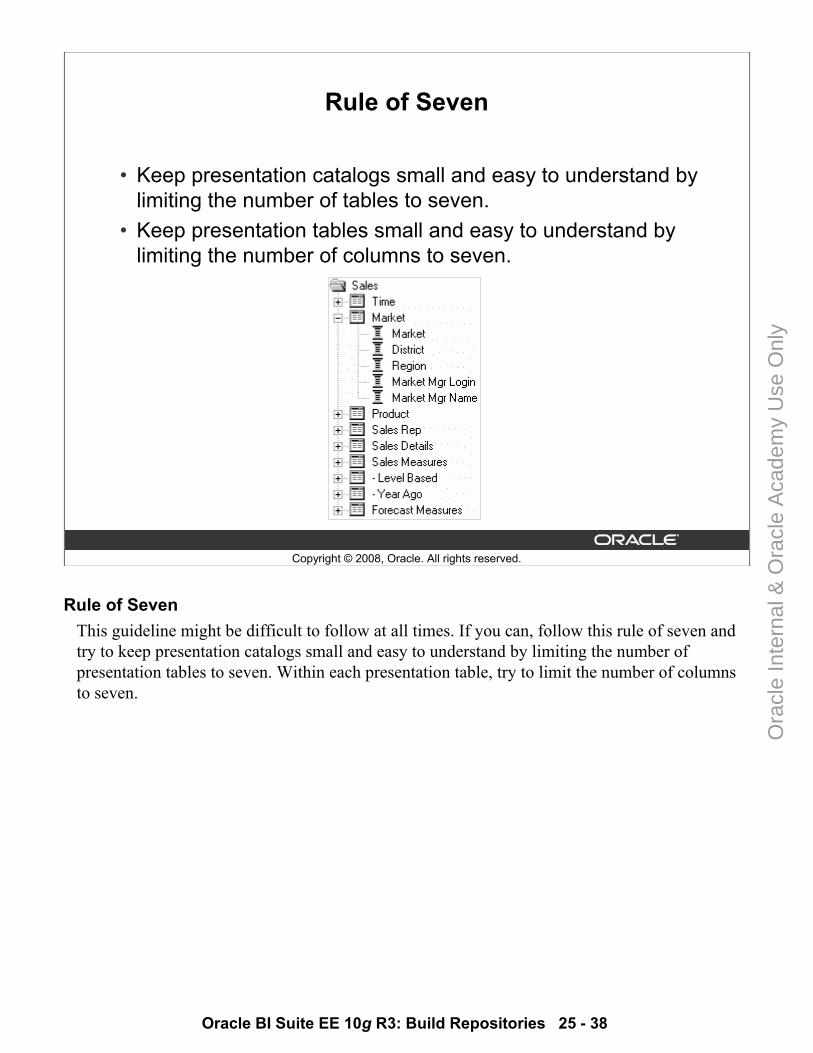
Oracle BI Suite EE 10g R3: Build Repositories 25 - 38
Copyright © 2008, Oracle. All rights reserved.
Rule of Seven
• Keep presentation catalogs small and easy to understand by limiting the number of tables to seven.
• Keep presentation tables small and easy to understand by limiting the number of columns to seven.
Rule of SevenThis guideline might be difficult to follow at all times. If you can, follow this rule of seven and try to keep presentation catalogs small and easy to understand by limiting the number of presentation tables to seven. Within each presentation table, try to limit the number of columns to seven.
Ora
cle
Inte
rnal
& O
racl
e A
cade
my
Use
Onl
y
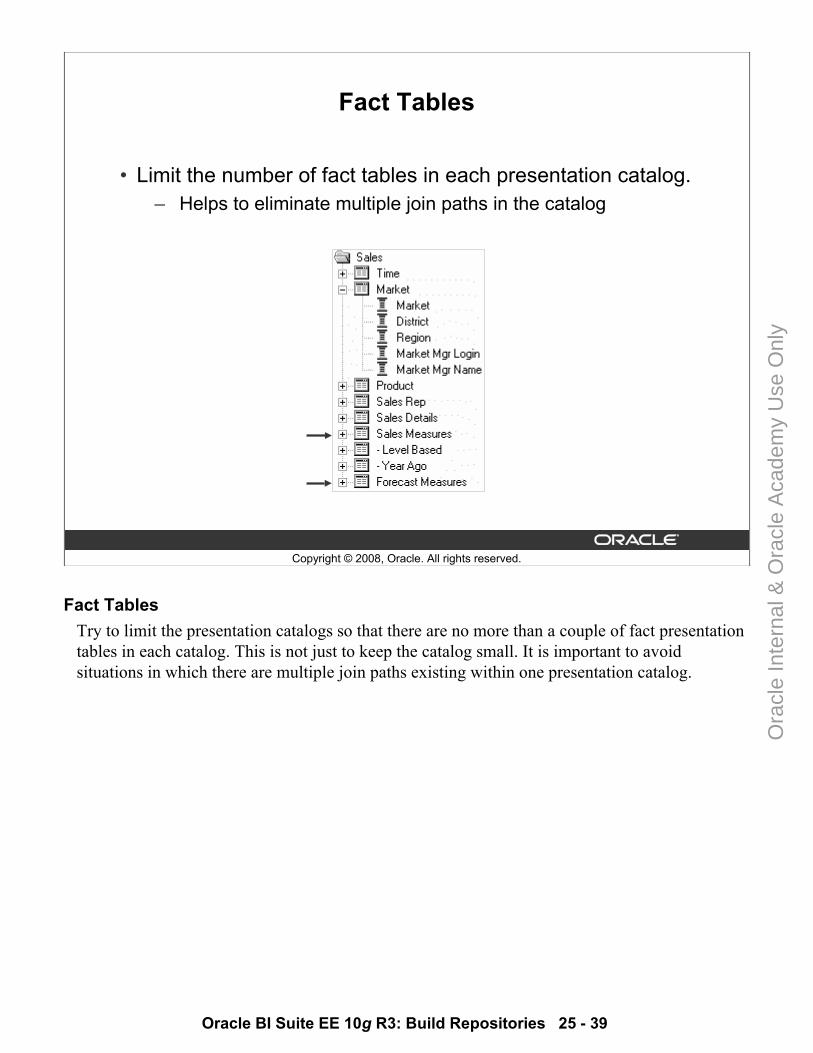
Oracle BI Suite EE 10g R3: Build Repositories 25 - 39
Copyright © 2008, Oracle. All rights reserved.
Fact Tables
• Limit the number of fact tables in each presentation catalog.– Helps to eliminate multiple join paths in the catalog
Fact TablesTry to limit the presentation catalogs so that there are no more than a couple of fact presentation tables in each catalog. This is not just to keep the catalog small. It is important to avoid situations in which there are multiple join paths existing within one presentation catalog.
Ora
cle
Inte
rnal
& O
racl
e A
cade
my
Use
Onl
y
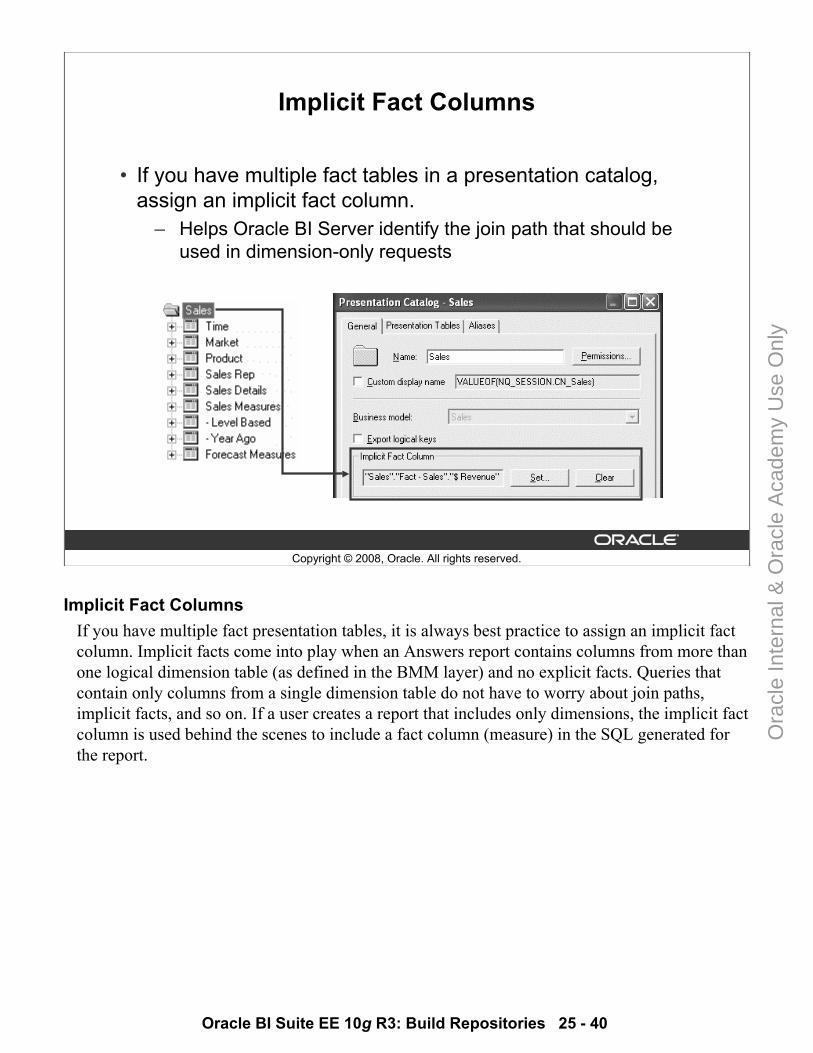
Oracle BI Suite EE 10g R3: Build Repositories 25 - 40
Copyright © 2008, Oracle. All rights reserved.
Implicit Fact Columns
• If you have multiple fact tables in a presentation catalog, assign an implicit fact column.
– Helps Oracle BI Server identify the join path that should be used in dimension-only requests
Implicit Fact ColumnsIf you have multiple fact presentation tables, it is always best practice to assign an implicit fact column. Implicit facts come into play when an Answers report contains columns from more than one logical dimension table (as defined in the BMM layer) and no explicit facts. Queries that contain only columns from a single dimension table do not have to worry about join paths, implicit facts, and so on. If a user creates a report that includes only dimensions, the implicit fact column is used behind the scenes to include a fact column (measure) in the SQL generated for the report.
Ora
cle
Inte
rnal
& O
racl
e A
cade
my
Use
Onl
y
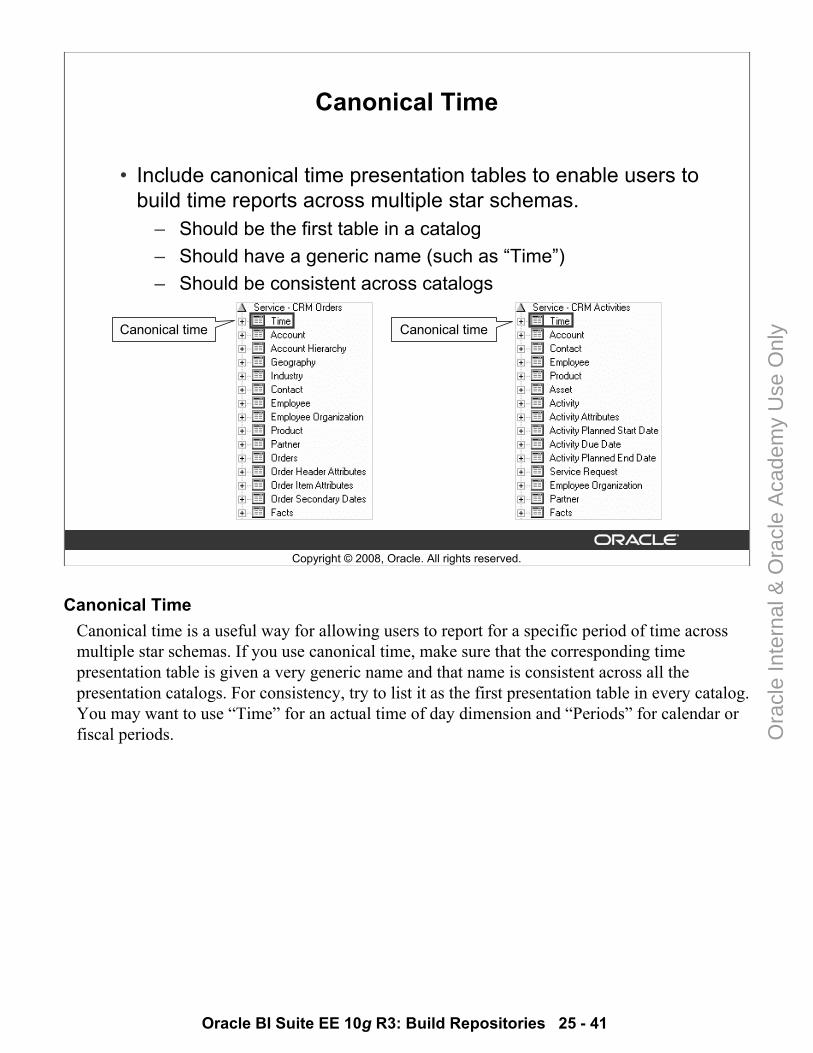
Oracle BI Suite EE 10g R3: Build Repositories 25 - 41
Copyright © 2008, Oracle. All rights reserved.
Canonical Time
• Include canonical time presentation tables to enable users to build time reports across multiple star schemas.
– Should be the first table in a catalog– Should have a generic name (such as “Time”)– Should be consistent across catalogs
Canonical time Canonical time
Canonical TimeCanonical time is a useful way for allowing users to report for a specific period of time across multiple star schemas. If you use canonical time, make sure that the corresponding time presentation table is given a very generic name and that name is consistent across all the presentation catalogs. For consistency, try to list it as the first presentation table in every catalog. You may want to use “Time” for an actual time of day dimension and “Periods” for calendar or fiscal periods.
Ora
cle
Inte
rnal
& O
racl
e A
cade
my
Use
Onl
y
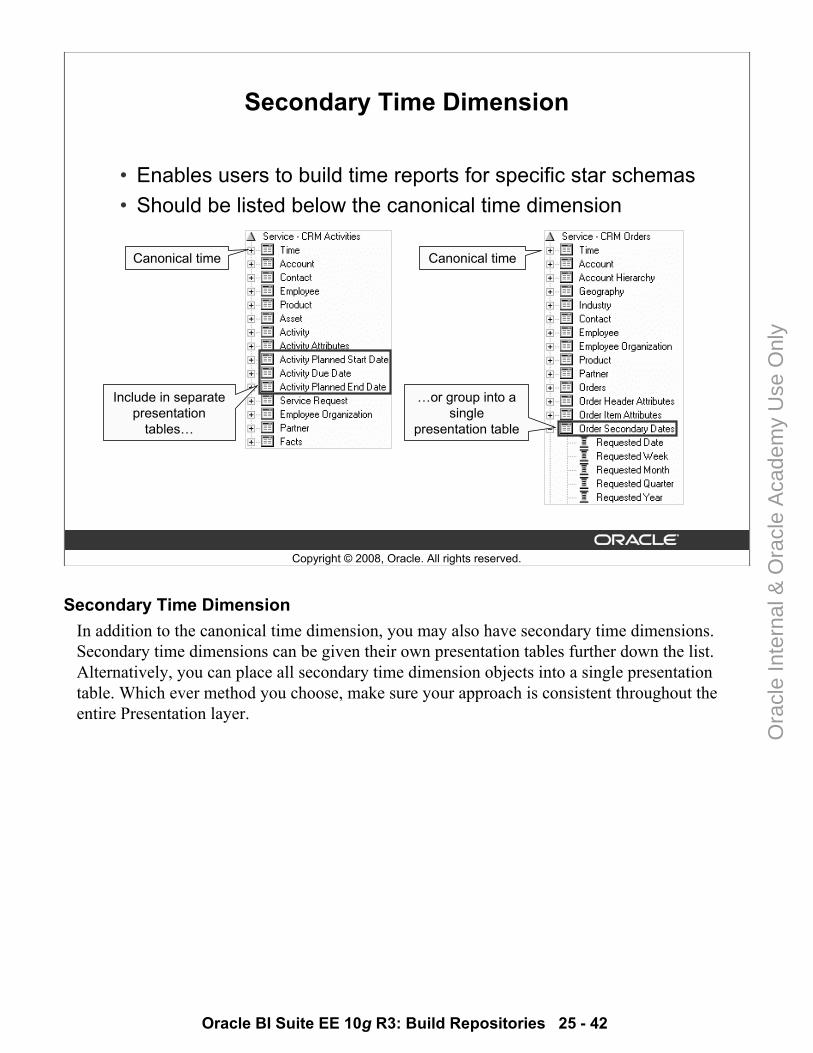
Oracle BI Suite EE 10g R3: Build Repositories 25 - 42
Copyright © 2008, Oracle. All rights reserved.
Secondary Time Dimension
• Enables users to build time reports for specific star schemas• Should be listed below the canonical time dimension
Include in separate presentation
tables…
…or group into a single
presentation table
Canonical time Canonical time
Secondary Time Dimension In addition to the canonical time dimension, you may also have secondary time dimensions. Secondary time dimensions can be given their own presentation tables further down the list. Alternatively, you can place all secondary time dimension objects into a single presentation table. Which ever method you choose, make sure your approach is consistent throughout the entire Presentation layer.
Ora
cle
Inte
rnal
& O
racl
e A
cade
my
Use
Onl
y
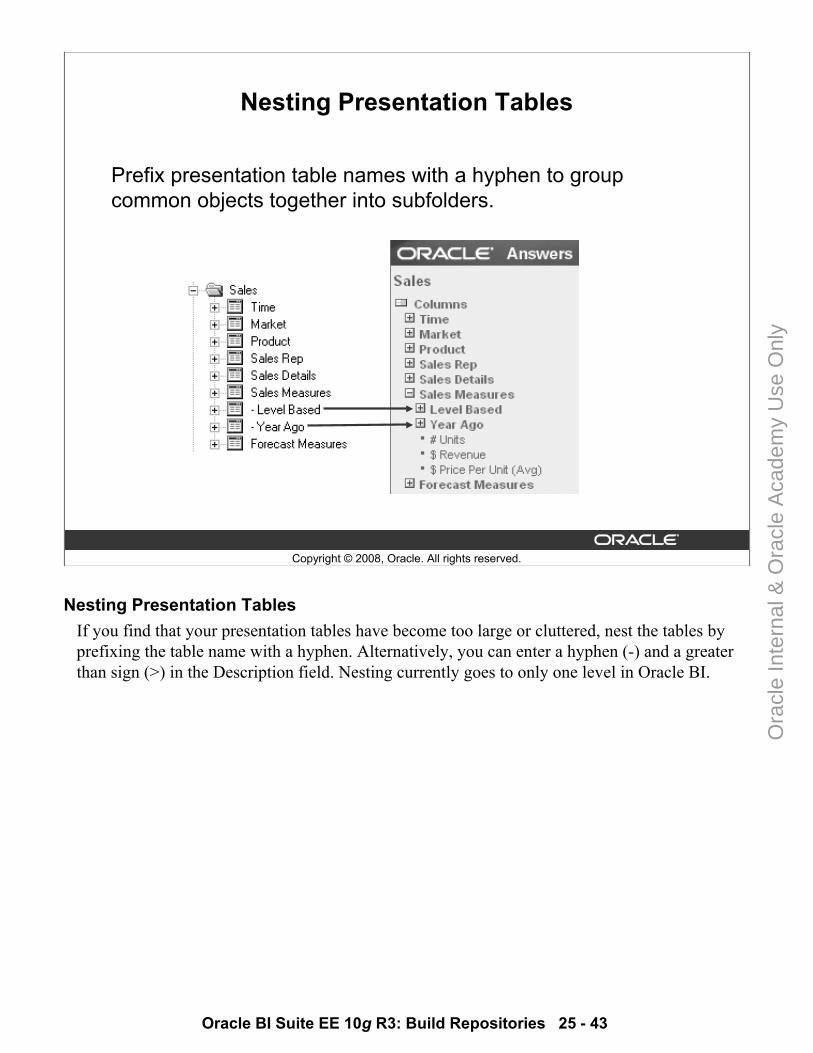
Oracle BI Suite EE 10g R3: Build Repositories 25 - 43
Copyright © 2008, Oracle. All rights reserved.
Nesting Presentation Tables
Prefix presentation table names with a hyphen to group common objects together into subfolders.
Nesting Presentation TablesIf you find that your presentation tables have become too large or cluttered, nest the tables by prefixing the table name with a hyphen. Alternatively, you can enter a hyphen (-) and a greater than sign (>) in the Description field. Nesting currently goes to only one level in Oracle BI.
Ora
cle
Inte
rnal
& O
racl
e A
cade
my
Use
Onl
y
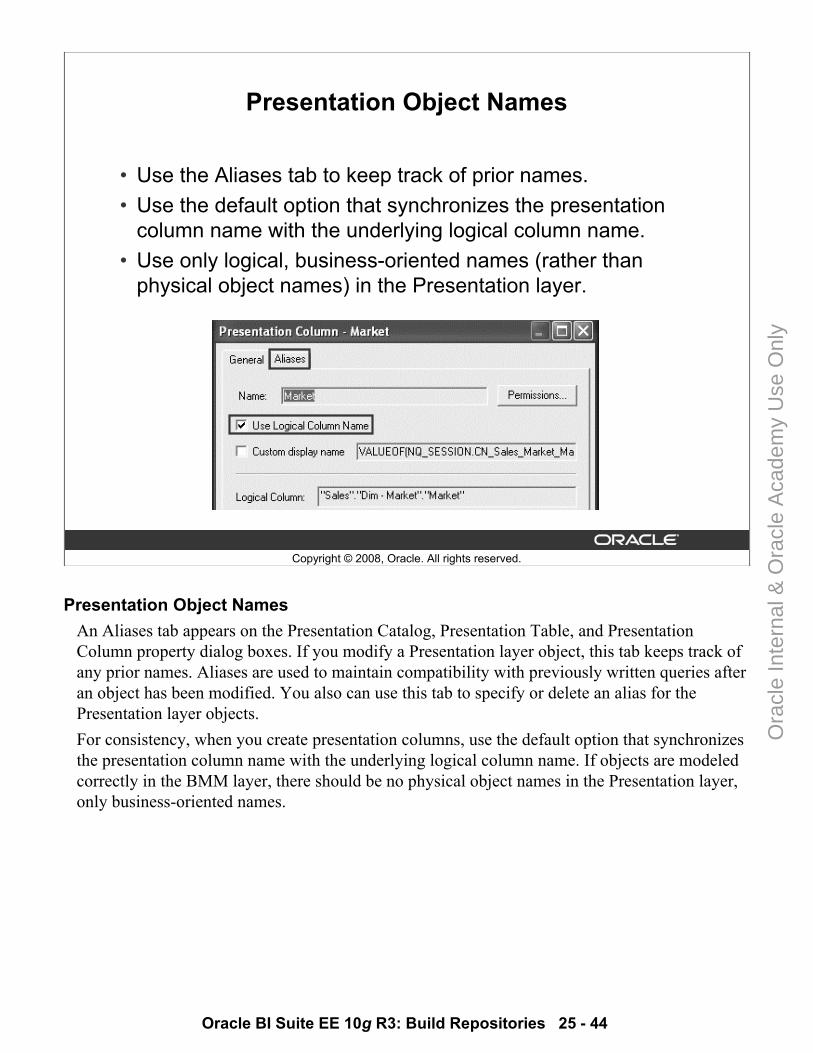
Oracle BI Suite EE 10g R3: Build Repositories 25 - 44
Copyright © 2008, Oracle. All rights reserved.
Presentation Object Names
• Use the Aliases tab to keep track of prior names.• Use the default option that synchronizes the presentation
column name with the underlying logical column name.• Use only logical, business-oriented names (rather than
physical object names) in the Presentation layer.
Presentation Object NamesAn Aliases tab appears on the Presentation Catalog, Presentation Table, and Presentation Column property dialog boxes. If you modify a Presentation layer object, this tab keeps track of any prior names. Aliases are used to maintain compatibility with previously written queries after an object has been modified. You also can use this tab to specify or delete an alias for the Presentation layer objects.For consistency, when you create presentation columns, use the default option that synchronizes the presentation column name with the underlying logical column name. If objects are modeled correctly in the BMM layer, there should be no physical object names in the Presentation layer, only business-oriented names.
Ora
cle
Inte
rnal
& O
racl
e A
cade
my
Use
Onl
y

Oracle BI Suite EE 10g R3: Build Repositories 25 - 45
Copyright © 2008, Oracle. All rights reserved.
Presentation Object Descriptions
• Add descriptions to presentation catalogs to explain the purpose of each subject area in Oracle BI Answers.
• Add descriptions to presentation tables to appear with mouse roll-over in Answers.
• Add descriptions with examples to presentation columns to explain the data content with mouse roll-over in Answers.
Presentation Object DescriptionsIt is a good idea to add descriptions to all the objects that are available to end users for reporting. Adding descriptions to objects in the Presentation layer helps explain their purpose to users in Answers. It is especially important to add descriptions to columns. With descriptions added, users see an explanation of the data content when they roll over a column in Answers. When you add descriptions to your presentation columns, also try to include examples of the actual column content that show the column format.
Ora
cle
Inte
rnal
& O
racl
e A
cade
my
Use
Onl
y
Oracle BI Suite EE 10g R3: Build Repositories 25 - 46
Copyright © 2008, Oracle. All rights reserved.
Summary
In this lesson, you should have learned how to identify and apply Oracle BI repository design principles.
Ora
cle
Inte
rnal
& O
racl
e A
cade
my
Use
Onl
y
Oracle BI Suite EE 10g R3: Build Repositories 25 - 47
Copyright © 2008, Oracle. All rights reserved.
Practice 25-1: Exploring Applied Design Principles
In the practice, you explore best practices and applied design principles in an Oracle BI repository.
Ora
cle
Inte
rnal
& O
racl
e A
cade
my
Use
Onl
y

Ora
cle
Inte
rnal
& O
racl
e A
cade
my
Use
Onl
y

Copyright © 2008, Oracle. All rights reserved.
Model First Development Methodology
Ora
cle
Inte
rnal
& O
racl
e A
cade
my
Use
Onl
y
Oracle BI Suite EE 10g R3: Build Repositories A - 2
Copyright © 2008, Oracle. All rights reserved.
Model First Development Methodology: Overview
• Recommended approach for developing Oracle BI repositories
• Driven by business analysis and usage history• Iterative, top-down approach that focuses on the
consolidation and abstraction of core business requirements irrespective of the underlying physical architecture:
– Build business model first– Integrate with underlying physical architecture– Quickly deploy baseline to end users– Pursue iterative development based on user feedback
Model First Development Methodology: OverviewA model first development methodology is the recommended methodology for developing Oracle BI repositories. It is an iterative, top-down approach to development that focuses on the consolidation and abstraction of core business requirements irrespective of the underlying physical architecture. Developers using a top-down, model first approach start with the business requirements, prioritize actual business use cases, and then methodically drill down to the technical details. This top-down approach is generally regarded as a macro view of the issues related to development, based on business drivers and users, and driven by business analysis. This is opposed to bottom-up analysis, which starts at the physical sources, catalogues technical details (databases, tables, columns, and so on) and then rationalizes the details into categories that attempt to match historical end-user usage patterns and business activities. Bottom-up analysis is an appropriate performance analysis technique for highly repeatable, static events, but falls short in dynamic, ad hoc environments where usage is less predictable. It is entirely possible for a thorough performance optimization process driven by a bottom-up analysis to become obsolete within days or weeks as the business adapts to differing views of the data.The main objective of the model first development approach is to build the desired business model first. This ensures that functional and inherent performance requirements are addressed by the logical integration and augmentation of the physical architecture. This approach allows developers to quickly get a reasonable baseline business model in front of users, and then pursue iterative development based on user feedback.
Ora
cle
Inte
rnal
& O
racl
e A
cade
my
Use
Onl
y
Oracle BI Suite EE 10g R3: Build Repositories A - 3
Copyright © 2008, Oracle. All rights reserved.
Central Tenets of the Model First Development Methodology
• Rapid prototyping– Leverage actual subsets or fictitious physical data stores and
manageable data volumes to reduce performance issues during development
• Iterative development and user feedback– Leverage prototypes for demos and hands-on sandboxes– Rollout augmented models frequently– Demonstrate responsiveness to feedback
• Gap analysis– Map the business model to actual physical sources– Manage scope and expectations accordingly
• Gather performance requirements along the way– Identify patterns of use, data granularity, user groups and
security constraints
Central Tenets of Model First Development MethodologyA model first methodology should employ rapid prototyping of the repository business model by leveraging actual subsets or fictitious physical data sources and manageable data volumes. This helps eliminate performance issues during development. After a prototype is built and delivered to users, iterative development should continue based on user feedback. This iterative development should ensure that augmented business models are rolled out frequently and that they demonstrate responsiveness to user feedback. During this process, developers must perform gap analysis to map the business model to actual physical data sources. Since there will be gaps, it is important to manage project scope and expectations accordingly. Developers should also gather performance requirements along the way by identifying patterns of use, data granularity, user roles and groups, and security constraints.
Ora
cle
Inte
rnal
& O
racl
e A
cade
my
Use
Onl
y
Oracle BI Suite EE 10g R3: Build Repositories A - 4
Copyright © 2008, Oracle. All rights reserved.
Baseline Performance Analysis
Enables you to analyze performance requirements better and discuss with business users:• Catalog and enumerate all users, roles, job titles, and
objectives.• Obtain a detailed organization chart of the business
intelligence (BI) users and organizations.• Identify mandated security model guidelines.• Collect row counts for all tables (facts and dimensions) as
well as dimension-level cardinality.
Baseline Performance Analysis It is important to perform a baseline performance analysis. The output of a top-down performance optimization analysis is a rationalized and prioritized framework of dimensions, levels and measures from which to build and map aggregate summary objects. Upfront analysis of the following key data points prepares you to discuss performance requirements with users better:
• Catalog and enumerate all users, roles, job titles, and objectives.• Obtain a detailed organization chart of the BI users and organizations.• Identify mandated security model guidelines.• Collect row counts for all tables (facts and dimensions) as well as dimension level
cardinalityFrom these four straightforward data inputs, it is often possible to pull together a workable framework that can be implemented across large user bases.From the user, role, title, objectives profile, natural groupings become apparent. Groups are easily organized via similar objectives. Key dimensions and levels can quickly surface. Organization charts, when held up to user groups, often overtly expose key dimension and levels such as geographic or product alignments and provide candidates for summaries.
Ora
cle
Inte
rnal
& O
racl
e A
cade
my
Use
Onl
y

Oracle BI Suite EE 10g R3: Build Repositories A - 5
Baseline Performance Analysis (continued)Security requirements show the required dimensionality for record filtering and can even eliminate entire groups from aggregate summary analysis due to highly restrictive data access requirements.Records counts and cardinality are instrumental in calculating record compression and validating aggregate summary prototypes. Without significant compression, the aggregate summaries may prove too time-intensive to build or not worth the effort.
Ora
cle
Inte
rnal
& O
racl
e A
cade
my
Use
Onl
y
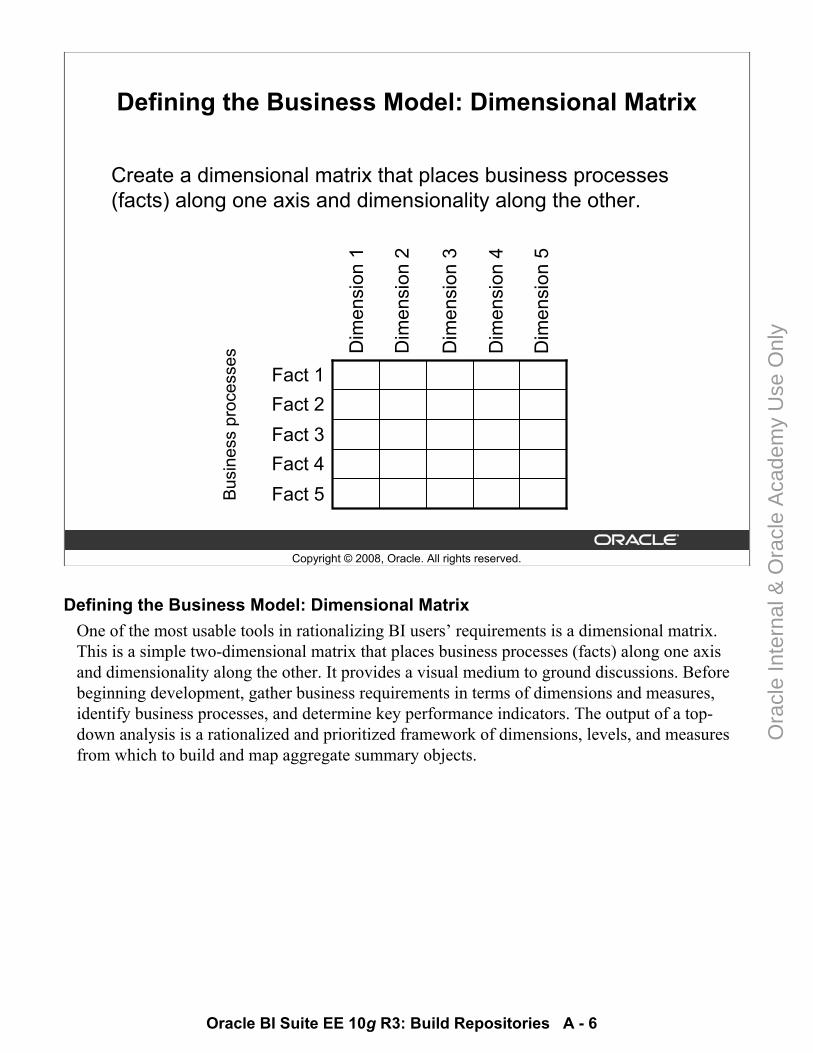
Oracle BI Suite EE 10g R3: Build Repositories A - 6
Copyright © 2008, Oracle. All rights reserved.
Defining the Business Model: Dimensional Matrix
Create a dimensional matrix that places business processes (facts) along one axis and dimensionality along the other.
Fact 1Fact 2Fact 3Fact 4Fact 5
Dim
ensi
on 5
Dim
ensi
on 4
Dim
ensi
on 3
Dim
ensi
on 2
Dim
ensi
on 1
Bus
ines
s pr
oces
ses
Defining the Business Model: Dimensional MatrixOne of the most usable tools in rationalizing BI users’ requirements is a dimensional matrix. This is a simple two-dimensional matrix that places business processes (facts) along one axis and dimensionality along the other. It provides a visual medium to ground discussions. Before beginning development, gather business requirements in terms of dimensions and measures, identify business processes, and determine key performance indicators. The output of a top-down analysis is a rationalized and prioritized framework of dimensions, levels, and measures from which to build and map aggregate summary objects.
Ora
cle
Inte
rnal
& O
racl
e A
cade
my
Use
Onl
y
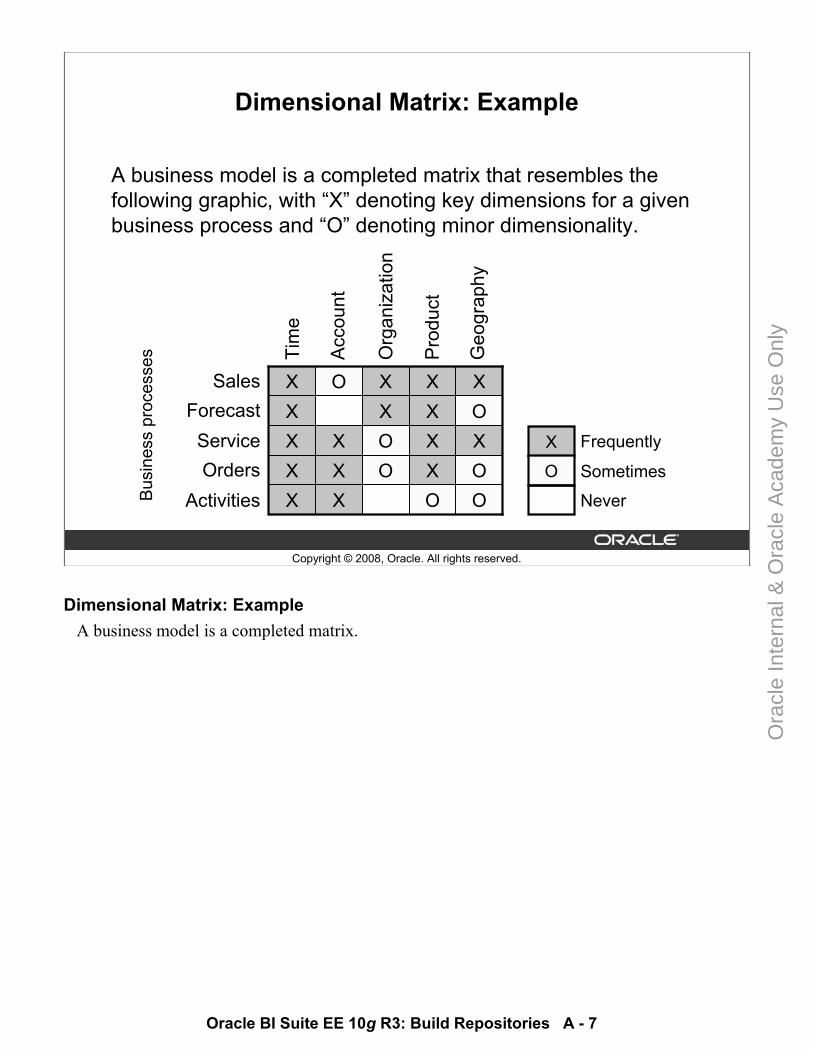
Oracle BI Suite EE 10g R3: Build Repositories A - 7
Copyright © 2008, Oracle. All rights reserved.
Dimensional Matrix: Example
A business model is a completed matrix that resembles the following graphic, with “X” denoting key dimensions for a given business process and “O” denoting minor dimensionality.
Bus
ines
s pr
oces
ses
OOXXOXOXXXXOXXOXXXXXXOXSales
ForecastServiceOrders
ActivitiesG
eogr
aphy
Pro
duct
Org
aniz
atio
n
Acc
ount
Tim
e
X
O
Frequently
Sometimes
Never
Dimensional Matrix: ExampleA business model is a completed matrix.
Ora
cle
Inte
rnal
& O
racl
e A
cade
my
Use
Onl
y
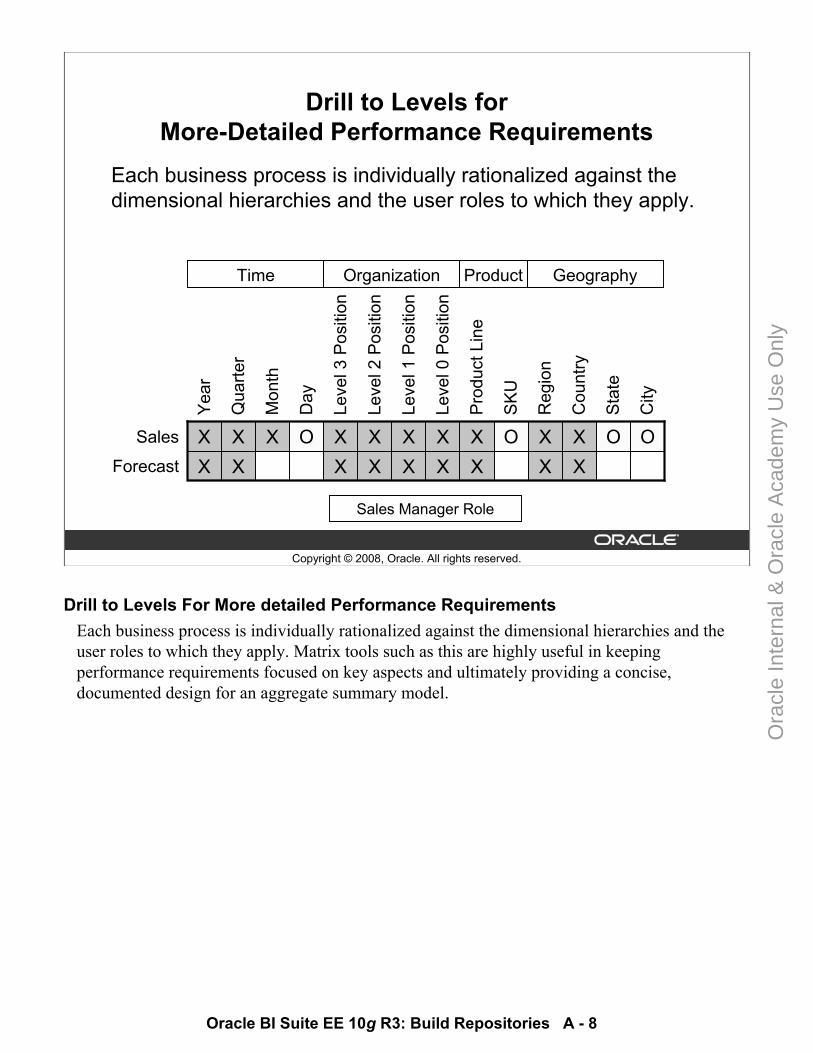
Oracle BI Suite EE 10g R3: Build Repositories A - 8
Copyright © 2008, Oracle. All rights reserved.
Drill to Levels for More-Detailed Performance Requirements
Each business process is individually rationalized against the dimensional hierarchies and the user roles to which they apply.
OOXX
XXO
XX
XX
XX
XX
XXXXOXXXSales
Forecast
Cou
ntry
Leve
l 3 P
ositi
on
Day
Qua
rter
Yea
r
Mon
th
Leve
l 2 P
ositi
on
Leve
l 1 P
ositi
on
Leve
l 0 P
ositi
on
Prod
uct L
ine
SKU
Reg
ion
Sta
te
City
Time Organization Product Geography
Sales Manager Role
Drill to Levels For More detailed Performance RequirementsEach business process is individually rationalized against the dimensional hierarchies and the user roles to which they apply. Matrix tools such as this are highly useful in keeping performance requirements focused on key aspects and ultimately providing a concise, documented design for an aggregate summary model.
Ora
cle
Inte
rnal
& O
racl
e A
cade
my
Use
Onl
y
Oracle BI Suite EE 10g R3: Build Repositories A - 9
Copyright © 2008, Oracle. All rights reserved.
Focus on the Business Model
Focus on the business model rather than the presentation: • Ad hoc reports are typically used once and are not
pervasive.• Existing reports are useful only when abstracted for their
dimension and measure objects.
Ora
cle
Inte
rnal
& O
racl
e A
cade
my
Use
Onl
y
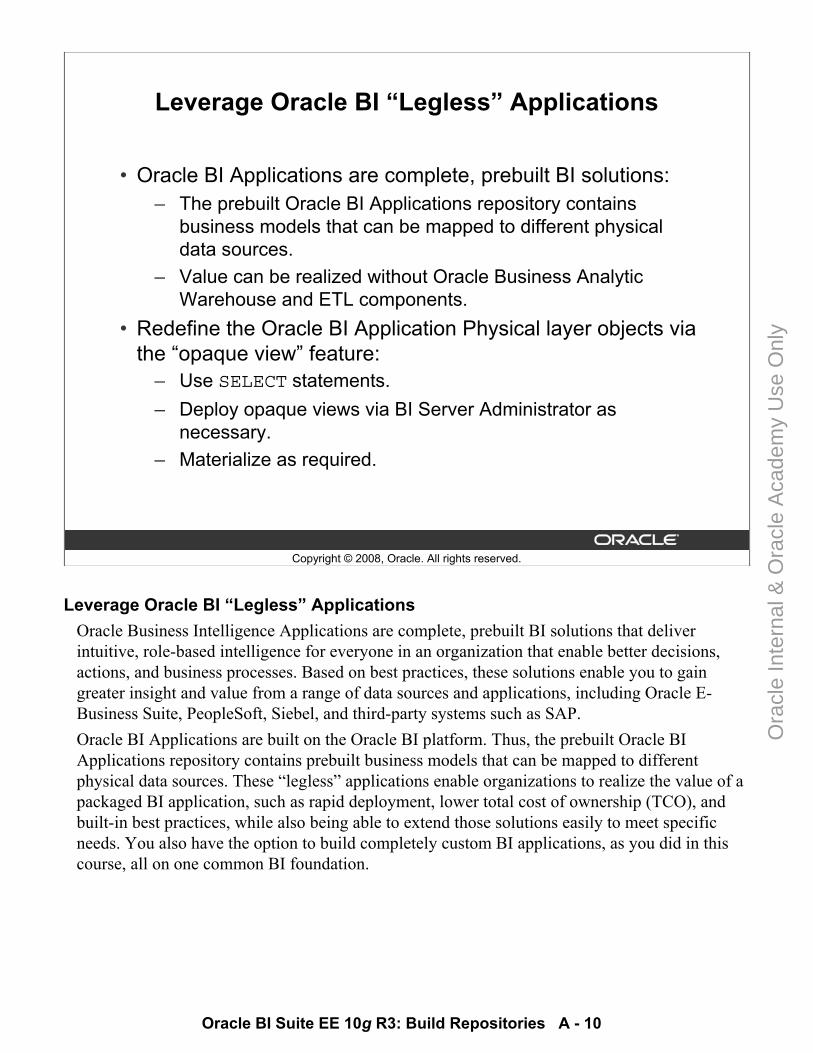
Oracle BI Suite EE 10g R3: Build Repositories A - 10
Copyright © 2008, Oracle. All rights reserved.
Leverage Oracle BI “Legless” Applications
• Oracle BI Applications are complete, prebuilt BI solutions:– The prebuilt Oracle BI Applications repository contains
business models that can be mapped to different physical data sources.
– Value can be realized without Oracle Business Analytic Warehouse and ETL components.
• Redefine the Oracle BI Application Physical layer objects via the “opaque view” feature:
– Use SELECT statements.– Deploy opaque views via BI Server Administrator as
necessary.– Materialize as required.
Leverage Oracle BI “Legless” Applications Oracle Business Intelligence Applications are complete, prebuilt BI solutions that deliver intuitive, role-based intelligence for everyone in an organization that enable better decisions, actions, and business processes. Based on best practices, these solutions enable you to gain greater insight and value from a range of data sources and applications, including Oracle E-Business Suite, PeopleSoft, Siebel, and third-party systems such as SAP.Oracle BI Applications are built on the Oracle BI platform. Thus, the prebuilt Oracle BI Applications repository contains prebuilt business models that can be mapped to different physical data sources. These “legless” applications enable organizations to realize the value of a packaged BI application, such as rapid deployment, lower total cost of ownership (TCO), and built-in best practices, while also being able to extend those solutions easily to meet specific needs. You also have the option to build completely custom BI applications, as you did in this course, all on one common BI foundation.
Ora
cle
Inte
rnal
& O
racl
e A
cade
my
Use
Onl
y
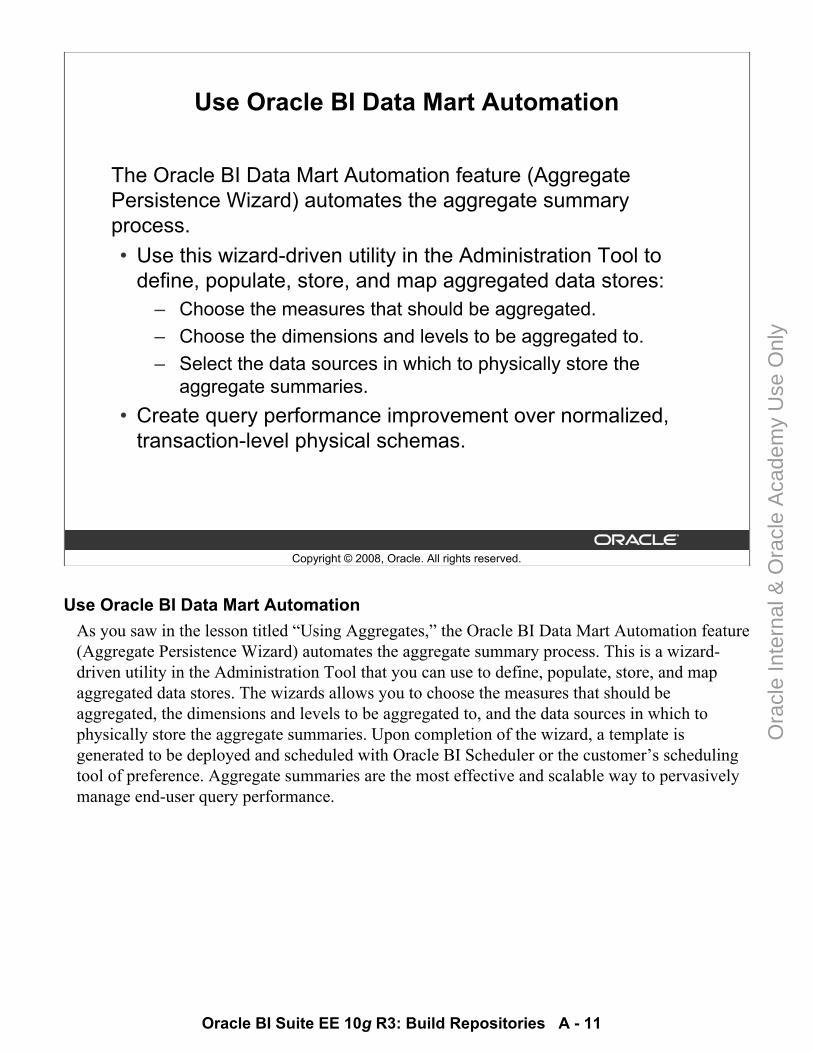
Oracle BI Suite EE 10g R3: Build Repositories A - 11
Copyright © 2008, Oracle. All rights reserved.
Use Oracle BI Data Mart Automation
The Oracle BI Data Mart Automation feature (Aggregate Persistence Wizard) automates the aggregate summary process. • Use this wizard-driven utility in the Administration Tool to
define, populate, store, and map aggregated data stores:– Choose the measures that should be aggregated.– Choose the dimensions and levels to be aggregated to.– Select the data sources in which to physically store the
aggregate summaries.• Create query performance improvement over normalized,
transaction-level physical schemas.
Use Oracle BI Data Mart AutomationAs you saw in the lesson titled “Using Aggregates,” the Oracle BI Data Mart Automation feature (Aggregate Persistence Wizard) automates the aggregate summary process. This is a wizard-driven utility in the Administration Tool that you can use to define, populate, store, and map aggregated data stores. The wizards allows you to choose the measures that should be aggregated, the dimensions and levels to be aggregated to, and the data sources in which to physically store the aggregate summaries. Upon completion of the wizard, a template is generated to be deployed and scheduled with Oracle BI Scheduler or the customer’s scheduling tool of preference. Aggregate summaries are the most effective and scalable way to pervasively manage end-user query performance.
Ora
cle
Inte
rnal
& O
racl
e A
cade
my
Use
Onl
y

Ora
cle
Inte
rnal
& O
racl
e A
cade
my
Use
Onl
y