Embed Size (px)
Citation preview
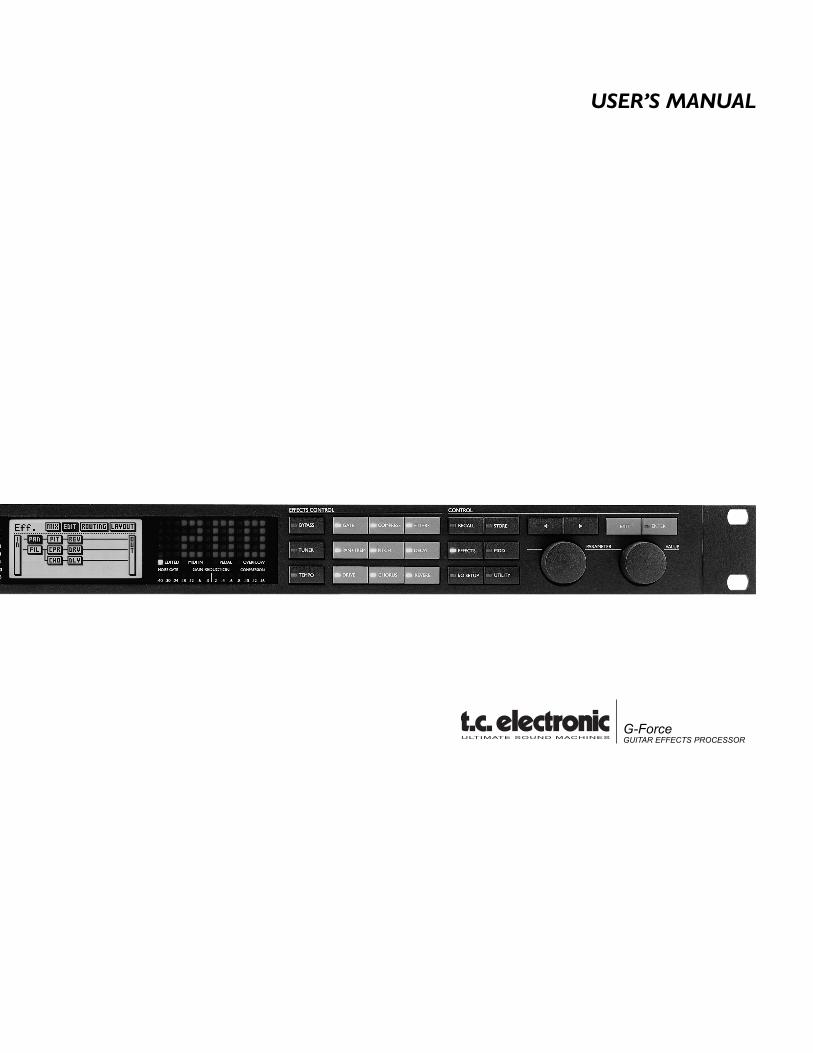
G-ForceGUITAR EFFECTS PROCESSOR
USER’S MANUAL

a
1 Read these instructions.2 Keep these instructions.3 Heed all warnings.4 Follow all instructions.5 Do not use this apparatus near water.6 Clean only with dry cloth.7 Do not block any ventilation openings. Install in
accordance with the manufacturer's instructions.8 Do not install near any heat sources such
as radiators, heat registers, stoves, or otherapparatus (including amplifiers) that produce heat.
9 Do not defeat the safety purpose of the polarizedor grounding-type plug. A polarized plug has twoblades with one wider than the other. A groundingtype plug has two blades and a third grounding prong. The wide blade or the third prong areprovided for your safety. If the provided plug doesnot fit into your outlet, consult an electrician forreplacement of the obsolete outlet.
10 Protect the power cord from being walked on or pinched particularly at plugs, conveniencereceptacles, and the point where they exit from theapparatus.
11 Only use attachments/accessories specified by themanufacturer.
12 Unplug this apparatus during lightning storms orwhen unused for long periods of time.
Use only with the cart, stand, tripod, bracket, ortable specified by the manufacturer, or sold withthe apparatus. When a cart is used, usecaution when moving the cart/apparatuscombination to avoid injury from tip-over.
13 Refer all servicing to qualified service personnel. Servicing is required when the apparatus has been damaged in any way, such as power-supply cord or plug is damaged,liquid has been spilled or objects have fallen intothe apparatus, the apparatus has been exposed torain or moisture, does not operate normally, or hasbeen dropped.
• This equipment should be installed near the socket outlet and disconnection of the device should be easily accessible.
• To completely disconnect from AC mains, disconnectthe power supply cord from the AC receptable.
• The mains plug of the power supply shall remainreadily operable.
• Do not install in a confined space.• Do not open the unit - risk of electric shock inside.
Caution:You are cautioned that any change or modifications notexpressly approved in this manual could void your authorityto operate this equipment.
Service• There are no user-serviceable parts inside. • All service must be performed by qualified personnel.
Warning!• To reduce the risk of fire or electrical shock, do not
expose this equipment to dripping or splashing andensure that no objects filled with liquids, such as vases,are placed on the equipment.
• This apparatus must be earthed.• Use a three wire grounding type line cord like the one
supplied with the product.• Be advised that different operating voltages require the
use of different types of line cord and attachment plugs.• Check the voltage in your area and use the
correct type. See table below:
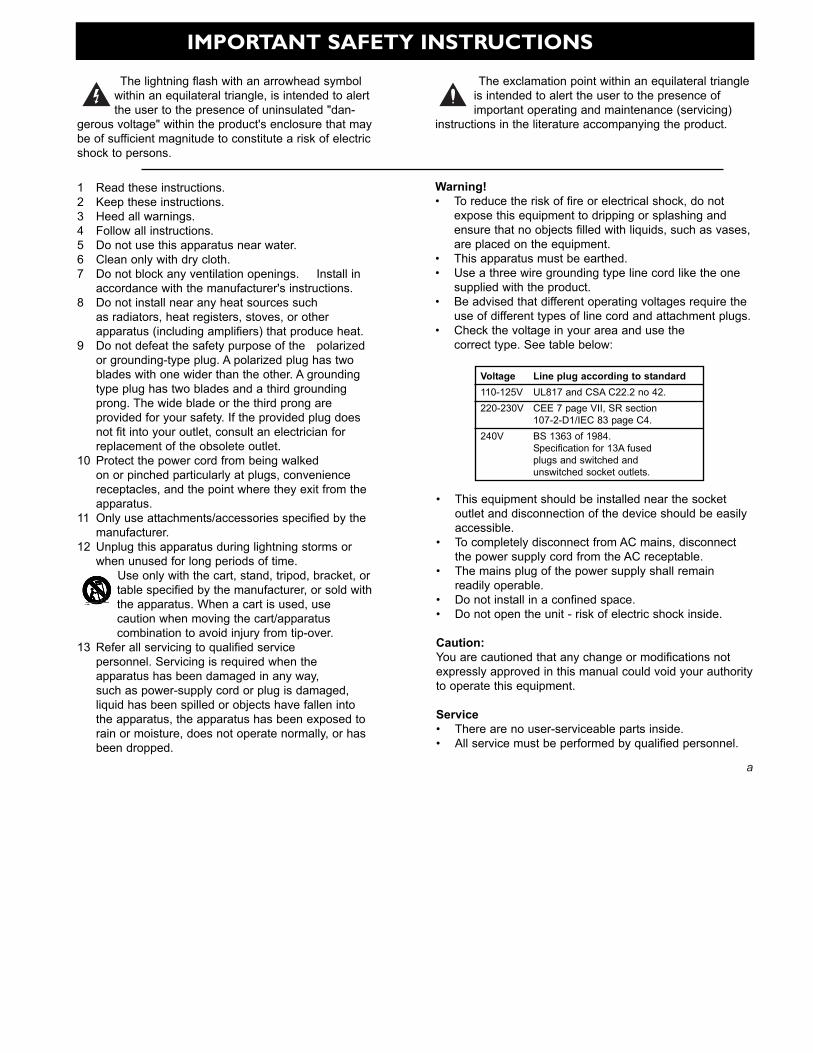
Voltage Line plug according to standard110-125V UL817 and CSA C22.2 no 42.220-230V CEE 7 page VII, SR section
107-2-D1/IEC 83 page C4.240V BS 1363 of 1984.
Specification for 13A fused plugs and switched and unswitched socket outlets.
The lightning flash with an arrowhead symbolwithin an equilateral triangle, is intended to alertthe user to the presence of uninsulated "dan-
gerous voltage" within the product's enclosure that maybe of sufficient magnitude to constitute a risk of electricshock to persons.
The exclamation point within an equilateral triangleis intended to alert the user to the presence ofimportant operating and maintenance (servicing)
instructions in the literature accompanying the product.
IMPORTANT SAFETY INSTRUCTIONS
b
Certificate Of Conformity
TC Electronic A/S, Sindalsvej 34, 8240 Risskov, Denmark,hereby declares on own responsibility that followingproduct:
G-Force - Guitar Effects Processor
That is covered by this certificate and marked with CE-labelconforms with following standards:
EN 60065 Safety requirements for mains (IEC 60065) operated electronic and related
apparatus for household and similar general use
EN 55103-1 Product family standard for audio, video, audio-visual and entertainment lighting control apparatus for professional use. Part 1: Emission.
EN 55103-2 Product family standard for audio, video, audio-visual and entertainment lighting control apparatus for professional use. Part 2: Immunity.
With reference to regulations in following directives:73/23/EEC, 89/336/EEC
Issued in Risskov, May 1997
Anders FauerskovManaging Director
EMC / EMI.This equipment has been tested and found to comply withthe limits for a Class B Digital device, pursuant to part 15 ofthe FCC rules.These limits are designed to provide reasonable protectionagainst harmful interference in residential installations. Thisequipment generates, uses and can radiate radiofrequency energy and, if not installed and used inaccordance with the instructions, may cause harmfulinterference to radio communications. However, there is noguarantee that interference will not occur in a particularinstallation. If this equipment does cause harmfulinterference to radio or television reception, which can bedetermined by turning the equipment off and on. The useris encouraged to try to correct the interference by one ormore of the following measures:
• Reorient or relocate the receiving antenna.• Increase the separation between the equipment and
receiver.• Connect the equipment into an outlet on a circuit
different from that to which the receiver is connected.• Consult the dealer or an experienced radio/TV
technician for help.
For the customers in Canada:This Class B digital apparatus complies with CanadianICES-003.Cet appareil numérique de la classe B est conforme à lanorme NMB-003 du Canada.
IMPORTANT SAFETY INSTRUCTIONS
3
TABLE OF CONTENTS
WELCOME
FROM THE USERS POINT OF VIEW
QUICK REFERENCE
THE FRONT PANEL
THE REAR PANEL
THE SIGNAL FLOW
HOW TO…
SETUPS
RECALL
STORE
EFFECTS
I/O MENU
MODIFIERS
UTILITY
TEMPO
TUNER
THE BLOCKS
THE RESET PAGE
TECHNICAL SPECIFICATIONS
TROUBLE SHOOTING
MIDI IMPLEMENTATION CHART
SELF TEST
PRESET LIST
About this Manual
Foreword by Palle Schultz
Buttons, Knobs, Controllers and other functions
Inputs, Outputs
build a User Preset, connect the Modifiers, setup an Expression Pedal etc.
Recalling a Preset, Factory/User presets, Memory card
Store a new preset, The Letterbox
I/O, Input selector, Sample Rate, Mix, MIDI setup
System parameters, Billboard settings
5678
10111216171829212529313233484950515254
TC Electronic, Sindalsvej 34, DK-8240 Risskov - [email protected] Rev 1.01 - SW - V 2.04Prod No: 606055012

CongratulationsCongratulations on the purchase of your new G-Force.We hope that you have as much pleasure using it aswe had making it.
The G-Force is carefully designed to produce the ultimateguitar effects. To achieve this, we supplied you with eight un-compromised, simultaneous effects. This means thatthe G-Force has the power to run all eight effects withoutlosing sound quality. You can route the effect blocks in anycombination you like, and the 24 bit resolution convertersmake it possible to run your guitar straight through withouta line-mixer, while preserving your original guitar tone.Check out the Modifier Matrix and discover a powerful toolfor real-time external and internal control of the manyparameters of the G-Force.
About this ManualMany people in the music business (and elsewhere) havean aversion to reading manuals. We understand that. So ifyou feel like starting without reading the whole manual,simply get going. You can always use the manual forchecking out areas that you have questions about, or if youwant to dig deeper into the unit. Refer to the Table ofContents for further information.On the other hand, you might want to know a little moreabout the G-Force before you start pressing keys. Themanual will take you step by step through all of the G-Force functions. If you want to read about a specificfunction, please refer to the Table of Contents.
WELCOME
5
FROM A USERS POINT OF VIEW
6
Foreword by Palle Schultz, a guitar player with 10 years experience.
From a users point of viewIf you ditch your beloved stomp boxes and invest your money in amulti- effects unit, you'll most likely lose the simplicity and flexibility ofyour pedal arrangement. You'll often have to deal with phone booksized manuals and interfaces made by and for computer experts.These circumstances often drive creative people and musicians awayfrom such space-age machinery.I've owned several different effect units, that each had their ownversion of a hostile user interface so I've been waiting a long time forsomeone to develop a multi-effect that doesn't clash with ones creativestate of mind. The fact that those "someone" are the people of TCElectronic guaranties the quality of the entire product.The G-FORCE is a very flexible machine which is very easy toapproach. You have the choice of simply using it as a linear chain ofeffects or you can go beyond the use of any known multi-effect unit,and explore the countless combinations and control possibilities withinthe G-FORCE.
After a short while of using the G-Force, I changed my whole approachtowards the creation of effects for my guitar. From simple use ofstandard effects like delay, chorus and reverb connected in a straightline, I now find myself thinking up a non-existing effect like say; atremolo that only kicks in when you play on the high notes, while thelevel of a phased distorted dark delay is controlled by your old volumepedal that you calibrated for use with your G-FORCE.If you are totally new to digital machinery like the G-FORCE, and are ahard-core knob turner but get frustrated dealing with scroll bars, LCD-displays and strange technical terms, then you have ended up buyingthe right product. The TC Electronic G-FORCE is so easy to use thatit’s a bit ridiculous that this manual even exists. When you cruisearound the G-FORCE, and want a certain thing to happen and have afeeling that this particular parameter is the right one to adjust, thenyou're most probably right. The way you learn this machine is by usingit, don't be afraid of tweaking anything to its maximum, the edges arethe learning spot and from there you either take a fall or a step back.The cool thing about the G-FORCE is that you won't hurt yourself, ifyou go over the edge, but you might end up with the strangest orcoolest new effect you ever heard.One very pleasing side effect of owning a G-FORCE is the dramaticallylighter rack you'll end up with. Mine certainly slimmed down to a tinyFormula One sized powerhouse.
Palle Schultz
QUICK REFERENCE
7
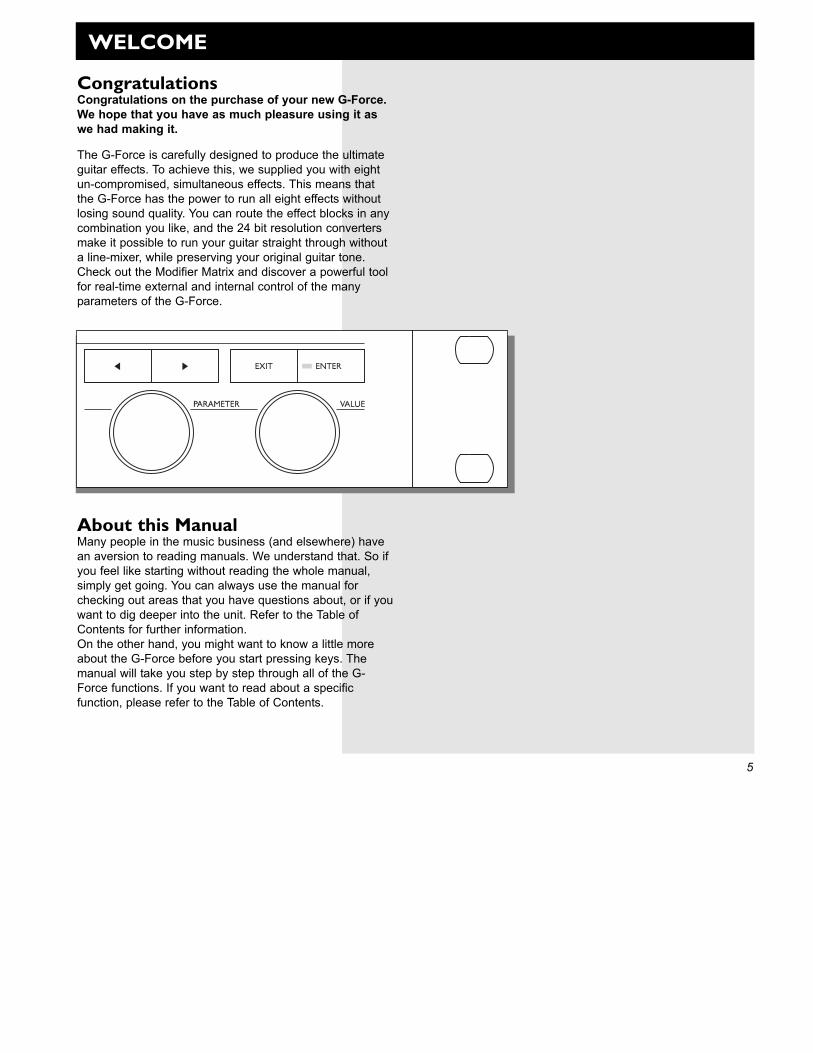
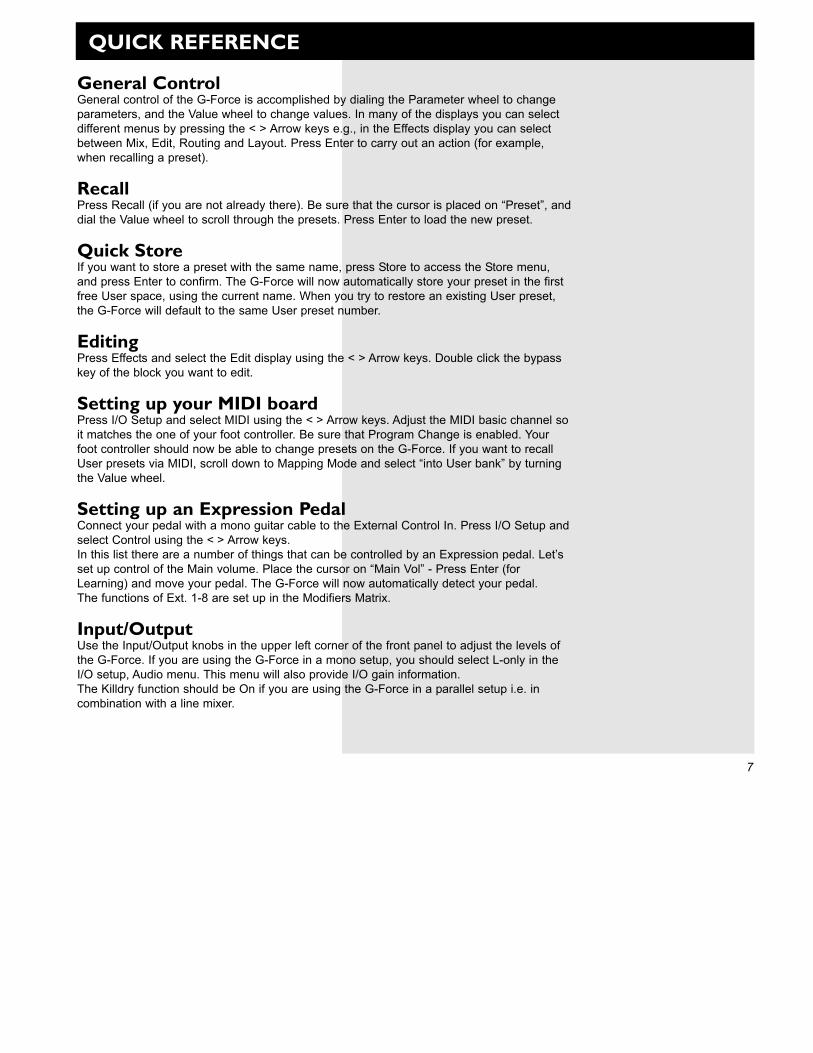
General ControlGeneral control of the G-Force is accomplished by dialing the Parameter wheel to changeparameters, and the Value wheel to change values. In many of the displays you can selectdifferent menus by pressing the < > Arrow keys e.g., in the Effects display you can selectbetween Mix, Edit, Routing and Layout. Press Enter to carry out an action (for example,when recalling a preset).
RecallPress Recall (if you are not already there). Be sure that the cursor is placed on “Preset”, anddial the Value wheel to scroll through the presets. Press Enter to load the new preset.
Quick StoreIf you want to store a preset with the same name, press Store to access the Store menu,and press Enter to confirm. The G-Force will now automatically store your preset in the firstfree User space, using the current name. When you try to restore an existing User preset,the G-Force will default to the same User preset number.
EditingPress Effects and select the Edit display using the < > Arrow keys. Double click the bypasskey of the block you want to edit.
Setting up your MIDI boardPress I/O Setup and select MIDI using the < > Arrow keys. Adjust the MIDI basic channel soit matches the one of your foot controller. Be sure that Program Change is enabled. Yourfoot controller should now be able to change presets on the G-Force. If you want to recallUser presets via MIDI, scroll down to Mapping Mode and select “into User bank” by turningthe Value wheel.
Setting up an Expression PedalConnect your pedal with a mono guitar cable to the External Control In. Press I/O Setup andselect Control using the < > Arrow keys. In this list there are a number of things that can be controlled by an Expression pedal. Let’sset up control of the Main volume. Place the cursor on “Main Vol” - Press Enter (forLearning) and move your pedal. The G-Force will now automatically detect your pedal. The functions of Ext. 1-8 are set up in the Modifiers Matrix.
Input/OutputUse the Input/Output knobs in the upper left corner of the front panel to adjust the levels ofthe G-Force. If you are using the G-Force in a mono setup, you should select L-only in theI/O setup, Audio menu. This menu will also provide I/O gain information.The Killdry function should be On if you are using the G-Force in a parallel setup i.e. incombination with a line mixer.
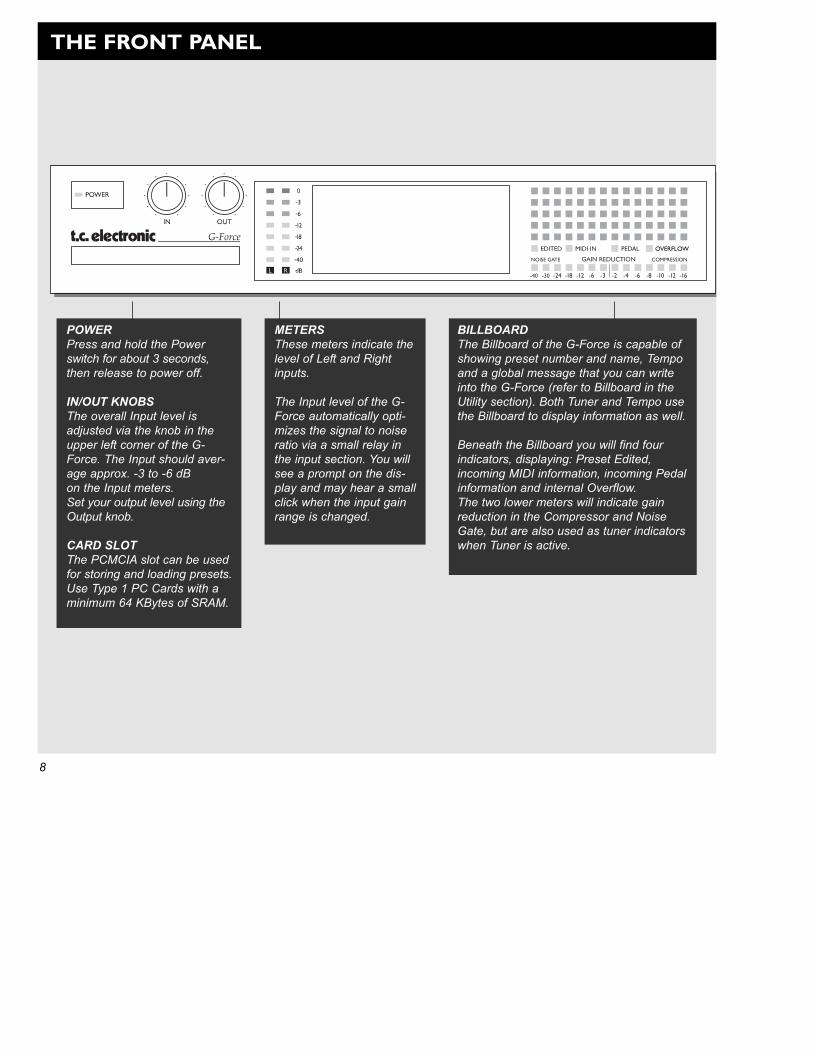
POWER Press and hold the Powerswitch for about 3 seconds,then release to power off.
IN/OUT KNOBSThe overall Input level isadjusted via the knob in theupper left corner of the G-Force. The Input should aver-age approx. -3 to -6 dB on the Input meters.Set your output level using theOutput knob.
CARD SLOTThe PCMCIA slot can be usedfor storing and loading presets.Use Type 1 PC Cards with aminimum 64 KBytes of SRAM.
BILLBOARDThe Billboard of the G-Force is capable ofshowing preset number and name, Tempoand a global message that you can writeinto the G-Force (refer to Billboard in theUtility section). Both Tuner and Tempo usethe Billboard to display information as well.
Beneath the Billboard you will find fourindicators, displaying: Preset Edited,incoming MIDI information, incoming Pedalinformation and internal Overflow.The two lower meters will indicate gainreduction in the Compressor and NoiseGate, but are also used as tuner indicatorswhen Tuner is active.
METERSThese meters indicate thelevel of Left and Rightinputs.
The Input level of the G-Force automatically opti-mizes the signal to noiseratio via a small relay inthe input section. You willsee a prompt on the dis-play and may hear a smallclick when the input gainrange is changed.
THE FRONT PANEL
8
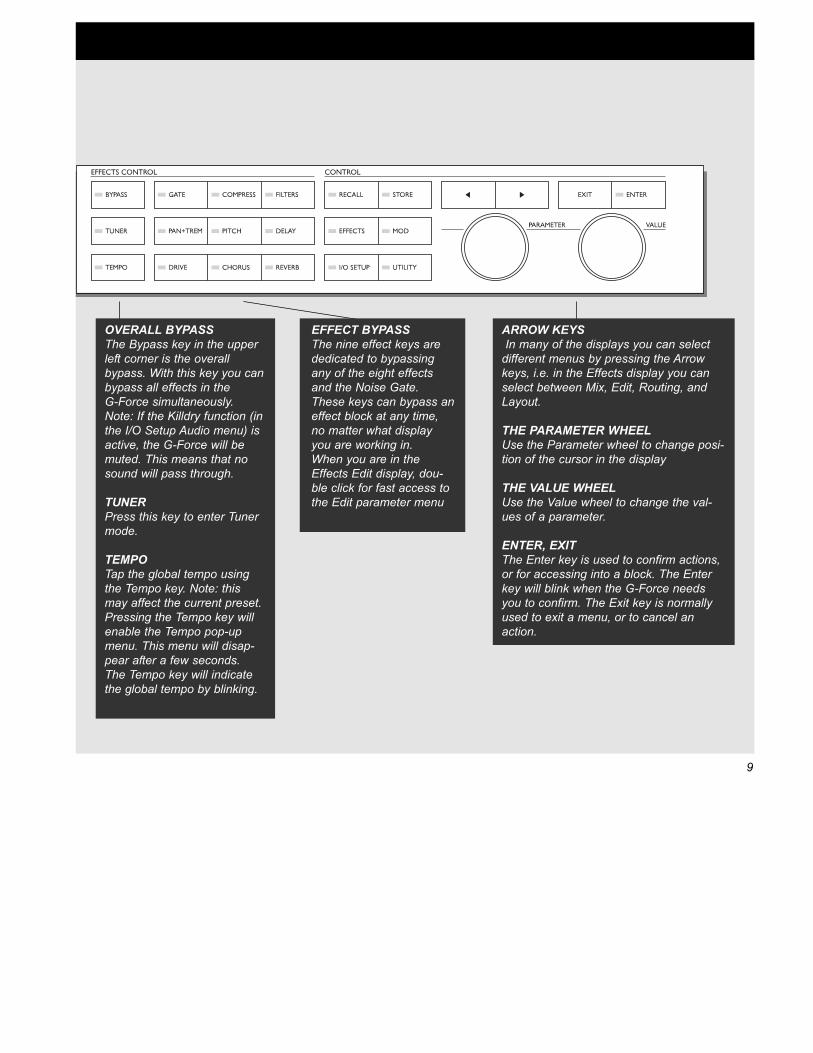
OVERALL BYPASSThe Bypass key in the upperleft corner is the overallbypass. With this key you canbypass all effects in the G-Force simultaneously.Note: If the Killdry function (inthe I/O Setup Audio menu) isactive, the G-Force will bemuted. This means that nosound will pass through.
TUNERPress this key to enter Tunermode.
TEMPOTap the global tempo usingthe Tempo key. Note: thismay affect the current preset.Pressing the Tempo key willenable the Tempo pop-upmenu. This menu will disap-pear after a few seconds.The Tempo key will indicatethe global tempo by blinking.
ARROW KEYSIn many of the displays you can select
different menus by pressing the Arrowkeys, i.e. in the Effects display you canselect between Mix, Edit, Routing, andLayout.
THE PARAMETER WHEELUse the Parameter wheel to change posi-tion of the cursor in the display
THE VALUE WHEELUse the Value wheel to change the val-ues of a parameter.
ENTER, EXITThe Enter key is used to confirm actions,or for accessing into a block. The Enterkey will blink when the G-Force needsyou to confirm. The Exit key is normallyused to exit a menu, or to cancel anaction.
9
EFFECT BYPASSThe nine effect keys arededicated to bypassingany of the eight effectsand the Noise Gate.These keys can bypass aneffect block at any time,no matter what displayyou are working in. When you are in theEffects Edit display, dou-ble click for fast access tothe Edit parameter menu
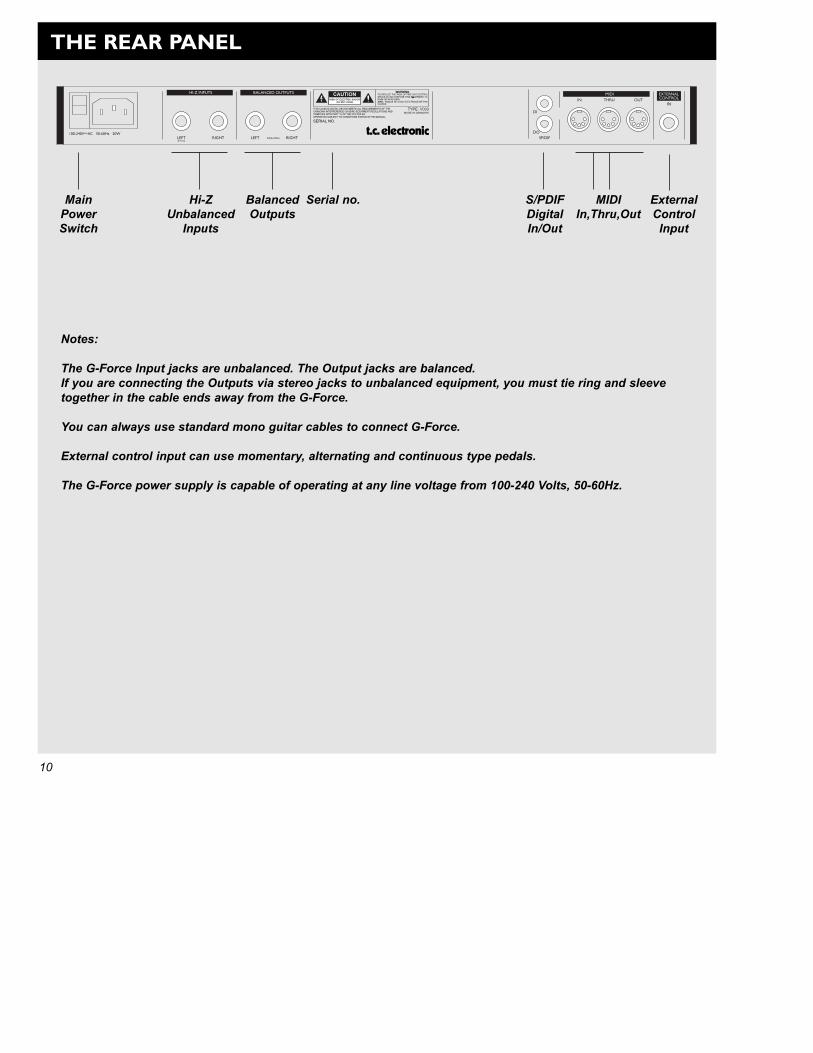
MainPowerSwitch
Hi-ZUnbalanced
Inputs
BalancedOutputs
Serial no. S/PDIFDigitalIn/Out
MIDIIn,Thru,Out
ExternalControlInput
Notes:
The G-Force Input jacks are unbalanced. The Output jacks are balanced. If you are connecting the Outputs via stereo jacks to unbalanced equipment, you must tie ring and sleevetogether in the cable ends away from the G-Force.
You can always use standard mono guitar cables to connect G-Force.
External control input can use momentary, alternating and continuous type pedals.
The G-Force power supply is capable of operating at any line voltage from 100-240 Volts, 50-60Hz.
THE REAR PANEL
10
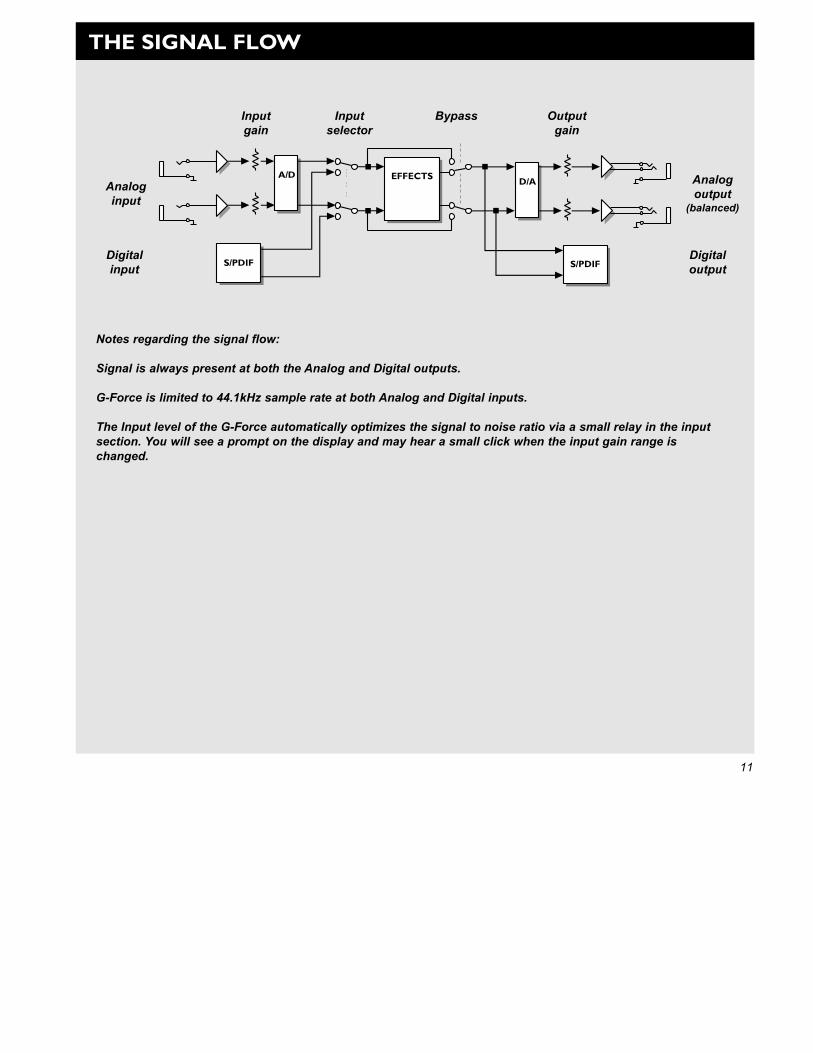
Notes regarding the signal flow:
Signal is always present at both the Analog and Digital outputs.
G-Force is limited to 44.1kHz sample rate at both Analog and Digital inputs.
The Input level of the G-Force automatically optimizes the signal to noise ratio via a small relay in the inputsection. You will see a prompt on the display and may hear a small click when the input gain range ischanged.
Digitalinput
Analoginput
Inputgain
Inputselector
Bypass Outputgain
Digitaloutput
Analogoutput
(balanced)
THE SIGNAL FLOW
11
How to build a User presetThis is a step by step guide to some of the main functionsused when building your own presets.
Start by Recalling factory preset #225 called “EmptyRouting”:- Press Recall.- Dial the Value wheel until you see preset 225.- Press Enter to recall the current preset.
Setting up an Effect There are two ways of inserting an effect. Let’s start bysetting up a Reverb.- Press the Effects key.- Use the < > Arrow keys to select the Routing display.- Use the Parameter wheel to place the cursor inthe third
position of the first column.- Double click on the Reverb bypass key to insert the
Reverb.
And the other way:- Press the Effects key.- Use the < > Arrow keys to select the Routing display.- Dial the Value wheel until you see “REV” and press Enter
to insert the Reverb in the Routing.
Editing an effectThere are two ways of getting into the Edit parameterdisplay. Here is the first and easiest - after pressing the
Effects key:- Use the < > Arrow keys to access the Edit display.- Double click on the Reverb bypass key.- Use the Parameter wheel to scroll up and down,
and the Value wheel to change values.
And the other way - after pressing the Effects key:- Use the < > Arrow keys to access the Edit display.- Dial the Parameter wheel to move the cursor to the
Reverb block.- Press Enter to access the Edit parameter display.- Use the Parameter wheel to scroll up and down, and the
Value wheel to change values.- Press Exit to leave the Edit parameter display
or double click the Reverb bypass key again.
HOW TO
12
If you want to Edit another effect you can justdouble click the current block bypass key rightaway, and the G-Force will exit the first and thenopen the second.
How to set the level of a preset:There are a couple of different ways to set the level of apreset, but in any case you should consider reserving a bitof headroom for the preset you want to be the loudest. Onemethod is to lower the Input (or Output) level of the lastblock in the routing. That means that if you have blocks ina parallel combination, you will have to change the levelequally to keep the same relationship between the currenteffects.Another way is to use the Level in the In section. Thatparticular level is placed after the Noise Gate but beforeanything else. This In Level is also present in the ModifierMatrix which means that you can control it via anexpression pedal.
How to add a block to the RoutingNow we have a Reverb, but we would like a Delay as well.You need to decide whether you want the Delay in parallelor series as opposed to the Reverb. Let’s try parallel, fromthe Routing menu:- Place the cursor in the second position, first column,
using the Parameter wheel.- Double click on the Delay bypass key to insert the
Delay block.If you run blocks in parallel, you should consider your mixstrategy. It may be wise to run all effects but one at 100%mix and use the In/Outlevel to balance the level of theeffects relative to each other.
How to change a sub-algorithmThe Delay that you just inserted is a Stereo Delay that usesthe same delay time in both left and right channels. Let’stry to find a delay with different times in left and right:- Move the cursor to the Delay block using theparameter
wheel.- Press Enter to dive into the Edit parameter display.- Use the < Arrow left key to step to the sub-algo list.- Dial the cursor to “Dual” using the Parameter wheel and
press Enter to change the sub-algorithm.You now have a Dual delay algorithm, where you are ableto set different delay times in left and right channels(remember to set the panning of the two delay times).
HOW TO
13
Moving all blocks using the LayoutIt suddenly comes to my mind that we need a Compressorin front of the Delay and Reverb. Let’s try to move theDelay and Reverb block:- Press the > Arrow right to move to the Layout display.- Dial the Value wheel to “Move R”.- Dial the Parameter wheel fully counter clockwise
and press Enter to move the two blocks to the right.- Press the < Arrow left key once to select the Routing
display.- Place the cursor in the second position, first
column and double click the Compressor bypass key.There you go, a Compressor in front of the Delay andReverb blocks.
How to Delete or Replace a blockIf you want to remove a block from a routing or just want toreplace it e.g. change the Reverb into a Chorus, here iswhat you do:- Press the Effects key.- Press > Arrow right key to access the Routing display.- Move the cursor to the block you want to remove, using
the Parameter wheel.- Dial the Value wheel counter clockwise until the block
is black or until you see the new block you want, and press Enter. You could also just double click on the desired block.
The Block is now removed or replaced.
How to Store your new presetNow that we built a preset with Compressor, Delay andReverb, it is time to Store. You can store very quickly usingthe same name or Store with a new name. This is the fast way:- Press the Store key.- Dial the Value wheel to select a storing space
(G-Force defaults to the first empty User preset).- Press Enter to Store with the same name.
Here is what you should do after you found the right storingspace, if you want to it store with a new name:- Dial the Parameter wheel to the name line.- Dial the Value wheel and press Enter to select a letter.- When you finish the name, go to “Done” using the Value
wheel and press Enter to Store.
How to obtain spillover at preset changeSpillover from one preset to another can be obtained byusing the same sub-algorithm and the right Mute mode intwo following presets.
Example: You want the tail Delay from one preset to ringout when you change to a none Delay preset, here is whatyou do:
- Enter the Edit Parameter display of the Delay in the firstpreset.
- Scroll down to “Mute mode” and select “FX In”.- Store that as preset 1.- Use the exact same Delay setting and Mute mode in
the next preset, but bypass the Delay block. - Store that as preset 2.
You are now able to change from preset 1 to preset 2 withthe Delay ringing out.
How to connect the ModifiersThe G-Force has a number of extra internal modifiers thatcan create extra functions and make your presets playalong with you, e.g. Envelope follower, ADSR, Pitchdetector, etc. Here are a couple of examples and how toset them up. The starting point is the preset we just built inthe above, or ROM preset #21.
Creating a ducking DelayRight now you have a constant level of Delay, wouldn’t itbe nice if the Delay only popped up in pauses where youdo not play. Let’s try that:- Press the Mod key to select the Matrix display.- Scroll horizontal using the Value wheel until you see
“ENV” (Envelope) in the top line.- Scroll vertical using the Parameter wheel until you hit
the point where “ENV” and Delay Outlevel meets.- Press Enter to link the two parameters.
Now you will hear the Delay follow the level of the Input,i.e. when you play, the Delay plays. But it would be moreusable if the Delay played when you didn’t play, so let’s dothat:- Place the cursor on the connection spot (if it is not
already there) and press Enter to dive into the link display.
HOW TO
14
- Change the curve by setting the three input parameters.If you want the Delay to stay down while you play, Lowinput should be 100%, and High input should be 0%.Experiment with these values.
Press Exit to leave the Link display. If you want remove thelink simply press Exit again.
If you want to remove all links of the Matrix, pressExit twice and you will see a pop up box asking youto confirm with Enter or abort with Exit.
Creating an Autopanning Delay via ModifiersIf you want the Delays to autopan you could of course,place the Pan/Tremolo block after the Delay, but you canalso use one of the extra LFO’s that are in the ModifierMatrix.- Press the Mod key to select the Matrix.- Connect the LFO1 output 1 to Delay Pan 1 and Pan 2
by pressing the Enter key.- Press > Arrow right key to enter the Modifiers display,
scroll down to LFO1 and press Enter to dive into the settings of the LFO1.
- Set the Speed, Depth, Curve etc. of LFO1 and listen to your Delay Panning.
Right now the two Delays are panning left and righttogether, but it would be nice if they panned opposite ofeach other.
- Press Exit to leave the LFO edit display.- Press the left < Arrow key to get back to the Matrix
display.- Scroll down to the connection between LFO1 and
Delay Pan1 and press Enter to access the link display.- Change Low input to 100%, and High Input to 0%.
Your delays are now panning opposite of each other.
How to set up an Expression pedalThe G-Force has several control possibilities that can makeyour presets a lot more flexible and interesting. Thesefunctions can be realtime controlled by more than eightexternal pedals or MIDI controllers.
Connecting Your Expression pedal can be connected in two ways,either directly to the “External control” jack on the backpanel of the G-Force, or via a MIDI board.
How to calibrate and choose Pedal typeThe G-Force can be controlled by various types of pedals.The type of pedal that you are using is set up in the Utilitydisplay, by the “Pedal type” parameter. When you are usingExpression pedals, you should select “Alternating”.
When you connect your expression pedal to the “Externalcontrol” jack, you should make sure that the G-Force iscalibrated for that particular pedal. That is done in theUtility display:
- Press Utility.- Scroll down to “Pedal calibration”, using the Parameter
wheel.- Press Enter and follow the instructions in the display.
You have now calibrated your expression pedal, and areready to setup the function of it.
The function of the PedalThe basic idea is that your pedal should be connected toone of the eight virtual handles called Ext1-8. That is donein the I/O Setup, Control display:
- Press the I/O Setup key.- Press the > Arrow right key to select the Control display.- Scroll down to “Ext1” using the Parameter wheel.- Press Enter to activate the Learn function and move
your pedal to get it detected.
Your pedal should now be detected whether using the 1/4”jack on the back panel of the G-Force, or a MIDI controller. The pedal could also control the Main volume, the overallbypass, the Tuner, the Tempo or one of the other sevenexternal controllers.Now that you have your pedal setup for Ext1, we will moveon to getting it connected to a parameter:
- Recall ROM preset #17 “Stereo Harmony C-maj”. That isa preset that will add a third, and a fifth to your lead playas long as you stay in C-major.
- Press the Mod key to access the Modifier Matrix.
HOW TO
15
- Scroll horizontal until you see Ext1 in the top line of the display, using the Value wheel.
- Scroll vertically using the Parameter wheel until the cursor is placed on the line where Pitch “In level” and “Ext1” meet.
- Press Enter to connect the two parameters.
You now have your pedal connected to the In level of thePitcher, which means that you can control the amount ofpitch with your foot. The function of the pedal is stored withthe preset.A lot of the ROM presets are setup for various pedalfunctions, they are all using Ext1 as Modifier.
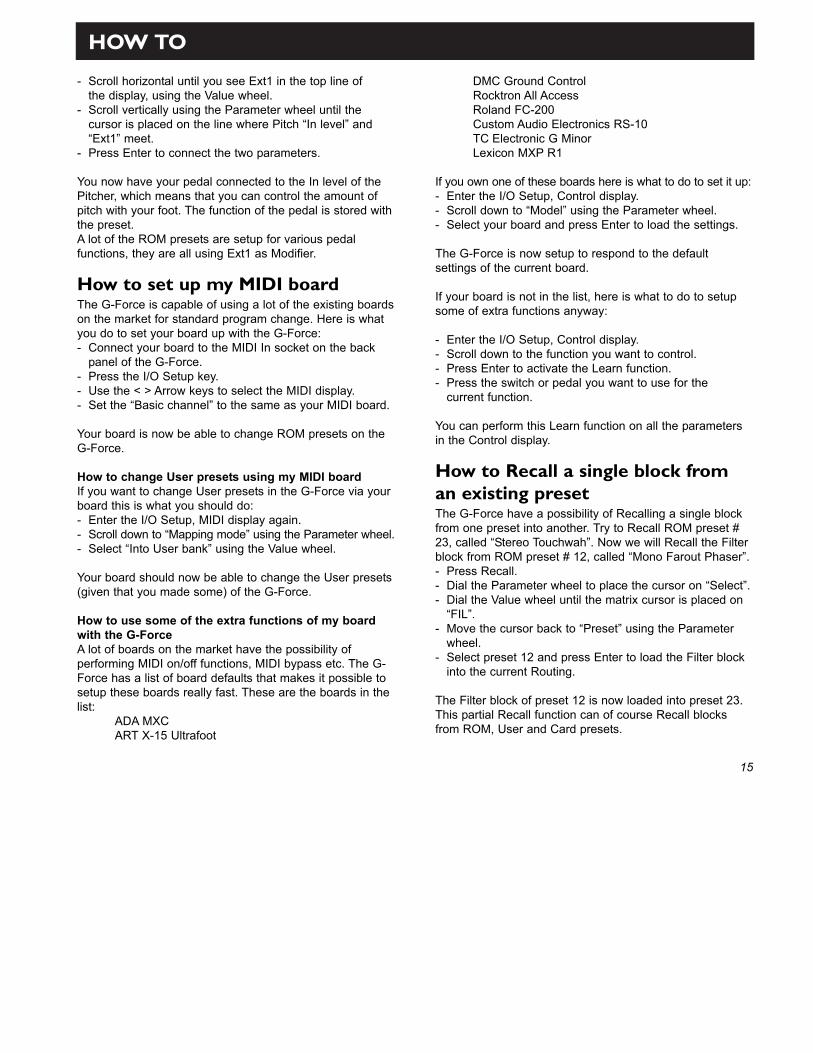
How to set up my MIDI boardThe G-Force is capable of using a lot of the existing boardson the market for standard program change. Here is whatyou do to set your board up with the G-Force:- Connect your board to the MIDI In socket on the back
panel of the G-Force. - Press the I/O Setup key.- Use the < > Arrow keys to select the MIDI display.- Set the “Basic channel” to the same as your MIDI board.
Your board is now be able to change ROM presets on theG-Force.
How to change User presets using my MIDI boardIf you want to change User presets in the G-Force via yourboard this is what you should do:- Enter the I/O Setup, MIDI display again.- Scroll down to “Mapping mode” using the Parameter wheel.- Select “Into User bank” using the Value wheel.
Your board should now be able to change the User presets(given that you made some) of the G-Force.
How to use some of the extra functions of my boardwith the G-ForceA lot of boards on the market have the possibility ofperforming MIDI on/off functions, MIDI bypass etc. The G-Force has a list of board defaults that makes it possible tosetup these boards really fast. These are the boards in thelist:
ADA MXCART X-15 Ultrafoot
DMC Ground ControlRocktron All Access Roland FC-200Custom Audio Electronics RS-10TC Electronic G MinorLexicon MXP R1
If you own one of these boards here is what to do to set it up:- Enter the I/O Setup, Control display.- Scroll down to “Model” using the Parameter wheel.- Select your board and press Enter to load the settings.
The G-Force is now setup to respond to the defaultsettings of the current board.
If your board is not in the list, here is what to do to setupsome of extra functions anyway:
- Enter the I/O Setup, Control display.- Scroll down to the function you want to control.- Press Enter to activate the Learn function.- Press the switch or pedal you want to use for the
current function.
You can perform this Learn function on all the parametersin the Control display.
How to Recall a single block froman existing presetThe G-Force have a possibility of Recalling a single blockfrom one preset into another. Try to Recall ROM preset #23, called “Stereo Touchwah”. Now we will Recall the Filterblock from ROM preset # 12, called “Mono Farout Phaser”. - Press Recall.- Dial the Parameter wheel to place the cursor on “Select”.- Dial the Value wheel until the matrix cursor is placed on
“FIL”.- Move the cursor back to “Preset” using the Parameter
wheel.- Select preset 12 and press Enter to load the Filter block
into the current Routing.
The Filter block of preset 12 is now loaded into preset 23.This partial Recall function can of course Recall blocksfrom ROM, User and Card presets.
SETUPS
16
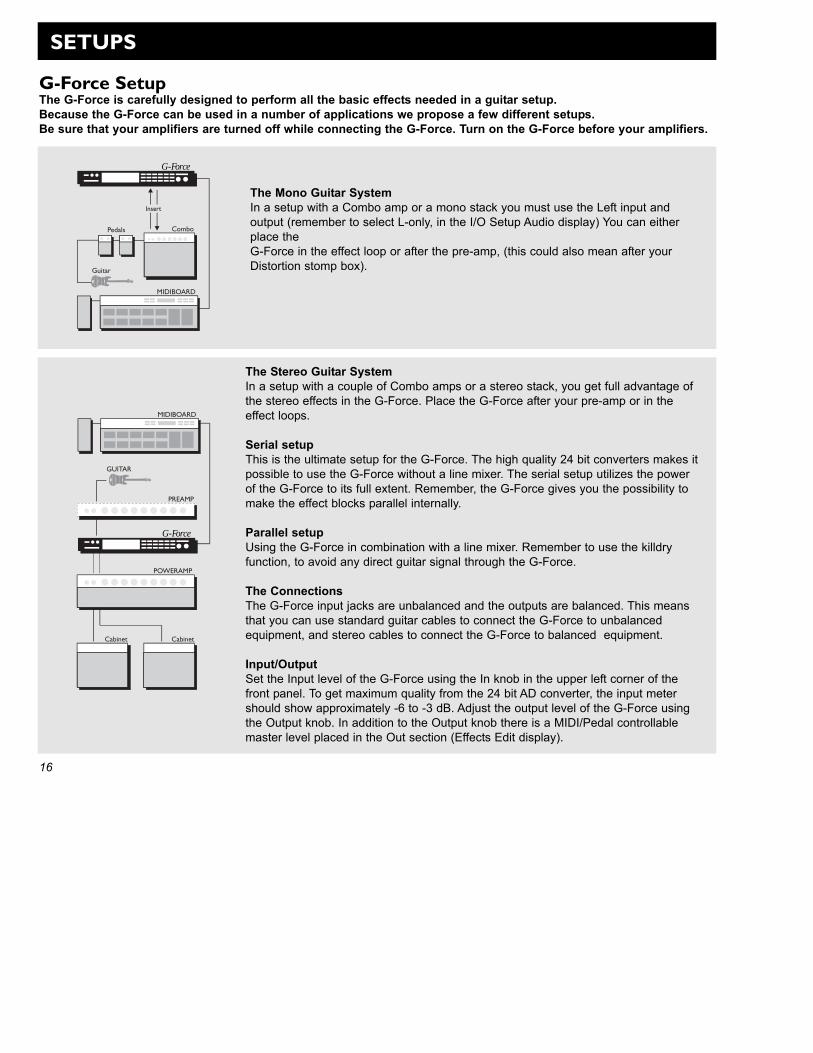
The Stereo Guitar SystemIn a setup with a couple of Combo amps or a stereo stack, you get full advantage ofthe stereo effects in the G-Force. Place the G-Force after your pre-amp or in theeffect loops.
Serial setupThis is the ultimate setup for the G-Force. The high quality 24 bit converters makes itpossible to use the G-Force without a line mixer. The serial setup utilizes the powerof the G-Force to its full extent. Remember, the G-Force gives you the possibility tomake the effect blocks parallel internally.
Parallel setupUsing the G-Force in combination with a line mixer. Remember to use the killdryfunction, to avoid any direct guitar signal through the G-Force.
The ConnectionsThe G-Force input jacks are unbalanced and the outputs are balanced. This meansthat you can use standard guitar cables to connect the G-Force to unbalancedequipment, and stereo cables to connect the G-Force to balanced equipment.
Input/OutputSet the Input level of the G-Force using the In knob in the upper left corner of thefront panel. To get maximum quality from the 24 bit AD converter, the input metershould show approximately -6 to -3 dB. Adjust the output level of the G-Force usingthe Output knob. In addition to the Output knob there is a MIDI/Pedal controllablemaster level placed in the Out section (Effects Edit display).
G-Force SetupThe G-Force is carefully designed to perform all the basic effects needed in a guitar setup.Because the G-Force can be used in a number of applications we propose a few different setups.Be sure that your amplifiers are turned off while connecting the G-Force. Turn on the G-Force before your amplifiers.
MIDIBOARD
Guitar
Pedals Combo
G-Force
Insert
The Mono Guitar SystemIn a setup with a Combo amp or a mono stack you must use the Left input andoutput (remember to select L-only, in the I/O Setup Audio display) You can eitherplace the G-Force in the effect loop or after the pre-amp, (this could also mean after yourDistortion stomp box).
PREAMP
POWERAMP
MIDIBOARD
GUITAR
Cabinet Cabinet
G-Force

RECALL
17
The Recall Display
Select which blocks will beloaded from new preset
Preset name ROM/USER/CARDbank selector
GeneralSelect sectionIs used to point to a certain block that you want to recallalone. Should be set to “All” when you want to recall acomplete preset. (default setting)
BankIs used to select which bank you would like to recall from,ROM (factory presets), User, or Card (only available whena pc-card is inserted).
PresetDial the Value wheel to preview the presets. Press ENTERto recall.
Recalling a Preset• Set cursor at “Bank” section using the PARAMETER
wheel. • Select which bank to recall from using the VALUE wheel.• Select “Preset” section using the PARAMETER wheel
(see illustration above)• Select which preset to recall using the PARAMETER
wheel.• Press ENTER.
Preserving the tail of Reverbs and Delays at presetchangeSpillover from one preset to another can be obtained byusing the same sub-algorithm, and combination of Mutemode = “Fx In” and bypassing the current block. Example: If you want to leave a Delay tail hanging over apreset change, you must be sure to keep the same sub-algorithm in both presets. In addition to that you shouldselect the “Fx In” Mute mode and just bypass the Delayblock in the second preset.
NOTE: Changing parameters like the Feedback or Mix overa preset change can kill the Delay.
Optimal preset changeSince the change from one preset to another can containdrastic changes in level and Routing, artifacts may occur ifthe preset is changed while playing. To obtain the best preset change while playing, you shouldkeep Routings as even as possible. Example: When changing from a preset containing Reverband Delay, to a preset containing only Reverb you shouldjust bypass the Delay block instead of removing it (that willalso enable you to obtain spillover from the Delay block)
Recalling a single effect It is possible to load a single effect setting into anexisting Routing, e.g. if you are building a new presetand have come up with a really nice Reverb and Delaybut would like to add that Chorus sound you designedlast week. Here is what you do:
Press Recall, and move the cursor to the Select parameterusing the Parameter wheel.Now use the Value wheel to point to “CHO” (Chorus). Movethe cursor back to the Preset parameter and use the Valuewheel to scroll through the presets (remember to set thebank, you wish to Recall from).
NOTE: the G-Force will now scroll through only presetscontaining the desired effect.Press Enter to Recall the desired effect. The G-Force willnow update your current preset with the new effect, andreturn to the current preset.
18
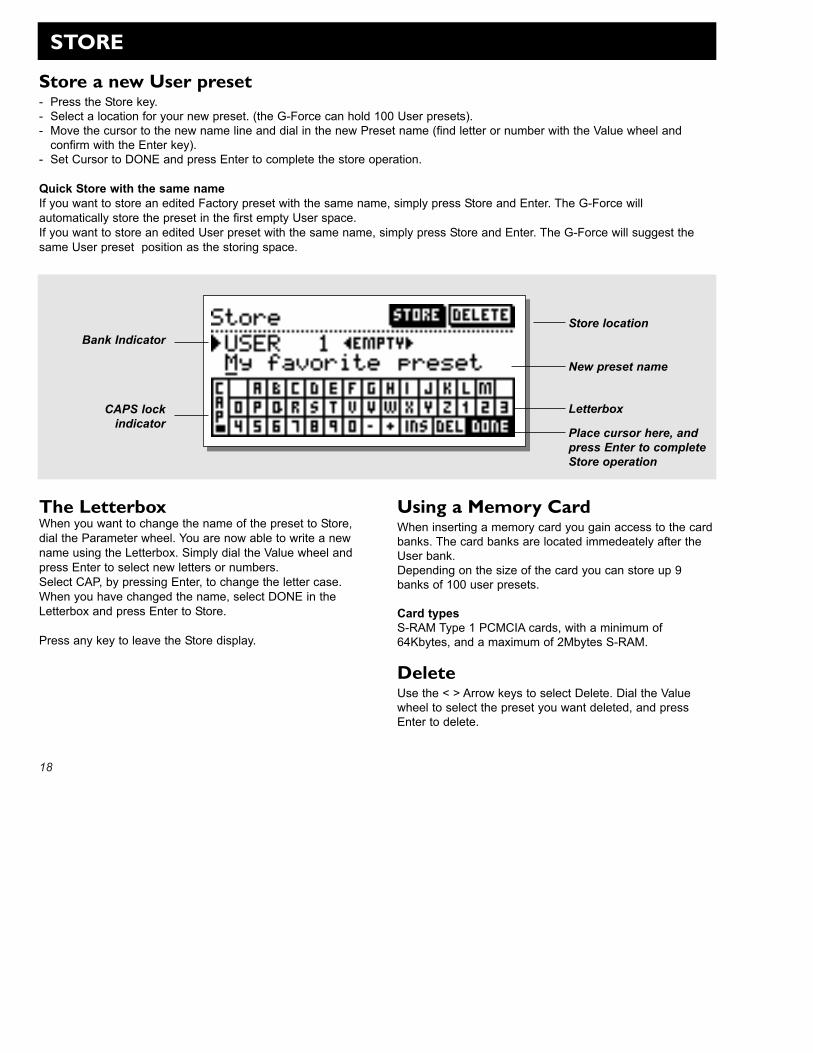
Store a new User preset- Press the Store key.- Select a location for your new preset. (the G-Force can hold 100 User presets).- Move the cursor to the new name line and dial in the new Preset name (find letter or number with the Value wheel and
confirm with the Enter key).- Set Cursor to DONE and press Enter to complete the store operation.
Quick Store with the same nameIf you want to store an edited Factory preset with the same name, simply press Store and Enter. The G-Force willautomatically store the preset in the first empty User space.If you want to store an edited User preset with the same name, simply press Store and Enter. The G-Force will suggest thesame User preset position as the storing space.
STORE
The LetterboxWhen you want to change the name of the preset to Store,dial the Parameter wheel. You are now able to write a newname using the Letterbox. Simply dial the Value wheel andpress Enter to select new letters or numbers.Select CAP, by pressing Enter, to change the letter case.When you have changed the name, select DONE in theLetterbox and press Enter to Store.
Press any key to leave the Store display.
Using a Memory CardWhen inserting a memory card you gain access to the cardbanks. The card banks are located immedeately after theUser bank.Depending on the size of the card you can store up 9banks of 100 user presets.
Card typesS-RAM Type 1 PCMCIA cards, with a minimum of64Kbytes, and a maximum of 2Mbytes S-RAM.
DeleteUse the < > Arrow keys to select Delete. Dial the Valuewheel to select the preset you want deleted, and pressEnter to delete.
Bank IndicatorStore location
CAPS lockindicator
New preset name
Letterbox
Place cursor here, andpress Enter to completeStore operation
19
Input meter ofeach block
Double click on theblock bypass key ofthe effect you want
to edit
Select In andpress Enter to edit
Noise Gate
Set mix ineach block
Set In Level ineach block
Selected
Select Out andpress Enter to editSpeaker filters
Dial Parameter wheelto select effect andpress Enter to editright away.
Double click on theblock bypass key of
the effect you want toinsert or dial Value
wheel to find neweffect and press Enter
to insert.
Empty spaces
Selected
Selected
Bypassed block
EFFECTS
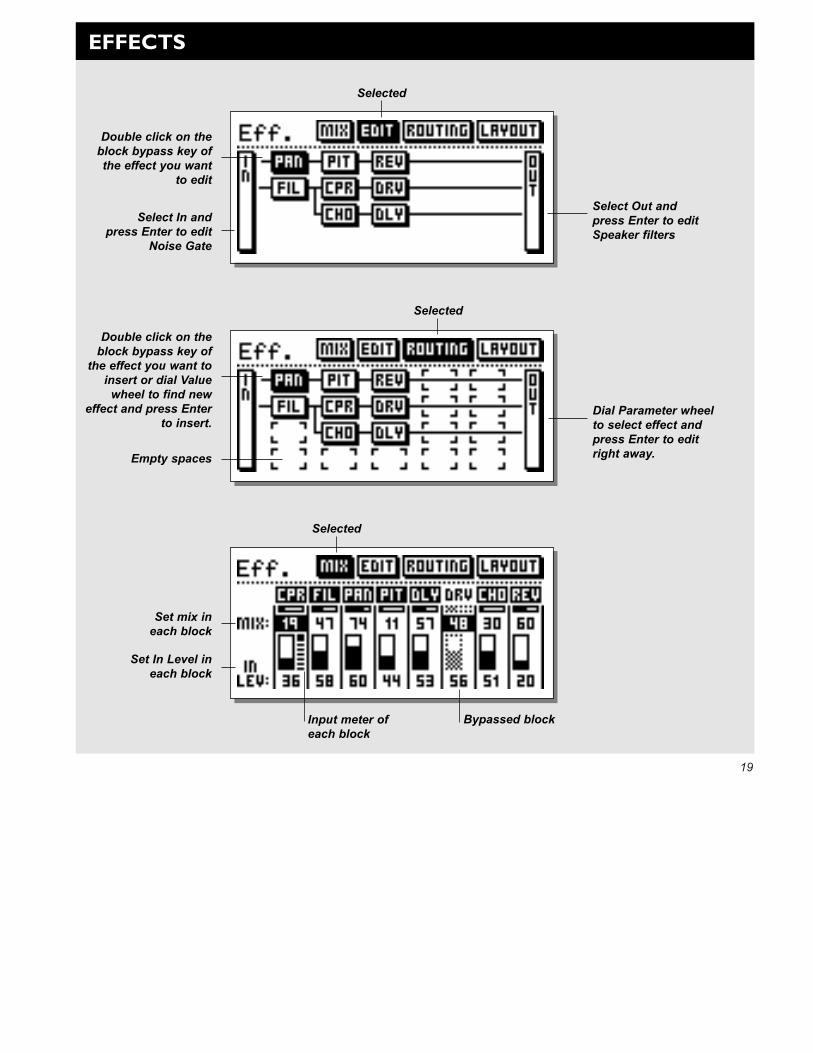
Editing directly from the Routing displayIf you want to edit an effect right away, press Enter toaccess the Edit parameter display.Use the Parameter wheel to scroll up and down, and theValue wheel to change values.Press Exit to leave the Edit parameter display again.
MixIn the Mix display, you are able to balance the mix and theIn Level of the effects in that particular preset. If an effect isbypassed, it will appear as grayed out, however, you canstill change the level and mix of that particular effect. Asmall PPM shows the input level of each block. When twosignals are joined together there may be occasionalovershoots. The meters of each block are therefore placedat the very input of the current block. This means that incase of overloads you should turn down the level of theprevious blocks.Use the Parameter wheel to scroll through the parametersand change values by dialing the Value wheel. Press Enterto activate the current effect or Exit to bypass it.
LayoutIn addition to the Routing display, you have a couple ofLayout tools. The Layout display can make certain actionsvery much easier. The functions of the Layout are verymuch like those of a spreadsheet. In the Layout display, you see a miniature version of theRouting. By turning the Value wheel, you can change thecursor position. Now dial the Parameter wheel to select thedesired function.
ColumnMove L - Will move the current Column to the Left.Move R - Will move the current Column to the Right.Insert - Will insert a new Column.Delete - Will delete the current Column.
RowMove U - Will move the current Row up.Move D - Will move the current Row down.Insert - Will Insert a new Row.Delete - Will delete the current Row.
Press Enter to carry out the selected function.
EFFECTS
20
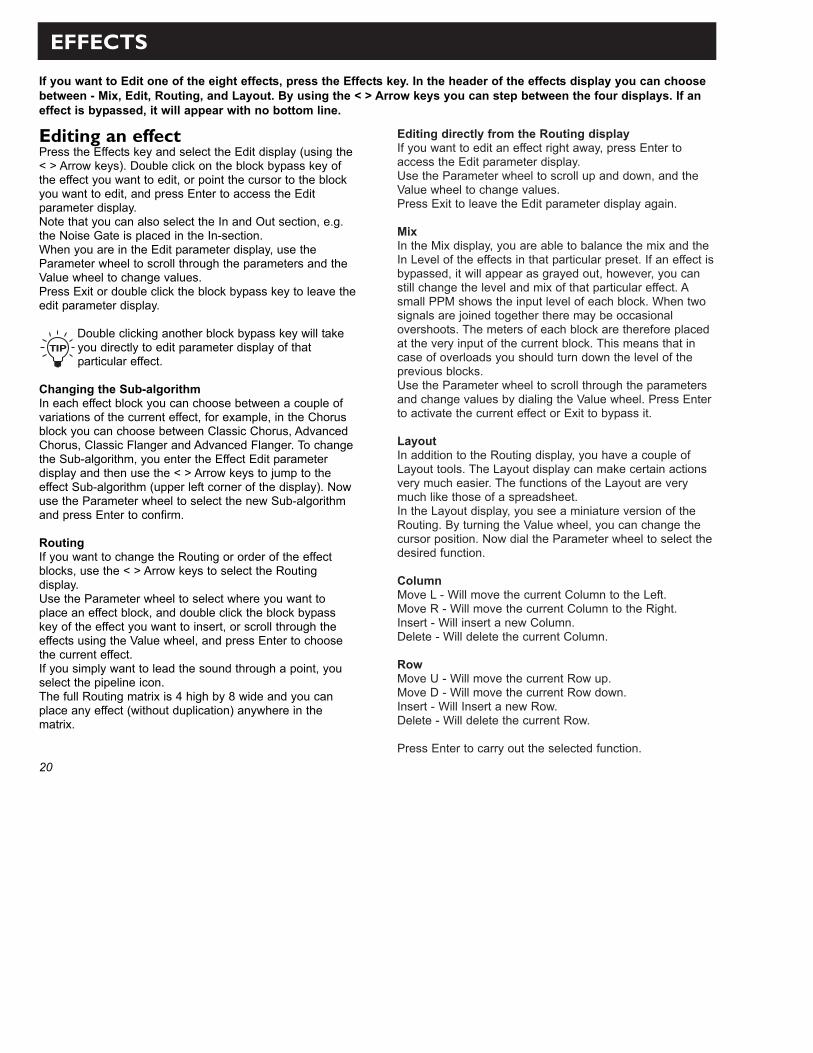
If you want to Edit one of the eight effects, press the Effects key. In the header of the effects display you can choosebetween - Mix, Edit, Routing, and Layout. By using the < > Arrow keys you can step between the four displays. If aneffect is bypassed, it will appear with no bottom line.
Editing an effectPress the Effects key and select the Edit display (using the< > Arrow keys). Double click on the block bypass key ofthe effect you want to edit, or point the cursor to the blockyou want to edit, and press Enter to access the Editparameter display.Note that you can also select the In and Out section, e.g.the Noise Gate is placed in the In-section.When you are in the Edit parameter display, use theParameter wheel to scroll through the parameters and theValue wheel to change values.Press Exit or double click the block bypass key to leave theedit parameter display.
Double clicking another block bypass key will takeyou directly to edit parameter display of thatparticular effect.
Changing the Sub-algorithmIn each effect block you can choose between a couple ofvariations of the current effect, for example, in the Chorusblock you can choose between Classic Chorus, AdvancedChorus, Classic Flanger and Advanced Flanger. To changethe Sub-algorithm, you enter the Effect Edit parameterdisplay and then use the < > Arrow keys to jump to theeffect Sub-algorithm (upper left corner of the display). Nowuse the Parameter wheel to select the new Sub-algorithmand press Enter to confirm.
RoutingIf you want to change the Routing or order of the effectblocks, use the < > Arrow keys to select the Routingdisplay.Use the Parameter wheel to select where you want toplace an effect block, and double click the block bypasskey of the effect you want to insert, or scroll through theeffects using the Value wheel, and press Enter to choosethe current effect.If you simply want to lead the sound through a point, youselect the pipeline icon. The full Routing matrix is 4 high by 8 wide and you canplace any effect (without duplication) anywhere in thematrix.
21
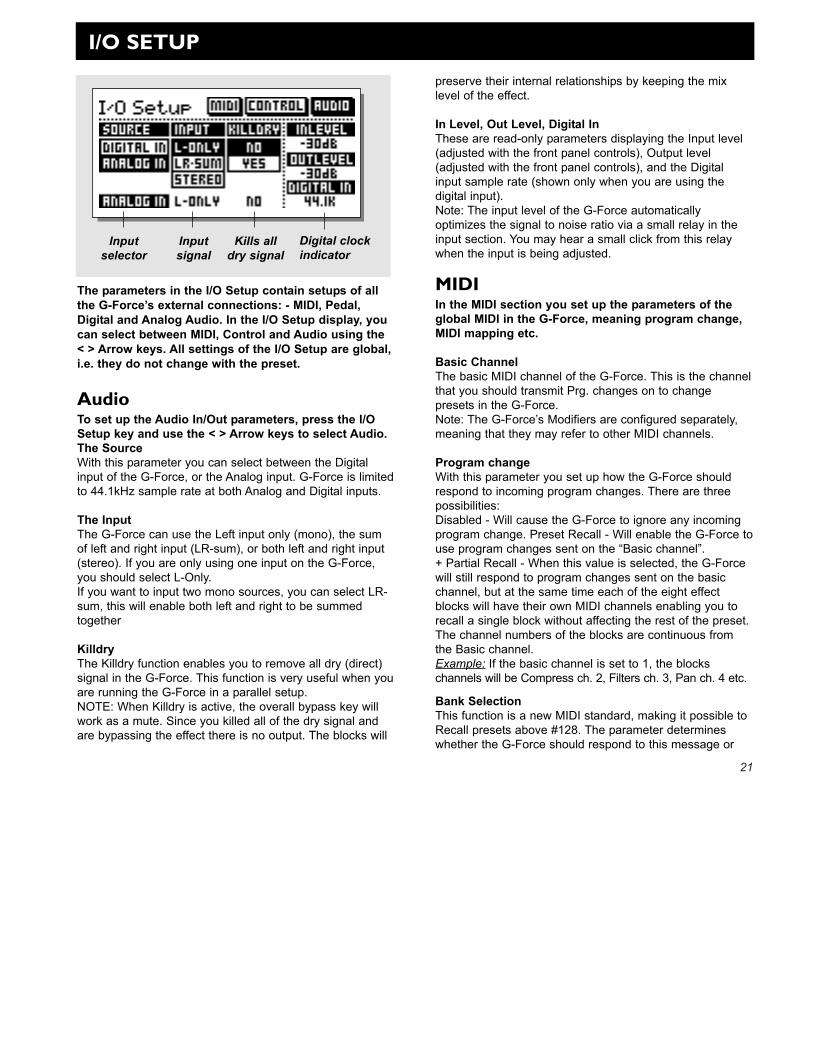
Digital clockindicator
Kills alldry signal
Inputsignal
Inputselector
The parameters in the I/O Setup contain setups of allthe G-Force’s external connections: - MIDI, Pedal,Digital and Analog Audio. In the I/O Setup display, youcan select between MIDI, Control and Audio using the< > Arrow keys. All settings of the I/O Setup are global,i.e. they do not change with the preset.
I/O SETUP
AudioTo set up the Audio In/Out parameters, press the I/OSetup key and use the < > Arrow keys to select Audio.The SourceWith this parameter you can select between the Digitalinput of the G-Force, or the Analog input. G-Force is limitedto 44.1kHz sample rate at both Analog and Digital inputs.
The InputThe G-Force can use the Left input only (mono), the sumof left and right input (LR-sum), or both left and right input(stereo). If you are only using one input on the G-Force,you should select L-Only.If you want to input two mono sources, you can select LR-sum, this will enable both left and right to be summedtogether
KilldryThe Killdry function enables you to remove all dry (direct)signal in the G-Force. This function is very useful when youare running the G-Force in a parallel setup. NOTE: When Killdry is active, the overall bypass key willwork as a mute. Since you killed all of the dry signal andare bypassing the effect there is no output. The blocks will
preserve their internal relationships by keeping the mixlevel of the effect.
In Level, Out Level, Digital InThese are read-only parameters displaying the Input level(adjusted with the front panel controls), Output level(adjusted with the front panel controls), and the Digitalinput sample rate (shown only when you are using thedigital input).Note: The input level of the G-Force automaticallyoptimizes the signal to noise ratio via a small relay in theinput section. You may hear a small click from this relaywhen the input is being adjusted.
MIDIIn the MIDI section you set up the parameters of theglobal MIDI in the G-Force, meaning program change,MIDI mapping etc.
Basic ChannelThe basic MIDI channel of the G-Force. This is the channelthat you should transmit Prg. changes on to changepresets in the G-Force.Note: The G-Force’s Modifiers are configured separately,meaning that they may refer to other MIDI channels.
Program changeWith this parameter you set up how the G-Force shouldrespond to incoming program changes. There are threepossibilities: Disabled - Will cause the G-Force to ignore any incomingprogram change. Preset Recall - Will enable the G-Force touse program changes sent on the “Basic channel”.+ Partial Recall - When this value is selected, the G-Forcewill still respond to program changes sent on the basicchannel, but at the same time each of the eight effectblocks will have their own MIDI channels enabling you torecall a single block without affecting the rest of the preset.The channel numbers of the blocks are continuous fromthe Basic channel. Example: If the basic channel is set to 1, the blockschannels will be Compress ch. 2, Filters ch. 3, Pan ch. 4 etc.
Bank SelectionThis function is a new MIDI standard, making it possible toRecall presets above #128. The parameter determineswhether the G-Force should respond to this message or
I/O SETUP
22
not. If your MIDI device or foot controller is capable ofusing this function, you should select Fine or Coarse.(Please refer to your MIDI device/Foot Controller ownersmanual to make sure which type the current product isusing). If set to “disabled”, the G-Force will act as astandard MIDI product.
Bank sizeThe bank size is used to adapt the G-Force to differentboard manufacturers when recalling preset above #128. Inmost cases this parameter should be set at 128, but insome cases e.g. when using the Roland FC-200, it shouldbe set at 100. The bank selection number contained in the programchange is multiplied with this value and the programchange number is added. Please refer to the manual of theboard manufacturer for proper setting.
Sysex device IDThe Sysex ID of the G-Force.
Program change offsetWith this parameter you are able to add or subtract to orfrom the incoming Prg. change; e.g. the incoming Prg.change is preset 123, and the offset is set to +1, the Prg.change will now be 124.The G-Force presets start at #1.
Mapping modeAdjusts which bank the MIDI mapping should use:ROM,USER, CARD or Custom. This means that you canguide an incoming Prg. change to use the USER bank, oryou can design your own MIDI map.
New Mapping ModeAn “External” mapping mode has been added. When External mapping mode is selected all presets in allbanks can be accessed from an external MIDI device, viacontroller 0 (Coarse), plus a sent program changeaccording to the following table. Bank Size must be set to100 and the Fine/Coarse parameter must be set accordingto the sending device. These parameters are both set-up inthe “I/O Setup - MIDI” menu.Please note that “Coarse” must be selected when aG•Minor is used as sending device.
Controller Value0 0 Rom bank preset 1 to 1000 1 Rom bank preset 101 to 2000 2 Rom bank preset 201 to 2250 3 User bank preset 1 to 1000 4 Card Bank 1 preset 1 to 1000 5 Card Bank 2 preset 1 to 100-- -- --0 9 Card Bank 6 preset 1 to 99
The number of card banks available depends on the sizeof the PCMCIA card.
Custom MapIn the Custom Map you can decide what every incomingPrg. change should map to, using the “Map ProgramChange No.” and the “Into Preset” parameters.
Map Program change no.Use this parameter to select the Prg. change you want toremap.
Into PresetUse this parameter to set the new destination of theincoming program change.
MIDI Program Change Re-TransmitThe G-Force is capable of controlling the re-transmissionof an incoming MIDI prg. change. This enables you to notonly remap an incoming program change,but also todetermine whether the current program change should bere-transmitted to other devices receiving MIDI informationfrom the G-Force MIDI Output or not.
A prg. change is re-transmitted on the G-Force MIDIOut connector, while the MIDI Thru connectortransmits a copy of the signals received on MIDI Inconnector
Reset Custom MapPlace the cursor on this parameter and press Enter toReset the Custom map.
23
I/O SETUP
Setup bankThe G-Force has four banks which you can use for yourdifferent setups. By using the Value wheel, you can changethe active bank from 1 through 4. The banks areinstantaneously Stored and Recalled, meaning that anychange you make in the Control menu is remembered inthe current bank, and Recalled next time you select thatparticular bank. Each bank contains every parametersetting in the Control menu.
Board factory defaults It is possible to set up the Control menu for a number ofboard defaults. Dial the Value wheel and confirm with theEnter key to load the board defaults. Only boards with MIDIOn/Off or Expression possibilities are represented on the list. The complete list is:ADA MXC ART X-15 Ultrafoot Roland FC-200 Rocktron All AccessDMC Ground Control Lexicon MPX R1 Custom Audio Electronics RS-10 G Minor
This will change the whole Control setup to thedefaults of the chosen board, meaning that it willoverride your settings.
G-Force controlMain Vol.- Controls the main output volume of the G-Force.Tempo - Use this parameter to tap the global tempo viaMIDI or the G-Force pedal input.Bypass - Controls the overall bypass of the G-Force.Tuner - Use this parameter to activate the Tuner.
Modifier inputExt. 1-8 - These eight inputs can control numerousparameters in the algorithms. Their functions are set up inthe Modifier matrix display. These are the parameters youshould set up to be controlled by your expression pedals.
Effect BypassThe nine block bypass functions can be externallycontrolled via these inputs, meaning that you can bypasseach of the nine effects independently. Some footcontrollers on the market have the capability to send MIDIon/off messages for exactly this purpose. If you do not own a board with these features, you can usean ordinary program change to bypass a block, e.g. Youcan setup the Pan section to be bypassed when you sendout program change #10 on MIDI channel 5.
Ext. ControllersThere are two ways to connect an expression pedal to theG-Force. One way is to connect it directly to the ExternalControl jack on the back panel of the G-Force. The otherway is to connect it via a foot-controller, i.e. as a MIDIcontroller.
To make it easy for you to set up a pedal, wedesigned a Learn function. Place the cursor on theparameter you want to control, press Enter toactivate Learn, and press your pedal. The G-Force
will now automatically detect your pedal, no matter if it isconnected to MIDI or to the pedal jack.
In each of the following parameters, you can setup theinput that the current parameter should be controlled by. Inthe first column you set up the source and in the secondcolumn you set up the type of the controller. Here is adescription of the possibilities -
Column 1Pedal: The G-Force pedal input (see back panel).MIDI basic: The parameter will respond to the basic
G-Force MIDI channel (set in MIDI).MIDI Omni: The current parameter will respond to
all channels.MIDI 1-16: The parameter will only respond to this channel.
Column 2 (please note that this column is only available when col.1 isset to MIDI).Pitch bend: Standard MIDI Pitch bend.Aftertouch: Standard MIDI Aftertouch.Note-on-key: Standard MIDI Note-on.Controller 0-127: MIDI standard controllers.Prg. Change: The Program Change feature is very
special.If a parameter is set to a certain Program Change, the current parameter will be toggled on/off by the current preset change.
If you are using a Program Change on the MIDIbasic channel for controller purposes, the currentProgram Change will be ignored and will not performa program change on the G-Force.
I/O SETUP
24
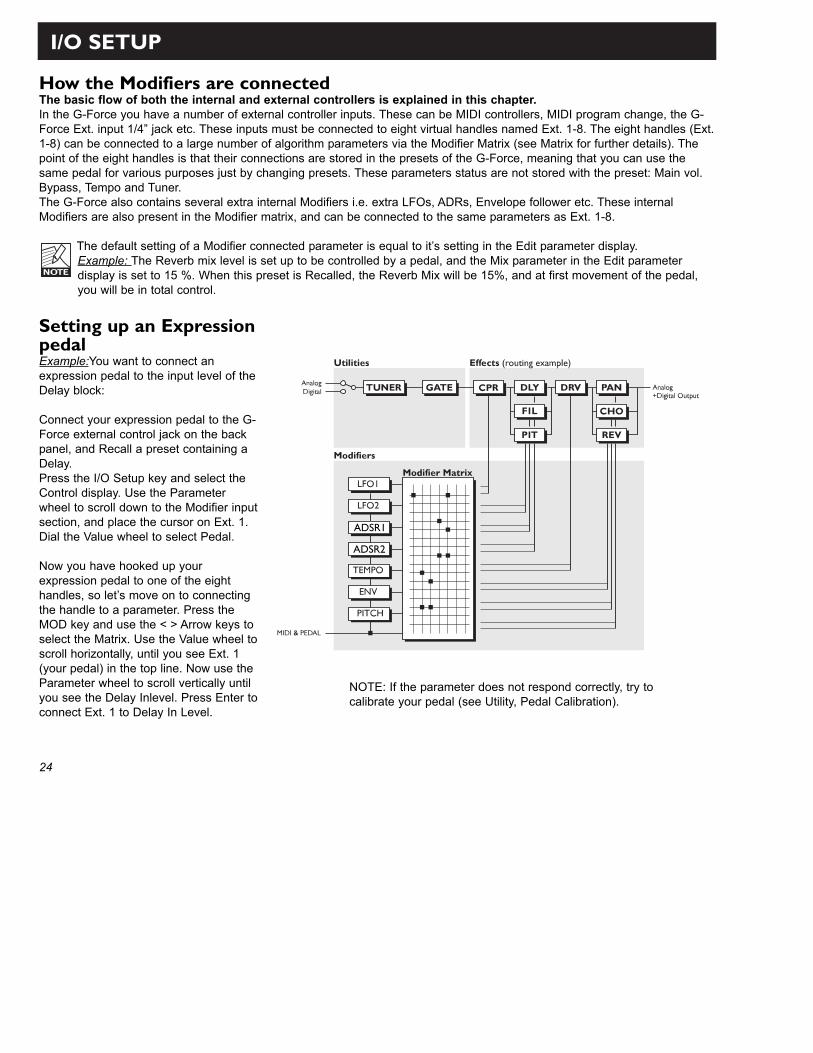
How the Modifiers are connectedThe basic flow of both the internal and external controllers is explained in this chapter.In the G-Force you have a number of external controller inputs. These can be MIDI controllers, MIDI program change, the G-Force Ext. input 1/4” jack etc. These inputs must be connected to eight virtual handles named Ext. 1-8. The eight handles (Ext.1-8) can be connected to a large number of algorithm parameters via the Modifier Matrix (see Matrix for further details). Thepoint of the eight handles is that their connections are stored in the presets of the G-Force, meaning that you can use thesame pedal for various purposes just by changing presets. These parameters status are not stored with the preset: Main vol.Bypass, Tempo and Tuner.The G-Force also contains several extra internal Modifiers i.e. extra LFOs, ADRs, Envelope follower etc. These internalModifiers are also present in the Modifier matrix, and can be connected to the same parameters as Ext. 1-8.
The default setting of a Modifier connected parameter is equal to it’s setting in the Edit parameter display.Example: The Reverb mix level is set up to be controlled by a pedal, and the Mix parameter in the Edit parameterdisplay is set to 15 %. When this preset is Recalled, the Reverb Mix will be 15%, and at first movement of the pedal,you will be in total control.
Setting up an ExpressionpedalExample:You want to connect anexpression pedal to the input level of theDelay block:
Connect your expression pedal to the G-Force external control jack on the backpanel, and Recall a preset containing aDelay.Press the I/O Setup key and select theControl display. Use the Parameterwheel to scroll down to the Modifier inputsection, and place the cursor on Ext. 1.Dial the Value wheel to select Pedal.
Now you have hooked up yourexpression pedal to one of the eighthandles, so let’s move on to connectingthe handle to a parameter. Press theMOD key and use the < > Arrow keys toselect the Matrix. Use the Value wheel toscroll horizontally, until you see Ext. 1(your pedal) in the top line. Now use theParameter wheel to scroll vertically untilyou see the Delay Inlevel. Press Enter toconnect Ext. 1 to Delay In Level.
NOTE: If the parameter does not respond correctly, try tocalibrate your pedal (see Utility, Pedal Calibration).
25
MODIFIER
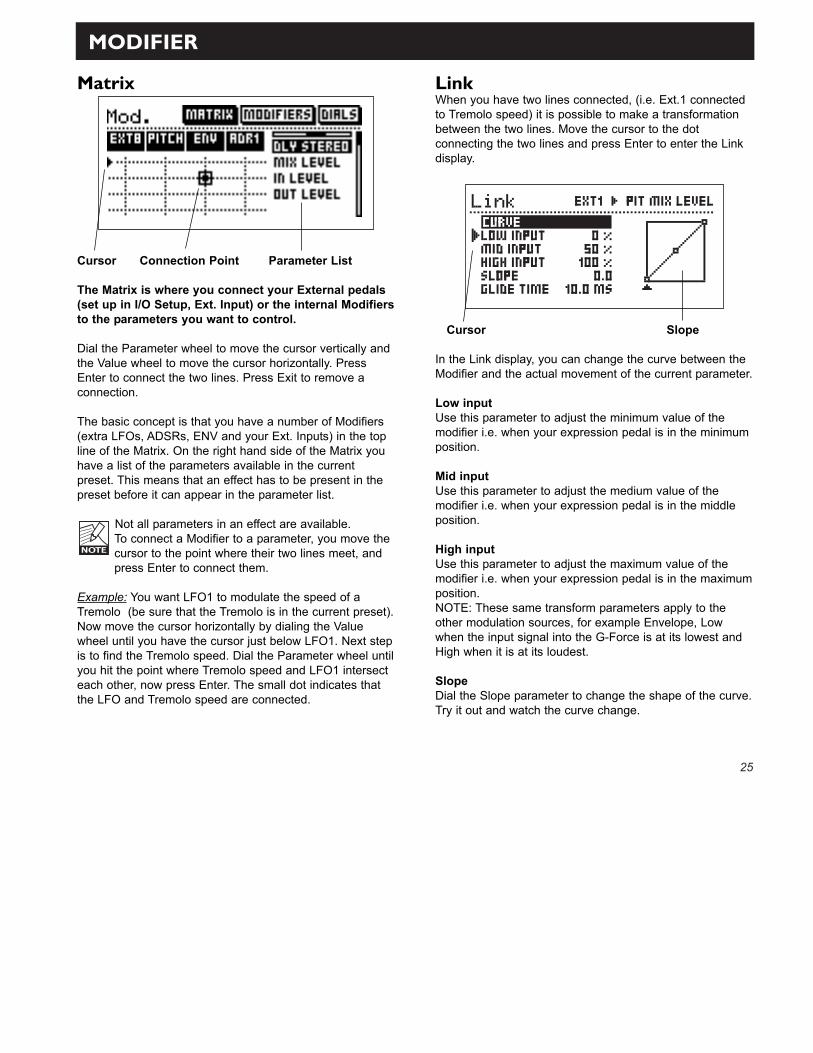
LinkWhen you have two lines connected, (i.e. Ext.1 connectedto Tremolo speed) it is possible to make a transformationbetween the two lines. Move the cursor to the dotconnecting the two lines and press Enter to enter the Linkdisplay.
Cursor Slope
In the Link display, you can change the curve between theModifier and the actual movement of the current parameter.
Low inputUse this parameter to adjust the minimum value of themodifier i.e. when your expression pedal is in the minimumposition.
Mid input Use this parameter to adjust the medium value of themodifier i.e. when your expression pedal is in the middleposition.
High inputUse this parameter to adjust the maximum value of themodifier i.e. when your expression pedal is in the maximumposition.NOTE: These same transform parameters apply to theother modulation sources, for example Envelope, Lowwhen the input signal into the G-Force is at its lowest andHigh when it is at its loudest.
Slope Dial the Slope parameter to change the shape of the curve.Try it out and watch the curve change.
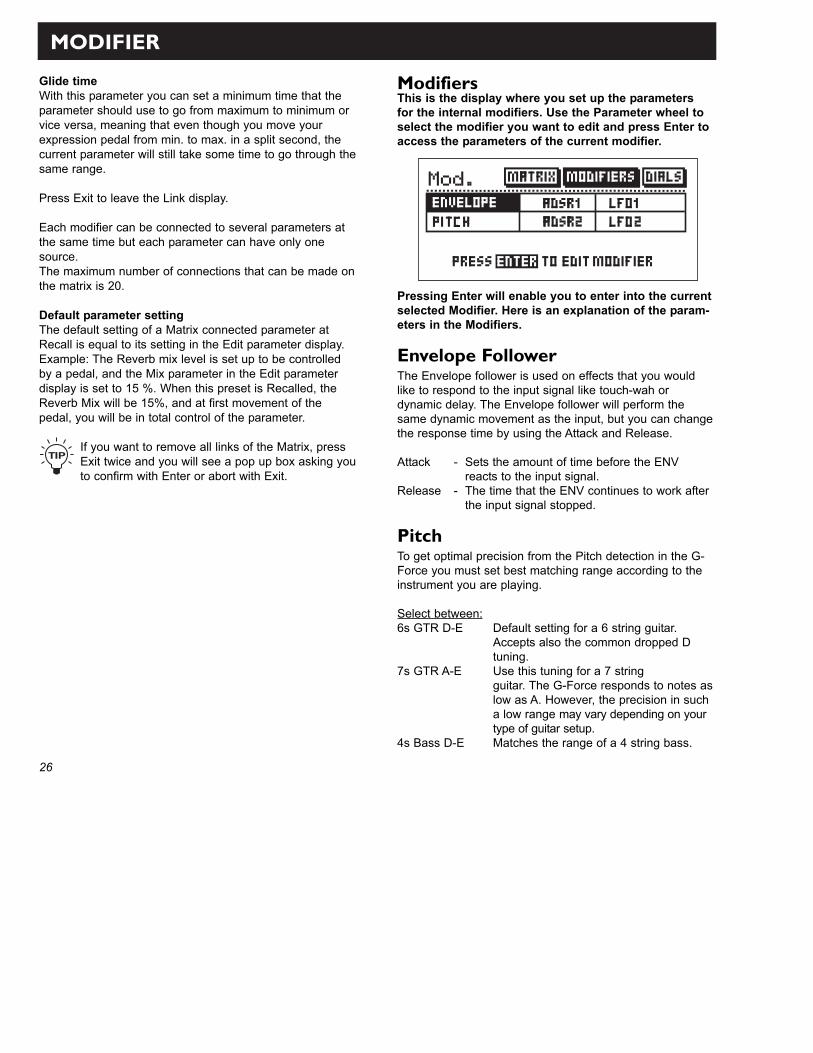
Matrix
Cursor Connection Point Parameter List
The Matrix is where you connect your External pedals(set up in I/O Setup, Ext. Input) or the internal Modifiersto the parameters you want to control.
Dial the Parameter wheel to move the cursor vertically andthe Value wheel to move the cursor horizontally. PressEnter to connect the two lines. Press Exit to remove aconnection.
The basic concept is that you have a number of Modifiers(extra LFOs, ADSRs, ENV and your Ext. Inputs) in the topline of the Matrix. On the right hand side of the Matrix youhave a list of the parameters available in the currentpreset. This means that an effect has to be present in thepreset before it can appear in the parameter list.
Not all parameters in an effect are available. To connect a Modifier to a parameter, you move thecursor to the point where their two lines meet, andpress Enter to connect them.
Example: You want LFO1 to modulate the speed of aTremolo (be sure that the Tremolo is in the current preset).Now move the cursor horizontally by dialing the Valuewheel until you have the cursor just below LFO1. Next stepis to find the Tremolo speed. Dial the Parameter wheel untilyou hit the point where Tremolo speed and LFO1 intersecteach other, now press Enter. The small dot indicates thatthe LFO and Tremolo speed are connected.
MODIFIER
26
ModifiersThis is the display where you set up the parametersfor the internal modifiers. Use the Parameter wheel toselect the modifier you want to edit and press Enter toaccess the parameters of the current modifier.
Pressing Enter will enable you to enter into the currentselected Modifier. Here is an explanation of the param-eters in the Modifiers.
Envelope FollowerThe Envelope follower is used on effects that you wouldlike to respond to the input signal like touch-wah ordynamic delay. The Envelope follower will perform thesame dynamic movement as the input, but you can changethe response time by using the Attack and Release.
Attack - Sets the amount of time before the ENV reacts to the input signal.
Release - The time that the ENV continues to work after the input signal stopped.
PitchTo get optimal precision from the Pitch detection in the G-Force you must set best matching range according to theinstrument you are playing.
Select between:6s GTR D-E Default setting for a 6 string guitar.
Accepts also the common dropped D tuning.
7s GTR A-E Use this tuning for a 7 string guitar. The G-Force responds to notes aslow as A. However, the precision in such a low range may vary depending on your type of guitar setup.
4s Bass D-E Matches the range of a 4 string bass.
Glide timeWith this parameter you can set a minimum time that theparameter should use to go from maximum to minimum orvice versa, meaning that even though you move yourexpression pedal from min. to max. in a split second, thecurrent parameter will still take some time to go through thesame range.
Press Exit to leave the Link display.
Each modifier can be connected to several parameters atthe same time but each parameter can have only onesource.The maximum number of connections that can be made onthe matrix is 20.
Default parameter settingThe default setting of a Matrix connected parameter atRecall is equal to its setting in the Edit parameter display.Example: The Reverb mix level is set up to be controlledby a pedal, and the Mix parameter in the Edit parameterdisplay is set to 15 %. When this preset is Recalled, theReverb Mix will be 15%, and at first movement of thepedal, you will be in total control of the parameter.
If you want to remove all links of the Matrix, pressExit twice and you will see a pop up box asking youto confirm with Enter or abort with Exit.
27
ADSR 1&2ADSR’s are used to play short sequences triggered by theaudio input. You set up a number of terms to describe thecurrent sequence, and a trigger level also known asThreshold.
Attack The Attack or rise time of the curve i.e. how long it takes togo from minimum to maximum level.
DecaySets how long it takes the curve to fall back from maximumto Sustain level.
SustainThe amount of time that the ADSR will hold the Sustainlevel.
Sustain levelThe value that will be sent out during the Sustain period.
ReleaseThe amount of time that it takes the ADSR to fall fromSustain level to zero. Release time will take over when theSustain time has expired (depending on the trig modesetting).
ModeWith the mode parameter parameter you can choose theway the ADSR should respond to trigs. In general theADSR can only retrig if the signal falls below threshold andcomes back up.Once - Will run the ADSR to the end once, and
afterthat be ready for a new trig. In “Once” mode the signal have to drop below threshold after the ADSR finished to be able to retrig.
Once-Retrig - Will run the ADSR to end once, but are capable of retriggering during the ADSR sequence.
Loop - Will keep running the ADSR sequence for as long as the signal stays above threshold.
Loop-Retrig - Will keep running the ADSR sequence for as long as the signal stays above threshold, but are capable of retriggering
MODIFIER
during the ADSR sequence.Sustain - Will stay at Sustain level for as long as
the signal stays above threshold.Sust-Retrig - Will stay at Sustain level for as long as
the signal stays above threshold, but is capable of retriggering during the ADSR sequence.
ThresholdWhen the input level exceeds this level, the ADSR istriggered.
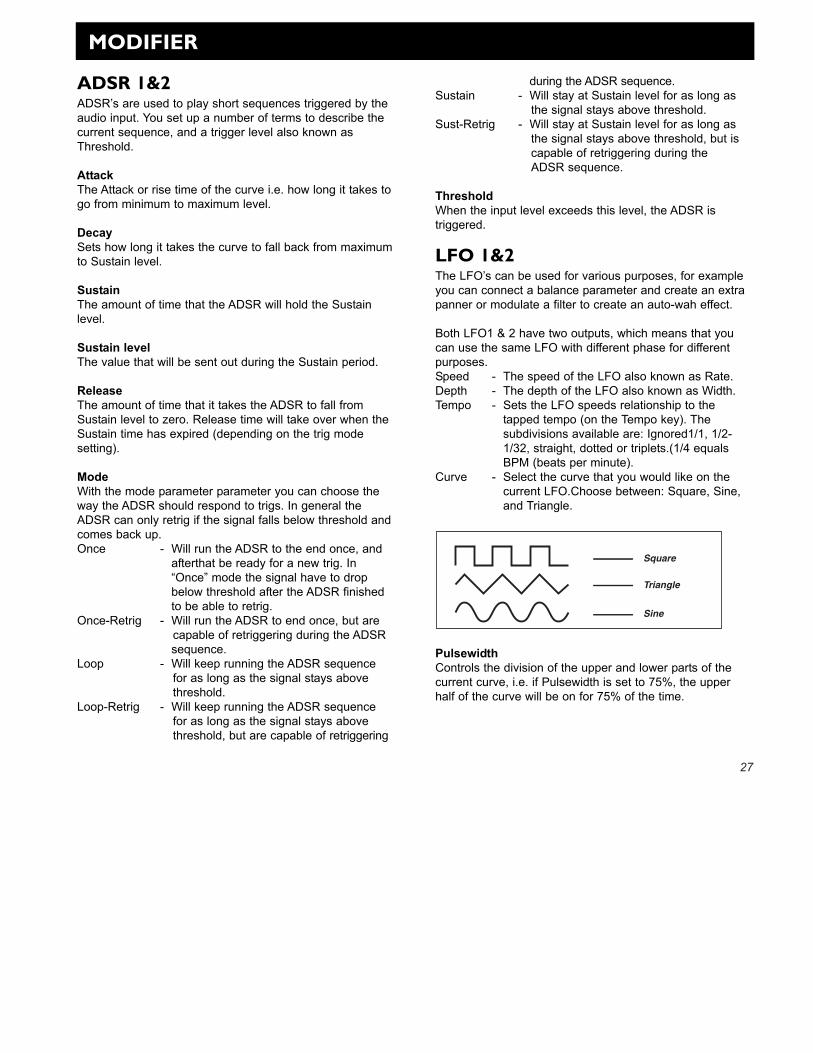
LFO 1&2The LFO’s can be used for various purposes, for exampleyou can connect a balance parameter and create an extrapanner or modulate a filter to create an auto-wah effect.
Both LFO1 & 2 have two outputs, which means that youcan use the same LFO with different phase for differentpurposes. Speed - The speed of the LFO also known as Rate.Depth - The depth of the LFO also known as Width.Tempo - Sets the LFO speeds relationship to the
tapped tempo (on the Tempo key). The subdivisions available are: Ignored1/1, 1/2-1/32, straight, dotted or triplets.(1/4 equals BPM (beats per minute).
Curve - Select the curve that you would like on the current LFO.Choose between: Square, Sine, and Triangle.
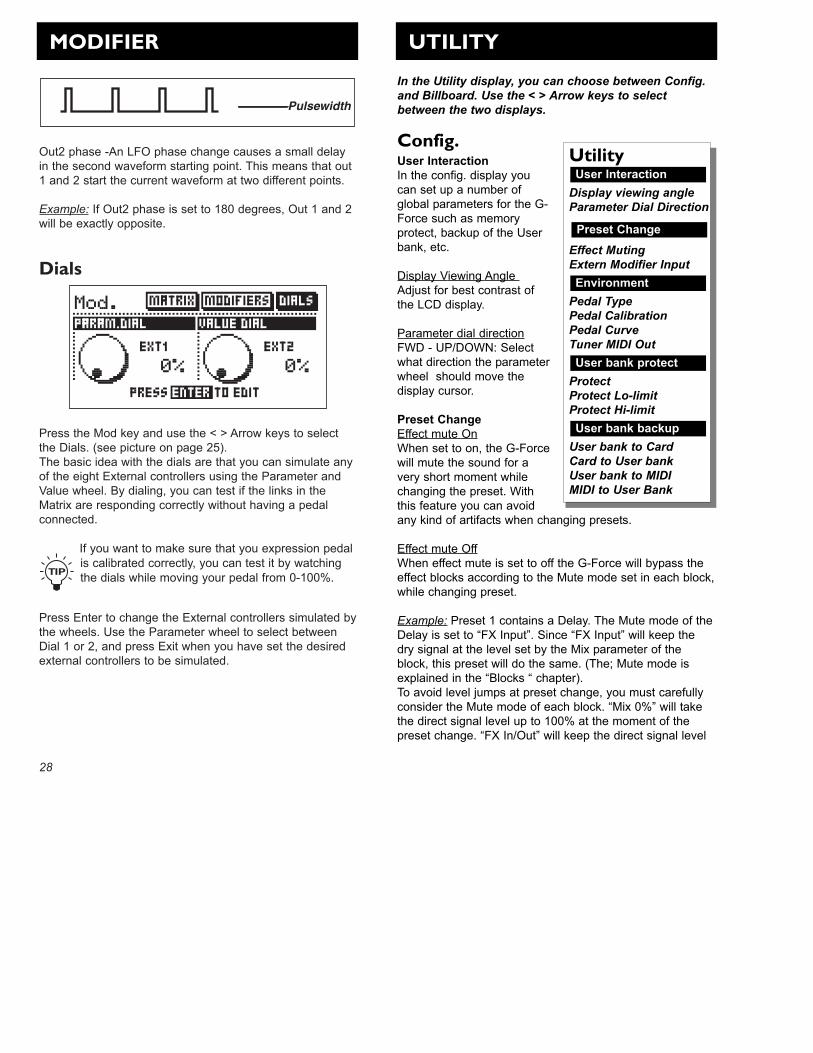
PulsewidthControls the division of the upper and lower parts of thecurrent curve, i.e. if Pulsewidth is set to 75%, the upperhalf of the curve will be on for 75% of the time.
Square
Triangle
Sine
28
Out2 phase -An LFO phase change causes a small delayin the second waveform starting point. This means that out1 and 2 start the current waveform at two different points.
Example: If Out2 phase is set to 180 degrees, Out 1 and 2will be exactly opposite.
Dials
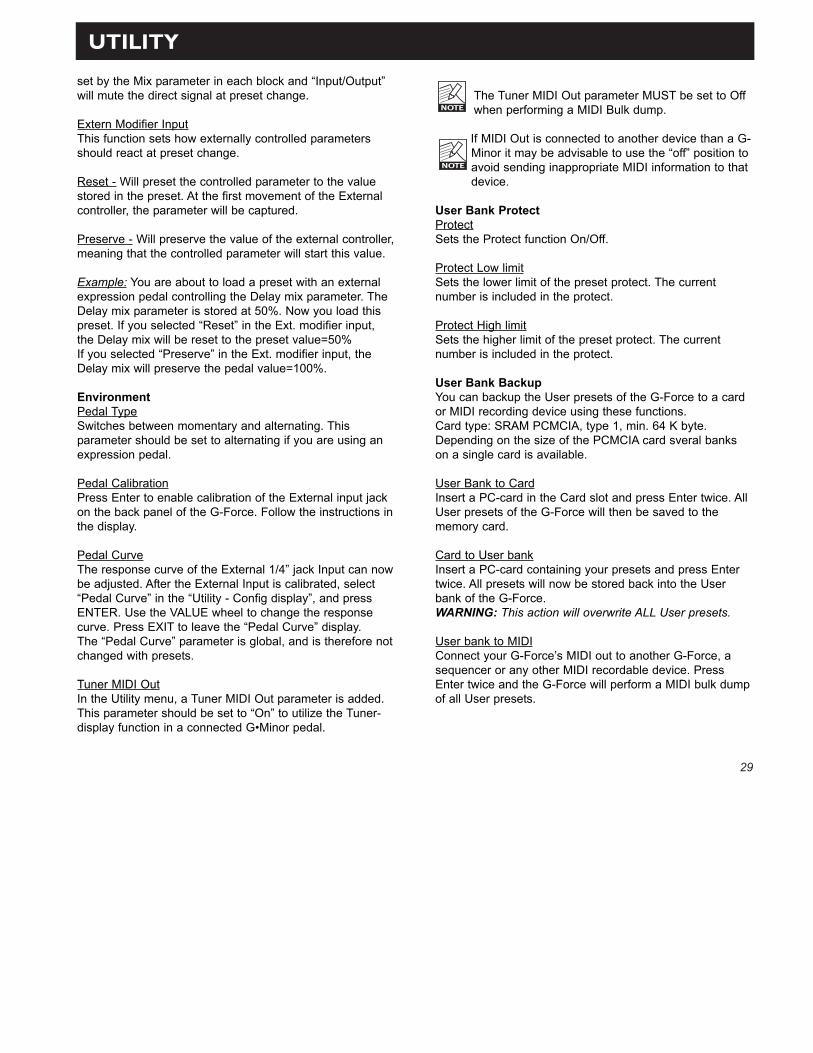
Press the Mod key and use the < > Arrow keys to selectthe Dials. (see picture on page 25).The basic idea with the dials are that you can simulate anyof the eight External controllers using the Parameter andValue wheel. By dialing, you can test if the links in theMatrix are responding correctly without having a pedalconnected.
If you want to make sure that you expression pedalis calibrated correctly, you can test it by watchingthe dials while moving your pedal from 0-100%.
Press Enter to change the External controllers simulated bythe wheels. Use the Parameter wheel to select betweenDial 1 or 2, and press Exit when you have set the desiredexternal controllers to be simulated.
Pulsewidth
MODIFIER UTILITY
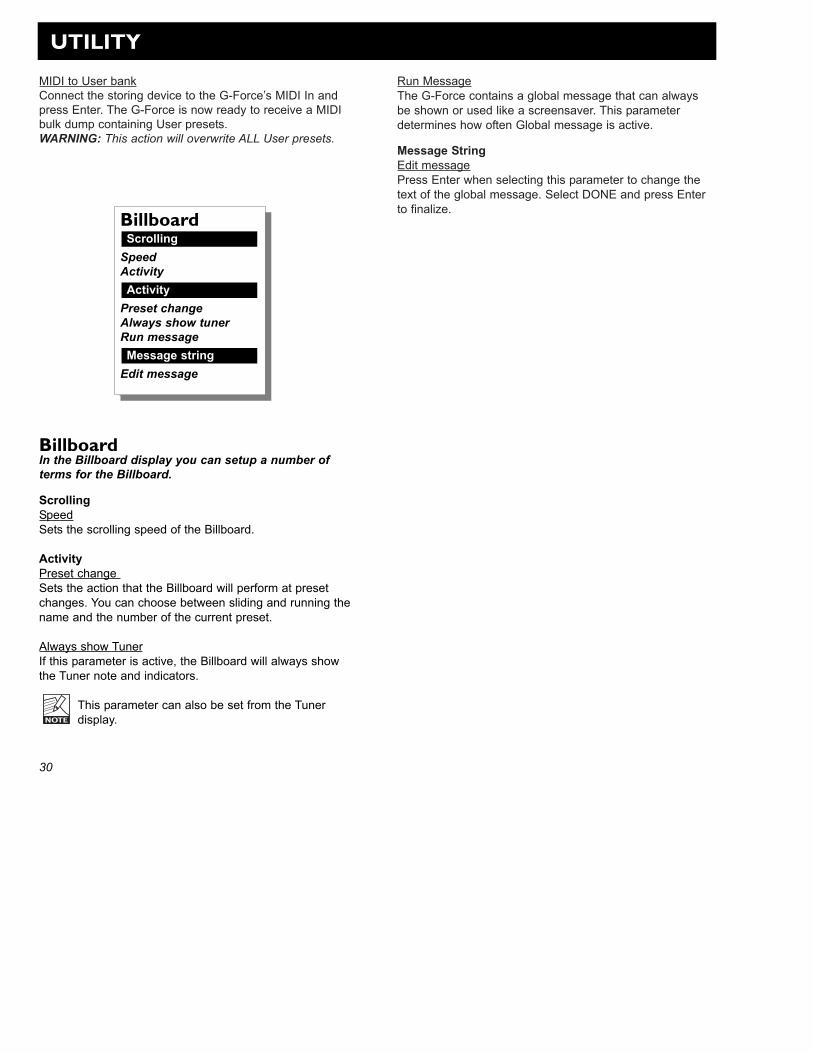
In the Utility display, you can choose between Config.and Billboard. Use the < > Arrow keys to selectbetween the two displays.
Config.User InteractionIn the config. display youcan set up a number ofglobal parameters for the G-Force such as memoryprotect, backup of the Userbank, etc.
Display Viewing Angle Adjust for best contrast ofthe LCD display.
Parameter dial directionFWD - UP/DOWN: Selectwhat direction the parameterwheel should move thedisplay cursor.
Preset ChangeEffect mute OnWhen set to on, the G-Forcewill mute the sound for avery short moment whilechanging the preset. Withthis feature you can avoidany kind of artifacts when changing presets.
Effect mute OffWhen effect mute is set to off the G-Force will bypass theeffect blocks according to the Mute mode set in each block,while changing preset.
Example: Preset 1 contains a Delay. The Mute mode of theDelay is set to “FX Input”. Since “FX Input” will keep thedry signal at the level set by the Mix parameter of theblock, this preset will do the same. (The; Mute mode isexplained in the “Blocks “ chapter).To avoid level jumps at preset change, you must carefullyconsider the Mute mode of each block. “Mix 0%” will takethe direct signal level up to 100% at the moment of thepreset change. “FX In/Out” will keep the direct signal level
Utility
Display viewing angleParameter Dial Direction
Effect MutingExtern Modifier Input
Pedal TypePedal CalibrationPedal CurveTuner MIDI Out
ProtectProtect Lo-limitProtect Hi-limit
User bank to CardCard to User bankUser bank to MIDIMIDI to User Bank
User bank backup
User bank protect
Environment
User Interaction
Preset Change
29
UTILITY
set by the Mix parameter in each block and “Input/Output”will mute the direct signal at preset change.
Extern Modifier InputThis function sets how externally controlled parametersshould react at preset change.
Reset - Will preset the controlled parameter to the valuestored in the preset. At the first movement of the Externalcontroller, the parameter will be captured.
Preserve - Will preserve the value of the external controller,meaning that the controlled parameter will start this value.
Example: You are about to load a preset with an externalexpression pedal controlling the Delay mix parameter. TheDelay mix parameter is stored at 50%. Now you load thispreset. If you selected “Reset” in the Ext. modifier input,the Delay mix will be reset to the preset value=50%If you selected “Preserve” in the Ext. modifier input, theDelay mix will preserve the pedal value=100%.
EnvironmentPedal TypeSwitches between momentary and alternating. Thisparameter should be set to alternating if you are using anexpression pedal.
Pedal CalibrationPress Enter to enable calibration of the External input jackon the back panel of the G-Force. Follow the instructions inthe display.
Pedal CurveThe response curve of the External 1/4” jack Input can nowbe adjusted. After the External Input is calibrated, select“Pedal Curve” in the “Utility - Config display”, and pressENTER. Use the VALUE wheel to change the responsecurve. Press EXIT to leave the “Pedal Curve” display.The “Pedal Curve” parameter is global, and is therefore notchanged with presets.
Tuner MIDI OutIn the Utility menu, a Tuner MIDI Out parameter is added.This parameter should be set to “On” to utilize the Tuner-display function in a connected G•Minor pedal.
The Tuner MIDI Out parameter MUST be set to Offwhen performing a MIDI Bulk dump.
If MIDI Out is connected to another device than a G-Minor it may be advisable to use the “off” position toavoid sending inappropriate MIDI information to thatdevice.
User Bank ProtectProtectSets the Protect function On/Off.
Protect Low limitSets the lower limit of the preset protect. The currentnumber is included in the protect.
Protect High limitSets the higher limit of the preset protect. The currentnumber is included in the protect.
User Bank BackupYou can backup the User presets of the G-Force to a cardor MIDI recording device using these functions. Card type: SRAM PCMCIA, type 1, min. 64 K byte.Depending on the size of the PCMCIA card sveral bankson a single card is available.
User Bank to CardInsert a PC-card in the Card slot and press Enter twice. AllUser presets of the G-Force will then be saved to thememory card.
Card to User bankInsert a PC-card containing your presets and press Entertwice. All presets will now be stored back into the Userbank of the G-Force.WARNING: This action will overwrite ALL User presets.
User bank to MIDIConnect your G-Force’s MIDI out to another G-Force, asequencer or any other MIDI recordable device. PressEnter twice and the G-Force will perform a MIDI bulk dumpof all User presets.
MIDI to User bankConnect the storing device to the G-Force’s MIDI In andpress Enter. The G-Force is now ready to receive a MIDIbulk dump containing User presets.WARNING: This action will overwrite ALL User presets.
Run MessageThe G-Force contains a global message that can alwaysbe shown or used like a screensaver. This parameterdetermines how often Global message is active.
Message StringEdit messagePress Enter when selecting this parameter to change thetext of the global message. Select DONE and press Enterto finalize.
UTILITY
Billboard
SpeedActivity
Preset changeAlways show tunerRun message
Edit messageMessage string
Activity
Scrolling
30
BillboardIn the Billboard display you can setup a number ofterms for the Billboard.
ScrollingSpeedSets the scrolling speed of the Billboard.
ActivityPreset change Sets the action that the Billboard will perform at presetchanges. You can choose between sliding and running thename and the number of the current preset.
Always show TunerIf this parameter is active, the Billboard will always showthe Tuner note and indicators.
This parameter can also be set from the Tunerdisplay.
31
TempoSet the global tempo by tapping the Tempo key. The global tempo can be used as a common tempoguide in all presets. All Delay algorithms and allalgorithms containing a speed are able to use theglobal tempo.
Tapping a tempo into a DelayAll Delay and Speed parameters have links to the GlobalTempo menu. This means that a tapped tempo can beused in any presets that have these parameters. To makethe tempo fit your purpose, we added a subdivision in allthese algorithms. All you have to do is set up whichsubdivision parameter you would like the tempo to divideinto.Example: You want a Delay to perform 1/8 triplets. Go intothe Edit parameter page of the Delay and select 1/8 T.Now you can just tap the BPM on the Tempo key (or via apedal), and the Delay will automatically recalculate into 1/8triplets in the current tempo. The same goes for all thealgorithms containing Speeds.
The algorithms able to use the global tempo are:DelayChorusFlangerPhaserTremoloPannerand modifiersLFO 1LFO 2
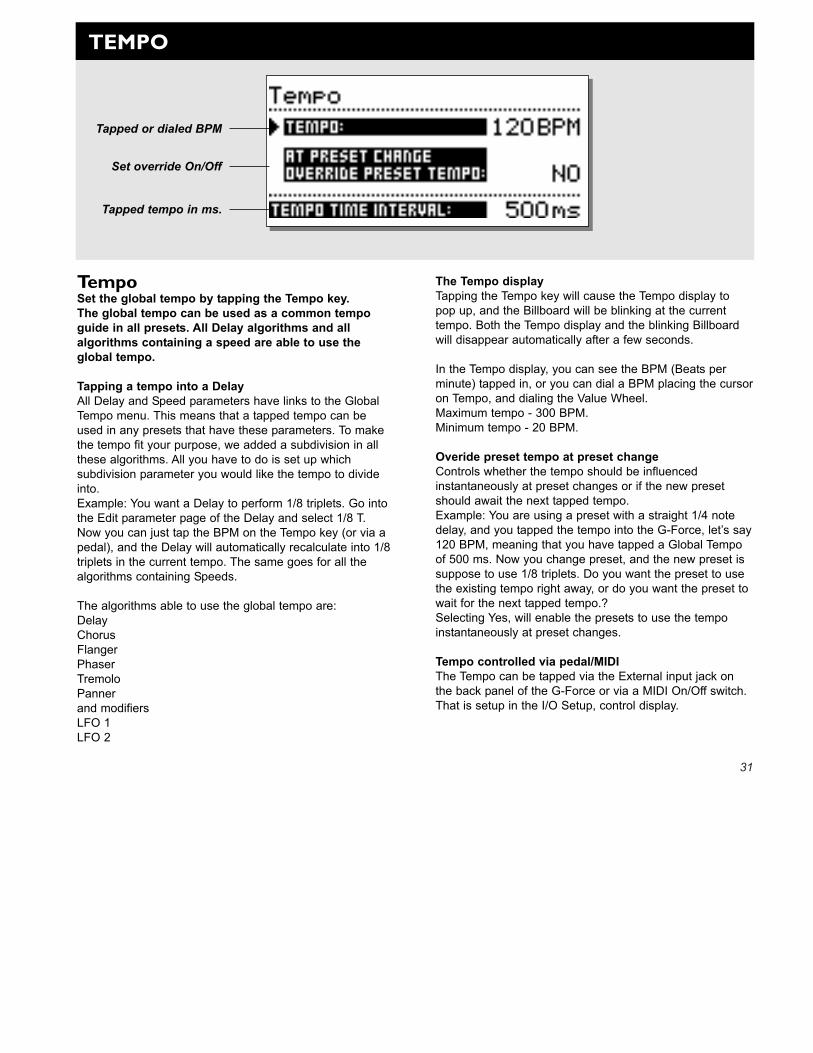
The Tempo displayTapping the Tempo key will cause the Tempo display topop up, and the Billboard will be blinking at the currenttempo. Both the Tempo display and the blinking Billboardwill disappear automatically after a few seconds.
In the Tempo display, you can see the BPM (Beats perminute) tapped in, or you can dial a BPM placing the cursoron Tempo, and dialing the Value Wheel. Maximum tempo - 300 BPM.Minimum tempo - 20 BPM.
Overide preset tempo at preset changeControls whether the tempo should be influencedinstantaneously at preset changes or if the new presetshould await the next tapped tempo.Example: You are using a preset with a straight 1/4 notedelay, and you tapped the tempo into the G-Force, let’s say120 BPM, meaning that you have tapped a Global Tempoof 500 ms. Now you change preset, and the new preset issuppose to use 1/8 triplets. Do you want the preset to usethe existing tempo right away, or do you want the preset towait for the next tapped tempo.?Selecting Yes, will enable the presets to use the tempoinstantaneously at preset changes.
Tempo controlled via pedal/MIDIThe Tempo can be tapped via the External input jack onthe back panel of the G-Force or via a MIDI On/Off switch.That is setup in the I/O Setup, control display.
Tapped or dialed BPM
Set override On/Off
Tapped tempo in ms.
TEMPO
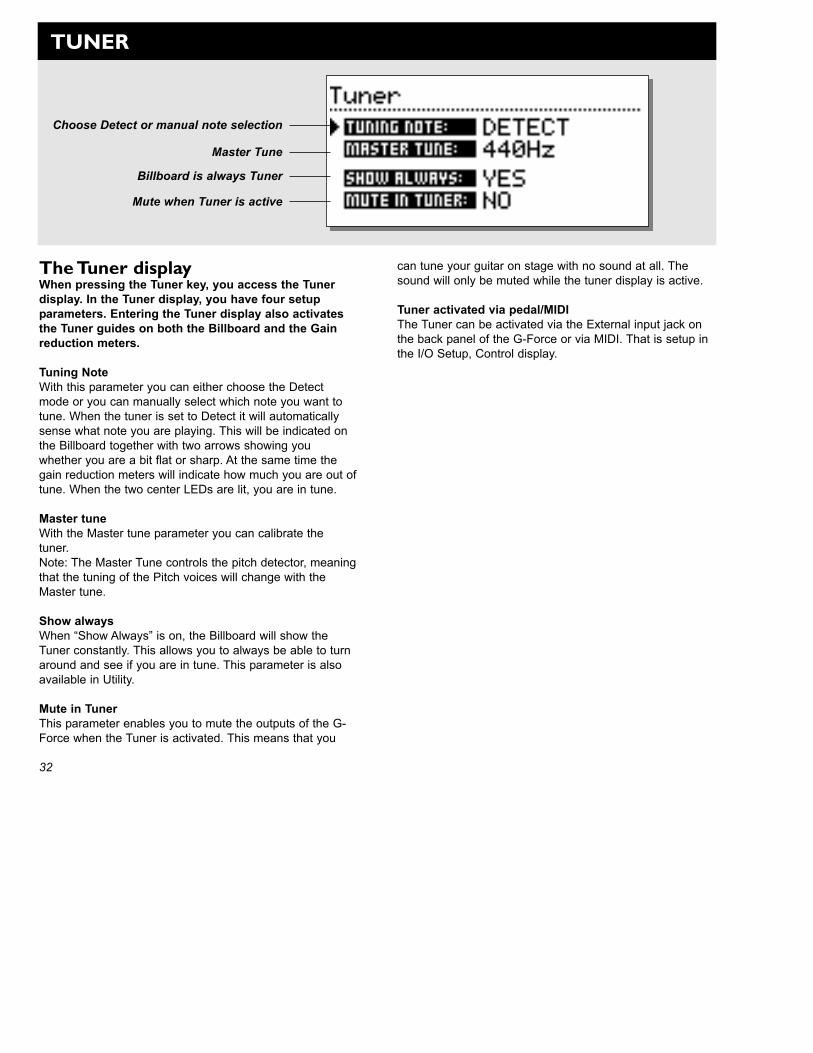
The Tuner displayWhen pressing the Tuner key, you access the Tunerdisplay. In the Tuner display, you have four setupparameters. Entering the Tuner display also activatesthe Tuner guides on both the Billboard and the Gainreduction meters.
Tuning NoteWith this parameter you can either choose the Detectmode or you can manually select which note you want totune. When the tuner is set to Detect it will automaticallysense what note you are playing. This will be indicated onthe Billboard together with two arrows showing youwhether you are a bit flat or sharp. At the same time thegain reduction meters will indicate how much you are out oftune. When the two center LEDs are lit, you are in tune.
Master tuneWith the Master tune parameter you can calibrate thetuner.Note: The Master Tune controls the pitch detector, meaningthat the tuning of the Pitch voices will change with theMaster tune.
Show alwaysWhen “Show Always” is on, the Billboard will show theTuner constantly. This allows you to always be able to turnaround and see if you are in tune. This parameter is alsoavailable in Utility.
Mute in TunerThis parameter enables you to mute the outputs of the G-Force when the Tuner is activated. This means that you
Choose Detect or manual note selection
Master Tune
Mute when Tuner is active
Billboard is always Tuner
32
TUNER
can tune your guitar on stage with no sound at all. Thesound will only be muted while the tuner display is active.
Tuner activated via pedal/MIDI The Tuner can be activated via the External input jack onthe back panel of the G-Force or via MIDI. That is setup inthe I/O Setup, Control display.
AlgorithmsThis chapter will go through all Edit parameters inthe eight blocks and the Input and Output sections.
Mute modeThe eight effect blocks all have a number of differentMute modes. They are located as the last parameter inthe Edit list of each block.The idea is that you can decide how every single blockshould react when you push the current blocks bypasskey on the front panel. Here is the description of whatthe five modes will do when bypassed:
Mix 0%: Will mute the output of effect, and take direct signal level up to 100% dry = 0% effect.
FX Out: Will mute the output of the effect, and preserve direct signal level, according to Mix.
Output : Will mute both the output of the effect and the direct signal.
FX In : Will mute the input of the effect, and preserve the direct signal level. This enables the blockto finish an effect tail after being bypassed, e.g. using this mute mode on a delay will let the delay tail ring out even after beingbypassed or at preset change between two presets with the same settings (only the Delay, Reverb and Pitch has this mute mode).
Input: Will mute both the input of the effect and the direct signal. Same basic function as FX In, only this mode will also mute the direct signal. (only the Delay, Reverb and Pitch havethis mute mode).
Using the Input/Output mute modes will meanthat no signal passes through the current blockwhen bypassed.
33
THE BLOCKS
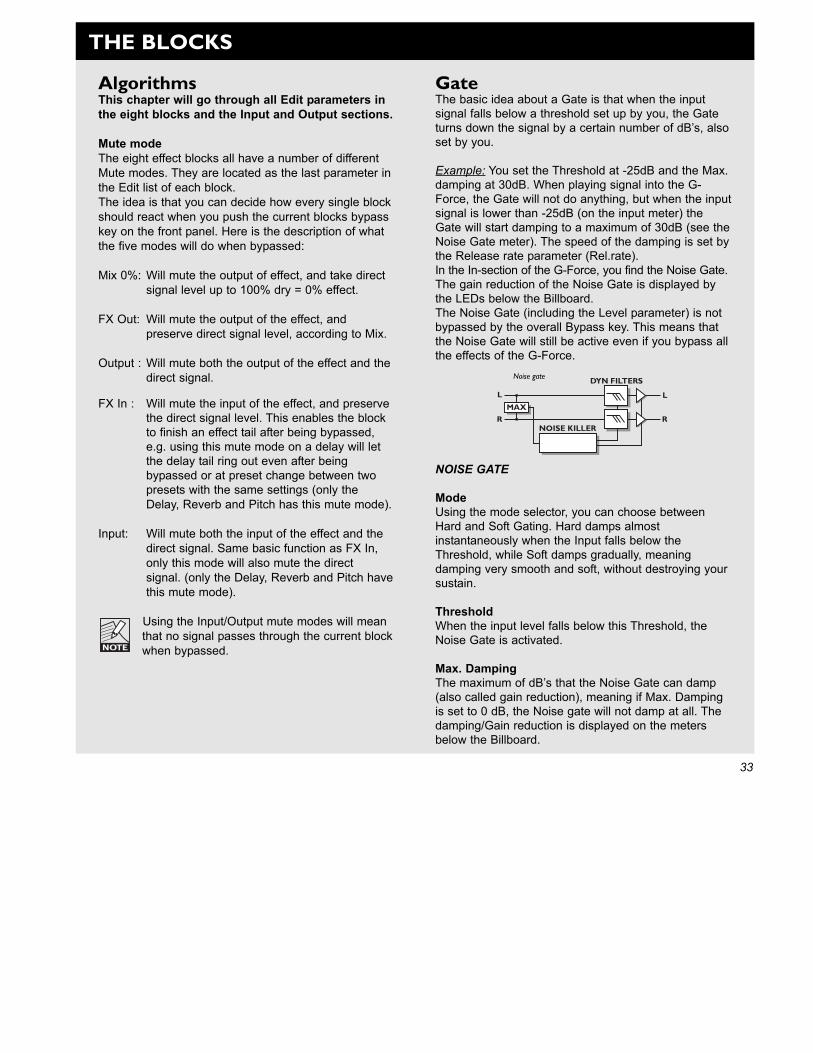
GateThe basic idea about a Gate is that when the inputsignal falls below a threshold set up by you, the Gateturns down the signal by a certain number of dB’s, alsoset by you.
Example: You set the Threshold at -25dB and the Max.damping at 30dB. When playing signal into the G-Force, the Gate will not do anything, but when the inputsignal is lower than -25dB (on the input meter) theGate will start damping to a maximum of 30dB (see theNoise Gate meter). The speed of the damping is set bythe Release rate parameter (Rel.rate). In the In-section of the G-Force, you find the Noise Gate.The gain reduction of the Noise Gate is displayed bythe LEDs below the Billboard.The Noise Gate (including the Level parameter) is notbypassed by the overall Bypass key. This means thatthe Noise Gate will still be active even if you bypass allthe effects of the G-Force.
NOISE GATE
ModeUsing the mode selector, you can choose betweenHard and Soft Gating. Hard damps almostinstantaneously when the Input falls below theThreshold, while Soft damps gradually, meaningdamping very smooth and soft, without destroying yoursustain.
ThresholdWhen the input level falls below this Threshold, theNoise Gate is activated.
Max. DampingThe maximum of dB’s that the Noise Gate can damp(also called gain reduction), meaning if Max. Dampingis set to 0 dB, the Noise gate will not damp at all. Thedamping/Gain reduction is displayed on the metersbelow the Billboard.
Release rateThe Release rate sets the speed that the Noise Gatedamps with, meaning if the parameter is set to 100dBpr. second, the Noise Gate will damp very quickly.
LevelThis level control can be used for controlling the InLevel of the different presets. By setting the Level at -6dB, in all your basic presets, you reserve a little extralevel for your lead presets. The Level parameter is alsofound in the Modifier Matrix, and can therefore becontrolled via pedal or MIDI.
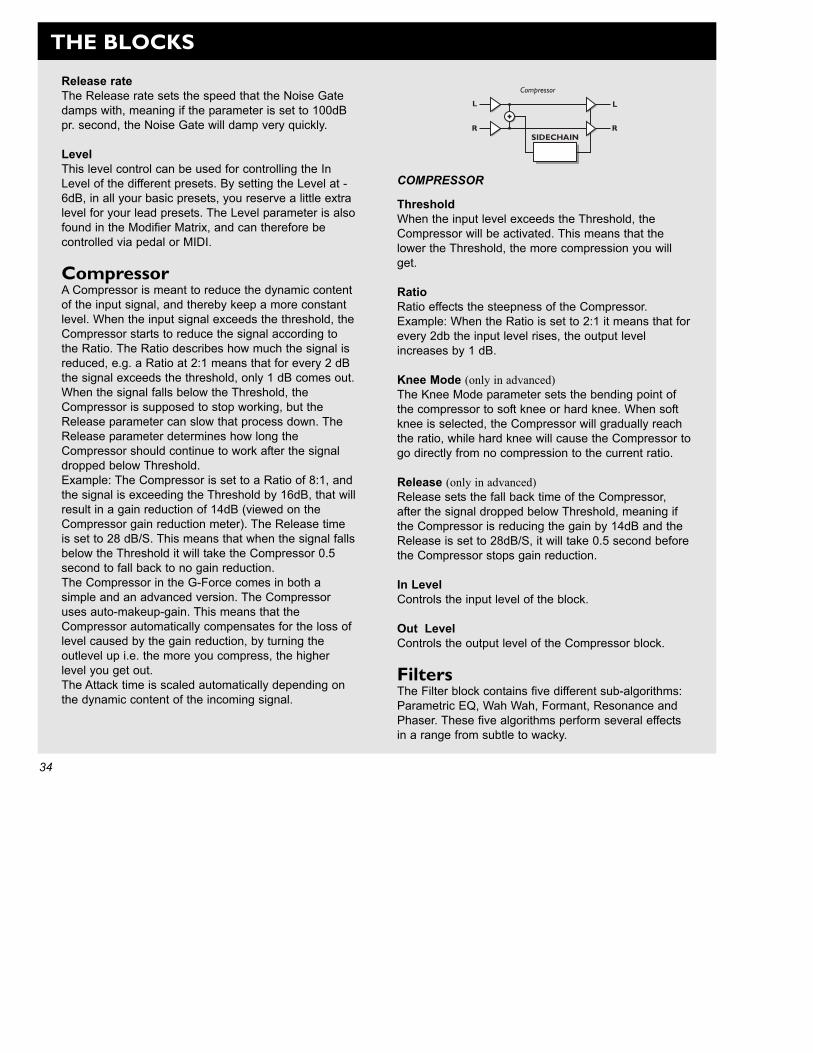
CompressorA Compressor is meant to reduce the dynamic contentof the input signal, and thereby keep a more constantlevel. When the input signal exceeds the threshold, theCompressor starts to reduce the signal according tothe Ratio. The Ratio describes how much the signal isreduced, e.g. a Ratio at 2:1 means that for every 2 dBthe signal exceeds the threshold, only 1 dB comes out.When the signal falls below the Threshold, theCompressor is supposed to stop working, but theRelease parameter can slow that process down. TheRelease parameter determines how long theCompressor should continue to work after the signaldropped below Threshold.Example: The Compressor is set to a Ratio of 8:1, andthe signal is exceeding the Threshold by 16dB, that willresult in a gain reduction of 14dB (viewed on theCompressor gain reduction meter). The Release timeis set to 28 dB/S. This means that when the signal fallsbelow the Threshold it will take the Compressor 0.5second to fall back to no gain reduction.The Compressor in the G-Force comes in both asimple and an advanced version. The Compressoruses auto-makeup-gain. This means that theCompressor automatically compensates for the loss oflevel caused by the gain reduction, by turning theoutlevel up i.e. the more you compress, the higherlevel you get out.The Attack time is scaled automatically depending onthe dynamic content of the incoming signal.
COMPRESSOR
ThresholdWhen the input level exceeds the Threshold, theCompressor will be activated. This means that thelower the Threshold, the more compression you willget.
RatioRatio effects the steepness of the Compressor.Example: When the Ratio is set to 2:1 it means that forevery 2db the input level rises, the output levelincreases by 1 dB.
Knee Mode (only in advanced)The Knee Mode parameter sets the bending point ofthe compressor to soft knee or hard knee. When softknee is selected, the Compressor will gradually reachthe ratio, while hard knee will cause the Compressor togo directly from no compression to the current ratio.
Release (only in advanced)Release sets the fall back time of the Compressor,after the signal dropped below Threshold, meaning ifthe Compressor is reducing the gain by 14dB and theRelease is set to 28dB/S, it will take 0.5 second beforethe Compressor stops gain reduction.
In LevelControls the input level of the block.
Out LevelControls the output level of the Compressor block.
FiltersThe Filter block contains five different sub-algorithms:Parametric EQ, Wah Wah, Formant, Resonance andPhaser. These five algorithms perform several effectsin a range from subtle to wacky.
34
THE BLOCKS

Parametric EqualizerThe parametric EQ contains two shelving filters (#1and #5) and three bell filters (#2, #3, #4).A low shelving filter is a filter that works from a certaintarget frequency and down, meaning everything belowthe target frequency will be adjusted. A high shelvingfilter is equal to low shelving but now all thefrequencies above the target are adjusted.A bell filter is a filter that works around a target. Thismeans that a certain number of the adjacentfrequencies are adjusted. The affected number ofadjacent frequencies is adjusted by the BW(bandwidth) parameter.
PARAMETRIC EQ
FreqUse the freq parameter to set the target frequency ofthe current band.
Slope/BW (bandwidth)Use the Slope parameter to adjust the steepness of the shelving filter. Bandwidth adjusts how broad thebell filters are.
GainUse the gain to boost or cut the target frequency. Allfilters can boost or cut +/-12dB.
In LevelControls the input level of the block.
Out LevelControls the output level of the block.
Mute modeSee Mute mode in the introduction of this chapter.
ResonanceThe Resonance filters are basically a high and low cutfilter that can be swept up and down the frequencyrange. When the Resonance (Q-factor) parameter isincreased, the filter’s peak at the cutoff frequency getsvery narrow and very steep. That is at the very core ofthe characteristic sound of Resonance filters. NOTE: The peak of the filters can get very loud andcan easily hit the internal ceiling and thereby causedistortion. To prevent that, turn down the input level ofthe Filter block.
RESONANCE
OrderThe Order parameter of the resonance filters changesthe steepness of the filters. 2nd order filters are12dB/Octave while 4th order are 24dB/Octave. 4thorder filters will “ring” or resonate more than 2nd orderfilters.
Locut freqSets the frequency of the Locut resonance filter.
Hicut Freq Sets the frequency of the Hicut resonance filter.
Lo ResonanceSets the amount of resonance on the Locut filter.
Hi ResonanceSets the amount of resonance on the Hicut filter.
Try to connect an LFO or an expression pedalto the two frequency parameters using theModifier Matrix.
MixMix between direct sound and effect.
In LevelControls the input level of the block.
35
THE BLOCKS
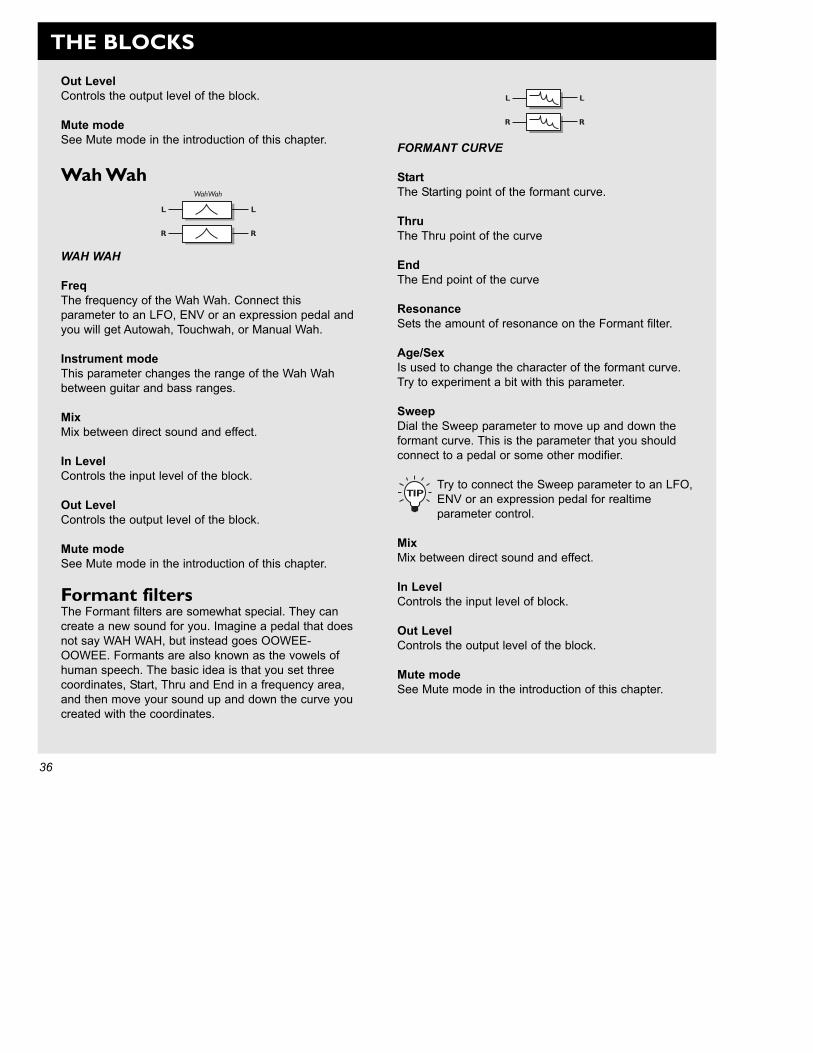
Out LevelControls the output level of the block.
Mute modeSee Mute mode in the introduction of this chapter.
Wah Wah
WAH WAH
FreqThe frequency of the Wah Wah. Connect thisparameter to an LFO, ENV or an expression pedal andyou will get Autowah, Touchwah, or Manual Wah.
Instrument modeThis parameter changes the range of the Wah Wahbetween guitar and bass ranges.
MixMix between direct sound and effect.
In LevelControls the input level of the block.
Out LevelControls the output level of the block.
Mute modeSee Mute mode in the introduction of this chapter.
Formant filtersThe Formant filters are somewhat special. They cancreate a new sound for you. Imagine a pedal that doesnot say WAH WAH, but instead goes OOWEE-OOWEE. Formants are also known as the vowels ofhuman speech. The basic idea is that you set threecoordinates, Start, Thru and End in a frequency area,and then move your sound up and down the curve youcreated with the coordinates.
FORMANT CURVE
StartThe Starting point of the formant curve.
ThruThe Thru point of the curve
EndThe End point of the curve
ResonanceSets the amount of resonance on the Formant filter.
Age/SexIs used to change the character of the formant curve.Try to experiment a bit with this parameter.
SweepDial the Sweep parameter to move up and down theformant curve. This is the parameter that you shouldconnect to a pedal or some other modifier.
Try to connect the Sweep parameter to an LFO,ENV or an expression pedal for realtimeparameter control.
MixMix between direct sound and effect.
In LevelControls the input level of block.
Out LevelControls the output level of the block.
Mute modeSee Mute mode in the introduction of this chapter.
36
THE BLOCKS
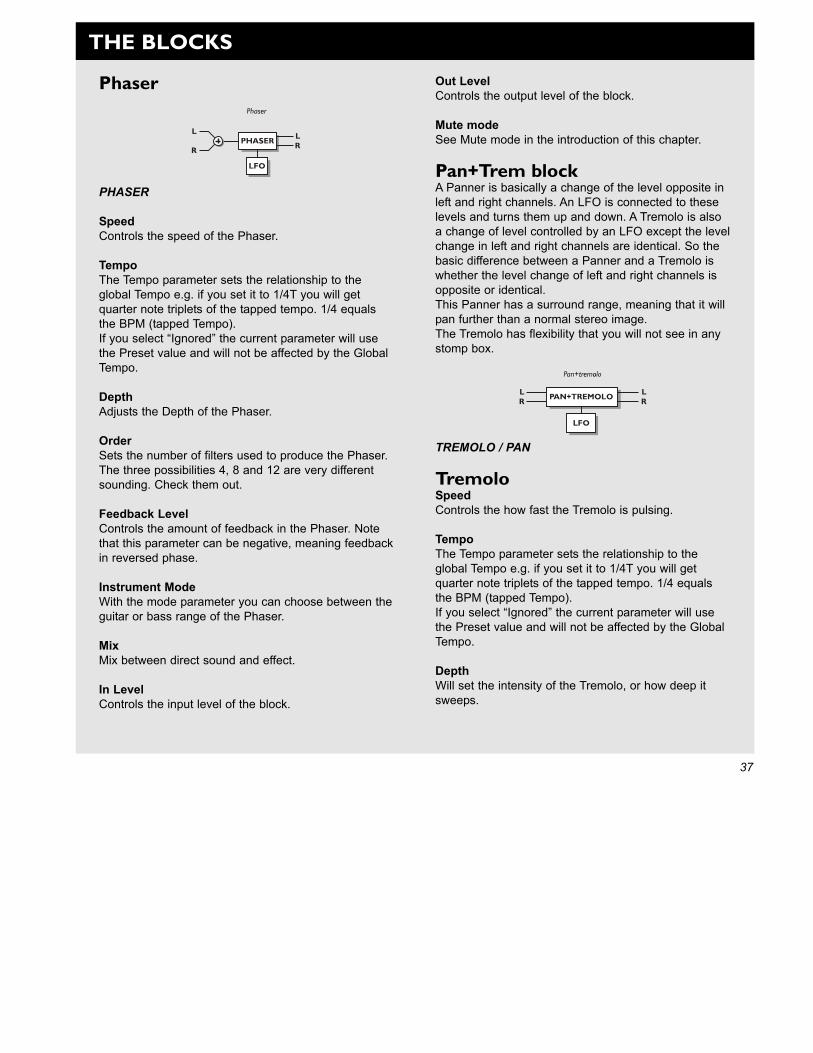
Phaser
PHASER
SpeedControls the speed of the Phaser.
TempoThe Tempo parameter sets the relationship to theglobal Tempo e.g. if you set it to 1/4T you will getquarter note triplets of the tapped tempo. 1/4 equalsthe BPM (tapped Tempo).If you select “Ignored” the current parameter will usethe Preset value and will not be affected by the GlobalTempo.
DepthAdjusts the Depth of the Phaser.
OrderSets the number of filters used to produce the Phaser.The three possibilities 4, 8 and 12 are very differentsounding. Check them out.
Feedback LevelControls the amount of feedback in the Phaser. Notethat this parameter can be negative, meaning feedbackin reversed phase.
Instrument ModeWith the mode parameter you can choose between theguitar or bass range of the Phaser.
MixMix between direct sound and effect.
In LevelControls the input level of the block.
Out LevelControls the output level of the block.
Mute modeSee Mute mode in the introduction of this chapter.
Pan+Trem blockA Panner is basically a change of the level opposite inleft and right channels. An LFO is connected to theselevels and turns them up and down. A Tremolo is alsoa change of level controlled by an LFO except the levelchange in left and right channels are identical. So thebasic difference between a Panner and a Tremolo iswhether the level change of left and right channels isopposite or identical.This Panner has a surround range, meaning that it willpan further than a normal stereo image.The Tremolo has flexibility that you will not see in anystomp box.
TREMOLO / PAN
Tremolo SpeedControls the how fast the Tremolo is pulsing.
TempoThe Tempo parameter sets the relationship to theglobal Tempo e.g. if you set it to 1/4T you will getquarter note triplets of the tapped tempo. 1/4 equalsthe BPM (tapped Tempo).If you select “Ignored” the current parameter will usethe Preset value and will not be affected by the GlobalTempo.
DepthWill set the intensity of the Tremolo, or how deep itsweeps.
37
THE BLOCKS
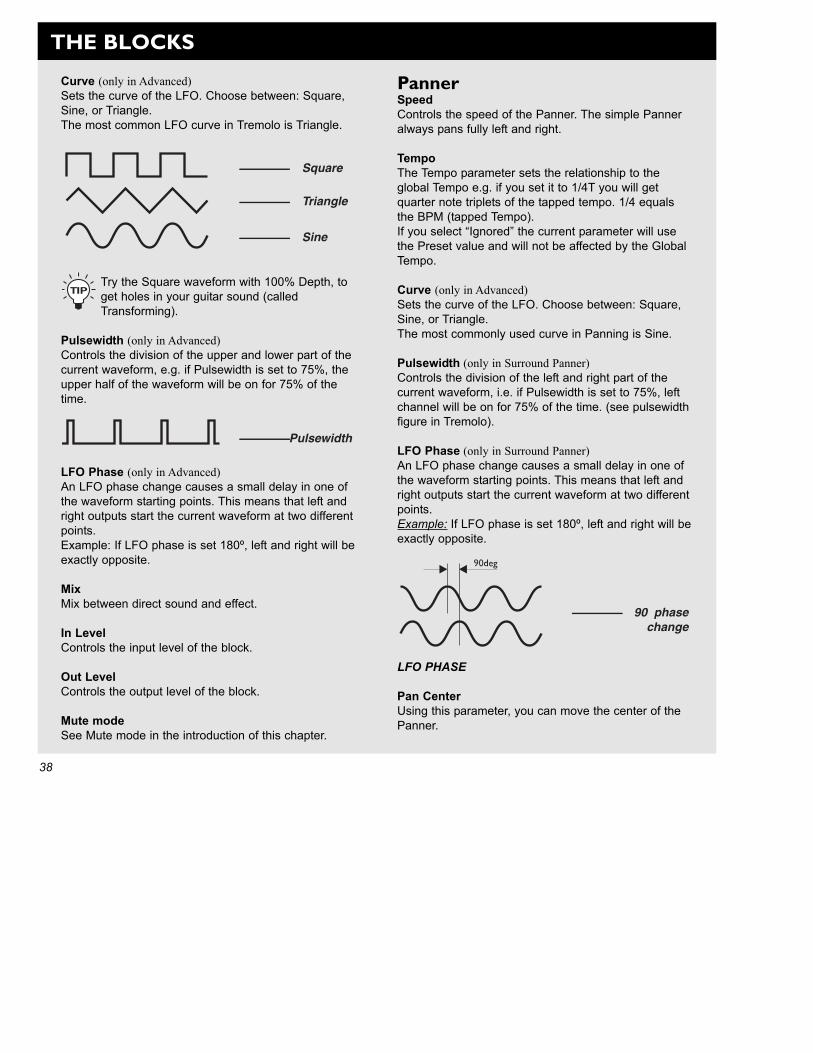
38
Curve (only in Advanced)Sets the curve of the LFO. Choose between: Square,Sine, or Triangle.The most common LFO curve in Tremolo is Triangle.
Try the Square waveform with 100% Depth, toget holes in your guitar sound (calledTransforming).
Pulsewidth (only in Advanced)Controls the division of the upper and lower part of thecurrent waveform, e.g. if Pulsewidth is set to 75%, theupper half of the waveform will be on for 75% of thetime.
LFO Phase (only in Advanced)An LFO phase change causes a small delay in one ofthe waveform starting points. This means that left andright outputs start the current waveform at two differentpoints. Example: If LFO phase is set 180º, left and right will beexactly opposite.
MixMix between direct sound and effect.
In LevelControls the input level of the block.
Out LevelControls the output level of the block.
Mute modeSee Mute mode in the introduction of this chapter.
Pulsewidth
Square
Triangle
Sine
PannerSpeed Controls the speed of the Panner. The simple Panneralways pans fully left and right.
TempoThe Tempo parameter sets the relationship to theglobal Tempo e.g. if you set it to 1/4T you will getquarter note triplets of the tapped tempo. 1/4 equalsthe BPM (tapped Tempo).If you select “Ignored” the current parameter will usethe Preset value and will not be affected by the GlobalTempo.
Curve (only in Advanced)Sets the curve of the LFO. Choose between: Square,Sine, or Triangle.The most commonly used curve in Panning is Sine.
Pulsewidth (only in Surround Panner)Controls the division of the left and right part of thecurrent waveform, i.e. if Pulsewidth is set to 75%, leftchannel will be on for 75% of the time. (see pulsewidthfigure in Tremolo).
LFO Phase (only in Surround Panner)An LFO phase change causes a small delay in one ofthe waveform starting points. This means that left andright outputs start the current waveform at two differentpoints. Example: If LFO phase is set 180º, left and right will beexactly opposite.
LFO PHASE
Pan CenterUsing this parameter, you can move the center of thePanner.
90 phasechange
THE BLOCKS
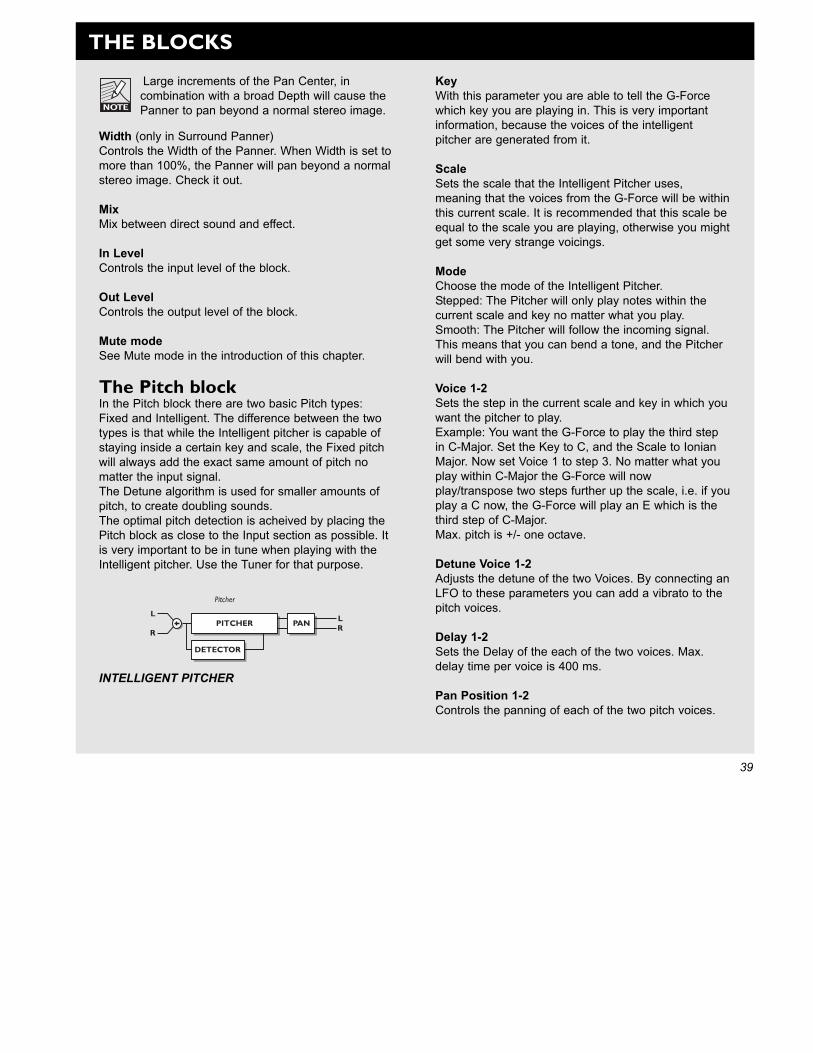
39
THE BLOCKS
Large increments of the Pan Center, incombination with a broad Depth will cause thePanner to pan beyond a normal stereo image.
Width (only in Surround Panner)Controls the Width of the Panner. When Width is set tomore than 100%, the Panner will pan beyond a normalstereo image. Check it out.
MixMix between direct sound and effect.
In LevelControls the input level of the block.
Out LevelControls the output level of the block.
Mute modeSee Mute mode in the introduction of this chapter.
The Pitch blockIn the Pitch block there are two basic Pitch types:Fixed and Intelligent. The difference between the twotypes is that while the Intelligent pitcher is capable ofstaying inside a certain key and scale, the Fixed pitchwill always add the exact same amount of pitch nomatter the input signal. The Detune algorithm is used for smaller amounts ofpitch, to create doubling sounds.The optimal pitch detection is acheived by placing thePitch block as close to the Input section as possible. Itis very important to be in tune when playing with theIntelligent pitcher. Use the Tuner for that purpose.
INTELLIGENT PITCHER
KeyWith this parameter you are able to tell the G-Forcewhich key you are playing in. This is very importantinformation, because the voices of the intelligentpitcher are generated from it.
ScaleSets the scale that the Intelligent Pitcher uses,meaning that the voices from the G-Force will be withinthis current scale. It is recommended that this scale beequal to the scale you are playing, otherwise you mightget some very strange voicings.
ModeChoose the mode of the Intelligent Pitcher.Stepped: The Pitcher will only play notes within thecurrent scale and key no matter what you play. Smooth: The Pitcher will follow the incoming signal.This means that you can bend a tone, and the Pitcherwill bend with you.
Voice 1-2Sets the step in the current scale and key in which youwant the pitcher to play.Example: You want the G-Force to play the third stepin C-Major. Set the Key to C, and the Scale to IonianMajor. Now set Voice 1 to step 3. No matter what youplay within C-Major the G-Force will nowplay/transpose two steps further up the scale, i.e. if youplay a C now, the G-Force will play an E which is thethird step of C-Major.Max. pitch is +/- one octave.
Detune Voice 1-2Adjusts the detune of the two Voices. By connecting anLFO to these parameters you can add a vibrato to thepitch voices.
Delay 1-2Sets the Delay of the each of the two voices. Max.delay time per voice is 400 ms.
Pan Position 1-2Controls the panning of each of the two pitch voices.
THE BLOCKS
40
Level 1-2Sets the level of the two pitch voices.
MixMix between direct sound and effect.
In LevelControls the input level of the block.
Out LevelControls the output level of the Intelligent Pitcher block.
Mute modeSee Mute mode in the introduction of this chapter.
Custom ScaleThe Custom scale enables you to make your ownscale, by specifying the number of notes, the root keyand the specific notes contained in the current scale.
Notes usedUse this parameter to specify the number of noteswithin your Custom scale. A Custom scale must containa minimum of 4 and maximum of 8 notes.
TonicSets the root key of your Custom Scale.
Note 2 - 8Use these parameters to specify the notes you want inyour Custom scale. You can only specify the numbernotes set by the “Notes Used” parameter. The Customscale must be described within an octave.
Fixed 1 & 2 Voice PitchVoice 1-2Sets the amount of pitch on each of the two voices.Maximum pitch is +/- 12 semitones.
Delay 1-2Sets the Delay of the each of the two voices. Maximumdelay time per voice is 400 ms.
Level 1-2Sets the level of the two pitch voices.
Pan Position 1-2Controls the panning of each of the two pitch voices.
Feedback 1-2Sets the amount of Feedback on the two voices. Thiscan create really weird effects since the signal will bepitched over and over meaning that it will rise/fall moreand more over a period of time.
MixMix between direct sound and effect.
In LevelControls the input level of the block.
Out LevelControls the output level of the Pitch block.
Mute modeSee Mute mode in the introduction of this chapter
2 Voice 2 OctaveVoice 1 & Voice 2Sets the amount of pitch on each of the two voices.Maximum pitch is +/- 24 semitones.
Delay - Voice1 & Voice 2Sets the Delay of the each of the two voices. Maximumdelay time per voice is 400 ms.
Pan Position 1-2Controls the panning of each of the two pitch voices.
Feedback 1-2Sets the amount of Feedback on the two voices. Thiscan create really weird effects since the signal will bepitched over and over meaning that it will rise/fall moreand more over a period of time.
MixMix between direct sound and effect.
In LevelControls the input level of the block.
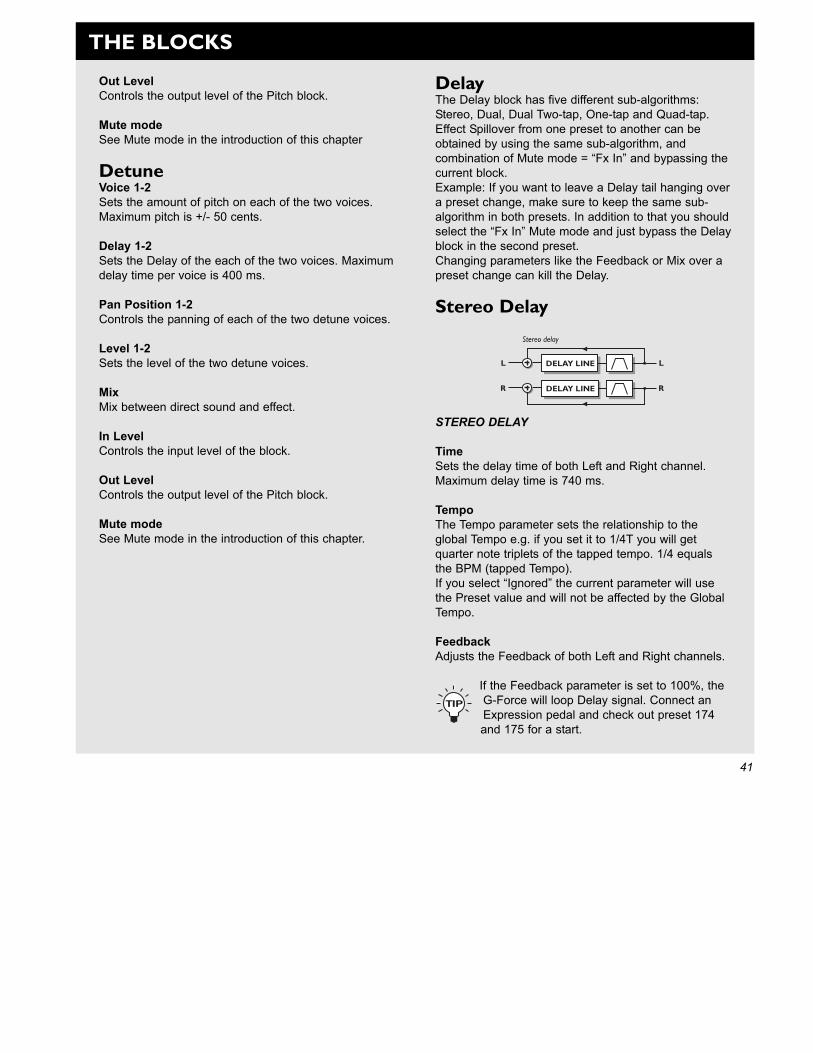
THE BLOCKS
41
DelayThe Delay block has five different sub-algorithms:Stereo, Dual, Dual Two-tap, One-tap and Quad-tap.Effect Spillover from one preset to another can beobtained by using the same sub-algorithm, andcombination of Mute mode = “Fx In” and bypassing thecurrent block. Example: If you want to leave a Delay tail hanging overa preset change, make sure to keep the same sub-algorithm in both presets. In addition to that you shouldselect the “Fx In” Mute mode and just bypass the Delayblock in the second preset.Changing parameters like the Feedback or Mix over apreset change can kill the Delay.
Stereo Delay
STEREO DELAY
TimeSets the delay time of both Left and Right channel.Maximum delay time is 740 ms.
TempoThe Tempo parameter sets the relationship to theglobal Tempo e.g. if you set it to 1/4T you will getquarter note triplets of the tapped tempo. 1/4 equalsthe BPM (tapped Tempo).If you select “Ignored” the current parameter will usethe Preset value and will not be affected by the GlobalTempo.
FeedbackAdjusts the Feedback of both Left and Right channels.
If the Feedback parameter is set to 100%, the G-Force will loop Delay signal. Connect an Expression pedal and check out preset 174and 175 for a start.
Out LevelControls the output level of the Pitch block.
Mute modeSee Mute mode in the introduction of this chapter
DetuneVoice 1-2Sets the amount of pitch on each of the two voices.Maximum pitch is +/- 50 cents.
Delay 1-2Sets the Delay of the each of the two voices. Maximumdelay time per voice is 400 ms.
Pan Position 1-2Controls the panning of each of the two detune voices.
Level 1-2Sets the level of the two detune voices.
MixMix between direct sound and effect.
In LevelControls the input level of the block.
Out LevelControls the output level of the Pitch block.
Mute modeSee Mute mode in the introduction of this chapter.
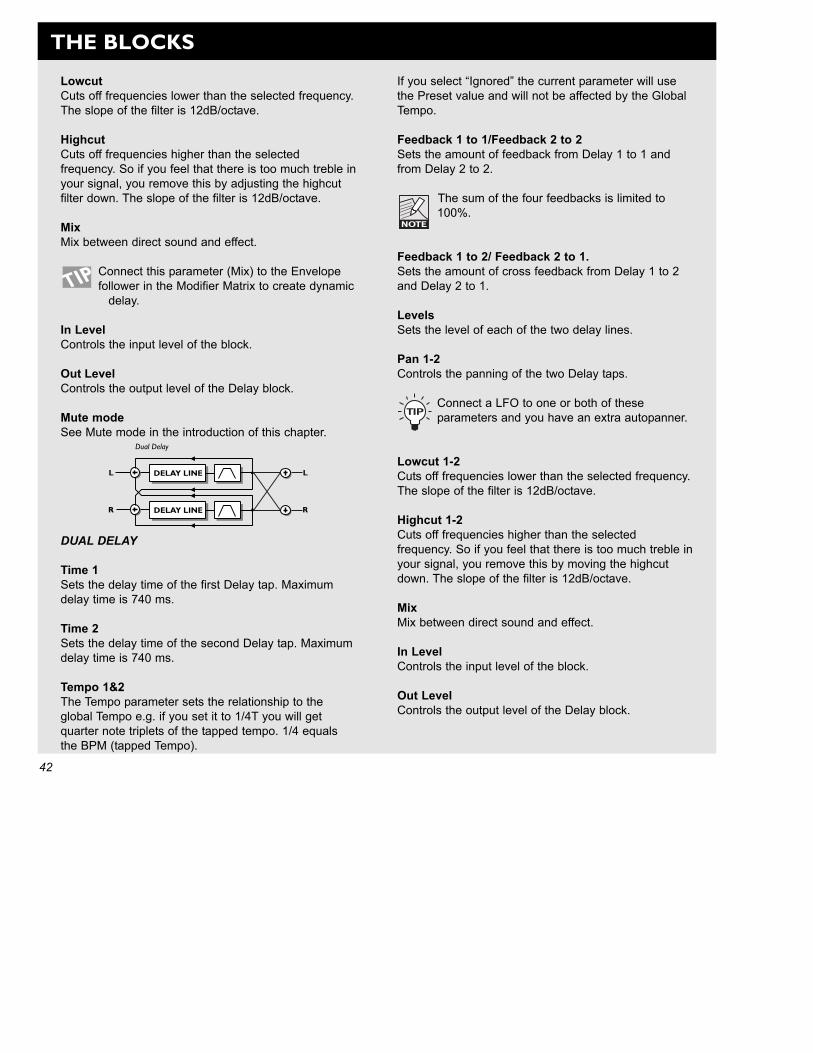
THE BLOCKS
42
LowcutCuts off frequencies lower than the selected frequency.The slope of the filter is 12dB/octave.
HighcutCuts off frequencies higher than the selectedfrequency. So if you feel that there is too much treble inyour signal, you remove this by adjusting the highcutfilter down. The slope of the filter is 12dB/octave.
MixMix between direct sound and effect.
Connect this parameter (Mix) to the Envelope follower in the Modifier Matrix to create dynamic
delay.
In LevelControls the input level of the block.
Out LevelControls the output level of the Delay block.
Mute modeSee Mute mode in the introduction of this chapter.
DUAL DELAY
Time 1Sets the delay time of the first Delay tap. Maximumdelay time is 740 ms.
Time 2Sets the delay time of the second Delay tap. Maximumdelay time is 740 ms.
Tempo 1&2The Tempo parameter sets the relationship to theglobal Tempo e.g. if you set it to 1/4T you will getquarter note triplets of the tapped tempo. 1/4 equalsthe BPM (tapped Tempo).
If you select “Ignored” the current parameter will usethe Preset value and will not be affected by the GlobalTempo.
Feedback 1 to 1/Feedback 2 to 2 Sets the amount of feedback from Delay 1 to 1 andfrom Delay 2 to 2.
The sum of the four feedbacks is limited to100%.
Feedback 1 to 2/ Feedback 2 to 1.Sets the amount of cross feedback from Delay 1 to 2and Delay 2 to 1.
Levels Sets the level of each of the two delay lines.
Pan 1-2Controls the panning of the two Delay taps.
Connect a LFO to one or both of theseparameters and you have an extra autopanner.
Lowcut 1-2Cuts off frequencies lower than the selected frequency.The slope of the filter is 12dB/octave.
Highcut 1-2Cuts off frequencies higher than the selectedfrequency. So if you feel that there is too much treble inyour signal, you remove this by moving the highcutdown. The slope of the filter is 12dB/octave.
MixMix between direct sound and effect.
In LevelControls the input level of the block.
Out LevelControls the output level of the Delay block.
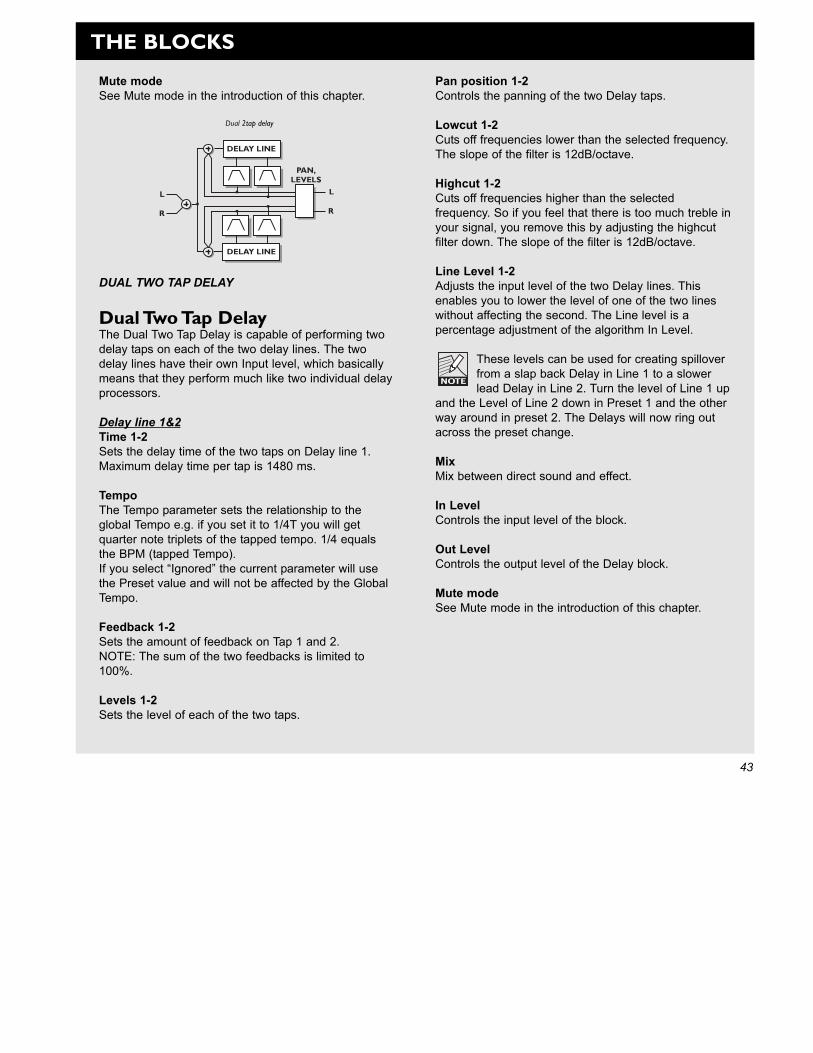
THE BLOCKS
43
Mute modeSee Mute mode in the introduction of this chapter.
DUAL TWO TAP DELAY
Dual Two Tap DelayThe Dual Two Tap Delay is capable of performing twodelay taps on each of the two delay lines. The twodelay lines have their own Input level, which basicallymeans that they perform much like two individual delayprocessors.
Delay line 1&2Time 1-2Sets the delay time of the two taps on Delay line 1.Maximum delay time per tap is 1480 ms.
TempoThe Tempo parameter sets the relationship to theglobal Tempo e.g. if you set it to 1/4T you will getquarter note triplets of the tapped tempo. 1/4 equalsthe BPM (tapped Tempo).If you select “Ignored” the current parameter will usethe Preset value and will not be affected by the GlobalTempo.
Feedback 1-2Sets the amount of feedback on Tap 1 and 2.NOTE: The sum of the two feedbacks is limited to100%.
Levels 1-2Sets the level of each of the two taps.
Pan position 1-2Controls the panning of the two Delay taps.
Lowcut 1-2Cuts off frequencies lower than the selected frequency.The slope of the filter is 12dB/octave.
Highcut 1-2Cuts off frequencies higher than the selectedfrequency. So if you feel that there is too much treble inyour signal, you remove this by adjusting the highcutfilter down. The slope of the filter is 12dB/octave.
Line Level 1-2Adjusts the input level of the two Delay lines. Thisenables you to lower the level of one of the two lineswithout affecting the second. The Line level is apercentage adjustment of the algorithm In Level.
These levels can be used for creating spillover from a slap back Delay in Line 1 to a slowerlead Delay in Line 2. Turn the level of Line 1 up
and the Level of Line 2 down in Preset 1 and the otherway around in preset 2. The Delays will now ring out across the preset change.
MixMix between direct sound and effect.
In LevelControls the input level of the block.
Out LevelControls the output level of the Delay block.
Mute modeSee Mute mode in the introduction of this chapter.
THE BLOCKS
44
One Tap DelayTimeSets the delay time. Maximum delay time is 1480 ms.
Tempo The Tempo parameter sets the relationship to the globalTempo e.g. if you set it to 1/4T you will get quarter notetriplets of the tapped tempo. 1/4 equals the BPM (tappedTempo).If you select “Ignored” the current parameter will use thePreset value and will not be affected by the GlobalTempo.
Feedback Adjusts the amount of Feedback.
Pan position Controls the panning of the Delay.
Lowcut Cuts off frequencies lower than the selected. The slope ofthe filter is 12dB/octave.
HighcutCuts off frequencies higher than the selected frequency.So if you feel that there is too much treble in your signal,you remove this by adjusting the highcut filter down. Theslope of the filter is 12dB/octave.
MixMix between direct sound and effect.
In LevelControls the input level of the block.
Out LevelControls the output level of the Delay block
Mute modeSee Mute mode in the introduction of this chapter.
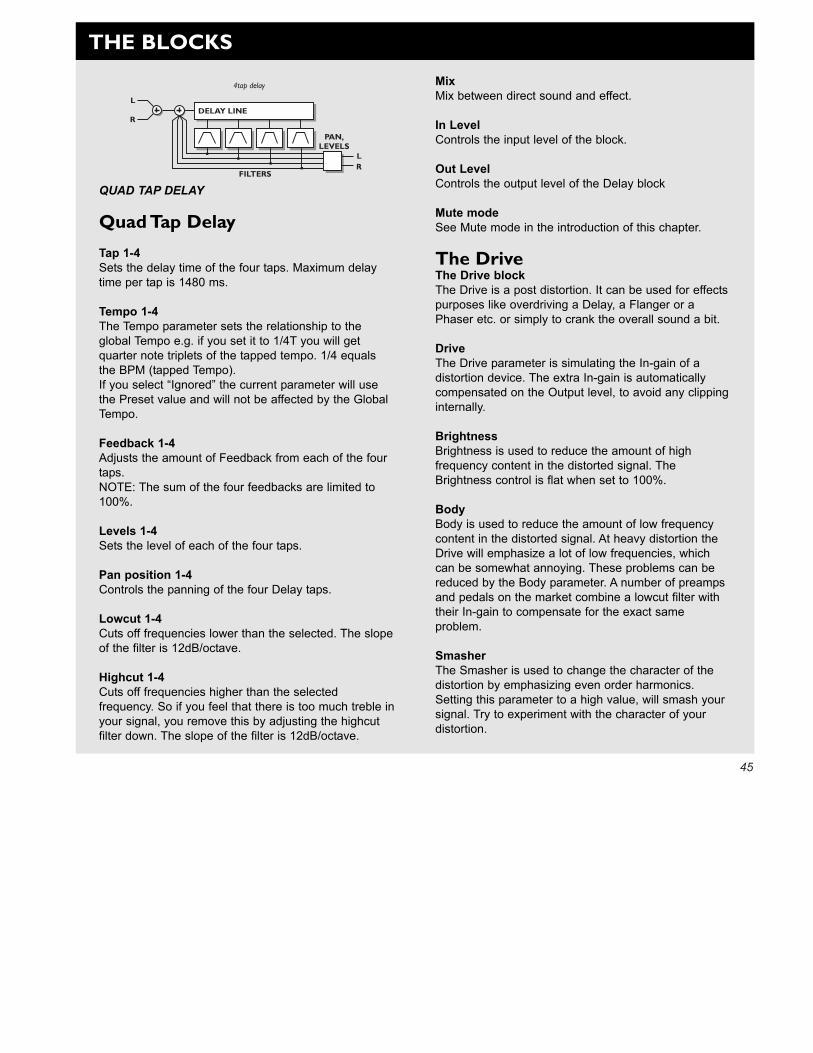
45
THE BLOCKS
QUAD TAP DELAY
Quad Tap Delay
Tap 1-4Sets the delay time of the four taps. Maximum delaytime per tap is 1480 ms.
Tempo 1-4The Tempo parameter sets the relationship to theglobal Tempo e.g. if you set it to 1/4T you will getquarter note triplets of the tapped tempo. 1/4 equalsthe BPM (tapped Tempo).If you select “Ignored” the current parameter will usethe Preset value and will not be affected by the GlobalTempo.
Feedback 1-4Adjusts the amount of Feedback from each of the fourtaps.NOTE: The sum of the four feedbacks are limited to100%.
Levels 1-4Sets the level of each of the four taps.
Pan position 1-4Controls the panning of the four Delay taps.
Lowcut 1-4Cuts off frequencies lower than the selected. The slopeof the filter is 12dB/octave.
Highcut 1-4 Cuts off frequencies higher than the selectedfrequency. So if you feel that there is too much treble inyour signal, you remove this by adjusting the highcutfilter down. The slope of the filter is 12dB/octave.
MixMix between direct sound and effect.
In LevelControls the input level of the block.
Out LevelControls the output level of the Delay block
Mute modeSee Mute mode in the introduction of this chapter.
The DriveThe Drive blockThe Drive is a post distortion. It can be used for effectspurposes like overdriving a Delay, a Flanger or aPhaser etc. or simply to crank the overall sound a bit.
DriveThe Drive parameter is simulating the In-gain of adistortion device. The extra In-gain is automaticallycompensated on the Output level, to avoid any clippinginternally.
Brightness Brightness is used to reduce the amount of highfrequency content in the distorted signal. TheBrightness control is flat when set to 100%.
BodyBody is used to reduce the amount of low frequencycontent in the distorted signal. At heavy distortion theDrive will emphasize a lot of low frequencies, whichcan be somewhat annoying. These problems can bereduced by the Body parameter. A number of preampsand pedals on the market combine a lowcut filter withtheir In-gain to compensate for the exact sameproblem.
SmasherThe Smasher is used to change the character of thedistortion by emphasizing even order harmonics.Setting this parameter to a high value, will smash yoursignal. Try to experiment with the character of yourdistortion.
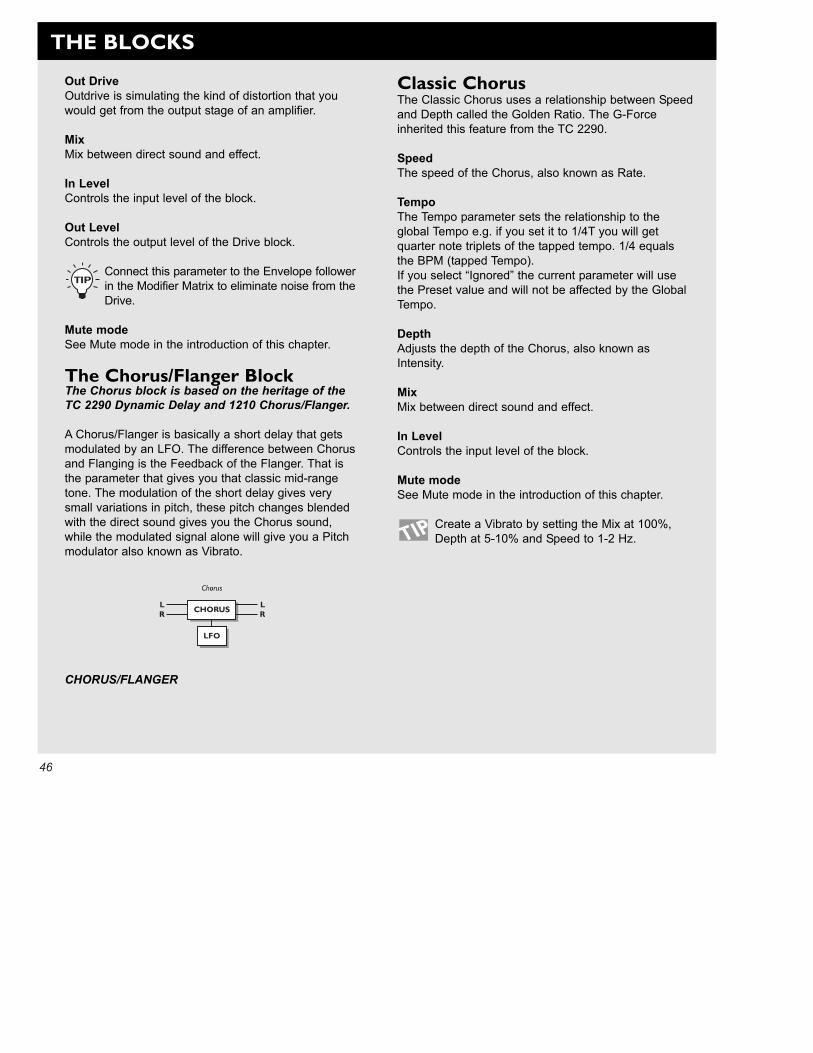
46
THE BLOCKS
Out DriveOutdrive is simulating the kind of distortion that youwould get from the output stage of an amplifier.
MixMix between direct sound and effect.
In LevelControls the input level of the block.
Out LevelControls the output level of the Drive block.
Connect this parameter to the Envelope followerin the Modifier Matrix to eliminate noise from theDrive.
Mute modeSee Mute mode in the introduction of this chapter.
The Chorus/Flanger BlockThe Chorus block is based on the heritage of theTC 2290 Dynamic Delay and 1210 Chorus/Flanger.
A Chorus/Flanger is basically a short delay that getsmodulated by an LFO. The difference between Chorusand Flanging is the Feedback of the Flanger. That isthe parameter that gives you that classic mid-rangetone. The modulation of the short delay gives verysmall variations in pitch, these pitch changes blendedwith the direct sound gives you the Chorus sound,while the modulated signal alone will give you a Pitchmodulator also known as Vibrato.
CHORUS/FLANGER
Classic Chorus The Classic Chorus uses a relationship between Speedand Depth called the Golden Ratio. The G-Forceinherited this feature from the TC 2290.
SpeedThe speed of the Chorus, also known as Rate.
TempoThe Tempo parameter sets the relationship to theglobal Tempo e.g. if you set it to 1/4T you will getquarter note triplets of the tapped tempo. 1/4 equalsthe BPM (tapped Tempo).If you select “Ignored” the current parameter will usethe Preset value and will not be affected by the GlobalTempo.
DepthAdjusts the depth of the Chorus, also known asIntensity.
MixMix between direct sound and effect.
In LevelControls the input level of the block.
Mute modeSee Mute mode in the introduction of this chapter.
Create a Vibrato by setting the Mix at 100%, Depth at 5-10% and Speed to 1-2 Hz.
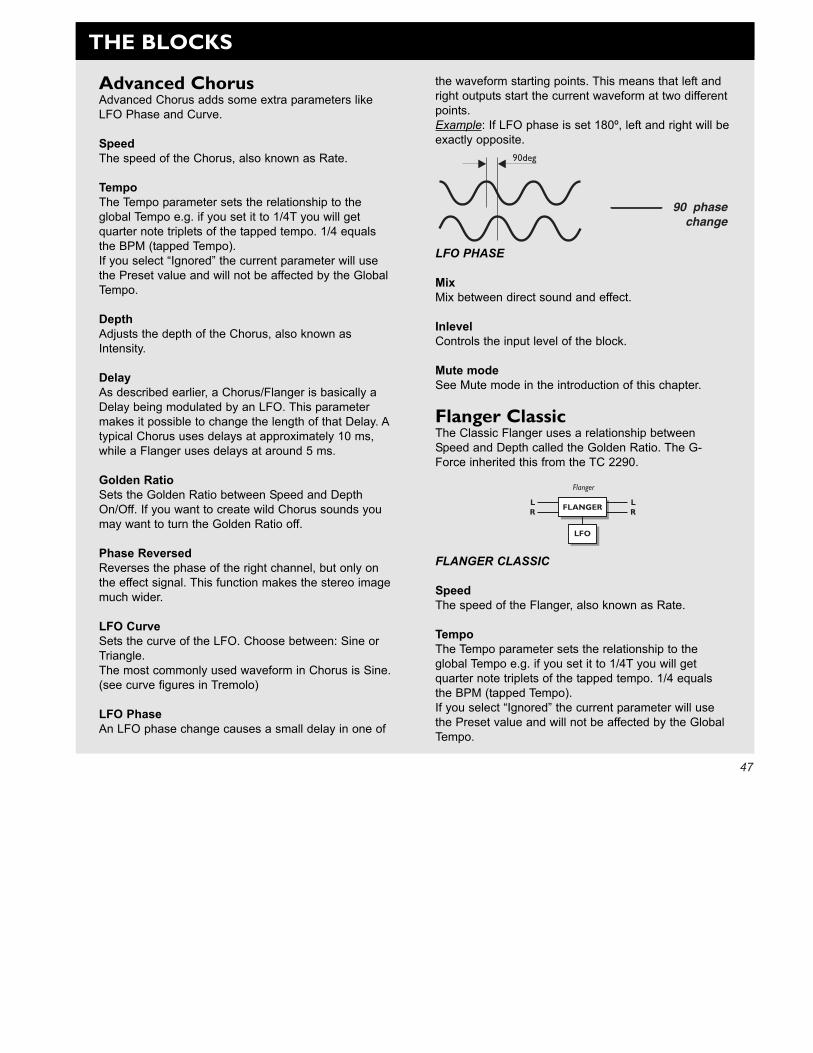
47
THE BLOCKS
the waveform starting points. This means that left andright outputs start the current waveform at two differentpoints. Example: If LFO phase is set 180º, left and right will beexactly opposite.
LFO PHASE
MixMix between direct sound and effect.
InlevelControls the input level of the block.
Mute modeSee Mute mode in the introduction of this chapter.
Flanger ClassicThe Classic Flanger uses a relationship betweenSpeed and Depth called the Golden Ratio. The G-Force inherited this from the TC 2290.
FLANGER CLASSIC
SpeedThe speed of the Flanger, also known as Rate.
TempoThe Tempo parameter sets the relationship to theglobal Tempo e.g. if you set it to 1/4T you will getquarter note triplets of the tapped tempo. 1/4 equalsthe BPM (tapped Tempo).If you select “Ignored” the current parameter will usethe Preset value and will not be affected by the GlobalTempo.
90 phasechange
Advanced ChorusAdvanced Chorus adds some extra parameters likeLFO Phase and Curve.
SpeedThe speed of the Chorus, also known as Rate.
TempoThe Tempo parameter sets the relationship to theglobal Tempo e.g. if you set it to 1/4T you will getquarter note triplets of the tapped tempo. 1/4 equalsthe BPM (tapped Tempo).If you select “Ignored” the current parameter will usethe Preset value and will not be affected by the GlobalTempo.
DepthAdjusts the depth of the Chorus, also known asIntensity.
Delay As described earlier, a Chorus/Flanger is basically aDelay being modulated by an LFO. This parametermakes it possible to change the length of that Delay. Atypical Chorus uses delays at approximately 10 ms,while a Flanger uses delays at around 5 ms.
Golden RatioSets the Golden Ratio between Speed and DepthOn/Off. If you want to create wild Chorus sounds youmay want to turn the Golden Ratio off.
Phase ReversedReverses the phase of the right channel, but only onthe effect signal. This function makes the stereo imagemuch wider.
LFO CurveSets the curve of the LFO. Choose between: Sine orTriangle.The most commonly used waveform in Chorus is Sine.(see curve figures in Tremolo)
LFO Phase An LFO phase change causes a small delay in one of

48
THE BLOCKS
DepthAdjusts the depth of the Flanger, also known asIntensity.
FeedbackControls the amount of feedback in the Flanger.Note that this parameter can be negative, i.e. feedbackin reversed phase.
MixMix between direct sound and effect.
In LevelControls the input level of the block.
Mute modeSee Mute mode in the introduction of this chapter.
Advanced FlangerAdvanced Flanger adds some of extra possibilities likeCross Feedback, LFO phase and Curve.
SpeedThe speed of the Flanger, also known as Rate.
TempoThe Tempo parameter sets the relationship to theglobal Tempo e.g. if you set it to 1/4T you will getquarter note triplets of the tapped tempo. 1/4 equalsthe BPM (tapped Tempo).If you select “Ignored” the current parameter will usethe Preset value and will not be affected by the GlobalTempo.
DepthAdjust the depth of the Flanger, also known asIntensity.
Delay As described earlier, a Chorus/Flanger is basically aDelay being modulated by an LFO. This parametermakes it possible to change the length of that Delay. Atypical Chorus uses delays at approximately 10 ms,while a Flanger is uses delays at around 5 ms.
FeedbackControls the amount of feedback in the Flanger.Note that this parameter can be negative, i.e. feedbackin reversed phase.
Golden RatioSets the Golden Ratio between Speed and DepthOn/Off. If you want to create wild Flanger sounds,you may want to turn the Golden Ratio off.
Phase ReversedReverses the phase of the right channel, but only onthe effect signal. This function makes the stereo imagemuch wider.
Cross FeedbackControls the amount of feedback between the twochannels. Note that the Crossfeed can be negative, i.e.Crossfeed in reversed phase.LFO CurveSets the curve of the LFO. Choose between: Sine orTriangle.The most commonly used waveform in Flanging isSine. (see curve figures in Tremolo)
LFO Phase An LFO phase change causes a small delay in one ofthe waveform starting points. This means that left andright outputs start the current waveform at two differentpoints.Example: If LFO is set 180º, left and right will beexactly opposite.(See the LFO phase figure in the Chorus section).
MixMix between direct sound and effect.
In LevelControls the input level of the block.
Mute modeSee Mute mode in the introduction of this chapter.
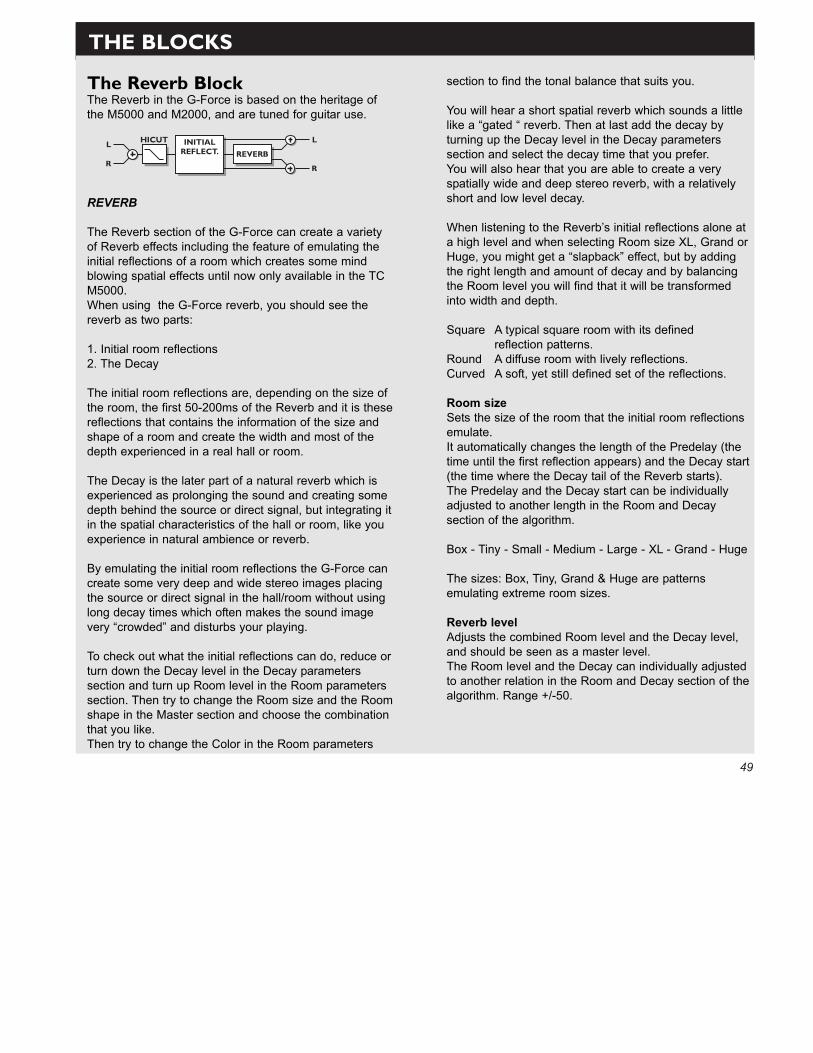
49
THE BLOCKS
The Reverb BlockThe Reverb in the G-Force is based on the heritage ofthe M5000 and M2000, and are tuned for guitar use.
REVERB
The Reverb section of the G-Force can create a varietyof Reverb effects including the feature of emulating theinitial reflections of a room which creates some mindblowing spatial effects until now only available in the TCM5000.When using the G-Force reverb, you should see thereverb as two parts:
1. Initial room reflections2. The Decay
The initial room reflections are, depending on the size ofthe room, the first 50-200ms of the Reverb and it is thesereflections that contains the information of the size andshape of a room and create the width and most of thedepth experienced in a real hall or room.
The Decay is the later part of a natural reverb which isexperienced as prolonging the sound and creating somedepth behind the source or direct signal, but integrating itin the spatial characteristics of the hall or room, like youexperience in natural ambience or reverb.
By emulating the initial room reflections the G-Force cancreate some very deep and wide stereo images placingthe source or direct signal in the hall/room without usinglong decay times which often makes the sound imagevery “crowded” and disturbs your playing.
To check out what the initial reflections can do, reduce orturn down the Decay level in the Decay parameterssection and turn up Room level in the Room parameterssection. Then try to change the Room size and the Roomshape in the Master section and choose the combinationthat you like. Then try to change the Color in the Room parameters
section to find the tonal balance that suits you.
You will hear a short spatial reverb which sounds a littlelike a “gated “ reverb. Then at last add the decay byturning up the Decay level in the Decay parameterssection and select the decay time that you prefer.You will also hear that you are able to create a veryspatially wide and deep stereo reverb, with a relativelyshort and low level decay.
When listening to the Reverb’s initial reflections alone ata high level and when selecting Room size XL, Grand orHuge, you might get a “slapback” effect, but by addingthe right length and amount of decay and by balancingthe Room level you will find that it will be transformedinto width and depth.
Square A typical square room with its defined reflection patterns.
Round A diffuse room with lively reflections.Curved A soft, yet still defined set of the reflections.
Room sizeSets the size of the room that the initial room reflectionsemulate.It automatically changes the length of the Predelay (thetime until the first reflection appears) and the Decay start(the time where the Decay tail of the Reverb starts).The Predelay and the Decay start can be individuallyadjusted to another length in the Room and Decaysection of the algorithm.
Box - Tiny - Small - Medium - Large - XL - Grand - Huge
The sizes: Box, Tiny, Grand & Huge are patternsemulating extreme room sizes.
Reverb levelAdjusts the combined Room level and the Decay level,and should be seen as a master level.The Room level and the Decay can individually adjustedto another relation in the Room and Decay section of thealgorithm. Range +/-50.
50
THE BLOCKS
High colorSets the treble color of the decay. When Color in theRoom section of the algorithm is set to Auto, it alsocontrols the treble factor of the initial room reflections.Wool - Warm - Real - Clear - Bright - Crisp - Glass
High factorEmphasizes or reduces the character set by the Highcolor. Range +/-25.
Low colorSets the Bass color of the Decay.Thick - Fat - Round - Natural - Light - Tight - Thin - Nobass.
Low factor Emphasizes or reduces the character set by the Lowcolor. Range +/-25.
Room parametersAdjusts the level of the initial room reflections, which ismaster controlled by the Reverb level.With this control you can emphasize or reduce the initialroom reflection’s influence on the Reverb sound. Range +/-50.
ColorSets the tonal color of the initial reflections.When set to Auto it is linked to High colorAuto - Wool - Warm - Real - Clear - Bright - Crisp -Glass.
Color factorEmphasizes or reduces the character set by Color.Range +/-50.
PredelayAllows adjustment of the predelay (the time until the firstreflection appears) which is automatically set whenchoosing the Room size. Range +/-50.
Decay levelAdjusts the level of the decay, which is master controlledby the reverb level.With this control you can emphasize or reduce the decaytail’s influence on the Reverb sound. Range +/-50.
DiffuseAllows fine tuning of the density of the decay tails. Is setautomatically when choosing the desired Decay time.Makes it possible to reduce flutter in the decay to anabsolute minimum. Range +/-25.
Decay startAllows adjustment of the decay start (the time where theDecay tail of the Reverb starts), which is setautomatically when choosing the Room size. Range +/-50.
MixThis parameter sets the mix relation between the dry(direct) and the wet signal. If you are using G-Force asan insert effect this means that your direct signal goesthrough the G-Force.
In LevelControls the input level of the block.
Out LevelControls the output level of the Reverb block.
Mute modeSee Mute mode in the introduction of this chapter.
51
THE BLOCKS
Simple ReverbThe Simple Reverb is based on the same algorithm asthe Advanced, but the number of parameters arereduced to 5. This makes it possible for you to set up theReverb easily and quickly
TypeSets the type of the Reverb, meaning the size andrelationship between Predelay, Early reflections andDecay automatically. (See Advanced Reverb for furtherexplanation).Types: Room, Club, Hall, Church, Cathedral, Grand Hall,Fast Decay, Slow Decay, Plate, Spring.
Decay timeSets the length of the reverb decay from0.01 - 20.0 seconds
PredelayAllows adjustment of the predelay (the time until the firstreflection appears) which is automatically set whenchoosing Type. Range +/-50.
Reverb levelAdjusts the combined Room level and the Decay level,and should be seen as a master level.The Room level and the Decay can be individuallyadjusted to another relation in the Room and Decaysection of the algorithm. Range +/-50
ColorSets the tonal color of the initial reflections.When set to Auto it is linked to High colorWool - Warm - Real - Clear - Bright - Crisp - Glass -Extreme.
MixThis parameter sets the mix relation between the dry(direct) and the wet signal. If you are using G-Force asan insert effect this means that your direct signal goesthrough the G-Force.
In LevelControls the input level of the block.
Out LevelControls the output level of the Reverb block.
Mute modeSee Mute mode in the introduction of this chapter.
OutputThe Output section contains a master output level controland a set of Speaker Filters. All parameters in the OutSection are global only, which means that they are notincluded when you store a preset.
LevelIn the Output block, you will find an overall outlevel inaddition to the potentiometer on the front panel. ThisOutlevel can be controlled via MIDI or pedal, set up inthe I/O Setup, Control display via the Main Volumeparameter.The Outlevel is not included in the preset.
Speaker FiltersThe Speaker Filters are meant to roll off some high andlow frequencies like a guitar cabinet would do. This willmake it possible to rehearse with the G-Force on yourhome stereo using a preamp or pedal and a pair ofheadphones.
FiltersSets the Speaker Filter On/Off.
LocutThe Locut filter cutoff frequency can be either 40 or80Hz.
HicutThe Hicut cutoff frequency can be 2,5kHz, 3kHz, 3,5kHz,4kHz, 4,5kHz or 5kHz.

52
How to enter the Reset pageHold the Overall Bypass key pressed during power-up.Move the marker using teh Parameter wheel and pressEnter to select the RESET type you desire.
Load User DefaultsThis will reset all system parameters back to a defaultsetup made by you (See Store User Def). This reset willNOT delete the User presets of the G-Force.
Store User DefaultsWhen you have the perfect setup of your G-Force, you canstore this as your own default setup. This function is veryuseful for example when you have finished a specialproduction and want to go back to normal. When you havethe perfect setup of your G-Force, simply select thisparameter and press Enter to store your default settings.
Set User InfoThis function makes it possible to store your name andphone number into the G-Force. Press Enter to access theUser data menu. Use the Value wheel and the Parameterwheel to write your name and phone number into the G-Force. Press Enter to accept. Your name and phonenumber will be displayed during power-up.
Reset System SetupThis will reset all system parameters back to the factorydefault. This reset will NOT delete the User presets of theG-Force.
Clear all PresetsThis will delete all User presets.
Run Test ProgramSee description on page 53
Store and load your owndefault settingsEnter User Data pageReset system parametersClear all user presetsTest Programs
Type your name here
and your phone number
THE RESET PAGE

53
Analog InputsConnectors: 1/4" phone jack, unbalanced (Ring: grounded)Impedance: 1 MOhm Max. Input Level: +21 dBuSensitivity: @ 15 dB headroom: -26 dBu to +6 dBuA to D Conversion: 24 bit (1 bit, 128 times oversampling)A to D Delay: 0,9 ms @ 44.1 kHzDynamic Range: >105 dBTHD: 0.003% @ 1 kHz, 6 dB below full scale Frequency Response: +0/-0.5 dB (20 Hz - 20 kHz)Crosstalk: <-60 dB (20 Hz - 20 kHz)
Analog OutputsConnectors: 1/4" phone jack, balancedImpedance: 100 Ohm (active transformer)Max. Output Level: +22 dBuFull Scale Output Range: -10 dBu to +22 dBuD to A Conversion: 24 bit (1 bit, 128 times oversampling)D to A Delay: 0.6 ms @ 44.1 kHzDynamic Range: >100 dBTHD: 0.005% @ 1 kHz, 6 dB below full scaleFrequency Response: +0/-0.5 dB (20 Hz - 20 kHz)Crosstalk: <-60 dB (20 Hz - 20 kHz)
Digital Inputs and OutputsS/PDIF In/Out: Coaxial, RCA TypeFormats: EIAJ CP-340, IEC 958, S/PDIF (24 bit)Sample Rate: 44.1 kHz
PCMCIA InterfaceConnector: PCMCIA Type 1 cardsStandards: PCMCIA 2.0, JEIDA 4.0Card Format: Supports up to 2 MB SRAM
Control InterfaceMIDI: In/Out/Thru: 5 Pin DINExternal control: 1/4" phone jack
GeneralFinish: Anodized aluminum face. Plated and painted steel chassisLED: 3 LED meters, 5 x 14 dot LED-matrixLCD: 56 x 128 dot graphic LCD-displayDimensions: 19" x 1.75" x 8.2" (483 x 44 x 208 mm)Weight: 5.0 lb. (2.25 kg)Mains Voltage: 100 to 240 VAC, 50 to 60 Hz (auto-select)Power Consumption: <20 WBackup Battery Life: >10 years
EMCComplies with: EN 55103-1, EN 55103-2 and
Class B limits of FCC rules, part 15
SafetyCertified to: EN 60065, UL 1419
EnvironmentOperating Temperature: 32 °F to 122 °F (0 °C to 50 °C)Storage Temperature: -22 °F to 167 °F (-30 °C to 70 °C)Humidity: Max. 90% non-condensing
NOTE: Due to continuous development and standardization all specifications are subject to change without notice
TECHNICAL SPECIFICATIONS
54
TROUBLESHOOTING
You are not getting any sound through the G-Force when you bypass it.- You selected Killdry ON, in the I/O Setup, Audio menu.
You press Power switch, but there is no reaction.- The power switch on the rear panel is switched off.
You can not turn the power off.- Press and hold the Power switch for 3 seconds, then release to power off
No sound through the G-Force.- You are using Analog input, but the input selector in I/O Setup, Audio menu is set to Digital.
The sound is phasing with your direct signal.- You are running the G-Force in a parallel setup, but the killdry function in I/O Setup, Audio menu is set to Off.
Right input meter is not showing any signal.- You selected L-Only in the I/O Setup, Audio menu.
Effects only in the Left Output- You are only using Left input, but the Input selector in I/O Setup is set to Stereo.
Your Expression pedal does not work properly- Be sure the G-Force is set to the correct pedal type and the pedal is calibrated correctly in the Utility menu.
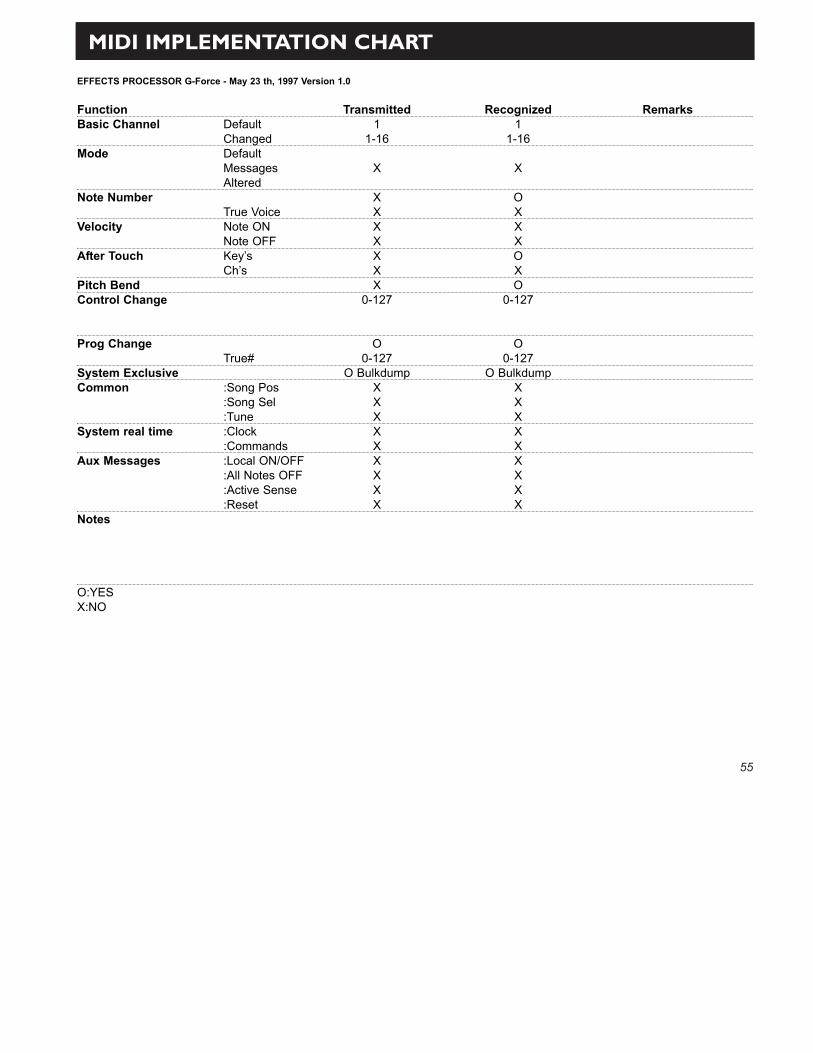
55
MIDI IMPLEMENTATION CHART
EFFECTS PROCESSOR G-Force - May 23 th, 1997 Version 1.0
Function Transmitted Recognized RemarksBasic Channel Default 1 1
Changed 1-16 1-16Mode Default
Messages X XAltered
Note Number X OTrue Voice X X
Velocity Note ON X XNote OFF X X
After Touch Key’s X OCh’s X X
Pitch Bend X OControl Change 0-127 0-127
Prog Change O OTrue# 0-127 0-127
System Exclusive O Bulkdump O BulkdumpCommon :Song Pos X X
:Song Sel X X:Tune X X
System real time :Clock X X:Commands X X
Aux Messages :Local ON/OFF X X:All Notes OFF X X:Active Sense X X:Reset X X
Notes
O:YESX:NO
56
SELF TEST
PRESS THE BYPASS KEY, WHILE POWERING UP, TOACCESS THE SELF-TEST AND SELECT »RUN TESTPROGRAM«Turn the Value Wheel to scroll through Self tests
Key testSelect Key test by pressing Enter.The keys must be pressed in the order they are requestedby the G-Force to pass the test.Press Exit to leave Key test.
In/Out knobs testSelect In/Out knobs test by pressing Enter. Turn the In/Out knobs to 30 and back to 0 to pass test. Press Exit to leave In/Out test.
Parameter + Value Wheel testSelect test by pressing Enter.Turn the Value and Parameter wheel to 30 and back to 0 to pass test. Press Exit to leave Adjust Wheel test.
LED testSelect LEDs test by pressing Enter.Turn Adjust Wheel to test the LEDs. The test is “ok” whennone Leds are lit.Press Exit to leave Led test.
Display testSelect Display test by pressing Enter.Press Enter to check that all pixels are lit. Press any key toleave the pixel test.Press Exit to leave Display test.
Analog I/O testSelect Analog I/O test by pressing Enter.Connect an Analog Output to the Analog Input, which hasto be tested and press Enter.PPM must show -12 dB to pass test.Press Exit to leave Analog I/O test.
Digital I/O testSelect Digital I/O test by pressing Enter.Connect a Digital Output to the Digital Input, which has tobe tested and press Enter.The AES/EBU output can also be connected to the S/PDIFinput and vice versa.
PPM must show 0 dB to pass test.Press Exit to leave Digital I/O test.
MIDI I/O testSelect Midi I/O test by pressing Enter.Connect Midi Out to Midi In.Prg change 1-128 is send out on Midi Thru. Connect thissocket to a Midi compatible device and confirm the Prg.changes.Press Exit to leave Midi I/O test.
Pedal socket testSelect Pedal test by pressing Enter.Connect a momentary pedal to the Pedal socket.When pressing the Pedal, the Result should be OK.When released, the Result should be Not OK.Press Exit to leave Pedal test.NOTE: Result of test must be OK if no jack is inserted.
PCMCIA testSelect PCMCIA test by pressing Enter.Insert PCMCIA card. Note that all Data on PCMCIA cardwill be destroyed.Press Enter to test.Result reads:Low battery - Time to change battery in your PCMCIAcard.Not OK - Try the test using another PCMCIA card.Press Exit to leave PCMCIA test.
Battery testSelect Battery test by pressing Enter.Confirm that Result is OK.Press Exit to leave Battery test.
System testSelect System test by pressing Enter.Confirm that Result is OK.Result reads:Eeprom Not OK - The unit will most likely work OK, themessage is for service matters only.DSP Not OK - Contact your local dealer.Press Exit to leave System test.
Power Off - On to start standard software.Build in test v.2.07
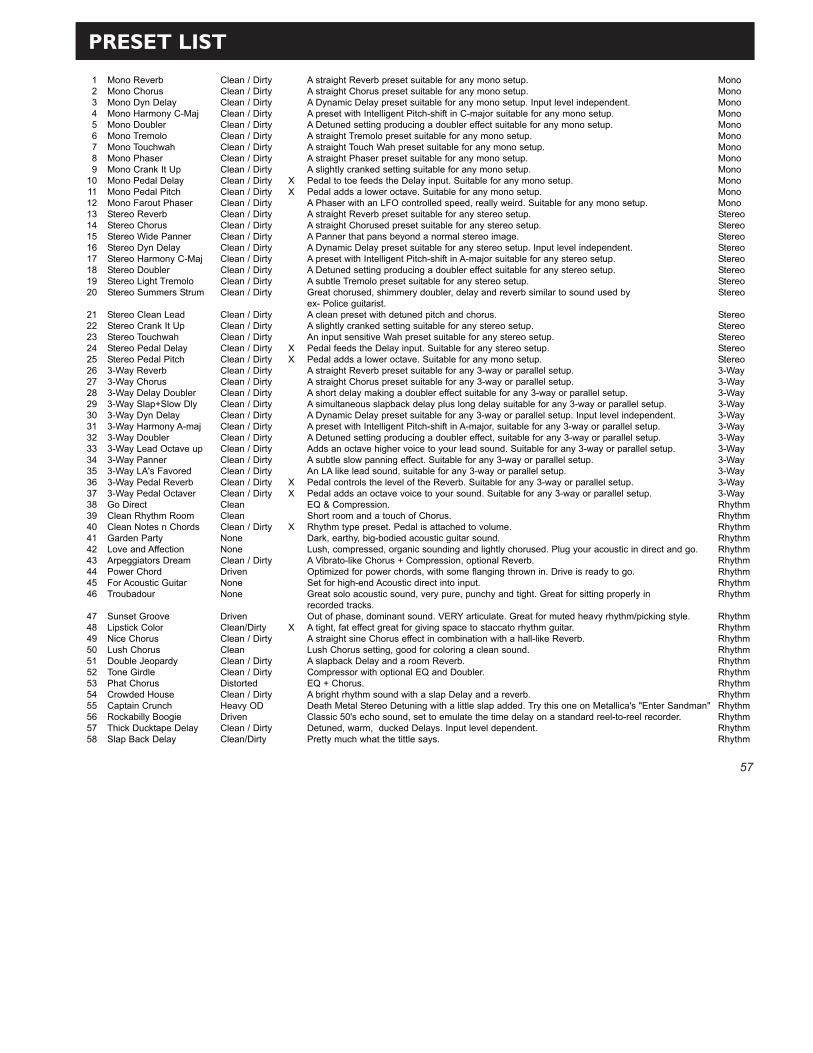
57
PRESET LIST
123456789
1011121314151617181920
2122232425262728293031323334353637383940414243444546
474849505152535455565758
Mono ReverbMono ChorusMono Dyn DelayMono Harmony C-MajMono DoublerMono TremoloMono TouchwahMono PhaserMono Crank It UpMono Pedal DelayMono Pedal PitchMono Farout PhaserStereo ReverbStereo ChorusStereo Wide PannerStereo Dyn DelayStereo Harmony C-MajStereo DoublerStereo Light TremoloStereo Summers Strum
Stereo Clean LeadStereo Crank It UpStereo TouchwahStereo Pedal DelayStereo Pedal Pitch3-Way Reverb3-Way Chorus3-Way Delay Doubler3-Way Slap+Slow Dly3-Way Dyn Delay3-Way Harmony A-maj3-Way Doubler3-Way Lead Octave up3-Way Panner3-Way LA's Favored3-Way Pedal Reverb3-Way Pedal OctaverGo DirectClean Rhythm RoomClean Notes n ChordsGarden PartyLove and AffectionArpeggiators DreamPower ChordFor Acoustic GuitarTroubadour
Sunset GrooveLipstick ColorNice ChorusLush ChorusDouble JeopardyTone GirdlePhat ChorusCrowded HouseCaptain CrunchRockabilly BoogieThick Ducktape DelaySlap Back Delay
Clean / DirtyClean / DirtyClean / DirtyClean / DirtyClean / DirtyClean / DirtyClean / DirtyClean / DirtyClean / DirtyClean / DirtyClean / DirtyClean / DirtyClean / DirtyClean / DirtyClean / DirtyClean / DirtyClean / DirtyClean / DirtyClean / DirtyClean / Dirty
Clean / DirtyClean / DirtyClean / DirtyClean / DirtyClean / DirtyClean / DirtyClean / DirtyClean / DirtyClean / DirtyClean / DirtyClean / DirtyClean / DirtyClean / DirtyClean / DirtyClean / DirtyClean / DirtyClean / DirtyCleanClean Clean / DirtyNoneNoneClean / DirtyDrivenNoneNone
DrivenClean/DirtyClean / DirtyCleanClean / DirtyClean / DirtyDistortedClean / DirtyHeavy ODDrivenClean / DirtyClean/Dirty
XX
XX
XX
X
X
A straight Reverb preset suitable for any mono setup.A straight Chorus preset suitable for any mono setup.A Dynamic Delay preset suitable for any mono setup. Input level independent.A preset with Intelligent Pitch-shift in C-major suitable for any mono setup. A Detuned setting producing a doubler effect suitable for any mono setup.A straight Tremolo preset suitable for any mono setup.A straight Touch Wah preset suitable for any mono setup.A straight Phaser preset suitable for any mono setup.A slightly cranked setting suitable for any mono setup.Pedal to toe feeds the Delay input. Suitable for any mono setup.Pedal adds a lower octave. Suitable for any mono setup.A Phaser with an LFO controlled speed, really weird. Suitable for any mono setup.A straight Reverb preset suitable for any stereo setup.A straight Chorused preset suitable for any stereo setup.A Panner that pans beyond a normal stereo image.A Dynamic Delay preset suitable for any stereo setup. Input level independent.A preset with Intelligent Pitch-shift in A-major suitable for any stereo setup. A Detuned setting producing a doubler effect suitable for any stereo setup.A subtle Tremolo preset suitable for any stereo setup.Great chorused, shimmery doubler, delay and reverb similar to sound used by ex- Police guitarist.A clean preset with detuned pitch and chorus.A slightly cranked setting suitable for any stereo setup.An input sensitive Wah preset suitable for any stereo setup.Pedal feeds the Delay input. Suitable for any stereo setup.Pedal adds a lower octave. Suitable for any mono setup.A straight Reverb preset suitable for any 3-way or parallel setup.A straight Chorus preset suitable for any 3-way or parallel setup.A short delay making a doubler effect suitable for any 3-way or parallel setup.A simultaneous slapback delay plus long delay suitable for any 3-way or parallel setup.A Dynamic Delay preset suitable for any 3-way or parallel setup. Input level independent.A preset with Intelligent Pitch-shift in A-major, suitable for any 3-way or parallel setup. A Detuned setting producing a doubler effect, suitable for any 3-way or parallel setup.Adds an octave higher voice to your lead sound. Suitable for any 3-way or parallel setup.A subtle slow panning effect. Suitable for any 3-way or parallel setup.An LA like lead sound, suitable for any 3-way or parallel setup.Pedal controls the level of the Reverb. Suitable for any 3-way or parallel setup.Pedal adds an octave voice to your sound. Suitable for any 3-way or parallel setup.EQ & Compression.Short room and a touch of Chorus.Rhythm type preset. Pedal is attached to volume.Dark, earthy, big-bodied acoustic guitar sound. Lush, compressed, organic sounding and lightly chorused. Plug your acoustic in direct and go.A Vibrato-like Chorus + Compression, optional Reverb.Optimized for power chords, with some flanging thrown in. Drive is ready to go.Set for high-end Acoustic direct into input.Great solo acoustic sound, very pure, punchy and tight. Great for sitting properly in recorded tracks.Out of phase, dominant sound. VERY articulate. Great for muted heavy rhythm/picking style.A tight, fat effect great for giving space to staccato rhythm guitar.A straight sine Chorus effect in combination with a hall-like Reverb.Lush Chorus setting, good for coloring a clean sound.A slapback Delay and a room Reverb.Compressor with optional EQ and Doubler.EQ + Chorus.A bright rhythm sound with a slap Delay and a reverb.Death Metal Stereo Detuning with a little slap added. Try this one on Metallica's "Enter Sandman"Classic 50's echo sound, set to emulate the time delay on a standard reel-to-reel recorder.Detuned, warm, ducked Delays. Input level dependent.Pretty much what the tittle says.
MonoMonoMonoMonoMonoMonoMonoMonoMonoMonoMonoMonoStereoStereoStereoStereoStereoStereoStereoStereo
StereoStereoStereoStereoStereo3-Way3-Way3-Way3-Way3-Way3-Way3-Way3-Way3-Way3-Way3-Way3-WayRhythmRhythmRhythmRhythmRhythmRhythmRhythmRhythmRhythm
RhythmRhythmRhythmRhythmRhythmRhythmRhythmRhythmRhythmRhythmRhythmRhythm
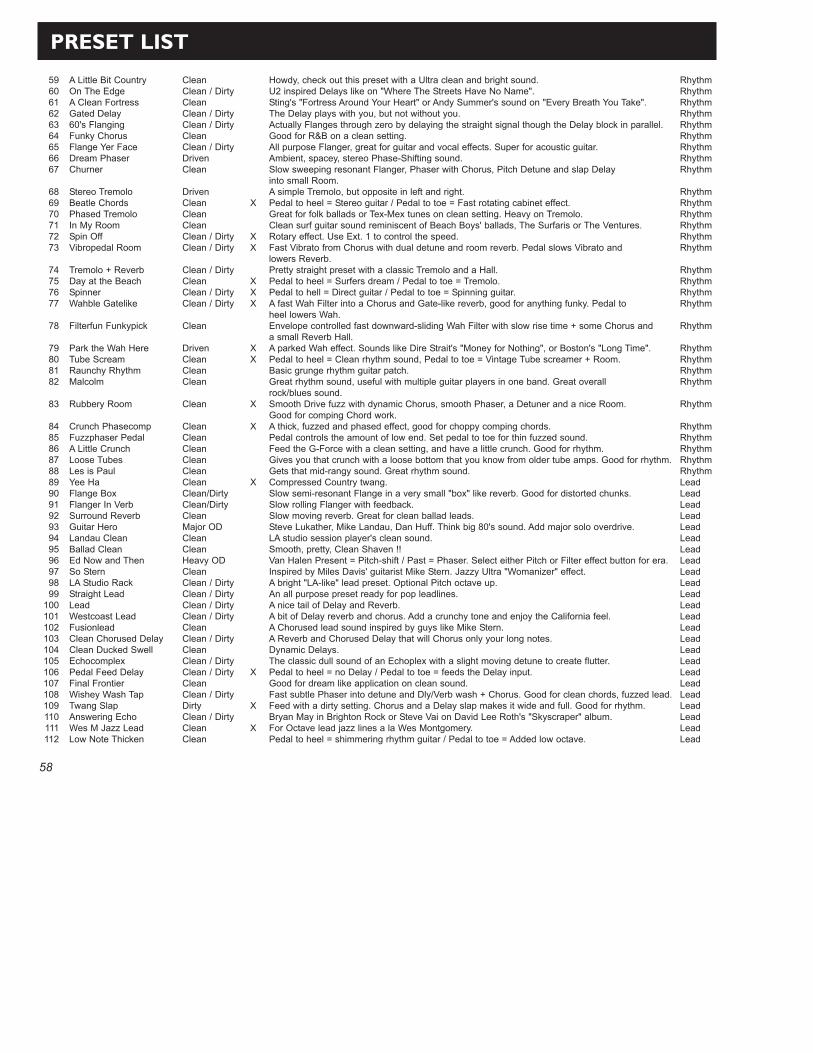
58
596061626364656667
686970717273
74757677
78
79808182
83
84858687888990919293949596979899
100101102103104105106107108109110111112
A Little Bit CountryOn The EdgeA Clean FortressGated Delay60's FlangingFunky ChorusFlange Yer FaceDream PhaserChurner
Stereo TremoloBeatle ChordsPhased TremoloIn My RoomSpin OffVibropedal Room
Tremolo + ReverbDay at the BeachSpinnerWahble Gatelike
Filterfun Funkypick
Park the Wah HereTube ScreamRaunchy RhythmMalcolm
Rubbery Room
Crunch PhasecompFuzzphaser PedalA Little CrunchLoose TubesLes is PaulYee Ha Flange BoxFlanger In VerbSurround ReverbGuitar HeroLandau CleanBallad CleanEd Now and ThenSo SternLA Studio RackStraight LeadLeadWestcoast LeadFusionleadClean Chorused DelayClean Ducked SwellEchocomplexPedal Feed DelayFinal FrontierWishey Wash TapTwang SlapAnswering EchoWes M Jazz LeadLow Note Thicken
CleanClean / DirtyCleanClean / DirtyClean / DirtyClean Clean / DirtyDrivenClean
DrivenCleanCleanCleanClean / DirtyClean / Dirty
Clean / DirtyCleanClean / DirtyClean / Dirty
Clean
DrivenCleanCleanClean
Clean
CleanCleanCleanCleanCleanClean Clean/DirtyClean/DirtyCleanMajor ODCleanCleanHeavy ODCleanClean / DirtyClean / DirtyClean / DirtyClean / DirtyCleanClean / DirtyCleanClean / DirtyClean / DirtyCleanClean / DirtyDirtyClean / DirtyCleanClean
X
XX
XXX
XX
X
X
X
X
X
X
Howdy, check out this preset with a Ultra clean and bright sound.U2 inspired Delays like on "Where The Streets Have No Name".Sting's "Fortress Around Your Heart" or Andy Summer's sound on "Every Breath You Take".The Delay plays with you, but not without you.Actually Flanges through zero by delaying the straight signal though the Delay block in parallel.Good for R&B on a clean setting.All purpose Flanger, great for guitar and vocal effects. Super for acoustic guitar.Ambient, spacey, stereo Phase-Shifting sound.Slow sweeping resonant Flanger, Phaser with Chorus, Pitch Detune and slap Delay into small Room.A simple Tremolo, but opposite in left and right.Pedal to heel = Stereo guitar / Pedal to toe = Fast rotating cabinet effect.Great for folk ballads or Tex-Mex tunes on clean setting. Heavy on Tremolo.Clean surf guitar sound reminiscent of Beach Boys' ballads, The Surfaris or The Ventures.Rotary effect. Use Ext. 1 to control the speed. Fast Vibrato from Chorus with dual detune and room reverb. Pedal slows Vibrato and lowers Reverb.Pretty straight preset with a classic Tremolo and a Hall.Pedal to heel = Surfers dream / Pedal to toe = Tremolo.Pedal to hell = Direct guitar / Pedal to toe = Spinning guitar.A fast Wah Filter into a Chorus and Gate-like reverb, good for anything funky. Pedal to heel lowers Wah.Envelope controlled fast downward-sliding Wah Filter with slow rise time + some Chorus and a small Reverb Hall.A parked Wah effect. Sounds like Dire Strait's "Money for Nothing", or Boston's "Long Time".Pedal to heel = Clean rhythm sound, Pedal to toe = Vintage Tube screamer + Room.Basic grunge rhythm guitar patch.Great rhythm sound, useful with multiple guitar players in one band. Great overall rock/blues sound.Smooth Drive fuzz with dynamic Chorus, smooth Phaser, a Detuner and a nice Room. Good for comping Chord work.A thick, fuzzed and phased effect, good for choppy comping chords.Pedal controls the amount of low end. Set pedal to toe for thin fuzzed sound.Feed the G-Force with a clean setting, and have a little crunch. Good for rhythm.Gives you that crunch with a loose bottom that you know from older tube amps. Good for rhythm.Gets that mid-rangy sound. Great rhythm sound.Compressed Country twang.Slow semi-resonant Flange in a very small "box" like reverb. Good for distorted chunks.Slow rolling Flanger with feedback.Slow moving reverb. Great for clean ballad leads.Steve Lukather, Mike Landau, Dan Huff. Think big 80's sound. Add major solo overdrive.LA studio session player's clean sound.Smooth, pretty, Clean Shaven !!Van Halen Present = Pitch-shift / Past = Phaser. Select either Pitch or Filter effect button for era.Inspired by Miles Davis' guitarist Mike Stern. Jazzy Ultra "Womanizer" effect.A bright "LA-like" lead preset. Optional Pitch octave up.An all purpose preset ready for pop leadlines.A nice tail of Delay and Reverb.A bit of Delay reverb and chorus. Add a crunchy tone and enjoy the California feel. A Chorused lead sound inspired by guys like Mike Stern.A Reverb and Chorused Delay that will Chorus only your long notes.Dynamic Delays.The classic dull sound of an Echoplex with a slight moving detune to create flutter.Pedal to heel = no Delay / Pedal to toe = feeds the Delay input.Good for dream like application on clean sound.Fast subtle Phaser into detune and Dly/Verb wash + Chorus. Good for clean chords, fuzzed lead.Feed with a dirty setting. Chorus and a Delay slap makes it wide and full. Good for rhythm.Bryan May in Brighton Rock or Steve Vai on David Lee Roth's "Skyscraper" album.For Octave lead jazz lines a la Wes Montgomery.Pedal to heel = shimmering rhythm guitar / Pedal to toe = Added low octave.
RhythmRhythmRhythmRhythmRhythmRhythmRhythmRhythmRhythm
RhythmRhythmRhythmRhythmRhythmRhythm
RhythmRhythmRhythmRhythm
Rhythm
RhythmRhythmRhythmRhythm
Rhythm
RhythmRhythmRhythmRhythmRhythmLeadLeadLeadLeadLeadLeadLeadLeadLeadLeadLeadLeadLeadLeadLeadLeadLeadLeadLeadLeadLeadLeadLeadLead
PRESET LIST
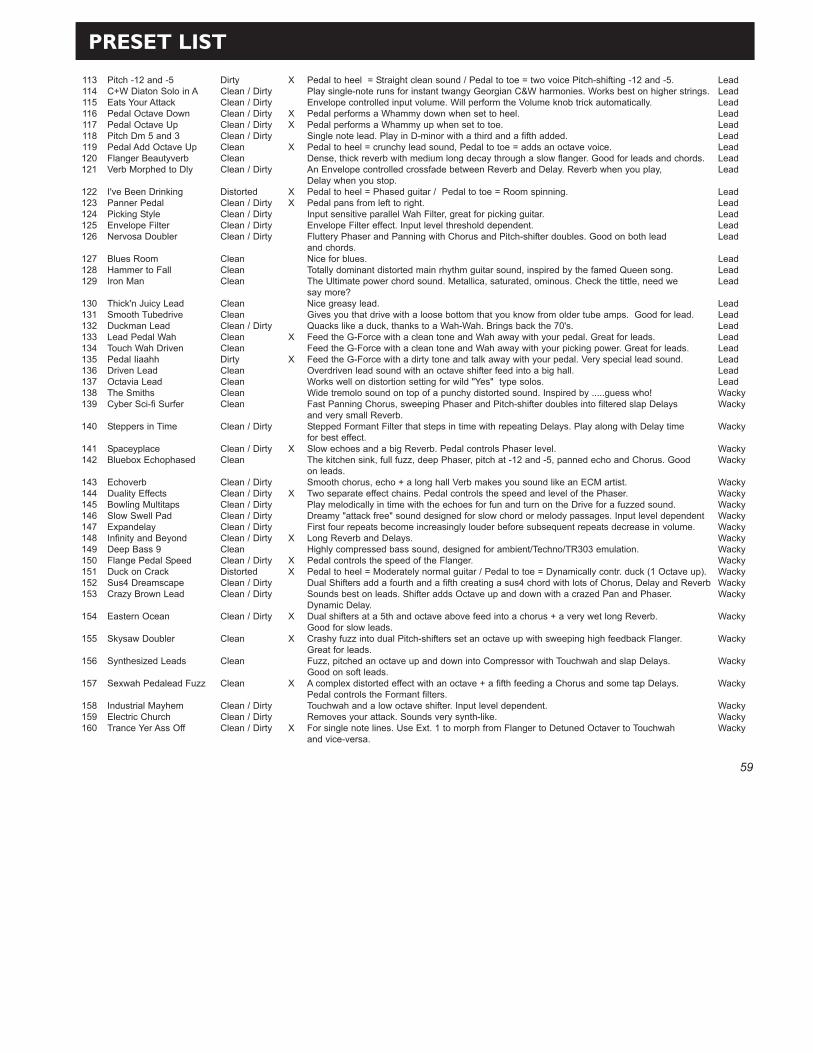
59
113114115116117118119120121
122123124125126
127128129
130131132133134135136137138139
140
141142
143144145146147148149150151152153
154
155
156
157
158159160
Pitch -12 and -5C+W Diaton Solo in AEats Your AttackPedal Octave DownPedal Octave UpPitch Dm 5 and 3Pedal Add Octave UpFlanger BeautyverbVerb Morphed to Dly
I've Been DrinkingPanner PedalPicking StyleEnvelope FilterNervosa Doubler
Blues RoomHammer to FallIron Man
Thick'n Juicy LeadSmooth TubedriveDuckman LeadLead Pedal WahTouch Wah DrivenPedal IiaahhDriven LeadOctavia LeadThe SmithsCyber Sci-fi Surfer
Steppers in Time
SpaceyplaceBluebox Echophased
EchoverbDuality EffectsBowling MultitapsSlow Swell PadExpandelayInfinity and BeyondDeep Bass 9Flange Pedal SpeedDuck on CrackSus4 DreamscapeCrazy Brown Lead
Eastern Ocean
Skysaw Doubler
Synthesized Leads
Sexwah Pedalead Fuzz
Industrial MayhemElectric ChurchTrance Yer Ass Off
DirtyClean / DirtyClean / DirtyClean / DirtyClean / DirtyClean / DirtyCleanCleanClean / Dirty
DistortedClean / DirtyClean / DirtyClean / DirtyClean / Dirty
CleanClean Clean
CleanCleanClean / DirtyCleanCleanDirty CleanClean Clean Clean
Clean / Dirty
Clean / DirtyClean
Clean / DirtyClean / DirtyClean / DirtyClean / DirtyClean / DirtyClean / DirtyClean Clean / DirtyDistortedClean / DirtyClean / Dirty
Clean / Dirty
Clean
Clean
Clean
Clean / DirtyClean / DirtyClean / Dirty
X
XX
X
XX
X
X
X
X
X
XX
X
X
X
X
Pedal to heel = Straight clean sound / Pedal to toe = two voice Pitch-shifting -12 and -5.Play single-note runs for instant twangy Georgian C&W harmonies. Works best on higher strings.Envelope controlled input volume. Will perform the Volume knob trick automatically.Pedal performs a Whammy down when set to heel.Pedal performs a Whammy up when set to toe.Single note lead. Play in D-minor with a third and a fifth added.Pedal to heel = crunchy lead sound, Pedal to toe = adds an octave voice.Dense, thick reverb with medium long decay through a slow flanger. Good for leads and chords.An Envelope controlled crossfade between Reverb and Delay. Reverb when you play, Delay when you stop.Pedal to heel = Phased guitar / Pedal to toe = Room spinning.Pedal pans from left to right.Input sensitive parallel Wah Filter, great for picking guitar.Envelope Filter effect. Input level threshold dependent.Fluttery Phaser and Panning with Chorus and Pitch-shifter doubles. Good on both lead and chords.Nice for blues.Totally dominant distorted main rhythm guitar sound, inspired by the famed Queen song.The Ultimate power chord sound. Metallica, saturated, ominous. Check the tittle, need we say more?Nice greasy lead.Gives you that drive with a loose bottom that you know from older tube amps. Good for lead.Quacks like a duck, thanks to a Wah-Wah. Brings back the 70's.Feed the G-Force with a clean tone and Wah away with your pedal. Great for leads.Feed the G-Force with a clean tone and Wah away with your picking power. Great for leads.Feed the G-Force with a dirty tone and talk away with your pedal. Very special lead sound.Overdriven lead sound with an octave shifter feed into a big hall.Works well on distortion setting for wild "Yes" type solos.Wide tremolo sound on top of a punchy distorted sound. Inspired by .....guess who! Fast Panning Chorus, sweeping Phaser and Pitch-shifter doubles into filtered slap Delays and very small Reverb.Stepped Formant Filter that steps in time with repeating Delays. Play along with Delay time for best effect.Slow echoes and a big Reverb. Pedal controls Phaser level.The kitchen sink, full fuzz, deep Phaser, pitch at -12 and -5, panned echo and Chorus. Good on leads.Smooth chorus, echo + a long hall Verb makes you sound like an ECM artist.Two separate effect chains. Pedal controls the speed and level of the Phaser.Play melodically in time with the echoes for fun and turn on the Drive for a fuzzed sound.Dreamy "attack free" sound designed for slow chord or melody passages. Input level dependentFirst four repeats become increasingly louder before subsequent repeats decrease in volume.Long Reverb and Delays.Highly compressed bass sound, designed for ambient/Techno/TR303 emulation.Pedal controls the speed of the Flanger.Pedal to heel = Moderately normal guitar / Pedal to toe = Dynamically contr. duck (1 Octave up).Dual Shifters add a fourth and a fifth creating a sus4 chord with lots of Chorus, Delay and ReverbSounds best on leads. Shifter adds Octave up and down with a crazed Pan and Phaser. Dynamic Delay.Dual shifters at a 5th and octave above feed into a chorus + a very wet long Reverb. Good for slow leads.Crashy fuzz into dual Pitch-shifters set an octave up with sweeping high feedback Flanger. Great for leads.Fuzz, pitched an octave up and down into Compressor with Touchwah and slap Delays. Good on soft leads.A complex distorted effect with an octave + a fifth feeding a Chorus and some tap Delays. Pedal controls the Formant filters.Touchwah and a low octave shifter. Input level dependent.Removes your attack. Sounds very synth-like.For single note lines. Use Ext. 1 to morph from Flanger to Detuned Octaver to Touchwah and vice-versa.
LeadLeadLeadLeadLeadLeadLeadLeadLead
LeadLeadLeadLeadLead
LeadLeadLead
LeadLeadLeadLeadLeadLeadLeadLeadWackyWacky
Wacky
WackyWacky
WackyWackyWackyWackyWackyWackyWackyWackyWackyWackyWacky
Wacky
Wacky
Wacky
Wacky
WackyWackyWacky
PRESET LIST
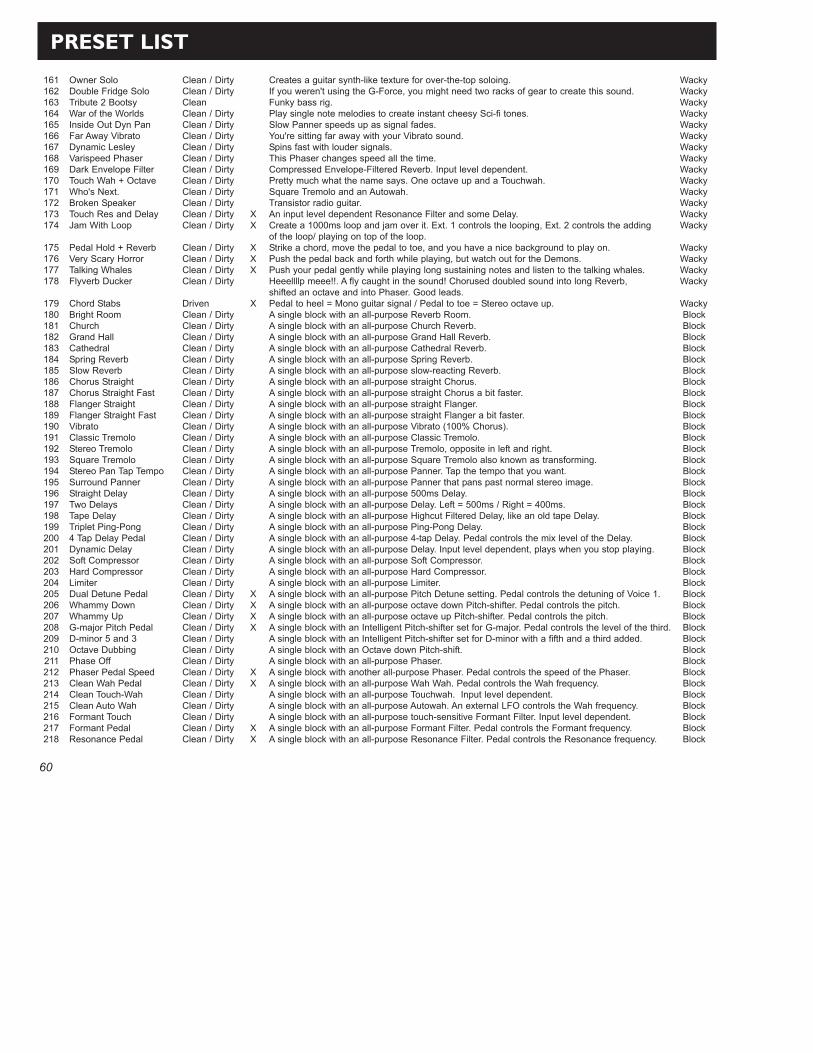
60
161162163164165166167168169170171172173174
175176177178
179180181182183184185186187188189190191192193194195196197198199200201202203204205206207208209210211212213214215216217218
Owner SoloDouble Fridge SoloTribute 2 BootsyWar of the WorldsInside Out Dyn PanFar Away VibratoDynamic LesleyVarispeed PhaserDark Envelope FilterTouch Wah + OctaveWho's Next.Broken SpeakerTouch Res and DelayJam With Loop
Pedal Hold + ReverbVery Scary HorrorTalking WhalesFlyverb Ducker
Chord StabsBright RoomChurchGrand HallCathedralSpring ReverbSlow ReverbChorus StraightChorus Straight FastFlanger StraightFlanger Straight Fast VibratoClassic TremoloStereo TremoloSquare TremoloStereo Pan Tap TempoSurround PannerStraight DelayTwo DelaysTape DelayTriplet Ping-Pong4 Tap Delay PedalDynamic DelaySoft CompressorHard CompressorLimiterDual Detune PedalWhammy DownWhammy UpG-major Pitch PedalD-minor 5 and 3 Octave DubbingPhase OffPhaser Pedal SpeedClean Wah PedalClean Touch-WahClean Auto WahFormant TouchFormant PedalResonance Pedal
Clean / DirtyClean / DirtyCleanClean / DirtyClean / DirtyClean / DirtyClean / DirtyClean / DirtyClean / DirtyClean / DirtyClean / DirtyClean / DirtyClean / DirtyClean / Dirty
Clean / DirtyClean / DirtyClean / DirtyClean / Dirty
DrivenClean / DirtyClean / DirtyClean / DirtyClean / DirtyClean / DirtyClean / DirtyClean / DirtyClean / DirtyClean / DirtyClean / DirtyClean / DirtyClean / DirtyClean / DirtyClean / DirtyClean / DirtyClean / DirtyClean / DirtyClean / DirtyClean / DirtyClean / DirtyClean / DirtyClean / DirtyClean / DirtyClean / DirtyClean / DirtyClean / DirtyClean / DirtyClean / DirtyClean / DirtyClean / DirtyClean / DirtyClean / DirtyClean / DirtyClean / DirtyClean / DirtyClean / DirtyClean / DirtyClean / DirtyClean / Dirty
XX
XXX
X
XXXX
XX
XX
Creates a guitar synth-like texture for over-the-top soloing.If you weren't using the G-Force, you might need two racks of gear to create this sound.Funky bass rig.Play single note melodies to create instant cheesy Sci-fi tones.Slow Panner speeds up as signal fades.You're sitting far away with your Vibrato sound.Spins fast with louder signals.This Phaser changes speed all the time.Compressed Envelope-Filtered Reverb. Input level dependent.Pretty much what the name says. One octave up and a Touchwah.Square Tremolo and an Autowah.Transistor radio guitar.An input level dependent Resonance Filter and some Delay.Create a 1000ms loop and jam over it. Ext. 1 controls the looping, Ext. 2 controls the adding of the loop/ playing on top of the loop.Strike a chord, move the pedal to toe, and you have a nice background to play on. Push the pedal back and forth while playing, but watch out for the Demons.Push your pedal gently while playing long sustaining notes and listen to the talking whales.Heeellllp meee!!. A fly caught in the sound! Chorused doubled sound into long Reverb, shifted an octave and into Phaser. Good leads. Pedal to heel = Mono guitar signal / Pedal to toe = Stereo octave up.A single block with an all-purpose Reverb Room.A single block with an all-purpose Church Reverb.A single block with an all-purpose Grand Hall Reverb.A single block with an all-purpose Cathedral Reverb.A single block with an all-purpose Spring Reverb.A single block with an all-purpose slow-reacting Reverb.A single block with an all-purpose straight Chorus.A single block with an all-purpose straight Chorus a bit faster.A single block with an all-purpose straight Flanger. A single block with an all-purpose straight Flanger a bit faster.A single block with an all-purpose Vibrato (100% Chorus).A single block with an all-purpose Classic Tremolo.A single block with an all-purpose Tremolo, opposite in left and right.A single block with an all-purpose Square Tremolo also known as transforming.A single block with an all-purpose Panner. Tap the tempo that you want. A single block with an all-purpose Panner that pans past normal stereo image.A single block with an all-purpose 500ms Delay.A single block with an all-purpose Delay. Left = 500ms / Right = 400ms.A single block with an all-purpose Highcut Filtered Delay, like an old tape Delay.A single block with an all-purpose Ping-Pong Delay.A single block with an all-purpose 4-tap Delay. Pedal controls the mix level of the Delay.A single block with an all-purpose Delay. Input level dependent, plays when you stop playing.A single block with an all-purpose Soft Compressor.A single block with an all-purpose Hard Compressor.A single block with an all-purpose Limiter.A single block with an all-purpose Pitch Detune setting. Pedal controls the detuning of Voice 1.A single block with an all-purpose octave down Pitch-shifter. Pedal controls the pitch.A single block with an all-purpose octave up Pitch-shifter. Pedal controls the pitch.A single block with an Intelligent Pitch-shifter set for G-major. Pedal controls the level of the third.A single block with an Intelligent Pitch-shifter set for D-minor with a fifth and a third added.A single block with an Octave down Pitch-shift.A single block with an all-purpose Phaser.A single block with another all-purpose Phaser. Pedal controls the speed of the Phaser.A single block with an all-purpose Wah Wah. Pedal controls the Wah frequency.A single block with an all-purpose Touchwah. Input level dependent.A single block with an all-purpose Autowah. An external LFO controls the Wah frequency.A single block with an all-purpose touch-sensitive Formant Filter. Input level dependent.A single block with an all-purpose Formant Filter. Pedal controls the Formant frequency.A single block with an all-purpose Resonance Filter. Pedal controls the Resonance frequency.
WackyWackyWackyWackyWackyWackyWackyWackyWackyWackyWackyWackyWackyWacky
WackyWackyWackyWacky
WackyBlockBlockBlockBlockBlockBlockBlockBlockBlockBlockBlockBlockBlockBlockBlockBlockBlockBlockBlockBlockBlockBlockBlockBlockBlockBlockBlockBlockBlockBlockBlockBlockBlockBlockBlockBlockBlockBlockBlock
PRESET LIST

61
219
220221222223224225
Auto Resonance
Drive 1 Drive 2Drive 3Noise Gate Slow Noise Gate SlowEmpty Routing
Clean / Dirty
Clean / DirtyClean / DirtyClean / DirtyClean / DirtyClean / DirtyClean / Dirty
A single block with an all-purpose Auto-Resonance Filter. An external LFO controls the Resonance filter.A single block with an all-purpose Drive.A single block with an all-purpose Drive.A single block with an all-purpose Drive.Pretty much what the title says. Pretty much what the title says. An Empty Routing, good for beginning building your own presets.
Block
BlockBlockBlockBlockBlockBlock
PRESET LIST