Embed Size (px)
Citation preview

G. David Wilkerson Davalen, LLC Blog: Taking Notez
WebSphere Portal Enable V8.5 !
Installation and Configuration of a Single Host Proof of Concept - Download Instructions!
• Using either IBM’s Partnerworld Software Catalog or IBM’s Passport Advantage locate the eAssembly part number CRRW9ML. The download list will include the following component parts:!
- IBM WebSphere Portal and Web Content Manager V8.5 Multilingual Quickstart Guide (CIYE7ML ) !
- IBM WebSphere Portal Enable Setup V8.5 Multiplatform Multilingual IMPORTANT: All parts of this image (Setup, Install, WAS ND, SDK) must be extracted into the same directory to create an installable image (CIYW3ML )!
- IBM WebSphere Portal Server Install V8.5 Multiplatform Multilingual IMPORTANT: All parts of this image (Setup, Install, WAS ND, SDK) must be extracted into the same directory to create an installable image (CIYV9ML )!
- IBM WebSphere Portal Enable Install V8.5 Multiplatform Multilingual IMPORTANT: All parts of this image (Setup, Install, WAS ND, SDK) must be extracted into the same directory to create an installable image (CIYW4ML ) !
- IBM WebSphere Application Server Network Deployment V8.5.5.2 Multiplatform Multilingual IMPORTANT: All parts of this image (Setup, Install, WAS ND, SDK) must be extracted into the same directory to create an installable image (CIYW0ML )!
- IBM WebSphere SDK Java Technology Edition V7.0.6.1 Multiplatform Multilingual IMPORTANT: All parts of this image (Setup, Install, WAS ND, SDK) must be extracted into the same directory to create an installable image (CIYW1ML )!
- IBM WebSphere Portal V8.5 Remote Search and Document Conversion Services Multiplatform Multilingual (CIYW2ML )!
- Other Software!
• In order to configure the evaluation environment for conventional fault tolerance and scalability additional software components are needed. !
Davalen, LLC�1
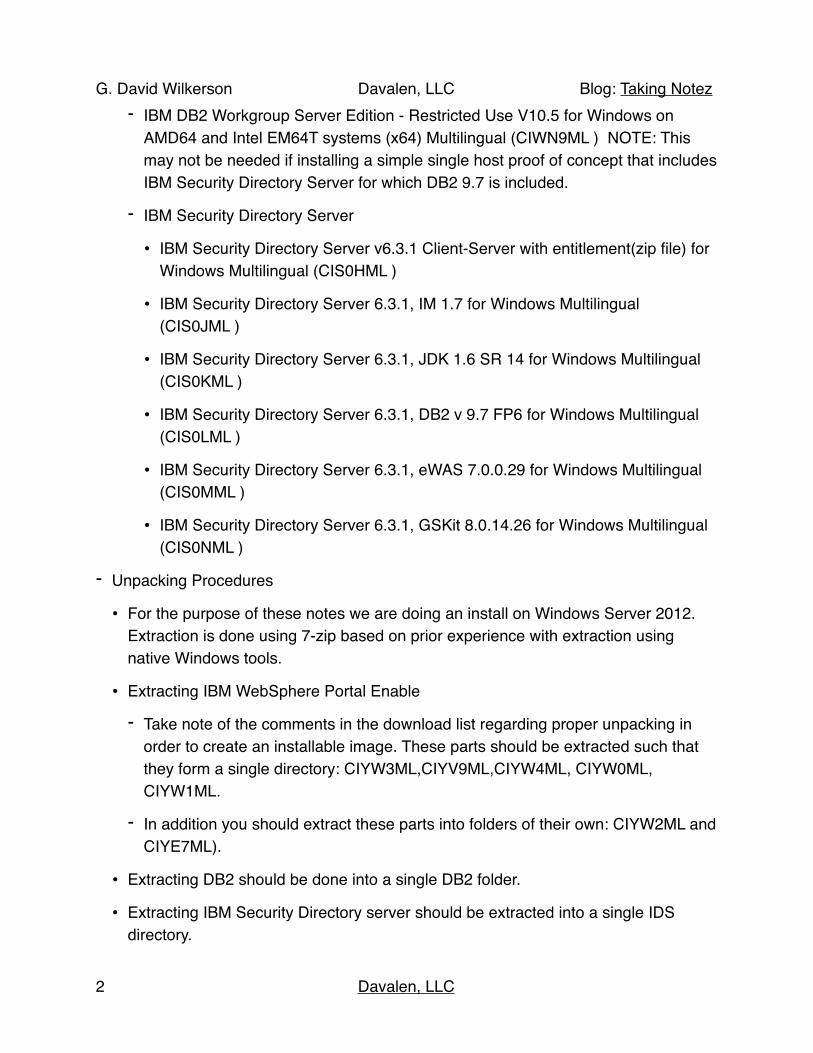
G. David Wilkerson Davalen, LLC Blog: Taking Notez - IBM DB2 Workgroup Server Edition - Restricted Use V10.5 for Windows on
AMD64 and Intel EM64T systems (x64) Multilingual (CIWN9ML ) NOTE: This may not be needed if installing a simple single host proof of concept that includes IBM Security Directory Server for which DB2 9.7 is included. !
- IBM Security Directory Server!
• IBM Security Directory Server v6.3.1 Client-Server with entitlement(zip file) for Windows Multilingual (CIS0HML )!
• IBM Security Directory Server 6.3.1, IM 1.7 for Windows Multilingual (CIS0JML )!
• IBM Security Directory Server 6.3.1, JDK 1.6 SR 14 for Windows Multilingual (CIS0KML )!
• IBM Security Directory Server 6.3.1, DB2 v 9.7 FP6 for Windows Multilingual (CIS0LML )!
• IBM Security Directory Server 6.3.1, eWAS 7.0.0.29 for Windows Multilingual (CIS0MML )!
• IBM Security Directory Server 6.3.1, GSKit 8.0.14.26 for Windows Multilingual (CIS0NML )!
- Unpacking Procedures!
• For the purpose of these notes we are doing an install on Windows Server 2012. Extraction is done using 7-zip based on prior experience with extraction using native Windows tools. !
• Extracting IBM WebSphere Portal Enable!
- Take note of the comments in the download list regarding proper unpacking in order to create an installable image. These parts should be extracted such that they form a single directory: CIYW3ML,CIYV9ML,CIYW4ML, CIYW0ML, CIYW1ML. !
- In addition you should extract these parts into folders of their own: CIYW2ML and CIYE7ML).!
• Extracting DB2 should be done into a single DB2 folder.!
• Extracting IBM Security Directory server should be extracted into a single IDS directory.!
Davalen, LLC�2

G. David Wilkerson Davalen, LLC Blog: Taking Notez - Preparing the Operating System!
- Installation of supporting software!
• Installation of IBM Security Directory Server!
- Using the IBM Installation Manager on Windows!
• Locate the correct launchpad for the system. In this example we are using a 64bit operating system. The executable to install using IBM Installation Manager is launchpad64.exe located in D:\IDS\sdsV6.3.1
Davalen, LLC�3

G. David Wilkerson Davalen, LLC Blog: Taking Notez • After launching, the Welcome page will appear. In the navigational links on the
left select one labeled “IBM Security Directory Server Installation”.!
• Then select the link in the detail view labeled “Launch the IBM Security Directory Server installer”
!
Davalen, LLC�4

G. David Wilkerson Davalen, LLC Blog: Taking Notez • The installer will facilitate installation of the IBM Installation Manager. On the
“Install Packages” page click the button labeled “Next”!
• On the following page (not illustrated) review the license agreement, select the appropriate choice (if you wish to continue you must select the radio button labeled “I accept the terms in the license agreement”) and then click the button labeled “Next”.
Davalen, LLC�5

G. David Wilkerson Davalen, LLC Blog: Taking Notez • On the following page take note of the warning. A decision to accept the default
location of IBM Installation Manager shared resources directory will mandate employment of elevated, or administrative, privileges. !
• In this example we will change to path to a non-virtualized directory. In addition we will install to a non-system disk partition. The shared resources directory will be set to D:\IBM\IBMIIMShared and the Installation Manager Directory will be set to C:\IBM\InstallationManager\eclipse.!
Davalen, LLC�6

G. David Wilkerson Davalen, LLC Blog: Taking Notez • Once the directory choices have been understood and made, click the button
labeled “Next”.!
• Now the IBM Installation Manager will configure installation options for the IBM Secure Directory Server package. Again, a warning regarding virtualized directories and the enforcement of administrative privileges will appear. We will proceed to alter the default location in a manner similar to that done for the Installation Manager.!
• The revised location for the installation directory will be changed to D:\IBM\ldap\V6.3.1 for reasons consistent with those provided in the previous steps.
Davalen, LLC�7
G. David Wilkerson Davalen, LLC Blog: Taking Notez • Once the changes have been made and you have observed that the correct
bitness is selected (64-bit in this case) click the button labeled “Next”.!
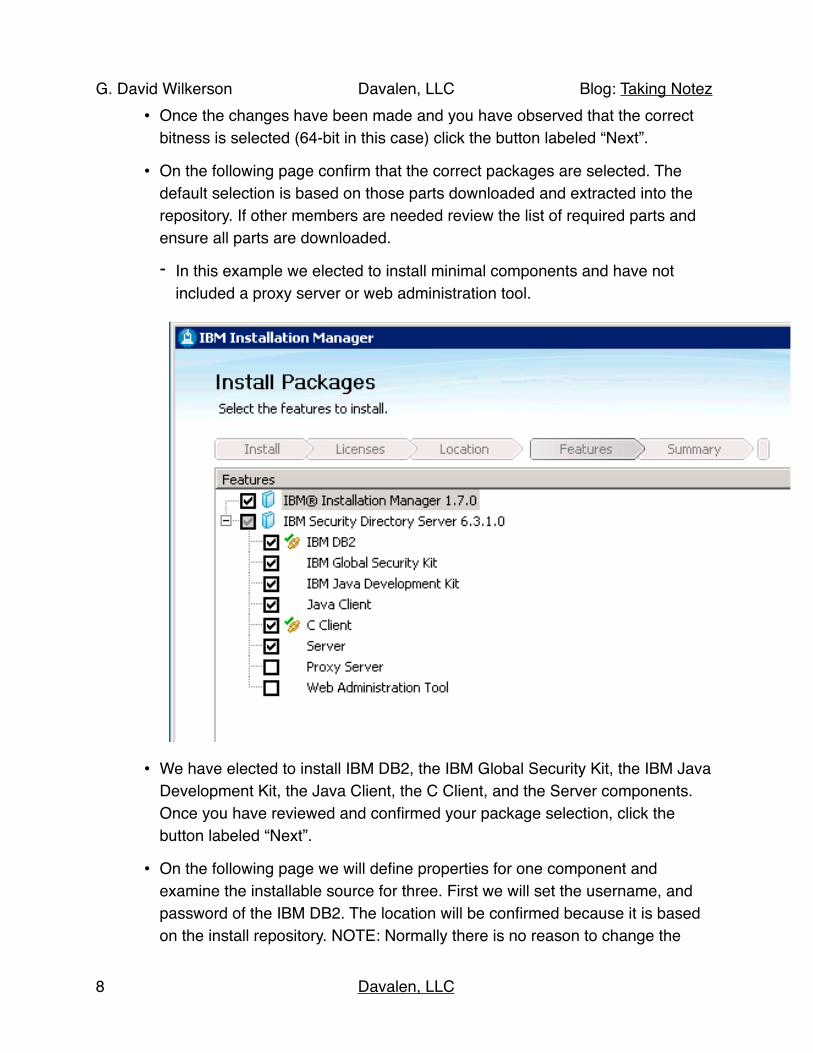
• On the following page confirm that the correct packages are selected. The default selection is based on those parts downloaded and extracted into the repository. If other members are needed review the list of required parts and ensure all parts are downloaded. !
- In this example we elected to install minimal components and have not included a proxy server or web administration tool.!
• We have elected to install IBM DB2, the IBM Global Security Kit, the IBM Java Development Kit, the Java Client, the C Client, and the Server components. Once you have reviewed and confirmed your package selection, click the button labeled “Next”.!
• On the following page we will define properties for one component and examine the installable source for three. First we will set the username, and password of the IBM DB2. The location will be confirmed because it is based on the install repository. NOTE: Normally there is no reason to change the
Davalen, LLC�8
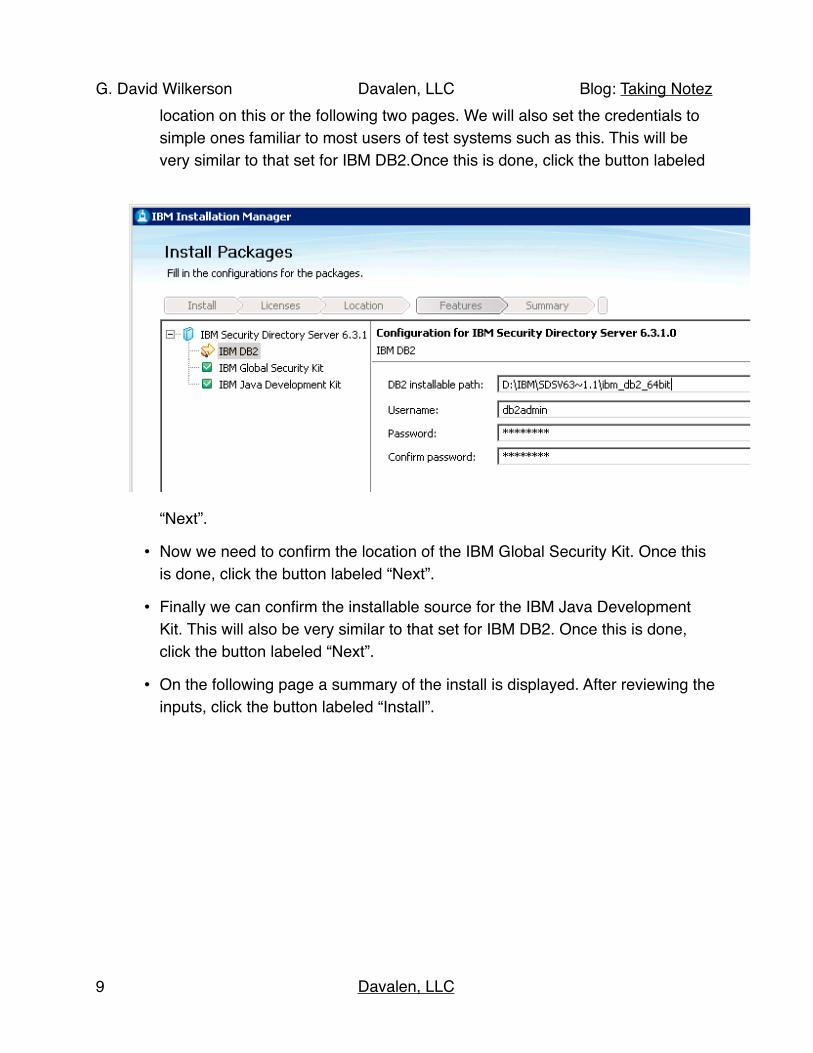
G. David Wilkerson Davalen, LLC Blog: Taking Notez location on this or the following two pages. We will also set the credentials to simple ones familiar to most users of test systems such as this. This will be very similar to that set for IBM DB2.Once this is done, click the button labeled
“Next”.!
• Now we need to confirm the location of the IBM Global Security Kit. Once this is done, click the button labeled “Next”.!
• Finally we can confirm the installable source for the IBM Java Development Kit. This will also be very similar to that set for IBM DB2. Once this is done, click the button labeled “Next”.!
• On the following page a summary of the install is displayed. After reviewing the inputs, click the button labeled “Install”.
Davalen, LLC�9

G. David Wilkerson Davalen, LLC Blog: Taking Notez • When the install is complete and a message indicating success is visible we
will retain the default choice such that closing the installation wizard will result in launching the IBM Secure Directory Server Instance Administration Tool. Click the button labeled “Finish”.
Davalen, LLC�10
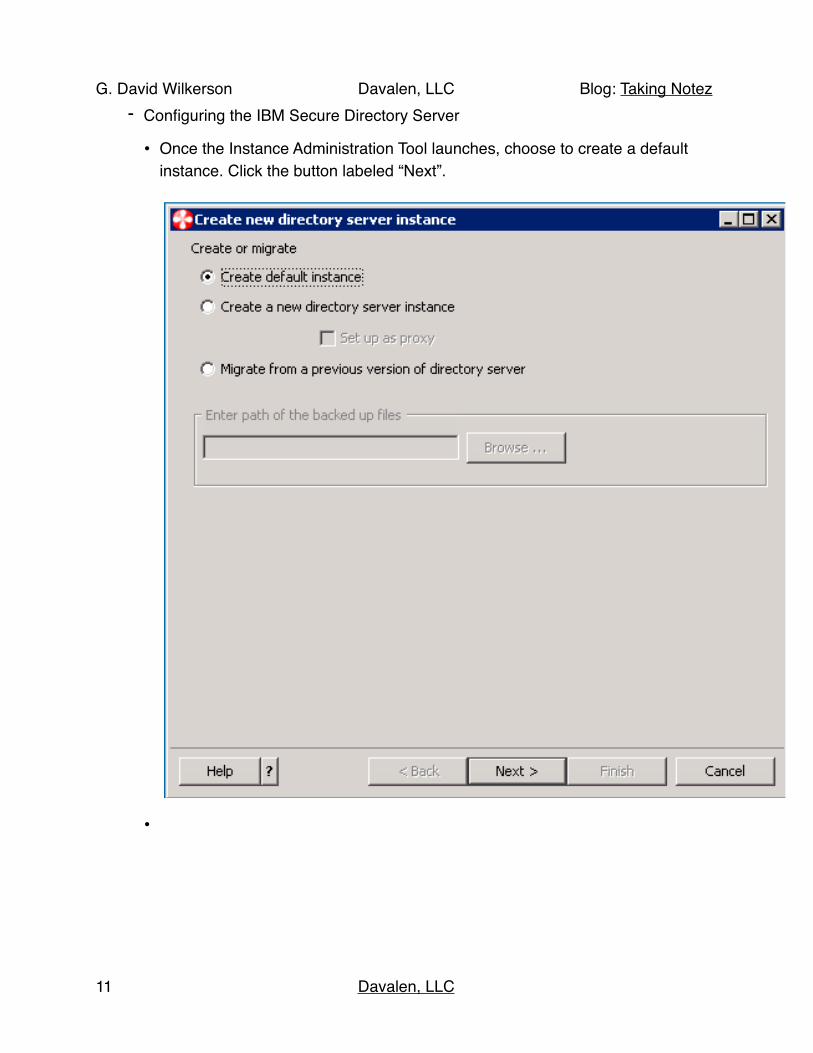
G. David Wilkerson Davalen, LLC Blog: Taking Notez - Configuring the IBM Secure Directory Server!
• Once the Instance Administration Tool launches, choose to create a default instance. Click the button labeled “Next”.!
• !
Davalen, LLC�11

G. David Wilkerson Davalen, LLC Blog: Taking Notez • On the following page populate the inputs according to the table listed beneath
the figure.
!
Davalen, LLC�12
Instance owner User password ISDSpassword
Encryption string ISDSseedstring
Administrator DN password ISDSpassword

G. David Wilkerson Davalen, LLC Blog: Taking Notez • After confirming (and recording) the credentials, click the button labeled “Next”.!
• A summary page will appear. After reviewing the configurations, click the button labeled “Finish”.
Davalen, LLC�13

G. David Wilkerson Davalen, LLC Blog: Taking Notez • The view will change and two windows will be visible. One, showing instance
creation results will appear and another, the Instance Administration Tool will appear. Review the results display and confirm that the creation tasks completed successfully. After doing so, click the button labeled “Close”.!
• Next, examine the tool interface. Notice that a default instance is created and can now be managed. Click the button labeled “Manage”.
Davalen, LLC�14

G. David Wilkerson Davalen, LLC Blog: Taking Notez • The interface for the IBM Secure Directory Server Configuration Tool will
appear.!
• In our proof of concept we want an end to end solution, including a pool of users. To do this, we are going to use an LDIF file that is already populated. In order to succeed we need to define the appropriate structure. In the navigational tree on the left locate the item named “Manage Suffixes” and click it.
Davalen, LLC�15

G. David Wilkerson Davalen, LLC Blog: Taking Notez • In the Suffixes detail window, enter the suffix cd=hal,dc=com. Then, click the
button labeled “Add” and, following that, click the button labeled “OK”.
Davalen, LLC�16

G. David Wilkerson Davalen, LLC Blog: Taking Notez • Next we will import the users contained in our LDIF file. There are two points to
note here. (1) If using a different file make sure that you have defined the appropriate suffix DN. (2) A copy of the LDIF file I am using is available on my blog site. In the navigational tree on the left, locate the item named “LDIF tasks” and expand it. Then locate the item named “Import LDIF data”.
Davalen, LLC�17

G. David Wilkerson Davalen, LLC Blog: Taking Notez • In our environment the file was named “portal.ldif” and saved in C:\samples.
The default settings are correct for this sample. To be sure, confirm that “Standard Import” is the selected option. Then, scroll down, locate, and click a button labeled “Import”. After about 30 seconds a pop-up will indicate a task was completed. In the tool you can see task messages. If using our sample LDIF file you should see that 30 entries were added out of 30 attempted.!
• Click the button on the pop-up labeled “OK”. !
Davalen, LLC�18

G. David Wilkerson Davalen, LLC Blog: Taking Notez • Next we will configure the bind user and password for this instance. These
were values imported by our LDIF import effort and we need to configure the IBM Secure Directory Server to use them. In the navigational tree on the left locate an item named “Manage administrator DN”. Click it. In the Administrator DN filed enter uid=wpsbind,cn=users,dc=hal,dc=com. Then, click the button labeled “OK”.!
• In the navigational tree on the left we will also locate an item named Manage administrator password. We will set this to match the password of the bind user. In the password input enter “IBMp0rtal”. Note the spelling includes a numeral zero and not a capitalized “O”. Again, be sure to click the button labeled “OK” or your changes will not be saved.
Davalen, LLC�19
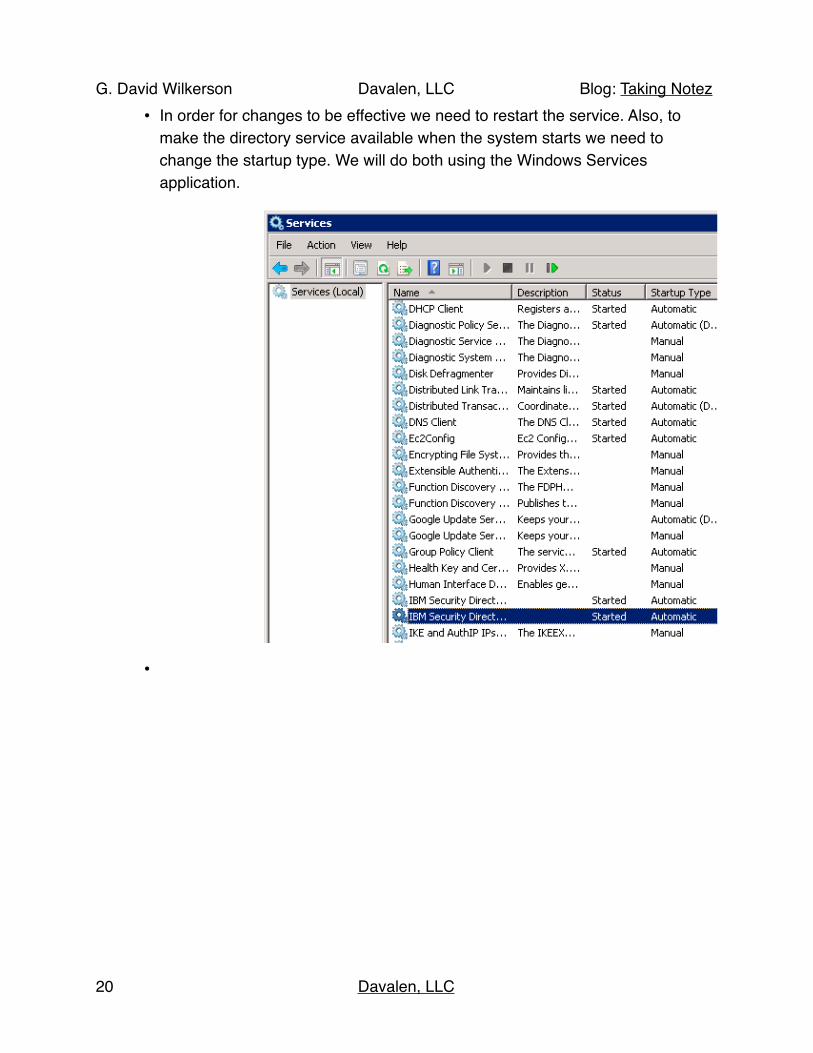
G. David Wilkerson Davalen, LLC Blog: Taking Notez • In order for changes to be effective we need to restart the service. Also, to
make the directory service available when the system starts we need to change the startup type. We will do both using the Windows Services application.!
• !
Davalen, LLC�20

G. David Wilkerson Davalen, LLC Blog: Taking Notez • For my proof of concept environment I wanted to ensure the integrity of my
configuration and LDIF import. To do this I downloaded an LDAP Browser. Once I configured a connection I was able to confirm my LDAP environment is ready.!
• The configuration of the IBM Secure Directory Server is complete. !
- Configuration of IBM DB2!
• IBM DB2 does not need to be installed for our proof of concept environment as a supported version has been installed as part of the IBM Secure Directory Server install. !
• To configure the database server for IBM WebSphere Portal’s configuration databases we must create those databases in advance.!
Davalen, LLC�21

G. David Wilkerson Davalen, LLC Blog: Taking Notez • To do this I have provided a Windows batch file and placed it into D:\Samples. !
• To execute the script, or the required database commands, open a DB2 Command Window. This is found in the Start menu under the IBM DB2Program Group. !
• Once the command window is open, navigate to the location of your batch file and execute the script or enter the required commands.
Davalen, LLC�22

G. David Wilkerson Davalen, LLC Blog: Taking Notez • The command window associated with the script I use will likely indicate some
errors. This is because the script, if executed against existing databases will drop each before creating it anew.!
• The script takes several minutes to complete. On my system it took about 15 minutes. Scan the output for other errors and, if there are none, close the command window.!
• Some additional instance information for this proof of concept environment will be needed later. The instance name was created by the IBM Secure Directory Server. It is named, “DB2DS631”. The communications port for this instance is 50000. The hostname is wps1.davalen.com. NOTE: If DB2 is configured on another system or installed differently the instance name and port number will likely be different than those provided here.!
• DB2 configuration is complete. !
- Installation of IBM WebSphere Portal Enable Version 8.5!
• Launching Setup!
- The typical install will begin by launching the setup of IBM Installation Manager (IIM). Since, on this proof of concept system IIM is already installed, we will modify the process. !
Davalen, LLC�23

G. David Wilkerson Davalen, LLC Blog: Taking Notez • The first step is to confirm that the downloaded parts for the product have been
extracted into a single structure such as that illustrated in the figure.!
• Next, navigate the folder structure, open the folder labeled SETUP, and launch the bit specific setup application: setup or setup64.An install wizard will appear. On the left side are navigational links. Click the link labeled “Install Portal”.!
Davalen, LLC�24

G. David Wilkerson Davalen, LLC Blog: Taking Notez • On the right, in the detail pane, locate a link labeled “Install IBM WebSphere
Portal “ and click it. !
• The wizard will launch IBM Installation Manager. IIM will present several options. Click the option labeled “Install”.!
• On the following page, IIM will list the available packages to install. You should see a list consisting of the following:!
- IBM WebSphere Application Server Network Deployment!
• Version 8.5.5.1!
- IBM WebSphere SDK Java Technology Edition (Optional)!
• Version 7.0.5.0!
- IBM WebSphere Portal Server!
• Version 8.5.0.0!
- IBM WebSphere Portal Enable!
Davalen, LLC�25

G. David Wilkerson Davalen, LLC Blog: Taking Notez • Version 8.5.0.0!
• Confirm that each of the listed packages is available and selected. Locate the button labeled “Next” and click it.!
• On the following page any required fixes will be displayed. Select any, locate a button labeled “Next” and click it.
Davalen, LLC�26

G. David Wilkerson Davalen, LLC Blog: Taking Notez • On the next page set the Installation Directory location of both the application
server and the portal server. Best practice is to choose a non-virtualized directory. In the case of our proof of concept we are using D:\IBM\WebSphere\AppServer and D:\IBM\WebSphere\PortalServer respectively. After setting BOTH properties, click the button labeled “Next”.!
• On the following page select the relevant languages available to the packages being installed. In our case the default language is English and is the only set being selected. Click the button labeled “Next”.!
• On the next page review the features to install. In most cases, and in the case of this proof of concept, the default selections will be maintained. It is NOT recommended to install the sample applications as these are unrelated to WebSphere Portal. Click the button labeled “Next”.!
Davalen, LLC�27

G. David Wilkerson Davalen, LLC Blog: Taking Notez • On the following page you will provide two sets of configuration data. The left side
of the page permits you to navigate between the two sets. The top element of the tree exposes inputs for setting the application server user credentials. Enter the name, password, and confirmation of the password. Then select the second element in the list on the left labeled “Enter the Administrator user ID and password for the Portal Server. Enter the preferred credentials and confirm the other inputs.!
• The radio button choice labeled advanced allows for setting other configurations such as an alternate location for the portal profile, a custom context root, default home, personalized home URI, and starting port number. In the case of our proof of concept we have retained default values and entered the same username and password combination as we used for the application server. !
• After setting the properties in the previous bullet points, locate and click the button labeled “Next”.
Davalen, LLC�28

G. David Wilkerson Davalen, LLC Blog: Taking Notez • On the following page a summary of packages to install appears. Review the list
and after confirming the choices, locate and click the button labeled “Install”.!
• !
Davalen, LLC�29

G. David Wilkerson Davalen, LLC Blog: Taking Notez • Once installation is finished you can proceed to launch First Steps. If you do not do
this now, you can do so later by using the WebSphere Portal program group created by the IBM Installation Manager. !
• !
Davalen, LLC�30

G. David Wilkerson Davalen, LLC Blog: Taking Notez • The Configuration Wizard interface has changed from version 8 and is much
simpler to use. Click the link labeled “Click here to launch the Configuration Wizard”
Then, login using the credentials supplied during the install.!
• Unlike the previous version you select the option to Create a Cluster in order to expose the workflows for Database Transfer, etc. !
Davalen, LLC�31

G. David Wilkerson Davalen, LLC Blog: Taking Notez • After clicking th slink labeled “Create a Cluster” click the link labeled “Database
Transfer”. Modify or confirm the settings for each input. In the case of the system used for this document, the default settings were correct: Target platform = Microsoft Windows, name of the target profile = wp_profile, home directory of the target profile, D:/IBM/WebSphere/wp_profile. When complete, locate the right arrow at the bottom of the page and click it. !
• !
Davalen, LLC�32

G. David Wilkerson Davalen, LLC Blog: Taking Notez • Next, indicate the target database type. This aspect of the wizard is very different
from the previous version. Specifically, it offers an option for the wizard to perform tasks automatically.!
!
Davalen, LLC�33

G. David Wilkerson Davalen, LLC Blog: Taking Notez • On the next screen you will provide WebSphere Application Server credentials.
Interestingly, the default is inconsistent with the actual credentials. Enter the username, the password, and confirm the password. Next, click the right arrow at the bottom of the page.
Davalen, LLC�34
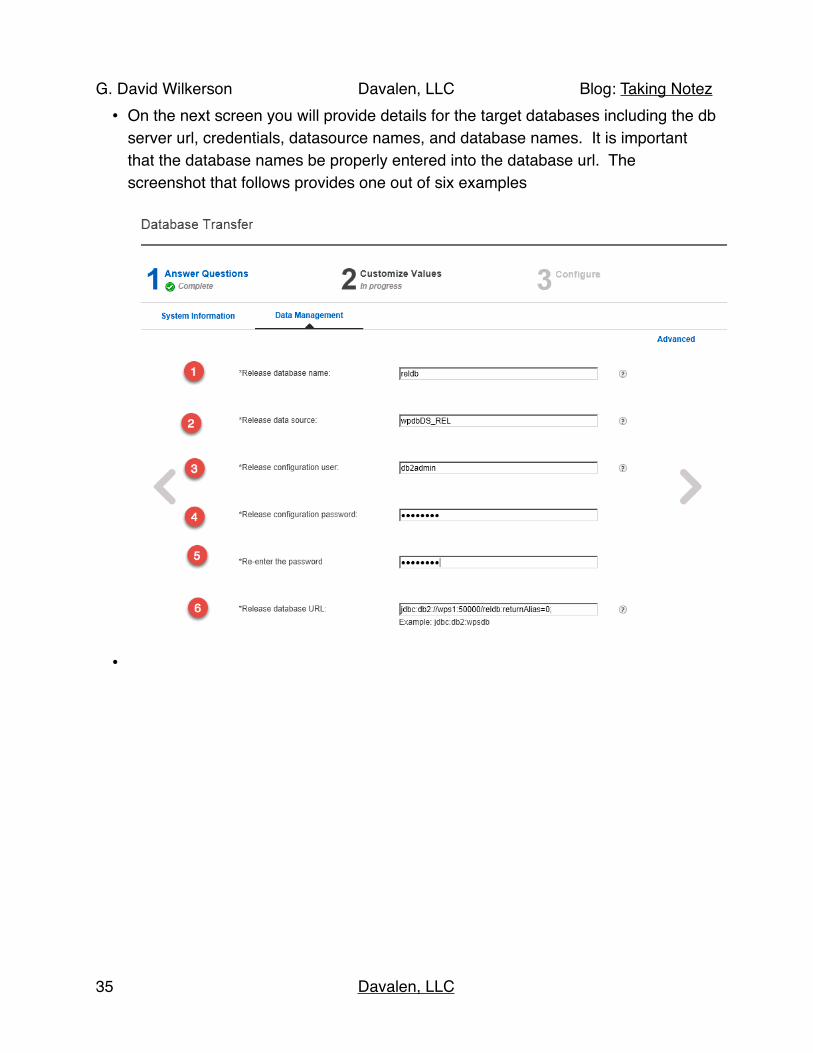
G. David Wilkerson Davalen, LLC Blog: Taking Notez • On the next screen you will provide details for the target databases including the db
server url, credentials, datasource names, and database names. It is important that the database names be properly entered into the database url. The screenshot that follows provides one out of six examples!
• !
Davalen, LLC�35

G. David Wilkerson Davalen, LLC Blog: Taking Notez • At the bottom of the page you must also specify the location of the type 4 database
drivers. Since this system was preconfigured with DB2 for the IBM Secure Directory Server, I elected to copy those drivers to a simpler location, D:\DB2Drivers. The screenshot below is an example. Once the settings for each database domain have been verified, click the arrow to continue to the right.!
• Run each step in the order provided. As each step is completed, the status will change.
Davalen, LLC�36

G. David Wilkerson Davalen, LLC Blog: Taking Notez • The third step, collation of the JCR database may be performed manually. We have
skipped this step for our proof of concept. !
• Next, run the step to validate the databases previously created. !
• Next run the step to migrate the data to the new databases.!
• When migration is complete Grant Privileges to database runtime users.!
• Optioinally, perform a reorg check. For this POC the step was skipped.!
• Set the datasource property to fullyMaterilaizedLobData to true.!
• Finally, start the WebSphere Portal Server. !
!Davalen, LLC�37

G. David Wilkerson Davalen, LLC Blog: Taking Notez • When the server is started you should return to the Set Up a Cluster page. Since
we are not setting up a standalone server we will proceed to create a deployment manager. The deployment manager is on the same system as the portal. !
!
Davalen, LLC�38

G. David Wilkerson Davalen, LLC Blog: Taking Notez • Confirm or update values presented on the Create Deployment Manager Profile
page. We noted that the default administrator name is not consistent with our choice and this input, along with the passwords, was updated. No other changes were needed in our environment.!
• Once the settings are confirmed, click the arrow to the right.
Davalen, LLC�39
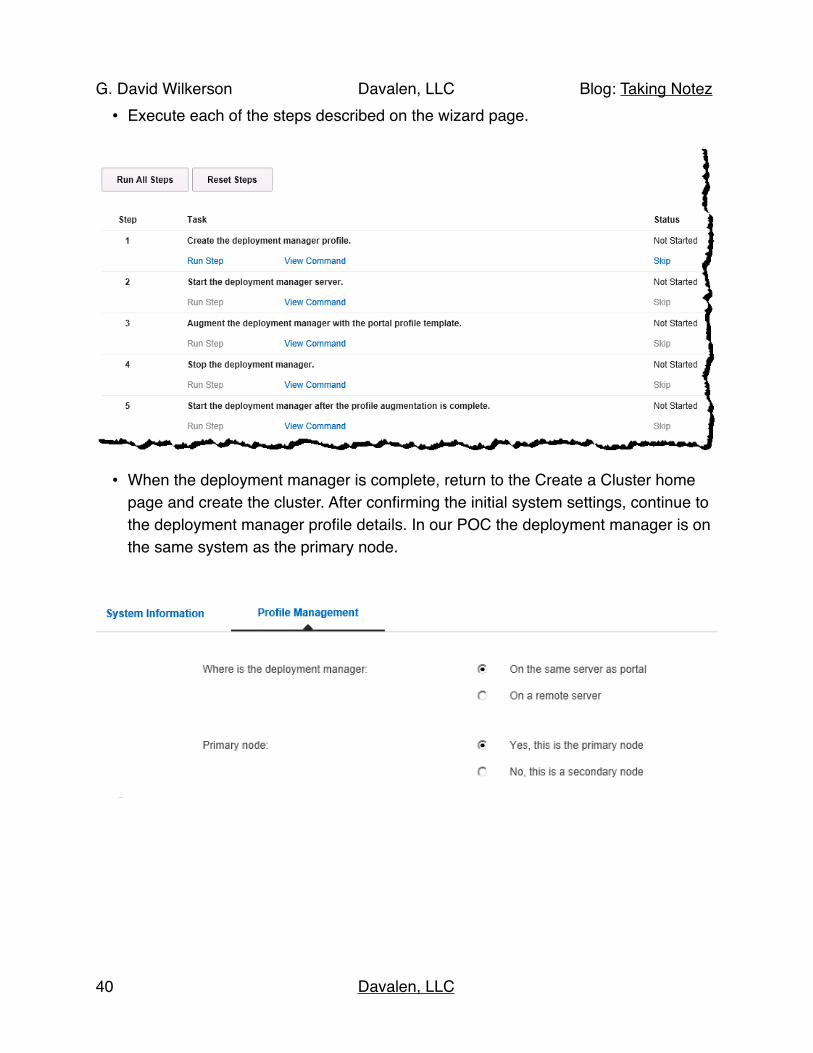
G. David Wilkerson Davalen, LLC Blog: Taking Notez • Execute each of the steps described on the wizard page.!
• When the deployment manager is complete, return to the Create a Cluster home page and create the cluster. After confirming the initial system settings, continue to the deployment manager profile details. In our POC the deployment manager is on the same system as the primary node.
Davalen, LLC�40

G. David Wilkerson Davalen, LLC Blog: Taking Notez • After clicking the right arrow, populate the profile details. Notice that in this version
the wizard can be used to created dynamic and static clusters. !
• !
Davalen, LLC�41

G. David Wilkerson Davalen, LLC Blog: Taking Notez • Confirm or update the values and click the right arrow to continue. Run each of the
enumerate steps. !
• When complete, return to the setup a cluster home page and launch the task to Enable Federated Security
Davalen, LLC�42

G. David Wilkerson Davalen, LLC Blog: Taking Notez • In the proof of concept environment we are building, the user registry is IBM Secure
Directory Server. I did not enable SSL though this would normally be done in a production setting. After selecting the registry software scroll down.!
• Provide the credentials to be used for the portal system to connect to the LDAP server. In addition, provide the Base DN, the name of the new administrative group, the name of the administrator of the portal defined in the registry, and the credentials for that user. After confirming the input values, click the right arrow.!
Davalen, LLC�43

G. David Wilkerson Davalen, LLC Blog: Taking Notez • The wizard now presents an enumerated list of tasks that must be performed in the
order listed. I prefer to run each task and, if necessary, resolve each issue rather than attempt to run all of the tasks. Pay attention to manual steps such as step #4.!
!
Davalen, LLC�44

G. David Wilkerson Davalen, LLC Blog: Taking Notez • The instructions for step #4 state the following: !
- Navigate to the D:/IBM/WebSphere/wp_profile/PortalServer/wcm/shared/app/config/wcmservices/MemberFixerModule.properties file. !
- Edit the MemberFixerModule.properties file to include these lines. uid=wpsadmin,o=defaultWIMFileBasedRealm -> uid=wpsadmin,cn=users,dc=hal,dc=com!
- Save your changes!
• Mark the step as complete and continue until all steps have been performed. After confirming the completion of the steps return to the configuration home page.!
• At this point the proof of concept environment is complete. Please remember that this is a network deployment configuration. In addition to ensuring the database server and LDAP server are started please observe the following procedure:!
Davalen, LLC�45

G. David Wilkerson Davalen, LLC Blog: Taking Notez - You MUST start the nodeagent first. Additionally, if you want to manage the
Application Server configuration, resource providers, etc. You MUST start the deployment manager.!
- To do so, open a command line and navigate to C:\IBM\WebSphere\AppServer\profiles\dmgr01\bin!
- Enter the command, startmanager.!
- Once started navigate to D:\IBM\WebSphere\wp_profile\bin!
- Enter the command, startnode!
- Once the nodeagent is started remain in the same folder context and enter the command!
- startServer WebSphere_Portal!
- NOTE: server names are Case Sensitive.!
• Let me hear from you if you find this procedure helpful!!
!.!
!!!!!!
Davalen, LLC�46