Embed Size (px)
Citation preview

Full Body IK (FBIK) Guide

Copyright NoticeAutodesk® Maya® 2011 Software© 2010 Autodesk, Inc. All rights reserved. Except as otherwise permitted by Autodesk, Inc., this publication, or parts thereof, may notbe reproduced in any form, by any method, for any purpose.Certain materials included in this publication are reprinted with the permission of the copyright holder.The following are registered trademarks or trademarks of Autodesk, Inc., and/or its subsidiaries and/or affiliates in the USA and other countries:3DEC (design/logo), 3December, 3December.com, 3ds Max, Algor, Alias, Alias (swirl design/logo), AliasStudio, Alias|Wavefront (design/logo),ATC, AUGI, AutoCAD, AutoCAD Learning Assistance, AutoCAD LT, AutoCAD Simulator, AutoCAD SQL Extension, AutoCAD SQL Interface,Autodesk, Autodesk Envision, Autodesk Intent, Autodesk Inventor, Autodesk Map, Autodesk MapGuide, Autodesk Streamline, AutoLISP, AutoSnap,AutoSketch, AutoTrack, Backburner, Backdraft, Built with ObjectARX (logo), Burn, Buzzsaw, CAiCE, Civil 3D, Cleaner, Cleaner Central, ClearScale,Colour Warper, Combustion, Communication Specification, Constructware, Content Explorer, Dancing Baby (image), DesignCenter, DesignDoctor, Designer's Toolkit, DesignKids, DesignProf, DesignServer, DesignStudio, Design Web Format, Discreet, DWF, DWG, DWG (logo), DWGExtreme, DWG TrueConvert, DWG TrueView, DXF, Ecotect, Exposure, Extending the Design Team, Face Robot, FBX, Fempro, Fire, Flame, Flare,Flint, FMDesktop, Freewheel, GDX Driver, Green Building Studio, Heads-up Design, Heidi, HumanIK, IDEA Server, i-drop, ImageModeler, iMOUT,Incinerator, Inferno, Inventor, Inventor LT, Kaydara, Kaydara (design/logo), Kynapse, Kynogon, LandXplorer, Lustre, MatchMover, Maya,Mechanical Desktop, Moldflow, Moonbox, MotionBuilder, Movimento, MPA, MPA (design/logo), Moldflow Plastics Advisers, MPI, MoldflowPlastics Insight, MPX, MPX (design/logo), Moldflow Plastics Xpert, Mudbox, Multi-Master Editing, Navisworks, ObjectARX, ObjectDBX, OpenReality, Opticore, Opticore Opus, Pipeplus, PolarSnap, PortfolioWall, Powered with Autodesk Technology, Productstream, ProjectPoint, ProMaterials,RasterDWG, RealDWG, Real-time Roto, Recognize, Render Queue, Retimer, Reveal, Revit, Showcase, ShowMotion, SketchBook, Smoke, Softimage,Softimage|XSI (design/logo), Sparks, SteeringWheels, Stitcher, Stone, StudioTools, ToolClip, Topobase, Toxik, TrustedDWG, ViewCube, Visual,Visual LISP, Volo, Vtour, Wire, Wiretap, WiretapCentral, XSI, and XSI (design/logo).ACE™, TAO™, CIAO™, and CoSMIC™ are copyrighted by Douglas C. Schmidt and his research group at Washington University, University ofCalifornia, Irvine, and Vanderbilt University, Copyright © 1993-2009, all rights reserved.Adobe, Illustrator and Photoshop are either registered trademarks or trademarks of Adobe Systems Incorporated in the United States and/orother countries.Intel is a registered trademark or trademark of Intel Corporation or its subsidiaries in the United States and other countries.mental ray is a registered trademark of mental images GmbH licensed for use by Autodesk, Inc.OpenGL is a trademark of Silicon Graphics, Inc. in the United States and other countries.Python and the Python logo are trademarks or registeredtrademarks of the Python Software Foundation.The Ravix logo is a trademark of Electric Rain, Inc.All other brand names, product names or trademarks belong to their respective holders.DisclaimerTHIS PUBLICATION AND THE INFORMATION CONTAINED HEREIN IS MADE AVAILABLE BY AUTODESK, INC. "AS IS." AUTODESK, INC. DISCLAIMSALL WARRANTIES, EITHER EXPRESS OR IMPLIED, INCLUDING BUT NOT LIMITED TO ANY IMPLIED WARRANTIES OF MERCHANTABILITY ORFITNESS FOR A PARTICULAR PURPOSE REGARDING THESE MATERIALS.

Contents
Chapter 1 Full Body IK (FBIK) . . . . . . . . . . . . . . . . . . . . . . . . . 1Restore Full body IK . . . . . . . . . . . . . . . . . . . . . . . . . . . . 1Full body IK overview . . . . . . . . . . . . . . . . . . . . . . . . . . . 1Prepare your character for full body IK . . . . . . . . . . . . . . . . . . . 2FBIK joint types . . . . . . . . . . . . . . . . . . . . . . . . . . . . . . . 3FBIK joint labelling and naming conventions . . . . . . . . . . . . . . . 4FBIK joint labelling and naming methods . . . . . . . . . . . . . . . . . 5Joint labels and names . . . . . . . . . . . . . . . . . . . . . . . . . . . 8Understanding the FBIK structure . . . . . . . . . . . . . . . . . . . . 20FBIK skeletons and effectors . . . . . . . . . . . . . . . . . . . . . . . . 21FBIK effectors . . . . . . . . . . . . . . . . . . . . . . . . . . . . . . . 22FBIK Body Parts . . . . . . . . . . . . . . . . . . . . . . . . . . . . . . 22Character and subcharacter sets . . . . . . . . . . . . . . . . . . . . . . 23Character animation with FBIK . . . . . . . . . . . . . . . . . . . . . . 25IK and FK Reach . . . . . . . . . . . . . . . . . . . . . . . . . . . . . . 27FBIK Keys . . . . . . . . . . . . . . . . . . . . . . . . . . . . . . . . . 28Create and use full body IK . . . . . . . . . . . . . . . . . . . . . . . . 30
Full body IK workflow . . . . . . . . . . . . . . . . . . . . . . . . 30Create the full body IK system for your character . . . . . . . . . 31Pin and unpin your character’s effectors . . . . . . . . . . . . . . 35Example workflows: Full body IK . . . . . . . . . . . . . . . . . . 41Create auxiliary pivots . . . . . . . . . . . . . . . . . . . . . . . 55Create auxiliary effectors . . . . . . . . . . . . . . . . . . . . . . 57Create floor contacts for your character’s hands and feet . . . . . 61
iii

Create and use full body IK . . . . . . . . . . . . . . . . . . . . . 66Troubleshoot full body IK character setup . . . . . . . . . . . . . 66
Animate > Set Full Body IK Keys . . . . . . . . . . . . . . . . . . . . . 69Skeleton > Full Body IK . . . . . . . . . . . . . . . . . . . . . . . . . . 71
Skeleton > Full Body IK > Add Full Body IK . . . . . . . . . . . . 71Skeleton > Full Body IK > Add Auxiliary Effector . . . . . . . . . 71Skeleton > Full Body IK > Add Auxiliary Pivot . . . . . . . . . . . 72Skeleton > Full Body IK > Activate Auxiliary Pivot . . . . . . . . . 72Skeleton > Full Body IK > Change Auxiliary Pivot Placement
. . . . . . . . . . . . . . . . . . . . . . . . . . . . . . . . . . . 72Skeleton > Full Body IK > Show FBIK FK Skeleton . . . . . . . . . 73Skeleton > Full Body IK > Hide FBIK FK Skeleton . . . . . . . . . 73Skeleton > Full Body IK > Add Floor Contact Plane . . . . . . . . 73Skeleton > Full Body IK > Go to Stance Pose . . . . . . . . . . . . 73Skeleton > Full Body IK > Add Missing Effectors . . . . . . . . . . 74Skeleton > Full Body IK > Body Part Autoload . . . . . . . . . . . 74
Edit > Keys > Delete FBIK Keys . . . . . . . . . . . . . . . . . . . . . . 74hikEffector . . . . . . . . . . . . . . . . . . . . . . . . . . . . . . . . 75hikFloorContactMarker . . . . . . . . . . . . . . . . . . . . . . . . . . 76
Index . . . . . . . . . . . . . . . . . . . . . . . . . . . . . . . . 81
iv | Contents
Full Body IK (FBIK)
Restore Full body IKIn Maya 2012, full body IK has been replaced by HumanIK technology thatprovides additional full body rigging and animation capabilities. All FBIK menusand options have been removed from Maya, however you can still load yourexisting scenes with FBIK rigs.
To have the deprecated FBIK user interface elements display in Maya, you canenter the following in the Maya command line:
optionVar -intValue showFbikMenuItem 1;
Full body IK overviewFull body IK (FBIK) lets you create natural poses and animation for yourcharacters. Instead of using single IK handles for each limb, full body IK letsyou translate and rotate a character’s body parts with FBIK effectors and makethe rest of the body follow those movements.
For example, if you use FBIK to animate the arm of a biped character reachingdown to pick up an object off the floor, your character will bend naturally atthe waist and knees as you move your character’s FBIK hand effectors downward.You can also use FBIK to animate character movements such as swinging froma tree branch, doing a handstand, a walk cycle, and so on.
Maya's FBIK is based on the Autodesk® HumanIK® solver used in Autodesk®
MotionBuilder®. FBIK utilizes the full capabilities of the HumanIK solver so thatyou can use the various attributes to tweak the motions of your characters duringinteraction and playback when animating with FBIK. The Autodesk® FBX®
plug-in and file interchange format allows you to transfer rigged characters
1
1
animated with FBIK between Maya and MotionBuilder without requiring theanimation to be baked.
Related topics
■ Full body IK workflow (page 30)
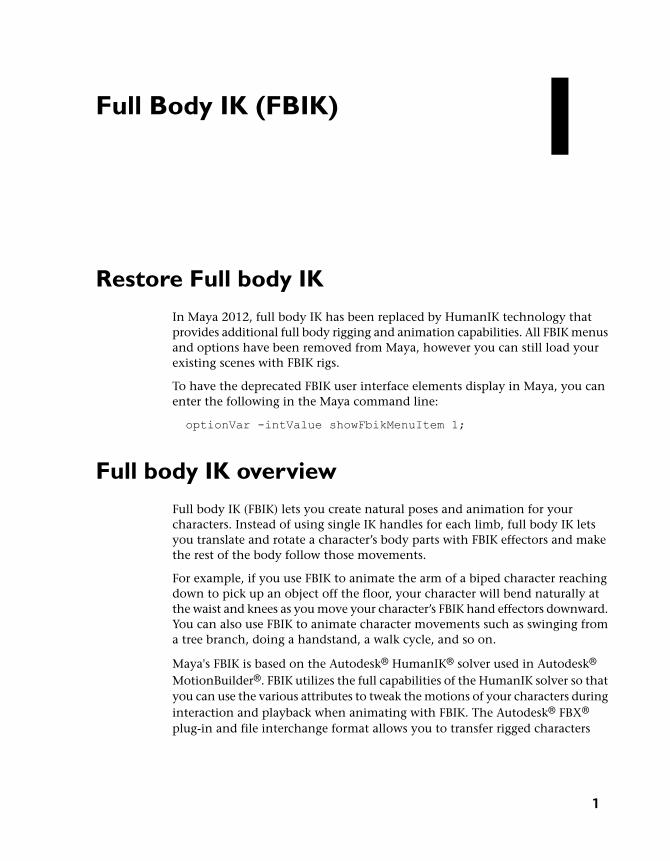
Prepare your character for full body IKBefore you create the FBIK effectors for your biped character, make sure yourcharacter is in a pose that will produce the best FBIK results.■ For a biped, position your character in a “T” pose (also known as the
T-stance) facing down the +Z-axis. Position the character’s feet straightforward, hands flat with palms facing downward, and thumbs pointingdown the +X-axis. The pose does not need to be an exact T-stance, but aclose approximation.
■ For a quadruped, position your character to face down the +Z-axis with itspaws/hooves pointing downwards with all their toes fully-extended towardsthe floor (not flat on the ground). If your character has a longer neck (likethat of a camel or giraffe), extend the neck (for example, as if the giraffeis reaching for a leaf) and point it down the +Z-axis.
Related topics
■ Full body IK workflow (page 30)
2 | Chapter 1 Full Body IK (FBIK)
FBIK joint typesWhen animating characters with FBIK, the joint labelling and namingconventions provide names for the following types of joints:■ Base joints
■ Roll joints
■ Auxiliary joints
■ Accessory and additional joints
Base joints
Base joints are the main joints in your character’s skeleton that are requiredfor FBIK to function. The base joints in your character’s skeletons include:Hips (pelvis or root), Spine, Head (top of neck), UpLeg (hips), Leg (knees), Foot(ankles), Arm (shoulders), ForeArm (elbows), and Hand (wrists).
Roll joints
Roll joints are optional joints with no real anatomical equivalents that let youcreate realistic twisting motions in the limbs of your characters. When labellingor renaming roll joints, give them the same labels or names as their parentjoints. The roll joints in your character’s skeletons include: ArmRoll (betweenthe shoulders and elbows), ForeArmRoll (between elbows and wrists), UpLegRoll(between hips and knees), and LegRoll (between knees and ankles).
Auxiliary joints
Auxiliary joints are optional joints that serve specific purposes that may notbe needed for all characters. The auxiliary joints in your character’s skeletonsinclude: Neck, Shoulder (collar bone), fingers, toes, InHand/InFoot(metacarpal/metatarsal) and FingerBase/ToeBase (carpal/tarsal) joints.FingerBase and InHand In your character’s hands there are two specializedauxiliary joint types: FingerBase and InHand. FingerBase is most often usedin quadruped hands to aid in paw/hoof placement. When you apply FBIK toyour character, an effector named FingerBaseEff is created for your FingerBasejoints. InHand joints are used to group each fingers’ joints. If you use InHand,you must also use the FingerBase joint as an intermediary between your InHandjoints and the LeftHand/RightHand (wrist) joints. FingerBase and InHand arenot needed to animate your character’s hands and fingers. However, whenusing hand floor contacts, FingerBase is required if you want your hands tobend at the bases of their fingers when they come in contact with the floor.
FBIK joint types | 3
ToeBase and InFoot In your character’s feet there are two specialized auxiliaryjoint types: ToeBase and InFoot. ToeBase is most often used in quadruped feetto aid in paw/hoof placement. When you apply FBIK to your character, aneffector named ToeBaseEff is created for your ToeBase joints. For bipedcharacters, you can use ToeBaseEff with Floor Contacts (similar to the wayyou can use auxiliary pivots) to create good bends at the base of yourcharacter’s toes when animating foot rolls with FBIK. InFoot joints are usedto group each toes’ joints. If you use InFoot, you must also use the ToeBasejoints as intermediaries between the InFoot and Foot joints in your character’sfeet. ToeBase and InFoot are not needed to animate your character’s feet andtoes. However, when using foot floor contacts, ToeBase is required if you wantyour feet to bend at the bases of their toes (balls of feet) when they come incontact with the floor.
HipsTranslation You can split the translation and rotation of your character’spelvis between two different joints by specifying a HipsTranslation joint inaddition to the Hips joint. When you then apply FBIK to your character, aneffector named HipsEff is created for your Hips joint, but an effector is notcreated for HipsTranslation. By default, the HipsTranslation joint will controlthe translation of your character’s hips and the Hips joint and effector willcontrol the rotation of your character’s hips. The HipsTranslation joint mustbe placed above the Hips joint in your character’s joint hierarchy and it mustalso be at the same position as the Hips joint in the scene view.
Accessory or additional joints
Accessory joints are the joints in your character’s skeletons that you do notwant to include in the FBIK solution because they are only used for skinningpurposes, for example, chest or rib joints and the joint at the top of yourcharacter’s head. Additional joints are the joints in your character’s skeletonsfor which FBIK joint labels or names do not exist, for example, wing or tailjoints. For these types of joints, you would use the None joint label or jointnames that are not recognized by the hikSolver. For information on how tolabel or rename these joints, see Other body parts (page 20).
FBIK joint labelling and naming conventionsTo use FBIK, you must label or rename each joint in your character’s skeletonto follow the FBIK joint labelling and naming conventions. Any joints in askeleton that are not labelled or renamed will not be included in the FBIKsolution.
4 | Chapter 1 Full Body IK (FBIK)
Each joint labelling and naming method provides the same level of controlover character poses, with the exception of joint labelling, which cannot beused on skeletons that have InHand, InFoot, or HipsTranslation joints.
For information on joint labelling and naming methods, the types of jointsthat are included in each joint labelling and naming method, and a completelist of the available FBIK joint labels and names, see the following:■ FBIK joint types (page 3)
FBIK joint labelling and naming methodsThere are three methods you can use to rename your joints so that they followthe FBIK joint labelling and naming conventions:■ Joint labelling
■ Renaming your character’s joints
■ Specifying custom joint names with MEL.
NOTE
If you label or rename only the base joints in your character’s skeleton,the joints in between the base joints will not be controlled by full body IK.If you label or rename all your character’s joints, then the hikSolver willproduce better results as its solution will include all your character’s jointsrather than just the base joints.
Joint labelling
You can use joint labels to tag your character’s joints so that when you createyour FBIK effectors, all the labeled joints are included in the full body IKsolution. When using the labelling FBIK joint labelling and naming method,you can label only your character’s base joints, or you can label all yourcharacter’s base, roll, and many of the auxiliary joints.
Joint labelling produces a complete full body IK solution. However, joint labelsdo not exist for the specialized InHand, InFoot, or HipsTranslation auxiliaryjoints. If you want to use these auxiliary joints in your skeleton, you need touse joint naming or MEL instead of labelling. See Accessory or additional joints(page 4).
FBIK joint labelling and naming methods | 5
NOTE
■ If you label FingerBase or ToeBase joints, their labels will appear as Fingerand Toe in the scene view.
■ For non-grasping hands/feet where their thumbs/big toes move with therest of their digits (such as quadruped paws and hooves or human feet),name their thumb and big toe joints as ExtraFingers so that the FingerBaseEffand ToeBaseEff effectors affect the digits of the hands/feet.
For grasping hands/feet where their thumbs/big toes flex independent of therest of their digits (such as human hands or primate hands and feet), nametheir thumb and big toe joints as HandThumbs and FootThumbs respectivelyso that the HandEff (wrist) and FootEff (ankle) effectors affect the digits of thehands/feet—rather than the BaseEff effectors.
Joint labels are useful when you do not want to rename the joints in yourcharacter’s skeleton. For example, you can use joint labels if you have anexisting character with custom joint names or if you are using referencedanimation with namespaces.
For most characters, we recommend that you use joint labelling since it is theeasiest and fastest FBIK joint labelling and naming method.
Labelling your joints for FBIK is similar to labelling your joints for animationretargeting. For steps on how to label your joints, see Label a skeleton’s joints.
TIP■ If you do not see your joint labels in the scene view, select Skeleton > Joint
Labelling > Show All Labels.
■ Label rolljoints the same as their parents are labelled. For example, youshould label a left forearm roll joint as Elbow(L) since the forearm rolljoints’ parent joint is labelled Elbow(L). Roll joints are supported for theelbow, shoulder, hip and knee.
■ You can automatically label entire limbs at a time, rather than labellingeach individual joint in your character’s skeleton. See Label a skeleton’sjoints.
Renaming your character’s joints
As an alternative to joint labelling, you can rename your character’s joints toproduce a complete full body IK solution.
6 | Chapter 1 Full Body IK (FBIK)
When using the renaming FBIK joint labelling and naming method, you canrename only your character’s base joints or you can rename all your character’sbase, roll, and auxiliary joints. See FBIK joint types (page 3).
For FBIK to work on your character, you are required to at least rename yourcharacter’s base joints according to the FBIK joint labelling and namingconventions. See Base joints (page 3). Renaming only your character’s basejoints is useful for simple biped characters that do not have any custom orspecialized joints, but require the ability of basic feet flexion. This joint namingmethod produces the simplest full body IK solution because the FBIK effectorsthat are created with this naming method will only use the main joints andnot the rest of the joints in your character’s skeleton (for example, roll jointsor finger and toe joints).
If you want to include all your character’s joints in your FBIKsolution—including auxiliary joints like the InHand/InFoot orToeBase/FingerBase joints, then you should rename all the joints in yourcharacter’s skeleton.
Specify custom joint names with MEL
You can create a custom joint naming convention for your full body IK usingMEL to meet the special needs of your production or game pipeline.
The -sourceSkeleton (-sk) flag on the command lets you specify theassociation between your character’s current joint names and the FBIK jointnames that adhere to the FBIK joint labelling and naming conventions. Foreach joint you want to include in the FBIK solution, you need to specify apartial path for the joint and the name of the full body joint it represents.These must then be separated by spaces, and multiple entries need to beseparated by commas (,). For example:
characterize -sk "myhips hips,rightHip rightupleg,leftHipleftupleg,..."
This MEL string tells the characterize command to look for and use thealternate joint names (provided within the quotation marks of the string)during the full body IK solution.
NOTE
When using MEL to specify custom joints names for FBIK, you cannot havemultiple joints in the scene with the same name. Instead, you need to providethe partial path name for the joints that are named the same.
FBIK joint labelling and naming methods | 7

Joint labels and namesFor information on joint types or joint labelling and renaming methods, seeFBIK joint types (page 3) and FBIK joint labelling and naming methods (page5).
NOTE
Joint naming is not case sensitive and you can use “l” or “r” instead of left orright.
8 | Chapter 1 Full Body IK (FBIK)
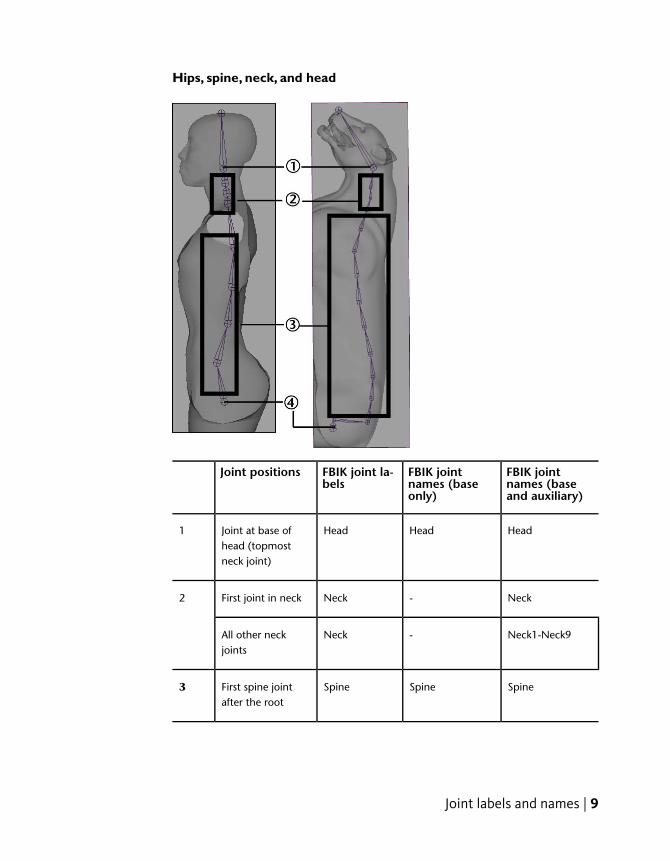
Hips, spine, neck, and head
FBIK jointnames (baseand auxiliary)
FBIK jointnames (baseonly)
FBIK joint la-bels
Joint positions
HeadHeadHeadJoint at base ofhead (topmostneck joint)
1
Neck-NeckFirst joint in neck2
Neck1-Neck9-NeckAll other neckjoints
SpineSpineSpineFirst spine jointafter the root
3
Joint labels and names | 9
FBIK jointnames (baseand auxiliary)
FBIK jointnames (baseonly)
FBIK joint la-bels
Joint positions
Spine1-Spine9Spine1-Spine9SpineAll other spinejoints
HipsHipsRootPelvis (root)4
HipsTranslation--
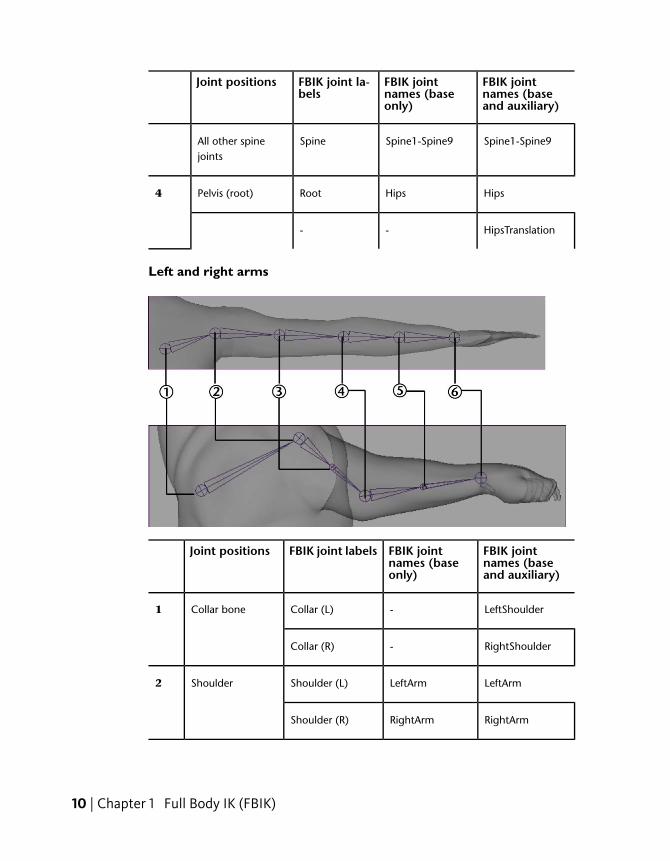
Left and right arms
FBIK jointnames (baseand auxiliary)
FBIK jointnames (baseonly)
FBIK joint labelsJoint positions
LeftShoulder-Collar (L)Collar bone1
RightShoulder-Collar (R)
LeftArmLeftArmShoulder (L)Shoulder2
RightArmRightArmShoulder (R)
10 | Chapter 1 Full Body IK (FBIK)
FBIK jointnames (baseand auxiliary)
FBIK jointnames (baseonly)
FBIK joint labelsJoint positions
LeftArmRoll-Shoulder (L)Upper arm rolljoint
3
RightArmRoll-Shoulder (R)
LeftForeArmLeftForeArmElbow (L)Elbow4
RightForeArmRightForeArmElbow (R)
LeftForeArmRoll-Elbow (L)Lower arm rolljoint
5
RightForeArmRoll-Elbow (R)
LeftHandLeftHandHand (L)Wrist6
RightHandRightHandHand (R)
Joint labels and names | 11
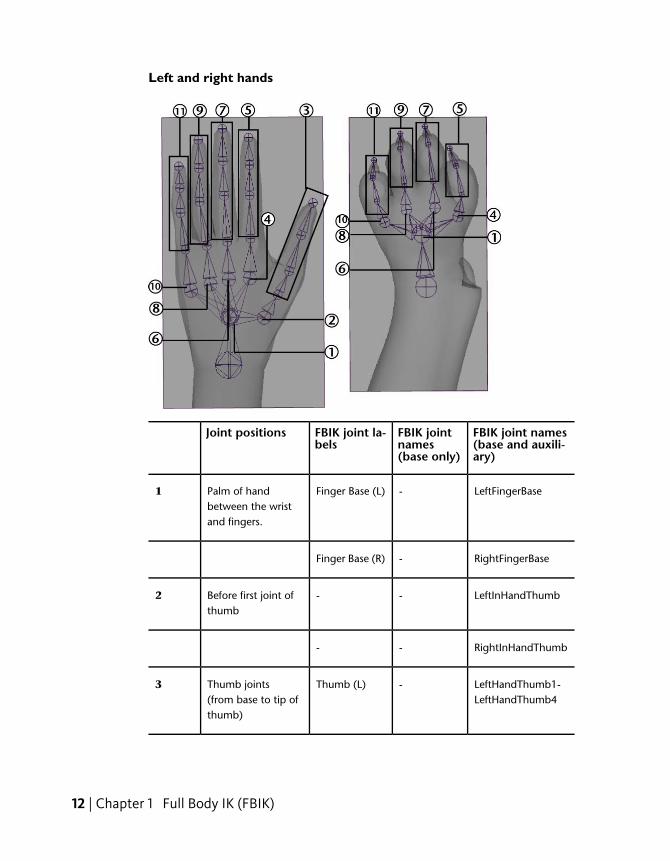
Left and right hands
FBIK joint names(base and auxili-ary)
FBIK jointnames(base only)
FBIK joint la-bels
Joint positions
LeftFingerBase-Finger Base (L)Palm of handbetween the wristand fingers.
1
RightFingerBase-Finger Base (R)
LeftInHandThumb--Before first joint ofthumb
2
RightInHandThumb--
LeftHandThumb1-LeftHandThumb4
-Thumb (L)Thumb joints(from base to tip ofthumb)
3
12 | Chapter 1 Full Body IK (FBIK)

FBIK joint names(base and auxili-ary)
FBIK jointnames(base only)
FBIK joint la-bels
Joint positions
RightHandThumb1-RightHandThumb4
-Thumb (R)
LeftInHandIndex--Before first joint ofindex finger
4
RightInHandIndex--
LeftHandIndex1-LeftHandIndex4
-Index (L)Index finger joints(from base to tip offinger)
5
RightHandIndex1-RightHandIndex4
-Index (R)
LeftInHandMiddle--Before first joint ofmiddle finger
6
RightInHandMiddle--
LeftHandMiddle1-LeftHandMiddle4
-Middle Finger(L)
Middle finger joints(from base to tip offinger)
7
RightHandMiddle1-RightHandMiddle4
-Middle Finger(R)
LeftInHandRing--Before first joint ofring finger
8
RighttInHandRing--
Joint labels and names | 13

FBIK joint names(base and auxili-ary)
FBIK jointnames(base only)
FBIK joint la-bels
Joint positions
LeftHandRing1-LeftHandRing4
-Ring Finger (L)Ring finger joints(from base to tip offinger)
9
RightHandRing1-RightHandRing4
-Ring Finger (R)
LeftInHandPinky--Before first joint ofpinky finger
10
RightInHandPinky--
LeftHandPinky1-LeftHandPinky4
-Pinky (L)Pinky finger joints(from base to tip offinger)
11
RightHandPinky1-RightHandPinky4
-Pinky (R)
LeftInHandEx-traFinger
--Before first joint ofextra finger
RightInHandEx-traFinger
--
LeftHandEx-traFinger1-LeftHan-dExtraFinger4
--Extra finger joints(from base to tip offinger)
RightHandEx-traFinger1-
--
RightHandEx-traFinger4
14 | Chapter 1 Full Body IK (FBIK)
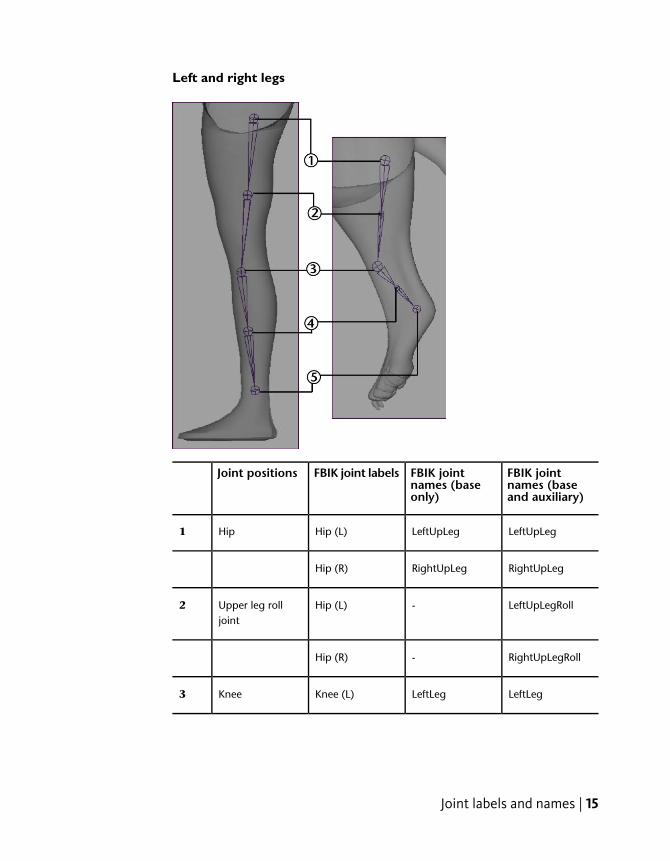
Left and right legs
FBIK jointnames (baseand auxiliary)
FBIK jointnames (baseonly)
FBIK joint labelsJoint positions
LeftUpLegLeftUpLegHip (L)Hip1
RightUpLegRightUpLegHip (R)
LeftUpLegRoll-Hip (L)Upper leg rolljoint
2
RightUpLegRoll-Hip (R)
LeftLegLeftLegKnee (L)Knee3
Joint labels and names | 15

FBIK jointnames (baseand auxiliary)
FBIK jointnames (baseonly)
FBIK joint labelsJoint positions
RightLegRightLegKnee (R)
LeftLegRoll-Knee (L)Lower leg rolljoint
4
RightLegRoll-Knee (R)
LeftFootLeftFootFoot (L)Ankle5
RightFootRightFootFoot (R)
16 | Chapter 1 Full Body IK (FBIK)
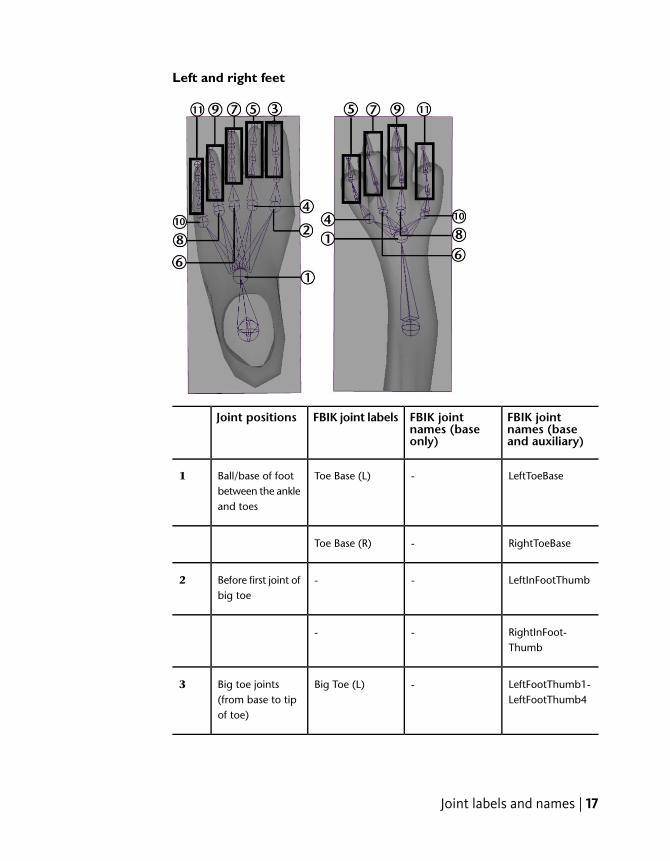
Left and right feet
FBIK jointnames (baseand auxiliary)
FBIK jointnames (baseonly)
FBIK joint labelsJoint positions
LeftToeBase-Toe Base (L)Ball/base of footbetween the ankleand toes
1
RightToeBase-Toe Base (R)
LeftInFootThumb--Before first joint ofbig toe
2
RightInFoot-Thumb
--
LeftFootThumb1-LeftFootThumb4
-Big Toe (L)Big toe joints(from base to tipof toe)
3
Joint labels and names | 17

FBIK jointnames (baseand auxiliary)
FBIK jointnames (baseonly)
FBIK joint labelsJoint positions
RightFoot-Thumb1-RightFootThumb4
-Big Toe (R)
LeftInFootIndex--Before first joint ofsecond toe
4
RightInFootIndex--
LeftFootIndex1-LeftFootIndex4
-Index Toe (L)Second toe joints(from base to tipof toe)
5
RightFootIndex1-RightFootIndex4
-Index Toe (R)
LeftInFootMiddle--Before first joint ofmiddle toe
6
RightInFoot-Middle
--
LeftFootMiddle1-LeftFootMiddle4
-Middle Toe (L)Middle toe joints(from base to tipof toe)
7
RightFoot-Middle1-RightFootMiddle4
-Middle Toe (R)
LeftInFootRing--Before first joint offourth toe
8
RightInFootRing--
18 | Chapter 1 Full Body IK (FBIK)

FBIK jointnames (baseand auxiliary)
FBIK jointnames (baseonly)
FBIK joint labelsJoint positions
LeftFootRing1-LeftFootRing4
-Ring Toe (L)Fourth toe joints(from base to tipof toe)
9
RightFootRing1-RightFootRing4
-Ring Toe (R)
LeftInFootPinky--Before first joint ofbaby toe
10
RightInFootPinky--
LeftFootPinky1-LeftFootPinky4
-Pinky Toe (L)Baby toe joints(from base to tipof toe)
11
RightFootPinky1-RightFootPinky4
-Pinky Toe (R)
LeftInFootEx-traFinger
--Before first joint ofextra toe
RightInFootEx-traFinger
--
LeftFootEx-traFinger1-LeftFoo-tExtraFinger4
--Extra toe joints(from base to tipof toe)
RightFootEx-traFinger1-
--
RightFootEx-traFinger4
Joint labels and names | 19

Other body parts
Use the None label or a joint name that does not adhere to the FBIK jointlabelling and naming conventions for:■ Any joints for which FBIK joint labels or names do not exist
■ Custom or accessory joints you do not want to include in the FBIK solution.
For example, chest or rib joints, the joint at the top of your character’s head,wing or tail joints, and so on.
Understanding the FBIK structureFull body IK uses multiple levels of hierarchy. These levels of hierarchy areused to group your effectors, joints, and even animation keys according tothe anatomical structures of your character’s body. When posing yourcharacters with FBIK, you work with your character’s FBIK effectors andskeletons. When animating your characters with FBIK, you work with yourcharacter’s body parts and character sets.
When you add full body IK to your character, the following levels of hierarchyare created:■ A FK skeleton and a set of FBIK effectors are created for your character, and
your character’s original skeleton becomes its input skeleton. See FBIKskeletons and effectors (page 21).
■ Each of your character’s FBIK effectors and FK joints are made membersof a body part. See FBIK Body Parts (page 22).
■ A top-level character set is created for your character and a series ofsubcharacter sets are created for each of your character’s body parts; all to
20 | Chapter 1 Full Body IK (FBIK)
house your character’s animation keys. See Character and subcharactersets (page 23).
FBIK skeletons and effectorsWhen you add full body IK to your character, a FK skeleton and a set of FBIKeffectors are created, and your character’s original skeleton becomes its inputskeleton. For FBIK to work, the hikSolver requires both the input and FKskeletons.
In the scene view, the input skeleton appears brown and the FK skeleton appearsdark blue. To make the FK skeleton visible in the scene view, select Skeleton> Full Body IK > Show FBIK FK Skeleton (page 73) or Hide FBIK FK Skeleton.
During interaction, the hikSolver synchronizes your FK skeleton and the inputskeleton driven by the FBIK effectors. Also, advanced FBIK attributes like Pulland Stiffness are not taken into account during interaction. See hikHandle.
During playback, your FK and input skeletons contribute to the resulting FBIKanimation, but they are no longer synchronized.
Input skeleton
When posing with FBIK, you can transform the joints of your character’s inputskeleton to create joint-level poses. This is similar to posing with regular FKin Maya. See Posing skeletons .
When animating with FBIK, you can key the joints of the your character’sinput skeleton and their FBIK effectors to create FK animation. Any keys youset on the input skeleton are not actually placed there, but are instead placedon the FK skeleton.
When playing back your FBIK animation, the input skeleton shows theresulting FBIK animation in the scene view, similar to the blend skeleton whenblending IK/FK animation. See IK/FK blending.
The input skeleton is also used to bind your character’s skin.
FK skeleton
When posing with FBIK, you do not transform the joints in the FK skeleton,but instead you manipulate the joints in the input skeleton to create FK-typeposes.
FBIK skeletons and effectors | 21
When animating with FBIK, you do not key the joints of your FK skeleton,but instead you key the joints of your input skeleton and their FBIK effectorsto create FK animation. However, the keys that you set on the input skeletonare placed on the FK skeleton.
When playing back your FBIK animation, you can show the FK skeleton toview the differences between your character’s input and FK skeleton’s poses.
FBIK effectorsWhen posing with FBIK, you can transform your FBIK effectors to create bodypart-level poses. This is similar to posing your characters with IK handles. SeePosing skeletons and IK handles.
When animating with FBIK, you can key your character’s FBIK effectors andinput joints to create IK animation. These keys are placed on the FBIK effectorsand their FK joints, not the input skeleton’s joints. You can also key your FBIKeffectors’ Reach values to set the amount of IK for your effectors. See ReachMode (page 69).
WARNING
Freezing the transforms of your FBIK effectors will change the position of yourcharacter and its joints in world space.
FBIK Body PartsEach of your character’s FBIK effectors and FK joints are a member of a bodypart that corresponds to an existing limb or structure in your character’s body.When animating with FBIK, you can then set keys on the FBIK effectors andinput joints in a body part to animate your character’s limbs.
Body part membership
FBIK effectorsFK jointsBody parts
HipsEffHipsHips
NeckEffSpineSpineSpineEffSpine1-Spine9
22 | Chapter 1 Full Body IK (FBIK)
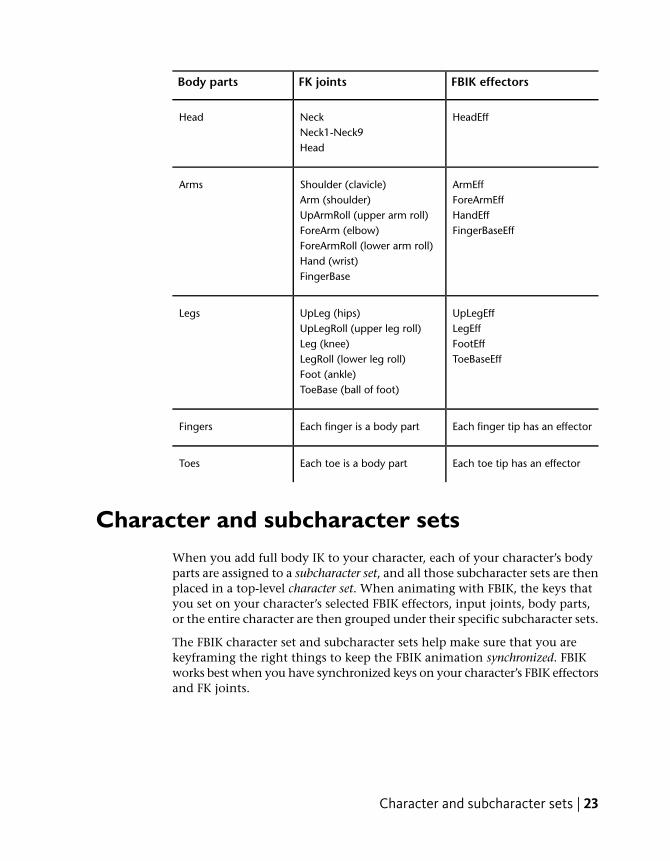
FBIK effectorsFK jointsBody parts
HeadEffNeckNeck1-Neck9
Head
Head
ArmEffShoulder (clavicle)ArmsForeArmEffArm (shoulder)HandEffUpArmRoll (upper arm roll)FingerBaseEffForeArm (elbow)
ForeArmRoll (lower arm roll)Hand (wrist)FingerBase
UpLegEffUpLeg (hips)LegsLegEffUpLegRoll (upper leg roll)FootEffLeg (knee)ToeBaseEffLegRoll (lower leg roll)
Foot (ankle)ToeBase (ball of foot)
Each finger tip has an effectorEach finger is a body partFingers
Each toe tip has an effectorEach toe is a body partToes
Character and subcharacter setsWhen you add full body IK to your character, each of your character’s bodyparts are assigned to a subcharacter set, and all those subcharacter sets are thenplaced in a top-level character set. When animating with FBIK, the keys thatyou set on your character’s selected FBIK effectors, input joints, body parts,or the entire character are then grouped under their specific subcharacter sets.
The FBIK character set and subcharacter sets help make sure that you arekeyframing the right things to keep the FBIK animation synchronized. FBIKworks best when you have synchronized keys on your character’s FBIK effectorsand FK joints.
Character and subcharacter sets | 23
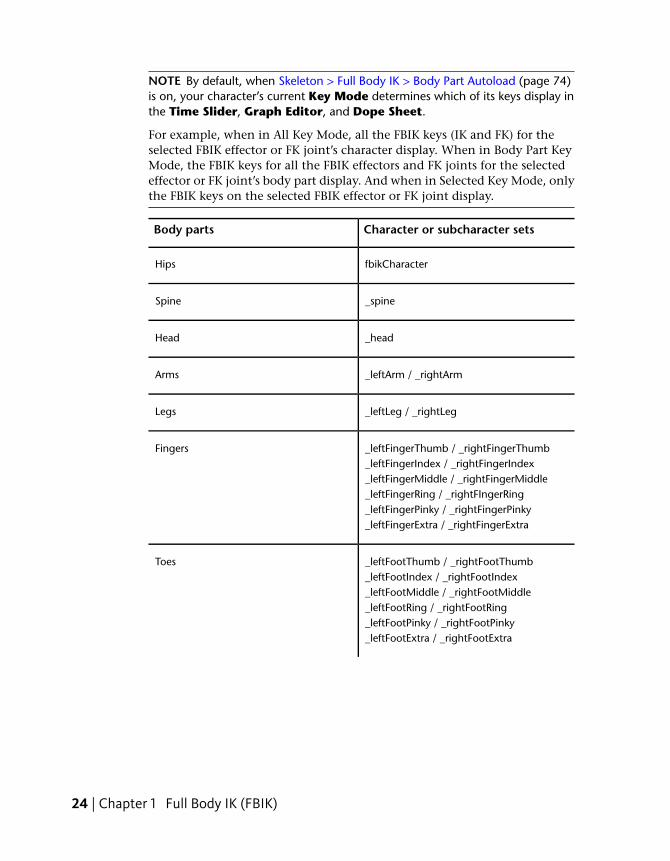
NOTE By default, when Skeleton > Full Body IK > Body Part Autoload (page 74)is on, your character’s current Key Mode determines which of its keys display inthe Time Slider, Graph Editor, and Dope Sheet.
For example, when in All Key Mode, all the FBIK keys (IK and FK) for theselected FBIK effector or FK joint’s character display. When in Body Part KeyMode, the FBIK keys for all the FBIK effectors and FK joints for the selectedeffector or FK joint’s body part display. And when in Selected Key Mode, onlythe FBIK keys on the selected FBIK effector or FK joint display.
Character or subcharacter setsBody parts
fbikCharacterHips
_spineSpine
_headHead
_leftArm / _rightArmArms
_leftLeg / _rightLegLegs
_leftFingerThumb / _rightFingerThumbFingers_leftFingerIndex / _rightFingerIndex_leftFingerMiddle / _rightFingerMiddle_leftFingerRing / _rightFIngerRing_leftFingerPinky / _rightFingerPinky_leftFingerExtra / _rightFingerExtra
_leftFootThumb / _rightFootThumbToes_leftFootIndex / _rightFootIndex_leftFootMiddle / _rightFootMiddle_leftFootRing / _rightFootRing_leftFootPinky / _rightFootPinky_leftFootExtra / _rightFootExtra
24 | Chapter 1 Full Body IK (FBIK)
Character animation with FBIKHow do I animate my characters with full body IK?
To animate with full body IK, you need to do the following:■ Pose your character’s body parts by translating and rotating their FBIK
effectors or input joints
■ Set your character’s FBIK Key Mode (Selected, Body Part, or All) and ReachMode (Simple, FK, or IK)
■ Set keys on the FBIK effectors or input joints you posed with Animate >Set Key or the Set Key hotkey (s key).
WARNING■ For Animate > Set Key or the S hotkey to work with FBIK, turn on Set
FullBodyIK keys in the Set Key Options (Animate > Set Key >
).
■ You cannot use Autokey when animating with FBIK.
NOTE If you use Key Selected to set FBIK keys on your character, only thecurrently selected objects’ (FBIK effectors or FK joints) keys are loaded in theTime Slider when Body Part Autoload is off. Therefore, you can easilydesynchronize your FBIK Input and FK skeletons when editing FBIK keys setwith Key Selected in the Time Slider. For FBIK to work properly, your Inputand FK skeletons need to be always synchronized.
When editing FBIK keys set with Key Selected in the Time Slider, youneed to select the FBIK effectors and/or their corresponding FK joints onwhich the keys reside so that you are editing all the appropriate FBIK keysin the Time Slider. This will keep your Input and FK skeletonssynchronized.
Pose characters with full body IK
To pose your character with full body IK, you need to transform yourcharacter’s FBIK effectors (for IK type behavior) and input joints (for FK typebehavior) while pinning and unpinning your effectors when needed. See Pinand unpin your character’s effectors (page 35).
You can also use auxiliary pivots and floor contacts for your characters to aidand enhance their FBIK poses. See Create auxiliary pivots (page 55) and Createfloor contacts for your character’s hands and feet (page 61).
Character animation with FBIK | 25

NOTE
Key Mode: Body Part isolates posing of your character to individual limbsor body parts. For example, if Body Part is the current Key Mode for yourbiped character, and you translate the RightHandEff, then the new pose ofyour character’s right arm does not affect or change the poses of any of itsother limbs.
Key FBIK effectors and joints
Setting the Key Mode and Reach Mode for your FBIK keys determines whereyour FBIK keys are placed on your character and whether your character’sFBIK animation is more FK or more IK at any given point during its animation.
When animating your character with FBIK, you can select the Key and Reachmodes for your keys from the FBIK marking menu or the Animate > Set FullBody IK Keys (page 69) window.
WARNING■ For Animate > Set Key or the S hotkey to work with FBIK, turn on Set
FullBodyIK keys in the Set Key Options (Animate > Set Key > ).
■ You cannot use Autokey when animating with FBIK.
To set FBIK keys
1 Pose your character.
2 Select an appropriate Reach Mode for your character. See Reach Mode(page 69).■ The IK mode sets the Reach channel values for your FBIK effectors
to 1 and makes sure they are keyed when you set your FBIK keys. IKmode sets that your effectors are completely controlled by IK.
■ The FK mode sets the Reach channel values for your FBIK effectorsto 0 and makes sure they are keyed when you set your FBIK keys. FKmode disables your effectors’ IK; allowing the underlying FK skeleton’sjoints to drive your character’s animation.
■ The Simple Key mode does not set the Reach channel values ofthe keyed FBIK effectors; the Reach values do not change and arenot keyed.
26 | Chapter 1 Full Body IK (FBIK)
3 Select the desired Key Mode for your character. See Key Mode (page69).■ The Selected mode sets keys on the input joints and FBIK effectors
you select.
■ The Body Part mode sets keys on the FBIK effector’s and inputjoints of your character’s body parts.
■ The All mode sets keys on the FBIK effectors and input joints of yourentire character.
4 Select the FBIK effectors or input joints you want to key and selectAnimate > Set Key or press s (the Set Key hotkey) to set keys on them.
NOTE■ FBIK works best when you have synchronized keys on the FK skeleton
and FBIK effectors. You can only set synchronized keys when SetFullBodyIK keys is on in the Set Key Options (Animate > Set Key
> ).
■ You can set advanced options in your FBIK solution to enhance andrefine your character’s poses and animation. See hikHandle.
■ For Animate > Set Key or the S hotkey to work with FBIK, turn onSet FullBodyIK keys in the Set Key Options.
IK and FK ReachYou should use IK Reach on your character when:■ You need to hold the positions of your character’s body parts during its
animation’s interpolation
■ You need to ensure that its body parts do not deviate from their positionsat which their keys were set.
For example, keying your character’s foot placements when they contact thefloor during a walk cycle. In this instance, setting keys on the FootEff effectorsprevents undesirable foot sliding.
You should set FK Reach on your character when:■ You need to release its body parts from their held positions
■ You need to key its positions, but the positions do not have to be exactduring its animation’s interpolation.
IK and FK Reach | 27
For example, keying your character’s FootEff when its legs are off the floorswinging through the air during a walk cycle. In the instance, you need tokey the movements of your character’s legs, but your character’s feet do nothave stick to any one position.
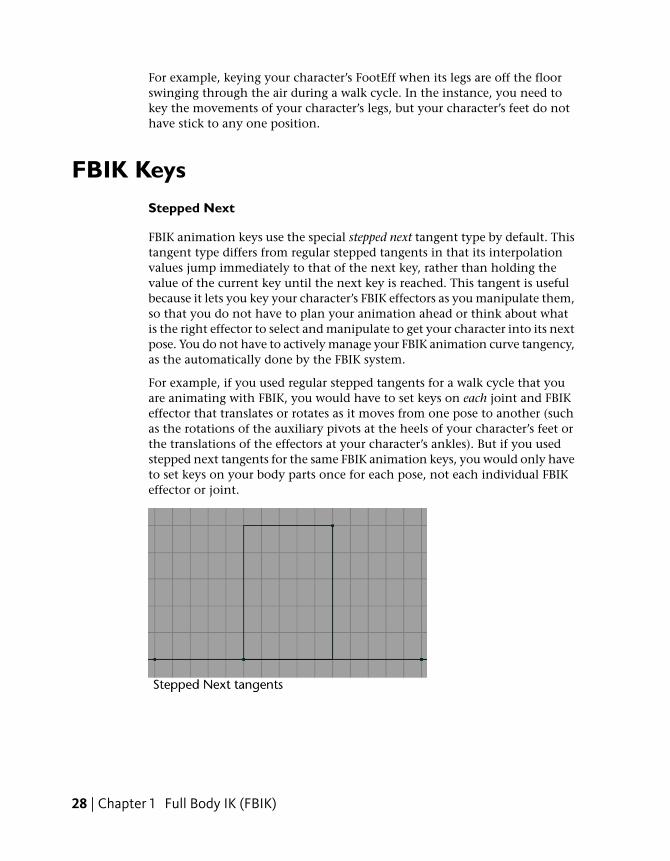
FBIK KeysStepped Next
FBIK animation keys use the special stepped next tangent type by default. Thistangent type differs from regular stepped tangents in that its interpolationvalues jump immediately to that of the next key, rather than holding thevalue of the current key until the next key is reached. This tangent is usefulbecause it lets you key your character’s FBIK effectors as you manipulate them,so that you do not have to plan your animation ahead or think about whatis the right effector to select and manipulate to get your character into its nextpose. You do not have to actively manage your FBIK animation curve tangency,as the automatically done by the FBIK system.
For example, if you used regular stepped tangents for a walk cycle that youare animating with FBIK, you would have to set keys on each joint and FBIKeffector that translates or rotates as it moves from one pose to another (suchas the rotations of the auxiliary pivots at the heels of your character’s feet orthe translations of the effectors at your character’s ankles). But if you usedstepped next tangents for the same FBIK animation keys, you would only haveto set keys on your body parts once for each pose, not each individual FBIKeffector or joint.
28 | Chapter 1 Full Body IK (FBIK)
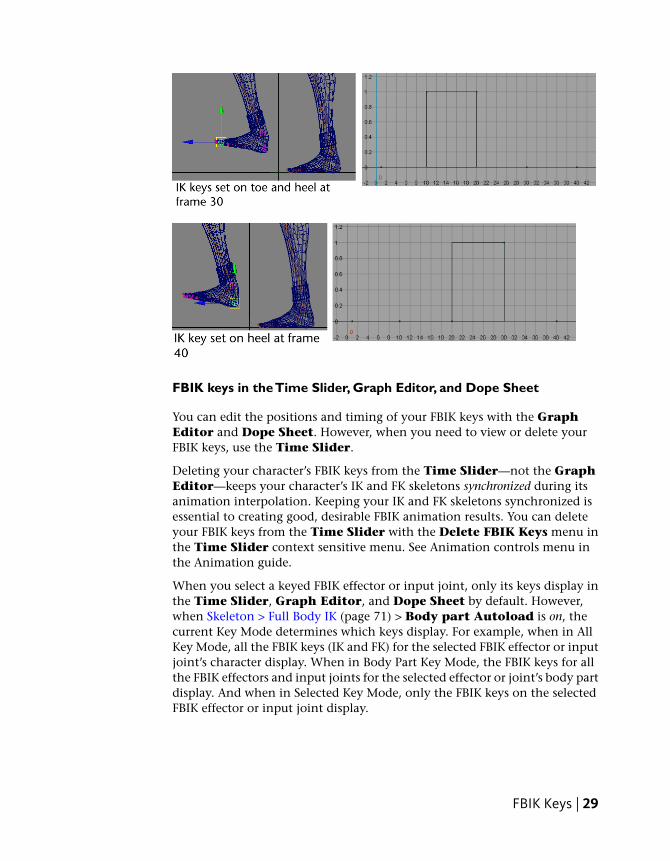
FBIK keys in the Time Slider, Graph Editor, and Dope Sheet
You can edit the positions and timing of your FBIK keys with the GraphEditor and Dope Sheet. However, when you need to view or delete yourFBIK keys, use the Time Slider.
Deleting your character’s FBIK keys from the Time Slider—not the GraphEditor—keeps your character’s IK and FK skeletons synchronized during itsanimation interpolation. Keeping your IK and FK skeletons synchronized isessential to creating good, desirable FBIK animation results. You can deleteyour FBIK keys from the Time Slider with the Delete FBIK Keys menu inthe Time Slider context sensitive menu. See Animation controls menu inthe Animation guide.
When you select a keyed FBIK effector or input joint, only its keys display inthe Time Slider, Graph Editor, and Dope Sheet by default. However,when Skeleton > Full Body IK (page 71) > Body part Autoload is on, thecurrent Key Mode determines which keys display. For example, when in AllKey Mode, all the FBIK keys (IK and FK) for the selected FBIK effector or inputjoint’s character display. When in Body Part Key Mode, the FBIK keys for allthe FBIK effectors and input joints for the selected effector or joint’s body partdisplay. And when in Selected Key Mode, only the FBIK keys on the selectedFBIK effector or input joint display.
FBIK Keys | 29
NOTE
When Skeleton > Full Body IK (page 71) > Body part Autoload is on, andBody Part or All Key Mode is on, then the selected FBIK effector or input joint’ssubcharacter set is automatically loaded as the Current Character.
Create and use full body IK
Full body IK workflow
Each of the following steps are mandatory when using FBIK in Maya unlessotherwise specified.
1 Prepare your character for full body IK (page 2).
2 Label or rename your character’s joints (page 4).
3 Create the full body IK system for your character (page 31).
4 Pose characters with full body IK (page 25).
See also Pin and unpin your character’s effectors (page 35).
5 Key your character’s movements with FBIK.
See How do I animate my characters with full body IK? (page 25) andFBIK Keys (page 28).
■ (Optional) Create auxiliary pivots (page 55).
■ (Optional) Create floor contacts for your character’s hands and feet (page61).
■ (Optional) Create auxiliary effectors (page 57)
TIP
To help you get started with FBIK, we have provided an example bipedand quadruped FBIK character. You can access them from Skeleton > FullBody IK (page 71) > Get FBIK Example or the FBIK Examples tab inthe Visor.
30 | Chapter 1 Full Body IK (FBIK)
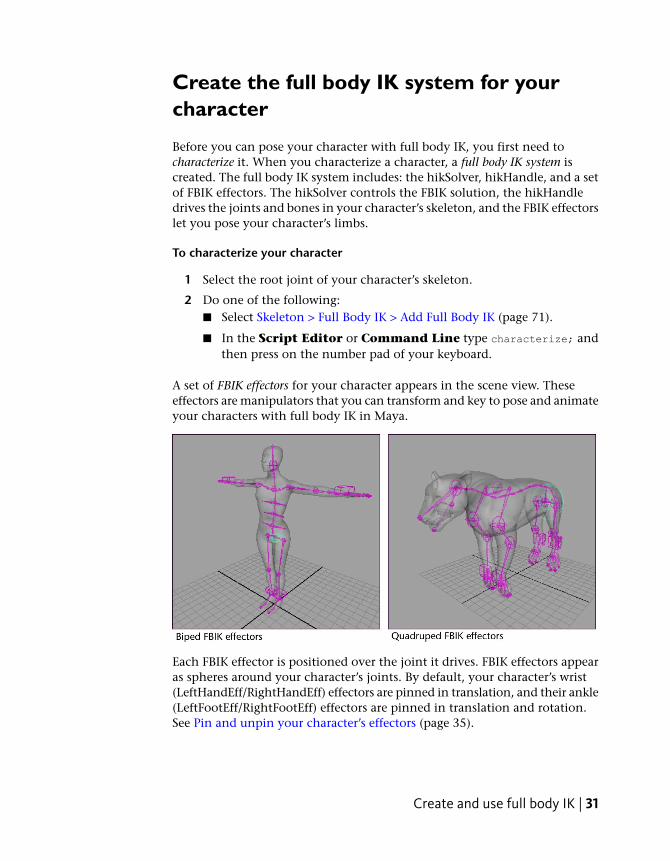
Create the full body IK system for yourcharacter
Before you can pose your character with full body IK, you first need tocharacterize it. When you characterize a character, a full body IK system iscreated. The full body IK system includes: the hikSolver, hikHandle, and a setof FBIK effectors. The hikSolver controls the FBIK solution, the hikHandledrives the joints and bones in your character’s skeleton, and the FBIK effectorslet you pose your character’s limbs.
To characterize your character
1 Select the root joint of your character’s skeleton.
2 Do one of the following:■ Select Skeleton > Full Body IK > Add Full Body IK (page 71).
■ In the Script Editor or Command Line type characterize; andthen press on the number pad of your keyboard.
A set of FBIK effectors for your character appears in the scene view. Theseeffectors are manipulators that you can transform and key to pose and animateyour characters with full body IK in Maya.
Each FBIK effector is positioned over the joint it drives. FBIK effectors appearas spheres around your character’s joints. By default, your character’s wrist(LeftHandEff/RightHandEff) effectors are pinned in translation, and their ankle(LeftFootEff/RightFootEff) effectors are pinned in translation and rotation.See Pin and unpin your character’s effectors (page 35).
Create and use full body IK | 31
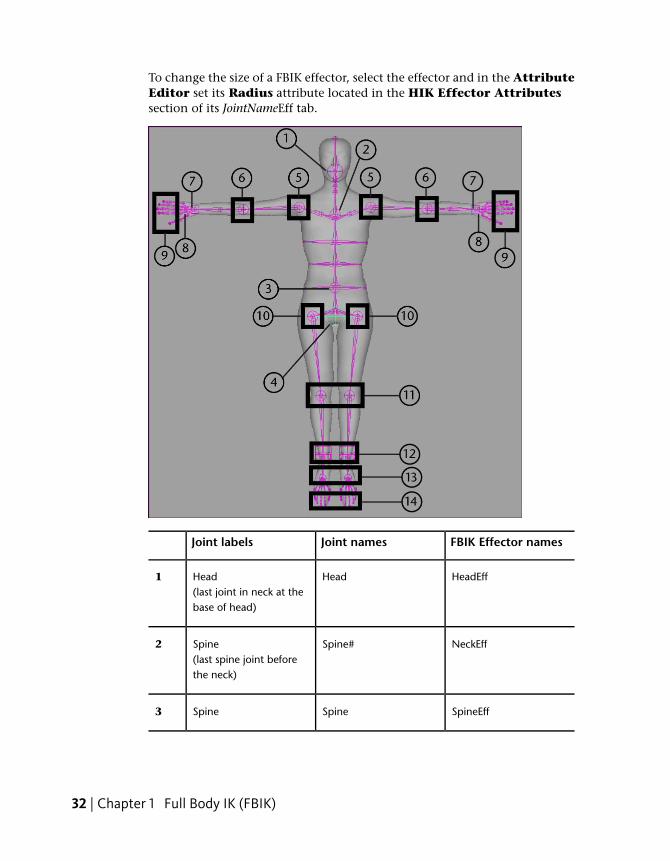
To change the size of a FBIK effector, select the effector and in the AttributeEditor set its Radius attribute located in the HIK Effector Attributessection of its JointNameEff tab.
FBIK Effector namesJoint namesJoint labels
HeadEffHeadHead(last joint in neck at thebase of head)
1
NeckEffSpine#Spine(last spine joint beforethe neck)
2
SpineEffSpineSpine3
32 | Chapter 1 Full Body IK (FBIK)

FBIK Effector namesJoint namesJoint labels
HipsEffHipsRoot4
HipsTranslationEffHipsTranslation-
LeftArmEffLeftArmShoulder (L)5
RightArmEffRightArmShoulder (R)
LeftForeArmEffLeftForeArmElbow (L)6
RightForeArmEffRightForeArmElbow (R)
LeftHandEffLeftHandHand (L)7
RightHandEffRightHandHand (R)
LeftFingerBaseEffLeftFingerBaseFinger Base (L)8
RightFingerBaseEffRightFingerBaseFinger Base (R)
LeftHandThumb1EffLeftHandThumb#Thumb (L)9
RightHandThumb1EffRightHandThumb#Thumb (R)
LeftHandIndex1EffLeftHandIndex#Index (L)
RightHandIndex1EffRightHandIndex#Index (R)
LeftHandMiddle1EffLeftHandMiddle#Middle Finger (L)
RightHandMiddle1EffRightHandMiddle#Middle Finger (R)
LeftHandRing1EffLeftHandRing#Ring Finger (L)
Create and use full body IK | 33

FBIK Effector namesJoint namesJoint labels
RightHandRing1EffRightHandRing#Ring Finger (R)
LeftHandPinky1EffLeftHandPinky#Pinky (L)
RightHandPinky1EffRightHandPinky#Pinky (R)
LeftHandExtra1EffLeftHandExtraFinger#-
RightHandExtra1EffRightHandExtraFinger#-
LeftUpLegEffLeftUpLegHip (L)10
RightUpLegEffRightUpLegHip (R)
LeftLegEffLeftLegKnee (L)11
RightLegEffRightLegKnee (R)
LeftFootEffLeftFootFoot (L)12
RightFootEffRightFootFoot (R)
LeftToeBaseEffLeftToeBaseToe Base (L)13
RightToeBaseEffRightToeBaseToe Base (R)
LeftFootThumb1EffLeftFootThumb#Big Toe (L)14
RightFootThumb1EffRightFootThumb#Big Toe (R)
LeftFootIndex1EffLeftFootIndex#Index Toe (L)
RightFootIndex1EffRightFootIndex#Index Toe (R)
34 | Chapter 1 Full Body IK (FBIK)
FBIK Effector namesJoint namesJoint labels
LeftFootMiddle1EffLeftFootMiddle#Middle Toe (L)
RightFootMiddle1EffRightFootMiddle#Middle Toe (R)
LeftFootRing1EffLeftFootRing#Ring Toe (L)
RightFootRing1EffRightFootRing#Ring Toe (R)
LeftFootPinky1EffLeftFootPinky#Pinky Toe (L)
RightFootPinky1EffRightFootPinky#Pinky Toe (R)
LeftFootExtra1EffLeftFootExtraToe#-
RightFootExtra1EffRightFootExtraToe#-
Pin and unpin your character’s effectors
You can use pinning to hold or limit the movements of your character’s bodyparts when posing with FBIK. Pinning allows you to lock the translation orrotation channels of specific effectors; so that when you move unpinned bodyparts, the pinned body parts do not follow. For example, you can pin acharacter’s foot effectors in translation and rotation when posing a walk cycleto prevent foot sliding.
When you first create the FBIK effectors for your character, by default, yourcharacter’s feet are pinned in translation and rotation and your character’shands are pinned in translation. This prevents your character’s limbs frombeing moved or dragged when you move the rest of the body.
Create and use full body IK | 35
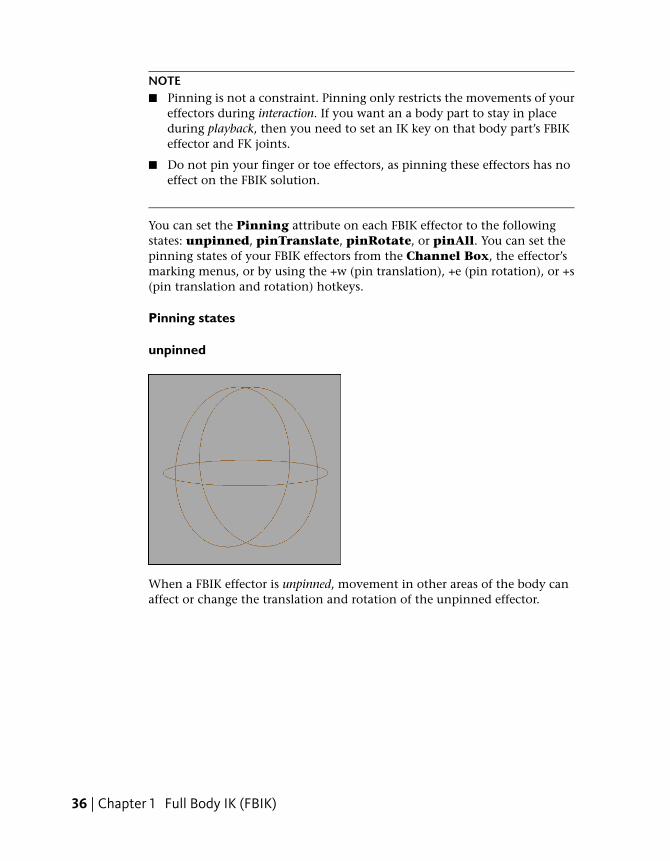
NOTE■ Pinning is not a constraint. Pinning only restricts the movements of your
effectors during interaction. If you want an a body part to stay in placeduring playback, then you need to set an IK key on that body part’s FBIKeffector and FK joints.
■ Do not pin your finger or toe effectors, as pinning these effectors has noeffect on the FBIK solution.
You can set the Pinning attribute on each FBIK effector to the followingstates: unpinned, pinTranslate, pinRotate, or pinAll. You can set thepinning states of your FBIK effectors from the Channel Box, the effector’smarking menus, or by using the +w (pin translation), +e (pin rotation), or +s(pin translation and rotation) hotkeys.
Pinning states
unpinned
When a FBIK effector is unpinned, movement in other areas of the body canaffect or change the translation and rotation of the unpinned effector.
36 | Chapter 1 Full Body IK (FBIK)
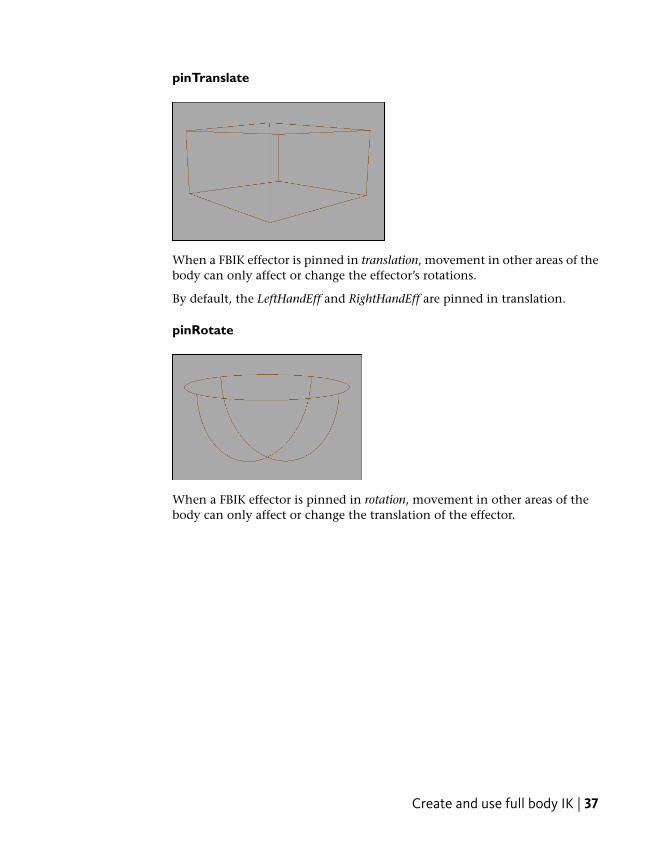
pinTranslate
When a FBIK effector is pinned in translation, movement in other areas of thebody can only affect or change the effector’s rotations.
By default, the LeftHandEff and RightHandEff are pinned in translation.
pinRotate
When a FBIK effector is pinned in rotation, movement in other areas of thebody can only affect or change the translation of the effector.
Create and use full body IK | 37
pinAll
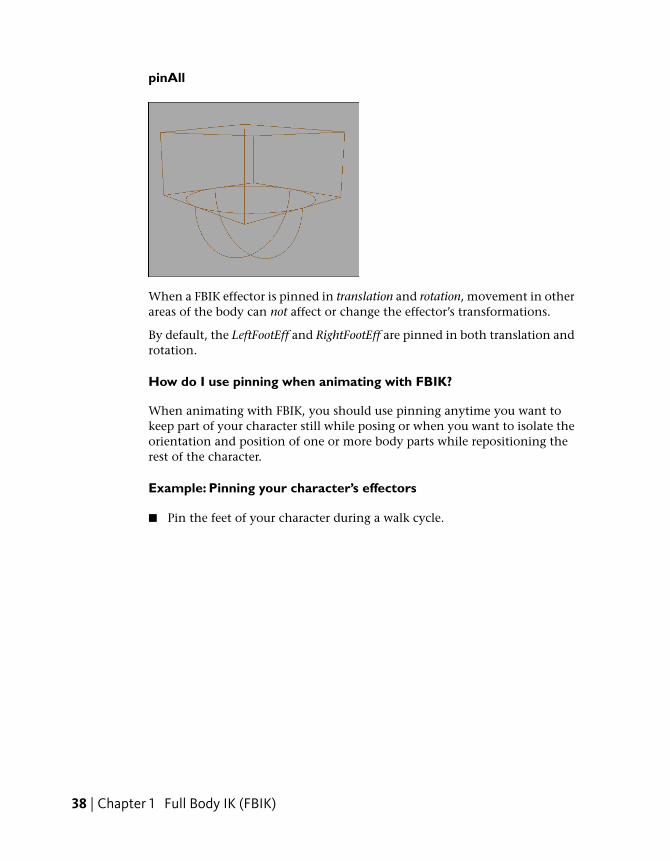
When a FBIK effector is pinned in translation and rotation, movement in otherareas of the body can not affect or change the effector’s transformations.
By default, the LeftFootEff and RightFootEff are pinned in both translation androtation.
How do I use pinning when animating with FBIK?
When animating with FBIK, you should use pinning anytime you want tokeep part of your character still while posing or when you want to isolate theorientation and position of one or more body parts while repositioning therest of the character.
Example: Pinning your character’s effectors
■ Pin the feet of your character during a walk cycle.
38 | Chapter 1 Full Body IK (FBIK)
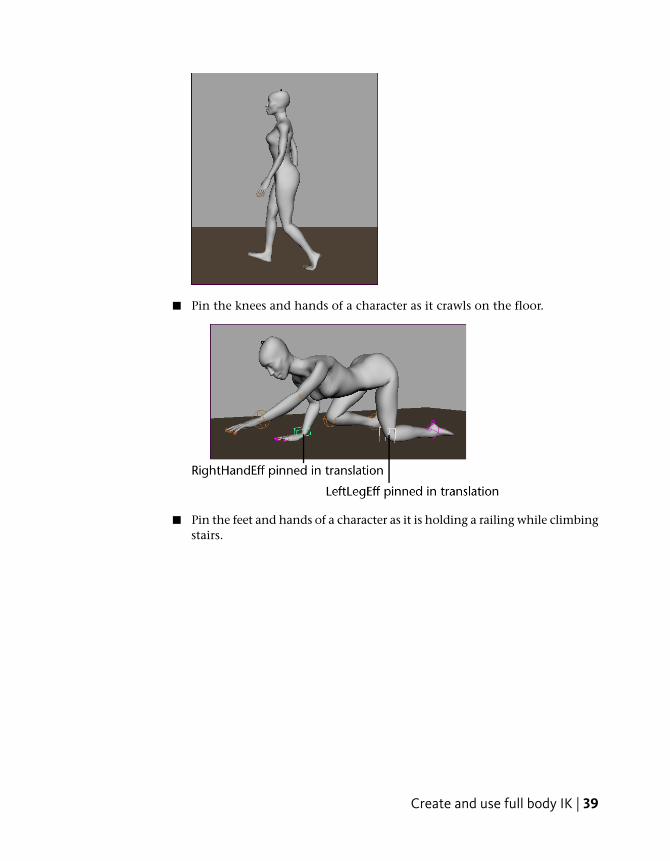
■ Pin the knees and hands of a character as it crawls on the floor.
■ Pin the feet and hands of a character as it is holding a railing while climbingstairs.
Create and use full body IK | 39
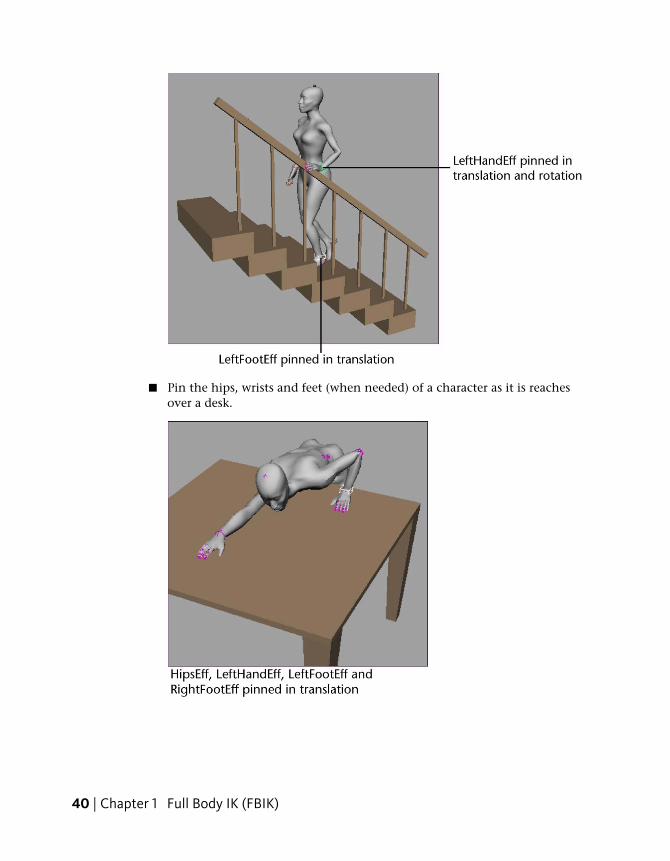
■ Pin the hips, wrists and feet (when needed) of a character as it is reachesover a desk.
40 | Chapter 1 Full Body IK (FBIK)
Example workflows: Full body IK
The following examples demonstrate just a few ways you can use full body IKto quickly and easily pose and animate your characters.■ Example 1: Bending over to touch the floor (page 42).
■ Example 2: Crawling on hands and knees across the floor (page 46).
■ Example 3: Walking across the floor (page 50).
TIP■ If you want your character’s FBIK solution to be influenced by a FBIK
effector during playback, you need to set the effector’s Reach Modeto IK and then key it. Typically, this technique is used to keep certainparts of a character’s body still during playback. See Reach Mode (page69).
■ If you want more control when posing your characters, rotate theirInput skeletons’ joints rather than just manipulating their FBIK effectors.
■ When keying your poses, select Key Mode: All to key your character’swhole body and select Key Mode: Body Part to set keys on only thebody part(s) you have selected (such as individual limbs).
■ At times your FBIK effectors may not stay with your character duringplayback. Do not be concerned because this is normal FBIK behaviorand it does not affect your FBIK animation. To return the FBIK effectorsto their proper positions, go to a frame in your character’s animationwhere the effectors move away from the character, select a FBIK effectoror an Input skeleton joint, and move it slightly. This should cause theeffectors that have moved away from the character to pop back to theirproper positions.
WARNING■ For Animate > Set Key or the Set Key hotkey (s key) to work with FBIK,
Set FullBodyIK keys needs to be on in Animate > Set Key > .
■ FBIK works the best when you have synchronized keys on the FKskeleton and FBIK effectors. You can only set synchronized keys withAnimate > Set Full Body IK Keys (page 69) or when Animate > Set
Key > > Set FullBodyIK keys is on.
■ You cannot use Autokey when animating with FBIK.
Create and use full body IK | 41
Example 1: Bending over to touch the floor
To pose and animate a character bending over to touch the floor
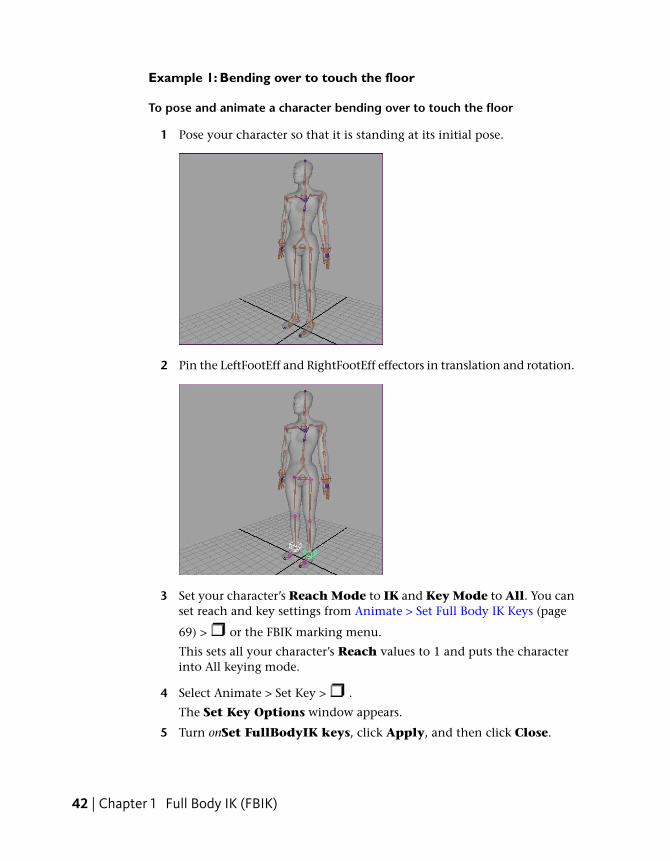
1 Pose your character so that it is standing at its initial pose.
2 Pin the LeftFootEff and RightFootEff effectors in translation and rotation.
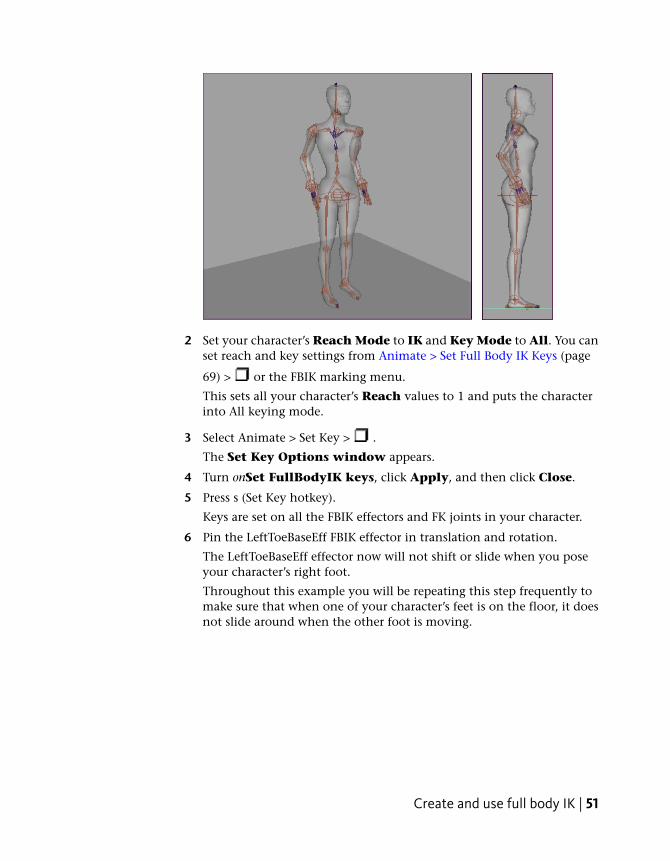
3 Set your character’s Reach Mode to IK and Key Mode to All. You canset reach and key settings from Animate > Set Full Body IK Keys (page
69) > or the FBIK marking menu.
This sets all your character’s Reach values to 1 and puts the characterinto All keying mode.
4 Select Animate > Set Key > .
The Set Key Options window appears.
5 Turn onSet FullBodyIK keys, click Apply, and then click Close.
42 | Chapter 1 Full Body IK (FBIK)
6 Press s (Set Key hotkey).
This sets keys on all the FBIK effectors and FK joints in your character.
Your character’s foot effectors now influence your character’s FBIKsolution during playback. Also, setting IK keys like this keeps yourcharacter’s feet perfectly still during playback. This is useful because youdo not want your character’s feet to move during its animation. If youhad instead set FK keys, your character’s feet would slide around duringplayback rather than stay still.
Throughout this example you will be repeating this step frequently tomake sure that your character’s feet stay still during each segment of theanimation.
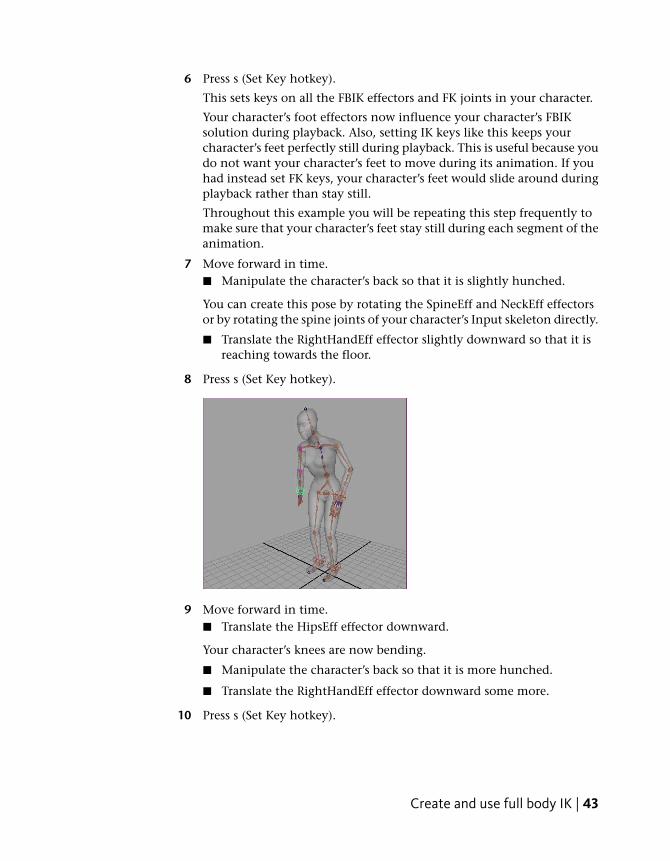
7 Move forward in time.■ Manipulate the character’s back so that it is slightly hunched.
You can create this pose by rotating the SpineEff and NeckEff effectorsor by rotating the spine joints of your character’s Input skeleton directly.
■ Translate the RightHandEff effector slightly downward so that it isreaching towards the floor.
8 Press s (Set Key hotkey).
9 Move forward in time.■ Translate the HipsEff effector downward.
Your character’s knees are now bending.
■ Manipulate the character’s back so that it is more hunched.
■ Translate the RightHandEff effector downward some more.
10 Press s (Set Key hotkey).
Create and use full body IK | 43
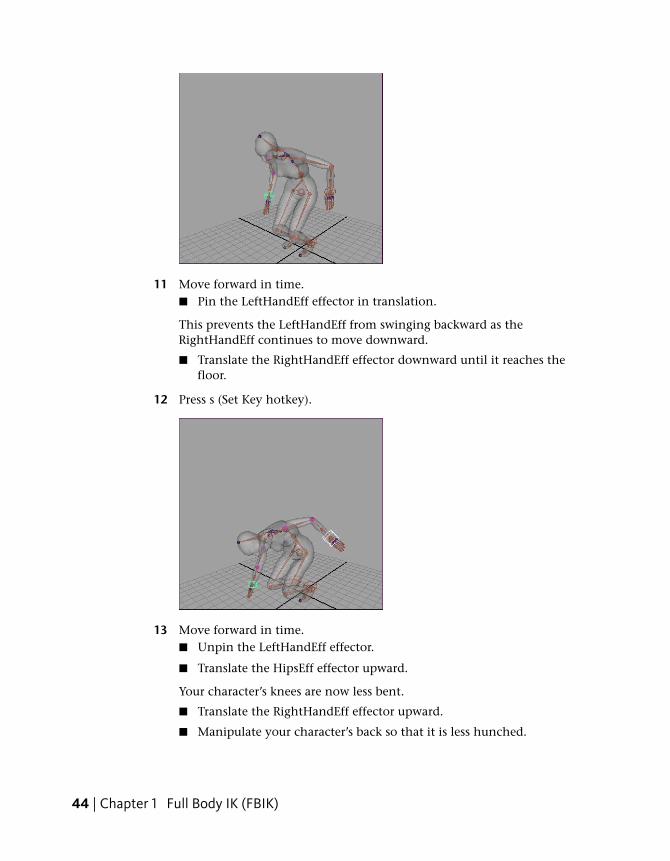
11 Move forward in time.■ Pin the LeftHandEff effector in translation.
This prevents the LeftHandEff from swinging backward as theRightHandEff continues to move downward.
■ Translate the RightHandEff effector downward until it reaches thefloor.
12 Press s (Set Key hotkey).
13 Move forward in time.■ Unpin the LeftHandEff effector.
■ Translate the HipsEff effector upward.
Your character’s knees are now less bent.
■ Translate the RightHandEff effector upward.
■ Manipulate your character’s back so that it is less hunched.
44 | Chapter 1 Full Body IK (FBIK)
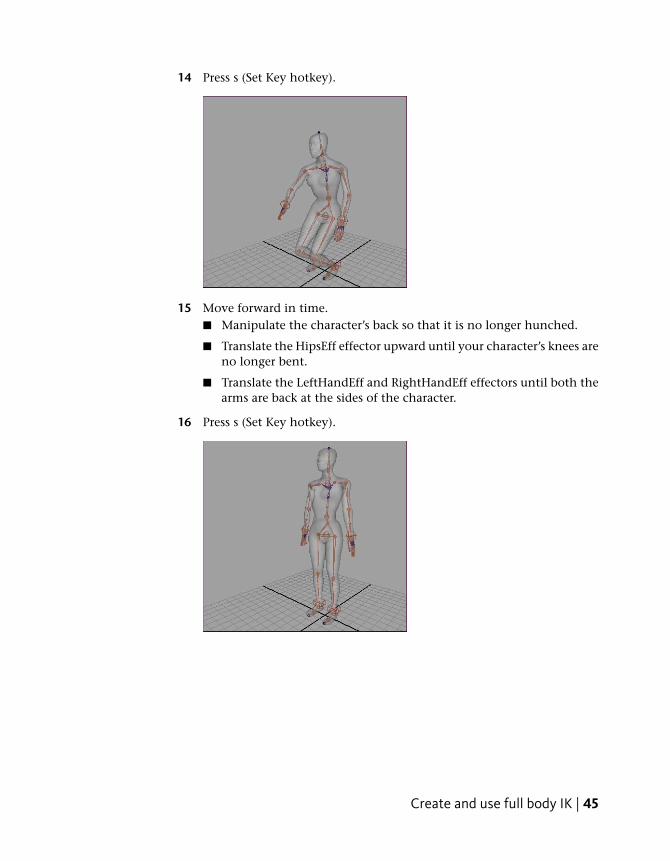
14 Press s (Set Key hotkey).
15 Move forward in time.■ Manipulate the character’s back so that it is no longer hunched.
■ Translate the HipsEff effector upward until your character’s knees areno longer bent.
■ Translate the LeftHandEff and RightHandEff effectors until both thearms are back at the sides of the character.
16 Press s (Set Key hotkey).
Create and use full body IK | 45
Example 2: Crawling on hands and knees across the floor
To pose and animate a character crawling on its hands and knees across thefloor
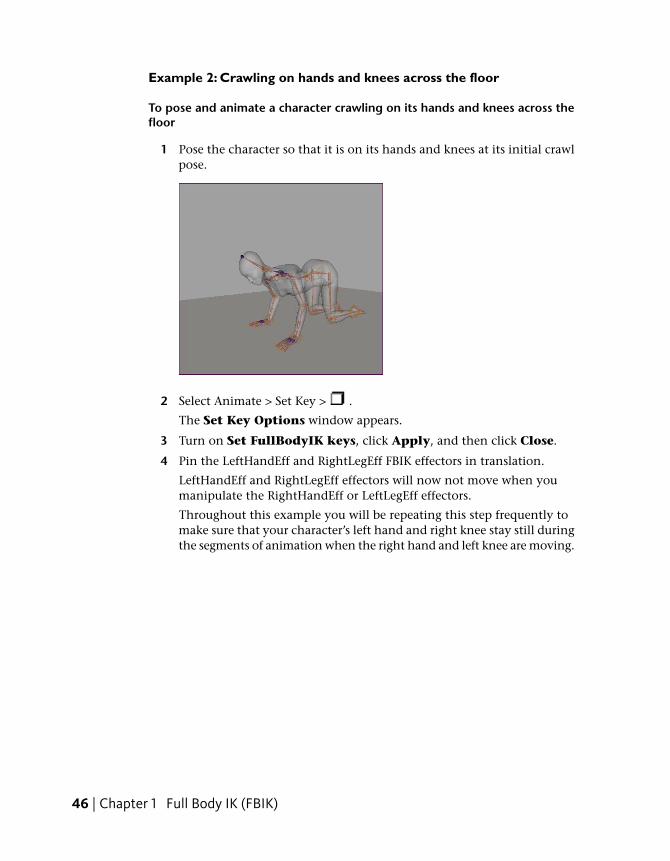
1 Pose the character so that it is on its hands and knees at its initial crawlpose.
2 Select Animate > Set Key > .
The Set Key Options window appears.
3 Turn on Set FullBodyIK keys, click Apply, and then click Close.
4 Pin the LeftHandEff and RightLegEff FBIK effectors in translation.
LeftHandEff and RightLegEff effectors will now not move when youmanipulate the RightHandEff or LeftLegEff effectors.
Throughout this example you will be repeating this step frequently tomake sure that your character’s left hand and right knee stay still duringthe segments of animation when the right hand and left knee are moving.
46 | Chapter 1 Full Body IK (FBIK)

5 Set your character’s Reach Mode to IK and Key Mode to All. You canset reach and key settings from Animate > Set Full Body IK Keys (page
69) > or the FBIK marking menu.
This sets all your character’s Reach values to 1 and puts the characterinto All keying mode.
6 Press s (Set Key hotkey).
Your character’s left hand and right knee effectors now influence yourcharacter’s FBIK solution during playback. Also, setting IK keys like thiskeeps your character’s left hand and right knee still during playback.This is useful because you do not want your character’s left hand andright knee effectors to move when its right hand and left knee effectorsare moving. If you had instead set FK keys, your character’s left handand right knee would shift around during playback rather than stay still.
Create and use full body IK | 47
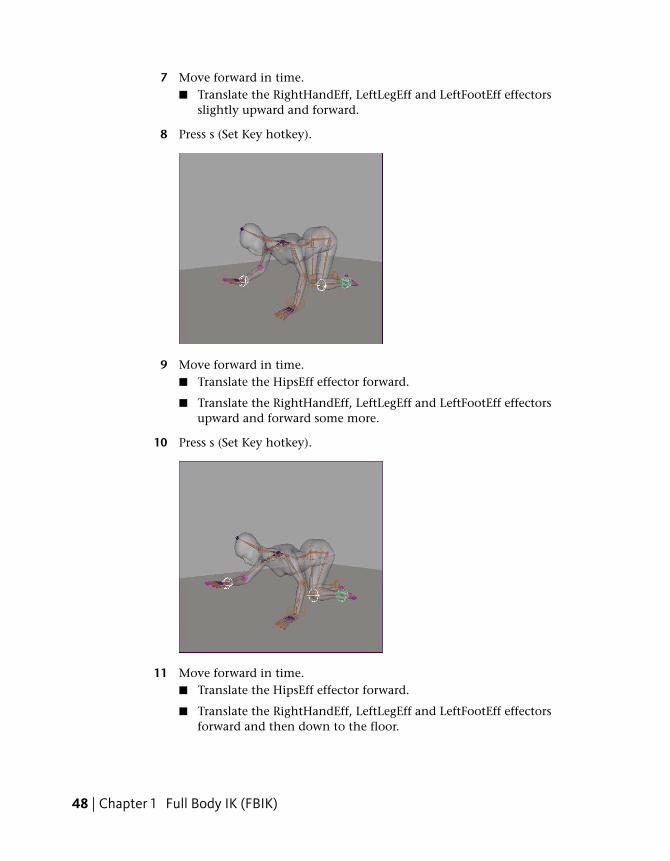
7 Move forward in time.■ Translate the RightHandEff, LeftLegEff and LeftFootEff effectors
slightly upward and forward.
8 Press s (Set Key hotkey).
9 Move forward in time.■ Translate the HipsEff effector forward.
■ Translate the RightHandEff, LeftLegEff and LeftFootEff effectorsupward and forward some more.
10 Press s (Set Key hotkey).
11 Move forward in time.■ Translate the HipsEff effector forward.
■ Translate the RightHandEff, LeftLegEff and LeftFootEff effectorsforward and then down to the floor.
48 | Chapter 1 Full Body IK (FBIK)
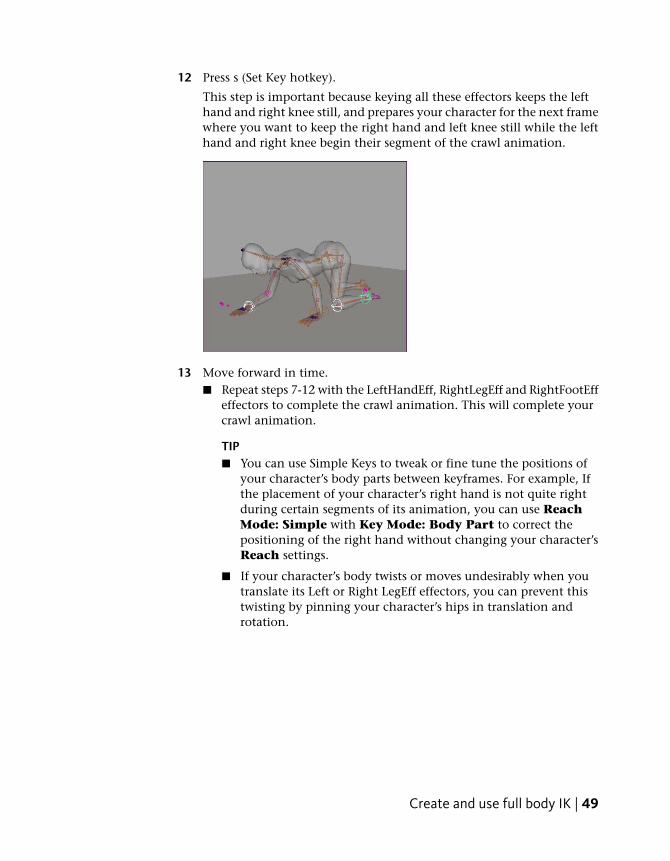
12 Press s (Set Key hotkey).
This step is important because keying all these effectors keeps the lefthand and right knee still, and prepares your character for the next framewhere you want to keep the right hand and left knee still while the lefthand and right knee begin their segment of the crawl animation.
13 Move forward in time.■ Repeat steps 7-12 with the LeftHandEff, RightLegEff and RightFootEff
effectors to complete the crawl animation. This will complete yourcrawl animation.
TIP■ You can use Simple Keys to tweak or fine tune the positions of
your character’s body parts between keyframes. For example, Ifthe placement of your character’s right hand is not quite rightduring certain segments of its animation, you can use ReachMode: Simple with Key Mode: Body Part to correct thepositioning of the right hand without changing your character’sReach settings.
■ If your character’s body twists or moves undesirably when youtranslate its Left or Right LegEff effectors, you can prevent thistwisting by pinning your character’s hips in translation androtation.
Create and use full body IK | 49
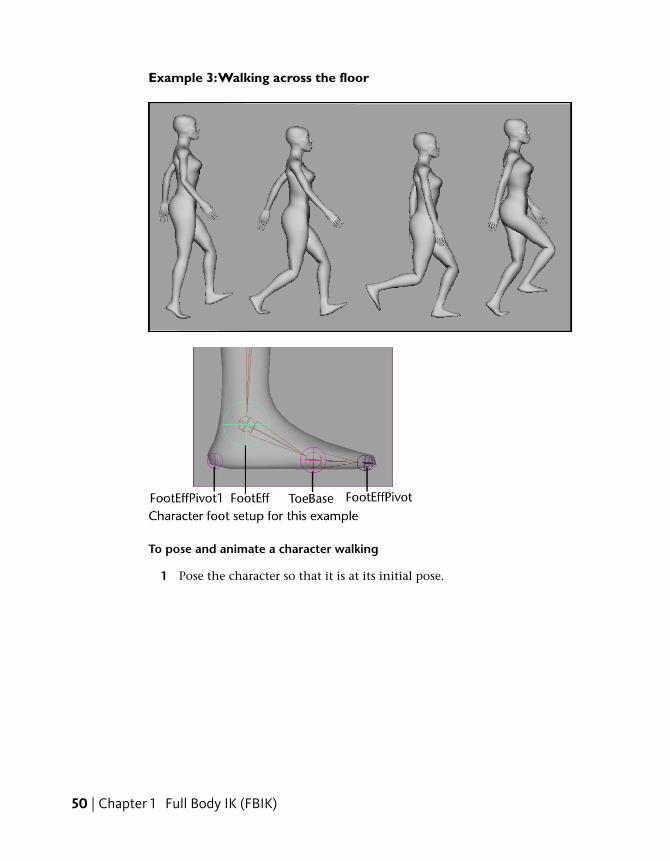
Example 3:Walking across the floor
To pose and animate a character walking
1 Pose the character so that it is at its initial pose.
50 | Chapter 1 Full Body IK (FBIK)
2 Set your character’s Reach Mode to IK and Key Mode to All. You canset reach and key settings from Animate > Set Full Body IK Keys (page
69) > or the FBIK marking menu.
This sets all your character’s Reach values to 1 and puts the characterinto All keying mode.
3 Select Animate > Set Key > .
The Set Key Options window appears.
4 Turn onSet FullBodyIK keys, click Apply, and then click Close.
5 Press s (Set Key hotkey).
Keys are set on all the FBIK effectors and FK joints in your character.
6 Pin the LeftToeBaseEff FBIK effector in translation and rotation.
The LeftToeBaseEff effector now will not shift or slide when you poseyour character’s right foot.
Throughout this example you will be repeating this step frequently tomake sure that when one of your character’s feet is on the floor, it doesnot slide around when the other foot is moving.
Create and use full body IK | 51
7 Move forward in time.■ Translate the HipsEff effector forward.
■ Translate the LeftFootEff effector upward.
This creates a heel lift motion for the left foot.
■ Translate the RightFootEff upward and forward.
This creates a lifting motion, and the beginning of a swinging motion,for the right foot.
■ Rotate the RightFootEff so that the toe of the right foot is pointingslightly upward.
This prepares the right foot for its heel strike motion.
■ In the Input skeleton, rotate the RightArm (left shoulder) joint sothat the right arm swings slightly backward and rotate the LeftArm(left shoulder) joint so that the left arm swings slightly forward.
This begins the arm swinging motion for the walk animation.
8 Press s (Set Key hotkey).
52 | Chapter 1 Full Body IK (FBIK)

Keys are set on all the FBIK effectors and FK joints in your character.
9 Move forward in time.■ Translate the HipsEff effector forward.
■ Translate the RightFootEff effector downward so that the heel touchesthe floor.
This creates the heel strike motion for the right foot.
■ Rotate the LeftArm joint so that the left arm swings forward somemore and rotate the RightArm joint so that the right arm swingsbackward some more.
10 Press s (Set Key hotkey).
Keys are set on all the FBIK effectors and FK joints in your character.
11 Move forward in time.■ Translate the HipsEff effector forward.
■ Rotate the RightFootEffPivot1 effector so that the right foot is nowflat on the floor.
■ Unpin the LeftToeBaseEff effector, translate the LeftFootEff effectorupward and rotate the LeftToeBaseEff to straighten out the left foot.
■ Rotate the LeftArm joint so that the left arm swings backward slightlyand rotate the RightArm joint so that the right arm swings forwardslightly.
Create and use full body IK | 53
12 Press s (Set Key hotkey).
Keys are set on all the FBIK effectors and FK joints in your character.
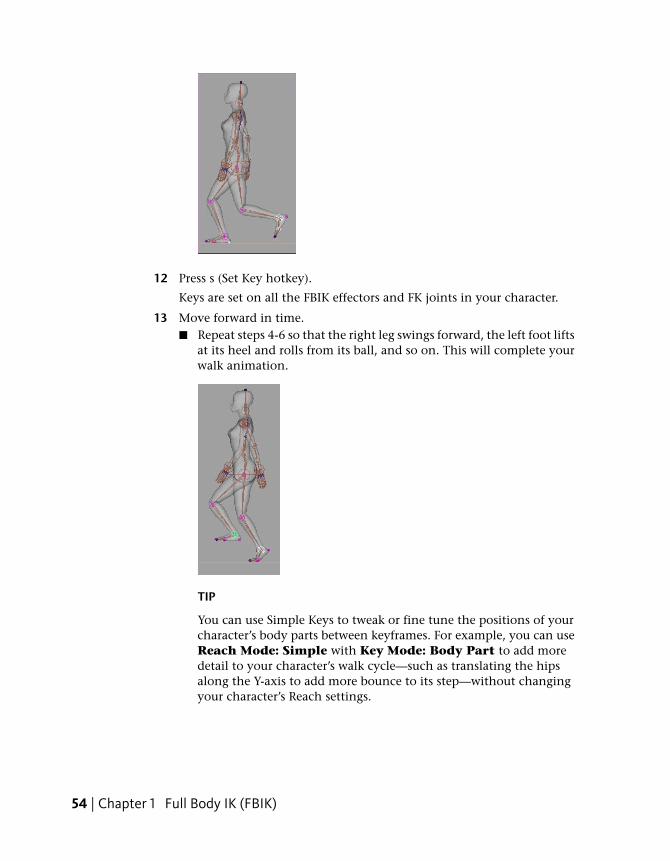
13 Move forward in time.■ Repeat steps 4-6 so that the right leg swings forward, the left foot lifts
at its heel and rolls from its ball, and so on. This will complete yourwalk animation.
TIP
You can use Simple Keys to tweak or fine tune the positions of yourcharacter’s body parts between keyframes. For example, you can useReach Mode: Simple with Key Mode: Body Part to add moredetail to your character’s walk cycle—such as translating the hipsalong the Y-axis to add more bounce to its step—without changingyour character’s Reach settings.
54 | Chapter 1 Full Body IK (FBIK)
Create auxiliary pivots
You can add additional pivot points to your FBIK effectors using auxiliarypivots. Auxiliary pivots allow you to transform your FBIK effectors fromdifferent points in 3D space to create specialized motions such as a foot rollduring a walk cycle, the ball of a foot putting out a cigarette, a body spinninghead over heels while flying through the air, and so on.
NOTE
Pinning auxiliary pivots has the same effect as pinning their parent effectors.For example, if you pin a FootEffPivot, the FootEff actually gets pinned—notthe FootEffPivot.
To create auxiliary pivots
1 Select the HipsEff effector and select Skeleton > Full Body IK > Go toStance Pose (page 73).
2 Select the effector for which you want to add a secondary pivot and thenselect Skeleton > Full Body IK > Add Auxiliary Pivot (page 72).
A auxiliary pivot is created for the foot FBIK effector. The name of theauxiliary pivot is the same as its parent effector except for the suffix Pivot.Also, each subsequent effector is given a number. For example, the firstauxiliary pivot for LeftFootEff would be named LeftFootEffPivot and thesecond auxiliary pivot would be named LeftFootEffPivot1.
3 Select the auxiliary pivot, scale it as desired by setting its Radius valuein the Channel Box, and then translate it to the position from whichyou want its parent effector to rotate.
4 With the auxiliary pivot selected, select Skeleton > Full Body IK > ActivateAuxiliary Pivot (page 72).
Now when you transform the auxiliary pivot, its parent effector willrotate from the position of its active auxiliary pivot.
Example: Biped foot rolls
To create good foot roll behavior with auxiliary pivots when animating a walkcycle for your biped character, you need to create two auxiliary pivots for yourLeftFootEff and RightFootEff effectors: one auxiliary pivot for the heel andthe other for the ball of the foot.
1 Select your LeftFootEff FBIK effector and then select Skeleton > Full BodyIK > Add Auxiliary Pivot (page 72).
Create and use full body IK | 55
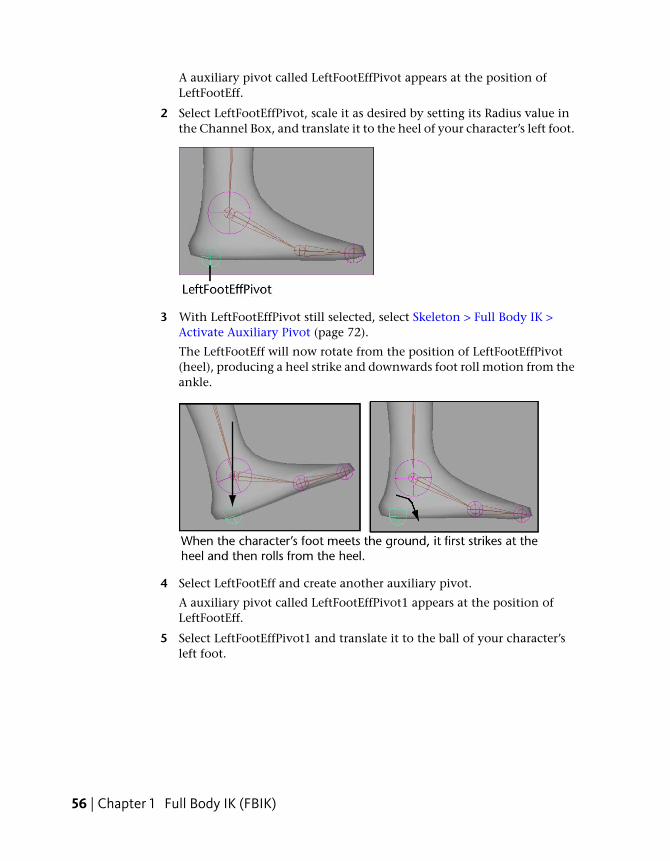
A auxiliary pivot called LeftFootEffPivot appears at the position ofLeftFootEff.
2 Select LeftFootEffPivot, scale it as desired by setting its Radius value inthe Channel Box, and translate it to the heel of your character’s left foot.
3 With LeftFootEffPivot still selected, select Skeleton > Full Body IK >Activate Auxiliary Pivot (page 72).
The LeftFootEff will now rotate from the position of LeftFootEffPivot(heel), producing a heel strike and downwards foot roll motion from theankle.
4 Select LeftFootEff and create another auxiliary pivot.
A auxiliary pivot called LeftFootEffPivot1 appears at the position ofLeftFootEff.
5 Select LeftFootEffPivot1 and translate it to the ball of your character’sleft foot.
56 | Chapter 1 Full Body IK (FBIK)

6 With LeftFootEffPivot1 still selected, select Skeleton > Full Body IK >Activate Auxiliary Pivot (page 72).
The LeftFootEff will now also rotate from the position ofLeftFootEffPivot1 (ball of the foot), bending the foot at the ball andproducing a pushing off motion in the foot.
7 Repeat steps 1-6 for the RightFootEff.
Create auxiliary effectors
Auxiliary effectors are supplementary effectors in a FBIK system that correspondto existing FBIK effectors. Every FBIK effector in a FBIK system can havemultiple auxiliary effectors. You can translate and rotate an auxiliary effectorto the position you want its corresponding FBIK body part to reach, thencontrol the amount of reach using the auxiliary effector’s Reach channel
Create and use full body IK | 57
values. Auxiliary effectors are useful in situations where you want an additionallevel of FBIK control.
To create auxiliary effectors
1 In the scene view, select the full body IK effector for which you want tocreate an auxiliary effector.
2 Select Skeleton > Full Body IK > Add Auxiliary Effector (page 71).
The auxiliary effector appears at the same Translate and Rotate XYZcoordinates as its corresponding FBIK effector.
Auxiliary effectors are named after their target FBIK effectors with thesuffix Aux plus a sequential number. For example, if you create threeauxiliary effectors for the RightFootEff effector, the first auxiliary effectoris named RightFootEffAux, the second is named RightFootEffAux1, andthe third is named RightFootEffAux2.
3 Translate the auxiliary effector to the position in XYZ space you wouldlike its corresponding FBIK body part to reach.
4 In the Channel Box, change the auxiliary effector’s ReachTranslation and Reach Rotation channel values to 0 and itscorresponding FBIK effector’s Reach Translation and Reach Rotationchannel values to 0.
Key the Reach Translation and Reach Rotation channels for theauxiliary effector and its corresponding FBIK effector.
5 Move the Time Slider forward in time to the point where you want theFBIK body part to reach the position of its auxiliary effector.
6 In the Channel Box, change the auxiliary effector’s ReachTranslation and Reach Rotation channel values to 1.
Key the Reach Translation and Reach Rotation channels for theauxiliary effector and its corresponding FBIK effector.
The FBIK effector will now move to the position of its auxiliary effectorduring it’s FBIK animation and its corresponding body part will reachtowards the auxiliary effector.
Example: Foot moving towards soccer ball
To place an auxiliary effector in a soccer ball and link it to the RightFootEffof your character and then animate its Reach channel values so that its rightfoot meets the soccer ball for a kick.
58 | Chapter 1 Full Body IK (FBIK)
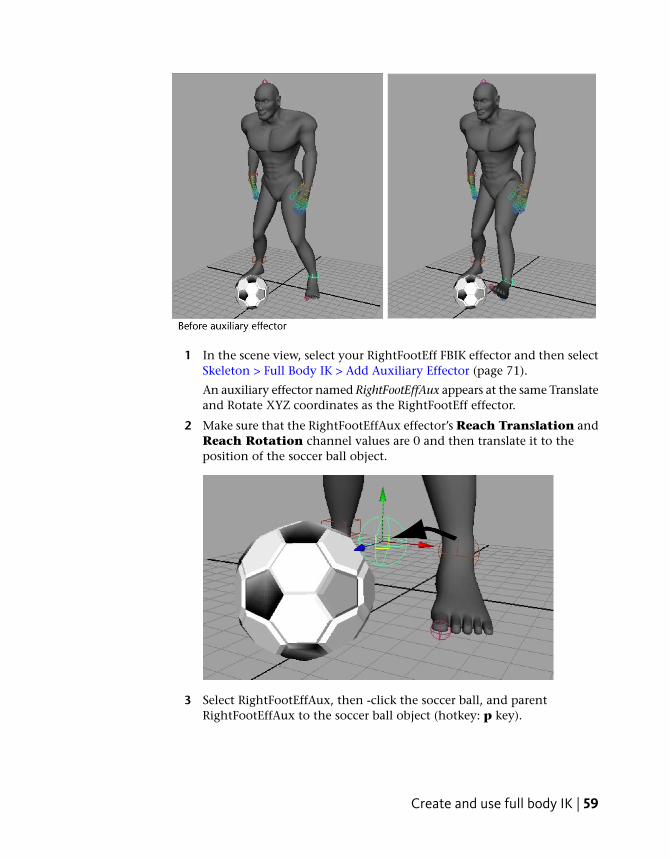
1 In the scene view, select your RightFootEff FBIK effector and then selectSkeleton > Full Body IK > Add Auxiliary Effector (page 71).
An auxiliary effector named RightFootEffAux appears at the same Translateand Rotate XYZ coordinates as the RightFootEff effector.
2 Make sure that the RightFootEffAux effector’s Reach Translation andReach Rotation channel values are 0 and then translate it to theposition of the soccer ball object.
3 Select RightFootEffAux, then -click the soccer ball, and parentRightFootEffAux to the soccer ball object (hotkey: p key).
Create and use full body IK | 59
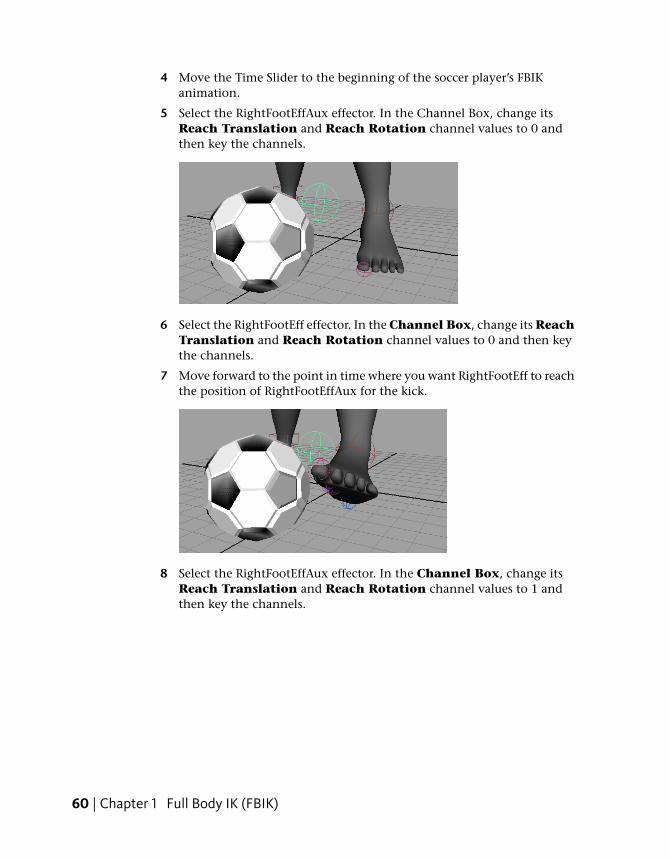
4 Move the Time Slider to the beginning of the soccer player’s FBIKanimation.
5 Select the RightFootEffAux effector. In the Channel Box, change itsReach Translation and Reach Rotation channel values to 0 andthen key the channels.
6 Select the RightFootEff effector. In the Channel Box, change its ReachTranslation and Reach Rotation channel values to 0 and then keythe channels.
7 Move forward to the point in time where you want RightFootEff to reachthe position of RightFootEffAux for the kick.
8 Select the RightFootEffAux effector. In the Channel Box, change itsReach Translation and Reach Rotation channel values to 1 andthen key the channels.
60 | Chapter 1 Full Body IK (FBIK)
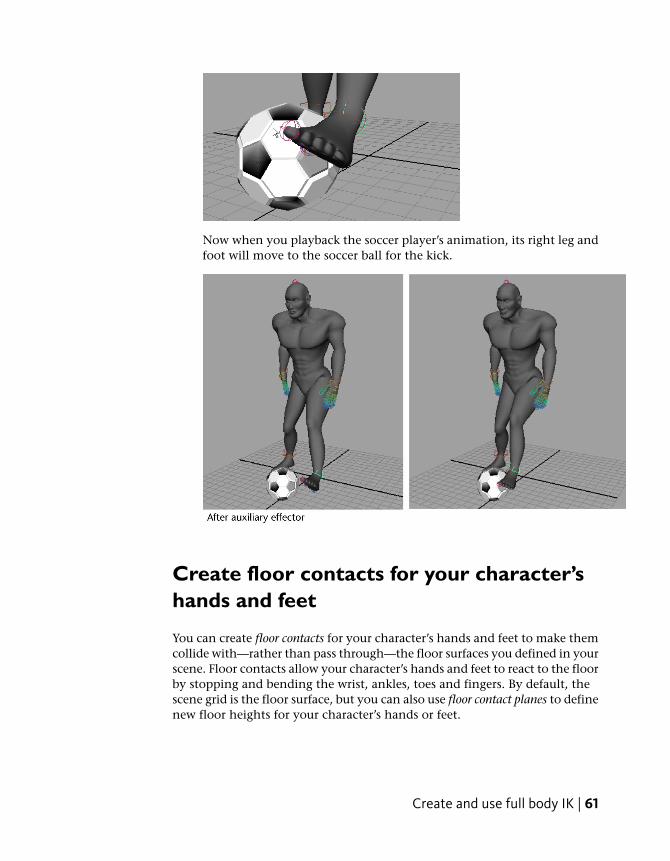
Now when you playback the soccer player’s animation, its right leg andfoot will move to the soccer ball for the kick.
Create floor contacts for your character’shands and feet
You can create floor contacts for your character’s hands and feet to make themcollide with—rather than pass through—the floor surfaces you defined in yourscene. Floor contacts allow your character’s hands and feet to react to the floorby stopping and bending the wrist, ankles, toes and fingers. By default, thescene grid is the floor surface, but you can also use floor contact planes to definenew floor heights for your character’s hands or feet.
Create and use full body IK | 61
NOTE
When using hand or foot floor contacts, your characters must have FingerBaseand ToeBase joints in their hands and feet for them to bend at the bases oftheir fingers and toes when they come in contact with the floor. See Auxiliaryjoints (page 3), Left and right hands (page 12), and Left and right feet (page17).
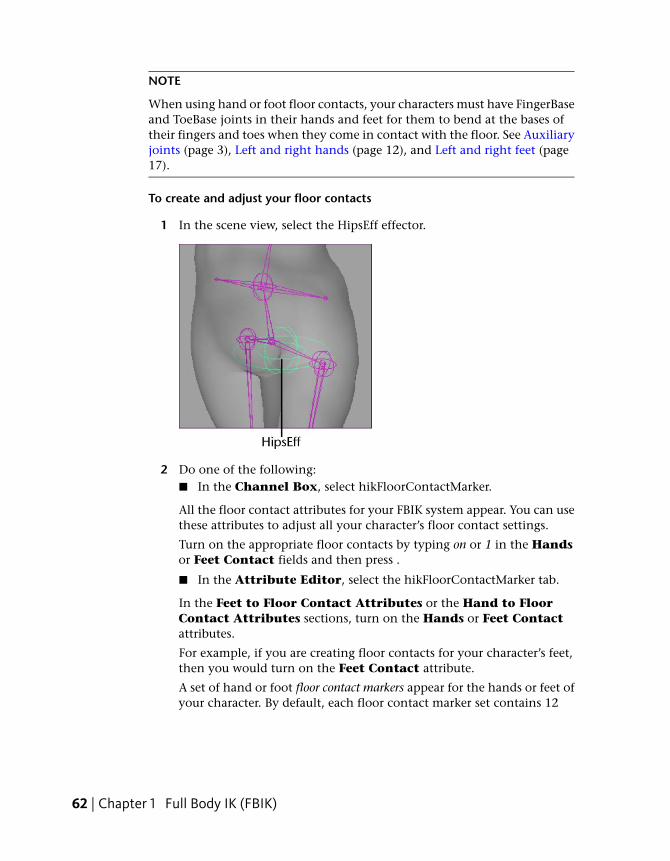
To create and adjust your floor contacts
1 In the scene view, select the HipsEff effector.
2 Do one of the following:■ In the Channel Box, select hikFloorContactMarker.
All the floor contact attributes for your FBIK system appear. You can usethese attributes to adjust all your character’s floor contact settings.
Turn on the appropriate floor contacts by typing on or 1 in the Handsor Feet Contact fields and then press .
■ In the Attribute Editor, select the hikFloorContactMarker tab.
In the Feet to Floor Contact Attributes or the Hand to FloorContact Attributes sections, turn on the Hands or Feet Contactattributes.
For example, if you are creating floor contacts for your character’s feet,then you would turn on the Feet Contact attribute.
A set of hand or foot floor contact markers appear for the hands or feet ofyour character. By default, each floor contact marker set contains 12
62 | Chapter 1 Full Body IK (FBIK)
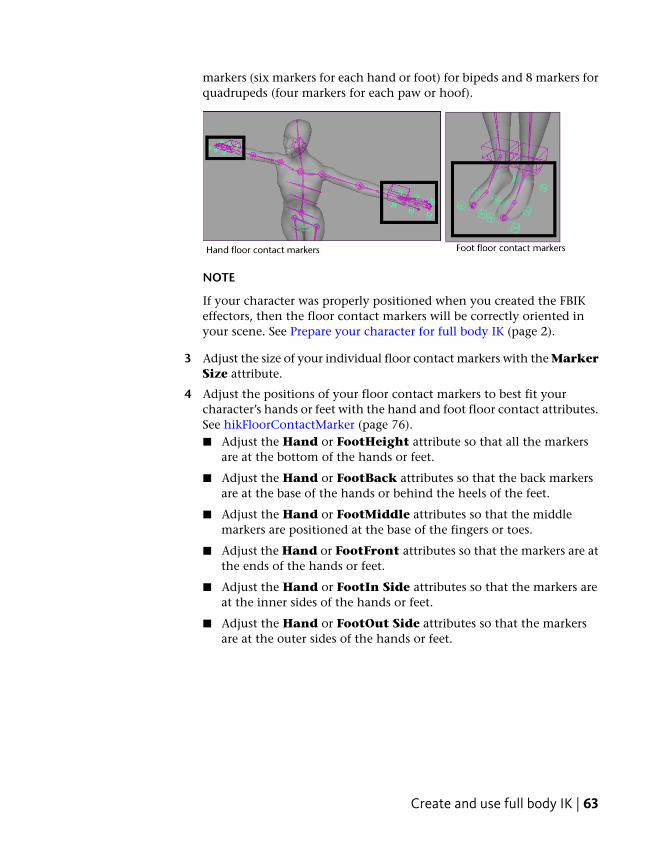
markers (six markers for each hand or foot) for bipeds and 8 markers forquadrupeds (four markers for each paw or hoof).
NOTE
If your character was properly positioned when you created the FBIKeffectors, then the floor contact markers will be correctly oriented inyour scene. See Prepare your character for full body IK (page 2).
3 Adjust the size of your individual floor contact markers with the MarkerSize attribute.
4 Adjust the positions of your floor contact markers to best fit yourcharacter’s hands or feet with the hand and foot floor contact attributes.See hikFloorContactMarker (page 76).■ Adjust the Hand or FootHeight attribute so that all the markers
are at the bottom of the hands or feet.
■ Adjust the Hand or FootBack attributes so that the back markersare at the base of the hands or behind the heels of the feet.
■ Adjust the Hand or FootMiddle attributes so that the middlemarkers are positioned at the base of the fingers or toes.
■ Adjust the Hand or FootFront attributes so that the markers are atthe ends of the hands or feet.
■ Adjust the Hand or FootIn Side attributes so that the markers areat the inner sides of the hands or feet.
■ Adjust the Hand or FootOut Side attributes so that the markersare at the outer sides of the hands or feet.
Create and use full body IK | 63
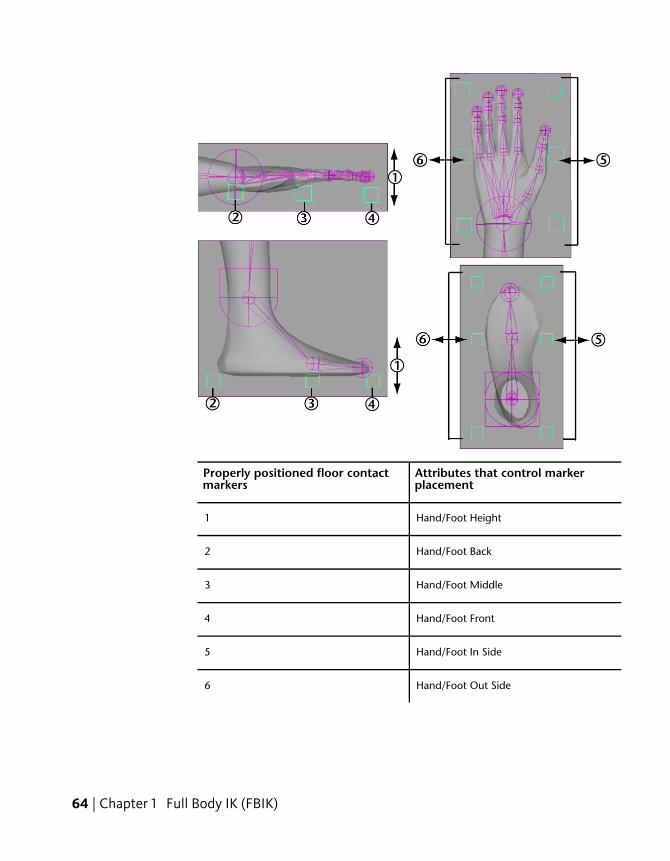
Attributes that control markerplacement
Properly positioned floor contactmarkers
Hand/Foot Height1
Hand/Foot Back2
Hand/Foot Middle3
Hand/Foot Front4
Hand/Foot In Side5
Hand/Foot Out Side6
64 | Chapter 1 Full Body IK (FBIK)
TIP
■ You can customize the orientation and number of floor contactmarkers for your character with the Hands and Feet ContactType attributes.
■ You can control the visibility of your hand and foot floor contactmarkers in your scene view with the Draw Hand Contact orDraw Feet Contact attributes.
■ You can also turn on floor contact markers for your character’sfingers and toes. If you decide to use finger and toe floor contacts,do not also use hand and foot floor contacts.
See hikFloorContactMarker (page 76).
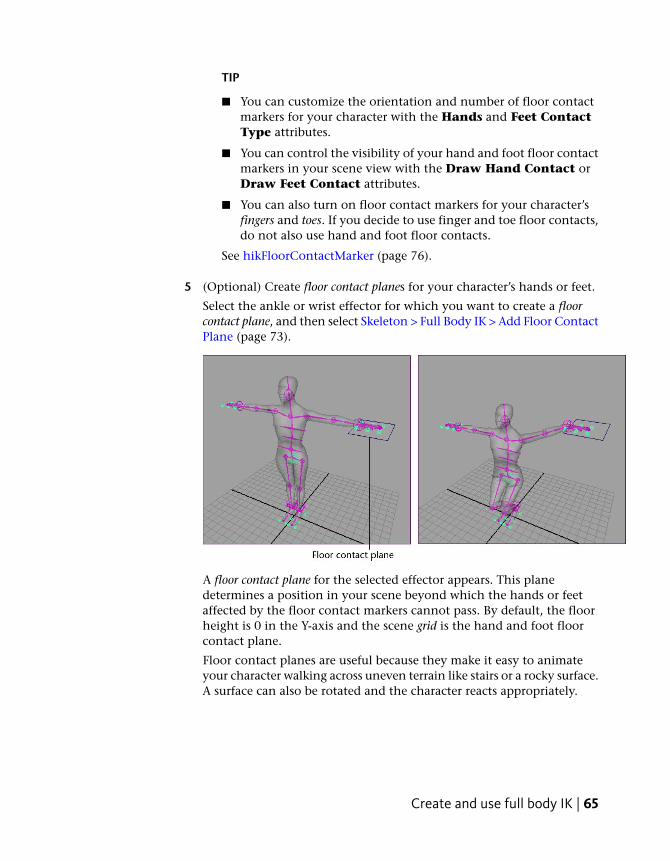
5 (Optional) Create floor contact planes for your character’s hands or feet.
Select the ankle or wrist effector for which you want to create a floorcontact plane, and then select Skeleton > Full Body IK > Add Floor ContactPlane (page 73).
A floor contact plane for the selected effector appears. This planedetermines a position in your scene beyond which the hands or feetaffected by the floor contact markers cannot pass. By default, the floorheight is 0 in the Y-axis and the scene grid is the hand and foot floorcontact plane.
Floor contact planes are useful because they make it easy to animateyour character walking across uneven terrain like stairs or a rocky surface.A surface can also be rotated and the character reacts appropriately.
Create and use full body IK | 65
NOTE
You can change the floor height without having to create a floor contactplane by going to the node and adjusting the attributes related to floorcontact planes. See hikFloorContactMarker (page 76).
6 If you created a floor contact plane, translate the floor contact plane tothe height at which you want your floor. You can also adjust the rotationof the plane to represent the incline or decline of the floor you wantyour model to stand on.
Create and use full body IK
Troubleshoot full body IK character setup
Exploded skin geometry or joints
Problem
Some of your character’s joints or segments of geometry appear out-of-scalewith their parent joints or other geometry. This can occur if you have theSegment Scale Compensate attribute for a joint turned on. When SegmentScale Compensate is on, scaling parent joints also scales lower joints in thechain, a process that conflicts with the HumanIK and FBIK solvers.
Solution
If you experience out-of-scale geometry or joints, make sure that you haveSegment Scale Compensate turned off. The Segment Scale Compensateattribute is automatically turned off when you load an FBIK rig, or if you mapthe joint in a HumanIK character definition. (See also Create a HumanIKcharacter definition.)
See Segment Scale Compensate for more information on this attribute.
66 | Chapter 1 Full Body IK (FBIK)
Error when creating full body IK effectors for animated character
Problem
You cannot add full body IK effectors to a character that is already animatedwith traditional FK, IK, or motion capture data. You can only create FBIKeffectors for characters with no previous animation.
Solution
1 Duplicate your character’s skeleton without the keys.
2 Create the full body IK effectors for the duplicate skeleton.
See Prepare your character for full body IK (page 2), Label or renameyour character’s joints (page 4), and Create the full body IK system foryour character (page 31).
3 Turn on the display of the FBIK FK skeleton.
Select Skeleton > Full Body IK > Show FBIK FK Skeleton (page 73).
4 Alternatively, set up the original skeleton as an HIK character and retargetthe animation to another HIK character.
See Retargeting workflow.
Characterization fails for characters with HipsTranslation joints
Problem
Characterization may fail and an error may occur when your character’sHipsTranslation joint is not properly positioned in the scene view or in yourcharacter’s joint hierarchy.
Solution
■ Place the HipsTranslation joint above the Hips joint in your character’sjoint hierarchy
■ In the scene view, move the HipsTranslation joint to the same TranslateX, Y, and Z coordinates as the Hips joint.
Create and use full body IK | 67
FBIK effectors corrupt skinning of characters with HipsTranslationjoints
Problem
Creating FBIK effectors for a character that has a HipsTranslation joint maycorrupt the character’s skinning if your character’s HipsTranslation joint isnot properly positioned in the scene view or in your character’s joint hierarchy.
Solution
■ Place the HipsTranslation joint above the Hips joint in your character’sjoint hierarchy.
■ In the scene view, move the HipsTranslation joint to the same TranslateX, Y, and Z coordinates as the Hips joint.
Feet slide around when they are pinned
Problem
Your pinned FBIK effectors translate and rotate during playback. This is becausepinning only affects your FBIK effectors during interaction—not duringplayback.
Solution
To constrain a FBIK effector in rotation or translation during playback, set anIK key on the FBIK effector. The IK key will anchor your effector and preventit from being transformed by movements in other parts of the body.
Constrained FBIK effectors break FBIK solution
Problem
If you constrain your FBIK effectors to other objects (for example, controlobjects), your character’s FBIK IK animation (input skeleton) will not followits FBIK effectors. This is because during playback, FBIK is only activated foreffectors whose Reach values are set to 1.0 (pure IK), and constraining youreffectors causes your Reach values to become values other than 1.0.
Solution
Set the constrained FBIK effectors’ Reach values to 1.0 (pure IK).
68 | Chapter 1 Full Body IK (FBIK)
Animate > Set Full Body IK Keys
Animate > Set Full Body IK Keys >
The Set Full Body IK Keys Options window lets you do the following:■ Specify which of your character’s FBIK effectors and input joints are keyed
■ Set your character’s FBIK effector’s Reach channel values
■ Place keys on your character’s FBIK effectors, FK joints, and Reach channels
NOTE
When animating with FBIK, you can pose and key your character’s FBIKeffectors and input joints to create IK animation. These keys are placed onthe FBIK effectors and their FK joints, not the input skeleton’s joints.
Key ModeDetermines the parts of your character that are keyed when you clickApply.
AllWhen on, keys are placed on all of the current character’s FBIK effectorsand FK joints. Also, the Reach channel values of all the body parts thatare not selected are keyed. You can also set the keying mode to All withthe +d hotkey or through the FBIK effector marking menu.
Body PartWhen on, keys are placed only on the FBIK effectors and FK joints in theselected body part. You can also set the keying mode to Body Part withthe +x hotkey or through the FBIK effector marking menu.
SelectedWhen on, keys are placed only on the selected FBIK effectors and their FKjoints. You can also set the keying mode to Selected with the +4 hotkeyor through the FBIK effector marking menu.
Reach ModeSpecifies the Reach channel value of the selected FBIK effector anddetermines whether or not Reach is keyed when you click Apply.
Reach determines the amount of IK that is set for an effector. For example,a Reach of 1.0 determines that the effector is completely controlled by IKand a Reach of 0.0 disables the effector’s IK; allowing you to then animatethe underlying FK skeleton’s joints.
IK Key (Reach = 1)
Animate > Set Full Body IK Keys | 69
When on, the Reach channel values of the selected FBIK effectors are setto 1 and are keyed when you click Apply. Also, the Reach channel valuesof all other effectors within the selected body part are set to 0 and the keyson the body part of the selected effectors are given Stepped Next tangents.You can also set the Reach Mode to IK Key with the +3 hotkey or throughthe FBIK effector marking menu.
FK Key (Reach = 0)When on, the Reach channel values of the selected FBIK effectors are setto 0 and are keyed when you click apply. Also, the Reach channel valuesof all other effectors within the selected body part are set to 0 and the keysset on Reach are given regular Stepped tangents.You can also set the Reach Mode to FK Key with the +1 hotkey orthrough the FBIK effector marking menu.
Simple Key (Reach not keyed)When on, the Reach channel values of your FBIK effectors are not changedor keyed when you click Apply. Simple key uses the global default tangency.Simple keys are most often used to rough out your character’s animationbefore keying the finer details of your FBIK animation with IK and FK keys.You can also set the Reach mode to Simple Key with the +2 hotkey orthrough the FBIK effector marking menu.
Apply and CloseSets a key on the current character’s FBIK effectors and input jointsaccording to the current Key Mode and then closes the Set Full BodyIK Keys Options window.
ApplySets a key on the current character’s FBIK effectors and joints according tothe current Key Mode.
CloseCancels the operation and closes the Set Full Body IK Keys Optionswindow.
Related topics
■ Pose and animate your character with full body IK (page 20)
■ Examples: Working with full body IK (page 41)
70 | Chapter 1 Full Body IK (FBIK)
Skeleton > Full Body IK
Skeleton > Full Body IK > Add Full Body IK
Skeleton > Full Body IK > Add Full Body IK >
These options let you specify the kind of character you want to create the fullbody IK effectors for and the FBIK joint labelling and naming method youused for your characters.Identify JointsSelect one of the following options.
By Label When on, labels are used to create the set of full body IK effectors.See Joint labelling (page 5).
By Name When on, joint names are used to create the set of full body IKeffectors. See Renaming your character’s joints (page 6).
PostureSelect one of the following options.
Biped When on, the character you want to create the full body IK effectorsfor is a biped.
Quadruped When on, the character you want to create the full body IKeffectors for is a quadruped.
Related topics
■ FBIK joint labelling and naming conventions (page 4)
Skeleton > Full Body IK > Add AuxiliaryEffector
Creates an auxiliary effector for the selected FBIK effector. Auxiliary effectorslet you direct the positions of their corresponding FBIK effectors duringplayback.
Skeleton > Full Body IK | 71

Related topics
■ Create auxiliary effectors (page 57)
Skeleton > Full Body IK > Add AuxiliaryPivot
Creates a auxiliary pivot for the selected FBIK effector. Auxiliary pivots let youcreate and position an additional pivot point for an FBIK effector.
Related topics
■ Create auxiliary pivots (page 55)
Skeleton > Full Body IK > Activate AuxiliaryPivot
Turns on the selected FBIK auxiliary pivot. When a auxiliary pivot is active,it acts like an additional pivot point for its parent effector during the FBIKsolution.
If you want to reposition a auxiliary pivot, deactivate it by selecting Skeleton> Full Body IK > Change Auxiliary Pivot Placement (page 72).
Related topics
■ Create auxiliary pivots (page 55)
Skeleton > Full Body IK > Change AuxiliaryPivot Placement
Turns off the selected FBIK auxiliary pivot, allowing you to translate the effectorto a new position. When a auxiliary pivot is inactive, it is not included in theFBIK solution.
Once you have repositioned the selected auxiliary pivot, you need to reactivateit by selecting Skeleton > Full Body IK > Activate Auxiliary Pivot (page 72).
72 | Chapter 1 Full Body IK (FBIK)

Related topics
■ Create auxiliary pivots (page 55)
Skeleton > Full Body IK > Show FBIK FKSkeleton
Turns on the visibility of the full body IK FK skeleton. The FK FBIK skeletonappears dark blue in your scene view. The FK skeleton stores all the FK keysfor the FBIK solution. See FK skeleton (page 21).
Skeleton > Full Body IK > Hide FBIK FKSkeleton
Turns off the visibility of the full body IK FK skeleton. See FK skeleton (page21).
Skeleton > Full Body IK > Add Floor ContactPlane
Creates a plane for the hand or foot floor contacts that represents the floorwhich the floor contact markers must respect. By default, the scene grid is thefloor.
Related topics
■ Create floor contacts for your character’s hands and feet (page 61)
Skeleton > Full Body IK > Go to Stance Pose
Moves and rotates your full body effectors to their initial positions on creation.
Skeleton > Full Body IK | 73

Skeleton > Full Body IK > Add MissingEffectors
Adds new effectors to a character that has an existing set of FBIK effectors andadds back any effectors you have deleted. For example, if you have a characterthat is already animated using full body IK, you can add fingers to its skeletonand then use Add Missing Effectors to create FBIK effectors for the fingers.
Add Missing Effectors is useful because it allows you to add new or deletedeffectors to your character without having to recreate its entire set of FBIKeffectors, which would cause it to lose all its existing FBIK animation.By Label Recreates your deleted effectors using label names.
By Name Recreates your deleted effectors using joint names.
Skeleton > Full Body IK > Body PartAutoload
When on, your character’s current Key Mode determines which of its keysdisplay in the Time Slider, Graph Editor, and Dope Sheet. For example, whenin Selected Key Mode, only the FBIK keys on the selected FBIK effector or FKjoint display. When in Body Part Key Mode, the FBIK keys for all the FBIKeffectors and FK joints for the selected effector or FK joint’s body part display.And when in All Key Mode, all the FBIK keys (IK and FK) for the selected FBIKeffector or FK joint’s character display.
When off, only the selected FBIK effector or FK joint’s keys are displayed inthe Time Slider, Graph Editor, and Dope Sheet.
Edit > Keys > Delete FBIK KeysDeletes all FBIK keys, body part keys, or selected keys. These items are alsoaccessible from the context-sensitive menu that appears by right-clicking inthe Time Slider.
Edit > Keys > Delete FBIK Keys > Delete All FBIK Keys
For the current character, deletes all the keys at the Current Time Indicatorfrom its FBIK effectors and FK joints.
74 | Chapter 1 Full Body IK (FBIK)
Edit > Keys > Delete FBIK Keys > Delete Body Part Keys
For the current body part, deletes all the keys at the Current Time Indicatorfrom its FBIK effectors and FK joints.
Edit > Keys > Delete FBIK Keys > Delete Selected FBIK Keys
For the selected FBIK effectors, deletes all their keys at the Current TimeIndicator as well as those on their FK joints.
hikEffectorHIK Effector Attributes
PinningWhen a FBIK effector’s channel is pinned, it will not move or rotate whenyou pose other parts of your character’s body.
NOTE
Pinning is not a constraint. Pinning only restricts the movements of youreffectors during interaction. If you want an effector to stay in place duringplayback, then you need to set an IK key on that effector.
unpinned The current effector is not pinned during interaction.
pinTranslate Pins the current effector in translation during interaction.
pinRotate Pins the current effector in rotation during interaction.
pinAll Pins the current effector in translation and rotation during interaction.
Reach Translation Specifies the amount of IK for the FBIK effector andcontrols how much your character’s joints want to reach their associatedeffector's translation.
For example, a Reach Translation of 1 sets that the effector is completelycontrolled by IK and its joints will try to reach the effector's translation. AReach Translation of 0 disables the effector’s IK (allowing you to thenanimate the underlying FK skeleton joints) and its joints ignore the effector'stranslation. The default Reach Translation values for your hip, hand, andfoot FBIK effectors are: 1.0 Foot Translate, 1.0 Hips Translate, and 1.0 HandsTranslate.
Reach Rotation Specifies the amount of IK for the FBIK effector and controlshow much your character’s joints want to reach their associated effector's
hikEffector | 75
rotation. For example, a Reach Rotation of 1 determines that the effector’srotation is completely controlled by IK and a Reach Rotation of 0 disablesthe effector’s IK (allowing you to then animate the underlying FK skeletonjoints) on its rotation channels. The default Reach Rotation values for yourhip, hand, and foot FBIK effectors are: 1.0 Foot Rotate, 1.0 Hips Rotate, and0.0 Hands Rotate.
Pivot Offset Sets the amount (in local coordinates) a secondary effector isoffset from its parent effector. All non-secondary FBIK effectors also havePivot Offsets, which are 0,0,0 by default. This should not be manuallymodified.
Radius Sets the size of the current FBIK effector in the scene view. Radiusis measured in the current user set working units.
hikFloorContactMarkerFloor Contact Marker Attributes
See also Create floor contacts for your character’s hands and feet (page 61).Marker Size Sets the size of the individual floor contact markers. MarkerSize does not affect how your character’s hands and feet contact the floor.Marker Size is measured in the current user set working units.
Feet to Floor Contact Attributes
Feet Contact When on, the current character’s foot floor contacts are active.
Draw Feet Contact When on, your foot floor contact markers are visible inthe scene view.
Feet Floor PivotSpecifies which parts of your feet take priority when they make contact withthe floor.
auto When selected, the priority is averaged between the ankle and toes.When the foot then makes contact with the floor, the ankle is translatedbackwards and the toes are pushed forwards. Auto is selected by default.
ankle When selected, the ankles are given priority. When the foot then makescontact with the floor, the toes are translated forward to maintain the ankle’strajectory towards the floor.
76 | Chapter 1 Full Body IK (FBIK)
toes When selected, the toes are given priority. When the foot then comesin contact with the floor, the ankle is translated backwards to keep the toesfirmly planted on the floor.
Feet Contact TypeSpecifies the number and orientation of the markers used to define the floorcontacts for your character’s feet.
normal When selected, six markers define each foot’s floor contact. Of thesix markers, the middle markers define the ball of each foot or the point wherethe toes begin.
ankle When selected, four markers define each foot’s floor contact and theyare positioned around the base of each foot.
toe base When selected, four markers define each foot’s floor contact andthey are positioned around the toes of each foot.
hoof When selected, four markers define each foot’s floor contact. The markersare oriented at a 90 degree angle to allow for 180 degree movement. Hoof isthe best feet contact type for animals with hooves such as horses.
Feet Contact Stiffness Sets how much your character’s hands resist goingthrough the floor when any part of the feet contact the floor. A Feet ContactStiffness of 1.0 produces no ankle rotations and maintains your foottransformations. A Feet Contact Stiffness of 0.0 rotates your character’sankles to minimize foot-floor penetration. With any Feet Contact Stiffnessvalue, your character’s ankles are translated for any final corrections.
Foot Height Sets the positions of your character’s foot floor contact markersalong the Y-axis.
Foot Back Sets the positions of the back most foot floor contacts along theZ-axis. The positions of the back markers determine where the heels of yourcharacter’s feet contact the floor.
Foot Middle Sets the positions of the middle foot floor contact markers alongthe Z-axis. The positions of the middle markers determine where yourcharacter’s feet will bend when they contact the floor.
Foot Front Sets the positions of the front most foot floor contact markersalong the Z-axis. The positions of the front most markers determine wherethe ends of your character’s toes will contact the floor.
Foot In Side Sets the positions of the inside (the markers closer to the middleof your character) floor contact markers along the X-axis.
hikFloorContactMarker | 77
Foot Out Side Sets the positions of the outside (the markers farthest fromthe middle of your character) floor contact markers along the X-axis.
Hands to Floor Contact Attributes
Hands Contact When on, the current character’s hand floor contacts areactive.
Draw Hand Contact When on, your hand floor contact markers are visiblein the scene view.
Hands Floor PivotSpecifies which parts of your hands take priority when they make contactwith the floor.
auto When selected, the priority is averaged between the wrist and fingers.When the hand then makes contact with the floor, the wrist is translatedbackwards and the fingers are pushed forwards. Auto is selected by default.
wrist When selected, the wrists are given priority. When the hand then makescontact with the floor, the fingers are translated forward to maintain the wrist’strajectory towards the floor.
fingers When selected, the fingers are given priority. When the hand thencomes in contact with the floor, the wrist is translated backwards to keep thefingers firmly planted on the floor.
Hands Contact TypeSpecifies the number and orientation of the markers used to define the floorcontacts for your character’s hands.
normal When selected, six markers define each hands’s floor contact. Of thesix markers, the middle markers define where the fingers begin.
wrist When selected, four markers define each hand’s floor contact and theyare positioned around each hand’s palm.
finger base When selected, four markers define each hand’s floor contactand they are positioned around the fingers of each hand.
hoof When selected, four markers define each hand’s floor contact. Themarkers are oriented at a 90 degree angle to allow for 180 degree movement.Hoof is the best hand contact type for animals with hooves such as horses.
Hands Contact Stiffness Sets how much your character’s hands resist goingthrough the floor when any part of the hands contact the floor. A HandsContact Stiffness of 1.0 produces no wrist rotations and maintains yourhand transformations. A Hands Contact Stiffness of 0.0 rotates your
78 | Chapter 1 Full Body IK (FBIK)
character’s wrists to minimize hand-floor penetration. With any Feet ContactStiffness value, your character’s wrists are translated for any final corrections.
Hand Height Sets the positions of the hand floor contact markers along theY-axis.
Hand Back Sets the positions of the back most hand floor contacts along theZ-axis. The positions of the back markers determine where the heals of yourcharacter’s hands contact the floor.
Hand Middle Sets the positions of the middle hand floor contact markersalong the Z-axis. The positions of the middle markers determine where yourcharacter’s hands bend when they contact the floor.
Hand Front Sets the positions of the front most hand floor contact markersalong the Z-axis. The positions of the front most markers determine wherethe ends of your character’s fingers contact the floor.
Hand In Side Sets the positions of the front most hand floor contact markersalong the Z-axis. The positions of the front most markers determine wherethe ends of your character’s fingers contact the floor.
Hand Out Side Sets the positions of the outside (the markers farthest fromthe middle of your character) hand contact markers along the X-axis.
Fingers/Toes to Floor Contact Attributes
Fingers Contact When on, the current character’s finger floor contacts areactive and the fingers will be taken into account by the hikSolver.
NOTE
When using Fingers Contact, do not also use Hands Contact as it willoverride your finger floor contact.
Fingers Contact TypeControls the behavior of your character’s fingers when they contact the floor.
sticky When selected, each finger sticks to the floor exactly where contact ismade.
spread When selected, the fingers spread as they make contact with the floor,attempting to keep the position of the fingers intact. Rotation is applied tothe root of each finger.
sticky-spread When selected, the fingers’ behavior is an average betweenSticky and Spread.
hikFloorContactMarker | 79
Fingers Contact Roll Stiffness Corrects unnatural finger rotation when fingerfloor contact markers touch the floor. A Fingers Contact Roll Stiffness of1.0 attempts to prevent the fingers from rotating in unnatural directions.
Toes Contact When on, the current character’s toe floor contacts are activeand the toes will be taken into account by the hikSolver.
NOTE
When using Toes Contact, do not also use Feet Contact as it will overrideyour toes floor contact.
Toes Contact TypeControls the behavior of your character’s toes when they contact the floor.
sticky When selected, each toe sticks to the floor exactly where contact ismade.
spread When selected, the toes spread as they make contact with the floor,attempting to keep the position of the toes intact. Rotation is applied to theroot of each toe.
sticky-spread When selected, the toes’ behavior is an average between Stickyand Spread.
Toes Contact Roll Stiffness Corrects unnatural toe rotation when toe floorcontact markers touch the floor. A Toes Contact Roll Stiffness of 1.0attempts to prevent the toes from rotating in unnatural directions.
80 | Chapter 1 Full Body IK (FBIK)
Index
A
accessory joints 4animate
character’s with FBIK 20FBIK 25
auxiliary joints 3
B
base joints 3biped
FBIK preparation 2
C
createFBIK floor contacts 61
E
editFBIK floor contacts 61
effectorscreate FBIK 31FBIK node 75pinning 35secondary FBIK 55
examplesFBIK pinning 38
F
FBIKanimate 25animate characters 20biped preparation 2create effectors 31custom joint names 7floor contacts 61
joint labelling 5joint renaming 6joint types 3labelling joints 4manage keys 28MEL 7pinning 35, 38pinning examples 38posing 25preparation 2quadruped preparation 2renaming joints 4secondary effectors 55workflow 30
floor contacts 61marker node 76
H
hikEffector 75
J
jointsaccessory 4auxiliary 3base 3custom FBIK names 7labelling for FBIK 4naming conventions 8renaming 6renaming for FBIK 4roll 3
K
keysmanage FBIK 28
81 | Index

L
labelFBIK joints 4, 5
M
manageFBIK keys 28
MELFBIK 7
N
nodesfloor contact marker 76hikEffector 75
P
pinning 35how to 38
posingFBIK 25
preparecharacter for FBIK 2
Q
quadrupedFBIK preparation 2
R
renameFBIK joints 4joints 6
roll joints 3
S
secondary effectors 55
W
workflowFBIK 20, 30
82 | Index