Embed Size (px)
Citation preview
User Guide
FS-1100FS-1300D
870CKGB20008*870CKGB20008*
FS-C1020MFP
Top Page
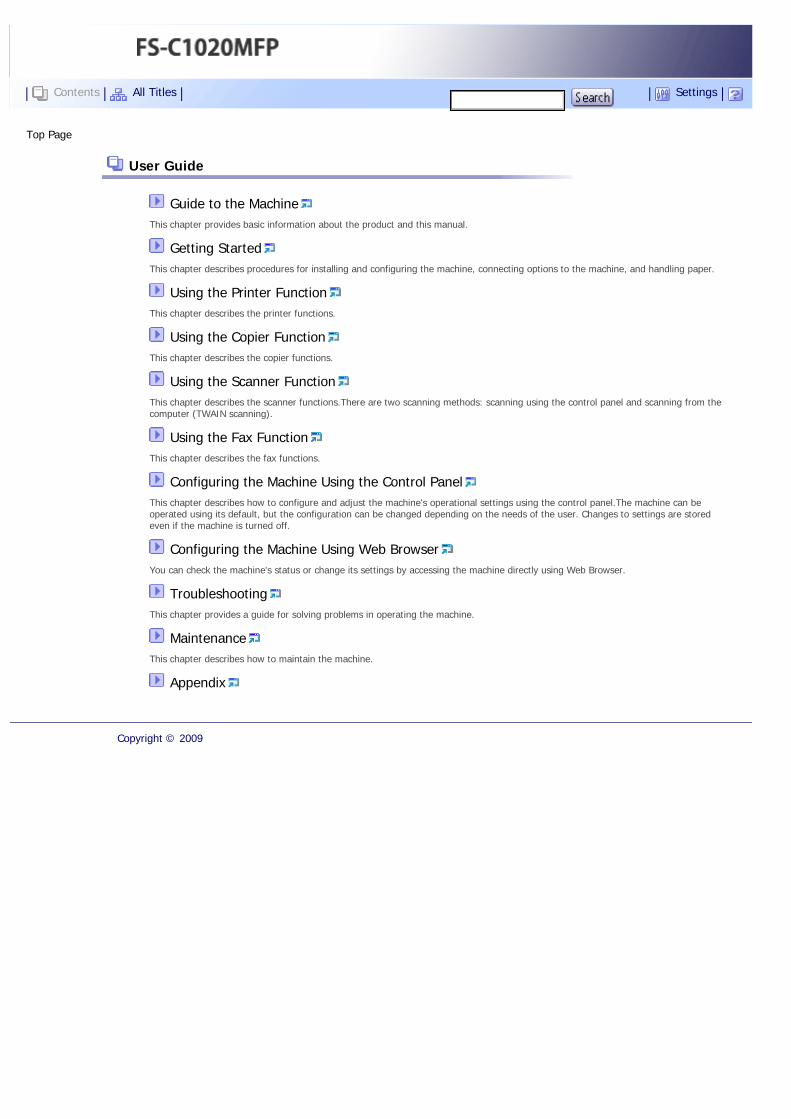
User Guide
Guide to the MachineThis chapter provides basic information about the product and this manual.
Getting StartedThis chapter describes procedures for installing and configuring the machine, connecting options to the machine, and handling paper.
Using the Printer FunctionThis chapter describes the printer functions.
Using the Copier FunctionThis chapter describes the copier functions.
Using the Scanner FunctionThis chapter describes the scanner functions.There are two scanning methods: scanning using the control panel and scanning from the computer (TWAIN scanning).
Using the Fax FunctionThis chapter describes the fax functions.
Configuring the Machine Using the Control PanelThis chapter describes how to configure and adjust the machine's operational settings using the control panel.The machine can be operated using its default, but the configuration can be changed depending on the needs of the user. Changes to settings are stored even if the machine is turned off.
Configuring the Machine Using Web BrowserYou can check the machine's status or change its settings by accessing the machine directly using Web Browser.
TroubleshootingThis chapter provides a guide for solving problems in operating the machine.
MaintenanceThis chapter describes how to maintain the machine.
Appendix
Copyright © 2009
Contents All Titles Settings

Top Page > Guide to the Machine
Guide to the Machine
Introduction
Trademarks
Disclaimer
Manuals for This Machine
Machine Types
How to Read This Manual
Symbols
Notes
Web Browser
Feature Highlights
Using the Machine as a Printer
Connecting via USB
Connecting via a network
Printing confidential documents
Using the Machine as a Copier
Making enlarged or reduced copies
Copying multiple pages onto a single sheet of paper
Copying both sides of an ID card onto one side of paper
Making 2-sided copies
Sorting the output paper
Using the Machine as a Scanner
Scanning from a computer
Sending scanned files via e-mail
Sending scanned files to an FTP server
Sending scanned files to a computer's shared folder
Using the Machine as a Fax Machine
Using as a fax machine
Using the machine with an external telephone
Sending faxes from a computer (LAN-Fax)
Guide to Components
Exterior: Front View
Exterior: Rear View
Interior
Control Panel
Contents Settings

Top
Copyright © 2009
Top Page > Getting Started
Getting Started
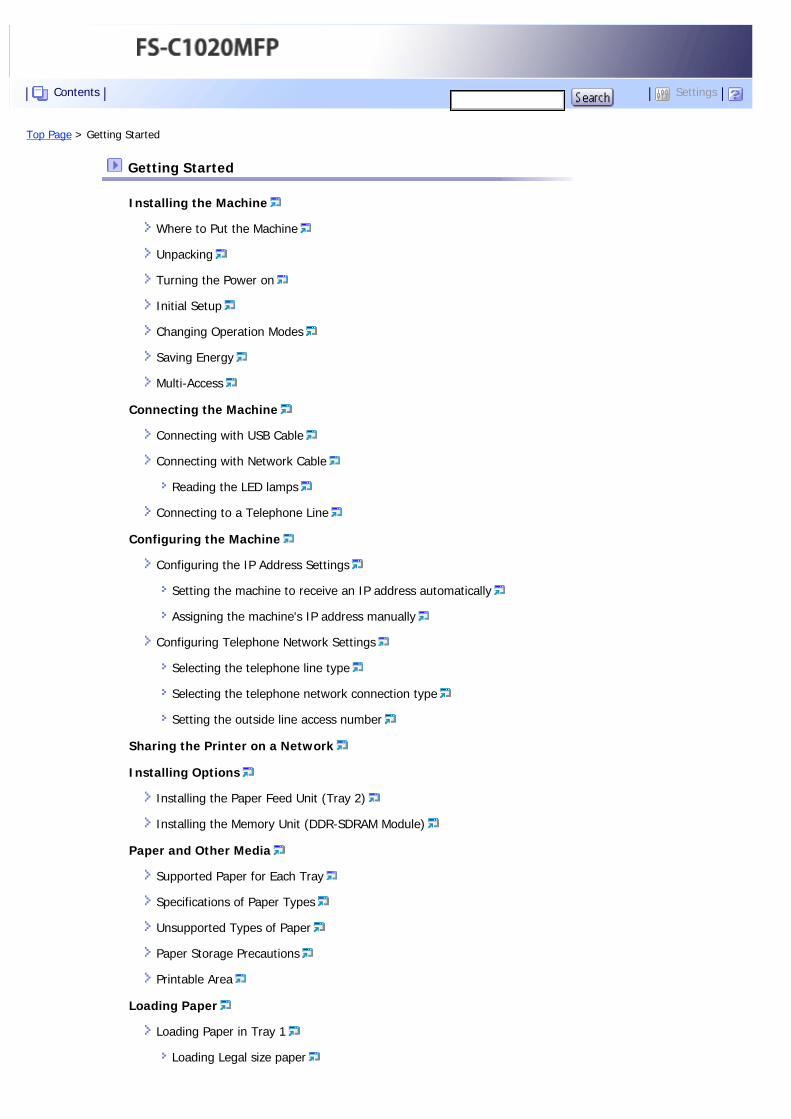
Installing the Machine
Where to Put the Machine
Unpacking
Turning the Power on
Initial Setup
Changing Operation Modes
Saving Energy
Multi-Access
Connecting the Machine
Connecting with USB Cable
Connecting with Network Cable
Reading the LED lamps
Connecting to a Telephone Line
Configuring the Machine
Configuring the IP Address Settings
Setting the machine to receive an IP address automatically
Assigning the machine's IP address manually
Configuring Telephone Network Settings
Selecting the telephone line type
Selecting the telephone network connection type
Setting the outside line access number
Sharing the Printer on a Network
Installing Options
Installing the Paper Feed Unit (Tray 2)
Installing the Memory Unit (DDR-SDRAM Module)
Paper and Other Media
Supported Paper for Each Tray
Specifications of Paper Types
Unsupported Types of Paper
Paper Storage Precautions
Printable Area
Loading Paper
Loading Paper in Tray 1
Loading Legal size paper
Contents Settings
Loading envelopes
Loading Paper in the Optional Paper Feed Unit
Loading Paper in the Bypass Tray
Specifying Paper Type and Paper Size
Specifying the paper type
Specifying the standard paper size
Specifying a custom paper size
Placing Originals
About Originals
Recommended size of originals
Types of originals not supported by the Auto Document Feeder
Unscannable image area
Placing Originals
Placing originals on the exposure glass
Placing originals in the Auto Document Feeder
Entering Characters
Value Input Mode
Fax Number Input Mode
Text Input Mode
Restricting Machine Functions According to User
Enabling the User Restriction Settings
Modifying user entries
Deleting user entries
When a Message Requesting a User ID Appears
Top
Copyright © 2009
Top Page > Using the Printer Function
Using the Printer Function
Configuring Option Settings for the Printer
Conditions for Bidirectional Communication
If Bidirectional Communication is Disabled
Windows
Mac OS X
Accessing the Printer Properties
Accessing the Printer Properties from the [Printers and Faxes] Window
Accessing the Printer Properties from an Application
Windows
Mac OS X
Basic Operation in Printer Mode
If a Paper Mismatch Occurs
Continuing printing using mismatched paper
Resetting the print job
Canceling a Print Job
Canceling a print job before printing has started
Canceling a print job while printing
Printing Confidential Documents
Storing a Locked Print file
Printing a Locked Print file
Deleting a Locked Print file
Checking which Locked Print File Jobs Have Been Canceled
Using Various Print Functions
Print Quality Functions
Print Output Functions
Top
Copyright © 2009
Contents Settings
Top Page > Using the Copier Function
Using the Copier Function
The Screen in Copier Mode
Basic Operation in Copier Mode
Canceling a Copy
Making Enlarged or Reduced Copies
Combining Multiple Pages
Copying Two or Four Pages onto One Sheet
Copying Both Sides of an ID Card onto One Side of Paper
Making 2-sided Copies
Specifying Scan Settings
Adjusting Image Density
Selecting the Document Type According to Original
Top
Copyright © 2009
Contents Settings
Top Page > Using the Scanner Function
Using the Scanner Function
The Screen in Scanner Mode
Registering Scan Destinations
Modifying Scan Destinations
Deleting Scan Destinations
Scanning Using the Control Panel
Basic Operation for Sending Scanned Files
Specifying the scan destination
Specifying the Scan Settings
Specifying the scanning size according to the size of the original
Adjusting image density
Specifying resolution
Scanning from a Computer
Settings you can configure in the TWAIN dialog box
Top
Copyright © 2009
Contents Settings
Top Page > Using the Fax Function
Using the Fax Function
The Screen in Fax Mode
Setting the Date and Time
Registering Fax Destinations
Registering Fax Destinations Using the Control Panel
Modifying fax destinations
Deleting fax destinations
Registering Fax Destinations Using Web Browser
Modifying fax destinations
Deleting fax destinations
Sending a Fax
Selecting Transmission Mode
Basic Operation for Sending a Fax
Canceling a fax
Specifying the Fax Destination
Specifying the destination using the One Touch buttons
Specifying the destination using Speed Dial
Specifying the destination using the broadcast function
Specifying the destination using the redial function
Useful Sending Functions
Specifying the Scan Settings
Adjusting image density
Specifying the resolution
Using the Fax Function from a Computer (LAN-Fax)
Configuring the LAN-Fax Address Book
Opening the LAN-Fax Address Book
Registering destinations
Modifying destinations
Registering groups
Modifying groups
Deleting individual destinations or groups
Exporting/Importing LAN-Fax Address Book data
Basic Operation for Sending Faxes from a Computer
Canceling a fax
Configuring Transmission Settings
Contents Settings

Settings you can configure in the LAN-Fax driver's properties
Receiving a Fax
Selecting Reception Mode
Receiving a Fax in Manual Mode
Receiving a Fax in Fax Only Mode
Receiving a Fax in FAX/TEL Mode
Receiving a Fax in FAX/TAD Mode
Top
Copyright © 2009
Top Page > Configuring the Machine Using the Control Panel
Configuring the Machine Using the Control Panel
Basic Operation Using the Menu Screen
Menu Chart
Copy Settings
Changing Copy Settings
Copy Setting Parameters
Scanner Settings
Changing Scanner Settings
Scanner Setting Parameters
Fax Transmission Settings
Changing Fax Transmission Settings
Fax Transmission Setting Parameters
Fax System Settings
Changing Fax System Settings
Fax System Setting Parameters
Fax Directory Settings
Registering Fax Destinations in Fax Quick Dial/Speed Dial
Fax Directory Parameters
Machine Settings
Changing Machine Settings
Machine Setting Parameters
Network Settings
Changing Network Settings
Network Setting Parameters
Reports Print
Printing the Configuration Page
Types of Report
Reading the Configuration Page
Reading the Activity Report
Reading the Memory List
Reading the Scan Transmission Log
Administrator Settings
Changing Administrator Settings
Administrator Setting Parameters
PDL Settings
Contents Settings

Changing PDL Settings
PDL Setting Parameters
Top
Copyright © 2009

Top Page > Configuring the Machine Using Web Browser
Configuring the Machine Using Web Browser
Using Web Browser
Displaying the Main Page
Changing the Interface Language
Checking the System Information
Checking the Status Information
Checking the Counter Information
Checking the Machine Information
Configuring the Machine Settings
Configuring the Speaker Volume
Configuring the Paper Settings
Specifying the Size of Paper for Printing Copies
Specifying the Tray for Printing Faxes
Specifying the Tray Priority for the Printer Function
Configuring Toner Saver Mode
Registering Destinations
Restricting Machine Functions According to User
Printing Reports
Configuring the Network Settings
Checking the Network Status
Configuring the Network Application Settings
Configuring the DNS Settings
Configuring the Alert Message Settings
Configuring the SNMP Settings
Configuring the SMTP Settings
Configuring the Administrator Settings
Configuring the Password
Restoring the Default Settings
Backing Up the Machine's Settings
Restoring the Machine's Settings from a Backup File
Configuring the Date and Time Settings
Configuring the Power Saver Mode Settings
Top
Copyright © 2009
Contents Settings

Top Page > Troubleshooting
Troubleshooting
Overview
Common Problems
Paper Feed Problems
Removing Printing Jams
If paper jams inside the fusing unit
If paper jams inside a tray
If paper jams inside the transfer unit
Removing Scanning Jams
Print Quality Problems
Checking the Condition of the Machine
Printer Problems
Changing the Printer Driver Settings
Printed Colors Do Not Match Displayed Colors
Print Positions Do Not Match Display Positions
Copier Problems
Scanner Problems
Fax Problems
Error and Status Messages on the Screen
Replacing Print Cartridges
Replacing the Waste Toner Bottle
Top
Copyright © 2009
Contents Settings
Top Page > Maintenance
Maintenance
Cleaning
Cautions to Take When Cleaning
Cleaning the Toner Density Sensor
Cleaning the Friction Pad and Paper Feed Roller
Cleaning the Registration Roller
Cleaning the Exposure Glass
Cleaning the Auto Document Feeder
Moving the Machine
Moving over a Short Distance
Moving over a Long Distance
Disposal
If the Machine is Not Going to Be Used for a Long Time
Preparing the Machine for a Long Period of Inactivity
Using the Machine Again After It Has Been Inactive for a Long Period
Consumables
Print Cartridges
Waste Toner Bottle
Top
Copyright © 2009
Contents Settings
Top Page > Appendix
Appendix
Specifications of the Machine
General Function Specifications
Printer Function Specifications
Copier Function Specifications
Scanner Function Specifications
Fax Function Specifications
Specifications of Options
Paper Feed Unit
Memory Unit
Electromagnetic Interference
Information about Installed Software
expat
JPEG LIBRARY
Top
Copyright © 2009
Contents Settings
Top Page > All Titles
Guide to the Machine
Introduction
Trademarks
Disclaimer
Manuals for This Machine
Machine Types
How to Read This Manual
Symbols
Notes
Web Browser
Feature Highlights
Using the Machine as a Printer
Connecting via USB
Connecting via a network
Printing confidential documents
Using the Machine as a Copier
Making enlarged or reduced copies
Copying multiple pages onto a single sheet of paper
Copying both sides of an ID card onto one side of paper
Making 2-sided copies
Sorting the output paper
Using the Machine as a Scanner
Scanning from a computer
Sending scanned files via e-mail
Sending scanned files to an FTP server
Sending scanned files to a computer's shared folder
Using the Machine as a Fax Machine
Using as a fax machine
Using the machine with an external telephone
Sending faxes from a computer (LAN-Fax)
Guide to Components
Exterior: Front View
Exterior: Rear View
Interior
Control Panel
Contents Settings
Getting Started
Installing the Machine
Where to Put the Machine
Unpacking
Turning the Power on
Initial Setup
Changing Operation Modes
Saving Energy
Multi-Access
Connecting the Machine
Connecting with USB Cable
Connecting with Network Cable
Reading the LED lamps
Connecting to a Telephone Line
Configuring the Machine
Configuring the IP Address Settings
Setting the machine to receive an IP address automatically
Assigning the machine's IP address manually
Configuring Telephone Network Settings
Selecting the telephone line type
Selecting the telephone network connection type
Setting the outside line access number
Sharing the Printer on a Network
Installing Options
Installing the Paper Feed Unit (Tray 2)
Installing the Memory Unit (DDR-SDRAM Module)
Paper and Other Media
Supported Paper for Each Tray
Specifications of Paper Types
Unsupported Types of Paper
Paper Storage Precautions
Printable Area
Loading Paper
Loading Paper in Tray 1
Loading Legal size paper
Loading envelopes
Loading Paper in the Optional Paper Feed Unit
Loading Paper in the Bypass Tray
Specifying Paper Type and Paper Size
Specifying the paper type
Specifying the standard paper size
Specifying a custom paper size
Placing Originals
About Originals
Recommended size of originals
Types of originals not supported by the Auto Document Feeder
Unscannable image area
Placing Originals
Placing originals on the exposure glass
Placing originals in the Auto Document Feeder
Entering Characters
Value Input Mode
Fax Number Input Mode
Text Input Mode
Restricting Machine Functions According to User
Enabling the User Restriction Settings
Modifying user entries
Deleting user entries
When a Message Requesting a User ID Appears
Using the Printer Function
Configuring Option Settings for the Printer
Conditions for Bidirectional Communication
If Bidirectional Communication is Disabled
Windows
Mac OS X
Accessing the Printer Properties
Accessing the Printer Properties from the [Printers and Faxes] Window
Accessing the Printer Properties from an Application
Windows
Mac OS X
Basic Operation in Printer Mode
If a Paper Mismatch Occurs
Continuing printing using mismatched paper
Resetting the print job
Canceling a Print Job
Canceling a print job before printing has started
Canceling a print job while printing
Printing Confidential Documents
Storing a Locked Print file
Printing a Locked Print file
Deleting a Locked Print file
Checking which Locked Print File Jobs Have Been Canceled
Using Various Print Functions
Print Quality Functions
Print Output Functions
Using the Copier Function
The Screen in Copier Mode
Basic Operation in Copier Mode
Canceling a Copy
Making Enlarged or Reduced Copies
Combining Multiple Pages
Copying Two or Four Pages onto One Sheet
Copying Both Sides of an ID Card onto One Side of Paper
Making 2-sided Copies
Specifying Scan Settings
Adjusting Image Density
Selecting the Document Type According to Original
Using the Scanner Function
The Screen in Scanner Mode
Registering Scan Destinations
Modifying Scan Destinations
Deleting Scan Destinations
Scanning Using the Control Panel
Basic Operation for Sending Scanned Files
Specifying the scan destination
Specifying the Scan Settings
Specifying the scanning size according to the size of the original
Adjusting image density
Specifying resolution
Scanning from a Computer
Settings you can configure in the TWAIN dialog box
Using the Fax Function
The Screen in Fax Mode
Setting the Date and Time
Registering Fax Destinations
Registering Fax Destinations Using the Control Panel
Modifying fax destinations
Deleting fax destinations
Registering Fax Destinations Using Web Browser
Modifying fax destinations
Deleting fax destinations
Sending a Fax
Selecting Transmission Mode
Basic Operation for Sending a Fax
Canceling a fax
Specifying the Fax Destination
Specifying the destination using the One Touch buttons
Specifying the destination using Speed Dial
Specifying the destination using the broadcast function
Specifying the destination using the redial function
Useful Sending Functions
Specifying the Scan Settings
Adjusting image density
Specifying the resolution
Using the Fax Function from a Computer (LAN-Fax)
Configuring the LAN-Fax Address Book
Opening the LAN-Fax Address Book
Registering destinations
Modifying destinations
Registering groups
Modifying groups
Deleting individual destinations or groups
Exporting/Importing LAN-Fax Address Book data
Basic Operation for Sending Faxes from a Computer
Canceling a fax
Configuring Transmission Settings
Settings you can configure in the LAN-Fax driver's properties
Receiving a Fax
Selecting Reception Mode
Receiving a Fax in Manual Mode
Receiving a Fax in Fax Only Mode
Receiving a Fax in FAX/TEL Mode
Receiving a Fax in FAX/TAD Mode
Configuring the Machine Using the Control Panel
Basic Operation Using the Menu Screen
Menu Chart
Copy Settings
Changing Copy Settings
Copy Setting Parameters
Scanner Settings
Changing Scanner Settings
Scanner Setting Parameters
Fax Transmission Settings
Changing Fax Transmission Settings
Fax Transmission Setting Parameters
Fax System Settings
Changing Fax System Settings
Fax System Setting Parameters
Fax Directory Settings
Registering Fax Destinations in Fax Quick Dial/Speed Dial
Fax Directory Parameters
Machine Settings
Changing Machine Settings
Machine Setting Parameters
Network Settings
Changing Network Settings
Network Setting Parameters
Reports Print
Printing the Configuration Page
Types of Report
Reading the Configuration Page
Reading the Activity Report
Reading the Memory List
Reading the Scan Transmission Log
Administrator Settings
Changing Administrator Settings
Administrator Setting Parameters
PDL Settings
Changing PDL Settings
PDL Setting Parameters
Configuring the Machine Using Web Browser
Using Web Browser
Displaying the Main Page
Changing the Interface Language
Checking the System Information
Checking the Status Information
Checking the Counter Information
Checking the Machine Information
Configuring the Machine Settings
Configuring the Speaker Volume
Configuring the Paper Settings
Specifying the Size of Paper for Printing Copies
Specifying the Tray for Printing Faxes
Specifying the Tray Priority for the Printer Function
Configuring Toner Saver Mode
Registering Destinations
Restricting Machine Functions According to User
Printing Reports
Configuring the Network Settings
Checking the Network Status
Configuring the Network Application Settings
Configuring the DNS Settings
Configuring the Alert Message Settings
Configuring the SNMP Settings
Configuring the SMTP Settings
Configuring the Administrator Settings
Configuring the Password
Restoring the Default Settings
Backing Up the Machine's Settings
Restoring the Machine's Settings from a Backup File
Configuring the Date and Time Settings
Configuring the Power Saver Mode Settings
Troubleshooting
Overview
Common Problems
Paper Feed Problems
Removing Printing Jams
If paper jams inside the fusing unit
If paper jams inside a tray
If paper jams inside the transfer unit
Removing Scanning Jams
Print Quality Problems
Checking the Condition of the Machine
Printer Problems
Changing the Printer Driver Settings
Printed Colors Do Not Match Displayed Colors
Print Positions Do Not Match Display Positions
Copier Problems
Scanner Problems
Fax Problems
Error and Status Messages on the Screen
Replacing Print Cartridges
Replacing the Waste Toner Bottle
Maintenance
Cleaning
Cautions to Take When Cleaning
Cleaning the Toner Density Sensor
Cleaning the Friction Pad and Paper Feed Roller
Cleaning the Registration Roller
Cleaning the Exposure Glass
Cleaning the Auto Document Feeder
Moving the Machine
Moving over a Short Distance
Moving over a Long Distance
Disposal
If the Machine is Not Going to Be Used for a Long Time
Preparing the Machine for a Long Period of Inactivity
Using the Machine Again After It Has Been Inactive for a Long Period
Consumables
Print Cartridges
Waste Toner Bottle
Appendix
Specifications of the Machine
General Function Specifications
Printer Function Specifications
Copier Function Specifications
Scanner Function Specifications
Fax Function Specifications
Specifications of Options
Paper Feed Unit
Memory Unit
Electromagnetic Interference
Information about Installed Software
expat
JPEG LIBRARY
Top
Copyright © 2009
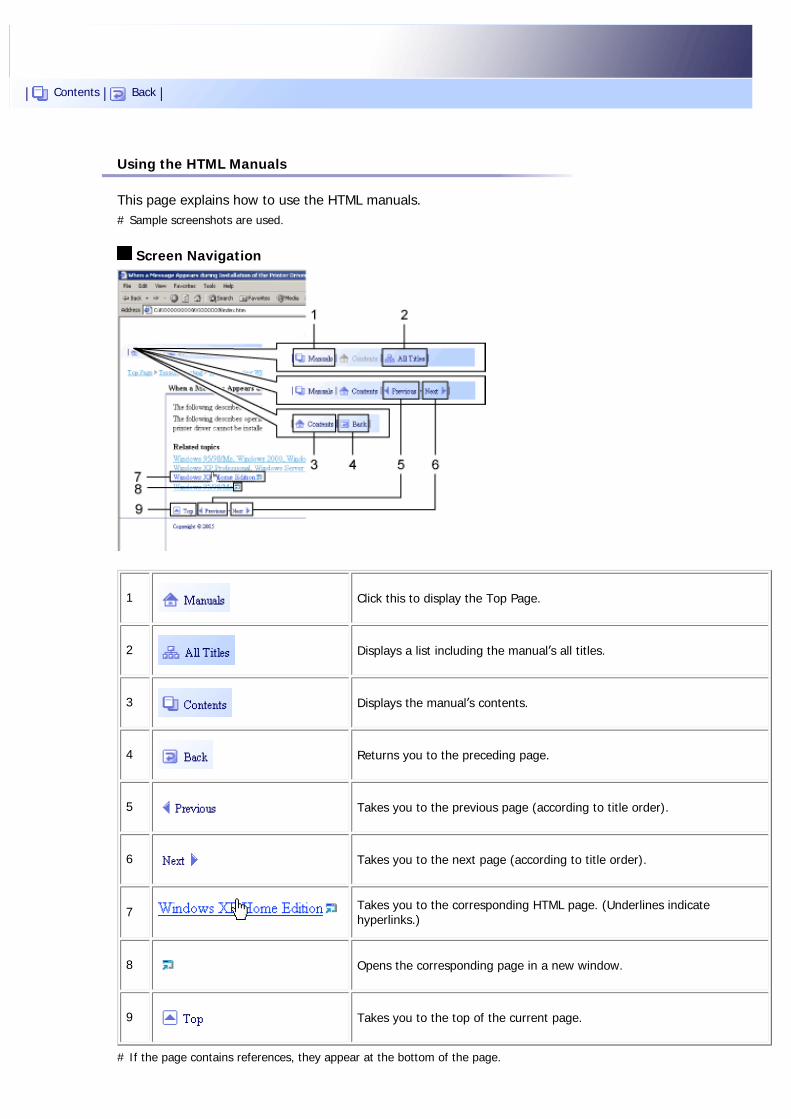
Using the HTML Manuals
This page explains how to use the HTML manuals.# Sample screenshots are used.
Screen Navigation
1 Click this to display the Top Page.
2 Displays a list including the manual’s all titles.
3 Displays the manual’s contents.
4 Returns you to the preceding page.
5 Takes you to the previous page (according to title order).
6 Takes you to the next page (according to title order).
7 Takes you to the corresponding HTML page. (Underlines indicate hyperlinks.)
8 Opens the corresponding page in a new window.
9 Takes you to the top of the current page.
# If the page contains references, they appear at the bottom of the page.
Contents Back
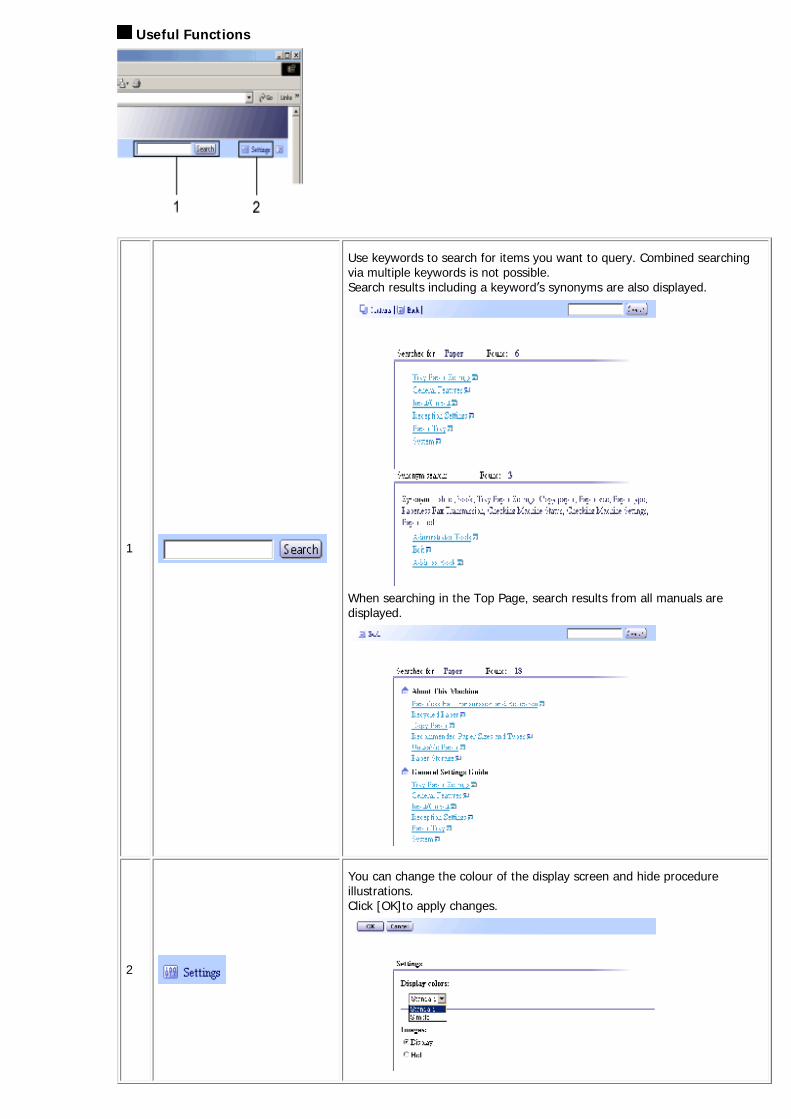
Useful Functions
1
Use keywords to search for items you want to query. Combined searching via multiple keywords is not possible. Search results including a keyword’s synonyms are also displayed.
When searching in the Top Page, search results from all manuals are displayed.
2
You can change the colour of the display screen and hide procedure illustrations. Click [OK]to apply changes.
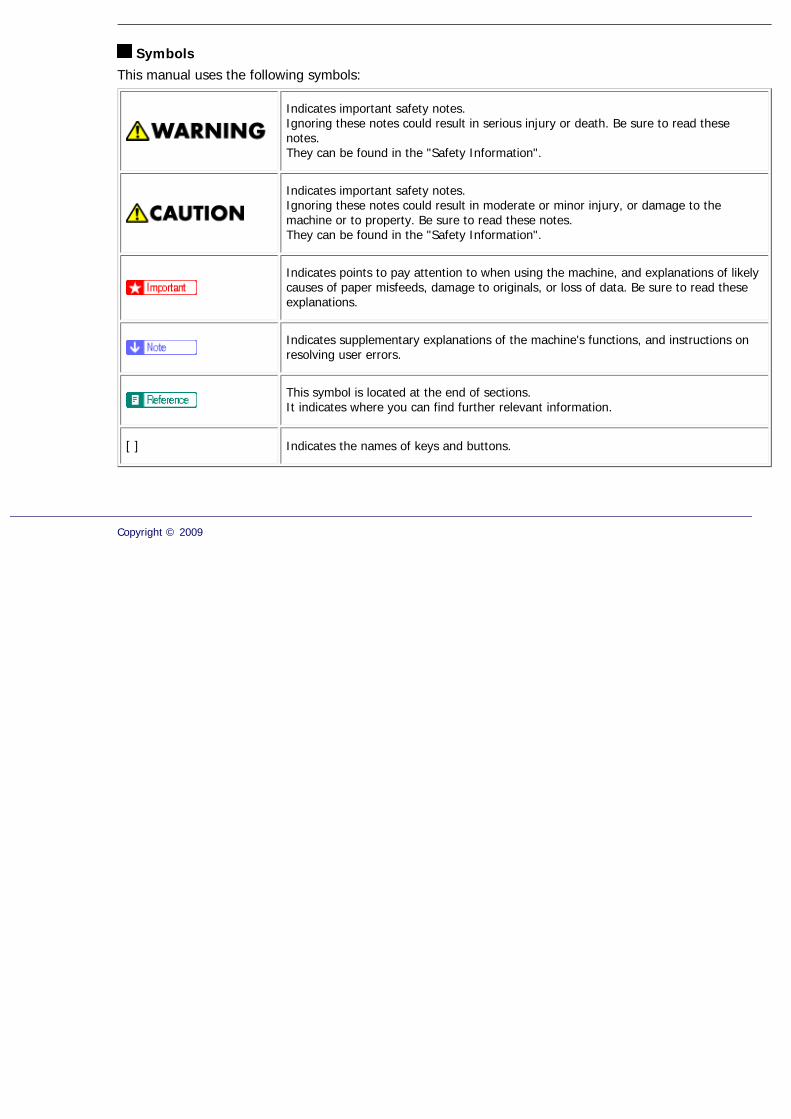
Symbols
This manual uses the following symbols:
Indicates important safety notes. Ignoring these notes could result in serious injury or death. Be sure to read these notes. They can be found in the "Safety Information".
Indicates important safety notes. Ignoring these notes could result in moderate or minor injury, or damage to the machine or to property. Be sure to read these notes. They can be found in the "Safety Information".
Indicates points to pay attention to when using the machine, and explanations of likely causes of paper misfeeds, damage to originals, or loss of data. Be sure to read these explanations.
Indicates supplementary explanations of the machine's functions, and instructions on resolving user errors.
This symbol is located at the end of sections. It indicates where you can find further relevant information.
[ ] Indicates the names of keys and buttons.
Copyright © 2009
Top Page > Guide to the Machine > Introduction
Introduction
Thank you very much for choosing this product.
This manual describes detailed instructions on the operation and notes about the use of this machine. To get maximum versatility from this machine, all operators are requested to read this manual carefully and follow the instructions. Please keep this manual in a handy place near the machine. Read this manual carefully before you use this machine and keep it handy for future reference. For safe and correct use, be sure to read the “Safety Information” before using the machine.
Related topics
Trademarks
Disclaimer
Top Previous Next
Copyright © 2009
Contents Previous Next Settings
Top Page > Guide to the Machine > Introduction > Trademarks
Trademarks
Microsoft®, Windows®, Windows Server®, and Windows Vista® are either registered trademarks or trademarks of Microsoft Corporation in the United States and/or other countries.
Adobe®, PostScript®, Acrobat®, PageMaker® and Adobe Type Manager are registered trademarks of Adobe Systems Incorporated.
PCL® is a registered trademark of Hewlett-Packard Company.
Apple, AppleTalk, EtherTalk, Macintosh, Mac OS, and True Type are trademarks of Apple Computer, Inc., registered in the U.S. and other countries.
Other product names used herein are for identification purposes only and might be trademarks of their respective companies. We disclaim any and all rights to those marks.
The proper names of the Windows operating systems are as follows:
● The product names of Windows 2000 are as follows:
Microsoft® Windows® 2000 Professional
Microsoft® Windows® 2000 Server
Microsoft® Windows® 2000 Advanced Server
● The product names of Windows XP are as follows:
Microsoft® Windows® XP Professional
Microsoft® Windows® XP Home Edition
● The product names of Windows Vista are as follows:
Microsoft® Windows Vista® Ultimate
Microsoft® Windows Vista® Enterprise
Microsoft® Windows Vista® Business
Microsoft® Windows Vista® Home Premium
Microsoft® Windows Vista® Home Basic
● The product names of Windows Server 2003 are as follows:
Microsoft® Windows Server® 2003 Standard Edition
Microsoft® Windows Server® 2003 Enterprise Edition
Microsoft® Windows Server® 2003 Web Edition
Microsoft® Windows Server® 2003 Datacenter Edition
● The product names of Windows Server 2003 R2 are as follows:
Microsoft® Windows Server® 2003 R2 Standard Edition
Microsoft® Windows Server® 2003 R2 Enterprise Edition
Microsoft® Windows Server® 2003 R2 Web Edition
● The product names of Windows Server 2008 are as follows:
Microsoft® Windows Server® 2008 Standard
Microsoft® Windows Server® 2008 Enterprise
Microsoft® Windows Server® 2008 Datacenter
Microsoft® Windows Server® 2008 for Itanium-based Systems
Microsoft® Windows® Web Server 2008
Microsoft® Windows® HPC Server 2008
Microsoft® Windows Server® 2008 Standard without Hyper-VTM
Microsoft® Windows Server® 2008 Enterprise without Hyper-VTM
Contents Previous Next Settings

Microsoft® Windows Server® 2008 Datacenter without Hyper-VTM
● PostScript 3 in this manual stands for “Adobe PostScript 3 Emulation”.
Top Previous Next
Copyright © 2009
Top Page > Guide to the Machine > Introduction > Disclaimer
Disclaimer
1. In no event will the company be liable for direct, indirect, special, incidental, or consequential damages as a result of handling or operating the machine.
2. This manual may not be reproduced in whole or in part, modified, quoted, or reprinted without permission.
Top Previous Next
Copyright © 2009
Contents Previous Next Settings
Top Page > Guide to the Machine > Manuals for This Machine
Manuals for This Machine
Read the relevant manual for your purposes.
Safety Information
Provides information on safe usage of this machine.
To avoid injury and prevent damage to the machine, be sure to read this.
Quick Installation Guide
Contains procedures for removing the machine from its box and connecting it to a computer.
Driver Installation Guide
Provides information about installing drivers and software to use this machine.
Scanning and Faxing Guide
Provides information about installation and operation for using the machine's scanner and fax functions. Details not covered in this manual can be found in User Guide.
User Guide
Provides information about general operation and covers the topics listed below.
● Installing options
● Suitable paper types
● Procedures to use the printer, copier, scanner, and fax functions
● Configuring the machine
● Troubleshooting problems and fixing paper jams
● Replacing consumables
● Checking the status of the machine using Web Browser
● Information about maintenance
This manual is stored in the CD-ROM supplied with the machine.
Quick Guide
Provides information about troubleshooting and basic operations for making photocopies, scanning, and sending faxes.
This manual is stored in the CD-ROM supplied with the machine.
Top Previous Next
Copyright © 2009
Contents Previous Next Settings
Top Page > Guide to the Machine > Machine Types
Machine Types
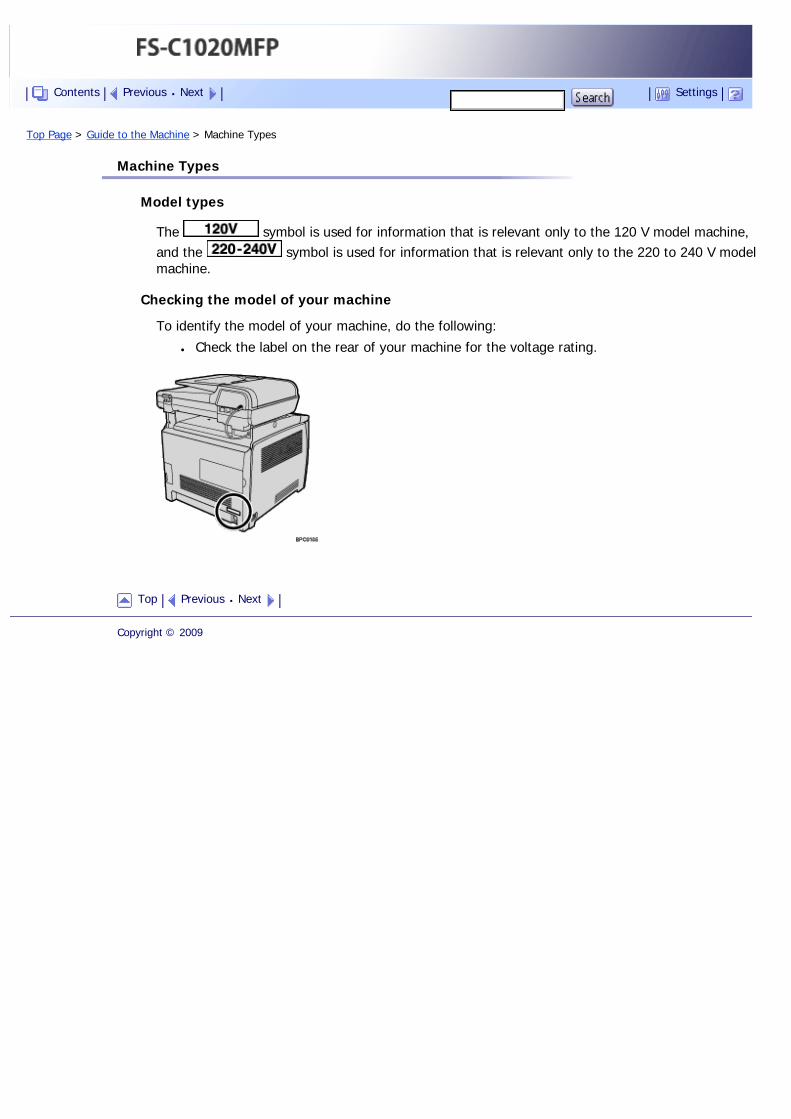
Model types
The symbol is used for information that is relevant only to the 120 V model machine, and the symbol is used for information that is relevant only to the 220 to 240 V model machine.
Checking the model of your machine
To identify the model of your machine, do the following:
● Check the label on the rear of your machine for the voltage rating.
Top Previous Next
Copyright © 2009
Contents Previous Next Settings
Top Page > Guide to the Machine > How to Read This Manual
How to Read This Manual
Related topics
Symbols
Notes
Web Browser
Top Previous Next
Copyright © 2009
Contents Previous Next Settings

Top Page > Guide to the Machine > How to Read This Manual > Symbols
Symbols
This manual uses the following symbols:
Indicates points to pay attention to when using the machine, and explanations of likely causes of paper misfeeds, damage to originals, or loss of data. Be sure to read these explanations.
Indicates supplementary explanations of the machine's functions, and instructions on resolving user errors.
This symbol is located at the end of sections. It indicates where you can find further relevant information.
[ ]
Indicates the names of keys that appear on the machine's display panel.
[ ]
Indicates the names of keys on the machine's control panel.
Top Previous Next
Copyright © 2009
Contents Previous Next Settings

Top Page > Guide to the Machine > How to Read This Manual > Notes
Notes
Contents of this manual are subject to change without prior notice.
Two kinds of size notation are employed in this manual.
Some illustrations in this manual might be slightly different from the machine.
Top Previous Next
Copyright © 2009
Contents Previous Next Settings

Top Page > Guide to the Machine > How to Read This Manual > Web Browser
Web Browser
Web Browser in this manual represents COMMAND CENTER.
Top Previous Next
Copyright © 2009
Contents Previous Next Settings

Top Page > Guide to the Machine > Feature Highlights
Feature Highlights
This section provides information about basic usage and some useful functions of the machine.
● Certain functions require special machine configuration.
Related topics
Using the Machine as a Printer
Using the Machine as a Copier
Using the Machine as a Scanner
Using the Machine as a Fax Machine
Top Previous Next
Copyright © 2009
Contents Previous Next Settings

Top Page > Guide to the Machine > Feature Highlights > Using the Machine as a Printer
Using the Machine as a Printer
To use this machine as a printer, two types of connection method are available:
● USB connection
● Network connection
Related topics
Connecting via USB
Connecting via a network
Printing confidential documents
Top Previous Next
Copyright © 2009
Contents Previous Next Settings
Top Page > Guide to the Machine > Feature Highlights > Using the Machine as a Printer > Connecting via USB
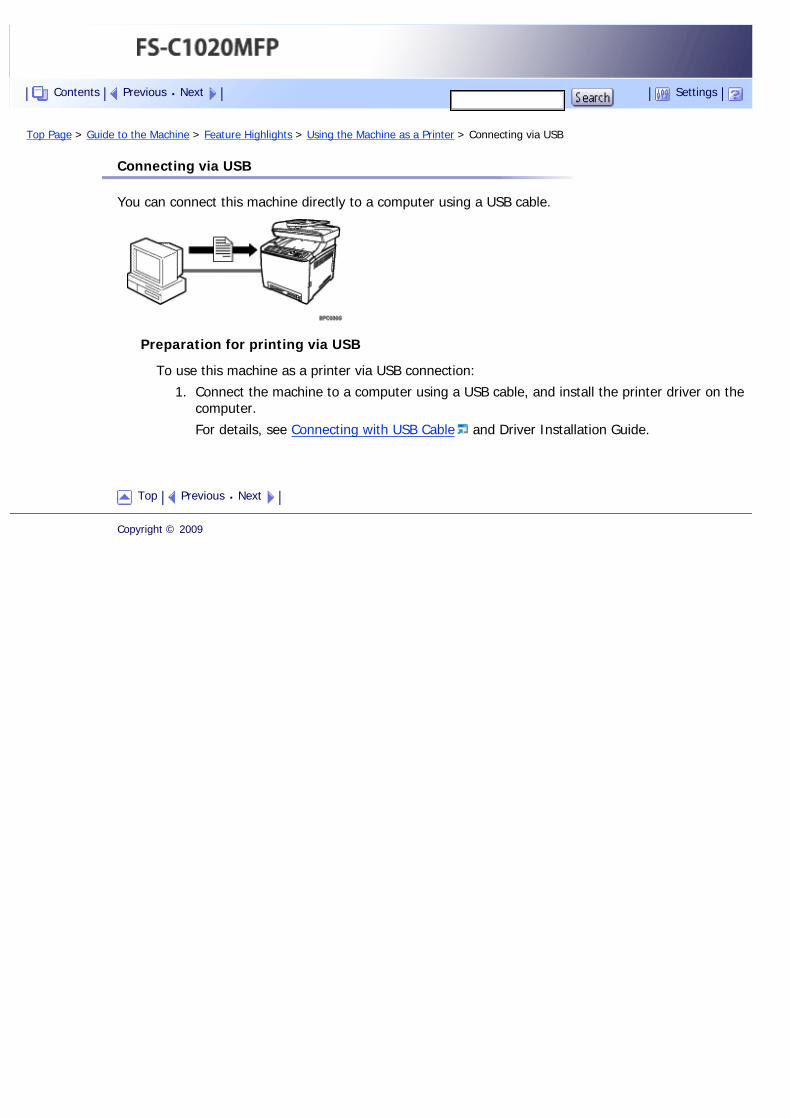
Connecting via USB
You can connect this machine directly to a computer using a USB cable.
Preparation for printing via USB
To use this machine as a printer via USB connection:
1. Connect the machine to a computer using a USB cable, and install the printer driver on the computer.
For details, see Connecting with USB Cable and Driver Installation Guide.
Top Previous Next
Copyright © 2009
Contents Previous Next Settings
Top Page > Guide to the Machine > Feature Highlights > Using the Machine as a Printer > Connecting via a network
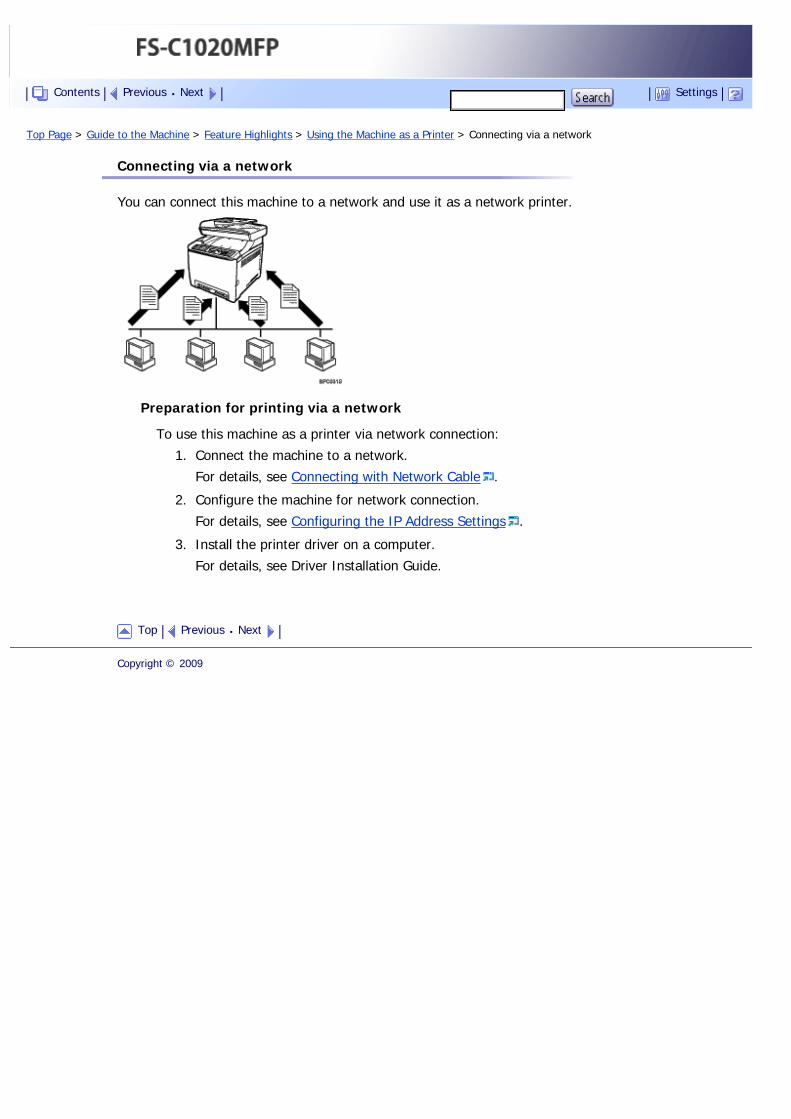
Connecting via a network
You can connect this machine to a network and use it as a network printer.
Preparation for printing via a network
To use this machine as a printer via network connection:
1. Connect the machine to a network.
For details, see Connecting with Network Cable .
2. Configure the machine for network connection.
For details, see Configuring the IP Address Settings .
3. Install the printer driver on a computer.
For details, see Driver Installation Guide.
Top Previous Next
Copyright © 2009
Contents Previous Next Settings
Top Page > Guide to the Machine > Feature Highlights > Using the Machine as a Printer > Printing confidential documents
Printing confidential documents
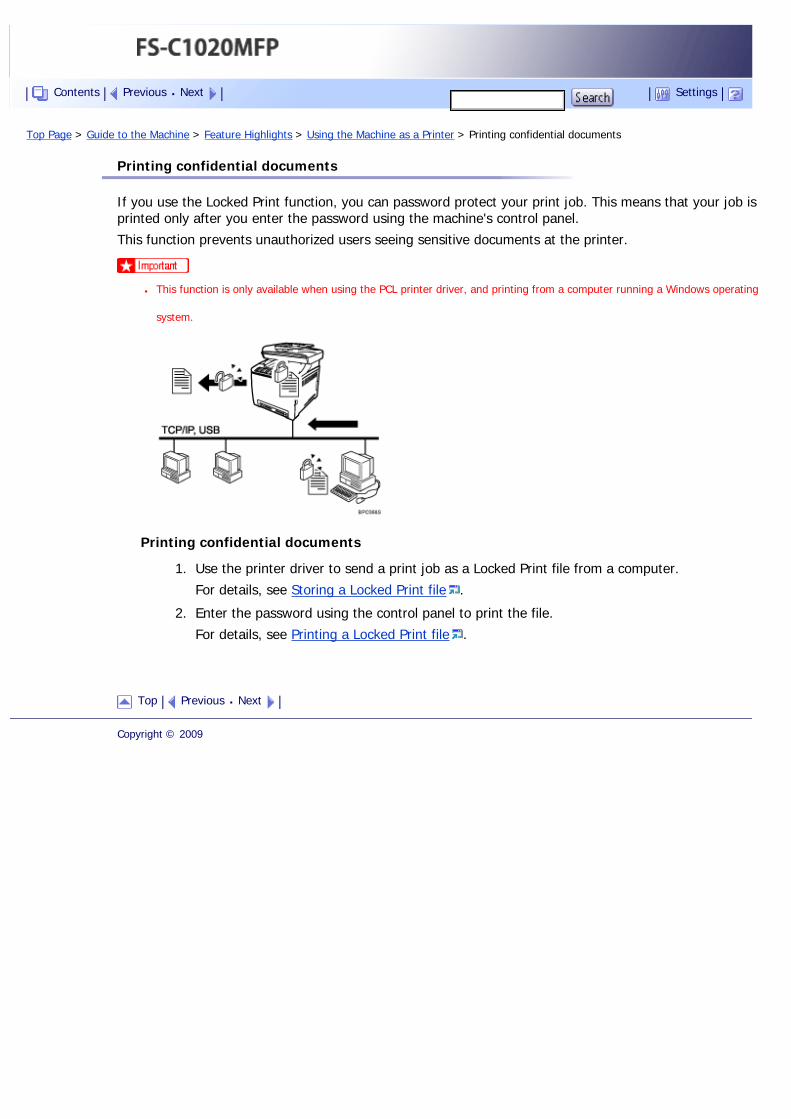
If you use the Locked Print function, you can password protect your print job. This means that your job is printed only after you enter the password using the machine's control panel.
This function prevents unauthorized users seeing sensitive documents at the printer.
● This function is only available when using the PCL printer driver, and printing from a computer running a Windows operating
system.
Printing confidential documents
1. Use the printer driver to send a print job as a Locked Print file from a computer.
For details, see Storing a Locked Print file .
2. Enter the password using the control panel to print the file.
For details, see Printing a Locked Print file .
Top Previous Next
Copyright © 2009
Contents Previous Next Settings
Top Page > Guide to the Machine > Feature Highlights > Using the Machine as a Copier
Using the Machine as a Copier
This section describes some useful functions of this machine when used as a copier.
Related topics
Making enlarged or reduced copies
Copying multiple pages onto a single sheet of paper
Copying both sides of an ID card onto one side of paper
Making 2-sided copies
Sorting the output paper
Top Previous Next
Copyright © 2009
Contents Previous Next Settings
Top Page > Guide to the Machine > Feature Highlights > Using the Machine as a Copier > Making enlarged or reduced copies
Making enlarged or reduced copies
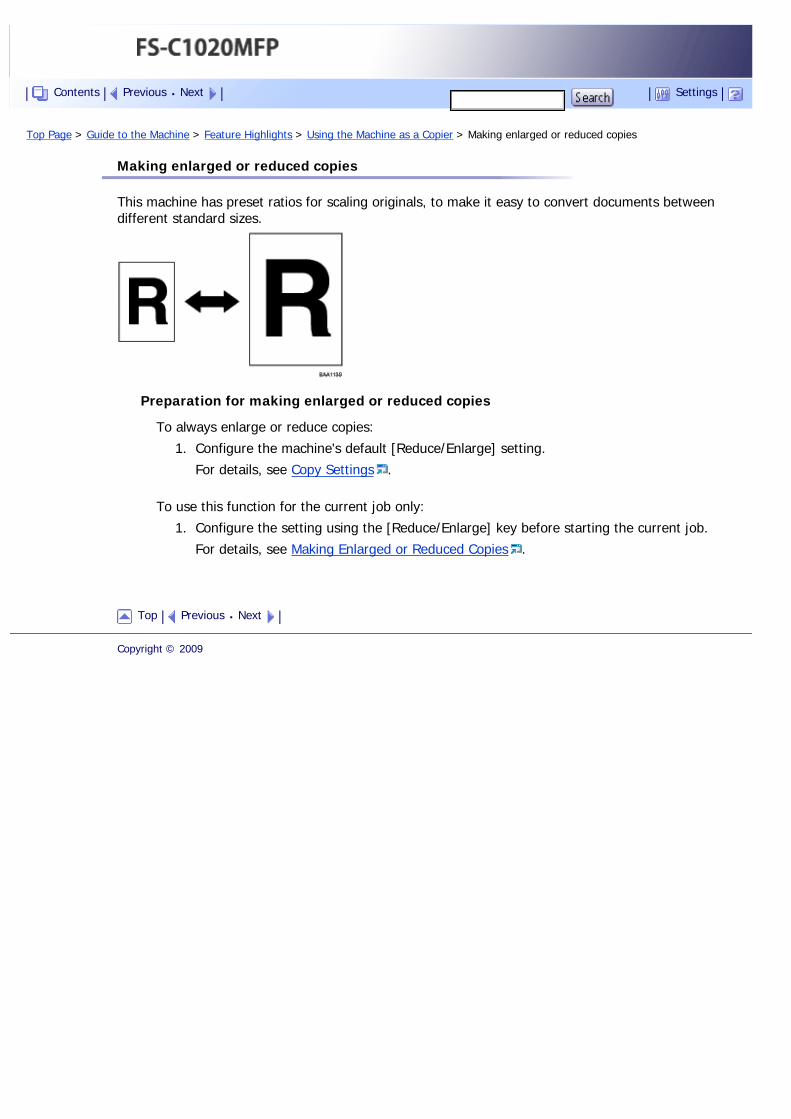
This machine has preset ratios for scaling originals, to make it easy to convert documents between different standard sizes.
Preparation for making enlarged or reduced copies
To always enlarge or reduce copies:
1. Configure the machine's default [Reduce/Enlarge] setting.
For details, see Copy Settings .
To use this function for the current job only:
1. Configure the setting using the [Reduce/Enlarge] key before starting the current job.
For details, see Making Enlarged or Reduced Copies .
Top Previous Next
Copyright © 2009
Contents Previous Next Settings
Top Page > Guide to the Machine > Feature Highlights > Using the Machine as a Copier > Copying multiple pages onto a single sheet of paper
Copying multiple pages onto a single sheet of paper
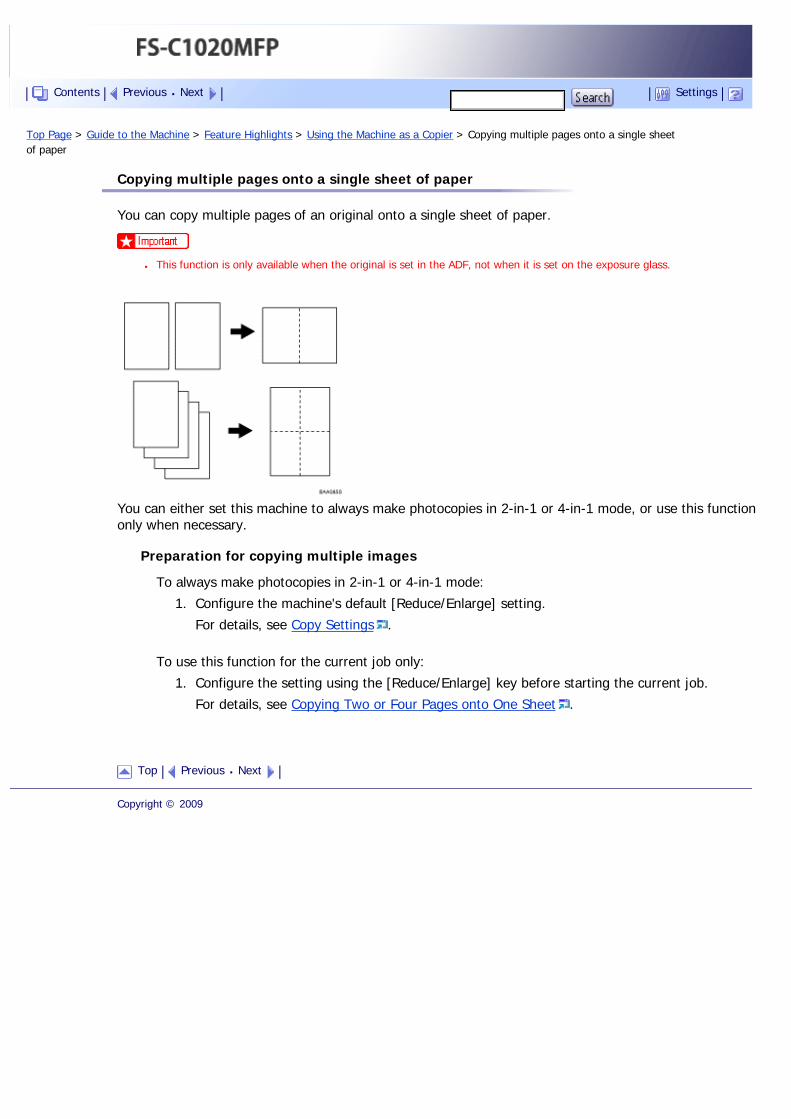
You can copy multiple pages of an original onto a single sheet of paper.
● This function is only available when the original is set in the ADF, not when it is set on the exposure glass.
You can either set this machine to always make photocopies in 2-in-1 or 4-in-1 mode, or use this function only when necessary.
Preparation for copying multiple images
To always make photocopies in 2-in-1 or 4-in-1 mode:
1. Configure the machine's default [Reduce/Enlarge] setting.
For details, see Copy Settings .
To use this function for the current job only:
1. Configure the setting using the [Reduce/Enlarge] key before starting the current job.
For details, see Copying Two or Four Pages onto One Sheet .
Top Previous Next
Copyright © 2009
Contents Previous Next Settings
Top Page > Guide to the Machine > Feature Highlights > Using the Machine as a Copier > Copying both sides of an ID card onto one side of paper
Copying both sides of an ID card onto one side of paper
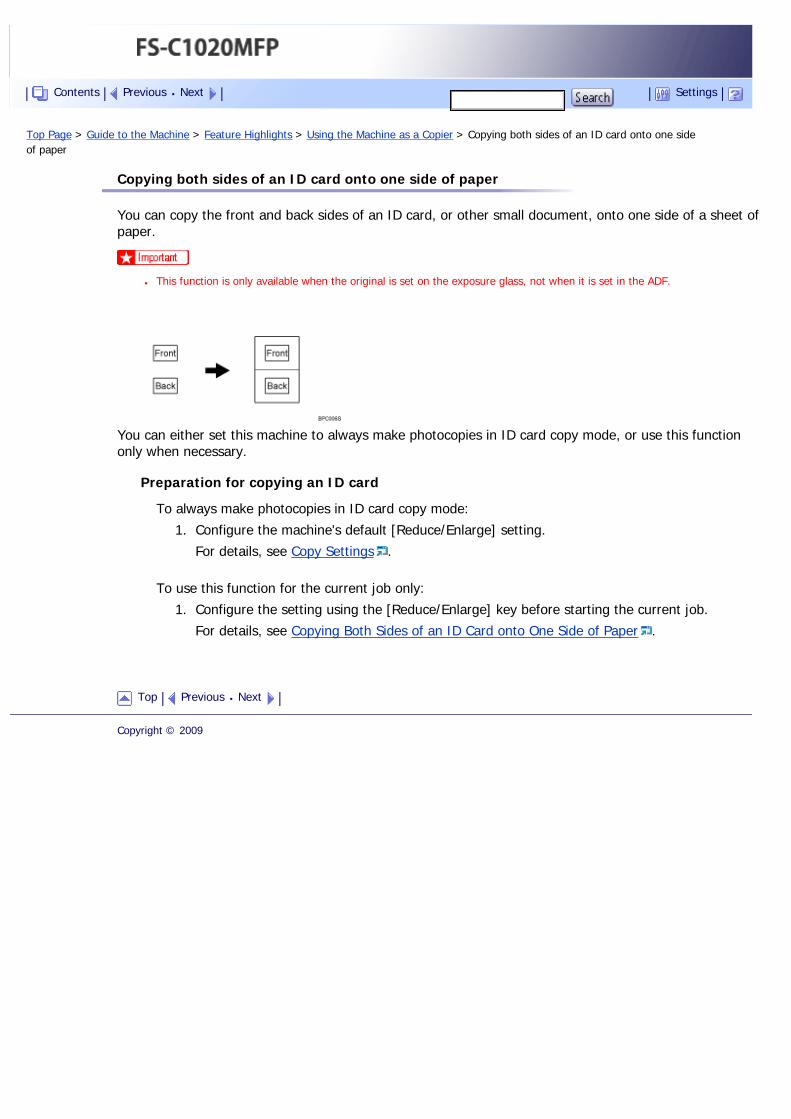
You can copy the front and back sides of an ID card, or other small document, onto one side of a sheet of paper.
● This function is only available when the original is set on the exposure glass, not when it is set in the ADF.
You can either set this machine to always make photocopies in ID card copy mode, or use this function only when necessary.
Preparation for copying an ID card
To always make photocopies in ID card copy mode:
1. Configure the machine's default [Reduce/Enlarge] setting.
For details, see Copy Settings .
To use this function for the current job only:
1. Configure the setting using the [Reduce/Enlarge] key before starting the current job.
For details, see Copying Both Sides of an ID Card onto One Side of Paper .
Top Previous Next
Copyright © 2009
Contents Previous Next Settings
Top Page > Guide to the Machine > Feature Highlights > Using the Machine as a Copier > Making 2-sided copies
Making 2-sided copies
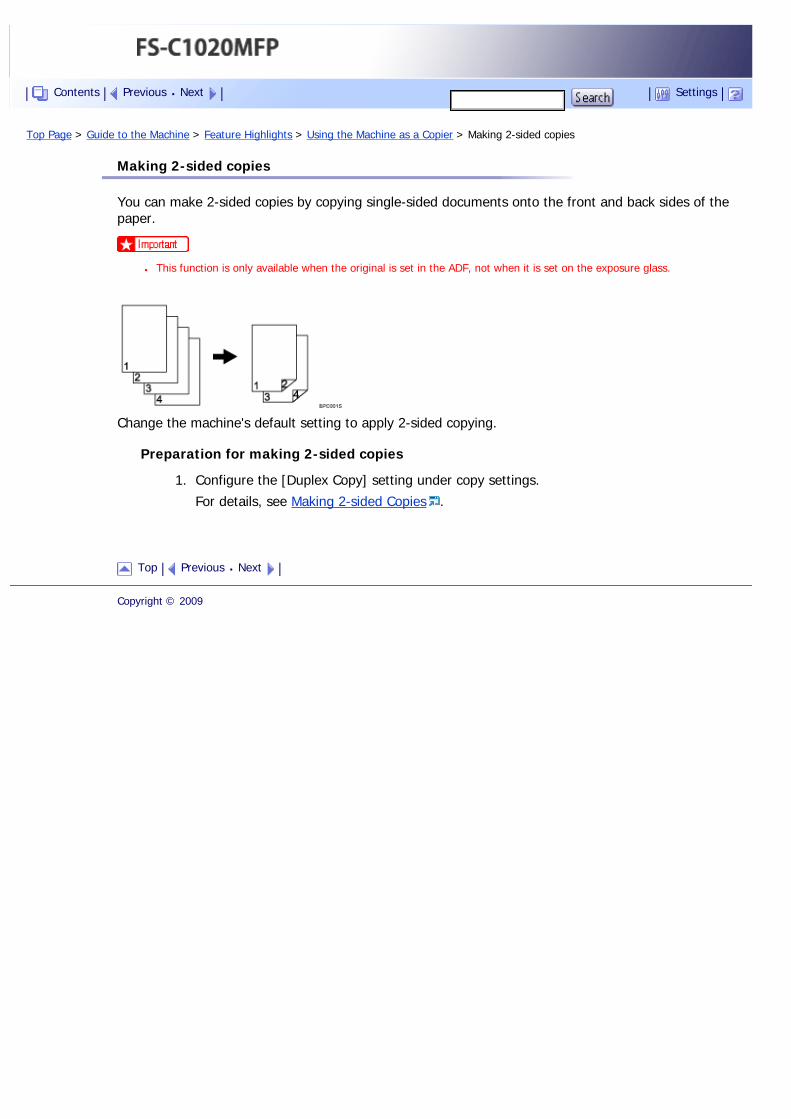
You can make 2-sided copies by copying single-sided documents onto the front and back sides of the paper.
● This function is only available when the original is set in the ADF, not when it is set on the exposure glass.
Change the machine's default setting to apply 2-sided copying.
Preparation for making 2-sided copies
1. Configure the [Duplex Copy] setting under copy settings.
For details, see Making 2-sided Copies .
Top Previous Next
Copyright © 2009
Contents Previous Next Settings

Top Page > Guide to the Machine > Feature Highlights > Using the Machine as a Copier > Sorting the output paper
Sorting the output paper
When making multiple copies of multiple pages, you can configure the machine to sort the output pages into sets.
● This function is only available when the original is set in the ADF, not when it is set on the exposure glass.
Preparation for sorting the output paper
1. Enable the [Sort] setting under copy settings.
For details, see Copy Settings .
Top Previous Next
Copyright © 2009
Contents Previous Next Settings
Top Page > Guide to the Machine > Feature Highlights > Using the Machine as a Scanner
Using the Machine as a Scanner
There are two scanning methods: scanning from the computer (TWAIN scanning) and scanning using the control panel.
Scanning from the computer
TWAIN scanning allows you to operate the machine from your computer and scan originals into your computer directly.
TWAIN scanning can be performed using a TWAIN-compliant application.
TWAIN scanning is available with both USB and network connections.
Scanning using the control panel
Scanning using the control panel allows you to send scanned files via e-mail (Scan to E-mail), to an FTP server (Scan to FTP), or to the shared folder of a computer on a network (Scan to Folder).
Scanning using the control panel is available with network connection only.
● The machine supports WIA scanning, an additional method of scanning originals from your computer, for USB connection.
WIA scanning is possible if your computer is running Windows operating system and a WIA-compatible application. For more
information, see the manual for your application.
Related topics
Scanning from a computer
Sending scanned files via e-mail
Sending scanned files to an FTP server
Sending scanned files to a computer's shared folder
Top Previous Next
Copyright © 2009
Contents Previous Next Settings
Top Page > Guide to the Machine > Feature Highlights > Using the Machine as a Scanner > Scanning from a computer
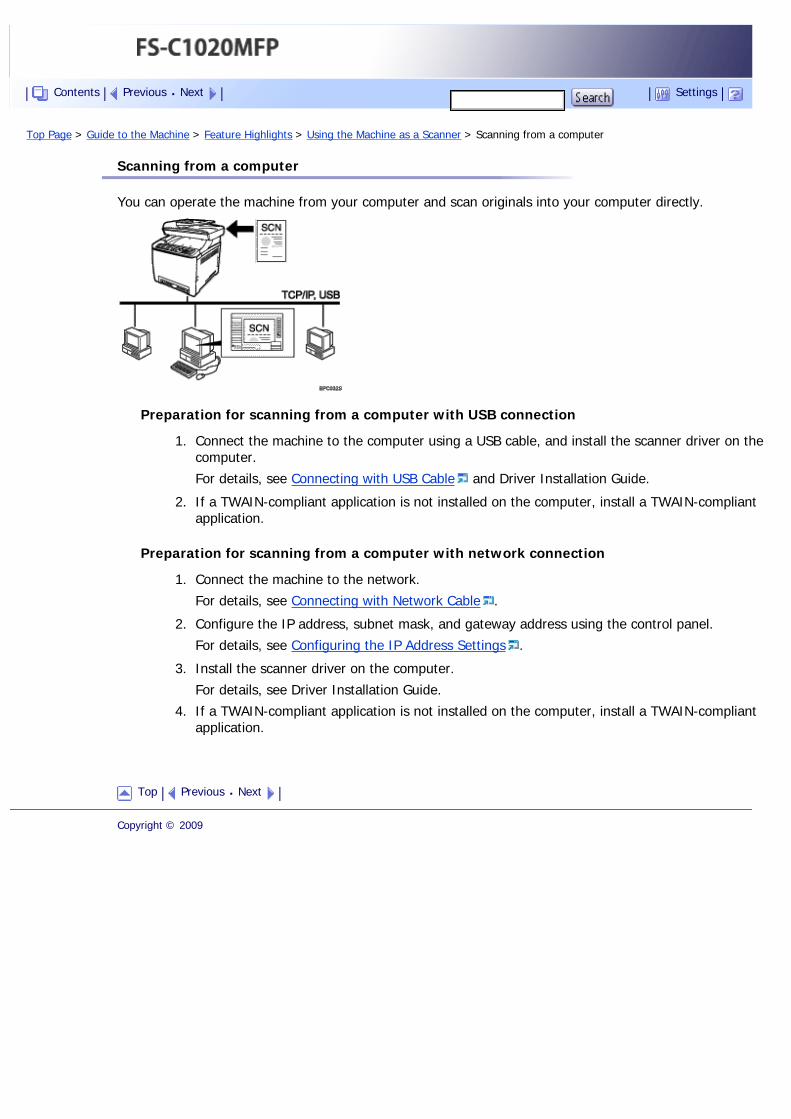
Scanning from a computer
You can operate the machine from your computer and scan originals into your computer directly.
Preparation for scanning from a computer with USB connection
1. Connect the machine to the computer using a USB cable, and install the scanner driver on the computer.
For details, see Connecting with USB Cable and Driver Installation Guide.
2. If a TWAIN-compliant application is not installed on the computer, install a TWAIN-compliant application.
Preparation for scanning from a computer with network connection
1. Connect the machine to the network.
For details, see Connecting with Network Cable .
2. Configure the IP address, subnet mask, and gateway address using the control panel.
For details, see Configuring the IP Address Settings .
3. Install the scanner driver on the computer.
For details, see Driver Installation Guide.
4. If a TWAIN-compliant application is not installed on the computer, install a TWAIN-compliant application.
Top Previous Next
Copyright © 2009
Contents Previous Next Settings
Top Page > Guide to the Machine > Feature Highlights > Using the Machine as a Scanner > Sending scanned files via e-mail
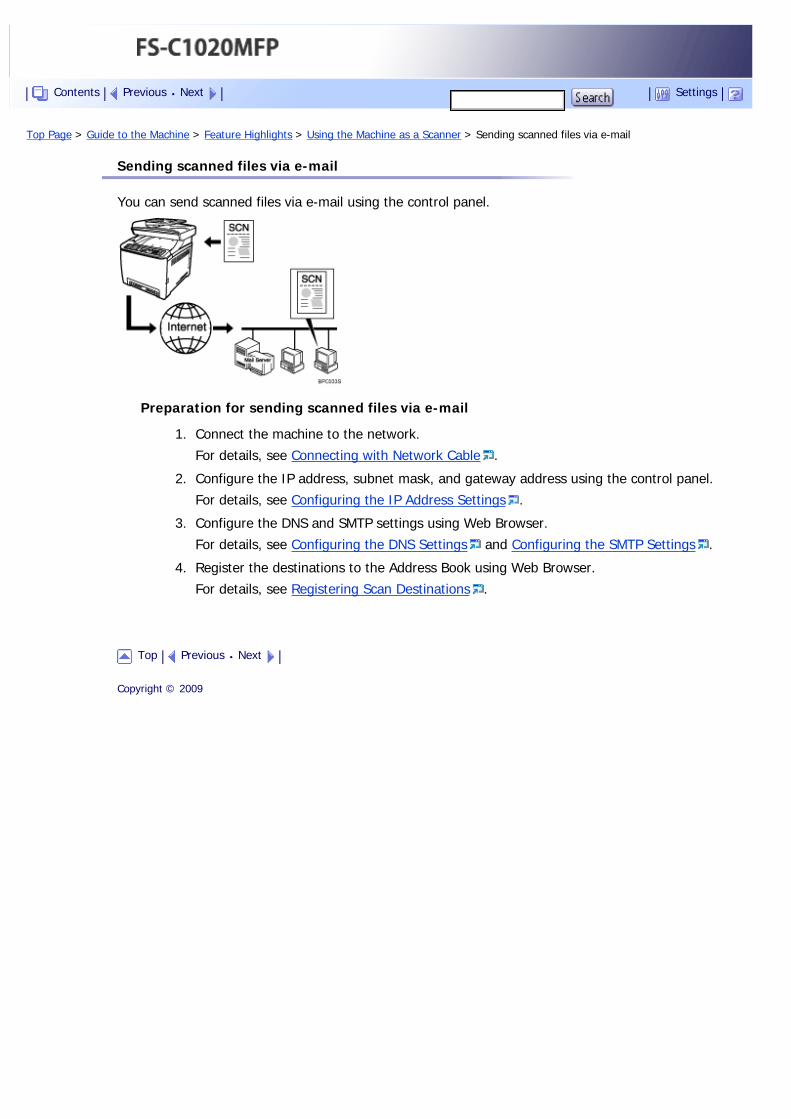
Sending scanned files via e-mail
You can send scanned files via e-mail using the control panel.
Preparation for sending scanned files via e-mail
1. Connect the machine to the network.
For details, see Connecting with Network Cable .
2. Configure the IP address, subnet mask, and gateway address using the control panel.
For details, see Configuring the IP Address Settings .
3. Configure the DNS and SMTP settings using Web Browser.
For details, see Configuring the DNS Settings and Configuring the SMTP Settings .
4. Register the destinations to the Address Book using Web Browser.
For details, see Registering Scan Destinations .
Top Previous Next
Copyright © 2009
Contents Previous Next Settings
Top Page > Guide to the Machine > Feature Highlights > Using the Machine as a Scanner > Sending scanned files to an FTP server
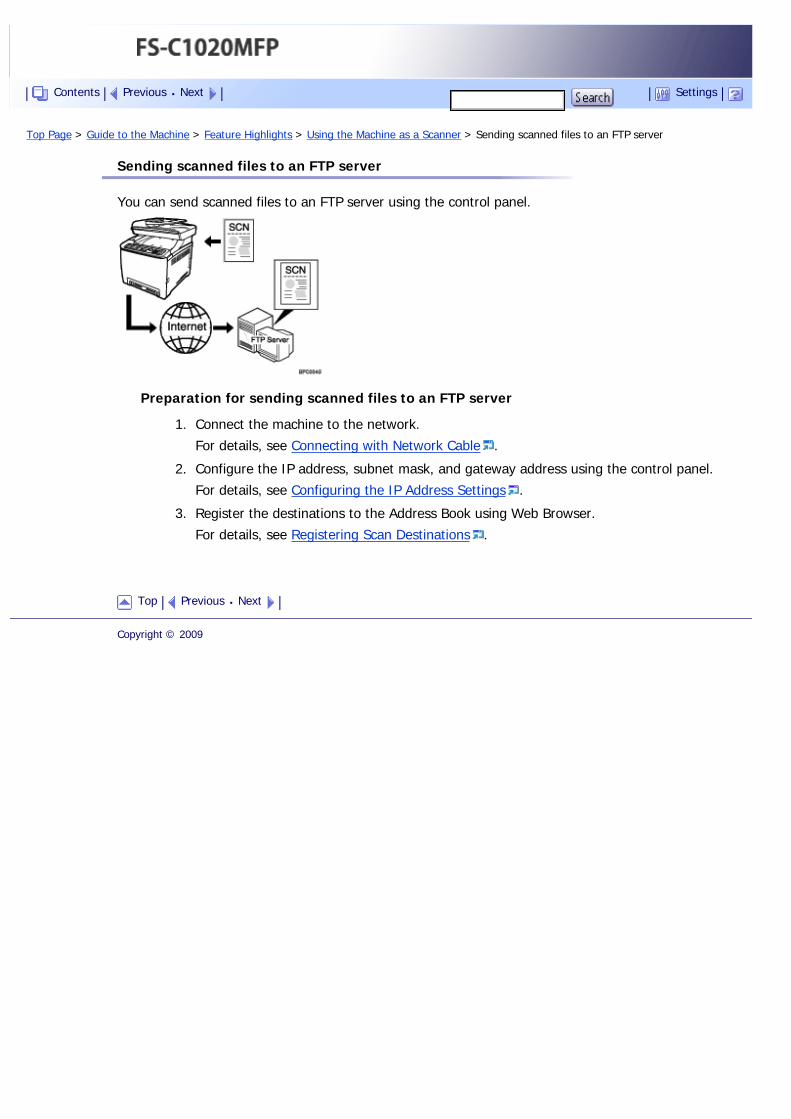
Sending scanned files to an FTP server
You can send scanned files to an FTP server using the control panel.
Preparation for sending scanned files to an FTP server
1. Connect the machine to the network.
For details, see Connecting with Network Cable .
2. Configure the IP address, subnet mask, and gateway address using the control panel.
For details, see Configuring the IP Address Settings .
3. Register the destinations to the Address Book using Web Browser.
For details, see Registering Scan Destinations .
Top Previous Next
Copyright © 2009
Contents Previous Next Settings
Top Page > Guide to the Machine > Feature Highlights > Using the Machine as a Scanner > Sending scanned files to a computer's shared folder
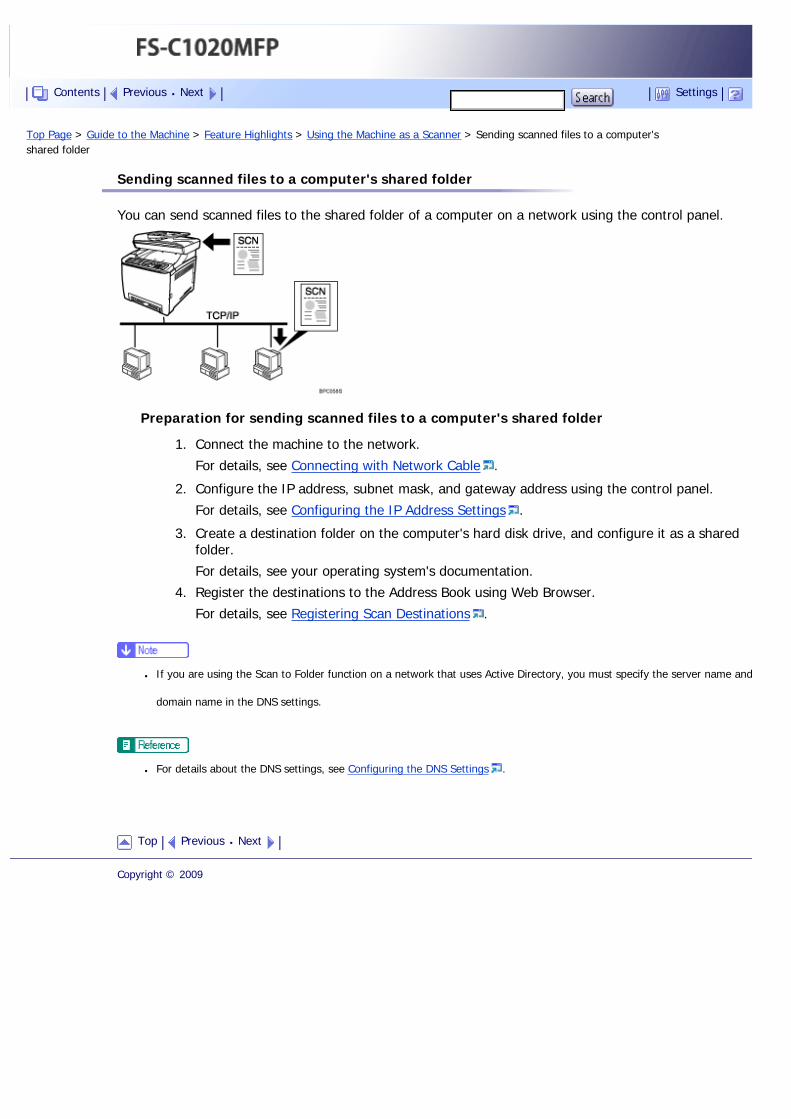
Sending scanned files to a computer's shared folder
You can send scanned files to the shared folder of a computer on a network using the control panel.
Preparation for sending scanned files to a computer's shared folder
1. Connect the machine to the network.
For details, see Connecting with Network Cable .
2. Configure the IP address, subnet mask, and gateway address using the control panel.
For details, see Configuring the IP Address Settings .
3. Create a destination folder on the computer's hard disk drive, and configure it as a shared folder.
For details, see your operating system's documentation.
4. Register the destinations to the Address Book using Web Browser.
For details, see Registering Scan Destinations .
● If you are using the Scan to Folder function on a network that uses Active Directory, you must specify the server name and
domain name in the DNS settings.
● For details about the DNS settings, see Configuring the DNS Settings .
Top Previous Next
Copyright © 2009
Contents Previous Next Settings

Top Page > Guide to the Machine > Feature Highlights > Using the Machine as a Fax Machine
Using the Machine as a Fax Machine
This section describes basic procedures for using this machine as a fax machine.
Related topics
Using as a fax machine
Using the machine with an external telephone
Sending faxes from a computer (LAN-Fax)
Top Previous Next
Copyright © 2009
Contents Previous Next Settings
Top Page > Guide to the Machine > Feature Highlights > Using the Machine as a Fax Machine > Using as a fax machine
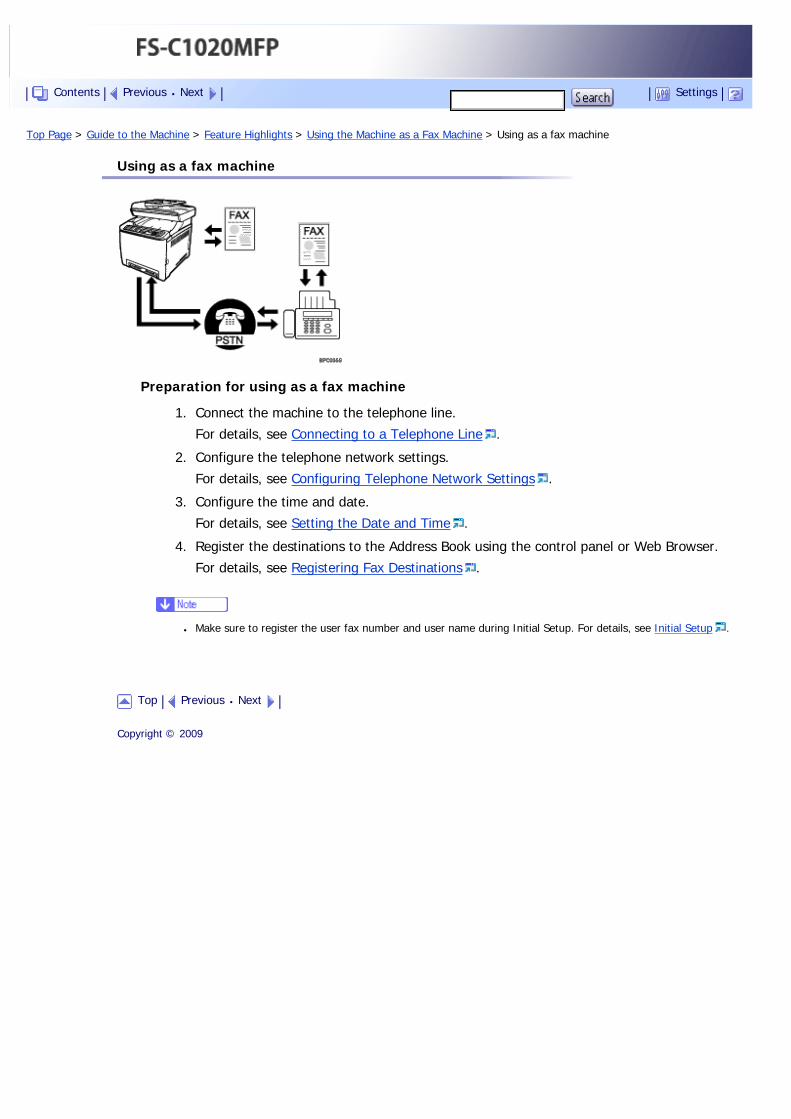
Using as a fax machine
Preparation for using as a fax machine
1. Connect the machine to the telephone line.
For details, see Connecting to a Telephone Line .
2. Configure the telephone network settings.
For details, see Configuring Telephone Network Settings .
3. Configure the time and date.
For details, see Setting the Date and Time .
4. Register the destinations to the Address Book using the control panel or Web Browser.
For details, see Registering Fax Destinations .
● Make sure to register the user fax number and user name during Initial Setup. For details, see Initial Setup .
Top Previous Next
Copyright © 2009
Contents Previous Next Settings
Top Page > Guide to the Machine > Feature Highlights > Using the Machine as a Fax Machine > Using the machine with an external telephone
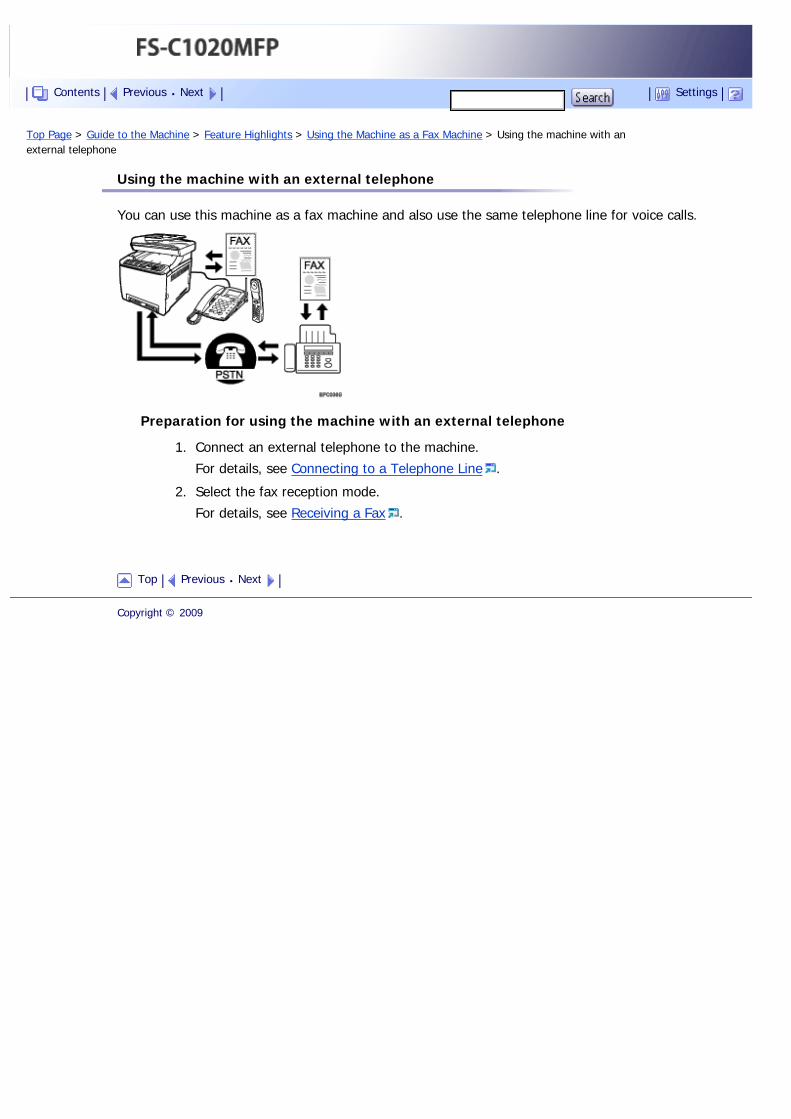
Using the machine with an external telephone
You can use this machine as a fax machine and also use the same telephone line for voice calls.
Preparation for using the machine with an external telephone
1. Connect an external telephone to the machine.
For details, see Connecting to a Telephone Line .
2. Select the fax reception mode.
For details, see Receiving a Fax .
Top Previous Next
Copyright © 2009
Contents Previous Next Settings
Top Page > Guide to the Machine > Feature Highlights > Using the Machine as a Fax Machine > Sending faxes from a computer (LAN-Fax)
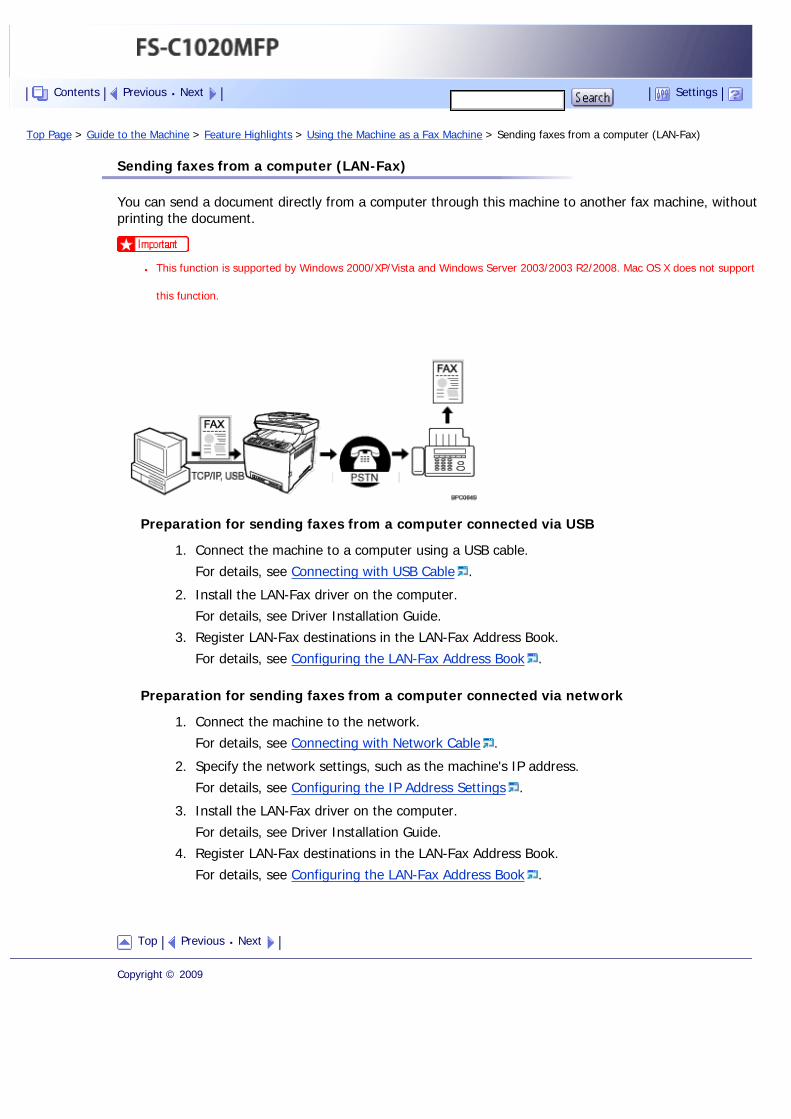
Sending faxes from a computer (LAN-Fax)
You can send a document directly from a computer through this machine to another fax machine, without printing the document.
● This function is supported by Windows 2000/XP/Vista and Windows Server 2003/2003 R2/2008. Mac OS X does not support
this function.
Preparation for sending faxes from a computer connected via USB
1. Connect the machine to a computer using a USB cable.
For details, see Connecting with USB Cable .
2. Install the LAN-Fax driver on the computer.
For details, see Driver Installation Guide.
3. Register LAN-Fax destinations in the LAN-Fax Address Book.
For details, see Configuring the LAN-Fax Address Book .
Preparation for sending faxes from a computer connected via network
1. Connect the machine to the network.
For details, see Connecting with Network Cable .
2. Specify the network settings, such as the machine's IP address.
For details, see Configuring the IP Address Settings .
3. Install the LAN-Fax driver on the computer.
For details, see Driver Installation Guide.
4. Register LAN-Fax destinations in the LAN-Fax Address Book.
For details, see Configuring the LAN-Fax Address Book .
Top Previous Next
Copyright © 2009
Contents Previous Next Settings
Top Page > Guide to the Machine > Guide to Components
Guide to Components
This section lists the names and functions of the parts of this machine.
Related topics
Exterior: Front View
Exterior: Rear View
Interior
Control Panel
Top Previous Next
Copyright © 2009
Contents Previous Next Settings
Top Page > Guide to the Machine > Guide to Components > Exterior: Front View
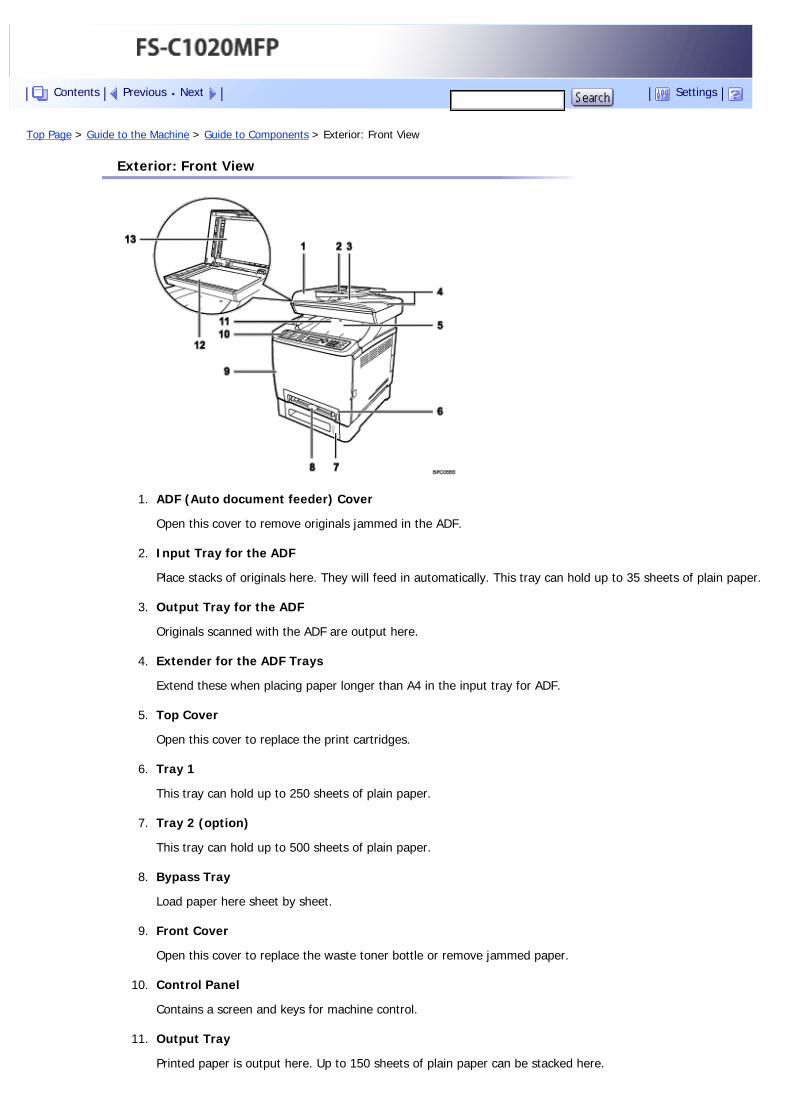
Exterior: Front View
1. ADF (Auto document feeder) Cover
Open this cover to remove originals jammed in the ADF.
2. Input Tray for the ADF
Place stacks of originals here. They will feed in automatically. This tray can hold up to 35 sheets of plain paper.
3. Output Tray for the ADF
Originals scanned with the ADF are output here.
4. Extender for the ADF Trays
Extend these when placing paper longer than A4 in the input tray for ADF.
5. Top Cover
Open this cover to replace the print cartridges.
6. Tray 1
This tray can hold up to 250 sheets of plain paper.
7. Tray 2 (option)
This tray can hold up to 500 sheets of plain paper.
8. Bypass Tray
Load paper here sheet by sheet.
9. Front Cover
Open this cover to replace the waste toner bottle or remove jammed paper.
10. Control Panel
Contains a screen and keys for machine control.
11. Output Tray
Printed paper is output here. Up to 150 sheets of plain paper can be stacked here.
Contents Previous Next Settings

12. Exposure Glass
Place originals here sheet by sheet.
13. Cover for the Exposure Glass
Open this cover to place originals on the exposure glass.
Top Previous Next
Copyright © 2009
Top Page > Guide to the Machine > Guide to Components > Exterior: Rear View
Exterior: Rear View
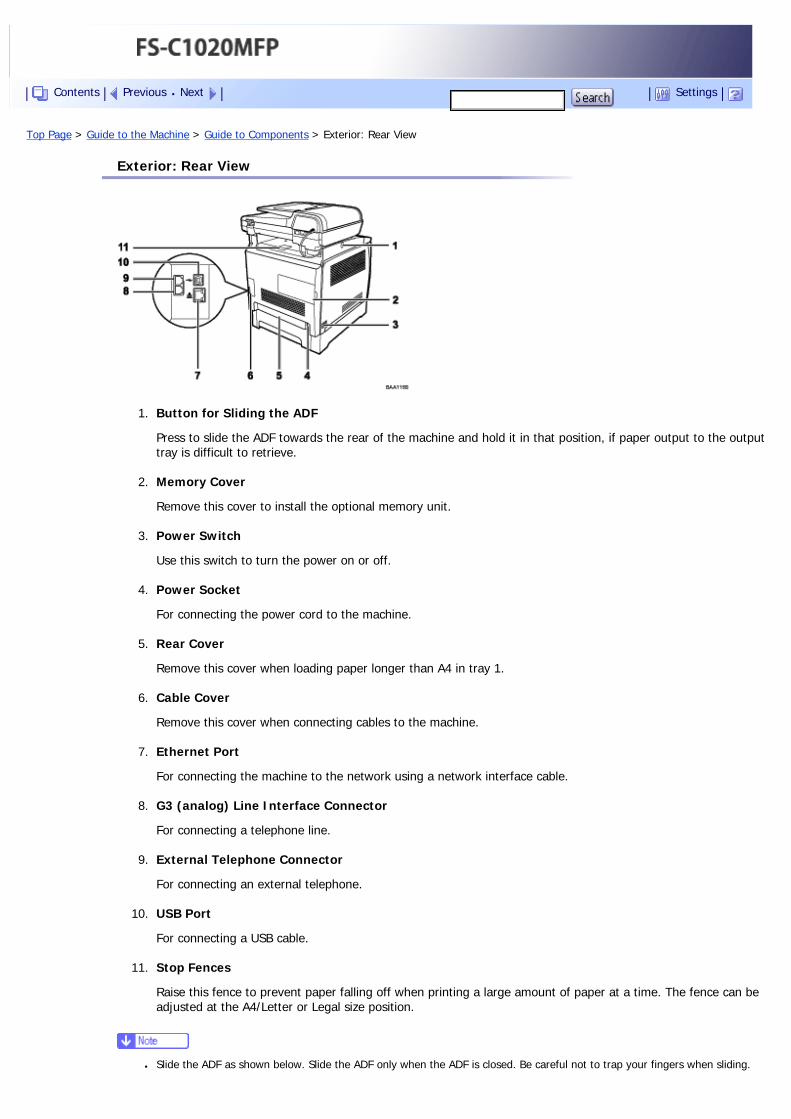
1. Button for Sliding the ADF
Press to slide the ADF towards the rear of the machine and hold it in that position, if paper output to the output tray is difficult to retrieve.
2. Memory Cover
Remove this cover to install the optional memory unit.
3. Power Switch
Use this switch to turn the power on or off.
4. Power Socket
For connecting the power cord to the machine.
5. Rear Cover
Remove this cover when loading paper longer than A4 in tray 1.
6. Cable Cover
Remove this cover when connecting cables to the machine.
7. Ethernet Port
For connecting the machine to the network using a network interface cable.
8. G3 (analog) Line Interface Connector
For connecting a telephone line.
9. External Telephone Connector
For connecting an external telephone.
10. USB Port
For connecting a USB cable.
11. Stop Fences
Raise this fence to prevent paper falling off when printing a large amount of paper at a time. The fence can be adjusted at the A4/Letter or Legal size position.
● Slide the ADF as shown below. Slide the ADF only when the ADF is closed. Be careful not to trap your fingers when sliding.
Contents Previous Next Settings
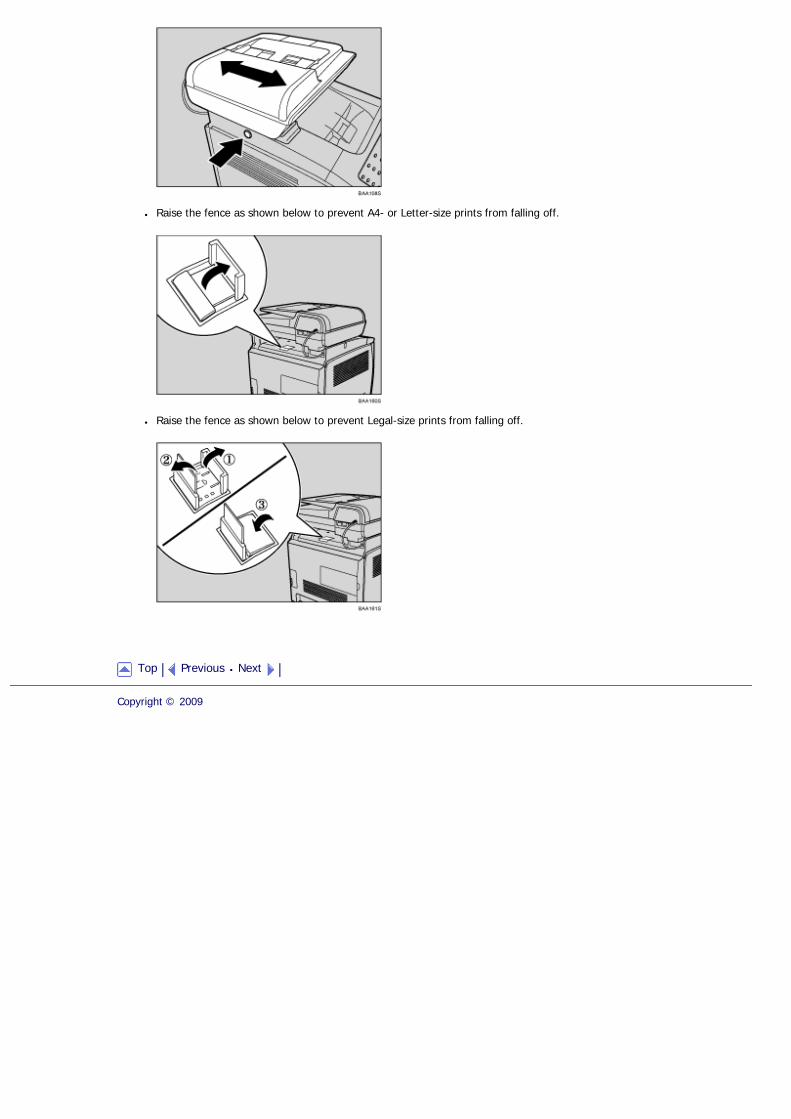
● Raise the fence as shown below to prevent A4- or Letter-size prints from falling off.
● Raise the fence as shown below to prevent Legal-size prints from falling off.
Top Previous Next
Copyright © 2009
Top Page > Guide to the Machine > Guide to Components > Interior
Interior
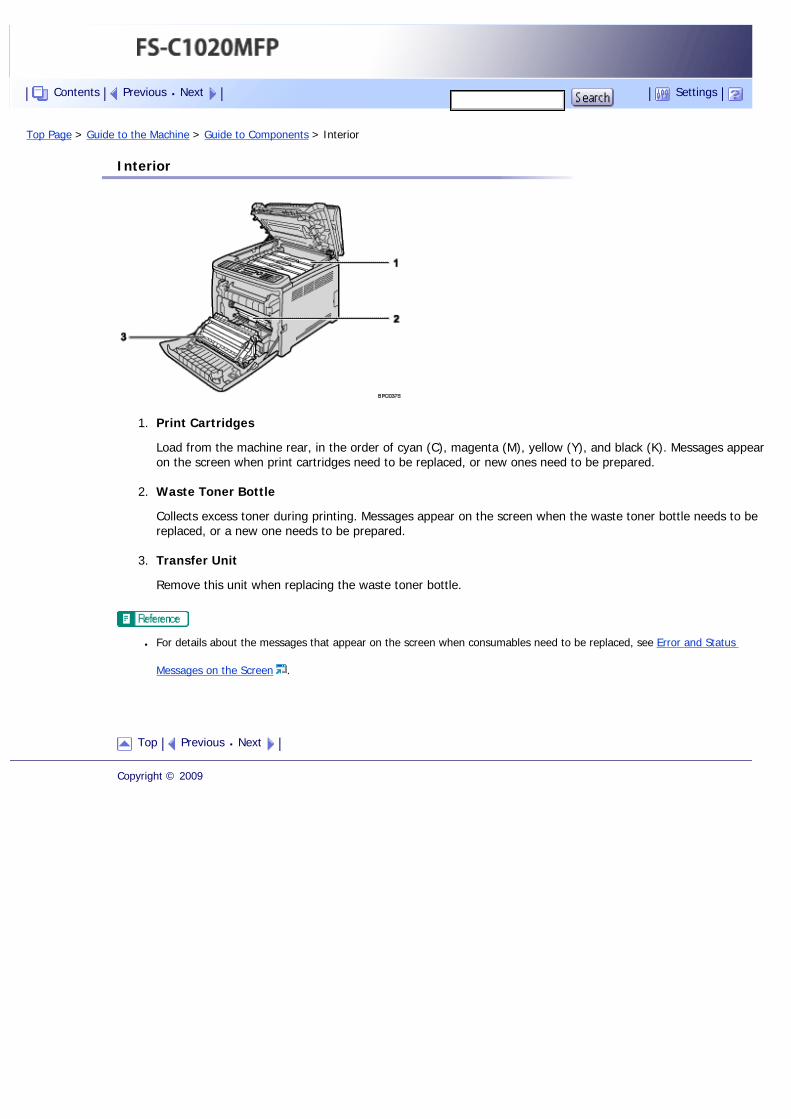
1. Print Cartridges
Load from the machine rear, in the order of cyan (C), magenta (M), yellow (Y), and black (K). Messages appear on the screen when print cartridges need to be replaced, or new ones need to be prepared.
2. Waste Toner Bottle
Collects excess toner during printing. Messages appear on the screen when the waste toner bottle needs to be replaced, or a new one needs to be prepared.
3. Transfer Unit
Remove this unit when replacing the waste toner bottle.
● For details about the messages that appear on the screen when consumables need to be replaced, see Error and Status
Messages on the Screen .
Top Previous Next
Copyright © 2009
Contents Previous Next Settings
Top Page > Guide to the Machine > Guide to Components > Control Panel
Control Panel
This section describes the names and usage of the parts of the control panel.
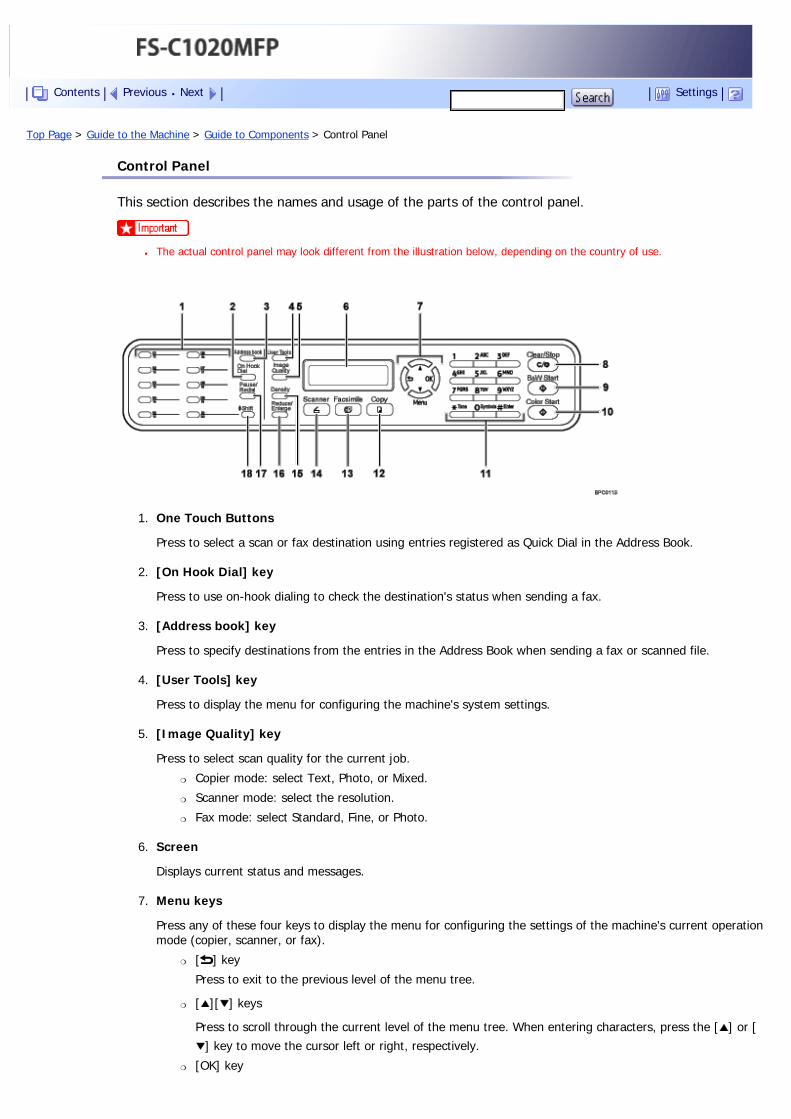
● The actual control panel may look different from the illustration below, depending on the country of use.
1. One Touch Buttons
Press to select a scan or fax destination using entries registered as Quick Dial in the Address Book.
2. [On Hook Dial] key
Press to use on-hook dialing to check the destination's status when sending a fax.
3. [Address book] key
Press to specify destinations from the entries in the Address Book when sending a fax or scanned file.
4. [User Tools] key
Press to display the menu for configuring the machine's system settings.
5. [Image Quality] key
Press to select scan quality for the current job.
�❍ Copier mode: select Text, Photo, or Mixed.
�❍ Scanner mode: select the resolution.
�❍ Fax mode: select Standard, Fine, or Photo.
6. Screen
Displays current status and messages.
7. Menu keys
Press any of these four keys to display the menu for configuring the settings of the machine's current operation mode (copier, scanner, or fax).
�❍ [ ] key
Press to exit to the previous level of the menu tree.
�❍ [ ][ ] keys
Press to scroll through the current level of the menu tree. When entering characters, press the [ ] or [] key to move the cursor left or right, respectively.
�❍ [OK] key
Contents Previous Next Settings
Press to confirm settings or enter the next level of the menu tree.
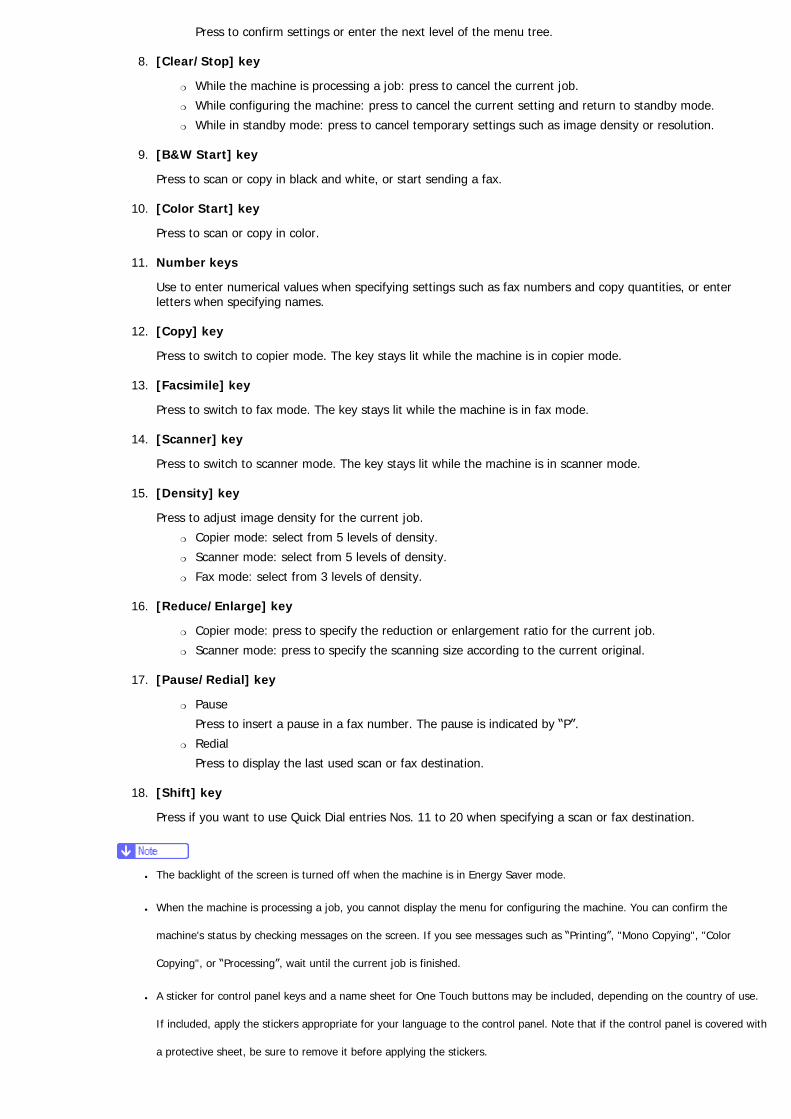
8. [Clear/Stop] key
�❍ While the machine is processing a job: press to cancel the current job.
�❍ While configuring the machine: press to cancel the current setting and return to standby mode.
�❍ While in standby mode: press to cancel temporary settings such as image density or resolution.
9. [B&W Start] key
Press to scan or copy in black and white, or start sending a fax.
10. [Color Start] key
Press to scan or copy in color.
11. Number keys
Use to enter numerical values when specifying settings such as fax numbers and copy quantities, or enter letters when specifying names.
12. [Copy] key
Press to switch to copier mode. The key stays lit while the machine is in copier mode.
13. [Facsimile] key
Press to switch to fax mode. The key stays lit while the machine is in fax mode.
14. [Scanner] key
Press to switch to scanner mode. The key stays lit while the machine is in scanner mode.
15. [Density] key
Press to adjust image density for the current job.
�❍ Copier mode: select from 5 levels of density.
�❍ Scanner mode: select from 5 levels of density.
�❍ Fax mode: select from 3 levels of density.
16. [Reduce/Enlarge] key
�❍ Copier mode: press to specify the reduction or enlargement ratio for the current job.
�❍ Scanner mode: press to specify the scanning size according to the current original.
17. [Pause/Redial] key
�❍ Pause
Press to insert a pause in a fax number. The pause is indicated by “P”.
�❍ Redial
Press to display the last used scan or fax destination.
18. [Shift] key
Press if you want to use Quick Dial entries Nos. 11 to 20 when specifying a scan or fax destination.
● The backlight of the screen is turned off when the machine is in Energy Saver mode.
● When the machine is processing a job, you cannot display the menu for configuring the machine. You can confirm the
machine's status by checking messages on the screen. If you see messages such as “Printing”, "Mono Copying", "Color
Copying", or “Processing”, wait until the current job is finished.
● A sticker for control panel keys and a name sheet for One Touch buttons may be included, depending on the country of use.
If included, apply the stickers appropriate for your language to the control panel. Note that if the control panel is covered with
a protective sheet, be sure to remove it before applying the stickers.
Top Previous Next
Copyright © 2009
Top Page > Getting Started > Installing the Machine
Installing the Machine
This section describes steps required to install the machine and prepare it for use.
Related topics
Where to Put the Machine
Unpacking
Turning the Power on
Initial Setup
Changing Operation Modes
Saving Energy
Multi-Access
Top Previous Next
Copyright © 2009
Contents Previous Next Settings
Top Page > Getting Started > Installing the Machine > Where to Put the Machine
Where to Put the Machine
The machine's location should be carefully chosen because environmental conditions greatly affect its performance.
● The supplied power cord is for use with this equipment only. Do not use with other appliances. Doing so may result in fire, electric shock, or injury.
● Keep the machine away from flammable liquids, gases, and aerosols. A fire or an electric shock might occur.
● The wall outlet shall be installed near the machine and shall be easily accessible.
● Connect the machine to the power source specified in this manual and do not use any other power sources. Connect the power cord directly to a wall outlet and do not use an extension cord. Power sources not specified in this manual and extension cords are electric shock or fire hazards.
● Power cords that are damaged, broken, modified, trapped under heavy objects, pulled hard, or bent severely are electric shock and fire hazards.
● Touching the prongs of the power cable's plug with anything metallic constitutes a fire and electric shock hazard.
● Keep the polythene materials (bags, gloves, etc.) supplied with this machine away from babies and small children at all times. Suffocation can result if polythene materials are brought into contact with the mouth or nose.
● Keep the machine away from humidity and dust. Otherwise a fire or an electric shock might occur. Do not place the machine on an unstable or tilted surface. If it topples over, an injury might occur.
● Keep the machine in an area that is within optimum environmental conditions. Operating the machine in an environment that is outside the recommended ranges of humidity and temperature can cause an electrical fire hazard. Keep the area around the socket free of dust. Accumulated dust can become an electrical fire hazard.
● Make sure the room where you are using the machine is well ventilated and spacious. Good ventilation is especially important when the machine is used heavily.
● Machine is not suitable for desk work environments, so place the machine in another room.
● When new, electrical devices containing volatile materials will normally release emissions into the air of their vicinity. For this reason, for the first few days after installation of a new device, strong ventilation inside the room where it is placed is necessary.
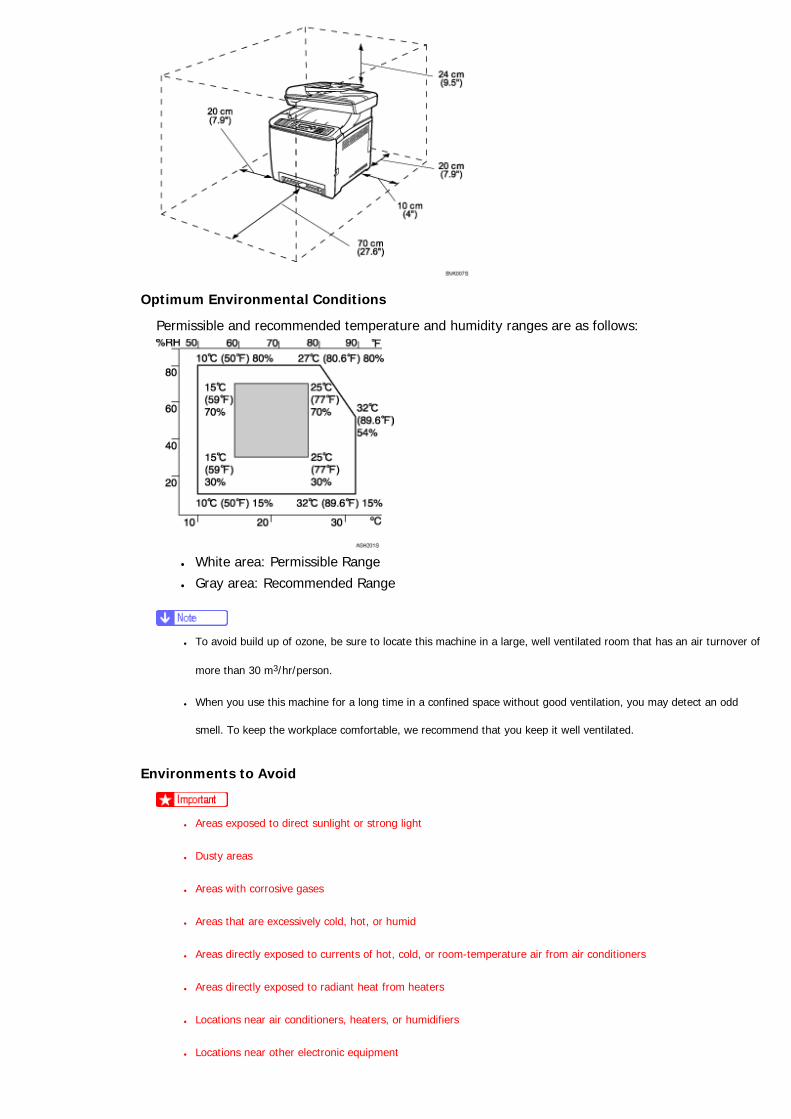
Space Required for Installation
The recommended (minimum) space requirements are as follows:
Contents Previous Next Settings
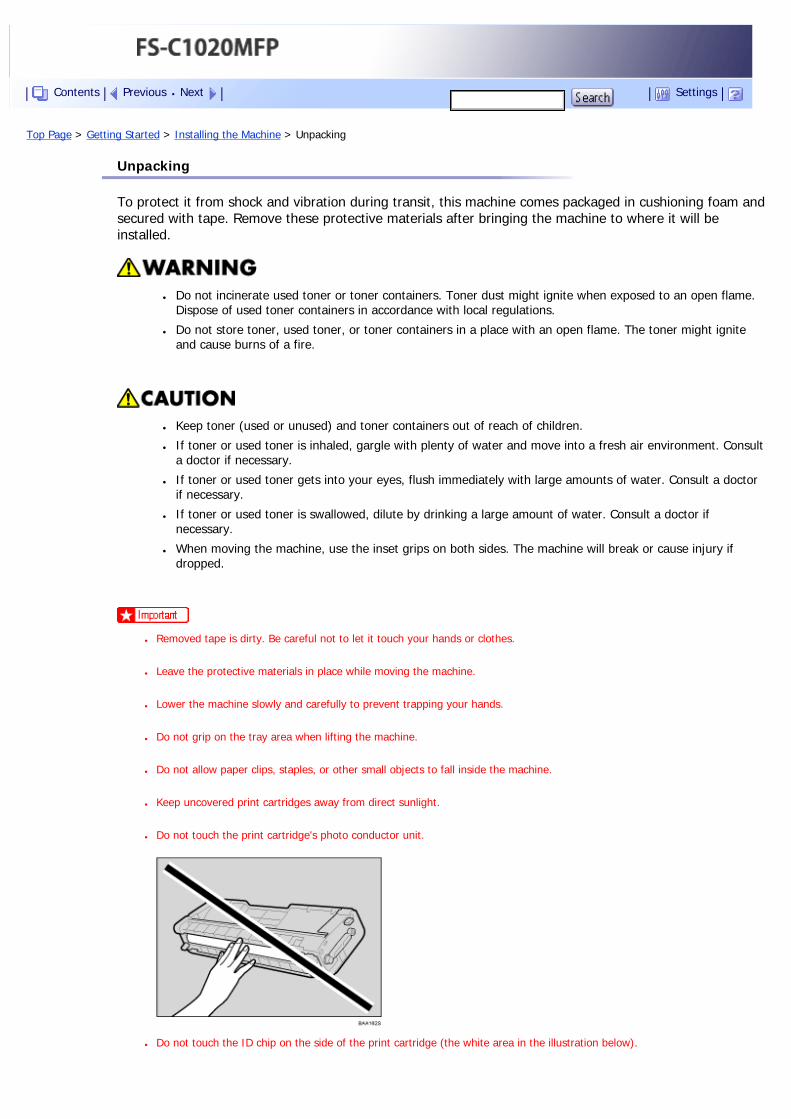
Optimum Environmental Conditions
Permissible and recommended temperature and humidity ranges are as follows:
● White area: Permissible Range
● Gray area: Recommended Range
● To avoid build up of ozone, be sure to locate this machine in a large, well ventilated room that has an air turnover of
more than 30 m3/hr/person.
● When you use this machine for a long time in a confined space without good ventilation, you may detect an odd
smell. To keep the workplace comfortable, we recommend that you keep it well ventilated.
Environments to Avoid
● Areas exposed to direct sunlight or strong light
● Dusty areas
● Areas with corrosive gases
● Areas that are excessively cold, hot, or humid
● Areas directly exposed to currents of hot, cold, or room-temperature air from air conditioners
● Areas directly exposed to radiant heat from heaters
● Locations near air conditioners, heaters, or humidifiers
● Locations near other electronic equipment

● Locations subject to frequent strong vibration
Power Source
Connect the power cord to a power source of the following specification:
● : 120 V, 50/ 60 Hz, 11 A or more (when fully equipped)
● : 220-240 V, 50/ 60 Hz, 6 A or more (when fully equipped)
Top Previous Next
Copyright © 2009
Top Page > Getting Started > Installing the Machine > Unpacking
Unpacking
To protect it from shock and vibration during transit, this machine comes packaged in cushioning foam and secured with tape. Remove these protective materials after bringing the machine to where it will be installed.
● Do not incinerate used toner or toner containers. Toner dust might ignite when exposed to an open flame. Dispose of used toner containers in accordance with local regulations.
● Do not store toner, used toner, or toner containers in a place with an open flame. The toner might ignite and cause burns of a fire.
● Keep toner (used or unused) and toner containers out of reach of children.
● If toner or used toner is inhaled, gargle with plenty of water and move into a fresh air environment. Consult a doctor if necessary.
● If toner or used toner gets into your eyes, flush immediately with large amounts of water. Consult a doctor if necessary.
● If toner or used toner is swallowed, dilute by drinking a large amount of water. Consult a doctor if necessary.
● When moving the machine, use the inset grips on both sides. The machine will break or cause injury if dropped.
● Removed tape is dirty. Be careful not to let it touch your hands or clothes.
● Leave the protective materials in place while moving the machine.
● Lower the machine slowly and carefully to prevent trapping your hands.
● Do not grip on the tray area when lifting the machine.
● Do not allow paper clips, staples, or other small objects to fall inside the machine.
● Keep uncovered print cartridges away from direct sunlight.
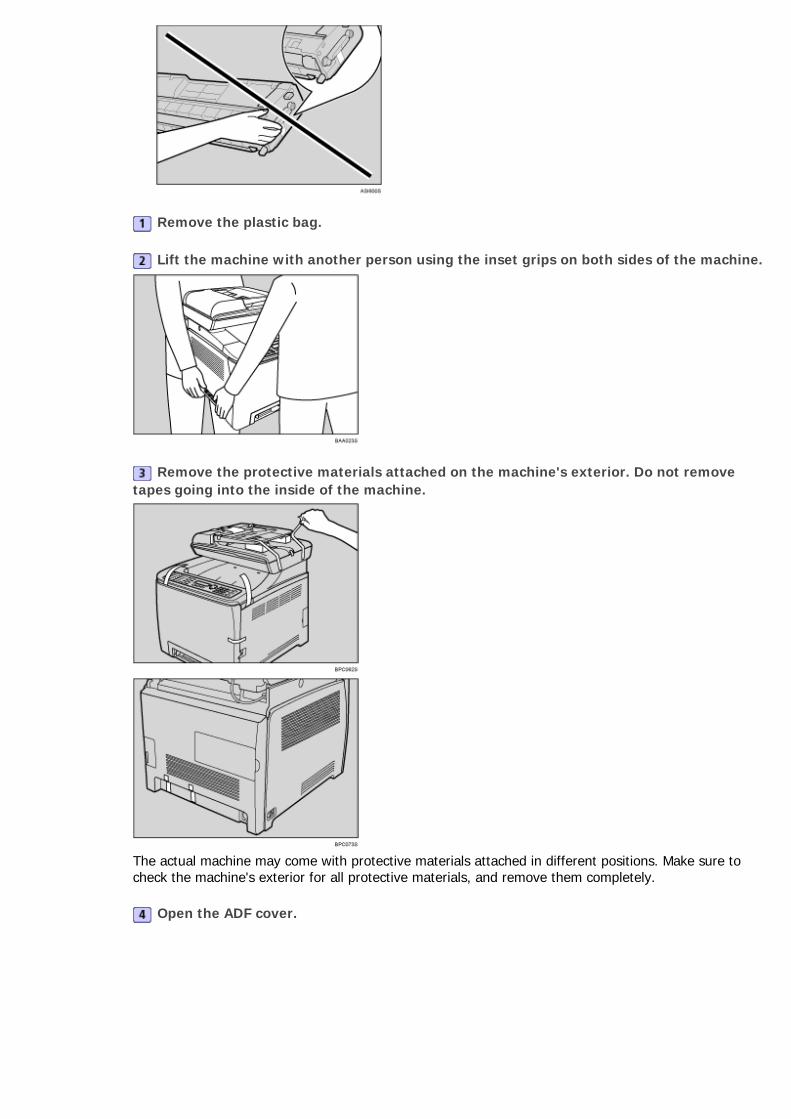
● Do not touch the print cartridge's photo conductor unit.
● Do not touch the ID chip on the side of the print cartridge (the white area in the illustration below).
Contents Previous Next Settings
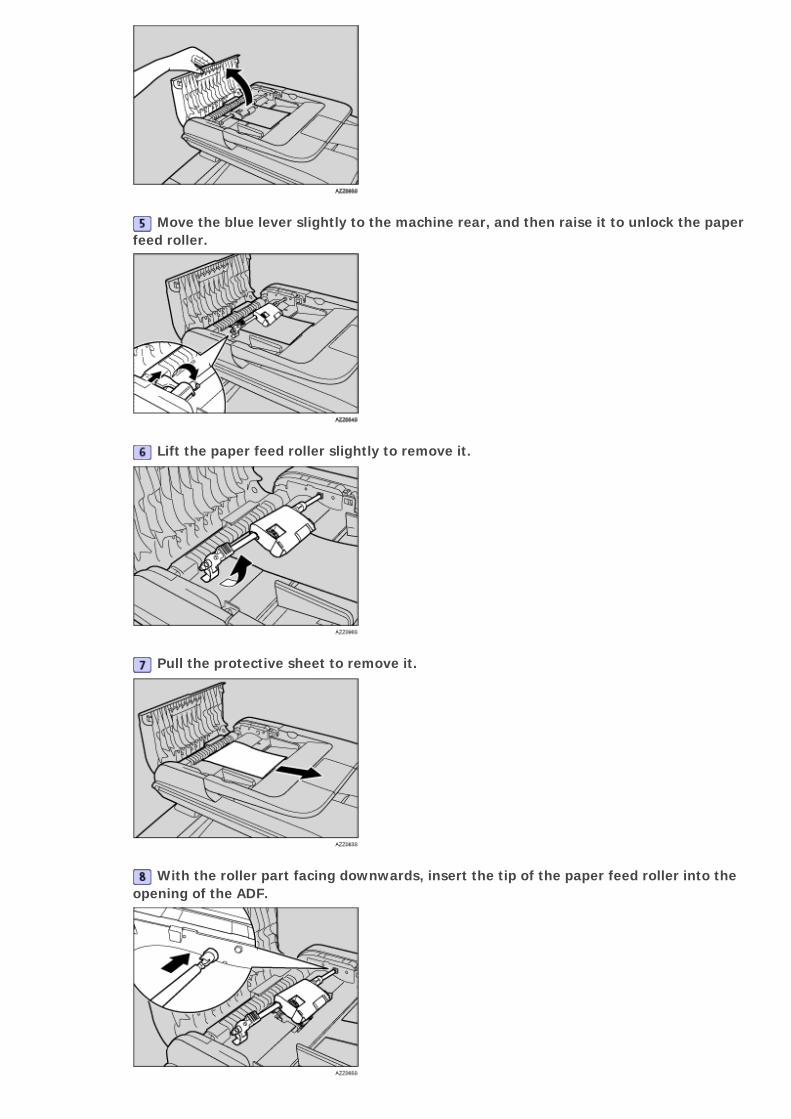
Remove the plastic bag.
Lift the machine with another person using the inset grips on both sides of the machine.
Remove the protective materials attached on the machine's exterior. Do not remove tapes going into the inside of the machine.
The actual machine may come with protective materials attached in different positions. Make sure to check the machine's exterior for all protective materials, and remove them completely.
Open the ADF cover.
Move the blue lever slightly to the machine rear, and then raise it to unlock the paper feed roller.
Lift the paper feed roller slightly to remove it.
Pull the protective sheet to remove it.
With the roller part facing downwards, insert the tip of the paper feed roller into the opening of the ADF.
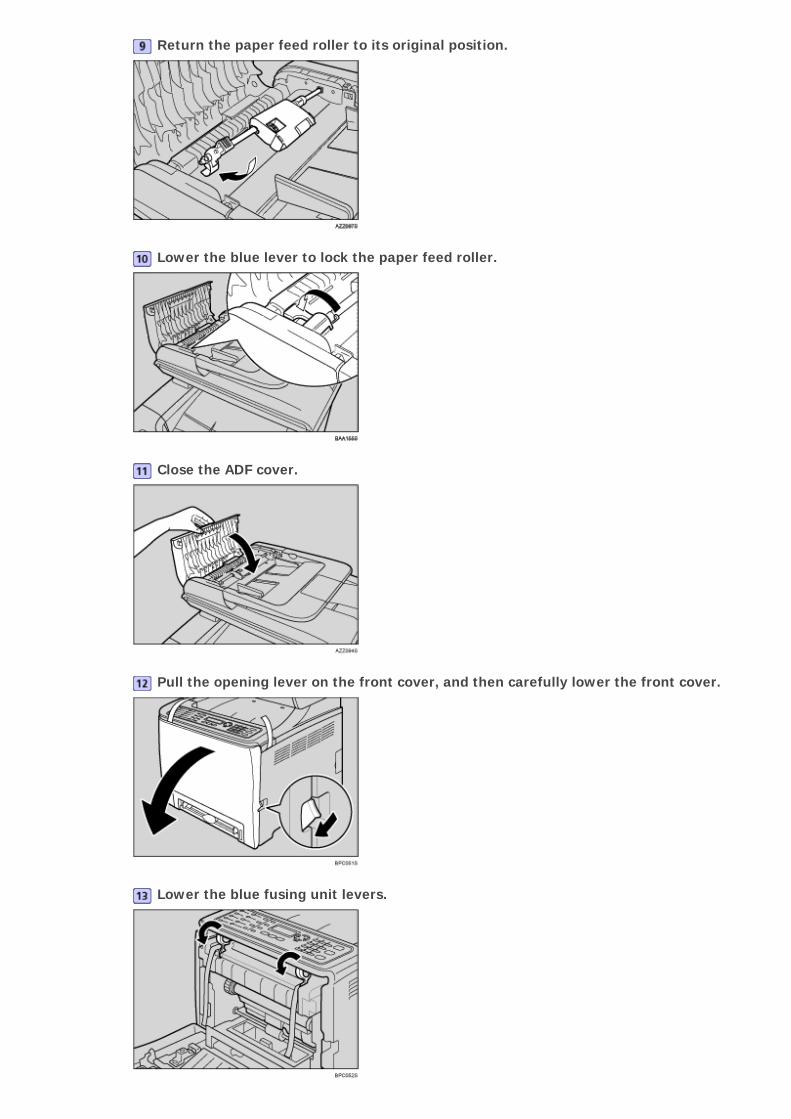
Return the paper feed roller to its original position.
Lower the blue lever to lock the paper feed roller.
Close the ADF cover.
Pull the opening lever on the front cover, and then carefully lower the front cover.
Lower the blue fusing unit levers.
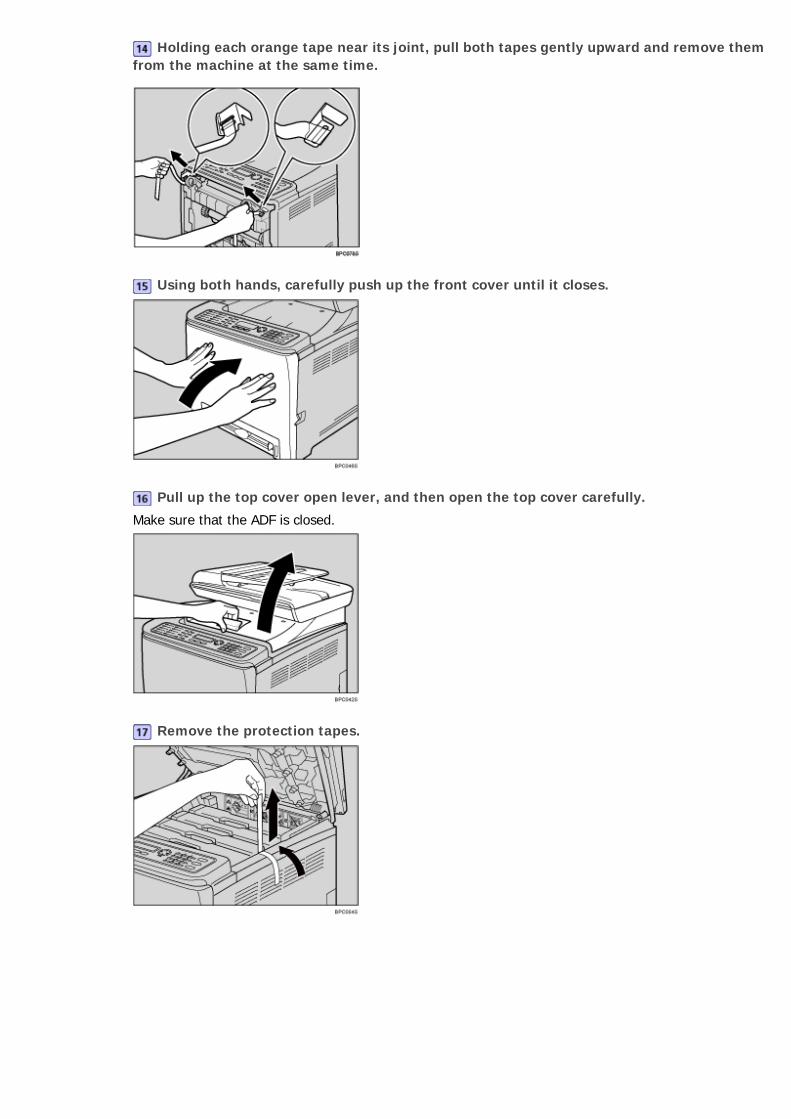
Holding each orange tape near its joint, pull both tapes gently upward and remove them from the machine at the same time.
Using both hands, carefully push up the front cover until it closes.
Pull up the top cover open lever, and then open the top cover carefully.
Make sure that the ADF is closed.
Remove the protection tapes.
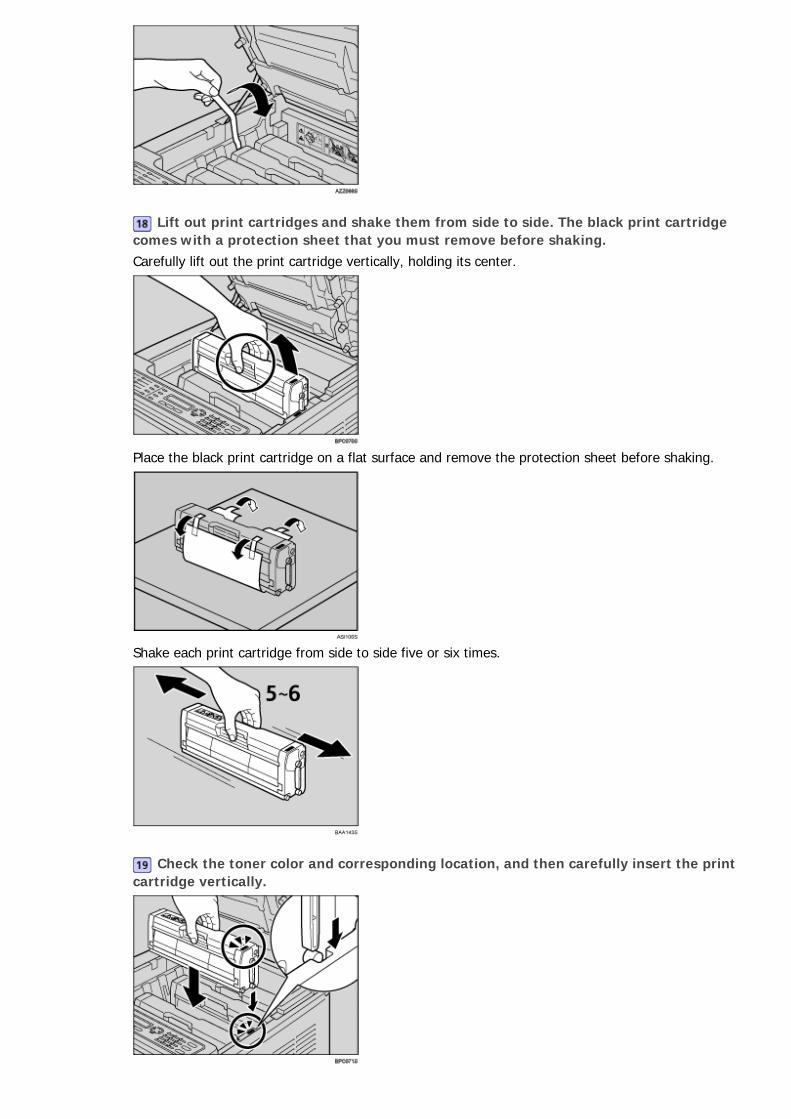
Lift out print cartridges and shake them from side to side. The black print cartridge comes with a protection sheet that you must remove before shaking.Carefully lift out the print cartridge vertically, holding its center.
Place the black print cartridge on a flat surface and remove the protection sheet before shaking.
Shake each print cartridge from side to side five or six times.
Check the toner color and corresponding location, and then carefully insert the print cartridge vertically.
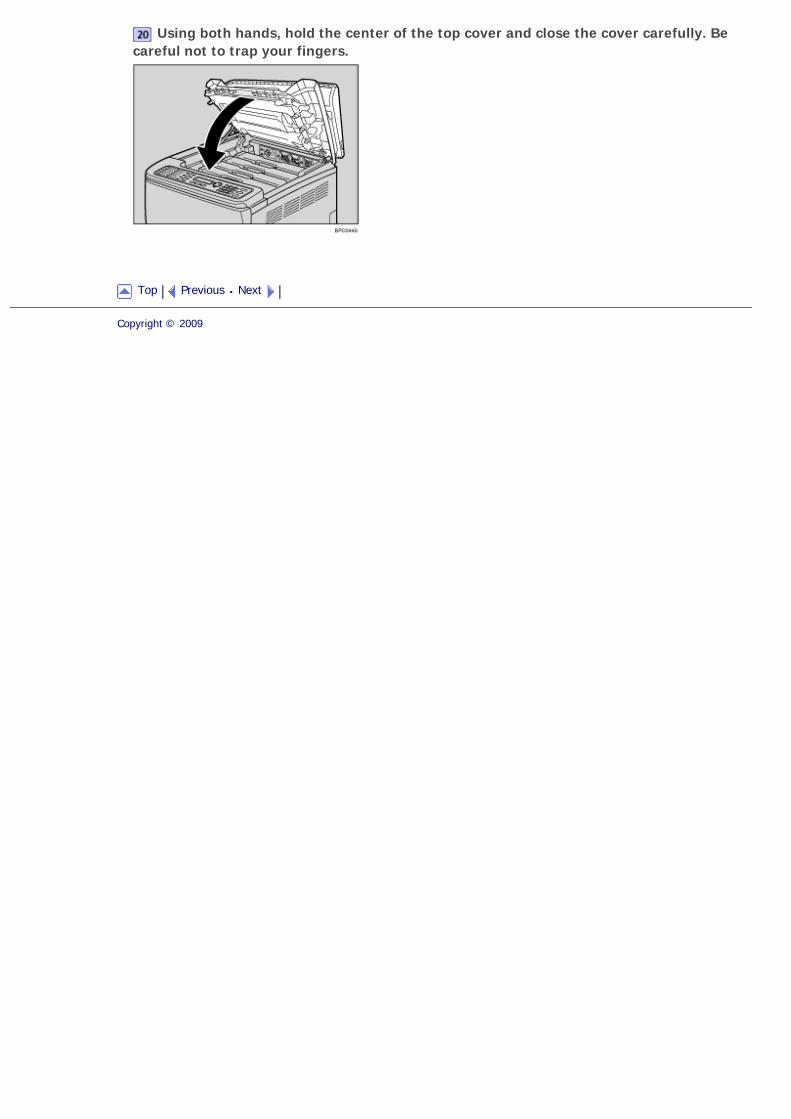
Using both hands, hold the center of the top cover and close the cover carefully. Be careful not to trap your fingers.
Top Previous Next
Copyright © 2009
Top Page > Getting Started > Installing the Machine > Turning the Power on
Turning the Power on
This section describes how to turn on the machine.
● Plug and unplug the power cable with dry hands, or an electric shock could occur.
● Make sure that the power cord is plugged securely into the wall outlet before turning the power on.
● Make sure that the power is off when plugging or unplugging the power cord.
● Do not turn off the power switch until initializing is completed. Doing so results in malfunction.
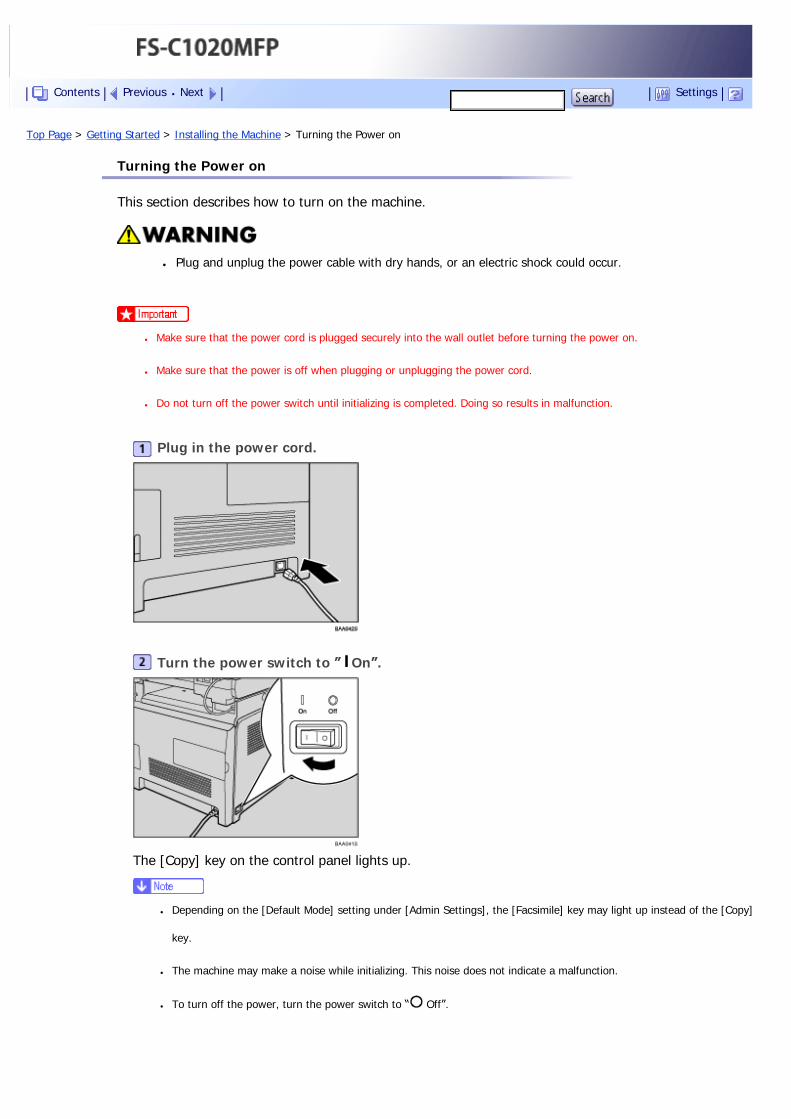
Plug in the power cord.
Turn the power switch to ” On”.
The [Copy] key on the control panel lights up.
● Depending on the [Default Mode] setting under [Admin Settings], the [Facsimile] key may light up instead of the [Copy]
key.
● The machine may make a noise while initializing. This noise does not indicate a malfunction.
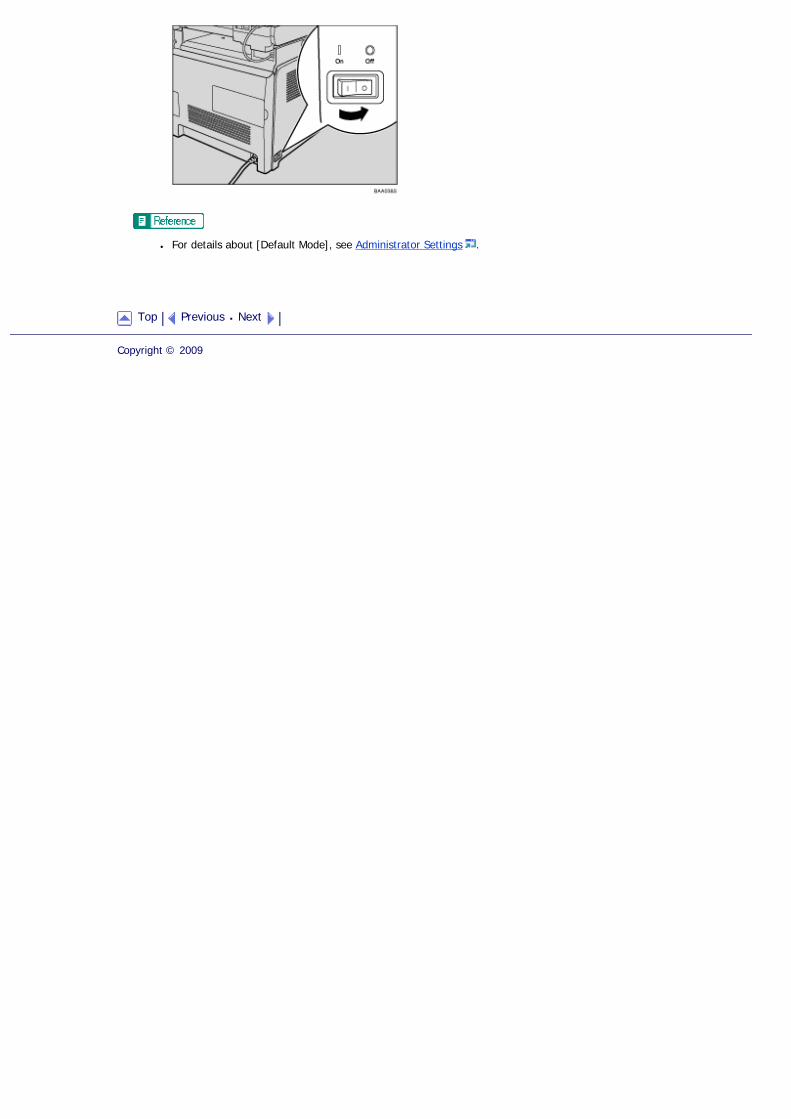
● To turn off the power, turn the power switch to “ Off”.
Contents Previous Next Settings
● For details about [Default Mode], see Administrator Settings .
Top Previous Next
Copyright © 2009
Top Page > Getting Started > Installing the Machine > Initial Setup
Initial Setup
When you turn on the machine for the first time, a menu for configuring the settings described below will appear on the display. This section describes how to complete the Initial Setup.
● : The fax number code is required by international law. You cannot legally connect a fax machine to the
telephone system if the fax number code is not programmed. Also, the fax header code and the date and time of transmission
must be included in the header of all pages faxed to, from, or within the United States.
● Make sure to select the correct code for the country of use. Selecting the wrong country code may cause failures in fax
transmissions.
Display language
The language selected here is used for the display.
User fax number
The number entered here is used as the fax number of the machine. The user fax number can contain 0 to 9, space, and "+".
User name
The name entered here is used as the name of the fax sender.
Country code
The country code selected here is used for configuring the time and date display formats, and the settings related to fax transmissions with appropriate default values for the country of use.
Press the [ ][ ] keys to select the required language, and then press the [OK] key.
Enter the user fax number (up to 20 characters) using the number keys, and then press the [OK] key.
To enter two 0s successively, press the [ ] key after the first 0.
You must enter at least one character, even if you are not using a fax function.
Enter the user name (up to 20 characters) using the number keys, and then press the [OK] key.
Press the [ ][ ] keys to select the required country code, and then press the [OK] key.
● You can change the settings configured during the Initial Setup later under [Admin Settings]. In addition, you can set the
machine's time and date under [Admin Settings].
● When the [Transmitter Header] setting under fax transmission settings is turned on, the registered user fax number, user
name, and time and date of transmission appear on the header of every fax you send.
Contents Previous Next Settings

● For details about entering characters, see Entering Characters .
● For details about [Admin Settings], see Administrator Settings .
● For details about [Transmitter Header], see Fax Transmission Settings .
Top Previous Next
Copyright © 2009
Top Page > Getting Started > Installing the Machine > Changing Operation Modes
Changing Operation Modes
You can switch between copier, scanner, and fax modes by pressing the corresponding keys.
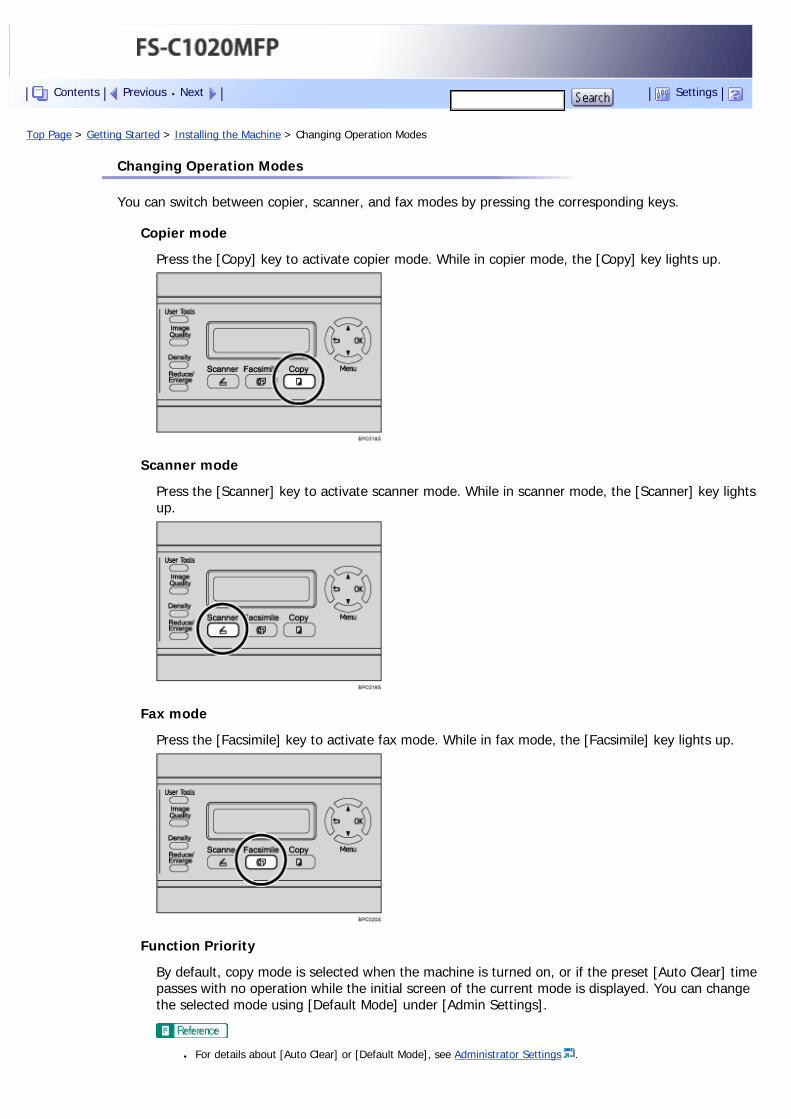
Copier mode
Press the [Copy] key to activate copier mode. While in copier mode, the [Copy] key lights up.
Scanner mode
Press the [Scanner] key to activate scanner mode. While in scanner mode, the [Scanner] key lights up.
Fax mode
Press the [Facsimile] key to activate fax mode. While in fax mode, the [Facsimile] key lights up.
Function Priority
By default, copy mode is selected when the machine is turned on, or if the preset [Auto Clear] time passes with no operation while the initial screen of the current mode is displayed. You can change the selected mode using [Default Mode] under [Admin Settings].
● For details about [Auto Clear] or [Default Mode], see Administrator Settings .
Contents Previous Next Settings

Top Previous Next
Copyright © 2009
Top Page > Getting Started > Installing the Machine > Saving Energy
Saving Energy
This machine is equipped with the following Energy Saver modes: Energy Saver mode 1 and Energy Saver mode 2. If the machine has been idle for a certain period of time, the machine automatically enters Energy Saver mode.
The machine recovers from Energy Saver mode when it receives a print job, prints a received fax, or when the [Copy], [Color Start], or [B&W Start] key is pressed.
Energy Saver mode 1
If [EnergySaverMode1] under [Admin Settings] is enabled, the machine enters Energy Saver mode 1 if the machine has been idle for about 30 seconds. When the machine is in Energy Saver mode 1, the backlight of the screen is turned off and "EnergySaverMode1" appears on the screen. It takes less time to recover from Energy Saver mode 1 than from power-off state or Energy Saver mode 2, but power consumption is higher in Energy Saver mode 1 than in Energy Saver mode 2.
Energy Saver mode 2
If [EnergySaverMode2] under [Admin Settings] is enabled, the machine enters Energy Saver mode 2 after the period of time specified for this setting is passed. When the machine is in Energy Saver mode 2, the backlight of the screen is turned off and "EnergySaverMode2" appears on the screen. Power consumption is lower in Energy Saver mode 2 than in Energy Saver mode 1, but it takes longer to recover from Energy Saver mode 2 than from Energy Saver mode 1.
● If the machine is in Energy Saver mode 2 for 24 hours continuously, the machine automatically returns to normal state and
performs self-maintenance.
● For details about [Power Saver], see Administrator Settings .
Top Previous Next
Copyright © 2009
Contents Previous Next Settings
Top Page > Getting Started > Installing the Machine > Multi-Access
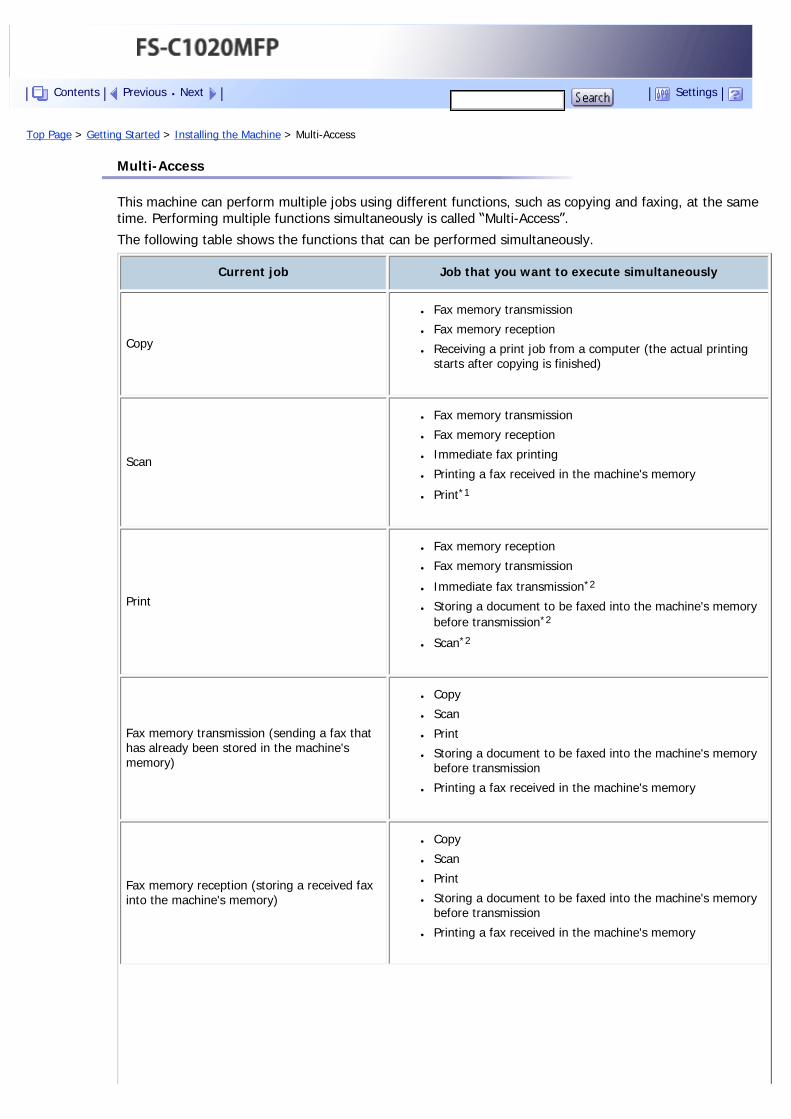
Multi-Access
This machine can perform multiple jobs using different functions, such as copying and faxing, at the same time. Performing multiple functions simultaneously is called “Multi-Access”.
The following table shows the functions that can be performed simultaneously.
Current job Job that you want to execute simultaneously
Copy
● Fax memory transmission
● Fax memory reception
● Receiving a print job from a computer (the actual printing starts after copying is finished)
Scan
● Fax memory transmission
● Fax memory reception
● Immediate fax printing
● Printing a fax received in the machine's memory
● Print*1
● Fax memory reception
● Fax memory transmission
● Immediate fax transmission*2
● Storing a document to be faxed into the machine's memory before transmission*2
● Scan*2
Fax memory transmission (sending a fax that has already been stored in the machine's memory)
● Copy
● Scan
● Storing a document to be faxed into the machine's memory before transmission
● Printing a fax received in the machine's memory
Fax memory reception (storing a received fax into the machine's memory)
● Copy
● Scan
● Storing a document to be faxed into the machine's memory before transmission
● Printing a fax received in the machine's memory
Contents Previous Next Settings
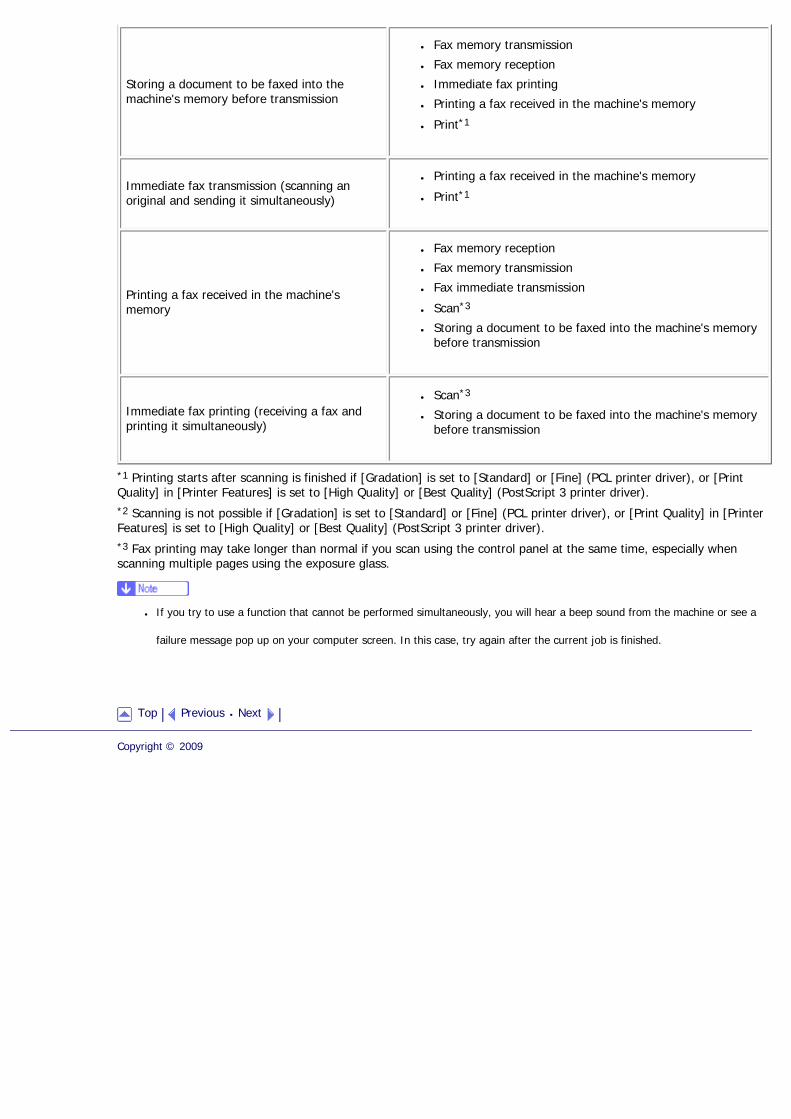
Storing a document to be faxed into the machine's memory before transmission
● Fax memory transmission
● Fax memory reception
● Immediate fax printing
● Printing a fax received in the machine's memory
● Print*1
Immediate fax transmission (scanning an original and sending it simultaneously)
● Printing a fax received in the machine's memory
● Print*1
Printing a fax received in the machine's memory
● Fax memory reception
● Fax memory transmission
● Fax immediate transmission
● Scan*3
● Storing a document to be faxed into the machine's memory before transmission
Immediate fax printing (receiving a fax and printing it simultaneously)
● Scan*3
● Storing a document to be faxed into the machine's memory before transmission
*1 Printing starts after scanning is finished if [Gradation] is set to [Standard] or [Fine] (PCL printer driver), or [Print Quality] in [Printer Features] is set to [High Quality] or [Best Quality] (PostScript 3 printer driver).*2 Scanning is not possible if [Gradation] is set to [Standard] or [Fine] (PCL printer driver), or [Print Quality] in [Printer Features] is set to [High Quality] or [Best Quality] (PostScript 3 printer driver).*3 Fax printing may take longer than normal if you scan using the control panel at the same time, especially when scanning multiple pages using the exposure glass.
● If you try to use a function that cannot be performed simultaneously, you will hear a beep sound from the machine or see a
failure message pop up on your computer screen. In this case, try again after the current job is finished.
Top Previous Next
Copyright © 2009

Top Page > Getting Started > Connecting the Machine
Connecting the Machine
This section describes connecting the machine to a computer and a telephone line.
Related topics
Connecting with USB Cable
Connecting with Network Cable
Connecting to a Telephone Line
Top Previous Next
Copyright © 2009
Contents Previous Next Settings
Top Page > Getting Started > Connecting the Machine > Connecting with USB Cable
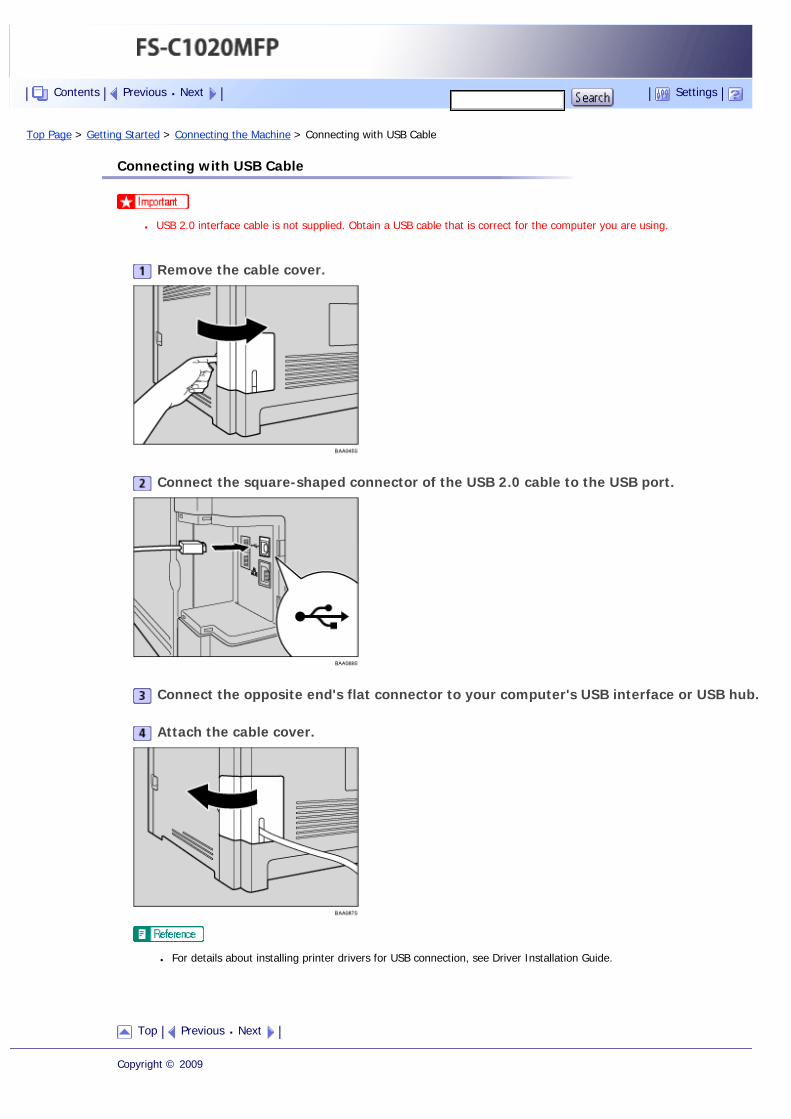
Connecting with USB Cable
● USB 2.0 interface cable is not supplied. Obtain a USB cable that is correct for the computer you are using.
Remove the cable cover.
Connect the square-shaped connector of the USB 2.0 cable to the USB port.
Connect the opposite end's flat connector to your computer's USB interface or USB hub.
Attach the cable cover.
● For details about installing printer drivers for USB connection, see Driver Installation Guide.
Top Previous Next
Copyright © 2009
Contents Previous Next Settings

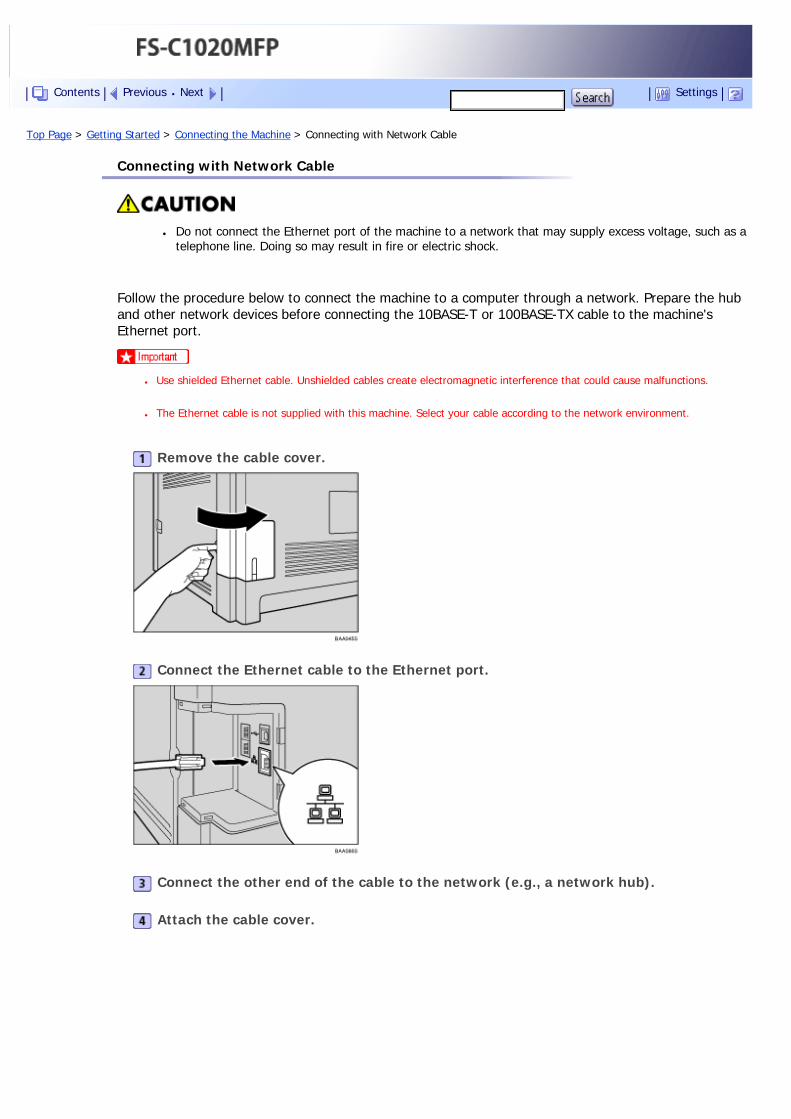
Top Page > Getting Started > Connecting the Machine > Connecting with Network Cable
Connecting with Network Cable
● Do not connect the Ethernet port of the machine to a network that may supply excess voltage, such as a telephone line. Doing so may result in fire or electric shock.
Follow the procedure below to connect the machine to a computer through a network. Prepare the hub and other network devices before connecting the 10BASE-T or 100BASE-TX cable to the machine's Ethernet port.
● Use shielded Ethernet cable. Unshielded cables create electromagnetic interference that could cause malfunctions.
● The Ethernet cable is not supplied with this machine. Select your cable according to the network environment.
Remove the cable cover.
Connect the Ethernet cable to the Ethernet port.
Connect the other end of the cable to the network (e.g., a network hub).
Attach the cable cover.
Contents Previous Next Settings
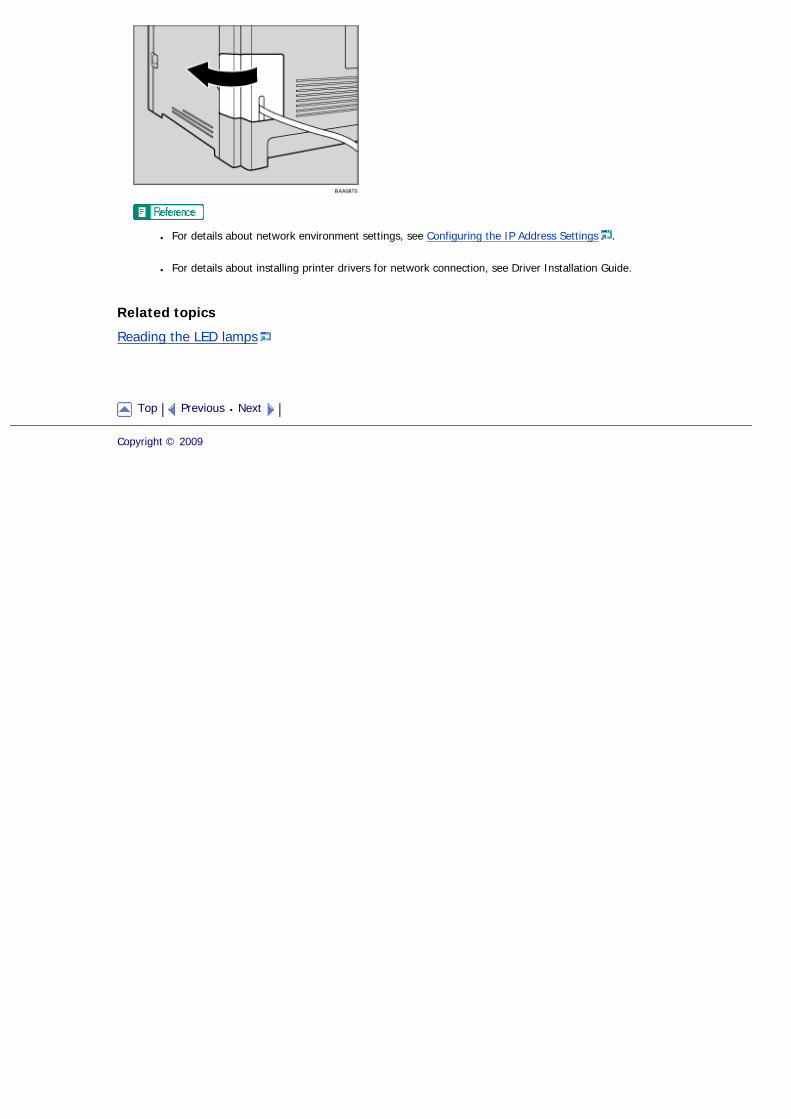
● For details about network environment settings, see Configuring the IP Address Settings .
● For details about installing printer drivers for network connection, see Driver Installation Guide.
Related topics
Reading the LED lamps
Top Previous Next
Copyright © 2009
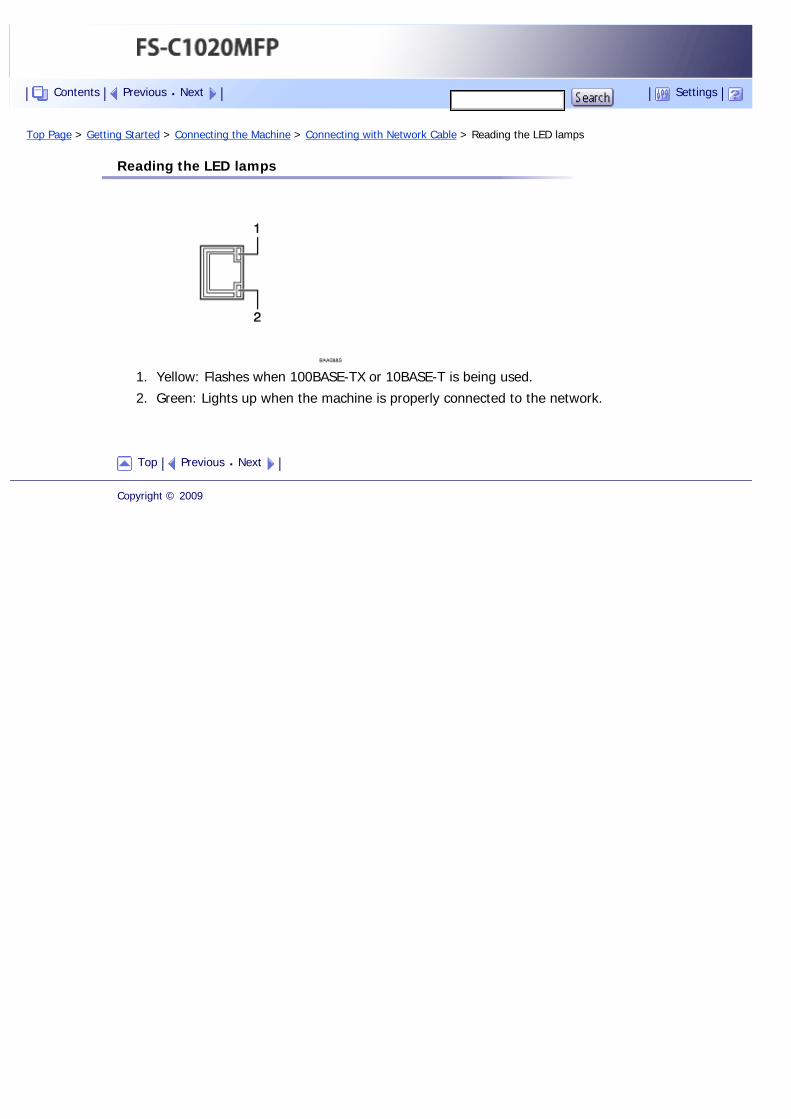
Top Page > Getting Started > Connecting the Machine > Connecting with Network Cable > Reading the LED lamps
Reading the LED lamps
1. Yellow: Flashes when 100BASE-TX or 10BASE-T is being used.
2. Green: Lights up when the machine is properly connected to the network.
Top Previous Next
Copyright © 2009
Contents Previous Next Settings
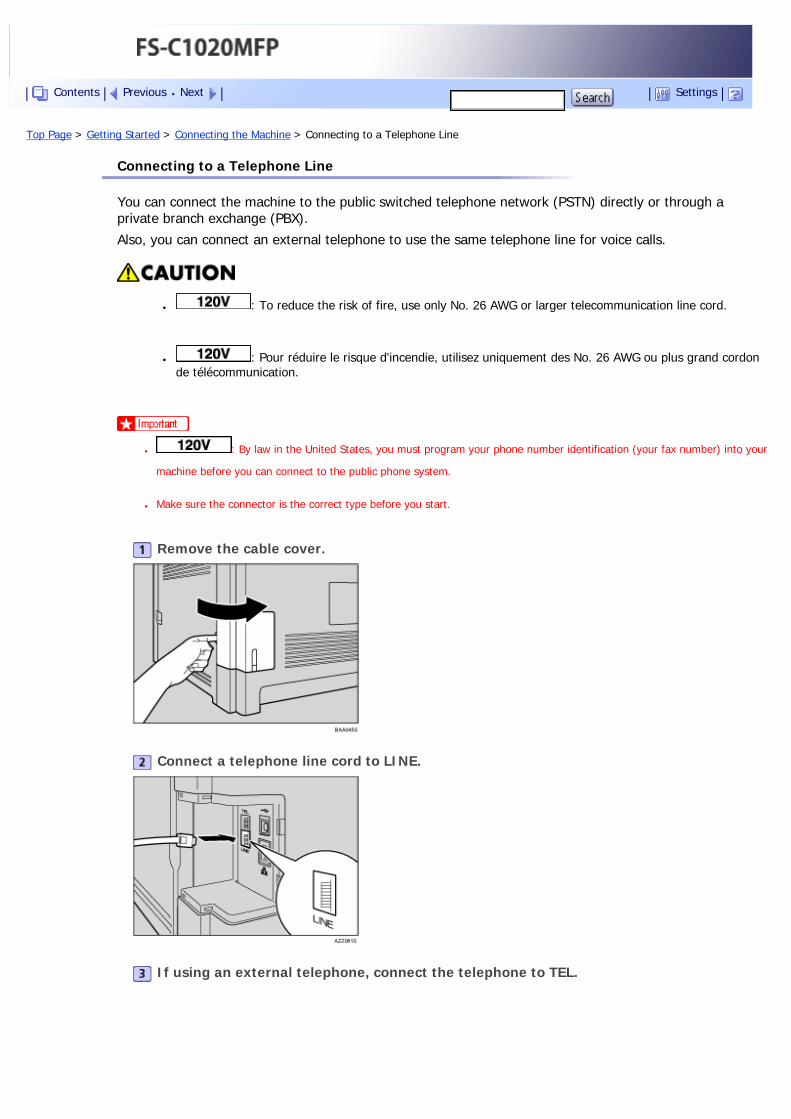
Top Page > Getting Started > Connecting the Machine > Connecting to a Telephone Line
Connecting to a Telephone Line
You can connect the machine to the public switched telephone network (PSTN) directly or through a private branch exchange (PBX).
Also, you can connect an external telephone to use the same telephone line for voice calls.
● : To reduce the risk of fire, use only No. 26 AWG or larger telecommunication line cord.
● : Pour réduire le risque d'incendie, utilisez uniquement des No. 26 AWG ou plus grand cordon de télécommunication.
● : By law in the United States, you must program your phone number identification (your fax number) into your
machine before you can connect to the public phone system.
● Make sure the connector is the correct type before you start.
Remove the cable cover.
Connect a telephone line cord to LINE.
If using an external telephone, connect the telephone to TEL.
Contents Previous Next Settings
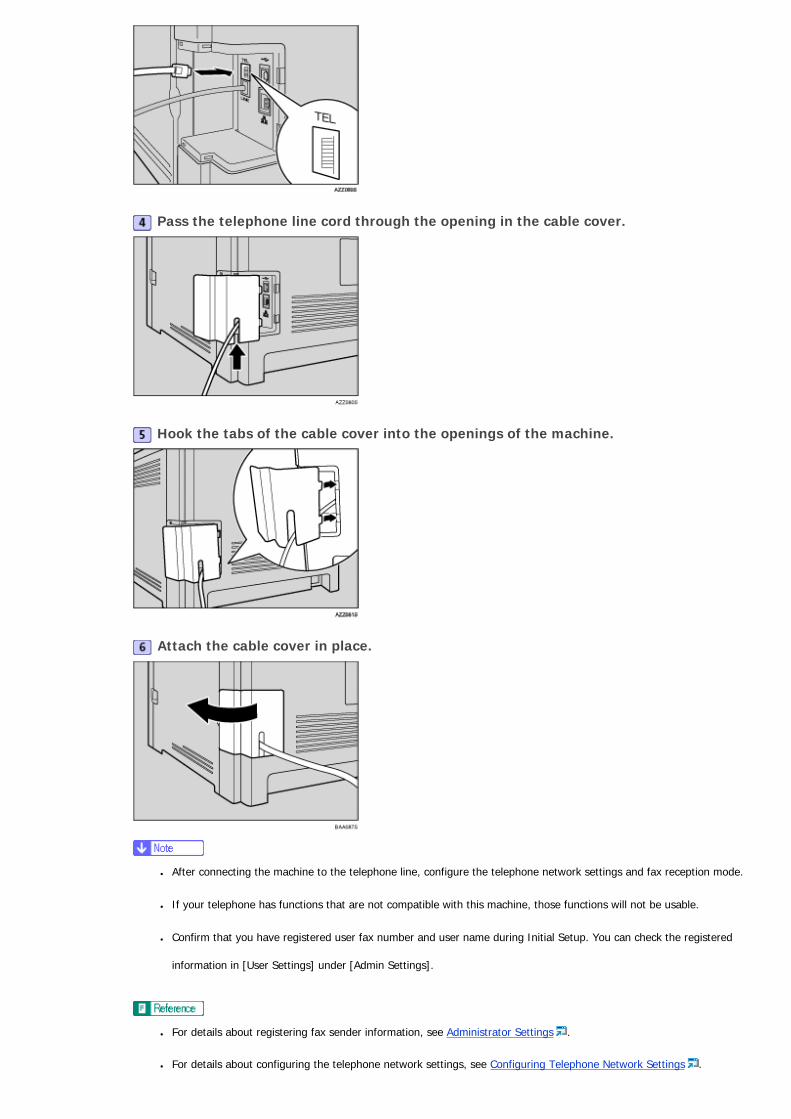
Pass the telephone line cord through the opening in the cable cover.
Hook the tabs of the cable cover into the openings of the machine.
Attach the cable cover in place.
● After connecting the machine to the telephone line, configure the telephone network settings and fax reception mode.
● If your telephone has functions that are not compatible with this machine, those functions will not be usable.
● Confirm that you have registered user fax number and user name during Initial Setup. You can check the registered
information in [User Settings] under [Admin Settings].
● For details about registering fax sender information, see Administrator Settings .
● For details about configuring the telephone network settings, see Configuring Telephone Network Settings .

● For details about configuring fax reception mode, see Selecting Reception Mode .
● For details about [User Settings], see Administrator Settings .
Top Previous Next
Copyright © 2009
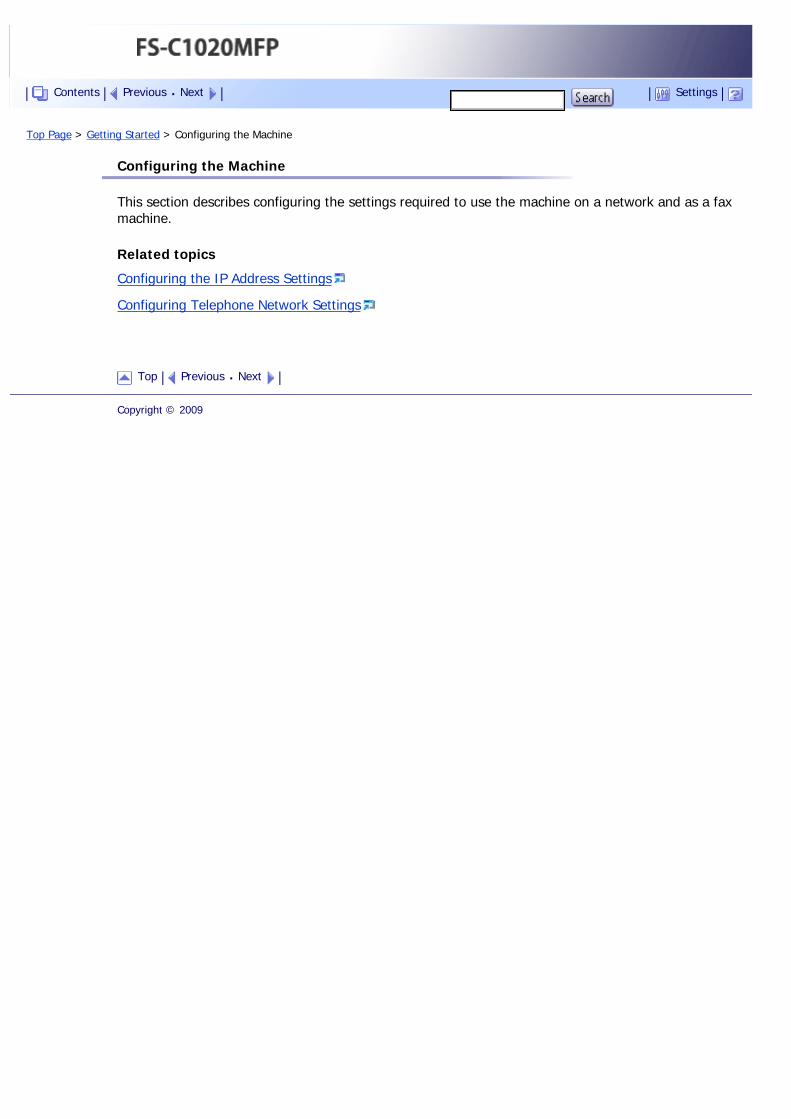
Top Page > Getting Started > Configuring the Machine
Configuring the Machine
This section describes configuring the settings required to use the machine on a network and as a fax machine.
Related topics
Configuring the IP Address Settings
Configuring Telephone Network Settings
Top Previous Next
Copyright © 2009
Contents Previous Next Settings
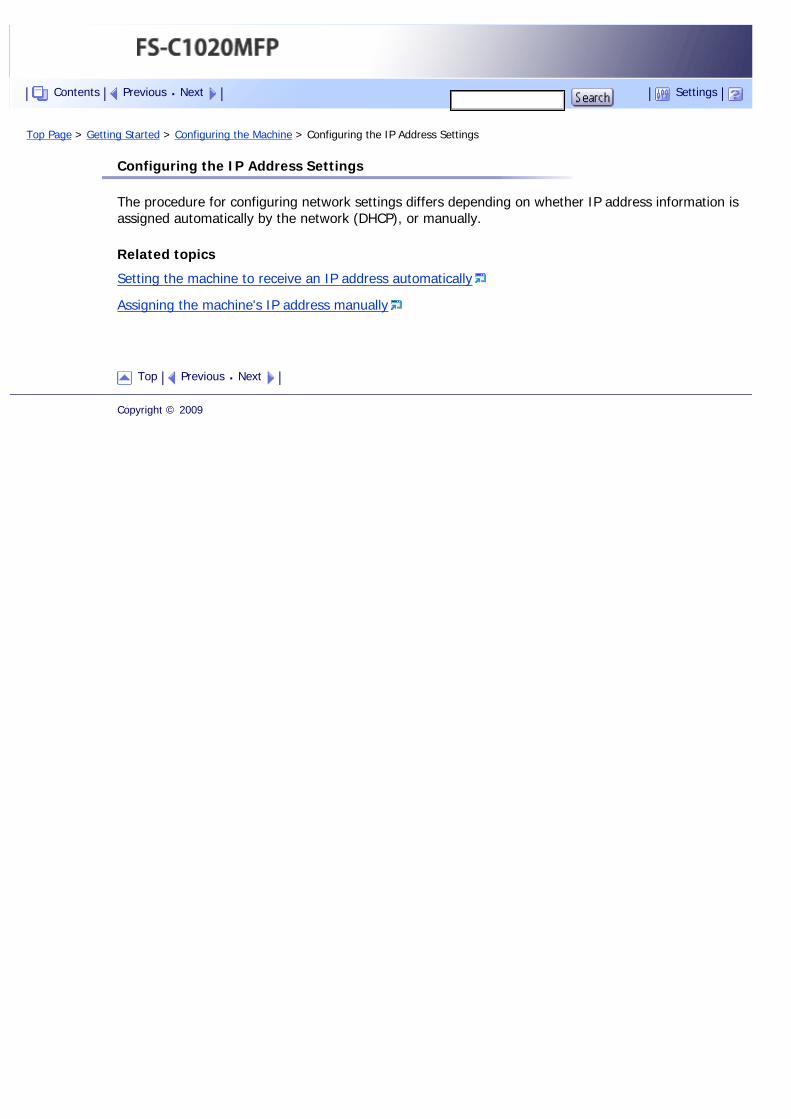
Top Page > Getting Started > Configuring the Machine > Configuring the IP Address Settings
Configuring the IP Address Settings
The procedure for configuring network settings differs depending on whether IP address information is assigned automatically by the network (DHCP), or manually.
Related topics
Setting the machine to receive an IP address automatically
Assigning the machine's IP address manually
Top Previous Next
Copyright © 2009
Contents Previous Next Settings
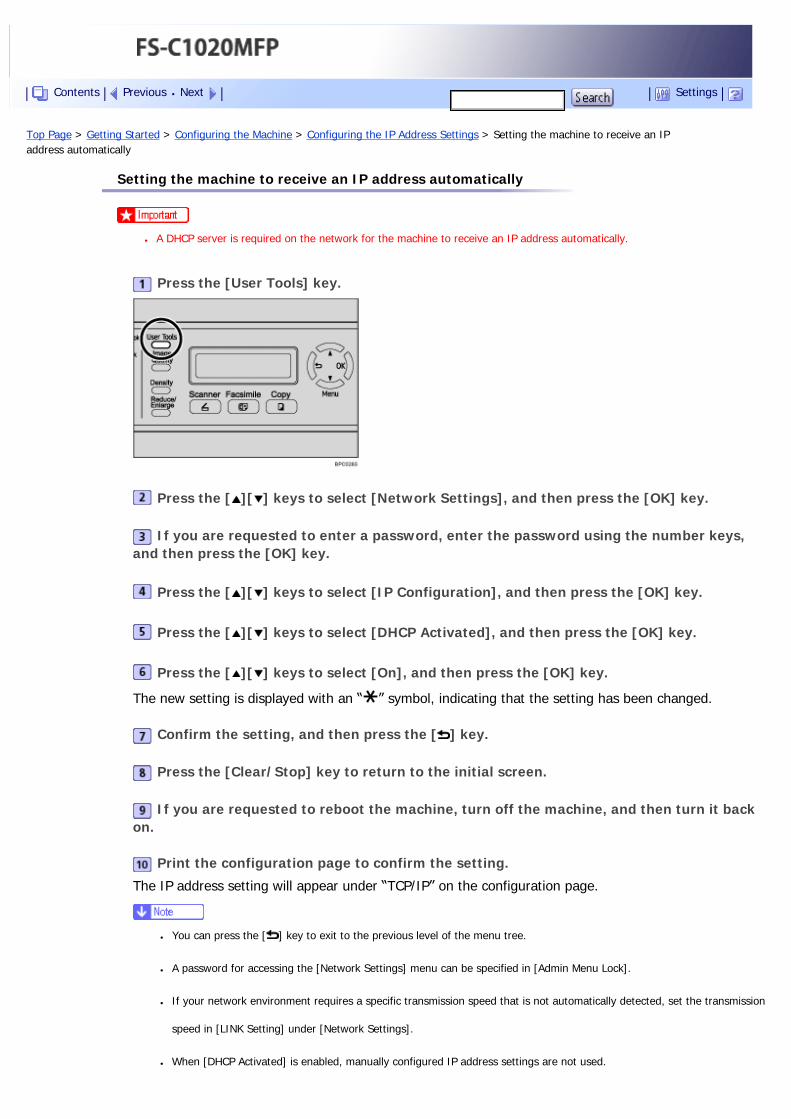
Top Page > Getting Started > Configuring the Machine > Configuring the IP Address Settings > Setting the machine to receive an IP address automatically
Setting the machine to receive an IP address automatically
● A DHCP server is required on the network for the machine to receive an IP address automatically.
Press the [User Tools] key.
Press the [ ][ ] keys to select [Network Settings], and then press the [OK] key.
If you are requested to enter a password, enter the password using the number keys, and then press the [OK] key.
Press the [ ][ ] keys to select [IP Configuration], and then press the [OK] key.
Press the [ ][ ] keys to select [DHCP Activated], and then press the [OK] key.
Press the [ ][ ] keys to select [On], and then press the [OK] key.
The new setting is displayed with an “ ” symbol, indicating that the setting has been changed.
Confirm the setting, and then press the [ ] key.
Press the [Clear/Stop] key to return to the initial screen.
If you are requested to reboot the machine, turn off the machine, and then turn it back on.
Print the configuration page to confirm the setting.
The IP address setting will appear under “TCP/IP” on the configuration page.
● You can press the [ ] key to exit to the previous level of the menu tree.
● A password for accessing the [Network Settings] menu can be specified in [Admin Menu Lock].
● If your network environment requires a specific transmission speed that is not automatically detected, set the transmission
speed in [LINK Setting] under [Network Settings].
● When [DHCP Activated] is enabled, manually configured IP address settings are not used.
Contents Previous Next Settings

● For details about turning the machine on and off, see Turning the Power on .
● For details about printing configuration page, see Printing the Configuration Page .
● For details about [Admin Menu Lock], see Administrator Settings .
● For details about [LINK Setting], see Network Settings .
Top Previous Next
Copyright © 2009
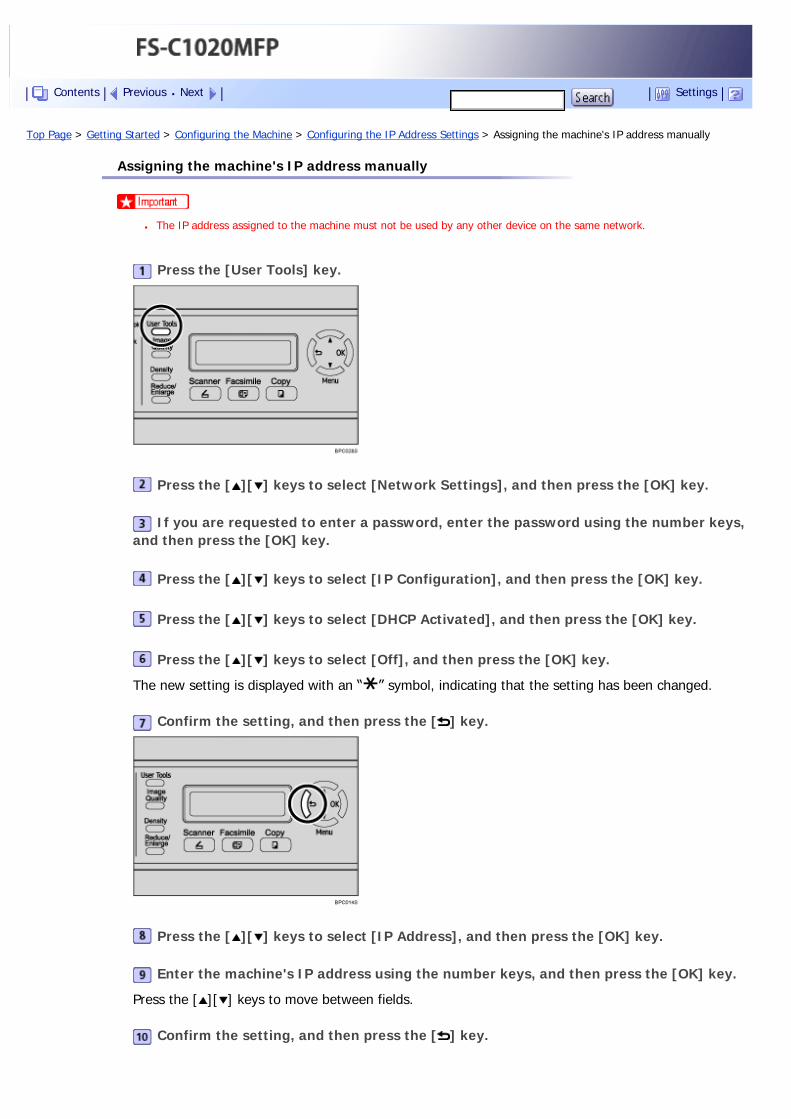
Top Page > Getting Started > Configuring the Machine > Configuring the IP Address Settings > Assigning the machine's IP address manually
Assigning the machine's IP address manually
● The IP address assigned to the machine must not be used by any other device on the same network.
Press the [User Tools] key.
Press the [ ][ ] keys to select [Network Settings], and then press the [OK] key.
If you are requested to enter a password, enter the password using the number keys, and then press the [OK] key.
Press the [ ][ ] keys to select [IP Configuration], and then press the [OK] key.
Press the [ ][ ] keys to select [DHCP Activated], and then press the [OK] key.
Press the [ ][ ] keys to select [Off], and then press the [OK] key.
The new setting is displayed with an “ ” symbol, indicating that the setting has been changed.
Confirm the setting, and then press the [ ] key.
Press the [ ][ ] keys to select [IP Address], and then press the [OK] key.
Enter the machine's IP address using the number keys, and then press the [OK] key.
Press the [ ][ ] keys to move between fields.
Confirm the setting, and then press the [ ] key.
Contents Previous Next Settings
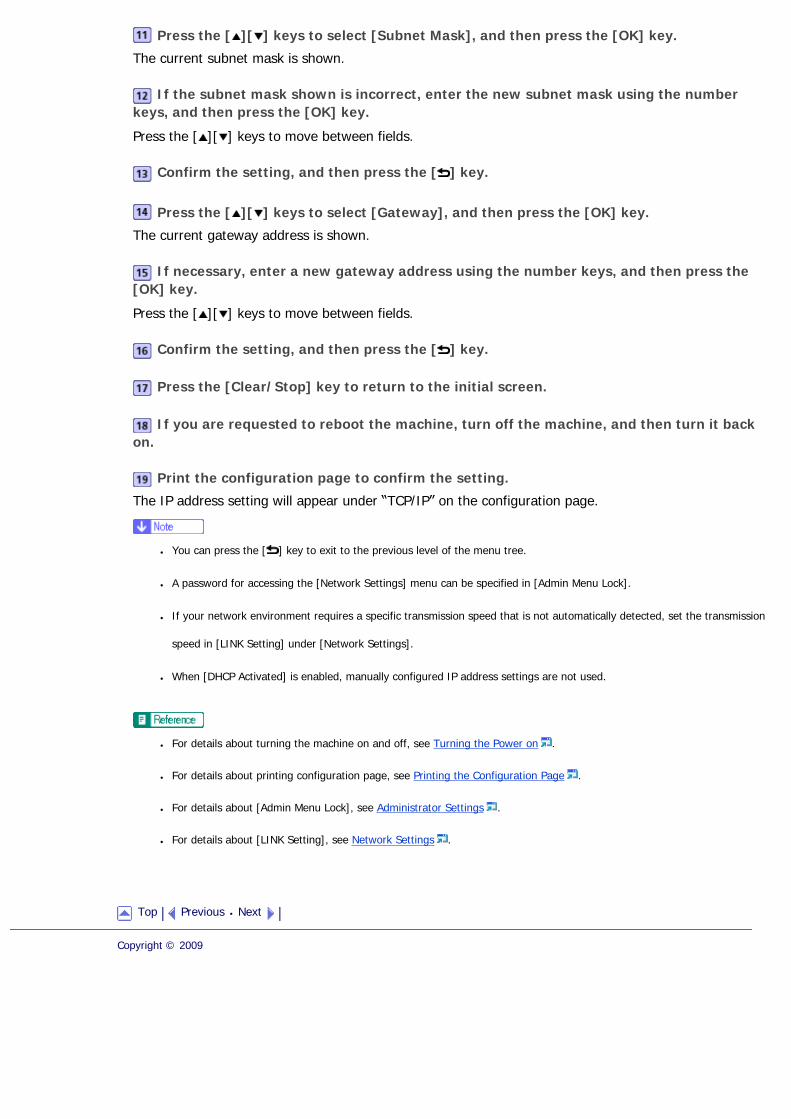
Press the [ ][ ] keys to select [Subnet Mask], and then press the [OK] key.
The current subnet mask is shown.
If the subnet mask shown is incorrect, enter the new subnet mask using the number keys, and then press the [OK] key.
Press the [ ][ ] keys to move between fields.
Confirm the setting, and then press the [ ] key.
Press the [ ][ ] keys to select [Gateway], and then press the [OK] key.
The current gateway address is shown.
If necessary, enter a new gateway address using the number keys, and then press the [OK] key.
Press the [ ][ ] keys to move between fields.
Confirm the setting, and then press the [ ] key.
Press the [Clear/Stop] key to return to the initial screen.
If you are requested to reboot the machine, turn off the machine, and then turn it back on.
Print the configuration page to confirm the setting.
The IP address setting will appear under “TCP/IP” on the configuration page.
● You can press the [ ] key to exit to the previous level of the menu tree.
● A password for accessing the [Network Settings] menu can be specified in [Admin Menu Lock].
● If your network environment requires a specific transmission speed that is not automatically detected, set the transmission
speed in [LINK Setting] under [Network Settings].
● When [DHCP Activated] is enabled, manually configured IP address settings are not used.
● For details about turning the machine on and off, see Turning the Power on .
● For details about printing configuration page, see Printing the Configuration Page .
● For details about [Admin Menu Lock], see Administrator Settings .
● For details about [LINK Setting], see Network Settings .
Top Previous Next
Copyright © 2009

Top Page > Getting Started > Configuring the Machine > Configuring Telephone Network Settings
Configuring Telephone Network Settings
Related topics
Selecting the telephone line type
Selecting the telephone network connection type
Setting the outside line access number
Top Previous Next
Copyright © 2009
Contents Previous Next Settings
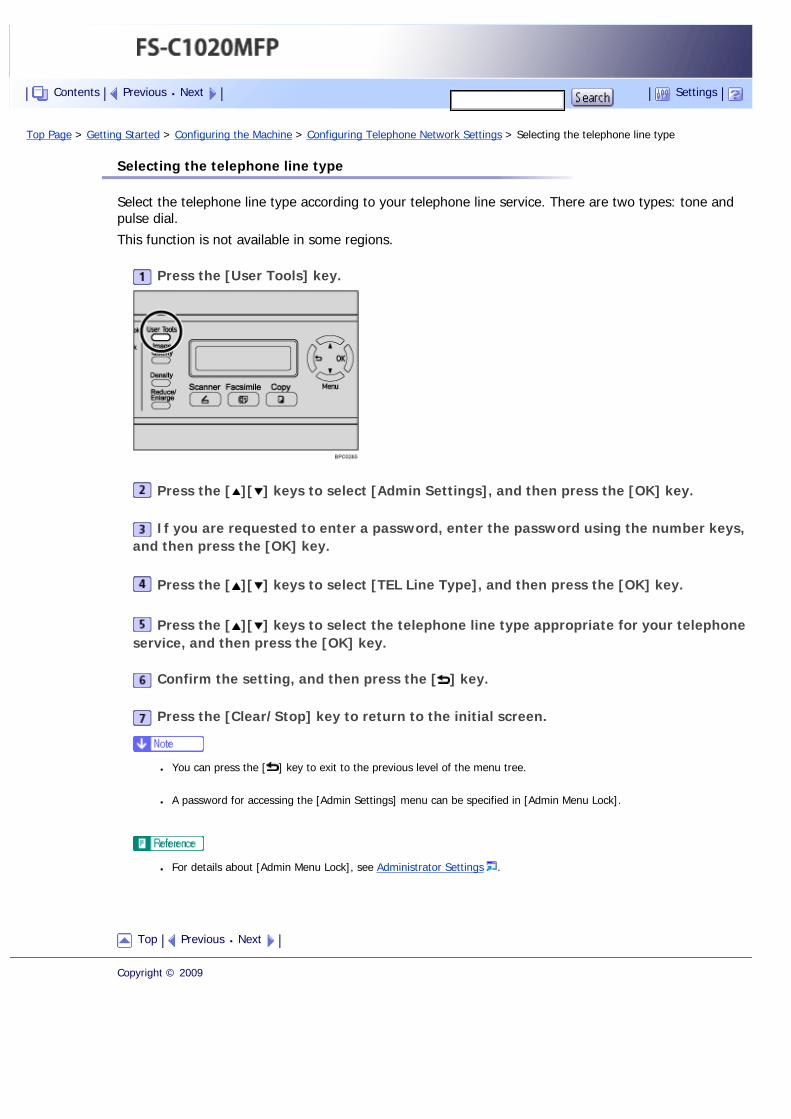
Top Page > Getting Started > Configuring the Machine > Configuring Telephone Network Settings > Selecting the telephone line type
Selecting the telephone line type
Select the telephone line type according to your telephone line service. There are two types: tone and pulse dial.
This function is not available in some regions.
Press the [User Tools] key.
Press the [ ][ ] keys to select [Admin Settings], and then press the [OK] key.
If you are requested to enter a password, enter the password using the number keys, and then press the [OK] key.
Press the [ ][ ] keys to select [TEL Line Type], and then press the [OK] key.
Press the [ ][ ] keys to select the telephone line type appropriate for your telephone service, and then press the [OK] key.
Confirm the setting, and then press the [ ] key.
Press the [Clear/Stop] key to return to the initial screen.
● You can press the [ ] key to exit to the previous level of the menu tree.
● A password for accessing the [Admin Settings] menu can be specified in [Admin Menu Lock].
● For details about [Admin Menu Lock], see Administrator Settings .
Top Previous Next
Copyright © 2009
Contents Previous Next Settings

Top Page > Getting Started > Configuring the Machine > Configuring Telephone Network Settings > Selecting the telephone network connection type
Selecting the telephone network connection type
Select the type of connection to the telephone network.
There are two types: public switched telephone network (PSTN) and private branch exchange (PBX).
Press the [User Tools] key.
Press the [ ][ ] keys to select [Admin Settings], and then press the [OK] key.
If you are requested to enter a password, enter the password using the number keys, and then press the [OK] key.
Press the [ ][ ] keys to select [PBX Selection], and then press the [OK] key.
Press the [ ][ ] keys to select [PSTN] or [PBX], and then press the [OK] key.
Confirm the setting, and then press the [ ] key.
Press the [Clear/Stop] key to return to the initial screen.
● You can press the [ ] key to exit to the previous level of the menu tree.
● A password for accessing the [Admin Settings] menu can be specified in [Admin Menu Lock].
● For details about [Admin Menu Lock], see Administrator Settings .
Top Previous Next
Copyright © 2009
Contents Previous Next Settings

Top Page > Getting Started > Configuring the Machine > Configuring Telephone Network Settings > Setting the outside line access number
Setting the outside line access number
If the machine is connected to the telephone network through a PBX, set the dial number to access the outside line.
● Make sure to set the outside line access number that matches the setting of your PBX. Otherwise, you may not be able to
send faxes to outside destinations.
Press the [User Tools] key.
Press the [ ][ ] keys to select [Admin Settings], and then press the [OK] key.
If you are requested to enter a password, enter the password using the number keys, and then press the [OK] key.
Press the [ ][ ] keys to select [PBX Access Digit], and then press the [OK] key.
Enter the outside line access number using the number keys, and then press the [OK] key.
Confirm the setting, and then press the [ ] key.
Press the [Clear/Stop] key to return to the initial screen.
● You can press the [ ] key to exit to the previous level of the menu tree.
● A password for accessing the [Admin Settings] menu can be specified in [Admin Menu Lock].
● For details about [Admin Menu Lock], see Administrator Settings .
Top Previous Next
Copyright © 2009
Contents Previous Next Settings
Top Page > Getting Started > Sharing the Printer on a Network
Sharing the Printer on a Network
This section describes how to set up the machine for use as a network printer.
The shared printer can be used by computers on the network.
● To change printer properties in the [Printer] folder, you must have Manage Printers permission. Log on to the file server as an
Administrators or member of the PowerUsers group to acquire this permission.
From the [Start] menu, open the [Printers] window.
Under Windows XP or Windows Server 2003/2003 R2/2008, the [Printers and Faxes] window appears.
Click the printer icon you want to use. On the [File] menu, click [Properties].
The printer properties appears.
On the [Sharing] tab, click [Shared as:].
To share the printer with users using a different version of Windows, click [Additional Drivers...].Omit this step if you have installed an alternative driver by selecting [Shared as:] during the printer driver installation.
Click [OK], and then close the printer properties.
Top Previous Next
Copyright © 2009
Contents Previous Next Settings

Top Page > Getting Started > Installing Options
Installing Options
This section describes how to install the optional paper feed unit and memory unit.
Related topics
Installing the Paper Feed Unit (Tray 2)
Installing the Memory Unit (DDR-SDRAM Module)
Top Previous Next
Copyright © 2009
Contents Previous Next Settings
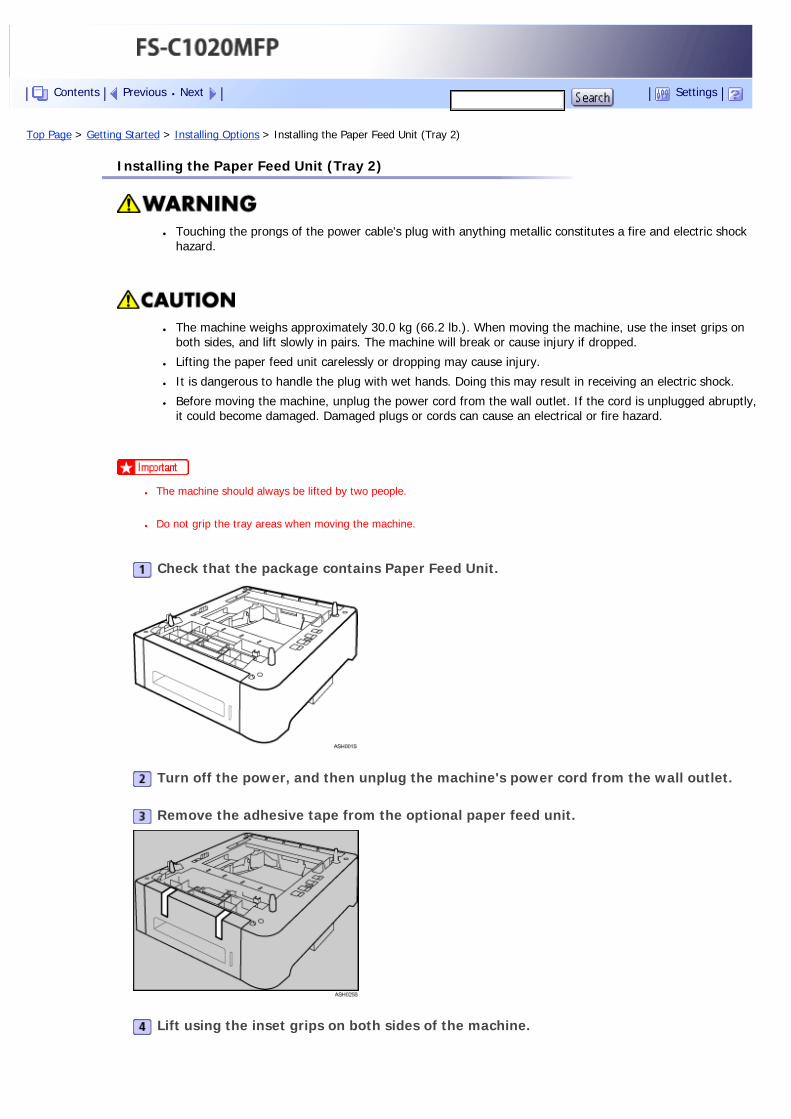
Top Page > Getting Started > Installing Options > Installing the Paper Feed Unit (Tray 2)
Installing the Paper Feed Unit (Tray 2)
● Touching the prongs of the power cable's plug with anything metallic constitutes a fire and electric shock hazard.
● The machine weighs approximately 30.0 kg (66.2 lb.). When moving the machine, use the inset grips on both sides, and lift slowly in pairs. The machine will break or cause injury if dropped.
● Lifting the paper feed unit carelessly or dropping may cause injury.
● It is dangerous to handle the plug with wet hands. Doing this may result in receiving an electric shock.
● Before moving the machine, unplug the power cord from the wall outlet. If the cord is unplugged abruptly, it could become damaged. Damaged plugs or cords can cause an electrical or fire hazard.
● The machine should always be lifted by two people.
● Do not grip the tray areas when moving the machine.
Check that the package contains Paper Feed Unit.
Turn off the power, and then unplug the machine's power cord from the wall outlet.
Remove the adhesive tape from the optional paper feed unit.
Lift using the inset grips on both sides of the machine.
Contents Previous Next Settings
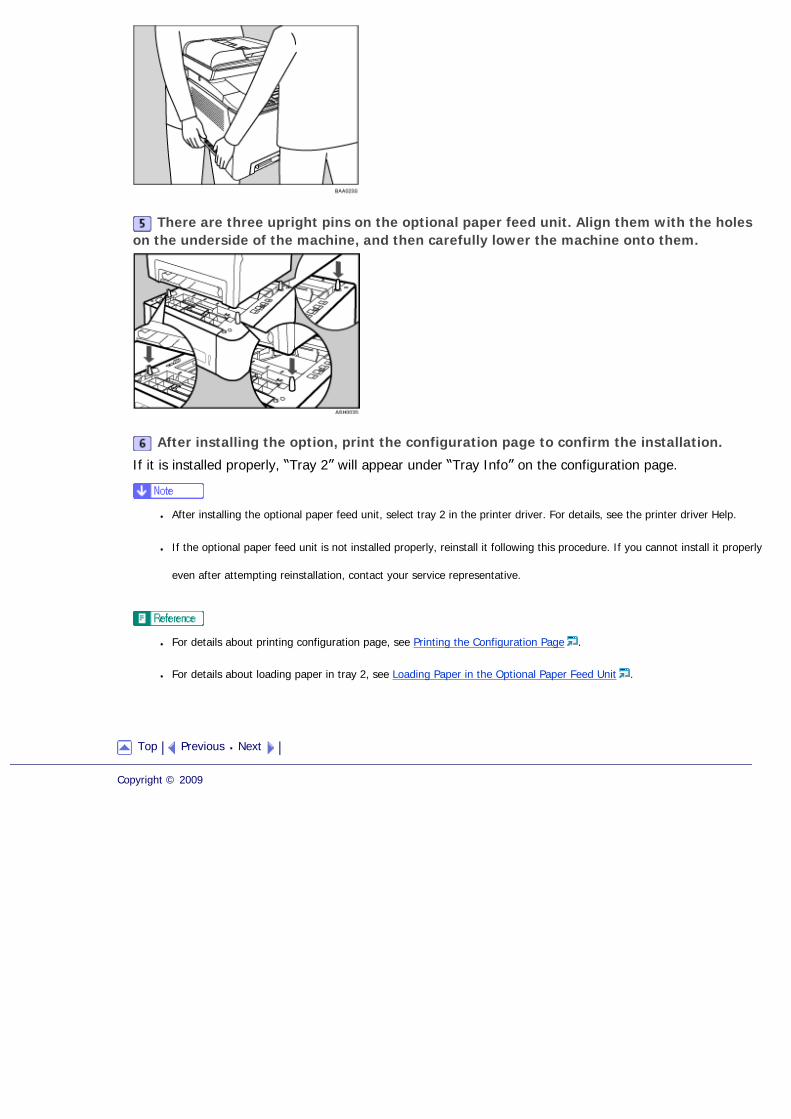
There are three upright pins on the optional paper feed unit. Align them with the holes on the underside of the machine, and then carefully lower the machine onto them.
After installing the option, print the configuration page to confirm the installation.
If it is installed properly, “Tray 2” will appear under “Tray Info” on the configuration page.
● After installing the optional paper feed unit, select tray 2 in the printer driver. For details, see the printer driver Help.
● If the optional paper feed unit is not installed properly, reinstall it following this procedure. If you cannot install it properly
even after attempting reinstallation, contact your service representative.
● For details about printing configuration page, see Printing the Configuration Page .
● For details about loading paper in tray 2, see Loading Paper in the Optional Paper Feed Unit .
Top Previous Next
Copyright © 2009
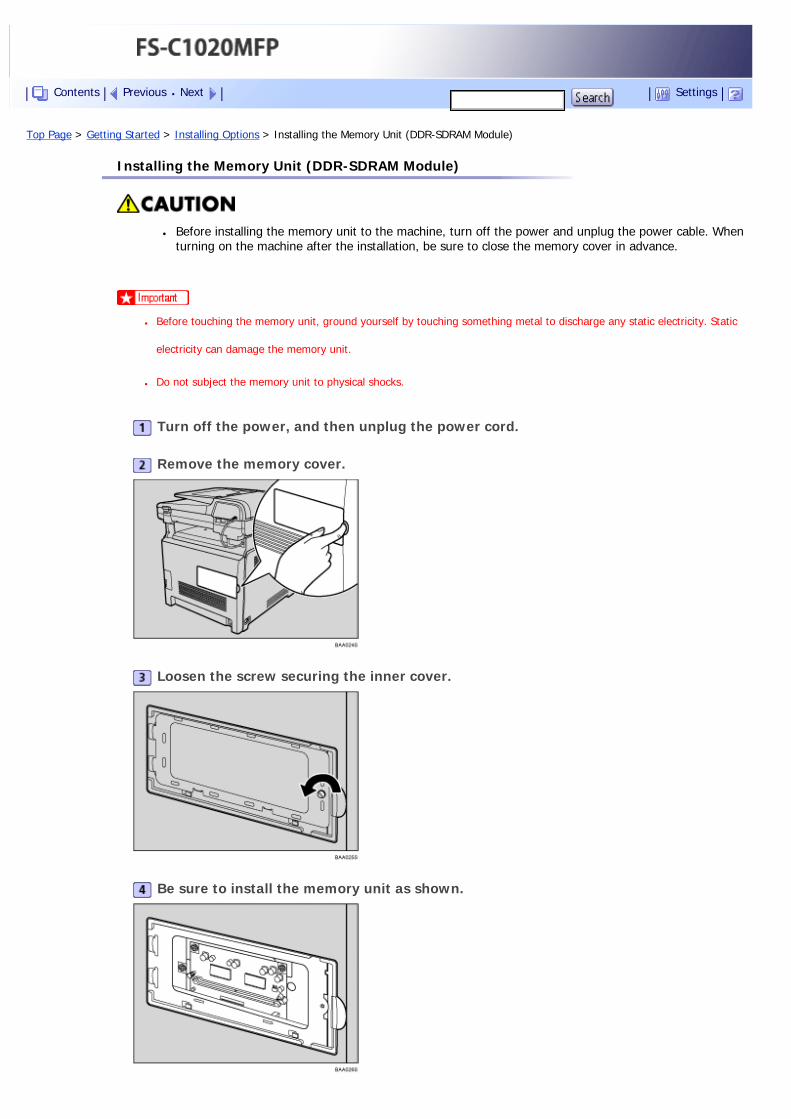
Top Page > Getting Started > Installing Options > Installing the Memory Unit (DDR-SDRAM Module)
Installing the Memory Unit (DDR-SDRAM Module)
● Before installing the memory unit to the machine, turn off the power and unplug the power cable. When turning on the machine after the installation, be sure to close the memory cover in advance.
● Before touching the memory unit, ground yourself by touching something metal to discharge any static electricity. Static
electricity can damage the memory unit.
● Do not subject the memory unit to physical shocks.
Turn off the power, and then unplug the power cord.
Remove the memory cover.
Loosen the screw securing the inner cover.
Be sure to install the memory unit as shown.
Contents Previous Next Settings

To install the memory unit, align the notch of the unit with the protruding part of the slot, and then carefully push in the unit at an angle.
Holding the module at an angle, press it down until it clicks into place.
Attach the inner cover, and then fasten the screw.
Attach the memory unit cover.
After installing the memory unit, print the PDL configuration page to confirm the installation.If it is installed properly, “384MB” will appear for "Total Memory" under "System Reference" on the PDL configuration page.
● After installing the optional memory unit, select the appropriate size for the machine's total memory in the printer driver.
For details, see the printer driver Help.
● If the memory unit is not properly installed, repeat this procedure. If you cannot install it properly even after reinstallation,
contact your service representative.
● For details about printing the PDL configuration page, see PDL Settings .
Top Previous Next

Copyright © 2009
Top Page > Getting Started > Paper and Other Media
Paper and Other Media
This section describes supported and unsupported paper, paper precautions, details of each paper type and the printable area.
● All paper must be set vertically, regardless of the paper size.
Related topics
Supported Paper for Each Tray
Specifications of Paper Types
Unsupported Types of Paper
Paper Storage Precautions
Printable Area
Top Previous Next
Copyright © 2009
Contents Previous Next Settings
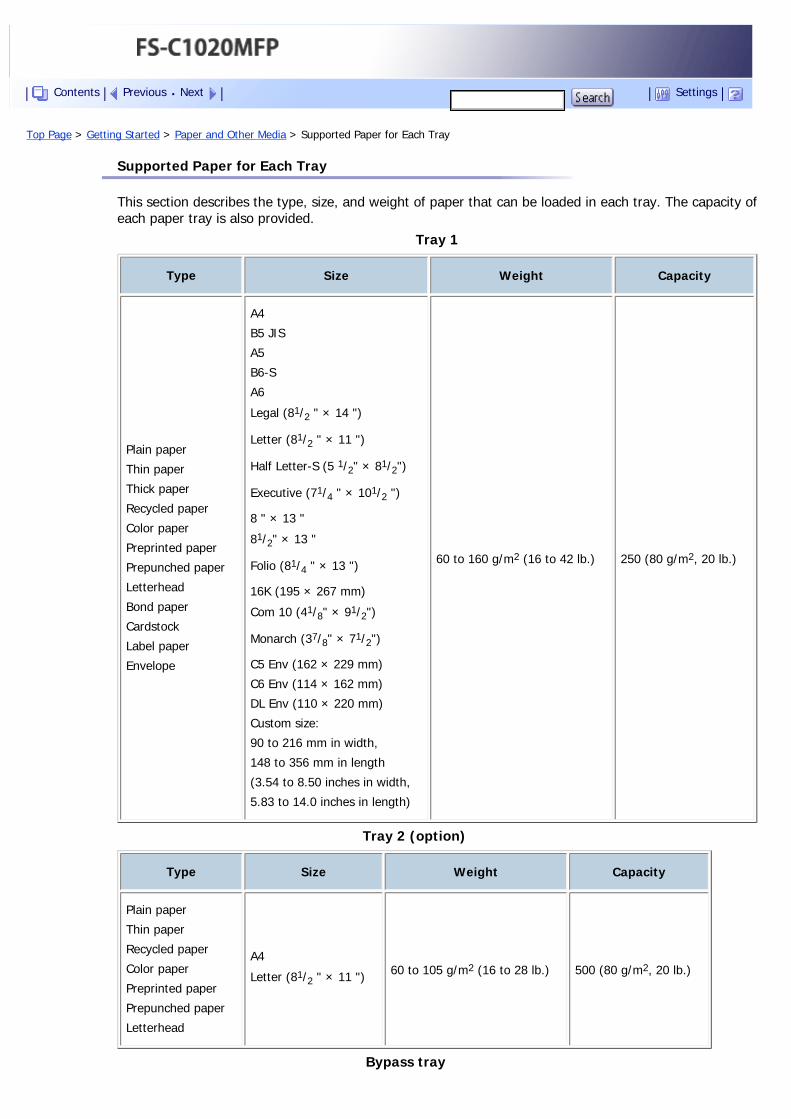
Top Page > Getting Started > Paper and Other Media > Supported Paper for Each Tray
Supported Paper for Each Tray
This section describes the type, size, and weight of paper that can be loaded in each tray. The capacity of each paper tray is also provided.
Tray 1
Type Size Weight Capacity
Plain paper
Thin paper
Thick paper
Recycled paper
Color paper
Preprinted paper
Prepunched paper
Letterhead
Bond paper
Cardstock
Label paper
Envelope
A4
B5 JIS
A5
B6-S
A6
Legal (81/2 " × 14 ")
Letter (81/2 " × 11 ")
Half Letter-S (5 1/2" × 81/2")
Executive (71/4 " × 101/2 ")
8 " × 13 "
81/2" × 13 "
Folio (81/4 " × 13 ")
16K (195 × 267 mm)
Com 10 (41/8" × 91/2")
Monarch (37/8" × 71/2")
C5 Env (162 × 229 mm)
C6 Env (114 × 162 mm)
DL Env (110 × 220 mm)
Custom size:
90 to 216 mm in width,
148 to 356 mm in length
(3.54 to 8.50 inches in width,
5.83 to 14.0 inches in length)
60 to 160 g/m2 (16 to 42 lb.) 250 (80 g/m2, 20 lb.)
Tray 2 (option)
Type Size Weight Capacity
Plain paper
Thin paper
Recycled paper
Color paper
Preprinted paper
Prepunched paper
Letterhead
A4
Letter (81/2 " × 11 ") 60 to 105 g/m2 (16 to 28 lb.) 500 (80 g/m2, 20 lb.)
Bypass tray
Contents Previous Next Settings
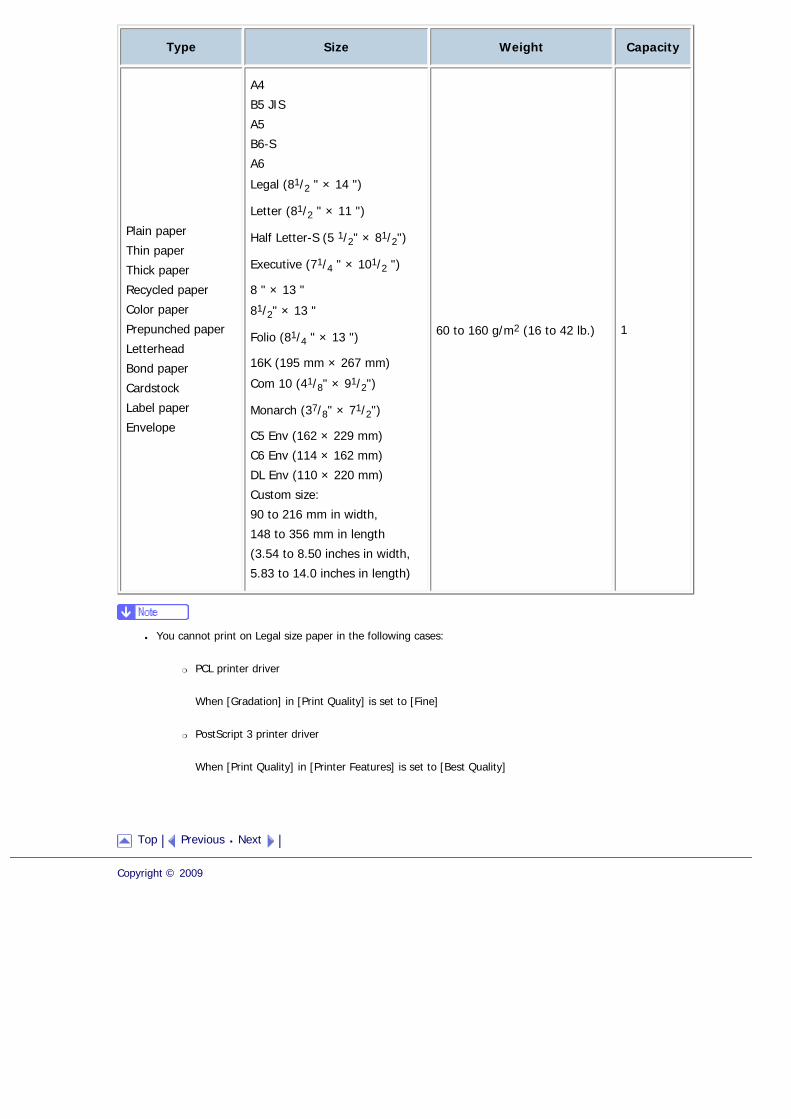
Type Size Weight Capacity
Plain paper
Thin paper
Thick paper
Recycled paper
Color paper
Prepunched paper
Letterhead
Bond paper
Cardstock
Label paper
Envelope
A4
B5 JIS
A5
B6-S
A6
Legal (81/2 " × 14 ")
Letter (81/2 " × 11 ")
Half Letter-S (5 1/2" × 81/2")
Executive (71/4 " × 101/2 ")
8 " × 13 "
81/2" × 13 "
Folio (81/4 " × 13 ")
16K (195 mm × 267 mm)
Com 10 (41/8" × 91/2")
Monarch (37/8" × 71/2")
C5 Env (162 × 229 mm)
C6 Env (114 × 162 mm)
DL Env (110 × 220 mm)
Custom size:
90 to 216 mm in width,
148 to 356 mm in length
(3.54 to 8.50 inches in width,
5.83 to 14.0 inches in length)
60 to 160 g/m2 (16 to 42 lb.) 1
● You cannot print on Legal size paper in the following cases:
�❍ PCL printer driver
When [Gradation] in [Print Quality] is set to [Fine]
�❍ PostScript 3 printer driver
When [Print Quality] in [Printer Features] is set to [Best Quality]
Top Previous Next
Copyright © 2009
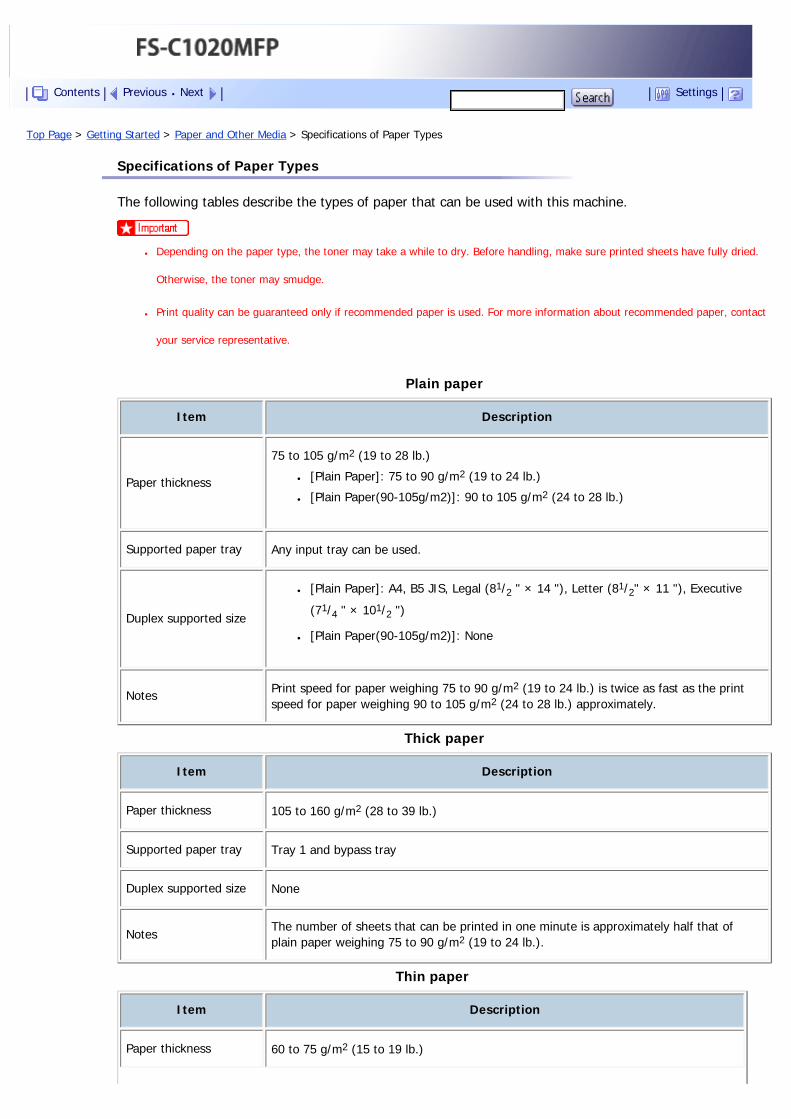
Top Page > Getting Started > Paper and Other Media > Specifications of Paper Types
Specifications of Paper Types
The following tables describe the types of paper that can be used with this machine.
● Depending on the paper type, the toner may take a while to dry. Before handling, make sure printed sheets have fully dried.
Otherwise, the toner may smudge.
● Print quality can be guaranteed only if recommended paper is used. For more information about recommended paper, contact
your service representative.
Plain paper
Item Description
Paper thickness
75 to 105 g/m2 (19 to 28 lb.)
● [Plain Paper]: 75 to 90 g/m2 (19 to 24 lb.)
● [Plain Paper(90-105g/m2)]: 90 to 105 g/m2 (24 to 28 lb.)
Supported paper tray Any input tray can be used.
Duplex supported size
● [Plain Paper]: A4, B5 JIS, Legal (81/2 " × 14 "), Letter (81/2" × 11 "), Executive
(71/4 " × 101/2 ")
● [Plain Paper(90-105g/m2)]: None
Notes Print speed for paper weighing 75 to 90 g/m2 (19 to 24 lb.) is twice as fast as the print speed for paper weighing 90 to 105 g/m2 (24 to 28 lb.) approximately.
Thick paper
Item Description
Paper thickness 105 to 160 g/m2 (28 to 39 lb.)
Supported paper tray Tray 1 and bypass tray
Duplex supported size None
NotesThe number of sheets that can be printed in one minute is approximately half that of plain paper weighing 75 to 90 g/m2 (19 to 24 lb.).
Thin paper
Item Description
Paper thickness 60 to 75 g/m2 (15 to 19 lb.)
Contents Previous Next Settings

Supported paper tray Any input tray can be used.
Duplex supported size A4, B5 JIS, Legal (81/2 " × 14 "), Letter (81/2 " × 11 "), Executive (71/4 " × 101/2 ")
Recycled paper
Item Description
Paper thickness 75 to 90 g/m2 (19 to 24 lb.)
Supported paper tray Any input tray can be used.
Duplex supported size A4, B5 JIS, Legal (81/2 " × 14 "), Letter (81/2 " × 11 "), Executive (71/4 " × 101/2 ")
Notes If the paper thickness is outside the specified range, select [Thin Paper(60-75g/m2)], [Plain Paper(90-105g/m2)] or [Thick Paper(105-160g/m2)].
Color paper
Item Description
Paper thickness 75 to 90 g/m2 (19 to 24 lb.)
Supported paper tray Any input tray can be used.
Duplex supported size A4, B5 JIS, Legal (81/2 " × 14 "), Letter (81/2 " × 11 "), Executive (71/4 " × 101/2 ")
Notes If the paper thickness is outside the specified range, select [Thin Paper(60-75g/m2)], [Plain Paper(90-105g/m2)] or [Thick Paper(105-160g/m2)].
Preprinted paper
Item Description
Paper thickness 75 to 90 g/m2 (19 to 24 lb.)
Supported paper tray Tray 1 and tray 2
Duplex supported size A4, B5 JIS, Legal (81/2 " × 14 "), Letter (81/2 " × 11 "), Executive (71/4 " × 101/2 ")
Notes If the paper thickness is outside the specified range, select [Thin Paper(60-75g/m2)], [Plain Paper(90-105g/m2)] or [Thick Paper(105-160g/m2)].
Prepunched paper
Item Description
Paper thickness 75 to 90 g/m2 (19 to 24 lb.)
Supported paper tray Any input tray can be used.
Duplex supported size A4, B5 JIS, Legal (81/2 " × 14 "), Letter (81/2 " × 11 "), Executive (71/4 " × 101/2 ")
Notes If the paper thickness is outside the specified range, select [Thin Paper(60-75g/m2)], [Plain Paper(90-105g/m2)] or [Thick Paper(105-160g/m2)].
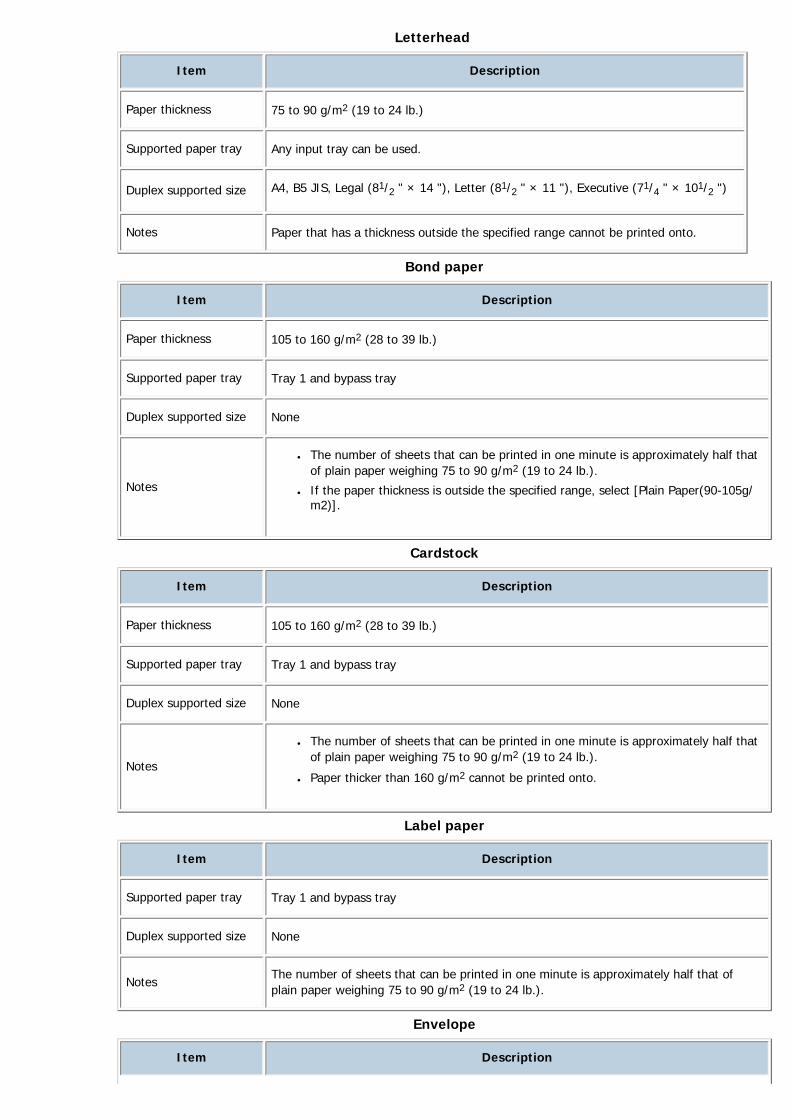
Letterhead
Item Description
Paper thickness 75 to 90 g/m2 (19 to 24 lb.)
Supported paper tray Any input tray can be used.
Duplex supported size A4, B5 JIS, Legal (81/2 " × 14 "), Letter (81/2 " × 11 "), Executive (71/4 " × 101/2 ")
Notes Paper that has a thickness outside the specified range cannot be printed onto.
Bond paper
Item Description
Paper thickness 105 to 160 g/m2 (28 to 39 lb.)
Supported paper tray Tray 1 and bypass tray
Duplex supported size None
Notes
● The number of sheets that can be printed in one minute is approximately half that of plain paper weighing 75 to 90 g/m2 (19 to 24 lb.).
● If the paper thickness is outside the specified range, select [Plain Paper(90-105g/m2)].
Cardstock
Item Description
Paper thickness 105 to 160 g/m2 (28 to 39 lb.)
Supported paper tray Tray 1 and bypass tray
Duplex supported size None
Notes
● The number of sheets that can be printed in one minute is approximately half that of plain paper weighing 75 to 90 g/m2 (19 to 24 lb.).
● Paper thicker than 160 g/m2 cannot be printed onto.
Label paper
Item Description
Supported paper tray Tray 1 and bypass tray
Duplex supported size None
NotesThe number of sheets that can be printed in one minute is approximately half that of plain paper weighing 75 to 90 g/m2 (19 to 24 lb.).
Envelope
Item Description

Supported paper tray Tray 1 and bypass tray
Duplex supported size None
Notes
● The number of envelopes that can be printed in one minute is approximately half that of plain paper weighing 75 to 90 g/m2 (19 to 24 lb.).
● If printed envelopes come out badly creased, load the envelopes in the opposite direction. Also, configure the printer driver to rotate the print object 180 degrees.
For details about changing the loading orientation, see the printer driver Help.
Top Previous Next
Copyright © 2009
Top Page > Getting Started > Paper and Other Media > Unsupported Types of Paper
Unsupported Types of Paper
Avoid using the following paper as they are not supported by this machine.
● Paper meant for an ink-jet printer
● Bent, folded, or creased paper
● Curled or twisted paper
● Torn paper
● Wrinkled paper
● Damp paper
● Paper that is dry enough to emit static electricity
● Paper that has already been printed onto, except a preprinted letterhead.
Malfunctions are especially likely when using paper printed on by other than a laser printer (e.g. monochrome and color copiers, ink-jet printers, etc.)
● Special paper, such as thermal paper, aluminum foil, carbon paper and conductive paper
● Paper that is heavier or lighter than the specified limitations
● Paper with windows, holes, perforations, cutouts, or embossing
● Adhesive label paper on which the adhesive underlayer or base paper is exposed
● Paper with clips or staples
● Do not use ink-jet printer paper because it may stick to the fusing unit and cause a paper jam.
● Do not load OHP transparencies. Load translucent media only.
● Do not use paper that has already been printed onto by other printers.
● Even supported types of paper may cause paper jams or malfunctions if the paper is not in good condition.
Top Previous Next
Copyright © 2009
Contents Previous Next Settings

Top Page > Getting Started > Paper and Other Media > Paper Storage Precautions
Paper Storage Precautions
Paper should always be stored properly. Improperly stored paper might result in poor print quality, paper jams, or printer damage.
Recommendations are as follows:
● Avoid storing paper in humid areas.
● Avoid exposing paper to direct sunlight.
● Store on a flat surface.
● Keep paper in its original packaging.
Top Previous Next
Copyright © 2009
Contents Previous Next Settings
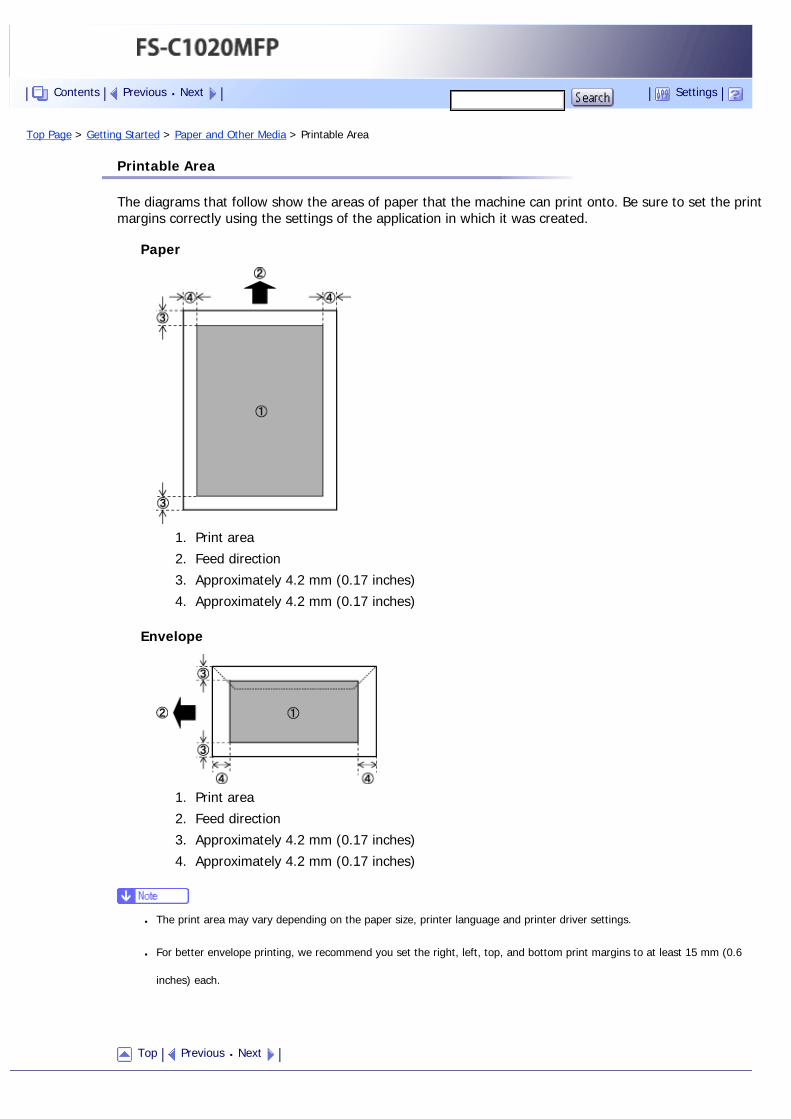
Top Page > Getting Started > Paper and Other Media > Printable Area
Printable Area
The diagrams that follow show the areas of paper that the machine can print onto. Be sure to set the print margins correctly using the settings of the application in which it was created.
Paper
1. Print area
2. Feed direction
3. Approximately 4.2 mm (0.17 inches)
4. Approximately 4.2 mm (0.17 inches)
Envelope
1. Print area
2. Feed direction
3. Approximately 4.2 mm (0.17 inches)
4. Approximately 4.2 mm (0.17 inches)
● The print area may vary depending on the paper size, printer language and printer driver settings.
● For better envelope printing, we recommend you set the right, left, top, and bottom print margins to at least 15 mm (0.6
inches) each.
Top Previous Next
Contents Previous Next Settings

Copyright © 2009

Top Page > Getting Started > Loading Paper
Loading Paper
This describes how to load paper into the paper tray and bypass tray.
● Do not pull out the paper tray forcefully. If you do, the tray might fall and cause an injury.
Related topics
Loading Paper in Tray 1
Loading Paper in the Optional Paper Feed Unit
Loading Paper in the Bypass Tray
Specifying Paper Type and Paper Size
Top Previous Next
Copyright © 2009
Contents Previous Next Settings
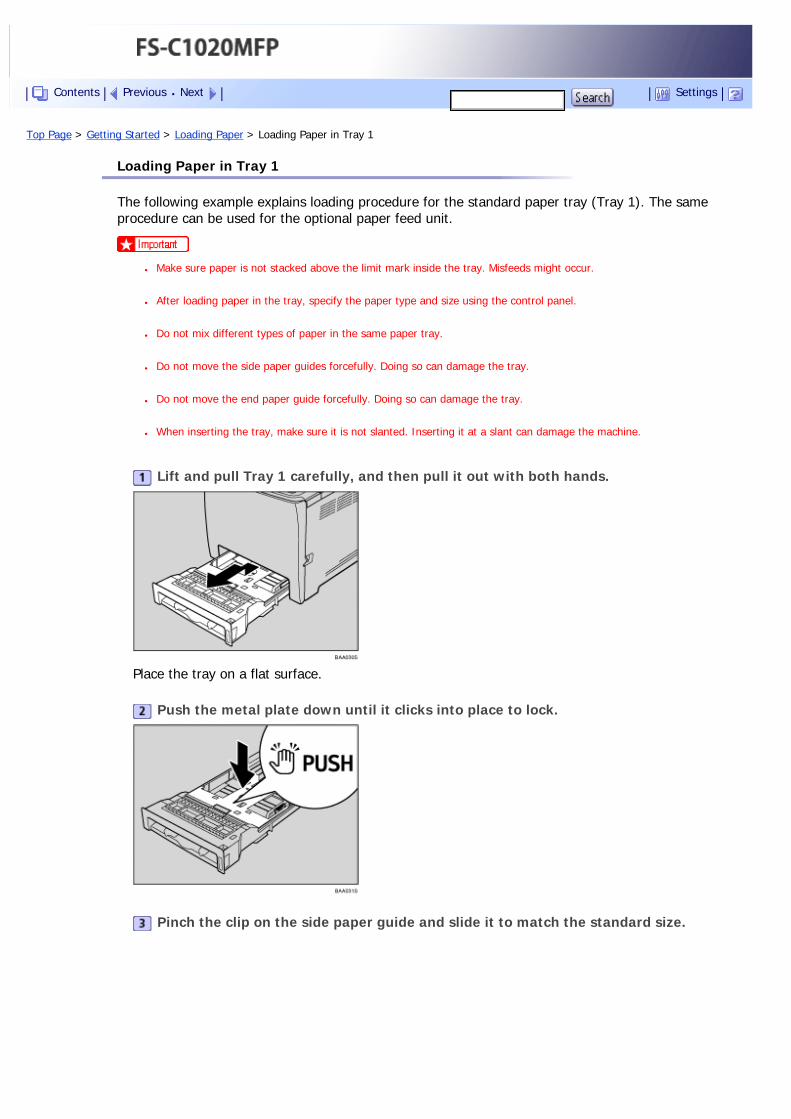
Top Page > Getting Started > Loading Paper > Loading Paper in Tray 1
Loading Paper in Tray 1
The following example explains loading procedure for the standard paper tray (Tray 1). The same procedure can be used for the optional paper feed unit.
● Make sure paper is not stacked above the limit mark inside the tray. Misfeeds might occur.
● After loading paper in the tray, specify the paper type and size using the control panel.
● Do not mix different types of paper in the same paper tray.
● Do not move the side paper guides forcefully. Doing so can damage the tray.
● Do not move the end paper guide forcefully. Doing so can damage the tray.
● When inserting the tray, make sure it is not slanted. Inserting it at a slant can damage the machine.
Lift and pull Tray 1 carefully, and then pull it out with both hands.
Place the tray on a flat surface.
Push the metal plate down until it clicks into place to lock.
Pinch the clip on the side paper guide and slide it to match the standard size.
Contents Previous Next Settings
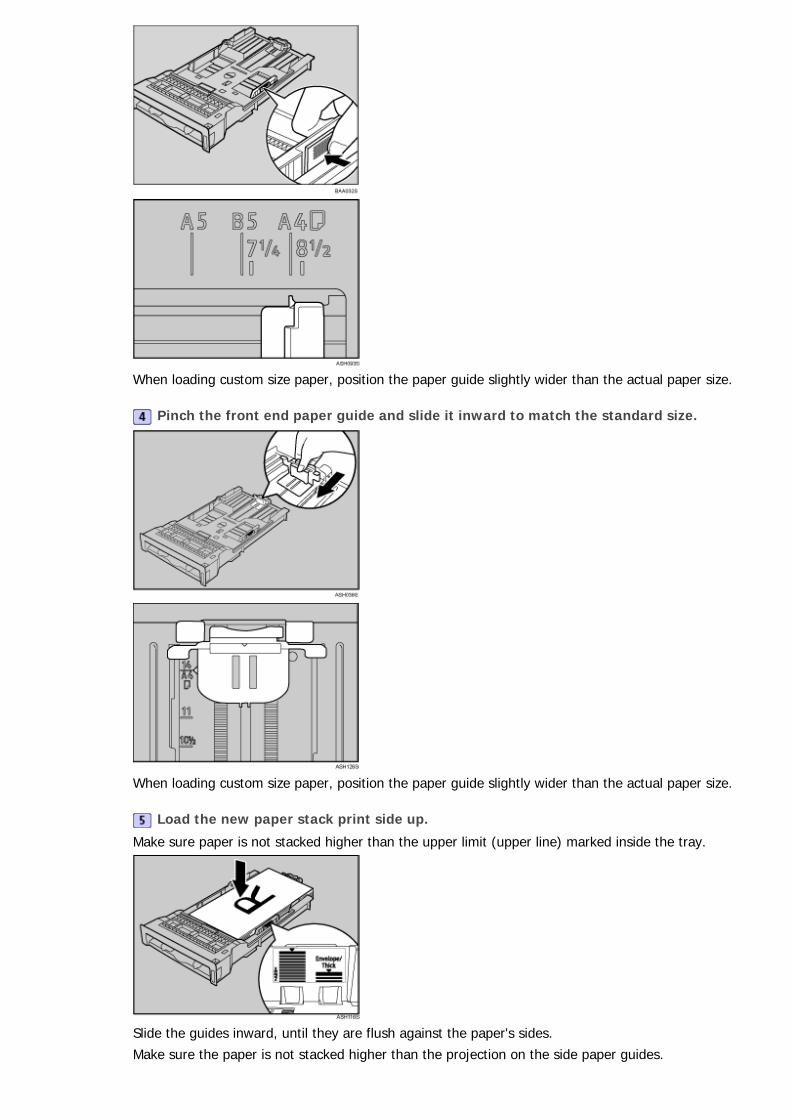
When loading custom size paper, position the paper guide slightly wider than the actual paper size.
Pinch the front end paper guide and slide it inward to match the standard size.
When loading custom size paper, position the paper guide slightly wider than the actual paper size.
Load the new paper stack print side up.
Make sure paper is not stacked higher than the upper limit (upper line) marked inside the tray.
Slide the guides inward, until they are flush against the paper's sides.
Make sure the paper is not stacked higher than the projection on the side paper guides.
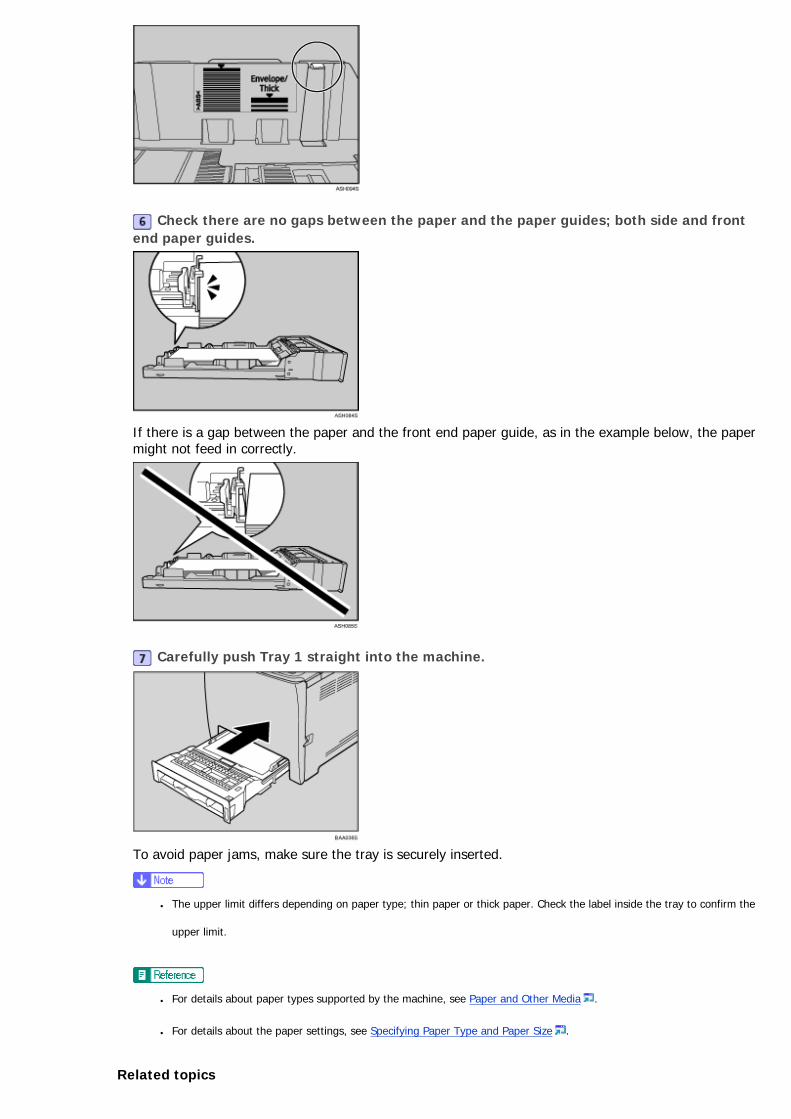
Check there are no gaps between the paper and the paper guides; both side and front end paper guides.
If there is a gap between the paper and the front end paper guide, as in the example below, the paper might not feed in correctly.
Carefully push Tray 1 straight into the machine.
To avoid paper jams, make sure the tray is securely inserted.
● The upper limit differs depending on paper type; thin paper or thick paper. Check the label inside the tray to confirm the
upper limit.
● For details about paper types supported by the machine, see Paper and Other Media .
● For details about the paper settings, see Specifying Paper Type and Paper Size .
Related topics

Loading Legal size paper
Loading envelopes
Top Previous Next
Copyright © 2009
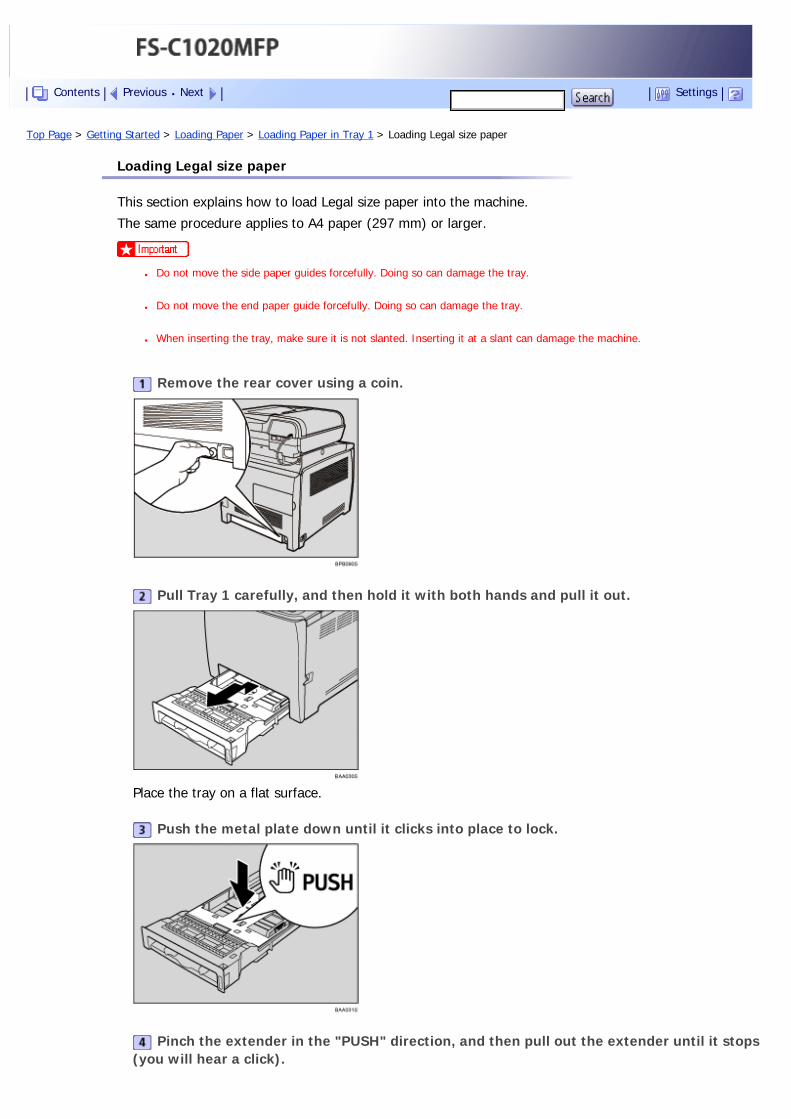
Top Page > Getting Started > Loading Paper > Loading Paper in Tray 1 > Loading Legal size paper
Loading Legal size paper
This section explains how to load Legal size paper into the machine.
The same procedure applies to A4 paper (297 mm) or larger.
● Do not move the side paper guides forcefully. Doing so can damage the tray.
● Do not move the end paper guide forcefully. Doing so can damage the tray.
● When inserting the tray, make sure it is not slanted. Inserting it at a slant can damage the machine.
Remove the rear cover using a coin.
Pull Tray 1 carefully, and then hold it with both hands and pull it out.
Place the tray on a flat surface.
Push the metal plate down until it clicks into place to lock.
Pinch the extender in the "PUSH" direction, and then pull out the extender until it stops (you will hear a click).
Contents Previous Next Settings
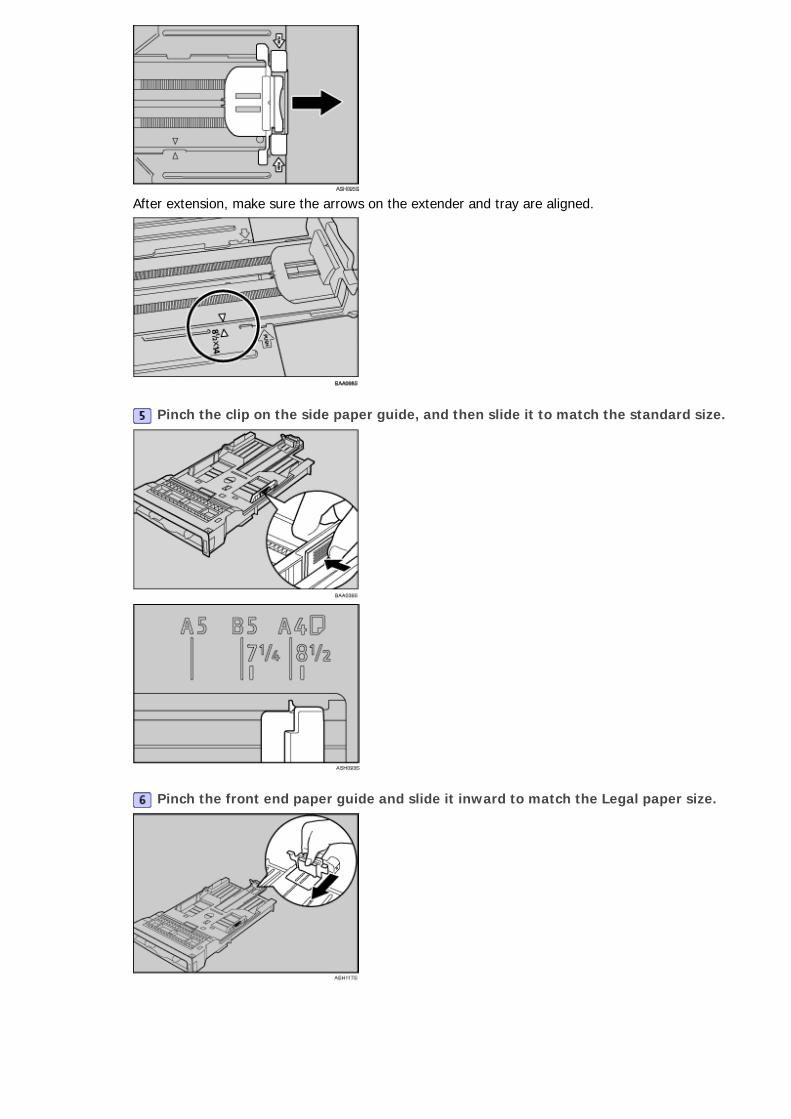
After extension, make sure the arrows on the extender and tray are aligned.
Pinch the clip on the side paper guide, and then slide it to match the standard size.
Pinch the front end paper guide and slide it inward to match the Legal paper size.

Load the new paper stack print side up.
Make sure paper is not stacked higher than the upper limit (upper line) marked inside the tray.
Slide the guides inward until they are flush against the paper's sides.
Make sure the paper is not stacked higher than the projection on the side paper guides.
Check there are no gaps between the paper and the paper guides; both side and front end paper guides.
If there is a gap between the paper and the front end paper guide, as in the example below, the paper might not feed in correctly.
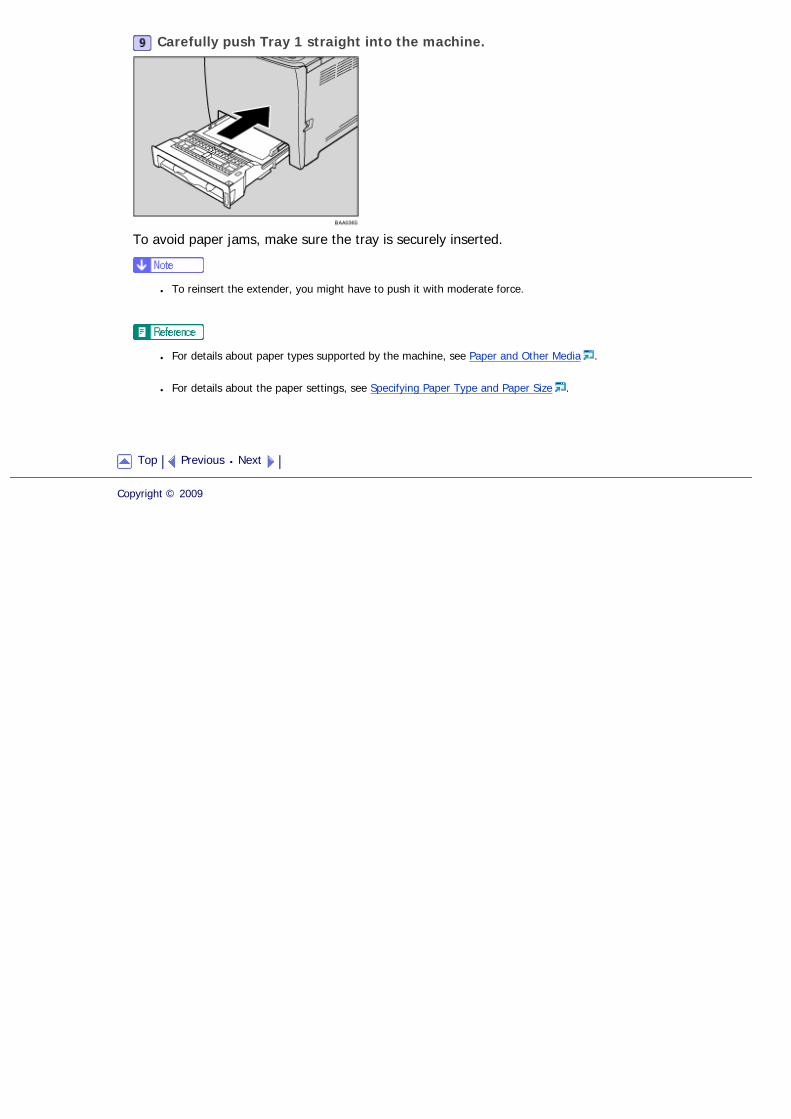
Carefully push Tray 1 straight into the machine.
To avoid paper jams, make sure the tray is securely inserted.
● To reinsert the extender, you might have to push it with moderate force.
● For details about paper types supported by the machine, see Paper and Other Media .
● For details about the paper settings, see Specifying Paper Type and Paper Size .
Top Previous Next
Copyright © 2009
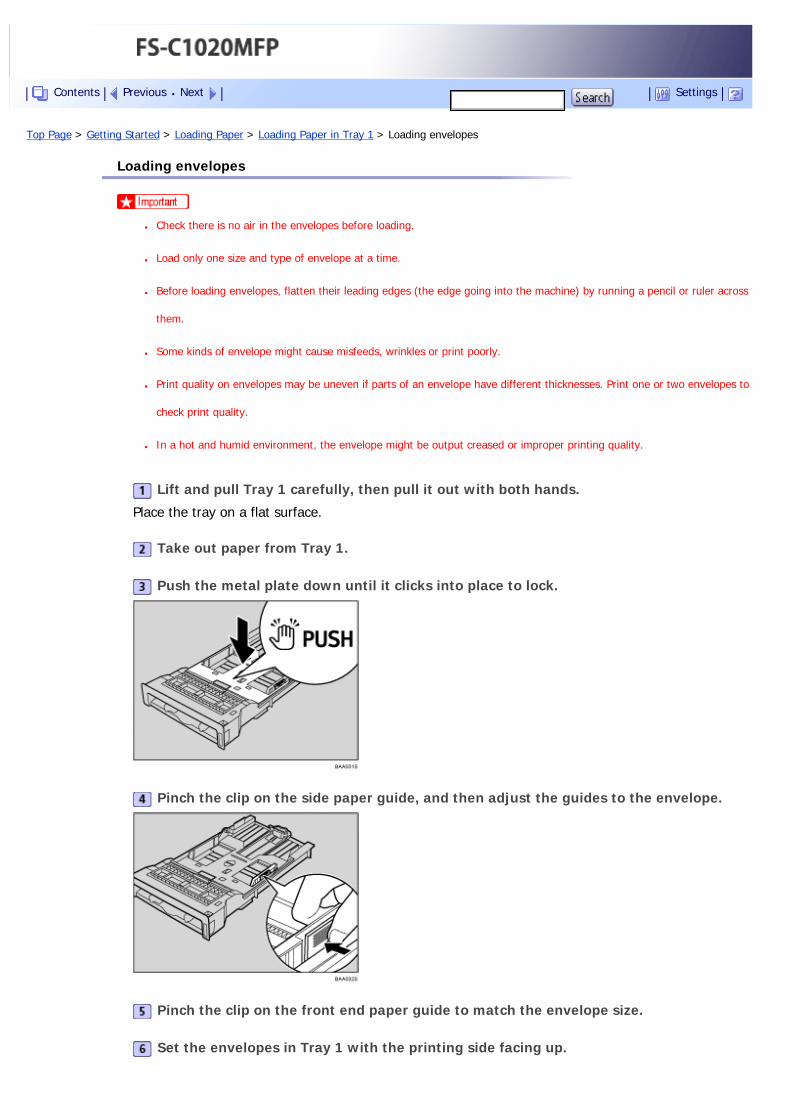
Top Page > Getting Started > Loading Paper > Loading Paper in Tray 1 > Loading envelopes
Loading envelopes
● Check there is no air in the envelopes before loading.
● Load only one size and type of envelope at a time.
● Before loading envelopes, flatten their leading edges (the edge going into the machine) by running a pencil or ruler across
them.
● Some kinds of envelope might cause misfeeds, wrinkles or print poorly.
● Print quality on envelopes may be uneven if parts of an envelope have different thicknesses. Print one or two envelopes to
check print quality.
● In a hot and humid environment, the envelope might be output creased or improper printing quality.
Lift and pull Tray 1 carefully, then pull it out with both hands.
Place the tray on a flat surface.
Take out paper from Tray 1.
Push the metal plate down until it clicks into place to lock.
Pinch the clip on the side paper guide, and then adjust the guides to the envelope.
Pinch the clip on the front end paper guide to match the envelope size.
Set the envelopes in Tray 1 with the printing side facing up.
Contents Previous Next Settings
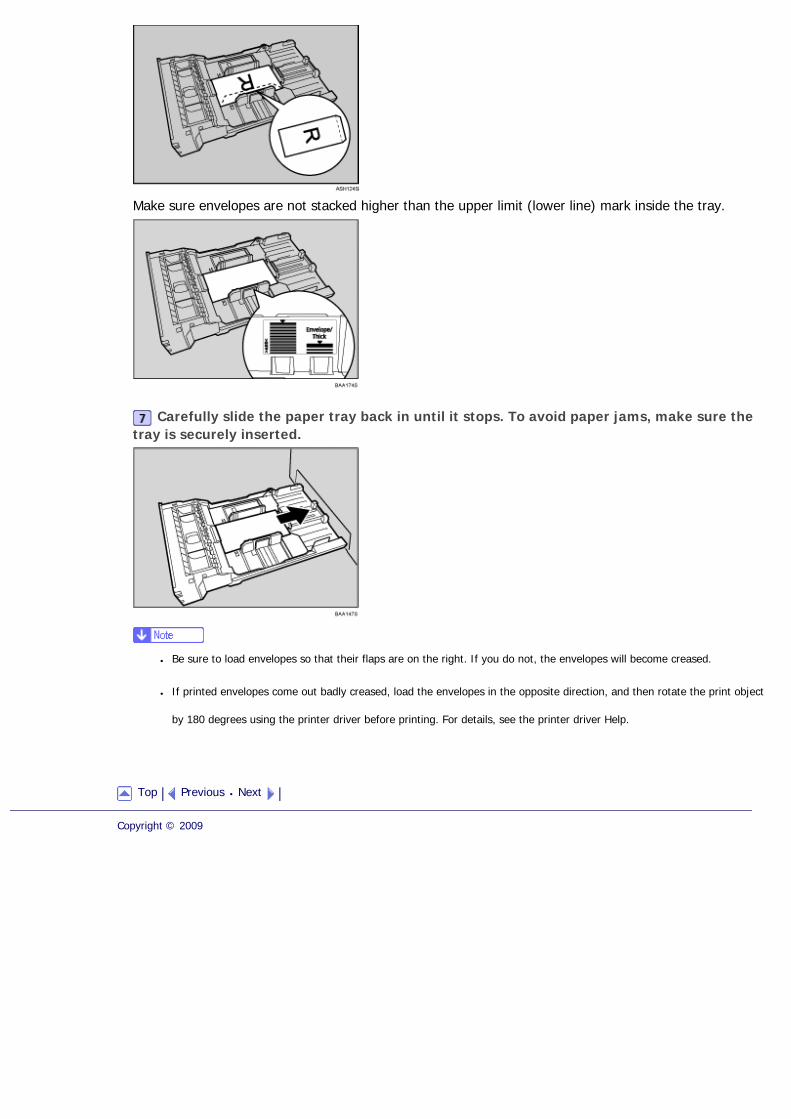
Make sure envelopes are not stacked higher than the upper limit (lower line) mark inside the tray.
Carefully slide the paper tray back in until it stops. To avoid paper jams, make sure the tray is securely inserted.
● Be sure to load envelopes so that their flaps are on the right. If you do not, the envelopes will become creased.
● If printed envelopes come out badly creased, load the envelopes in the opposite direction, and then rotate the print object
by 180 degrees using the printer driver before printing. For details, see the printer driver Help.
Top Previous Next
Copyright © 2009
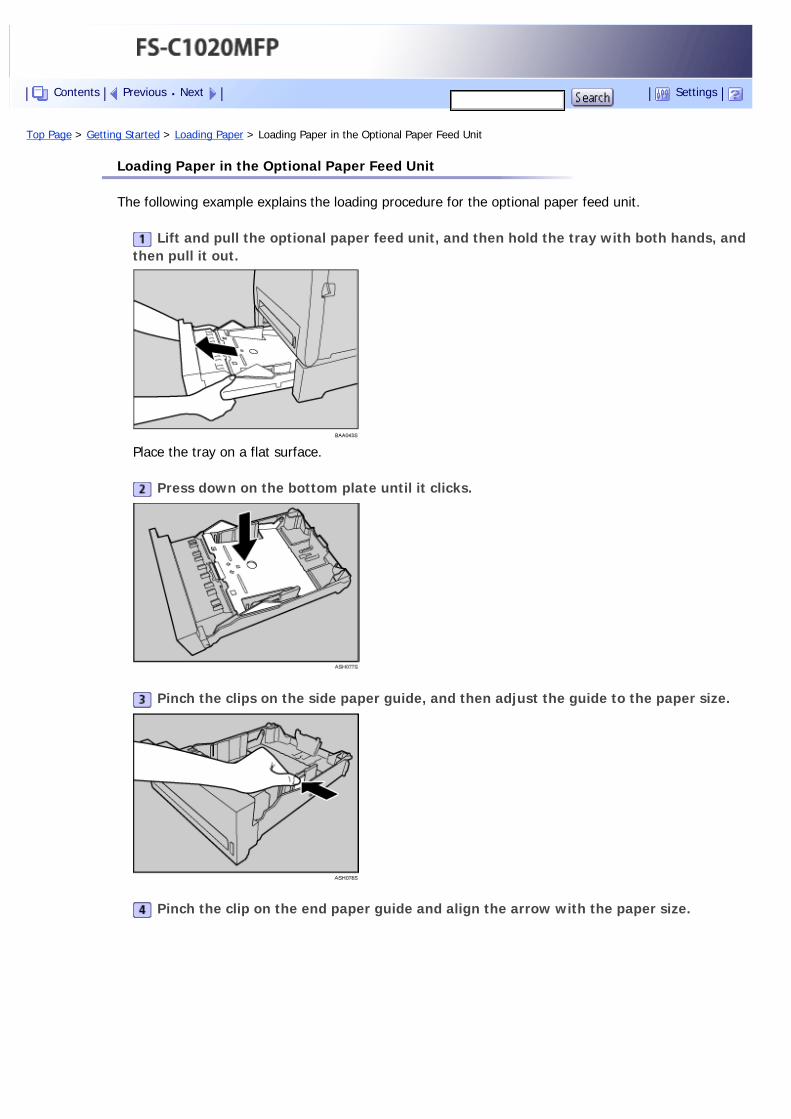
Top Page > Getting Started > Loading Paper > Loading Paper in the Optional Paper Feed Unit
Loading Paper in the Optional Paper Feed Unit
The following example explains the loading procedure for the optional paper feed unit.
Lift and pull the optional paper feed unit, and then hold the tray with both hands, and then pull it out.
Place the tray on a flat surface.
Press down on the bottom plate until it clicks.
Pinch the clips on the side paper guide, and then adjust the guide to the paper size.
Pinch the clip on the end paper guide and align the arrow with the paper size.
Contents Previous Next Settings
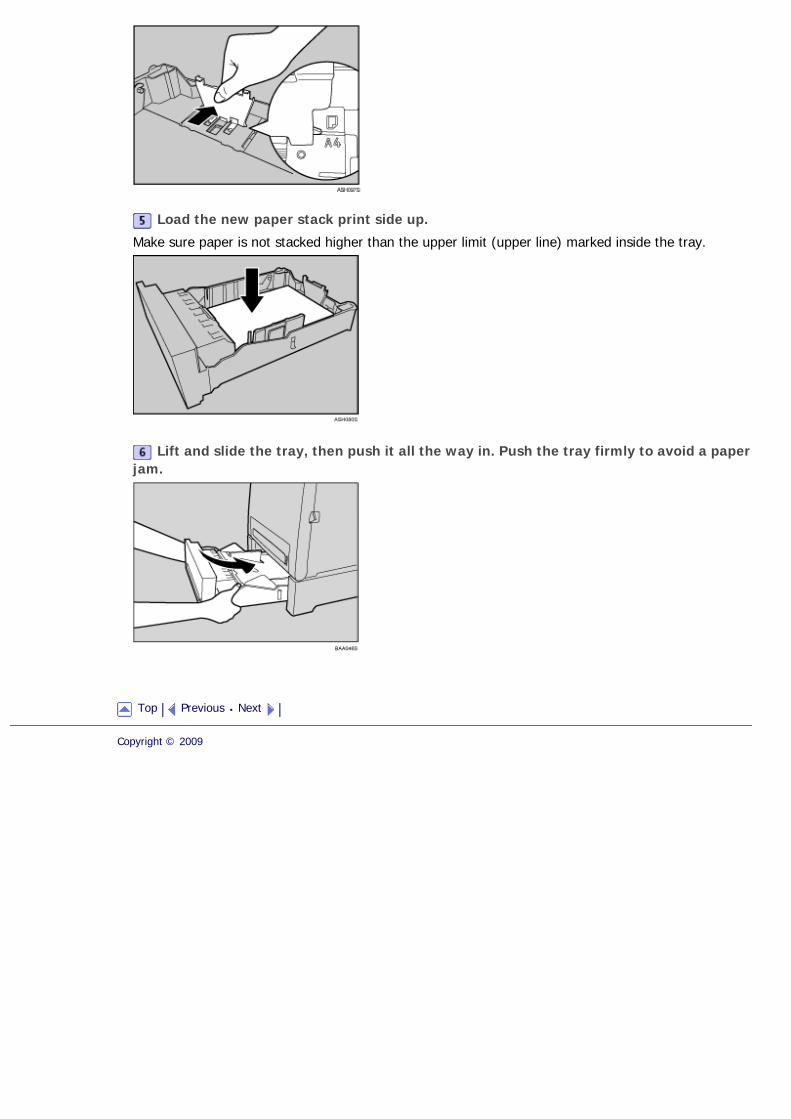
Load the new paper stack print side up.
Make sure paper is not stacked higher than the upper limit (upper line) marked inside the tray.
Lift and slide the tray, then push it all the way in. Push the tray firmly to avoid a paper jam.
Top Previous Next
Copyright © 2009

Top Page > Getting Started > Loading Paper > Loading Paper in the Bypass Tray
Loading Paper in the Bypass Tray
● Set the size of the loaded paper using the control panel or the printer driver. Make sure the settings do not conflict.
Otherwise, the paper may jam or the print quality may be affected.
● Load paper with the print side down and in the short-edge feed direction.
● Duplex printing is not possible.
● You cannot use the bypass tray to feed in paper that requires a specified printing position (such as preprinted paper). Use
tray 1 for such paper.
● If paper is curled, straighten it before loading, by bending it the paper in the opposite direction to the curl, for example.
● Do not load paper while the machine is printing.
● Tray 1 and 2 are unavailable while paper is being loaded in the bypass tray.
● You cannot load paper into the bypass tray while the machine is in Energy Saver mode. If the machine is in Energy Saver
mode, press the [Copy] key to recover from Energy Saver mode.
Insert the top edge of the paper into the machine.
Adjust the paper guides to the paper size.
Support the paper with both hands, and insert it carefully until it stops.
Contents Previous Next Settings
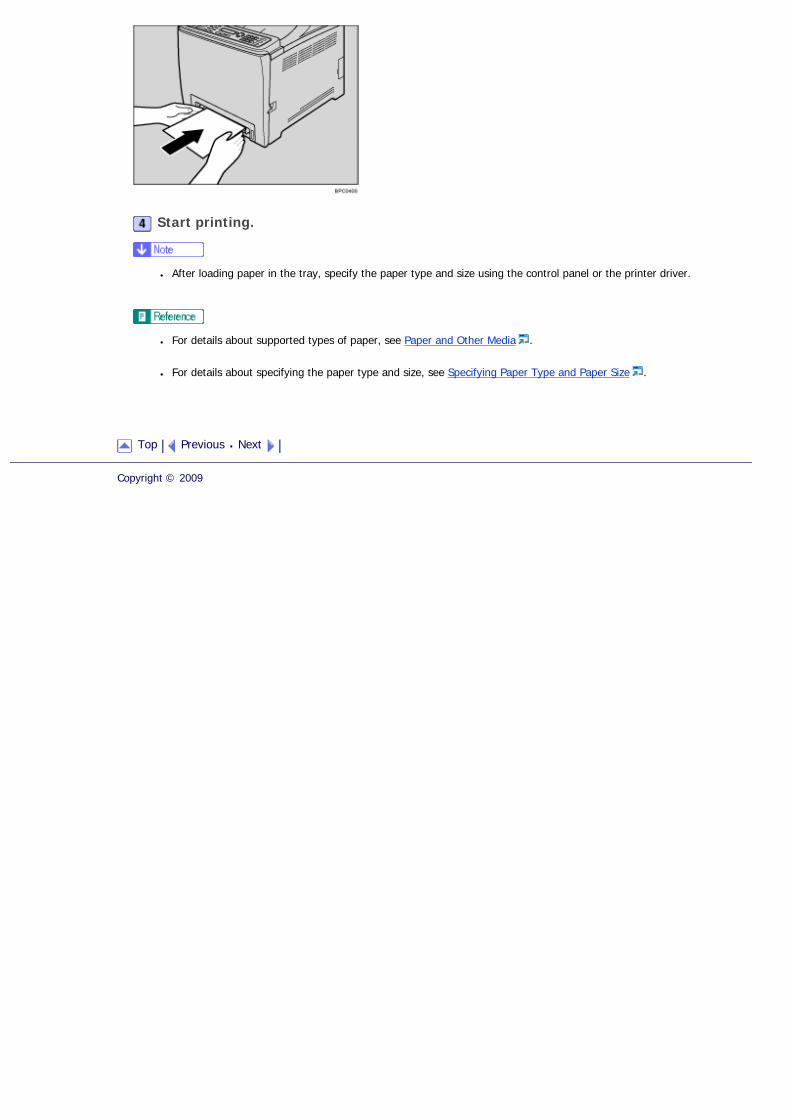
Start printing.
● After loading paper in the tray, specify the paper type and size using the control panel or the printer driver.
● For details about supported types of paper, see Paper and Other Media .
● For details about specifying the paper type and size, see Specifying Paper Type and Paper Size .
Top Previous Next
Copyright © 2009
Top Page > Getting Started > Loading Paper > Specifying Paper Type and Paper Size
Specifying Paper Type and Paper Size
This section describes how to specify the paper size and paper type using the control panel.
● Paper type and size can also be specified using the printer driver. For details, see the printer driver Help.
Related topics
Specifying the paper type
Specifying the standard paper size
Specifying a custom paper size
Top Previous Next
Copyright © 2009
Contents Previous Next Settings
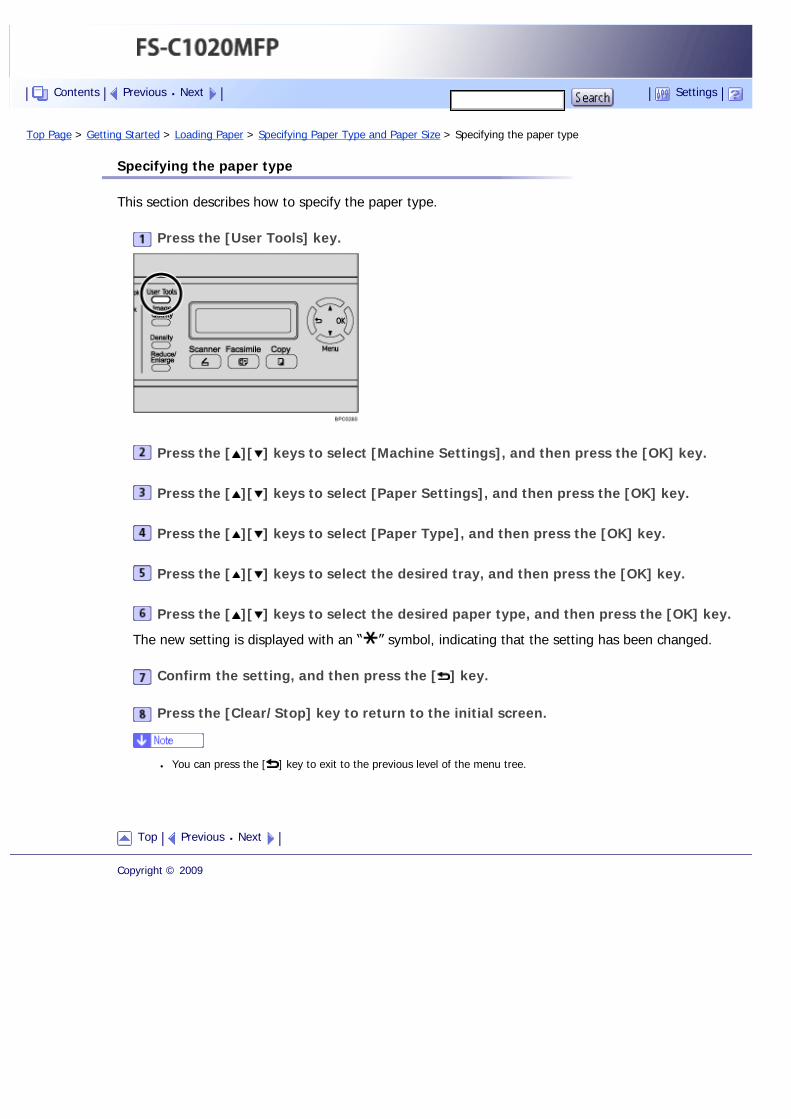
Top Page > Getting Started > Loading Paper > Specifying Paper Type and Paper Size > Specifying the paper type
Specifying the paper type
This section describes how to specify the paper type.
Press the [User Tools] key.
Press the [ ][ ] keys to select [Machine Settings], and then press the [OK] key.
Press the [ ][ ] keys to select [Paper Settings], and then press the [OK] key.
Press the [ ][ ] keys to select [Paper Type], and then press the [OK] key.
Press the [ ][ ] keys to select the desired tray, and then press the [OK] key.
Press the [ ][ ] keys to select the desired paper type, and then press the [OK] key.
The new setting is displayed with an “ ” symbol, indicating that the setting has been changed.
Confirm the setting, and then press the [ ] key.
Press the [Clear/Stop] key to return to the initial screen.
● You can press the [ ] key to exit to the previous level of the menu tree.
Top Previous Next
Copyright © 2009
Contents Previous Next Settings

Top Page > Getting Started > Loading Paper > Specifying Paper Type and Paper Size > Specifying the standard paper size
Specifying the standard paper size
This section describes how to specify the standard paper size.
Press the [User Tools] key.
Press the [ ][ ] keys to select [Machine Settings], and then press the [OK] key.
Press the [ ][ ] keys to select [Paper Settings], and then press the [OK] key.
Press the [ ][ ] keys to select [Paper Size], and then press the [OK] key.
Press the [ ][ ] keys to select the desired tray, and then press the [OK] key.
Press the [ ][ ] keys to select the desired paper size, and then press the [OK] key.
The new setting is displayed with an “ ” symbol, indicating that the setting has been changed.
Confirm the setting, and then press the [ ] key.
Press the [Clear/Stop] key to return to the initial screen.
● You can press the [ ] key to exit to the previous level of the menu tree.
Top Previous Next
Copyright © 2009
Contents Previous Next Settings
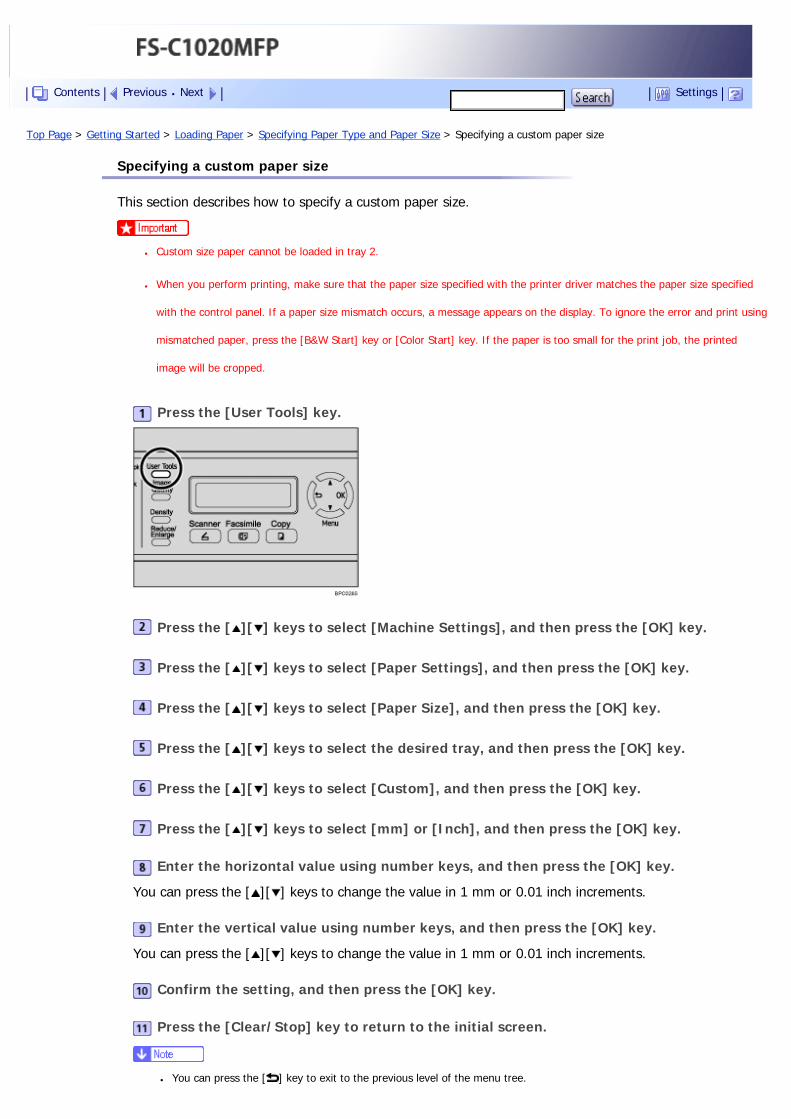
Top Page > Getting Started > Loading Paper > Specifying Paper Type and Paper Size > Specifying a custom paper size
Specifying a custom paper size
This section describes how to specify a custom paper size.
● Custom size paper cannot be loaded in tray 2.
● When you perform printing, make sure that the paper size specified with the printer driver matches the paper size specified
with the control panel. If a paper size mismatch occurs, a message appears on the display. To ignore the error and print using
mismatched paper, press the [B&W Start] key or [Color Start] key. If the paper is too small for the print job, the printed
image will be cropped.
Press the [User Tools] key.
Press the [ ][ ] keys to select [Machine Settings], and then press the [OK] key.
Press the [ ][ ] keys to select [Paper Settings], and then press the [OK] key.
Press the [ ][ ] keys to select [Paper Size], and then press the [OK] key.
Press the [ ][ ] keys to select the desired tray, and then press the [OK] key.
Press the [ ][ ] keys to select [Custom], and then press the [OK] key.
Press the [ ][ ] keys to select [mm] or [Inch], and then press the [OK] key.
Enter the horizontal value using number keys, and then press the [OK] key.
You can press the [ ][ ] keys to change the value in 1 mm or 0.01 inch increments.
Enter the vertical value using number keys, and then press the [OK] key.
You can press the [ ][ ] keys to change the value in 1 mm or 0.01 inch increments.
Confirm the setting, and then press the [OK] key.
Press the [Clear/Stop] key to return to the initial screen.
● You can press the [ ] key to exit to the previous level of the menu tree.
Contents Previous Next Settings

Top Previous Next
Copyright © 2009

Top Page > Getting Started > Placing Originals
Placing Originals
This section describes the types of originals you can set and how to place them.
Related topics
About Originals
Placing Originals
Top Previous Next
Copyright © 2009
Contents Previous Next Settings

Top Page > Getting Started > Placing Originals > About Originals
About Originals
This section describes the types of originals that can be placed and which parts of the original are unscannable.
Related topics
Recommended size of originals
Types of originals not supported by the Auto Document Feeder
Unscannable image area
Top Previous Next
Copyright © 2009
Contents Previous Next Settings
Top Page > Getting Started > Placing Originals > About Originals > Recommended size of originals
Recommended size of originals
This section describes the recommended size of the original.
Exposure glass
Up to 216 mm (8.5 ") in width, up to 297 mm (11.7 ") in length
ADF
● Paper size: 140 to 216 mm (51/2 " to 81/2 ") in width, 140 to 356 mm (51/2 " to 14 ") in length
● Paper weight: 64 to 90 g/m2 (17 to 24 lb.)
● Only 1 sheet of an original can be placed on the exposure glass at a time.
● Up to 35 sheets of an original can be placed in the ADF at once (when using paper weighing 80 g/m2, 20 lb.).
Top Previous Next
Copyright © 2009
Contents Previous Next Settings
Top Page > Getting Started > Placing Originals > About Originals > Types of originals not supported by the Auto Document Feeder
Types of originals not supported by the Auto Document Feeder
If placed in the ADF, the following types of original might be damaged or become jammed, or result in gray or black lines appearing on prints:
● Originals larger or heavier than recommended
● Stapled or clipped originals
● Perforated or torn originals
● Curled, folded, or creased originals
● Pasted originals
● Originals with any kind of coating, such as thermal fax paper, art paper, aluminum foil, carbon paper, or conductive paper
● Originals with perforated lines
● Originals with indexes, tags, or other projecting parts
● Sticky originals such as translucent paper
● Thin, highly flexible originals
● Thick originals such as postcards
● Bound originals such as books
● Transparent originals such as OHP transparencies or translucent paper
● Originals that are wet with toner or white out
Top Previous Next
Copyright © 2009
Contents Previous Next Settings
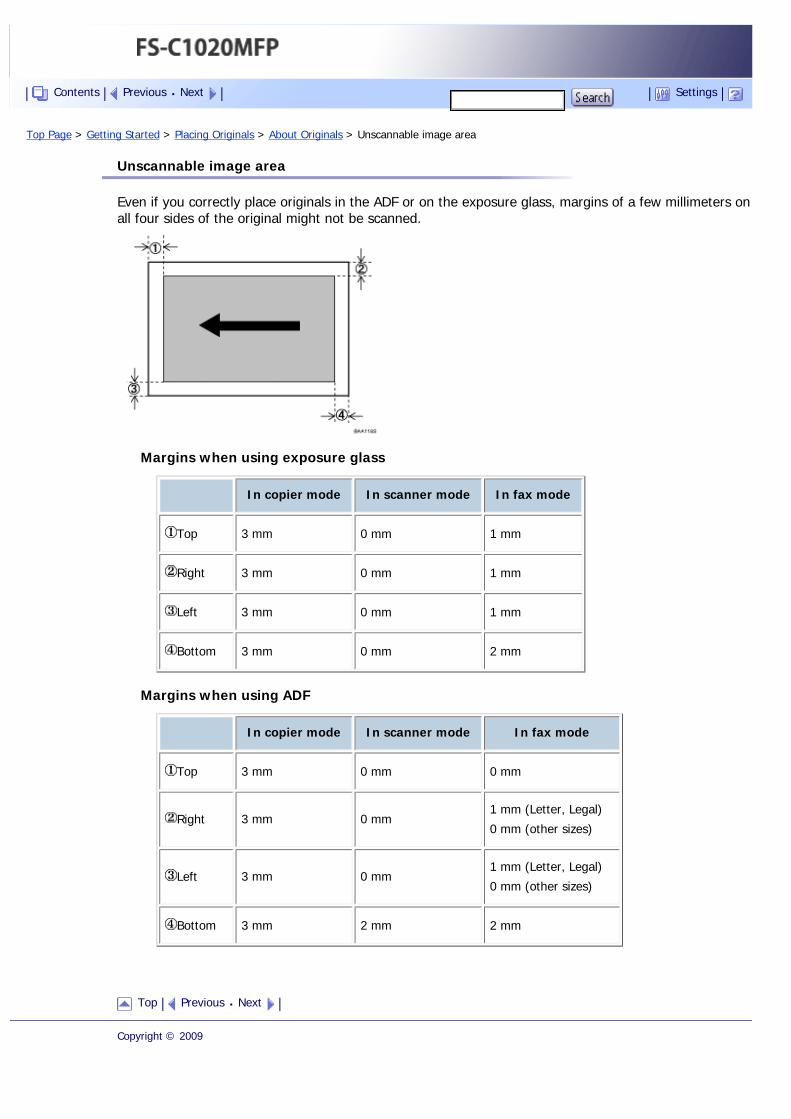
Top Page > Getting Started > Placing Originals > About Originals > Unscannable image area
Unscannable image area
Even if you correctly place originals in the ADF or on the exposure glass, margins of a few millimeters on all four sides of the original might not be scanned.
Margins when using exposure glass
In copier mode In scanner mode In fax mode
Top 3 mm 0 mm 1 mm
Right 3 mm 0 mm 1 mm
Left 3 mm 0 mm 1 mm
Bottom 3 mm 0 mm 2 mm
Margins when using ADF
In copier mode In scanner mode In fax mode
Top 3 mm 0 mm 0 mm
Right 3 mm 0 mm1 mm (Letter, Legal)
0 mm (other sizes)
Left 3 mm 0 mm1 mm (Letter, Legal)
0 mm (other sizes)
Bottom 3 mm 2 mm 2 mm
Top Previous Next
Copyright © 2009
Contents Previous Next Settings
Top Page > Getting Started > Placing Originals > Placing Originals
Placing Originals
This section describes the procedure for placing originals on the exposure glass and in the ADF.
● Do not place originals before any correction fluid and toner has completely dried. Doing so may make marks on the exposure
glass that will appear on copies.
● The original in the ADF takes precedence over the original on the exposure glass if you place originals both in the ADF and on
the exposure glass.
● Because colors made by marker or highlighter pen on originals are difficult to reproduce, they might not appear on copies, or
might appear as different colors.
Related topics
Placing originals on the exposure glass
Placing originals in the Auto Document Feeder
Top Previous Next
Copyright © 2009
Contents Previous Next Settings
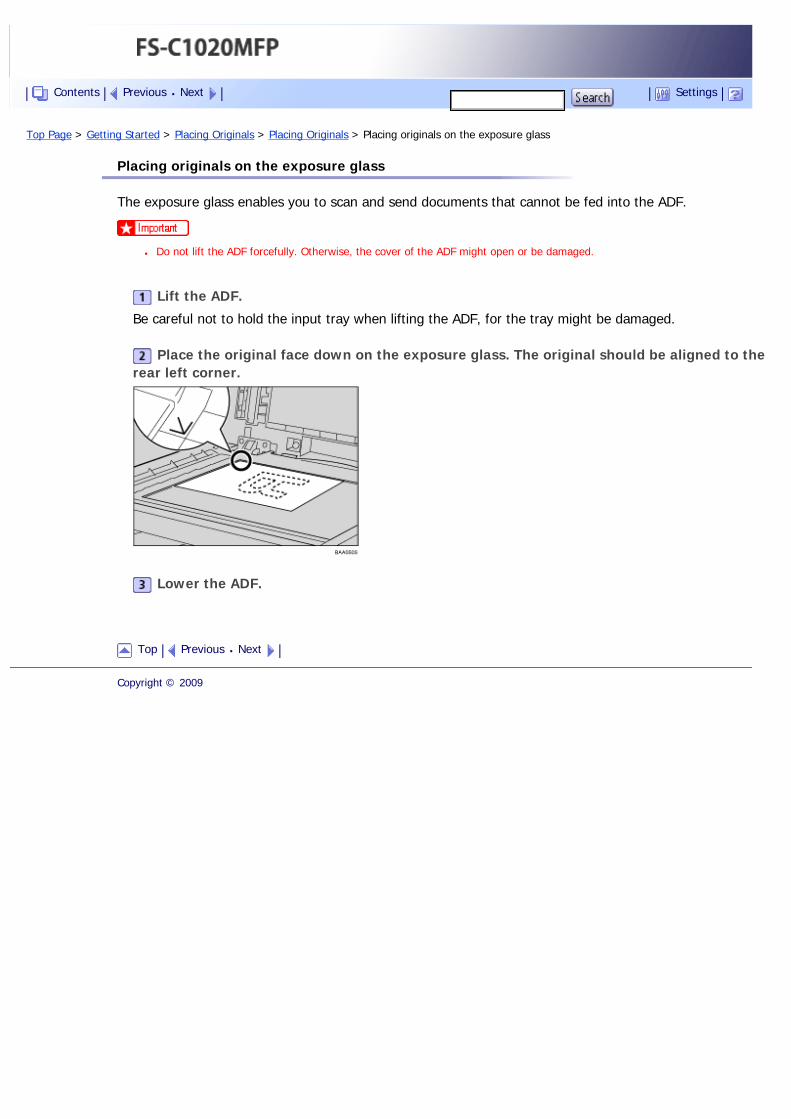
Top Page > Getting Started > Placing Originals > Placing Originals > Placing originals on the exposure glass
Placing originals on the exposure glass
The exposure glass enables you to scan and send documents that cannot be fed into the ADF.
● Do not lift the ADF forcefully. Otherwise, the cover of the ADF might open or be damaged.
Lift the ADF.
Be careful not to hold the input tray when lifting the ADF, for the tray might be damaged.
Place the original face down on the exposure glass. The original should be aligned to the rear left corner.
Lower the ADF.
Top Previous Next
Copyright © 2009
Contents Previous Next Settings
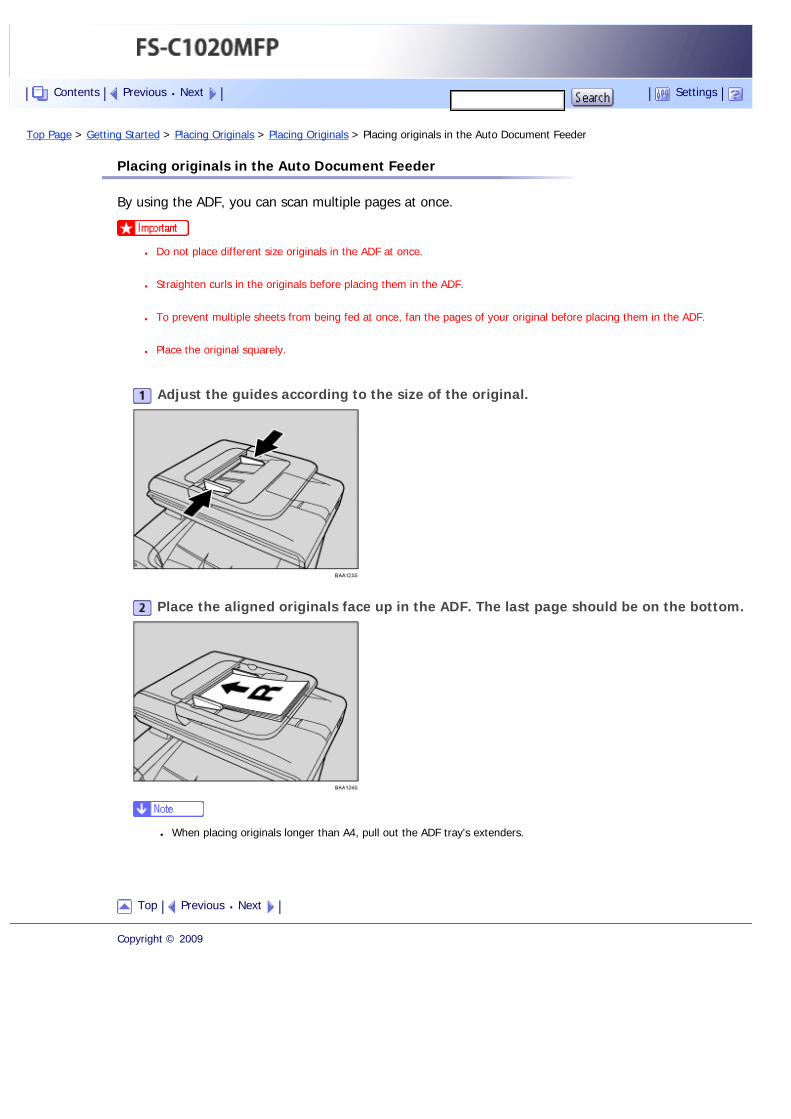
Top Page > Getting Started > Placing Originals > Placing Originals > Placing originals in the Auto Document Feeder
Placing originals in the Auto Document Feeder
By using the ADF, you can scan multiple pages at once.
● Do not place different size originals in the ADF at once.
● Straighten curls in the originals before placing them in the ADF.
● To prevent multiple sheets from being fed at once, fan the pages of your original before placing them in the ADF.
● Place the original squarely.
Adjust the guides according to the size of the original.
Place the aligned originals face up in the ADF. The last page should be on the bottom.
● When placing originals longer than A4, pull out the ADF tray's extenders.
Top Previous Next
Copyright © 2009
Contents Previous Next Settings
Top Page > Getting Started > Entering Characters
Entering Characters
This section describes how to enter characters using the control panel when configuring the machine's settings.
There are three modes for entering characters, depending on the type of setting you are configuring:
● Value input mode for entering numerical values.
● Fax number input mode for entering fax numbers.
● Text input mode for entering names.
Related topics
Value Input Mode
Fax Number Input Mode
Text Input Mode
Top Previous Next
Copyright © 2009
Contents Previous Next Settings

Top Page > Getting Started > Entering Characters > Value Input Mode
Value Input Mode
Value input mode becomes active when configuring settings such as paper size or copy zoom ratio. In this mode, use the keys as follows:
● To enter a digit
Press a number key. Press the number keys successively to enter a multi-digit number.
● To increase or decrease the current value in units
Press the [ ][ ] keys. The unit of increments depends on the setting you are configuring.
● If a digit is entered more than three seconds after the last input, the entered digit replaces the current value.
● When the maximum number of digits has already been entered, the next input digit replaces the current value.
● If the current value is too large or too small for the current setting, it will not be accepted. In this case, pressing the [ ] or [
] key changes the value to the minimum or maximum value for the current setting, respectively.
Top Previous Next
Copyright © 2009
Contents Previous Next Settings

Top Page > Getting Started > Entering Characters > Fax Number Input Mode
Fax Number Input Mode
Fax number input mode becomes active when entering fax numbers. In this mode, use the keys as follows:
● To enter a number
Press a number key.
● To enter characters other than digits
“ ”: Press the [ ] key.
“ ”: Press the [ ] key.
“+”: Press [0] twice.
Pause: Press the [Pause/Redial] key. A pause is indicated on the screen as a “P”.
Space: Place the cursor on the right-most character, and then press the [ ] key.
● To move the cursor left or right
Press the [ ] key to move the cursor left, and the [ ] key to move the cursor right.
If you enter a character when there is a character at the cursor position, the current character shifts to the right.
● To delete a character
Place the cursor on the character you want to delete, and then press and hold the [ ] key until the character is deleted.
● To delete all characters
Press the [Clear/Stop] key.
● Some characters other than digits cannot be used, depending on the setting you are configuring.
● When the maximum number of characters has already been entered, characters entered subsequently are ignored.
Top Previous Next
Copyright © 2009
Contents Previous Next Settings
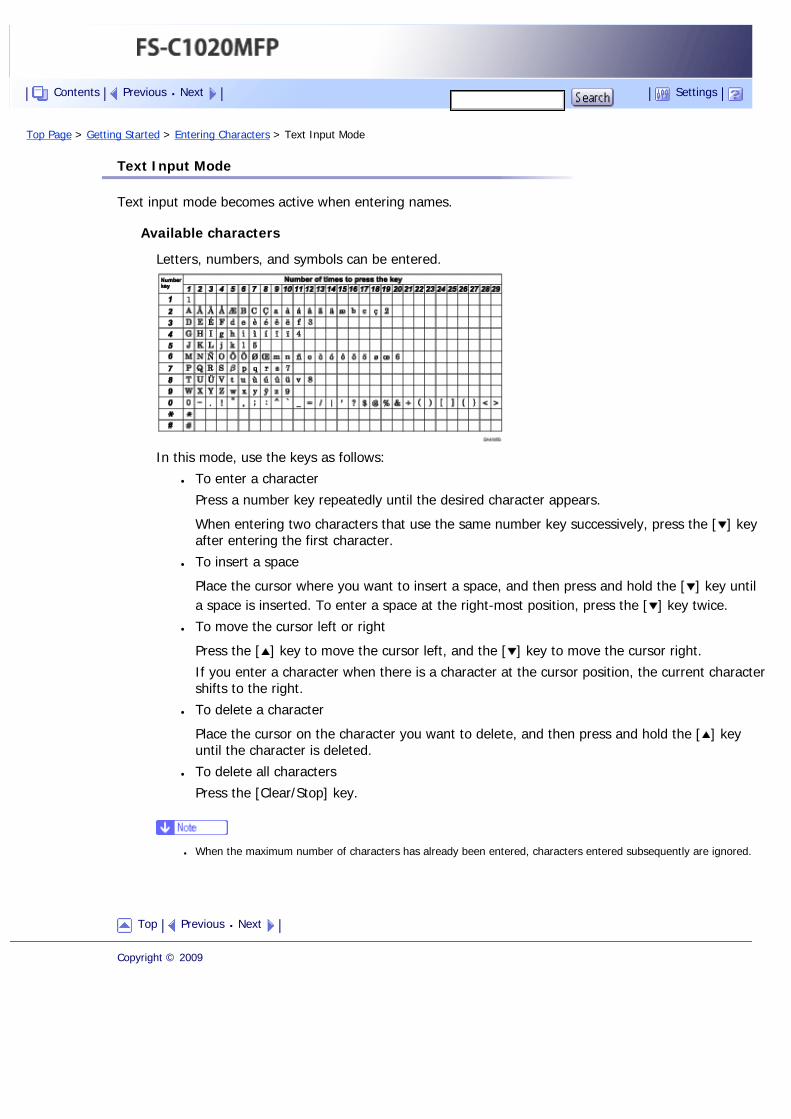
Top Page > Getting Started > Entering Characters > Text Input Mode
Text Input Mode
Text input mode becomes active when entering names.
Available characters
Letters, numbers, and symbols can be entered.
In this mode, use the keys as follows:
● To enter a character
Press a number key repeatedly until the desired character appears.
When entering two characters that use the same number key successively, press the [ ] key after entering the first character.
● To insert a space
Place the cursor where you want to insert a space, and then press and hold the [ ] key until a space is inserted. To enter a space at the right-most position, press the [ ] key twice.
● To move the cursor left or right
Press the [ ] key to move the cursor left, and the [ ] key to move the cursor right.
If you enter a character when there is a character at the cursor position, the current character shifts to the right.
● To delete a character
Place the cursor on the character you want to delete, and then press and hold the [ ] key until the character is deleted.
● To delete all characters
Press the [Clear/Stop] key.
● When the maximum number of characters has already been entered, characters entered subsequently are ignored.
Top Previous Next
Copyright © 2009
Contents Previous Next Settings

Top Page > Getting Started > Restricting Machine Functions According to User
Restricting Machine Functions According to User
You can set the machine to require a user ID when someone tries to copy, send faxes, or scan using the control panel.
To enable this setting, you must first configure the machine via Web Browser.
Related topics
Enabling the User Restriction Settings
Top Previous Next
Copyright © 2009
Contents Previous Next Settings

Top Page > Getting Started > Restricting Machine Functions According to User > Enabling the User Restriction Settings
Enabling the User Restriction Settings
This section describes how to set the machine to permit only authorized users to copy, send faxes, or scan using the control panel.
Using Web Browser, select the function you want to restrict, and then register the users who can use that function. For each user, you can specify which functions are available upon authentication.
A maximum of 20 users can be registered.
Start the Web browsing software, and access the machine by entering its IP address.
Click [Restrict User Function].
Under "Restrict User Settings", select [Enable] for the function you want to restrict.
Select [Disable] for the functions you do not want to restrict.
Enter the administrator password if required.
Click [Submit].
The user restriction setting is enabled for the selected function. Proceed to the following steps to register users.
Click [User Function List].
A list of currently registered user entries appears.
Contents Previous Next Settings
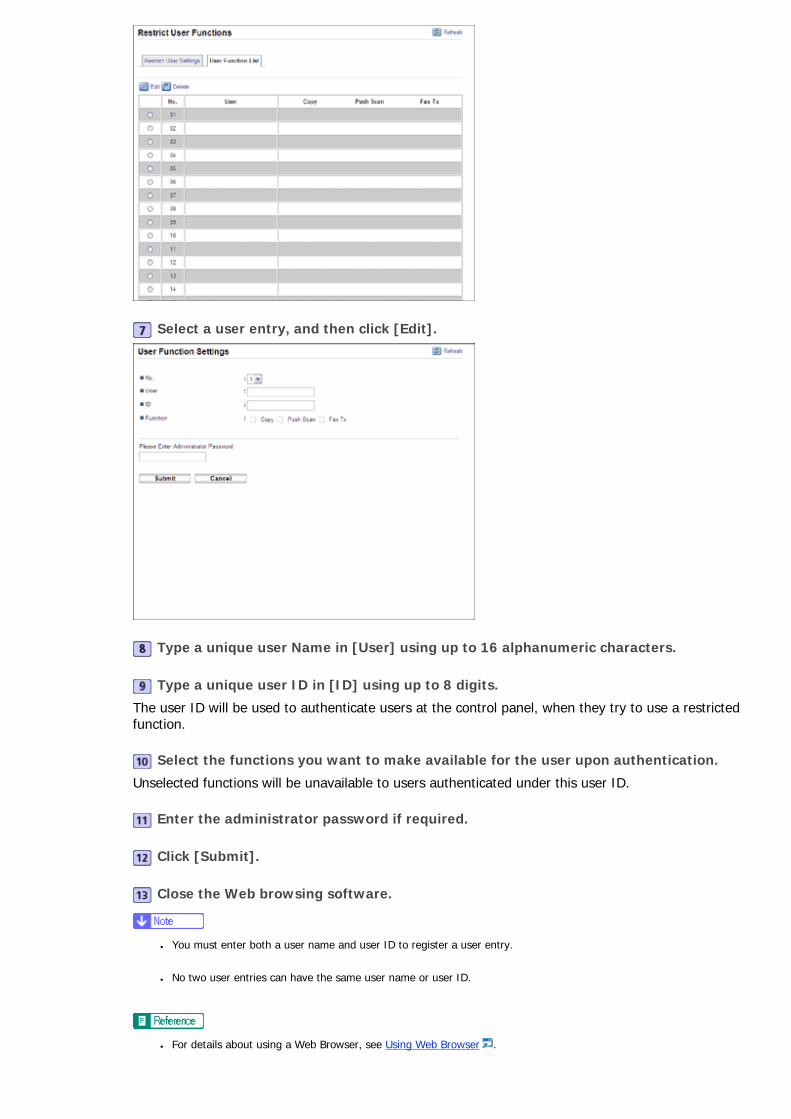
Select a user entry, and then click [Edit].
Type a unique user Name in [User] using up to 16 alphanumeric characters.
Type a unique user ID in [ID] using up to 8 digits.
The user ID will be used to authenticate users at the control panel, when they try to use a restricted function.
Select the functions you want to make available for the user upon authentication.
Unselected functions will be unavailable to users authenticated under this user ID.
Enter the administrator password if required.
Click [Submit].
Close the Web browsing software.
● You must enter both a user name and user ID to register a user entry.
● No two user entries can have the same user name or user ID.
● For details about using a Web Browser, see Using Web Browser .

Related topics
Modifying user entries
Deleting user entries
Top Previous Next
Copyright © 2009
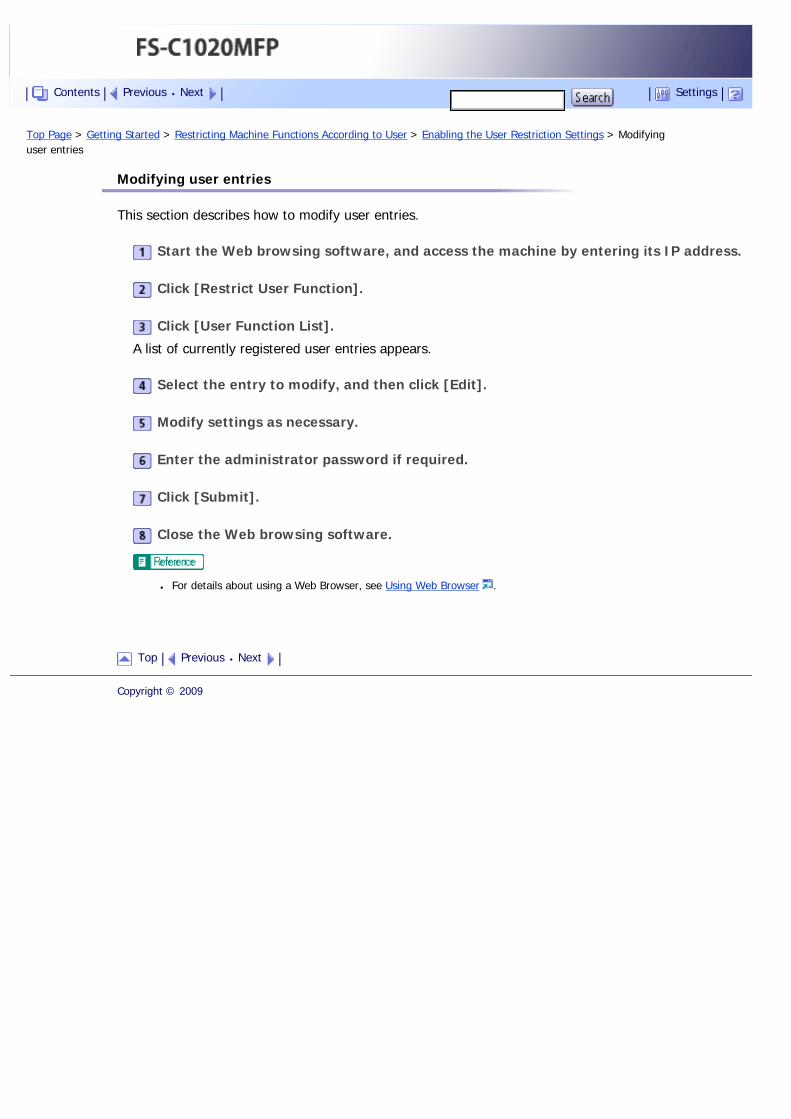
Top Page > Getting Started > Restricting Machine Functions According to User > Enabling the User Restriction Settings > Modifying user entries
Modifying user entries
This section describes how to modify user entries.
Start the Web browsing software, and access the machine by entering its IP address.
Click [Restrict User Function].
Click [User Function List].
A list of currently registered user entries appears.
Select the entry to modify, and then click [Edit].
Modify settings as necessary.
Enter the administrator password if required.
Click [Submit].
Close the Web browsing software.
● For details about using a Web Browser, see Using Web Browser .
Top Previous Next
Copyright © 2009
Contents Previous Next Settings
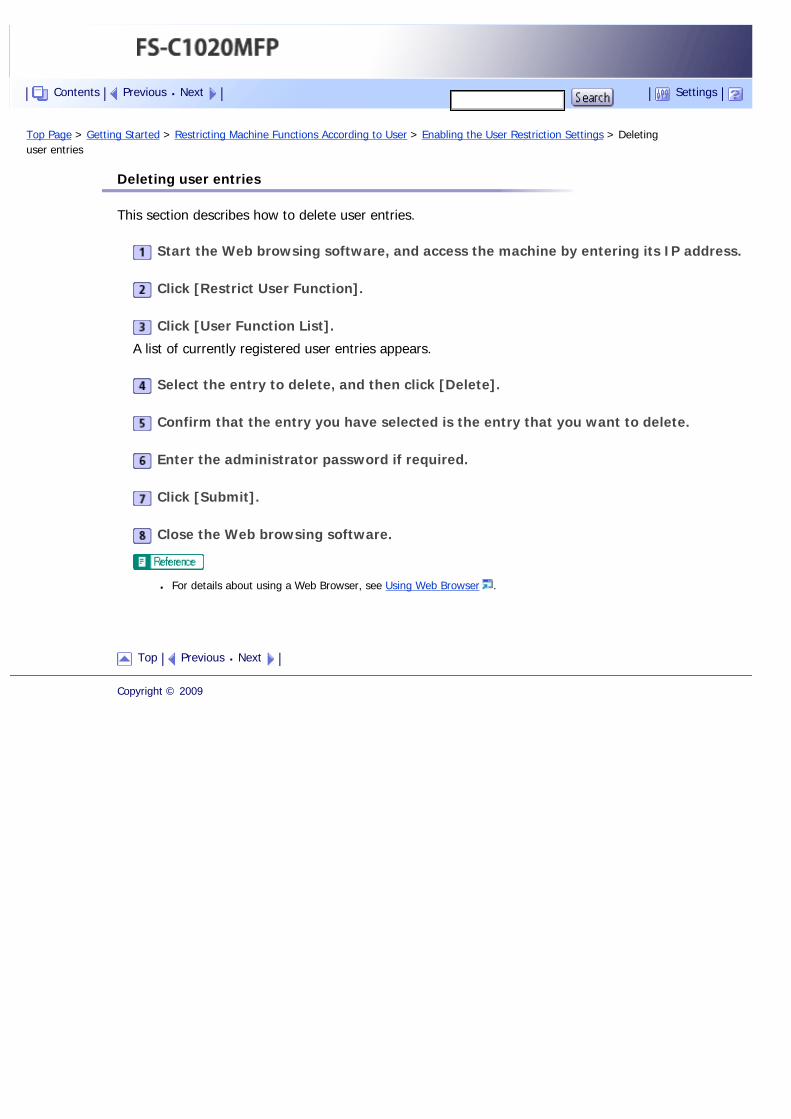
Top Page > Getting Started > Restricting Machine Functions According to User > Enabling the User Restriction Settings > Deleting user entries
Deleting user entries
This section describes how to delete user entries.
Start the Web browsing software, and access the machine by entering its IP address.
Click [Restrict User Function].
Click [User Function List].
A list of currently registered user entries appears.
Select the entry to delete, and then click [Delete].
Confirm that the entry you have selected is the entry that you want to delete.
Enter the administrator password if required.
Click [Submit].
Close the Web browsing software.
● For details about using a Web Browser, see Using Web Browser .
Top Previous Next
Copyright © 2009
Contents Previous Next Settings
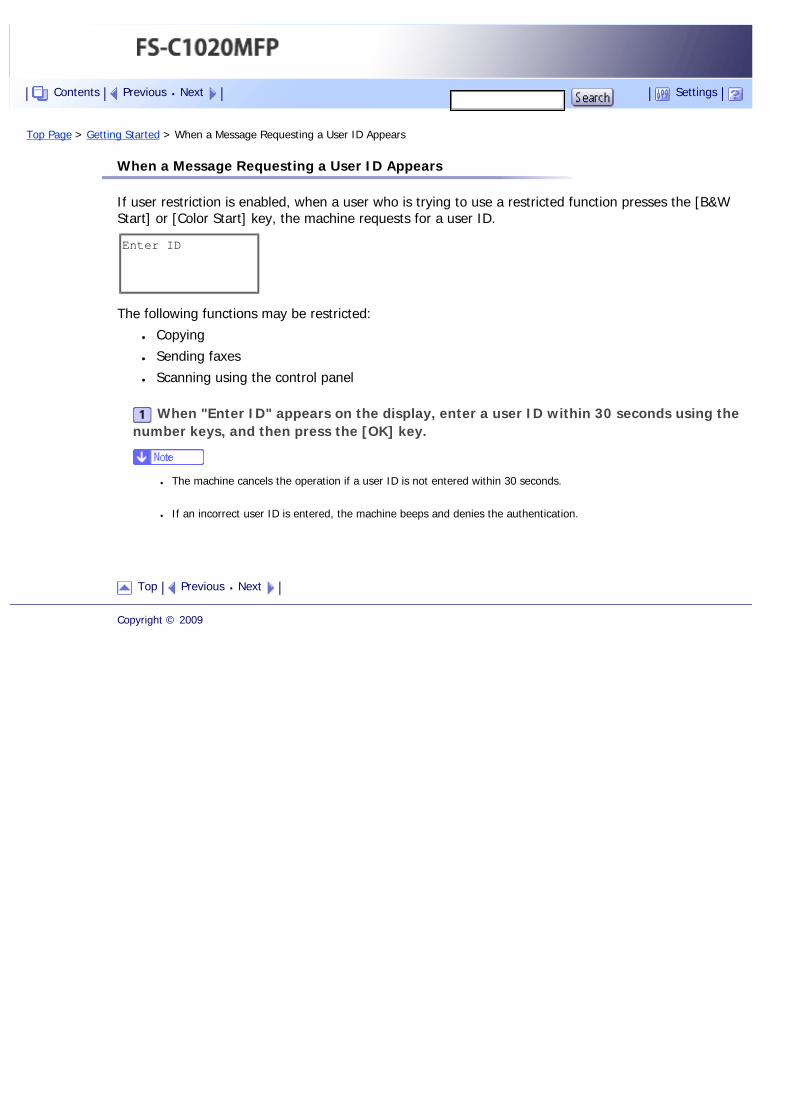
Top Page > Getting Started > When a Message Requesting a User ID Appears
When a Message Requesting a User ID Appears
If user restriction is enabled, when a user who is trying to use a restricted function presses the [B&W Start] or [Color Start] key, the machine requests for a user ID.
Enter ID
The following functions may be restricted:
● Copying
● Sending faxes
● Scanning using the control panel
When "Enter ID" appears on the display, enter a user ID within 30 seconds using the number keys, and then press the [OK] key.
● The machine cancels the operation if a user ID is not entered within 30 seconds.
● If an incorrect user ID is entered, the machine beeps and denies the authentication.
Top Previous Next
Copyright © 2009
Contents Previous Next Settings
Top Page > Using the Printer Function > Configuring Option Settings for the Printer
Configuring Option Settings for the Printer
If bidirectional communication is not available, use the printer driver to configure the printer's option settings.
Related topics
Conditions for Bidirectional Communication
If Bidirectional Communication is Disabled
Top Previous Next
Copyright © 2009
Contents Previous Next Settings
Top Page > Using the Printer Function > Configuring Option Settings for the Printer > Conditions for Bidirectional Communication
Conditions for Bidirectional Communication
Bidirectional communication allows information about paper settings to be automatically sent from the printer. Bidirectional communication allows you to check the status of the printer from your computer.
● Bidirectional communication is supported by Windows 2000/XP/Vista, and Windows Server 2003/2003 R2/2008.
To support bidirectional communication, the following conditions must be met:
When connected via a network
The printer must be connected via a standard TCP/IP port, and the default port name must not be changed.
When connected via USB
The printer must be connected to the computer's USB port using a USB interface cable.
The computer must support bidirectional communication.
Bidirectional communication must be enabled in the printer properties.
● The PostScript 3 printer driver does not support bidirectional communication. You can update printer status manually.
Top Previous Next
Copyright © 2009
Contents Previous Next Settings
Top Page > Using the Printer Function > Configuring Option Settings for the Printer > If Bidirectional Communication is Disabled
If Bidirectional Communication is Disabled
Configure option settings when bidirectional communications are disabled.
● Manage Printers permission is required to change the printer properties in the [Printers] folder. Log on as an Administrators or
Power Users group member to acquire this permission.
● Make sure that [Enable bidirectional support] in the [Port] tab of the printer properties is selected. The machine cannot print if
[Enable bidirectional support] is not selected.
Related topics
Windows
Mac OS X
Top Previous Next
Copyright © 2009
Contents Previous Next Settings
Top Page > Using the Printer Function > Configuring Option Settings for the Printer > If Bidirectional Communication is Disabled > Windows
Windows
On the [Start] menu, point to [Settings], and then click [Printers].
The [Printers] window appears.
Click the printer icon you want to use.
On the [File] menu, click [Properties].
Click the [Accessories] tab.
If you are using the PostScript 3 printer driver, click the [Device Settings] tab.
In the [Options] area, select the options that are installed, and then configure the necessary settings.
If the optional SDRAM module is installed, specify the total amount of memory in [Total Memory:].
Under [Paper Size Settings], select the tray you want to use, then select the paper size, and then click [Update].
Click [OK] to close the printer properties dialog box.
Top Previous Next
Copyright © 2009
Contents Previous Next Settings
Top Page > Using the Printer Function > Configuring Option Settings for the Printer > If Bidirectional Communication is Disabled > Mac OS X
Mac OS X
Double-click the hard drive icon on the desktop.
Click [Applications], and then open the [Utilities] folder.
Double-click [Printer Setup Utility].
The [Printer List] dialog box appears.
Select the machine you are using and click [Show Info].
The [Printer Info] window appears.
Select [Installable Options] from the drop-down menu, and then select an appropriate setting for it.
Click [Apply Changes].
Quit Printer Setup Utility.
● If the option you want to select is not displayed, PPD files may not be set up correctly. To complete the setup, check the
name of the PPD file displayed in the dialog box.
Top Previous Next
Copyright © 2009
Contents Previous Next Settings
Top Page > Using the Printer Function > Accessing the Printer Properties
Accessing the Printer Properties
This section describes accessing the printer properties. For details about settings, see the printer driver Help.
Related topics
Accessing the Printer Properties from the [Printers and Faxes] Window
Accessing the Printer Properties from an Application
Top Previous Next
Copyright © 2009
Contents Previous Next Settings
Top Page > Using the Printer Function > Accessing the Printer Properties > Accessing the Printer Properties from the [Printers and Faxes] Window
Accessing the Printer Properties from the [Printers and Faxes] Window
● To change the printer default settings including option configuration settings, log on using an account that has Manage
Printers permission. Members of the Administrators and Power Users groups have Manage Printers permission by default.
● You cannot change the printer default settings for each user. Settings configured in the printer properties dialog box are
applied to all users. Procedures and screens might vary depending on the operating system you are using.
On the [Start] menu, click [Printers and Faxes].
The [Printers and Faxes] window appears.
Click the printer icon you want to use.
On the [File] menu, click [Properties].
The printer properties dialog box appears.
● The settings you configure here are used as the default settings for all applications.
● Do not configure a setting for [Form to Tray Assignment].
Top Previous Next
Copyright © 2009
Contents Previous Next Settings
Top Page > Using the Printer Function > Accessing the Printer Properties > Accessing the Printer Properties from an Application
Accessing the Printer Properties from an Application
Related topics
Windows
Mac OS X
Top Previous Next
Copyright © 2009
Contents Previous Next Settings
Top Page > Using the Printer Function > Accessing the Printer Properties > Accessing the Printer Properties from an Application > Windows
Windows
You can configure printer settings for a specific application.
To configure printer settings for a specific application, open the [Printing Preferences] dialog box in that application.
The following procedure explains how to configure settings for the WordPad application provided with Windows XP.
On the [File] menu, click [Print...].
The [Print] dialog box appears.
Select the printer you want to use in the [Select Printer] list, and then click [Preferences].
● The procedure to open the [Printing Preferences] dialog box may vary depending on the application. For details, see the
manuals provided with the application.
● Any settings you configure in the procedure above are valid for the current application only.
● General users can change the properties displayed in the [Print] dialog box of an application. The settings configured here
are used as defaults when printing from that application.
Top Previous Next
Copyright © 2009
Contents Previous Next Settings
Top Page > Using the Printer Function > Accessing the Printer Properties > Accessing the Printer Properties from an Application > Mac OS X
Mac OS X
Open the file you want to print.
On the [File] menu, click [Print].
In the [Select Printer] list, select the printer you want to use, and then configure it as necessary.
When you have finished configuring the printer, click [OK].
Top Previous Next
Copyright © 2009
Contents Previous Next Settings
Top Page > Using the Printer Function > Basic Operation in Printer Mode
Basic Operation in Printer Mode
The following procedure explains how to perform basic printing.
Open the printer properties dialog box in your document's application.
Set printing options as necessary, and then click [OK].
The printer properties dialog box closes.
Click [OK].
● If tray 2 is installed, you can select tray 1 or 2 as the priority tray using the [Tray Priority] setting under [PDL Settings].
● If a paper jam occurs, printing stops after the current page has been printed out. After the jammed paper is removed,
printing restarts from the jammed page automatically.
● For details about accessing the printer properties, see Accessing the Printer Properties from an Application .
● For details about [Tray Priority], see PDL Settings .
● For details about how to remove the jammed paper, see Removing Printing Jams .
Related topics
If a Paper Mismatch Occurs
Canceling a Print Job
Top Previous Next
Copyright © 2009
Contents Previous Next Settings
Top Page > Using the Printer Function > Basic Operation in Printer Mode > If a Paper Mismatch Occurs
If a Paper Mismatch Occurs
If the paper size or type does not match the print job's settings, the machine reports an error. There are two ways to resolve this error:
Continue printing using mismatched paper
Use the form-feed function to ignore the error and print using mismatched paper.
Reset the print job
Cancel printing.
● If the [Auto Continue] setting under [Machine Settings] is enabled, the machine ignores the paper type and size
settings and prints on whatever paper is loaded. Printing stops temporarily when the error is detected, and restarts
automatically after ten seconds.
● For details about [Auto Continue], see Machine Settings .
Related topics
Continuing printing using mismatched paper
Resetting the print job
Top Previous Next
Copyright © 2009
Contents Previous Next Settings
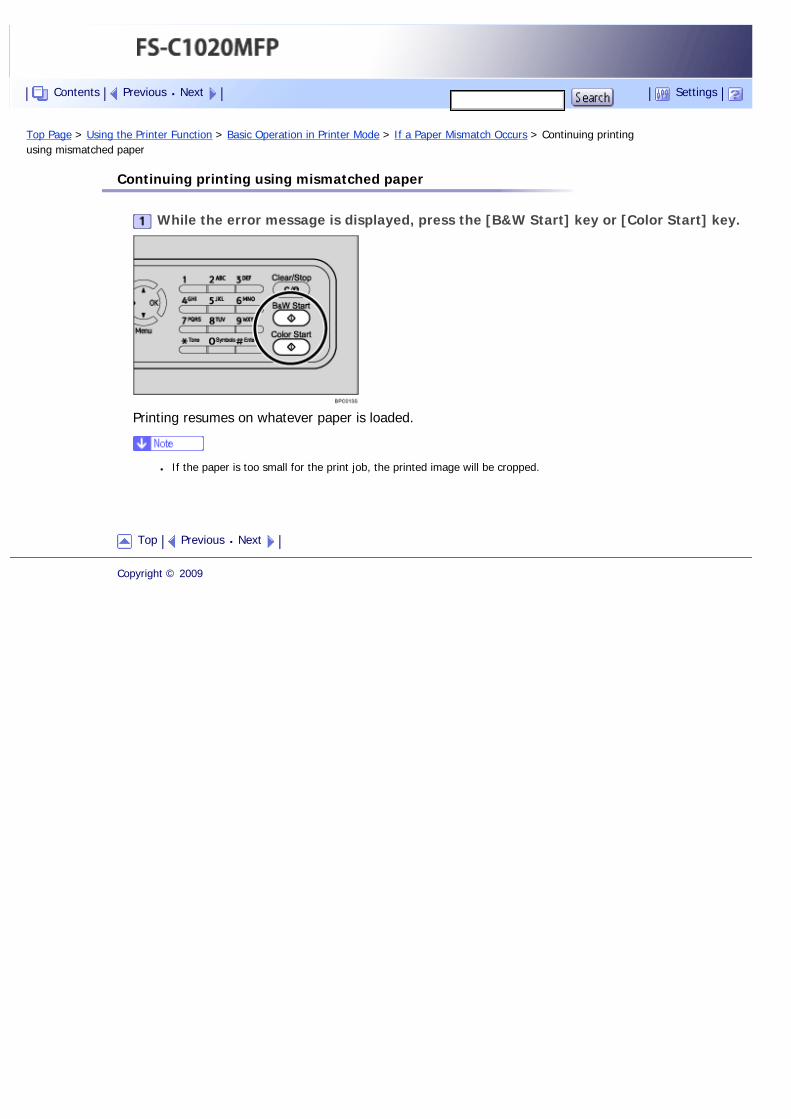
Top Page > Using the Printer Function > Basic Operation in Printer Mode > If a Paper Mismatch Occurs > Continuing printing using mismatched paper
Continuing printing using mismatched paper
While the error message is displayed, press the [B&W Start] key or [Color Start] key.
Printing resumes on whatever paper is loaded.
● If the paper is too small for the print job, the printed image will be cropped.
Top Previous Next
Copyright © 2009
Contents Previous Next Settings
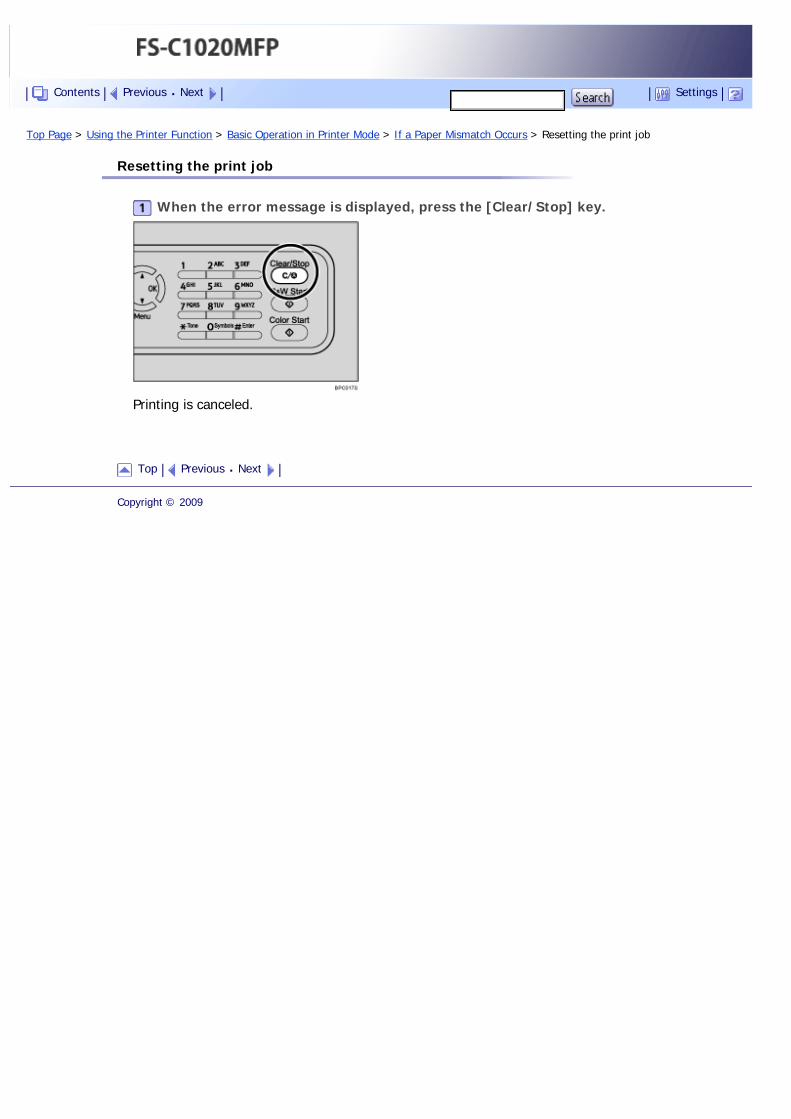
Top Page > Using the Printer Function > Basic Operation in Printer Mode > If a Paper Mismatch Occurs > Resetting the print job
Resetting the print job
When the error message is displayed, press the [Clear/Stop] key.
Printing is canceled.
Top Previous Next
Copyright © 2009
Contents Previous Next Settings

Top Page > Using the Printer Function > Basic Operation in Printer Mode > Canceling a Print Job
Canceling a Print Job
You can cancel print jobs using either the machine's control panel or your computer, depending on the status of the job.
Related topics
Canceling a print job before printing has started
Canceling a print job while printing
Top Previous Next
Copyright © 2009
Contents Previous Next Settings
Top Page > Using the Printer Function > Basic Operation in Printer Mode > Canceling a Print Job > Canceling a print job before printing has started
Canceling a print job before printing has started
Cancel the print job from the computer.
Windows
Double-click the printer icon on the task bar of your computer.
Select the print job you want to cancel, click the [Document] menu, and then click [Cancel].
Mac OS X
Start Print Center.
Select the name of the job you want to cancel.
Click the Pause icon, and then click the Trash icon.
● If the printer is shared by multiple computers, be careful not to cancel the print job of another user.
● If you cancel a print job that has already been processed, printing may continue for a few pages before being canceled.
● If you cancel a Locked Print job, the machine might have already stored some pages of the job as a Locked Print file. If
this happens, use the control panel to delete the Locked Print file.
● It may take a while to cancel a large print job.
● For details about deleting a Locked Print file, see Deleting a Locked Print file .
Top Previous Next
Copyright © 2009
Contents Previous Next Settings
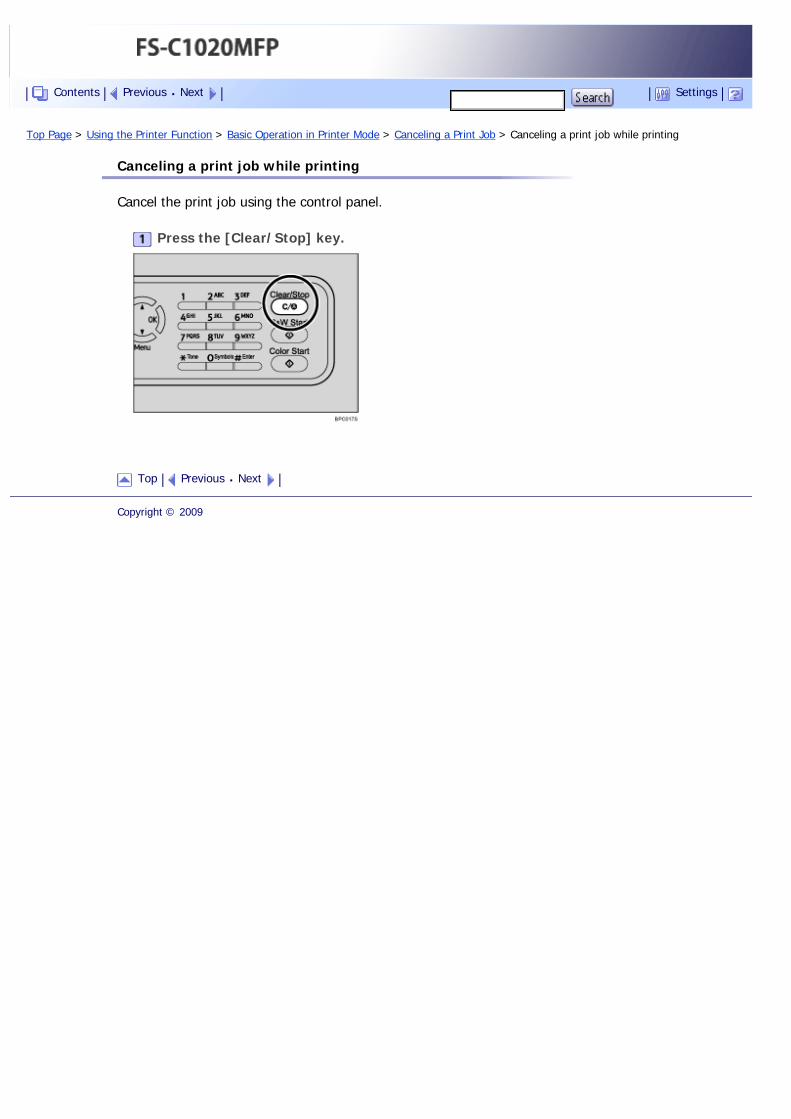
Top Page > Using the Printer Function > Basic Operation in Printer Mode > Canceling a Print Job > Canceling a print job while printing
Canceling a print job while printing
Cancel the print job using the control panel.
Press the [Clear/Stop] key.
Top Previous Next
Copyright © 2009
Contents Previous Next Settings
Top Page > Using the Printer Function > Printing Confidential Documents
Printing Confidential Documents
If you use the Locked Print function, you can password protect your print job. This means that your job is printed only after you enter the password using the machine's control panel.
This function prevents unauthorized users seeing sensitive documents at the printer.
● This function is only available when using the PCL printer driver, and printing from a computer running a Windows operating
system.
Related topics
Storing a Locked Print file
Printing a Locked Print file
Deleting a Locked Print file
Checking which Locked Print File Jobs Have Been Canceled
Top Previous Next
Copyright © 2009
Contents Previous Next Settings
Top Page > Using the Printer Function > Printing Confidential Documents > Storing a Locked Print file
Storing a Locked Print file
This section describes how to store a Locked Print file in the machine using the printer driver.
Open the file you want to print on your computer.
Open the printer driver's properties.
Click the [Setup] tab, and then select [Locked Print].
The [Password:] and [User ID:] text boxes become available.
The [User ID:] text box contains the login user name of your computer account or the user ID that you used for the previous Locked Print job.
Type the password (containing 4 to 8 digits) and user ID (containing up to 9 alphanumeric characters), and then click [OK].The user ID will be used to identify your Locked Print file on the machine's control panel.
Execute a print command.
The print job is stored in the machine as a Locked Print file. You can print the file by entering the password using the control panel.
● The Locked Print file is automatically erased from the machine's memory when it is printed out, or when the machine's
power is turned off.
● The machine can store a maximum of 5 jobs or 5 MB of Locked Print data at a time.
● Even if the machine cannot store any more Locked Print files, the machine holds a new Locked Print file for the period of
time specified in [Locked Print] under [Machine Settings] before canceling the job. Within this time, you can print or delete
the new Locked Print file. You can also print or delete an existing Locked Print file so that the new Locked Print file can be
stored in the machine.
● When a Locked Print job is canceled, the machine automatically records the cancellation in a log. You can use this log to
identify which Locked Print jobs have been canceled.
● For details about [Locked Print], see Machine Settings .
Top Previous Next
Copyright © 2009
Contents Previous Next Settings
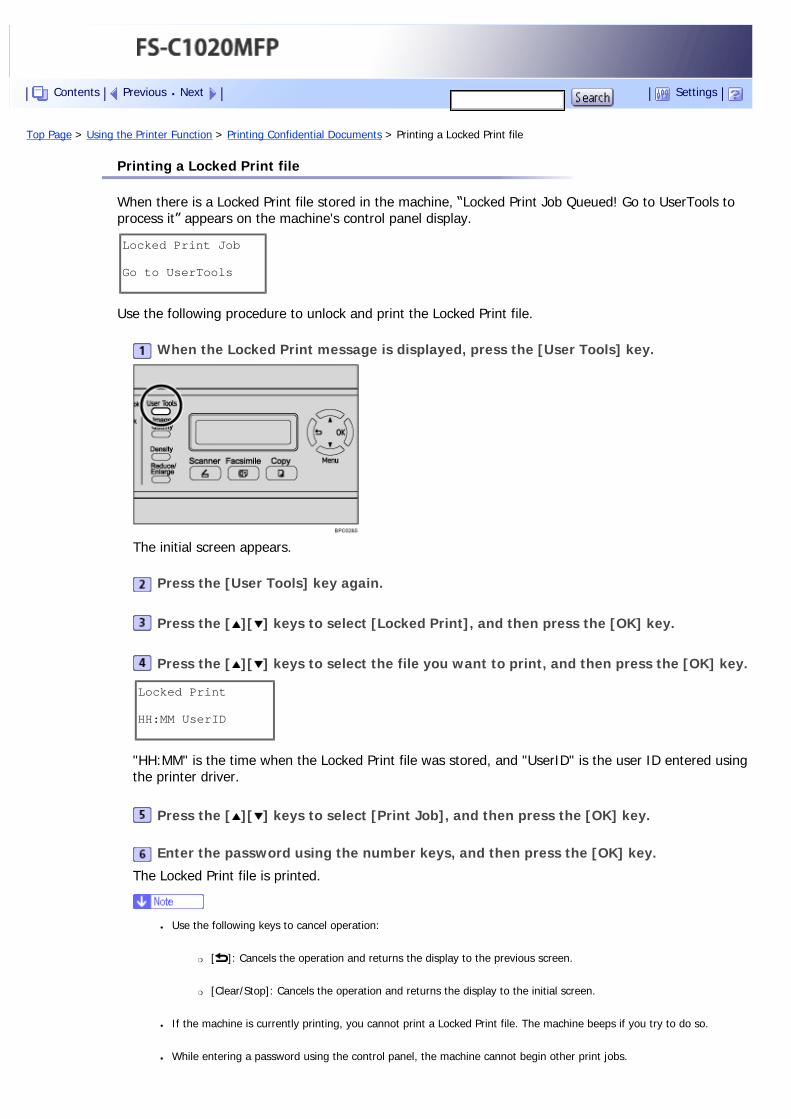
Top Page > Using the Printer Function > Printing Confidential Documents > Printing a Locked Print file
Printing a Locked Print file
When there is a Locked Print file stored in the machine, “Locked Print Job Queued! Go to UserTools to process it” appears on the machine's control panel display.
Locked Print Job
Go to UserTools
Use the following procedure to unlock and print the Locked Print file.
When the Locked Print message is displayed, press the [User Tools] key.
The initial screen appears.
Press the [User Tools] key again.
Press the [ ][ ] keys to select [Locked Print], and then press the [OK] key.
Press the [ ][ ] keys to select the file you want to print, and then press the [OK] key.
Locked Print
HH:MM UserID
"HH:MM" is the time when the Locked Print file was stored, and "UserID" is the user ID entered using the printer driver.
Press the [ ][ ] keys to select [Print Job], and then press the [OK] key.
Enter the password using the number keys, and then press the [OK] key.
The Locked Print file is printed.
● Use the following keys to cancel operation:
�❍ [ ]: Cancels the operation and returns the display to the previous screen.
�❍ [Clear/Stop]: Cancels the operation and returns the display to the initial screen.
● If the machine is currently printing, you cannot print a Locked Print file. The machine beeps if you try to do so.
● While entering a password using the control panel, the machine cannot begin other print jobs.
Contents Previous Next Settings

● The Locked Print file is automatically erased from the machine's memory when it is printed out, or when the machine's
power is turned off.
Top Previous Next
Copyright © 2009
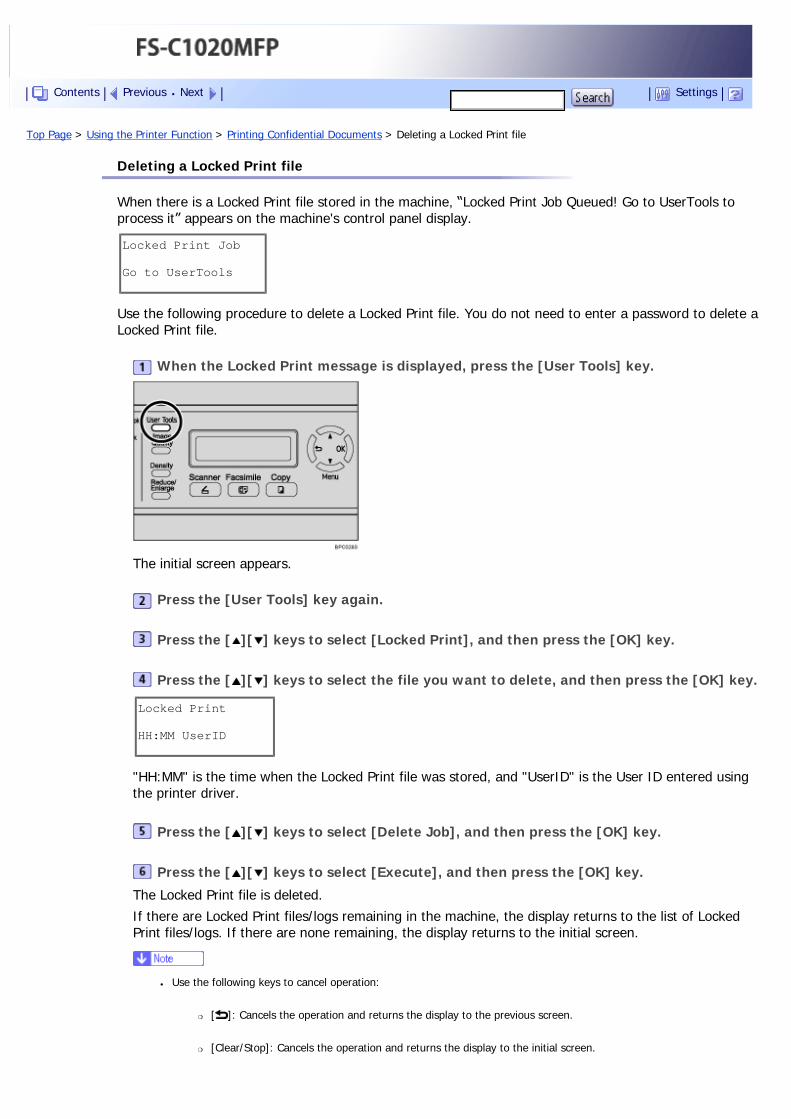
Top Page > Using the Printer Function > Printing Confidential Documents > Deleting a Locked Print file
Deleting a Locked Print file
When there is a Locked Print file stored in the machine, “Locked Print Job Queued! Go to UserTools to process it” appears on the machine's control panel display.
Locked Print Job
Go to UserTools
Use the following procedure to delete a Locked Print file. You do not need to enter a password to delete a Locked Print file.
When the Locked Print message is displayed, press the [User Tools] key.
The initial screen appears.
Press the [User Tools] key again.
Press the [ ][ ] keys to select [Locked Print], and then press the [OK] key.
Press the [ ][ ] keys to select the file you want to delete, and then press the [OK] key.
Locked Print
HH:MM UserID
"HH:MM" is the time when the Locked Print file was stored, and "UserID" is the User ID entered using the printer driver.
Press the [ ][ ] keys to select [Delete Job], and then press the [OK] key.
Press the [ ][ ] keys to select [Execute], and then press the [OK] key.
The Locked Print file is deleted.
If there are Locked Print files/logs remaining in the machine, the display returns to the list of Locked Print files/logs. If there are none remaining, the display returns to the initial screen.
● Use the following keys to cancel operation:
�❍ [ ]: Cancels the operation and returns the display to the previous screen.
�❍ [Clear/Stop]: Cancels the operation and returns the display to the initial screen.
Contents Previous Next Settings

Top Previous Next
Copyright © 2009
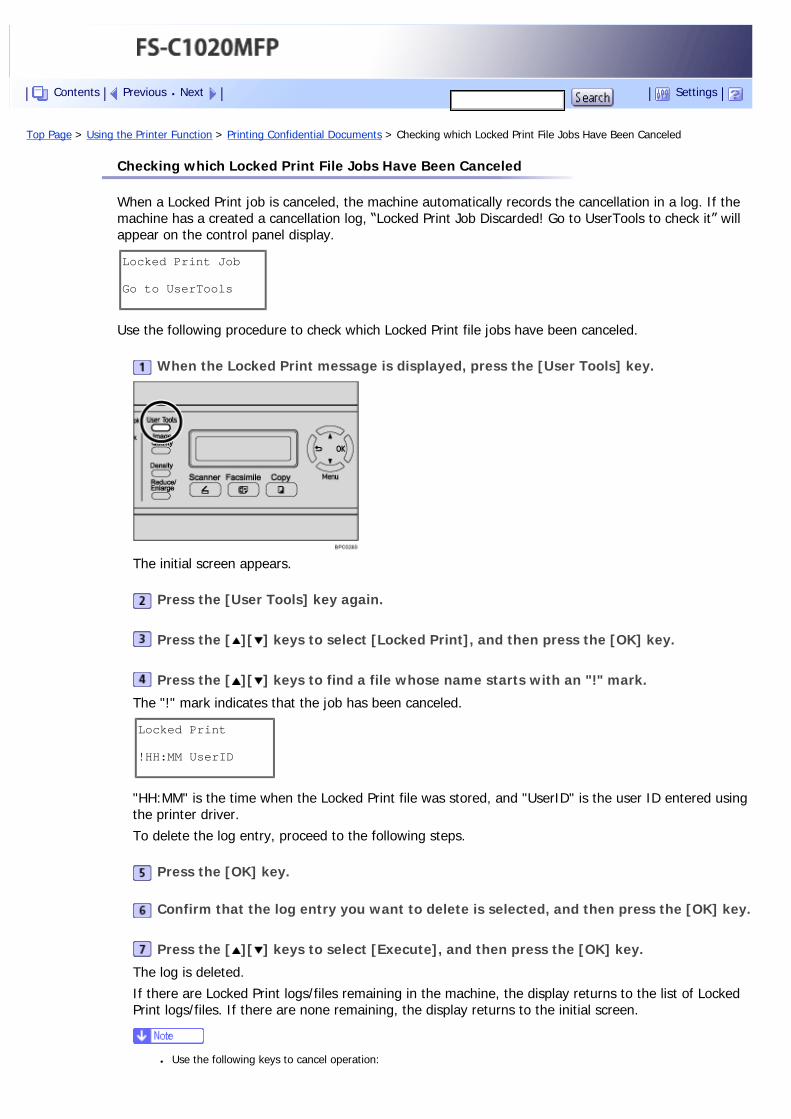
Top Page > Using the Printer Function > Printing Confidential Documents > Checking which Locked Print File Jobs Have Been Canceled
Checking which Locked Print File Jobs Have Been Canceled
When a Locked Print job is canceled, the machine automatically records the cancellation in a log. If the machine has a created a cancellation log, “Locked Print Job Discarded! Go to UserTools to check it” will appear on the control panel display.
Locked Print Job
Go to UserTools
Use the following procedure to check which Locked Print file jobs have been canceled.
When the Locked Print message is displayed, press the [User Tools] key.
The initial screen appears.
Press the [User Tools] key again.
Press the [ ][ ] keys to select [Locked Print], and then press the [OK] key.
Press the [ ][ ] keys to find a file whose name starts with an "!" mark.
The "!" mark indicates that the job has been canceled.
Locked Print
!HH:MM UserID
"HH:MM" is the time when the Locked Print file was stored, and "UserID" is the user ID entered using the printer driver.
To delete the log entry, proceed to the following steps.
Press the [OK] key.
Confirm that the log entry you want to delete is selected, and then press the [OK] key.
Press the [ ][ ] keys to select [Execute], and then press the [OK] key.
The log is deleted.
If there are Locked Print logs/files remaining in the machine, the display returns to the list of Locked Print logs/files. If there are none remaining, the display returns to the initial screen.
● Use the following keys to cancel operation:
Contents Previous Next Settings

�❍ [ ]: Cancels the operation and returns the display to the previous screen.
�❍ [Clear/Stop]: Cancels the operation and returns the display to the initial screen.
● The machine keeps a log of the 10 most recent canceled jobs. If a Locked Print file is canceled when the machine's log is
already full, the oldest log will be deleted automatically.
● The message “Locked Print Job Discarded! Go to UserTools to check it” disappears when all log entries are cleared.
● The log will be cleared when the machine is turned off.
Top Previous Next
Copyright © 2009
Top Page > Using the Printer Function > Using Various Print Functions
Using Various Print Functions
This section briefly describes various print functions that you can use to make printouts appropriate for your purposes. For details about the functions below, see the printer driver Help.
● Some functions might not be available, depending on the printer driver you are using.
Related topics
Print Quality Functions
Print Output Functions
Top Previous Next
Copyright © 2009
Contents Previous Next Settings
Top Page > Using the Printer Function > Using Various Print Functions > Print Quality Functions
Print Quality Functions
Print quality and color tone can be adjusted to suit the print data. Some of the print quality settings you can configure are described below. For details, see the printer driver Help.
Printing color documents in black and white
Because black and white printing is faster than color printing, this is more efficient for documents that do not need to be printed in color. Also, the black produced in black and white printing is a more distinct black than that produced in color printing.
Saving color toner when printing
You can save color toner by printing graphics and images with less than the usual amount of toner. Text is printed as usual so that it remains clear and easy to read.
This function is not available with Mac OS X.
Changing the image printing method
You can select to print with priority on print quality or print speed. When printing images, the higher the resolution of images, the longer the time required for printing.
Changing the dither pattern
A dither pattern is a pattern of dots used to simulate a color or shade of an image. If the pattern is changed, the characteristics of the image will also change. You can select a pattern suitable for the image to be printed.
Changing the color profiling pattern
You can select a color profiling pattern to adjust the tone of colors according to the colors displayed on the computer screen.
Because colors on the computer screen are created using the three RGB colors while colors for printing are composed of the four CMYK colors, colors need to be converted during the printing process. Therefore, images on the printed paper may look different from those on the computer screen if adjustment is not performed.
Printing grayscale images using black or CMYK
You can print black or gray sections of an image using black toner only, instead of using all CMYK toners. Compared to the black printed with CMYK toner, this results in a black that is flatter and purer.
Using ICM (Image Color Matching)
You can use Windows ICM function to reproduce colors that appear on the computer screen as close as they are on printed paper.
To use this function, the color profile must be added to the printer. You can find the color profile in the ICM folder stored on the provided CD-ROM. For information about adding a color profile, search Windows Help for “color profile”, and then see the appropriate topic.
This function is not available with Mac OS X.
Changing the method of downloading TrueType fonts to the machine
When you print documents that contain characters in TrueType fonts, garbled or distorted characters may be printed. Changing the method of downloading TrueType fonts may help to solve the problem. You can specify whether TrueType fonts are downloaded as TrueType fonts, bitmapped images, or graphics.
Contents Previous Next Settings

● If you perform color printing under Mac OS X, black and gray sections will be printed using all CMYK colors. If you want to
print grayscale sections using black toner only, print the document in black and white mode.
Top Previous Next
Copyright © 2009
Top Page > Using the Printer Function > Using Various Print Functions > Print Output Functions
Print Output Functions
You can specify the form of print outputs according to your purposes. This section briefly describes some of the settings that you can specify. For details, see the printer driver Help.
Printing multiple sets of a document
You can print multiple sets of the same document.
Collating the output in document batches
You can print complete sets of a multiple-page document one set at a time (P1, P2, P1, P2 ...). If this function is not used when printing multiple sets, prints will be output in page batches (P1, P1, P2, P2 ...). This function is useful when, for example, making presentation materials.
Changing orientation or rotating the image
You can change the orientation of an image to portrait or landscape. You can also rotate the image by 180 degrees. Use rotation to prevent an image from being printed upside down when using paper that a predefined top and bottom (such as letterhead paper).
Printing multiple pages per sheet
You can print multiple pages onto one sheet of paper.
When using this function, a suitable reduction or enlargement ratio is selected automatically based on the paper size and the number of pages you want to fit on each sheet.
Printing on both sides of paper (duplex printing)
You can print on both sides of paper, and available binding options include booklet.
Booklet binding is not available with Mac OS X.
Reducing or enlarging the document
You can reduce or enlarge documents by a specific ratio, from 25% to 400% in 1% increments. You can also reduce or enlarge documents automatically to fit a specific paper size. This function is useful, for example, when printing Web pages.
If the [Enable Large Papers] option is selected, A3/11” × 17”/B4/8K documents can be scaled to a size that the machine supports, so it can then be printed out.
[Enable Large Papers] is not available with Mac OS X.
Printing with a cover page
You can add a cover page to the print job.
You can select to leave the cover page blank, or print the first page of the document on the cover page. If a cover page is inserted into a duplex job, you can print on its back side also.
Paper for the cover page can either be the same as or different from the remaining pages.
Printing on custom size paper
You can print using non-standard size paper by specifying the size of the paper as custom size.
Superimposing images or text on prints (watermark)
You can superimpose watermark text and images on prints. Various predefined watermarks are provided. You can also create your own watermarks.
Contents Previous Next Settings

Top Previous Next
Copyright © 2009
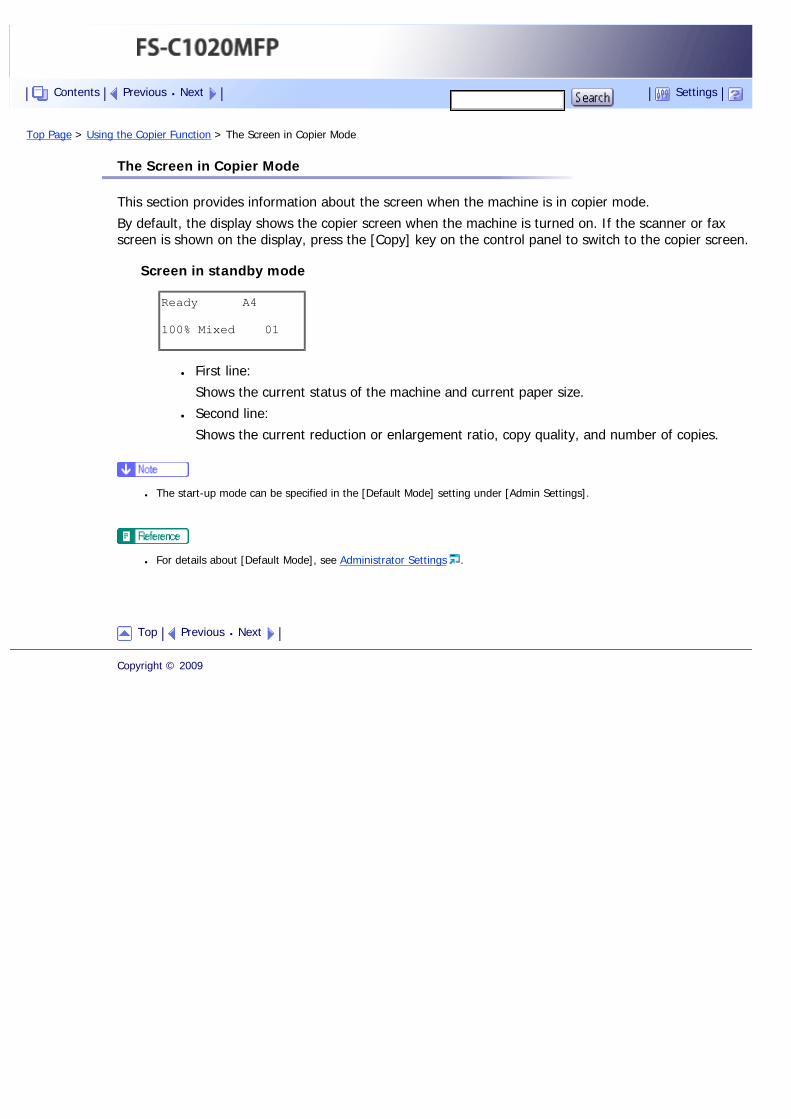
Top Page > Using the Copier Function > The Screen in Copier Mode
The Screen in Copier Mode
This section provides information about the screen when the machine is in copier mode.
By default, the display shows the copier screen when the machine is turned on. If the scanner or fax screen is shown on the display, press the [Copy] key on the control panel to switch to the copier screen.
Screen in standby mode
Ready A4
100% Mixed 01
● First line:
Shows the current status of the machine and current paper size.
● Second line:
Shows the current reduction or enlargement ratio, copy quality, and number of copies.
● The start-up mode can be specified in the [Default Mode] setting under [Admin Settings].
● For details about [Default Mode], see Administrator Settings .
Top Previous Next
Copyright © 2009
Contents Previous Next Settings
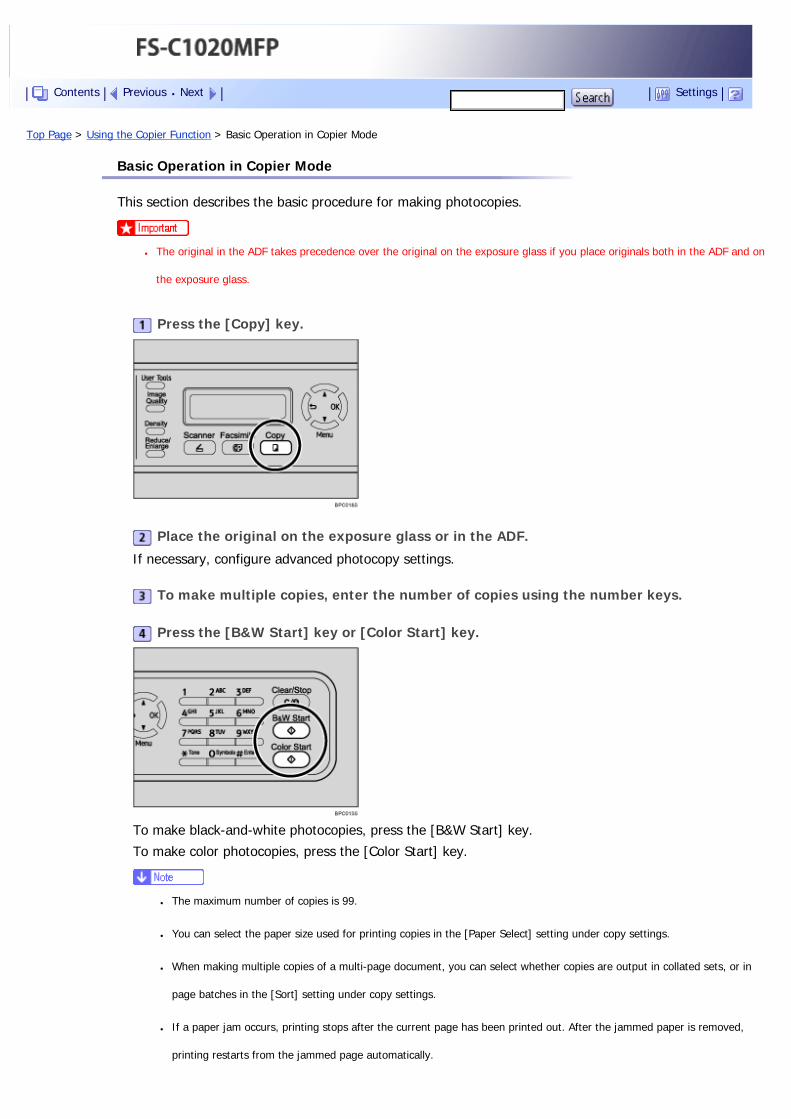
Top Page > Using the Copier Function > Basic Operation in Copier Mode
Basic Operation in Copier Mode
This section describes the basic procedure for making photocopies.
● The original in the ADF takes precedence over the original on the exposure glass if you place originals both in the ADF and on
the exposure glass.
Press the [Copy] key.
Place the original on the exposure glass or in the ADF.
If necessary, configure advanced photocopy settings.
To make multiple copies, enter the number of copies using the number keys.
Press the [B&W Start] key or [Color Start] key.
To make black-and-white photocopies, press the [B&W Start] key.
To make color photocopies, press the [Color Start] key.
● The maximum number of copies is 99.
● You can select the paper size used for printing copies in the [Paper Select] setting under copy settings.
● When making multiple copies of a multi-page document, you can select whether copies are output in collated sets, or in
page batches in the [Sort] setting under copy settings.
● If a paper jam occurs, printing stops after the current page has been printed out. After the jammed paper is removed,
printing restarts from the jammed page automatically.
Contents Previous Next Settings
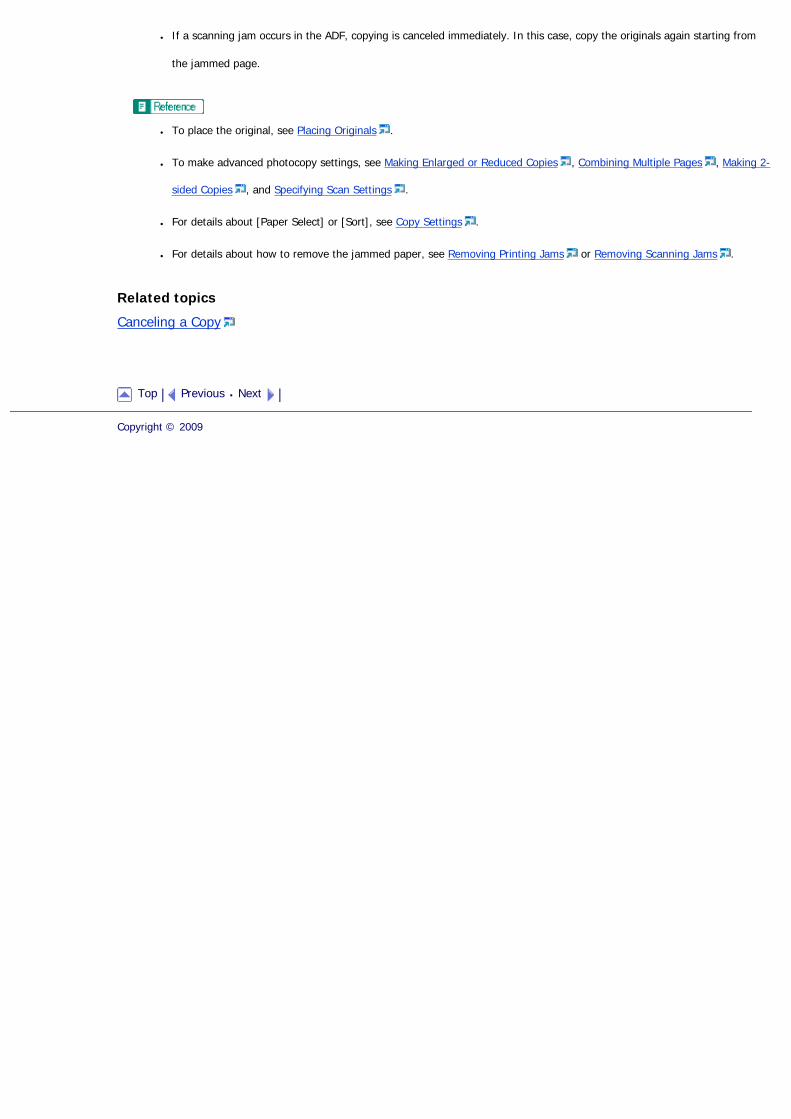
● If a scanning jam occurs in the ADF, copying is canceled immediately. In this case, copy the originals again starting from
the jammed page.
● To place the original, see Placing Originals .
● To make advanced photocopy settings, see Making Enlarged or Reduced Copies , Combining Multiple Pages , Making 2-
sided Copies , and Specifying Scan Settings .
● For details about [Paper Select] or [Sort], see Copy Settings .
● For details about how to remove the jammed paper, see Removing Printing Jams or Removing Scanning Jams .
Related topics
Canceling a Copy
Top Previous Next
Copyright © 2009
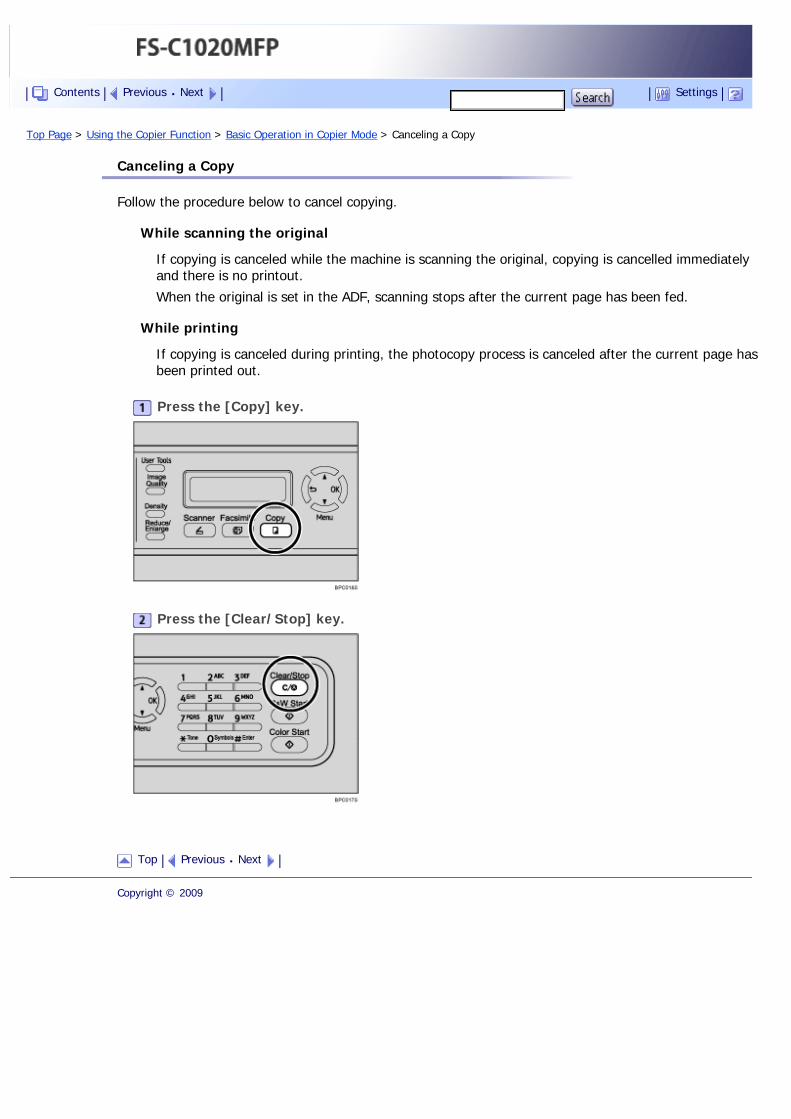
Top Page > Using the Copier Function > Basic Operation in Copier Mode > Canceling a Copy
Canceling a Copy
Follow the procedure below to cancel copying.
While scanning the original
If copying is canceled while the machine is scanning the original, copying is cancelled immediately and there is no printout.
When the original is set in the ADF, scanning stops after the current page has been fed.
While printing
If copying is canceled during printing, the photocopy process is canceled after the current page has been printed out.
Press the [Copy] key.
Press the [Clear/Stop] key.
Top Previous Next
Copyright © 2009
Contents Previous Next Settings
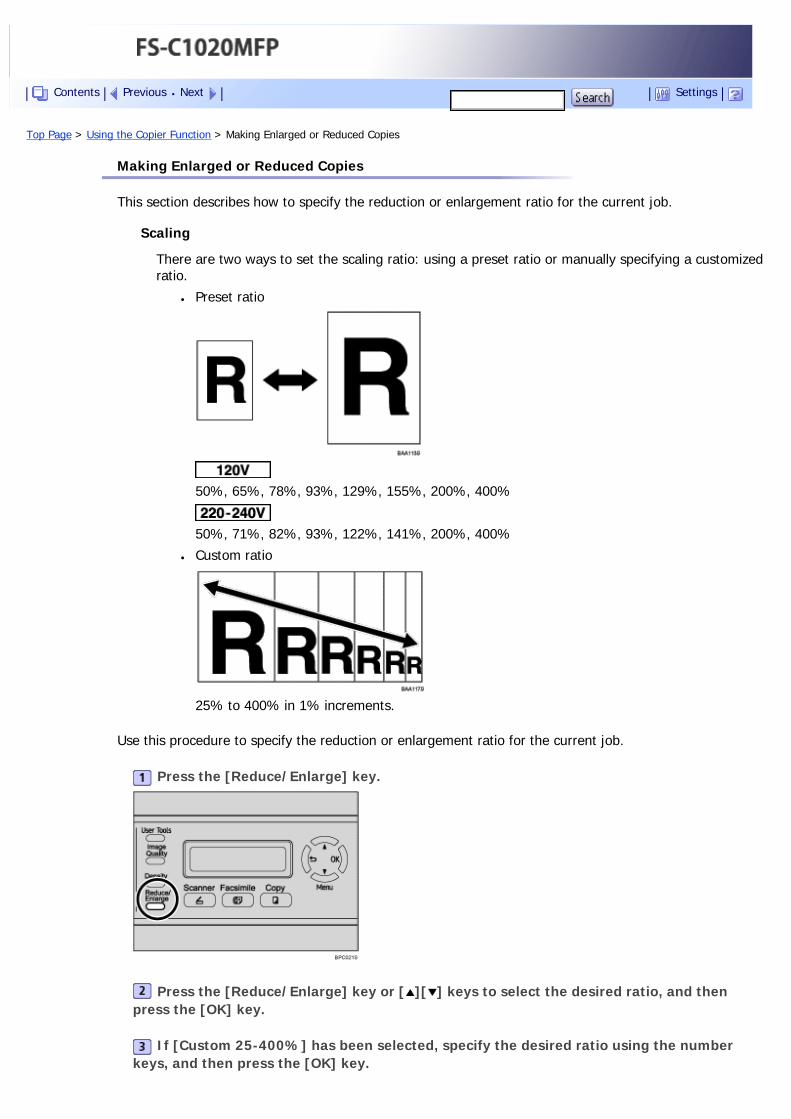
Top Page > Using the Copier Function > Making Enlarged or Reduced Copies
Making Enlarged or Reduced Copies
This section describes how to specify the reduction or enlargement ratio for the current job.
Scaling
There are two ways to set the scaling ratio: using a preset ratio or manually specifying a customized ratio.
● Preset ratio
50%, 65%, 78%, 93%, 129%, 155%, 200%, 400%
50%, 71%, 82%, 93%, 122%, 141%, 200%, 400%
● Custom ratio
25% to 400% in 1% increments.
Use this procedure to specify the reduction or enlargement ratio for the current job.
Press the [Reduce/Enlarge] key.
Press the [Reduce/Enlarge] key or [ ][ ] keys to select the desired ratio, and then press the [OK] key.
If [Custom 25-400%] has been selected, specify the desired ratio using the number keys, and then press the [OK] key.
Contents Previous Next Settings

● Use the following keys to cancel settings:
�❍ [ ]: Cancels the changes made to settings and returns the display to the previous screen.
�❍ [Clear/Stop]: Cancels the changes made to settings and returns the display to the initial screen.
● You can change the machine's default [Reduce/Enlarge] setting to always make photocopies in the specified ratio.
● Temporary job settings are cleared in the following cases:
�❍ When no input is received for the period of time specified in [Auto Clear] while the initial screen is displayed.
�❍ When the [Clear/Stop] key is pressed while the initial screen is displayed.
�❍ When the machine's mode is changed.
�❍ When the power is turned off.
�❍ When the machine's default for the same setting is changed.
● For details about [Reduce/Enlarge], see Copy Settings .
● For details about [Auto Clear], see Administrator Settings .
Top Previous Next
Copyright © 2009
Top Page > Using the Copier Function > Combining Multiple Pages
Combining Multiple Pages
This section describes how to set the machine to combine multiple pages of an original onto a single sheet of paper.
There are two ways to combine multiple pages: 2-in-1/4-in-1 copy and ID card copy.
2-in-1/4-in-1 copy
You can copy two or four pages of an original onto a single sheet of paper.
ID card copy
You can copy the front and back sides of an ID card, or other small document, onto one side of a sheet of paper.
Related topics
Copying Two or Four Pages onto One Sheet
Copying Both Sides of an ID Card onto One Side of Paper
Top Previous Next
Copyright © 2009
Contents Previous Next Settings
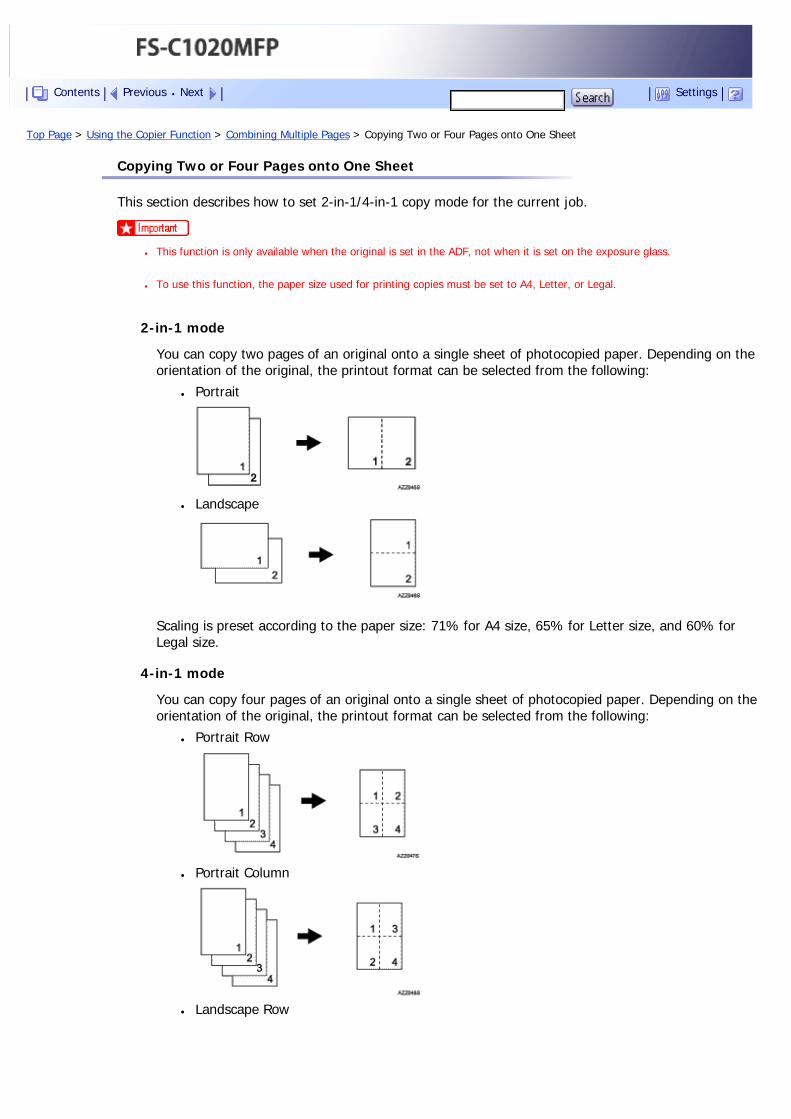
Top Page > Using the Copier Function > Combining Multiple Pages > Copying Two or Four Pages onto One Sheet
Copying Two or Four Pages onto One Sheet
This section describes how to set 2-in-1/4-in-1 copy mode for the current job.
● This function is only available when the original is set in the ADF, not when it is set on the exposure glass.
● To use this function, the paper size used for printing copies must be set to A4, Letter, or Legal.
2-in-1 mode
You can copy two pages of an original onto a single sheet of photocopied paper. Depending on the orientation of the original, the printout format can be selected from the following:
● Portrait
● Landscape
Scaling is preset according to the paper size: 71% for A4 size, 65% for Letter size, and 60% for Legal size.
4-in-1 mode
You can copy four pages of an original onto a single sheet of photocopied paper. Depending on the orientation of the original, the printout format can be selected from the following:
● Portrait Row
● Portrait Column
● Landscape Row
Contents Previous Next Settings
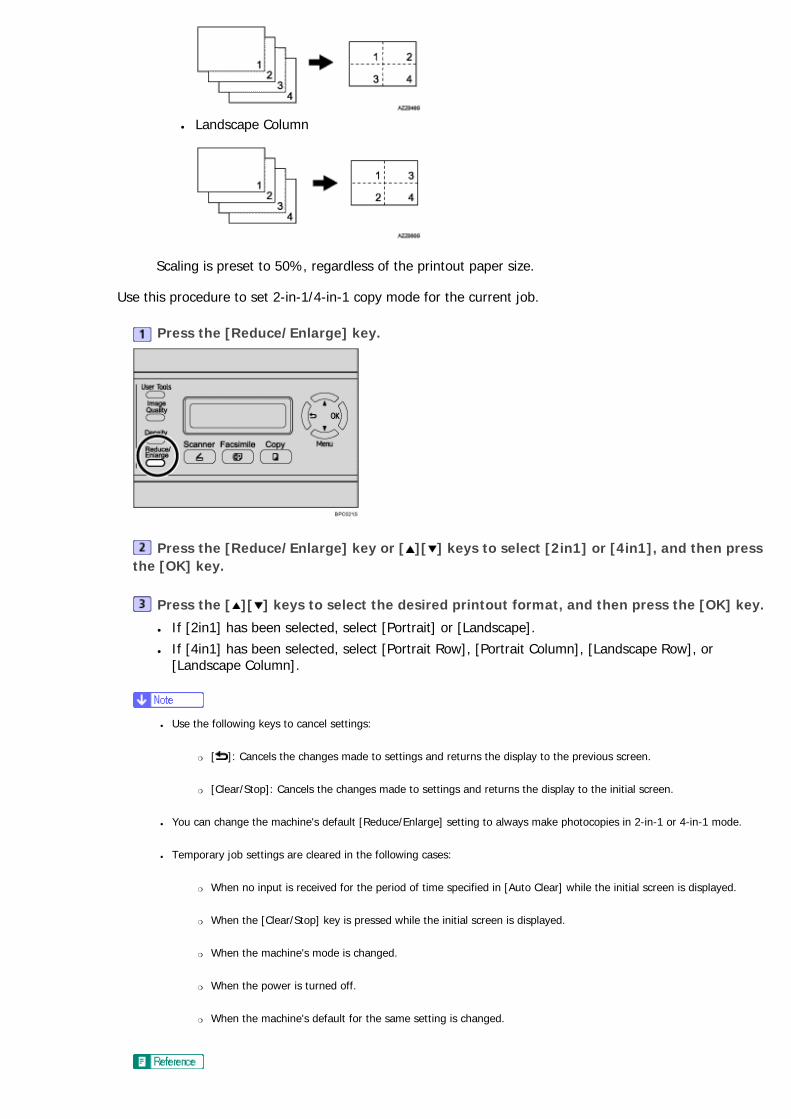
● Landscape Column
Scaling is preset to 50%, regardless of the printout paper size.
Use this procedure to set 2-in-1/4-in-1 copy mode for the current job.
Press the [Reduce/Enlarge] key.
Press the [Reduce/Enlarge] key or [ ][ ] keys to select [2in1] or [4in1], and then press the [OK] key.
Press the [ ][ ] keys to select the desired printout format, and then press the [OK] key.
● If [2in1] has been selected, select [Portrait] or [Landscape].
● If [4in1] has been selected, select [Portrait Row], [Portrait Column], [Landscape Row], or [Landscape Column].
● Use the following keys to cancel settings:
�❍ [ ]: Cancels the changes made to settings and returns the display to the previous screen.
�❍ [Clear/Stop]: Cancels the changes made to settings and returns the display to the initial screen.
● You can change the machine's default [Reduce/Enlarge] setting to always make photocopies in 2-in-1 or 4-in-1 mode.
● Temporary job settings are cleared in the following cases:
�❍ When no input is received for the period of time specified in [Auto Clear] while the initial screen is displayed.
�❍ When the [Clear/Stop] key is pressed while the initial screen is displayed.
�❍ When the machine's mode is changed.
�❍ When the power is turned off.
�❍ When the machine's default for the same setting is changed.

● For details about [Reduce/Enlarge], see Copy Settings .
● For details about [Auto Clear], see Administrator Settings .
Top Previous Next
Copyright © 2009
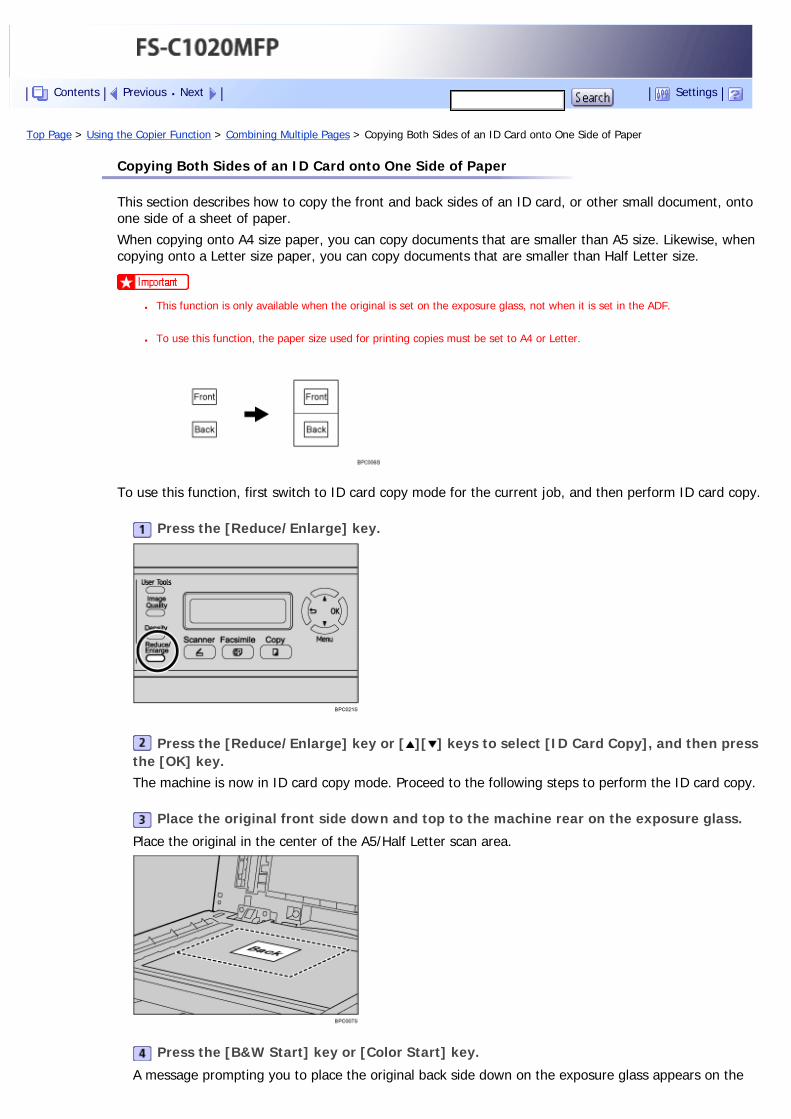
Top Page > Using the Copier Function > Combining Multiple Pages > Copying Both Sides of an ID Card onto One Side of Paper
Copying Both Sides of an ID Card onto One Side of Paper
This section describes how to copy the front and back sides of an ID card, or other small document, onto one side of a sheet of paper.
When copying onto A4 size paper, you can copy documents that are smaller than A5 size. Likewise, when copying onto a Letter size paper, you can copy documents that are smaller than Half Letter size.
● This function is only available when the original is set on the exposure glass, not when it is set in the ADF.
● To use this function, the paper size used for printing copies must be set to A4 or Letter.
To use this function, first switch to ID card copy mode for the current job, and then perform ID card copy.
Press the [Reduce/Enlarge] key.
Press the [Reduce/Enlarge] key or [ ][ ] keys to select [ID Card Copy], and then press the [OK] key.The machine is now in ID card copy mode. Proceed to the following steps to perform the ID card copy.
Place the original front side down and top to the machine rear on the exposure glass.
Place the original in the center of the A5/Half Letter scan area.
Press the [B&W Start] key or [Color Start] key.
A message prompting you to place the original back side down on the exposure glass appears on the
Contents Previous Next Settings
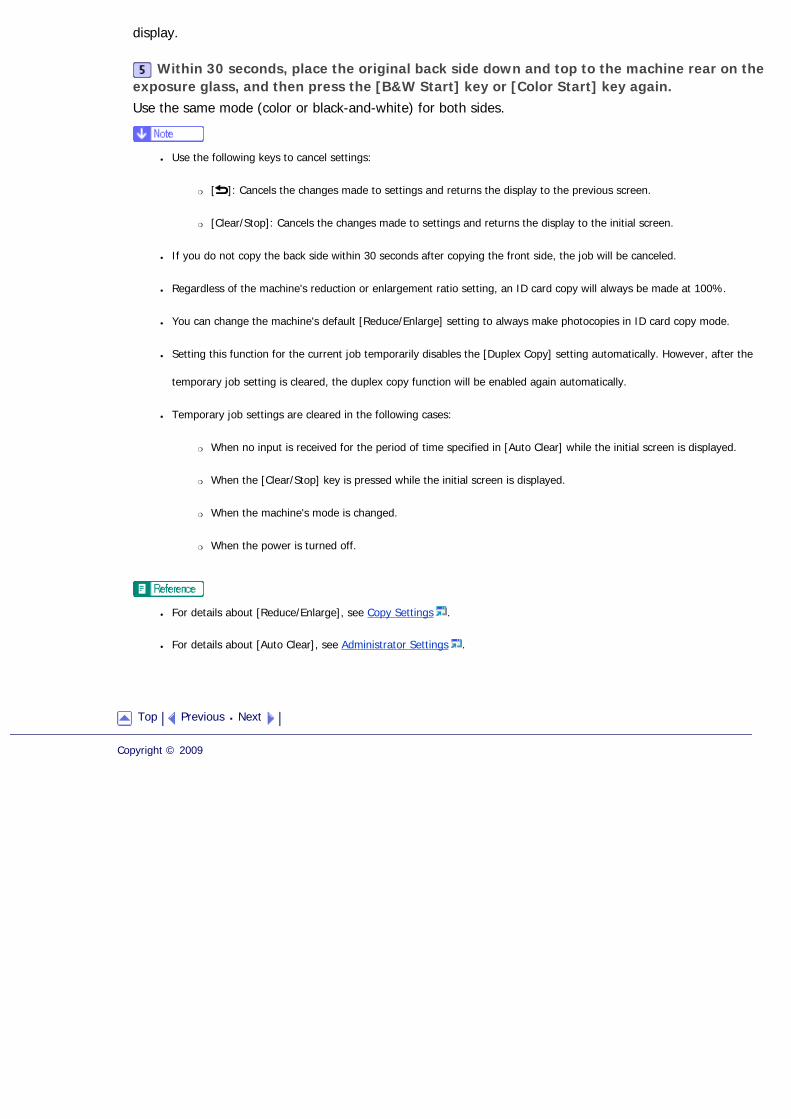
display.
Within 30 seconds, place the original back side down and top to the machine rear on the exposure glass, and then press the [B&W Start] key or [Color Start] key again.Use the same mode (color or black-and-white) for both sides.
● Use the following keys to cancel settings:
�❍ [ ]: Cancels the changes made to settings and returns the display to the previous screen.
�❍ [Clear/Stop]: Cancels the changes made to settings and returns the display to the initial screen.
● If you do not copy the back side within 30 seconds after copying the front side, the job will be canceled.
● Regardless of the machine's reduction or enlargement ratio setting, an ID card copy will always be made at 100%.
● You can change the machine's default [Reduce/Enlarge] setting to always make photocopies in ID card copy mode.
● Setting this function for the current job temporarily disables the [Duplex Copy] setting automatically. However, after the
temporary job setting is cleared, the duplex copy function will be enabled again automatically.
● Temporary job settings are cleared in the following cases:
�❍ When no input is received for the period of time specified in [Auto Clear] while the initial screen is displayed.
�❍ When the [Clear/Stop] key is pressed while the initial screen is displayed.
�❍ When the machine's mode is changed.
�❍ When the power is turned off.
● For details about [Reduce/Enlarge], see Copy Settings .
● For details about [Auto Clear], see Administrator Settings .
Top Previous Next
Copyright © 2009
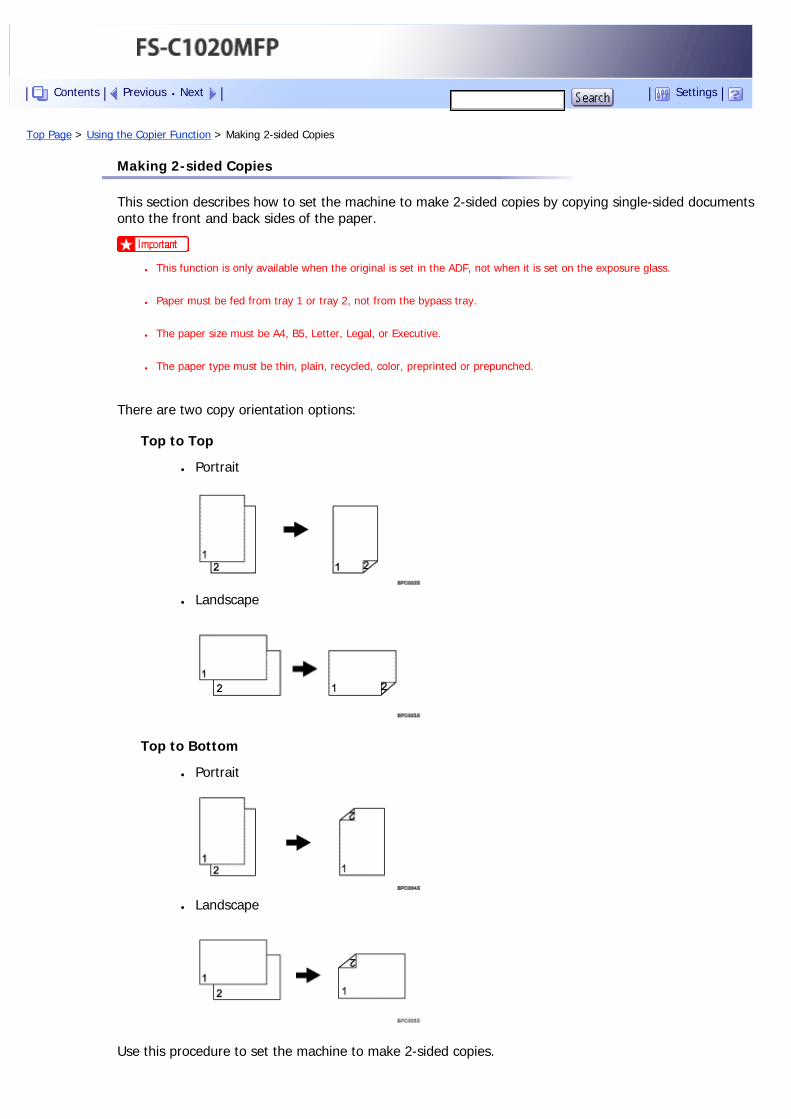
Top Page > Using the Copier Function > Making 2-sided Copies
Making 2-sided Copies
This section describes how to set the machine to make 2-sided copies by copying single-sided documents onto the front and back sides of the paper.
● This function is only available when the original is set in the ADF, not when it is set on the exposure glass.
● Paper must be fed from tray 1 or tray 2, not from the bypass tray.
● The paper size must be A4, B5, Letter, Legal, or Executive.
● The paper type must be thin, plain, recycled, color, preprinted or prepunched.
There are two copy orientation options:
Top to Top
● Portrait
● Landscape
Top to Bottom
● Portrait
● Landscape
Use this procedure to set the machine to make 2-sided copies.
Contents Previous Next Settings
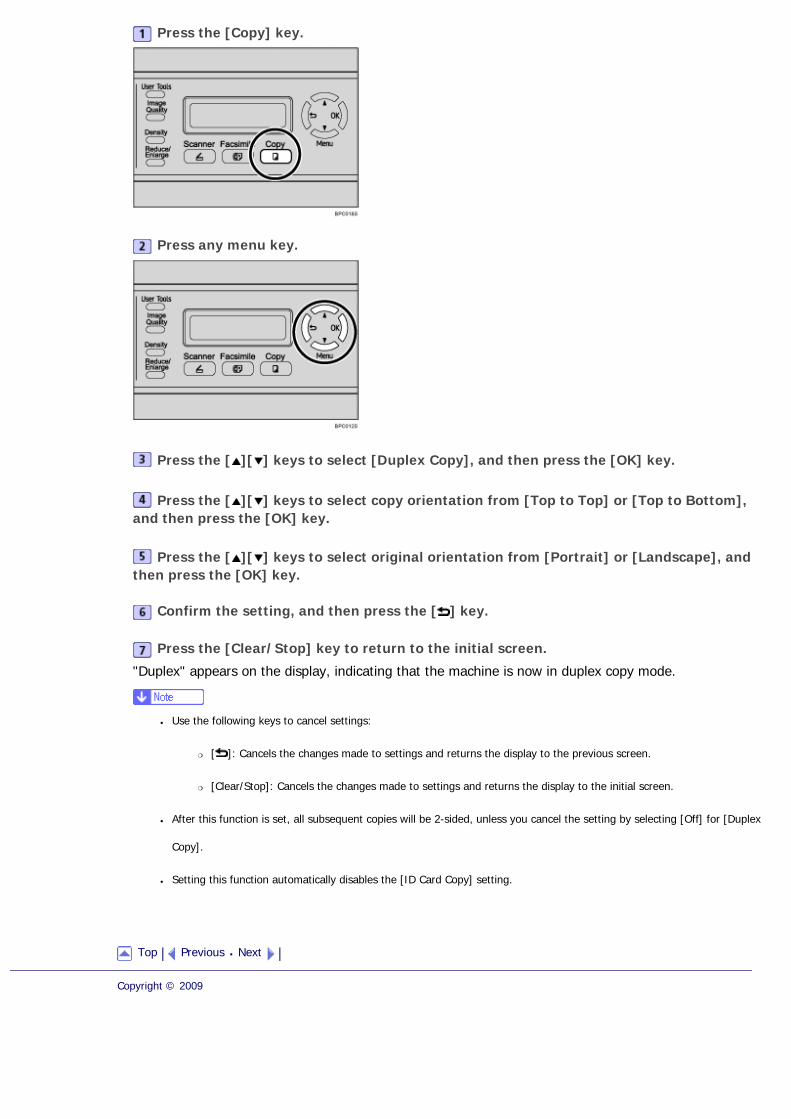
Press the [Copy] key.
Press any menu key.
Press the [ ][ ] keys to select [Duplex Copy], and then press the [OK] key.
Press the [ ][ ] keys to select copy orientation from [Top to Top] or [Top to Bottom], and then press the [OK] key.
Press the [ ][ ] keys to select original orientation from [Portrait] or [Landscape], and then press the [OK] key.
Confirm the setting, and then press the [ ] key.
Press the [Clear/Stop] key to return to the initial screen.
"Duplex" appears on the display, indicating that the machine is now in duplex copy mode.
● Use the following keys to cancel settings:
�❍ [ ]: Cancels the changes made to settings and returns the display to the previous screen.
�❍ [Clear/Stop]: Cancels the changes made to settings and returns the display to the initial screen.
● After this function is set, all subsequent copies will be 2-sided, unless you cancel the setting by selecting [Off] for [Duplex
Copy].
● Setting this function automatically disables the [ID Card Copy] setting.
Top Previous Next
Copyright © 2009

Top Page > Using the Copier Function > Specifying Scan Settings
Specifying Scan Settings
This section describes how to specify image density and quality for the current job.
Related topics
Adjusting Image Density
Selecting the Document Type According to Original
Top Previous Next
Copyright © 2009
Contents Previous Next Settings
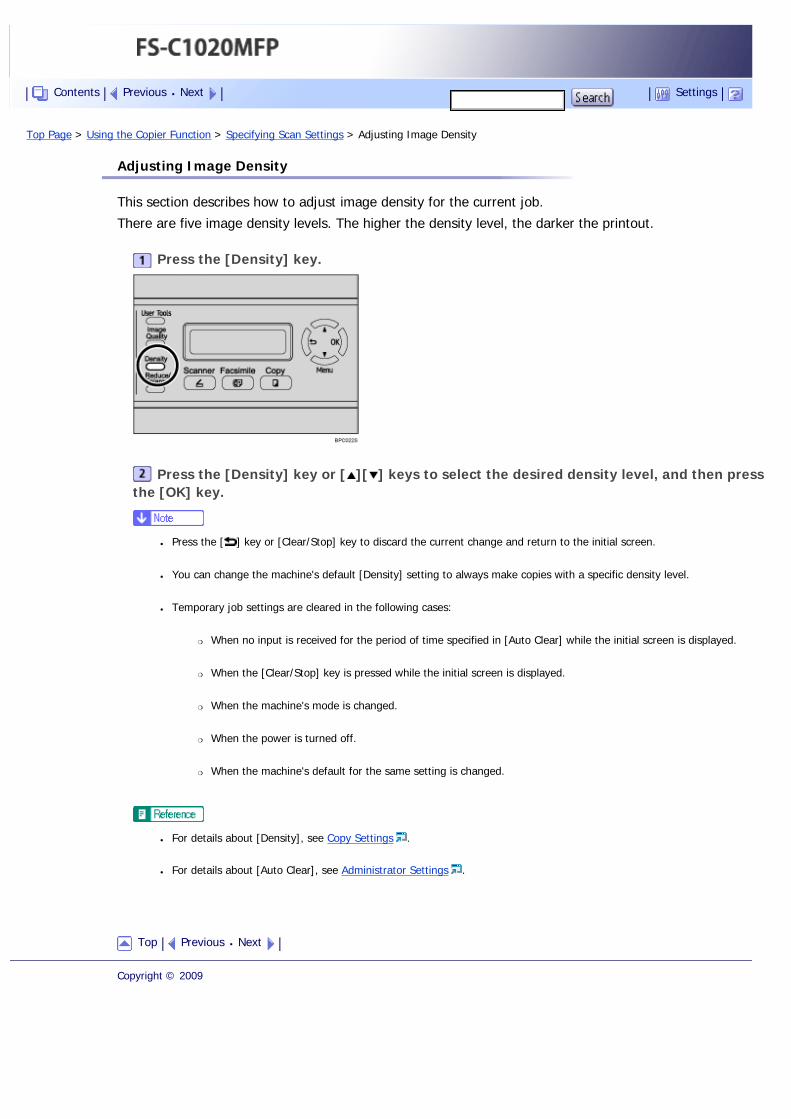
Top Page > Using the Copier Function > Specifying Scan Settings > Adjusting Image Density
Adjusting Image Density
This section describes how to adjust image density for the current job.
There are five image density levels. The higher the density level, the darker the printout.
Press the [Density] key.
Press the [Density] key or [ ][ ] keys to select the desired density level, and then press the [OK] key.
● Press the [ ] key or [Clear/Stop] key to discard the current change and return to the initial screen.
● You can change the machine's default [Density] setting to always make copies with a specific density level.
● Temporary job settings are cleared in the following cases:
�❍ When no input is received for the period of time specified in [Auto Clear] while the initial screen is displayed.
�❍ When the [Clear/Stop] key is pressed while the initial screen is displayed.
�❍ When the machine's mode is changed.
�❍ When the power is turned off.
�❍ When the machine's default for the same setting is changed.
● For details about [Density], see Copy Settings .
● For details about [Auto Clear], see Administrator Settings .
Top Previous Next
Copyright © 2009
Contents Previous Next Settings
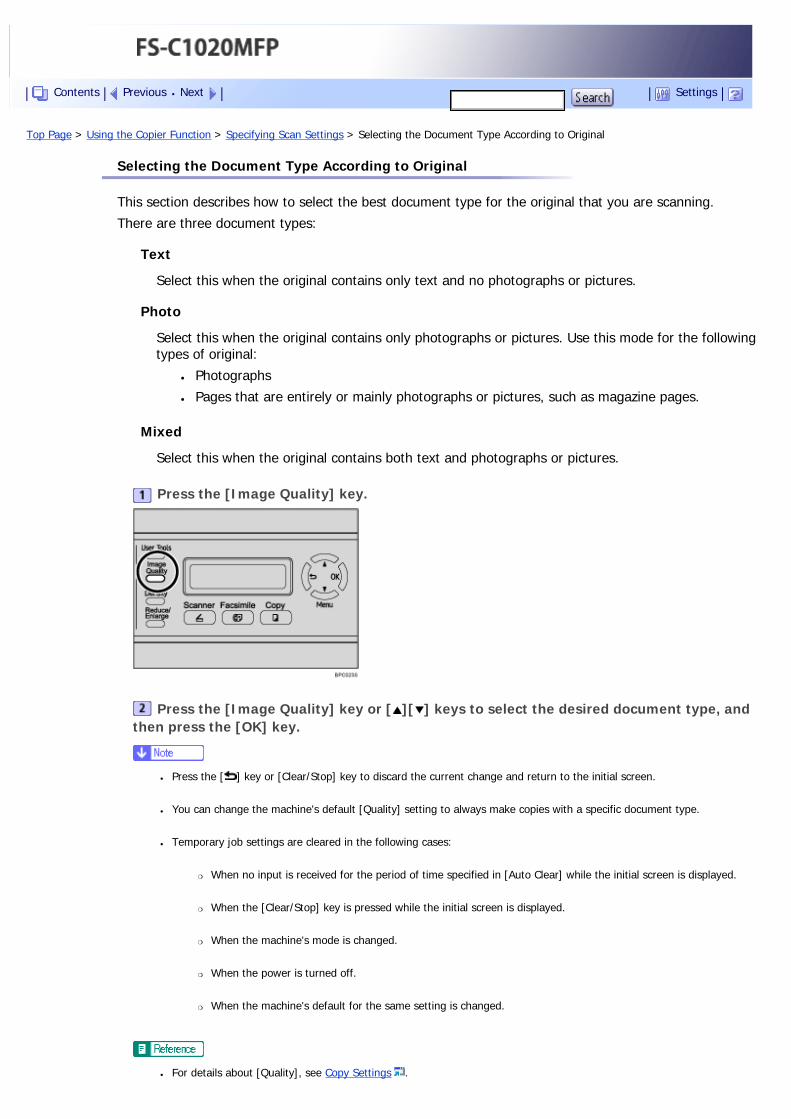
Top Page > Using the Copier Function > Specifying Scan Settings > Selecting the Document Type According to Original
Selecting the Document Type According to Original
This section describes how to select the best document type for the original that you are scanning.
There are three document types:
Text
Select this when the original contains only text and no photographs or pictures.
Photo
Select this when the original contains only photographs or pictures. Use this mode for the following types of original:
● Photographs
● Pages that are entirely or mainly photographs or pictures, such as magazine pages.
Mixed
Select this when the original contains both text and photographs or pictures.
Press the [Image Quality] key.
Press the [Image Quality] key or [ ][ ] keys to select the desired document type, and then press the [OK] key.
● Press the [ ] key or [Clear/Stop] key to discard the current change and return to the initial screen.
● You can change the machine's default [Quality] setting to always make copies with a specific document type.
● Temporary job settings are cleared in the following cases:
�❍ When no input is received for the period of time specified in [Auto Clear] while the initial screen is displayed.
�❍ When the [Clear/Stop] key is pressed while the initial screen is displayed.
�❍ When the machine's mode is changed.
�❍ When the power is turned off.
�❍ When the machine's default for the same setting is changed.
● For details about [Quality], see Copy Settings .
Contents Previous Next Settings

● For details about [Auto Clear], see Administrator Settings .
Top Previous Next
Copyright © 2009
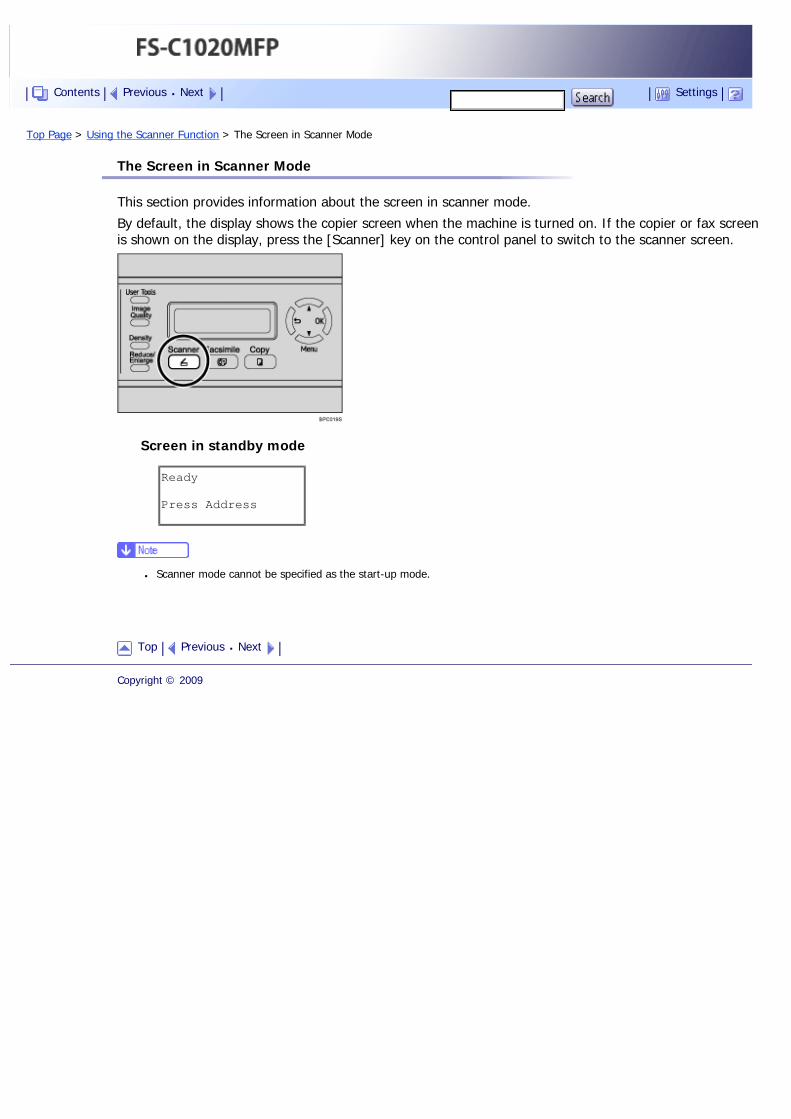
Top Page > Using the Scanner Function > The Screen in Scanner Mode
The Screen in Scanner Mode
This section provides information about the screen in scanner mode.
By default, the display shows the copier screen when the machine is turned on. If the copier or fax screen is shown on the display, press the [Scanner] key on the control panel to switch to the scanner screen.
Screen in standby mode
Ready
Press Address
● Scanner mode cannot be specified as the start-up mode.
Top Previous Next
Copyright © 2009
Contents Previous Next Settings
Top Page > Using the Scanner Function > Registering Scan Destinations
Registering Scan Destinations
This section describes how to register scan destinations in the Address Book. To send scanned files to an e-mail address (Scan to E-mail), FTP server (Scan to FTP), or a shared folder on a network computer (Scan to Folder), you must first register the destination in the Address Book using Web Browser.
● The Address Book data could be damaged or lost unexpectedly. The manufacturer shall not be responsible for any damages
resulting from such data loss. Be sure to create backup files of the Address Book data periodically.
● Depending on your network environment, the Scan to FTP and Scan to Folder functions may require a user name and
password to be correctly entered in the destination information. In such cases, after registering destinations, check that the
user name and password are correctly entered by sending test documents to those destinations.
The Address Book can contain up to 100 entries, including 20 Quick Dial entries.
Destinations registered as Quick Dial entries can be selected by pressing the corresponding One Touch button.
Start the Web browsing software, and access the machine by entering its IP address.
Click [One Touch Button] or [Scan Destination].
From the [Add New Type] list, select [E-mail], [FTP] or [Folder].
Register information as necessary.
The information you must register varies depending on the destination type. For details, see the tables below.
Enter the administrator password if required.
Click [Submit].
Close the Web browsing software.
Scan to E-mail Settings
Contents Previous Next Settings
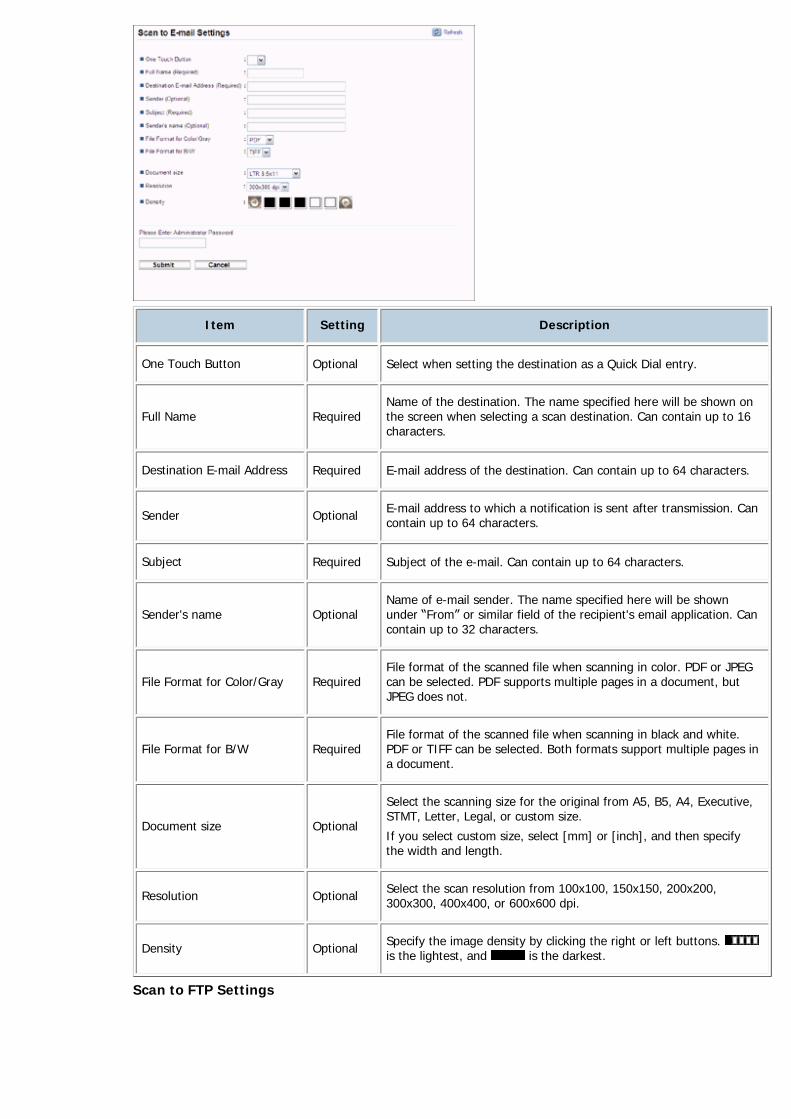
Item Setting Description
One Touch Button Optional Select when setting the destination as a Quick Dial entry.
Full Name RequiredName of the destination. The name specified here will be shown on the screen when selecting a scan destination. Can contain up to 16 characters.
Destination E-mail Address Required E-mail address of the destination. Can contain up to 64 characters.
Sender Optional E-mail address to which a notification is sent after transmission. Can contain up to 64 characters.
Subject Required Subject of the e-mail. Can contain up to 64 characters.
Sender's name OptionalName of e-mail sender. The name specified here will be shown under “From” or similar field of the recipient's email application. Can contain up to 32 characters.
File Format for Color/Gray RequiredFile format of the scanned file when scanning in color. PDF or JPEG can be selected. PDF supports multiple pages in a document, but JPEG does not.
File Format for B/W RequiredFile format of the scanned file when scanning in black and white. PDF or TIFF can be selected. Both formats support multiple pages in a document.
Document size Optional
Select the scanning size for the original from A5, B5, A4, Executive, STMT, Letter, Legal, or custom size.
If you select custom size, select [mm] or [inch], and then specify the width and length.
Resolution Optional Select the scan resolution from 100x100, 150x150, 200x200, 300x300, 400x400, or 600x600 dpi.
Density Optional Specify the image density by clicking the right or left buttons. is the lightest, and is the darkest.
Scan to FTP Settings
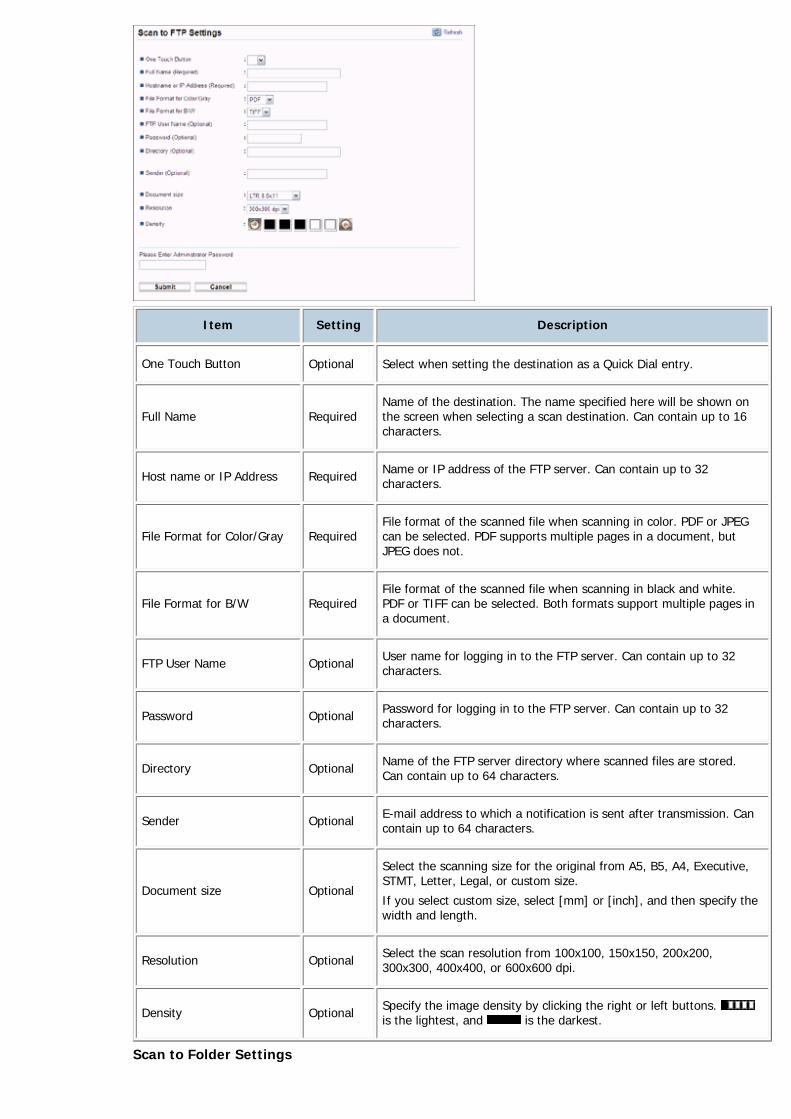
Item Setting Description
One Touch Button Optional Select when setting the destination as a Quick Dial entry.
Full Name RequiredName of the destination. The name specified here will be shown on the screen when selecting a scan destination. Can contain up to 16 characters.
Host name or IP Address Required Name or IP address of the FTP server. Can contain up to 32 characters.
File Format for Color/Gray RequiredFile format of the scanned file when scanning in color. PDF or JPEG can be selected. PDF supports multiple pages in a document, but JPEG does not.
File Format for B/W RequiredFile format of the scanned file when scanning in black and white. PDF or TIFF can be selected. Both formats support multiple pages in a document.
FTP User Name Optional User name for logging in to the FTP server. Can contain up to 32 characters.
Password Optional Password for logging in to the FTP server. Can contain up to 32 characters.
Directory Optional Name of the FTP server directory where scanned files are stored. Can contain up to 64 characters.
Sender Optional E-mail address to which a notification is sent after transmission. Can contain up to 64 characters.
Document size Optional
Select the scanning size for the original from A5, B5, A4, Executive, STMT, Letter, Legal, or custom size.
If you select custom size, select [mm] or [inch], and then specify the width and length.
Resolution Optional Select the scan resolution from 100x100, 150x150, 200x200, 300x300, 400x400, or 600x600 dpi.
Density Optional Specify the image density by clicking the right or left buttons. is the lightest, and is the darkest.
Scan to Folder Settings
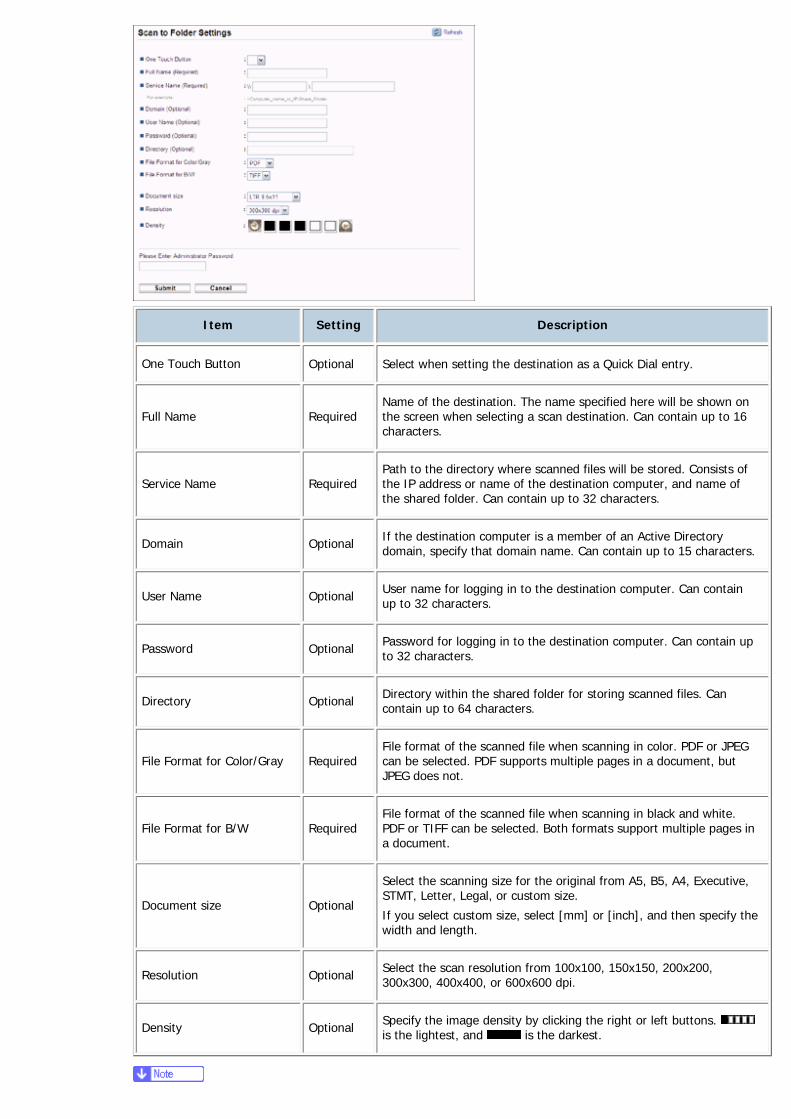
Item Setting Description
One Touch Button Optional Select when setting the destination as a Quick Dial entry.
Full Name RequiredName of the destination. The name specified here will be shown on the screen when selecting a scan destination. Can contain up to 16 characters.
Service Name RequiredPath to the directory where scanned files will be stored. Consists of the IP address or name of the destination computer, and name of the shared folder. Can contain up to 32 characters.
Domain Optional If the destination computer is a member of an Active Directory domain, specify that domain name. Can contain up to 15 characters.
User Name Optional User name for logging in to the destination computer. Can contain up to 32 characters.
Password Optional Password for logging in to the destination computer. Can contain up to 32 characters.
Directory Optional Directory within the shared folder for storing scanned files. Can contain up to 64 characters.
File Format for Color/Gray RequiredFile format of the scanned file when scanning in color. PDF or JPEG can be selected. PDF supports multiple pages in a document, but JPEG does not.
File Format for B/W RequiredFile format of the scanned file when scanning in black and white. PDF or TIFF can be selected. Both formats support multiple pages in a document.
Document size Optional
Select the scanning size for the original from A5, B5, A4, Executive, STMT, Letter, Legal, or custom size.
If you select custom size, select [mm] or [inch], and then specify the width and length.
Resolution Optional Select the scan resolution from 100x100, 150x150, 200x200, 300x300, 400x400, or 600x600 dpi.
Density Optional Specify the image density by clicking the right or left buttons. is the lightest, and is the darkest.
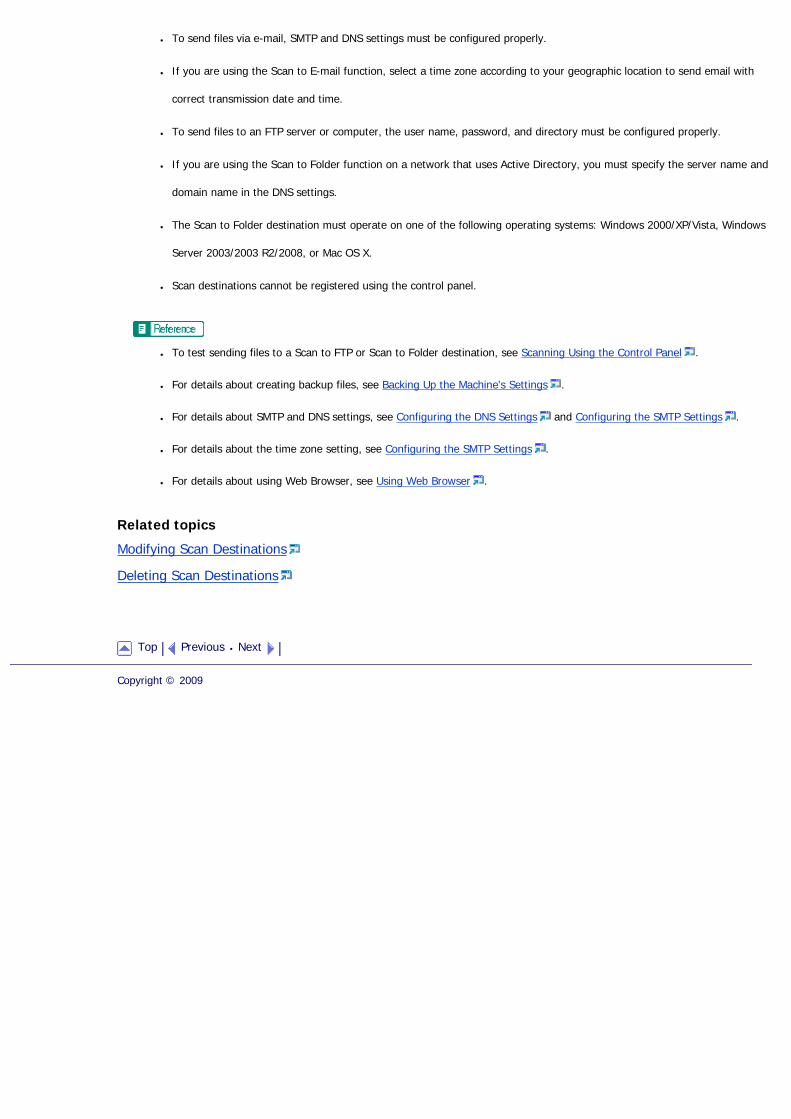
● To send files via e-mail, SMTP and DNS settings must be configured properly.
● If you are using the Scan to E-mail function, select a time zone according to your geographic location to send email with
correct transmission date and time.
● To send files to an FTP server or computer, the user name, password, and directory must be configured properly.
● If you are using the Scan to Folder function on a network that uses Active Directory, you must specify the server name and
domain name in the DNS settings.
● The Scan to Folder destination must operate on one of the following operating systems: Windows 2000/XP/Vista, Windows
Server 2003/2003 R2/2008, or Mac OS X.
● Scan destinations cannot be registered using the control panel.
● To test sending files to a Scan to FTP or Scan to Folder destination, see Scanning Using the Control Panel .
● For details about creating backup files, see Backing Up the Machine's Settings .
● For details about SMTP and DNS settings, see Configuring the DNS Settings and Configuring the SMTP Settings .
● For details about the time zone setting, see Configuring the SMTP Settings .
● For details about using Web Browser, see Using Web Browser .
Related topics
Modifying Scan Destinations
Deleting Scan Destinations
Top Previous Next
Copyright © 2009
Top Page > Using the Scanner Function > Registering Scan Destinations > Modifying Scan Destinations
Modifying Scan Destinations
This section describes how to modify the information of registered destinations.
Start the Web browsing software, and access the machine by entering its IP address.
Click [Scan Destination].
Select the entry to modify, and then click [Edit].
Modify settings as necessary.
Enter the administrator password if required.
Click [Submit].
Close the Web browsing software.
● You can unassign a Quick Dial entry from a One-touch button from the [One Touch Button] page. To do this, select the
desired entry, click [Exclude], and then click [Exclude] again on a confirmation page.
● For details about using Web Browser, see Using Web Browser .
Top Previous Next
Copyright © 2009
Contents Previous Next Settings
Top Page > Using the Scanner Function > Registering Scan Destinations > Deleting Scan Destinations
Deleting Scan Destinations
This section describes how to delete registered destinations.
Start the Web browsing software, and access the machine by entering its IP address.
Click [Scan Destination].
Select the entry to delete, and then click [Delete].
Confirm that the entry you have selected is the entry that you want to delete.
Enter the administrator password if required.
Click [Delete].
Close the Web browsing software.
● For details about using Web Browser, see Using Web Browser .
Top Previous Next
Copyright © 2009
Contents Previous Next Settings

Top Page > Using the Scanner Function > Scanning Using the Control Panel
Scanning Using the Control Panel
Scanning using the control panel allows you to send scanned files via e-mail (Scan to E-mail), to an FTP server (Scan to FTP), or to the shared folder of a computer on a network (Scan to Folder).
Scanning using the control panel is only available with network connection.
Related topics
Basic Operation for Sending Scanned Files
Specifying the Scan Settings
Top Previous Next
Copyright © 2009
Contents Previous Next Settings
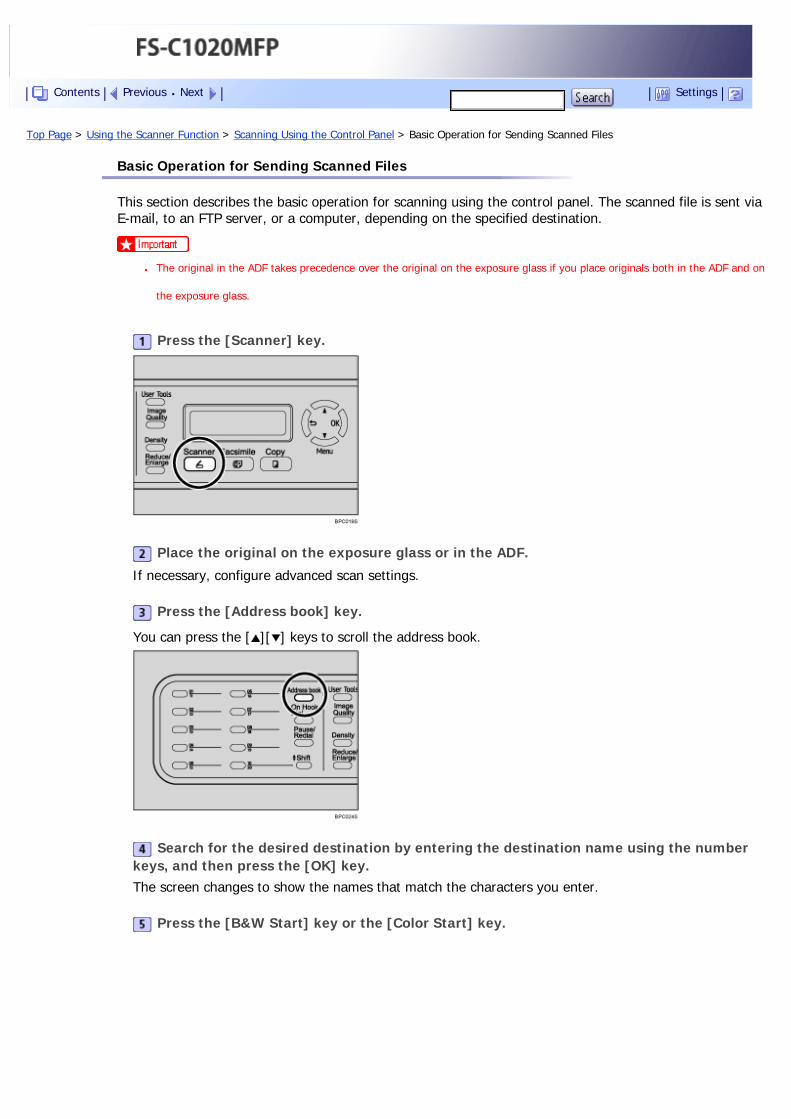
Top Page > Using the Scanner Function > Scanning Using the Control Panel > Basic Operation for Sending Scanned Files
Basic Operation for Sending Scanned Files
This section describes the basic operation for scanning using the control panel. The scanned file is sent via E-mail, to an FTP server, or a computer, depending on the specified destination.
● The original in the ADF takes precedence over the original on the exposure glass if you place originals both in the ADF and on
the exposure glass.
Press the [Scanner] key.
Place the original on the exposure glass or in the ADF.
If necessary, configure advanced scan settings.
Press the [Address book] key.
You can press the [ ][ ] keys to scroll the address book.
Search for the desired destination by entering the destination name using the number keys, and then press the [OK] key.The screen changes to show the names that match the characters you enter.
Press the [B&W Start] key or the [Color Start] key.
Contents Previous Next Settings
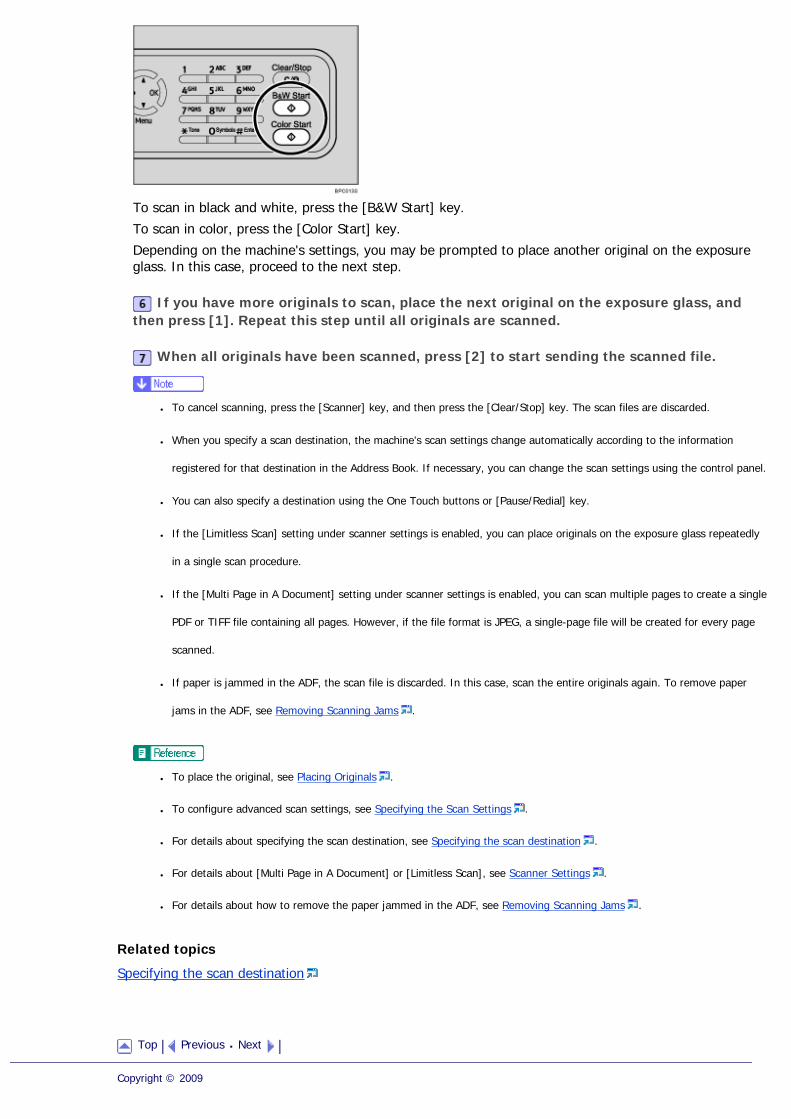
To scan in black and white, press the [B&W Start] key.
To scan in color, press the [Color Start] key.
Depending on the machine's settings, you may be prompted to place another original on the exposure glass. In this case, proceed to the next step.
If you have more originals to scan, place the next original on the exposure glass, and then press [1]. Repeat this step until all originals are scanned.
When all originals have been scanned, press [2] to start sending the scanned file.
● To cancel scanning, press the [Scanner] key, and then press the [Clear/Stop] key. The scan files are discarded.
● When you specify a scan destination, the machine's scan settings change automatically according to the information
registered for that destination in the Address Book. If necessary, you can change the scan settings using the control panel.
● You can also specify a destination using the One Touch buttons or [Pause/Redial] key.
● If the [Limitless Scan] setting under scanner settings is enabled, you can place originals on the exposure glass repeatedly
in a single scan procedure.
● If the [Multi Page in A Document] setting under scanner settings is enabled, you can scan multiple pages to create a single
PDF or TIFF file containing all pages. However, if the file format is JPEG, a single-page file will be created for every page
scanned.
● If paper is jammed in the ADF, the scan file is discarded. In this case, scan the entire originals again. To remove paper
jams in the ADF, see Removing Scanning Jams .
● To place the original, see Placing Originals .
● To configure advanced scan settings, see Specifying the Scan Settings .
● For details about specifying the scan destination, see Specifying the scan destination .
● For details about [Multi Page in A Document] or [Limitless Scan], see Scanner Settings .
● For details about how to remove the paper jammed in the ADF, see Removing Scanning Jams .
Related topics
Specifying the scan destination
Top Previous Next
Copyright © 2009

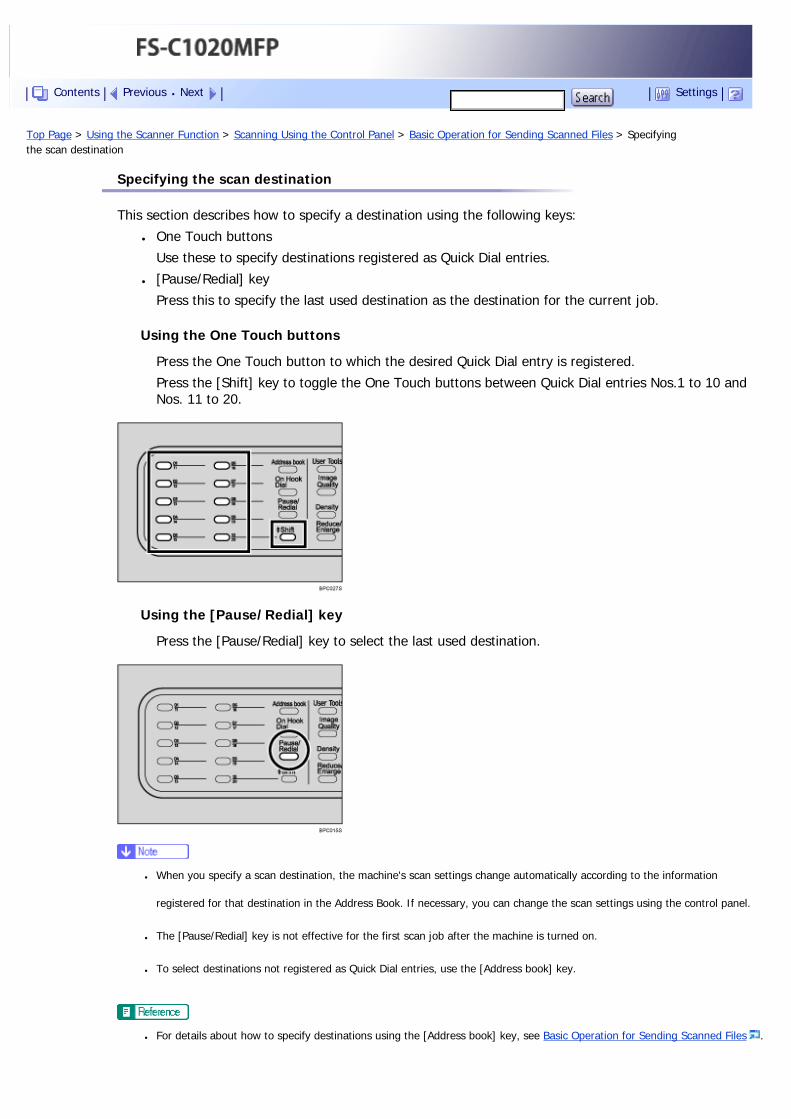
Top Page > Using the Scanner Function > Scanning Using the Control Panel > Basic Operation for Sending Scanned Files > Specifying the scan destination
Specifying the scan destination
This section describes how to specify a destination using the following keys:
● One Touch buttons
Use these to specify destinations registered as Quick Dial entries.
● [Pause/Redial] key
Press this to specify the last used destination as the destination for the current job.
Using the One Touch buttons
Press the One Touch button to which the desired Quick Dial entry is registered.
Press the [Shift] key to toggle the One Touch buttons between Quick Dial entries Nos.1 to 10 and Nos. 11 to 20.
Using the [Pause/Redial] key
Press the [Pause/Redial] key to select the last used destination.
● When you specify a scan destination, the machine's scan settings change automatically according to the information
registered for that destination in the Address Book. If necessary, you can change the scan settings using the control panel.
● The [Pause/Redial] key is not effective for the first scan job after the machine is turned on.
● To select destinations not registered as Quick Dial entries, use the [Address book] key.
● For details about how to specify destinations using the [Address book] key, see Basic Operation for Sending Scanned Files .
Contents Previous Next Settings

Top Previous Next
Copyright © 2009
Top Page > Using the Scanner Function > Scanning Using the Control Panel > Specifying the Scan Settings
Specifying the Scan Settings
This section describes how to specify the scanning size, image density, and resolution for the current job.
When a scan destination is specified
When you specify a scan destination, the machine's scan settings change automatically according to the information registered for that destination in the Address Book.
This allows you to send scanned files without having to reconfigure the scan settings according to each destination. If necessary, you can change the scan settings using the control panel.
● The machine maintains the preset scan settings for the current destination until the machine returns to standby mode.
● Changing the preset scan settings for the current destination does not change the information registered in the Address Book.
● If you specify the last used destination, the preset scan settings become effective again, even if you have changed the
settings for the previous job.
Related topics
Specifying the scanning size according to the size of the original
Adjusting image density
Specifying resolution
Top Previous Next
Copyright © 2009
Contents Previous Next Settings
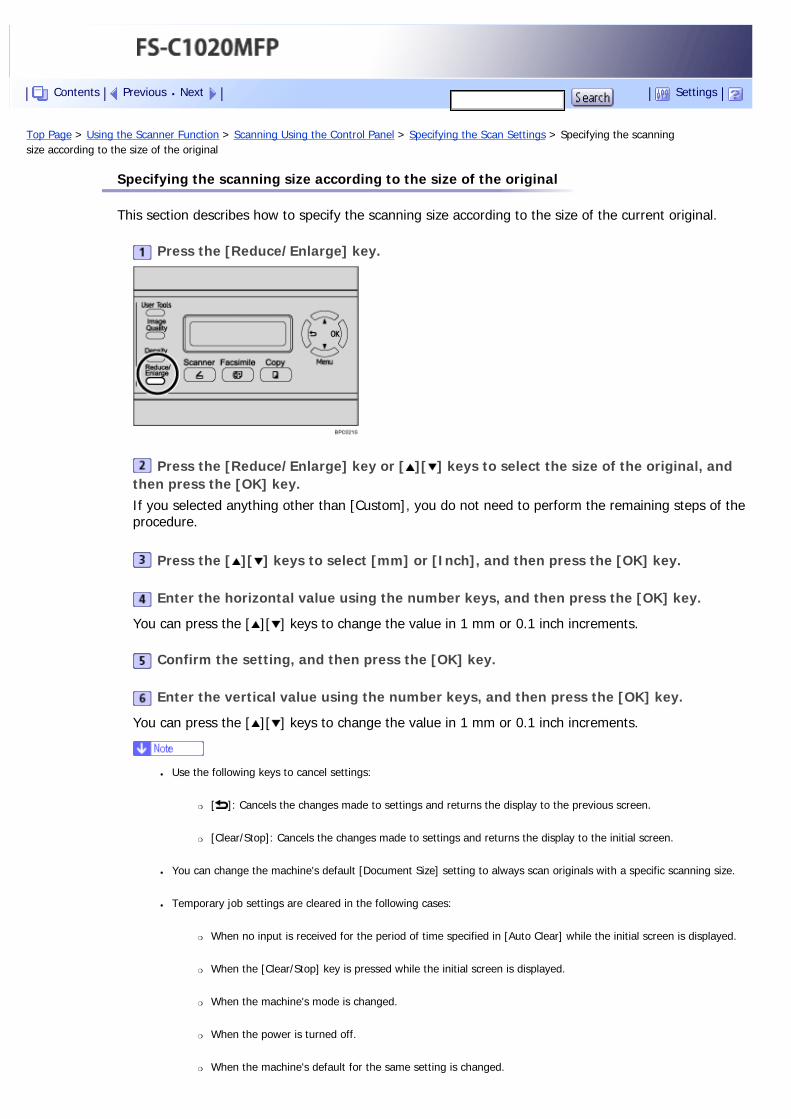
Top Page > Using the Scanner Function > Scanning Using the Control Panel > Specifying the Scan Settings > Specifying the scanning size according to the size of the original
Specifying the scanning size according to the size of the original
This section describes how to specify the scanning size according to the size of the current original.
Press the [Reduce/Enlarge] key.
Press the [Reduce/Enlarge] key or [ ][ ] keys to select the size of the original, and then press the [OK] key.If you selected anything other than [Custom], you do not need to perform the remaining steps of the procedure.
Press the [ ][ ] keys to select [mm] or [Inch], and then press the [OK] key.
Enter the horizontal value using the number keys, and then press the [OK] key.
You can press the [ ][ ] keys to change the value in 1 mm or 0.1 inch increments.
Confirm the setting, and then press the [OK] key.
Enter the vertical value using the number keys, and then press the [OK] key.
You can press the [ ][ ] keys to change the value in 1 mm or 0.1 inch increments.
● Use the following keys to cancel settings:
�❍ [ ]: Cancels the changes made to settings and returns the display to the previous screen.
�❍ [Clear/Stop]: Cancels the changes made to settings and returns the display to the initial screen.
● You can change the machine's default [Document Size] setting to always scan originals with a specific scanning size.
● Temporary job settings are cleared in the following cases:
�❍ When no input is received for the period of time specified in [Auto Clear] while the initial screen is displayed.
�❍ When the [Clear/Stop] key is pressed while the initial screen is displayed.
�❍ When the machine's mode is changed.
�❍ When the power is turned off.
�❍ When the machine's default for the same setting is changed.
Contents Previous Next Settings

● For details about [Document Size], see Scanner Settings .
● For details about [Auto Clear], see Administrator Settings .
Top Previous Next
Copyright © 2009
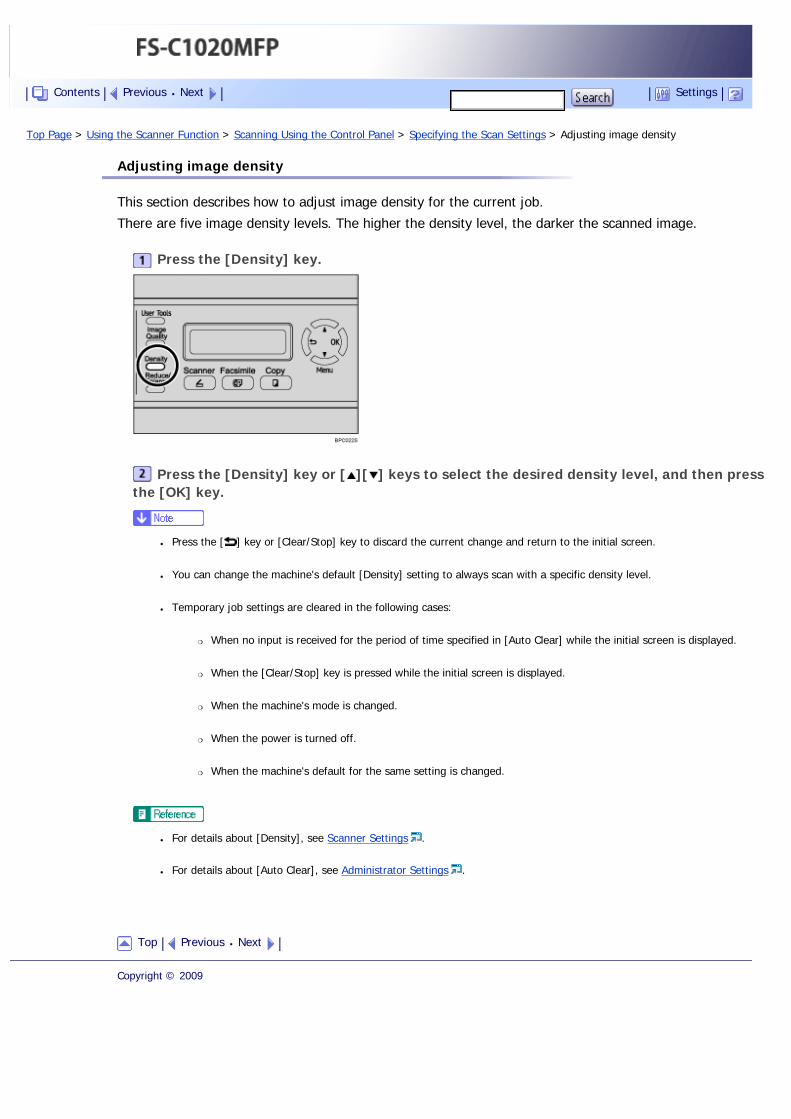
Top Page > Using the Scanner Function > Scanning Using the Control Panel > Specifying the Scan Settings > Adjusting image density
Adjusting image density
This section describes how to adjust image density for the current job.
There are five image density levels. The higher the density level, the darker the scanned image.
Press the [Density] key.
Press the [Density] key or [ ][ ] keys to select the desired density level, and then press the [OK] key.
● Press the [ ] key or [Clear/Stop] key to discard the current change and return to the initial screen.
● You can change the machine's default [Density] setting to always scan with a specific density level.
● Temporary job settings are cleared in the following cases:
�❍ When no input is received for the period of time specified in [Auto Clear] while the initial screen is displayed.
�❍ When the [Clear/Stop] key is pressed while the initial screen is displayed.
�❍ When the machine's mode is changed.
�❍ When the power is turned off.
�❍ When the machine's default for the same setting is changed.
● For details about [Density], see Scanner Settings .
● For details about [Auto Clear], see Administrator Settings .
Top Previous Next
Copyright © 2009
Contents Previous Next Settings
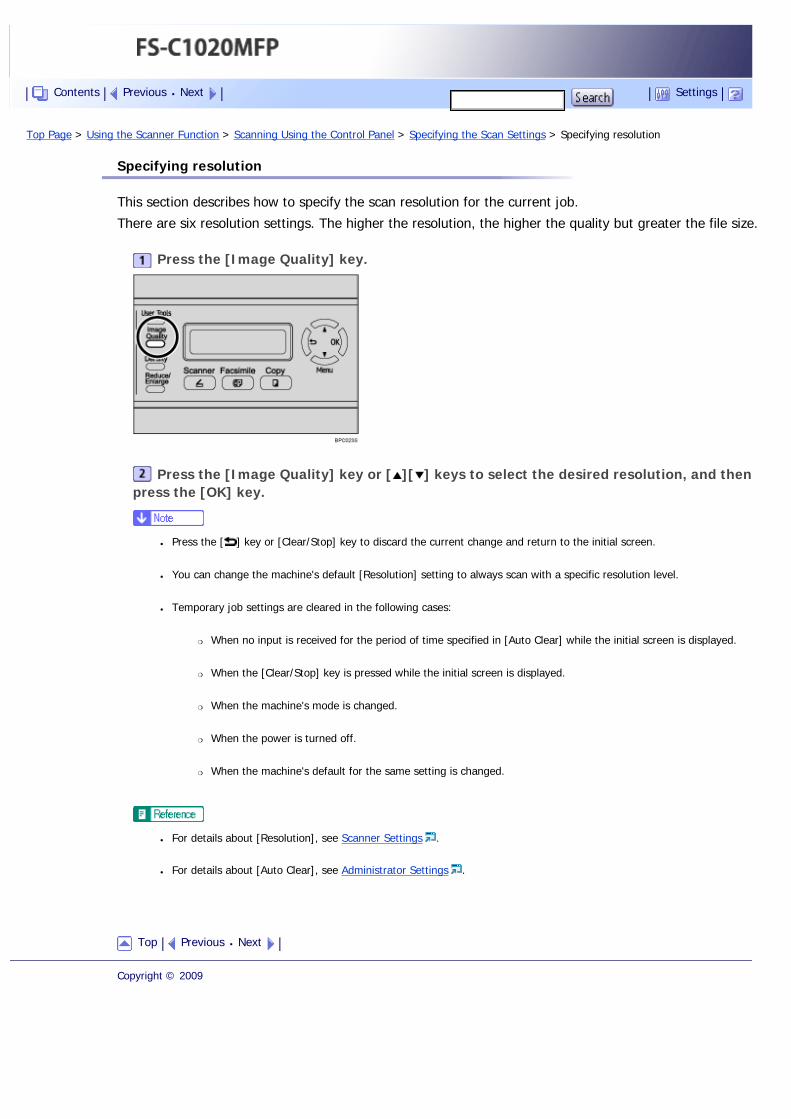
Top Page > Using the Scanner Function > Scanning Using the Control Panel > Specifying the Scan Settings > Specifying resolution
Specifying resolution
This section describes how to specify the scan resolution for the current job.
There are six resolution settings. The higher the resolution, the higher the quality but greater the file size.
Press the [Image Quality] key.
Press the [Image Quality] key or [ ][ ] keys to select the desired resolution, and then press the [OK] key.
● Press the [ ] key or [Clear/Stop] key to discard the current change and return to the initial screen.
● You can change the machine's default [Resolution] setting to always scan with a specific resolution level.
● Temporary job settings are cleared in the following cases:
�❍ When no input is received for the period of time specified in [Auto Clear] while the initial screen is displayed.
�❍ When the [Clear/Stop] key is pressed while the initial screen is displayed.
�❍ When the machine's mode is changed.
�❍ When the power is turned off.
�❍ When the machine's default for the same setting is changed.
● For details about [Resolution], see Scanner Settings .
● For details about [Auto Clear], see Administrator Settings .
Top Previous Next
Copyright © 2009
Contents Previous Next Settings
Top Page > Using the Scanner Function > Scanning from a Computer
Scanning from a Computer
Scanning from a computer (TWAIN scanning) allows you to operate the machine from your computer and scan originals into your computer directly.
TWAIN scanning is available with both USB and network connections.
Run a TWAIN-compatible application.
Select this machine within the application to display the TWAIN dialog box.
● For more information, see the TWAIN driver Help or the manual for your application.
● The machine supports WIA scanning, an additional method of scanning originals from your computer, for USB connection.
WIA scanning is possible if your computer is running a WIA-compatible application. For more information, see the manual
for your application.
Related topics
Settings you can configure in the TWAIN dialog box
Top Previous Next
Copyright © 2009
Contents Previous Next Settings

Top Page > Using the Scanner Function > Scanning from a Computer > Settings you can configure in the TWAIN dialog box
Settings you can configure in the TWAIN dialog box
This section describes the settings in you can configure in the TWAIN dialog box.
1. Scanner:
Select the scanner you want to use. The scanner you select becomes the default scanner. Click [Refresh] to discover all available scanners connected via USB or the network.
2. Paper:
Select [Reflective] to scan from the exposure glass, or [Automatic Document Feeder] to scan from the ADF.
3. Original type
According to your original, select a setting from the list of options detailed below, or select [Custom] to configure your own scan settings.
�❍ When using the exposure glass:
[Editing Text (OCR)]
Select this to scan business letters, contracts, memos, or other documents in editable form.
[Faxing, Filing, or Copying]
Select this to scan newspaper and magazine articles, receipts, forms, or other printed text material.
[Black & White Photo]
Select this to scan black and white photographs as grayscale images.
[Color Document - fast]
Select this to scan originals with many graphics, originals with both text and graphics, line art, or color photographs in fast scan mode.
[Color Document - Better Quality]
Select this to scan originals with many graphics, originals with both text and graphics, line art, or color photographs in high-resolution scan mode.
[Custom...]
Select this to configure your own scan settings. You can save or delete your custom scan settings by clicking [Save As] or [Delete], respectively.
�❍ When using the ADF:
[ADF-Faster]
Contents Previous Next Settings
Select this to scan originals with many graphics, originals with both text and graphics, line art, or color photographs in fast scan mode.
[ADF-Better]
Select this to scan originals with many graphics, originals with both text and graphics, line art, or color photographs in high-resolution scan mode.
[ADF-gray]
Select this to scan originals with many graphics, originals with both text and graphics, line art, or color photographs as grayscale images.
[Custom...]
Select this to configure your own scan settings. You can save or delete your custom scan settings by clicking [Save As] or [Delete], respectively.
4. Mode:
Select from color, grayscale, or black-and-white.
5. Resolution:
Select a resolution from the list. If you select [User defined], enter a resolution value directly in the edit box. Note that increasing the resolution also increases the file size and scanning time.
Selectable resolutions vary depending on where the original is set.
�❍ When using the exposure glass:
75, 100, 150, 200, 300, 400, 500, 600, 1200, 2400, 4800, 9600, 19200 dpi, User defined
�❍ When using the ADF:
75, 100, 150, 200, 300, 400, 500, 600 dpi, User defined
6. Size:
Select the scanning size. If you select [User defined], enter the scanning size directly in the edit box. Also, you can change the scanning size with your mouse in the preview area. You can select the unit of measure from [cm], [inches], or [pixels].
7. Scan task:
Displays a maximum of 10 previously used scan areas. To remove a scan task, select the number of the task, and then click [Remove]. When scanning from the exposure glass, you can select [Auto Crop] to let the scanner automatically detect the size of your original.
● If the scan data is larger than the memory capacity, an error message appears and scanning is canceled. If this happens,
specify a lower resolution and scan the original again.
Top Previous Next
Copyright © 2009
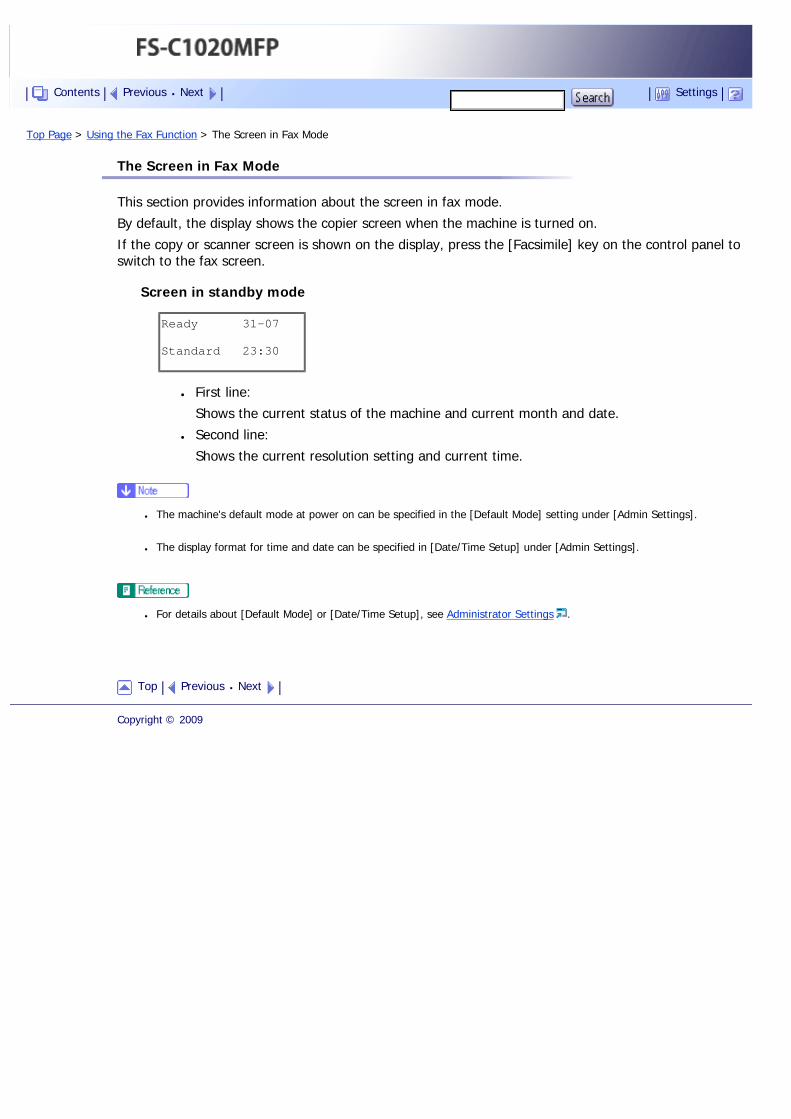
Top Page > Using the Fax Function > The Screen in Fax Mode
The Screen in Fax Mode
This section provides information about the screen in fax mode.
By default, the display shows the copier screen when the machine is turned on.
If the copy or scanner screen is shown on the display, press the [Facsimile] key on the control panel to switch to the fax screen.
Screen in standby mode
Ready 31-07
Standard 23:30
● First line:
Shows the current status of the machine and current month and date.
● Second line:
Shows the current resolution setting and current time.
● The machine's default mode at power on can be specified in the [Default Mode] setting under [Admin Settings].
● The display format for time and date can be specified in [Date/Time Setup] under [Admin Settings].
● For details about [Default Mode] or [Date/Time Setup], see Administrator Settings .
Top Previous Next
Copyright © 2009
Contents Previous Next Settings
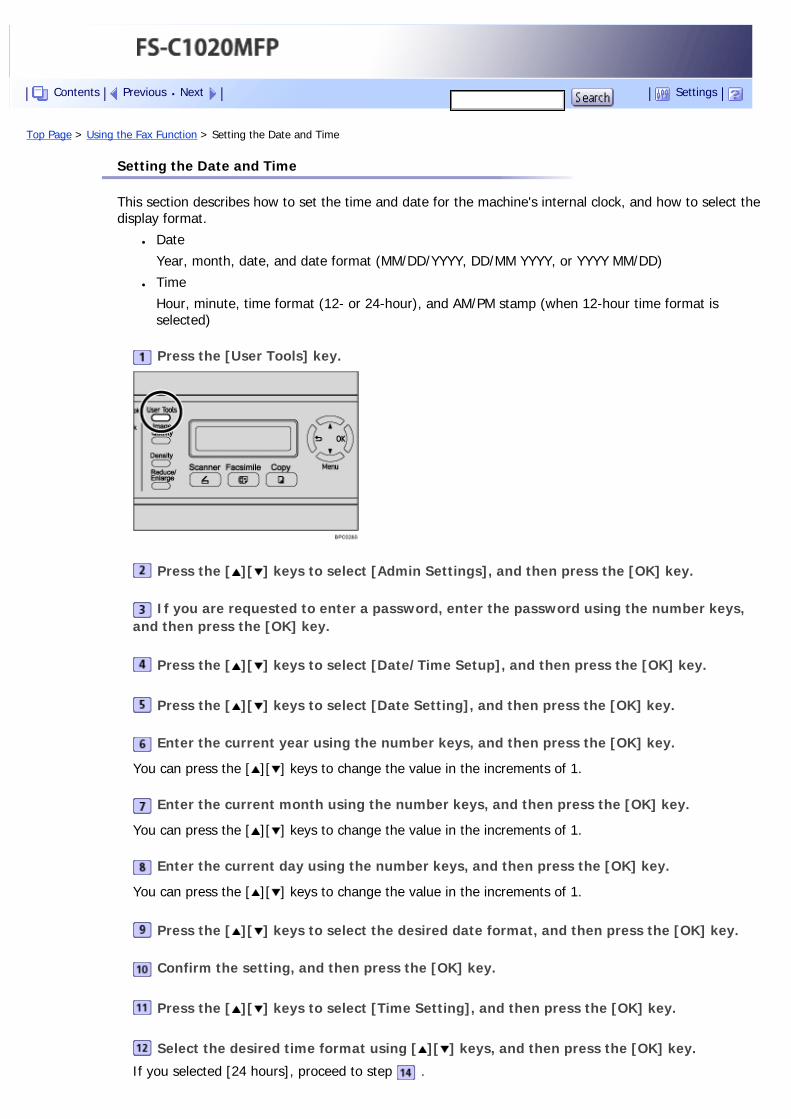
Top Page > Using the Fax Function > Setting the Date and Time
Setting the Date and Time
This section describes how to set the time and date for the machine's internal clock, and how to select the display format.
● Date
Year, month, date, and date format (MM/DD/YYYY, DD/MM YYYY, or YYYY MM/DD)
● Time
Hour, minute, time format (12- or 24-hour), and AM/PM stamp (when 12-hour time format is selected)
Press the [User Tools] key.
Press the [ ][ ] keys to select [Admin Settings], and then press the [OK] key.
If you are requested to enter a password, enter the password using the number keys, and then press the [OK] key.
Press the [ ][ ] keys to select [Date/Time Setup], and then press the [OK] key.
Press the [ ][ ] keys to select [Date Setting], and then press the [OK] key.
Enter the current year using the number keys, and then press the [OK] key.
You can press the [ ][ ] keys to change the value in the increments of 1.
Enter the current month using the number keys, and then press the [OK] key.
You can press the [ ][ ] keys to change the value in the increments of 1.
Enter the current day using the number keys, and then press the [OK] key.
You can press the [ ][ ] keys to change the value in the increments of 1.
Press the [ ][ ] keys to select the desired date format, and then press the [OK] key.
Confirm the setting, and then press the [OK] key.
Press the [ ][ ] keys to select [Time Setting], and then press the [OK] key.
Select the desired time format using [ ][ ] keys, and then press the [OK] key.
If you selected [24 hours], proceed to step .
Contents Previous Next Settings
If you selected [12 hours], proceed to the next step.
Press the [ ][ ] keys to select [Am] or [Pm], and then press the [OK] key.
Enter the current hour using the number keys, and then press the [OK] key.
Enter the current minute using the number keys, and then press the [OK] key.
Confirm the current setting, and then press the [OK] key.
Press the [ ] key to return to the previous level of menu tree.
Press the [Clear/Stop] key to return to the initial screen.
● You can press the [ ] key to exit to the previous level of the menu tree.
● A password for accessing the [Admin Settings] menu can be specified in [Admin Menu Lock].
● Only dates that correspond with the year and month can be set. Incompatible dates will be refused.
● For details about [Admin Menu Lock], see Administrator Settings .
Top Previous Next
Copyright © 2009

Top Page > Using the Fax Function > Registering Fax Destinations
Registering Fax Destinations
This section describes how to register fax destinations in the Address Book using the control panel or Web Browser. The Address Book allows you to specify fax destinations quickly and easily.
● The Address Book data could be damaged or lost unexpectedly. The manufacturer shall not be responsible for any damages
resulting from such data loss. Be sure to create backup files of the Address Book data periodically.
The Address Book can contain up to 70 entries (20 Quick Dial entries and 50 Speed Dial entries).
Quick Dial entries
Destinations registered as Quick Dial entries can be selected by pressing the corresponding One Touch button.
Speed Dial entries
Destinations registered as Speed Dial entries can be selected by pressing the [Address book] key, and then entering the corresponding registration number.
● For details about creating backup files, see Backing Up the Machine's Settings .
Related topics
Registering Fax Destinations Using the Control Panel
Registering Fax Destinations Using Web Browser
Top Previous Next
Copyright © 2009
Contents Previous Next Settings
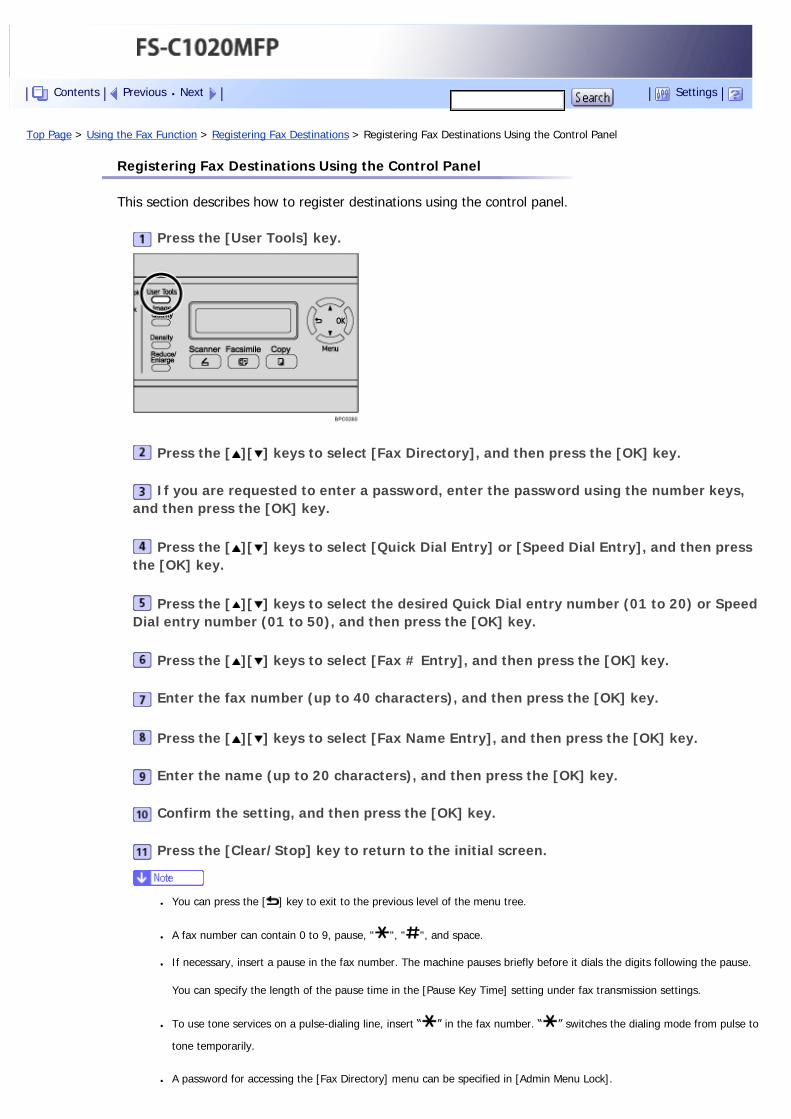
Top Page > Using the Fax Function > Registering Fax Destinations > Registering Fax Destinations Using the Control Panel
Registering Fax Destinations Using the Control Panel
This section describes how to register destinations using the control panel.
Press the [User Tools] key.
Press the [ ][ ] keys to select [Fax Directory], and then press the [OK] key.
If you are requested to enter a password, enter the password using the number keys, and then press the [OK] key.
Press the [ ][ ] keys to select [Quick Dial Entry] or [Speed Dial Entry], and then press the [OK] key.
Press the [ ][ ] keys to select the desired Quick Dial entry number (01 to 20) or Speed Dial entry number (01 to 50), and then press the [OK] key.
Press the [ ][ ] keys to select [Fax # Entry], and then press the [OK] key.
Enter the fax number (up to 40 characters), and then press the [OK] key.
Press the [ ][ ] keys to select [Fax Name Entry], and then press the [OK] key.
Enter the name (up to 20 characters), and then press the [OK] key.
Confirm the setting, and then press the [OK] key.
Press the [Clear/Stop] key to return to the initial screen.
● You can press the [ ] key to exit to the previous level of the menu tree.
● A fax number can contain 0 to 9, pause, " ", " ", and space.
● If necessary, insert a pause in the fax number. The machine pauses briefly before it dials the digits following the pause.
You can specify the length of the pause time in the [Pause Key Time] setting under fax transmission settings.
● To use tone services on a pulse-dialing line, insert “ ” in the fax number. “ ” switches the dialing mode from pulse to
tone temporarily.
● A password for accessing the [Fax Directory] menu can be specified in [Admin Menu Lock].
Contents Previous Next Settings
● For details about entering characters, see Entering Characters .
● For details about [Pause Key Time], see Fax Transmission Settings .
● For details about [Admin Menu Lock], see Administrator Settings .
Related topics
Modifying fax destinations
Deleting fax destinations
Top Previous Next
Copyright © 2009
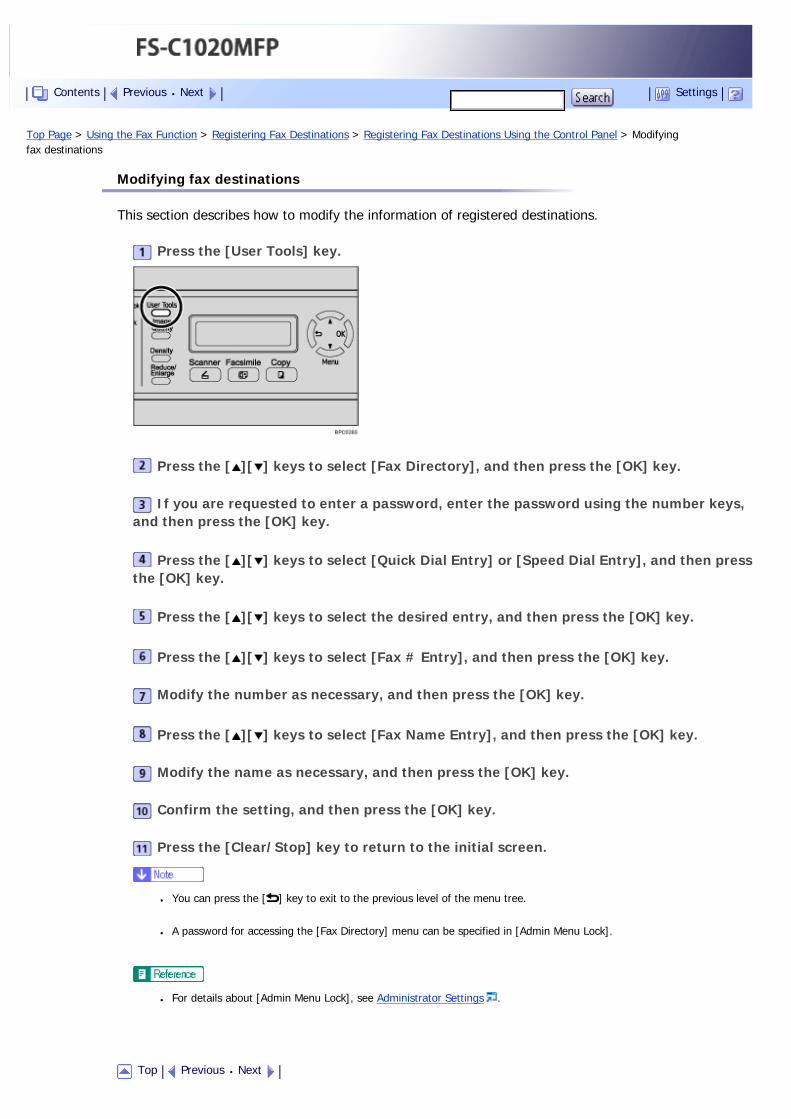
Top Page > Using the Fax Function > Registering Fax Destinations > Registering Fax Destinations Using the Control Panel > Modifying fax destinations
Modifying fax destinations
This section describes how to modify the information of registered destinations.
Press the [User Tools] key.
Press the [ ][ ] keys to select [Fax Directory], and then press the [OK] key.
If you are requested to enter a password, enter the password using the number keys, and then press the [OK] key.
Press the [ ][ ] keys to select [Quick Dial Entry] or [Speed Dial Entry], and then press the [OK] key.
Press the [ ][ ] keys to select the desired entry, and then press the [OK] key.
Press the [ ][ ] keys to select [Fax # Entry], and then press the [OK] key.
Modify the number as necessary, and then press the [OK] key.
Press the [ ][ ] keys to select [Fax Name Entry], and then press the [OK] key.
Modify the name as necessary, and then press the [OK] key.
Confirm the setting, and then press the [OK] key.
Press the [Clear/Stop] key to return to the initial screen.
● You can press the [ ] key to exit to the previous level of the menu tree.
● A password for accessing the [Fax Directory] menu can be specified in [Admin Menu Lock].
● For details about [Admin Menu Lock], see Administrator Settings .
Top Previous Next
Contents Previous Next Settings

Copyright © 2009
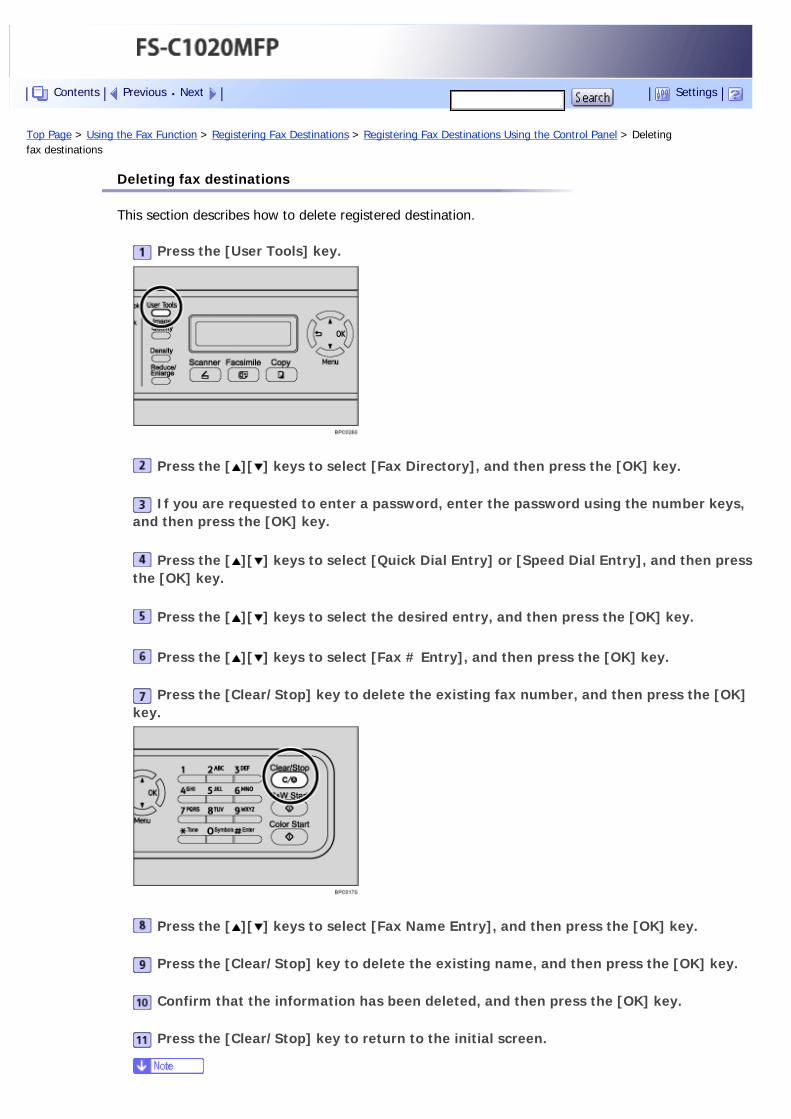
Top Page > Using the Fax Function > Registering Fax Destinations > Registering Fax Destinations Using the Control Panel > Deleting fax destinations
Deleting fax destinations
This section describes how to delete registered destination.
Press the [User Tools] key.
Press the [ ][ ] keys to select [Fax Directory], and then press the [OK] key.
If you are requested to enter a password, enter the password using the number keys, and then press the [OK] key.
Press the [ ][ ] keys to select [Quick Dial Entry] or [Speed Dial Entry], and then press the [OK] key.
Press the [ ][ ] keys to select the desired entry, and then press the [OK] key.
Press the [ ][ ] keys to select [Fax # Entry], and then press the [OK] key.
Press the [Clear/Stop] key to delete the existing fax number, and then press the [OK] key.
Press the [ ][ ] keys to select [Fax Name Entry], and then press the [OK] key.
Press the [Clear/Stop] key to delete the existing name, and then press the [OK] key.
Confirm that the information has been deleted, and then press the [OK] key.
Press the [Clear/Stop] key to return to the initial screen.
Contents Previous Next Settings

● You can press the [ ] key to exit to the previous level of the menu tree.
● A password for accessing the [Fax Directory] menu can be specified in [Admin Menu Lock].
● For details about [Admin Menu Lock], see Administrator Settings .
Top Previous Next
Copyright © 2009
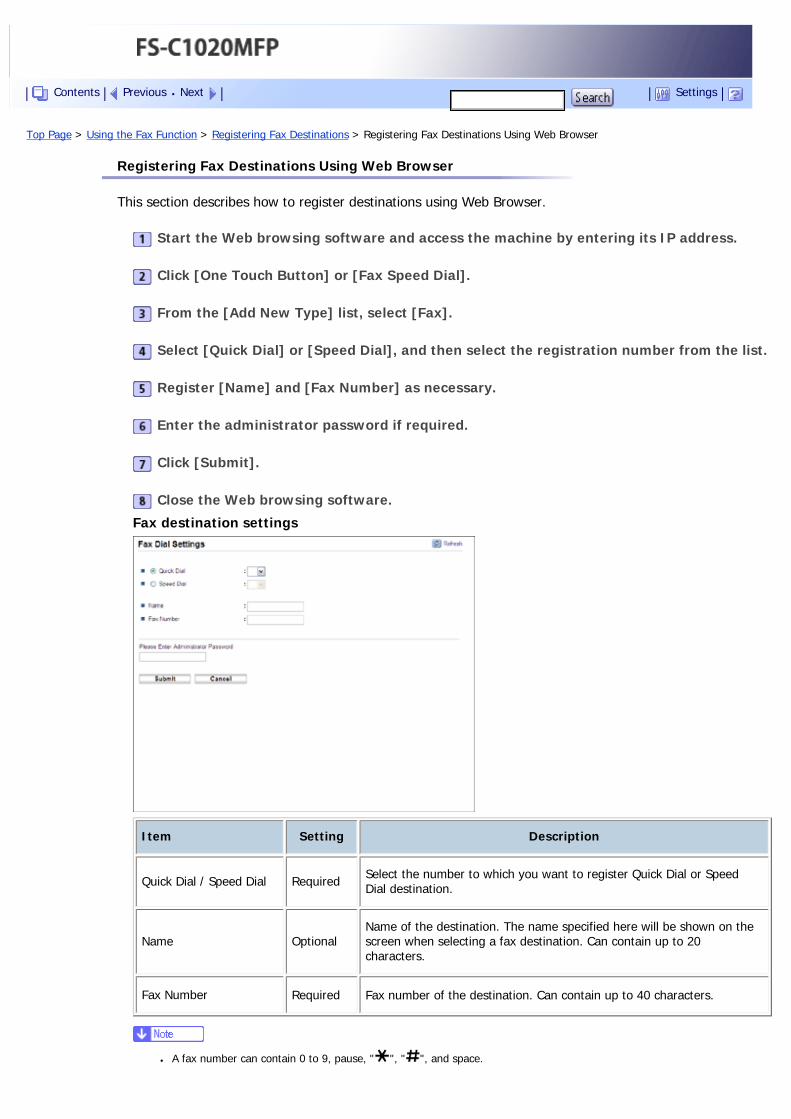
Top Page > Using the Fax Function > Registering Fax Destinations > Registering Fax Destinations Using Web Browser
Registering Fax Destinations Using Web Browser
This section describes how to register destinations using Web Browser.
Start the Web browsing software and access the machine by entering its IP address.
Click [One Touch Button] or [Fax Speed Dial].
From the [Add New Type] list, select [Fax].
Select [Quick Dial] or [Speed Dial], and then select the registration number from the list.
Register [Name] and [Fax Number] as necessary.
Enter the administrator password if required.
Click [Submit].
Close the Web browsing software.
Fax destination settings
Item Setting Description
Quick Dial / Speed Dial Required Select the number to which you want to register Quick Dial or Speed Dial destination.
Name OptionalName of the destination. The name specified here will be shown on the screen when selecting a fax destination. Can contain up to 20 characters.
Fax Number Required Fax number of the destination. Can contain up to 40 characters.
● A fax number can contain 0 to 9, pause, " ", " ", and space.
Contents Previous Next Settings

● If necessary, insert a pause in a fax number. The machine pauses briefly before it dials the digits following the pause. You
can specify the length of the pause time in the [Pause Key Time] setting under fax transmission settings.
● To use tone services on a pulse-dialing line, insert “ ” in a fax number. “ ” switches the dialing mode from pulse to
tone temporarily.
● For details about [Pause Key Time], see Fax Transmission Settings .
● For details about using Web Browser, see Using Web Browser .
Related topics
Modifying fax destinations
Deleting fax destinations
Top Previous Next
Copyright © 2009
Top Page > Using the Fax Function > Registering Fax Destinations > Registering Fax Destinations Using Web Browser > Modifying fax destinations
Modifying fax destinations
This section describes how to modify the information of registered destinations.
Start the Web browsing software and access the machine by entering its IP address.
Click [One Touch Button] or [Fax Speed Dial].
If you modify the Speed Dial entry, proceed to step .
Click [Fax Quick Dial].
Select the entry to modify, and then click [Edit].
Modify settings as necessary.
Enter the administrator password if required.
Click [Submit].
Close the Web browsing software.
Top Previous Next
Copyright © 2009
Contents Previous Next Settings

Top Page > Using the Fax Function > Registering Fax Destinations > Registering Fax Destinations Using Web Browser > Deleting fax destinations
Deleting fax destinations
This section describes how to delete registered destination.
Start the Web browsing software and access the machine by entering its IP address.
Click [One Touch Button] or [Fax Speed Dial].
If you delete the Speed Dial entry, proceed to step .
Click [Fax Quick Dial].
Select the entry to delete, and then click [Delete].
Confirm that the entry you have selected is the entry that you want to delete.
Enter the administrator password if required.
Click [Submit].
Close the Web browsing software.
Top Previous Next
Copyright © 2009
Contents Previous Next Settings
Top Page > Using the Fax Function > Sending a Fax
Sending a Fax
This section describes the transmission modes and the basic operations for sending a fax.
● It is recommended that you call the receiver and confirm with them when sending important documents.
Related topics
Selecting Transmission Mode
Basic Operation for Sending a Fax
Specifying the Fax Destination
Useful Sending Functions
Specifying the Scan Settings
Top Previous Next
Copyright © 2009
Contents Previous Next Settings
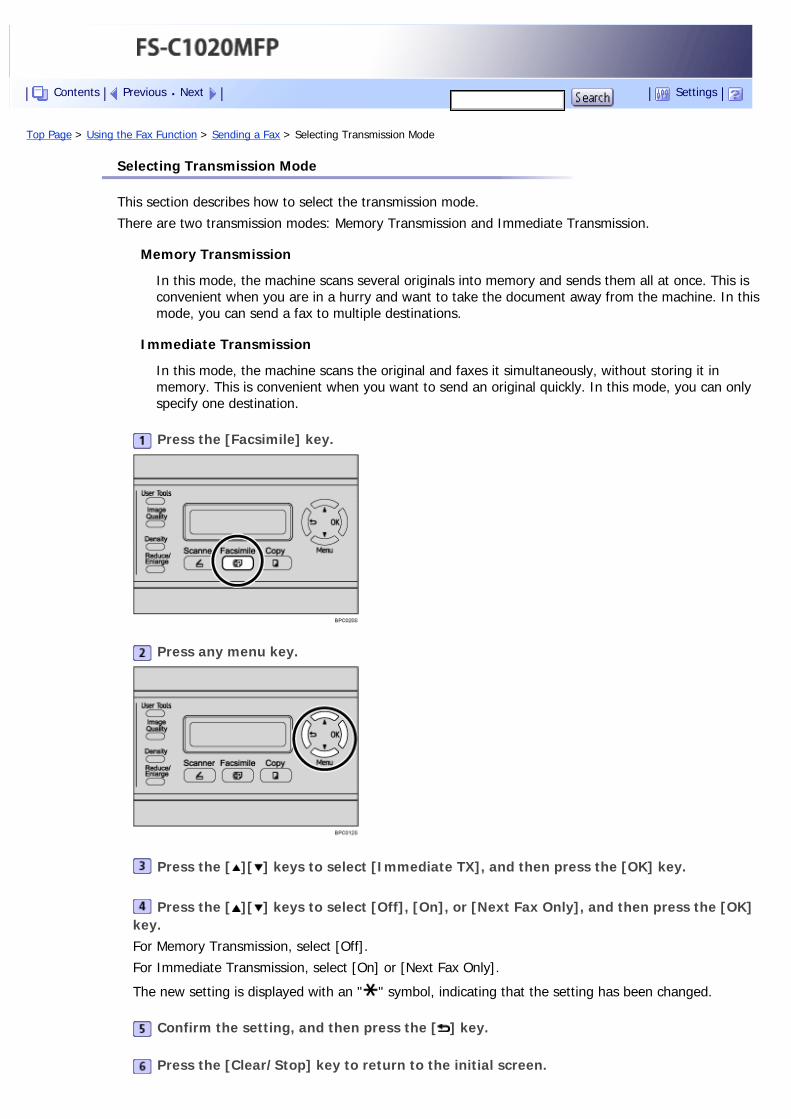
Top Page > Using the Fax Function > Sending a Fax > Selecting Transmission Mode
Selecting Transmission Mode
This section describes how to select the transmission mode.
There are two transmission modes: Memory Transmission and Immediate Transmission.
Memory Transmission
In this mode, the machine scans several originals into memory and sends them all at once. This is convenient when you are in a hurry and want to take the document away from the machine. In this mode, you can send a fax to multiple destinations.
Immediate Transmission
In this mode, the machine scans the original and faxes it simultaneously, without storing it in memory. This is convenient when you want to send an original quickly. In this mode, you can only specify one destination.
Press the [Facsimile] key.
Press any menu key.
Press the [ ][ ] keys to select [Immediate TX], and then press the [OK] key.
Press the [ ][ ] keys to select [Off], [On], or [Next Fax Only], and then press the [OK] key.For Memory Transmission, select [Off].
For Immediate Transmission, select [On] or [Next Fax Only].
The new setting is displayed with an " " symbol, indicating that the setting has been changed.
Confirm the setting, and then press the [ ] key.
Press the [Clear/Stop] key to return to the initial screen.
Contents Previous Next Settings

● You can press the [ ] key to exit to the previous level of the menu tree.
Top Previous Next
Copyright © 2009

Top Page > Using the Fax Function > Sending a Fax > Basic Operation for Sending a Fax
Basic Operation for Sending a Fax
This section describes the basic operation for sending a fax.
● The original in the ADF takes precedence over the original on the exposure glass if you place originals both in the ADF and on
the exposure glass.
Press the [Facsimile] key.
Place the original on the exposure glass or in the ADF.
If necessary, configure the advanced scan settings.
Enter the fax number (up to 40 characters) using the number keys.
Press the [B&W Start] key.
When using the exposure glass in Memory Transmission mode, you will be prompted to place another original. In this case, proceed to the next step.
If you have more originals to scan, press [1] within 60 seconds, place the next original on the exposure glass, and then press the [OK] key. Repeat this step until all originals are scanned.If you do not press [1] within 60 seconds, the machine will start to dial the destination.
When all originals have been scanned, press [2] to start sending the fax.
● A fax number can contain 0 to 9, pause, " ", " ", and space.
● If necessary, insert a pause in a fax number. The machine pauses briefly before it dials the digits following the pause. You
Contents Previous Next Settings
can specify the length of the pause time in the [Pause Key Time] setting under fax transmission settings.
● To use tone services on a pulse-dialing line, insert " " in a fax number. " " switches the dialing mode from pulse to
tone temporarily.
● You can also specify a destination using the One Touch buttons, Speed Dial function, or [Pause/Redial] key. In addition,
you can specify multiple destinations and broadcast the fax you are sending.
● When in Memory Transmission mode, you can enable the [Auto Redial] setting under fax transmission settings to set the
machine to automatically redial the destination if the line is busy or an error occurs during transmission.
● When in Memory Transmission mode, the machine's memory may become full while scanning the originals. In this case,
the screen prompts you to cancel the transmission or to send only the pages that have been scanned successfully.
● If paper is jammed in the ADF, the jammed page has not been scanned properly. When the machine is in Immediate
Transmission mode, resend the fax starting from the jammed page. When in Memory Transmission mode, scan the entire
originals again.
● For details about entering characters, see Entering Characters .
● To place the originals, see Placing Originals .
● To configure advanced scan settings, see Specifying the Scan Settings .
● For details about other methods of specifying destinations, see Specifying the Fax Destination .
● For details about [Auto Redial] or [Pause Key Time], see Fax Transmission Settings .
● For details about how to remove the paper jammed in the ADF, see Removing Scanning Jams .
Related topics
Canceling a fax
Top Previous Next
Copyright © 2009
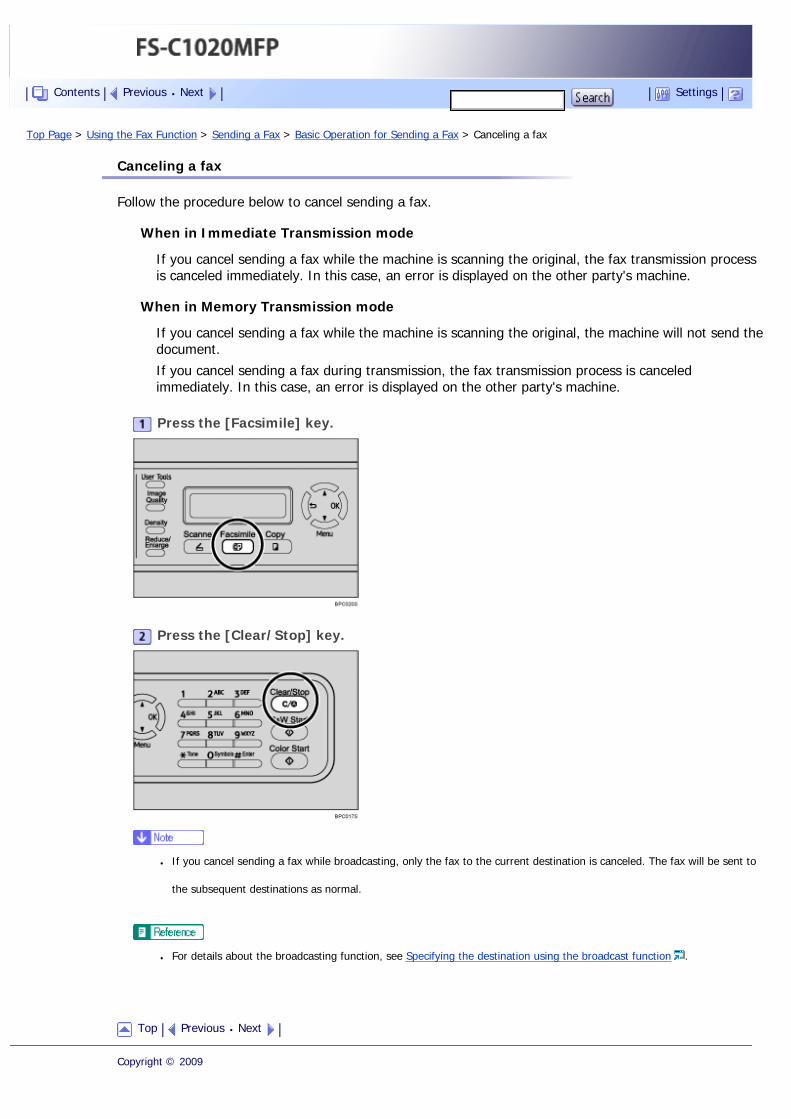
Top Page > Using the Fax Function > Sending a Fax > Basic Operation for Sending a Fax > Canceling a fax
Canceling a fax
Follow the procedure below to cancel sending a fax.
When in Immediate Transmission mode
If you cancel sending a fax while the machine is scanning the original, the fax transmission process is canceled immediately. In this case, an error is displayed on the other party's machine.
When in Memory Transmission mode
If you cancel sending a fax while the machine is scanning the original, the machine will not send the document.
If you cancel sending a fax during transmission, the fax transmission process is canceled immediately. In this case, an error is displayed on the other party's machine.
Press the [Facsimile] key.
Press the [Clear/Stop] key.
● If you cancel sending a fax while broadcasting, only the fax to the current destination is canceled. The fax will be sent to
the subsequent destinations as normal.
● For details about the broadcasting function, see Specifying the destination using the broadcast function .
Top Previous Next
Copyright © 2009
Contents Previous Next Settings

Top Page > Using the Fax Function > Sending a Fax > Specifying the Fax Destination
Specifying the Fax Destination
This section describes how to specify the destination when sending a fax.
Other than entering the destination fax number using the number keys, you can specify destinations using the following functions:
● Using the One Touch buttons
● Using Speed Dial
● Using the Broadcast function
● Using the Redial function
Related topics
Specifying the destination using the One Touch buttons
Specifying the destination using Speed Dial
Specifying the destination using the broadcast function
Specifying the destination using the redial function
Top Previous Next
Copyright © 2009
Contents Previous Next Settings
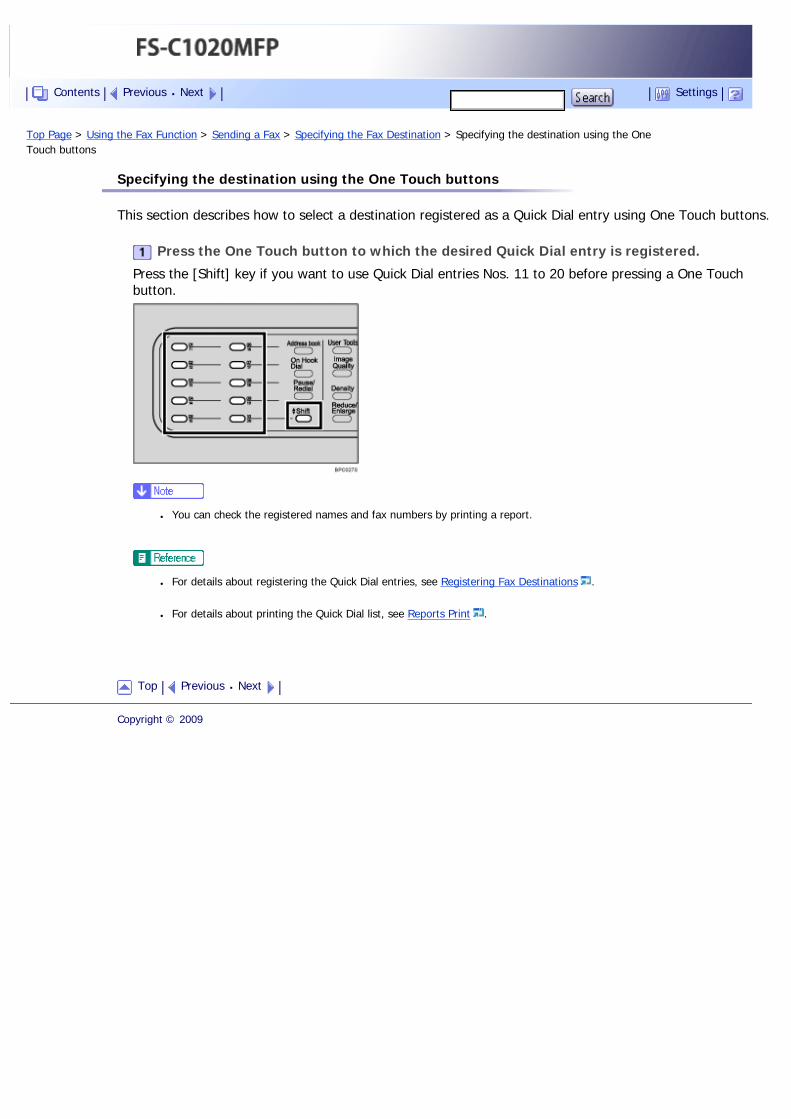
Top Page > Using the Fax Function > Sending a Fax > Specifying the Fax Destination > Specifying the destination using the One Touch buttons
Specifying the destination using the One Touch buttons
This section describes how to select a destination registered as a Quick Dial entry using One Touch buttons.
Press the One Touch button to which the desired Quick Dial entry is registered.
Press the [Shift] key if you want to use Quick Dial entries Nos. 11 to 20 before pressing a One Touch button.
● You can check the registered names and fax numbers by printing a report.
● For details about registering the Quick Dial entries, see Registering Fax Destinations .
● For details about printing the Quick Dial list, see Reports Print .
Top Previous Next
Copyright © 2009
Contents Previous Next Settings
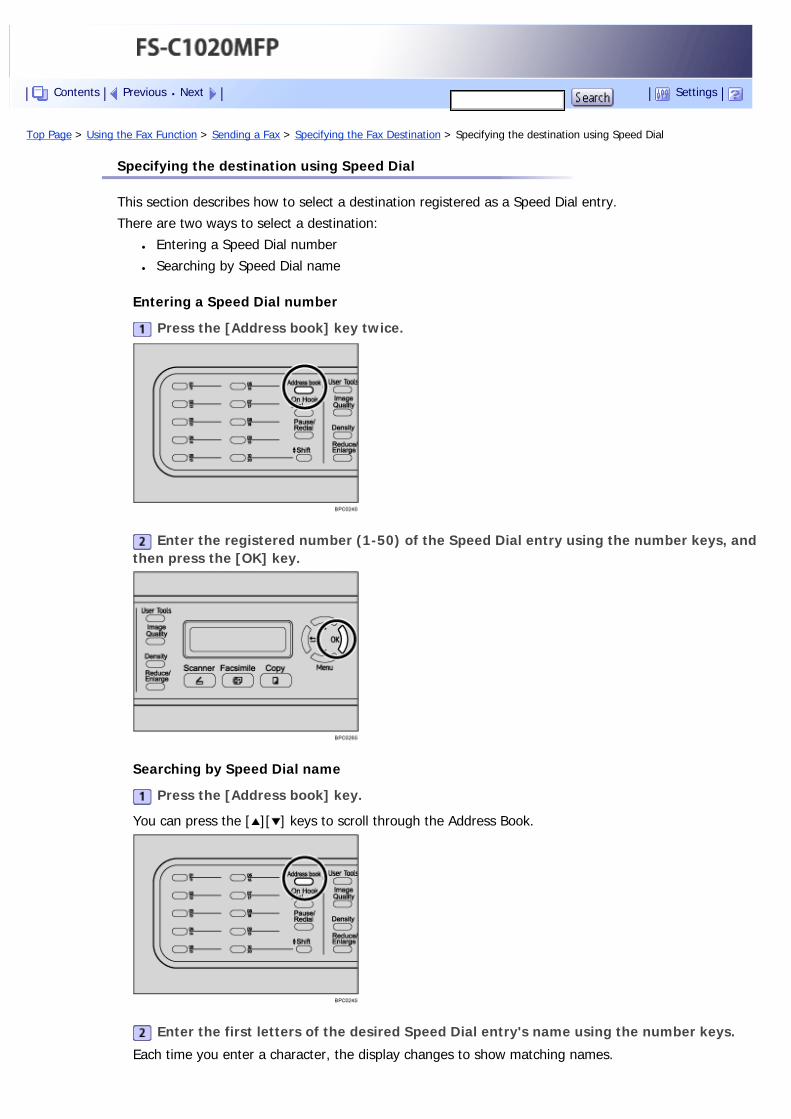
Top Page > Using the Fax Function > Sending a Fax > Specifying the Fax Destination > Specifying the destination using Speed Dial
Specifying the destination using Speed Dial
This section describes how to select a destination registered as a Speed Dial entry.
There are two ways to select a destination:
● Entering a Speed Dial number
● Searching by Speed Dial name
Entering a Speed Dial number
Press the [Address book] key twice.
Enter the registered number (1-50) of the Speed Dial entry using the number keys, and then press the [OK] key.
Searching by Speed Dial name
Press the [Address book] key.
You can press the [ ][ ] keys to scroll through the Address Book.
Enter the first letters of the desired Speed Dial entry's name using the number keys.
Each time you enter a character, the display changes to show matching names.
Contents Previous Next Settings
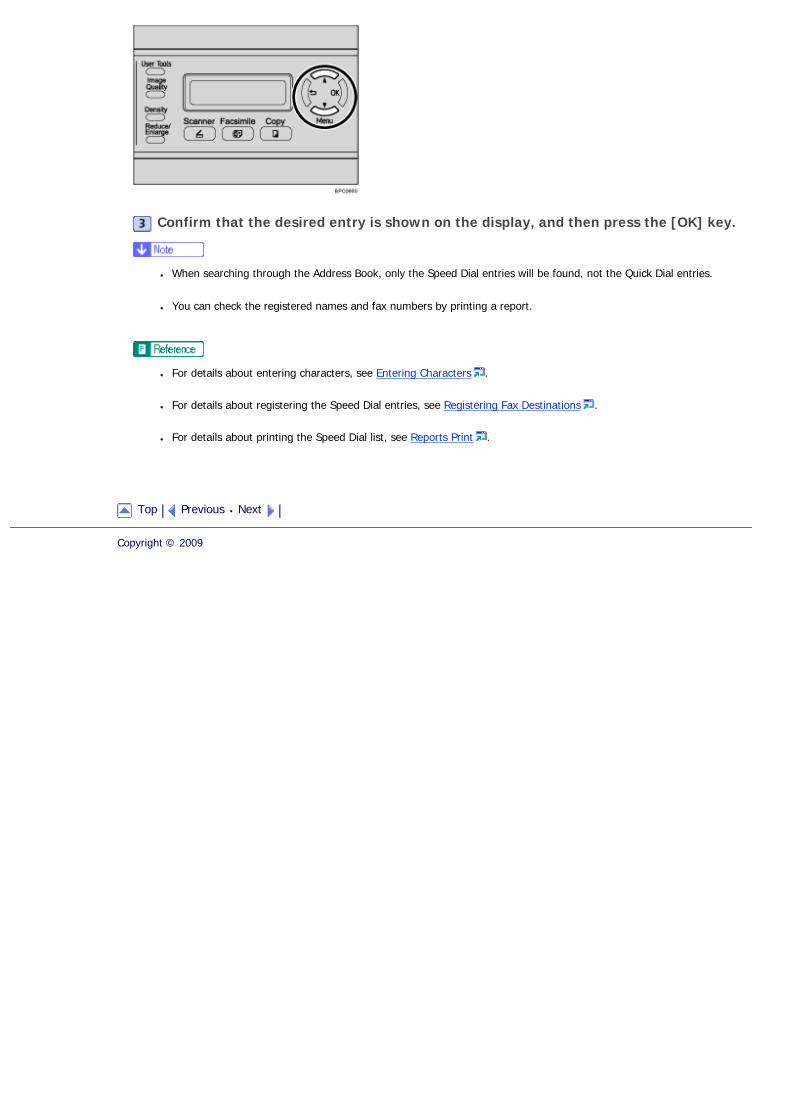
Confirm that the desired entry is shown on the display, and then press the [OK] key.
● When searching through the Address Book, only the Speed Dial entries will be found, not the Quick Dial entries.
● You can check the registered names and fax numbers by printing a report.
● For details about entering characters, see Entering Characters .
● For details about registering the Speed Dial entries, see Registering Fax Destinations .
● For details about printing the Speed Dial list, see Reports Print .
Top Previous Next
Copyright © 2009
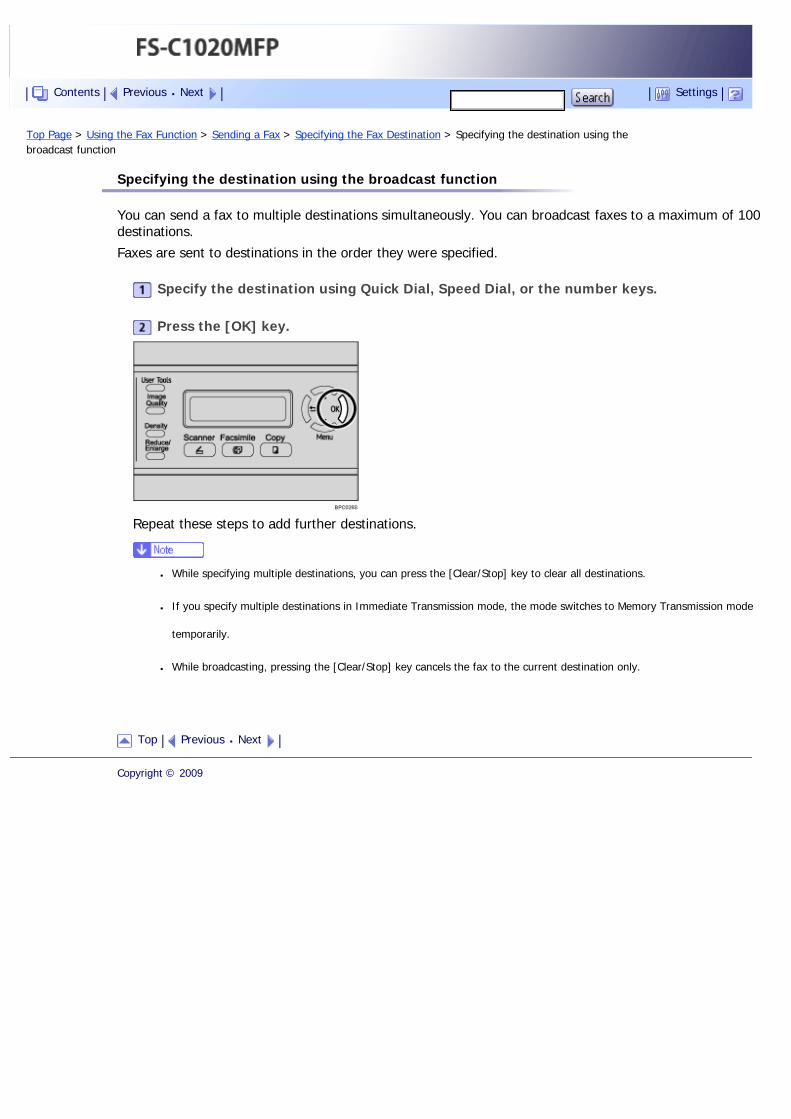
Top Page > Using the Fax Function > Sending a Fax > Specifying the Fax Destination > Specifying the destination using the broadcast function
Specifying the destination using the broadcast function
You can send a fax to multiple destinations simultaneously. You can broadcast faxes to a maximum of 100 destinations.
Faxes are sent to destinations in the order they were specified.
Specify the destination using Quick Dial, Speed Dial, or the number keys.
Press the [OK] key.
Repeat these steps to add further destinations.
● While specifying multiple destinations, you can press the [Clear/Stop] key to clear all destinations.
● If you specify multiple destinations in Immediate Transmission mode, the mode switches to Memory Transmission mode
temporarily.
● While broadcasting, pressing the [Clear/Stop] key cancels the fax to the current destination only.
Top Previous Next
Copyright © 2009
Contents Previous Next Settings
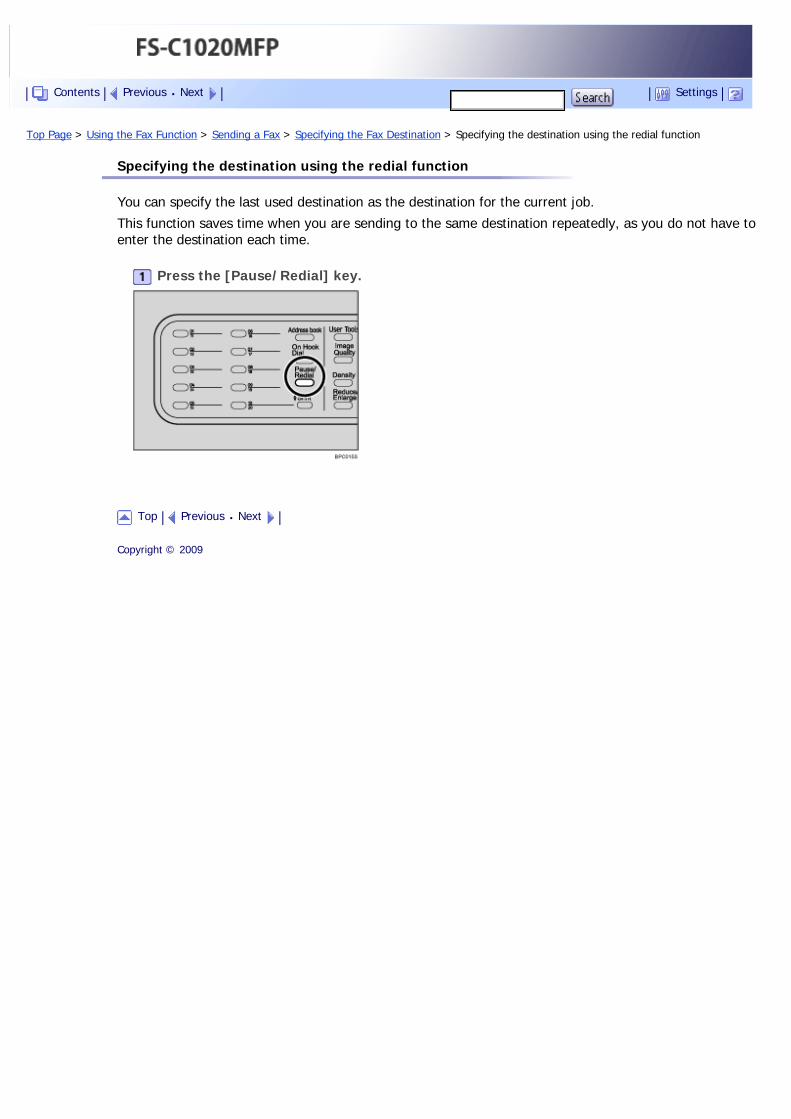
Top Page > Using the Fax Function > Sending a Fax > Specifying the Fax Destination > Specifying the destination using the redial function
Specifying the destination using the redial function
You can specify the last used destination as the destination for the current job.
This function saves time when you are sending to the same destination repeatedly, as you do not have to enter the destination each time.
Press the [Pause/Redial] key.
Top Previous Next
Copyright © 2009
Contents Previous Next Settings
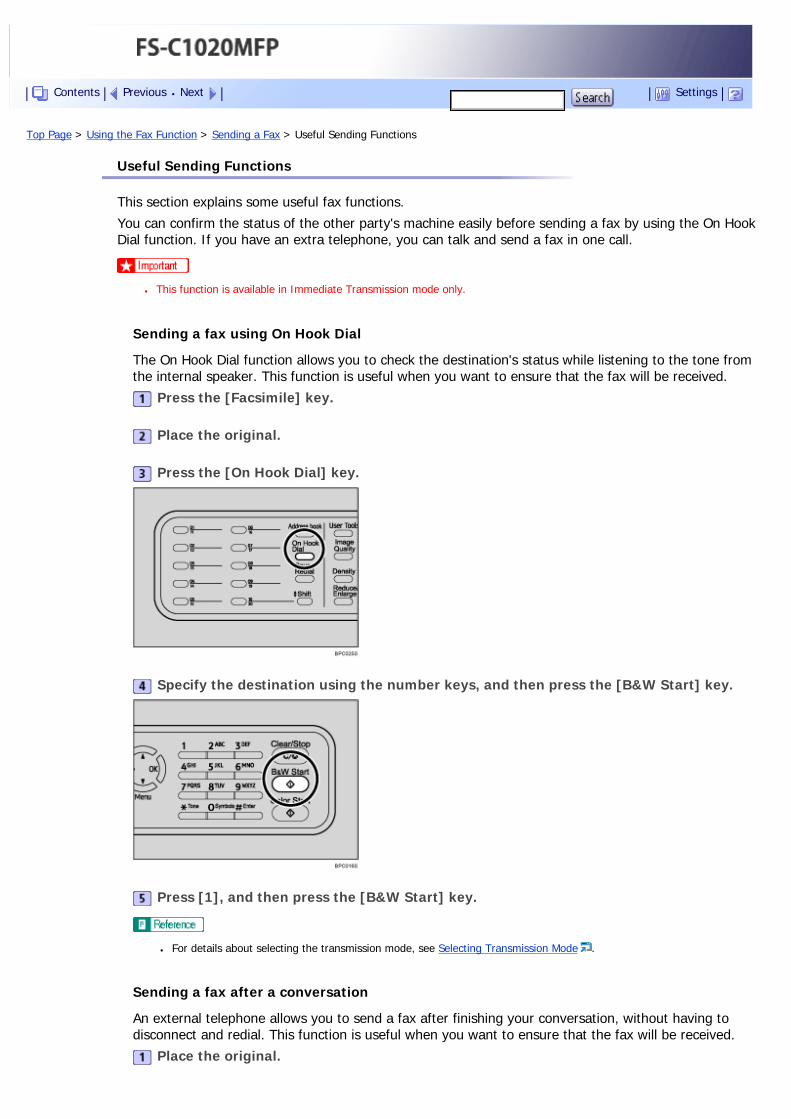
Top Page > Using the Fax Function > Sending a Fax > Useful Sending Functions
Useful Sending Functions
This section explains some useful fax functions.
You can confirm the status of the other party's machine easily before sending a fax by using the On Hook Dial function. If you have an extra telephone, you can talk and send a fax in one call.
● This function is available in Immediate Transmission mode only.
Sending a fax using On Hook Dial
The On Hook Dial function allows you to check the destination's status while listening to the tone from the internal speaker. This function is useful when you want to ensure that the fax will be received.
Press the [Facsimile] key.
Place the original.
Press the [On Hook Dial] key.
Specify the destination using the number keys, and then press the [B&W Start] key.
Press [1], and then press the [B&W Start] key.
● For details about selecting the transmission mode, see Selecting Transmission Mode .
Sending a fax after a conversation
An external telephone allows you to send a fax after finishing your conversation, without having to disconnect and redial. This function is useful when you want to ensure that the fax will be received.
Place the original.
Contents Previous Next Settings
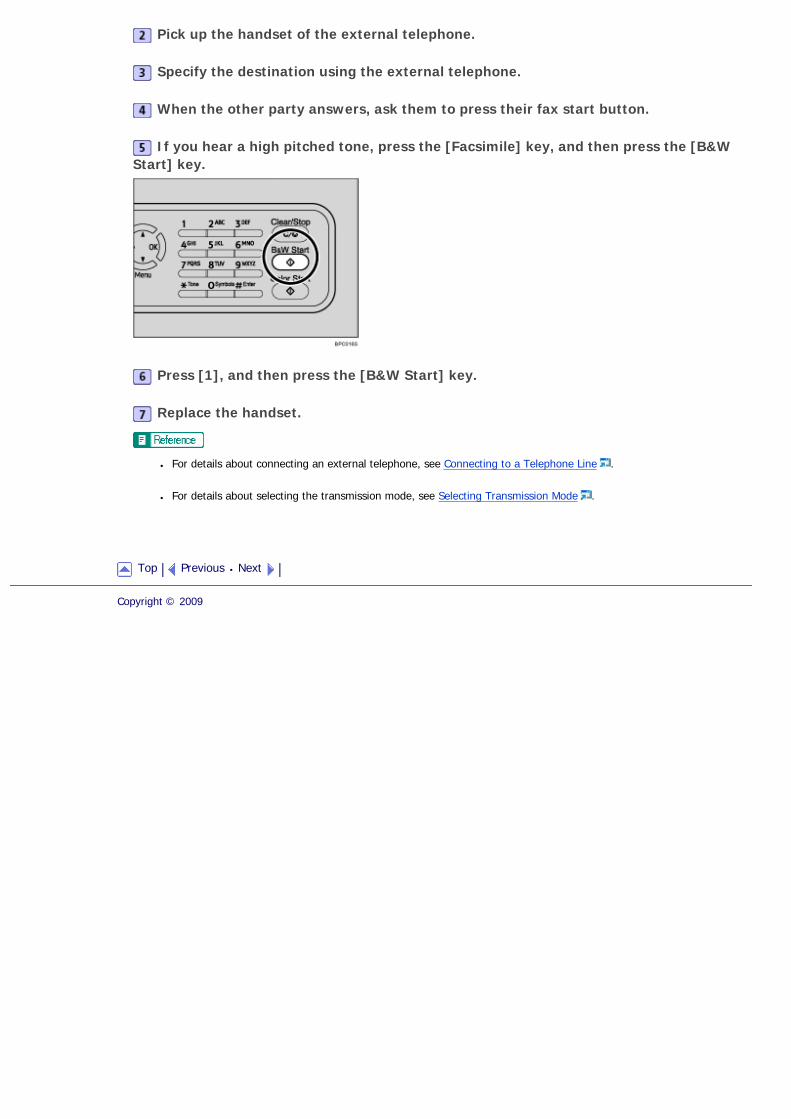
Pick up the handset of the external telephone.
Specify the destination using the external telephone.
When the other party answers, ask them to press their fax start button.
If you hear a high pitched tone, press the [Facsimile] key, and then press the [B&W Start] key.
Press [1], and then press the [B&W Start] key.
Replace the handset.
● For details about connecting an external telephone, see Connecting to a Telephone Line .
● For details about selecting the transmission mode, see Selecting Transmission Mode .
Top Previous Next
Copyright © 2009

Top Page > Using the Fax Function > Sending a Fax > Specifying the Scan Settings
Specifying the Scan Settings
This section describes how to specify image density and resolution for the current scan job.
Related topics
Adjusting image density
Specifying the resolution
Top Previous Next
Copyright © 2009
Contents Previous Next Settings
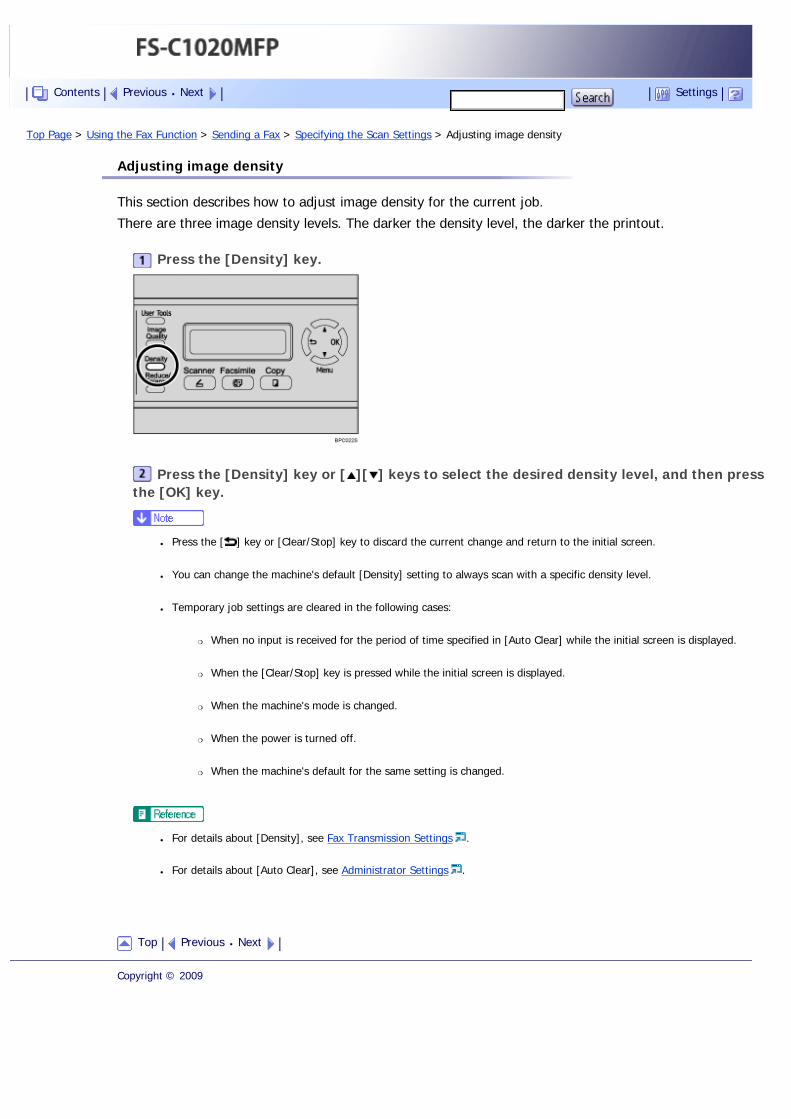
Top Page > Using the Fax Function > Sending a Fax > Specifying the Scan Settings > Adjusting image density
Adjusting image density
This section describes how to adjust image density for the current job.
There are three image density levels. The darker the density level, the darker the printout.
Press the [Density] key.
Press the [Density] key or [ ][ ] keys to select the desired density level, and then press the [OK] key.
● Press the [ ] key or [Clear/Stop] key to discard the current change and return to the initial screen.
● You can change the machine's default [Density] setting to always scan with a specific density level.
● Temporary job settings are cleared in the following cases:
�❍ When no input is received for the period of time specified in [Auto Clear] while the initial screen is displayed.
�❍ When the [Clear/Stop] key is pressed while the initial screen is displayed.
�❍ When the machine's mode is changed.
�❍ When the power is turned off.
�❍ When the machine's default for the same setting is changed.
● For details about [Density], see Fax Transmission Settings .
● For details about [Auto Clear], see Administrator Settings .
Top Previous Next
Copyright © 2009
Contents Previous Next Settings
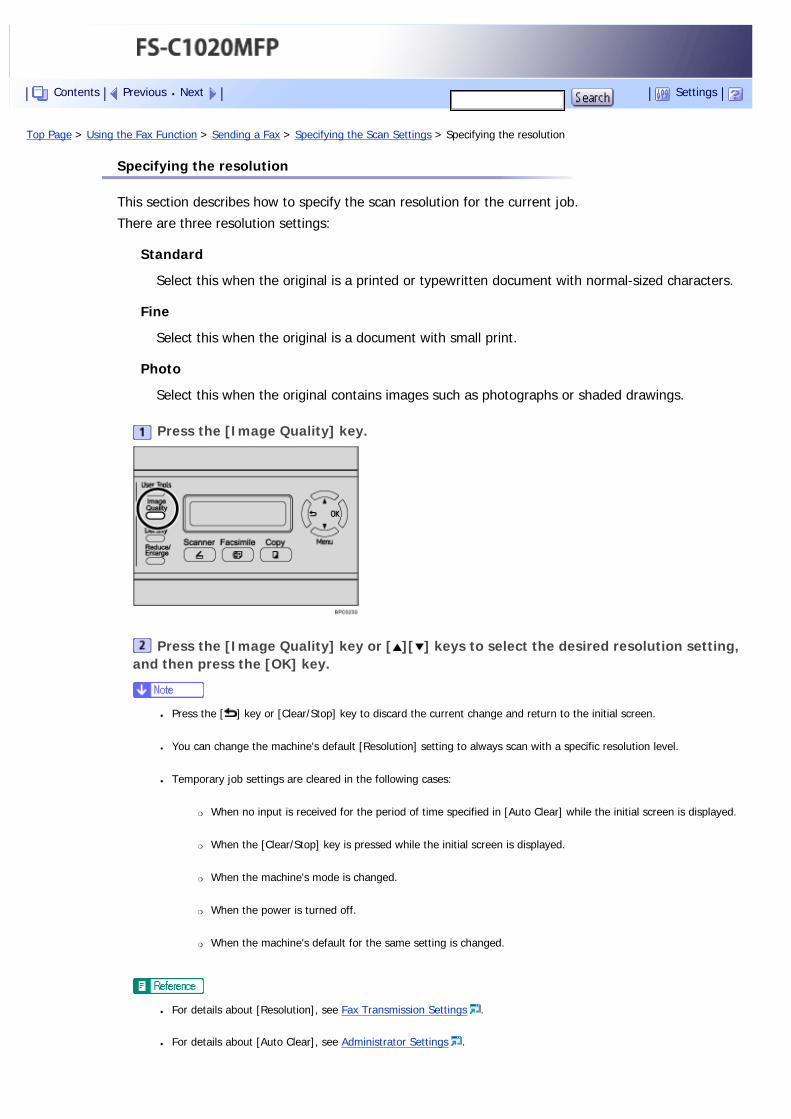
Top Page > Using the Fax Function > Sending a Fax > Specifying the Scan Settings > Specifying the resolution
Specifying the resolution
This section describes how to specify the scan resolution for the current job.
There are three resolution settings:
Standard
Select this when the original is a printed or typewritten document with normal-sized characters.
Fine
Select this when the original is a document with small print.
Photo
Select this when the original contains images such as photographs or shaded drawings.
Press the [Image Quality] key.
Press the [Image Quality] key or [ ][ ] keys to select the desired resolution setting, and then press the [OK] key.
● Press the [ ] key or [Clear/Stop] key to discard the current change and return to the initial screen.
● You can change the machine's default [Resolution] setting to always scan with a specific resolution level.
● Temporary job settings are cleared in the following cases:
�❍ When no input is received for the period of time specified in [Auto Clear] while the initial screen is displayed.
�❍ When the [Clear/Stop] key is pressed while the initial screen is displayed.
�❍ When the machine's mode is changed.
�❍ When the power is turned off.
�❍ When the machine's default for the same setting is changed.
● For details about [Resolution], see Fax Transmission Settings .
● For details about [Auto Clear], see Administrator Settings .
Contents Previous Next Settings

Top Previous Next
Copyright © 2009
Top Page > Using the Fax Function > Using the Fax Function from a Computer (LAN-Fax)
Using the Fax Function from a Computer (LAN-Fax)
This section describes how to use the fax function of the machine from a computer.
You can send a document directly from a computer through this machine to another fax machine, without printing the document.
● This functions is supported by Windows 2000/XP/Vista and Windows Server 2003/2003 R2/2008. Mac OS X does not support
this function.
Related topics
Configuring the LAN-Fax Address Book
Basic Operation for Sending Faxes from a Computer
Configuring Transmission Settings
Top Previous Next
Copyright © 2009
Contents Previous Next Settings
Top Page > Using the Fax Function > Using the Fax Function from a Computer (LAN-Fax) > Configuring the LAN-Fax Address Book
Configuring the LAN-Fax Address Book
This section describes the LAN-Fax Address Book. Configure the LAN-Fax Address Book on the computer. The LAN-Fax Address Book allows you to specify LAN-Fax destinations quickly and easily.
The LAN-Fax Address Book can contain up to 1000 entries, including individual destinations and groups of destinations.
● You can configure separate LAN-Fax Address Books for each user account on your computer.
● You can import and export the LAN-Fax Address Book as required.
Related topics
Opening the LAN-Fax Address Book
Registering destinations
Modifying destinations
Registering groups
Modifying groups
Deleting individual destinations or groups
Exporting/Importing LAN-Fax Address Book data
Top Previous Next
Copyright © 2009
Contents Previous Next Settings
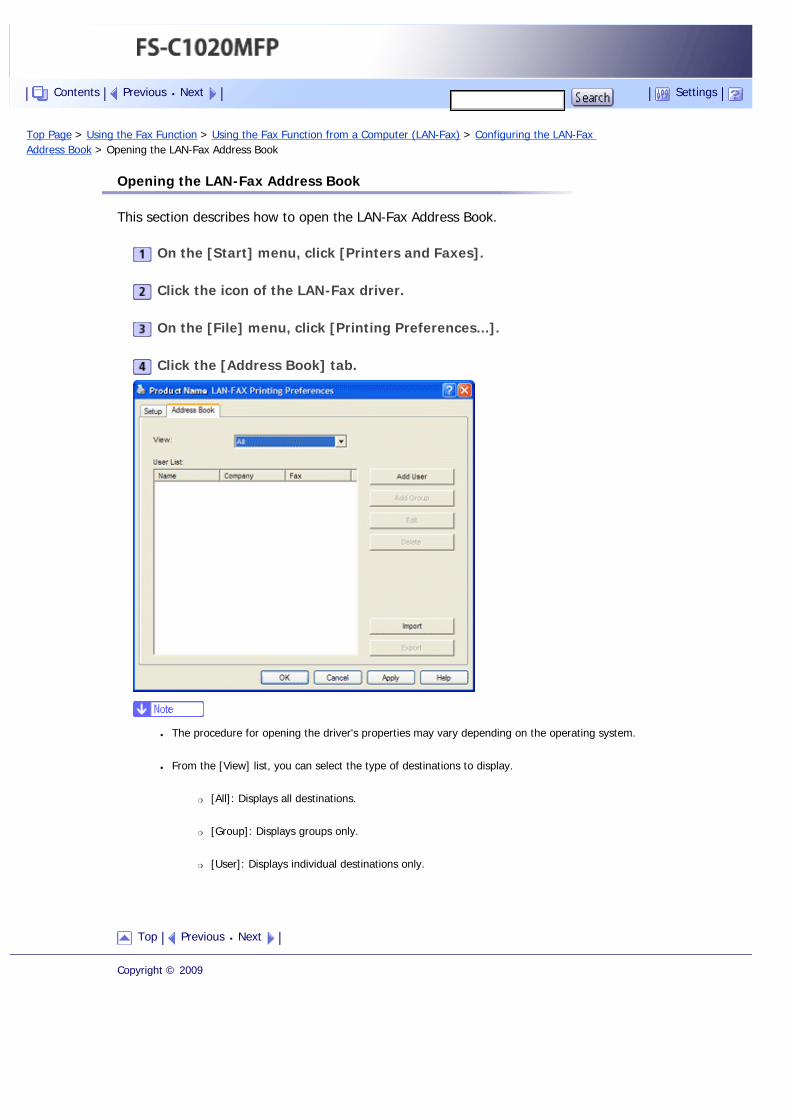
Top Page > Using the Fax Function > Using the Fax Function from a Computer (LAN-Fax) > Configuring the LAN-Fax Address Book > Opening the LAN-Fax Address Book
Opening the LAN-Fax Address Book
This section describes how to open the LAN-Fax Address Book.
On the [Start] menu, click [Printers and Faxes].
Click the icon of the LAN-Fax driver.
On the [File] menu, click [Printing Preferences...].
Click the [Address Book] tab.
● The procedure for opening the driver's properties may vary depending on the operating system.
● From the [View] list, you can select the type of destinations to display.
�❍ [All]: Displays all destinations.
�❍ [Group]: Displays groups only.
�❍ [User]: Displays individual destinations only.
Top Previous Next
Copyright © 2009
Contents Previous Next Settings
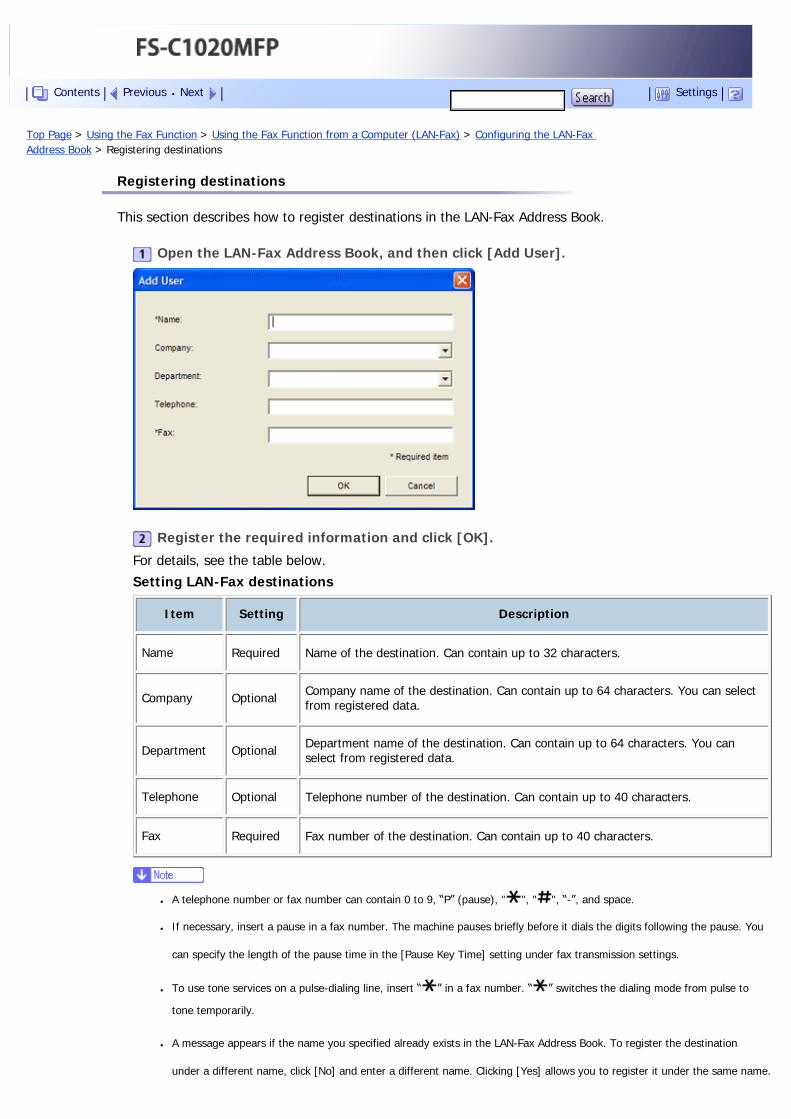
Top Page > Using the Fax Function > Using the Fax Function from a Computer (LAN-Fax) > Configuring the LAN-Fax Address Book > Registering destinations
Registering destinations
This section describes how to register destinations in the LAN-Fax Address Book.
Open the LAN-Fax Address Book, and then click [Add User].
Register the required information and click [OK].
For details, see the table below.
Setting LAN-Fax destinations
Item Setting Description
Name Required Name of the destination. Can contain up to 32 characters.
Company Optional Company name of the destination. Can contain up to 64 characters. You can select from registered data.
Department Optional Department name of the destination. Can contain up to 64 characters. You can select from registered data.
Telephone Optional Telephone number of the destination. Can contain up to 40 characters.
Fax Required Fax number of the destination. Can contain up to 40 characters.
● A telephone number or fax number can contain 0 to 9, “P” (pause), " ", " ", “-”, and space.
● If necessary, insert a pause in a fax number. The machine pauses briefly before it dials the digits following the pause. You
can specify the length of the pause time in the [Pause Key Time] setting under fax transmission settings.
● To use tone services on a pulse-dialing line, insert “ ” in a fax number. “ ” switches the dialing mode from pulse to
tone temporarily.
● A message appears if the name you specified already exists in the LAN-Fax Address Book. To register the destination
under a different name, click [No] and enter a different name. Clicking [Yes] allows you to register it under the same name.
Contents Previous Next Settings

● You can partly modify an existing destination and register it as a new one with similar information.
● For details about [Pause Key Time], see Fax Transmission Settings .
● For details about how to register a new destination similar to an existing one, see Modifying destinations .
Top Previous Next
Copyright © 2009
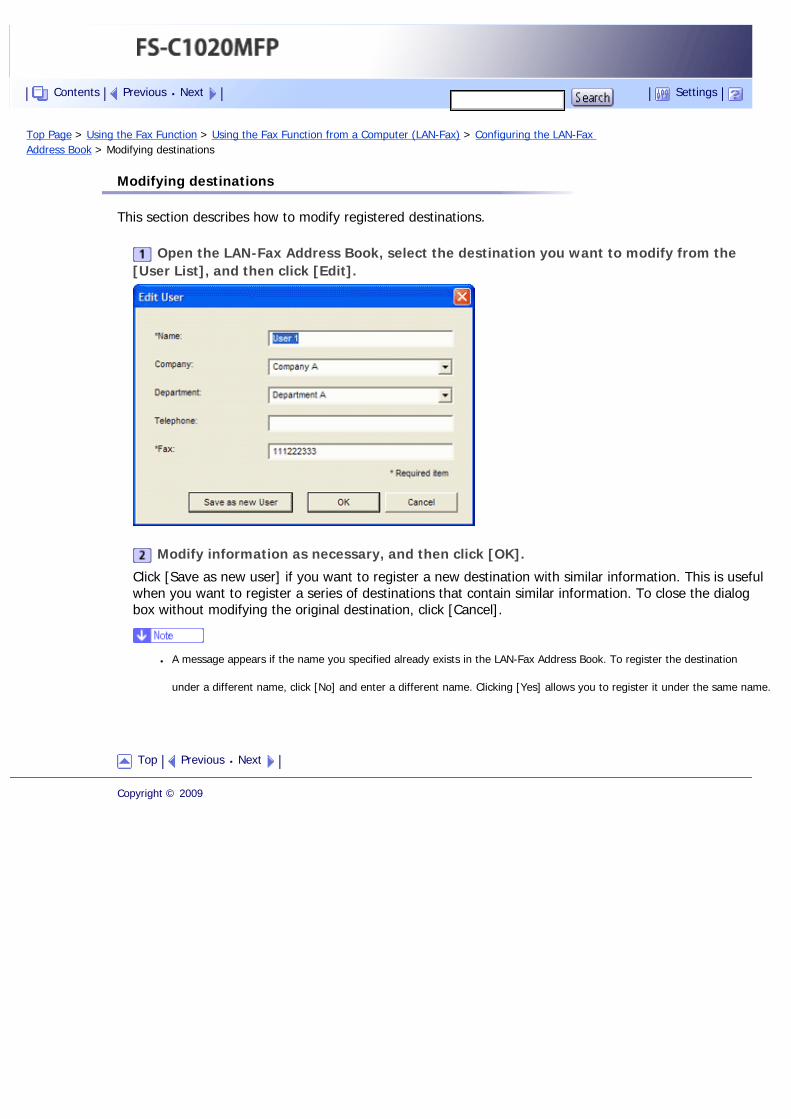
Top Page > Using the Fax Function > Using the Fax Function from a Computer (LAN-Fax) > Configuring the LAN-Fax Address Book > Modifying destinations
Modifying destinations
This section describes how to modify registered destinations.
Open the LAN-Fax Address Book, select the destination you want to modify from the [User List], and then click [Edit].
Modify information as necessary, and then click [OK].
Click [Save as new user] if you want to register a new destination with similar information. This is useful when you want to register a series of destinations that contain similar information. To close the dialog box without modifying the original destination, click [Cancel].
● A message appears if the name you specified already exists in the LAN-Fax Address Book. To register the destination
under a different name, click [No] and enter a different name. Clicking [Yes] allows you to register it under the same name.
Top Previous Next
Copyright © 2009
Contents Previous Next Settings
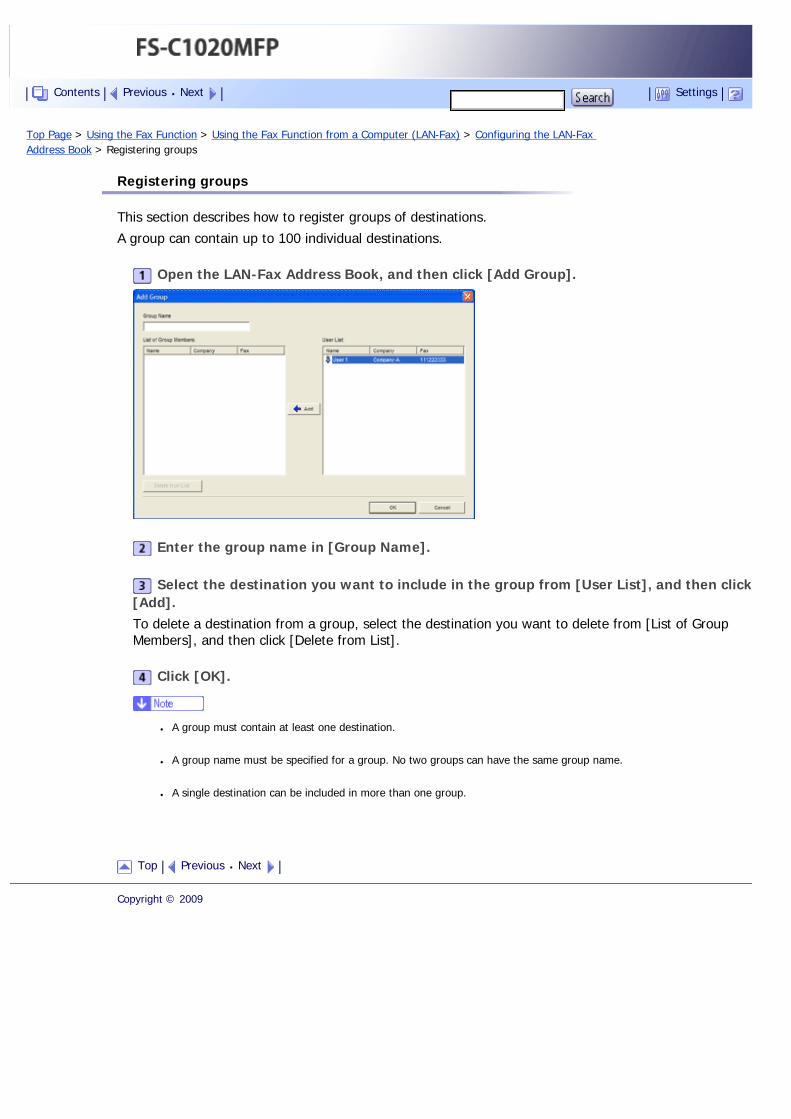
Top Page > Using the Fax Function > Using the Fax Function from a Computer (LAN-Fax) > Configuring the LAN-Fax Address Book > Registering groups
Registering groups
This section describes how to register groups of destinations.
A group can contain up to 100 individual destinations.
Open the LAN-Fax Address Book, and then click [Add Group].
Enter the group name in [Group Name].
Select the destination you want to include in the group from [User List], and then click [Add].To delete a destination from a group, select the destination you want to delete from [List of Group Members], and then click [Delete from List].
Click [OK].
● A group must contain at least one destination.
● A group name must be specified for a group. No two groups can have the same group name.
● A single destination can be included in more than one group.
Top Previous Next
Copyright © 2009
Contents Previous Next Settings
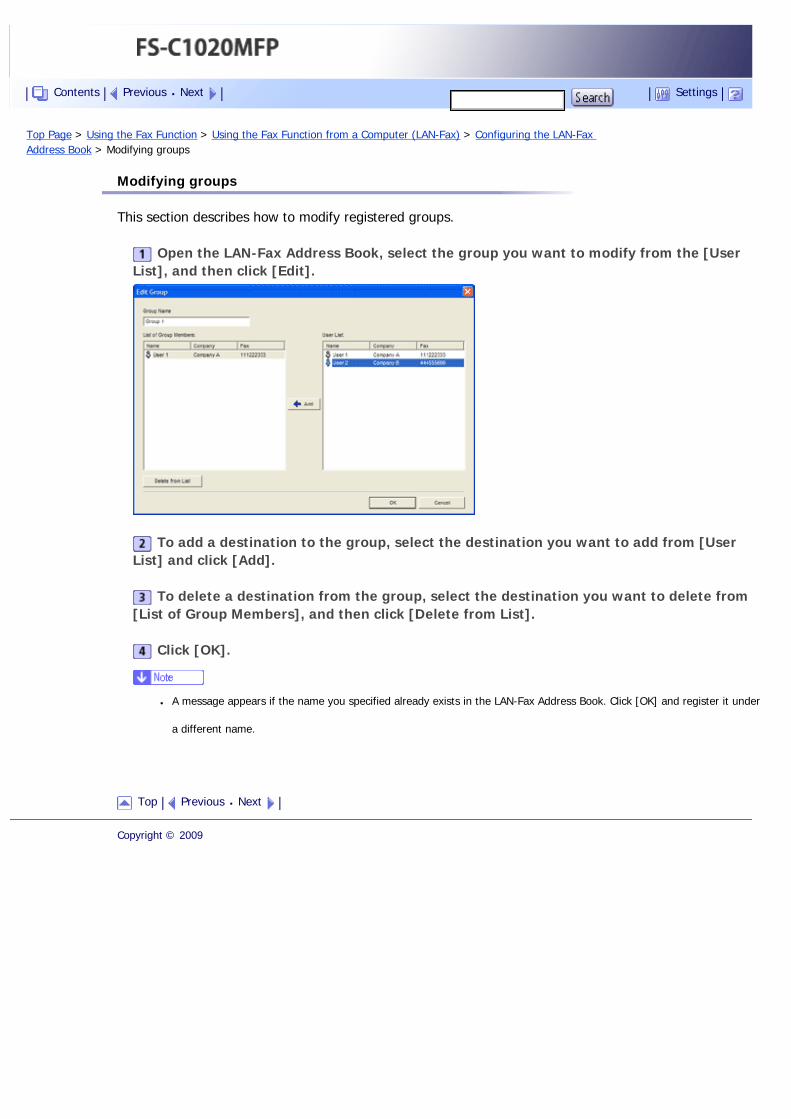
Top Page > Using the Fax Function > Using the Fax Function from a Computer (LAN-Fax) > Configuring the LAN-Fax Address Book > Modifying groups
Modifying groups
This section describes how to modify registered groups.
Open the LAN-Fax Address Book, select the group you want to modify from the [User List], and then click [Edit].
To add a destination to the group, select the destination you want to add from [User List] and click [Add].
To delete a destination from the group, select the destination you want to delete from [List of Group Members], and then click [Delete from List].
Click [OK].
● A message appears if the name you specified already exists in the LAN-Fax Address Book. Click [OK] and register it under
a different name.
Top Previous Next
Copyright © 2009
Contents Previous Next Settings
Top Page > Using the Fax Function > Using the Fax Function from a Computer (LAN-Fax) > Configuring the LAN-Fax Address Book > Deleting individual destinations or groups
Deleting individual destinations or groups
This section describes how to delete individual destinations or groups from the LAN-Fax Address Book.
Open the LAN-Fax Address Book, select the destination you want to delete from [User List], and then click [Delete].A confirmation message appears.
Click [Yes].
● A destination is automatically deleted from a group if that destination is deleted from the LAN-Fax Address Book. If you are
deleting the last destination from a group, a message asking you to confirm the deletion appears. Click [OK] if you want to
delete the group.
● Deleting a group does not delete the destinations it contains from the LAN-Fax Address Book.
Top Previous Next
Copyright © 2009
Contents Previous Next Settings
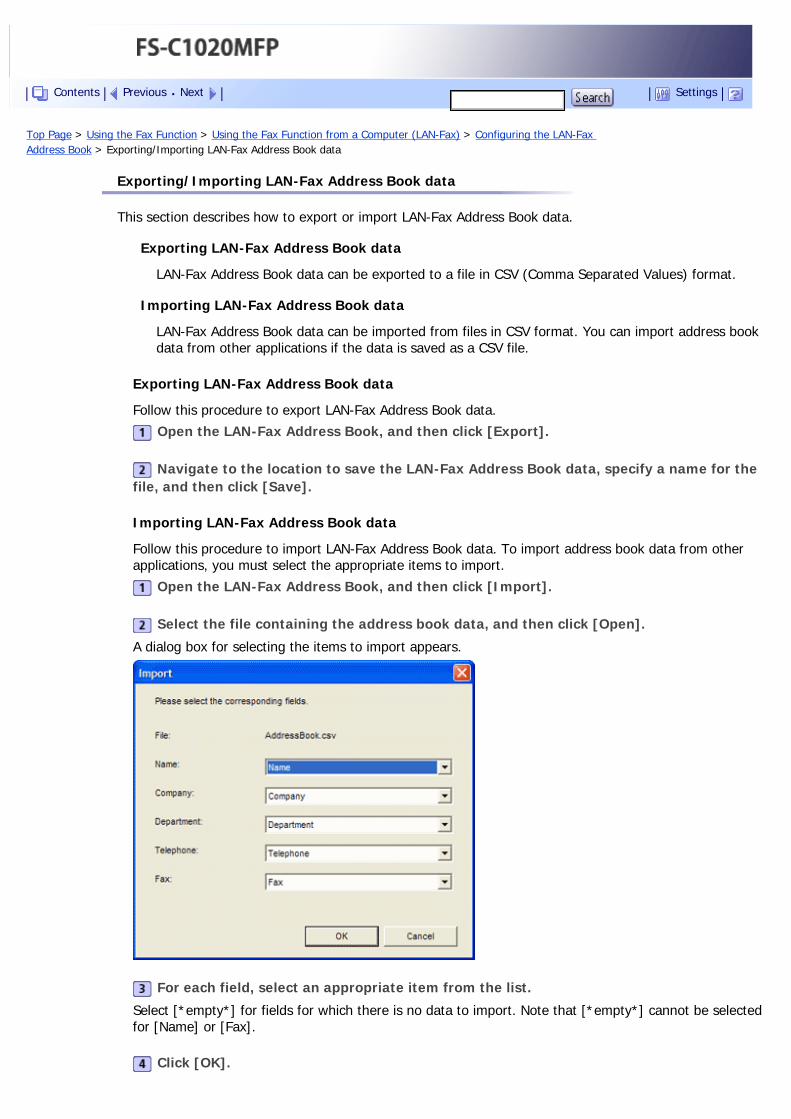
Top Page > Using the Fax Function > Using the Fax Function from a Computer (LAN-Fax) > Configuring the LAN-Fax Address Book > Exporting/Importing LAN-Fax Address Book data
Exporting/Importing LAN-Fax Address Book data
This section describes how to export or import LAN-Fax Address Book data.
Exporting LAN-Fax Address Book data
LAN-Fax Address Book data can be exported to a file in CSV (Comma Separated Values) format.
Importing LAN-Fax Address Book data
LAN-Fax Address Book data can be imported from files in CSV format. You can import address book data from other applications if the data is saved as a CSV file.
Exporting LAN-Fax Address Book data
Follow this procedure to export LAN-Fax Address Book data.
Open the LAN-Fax Address Book, and then click [Export].
Navigate to the location to save the LAN-Fax Address Book data, specify a name for the file, and then click [Save].
Importing LAN-Fax Address Book data
Follow this procedure to import LAN-Fax Address Book data. To import address book data from other applications, you must select the appropriate items to import.
Open the LAN-Fax Address Book, and then click [Import].
Select the file containing the address book data, and then click [Open].
A dialog box for selecting the items to import appears.
For each field, select an appropriate item from the list.
Select [*empty*] for fields for which there is no data to import. Note that [*empty*] cannot be selected for [Name] or [Fax].
Click [OK].
Contents Previous Next Settings
If a destination with the same name is found during the import process, select one of the following operations:
● [Skip]: Skips the destination, and imports the remaining data.
● [Save as new User]: Imports the current destination as a separate destination under the same name as an existing destination.
● [Save All as new]: Imports the current and subsequent destinations as separate destinations under the same names as existing destinations.
● [Overwrite]: Imports the destination, overwriting the data in the LAN-Fax Address Book.
● [Overwrite All]: Imports the current and subsequent destinations under the same names as existing destinations, overwriting the data in the LAN-Fax Address Book.
● [Cancel]: Cancels the import operation.
If a destination does not contain a name, or invalid characters are used in the telephone number or fax number, select one of the following operations:
● [Skip]: Skips the destination, and imports the remaining data.
● [Save]: Imports the destination as is.
● [Save All]: Imports the current and subsequent destinations as is.
● [Cancel]: Cancels the import operation.
● CSV files are exported using Unicode encoding.
● LAN-Fax Address Book data can be imported from CSV files whose character encoding is Unicode or ASCII.
● Group data cannot be exported or imported.
● Up to 1000 destinations can be registered in the Lan-Fax Address Book. If this limit is exceeded during importing, the
remaining destinations will not be imported.
Top Previous Next
Copyright © 2009
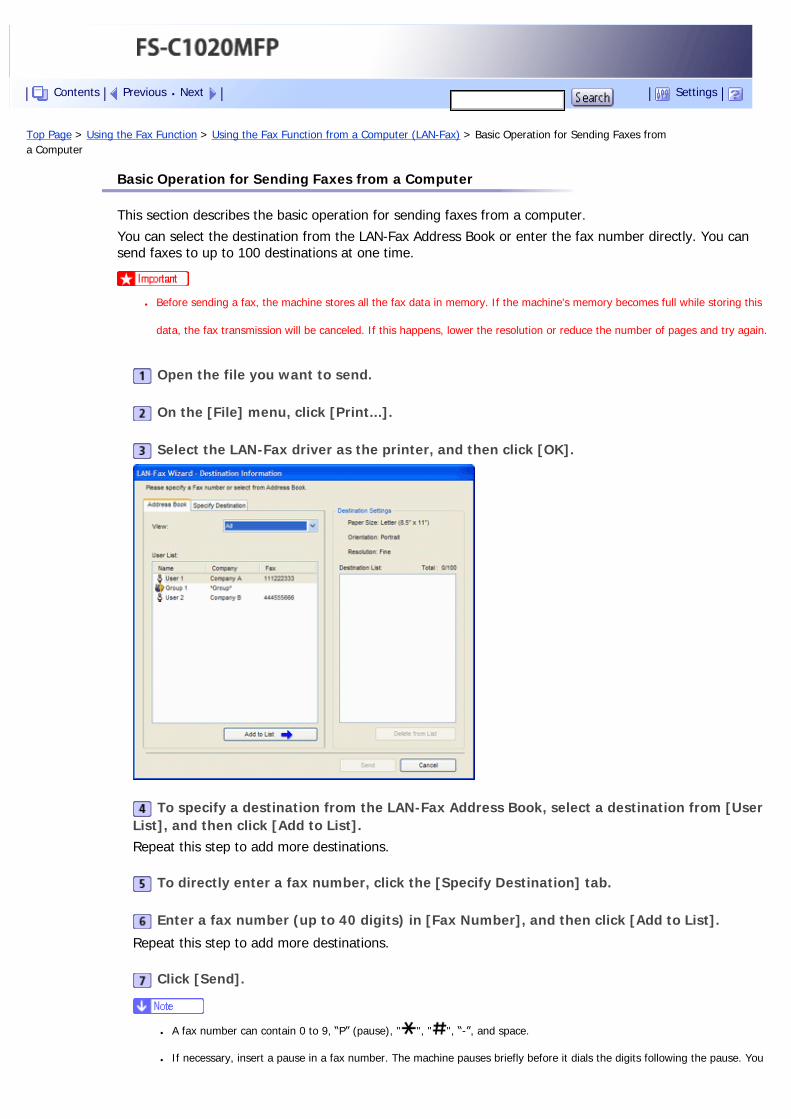
Top Page > Using the Fax Function > Using the Fax Function from a Computer (LAN-Fax) > Basic Operation for Sending Faxes from a Computer
Basic Operation for Sending Faxes from a Computer
This section describes the basic operation for sending faxes from a computer.
You can select the destination from the LAN-Fax Address Book or enter the fax number directly. You can send faxes to up to 100 destinations at one time.
● Before sending a fax, the machine stores all the fax data in memory. If the machine's memory becomes full while storing this
data, the fax transmission will be canceled. If this happens, lower the resolution or reduce the number of pages and try again.
Open the file you want to send.
On the [File] menu, click [Print...].
Select the LAN-Fax driver as the printer, and then click [OK].
To specify a destination from the LAN-Fax Address Book, select a destination from [User List], and then click [Add to List].Repeat this step to add more destinations.
To directly enter a fax number, click the [Specify Destination] tab.
Enter a fax number (up to 40 digits) in [Fax Number], and then click [Add to List].
Repeat this step to add more destinations.
Click [Send].
● A fax number can contain 0 to 9, “P” (pause), " ", " ", “-”, and space.
● If necessary, insert a pause in a fax number. The machine pauses briefly before it dials the digits following the pause. You
Contents Previous Next Settings

can specify the length of the pause time in the [Pause Key Time] setting under fax transmission settings.
● To use tone services on a pulse-dialing line, insert “ ” in a fax number. “ ” switches the dialing mode from pulse to
tone temporarily.
● To delete an entered destination, select the destination in the [Destination List], and then click [Delete from List].
● You can register the fax number you entered in the [Specify Destination] tab in the LAN-Fax Address Book. Click [Save to
Address Book] to open the dialog box for registering a destination.
● From the [View] list, you can select the types of destinations to display.
�❍ [All]: Displays all destinations.
�❍ [Group]: Displays groups only.
�❍ [User]: Displays individual destinations only.
● You can configure transmission settings in the LAN-Fax driver's properties.
● For details about [Pause Key Time], see Fax Transmission Settings .
● For details about configuring the transmission settings, see Configuring Transmission Settings .
Related topics
Canceling a fax
Top Previous Next
Copyright © 2009
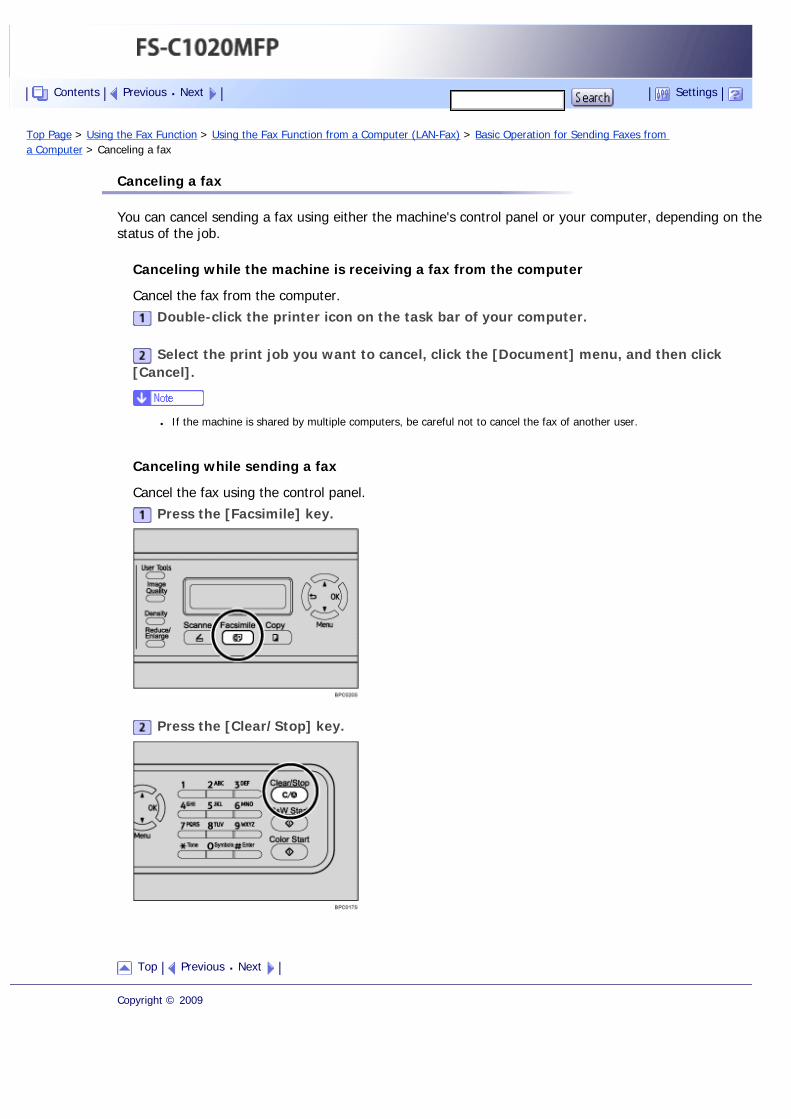
Top Page > Using the Fax Function > Using the Fax Function from a Computer (LAN-Fax) > Basic Operation for Sending Faxes from a Computer > Canceling a fax
Canceling a fax
You can cancel sending a fax using either the machine's control panel or your computer, depending on the status of the job.
Canceling while the machine is receiving a fax from the computer
Cancel the fax from the computer.
Double-click the printer icon on the task bar of your computer.
Select the print job you want to cancel, click the [Document] menu, and then click [Cancel].
● If the machine is shared by multiple computers, be careful not to cancel the fax of another user.
Canceling while sending a fax
Cancel the fax using the control panel.
Press the [Facsimile] key.
Press the [Clear/Stop] key.
Top Previous Next
Copyright © 2009
Contents Previous Next Settings
Top Page > Using the Fax Function > Using the Fax Function from a Computer (LAN-Fax) > Configuring Transmission Settings
Configuring Transmission Settings
This section describes how to configure transmission settings in the LAN-Fax driver's properties.
Properties are set separately for each application.
On the [File] menu, click [Print...].
Select the LAN-Fax driver as the printer, and then click a button such as [Advanced Options] or [Properties] to open the driver's properties.LAN-Fax driver properties dialog box appears.
Click the [Setup] tab.
Configure settings as necessary, and then click [OK].
● For details about settings, see Settings you can configure in the LAN-Fax driver's properties .
Related topics
Settings you can configure in the LAN-Fax driver's properties
Top Previous Next
Copyright © 2009
Contents Previous Next Settings
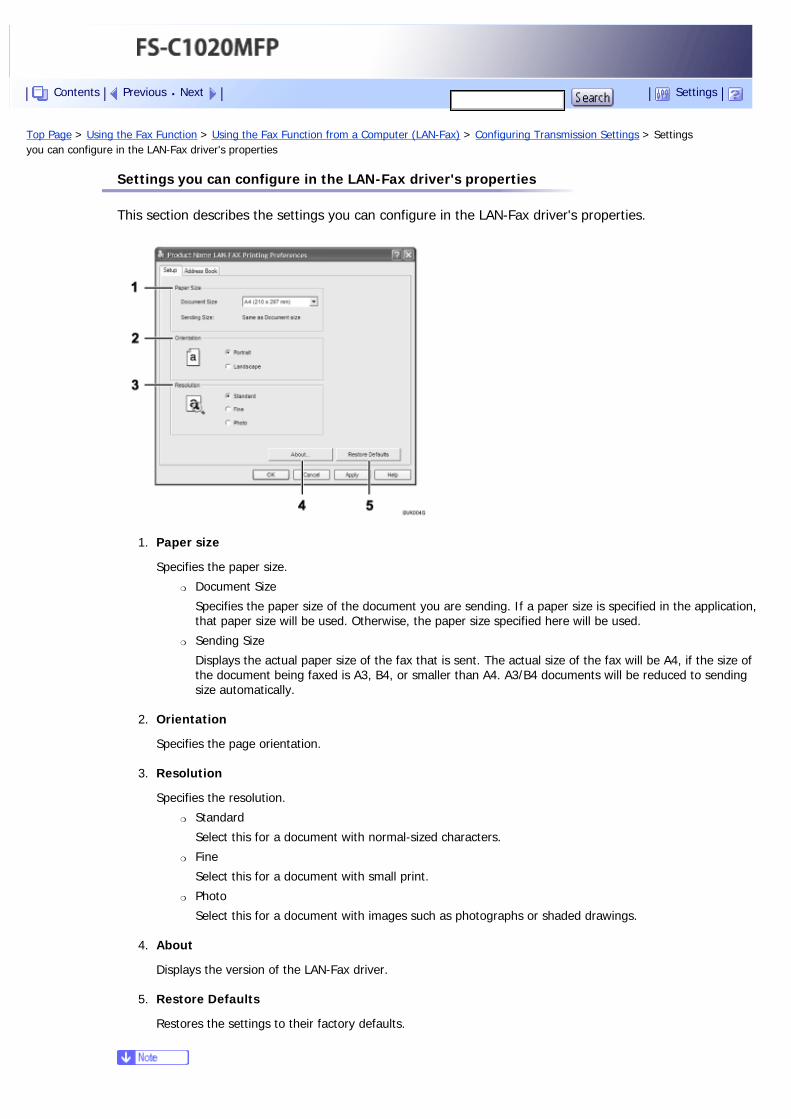
Top Page > Using the Fax Function > Using the Fax Function from a Computer (LAN-Fax) > Configuring Transmission Settings > Settings you can configure in the LAN-Fax driver's properties
Settings you can configure in the LAN-Fax driver's properties
This section describes the settings you can configure in the LAN-Fax driver's properties.
1. Paper size
Specifies the paper size.
�❍ Document Size
Specifies the paper size of the document you are sending. If a paper size is specified in the application, that paper size will be used. Otherwise, the paper size specified here will be used.
�❍ Sending Size
Displays the actual paper size of the fax that is sent. The actual size of the fax will be A4, if the size of the document being faxed is A3, B4, or smaller than A4. A3/B4 documents will be reduced to sending size automatically.
2. Orientation
Specifies the page orientation.
3. Resolution
Specifies the resolution.
�❍ Standard
Select this for a document with normal-sized characters.
�❍ Fine
Select this for a document with small print.
�❍ Photo
Select this for a document with images such as photographs or shaded drawings.
4. About
Displays the version of the LAN-Fax driver.
5. Restore Defaults
Restores the settings to their factory defaults.
Contents Previous Next Settings

● The settings configured here are applicable for the current application only.
Top Previous Next
Copyright © 2009
Top Page > Using the Fax Function > Receiving a Fax
Receiving a Fax
This section describes the reception modes and the basic operations for receiving a fax.
● When receiving an important fax, we recommend you confirm the contents of the received fax with the sender.
● The machine may not be able to receive faxes when the amount of free memory space is low.
● If a printing problem occurs, the fax is stored in memory. Stored received documents are printed as soon as the problem is
resolved.
● If the machine remains turned off for a certain period of time (for example, when the power switch is turned off or when
there is a power failure), all documents stored in memory will be lost. Make sure to print out the stored documents before
turning off the power (for example, prior to relocating the machine).
● An external telephone is required to use this machine as a telephone.
● Only A4, Letter, or Legal size paper can be used for printing faxes.
● If tray 2 is installed, you can select which tray to feed paper from in the [Tray Use: Fax] setting.
● For details about connecting an external telephone with this machine, see Connecting to a Telephone Line .
● For details about [Tray Use: Fax], see Fax System Settings .
Related topics
Selecting Reception Mode
Receiving a Fax in Manual Mode
Receiving a Fax in Fax Only Mode
Receiving a Fax in FAX/TEL Mode
Receiving a Fax in FAX/TAD Mode
Top Previous Next
Copyright © 2009
Contents Previous Next Settings
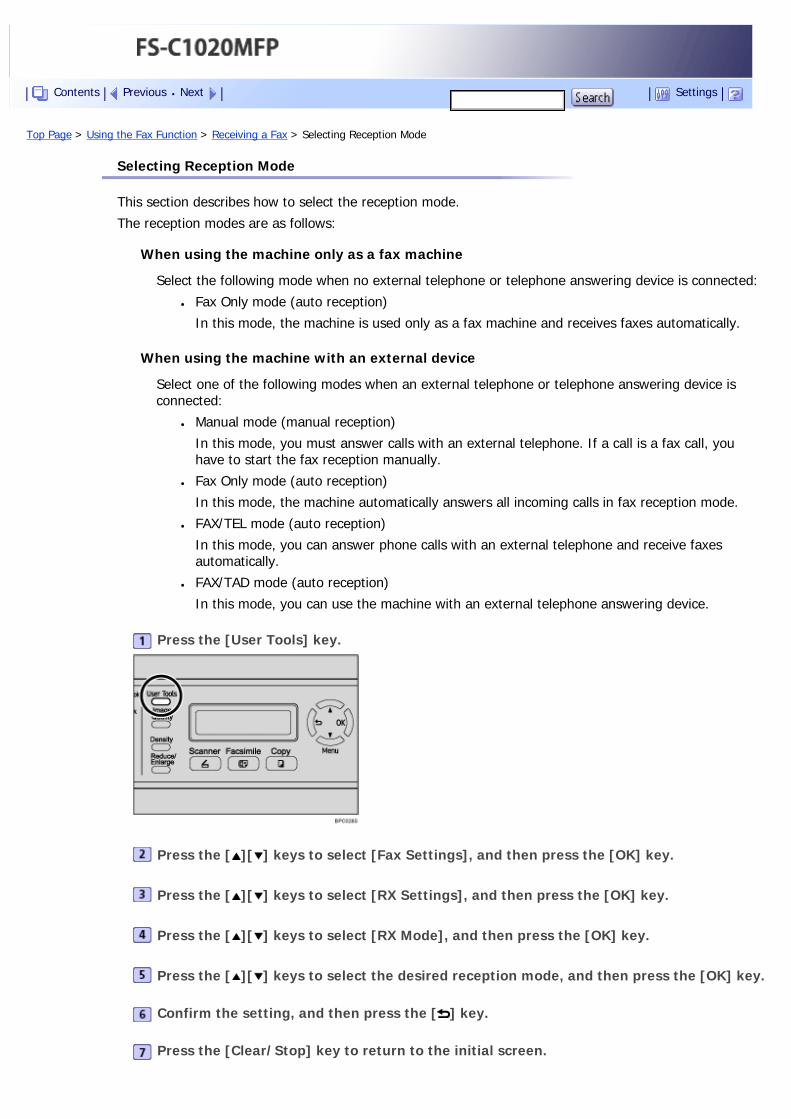
Top Page > Using the Fax Function > Receiving a Fax > Selecting Reception Mode
Selecting Reception Mode
This section describes how to select the reception mode.
The reception modes are as follows:
When using the machine only as a fax machine
Select the following mode when no external telephone or telephone answering device is connected:
● Fax Only mode (auto reception)
In this mode, the machine is used only as a fax machine and receives faxes automatically.
When using the machine with an external device
Select one of the following modes when an external telephone or telephone answering device is connected:
● Manual mode (manual reception)
In this mode, you must answer calls with an external telephone. If a call is a fax call, you have to start the fax reception manually.
● Fax Only mode (auto reception)
In this mode, the machine automatically answers all incoming calls in fax reception mode.
● FAX/TEL mode (auto reception)
In this mode, you can answer phone calls with an external telephone and receive faxes automatically.
● FAX/TAD mode (auto reception)
In this mode, you can use the machine with an external telephone answering device.
Press the [User Tools] key.
Press the [ ][ ] keys to select [Fax Settings], and then press the [OK] key.
Press the [ ][ ] keys to select [RX Settings], and then press the [OK] key.
Press the [ ][ ] keys to select [RX Mode], and then press the [OK] key.
Press the [ ][ ] keys to select the desired reception mode, and then press the [OK] key.
Confirm the setting, and then press the [ ] key.
Press the [Clear/Stop] key to return to the initial screen.
Contents Previous Next Settings

● You can press the [ ] key to exit to the previous level of the menu tree.
● In FAX/TAD mode, make sure to set the external answering device to answer calls within five rings, because the machine
automatically starts to receive faxes after the fifth ring.
Top Previous Next
Copyright © 2009
Top Page > Using the Fax Function > Receiving a Fax > Receiving a Fax in Manual Mode
Receiving a Fax in Manual Mode
This section describes the basic operation for receiving a fax when the reception mode is set to Manual mode.
Pick up the handset of the external telephone to answer the call.
A normal telephone call starts.
When you hear a fax calling tone or no sound, press the [Facsimile] key, and then press the [B&W Start] key.
Press [3].
Press the [B&W Start] key.
Replace the handset.
Top Previous Next
Copyright © 2009
Contents Previous Next Settings
Top Page > Using the Fax Function > Receiving a Fax > Receiving a Fax in Fax Only Mode
Receiving a Fax in Fax Only Mode
When the reception mode is set to Fax Only mode, the machine automatically answers all incoming calls in fax reception mode.
● You can specify the number of times the machine rings before answering a call in the [Ring Count Delay] setting under [Fax
Settings].
● If you answer a call with the external telephone while the machine is ringing, a normal telephone call starts. If you hear a fax
calling tone or no sound, receive the fax manually.
● For details about [Ring Count Delay], see Fax System Settings .
● For details about manually receiving a fax, see Receiving a Fax in Manual Mode .
Top Previous Next
Copyright © 2009
Contents Previous Next Settings
Top Page > Using the Fax Function > Receiving a Fax > Receiving a Fax in FAX/TEL Mode
Receiving a Fax in FAX/TEL Mode
When the reception mode is set to FAX/TEL mode, the machine receives a fax automatically if the incoming call is a fax call and rings when it receives voice calls.
1. When there is an incoming call, the machine tries to detect a fax calling tone for five seconds.
If a fax calling tone is detected, the machine starts to receive the fax automatically.
2. If a fax calling tone is not detected, the machine starts to ring, and continues to try to detect a fax calling tone for the period of time specified in [F/T Ring Time] under [Fax Settings].
�❍ If a fax calling tone is detected, or if you do not pick up the handset, the machine starts to receive the fax automatically.
�❍ To start a normal telephone call, pick up the handset, press the [Facsimile] key, and then press the [Clear/Stop] key. If you hear a fax calling tone or no sound, receive the fax manually.
�❍ If you pick up the handset but the time specified in [F/T Ring Time] passes before a normal telephone call starts, the machine starts to receive the fax automatically.
● After you pick up the handset to answer a call, make sure to press the [Facsimile] key to activate fax mode before pressing
the [Clear/Stop] key. If the machine is not in fax mode, pressing the [Clear/Stop] key will not let you start a normal telephone
call.
● For details about [F/T Ring Time], see Fax System Settings .
● For details about manually receiving a fax, see Receiving a Fax in Manual Mode .
Top Previous Next
Copyright © 2009
Contents Previous Next Settings
Top Page > Using the Fax Function > Receiving a Fax > Receiving a Fax in FAX/TAD Mode
Receiving a Fax in FAX/TAD Mode
When the reception mode is set to FAX/TAD mode, the external telephone answering device answers and records messages when the machine receives telephone calls. If the incoming call is a fax call, the machine receives the fax automatically.
1. When there is an incoming call, the machine rings up to five times.
If the external telephone answering device does not answer, the machine starts to receive the fax automatically.
2. If the external telephone answering device answers, the machine monitors silence on the line for 30 seconds (silence detection).
�❍ If a fax calling tone or no sound is detected, the machine starts to receive the fax automatically.
�❍ If a voice is detected, a normal telephone call starts. The external telephone answering device records messages.
● You can manually receive a fax during silence detection.
● Silence detection does not terminate for 30 seconds even if the external telephone answering device goes on-hook, unless
you press the [Clear/Stop] key and disconnect the call.
● For details about manually receiving a fax, see Receiving a Fax in Manual Mode .
Top Previous Next
Copyright © 2009
Contents Previous Next Settings
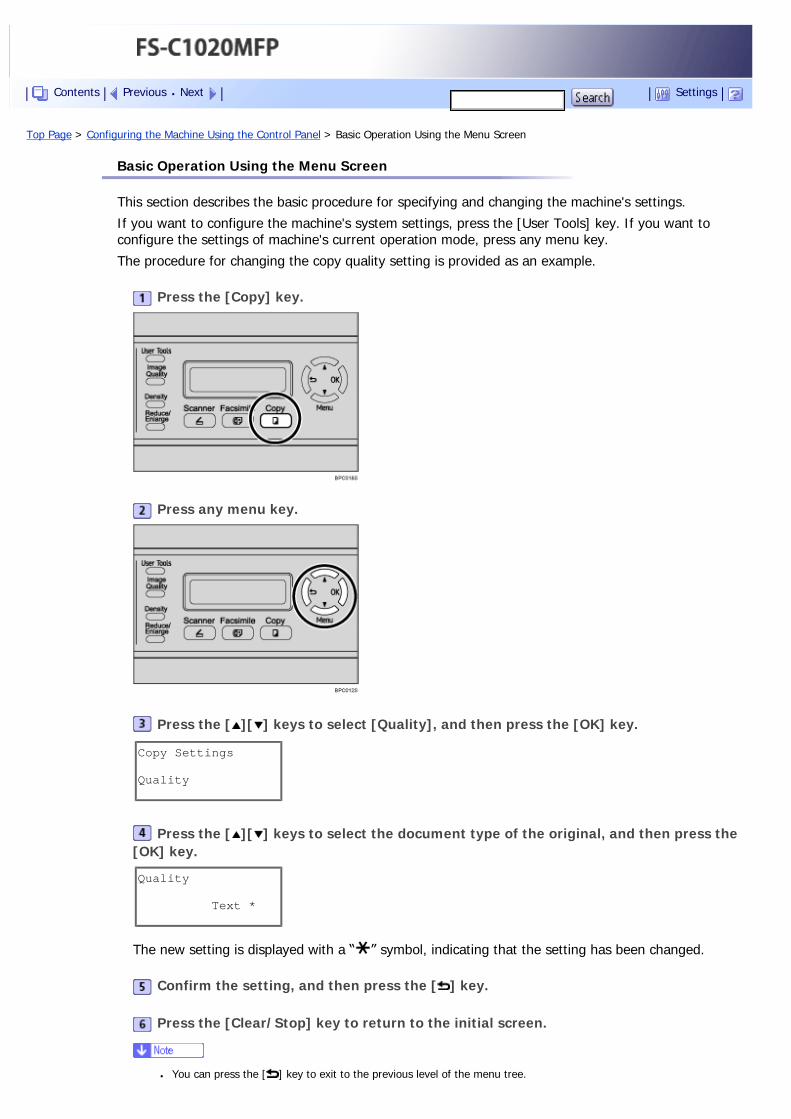
Top Page > Configuring the Machine Using the Control Panel > Basic Operation Using the Menu Screen
Basic Operation Using the Menu Screen
This section describes the basic procedure for specifying and changing the machine's settings.
If you want to configure the machine's system settings, press the [User Tools] key. If you want to configure the settings of machine's current operation mode, press any menu key.
The procedure for changing the copy quality setting is provided as an example.
Press the [Copy] key.
Press any menu key.
Press the [ ][ ] keys to select [Quality], and then press the [OK] key.
Copy Settings
Quality
Press the [ ][ ] keys to select the document type of the original, and then press the [OK] key.
Quality
Text *
The new setting is displayed with a “ ” symbol, indicating that the setting has been changed.
Confirm the setting, and then press the [ ] key.
Press the [Clear/Stop] key to return to the initial screen.
● You can press the [ ] key to exit to the previous level of the menu tree.
Contents Previous Next Settings

Top Previous Next
Copyright © 2009
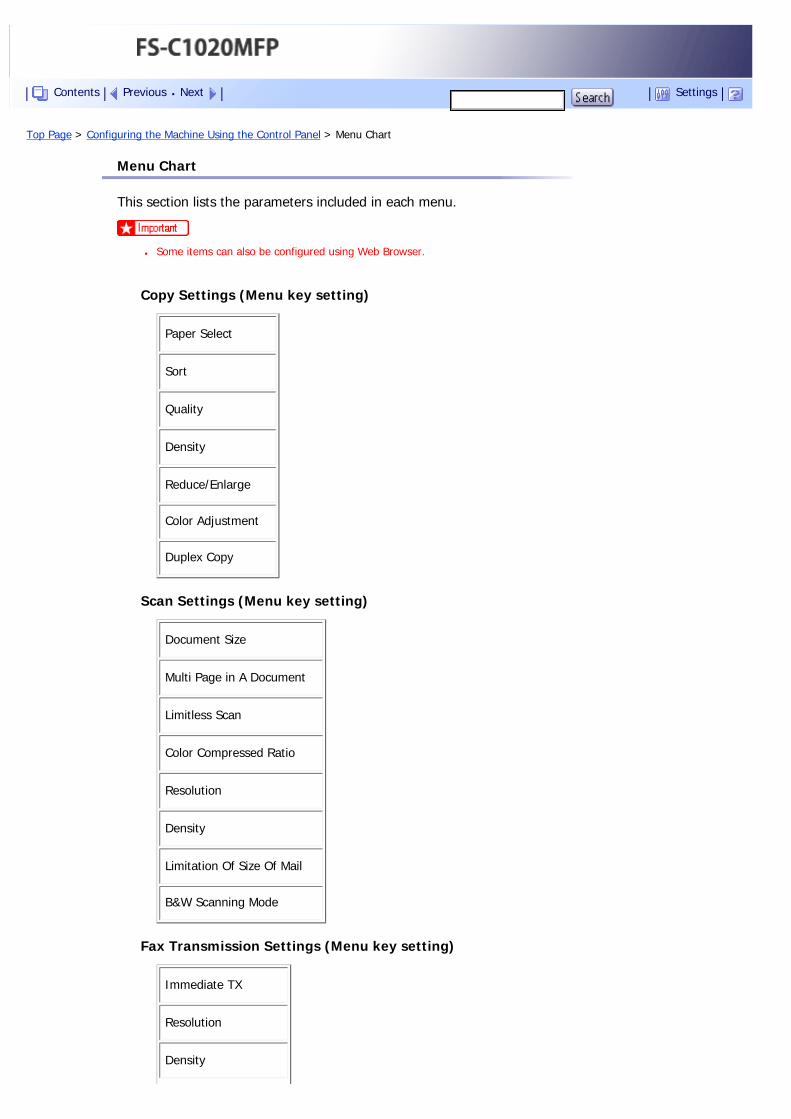
Top Page > Configuring the Machine Using the Control Panel > Menu Chart
Menu Chart
This section lists the parameters included in each menu.
● Some items can also be configured using Web Browser.
Copy Settings (Menu key setting)
Paper Select
Sort
Quality
Density
Reduce/Enlarge
Color Adjustment
Duplex Copy
Scan Settings (Menu key setting)
Document Size
Multi Page in A Document
Limitless Scan
Color Compressed Ratio
Resolution
Density
Limitation Of Size Of Mail
B&W Scanning Mode
Fax Transmission Settings (Menu key setting)
Immediate TX
Resolution
Density
Contents Previous Next Settings
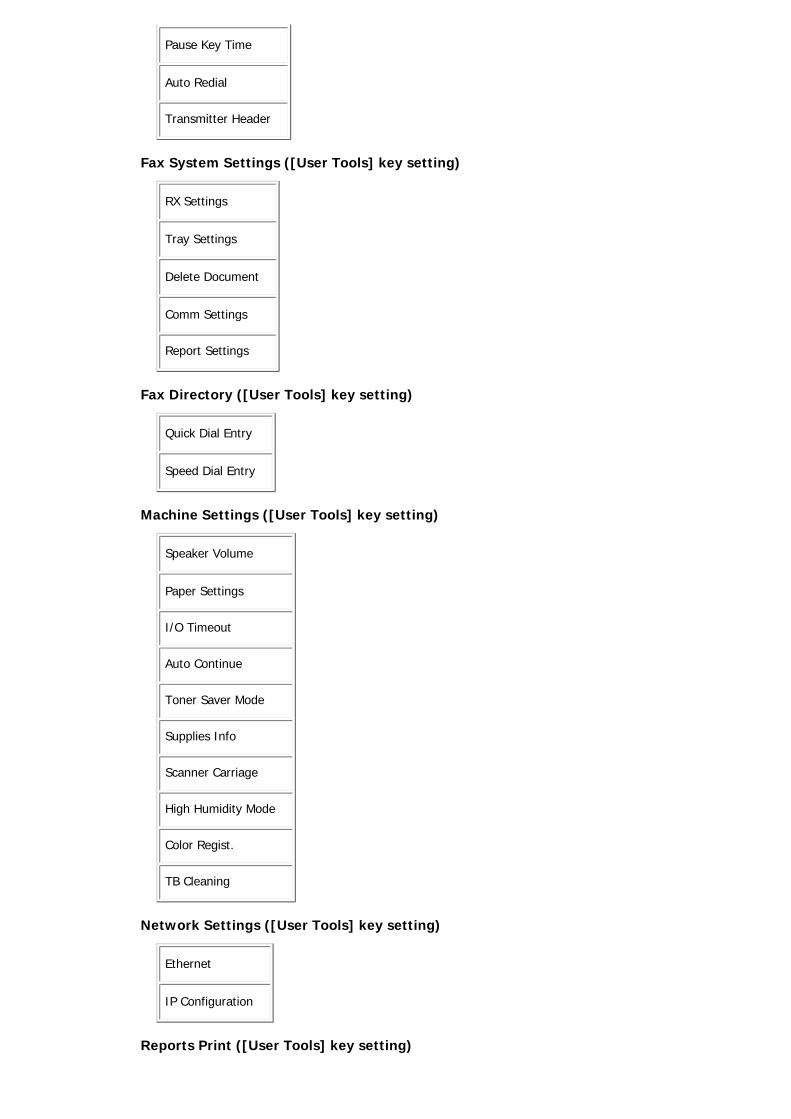
Pause Key Time
Auto Redial
Transmitter Header
Fax System Settings ([User Tools] key setting)
RX Settings
Tray Settings
Delete Document
Comm Settings
Report Settings
Fax Directory ([User Tools] key setting)
Quick Dial Entry
Speed Dial Entry
Machine Settings ([User Tools] key setting)
Speaker Volume
Paper Settings
I/O Timeout
Auto Continue
Toner Saver Mode
Supplies Info
Scanner Carriage
High Humidity Mode
Color Regist.
TB Cleaning
Network Settings ([User Tools] key setting)
Ethernet
IP Configuration
Reports Print ([User Tools] key setting)
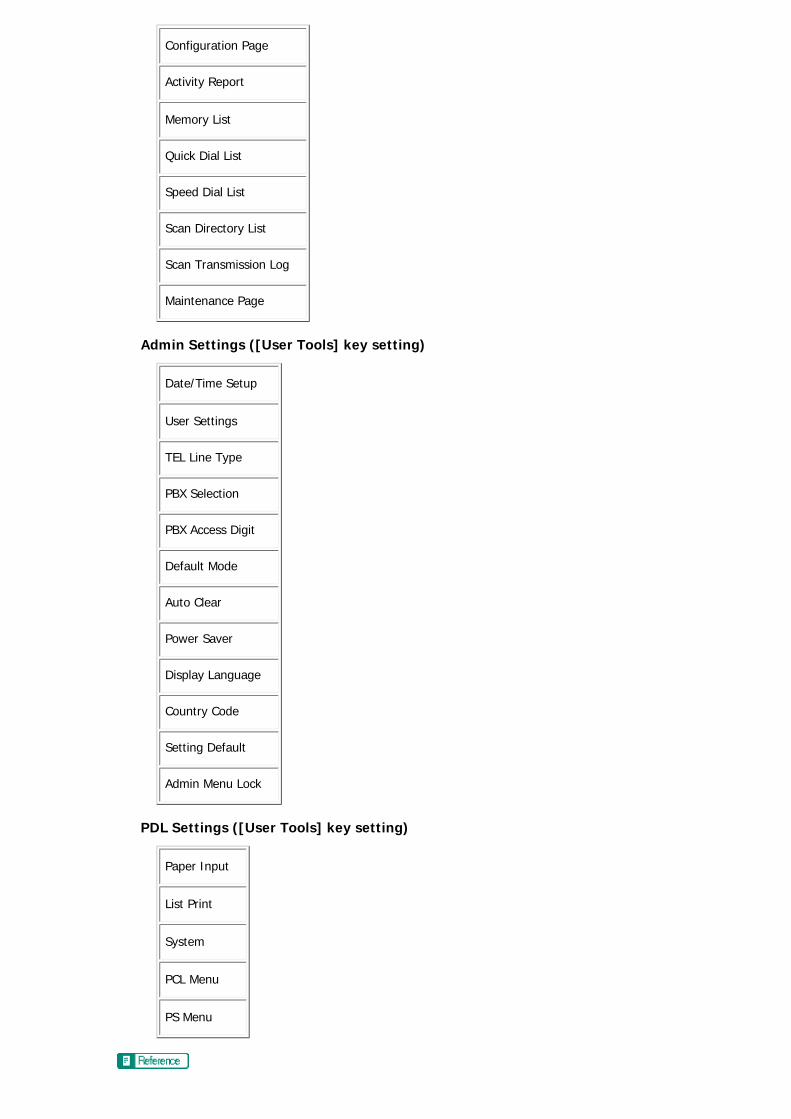
Configuration Page
Activity Report
Memory List
Quick Dial List
Speed Dial List
Scan Directory List
Scan Transmission Log
Maintenance Page
Admin Settings ([User Tools] key setting)
Date/Time Setup
User Settings
TEL Line Type
PBX Selection
PBX Access Digit
Default Mode
Auto Clear
Power Saver
Display Language
Country Code
Setting Default
Admin Menu Lock
PDL Settings ([User Tools] key setting)
Paper Input
List Print
System
PCL Menu
PS Menu

● For details about configuring the machine using Web Browser, see Configuring the Machine Using Web Browser .
Top Previous Next
Copyright © 2009
Top Page > Configuring the Machine Using the Control Panel > Copy Settings
Copy Settings
This section describes how to configure the copy settings.
Related topics
Changing Copy Settings
Copy Setting Parameters
Top Previous Next
Copyright © 2009
Contents Previous Next Settings
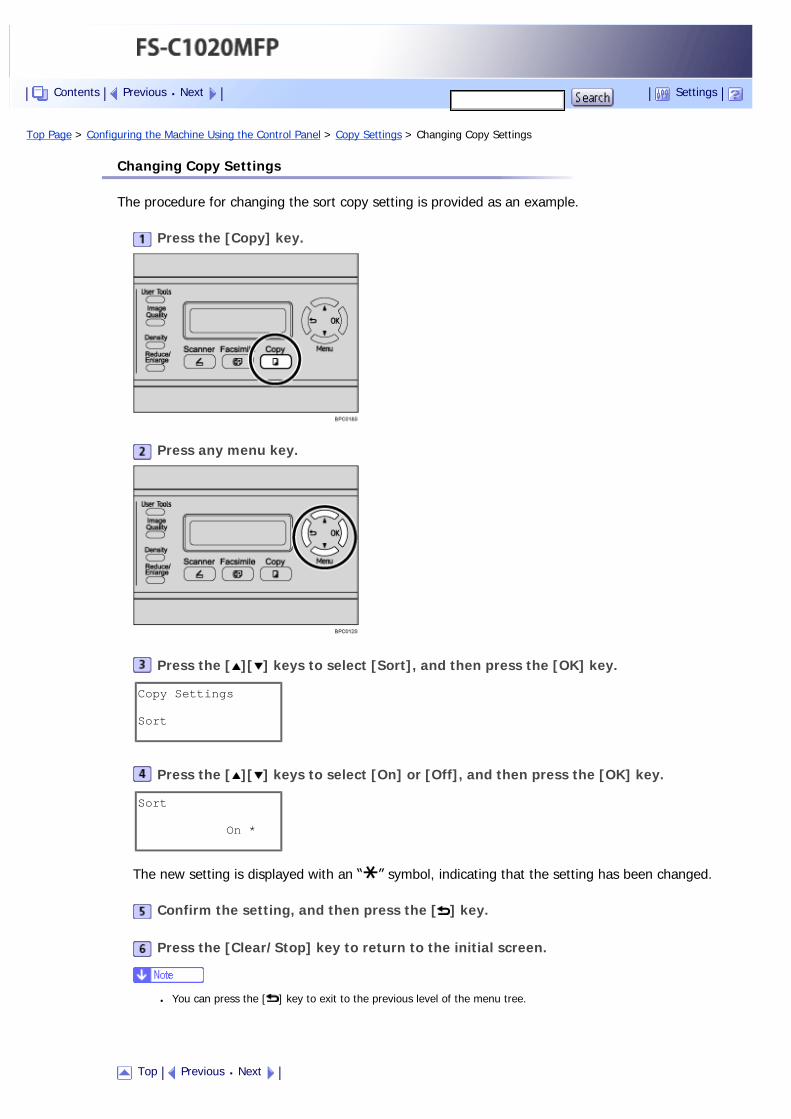
Top Page > Configuring the Machine Using the Control Panel > Copy Settings > Changing Copy Settings
Changing Copy Settings
The procedure for changing the sort copy setting is provided as an example.
Press the [Copy] key.
Press any menu key.
Press the [ ][ ] keys to select [Sort], and then press the [OK] key.
Copy Settings
Sort
Press the [ ][ ] keys to select [On] or [Off], and then press the [OK] key.
Sort
On *
The new setting is displayed with an “ ” symbol, indicating that the setting has been changed.
Confirm the setting, and then press the [ ] key.
Press the [Clear/Stop] key to return to the initial screen.
● You can press the [ ] key to exit to the previous level of the menu tree.
Top Previous Next
Contents Previous Next Settings

Copyright © 2009
Top Page > Configuring the Machine Using the Control Panel > Copy Settings > Copy Setting Parameters
Copy Setting Parameters
This section describes the copy setting parameters.
● Some items might not appear, depending on the model type you are using.
Paper Select
Specifies the paper size used for printing copies.
When a tray is selected, the machine prints from that tray only.
When a paper size is selected, the machine prints from the trays that contain the paper of the specified size, except the bypass tray. If tray 1 and tray 2 both contain the paper of the specified size, the machine starts to print from tray 1. If tray 1 runs out of paper, the machine automatically switches to tray 2 to continue printing. If tray 2 runs out of paper, load paper in tray 1.
If tray 2 is not installed, only [Tray1] and [Bypass Tray] appear.
Default: [Tray1]
● Tray1
● Tray2
● Bypass Tray
● A4
● LTR
Sort
Configures the machine to sort the output pages into sets when making multiple copies of a multi-page document (P1, P2, P1, P2...).
Default: [Off]
● On
● Off
Quality
Specifies the content of originals, to optimize copy quality.
Default: [Mixed]
● Text
Select this when the original contains only text and no photographs or pictures.
● Photo
Select this when the original contains photographs or pictures. Use this mode for the following types of original:
�❍ Photographs
�❍ Pages that are entirely or mainly photographs or pictures, such as magazine pages.
● Mixed
Select this when the original contains both text and photographs or pictures.
Density
Specifies the image density for photocopying.
Default:
● (Lightest)
Contents Previous Next Settings

●
●
●
● (Darkest)
Reduce/Enlarge
Specifies a combined copy, or the percentage by which copies are enlarged or reduced.
Default: 100%
● 50%
● 65% ( model only)
● 71% ( model only)
● 78% ( model only)
● 82% ( model only)
● 93%
● 100%
● 2in1
Select this to photocopy two pages of an original onto a single sheet of paper. When selecting this option, also select the orientation.
�❍ Portrait
�❍ Landscape
● 4in1
Select this to photocopy four pages of an original onto a single sheet of paper. When selecting this option, also select the orientation and layout.
�❍ Portrait Row
�❍ Portrait Column
�❍ Landscape Row
�❍ Landscape Column
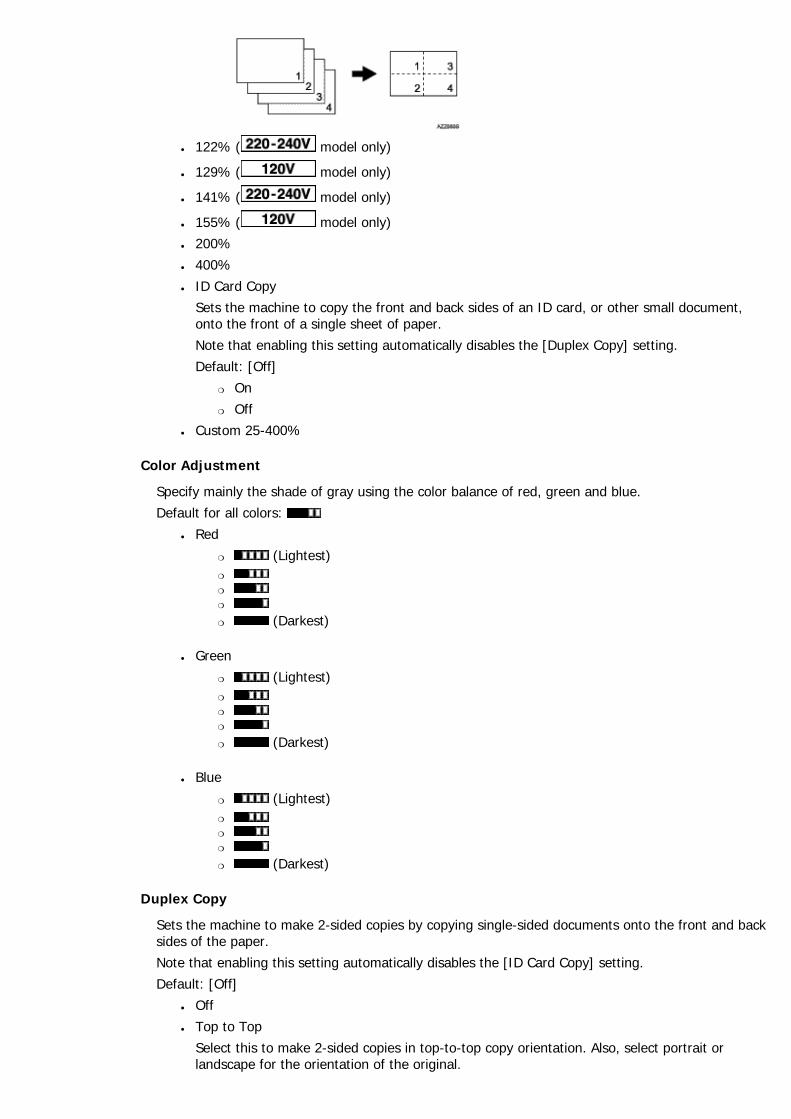
● 122% ( model only)
● 129% ( model only)
● 141% ( model only)
● 155% ( model only)
● 200%
● 400%
● ID Card Copy
Sets the machine to copy the front and back sides of an ID card, or other small document, onto the front of a single sheet of paper.
Note that enabling this setting automatically disables the [Duplex Copy] setting.
Default: [Off]
�❍ On
�❍ Off
● Custom 25-400%
Color Adjustment
Specify mainly the shade of gray using the color balance of red, green and blue.
Default for all colors:
● Red
�❍ (Lightest)�❍
�❍
�❍
�❍ (Darkest)
● Green
�❍ (Lightest)�❍
�❍
�❍
�❍ (Darkest)
● Blue
�❍ (Lightest)�❍
�❍
�❍
�❍ (Darkest)
Duplex Copy
Sets the machine to make 2-sided copies by copying single-sided documents onto the front and back sides of the paper.
Note that enabling this setting automatically disables the [ID Card Copy] setting.
Default: [Off]
● Off
● Top to Top
Select this to make 2-sided copies in top-to-top copy orientation. Also, select portrait or landscape for the orientation of the original.
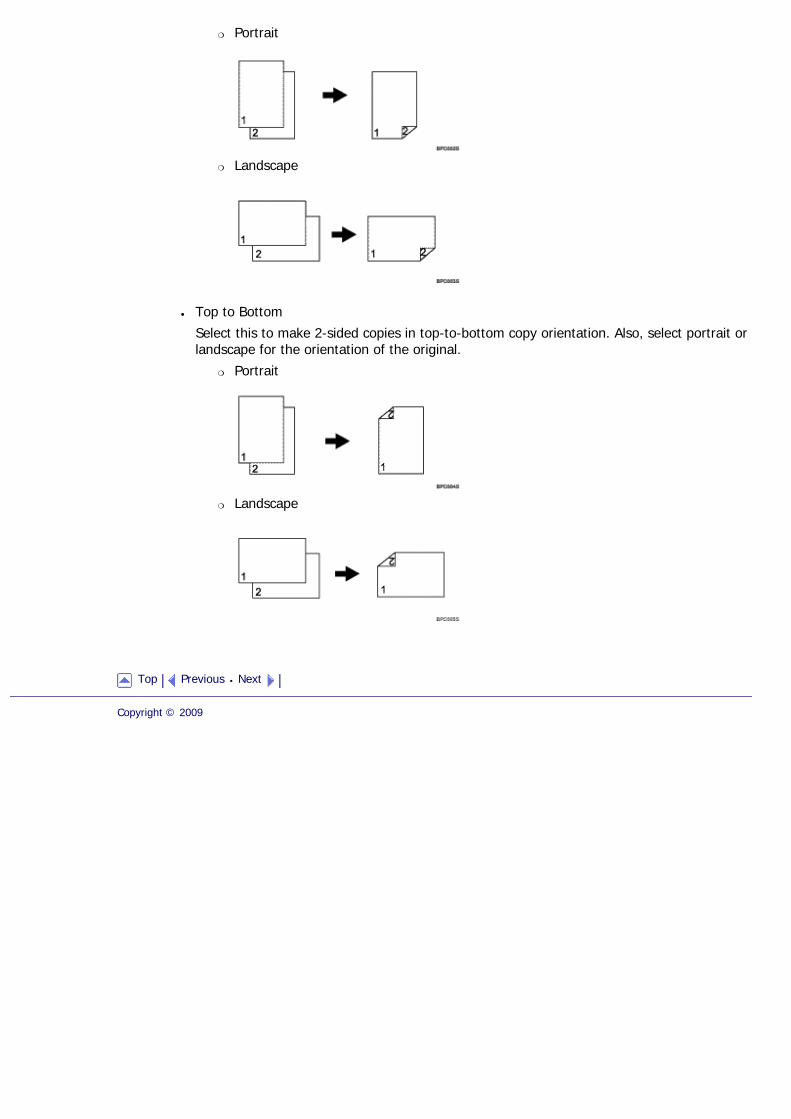
�❍ Portrait
�❍ Landscape
● Top to Bottom
Select this to make 2-sided copies in top-to-bottom copy orientation. Also, select portrait or landscape for the orientation of the original.
�❍ Portrait
�❍ Landscape
Top Previous Next
Copyright © 2009
Top Page > Configuring the Machine Using the Control Panel > Scanner Settings
Scanner Settings
This section describes how to configure the scanner settings.
Related topics
Changing Scanner Settings
Scanner Setting Parameters
Top Previous Next
Copyright © 2009
Contents Previous Next Settings
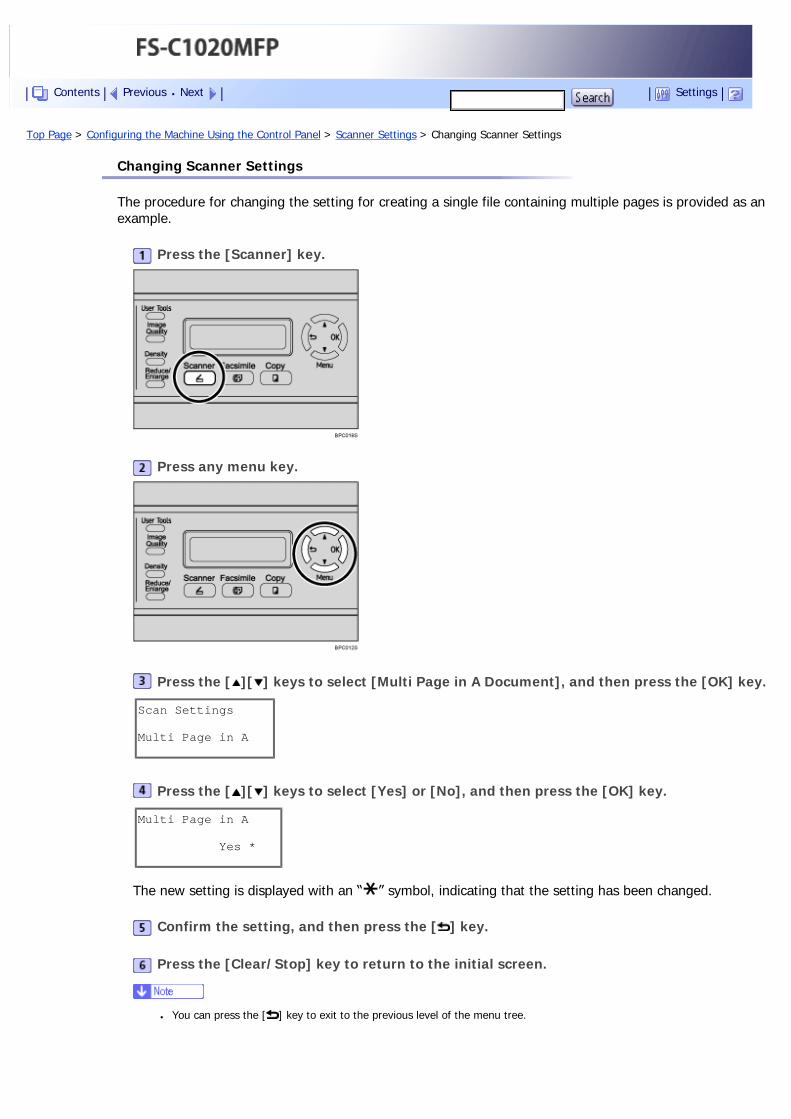
Top Page > Configuring the Machine Using the Control Panel > Scanner Settings > Changing Scanner Settings
Changing Scanner Settings
The procedure for changing the setting for creating a single file containing multiple pages is provided as an example.
Press the [Scanner] key.
Press any menu key.
Press the [ ][ ] keys to select [Multi Page in A Document], and then press the [OK] key.
Scan Settings
Multi Page in A
Press the [ ][ ] keys to select [Yes] or [No], and then press the [OK] key.
Multi Page in A
Yes *
The new setting is displayed with an “ ” symbol, indicating that the setting has been changed.
Confirm the setting, and then press the [ ] key.
Press the [Clear/Stop] key to return to the initial screen.
● You can press the [ ] key to exit to the previous level of the menu tree.
Contents Previous Next Settings

Top Previous Next
Copyright © 2009
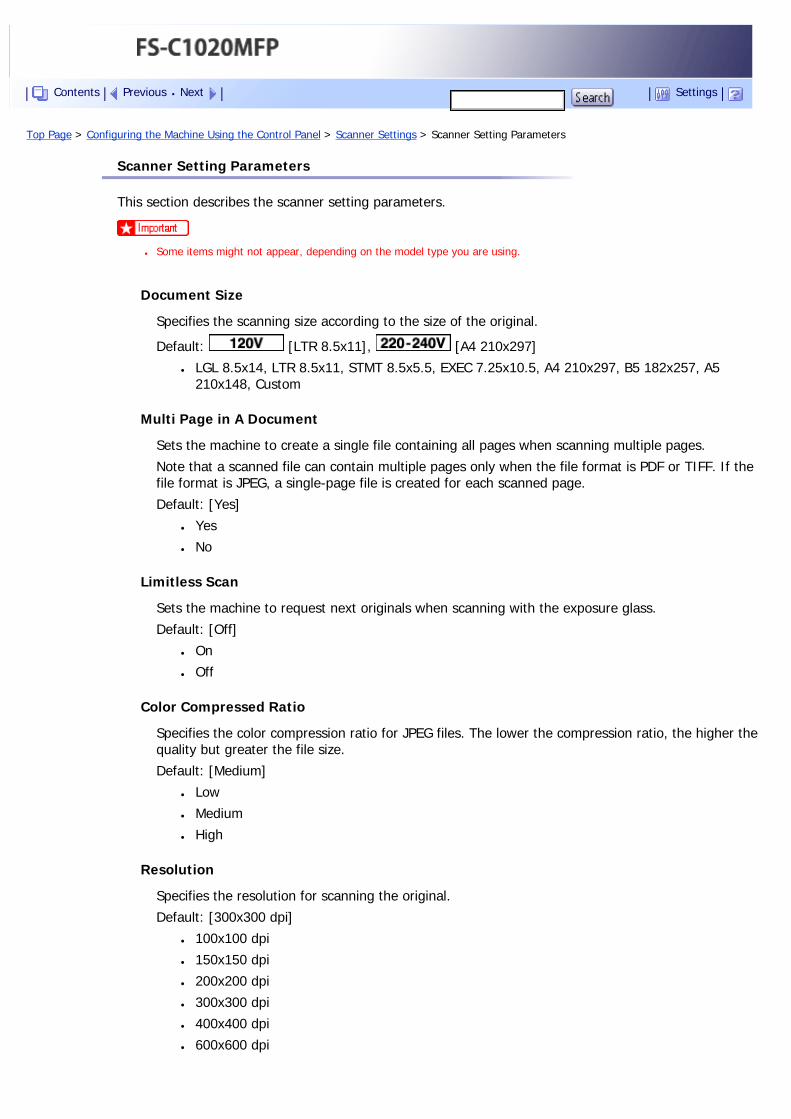
Top Page > Configuring the Machine Using the Control Panel > Scanner Settings > Scanner Setting Parameters
Scanner Setting Parameters
This section describes the scanner setting parameters.
● Some items might not appear, depending on the model type you are using.
Document Size
Specifies the scanning size according to the size of the original.
Default: [LTR 8.5x11], [A4 210x297]
● LGL 8.5x14, LTR 8.5x11, STMT 8.5x5.5, EXEC 7.25x10.5, A4 210x297, B5 182x257, A5 210x148, Custom
Multi Page in A Document
Sets the machine to create a single file containing all pages when scanning multiple pages.
Note that a scanned file can contain multiple pages only when the file format is PDF or TIFF. If the file format is JPEG, a single-page file is created for each scanned page.
Default: [Yes]
● Yes
● No
Limitless Scan
Sets the machine to request next originals when scanning with the exposure glass.
Default: [Off]
● On
● Off
Color Compressed Ratio
Specifies the color compression ratio for JPEG files. The lower the compression ratio, the higher the quality but greater the file size.
Default: [Medium]
● Low
● Medium
● High
Resolution
Specifies the resolution for scanning the original.
Default: [300x300 dpi]
● 100x100 dpi
● 150x150 dpi
● 200x200 dpi
● 300x300 dpi
● 400x400 dpi
● 600x600 dpi
Contents Previous Next Settings
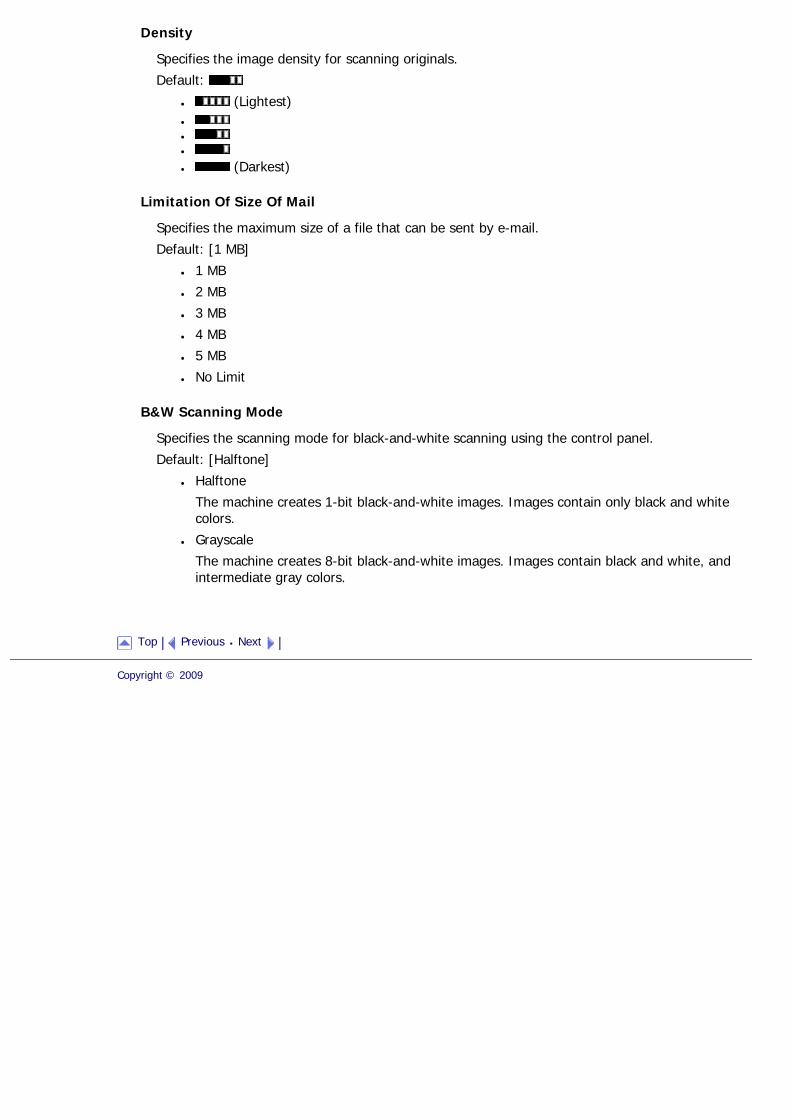
Density
Specifies the image density for scanning originals.
Default:
● (Lightest)●
●
●
● (Darkest)
Limitation Of Size Of Mail
Specifies the maximum size of a file that can be sent by e-mail.
Default: [1 MB]
● 1 MB
● 2 MB
● 3 MB
● 4 MB
● 5 MB
● No Limit
B&W Scanning Mode
Specifies the scanning mode for black-and-white scanning using the control panel.
Default: [Halftone]
● Halftone
The machine creates 1-bit black-and-white images. Images contain only black and white colors.
● Grayscale
The machine creates 8-bit black-and-white images. Images contain black and white, and intermediate gray colors.
Top Previous Next
Copyright © 2009

Top Page > Configuring the Machine Using the Control Panel > Fax Transmission Settings
Fax Transmission Settings
This section describes how to configure the fax transmission settings.
Related topics
Changing Fax Transmission Settings
Fax Transmission Setting Parameters
Top Previous Next
Copyright © 2009
Contents Previous Next Settings
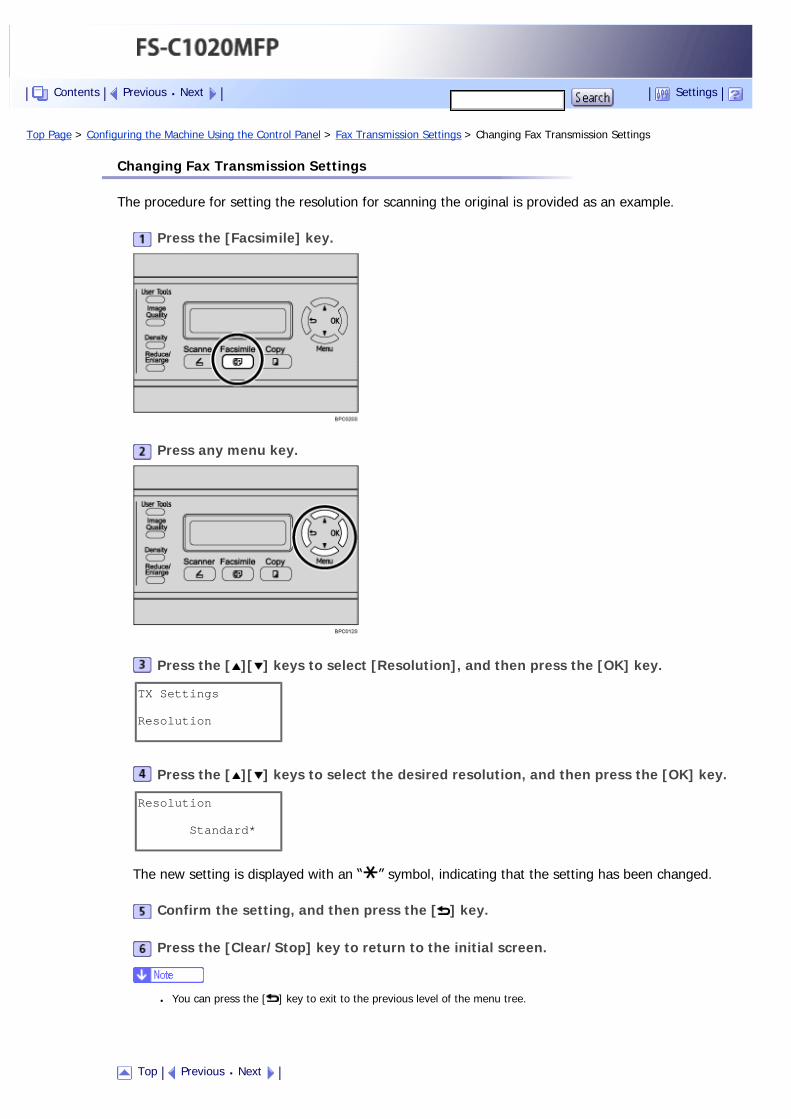
Top Page > Configuring the Machine Using the Control Panel > Fax Transmission Settings > Changing Fax Transmission Settings
Changing Fax Transmission Settings
The procedure for setting the resolution for scanning the original is provided as an example.
Press the [Facsimile] key.
Press any menu key.
Press the [ ][ ] keys to select [Resolution], and then press the [OK] key.
TX Settings
Resolution
Press the [ ][ ] keys to select the desired resolution, and then press the [OK] key.
Resolution
Standard*
The new setting is displayed with an “ ” symbol, indicating that the setting has been changed.
Confirm the setting, and then press the [ ] key.
Press the [Clear/Stop] key to return to the initial screen.
● You can press the [ ] key to exit to the previous level of the menu tree.
Top Previous Next
Contents Previous Next Settings

Copyright © 2009
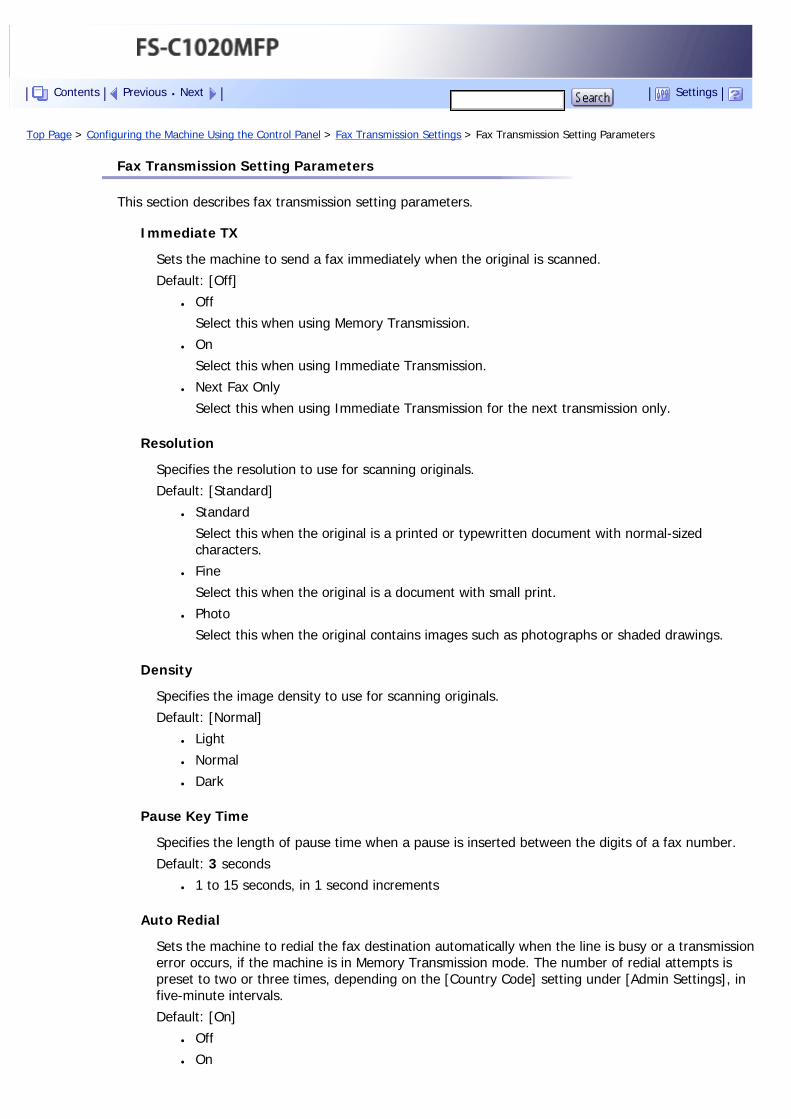
Top Page > Configuring the Machine Using the Control Panel > Fax Transmission Settings > Fax Transmission Setting Parameters
Fax Transmission Setting Parameters
This section describes fax transmission setting parameters.
Immediate TX
Sets the machine to send a fax immediately when the original is scanned.
Default: [Off]
● Off
Select this when using Memory Transmission.
● On
Select this when using Immediate Transmission.
● Next Fax Only
Select this when using Immediate Transmission for the next transmission only.
Resolution
Specifies the resolution to use for scanning originals.
Default: [Standard]
● Standard
Select this when the original is a printed or typewritten document with normal-sized characters.
● Fine
Select this when the original is a document with small print.
● Photo
Select this when the original contains images such as photographs or shaded drawings.
Density
Specifies the image density to use for scanning originals.
Default: [Normal]
● Light
● Normal
● Dark
Pause Key Time
Specifies the length of pause time when a pause is inserted between the digits of a fax number.
Default: 3 seconds
● 1 to 15 seconds, in 1 second increments
Auto Redial
Sets the machine to redial the fax destination automatically when the line is busy or a transmission error occurs, if the machine is in Memory Transmission mode. The number of redial attempts is preset to two or three times, depending on the [Country Code] setting under [Admin Settings], in five-minute intervals.
Default: [On]
● Off
● On
Contents Previous Next Settings

Transmitter Header
Sets the machine to add a header to every fax you send. The header includes the current date and time, user fax name and number, job ID, and page information.
Default: [On]
● Off
● On
Top Previous Next
Copyright © 2009
Top Page > Configuring the Machine Using the Control Panel > Fax System Settings
Fax System Settings
This section describes how to configure the fax system settings.
Related topics
Changing Fax System Settings
Fax System Setting Parameters
Top Previous Next
Copyright © 2009
Contents Previous Next Settings
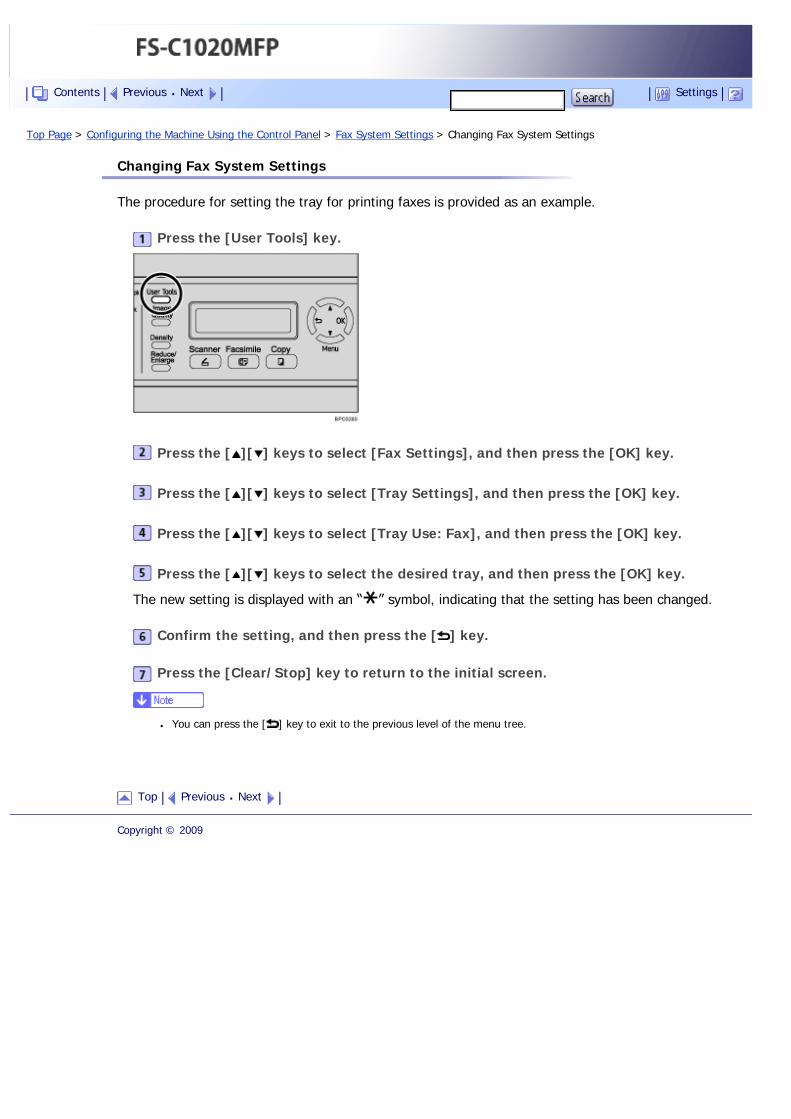
Top Page > Configuring the Machine Using the Control Panel > Fax System Settings > Changing Fax System Settings
Changing Fax System Settings
The procedure for setting the tray for printing faxes is provided as an example.
Press the [User Tools] key.
Press the [ ][ ] keys to select [Fax Settings], and then press the [OK] key.
Press the [ ][ ] keys to select [Tray Settings], and then press the [OK] key.
Press the [ ][ ] keys to select [Tray Use: Fax], and then press the [OK] key.
Press the [ ][ ] keys to select the desired tray, and then press the [OK] key.
The new setting is displayed with an “ ” symbol, indicating that the setting has been changed.
Confirm the setting, and then press the [ ] key.
Press the [Clear/Stop] key to return to the initial screen.
● You can press the [ ] key to exit to the previous level of the menu tree.
Top Previous Next
Copyright © 2009
Contents Previous Next Settings
Top Page > Configuring the Machine Using the Control Panel > Fax System Settings > Fax System Setting Parameters
Fax System Setting Parameters
This section describes fax system setting parameters.
RX Settings (Reception Settings)
Specifies the settings for receiving a fax.
● RX Mode
Specifies the reception mode.
Default: [Fax Only]
�❍ Fax Only
The machine automatically answers all incoming calls in fax reception mode.
�❍ Manual
The machine rings when it receives incoming calls. The machine receives faxes only when you manually receive faxes.
�❍ FAX/TAD
The machine receives faxes automatically when a fax call is received. Otherwise, the connected telephone answering device answers the call.
�❍ FAX/TEL
The machine receives faxes automatically when a fax call is received. Otherwise, the machine starts to ring.
● Auto Reduction
Sets the machine to reduce the size of a received fax if it is too large to print on a single sheet of paper.
Note that the machine only reduces the size down to 74%. If further reduction is required to fit the fax on a single sheet, it will be printed on separate sheets without being reduced.
Default: [On]
(Default may be [Off] depending on the [Country Code] setting under [Admin Settings].)
�❍ Off
�❍ On
● Ring Count Delay
Specifies the number of times the machine rings before it starts to receive faxes in Fax Only mode.
Default: 3 times
�❍ 3 to 5 times, in increments of 1
● F/T Ring Time
Specifies the length of time the machine tries to detect the fax calling tone in FAX/TEL mode.
Default: 15 seconds
�❍ 5 to 99 seconds, 1 second increments
Tray Settings
● Tray Use: Fax
Specifies the tray for printing received faxes. Note that only A4, Letter, or Legal size paper can be used for printing faxes. Make sure to select a tray that contains paper of the valid size.
If tray 2 is not installed, only [Tray1 Only] appears.
Default: [Auto]
�❍ Auto
Contents Previous Next Settings
The machine uses tray 1 and tray 2 if they contain paper of the same size. In this case, the machine starts to print from tray 1. If tray 1 runs out of paper, the machine automatically switches to tray 2 to continue printing. If tray 2 runs out of paper, load paper in tray 1.
�❍ Tray1 Only
�❍ Tray2 Only
Delete Document
Deletes unsent fax jobs remaining in the machine's memory.
This function is only performed when selected.
● Memory Job Clear
To delete a fax job, select the desired job, and then select [Clear]. Selecting [Not Clear] exits to the previous level of the menu tree without deleting the fax job.
● All Clear
To delete the fax jobs, select [Clear]. Selecting [Not Clear] exits to the previous level of the menu tree without deleting the fax job.
Comm Settings
● ECM TX
Sets the machine to automatically resend parts of the data that are lost during transmission.
Default: [On]
�❍ Off
�❍ On
● ECM RX
Sets the machine to automatically receive parts of the data that are lost during reception.
Default: [On]
�❍ Off
�❍ On
● Dial Tone Detect
Sets the machine to detect a dial tone before the machine begins to dial the destination automatically.
Default: [Detection]
�❍ Detection
�❍ Not Detection
● TX Speed
Specifies the transmission speed for the fax modem.
Default: [33.6 Kbps]
�❍ 33.6 Kbps
�❍ 14.4 Kbps
�❍ 9.6 Kbps
�❍ 7.2 Kbps
�❍ 4.8 Kbps
�❍ 2.4 Kbps
● RX Speed
Specifies the reception speed for the fax modem.
Default: [33.6 Kbps]
�❍ 33.6 Kbps
�❍ 14.4 Kbps
�❍ 9.6 Kbps
�❍ 7.2 Kbps
�❍ 4.8 Kbps
�❍ 2.4 Kbps
Report Settings
● TX Report
Sets the machine to print a transmission report automatically after a fax transmission.
When the machine is in Immediate Transmission mode, the image of the original will not be reproduced on the report, even if [Error Only Img] or [Always Prt Img] is selected.
Default: [Always Prt Img]
�❍ Error Only
Prints a report when a transmission error occurs.
�❍ Error Only Img
Prints a report with an image of the original when transmission error occurs.
�❍ Always Printed
Prints a report for every fax transmission.
�❍ Always Prt Img
Prints a report with an image of the original for every fax transmission.
�❍ Not Printed
● Activity Report
Sets the machine to print an activity report automatically for every 100 fax jobs (both sent and received).
Default: [Auto Print]
�❍ Auto Print
�❍ Not Printed
Top Previous Next
Copyright © 2009
Top Page > Configuring the Machine Using the Control Panel > Fax Directory Settings
Fax Directory Settings
This section describes the fax Quick Dial/Speed Dial settings.
Related topics
Registering Fax Destinations in Fax Quick Dial/Speed Dial
Fax Directory Parameters
Top Previous Next
Copyright © 2009
Contents Previous Next Settings
Top Page > Configuring the Machine Using the Control Panel > Fax Directory Settings > Registering Fax Destinations in Fax Quick Dial/Speed Dial
Registering Fax Destinations in Fax Quick Dial/Speed Dial
Register fax destinations in the Address Book using this menu.
● A password for accessing the [Fax Directory] menu can be specified in [Admin Menu Lock].
● For details about the procedure for registering fax destinations, see Registering Fax Destinations Using the Control Panel .
● For details about [Admin Menu Lock], see Administrator Settings .
Top Previous Next
Copyright © 2009
Contents Previous Next Settings

Top Page > Configuring the Machine Using the Control Panel > Fax Directory Settings > Fax Directory Parameters
Fax Directory Parameters
Quick Dial Entry
Specifies the fax number and name for Quick Dial entries. You can register up to 20 Quick Dial entries.
● 01 to 20
�❍ Fax # Entry
Specifies the fax number for Quick Dial entries. The fax number can contain up to 40 characters, including 0 to 9, pause, " ", " ", and space.
�❍ Fax Name Entry
Specifies the name for Quick Dial entries. The name can contain up to 20 characters.
Speed Dial Entry
Specifies the fax number and name for Speed Dial entries. You can register up to 50 Speed Dial entries.
● 01 to 50
�❍ Fax # Entry
Specifies the fax number for Speed Dial entries. The fax number can contain up to 40 characters, including 0 to 9, pause, " ", " ", and space.
�❍ Fax Name Entry
Specifies the name for Speed Dial entries. The name can contain up to 20 characters.
Top Previous Next
Copyright © 2009
Contents Previous Next Settings

Top Page > Configuring the Machine Using the Control Panel > Machine Settings
Machine Settings
This section describes the machine's operational settings.
Related topics
Changing Machine Settings
Machine Setting Parameters
Top Previous Next
Copyright © 2009
Contents Previous Next Settings
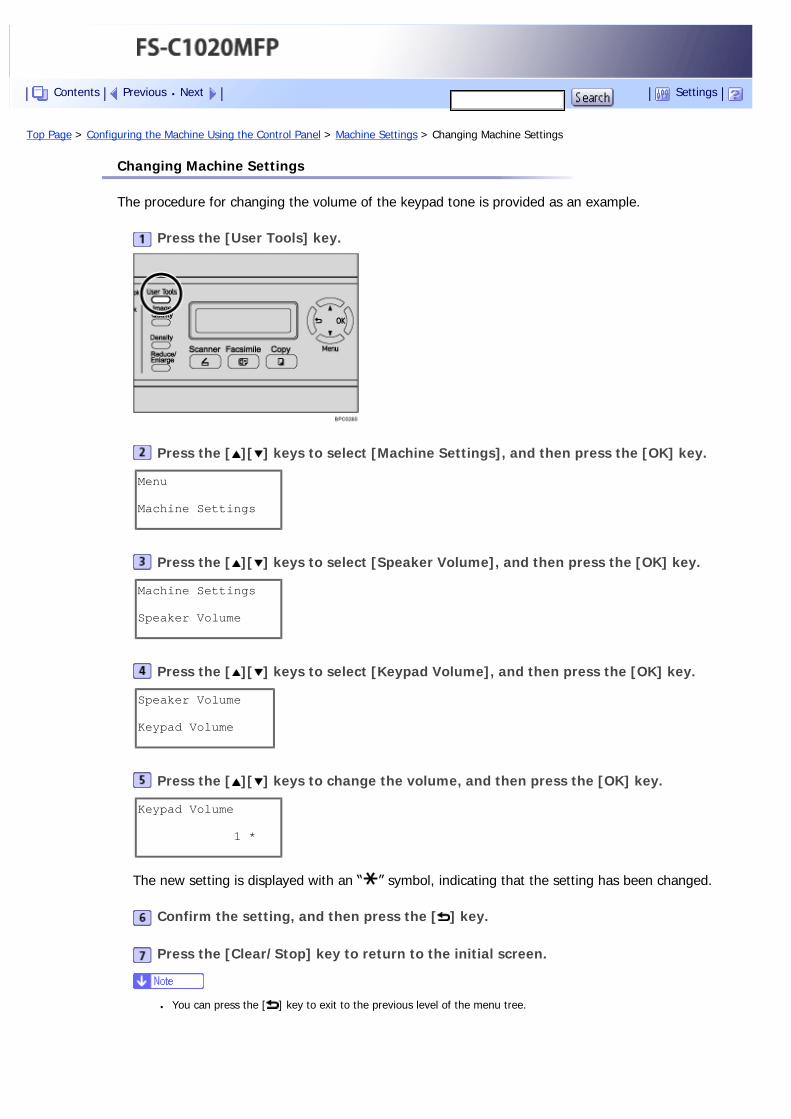
Top Page > Configuring the Machine Using the Control Panel > Machine Settings > Changing Machine Settings
Changing Machine Settings
The procedure for changing the volume of the keypad tone is provided as an example.
Press the [User Tools] key.
Press the [ ][ ] keys to select [Machine Settings], and then press the [OK] key.
Menu
Machine Settings
Press the [ ][ ] keys to select [Speaker Volume], and then press the [OK] key.
Machine Settings
Speaker Volume
Press the [ ][ ] keys to select [Keypad Volume], and then press the [OK] key.
Speaker Volume
Keypad Volume
Press the [ ][ ] keys to change the volume, and then press the [OK] key.
Keypad Volume
1 *
The new setting is displayed with an “ ” symbol, indicating that the setting has been changed.
Confirm the setting, and then press the [ ] key.
Press the [Clear/Stop] key to return to the initial screen.
● You can press the [ ] key to exit to the previous level of the menu tree.
Contents Previous Next Settings

Top Previous Next
Copyright © 2009
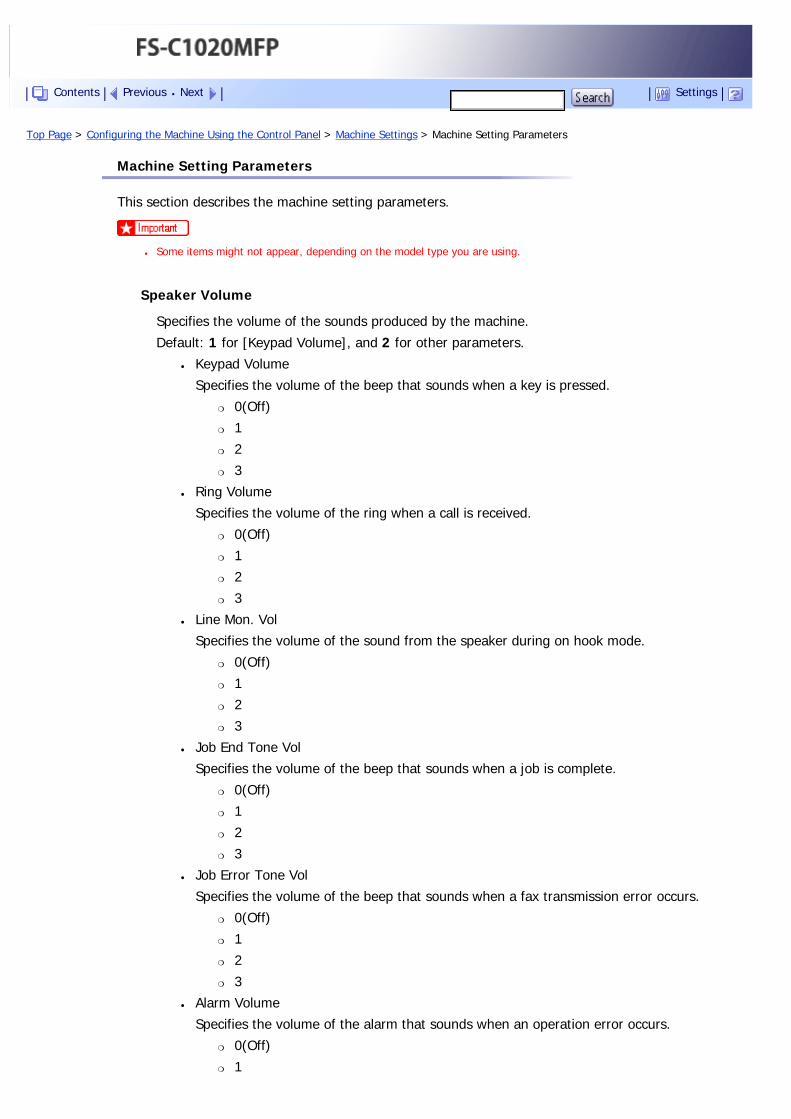
Top Page > Configuring the Machine Using the Control Panel > Machine Settings > Machine Setting Parameters
Machine Setting Parameters
This section describes the machine setting parameters.
● Some items might not appear, depending on the model type you are using.
Speaker Volume
Specifies the volume of the sounds produced by the machine.
Default: 1 for [Keypad Volume], and 2 for other parameters.
● Keypad Volume
Specifies the volume of the beep that sounds when a key is pressed.
�❍ 0(Off)
�❍ 1
�❍ 2
�❍ 3
● Ring Volume
Specifies the volume of the ring when a call is received.
�❍ 0(Off)
�❍ 1
�❍ 2
�❍ 3
● Line Mon. Vol
Specifies the volume of the sound from the speaker during on hook mode.
�❍ 0(Off)
�❍ 1
�❍ 2
�❍ 3
● Job End Tone Vol
Specifies the volume of the beep that sounds when a job is complete.
�❍ 0(Off)
�❍ 1
�❍ 2
�❍ 3
● Job Error Tone Vol
Specifies the volume of the beep that sounds when a fax transmission error occurs.
�❍ 0(Off)
�❍ 1
�❍ 2
�❍ 3
● Alarm Volume
Specifies the volume of the alarm that sounds when an operation error occurs.
�❍ 0(Off)
�❍ 1
Contents Previous Next Settings
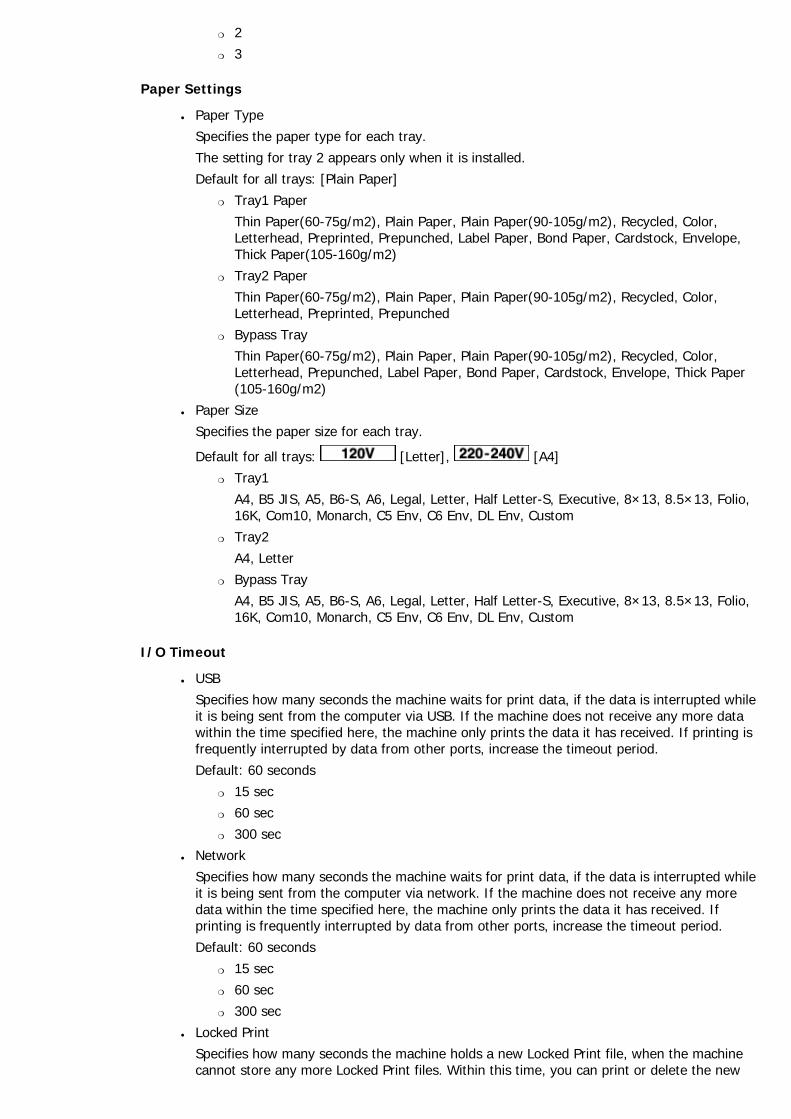
�❍ 2
�❍ 3
Paper Settings
● Paper Type
Specifies the paper type for each tray.
The setting for tray 2 appears only when it is installed.
Default for all trays: [Plain Paper]
�❍ Tray1 Paper
Thin Paper(60-75g/m2), Plain Paper, Plain Paper(90-105g/m2), Recycled, Color, Letterhead, Preprinted, Prepunched, Label Paper, Bond Paper, Cardstock, Envelope, Thick Paper(105-160g/m2)
�❍ Tray2 Paper
Thin Paper(60-75g/m2), Plain Paper, Plain Paper(90-105g/m2), Recycled, Color, Letterhead, Preprinted, Prepunched
�❍ Bypass Tray
Thin Paper(60-75g/m2), Plain Paper, Plain Paper(90-105g/m2), Recycled, Color, Letterhead, Prepunched, Label Paper, Bond Paper, Cardstock, Envelope, Thick Paper(105-160g/m2)
● Paper Size
Specifies the paper size for each tray.
Default for all trays: [Letter], [A4]
�❍ Tray1
A4, B5 JIS, A5, B6-S, A6, Legal, Letter, Half Letter-S, Executive, 8×13, 8.5×13, Folio, 16K, Com10, Monarch, C5 Env, C6 Env, DL Env, Custom
�❍ Tray2
A4, Letter
�❍ Bypass Tray
A4, B5 JIS, A5, B6-S, A6, Legal, Letter, Half Letter-S, Executive, 8×13, 8.5×13, Folio, 16K, Com10, Monarch, C5 Env, C6 Env, DL Env, Custom
I/O Timeout
● USB
Specifies how many seconds the machine waits for print data, if the data is interrupted while it is being sent from the computer via USB. If the machine does not receive any more data within the time specified here, the machine only prints the data it has received. If printing is frequently interrupted by data from other ports, increase the timeout period.
Default: 60 seconds
�❍ 15 sec
�❍ 60 sec
�❍ 300 sec
● Network
Specifies how many seconds the machine waits for print data, if the data is interrupted while it is being sent from the computer via network. If the machine does not receive any more data within the time specified here, the machine only prints the data it has received. If printing is frequently interrupted by data from other ports, increase the timeout period.
Default: 60 seconds
�❍ 15 sec
�❍ 60 sec
�❍ 300 sec
● Locked Print
Specifies how many seconds the machine holds a new Locked Print file, when the machine cannot store any more Locked Print files. Within this time, you can print or delete the new
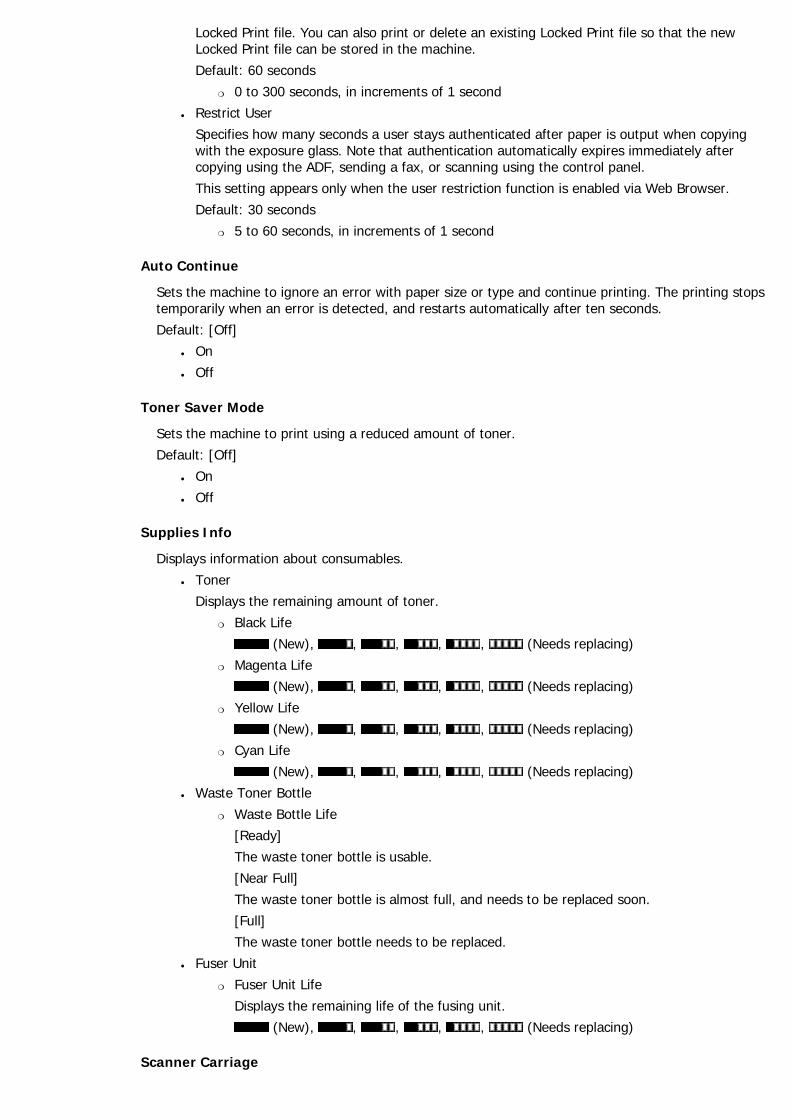
Locked Print file. You can also print or delete an existing Locked Print file so that the new Locked Print file can be stored in the machine.
Default: 60 seconds
�❍ 0 to 300 seconds, in increments of 1 second
● Restrict User
Specifies how many seconds a user stays authenticated after paper is output when copying with the exposure glass. Note that authentication automatically expires immediately after copying using the ADF, sending a fax, or scanning using the control panel.
This setting appears only when the user restriction function is enabled via Web Browser.
Default: 30 seconds
�❍ 5 to 60 seconds, in increments of 1 second
Auto Continue
Sets the machine to ignore an error with paper size or type and continue printing. The printing stops temporarily when an error is detected, and restarts automatically after ten seconds.
Default: [Off]
● On
● Off
Toner Saver Mode
Sets the machine to print using a reduced amount of toner.
Default: [Off]
● On
● Off
Supplies Info
Displays information about consumables.
● Toner
Displays the remaining amount of toner.
�❍ Black Life
(New), , , , , (Needs replacing)
�❍ Magenta Life
(New), , , , , (Needs replacing)
�❍ Yellow Life
(New), , , , , (Needs replacing)
�❍ Cyan Life
(New), , , , , (Needs replacing)
● Waste Toner Bottle
�❍ Waste Bottle Life
[Ready]
The waste toner bottle is usable.
[Near Full]
The waste toner bottle is almost full, and needs to be replaced soon.
[Full]
The waste toner bottle needs to be replaced.
● Fuser Unit
�❍ Fuser Unit Life
Displays the remaining life of the fusing unit.
(New), , , , , (Needs replacing)
Scanner Carriage
Returns the scanning unit inside the machine to its original position. Before transporting the machine, use this function to return the scanning unit to its original position.
● Move To Lock
�❍ [Not Execute]
Exits to the previous level of the menu tree without returning the scanning unit to its original position.
�❍ [Execute]
Returns the scanning unit to its original position.
High Humidity Mode
Sets the machine to produce prints in consistent quality even when humidity is high.
Default: [Off]
● Off
● Mode1
Select this mode if printouts are blurred.
● Mode2
Select this mode if printouts are curled and/or blurred. Note that if you select this mode, the first print takes longer than subsequent prints to complete.
● Mode3
Select this mode if printouts are still curled and/or blurred even when prints are made in [Mode2]. Note that this mode requires more time to produce the first print than [Mode2].
Color Regist.
Adjusts color registration as necessary. (This adjustment is usually executed by the machine automatically.)
● [Not Execute]
Exits to the previous level of the menu tree without adjusting color registration.
● [Execute]
Executes color registration adjustment.
TB Cleaning
Sets the machine to execute periodic cleaning of the interior. You may hear some noise while cleaning is being executed. This noise does not indicate a malfunction.
Default: [On]
● On
● Off
Top Previous Next
Copyright © 2009

Top Page > Configuring the Machine Using the Control Panel > Network Settings
Network Settings
This section describes the network settings.
Related topics
Changing Network Settings
Network Setting Parameters
Top Previous Next
Copyright © 2009
Contents Previous Next Settings
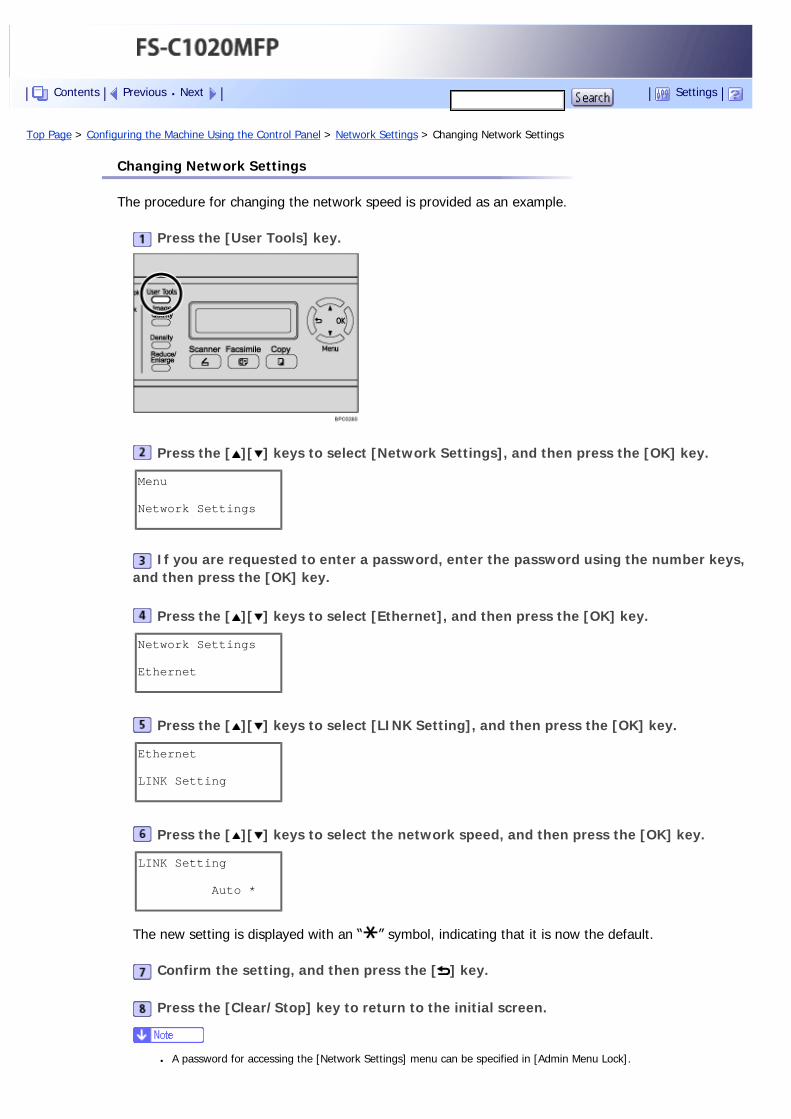
Top Page > Configuring the Machine Using the Control Panel > Network Settings > Changing Network Settings
Changing Network Settings
The procedure for changing the network speed is provided as an example.
Press the [User Tools] key.
Press the [ ][ ] keys to select [Network Settings], and then press the [OK] key.
Menu
Network Settings
If you are requested to enter a password, enter the password using the number keys, and then press the [OK] key.
Press the [ ][ ] keys to select [Ethernet], and then press the [OK] key.
Network Settings
Ethernet
Press the [ ][ ] keys to select [LINK Setting], and then press the [OK] key.
Ethernet
LINK Setting
Press the [ ][ ] keys to select the network speed, and then press the [OK] key.
LINK Setting
Auto *
The new setting is displayed with an “ ” symbol, indicating that it is now the default.
Confirm the setting, and then press the [ ] key.
Press the [Clear/Stop] key to return to the initial screen.
● A password for accessing the [Network Settings] menu can be specified in [Admin Menu Lock].
Contents Previous Next Settings

● You can press the [ ] key to exit to the previous level of the menu tree.
● For details about [Admin Menu Lock], see Administrator Settings .
Top Previous Next
Copyright © 2009
Top Page > Configuring the Machine Using the Control Panel > Network Settings > Network Setting Parameters
Network Setting Parameters
This section describes the network setting parameters.
Ethernet
● MAC
Displays the machine's MAC address.
● LINK Status
Displays the current Ethernet speed setting.
�❍ 100M Full Duplex
�❍ 100M Half Duplex
�❍ 10M Full Duplex
�❍ 10M Half Duplex
● LINK Setting
Specifies the speed for Ethernet communication. Select a speed that matches your network environment.
For most networks, the default setting is the optimum setting.
Default: [Auto]
�❍ Auto
�❍ 100M Full Dup
�❍ 100M Half Dup
�❍ 10M Full Dup
�❍ 10M Half Dup
IP Configuration
● DHCP Activated
Sets the machine to receive its IP address, subnet mask, and default gateway address automatically from a DHCP server.
When DHCP is used, you cannot specify the IP address, subnet mask, or default gateway address manually.
Default: [On]
�❍ On
�❍ Off
● IP Address
Specifies the machine's IP address when DHCP is not used.
Use this menu to check the current IP address when DHCP is used.
Default: 192.0.0.192● Subnet Mask
Specifies the machine's subnet mask when DHCP is not used.
Use this menu to check the current subnet mask when DHCP is used.
Default: 255.255.255.0● Gateway
Specifies the machine's default gateway address when DHCP is not used.
Use this menu to check the current default gateway address when DHCP is used.
Default: 192.0.0.192
Contents Previous Next Settings

● IP Source
Displays the IP address acquisition method.
Default: [Default IP]
�❍ DHCP
�❍ AUTO IP
�❍ Manual
�❍ Default IP
Top Previous Next
Copyright © 2009
Top Page > Configuring the Machine Using the Control Panel > Reports Print
Reports Print
This section describes the types of reports that can be printed.
Related topics
Printing the Configuration Page
Types of Report
Reading the Configuration Page
Reading the Activity Report
Reading the Memory List
Reading the Scan Transmission Log
Top Previous Next
Copyright © 2009
Contents Previous Next Settings
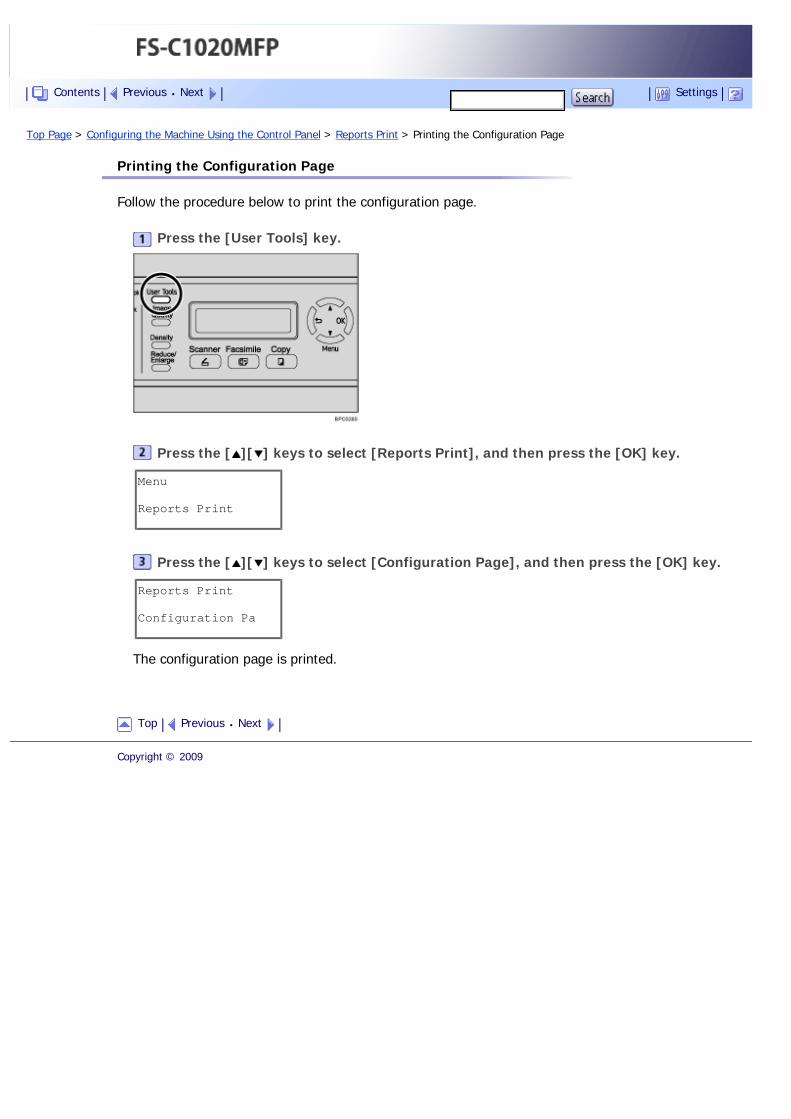
Top Page > Configuring the Machine Using the Control Panel > Reports Print > Printing the Configuration Page
Printing the Configuration Page
Follow the procedure below to print the configuration page.
Press the [User Tools] key.
Press the [ ][ ] keys to select [Reports Print], and then press the [OK] key.
Menu
Reports Print
Press the [ ][ ] keys to select [Configuration Page], and then press the [OK] key.
Reports Print
Configuration Pa
The configuration page is printed.
Top Previous Next
Copyright © 2009
Contents Previous Next Settings
Top Page > Configuring the Machine Using the Control Panel > Reports Print > Types of Report
Types of Report
● Some items might not appear, depending on the model type you are using.
Configuration Page
Prints general information and the current configurations of the machine.
Activity Report
Prints a fax transmission and reception report for the last 100 jobs.
Memory List
Prints a list of unsent fax jobs remaining in the machine's memory.
Quick Dial List
Prints a list of scan and fax Quick Dial entries.
Speed Dial List
Prints a list of Speed Dial entries.
● No Sort
Prints the list with the entries sorted by Speed Dial registration number.
● Sort By Name
Prints the list with the entries sorted by name.
Scan Directory List
Prints a list of scan destinations.
Scan Transmission Log
Prints a scan transmission report.
Maintenance Page
Prints the maintenance page.
Top Previous Next
Copyright © 2009
Contents Previous Next Settings
Top Page > Configuring the Machine Using the Control Panel > Reports Print > Reading the Configuration Page
Reading the Configuration Page
Device Info
● Model Name
Shows the machine model name.
● Serial Number
Shows the serial number assigned to the machine by the manufacturer.
● Memory Size
Shows the total amount of memory installed on the machine.
● Firmware Version
Shows the version of the machine's firmware.
● Engine FW Version
Shows the version of firmware for the machine engine.
Tray Info
“Tray 2” appears only when it is installed.
● Bypass Tray
Shows paper size and type settings.
● Tray 1
Shows paper size and type settings.
● Tray 2
Shows paper size and type settings.
Supplies Info
Shows the information about supply levels.
● Black Toner
● Magenta Toner
● Yellow Toner
● Cyan Toner
● Waste Toner Bottle
Counter Info
● Total Mode
● Print Mode
● Scan Mode
● Fax Mode
● Copy Mode
● Both Sides
Network Info
Shows the settings for the following items:
● MAC Address
● Network Speed
● TCP/IP
Contents Previous Next Settings

● SNMP
�❍ Time Zone
�❍ Email Address 1
�❍ Notification Level 1
�❍ Email Address 2
�❍ Notification Level 2
Top Previous Next
Copyright © 2009
Top Page > Configuring the Machine Using the Control Panel > Reports Print > Reading the Activity Report
Reading the Activity Report
#
Shows file management numbers.
Date/Time
Shows the transmission start date and time for fax transmission.
Shows the reception date and time for fax reception.
TX/RX
Shows whether a fax was sent or received.
Duration
Shows the time taken for fax transmission or reception to complete.
Remote
Shows the fax number registered by the sender for fax reception.
Shows the following information according to specified transmission method:
● If an external telephone was used: shows the fax number registered by the receiving party.
● If a Quick Dial/Speed Dial was used: shows the name registered for the destination; if a name was not programmed, shows the destination's fax number.
● If a fax number was input using the control panel number keys: shows the dialed fax number.
● If the fax was sent from the computer (LAN-Fax): shows the dialed fax number.
Pages
Shows the number of pages transmitted or received.
Results
Shows the result of a fax transmission or reception. If an error occurred during the fax communication, shows an error code.
● For details about the error codes, see Fax Problems .
Top Previous Next
Copyright © 2009
Contents Previous Next Settings
Top Page > Configuring the Machine Using the Control Panel > Reports Print > Reading the Memory List
Reading the Memory List
#
Shows file management numbers.
Date/Time
Shows the date and time at which a fax was stored in memory.
Type
Shows the type of function used to send the fax: "Redial" if sending was by automatic redial; "Broadcast" if sending was by broadcast; "Memory TX" if sending was by any other method.
Remote
Shows the following information according to specified transmission method:
● If a Quick Dial/Speed Dial was used: shows the name registered for the destination; if a name was not programmed, shows the destination's fax number.
● If a fax number was input using the control panel number keys: shows the dialed fax number.
● If the fax was sent from the computer (LAN-Fax): shows the dialed fax number.
Pages
Shows the number of pages a fax contained.
Top Previous Next
Copyright © 2009
Contents Previous Next Settings
Top Page > Configuring the Machine Using the Control Panel > Reports Print > Reading the Scan Transmission Log
Reading the Scan Transmission Log
No.
Shows file management numbers.
Date
Shows the date of a transmission.
Time
Shows the time at which a transmission was completed.
Type
Shows the transmission method.
Scan Destination
Shows the scan destination.
Page
Shows the number of pages scanned.
Color
Shows whether scanning was performed in color or black and white.
Format
Shows the file format.
Result
Shows the result of the transmission: "OK" if the file was sent successfully; "Err" if sending failed.
Top Previous Next
Copyright © 2009
Contents Previous Next Settings
Top Page > Configuring the Machine Using the Control Panel > Administrator Settings
Administrator Settings
This section describes administrator settings.
Related topics
Changing Administrator Settings
Administrator Setting Parameters
Top Previous Next
Copyright © 2009
Contents Previous Next Settings
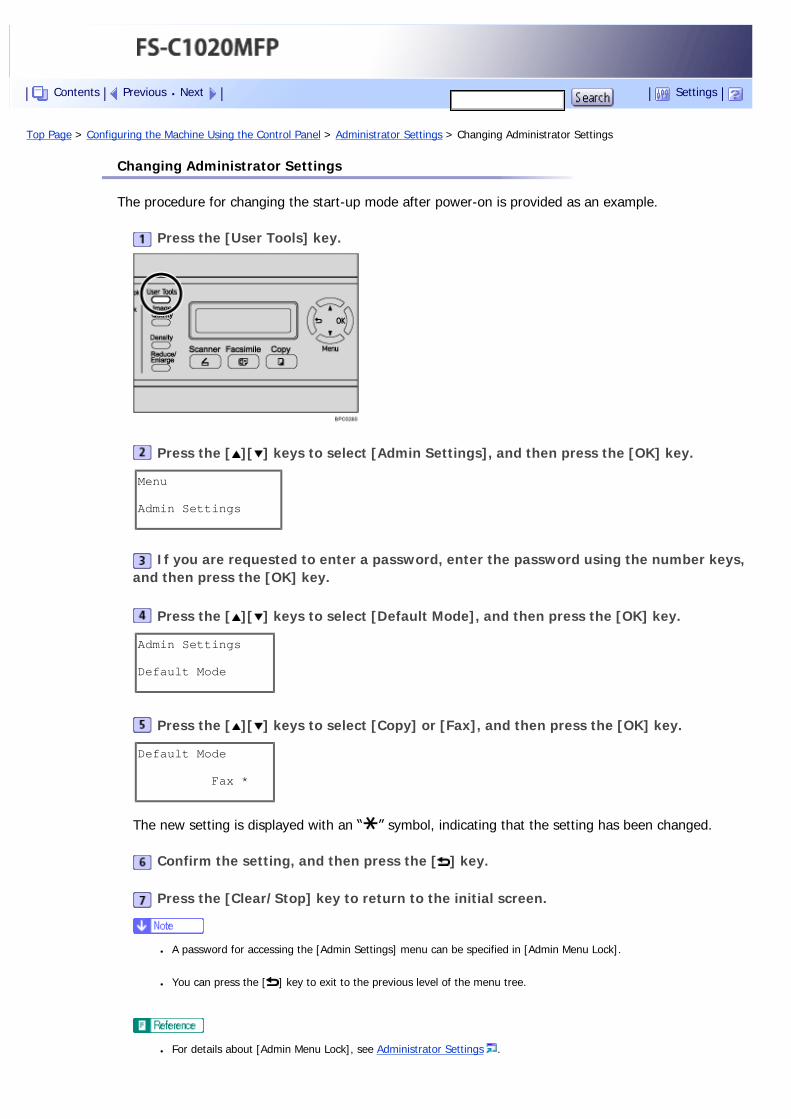
Top Page > Configuring the Machine Using the Control Panel > Administrator Settings > Changing Administrator Settings
Changing Administrator Settings
The procedure for changing the start-up mode after power-on is provided as an example.
Press the [User Tools] key.
Press the [ ][ ] keys to select [Admin Settings], and then press the [OK] key.
Menu
Admin Settings
If you are requested to enter a password, enter the password using the number keys, and then press the [OK] key.
Press the [ ][ ] keys to select [Default Mode], and then press the [OK] key.
Admin Settings
Default Mode
Press the [ ][ ] keys to select [Copy] or [Fax], and then press the [OK] key.
Default Mode
Fax *
The new setting is displayed with an “ ” symbol, indicating that the setting has been changed.
Confirm the setting, and then press the [ ] key.
Press the [Clear/Stop] key to return to the initial screen.
● A password for accessing the [Admin Settings] menu can be specified in [Admin Menu Lock].
● You can press the [ ] key to exit to the previous level of the menu tree.
● For details about [Admin Menu Lock], see Administrator Settings .
Contents Previous Next Settings

Top Previous Next
Copyright © 2009
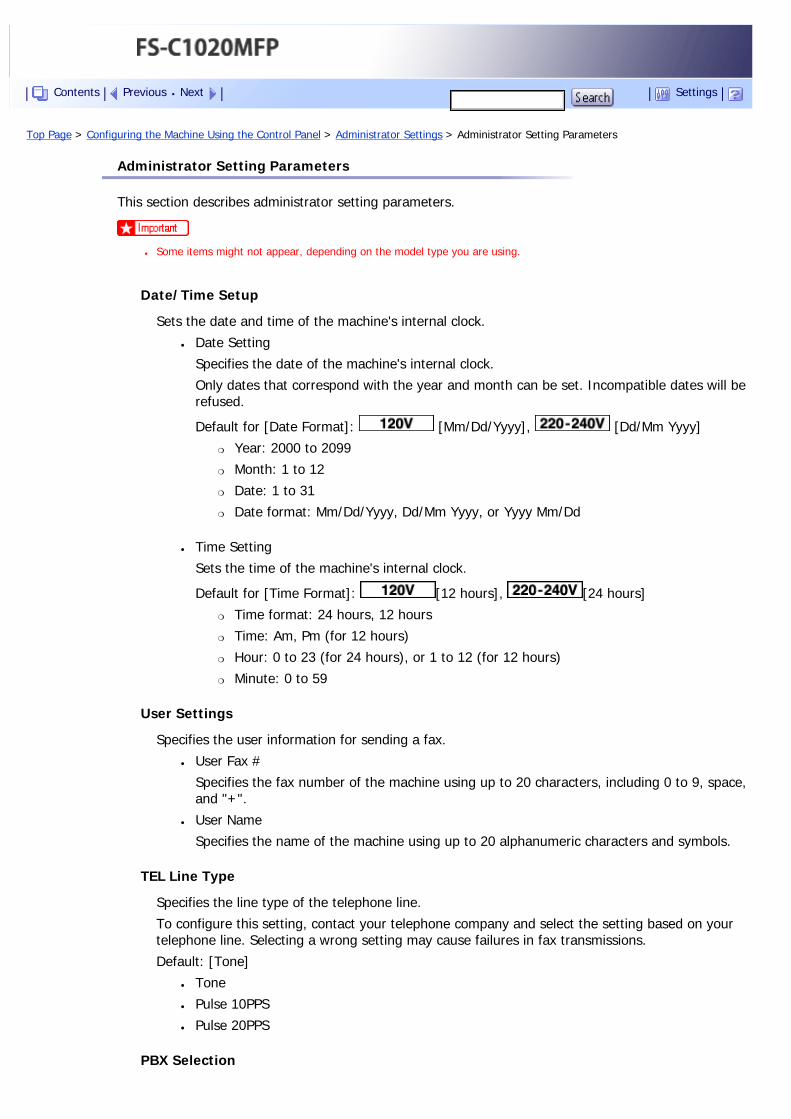
Top Page > Configuring the Machine Using the Control Panel > Administrator Settings > Administrator Setting Parameters
Administrator Setting Parameters
This section describes administrator setting parameters.
● Some items might not appear, depending on the model type you are using.
Date/Time Setup
Sets the date and time of the machine's internal clock.
● Date Setting
Specifies the date of the machine's internal clock.
Only dates that correspond with the year and month can be set. Incompatible dates will be refused.
Default for [Date Format]: [Mm/Dd/Yyyy], [Dd/Mm Yyyy]
�❍ Year: 2000 to 2099
�❍ Month: 1 to 12
�❍ Date: 1 to 31
�❍ Date format: Mm/Dd/Yyyy, Dd/Mm Yyyy, or Yyyy Mm/Dd
● Time Setting
Sets the time of the machine's internal clock.
Default for [Time Format]: [12 hours], [24 hours]
�❍ Time format: 24 hours, 12 hours
�❍ Time: Am, Pm (for 12 hours)
�❍ Hour: 0 to 23 (for 24 hours), or 1 to 12 (for 12 hours)
�❍ Minute: 0 to 59
User Settings
Specifies the user information for sending a fax.
● User Fax #
Specifies the fax number of the machine using up to 20 characters, including 0 to 9, space, and "+".
● User Name
Specifies the name of the machine using up to 20 alphanumeric characters and symbols.
TEL Line Type
Specifies the line type of the telephone line.
To configure this setting, contact your telephone company and select the setting based on your telephone line. Selecting a wrong setting may cause failures in fax transmissions.
Default: [Tone]
● Tone
● Pulse 10PPS
● Pulse 20PPS
PBX Selection
Contents Previous Next Settings
Sets the machine to connect to the public switched telephone network (PSTN) or a private branch exchange (PBX).
Default: [PSTN]
● PSTN
● PBX
PBX Access Digit
Specifies the dial number to access the outside line when the machine is connected to a PBX.
Make sure that this setting matches the setting of your PBX. Otherwise, you may not be able to send faxes to outside destinations.
Default: 9● 000 to 999, in increments of 1
Default Mode
Specifies the mode that is activated when the power is turned on, or if the time specified for [Auto Clear] elapses without activity while the initial screen of the current mode is displayed.
Default: [Copy]
● Copy
● Fax
Auto Clear
Sets the machine to return to the initial screen of the current mode if the machine receives no input for a specified period of time during configuration.
Also, if the specified period elapses while the initial screen of the current mode is displayed, the machine returns to the mode specified in [Default Mode].
Default: [On] (30 seconds)
● On (30 sec, 1 min, 2 min, 3 min, 5 min, 10 min)
● Off
Power Saver
Sets the machine to enter Energy Saver mode, Energy Saver mode 1 or Energy Saver mode 2, to reduce power consumption. The machine recovers from Energy Saver mode when it receives a print job, prints a received fax, or when the [Copy], [Color Start], or [B&W Start] key is pressed.
● EnergySaverMode1
The machine enters Energy Saver mode 1 if the machine has been idle for about 30 seconds. It takes less time to recover from Energy Saver mode 1 than from power-off state or Energy Saver mode 2, but power consumption is higher in Energy Saver mode 1 than in Energy Saver mode 2.
Default: [On]
�❍ Off
�❍ On (30 seconds)
● EnergySaverMode2
The machine enters Energy Saver mode 2 after the period of time specified for this setting is passed. The machine consumes less power in Energy Saver mode 2 than in Energy Saver mode 1, but it takes longer to recover from Energy Saver mode 2 than from Energy Saver mode 1.
Default: [On] (2 minutes)
�❍ On (1 to 240 minutes, in 1 minute increments)
�❍ Off
Display Language
Specifies the language used on the screen and in reports.
Default: [English]
Country Code
Selects the country in which the machine is used. The country code you specify determines the time and date display format and the default values of the fax transmission-related settings.
Make sure to select the country code correctly. Selecting a wrong country code may cause failures in fax transmissions.
Default: [USA]
Setting Default
● Clear Menu Settings
�❍ Not Execute
Exits to the previous level of the menu tree without clearing the settings.
�❍ Execute
Resets the machine's settings to their defaults except the following: language for the screen, country setting, network settings, and fax Quick Dial/Speed Dial destinations.
● Clear Network Settings
Be sure not to clear the settings by mistake.
�❍ Not Execute
Exits to the previous level of the menu tree without clearing the settings.
�❍ Execute
Resets the network settings to their defaults.
● Clear Fax Directory
�❍ Not Execute
Exits to the previous level of the menu tree without clearing the settings.
�❍ Execute
Clears the fax Quick Dial/Speed Dial destinations.
Admin Menu Lock
Specifies a four-digit password for accessing the [Fax Directory], [Network Settings], and [Admin Settings] menus.
Do not forget this password.
● On (0000 to 9999, in increments of 1)
● Off
Top Previous Next
Copyright © 2009

Top Page > Configuring the Machine Using the Control Panel > PDL Settings
PDL Settings
This section describes the PDL settings.
Related topics
Changing PDL Settings
PDL Setting Parameters
Top Previous Next
Copyright © 2009
Contents Previous Next Settings
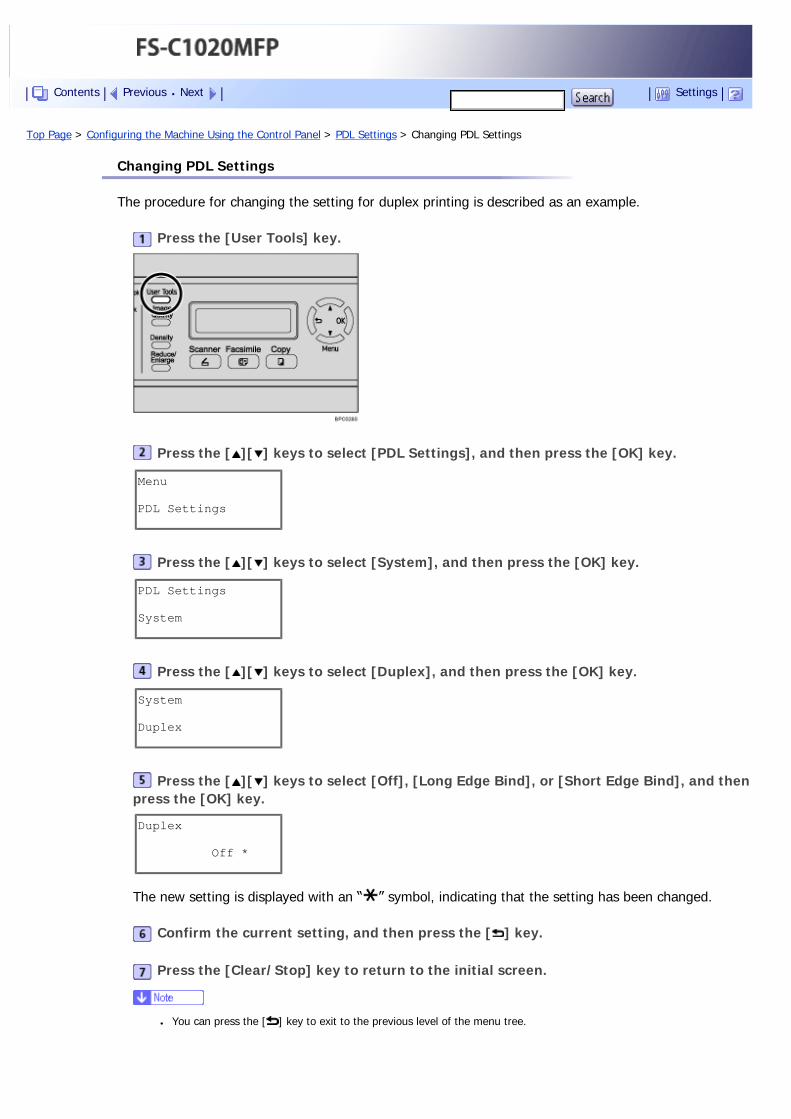
Top Page > Configuring the Machine Using the Control Panel > PDL Settings > Changing PDL Settings
Changing PDL Settings
The procedure for changing the setting for duplex printing is described as an example.
Press the [User Tools] key.
Press the [ ][ ] keys to select [PDL Settings], and then press the [OK] key.
Menu
PDL Settings
Press the [ ][ ] keys to select [System], and then press the [OK] key.
PDL Settings
System
Press the [ ][ ] keys to select [Duplex], and then press the [OK] key.
System
Duplex
Press the [ ][ ] keys to select [Off], [Long Edge Bind], or [Short Edge Bind], and then press the [OK] key.
Duplex
Off *
The new setting is displayed with an “ ” symbol, indicating that the setting has been changed.
Confirm the current setting, and then press the [ ] key.
Press the [Clear/Stop] key to return to the initial screen.
● You can press the [ ] key to exit to the previous level of the menu tree.
Contents Previous Next Settings

Top Previous Next
Copyright © 2009
Top Page > Configuring the Machine Using the Control Panel > PDL Settings > PDL Setting Parameters
PDL Setting Parameters
This section describes the PDL setting parameters.
Paper Input
● Tray Priority
Specifies the tray that the machine checks first for paper that matches the print.
[Tray2] appears only when it is installed.
Default: [Tray1]
�❍ Tray1
�❍ Tray2
List Print
Prints lists showing configurations on the machine.
● Configuration Page
Prints general information and the current configurations of the machine.
● Menu List
Prints the machine's function menus.
● Test Page
Prints a test page to check the current color settings.
● PCL Font List
Prints installed PCL font list.
● PS Font List
Prints installed PostScript font list.
System
● Copies
Sets the machine to print the specified number of sets.
This setting is disabled if the number of pages to print is specified by the printer driver.
Default: 1�❍ 1 to 999, in increments of 1
● Sub Paper Size
Sets the machine to print onto paper of another size if the specified paper is not loaded in any tray. Alternative sizes are preset to A4 and Letter.
Default: [Off]
�❍ On
�❍ Off
● Default Paper Size
Specifies the paper size to be used when the paper size is not specified in the print job.
Default: Letter (81/2” × 11”), A4
�❍ A4, B5 JIS, A5, B6-S, A6, Legal, Letter, Half Letter-S, Executive, 8 × 13, 8.5 × 13, Folio, 16K, Com 10, Monarch, C5 Env, C6 Env, DL Env
Contents Previous Next Settings
● Duplex
Sets the machine to print on both sides of paper according to the specified binding method.
Default: [Off]
�❍ Off
�❍ Long Edge Bind
�❍ Short Edge Bind
● Blank Page Print
Sets the machine to print blank pages.
When cover sheet printing is enabled from the printer driver, cover sheets are inserted even if you select [No Print].
Default: [Print]
�❍ No Print
● B&W Page Detect
Sets the machine to print all monochrome pages in monochrome mode even if color printing is specified.
Default: [Off]
�❍ On
�❍ Off
● Print Error Page
Sets the machine to print an error page when the machine detects an error.
Default: [Off]
�❍ On
�❍ Off
PCL Menu
Specifies conditions when using PCL for printing.
● Orientation
Specifies the page orientation.
Default: [Portrait]
�❍ Portrait
�❍ Landscape
● Form Lines
Specifies the number of lines per page.
Default: 60, 64�❍ 5 to 128, in increments of 1
● Font Number
Specifies the ID of the default font you want to use.
Default: 0
�❍ 0 to 89
● Point Size
Specifies the point size for the default font.
This setting is effective only for a variable-space font.
Default: 12.00 points
�❍ 4.00 to 999.75, in 0.25 increments
● Font Pitch
Specifies the number of characters per inch for the default font.
This setting is effective only for fixed-space fonts.
Default: 10.00 pitch
�❍ 0.44 to 99.99, in 0.01 increments
● Symbol Set
Specifies the character set for the default font. The following sets are available:
Default: [PC-8]
�❍ ISO L1, ISO L2, ISO L5, PC-8, PC-8 D/N, PC-850, PC-852, PC-858, PC8-TK, Win L1, Win L2, Win L5, Desktop, PS Text, VN Int1, VN US, MS Pub1, Math-8, PS Math, VN Math, Pifont, Legal, ISO 4, ISO 6, ISO 11, ISO 15, ISO 17, ISO 21, ISO 60, ISO 69, Win 3.0, MC Text, ISO L6, ISO L9, PC-775, PC-1004, Win Balt, Roman-8, Roman-9
● Courier Font
Specifies a courier-type font.
Default: [Regular]
�❍ Regular
�❍ Dark
● Ext. A4 Width
Sets the machine to extend the width of the printable area of A4 size paper, reducing side margin width.
Default: [Off]
�❍ On
�❍ Off
● Append CR To LF
Sets the machine to append a CR code to each LF code to print text data clearly.
Default: [Off]
�❍ On
�❍ Off
● Resolution
Specifies the print resolution in dots per inch.
Default: [600X600 1Bit]
�❍ 600X600 1Bit
�❍ 600X600 2Bit
�❍ 600X600 4Bit
PS Menu
Specifies conditions when using PostScript for printing.
● Resolution
Specifies the print resolution in dots per inch.
Default: [600X600 1Bit]
�❍ 600X600 1Bit
�❍ 600X600 2Bit
�❍ 600X600 4Bit
● Color Profile
Specifies the color profile.
Default: [Solid Color]
�❍ Solid Color

�❍ Presentation
�❍ Photographics
�❍ Off
Top Previous Next
Copyright © 2009
Top Page > Configuring the Machine Using Web Browser > Using Web Browser
Using Web Browser
● Some items can also be configured using the control panel.
Available operations
The following operations can be performed remotely using Web Browser on a computer:
● Displaying the machine's status or settings
● Configuring the machine's settings
● Printing reports
● Registering scan and fax destinations
● Configuring the user restriction settings
● Configuring network settings
● Setting a password for changing the machine's configuration
● Restoring the default values for the machine's configuration
● Creating backup files of the machine's configuration
● Restoring the machine's configuration from backup files
● Configuring the machine's date and time
● Configuring the machine's Energy Saver mode setting
Supported Web browsing software
● Windows operating systems: Internet Explorer 5.0 or later
● Mac OS X: Safari
● To operate the machine via Web Browser, you must first configure the machine's TCP/IP settings.
● If you use an older version of a supported Web browsing software or the Web browsing software has JavaScript and cookies
disabled, display and operation problems may occur.
● If you are using a proxy server, configure the Web browsing software settings as necessary. For details about the settings,
contact your network administrator.
● The previous page may not appear even if the back button of the Web browsing software is clicked. If this happens, click the
refresh button of the Web browsing software.
● Displayed information is not automatically refreshed. Click the [Refresh] button in the upper right-hand corner.
● For details about configuring the machine using the control panel, see Configuring the Machine Using the Control Panel .
● For details about TCP/IP settings, see Configuring the Machine .
Contents Previous Next Settings

Top Previous Next
Copyright © 2009
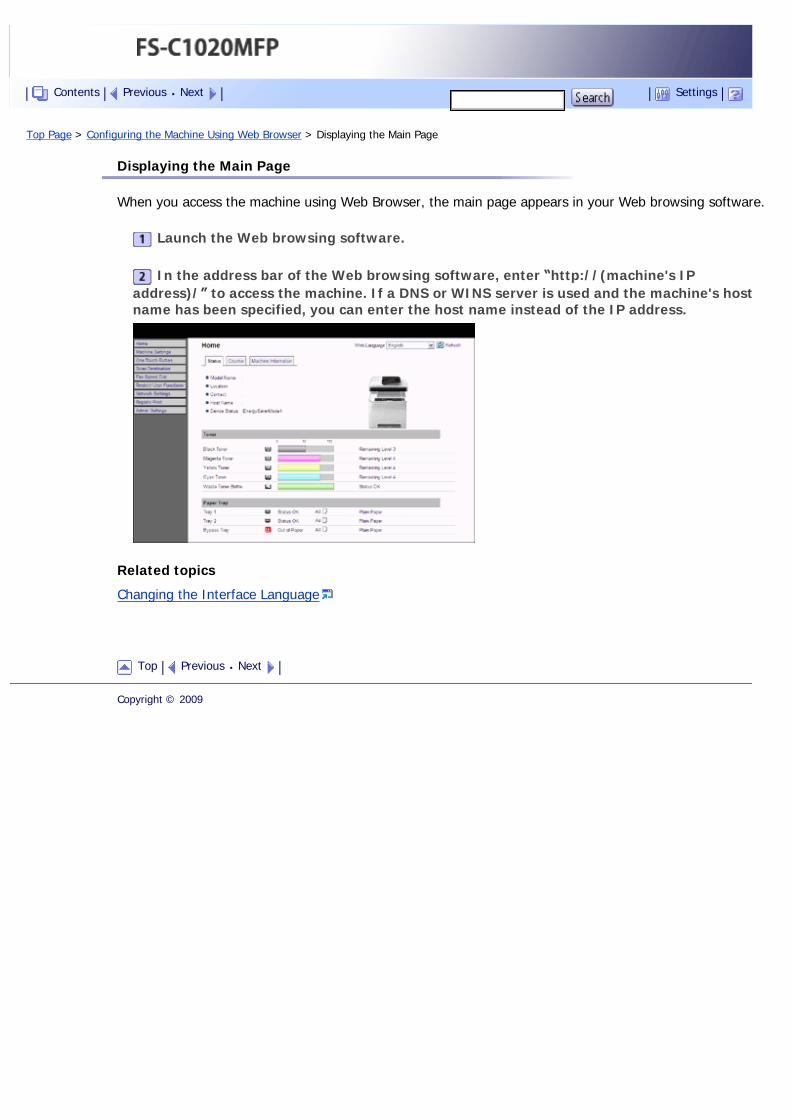
Top Page > Configuring the Machine Using Web Browser > Displaying the Main Page
Displaying the Main Page
When you access the machine using Web Browser, the main page appears in your Web browsing software.
Launch the Web browsing software.
In the address bar of the Web browsing software, enter “http://(machine's IP address)/” to access the machine. If a DNS or WINS server is used and the machine's host name has been specified, you can enter the host name instead of the IP address.
Related topics
Changing the Interface Language
Top Previous Next
Copyright © 2009
Contents Previous Next Settings

Top Page > Configuring the Machine Using Web Browser > Displaying the Main Page > Changing the Interface Language
Changing the Interface Language
Select the desired interface language from the [Web Language] list.
Top Previous Next
Copyright © 2009
Contents Previous Next Settings
Top Page > Configuring the Machine Using Web Browser > Checking the System Information
Checking the System Information
Click [Home] to display the main page of Web Browser. You can check the current system information on this page.
This page contains three tabs: [Status], [Counter], and [Machine Information].
Related topics
Checking the Status Information
Checking the Counter Information
Checking the Machine Information
Top Previous Next
Copyright © 2009
Contents Previous Next Settings
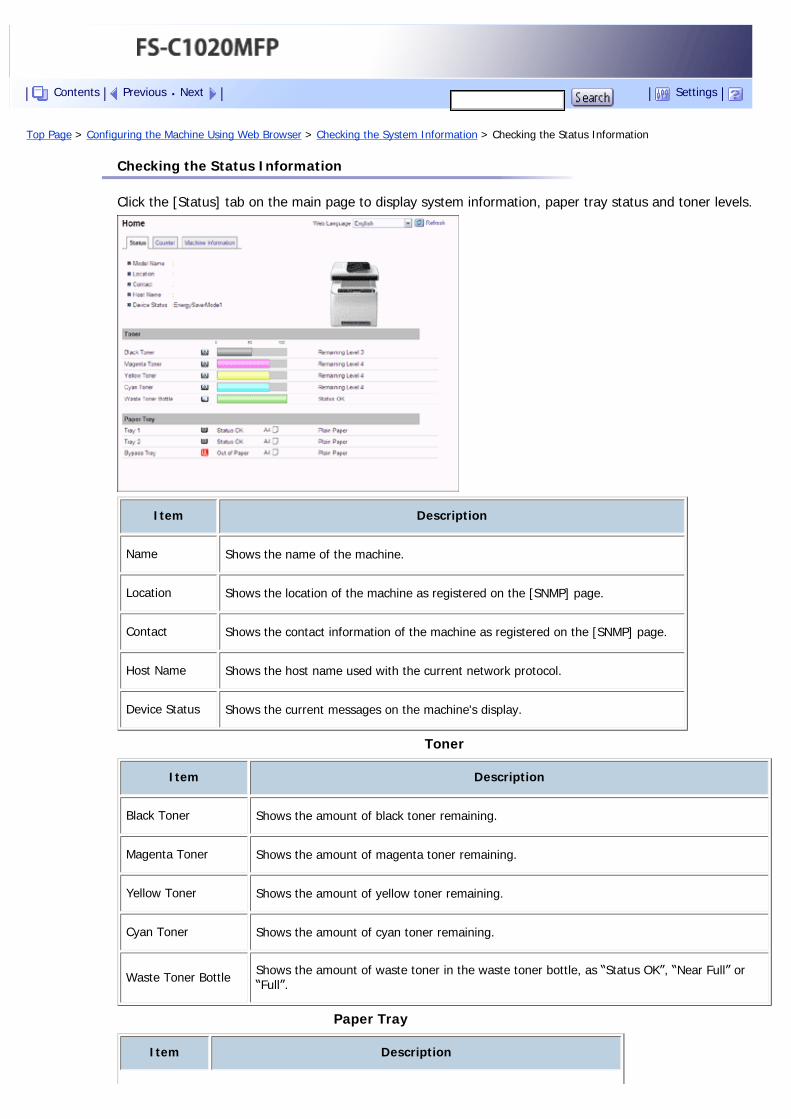
Top Page > Configuring the Machine Using Web Browser > Checking the System Information > Checking the Status Information
Checking the Status Information
Click the [Status] tab on the main page to display system information, paper tray status and toner levels.
Item Description
Name Shows the name of the machine.
Location Shows the location of the machine as registered on the [SNMP] page.
Contact Shows the contact information of the machine as registered on the [SNMP] page.
Host Name Shows the host name used with the current network protocol.
Device Status Shows the current messages on the machine's display.
Toner
Item Description
Black Toner Shows the amount of black toner remaining.
Magenta Toner Shows the amount of magenta toner remaining.
Yellow Toner Shows the amount of yellow toner remaining.
Cyan Toner Shows the amount of cyan toner remaining.
Waste Toner Bottle Shows the amount of waste toner in the waste toner bottle, as “Status OK”, “Near Full” or “Full”.
Paper Tray
Item Description
Contents Previous Next Settings
Tray 1 Shows the current state and paper size/type setting of tray 1.
Tray 2 Shows the current state and paper size/type setting of tray 2.
Bypass Tray Shows the current state and paper size/type setting of the bypass tray.
● The information about tray 2 appears only when it is installed.
● If non-genuine print cartridges are installed, toner life cannot be reliably indicated.
● For details about location and contact information, see Configuring the SNMP Settings .
Top Previous Next
Copyright © 2009
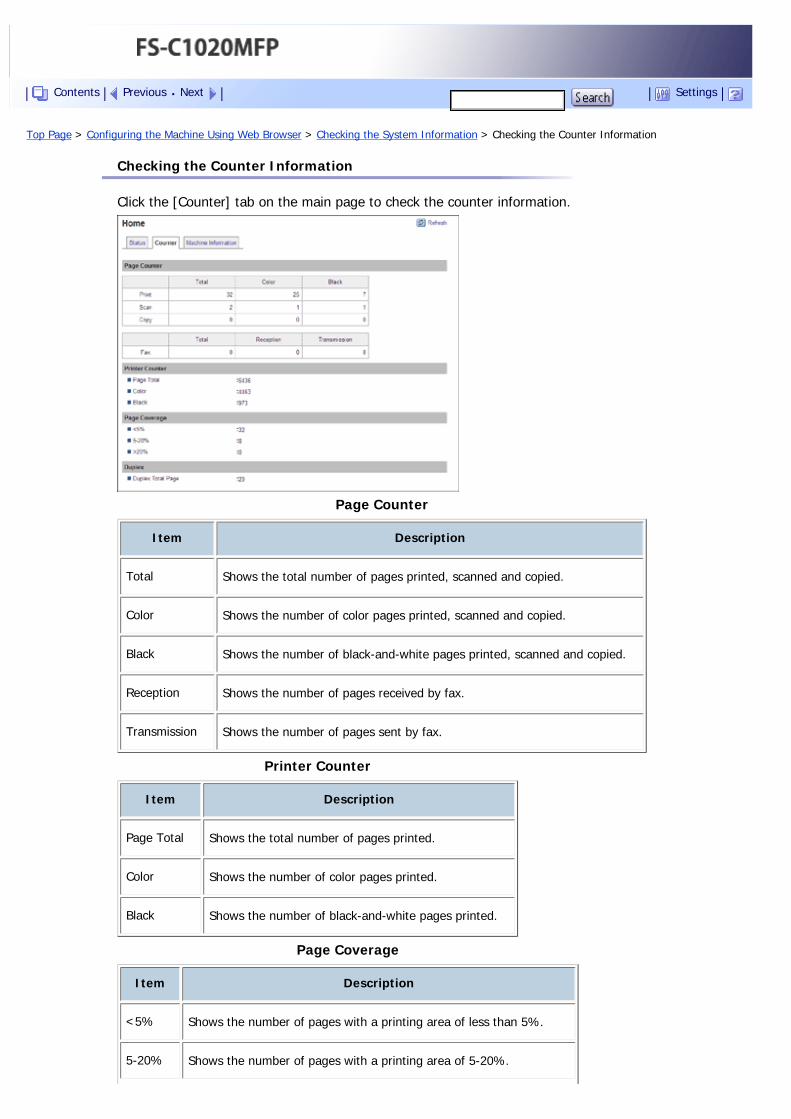
Top Page > Configuring the Machine Using Web Browser > Checking the System Information > Checking the Counter Information
Checking the Counter Information
Click the [Counter] tab on the main page to check the counter information.
Page Counter
Item Description
Total Shows the total number of pages printed, scanned and copied.
Color Shows the number of color pages printed, scanned and copied.
Black Shows the number of black-and-white pages printed, scanned and copied.
Reception Shows the number of pages received by fax.
Transmission Shows the number of pages sent by fax.
Printer Counter
Item Description
Page Total Shows the total number of pages printed.
Color Shows the number of color pages printed.
Black Shows the number of black-and-white pages printed.
Page Coverage
Item Description
<5% Shows the number of pages with a printing area of less than 5%.
5-20% Shows the number of pages with a printing area of 5-20%.
Contents Previous Next Settings

>20% Shows the number of pages with a printing area of more than 20%.
Duplex
Item Description
Duplex Total Page Shows the total number of pages printed on both sides.
● A sheet printed on both sides counts as two printed pages.
Top Previous Next
Copyright © 2009
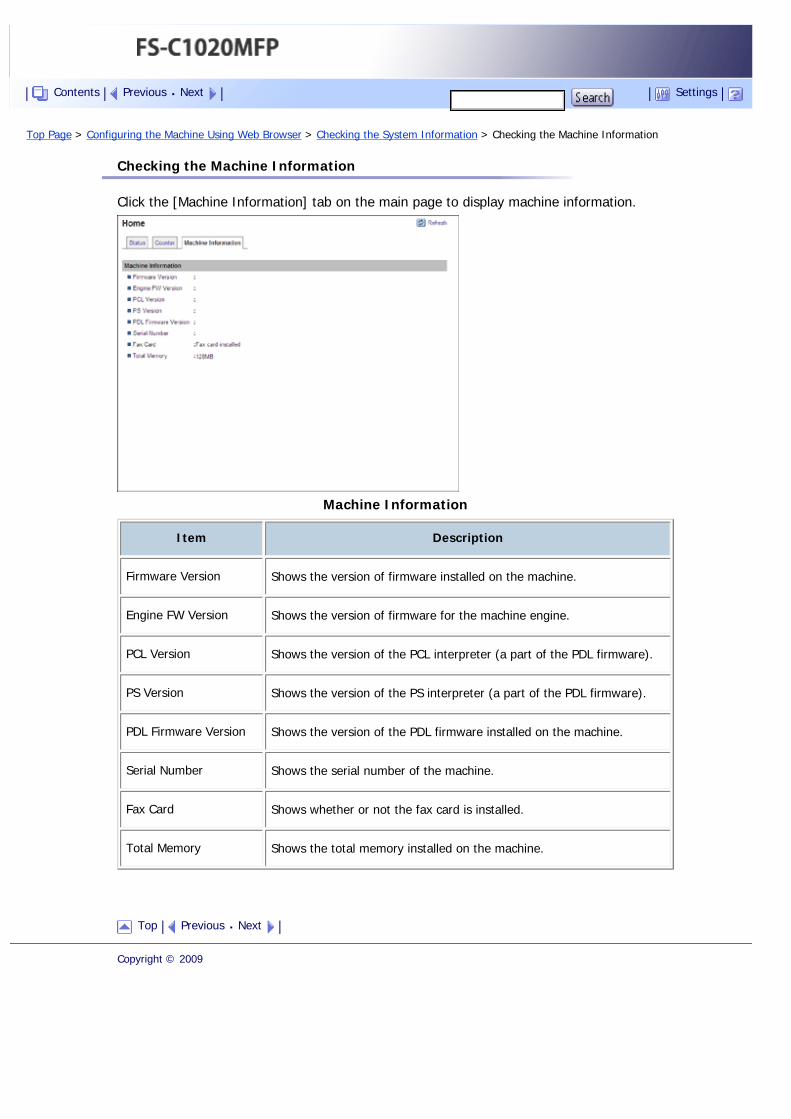
Top Page > Configuring the Machine Using Web Browser > Checking the System Information > Checking the Machine Information
Checking the Machine Information
Click the [Machine Information] tab on the main page to display machine information.
Machine Information
Item Description
Firmware Version Shows the version of firmware installed on the machine.
Engine FW Version Shows the version of firmware for the machine engine.
PCL Version Shows the version of the PCL interpreter (a part of the PDL firmware).
PS Version Shows the version of the PS interpreter (a part of the PDL firmware).
PDL Firmware Version Shows the version of the PDL firmware installed on the machine.
Serial Number Shows the serial number of the machine.
Fax Card Shows whether or not the fax card is installed.
Total Memory Shows the total memory installed on the machine.
Top Previous Next
Copyright © 2009
Contents Previous Next Settings

Top Page > Configuring the Machine Using Web Browser > Configuring the Machine Settings
Configuring the Machine Settings
Click [Machine Settings] to display the page for configuring the machine settings.
This page contains six tabs: [Speaker Volume], [Paper Settings], [Copy], [Fax], [Printer], and [Toner Saver Mode].
Related topics
Configuring the Speaker Volume
Configuring the Paper Settings
Specifying the Size of Paper for Printing Copies
Specifying the Tray for Printing Faxes
Specifying the Tray Priority for the Printer Function
Configuring Toner Saver Mode
Top Previous Next
Copyright © 2009
Contents Previous Next Settings

Top Page > Configuring the Machine Using Web Browser > Configuring the Machine Settings > Configuring the Speaker Volume
Configuring the Speaker Volume
Click the [Speaker Volume] tab on the machine settings page to configure the speaker volume settings.
Speaker Volume
Item Description
Keypad Volume Select the volume of the beep that sounds when a key is pressed from 0 (sound off) to 3.
Ring Volume Select the volume of the ring when a call is received from 0 (sound off) to 3.
Line Mon. Vol Select the volume of the sound from the speaker during on hook mode from 0 (sound off) to 3.
Job End Tone Vol Select the volume of the beep that sounds when a job is complete from 0 (sound off) to 3.
Job Error Tone Vol Select the volume of the beep that sounds when a job error occurs from 0 (sound off) to 3.
Alarm Volume Select the volume of the alarm that sounds when a transmission error or other alert occurs from 0 (sound off) to 3.
Top Previous Next
Copyright © 2009
Contents Previous Next Settings
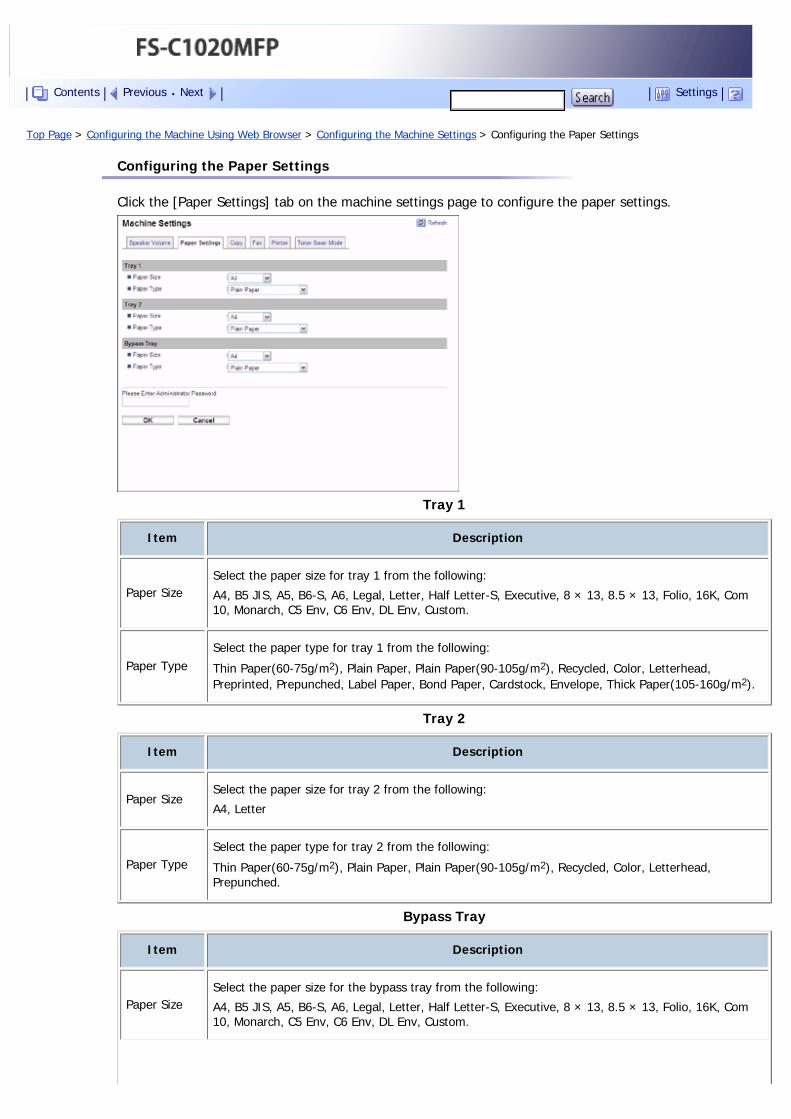
Top Page > Configuring the Machine Using Web Browser > Configuring the Machine Settings > Configuring the Paper Settings
Configuring the Paper Settings
Click the [Paper Settings] tab on the machine settings page to configure the paper settings.
Tray 1
Item Description
Paper SizeSelect the paper size for tray 1 from the following:
A4, B5 JIS, A5, B6-S, A6, Legal, Letter, Half Letter-S, Executive, 8 × 13, 8.5 × 13, Folio, 16K, Com 10, Monarch, C5 Env, C6 Env, DL Env, Custom.
Paper TypeSelect the paper type for tray 1 from the following:
Thin Paper(60-75g/m2), Plain Paper, Plain Paper(90-105g/m2), Recycled, Color, Letterhead, Preprinted, Prepunched, Label Paper, Bond Paper, Cardstock, Envelope, Thick Paper(105-160g/m2).
Tray 2
Item Description
Paper SizeSelect the paper size for tray 2 from the following:
A4, Letter
Paper TypeSelect the paper type for tray 2 from the following:
Thin Paper(60-75g/m2), Plain Paper, Plain Paper(90-105g/m2), Recycled, Color, Letterhead, Prepunched.
Bypass Tray
Item Description
Paper SizeSelect the paper size for the bypass tray from the following:
A4, B5 JIS, A5, B6-S, A6, Legal, Letter, Half Letter-S, Executive, 8 × 13, 8.5 × 13, Folio, 16K, Com 10, Monarch, C5 Env, C6 Env, DL Env, Custom.
Contents Previous Next Settings

Paper TypeSelect the paper type for the bypass tray from the following:
Thin Paper(60-75g/m2), Plain Paper, Plain Paper(90-105g/m2), Recycled, Color, Letterhead, Prepunched, Label Paper, Bond Paper, Cardstock, Envelope, Thick Paper(105-160g/m2).
● The information about tray 2 appears only when it is installed.
Top Previous Next
Copyright © 2009
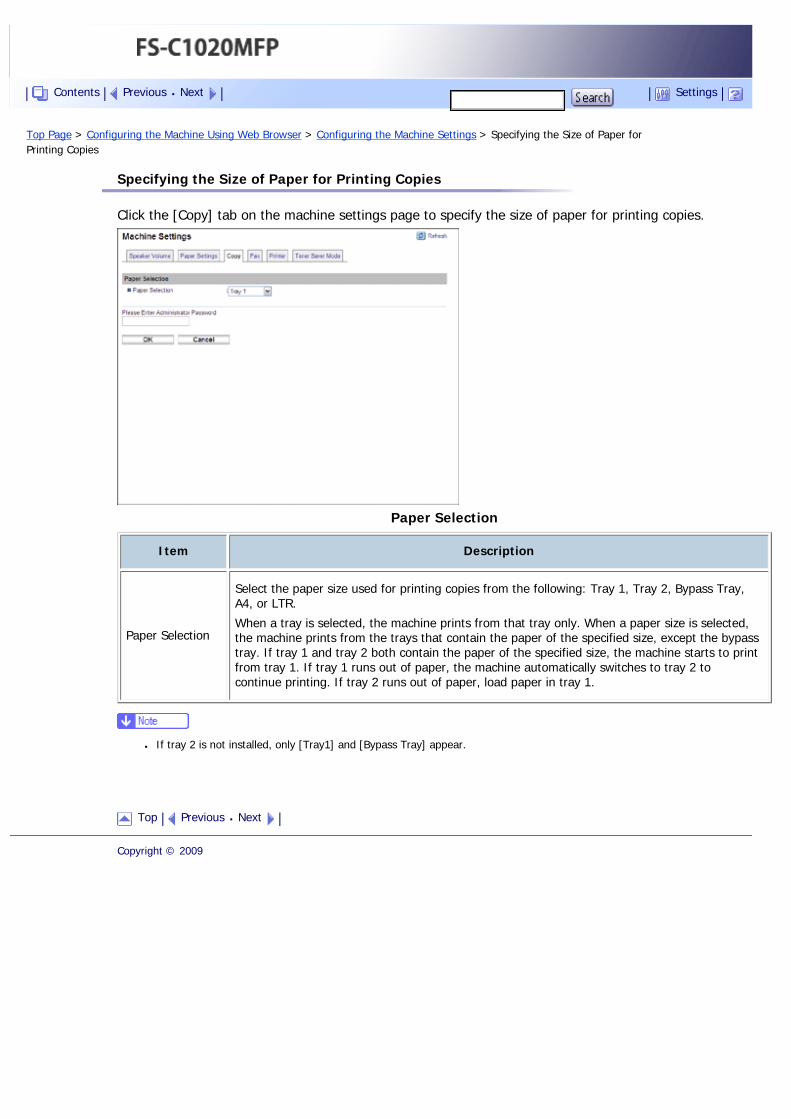
Top Page > Configuring the Machine Using Web Browser > Configuring the Machine Settings > Specifying the Size of Paper for Printing Copies
Specifying the Size of Paper for Printing Copies
Click the [Copy] tab on the machine settings page to specify the size of paper for printing copies.
Paper Selection
Item Description
Paper Selection
Select the paper size used for printing copies from the following: Tray 1, Tray 2, Bypass Tray, A4, or LTR.
When a tray is selected, the machine prints from that tray only. When a paper size is selected, the machine prints from the trays that contain the paper of the specified size, except the bypass tray. If tray 1 and tray 2 both contain the paper of the specified size, the machine starts to print from tray 1. If tray 1 runs out of paper, the machine automatically switches to tray 2 to continue printing. If tray 2 runs out of paper, load paper in tray 1.
● If tray 2 is not installed, only [Tray1] and [Bypass Tray] appear.
Top Previous Next
Copyright © 2009
Contents Previous Next Settings
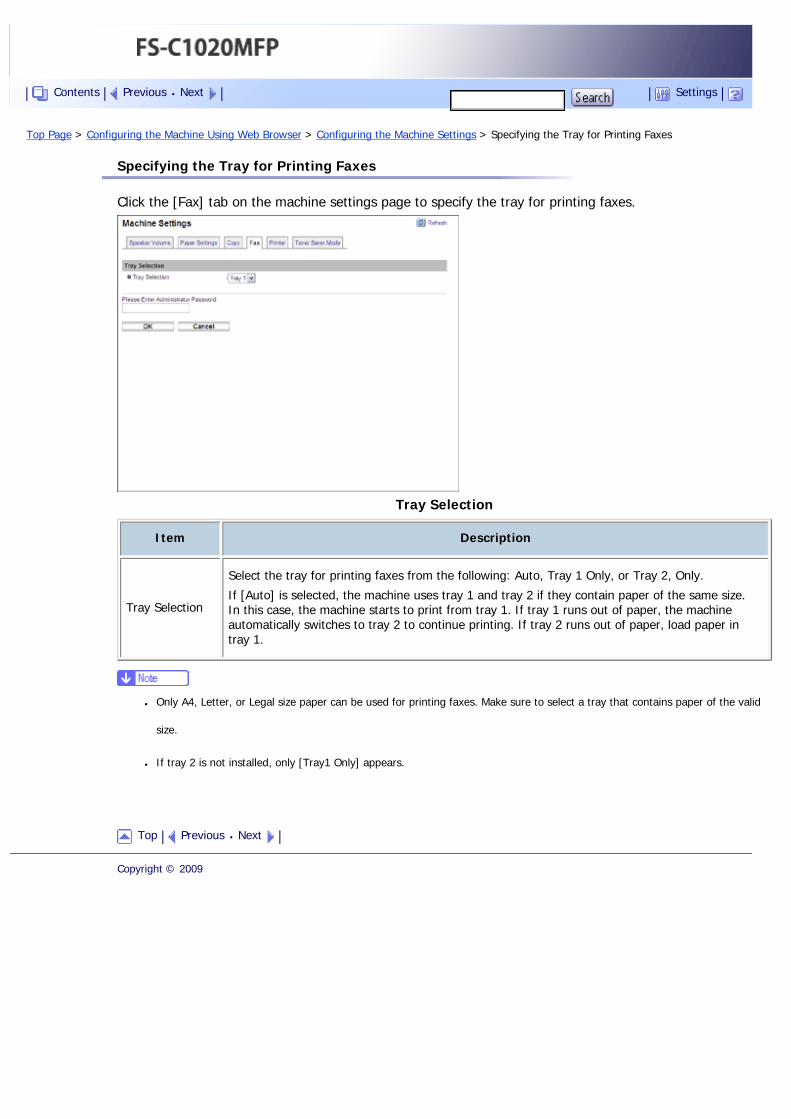
Top Page > Configuring the Machine Using Web Browser > Configuring the Machine Settings > Specifying the Tray for Printing Faxes
Specifying the Tray for Printing Faxes
Click the [Fax] tab on the machine settings page to specify the tray for printing faxes.
Tray Selection
Item Description
Tray Selection
Select the tray for printing faxes from the following: Auto, Tray 1 Only, or Tray 2, Only.
If [Auto] is selected, the machine uses tray 1 and tray 2 if they contain paper of the same size. In this case, the machine starts to print from tray 1. If tray 1 runs out of paper, the machine automatically switches to tray 2 to continue printing. If tray 2 runs out of paper, load paper in tray 1.
● Only A4, Letter, or Legal size paper can be used for printing faxes. Make sure to select a tray that contains paper of the valid
size.
● If tray 2 is not installed, only [Tray1 Only] appears.
Top Previous Next
Copyright © 2009
Contents Previous Next Settings
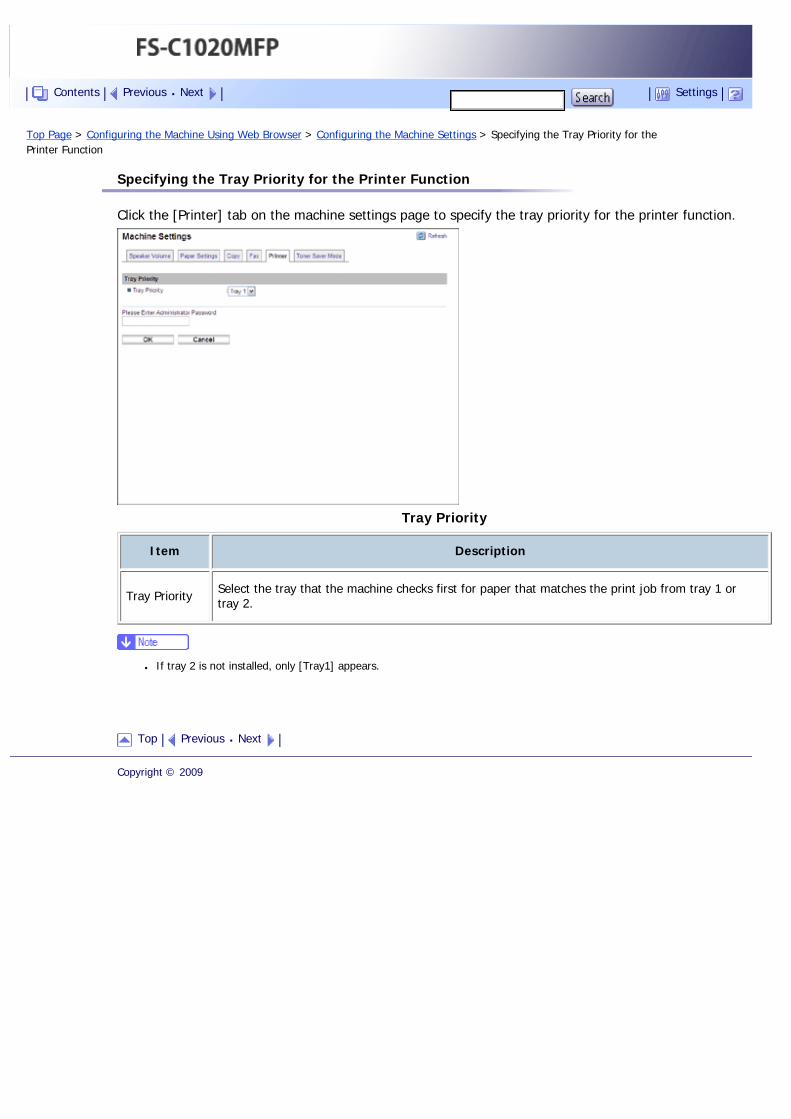
Top Page > Configuring the Machine Using Web Browser > Configuring the Machine Settings > Specifying the Tray Priority for the Printer Function
Specifying the Tray Priority for the Printer Function
Click the [Printer] tab on the machine settings page to specify the tray priority for the printer function.
Tray Priority
Item Description
Tray Priority Select the tray that the machine checks first for paper that matches the print job from tray 1 or tray 2.
● If tray 2 is not installed, only [Tray1] appears.
Top Previous Next
Copyright © 2009
Contents Previous Next Settings
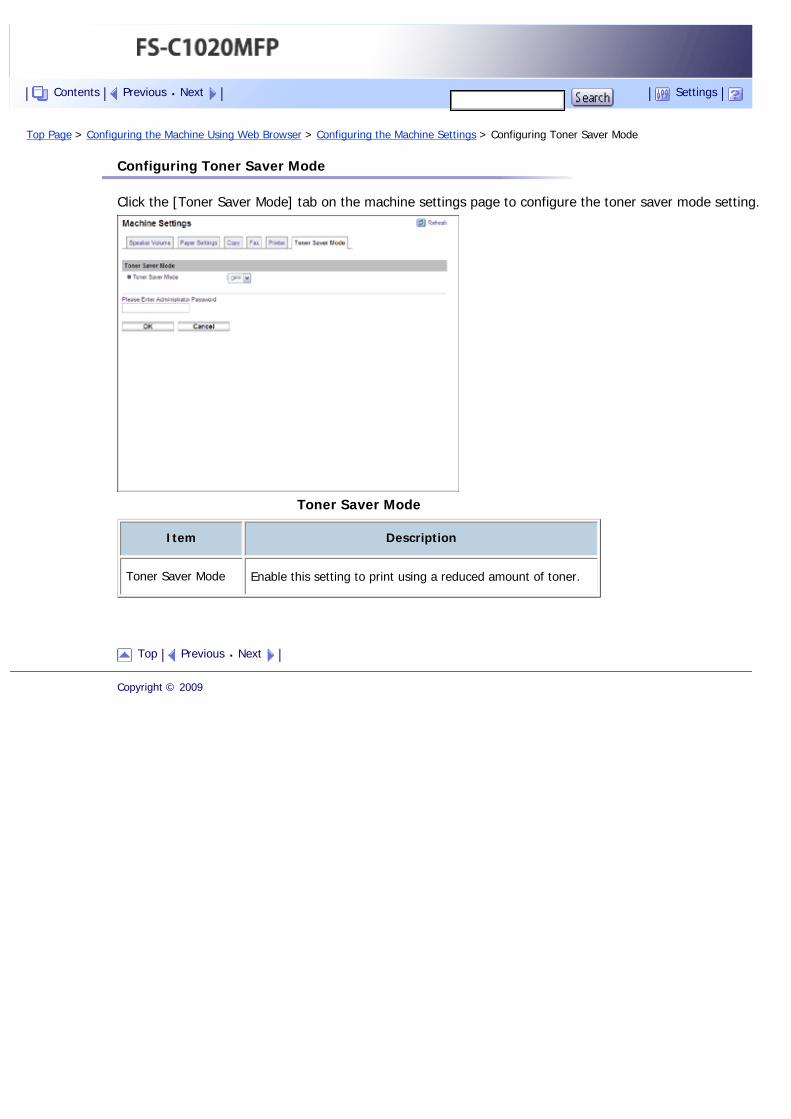
Top Page > Configuring the Machine Using Web Browser > Configuring the Machine Settings > Configuring Toner Saver Mode
Configuring Toner Saver Mode
Click the [Toner Saver Mode] tab on the machine settings page to configure the toner saver mode setting.
Toner Saver Mode
Item Description
Toner Saver Mode Enable this setting to print using a reduced amount of toner.
Top Previous Next
Copyright © 2009
Contents Previous Next Settings
Top Page > Configuring the Machine Using Web Browser > Registering Destinations
Registering Destinations
Scan and fax destinations can be registered using Web Browser. A maximum of 100 destinations can be registered. See the scan and fax sections for more information on registering destinations.
● For details about registering scan destinations, see Registering Scan Destinations .
● For details about registering fax destinations using Web Browser, see Registering Fax Destinations Using Web Browser .
Top Previous Next
Copyright © 2009
Contents Previous Next Settings
Top Page > Configuring the Machine Using Web Browser > Restricting Machine Functions According to User
Restricting Machine Functions According to User
You can set the machine to require a user ID when someone tries to copy, send faxes, or scan using the control panel.
Using Web Browser, you can select the function you want to restrict, and register the users who can use that function. A maximum of 20 users can be registered. For each user, you can specify which functions are available upon authentication.
● For details about configuring the user restriction settings, see Restricting Machine Functions According to User .
Top Previous Next
Copyright © 2009
Contents Previous Next Settings
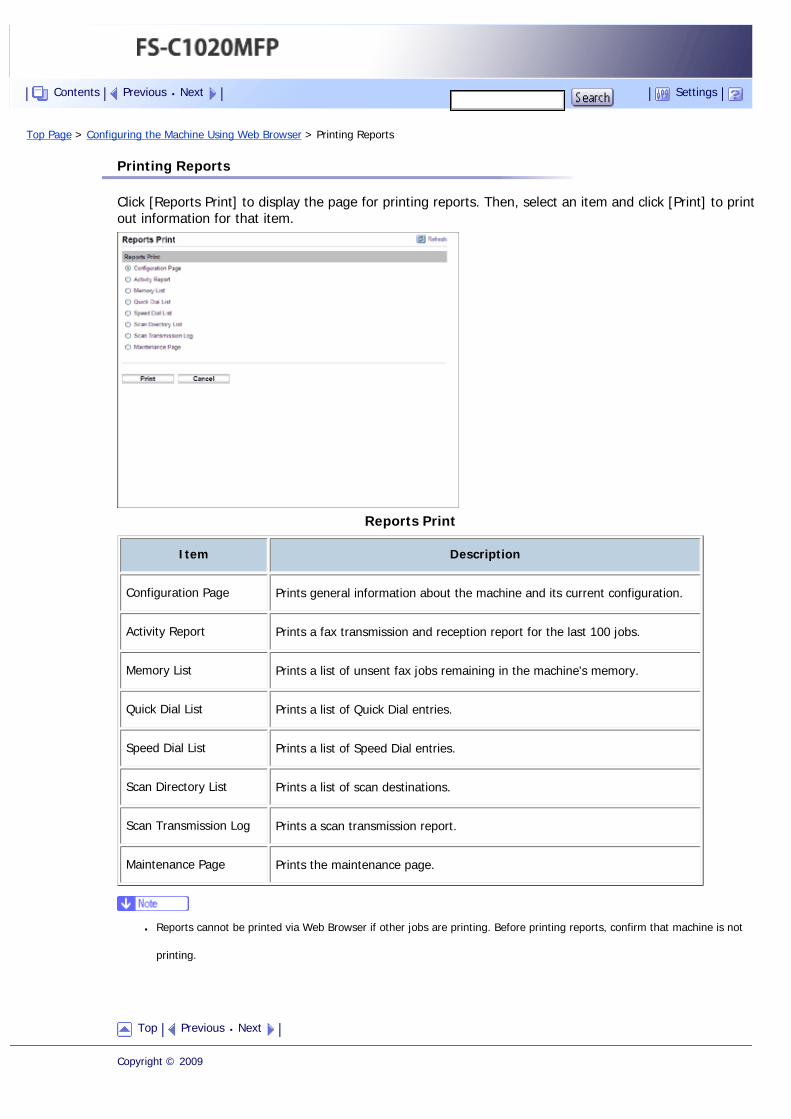
Top Page > Configuring the Machine Using Web Browser > Printing Reports
Printing Reports
Click [Reports Print] to display the page for printing reports. Then, select an item and click [Print] to print out information for that item.
Reports Print
Item Description
Configuration Page Prints general information about the machine and its current configuration.
Activity Report Prints a fax transmission and reception report for the last 100 jobs.
Memory List Prints a list of unsent fax jobs remaining in the machine's memory.
Quick Dial List Prints a list of Quick Dial entries.
Speed Dial List Prints a list of Speed Dial entries.
Scan Directory List Prints a list of scan destinations.
Scan Transmission Log Prints a scan transmission report.
Maintenance Page Prints the maintenance page.
● Reports cannot be printed via Web Browser if other jobs are printing. Before printing reports, confirm that machine is not
printing.
Top Previous Next
Copyright © 2009
Contents Previous Next Settings

Top Page > Configuring the Machine Using Web Browser > Configuring the Network Settings
Configuring the Network Settings
Click [Network Settings] to display the page for configuring the network settings.
This page contains six tabs: [Network Status], [Network Application], [DNS], [Alert Messages], [SNMP], and [SMTP].
Related topics
Checking the Network Status
Configuring the Network Application Settings
Configuring the DNS Settings
Configuring the Alert Message Settings
Configuring the SNMP Settings
Configuring the SMTP Settings
Top Previous Next
Copyright © 2009
Contents Previous Next Settings
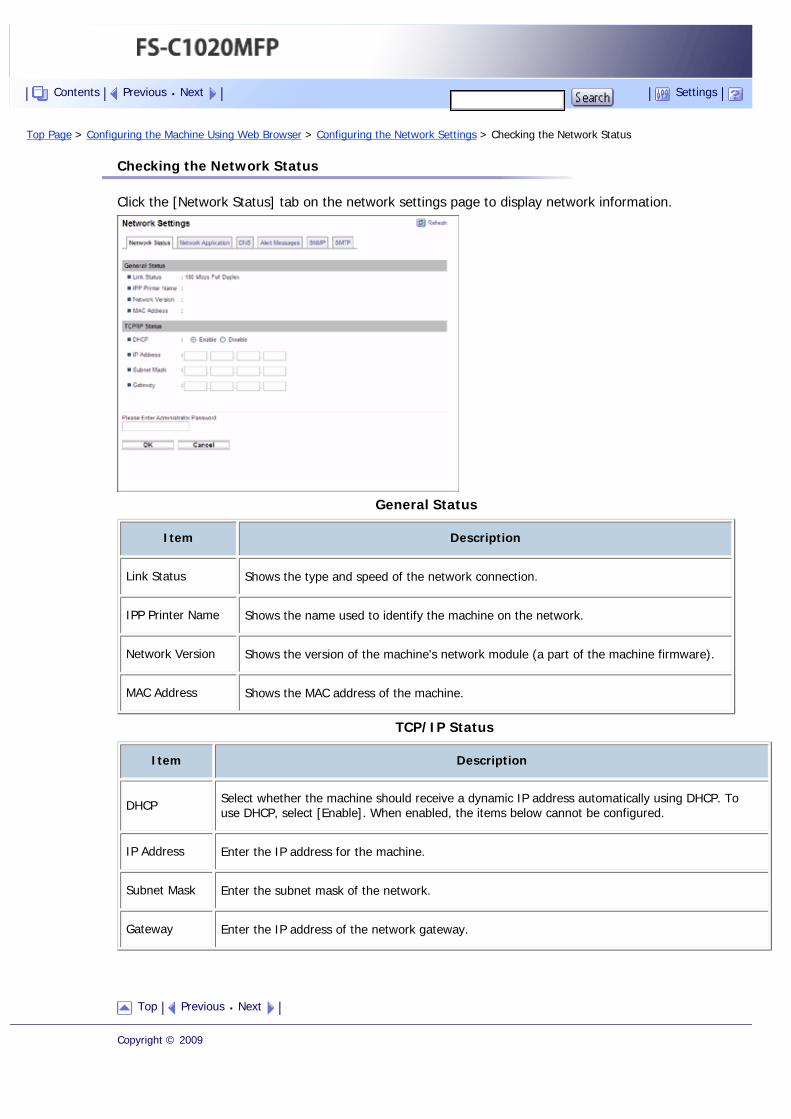
Top Page > Configuring the Machine Using Web Browser > Configuring the Network Settings > Checking the Network Status
Checking the Network Status
Click the [Network Status] tab on the network settings page to display network information.
General Status
Item Description
Link Status Shows the type and speed of the network connection.
IPP Printer Name Shows the name used to identify the machine on the network.
Network Version Shows the version of the machine's network module (a part of the machine firmware).
MAC Address Shows the MAC address of the machine.
TCP/IP Status
Item Description
DHCP Select whether the machine should receive a dynamic IP address automatically using DHCP. To use DHCP, select [Enable]. When enabled, the items below cannot be configured.
IP Address Enter the IP address for the machine.
Subnet Mask Enter the subnet mask of the network.
Gateway Enter the IP address of the network gateway.
Top Previous Next
Copyright © 2009
Contents Previous Next Settings
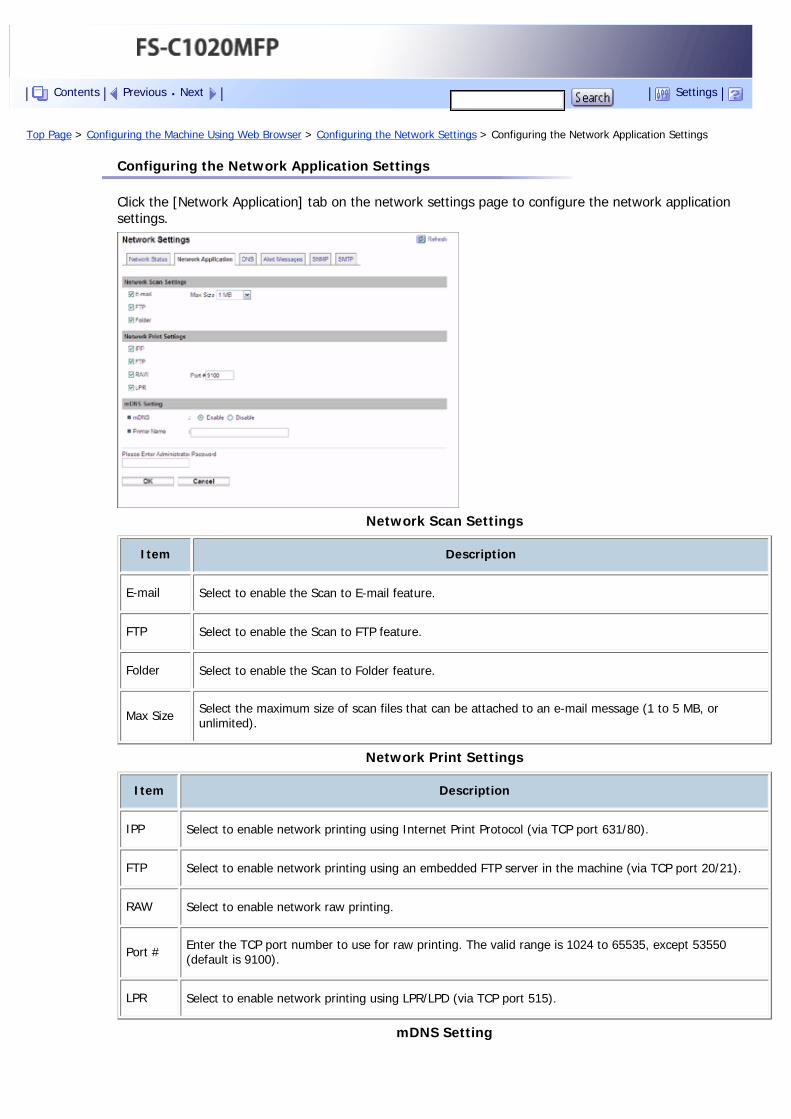
Top Page > Configuring the Machine Using Web Browser > Configuring the Network Settings > Configuring the Network Application Settings
Configuring the Network Application Settings
Click the [Network Application] tab on the network settings page to configure the network application settings.
Network Scan Settings
Item Description
E-mail Select to enable the Scan to E-mail feature.
FTP Select to enable the Scan to FTP feature.
Folder Select to enable the Scan to Folder feature.
Max Size Select the maximum size of scan files that can be attached to an e-mail message (1 to 5 MB, or unlimited).
Network Print Settings
Item Description
IPP Select to enable network printing using Internet Print Protocol (via TCP port 631/80).
FTP Select to enable network printing using an embedded FTP server in the machine (via TCP port 20/21).
RAW Select to enable network raw printing.
Port # Enter the TCP port number to use for raw printing. The valid range is 1024 to 65535, except 53550 (default is 9100).
LPR Select to enable network printing using LPR/LPD (via TCP port 515).
mDNS Setting
Contents Previous Next Settings

Item Description
mDNS Select to enable Multicast DNS (via UDP port 5353). If disabled, the item below cannot be configured.
Printer Name Enter the name of the machine. Can contain up to 32 characters.
Top Previous Next
Copyright © 2009
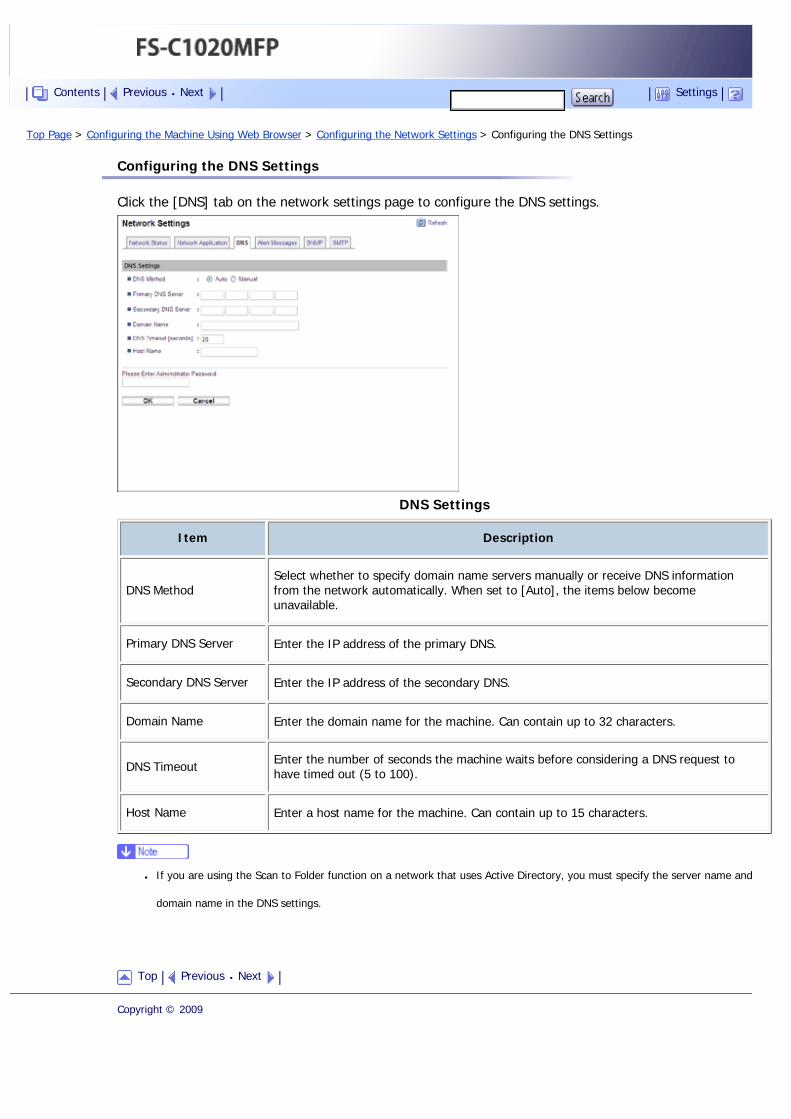
Top Page > Configuring the Machine Using Web Browser > Configuring the Network Settings > Configuring the DNS Settings
Configuring the DNS Settings
Click the [DNS] tab on the network settings page to configure the DNS settings.
DNS Settings
Item Description
DNS MethodSelect whether to specify domain name servers manually or receive DNS information from the network automatically. When set to [Auto], the items below become unavailable.
Primary DNS Server Enter the IP address of the primary DNS.
Secondary DNS Server Enter the IP address of the secondary DNS.
Domain Name Enter the domain name for the machine. Can contain up to 32 characters.
DNS Timeout Enter the number of seconds the machine waits before considering a DNS request to have timed out (5 to 100).
Host Name Enter a host name for the machine. Can contain up to 15 characters.
● If you are using the Scan to Folder function on a network that uses Active Directory, you must specify the server name and
domain name in the DNS settings.
Top Previous Next
Copyright © 2009
Contents Previous Next Settings
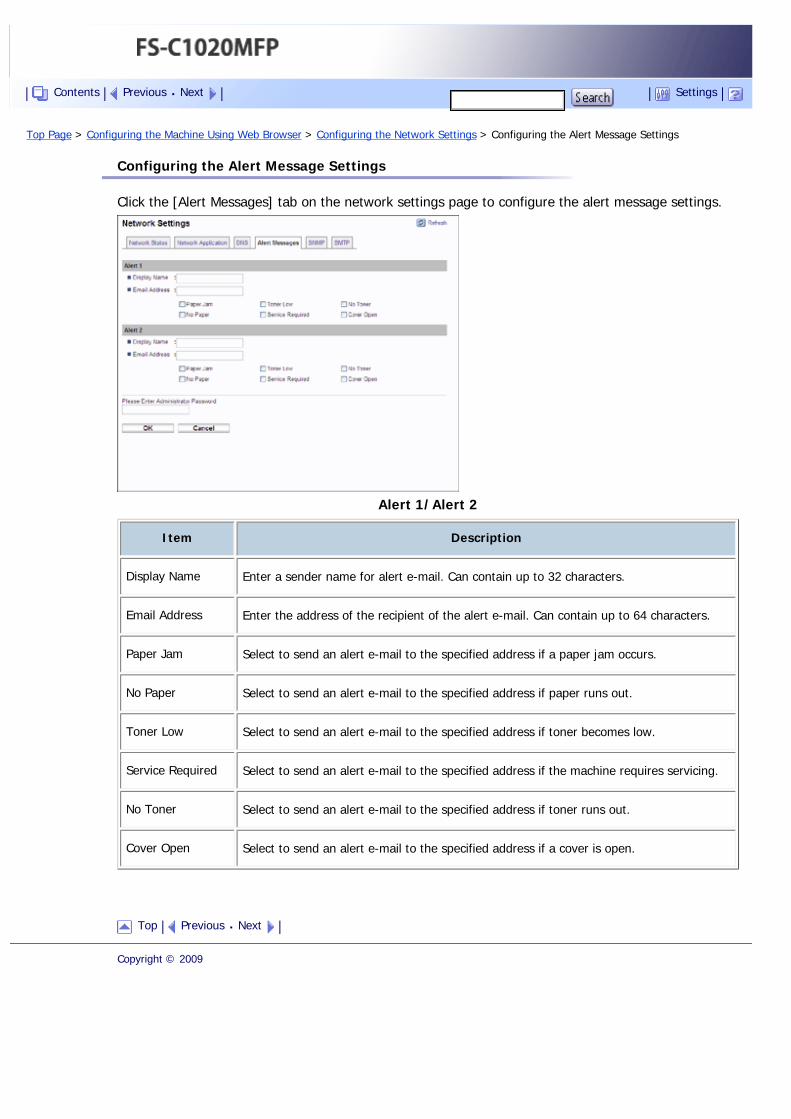
Top Page > Configuring the Machine Using Web Browser > Configuring the Network Settings > Configuring the Alert Message Settings
Configuring the Alert Message Settings
Click the [Alert Messages] tab on the network settings page to configure the alert message settings.
Alert 1/Alert 2
Item Description
Display Name Enter a sender name for alert e-mail. Can contain up to 32 characters.
Email Address Enter the address of the recipient of the alert e-mail. Can contain up to 64 characters.
Paper Jam Select to send an alert e-mail to the specified address if a paper jam occurs.
No Paper Select to send an alert e-mail to the specified address if paper runs out.
Toner Low Select to send an alert e-mail to the specified address if toner becomes low.
Service Required Select to send an alert e-mail to the specified address if the machine requires servicing.
No Toner Select to send an alert e-mail to the specified address if toner runs out.
Cover Open Select to send an alert e-mail to the specified address if a cover is open.
Top Previous Next
Copyright © 2009
Contents Previous Next Settings
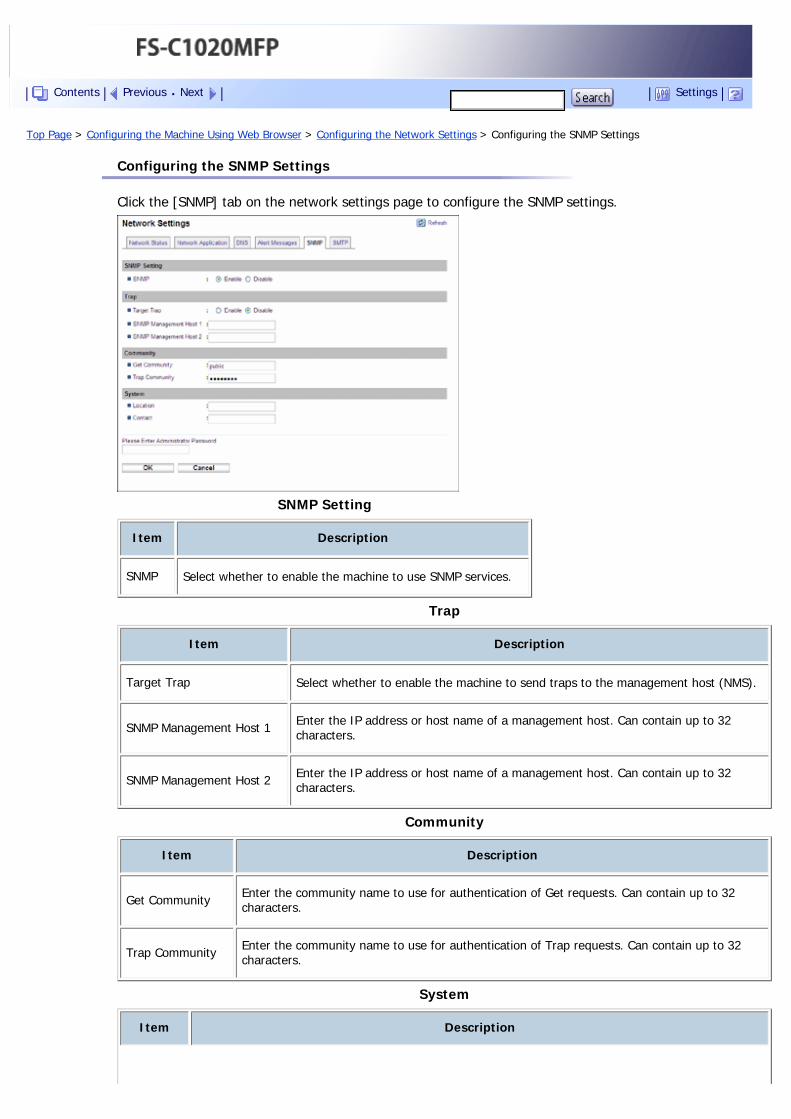
Top Page > Configuring the Machine Using Web Browser > Configuring the Network Settings > Configuring the SNMP Settings
Configuring the SNMP Settings
Click the [SNMP] tab on the network settings page to configure the SNMP settings.
SNMP Setting
Item Description
SNMP Select whether to enable the machine to use SNMP services.
Trap
Item Description
Target Trap Select whether to enable the machine to send traps to the management host (NMS).
SNMP Management Host 1 Enter the IP address or host name of a management host. Can contain up to 32 characters.
SNMP Management Host 2 Enter the IP address or host name of a management host. Can contain up to 32 characters.
Community
Item Description
Get Community Enter the community name to use for authentication of Get requests. Can contain up to 32 characters.
Trap Community Enter the community name to use for authentication of Trap requests. Can contain up to 32 characters.
System
Item Description
Contents Previous Next Settings

Location Enter the location of the machine. The location entered here is displayed on the main page. Can contain up to 64 characters.
Contact Enter the contact information of the machine. The contact information entered here is displayed on the main page. Can contain up to 64 characters.
Top Previous Next
Copyright © 2009
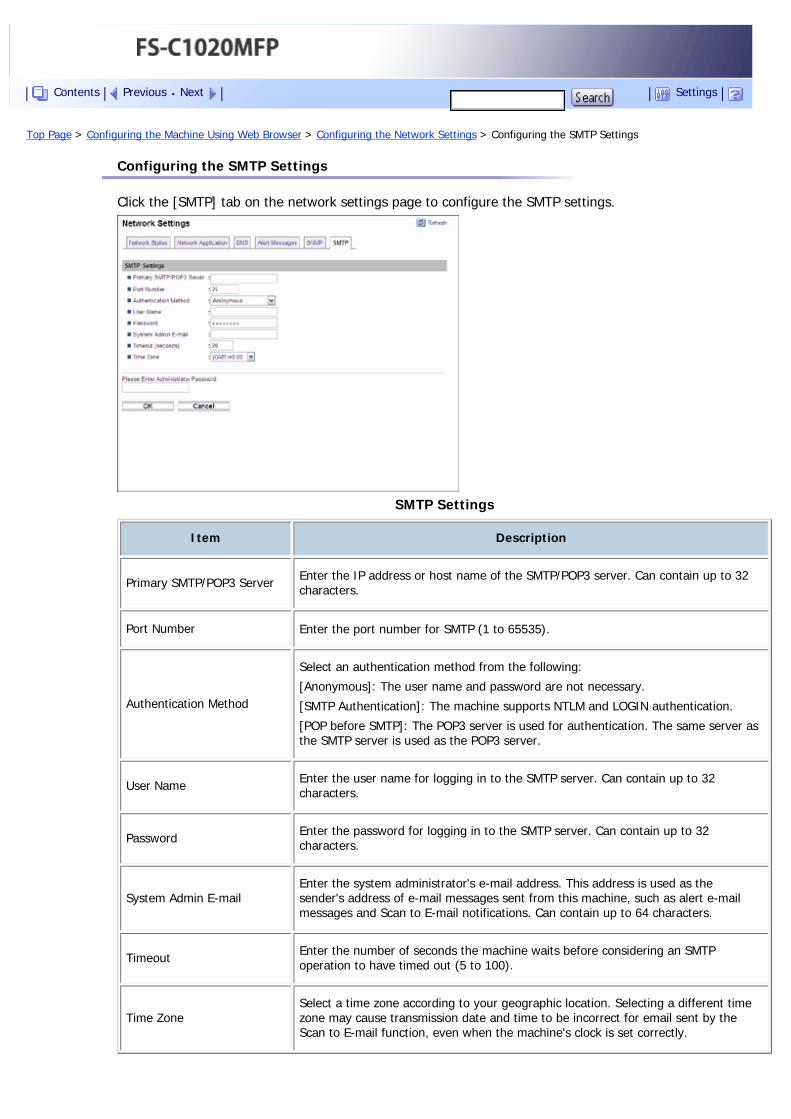
Top Page > Configuring the Machine Using Web Browser > Configuring the Network Settings > Configuring the SMTP Settings
Configuring the SMTP Settings
Click the [SMTP] tab on the network settings page to configure the SMTP settings.
SMTP Settings
Item Description
Primary SMTP/POP3 Server Enter the IP address or host name of the SMTP/POP3 server. Can contain up to 32 characters.
Port Number Enter the port number for SMTP (1 to 65535).
Authentication Method
Select an authentication method from the following:
[Anonymous]: The user name and password are not necessary.
[SMTP Authentication]: The machine supports NTLM and LOGIN authentication.
[POP before SMTP]: The POP3 server is used for authentication. The same server as the SMTP server is used as the POP3 server.
User Name Enter the user name for logging in to the SMTP server. Can contain up to 32 characters.
Password Enter the password for logging in to the SMTP server. Can contain up to 32 characters.
System Admin E-mailEnter the system administrator's e-mail address. This address is used as the sender's address of e-mail messages sent from this machine, such as alert e-mail messages and Scan to E-mail notifications. Can contain up to 64 characters.
Timeout Enter the number of seconds the machine waits before considering an SMTP operation to have timed out (5 to 100).
Time ZoneSelect a time zone according to your geographic location. Selecting a different time zone may cause transmission date and time to be incorrect for email sent by the Scan to E-mail function, even when the machine's clock is set correctly.
Contents Previous Next Settings

Top Previous Next
Copyright © 2009
Top Page > Configuring the Machine Using Web Browser > Configuring the Administrator Settings
Configuring the Administrator Settings
Click [Admin Settings] to display the page for configuring the administrator settings.
This page contains six tabs: [Password], [Default Settings], [Backup Settings], [Restore Settings], [Date/Time Setup], and [Power Saver].
Related topics
Configuring the Password
Restoring the Default Settings
Backing Up the Machine's Settings
Restoring the Machine's Settings from a Backup File
Configuring the Date and Time Settings
Configuring the Power Saver Mode Settings
Top Previous Next
Copyright © 2009
Contents Previous Next Settings
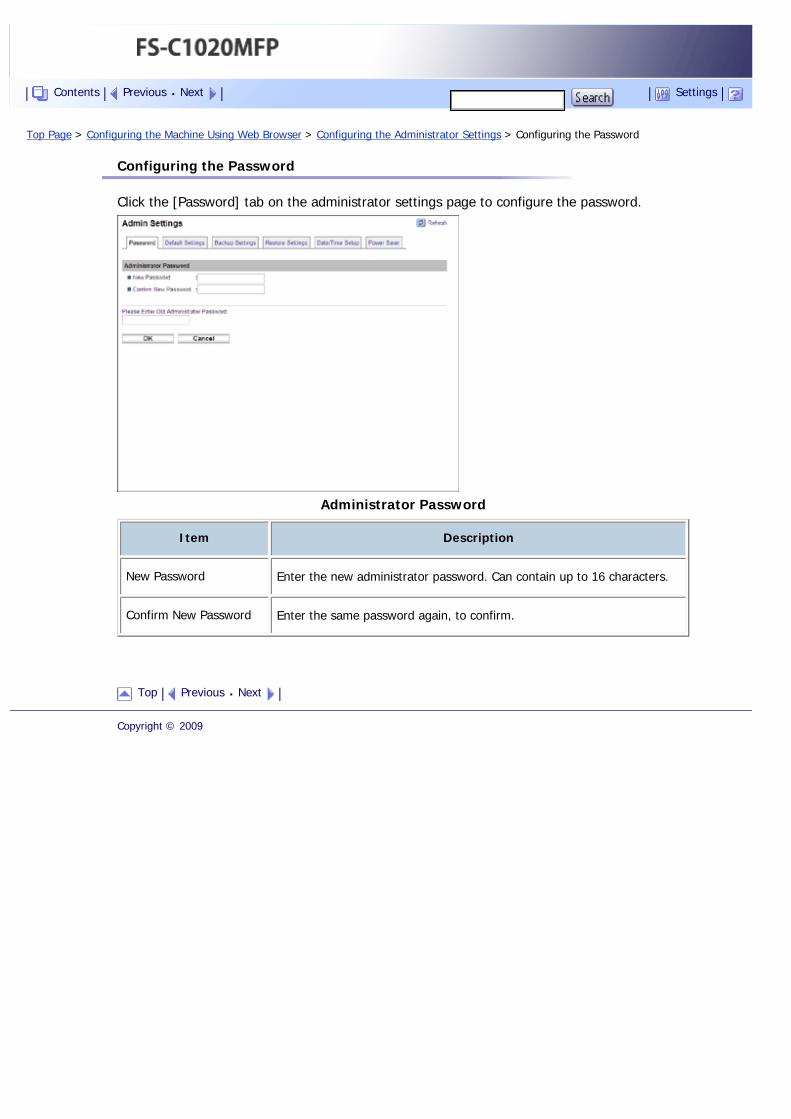
Top Page > Configuring the Machine Using Web Browser > Configuring the Administrator Settings > Configuring the Password
Configuring the Password
Click the [Password] tab on the administrator settings page to configure the password.
Administrator Password
Item Description
New Password Enter the new administrator password. Can contain up to 16 characters.
Confirm New Password Enter the same password again, to confirm.
Top Previous Next
Copyright © 2009
Contents Previous Next Settings
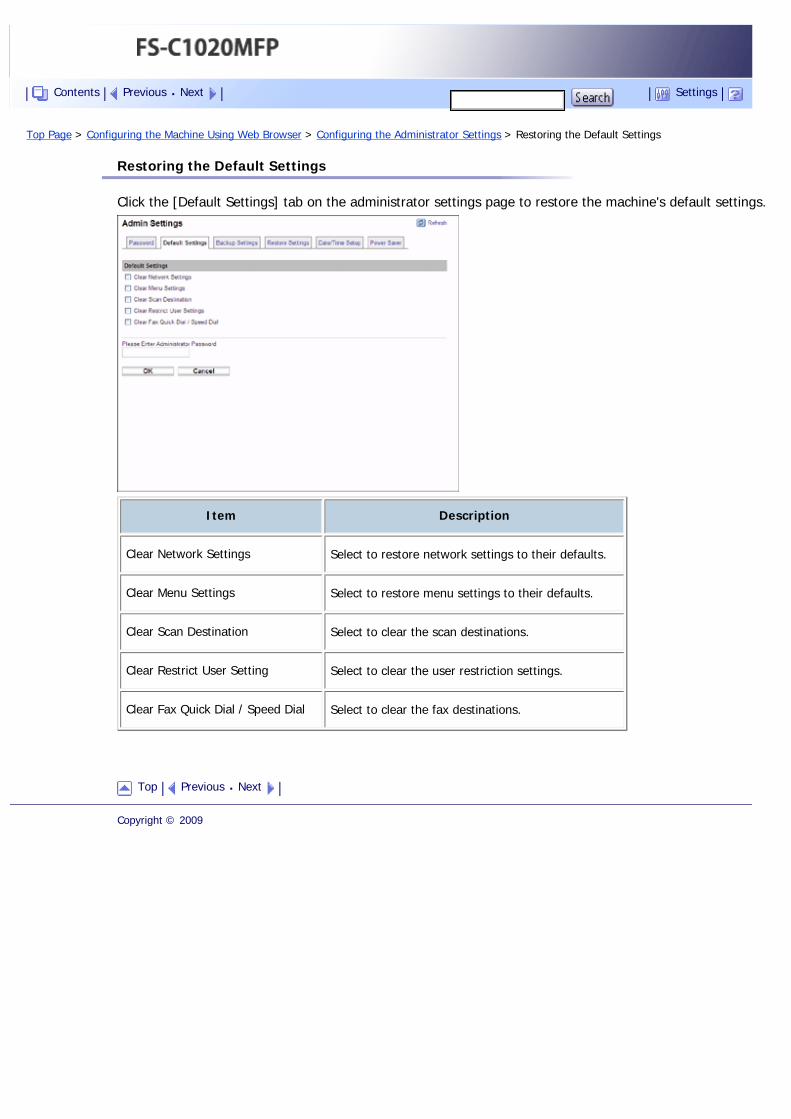
Top Page > Configuring the Machine Using Web Browser > Configuring the Administrator Settings > Restoring the Default Settings
Restoring the Default Settings
Click the [Default Settings] tab on the administrator settings page to restore the machine's default settings.
Item Description
Clear Network Settings Select to restore network settings to their defaults.
Clear Menu Settings Select to restore menu settings to their defaults.
Clear Scan Destination Select to clear the scan destinations.
Clear Restrict User Setting Select to clear the user restriction settings.
Clear Fax Quick Dial / Speed Dial Select to clear the fax destinations.
Top Previous Next
Copyright © 2009
Contents Previous Next Settings
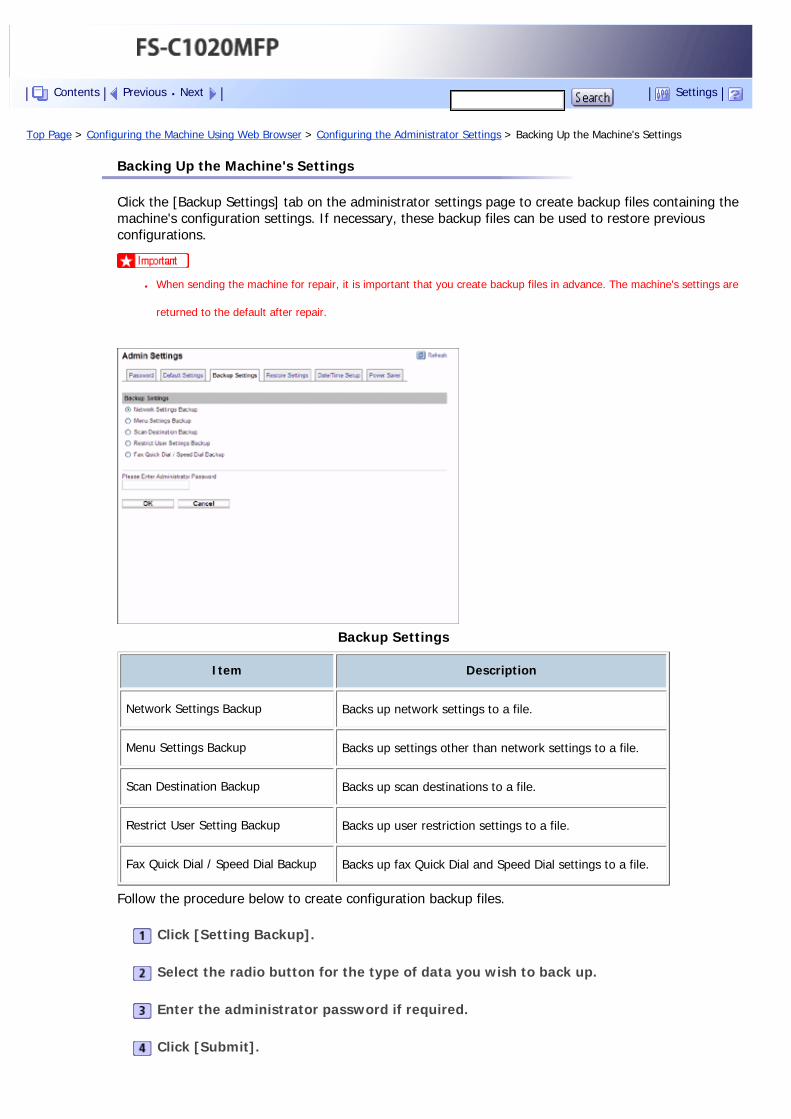
Top Page > Configuring the Machine Using Web Browser > Configuring the Administrator Settings > Backing Up the Machine's Settings
Backing Up the Machine's Settings
Click the [Backup Settings] tab on the administrator settings page to create backup files containing the machine's configuration settings. If necessary, these backup files can be used to restore previous configurations.
● When sending the machine for repair, it is important that you create backup files in advance. The machine's settings are
returned to the default after repair.
Backup Settings
Item Description
Network Settings Backup Backs up network settings to a file.
Menu Settings Backup Backs up settings other than network settings to a file.
Scan Destination Backup Backs up scan destinations to a file.
Restrict User Setting Backup Backs up user restriction settings to a file.
Fax Quick Dial / Speed Dial Backup Backs up fax Quick Dial and Speed Dial settings to a file.
Follow the procedure below to create configuration backup files.
Click [Setting Backup].
Select the radio button for the type of data you wish to back up.
Enter the administrator password if required.
Click [Submit].
Contents Previous Next Settings

Navigate to the location to save the backup file.
Specify a name for the file, and click [Save].
Top Previous Next
Copyright © 2009
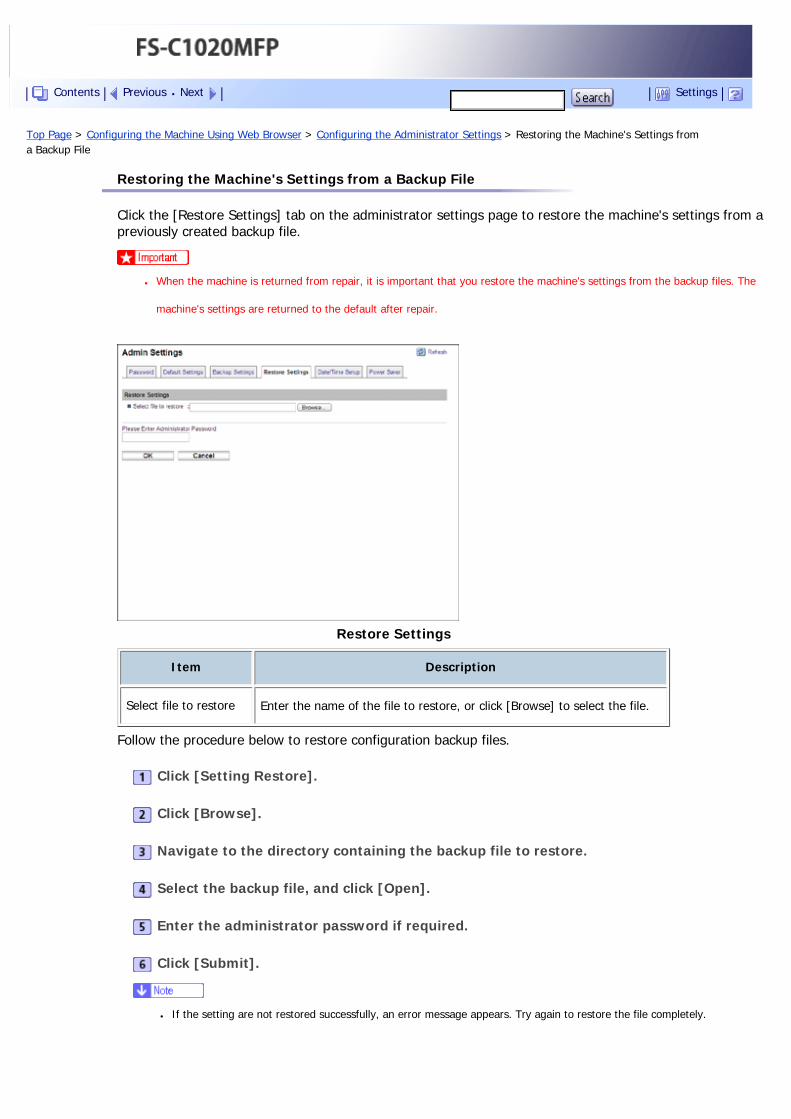
Top Page > Configuring the Machine Using Web Browser > Configuring the Administrator Settings > Restoring the Machine's Settings from a Backup File
Restoring the Machine's Settings from a Backup File
Click the [Restore Settings] tab on the administrator settings page to restore the machine's settings from a previously created backup file.
● When the machine is returned from repair, it is important that you restore the machine's settings from the backup files. The
machine's settings are returned to the default after repair.
Restore Settings
Item Description
Select file to restore Enter the name of the file to restore, or click [Browse] to select the file.
Follow the procedure below to restore configuration backup files.
Click [Setting Restore].
Click [Browse].
Navigate to the directory containing the backup file to restore.
Select the backup file, and click [Open].
Enter the administrator password if required.
Click [Submit].
● If the setting are not restored successfully, an error message appears. Try again to restore the file completely.
Contents Previous Next Settings

Top Previous Next
Copyright © 2009
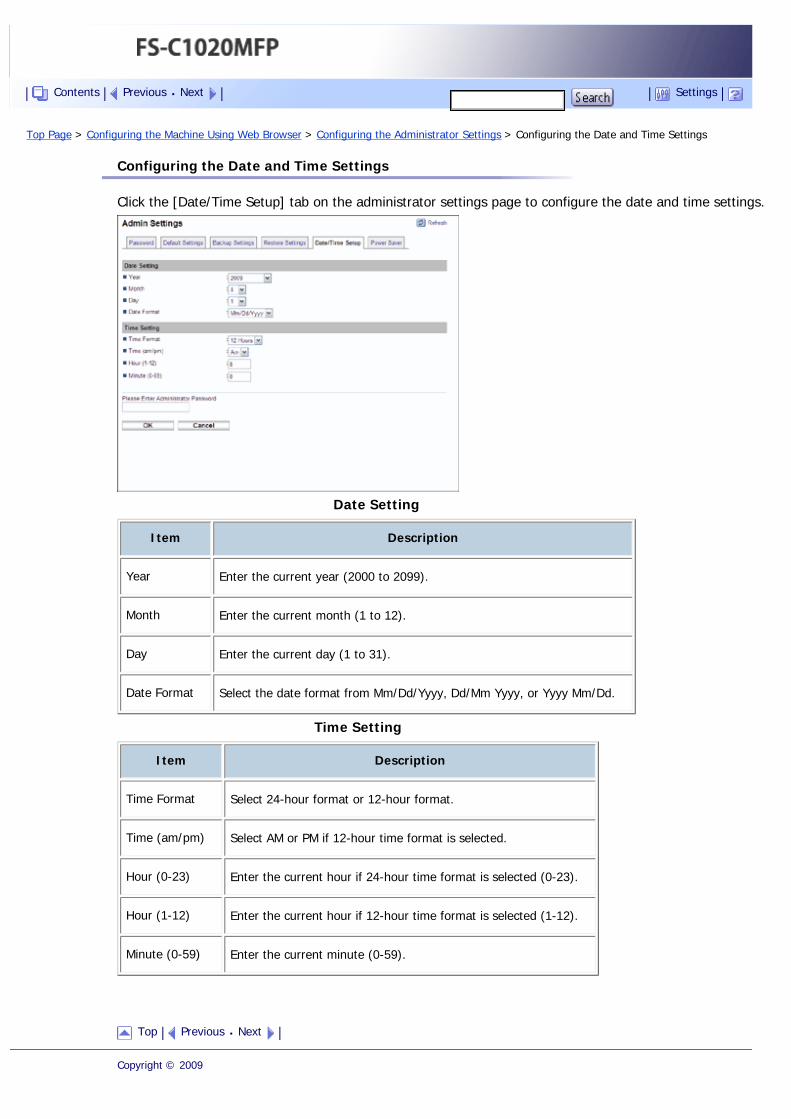
Top Page > Configuring the Machine Using Web Browser > Configuring the Administrator Settings > Configuring the Date and Time Settings
Configuring the Date and Time Settings
Click the [Date/Time Setup] tab on the administrator settings page to configure the date and time settings.
Date Setting
Item Description
Year Enter the current year (2000 to 2099).
Month Enter the current month (1 to 12).
Day Enter the current day (1 to 31).
Date Format Select the date format from Mm/Dd/Yyyy, Dd/Mm Yyyy, or Yyyy Mm/Dd.
Time Setting
Item Description
Time Format Select 24-hour format or 12-hour format.
Time (am/pm) Select AM or PM if 12-hour time format is selected.
Hour (0-23) Enter the current hour if 24-hour time format is selected (0-23).
Hour (1-12) Enter the current hour if 12-hour time format is selected (1-12).
Minute (0-59) Enter the current minute (0-59).
Top Previous Next
Copyright © 2009
Contents Previous Next Settings

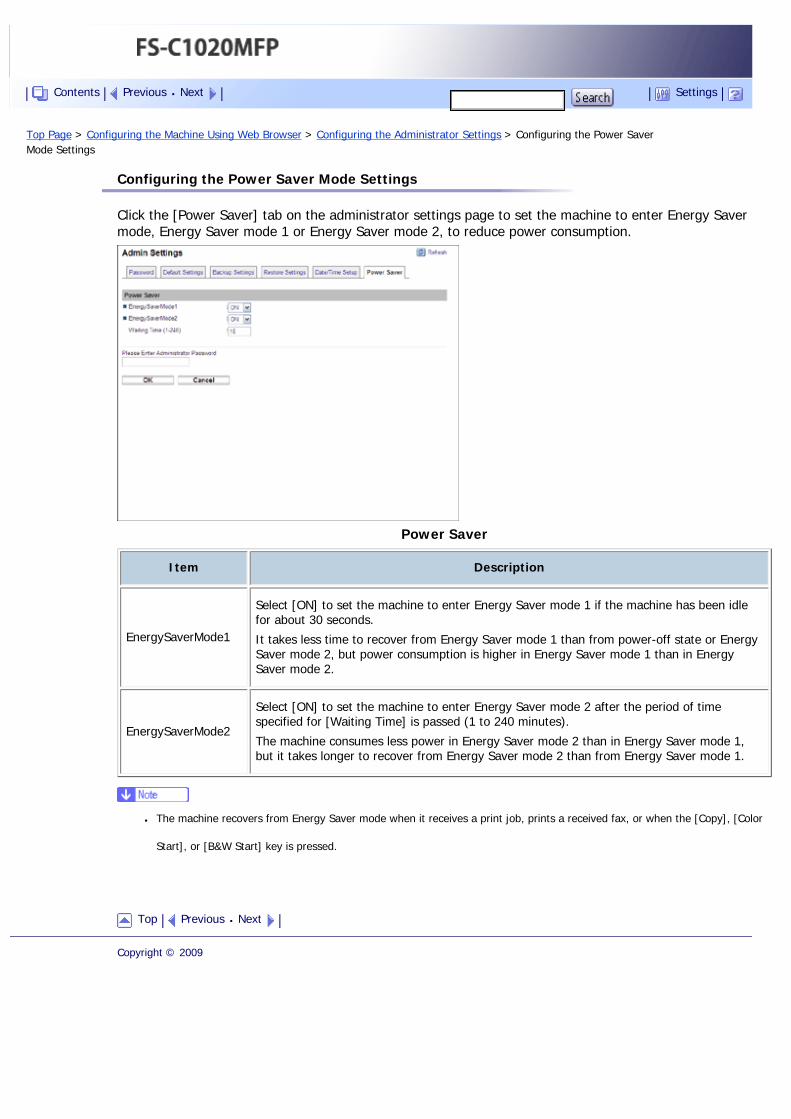
Top Page > Configuring the Machine Using Web Browser > Configuring the Administrator Settings > Configuring the Power Saver Mode Settings
Configuring the Power Saver Mode Settings
Click the [Power Saver] tab on the administrator settings page to set the machine to enter Energy Saver mode, Energy Saver mode 1 or Energy Saver mode 2, to reduce power consumption.
Power Saver
Item Description
EnergySaverMode1
Select [ON] to set the machine to enter Energy Saver mode 1 if the machine has been idle for about 30 seconds.
It takes less time to recover from Energy Saver mode 1 than from power-off state or Energy Saver mode 2, but power consumption is higher in Energy Saver mode 1 than in Energy Saver mode 2.
EnergySaverMode2
Select [ON] to set the machine to enter Energy Saver mode 2 after the period of time specified for [Waiting Time] is passed (1 to 240 minutes).
The machine consumes less power in Energy Saver mode 2 than in Energy Saver mode 1, but it takes longer to recover from Energy Saver mode 2 than from Energy Saver mode 1.
● The machine recovers from Energy Saver mode when it receives a print job, prints a received fax, or when the [Copy], [Color
Start], or [B&W Start] key is pressed.
Top Previous Next
Copyright © 2009
Contents Previous Next Settings
Top Page > Troubleshooting > Overview
Overview
Troubleshooting is divided into the following sections:
● Common Problems
● Paper Feed Problems
● Print Quality Problems
● Printer Problems
● Copier Problems
● Scanner Problems
● Fax Problems
● Error and Status Messages on the Screen
● Replacing Print Cartridges
● Replacing the Waste Toner Bottle
Top Previous Next
Copyright © 2009
Contents Previous Next Settings
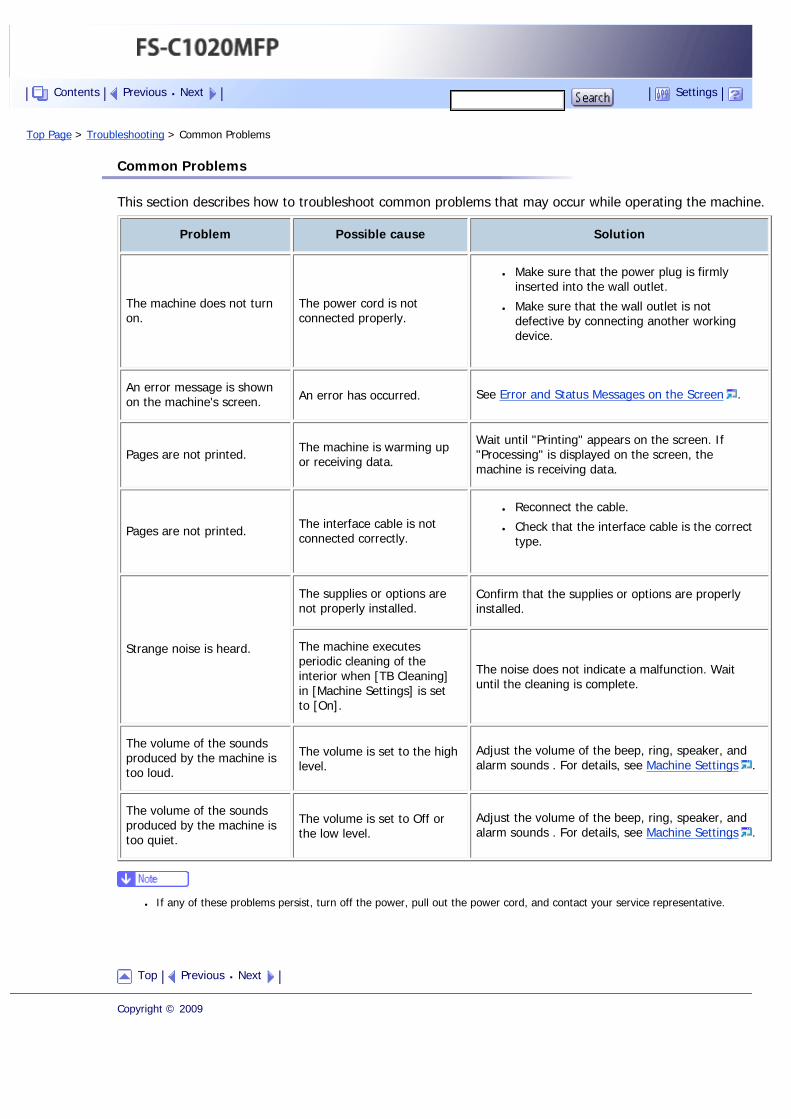
Top Page > Troubleshooting > Common Problems
Common Problems
This section describes how to troubleshoot common problems that may occur while operating the machine.
Problem Possible cause Solution
The machine does not turn on.
The power cord is not connected properly.
● Make sure that the power plug is firmly inserted into the wall outlet.
● Make sure that the wall outlet is not defective by connecting another working device.
An error message is shown on the machine's screen. An error has occurred. See Error and Status Messages on the Screen .
Pages are not printed. The machine is warming up or receiving data.
Wait until "Printing" appears on the screen. If "Processing" is displayed on the screen, the machine is receiving data.
Pages are not printed. The interface cable is not connected correctly.
● Reconnect the cable.
● Check that the interface cable is the correct type.
Strange noise is heard.
The supplies or options are not properly installed.
Confirm that the supplies or options are properly installed.
The machine executes periodic cleaning of the interior when [TB Cleaning] in [Machine Settings] is set to [On].
The noise does not indicate a malfunction. Wait until the cleaning is complete.
The volume of the sounds produced by the machine is too loud.
The volume is set to the high level.
Adjust the volume of the beep, ring, speaker, and alarm sounds . For details, see Machine Settings .
The volume of the sounds produced by the machine is too quiet.
The volume is set to Off or the low level.
Adjust the volume of the beep, ring, speaker, and alarm sounds . For details, see Machine Settings .
● If any of these problems persist, turn off the power, pull out the power cord, and contact your service representative.
Top Previous Next
Copyright © 2009
Contents Previous Next Settings
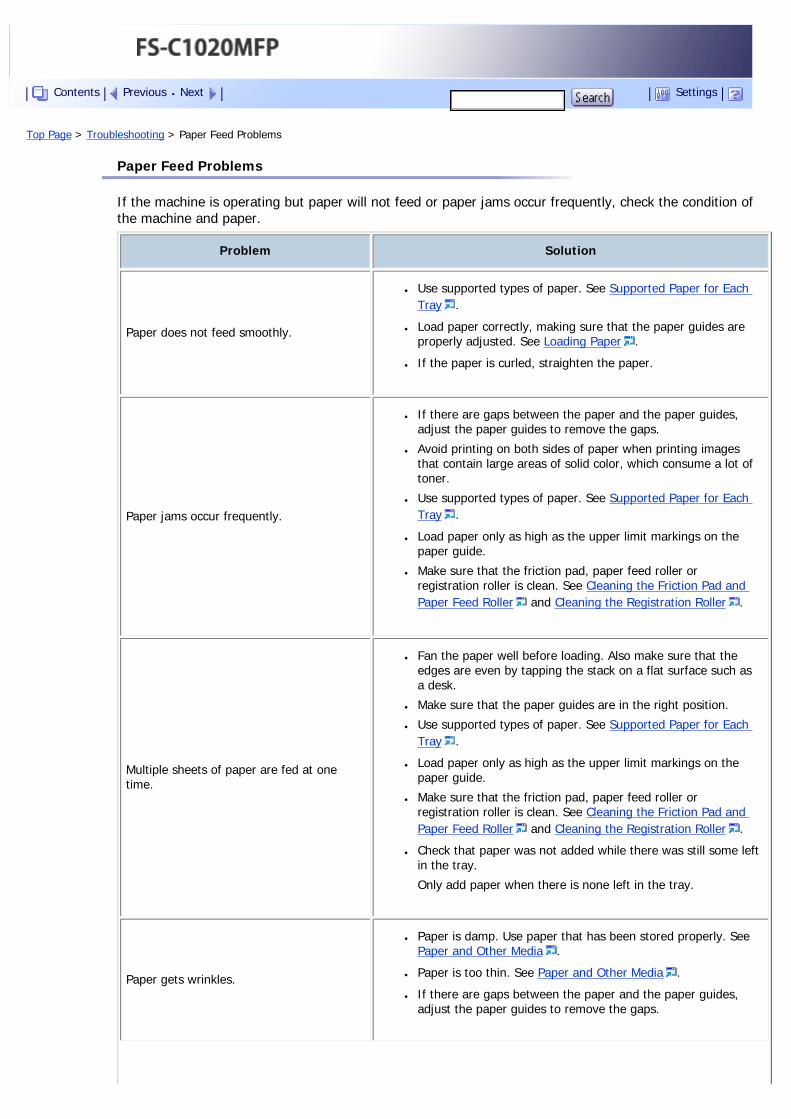
Top Page > Troubleshooting > Paper Feed Problems
Paper Feed Problems
If the machine is operating but paper will not feed or paper jams occur frequently, check the condition of the machine and paper.
Problem Solution
Paper does not feed smoothly.
● Use supported types of paper. See Supported Paper for Each Tray .
● Load paper correctly, making sure that the paper guides are properly adjusted. See Loading Paper .
● If the paper is curled, straighten the paper.
Paper jams occur frequently.
● If there are gaps between the paper and the paper guides, adjust the paper guides to remove the gaps.
● Avoid printing on both sides of paper when printing images that contain large areas of solid color, which consume a lot of toner.
● Use supported types of paper. See Supported Paper for Each Tray .
● Load paper only as high as the upper limit markings on the paper guide.
● Make sure that the friction pad, paper feed roller or registration roller is clean. See Cleaning the Friction Pad and Paper Feed Roller and Cleaning the Registration Roller .
Multiple sheets of paper are fed at one time.
● Fan the paper well before loading. Also make sure that the edges are even by tapping the stack on a flat surface such as a desk.
● Make sure that the paper guides are in the right position.
● Use supported types of paper. See Supported Paper for Each Tray .
● Load paper only as high as the upper limit markings on the paper guide.
● Make sure that the friction pad, paper feed roller or registration roller is clean. See Cleaning the Friction Pad and Paper Feed Roller and Cleaning the Registration Roller .
● Check that paper was not added while there was still some left in the tray.
Only add paper when there is none left in the tray.
Paper gets wrinkles.
● Paper is damp. Use paper that has been stored properly. See Paper and Other Media .
● Paper is too thin. See Paper and Other Media .
● If there are gaps between the paper and the paper guides, adjust the paper guides to remove the gaps.
Contents Previous Next Settings
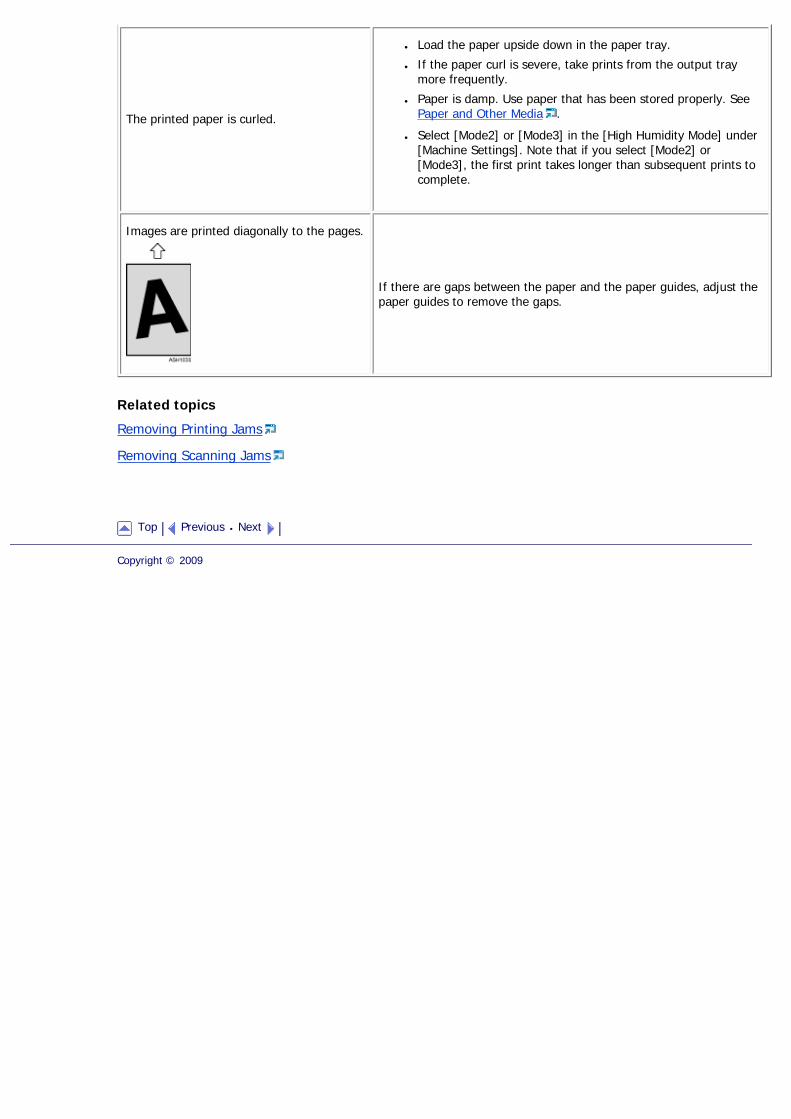
The printed paper is curled.
● Load the paper upside down in the paper tray.
● If the paper curl is severe, take prints from the output tray more frequently.
● Paper is damp. Use paper that has been stored properly. See Paper and Other Media .
● Select [Mode2] or [Mode3] in the [High Humidity Mode] under [Machine Settings]. Note that if you select [Mode2] or [Mode3], the first print takes longer than subsequent prints to complete.
Images are printed diagonally to the pages.
If there are gaps between the paper and the paper guides, adjust the paper guides to remove the gaps.
Related topics
Removing Printing Jams
Removing Scanning Jams
Top Previous Next
Copyright © 2009
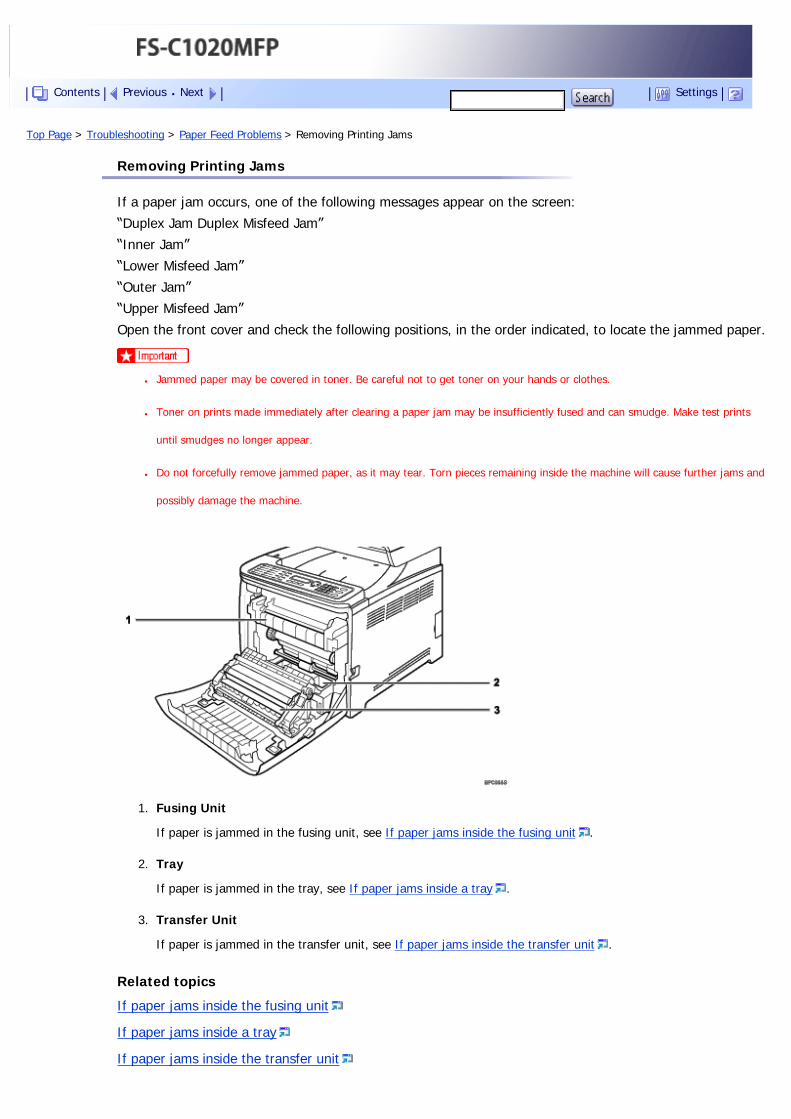
Top Page > Troubleshooting > Paper Feed Problems > Removing Printing Jams
Removing Printing Jams
If a paper jam occurs, one of the following messages appear on the screen:
“Duplex Jam Duplex Misfeed Jam”
“Inner Jam”
“Lower Misfeed Jam”
“Outer Jam”
“Upper Misfeed Jam”
Open the front cover and check the following positions, in the order indicated, to locate the jammed paper.
● Jammed paper may be covered in toner. Be careful not to get toner on your hands or clothes.
● Toner on prints made immediately after clearing a paper jam may be insufficiently fused and can smudge. Make test prints
until smudges no longer appear.
● Do not forcefully remove jammed paper, as it may tear. Torn pieces remaining inside the machine will cause further jams and
possibly damage the machine.
1. Fusing Unit
If paper is jammed in the fusing unit, see If paper jams inside the fusing unit .
2. Tray
If paper is jammed in the tray, see If paper jams inside a tray .
3. Transfer Unit
If paper is jammed in the transfer unit, see If paper jams inside the transfer unit .
Related topics
If paper jams inside the fusing unit
If paper jams inside a tray
If paper jams inside the transfer unit
Contents Previous Next Settings

Top Previous Next
Copyright © 2009
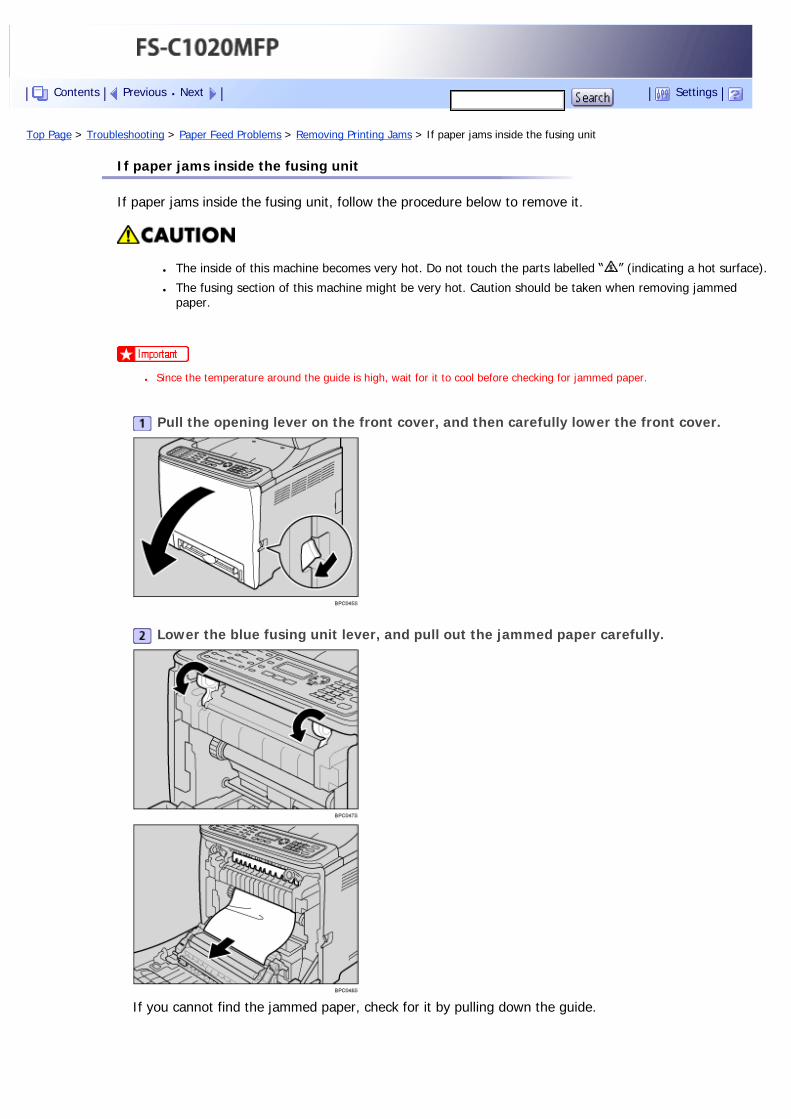
Top Page > Troubleshooting > Paper Feed Problems > Removing Printing Jams > If paper jams inside the fusing unit
If paper jams inside the fusing unit
If paper jams inside the fusing unit, follow the procedure below to remove it.
● The inside of this machine becomes very hot. Do not touch the parts labelled “ ” (indicating a hot surface).
● The fusing section of this machine might be very hot. Caution should be taken when removing jammed paper.
● Since the temperature around the guide is high, wait for it to cool before checking for jammed paper.
Pull the opening lever on the front cover, and then carefully lower the front cover.
Lower the blue fusing unit lever, and pull out the jammed paper carefully.
If you cannot find the jammed paper, check for it by pulling down the guide.
Contents Previous Next Settings
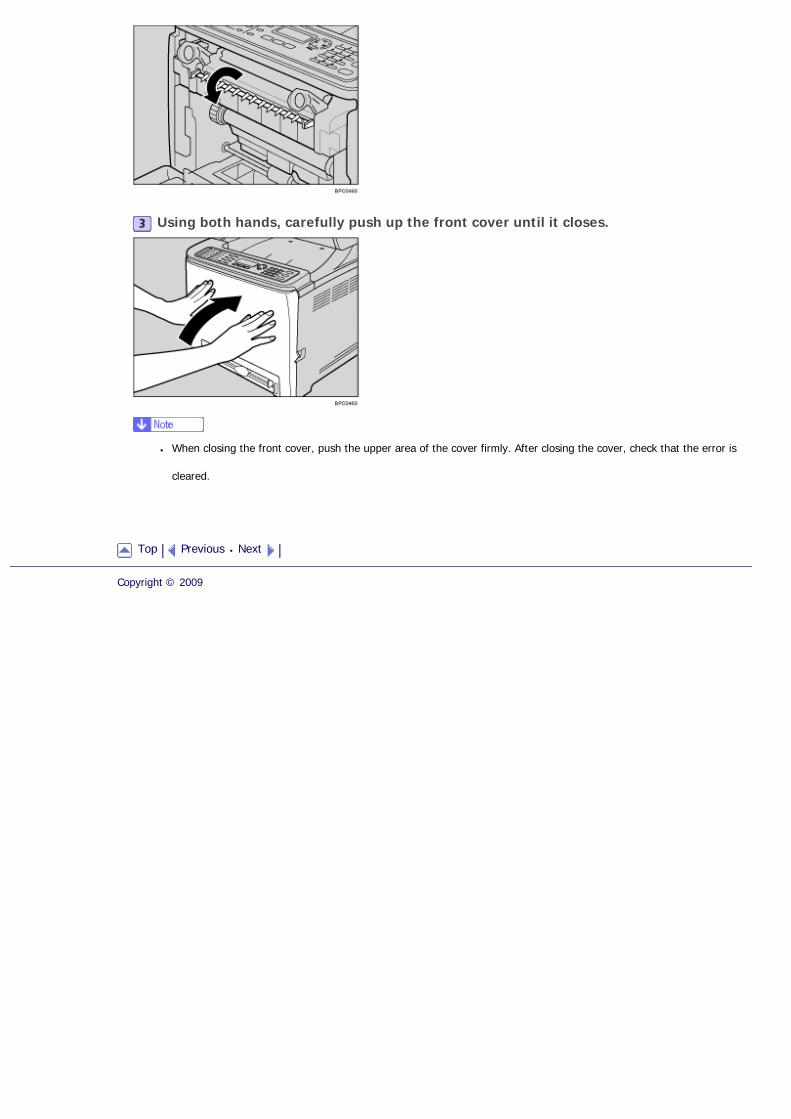
Using both hands, carefully push up the front cover until it closes.
● When closing the front cover, push the upper area of the cover firmly. After closing the cover, check that the error is
cleared.
Top Previous Next
Copyright © 2009

Top Page > Troubleshooting > Paper Feed Problems > Removing Printing Jams > If paper jams inside a tray
If paper jams inside a tray
If paper jams in tray 1 or 2, follow the procedure below to remove it.
Pull the opening lever on the front cover, and then carefully lower the front cover.
Pull out the jammed paper carefully.
If paper has become jammed inside the transfer unit, pull the paper forward.
Using both hands, carefully push up the front cover until it closes.
Contents Previous Next Settings

● Do not pull out the paper tray (Tray 1).
● If paper is jammed in tray 2 but is difficult to locate, pull out tray 2 to remove it. After removing the paper, carefully push
tray 2 all the way back inside the machine.
● When closing the front cover, push the upper area of the cover firmly. After closing the cover, check that the error is
cleared.
Top Previous Next
Copyright © 2009
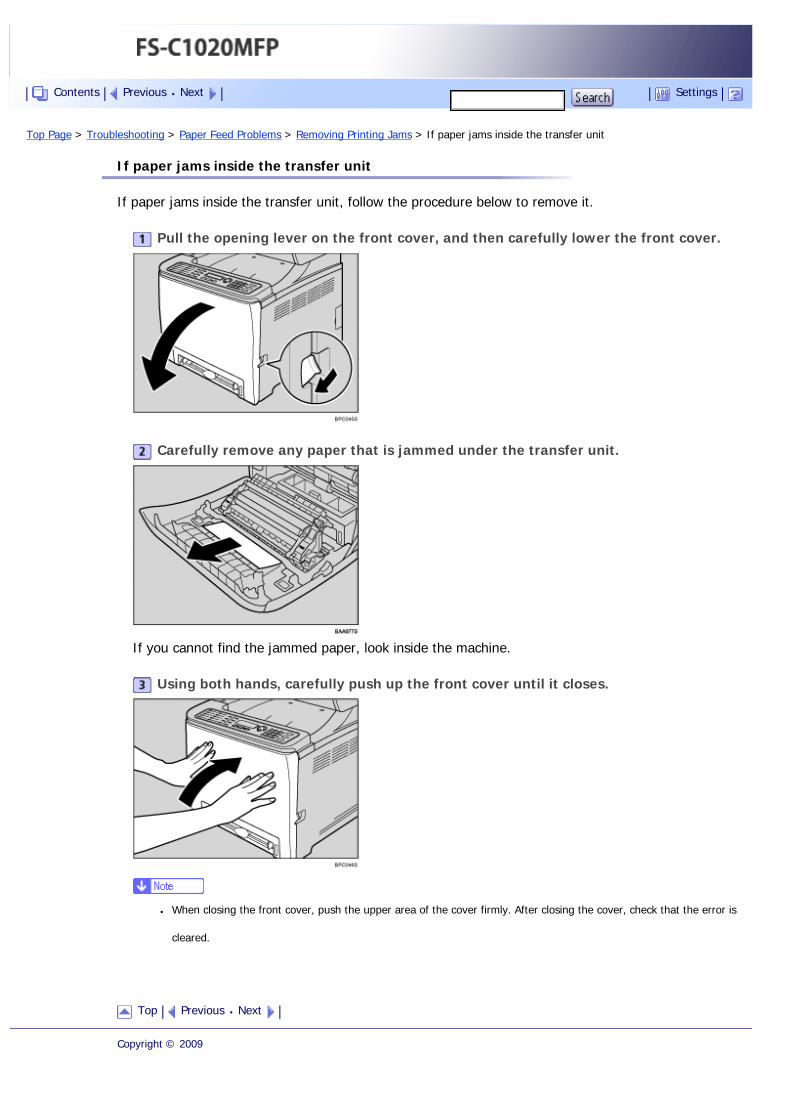
Top Page > Troubleshooting > Paper Feed Problems > Removing Printing Jams > If paper jams inside the transfer unit
If paper jams inside the transfer unit
If paper jams inside the transfer unit, follow the procedure below to remove it.
Pull the opening lever on the front cover, and then carefully lower the front cover.
Carefully remove any paper that is jammed under the transfer unit.
If you cannot find the jammed paper, look inside the machine.
Using both hands, carefully push up the front cover until it closes.
● When closing the front cover, push the upper area of the cover firmly. After closing the cover, check that the error is
cleared.
Top Previous Next
Copyright © 2009
Contents Previous Next Settings
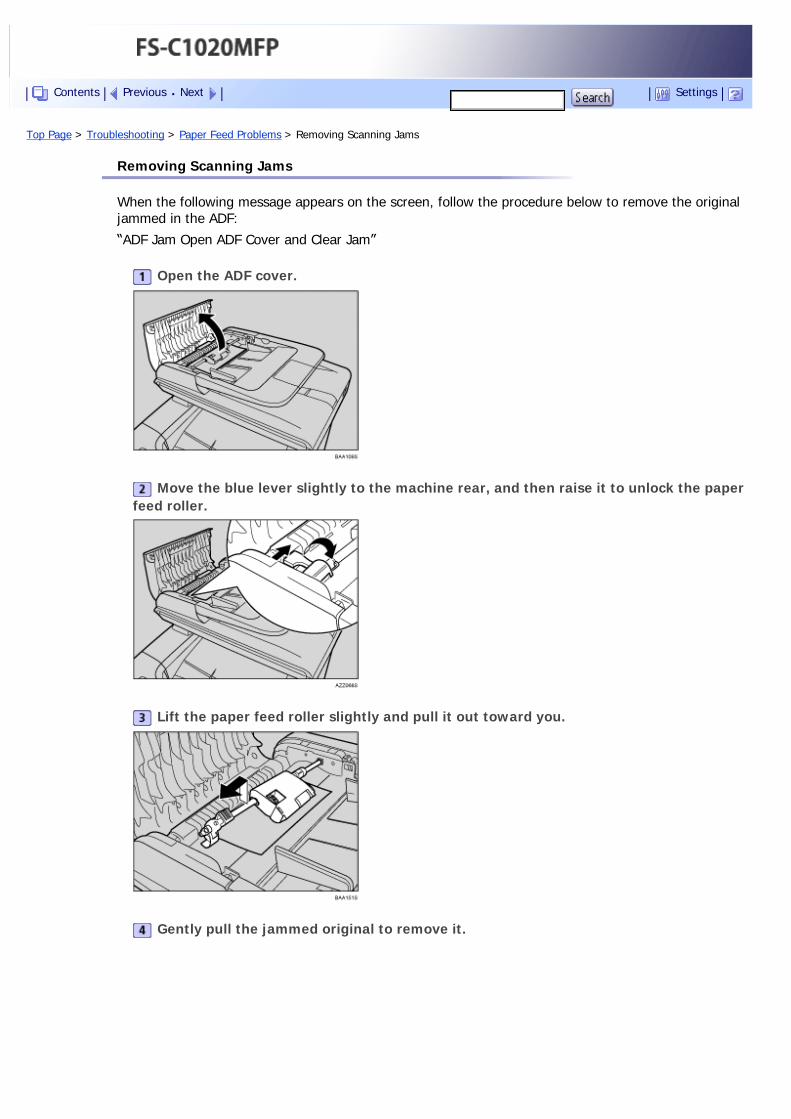
Top Page > Troubleshooting > Paper Feed Problems > Removing Scanning Jams
Removing Scanning Jams
When the following message appears on the screen, follow the procedure below to remove the original jammed in the ADF:
“ADF Jam Open ADF Cover and Clear Jam”
Open the ADF cover.
Move the blue lever slightly to the machine rear, and then raise it to unlock the paper feed roller.
Lift the paper feed roller slightly and pull it out toward you.
Gently pull the jammed original to remove it.
Contents Previous Next Settings
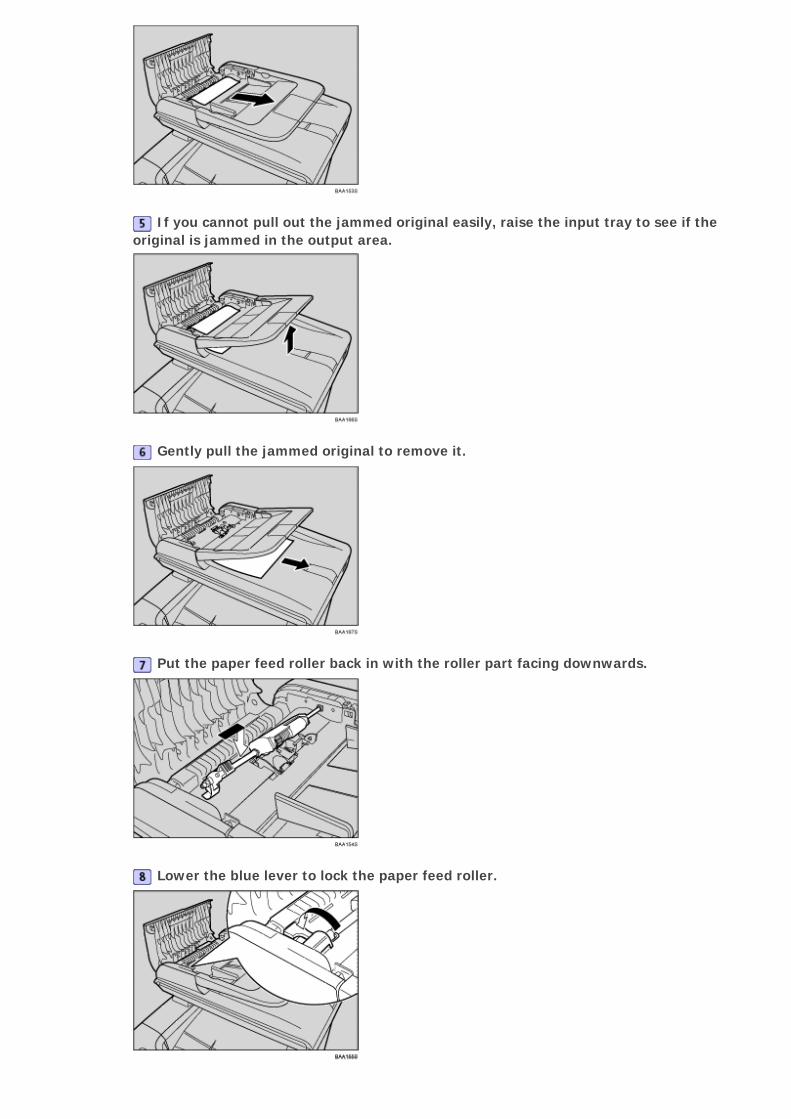
If you cannot pull out the jammed original easily, raise the input tray to see if the original is jammed in the output area.
Gently pull the jammed original to remove it.
Put the paper feed roller back in with the roller part facing downwards.
Lower the blue lever to lock the paper feed roller.
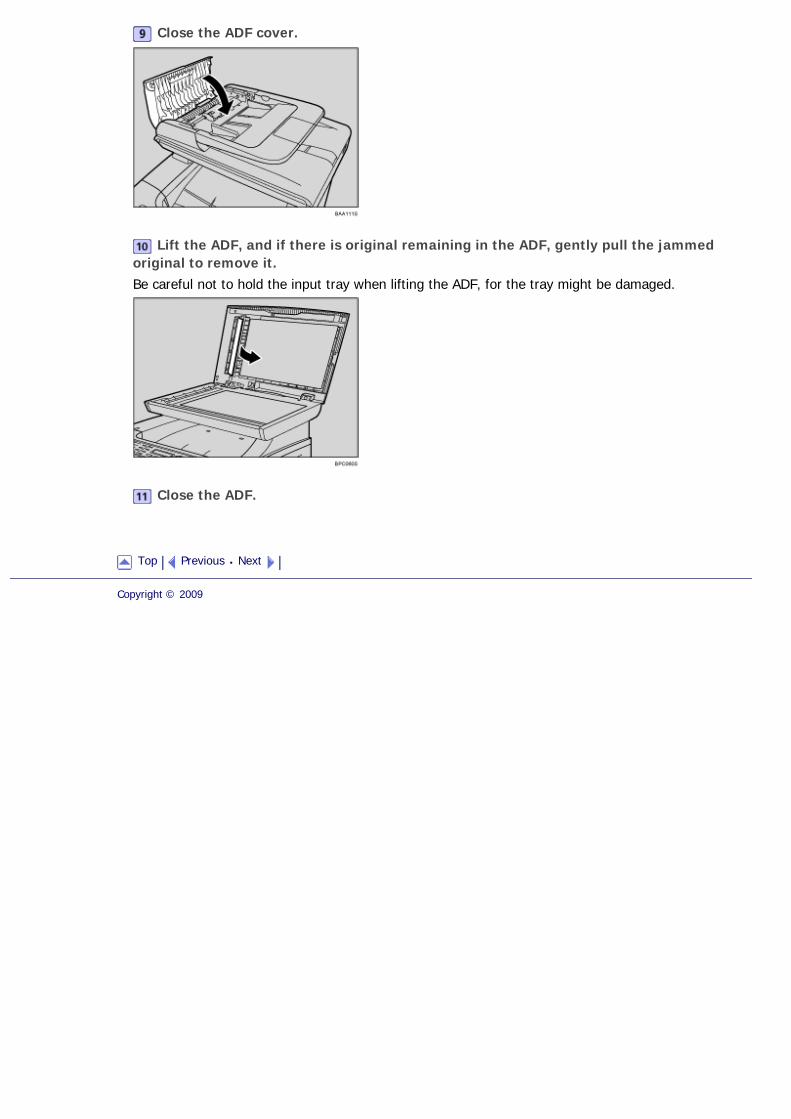
Close the ADF cover.
Lift the ADF, and if there is original remaining in the ADF, gently pull the jammed original to remove it.Be careful not to hold the input tray when lifting the ADF, for the tray might be damaged.
Close the ADF.
Top Previous Next
Copyright © 2009

Top Page > Troubleshooting > Print Quality Problems
Print Quality Problems
This section describes likely causes of and possible solutions for problems with print quality.
Related topics
Checking the Condition of the Machine
Top Previous Next
Copyright © 2009
Contents Previous Next Settings
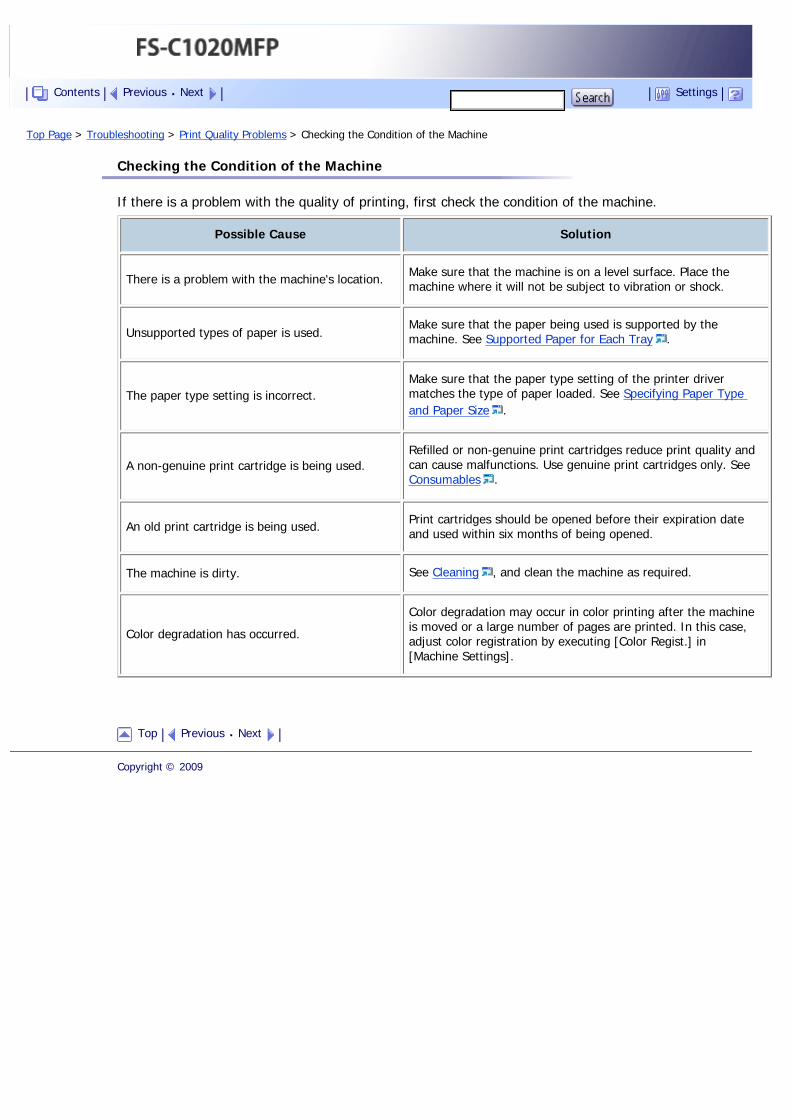
Top Page > Troubleshooting > Print Quality Problems > Checking the Condition of the Machine
Checking the Condition of the Machine
If there is a problem with the quality of printing, first check the condition of the machine.
Possible Cause Solution
There is a problem with the machine's location. Make sure that the machine is on a level surface. Place the machine where it will not be subject to vibration or shock.
Unsupported types of paper is used.Make sure that the paper being used is supported by the machine. See Supported Paper for Each Tray .
The paper type setting is incorrect.Make sure that the paper type setting of the printer driver matches the type of paper loaded. See Specifying Paper Type and Paper Size .
A non-genuine print cartridge is being used.Refilled or non-genuine print cartridges reduce print quality and can cause malfunctions. Use genuine print cartridges only. See Consumables .
An old print cartridge is being used. Print cartridges should be opened before their expiration date and used within six months of being opened.
The machine is dirty. See Cleaning , and clean the machine as required.
Color degradation has occurred.
Color degradation may occur in color printing after the machine is moved or a large number of pages are printed. In this case, adjust color registration by executing [Color Regist.] in [Machine Settings].
Top Previous Next
Copyright © 2009
Contents Previous Next Settings
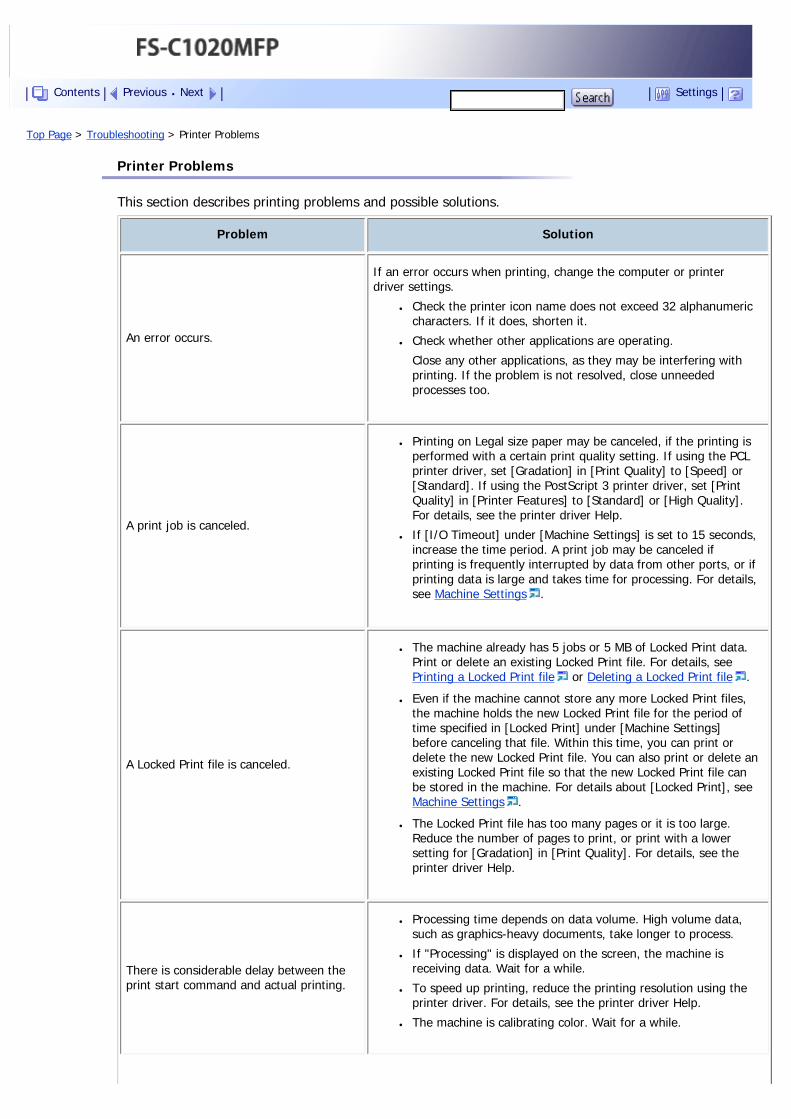
Top Page > Troubleshooting > Printer Problems
Printer Problems
This section describes printing problems and possible solutions.
Problem Solution
An error occurs.
If an error occurs when printing, change the computer or printer driver settings.
● Check the printer icon name does not exceed 32 alphanumeric characters. If it does, shorten it.
● Check whether other applications are operating.
Close any other applications, as they may be interfering with printing. If the problem is not resolved, close unneeded processes too.
A print job is canceled.
● Printing on Legal size paper may be canceled, if the printing is performed with a certain print quality setting. If using the PCL printer driver, set [Gradation] in [Print Quality] to [Speed] or [Standard]. If using the PostScript 3 printer driver, set [Print Quality] in [Printer Features] to [Standard] or [High Quality]. For details, see the printer driver Help.
● If [I/O Timeout] under [Machine Settings] is set to 15 seconds, increase the time period. A print job may be canceled if printing is frequently interrupted by data from other ports, or if printing data is large and takes time for processing. For details, see Machine Settings .
A Locked Print file is canceled.
● The machine already has 5 jobs or 5 MB of Locked Print data. Print or delete an existing Locked Print file. For details, see Printing a Locked Print file or Deleting a Locked Print file .
● Even if the machine cannot store any more Locked Print files, the machine holds the new Locked Print file for the period of time specified in [Locked Print] under [Machine Settings] before canceling that file. Within this time, you can print or delete the new Locked Print file. You can also print or delete an existing Locked Print file so that the new Locked Print file can be stored in the machine. For details about [Locked Print], see Machine Settings .
● The Locked Print file has too many pages or it is too large. Reduce the number of pages to print, or print with a lower setting for [Gradation] in [Print Quality]. For details, see the printer driver Help.
There is considerable delay between the print start command and actual printing.
● Processing time depends on data volume. High volume data, such as graphics-heavy documents, take longer to process.
● If "Processing" is displayed on the screen, the machine is receiving data. Wait for a while.
● To speed up printing, reduce the printing resolution using the printer driver. For details, see the printer driver Help.
● The machine is calibrating color. Wait for a while.
Contents Previous Next Settings
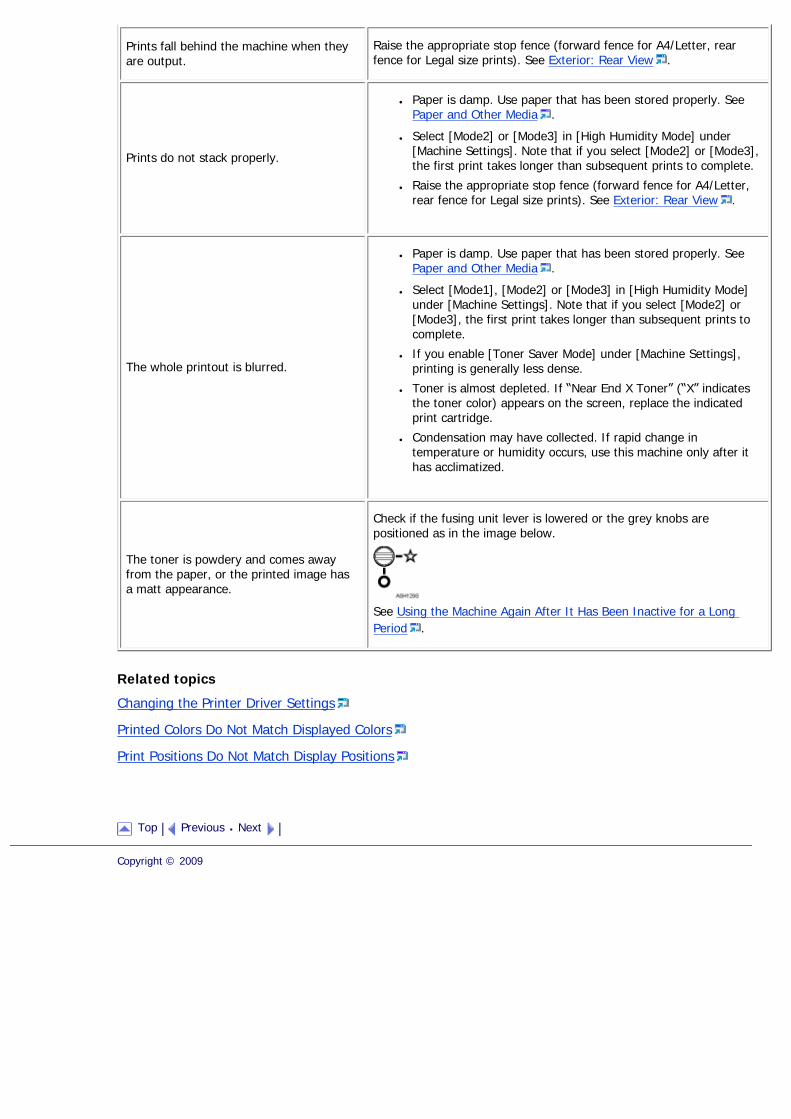
Prints fall behind the machine when they are output.
Raise the appropriate stop fence (forward fence for A4/Letter, rear fence for Legal size prints). See Exterior: Rear View .
Prints do not stack properly.
● Paper is damp. Use paper that has been stored properly. See Paper and Other Media .
● Select [Mode2] or [Mode3] in [High Humidity Mode] under [Machine Settings]. Note that if you select [Mode2] or [Mode3], the first print takes longer than subsequent prints to complete.
● Raise the appropriate stop fence (forward fence for A4/Letter, rear fence for Legal size prints). See Exterior: Rear View .
The whole printout is blurred.
● Paper is damp. Use paper that has been stored properly. See Paper and Other Media .
● Select [Mode1], [Mode2] or [Mode3] in [High Humidity Mode] under [Machine Settings]. Note that if you select [Mode2] or [Mode3], the first print takes longer than subsequent prints to complete.
● If you enable [Toner Saver Mode] under [Machine Settings], printing is generally less dense.
● Toner is almost depleted. If “Near End X Toner” (“X” indicates the toner color) appears on the screen, replace the indicated print cartridge.
● Condensation may have collected. If rapid change in temperature or humidity occurs, use this machine only after it has acclimatized.
The toner is powdery and comes away from the paper, or the printed image has a matt appearance.
Check if the fusing unit lever is lowered or the grey knobs are positioned as in the image below.
See Using the Machine Again After It Has Been Inactive for a Long Period .
Related topics
Changing the Printer Driver Settings
Printed Colors Do Not Match Displayed Colors
Print Positions Do Not Match Display Positions
Top Previous Next
Copyright © 2009
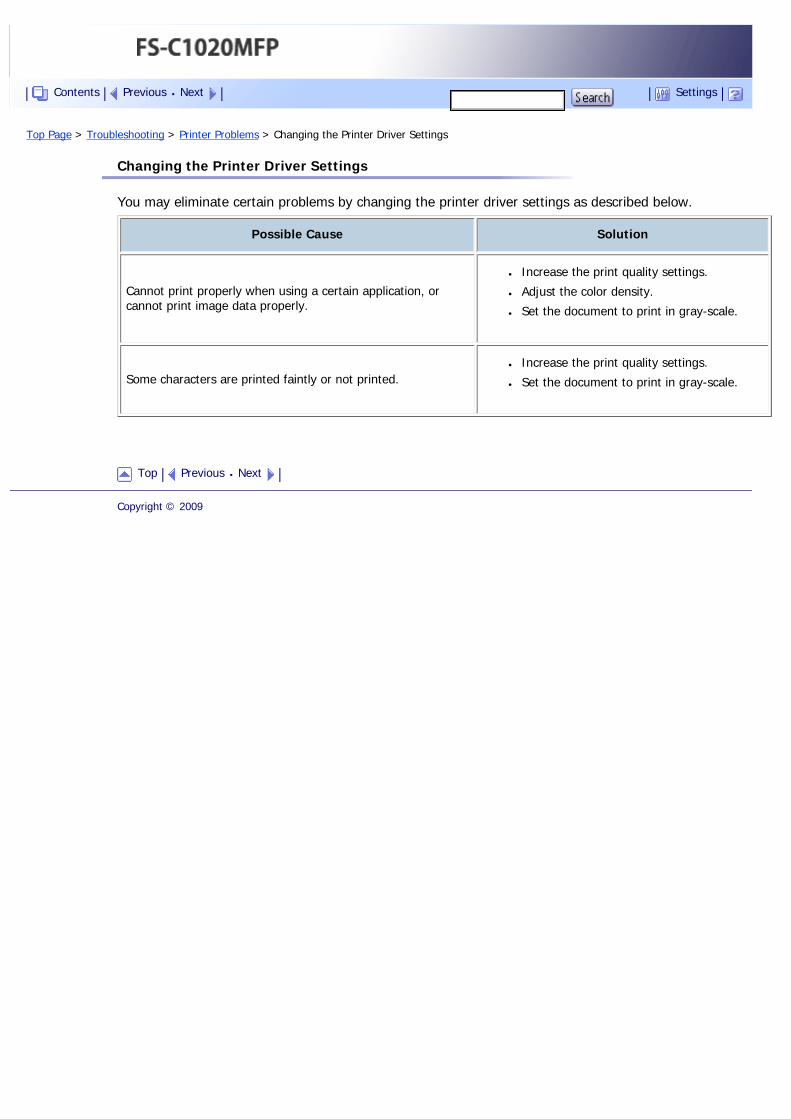
Top Page > Troubleshooting > Printer Problems > Changing the Printer Driver Settings
Changing the Printer Driver Settings
You may eliminate certain problems by changing the printer driver settings as described below.
Possible Cause Solution
Cannot print properly when using a certain application, or cannot print image data properly.
● Increase the print quality settings.
● Adjust the color density.
● Set the document to print in gray-scale.
Some characters are printed faintly or not printed.● Increase the print quality settings.
● Set the document to print in gray-scale.
Top Previous Next
Copyright © 2009
Contents Previous Next Settings
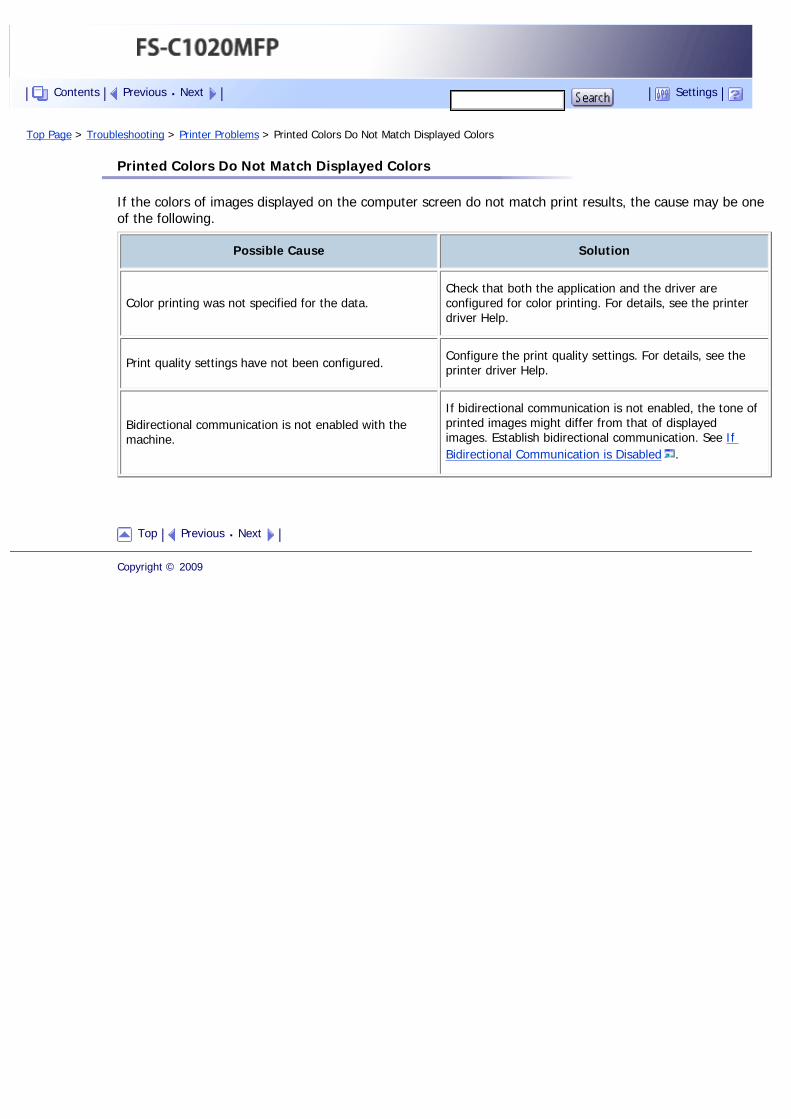
Top Page > Troubleshooting > Printer Problems > Printed Colors Do Not Match Displayed Colors
Printed Colors Do Not Match Displayed Colors
If the colors of images displayed on the computer screen do not match print results, the cause may be one of the following.
Possible Cause Solution
Color printing was not specified for the data.Check that both the application and the driver are configured for color printing. For details, see the printer driver Help.
Print quality settings have not been configured. Configure the print quality settings. For details, see the printer driver Help.
Bidirectional communication is not enabled with the machine.
If bidirectional communication is not enabled, the tone of printed images might differ from that of displayed images. Establish bidirectional communication. See If Bidirectional Communication is Disabled .
Top Previous Next
Copyright © 2009
Contents Previous Next Settings
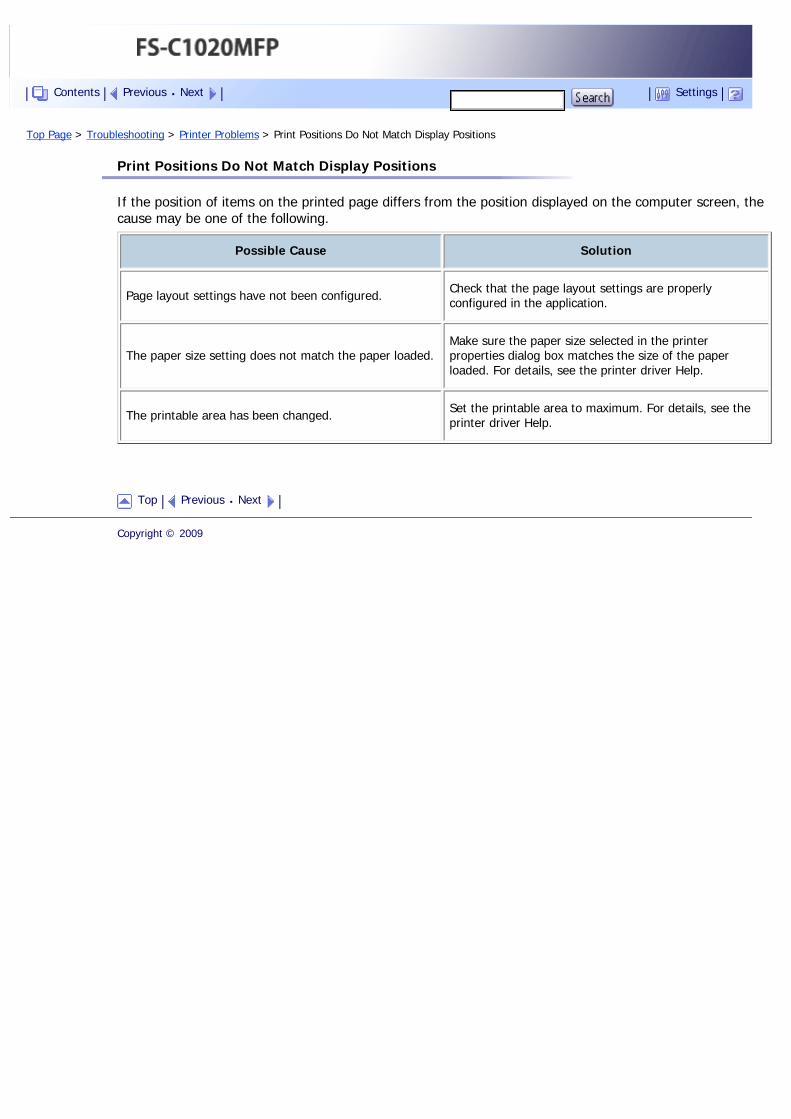
Top Page > Troubleshooting > Printer Problems > Print Positions Do Not Match Display Positions
Print Positions Do Not Match Display Positions
If the position of items on the printed page differs from the position displayed on the computer screen, the cause may be one of the following.
Possible Cause Solution
Page layout settings have not been configured. Check that the page layout settings are properly configured in the application.
The paper size setting does not match the paper loaded.Make sure the paper size selected in the printer properties dialog box matches the size of the paper loaded. For details, see the printer driver Help.
The printable area has been changed. Set the printable area to maximum. For details, see the printer driver Help.
Top Previous Next
Copyright © 2009
Contents Previous Next Settings
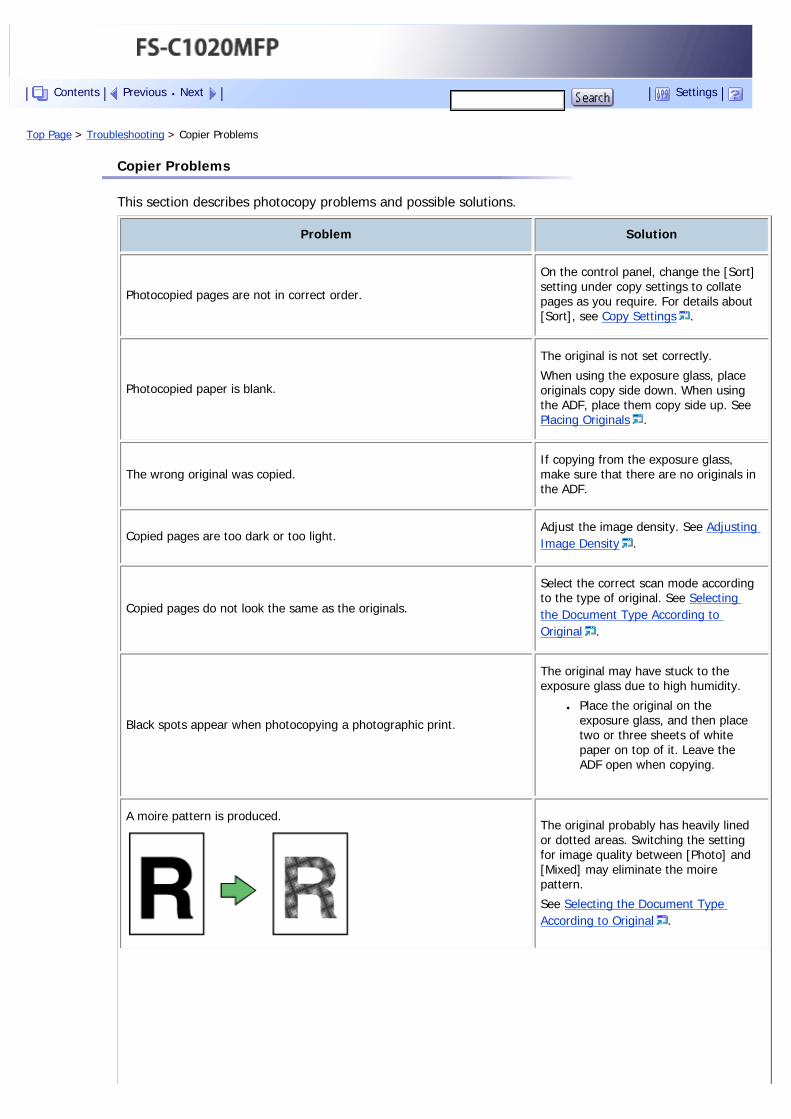
Top Page > Troubleshooting > Copier Problems
Copier Problems
This section describes photocopy problems and possible solutions.
Problem Solution
Photocopied pages are not in correct order.
On the control panel, change the [Sort] setting under copy settings to collate pages as you require. For details about [Sort], see Copy Settings .
Photocopied paper is blank.
The original is not set correctly.
When using the exposure glass, place originals copy side down. When using the ADF, place them copy side up. See Placing Originals .
The wrong original was copied.If copying from the exposure glass, make sure that there are no originals in the ADF.
Copied pages are too dark or too light.Adjust the image density. See Adjusting Image Density .
Copied pages do not look the same as the originals.
Select the correct scan mode according to the type of original. See Selecting the Document Type According to Original .
Black spots appear when photocopying a photographic print.
The original may have stuck to the exposure glass due to high humidity.
● Place the original on the exposure glass, and then place two or three sheets of white paper on top of it. Leave the ADF open when copying.
A moire pattern is produced.The original probably has heavily lined or dotted areas. Switching the setting for image quality between [Photo] and [Mixed] may eliminate the moire pattern.
See Selecting the Document Type According to Original .
Contents Previous Next Settings
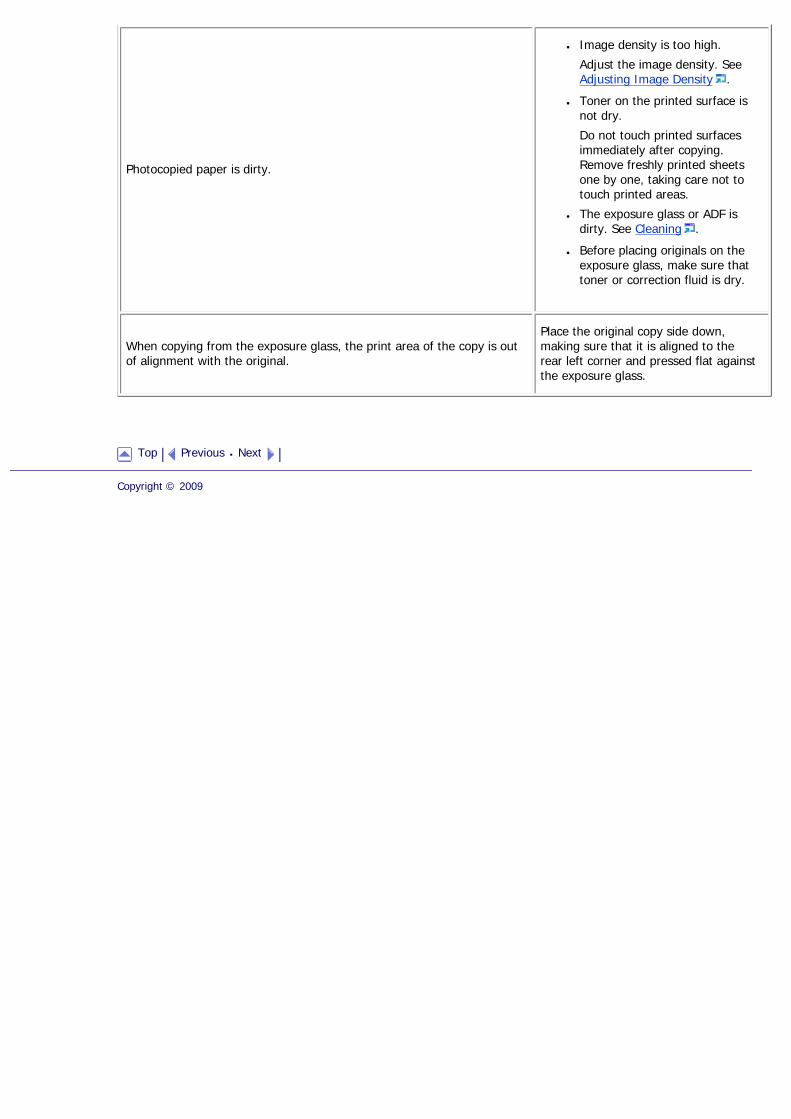
Photocopied paper is dirty.
● Image density is too high.
Adjust the image density. See Adjusting Image Density .
● Toner on the printed surface is not dry.
Do not touch printed surfaces immediately after copying. Remove freshly printed sheets one by one, taking care not to touch printed areas.
● The exposure glass or ADF is dirty. See Cleaning .
● Before placing originals on the exposure glass, make sure that toner or correction fluid is dry.
When copying from the exposure glass, the print area of the copy is out of alignment with the original.
Place the original copy side down, making sure that it is aligned to the rear left corner and pressed flat against the exposure glass.
Top Previous Next
Copyright © 2009
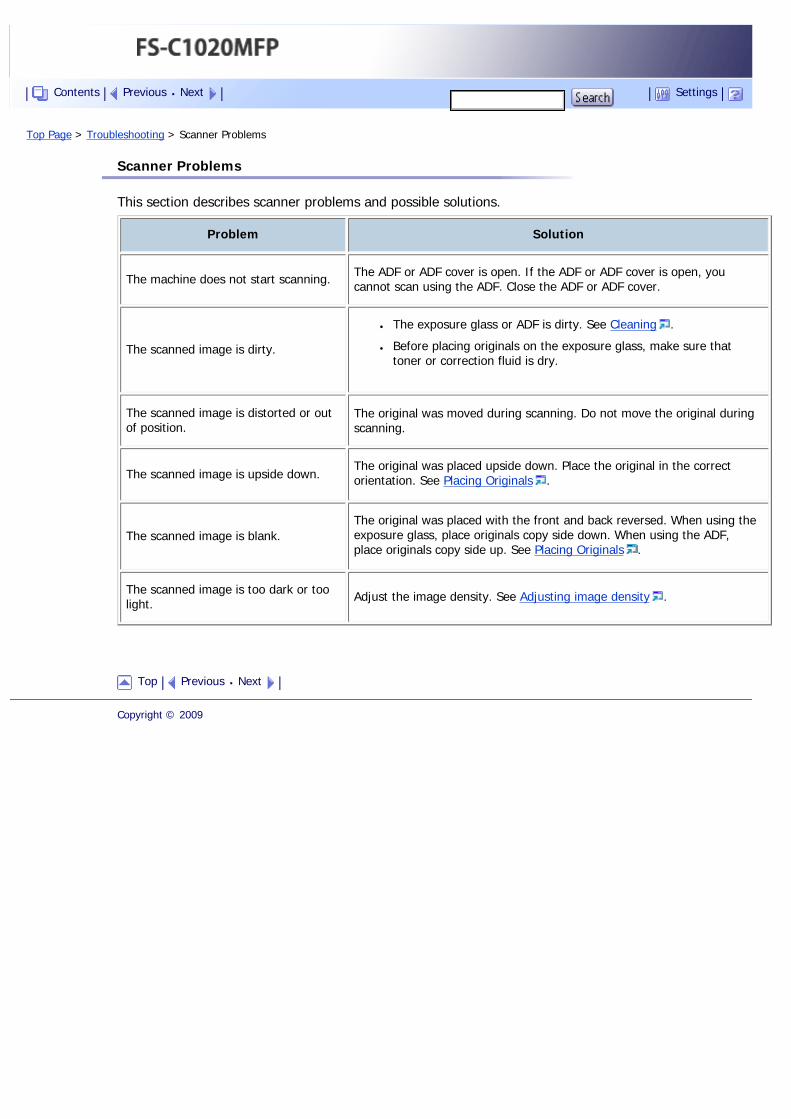
Top Page > Troubleshooting > Scanner Problems
Scanner Problems
This section describes scanner problems and possible solutions.
Problem Solution
The machine does not start scanning. The ADF or ADF cover is open. If the ADF or ADF cover is open, you cannot scan using the ADF. Close the ADF or ADF cover.
The scanned image is dirty.
● The exposure glass or ADF is dirty. See Cleaning .
● Before placing originals on the exposure glass, make sure that toner or correction fluid is dry.
The scanned image is distorted or out of position.
The original was moved during scanning. Do not move the original during scanning.
The scanned image is upside down.The original was placed upside down. Place the original in the correct orientation. See Placing Originals .
The scanned image is blank.The original was placed with the front and back reversed. When using the exposure glass, place originals copy side down. When using the ADF, place originals copy side up. See Placing Originals .
The scanned image is too dark or too light. Adjust the image density. See Adjusting image density .
Top Previous Next
Copyright © 2009
Contents Previous Next Settings
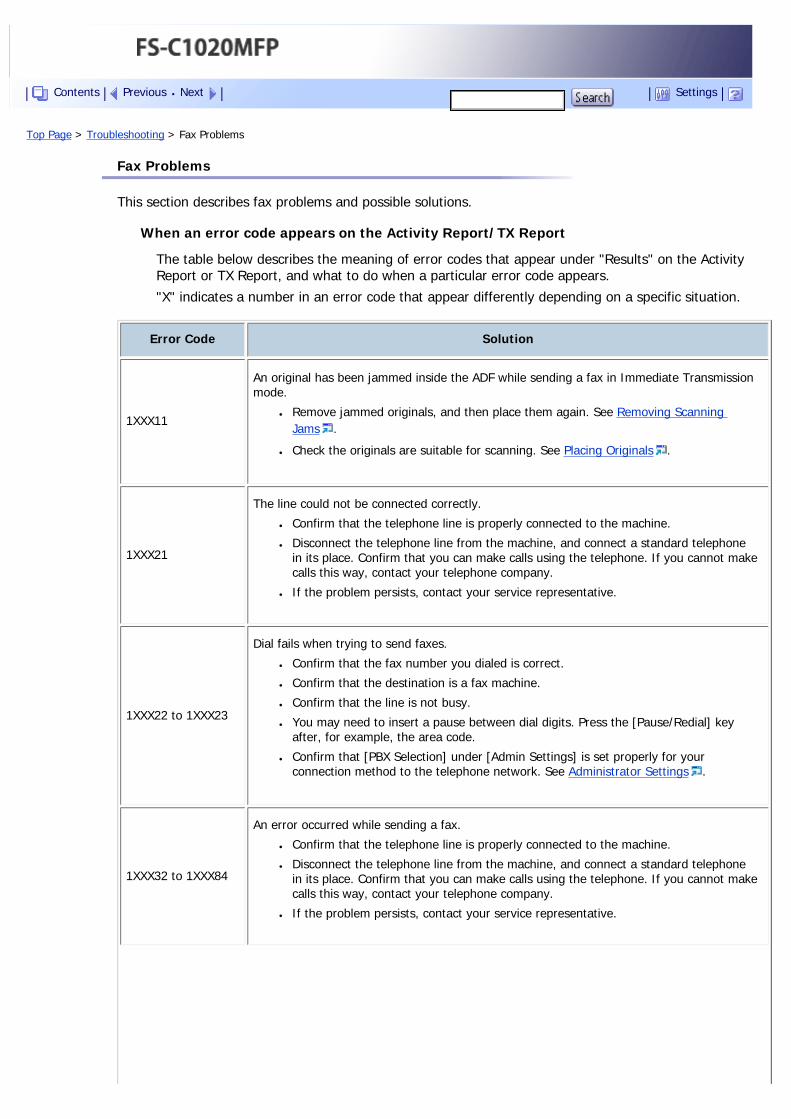
Top Page > Troubleshooting > Fax Problems
Fax Problems
This section describes fax problems and possible solutions.
When an error code appears on the Activity Report/TX Report
The table below describes the meaning of error codes that appear under "Results" on the Activity Report or TX Report, and what to do when a particular error code appears.
"X" indicates a number in an error code that appear differently depending on a specific situation.
Error Code Solution
1XXX11
An original has been jammed inside the ADF while sending a fax in Immediate Transmission mode.
● Remove jammed originals, and then place them again. See Removing Scanning Jams .
● Check the originals are suitable for scanning. See Placing Originals .
1XXX21
The line could not be connected correctly.
● Confirm that the telephone line is properly connected to the machine.
● Disconnect the telephone line from the machine, and connect a standard telephone in its place. Confirm that you can make calls using the telephone. If you cannot make calls this way, contact your telephone company.
● If the problem persists, contact your service representative.
1XXX22 to 1XXX23
Dial fails when trying to send faxes.
● Confirm that the fax number you dialed is correct.
● Confirm that the destination is a fax machine.
● Confirm that the line is not busy.
● You may need to insert a pause between dial digits. Press the [Pause/Redial] key after, for example, the area code.
● Confirm that [PBX Selection] under [Admin Settings] is set properly for your connection method to the telephone network. See Administrator Settings .
1XXX32 to 1XXX84
An error occurred while sending a fax.
● Confirm that the telephone line is properly connected to the machine.
● Disconnect the telephone line from the machine, and connect a standard telephone in its place. Confirm that you can make calls using the telephone. If you cannot make calls this way, contact your telephone company.
● If the problem persists, contact your service representative.
Contents Previous Next Settings
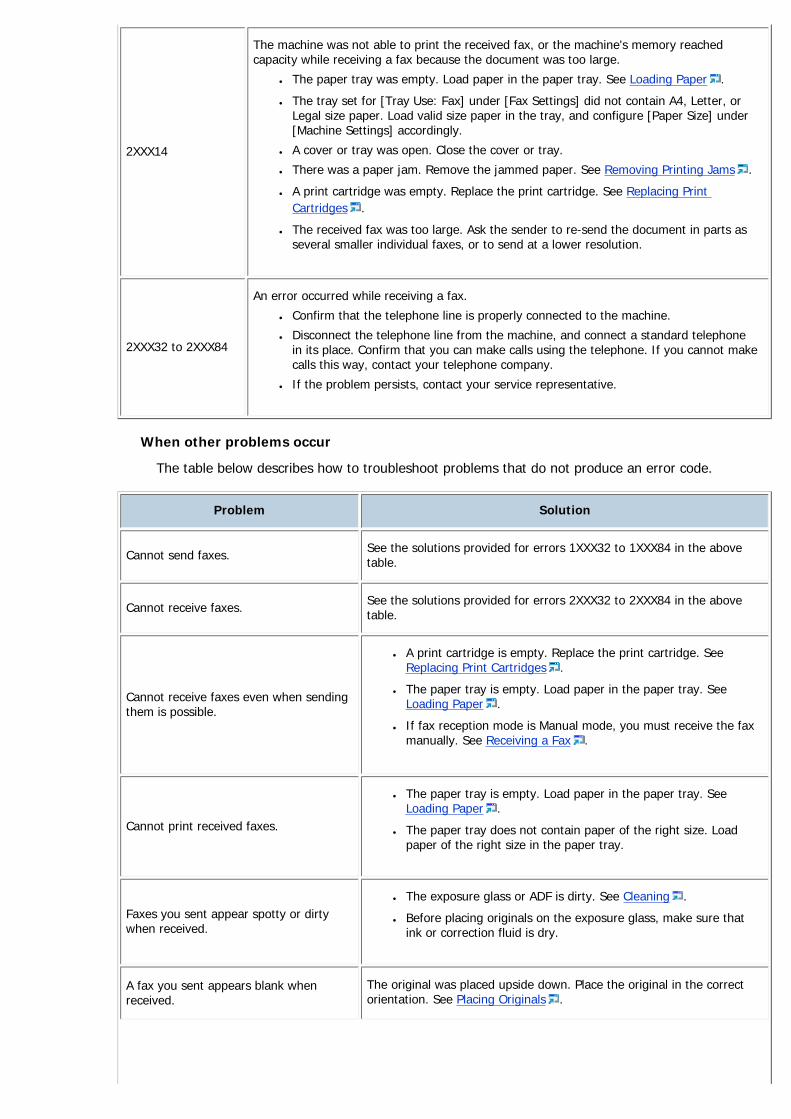
2XXX14
The machine was not able to print the received fax, or the machine's memory reached capacity while receiving a fax because the document was too large.
● The paper tray was empty. Load paper in the paper tray. See Loading Paper .
● The tray set for [Tray Use: Fax] under [Fax Settings] did not contain A4, Letter, or Legal size paper. Load valid size paper in the tray, and configure [Paper Size] under [Machine Settings] accordingly.
● A cover or tray was open. Close the cover or tray.
● There was a paper jam. Remove the jammed paper. See Removing Printing Jams .
● A print cartridge was empty. Replace the print cartridge. See Replacing Print Cartridges .
● The received fax was too large. Ask the sender to re-send the document in parts as several smaller individual faxes, or to send at a lower resolution.
2XXX32 to 2XXX84
An error occurred while receiving a fax.
● Confirm that the telephone line is properly connected to the machine.
● Disconnect the telephone line from the machine, and connect a standard telephone in its place. Confirm that you can make calls using the telephone. If you cannot make calls this way, contact your telephone company.
● If the problem persists, contact your service representative.
When other problems occur
The table below describes how to troubleshoot problems that do not produce an error code.
Problem Solution
Cannot send faxes. See the solutions provided for errors 1XXX32 to 1XXX84 in the above table.
Cannot receive faxes. See the solutions provided for errors 2XXX32 to 2XXX84 in the above table.
Cannot receive faxes even when sending them is possible.
● A print cartridge is empty. Replace the print cartridge. See Replacing Print Cartridges .
● The paper tray is empty. Load paper in the paper tray. See Loading Paper .
● If fax reception mode is Manual mode, you must receive the fax manually. See Receiving a Fax .
Cannot print received faxes.
● The paper tray is empty. Load paper in the paper tray. See Loading Paper .
● The paper tray does not contain paper of the right size. Load paper of the right size in the paper tray.
Faxes you sent appear spotty or dirty when received.
● The exposure glass or ADF is dirty. See Cleaning .
● Before placing originals on the exposure glass, make sure that ink or correction fluid is dry.
A fax you sent appears blank when received.
The original was placed upside down. Place the original in the correct orientation. See Placing Originals .

The background of received images is dirty, or images from the rear side of the originals are visible.
Image density is too high. Adjust the image density. See Adjusting Image Density .
Dial fails when trying to send faxes. See the solutions provided for errors 1XXX22 to 1XXX23 in the above table.
Top Previous Next
Copyright © 2009

Top Page > Troubleshooting > Error and Status Messages on the Screen
Error and Status Messages on the Screen
This section describes the meaning of messages that appear on the screen and what to do when a particular message appears.
Messages are listed in alphabetical order in the table below.
“X” indicates the parts of the messages that appear differently depending on a specific situation, such as the paper sizes or types, tray names, or toner colors.
Message Causes Solutions
2XXX14
The machine was not able to print the received fax, or the machine's memory reached capacity while receiving a fax because the document was too large.
● The paper tray was empty. Load paper in the paper tray. See Loading Paper .
● The tray set for [Tray Use: Fax] under [Fax Settings] did not contain A4, Letter, or Legal size paper. Load valid size paper in the tray, and configure [Paper Size] under [Machine Settings] accordingly.
● A cover or tray was open. Close the cover or tray.
● There was a paper jam. Remove the jammed paper. See Removing Printing Jams .
● A print cartridge was empty. Replace the print cartridge. See Replacing Print Cartridges .
● The received fax was too large. Ask the sender to re-send the document in parts as several smaller individual faxes, or to send at a lower resolution.
ADF JAM Open ADF Cover and Clear Jam
An original has been jammed inside the ADF.
● Remove jammed originals, and then place them again. See Removing Scanning Jams .
● Check the originals are suitable for scanning. See Placing Originals .
BP Tray Print Job SizeMismatch?Y/N
The paper size set for the document differs from the size of the paper in the tray.
Press the [B&W Start] key or [Color Start] key to begin printing, or press the [Clear/Stop] key to cancel the job.
BP Tray Print Job TypeMismatch?Y/N
The paper type set for the document differs from the type of the paper in the tray.
Press the [B&W Start] key or [Color Start] key to begin printing, or press the [Clear/Stop] key to cancel the job.
Cancel Print JOB
I/O TimeOut
The timeout period set in [I/O Timeout] expires when printing is frequently interrupted by data from other ports, or when printing data is large and takes time for processing.
If [I/O Timeout] is set to 15 seconds, increase the time period. For details, see Machine Settings .
Contents Previous Next Settings
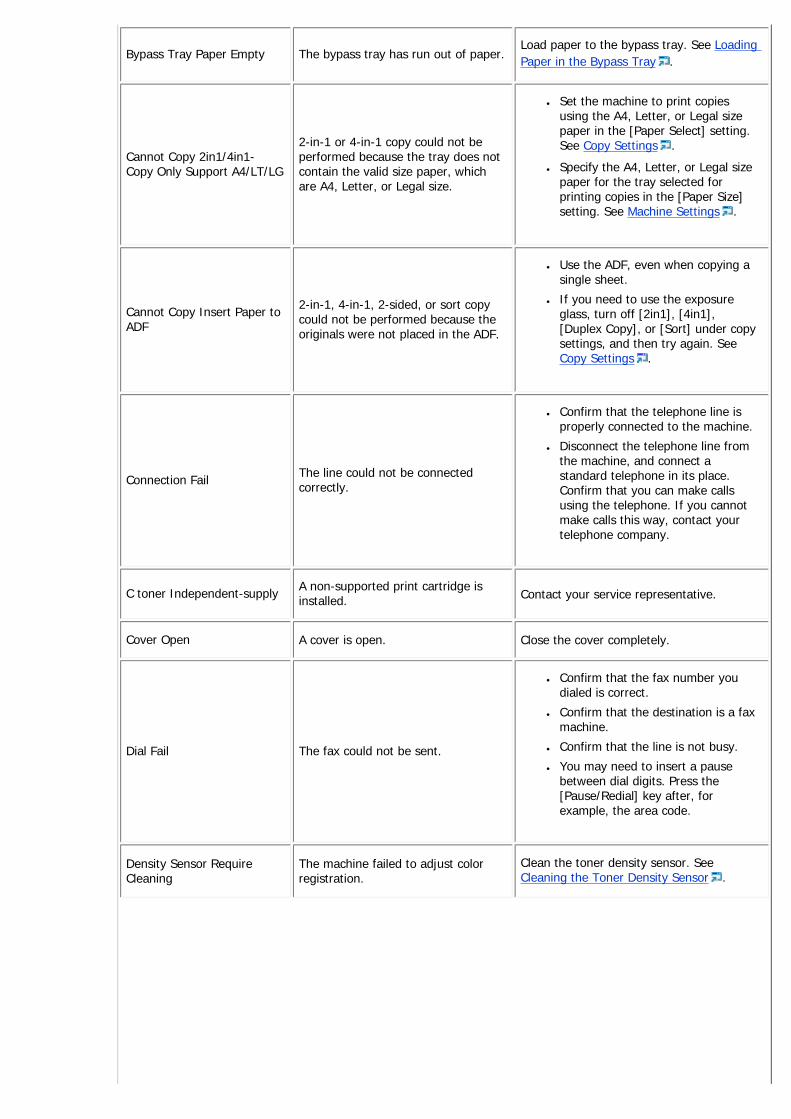
Bypass Tray Paper Empty The bypass tray has run out of paper.Load paper to the bypass tray. See Loading Paper in the Bypass Tray .
Cannot Copy 2in1/4in1-Copy Only Support A4/LT/LG
2-in-1 or 4-in-1 copy could not be performed because the tray does not contain the valid size paper, which are A4, Letter, or Legal size.
● Set the machine to print copies using the A4, Letter, or Legal size paper in the [Paper Select] setting. See Copy Settings .
● Specify the A4, Letter, or Legal size paper for the tray selected for printing copies in the [Paper Size] setting. See Machine Settings .
Cannot Copy Insert Paper to ADF
2-in-1, 4-in-1, 2-sided, or sort copy could not be performed because the originals were not placed in the ADF.
● Use the ADF, even when copying a single sheet.
● If you need to use the exposure glass, turn off [2in1], [4in1], [Duplex Copy], or [Sort] under copy settings, and then try again. See Copy Settings .
Connection Fail The line could not be connected correctly.
● Confirm that the telephone line is properly connected to the machine.
● Disconnect the telephone line from the machine, and connect a standard telephone in its place. Confirm that you can make calls using the telephone. If you cannot make calls this way, contact your telephone company.
C toner Independent-supply A non-supported print cartridge is installed. Contact your service representative.
Cover Open A cover is open. Close the cover completely.
Dial Fail The fax could not be sent.
● Confirm that the fax number you dialed is correct.
● Confirm that the destination is a fax machine.
● Confirm that the line is not busy.
● You may need to insert a pause between dial digits. Press the [Pause/Redial] key after, for example, the area code.
Density Sensor Require Cleaning
The machine failed to adjust color registration.
Clean the toner density sensor. See Cleaning the Toner Density Sensor .
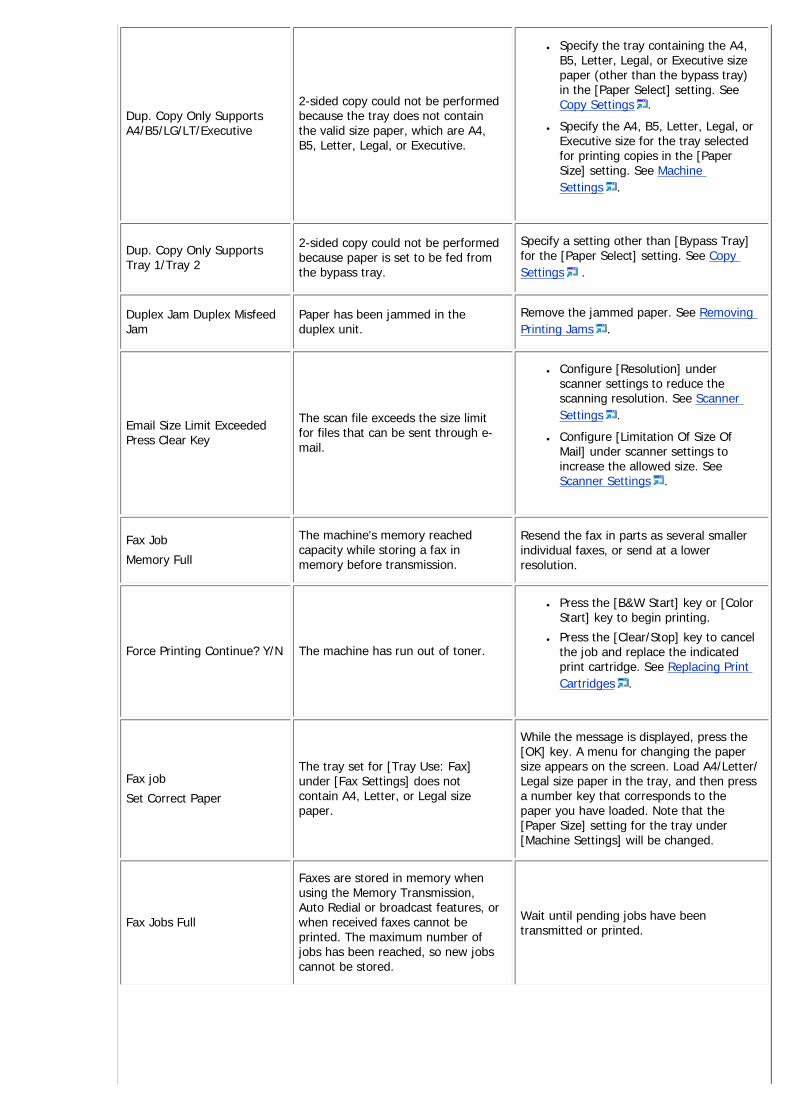
Dup. Copy Only Supports A4/B5/LG/LT/Executive
2-sided copy could not be performed because the tray does not contain the valid size paper, which are A4, B5, Letter, Legal, or Executive.
● Specify the tray containing the A4, B5, Letter, Legal, or Executive size paper (other than the bypass tray) in the [Paper Select] setting. See Copy Settings .
● Specify the A4, B5, Letter, Legal, or Executive size for the tray selected for printing copies in the [Paper Size] setting. See Machine Settings .
Dup. Copy Only Supports Tray 1/Tray 2
2-sided copy could not be performed because paper is set to be fed from the bypass tray.
Specify a setting other than [Bypass Tray] for the [Paper Select] setting. See Copy Settings .
Duplex Jam Duplex Misfeed Jam
Paper has been jammed in the duplex unit.
Remove the jammed paper. See Removing Printing Jams .
Email Size Limit Exceeded Press Clear Key
The scan file exceeds the size limit for files that can be sent through e-mail.
● Configure [Resolution] under scanner settings to reduce the scanning resolution. See Scanner Settings .
● Configure [Limitation Of Size Of Mail] under scanner settings to increase the allowed size. See Scanner Settings .
Fax Job
Memory Full
The machine's memory reached capacity while storing a fax in memory before transmission.
Resend the fax in parts as several smaller individual faxes, or send at a lower resolution.
Force Printing Continue? Y/N The machine has run out of toner.
● Press the [B&W Start] key or [Color Start] key to begin printing.
● Press the [Clear/Stop] key to cancel the job and replace the indicated print cartridge. See Replacing Print Cartridges .
Fax job
Set Correct Paper
The tray set for [Tray Use: Fax] under [Fax Settings] does not contain A4, Letter, or Legal size paper.
While the message is displayed, press the [OK] key. A menu for changing the paper size appears on the screen. Load A4/Letter/Legal size paper in the tray, and then press a number key that corresponds to the paper you have loaded. Note that the [Paper Size] setting for the tray under [Machine Settings] will be changed.
Fax Jobs Full
Faxes are stored in memory when using the Memory Transmission, Auto Redial or broadcast features, or when received faxes cannot be printed. The maximum number of jobs has been reached, so new jobs cannot be stored.
Wait until pending jobs have been transmitted or printed.
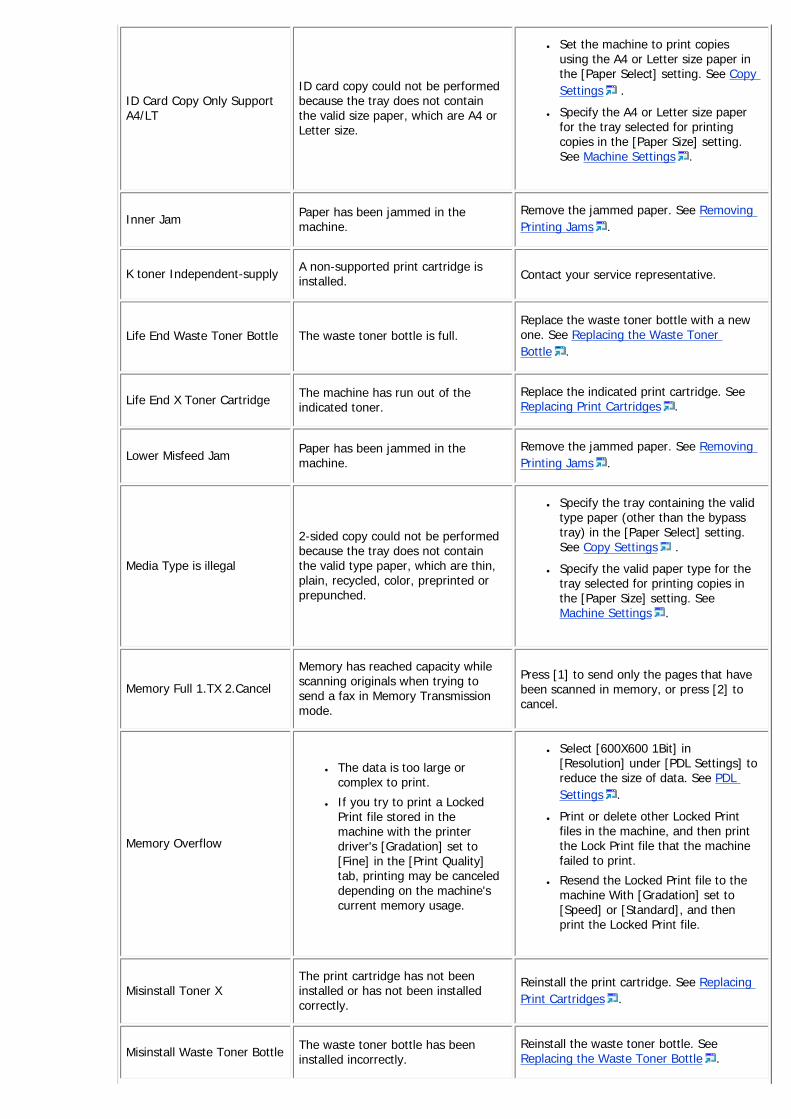
ID Card Copy Only Support A4/LT
ID card copy could not be performed because the tray does not contain the valid size paper, which are A4 or Letter size.
● Set the machine to print copies using the A4 or Letter size paper in the [Paper Select] setting. See Copy Settings .
● Specify the A4 or Letter size paper for the tray selected for printing copies in the [Paper Size] setting. See Machine Settings .
Inner Jam Paper has been jammed in the machine.
Remove the jammed paper. See Removing Printing Jams .
K toner Independent-supply A non-supported print cartridge is installed. Contact your service representative.
Life End Waste Toner Bottle The waste toner bottle is full.Replace the waste toner bottle with a new one. See Replacing the Waste Toner Bottle .
Life End X Toner Cartridge The machine has run out of the indicated toner.
Replace the indicated print cartridge. See Replacing Print Cartridges .
Lower Misfeed Jam Paper has been jammed in the machine.
Remove the jammed paper. See Removing Printing Jams .
Media Type is illegal
2-sided copy could not be performed because the tray does not contain the valid type paper, which are thin, plain, recycled, color, preprinted or prepunched.
● Specify the tray containing the valid type paper (other than the bypass tray) in the [Paper Select] setting. See Copy Settings .
● Specify the valid paper type for the tray selected for printing copies in the [Paper Size] setting. See Machine Settings .
Memory Full 1.TX 2.Cancel
Memory has reached capacity while scanning originals when trying to send a fax in Memory Transmission mode.
Press [1] to send only the pages that have been scanned in memory, or press [2] to cancel.
Memory Overflow
● The data is too large or complex to print.
● If you try to print a Locked Print file stored in the machine with the printer driver's [Gradation] set to [Fine] in the [Print Quality] tab, printing may be canceled depending on the machine's current memory usage.
● Select [600X600 1Bit] in [Resolution] under [PDL Settings] to reduce the size of data. See PDL Settings .
● Print or delete other Locked Print files in the machine, and then print the Lock Print file that the machine failed to print.
● Resend the Locked Print file to the machine With [Gradation] set to [Speed] or [Standard], and then print the Locked Print file.
Misinstall Toner XThe print cartridge has not been installed or has not been installed correctly.
Reinstall the print cartridge. See Replacing Print Cartridges .
Misinstall Waste Toner Bottle The waste toner bottle has been installed incorrectly.
Reinstall the waste toner bottle. See Replacing the Waste Toner Bottle .
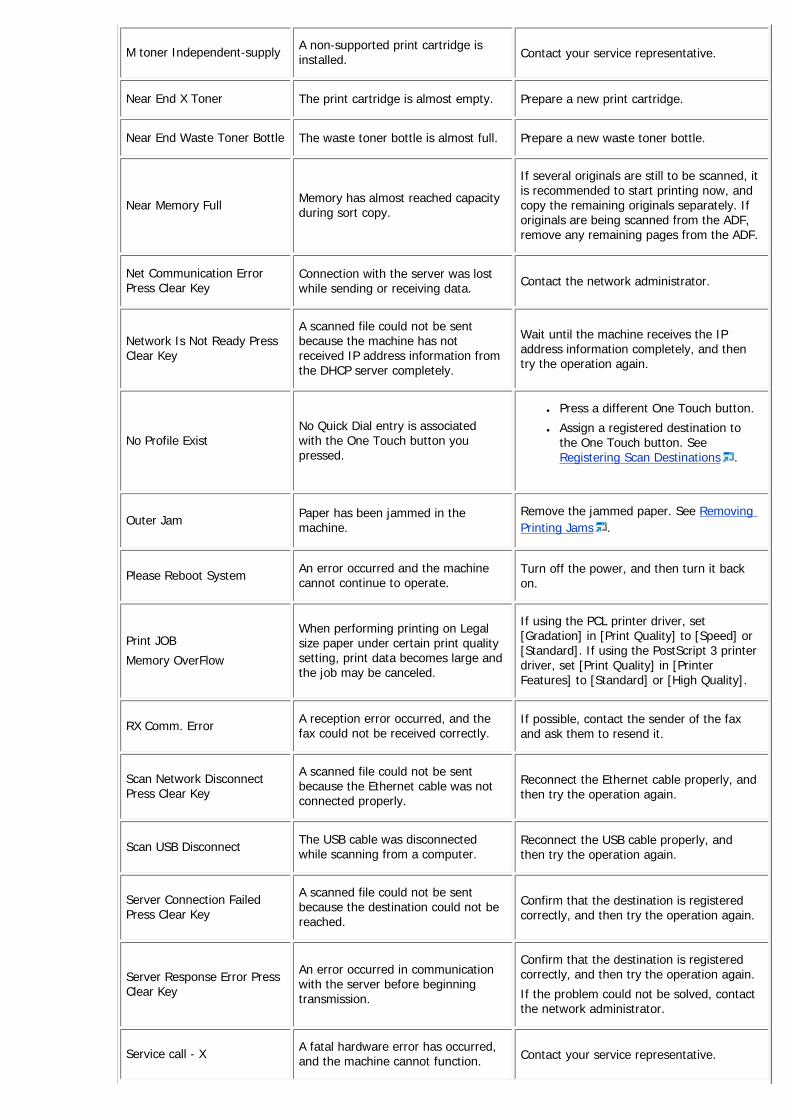
M toner Independent-supply A non-supported print cartridge is installed. Contact your service representative.
Near End X Toner The print cartridge is almost empty. Prepare a new print cartridge.
Near End Waste Toner Bottle The waste toner bottle is almost full. Prepare a new waste toner bottle.
Near Memory Full Memory has almost reached capacity during sort copy.
If several originals are still to be scanned, it is recommended to start printing now, and copy the remaining originals separately. If originals are being scanned from the ADF, remove any remaining pages from the ADF.
Net Communication Error Press Clear Key
Connection with the server was lost while sending or receiving data. Contact the network administrator.
Network Is Not Ready Press Clear Key
A scanned file could not be sent because the machine has not received IP address information from the DHCP server completely.
Wait until the machine receives the IP address information completely, and then try the operation again.
No Profile ExistNo Quick Dial entry is associated with the One Touch button you pressed.
● Press a different One Touch button.
● Assign a registered destination to the One Touch button. See Registering Scan Destinations .
Outer Jam Paper has been jammed in the machine.
Remove the jammed paper. See Removing Printing Jams .
Please Reboot System An error occurred and the machine cannot continue to operate.
Turn off the power, and then turn it back on.
Print JOB
Memory OverFlow
When performing printing on Legal size paper under certain print quality setting, print data becomes large and the job may be canceled.
If using the PCL printer driver, set [Gradation] in [Print Quality] to [Speed] or [Standard]. If using the PostScript 3 printer driver, set [Print Quality] in [Printer Features] to [Standard] or [High Quality].
RX Comm. Error A reception error occurred, and the fax could not be received correctly.
If possible, contact the sender of the fax and ask them to resend it.
Scan Network Disconnect Press Clear Key
A scanned file could not be sent because the Ethernet cable was not connected properly.
Reconnect the Ethernet cable properly, and then try the operation again.
Scan USB Disconnect The USB cable was disconnected while scanning from a computer.
Reconnect the USB cable properly, and then try the operation again.
Server Connection Failed Press Clear Key
A scanned file could not be sent because the destination could not be reached.
Confirm that the destination is registered correctly, and then try the operation again.
Server Response Error Press Clear Key
An error occurred in communication with the server before beginning transmission.
Confirm that the destination is registered correctly, and then try the operation again.
If the problem could not be solved, contact the network administrator.
Service call - X A fatal hardware error has occurred, and the machine cannot function. Contact your service representative.
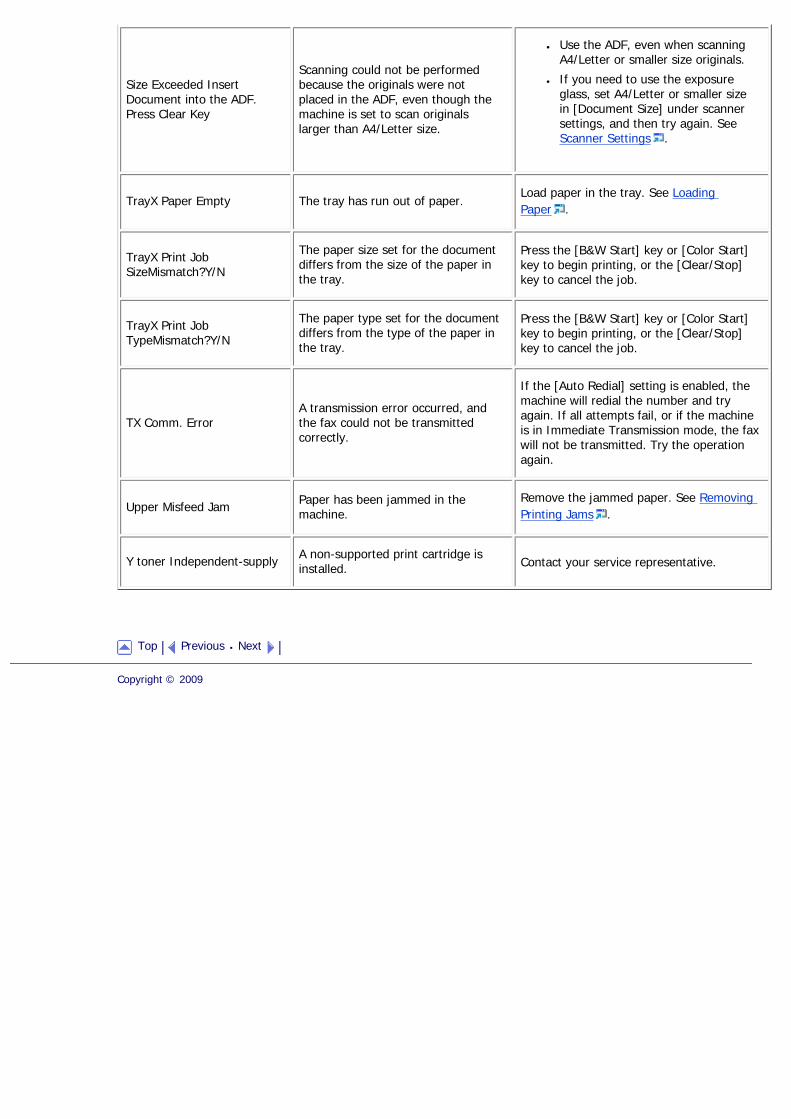
Size Exceeded Insert Document into the ADF. Press Clear Key
Scanning could not be performed because the originals were not placed in the ADF, even though the machine is set to scan originals larger than A4/Letter size.
● Use the ADF, even when scanning A4/Letter or smaller size originals.
● If you need to use the exposure glass, set A4/Letter or smaller size in [Document Size] under scanner settings, and then try again. See Scanner Settings .
TrayX Paper Empty The tray has run out of paper.Load paper in the tray. See Loading Paper .
TrayX Print Job SizeMismatch?Y/N
The paper size set for the document differs from the size of the paper in the tray.
Press the [B&W Start] key or [Color Start] key to begin printing, or the [Clear/Stop] key to cancel the job.
TrayX Print Job TypeMismatch?Y/N
The paper type set for the document differs from the type of the paper in the tray.
Press the [B&W Start] key or [Color Start] key to begin printing, or the [Clear/Stop] key to cancel the job.
TX Comm. ErrorA transmission error occurred, and the fax could not be transmitted correctly.
If the [Auto Redial] setting is enabled, the machine will redial the number and try again. If all attempts fail, or if the machine is in Immediate Transmission mode, the fax will not be transmitted. Try the operation again.
Upper Misfeed Jam Paper has been jammed in the machine.
Remove the jammed paper. See Removing Printing Jams .
Y toner Independent-supply A non-supported print cartridge is installed. Contact your service representative.
Top Previous Next
Copyright © 2009
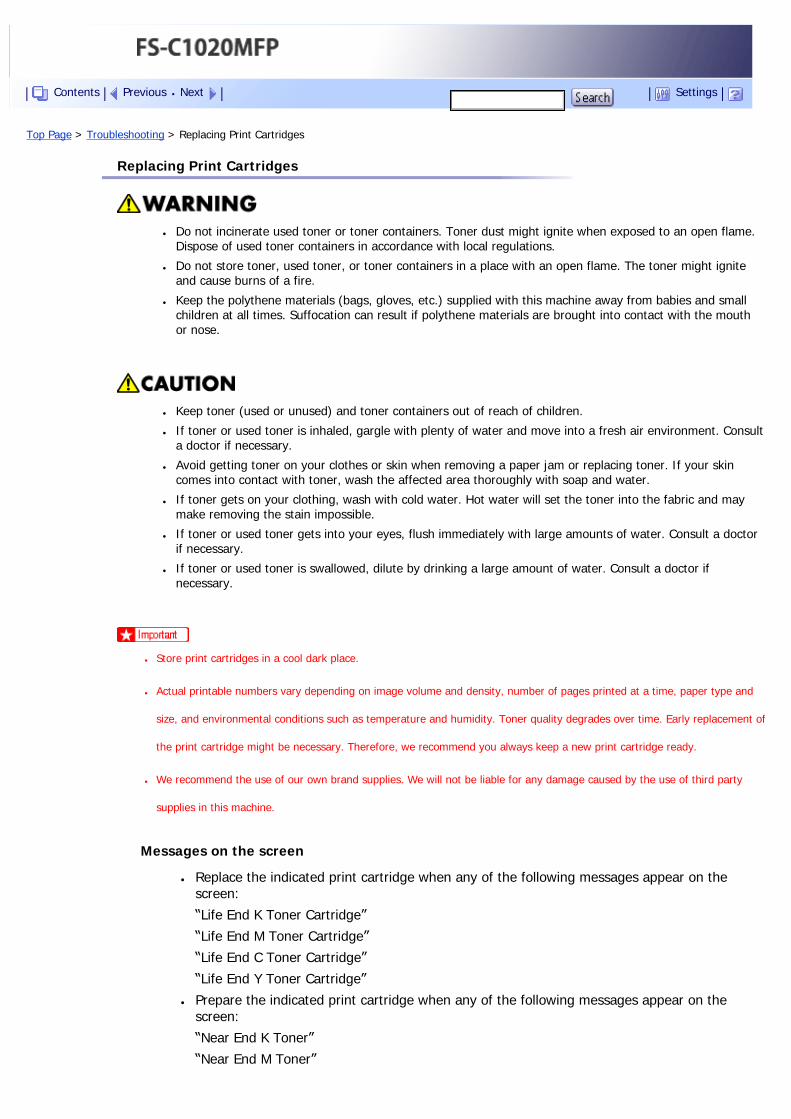
Top Page > Troubleshooting > Replacing Print Cartridges
Replacing Print Cartridges
● Do not incinerate used toner or toner containers. Toner dust might ignite when exposed to an open flame. Dispose of used toner containers in accordance with local regulations.
● Do not store toner, used toner, or toner containers in a place with an open flame. The toner might ignite and cause burns of a fire.
● Keep the polythene materials (bags, gloves, etc.) supplied with this machine away from babies and small children at all times. Suffocation can result if polythene materials are brought into contact with the mouth or nose.
● Keep toner (used or unused) and toner containers out of reach of children.
● If toner or used toner is inhaled, gargle with plenty of water and move into a fresh air environment. Consult a doctor if necessary.
● Avoid getting toner on your clothes or skin when removing a paper jam or replacing toner. If your skin comes into contact with toner, wash the affected area thoroughly with soap and water.
● If toner gets on your clothing, wash with cold water. Hot water will set the toner into the fabric and may make removing the stain impossible.
● If toner or used toner gets into your eyes, flush immediately with large amounts of water. Consult a doctor if necessary.
● If toner or used toner is swallowed, dilute by drinking a large amount of water. Consult a doctor if necessary.
● Store print cartridges in a cool dark place.
● Actual printable numbers vary depending on image volume and density, number of pages printed at a time, paper type and
size, and environmental conditions such as temperature and humidity. Toner quality degrades over time. Early replacement of
the print cartridge might be necessary. Therefore, we recommend you always keep a new print cartridge ready.
● We recommend the use of our own brand supplies. We will not be liable for any damage caused by the use of third party
supplies in this machine.
Messages on the screen
● Replace the indicated print cartridge when any of the following messages appear on the screen:
“Life End K Toner Cartridge”
“Life End M Toner Cartridge”
“Life End C Toner Cartridge”
“Life End Y Toner Cartridge”
● Prepare the indicated print cartridge when any of the following messages appear on the screen:
“Near End K Toner”
“Near End M Toner”
Contents Previous Next Settings
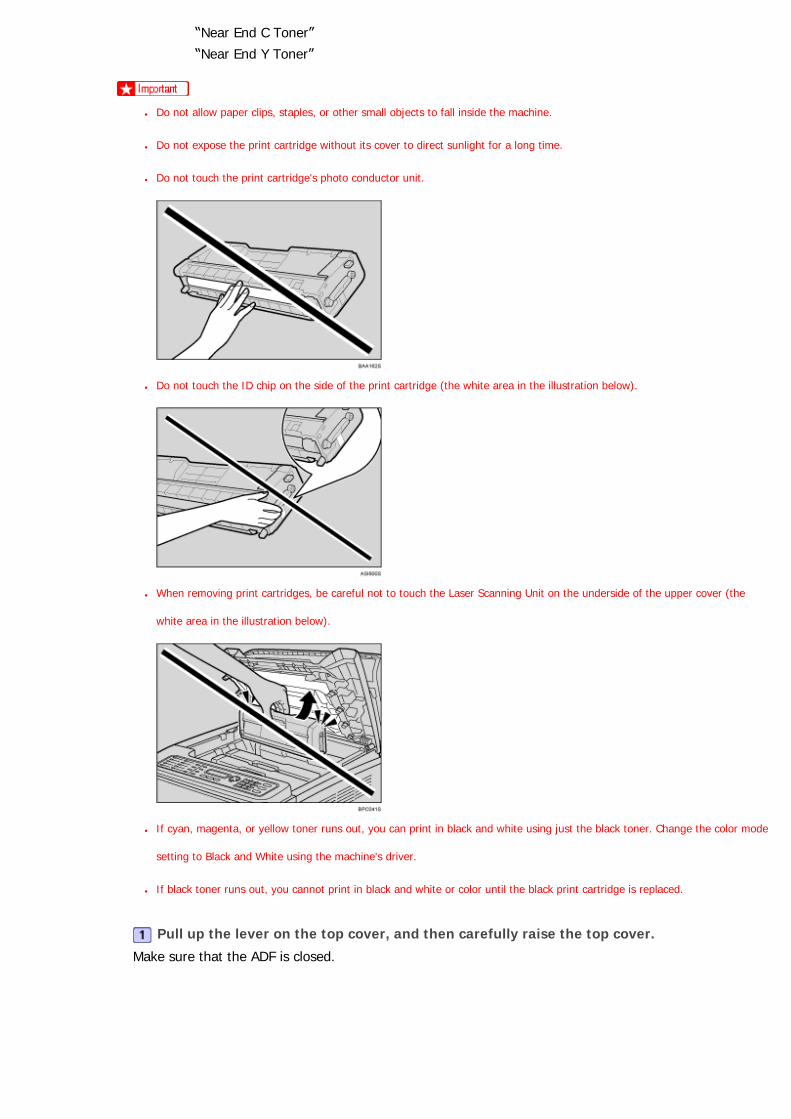
“Near End C Toner”
“Near End Y Toner”
● Do not allow paper clips, staples, or other small objects to fall inside the machine.
● Do not expose the print cartridge without its cover to direct sunlight for a long time.
● Do not touch the print cartridge's photo conductor unit.
● Do not touch the ID chip on the side of the print cartridge (the white area in the illustration below).
● When removing print cartridges, be careful not to touch the Laser Scanning Unit on the underside of the upper cover (the
white area in the illustration below).
● If cyan, magenta, or yellow toner runs out, you can print in black and white using just the black toner. Change the color mode
setting to Black and White using the machine's driver.
● If black toner runs out, you cannot print in black and white or color until the black print cartridge is replaced.
Pull up the lever on the top cover, and then carefully raise the top cover.
Make sure that the ADF is closed.
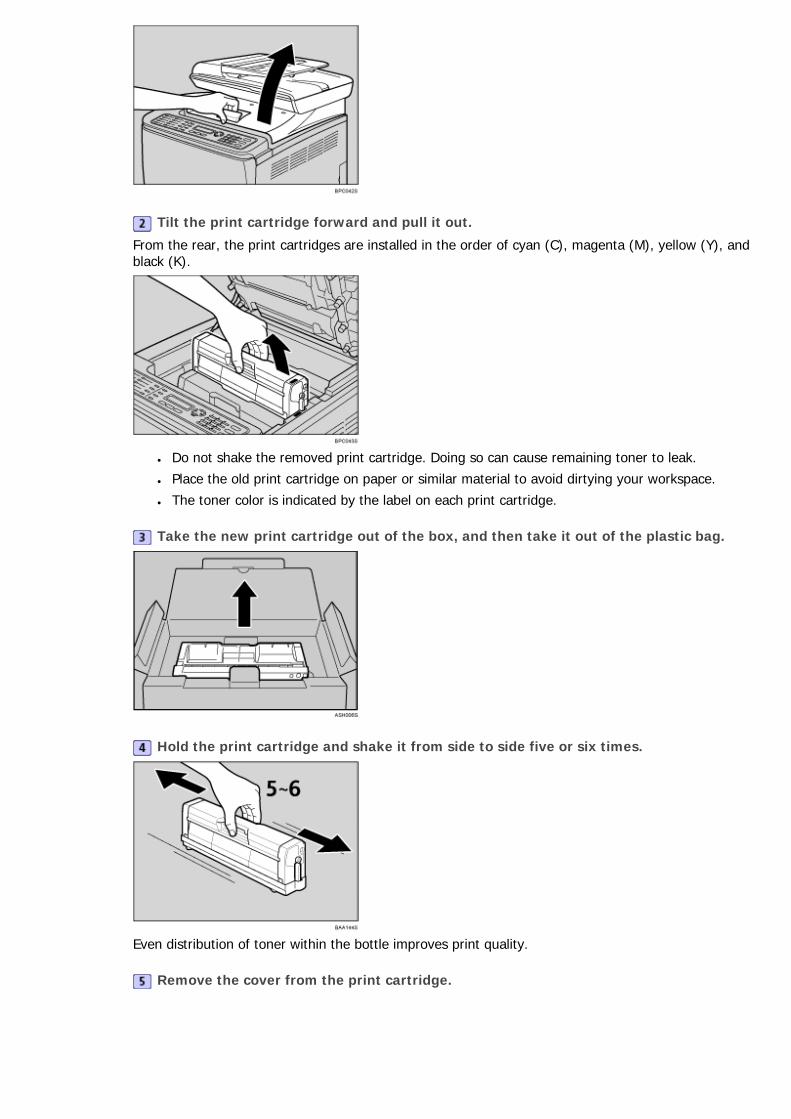
Tilt the print cartridge forward and pull it out.
From the rear, the print cartridges are installed in the order of cyan (C), magenta (M), yellow (Y), and black (K).
● Do not shake the removed print cartridge. Doing so can cause remaining toner to leak.
● Place the old print cartridge on paper or similar material to avoid dirtying your workspace.
● The toner color is indicated by the label on each print cartridge.
Take the new print cartridge out of the box, and then take it out of the plastic bag.
Hold the print cartridge and shake it from side to side five or six times.
Even distribution of toner within the bottle improves print quality.
Remove the cover from the print cartridge.
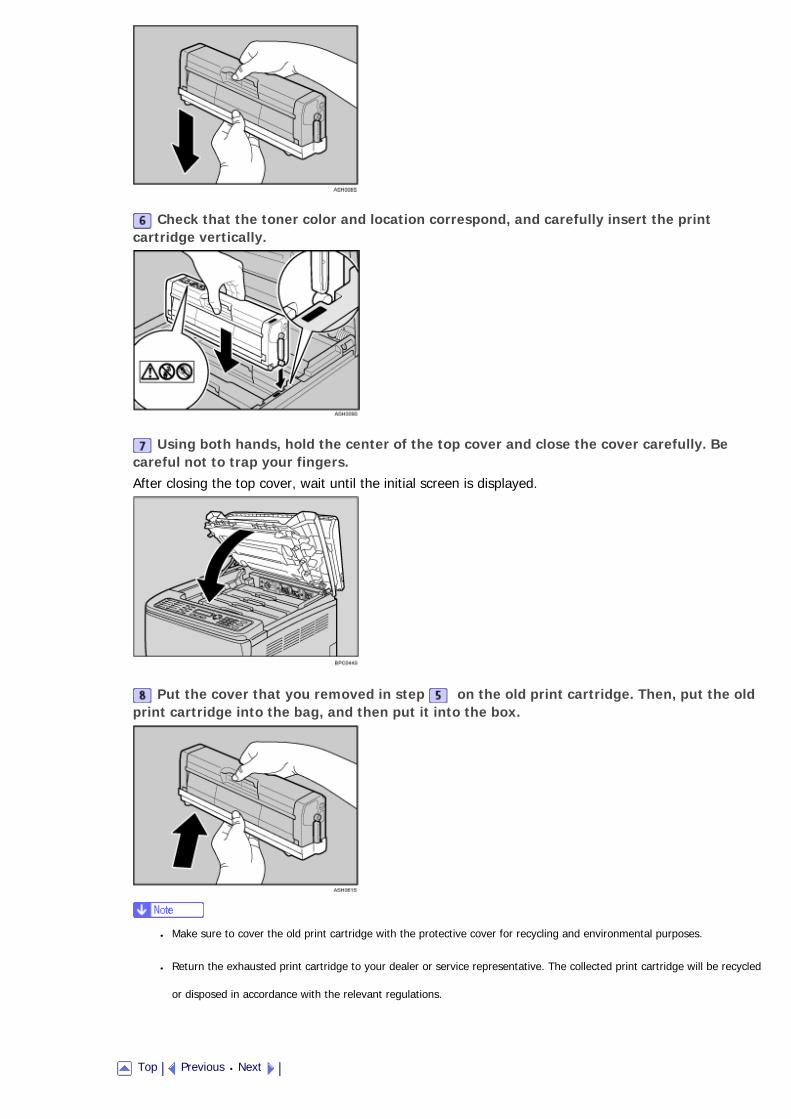
Check that the toner color and location correspond, and carefully insert the print cartridge vertically.
Using both hands, hold the center of the top cover and close the cover carefully. Be careful not to trap your fingers.After closing the top cover, wait until the initial screen is displayed.
Put the cover that you removed in step on the old print cartridge. Then, put the old print cartridge into the bag, and then put it into the box.
● Make sure to cover the old print cartridge with the protective cover for recycling and environmental purposes.
● Return the exhausted print cartridge to your dealer or service representative. The collected print cartridge will be recycled
or disposed in accordance with the relevant regulations.
Top Previous Next

Copyright © 2009
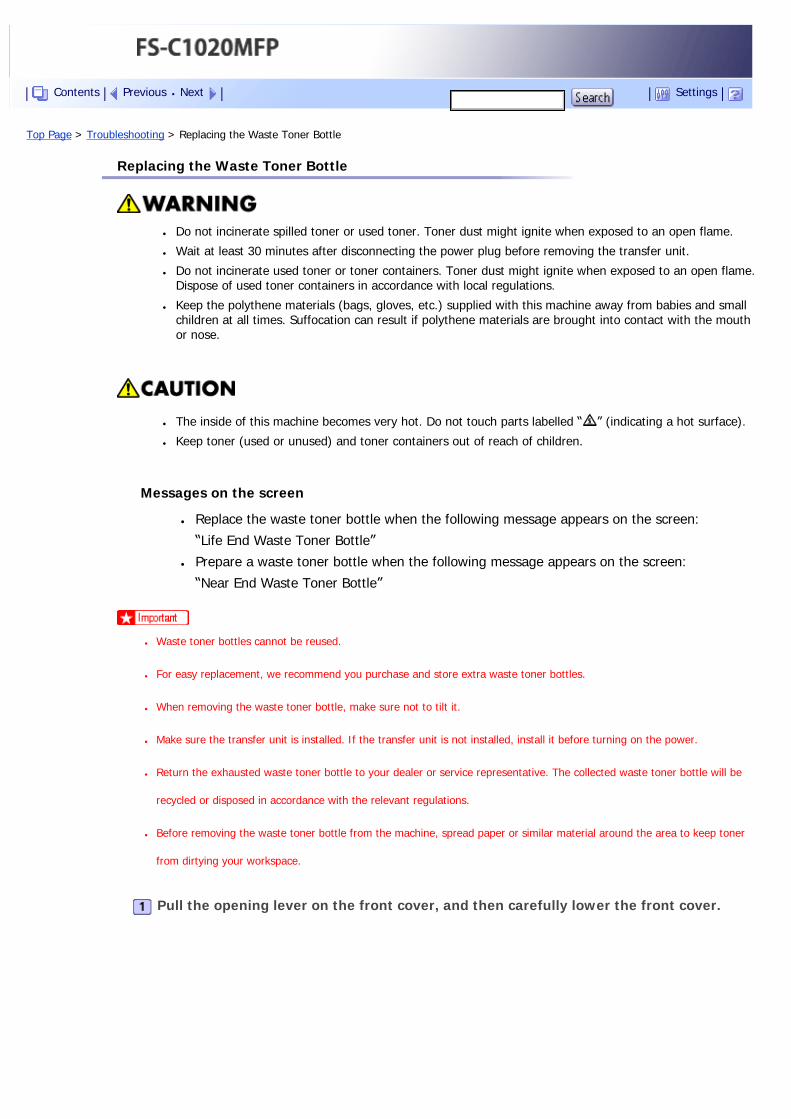
Top Page > Troubleshooting > Replacing the Waste Toner Bottle
Replacing the Waste Toner Bottle
● Do not incinerate spilled toner or used toner. Toner dust might ignite when exposed to an open flame.
● Wait at least 30 minutes after disconnecting the power plug before removing the transfer unit.
● Do not incinerate used toner or toner containers. Toner dust might ignite when exposed to an open flame. Dispose of used toner containers in accordance with local regulations.
● Keep the polythene materials (bags, gloves, etc.) supplied with this machine away from babies and small children at all times. Suffocation can result if polythene materials are brought into contact with the mouth or nose.
● The inside of this machine becomes very hot. Do not touch parts labelled “ ” (indicating a hot surface).
● Keep toner (used or unused) and toner containers out of reach of children.
Messages on the screen
● Replace the waste toner bottle when the following message appears on the screen:
“Life End Waste Toner Bottle”
● Prepare a waste toner bottle when the following message appears on the screen:
“Near End Waste Toner Bottle”
● Waste toner bottles cannot be reused.
● For easy replacement, we recommend you purchase and store extra waste toner bottles.
● When removing the waste toner bottle, make sure not to tilt it.
● Make sure the transfer unit is installed. If the transfer unit is not installed, install it before turning on the power.
● Return the exhausted waste toner bottle to your dealer or service representative. The collected waste toner bottle will be
recycled or disposed in accordance with the relevant regulations.
● Before removing the waste toner bottle from the machine, spread paper or similar material around the area to keep toner
from dirtying your workspace.
Pull the opening lever on the front cover, and then carefully lower the front cover.
Contents Previous Next Settings
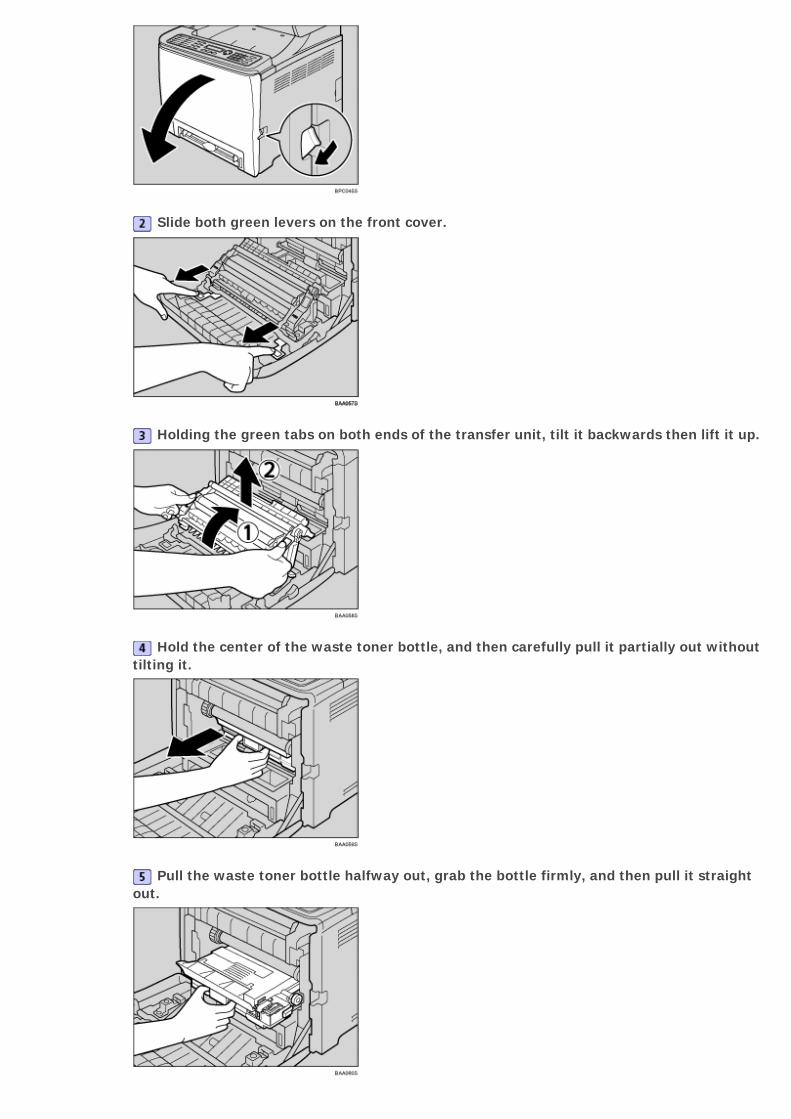
Slide both green levers on the front cover.
Holding the green tabs on both ends of the transfer unit, tilt it backwards then lift it up.
Hold the center of the waste toner bottle, and then carefully pull it partially out without tilting it.
Pull the waste toner bottle halfway out, grab the bottle firmly, and then pull it straight out.
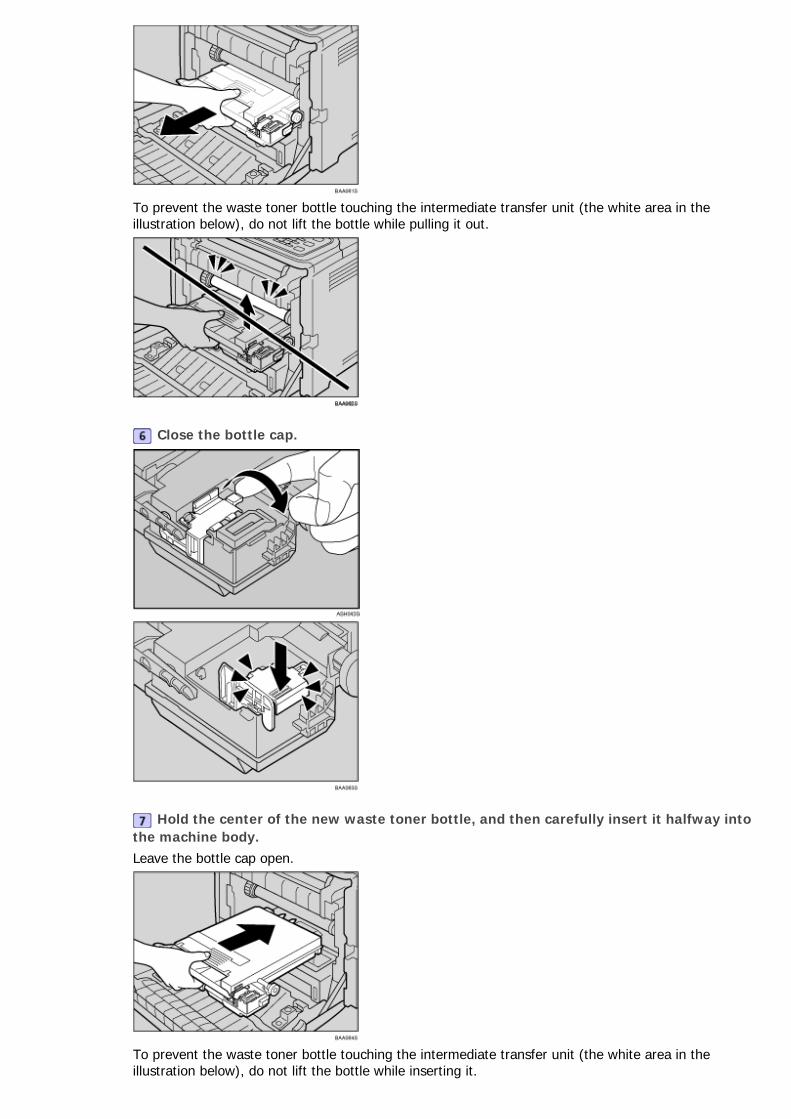
To prevent the waste toner bottle touching the intermediate transfer unit (the white area in the illustration below), do not lift the bottle while pulling it out.
Close the bottle cap.
Hold the center of the new waste toner bottle, and then carefully insert it halfway into the machine body.Leave the bottle cap open.
To prevent the waste toner bottle touching the intermediate transfer unit (the white area in the illustration below), do not lift the bottle while inserting it.
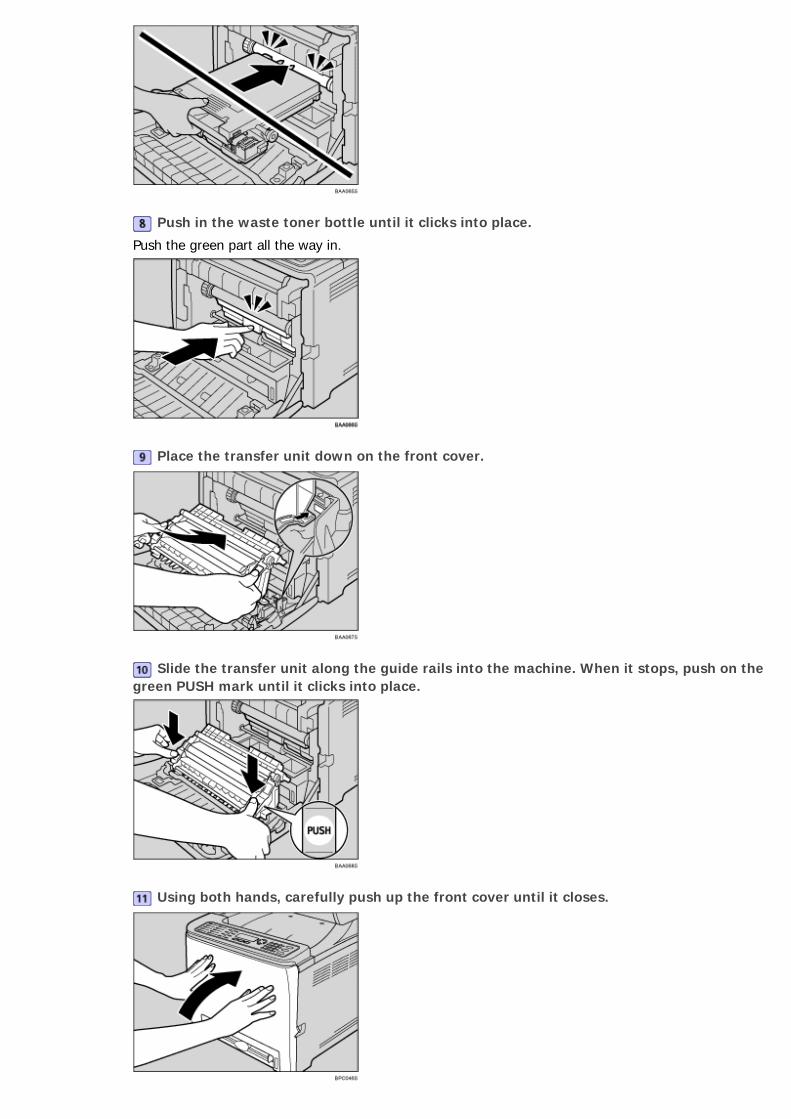
Push in the waste toner bottle until it clicks into place.
Push the green part all the way in.
Place the transfer unit down on the front cover.
Slide the transfer unit along the guide rails into the machine. When it stops, push on the green PUSH mark until it clicks into place.
Using both hands, carefully push up the front cover until it closes.

● When closing the front cover, push the upper area of the cover firmly.
● Return the exhausted waste toner bottle to your dealer or service representative. The collected waste toner bottle will be
recycled or disposed in accordance with the relevant regulations.
Top Previous Next
Copyright © 2009

Top Page > Maintenance > Cleaning
Cleaning
Related topics
Cautions to Take When Cleaning
Cleaning the Toner Density Sensor
Cleaning the Friction Pad and Paper Feed Roller
Cleaning the Registration Roller
Cleaning the Exposure Glass
Cleaning the Auto Document Feeder
Top Previous Next
Copyright © 2009
Contents Previous Next Settings
Top Page > Maintenance > Cleaning > Cautions to Take When Cleaning
Cautions to Take When Cleaning
● Do not attempt any maintenance or troubleshooting other than that mentioned in this manual. This machine contains a laser beam generator and direct exposure to laser beams can cause permanent eye damage.
● The inside of this machine becomes very hot. Do not touch parts labelled “ ” (indicating a hot surface).
● Be sure to disconnect the plug from the wall outlet and clean the prongs and the area around the prongs at least once a year. Allowing dust to build up on the plug constitutes a fire hazard.
Clean the machine periodically to maintain high print quality.
Dry wipe the exterior with a soft cloth. If dry wiping is not enough, wipe with a soft, damp cloth that is wrung out well. If you still cannot remove the stain or grime, use a neutral detergent, wipe over the area with a well-wrung damp cloth, and then dry wipe the area and allow it to dry.
● To avoid deformation, discoloration, or cracking, do not use volatile chemicals, such as benzine and thinner, or spray
insecticide on the machine.
● If there is dust or grime inside the machine, wipe with a clean, dry cloth.
● You must disconnect the plug from the wall outlet at least once a year. Clean away any dust and grime from the plug and
outlet before reconnecting. Accumulated dust and grime pose a fire hazard.
● Do not allow paper clips, staples, or other small objects to fall inside the machine.
Top Previous Next
Copyright © 2009
Contents Previous Next Settings
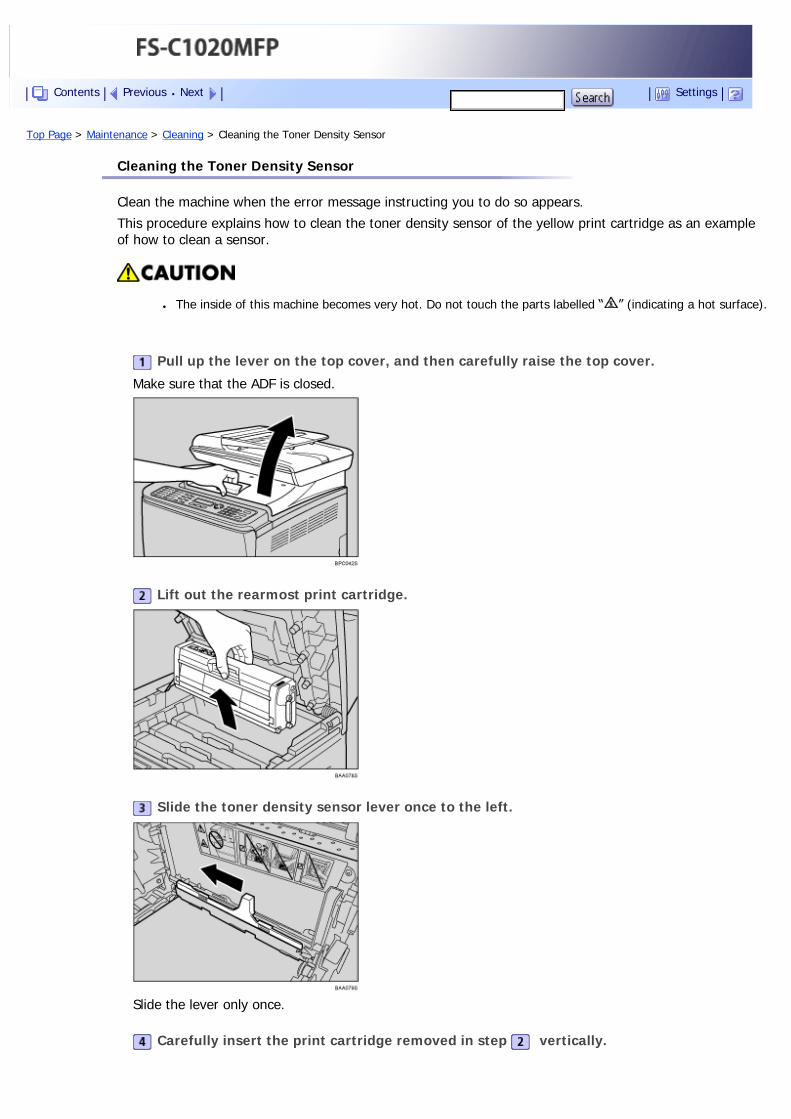
Top Page > Maintenance > Cleaning > Cleaning the Toner Density Sensor
Cleaning the Toner Density Sensor
Clean the machine when the error message instructing you to do so appears.
This procedure explains how to clean the toner density sensor of the yellow print cartridge as an example of how to clean a sensor.
● The inside of this machine becomes very hot. Do not touch the parts labelled “ ” (indicating a hot surface).
Pull up the lever on the top cover, and then carefully raise the top cover.
Make sure that the ADF is closed.
Lift out the rearmost print cartridge.
Slide the toner density sensor lever once to the left.
Slide the lever only once.
Carefully insert the print cartridge removed in step vertically.
Contents Previous Next Settings
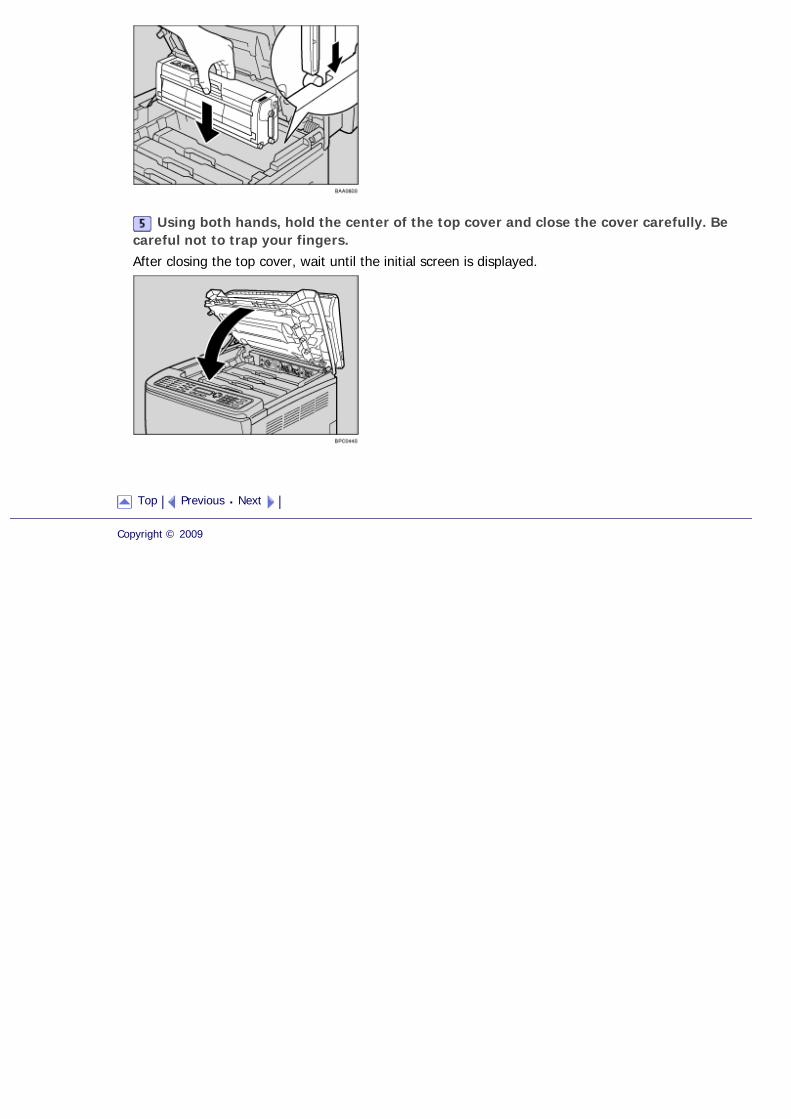
Using both hands, hold the center of the top cover and close the cover carefully. Be careful not to trap your fingers.After closing the top cover, wait until the initial screen is displayed.
Top Previous Next
Copyright © 2009
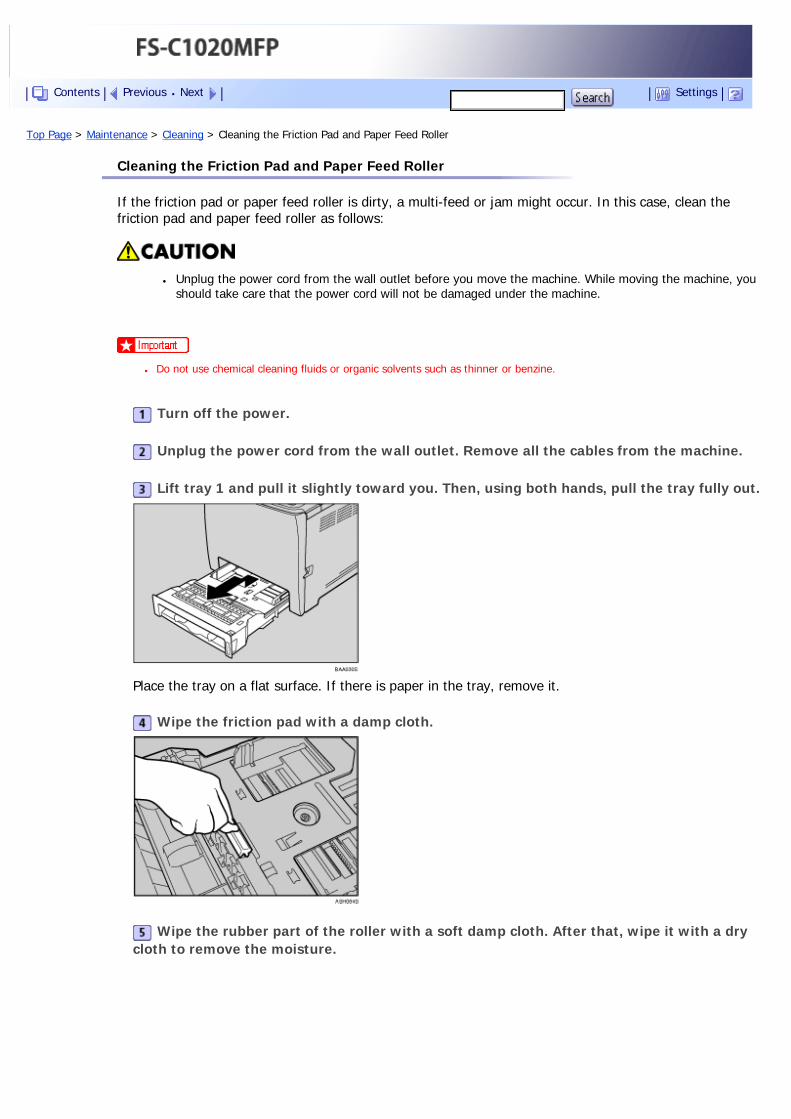
Top Page > Maintenance > Cleaning > Cleaning the Friction Pad and Paper Feed Roller
Cleaning the Friction Pad and Paper Feed Roller
If the friction pad or paper feed roller is dirty, a multi-feed or jam might occur. In this case, clean the friction pad and paper feed roller as follows:
● Unplug the power cord from the wall outlet before you move the machine. While moving the machine, you should take care that the power cord will not be damaged under the machine.
● Do not use chemical cleaning fluids or organic solvents such as thinner or benzine.
Turn off the power.
Unplug the power cord from the wall outlet. Remove all the cables from the machine.
Lift tray 1 and pull it slightly toward you. Then, using both hands, pull the tray fully out.
Place the tray on a flat surface. If there is paper in the tray, remove it.
Wipe the friction pad with a damp cloth.
Wipe the rubber part of the roller with a soft damp cloth. After that, wipe it with a dry cloth to remove the moisture.
Contents Previous Next Settings
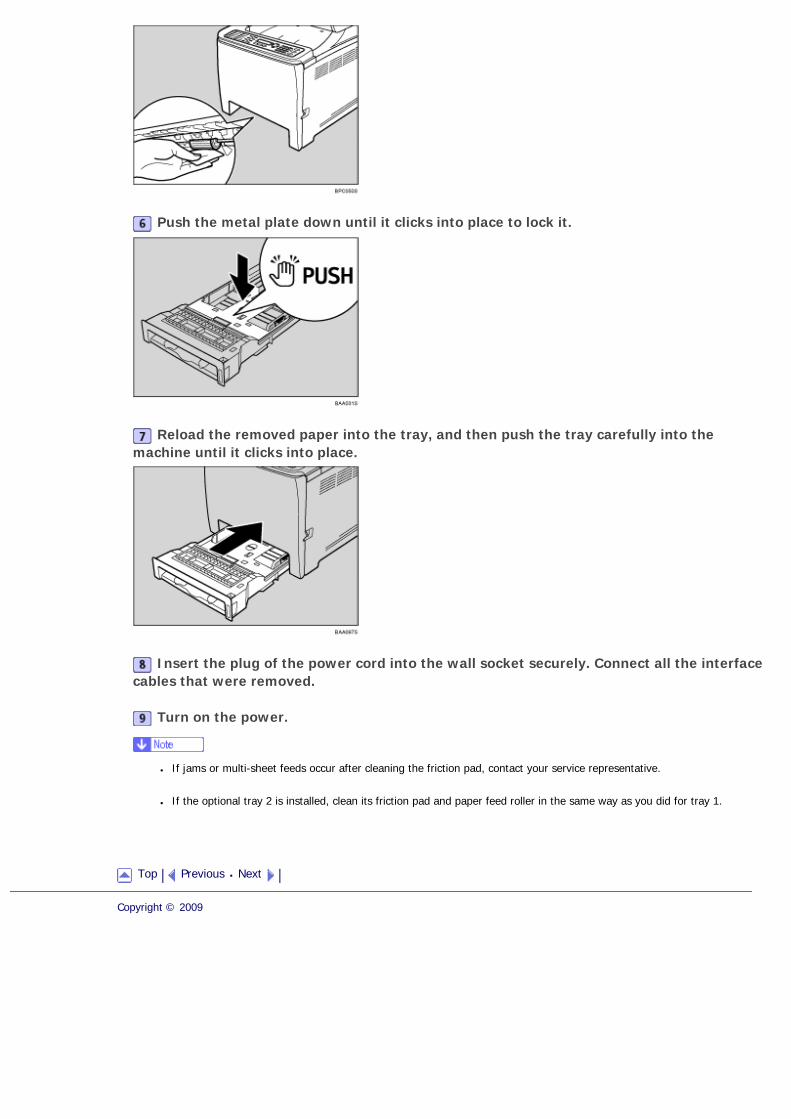
Push the metal plate down until it clicks into place to lock it.
Reload the removed paper into the tray, and then push the tray carefully into the machine until it clicks into place.
Insert the plug of the power cord into the wall socket securely. Connect all the interface cables that were removed.
Turn on the power.
● If jams or multi-sheet feeds occur after cleaning the friction pad, contact your service representative.
● If the optional tray 2 is installed, clean its friction pad and paper feed roller in the same way as you did for tray 1.
Top Previous Next
Copyright © 2009
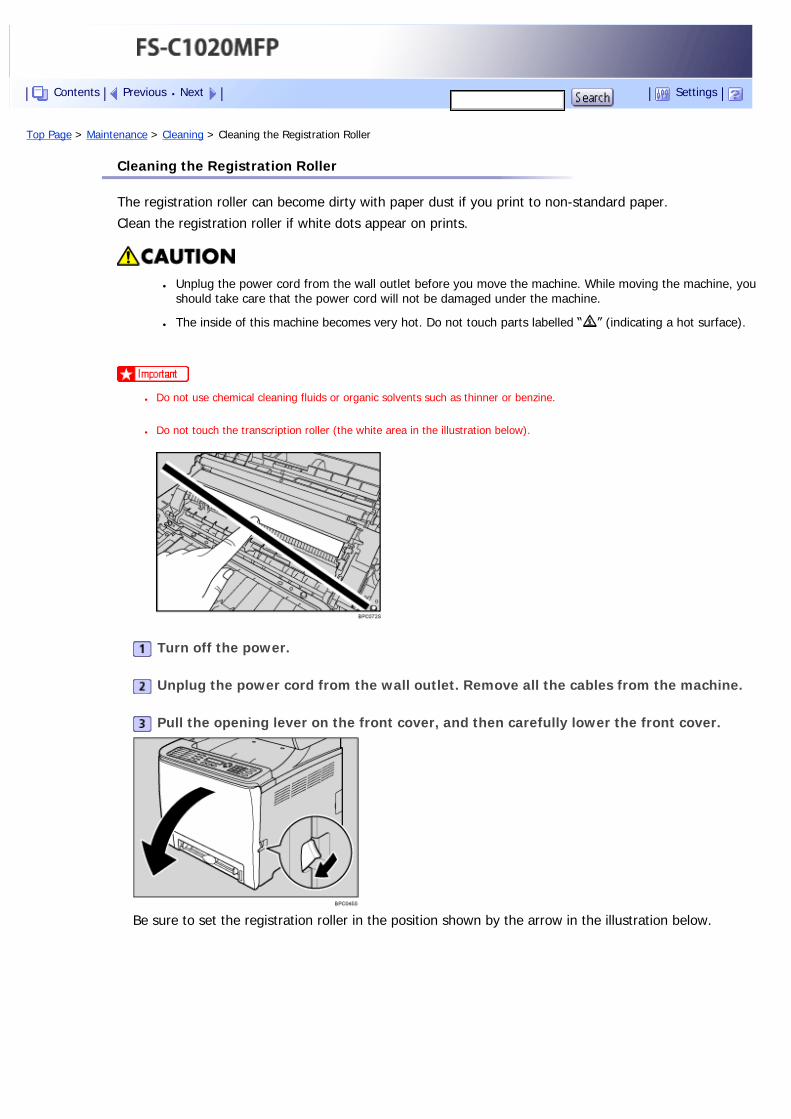
Top Page > Maintenance > Cleaning > Cleaning the Registration Roller
Cleaning the Registration Roller
The registration roller can become dirty with paper dust if you print to non-standard paper.
Clean the registration roller if white dots appear on prints.
● Unplug the power cord from the wall outlet before you move the machine. While moving the machine, you should take care that the power cord will not be damaged under the machine.
● The inside of this machine becomes very hot. Do not touch parts labelled “ ” (indicating a hot surface).
● Do not use chemical cleaning fluids or organic solvents such as thinner or benzine.
● Do not touch the transcription roller (the white area in the illustration below).
Turn off the power.
Unplug the power cord from the wall outlet. Remove all the cables from the machine.
Pull the opening lever on the front cover, and then carefully lower the front cover.
Be sure to set the registration roller in the position shown by the arrow in the illustration below.
Contents Previous Next Settings
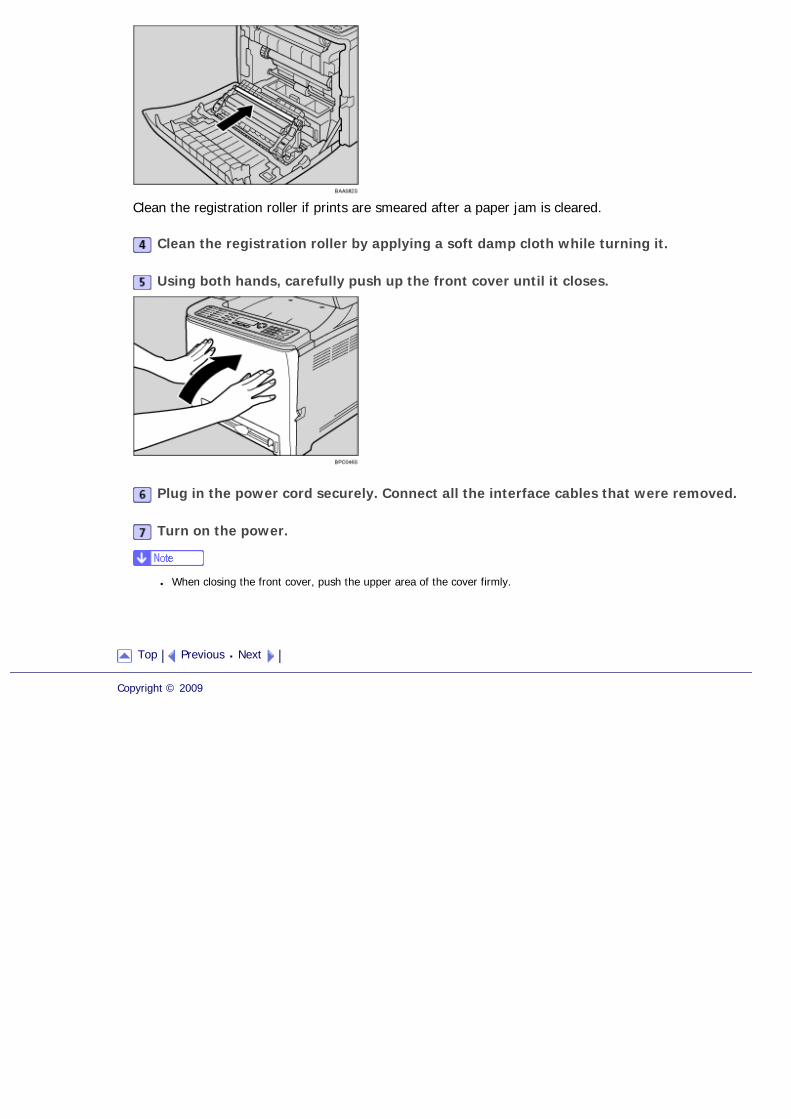
Clean the registration roller if prints are smeared after a paper jam is cleared.
Clean the registration roller by applying a soft damp cloth while turning it.
Using both hands, carefully push up the front cover until it closes.
Plug in the power cord securely. Connect all the interface cables that were removed.
Turn on the power.
● When closing the front cover, push the upper area of the cover firmly.
Top Previous Next
Copyright © 2009
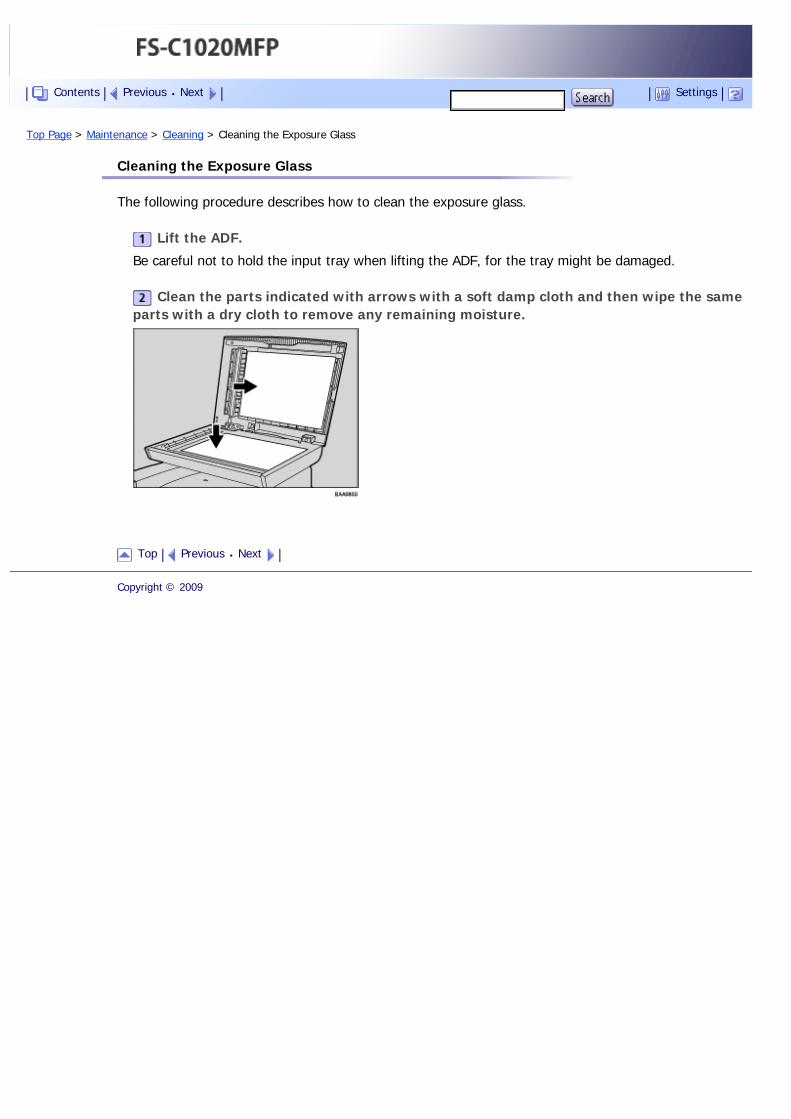
Top Page > Maintenance > Cleaning > Cleaning the Exposure Glass
Cleaning the Exposure Glass
The following procedure describes how to clean the exposure glass.
Lift the ADF.
Be careful not to hold the input tray when lifting the ADF, for the tray might be damaged.
Clean the parts indicated with arrows with a soft damp cloth and then wipe the same parts with a dry cloth to remove any remaining moisture.
Top Previous Next
Copyright © 2009
Contents Previous Next Settings
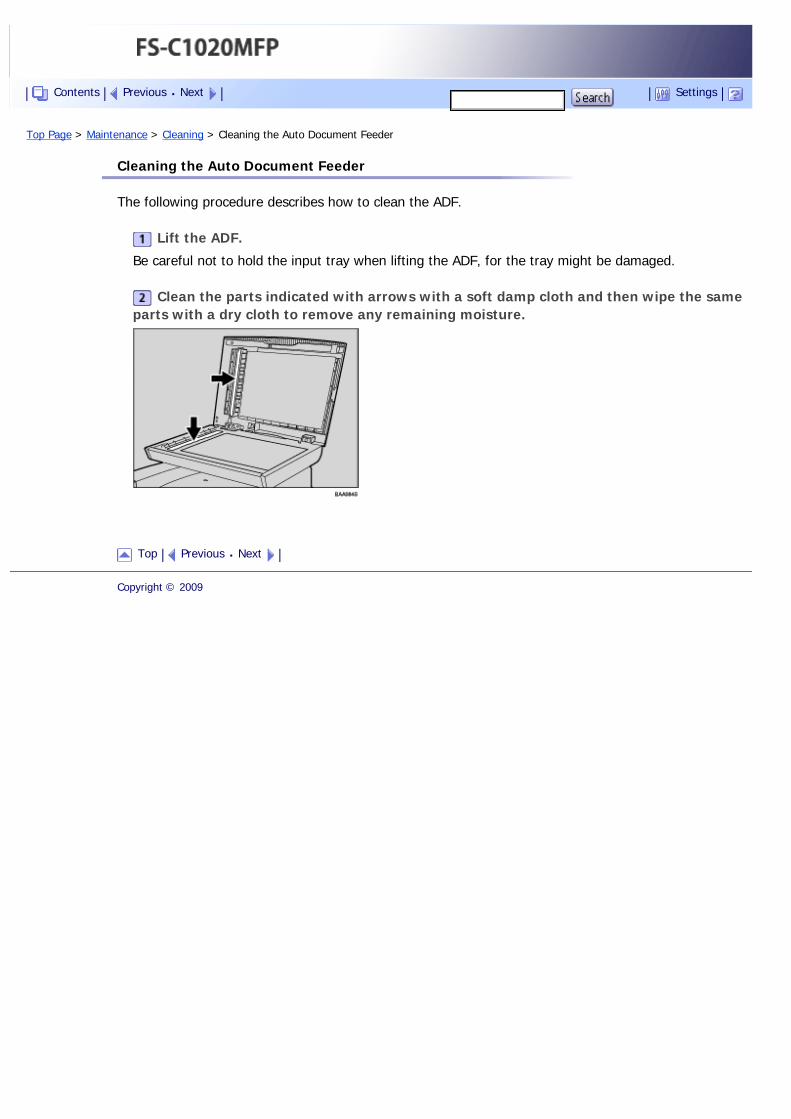
Top Page > Maintenance > Cleaning > Cleaning the Auto Document Feeder
Cleaning the Auto Document Feeder
The following procedure describes how to clean the ADF.
Lift the ADF.
Be careful not to hold the input tray when lifting the ADF, for the tray might be damaged.
Clean the parts indicated with arrows with a soft damp cloth and then wipe the same parts with a dry cloth to remove any remaining moisture.
Top Previous Next
Copyright © 2009
Contents Previous Next Settings
Top Page > Maintenance > Moving the Machine
Moving the Machine
This section provides cautions that you must follow when moving the machine both short and long distances.
● The machine weighs approximately 30.0 kg (66.2 lb.). When moving the machine, use the inset grips on both sides, and lift slowly in pairs. The machine will break or cause injury if dropped.
● Unplug the power cord from the wall outlet before you move the machine. While moving the machine, you should take care that the power cord will not be damaged under the machine.
● When you disconnect the power plug from the wall outlet, always pull the plug (not the cable).
● When moving the machine after use, do not take out any of the toners, nor the waste toner bottle to prevent toner spill inside the machine.
Repack the machine in its original packing materials when moving it a long distance.
● Be sure to disconnect all cables from the machine before transporting it.
● The machine is a precision piece of machinery. Be sure to handle it carefully when moving it.
● Make sure to move the machine horizontally. Take extra caution when carrying the machine up or down stairs.
● If tray 2 is installed, remove it from the machine, and move them separately.
● Do not hold onto the tray area when lifting the machine.
Related topics
Moving over a Short Distance
Moving over a Long Distance
Top Previous Next
Copyright © 2009
Contents Previous Next Settings
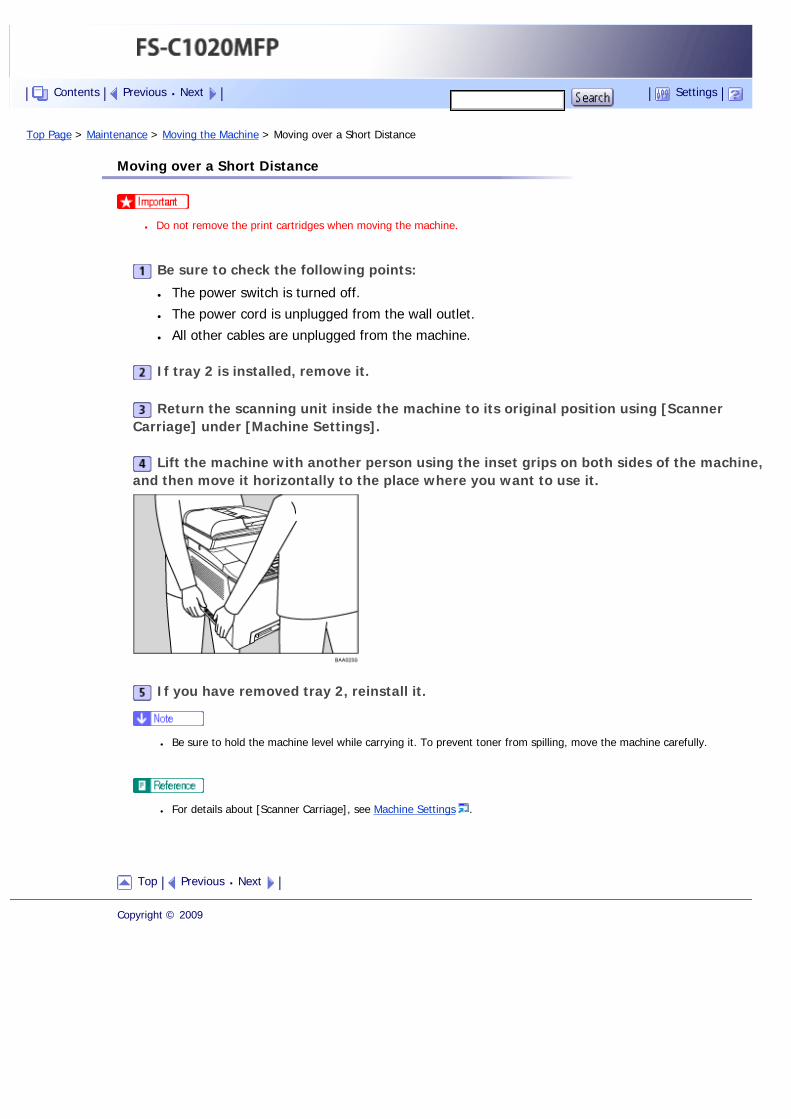
Top Page > Maintenance > Moving the Machine > Moving over a Short Distance
Moving over a Short Distance
● Do not remove the print cartridges when moving the machine.
Be sure to check the following points:
● The power switch is turned off.
● The power cord is unplugged from the wall outlet.
● All other cables are unplugged from the machine.
If tray 2 is installed, remove it.
Return the scanning unit inside the machine to its original position using [Scanner Carriage] under [Machine Settings].
Lift the machine with another person using the inset grips on both sides of the machine, and then move it horizontally to the place where you want to use it.
If you have removed tray 2, reinstall it.
● Be sure to hold the machine level while carrying it. To prevent toner from spilling, move the machine carefully.
● For details about [Scanner Carriage], see Machine Settings .
Top Previous Next
Copyright © 2009
Contents Previous Next Settings

Top Page > Maintenance > Moving the Machine > Moving over a Long Distance
Moving over a Long Distance
If you intend to move the machine over a long distance, you must pack it well. Empty all the paper trays, but do not remove any print cartridges. Take care not to tip or tilt the machine during transit.
● Do not remove the print cartridges when moving the machine.
Be sure to check the following points:
● The power switch is turned off.
● The power cord is unplugged from the wall outlet.
● All other cables are unplugged from the machine.
● All paper trays are empty.
If tray 2 is installed, remove it.
Return the scanning unit inside the machine to its original position using [Scanner Carriage] under [Machine Settings].
● Toner might spill inside the machine if the machine is not kept level during transit.
● For more information about moving the machine, contact your service representative.
● For details about [Scanner Carriage], see Machine Settings .
Top Previous Next
Copyright © 2009
Contents Previous Next Settings
Top Page > Maintenance > Disposal
Disposal
Ask your service representative for information about correct disposal of this machine.
Top Previous Next
Copyright © 2009
Contents Previous Next Settings
Top Page > Maintenance > If the Machine is Not Going to Be Used for a Long Time
If the Machine is Not Going to Be Used for a Long Time
If the machine is going to be inactive for a long time, follow the procedure shown here.
● Plug and unplug the power cable with dry hands, or an electric shock could occur.
● The inside of this machine becomes very hot. Do not touch parts labelled “ ” (indicating a hot surface).
● Unplug the power cord from the wall outlet before you move the machine. While moving the machine, you should take care that the power cord will not be damaged under the machine.
Related topics
Preparing the Machine for a Long Period of Inactivity
Using the Machine Again After It Has Been Inactive for a Long Period
Top Previous Next
Copyright © 2009
Contents Previous Next Settings
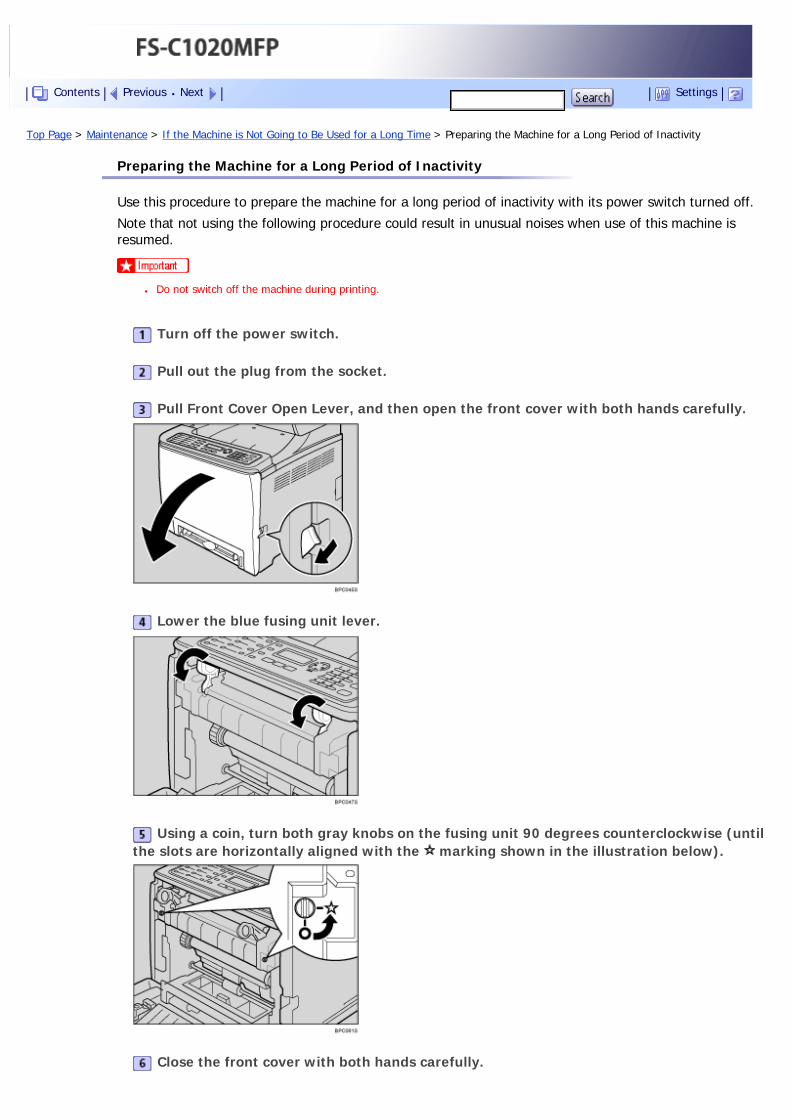
Top Page > Maintenance > If the Machine is Not Going to Be Used for a Long Time > Preparing the Machine for a Long Period of Inactivity
Preparing the Machine for a Long Period of Inactivity
Use this procedure to prepare the machine for a long period of inactivity with its power switch turned off.
Note that not using the following procedure could result in unusual noises when use of this machine is resumed.
● Do not switch off the machine during printing.
Turn off the power switch.
Pull out the plug from the socket.
Pull Front Cover Open Lever, and then open the front cover with both hands carefully.
Lower the blue fusing unit lever.
Using a coin, turn both gray knobs on the fusing unit 90 degrees counterclockwise (until the slots are horizontally aligned with the marking shown in the illustration below).
Close the front cover with both hands carefully.
Contents Previous Next Settings
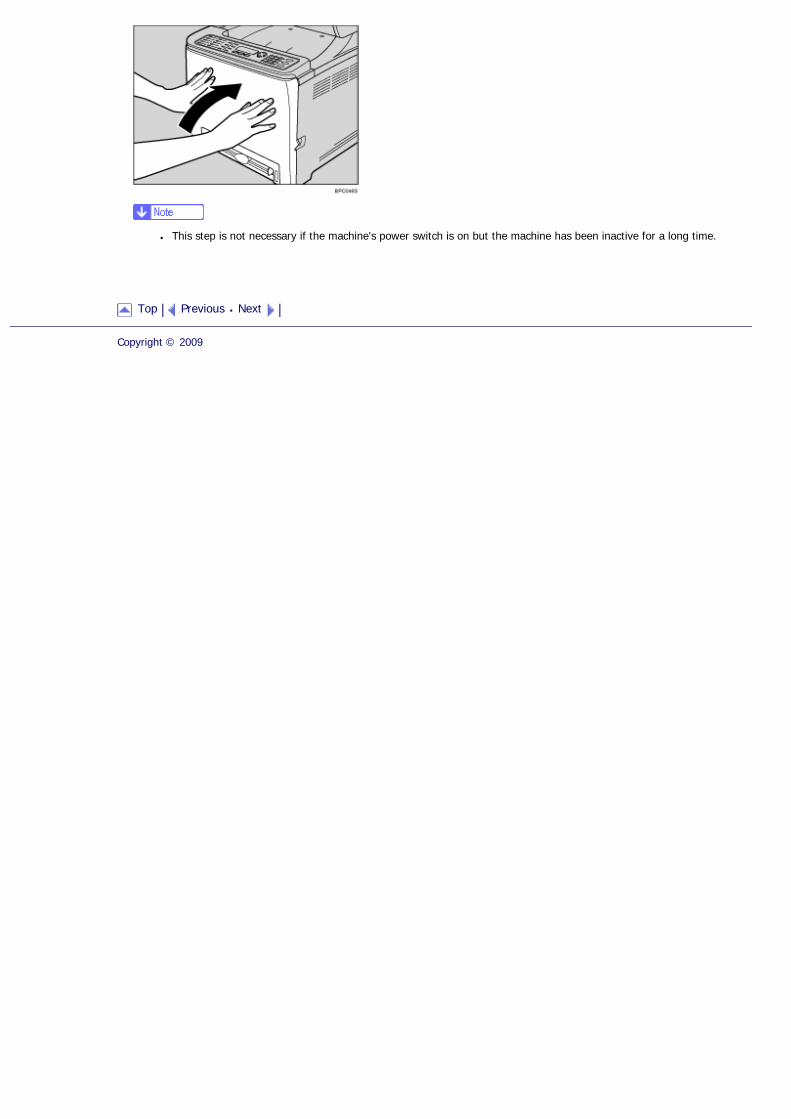
● This step is not necessary if the machine's power switch is on but the machine has been inactive for a long time.
Top Previous Next
Copyright © 2009
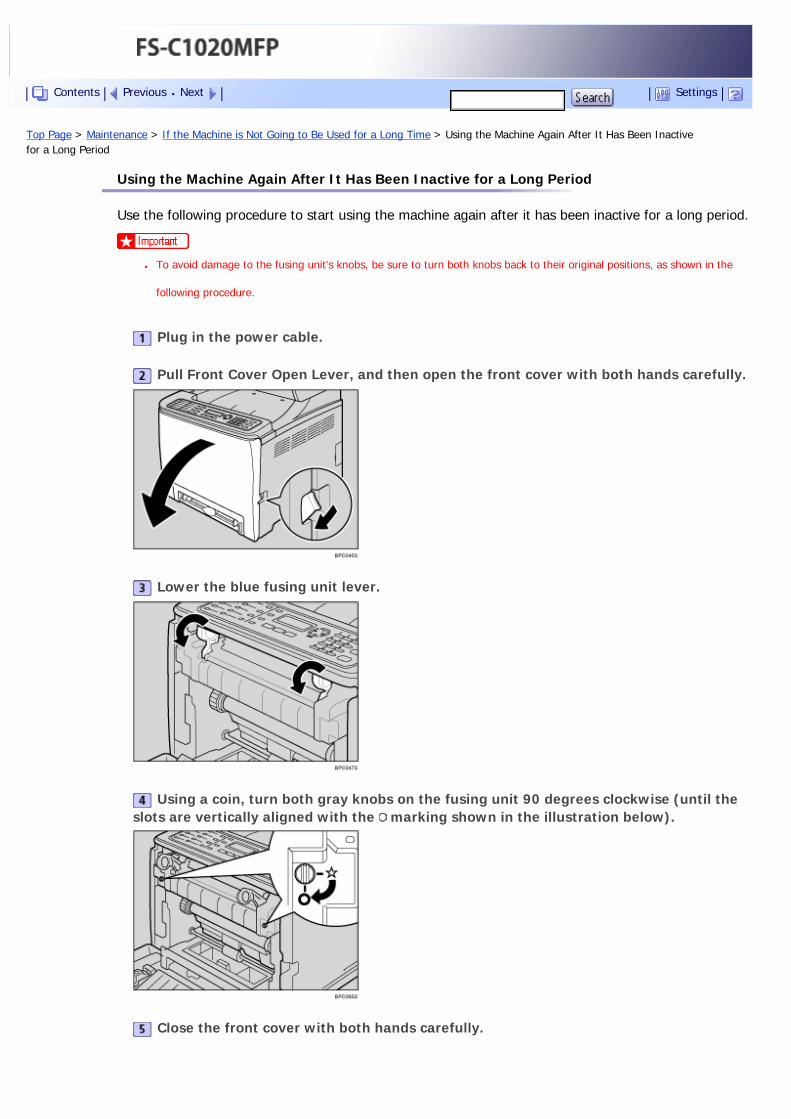
Top Page > Maintenance > If the Machine is Not Going to Be Used for a Long Time > Using the Machine Again After It Has Been Inactive for a Long Period
Using the Machine Again After It Has Been Inactive for a Long Period
Use the following procedure to start using the machine again after it has been inactive for a long period.
● To avoid damage to the fusing unit's knobs, be sure to turn both knobs back to their original positions, as shown in the
following procedure.
Plug in the power cable.
Pull Front Cover Open Lever, and then open the front cover with both hands carefully.
Lower the blue fusing unit lever.
Using a coin, turn both gray knobs on the fusing unit 90 degrees clockwise (until the slots are vertically aligned with the marking shown in the illustration below).
Close the front cover with both hands carefully.
Contents Previous Next Settings
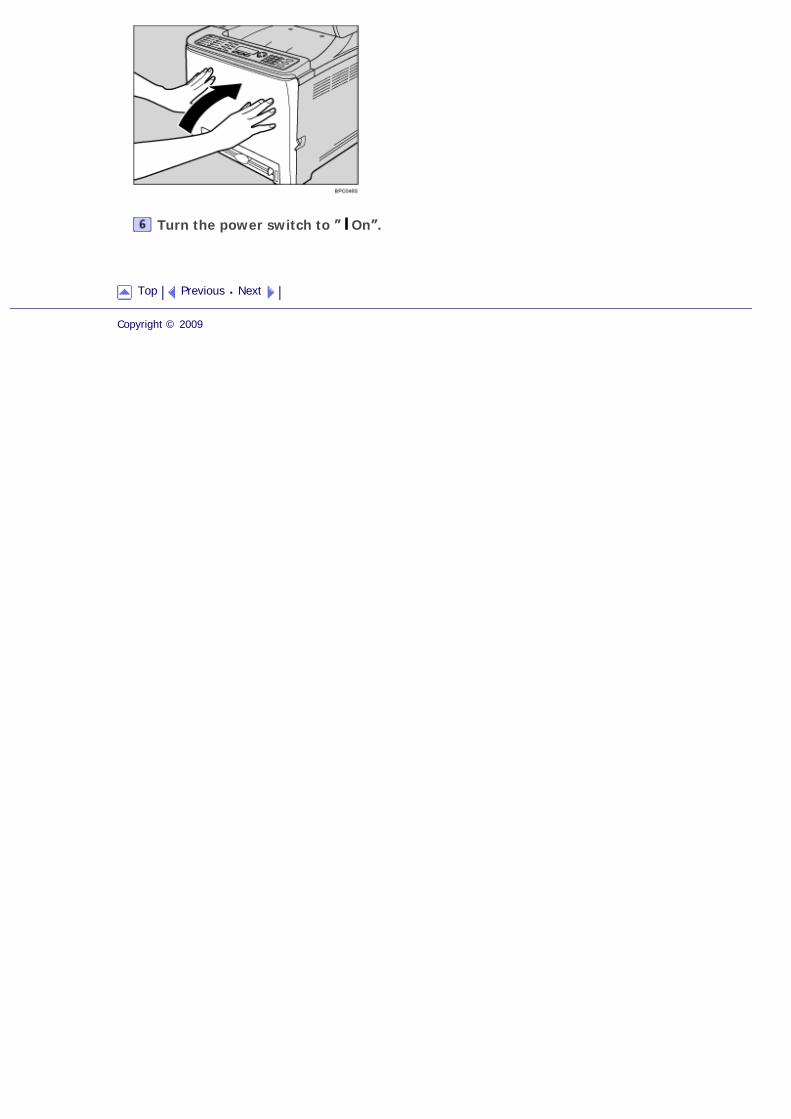
Turn the power switch to ” On”.
Top Previous Next
Copyright © 2009
Top Page > Maintenance > Consumables
Consumables
● Our products are engineered to meet high standards of quality and functionality, and we recommend that you use only the expendable supplies available at an authorized dealer.
Related topics
Print Cartridges
Waste Toner Bottle
Top Previous Next
Copyright © 2009
Contents Previous Next Settings
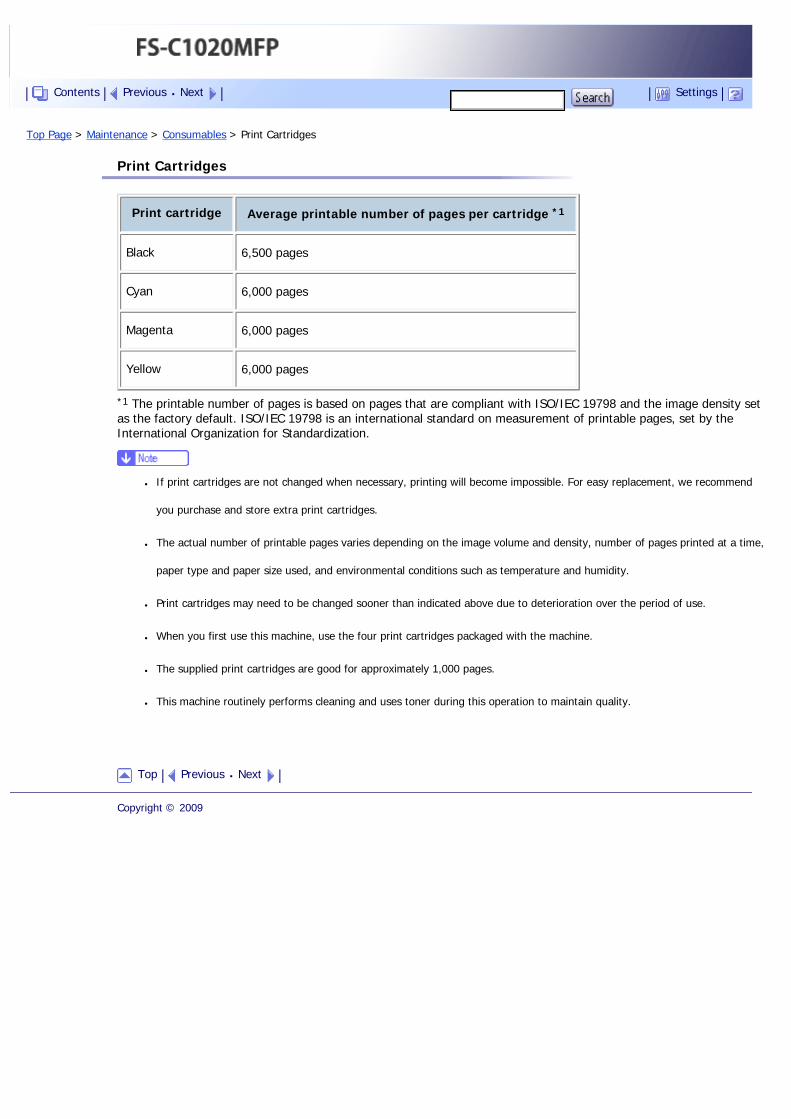
Top Page > Maintenance > Consumables > Print Cartridges
Print Cartridges
Print cartridge Average printable number of pages per cartridge *1
Black 6,500 pages
Cyan 6,000 pages
Magenta 6,000 pages
Yellow 6,000 pages
*1 The printable number of pages is based on pages that are compliant with ISO/IEC 19798 and the image density set as the factory default. ISO/IEC 19798 is an international standard on measurement of printable pages, set by the International Organization for Standardization.
● If print cartridges are not changed when necessary, printing will become impossible. For easy replacement, we recommend
you purchase and store extra print cartridges.
● The actual number of printable pages varies depending on the image volume and density, number of pages printed at a time,
paper type and paper size used, and environmental conditions such as temperature and humidity.
● Print cartridges may need to be changed sooner than indicated above due to deterioration over the period of use.
● When you first use this machine, use the four print cartridges packaged with the machine.
● The supplied print cartridges are good for approximately 1,000 pages.
● This machine routinely performs cleaning and uses toner during this operation to maintain quality.
Top Previous Next
Copyright © 2009
Contents Previous Next Settings
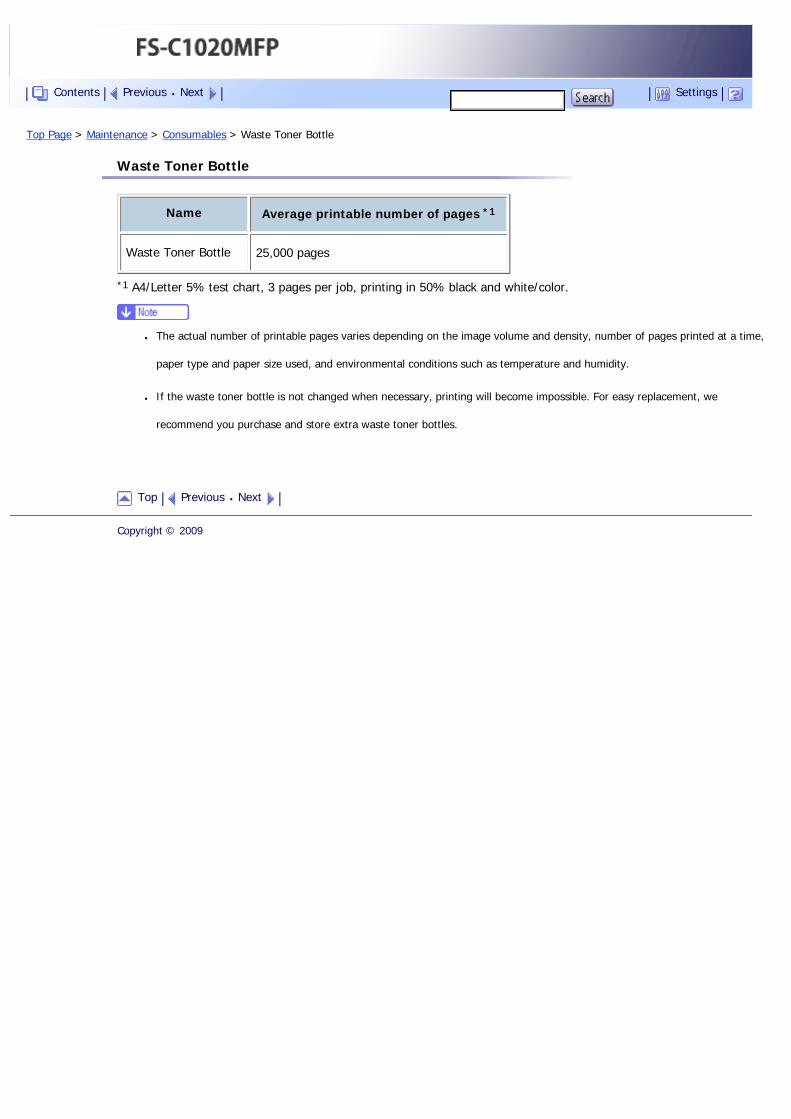
Top Page > Maintenance > Consumables > Waste Toner Bottle
Waste Toner Bottle
Name Average printable number of pages *1
Waste Toner Bottle 25,000 pages
*1 A4/Letter 5% test chart, 3 pages per job, printing in 50% black and white/color.
● The actual number of printable pages varies depending on the image volume and density, number of pages printed at a time,
paper type and paper size used, and environmental conditions such as temperature and humidity.
● If the waste toner bottle is not changed when necessary, printing will become impossible. For easy replacement, we
recommend you purchase and store extra waste toner bottles.
Top Previous Next
Copyright © 2009
Contents Previous Next Settings

Top Page > Appendix > Specifications of the Machine
Specifications of the Machine
This section lists the machine's specifications.
Related topics
General Function Specifications
Printer Function Specifications
Copier Function Specifications
Scanner Function Specifications
Fax Function Specifications
Top Previous Next
Copyright © 2009
Contents Previous Next Settings
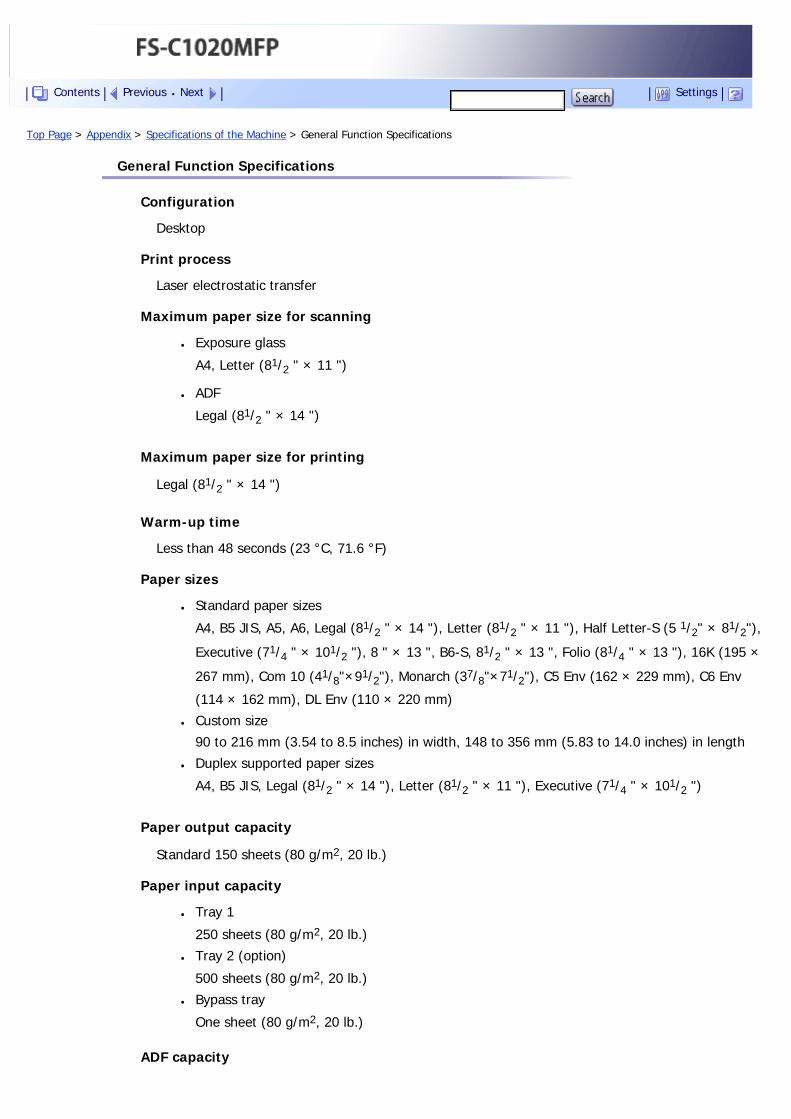
Top Page > Appendix > Specifications of the Machine > General Function Specifications
General Function Specifications
Configuration
Desktop
Print process
Laser electrostatic transfer
Maximum paper size for scanning
● Exposure glass
A4, Letter (81/2 " × 11 ")
● ADF
Legal (81/2 " × 14 ")
Maximum paper size for printing
Legal (81/2 " × 14 ")
Warm-up time
Less than 48 seconds (23 °C, 71.6 °F)
Paper sizes
● Standard paper sizes
A4, B5 JIS, A5, A6, Legal (81/2 " × 14 "), Letter (81/2 " × 11 "), Half Letter-S (5 1/2" × 81/2"),
Executive (71/4 " × 101/2 "), 8 " × 13 ", B6-S, 81/2 " × 13 ", Folio (81/4 " × 13 "), 16K (195 ×
267 mm), Com 10 (41/8"×91/2"), Monarch (37/8"×71/2"), C5 Env (162 × 229 mm), C6 Env
(114 × 162 mm), DL Env (110 × 220 mm)
● Custom size
90 to 216 mm (3.54 to 8.5 inches) in width, 148 to 356 mm (5.83 to 14.0 inches) in length
● Duplex supported paper sizes
A4, B5 JIS, Legal (81/2 " × 14 "), Letter (81/2 " × 11 "), Executive (71/4 " × 101/2 ")
Paper output capacity
Standard 150 sheets (80 g/m2, 20 lb.)
Paper input capacity
● Tray 1
250 sheets (80 g/m2, 20 lb.)
● Tray 2 (option)
500 sheets (80 g/m2, 20 lb.)
● Bypass tray
One sheet (80 g/m2, 20 lb.)
ADF capacity
Contents Previous Next Settings
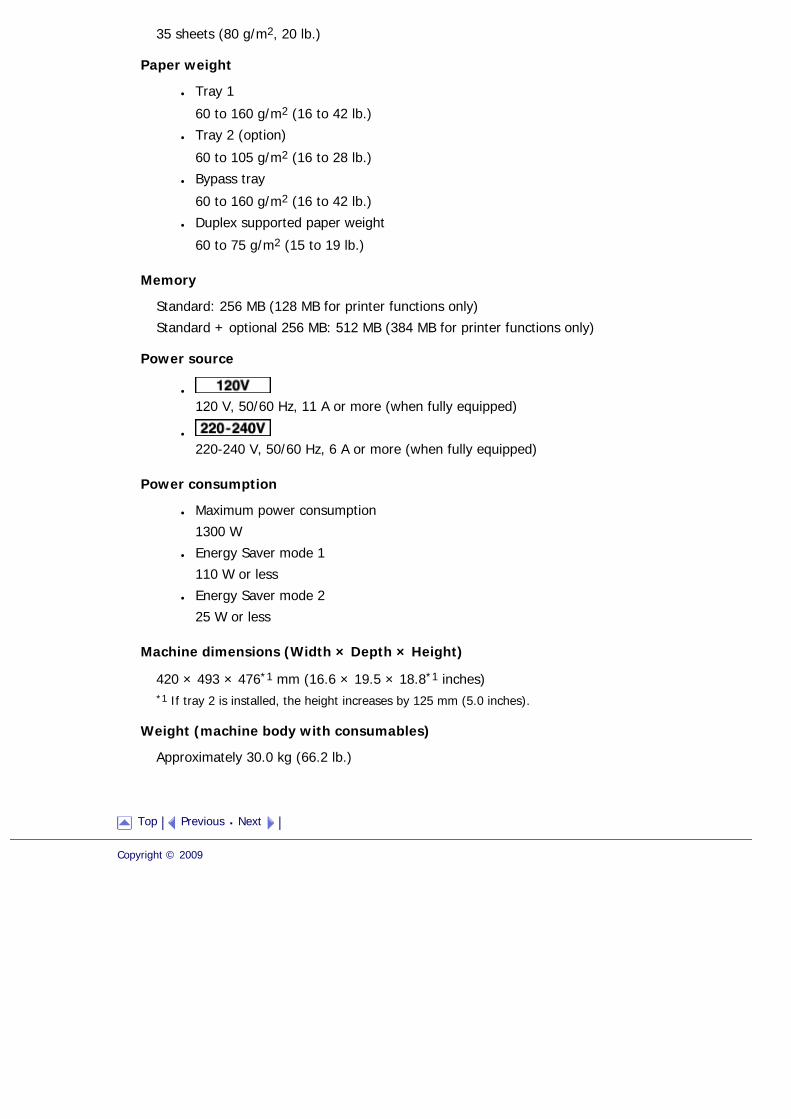
35 sheets (80 g/m2, 20 lb.)
Paper weight
● Tray 1
60 to 160 g/m2 (16 to 42 lb.)
● Tray 2 (option)
60 to 105 g/m2 (16 to 28 lb.)
● Bypass tray
60 to 160 g/m2 (16 to 42 lb.)
● Duplex supported paper weight
60 to 75 g/m2 (15 to 19 lb.)
Memory
Standard: 256 MB (128 MB for printer functions only)
Standard + optional 256 MB: 512 MB (384 MB for printer functions only)
Power source
●
120 V, 50/60 Hz, 11 A or more (when fully equipped)
●
220-240 V, 50/60 Hz, 6 A or more (when fully equipped)
Power consumption
● Maximum power consumption
1300 W
● Energy Saver mode 1
110 W or less
● Energy Saver mode 2
25 W or less
Machine dimensions (Width × Depth × Height)
420 × 493 × 476*1 mm (16.6 × 19.5 × 18.8*1 inches)*1 If tray 2 is installed, the height increases by 125 mm (5.0 inches).
Weight (machine body with consumables)
Approximately 30.0 kg (66.2 lb.)
Top Previous Next
Copyright © 2009
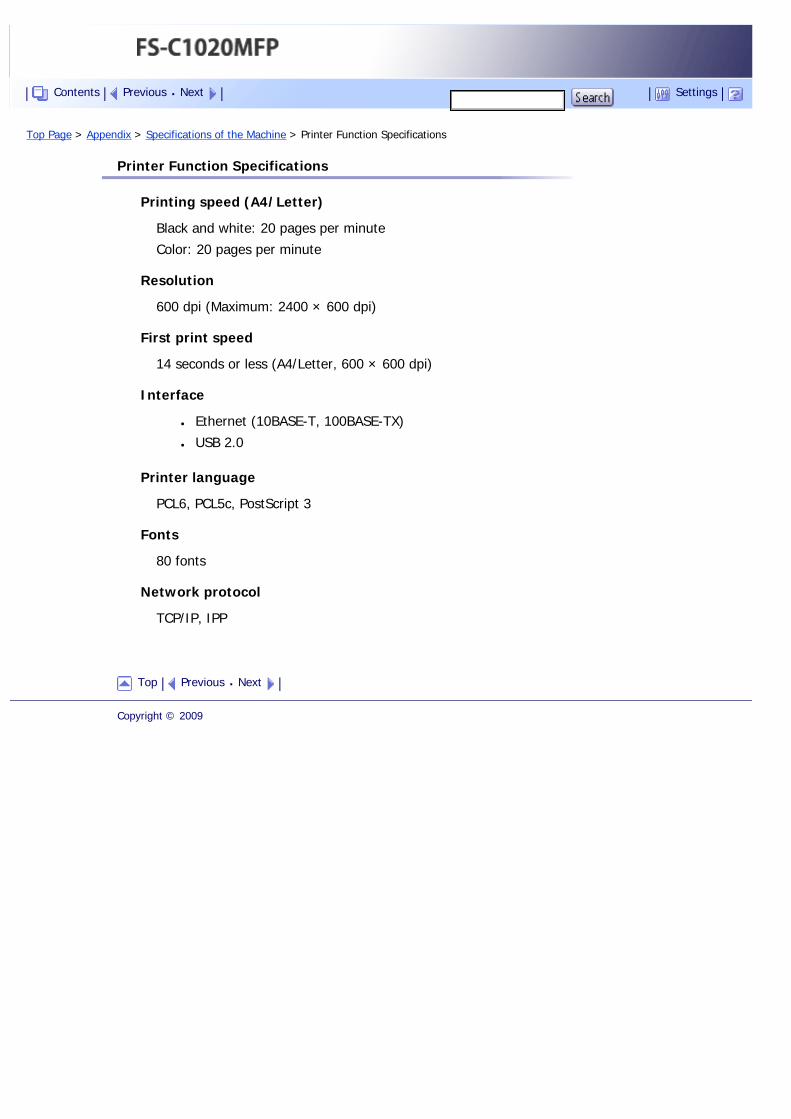
Top Page > Appendix > Specifications of the Machine > Printer Function Specifications
Printer Function Specifications
Printing speed (A4/Letter)
Black and white: 20 pages per minute
Color: 20 pages per minute
Resolution
600 dpi (Maximum: 2400 × 600 dpi)
First print speed
14 seconds or less (A4/Letter, 600 × 600 dpi)
Interface
● Ethernet (10BASE-T, 100BASE-TX)
● USB 2.0
Printer language
PCL6, PCL5c, PostScript 3
Fonts
80 fonts
Network protocol
TCP/IP, IPP
Top Previous Next
Copyright © 2009
Contents Previous Next Settings
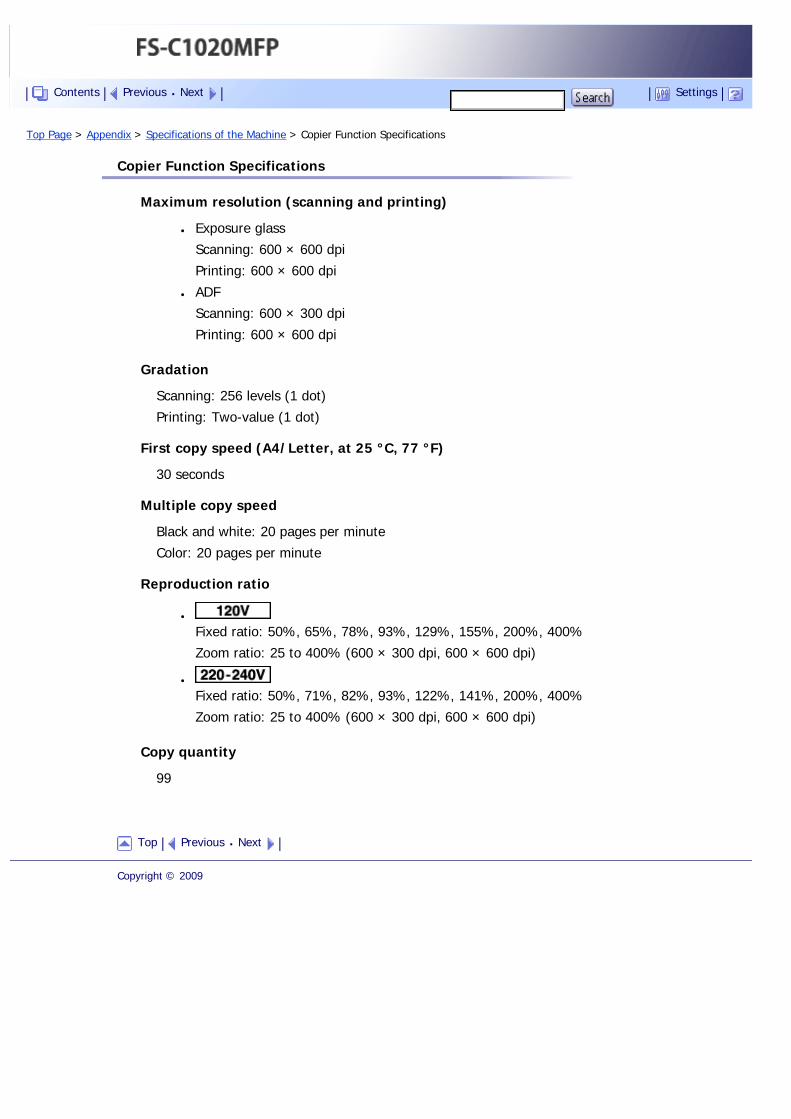
Top Page > Appendix > Specifications of the Machine > Copier Function Specifications
Copier Function Specifications
Maximum resolution (scanning and printing)
● Exposure glass
Scanning: 600 × 600 dpi
Printing: 600 × 600 dpi
● ADF
Scanning: 600 × 300 dpi
Printing: 600 × 600 dpi
Gradation
Scanning: 256 levels (1 dot)
Printing: Two-value (1 dot)
First copy speed (A4/Letter, at 25 °C, 77 °F)
30 seconds
Multiple copy speed
Black and white: 20 pages per minute
Color: 20 pages per minute
Reproduction ratio
●
Fixed ratio: 50%, 65%, 78%, 93%, 129%, 155%, 200%, 400%
Zoom ratio: 25 to 400% (600 × 300 dpi, 600 × 600 dpi)
●
Fixed ratio: 50%, 71%, 82%, 93%, 122%, 141%, 200%, 400%
Zoom ratio: 25 to 400% (600 × 300 dpi, 600 × 600 dpi)
Copy quantity
99
Top Previous Next
Copyright © 2009
Contents Previous Next Settings

Top Page > Appendix > Specifications of the Machine > Scanner Function Specifications
Scanner Function Specifications
Maximum scanning area (horizontal × vertical)
● Exposure glass
216 × 297 mm (8.5 × 11.7 inches)
● ADF
216 × 356 mm (8.5 × 14.1 inches)
Maximum resolution when scanning from the control panel (Scan to E-mail, Scan to FTP, Scan to Folder)
● Exposure glass
600 × 600 dpi
● ADF
600 × 600 dpi
Maximum resolution when scanning from a computer (TWAIN)
● Exposure glass
19200 × 19200 dpi
● ADF
600 × 600 dpi
Maximum resolution when scanning from a computer (WIA)
● Exposure glass
600 × 600 dpi
● ADF
600 × 600 dpi
Gradation
Input: 16 bit color processing
Output: 8 bit color processing
Scanning time
Black and white: 5 seconds or less
Color: 10 seconds or less (A4/200 dpi/Compressed)
Not including transfer time.
ADF throughput
Black and white: 120 mm per second
Color: 60 mm per second (200 dpi)
Interface
● Scanning from the control panel
Ethernet (10BASE-T, 100BASE-TX)
● Scanning from a computer
Ethernet (10BASE-T, 100BASE-TX), USB 2.0
Contents Previous Next Settings

Sendable file formats
TIFF, JPEG, PDF
Address book
Maximum 100 items
Number of redials: 1
Top Previous Next
Copyright © 2009
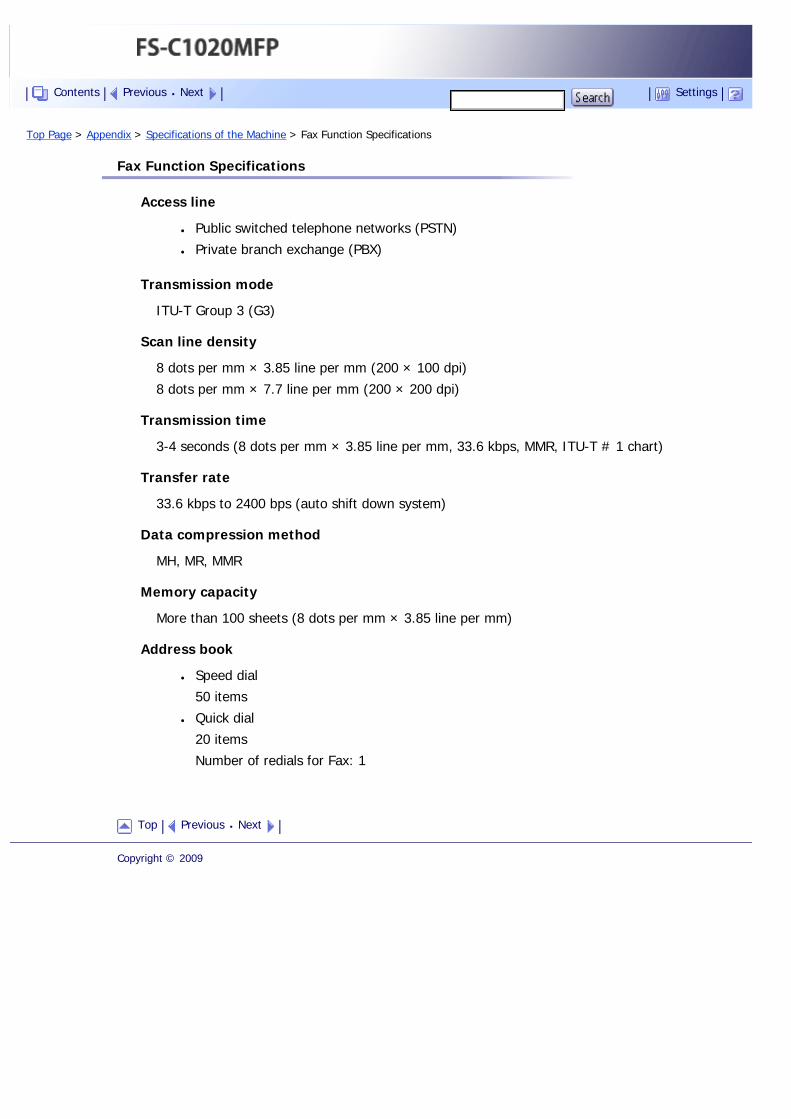
Top Page > Appendix > Specifications of the Machine > Fax Function Specifications
Fax Function Specifications
Access line
● Public switched telephone networks (PSTN)
● Private branch exchange (PBX)
Transmission mode
ITU-T Group 3 (G3)
Scan line density
8 dots per mm × 3.85 line per mm (200 × 100 dpi)
8 dots per mm × 7.7 line per mm (200 × 200 dpi)
Transmission time
3-4 seconds (8 dots per mm × 3.85 line per mm, 33.6 kbps, MMR, ITU-T # 1 chart)
Transfer rate
33.6 kbps to 2400 bps (auto shift down system)
Data compression method
MH, MR, MMR
Memory capacity
More than 100 sheets (8 dots per mm × 3.85 line per mm)
Address book
● Speed dial
50 items
● Quick dial
20 items
Number of redials for Fax: 1
Top Previous Next
Copyright © 2009
Contents Previous Next Settings
Top Page > Appendix > Specifications of Options
Specifications of Options
This section lists the specifications of the various options.
Related topics
Paper Feed Unit
Memory Unit
Top Previous Next
Copyright © 2009
Contents Previous Next Settings
Top Page > Appendix > Specifications of Options > Paper Feed Unit
Paper Feed Unit
Paper capacity
500 sheets
Paper size
A4, Letter (81/2” × 11”)
Dimensions (Width × Depth × Height)
400 × 450 × 127 mm (15.8 × 17.8 × 5 inches)
Paper weight
60 to 105 g/m2(16 to 28 lb.)
Weight
Less than 4 kg (8.9 lb.)
Top Previous Next
Copyright © 2009
Contents Previous Next Settings
Top Page > Appendix > Specifications of Options > Memory Unit
Memory Unit
Module Type
DDR-DIMM (Double Data Rate Dual Inline Memory Module)
Memory Type
DDR-SDRAM (Double Data Rate Synchronous Dynamic RAM)
Number of Pins
100
Top Previous Next
Copyright © 2009
Contents Previous Next Settings
Top Page > Appendix > Electromagnetic Interference
Electromagnetic Interference
If this machine is located close to another electronic device, both devices may malfunction due electromagnetic interference.
Televisions and radios may produce noise if located too close to this machine. If this happens, do the following:
● Move the television or radio as far as possible from the machine.
● Change the position of the antenna of the television or radio.
● Use a different wall outlet on a different circuit.
Top Previous Next
Copyright © 2009
Contents Previous Next Settings
Top Page > Appendix > Information about Installed Software
Information about Installed Software
Related topics
expat
JPEG LIBRARY
Top Previous Next
Copyright © 2009
Contents Previous Next Settings

Top Page > Appendix > Information about Installed Software > expat
expat
● The software including controller, etc. (hereinafter “software”) installed on this product uses the expat under the conditions mentioned below.
● The product manufacturer provides warranty and support to the software of the product including the expat, and the product manufacturer makes the initial developer and copyright holder of the expat, free from these obligations.
● Information relating to the expat is available at: http://expat.sourceforge.net/
Copyright © 1998, 1999, 2000 Thai Open Source Software Center, Ltd. and Clark Cooper.
Copyright © 2001, 2002 Expat maintainers.
Permission is hereby granted, free of charge, to any person obtaining a copy of this software and associated documentation files (the “Software”), to deal in the Software without restriction, including without limitation the rights to use, copy, modify, merge, publish, distribute, sublicense, and/or sell copies of the Software, and to permit persons to whom the Software is furnished to do so, subject to the following conditions:
The above copyright notice and this permission notice shall be included in all copies or substantial portions of the Software.
THE SOFTWARE IS PROVIDED “AS IS”, WITHOUT WARRANTY OF ANY KIND, EXPRESS OR IMPLIED, INCLUDING BUT NOT LIMITED TO THE WARRANTIES OF MERCHANTABILITY, FITNESS FOR A PARTICULAR PURPOSE AND NONINFRINGEMENT. IN NO EVENT SHALL THE AUTHORS OR COPYRIGHT HOLDERS BE LIABLE FOR ANY CLAIM, DAMAGES OR OTHER LIABILITY, WHETHER IN AN ACTION OF CONTRACT, TORT OR OTHERWISE, ARISING FROM, OUT OF OR IN CONNECTION WITH THE SOFTWARE OR THE USE OR OTHER DEALINGS IN THE SOFTWARE.
Top Previous Next
Copyright © 2009
Contents Previous Next Settings
Top Page > Appendix > Information about Installed Software > JPEG LIBRARY
JPEG LIBRARY
The software installed on this product is based in part on the work of the Independent JPEG Group.
Top Previous Next
Copyright © 2009
Contents Previous Next Settings