Embed Size (px)
Citation preview
FRONT PAGE BASICS TUTORIAL BEFORE YOU START – READ THIS:
1. YOU MUST USE A USB JUMP DRIVE if you are going to be using more than one computer system to work on your Frontpage website AND you are including links to video clips, PDF files, Word documents and/or lots of images. A floppy disk won’t be large enough and using CD-Rs can create link problems.
WARNING: You can not use more than one removable media, like 2 floppy disks or a floppy disk and a CD-R, to store web pages, pictures, media and/or any other documents that you are going to create “relative” links to from any of your web pages. The links will not work!
If you know what you’re doing….. you could create “absolute” links to these pages, media, documents but if you don’t know what the difference is between “relative” and “absolute” links are and how to create them, DON’T DO IT!
2. DO NOT APPLY A DESIGN THEME TO ANY OF YOUR PAGES if you don’t know how to change the Folder View on your computer so that you can see “hidden files and folders”. When you apply a Design Theme, it creates a “hidden” folder (a very stupid thing for Microsoft to do!!) that is necessary to upload to the server so that you can view your pages with the theme’s backgrounds, bullets, etc. But, you will not be able to find the folder to transfer it to the server unless you change the Folder View to show hidden files and folders.
3. READ AND FOLLOW THESE INSTRUCTIONS, STEP-BY-STEP, VERY CAREFULLY.
4. IF YOU ARE ADDING TO AN EXISTING WEBSITE OR CONTINUING WORK ON A WEBSITE THAT YOU ALREADY STARTED: You must reopen the existing website first to continue working on it. (ie: Add new pages, modify pages, create links to pages, documents or media clips, etc.) See the Note under Step 3 below.
If, at any time, you don’t understand how to do any of the following steps, it’s best you STOP and get help before continuing.
That being said here are the key steps for creating a Frontpage Website:
1. Create a folder on your USB JumpDrive. You can name it anything you want but for this tutorial, we are naming it, “myweb”.
2. Save or transfer all media (video/audio files), documents (like PDFs, Word Docs, Excel Spreadsheets, etc. ) and pictures into the myweb folder.
3. Create a New FrontPage Web Site Note: If you are continuing work on website you already started creating, you would skip this step and just choose File | Open Web from the FrontPage menu bar then browse to the folder that contains your website (myweb or whatever you named the folder where you started building your website) and click “open”. Your “old” website will open. Assuming you already created a “home page” with the filename, index.htm, you should also skip Step 4, Create a Home Page, and just continue adding, modifying pages, creating links, etc.
• From the Frontpage Menu select: File | New o A “Task Pane” will open on the right
• In the Task Pane on the right under New Web Site select : One Page Web Site o A “Web Site Templates” window will open
• In the Web Site Templates window: o Under Options, click on the Browse button then navigate to the
myweb folder you created on your USB JumpDrive o Now, on the left side of the Web Site Templates window under the
General Tab select: One Page Web Site o Click OK
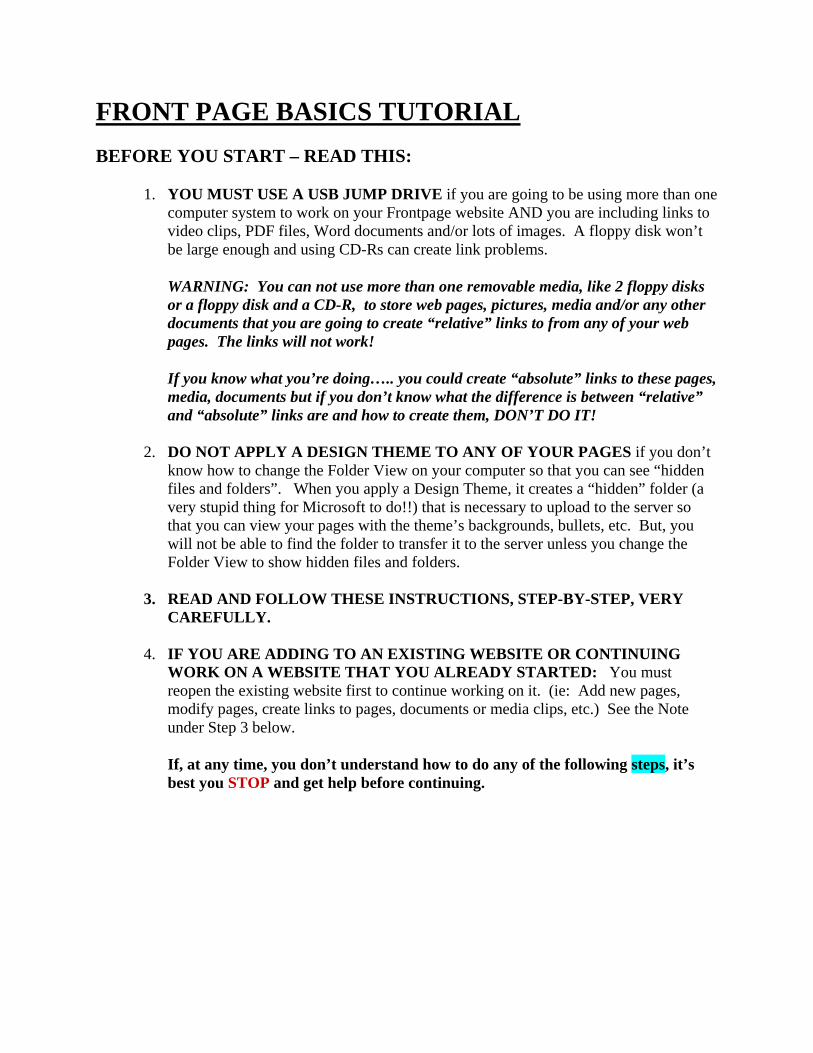
• Your “Website” has been created. • On the left side is a Folder List panel. On the right side is a Tab labeled Web
Site. Both of these will display a _private and images folder and a file named, index.htm
4. Your “home page” --- It’s already there!!! Note: In this step and in Step 5 and Step 6, you will just be creating pages with “titles” for the pages typed at the top of each page. After saving all of the pages you will need for your website, you will create navigation buttons with links between all of the pages. It’s easiest to do this first, then add links between your pages and finally, add “content” and links to other documents, media clips, other websites, email, etc. to each of the pages.
• When you selected One Page Web Site in the previous step, a “Home Page” was automatically created and saved on your website with the filename, index.htm.
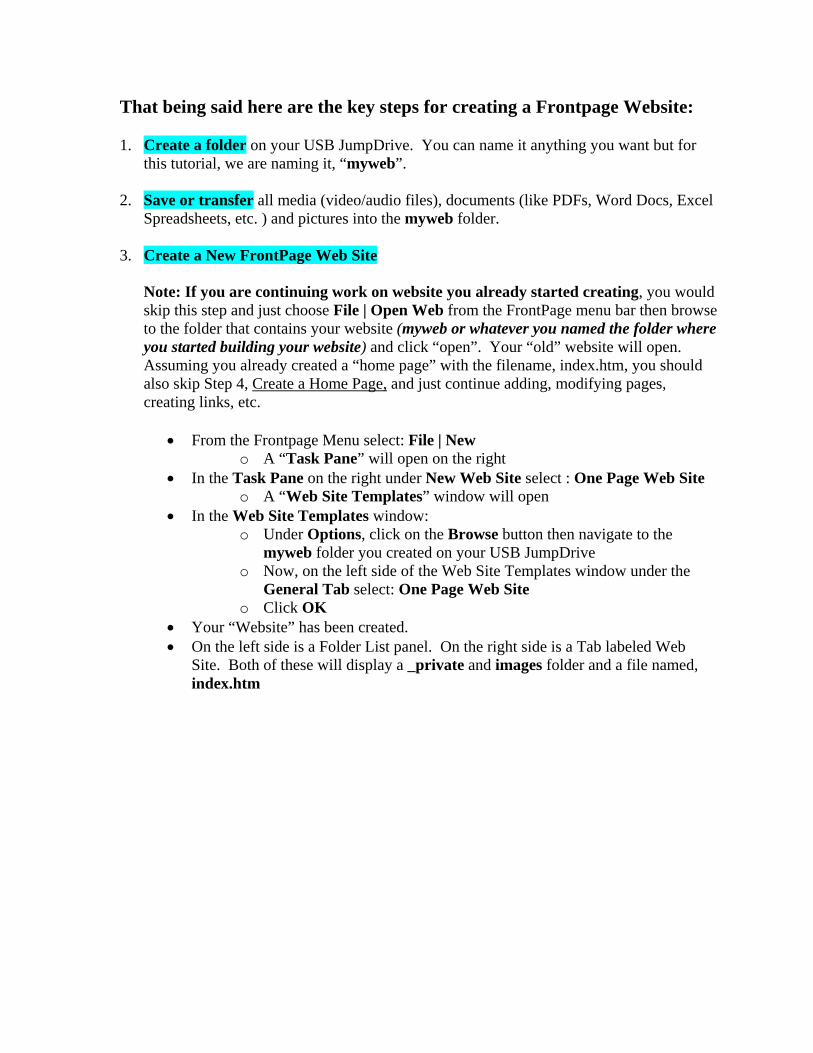
• To open your “Home Page” in the Design View, simply double-click on the file, index.htm in either the Folder list or the Web Site pane.
• After opening your “Home Page” the Design View will automatically open with a new tab at the top of the pane with the name, index.htm (the filename for your “Home Page” as shown below:
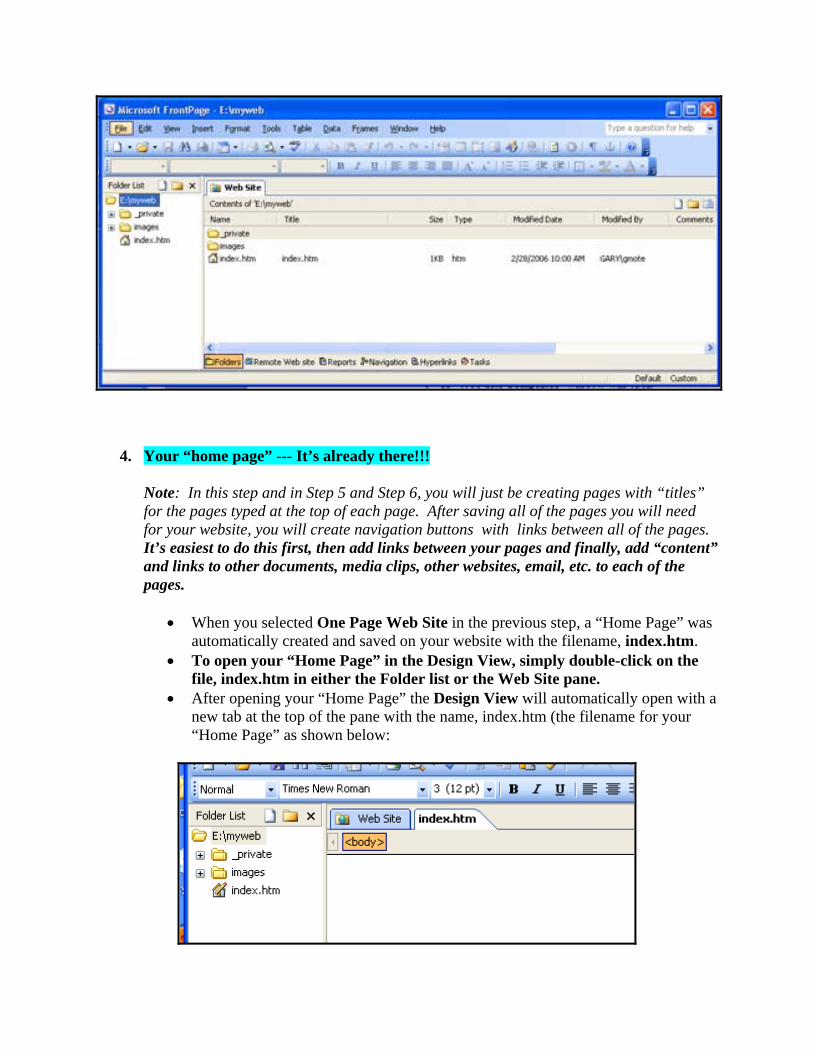
• This is a “blank” page. Type the words, Home Page, onto this page as shown below:
• From the menu bar select: File | Save as o The “Save as” window will open
• In the Save As Window: • Change the “Title” of the page by clicking on the Change Title… button.
o Note: This “title” has nothing to do with the “file name”. This “title” is the name that will be saved as a “bookmark” if someone “bookmarks” this page in their “favorites” folder of their browser.
• Note: You don’t have to change the filename. Since your “Home Page” was automatically created in Step #3 above and given the filename, index.htm.
• Click the Save button to save your Home Page. Answer yes when it asks you if you want to replace the existing page.
Optional: Apply a Design Theme
• At this point you might want to apply a Design Theme as the default theme for all of the pages on your website.
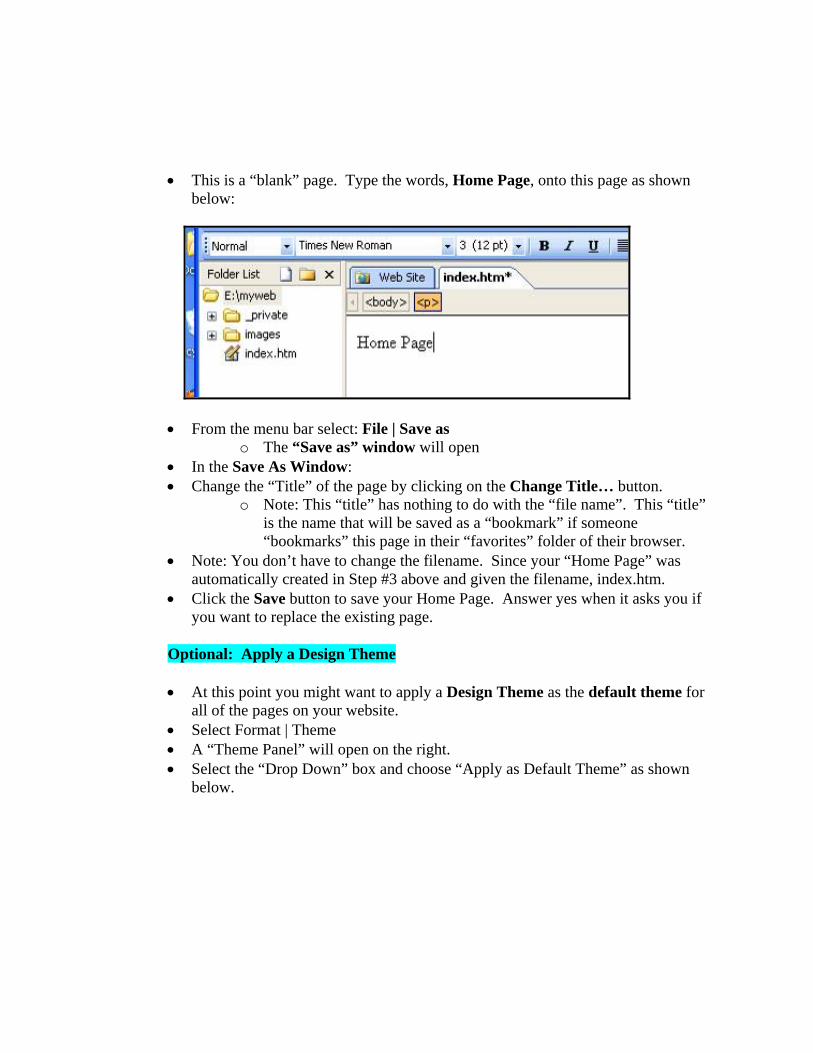
• Select Format | Theme • A “Theme Panel” will open on the right. • Select the “Drop Down” box and choose “Apply as Default Theme” as shown
below.
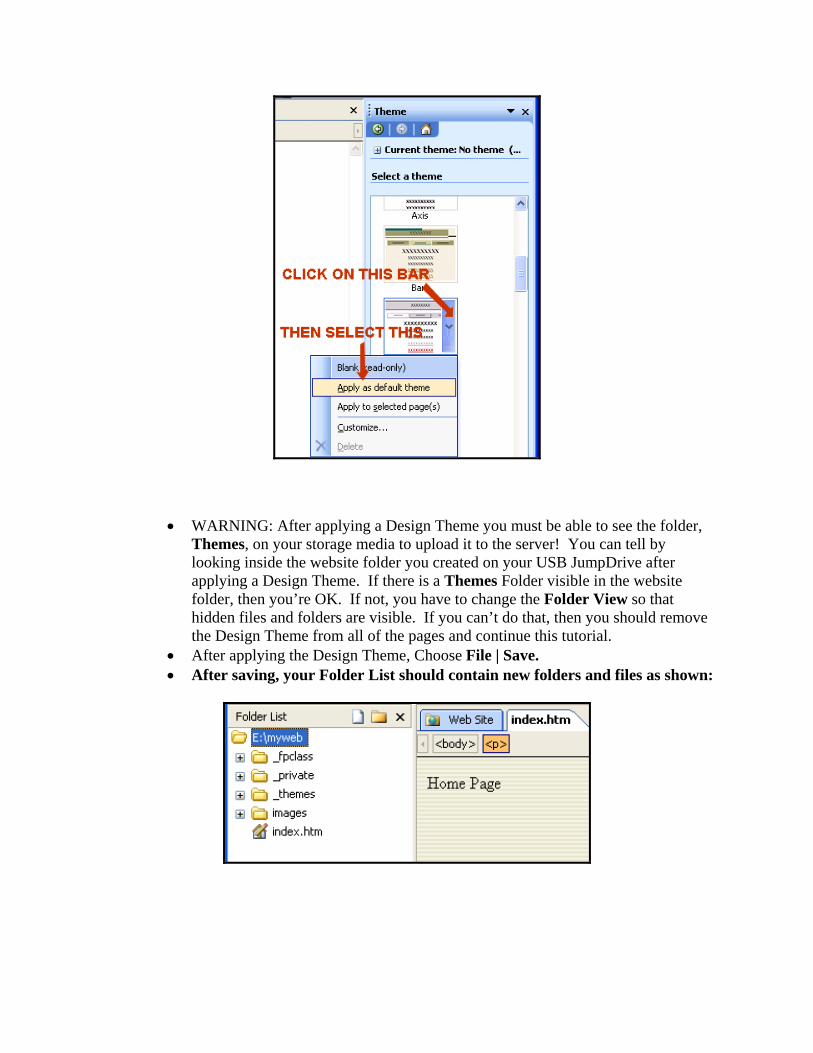
• WARNING: After applying a Design Theme you must be able to see the folder, Themes, on your storage media to upload it to the server! You can tell by looking inside the website folder you created on your USB JumpDrive after applying a Design Theme. If there is a Themes Folder visible in the website folder, then you’re OK. If not, you have to change the Folder View so that hidden files and folders are visible. If you can’t do that, then you should remove the Design Theme from all of the pages and continue this tutorial.
• After applying the Design Theme, Choose File | Save. • After saving, your Folder List should contain new folders and files as shown:

5. Create the rest of the pages you will need on your website
• From the Menu Bar, select File | New | Page o The Task Pane will reopen on the right
• From the Task Pane select New | Blank Page • A new blank page will open in the center Page View with the tab,
new_page_1.htm as shown below:
• Type a name for that page at the top of this page. You can type whatever you want there. (ie: You could type “Standards 1” or “My Resume” or “Links”, etc.
• From the menu bar select: File | Save as o The “Save as” window will open
• In the Save As Window: o Check to make sure that the Save in: “location” is to your myweb
folder. Note: It should automatically default to this location.
o Frontpage will automatically assign whatever you typed on the page as the file name for that page as shown below:
o For instance, if you typed, Standard 1, on the page in the Design View (as shown above), the file name will automatically default to: standards_1.htm. If you typed, My Resume, on the page, the filename will automatically default to my_resume.htm
• Note that the capital letters in the name you typed on the webpage itself are automatically changed to all lowercase letters and the spaces are changed to
underscores. This is a good thing since it’s generally not good practice to leave spaces or use capital letters in a filename.
• Also note that the “Title” matches what you typed on the page.
If you want, you can just save the page with the default file name and title or you can change the file name and title to whatever you want them to be. Here, we used the defaults.
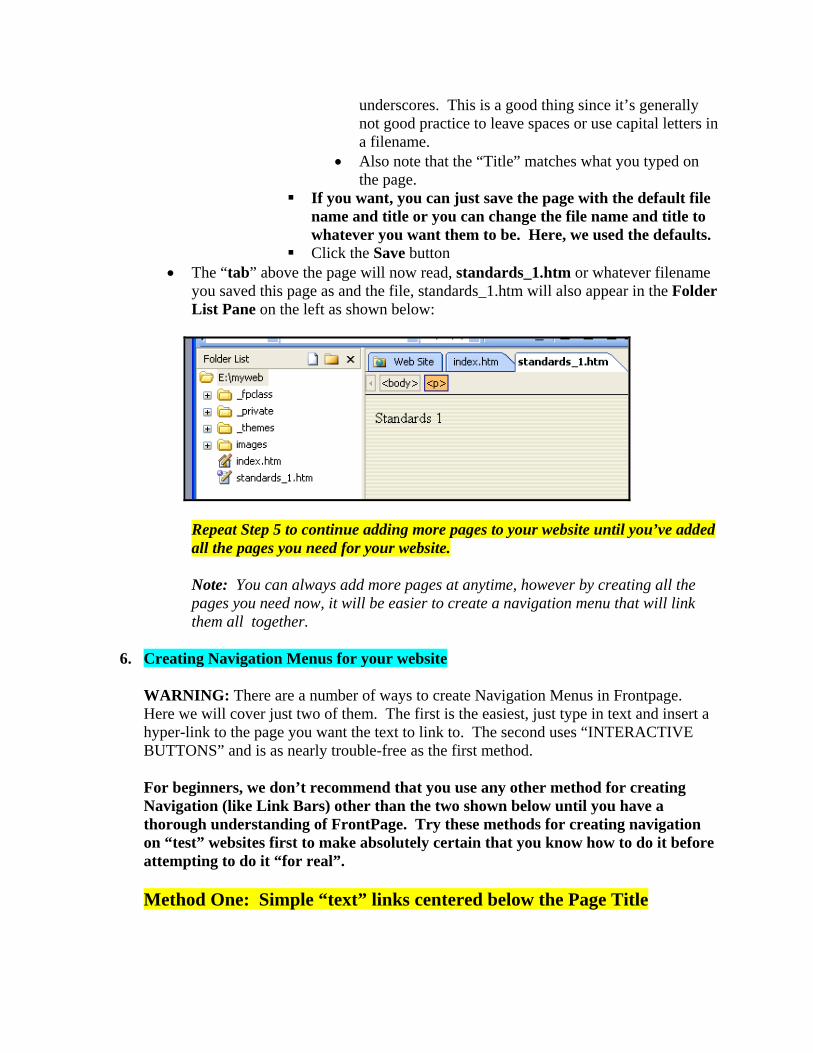
Click the Save button • The “tab” above the page will now read, standards_1.htm or whatever filename
you saved this page as and the file, standards_1.htm will also appear in the Folder List Pane on the left as shown below:
Repeat Step 5 to continue adding more pages to your website until you’ve added all the pages you need for your website.
Note: You can always add more pages at anytime, however by creating all the pages you need now, it will be easier to create a navigation menu that will link them all together.
6. Creating Navigation Menus for your website
WARNING: There are a number of ways to create Navigation Menus in Frontpage. Here we will cover just two of them. The first is the easiest, just type in text and insert a hyper-link to the page you want the text to link to. The second uses “INTERACTIVE BUTTONS” and is as nearly trouble-free as the first method.
For beginners, we don’t recommend that you use any other method for creating Navigation (like Link Bars) other than the two shown below until you have a thorough understanding of FrontPage. Try these methods for creating navigation on “test” websites first to make absolutely certain that you know how to do it before attempting to do it “for real”.
Method One: Simple “text” links centered below the Page Title
• The easiest way to create links between all of the pages on your new website is to create them on one page, like your home page, then copy and paste all of the links as a group onto the other pages.
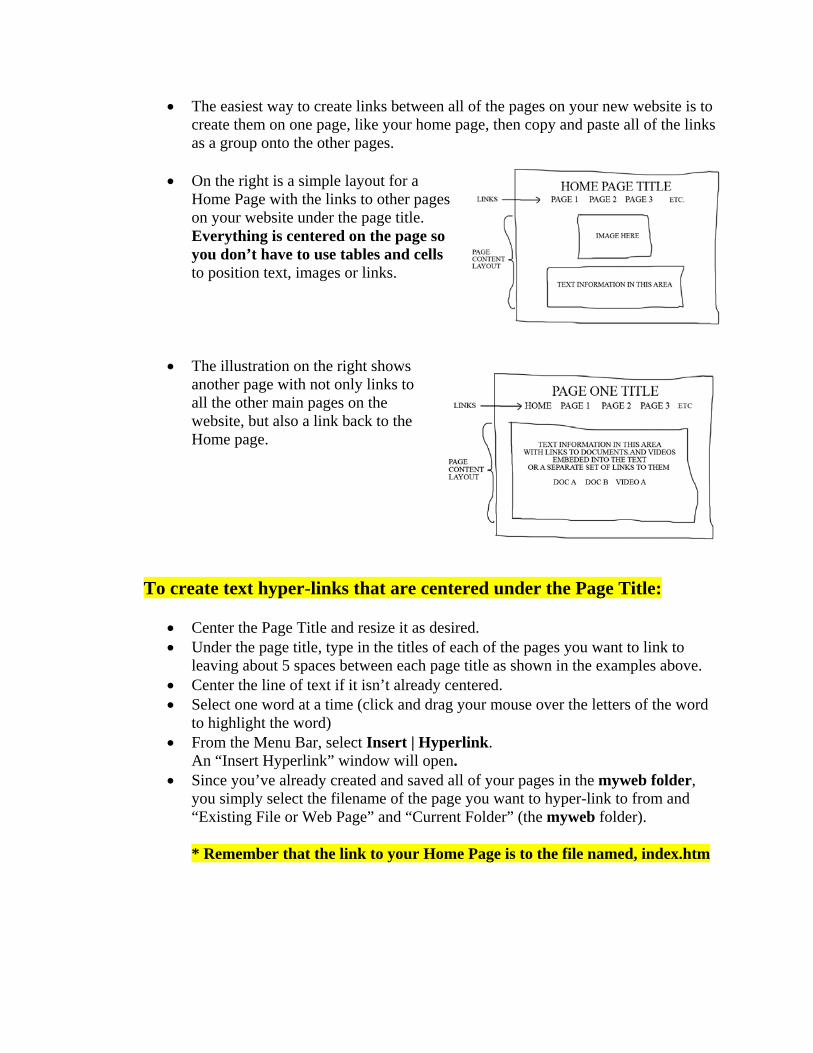
• On the right is a simple layout for a Home Page with the links to other pages on your website under the page title. Everything is centered on the page so you don’t have to use tables and cells to position text, images or links.
• The illustration on the right shows another page with not only links to all the other main pages on the website, but also a link back to the Home page.
To create text hyper-links that are centered under the Page Title:
• Center the Page Title and resize it as desired. • Under the page title, type in the titles of each of the pages you want to link to
leaving about 5 spaces between each page title as shown in the examples above. • Center the line of text if it isn’t already centered. • Select one word at a time (click and drag your mouse over the letters of the word
to highlight the word) • From the Menu Bar, select Insert | Hyperlink.
An “Insert Hyperlink” window will open. • Since you’ve already created and saved all of your pages in the myweb folder,
you simply select the filename of the page you want to hyper-link to from and “Existing File or Web Page” and “Current Folder” (the myweb folder). * Remember that the link to your Home Page is to the file named, index.htm
• The easiest way to create links between all of the pages on your new website is to create them on one page, such as your Home Page, then copy and paste all of the links as a group onto the other pages.
Method Two: Interactive Buttons placed in a column [ Interactive “buttons” change color or “style” when a mouse hovers over them and when “clicked” and are much more “dynamic” than simple text hyper-links. While you can center Interactive Buttons under the page title as described above for the “text” hyperlinks, it’s sometimes more effective to have your navigation menu placed on the left “column” of your web pages. However, you must first create a Table with columns (and rows) of cells to HOLD the buttons in position on the left and allow you to add content (text, pictures, etc.) to the right of the buttons.
Create a Table with 2 columns and 1 row
• Select Table | Insert | Table • Specify the number of columns (2) and rows (1) • Set the Border Size to “0” unless you want to see a box around the table’s cells. • Click OK • A table will appear on your web page as “Dotted Lines”
o Position the cursor INSIDE THE CELL ON THE LEFT on the page in the Design View where you want to create a button.
o Choose Insert | Interactive Button Alternately, you can choose: Insert | Navigation then select Dynamic Effect | Interactive Button
o In the Interactive Button window, choose a button style you like (examples will be seen in a preview window.
o Change the Text to what you want the button to read. ie: Type in “HOME” for your Home Page.
o Click the Browse button and select the filename of the page you want the button to link to. In the example below, the Interactive Button will link to the Home Page. Remember, the filename for the Home Page is; index.htm.
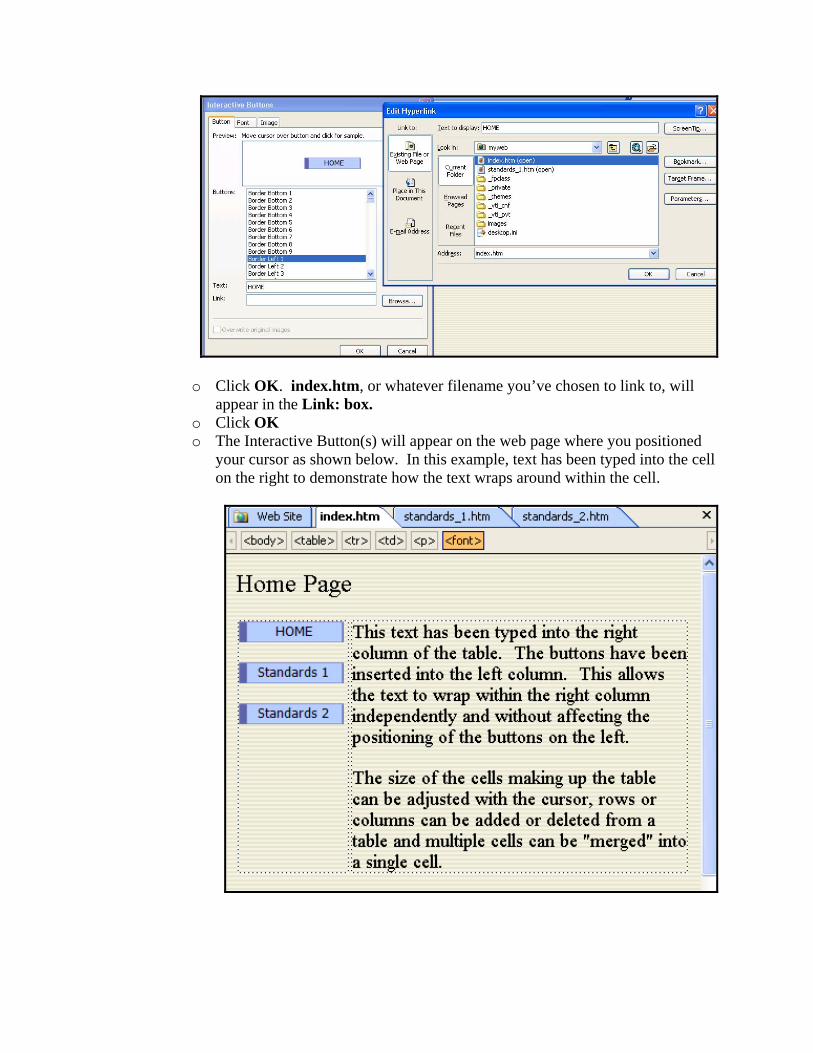
o Click OK. index.htm, or whatever filename you’ve chosen to link to, will appear in the Link: box.
o Click OK o The Interactive Button(s) will appear on the web page where you positioned
your cursor as shown below. In this example, text has been typed into the cell on the right to demonstrate how the text wraps around within the cell.
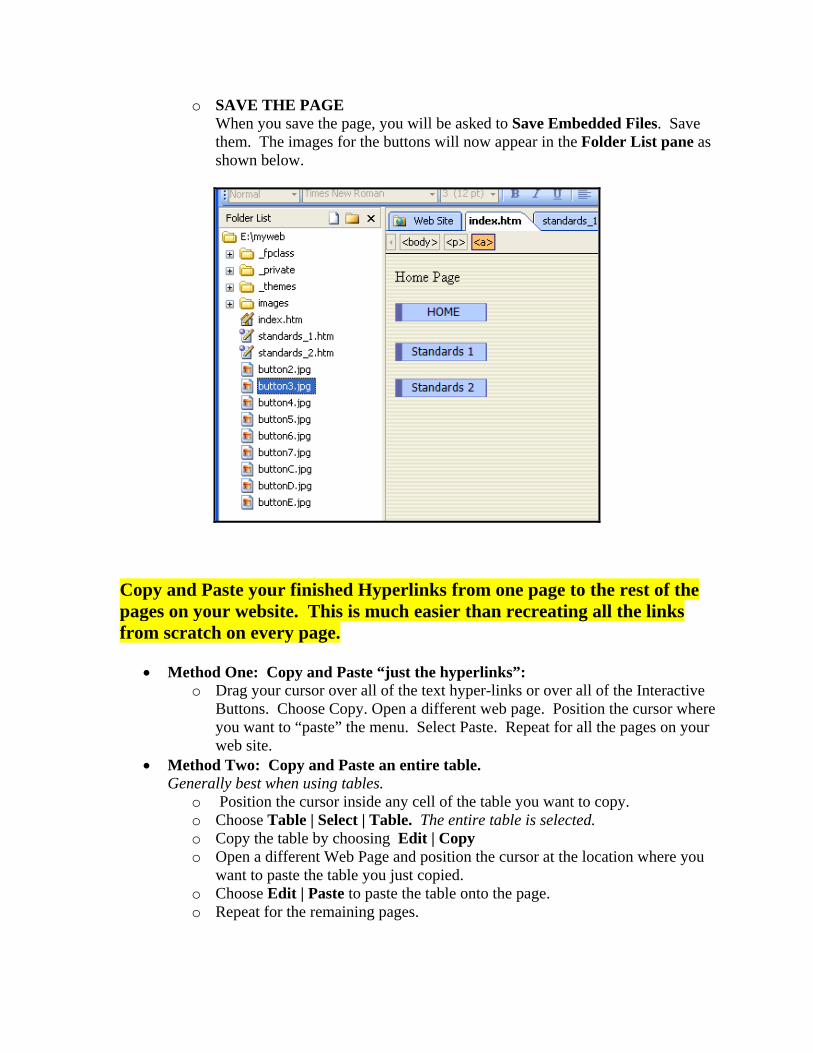
o SAVE THE PAGE When you save the page, you will be asked to Save Embedded Files. Save them. The images for the buttons will now appear in the Folder List pane as shown below.
Copy and Paste your finished Hyperlinks from one page to the rest of the pages on your website. This is much easier than recreating all the links from scratch on every page.
• Method One: Copy and Paste “just the hyperlinks”: o Drag your cursor over all of the text hyper-links or over all of the Interactive
Buttons. Choose Copy. Open a different web page. Position the cursor where you want to “paste” the menu. Select Paste. Repeat for all the pages on your web site.
• Method Two: Copy and Paste an entire table. Generally best when using tables.
o Position the cursor inside any cell of the table you want to copy. o Choose Table | Select | Table. The entire table is selected. o Copy the table by choosing Edit | Copy o Open a different Web Page and position the cursor at the location where you
want to paste the table you just copied. o Choose Edit | Paste to paste the table onto the page. o Repeat for the remaining pages.
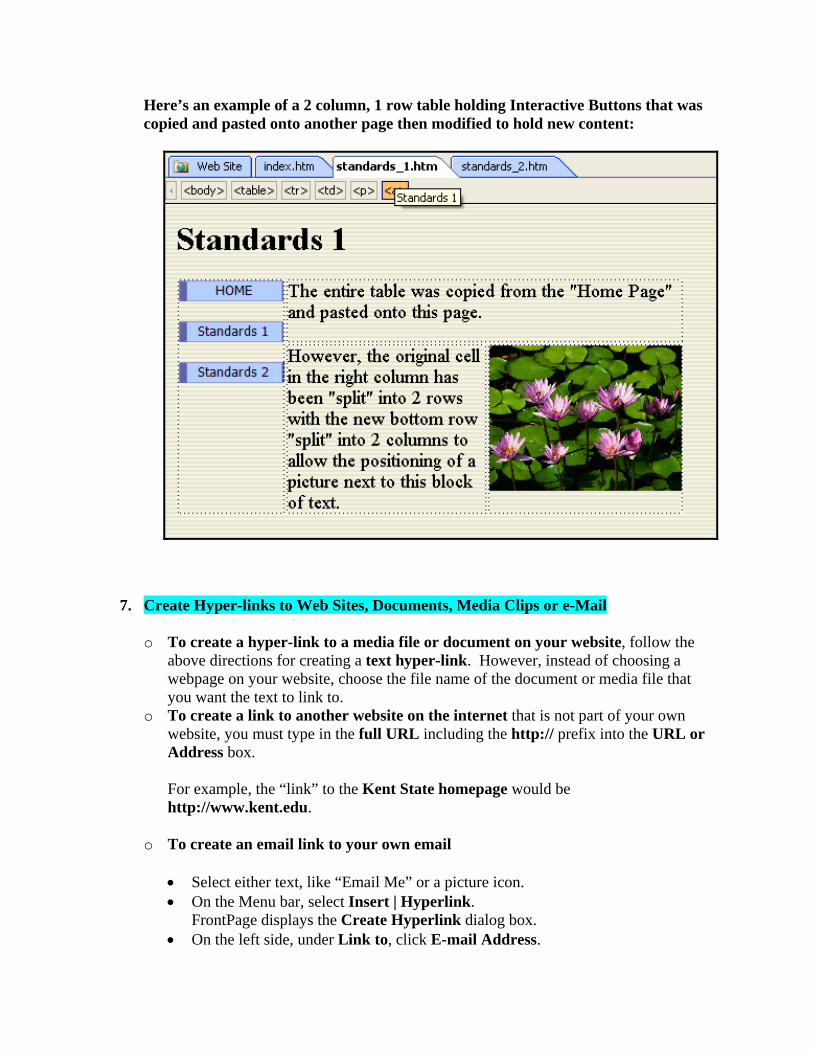
Here’s an example of a 2 column, 1 row table holding Interactive Buttons that was copied and pasted onto another page then modified to hold new content:
7. Create Hyper-links to Web Sites, Documents, Media Clips or e-Mail
o To create a hyper-link to a media file or document on your website, follow the above directions for creating a text hyper-link. However, instead of choosing a webpage on your website, choose the file name of the document or media file that you want the text to link to.
o To create a link to another website on the internet that is not part of your own website, you must type in the full URL including the http:// prefix into the URL or Address box. For example, the “link” to the Kent State homepage would be http://www.kent.edu.
o To create an email link to your own email
• Select either text, like “Email Me” or a picture icon. • On the Menu bar, select Insert | Hyperlink.
FrontPage displays the Create Hyperlink dialog box. • On the left side, under Link to, click E-mail Address.
• Type the e-mail address you want in the E-mail address box • Optional: In the Subject box, type the subject of the e-mail message. You could
type something like, “Email from my website”.
8. Upload your website to the server
FIRST - 3 WARNINGS ABOUT UPLOADING:
1) DO NOT UPLOAD THE “MYWEB FOLDER” ITSELF TO THE SERVER. ONLY UPLOAD THE FILES THAT ARE INSIDE THE FOLDER TO THE SERVER, NOT THE MYWEB FOLDER ITSELF.
2) MAKE SURE THE FILES YOU UPLOAD ARE PLACED INSIDE THE public_html FOLDER ON THE SERVER.
3) MAKE SURE THAT YOUR “HOME” PAGE’S FILENAME IS, index.htm. ALL CHARACTERS IN THIS FILENAME MUST BE LOWERCASE LETTERS. ALSO, THE FILENAME FOR YOUR HOMEPAGE CAN NOT BE “hompage.htm” OR homepage.index.htm OR ANY OTHER NAME OTHER THAN JUST index.htm IF YOU ARE USING THE DEFAULT URL FOR YOUR PERSONAL WEBSPACE ON THE KENT PERSONAL SERVER FOR YOUR HOMEPAGE.
Open Internet Explorer (IE)
• Enter ftp://mail.kent.edu in the IE browser address bar. • Enter your Flashline user name. • For example: If your kent email is [email protected], the Flashline user name you
should enter would be: jdoe • Enter your Flashline password. • Click the Logon button.
You will now see your space on the Kent Personal Server in the IE Browser window as shown in the image below. There may be some files there having to do with your email but there should be a folder called: public_html

• Double-click on the public_html folder to open it. The Address in your browser should be ftp://mail.kent.edu/public_html as circled in red below:
If you’ve never used this space on the personal server to store files or web pages before, you will see an empty window in the IE browser as shown above.
If you've uploaded files or web pages to your personal server before, they will appear in the IE window.
• Reduce the size of the IE Browser window so you can move it off to the right on your desktop.
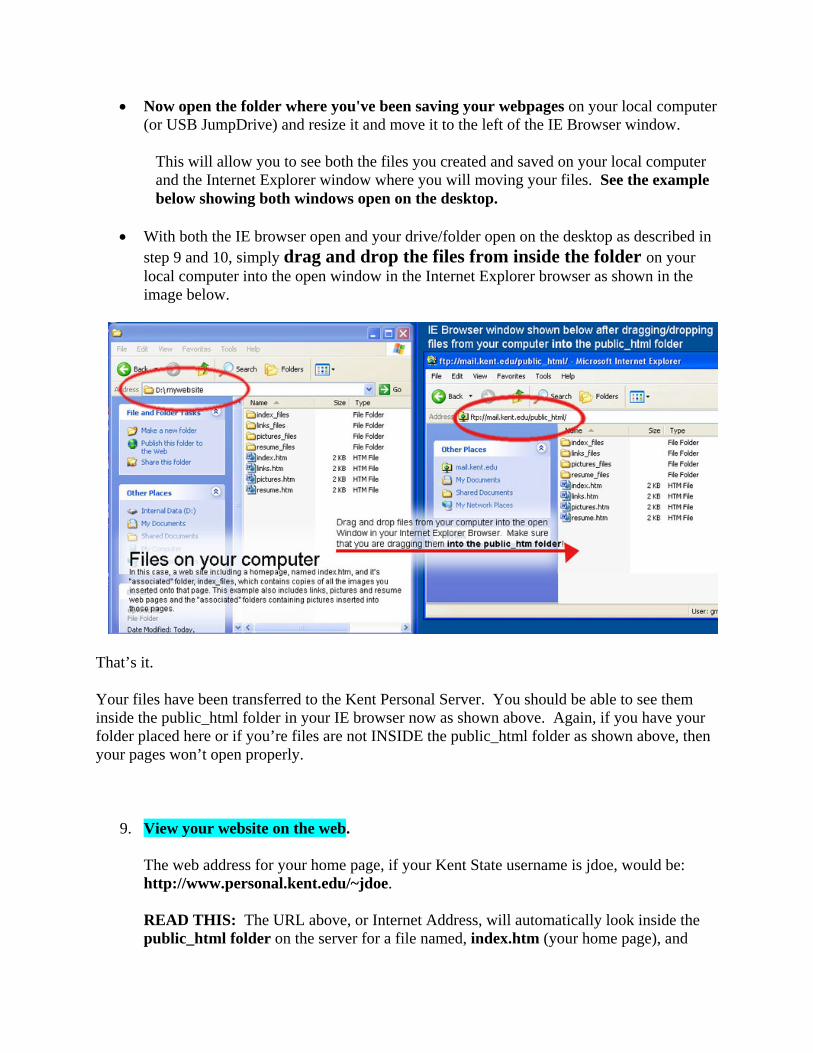
• Now open the folder where you've been saving your webpages on your local computer (or USB JumpDrive) and resize it and move it to the left of the IE Browser window.
This will allow you to see both the files you created and saved on your local computer and the Internet Explorer window where you will moving your files. See the example below showing both windows open on the desktop.
• With both the IE browser open and your drive/folder open on the desktop as described in step 9 and 10, simply drag and drop the files from inside the folder on your local computer into the open window in the Internet Explorer browser as shown in the image below.
That’s it.
Your files have been transferred to the Kent Personal Server. You should be able to see them inside the public_html folder in your IE browser now as shown above. Again, if you have your folder placed here or if you’re files are not INSIDE the public_html folder as shown above, then your pages won’t open properly.
9. View your website on the web. The web address for your home page, if your Kent State username is jdoe, would be: http://www.personal.kent.edu/~jdoe. READ THIS: The URL above, or Internet Address, will automatically look inside the public_html folder on the server for a file named, index.htm (your home page), and
open it. If there isn’t a file inside the public_html folder on the server named, index.htm, then you will get a message that access is forbidden.
Also, if you uploaded your website folder (myweb or whatever you called it) into the public_html folder, instead of the “files” inside your folder to the server, you will not be able to use the default URL described above.
Reminder….When you move from one computer to another you must reopen your website properly for all of your links to continue to work properly.
You have to re-establish the location of your Frontpage website when you move to a different computer. To do this:
1. Open Frontpage 2. Select File | Open Site 3. Browse to the location where you saved your myweb folder, or whatever you named
your website folder, on your USB JumpDrive) 4. Click OK
Continue working on your website.