Embed Size (px)
Citation preview
From User Story to User Interface Collaboratively designing and testing user interface that help you users succeed
Agile 2007 Tutorial Handouts
Jeff Patton ThoughtWorks Inc.
[email protected] [email protected]
www.agileproductdesign.com
The most current version of this presentation and handouts can be downloaded at:
www.agileproductdesign.com/presentations
From Use Story to User Interface 1
From Use Story to User Interface Collaboratively designing and testing user interfac e that help your users succeed
To many in software development the design of user interface is a mysterious thing accomplished best by UI people hidden behind high cubical
walls. While it’s true that user interface design does benefit from experience and creativity, the design of useful and effective user interface may be a bit
more mechanical than you think.
This tutorial will describe a simple, repeatable process for designing and
testing usable user interface based on the goals and intended use of its target user.
In these handouts you’ll find the slides used during the presentation along with the design problem we’ll be designing user interface for. In addition
you’ll find three short articles describing in more detail how to write a task case, identify abstract components, then build and test a paper prototype.
Our Design Problem.....................................................2
Task to Abstract Components: Step by Step ...................4
Component to Paper Prototype, Step by Step................ 10
Usability Testing a Paper Prototype, Step by Step.......... 14
User Story Driven Development Processes
and User Interface Design ........................................ 18
From Use Story to User Interface 2
Our Design Problem:
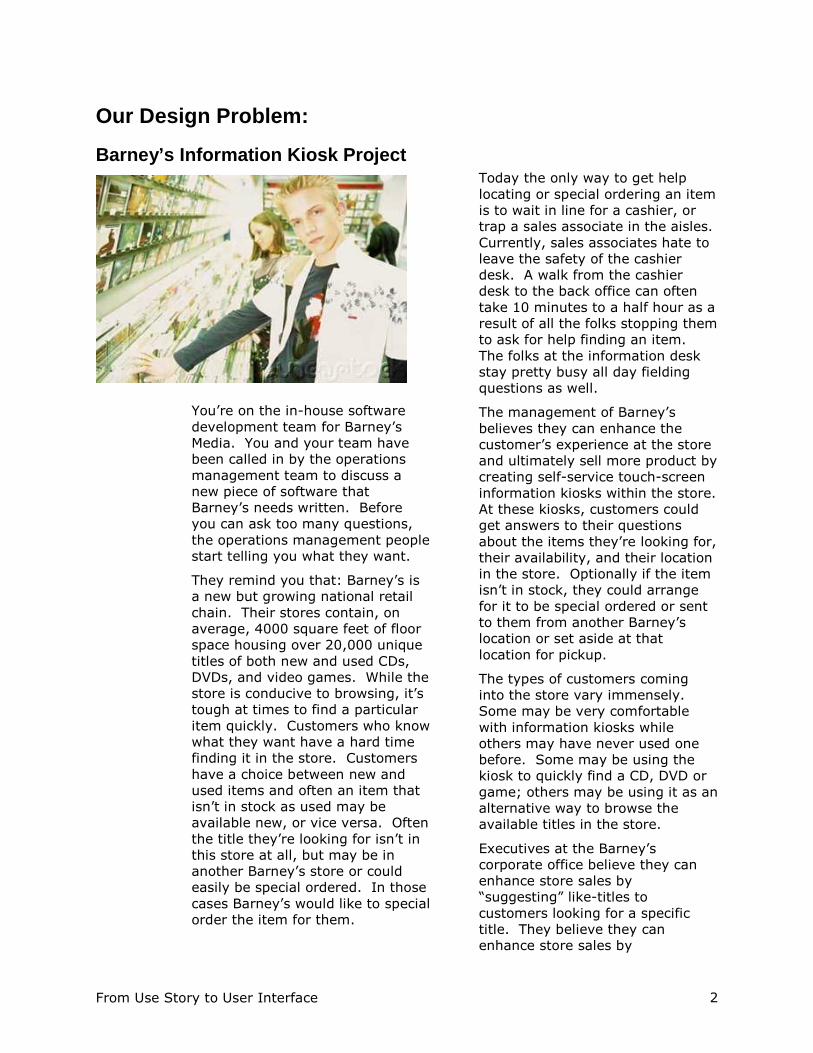
Barney’s Information Kiosk Project
You’re on the in-house software
development team for Barney’s
Media. You and your team have
been called in by the operations
management team to discuss a
new piece of software that
Barney’s needs written. Before
you can ask too many questions,
the operations management people
start telling you what they want.
They remind you that: Barney’s is
a new but growing national retail
chain. Their stores contain, on
average, 4000 square feet of floor
space housing over 20,000 unique
titles of both new and used CDs,
DVDs, and video games. While the
store is conducive to browsing, it’s
tough at times to find a particular
item quickly. Customers who know
what they want have a hard time
finding it in the store. Customers
have a choice between new and
used items and often an item that
isn’t in stock as used may be
available new, or vice versa. Often
the title they’re looking for isn’t in
this store at all, but may be in
another Barney’s store or could
easily be special ordered. In those
cases Barney’s would like to special
order the item for them.
Today the only way to get help
locating or special ordering an item
is to wait in line for a cashier, or
trap a sales associate in the aisles.
Currently, sales associates hate to
leave the safety of the cashier
desk. A walk from the cashier
desk to the back office can often
take 10 minutes to a half hour as a
result of all the folks stopping them
to ask for help finding an item.
The folks at the information desk
stay pretty busy all day fielding
questions as well.
The management of Barney’s
believes they can enhance the
customer’s experience at the store
and ultimately sell more product by
creating self-service touch-screen
information kiosks within the store.
At these kiosks, customers could
get answers to their questions
about the items they’re looking for,
their availability, and their location
in the store. Optionally if the item
isn’t in stock, they could arrange
for it to be special ordered or sent
to them from another Barney’s
location or set aside at that
location for pickup.
The types of customers coming
into the store vary immensely.
Some may be very comfortable
with information kiosks while
others may have never used one
before. Some may be using the
kiosk to quickly find a CD, DVD or
game; others may be using it as an
alternative way to browse the
available titles in the store.
Executives at the Barney’s
corporate office believe they can
enhance store sales by
“suggesting” like-titles to
customers looking for a specific
title. They believe they can
enhance store sales by

From Use Story to User Interface 3
encouraging customers to special
order titles they don’t currently
have in stock. They believe it
would be valuable to know how
often customers look up or ask for
titles not currently in stock. They
also believe they can reduce labor
costs at the store a bit by allowing
customers to help themselves. So
these executives can feel
comfortable they’ve spent their
money wisely, they’ll expect
statistics on how many people, by
location, are using the kiosks. It
would be valuable to know how
many times customers looked
closer at suggestions made by the
kiosk. It would be valuable to
know how many special orders
were placed through the kiosk.
Your design and development team
has been given the task to design
and build this new information
kiosk. Barney’s already has
massive databases of the items
they carry, inventory systems that
tell them which and how many
items are in stock at each location,
and order entry systems to place
special orders. Your team will
need to integrate this information
in a piece of kiosk software.
The operations management team
doesn’t have specific functional
requirements past those discussed
here. They’re looking for an
estimate from your design and
development team that suggests
the functionality they should build
and the timeframe it will take to
build it. They’d like to see a
functional kiosk in stores as soon
as possible. In fact, if you can’t
get something functional in stores
within a couple months, we’ll
outsource it to another team that
can.
What will you build? And, how
soon before we can see something
running and put it into pilot stores?
***
From Use Story to User Interface 4
Task to Abstract Components, Step by Step
1. Start with a task or collection of tasks In user interface design a proposed user of a product will attempt to meet his or her goals
by executing “tasks” using the product. For our purposes here, we’ll define a task as:
� a series of actions taken by a user of a product in pursuit of a goal
The name of a task should not necessarily imply a particular way of accomplishing that task.
For example if I have a goal to happily listen to the most recent Mike Doughty CD in my car,
I might walk into a music store to buy it. “Buy a CD” is a task. It’s easy to assume, given
the bit of context I just gave you, that it will be in a store with shelves of CDs and that I
might pay for the CD at a cash register operated by sales person at the music store. But,
given a different context, such as at home, the store could be an on-line store where the
mechanisms for finding and paying for a CD might be quite different.
Tasks contain other tasks For example my “Buy a CD” task might contain the tasks: locate the CD I want in the store,
check the price of the CD, purchase the CD. And it doesn’t stop there. Each one of those
tasks may further break down into smaller tasks. The lower you go, the more you
decompose tasks into smaller tasks, the more you need to decide or assume about where
and exactly how the task will be accomplished.
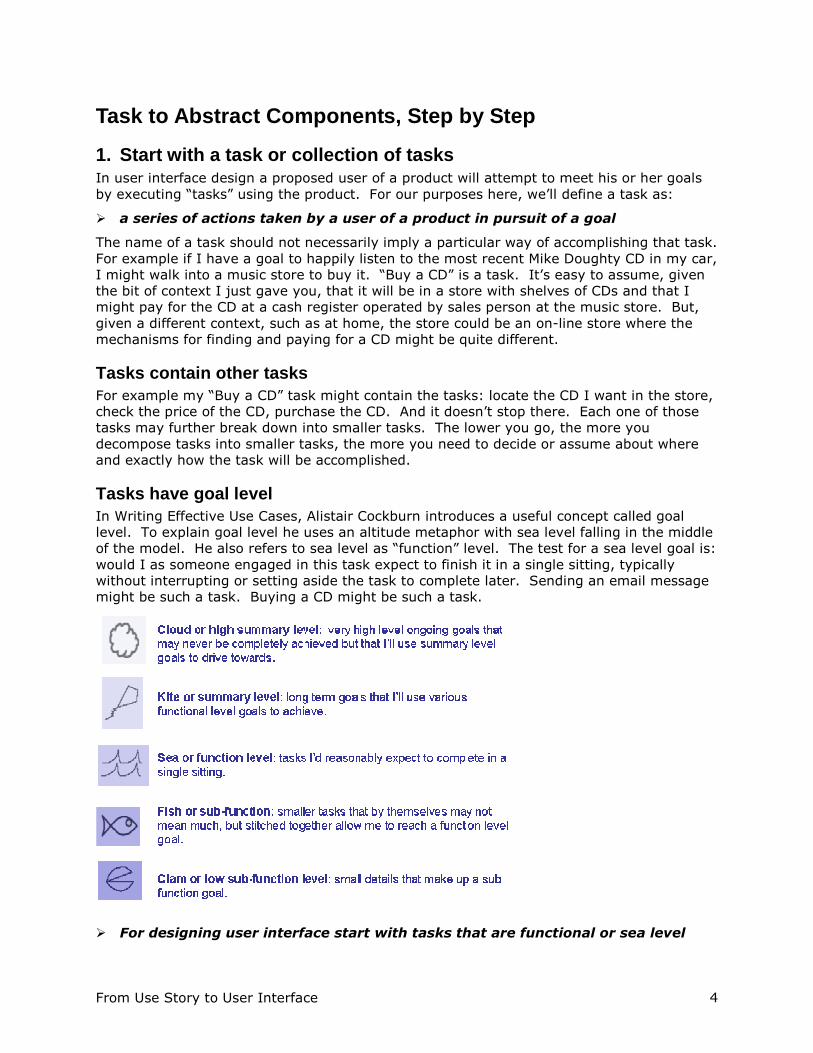
Tasks have goal level In Writing Effective Use Cases, Alistair Cockburn introduces a useful concept called goal
level. To explain goal level he uses an altitude metaphor with sea level falling in the middle
of the model. He also refers to sea level as “function” level. The test for a sea level goal is:
would I as someone engaged in this task expect to finish it in a single sitting, typically
without interrupting or setting aside the task to complete later. Sending an email message
might be such a task. Buying a CD might be such a task.
� For designing user interface start with tasks that are functional or sea level
From Use Story to User Interface 5
It’s important to note that goal level is a continuum – much like an analog dial for adjusting
volume on a stereo. The goal level dial may have five labeled settings but a particular task
can easily fall between two of those settings.
2. Write the sub-tasks, or steps that allow our use r to reach her goal Select a candidate user, context of use, and functional task. The user selection is
important. Me stopping to buy a CD in the context of running errands may have different
steps than you choosing to buy a CD while surfing the web during a lunch break at work.
One important part of the context for us to proceed is the assumption that the context
includes some product that we’ll be designing. For our use here we’ll assume the store I
stopped in contains a handy kiosk that allows me to find the physical location of CDs in the
store. The task we’ll be writing sub-tasks or steps for will be “Buy a CD.”
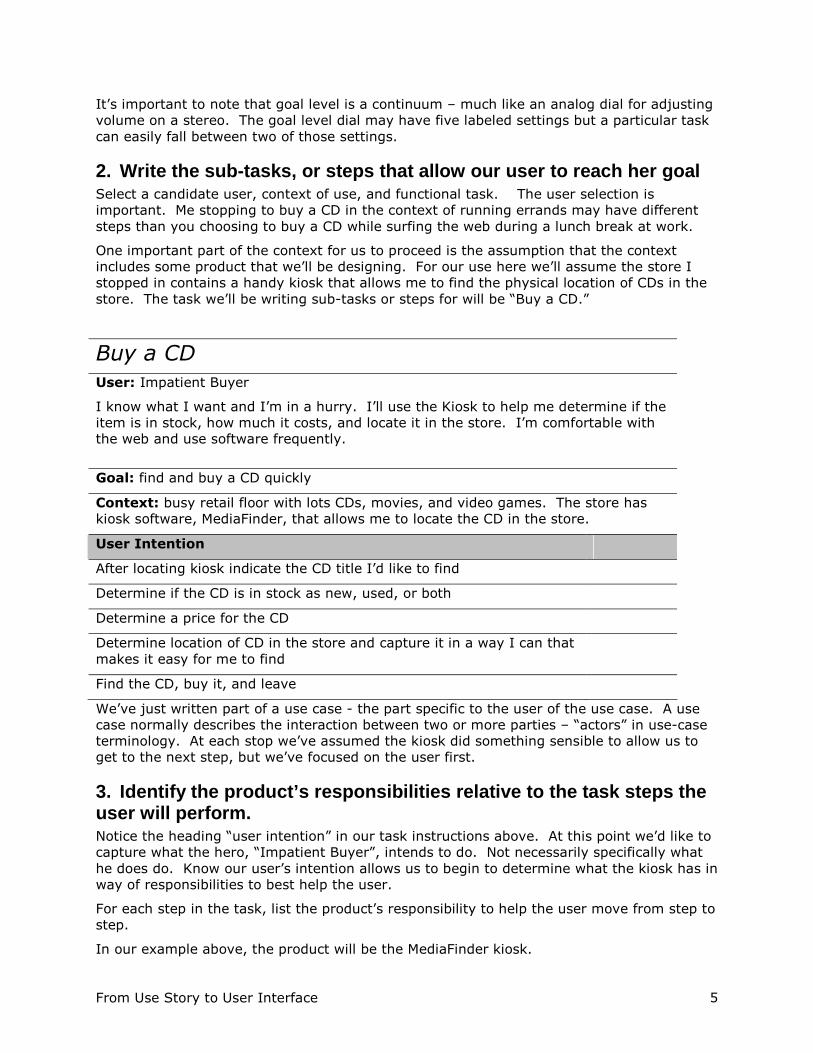
Buy a CD
User: Impatient Buyer
I know what I want and I’m in a hurry. I’ll use the Kiosk to help me determine if the
item is in stock, how much it costs, and locate it in the store. I’m comfortable with
the web and use software frequently.
Goal: find and buy a CD quickly
Context: busy retail floor with lots CDs, movies, and video games. The store has
kiosk software, MediaFinder, that allows me to locate the CD in the store.
User Intention
After locating kiosk indicate the CD title I’d like to find
Determine if the CD is in stock as new, used, or both
Determine a price for the CD
Determine location of CD in the store and capture it in a way I can that
makes it easy for me to find
Find the CD, buy it, and leave
We’ve just written part of a use case - the part specific to the user of the use case. A use
case normally describes the interaction between two or more parties – “actors” in use-case
terminology. At each stop we’ve assumed the kiosk did something sensible to allow us to
get to the next step, but we’ve focused on the user first.
3. Identify the product’s responsibilities relative to the task steps the user will perform. Notice the heading “user intention” in our task instructions above. At this point we’d like to
capture what the hero, “Impatient Buyer”, intends to do. Not necessarily specifically what
he does do. Know our user’s intention allows us to begin to determine what the kiosk has in
way of responsibilities to best help the user.
For each step in the task, list the product’s responsibility to help the user move from step to
step.
In our example above, the product will be the MediaFinder kiosk.
From Use Story to User Interface 6
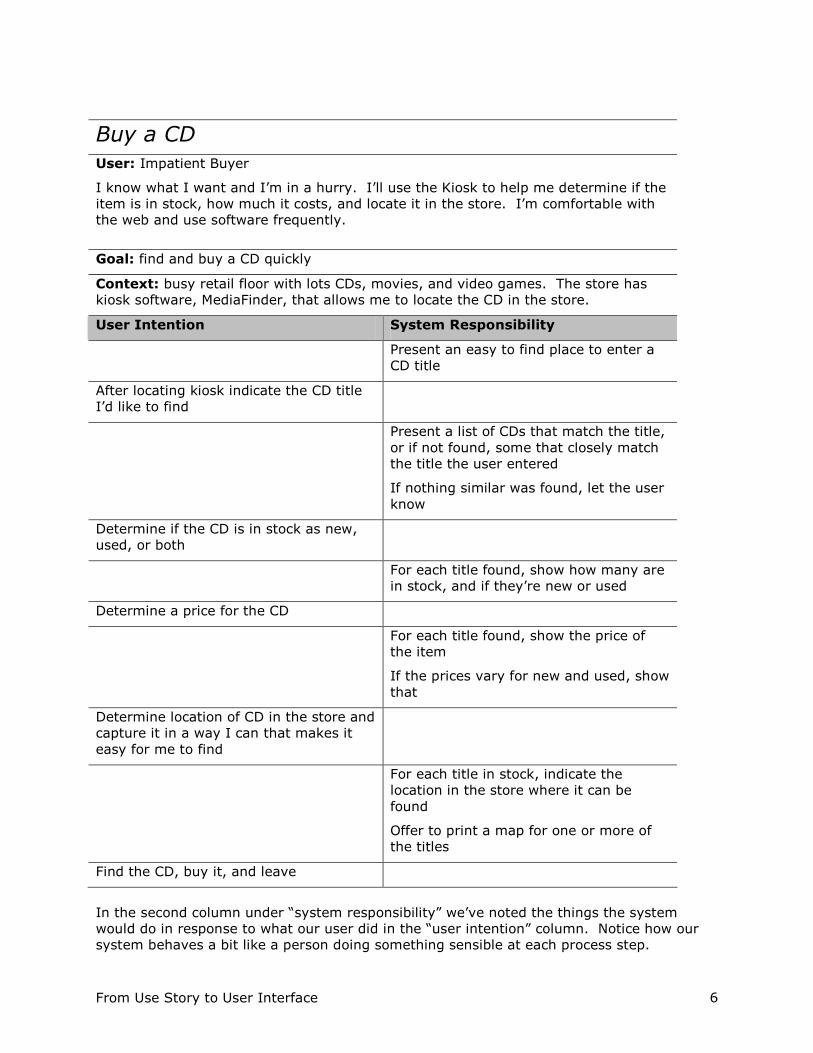
Buy a CD
User: Impatient Buyer
I know what I want and I’m in a hurry. I’ll use the Kiosk to help me determine if the
item is in stock, how much it costs, and locate it in the store. I’m comfortable with
the web and use software frequently.
Goal: find and buy a CD quickly
Context: busy retail floor with lots CDs, movies, and video games. The store has
kiosk software, MediaFinder, that allows me to locate the CD in the store.
User Intention System Responsibility
Present an easy to find place to enter a
CD title
After locating kiosk indicate the CD title
I’d like to find
Present a list of CDs that match the title,
or if not found, some that closely match
the title the user entered
If nothing similar was found, let the user
know
Determine if the CD is in stock as new,
used, or both
For each title found, show how many are
in stock, and if they’re new or used
Determine a price for the CD
For each title found, show the price of
the item
If the prices vary for new and used, show
that
Determine location of CD in the store and
capture it in a way I can that makes it
easy for me to find
For each title in stock, indicate the
location in the store where it can be
found
Offer to print a map for one or more of
the titles
Find the CD, buy it, and leave
In the second column under “system responsibility” we’ve noted the things the system
would do in response to what our user did in the “user intention” column. Notice how our
system behaves a bit like a person doing something sensible at each process step.
From Use Story to User Interface 7
The use case format used here is an Essential Use Case or Task Case - a format described
by Constantine & Lockwood in Software for Use. It’s a variation on a multi-column format
first introduced by Rebecca Wirfs-Brock. The multi column format allows us to easily see
what our user does, and what the system does in response. Separating each statement into
another row allows us to see the chronological back and forth that’s occurring in our user’s
“conversation” with the system. You could easily merge these into a single column if you
wish. Just prefix each statement with “the user will” or “the system will.”
4. Identify abstract components that help the produ ct meet its responsibilities to the user. Think of an abstract component as the idea of a real user interface component that
describes the component’s general responsibility; for instance in a typical graphic user
interface the user is often presented with the need to make a choice from a series of
possible choices. Specific ways to make those choices might include radio buttons, check
boxes, or a drop down selection list. All these components afford the selection of a
particular choice. If we didn’t want to decide just yet what the specific UI component might
be, a “choice selector” might be a simple way to abstractly refer to this component.
� An abstract component refers to a general type of component with a certain
responsibility.
In Constantine, Windl, Noble, & Lockwood’s paper From Abstraction to Realization they
describe the idea of canonical abstract components. They divide components into two
general sets of responsibilities: those that contain and present information and those that
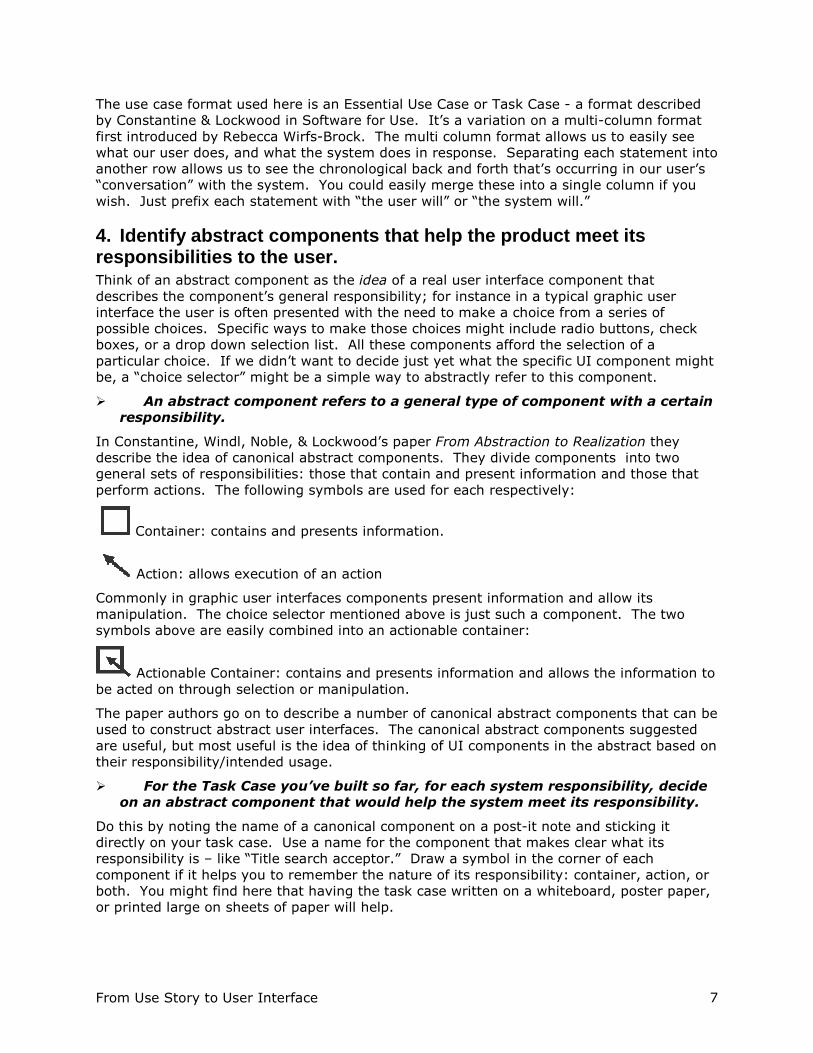
perform actions. The following symbols are used for each respectively:
Container: contains and presents information.
Action: allows execution of an action
Commonly in graphic user interfaces components present information and allow its
manipulation. The choice selector mentioned above is just such a component. The two
symbols above are easily combined into an actionable container:
Actionable Container: contains and presents information and allows the information to
be acted on through selection or manipulation.
The paper authors go on to describe a number of canonical abstract components that can be
used to construct abstract user interfaces. The canonical abstract components suggested
are useful, but most useful is the idea of thinking of UI components in the abstract based on
their responsibility/intended usage.
� For the Task Case you’ve built so far, for each system responsibility, decide
on an abstract component that would help the system meet its responsibility.
Do this by noting the name of a canonical component on a post-it note and sticking it
directly on your task case. Use a name for the component that makes clear what its
responsibility is – like “Title search acceptor.” Draw a symbol in the corner of each
component if it helps you to remember the nature of its responsibility: container, action, or
both. You might find here that having the task case written on a whiteboard, poster paper,
or printed large on sheets of paper will help.
From Use Story to User Interface 8
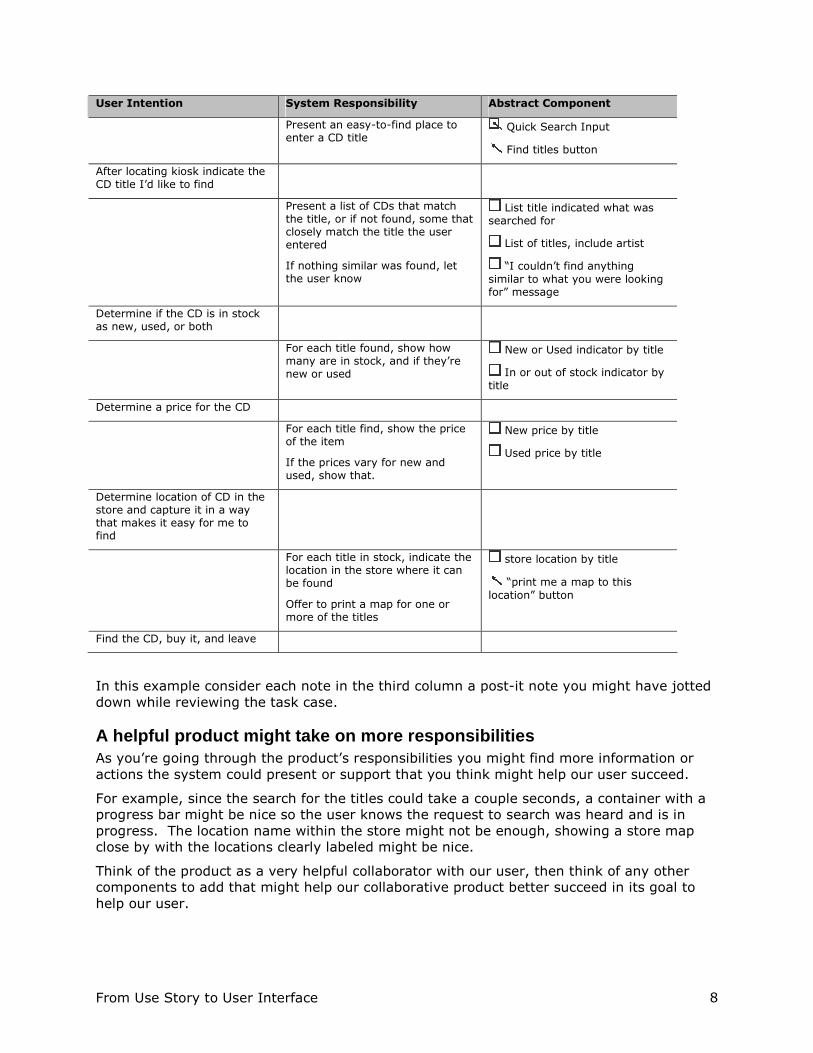
User Intention System Responsibility Abstract Component
Present an easy-to-find place to enter a CD title
Quick Search Input
Find titles button
After locating kiosk indicate the CD title I’d like to find
Present a list of CDs that match the title, or if not found, some that closely match the title the user entered
If nothing similar was found, let the user know
List title indicated what was searched for
List of titles, include artist
“I couldn’t find anything
similar to what you were looking for” message
Determine if the CD is in stock as new, used, or both
For each title found, show how many are in stock, and if they’re new or used
New or Used indicator by title
In or out of stock indicator by
title
Determine a price for the CD
For each title find, show the price of the item
If the prices vary for new and used, show that.
New price by title
Used price by title
Determine location of CD in the store and capture it in a way that makes it easy for me to find
For each title in stock, indicate the location in the store where it can be found
Offer to print a map for one or more of the titles
store location by title
“print me a map to this
location” button
Find the CD, buy it, and leave
In this example consider each note in the third column a post-it note you might have jotted
down while reviewing the task case.
A helpful product might take on more responsibiliti es As you’re going through the product’s responsibilities you might find more information or
actions the system could present or support that you think might help our user succeed.
For example, since the search for the titles could take a couple seconds, a container with a
progress bar might be nice so the user knows the request to search was heard and is in
progress. The location name within the store might not be enough, showing a store map
close by with the locations clearly labeled might be nice.
Think of the product as a very helpful collaborator with our user, then think of any other
components to add that might help our collaborative product better succeed in its goal to
help our user.
From Use Story to User Interface 9
The process of looking at user tasks and considering how the system might best support
those activities is a common idea among user interface practitioners. Cooper & Reimann’s
About Face 2.0 gives a good description of a similar process.
For more information look at these resources: Cockburn, Writing Effective Use Cases, Addison-Wesley, 2000
Constantine & Lockwood, Software For Use, Addison-Wesley, 1999
Constantine, Windl, Noble, & Lockwood, From Abstraction to Realization, ForUse
website: http://www.foruse.com/articles/canonical.pdf
Cooper, Reimann, & Cronin, About Face 3, Wiley, 2007
From Use Story to User Interface 10
Component to Paper Prototype, Step by Step Armed with a user tasks and an inventory of candidate user interface components you can
begin to arrange the components in a candidate user interface.
1. Create candidate interaction contexts An interaction context is a useful idea from Constantine & Lockwood’s Software for Use.
� An interaction context is an abstract container for UI components. It has a
name and a higher level goal or purpose.
In computer software an interaction context may be a particular screen or dialog box.
However, just like tasks, contexts may contain smaller sub-contexts. For example if you
were to look for a product on a typical ecommerce site, you’ll find the searched for items
appear in a context – let’s call it the “found items.” But likely next to that search return are
contexts that support navigation to other areas of the site, and contexts that show you
items you might be interested in. They all occupy the same screen, but contexts are likely
clearly separated from each other on that screen and have clearly separate responsibilities.
From the user interface an interaction context switch often happens when the user’s goal
has changed somewhat substantially. For instance when I first enter an ecommerce
website, my first goal might be to find something and the first context I see likely supports
that goal. Once I’ve looked for some things, I may need to look more closely at those
things I’ve found. You’ll generally find screens in an ecommerce website that support
scrutinizing individual items in more detail. In that context you’ll find it better supports
those goals by having components and a layout to do so. Contexts may appear adjacent to
each other in the user interface or the user may navigate from one context to the next.
Using the task case we’ve written so far, look for goal changes that might indicate a context
change. In this task case starting to search might be one goal, then evaluating what was
found might be another big goal. Let’s start with two contexts that support those goals.
Give those contexts a name, and note their name and goals on a post-it. Stick the post-it
on a sheet of paper.
Starting Point: give the user a clear starting point for starting a search for titles in the
store.
Search Return Evaluation: help the user decide if the searched for items were the items
she was looking for or an easy way to reinitiate the search if not. Also aid in the quick
decision to buy any successfully found item.
2. Transfer abstract components to candidate intera ction contexts For each abstract component, transfer it to the interaction context that best matches the
goal that the component is helping the user reach.
You might find that some components belong in multiple contexts. If so, write up an
additional post-it and place it there.
You’ll now have sheets of paper representing your named interaction contexts, each of
those with an inventory of post-it note components.
3. Arrange components in interaction contexts accor ding to use At this stage we’ll begin to think a bit more concretely about the user interface.
From Use Story to User Interface 11
If you’re reading this, and at this point I strongly suspect you are, you’re likely reading from
top to bottom and from left to right. Typically, software user interfaces also read from top
to bottom and left to right.
Look back at the task case we’ve written. Arrange the component post-its in a logical
spatial arrangement that allows the user in the task case to encounter each component in a
logical order – from top to bottom and from left to right. You should be able to start
imagining a user interface screen in your head.
4. Validate the abstract contexts and components ag ainst the user task(s) To make sure these components and their arrangement are making sense, let’s check what
we have so far against our task case.
Place yourself in the role of the user. Think about the user’s likely skills, goal and context of
use as you do this. Looking at the first interaction context the user would encounter then
go through each step in the task case. At each step imagine using the abstract component
to accomplish your intention. Assume each component does its job well.
As the task case’s user, make sure you have every component you need as you step
through the task case. Make sure the component appears where you expect it to in the
user interface.
� If you encounter missing components, add them. � If some components don’t get used, consider removing them. � If the intention of some components could be better stated, rename them.
5. Convert each abstract component to a user interf ace component At this stage it’s time to think much more concretely about user interface.
For each abstract component make a preliminary choice about what that component could
be. Draw the component in pencil on heavy paper – an index card or card stock works well
here. Draw the component the approximate size that you believe it should be in the
interaction context. You may need to cut the interaction context down to size if you believe
it will fall inside some other interaction context. Place the component on the interaction
context in the place where you believe it should be.
Once all components are arranged in an interaction context inspect the layout. You may
find you need to recreate or resize some of the components. You may find that drawing
boxes or lines directly on the paper for the interaction context helps your layout a bit.
When you feel you’ve got all the components represented well for now, stick them down
with repositionable double-sided tape.
You’ve now built a componentized testable paper prototype.
You’ll find lots of great ideas on materials and approaches for building and testing paper
prototypes in Snyder’s Paper Prototyping.
6. Revalidate the paper contexts and components aga inst the user task(s) As you did when interaction contexts were sheets of paper and components were post-it
notes, assume the role of the user and step through the task case. As when components
were post-its, add, remove, or change components so that they support the task case
effectively.
From Use Story to User Interface 12
For more information look at these resources: Constantine & Lockwood, Software For Use, Addison-Wesley, 1999
Snyder, Paper Prototyping, Morgan-Kaufmann, 2003
From Use Story to User Interface 13
Usability Testing a Paper Prototype, Step by Step On a typical software project, finished software is tested by testers to make sure it doesn’t
have functional errors. However, for most software to be considered to be a success, the
application must not only be free of bugs, but must be easily used by its primary user
constituencies. Testing for this quality is done through usability testing. And, happily, basic
usability testing can be done ahead of building the actual software.
If you’ve built a paper user interface prototype, you’ve considered the users and their
probable usage, and selected screens and components that best support that usage.
However, real users are a bit unpredictable. Validating the design on paper with real
candidate users will help give you more confidence that your candidate user interface really
is meeting its goals, and that your software really will be usable.
1. Select test participants Identify people you could use for your test. Ideal candidates will match the characteristics
of the intended audience for the software. The more critical the success of the finished
product, the more appropriate it is to locate users that best represent the audience of your
product. Snyder’s Paper Prototyping gives great guidance on finding and identifying
candidate users for usability tests.
However, if you’re at a preliminary stage with you user interface design, it’s very valuable
to quickly find someone that, while not ideal, can help to refine the design you might place
in front of a more ideal candidate. For this purpose select individuals from within your
office, friends, or family. People close by that you can coach a little on how to best help
your user interface design effort. We’ll call these sorts of test subjects user stand-ins.
Identify some user stand-ins. For preliminary testing of a user interface design, 2-4 is
sufficient.
Coach user stand-ins by explaining to them:
� the purpose of your product � who the target users are, and what sorts of characteristics they’re likely to have � where the product will likely be encountered and characteristics of that environment
2. Identify tasks to test Identify the functional level tasks you’d like to validate for your user interface prototype. A
typical user interface is built to support a number of functional level tasks. Identify the
tasks you’d like validated with your candidate user interface.
For the example we’ve been building “Find a CD” was the primary task we’d started with.
We may want to consider related tasks that our user interface might also accommodate:
� Locate a title from an artist I know � Browse new arrivals � Browse titles similar to those I already own and like � Browse items on sale
For each task consider alternative conditions, exceptions, or errors you might also want to
test. For example:
� Title doesn’t exist � Artist doesn’t exist � Title was found, but not in stock
From Use Story to User Interface 14
3. Identify tester roles For an effective usability test, in addition to test subjects you’ll need to fill three primary
roles in a usability testing team:
The facilitator will be responsible for interacting with the test subject and directing the
usability test. The facilitator will set up tasks being tested by describing some starting
context then naming the task and the goal. The facilitator should not provide any other
instruction on performing the task.
The computer will control the paper prototype acting as the computer responding to
gestures and verbal commands issued by the test subjects. The computer must not speak.
Even if directly spoken to, smile and respond by reminding the test subject that “computers
can’t talk.”
The observers will be responsible for quietly and unobtrusively recording results for the
test.
Use only one person on the facilitator role. One or two people working together may play
the computer role. One to four may fill the observer role.
Combining roles in one person is difficult. But if people are unavailable to fill the roles,
combining the facilitator and computer role can work. Combining the facilitator and
observer role can also work but is less effective. Combining all three roles in one person is
a bad idea.
Keep three personalities in mind when performing a usability test: � The flight attendant
A flight attendant’s job is to both provide service to his or her passengers and to keep
them safe. The facilitator generally assumes a flight attendant role to make sure the
user has proper instruction and feels safe. If the user makes missteps while testing the
user interface, make sure they understand that it’s not them being tested, but the user
interface. Make sure they don’t feel foolish.
� The sportscaster
The sportscaster’s job is to make sure that everyone watching or listening to the action
knows what’s going on. The facilitator balances this personality with the flight attendant
personality. While observers are quietly taking notes they may not be able to see
specifically what the user is doing or what’s happened in the user interface. The
facilitator in the sportscaster personality maintains a dialog with the test subjects with
the intent of making sure everyone in the room understands the play-by-play of what’s
going on in the usability test.
� The scientist
Everyone assumes the scientist personality. Observers, computer, and facilitator all
strive to ensure they’re getting accurate information about how effectively users are
able to reach their goals in the candidate user interface. While eliminating all bias is
impossible, the facilitator works to eliminate bias by not leading or suggesting to the
users they follow any particular path through the user interface. The computer tries not
to hint to the users where to click next. Even reaching for a guess at what the next
component may be might inadvertently hint the user on what’s next. Observers must
sit and record quietly. Non-verbal gestures, sighs, gasps, or groans all contribute to
influencing the user to behave or not behave in a particular way. Avoid these behaviors.
From Use Story to User Interface 15
Choose the team that will run the usability test. Together decide on who will perform in
what role. Review and make sure everyone understands the roles and the three important
personalities they all need to be aware of.
4. Set up test facility Chose a test location where all participants including observers, computer, facilitator, and
test subjects can sit around a table or work area.
Position test subjects on one side or end of the table.
Position the computer directly across from the test subjects. Tape the background of the
user interface down to the table so it doesn’t move during the test. Set up the screen to its
starting point. Place all the other components you’ll need close by. Consider placing them
in a folder so they’re not visible to the test subjects.
The facilitator should sit to one side of the test subjects.
The observers should sit at available places around the table with notepads or post-it notes
ready to take notes.
5. Perform tests Invite users in to the test.
You may perform the test with one test user or two users working together as a pair.
Generally explain the product being tested to the users. Explain to them the test goals of
determining if the proposed user interface is effective at helping users meet their goals.
Inform them they’ll be asked to accomplish a few tasks with the proposed user interface.
Explain to the test subjects how to use the paper prototype and your very low-tech
computer. They’ll use their finger as a mouse and point directly to objects on the screen
and indicate that they wish to click, right-click, or double click on them. If they need to
enter data, ask them to write directly on the prototype using a marker. [The computer
should cover input fields with removable tape or transparency film to allow users to directly
write on the user interface.]
Ask the users to “think out loud.” When they first look at the screen ask them to comment
on what they see. As they move to perform an action in the user interface, ask them to
comment on what they’re about to do, why, and what they expect to happen. Pairing two
users allows this to happen naturally. Two paired users will generally discuss with each
other what they’re seeing and what to do next.
Introduce the first task and goal to the test subjects and ask them to begin.
As users step through the user interface the facilitator should offer guidance to the test
subjects without suggesting how to use the user interface. This is the flight attendant. The
facilitator also keeps conversation active suggesting users comment on what they’re doing
or what they see or asking them directly. This is the sports caster.
As users step through the prototype observers should write down any observations they
have about the user interface. What seems to be working, along with errors, missteps, or
confusion the user has with the UI.
When the users successfully achieve the goal that completes the task, the facilitator may
stop the test. Alternatively if the users just can’t complete the task they can stop the test
explaining that, “It looks like we’ve got quite a bit or work do to on this user interface for it
to work effectively. Let’s stop the test for now. We’ve gathered lots of helpful information
to help us improve the design.” This is the flight attendant speaking.
From Use Story to User Interface 16
The facilitator then asks the observers if they have any questions for the test subjects.
The observers, silent until now, ask question being careful not to bias the users or imply
that they should have done things differently. This is the scientist and flight attendant.
The facilitator then introduces the next task and goal while the computer quickly resets the
user interface if needed.
Continue with the testing of each task until all tasks have been tested or time runs out.
One, to one-and-a-half hours is a good time limit for a usability test. This can be tiring
work for everyone involved.
After the test is complete, thank the subjects and let them leave. If you’re using test
subjects from outside your company, it’s customary to pay the test subjects or give them a
gift of some type to compensate them for their time.
The test team then needs to discuss what they’ve observed and either respond to feedback
immediately before the next test subjects show up or elect to consolidate results later and
respond later that day or on a subsequent day.
6. Respond to feedback immediately One advantage of a paper prototype is the ease in which it can be altered. If there are
obvious issues with the prototype, there’s no need to wait for a next test subject to
predictably encounter them. As a team discuss what the big problems were with the test
they just observed. Agree on changes to make and alter the paper prototype before the
next test subjects arrive.
7. Consolidate results and respond After a few usability tests the observers will have accumulated a number of notes regarding
the issues they observed users encounter. We now need to consolidate those notes from
multiple interviews to make decisions about where to change the user interface prototype.
Transfer observer notes to post-its – one observation per post-it. Each observer combines
their post-its with the others on a wall or table top. Notes that describe similar problems
should be placed near each other. Dissimilar notes farther apart. At the end of this
consolidation exercise you’ll find you have many clusters of notes. Some of the clusters will
likely be bigger than others. These are likely the areas with the most severe problems.
This type of model is referred to as an “affinity diagram” since the information in it is
clustered by affinity.
For each cluster write another post-it note summarizing the contents of the cluster. Use a
different colored post-it than the others.
For each summarized cluster, starting from the largest clusters first, decide as a team how
best to change the user interface to rectify the problem.
Perform adjustments to the paper prototype and prepare for your next usability test.
For more information look at these resources: Snyder, Paper Prototyping, Morgan-Kaufmann, 2003
From Use Story to User Interface 17
User Story Driven Development Processes and User Interface Design From the time when they were originally described in Extreme Programming Explained, User
Stories have become popular as an approach to representing, estimating, and planning
requirements in Agile Software Development Processes. The precise definition of a user
story varies on the source. Beck’s original Extreme Programming Explained describes a
user story as a sentence or two written on an index card as a reminder for a future
conversation between developer and customer. In User Stories Applied, Mike Cohn puts
quite a bit more detail around how you might create and use User Stories throughout an
Agile development process. Mike also credits Rachel Davies with a particularly useful story
writing form that can work well to combine elements useful for user interface design.
Rachel suggests we write stories like this:
As a [type of user]
I want to [perform some task]
so that I can [achieve some goal.]
Using this story writing form we identify types of users, tasks they wish to perform, and the
goal they wish to achieve. In our CD buying example a story for the software we might
write could read like this:
As a harried shopper
I want to locate a CD in the store
so that I can purchase it quickly, leave, and continue with my day.
If we were to write the name of such a story as concisely as possible to place in a user story
list, or backlog, we might use the simple name: “locate a CD” which also happens to be a
good task name.
User stories often describe the tool, not the user and task In this example we’ve been describing the software we’d like to build from the perspective
of the user who needs to perform particular tasks. However, sometimes we get tempted to
describe the way the finished software might look or behave. For example we could just as
easily have written the story this way:
As a harried shopper
I want to enter the CD name in the search box
so that I can view the CD location in the store from the search return.
We might then be tempted to concisely describe the story as “CD search screen.” While
more precise, this story has already made the decision that there is a search box where I
can type in the CD name and that the CD location will appear as part of the search return.
Much of the user interface design has already been pre-supposed in this story. Rather than
describing the task abstractly the story describes the user using the software, or the “tool,”
in a specific way.
While with this particular user interface the use of a typical search box, search button, and
search return list may seem like an obvious and adequate solution, with some other design
problems the solution will be far less obvious. And, capturing suppositions about the design
solution inside your user story may make it likely you and your team may not consider
alternative viable design solutions later during a UI prototyping and testing effort.
From Use Story to User Interface 18
Estimable user stories are often low level A user story as a form of software requirement for Agile Development often carries the
constraint that developers be able to complete the construction of story functionality in a
single development cycle, or iteration – generally one to three weeks. As Agile
Development matures the idea of smaller user stories increases in popularity. Currently it’s
common for a user story to be no larger than a single developer can complete in less than
three days.
Smaller user stories are easier to estimate, quicker to develop, and more accurate as a tool
to measure project progress. However, the smaller and more estimable user stories get,
the less likely they are to be task-centric, and the more likely they are to describe specific
elements of the finished software. If they are task-centric they’re more likely to be written
at a user goal level too low (below functional level) for easily designing and validating user
interface. Generally speaking, smaller, more granular user stories often describe proposed
details of the user interface or small user sub-tasks such that it becomes difficult to see how
and why a user might use the finished software. This makes the user interface difficult to
design.
If your project is moving to smaller user stories, you may find you’ll have to maintain task
models other than user stories alone to understand your users and their intended usage of
your software. You may also find you’ll have to engage in user interface design,
prototyping, and testing earlier as part of initial story writing and release planning. These
smaller more detailed stories represent a more detailed understanding of your software.
You’ll have to do more work early to gain this level of detailed understanding instead of
letting that understanding emerge or be discovered over time.
� When possible, scope your project using functional level, task-centric user stories. Defer user interface design, prototyping, and testing activities till the
latest responsible moment.
Poppendiek and Poppendiek use the term “latest responsible moment” in their book Lean
Software Development to describe a strategy of deferring decisions until we know as much
as possible about the problem we’re solving. Jim Shore puts it well it his blog: “…it's the
latest responsible moment, not the last possible moment. That wouldn't be responsible.”
Prototyping and testing user stories may result in more user stories It’s often easy to use pencil, paper, and tape to prototype and test a user interface that
works very well. But, then when it comes time to estimate the cost of building such a user
interface, the cost is prohibitively expensive – or at least more than we want to stomach
right now.
I’ve found it makes good sense to have developers involved in the prototyping and testing
effort both to gain a better understanding of what works well with end users, and to help
understand the development cost of what we’re prototyping and testing. If the cost is high,
it’s worth prototyping and testing variations of the user interface that, while they may be a
little less ideal from a user’s perspective, could be significantly less expensive to develop.
It’s possible to write a first user story that requests the building of the lower cost user
interface, and a subsequent story to be scheduled for a later release that upgrades the UI to
the better performing version.
Alternatively we might decide an expensive user interface is economically feasible for our
product, but we just don’t believe it’s a good idea to release it into development as one
large user story. In these situations the user interface may need to be broken into smaller
stories that describe portions of the functionality such that as each portion is implemented it
can be seen, demonstrated, and tested in the finished software.
From Use Story to User Interface 19
In both of these examples a task-centric user story may need to be split into subsequent
user stories that may represent different versions of the same user completing the same
task, or versions that allow that same user to only complete a fraction of their intended
task. In both of these cases the splitting comes as a consequence of better understanding
the user interface after prototyping and testing.
As you prototype and test your user interface be prepared for surprises that may cause the
addition of or splitting of user stories in your Agile project.
Combining a solid user interface design approach with a strong story-driven Agile
development approach is not without challenges. There aren’t hard and fast solutions to
many of the complications that might arise. Stay alert and be prepared to improvise and
compromise.
For more information look at these resources: Beck, Extreme Programming Explained, Addison-Wesley, 1999
Beck, Extreme Programming Explained 2nd Edition, Addison-Wesley, 2004
Cohn, User Stories Applied, Addison-Wesley, 2004
Poppendiek & Poppendiek, Lean Software Development, Addison Wesley, 2003
Shore, Beyond Story Cards, http://www.jamesshore.com/Multimedia/Beyond-Story-
Cards.html, 2005