Embed Size (px)
Citation preview
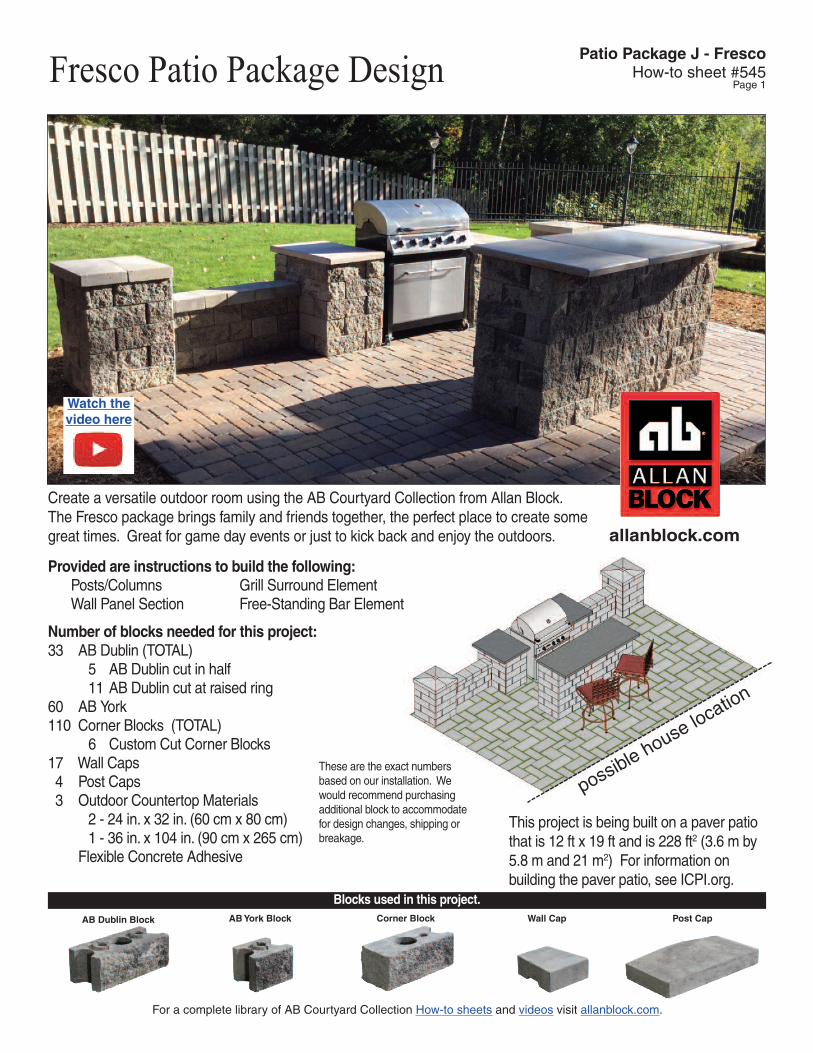
How-to sheet #545Patio Package J - Fresco
Page 1
possible house location
allanblock.com
Fresco Patio Package Design
Corner BlockAB Dublin Block AB York Block Wall Cap Post Cap
Blocks used in this project.
For a complete library of AB Courtyard Collection How-to sheets and videos visit allanblock.com.
This project is being built on a paver patiothat is 12 ft x 19 ft and is 228 ft2 (3.6 m by5.8 m and 21 m2) For information onbuilding the paver patio, see ICPI.org.
Watch thevideo here
Create a versatile outdoor room using the AB Courtyard Collection from Allan Block. The Fresco package brings family and friends together, the perfect place to create somegreat times. Great for game day events or just to kick back and enjoy the outdoors.
Provided are instructions to build the following: Posts/Columns Grill Surround Element Wall Panel Section Free-Standing Bar Element
Number of blocks needed for this project:33 AB Dublin (TOTAL)
5 AB Dublin cut in half11 AB Dublin cut at raised ring
60 AB York110 Corner Blocks (TOTAL)
6 Custom Cut Corner Blocks17 Wall Caps 4 Post Caps 3 Outdoor Countertop Materials
2 - 24 in. x 32 in. (60 cm x 80 cm)1 - 36 in. x 104 in. (90 cm x 265 cm)Flexible Concrete Adhesive
These are the exact numbersbased on our installation. Wewould recommend purchasingadditional block to accommodatefor design changes, shipping orbreakage.
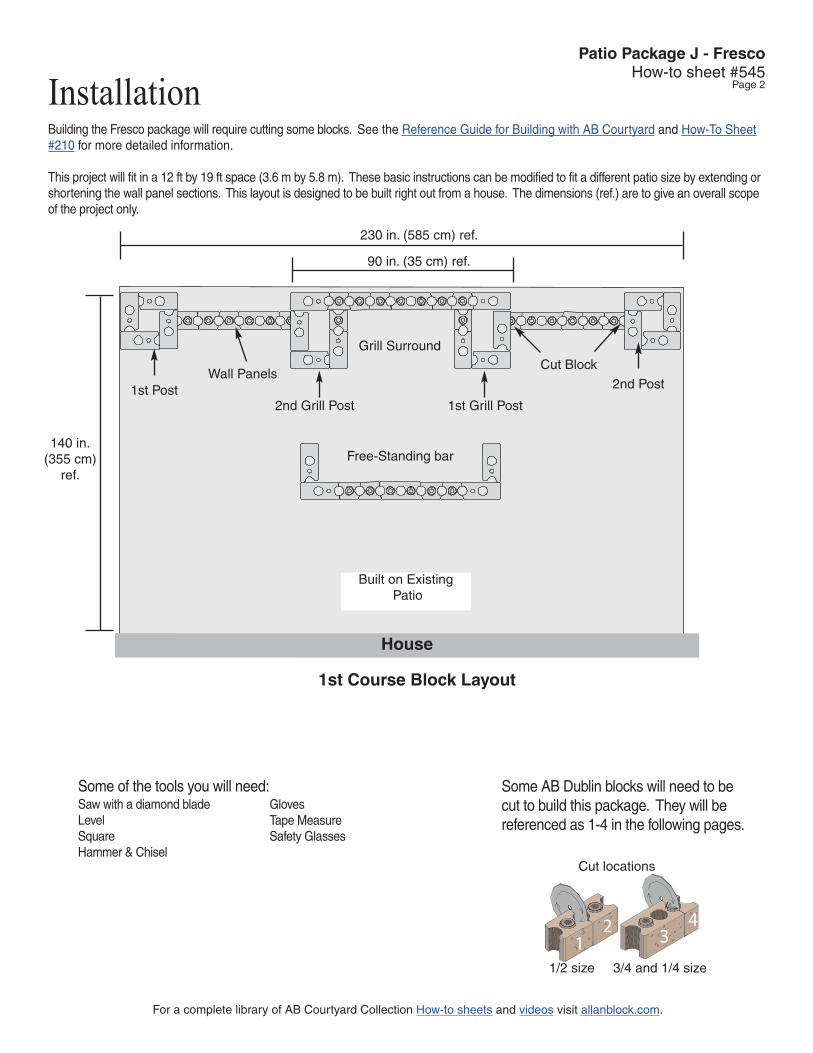
InstallationBuilding the Fresco package will require cutting some blocks. See the Reference Guide for Building with AB Courtyard and How-To Sheet#210 for more detailed information.
This project will fit in a 12 ft by 19 ft space (3.6 m by 5.8 m). These basic instructions can be modified to fit a different patio size by extending orshortening the wall panel sections. This layout is designed to be built right out from a house. The dimensions (ref.) are to give an overall scopeof the project only.
2nd PostWall Panels
Built on ExistingPatio
140 in.(355 cm)ref.
230 in. (585 cm) ref.
Cut Block
1st Course Block Layout
For a complete library of AB Courtyard Collection How-to sheets and videos visit allanblock.com.
How-to sheet #545Patio Package J - Fresco
Page 2
House
Some of the tools you will need:Saw with a diamond blade GlovesLevel Tape MeasureSquare Safety GlassesHammer & Chisel
12 3
4
Cut locations
1/2 size 3/4 and 1/4 size
Grill Surround
Some AB Dublin blocks will need to becut to build this package. They will bereferenced as 1-4 in the following pages.
1st Post
Free-Standing bar
1st Grill Post2nd Grill Post
90 in. (35 cm) ref.

How-to sheet #545Patio Package J - Fresco
Page 3
For a complete library of AB Courtyard Collection How-to sheets and videos visit allanblock.com.
Step 1 BBQ Grilling StationThe dimensions of this BBQ grilling station inthis example are 33 in. H x 30 in. D x 90 in. W(85 cm H x 75 cm D x 230 cm W) using a 39 in.(100 cm) wide grill. To accommodate a differentgrill size, simply add or remove an AB York blockon every course in the back wall panel section.Each AB York block will adjust the length of theback panel by approx 8 in. (20 cm).
Step 2 Build the First Post/ColumnMark out the location of your grilling station. Measure a 90 in. (230 cm) spacewhere the BBQ grilling station will be constructed. Place the grill in the middle ofthe space and set a Corner block to mark the location of the first grill post.
Using the pattern shown, using the first Cornerblock next to the grill, place 3 more Corner blocks,with one that has the short side facing out, thenplace an AB York block. To finish the post pat-tern, cut an AB Dublin in half to create two 1/2size cut pieces. Using a hammer and chisel,remove the raised rings and place one of thecut pieces with the cut side against the cornerblock. This will provide a flat surface for the nextcourse of blocks.
Use a square to line up the blocks to ensure your post/column is square. The pat-terns shown for these larger posts will be the same for both sides, just reversed.
Step 3 Build the Wall Panel and 2nd postFrom the AB York at the back of the 1st post, install 1 AB Dublin and more 3 ABYorks to build the wall panel to the location of the 2nd post and opposite side ofthe grill surround. Finish with an AB York and a Corner block to start the pattern ofthe 2nd post.
Using the same pattern as the 1st post install 3 more Corner blocks and 1 AB Yorkand an AB Dublin 1/2 size cut piece with the raised ring removed. One of the Cor-ner blocks will be the temporary block placed to ensure the proper opening for thegrill is maintained. Slide this block in place, this may allow a slightly larger openingfor the grill. If the block needs to be altered to move toward the grill space, anotherblock will need to be added to the back panel to make the surround larger.
Installation
1st Grill Post
Back Grill Surround Panel
2nd Grill Post
1st Course Post Pattern
First Cornerblock next to grill
AB York block
AB Dublin 1/2 size cutblock withraised ringsremoved
AB Dublin 1/2size cut blockwith raisedring removed
12 3
4
Cut locations
1/2 size 3/4 and 1/4 size
Slide temporaryblock to meet postin proper locationso grill fits.
Cut side
Determine Grill Placement
Grill space
Block todetermineplacement
Temporaryblock to ensuregrill fits
Corner block, shortside facing out
Back Panel
Temporaryblock
Build first
Build second
Build third
1st Course Grill Surround
Cut blocks
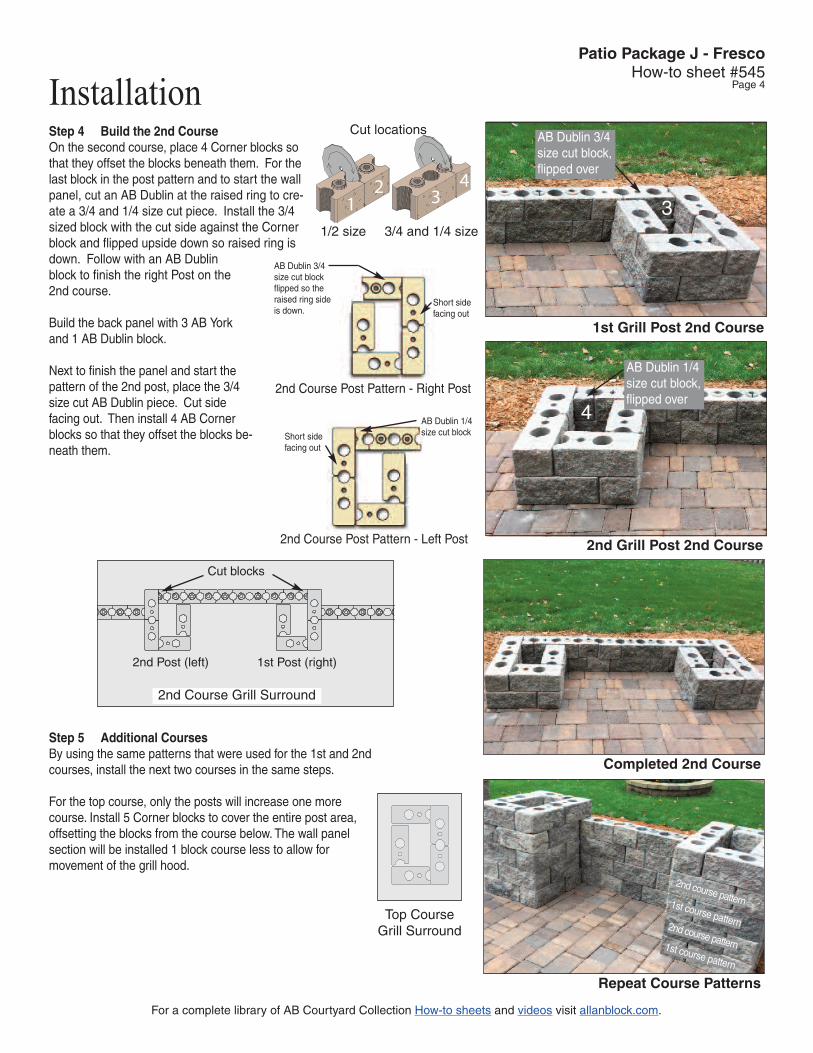
Step 4 Build the 2nd CourseOn the second course, place 4 Corner blocks sothat they offset the blocks beneath them. For thelast block in the post pattern and to start the wallpanel, cut an AB Dublin at the raised ring to cre-ate a 3/4 and 1/4 size cut piece. Install the 3/4sized block with the cut side against the Cornerblock and flipped upside down so raised ring isdown. Follow with an AB Dublinblock to finish the right Post on the2nd course.
Build the back panel with 3 AB Yorkand 1 AB Dublin block.
Next to finish the panel and start thepattern of the 2nd post, place the 3/4size cut AB Dublin piece. Cut sidefacing out. Then install 4 AB Cornerblocks so that they offset the blocks be-neath them.
Step 5 Additional CoursesBy using the same patterns that were used for the 1st and 2ndcourses, install the next two courses in the same steps.
For the top course, only the posts will increase one morecourse. Install 5 Corner blocks to cover the entire post area,offsetting the blocks from the course below. The wall panelsection will be installed 1 block course less to allow formovement of the grill hood.
InstallationHow-to sheet #545
Patio Package J - Fresco
Page 4
1st Grill Post 2nd Course
2nd Grill Post 2nd Course
Completed 2nd Course
AB Dublin 3/4size cut block,flipped over
Repeat Course Patterns
For a complete library of AB Courtyard Collection How-to sheets and videos visit allanblock.com.
Short sidefacing out
AB Dublin 3/4size cut blockflipped so theraised ring sideis down.
2nd Course Post Pattern - Right Post
Short sidefacing out
AB Dublin 1/4size cut block
2nd Course Post Pattern - Left Post
1st course pattern
2nd course pattern
3
4
1st course pattern
2nd course pattern
12 3
4
Cut locations
1/2 size 3/4 and 1/4 size
AB Dublin 1/4size cut block,flipped over
1st Post (right)2nd Post (left)
2nd Course Grill Surround
Cut blocks
Top CourseGrill Surround
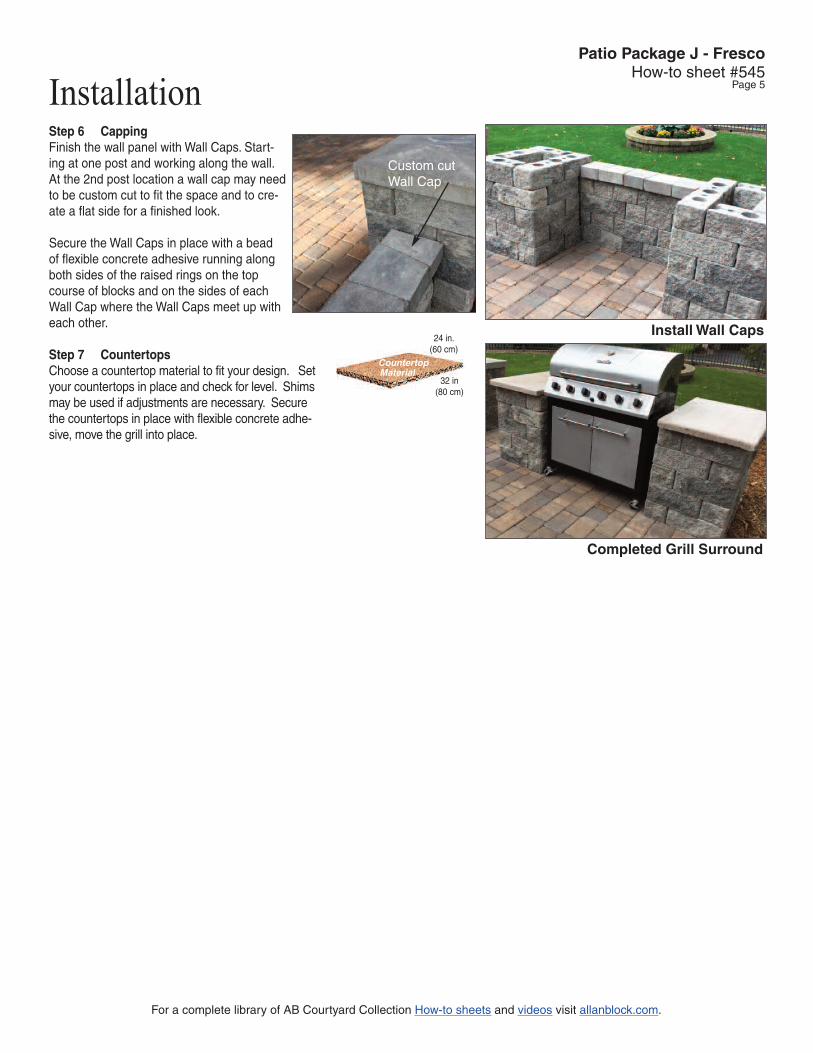
Step 6 CappingFinish the wall panel with Wall Caps. Start-ing at one post and working along the wall.At the 2nd post location a wall cap may needto be custom cut to fit the space and to cre-ate a flat side for a finished look.
Secure the Wall Caps in place with a beadof flexible concrete adhesive running alongboth sides of the raised rings on the topcourse of blocks and on the sides of eachWall Cap where the Wall Caps meet up witheach other.
Step 7 CountertopsChoose a countertop material to fit your design. Setyour countertops in place and check for level. Shimsmay be used if adjustments are necessary. Securethe countertops in place with flexible concrete adhe-sive, move the grill into place.
InstallationHow-to sheet #545
Patio Package J - Fresco
Page 5
Install Wall Caps
Completed Grill Surround
For a complete library of AB Courtyard Collection How-to sheets and videos visit allanblock.com.
CountertopMaterial
32 in (80 cm)
24 in. (60 cm)
Custom cutWall Cap
How-to sheet #545Patio Package J - Fresco
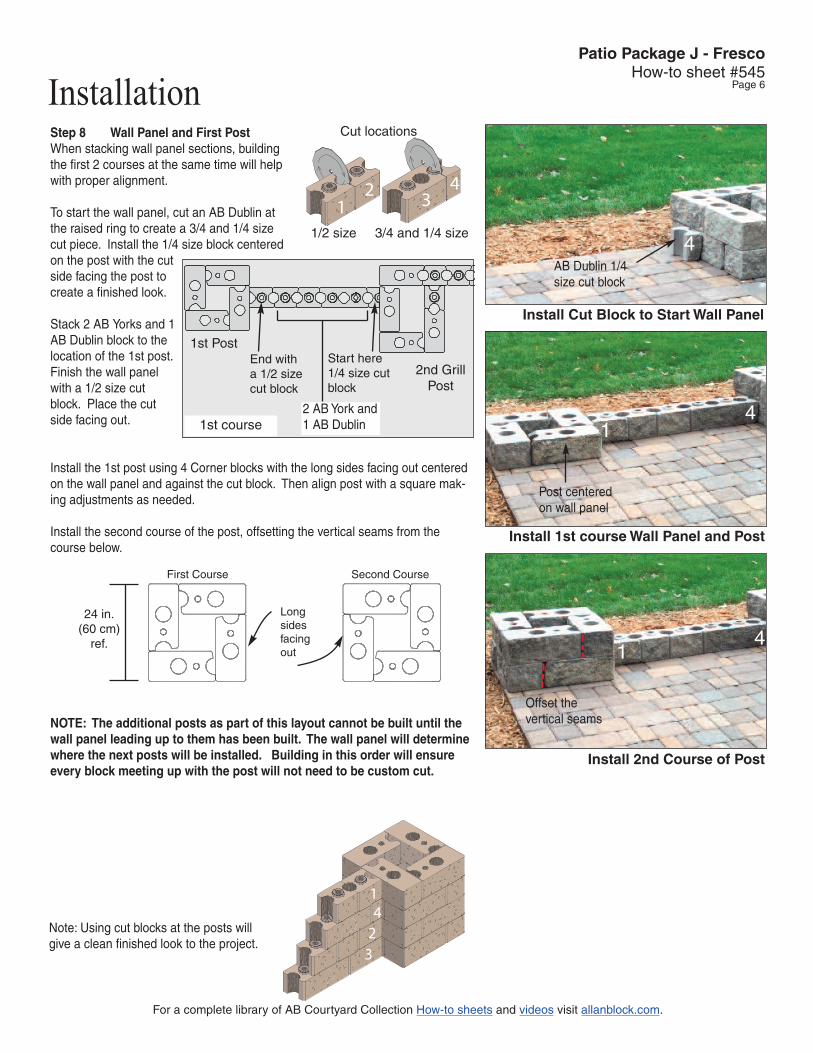
Page 6InstallationStep 8 Wall Panel and First PostWhen stacking wall panel sections, buildingthe first 2 courses at the same time will helpwith proper alignment.
To start the wall panel, cut an AB Dublin atthe raised ring to create a 3/4 and 1/4 sizecut piece. Install the 1/4 size block centeredon the post with the cutside facing the post tocreate a finished look.
Stack 2 AB Yorks and 1AB Dublin block to thelocation of the 1st post.Finish the wall panelwith a 1/2 size cutblock. Place the cutside facing out.
Install the 1st post using 4 Corner blocks with the long sides facing out centeredon the wall panel and against the cut block. Then align post with a square mak-ing adjustments as needed.
Install the second course of the post, offsetting the vertical seams from thecourse below.
NOTE: The additional posts as part of this layout cannot be built until thewall panel leading up to them has been built. The wall panel will determinewhere the next posts will be installed. Building in this order will ensureevery block meeting up with the post will not need to be custom cut.
Offset the vertical seams
AB Dublin 1/4size cut block
Install Cut Block to Start Wall Panel
Install 1st course Wall Panel and Post
Install 2nd Course of Post
1st course
12 3
4
Cut locations
1/2 size 3/4 and 1/4 size4
Post centeredon wall panel
For a complete library of AB Courtyard Collection How-to sheets and videos visit allanblock.com.
Start here1/4 size cutblock
End witha 1/2 sizecut block
2nd GrillPost
1st Post
First Course Second Course
Longsidesfacingout
24 in.(60 cm)ref.
41
41
2 AB York and1 AB Dublin
1423
Note: Using cut blocks at the posts willgive a clean finished look to the project.

Step 9 Second Course of Wall PanelInstall the second course of the wall panel between the grill surround and firstpost. To ensure the blocks line up properly and the seams are offset from thecourse below, use a 1/2size cut block. Placethe cut side against theside of the grill post.Then stack 2 AB Yorkand 1 AB Dublin blocksto build this section.
Finish with another 1/4size cut block with thecut side against the 1stpost. Make adjust-ments as needed.
Step 10 Additional CoursesWith two courses in place, start with the post and stack up an additional 3courses of the post using Corner blocks. Install each course with the Cornerblocks long side facing out and the vertical seams offset from the course below.
Next, stack the 3rd course of the wall panel to match the 1st course. Start andfinish with a cut block.
Step 11 CappingFinish each post/column with two Post Caps. To secure the Post Caps in place,apply a bead of flexible concrete adhesive along the outside edge of the topcourse of Corner blocks and then set the Post Caps in place.
Finish each wall panel with Wall Caps. Starting at one post and working alongthe wall. At each post location a wall cap may need to be custom cut to fit thespace and to create a flat side for a finished look.
Secure the Wall Caps in place with a bead of flexible concrete adhesive runningalong both sides of the raised rings on the top course of blocks and on the sidesof each Wall Cap where the Wall Caps meet up with each other.
See How-to sheet #210 for more infor-mation on cutting blocks and caps.
Using steps 7-10, complete the oppositeside of the project.
Install 3 morecourses ofthe post
InstallationHow-to sheet #545
Patio Package J - Fresco
Page 7
Additional Courses
Install Wall and Post Caps
For a complete library of AB Courtyard Collection How-to sheets and videos visit allanblock.com.
4
2
4
4
1
1
Install 1 morecourse of thewall panel
Place two PostCaps on eachpost/column
Capping straight walls
Custom cutWall Cap
Complete Opposite Side
Install 2nd Course of Wall Panel
41
24
2nd course
1/2 sizecut block
1/4 sizecut block 2nd Grill
Post
1st Post
2 AB York and1 AB Dublin
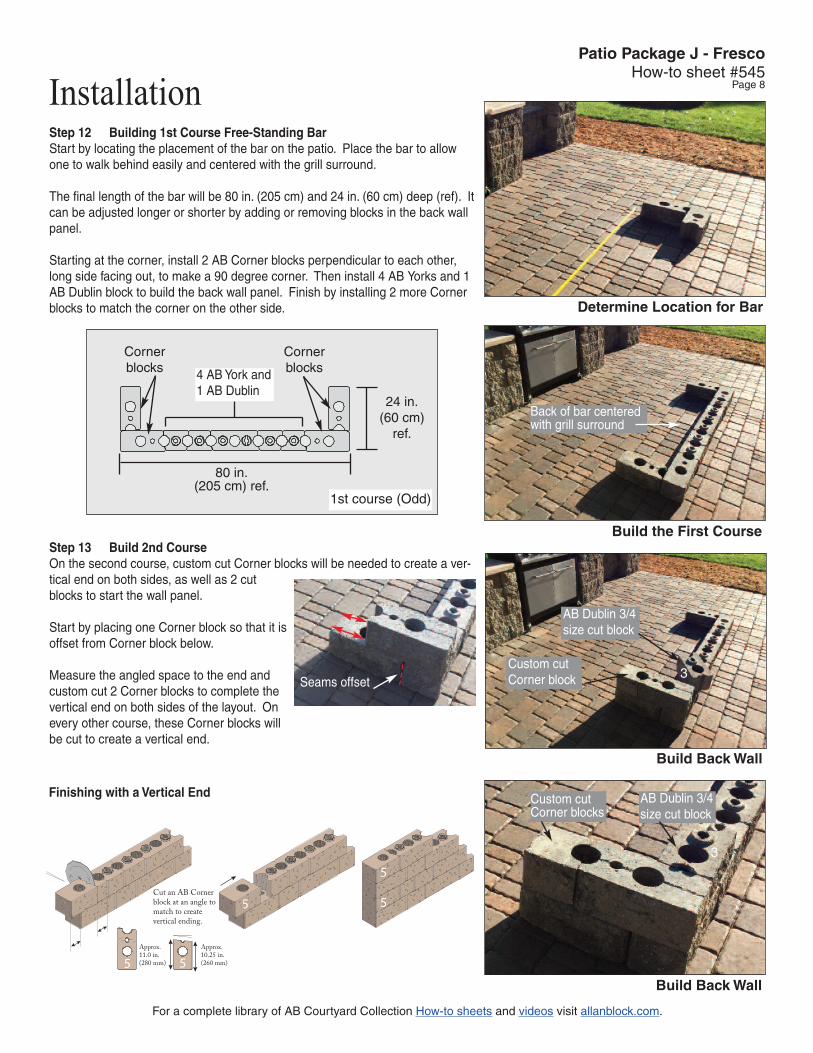
Step 12 Building 1st Course Free-Standing BarStart by locating the placement of the bar on the patio. Place the bar to allowone to walk behind easily and centered with the grill surround.
The final length of the bar will be 80 in. (205 cm) and 24 in. (60 cm) deep (ref). Itcan be adjusted longer or shorter by adding or removing blocks in the back wallpanel.
Starting at the corner, install 2 AB Corner blocks perpendicular to each other,long side facing out, to make a 90 degree corner. Then install 4 AB Yorks and 1AB Dublin block to build the back wall panel. Finish by installing 2 more Cornerblocks to match the corner on the other side.
Step 13 Build 2nd CourseOn the second course, custom cut Corner blocks will be needed to create a ver-tical end on both sides, as well as 2 cutblocks to start the wall panel.
Start by placing one Corner block so that it isoffset from Corner block below.
Measure the angled space to the end andcustom cut 2 Corner blocks to complete thevertical end on both sides of the layout. Onevery other course, these Corner blocks will be cut to create a vertical end.
InstallationHow-to sheet #545
Patio Package J - Fresco
Page 8
Determine Location for Bar
Build the First Course
For a complete library of AB Courtyard Collection How-to sheets and videos visit allanblock.com.
Build Back Wall
1st course (Odd)
Cornerblocks4 AB York and
1 AB Dublin
Cornerblocks
80 in.(205 cm) ref.
24 in.(60 cm)ref.
Back of bar centeredwith grill surround
AB Dublin 3/4size cut block
3Seams offset
Custom cutCorner block
Finishing with a Vertical End
Build Back Wall
Custom cutCorner blocks
3
AB Dublin 3/4size cut block
5
5
5
55
Cut an AB Cornerblock at an angle tomatch to createvertical ending.
Approx.11.0 in.(280 mm)
Approx.10.25 in.(260 mm)
Build the wall panel starting with a 3/4 sized cut block. This creates a straightside to the block to place against the Corner block. Using 3 AB York and 1 ABDublin, build the 2nd course of the back wall panel. At the next corner, end witha 1/4 size cut block, cut side out to meet up with the Corner block. Then meas-ure and install another custom cut Corner block to finish the course.
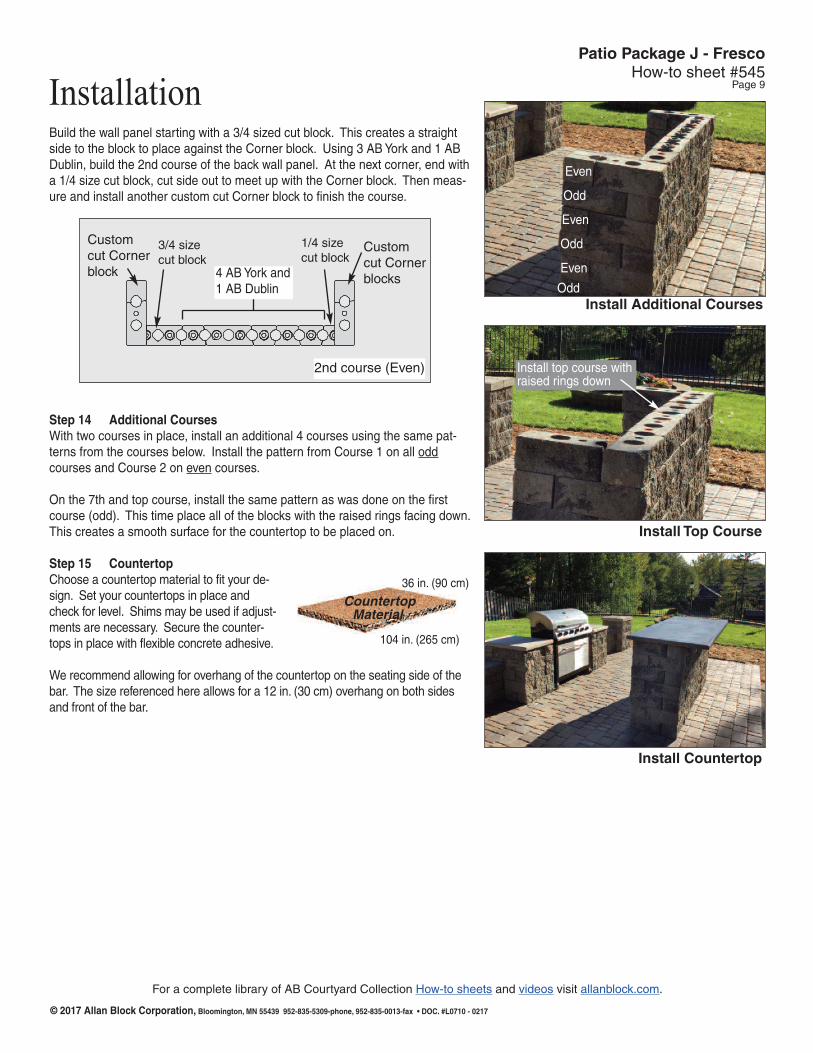
Step 14 Additional CoursesWith two courses in place, install an additional 4 courses using the same pat-terns from the courses below. Install the pattern from Course 1 on all oddcourses and Course 2 on even courses.
On the 7th and top course, install the same pattern as was done on the firstcourse (odd). This time place all of the blocks with the raised rings facing down.This creates a smooth surface for the countertop to be placed on.
Step 15 CountertopChoose a countertop material to fit your de-sign. Set your countertops in place andcheck for level. Shims may be used if adjust-ments are necessary. Secure the counter-tops in place with flexible concrete adhesive.
We recommend allowing for overhang of the countertop on the seating side of thebar. The size referenced here allows for a 12 in. (30 cm) overhang on both sidesand front of the bar.
InstallationHow-to sheet #545
Patio Package J - Fresco
Page 9
Install Additional Courses
Install Top Course
Install Countertop
For a complete library of AB Courtyard Collection How-to sheets and videos visit allanblock.com.
Odd
Odd
Odd
Even
Even
Even
Install top course withraised rings down
2nd course (Even)
Customcut Cornerblocks4 AB York and
1 AB Dublin
Customcut Cornerblock
3/4 sizecut block
1/4 sizecut block
© 2017 Allan Block Corporation, Bloomington, MN 55439 952-835-5309-phone, 952-835-0013-fax • DOC. #L0710 - 0217
CountertopMaterial
36 in. (90 cm)
104 in. (265 cm)