Embed Size (px)
Citation preview
Third Party System Management Integration Solution
Microsoft Windows Deployment Guide for Sun Servers Using Symantec Altiris Deployment Solution 6.9
Servers supported:
Sun x64 Servers
A complete, current list of supported Sun servers, service processors, and service processor firmware is available at the following web site:
http://www.sun.com/system-management/tools.jsp
Please consult this web site before configuring the Altiris Deployment Solution forSun Servers.
Sun Microsystems, Inc.
www.sun.com
Part No. 820568210
September 2008, Revision A

Copyright 2008 Sun Microsystems, Inc., 4150 Network Circle, Santa Clara, California 95054, U.S.A. All rights reserved.
Sun Microsystems, Inc. has intellectual property rights relating to technology that is described in this document. In particular, and without limitation, these intellectual property rights may include one or more of the U.S. patents listed at http://www.sun.com/patents and one or more additional patents or pending patent applications in the U.S. and in other countries.
This document and the product to which it pertains are distributed under licenses restricting their use, copying, distribution, and ecompilation. No part of the product or of this document may be reproduced in any form by any means without prior written authorization of Sun and its licensors, if any.Thirdparty software, including font technology, is copyrighted and licensed from Sun suppliers.
Parts of the product may be derived from Berkeley BSD systems, licensed from the University of California. UNIX is a registered trademark in the U.S. and in other countries, exclusively licensed through X/Open Company, Ltd.
Sun, Sun Microsystems, the Sun logo, Sun Blade, and Solaris are trademarks or registered trademarks of Sun Microsystems, Inc., or its subsidiaries, in the U.S. and in other countries.
U.S. Government Rights—Commercial use. Government users are subject to the Sun Microsystems, Inc. standard license agreement and applicable provisions of the FAR and its supplements.
DOCUMENTATION IS PROVIDED "AS IS" AND ALL EXPRESS OR IMPLIED CONDITIONS, REPRESENTATIONS AND WARRANTIES, INCLUDING ANY IMPLIED WARRANTY OF MERCHANTABILITY, FITNESS FOR A PARTICULAR PURPOSE OR NONINFRINGEMENT, ARE DISCLAIMED, EXCEPT TO THE EXTENT THAT SUCH DISCLAIMERS ARE HELD TO BE LEGALLY INVALID.
Copyright 2008 Sun Microsystems, Inc., 4150 Network Circle, Santa Clara, California 95054, ÉtatsUnis. Tous droits réservés.
Sun Microsystems, Inc. possède les droits de propriété intellectuels relatifs à la technologie décrite dans ce document. En particulier, et sans limitation, ces droits de propriété intellectuels peuvent inclure un ou plusieurs des brevets américains listés sur le site http://www.sun.com/patents, un ou les plusieurs brevets supplémentaires ainsi que les demandes de brevet en attente aux les ÉtatsUnis et dans d’autres pays.
Ce document et le produit auquel il se rapporte sont protégés par un copyright et distribués sous licences, cellesci en restreignent l’utilisation, la copie, la distribution, et la décompilation. Aucune partie de ce produit ou document ne peut être reproduite sous aucune forme, par quelque moyen que ce soit, sans l’autorisation préalable et écrite de Sun et de ses bailleurs de licence, s’il y en a.
Tout logiciel tiers, sa technologie relative aux polices de caractères, comprise, est protégé par un copyright et licencié par des fournisseurs de Sun.
Des parties de ce produit peuvent dériver des systèmes Berkeley BSD licenciés par l’Université de Californie. UNIX est une marque déposée aux ÉtatsUnis et dans d’autres pays, licenciée exclusivement par X/Open Company, Ltd.
Sun, Sun Microsystems, le logo Sun, Sun Blade, et Solaris sont des marques de fabrique ou des marques déposées de Sun Microsystems, Inc., ou ses filiales, aux ÉtatsUnis et dans d’autres pays.
LA DOCUMENTATION EST FOURNIE "EN L’ÉTAT" ET TOUTES AUTRES CONDITIONS, DÉCLARATIONS ET RANTIES EXPRESSES OU TACITES SONT FORMELLEMENT EXCLUES DANS LA LIMITE DE LA LOI APPLICABLE, Y COMPRIS NOTAMMENT TOUTE GARANTIE IMPLICITE RELATIVE À LA QUALITÉ MARCHANDE, À L’APTITUDE À UNE UTILISATION PARTICULIÈRE OU À L’ABSENCE DE CONTREFAÇON.

Contents
Introduction 1
Supported Systems 1
Software Requirements 2
Special Infrastructure Considerations 3
Server Deployment Overview 4
Automation Environment 4
Automation Boot Methods 4
PXE Boot Loader 5
Deployment Share 5
Deployment Console 5
Jobs and Tasks 5
Deployment Process WalkThrough 6
Configuration Workflow 9
Outofband Management Considerations 9
Preparing the Database 10
Preparing Sun x64 Servers for Windows Provisioning 11
Configuring the Service Processor 11
Obtaining the MAC address 11
Alternative way of obtaining the MAC address 11
Setting BIOS Boot Order 12
Configuring RAID Controllers 12
Preparing Symantec Altiris Deployment Solution 13
Installing Sun Tools 13
Creating Windows PE 2.1 Boot Option 13
Configuring Altiris Deployment Solution 15
Creating a Windows Deployment Job 15
Creating a Scripted OS Install Task 16
Slipstreaming Device Drivers 18
Creating Disk Partitioning and Format Task 19
iii

Creating Power Control Tasks 20
Creating a Boot Device Change Task 21
Creating a Restart Task 22
Finishing the Windows Deployment Job 22
Creating Preconfigured Computer Accounts 23
Importing Device Drivers 24
Conventions 24
Driver Import Overview 24
Basic Directory Structure Overview 24
Placing Files in the Correct Locations 25
Unattend.txt 25
Instructions for Sun Fire X2100 M2 26
Slipstreaming Device Drivers 26
Unattended Configuration File 27
Instructions for Sun Fire X2200 M2 28
Slipstreaming Device Drivers 28
Unattended Configuration File 29
Instructions for Sun Fire X4100 M2,X4200 M2 29
Slipstreaming Device Drivers 29
Unattended Configuration File 30
Instructions for Sun Fire X4140, X4240, X4440 31
Slipstreaming Device Drivers 31
Unattended Configuration File 32
Instructions for Sun Fire X4150 33
Slipstreaming Device Drivers 33
Unattended Configuration File (Sun StorageTek RAID Adapter) 34
Unattended Configuration File (LSI RAID Adapter) 35
Instructions for Sun Fire X4450 35
Slipstreaming Device Drivers 35
Unattended Configuration File (Sun StorageTek RAID Adapter) 36
Unattended Configuration File (LSI RAID Adapter) 37
Instructions for Sun Fire X4600 M2 37
Slipstreaming Device Drivers 37
Unattended Configuration File 38
iv Microsoft Windows Deployment Guide for Sun Servers Using Symantec Altiris Deployment Solution 6.9

Instructions for Sun Blade X6220 39
Slipstreaming Device Drivers 39
Unattended Configuration File 40
Instructions for Sun Blade X6250 41
Slipstreaming Device Drivers 41
Unattended Configuration File 42
Instructions for Sun Blade X8440 42
Slipstreaming Device Drivers 42
Unattended Configuration File 43
Troubleshooting 44
Keep Your Altiris Deployment Solution Up To Date 44
Diagnosing Problems Using an Interactive Session 44
BSOD With Windows PE 2.1 45
Scripted OS Install Is Failing 45
Error Loading Operating System When Using Diskpart for Disk Partitioning 46
Clients Not Booting Into Automation When Using Outofband Boot Device Control 46
Modifications for 32bit Windows 48
Sample SQL Scripts 49
Creating SunHW Database 49
Definition of a Custom Data Source 49
Service Processor Registration 50
v

CHAPTER 1
Introduction
This white paper describes the procedures required to configure Altiris® Deployment Solution 6.9 for provisioning of Windows Server 2003 to Sun x64 servers. The solution presented in this document requires Windows PE 2.1 as the automation operating system and PXE as the boot image delivery method. Although only the 64bit Windows version will be discussed, a generic guide for slipstreaming custom device drivers will be provided.
This document does not cover the installation of Altiris® Deployment Solution 6.9 or any of its dependencies. For instructions about how to set up the deployment environment, see the Altiris® Deployment Solution 6.9 Admin Guide, which is available at the following website: http://www.altiris.com/upload/deployment_004.pdf
─────Supported SystemsThe procedures described in this document were tested with the following server types.
Sun Fire X2100 M2
Sun Fire X2200 M2
Sun Fire X4100 M2
Sun Fire X4140
Sun Fire X4150
Sun Fire X4200 M2
Sun Fire X4240
Sun Fire X4440
Sun Fire X4450
Sun Fire X4600 M2
Sun Blade X6220
Sun Blade X6250
Sun Blade X8440
1
─────Software RequirementsThis section describes the software required to successfully perform the tasks outlined in this document.
Altiris Deployment Solution 6.9A working Altiris deployment environment is required with PXE and TFTP services installed and configured. This setup also requires a DHCP server to be installed.
Windows PE 2.1 64bitWindows PE 2.1 is used as the automation environment in which preOS installation tasks are executed. This document is concerned with 64bit Windows deployment, hence the requirement for a 64bit automation environment. Installation packages of various automation OSes including Windows PE 2.1 64bit are provided as part of Altiris Deployment Solution 6.9 or can be downloaded separately from the Altiris web portal.
Windows Server 2003 Enterprise Edition 64bitThe original Windows installation media are required.
Platformspecific Tools & Drivers CDEach Tools & Drivers CD contains device drivers specific to a particular server type. Tools & Drivers CDs are included in every Sun server package or can be downloaded from Sun download portal. For a list of available Tools & Drivers CD images go to http://www.sun.com/download , navigate to the tab “View by Category”, locate the category “Hardware Drivers” and click the link “x64 Servers & Workstations”.
IPMItool 1.8.8 for Microsoft WindowsIPMItool utility is required to enable outofband management of Sun x64 servers. This includes power management tasks or boot device selection. IPMItool 1.8.8 can be downloaded from the following location: http://www.sun.com/systemmanagement/tools.jsp
2 Microsoft Windows Deployment Guide for Sun Servers Using Symantec Altiris Deployment Solution 6.9

─────Special Infrastructure ConsiderationsSun x64 servers are equipped with the Sun Integrated Lights Out Manager (ILOM) service processor. ILOM is embedded into new Sun platforms, and comes complete with network and serial ports to provide rich and secure outofband remote management and configuration.
In order to enable the outofband management functionality including remote power control and boot device selection in Altiris Deployment Solution, the ILOM service processor must be connected to the network and assigned with an IP address.
In general, service processors can be connected to a separate management network while the hostside network ports are connected to a production or provisioning network. In such cases, hosts in the management network must be accessible from the provisioning server either by connecting one network interface of the provisioning server directly to the management network or by means of routing.
For details about the Sun Integrated Lights Out Manager, consult the following page: http://www.sun.com/systemmanagement/ilom.jsp or the Sun Integrated Lights Out Manager 2.0 User's Guide, which can be found at the following website: http://docs.sun.com/source/820118811
3
CHAPTER 2
Server Deployment Overview
Before proceeding to the description of the configuration steps that enable Altiris Deployment Solution for provisioning of Sun x64 servers, this chapter provides the basic background for understanding the important components of the deployment architecture and their role throughout the provisioning process. We will also provide a highlevel overview of the communication between the deployment server and target nodes and identify the important milestones of the provisioning process.
─────
Automation EnvironmentIn order to perform administrative tasks on a computer in case there is no operating system installed or independently on the production operating system, Altiris Deployment Solution provides several automation environments. An automation environment is a lightweight operating system distribution containing Altiris agent software. Computers to be managed can be instructed to boot this lightweight OS to provide either an interactive environment where operators can perform administrative tasks manually or a noninteractive environment where commands and scripts can be run remotely using the Altiris agent. Altiris Deployment Solution 6.9 offers three default automation environments based on the following operating systems:
FreeDOS
Linux
Windows PE 2.1
The solution outlined in this paper requires the Windows PE 2.1 automation environment. Other automation operating systems are not discussed here.
Automation Boot Methods
There are three methods of booting the automation environment supported in Altiris Deployment Solution 6.9:
PXE
Automation Partitions
Boot Media, for example, DVD/CD, USB device or floppy
This paper describes a solution based on PXE. Other automation boot methods will not be documented. For a detailed overview of the various automation boot methods, consult Altiris® Deployment Solution 6.9 Admin Guide, Part II.
4 Microsoft Windows Deployment Guide for Sun Servers Using Symantec Altiris Deployment Solution 6.9
Did you know? Sun Integrated Lights Out Manager provides the Storage Device Redirection feature that enables local DVD/CDROM and floppy drive redirection including ISO or floppy images to a remote server. For details, consult Chapter 12 of the Sun Integrated Lights Out Manager 2.0 User's Guide.
PXE Boot Loader
Every time a computer that is connected to a network which is part of the Altiris Deployment Solution infrastructure boots from the network using PXE, the Altiris PXE boot loader will be downloaded from the deployment server and launched. The boot loader is used by the Deployment Solution to control which environment should be started on the server that initiated the network boot request. This environment can either be the automation operating system or the production operating system.
─────
Deployment ShareDeployment Share is a Windows file share which stores all files that need to be accessible to managed computers. The deployment share is accessible from all supported automation environments and as such is the ideal place to store various administrative utilities or large data that do not need to be included in the automation boot image. As a result, the automation boot images can be smaller in size, reducing the time required to download and boot the automation environment over PXE.
By default, the Deployment Share is represented by the folderC:\Program Files\Altiris\eXpress\Deployment Server.
─────
Deployment ConsoleDeployment Console is the main tool that enables operators to configure properties of Altiris Deployment Solution, create jobs and tasks, manage computers and schedule work to be performed on the computers. In addition, Altiris Deployment Server provides Deployment Server Web Console as an alternative operator environment. The Web Console will not be discussed in this paper, all configuration tasks will be performed using the Deployment Console GUI.
Jobs and Tasks
Jobs and tasks are the essential instruments that allow Altiris Deployment Solution to perform operations on the client computers.
Jobs represent complex operations. Jobs can be composed of one or multiple tasks. Various conditions can be defined to restrict the scope of a job only to a particular computer or set of computers that match the conditions specified.
5
Tasks represent atomic operations such as power control, disk imaging, copying files to a remote system, running a script, running a scripted OS installation and more. Tasks can be chained together based on the return value of a task run. Using this mechanism, robust solutions can be easily constructed. For example, a custom cleanup or rollback task can be launched after an unsuccessful configuration task run.
─────
Deployment Process WalkThroughTo provide a better insight into the OS deployment process as implemented by Altiris Deployment Solution, the following section contains a simplified walkthrough of a typical Windows deployment scenario. The configuration steps that need to be performed in order to implement this scenario for Windows provisioning will be described in Chapter 3, Configuration Workflow.
Note: This scenario requires the DHCP, PXE and TFTP servers to be installed and running in the provisioning network. For instructions on installing and configuring the Altiris PXE Server, consult Altiris® Deployment Solution 6.9 Admin Guide, Chapter 9.
The following sequence of events assumes that the computer to be provisioned is unknown to Altiris Deployment Server and that the Altiris Deployment Solution is configured to send responses to unknown clients.
1. The computer to be provisioned (hereafter the client) is powered on and instructed to boot from the network. This can be achieved either by changing the BIOS boot order, by manual intervention during the computer startup, or by using a remote control mechanism.
2. The client obtains an IP address from the DHCP server. The Altiris PXE server (which is a proxy DHCP server), instructs the client to download and run the Altiris PXE boot loader.
3. Since the client is not recognized by Altiris Deployment Solution as a known computer, the PXE boot loader initiates a boot into an automation environment. The purpose of the first automation run is to discover the properties of the unknown client and to register the client in the deployment database.
4. Once the automation operating system startup is complete, the Altiris agent launches and attempts to connect to the Altiris deployment server. The deployment server can be explicitly specified during the configuration of the automation environment or discovered using multicast.
5. The Altiris agent gathers basic information about the client computer, such as MAC addresses of the network interface cards, manufacturer, computer model, serial number and other SMBIOS values that can be used to identify the computer. These values are subsequently sent back to the deployment server and stored in the Deployment Database.
6. The client computer is now properly discovered and operators can schedule jobs to be run on the client. Altiris Deployment Solution can also be configured for automatic initial deployment of new computers. In such a case, no manual intervention is required to launch the deployment job.
6 Microsoft Windows Deployment Guide for Sun Servers Using Symantec Altiris Deployment Solution 6.9

7. Once a scheduled or an initial OS deployment job is launched, Altiris Deployment Solution starts to run the tasks that make up the deployment job one by one. If a task is required to run in a particular automation environment, the client computer will be rebooted into the required automation OS. If two consequent tasks are configured to run in an identical automation environment, the client computer will not be rebooted between two such task runs. The OS deployment job may consist of various configuration tasks such as:
Server or option card firmware update
RAID controller configuration
Specific disk partitioning
After performing the above listed tasks, the client computer usually needs to be rebooted so that the automation OS can correctly detect the new settings.
8. The key component of the OS deployment job, though, is the Scripted OS Install task. This task type is preconfigured in Altiris Deployment Solution, so that no scripting is required to setup the OS deployment. A graphical wizard is provided that assist administrators with configuring the parameters of a scripted OS installation. The Scripted OS Install task automatically performs the following actions:
Disk partitioning and format (optional, client reboot is required after this step).
Generate files that control the unattended OS installation process.
Copy the control files and Altiris agent installation binary to the target hard drive on the client computer.
Launch the Windows installer in the unattended mode. The first stage of the Windows installer is launched in the Windows PE automation environment.
9. The Windows installer reads the unattended setup control file and copies the required files from the deployment share to the local hard disk of the client computer. Further, the disk is made bootable. Upon completion of this stage, the client computer is rebooted from the local hard disk. From this point until the very end of the Windows installation, Altiris Deployment Solution has no control over the process nor any notion about the progress.
10. The client computer boots from the local disk. Windows textmode Setup starts, required OEM mass storage drivers are loaded and the OS installation procedure is started. After the textmode Setup finishes, the client computer is rebooted.
11. The client computer boots from the local hard drive. An optional file system conversion from FAT32 to NTFS might be launched followed by a reboot. Windows Setup starts in a graphical mode and the OS installation and configuration is finished. As part of the configuration phase, the Altiris agent is installed to the local hard drive. The role of the agent is to provide a connection between Altiris Deployment Solution and the production operating system that will run on the client computer. After the OS installation procedures are finished, the client reboots for the last time.
12. The client boots from the local hard drive and the production operating system is launched. Once the OS is up and running, the Altiris agent connects to the
7

deployment server and indicates that the OS deployment has been successfully completed. This is indicated in the Deployment Console.
8 Microsoft Windows Deployment Guide for Sun Servers Using Symantec Altiris Deployment Solution 6.9

CHAPTER 3
Configuration Workflow
This chapter contains stepbystep instructions for configuring Altiris Deployment Solution 6.9 for provisioning Sun x64 servers with a Microsoft Windows Server 2003 operating system.
─────
Outofband Management ConsiderationsAll Sun x64 servers are equipped with a service processor that enables the servers to be remotely managed. The remote management capabilities include remote power control, boot device selection, hardware monitoring, BIOS and firmware update and more. In order to be able to use these features, the service processors need to be connected to a LAN. Refer to section Special Infrastructure Considerations onpage 3.
During the Windows deployment process we are about to configure, the target client computers need to be rebooted several times. After each reboot it is important that the client boots from a network which allows Altiris Deployment Solution to control the provisioning work flow. There are two options:
No outofband control. For this option, the BIOS boot order needs to be set as follows: network interface card first, hard drive (RAID adapter) second. Further boot device order is not important.
Outofband control using IPMItool. For this option, the BIOS boot order needs to be set as follows: hard drive (RAID adapter) first. Further boot device order is not important.
Note: In case you decide to use no outofband control and set the network card as the first boot device in BIOS it is safe to keep these BIOS settings in place during entire machine life cycle. There is no risk of unintentional reprovisioning of the client. Even if the client boots from network each time it is rebooted, the Altiris PXE boot loader will instruct the server to continue its normal boot sequence (i.e. to boot from the next device in a row as per BIOS settings) unless the Altiris Deployment Solution operator decided differently (for example, to reprovision the client or to boot into automation in order to perform administrative tasks outside of the production operating system).
Depending on which approach you choose, the configuration procedure may differ. Those configuration steps specific solely to the outofband approach will be marked as Outofband.
9

─────
Preparing the DatabaseIn order to be able to use outofband management features in an automated fashion, it is necessary to prepare the required infrastructure that enables you to associate servers managed by Altiris Deployment Solution with corresponding service processor IP address and authentication credentials.
Altiris Deployment Solution stores information about client computers in a database. Each client is uniquely identified by an ID. The following procedure describes how to create a new database that will be used by Altiris Deployment Solution as an external data source to perform lookup of the outofband management credentials with client ID as the key.
To create the database and register a new custom data source with Altiris Deployment Solution manually, follow the procedure below.
Note: Operations required to set up the database and to register it with Altiris Deployment Solution can be automated. Refer to Appendix B – Sample SQL Scripts for instructions and samples.
1. Run MS SQL Server Management Studio, connect to the SQL server used by Altiris Deployment Solution and create a new database called SunHW.
2. Adjust the database permissions so that the user associated with the Altiris Deployment Server can perform SELECTs on the SunHW database.
3. In the SunHW database create a table called sp with the following columns and properties.
Column Properties
computer_id primary key, int, not null
sp_ip varchar(16), not null
login varchar(64), not null
pass varchar(128), not null
4. Define a custom data source in Altiris Deployment Console using the Tools > Options > Custom Data Sources menu.
This step enables you to perform queries on the SunHW database from within scripted tasks using custom database tokens. Usage of custom database tokens will be demonstrated further in the text.
Use the settings in the following table. In the field Server, use the host name of your MS SQL server unless the database server is running on the same system as Altiris Deployment Solution.
10 Microsoft Windows Deployment Guide for Sun Servers Using Symantec Altiris Deployment Solution 6.9
Outofband
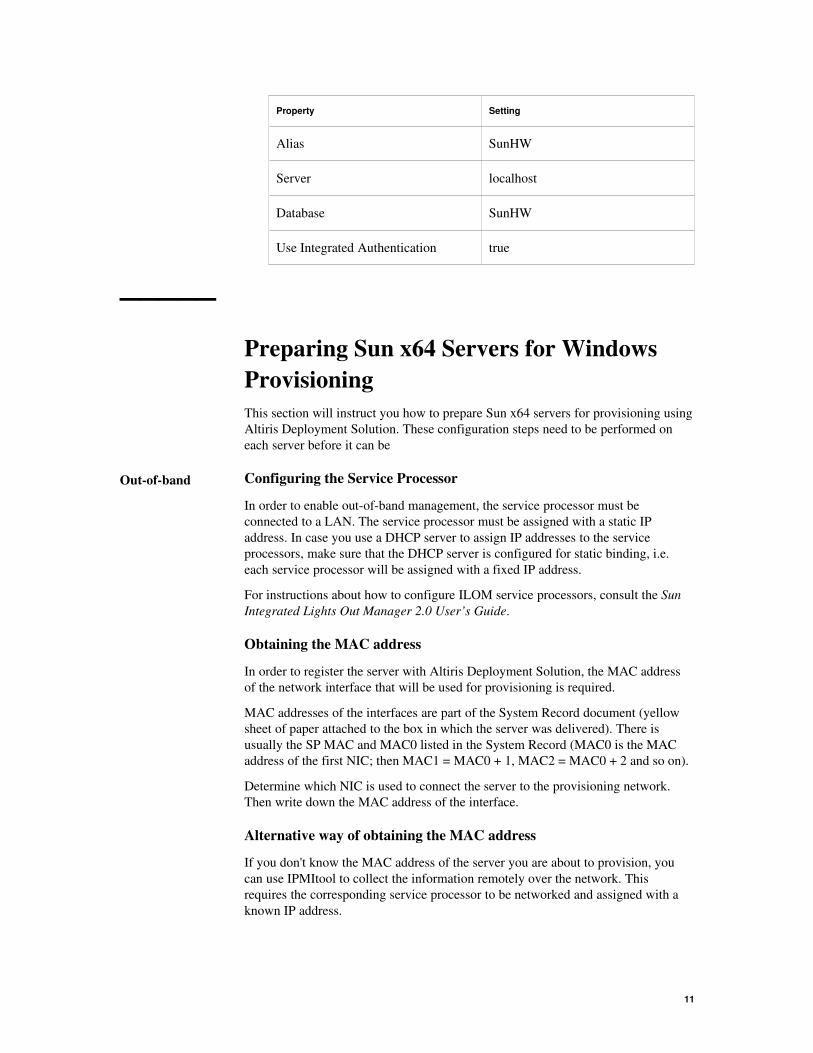
Property Setting
Alias SunHW
Server localhost
Database SunHW
Use Integrated Authentication true
─────
Preparing Sun x64 Servers for Windows ProvisioningThis section will instruct you how to prepare Sun x64 servers for provisioning using Altiris Deployment Solution. These configuration steps need to be performed on each server before it can be
Configuring the Service Processor
In order to enable outofband management, the service processor must be connected to a LAN. The service processor must be assigned with a static IP address. In case you use a DHCP server to assign IP addresses to the service processors, make sure that the DHCP server is configured for static binding, i.e. each service processor will be assigned with a fixed IP address.
For instructions about how to configure ILOM service processors, consult the Sun Integrated Lights Out Manager 2.0 User’s Guide.
Obtaining the MAC address
In order to register the server with Altiris Deployment Solution, the MAC address of the network interface that will be used for provisioning is required.
MAC addresses of the interfaces are part of the System Record document (yellow sheet of paper attached to the box in which the server was delivered). There is usually the SP MAC and MAC0 listed in the System Record (MAC0 is the MAC address of the first NIC; then MAC1 = MAC0 + 1, MAC2 = MAC0 + 2 and so on).
Determine which NIC is used to connect the server to the provisioning network. Then write down the MAC address of the interface.
Alternative way of obtaining the MAC address
If you don't know the MAC address of the server you are about to provision, you can use IPMItool to collect the information remotely over the network. This requires the corresponding service processor to be networked and assigned with a known IP address.
11
Outofband

Issue the following command on a Solaris, Linux or Windows host with IPMItool installed:
ipmitool -H <sp_ip> -U <user> -P <password> fru print
where sp_ip is the IP address of the service processor, user is the user name and password is the password required to connect to the service processor.
Note: The factory default user name that can be used to connect to an ILOM 2.0 service processor is root and the default password for this account is changeme.
In the output of the command, locate the entry that corresponds with the NIC. The output will look similar to the following:
FRU Device Description : mb.net0.fru (ID 24)
Product Manufacturer : NVIDIA
Product Name : DUAL GIGABIT ETHERNET CONTROLLERS
Product Part Number : MCP55
Product Serial : 00:14:4F:8D:6F:F6
Product Extra : 01
Product Extra : 00:14:4F:8D:6F:F6
Based on the output above, the MAC address of the first and the second network interface would be 00:14:4F:8D:6F:F6 and 00:14:4F:8D:6F:F7 respectively.
Setting BIOS Boot Order
The BIOS boot order can be permanently changed using the BIOS Setup utility. The utility is started by pressing the F2 key during the poweron selftest (POST) sequence upon server poweron. The boot order you set will depend on the type of management configuration you have chosen.
No outofband control: The BIOS boot order needs to be set as follows: network interface card first, hard drive (RAID adapter) second. Further boot device order is not important.
Outofband control: The BIOS boot order needs to be set as follows: hard drive (RAID adapter) first. Further boot device order is not important.
Configuring RAID Controllers
Every Sun x64 server is usually equipped with an integrated RAID controller or with a RAID HBA option card for internal storage. You may want to preconfigure the storage controller before installing an operating system on the server.
For Adaptecbased controllers (for example, option SGXPCIESASRINTZ), you must first use the Adaptec BIOS utility to initialize and create an array or volume on all of the disks you want the OS to recognize. The Adaptec BIOS utility is accessible using CtrlA during system POST.
For LSIbased controllers (for example, option SGXPCIE8SASIZ or onboard controllers), use CtrlC during system POST to enter the LSI BIOS utility.
12 Microsoft Windows Deployment Guide for Sun Servers Using Symantec Altiris Deployment Solution 6.9
Outofband
Generally, the RAID controllers can also be configured from an preexecution environment such as Windows PE using utilities provided by the controller vendor. For further information, consult your controller vendor documentation.
─────
Preparing Symantec Altiris Deployment SolutionThis section will guide you through the configuration steps that are required to set up Windows deployment for Sun x64 servers.
Installing Sun Tools
To enable outofband management features, you need to install IPMItool for Windows. Refer to Software Requirements, page 2, for information about where to obtain IPMItool.
1. Create a directory called Sun on your Deployment Share. By default, the Deployment Share is located in the directory C:\Program Files\Altiris\eXpress\Deployment Server on your deployment server. In such a case, you would create the directory C:\Program Files\Altiris\eXpress\Deployment Server\Sun.
2. Copy the IPMItool binaries from the distribution package to the newlycreated directory. There are two files that are required: ipmitool.exe and libeay32.dll.
3. (optional) If you plan to use additional tools specific to Sun servers deployment, place these in the Sun directory as well.
Creating Windows PE 2.1 Boot Option
In order to perform the Windows deployment, you need to install an automation environment. Since we will be installing the x64 version of Windows Server 2003, a version of Windows PE 2.1 for the x64 processor architecture is required. Follow the steps below to install and configure Windows PE 2.1.
Install the Preexecution Environment
If you have already installed the Windows PE 2.1 x64 preexecution environment as part of your Altris Deployment Solution installation, this procedure is not necessary. Proceed to Create a New Boot Menu Option, on Page 14.
1. Launch the PXE Configuration Utility (in the Deployment Console, open the Tools menu and select PXE Configuration).
2. Navigate to the tab named Boot Menu and click the New... button.
3. In the New Shared Menu Option dialog, click the Add preboot... button.
4. In the Altiris Boot Disk Creator – Install Preboot Operating System Files dialog, highlight the row WinPE 2.1 X64, select the radio button Altiris WinPE installer and click the Browse... button.
13
Outofband

5. Navigate to the folder containing the Windows PE 2.1 x64 installer (Altiris_DS_Preboot_WinPE_2.1_x64.exe) and confirm.
6. In the Altiris Boot Disk Creator dialog, click the Next button.
7. Follow the on screen instructions that will guide you through the installation of the preexecution environment.
Create a New Boot Menu Option
After installing the preexecution environment, follow the steps below to create a new boot menu option.
1. In the New Shared Menu Option dialog, make the following selections:
Name: WinPE 2.1
Allow as default PXE boot option: true
Operating System & Processor Options: WinPE, x64
Image Creation Method: Boot Disk Creator
2. Click the Create Boot Image... button.
3. A dialog named Altiris Boot Disk Creator – Create Configuration will be opened. Follow the steps in the Altiris Boot Disk Creator Create Configuration dialog.
Step 1 of 12 – Add an optional description of the preexecution environment you are creating and click Next.
Step 2 of 12 – Make sure the checkbox Autodetect all device drivers is checked. Click Next.
Step 3 of 12 – Select Obtain an IP address from a DHCP server and click Next.
Step 4 of 12 – Choose whether you want to establish the connection between Altiris agent that will run in the automation environment and the Deployment Server using multicast or unicast. Select whether you want to use a remote agent (the agent resides in the Deployment Share) or a local agent that is part of the automation environment. You can also configure the automation environment to disable keyboard (for security reasons). Then click Next.
Step 5 of 12 – The automation OS needs to connect to a Windows workgroup or a domain and to authenticate in order to gain access to the Deployment Share. Enter the Workgroup/Domain name and provide authentication credentials for accessing the Deployment Share. Then click Next.
Step 6 of 12 – The Deployment Share will be mapped to a drive letter once the automation environment is started. You can adjust the settings in this dialog. Drive F: is the default for mapping the share. In case there are four or more physical drivers or RAID volumes present in your system, you might need to map the share to a letter that comes later in the alphabet to avoid drive mapping conflicts. Click Next.
Step 7 of 12 – You can adjust what optional components will be included in the WinPE automation image or enable the builtin firewall if required.
14 Microsoft Windows Deployment Guide for Sun Servers Using Symantec Altiris Deployment Solution 6.9

For the purpose of Windows deployment as described in this paper, you can accept the default settings. Then click Next.
Steps 8, 9, 10 of 12 – Click Next. The Boot Disk Creator will now generate the PXE image required to boot the automation environment.
4. After the image creation is complete, click the Finish button to exit the Boot Disk Creator.
5. In the New Shared Menu Option dialog, click OK to finalize and store the boot option.
6. You should now see the newly created boot option in the PXE Configuration Utility, on the tab Boot Menu.
7. In the PXE Configuration Utility, click Save and then OK to close the tool.
The Windows PE 2.1 automation environment is now ready to be used for running commands and scripts on the managed clients.
Configuring Altiris Deployment Solution
There are certain general properties that need to be set before Sun x64 servers can be provisioned. Those are listed below.
1. Enable unknown computers to be serviced by the Deployment Server.
a. Launch the PXE Configuration Utility (in the Deployment Console, open the Tools menu and select PXE Configuration).
b. Navigate to the tab named DS. Make sure the checkbox named Enable response to request from computers not in the DS Database is checked.
c. Select the boot option created in the previous step as the Boot option for unknown computer.
d. Confirm the new settings by clicking on Save.
e. Close the dialog by clicking the OK button.
2. Disable implicit WakeOnLAN.
a. Launch the Altiris Deployment Server Configuration tool by opening the Windows Start menu and navigate to All Programs → Altiris → Deployment Solution and click the Configuration shortcut.
b. In the Altiris Deployment Server Configuration tool, click the Options button.
c. Navigate to the tab named General and make sure the checkbox Send WakeOnLAN to inactive computers when scheduling is unchecked.
d. Click OK and close the configuration tool.
Creating a Windows Deployment Job
Before you proceed to creating the tasks that will perform the actual server provisioning, you need to create a job. The job will act as a container for the tasks. This will allow you to define the order in which the tasks should run. Optionally, the job can be conditionalized using a set of rules that restrict the scope of the job,
15

for example, only to clients with certain properties. For detailed information about setting job conditions, refer to the Altiris® Deployment Solution 6.9 Admin Guide.
Note: You need to create a separate Windows deployment job for each Sun server model you want to deploy Windows to. Different server models may require different set of mass storage drivers that cannot be intermixed without performing nontrivial modifications in the driver configuration files required by the Windows installer. Since this is outside of the scope of this document, we require you to create a separate deployment job per server model.
To create a Windows deployment job, follow the steps below:
1. In the Deployment Console, rightclick the Jobs pane in the bottom left part of the console window.
2. In the popup menu, select New Job. A new job entry named New Job <number> appears in the Jobs pane.
3. Modify the new job name to a unique identifier, for example, Windows – <ServerModel>.
The job has been created and you can start adding tasks. This is described in the following sections.
Creating a Scripted OS Install Task
The Scripted OS Install task is the key element that is responsible for set up and control of the Windows deployment. To create a Scripted OS Install task, follow the steps below:
1. In the Deployment Console, click the name of the Windows deployment job created in the previous procedure.
2. In the right pane, click the Add>> button.
3. In the popup menu, select Scripted OS Install. A Scripted OS Install dialog opens.
4. Select the Windows radio button and click Next.
5. Click the Select the OS version dropdown menu and select Windows Server 2003 Enterprise x64 Edition. Alternatively, select a different version of the Windows Server 2003 operating system depending on which version you want to deploy using Altiris Deployment Solution.
Note: This paper describes only the procedures related to the x64 edition of Windows. However, these procedures can be easily adjusted for the 32bit Windows editions. Refer to Apendix A – Modifications for 32bit Windows.
6. Click the Select the OS language dropdown menu and select the language that should be used by the OS that will be deployed. The language should match the language version of the Windows media you plan to use to configure the OS deployment.
7. Click the Automation preboot environment dropdown menu and select WinPE 2.1 (64bit). In case you named the previously created WinPE boot menu option differently, select <YourBootOptionName> (64bit) as the automation environment. Click Next.
16 Microsoft Windows Deployment Guide for Sun Servers Using Symantec Altiris Deployment Solution 6.9

8. At this point, the Scripted OS Install wizard requires you to import OS source files.
a. Expand the Select or add new OS source files dropdown menu and select the entry named Add new. A dialog named Operating System Source Files opens.
b. Enter a unique name for the OS source files, for example, Windows Server 2003 EE 64bit for <ServerModel>.
c. Click the button with a folder icon next to the Enter path to OS source files text box.
d. Insert the Windows Server 2003 Enterprise x64 Edition CD1 to the CD/DVD drive or mount a corresponding ISO image containing the OS files.
e. Navigate to the directory \AMD64 on the CD, select WINNT32.EXE and click Open.
f. Click OK in the Operating System Source Files dialog.
The wizard will import the required OS files to Altiris DS. After the import is completed, the name of the newly created OS source will be selected in the Scripted OS Install dialog.
9. Check and note the directory name next to the Location label. The directory name will be similar to .\deploy\WinOS001\AMD64\. This location is relative to the directory where the Deployment Share is located. The location of the imported OS source will be required in the section concerning slipstreaming device drivers further in the text.
10. Optionally, repeat similar procedure to import a Service Pack.
11. Click Next.
12. In the window named Partition and Format Disk, choose the option named Continue without distributing DOS image\Diskpart Tool. You will create a custom disk partitioning task later.
Note: If you encounter errors during execution of the Scripted OS Install task on a client machine, refer to Chapter 5 – Troubleshooting.
13. Click Next. In the window named Sripted Operating System Installation, check the checkbox named Import existing unattend.txt.
14. Click the button with a folder icon next to the Path of the unattend.txt text box, navigate to the unattend.txt file you want to import and confirm.
Note: Sample unattend.txt files for Sun x64 server models supported in this paper are available in Chapter 4 – Importing Device Drivers for Sun x64 Servers.
15. Click Next. In the window asking you to confirm the import of the unattend.txt file click Yes. A dialog named New Variable for Section "MassStorageDrivers” will be opened. Check the checkbox named Accept all further variable proposals and click OK.
16. In the window named Answer File Setup, you can customize the unattended Windows installation parameters. Navigate to the GUIUnattended tab and fill in
17

a value of for the AdminPassword property. If you don't provide the password for the Administrator here, the installation will fall back to the interactive mode.
17. Once done, click Finish to close the Scripted OS Install dialog.
Slipstreaming Device Drivers
At this point, we have finished configuring the Scripted OS Install task. To make the settings performed in the previous section valid, it is necessary to import the device drivers that the Scripted OS Install task was instructed to use.
The following information and software is required to successfully perform the driver import:
Location of Windows source files that were imported during the creation of the Scripted OS Install task. Sunspecific device drivers will be placed within this directory. Hereafter this location is referred to as <OSSOURCE>.
Tools & Drivers CD or ISO image for a particular Sun x64 server model. The Tools & Drivers CDs contains device drivers that are required to install and operate Windows on Sun x64 servers.
There are two driver types that can be imported:
Mass Storage drivers required by the Windows installer to access the storage device during the installation. These include drivers for RAID controllers and virtual CDROM devices.
Other device drivers that are not required during the installation, but are required for proper operation of the production operating systems. These include drivers for Ethernet adapters, Fibre Channel adapters, graphic cards etc.
Each of these driver types needs to be placed in a different location within the Windows installation source directory. To enable this, you need to create the following directory structure:
<OSSOURCE>\AMD64\$OEM$
<OSSOURCE>\AMD64\$OEM$\$1
<OSSOURCE>\AMD64\$OEM$\$$
<OSSOURCE>\AMD64\$OEM$\$$\OEMDIR
<OSSOURCE>\AMD64\$OEM$\TEXTMODE
Example:
If your Deployment Share is located in C:\Program Files\ Altiris\eXpress\Deployment Server (the default location of the Deployment Share) and the location of the imported OS sources as reported by the Scripted OS Install wizard is .\deploy\WinOS001\AMD64\, the following directories must be created:
C:\Program Files\Altiris\eXpress\Deployment Server\deploy\WinOS001\AMD64\$OEM$
C:\Program Files\Altiris\eXpress\Deployment Server\deploy\WinOS001\AMD64\$OEM$\$1
C:\Program Files\Altiris\eXpress\Deployment Server\deploy\WinOS001\AMD64\$OEM$\$$
18 Microsoft Windows Deployment Guide for Sun Servers Using Symantec Altiris Deployment Solution 6.9

C:\Program Files\Altiris\eXpress\Deployment Server\deploy\WinOS001\AMD64\$OEM$\$$\OEMDIR
C:\Program Files\Altiris\eXpress\Deployment Server\deploy\WinOS001\AMD64\$OEM$\TEXTMODE
Hereafter, the directories specified above will be referred to only by the name of the directory without the absolute path, for example, $OEM$, $1, $$, OEMDIR, TEXTMODE.
Having the directory structure in place, you can copy the device drivers and configuration files to corresponding directories. Instructions on slipstreaming device drivers and readytouse examples specific to particular Sun server models are available in Chapter 4 – Importing Device Drivers for Sun x64 Servers.
Creating Disk Partitioning and Format Task
In order to prepare the target hard drive or volume for Windows deployment, it is necessary to create a partition and a file system. Follow the steps below to create the disk partitioning and format task:
1. In the Deployment Share, create the following directories:
Sun
Sun\disk
In case the Deployment Share is in the default location, you would create the directories as follows:
C:\Program Files\Altiris\eXpress\Deployment Server\Sun
C:\Program Files\Altiris\eXpress\Deployment Server\Sun\disk
2. Copy and paste the following code into a file called diskpart.txt that will be stored in the directory Sun\disk created in the Step 1:
select disk=0
clean
create partition primary
select partition=1
assign letter=c:
active
3. Create the Diskpart & Format task:
a. In the Deployment Console, click the name of the Windows deployment job into which you want to add the power control task.
b. In the right pane, click the Add>> button.
c. In the popup menu, select Run Script. A Run Script dialog opens.
d. Select the Run this script option and paste the following script to the text field:
19

REM Diskpart & Format
%ALTIRIS_SHARE%
cd \Sun\disk
diskpart /s diskpart.txt
echo y | format c: /FS:NTFS /Q
e. Choose Windows as the script operating system. Click Next.
f. Set the Script Run Location property to On the client computer.
g. Set the Client Run Environment property to Automation preboot environment and set the WinPE 2.1 (64bit) as the automation environment.
h. Click Finish to save the task.
Creating Power Control Tasks
In order to control server's power, we need to create two tasks, one for turning the power on and one for turning the power off. Follow the steps below to create the power control tasks:
Create the Power On task
1. In the Deployment Console, click the name of the Windows deployment job into which you want to add the power control task.
2. In the right pane, click the Add>> button.
3. In the popup menu, select Run Script. A Run Script dialog opens.
4. Select the Run this script option and paste the following script to the text field:
REM IPMI Power On
set SPIP=%#SunHW!sp@sp_ip%
set SPLOGIN=%#SunHW!sp@login%
set SPPASS=%#SunHW!sp@pass%
cd C:\Program Files\Altiris\eXpress\Deployment Server\Sun
timeout /t 10
ipmitool.exe -H %SPIP% -U %SPLOGIN% -P %SPPASS% chassis power on
5. Choose Windows as the script operating system. Click Next.
6. Set the Script Run Location property to Locally on the Deployment Server.
7. Leave the checkbox Run when the agent is connected unchecked.
8. Click Finish to save the task.
Note: The script presented above uses a feature called Custom Tokens. This feature enables for custom database queries to be included in a script. In this particular case, three queries against the SunHW database are performed in order to determine the IP address, login and password of a service processor associated with the host on which the script runs. For
20 Microsoft Windows Deployment Guide for Sun Servers Using Symantec Altiris Deployment Solution 6.9
Outofband

detailed information on Custom Tokens, refer to the Altiris® Deployment Solution 6.9 Admin Guide.
Create the Power Off task
1. In the Deployment Console, click the name of the Windows deployment job into which you want to add the power control task.
2. In the right pane, click the Add>> button.
3. In the popup menu, select Run Script. A Run Script dialog opens.
4. Select the Run this script option and paste the following script to the text field:
REM IPMI Power Off
set SPIP=%#SunHW!sp@sp_ip%
set SPLOGIN=%#SunHW!sp@login%
set SPPASS=%#SunHW!sp@pass%
cd C:\Program Files\Altiris\eXpress\Deployment Server\Sun
ipmitool.exe -H %SPIP% -U %SPLOGIN% -P %SPPASS% chassis power off
5. Choose Windows as the script operating system. Click Next.
6. Set the Script Run Location property to Locally on the Deployment Server.
7. Leave the checkbox Run when the agent is connected unchecked.
8. Click Finish to save the task.
Creating a Boot Device Change Task
In case the server's BIOS boot order is not configured to use network as the first boot device, you need to create a boot device change task that will instruct the server to boot from network if required. Follow the steps below to create the Boot Device Change task:
1. In the Deployment Console, click the name of the Windows deployment job into which you want to add the Boot Device Change task.
2. In the right pane, click the Add>> button.
3. In the popup menu, select Run Script. A Run Script dialog opens.
4. Select the Run this script option and paste the following code to the text field:
REM Change boot device to PXE
set SPIP=%#SunHW!sp@sp_ip%
set SPLOGIN=%#SunHW!sp@login%
set PASS=%#SunHW!sp@pass%
cd C:\Program Files\Altiris\eXpress\Deployment Server\Sun
timeout /t 10
ipmitool.exe -H %SPIP% -U %SPLOGIN% -P %PASS% chassis bootdev pxe
5. Choose Windows as the script operating system. Click Next.
21
Outofband
6. Set the Script Run Location property to Locally on the Deployment Server.
7. Leave the checkbox Run when the agent is connected unchecked.
8. Click Finish to save the task.
Creating a Restart Task
During the server provisioning process, it might be necessary to instruct the automation environment to restart the server, for example, after disk partitioning. Follow the steps below to create the Restart task:
1. In the Deployment Console, click the name of the Windows deployment job into which you want to add this power control task.
2. In the right pane, click the Add>> button.
3. In the popup menu, select Power Control. A Power Control Options dialog opens.
4. Select the Restart option.
5. Click Finish to save the task.
Finishing the Windows Deployment Job
At this point, we have created all tasks that are required for building a Windows deployment job.
If you are using the Outofband management approach, the final deployment job will consists of the following tasks with the task order as specified here:
1. IPMI Power Off
2. Change boot device to PXE
3. IPMI Power On
4. Diskpart & Format
5. Change boot device to PXE
6. Reboot
7. Scripted OS Install
Note: You might encounter a problem when rebooting into automation after the Change boot device to PXE task is run. If the client does not reboot into automation after the Diskpart & Format task is finished, consultChapter 5 – Troubleshooting.
If you are not using the Outofband management approach and your servers are set to always boot from network first, the final deployment job will consist of the following tasks with the task order as specified here:
1. Diskpart & Format
2. Reboot
3. Scripted OS Install
22 Microsoft Windows Deployment Guide for Sun Servers Using Symantec Altiris Deployment Solution 6.9
Outofband

Creating Preconfigured Computer Accounts
In order to make new computers known to Altiris Deployment Solution, you need to create a preconfigured computer account for each of them. This will register the new computers in the deployment database and enable jobs to be scheduled on the new computers.
Follow the steps below to create a new preconfigured computer account:
1. Rightclick the Computers pane, and select New Computer from the popup menu. A New Computers dialog will be opened.
2. Click the Add button.
3. Fill in the Name and Computer name fields. The name and computer name can be arbitrary.
4. Fill in the MAC address field. Use the MAC address you obtained in the Preparing Sun x64 Servers for Windows Provisioning section. Then click OK.
5. Click OK in the New Computers dialog to close it and create the new computer account.
6. Click OK to confirm the computer import completion dialog.
In order to enable the Outofband management features, you need to associate the service processor with the computer account created in the previous step. To register the service processor with a computer account, follow the steps below:
1. Rightclick the newly created computer entry in the Computers pane and select Properties from the popup menu.
2. Locate the ID entry in the Computer Properties dialog and record the number.
3. Save the registerSP.sql script available in Appendix B – Sample SQL Scripts to a file on the server where the SQL database used by your Altiris Deployment Solution is running.
4. Modify the registerSP.sql script to include the ID, service processor IP and login credentials for the given server.
5. Execute the script using a management tool, for example, Microsoft SQL Server Management Studio which is a component of MS SQL Server 2005.
A new computer/service processor pair will be added to the database.
23
Outofband

CHAPTER 4
Importing Device Drivers
ConventionsIn this chapter, the following conventions are used:
Symbol <CDROOT> corresponds with the root of the Tools & Drivers CD.
Symbol * stands for all files and directories present in a given directory.
Symbols $OEM$, $$, OEMDIR, $1, TEXTMODE correspond with directories defined in Slipstreaming Device Drivers, on page 18.
─────
Driver Import OverviewThis section provides an overview of the driver slipstreaming process.
Basic Directory Structure Overview
Microsoft Windows Server 2003 provides a mechanism for extending the installation media with OEMsupplied device drivers. All files required for Windows installation are located on the installation medium in the directory \I386 for 32bit Windows or \AMD64 for Windows x64 edition. These directories can be extended for the purpose of adding third party drivers as shown in the table below.
Directory (32bit) Directory (x64) Purpose
\I386\$OEM$ \AMD64\$OEM$
This directory is examined during Windows setup to identify whether there are any OEMsupplied drivers and applications that should be copied to the destination drive as part of Windows installation.
\I386\$OEM$\$1 \AMD64\$OEM$\$1
This directory represents the root folder of the partition where Windows will be installed.
\I386\$OEM$\$$ \AMD64\$OEM$\$$
This directory represents the Windows folder on the destination drive where Windows will be installed.
24 Microsoft Windows Deployment Guide for Sun Servers Using Symantec Altiris Deployment Solution 6.9
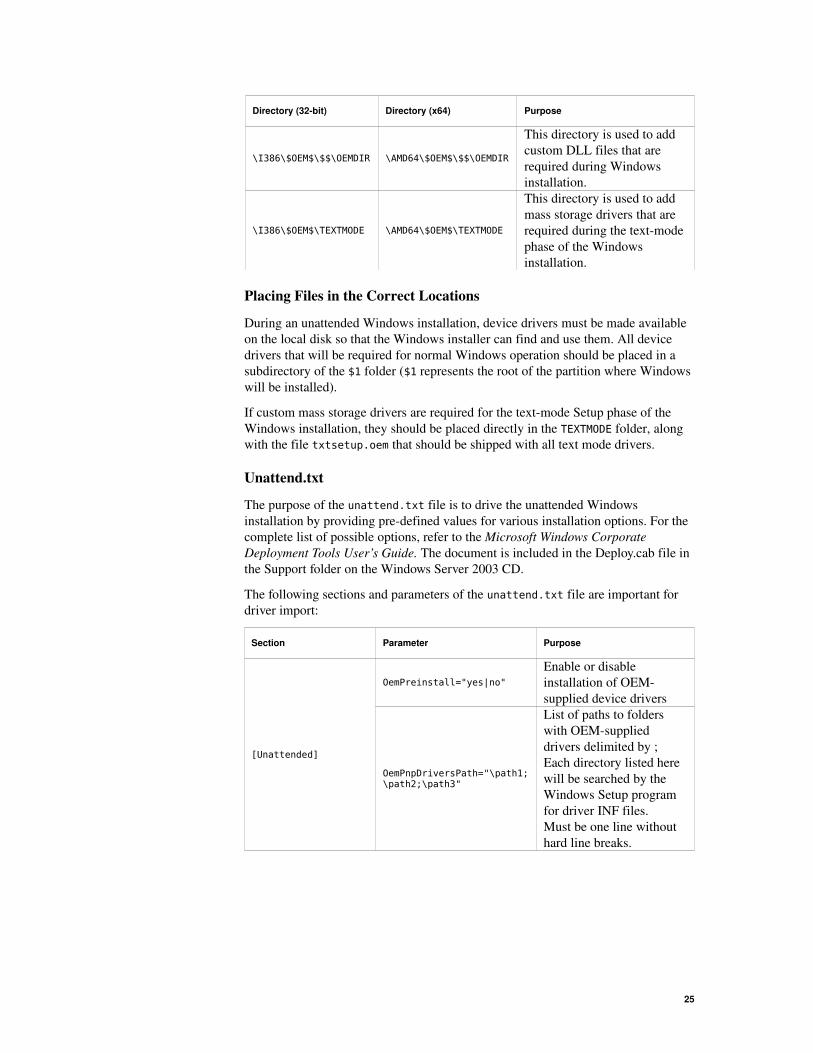
Directory (32bit) Directory (x64) Purpose
\I386\$OEM$\$$\OEMDIR \AMD64\$OEM$\$$\OEMDIR
This directory is used to add custom DLL files that are required during Windows installation.
\I386\$OEM$\TEXTMODE \AMD64\$OEM$\TEXTMODE
This directory is used to add mass storage drivers that are required during the textmode phase of the Windows installation.
Placing Files in the Correct Locations
During an unattended Windows installation, device drivers must be made available on the local disk so that the Windows installer can find and use them. All device drivers that will be required for normal Windows operation should be placed in a subdirectory of the $1 folder ($1 represents the root of the partition where Windows will be installed).
If custom mass storage drivers are required for the textmode Setup phase of the Windows installation, they should be placed directly in the TEXTMODE folder, along with the file txtsetup.oem that should be shipped with all text mode drivers.
Unattend.txt
The purpose of the unattend.txt file is to drive the unattended Windows installation by providing predefined values for various installation options. For the complete list of possible options, refer to the Microsoft Windows Corporate Deployment Tools User’s Guide. The document is included in the Deploy.cab file in the Support folder on the Windows Server 2003 CD.
The following sections and parameters of the unattend.txt file are important for driver import:
Section Parameter Purpose
[Unattended]
OemPreinstall="yes|no"
Enable or disable installation of OEMsupplied device drivers
OemPnpDriversPath="\path1;\path2;\path3"
List of paths to folders with OEMsupplied drivers delimited by ;Each directory listed here will be searched by the Windows Setup program for driver INF files.Must be one line without hard line breaks.
25

Section Parameter Purpose
[OEMBootFiles] one file name per line
List of files required by the textmode Setup which are placed in the TEXTMODE folder
[MassStorageDrivers] "description" = OEM
Specifies which mass storage drivers should be loaded by the textmode Setup program
Determining the correct parameter names for the [MassStorageDrivers] section:
1. Open the file txtsetup.oem that is shipped with the mass storage driver you want to use.
2. Locate a section named [Scsi]. The format of an entry in the [Scsi] section is as follows:ID = "description", ID
3. Use the description part of the identifier as the parameter name in the [MassStorageDrivers] section of the unattend.txt file.
Example:
A [Scsi] section of a txtsetup.oem looks as follows:
[Scsi]
arcsas = "Adaptec SAS/SATA-II RAID Controller", arcsas
arc = "Adaptec RAID Controller", arc
The corresponding [MassStorageDrivers] section of an unattend.txt file would look as follows:
[MassStorageDrivers]
"Adaptec SAS/SATA-II RAID Controller" = OEM
"Adaptec RAID Controller" = OEM
─────
Instructions for Sun Fire X2100 M2Slipstreaming Device Drivers
Perform the following steps to slipstream device drivers from the Tools & Drivers CD for the Sun Fire X2100 M2 server into the Windows OS source directory that was created by Altiris Deployment Solution during the configuration of the scripted OS installation.
26 Microsoft Windows Deployment Guide for Sun Servers Using Symantec Altiris Deployment Solution 6.9
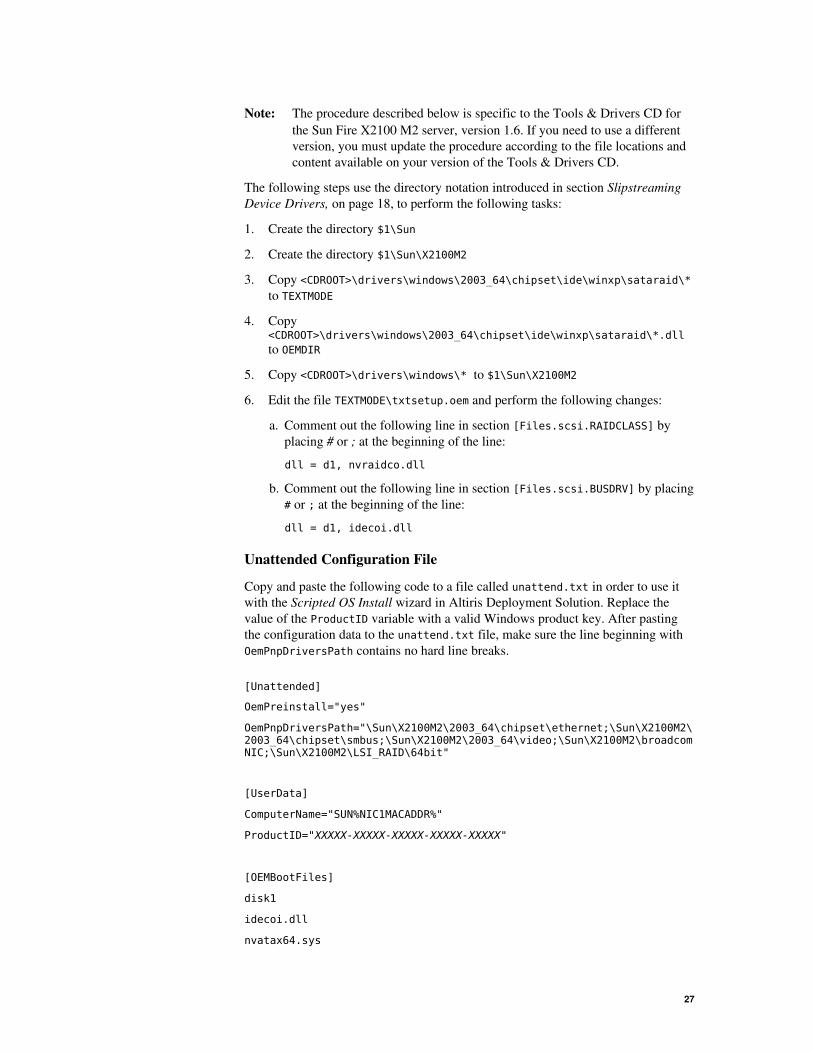
Note: The procedure described below is specific to the Tools & Drivers CD for the Sun Fire X2100 M2 server, version 1.6. If you need to use a different version, you must update the procedure according to the file locations and content available on your version of the Tools & Drivers CD.
The following steps use the directory notation introduced in section Slipstreaming Device Drivers, on page 18, to perform the following tasks:
1. Create the directory $1\Sun
2. Create the directory $1\Sun\X2100M2
3. Copy <CDROOT>\drivers\windows\2003_64\chipset\ide\winxp\sataraid\* to TEXTMODE
4. Copy <CDROOT>\drivers\windows\2003_64\chipset\ide\winxp\sataraid\*.dll to OEMDIR
5. Copy <CDROOT>\drivers\windows\* to $1\Sun\X2100M2
6. Edit the file TEXTMODE\txtsetup.oem and perform the following changes:
a. Comment out the following line in section [Files.scsi.RAIDCLASS] by placing # or ; at the beginning of the line:
dll = d1, nvraidco.dll
b. Comment out the following line in section [Files.scsi.BUSDRV] by placing # or ; at the beginning of the line:
dll = d1, idecoi.dll
Unattended Configuration File
Copy and paste the following code to a file called unattend.txt in order to use it with the Scripted OS Install wizard in Altiris Deployment Solution. Replace the value of the ProductID variable with a valid Windows product key. After pasting the configuration data to the unattend.txt file, make sure the line beginning with OemPnpDriversPath contains no hard line breaks.
[Unattended]
OemPreinstall="yes"
OemPnpDriversPath="\Sun\X2100M2\2003_64\chipset\ethernet;\Sun\X2100M2\2003_64\chipset\smbus;\Sun\X2100M2\2003_64\video;\Sun\X2100M2\broadcomNIC;\Sun\X2100M2\LSI_RAID\64bit"
[UserData]
ComputerName="SUN%NIC1MACADDR%"
ProductID="XXXXX-XXXXX-XXXXX-XXXXX-XXXXX"
[OEMBootFiles]
disk1
idecoi.dll
nvatax64.sys
27

nvraid.cat
nvraidco.dll
nvrdx64.inf
nvrdx64.sys
txtsetup.oem
[MassStorageDrivers]
"NVIDIA RAID CLASS DRIVER (required)" = OEM
"NVIDIA nForce Storage Controller (required)" = OEM
─────
Instructions for Sun Fire X2200 M2Slipstreaming Device Drivers
Perform the following steps to slipstream device drivers from the Tools & Drivers CD for the Sun Fire X2200 M2 server into the Windows OS source directory that was created by Altiris Deployment Solution during the configuration of the scripted OS installation.
Note: The procedure described below is specific to the Tools & Drivers CD for the Sun Fire X2200 M2 server, version 2.0. If you need to use a different version, you must update the procedure according to the file locations and content available on your version of the Tools & Drivers CD.
The following steps use the directory notation introduced in section Slipstreaming Device Drivers, on page 18, to perform the following tasks:
1. Create the directory $1\Sun
2. Create the directory $1\Sun\X2200M2
3. Copy <CDROOT>\drivers\windows\2003_64\chipset\ide\winxp\sataraid\* to TEXTMODE
4. Copy <CDROOT>\drivers\windows\2003_64\chipset\ide\winxp\sataraid\*.dll to OEMDIR
5. Copy <CDROOT>\drivers\windows\* to $1\Sun\X2200M2
6. Edit the file TEXTMODE\txtsetup.oem and perform the following changes:
a. Comment out the following line in section [Files.scsi.RAIDCLASS] by placing # or ; at the beginning of the line:
dll = d1, nvraidco.dll
b. Comment out the following line in section [Files.scsi.BUSDRV] by placing # or ; at the beginning of the line:
dll = d1, idecoi.dll
28 Microsoft Windows Deployment Guide for Sun Servers Using Symantec Altiris Deployment Solution 6.9
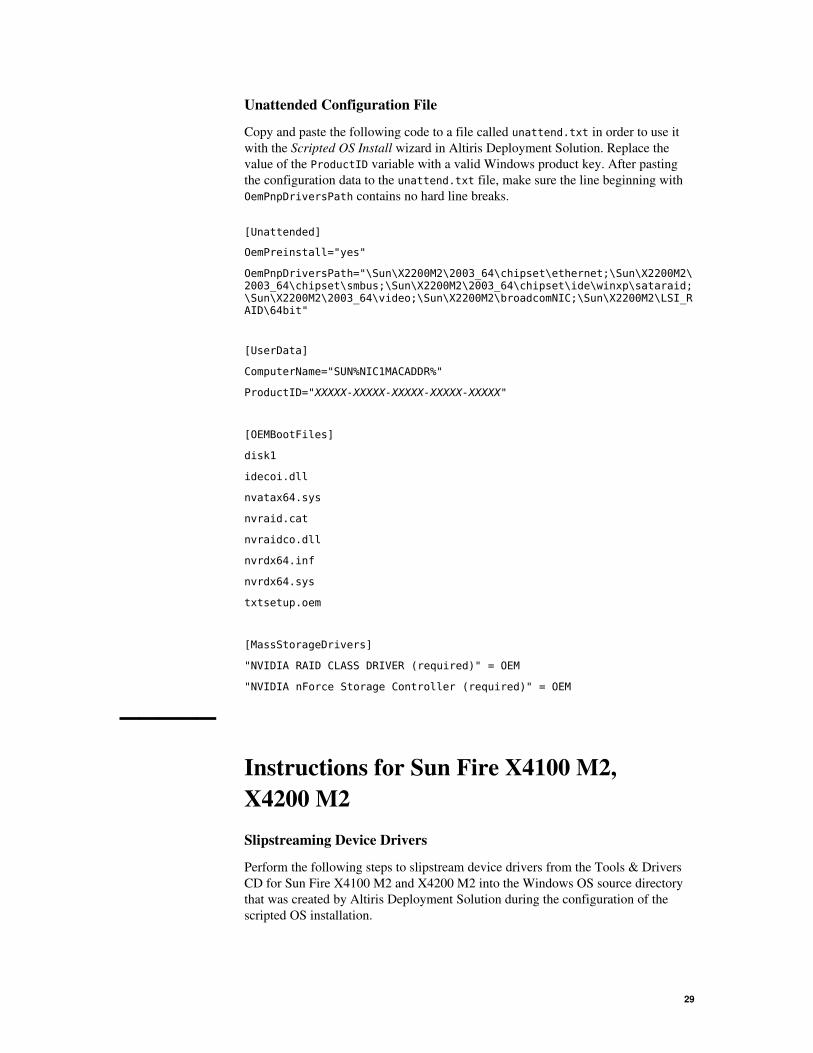
Unattended Configuration File
Copy and paste the following code to a file called unattend.txt in order to use it with the Scripted OS Install wizard in Altiris Deployment Solution. Replace the value of the ProductID variable with a valid Windows product key. After pasting the configuration data to the unattend.txt file, make sure the line beginning with OemPnpDriversPath contains no hard line breaks.
[Unattended]
OemPreinstall="yes"
OemPnpDriversPath="\Sun\X2200M2\2003_64\chipset\ethernet;\Sun\X2200M2\2003_64\chipset\smbus;\Sun\X2200M2\2003_64\chipset\ide\winxp\sataraid;\Sun\X2200M2\2003_64\video;\Sun\X2200M2\broadcomNIC;\Sun\X2200M2\LSI_RAID\64bit"
[UserData]
ComputerName="SUN%NIC1MACADDR%"
ProductID="XXXXX-XXXXX-XXXXX-XXXXX-XXXXX"
[OEMBootFiles]
disk1
idecoi.dll
nvatax64.sys
nvraid.cat
nvraidco.dll
nvrdx64.inf
nvrdx64.sys
txtsetup.oem
[MassStorageDrivers]
"NVIDIA RAID CLASS DRIVER (required)" = OEM
"NVIDIA nForce Storage Controller (required)" = OEM
─────
Instructions for Sun Fire X4100 M2,X4200 M2Slipstreaming Device Drivers
Perform the following steps to slipstream device drivers from the Tools & Drivers CD for Sun Fire X4100 M2 and X4200 M2 into the Windows OS source directory that was created by Altiris Deployment Solution during the configuration of the scripted OS installation.
29

Note: The procedure described below is specific to the Tools & Drivers CD for the Sun Fire X4100 M2 and X4200 M2 servers, version 2.1. If you need to use a different version, you must update the procedure according to the file locations and content available on your version of the Tools & Drivers CD.
1. Locate the Floppy Pack and the Driver Pack on the Tools & Drivers CD. The packs are available as zip files in the directory \windows\w2k3\packages\ on the Tools & Drivers CD.
2. Uncompress the Floppy Pack to a directory, for example, C:\Sun\X4200M2\FP, hereafter %FP%
3. Uncompress the Driver Pack to a directory, for example C:\Sun\X4200M2\DP, hereafter %DP%
The following steps use the directory notation introduced in section Slipstreaming Device Drivers, on page 18, to perform the following tasks:
4. Create the directory $1\Sun
5. Create the directory $1\Sun\X4200M2
6. Copy %FP%\files\txtsetup.oem to TEXTMODE
7. Copy %FP%\files\ami\amd64\* to TEXTMODE
8. Copy %FP%\files\lsi\amd64\* to TEXTMODE
9. Copy %DP%\* to $1\Sun\X4200M2
10. Edit the file TEXTMODE\txtsetup.oem and perform the following changes:
a. In section [Disks], change the line:
d2 = "LSI Logic Fusion-MPT SAS Storport Driver", \disk1.tag, \lsi\amd64
to
d2 = "LSI Logic Fusion-MPT SAS Storport Driver", \disk1.tag, \
b. In section [Disks], change the line:
d4 = "AMI Virtual Floppy Driver", \disk1.tag, \ami\amd64
to
d4 = "AMI Virtual Floppy Driver", \disk1.tag, \
Unattended Configuration File
Copy and paste the following code to a file called unattend.txt in order to use it with the Scripted OS Install wizard in Altiris Deployment Solution. Replace the value of the ProductID variable with a valid Windows product key. After pasting the configuration data to the unattend.txt file, make sure the line beginning with OemPnpDriversPath contains no hard line breaks.
[Unattended]
OemPreinstall="yes"
OemPnpDriversPath="\Sun\X4200M2\amd64\amd\8132\ioapci;\Sun\X4200M2\amd64\amd\cpu;\Sun\X4200M2\amd64\ami;\Sun\X4200M2\amd64\lsi;\Sun\X4200M2\amd64\nvidia\smbus;\Sun\X4200M2\amd64\nvidia\ethernet"
30 Microsoft Windows Deployment Guide for Sun Servers Using Symantec Altiris Deployment Solution 6.9
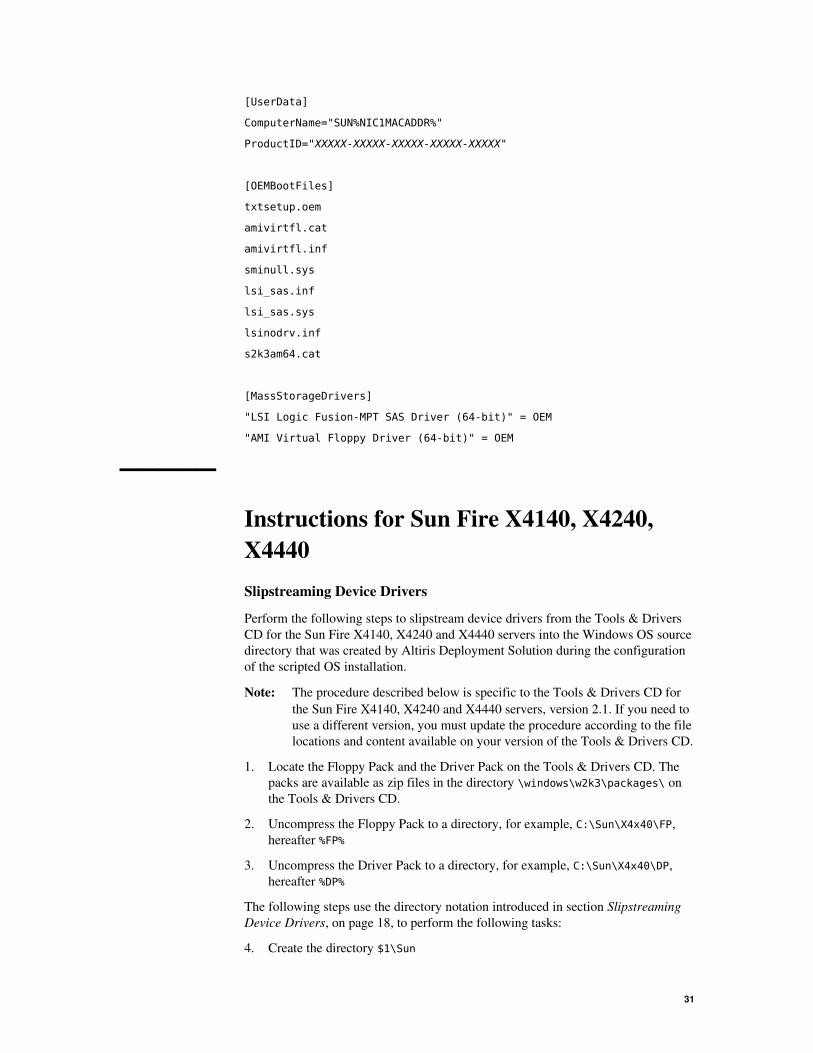
[UserData]
ComputerName="SUN%NIC1MACADDR%"
ProductID="XXXXX-XXXXX-XXXXX-XXXXX-XXXXX"
[OEMBootFiles]
txtsetup.oem
amivirtfl.cat
amivirtfl.inf
sminull.sys
lsi_sas.inf
lsi_sas.sys
lsinodrv.inf
s2k3am64.cat
[MassStorageDrivers]
"LSI Logic Fusion-MPT SAS Driver (64-bit)" = OEM
"AMI Virtual Floppy Driver (64-bit)" = OEM
─────
Instructions for Sun Fire X4140, X4240, X4440Slipstreaming Device Drivers
Perform the following steps to slipstream device drivers from the Tools & Drivers CD for the Sun Fire X4140, X4240 and X4440 servers into the Windows OS source directory that was created by Altiris Deployment Solution during the configuration of the scripted OS installation.
Note: The procedure described below is specific to the Tools & Drivers CD for the Sun Fire X4140, X4240 and X4440 servers, version 2.1. If you need to use a different version, you must update the procedure according to the file locations and content available on your version of the Tools & Drivers CD.
1. Locate the Floppy Pack and the Driver Pack on the Tools & Drivers CD. The packs are available as zip files in the directory \windows\w2k3\packages\ on the Tools & Drivers CD.
2. Uncompress the Floppy Pack to a directory, for example, C:\Sun\X4x40\FP, hereafter %FP%
3. Uncompress the Driver Pack to a directory, for example, C:\Sun\X4x40\DP, hereafter %DP%
The following steps use the directory notation introduced in section Slipstreaming Device Drivers, on page 18, to perform the following tasks:
4. Create the directory $1\Sun
31

5. Create the directory $1\Sun\X4x40
6. Copy %FP%\txtsetup.oem to TEXTMODE
7. Copy %FP%\files\lsi\amd64\* to TEXTMODE
8. Copy %FP%\files\smi\amd64\* to TEXTMODE
9. Copy %DP%\amd64\nvidia\sata to TEXTMODE
10. Copy %DP%\amd64\nvidia\sata\*.dll to OEMDIR
11. Copy %DP%\* to $1\Sun\X4x40
12. Edit the file TEXTMODE\txtsetup.oem and perform the following changes:
a. In section [Disks], change the line:
d2 = "LSI Logic Fusion-MPT SAS Storport Driver (64-bit)", \disk1.tag, \lsi\amd64
to
d2 = "LSI Logic Fusion-MPT SAS Storport Driver (64-bit)", \disk1.tag, \
b. In section [Disks], change the line:
d4 = "Adaptec SAS/SATA-II RAID Driver (64-bit)", \disk1.tag, \smi\amd64
to
d4 = "Adaptec SAS/SATA-II RAID Driver (64-bit)", \disk1.tag, \
c. In section [Disks], change the line:
d6 = "NVIDIA SATA Driver (64-bit)", \disk1.tag, \nvidia\amd64
to
d6 = "NVIDIA SATA Driver (64-bit)", \disk1.tag, \
d. Comment out the following line in section [Files.scsi.NVIDIA_AMD64] by placing # or ; at the beginning of the line:
dll = d6, idecoi.dll
Unattended Configuration File
Copy and paste the following code to a file called unattend.txt in order to use it with the Scripted OS Install wizard in Altiris Deployment Solution. Replace the value of the ProductID variable with a valid Windows product key. After pasting the configuration data to the unattend.txt file, make sure the line beginning with OemPnpDriversPath contains no hard line breaks.
[Unattended]
OemPreinstall="yes"
OemPnpDriversPath="\Sun\X4x40\amd64\amd\cpu;\Sun\X4x40\amd64\lsi;\Sun\X4x40\amd64\ast;\Sun\X4x40\amd64\nvidia\ethernet;\Sun\X4x40\amd64\nvidia\ris;\Sun\X4x40\amd64\nvidia\sata;\Sun\X4x40\amd64\nvidia\smbus;\Sun\X4x40\amd64\smi"
[UserData]
32 Microsoft Windows Deployment Guide for Sun Servers Using Symantec Altiris Deployment Solution 6.9
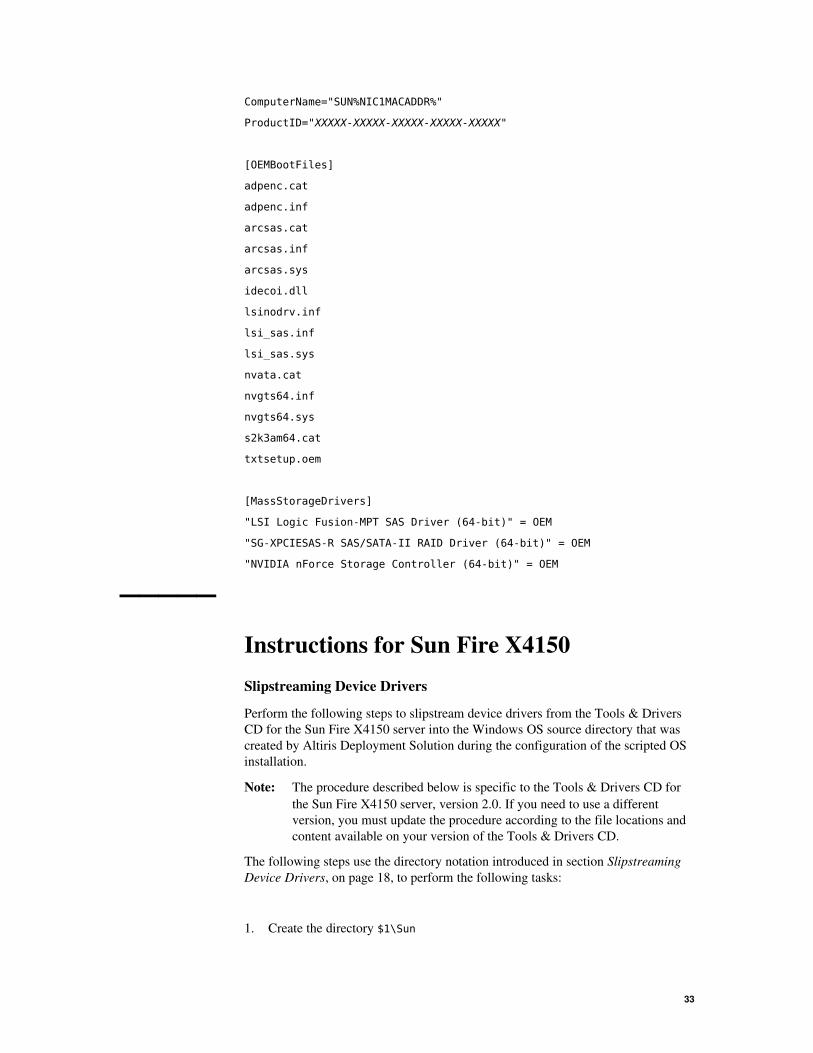
ComputerName="SUN%NIC1MACADDR%"
ProductID="XXXXX-XXXXX-XXXXX-XXXXX-XXXXX"
[OEMBootFiles]
adpenc.cat
adpenc.inf
arcsas.cat
arcsas.inf
arcsas.sys
idecoi.dll
lsinodrv.inf
lsi_sas.inf
lsi_sas.sys
nvata.cat
nvgts64.inf
nvgts64.sys
s2k3am64.cat
txtsetup.oem
[MassStorageDrivers]
"LSI Logic Fusion-MPT SAS Driver (64-bit)" = OEM
"SG-XPCIESAS-R SAS/SATA-II RAID Driver (64-bit)" = OEM
"NVIDIA nForce Storage Controller (64-bit)" = OEM
─────
Instructions for Sun Fire X4150Slipstreaming Device Drivers
Perform the following steps to slipstream device drivers from the Tools & Drivers CD for the Sun Fire X4150 server into the Windows OS source directory that was created by Altiris Deployment Solution during the configuration of the scripted OS installation.
Note: The procedure described below is specific to the Tools & Drivers CD for the Sun Fire X4150 server, version 2.0. If you need to use a different version, you must update the procedure according to the file locations and content available on your version of the Tools & Drivers CD.
The following steps use the directory notation introduced in section Slipstreaming Device Drivers, on page 18, to perform the following tasks:
1. Create the directory $1\Sun
33

2. Create the directory $1\Sun\X4150
3. Copy the storage adapter drivers to TEXTMODE:
a. If your X4150 server is equipped with a Sun StorageTek RAID adapter, copy <CDROOT>\drivers\windows\RAID\StorageTEK\2003\amd64\* to TEXTMODE.
b. If your X4150 server is equipped with an LSI RAID adapter, copy <CDROOT>\drivers\windows\RAID\LSI\2003_64\* to TEXTMODE.
4. Copy <CDROOT>\drivers\windows\* to $1\Sun\X4150
Unattended Configuration File (Sun StorageTek RAID Adapter)
Copy and paste the following code to a file called unattend.txt in order to use it with the Scripted OS Install wizard in Altiris Deployment Solution. Replace the value of the ProductID variable with a valid Windows product key. After pasting the configuration data to the unattend.txt file, make sure the line beginning with OemPnpDriversPath contains no hard line breaks.
[Unattended]
OemPreinstall="yes"
OemPnpDriversPath="\Sun\X4150\Chipset\AHCI\2003_64;\Sun\X4150\Chipset\win2003;\Sun\X4150\Chipset\win2003\SP;\Sun\X4150\Display\2003_64;\Sun\X4150\IntelNIC\PRO1000\Winx64;\Sun\X4150\RAID\LSI\2003_64;\Sun\X4150\RAID\StorageTEK\2003\amd64;\Sun\X4150\TPM\2003_64\TPM_Driver"
[UserData]
ComputerName="SUN%NIC1MACADDR%"
ProductID="XXXXX-XXXXX-XXXXX-XXXXX-XXXXX"
[OEMBootFiles]
adpenc.cat
adpenc.inf
arc.cat
arc.inf
arc.sys
arcsas.cat
arcsas.inf
arcsas.sys
raidisk1
txtsetup.oem
[MassStorageDrivers]
"Adaptec SAS/SATA-II RAID Controller (x64 device drivers)" = OEM
"Adaptec RAID Controller (x64 device drivers)" = OEM
34 Microsoft Windows Deployment Guide for Sun Servers Using Symantec Altiris Deployment Solution 6.9
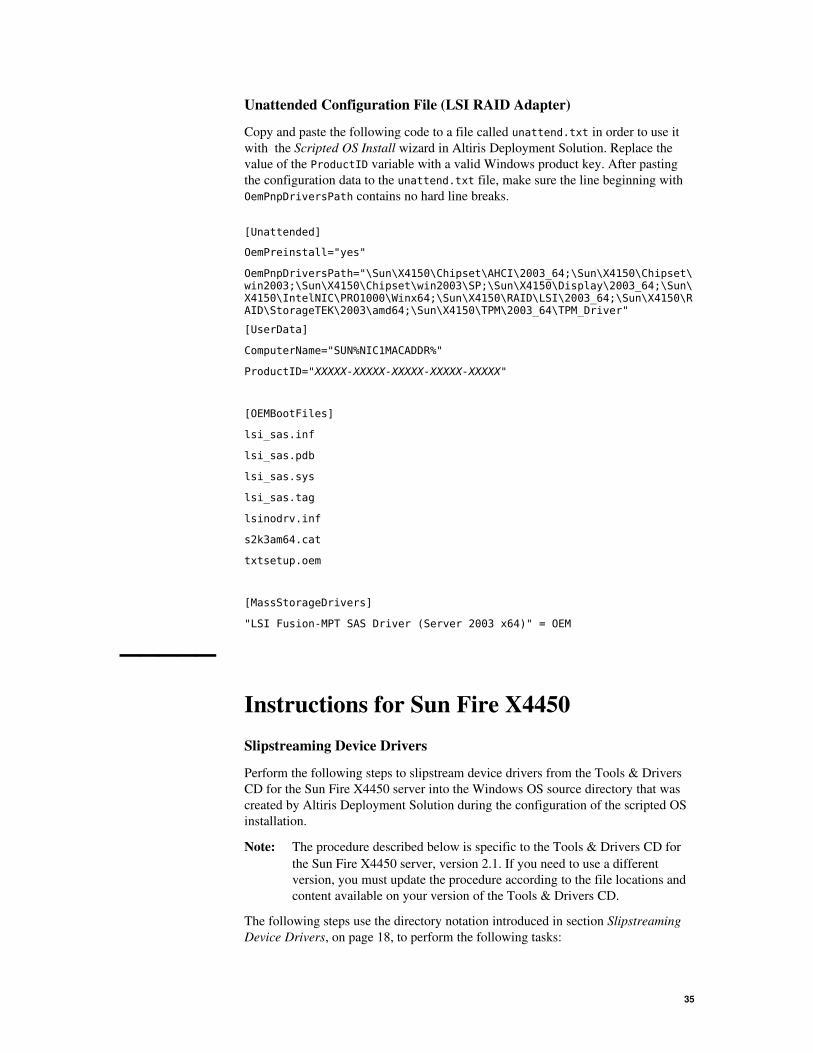
Unattended Configuration File (LSI RAID Adapter)
Copy and paste the following code to a file called unattend.txt in order to use it with the Scripted OS Install wizard in Altiris Deployment Solution. Replace the value of the ProductID variable with a valid Windows product key. After pasting the configuration data to the unattend.txt file, make sure the line beginning with OemPnpDriversPath contains no hard line breaks.
[Unattended]
OemPreinstall="yes"
OemPnpDriversPath="\Sun\X4150\Chipset\AHCI\2003_64;\Sun\X4150\Chipset\win2003;\Sun\X4150\Chipset\win2003\SP;\Sun\X4150\Display\2003_64;\Sun\X4150\IntelNIC\PRO1000\Winx64;\Sun\X4150\RAID\LSI\2003_64;\Sun\X4150\RAID\StorageTEK\2003\amd64;\Sun\X4150\TPM\2003_64\TPM_Driver"
[UserData]
ComputerName="SUN%NIC1MACADDR%"
ProductID="XXXXX-XXXXX-XXXXX-XXXXX-XXXXX"
[OEMBootFiles]
lsi_sas.inf
lsi_sas.pdb
lsi_sas.sys
lsi_sas.tag
lsinodrv.inf
s2k3am64.cat
txtsetup.oem
[MassStorageDrivers]
"LSI Fusion-MPT SAS Driver (Server 2003 x64)" = OEM
─────
Instructions for Sun Fire X4450Slipstreaming Device Drivers
Perform the following steps to slipstream device drivers from the Tools & Drivers CD for the Sun Fire X4450 server into the Windows OS source directory that was created by Altiris Deployment Solution during the configuration of the scripted OS installation.
Note: The procedure described below is specific to the Tools & Drivers CD for the Sun Fire X4450 server, version 2.1. If you need to use a different version, you must update the procedure according to the file locations and content available on your version of the Tools & Drivers CD.
The following steps use the directory notation introduced in section Slipstreaming Device Drivers, on page 18, to perform the following tasks:
35
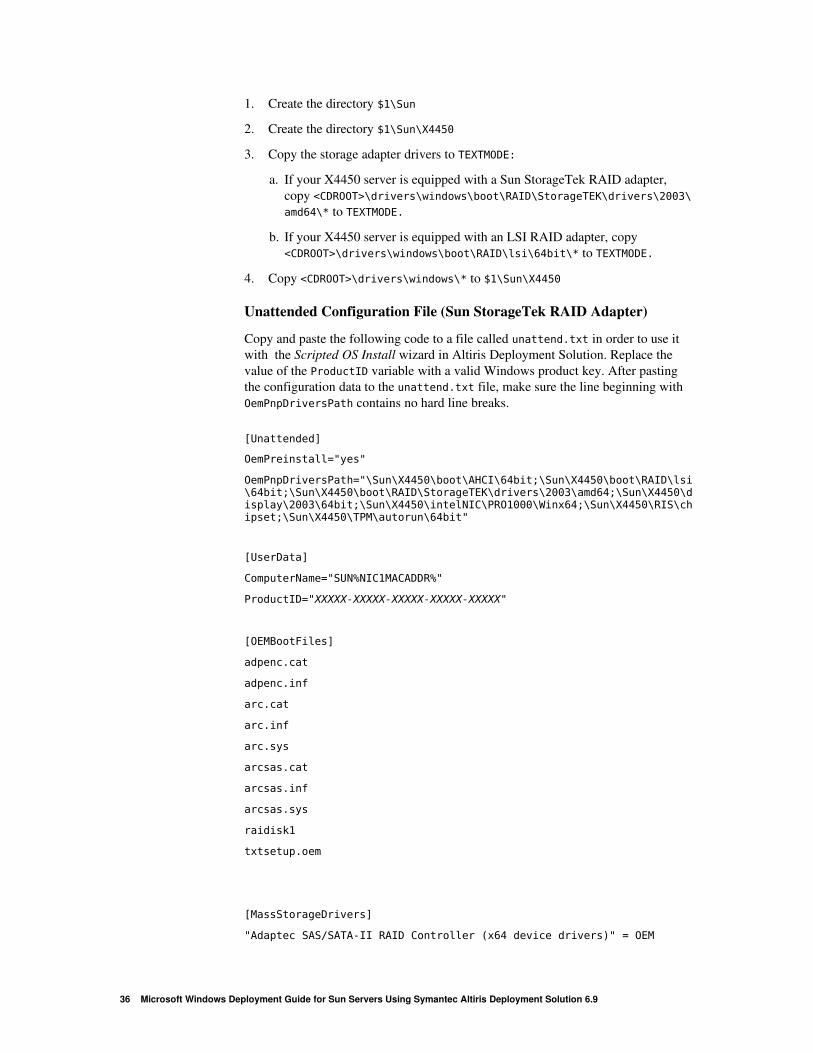
1. Create the directory $1\Sun
2. Create the directory $1\Sun\X4450
3. Copy the storage adapter drivers to TEXTMODE:
a. If your X4450 server is equipped with a Sun StorageTek RAID adapter, copy <CDROOT>\drivers\windows\boot\RAID\StorageTEK\drivers\2003\amd64\* to TEXTMODE.
b. If your X4450 server is equipped with an LSI RAID adapter, copy <CDROOT>\drivers\windows\boot\RAID\lsi\64bit\* to TEXTMODE.
4. Copy <CDROOT>\drivers\windows\* to $1\Sun\X4450
Unattended Configuration File (Sun StorageTek RAID Adapter)
Copy and paste the following code to a file called unattend.txt in order to use it with the Scripted OS Install wizard in Altiris Deployment Solution. Replace the value of the ProductID variable with a valid Windows product key. After pasting the configuration data to the unattend.txt file, make sure the line beginning with OemPnpDriversPath contains no hard line breaks.
[Unattended]
OemPreinstall="yes"
OemPnpDriversPath="\Sun\X4450\boot\AHCI\64bit;\Sun\X4450\boot\RAID\lsi\64bit;\Sun\X4450\boot\RAID\StorageTEK\drivers\2003\amd64;\Sun\X4450\display\2003\64bit;\Sun\X4450\intelNIC\PRO1000\Winx64;\Sun\X4450\RIS\chipset;\Sun\X4450\TPM\autorun\64bit"
[UserData]
ComputerName="SUN%NIC1MACADDR%"
ProductID="XXXXX-XXXXX-XXXXX-XXXXX-XXXXX"
[OEMBootFiles]
adpenc.cat
adpenc.inf
arc.cat
arc.inf
arc.sys
arcsas.cat
arcsas.inf
arcsas.sys
raidisk1
txtsetup.oem
[MassStorageDrivers]
"Adaptec SAS/SATA-II RAID Controller (x64 device drivers)" = OEM
36 Microsoft Windows Deployment Guide for Sun Servers Using Symantec Altiris Deployment Solution 6.9
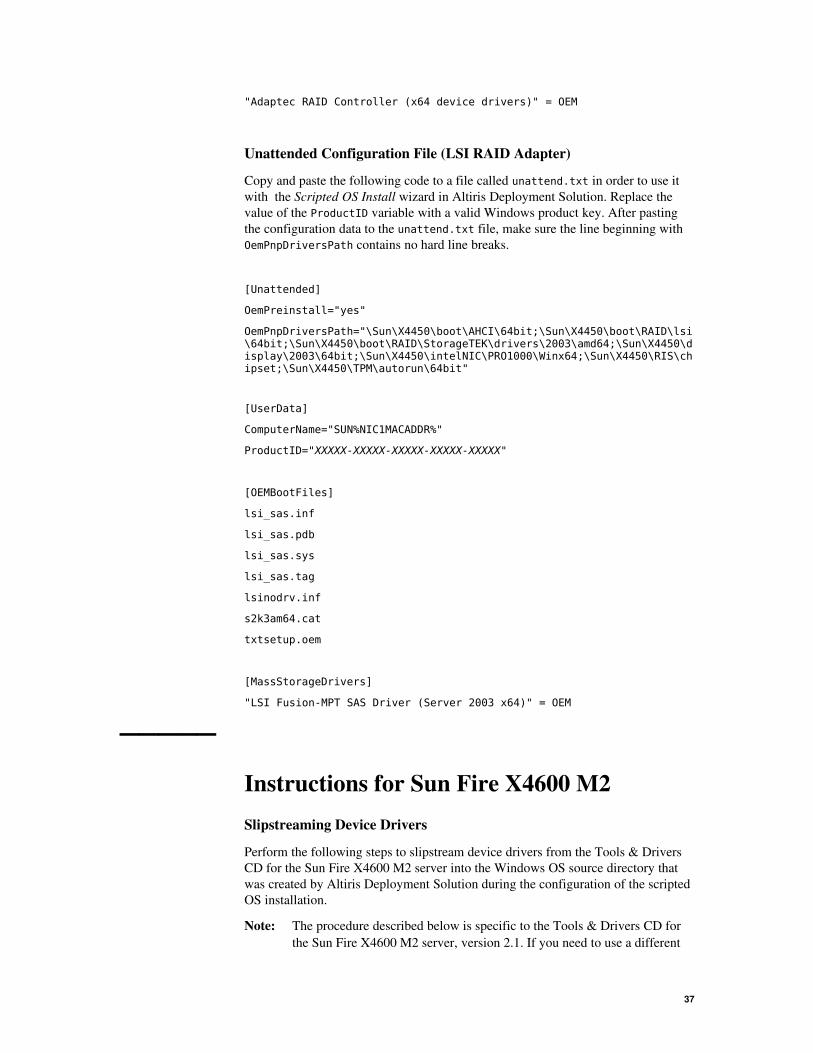
"Adaptec RAID Controller (x64 device drivers)" = OEM
Unattended Configuration File (LSI RAID Adapter)
Copy and paste the following code to a file called unattend.txt in order to use it with the Scripted OS Install wizard in Altiris Deployment Solution. Replace the value of the ProductID variable with a valid Windows product key. After pasting the configuration data to the unattend.txt file, make sure the line beginning with OemPnpDriversPath contains no hard line breaks.
[Unattended]
OemPreinstall="yes"
OemPnpDriversPath="\Sun\X4450\boot\AHCI\64bit;\Sun\X4450\boot\RAID\lsi\64bit;\Sun\X4450\boot\RAID\StorageTEK\drivers\2003\amd64;\Sun\X4450\display\2003\64bit;\Sun\X4450\intelNIC\PRO1000\Winx64;\Sun\X4450\RIS\chipset;\Sun\X4450\TPM\autorun\64bit"
[UserData]
ComputerName="SUN%NIC1MACADDR%"
ProductID="XXXXX-XXXXX-XXXXX-XXXXX-XXXXX"
[OEMBootFiles]
lsi_sas.inf
lsi_sas.pdb
lsi_sas.sys
lsi_sas.tag
lsinodrv.inf
s2k3am64.cat
txtsetup.oem
[MassStorageDrivers]
"LSI Fusion-MPT SAS Driver (Server 2003 x64)" = OEM
─────
Instructions for Sun Fire X4600 M2Slipstreaming Device Drivers
Perform the following steps to slipstream device drivers from the Tools & Drivers CD for the Sun Fire X4600 M2 server into the Windows OS source directory that was created by Altiris Deployment Solution during the configuration of the scripted OS installation.
Note: The procedure described below is specific to the Tools & Drivers CD for the Sun Fire X4600 M2 server, version 2.1. If you need to use a different
37

version, you must update the procedure according to the file locations and content available on your version of the Tools & Drivers CD.
1. Locate the Floppy Pack and the Driver Pack on the Tools & Drivers CD. The packs are available as zip files in the directory \windows\w2k3\packages\ on the Tools & Drivers CD.
2. Uncompress the Floppy Pack to a directory, for example, C:\Sun\X4600M2\FP, hereafter %FP%
3. Uncompress the Driver Pack to a directory, for example, C:\Sun\X4600M2\DP, hereafter %DP%
The following steps use the directory notation introduced in section Slipstreaming Device Drivers, on page 18, to perform the following tasks:
4. Create the directory $1\Sun
5. Create the directory $1\Sun\X4600M2
6. Copy %FP%\files\txtsetup.oem to TEXTMODE
7. Copy %FP%\files\ami\amd64\* to TEXTMODE
8. Copy %FP%\files\lsi\amd64\* to TEXTMODE
9. Copy %DP%\* to $1\Sun\X4600M2
10. Edit the file TEXTMODE\txtsetup.oem and perform the following changes:
a. In section [Disks], change the line:
d2 = "LSI Logic Fusion-MPT SAS Storport Driver", \disk1.tag, \lsi\amd64
to
d2 = "LSI Logic Fusion-MPT SAS Storport Driver", \disk1.tag, \
b. In section [Disks], change the line:
d4 = "AMI Virtual Floppy Driver", \disk1.tag, \ami\amd64
to
d4 = "AMI Virtual Floppy Driver", \disk1.tag, \
Unattended Configuration File
Copy and paste the following code to a file called unattend.txt in order to use it with the Scripted OS Install wizard in Altiris Deployment Solution. Replace the value of the ProductID variable with a valid Windows product key. After pasting the configuration data to the unattend.txt file, make sure the line beginning with OemPnpDriversPath contains no hard line breaks.
[Unattended]
OemPreinstall="yes"
OemPnpDriversPath="\Sun\X4600M2\amd64\amd\ioapic;\Sun\X4600M2\amd64\amd\cpu;\Sun\X4600M2\amd64\ami;\Sun\X4600M2\amd64\lsi;\Sun\X4600M2\amd64\nvidia\smbus"
[UserData]
38 Microsoft Windows Deployment Guide for Sun Servers Using Symantec Altiris Deployment Solution 6.9

ComputerName="SUN%NIC1MACADDR%"
ProductID="XXXXX-XXXXX-XXXXX-XXXXX-XXXXX"
[OEMBootFiles]
txtsetup.oem
amivirtfl.cat
amivirtfl.inf
sminull.sys
lsi_sas.inf
lsi_sas.sys
lsinodrv.inf
s2k3am64.cat
[MassStorageDrivers]
"LSI Logic Fusion-MPT SAS Driver (64-bit)" = OEM
"AMI Virtual Floppy Driver (64-bit)" = OEM
─────
Instructions for Sun Blade X6220Slipstreaming Device Drivers
Perform the following steps to slipstream device drivers from the Tools & Drivers CD for the Sun Blade X6220 server into the Windows OS source directory that was created by Altiris Deployment Solution during the configuration of the scripted OS installation.
Note: The procedure described below is specific to the Tools & Drivers CD for the Sun Blade X6220 server, version 2.0. If you need to use a different version, you must update the procedure according to the file locations and content available on your version of the Tools & Drivers CD.
1. Locate the Floppy Pack and the Driver Pack on the Tools & Drivers CD. The packs are available as zip files in the directory \windows\w2k3\packages\ on the Tools & Drivers CD.
2. Uncompress the Floppy Pack to a directory, for example, C:\Sun\X6220\FP, hereafter %FP%
3. Uncompress the Driver Pack to a directory, for example, C:\Sun\X6220\DP, hereafter %DP%
The following steps use the directory notation introduced in section Slipstreaming Device Drivers, on page 18, to perform the following tasks:
4. Create the directory $1\Sun
5. Create the directory $1\Sun\X6220
6. Copy %FP%\files\txtsetup.oem to TEXTMODE
39
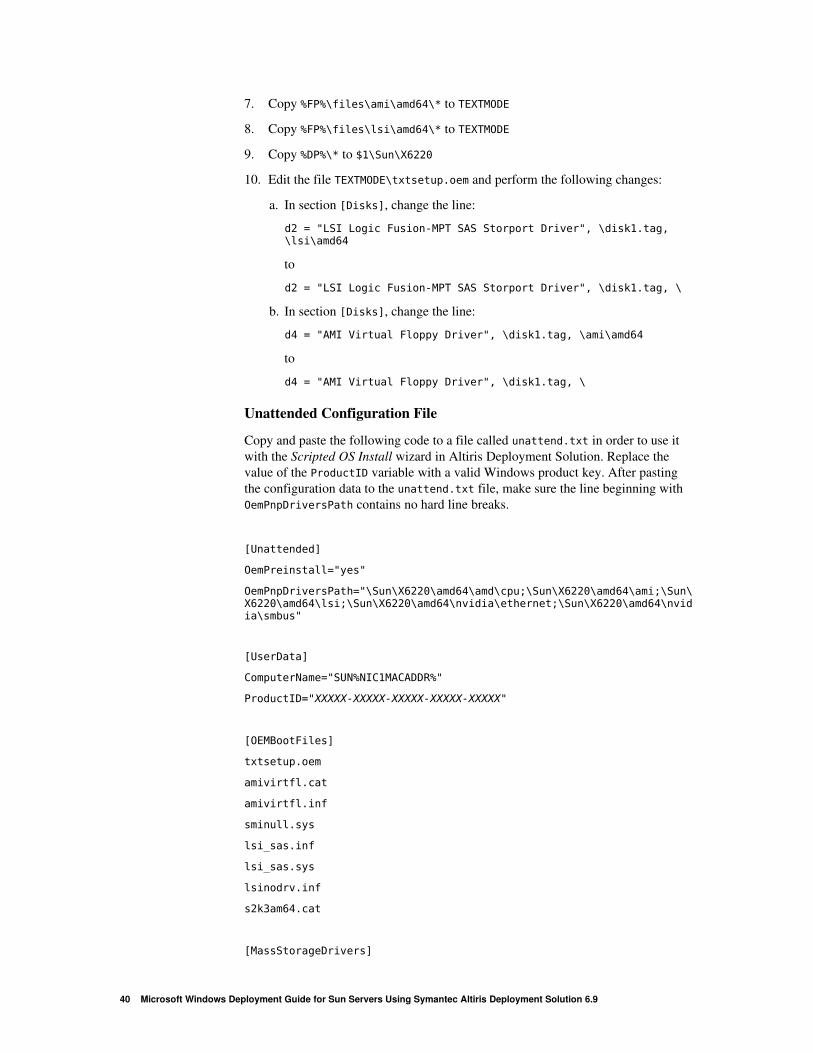
7. Copy %FP%\files\ami\amd64\* to TEXTMODE
8. Copy %FP%\files\lsi\amd64\* to TEXTMODE
9. Copy %DP%\* to $1\Sun\X6220
10. Edit the file TEXTMODE\txtsetup.oem and perform the following changes:
a. In section [Disks], change the line:
d2 = "LSI Logic Fusion-MPT SAS Storport Driver", \disk1.tag, \lsi\amd64
to
d2 = "LSI Logic Fusion-MPT SAS Storport Driver", \disk1.tag, \
b. In section [Disks], change the line:
d4 = "AMI Virtual Floppy Driver", \disk1.tag, \ami\amd64
to
d4 = "AMI Virtual Floppy Driver", \disk1.tag, \
Unattended Configuration File
Copy and paste the following code to a file called unattend.txt in order to use it with the Scripted OS Install wizard in Altiris Deployment Solution. Replace the value of the ProductID variable with a valid Windows product key. After pasting the configuration data to the unattend.txt file, make sure the line beginning with OemPnpDriversPath contains no hard line breaks.
[Unattended]
OemPreinstall="yes"
OemPnpDriversPath="\Sun\X6220\amd64\amd\cpu;\Sun\X6220\amd64\ami;\Sun\X6220\amd64\lsi;\Sun\X6220\amd64\nvidia\ethernet;\Sun\X6220\amd64\nvidia\smbus"
[UserData]
ComputerName="SUN%NIC1MACADDR%"
ProductID="XXXXX-XXXXX-XXXXX-XXXXX-XXXXX"
[OEMBootFiles]
txtsetup.oem
amivirtfl.cat
amivirtfl.inf
sminull.sys
lsi_sas.inf
lsi_sas.sys
lsinodrv.inf
s2k3am64.cat
[MassStorageDrivers]
40 Microsoft Windows Deployment Guide for Sun Servers Using Symantec Altiris Deployment Solution 6.9

"LSI Logic Fusion-MPT SAS Driver (64-bit)" = OEM
"AMI Virtual Floppy Driver (64-bit)" = OEM
─────
Instructions for Sun Blade X6250Slipstreaming Device Drivers
Perform the following steps to slipstream device drivers from the Tools & Drivers CD for the Sun Blade X6250 server into the Windows OS source directory that was created by Altiris Deployment Solution during the configuration of the scripted OS installation.
Note: The procedure described below is specific to the Tools & Drivers CD for the Sun Blade X6250 server, version 2.0. If you need to use a different version, you must update the procedure according to the file locations and content available on your version of the Tools & Drivers CD.
1. Locate the Floppy Pack and the Driver Pack on the Tools & Drivers CD. The packs are available as zip files in the directory \windows\w2k3\packages\ on the Tools & Drivers CD.
2. Uncompress the Floppy Pack to a directory, for example, C:\Sun\X6250\FP, hereafter %FP%
3. Uncompress the Driver Pack to a directory, for example, C:\Sun\X6250\DP, hereafter %DP%
The following steps use the directory notation introduced in section Slipstreaming Device Drivers, on page 18, to perform the following tasks:
4. Create the directory $1\Sun
5. Create the directory $1\Sun\X6250
6. Copy %FP%\files\txtsetup.oem to TEXTMODE
7. Copy %FP%\files\smi\amd64\* to TEXTMODE
8. Copy %DP%\amd64\* to $OEM$\$1\Sun\X6250
9. Edit the file TEXTMODE\txtsetup.oem and perform the following changes:
41
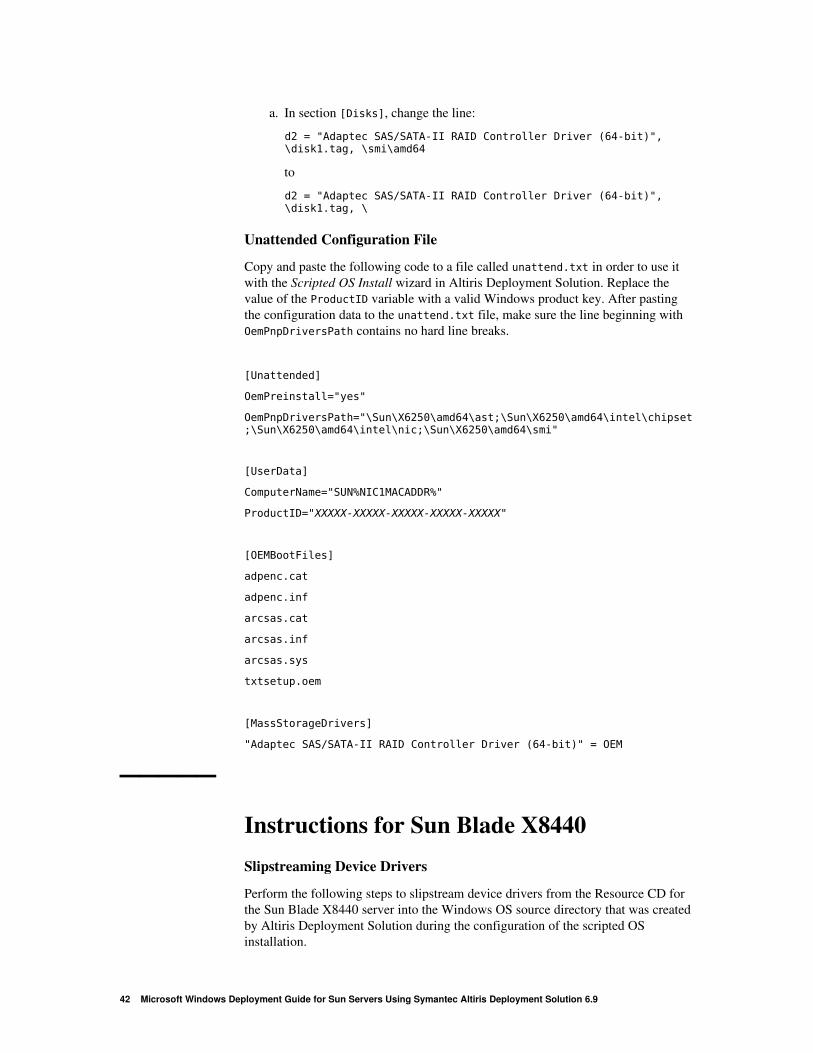
a. In section [Disks], change the line:
d2 = "Adaptec SAS/SATA-II RAID Controller Driver (64-bit)", \disk1.tag, \smi\amd64
to
d2 = "Adaptec SAS/SATA-II RAID Controller Driver (64-bit)", \disk1.tag, \
Unattended Configuration File
Copy and paste the following code to a file called unattend.txt in order to use it with the Scripted OS Install wizard in Altiris Deployment Solution. Replace the value of the ProductID variable with a valid Windows product key. After pasting the configuration data to the unattend.txt file, make sure the line beginning with OemPnpDriversPath contains no hard line breaks.
[Unattended]
OemPreinstall="yes"
OemPnpDriversPath="\Sun\X6250\amd64\ast;\Sun\X6250\amd64\intel\chipset;\Sun\X6250\amd64\intel\nic;\Sun\X6250\amd64\smi"
[UserData]
ComputerName="SUN%NIC1MACADDR%"
ProductID="XXXXX-XXXXX-XXXXX-XXXXX-XXXXX"
[OEMBootFiles]
adpenc.cat
adpenc.inf
arcsas.cat
arcsas.inf
arcsas.sys
txtsetup.oem
[MassStorageDrivers]
"Adaptec SAS/SATA-II RAID Controller Driver (64-bit)" = OEM
─────
Instructions for Sun Blade X8440Slipstreaming Device Drivers
Perform the following steps to slipstream device drivers from the Resource CD for the Sun Blade X8440 server into the Windows OS source directory that was created by Altiris Deployment Solution during the configuration of the scripted OS installation.
42 Microsoft Windows Deployment Guide for Sun Servers Using Symantec Altiris Deployment Solution 6.9
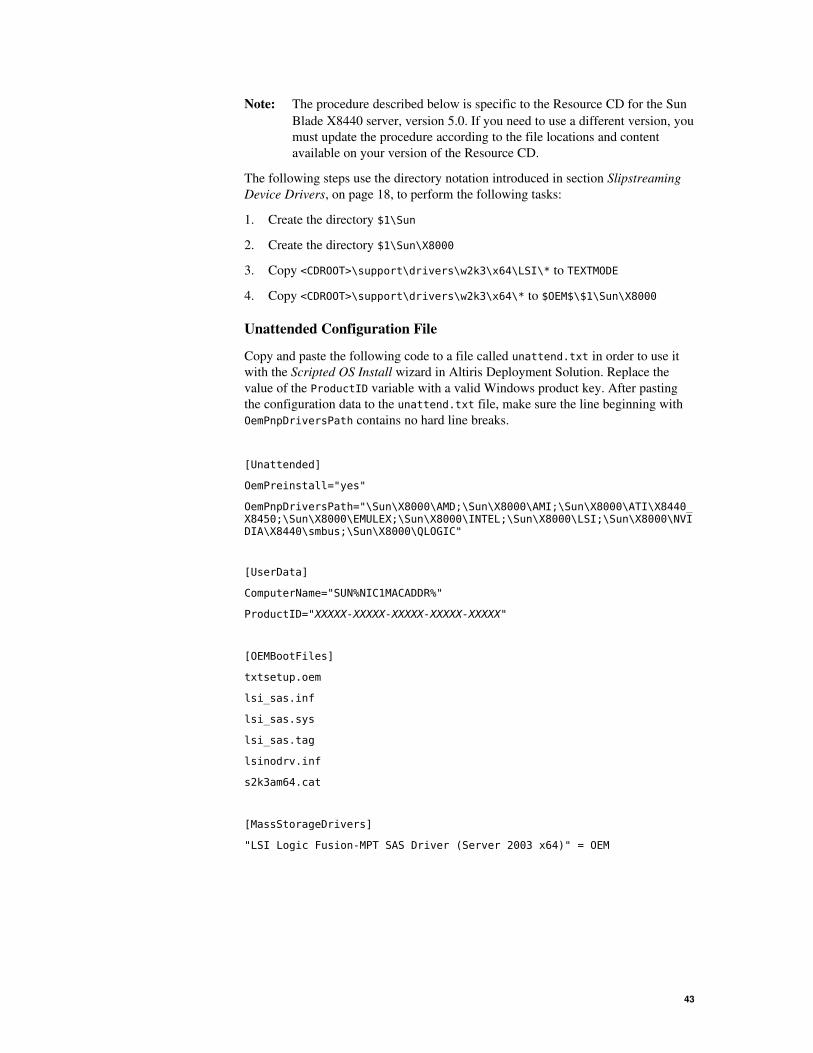
Note: The procedure described below is specific to the Resource CD for the Sun Blade X8440 server, version 5.0. If you need to use a different version, you must update the procedure according to the file locations and content available on your version of the Resource CD.
The following steps use the directory notation introduced in section Slipstreaming Device Drivers, on page 18, to perform the following tasks:
1. Create the directory $1\Sun
2. Create the directory $1\Sun\X8000
3. Copy <CDROOT>\support\drivers\w2k3\x64\LSI\* to TEXTMODE
4. Copy <CDROOT>\support\drivers\w2k3\x64\* to $OEM$\$1\Sun\X8000
Unattended Configuration File
Copy and paste the following code to a file called unattend.txt in order to use it with the Scripted OS Install wizard in Altiris Deployment Solution. Replace the value of the ProductID variable with a valid Windows product key. After pasting the configuration data to the unattend.txt file, make sure the line beginning with OemPnpDriversPath contains no hard line breaks.
[Unattended]
OemPreinstall="yes"
OemPnpDriversPath="\Sun\X8000\AMD;\Sun\X8000\AMI;\Sun\X8000\ATI\X8440_X8450;\Sun\X8000\EMULEX;\Sun\X8000\INTEL;\Sun\X8000\LSI;\Sun\X8000\NVIDIA\X8440\smbus;\Sun\X8000\QLOGIC"
[UserData]
ComputerName="SUN%NIC1MACADDR%"
ProductID="XXXXX-XXXXX-XXXXX-XXXXX-XXXXX"
[OEMBootFiles]
txtsetup.oem
lsi_sas.inf
lsi_sas.sys
lsi_sas.tag
lsinodrv.inf
s2k3am64.cat
[MassStorageDrivers]
"LSI Logic Fusion-MPT SAS Driver (Server 2003 x64)" = OEM
43
CHAPTER 5
Troubleshooting
This section provides tips and solutions for the most common problems you may encounter when setting up Altiris Deployment Solution 6.9 for provisioning Sun x64 servers.
─────
Keep Your Altiris Deployment Solution Up To DateIf you encounter any out of the ordinary behavior, check the Altiris Knowledge Base at http://kb.altiris.com for a list of known issues.
Apply all available hotfixes and use the latest build of the Windows PE 2.1 automation environment. Available hotfixes can be downloaded from ftp://ftp.altiris.com/product/Deployment_Server/6.9 .
─────
Diagnosing Problems Using an Interactive SessionBy default when a task fails, the job execution will be stopped and the client will be restarted, leaving little to no space for further diagnosis. To avoid this, you can set up each task to fall back to the interactive mode in case a failure occurs. To do so, follow the steps below:
1. Create a job for an interactive session.
a. In the Deployment Console, rightclick the Jobs pane at bottom left of the console window.
b. In the popup menu, select New Job.
c. A new job entry named New Job <number> appears in the Jobs pane. Modify its name to a unique identifier, for example, Interactive Session.
d. In the Jobs pane, select the Interactive Session job.
e. In the right pane, click the Add>> button.
f. In the popup menu, select Wait.
44 Microsoft Windows Deployment Guide for Sun Servers Using Symantec Altiris Deployment Solution 6.9
g. In the Wait dialog, select the automation environment that is used by the task you want to diagnose.
h. Click Finish to save the new task.
2. Configure the task to be diagnosed to fall back to the interactive session in case of failure:
a. In the Deployment Console, select a task you want to modify and click the Modify button in the right pane. Press Next until you get to the Return Codes window.
b. Expand the Default dropdown menu and select Select a Job.
c. Navigate to the Interactive Session job created in the previous step and confirm.
d. Click Finish to apply the new settings.
Now rerun the job that was failing. This time, after an unsuccessful task run, the automation environment will not reboot and you will be given an interactive console that will enable you to better diagnose the problem.
─────
BSOD With Windows PE 2.1If you encounter a Blue Screen of Death (BSOD) when booting Windows PE 2.1, check whether the client where this problem occurs has the latest available BIOS version installed. New BIOS versions for Sun x64 servers are released as part of the firmware update. Visit http://www.sun.com/download , navigate to the tab “View by Category”, locate the category “Hardware Drivers” and click the link “x64 Servers & Workstations”. Locate the latest software release for the affected platform and check whether there is a new firmware version.
─────
Scripted OS Install Is FailingIf the Scripted OS Install task is failing during the textmode Setup phase of the installation with a message that the installer could not find a file, check the Scripted OS Install task in section OEMBootFiles of the Unattended properties. Ensure that only those files that apply to your particular configuration are selected in the Unattended properties dialog.
45
─────
Error Loading Operating System When Using Diskpart for Disk PartitioningIf you encounter the error message “Error loading operating system” when a client computer is trying to boot from the hard drive in the final phase of the scripted OS deployment, you need to modify the Windows deployment job as follows:
Replace the Diskpart & Format task by a Distribute FAT32 Image task:
1. Select the problematic Windows deployment job.
2. Delete the Diskpart & Format task from the task list.
3. Create the Distribute FAT32 Image task:
a. In the right pane, click the Add>> button.
b. In the popup menu, select Distribute Disk Image.
c. Click the Select a disk image file radio button.
d. Navigate to the directory Images on the Deployment Share, and open the image named FAT32.IMG .
e. Set the automation environment to be identical as it was in the original Diskpart & Format task.
f. Leave the checkboxes Automatically perform configuration task after completing this imaging task and Boot to production to complete configuration task unchecked.
g. Click Finish to save the new task.
4. Move the new disk imaging task to the position of the original Diskpart & Format task.
5. Check the corresponding Scripted OS Install task, section Unattended of the Unattended properties and make sure the variable FileSystem is set to ConvertNTFS.
Now try to rerun the deployment job.
─────
Clients Not Booting Into Automation When Using Outofband Boot Device ControlIf a client computer does not boot into automation after the Change Boot Device to PXE task is run and the client is rebooted, follow the steps below to implement a work around:
1. In the Deployment Console, click the name of the Windows deployment job into which you want to add the work around.
46 Microsoft Windows Deployment Guide for Sun Servers Using Symantec Altiris Deployment Solution 6.9

2. In the right pane, click the Add>> button.
3. In the popup menu, select Run Script. A Run Script dialog opens.
4. Select the Run this script option and paste the following code to the text field:
REM Automation Boot Work Around
echo "Automation Boot Work Around"
5. Choose Windows as the script operating system. Click Next.
6. Set the Script Run Location property to On the client computer.
7. Set the automation environment to the one that is used by the task that should be run just before the Change Boot Device to PXE task that is causing problems. Click Finish to save the task.
8. Adjust the task order so that the work around task will be run immediately after the Change Boot Device to PXE task. The final task order will look as follows:
IPMI Power Off
Change boot device to PXE
IPMI Power On
Diskpart & Format
Change boot device to PXE
Automation Boot Work Around
Reboot
Scripted OS Install
47
APPENDIX A
Modifications for 32bit Windows
In case you want to perform deployment of the 32bit Windows version, you need to perform the following adjustments of the configuration process:
Create a 32bit Windows PE 2.1 boot option instead of the x64 version and use it as the automation environment for all tasks.
Import 32bit Windows OS sources when creating the Scripted OS Install task.
In the driver import phase, look for 32bit drivers. They usually exist in parallel to the x64 version. Create the $OEM$, $1 and TEXTMODE directories in the I386 folder of the imported Windows OS sources instead of the AMD64 folder. Copy the 32bit drivers to those folders. Reflect any folder differences in the OemPnPDriversPath property of the Unattend.txt.
If any changes to the txtsetup.oem file are required for the x64 driver versions, perform similar changes on the lines concerning the 32bit drivers.
48 Microsoft Windows Deployment Guide for Sun Servers Using Symantec Altiris Deployment Solution 6.9
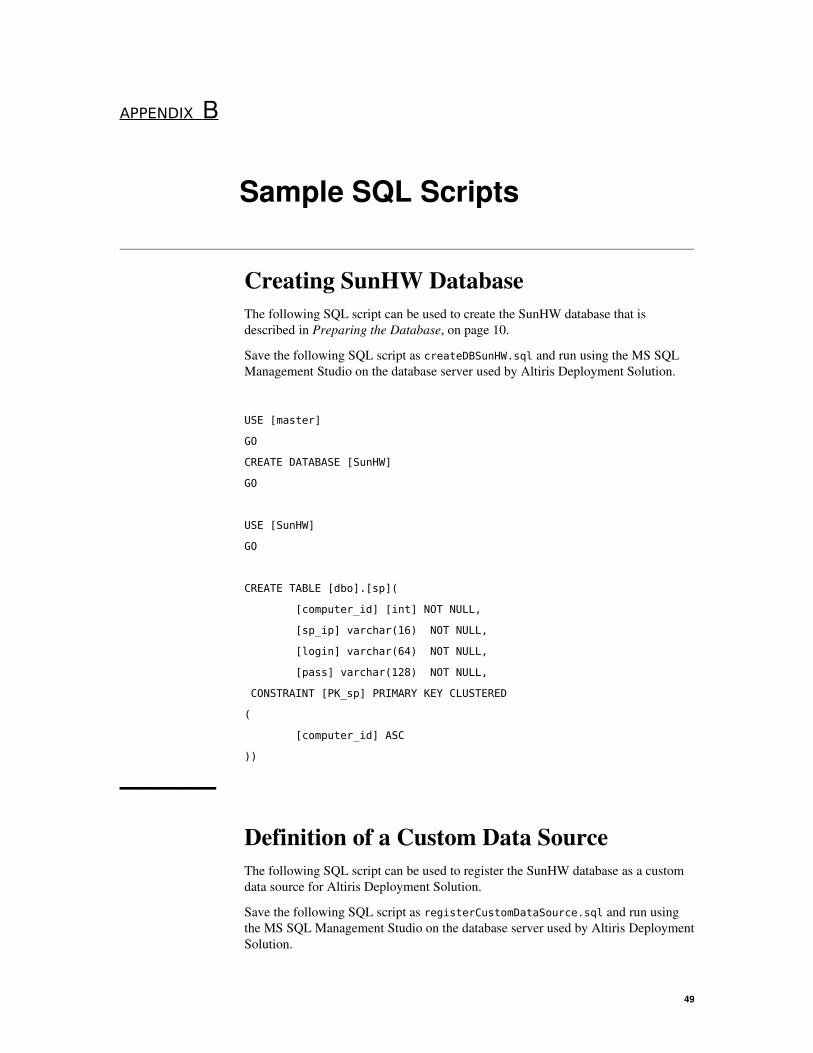
APPENDIX B
Sample SQL Scripts
Creating SunHW DatabaseThe following SQL script can be used to create the SunHW database that is described in Preparing the Database, on page 10.
Save the following SQL script as createDBSunHW.sql and run using the MS SQL Management Studio on the database server used by Altiris Deployment Solution.
USE [master]
GO
CREATE DATABASE [SunHW]
GO
USE [SunHW]
GO
CREATE TABLE [dbo].[sp](
[computer_id] [int] NOT NULL,
[sp_ip] varchar(16) NOT NULL,
[login] varchar(64) NOT NULL,
[pass] varchar(128) NOT NULL,
CONSTRAINT [PK_sp] PRIMARY KEY CLUSTERED
(
[computer_id] ASC
))
─────
Definition of a Custom Data SourceThe following SQL script can be used to register the SunHW database as a custom data source for Altiris Deployment Solution.
Save the following SQL script as registerCustomDataSource.sql and run using the MS SQL Management Studio on the database server used by Altiris Deployment Solution.
49
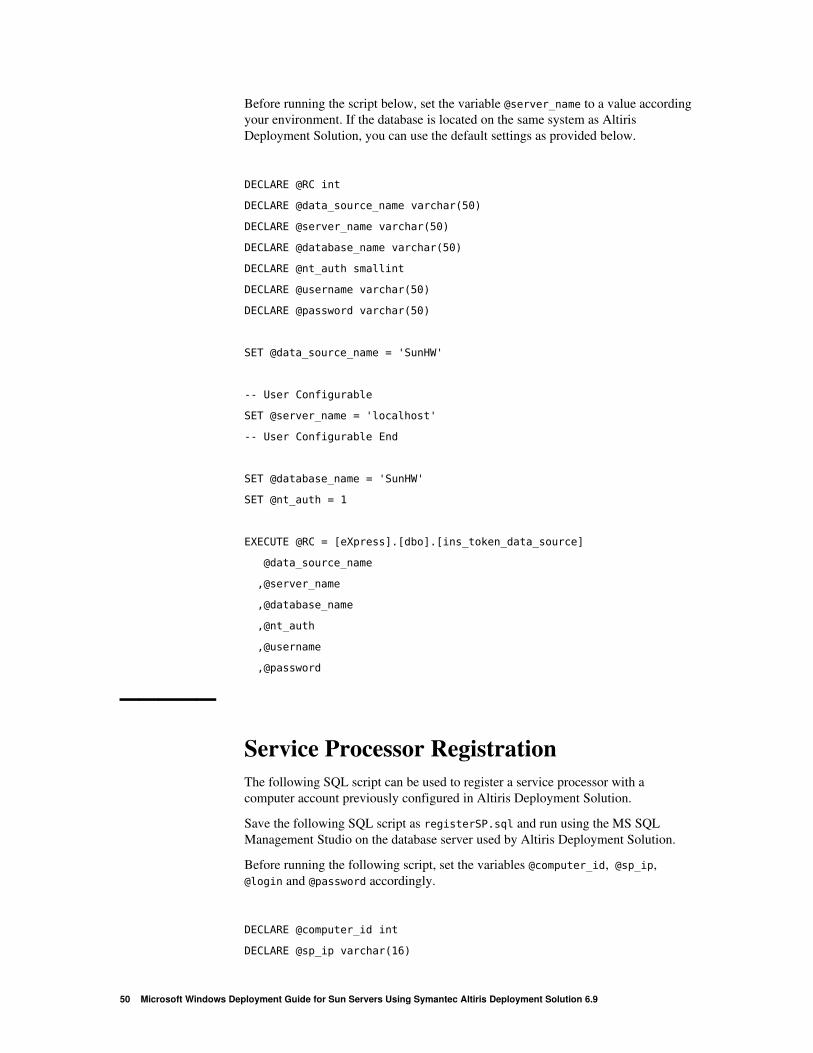
Before running the script below, set the variable @server_name to a value according your environment. If the database is located on the same system as Altiris Deployment Solution, you can use the default settings as provided below.
DECLARE @RC int
DECLARE @data_source_name varchar(50)
DECLARE @server_name varchar(50)
DECLARE @database_name varchar(50)
DECLARE @nt_auth smallint
DECLARE @username varchar(50)
DECLARE @password varchar(50)
SET @data_source_name = 'SunHW'
-- User Configurable
SET @server_name = 'localhost'
-- User Configurable End
SET @database_name = 'SunHW'
SET @nt_auth = 1
EXECUTE @RC = [eXpress].[dbo].[ins_token_data_source]
@data_source_name
,@server_name
,@database_name
,@nt_auth
,@username
,@password
─────
Service Processor RegistrationThe following SQL script can be used to register a service processor with a computer account previously configured in Altiris Deployment Solution.
Save the following SQL script as registerSP.sql and run using the MS SQL Management Studio on the database server used by Altiris Deployment Solution.
Before running the following script, set the variables @computer_id, @sp_ip, @login and @password accordingly.
DECLARE @computer_id int
DECLARE @sp_ip varchar(16)
50 Microsoft Windows Deployment Guide for Sun Servers Using Symantec Altiris Deployment Solution 6.9

DECLARE @login varchar(20)
DECLARE @pass varchar(20)
-- User Configurable
SET @computer_id = '5000001'
SET @sp_ip = '192.169.1.1'
SET @login = 'root'
SET @pass = 'changeme'
-- User Configurable End
INSERT INTO [SunHW].[dbo].[sp]
([computer_id]
,[sp_ip]
,[login]
,[pass])
VALUES
(@computer_id
,@sp_ip
,@login
,@pass)
51