Embed Size (px)
Citation preview

Frankiersystem PostBase™One - Servicedocumentation Chapter 2 Installation CONTENTS
3 SETTING UP AND INSTALLATION 2
3.1 Unpack the system 2 3.2 Establish connections and preparative measures 4
4 STARTING THE POSTAGE METER 5
5 INSTALLATION OF PRINT SYSTEM 7
6 SYSTEM UPDATING AND TELESET 9
7 INSTALLATION OF A SYSTEM WITH SEALING DEVICE 10
8 DISPOSAL 10
[email protected] BPM !!company confidential!! ServiceDoku_PostBase_one_Installation_ENG_0004.docx rev. 21.06.2016 page 1
Frankiersystem PostBase™One - Servicedocumentation
3 SETTING UP AND INSTALLATION Set up and install the PostBase™One system by following these steps:
1) Unpack the system, including peripheral devices like Automatic Feeder, Dynamic Scale (DS plus), and Sealing Unit.
2) Set up the system and make available all necessary connections, including network.
3) Keep ready the printing system components (cartridges) for operation
4) If applicable, keep ready the optional large ink-supply system (Priming device, ink tank)
5) Authorize and validate the system (load postage credit)
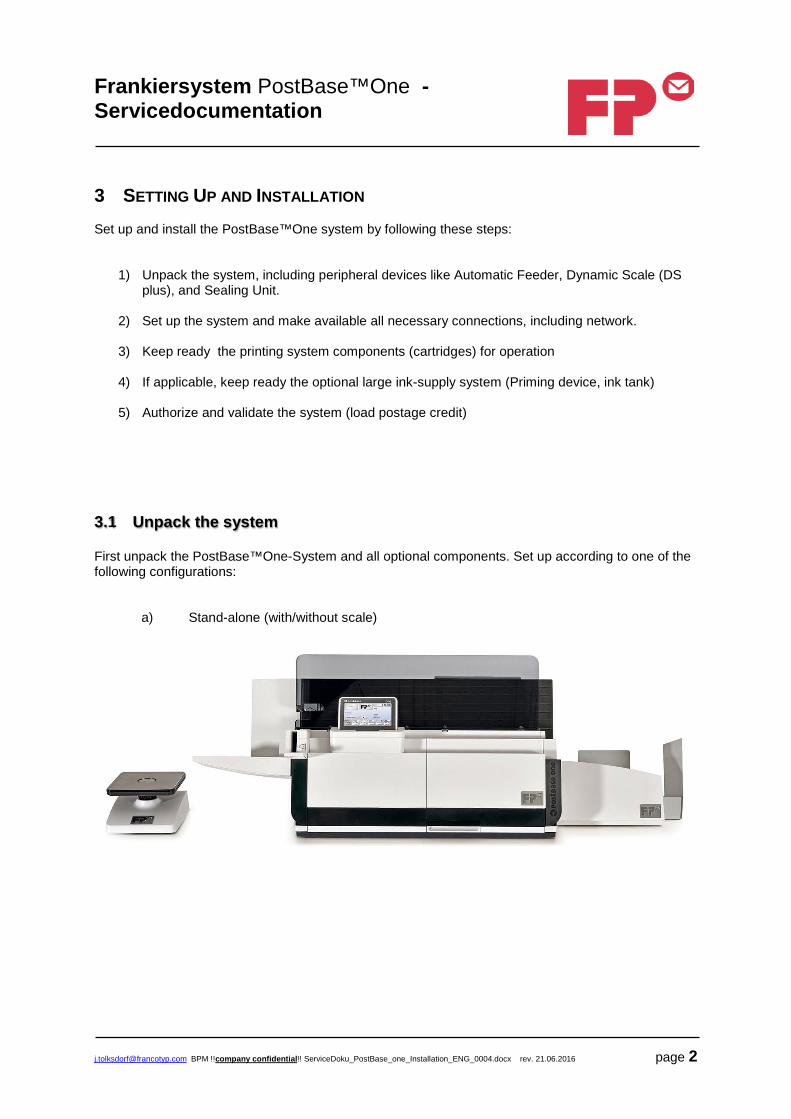
3.1 Unpack the system First unpack the PostBase™One-System and all optional components. Set up according to one of the following configurations:
a) Stand-alone (with/without scale)
[email protected] BPM !!company confidential!! ServiceDoku_PostBase_one_Installation_ENG_0004.docx rev. 21.06.2016 page 2

Frankiersystem PostBase™One - Servicedocumentation
b) PostBase™One (with/without scale) with automatic feeder
c) PostBase™One (with/without scale), dynamic scale and automatic feeder, sealer
d) PostBase™One (with/without scale), dynamic scale and automatic feeder, sealer, touchscreen
Note: Installation order of the systems: Automatic Feeder/ Sealer / DS / FM / PowerSealer
If you install a Sealer unit please follow the steps in the Install-check list (“Installation of a system with sealing device”)
[email protected] BPM !!company confidential!! ServiceDoku_PostBase_one_Installation_ENG_0004.docx rev. 21.06.2016 page 3
Frankiersystem PostBase™One - Servicedocumentation
3.2 Establish connections and preparative measures
Action done
- Each system component requires its own electric power supply. The franking unit requires a network connection.
- Also use "Connectors" (part no. 51.0022.2559.00) to securely connect all components to each other on a stable surface
- and connect the data-cables on the rear side. The last component (i.e. the automatic feeder) needs a capping plug.
- Now install the plexi shield on the FM
- Place the ink fleece (clip to the front) into the FM
- Remove transport material (desiccant bag) from AZ and Sealer unit.
- Set Sealer to the “non seal” mode.
[email protected] BPM !!company confidential!! ServiceDoku_PostBase_one_Installation_ENG_0004.docx rev. 21.06.2016 page 4

Frankiersystem PostBase™One - Servicedocumentation 4 STARTING THE POSTAGE METER # Action Note 1 Power on
2 Choose language
3 Network settings
Use change to modify
[email protected] BPM !!company confidential!! ServiceDoku_PostBase_one_Installation_ENG_0004.docx rev. 21.06.2016 page 5

Frankiersystem PostBase™One - Servicedocumentation
Test if new settings are entered
4. Enter your R-PIN
R-Pin = 6 digits If required contact the suppport
5. Connect to FPI System will be synchronised Software update system reboots
wait
6 reboot
Reboot may be repeated several times during installation New software is displayed
PostBase One skips to installation of print unit
[email protected] BPM !!company confidential!! ServiceDoku_PostBase_one_Installation_ENG_0004.docx rev. 21.06.2016 page 6
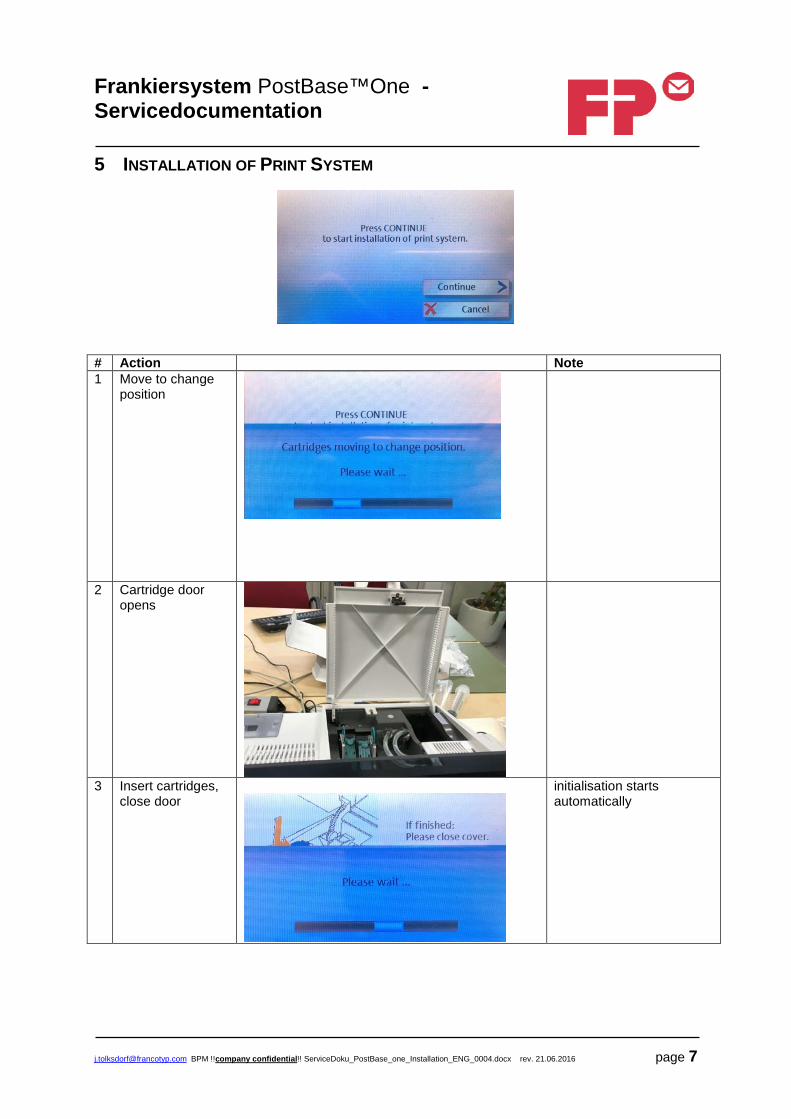
Frankiersystem PostBase™One - Servicedocumentation 5 INSTALLATION OF PRINT SYSTEM
# Action Note 1 Move to change
position
2 Cartridge door opens
3 Insert cartridges, close door
initialisation starts automatically
[email protected] BPM !!company confidential!! ServiceDoku_PostBase_one_Installation_ENG_0004.docx rev. 21.06.2016 page 7

Frankiersystem PostBase™One - Servicedocumentation 4 If system is
equipped with bulk ink system: Use the Priming Device (follow factory preferences!) Afterwards connect ink tubes
Priming Device and instruction for use are enclosed
5. Calibration will start automatically
4. Completion with alignment of print heads
Adjust if necessary (follow the display instruction)
[email protected] BPM !!company confidential!! ServiceDoku_PostBase_one_Installation_ENG_0004.docx rev. 21.06.2016 page 8
Frankiersystem PostBase™One - Servicedocumentation
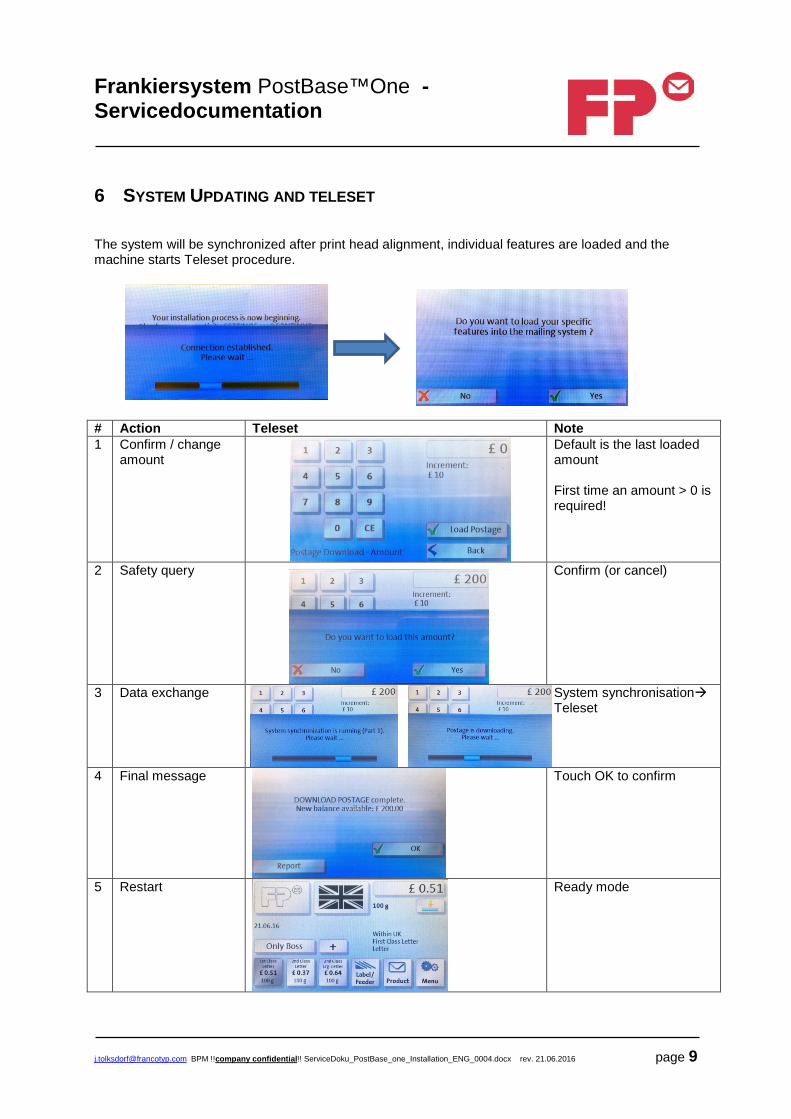
6 SYSTEM UPDATING AND TELESET The system will be synchronized after print head alignment, individual features are loaded and the machine starts Teleset procedure. # Action Teleset Note 1 Confirm / change
amount Default is the last loaded
amount First time an amount > 0 is required!
2 Safety query
Confirm (or cancel)
3 Data exchange
System synchronisation Teleset
4 Final message
Touch OK to confirm
5 Restart
Ready mode
[email protected] BPM !!company confidential!! ServiceDoku_PostBase_one_Installation_ENG_0004.docx rev. 21.06.2016 page 9

Frankiersystem PostBase™One - Servicedocumentation
7 INSTALLATION OF A SYSTEM WITH SEALING DEVICE
Action done
1) Install the system on a stable surface by using the "Connectors" (A Sealer can be used in combination with a feeder unit only!)
2) Please make sure that the AZ opt. is already prepared with distance washer down under the two black system feet’s.
3) Connect the data-cables on the rear.
4) The last component (i.e. the automatic feeder) needs a capping plug.
5) Each system component requires its own electric power connection. (Sealer -> external power supply)
6) Filling with sealing liquid “SealIt” (sealing solution) in to the Sealer-tank.
7) Make an initial manual moistening of the sealing sponge Switch to “SEAL” mode! MENUE -> "▼" ->SEALING -> START PUMP Start the pump several times until the sealing liquid drops out of the sealing sponge back to the reflow!
8) Test the sealing function with customer envelopes, repeat the adjustments if required (see service manual chap. 6.1. “Sealer” Adjustments on the sealing unit) For this test select the “SEAL ONLY” mode on the FM FM is in Ready mode -> special functions -> SEAL ONLY
Note: Before transport, please make sure the Sealer tank is empty! With low pressure in an empty original bottle you can drain the tank
8 DISPOSAL Disposal Priming Device Household trash Cleaning fleece, swabs Household trash Ink cartridges FP cartridge recycling system Ink tanks Household trash
[email protected] BPM !!company confidential!! ServiceDoku_PostBase_one_Installation_ENG_0004.docx rev. 21.06.2016 page 10


![[PostBase Mini / ENG] Refernce Guide · PostBase Mini is a digital franking machine with ink-jet print technology for franking mail. PostBase Mini complies with the pertinent safety](https://img.pdfslide.us/doc/110x75/5edaa9846b9d403acf05deab/postbase-mini-eng-refernce-guide-postbase-mini-is-a-digital-franking-machine.jpg)