Embed Size (px)
DESCRIPTION
Learn the beautiful technique of Fracture & Fusion Step-by-Step with Jana Ewy
Citation preview

All Rights Reserved Jana Ewy
FRACTURE & FUSION
STEP-BY-STEP WITH Jana Ewy

All Rights Reserved Jana Ewy
I like to use 5 color coordinated sticks of Friendly Plastic to create my Fracture & Fusion sheets. Two that are original colors of Friendly Plastic and three that I have enhanced using alcohol inks. I think it makes for a more interesting =inished design.
Note: This extra technique is not necessary. You can create beautiful multi-‐colored sheets using only the original colors.
1

All Rights Reserved Jana Ewy
A Splash of color: For each sheet, create three coordinating colored sticks.
Apply a wash of blending solution over two white and one silver spectra plastic stick. Apply drops of alcohol ink. Allow the color to disperse. Use your paintbrush or sponge to =ill in any white areas that are left. Continuing adding ink and playing with the color until a desired pattern is achieved. The metallic inks from Krylon pens blend beautifully with the alcohol inks, and create some unique patterns.
2

All Rights Reserved Jana Ewy
Repeat the Splash process, for each color coordinated sheet. Creating purple, pink, blue, orange and green.3

All Rights Reserved Jana Ewy
Fracture: Using a cutting mat, ruler and blade, cut the plastic sticks into ¼” strips. Then cut each strips in half using a scissor.
4

All Rights Reserved Jana Ewy
Arrange the strips into a pleasing pattern.5

All Rights Reserved Jana Ewy
Continue adding strips, until your have reached a length of 7”.6
All Rights Reserved Jana Ewy
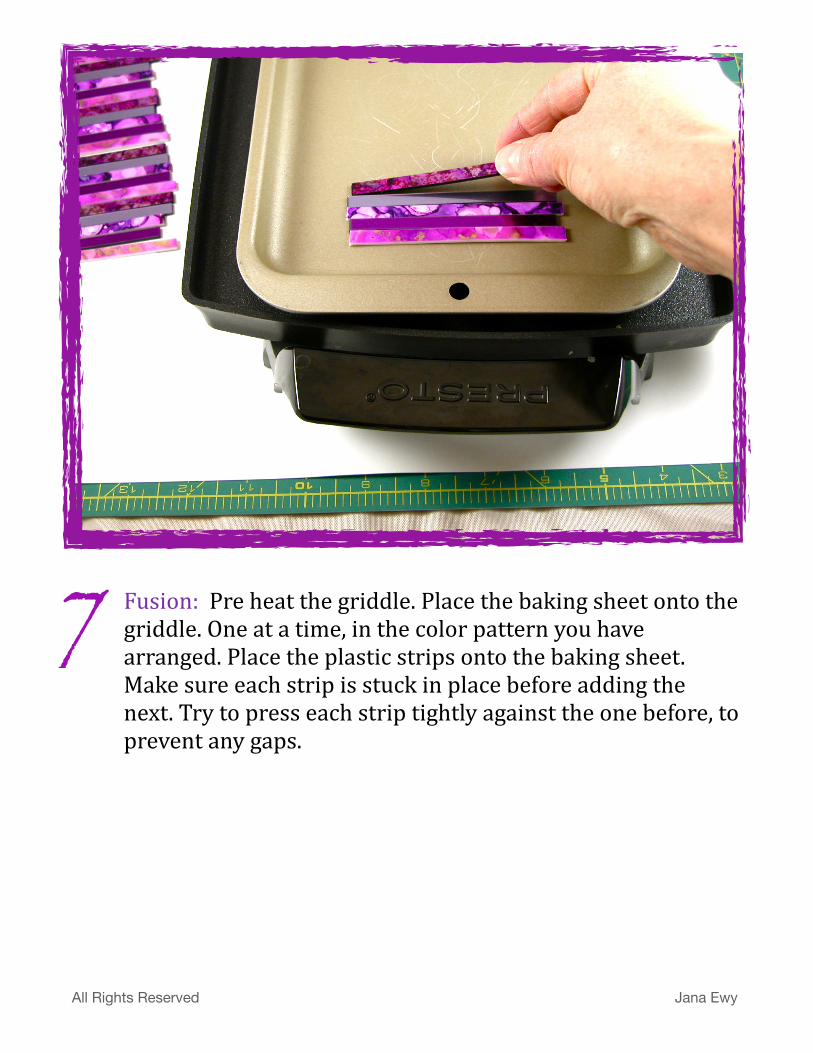
Fusion: Pre heat the griddle. Place the baking sheet onto the griddle. One at a time, in the color pattern you have arranged. Place the plastic strips onto the baking sheet. Make sure each strip is stuck in place before adding the next. Try to press each strip tightly against the one before, to prevent any gaps.
7

All Rights Reserved Jana Ewy
Continue until all of the strips have been added. Allow the plastic to soften and seal together. If any gaps do appear, simply tap over them with your =inger, gently pressing the softened plastic together.
8

All Rights Reserved Jana Ewy
When all the strips have softened and sealed together, remove the baking sheet from the griddle and allow the plastic to cool. Use the needle tool to press under the edges of the cooled plastic and remove it from the pan.
9

All Rights Reserved Jana Ewy
Repeat the steps for each colored sheet.10

All Rights Reserved Jana Ewy
Fracture: Place the cooled plastic back onto the cutting mat and trim off the uneven edge. Cut the plastic into ¼” and 1/8” strips. Cut three of each width. That will give you enough to play with. You can always cut more as you need them. Continue with each of the colored sheets
11

All Rights Reserved Jana Ewy
Now it’s playtime. Arrange the strips by color and size until you are happy with the design. There are so many options; it’s hard to know when to stop. Have fun.12

All Rights Reserved Jana Ewy
Fusion: Place the baking sheet back onto the griddle. One at a time, in the pattern you have arranged, place the plastic strips onto the baking sheet. Make sure each strip is stuck in place before adding the next strip. Try to press each strip tightly against the one before, to prevent any gaps. Continue until all of the strips have been added. Allow the plastic to soften and seal together. If any gaps do appear, remember to tap over them with your =inger pressing the softened plastic together. When all the strips have softened and sealed together, remove the baking sheet from the griddle.
13

All Rights Reserved Jana Ewy
While the plastic is still warm, cut desired shapes by pressing the cutter into the softened plastic. Dip the cutter back into a dish of cold water after each cut. This will help keep it from sticking to the plastic. Allow the plastic to cool. You may place the pan under cold running water to speed the cooling process along.
14

All Rights Reserved Jana Ewy
Use the needle tool to press under the edge of the cooled plastic and remove it from the pan.15

All Rights Reserved Jana Ewy
Pop out the cut shapes. If needed use the craft knife to cut around each one.16

All Rights Reserved Jana Ewy
OPTIONAL: Mix the Envirotex Lite sealer following the manufactures instructions.
Application: I like to place my pieces on a non-‐stick cookie sheet. This way if there is any run off, it will be easy to remove later.
Once I have the Envirotex mixed, I like to pour it into a small squeeze bottle. The application will be more precise and much easier.
Note: Apply strips of double sided tape to your non-‐stick pan to hold the plastic in place while applying the resin coating.
17
All Rights Reserved Jana Ewy
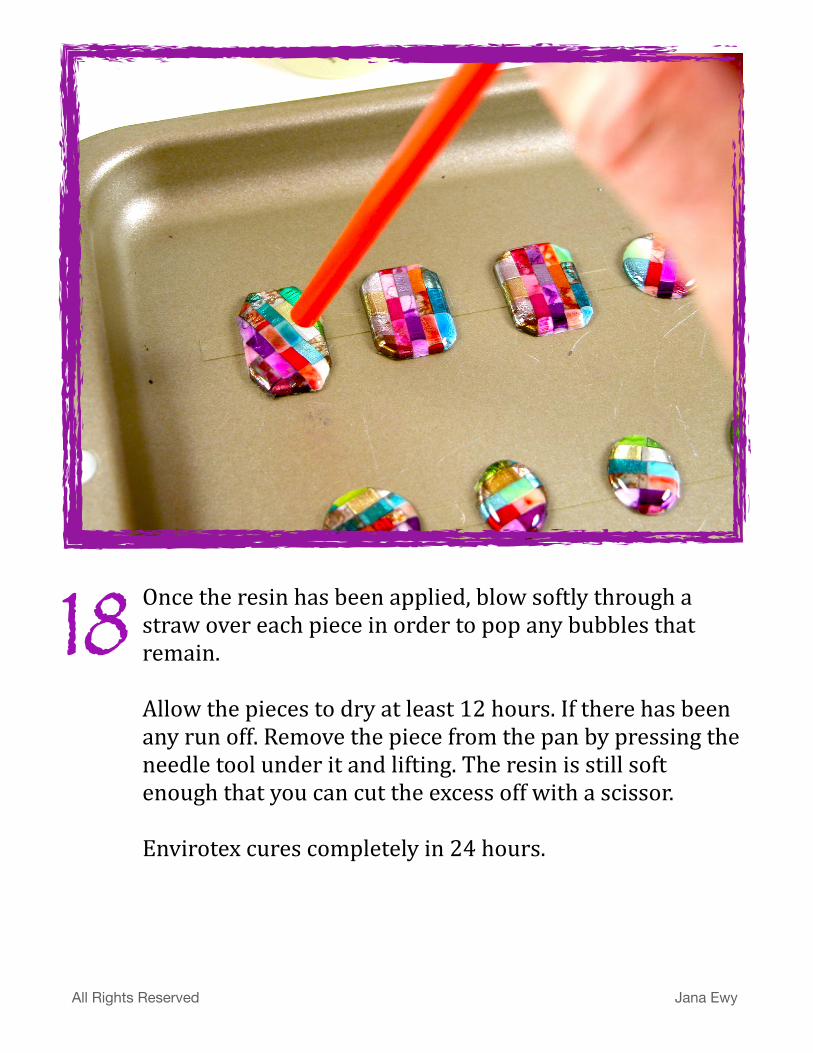
Once the resin has been applied, blow softly through a straw over each piece in order to pop any bubbles that remain.
Allow the pieces to dry at least 12 hours. If there has been any run off. Remove the piece from the pan by pressing the needle tool under it and lifting. The resin is still soft enough that you can cut the excess off with a scissor.
Envirotex cures completely in 24 hours.
18

All Rights Reserved Jana Ewy
Have fun creating your desired components. 19

All Rights Reserved Jana Ewy
Creating color coordinated beaded components are the perfect complement to any design.20

All Rights Reserved Jana Ewy
A =inished design.21

WWW.FRIENDLYPLASTIC.ETSY.COM 23
TOOLS AND MATERIALS
Friendly Plastic 7” sticks: Alcohol inks: Alcohol blending fluidGold metallic penPaint brushes or make-upsponges (for use with inks)Matt knifeAcrylic rulerCutting matCraft knifeScissorNeedle toolShaped cutters: 7/8 and 1 3/4 inchSmall dish of cold water with a few drops of olive oil Griddle set at 200-300 degreesNon-stick baking sheet that fits flat on griddle surface Sealer: I used Envirotex Lite, but any high gloss acrylic sealer will work.Disposable mixing container and stir stickStrawNon-stick cookie sheetRound nose and needle nose jewelry pliersWire cuttersJewelry findings: of your choice.