Embed Size (px)
Citation preview
FortiOS™ CLI Reference
FortiOS 4.0 MR3
Visit http://support.fortinet.com to register your FortiOS product. By registering you canreceive product updates, technical support, and FortiGuard services.
FortiOS CLI ReferenceFortiOS 4.0 MR3June 23 201101-431-99686-20110623
© Copyright 2011 Fortinet, Inc. All rights reserved. No part of this publication including text, examples, diagrams or illustrations may be reproduced, transmitted, or translated in any form or by any means, electronic, mechanical, manual, optical or otherwise, for any purpose, without prior written permission of Fortinet, Inc.
TrademarksThe symbols ® and ™ denote respectively federally registered trademarks and unregistered trademarks of Fortinet, Inc., its subsidiaries and affiliates including, but not limited to, the following names: Fortinet, FortiGate, FortiOS, FortiASIC, FortiAnalyser, FortiSwitch, FortiBIOS, FortiLog, FortiVoIP, FortiResponse, FortiManager, FortiWiFi, FortiGuard, FortiReporter, FortiClient, FortiLog, APSecure, ABACAS. Other trademarks belong to their respective owners.
F0h
Contents
Introduction 21How this guide is organized . . . . . . . . . . . . . . . . . . . . . . . . . . . . . . 21
Availability of commands and options . . . . . . . . . . . . . . . . . . . . . . . 21
Document conventions and other information . . . . . . . . . . . . . . . . . . . . . 21
What’s new 23Changes for FortiOS 4.3 Patch 1 . . . . . . . . . . . . . . . . . . . . . . . . . . . . 41
alertemail 43setting. . . . . . . . . . . . . . . . . . . . . . . . . . . . . . . . . . . . . . . . . . 44
antivirus 47heuristic. . . . . . . . . . . . . . . . . . . . . . . . . . . . . . . . . . . . . . . . . 48
mms-checksum . . . . . . . . . . . . . . . . . . . . . . . . . . . . . . . . . . . . . 49
notification . . . . . . . . . . . . . . . . . . . . . . . . . . . . . . . . . . . . . . . 50
profile . . . . . . . . . . . . . . . . . . . . . . . . . . . . . . . . . . . . . . . . . . 51config {http | https | ftp | ftps | imap | imaps | pop3 | pop3s | smtp | smtps | nntp | im} 51config nac-quar . . . . . . . . . . . . . . . . . . . . . . . . . . . . . . . . . . . 52
quarantine . . . . . . . . . . . . . . . . . . . . . . . . . . . . . . . . . . . . . . . 53
quarfilepattern . . . . . . . . . . . . . . . . . . . . . . . . . . . . . . . . . . . . . 55
service . . . . . . . . . . . . . . . . . . . . . . . . . . . . . . . . . . . . . . . . . 56
settings . . . . . . . . . . . . . . . . . . . . . . . . . . . . . . . . . . . . . . . . . 57
application 59list . . . . . . . . . . . . . . . . . . . . . . . . . . . . . . . . . . . . . . . . . . . . 60
name . . . . . . . . . . . . . . . . . . . . . . . . . . . . . . . . . . . . . . . . . . 63
dlp 65compound . . . . . . . . . . . . . . . . . . . . . . . . . . . . . . . . . . . . . . . 66
filepattern . . . . . . . . . . . . . . . . . . . . . . . . . . . . . . . . . . . . . . . . 68
fp-doc-source . . . . . . . . . . . . . . . . . . . . . . . . . . . . . . . . . . . . . . 70
ortiOS 4.0 MR3 CLI Reference1-431-99686-20110623 3ttp://docs.fortinet.com/ • Feedback
Contents
fp-sensitivity . . . . . . . . . . . . . . . . . . . . . . . . . . . . . . . . . . . . . . 72
rule . . . . . . . . . . . . . . . . . . . . . . . . . . . . . . . . . . . . . . . . . . . 73
sensor . . . . . . . . . . . . . . . . . . . . . . . . . . . . . . . . . . . . . . . . . 78
settings . . . . . . . . . . . . . . . . . . . . . . . . . . . . . . . . . . . . . . . . . 81
endpoint-control 83app-detect rule-list . . . . . . . . . . . . . . . . . . . . . . . . . . . . . . . . . . . 84
profile . . . . . . . . . . . . . . . . . . . . . . . . . . . . . . . . . . . . . . . . . . 85
settings . . . . . . . . . . . . . . . . . . . . . . . . . . . . . . . . . . . . . . . . . 87
firewall 89address, address6 . . . . . . . . . . . . . . . . . . . . . . . . . . . . . . . . . . . 90
addrgrp, addrgrp6 . . . . . . . . . . . . . . . . . . . . . . . . . . . . . . . . . . . 92
carrier-endpoint-bwl . . . . . . . . . . . . . . . . . . . . . . . . . . . . . . . . . . 93
carrier-endpoint-ip-filter . . . . . . . . . . . . . . . . . . . . . . . . . . . . . . . . . 94
central-nat . . . . . . . . . . . . . . . . . . . . . . . . . . . . . . . . . . . . . . . 95
dnstranslation. . . . . . . . . . . . . . . . . . . . . . . . . . . . . . . . . . . . . . 96
gtp . . . . . . . . . . . . . . . . . . . . . . . . . . . . . . . . . . . . . . . . . . . 97
interface-policy . . . . . . . . . . . . . . . . . . . . . . . . . . . . . . . . . . . . . 105
interface-policy6 . . . . . . . . . . . . . . . . . . . . . . . . . . . . . . . . . . . . 107
ipmacbinding setting . . . . . . . . . . . . . . . . . . . . . . . . . . . . . . . . . . 108
ipmacbinding table . . . . . . . . . . . . . . . . . . . . . . . . . . . . . . . . . . . 109
ippool . . . . . . . . . . . . . . . . . . . . . . . . . . . . . . . . . . . . . . . . . . 110
ldb-monitor . . . . . . . . . . . . . . . . . . . . . . . . . . . . . . . . . . . . . . . 111
local-in-policy, local-in-policy6 . . . . . . . . . . . . . . . . . . . . . . . . . . . . . 113
mms-profile . . . . . . . . . . . . . . . . . . . . . . . . . . . . . . . . . . . . . . . 114config dupe {mm1 | mm4} . . . . . . . . . . . . . . . . . . . . . . . . . . . . . 119config flood {mm1 | mm4} . . . . . . . . . . . . . . . . . . . . . . . . . . . . . 120config log . . . . . . . . . . . . . . . . . . . . . . . . . . . . . . . . . . . . . . 121config notification {alert-dupe-1 | alert-flood-1 | mm1 | mm3 | mm4 | mm7} . . . . 122config notif-msisdn . . . . . . . . . . . . . . . . . . . . . . . . . . . . . . . . . 125
multicast-policy . . . . . . . . . . . . . . . . . . . . . . . . . . . . . . . . . . . . . 126
policy, policy6. . . . . . . . . . . . . . . . . . . . . . . . . . . . . . . . . . . . . . 127config identity-based-policy . . . . . . . . . . . . . . . . . . . . . . . . . . . . 137
profile-group . . . . . . . . . . . . . . . . . . . . . . . . . . . . . . . . . . . . . . 138
FortiOS 4.0 MR3 CLI Reference4 01-431-99686-20110623
http://docs.fortinet.com/ • Feedback
Contents
F0h
profile-protocol-options . . . . . . . . . . . . . . . . . . . . . . . . . . . . . . . . . 140config http . . . . . . . . . . . . . . . . . . . . . . . . . . . . . . . . . . . . . 142config https . . . . . . . . . . . . . . . . . . . . . . . . . . . . . . . . . . . . . 143config ftp . . . . . . . . . . . . . . . . . . . . . . . . . . . . . . . . . . . . . . 144config ftps . . . . . . . . . . . . . . . . . . . . . . . . . . . . . . . . . . . . . 145config imap . . . . . . . . . . . . . . . . . . . . . . . . . . . . . . . . . . . . . 146config imaps . . . . . . . . . . . . . . . . . . . . . . . . . . . . . . . . . . . . 146config pop3 . . . . . . . . . . . . . . . . . . . . . . . . . . . . . . . . . . . . . 147config pop3s . . . . . . . . . . . . . . . . . . . . . . . . . . . . . . . . . . . . 147config smtp . . . . . . . . . . . . . . . . . . . . . . . . . . . . . . . . . . . . . 148config smtps . . . . . . . . . . . . . . . . . . . . . . . . . . . . . . . . . . . . 149config nntp . . . . . . . . . . . . . . . . . . . . . . . . . . . . . . . . . . . . . 149config im . . . . . . . . . . . . . . . . . . . . . . . . . . . . . . . . . . . . . . 150config ssl-server . . . . . . . . . . . . . . . . . . . . . . . . . . . . . . . . . . 150config mail-signature . . . . . . . . . . . . . . . . . . . . . . . . . . . . . . . . 151
schedule onetime . . . . . . . . . . . . . . . . . . . . . . . . . . . . . . . . . . . . 152
schedule recurring . . . . . . . . . . . . . . . . . . . . . . . . . . . . . . . . . . . 153
schedule group . . . . . . . . . . . . . . . . . . . . . . . . . . . . . . . . . . . . . 154
service custom . . . . . . . . . . . . . . . . . . . . . . . . . . . . . . . . . . . . . 155
service explicit-web . . . . . . . . . . . . . . . . . . . . . . . . . . . . . . . . . . . 158
service group . . . . . . . . . . . . . . . . . . . . . . . . . . . . . . . . . . . . . . 159
service group-explicit-web . . . . . . . . . . . . . . . . . . . . . . . . . . . . . . . 160
shaper per-ip-shaper . . . . . . . . . . . . . . . . . . . . . . . . . . . . . . . . . . 161
shaper traffic-shaper . . . . . . . . . . . . . . . . . . . . . . . . . . . . . . . . . . 162
sniff-interface-policy . . . . . . . . . . . . . . . . . . . . . . . . . . . . . . . . . . 163
sniff-interface-policy6 . . . . . . . . . . . . . . . . . . . . . . . . . . . . . . . . . . 165
ssl setting . . . . . . . . . . . . . . . . . . . . . . . . . . . . . . . . . . . . . . . . 167
vip. . . . . . . . . . . . . . . . . . . . . . . . . . . . . . . . . . . . . . . . . . . . 169
vipgrp . . . . . . . . . . . . . . . . . . . . . . . . . . . . . . . . . . . . . . . . . . 182
ftp-proxy 183explicit . . . . . . . . . . . . . . . . . . . . . . . . . . . . . . . . . . . . . . . . . 184
gui 185console . . . . . . . . . . . . . . . . . . . . . . . . . . . . . . . . . . . . . . . . . 186
icap 187profile . . . . . . . . . . . . . . . . . . . . . . . . . . . . . . . . . . . . . . . . . . 188
server . . . . . . . . . . . . . . . . . . . . . . . . . . . . . . . . . . . . . . . . . . 189
ortiOS 4.0 MR3 CLI Reference1-431-99686-20110623 5ttp://docs.fortinet.com/ • Feedback
Contents
imp2p 191aim-user . . . . . . . . . . . . . . . . . . . . . . . . . . . . . . . . . . . . . . . . 192
icq-user . . . . . . . . . . . . . . . . . . . . . . . . . . . . . . . . . . . . . . . . . 193
msn-user . . . . . . . . . . . . . . . . . . . . . . . . . . . . . . . . . . . . . . . . 194
old-version . . . . . . . . . . . . . . . . . . . . . . . . . . . . . . . . . . . . . . . 195
policy . . . . . . . . . . . . . . . . . . . . . . . . . . . . . . . . . . . . . . . . . . 196
yahoo-user . . . . . . . . . . . . . . . . . . . . . . . . . . . . . . . . . . . . . . . 197
ips 199DoS . . . . . . . . . . . . . . . . . . . . . . . . . . . . . . . . . . . . . . . . . . . 200
config limit . . . . . . . . . . . . . . . . . . . . . . . . . . . . . . . . . . . . . 200
custom . . . . . . . . . . . . . . . . . . . . . . . . . . . . . . . . . . . . . . . . . 202
decoder . . . . . . . . . . . . . . . . . . . . . . . . . . . . . . . . . . . . . . . . . 203
global . . . . . . . . . . . . . . . . . . . . . . . . . . . . . . . . . . . . . . . . . . 204
rule . . . . . . . . . . . . . . . . . . . . . . . . . . . . . . . . . . . . . . . . . . . 205
sensor . . . . . . . . . . . . . . . . . . . . . . . . . . . . . . . . . . . . . . . . . 206
setting. . . . . . . . . . . . . . . . . . . . . . . . . . . . . . . . . . . . . . . . . . 209
log 211custom-field. . . . . . . . . . . . . . . . . . . . . . . . . . . . . . . . . . . . . . . 212
{disk | fortianalyzer | fortianalyzer2 | fortianalyzer3 | memory | syslogd | syslogd2 | syslogd3 | webtrends | fortiguard} filter . . . . . . . . . . . . . . . . . . . . . . . . 213
disk setting . . . . . . . . . . . . . . . . . . . . . . . . . . . . . . . . . . . . . . . 218
eventfilter . . . . . . . . . . . . . . . . . . . . . . . . . . . . . . . . . . . . . . . . 222
{fortianalyzer | syslogd} override-filter . . . . . . . . . . . . . . . . . . . . . . . . . 224
fortianalyzer override-setting . . . . . . . . . . . . . . . . . . . . . . . . . . . . . . 225
{fortianalyzer | fortianalyzer2 | fortianalyzer3} setting. . . . . . . . . . . . . . . . . . 226
fortiguard setting . . . . . . . . . . . . . . . . . . . . . . . . . . . . . . . . . . . . 228
gui . . . . . . . . . . . . . . . . . . . . . . . . . . . . . . . . . . . . . . . . . . . 229
memory setting . . . . . . . . . . . . . . . . . . . . . . . . . . . . . . . . . . . . . 230
memory global-setting . . . . . . . . . . . . . . . . . . . . . . . . . . . . . . . . . 231
syslogd override-setting . . . . . . . . . . . . . . . . . . . . . . . . . . . . . . . . 232
{syslogd | syslogd2 | syslogd3} setting . . . . . . . . . . . . . . . . . . . . . . . . . 233
trafficfilter . . . . . . . . . . . . . . . . . . . . . . . . . . . . . . . . . . . . . . . . 235
webtrends setting . . . . . . . . . . . . . . . . . . . . . . . . . . . . . . . . . . . . 236
FortiOS 4.0 MR3 CLI Reference6 01-431-99686-20110623
http://docs.fortinet.com/ • Feedback

Contents
F0h
netscan 237assets. . . . . . . . . . . . . . . . . . . . . . . . . . . . . . . . . . . . . . . . . . 238
settings . . . . . . . . . . . . . . . . . . . . . . . . . . . . . . . . . . . . . . . . . 239
report 241chart . . . . . . . . . . . . . . . . . . . . . . . . . . . . . . . . . . . . . . . . . . 242
dataset . . . . . . . . . . . . . . . . . . . . . . . . . . . . . . . . . . . . . . . . . 246
layout . . . . . . . . . . . . . . . . . . . . . . . . . . . . . . . . . . . . . . . . . . 247
style. . . . . . . . . . . . . . . . . . . . . . . . . . . . . . . . . . . . . . . . . . . 251
summary . . . . . . . . . . . . . . . . . . . . . . . . . . . . . . . . . . . . . . . . 254
theme . . . . . . . . . . . . . . . . . . . . . . . . . . . . . . . . . . . . . . . . . . 255
router 259access-list, access-list6. . . . . . . . . . . . . . . . . . . . . . . . . . . . . . . . . 260
aspath-list . . . . . . . . . . . . . . . . . . . . . . . . . . . . . . . . . . . . . . . . 262
auth-path . . . . . . . . . . . . . . . . . . . . . . . . . . . . . . . . . . . . . . . . 263
bgp . . . . . . . . . . . . . . . . . . . . . . . . . . . . . . . . . . . . . . . . . . . 264config router bgp . . . . . . . . . . . . . . . . . . . . . . . . . . . . . . . . . . 267config admin-distance . . . . . . . . . . . . . . . . . . . . . . . . . . . . . . . 270config aggregate-address . . . . . . . . . . . . . . . . . . . . . . . . . . . . . 271config aggregate-address6 . . . . . . . . . . . . . . . . . . . . . . . . . . . . . 271config neighbor . . . . . . . . . . . . . . . . . . . . . . . . . . . . . . . . . . . 271config network . . . . . . . . . . . . . . . . . . . . . . . . . . . . . . . . . . . 277config network6. . . . . . . . . . . . . . . . . . . . . . . . . . . . . . . . . . . 277config redistribute . . . . . . . . . . . . . . . . . . . . . . . . . . . . . . . . . 278config redistribute6 . . . . . . . . . . . . . . . . . . . . . . . . . . . . . . . . . 278
community-list . . . . . . . . . . . . . . . . . . . . . . . . . . . . . . . . . . . . . 280
gwdetect . . . . . . . . . . . . . . . . . . . . . . . . . . . . . . . . . . . . . . . . 282
isis . . . . . . . . . . . . . . . . . . . . . . . . . . . . . . . . . . . . . . . . . . . 283config isis-interface . . . . . . . . . . . . . . . . . . . . . . . . . . . . . . . . . 286config isis-net. . . . . . . . . . . . . . . . . . . . . . . . . . . . . . . . . . . . 287config redistribute {bgp | connected | ospf | rip | static} . . . . . . . . . . . . . . 287config summary-address . . . . . . . . . . . . . . . . . . . . . . . . . . . . . . 288
key-chain . . . . . . . . . . . . . . . . . . . . . . . . . . . . . . . . . . . . . . . . 289
ortiOS 4.0 MR3 CLI Reference1-431-99686-20110623 7ttp://docs.fortinet.com/ • Feedback
Contents
multicast . . . . . . . . . . . . . . . . . . . . . . . . . . . . . . . . . . . . . . . . 291Sparse mode . . . . . . . . . . . . . . . . . . . . . . . . . . . . . . . . . . . . 291Dense mode . . . . . . . . . . . . . . . . . . . . . . . . . . . . . . . . . . . . 292config router multicast . . . . . . . . . . . . . . . . . . . . . . . . . . . . . . . 293config interface . . . . . . . . . . . . . . . . . . . . . . . . . . . . . . . . . . . 295config pim-sm-global . . . . . . . . . . . . . . . . . . . . . . . . . . . . . . . . 297
multicast-flow . . . . . . . . . . . . . . . . . . . . . . . . . . . . . . . . . . . . . . 300
ospf . . . . . . . . . . . . . . . . . . . . . . . . . . . . . . . . . . . . . . . . . . . 301config router ospf . . . . . . . . . . . . . . . . . . . . . . . . . . . . . . . . . . 303config area . . . . . . . . . . . . . . . . . . . . . . . . . . . . . . . . . . . . . 305config distribute-list . . . . . . . . . . . . . . . . . . . . . . . . . . . . . . . . . 309config neighbor . . . . . . . . . . . . . . . . . . . . . . . . . . . . . . . . . . . 310config network . . . . . . . . . . . . . . . . . . . . . . . . . . . . . . . . . . . 310config ospf-interface . . . . . . . . . . . . . . . . . . . . . . . . . . . . . . . . 311config redistribute . . . . . . . . . . . . . . . . . . . . . . . . . . . . . . . . . 313config summary-address . . . . . . . . . . . . . . . . . . . . . . . . . . . . . . 314
ospf6 . . . . . . . . . . . . . . . . . . . . . . . . . . . . . . . . . . . . . . . . . . 315
policy . . . . . . . . . . . . . . . . . . . . . . . . . . . . . . . . . . . . . . . . . . 320
prefix-list, prefix-list6 . . . . . . . . . . . . . . . . . . . . . . . . . . . . . . . . . . 323
rip . . . . . . . . . . . . . . . . . . . . . . . . . . . . . . . . . . . . . . . . . . . . 325config router rip. . . . . . . . . . . . . . . . . . . . . . . . . . . . . . . . . . . 326config distance . . . . . . . . . . . . . . . . . . . . . . . . . . . . . . . . . . . 327config distribute-list . . . . . . . . . . . . . . . . . . . . . . . . . . . . . . . . . 328config interface . . . . . . . . . . . . . . . . . . . . . . . . . . . . . . . . . . . 329config neighbor . . . . . . . . . . . . . . . . . . . . . . . . . . . . . . . . . . . 330config network . . . . . . . . . . . . . . . . . . . . . . . . . . . . . . . . . . . 331config offset-list. . . . . . . . . . . . . . . . . . . . . . . . . . . . . . . . . . . 331config redistribute . . . . . . . . . . . . . . . . . . . . . . . . . . . . . . . . . 332
ripng . . . . . . . . . . . . . . . . . . . . . . . . . . . . . . . . . . . . . . . . . . 333
route-map. . . . . . . . . . . . . . . . . . . . . . . . . . . . . . . . . . . . . . . . 338Using route maps with BGP . . . . . . . . . . . . . . . . . . . . . . . . . . . . 340
setting. . . . . . . . . . . . . . . . . . . . . . . . . . . . . . . . . . . . . . . . . . 344
static . . . . . . . . . . . . . . . . . . . . . . . . . . . . . . . . . . . . . . . . . . 345
static6. . . . . . . . . . . . . . . . . . . . . . . . . . . . . . . . . . . . . . . . . . 347
spamfilter 349bword . . . . . . . . . . . . . . . . . . . . . . . . . . . . . . . . . . . . . . . . . . 350
dnsbl . . . . . . . . . . . . . . . . . . . . . . . . . . . . . . . . . . . . . . . . . . 352
emailbwl . . . . . . . . . . . . . . . . . . . . . . . . . . . . . . . . . . . . . . . . 354
fortishield . . . . . . . . . . . . . . . . . . . . . . . . . . . . . . . . . . . . . . . . 356
FortiOS 4.0 MR3 CLI Reference8 01-431-99686-20110623
http://docs.fortinet.com/ • Feedback
Contents
F0h
ipbwl . . . . . . . . . . . . . . . . . . . . . . . . . . . . . . . . . . . . . . . . . . 358
iptrust . . . . . . . . . . . . . . . . . . . . . . . . . . . . . . . . . . . . . . . . . . 360
mheader . . . . . . . . . . . . . . . . . . . . . . . . . . . . . . . . . . . . . . . . 361
options . . . . . . . . . . . . . . . . . . . . . . . . . . . . . . . . . . . . . . . . . 363
profile . . . . . . . . . . . . . . . . . . . . . . . . . . . . . . . . . . . . . . . . . . 364config {imap | imaps | pop3 | pop3s | smtp | smtps} . . . . . . . . . . . . . . . . 365config {gmail | msn-hotmail | yahoo-mail} . . . . . . . . . . . . . . . . . . . . . 366
system 3673g-modem custom . . . . . . . . . . . . . . . . . . . . . . . . . . . . . . . . . . . 368
accprofile . . . . . . . . . . . . . . . . . . . . . . . . . . . . . . . . . . . . . . . . 369
admin . . . . . . . . . . . . . . . . . . . . . . . . . . . . . . . . . . . . . . . . . . 372
alertemail . . . . . . . . . . . . . . . . . . . . . . . . . . . . . . . . . . . . . . . . 379
amc . . . . . . . . . . . . . . . . . . . . . . . . . . . . . . . . . . . . . . . . . . . 380
arp-table . . . . . . . . . . . . . . . . . . . . . . . . . . . . . . . . . . . . . . . . 381
auto-install . . . . . . . . . . . . . . . . . . . . . . . . . . . . . . . . . . . . . . . 382
autoupdate clientoverride. . . . . . . . . . . . . . . . . . . . . . . . . . . . . . . . 383
autoupdate override . . . . . . . . . . . . . . . . . . . . . . . . . . . . . . . . . . 384
autoupdate push-update . . . . . . . . . . . . . . . . . . . . . . . . . . . . . . . . 385
autoupdate schedule . . . . . . . . . . . . . . . . . . . . . . . . . . . . . . . . . . 386
autoupdate tunneling . . . . . . . . . . . . . . . . . . . . . . . . . . . . . . . . . . 387
aux . . . . . . . . . . . . . . . . . . . . . . . . . . . . . . . . . . . . . . . . . . . 388
bug-report. . . . . . . . . . . . . . . . . . . . . . . . . . . . . . . . . . . . . . . . 389
central-management . . . . . . . . . . . . . . . . . . . . . . . . . . . . . . . . . . 390
console . . . . . . . . . . . . . . . . . . . . . . . . . . . . . . . . . . . . . . . . . 392
ddns . . . . . . . . . . . . . . . . . . . . . . . . . . . . . . . . . . . . . . . . . . 393
dhcp reserved-address . . . . . . . . . . . . . . . . . . . . . . . . . . . . . . . . . 394
dhcp server . . . . . . . . . . . . . . . . . . . . . . . . . . . . . . . . . . . . . . . 395
dhcp6 server . . . . . . . . . . . . . . . . . . . . . . . . . . . . . . . . . . . . . . 398
dns . . . . . . . . . . . . . . . . . . . . . . . . . . . . . . . . . . . . . . . . . . . 400
dns-database . . . . . . . . . . . . . . . . . . . . . . . . . . . . . . . . . . . . . . 401
dns-server . . . . . . . . . . . . . . . . . . . . . . . . . . . . . . . . . . . . . . . 403
elbc . . . . . . . . . . . . . . . . . . . . . . . . . . . . . . . . . . . . . . . . . . . 404
fips-cc. . . . . . . . . . . . . . . . . . . . . . . . . . . . . . . . . . . . . . . . . . 405
fortiguard . . . . . . . . . . . . . . . . . . . . . . . . . . . . . . . . . . . . . . . . 406
fortiguard-log . . . . . . . . . . . . . . . . . . . . . . . . . . . . . . . . . . . . . . 410
ortiOS 4.0 MR3 CLI Reference1-431-99686-20110623 9ttp://docs.fortinet.com/ • Feedback
Contents
gi-gk . . . . . . . . . . . . . . . . . . . . . . . . . . . . . . . . . . . . . . . . . . 411
global . . . . . . . . . . . . . . . . . . . . . . . . . . . . . . . . . . . . . . . . . . 412
gre-tunnel . . . . . . . . . . . . . . . . . . . . . . . . . . . . . . . . . . . . . . . . 423
ha . . . . . . . . . . . . . . . . . . . . . . . . . . . . . . . . . . . . . . . . . . . . 424
interface . . . . . . . . . . . . . . . . . . . . . . . . . . . . . . . . . . . . . . . . 431
ipv6-tunnel . . . . . . . . . . . . . . . . . . . . . . . . . . . . . . . . . . . . . . . 449
mac-address-table . . . . . . . . . . . . . . . . . . . . . . . . . . . . . . . . . . . 450
modem . . . . . . . . . . . . . . . . . . . . . . . . . . . . . . . . . . . . . . . . . 451
monitors . . . . . . . . . . . . . . . . . . . . . . . . . . . . . . . . . . . . . . . . 454
npu . . . . . . . . . . . . . . . . . . . . . . . . . . . . . . . . . . . . . . . . . . . 456
ntp . . . . . . . . . . . . . . . . . . . . . . . . . . . . . . . . . . . . . . . . . . . 457
object-tag . . . . . . . . . . . . . . . . . . . . . . . . . . . . . . . . . . . . . . . . 458
password-policy . . . . . . . . . . . . . . . . . . . . . . . . . . . . . . . . . . . . 459
port-pair. . . . . . . . . . . . . . . . . . . . . . . . . . . . . . . . . . . . . . . . . 460
proxy-arp . . . . . . . . . . . . . . . . . . . . . . . . . . . . . . . . . . . . . . . . 461
replacemsg admin . . . . . . . . . . . . . . . . . . . . . . . . . . . . . . . . . . . 462
replacemsg alertmail . . . . . . . . . . . . . . . . . . . . . . . . . . . . . . . . . . 463
replacemsg auth . . . . . . . . . . . . . . . . . . . . . . . . . . . . . . . . . . . . 465
replacemsg ec . . . . . . . . . . . . . . . . . . . . . . . . . . . . . . . . . . . . . 468
replacemsg fortiguard-wf . . . . . . . . . . . . . . . . . . . . . . . . . . . . . . . . 470
replacemsg ftp . . . . . . . . . . . . . . . . . . . . . . . . . . . . . . . . . . . . . 471
replacemsg http. . . . . . . . . . . . . . . . . . . . . . . . . . . . . . . . . . . . . 473
replacemsg im . . . . . . . . . . . . . . . . . . . . . . . . . . . . . . . . . . . . . 476
replacemsg mail . . . . . . . . . . . . . . . . . . . . . . . . . . . . . . . . . . . . 478
replacemsg mm1 . . . . . . . . . . . . . . . . . . . . . . . . . . . . . . . . . . . . 480
replacemsg mm3 . . . . . . . . . . . . . . . . . . . . . . . . . . . . . . . . . . . . 482
replacemsg mm4 . . . . . . . . . . . . . . . . . . . . . . . . . . . . . . . . . . . . 483
replacemsg mm7 . . . . . . . . . . . . . . . . . . . . . . . . . . . . . . . . . . . . 485
replacemsg-group . . . . . . . . . . . . . . . . . . . . . . . . . . . . . . . . . . . 487
replacemsg-group . . . . . . . . . . . . . . . . . . . . . . . . . . . . . . . . . . . 488
replacemsg-image . . . . . . . . . . . . . . . . . . . . . . . . . . . . . . . . . . . 490
replacemsg nac-quar . . . . . . . . . . . . . . . . . . . . . . . . . . . . . . . . . . 491
replacemsg nntp . . . . . . . . . . . . . . . . . . . . . . . . . . . . . . . . . . . . 492
replacemsg spam. . . . . . . . . . . . . . . . . . . . . . . . . . . . . . . . . . . . 494
replacemsg sslvpn . . . . . . . . . . . . . . . . . . . . . . . . . . . . . . . . . . . 496
replacemsg traffic-quota . . . . . . . . . . . . . . . . . . . . . . . . . . . . . . . . 497
FortiOS 4.0 MR3 CLI Reference10 01-431-99686-20110623
http://docs.fortinet.com/ • Feedback
Contents
F0h
replacemsg webproxy . . . . . . . . . . . . . . . . . . . . . . . . . . . . . . . . . 498
resource-limits . . . . . . . . . . . . . . . . . . . . . . . . . . . . . . . . . . . . . 499
session-helper . . . . . . . . . . . . . . . . . . . . . . . . . . . . . . . . . . . . . 501
session-sync . . . . . . . . . . . . . . . . . . . . . . . . . . . . . . . . . . . . . . 503
session-ttl . . . . . . . . . . . . . . . . . . . . . . . . . . . . . . . . . . . . . . . . 505
settings . . . . . . . . . . . . . . . . . . . . . . . . . . . . . . . . . . . . . . . . . 506
sit-tunnel . . . . . . . . . . . . . . . . . . . . . . . . . . . . . . . . . . . . . . . . 510
sflow . . . . . . . . . . . . . . . . . . . . . . . . . . . . . . . . . . . . . . . . . . 511
snmp community . . . . . . . . . . . . . . . . . . . . . . . . . . . . . . . . . . . . 512
snmp sysinfo . . . . . . . . . . . . . . . . . . . . . . . . . . . . . . . . . . . . . . 515
snmp user . . . . . . . . . . . . . . . . . . . . . . . . . . . . . . . . . . . . . . . 516
sp . . . . . . . . . . . . . . . . . . . . . . . . . . . . . . . . . . . . . . . . . . . . 518
storage . . . . . . . . . . . . . . . . . . . . . . . . . . . . . . . . . . . . . . . . . 519
switch-interface . . . . . . . . . . . . . . . . . . . . . . . . . . . . . . . . . . . . . 520
tos-based-priority . . . . . . . . . . . . . . . . . . . . . . . . . . . . . . . . . . . . 522
vdom-dns . . . . . . . . . . . . . . . . . . . . . . . . . . . . . . . . . . . . . . . . 523
vdom-link . . . . . . . . . . . . . . . . . . . . . . . . . . . . . . . . . . . . . . . . 524
vdom-property . . . . . . . . . . . . . . . . . . . . . . . . . . . . . . . . . . . . . 525
vdom-sflow . . . . . . . . . . . . . . . . . . . . . . . . . . . . . . . . . . . . . . . 527
wccp . . . . . . . . . . . . . . . . . . . . . . . . . . . . . . . . . . . . . . . . . . 528
zone . . . . . . . . . . . . . . . . . . . . . . . . . . . . . . . . . . . . . . . . . . 530
user 531Configuring users for authentication . . . . . . . . . . . . . . . . . . . . . . . . . . 532
Configuring users for password authentication. . . . . . . . . . . . . . . . . . . 532Configuring peers for certificate authentication . . . . . . . . . . . . . . . . . . 532
ban . . . . . . . . . . . . . . . . . . . . . . . . . . . . . . . . . . . . . . . . . . . 533
fortitoken . . . . . . . . . . . . . . . . . . . . . . . . . . . . . . . . . . . . . . . . 537
fsso . . . . . . . . . . . . . . . . . . . . . . . . . . . . . . . . . . . . . . . . . . . 538
group . . . . . . . . . . . . . . . . . . . . . . . . . . . . . . . . . . . . . . . . . . 540
ldap . . . . . . . . . . . . . . . . . . . . . . . . . . . . . . . . . . . . . . . . . . . 541
local. . . . . . . . . . . . . . . . . . . . . . . . . . . . . . . . . . . . . . . . . . . 543
peer . . . . . . . . . . . . . . . . . . . . . . . . . . . . . . . . . . . . . . . . . . . 544
peergrp . . . . . . . . . . . . . . . . . . . . . . . . . . . . . . . . . . . . . . . . . 546
radius . . . . . . . . . . . . . . . . . . . . . . . . . . . . . . . . . . . . . . . . . . 547
setting. . . . . . . . . . . . . . . . . . . . . . . . . . . . . . . . . . . . . . . . . . 552
ortiOS 4.0 MR3 CLI Reference1-431-99686-20110623 11ttp://docs.fortinet.com/ • Feedback
Contents
sms-provider . . . . . . . . . . . . . . . . . . . . . . . . . . . . . . . . . . . . . . 554
tacacs+ . . . . . . . . . . . . . . . . . . . . . . . . . . . . . . . . . . . . . . . . . 555
voip 557profile . . . . . . . . . . . . . . . . . . . . . . . . . . . . . . . . . . . . . . . . . . 558
config sip . . . . . . . . . . . . . . . . . . . . . . . . . . . . . . . . . . . . . . 560config sccp . . . . . . . . . . . . . . . . . . . . . . . . . . . . . . . . . . . . . 565
vpn 567certificate ca . . . . . . . . . . . . . . . . . . . . . . . . . . . . . . . . . . . . . . 568
certificate crl . . . . . . . . . . . . . . . . . . . . . . . . . . . . . . . . . . . . . . 569
certificate local . . . . . . . . . . . . . . . . . . . . . . . . . . . . . . . . . . . . . 571
certificate ocsp . . . . . . . . . . . . . . . . . . . . . . . . . . . . . . . . . . . . . 573
certificate remote . . . . . . . . . . . . . . . . . . . . . . . . . . . . . . . . . . . . 574
ipsec concentrator . . . . . . . . . . . . . . . . . . . . . . . . . . . . . . . . . . . 575
ipsec forticlient . . . . . . . . . . . . . . . . . . . . . . . . . . . . . . . . . . . . . 576
ipsec manualkey . . . . . . . . . . . . . . . . . . . . . . . . . . . . . . . . . . . . 577
ipsec manualkey-interface . . . . . . . . . . . . . . . . . . . . . . . . . . . . . . . 580
ipsec phase1 . . . . . . . . . . . . . . . . . . . . . . . . . . . . . . . . . . . . . . 582
ipsec phase1-interface . . . . . . . . . . . . . . . . . . . . . . . . . . . . . . . . . 589
ipsec phase2 . . . . . . . . . . . . . . . . . . . . . . . . . . . . . . . . . . . . . . 599
ipsec phase2-interface . . . . . . . . . . . . . . . . . . . . . . . . . . . . . . . . . 604
l2tp . . . . . . . . . . . . . . . . . . . . . . . . . . . . . . . . . . . . . . . . . . . 610
pptp . . . . . . . . . . . . . . . . . . . . . . . . . . . . . . . . . . . . . . . . . . . 611
ssl settings . . . . . . . . . . . . . . . . . . . . . . . . . . . . . . . . . . . . . . . 613
ssl web host-check-software . . . . . . . . . . . . . . . . . . . . . . . . . . . . . . 616
ssl web portal . . . . . . . . . . . . . . . . . . . . . . . . . . . . . . . . . . . . . . 618
ssl web virtual-desktop-app-list . . . . . . . . . . . . . . . . . . . . . . . . . . . . . 624
wanopt 625auth-group . . . . . . . . . . . . . . . . . . . . . . . . . . . . . . . . . . . . . . . 626
peer . . . . . . . . . . . . . . . . . . . . . . . . . . . . . . . . . . . . . . . . . . . 627
rule . . . . . . . . . . . . . . . . . . . . . . . . . . . . . . . . . . . . . . . . . . . 628
settings . . . . . . . . . . . . . . . . . . . . . . . . . . . . . . . . . . . . . . . . . 632
ssl-server . . . . . . . . . . . . . . . . . . . . . . . . . . . . . . . . . . . . . . . . 633
storage . . . . . . . . . . . . . . . . . . . . . . . . . . . . . . . . . . . . . . . . . 635
FortiOS 4.0 MR3 CLI Reference12 01-431-99686-20110623
http://docs.fortinet.com/ • Feedback
Contents
F0h
webcache . . . . . . . . . . . . . . . . . . . . . . . . . . . . . . . . . . . . . . . . 636config cache-exemption-list . . . . . . . . . . . . . . . . . . . . . . . . . . . . 638
web-proxy 639explicit . . . . . . . . . . . . . . . . . . . . . . . . . . . . . . . . . . . . . . . . . 640
forward-server . . . . . . . . . . . . . . . . . . . . . . . . . . . . . . . . . . . . . 643
global . . . . . . . . . . . . . . . . . . . . . . . . . . . . . . . . . . . . . . . . . . 644
webfilter 645content . . . . . . . . . . . . . . . . . . . . . . . . . . . . . . . . . . . . . . . . . 646
content-header . . . . . . . . . . . . . . . . . . . . . . . . . . . . . . . . . . . . . 648
fortiguard . . . . . . . . . . . . . . . . . . . . . . . . . . . . . . . . . . . . . . . . 649
ftgd-local-cat . . . . . . . . . . . . . . . . . . . . . . . . . . . . . . . . . . . . . . 650
ftgd-local-rating . . . . . . . . . . . . . . . . . . . . . . . . . . . . . . . . . . . . . 651
ftgd-warning . . . . . . . . . . . . . . . . . . . . . . . . . . . . . . . . . . . . . . 652
override . . . . . . . . . . . . . . . . . . . . . . . . . . . . . . . . . . . . . . . . . 653
override-user . . . . . . . . . . . . . . . . . . . . . . . . . . . . . . . . . . . . . . 654
profile . . . . . . . . . . . . . . . . . . . . . . . . . . . . . . . . . . . . . . . . . . 655config ftgd-wf . . . . . . . . . . . . . . . . . . . . . . . . . . . . . . . . . . . . 658config override . . . . . . . . . . . . . . . . . . . . . . . . . . . . . . . . . . . 659config quota . . . . . . . . . . . . . . . . . . . . . . . . . . . . . . . . . . . . 659config web . . . . . . . . . . . . . . . . . . . . . . . . . . . . . . . . . . . . . 660
urlfilter . . . . . . . . . . . . . . . . . . . . . . . . . . . . . . . . . . . . . . . . . 661
wireless-controller 663ap-status . . . . . . . . . . . . . . . . . . . . . . . . . . . . . . . . . . . . . . . . 664
global . . . . . . . . . . . . . . . . . . . . . . . . . . . . . . . . . . . . . . . . . . 665
setting. . . . . . . . . . . . . . . . . . . . . . . . . . . . . . . . . . . . . . . . . . 667
timers . . . . . . . . . . . . . . . . . . . . . . . . . . . . . . . . . . . . . . . . . . 668
vap . . . . . . . . . . . . . . . . . . . . . . . . . . . . . . . . . . . . . . . . . . . 669
vap-group . . . . . . . . . . . . . . . . . . . . . . . . . . . . . . . . . . . . . . . . 672
wtp . . . . . . . . . . . . . . . . . . . . . . . . . . . . . . . . . . . . . . . . . . . 673
wtp-profile. . . . . . . . . . . . . . . . . . . . . . . . . . . . . . . . . . . . . . . . 675
ortiOS 4.0 MR3 CLI Reference1-431-99686-20110623 13ttp://docs.fortinet.com/ • Feedback
Contents
execute 677backup . . . . . . . . . . . . . . . . . . . . . . . . . . . . . . . . . . . . . . . . . 679
batch . . . . . . . . . . . . . . . . . . . . . . . . . . . . . . . . . . . . . . . . . . 682
carrier-license. . . . . . . . . . . . . . . . . . . . . . . . . . . . . . . . . . . . . . 683
central-mgmt . . . . . . . . . . . . . . . . . . . . . . . . . . . . . . . . . . . . . . 684
cfg reload . . . . . . . . . . . . . . . . . . . . . . . . . . . . . . . . . . . . . . . . 685
cfg save. . . . . . . . . . . . . . . . . . . . . . . . . . . . . . . . . . . . . . . . . 686
clear system arp table . . . . . . . . . . . . . . . . . . . . . . . . . . . . . . . . . 687
cli check-template-status . . . . . . . . . . . . . . . . . . . . . . . . . . . . . . . . 688
cli status-msg-only . . . . . . . . . . . . . . . . . . . . . . . . . . . . . . . . . . . 689
date . . . . . . . . . . . . . . . . . . . . . . . . . . . . . . . . . . . . . . . . . . . 690
disk . . . . . . . . . . . . . . . . . . . . . . . . . . . . . . . . . . . . . . . . . . . 691
disk raid. . . . . . . . . . . . . . . . . . . . . . . . . . . . . . . . . . . . . . . . . 692
dhcp lease-clear . . . . . . . . . . . . . . . . . . . . . . . . . . . . . . . . . . . . 693
dhcp lease-list . . . . . . . . . . . . . . . . . . . . . . . . . . . . . . . . . . . . . 694
disconnect-admin-session . . . . . . . . . . . . . . . . . . . . . . . . . . . . . . . 695
enter . . . . . . . . . . . . . . . . . . . . . . . . . . . . . . . . . . . . . . . . . . 696
factoryreset . . . . . . . . . . . . . . . . . . . . . . . . . . . . . . . . . . . . . . . 697
firmware-list update. . . . . . . . . . . . . . . . . . . . . . . . . . . . . . . . . . . 698
formatlogdisk . . . . . . . . . . . . . . . . . . . . . . . . . . . . . . . . . . . . . . 699
forticlient-connect . . . . . . . . . . . . . . . . . . . . . . . . . . . . . . . . . . . . 700
fortiguard-log update . . . . . . . . . . . . . . . . . . . . . . . . . . . . . . . . . . 701
fortitoken . . . . . . . . . . . . . . . . . . . . . . . . . . . . . . . . . . . . . . . . 702
fsso refresh . . . . . . . . . . . . . . . . . . . . . . . . . . . . . . . . . . . . . . . 703
ha disconnect . . . . . . . . . . . . . . . . . . . . . . . . . . . . . . . . . . . . . . 704
ha manage . . . . . . . . . . . . . . . . . . . . . . . . . . . . . . . . . . . . . . . 705
ha synchronize . . . . . . . . . . . . . . . . . . . . . . . . . . . . . . . . . . . . . 706
interface dhcpclient-renew . . . . . . . . . . . . . . . . . . . . . . . . . . . . . . . 707
interface pppoe-reconnect . . . . . . . . . . . . . . . . . . . . . . . . . . . . . . . 708
log client-reputation-report . . . . . . . . . . . . . . . . . . . . . . . . . . . . . . . 709
log delete-all . . . . . . . . . . . . . . . . . . . . . . . . . . . . . . . . . . . . . . 710
log delete-rolled. . . . . . . . . . . . . . . . . . . . . . . . . . . . . . . . . . . . . 711
log display . . . . . . . . . . . . . . . . . . . . . . . . . . . . . . . . . . . . . . . 712
log filter . . . . . . . . . . . . . . . . . . . . . . . . . . . . . . . . . . . . . . . . . 713
log fortianalyzer test-connectivity . . . . . . . . . . . . . . . . . . . . . . . . . . . . 714
FortiOS 4.0 MR3 CLI Reference14 01-431-99686-20110623
http://docs.fortinet.com/ • Feedback

Contents
F0h
log list . . . . . . . . . . . . . . . . . . . . . . . . . . . . . . . . . . . . . . . . . . 715
log rebuild-sqldb . . . . . . . . . . . . . . . . . . . . . . . . . . . . . . . . . . . . 716
log recreate-sqldb . . . . . . . . . . . . . . . . . . . . . . . . . . . . . . . . . . . 717
log-report reset . . . . . . . . . . . . . . . . . . . . . . . . . . . . . . . . . . . . . 718
log roll. . . . . . . . . . . . . . . . . . . . . . . . . . . . . . . . . . . . . . . . . . 719
modem dial . . . . . . . . . . . . . . . . . . . . . . . . . . . . . . . . . . . . . . . 720
modem hangup . . . . . . . . . . . . . . . . . . . . . . . . . . . . . . . . . . . . . 721
modem trigger . . . . . . . . . . . . . . . . . . . . . . . . . . . . . . . . . . . . . 722
mrouter clear . . . . . . . . . . . . . . . . . . . . . . . . . . . . . . . . . . . . . . 723
netscan . . . . . . . . . . . . . . . . . . . . . . . . . . . . . . . . . . . . . . . . . 724
ping . . . . . . . . . . . . . . . . . . . . . . . . . . . . . . . . . . . . . . . . . . . 725
ping-options, ping6-options . . . . . . . . . . . . . . . . . . . . . . . . . . . . . . . 726
ping6 . . . . . . . . . . . . . . . . . . . . . . . . . . . . . . . . . . . . . . . . . . 727
reboot . . . . . . . . . . . . . . . . . . . . . . . . . . . . . . . . . . . . . . . . . . 728
report-config reset . . . . . . . . . . . . . . . . . . . . . . . . . . . . . . . . . . . 729
restore . . . . . . . . . . . . . . . . . . . . . . . . . . . . . . . . . . . . . . . . . 730
revision . . . . . . . . . . . . . . . . . . . . . . . . . . . . . . . . . . . . . . . . . 733
router clear bfd session. . . . . . . . . . . . . . . . . . . . . . . . . . . . . . . . . 734
router clear bgp . . . . . . . . . . . . . . . . . . . . . . . . . . . . . . . . . . . . . 735
router clear ospf process . . . . . . . . . . . . . . . . . . . . . . . . . . . . . . . . 736
router restart . . . . . . . . . . . . . . . . . . . . . . . . . . . . . . . . . . . . . . 737
send-fds-statistics . . . . . . . . . . . . . . . . . . . . . . . . . . . . . . . . . . . 738
set system session filter . . . . . . . . . . . . . . . . . . . . . . . . . . . . . . . . 739
set-next-reboot . . . . . . . . . . . . . . . . . . . . . . . . . . . . . . . . . . . . . 741
sfp-mode-sgmii . . . . . . . . . . . . . . . . . . . . . . . . . . . . . . . . . . . . . 742
shutdown . . . . . . . . . . . . . . . . . . . . . . . . . . . . . . . . . . . . . . . . 743
ssh . . . . . . . . . . . . . . . . . . . . . . . . . . . . . . . . . . . . . . . . . . . 744
tac report . . . . . . . . . . . . . . . . . . . . . . . . . . . . . . . . . . . . . . . . 745
telnet . . . . . . . . . . . . . . . . . . . . . . . . . . . . . . . . . . . . . . . . . . 746
time . . . . . . . . . . . . . . . . . . . . . . . . . . . . . . . . . . . . . . . . . . . 747
traceroute . . . . . . . . . . . . . . . . . . . . . . . . . . . . . . . . . . . . . . . . 748
tracert6 . . . . . . . . . . . . . . . . . . . . . . . . . . . . . . . . . . . . . . . . . 749
update-ase . . . . . . . . . . . . . . . . . . . . . . . . . . . . . . . . . . . . . . . 750
update-av . . . . . . . . . . . . . . . . . . . . . . . . . . . . . . . . . . . . . . . . 751
update-ips . . . . . . . . . . . . . . . . . . . . . . . . . . . . . . . . . . . . . . . 752
update-modem . . . . . . . . . . . . . . . . . . . . . . . . . . . . . . . . . . . . . 753
ortiOS 4.0 MR3 CLI Reference1-431-99686-20110623 15ttp://docs.fortinet.com/ • Feedback
Contents
update-now . . . . . . . . . . . . . . . . . . . . . . . . . . . . . . . . . . . . . . . 754
upd-vd-license . . . . . . . . . . . . . . . . . . . . . . . . . . . . . . . . . . . . . 755
upload . . . . . . . . . . . . . . . . . . . . . . . . . . . . . . . . . . . . . . . . . 756
usb-disk. . . . . . . . . . . . . . . . . . . . . . . . . . . . . . . . . . . . . . . . . 757
vpn certificate ca . . . . . . . . . . . . . . . . . . . . . . . . . . . . . . . . . . . . 758
vpn certificate crl . . . . . . . . . . . . . . . . . . . . . . . . . . . . . . . . . . . . 759
vpn certificate local . . . . . . . . . . . . . . . . . . . . . . . . . . . . . . . . . . . 760
vpn certificate remote. . . . . . . . . . . . . . . . . . . . . . . . . . . . . . . . . . 762
vpn ipsec tunnel down . . . . . . . . . . . . . . . . . . . . . . . . . . . . . . . . . 763
vpn ipsec tunnel up . . . . . . . . . . . . . . . . . . . . . . . . . . . . . . . . . . . 764
vpn sslvpn del-all . . . . . . . . . . . . . . . . . . . . . . . . . . . . . . . . . . . . 765
vpn sslvpn del-tunnel . . . . . . . . . . . . . . . . . . . . . . . . . . . . . . . . . . 766
vpn sslvpn del-web . . . . . . . . . . . . . . . . . . . . . . . . . . . . . . . . . . . 767
vpn sslvpn list . . . . . . . . . . . . . . . . . . . . . . . . . . . . . . . . . . . . . . 768
wireless-controller delete-wtp-image . . . . . . . . . . . . . . . . . . . . . . . . . . 769
wireless-controller list-wtp-image . . . . . . . . . . . . . . . . . . . . . . . . . . . . 770
wireless-controller reset-wtp . . . . . . . . . . . . . . . . . . . . . . . . . . . . . . 771
wireless-controller restart-acd . . . . . . . . . . . . . . . . . . . . . . . . . . . . . 772
wireless-controller restart-wtpd . . . . . . . . . . . . . . . . . . . . . . . . . . . . . 773
wireless-controller upload-wtp-image. . . . . . . . . . . . . . . . . . . . . . . . . . 774
get 775endpoint-control app-detect . . . . . . . . . . . . . . . . . . . . . . . . . . . . . . 776
firewall dnstranslation. . . . . . . . . . . . . . . . . . . . . . . . . . . . . . . . . . 778
firewall iprope appctrl . . . . . . . . . . . . . . . . . . . . . . . . . . . . . . . . . . 779
firewall iprope list . . . . . . . . . . . . . . . . . . . . . . . . . . . . . . . . . . . . 780
firewall proute. . . . . . . . . . . . . . . . . . . . . . . . . . . . . . . . . . . . . . 781
firewall service predefined . . . . . . . . . . . . . . . . . . . . . . . . . . . . . . . 782
firewall shaper . . . . . . . . . . . . . . . . . . . . . . . . . . . . . . . . . . . . . 783
grep . . . . . . . . . . . . . . . . . . . . . . . . . . . . . . . . . . . . . . . . . . . 784
gui console status . . . . . . . . . . . . . . . . . . . . . . . . . . . . . . . . . . . 785
gui topology status . . . . . . . . . . . . . . . . . . . . . . . . . . . . . . . . . . . 786
hardware cpu . . . . . . . . . . . . . . . . . . . . . . . . . . . . . . . . . . . . . . 787
hardware memory . . . . . . . . . . . . . . . . . . . . . . . . . . . . . . . . . . . 788
hardware nic . . . . . . . . . . . . . . . . . . . . . . . . . . . . . . . . . . . . . . 789
hardware npu . . . . . . . . . . . . . . . . . . . . . . . . . . . . . . . . . . . . . . 790
FortiOS 4.0 MR3 CLI Reference16 01-431-99686-20110623
http://docs.fortinet.com/ • Feedback
Contents
F0h
hardware status. . . . . . . . . . . . . . . . . . . . . . . . . . . . . . . . . . . . . 793
ips decoder status . . . . . . . . . . . . . . . . . . . . . . . . . . . . . . . . . . . 794
ips rule status . . . . . . . . . . . . . . . . . . . . . . . . . . . . . . . . . . . . . . 795
ips session . . . . . . . . . . . . . . . . . . . . . . . . . . . . . . . . . . . . . . . 796
ipsec tunnel list . . . . . . . . . . . . . . . . . . . . . . . . . . . . . . . . . . . . . 797
log sql status . . . . . . . . . . . . . . . . . . . . . . . . . . . . . . . . . . . . . . 798
netscan scan . . . . . . . . . . . . . . . . . . . . . . . . . . . . . . . . . . . . . . 799
netscan settings . . . . . . . . . . . . . . . . . . . . . . . . . . . . . . . . . . . . 800
report database schema . . . . . . . . . . . . . . . . . . . . . . . . . . . . . . . . 801
router info bfd neighbor . . . . . . . . . . . . . . . . . . . . . . . . . . . . . . . . . 802
router info bgp . . . . . . . . . . . . . . . . . . . . . . . . . . . . . . . . . . . . . 803
router info gwdetect. . . . . . . . . . . . . . . . . . . . . . . . . . . . . . . . . . . 805
router info isis. . . . . . . . . . . . . . . . . . . . . . . . . . . . . . . . . . . . . . 806
router info kernel . . . . . . . . . . . . . . . . . . . . . . . . . . . . . . . . . . . . 807
router info multicast. . . . . . . . . . . . . . . . . . . . . . . . . . . . . . . . . . . 808
router info ospf . . . . . . . . . . . . . . . . . . . . . . . . . . . . . . . . . . . . . 809
router info protocols . . . . . . . . . . . . . . . . . . . . . . . . . . . . . . . . . . 811
router info rip . . . . . . . . . . . . . . . . . . . . . . . . . . . . . . . . . . . . . . 812
router info routing-table . . . . . . . . . . . . . . . . . . . . . . . . . . . . . . . . 813
router info vrrp . . . . . . . . . . . . . . . . . . . . . . . . . . . . . . . . . . . . . 814
router info6 bgp . . . . . . . . . . . . . . . . . . . . . . . . . . . . . . . . . . . . . 815
router info6 interface . . . . . . . . . . . . . . . . . . . . . . . . . . . . . . . . . . 816
router info6 kernel . . . . . . . . . . . . . . . . . . . . . . . . . . . . . . . . . . . 817
router info6 ospf . . . . . . . . . . . . . . . . . . . . . . . . . . . . . . . . . . . . 818
router info6 protocols . . . . . . . . . . . . . . . . . . . . . . . . . . . . . . . . . . 819
router info6 rip . . . . . . . . . . . . . . . . . . . . . . . . . . . . . . . . . . . . . 820
router info6 routing-table . . . . . . . . . . . . . . . . . . . . . . . . . . . . . . . . 821
system admin list . . . . . . . . . . . . . . . . . . . . . . . . . . . . . . . . . . . . 822
system admin status . . . . . . . . . . . . . . . . . . . . . . . . . . . . . . . . . . 823
system arp . . . . . . . . . . . . . . . . . . . . . . . . . . . . . . . . . . . . . . . 824
system auto-update. . . . . . . . . . . . . . . . . . . . . . . . . . . . . . . . . . . 825
system central-management . . . . . . . . . . . . . . . . . . . . . . . . . . . . . . 826
system checksum. . . . . . . . . . . . . . . . . . . . . . . . . . . . . . . . . . . . 827
system cmdb status . . . . . . . . . . . . . . . . . . . . . . . . . . . . . . . . . . 828
system dashboard . . . . . . . . . . . . . . . . . . . . . . . . . . . . . . . . . . . 829
system fdp-fortianalyzer . . . . . . . . . . . . . . . . . . . . . . . . . . . . . . . . 830
ortiOS 4.0 MR3 CLI Reference1-431-99686-20110623 17ttp://docs.fortinet.com/ • Feedback
Contents
system fortianalyzer-connectivity . . . . . . . . . . . . . . . . . . . . . . . . . . . . 831
system fortiguard-log-service status . . . . . . . . . . . . . . . . . . . . . . . . . . 832
system fortiguard-service status . . . . . . . . . . . . . . . . . . . . . . . . . . . . 833
system ha-nonsync-csum . . . . . . . . . . . . . . . . . . . . . . . . . . . . . . . 834
system ha status . . . . . . . . . . . . . . . . . . . . . . . . . . . . . . . . . . . . 835
system info admin ssh . . . . . . . . . . . . . . . . . . . . . . . . . . . . . . . . . 837
system info admin status . . . . . . . . . . . . . . . . . . . . . . . . . . . . . . . . 838
system interface physical . . . . . . . . . . . . . . . . . . . . . . . . . . . . . . . . 839
system mgmt-csum . . . . . . . . . . . . . . . . . . . . . . . . . . . . . . . . . . . 840
system performance firewall . . . . . . . . . . . . . . . . . . . . . . . . . . . . . . 841
system performance status . . . . . . . . . . . . . . . . . . . . . . . . . . . . . . . 842
system performance top . . . . . . . . . . . . . . . . . . . . . . . . . . . . . . . . 843
system session list . . . . . . . . . . . . . . . . . . . . . . . . . . . . . . . . . . . 844
system startup-error-log . . . . . . . . . . . . . . . . . . . . . . . . . . . . . . . . 845
system session status . . . . . . . . . . . . . . . . . . . . . . . . . . . . . . . . . 846
system session-helper-info list . . . . . . . . . . . . . . . . . . . . . . . . . . . . . 847
system session-info. . . . . . . . . . . . . . . . . . . . . . . . . . . . . . . . . . . 848
system source-ip . . . . . . . . . . . . . . . . . . . . . . . . . . . . . . . . . . . . 849
system status . . . . . . . . . . . . . . . . . . . . . . . . . . . . . . . . . . . . . . 850
test . . . . . . . . . . . . . . . . . . . . . . . . . . . . . . . . . . . . . . . . . . . 851
user adgrp . . . . . . . . . . . . . . . . . . . . . . . . . . . . . . . . . . . . . . . 853
vpn ike gateway . . . . . . . . . . . . . . . . . . . . . . . . . . . . . . . . . . . . 854
vpn ipsec tunnel details. . . . . . . . . . . . . . . . . . . . . . . . . . . . . . . . . 855
vpn ipsec tunnel name . . . . . . . . . . . . . . . . . . . . . . . . . . . . . . . . . 856
vpn ipsec stats crypto. . . . . . . . . . . . . . . . . . . . . . . . . . . . . . . . . . 857
vpn ipsec stats tunnel. . . . . . . . . . . . . . . . . . . . . . . . . . . . . . . . . . 858
vpn ssl monitor . . . . . . . . . . . . . . . . . . . . . . . . . . . . . . . . . . . . . 859
vpn status l2tp . . . . . . . . . . . . . . . . . . . . . . . . . . . . . . . . . . . . . 860
vpn status pptp . . . . . . . . . . . . . . . . . . . . . . . . . . . . . . . . . . . . . 861
vpn status ssl . . . . . . . . . . . . . . . . . . . . . . . . . . . . . . . . . . . . . . 862
webfilter ftgd-statistics . . . . . . . . . . . . . . . . . . . . . . . . . . . . . . . . . 863
webfilter status . . . . . . . . . . . . . . . . . . . . . . . . . . . . . . . . . . . . . 865
wireless-controller scan. . . . . . . . . . . . . . . . . . . . . . . . . . . . . . . . . 866
FortiOS 4.0 MR3 CLI Reference18 01-431-99686-20110623
http://docs.fortinet.com/ • Feedback
Contents
F0h
tree 867
Appendix 870Document conventions . . . . . . . . . . . . . . . . . . . . . . . . . . . . . . . . . 870
IP addresses . . . . . . . . . . . . . . . . . . . . . . . . . . . . . . . . . . . . 870Example Network configuration . . . . . . . . . . . . . . . . . . . . . . . . . . 872Cautions, Notes and Tips . . . . . . . . . . . . . . . . . . . . . . . . . . . . . 873Typographical conventions . . . . . . . . . . . . . . . . . . . . . . . . . . . . . 874CLI command syntax conventions . . . . . . . . . . . . . . . . . . . . . . . . . 874
Entering FortiOS configuration data . . . . . . . . . . . . . . . . . . . . . . . . . . 876Entering text strings (names). . . . . . . . . . . . . . . . . . . . . . . . . . . . 876Entering numeric values . . . . . . . . . . . . . . . . . . . . . . . . . . . . . . 877Selecting options from a list . . . . . . . . . . . . . . . . . . . . . . . . . . . . 877Enabling or disabling options. . . . . . . . . . . . . . . . . . . . . . . . . . . . 877
Registering your Fortinet product. . . . . . . . . . . . . . . . . . . . . . . . . . . . 877
Fortinet products End User License Agreement . . . . . . . . . . . . . . . . . . . . 877
Training . . . . . . . . . . . . . . . . . . . . . . . . . . . . . . . . . . . . . . . . . 878
Documentation . . . . . . . . . . . . . . . . . . . . . . . . . . . . . . . . . . . . . 878Fortinet Tools and Documentation CD . . . . . . . . . . . . . . . . . . . . . . . 878Fortinet Knowledge Base . . . . . . . . . . . . . . . . . . . . . . . . . . . . . 878Comments on Fortinet technical documentation . . . . . . . . . . . . . . . . . 878
Customer service and technical support . . . . . . . . . . . . . . . . . . . . . . . . 878
ortiOS 4.0 MR3 CLI Reference1-431-99686-20110623 19ttp://docs.fortinet.com/ • Feedback

Contents
FortiOS 4.0 MR3 CLI Reference20 01-431-99686-20110623
http://docs.fortinet.com/ • Feedback
F0h
IntroductionThis document describes FortiOS 4.0 MR3 CLI commands used to configure and manage a FortiGate unit from the command line interface (CLI).• How this guide is organized
How this guide is organizedMost of the chapters in this document describe the commands for each configuration branch of the FortiOS CLI. The command branches and commands are in alphabetical order.This document also contains the following sections:What’s new describes changes to the 4.0 MR3 CLI.execute describes execute commands.get describes get commands.tree describes the tree command.
Availability of commands and optionsSome FortiOS CLI commands and options are not available on all FortiGate units. The CLI displays an error message if you attempt to enter a command or option that is not available. You can use the question mark ‘?’ to verify the commands and options that are available.Commands and options may not be available for the following reasons:• FortiGate model. All commands are not available on all FortiGate models. For
example, low end FortiGate models do not support the aggregate option of the config system interface command.
• Hardware configuration. For example, some AMC module commands are only available when an AMC module is installed.
• FortiOS Carrier, FortiGate Voice, FortiWiFi etc. Commands for extended functionality are not available on all FortiGate models. The CLI Reference includes commands only available for FortiWiFi units, FortiOS Carrier, and FortiGate Voice units
Document conventions and other informationSee “Appendix” on page 870.
ortiOS 4.0 MR3 CLI Reference1-431-99686-20110623 21ttp://docs.fortinet.com/ • Feedback

Document conventions and other information Introduction
FortiOS 4.0 MR3 CLI Reference22 01-431-99686-20110623
http://docs.fortinet.com/ • Feedback
F0h
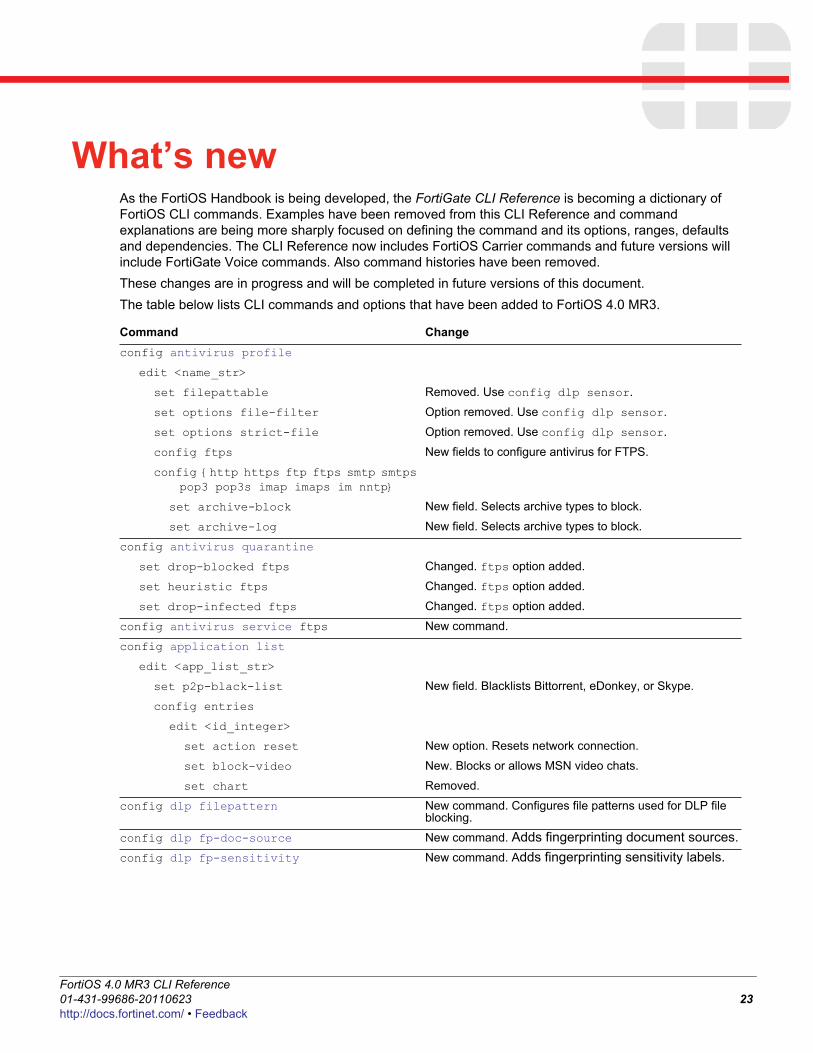
What’s newAs the FortiOS Handbook is being developed, the FortiGate CLI Reference is becoming a dictionary of FortiOS CLI commands. Examples have been removed from this CLI Reference and command explanations are being more sharply focused on defining the command and its options, ranges, defaults and dependencies. The CLI Reference now includes FortiOS Carrier commands and future versions will include FortiGate Voice commands. Also command histories have been removed.These changes are in progress and will be completed in future versions of this document.The table below lists CLI commands and options that have been added to FortiOS 4.0 MR3.
Command Changeconfig antivirus profile
edit <name_str>
set filepattable Removed. Use config dlp sensor.
set options file-filter Option removed. Use config dlp sensor.
set options strict-file Option removed. Use config dlp sensor.
config ftps New fields to configure antivirus for FTPS.
config {http https ftp ftps smtp smtps pop3 pop3s imap imaps im nntp}
set archive-block New field. Selects archive types to block.
set archive-log New field. Selects archive types to block.
config antivirus quarantine
set drop-blocked ftps Changed. ftps option added.
set heuristic ftps Changed. ftps option added.
set drop-infected ftps Changed. ftps option added.
config antivirus service ftps New command.
config application list
edit <app_list_str>
set p2p-black-list New field. Blacklists Bittorrent, eDonkey, or Skype.
config entries
edit <id_integer>
set action reset New option. Resets network connection.
set block-video New. Blocks or allows MSN video chats.
set chart Removed.
config dlp filepattern New command. Configures file patterns used for DLP file blocking.
config dlp fp-doc-source New command. Adds fingerprinting document sources.config dlp fp-sensitivity New command. Adds fingerprinting sensitivity labels.
ortiOS 4.0 MR3 CLI Reference1-431-99686-20110623 23ttp://docs.fortinet.com/ • Feedback
What’s new
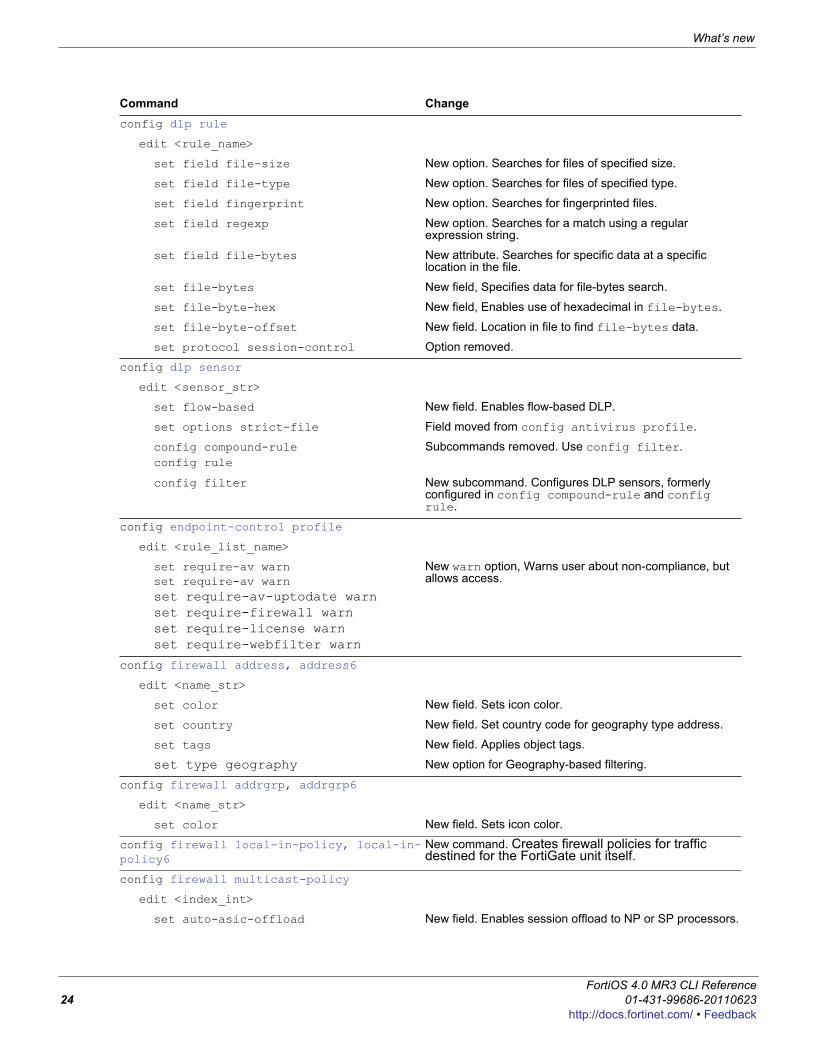
config dlp rule
edit <rule_name>
set field file-size New option. Searches for files of specified size.
set field file-type New option. Searches for files of specified type.
set field fingerprint New option. Searches for fingerprinted files.
set field regexp New option. Searches for a match using a regular expression string.
set field file-bytes New attribute. Searches for specific data at a specific location in the file.
set file-bytes New field, Specifies data for file-bytes search.
set file-byte-hex New field, Enables use of hexadecimal in file-bytes.
set file-byte-offset New field. Location in file to find file-bytes data.
set protocol session-control Option removed.
config dlp sensor
edit <sensor_str>
set flow-based New field. Enables flow-based DLP.
set options strict-file Field moved from config antivirus profile.
config compound-ruleconfig rule
Subcommands removed. Use config filter.
config filter New subcommand. Configures DLP sensors, formerly configured in config compound-rule and config rule.
config endpoint-control profile
edit <rule_list_name>
set require-av warnset require-av warnset require-av-uptodate warnset require-firewall warnset require-license warnset require-webfilter warn
New warn option, Warns user about non-compliance, but allows access.
config firewall address, address6
edit <name_str>
set color New field. Sets icon color.
set country New field. Set country code for geography type address.
set tags New field. Applies object tags.
set type geography New option for Geography-based filtering.
config firewall addrgrp, addrgrp6
edit <name_str>
set color New field. Sets icon color.
config firewall local-in-policy, local-in-policy6
New command. Creates firewall policies for traffic destined for the FortiGate unit itself.
config firewall multicast-policy
edit <index_int>
set auto-asic-offload New field. Enables session offload to NP or SP processors.
Command Change
FortiOS 4.0 MR3 CLI Reference24 01-431-99686-20110623
http://docs.fortinet.com/ • Feedback
What’s new
F0h
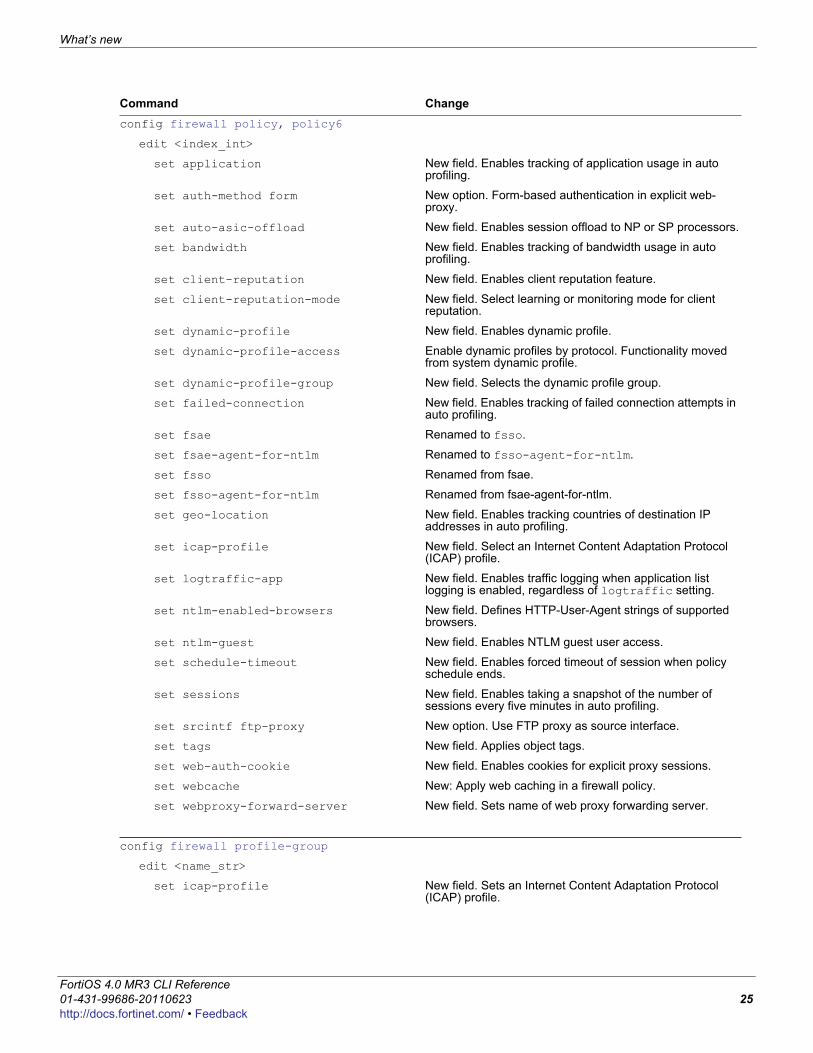
config firewall policy, policy6
edit <index_int>
set application New field. Enables tracking of application usage in auto profiling.
set auth-method form New option. Form-based authentication in explicit web-proxy.
set auto-asic-offload New field. Enables session offload to NP or SP processors.
set bandwidth New field. Enables tracking of bandwidth usage in auto profiling.
set client-reputation New field. Enables client reputation feature.
set client-reputation-mode New field. Select learning or monitoring mode for client reputation.
set dynamic-profile New field. Enables dynamic profile.
set dynamic-profile-access Enable dynamic profiles by protocol. Functionality moved from system dynamic profile.
set dynamic-profile-group New field. Selects the dynamic profile group.
set failed-connection New field. Enables tracking of failed connection attempts in auto profiling.
set fsae Renamed to fsso.
set fsae-agent-for-ntlm Renamed to fsso-agent-for-ntlm.
set fsso Renamed from fsae.
set fsso-agent-for-ntlm Renamed from fsae-agent-for-ntlm.
set geo-location New field. Enables tracking countries of destination IP addresses in auto profiling.
set icap-profile New field. Select an Internet Content Adaptation Protocol (ICAP) profile.
set logtraffic-app New field. Enables traffic logging when application list logging is enabled, regardless of logtraffic setting.
set ntlm-enabled-browsers New field. Defines HTTP-User-Agent strings of supported browsers.
set ntlm-guest New field. Enables NTLM guest user access.
set schedule-timeout New field. Enables forced timeout of session when policy schedule ends.
set sessions New field. Enables taking a snapshot of the number of sessions every five minutes in auto profiling.
set srcintf ftp-proxy New option. Use FTP proxy as source interface.
set tags New field. Applies object tags.
set web-auth-cookie New field. Enables cookies for explicit proxy sessions.
set webcache New: Apply web caching in a firewall policy.
set webproxy-forward-server New field. Sets name of web proxy forwarding server.
config firewall profile-group
edit <name_str>
set icap-profile New field. Sets an Internet Content Adaptation Protocol (ICAP) profile.
Command Change
ortiOS 4.0 MR3 CLI Reference1-431-99686-20110623 25ttp://docs.fortinet.com/ • Feedback

What’s new
config firewall profile-protocol-options
edit <name_str>
config ftp
set post-lang Removed. Post-lang does not apply to FTP.
config ftps New subcommand. Configures FTPS protocol options.
config https
set options ssl-ca-list New option. Verifies SSL session server certificate against stored CA certificate list.
set client-cert-request New field. Selects action to take if the client certificate request fails during the SSL handshake.
config ssl-server New subcommand. Configures SSL server settings for use with the secure protocols (HTTPS, FTPS, POP3S, SMTPS).
config firewall schedule group
edit <name_str>
set color New field. Sets icon color.
config firewall schedule onetime
edit <name_str>
set color New field. Sets icon color.
config firewall schedule recurring
edit <name_str>
set color New field. Sets icon color.
config firewall service custom
edit <name_str>
set color New field. Sets icon color.
set protocol TCP/UDP/SCTPset tcp-halfopen-timerset tcp-halfclose-timerset tcp-timewait-timerset udp-idle-timerset check-reset-rangeset session-ttl
New session control options for custom services.
config firewall service explicit-web New command. Configures explicit web proxy services.
config firewall service group
edit <name_str>
set color New field. Sets icon color.
config firewall service group-explicit-web New command. Configures explicit web proxy service groups.
config firewall shaper per-ip-shaper
edit <name_str>
set diffserv-forward set diffservcode-forward set diffserv-reverse set diffservcode-rev
New fields. Manage differentiated services code point (DSCP) values.
Command Change
FortiOS 4.0 MR3 CLI Reference26 01-431-99686-20110623
http://docs.fortinet.com/ • Feedback
What’s new
F0h
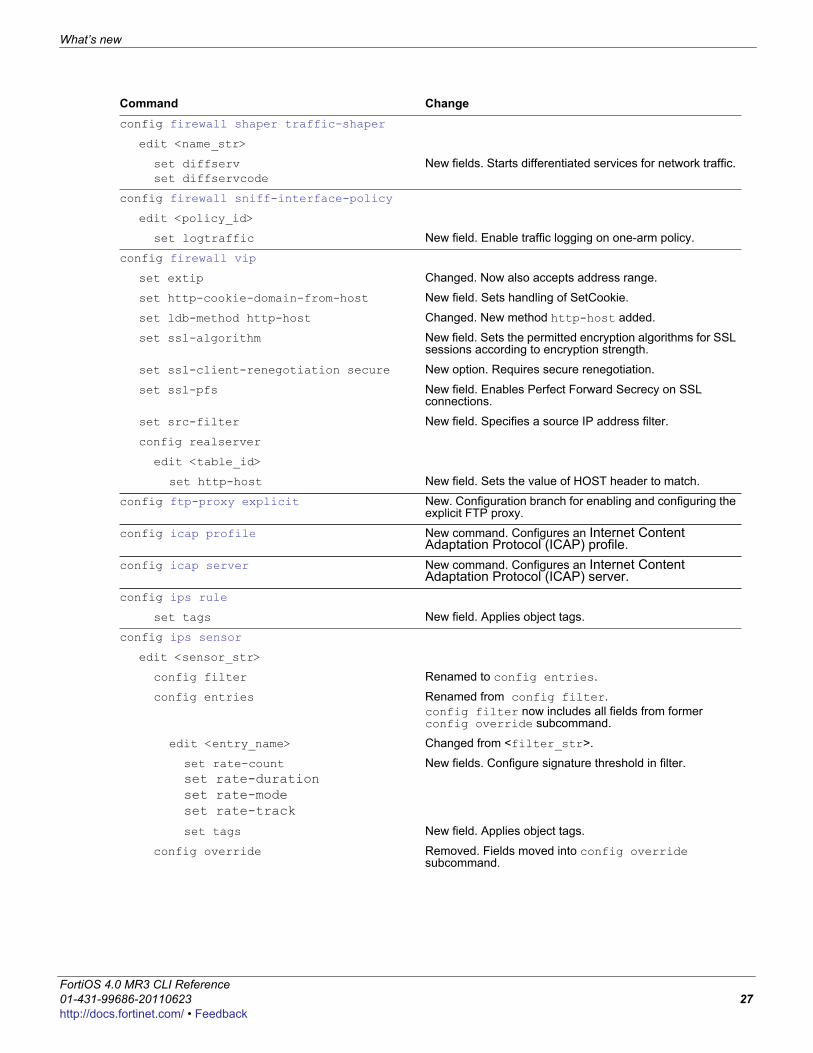
config firewall shaper traffic-shaper
edit <name_str>
set diffservset diffservcode
New fields. Starts differentiated services for network traffic.
config firewall sniff-interface-policy
edit <policy_id>
set logtraffic New field. Enable traffic logging on one-arm policy.
config firewall vip
set extip Changed. Now also accepts address range.
set http-cookie-domain-from-host New field. Sets handling of SetCookie.
set ldb-method http-host Changed. New method http-host added.
set ssl-algorithm New field. Sets the permitted encryption algorithms for SSL sessions according to encryption strength.
set ssl-client-renegotiation secure New option. Requires secure renegotiation.
set ssl-pfs New field. Enables Perfect Forward Secrecy on SSL connections.
set src-filter New field. Specifies a source IP address filter.
config realserver
edit <table_id>
set http-host New field. Sets the value of HOST header to match.
config ftp-proxy explicit New. Configuration branch for enabling and configuring the explicit FTP proxy.
config icap profile New command. Configures an Internet Content Adaptation Protocol (ICAP) profile.
config icap server New command. Configures an Internet Content Adaptation Protocol (ICAP) server.
config ips rule
set tags New field. Applies object tags.
config ips sensor
edit <sensor_str>
config filter Renamed to config entries.
config entries Renamed from config filter. config filter now includes all fields from former config override subcommand.
edit <entry_name> Changed from <filter_str>.
set rate-countset rate-durationset rate-modeset rate-track
New fields. Configure signature threshold in filter.
set tags New field. Applies object tags.
config override Removed. Fields moved into config override subcommand.
Command Change
ortiOS 4.0 MR3 CLI Reference1-431-99686-20110623 27ttp://docs.fortinet.com/ • Feedback
What’s new
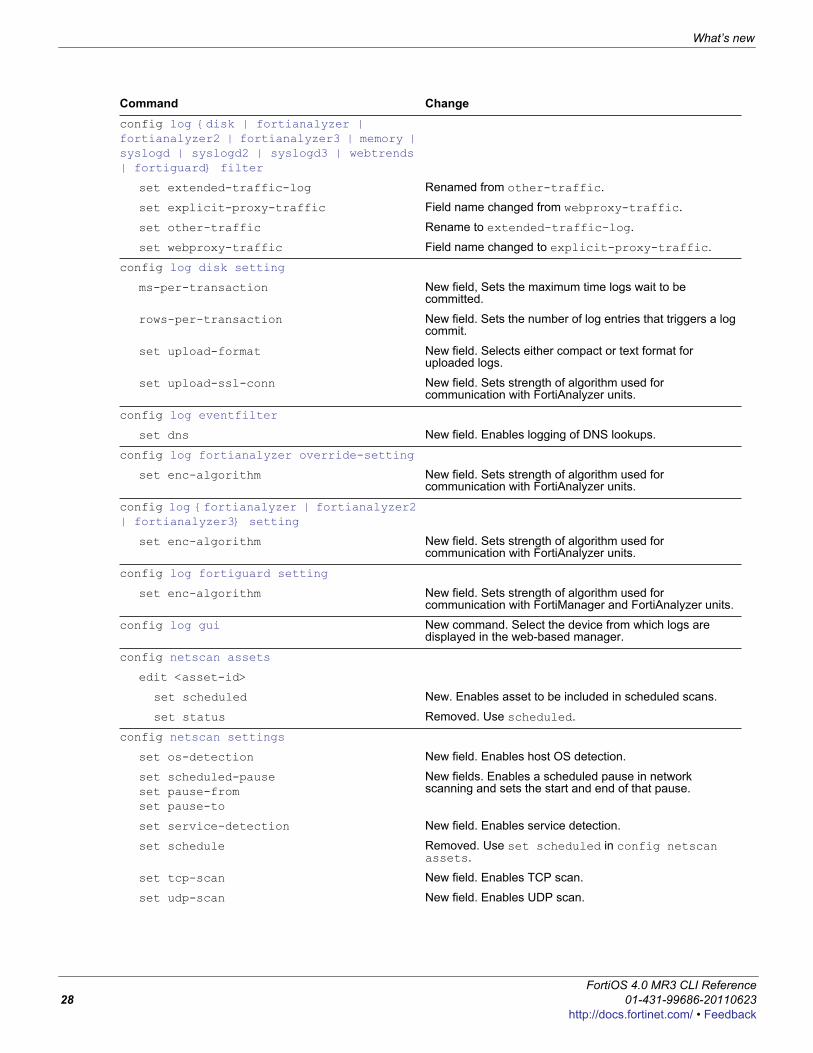
config log {disk | fortianalyzer | fortianalyzer2 | fortianalyzer3 | memory | syslogd | syslogd2 | syslogd3 | webtrends | fortiguard} filter
set extended-traffic-log Renamed from other-traffic.
set explicit-proxy-traffic Field name changed from webproxy-traffic.
set other-traffic Rename to extended-traffic-log.
set webproxy-traffic Field name changed to explicit-proxy-traffic.
config log disk setting
ms-per-transaction New field, Sets the maximum time logs wait to be committed.
rows-per-transaction New field. Sets the number of log entries that triggers a log commit.
set upload-format New field. Selects either compact or text format for uploaded logs.
set upload-ssl-conn New field. Sets strength of algorithm used for communication with FortiAnalyzer units.
config log eventfilter
set dns New field. Enables logging of DNS lookups.
config log fortianalyzer override-setting
set enc-algorithm New field. Sets strength of algorithm used for communication with FortiAnalyzer units.
config log {fortianalyzer | fortianalyzer2 | fortianalyzer3} setting
set enc-algorithm New field. Sets strength of algorithm used for communication with FortiAnalyzer units.
config log fortiguard setting
set enc-algorithm New field. Sets strength of algorithm used for communication with FortiManager and FortiAnalyzer units.
config log gui New command. Select the device from which logs are displayed in the web-based manager.
config netscan assets
edit <asset-id>
set scheduled New. Enables asset to be included in scheduled scans.
set status Removed. Use scheduled.
config netscan settings
set os-detection New field. Enables host OS detection.
set scheduled-pauseset pause-fromset pause-to
New fields. Enables a scheduled pause in network scanning and sets the start and end of that pause.
set service-detection New field. Enables service detection.
set schedule Removed. Use set scheduled in config netscan assets.
set tcp-scan New field. Enables TCP scan.
set udp-scan New field. Enables UDP scan.
Command Change
FortiOS 4.0 MR3 CLI Reference28 01-431-99686-20110623
http://docs.fortinet.com/ • Feedback
What’s new
F0h
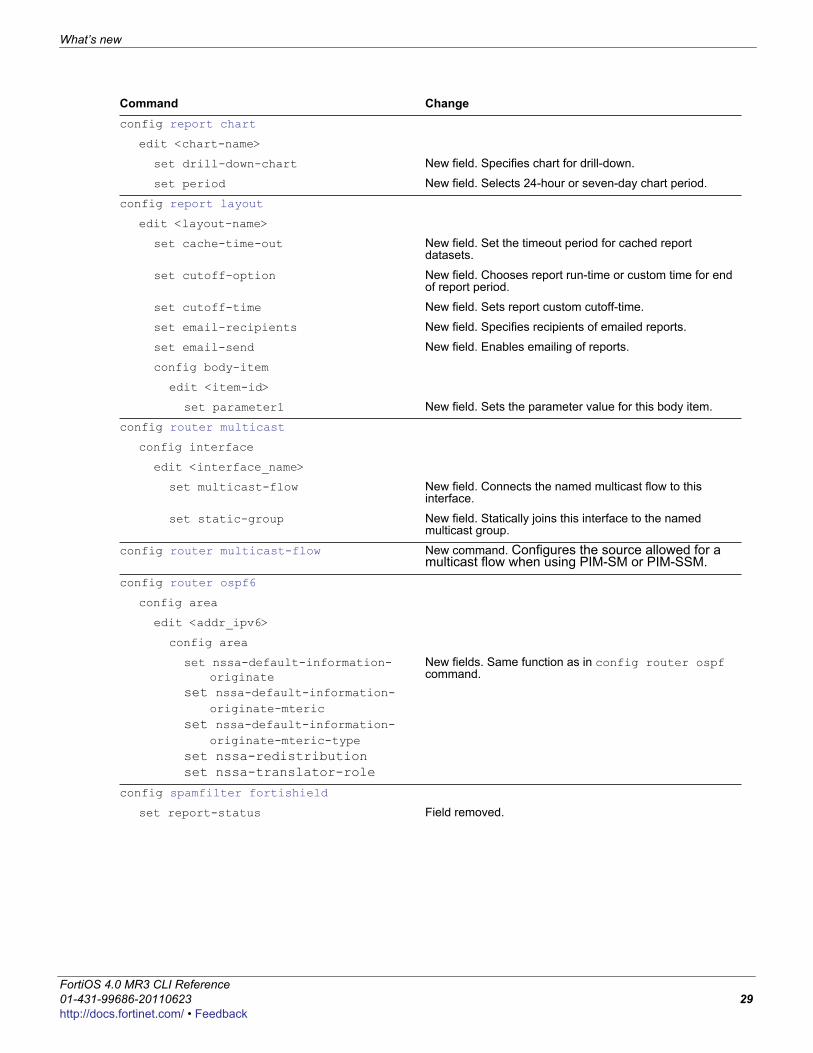
config report chart
edit <chart-name>
set drill-down-chart New field. Specifies chart for drill-down.
set period New field. Selects 24-hour or seven-day chart period.
config report layout
edit <layout-name>
set cache-time-out New field. Set the timeout period for cached report datasets.
set cutoff-option New field. Chooses report run-time or custom time for end of report period.
set cutoff-time New field. Sets report custom cutoff-time.
set email-recipients New field. Specifies recipients of emailed reports.
set email-send New field. Enables emailing of reports.
config body-item
edit <item-id>
set parameter1 New field. Sets the parameter value for this body item.
config router multicast
config interface
edit <interface_name>
set multicast-flow New field. Connects the named multicast flow to this interface.
set static-group New field. Statically joins this interface to the named multicast group.
config router multicast-flow New command. Configures the source allowed for a multicast flow when using PIM-SM or PIM-SSM.
config router ospf6
config area
edit <addr_ipv6>
config area
set nssa-default-information-originate
set nssa-default-information-originate-mteric
set nssa-default-information-originate-mteric-type
set nssa-redistributionset nssa-translator-role
New fields. Same function as in config router ospf command.
config spamfilter fortishield
set report-status Field removed.
Command Change
ortiOS 4.0 MR3 CLI Reference1-431-99686-20110623 29ttp://docs.fortinet.com/ • Feedback
What’s new
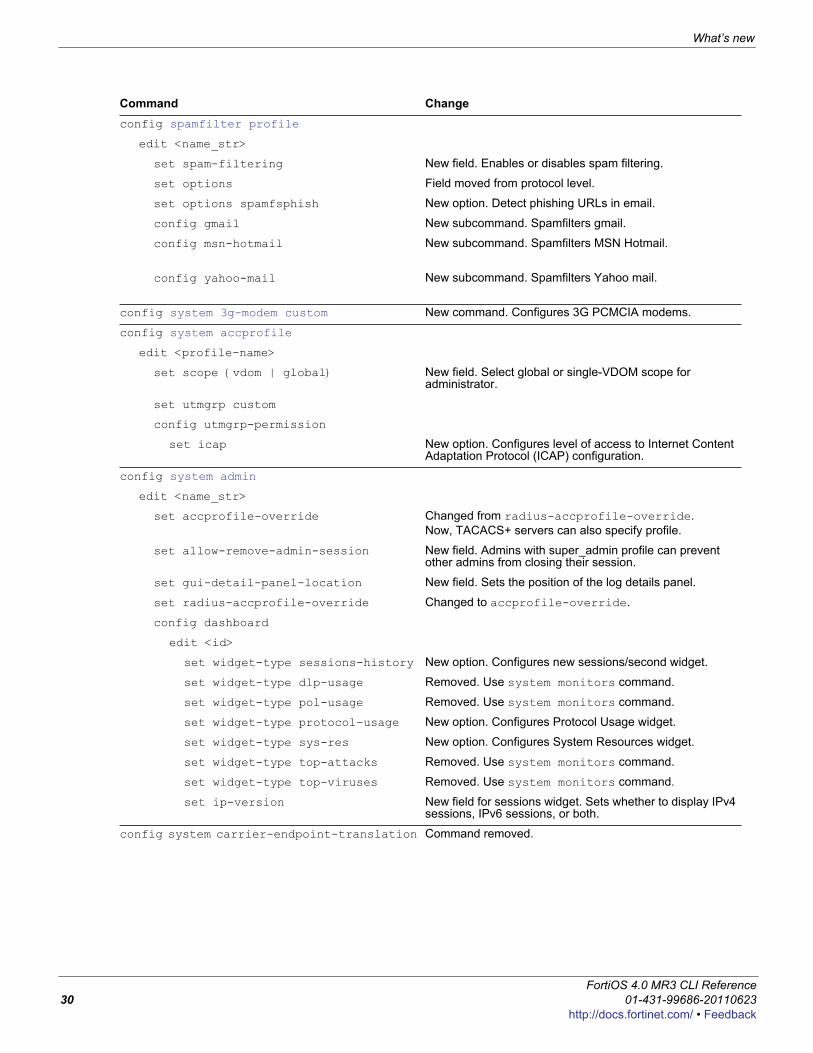
config spamfilter profile
edit <name_str>
set spam-filtering New field. Enables or disables spam filtering.
set options Field moved from protocol level.
set options spamfsphish New option. Detect phishing URLs in email.
config gmail New subcommand. Spamfilters gmail.
config msn-hotmail New subcommand. Spamfilters MSN Hotmail.
config yahoo-mail New subcommand. Spamfilters Yahoo mail.
config system 3g-modem custom New command. Configures 3G PCMCIA modems.
config system accprofile
edit <profile-name>
set scope {vdom | global} New field. Select global or single-VDOM scope for administrator.
set utmgrp custom
config utmgrp-permission
set icap New option. Configures level of access to Internet Content Adaptation Protocol (ICAP) configuration.
config system admin
edit <name_str>
set accprofile-override Changed from radius-accprofile-override. Now, TACACS+ servers can also specify profile.
set allow-remove-admin-session New field. Admins with super_admin profile can prevent other admins from closing their session.
set gui-detail-panel-location New field. Sets the position of the log details panel.
set radius-accprofile-override Changed to accprofile-override.
config dashboard
edit <id>
set widget-type sessions-history New option. Configures new sessions/second widget.
set widget-type dlp-usage Removed. Use system monitors command.
set widget-type pol-usage Removed. Use system monitors command.
set widget-type protocol-usage New option. Configures Protocol Usage widget.
set widget-type sys-res New option. Configures System Resources widget.
set widget-type top-attacks Removed. Use system monitors command.
set widget-type top-viruses Removed. Use system monitors command.
set ip-version New field for sessions widget. Sets whether to display IPv4 sessions, IPv6 sessions, or both.
config system carrier-endpoint-translation Command removed.
Command Change
FortiOS 4.0 MR3 CLI Reference30 01-431-99686-20110623
http://docs.fortinet.com/ • Feedback
What’s new
F0h
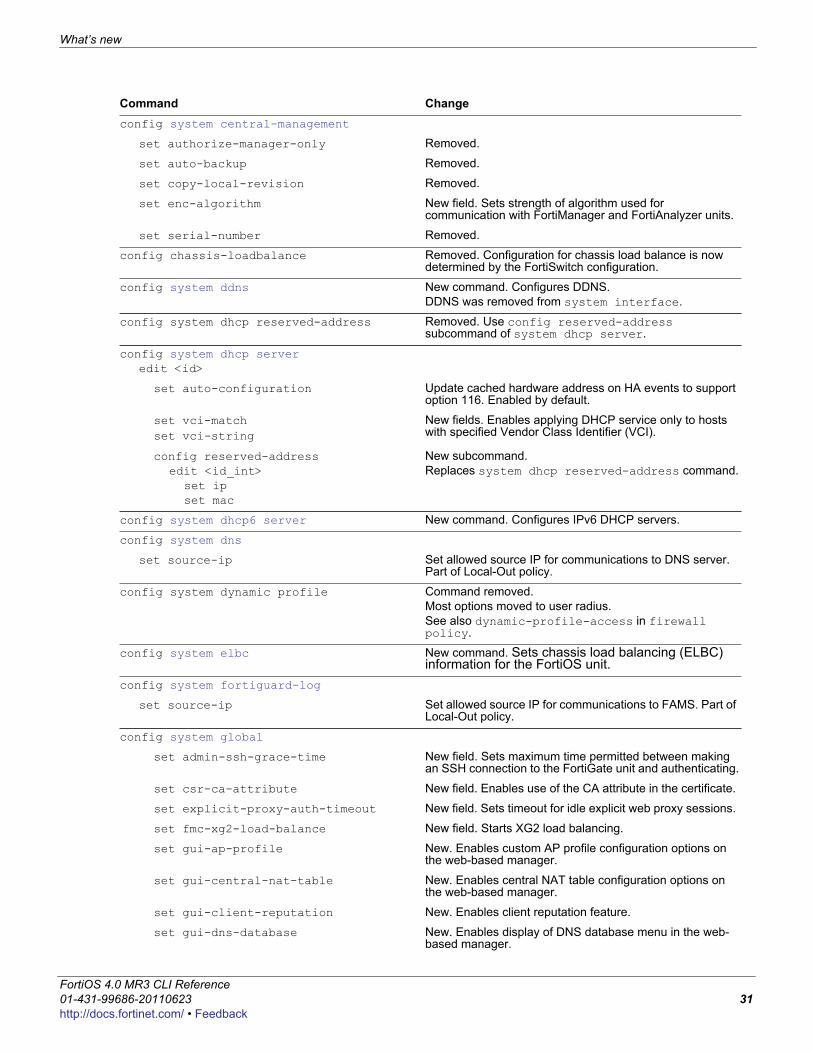
config system central-management
set authorize-manager-only Removed.
set auto-backup Removed.
set copy-local-revision Removed.
set enc-algorithm New field. Sets strength of algorithm used for communication with FortiManager and FortiAnalyzer units.
set serial-number Removed.
config chassis-loadbalance Removed. Configuration for chassis load balance is now determined by the FortiSwitch configuration.
config system ddns New command. Configures DDNS. DDNS was removed from system interface.
config system dhcp reserved-address Removed. Use config reserved-address subcommand of system dhcp server.
config system dhcp serveredit <id>
set auto-configuration Update cached hardware address on HA events to support option 116. Enabled by default.
set vci-matchset vci-string
New fields. Enables applying DHCP service only to hosts with specified Vendor Class Identifier (VCI).
config reserved-addressedit <id_int>
set ipset mac
New subcommand. Replaces system dhcp reserved-address command.
config system dhcp6 server New command. Configures IPv6 DHCP servers.
config system dns
set source-ip Set allowed source IP for communications to DNS server. Part of Local-Out policy.
config system dynamic profile Command removed. Most options moved to user radius.See also dynamic-profile-access in firewall policy.
config system elbc New command. Sets chassis load balancing (ELBC) information for the FortiOS unit.
config system fortiguard-log
set source-ip Set allowed source IP for communications to FAMS. Part of Local-Out policy.
config system global
set admin-ssh-grace-time New field. Sets maximum time permitted between making an SSH connection to the FortiGate unit and authenticating.
set csr-ca-attribute New field. Enables use of the CA attribute in the certificate.
set explicit-proxy-auth-timeout New field. Sets timeout for idle explicit web proxy sessions.
set fmc-xg2-load-balance New field. Starts XG2 load balancing.
set gui-ap-profile New. Enables custom AP profile configuration options on the web-based manager.
set gui-central-nat-table New. Enables central NAT table configuration options on the web-based manager.
set gui-client-reputation New. Enables client reputation feature.
set gui-dns-database New. Enables display of DNS database menu in the web-based manager.
Command Change
ortiOS 4.0 MR3 CLI Reference1-431-99686-20110623 31ttp://docs.fortinet.com/ • Feedback

What’s new
config system global (continued)
set gui-dynamic-profile-display New. Enables display of dynamic profile feature controls in the web-based manager.
set gui-icap New. Enable or disable ICAP configuration options on the web-based manager.
set gui-implicit-id-based-policy New. Enable or disable identity-based firewall implicit policy configuration options on the web-based manager.
set gui-implicit-policy New. Enable or disable implicit firewall policy configuration options on the web-based manager.
set gui-ipsec-manual-key New. Enables manual key IPsec configuration in the web-based manager.
set gui-object-tags New. Enable or disable object tagging and object coloring configuration options on the web-based manager.
set ipv6-accept-dad New. Configures IPv6 DAD (Duplicate Address Detection) operation.
set num-cpus New field. Sets number of active CPUs.
set sslvpn-sport Field removed. Use set port in vpn ssl settings.
set wifi-certificateset wifi-ca-certificate
New fields. Select WiFi server certificates.
set wimax-4g-usb New field. Enables access to a WIMAX 4G USB device.
set wireless-mode New field. Sets wireless operating mode for FortiWiFi units.
config system ha
set session-pickup-delay {enable | disable}
New. Improve performance by synchronizing session only if they are active for more than 30 seconds.
set session-sync-dev New. Specify up to 8 interfaces to be used for session synchronization (session pickup) instead of the heartbeat interface.
set subsecond Removed. Not necessary. Underlying NIC driver supports subsecond link failure detection. User can set the hb-interval/threshold values for subsecond failover.
set weight Default changed to set all weights to 40. Range changed to 0 to 255 (was 0 to 31).
set cpu-threshold New. Configure dynamic weighted load balancing for CPU usage.
set ha-uptime-diff-margin New. Change the cluster age difference margin (grace period) ignored by the cluster when selecting a primary unit based on age.
set memory-threshold New. Configure dynamic weighted load balancing for memory usage.
set http-proxy-threshold New. Configure dynamic weighted load balancing for HTTP proxy sessions.
set ftp-proxy-threshold New. Configure dynamic weighted load balancing for FTP proxy sessions.
set imap-proxy-threshold New. Configure dynamic weighted load balancing for IMAP proxy sessions.
set nntp-proxy-threshold New. Configure dynamic weighted load balancing for NNTP proxy sessions.
set pop3-proxy-threshold New. Configure dynamic weighted load balancing for POP3 proxy sessions.
set smtp-proxy-threshold New. Configure dynamic weighted load balancing for SMTP proxy sessions.
Command Change
FortiOS 4.0 MR3 CLI Reference32 01-431-99686-20110623
http://docs.fortinet.com/ • Feedback
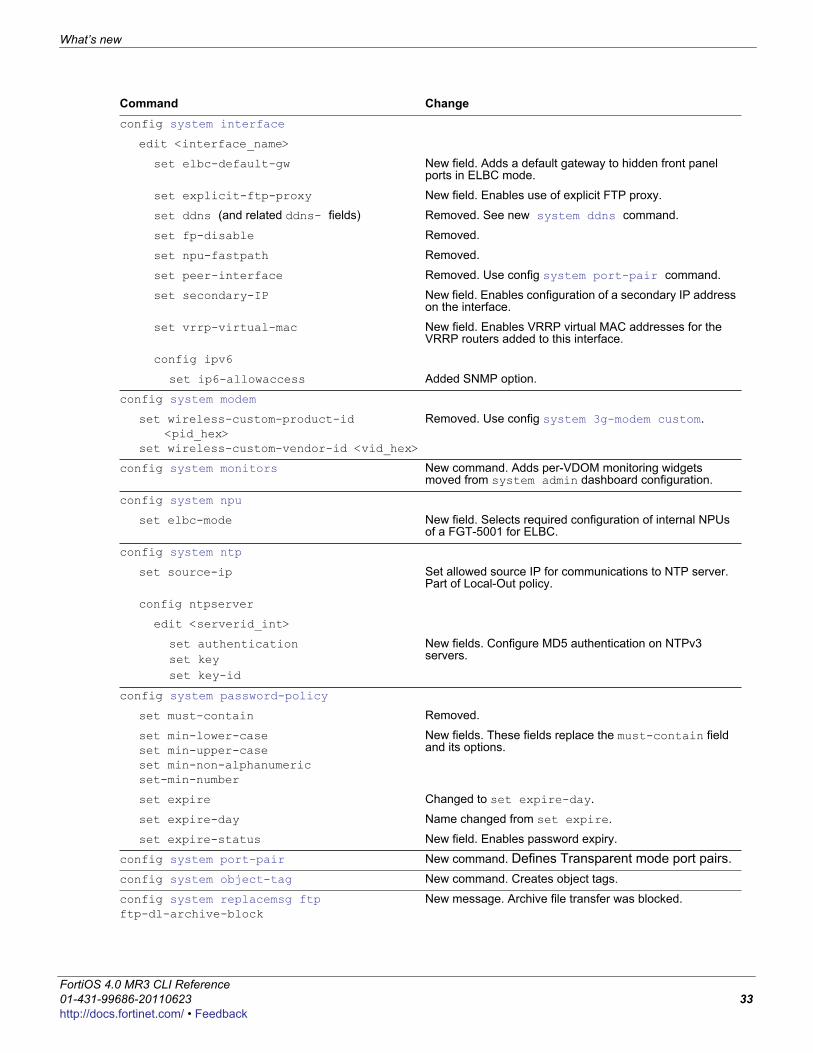
What’s new
F0h
config system interface
edit <interface_name>
set elbc-default-gw New field. Adds a default gateway to hidden front panel ports in ELBC mode.
set explicit-ftp-proxy New field. Enables use of explicit FTP proxy.
set ddns (and related ddns- fields) Removed. See new system ddns command.
set fp-disable Removed.
set npu-fastpath Removed.
set peer-interface Removed. Use config system port-pair command.
set secondary-IP New field. Enables configuration of a secondary IP address on the interface.
set vrrp-virtual-mac New field. Enables VRRP virtual MAC addresses for the VRRP routers added to this interface.
config ipv6
set ip6-allowaccess Added SNMP option.
config system modem
set wireless-custom-product-id <pid_hex>
set wireless-custom-vendor-id <vid_hex>
Removed. Use config system 3g-modem custom.
config system monitors New command. Adds per-VDOM monitoring widgets moved from system admin dashboard configuration.
config system npu
set elbc-mode New field. Selects required configuration of internal NPUs of a FGT-5001 for ELBC.
config system ntp
set source-ip Set allowed source IP for communications to NTP server. Part of Local-Out policy.
config ntpserver
edit <serverid_int>
set authentication set keyset key-id
New fields. Configure MD5 authentication on NTPv3 servers.
config system password-policy
set must-contain Removed.
set min-lower-caseset min-upper-caseset min-non-alphanumericset-min-number
New fields. These fields replace the must-contain field and its options.
set expire Changed to set expire-day.
set expire-day Name changed from set expire.
set expire-status New field. Enables password expiry.
config system port-pair New command. Defines Transparent mode port pairs. config system object-tag New command. Creates object tags.
config system replacemsg ftp ftp-dl-archive-block
New message. Archive file transfer was blocked.
Command Change
ortiOS 4.0 MR3 CLI Reference1-431-99686-20110623 33ttp://docs.fortinet.com/ • Feedback
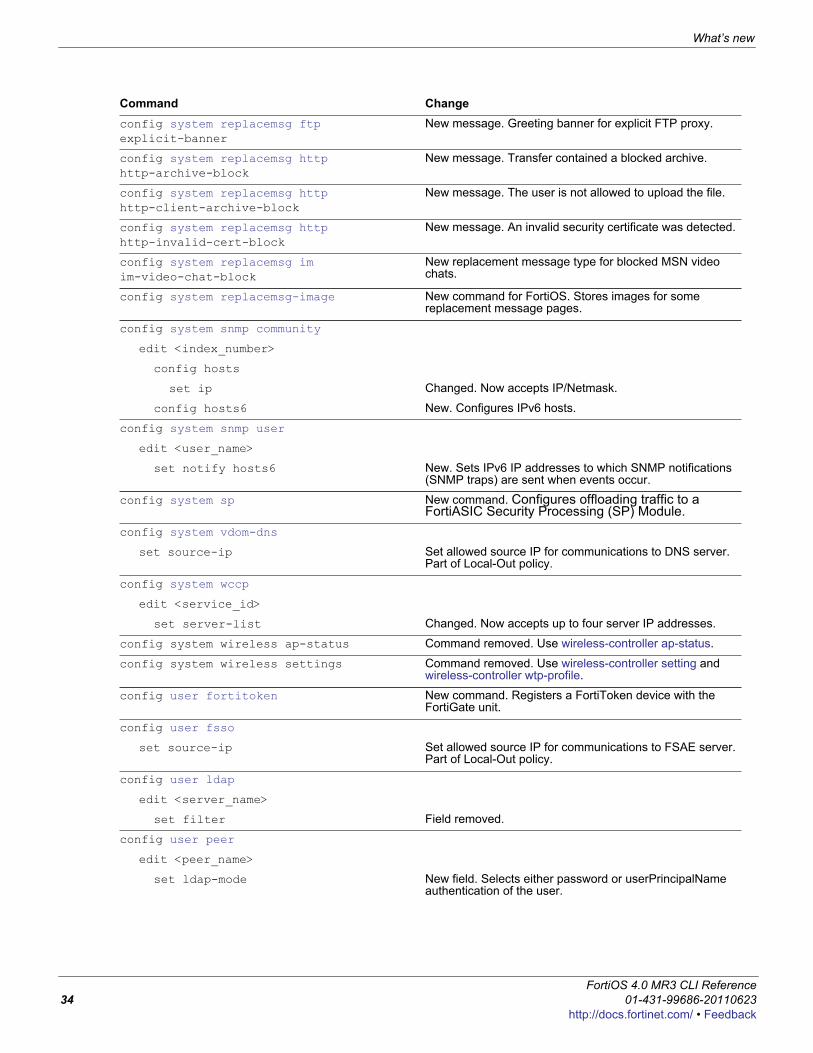
What’s new
config system replacemsg ftp explicit-banner
New message. Greeting banner for explicit FTP proxy.
config system replacemsg http http-archive-block
New message. Transfer contained a blocked archive.
config system replacemsg http http-client-archive-block
New message. The user is not allowed to upload the file.
config system replacemsg http http-invalid-cert-block
New message. An invalid security certificate was detected.
config system replacemsg im im-video-chat-block
New replacement message type for blocked MSN video chats.
config system replacemsg-image New command for FortiOS. Stores images for some replacement message pages.
config system snmp community
edit <index_number>
config hosts
set ip Changed. Now accepts IP/Netmask.
config hosts6 New. Configures IPv6 hosts.
config system snmp user
edit <user_name>
set notify hosts6 New. Sets IPv6 IP addresses to which SNMP notifications (SNMP traps) are sent when events occur.
config system sp New command. Configures offloading traffic to a FortiASIC Security Processing (SP) Module.
config system vdom-dns
set source-ip Set allowed source IP for communications to DNS server. Part of Local-Out policy.
config system wccp
edit <service_id>
set server-list Changed. Now accepts up to four server IP addresses.
config system wireless ap-status Command removed. Use wireless-controller ap-status.
config system wireless settings Command removed. Use wireless-controller setting and wireless-controller wtp-profile.
config user fortitoken New command. Registers a FortiToken device with the FortiGate unit.
config user fsso
set source-ip Set allowed source IP for communications to FSAE server. Part of Local-Out policy.
config user ldap
edit <server_name>
set filter Field removed.
config user peer
edit <peer_name>
set ldap-mode New field. Selects either password or userPrincipalName authentication of the user.
Command Change
FortiOS 4.0 MR3 CLI Reference34 01-431-99686-20110623
http://docs.fortinet.com/ • Feedback
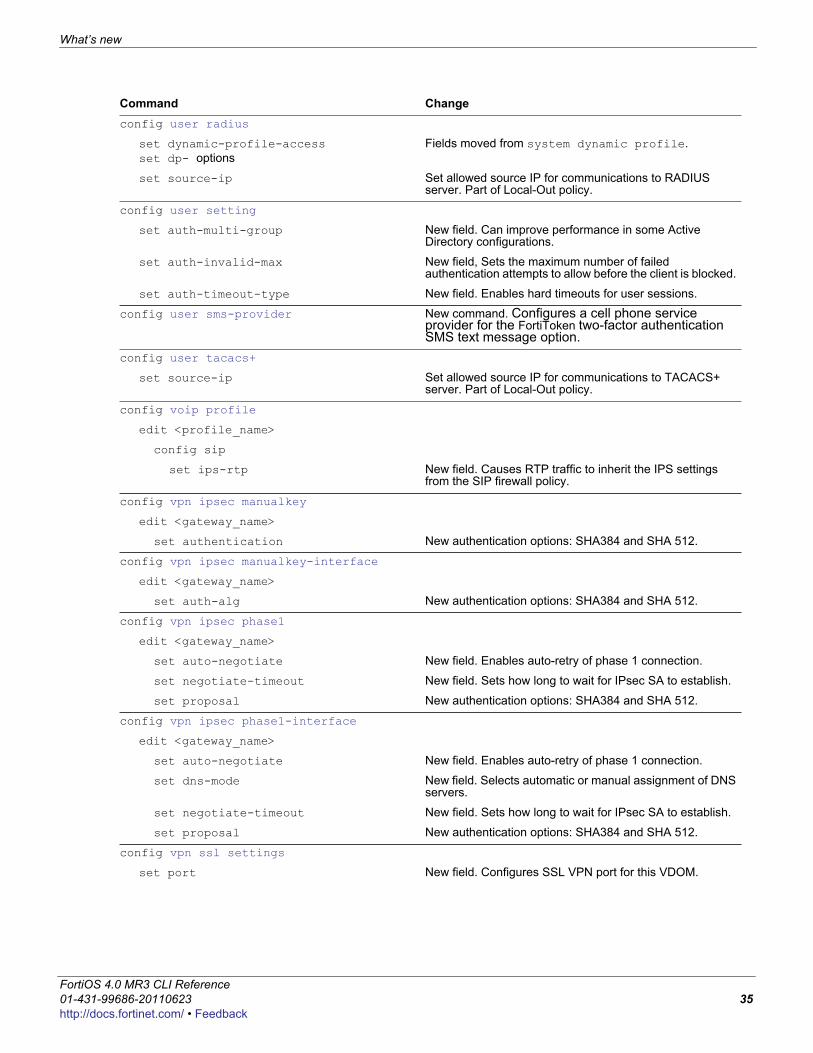
What’s new
F0h
config user radius
set dynamic-profile-accessset dp- options
Fields moved from system dynamic profile.
set source-ip Set allowed source IP for communications to RADIUS server. Part of Local-Out policy.
config user setting
set auth-multi-group New field. Can improve performance in some Active Directory configurations.
set auth-invalid-max New field, Sets the maximum number of failed authentication attempts to allow before the client is blocked.
set auth-timeout-type New field. Enables hard timeouts for user sessions.
config user sms-provider New command. Configures a cell phone service provider for the FortiToken two-factor authentication SMS text message option.
config user tacacs+
set source-ip Set allowed source IP for communications to TACACS+ server. Part of Local-Out policy.
config voip profile
edit <profile_name>
config sip
set ips-rtp New field. Causes RTP traffic to inherit the IPS settings from the SIP firewall policy.
config vpn ipsec manualkey
edit <gateway_name>
set authentication New authentication options: SHA384 and SHA 512.
config vpn ipsec manualkey-interface
edit <gateway_name>
set auth-alg New authentication options: SHA384 and SHA 512.
config vpn ipsec phase1
edit <gateway_name>
set auto-negotiate New field. Enables auto-retry of phase 1 connection.
set negotiate-timeout New field. Sets how long to wait for IPsec SA to establish.
set proposal New authentication options: SHA384 and SHA 512.
config vpn ipsec phase1-interface
edit <gateway_name>
set auto-negotiate New field. Enables auto-retry of phase 1 connection.
set dns-mode New field. Selects automatic or manual assignment of DNS servers.
set negotiate-timeout New field. Sets how long to wait for IPsec SA to establish.
set proposal New authentication options: SHA384 and SHA 512.
config vpn ssl settings
set port New field. Configures SSL VPN port for this VDOM.
Command Change
ortiOS 4.0 MR3 CLI Reference1-431-99686-20110623 35ttp://docs.fortinet.com/ • Feedback
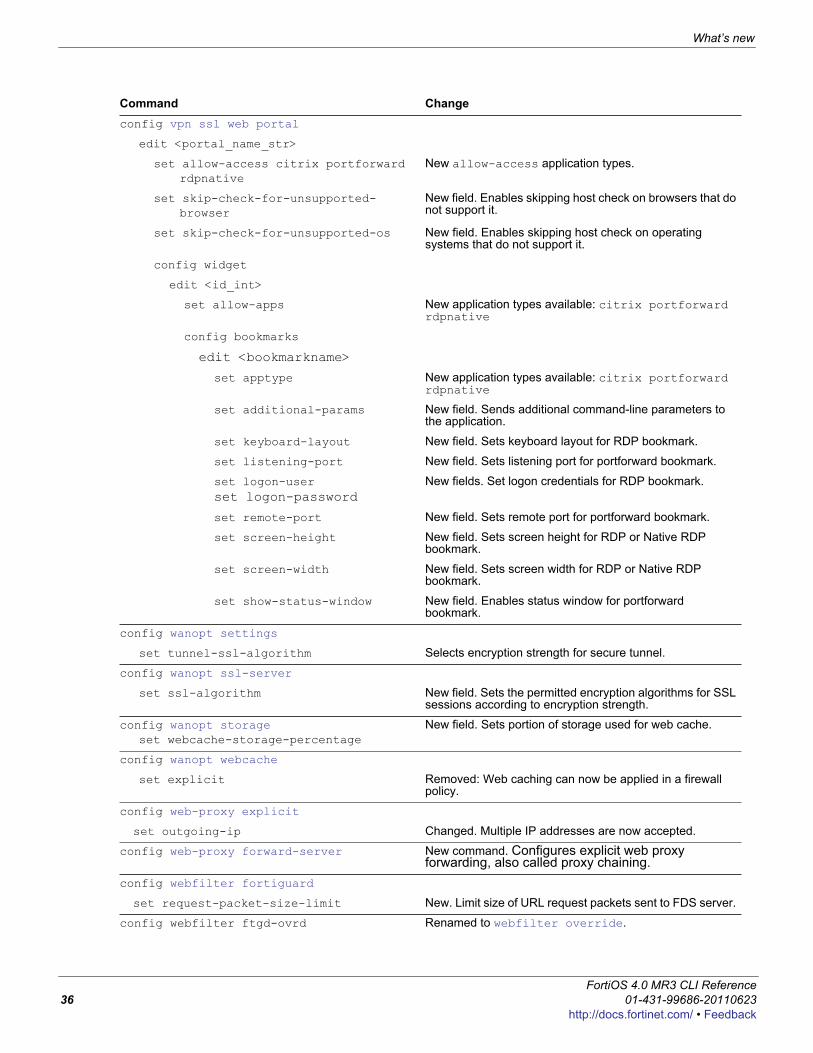
What’s new
config vpn ssl web portal
edit <portal_name_str>
set allow-access citrix portforward rdpnative
New allow-access application types.
set skip-check-for-unsupported-browser
New field. Enables skipping host check on browsers that do not support it.
set skip-check-for-unsupported-os New field. Enables skipping host check on operating systems that do not support it.
config widget
edit <id_int>
set allow-apps New application types available: citrix portforward rdpnative
config bookmarks
edit <bookmarkname>
set apptype New application types available: citrix portforward rdpnative
set additional-params New field. Sends additional command-line parameters to the application.
set keyboard-layout New field. Sets keyboard layout for RDP bookmark.
set listening-port New field. Sets listening port for portforward bookmark.
set logon-userset logon-password
New fields. Set logon credentials for RDP bookmark.
set remote-port New field. Sets remote port for portforward bookmark.
set screen-height New field. Sets screen height for RDP or Native RDP bookmark.
set screen-width New field. Sets screen width for RDP or Native RDP bookmark.
set show-status-window New field. Enables status window for portforward bookmark.
config wanopt settings
set tunnel-ssl-algorithm Selects encryption strength for secure tunnel.
config wanopt ssl-server
set ssl-algorithm New field. Sets the permitted encryption algorithms for SSL sessions according to encryption strength.
config wanopt storageset webcache-storage-percentage
New field. Sets portion of storage used for web cache.
config wanopt webcache
set explicit Removed: Web caching can now be applied in a firewall policy.
config web-proxy explicit
set outgoing-ip Changed. Multiple IP addresses are now accepted.
config web-proxy forward-server New command. Configures explicit web proxy forwarding, also called proxy chaining.
config webfilter fortiguard
set request-packet-size-limit New. Limit size of URL request packets sent to FDS server.
config webfilter ftgd-ovrd Renamed to webfilter override.
Command Change
FortiOS 4.0 MR3 CLI Reference36 01-431-99686-20110623
http://docs.fortinet.com/ • Feedback
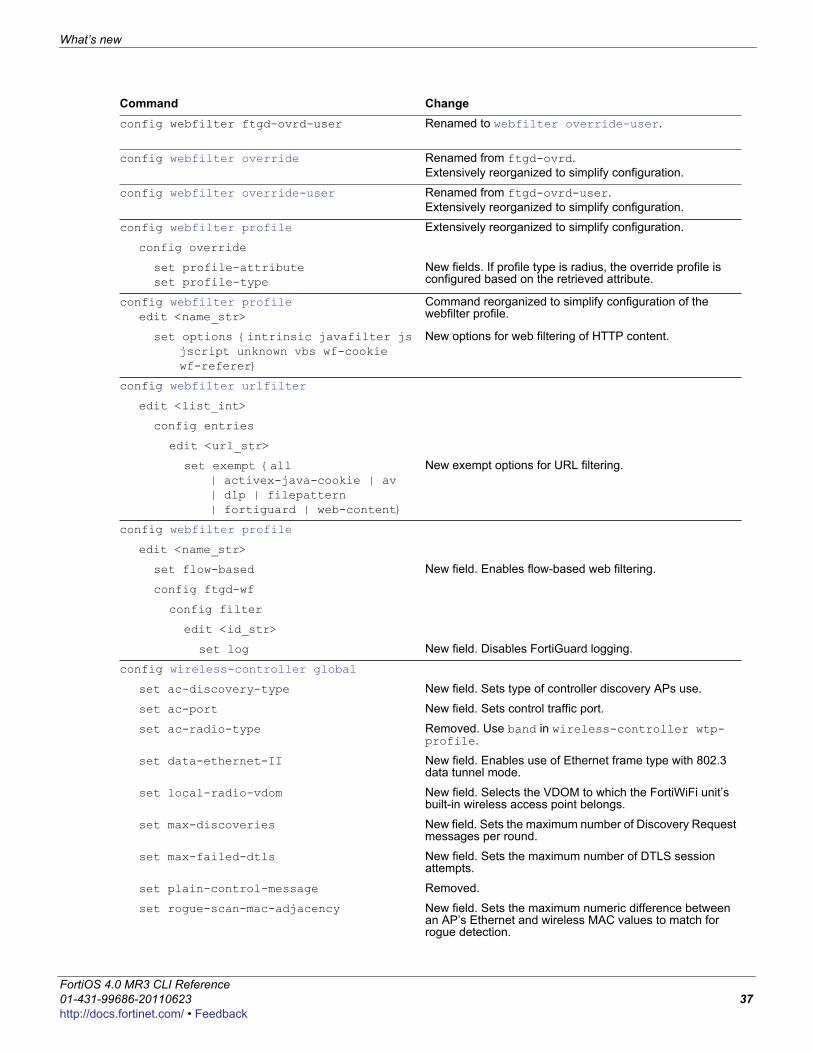
What’s new
F0h
config webfilter ftgd-ovrd-user Renamed to webfilter override-user.
config webfilter override Renamed from ftgd-ovrd.Extensively reorganized to simplify configuration.
config webfilter override-user Renamed from ftgd-ovrd-user.Extensively reorganized to simplify configuration.
config webfilter profile Extensively reorganized to simplify configuration.
config override
set profile-attributeset profile-type
New fields. If profile type is radius, the override profile is configured based on the retrieved attribute.
config webfilter profileedit <name_str>
Command reorganized to simplify configuration of the webfilter profile.
set options {intrinsic javafilter js jscript unknown vbs wf-cookie wf-referer}
New options for web filtering of HTTP content.
config webfilter urlfilter
edit <list_int>
config entries
edit <url_str>
set exempt {all | activex-java-cookie | av | dlp | filepattern | fortiguard | web-content}
New exempt options for URL filtering.
config webfilter profile
edit <name_str>
set flow-based New field. Enables flow-based web filtering.
config ftgd-wf
config filter
edit <id_str>
set log New field. Disables FortiGuard logging.
config wireless-controller global
set ac-discovery-type New field. Sets type of controller discovery APs use.
set ac-port New field. Sets control traffic port.
set ac-radio-type Removed. Use band in wireless-controller wtp-profile.
set data-ethernet-II New field. Enables use of Ethernet frame type with 802.3 data tunnel mode.
set local-radio-vdom New field. Selects the VDOM to which the FortiWiFi unit’s built-in wireless access point belongs.
set max-discoveries New field. Sets the maximum number of Discovery Request messages per round.
set max-failed-dtls New field. Sets the maximum number of DTLS session attempts.
set plain-control-message Removed.
set rogue-scan-mac-adjacency New field. Sets the maximum numeric difference between an AP’s Ethernet and wireless MAC values to match for rogue detection.
Command Change
ortiOS 4.0 MR3 CLI Reference1-431-99686-20110623 37ttp://docs.fortinet.com/ • Feedback
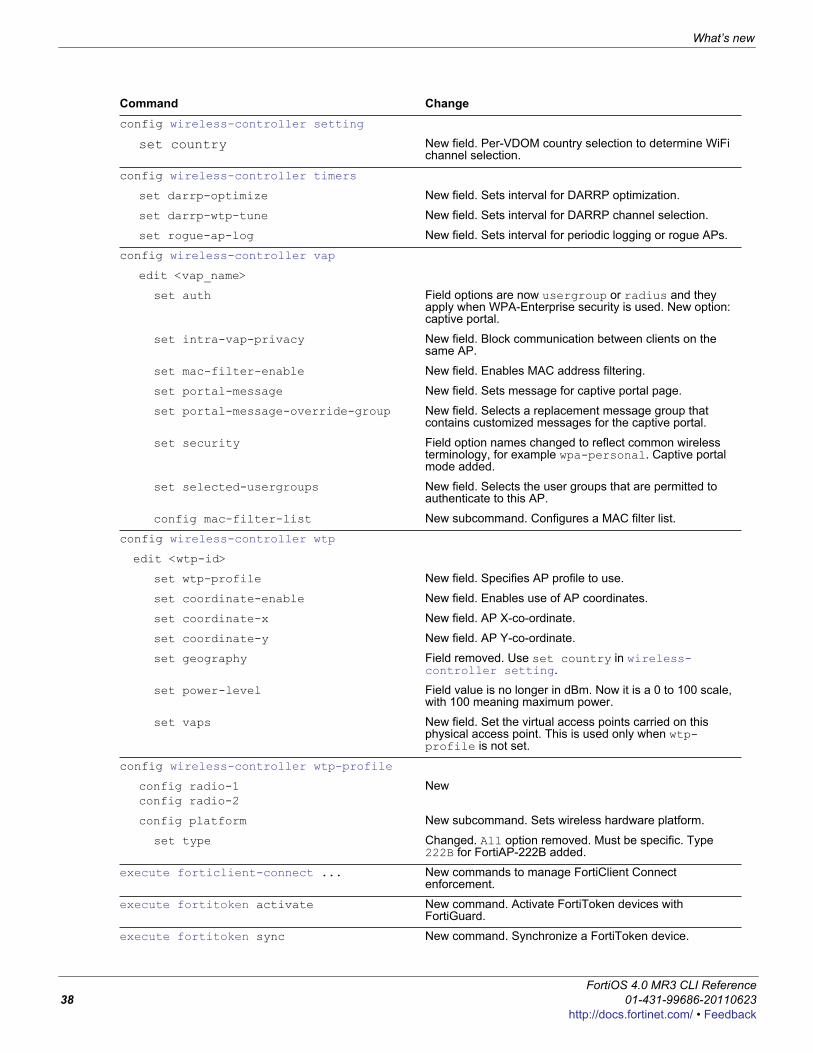
What’s new
config wireless-controller setting
set country New field. Per-VDOM country selection to determine WiFi channel selection.
config wireless-controller timers
set darrp-optimize New field. Sets interval for DARRP optimization.
set darrp-wtp-tune New field. Sets interval for DARRP channel selection.
set rogue-ap-log New field. Sets interval for periodic logging or rogue APs.
config wireless-controller vap
edit <vap_name>
set auth Field options are now usergroup or radius and they apply when WPA-Enterprise security is used. New option: captive portal.
set intra-vap-privacy New field. Block communication between clients on the same AP.
set mac-filter-enable New field. Enables MAC address filtering.
set portal-message New field. Sets message for captive portal page.
set portal-message-override-group New field. Selects a replacement message group that contains customized messages for the captive portal.
set security Field option names changed to reflect common wireless terminology, for example wpa-personal. Captive portal mode added.
set selected-usergroups New field. Selects the user groups that are permitted to authenticate to this AP.
config mac-filter-list New subcommand. Configures a MAC filter list.
config wireless-controller wtp
edit <wtp-id>
set wtp-profile New field. Specifies AP profile to use.
set coordinate-enable New field. Enables use of AP coordinates.
set coordinate-x New field. AP X-co-ordinate.
set coordinate-y New field. AP Y-co-ordinate.
set geography Field removed. Use set country in wireless-controller setting.
set power-level Field value is no longer in dBm. Now it is a 0 to 100 scale, with 100 meaning maximum power.
set vaps New field. Set the virtual access points carried on this physical access point. This is used only when wtp-profile is not set.
config wireless-controller wtp-profile
config radio-1config radio-2
New
config platform New subcommand. Sets wireless hardware platform.
set type Changed. All option removed. Must be specific. Type 222B for FortiAP-222B added.
execute forticlient-connect ... New commands to manage FortiClient Connect enforcement.
execute fortitoken activate New command. Activate FortiToken devices with FortiGuard.
execute fortitoken sync New command. Synchronize a FortiToken device.
Command Change
FortiOS 4.0 MR3 CLI Reference38 01-431-99686-20110623
http://docs.fortinet.com/ • Feedback
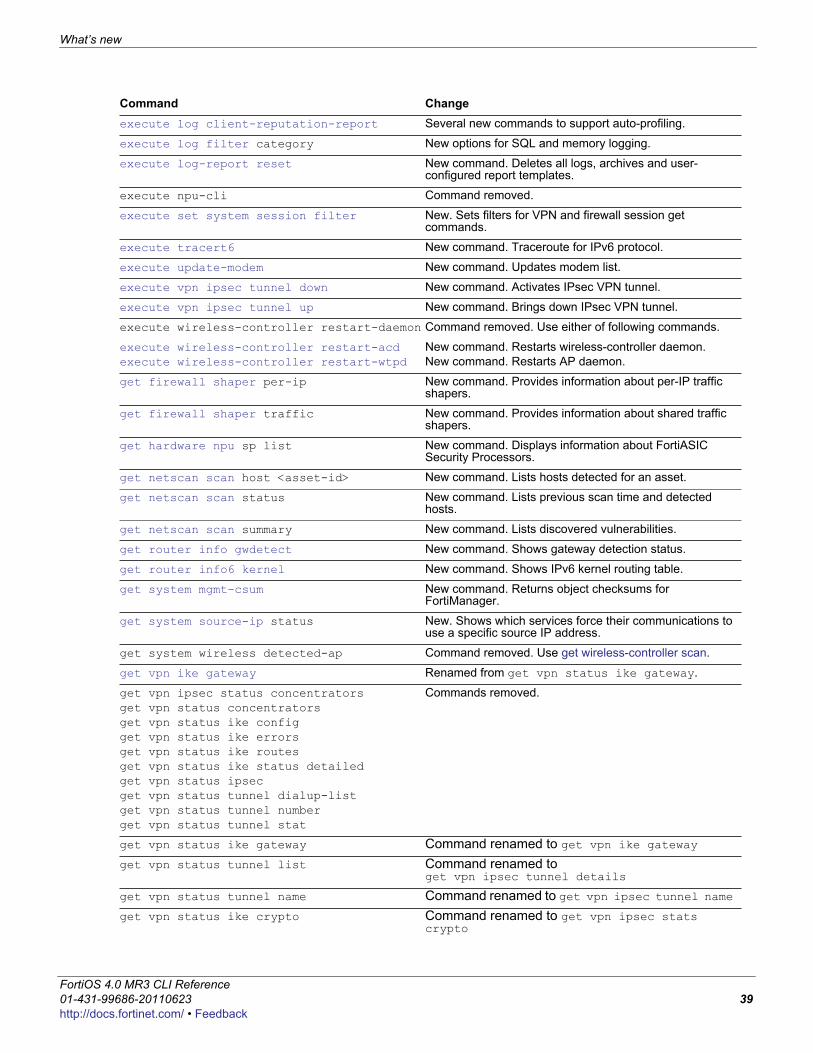
What’s new
F0h
execute log client-reputation-report Several new commands to support auto-profiling.
execute log filter category New options for SQL and memory logging.
execute log-report reset New command. Deletes all logs, archives and user-configured report templates.
execute npu-cli Command removed.
execute set system session filter New. Sets filters for VPN and firewall session get commands.
execute tracert6 New command. Traceroute for IPv6 protocol.
execute update-modem New command. Updates modem list.
execute vpn ipsec tunnel down New command. Activates IPsec VPN tunnel.
execute vpn ipsec tunnel up New command. Brings down IPsec VPN tunnel.
execute wireless-controller restart-daemon Command removed. Use either of following commands.
execute wireless-controller restart-acdexecute wireless-controller restart-wtpd
New command. Restarts wireless-controller daemon.New command. Restarts AP daemon.
get firewall shaper per-ip New command. Provides information about per-IP traffic shapers.
get firewall shaper traffic New command. Provides information about shared traffic shapers.
get hardware npu sp list New command. Displays information about FortiASIC Security Processors.
get netscan scan host <asset-id> New command. Lists hosts detected for an asset.
get netscan scan status New command. Lists previous scan time and detected hosts.
get netscan scan summary New command. Lists discovered vulnerabilities.
get router info gwdetect New command. Shows gateway detection status.
get router info6 kernel New command. Shows IPv6 kernel routing table.
get system mgmt-csum New command. Returns object checksums for FortiManager.
get system source-ip status New. Shows which services force their communications to use a specific source IP address.
get system wireless detected-ap Command removed. Use get wireless-controller scan.
get vpn ike gateway Renamed from get vpn status ike gateway.
get vpn ipsec status concentratorsget vpn status concentratorsget vpn status ike configget vpn status ike errorsget vpn status ike routesget vpn status ike status detailedget vpn status ipsecget vpn status tunnel dialup-listget vpn status tunnel numberget vpn status tunnel stat
Commands removed.
get vpn status ike gateway Command renamed to get vpn ike gateway get vpn status tunnel list Command renamed to
get vpn ipsec tunnel details
get vpn status tunnel name Command renamed to get vpn ipsec tunnel name get vpn status ike crypto Command renamed to get vpn ipsec stats
crypto
Command Change
ortiOS 4.0 MR3 CLI Reference1-431-99686-20110623 39ttp://docs.fortinet.com/ • Feedback
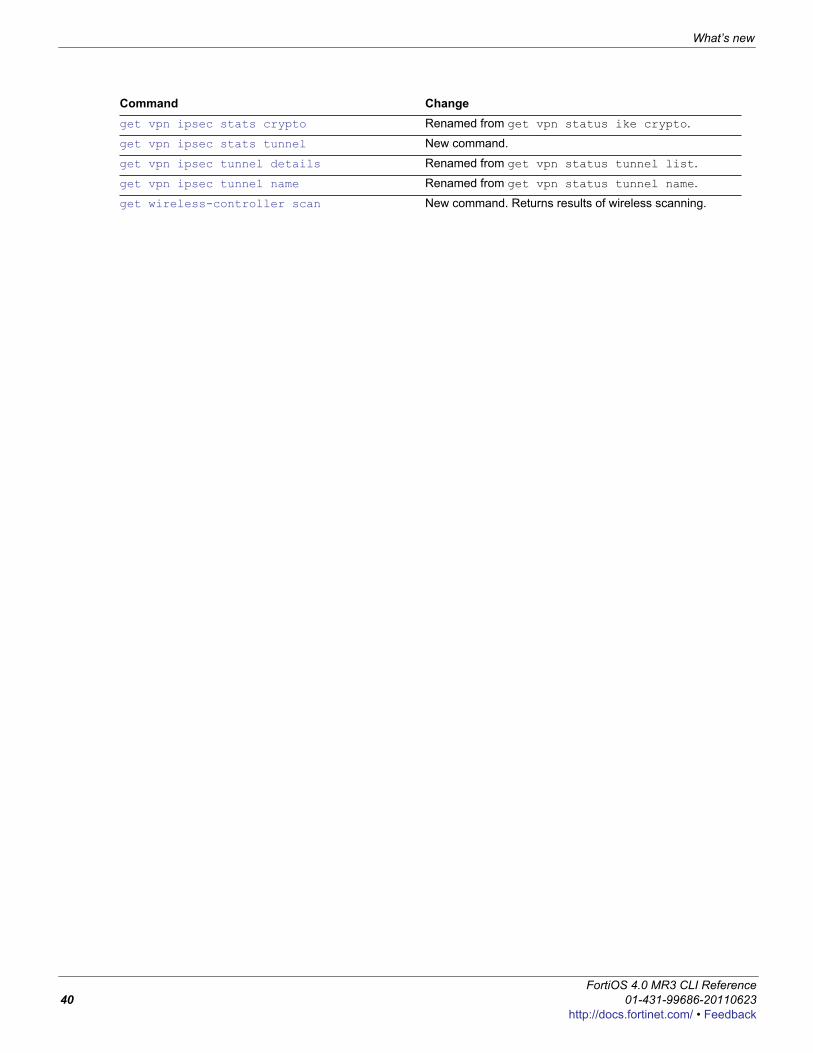
What’s new
get vpn ipsec stats crypto Renamed from get vpn status ike crypto.
get vpn ipsec stats tunnel New command.
get vpn ipsec tunnel details Renamed from get vpn status tunnel list.
get vpn ipsec tunnel name Renamed from get vpn status tunnel name.
get wireless-controller scan New command. Returns results of wireless scanning.
Command Change
FortiOS 4.0 MR3 CLI Reference40 01-431-99686-20110623
http://docs.fortinet.com/ • Feedback

What’s new Changes for FortiOS 4.3 Patch 1
F0h
Changes for FortiOS 4.3 Patch 1The table below lists CLI commands and options that have been added to FortiOS 4.0 MR3 patch 1.
Command Changeconfig application list
edit <app-list_str>
config entries
edit <id>
set applicationset category
These fields now accept multiple options.
config firewall policy, policy6
edit <id>
set endpoint-keepalive-interface New field. Specifies keepalive interface for endpoint-check.
set identity-based This field is invisible if dynamic-profile is enabled.
set traffic-shaper-reverse Field can now be set without setting traffic-shaper.
config firewall profile-protocol-options
edit <name_str>
config ftps
set unsupported-ssl New field. Selects bypass or block action for undecryptable SSL sessions.
config https
set unsupported-ssl New field. Selects bypass or block action for undecryptable SSL sessions.
config imaps
set unsupported-ssl New field. Selects bypass or block action for undecryptable SSL sessions.
config pop3s
set unsupported-ssl New field. Selects bypass or block action for undecryptable SSL sessions.
config smtps
set unsupported-ssl New field. Selects bypass or block action for undecryptable SSL sessions.
config ips sensor
edit <sensor_str>
config entries
edit <id>
set rule Field now accepts multiple entries.
config report layout
edit <layout-name>
set schedule-type demand New option. Enables on-demand reports.
ortiOS 4.0 MR3 CLI Reference1-431-99686-20110623 41ttp://docs.fortinet.com/ • Feedback
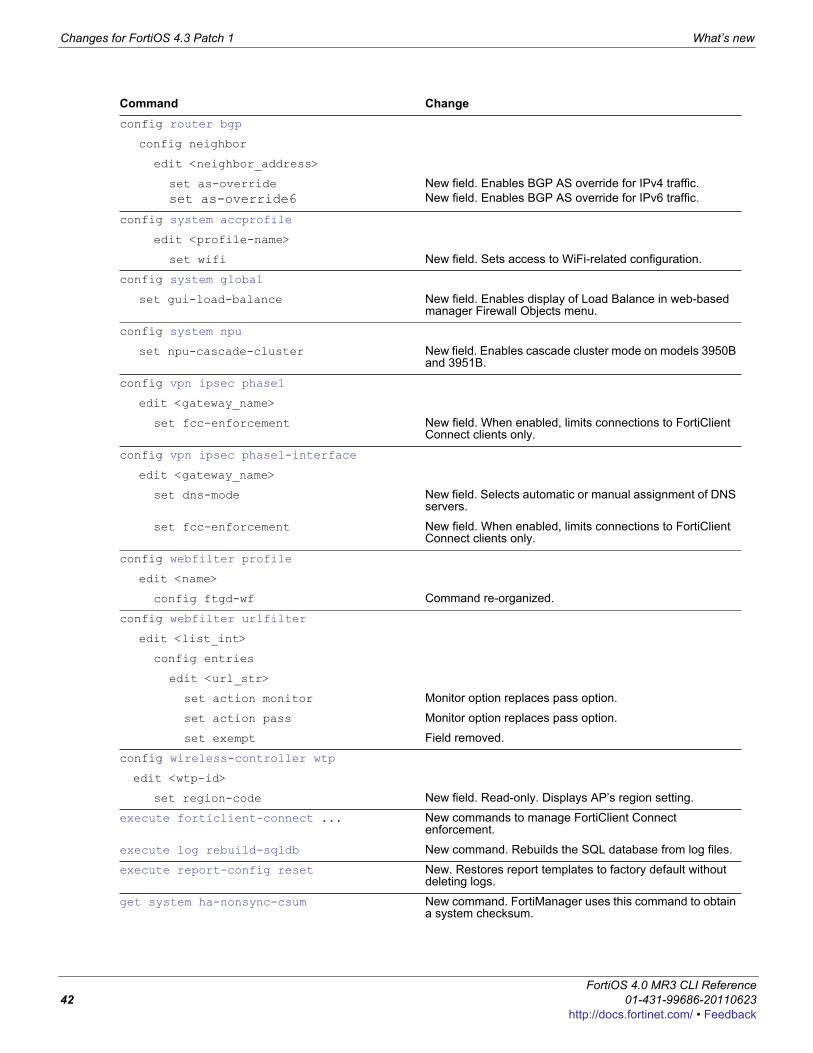
Changes for FortiOS 4.3 Patch 1 What’s new
config router bgp
config neighbor
edit <neighbor_address>
set as-overrideset as-override6
New field. Enables BGP AS override for IPv4 traffic. New field. Enables BGP AS override for IPv6 traffic.
config system accprofile
edit <profile-name>
set wifi New field. Sets access to WiFi-related configuration.
config system global
set gui-load-balance New field. Enables display of Load Balance in web-based manager Firewall Objects menu.
config system npu
set npu-cascade-cluster New field. Enables cascade cluster mode on models 3950B and 3951B.
config vpn ipsec phase1
edit <gateway_name>
set fcc-enforcement New field. When enabled, limits connections to FortiClient Connect clients only.
config vpn ipsec phase1-interface
edit <gateway_name>
set dns-mode New field. Selects automatic or manual assignment of DNS servers.
set fcc-enforcement New field. When enabled, limits connections to FortiClient Connect clients only.
config webfilter profile
edit <name>
config ftgd-wf Command re-organized.
config webfilter urlfilter
edit <list_int>
config entries
edit <url_str>
set action monitor Monitor option replaces pass option.
set action pass Monitor option replaces pass option.
set exempt Field removed.
config wireless-controller wtp
edit <wtp-id>
set region-code New field. Read-only. Displays AP’s region setting.
execute forticlient-connect ... New commands to manage FortiClient Connect enforcement.
execute log rebuild-sqldb New command. Rebuilds the SQL database from log files.
execute report-config reset New. Restores report templates to factory default without deleting logs.
get system ha-nonsync-csum New command. FortiManager uses this command to obtain a system checksum.
Command Change
FortiOS 4.0 MR3 CLI Reference42 01-431-99686-20110623
http://docs.fortinet.com/ • Feedback

F0h
alertemailUse the config alertemail command to configure the FortiGate unit to monitor logs for log messages with certain severity levels. If the message appears in the logs, the FortiGate unit sends an email to predefined recipients of the log message encountered. Alert emails provide immediate notification of issues occurring on the FortiGate unit, such as system failures or network attacks.
This chapter describes the following command:
Note: You must configure the server setting under config system alertemail before the commands under config alertemail become accessible.
setting
ortiOS 4.0 MR3 CLI Reference1-431-99686-20110623 43ttp://docs.fortinet.com/ • Feedback
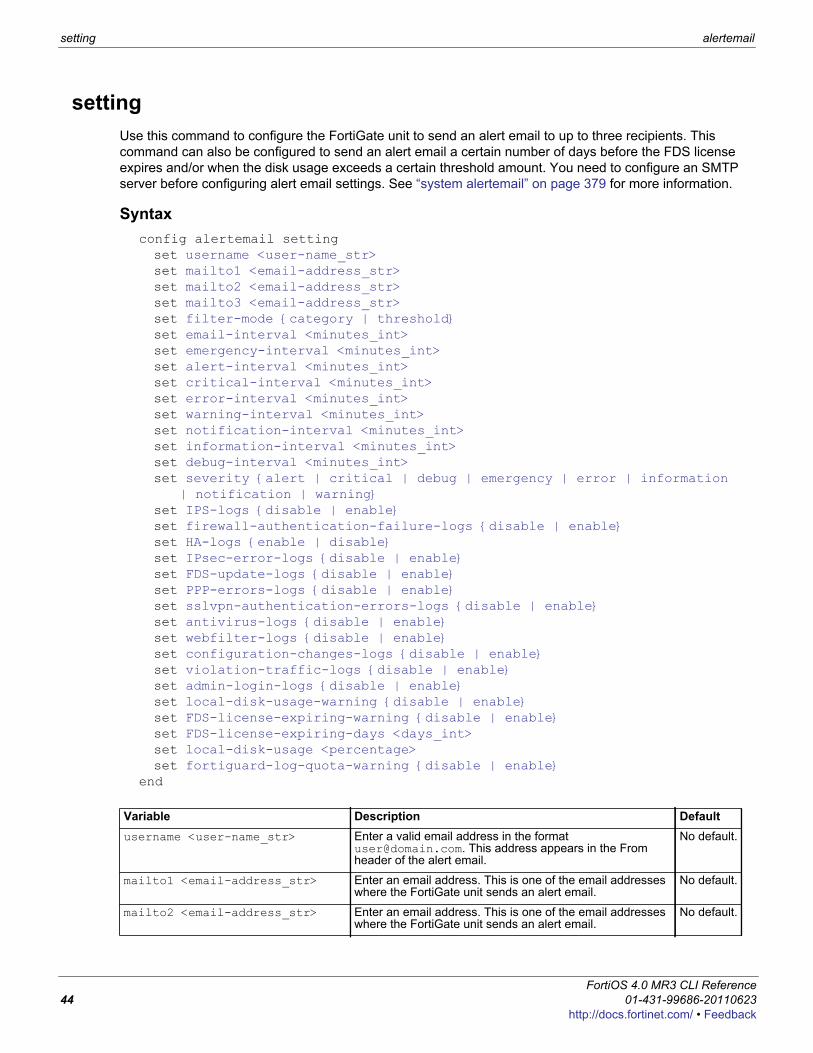
setting alertemail
settingUse this command to configure the FortiGate unit to send an alert email to up to three recipients. This command can also be configured to send an alert email a certain number of days before the FDS license expires and/or when the disk usage exceeds a certain threshold amount. You need to configure an SMTP server before configuring alert email settings. See “system alertemail” on page 379 for more information.
Syntaxconfig alertemail settingset username <user-name_str>set mailto1 <email-address_str>set mailto2 <email-address_str>set mailto3 <email-address_str>set filter-mode {category | threshold}set email-interval <minutes_int>set emergency-interval <minutes_int>set alert-interval <minutes_int>set critical-interval <minutes_int>set error-interval <minutes_int>set warning-interval <minutes_int>set notification-interval <minutes_int>set information-interval <minutes_int>set debug-interval <minutes_int>set severity {alert | critical | debug | emergency | error | information
| notification | warning}set IPS-logs {disable | enable}set firewall-authentication-failure-logs {disable | enable}set HA-logs {enable | disable}set IPsec-error-logs {disable | enable}set FDS-update-logs {disable | enable}set PPP-errors-logs {disable | enable}set sslvpn-authentication-errors-logs {disable | enable}set antivirus-logs {disable | enable}set webfilter-logs {disable | enable}set configuration-changes-logs {disable | enable}set violation-traffic-logs {disable | enable}set admin-login-logs {disable | enable}set local-disk-usage-warning {disable | enable}set FDS-license-expiring-warning {disable | enable}set FDS-license-expiring-days <days_int>set local-disk-usage <percentage>set fortiguard-log-quota-warning {disable | enable}
end
Variable Description Defaultusername <user-name_str> Enter a valid email address in the format
[email protected]. This address appears in the From header of the alert email.
No default.
mailto1 <email-address_str> Enter an email address. This is one of the email addresses where the FortiGate unit sends an alert email.
No default.
mailto2 <email-address_str> Enter an email address. This is one of the email addresses where the FortiGate unit sends an alert email.
No default.
FortiOS 4.0 MR3 CLI Reference44 01-431-99686-20110623
http://docs.fortinet.com/ • Feedback
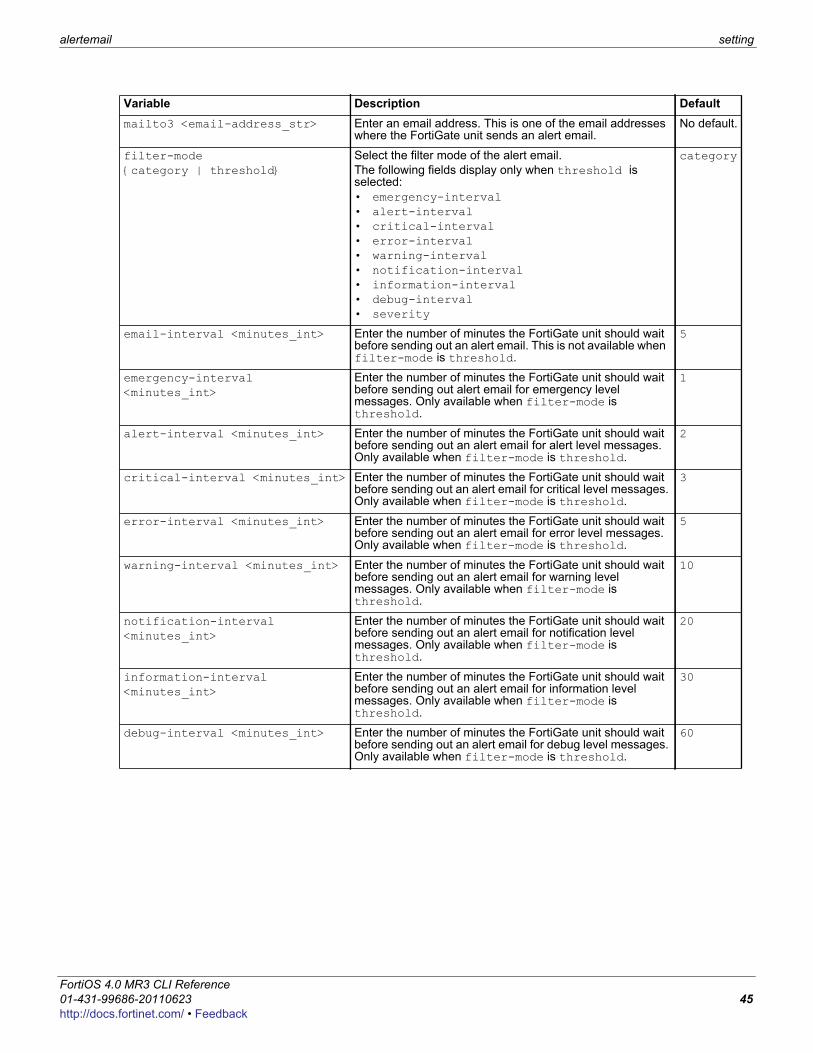
alertemail setting
F0h
mailto3 <email-address_str> Enter an email address. This is one of the email addresses where the FortiGate unit sends an alert email.
No default.
filter-mode {category | threshold}
Select the filter mode of the alert email.The following fields display only when threshold is selected:• emergency-interval• alert-interval• critical-interval• error-interval• warning-interval• notification-interval• information-interval• debug-interval• severity
category
email-interval <minutes_int> Enter the number of minutes the FortiGate unit should wait before sending out an alert email. This is not available when filter-mode is threshold.
5
emergency-interval <minutes_int>
Enter the number of minutes the FortiGate unit should wait before sending out alert email for emergency level messages. Only available when filter-mode is threshold.
1
alert-interval <minutes_int> Enter the number of minutes the FortiGate unit should wait before sending out an alert email for alert level messages. Only available when filter-mode is threshold.
2
critical-interval <minutes_int> Enter the number of minutes the FortiGate unit should wait before sending out an alert email for critical level messages. Only available when filter-mode is threshold.
3
error-interval <minutes_int> Enter the number of minutes the FortiGate unit should wait before sending out an alert email for error level messages. Only available when filter-mode is threshold.
5
warning-interval <minutes_int> Enter the number of minutes the FortiGate unit should wait before sending out an alert email for warning level messages. Only available when filter-mode is threshold.
10
notification-interval <minutes_int>
Enter the number of minutes the FortiGate unit should wait before sending out an alert email for notification level messages. Only available when filter-mode is threshold.
20
information-interval <minutes_int>
Enter the number of minutes the FortiGate unit should wait before sending out an alert email for information level messages. Only available when filter-mode is threshold.
30
debug-interval <minutes_int> Enter the number of minutes the FortiGate unit should wait before sending out an alert email for debug level messages. Only available when filter-mode is threshold.
60
Variable Description Default
ortiOS 4.0 MR3 CLI Reference1-431-99686-20110623 45ttp://docs.fortinet.com/ • Feedback
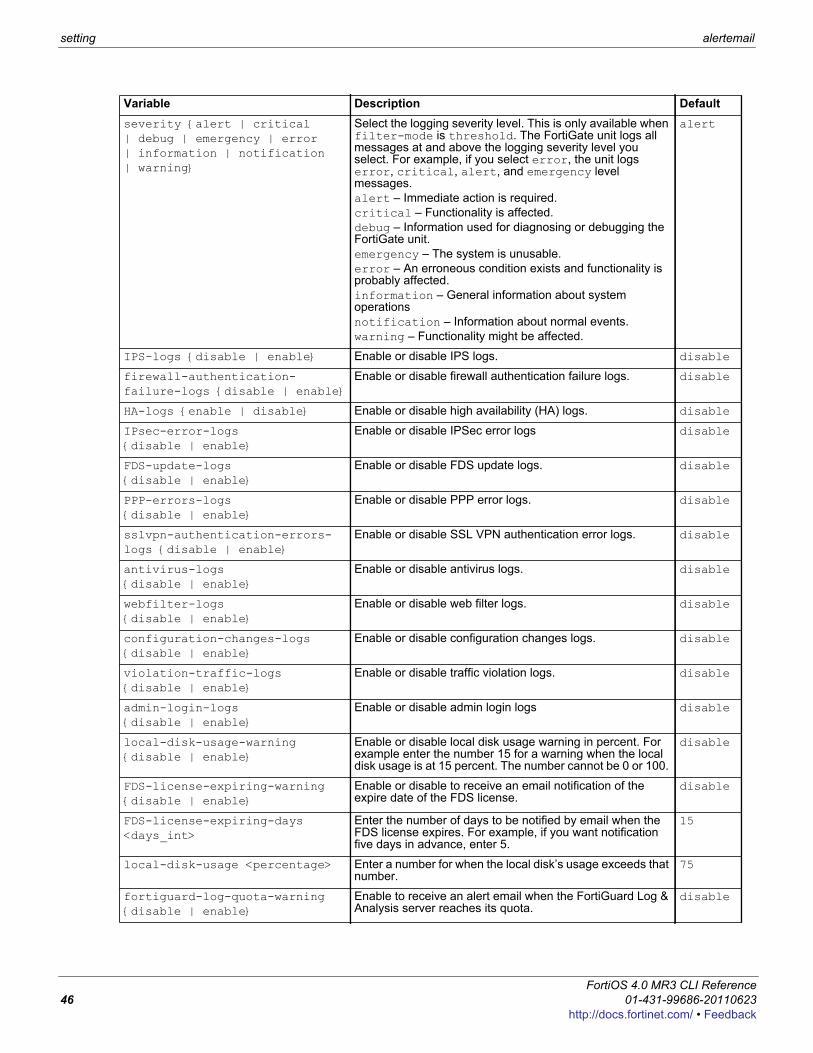
setting alertemail
severity {alert | critical | debug | emergency | error | information | notification | warning}
Select the logging severity level. This is only available when filter-mode is threshold. The FortiGate unit logs all messages at and above the logging severity level you select. For example, if you select error, the unit logs error, critical, alert, and emergency level messages.alert – Immediate action is required. critical – Functionality is affected. debug – Information used for diagnosing or debugging the FortiGate unit. emergency – The system is unusable. error – An erroneous condition exists and functionality is probably affected. information – General information about system operationsnotification – Information about normal events.warning – Functionality might be affected.
alert
IPS-logs {disable | enable} Enable or disable IPS logs. disable
firewall-authentication-failure-logs {disable | enable}
Enable or disable firewall authentication failure logs. disable
HA-logs {enable | disable} Enable or disable high availability (HA) logs. disable
IPsec-error-logs {disable | enable}
Enable or disable IPSec error logs disable
FDS-update-logs {disable | enable}
Enable or disable FDS update logs. disable
PPP-errors-logs {disable | enable}
Enable or disable PPP error logs. disable
sslvpn-authentication-errors-logs {disable | enable}
Enable or disable SSL VPN authentication error logs. disable
antivirus-logs {disable | enable}
Enable or disable antivirus logs. disable
webfilter-logs{disable | enable}
Enable or disable web filter logs. disable
configuration-changes-logs {disable | enable}
Enable or disable configuration changes logs. disable
violation-traffic-logs {disable | enable}
Enable or disable traffic violation logs. disable
admin-login-logs {disable | enable}
Enable or disable admin login logs disable
local-disk-usage-warning {disable | enable}
Enable or disable local disk usage warning in percent. For example enter the number 15 for a warning when the local disk usage is at 15 percent. The number cannot be 0 or 100.
disable
FDS-license-expiring-warning {disable | enable}
Enable or disable to receive an email notification of the expire date of the FDS license.
disable
FDS-license-expiring-days <days_int>
Enter the number of days to be notified by email when the FDS license expires. For example, if you want notification five days in advance, enter 5.
15
local-disk-usage <percentage> Enter a number for when the local disk’s usage exceeds that number.
75
fortiguard-log-quota-warning {disable | enable}
Enable to receive an alert email when the FortiGuard Log & Analysis server reaches its quota.
disable
Variable Description Default
FortiOS 4.0 MR3 CLI Reference46 01-431-99686-20110623
http://docs.fortinet.com/ • Feedback

F0h
antivirusUse antivirus commands to configure antivirus scanning for services, quarantine options, and to enable or disable grayware and heuristic scanning.This chapter describes the following commands:
heuristicmms-checksumnotificationprofilequarantinequarfilepatternservicesettings
ortiOS 4.0 MR3 CLI Reference1-431-99686-20110623 47ttp://docs.fortinet.com/ • Feedback
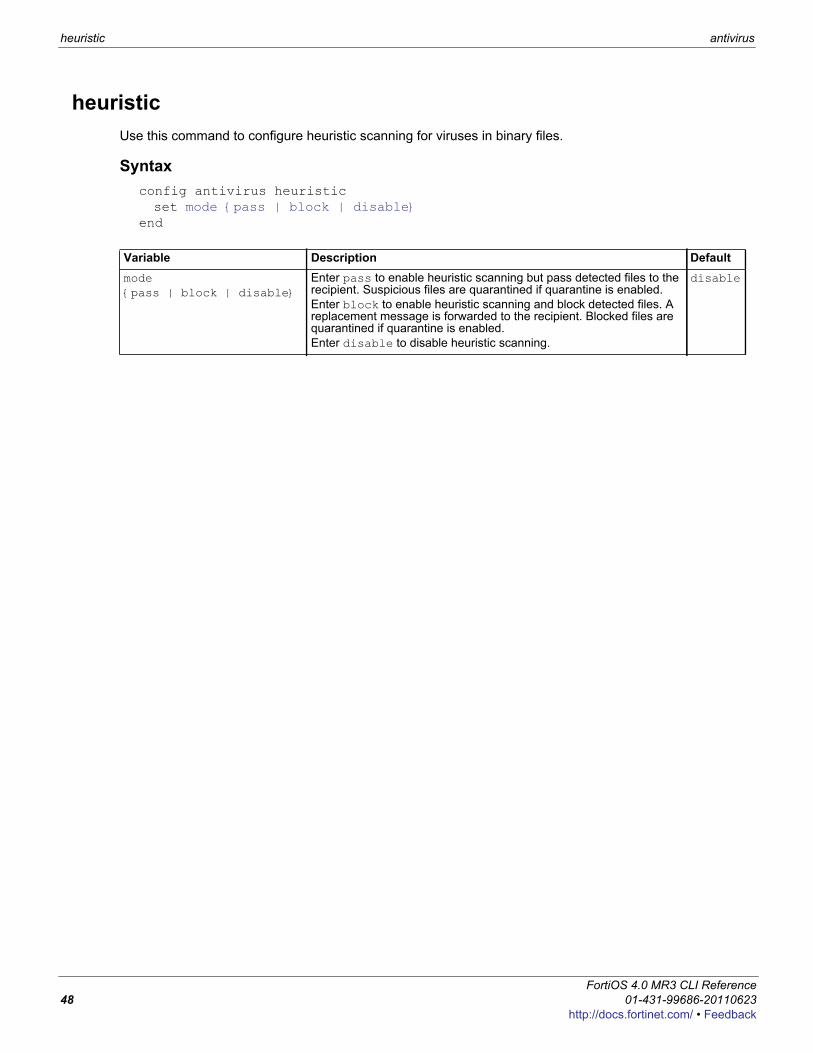
heuristic antivirus
heuristicUse this command to configure heuristic scanning for viruses in binary files.
Syntaxconfig antivirus heuristicset mode {pass | block | disable}
end
Variable Description Defaultmode {pass | block | disable}
Enter pass to enable heuristic scanning but pass detected files to the recipient. Suspicious files are quarantined if quarantine is enabled. Enter block to enable heuristic scanning and block detected files. A replacement message is forwarded to the recipient. Blocked files are quarantined if quarantine is enabled.Enter disable to disable heuristic scanning.
disable
FortiOS 4.0 MR3 CLI Reference48 01-431-99686-20110623
http://docs.fortinet.com/ • Feedback
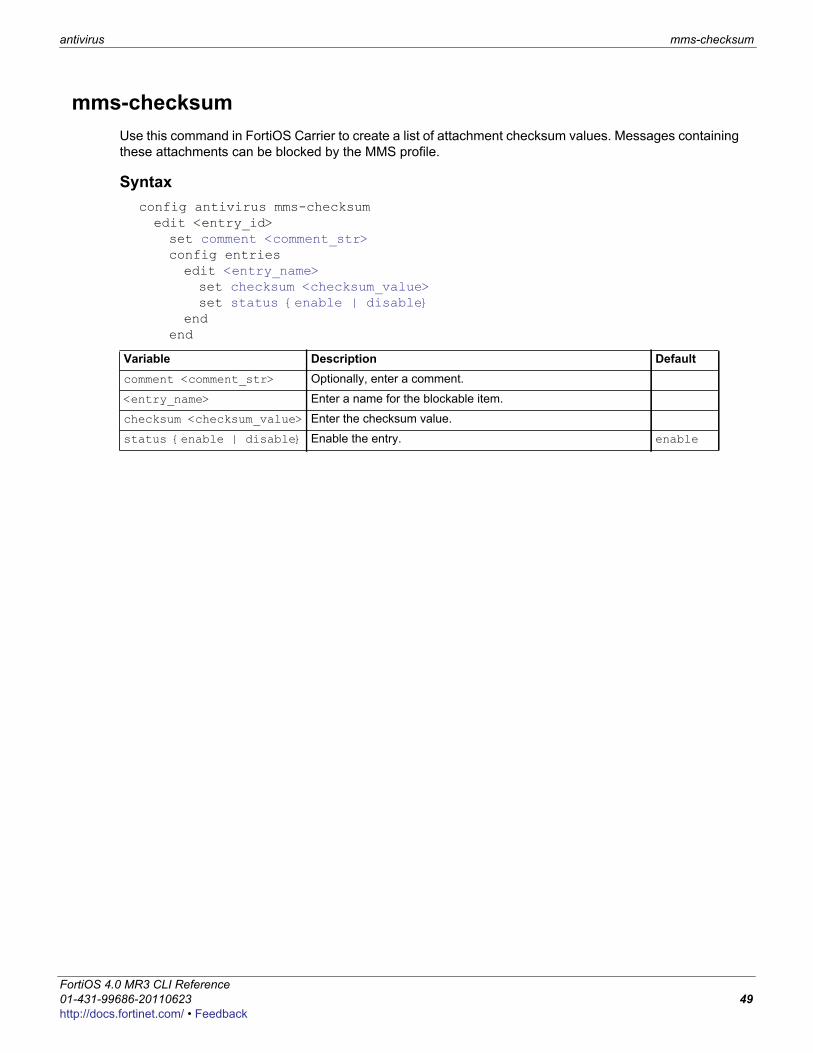
antivirus mms-checksum
F0h
mms-checksumUse this command in FortiOS Carrier to create a list of attachment checksum values. Messages containing these attachments can be blocked by the MMS profile.
Syntaxconfig antivirus mms-checksumedit <entry_id>set comment <comment_str>config entriesedit <entry_name>set checksum <checksum_value>set status {enable | disable}
endend
Variable Description Defaultcomment <comment_str> Optionally, enter a comment.
<entry_name> Enter a name for the blockable item.
checksum <checksum_value> Enter the checksum value.
status {enable | disable} Enable the entry. enable
ortiOS 4.0 MR3 CLI Reference1-431-99686-20110623 49ttp://docs.fortinet.com/ • Feedback
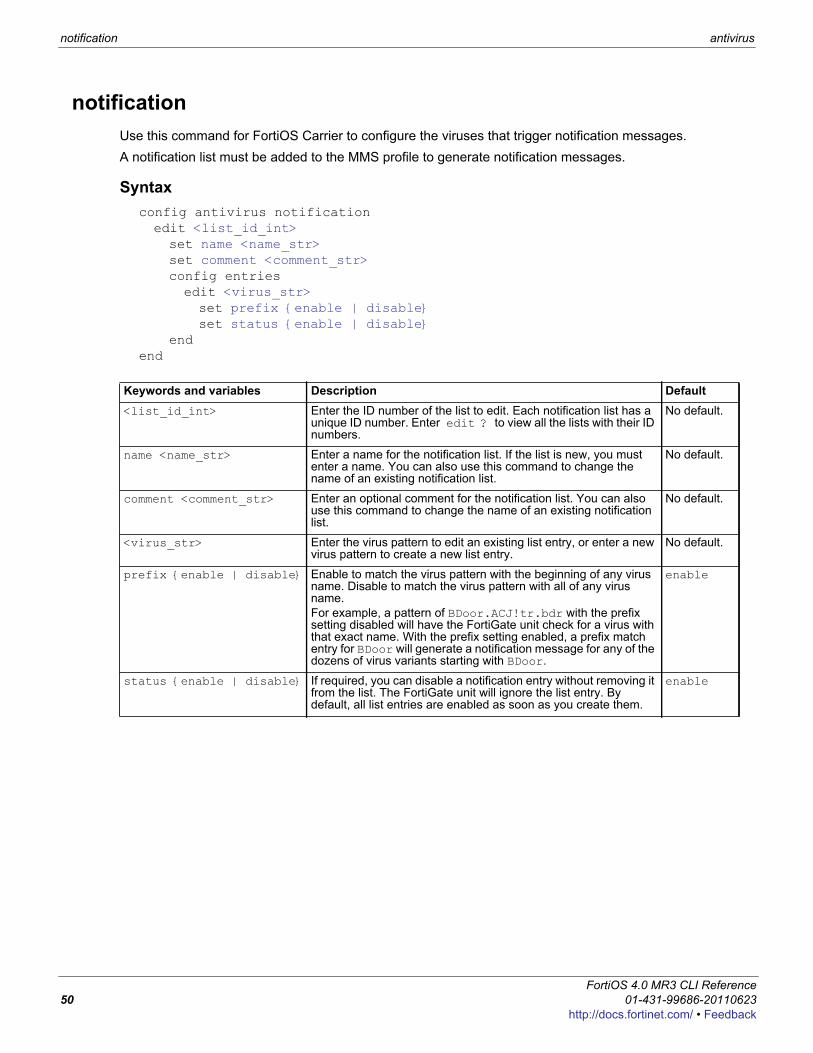
notification antivirus
notificationUse this command for FortiOS Carrier to configure the viruses that trigger notification messages.A notification list must be added to the MMS profile to generate notification messages.
Syntaxconfig antivirus notificationedit <list_id_int>set name <name_str>set comment <comment_str>config entriesedit <virus_str>set prefix {enable | disable}set status {enable | disable}
endend
Keywords and variables Description Default<list_id_int> Enter the ID number of the list to edit. Each notification list has a
unique ID number. Enter edit ? to view all the lists with their ID numbers.
No default.
name <name_str> Enter a name for the notification list. If the list is new, you must enter a name. You can also use this command to change the name of an existing notification list.
No default.
comment <comment_str> Enter an optional comment for the notification list. You can also use this command to change the name of an existing notification list.
No default.
<virus_str> Enter the virus pattern to edit an existing list entry, or enter a new virus pattern to create a new list entry.
No default.
prefix {enable | disable} Enable to match the virus pattern with the beginning of any virus name. Disable to match the virus pattern with all of any virus name.For example, a pattern of BDoor.ACJ!tr.bdr with the prefix setting disabled will have the FortiGate unit check for a virus with that exact name. With the prefix setting enabled, a prefix match entry for BDoor will generate a notification message for any of the dozens of virus variants starting with BDoor.
enable
status {enable | disable} If required, you can disable a notification entry without removing it from the list. The FortiGate unit will ignore the list entry. By default, all list entries are enabled as soon as you create them.
enable
FortiOS 4.0 MR3 CLI Reference50 01-431-99686-20110623
http://docs.fortinet.com/ • Feedback
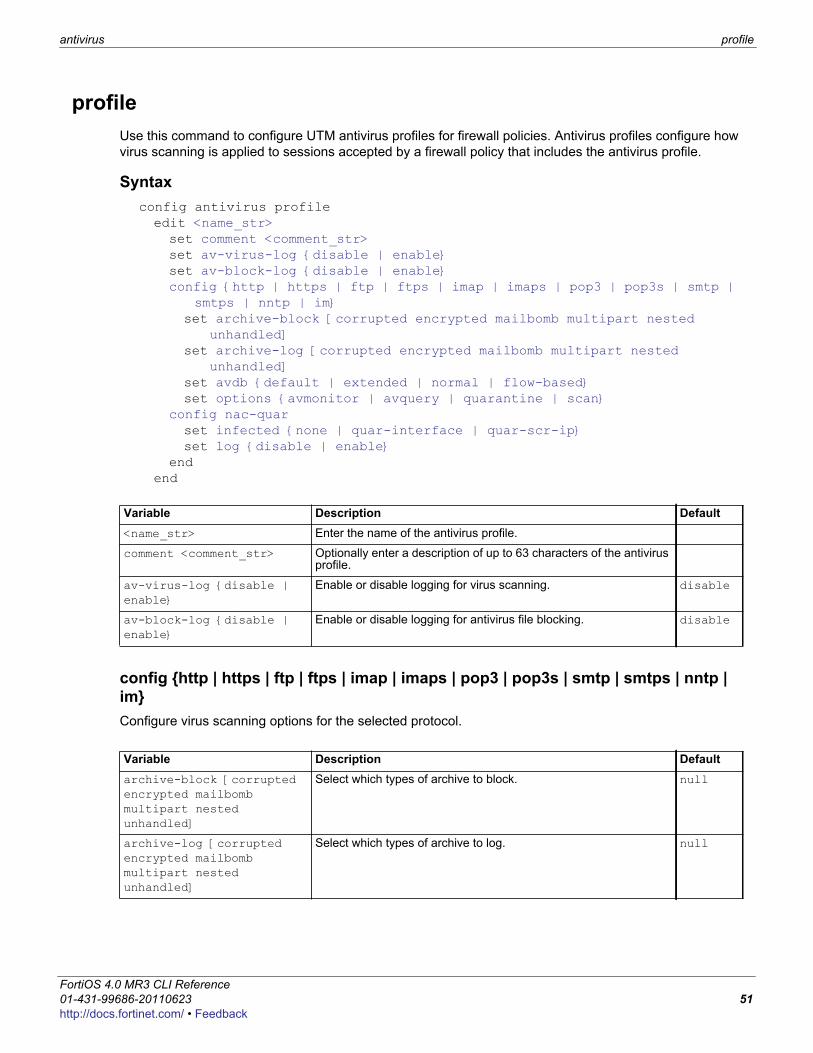
antivirus profile
F0h
profileUse this command to configure UTM antivirus profiles for firewall policies. Antivirus profiles configure how virus scanning is applied to sessions accepted by a firewall policy that includes the antivirus profile.
Syntaxconfig antivirus profileedit <name_str>set comment <comment_str>set av-virus-log {disable | enable}set av-block-log {disable | enable}config {http | https | ftp | ftps | imap | imaps | pop3 | pop3s | smtp |
smtps | nntp | im}set archive-block [corrupted encrypted mailbomb multipart nested
unhandled]set archive-log [corrupted encrypted mailbomb multipart nested
unhandled]set avdb {default | extended | normal | flow-based}set options {avmonitor | avquery | quarantine | scan}
config nac-quarset infected {none | quar-interface | quar-scr-ip}set log {disable | enable}
endend
config {http | https | ftp | ftps | imap | imaps | pop3 | pop3s | smtp | smtps | nntp | im}Configure virus scanning options for the selected protocol.
Variable Description Default<name_str> Enter the name of the antivirus profile.
comment <comment_str> Optionally enter a description of up to 63 characters of the antivirus profile.
av-virus-log {disable | enable}
Enable or disable logging for virus scanning. disable
av-block-log {disable | enable}
Enable or disable logging for antivirus file blocking. disable
Variable Description Defaultarchive-block [corrupted encrypted mailbomb multipart nested unhandled]
Select which types of archive to block. null
archive-log [corrupted encrypted mailbomb multipart nested unhandled]
Select which types of archive to log. null
ortiOS 4.0 MR3 CLI Reference1-431-99686-20110623 51ttp://docs.fortinet.com/ • Feedback

profile antivirus
config nac-quarConfigure NAC quarantine virus scanning options.
avdb {default | extended | normal | flow-based}
Select the antivirus database to use for the protocol.default use the database selected in “antivirus settings” on page 57.extended select the extended virus database, which includes both In the Wild viruses and a large collection of zoo viruses that are no longer seen in recent virus studies. It is suitable for an enhanced security environment.extreme select the extreme virus database, which includes both In the Wild viruses and all available zoo viruses that are no longer seen in recent virus studies. It is suitable for an enhanced security environment.flow-based select the flow-based virus database, which includes In the Wild viruses and some commonly seen viruses on the network. Flow-based virus scan is an alternate to the file-based virus scan. It provides better performance but lower coverage rate compared to file-based virus scan.normal select the regular virus database, which includes In the Wild viruses and most commonly seen viruses on the network. For regular virus protection, it is sufficient to use this database.
default
options {avmonitor | avquery | quarantine | scan}
Select one or more options apply to virus scanning for the protocol. To select more than one, enter the option names separated by a space. Some options are only available for some protocols.avmonitor log detected viruses, but allow them through the firewall without modification. Available for FortiOS Carrier.avquery use the FortiGuard AV query service.quarantine quarantine files that contain viruses. This feature is available for FortiGate units that contain a hard disk or are connected to a FortiAnalyzer unit.scan Scan files transferred using this protocol for viruses.
Variable Description Defaultinfected {none | quar-interface | quar-scr-ip}
Select to quarantine infected hosts to banned user list.none no action is taken.quar-interface quarantine all traffic on infected interface.quar-src-ip quarantine all traffic from source IP.
none
log {disable | enable} Enable or disabling logging for NAC quarantine. disable
Variable Description Default
FortiOS 4.0 MR3 CLI Reference52 01-431-99686-20110623
http://docs.fortinet.com/ • Feedback
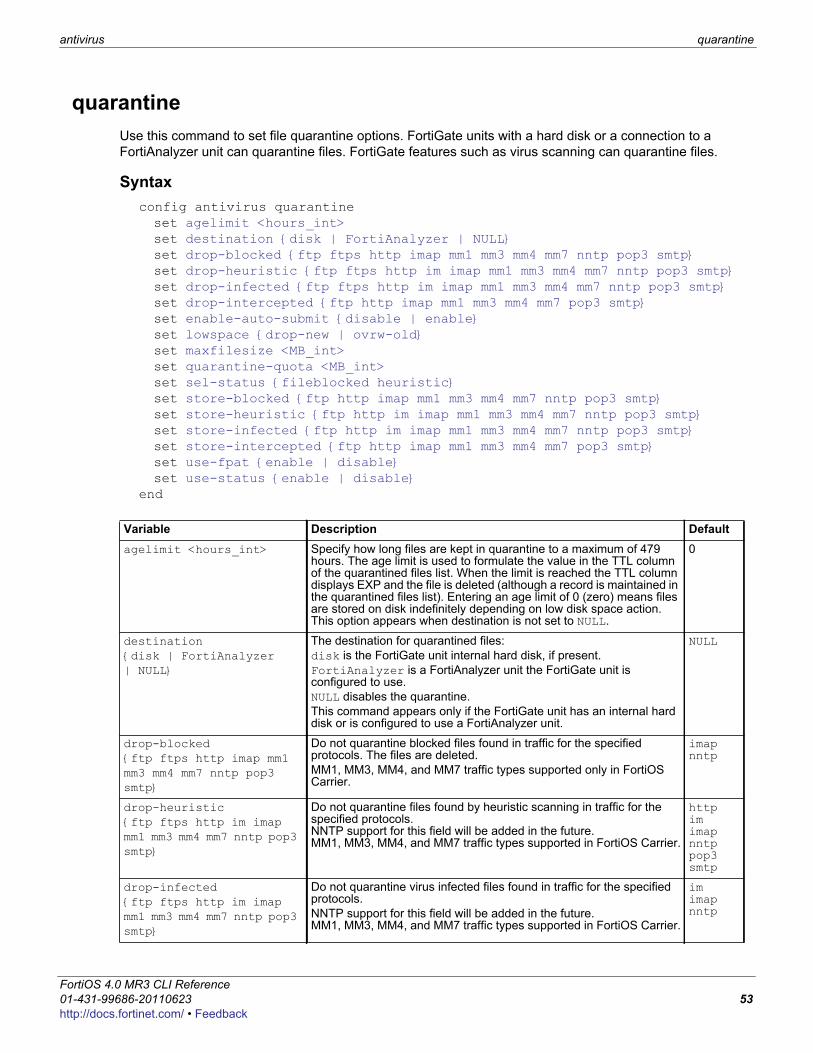
antivirus quarantine
F0h
quarantineUse this command to set file quarantine options. FortiGate units with a hard disk or a connection to a FortiAnalyzer unit can quarantine files. FortiGate features such as virus scanning can quarantine files.
Syntaxconfig antivirus quarantineset agelimit <hours_int>set destination {disk | FortiAnalyzer | NULL}set drop-blocked {ftp ftps http imap mm1 mm3 mm4 mm7 nntp pop3 smtp}set drop-heuristic {ftp ftps http im imap mm1 mm3 mm4 mm7 nntp pop3 smtp}set drop-infected {ftp ftps http im imap mm1 mm3 mm4 mm7 nntp pop3 smtp}set drop-intercepted {ftp http imap mm1 mm3 mm4 mm7 pop3 smtp}set enable-auto-submit {disable | enable}set lowspace {drop-new | ovrw-old}set maxfilesize <MB_int>set quarantine-quota <MB_int>set sel-status {fileblocked heuristic}set store-blocked {ftp http imap mm1 mm3 mm4 mm7 nntp pop3 smtp}set store-heuristic {ftp http im imap mm1 mm3 mm4 mm7 nntp pop3 smtp}set store-infected {ftp http im imap mm1 mm3 mm4 mm7 nntp pop3 smtp}set store-intercepted {ftp http imap mm1 mm3 mm4 mm7 pop3 smtp}set use-fpat {enable | disable}set use-status {enable | disable}
end
Variable Description Defaultagelimit <hours_int> Specify how long files are kept in quarantine to a maximum of 479
hours. The age limit is used to formulate the value in the TTL column of the quarantined files list. When the limit is reached the TTL column displays EXP and the file is deleted (although a record is maintained in the quarantined files list). Entering an age limit of 0 (zero) means files are stored on disk indefinitely depending on low disk space action. This option appears when destination is not set to NULL.
0
destination{disk | FortiAnalyzer | NULL}
The destination for quarantined files:disk is the FortiGate unit internal hard disk, if present.FortiAnalyzer is a FortiAnalyzer unit the FortiGate unit is configured to use.NULL disables the quarantine.This command appears only if the FortiGate unit has an internal hard disk or is configured to use a FortiAnalyzer unit.
NULL
drop-blocked {ftp ftps http imap mm1 mm3 mm4 mm7 nntp pop3 smtp}
Do not quarantine blocked files found in traffic for the specified protocols. The files are deleted.MM1, MM3, MM4, and MM7 traffic types supported only in FortiOS Carrier.
imap nntp
drop-heuristic {ftp ftps http im imap mm1 mm3 mm4 mm7 nntp pop3 smtp}
Do not quarantine files found by heuristic scanning in traffic for the specified protocols.NNTP support for this field will be added in the future.MM1, MM3, MM4, and MM7 traffic types supported in FortiOS Carrier.
http im imap nntp pop3 smtp
drop-infected {ftp ftps http im imap mm1 mm3 mm4 mm7 nntp pop3 smtp}
Do not quarantine virus infected files found in traffic for the specified protocols.NNTP support for this field will be added in the future.MM1, MM3, MM4, and MM7 traffic types supported in FortiOS Carrier.
im imap nntp
ortiOS 4.0 MR3 CLI Reference1-431-99686-20110623 53ttp://docs.fortinet.com/ • Feedback

quarantine antivirus
drop-intercepted {ftp http imap mm1 mm3 mm4 mm7 pop3 smtp}
For FortiOS Carrier, do not quarantine intercepted files found in traffic for the specified protocols. The files are deleted.
imap smtp pop3 http ftp mm1 mm3 mm4 mm7
enable-auto-submit {disable | enable}
Enable or disable automatic submission of the quarantined files matching the use-fpat or use-status settings.This option appears when destination is not set to NULL.
disable
lowspace {drop-new | ovrw-old}
Select the method for handling additional files when the FortiGate hard disk is running out of space.Enter ovwr-old to drop the oldest file (lowest TTL), or drop-new to drop new quarantine files.This option appears when destination is not set to NULL.
ovrw-old
maxfilesize <MB_int> Specify, in MB, the maximum file size to quarantine.The FortiGate unit keeps any existing quarantined files over the limit. The FortiGate unit does not quarantine any new files larger than this value. The file size range is 0-499 MB. Enter 0 for unlimited file size.
0
quarantine-quota <MB_int> Set the antivirus quarantine quota in MB, which is the amount of disk space to reserve for quarantining files.
0
sel-status {fileblocked heuristic}
Configure the status used for automatic uploading of quarantined files.This option appears when destination is not set to NULL.
No default.
store-blocked {ftp http imap mm1 mm3 mm4 mm7 nntp pop3 smtp}
Quarantine blocked files found in traffic for the specified protocols.NNTP support for this field will be added in the future.HTTP, FTP, MM1, MM3, MM4, and MM7 traffic types supported in FortiOS Carrier.
No default.
store-heuristic {ftp http im imap mm1 mm3 mm4 mm7 nntp pop3 smtp}
Quarantine files found by heuristic scanning in traffic for the specified protocols.NNTP support for this field will be added in the future.MM1, MM3, MM4, and MM7 traffic types supported in FortiOS Carrier.
No default.
store-infected {ftp http im imap mm1 mm3 mm4 mm7 nntp pop3 smtp}
Quarantine virus infected files found in traffic for the specified protocols.NNTP support for this field will be added in the future.MM1, MM3, MM4, and MM7 traffic types supported in FortiOS Carrier.
No default.
store-intercepted {ftp http imap mm1 mm3 mm4 mm7 pop3 smtp}
Quarantine intercepted FortiOS Carrier files found in traffic of the specified protocols.
imap smtp pop3 http ftp mm1 mm3 mm4 mm7
use-fpat {enable | disable}
Enable or disable using file patterns to select quarantined files for automatic uploading. See “antivirus quarfilepattern” on page 55 for information on how to configure the file patterns used for automatic uploading.This option appears when destination is not set to NULL.
disable
use-status {enable | disable}
Enable or disable using file status to select quarantined files for automatic uploading.This option appears when destination is not set to NULL.
disable
Variable Description Default
FortiOS 4.0 MR3 CLI Reference54 01-431-99686-20110623
http://docs.fortinet.com/ • Feedback
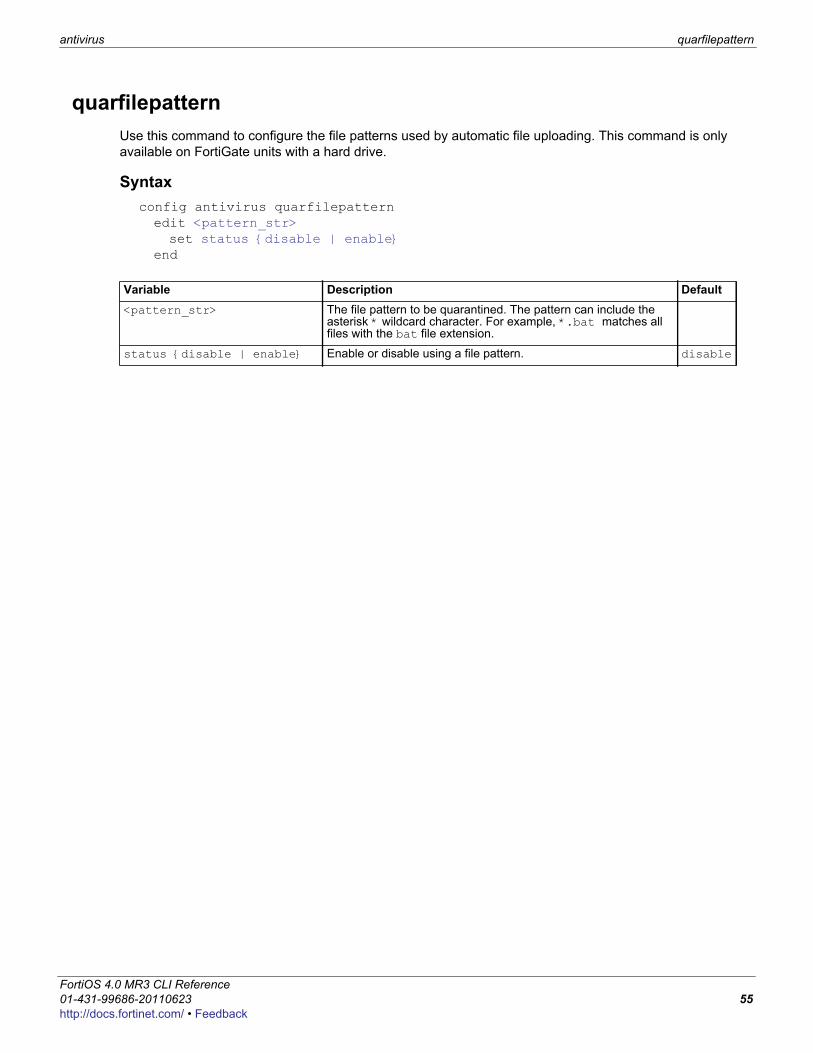
antivirus quarfilepattern
F0h
quarfilepatternUse this command to configure the file patterns used by automatic file uploading. This command is only available on FortiGate units with a hard drive.
Syntaxconfig antivirus quarfilepatternedit <pattern_str>set status {disable | enable}
end
Variable Description Default<pattern_str> The file pattern to be quarantined. The pattern can include the
asterisk * wildcard character. For example, *.bat matches all files with the bat file extension.
status {disable | enable} Enable or disable using a file pattern. disable
ortiOS 4.0 MR3 CLI Reference1-431-99686-20110623 55ttp://docs.fortinet.com/ • Feedback
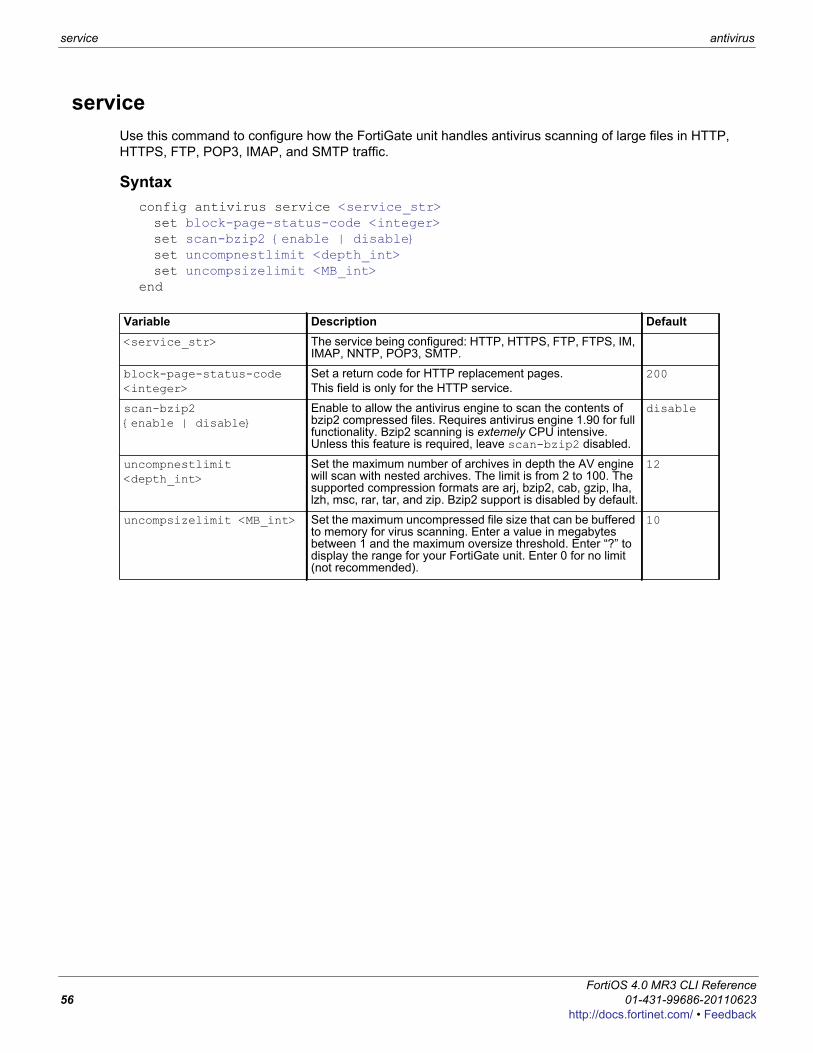
service antivirus
serviceUse this command to configure how the FortiGate unit handles antivirus scanning of large files in HTTP, HTTPS, FTP, POP3, IMAP, and SMTP traffic.
Syntaxconfig antivirus service <service_str>set block-page-status-code <integer>set scan-bzip2 {enable | disable}set uncompnestlimit <depth_int>set uncompsizelimit <MB_int>
end
Variable Description Default<service_str> The service being configured: HTTP, HTTPS, FTP, FTPS, IM,
IMAP, NNTP, POP3, SMTP.
block-page-status-code <integer>
Set a return code for HTTP replacement pages. This field is only for the HTTP service.
200
scan-bzip2 {enable | disable}
Enable to allow the antivirus engine to scan the contents of bzip2 compressed files. Requires antivirus engine 1.90 for full functionality. Bzip2 scanning is extemely CPU intensive. Unless this feature is required, leave scan-bzip2 disabled.
disable
uncompnestlimit <depth_int>
Set the maximum number of archives in depth the AV engine will scan with nested archives. The limit is from 2 to 100. The supported compression formats are arj, bzip2, cab, gzip, lha, lzh, msc, rar, tar, and zip. Bzip2 support is disabled by default.
12
uncompsizelimit <MB_int> Set the maximum uncompressed file size that can be buffered to memory for virus scanning. Enter a value in megabytes between 1 and the maximum oversize threshold. Enter “?” to display the range for your FortiGate unit. Enter 0 for no limit (not recommended).
10
FortiOS 4.0 MR3 CLI Reference56 01-431-99686-20110623
http://docs.fortinet.com/ • Feedback
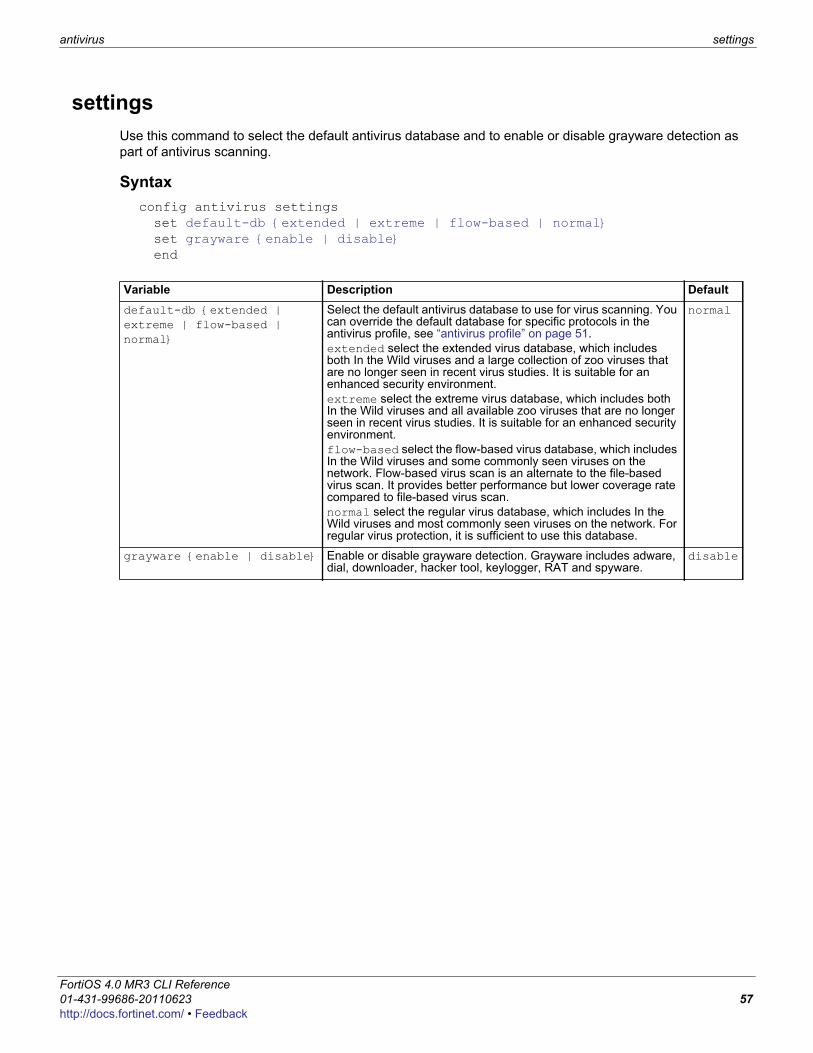
antivirus settings
F0h
settingsUse this command to select the default antivirus database and to enable or disable grayware detection as part of antivirus scanning.
Syntaxconfig antivirus settingsset default-db {extended | extreme | flow-based | normal}set grayware {enable | disable}end
Variable Description Defaultdefault-db {extended | extreme | flow-based | normal}
Select the default antivirus database to use for virus scanning. You can override the default database for specific protocols in the antivirus profile, see “antivirus profile” on page 51.extended select the extended virus database, which includes both In the Wild viruses and a large collection of zoo viruses that are no longer seen in recent virus studies. It is suitable for an enhanced security environment.extreme select the extreme virus database, which includes both In the Wild viruses and all available zoo viruses that are no longer seen in recent virus studies. It is suitable for an enhanced security environment.flow-based select the flow-based virus database, which includes In the Wild viruses and some commonly seen viruses on the network. Flow-based virus scan is an alternate to the file-based virus scan. It provides better performance but lower coverage rate compared to file-based virus scan.normal select the regular virus database, which includes In the Wild viruses and most commonly seen viruses on the network. For regular virus protection, it is sufficient to use this database.
normal
grayware {enable | disable} Enable or disable grayware detection. Grayware includes adware, dial, downloader, hacker tool, keylogger, RAT and spyware.
disable
ortiOS 4.0 MR3 CLI Reference1-431-99686-20110623 57ttp://docs.fortinet.com/ • Feedback

settings antivirus
FortiOS 4.0 MR3 CLI Reference58 01-431-99686-20110623
http://docs.fortinet.com/ • Feedback
F0h
applicationUse these commands to configure application control.
listname
ortiOS 4.0 MR3 CLI Reference1-431-99686-20110623 59ttp://docs.fortinet.com/ • Feedback
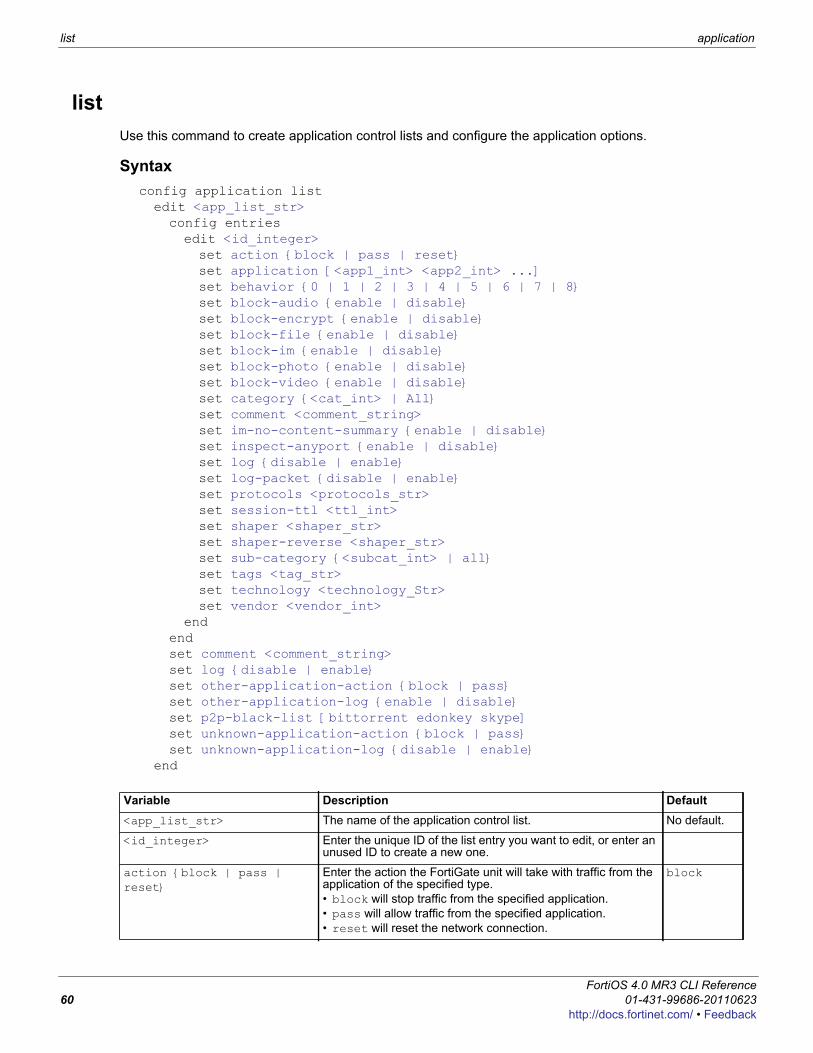
list application
listUse this command to create application control lists and configure the application options.
Syntaxconfig application listedit <app_list_str>config entriesedit <id_integer>set action {block | pass | reset}set application [<app1_int> <app2_int> ...]set behavior {0 | 1 | 2 | 3 | 4 | 5 | 6 | 7 | 8}set block-audio {enable | disable}set block-encrypt {enable | disable}set block-file {enable | disable}set block-im {enable | disable}set block-photo {enable | disable}set block-video {enable | disable}set category {<cat_int> | All}set comment <comment_string>set im-no-content-summary {enable | disable}set inspect-anyport {enable | disable}set log {disable | enable}set log-packet {disable | enable}set protocols <protocols_str>set session-ttl <ttl_int>set shaper <shaper_str>set shaper-reverse <shaper_str>set sub-category {<subcat_int> | all}set tags <tag_str>set technology <technology_Str>set vendor <vendor_int>
endendset comment <comment_string>set log {disable | enable}set other-application-action {block | pass}set other-application-log {enable | disable}set p2p-black-list [bittorrent edonkey skype]set unknown-application-action {block | pass}set unknown-application-log {disable | enable}
end
Variable Description Default<app_list_str> The name of the application control list. No default.
<id_integer> Enter the unique ID of the list entry you want to edit, or enter an unused ID to create a new one.
action {block | pass | reset}
Enter the action the FortiGate unit will take with traffic from the application of the specified type.• block will stop traffic from the specified application.• pass will allow traffic from the specified application.• reset will reset the network connection.
block
FortiOS 4.0 MR3 CLI Reference60 01-431-99686-20110623
http://docs.fortinet.com/ • Feedback
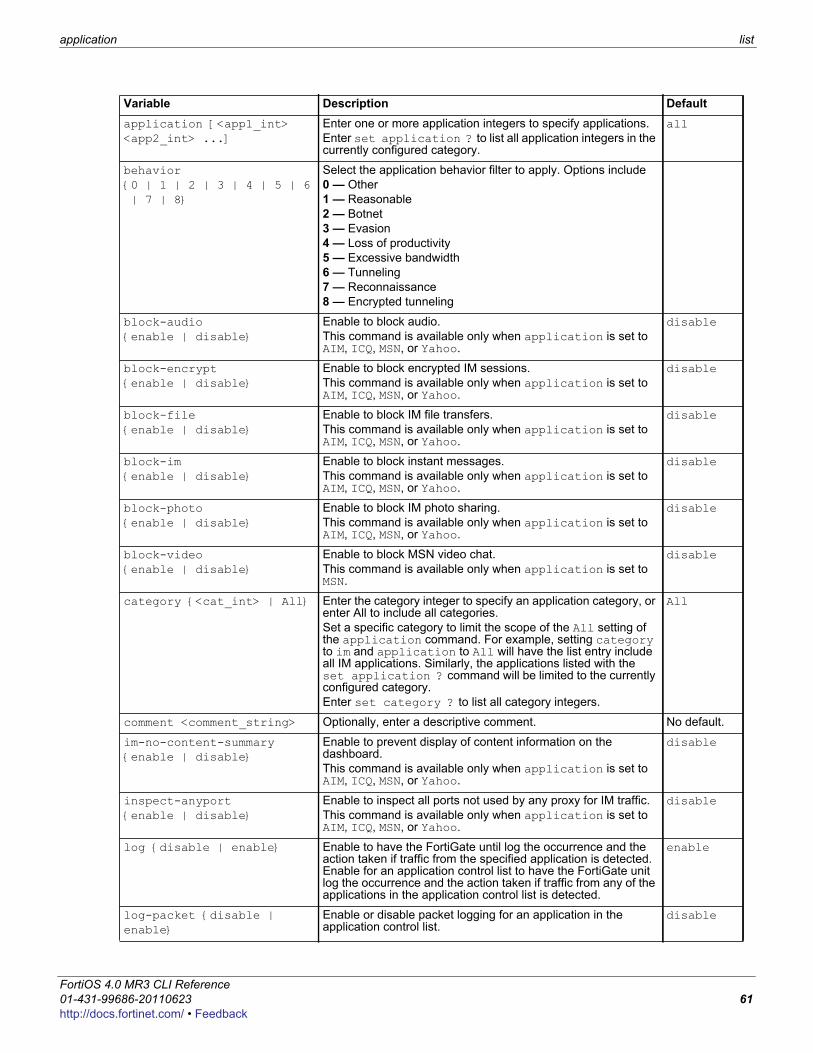
application list
F0h
application [<app1_int> <app2_int> ...]
Enter one or more application integers to specify applications.Enter set application ? to list all application integers in the currently configured category.
all
behavior {0 | 1 | 2 | 3 | 4 | 5 | 6 | 7 | 8}
Select the application behavior filter to apply. Options include0 — Other1 — Reasonable2 — Botnet3 — Evasion4 — Loss of productivity5 — Excessive bandwidth6 — Tunneling7 — Reconnaissance8 — Encrypted tunneling
block-audio {enable | disable}
Enable to block audio.This command is available only when application is set to AIM, ICQ, MSN, or Yahoo.
disable
block-encrypt {enable | disable}
Enable to block encrypted IM sessions.This command is available only when application is set to AIM, ICQ, MSN, or Yahoo.
disable
block-file {enable | disable}
Enable to block IM file transfers.This command is available only when application is set to AIM, ICQ, MSN, or Yahoo.
disable
block-im {enable | disable}
Enable to block instant messages.This command is available only when application is set to AIM, ICQ, MSN, or Yahoo.
disable
block-photo {enable | disable}
Enable to block IM photo sharing.This command is available only when application is set to AIM, ICQ, MSN, or Yahoo.
disable
block-video {enable | disable}
Enable to block MSN video chat. This command is available only when application is set to MSN.
disable
category {<cat_int> | All} Enter the category integer to specify an application category, or enter All to include all categories.Set a specific category to limit the scope of the All setting of the application command. For example, setting category to im and application to All will have the list entry include all IM applications. Similarly, the applications listed with the set application ? command will be limited to the currently configured category.Enter set category ? to list all category integers.
All
comment <comment_string> Optionally, enter a descriptive comment. No default.
im-no-content-summary {enable | disable}
Enable to prevent display of content information on the dashboard.This command is available only when application is set to AIM, ICQ, MSN, or Yahoo.
disable
inspect-anyport {enable | disable}
Enable to inspect all ports not used by any proxy for IM traffic.This command is available only when application is set to AIM, ICQ, MSN, or Yahoo.
disable
log {disable | enable} Enable to have the FortiGate until log the occurrence and the action taken if traffic from the specified application is detected. Enable for an application control list to have the FortiGate unit log the occurrence and the action taken if traffic from any of the applications in the application control list is detected.
enable
log-packet {disable | enable}
Enable or disable packet logging for an application in the application control list.
disable
Variable Description Default
ortiOS 4.0 MR3 CLI Reference1-431-99686-20110623 61ttp://docs.fortinet.com/ • Feedback
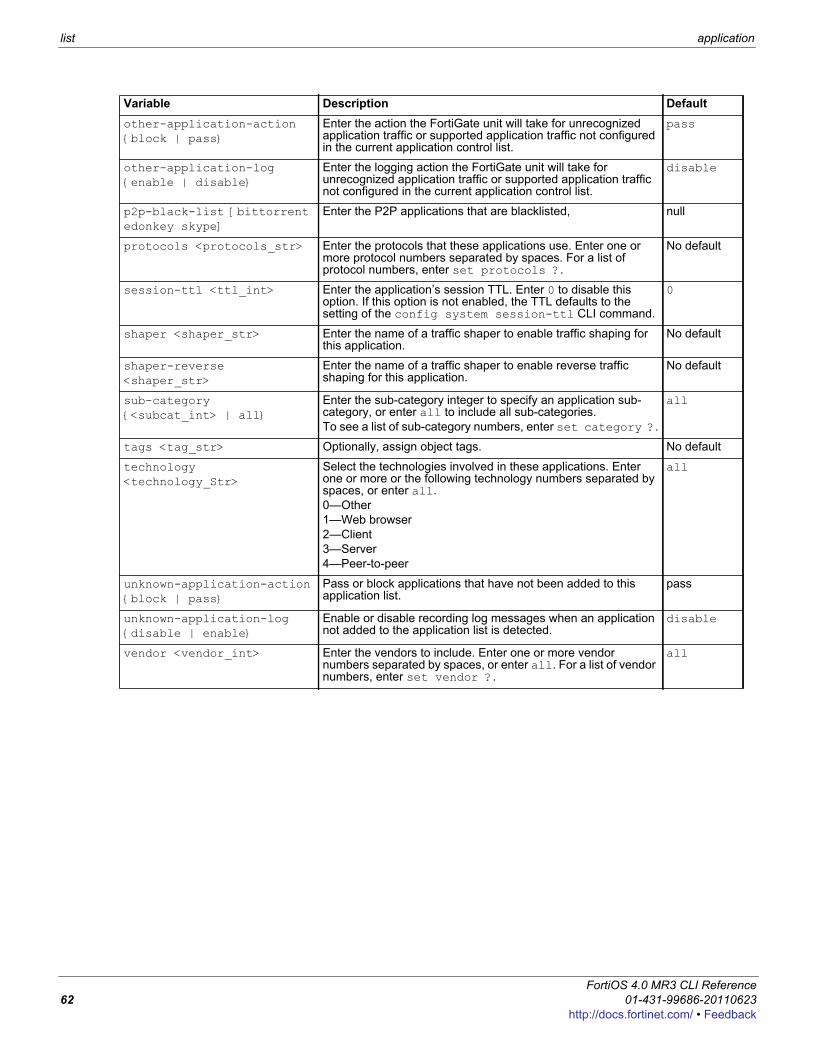
list application
other-application-action {block | pass}
Enter the action the FortiGate unit will take for unrecognized application traffic or supported application traffic not configured in the current application control list.
pass
other-application-log {enable | disable}
Enter the logging action the FortiGate unit will take for unrecognized application traffic or supported application traffic not configured in the current application control list.
disable
p2p-black-list [bittorrent edonkey skype]
Enter the P2P applications that are blacklisted, null
protocols <protocols_str> Enter the protocols that these applications use. Enter one or more protocol numbers separated by spaces. For a list of protocol numbers, enter set protocols ?.
No default
session-ttl <ttl_int> Enter the application’s session TTL. Enter 0 to disable this option. If this option is not enabled, the TTL defaults to the setting of the config system session-ttl CLI command.
0
shaper <shaper_str> Enter the name of a traffic shaper to enable traffic shaping for this application.
No default
shaper-reverse <shaper_str>
Enter the name of a traffic shaper to enable reverse traffic shaping for this application.
No default
sub-category {<subcat_int> | all}
Enter the sub-category integer to specify an application sub-category, or enter all to include all sub-categories.To see a list of sub-category numbers, enter set category ?.
all
tags <tag_str> Optionally, assign object tags. No default
technology <technology_Str>
Select the technologies involved in these applications. Enter one or more or the following technology numbers separated by spaces, or enter all.0—Other1—Web browser2—Client3—Server4—Peer-to-peer
all
unknown-application-action {block | pass}
Pass or block applications that have not been added to this application list.
pass
unknown-application-log {disable | enable}
Enable or disable recording log messages when an application not added to the application list is detected.
disable
vendor <vendor_int> Enter the vendors to include. Enter one or more vendor numbers separated by spaces, or enter all. For a list of vendor numbers, enter set vendor ?.
all
Variable Description Default
FortiOS 4.0 MR3 CLI Reference62 01-431-99686-20110623
http://docs.fortinet.com/ • Feedback
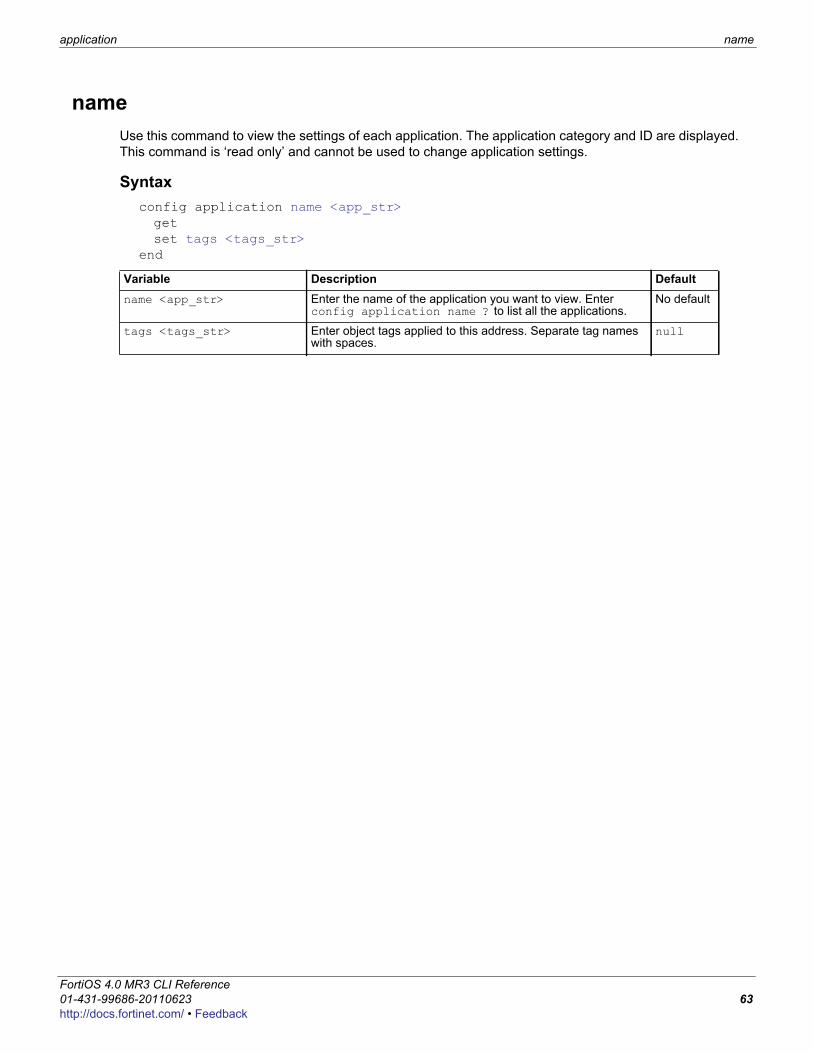
application name
F0h
nameUse this command to view the settings of each application. The application category and ID are displayed. This command is ‘read only’ and cannot be used to change application settings.
Syntaxconfig application name <app_str>getset tags <tags_str>
end
Variable Description Defaultname <app_str> Enter the name of the application you want to view. Enter
config application name ? to list all the applications.No default
tags <tags_str> Enter object tags applied to this address. Separate tag names with spaces.
null
ortiOS 4.0 MR3 CLI Reference1-431-99686-20110623 63ttp://docs.fortinet.com/ • Feedback

name application
FortiOS 4.0 MR3 CLI Reference64 01-431-99686-20110623
http://docs.fortinet.com/ • Feedback
F0h
dlpUse these commands to configure Data Leak Prevention (DLP).
compoundfilepatternfp-doc-sourcefp-sensitivityrulesensorsettings
ortiOS 4.0 MR3 CLI Reference1-431-99686-20110623 65ttp://docs.fortinet.com/ • Feedback
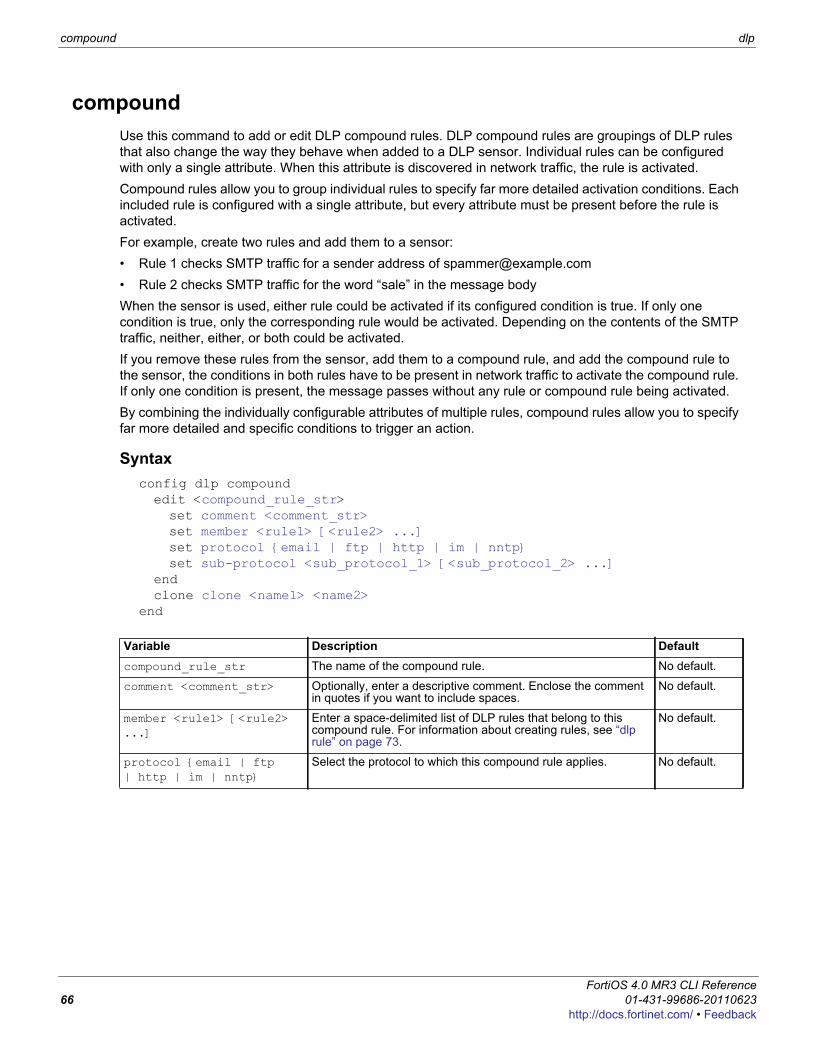
compound dlp
compoundUse this command to add or edit DLP compound rules. DLP compound rules are groupings of DLP rules that also change the way they behave when added to a DLP sensor. Individual rules can be configured with only a single attribute. When this attribute is discovered in network traffic, the rule is activated.Compound rules allow you to group individual rules to specify far more detailed activation conditions. Each included rule is configured with a single attribute, but every attribute must be present before the rule is activated.For example, create two rules and add them to a sensor:• Rule 1 checks SMTP traffic for a sender address of [email protected]• Rule 2 checks SMTP traffic for the word “sale” in the message bodyWhen the sensor is used, either rule could be activated if its configured condition is true. If only one condition is true, only the corresponding rule would be activated. Depending on the contents of the SMTP traffic, neither, either, or both could be activated.If you remove these rules from the sensor, add them to a compound rule, and add the compound rule to the sensor, the conditions in both rules have to be present in network traffic to activate the compound rule. If only one condition is present, the message passes without any rule or compound rule being activated.By combining the individually configurable attributes of multiple rules, compound rules allow you to specify far more detailed and specific conditions to trigger an action.
Syntaxconfig dlp compoundedit <compound_rule_str>set comment <comment_str>set member <rule1> [<rule2> ...]set protocol {email | ftp | http | im | nntp}set sub-protocol <sub_protocol_1> [<sub_protocol_2> ...]
endclone clone <name1> <name2>
end
Variable Description Defaultcompound_rule_str The name of the compound rule. No default.
comment <comment_str> Optionally, enter a descriptive comment. Enclose the comment in quotes if you want to include spaces.
No default.
member <rule1> [<rule2> ...]
Enter a space-delimited list of DLP rules that belong to this compound rule. For information about creating rules, see “dlp rule” on page 73.
No default.
protocol {email | ftp | http | im | nntp}
Select the protocol to which this compound rule applies. No default.
FortiOS 4.0 MR3 CLI Reference66 01-431-99686-20110623
http://docs.fortinet.com/ • Feedback
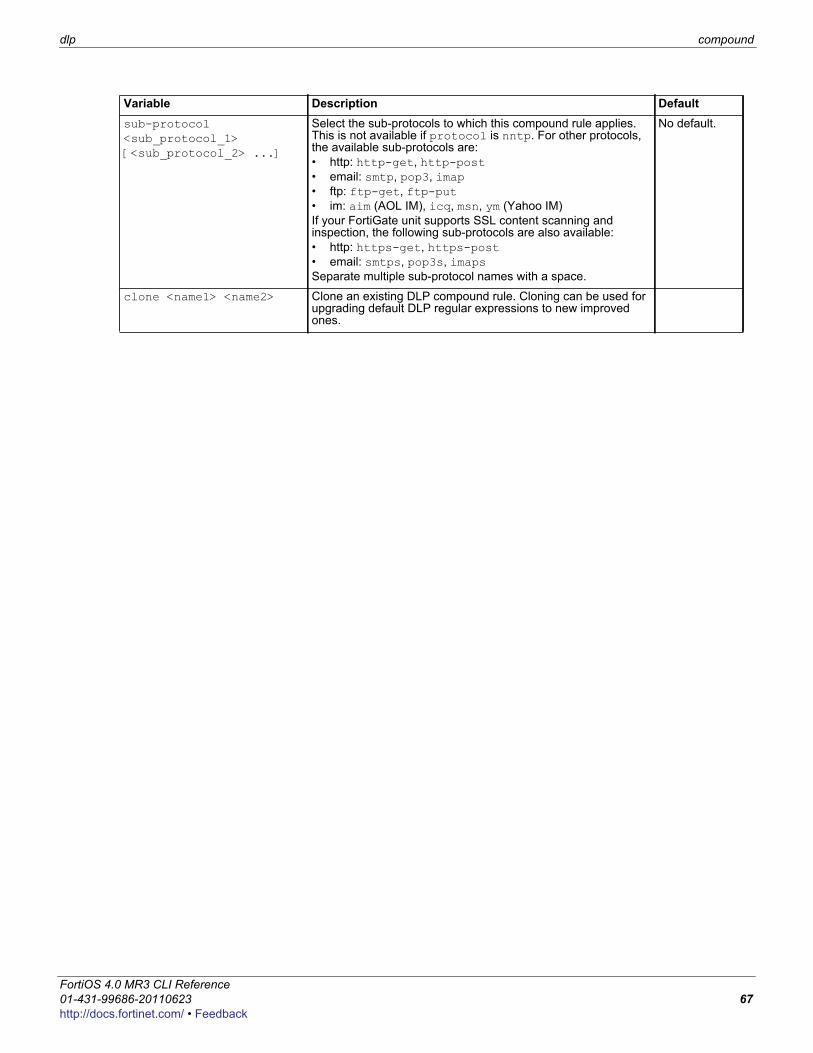
dlp compound
F0h
sub-protocol <sub_protocol_1> [<sub_protocol_2> ...]
Select the sub-protocols to which this compound rule applies. This is not available if protocol is nntp. For other protocols, the available sub-protocols are:• http: http-get, http-post• email: smtp, pop3, imap• ftp: ftp-get, ftp-put• im: aim (AOL IM), icq, msn, ym (Yahoo IM)If your FortiGate unit supports SSL content scanning and inspection, the following sub-protocols are also available:• http: https-get, https-post• email: smtps, pop3s, imapsSeparate multiple sub-protocol names with a space.
No default.
clone <name1> <name2> Clone an existing DLP compound rule. Cloning can be used for upgrading default DLP regular expressions to new improved ones.
Variable Description Default
ortiOS 4.0 MR3 CLI Reference1-431-99686-20110623 67ttp://docs.fortinet.com/ • Feedback
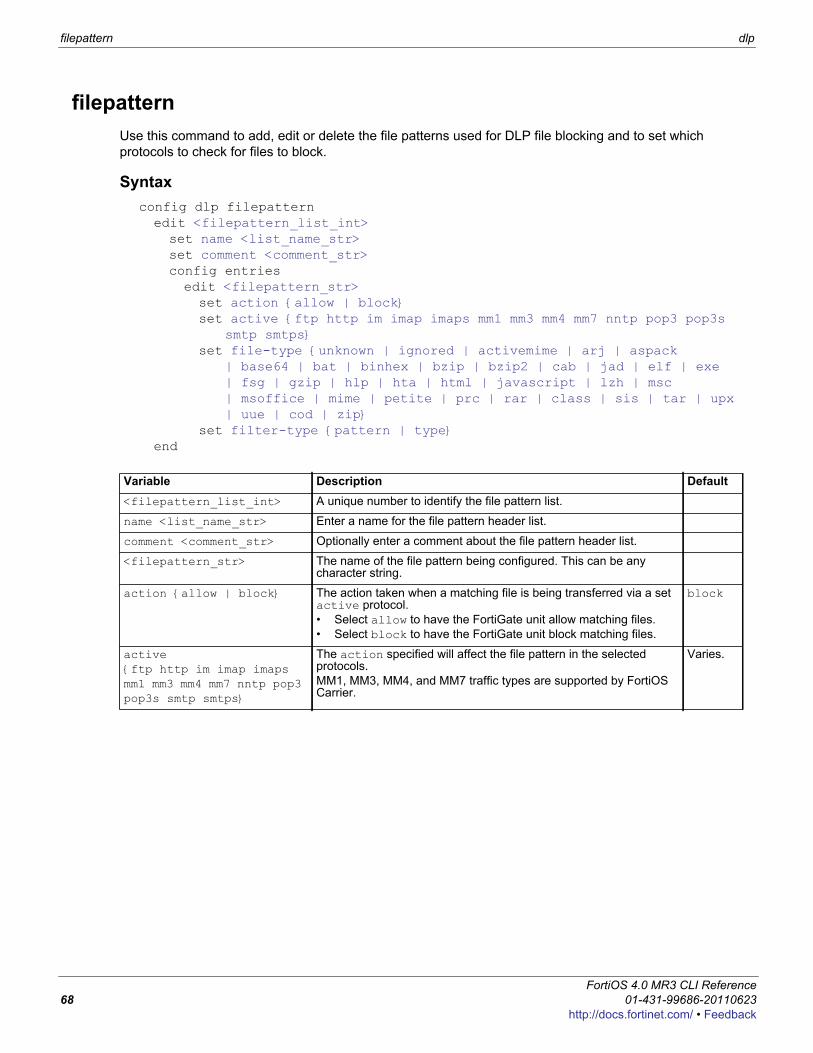
filepattern dlp
filepatternUse this command to add, edit or delete the file patterns used for DLP file blocking and to set which protocols to check for files to block.
Syntax config dlp filepatternedit <filepattern_list_int>set name <list_name_str>set comment <comment_str>config entriesedit <filepattern_str>set action {allow | block}set active {ftp http im imap imaps mm1 mm3 mm4 mm7 nntp pop3 pop3s
smtp smtps}set file-type {unknown | ignored | activemime | arj | aspack
| base64 | bat | binhex | bzip | bzip2 | cab | jad | elf | exe | fsg | gzip | hlp | hta | html | javascript | lzh | msc | msoffice | mime | petite | prc | rar | class | sis | tar | upx | uue | cod | zip}
set filter-type {pattern | type}end
Variable Description Default<filepattern_list_int> A unique number to identify the file pattern list.
name <list_name_str> Enter a name for the file pattern header list.
comment <comment_str> Optionally enter a comment about the file pattern header list.
<filepattern_str> The name of the file pattern being configured. This can be any character string.
action {allow | block} The action taken when a matching file is being transferred via a set active protocol.• Select allow to have the FortiGate unit allow matching files.• Select block to have the FortiGate unit block matching files.
block
active {ftp http im imap imaps mm1 mm3 mm4 mm7 nntp pop3 pop3s smtp smtps}
The action specified will affect the file pattern in the selected protocols.MM1, MM3, MM4, and MM7 traffic types are supported by FortiOS Carrier.
Varies.
FortiOS 4.0 MR3 CLI Reference68 01-431-99686-20110623
http://docs.fortinet.com/ • Feedback
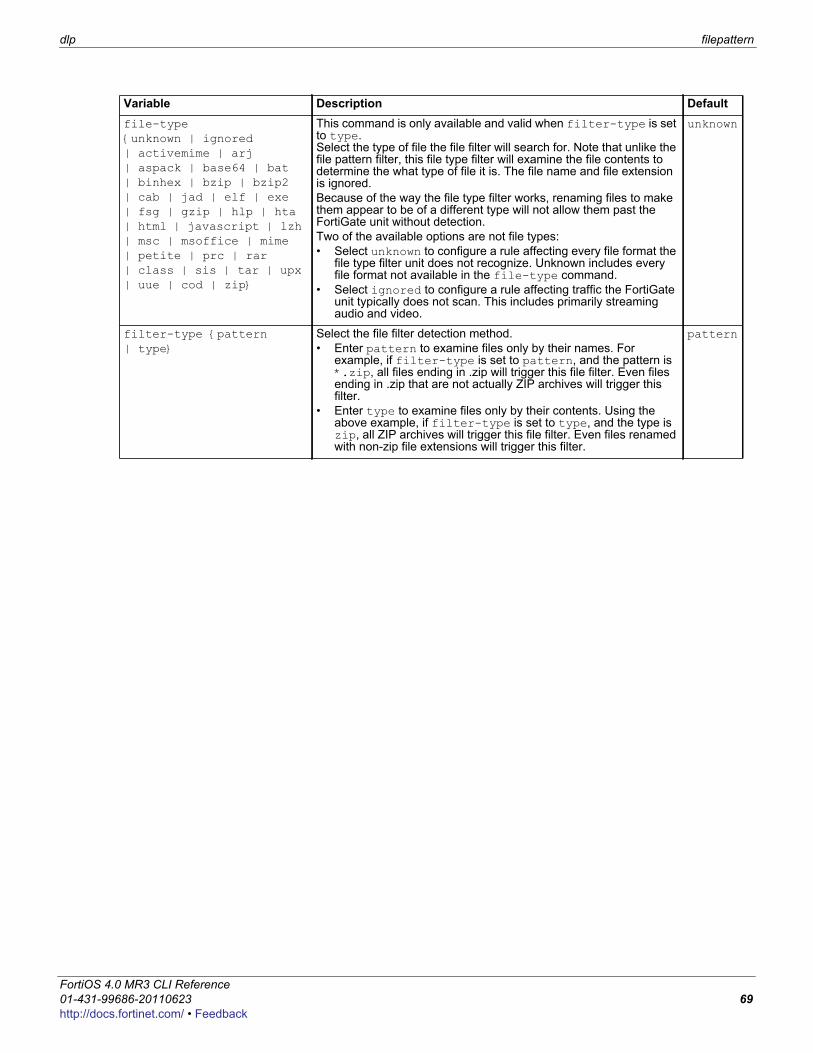
dlp filepattern
F0h
file-type {unknown | ignored | activemime | arj | aspack | base64 | bat | binhex | bzip | bzip2 | cab | jad | elf | exe | fsg | gzip | hlp | hta | html | javascript | lzh | msc | msoffice | mime | petite | prc | rar | class | sis | tar | upx | uue | cod | zip}
This command is only available and valid when filter-type is set to type.Select the type of file the file filter will search for. Note that unlike the file pattern filter, this file type filter will examine the file contents to determine the what type of file it is. The file name and file extension is ignored.Because of the way the file type filter works, renaming files to make them appear to be of a different type will not allow them past the FortiGate unit without detection.Two of the available options are not file types:• Select unknown to configure a rule affecting every file format the
file type filter unit does not recognize. Unknown includes every file format not available in the file-type command.
• Select ignored to configure a rule affecting traffic the FortiGate unit typically does not scan. This includes primarily streaming audio and video.
unknown
filter-type {pattern | type}
Select the file filter detection method.• Enter pattern to examine files only by their names. For
example, if filter-type is set to pattern, and the pattern is *.zip, all files ending in .zip will trigger this file filter. Even files ending in .zip that are not actually ZIP archives will trigger this filter.
• Enter type to examine files only by their contents. Using the above example, if filter-type is set to type, and the type is zip, all ZIP archives will trigger this file filter. Even files renamed with non-zip file extensions will trigger this filter.
pattern
Variable Description Default
ortiOS 4.0 MR3 CLI Reference1-431-99686-20110623 69ttp://docs.fortinet.com/ • Feedback
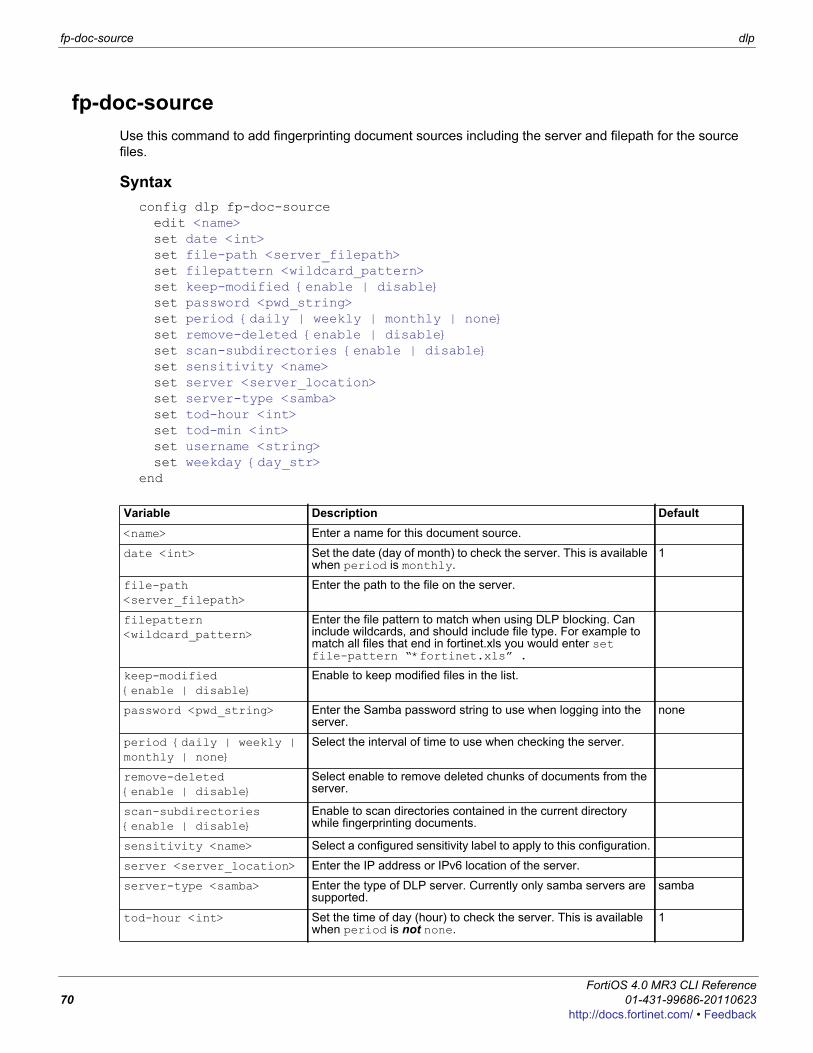
fp-doc-source dlp
fp-doc-sourceUse this command to add fingerprinting document sources including the server and filepath for the source files.
Syntaxconfig dlp fp-doc-sourceedit <name>set date <int>set file-path <server_filepath>set filepattern <wildcard_pattern>set keep-modified {enable | disable}set password <pwd_string>set period {daily | weekly | monthly | none}set remove-deleted {enable | disable}set scan-subdirectories {enable | disable}set sensitivity <name>set server <server_location>set server-type <samba>set tod-hour <int>set tod-min <int>set username <string>set weekday {day_str>
end
Variable Description Default<name> Enter a name for this document source.
date <int> Set the date (day of month) to check the server. This is available when period is monthly.
1
file-path <server_filepath>
Enter the path to the file on the server.
filepattern <wildcard_pattern>
Enter the file pattern to match when using DLP blocking. Can include wildcards, and should include file type. For example to match all files that end in fortinet.xls you would enter set file-pattern “*fortinet.xls” .
keep-modified {enable | disable}
Enable to keep modified files in the list.
password <pwd_string> Enter the Samba password string to use when logging into the server.
none
period {daily | weekly | monthly | none}
Select the interval of time to use when checking the server.
remove-deleted {enable | disable}
Select enable to remove deleted chunks of documents from the server.
scan-subdirectories {enable | disable}
Enable to scan directories contained in the current directory while fingerprinting documents.
sensitivity <name> Select a configured sensitivity label to apply to this configuration.
server <server_location> Enter the IP address or IPv6 location of the server.
server-type <samba> Enter the type of DLP server. Currently only samba servers are supported.
samba
tod-hour <int> Set the time of day (hour) to check the server. This is available when period is not none.
1
FortiOS 4.0 MR3 CLI Reference70 01-431-99686-20110623
http://docs.fortinet.com/ • Feedback
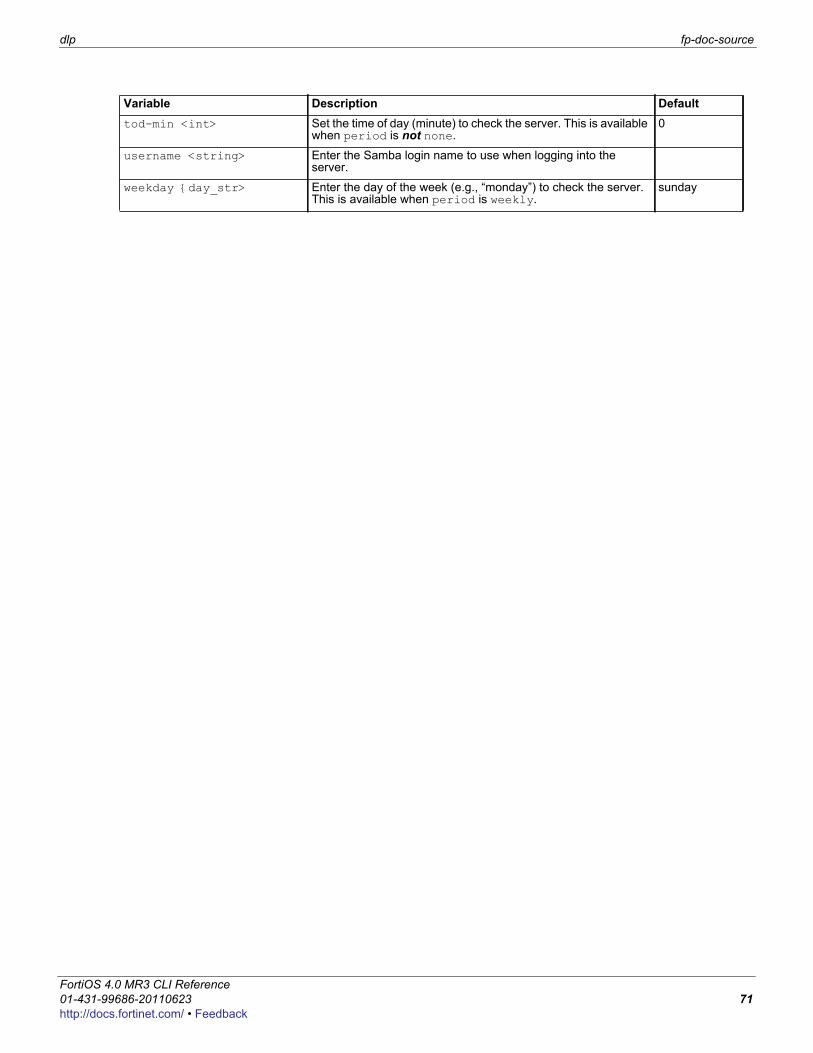
dlp fp-doc-source
F0h
tod-min <int> Set the time of day (minute) to check the server. This is available when period is not none.
0
username <string> Enter the Samba login name to use when logging into the server.
weekday {day_str> Enter the day of the week (e.g., “monday”) to check the server. This is available when period is weekly.
sunday
Variable Description Default
ortiOS 4.0 MR3 CLI Reference1-431-99686-20110623 71ttp://docs.fortinet.com/ • Feedback
fp-sensitivity dlp
fp-sensitivityUse this command to add fingerprinting sensitivity labels that can be applied to document sources and DLP rules. These entries are labels only.
Syntaxconfig dlp fp-sensitivityedit <name_string>
end
Variable Description Default<name_string> Enter a string that will be a label. It will be used to describe DLP
rules.
FortiOS 4.0 MR3 CLI Reference72 01-431-99686-20110623
http://docs.fortinet.com/ • Feedback
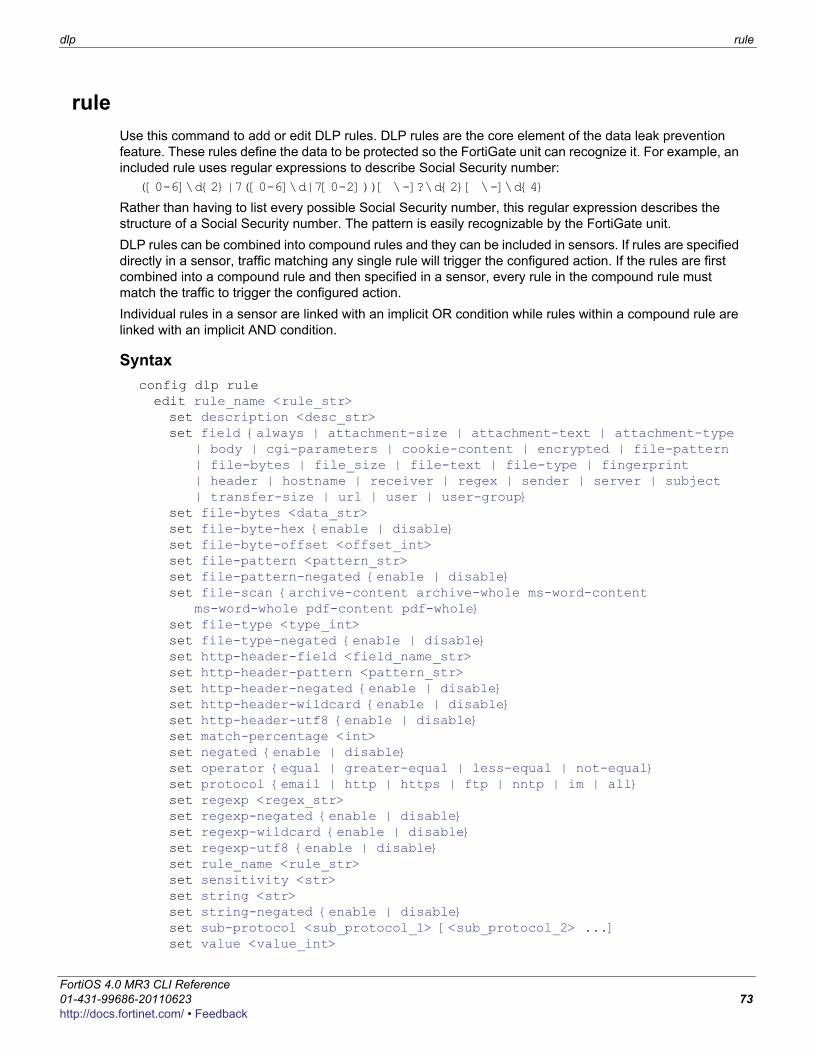
dlp rule
F0h
ruleUse this command to add or edit DLP rules. DLP rules are the core element of the data leak prevention feature. These rules define the data to be protected so the FortiGate unit can recognize it. For example, an included rule uses regular expressions to describe Social Security number:
([0-6]\d{2}|7([0-6]\d|7[0-2]))[ \-]?\d{2}[ \-]\d{4}
Rather than having to list every possible Social Security number, this regular expression describes the structure of a Social Security number. The pattern is easily recognizable by the FortiGate unit.DLP rules can be combined into compound rules and they can be included in sensors. If rules are specified directly in a sensor, traffic matching any single rule will trigger the configured action. If the rules are first combined into a compound rule and then specified in a sensor, every rule in the compound rule must match the traffic to trigger the configured action.Individual rules in a sensor are linked with an implicit OR condition while rules within a compound rule are linked with an implicit AND condition.
Syntaxconfig dlp ruleedit rule_name <rule_str>set description <desc_str>set field {always | attachment-size | attachment-text | attachment-type
| body | cgi-parameters | cookie-content | encrypted | file-pattern | file-bytes | file_size | file-text | file-type | fingerprint | header | hostname | receiver | regex | sender | server | subject | transfer-size | url | user | user-group}
set file-bytes <data_str>set file-byte-hex {enable | disable}set file-byte-offset <offset_int>set file-pattern <pattern_str>set file-pattern-negated {enable | disable}set file-scan {archive-content archive-whole ms-word-content
ms-word-whole pdf-content pdf-whole}set file-type <type_int>set file-type-negated {enable | disable}set http-header-field <field_name_str>set http-header-pattern <pattern_str>set http-header-negated {enable | disable}set http-header-wildcard {enable | disable}set http-header-utf8 {enable | disable}set match-percentage <int>set negated {enable | disable}set operator {equal | greater-equal | less-equal | not-equal}set protocol {email | http | https | ftp | nntp | im | all}set regexp <regex_str>set regexp-negated {enable | disable}set regexp-wildcard {enable | disable}set regexp-utf8 {enable | disable}set rule_name <rule_str>set sensitivity <str>set string <str>set string-negated {enable | disable}set sub-protocol <sub_protocol_1> [<sub_protocol_2> ...]set value <value_int>
ortiOS 4.0 MR3 CLI Reference1-431-99686-20110623 73ttp://docs.fortinet.com/ • Feedback
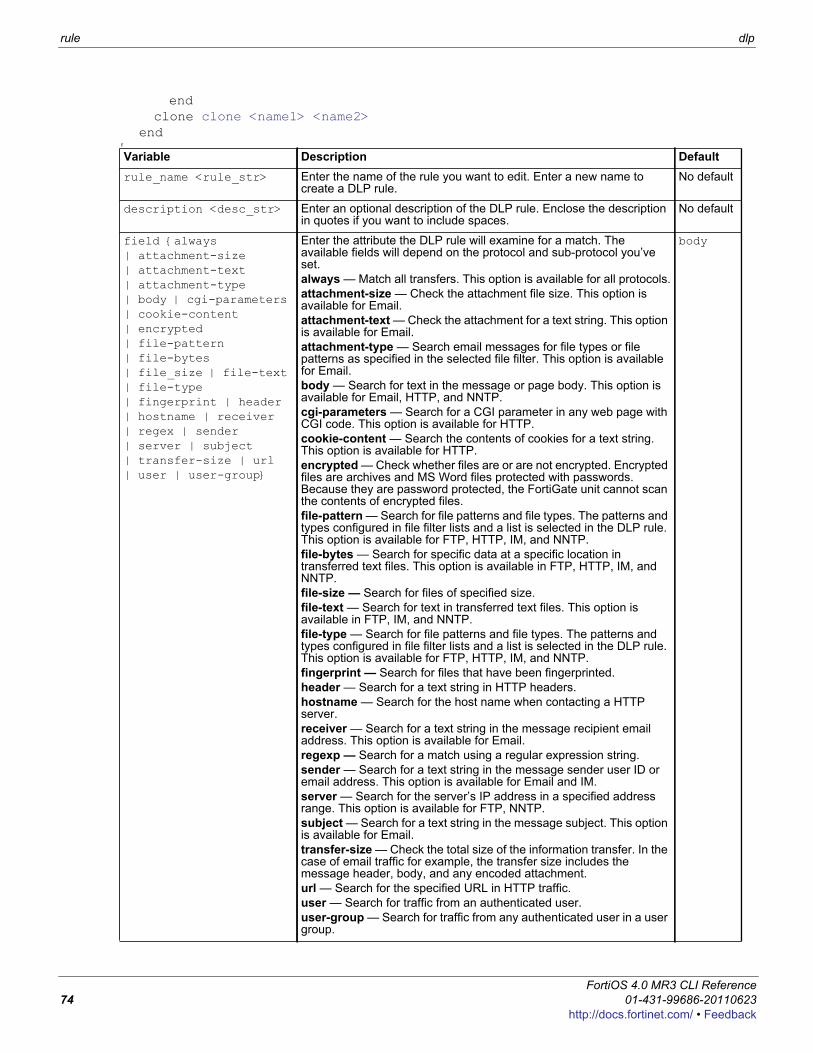
rule dlp
endclone clone <name1> <name2>
end f
Variable Description Defaultrule_name <rule_str> Enter the name of the rule you want to edit. Enter a new name to
create a DLP rule.No default
description <desc_str> Enter an optional description of the DLP rule. Enclose the description in quotes if you want to include spaces.
No default
field {always | attachment-size | attachment-text | attachment-type | body | cgi-parameters | cookie-content | encrypted | file-pattern | file-bytes | file_size | file-text | file-type | fingerprint | header | hostname | receiver | regex | sender | server | subject | transfer-size | url | user | user-group}
Enter the attribute the DLP rule will examine for a match. The available fields will depend on the protocol and sub-protocol you’ve set.always — Match all transfers. This option is available for all protocols.attachment-size — Check the attachment file size. This option is available for Email.attachment-text — Check the attachment for a text string. This option is available for Email.attachment-type — Search email messages for file types or file patterns as specified in the selected file filter. This option is available for Email.body — Search for text in the message or page body. This option is available for Email, HTTP, and NNTP.cgi-parameters — Search for a CGI parameter in any web page with CGI code. This option is available for HTTP.cookie-content — Search the contents of cookies for a text string. This option is available for HTTP.encrypted — Check whether files are or are not encrypted. Encrypted files are archives and MS Word files protected with passwords. Because they are password protected, the FortiGate unit cannot scan the contents of encrypted files.file-pattern — Search for file patterns and file types. The patterns and types configured in file filter lists and a list is selected in the DLP rule. This option is available for FTP, HTTP, IM, and NNTP.file-bytes — Search for specific data at a specific location in transferred text files. This option is available in FTP, HTTP, IM, and NNTP.file-size — Search for files of specified size.file-text — Search for text in transferred text files. This option is available in FTP, IM, and NNTP.file-type — Search for file patterns and file types. The patterns and types configured in file filter lists and a list is selected in the DLP rule. This option is available for FTP, HTTP, IM, and NNTP.fingerprint — Search for files that have been fingerprinted.header — Search for a text string in HTTP headers.hostname — Search for the host name when contacting a HTTP server.receiver — Search for a text string in the message recipient email address. This option is available for Email.regexp — Search for a match using a regular expression string.sender — Search for a text string in the message sender user ID or email address. This option is available for Email and IM.server — Search for the server’s IP address in a specified address range. This option is available for FTP, NNTP.subject — Search for a text string in the message subject. This option is available for Email.transfer-size — Check the total size of the information transfer. In the case of email traffic for example, the transfer size includes the message header, body, and any encoded attachment.url — Search for the specified URL in HTTP traffic.user — Search for traffic from an authenticated user.user-group — Search for traffic from any authenticated user in a user group.
body
FortiOS 4.0 MR3 CLI Reference74 01-431-99686-20110623
http://docs.fortinet.com/ • Feedback
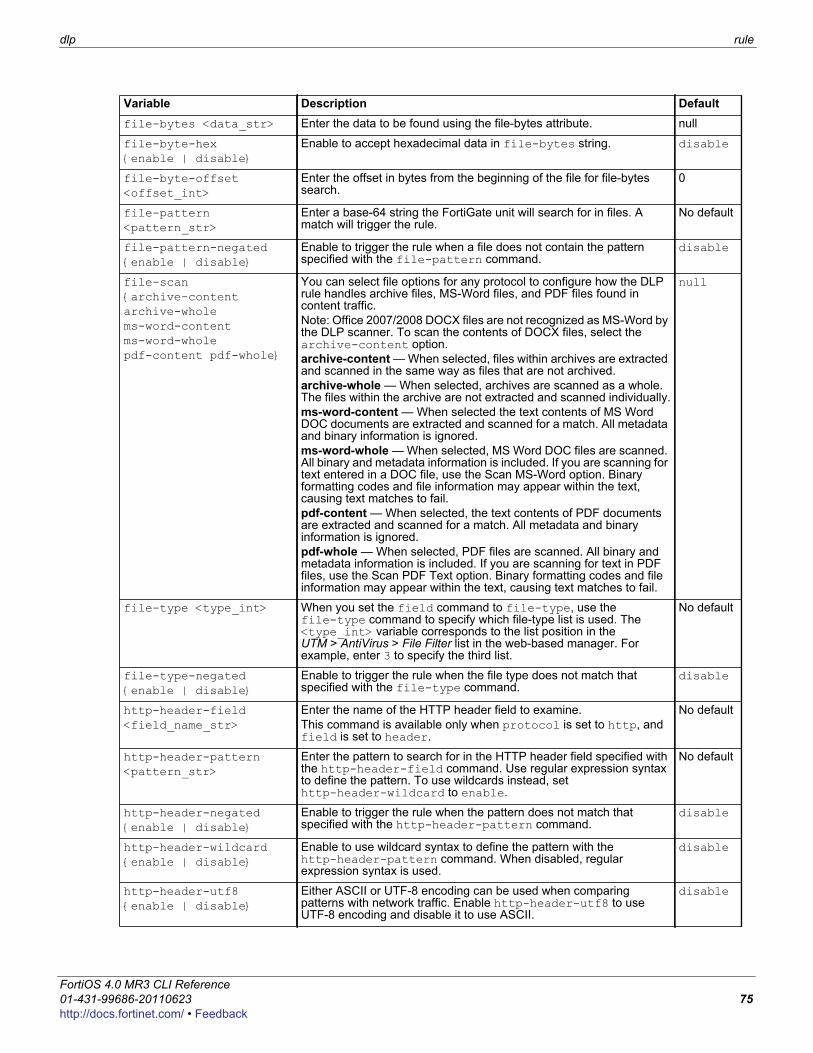
dlp rule
F0h
file-bytes <data_str> Enter the data to be found using the file-bytes attribute. null
file-byte-hex {enable | disable}
Enable to accept hexadecimal data in file-bytes string. disable
file-byte-offset <offset_int>
Enter the offset in bytes from the beginning of the file for file-bytes search.
0
file-pattern <pattern_str>
Enter a base-64 string the FortiGate unit will search for in files. A match will trigger the rule.
No default
file-pattern-negated {enable | disable}
Enable to trigger the rule when a file does not contain the pattern specified with the file-pattern command.
disable
file-scan {archive-content archive-whole ms-word-content ms-word-whole pdf-content pdf-whole}
You can select file options for any protocol to configure how the DLP rule handles archive files, MS-Word files, and PDF files found in content traffic.Note: Office 2007/2008 DOCX files are not recognized as MS-Word by the DLP scanner. To scan the contents of DOCX files, select the archive-content option.archive-content — When selected, files within archives are extracted and scanned in the same way as files that are not archived.archive-whole — When selected, archives are scanned as a whole. The files within the archive are not extracted and scanned individually.ms-word-content — When selected the text contents of MS Word DOC documents are extracted and scanned for a match. All metadata and binary information is ignored.ms-word-whole — When selected, MS Word DOC files are scanned. All binary and metadata information is included. If you are scanning for text entered in a DOC file, use the Scan MS-Word option. Binary formatting codes and file information may appear within the text, causing text matches to fail.pdf-content — When selected, the text contents of PDF documents are extracted and scanned for a match. All metadata and binary information is ignored.pdf-whole — When selected, PDF files are scanned. All binary and metadata information is included. If you are scanning for text in PDF files, use the Scan PDF Text option. Binary formatting codes and file information may appear within the text, causing text matches to fail.
null
file-type <type_int> When you set the field command to file-type, use the file-type command to specify which file-type list is used. The <type_int> variable corresponds to the list position in the UTM > AntiVirus > File Filter list in the web-based manager. For example, enter 3 to specify the third list.
No default
file-type-negated {enable | disable}
Enable to trigger the rule when the file type does not match that specified with the file-type command.
disable
http-header-field <field_name_str>
Enter the name of the HTTP header field to examine.This command is available only when protocol is set to http, and field is set to header.
No default
http-header-pattern <pattern_str>
Enter the pattern to search for in the HTTP header field specified with the http-header-field command. Use regular expression syntax to define the pattern. To use wildcards instead, set http-header-wildcard to enable.
No default
http-header-negated {enable | disable}
Enable to trigger the rule when the pattern does not match that specified with the http-header-pattern command.
disable
http-header-wildcard {enable | disable}
Enable to use wildcard syntax to define the pattern with the http-header-pattern command. When disabled, regular expression syntax is used.
disable
http-header-utf8 {enable | disable}
Either ASCII or UTF-8 encoding can be used when comparing patterns with network traffic. Enable http-header-utf8 to use UTF-8 encoding and disable it to use ASCII.
disable
Variable Description Default
ortiOS 4.0 MR3 CLI Reference1-431-99686-20110623 75ttp://docs.fortinet.com/ • Feedback

rule dlp
match-percentage <int> Enter the percentage of a document that must match a fingerprinted document for the result to be considered a match. Enter 100 to require an exact match. In this case, even a single changed character causes a match failure.
50
negated {enable | disable}
When the field command is set to encrypted, password protected archives and MS Word documents trigger the rule. To reverse this behavior and trigger the rule when archives and MS Word documents are not password protected, set negated to enable.
disable
operator {equal | greater-equal | less-equal | not-equal}
When the FortiGate unit checks sizes or quantities, an operator must be used to specify when the rule is triggered. The operators are:equal — The rule is triggered when the stated quantity is equal to the quantity detected.greater-equal — The rule is triggered when the stated quantity is greater then or equal to the quantity detected.less-equal — The rule is triggered when the stated quantity is less than or equal to the quantity detected.not-equal — The rule is triggered when the stated quantity is not equal to the quantity detected. The detected quantity can be greater than or less than the stated quantity.
equal
protocol {email | http | https | ftp | nntp | im | all}
Select the type of content traffic to which the DLP rule the rule will apply. The available rule options vary depending on the protocol that you select. Select all to include all protocols.
No default
regexp <regex_str> Enter the regular expression or wildcard to test. Use the regexp-wildcard field to choose between regular expression syntax and wildcards.
No default
regexp-negated {enable | disable}
By default, DLP rules are triggered when the FortiGate unit discovers network traffic that matches the regular expressions or wildcards specified in DLP rules. Enable regexp-negated to have the DLP rule triggered when traffic does not match the regular expression or wildcard specified in the rule.
disable
regexp-wildcard {enable | disable}
DLP rule expressions can be written using regular expressions or wildcards. Enable regexp-wildcard to use wildcards and disable it to use regular expressions.
disable
regexp-utf8 {enable | disable}
Either ASCII or UTF-8 encoding can be used when comparing rules with network traffic. Enable regexp-utf8 to use UTF-8 encoding and disable it to use plain ASCII.
disable
sensitivity <str> Enter the sensitivity of the rule. The default types are Warning, Private, and Critical.
No default
string <str> When the field command is set to user or user-group, use the string command to specify the user name or user-group name.
No default
string-negated {enable | disable}
Enable string-negated to have the DLP rule triggered when the user or user-group specified with the string command does not match.
disable
sub-protocol <sub_protocol_1> [<sub_protocol_2> ...]
Set the sub-protocols to which this rule applies. This is not available if protocol is nntp. For other protocols, the available sub-protocols are:• http: http-get, http-post• email: smtp, pop3, imap• ftp: ftp-get, ftp-put• im: aim (AOL IM), icq, msn, ym (Yahoo IM)• session-ctrl: sip, simple, sccpIf your FortiGate unit supports SSL content scanning and inspection, the following sub-protocols are also available:• http: https-get, https-post• email: smtps, pop3s, imapsSeparate multiple sub-protocol names with a space.
null
Variable Description Default
FortiOS 4.0 MR3 CLI Reference76 01-431-99686-20110623
http://docs.fortinet.com/ • Feedback
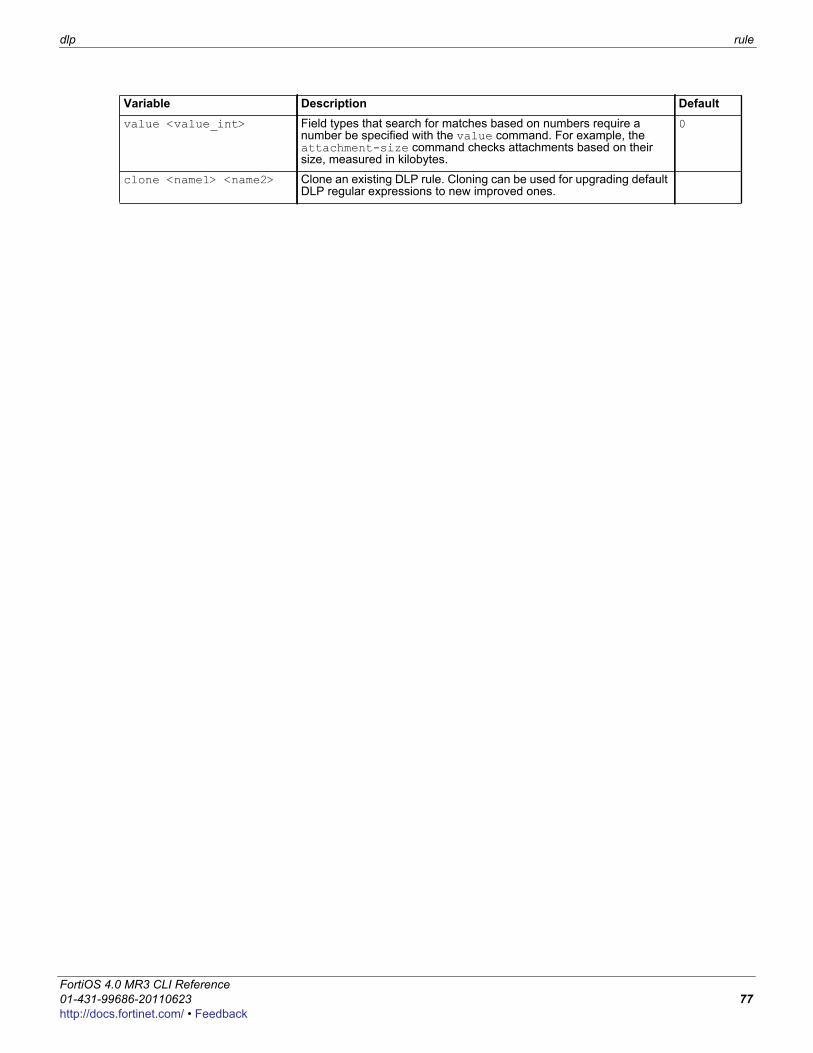
dlp rule
F0h
value <value_int> Field types that search for matches based on numbers require a number be specified with the value command. For example, the attachment-size command checks attachments based on their size, measured in kilobytes.
0
clone <name1> <name2> Clone an existing DLP rule. Cloning can be used for upgrading default DLP regular expressions to new improved ones.
Variable Description Default
ortiOS 4.0 MR3 CLI Reference1-431-99686-20110623 77ttp://docs.fortinet.com/ • Feedback

sensor dlp
sensorUse this command to create a DLP sensor. DLP sensors are simply collections of DLP rules and DLP compound rules. The DLP sensor also includes settings such as action, archive, and severity for each rule or compound rule.
Syntaxconfig dlp sensoredit <sensor_str>set comment <comment_str>set dlp-log {disable | enable}set flow-based {disable | enable}set nac-quar-log (disable | enable}set options {strict-file}config filteredit <filter_str>set action {ban | block | exempt | log-only | quarantine-ip
| quarantine-port}set archive {disable | enable | summary-only}set compound-name <compount_rule_str>set expiry {<int>d <int>h <int>m | indefinite}set file-type <table_str>set file-scan {archive-content | archive-whole}set filter-type {advanced-rule | advanced-compound-rule |
file-type | file-size | fingerprint | regexp}set fp-sensitivity <str>set regexp <regex_str>set regexp-wildcard {enable | disable}set regexp-utf8 {enable | disable}set rule-name <advanced_rule_str>set severity <severity_int>set status {enable | disable}
endclone clone <name1> <name2>
end
Variable Description Default<sensor_str> Enter the name of a sensor to edit. Enter a new name to
create a new DLP sensor.No default
comment <comment_str> Enter an optional description of the DLP sensor. Enclose the description in quotes if you want to include spaces.
No default
dlp-log {disable | enable} Enable or disable logging for data leak protection. disable
flow-based {disable | enable}
Enable or disable flow-based DLP. disable
nac-quar-log (disable | enable}
Enable or disable logging when data leak protection quarantine’s a user.
disable
options {strict-file} strict-file is required for file filtering to function when the URL contains a ? character. For example, a file pattern configured to block *.exe will not block file.exe if the URL is www.example.com/download?filename=file.exe unless strict-file is specified.
No default
edit <filter_str> Add a rule to a sensor by specifying the name of a DLP rule that has already been added.
FortiOS 4.0 MR3 CLI Reference78 01-431-99686-20110623
http://docs.fortinet.com/ • Feedback
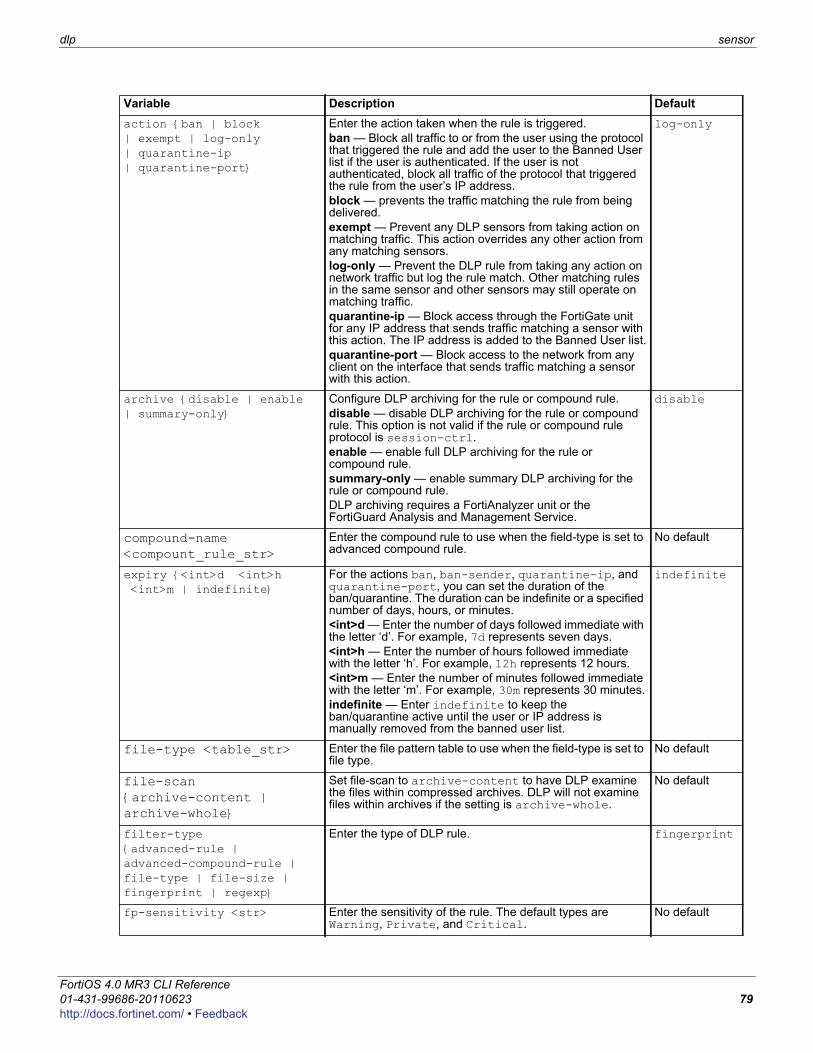
dlp sensor
F0h
action {ban | block | exempt | log-only | quarantine-ip | quarantine-port}
Enter the action taken when the rule is triggered.ban — Block all traffic to or from the user using the protocol that triggered the rule and add the user to the Banned User list if the user is authenticated. If the user is not authenticated, block all traffic of the protocol that triggered the rule from the user’s IP address.block — prevents the traffic matching the rule from being delivered.exempt — Prevent any DLP sensors from taking action on matching traffic. This action overrides any other action from any matching sensors.log-only — Prevent the DLP rule from taking any action on network traffic but log the rule match. Other matching rules in the same sensor and other sensors may still operate on matching traffic.quarantine-ip — Block access through the FortiGate unit for any IP address that sends traffic matching a sensor with this action. The IP address is added to the Banned User list.quarantine-port — Block access to the network from any client on the interface that sends traffic matching a sensor with this action.
log-only
archive {disable | enable | summary-only}
Configure DLP archiving for the rule or compound rule. disable — disable DLP archiving for the rule or compound rule. This option is not valid if the rule or compound rule protocol is session-ctrl.enable — enable full DLP archiving for the rule or compound rule.summary-only — enable summary DLP archiving for the rule or compound rule.DLP archiving requires a FortiAnalyzer unit or the FortiGuard Analysis and Management Service.
disable
compound-name <compount_rule_str>
Enter the compound rule to use when the field-type is set to advanced compound rule.
No default
expiry {<int>d <int>h <int>m | indefinite}
For the actions ban, ban-sender, quarantine-ip, and quarantine-port, you can set the duration of the ban/quarantine. The duration can be indefinite or a specified number of days, hours, or minutes.<int>d — Enter the number of days followed immediate with the letter ‘d’. For example, 7d represents seven days.<int>h — Enter the number of hours followed immediate with the letter ‘h’. For example, 12h represents 12 hours.<int>m — Enter the number of minutes followed immediate with the letter ‘m’. For example, 30m represents 30 minutes.indefinite — Enter indefinite to keep the ban/quarantine active until the user or IP address is manually removed from the banned user list.
indefinite
file-type <table_str> Enter the file pattern table to use when the field-type is set to file type.
No default
file-scan {archive-content | archive-whole}
Set file-scan to archive-content to have DLP examine the files within compressed archives. DLP will not examine files within archives if the setting is archive-whole.
No default
filter-type {advanced-rule | advanced-compound-rule | file-type | file-size | fingerprint | regexp}
Enter the type of DLP rule. fingerprint
fp-sensitivity <str> Enter the sensitivity of the rule. The default types are Warning, Private, and Critical.
No default
Variable Description Default
ortiOS 4.0 MR3 CLI Reference1-431-99686-20110623 79ttp://docs.fortinet.com/ • Feedback
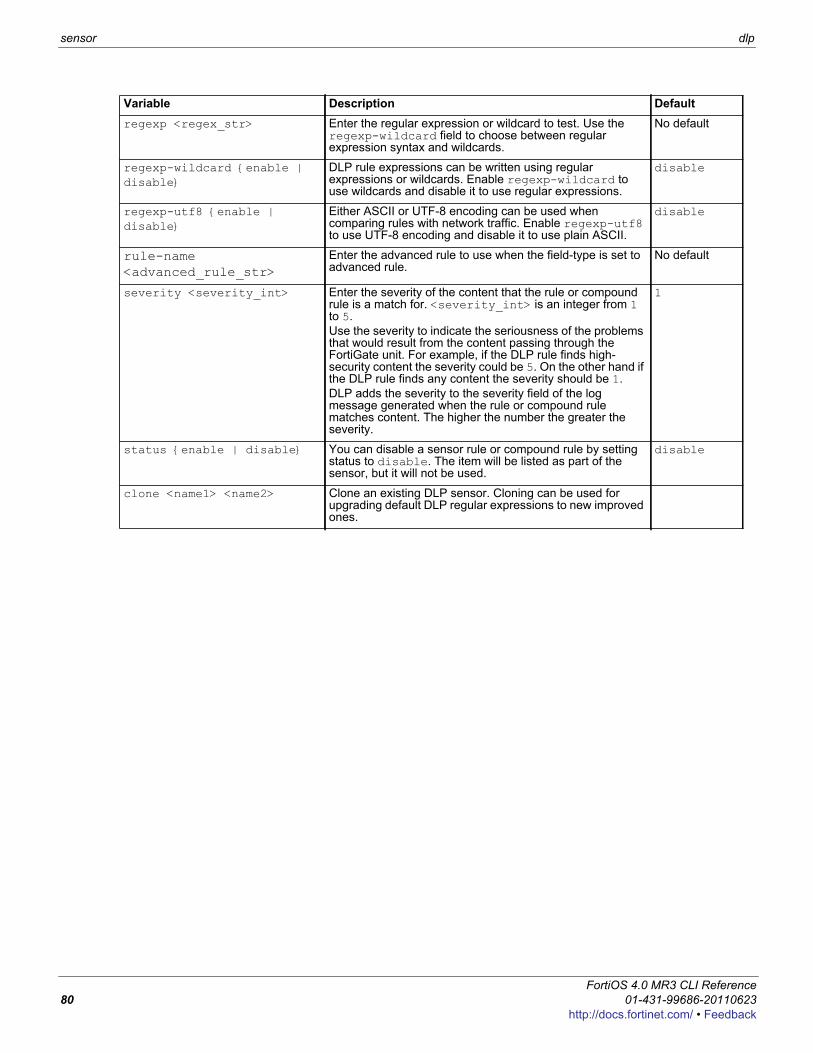
sensor dlp
regexp <regex_str> Enter the regular expression or wildcard to test. Use the regexp-wildcard field to choose between regular expression syntax and wildcards.
No default
regexp-wildcard {enable | disable}
DLP rule expressions can be written using regular expressions or wildcards. Enable regexp-wildcard to use wildcards and disable it to use regular expressions.
disable
regexp-utf8 {enable | disable}
Either ASCII or UTF-8 encoding can be used when comparing rules with network traffic. Enable regexp-utf8 to use UTF-8 encoding and disable it to use plain ASCII.
disable
rule-name <advanced_rule_str>
Enter the advanced rule to use when the field-type is set to advanced rule.
No default
severity <severity_int> Enter the severity of the content that the rule or compound rule is a match for. <severity_int> is an integer from 1 to 5. Use the severity to indicate the seriousness of the problems that would result from the content passing through the FortiGate unit. For example, if the DLP rule finds high-security content the severity could be 5. On the other hand if the DLP rule finds any content the severity should be 1.DLP adds the severity to the severity field of the log message generated when the rule or compound rule matches content. The higher the number the greater the severity.
1
status {enable | disable} You can disable a sensor rule or compound rule by setting status to disable. The item will be listed as part of the sensor, but it will not be used.
disable
clone <name1> <name2> Clone an existing DLP sensor. Cloning can be used for upgrading default DLP regular expressions to new improved ones.
Variable Description Default
FortiOS 4.0 MR3 CLI Reference80 01-431-99686-20110623
http://docs.fortinet.com/ • Feedback
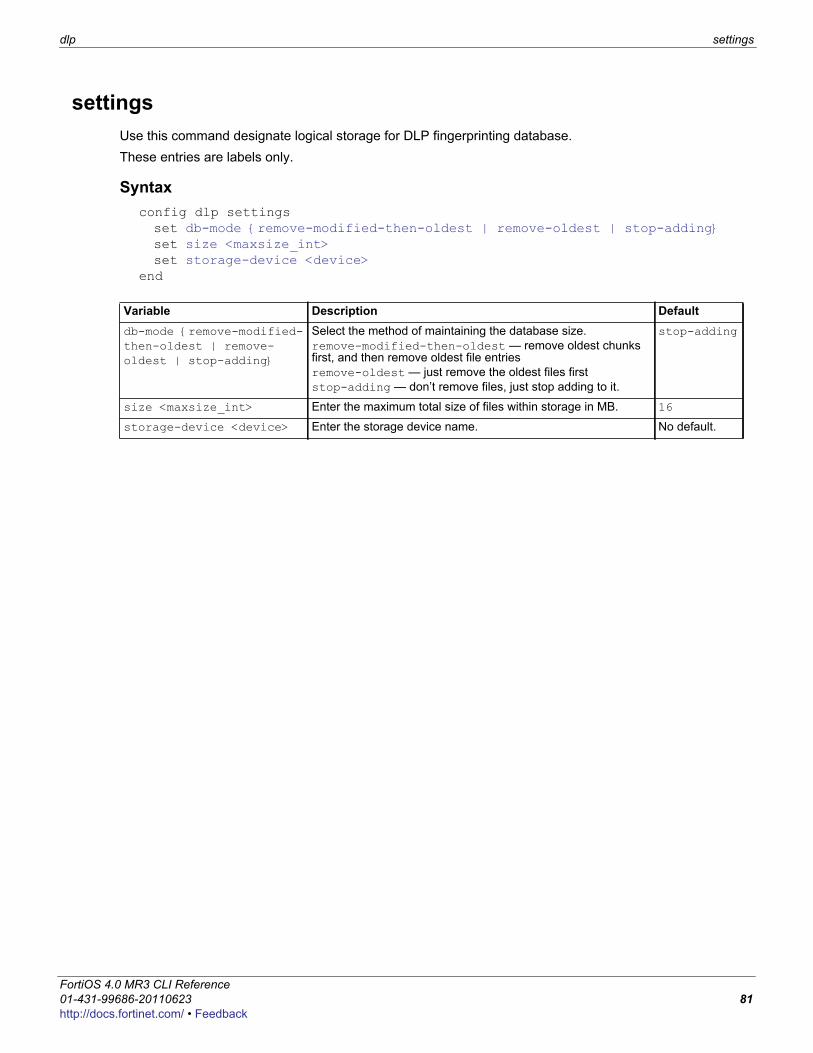
dlp settings
F0h
settingsUse this command designate logical storage for DLP fingerprinting database.These entries are labels only.
Syntaxconfig dlp settingsset db-mode {remove-modified-then-oldest | remove-oldest | stop-adding}set size <maxsize_int>set storage-device <device>
end
Variable Description Defaultdb-mode {remove-modified-then-oldest | remove-oldest | stop-adding}
Select the method of maintaining the database size.remove-modified-then-oldest — remove oldest chunks first, and then remove oldest file entriesremove-oldest — just remove the oldest files firststop-adding — don’t remove files, just stop adding to it.
stop-adding
size <maxsize_int> Enter the maximum total size of files within storage in MB. 16
storage-device <device> Enter the storage device name. No default.
ortiOS 4.0 MR3 CLI Reference1-431-99686-20110623 81ttp://docs.fortinet.com/ • Feedback

settings dlp
FortiOS 4.0 MR3 CLI Reference82 01-431-99686-20110623
http://docs.fortinet.com/ • Feedback
F0h
endpoint-controlUse endpoint-control commands to configure the following parts of the Endpoint NAC feature:• application detection rules• Endpoint NAC profiles• the required minimum version of FortiClient Endpoint Security• the FortiClient installer download locationEndpoint NAC is enabled in firewall policies.This chapter contains the following sections:
app-detect rule-listprofilesettings
ortiOS 4.0 MR3 CLI Reference1-431-99686-20110623 83ttp://docs.fortinet.com/ • Feedback
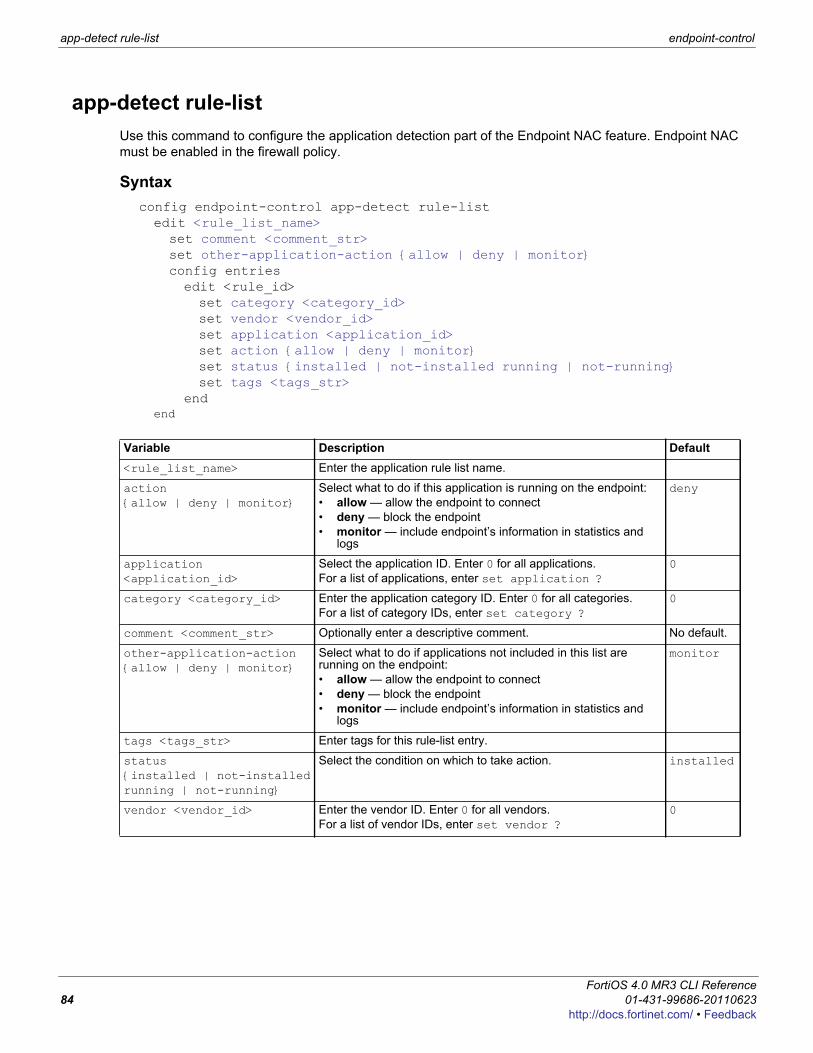
app-detect rule-list endpoint-control
app-detect rule-listUse this command to configure the application detection part of the Endpoint NAC feature. Endpoint NAC must be enabled in the firewall policy.
Syntaxconfig endpoint-control app-detect rule-listedit <rule_list_name>set comment <comment_str>set other-application-action {allow | deny | monitor}config entriesedit <rule_id>set category <category_id>set vendor <vendor_id>set application <application_id>set action {allow | deny | monitor}set status {installed | not-installed running | not-running}set tags <tags_str>
endend
Variable Description Default<rule_list_name> Enter the application rule list name.
action {allow | deny | monitor}
Select what to do if this application is running on the endpoint:• allow — allow the endpoint to connect• deny — block the endpoint• monitor — include endpoint’s information in statistics and
logs
deny
application <application_id>
Select the application ID. Enter 0 for all applications.For a list of applications, enter set application ?
0
category <category_id> Enter the application category ID. Enter 0 for all categories.For a list of category IDs, enter set category ?
0
comment <comment_str> Optionally enter a descriptive comment. No default.
other-application-action {allow | deny | monitor}
Select what to do if applications not included in this list are running on the endpoint:• allow — allow the endpoint to connect• deny — block the endpoint• monitor — include endpoint’s information in statistics and
logs
monitor
tags <tags_str> Enter tags for this rule-list entry.
status {installed | not-installed running | not-running}
Select the condition on which to take action. installed
vendor <vendor_id> Enter the vendor ID. Enter 0 for all vendors.For a list of vendor IDs, enter set vendor ?
0
FortiOS 4.0 MR3 CLI Reference84 01-431-99686-20110623
http://docs.fortinet.com/ • Feedback
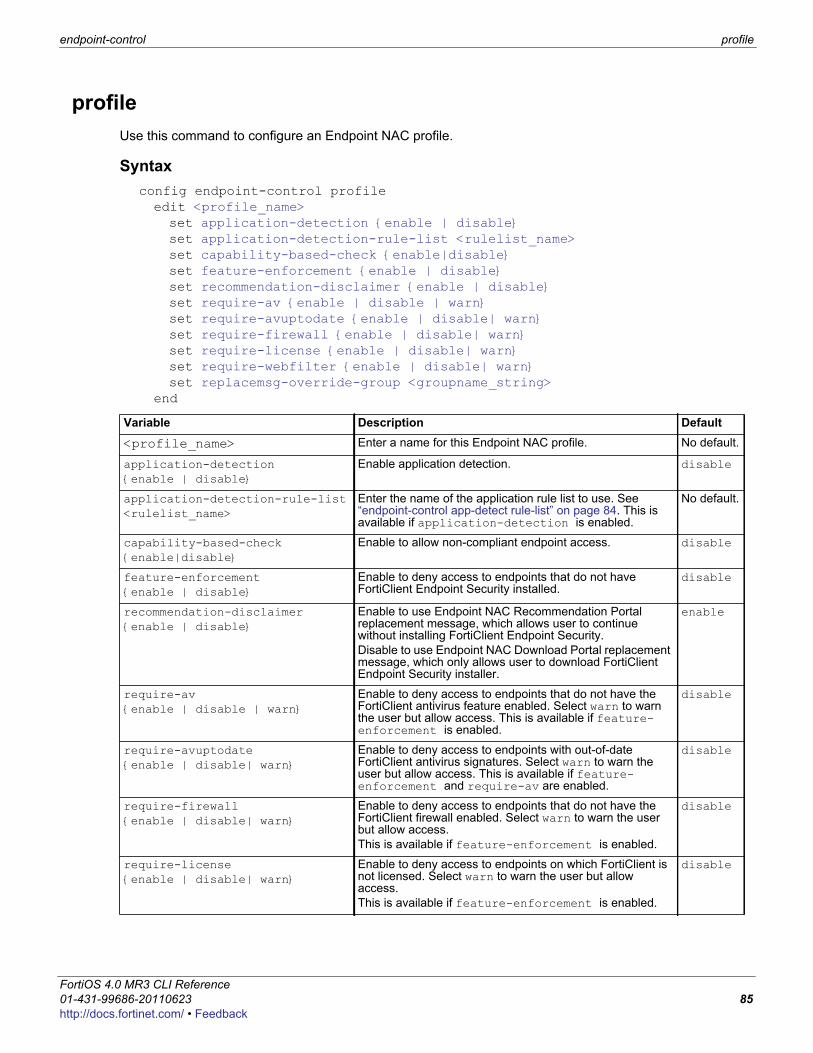
endpoint-control profile
F0h
profileUse this command to configure an Endpoint NAC profile.
Syntaxconfig endpoint-control profileedit <profile_name>set application-detection {enable | disable}set application-detection-rule-list <rulelist_name>set capability-based-check {enable|disable}set feature-enforcement {enable | disable}set recommendation-disclaimer {enable | disable}set require-av {enable | disable | warn}set require-avuptodate {enable | disable| warn}set require-firewall {enable | disable| warn}set require-license {enable | disable| warn}set require-webfilter {enable | disable| warn}set replacemsg-override-group <groupname_string>
end
Variable Description Default
<profile_name> Enter a name for this Endpoint NAC profile. No default.
application-detection {enable | disable}
Enable application detection. disable
application-detection-rule-list <rulelist_name>
Enter the name of the application rule list to use. See “endpoint-control app-detect rule-list” on page 84. This is available if application-detection is enabled.
No default.
capability-based-check {enable|disable}
Enable to allow non-compliant endpoint access. disable
feature-enforcement {enable | disable}
Enable to deny access to endpoints that do not have FortiClient Endpoint Security installed.
disable
recommendation-disclaimer {enable | disable}
Enable to use Endpoint NAC Recommendation Portal replacement message, which allows user to continue without installing FortiClient Endpoint Security.Disable to use Endpoint NAC Download Portal replacement message, which only allows user to download FortiClient Endpoint Security installer.
enable
require-av {enable | disable | warn}
Enable to deny access to endpoints that do not have the FortiClient antivirus feature enabled. Select warn to warn the user but allow access. This is available if feature-enforcement is enabled.
disable
require-avuptodate {enable | disable| warn}
Enable to deny access to endpoints with out-of-date FortiClient antivirus signatures. Select warn to warn the user but allow access. This is available if feature-enforcement and require-av are enabled.
disable
require-firewall {enable | disable| warn}
Enable to deny access to endpoints that do not have the FortiClient firewall enabled. Select warn to warn the user but allow access. This is available if feature-enforcement is enabled.
disable
require-license {enable | disable| warn}
Enable to deny access to endpoints on which FortiClient is not licensed. Select warn to warn the user but allow access. This is available if feature-enforcement is enabled.
disable
ortiOS 4.0 MR3 CLI Reference1-431-99686-20110623 85ttp://docs.fortinet.com/ • Feedback
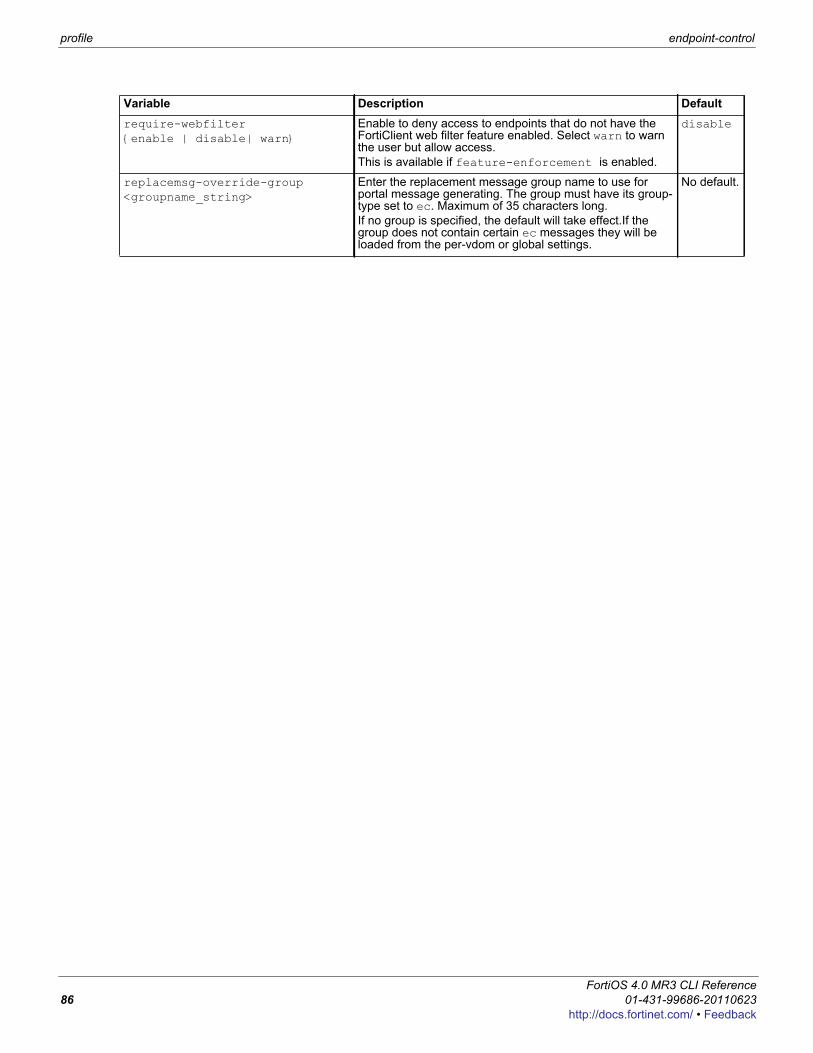
profile endpoint-control
require-webfilter {enable | disable| warn}
Enable to deny access to endpoints that do not have the FortiClient web filter feature enabled. Select warn to warn the user but allow access. This is available if feature-enforcement is enabled.
disable
replacemsg-override-group <groupname_string>
Enter the replacement message group name to use for portal message generating. The group must have its group-type set to ec. Maximum of 35 characters long.If no group is specified, the default will take effect.If the group does not contain certain ec messages they will be loaded from the per-vdom or global settings.
No default.
Variable Description Default
FortiOS 4.0 MR3 CLI Reference86 01-431-99686-20110623
http://docs.fortinet.com/ • Feedback
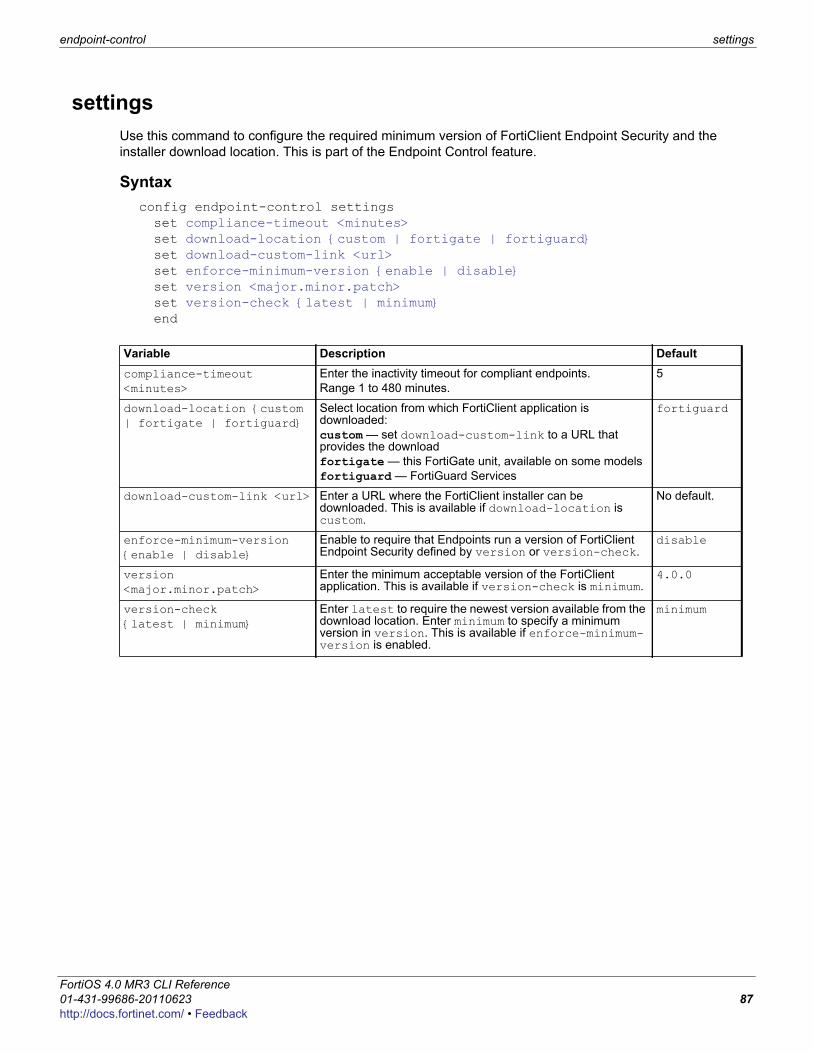
endpoint-control settings
F0h
settingsUse this command to configure the required minimum version of FortiClient Endpoint Security and the installer download location. This is part of the Endpoint Control feature.
Syntaxconfig endpoint-control settingsset compliance-timeout <minutes>set download-location {custom | fortigate | fortiguard}set download-custom-link <url>set enforce-minimum-version {enable | disable}set version <major.minor.patch>set version-check {latest | minimum}end
Variable Description Defaultcompliance-timeout <minutes>
Enter the inactivity timeout for compliant endpoints.Range 1 to 480 minutes.
5
download-location {custom | fortigate | fortiguard}
Select location from which FortiClient application is downloaded:custom — set download-custom-link to a URL that provides the downloadfortigate — this FortiGate unit, available on some modelsfortiguard — FortiGuard Services
fortiguard
download-custom-link <url> Enter a URL where the FortiClient installer can be downloaded. This is available if download-location is custom.
No default.
enforce-minimum-version {enable | disable}
Enable to require that Endpoints run a version of FortiClient Endpoint Security defined by version or version-check.
disable
version <major.minor.patch>
Enter the minimum acceptable version of the FortiClient application. This is available if version-check is minimum.
4.0.0
version-check {latest | minimum}
Enter latest to require the newest version available from the download location. Enter minimum to specify a minimum version in version. This is available if enforce-minimum-version is enabled.
minimum
ortiOS 4.0 MR3 CLI Reference1-431-99686-20110623 87ttp://docs.fortinet.com/ • Feedback

settings endpoint-control
FortiOS 4.0 MR3 CLI Reference88 01-431-99686-20110623
http://docs.fortinet.com/ • Feedback
F0h
firewallUse firewall commands to configure firewall policies and the data they use.This chapter contains the following sections:
address, address6addrgrp, addrgrp6carrier-endpoint-bwlcarrier-endpoint-ip-filtercentral-natdnstranslationgtpinterface-policyinterface-policy6ipmacbinding settingipmacbinding tableippool
ldb-monitorlocal-in-policy, local-in-policy6mms-profilemulticast-policypolicy, policy6profile-groupprofile-protocol-optionsschedule onetimeschedule recurringschedule groupservice customservice explicit-web
service groupservice group-explicit-webshaper per-ip-shapershaper traffic-shapersniff-interface-policysniff-interface-policy6ssl settingvipvipgrp
ortiOS 4.0 MR3 CLI Reference1-431-99686-20110623 89ttp://docs.fortinet.com/ • Feedback
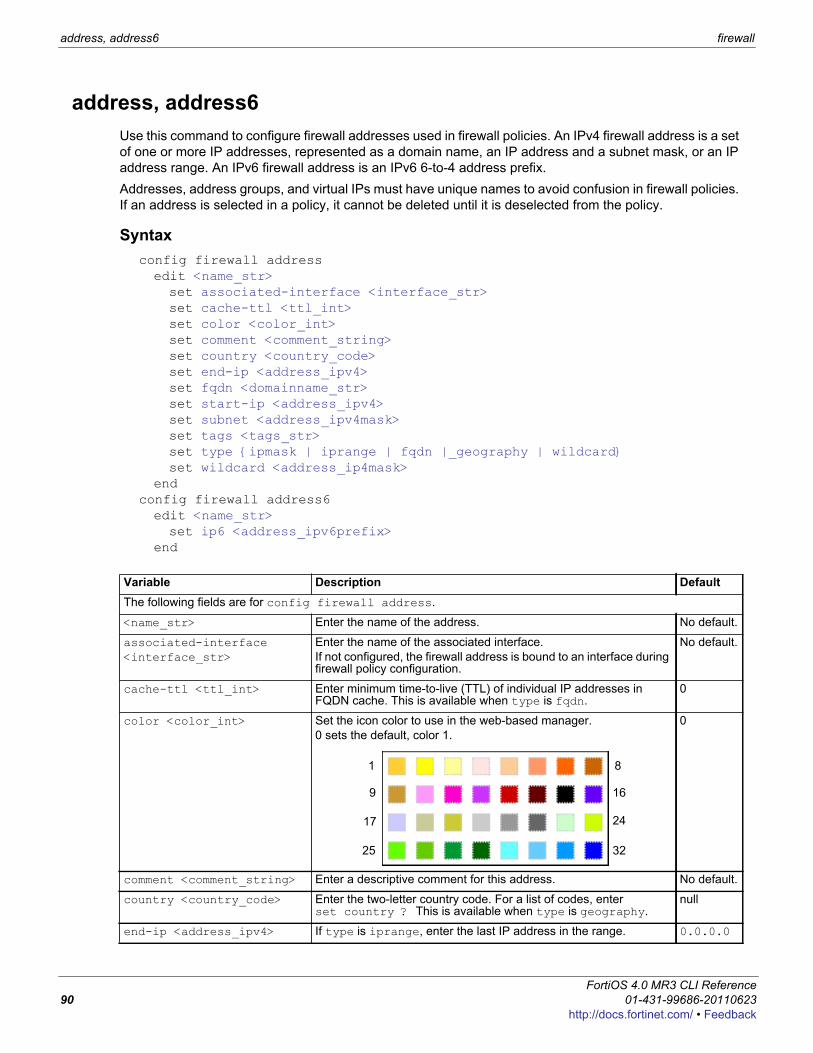
address, address6 firewall
address, address6Use this command to configure firewall addresses used in firewall policies. An IPv4 firewall address is a set of one or more IP addresses, represented as a domain name, an IP address and a subnet mask, or an IP address range. An IPv6 firewall address is an IPv6 6-to-4 address prefix.Addresses, address groups, and virtual IPs must have unique names to avoid confusion in firewall policies. If an address is selected in a policy, it cannot be deleted until it is deselected from the policy.
Syntaxconfig firewall addressedit <name_str>set associated-interface <interface_str>set cache-ttl <ttl_int>set color <color_int>set comment <comment_string>set country <country_code>set end-ip <address_ipv4>set fqdn <domainname_str>set start-ip <address_ipv4>set subnet <address_ipv4mask>set tags <tags_str>set type {ipmask | iprange | fqdn |_geography | wildcard}set wildcard <address_ip4mask>
endconfig firewall address6edit <name_str>set ip6 <address_ipv6prefix>
end
Variable Description DefaultThe following fields are for config firewall address.
<name_str> Enter the name of the address. No default.
associated-interface <interface_str>
Enter the name of the associated interface.If not configured, the firewall address is bound to an interface during firewall policy configuration.
No default.
cache-ttl <ttl_int> Enter minimum time-to-live (TTL) of individual IP addresses in FQDN cache. This is available when type is fqdn.
0
color <color_int> Set the icon color to use in the web-based manager.0 sets the default, color 1.
0
comment <comment_string> Enter a descriptive comment for this address. No default.
country <country_code> Enter the two-letter country code. For a list of codes, enter set country ? This is available when type is geography.
null
end-ip <address_ipv4> If type is iprange, enter the last IP address in the range. 0.0.0.0
1 8
9 16
17 24
25 32
FortiOS 4.0 MR3 CLI Reference90 01-431-99686-20110623
http://docs.fortinet.com/ • Feedback
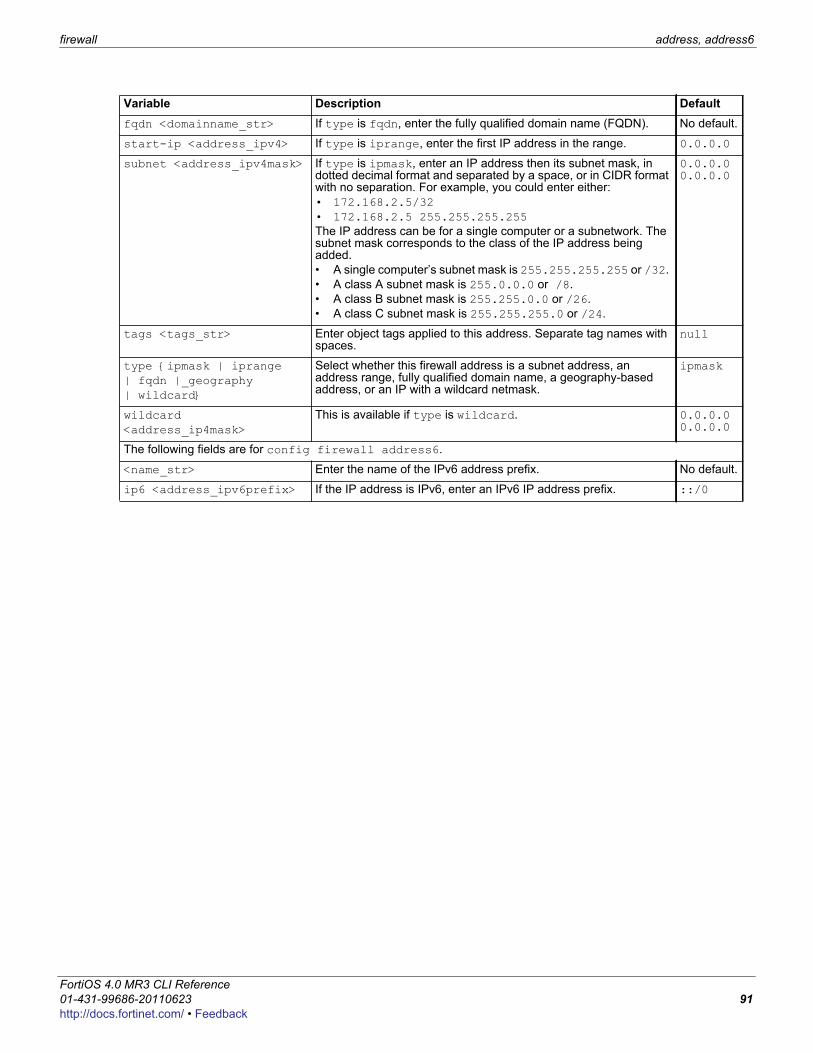
firewall address, address6
F0h
fqdn <domainname_str> If type is fqdn, enter the fully qualified domain name (FQDN). No default.
start-ip <address_ipv4> If type is iprange, enter the first IP address in the range. 0.0.0.0
subnet <address_ipv4mask> If type is ipmask, enter an IP address then its subnet mask, in dotted decimal format and separated by a space, or in CIDR format with no separation. For example, you could enter either:• 172.168.2.5/32• 172.168.2.5 255.255.255.255The IP address can be for a single computer or a subnetwork. The subnet mask corresponds to the class of the IP address being added.• A single computer’s subnet mask is 255.255.255.255 or /32. • A class A subnet mask is 255.0.0.0 or /8.• A class B subnet mask is 255.255.0.0 or /26.• A class C subnet mask is 255.255.255.0 or /24.
0.0.0.0 0.0.0.0
tags <tags_str> Enter object tags applied to this address. Separate tag names with spaces.
null
type {ipmask | iprange | fqdn |_geography | wildcard}
Select whether this firewall address is a subnet address, an address range, fully qualified domain name, a geography-based address, or an IP with a wildcard netmask.
ipmask
wildcard <address_ip4mask>
This is available if type is wildcard. 0.0.0.0 0.0.0.0
The following fields are for config firewall address6.
<name_str> Enter the name of the IPv6 address prefix. No default.
ip6 <address_ipv6prefix> If the IP address is IPv6, enter an IPv6 IP address prefix. ::/0
Variable Description Default
ortiOS 4.0 MR3 CLI Reference1-431-99686-20110623 91ttp://docs.fortinet.com/ • Feedback
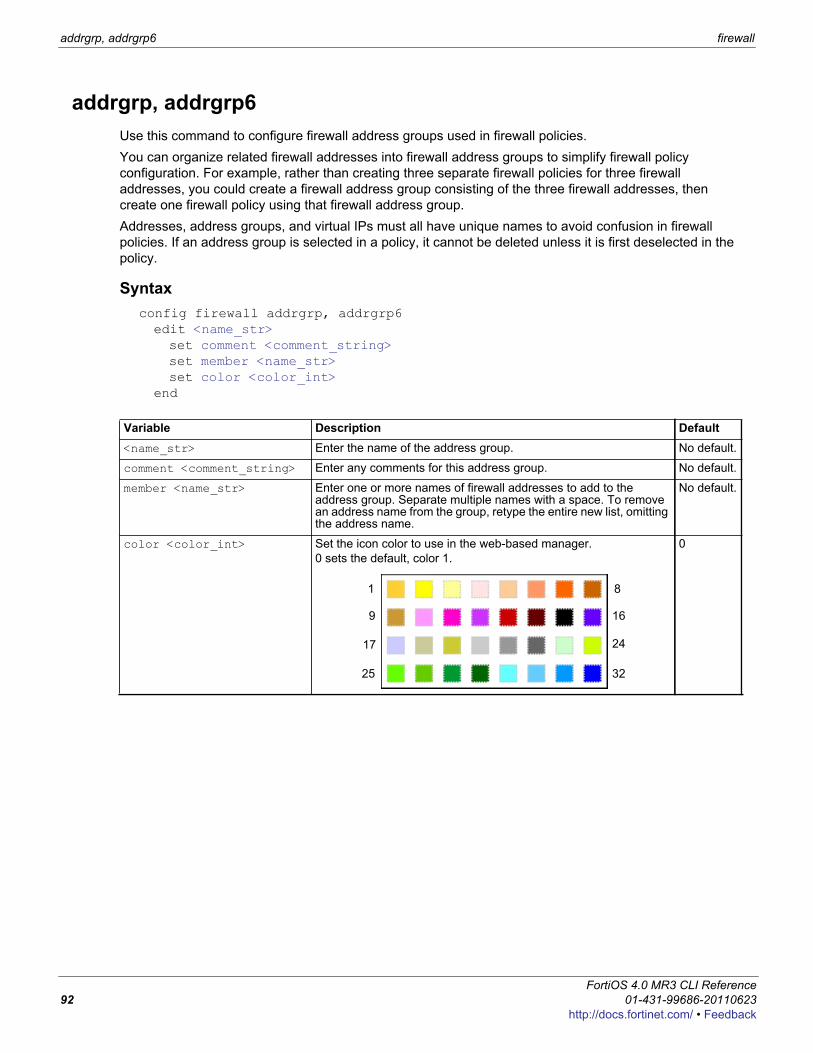
addrgrp, addrgrp6 firewall
addrgrp, addrgrp6Use this command to configure firewall address groups used in firewall policies.You can organize related firewall addresses into firewall address groups to simplify firewall policy configuration. For example, rather than creating three separate firewall policies for three firewall addresses, you could create a firewall address group consisting of the three firewall addresses, then create one firewall policy using that firewall address group.Addresses, address groups, and virtual IPs must all have unique names to avoid confusion in firewall policies. If an address group is selected in a policy, it cannot be deleted unless it is first deselected in the policy.
Syntaxconfig firewall addrgrp, addrgrp6edit <name_str>set comment <comment_string>set member <name_str>set color <color_int>
end
Variable Description Default<name_str> Enter the name of the address group. No default.
comment <comment_string> Enter any comments for this address group. No default.
member <name_str> Enter one or more names of firewall addresses to add to the address group. Separate multiple names with a space. To remove an address name from the group, retype the entire new list, omitting the address name.
No default.
color <color_int> Set the icon color to use in the web-based manager.0 sets the default, color 1.
0
1 8
9 16
17 24
25 32
FortiOS 4.0 MR3 CLI Reference92 01-431-99686-20110623
http://docs.fortinet.com/ • Feedback
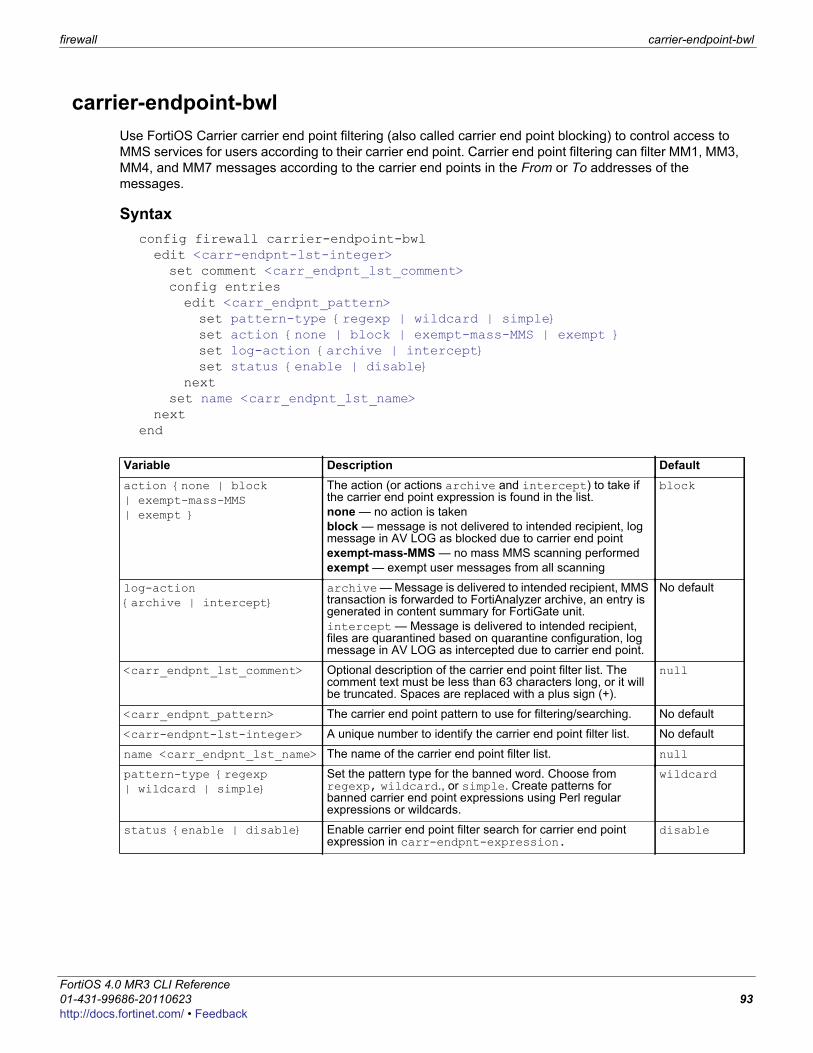
firewall carrier-endpoint-bwl
F0h
carrier-endpoint-bwlUse FortiOS Carrier carrier end point filtering (also called carrier end point blocking) to control access to MMS services for users according to their carrier end point. Carrier end point filtering can filter MM1, MM3, MM4, and MM7 messages according to the carrier end points in the From or To addresses of the messages.
Syntaxconfig firewall carrier-endpoint-bwledit <carr-endpnt-lst-integer>set comment <carr_endpnt_lst_comment>config entriesedit <carr_endpnt_pattern>set pattern-type {regexp | wildcard | simple}set action {none | block | exempt-mass-MMS | exempt }set log-action {archive | intercept}set status {enable | disable}
nextset name <carr_endpnt_lst_name>
nextend
Variable Description Defaultaction {none | block | exempt-mass-MMS | exempt }
The action (or actions archive and intercept) to take if the carrier end point expression is found in the list.none — no action is takenblock — message is not delivered to intended recipient, log message in AV LOG as blocked due to carrier end pointexempt-mass-MMS — no mass MMS scanning performedexempt — exempt user messages from all scanning
block
log-action {archive | intercept}
archive — Message is delivered to intended recipient, MMS transaction is forwarded to FortiAnalyzer archive, an entry is generated in content summary for FortiGate unit.intercept — Message is delivered to intended recipient, files are quarantined based on quarantine configuration, log message in AV LOG as intercepted due to carrier end point.
No default
<carr_endpnt_lst_comment> Optional description of the carrier end point filter list. The comment text must be less than 63 characters long, or it will be truncated. Spaces are replaced with a plus sign (+).
null
<carr_endpnt_pattern> The carrier end point pattern to use for filtering/searching. No default
<carr-endpnt-lst-integer> A unique number to identify the carrier end point filter list. No default
name <carr_endpnt_lst_name> The name of the carrier end point filter list. null
pattern-type {regexp | wildcard | simple}
Set the pattern type for the banned word. Choose from regexp, wildcard., or simple. Create patterns for banned carrier end point expressions using Perl regular expressions or wildcards.
wildcard
status {enable | disable} Enable carrier end point filter search for carrier end point expression in carr-endpnt-expression.
disable
ortiOS 4.0 MR3 CLI Reference1-431-99686-20110623 93ttp://docs.fortinet.com/ • Feedback
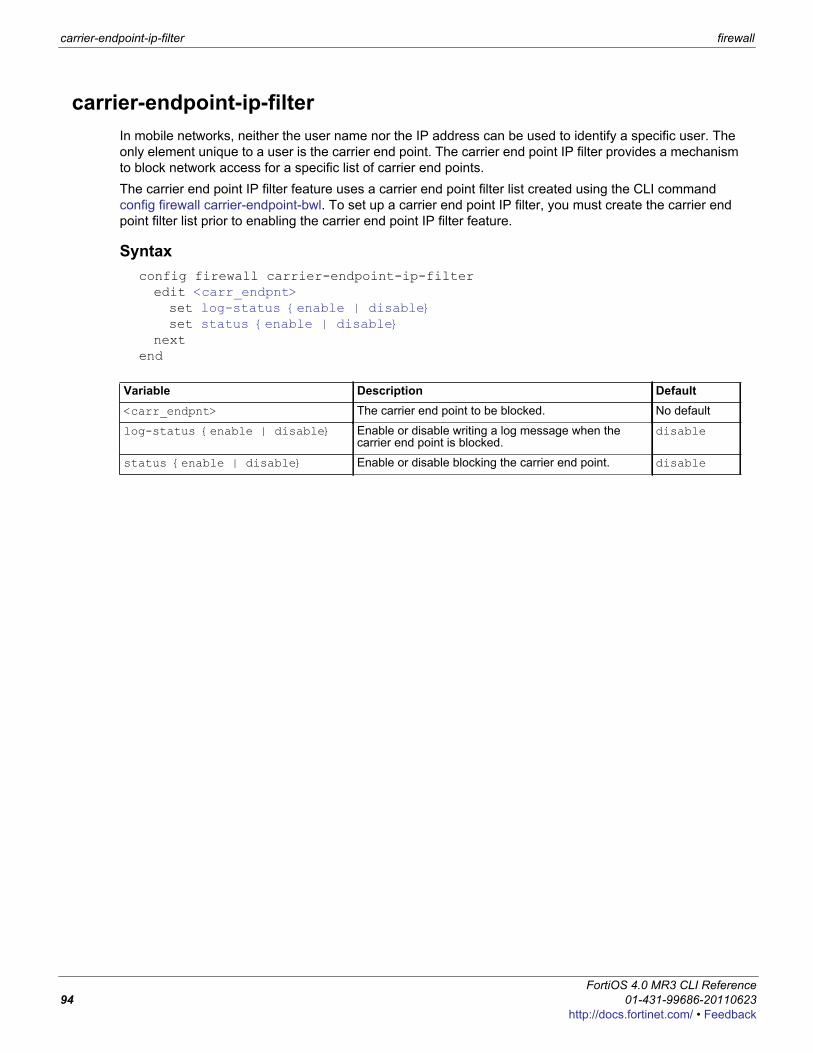
carrier-endpoint-ip-filter firewall
carrier-endpoint-ip-filterIn mobile networks, neither the user name nor the IP address can be used to identify a specific user. The only element unique to a user is the carrier end point. The carrier end point IP filter provides a mechanism to block network access for a specific list of carrier end points.The carrier end point IP filter feature uses a carrier end point filter list created using the CLI command config firewall carrier-endpoint-bwl. To set up a carrier end point IP filter, you must create the carrier end point filter list prior to enabling the carrier end point IP filter feature.
Syntaxconfig firewall carrier-endpoint-ip-filteredit <carr_endpnt>set log-status {enable | disable}set status {enable | disable}
nextend
Variable Description Default<carr_endpnt> The carrier end point to be blocked. No default
log-status {enable | disable} Enable or disable writing a log message when the carrier end point is blocked.
disable
status {enable | disable} Enable or disable blocking the carrier end point. disable
FortiOS 4.0 MR3 CLI Reference94 01-431-99686-20110623
http://docs.fortinet.com/ • Feedback
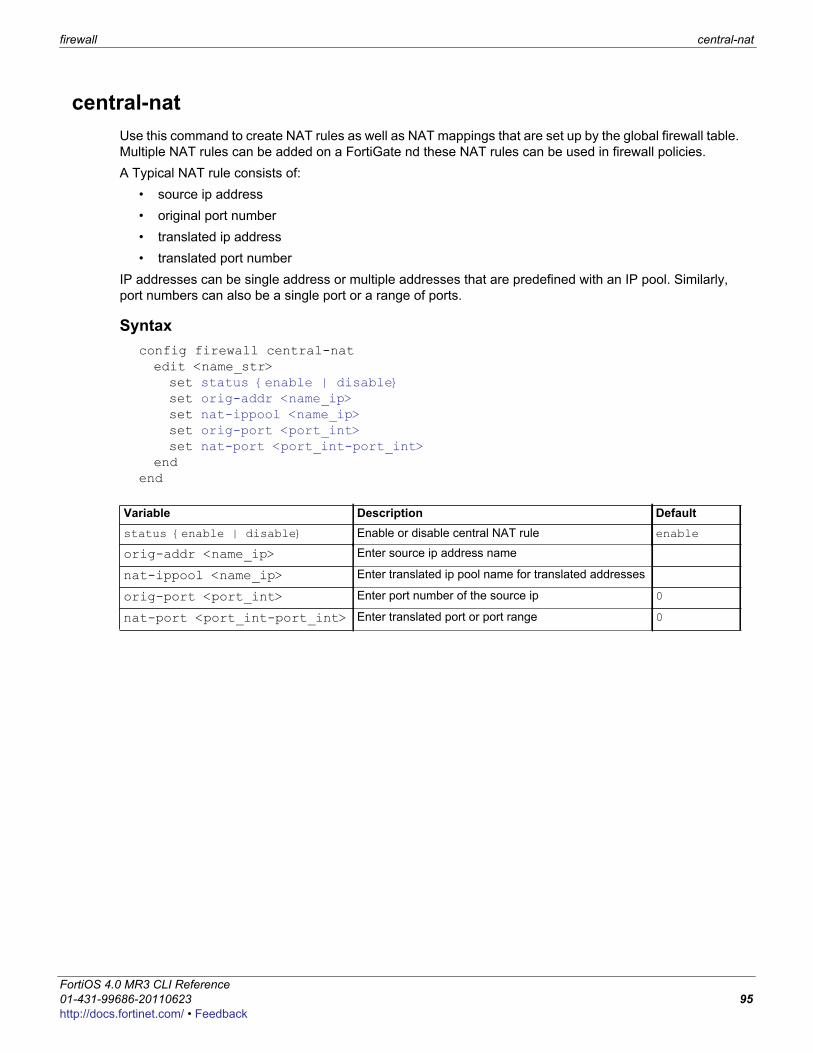
firewall central-nat
F0h
central-natUse this command to create NAT rules as well as NAT mappings that are set up by the global firewall table. Multiple NAT rules can be added on a FortiGate nd these NAT rules can be used in firewall policies. A Typical NAT rule consists of:
• source ip address• original port number• translated ip address• translated port number
IP addresses can be single address or multiple addresses that are predefined with an IP pool. Similarly, port numbers can also be a single port or a range of ports.
Syntaxconfig firewall central-natedit <name_str>set status {enable | disable}set orig-addr <name_ip>set nat-ippool <name_ip>set orig-port <port_int>set nat-port <port_int-port_int>
endend
Variable Description Defaultstatus {enable | disable} Enable or disable central NAT rule enable
orig-addr <name_ip> Enter source ip address name
nat-ippool <name_ip> Enter translated ip pool name for translated addresses
orig-port <port_int> Enter port number of the source ip 0
nat-port <port_int-port_int> Enter translated port or port range 0
ortiOS 4.0 MR3 CLI Reference1-431-99686-20110623 95ttp://docs.fortinet.com/ • Feedback
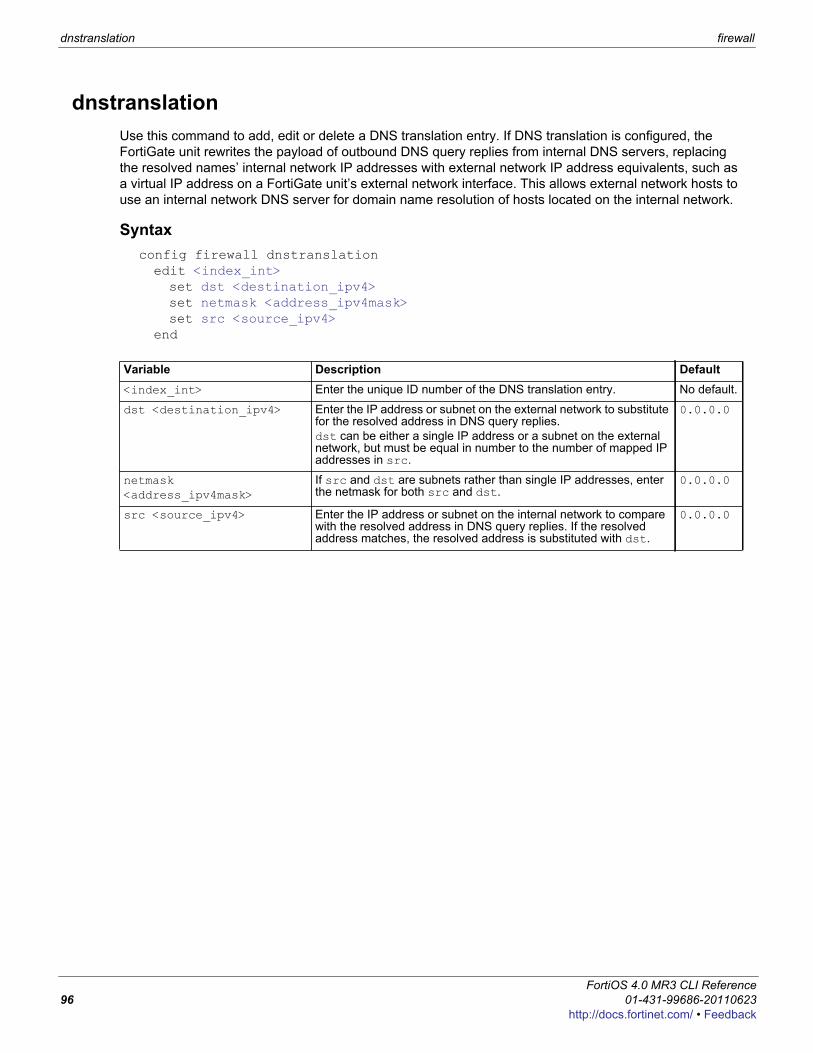
dnstranslation firewall
dnstranslationUse this command to add, edit or delete a DNS translation entry. If DNS translation is configured, the FortiGate unit rewrites the payload of outbound DNS query replies from internal DNS servers, replacing the resolved names’ internal network IP addresses with external network IP address equivalents, such as a virtual IP address on a FortiGate unit’s external network interface. This allows external network hosts to use an internal network DNS server for domain name resolution of hosts located on the internal network.
Syntaxconfig firewall dnstranslationedit <index_int>set dst <destination_ipv4>set netmask <address_ipv4mask>set src <source_ipv4>
end
Variable Description Default<index_int> Enter the unique ID number of the DNS translation entry. No default.
dst <destination_ipv4> Enter the IP address or subnet on the external network to substitute for the resolved address in DNS query replies.dst can be either a single IP address or a subnet on the external network, but must be equal in number to the number of mapped IP addresses in src.
0.0.0.0
netmask <address_ipv4mask>
If src and dst are subnets rather than single IP addresses, enter the netmask for both src and dst.
0.0.0.0
src <source_ipv4> Enter the IP address or subnet on the internal network to compare with the resolved address in DNS query replies. If the resolved address matches, the resolved address is substituted with dst.
0.0.0.0
FortiOS 4.0 MR3 CLI Reference96 01-431-99686-20110623
http://docs.fortinet.com/ • Feedback
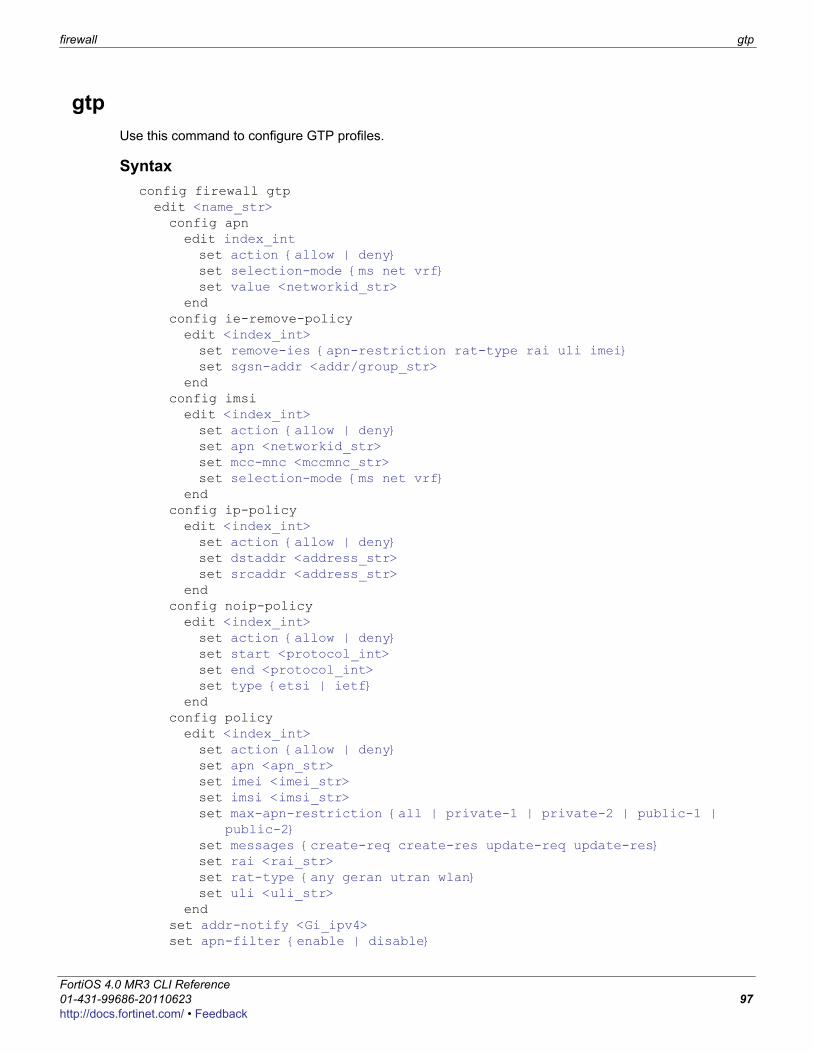
firewall gtp
F0h
gtpUse this command to configure GTP profiles.
Syntaxconfig firewall gtpedit <name_str>config apnedit index_intset action {allow | deny}set selection-mode {ms net vrf}set value <networkid_str>
endconfig ie-remove-policyedit <index_int>set remove-ies {apn-restriction rat-type rai uli imei}set sgsn-addr <addr/group_str>
endconfig imsiedit <index_int>set action {allow | deny}set apn <networkid_str>set mcc-mnc <mccmnc_str>set selection-mode {ms net vrf}
endconfig ip-policyedit <index_int>set action {allow | deny}set dstaddr <address_str>set srcaddr <address_str>
endconfig noip-policyedit <index_int>set action {allow | deny}set start <protocol_int>set end <protocol_int>set type {etsi | ietf}
endconfig policyedit <index_int>set action {allow | deny}set apn <apn_str>set imei <imei_str>set imsi <imsi_str>set max-apn-restriction {all | private-1 | private-2 | public-1 |
public-2}set messages {create-req create-res update-req update-res}set rai <rai_str>set rat-type {any geran utran wlan}set uli <uli_str>
endset addr-notify <Gi_ipv4>set apn-filter {enable | disable}
ortiOS 4.0 MR3 CLI Reference1-431-99686-20110623 97ttp://docs.fortinet.com/ • Feedback
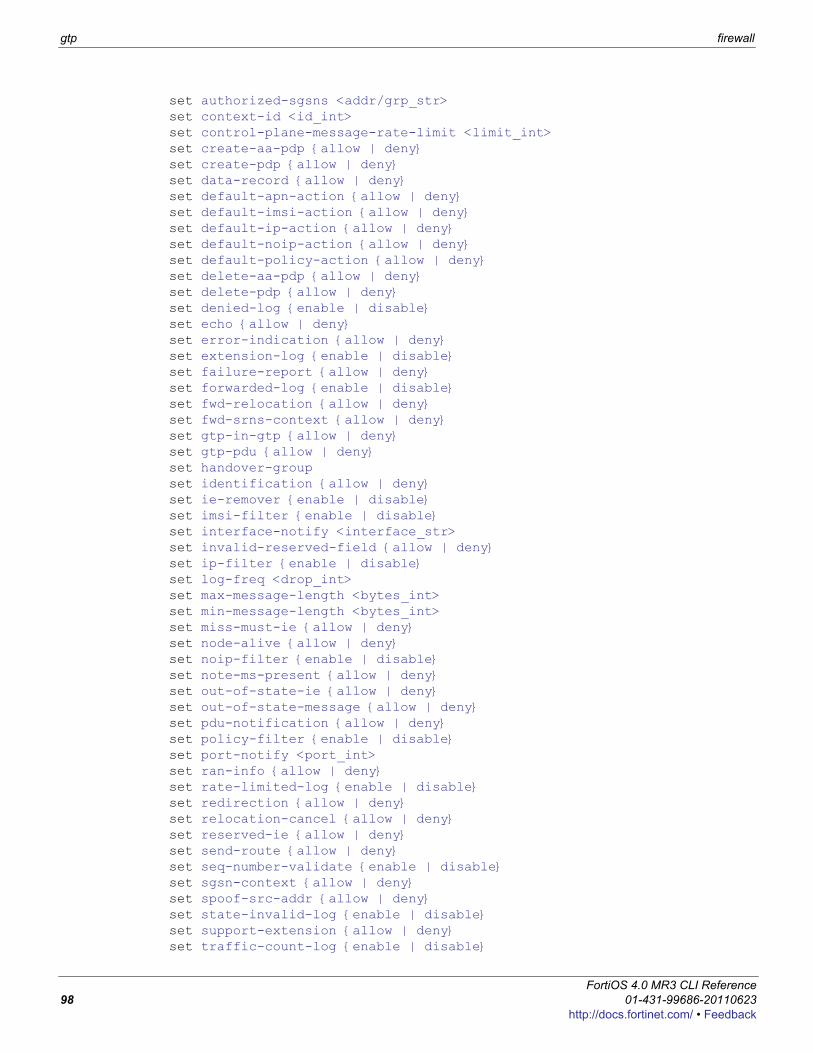
gtp firewall
set authorized-sgsns <addr/grp_str>set context-id <id_int>set control-plane-message-rate-limit <limit_int>set create-aa-pdp {allow | deny}set create-pdp {allow | deny}set data-record {allow | deny}set default-apn-action {allow | deny}set default-imsi-action {allow | deny}set default-ip-action {allow | deny}set default-noip-action {allow | deny}set default-policy-action {allow | deny}set delete-aa-pdp {allow | deny}set delete-pdp {allow | deny}set denied-log {enable | disable}set echo {allow | deny}set error-indication {allow | deny}set extension-log {enable | disable}set failure-report {allow | deny}set forwarded-log {enable | disable}set fwd-relocation {allow | deny}set fwd-srns-context {allow | deny}set gtp-in-gtp {allow | deny}set gtp-pdu {allow | deny}set handover-groupset identification {allow | deny}set ie-remover {enable | disable}set imsi-filter {enable | disable}set interface-notify <interface_str>set invalid-reserved-field {allow | deny}set ip-filter {enable | disable}set log-freq <drop_int>set max-message-length <bytes_int>set min-message-length <bytes_int>set miss-must-ie {allow | deny}set node-alive {allow | deny}set noip-filter {enable | disable}set note-ms-present {allow | deny}set out-of-state-ie {allow | deny}set out-of-state-message {allow | deny}set pdu-notification {allow | deny}set policy-filter {enable | disable}set port-notify <port_int>set ran-info {allow | deny}set rate-limited-log {enable | disable}set redirection {allow | deny}set relocation-cancel {allow | deny}set reserved-ie {allow | deny}set send-route {allow | deny}set seq-number-validate {enable | disable}set sgsn-context {allow | deny}set spoof-src-addr {allow | deny}set state-invalid-log {enable | disable}set support-extension {allow | deny}set traffic-count-log {enable | disable}
FortiOS 4.0 MR3 CLI Reference98 01-431-99686-20110623
http://docs.fortinet.com/ • Feedback
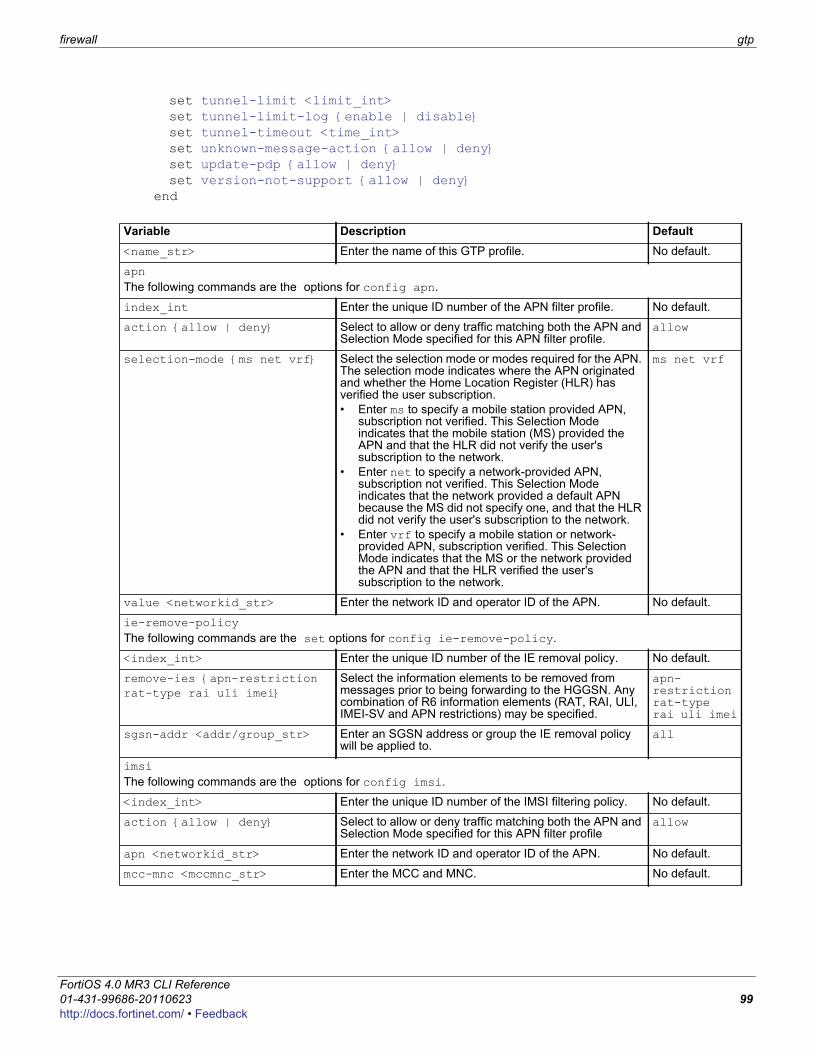
firewall gtp
F0h
set tunnel-limit <limit_int>set tunnel-limit-log {enable | disable}set tunnel-timeout <time_int>set unknown-message-action {allow | deny}set update-pdp {allow | deny}set version-not-support {allow | deny}
end
Variable Description Default<name_str> Enter the name of this GTP profile. No default.
apnThe following commands are the options for config apn.
index_int Enter the unique ID number of the APN filter profile. No default.
action {allow | deny} Select to allow or deny traffic matching both the APN and Selection Mode specified for this APN filter profile.
allow
selection-mode {ms net vrf} Select the selection mode or modes required for the APN. The selection mode indicates where the APN originated and whether the Home Location Register (HLR) has verified the user subscription.• Enter ms to specify a mobile station provided APN,
subscription not verified. This Selection Mode indicates that the mobile station (MS) provided the APN and that the HLR did not verify the user's subscription to the network.
• Enter net to specify a network-provided APN, subscription not verified. This Selection Mode indicates that the network provided a default APN because the MS did not specify one, and that the HLR did not verify the user's subscription to the network.
• Enter vrf to specify a mobile station or network-provided APN, subscription verified. This Selection Mode indicates that the MS or the network provided the APN and that the HLR verified the user's subscription to the network.
ms net vrf
value <networkid_str> Enter the network ID and operator ID of the APN. No default.
ie-remove-policyThe following commands are the set options for config ie-remove-policy.
<index_int> Enter the unique ID number of the IE removal policy. No default.
remove-ies {apn-restriction rat-type rai uli imei}
Select the information elements to be removed from messages prior to being forwarding to the HGGSN. Any combination of R6 information elements (RAT, RAI, ULI, IMEI-SV and APN restrictions) may be specified.
apn-restriction rat-type rai uli imei
sgsn-addr <addr/group_str> Enter an SGSN address or group the IE removal policy will be applied to.
all
imsiThe following commands are the options for config imsi.
<index_int> Enter the unique ID number of the IMSI filtering policy. No default.
action {allow | deny} Select to allow or deny traffic matching both the APN and Selection Mode specified for this APN filter profile
allow
apn <networkid_str> Enter the network ID and operator ID of the APN. No default.
mcc-mnc <mccmnc_str> Enter the MCC and MNC. No default.
ortiOS 4.0 MR3 CLI Reference1-431-99686-20110623 99ttp://docs.fortinet.com/ • Feedback
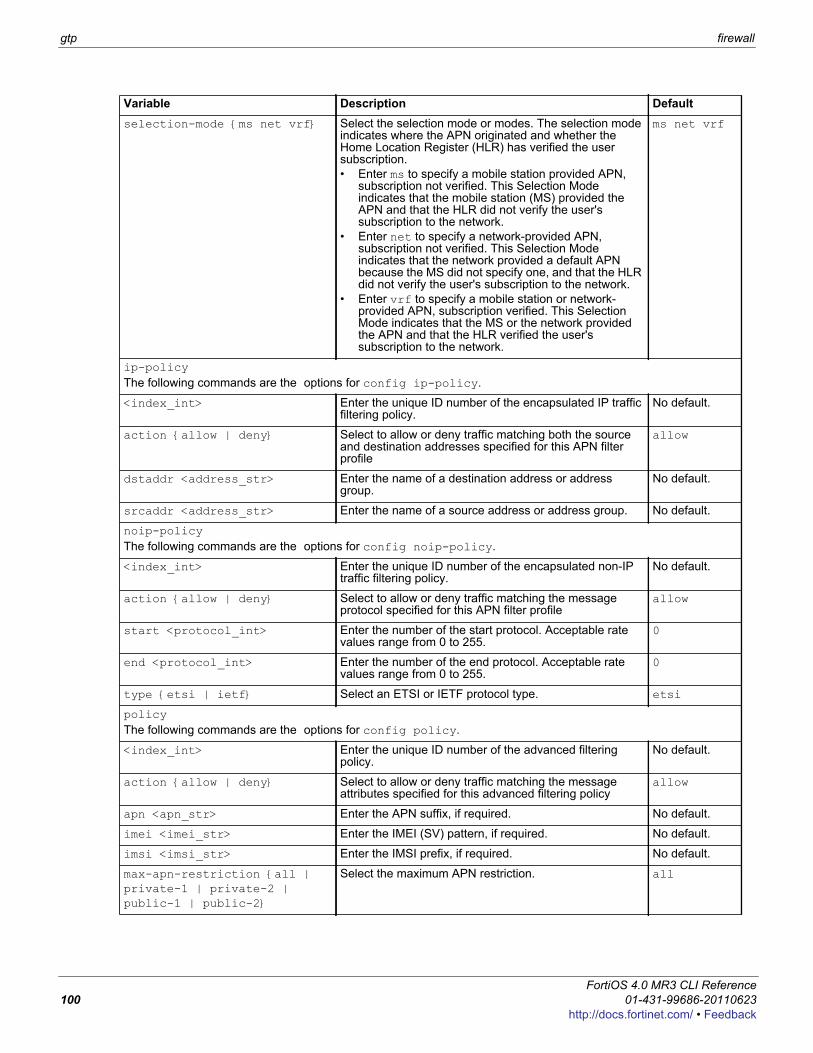
gtp firewall
selection-mode {ms net vrf} Select the selection mode or modes. The selection mode indicates where the APN originated and whether the Home Location Register (HLR) has verified the user subscription.• Enter ms to specify a mobile station provided APN,
subscription not verified. This Selection Mode indicates that the mobile station (MS) provided the APN and that the HLR did not verify the user's subscription to the network.
• Enter net to specify a network-provided APN, subscription not verified. This Selection Mode indicates that the network provided a default APN because the MS did not specify one, and that the HLR did not verify the user's subscription to the network.
• Enter vrf to specify a mobile station or network-provided APN, subscription verified. This Selection Mode indicates that the MS or the network provided the APN and that the HLR verified the user's subscription to the network.
ms net vrf
ip-policyThe following commands are the options for config ip-policy.
<index_int> Enter the unique ID number of the encapsulated IP traffic filtering policy.
No default.
action {allow | deny} Select to allow or deny traffic matching both the source and destination addresses specified for this APN filter profile
allow
dstaddr <address_str> Enter the name of a destination address or address group.
No default.
srcaddr <address_str> Enter the name of a source address or address group. No default.
noip-policyThe following commands are the options for config noip-policy.
<index_int> Enter the unique ID number of the encapsulated non-IP traffic filtering policy.
No default.
action {allow | deny} Select to allow or deny traffic matching the message protocol specified for this APN filter profile
allow
start <protocol_int> Enter the number of the start protocol. Acceptable rate values range from 0 to 255.
0
end <protocol_int> Enter the number of the end protocol. Acceptable rate values range from 0 to 255.
0
type {etsi | ietf} Select an ETSI or IETF protocol type. etsi
policyThe following commands are the options for config policy.
<index_int> Enter the unique ID number of the advanced filtering policy.
No default.
action {allow | deny} Select to allow or deny traffic matching the message attributes specified for this advanced filtering policy
allow
apn <apn_str> Enter the APN suffix, if required. No default.
imei <imei_str> Enter the IMEI (SV) pattern, if required. No default.
imsi <imsi_str> Enter the IMSI prefix, if required. No default.
max-apn-restriction {all | private-1 | private-2 | public-1 | public-2}
Select the maximum APN restriction. all
Variable Description Default
FortiOS 4.0 MR3 CLI Reference100 01-431-99686-20110623
http://docs.fortinet.com/ • Feedback
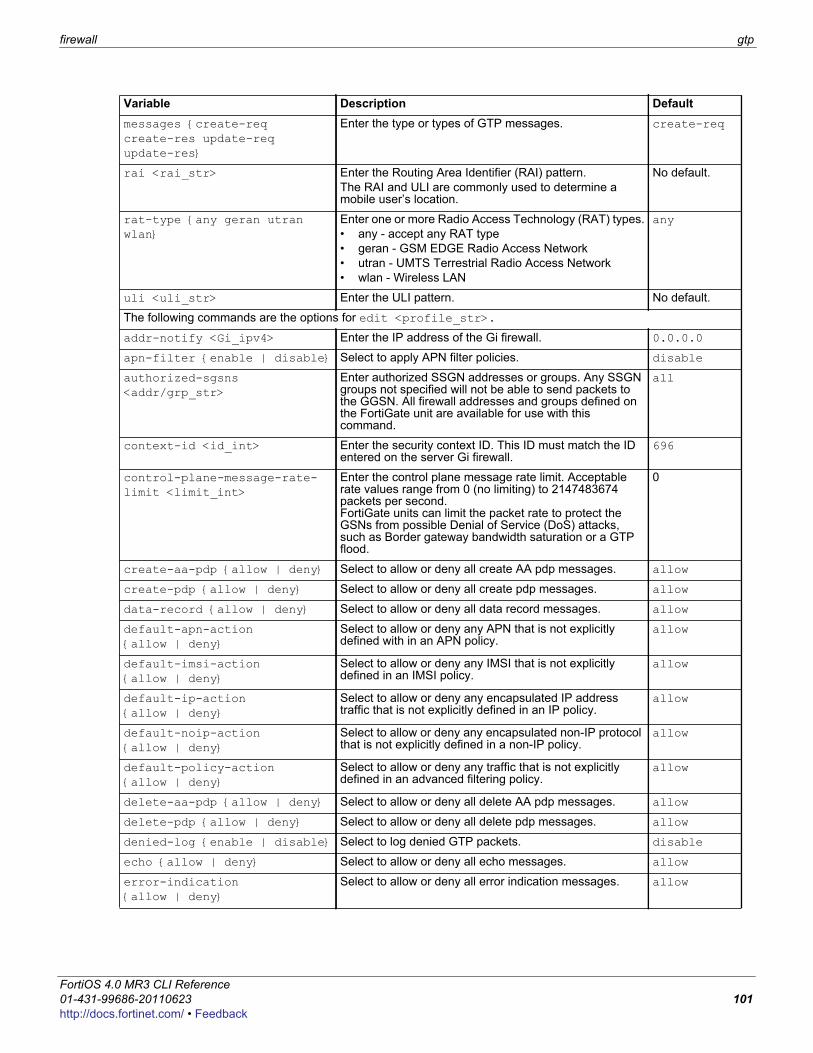
firewall gtp
F0h
messages {create-req create-res update-req update-res}
Enter the type or types of GTP messages. create-req
rai <rai_str> Enter the Routing Area Identifier (RAI) pattern.The RAI and ULI are commonly used to determine a mobile user’s location.
No default.
rat-type {any geran utran wlan}
Enter one or more Radio Access Technology (RAT) types.• any - accept any RAT type• geran - GSM EDGE Radio Access Network• utran - UMTS Terrestrial Radio Access Network• wlan - Wireless LAN
any
uli <uli_str> Enter the ULI pattern. No default.
The following commands are the options for edit <profile_str>.
addr-notify <Gi_ipv4> Enter the IP address of the Gi firewall. 0.0.0.0
apn-filter {enable | disable} Select to apply APN filter policies. disable
authorized-sgsns <addr/grp_str>
Enter authorized SSGN addresses or groups. Any SSGN groups not specified will not be able to send packets to the GGSN. All firewall addresses and groups defined on the FortiGate unit are available for use with this command.
all
context-id <id_int> Enter the security context ID. This ID must match the ID entered on the server Gi firewall.
696
control-plane-message-rate-limit <limit_int>
Enter the control plane message rate limit. Acceptable rate values range from 0 (no limiting) to 2147483674 packets per second.FortiGate units can limit the packet rate to protect the GSNs from possible Denial of Service (DoS) attacks, such as Border gateway bandwidth saturation or a GTP flood.
0
create-aa-pdp {allow | deny} Select to allow or deny all create AA pdp messages. allow
create-pdp {allow | deny} Select to allow or deny all create pdp messages. allow
data-record {allow | deny} Select to allow or deny all data record messages. allow
default-apn-action {allow | deny}
Select to allow or deny any APN that is not explicitly defined with in an APN policy.
allow
default-imsi-action {allow | deny}
Select to allow or deny any IMSI that is not explicitly defined in an IMSI policy.
allow
default-ip-action {allow | deny}
Select to allow or deny any encapsulated IP address traffic that is not explicitly defined in an IP policy.
allow
default-noip-action {allow | deny}
Select to allow or deny any encapsulated non-IP protocol that is not explicitly defined in a non-IP policy.
allow
default-policy-action {allow | deny}
Select to allow or deny any traffic that is not explicitly defined in an advanced filtering policy.
allow
delete-aa-pdp {allow | deny} Select to allow or deny all delete AA pdp messages. allow
delete-pdp {allow | deny} Select to allow or deny all delete pdp messages. allow
denied-log {enable | disable} Select to log denied GTP packets. disable
echo {allow | deny} Select to allow or deny all echo messages. allow
error-indication {allow | deny}
Select to allow or deny all error indication messages. allow
Variable Description Default
ortiOS 4.0 MR3 CLI Reference1-431-99686-20110623 101ttp://docs.fortinet.com/ • Feedback
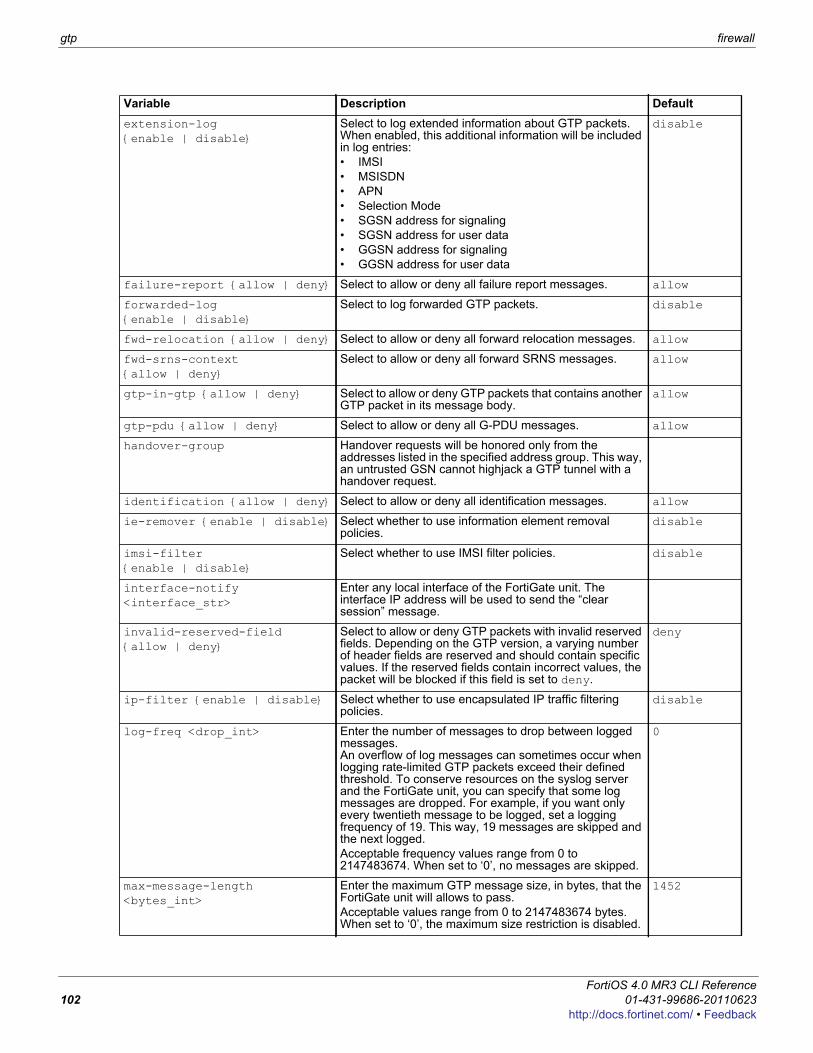
gtp firewall
extension-log {enable | disable}
Select to log extended information about GTP packets. When enabled, this additional information will be included in log entries:• IMSI• MSISDN• APN• Selection Mode• SGSN address for signaling• SGSN address for user data• GGSN address for signaling• GGSN address for user data
disable
failure-report {allow | deny} Select to allow or deny all failure report messages. allow
forwarded-log {enable | disable}
Select to log forwarded GTP packets. disable
fwd-relocation {allow | deny} Select to allow or deny all forward relocation messages. allow
fwd-srns-context {allow | deny}
Select to allow or deny all forward SRNS messages. allow
gtp-in-gtp {allow | deny} Select to allow or deny GTP packets that contains another GTP packet in its message body.
allow
gtp-pdu {allow | deny} Select to allow or deny all G-PDU messages. allow
handover-group Handover requests will be honored only from the addresses listed in the specified address group. This way, an untrusted GSN cannot highjack a GTP tunnel with a handover request.
identification {allow | deny} Select to allow or deny all identification messages. allow
ie-remover {enable | disable} Select whether to use information element removal policies.
disable
imsi-filter {enable | disable}
Select whether to use IMSI filter policies. disable
interface-notify <interface_str>
Enter any local interface of the FortiGate unit. The interface IP address will be used to send the “clear session” message.
invalid-reserved-field {allow | deny}
Select to allow or deny GTP packets with invalid reserved fields. Depending on the GTP version, a varying number of header fields are reserved and should contain specific values. If the reserved fields contain incorrect values, the packet will be blocked if this field is set to deny.
deny
ip-filter {enable | disable} Select whether to use encapsulated IP traffic filtering policies.
disable
log-freq <drop_int> Enter the number of messages to drop between logged messages.An overflow of log messages can sometimes occur when logging rate-limited GTP packets exceed their defined threshold. To conserve resources on the syslog server and the FortiGate unit, you can specify that some log messages are dropped. For example, if you want only every twentieth message to be logged, set a logging frequency of 19. This way, 19 messages are skipped and the next logged.Acceptable frequency values range from 0 to 2147483674. When set to ‘0’, no messages are skipped.
0
max-message-length <bytes_int>
Enter the maximum GTP message size, in bytes, that the FortiGate unit will allows to pass.Acceptable values range from 0 to 2147483674 bytes. When set to ‘0’, the maximum size restriction is disabled.
1452
Variable Description Default
FortiOS 4.0 MR3 CLI Reference102 01-431-99686-20110623
http://docs.fortinet.com/ • Feedback
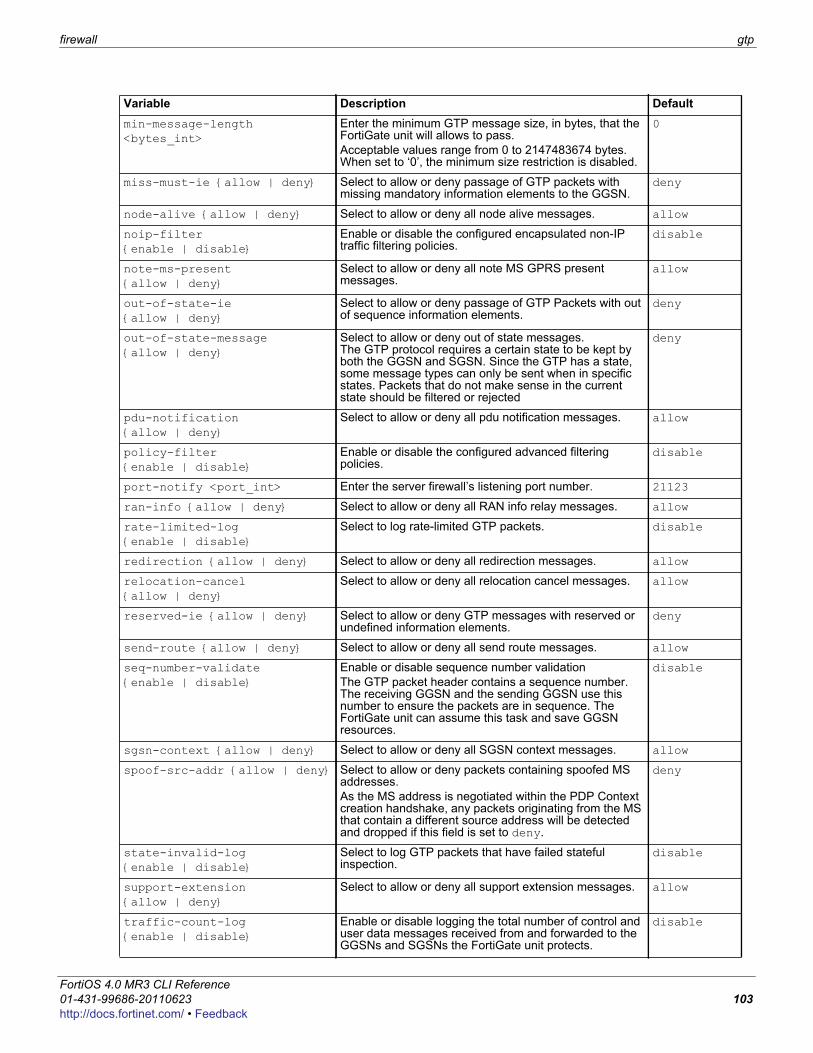
firewall gtp
F0h
min-message-length <bytes_int>
Enter the minimum GTP message size, in bytes, that the FortiGate unit will allows to pass.Acceptable values range from 0 to 2147483674 bytes. When set to ‘0’, the minimum size restriction is disabled.
0
miss-must-ie {allow | deny} Select to allow or deny passage of GTP packets with missing mandatory information elements to the GGSN.
deny
node-alive {allow | deny} Select to allow or deny all node alive messages. allow
noip-filter {enable | disable}
Enable or disable the configured encapsulated non-IP traffic filtering policies.
disable
note-ms-present {allow | deny}
Select to allow or deny all note MS GPRS present messages.
allow
out-of-state-ie {allow | deny}
Select to allow or deny passage of GTP Packets with out of sequence information elements.
deny
out-of-state-message {allow | deny}
Select to allow or deny out of state messages.The GTP protocol requires a certain state to be kept by both the GGSN and SGSN. Since the GTP has a state, some message types can only be sent when in specific states. Packets that do not make sense in the current state should be filtered or rejected
deny
pdu-notification {allow | deny}
Select to allow or deny all pdu notification messages. allow
policy-filter {enable | disable}
Enable or disable the configured advanced filtering policies.
disable
port-notify <port_int> Enter the server firewall’s listening port number. 21123
ran-info {allow | deny} Select to allow or deny all RAN info relay messages. allow
rate-limited-log {enable | disable}
Select to log rate-limited GTP packets. disable
redirection {allow | deny} Select to allow or deny all redirection messages. allow
relocation-cancel {allow | deny}
Select to allow or deny all relocation cancel messages. allow
reserved-ie {allow | deny} Select to allow or deny GTP messages with reserved or undefined information elements.
deny
send-route {allow | deny} Select to allow or deny all send route messages. allow
seq-number-validate {enable | disable}
Enable or disable sequence number validationThe GTP packet header contains a sequence number. The receiving GGSN and the sending GGSN use this number to ensure the packets are in sequence. The FortiGate unit can assume this task and save GGSN resources.
disable
sgsn-context {allow | deny} Select to allow or deny all SGSN context messages. allow
spoof-src-addr {allow | deny} Select to allow or deny packets containing spoofed MS addresses.As the MS address is negotiated within the PDP Context creation handshake, any packets originating from the MS that contain a different source address will be detected and dropped if this field is set to deny.
deny
state-invalid-log {enable | disable}
Select to log GTP packets that have failed stateful inspection.
disable
support-extension {allow | deny}
Select to allow or deny all support extension messages. allow
traffic-count-log {enable | disable}
Enable or disable logging the total number of control and user data messages received from and forwarded to the GGSNs and SGSNs the FortiGate unit protects.
disable
Variable Description Default
ortiOS 4.0 MR3 CLI Reference1-431-99686-20110623 103ttp://docs.fortinet.com/ • Feedback
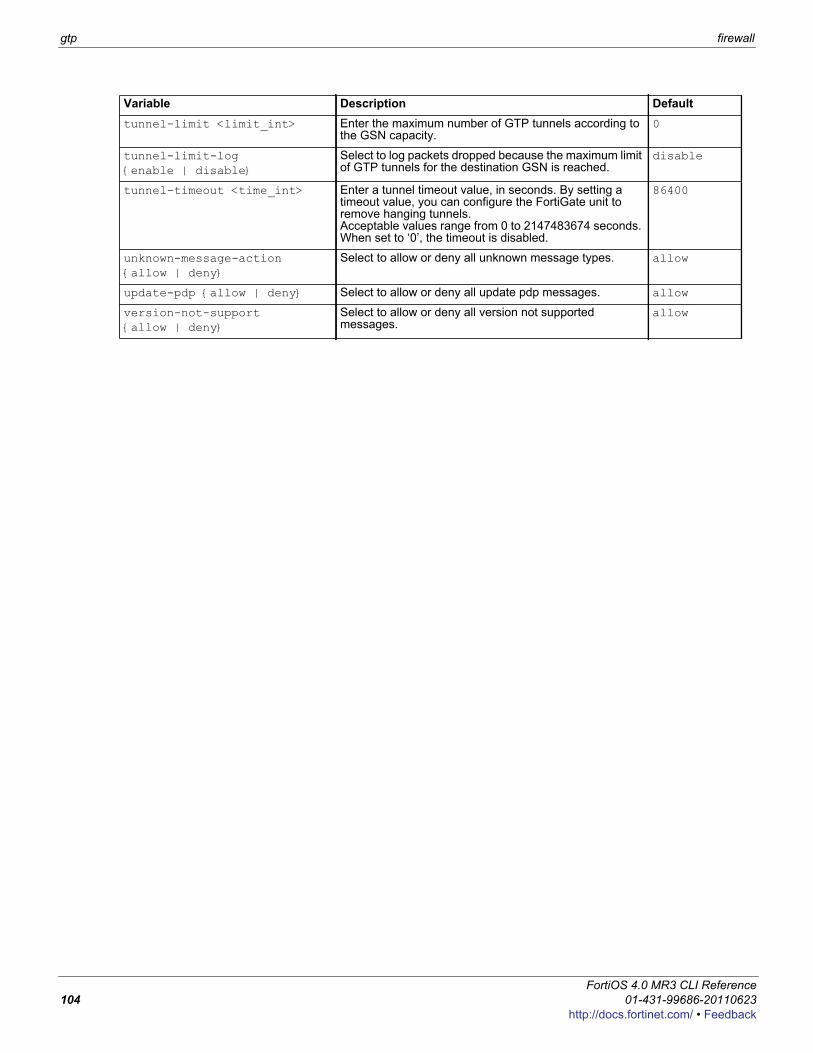
gtp firewall
tunnel-limit <limit_int> Enter the maximum number of GTP tunnels according to the GSN capacity.
0
tunnel-limit-log {enable | disable}
Select to log packets dropped because the maximum limit of GTP tunnels for the destination GSN is reached.
disable
tunnel-timeout <time_int> Enter a tunnel timeout value, in seconds. By setting a timeout value, you can configure the FortiGate unit to remove hanging tunnels.Acceptable values range from 0 to 2147483674 seconds. When set to ‘0’, the timeout is disabled.
86400
unknown-message-action {allow | deny}
Select to allow or deny all unknown message types. allow
update-pdp {allow | deny} Select to allow or deny all update pdp messages. allow
version-not-support {allow | deny}
Select to allow or deny all version not supported messages.
allow
Variable Description Default
FortiOS 4.0 MR3 CLI Reference104 01-431-99686-20110623
http://docs.fortinet.com/ • Feedback
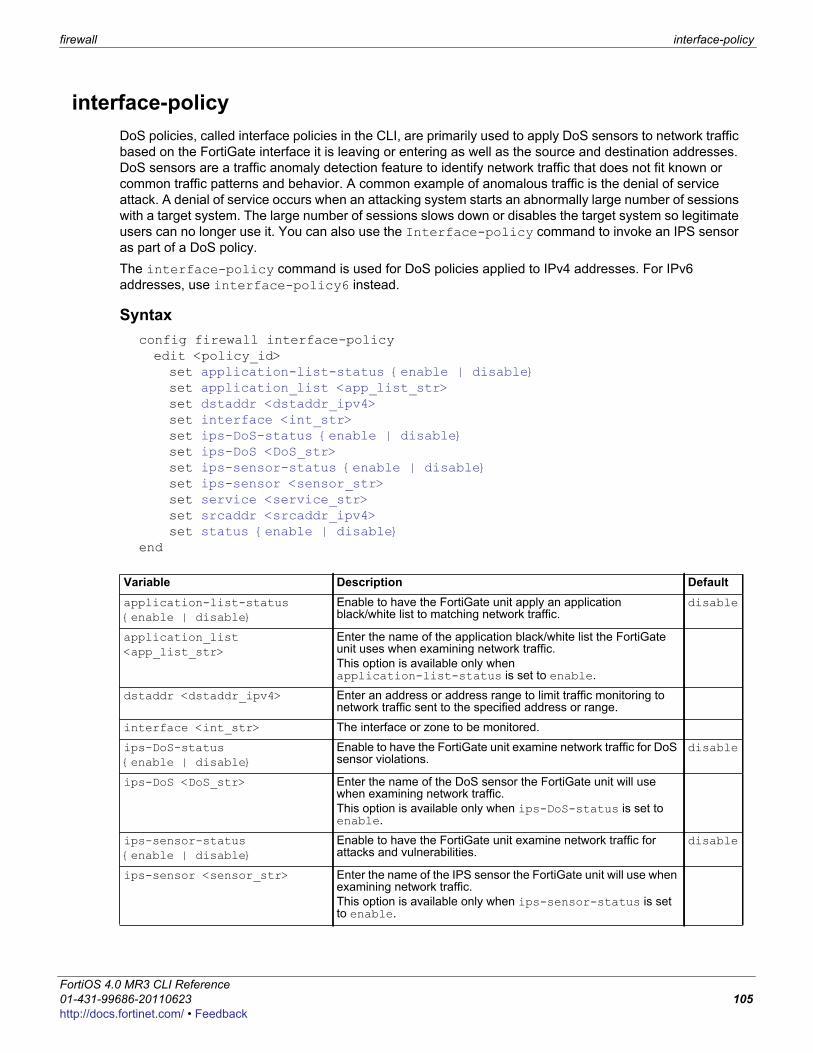
firewall interface-policy
F0h
interface-policyDoS policies, called interface policies in the CLI, are primarily used to apply DoS sensors to network traffic based on the FortiGate interface it is leaving or entering as well as the source and destination addresses. DoS sensors are a traffic anomaly detection feature to identify network traffic that does not fit known or common traffic patterns and behavior. A common example of anomalous traffic is the denial of service attack. A denial of service occurs when an attacking system starts an abnormally large number of sessions with a target system. The large number of sessions slows down or disables the target system so legitimate users can no longer use it. You can also use the Interface-policy command to invoke an IPS sensor as part of a DoS policy.The interface-policy command is used for DoS policies applied to IPv4 addresses. For IPv6 addresses, use interface-policy6 instead.
Syntaxconfig firewall interface-policyedit <policy_id>set application-list-status {enable | disable}set application_list <app_list_str>set dstaddr <dstaddr_ipv4>set interface <int_str>set ips-DoS-status {enable | disable}set ips-DoS <DoS_str>set ips-sensor-status {enable | disable}set ips-sensor <sensor_str>set service <service_str>set srcaddr <srcaddr_ipv4>set status {enable | disable}
end
Variable Description Defaultapplication-list-status {enable | disable}
Enable to have the FortiGate unit apply an application black/white list to matching network traffic.
disable
application_list <app_list_str>
Enter the name of the application black/white list the FortiGate unit uses when examining network traffic.This option is available only when application-list-status is set to enable.
dstaddr <dstaddr_ipv4> Enter an address or address range to limit traffic monitoring to network traffic sent to the specified address or range.
interface <int_str> The interface or zone to be monitored.
ips-DoS-status {enable | disable}
Enable to have the FortiGate unit examine network traffic for DoS sensor violations.
disable
ips-DoS <DoS_str> Enter the name of the DoS sensor the FortiGate unit will use when examining network traffic.This option is available only when ips-DoS-status is set to enable.
ips-sensor-status {enable | disable}
Enable to have the FortiGate unit examine network traffic for attacks and vulnerabilities.
disable
ips-sensor <sensor_str> Enter the name of the IPS sensor the FortiGate unit will use when examining network traffic.This option is available only when ips-sensor-status is set to enable.
ortiOS 4.0 MR3 CLI Reference1-431-99686-20110623 105ttp://docs.fortinet.com/ • Feedback
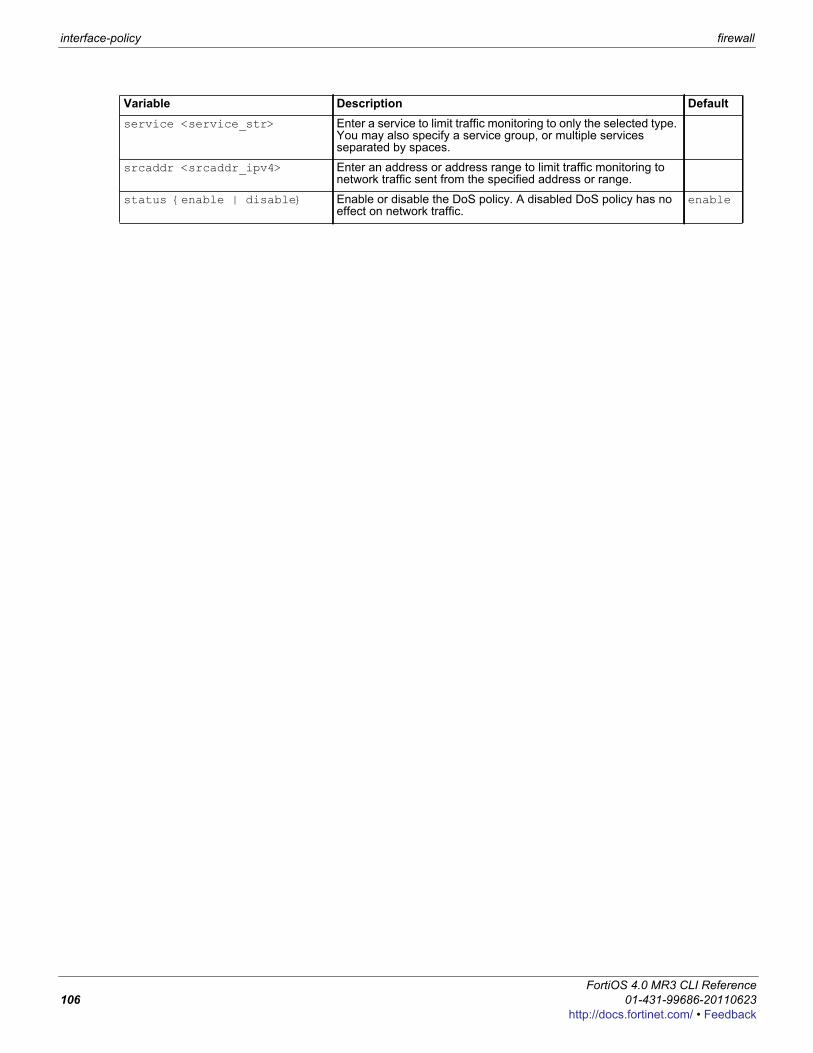
interface-policy firewall
service <service_str> Enter a service to limit traffic monitoring to only the selected type. You may also specify a service group, or multiple services separated by spaces.
srcaddr <srcaddr_ipv4> Enter an address or address range to limit traffic monitoring to network traffic sent from the specified address or range.
status {enable | disable} Enable or disable the DoS policy. A disabled DoS policy has no effect on network traffic.
enable
Variable Description Default
FortiOS 4.0 MR3 CLI Reference106 01-431-99686-20110623
http://docs.fortinet.com/ • Feedback
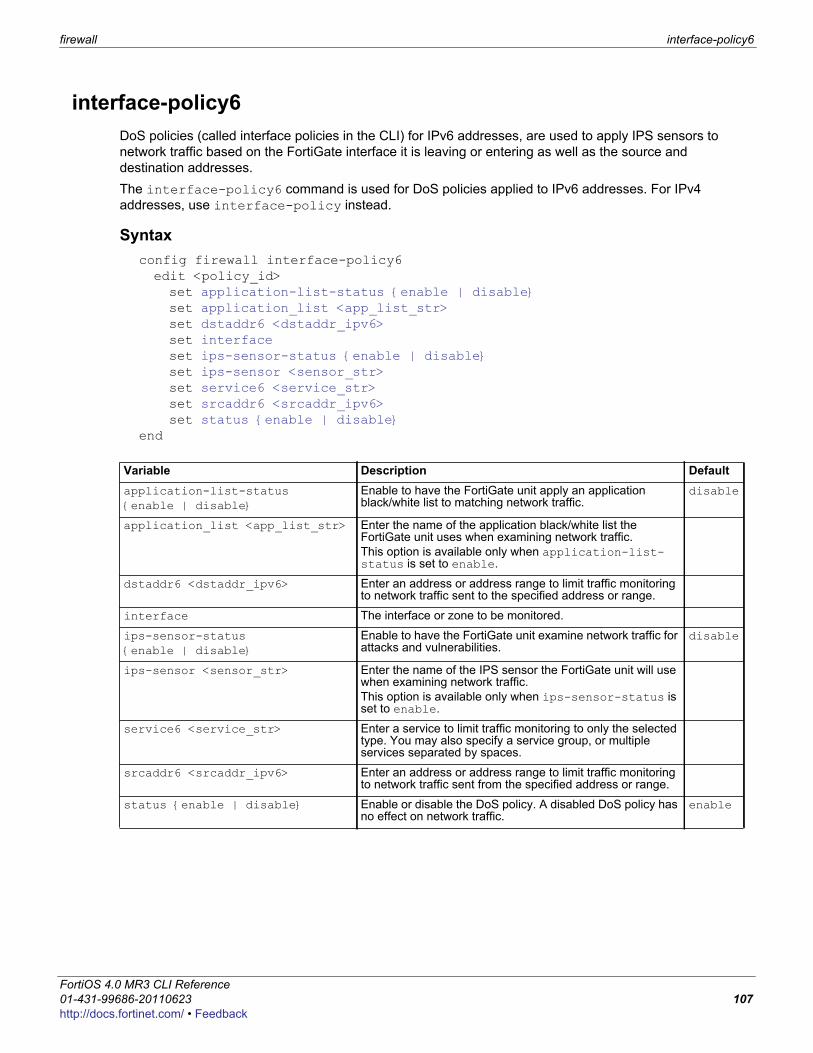
firewall interface-policy6
F0h
interface-policy6DoS policies (called interface policies in the CLI) for IPv6 addresses, are used to apply IPS sensors to network traffic based on the FortiGate interface it is leaving or entering as well as the source and destination addresses.The interface-policy6 command is used for DoS policies applied to IPv6 addresses. For IPv4 addresses, use interface-policy instead.
Syntaxconfig firewall interface-policy6edit <policy_id>set application-list-status {enable | disable}set application_list <app_list_str>set dstaddr6 <dstaddr_ipv6>set interfaceset ips-sensor-status {enable | disable}set ips-sensor <sensor_str>set service6 <service_str>set srcaddr6 <srcaddr_ipv6>set status {enable | disable}
end
Variable Description Defaultapplication-list-status {enable | disable}
Enable to have the FortiGate unit apply an application black/white list to matching network traffic.
disable
application_list <app_list_str> Enter the name of the application black/white list the FortiGate unit uses when examining network traffic.This option is available only when application-list-status is set to enable.
dstaddr6 <dstaddr_ipv6> Enter an address or address range to limit traffic monitoring to network traffic sent to the specified address or range.
interface The interface or zone to be monitored.
ips-sensor-status {enable | disable}
Enable to have the FortiGate unit examine network traffic for attacks and vulnerabilities.
disable
ips-sensor <sensor_str> Enter the name of the IPS sensor the FortiGate unit will use when examining network traffic.This option is available only when ips-sensor-status is set to enable.
service6 <service_str> Enter a service to limit traffic monitoring to only the selected type. You may also specify a service group, or multiple services separated by spaces.
srcaddr6 <srcaddr_ipv6> Enter an address or address range to limit traffic monitoring to network traffic sent from the specified address or range.
status {enable | disable} Enable or disable the DoS policy. A disabled DoS policy has no effect on network traffic.
enable
ortiOS 4.0 MR3 CLI Reference1-431-99686-20110623 107ttp://docs.fortinet.com/ • Feedback
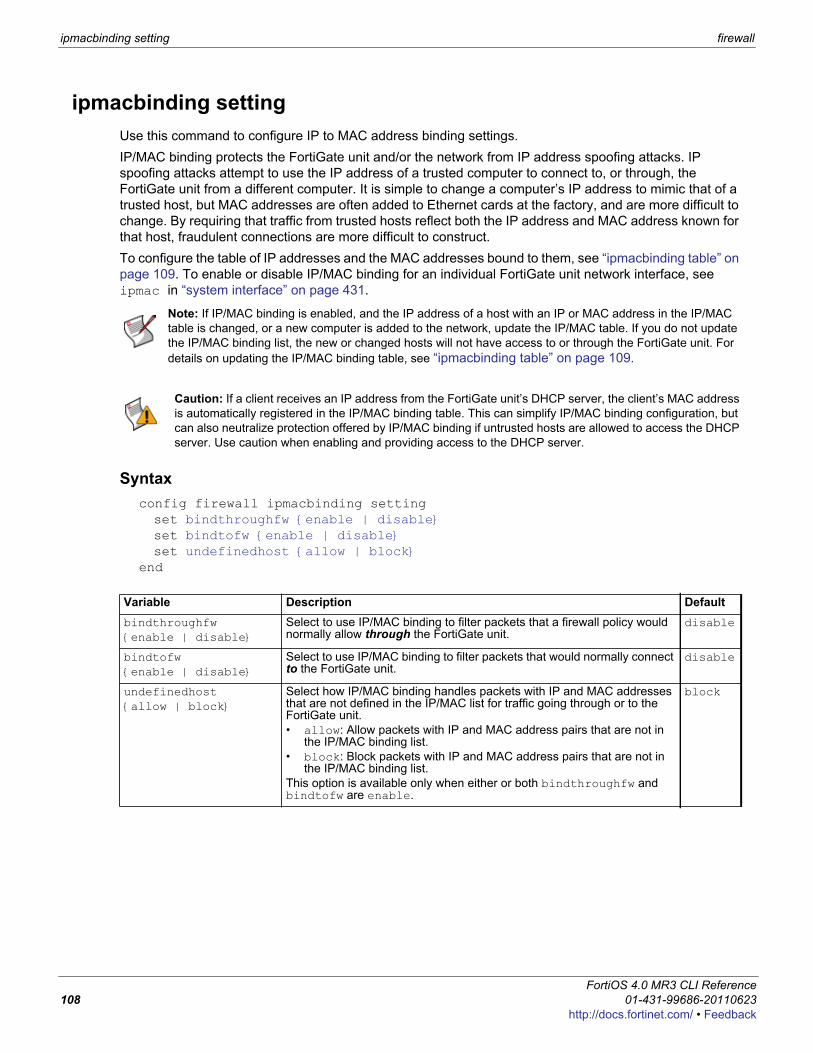
ipmacbinding setting firewall
ipmacbinding settingUse this command to configure IP to MAC address binding settings.IP/MAC binding protects the FortiGate unit and/or the network from IP address spoofing attacks. IP spoofing attacks attempt to use the IP address of a trusted computer to connect to, or through, the FortiGate unit from a different computer. It is simple to change a computer’s IP address to mimic that of a trusted host, but MAC addresses are often added to Ethernet cards at the factory, and are more difficult to change. By requiring that traffic from trusted hosts reflect both the IP address and MAC address known for that host, fraudulent connections are more difficult to construct.To configure the table of IP addresses and the MAC addresses bound to them, see “ipmacbinding table” on page 109. To enable or disable IP/MAC binding for an individual FortiGate unit network interface, see ipmac in “system interface” on page 431.
Syntaxconfig firewall ipmacbinding settingset bindthroughfw {enable | disable}set bindtofw {enable | disable}set undefinedhost {allow | block}
end
Note: If IP/MAC binding is enabled, and the IP address of a host with an IP or MAC address in the IP/MAC table is changed, or a new computer is added to the network, update the IP/MAC table. If you do not update the IP/MAC binding list, the new or changed hosts will not have access to or through the FortiGate unit. For details on updating the IP/MAC binding table, see “ipmacbinding table” on page 109.
Caution: If a client receives an IP address from the FortiGate unit’s DHCP server, the client’s MAC address is automatically registered in the IP/MAC binding table. This can simplify IP/MAC binding configuration, but can also neutralize protection offered by IP/MAC binding if untrusted hosts are allowed to access the DHCP server. Use caution when enabling and providing access to the DHCP server.
Variable Description Defaultbindthroughfw {enable | disable}
Select to use IP/MAC binding to filter packets that a firewall policy would normally allow through the FortiGate unit.
disable
bindtofw {enable | disable}
Select to use IP/MAC binding to filter packets that would normally connect to the FortiGate unit.
disable
undefinedhost {allow | block}
Select how IP/MAC binding handles packets with IP and MAC addresses that are not defined in the IP/MAC list for traffic going through or to the FortiGate unit.• allow: Allow packets with IP and MAC address pairs that are not in
the IP/MAC binding list.• block: Block packets with IP and MAC address pairs that are not in
the IP/MAC binding list.This option is available only when either or both bindthroughfw and bindtofw are enable.
block
FortiOS 4.0 MR3 CLI Reference108 01-431-99686-20110623
http://docs.fortinet.com/ • Feedback
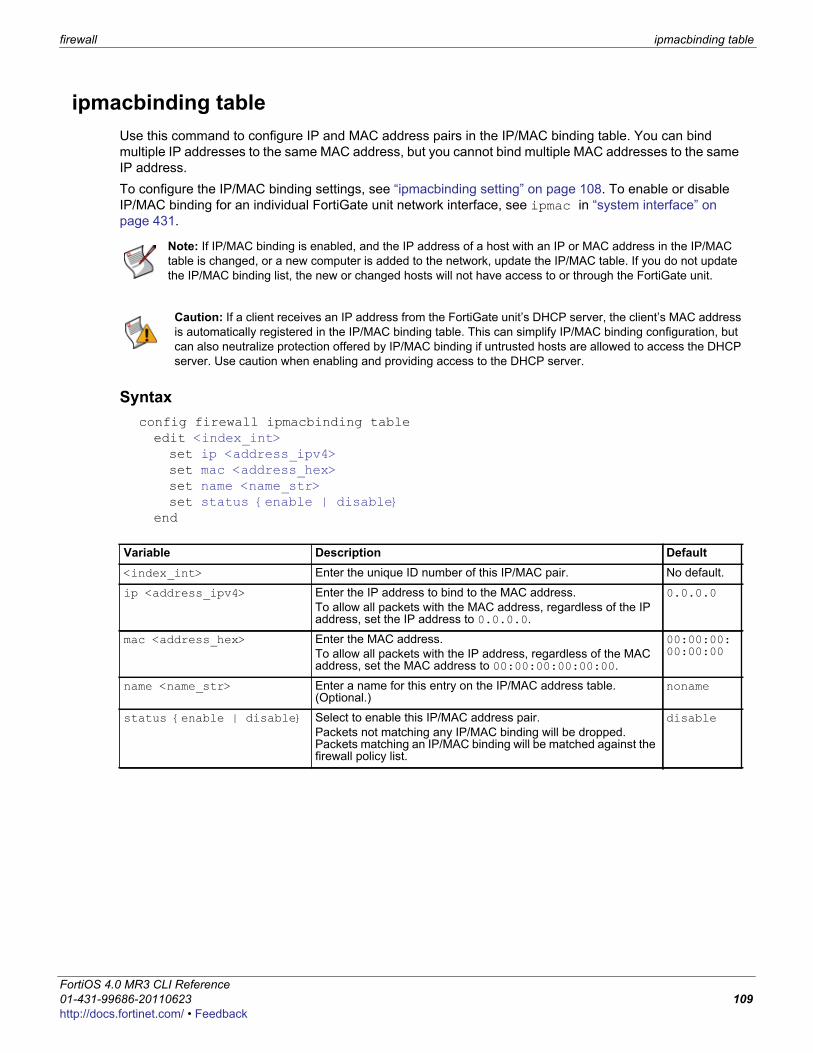
firewall ipmacbinding table
F0h
ipmacbinding tableUse this command to configure IP and MAC address pairs in the IP/MAC binding table. You can bind multiple IP addresses to the same MAC address, but you cannot bind multiple MAC addresses to the same IP address.To configure the IP/MAC binding settings, see “ipmacbinding setting” on page 108. To enable or disable IP/MAC binding for an individual FortiGate unit network interface, see ipmac in “system interface” on page 431.
Syntaxconfig firewall ipmacbinding tableedit <index_int>set ip <address_ipv4>set mac <address_hex>set name <name_str>set status {enable | disable}
end
Note: If IP/MAC binding is enabled, and the IP address of a host with an IP or MAC address in the IP/MAC table is changed, or a new computer is added to the network, update the IP/MAC table. If you do not update the IP/MAC binding list, the new or changed hosts will not have access to or through the FortiGate unit.
Caution: If a client receives an IP address from the FortiGate unit’s DHCP server, the client’s MAC address is automatically registered in the IP/MAC binding table. This can simplify IP/MAC binding configuration, but can also neutralize protection offered by IP/MAC binding if untrusted hosts are allowed to access the DHCP server. Use caution when enabling and providing access to the DHCP server.
Variable Description Default<index_int> Enter the unique ID number of this IP/MAC pair. No default.
ip <address_ipv4> Enter the IP address to bind to the MAC address.To allow all packets with the MAC address, regardless of the IP address, set the IP address to 0.0.0.0.
0.0.0.0
mac <address_hex> Enter the MAC address.To allow all packets with the IP address, regardless of the MAC address, set the MAC address to 00:00:00:00:00:00.
00:00:00:00:00:00
name <name_str> Enter a name for this entry on the IP/MAC address table. (Optional.)
noname
status {enable | disable} Select to enable this IP/MAC address pair.Packets not matching any IP/MAC binding will be dropped. Packets matching an IP/MAC binding will be matched against the firewall policy list.
disable
ortiOS 4.0 MR3 CLI Reference1-431-99686-20110623 109ttp://docs.fortinet.com/ • Feedback

ippool firewall
ippool Use this command to configure IP address pools.Use IP pools to add NAT policies that translate source addresses to addresses randomly selected from the IP pool, rather than the IP address assigned to that FortiOS unit interface. In Transparent mode, IP pools are available only from the FortiGate CLI.An IP pool defines a single IP address or a range of IP addresses. A single IP address in an IP pool becomes a range of one IP address. For example, if you enter an IP pool as 1.1.1.1 the IP pool is actually the address range 1.1.1.1 to 1.1.1.1.If a FortiGate interface IP address overlaps with one or more IP pool address ranges, the interface responds to ARP requests for all of the IP addresses in the overlapping IP pools.For example, consider a FortiGate unit with the following IP addresses for the port1 and port2 interfaces:• port1 IP address: 1.1.1.1/255.255.255.0 (range is 1.1.1.0-1.1.1.255)• port2 IP address: 2.2.2.2/255.255.255.0 (range is 2.2.2.0-2.2.2.255)And the following IP pools:• IP_pool_1: 1.1.1.10-1.1.1.20• IP_pool_2: 2.2.2.10-2.2.2.20• IP_pool_3: 2.2.2.30-2.2.2.40The port1 interface overlap IP range with IP_pool_1 is:• (1.1.1.0-1.1.1.255) and (1.1.1.10-1.1.1.20) = 1.1.1.10-1.1.1.20The port2 interface overlap IP range with IP_pool_2 is:• (2.2.2.0-2.2.2.255) & (2.2.2.10-2.2.2.20) = 2.2.2.10-2.2.2.20The port2 interface overlap IP range with IP_pool_3 is:• (2.2.2.0-2.2.2.255) & (2.2.2.30-2.2.2.40) = 2.2.2.30-2.2.2.40And the result is:• The port1 interface answers ARP requests for 1.1.1.10-1.1.1.20• The port2 interface answers ARP requests for 2.2.2.10-2.2.2.20 and for 2.2.2.30-2.2.2.40Select NAT in a firewall policy and then select Dynamic IP Pool and select an IP pool to translate the source address of packets leaving the FortiGate unit to an address randomly selected from the IP pool.
Syntaxconfig firewall ippooledit <index_int>set endip <address_ipv4>set startip <address_ipv4>
end
Variable Description Default<index_int> The unique ID number of this IP pool. No default.
endip <address_ipv4> The end IP of the address range. The end IP must be higher than the start IP. The end IP does not have to be on the same subnet as the IP address of the interface for which you are adding the IP pool.
0.0.0.0
startip <address_ipv4> The start IP of the address range. The start IP does not have to be on the same subnet as the IP address of the interface for which you are adding the IP pool.
0.0.0.0
FortiOS 4.0 MR3 CLI Reference110 01-431-99686-20110623
http://docs.fortinet.com/ • Feedback

firewall ldb-monitor
F0h
ldb-monitorUse this command to configure health check settings.Health check settings can be used by load balancing VIPs to determine if a real server is currently responsive before forwarding traffic. One health check is sent per interval using the specified protocol, port and HTTP-GET, where applicable to the protocol. If the server does not respond during the timeout period, the health check fails and, if retries are configured, another health check is performed. If all health checks fail, the server is deemed unavailable, and another real server is selected to receive the traffic according to the selected load balancing algorithm.Health check settings can be re-used by multiple real servers. For details on enabling health checking and using configured health check settings, see “firewall vip” on page 169.
Syntaxconfig firewall ldb-monitoredit <name_str>set http-get <httprequest_str>set http-match <contentmatch_str>set interval <seconds_int>set port <port_int>set retry <retries_int>set timeout <seconds_int>set type {http | ping | tcp}
end
Variable Description Default<name_str> Enter the name of the health check monitor. No default.
http-get <httprequest_str>
For HTTP health check monitors, add a URL that the FortiGate unit uses when sending a get request to check the health of a HTTP server. The URL should match an actual URL for the real HTTP servers. The URL is optional.The URL would not usually include an IP address or domain name. Instead it should start with a /and be followed by the address of an actual web page on the real server. For example, if the IP address of the real server is 10.10.10.1, the URL /test_page.htm causes the FortiGate unit to send am HTTP get request to http://10.10.10.1/test_page.htm.This option appears only if type is http.
No default.
http-match <contentmatch_str>
For HTTP health check monitors, add a phrase that a real HTTP server should include in response to the get request sent by the FortiGate unit using the content of the http-get option. If the http-get URL returns a web page, the http-match option should exactly match some of the text on the web page. You can use the http-get and http-matched options to verify that an HTTP server is actually operating correctly by responding to get requests with expected web pages. http-match is only required if you add a http-get URL.For example, you can set http-match to “server test page” if the real HTTP server page defined by http-get contains the phrase server test page. When the FortiGate unit receives the web page in response to the URL get request, the system searches the content of the web page for the http-match phrase.This option appears only if type is http.
No default.
interval <seconds_int> Enter the interval time in seconds between health checks. 10
ortiOS 4.0 MR3 CLI Reference1-431-99686-20110623 111ttp://docs.fortinet.com/ • Feedback
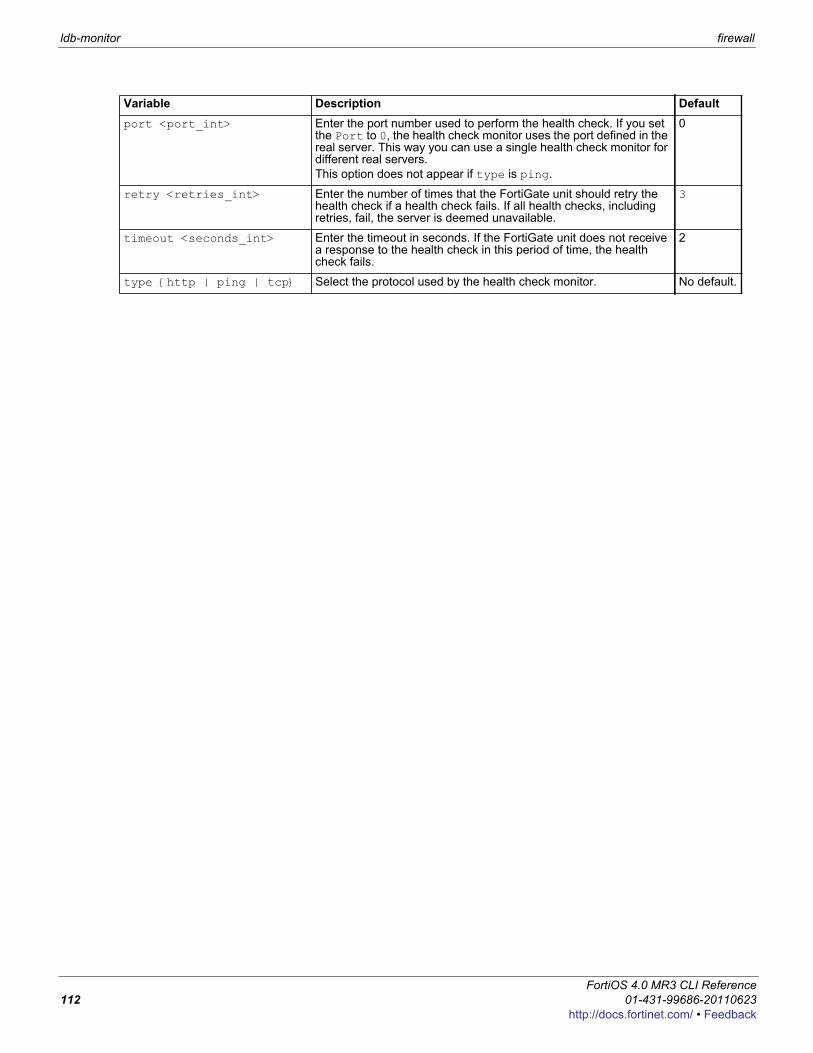
ldb-monitor firewall
port <port_int> Enter the port number used to perform the health check. If you set the Port to 0, the health check monitor uses the port defined in the real server. This way you can use a single health check monitor for different real servers.This option does not appear if type is ping.
0
retry <retries_int> Enter the number of times that the FortiGate unit should retry the health check if a health check fails. If all health checks, including retries, fail, the server is deemed unavailable.
3
timeout <seconds_int> Enter the timeout in seconds. If the FortiGate unit does not receive a response to the health check in this period of time, the health check fails.
2
type {http | ping | tcp} Select the protocol used by the health check monitor. No default.
Variable Description Default
FortiOS 4.0 MR3 CLI Reference112 01-431-99686-20110623
http://docs.fortinet.com/ • Feedback
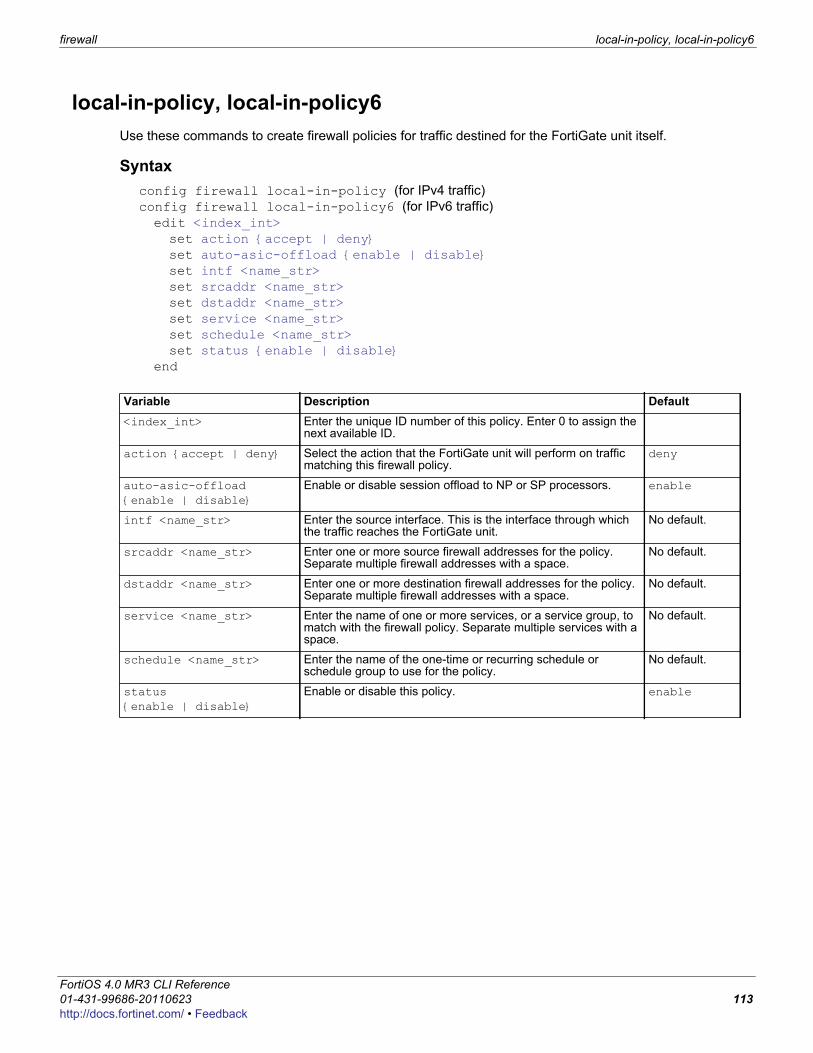
firewall local-in-policy, local-in-policy6
F0h
local-in-policy, local-in-policy6Use these commands to create firewall policies for traffic destined for the FortiGate unit itself.
Syntaxconfig firewall local-in-policy (for IPv4 traffic)config firewall local-in-policy6 (for IPv6 traffic)edit <index_int>set action {accept | deny}set auto-asic-offload {enable | disable}set intf <name_str>set srcaddr <name_str>set dstaddr <name_str>set service <name_str>set schedule <name_str>set status {enable | disable}
end
Variable Description Default<index_int> Enter the unique ID number of this policy. Enter 0 to assign the
next available ID.
action {accept | deny} Select the action that the FortiGate unit will perform on traffic matching this firewall policy.
deny
auto-asic-offload {enable | disable}
Enable or disable session offload to NP or SP processors. enable
intf <name_str> Enter the source interface. This is the interface through which the traffic reaches the FortiGate unit.
No default.
srcaddr <name_str> Enter one or more source firewall addresses for the policy. Separate multiple firewall addresses with a space.
No default.
dstaddr <name_str> Enter one or more destination firewall addresses for the policy. Separate multiple firewall addresses with a space.
No default.
service <name_str> Enter the name of one or more services, or a service group, to match with the firewall policy. Separate multiple services with a space.
No default.
schedule <name_str> Enter the name of the one-time or recurring schedule or schedule group to use for the policy.
No default.
status {enable | disable}
Enable or disable this policy. enable
ortiOS 4.0 MR3 CLI Reference1-431-99686-20110623 113ttp://docs.fortinet.com/ • Feedback
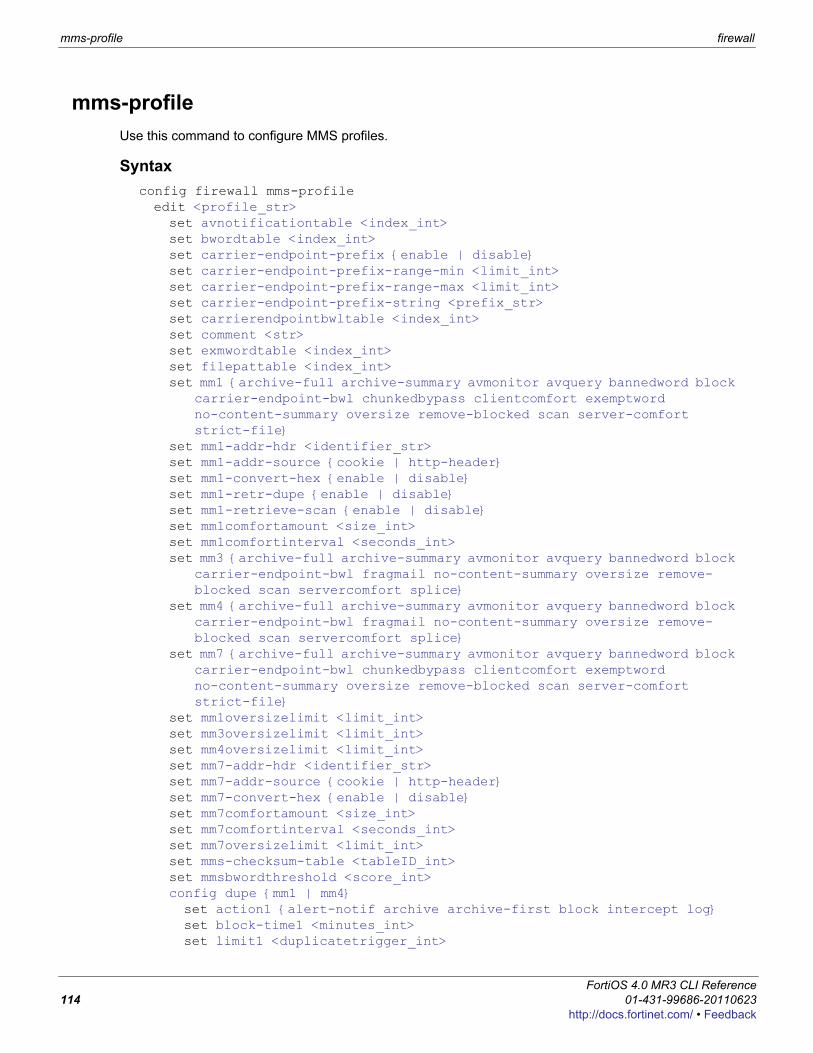
mms-profile firewall
mms-profileUse this command to configure MMS profiles.
Syntaxconfig firewall mms-profileedit <profile_str>set avnotificationtable <index_int> set bwordtable <index_int> set carrier-endpoint-prefix {enable | disable} set carrier-endpoint-prefix-range-min <limit_int> set carrier-endpoint-prefix-range-max <limit_int> set carrier-endpoint-prefix-string <prefix_str> set carrierendpointbwltable <index_int>set comment <str>set exmwordtable <index_int>set filepattable <index_int>set mm1 {archive-full archive-summary avmonitor avquery bannedword block
carrier-endpoint-bwl chunkedbypass clientcomfort exemptword no-content-summary oversize remove-blocked scan server-comfort strict-file}
set mm1-addr-hdr <identifier_str> set mm1-addr-source {cookie | http-header} set mm1-convert-hex {enable | disable} set mm1-retr-dupe {enable | disable} set mm1-retrieve-scan {enable | disable} set mm1comfortamount <size_int> set mm1comfortinterval <seconds_int> set mm3 {archive-full archive-summary avmonitor avquery bannedword block
carrier-endpoint-bwl fragmail no-content-summary oversize remove-blocked scan servercomfort splice}
set mm4 {archive-full archive-summary avmonitor avquery bannedword block carrier-endpoint-bwl fragmail no-content-summary oversize remove-blocked scan servercomfort splice}
set mm7 {archive-full archive-summary avmonitor avquery bannedword block carrier-endpoint-bwl chunkedbypass clientcomfort exemptword no-content-summary oversize remove-blocked scan server-comfort strict-file}
set mm1oversizelimit <limit_int> set mm3oversizelimit <limit_int> set mm4oversizelimit <limit_int> set mm7-addr-hdr <identifier_str> set mm7-addr-source {cookie | http-header} set mm7-convert-hex {enable | disable} set mm7comfortamount <size_int> set mm7comfortinterval <seconds_int> set mm7oversizelimit <limit_int> set mms-checksum-table <tableID_int> set mmsbwordthreshold <score_int> config dupe {mm1 | mm4}set action1 {alert-notif archive archive-first block intercept log} set block-time1 <minutes_int> set limit1 <duplicatetrigger_int>
FortiOS 4.0 MR3 CLI Reference114 01-431-99686-20110623
http://docs.fortinet.com/ • Feedback
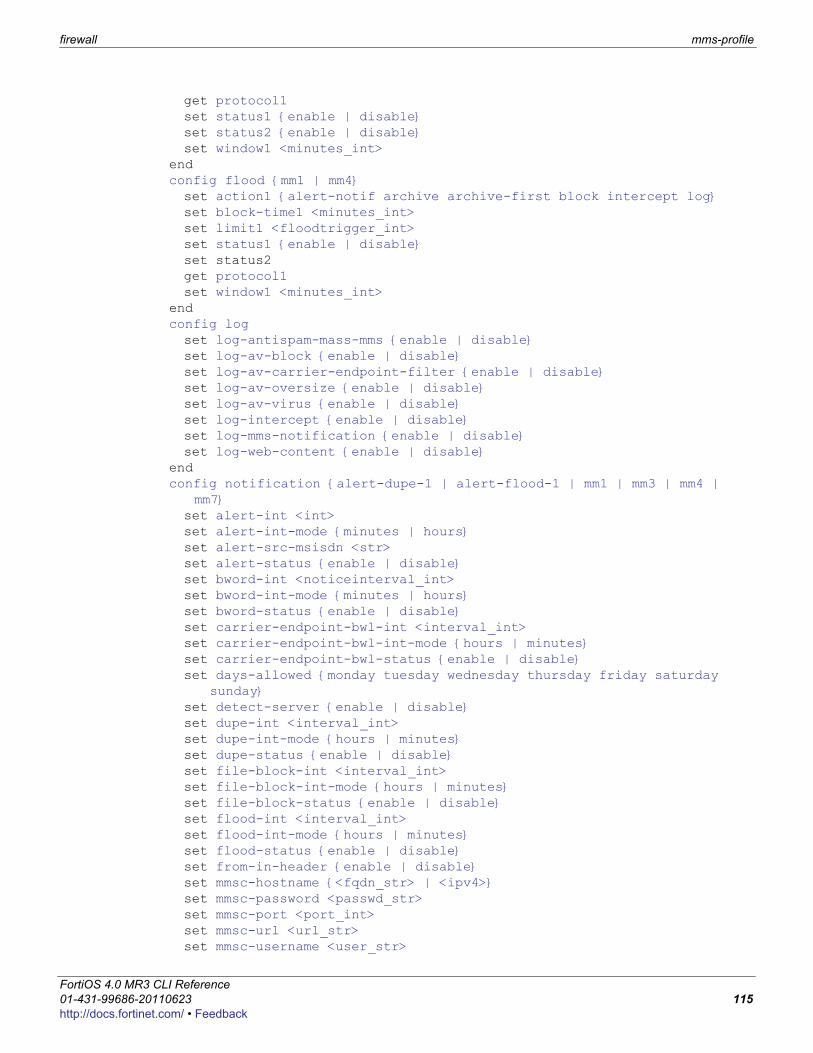
firewall mms-profile
F0h
get protocol1 set status1 {enable | disable} set status2 {enable | disable} set window1 <minutes_int>
endconfig flood {mm1 | mm4}set action1 {alert-notif archive archive-first block intercept log} set block-time1 <minutes_int>set limit1 <floodtrigger_int>set status1 {enable | disable}set status2 get protocol1set window1 <minutes_int>
endconfig logset log-antispam-mass-mms {enable | disable}set log-av-block {enable | disable}set log-av-carrier-endpoint-filter {enable | disable}set log-av-oversize {enable | disable}set log-av-virus {enable | disable}set log-intercept {enable | disable}set log-mms-notification {enable | disable}set log-web-content {enable | disable}
endconfig notification {alert-dupe-1 | alert-flood-1 | mm1 | mm3 | mm4 |
mm7}set alert-int <int>set alert-int-mode {minutes | hours}set alert-src-msisdn <str>set alert-status {enable | disable}set bword-int <noticeinterval_int>set bword-int-mode {minutes | hours}set bword-status {enable | disable}set carrier-endpoint-bwl-int <interval_int>set carrier-endpoint-bwl-int-mode {hours | minutes}set carrier-endpoint-bwl-status {enable | disable}set days-allowed {monday tuesday wednesday thursday friday saturday
sunday}set detect-server {enable | disable}set dupe-int <interval_int>set dupe-int-mode {hours | minutes}set dupe-status {enable | disable}set file-block-int <interval_int>set file-block-int-mode {hours | minutes}set file-block-status {enable | disable}set flood-int <interval_int>set flood-int-mode {hours | minutes}set flood-status {enable | disable}set from-in-header {enable | disable}set mmsc-hostname {<fqdn_str> | <ipv4>}set mmsc-password <passwd_str>set mmsc-port <port_int>set mmsc-url <url_str>set mmsc-username <user_str>
ortiOS 4.0 MR3 CLI Reference1-431-99686-20110623 115ttp://docs.fortinet.com/ • Feedback
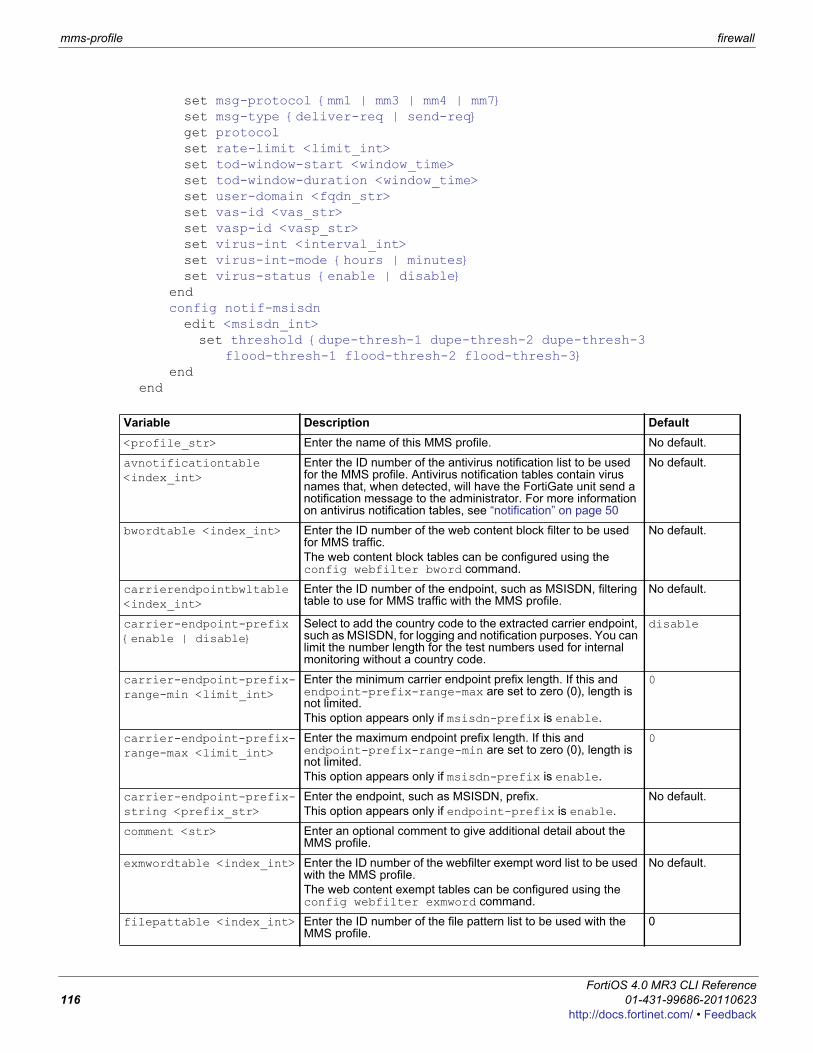
mms-profile firewall
set msg-protocol {mm1 | mm3 | mm4 | mm7}set msg-type {deliver-req | send-req}get protocolset rate-limit <limit_int>set tod-window-start <window_time>set tod-window-duration <window_time>set user-domain <fqdn_str>set vas-id <vas_str>set vasp-id <vasp_str>set virus-int <interval_int>set virus-int-mode {hours | minutes}set virus-status {enable | disable}
endconfig notif-msisdnedit <msisdn_int>set threshold {dupe-thresh-1 dupe-thresh-2 dupe-thresh-3
flood-thresh-1 flood-thresh-2 flood-thresh-3}end
end
Variable Description Default<profile_str> Enter the name of this MMS profile. No default.
avnotificationtable <index_int>
Enter the ID number of the antivirus notification list to be used for the MMS profile. Antivirus notification tables contain virus names that, when detected, will have the FortiGate unit send a notification message to the administrator. For more information on antivirus notification tables, see “notification” on page 50
No default.
bwordtable <index_int> Enter the ID number of the web content block filter to be used for MMS traffic.The web content block tables can be configured using the config webfilter bword command.
No default.
carrierendpointbwltable <index_int>
Enter the ID number of the endpoint, such as MSISDN, filtering table to use for MMS traffic with the MMS profile.
No default.
carrier-endpoint-prefix {enable | disable}
Select to add the country code to the extracted carrier endpoint, such as MSISDN, for logging and notification purposes. You can limit the number length for the test numbers used for internal monitoring without a country code.
disable
carrier-endpoint-prefix-range-min <limit_int>
Enter the minimum carrier endpoint prefix length. If this and endpoint-prefix-range-max are set to zero (0), length is not limited.This option appears only if msisdn-prefix is enable.
0
carrier-endpoint-prefix-range-max <limit_int>
Enter the maximum endpoint prefix length. If this and endpoint-prefix-range-min are set to zero (0), length is not limited.This option appears only if msisdn-prefix is enable.
0
carrier-endpoint-prefix-string <prefix_str>
Enter the endpoint, such as MSISDN, prefix.This option appears only if endpoint-prefix is enable.
No default.
comment <str> Enter an optional comment to give additional detail about the MMS profile.
exmwordtable <index_int> Enter the ID number of the webfilter exempt word list to be used with the MMS profile.The web content exempt tables can be configured using the config webfilter exmword command.
No default.
filepattable <index_int> Enter the ID number of the file pattern list to be used with the MMS profile.
0
FortiOS 4.0 MR3 CLI Reference116 01-431-99686-20110623
http://docs.fortinet.com/ • Feedback
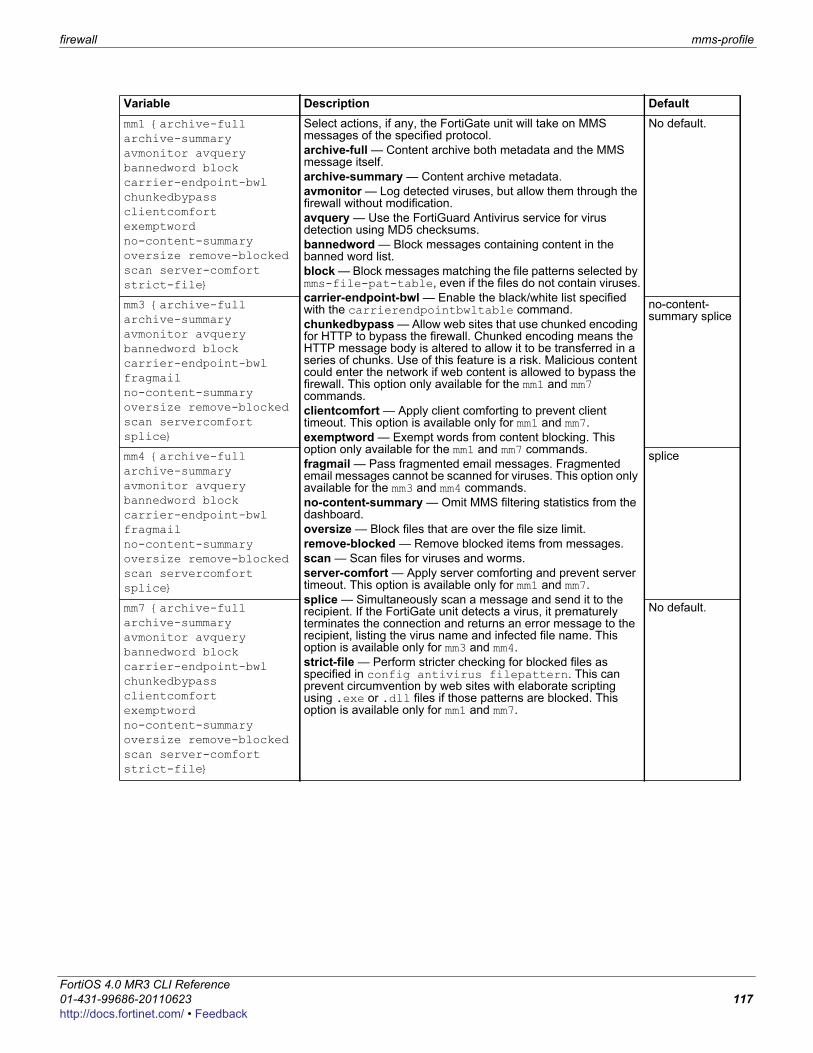
firewall mms-profile
F0h
mm1 {archive-full archive-summary avmonitor avquery bannedword block carrier-endpoint-bwl chunkedbypass clientcomfort exemptword no-content-summary oversize remove-blocked scan server-comfort strict-file}
Select actions, if any, the FortiGate unit will take on MMS messages of the specified protocol.archive-full — Content archive both metadata and the MMS message itself.archive-summary — Content archive metadata.avmonitor — Log detected viruses, but allow them through the firewall without modification.avquery — Use the FortiGuard Antivirus service for virus detection using MD5 checksums.bannedword — Block messages containing content in the banned word list. block — Block messages matching the file patterns selected by mms-file-pat-table, even if the files do not contain viruses.carrier-endpoint-bwl — Enable the black/white list specified with the carrierendpointbwltable command.chunkedbypass — Allow web sites that use chunked encoding for HTTP to bypass the firewall. Chunked encoding means the HTTP message body is altered to allow it to be transferred in a series of chunks. Use of this feature is a risk. Malicious content could enter the network if web content is allowed to bypass the firewall. This option only available for the mm1 and mm7 commands.clientcomfort — Apply client comforting to prevent client timeout. This option is available only for mm1 and mm7.exemptword — Exempt words from content blocking. This option only available for the mm1 and mm7 commands.fragmail — Pass fragmented email messages. Fragmented email messages cannot be scanned for viruses. This option only available for the mm3 and mm4 commands.no-content-summary — Omit MMS filtering statistics from the dashboard.oversize — Block files that are over the file size limit. remove-blocked — Remove blocked items from messages.scan — Scan files for viruses and worms.server-comfort — Apply server comforting and prevent server timeout. This option is available only for mm1 and mm7.splice — Simultaneously scan a message and send it to the recipient. If the FortiGate unit detects a virus, it prematurely terminates the connection and returns an error message to the recipient, listing the virus name and infected file name. This option is available only for mm3 and mm4.strict-file — Perform stricter checking for blocked files as specified in config antivirus filepattern. This can prevent circumvention by web sites with elaborate scripting using .exe or .dll files if those patterns are blocked. This option is available only for mm1 and mm7.
No default.
mm3 {archive-full archive-summary avmonitor avquery bannedword block carrier-endpoint-bwl fragmail no-content-summary oversize remove-blocked scan servercomfort splice}
no-content-summary splice
mm4 {archive-full archive-summary avmonitor avquery bannedword block carrier-endpoint-bwl fragmail no-content-summary oversize remove-blocked scan servercomfortsplice}
splice
mm7 {archive-full archive-summary avmonitor avquery bannedword block carrier-endpoint-bwl chunkedbypass clientcomfort exemptword no-content-summary oversize remove-blocked scan server-comfort strict-file}
No default.
Variable Description Default
ortiOS 4.0 MR3 CLI Reference1-431-99686-20110623 117ttp://docs.fortinet.com/ • Feedback
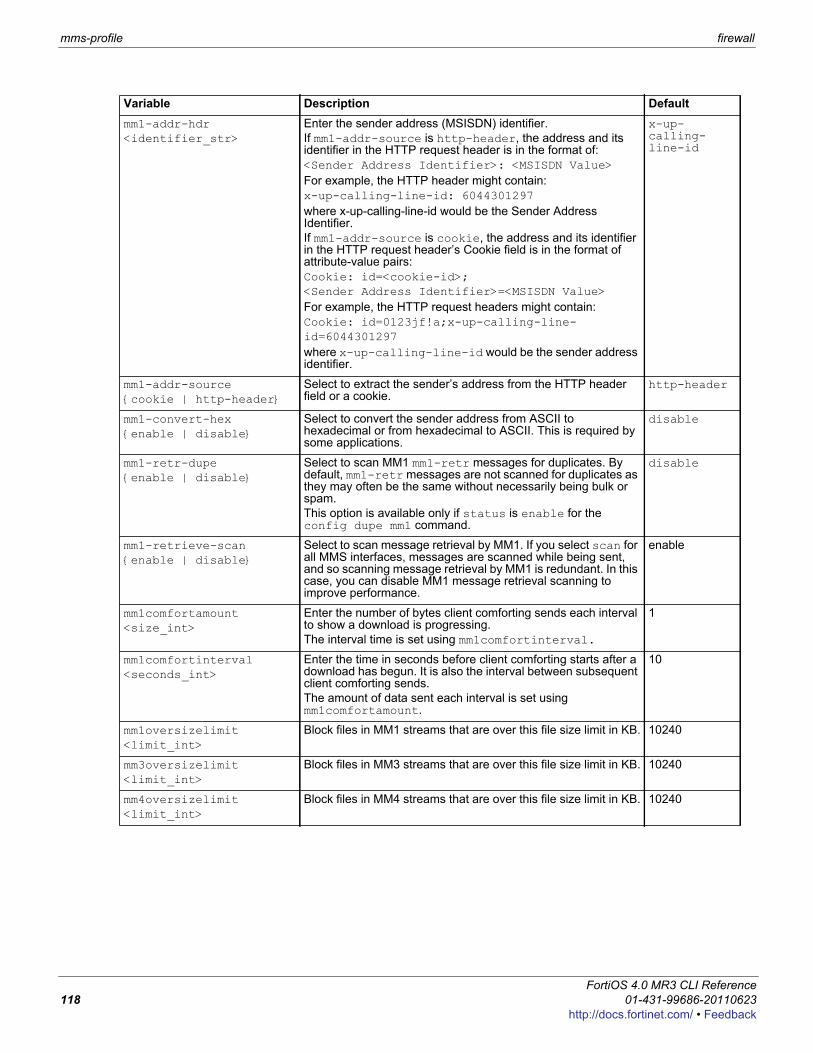
mms-profile firewall
mm1-addr-hdr <identifier_str>
Enter the sender address (MSISDN) identifier.If mm1-addr-source is http-header, the address and its identifier in the HTTP request header is in the format of:<Sender Address Identifier>: <MSISDN Value>For example, the HTTP header might contain:x-up-calling-line-id: 6044301297where x-up-calling-line-id would be the Sender Address Identifier.If mm1-addr-source is cookie, the address and its identifier in the HTTP request header’s Cookie field is in the format of attribute-value pairs:Cookie: id=<cookie-id>;<Sender Address Identifier>=<MSISDN Value>For example, the HTTP request headers might contain:Cookie: id=0123jf!a;x-up-calling-line-id=6044301297where x-up-calling-line-id would be the sender address identifier.
x-up-calling-line-id
mm1-addr-source {cookie | http-header}
Select to extract the sender’s address from the HTTP header field or a cookie.
http-header
mm1-convert-hex {enable | disable}
Select to convert the sender address from ASCII to hexadecimal or from hexadecimal to ASCII. This is required by some applications.
disable
mm1-retr-dupe {enable | disable}
Select to scan MM1 mm1-retr messages for duplicates. By default, mm1-retr messages are not scanned for duplicates as they may often be the same without necessarily being bulk or spam.This option is available only if status is enable for the config dupe mm1 command.
disable
mm1-retrieve-scan {enable | disable}
Select to scan message retrieval by MM1. If you select scan for all MMS interfaces, messages are scanned while being sent, and so scanning message retrieval by MM1 is redundant. In this case, you can disable MM1 message retrieval scanning to improve performance.
enable
mm1comfortamount <size_int>
Enter the number of bytes client comforting sends each interval to show a download is progressing.The interval time is set using mm1comfortinterval.
1
mm1comfortinterval <seconds_int>
Enter the time in seconds before client comforting starts after a download has begun. It is also the interval between subsequent client comforting sends.The amount of data sent each interval is set using mm1comfortamount.
10
mm1oversizelimit <limit_int>
Block files in MM1 streams that are over this file size limit in KB. 10240
mm3oversizelimit <limit_int>
Block files in MM3 streams that are over this file size limit in KB. 10240
mm4oversizelimit <limit_int>
Block files in MM4 streams that are over this file size limit in KB. 10240
Variable Description Default
FortiOS 4.0 MR3 CLI Reference118 01-431-99686-20110623
http://docs.fortinet.com/ • Feedback
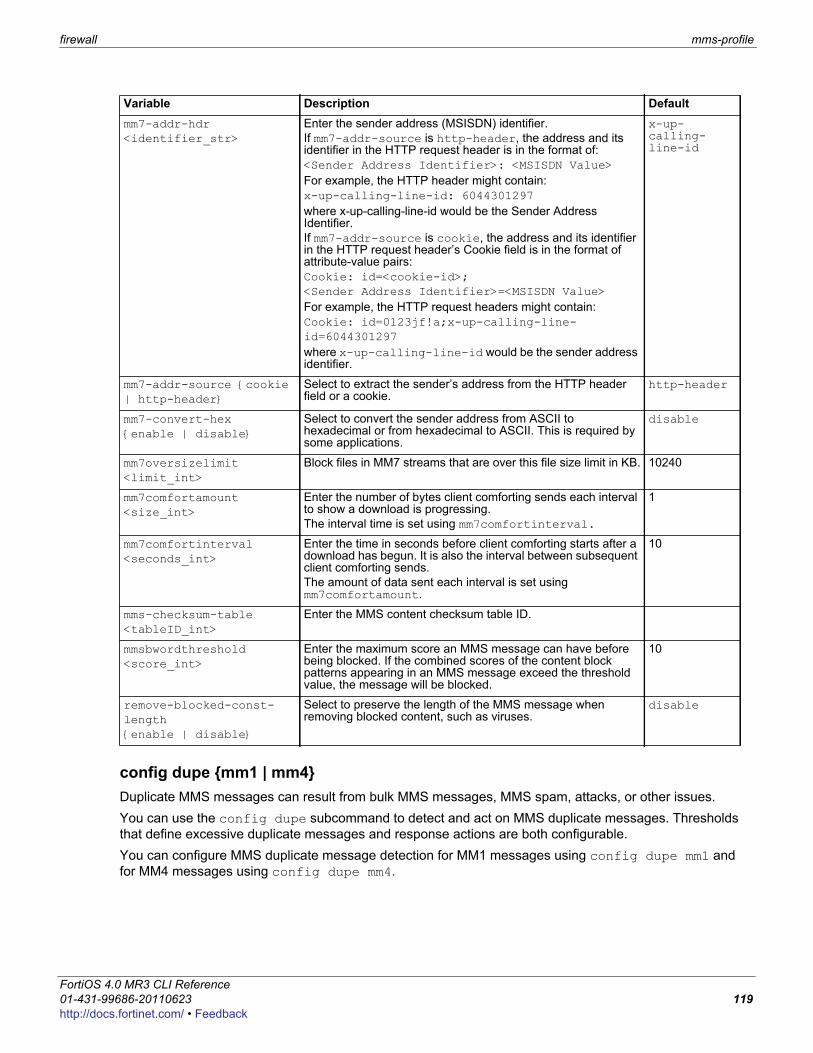
firewall mms-profile
F0h
config dupe {mm1 | mm4}Duplicate MMS messages can result from bulk MMS messages, MMS spam, attacks, or other issues.You can use the config dupe subcommand to detect and act on MMS duplicate messages. Thresholds that define excessive duplicate messages and response actions are both configurable. You can configure MMS duplicate message detection for MM1 messages using config dupe mm1 and for MM4 messages using config dupe mm4.
mm7-addr-hdr <identifier_str>
Enter the sender address (MSISDN) identifier.If mm7-addr-source is http-header, the address and its identifier in the HTTP request header is in the format of:<Sender Address Identifier>: <MSISDN Value>For example, the HTTP header might contain:x-up-calling-line-id: 6044301297where x-up-calling-line-id would be the Sender Address Identifier.If mm7-addr-source is cookie, the address and its identifier in the HTTP request header’s Cookie field is in the format of attribute-value pairs:Cookie: id=<cookie-id>;<Sender Address Identifier>=<MSISDN Value>For example, the HTTP request headers might contain:Cookie: id=0123jf!a;x-up-calling-line-id=6044301297where x-up-calling-line-id would be the sender address identifier.
x-up-calling-line-id
mm7-addr-source {cookie | http-header}
Select to extract the sender’s address from the HTTP header field or a cookie.
http-header
mm7-convert-hex {enable | disable}
Select to convert the sender address from ASCII to hexadecimal or from hexadecimal to ASCII. This is required by some applications.
disable
mm7oversizelimit <limit_int>
Block files in MM7 streams that are over this file size limit in KB. 10240
mm7comfortamount <size_int>
Enter the number of bytes client comforting sends each interval to show a download is progressing.The interval time is set using mm7comfortinterval.
1
mm7comfortinterval <seconds_int>
Enter the time in seconds before client comforting starts after a download has begun. It is also the interval between subsequent client comforting sends.The amount of data sent each interval is set using mm7comfortamount.
10
mms-checksum-table <tableID_int>
Enter the MMS content checksum table ID.
mmsbwordthreshold <score_int>
Enter the maximum score an MMS message can have before being blocked. If the combined scores of the content block patterns appearing in an MMS message exceed the threshold value, the message will be blocked.
10
remove-blocked-const-length {enable | disable}
Select to preserve the length of the MMS message when removing blocked content, such as viruses.
disable
Variable Description Default
ortiOS 4.0 MR3 CLI Reference1-431-99686-20110623 119ttp://docs.fortinet.com/ • Feedback
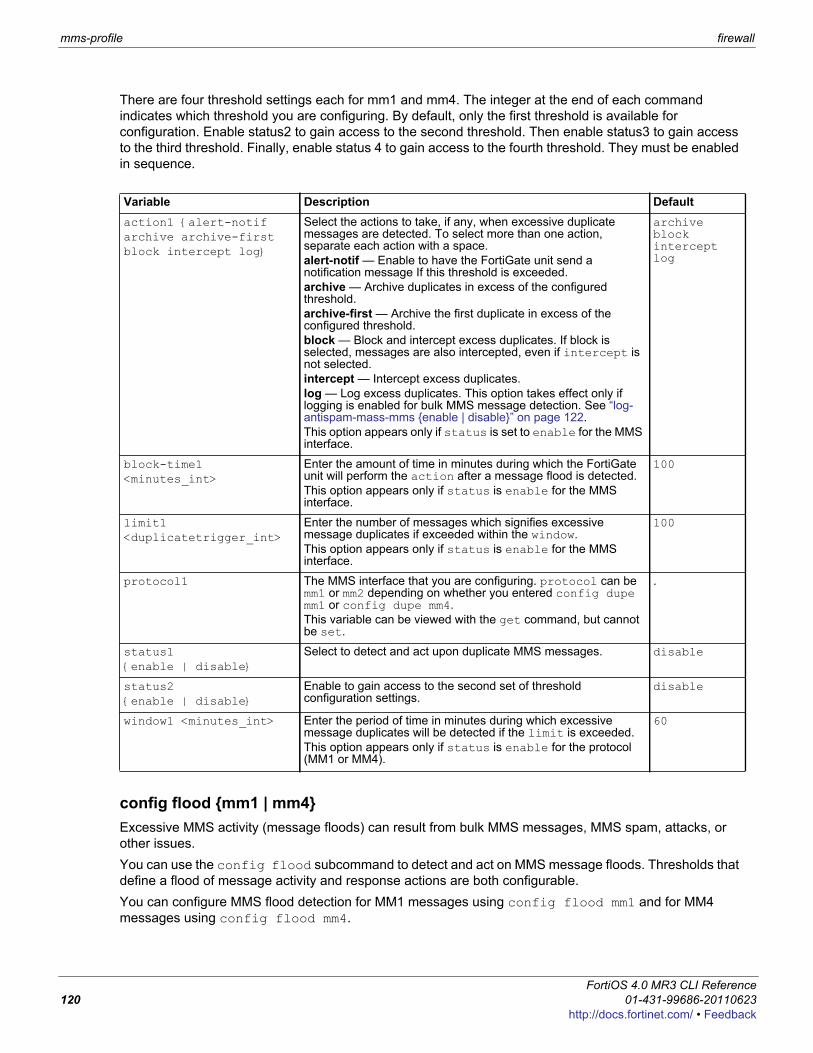
mms-profile firewall
There are four threshold settings each for mm1 and mm4. The integer at the end of each command indicates which threshold you are configuring. By default, only the first threshold is available for configuration. Enable status2 to gain access to the second threshold. Then enable status3 to gain access to the third threshold. Finally, enable status 4 to gain access to the fourth threshold. They must be enabled in sequence.
config flood {mm1 | mm4}Excessive MMS activity (message floods) can result from bulk MMS messages, MMS spam, attacks, or other issues.You can use the config flood subcommand to detect and act on MMS message floods. Thresholds that define a flood of message activity and response actions are both configurable.You can configure MMS flood detection for MM1 messages using config flood mm1 and for MM4 messages using config flood mm4.
Variable Description Defaultaction1 {alert-notif archive archive-first block intercept log}
Select the actions to take, if any, when excessive duplicate messages are detected. To select more than one action, separate each action with a space.alert-notif — Enable to have the FortiGate unit send a notification message If this threshold is exceeded.archive — Archive duplicates in excess of the configured threshold.archive-first — Archive the first duplicate in excess of the configured threshold.block — Block and intercept excess duplicates. If block is selected, messages are also intercepted, even if intercept is not selected.intercept — Intercept excess duplicates.log — Log excess duplicates. This option takes effect only if logging is enabled for bulk MMS message detection. See “log-antispam-mass-mms {enable | disable}” on page 122.This option appears only if status is set to enable for the MMS interface.
archive block intercept log
block-time1 <minutes_int>
Enter the amount of time in minutes during which the FortiGate unit will perform the action after a message flood is detected.This option appears only if status is enable for the MMS interface.
100
limit1 <duplicatetrigger_int>
Enter the number of messages which signifies excessive message duplicates if exceeded within the window.This option appears only if status is enable for the MMS interface.
100
protocol1 The MMS interface that you are configuring. protocol can be mm1 or mm2 depending on whether you entered config dupe mm1 or config dupe mm4.This variable can be viewed with the get command, but cannot be set.
.
status1 {enable | disable}
Select to detect and act upon duplicate MMS messages. disable
status2 {enable | disable}
Enable to gain access to the second set of threshold configuration settings.
disable
window1 <minutes_int> Enter the period of time in minutes during which excessive message duplicates will be detected if the limit is exceeded.This option appears only if status is enable for the protocol (MM1 or MM4).
60
FortiOS 4.0 MR3 CLI Reference120 01-431-99686-20110623
http://docs.fortinet.com/ • Feedback
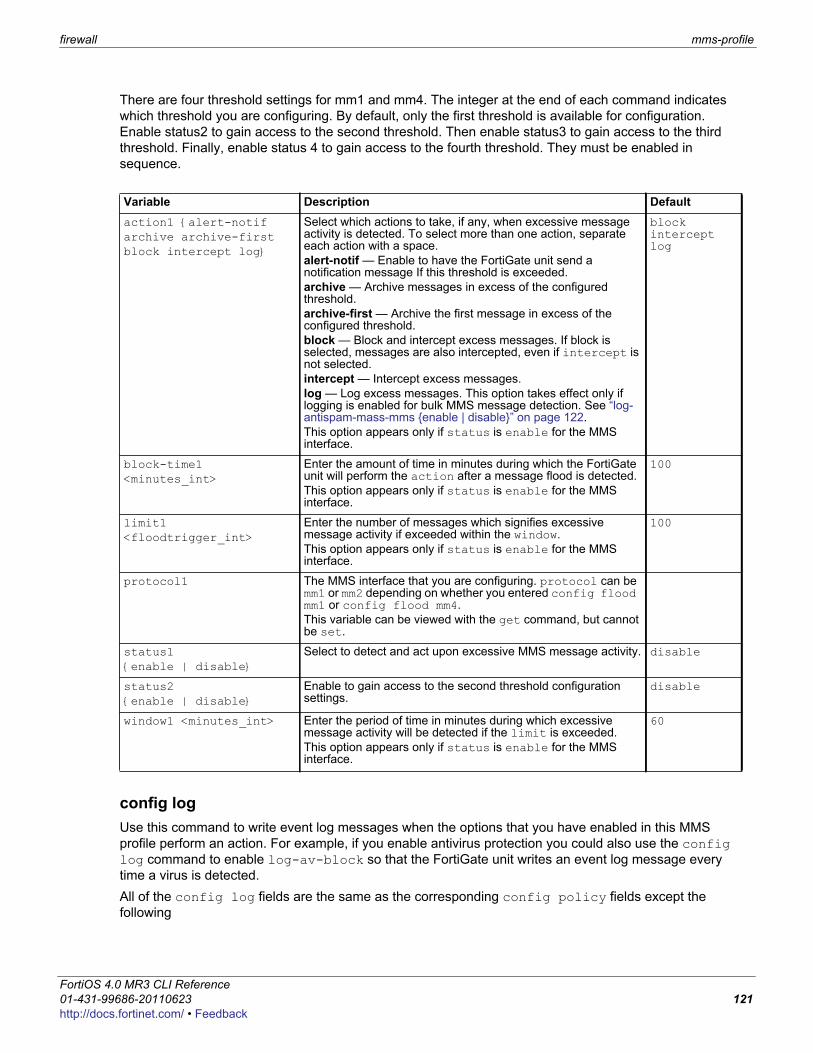
firewall mms-profile
F0h
There are four threshold settings for mm1 and mm4. The integer at the end of each command indicates which threshold you are configuring. By default, only the first threshold is available for configuration. Enable status2 to gain access to the second threshold. Then enable status3 to gain access to the third threshold. Finally, enable status 4 to gain access to the fourth threshold. They must be enabled in sequence.
config logUse this command to write event log messages when the options that you have enabled in this MMS profile perform an action. For example, if you enable antivirus protection you could also use the config log command to enable log-av-block so that the FortiGate unit writes an event log message every time a virus is detected. All of the config log fields are the same as the corresponding config policy fields except the following
Variable Description Defaultaction1 {alert-notif archive archive-first block intercept log}
Select which actions to take, if any, when excessive message activity is detected. To select more than one action, separate each action with a space.alert-notif — Enable to have the FortiGate unit send a notification message If this threshold is exceeded.archive — Archive messages in excess of the configured threshold.archive-first — Archive the first message in excess of the configured threshold.block — Block and intercept excess messages. If block is selected, messages are also intercepted, even if intercept is not selected.intercept — Intercept excess messages.log — Log excess messages. This option takes effect only if logging is enabled for bulk MMS message detection. See “log-antispam-mass-mms {enable | disable}” on page 122.This option appears only if status is enable for the MMS interface.
block intercept log
block-time1 <minutes_int>
Enter the amount of time in minutes during which the FortiGate unit will perform the action after a message flood is detected.This option appears only if status is enable for the MMS interface.
100
limit1 <floodtrigger_int>
Enter the number of messages which signifies excessive message activity if exceeded within the window.This option appears only if status is enable for the MMS interface.
100
protocol1 The MMS interface that you are configuring. protocol can be mm1 or mm2 depending on whether you entered config flood mm1 or config flood mm4.This variable can be viewed with the get command, but cannot be set.
status1 {enable | disable}
Select to detect and act upon excessive MMS message activity. disable
status2 {enable | disable}
Enable to gain access to the second threshold configuration settings.
disable
window1 <minutes_int> Enter the period of time in minutes during which excessive message activity will be detected if the limit is exceeded.This option appears only if status is enable for the MMS interface.
60
ortiOS 4.0 MR3 CLI Reference1-431-99686-20110623 121ttp://docs.fortinet.com/ • Feedback
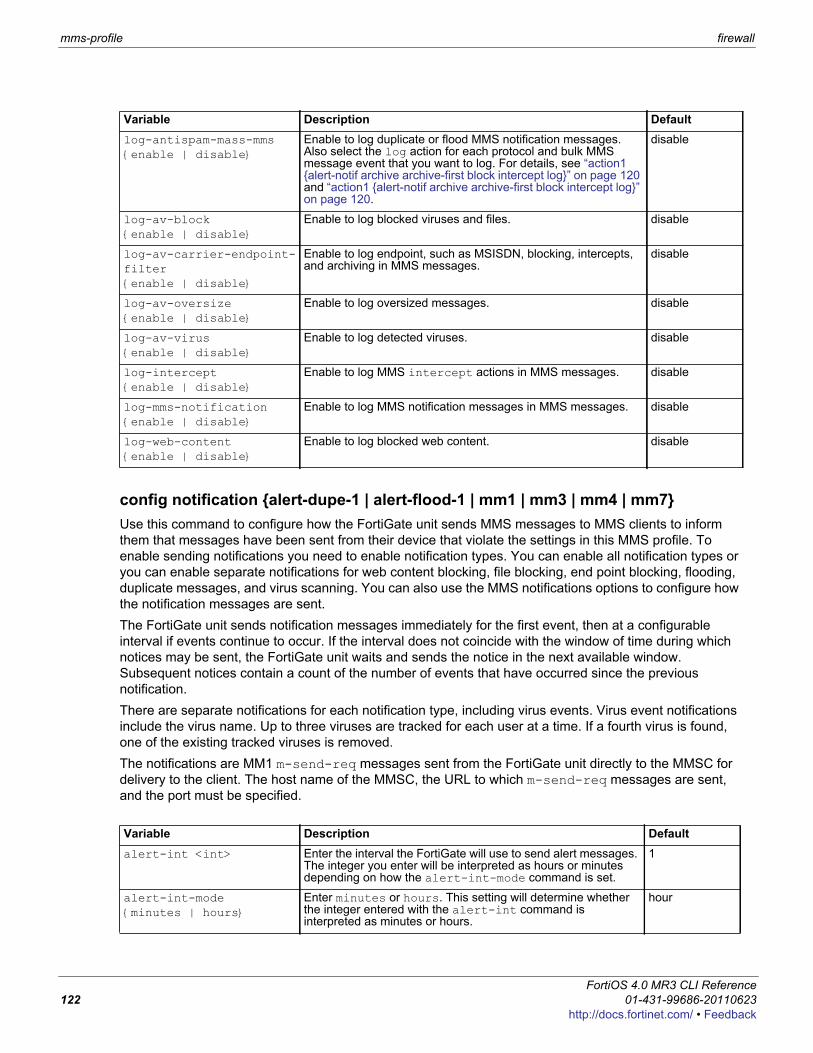
mms-profile firewall
config notification {alert-dupe-1 | alert-flood-1 | mm1 | mm3 | mm4 | mm7}Use this command to configure how the FortiGate unit sends MMS messages to MMS clients to inform them that messages have been sent from their device that violate the settings in this MMS profile. To enable sending notifications you need to enable notification types. You can enable all notification types or you can enable separate notifications for web content blocking, file blocking, end point blocking, flooding, duplicate messages, and virus scanning. You can also use the MMS notifications options to configure how the notification messages are sent.The FortiGate unit sends notification messages immediately for the first event, then at a configurable interval if events continue to occur. If the interval does not coincide with the window of time during which notices may be sent, the FortiGate unit waits and sends the notice in the next available window. Subsequent notices contain a count of the number of events that have occurred since the previous notification.There are separate notifications for each notification type, including virus events. Virus event notifications include the virus name. Up to three viruses are tracked for each user at a time. If a fourth virus is found, one of the existing tracked viruses is removed.The notifications are MM1 m-send-req messages sent from the FortiGate unit directly to the MMSC for delivery to the client. The host name of the MMSC, the URL to which m-send-req messages are sent, and the port must be specified.
Variable Description Defaultlog-antispam-mass-mms {enable | disable}
Enable to log duplicate or flood MMS notification messages. Also select the log action for each protocol and bulk MMS message event that you want to log. For details, see “action1 {alert-notif archive archive-first block intercept log}” on page 120 and “action1 {alert-notif archive archive-first block intercept log}” on page 120.
disable
log-av-block {enable | disable}
Enable to log blocked viruses and files. disable
log-av-carrier-endpoint-filter {enable | disable}
Enable to log endpoint, such as MSISDN, blocking, intercepts, and archiving in MMS messages.
disable
log-av-oversize {enable | disable}
Enable to log oversized messages. disable
log-av-virus {enable | disable}
Enable to log detected viruses. disable
log-intercept {enable | disable}
Enable to log MMS intercept actions in MMS messages. disable
log-mms-notification {enable | disable}
Enable to log MMS notification messages in MMS messages. disable
log-web-content {enable | disable}
Enable to log blocked web content. disable
Variable Description Defaultalert-int <int> Enter the interval the FortiGate will use to send alert messages.
The integer you enter will be interpreted as hours or minutes depending on how the alert-int-mode command is set.
1
alert-int-mode {minutes | hours}
Enter minutes or hours. This setting will determine whether the integer entered with the alert-int command is interpreted as minutes or hours.
hour
FortiOS 4.0 MR3 CLI Reference122 01-431-99686-20110623
http://docs.fortinet.com/ • Feedback
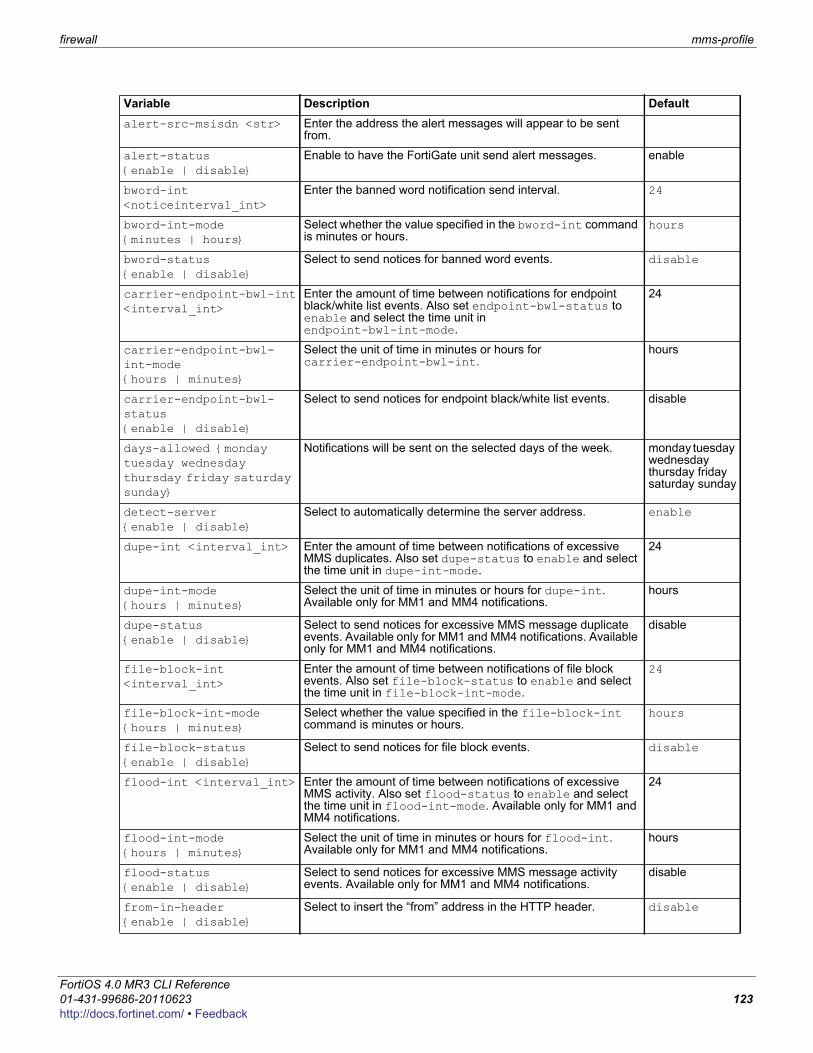
firewall mms-profile
F0h
alert-src-msisdn <str> Enter the address the alert messages will appear to be sent from.
alert-status {enable | disable}
Enable to have the FortiGate unit send alert messages. enable
bword-int <noticeinterval_int>
Enter the banned word notification send interval. 24
bword-int-mode {minutes | hours}
Select whether the value specified in the bword-int command is minutes or hours.
hours
bword-status {enable | disable}
Select to send notices for banned word events. disable
carrier-endpoint-bwl-int <interval_int>
Enter the amount of time between notifications for endpoint black/white list events. Also set endpoint-bwl-status to enable and select the time unit in endpoint-bwl-int-mode.
24
carrier-endpoint-bwl-int-mode {hours | minutes}
Select the unit of time in minutes or hours for carrier-endpoint-bwl-int.
hours
carrier-endpoint-bwl-status {enable | disable}
Select to send notices for endpoint black/white list events. disable
days-allowed {monday tuesday wednesday thursday friday saturday sunday}
Notifications will be sent on the selected days of the week. monday tuesday wednesday thursday friday saturday sunday
detect-server {enable | disable}
Select to automatically determine the server address. enable
dupe-int <interval_int> Enter the amount of time between notifications of excessive MMS duplicates. Also set dupe-status to enable and select the time unit in dupe-int-mode.
24
dupe-int-mode {hours | minutes}
Select the unit of time in minutes or hours for dupe-int. Available only for MM1 and MM4 notifications.
hours
dupe-status {enable | disable}
Select to send notices for excessive MMS message duplicate events. Available only for MM1 and MM4 notifications. Available only for MM1 and MM4 notifications.
disable
file-block-int <interval_int>
Enter the amount of time between notifications of file block events. Also set file-block-status to enable and select the time unit in file-block-int-mode.
24
file-block-int-mode {hours | minutes}
Select whether the value specified in the file-block-int command is minutes or hours.
hours
file-block-status {enable | disable}
Select to send notices for file block events. disable
flood-int <interval_int> Enter the amount of time between notifications of excessive MMS activity. Also set flood-status to enable and select the time unit in flood-int-mode. Available only for MM1 and MM4 notifications.
24
flood-int-mode {hours | minutes}
Select the unit of time in minutes or hours for flood-int. Available only for MM1 and MM4 notifications.
hours
flood-status {enable | disable}
Select to send notices for excessive MMS message activity events. Available only for MM1 and MM4 notifications.
disable
from-in-header {enable | disable}
Select to insert the “from” address in the HTTP header. disable
Variable Description Default
ortiOS 4.0 MR3 CLI Reference1-431-99686-20110623 123ttp://docs.fortinet.com/ • Feedback
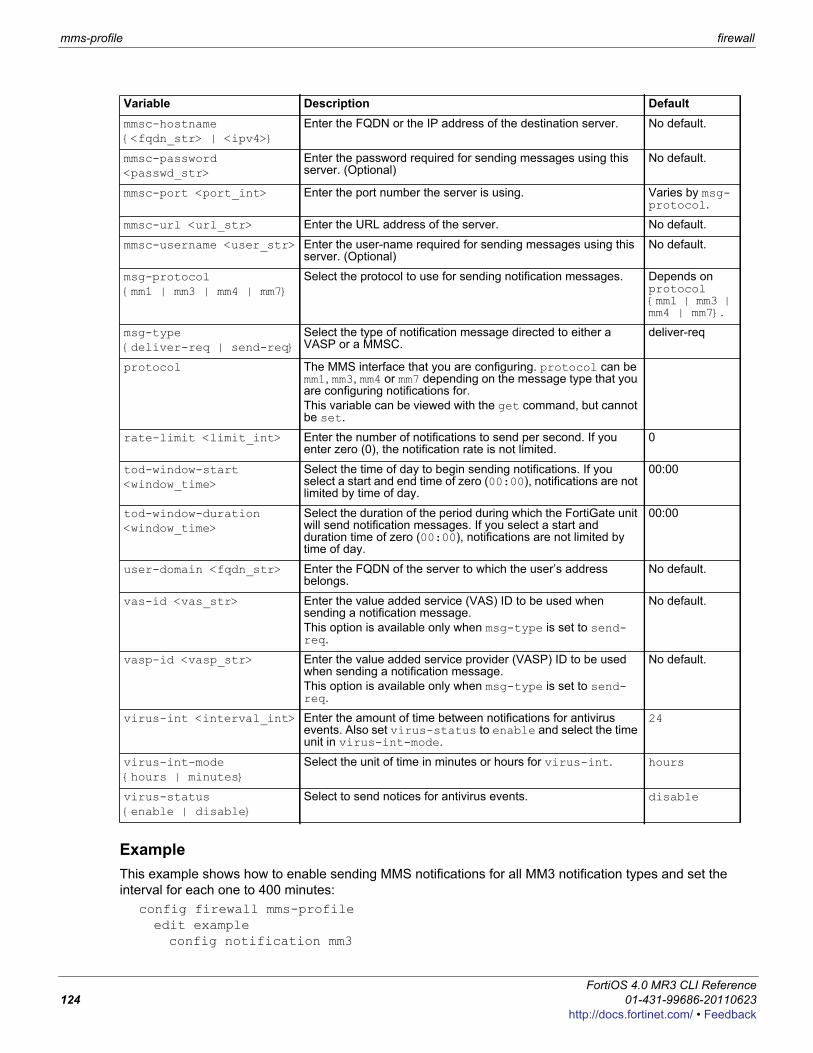
mms-profile firewall
ExampleThis example shows how to enable sending MMS notifications for all MM3 notification types and set the interval for each one to 400 minutes:
config firewall mms-profileedit exampleconfig notification mm3
mmsc-hostname {<fqdn_str> | <ipv4>}
Enter the FQDN or the IP address of the destination server. No default.
mmsc-password <passwd_str>
Enter the password required for sending messages using this server. (Optional)
No default.
mmsc-port <port_int> Enter the port number the server is using. Varies by msg-protocol.
mmsc-url <url_str> Enter the URL address of the server. No default.
mmsc-username <user_str> Enter the user-name required for sending messages using this server. (Optional)
No default.
msg-protocol {mm1 | mm3 | mm4 | mm7}
Select the protocol to use for sending notification messages. Depends on protocol {mm1 | mm3 | mm4 | mm7}.
msg-type {deliver-req | send-req}
Select the type of notification message directed to either a VASP or a MMSC.
deliver-req
protocol The MMS interface that you are configuring. protocol can be mm1, mm3, mm4 or mm7 depending on the message type that you are configuring notifications for.This variable can be viewed with the get command, but cannot be set.
rate-limit <limit_int> Enter the number of notifications to send per second. If you enter zero (0), the notification rate is not limited.
0
tod-window-start <window_time>
Select the time of day to begin sending notifications. If you select a start and end time of zero (00:00), notifications are not limited by time of day.
00:00
tod-window-duration <window_time>
Select the duration of the period during which the FortiGate unit will send notification messages. If you select a start and duration time of zero (00:00), notifications are not limited by time of day.
00:00
user-domain <fqdn_str> Enter the FQDN of the server to which the user’s address belongs.
No default.
vas-id <vas_str> Enter the value added service (VAS) ID to be used when sending a notification message.This option is available only when msg-type is set to send-req.
No default.
vasp-id <vasp_str> Enter the value added service provider (VASP) ID to be used when sending a notification message.This option is available only when msg-type is set to send-req.
No default.
virus-int <interval_int> Enter the amount of time between notifications for antivirus events. Also set virus-status to enable and select the time unit in virus-int-mode.
24
virus-int-mode {hours | minutes}
Select the unit of time in minutes or hours for virus-int. hours
virus-status {enable | disable}
Select to send notices for antivirus events. disable
Variable Description Default
FortiOS 4.0 MR3 CLI Reference124 01-431-99686-20110623
http://docs.fortinet.com/ • Feedback
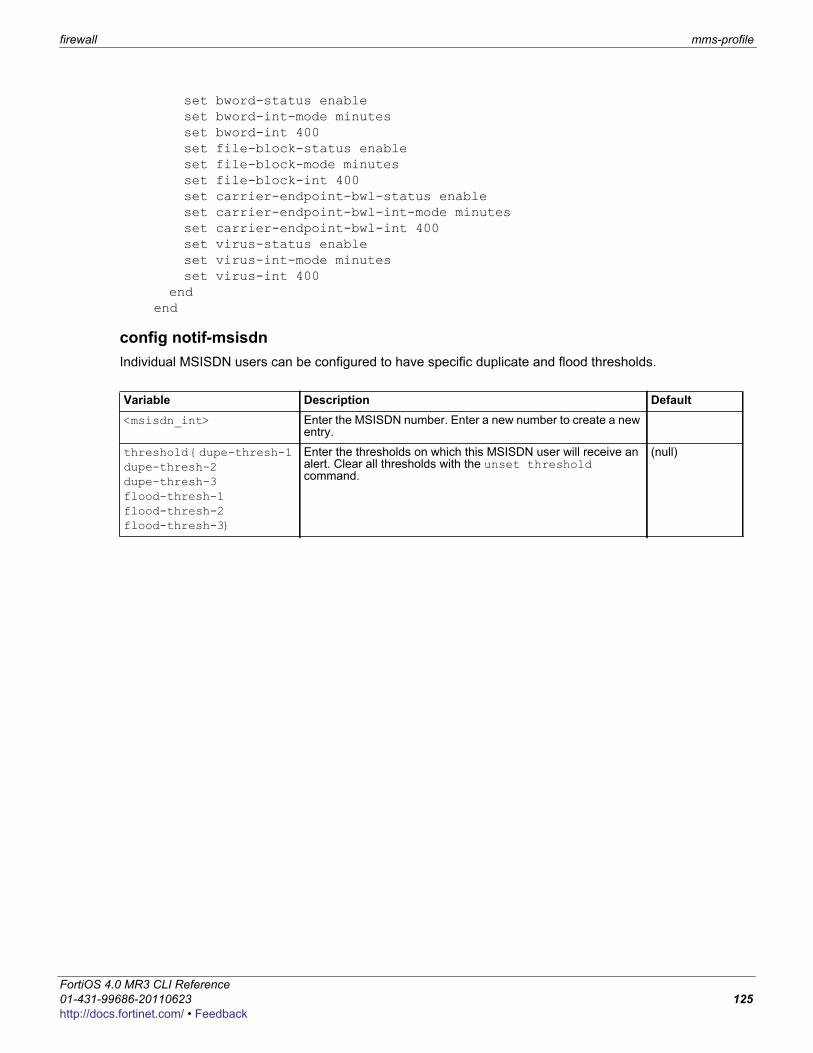
firewall mms-profile
F0h
set bword-status enableset bword-int-mode minutesset bword-int 400set file-block-status enableset file-block-mode minutesset file-block-int 400set carrier-endpoint-bwl-status enableset carrier-endpoint-bwl-int-mode minutesset carrier-endpoint-bwl-int 400set virus-status enableset virus-int-mode minutesset virus-int 400
endend
config notif-msisdnIndividual MSISDN users can be configured to have specific duplicate and flood thresholds.
Variable Description Default<msisdn_int> Enter the MSISDN number. Enter a new number to create a new
entry.
threshold {dupe-thresh-1 dupe-thresh-2 dupe-thresh-3 flood-thresh-1 flood-thresh-2 flood-thresh-3}
Enter the thresholds on which this MSISDN user will receive an alert. Clear all thresholds with the unset threshold command.
(null)
ortiOS 4.0 MR3 CLI Reference1-431-99686-20110623 125ttp://docs.fortinet.com/ • Feedback
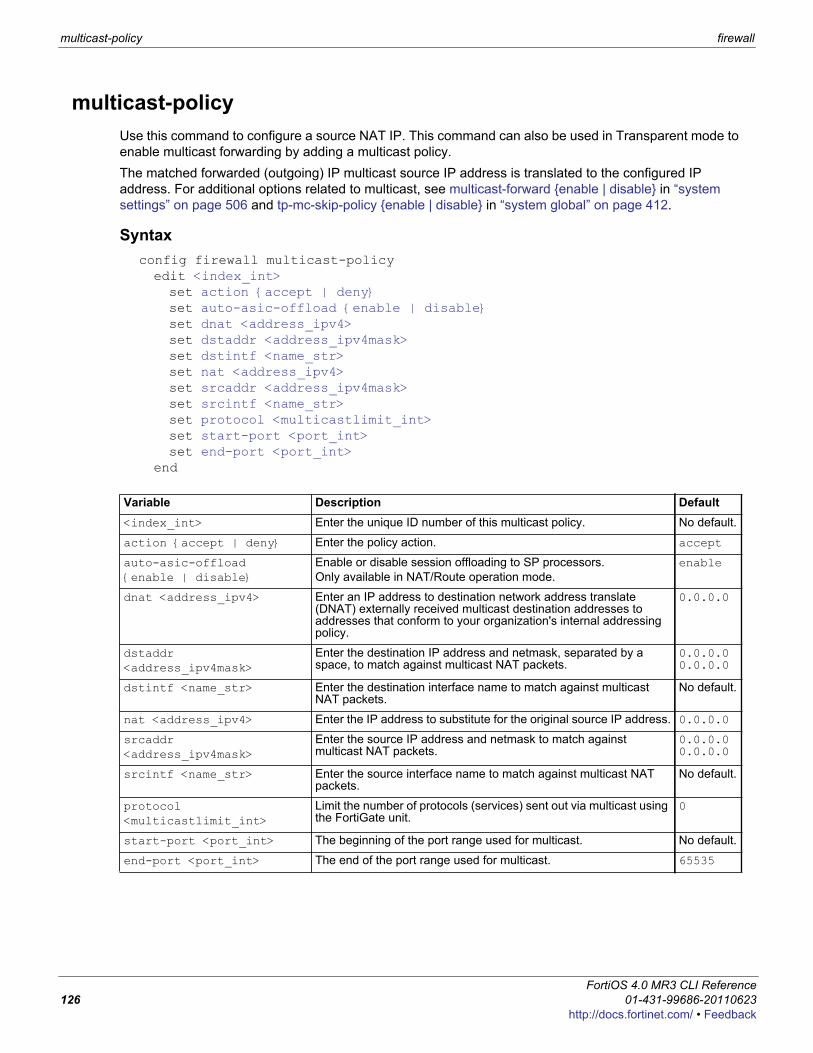
multicast-policy firewall
multicast-policyUse this command to configure a source NAT IP. This command can also be used in Transparent mode to enable multicast forwarding by adding a multicast policy.The matched forwarded (outgoing) IP multicast source IP address is translated to the configured IP address. For additional options related to multicast, see multicast-forward {enable | disable} in “system settings” on page 506 and tp-mc-skip-policy {enable | disable} in “system global” on page 412.
Syntaxconfig firewall multicast-policyedit <index_int>set action {accept | deny}set auto-asic-offload {enable | disable}set dnat <address_ipv4>set dstaddr <address_ipv4mask>set dstintf <name_str>set nat <address_ipv4>set srcaddr <address_ipv4mask>set srcintf <name_str>set protocol <multicastlimit_int>set start-port <port_int>set end-port <port_int>
end
Variable Description Default<index_int> Enter the unique ID number of this multicast policy. No default.
action {accept | deny} Enter the policy action. accept
auto-asic-offload {enable | disable}
Enable or disable session offloading to SP processors.Only available in NAT/Route operation mode.
enable
dnat <address_ipv4> Enter an IP address to destination network address translate (DNAT) externally received multicast destination addresses to addresses that conform to your organization's internal addressing policy.
0.0.0.0
dstaddr <address_ipv4mask>
Enter the destination IP address and netmask, separated by a space, to match against multicast NAT packets.
0.0.0.0 0.0.0.0
dstintf <name_str> Enter the destination interface name to match against multicast NAT packets.
No default.
nat <address_ipv4> Enter the IP address to substitute for the original source IP address. 0.0.0.0
srcaddr <address_ipv4mask>
Enter the source IP address and netmask to match against multicast NAT packets.
0.0.0.0 0.0.0.0
srcintf <name_str> Enter the source interface name to match against multicast NAT packets.
No default.
protocol <multicastlimit_int>
Limit the number of protocols (services) sent out via multicast using the FortiGate unit.
0
start-port <port_int> The beginning of the port range used for multicast. No default.
end-port <port_int> The end of the port range used for multicast. 65535
FortiOS 4.0 MR3 CLI Reference126 01-431-99686-20110623
http://docs.fortinet.com/ • Feedback
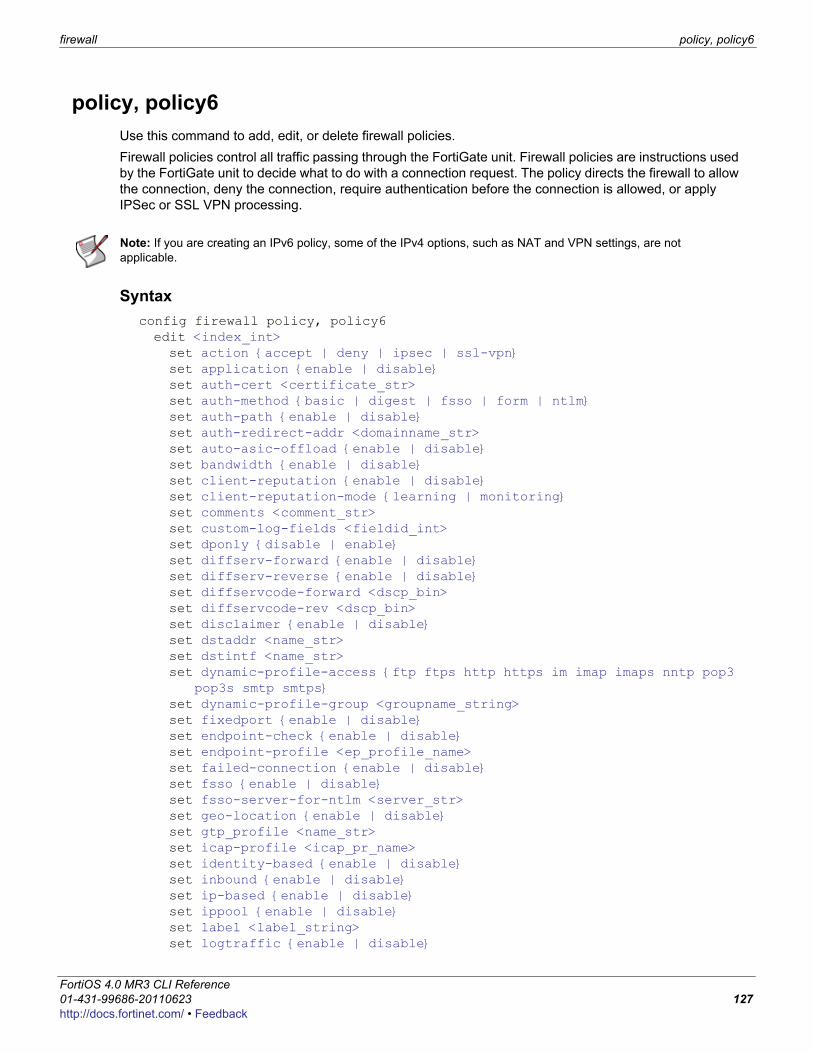
firewall policy, policy6
F0h
policy, policy6Use this command to add, edit, or delete firewall policies.Firewall policies control all traffic passing through the FortiGate unit. Firewall policies are instructions used by the FortiGate unit to decide what to do with a connection request. The policy directs the firewall to allow the connection, deny the connection, require authentication before the connection is allowed, or apply IPSec or SSL VPN processing.
Syntaxconfig firewall policy, policy6edit <index_int>set action {accept | deny | ipsec | ssl-vpn}set application {enable | disable}set auth-cert <certificate_str>set auth-method {basic | digest | fsso | form | ntlm}set auth-path {enable | disable}set auth-redirect-addr <domainname_str>set auto-asic-offload {enable | disable}set bandwidth {enable | disable}set client-reputation {enable | disable}set client-reputation-mode {learning | monitoring}set comments <comment_str>set custom-log-fields <fieldid_int>set dponly {disable | enable}set diffserv-forward {enable | disable}set diffserv-reverse {enable | disable}set diffservcode-forward <dscp_bin>set diffservcode-rev <dscp_bin>set disclaimer {enable | disable}set dstaddr <name_str>set dstintf <name_str>set dynamic-profile-access {ftp ftps http https im imap imaps nntp pop3
pop3s smtp smtps}set dynamic-profile-group <groupname_string>set fixedport {enable | disable}set endpoint-check {enable | disable}set endpoint-profile <ep_profile_name>set failed-connection {enable | disable}set fsso {enable | disable}set fsso-server-for-ntlm <server_str>set geo-location {enable | disable}set gtp_profile <name_str>set icap-profile <icap_pr_name>set identity-based {enable | disable}set inbound {enable | disable}set ip-based {enable | disable}set ippool {enable | disable}set label <label_string>set logtraffic {enable | disable}
Note: If you are creating an IPv6 policy, some of the IPv4 options, such as NAT and VPN settings, are not applicable.
ortiOS 4.0 MR3 CLI Reference1-431-99686-20110623 127ttp://docs.fortinet.com/ • Feedback
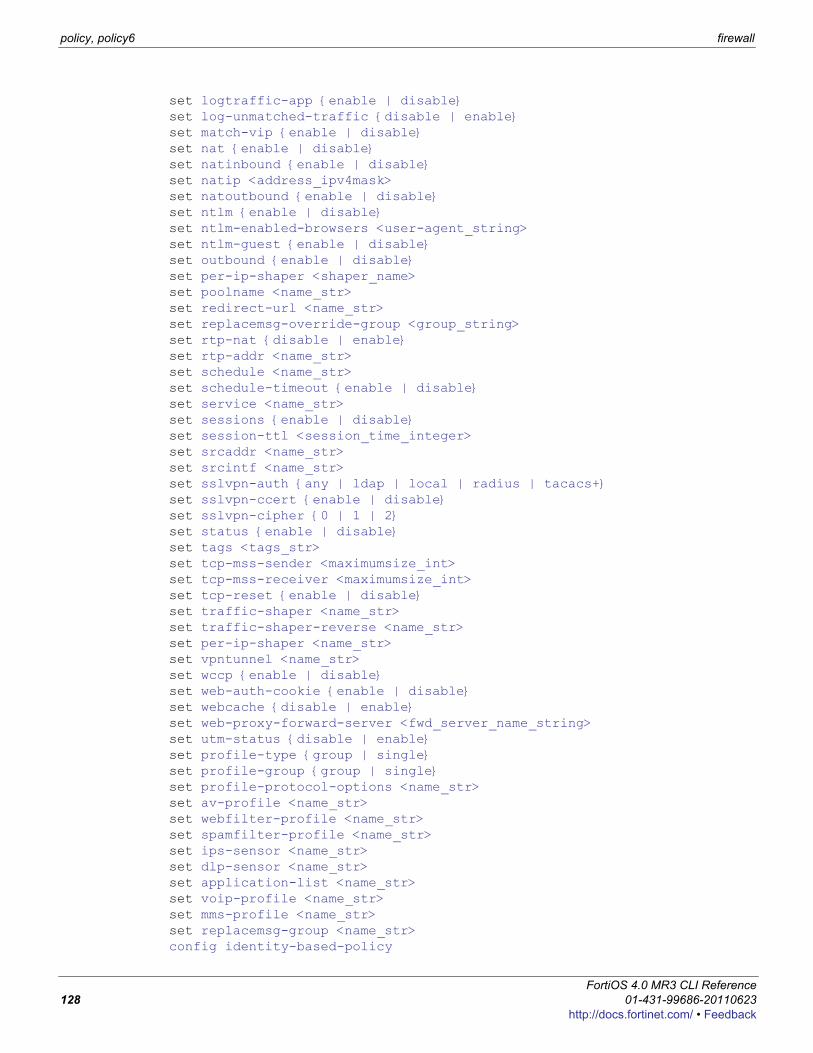
policy, policy6 firewall
set logtraffic-app {enable | disable}set log-unmatched-traffic {disable | enable}set match-vip {enable | disable}set nat {enable | disable}set natinbound {enable | disable}set natip <address_ipv4mask>set natoutbound {enable | disable}set ntlm {enable | disable}set ntlm-enabled-browsers <user-agent_string>set ntlm-guest {enable | disable}set outbound {enable | disable}set per-ip-shaper <shaper_name>set poolname <name_str>set redirect-url <name_str>set replacemsg-override-group <group_string>set rtp-nat {disable | enable}set rtp-addr <name_str>set schedule <name_str>set schedule-timeout {enable | disable}set service <name_str>set sessions {enable | disable}set session-ttl <session_time_integer>set srcaddr <name_str>set srcintf <name_str>set sslvpn-auth {any | ldap | local | radius | tacacs+}set sslvpn-ccert {enable | disable}set sslvpn-cipher {0 | 1 | 2}set status {enable | disable}set tags <tags_str>set tcp-mss-sender <maximumsize_int>set tcp-mss-receiver <maximumsize_int>set tcp-reset {enable | disable}set traffic-shaper <name_str>set traffic-shaper-reverse <name_str>set per-ip-shaper <name_str>set vpntunnel <name_str>set wccp {enable | disable}set web-auth-cookie {enable | disable}set webcache {disable | enable}set web-proxy-forward-server <fwd_server_name_string>set utm-status {disable | enable}set profile-type {group | single}set profile-group {group | single}set profile-protocol-options <name_str>set av-profile <name_str>set webfilter-profile <name_str>set spamfilter-profile <name_str>set ips-sensor <name_str>set dlp-sensor <name_str>set application-list <name_str>set voip-profile <name_str>set mms-profile <name_str>set replacemsg-group <name_str>config identity-based-policy
FortiOS 4.0 MR3 CLI Reference128 01-431-99686-20110623
http://docs.fortinet.com/ • Feedback
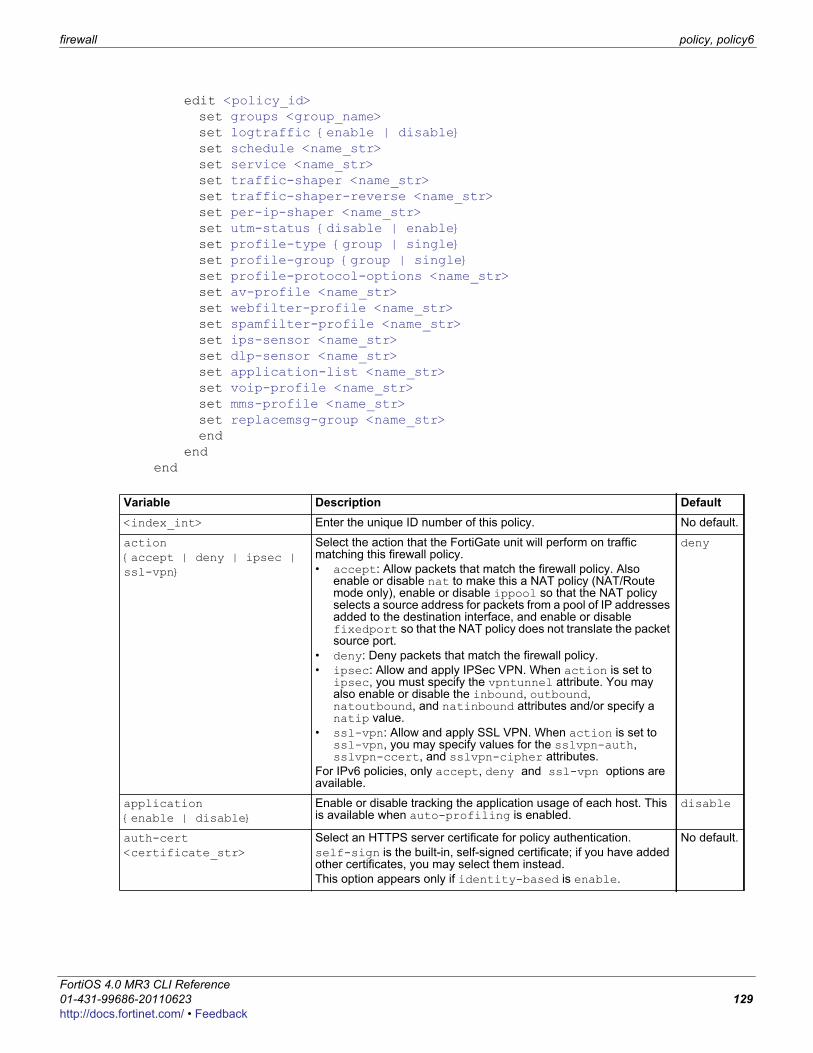
firewall policy, policy6
F0h
edit <policy_id>set groups <group_name>set logtraffic {enable | disable}set schedule <name_str>set service <name_str>set traffic-shaper <name_str>set traffic-shaper-reverse <name_str>set per-ip-shaper <name_str>set utm-status {disable | enable}set profile-type {group | single}set profile-group {group | single}set profile-protocol-options <name_str>set av-profile <name_str>set webfilter-profile <name_str>set spamfilter-profile <name_str>set ips-sensor <name_str>set dlp-sensor <name_str>set application-list <name_str>set voip-profile <name_str>set mms-profile <name_str>set replacemsg-group <name_str>end
endend
Variable Description Default<index_int> Enter the unique ID number of this policy. No default.
action {accept | deny | ipsec | ssl-vpn}
Select the action that the FortiGate unit will perform on traffic matching this firewall policy.• accept: Allow packets that match the firewall policy. Also
enable or disable nat to make this a NAT policy (NAT/Route mode only), enable or disable ippool so that the NAT policy selects a source address for packets from a pool of IP addresses added to the destination interface, and enable or disable fixedport so that the NAT policy does not translate the packet source port.
• deny: Deny packets that match the firewall policy. • ipsec: Allow and apply IPSec VPN. When action is set to
ipsec, you must specify the vpntunnel attribute. You may also enable or disable the inbound, outbound, natoutbound, and natinbound attributes and/or specify a natip value.
• ssl-vpn: Allow and apply SSL VPN. When action is set to ssl-vpn, you may specify values for the sslvpn-auth, sslvpn-ccert, and sslvpn-cipher attributes.
For IPv6 policies, only accept, deny and ssl-vpn options are available.
deny
application {enable | disable}
Enable or disable tracking the application usage of each host. This is available when auto-profiling is enabled.
disable
auth-cert <certificate_str>
Select an HTTPS server certificate for policy authentication.self-sign is the built-in, self-signed certificate; if you have added other certificates, you may select them instead.This option appears only if identity-based is enable.
No default.
ortiOS 4.0 MR3 CLI Reference1-431-99686-20110623 129ttp://docs.fortinet.com/ • Feedback
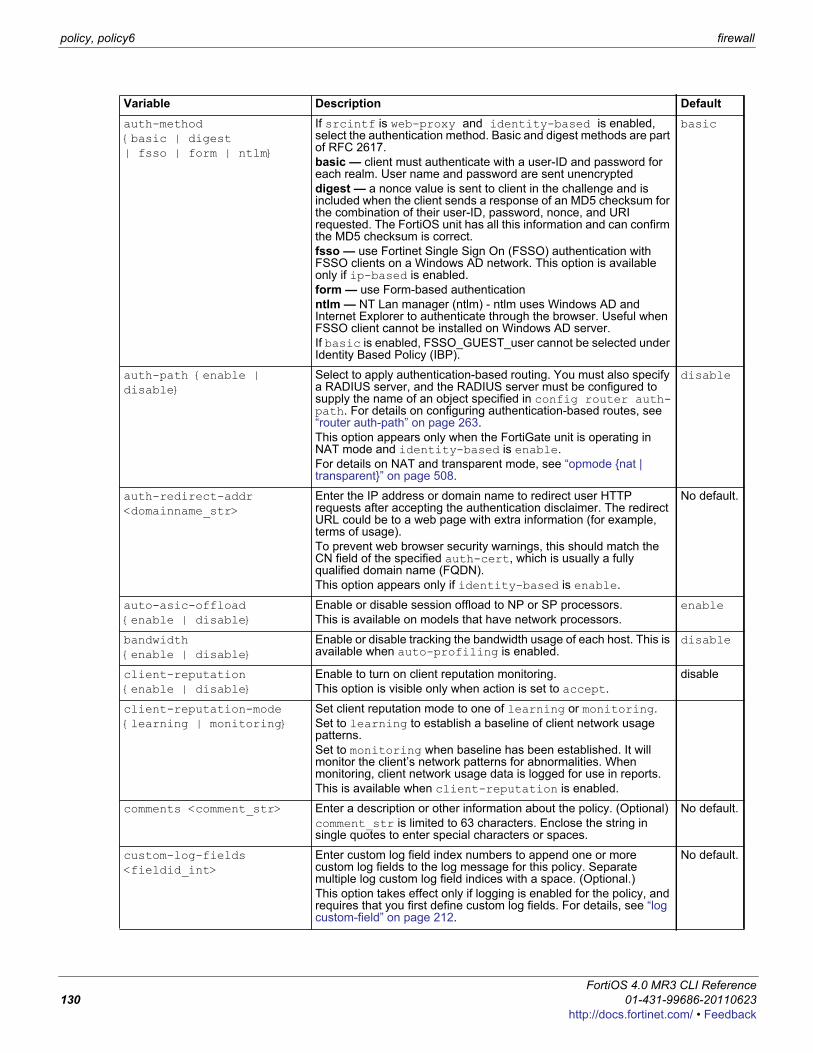
policy, policy6 firewall
auth-method {basic | digest | fsso | form | ntlm}
If srcintf is web-proxy and identity-based is enabled, select the authentication method. Basic and digest methods are part of RFC 2617.basic — client must authenticate with a user-ID and password for each realm. User name and password are sent unencrypteddigest — a nonce value is sent to client in the challenge and is included when the client sends a response of an MD5 checksum for the combination of their user-ID, password, nonce, and URI requested. The FortiOS unit has all this information and can confirm the MD5 checksum is correct.fsso — use Fortinet Single Sign On (FSSO) authentication with FSSO clients on a Windows AD network. This option is available only if ip-based is enabled.form — use Form-based authenticationntlm — NT Lan manager (ntlm) - ntlm uses Windows AD and Internet Explorer to authenticate through the browser. Useful when FSSO client cannot be installed on Windows AD server.If basic is enabled, FSSO_GUEST_user cannot be selected under Identity Based Policy (IBP).
basic
auth-path {enable | disable}
Select to apply authentication-based routing. You must also specify a RADIUS server, and the RADIUS server must be configured to supply the name of an object specified in config router auth-path. For details on configuring authentication-based routes, see “router auth-path” on page 263.This option appears only when the FortiGate unit is operating in NAT mode and identity-based is enable.For details on NAT and transparent mode, see “opmode {nat | transparent}” on page 508.
disable
auth-redirect-addr <domainname_str>
Enter the IP address or domain name to redirect user HTTP requests after accepting the authentication disclaimer. The redirect URL could be to a web page with extra information (for example, terms of usage).To prevent web browser security warnings, this should match the CN field of the specified auth-cert, which is usually a fully qualified domain name (FQDN).This option appears only if identity-based is enable.
No default.
auto-asic-offload {enable | disable}
Enable or disable session offload to NP or SP processors.This is available on models that have network processors.
enable
bandwidth {enable | disable}
Enable or disable tracking the bandwidth usage of each host. This is available when auto-profiling is enabled.
disable
client-reputation {enable | disable}
Enable to turn on client reputation monitoring. This option is visible only when action is set to accept.
disable
client-reputation-mode {learning | monitoring}
Set client reputation mode to one of learning or monitoring. Set to learning to establish a baseline of client network usage patterns. Set to monitoring when baseline has been established. It will monitor the client’s network patterns for abnormalities. When monitoring, client network usage data is logged for use in reports.This is available when client-reputation is enabled.
comments <comment_str> Enter a description or other information about the policy. (Optional)comment_str is limited to 63 characters. Enclose the string in single quotes to enter special characters or spaces.
No default.
custom-log-fields <fieldid_int>
Enter custom log field index numbers to append one or more custom log fields to the log message for this policy. Separate multiple log custom log field indices with a space. (Optional.)This option takes effect only if logging is enabled for the policy, and requires that you first define custom log fields. For details, see “log custom-field” on page 212.
No default.
Variable Description Default
FortiOS 4.0 MR3 CLI Reference130 01-431-99686-20110623
http://docs.fortinet.com/ • Feedback
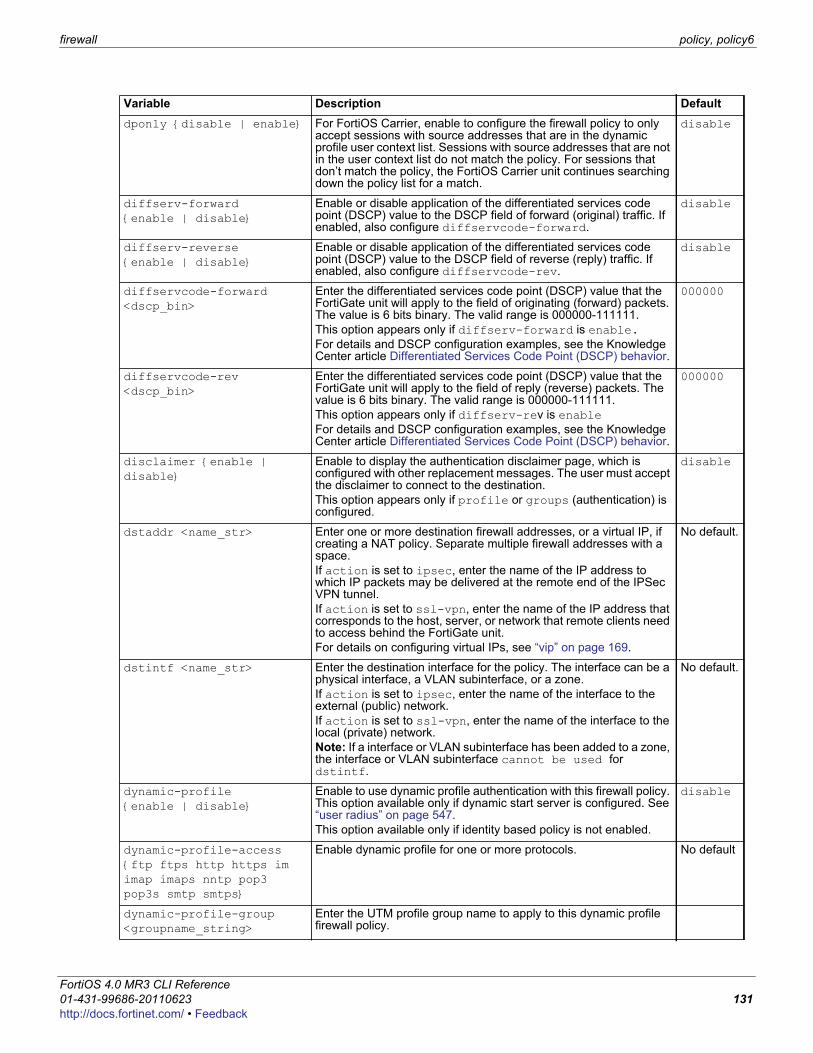
firewall policy, policy6
F0h
dponly {disable | enable} For FortiOS Carrier, enable to configure the firewall policy to only accept sessions with source addresses that are in the dynamic profile user context list. Sessions with source addresses that are not in the user context list do not match the policy. For sessions that don’t match the policy, the FortiOS Carrier unit continues searching down the policy list for a match.
disable
diffserv-forward{enable | disable}
Enable or disable application of the differentiated services code point (DSCP) value to the DSCP field of forward (original) traffic. If enabled, also configure diffservcode-forward.
disable
diffserv-reverse{enable | disable}
Enable or disable application of the differentiated services code point (DSCP) value to the DSCP field of reverse (reply) traffic. If enabled, also configure diffservcode-rev.
disable
diffservcode-forward <dscp_bin>
Enter the differentiated services code point (DSCP) value that the FortiGate unit will apply to the field of originating (forward) packets. The value is 6 bits binary. The valid range is 000000-111111.This option appears only if diffserv-forward is enable.For details and DSCP configuration examples, see the Knowledge Center article Differentiated Services Code Point (DSCP) behavior.
000000
diffservcode-rev <dscp_bin>
Enter the differentiated services code point (DSCP) value that the FortiGate unit will apply to the field of reply (reverse) packets. The value is 6 bits binary. The valid range is 000000-111111.This option appears only if diffserv-rev is enableFor details and DSCP configuration examples, see the Knowledge Center article Differentiated Services Code Point (DSCP) behavior.
000000
disclaimer {enable | disable}
Enable to display the authentication disclaimer page, which is configured with other replacement messages. The user must accept the disclaimer to connect to the destination.This option appears only if profile or groups (authentication) is configured.
disable
dstaddr <name_str> Enter one or more destination firewall addresses, or a virtual IP, if creating a NAT policy. Separate multiple firewall addresses with a space.If action is set to ipsec, enter the name of the IP address to which IP packets may be delivered at the remote end of the IPSec VPN tunnel.If action is set to ssl-vpn, enter the name of the IP address that corresponds to the host, server, or network that remote clients need to access behind the FortiGate unit.For details on configuring virtual IPs, see “vip” on page 169.
No default.
dstintf <name_str> Enter the destination interface for the policy. The interface can be a physical interface, a VLAN subinterface, or a zone.If action is set to ipsec, enter the name of the interface to the external (public) network.If action is set to ssl-vpn, enter the name of the interface to the local (private) network.Note: If a interface or VLAN subinterface has been added to a zone, the interface or VLAN subinterface cannot be used for dstintf.
No default.
dynamic-profile {enable | disable}
Enable to use dynamic profile authentication with this firewall policy. This option available only if dynamic start server is configured. See “user radius” on page 547.This option available only if identity based policy is not enabled.
disable
dynamic-profile-access {ftp ftps http https im imap imaps nntp pop3 pop3s smtp smtps}
Enable dynamic profile for one or more protocols. No default
dynamic-profile-group <groupname_string>
Enter the UTM profile group name to apply to this dynamic profile firewall policy.
Variable Description Default
ortiOS 4.0 MR3 CLI Reference1-431-99686-20110623 131ttp://docs.fortinet.com/ • Feedback
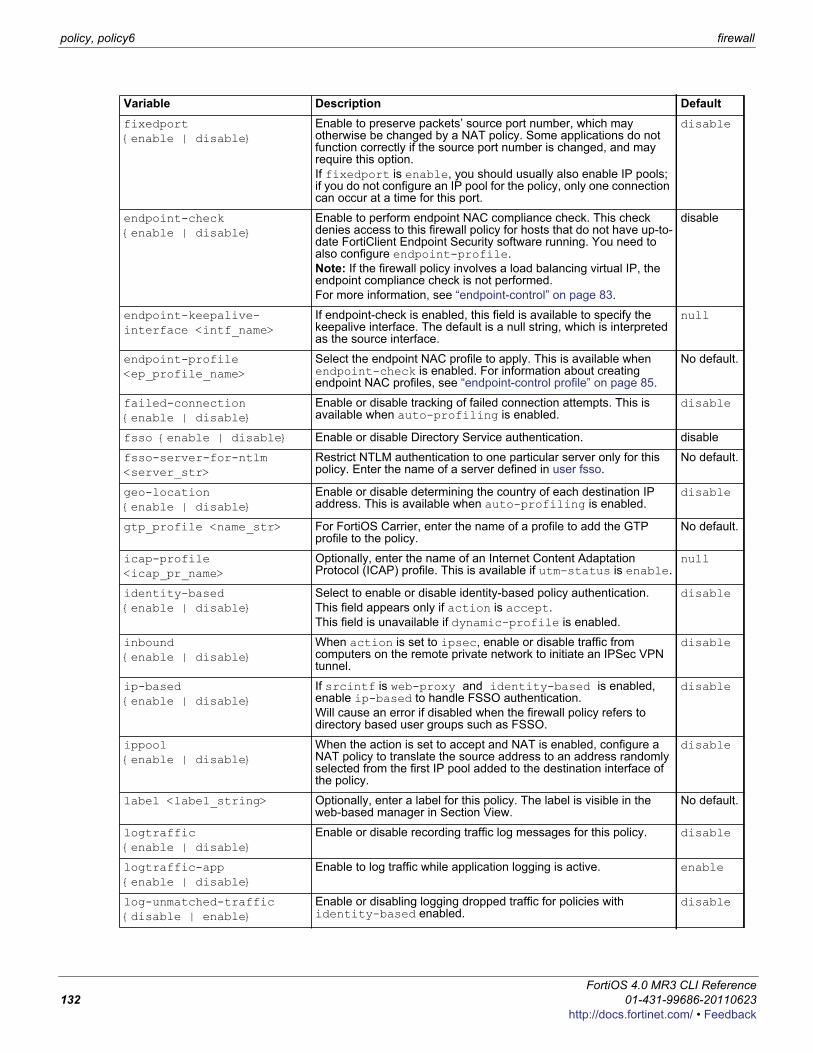
policy, policy6 firewall
fixedport {enable | disable}
Enable to preserve packets’ source port number, which may otherwise be changed by a NAT policy. Some applications do not function correctly if the source port number is changed, and may require this option.If fixedport is enable, you should usually also enable IP pools; if you do not configure an IP pool for the policy, only one connection can occur at a time for this port.
disable
endpoint-check {enable | disable}
Enable to perform endpoint NAC compliance check. This check denies access to this firewall policy for hosts that do not have up-to-date FortiClient Endpoint Security software running. You need to also configure endpoint-profile.Note: If the firewall policy involves a load balancing virtual IP, the endpoint compliance check is not performed.For more information, see “endpoint-control” on page 83.
disable
endpoint-keepalive-interface <intf_name>
If endpoint-check is enabled, this field is available to specify the keepalive interface. The default is a null string, which is interpreted as the source interface.
null
endpoint-profile <ep_profile_name>
Select the endpoint NAC profile to apply. This is available when endpoint-check is enabled. For information about creating endpoint NAC profiles, see “endpoint-control profile” on page 85.
No default.
failed-connection {enable | disable}
Enable or disable tracking of failed connection attempts. This is available when auto-profiling is enabled.
disable
fsso {enable | disable} Enable or disable Directory Service authentication. disable
fsso-server-for-ntlm <server_str>
Restrict NTLM authentication to one particular server only for this policy. Enter the name of a server defined in user fsso.
No default.
geo-location {enable | disable}
Enable or disable determining the country of each destination IP address. This is available when auto-profiling is enabled.
disable
gtp_profile <name_str> For FortiOS Carrier, enter the name of a profile to add the GTP profile to the policy.
No default.
icap-profile <icap_pr_name>
Optionally, enter the name of an Internet Content Adaptation Protocol (ICAP) profile. This is available if utm-status is enable.
null
identity-based {enable | disable}
Select to enable or disable identity-based policy authentication. This field appears only if action is accept.This field is unavailable if dynamic-profile is enabled.
disable
inbound {enable | disable}
When action is set to ipsec, enable or disable traffic from computers on the remote private network to initiate an IPSec VPN tunnel.
disable
ip-based {enable | disable}
If srcintf is web-proxy and identity-based is enabled, enable ip-based to handle FSSO authentication.Will cause an error if disabled when the firewall policy refers to directory based user groups such as FSSO.
disable
ippool {enable | disable}
When the action is set to accept and NAT is enabled, configure a NAT policy to translate the source address to an address randomly selected from the first IP pool added to the destination interface of the policy.
disable
label <label_string> Optionally, enter a label for this policy. The label is visible in the web-based manager in Section View.
No default.
logtraffic {enable | disable}
Enable or disable recording traffic log messages for this policy. disable
logtraffic-app {enable | disable}
Enable to log traffic while application logging is active. enable
log-unmatched-traffic {disable | enable}
Enable or disabling logging dropped traffic for policies with identity-based enabled.
disable
Variable Description Default
FortiOS 4.0 MR3 CLI Reference132 01-431-99686-20110623
http://docs.fortinet.com/ • Feedback
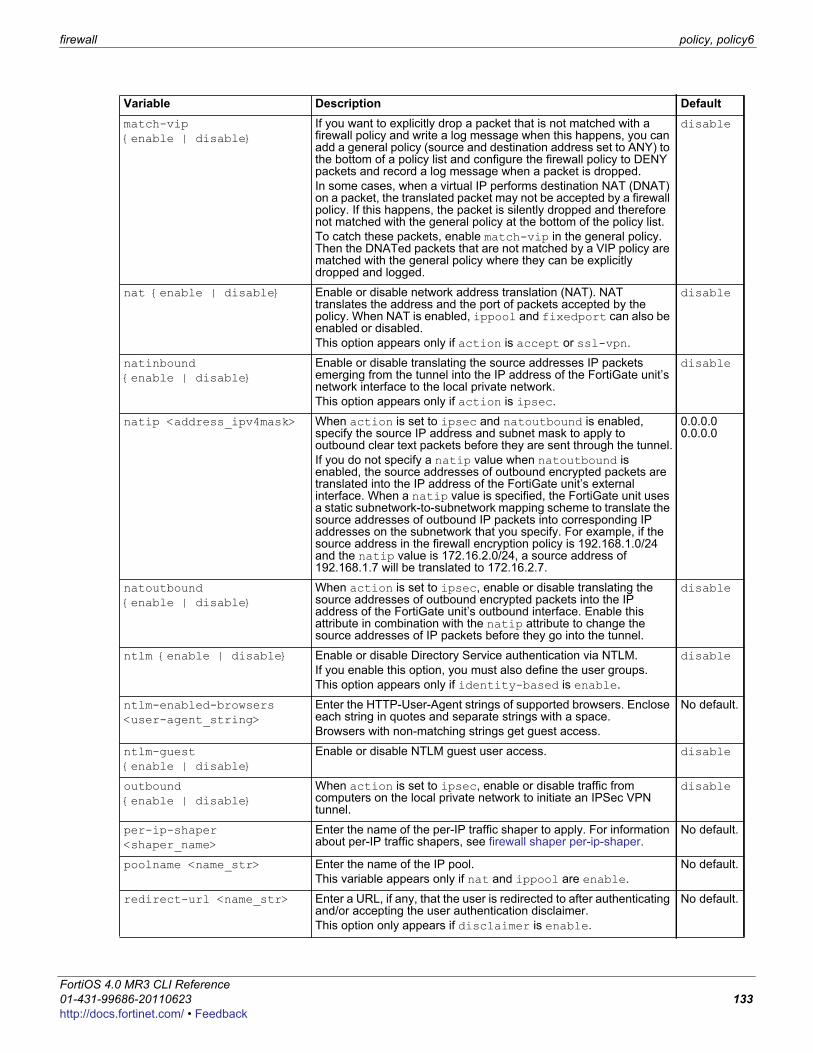
firewall policy, policy6
F0h
match-vip {enable | disable}
If you want to explicitly drop a packet that is not matched with a firewall policy and write a log message when this happens, you can add a general policy (source and destination address set to ANY) to the bottom of a policy list and configure the firewall policy to DENY packets and record a log message when a packet is dropped.In some cases, when a virtual IP performs destination NAT (DNAT) on a packet, the translated packet may not be accepted by a firewall policy. If this happens, the packet is silently dropped and therefore not matched with the general policy at the bottom of the policy list.To catch these packets, enable match-vip in the general policy. Then the DNATed packets that are not matched by a VIP policy are matched with the general policy where they can be explicitly dropped and logged.
disable
nat {enable | disable} Enable or disable network address translation (NAT). NAT translates the address and the port of packets accepted by the policy. When NAT is enabled, ippool and fixedport can also be enabled or disabled.This option appears only if action is accept or ssl-vpn.
disable
natinbound {enable | disable}
Enable or disable translating the source addresses IP packets emerging from the tunnel into the IP address of the FortiGate unit’s network interface to the local private network.This option appears only if action is ipsec.
disable
natip <address_ipv4mask> When action is set to ipsec and natoutbound is enabled, specify the source IP address and subnet mask to apply to outbound clear text packets before they are sent through the tunnel.If you do not specify a natip value when natoutbound is enabled, the source addresses of outbound encrypted packets are translated into the IP address of the FortiGate unit’s external interface. When a natip value is specified, the FortiGate unit uses a static subnetwork-to-subnetwork mapping scheme to translate the source addresses of outbound IP packets into corresponding IP addresses on the subnetwork that you specify. For example, if the source address in the firewall encryption policy is 192.168.1.0/24 and the natip value is 172.16.2.0/24, a source address of 192.168.1.7 will be translated to 172.16.2.7.
0.0.0.0 0.0.0.0
natoutbound {enable | disable}
When action is set to ipsec, enable or disable translating the source addresses of outbound encrypted packets into the IP address of the FortiGate unit’s outbound interface. Enable this attribute in combination with the natip attribute to change the source addresses of IP packets before they go into the tunnel.
disable
ntlm {enable | disable} Enable or disable Directory Service authentication via NTLM.If you enable this option, you must also define the user groups.This option appears only if identity-based is enable.
disable
ntlm-enabled-browsers <user-agent_string>
Enter the HTTP-User-Agent strings of supported browsers. Enclose each string in quotes and separate strings with a space.Browsers with non-matching strings get guest access.
No default.
ntlm-guest {enable | disable}
Enable or disable NTLM guest user access. disable
outbound {enable | disable}
When action is set to ipsec, enable or disable traffic from computers on the local private network to initiate an IPSec VPN tunnel.
disable
per-ip-shaper <shaper_name>
Enter the name of the per-IP traffic shaper to apply. For information about per-IP traffic shapers, see firewall shaper per-ip-shaper.
No default.
poolname <name_str> Enter the name of the IP pool. This variable appears only if nat and ippool are enable.
No default.
redirect-url <name_str> Enter a URL, if any, that the user is redirected to after authenticating and/or accepting the user authentication disclaimer. This option only appears if disclaimer is enable.
No default.
Variable Description Default
ortiOS 4.0 MR3 CLI Reference1-431-99686-20110623 133ttp://docs.fortinet.com/ • Feedback
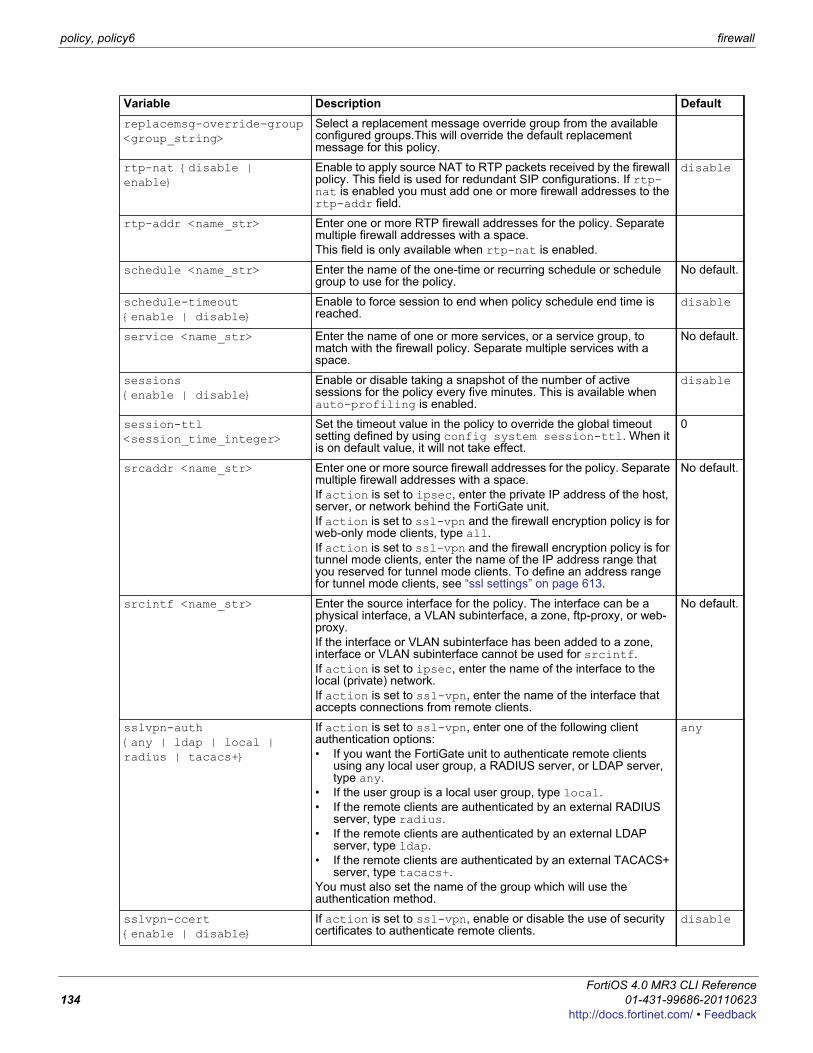
policy, policy6 firewall
replacemsg-override-group <group_string>
Select a replacement message override group from the available configured groups.This will override the default replacement message for this policy.
rtp-nat {disable | enable}
Enable to apply source NAT to RTP packets received by the firewall policy. This field is used for redundant SIP configurations. If rtp-nat is enabled you must add one or more firewall addresses to the rtp-addr field.
disable
rtp-addr <name_str> Enter one or more RTP firewall addresses for the policy. Separate multiple firewall addresses with a space.This field is only available when rtp-nat is enabled.
schedule <name_str> Enter the name of the one-time or recurring schedule or schedule group to use for the policy.
No default.
schedule-timeout {enable | disable}
Enable to force session to end when policy schedule end time is reached.
disable
service <name_str> Enter the name of one or more services, or a service group, to match with the firewall policy. Separate multiple services with a space.
No default.
sessions {enable | disable}
Enable or disable taking a snapshot of the number of active sessions for the policy every five minutes. This is available when auto-profiling is enabled.
disable
session-ttl <session_time_integer>
Set the timeout value in the policy to override the global timeout setting defined by using config system session-ttl. When it is on default value, it will not take effect.
0
srcaddr <name_str> Enter one or more source firewall addresses for the policy. Separate multiple firewall addresses with a space.If action is set to ipsec, enter the private IP address of the host, server, or network behind the FortiGate unit.If action is set to ssl-vpn and the firewall encryption policy is for web-only mode clients, type all.If action is set to ssl-vpn and the firewall encryption policy is for tunnel mode clients, enter the name of the IP address range that you reserved for tunnel mode clients. To define an address range for tunnel mode clients, see “ssl settings” on page 613.
No default.
srcintf <name_str> Enter the source interface for the policy. The interface can be a physical interface, a VLAN subinterface, a zone, ftp-proxy, or web-proxy.If the interface or VLAN subinterface has been added to a zone, interface or VLAN subinterface cannot be used for srcintf.If action is set to ipsec, enter the name of the interface to the local (private) network.If action is set to ssl-vpn, enter the name of the interface that accepts connections from remote clients.
No default.
sslvpn-auth {any | ldap | local | radius | tacacs+}
If action is set to ssl-vpn, enter one of the following client authentication options:• If you want the FortiGate unit to authenticate remote clients
using any local user group, a RADIUS server, or LDAP server, type any.
• If the user group is a local user group, type local.• If the remote clients are authenticated by an external RADIUS
server, type radius.• If the remote clients are authenticated by an external LDAP
server, type ldap.• If the remote clients are authenticated by an external TACACS+
server, type tacacs+.You must also set the name of the group which will use the authentication method.
any
sslvpn-ccert {enable | disable}
If action is set to ssl-vpn, enable or disable the use of security certificates to authenticate remote clients.
disable
Variable Description Default
FortiOS 4.0 MR3 CLI Reference134 01-431-99686-20110623
http://docs.fortinet.com/ • Feedback
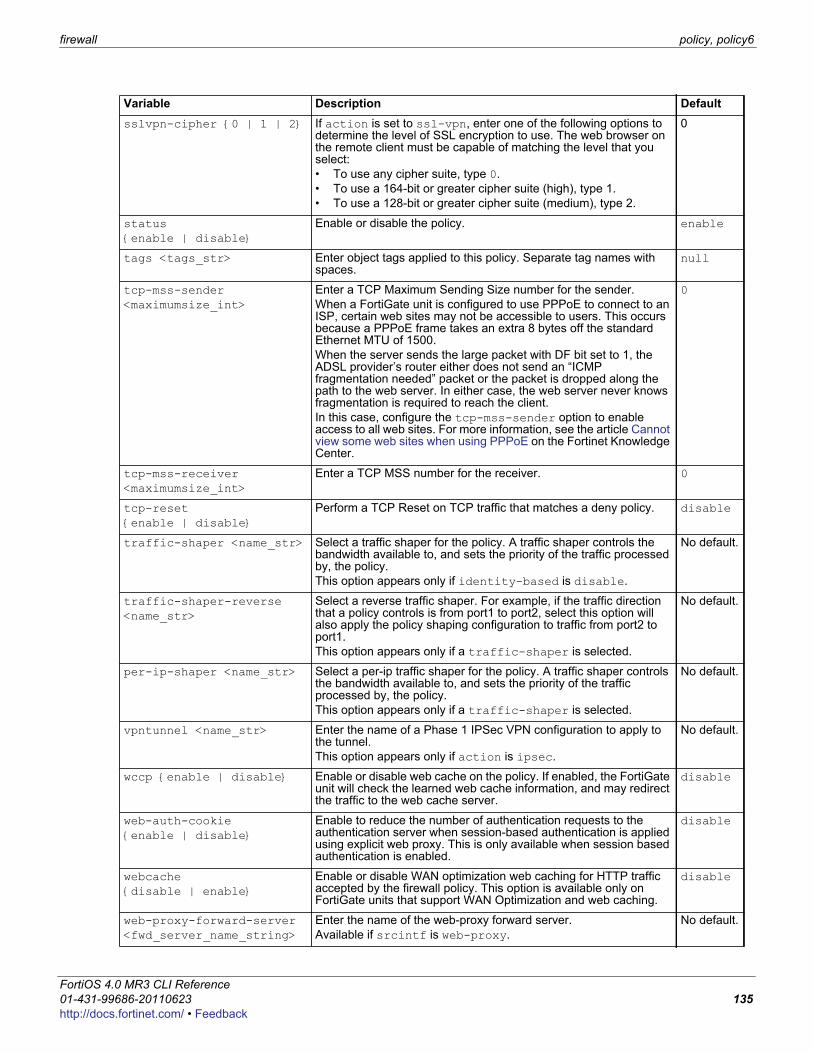
firewall policy, policy6
F0h
sslvpn-cipher {0 | 1 | 2} If action is set to ssl-vpn, enter one of the following options to determine the level of SSL encryption to use. The web browser on the remote client must be capable of matching the level that you select: • To use any cipher suite, type 0.• To use a 164-bit or greater cipher suite (high), type 1.• To use a 128-bit or greater cipher suite (medium), type 2.
0
status {enable | disable}
Enable or disable the policy. enable
tags <tags_str> Enter object tags applied to this policy. Separate tag names with spaces.
null
tcp-mss-sender <maximumsize_int>
Enter a TCP Maximum Sending Size number for the sender.When a FortiGate unit is configured to use PPPoE to connect to an ISP, certain web sites may not be accessible to users. This occurs because a PPPoE frame takes an extra 8 bytes off the standard Ethernet MTU of 1500.When the server sends the large packet with DF bit set to 1, the ADSL provider’s router either does not send an “ICMP fragmentation needed” packet or the packet is dropped along the path to the web server. In either case, the web server never knows fragmentation is required to reach the client.In this case, configure the tcp-mss-sender option to enable access to all web sites. For more information, see the article Cannot view some web sites when using PPPoE on the Fortinet Knowledge Center.
0
tcp-mss-receiver <maximumsize_int>
Enter a TCP MSS number for the receiver. 0
tcp-reset {enable | disable}
Perform a TCP Reset on TCP traffic that matches a deny policy. disable
traffic-shaper <name_str> Select a traffic shaper for the policy. A traffic shaper controls the bandwidth available to, and sets the priority of the traffic processed by, the policy. This option appears only if identity-based is disable.
No default.
traffic-shaper-reverse <name_str>
Select a reverse traffic shaper. For example, if the traffic direction that a policy controls is from port1 to port2, select this option will also apply the policy shaping configuration to traffic from port2 to port1.This option appears only if a traffic-shaper is selected.
No default.
per-ip-shaper <name_str> Select a per-ip traffic shaper for the policy. A traffic shaper controls the bandwidth available to, and sets the priority of the traffic processed by, the policy. This option appears only if a traffic-shaper is selected.
No default.
vpntunnel <name_str> Enter the name of a Phase 1 IPSec VPN configuration to apply to the tunnel.This option appears only if action is ipsec.
No default.
wccp {enable | disable} Enable or disable web cache on the policy. If enabled, the FortiGate unit will check the learned web cache information, and may redirect the traffic to the web cache server.
disable
web-auth-cookie {enable | disable}
Enable to reduce the number of authentication requests to the authentication server when session-based authentication is applied using explicit web proxy. This is only available when session based authentication is enabled.
disable
webcache {disable | enable}
Enable or disable WAN optimization web caching for HTTP traffic accepted by the firewall policy. This option is available only on FortiGate units that support WAN Optimization and web caching.
disable
web-proxy-forward-server <fwd_server_name_string>
Enter the name of the web-proxy forward server. Available if srcintf is web-proxy.
No default.
Variable Description Default
ortiOS 4.0 MR3 CLI Reference1-431-99686-20110623 135ttp://docs.fortinet.com/ • Feedback
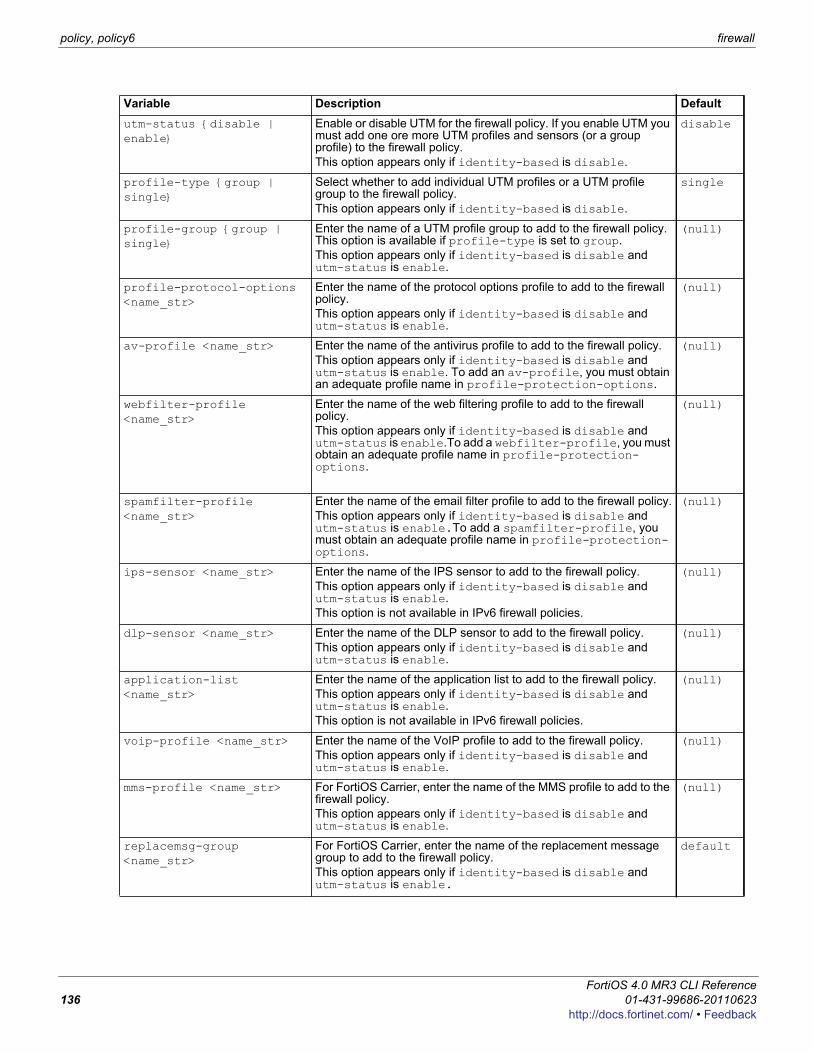
policy, policy6 firewall
utm-status {disable | enable}
Enable or disable UTM for the firewall policy. If you enable UTM you must add one ore more UTM profiles and sensors (or a group profile) to the firewall policy.This option appears only if identity-based is disable.
disable
profile-type {group | single}
Select whether to add individual UTM profiles or a UTM profile group to the firewall policy.This option appears only if identity-based is disable.
single
profile-group {group | single}
Enter the name of a UTM profile group to add to the firewall policy. This option is available if profile-type is set to group.This option appears only if identity-based is disable and utm-status is enable.
(null)
profile-protocol-options <name_str>
Enter the name of the protocol options profile to add to the firewall policy.This option appears only if identity-based is disable and utm-status is enable.
(null)
av-profile <name_str> Enter the name of the antivirus profile to add to the firewall policy.This option appears only if identity-based is disable and utm-status is enable. To add an av-profile, you must obtain an adequate profile name in profile-protection-options.
(null)
webfilter-profile <name_str>
Enter the name of the web filtering profile to add to the firewall policy.This option appears only if identity-based is disable and utm-status is enable.To add a webfilter-profile, you must obtain an adequate profile name in profile-protection-options.
(null)
spamfilter-profile <name_str>
Enter the name of the email filter profile to add to the firewall policy.This option appears only if identity-based is disable and utm-status is enable.To add a spamfilter-profile, you must obtain an adequate profile name in profile-protection-options.
(null)
ips-sensor <name_str> Enter the name of the IPS sensor to add to the firewall policy.This option appears only if identity-based is disable and utm-status is enable.This option is not available in IPv6 firewall policies.
(null)
dlp-sensor <name_str> Enter the name of the DLP sensor to add to the firewall policy.This option appears only if identity-based is disable and utm-status is enable.
(null)
application-list <name_str>
Enter the name of the application list to add to the firewall policy.This option appears only if identity-based is disable and utm-status is enable.This option is not available in IPv6 firewall policies.
(null)
voip-profile <name_str> Enter the name of the VoIP profile to add to the firewall policy.This option appears only if identity-based is disable and utm-status is enable.
(null)
mms-profile <name_str> For FortiOS Carrier, enter the name of the MMS profile to add to the firewall policy.This option appears only if identity-based is disable and utm-status is enable.
(null)
replacemsg-group <name_str>
For FortiOS Carrier, enter the name of the replacement message group to add to the firewall policy.This option appears only if identity-based is disable and utm-status is enable.
default
Variable Description Default
FortiOS 4.0 MR3 CLI Reference136 01-431-99686-20110623
http://docs.fortinet.com/ • Feedback
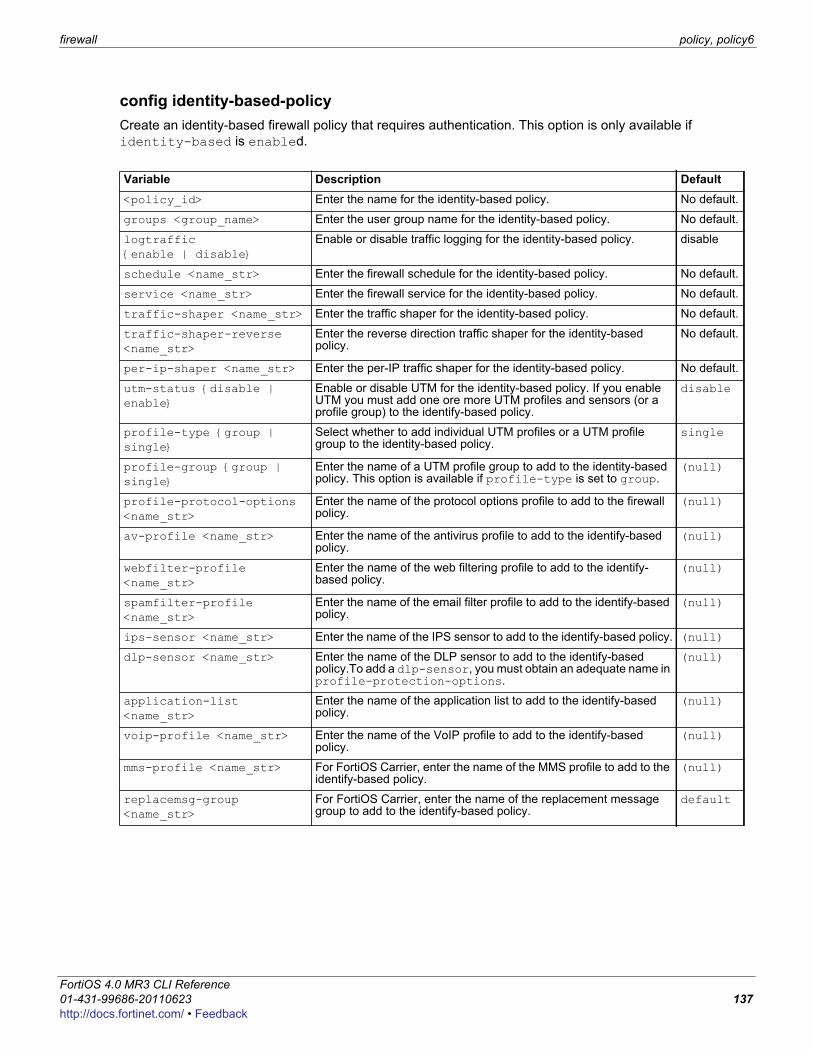
firewall policy, policy6
F0h
config identity-based-policy Create an identity-based firewall policy that requires authentication. This option is only available if identity-based is enabled.
Variable Description Default<policy_id> Enter the name for the identity-based policy. No default.
groups <group_name> Enter the user group name for the identity-based policy. No default.
logtraffic {enable | disable}
Enable or disable traffic logging for the identity-based policy. disable
schedule <name_str> Enter the firewall schedule for the identity-based policy. No default.
service <name_str> Enter the firewall service for the identity-based policy. No default.
traffic-shaper <name_str> Enter the traffic shaper for the identity-based policy. No default.
traffic-shaper-reverse <name_str>
Enter the reverse direction traffic shaper for the identity-based policy.
No default.
per-ip-shaper <name_str> Enter the per-IP traffic shaper for the identity-based policy. No default.
utm-status {disable | enable}
Enable or disable UTM for the identity-based policy. If you enable UTM you must add one ore more UTM profiles and sensors (or a profile group) to the identify-based policy.
disable
profile-type {group | single}
Select whether to add individual UTM profiles or a UTM profile group to the identity-based policy.
single
profile-group {group | single}
Enter the name of a UTM profile group to add to the identity-based policy. This option is available if profile-type is set to group.
(null)
profile-protocol-options <name_str>
Enter the name of the protocol options profile to add to the firewall policy.
(null)
av-profile <name_str> Enter the name of the antivirus profile to add to the identify-based policy.
(null)
webfilter-profile <name_str>
Enter the name of the web filtering profile to add to the identify-based policy.
(null)
spamfilter-profile <name_str>
Enter the name of the email filter profile to add to the identify-based policy.
(null)
ips-sensor <name_str> Enter the name of the IPS sensor to add to the identify-based policy. (null)
dlp-sensor <name_str> Enter the name of the DLP sensor to add to the identify-based policy.To add a dlp-sensor, you must obtain an adequate name in profile-protection-options.
(null)
application-list <name_str>
Enter the name of the application list to add to the identify-based policy.
(null)
voip-profile <name_str> Enter the name of the VoIP profile to add to the identify-based policy.
(null)
mms-profile <name_str> For FortiOS Carrier, enter the name of the MMS profile to add to the identify-based policy.
(null)
replacemsg-group <name_str>
For FortiOS Carrier, enter the name of the replacement message group to add to the identify-based policy.
default
ortiOS 4.0 MR3 CLI Reference1-431-99686-20110623 137ttp://docs.fortinet.com/ • Feedback
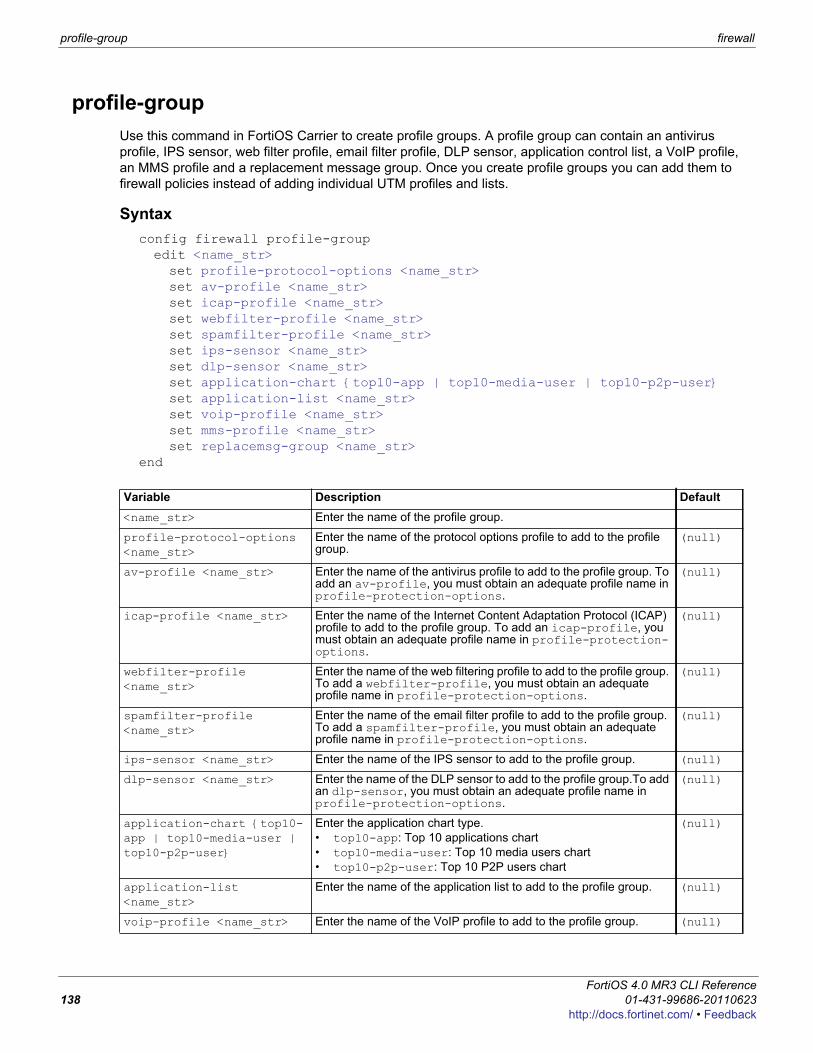
profile-group firewall
profile-groupUse this command in FortiOS Carrier to create profile groups. A profile group can contain an antivirus profile, IPS sensor, web filter profile, email filter profile, DLP sensor, application control list, a VoIP profile, an MMS profile and a replacement message group. Once you create profile groups you can add them to firewall policies instead of adding individual UTM profiles and lists.
Syntaxconfig firewall profile-groupedit <name_str>set profile-protocol-options <name_str>set av-profile <name_str>set icap-profile <name_str>set webfilter-profile <name_str>set spamfilter-profile <name_str>set ips-sensor <name_str>set dlp-sensor <name_str>set application-chart {top10-app | top10-media-user | top10-p2p-user}set application-list <name_str>set voip-profile <name_str>set mms-profile <name_str>set replacemsg-group <name_str>
end
Variable Description Default<name_str> Enter the name of the profile group.
profile-protocol-options <name_str>
Enter the name of the protocol options profile to add to the profile group.
(null)
av-profile <name_str> Enter the name of the antivirus profile to add to the profile group. To add an av-profile, you must obtain an adequate profile name in profile-protection-options.
(null)
icap-profile <name_str> Enter the name of the Internet Content Adaptation Protocol (ICAP) profile to add to the profile group. To add an icap-profile, you must obtain an adequate profile name in profile-protection-options.
(null)
webfilter-profile <name_str>
Enter the name of the web filtering profile to add to the profile group. To add a webfilter-profile, you must obtain an adequate profile name in profile-protection-options.
(null)
spamfilter-profile <name_str>
Enter the name of the email filter profile to add to the profile group. To add a spamfilter-profile, you must obtain an adequate profile name in profile-protection-options.
(null)
ips-sensor <name_str> Enter the name of the IPS sensor to add to the profile group. (null)
dlp-sensor <name_str> Enter the name of the DLP sensor to add to the profile group.To add an dlp-sensor, you must obtain an adequate profile name in profile-protection-options.
(null)
application-chart {top10-app | top10-media-user | top10-p2p-user}
Enter the application chart type.• top10-app: Top 10 applications chart• top10-media-user: Top 10 media users chart• top10-p2p-user: Top 10 P2P users chart
(null)
application-list <name_str>
Enter the name of the application list to add to the profile group. (null)
voip-profile <name_str> Enter the name of the VoIP profile to add to the profile group. (null)
FortiOS 4.0 MR3 CLI Reference138 01-431-99686-20110623
http://docs.fortinet.com/ • Feedback

firewall profile-group
F0h
mms-profile <name_str> For FortiOS Carrier, enter the name of the MMS profile to add to the profile group.
(null)
replacemsg-group <name_str>
For FortiOS Carrier, enter the name of the replacement message group to add to the profile group.
default
Variable Description Default
ortiOS 4.0 MR3 CLI Reference1-431-99686-20110623 139ttp://docs.fortinet.com/ • Feedback
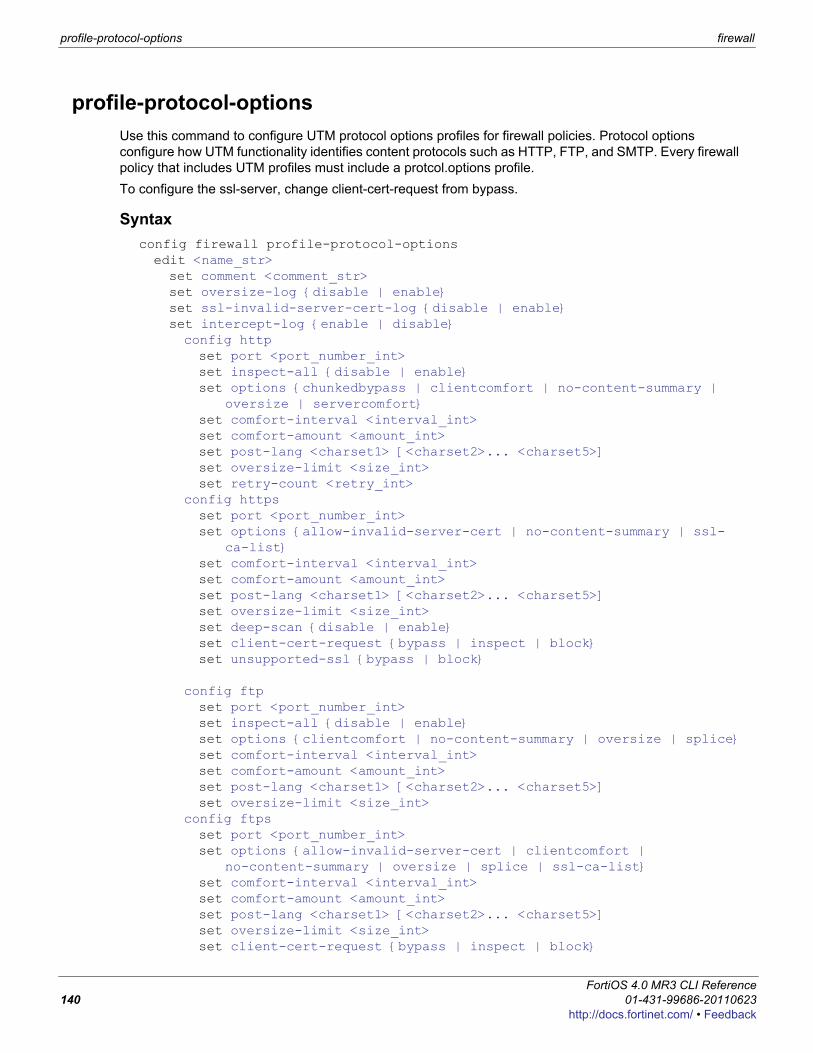
profile-protocol-options firewall
profile-protocol-optionsUse this command to configure UTM protocol options profiles for firewall policies. Protocol options configure how UTM functionality identifies content protocols such as HTTP, FTP, and SMTP. Every firewall policy that includes UTM profiles must include a protcol.options profile.To configure the ssl-server, change client-cert-request from bypass.
Syntaxconfig firewall profile-protocol-optionsedit <name_str>set comment <comment_str>set oversize-log {disable | enable}set ssl-invalid-server-cert-log {disable | enable}set intercept-log {enable | disable}config httpset port <port_number_int>set inspect-all {disable | enable}set options {chunkedbypass | clientcomfort | no-content-summary |
oversize | servercomfort}set comfort-interval <interval_int>set comfort-amount <amount_int>set post-lang <charset1> [<charset2>... <charset5>]set oversize-limit <size_int>set retry-count <retry_int>
config httpsset port <port_number_int>set options {allow-invalid-server-cert | no-content-summary | ssl-
ca-list}set comfort-interval <interval_int>set comfort-amount <amount_int>set post-lang <charset1> [<charset2>... <charset5>]set oversize-limit <size_int>set deep-scan {disable | enable}set client-cert-request {bypass | inspect | block}set unsupported-ssl {bypass | block}
config ftpset port <port_number_int>set inspect-all {disable | enable}set options {clientcomfort | no-content-summary | oversize | splice}set comfort-interval <interval_int>set comfort-amount <amount_int>set post-lang <charset1> [<charset2>... <charset5>]set oversize-limit <size_int>
config ftpsset port <port_number_int>set options {allow-invalid-server-cert | clientcomfort |
no-content-summary | oversize | splice | ssl-ca-list}set comfort-interval <interval_int>set comfort-amount <amount_int>set post-lang <charset1> [<charset2>... <charset5>]set oversize-limit <size_int>set client-cert-request {bypass | inspect | block}
FortiOS 4.0 MR3 CLI Reference140 01-431-99686-20110623
http://docs.fortinet.com/ • Feedback
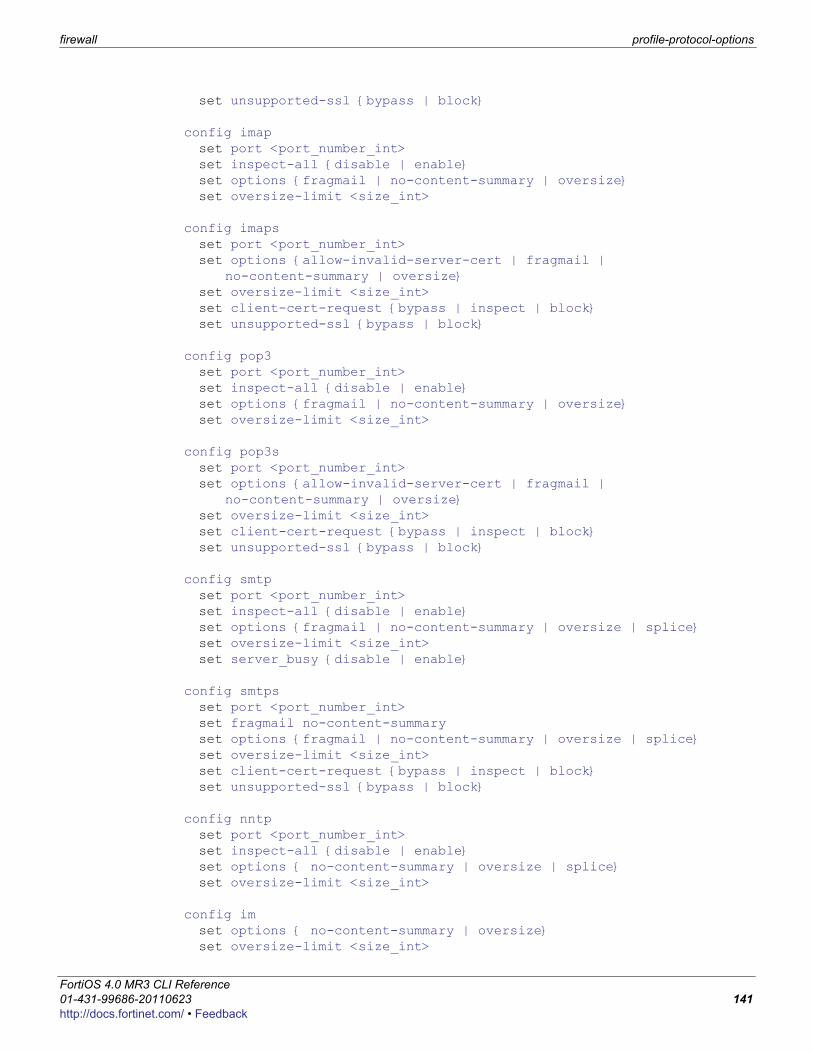
firewall profile-protocol-options
F0h
set unsupported-ssl {bypass | block}
config imapset port <port_number_int>set inspect-all {disable | enable}set options {fragmail | no-content-summary | oversize}set oversize-limit <size_int>
config imapsset port <port_number_int>set options {allow-invalid-server-cert | fragmail |
no-content-summary | oversize}set oversize-limit <size_int>set client-cert-request {bypass | inspect | block}set unsupported-ssl {bypass | block}
config pop3set port <port_number_int>set inspect-all {disable | enable}set options {fragmail | no-content-summary | oversize}set oversize-limit <size_int>
config pop3sset port <port_number_int>set options {allow-invalid-server-cert | fragmail |
no-content-summary | oversize}set oversize-limit <size_int>set client-cert-request {bypass | inspect | block}set unsupported-ssl {bypass | block}
config smtpset port <port_number_int>set inspect-all {disable | enable}set options {fragmail | no-content-summary | oversize | splice}set oversize-limit <size_int>set server_busy {disable | enable}
config smtpsset port <port_number_int>set fragmail no-content-summaryset options {fragmail | no-content-summary | oversize | splice}set oversize-limit <size_int>set client-cert-request {bypass | inspect | block}set unsupported-ssl {bypass | block}
config nntpset port <port_number_int>set inspect-all {disable | enable}set options { no-content-summary | oversize | splice}set oversize-limit <size_int>
config imset options { no-content-summary | oversize}set oversize-limit <size_int>
ortiOS 4.0 MR3 CLI Reference1-431-99686-20110623 141ttp://docs.fortinet.com/ • Feedback
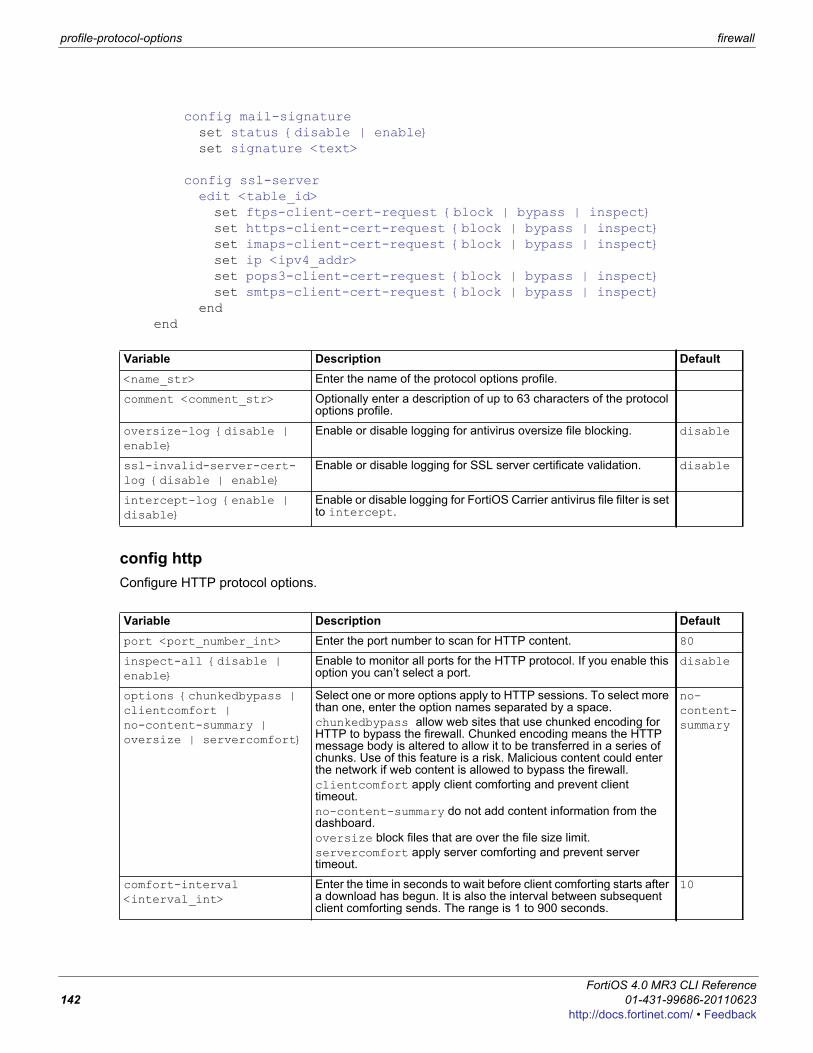
profile-protocol-options firewall
config mail-signatureset status {disable | enable}set signature <text>
config ssl-serveredit <table_id>set ftps-client-cert-request {block | bypass | inspect}set https-client-cert-request {block | bypass | inspect}set imaps-client-cert-request {block | bypass | inspect}set ip <ipv4_addr>set pops3-client-cert-request {block | bypass | inspect}set smtps-client-cert-request {block | bypass | inspect}
endend
config httpConfigure HTTP protocol options.
Variable Description Default<name_str> Enter the name of the protocol options profile.
comment <comment_str> Optionally enter a description of up to 63 characters of the protocol options profile.
oversize-log {disable | enable}
Enable or disable logging for antivirus oversize file blocking. disable
ssl-invalid-server-cert-log {disable | enable}
Enable or disable logging for SSL server certificate validation. disable
intercept-log {enable | disable}
Enable or disable logging for FortiOS Carrier antivirus file filter is set to intercept.
Variable Description Defaultport <port_number_int> Enter the port number to scan for HTTP content. 80
inspect-all {disable | enable}
Enable to monitor all ports for the HTTP protocol. If you enable this option you can’t select a port.
disable
options {chunkedbypass | clientcomfort | no-content-summary | oversize | servercomfort}
Select one or more options apply to HTTP sessions. To select more than one, enter the option names separated by a space.chunkedbypass allow web sites that use chunked encoding for HTTP to bypass the firewall. Chunked encoding means the HTTP message body is altered to allow it to be transferred in a series of chunks. Use of this feature is a risk. Malicious content could enter the network if web content is allowed to bypass the firewall.clientcomfort apply client comforting and prevent client timeout.no-content-summary do not add content information from the dashboard.oversize block files that are over the file size limit.servercomfort apply server comforting and prevent server timeout.
no-content-summary
comfort-interval <interval_int>
Enter the time in seconds to wait before client comforting starts after a download has begun. It is also the interval between subsequent client comforting sends. The range is 1 to 900 seconds.
10
FortiOS 4.0 MR3 CLI Reference142 01-431-99686-20110623
http://docs.fortinet.com/ • Feedback
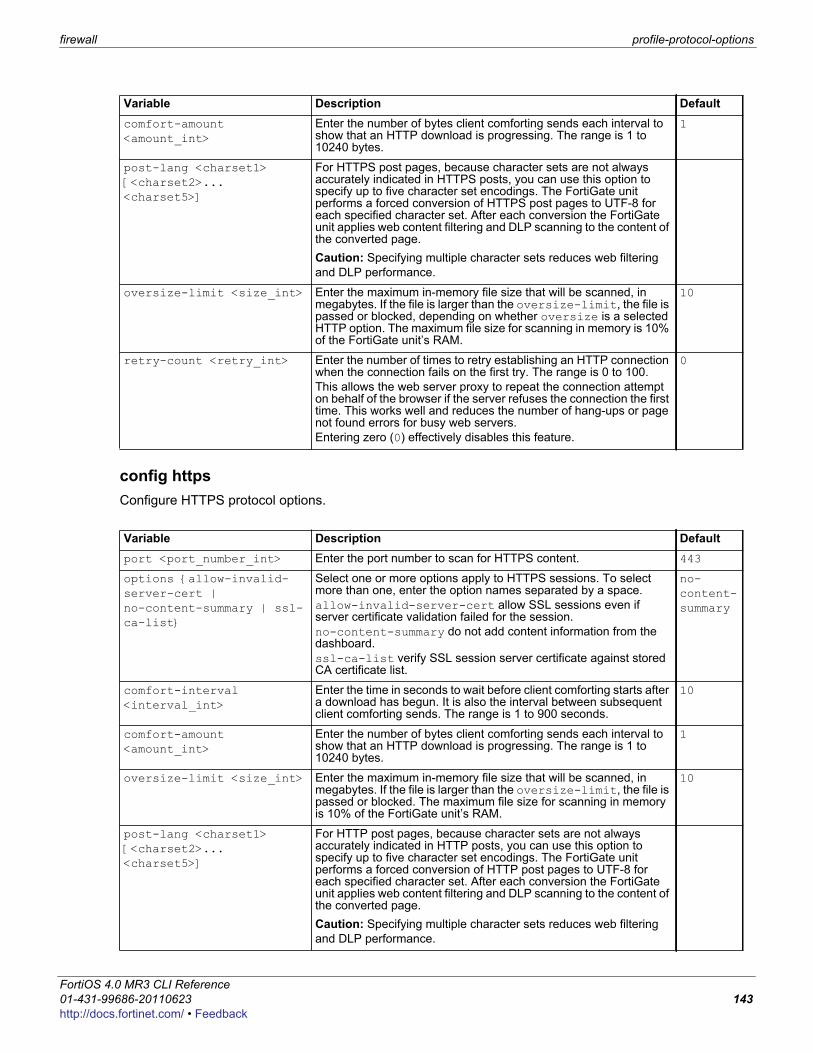
firewall profile-protocol-options
F0h
config httpsConfigure HTTPS protocol options.
comfort-amount <amount_int>
Enter the number of bytes client comforting sends each interval to show that an HTTP download is progressing. The range is 1 to 10240 bytes.
1
post-lang <charset1> [<charset2>... <charset5>]
For HTTPS post pages, because character sets are not always accurately indicated in HTTPS posts, you can use this option to specify up to five character set encodings. The FortiGate unit performs a forced conversion of HTTPS post pages to UTF-8 for each specified character set. After each conversion the FortiGate unit applies web content filtering and DLP scanning to the content of the converted page.Caution: Specifying multiple character sets reduces web filtering and DLP performance.
oversize-limit <size_int> Enter the maximum in-memory file size that will be scanned, in megabytes. If the file is larger than the oversize-limit, the file is passed or blocked, depending on whether oversize is a selected HTTP option. The maximum file size for scanning in memory is 10% of the FortiGate unit’s RAM.
10
retry-count <retry_int> Enter the number of times to retry establishing an HTTP connection when the connection fails on the first try. The range is 0 to 100.This allows the web server proxy to repeat the connection attempt on behalf of the browser if the server refuses the connection the first time. This works well and reduces the number of hang-ups or page not found errors for busy web servers.Entering zero (0) effectively disables this feature.
0
Variable Description Defaultport <port_number_int> Enter the port number to scan for HTTPS content. 443
options {allow-invalid-server-cert | no-content-summary | ssl-ca-list}
Select one or more options apply to HTTPS sessions. To select more than one, enter the option names separated by a space.allow-invalid-server-cert allow SSL sessions even if server certificate validation failed for the session.no-content-summary do not add content information from the dashboard.ssl-ca-list verify SSL session server certificate against stored CA certificate list.
no-content-summary
comfort-interval <interval_int>
Enter the time in seconds to wait before client comforting starts after a download has begun. It is also the interval between subsequent client comforting sends. The range is 1 to 900 seconds.
10
comfort-amount <amount_int>
Enter the number of bytes client comforting sends each interval to show that an HTTP download is progressing. The range is 1 to 10240 bytes.
1
oversize-limit <size_int> Enter the maximum in-memory file size that will be scanned, in megabytes. If the file is larger than the oversize-limit, the file is passed or blocked. The maximum file size for scanning in memory is 10% of the FortiGate unit’s RAM.
10
post-lang <charset1> [<charset2>... <charset5>]
For HTTP post pages, because character sets are not always accurately indicated in HTTP posts, you can use this option to specify up to five character set encodings. The FortiGate unit performs a forced conversion of HTTP post pages to UTF-8 for each specified character set. After each conversion the FortiGate unit applies web content filtering and DLP scanning to the content of the converted page.Caution: Specifying multiple character sets reduces web filtering and DLP performance.
Variable Description Default
ortiOS 4.0 MR3 CLI Reference1-431-99686-20110623 143ttp://docs.fortinet.com/ • Feedback
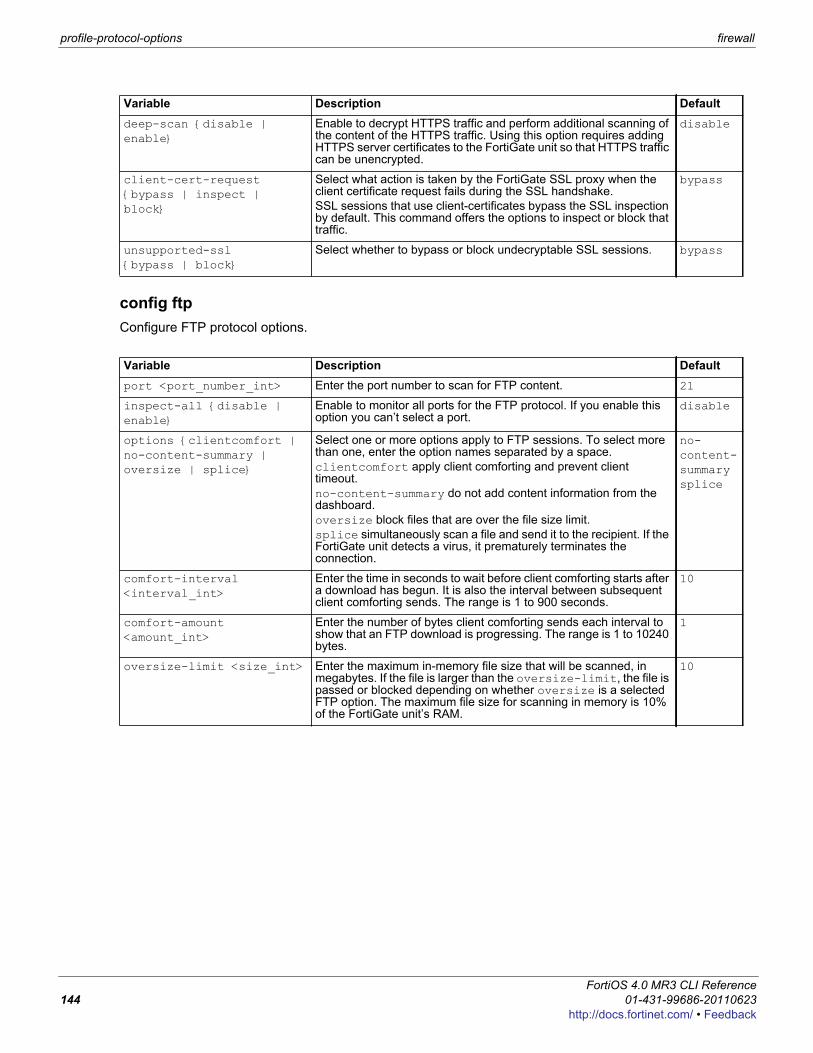
profile-protocol-options firewall
config ftpConfigure FTP protocol options.
deep-scan {disable | enable}
Enable to decrypt HTTPS traffic and perform additional scanning of the content of the HTTPS traffic. Using this option requires adding HTTPS server certificates to the FortiGate unit so that HTTPS traffic can be unencrypted.
disable
client-cert-request {bypass | inspect | block}
Select what action is taken by the FortiGate SSL proxy when the client certificate request fails during the SSL handshake.SSL sessions that use client-certificates bypass the SSL inspection by default. This command offers the options to inspect or block that traffic.
bypass
unsupported-ssl {bypass | block}
Select whether to bypass or block undecryptable SSL sessions. bypass
Variable Description Defaultport <port_number_int> Enter the port number to scan for FTP content. 21
inspect-all {disable | enable}
Enable to monitor all ports for the FTP protocol. If you enable this option you can’t select a port.
disable
options {clientcomfort | no-content-summary | oversize | splice}
Select one or more options apply to FTP sessions. To select more than one, enter the option names separated by a space.clientcomfort apply client comforting and prevent client timeout.no-content-summary do not add content information from the dashboard.oversize block files that are over the file size limit.splice simultaneously scan a file and send it to the recipient. If the FortiGate unit detects a virus, it prematurely terminates the connection.
no-content-summary splice
comfort-interval <interval_int>
Enter the time in seconds to wait before client comforting starts after a download has begun. It is also the interval between subsequent client comforting sends. The range is 1 to 900 seconds.
10
comfort-amount <amount_int>
Enter the number of bytes client comforting sends each interval to show that an FTP download is progressing. The range is 1 to 10240 bytes.
1
oversize-limit <size_int> Enter the maximum in-memory file size that will be scanned, in megabytes. If the file is larger than the oversize-limit, the file is passed or blocked depending on whether oversize is a selected FTP option. The maximum file size for scanning in memory is 10% of the FortiGate unit’s RAM.
10
Variable Description Default
FortiOS 4.0 MR3 CLI Reference144 01-431-99686-20110623
http://docs.fortinet.com/ • Feedback
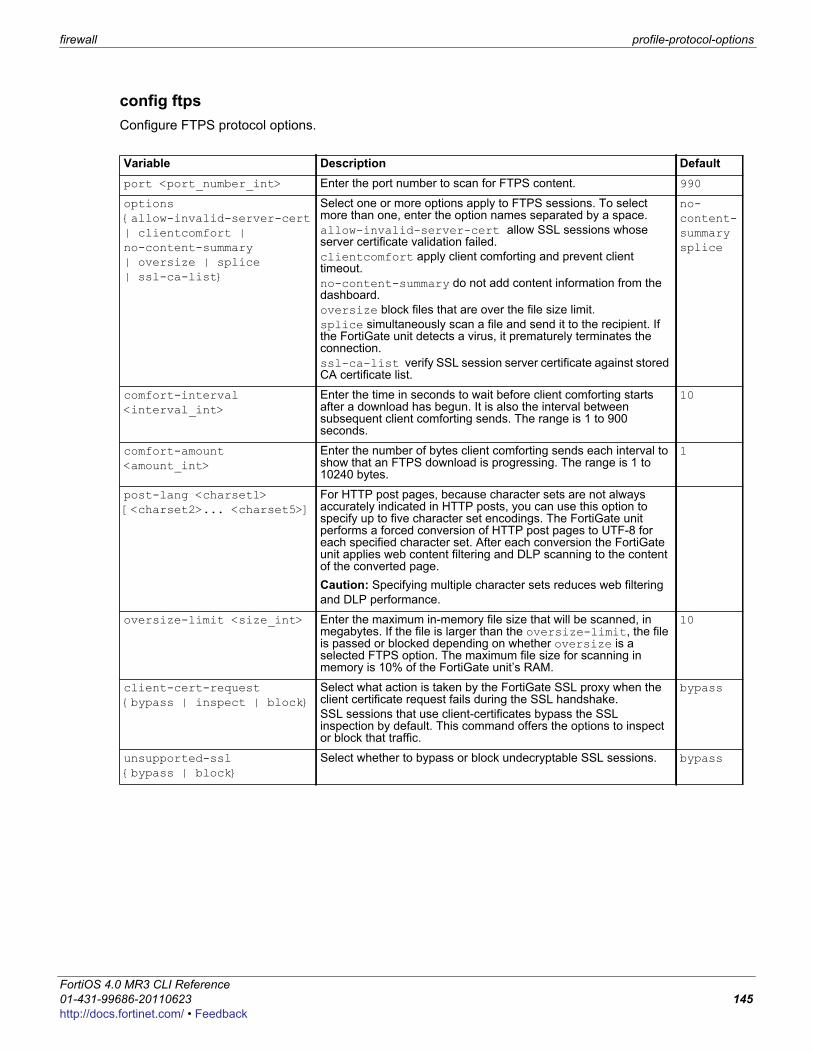
firewall profile-protocol-options
F0h
config ftpsConfigure FTPS protocol options.
Variable Description Defaultport <port_number_int> Enter the port number to scan for FTPS content. 990
options {allow-invalid-server-cert | clientcomfort | no-content-summary | oversize | splice | ssl-ca-list}
Select one or more options apply to FTPS sessions. To select more than one, enter the option names separated by a space.allow-invalid-server-cert allow SSL sessions whose server certificate validation failed.clientcomfort apply client comforting and prevent client timeout.no-content-summary do not add content information from the dashboard.oversize block files that are over the file size limit.splice simultaneously scan a file and send it to the recipient. If the FortiGate unit detects a virus, it prematurely terminates the connection.ssl-ca-list verify SSL session server certificate against stored CA certificate list.
no-content-summary splice
comfort-interval <interval_int>
Enter the time in seconds to wait before client comforting starts after a download has begun. It is also the interval between subsequent client comforting sends. The range is 1 to 900 seconds.
10
comfort-amount <amount_int>
Enter the number of bytes client comforting sends each interval to show that an FTPS download is progressing. The range is 1 to 10240 bytes.
1
post-lang <charset1> [<charset2>... <charset5>]
For HTTP post pages, because character sets are not always accurately indicated in HTTP posts, you can use this option to specify up to five character set encodings. The FortiGate unit performs a forced conversion of HTTP post pages to UTF-8 for each specified character set. After each conversion the FortiGate unit applies web content filtering and DLP scanning to the content of the converted page.Caution: Specifying multiple character sets reduces web filtering and DLP performance.
oversize-limit <size_int> Enter the maximum in-memory file size that will be scanned, in megabytes. If the file is larger than the oversize-limit, the file is passed or blocked depending on whether oversize is a selected FTPS option. The maximum file size for scanning in memory is 10% of the FortiGate unit’s RAM.
10
client-cert-request {bypass | inspect | block}
Select what action is taken by the FortiGate SSL proxy when the client certificate request fails during the SSL handshake.SSL sessions that use client-certificates bypass the SSL inspection by default. This command offers the options to inspect or block that traffic.
bypass
unsupported-ssl {bypass | block}
Select whether to bypass or block undecryptable SSL sessions. bypass
ortiOS 4.0 MR3 CLI Reference1-431-99686-20110623 145ttp://docs.fortinet.com/ • Feedback
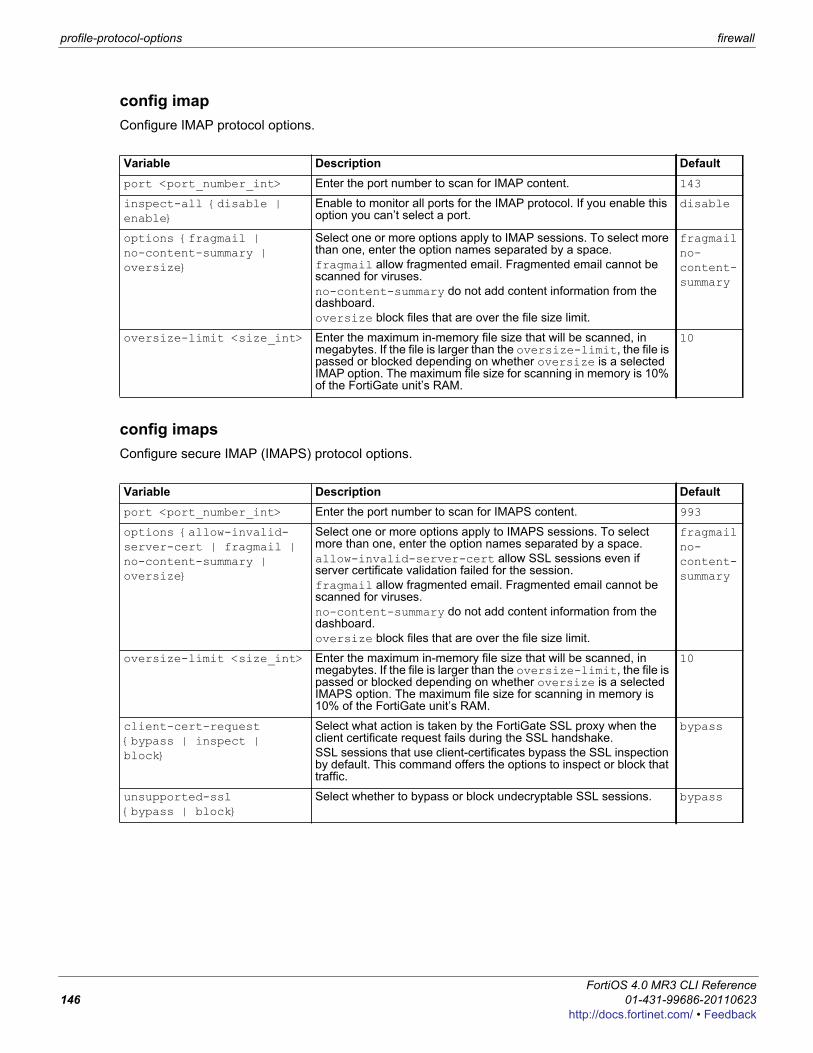
profile-protocol-options firewall
config imapConfigure IMAP protocol options.
config imapsConfigure secure IMAP (IMAPS) protocol options.
Variable Description Defaultport <port_number_int> Enter the port number to scan for IMAP content. 143
inspect-all {disable | enable}
Enable to monitor all ports for the IMAP protocol. If you enable this option you can’t select a port.
disable
options {fragmail | no-content-summary | oversize}
Select one or more options apply to IMAP sessions. To select more than one, enter the option names separated by a space.fragmail allow fragmented email. Fragmented email cannot be scanned for viruses.no-content-summary do not add content information from the dashboard.oversize block files that are over the file size limit.
fragmail no-content-summary
oversize-limit <size_int> Enter the maximum in-memory file size that will be scanned, in megabytes. If the file is larger than the oversize-limit, the file is passed or blocked depending on whether oversize is a selected IMAP option. The maximum file size for scanning in memory is 10% of the FortiGate unit’s RAM.
10
Variable Description Defaultport <port_number_int> Enter the port number to scan for IMAPS content. 993
options {allow-invalid-server-cert | fragmail | no-content-summary | oversize}
Select one or more options apply to IMAPS sessions. To select more than one, enter the option names separated by a space.allow-invalid-server-cert allow SSL sessions even if server certificate validation failed for the session.fragmail allow fragmented email. Fragmented email cannot be scanned for viruses.no-content-summary do not add content information from the dashboard.oversize block files that are over the file size limit.
fragmail no-content-summary
oversize-limit <size_int> Enter the maximum in-memory file size that will be scanned, in megabytes. If the file is larger than the oversize-limit, the file is passed or blocked depending on whether oversize is a selected IMAPS option. The maximum file size for scanning in memory is 10% of the FortiGate unit’s RAM.
10
client-cert-request {bypass | inspect | block}
Select what action is taken by the FortiGate SSL proxy when the client certificate request fails during the SSL handshake.SSL sessions that use client-certificates bypass the SSL inspection by default. This command offers the options to inspect or block that traffic.
bypass
unsupported-ssl {bypass | block}
Select whether to bypass or block undecryptable SSL sessions. bypass
FortiOS 4.0 MR3 CLI Reference146 01-431-99686-20110623
http://docs.fortinet.com/ • Feedback
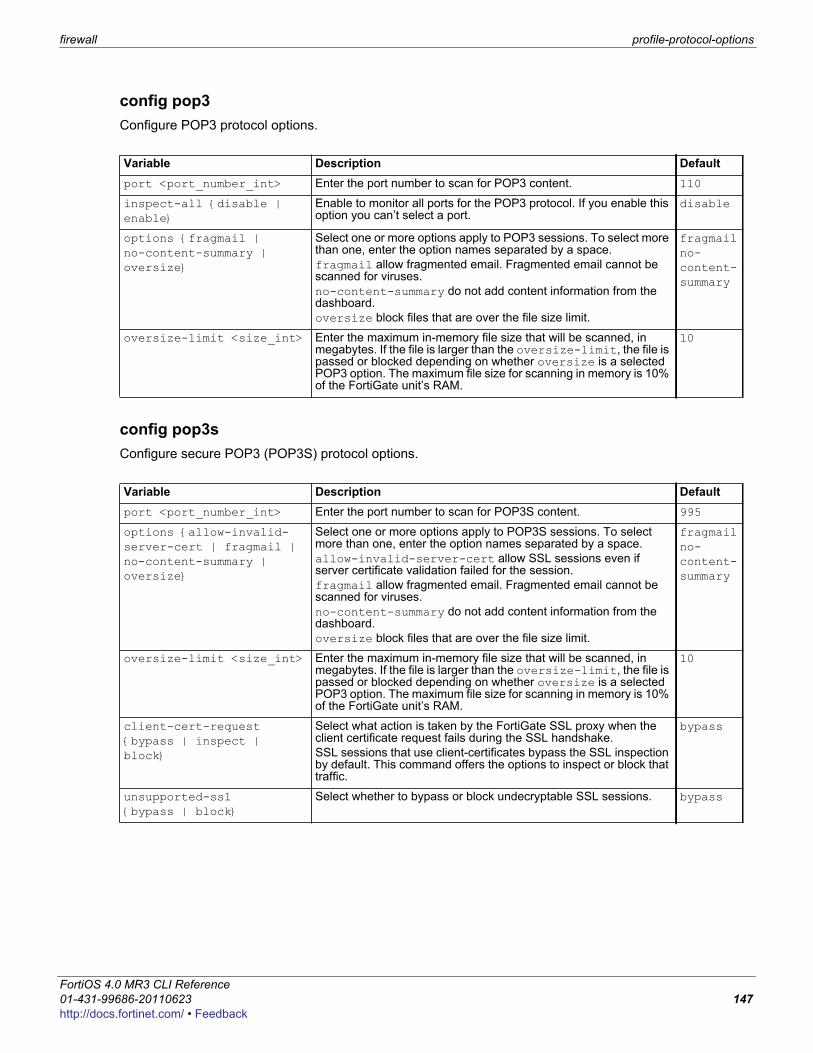
firewall profile-protocol-options
F0h
config pop3Configure POP3 protocol options.
config pop3sConfigure secure POP3 (POP3S) protocol options.
Variable Description Defaultport <port_number_int> Enter the port number to scan for POP3 content. 110
inspect-all {disable | enable}
Enable to monitor all ports for the POP3 protocol. If you enable this option you can’t select a port.
disable
options {fragmail | no-content-summary | oversize}
Select one or more options apply to POP3 sessions. To select more than one, enter the option names separated by a space.fragmail allow fragmented email. Fragmented email cannot be scanned for viruses.no-content-summary do not add content information from the dashboard.oversize block files that are over the file size limit.
fragmail no-content-summary
oversize-limit <size_int> Enter the maximum in-memory file size that will be scanned, in megabytes. If the file is larger than the oversize-limit, the file is passed or blocked depending on whether oversize is a selected POP3 option. The maximum file size for scanning in memory is 10% of the FortiGate unit’s RAM.
10
Variable Description Defaultport <port_number_int> Enter the port number to scan for POP3S content. 995
options {allow-invalid-server-cert | fragmail | no-content-summary | oversize}
Select one or more options apply to POP3S sessions. To select more than one, enter the option names separated by a space.allow-invalid-server-cert allow SSL sessions even if server certificate validation failed for the session.fragmail allow fragmented email. Fragmented email cannot be scanned for viruses.no-content-summary do not add content information from the dashboard.oversize block files that are over the file size limit.
fragmail no-content-summary
oversize-limit <size_int> Enter the maximum in-memory file size that will be scanned, in megabytes. If the file is larger than the oversize-limit, the file is passed or blocked depending on whether oversize is a selected POP3 option. The maximum file size for scanning in memory is 10% of the FortiGate unit’s RAM.
10
client-cert-request {bypass | inspect | block}
Select what action is taken by the FortiGate SSL proxy when the client certificate request fails during the SSL handshake.SSL sessions that use client-certificates bypass the SSL inspection by default. This command offers the options to inspect or block that traffic.
bypass
unsupported-ssl {bypass | block}
Select whether to bypass or block undecryptable SSL sessions. bypass
ortiOS 4.0 MR3 CLI Reference1-431-99686-20110623 147ttp://docs.fortinet.com/ • Feedback
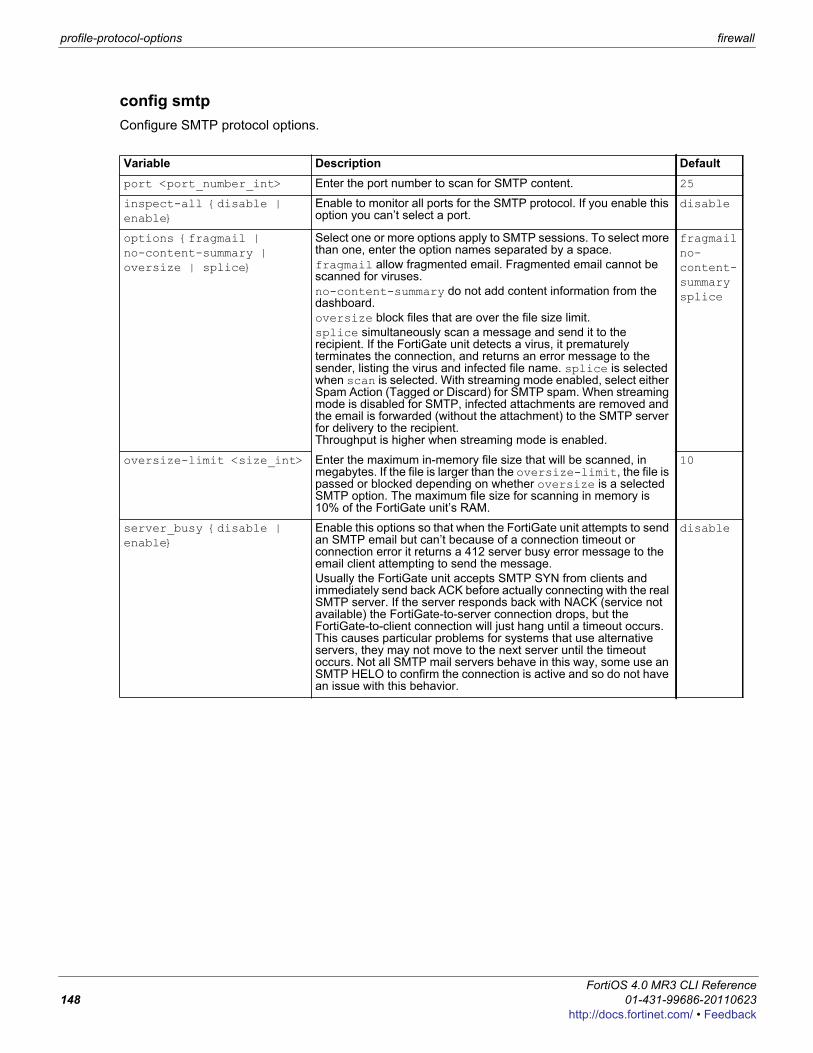
profile-protocol-options firewall
config smtpConfigure SMTP protocol options.
Variable Description Defaultport <port_number_int> Enter the port number to scan for SMTP content. 25
inspect-all {disable | enable}
Enable to monitor all ports for the SMTP protocol. If you enable this option you can’t select a port.
disable
options {fragmail | no-content-summary | oversize | splice}
Select one or more options apply to SMTP sessions. To select more than one, enter the option names separated by a space.fragmail allow fragmented email. Fragmented email cannot be scanned for viruses.no-content-summary do not add content information from the dashboard.oversize block files that are over the file size limit.splice simultaneously scan a message and send it to the recipient. If the FortiGate unit detects a virus, it prematurely terminates the connection, and returns an error message to the sender, listing the virus and infected file name. splice is selected when scan is selected. With streaming mode enabled, select either Spam Action (Tagged or Discard) for SMTP spam. When streaming mode is disabled for SMTP, infected attachments are removed and the email is forwarded (without the attachment) to the SMTP server for delivery to the recipient. Throughput is higher when streaming mode is enabled.
fragmail no-content-summarysplice
oversize-limit <size_int> Enter the maximum in-memory file size that will be scanned, in megabytes. If the file is larger than the oversize-limit, the file is passed or blocked depending on whether oversize is a selected SMTP option. The maximum file size for scanning in memory is 10% of the FortiGate unit’s RAM.
10
server_busy {disable | enable}
Enable this options so that when the FortiGate unit attempts to send an SMTP email but can’t because of a connection timeout or connection error it returns a 412 server busy error message to the email client attempting to send the message.Usually the FortiGate unit accepts SMTP SYN from clients and immediately send back ACK before actually connecting with the real SMTP server. If the server responds back with NACK (service not available) the FortiGate-to-server connection drops, but the FortiGate-to-client connection will just hang until a timeout occurs. This causes particular problems for systems that use alternative servers, they may not move to the next server until the timeout occurs. Not all SMTP mail servers behave in this way, some use an SMTP HELO to confirm the connection is active and so do not have an issue with this behavior.
disable
FortiOS 4.0 MR3 CLI Reference148 01-431-99686-20110623
http://docs.fortinet.com/ • Feedback
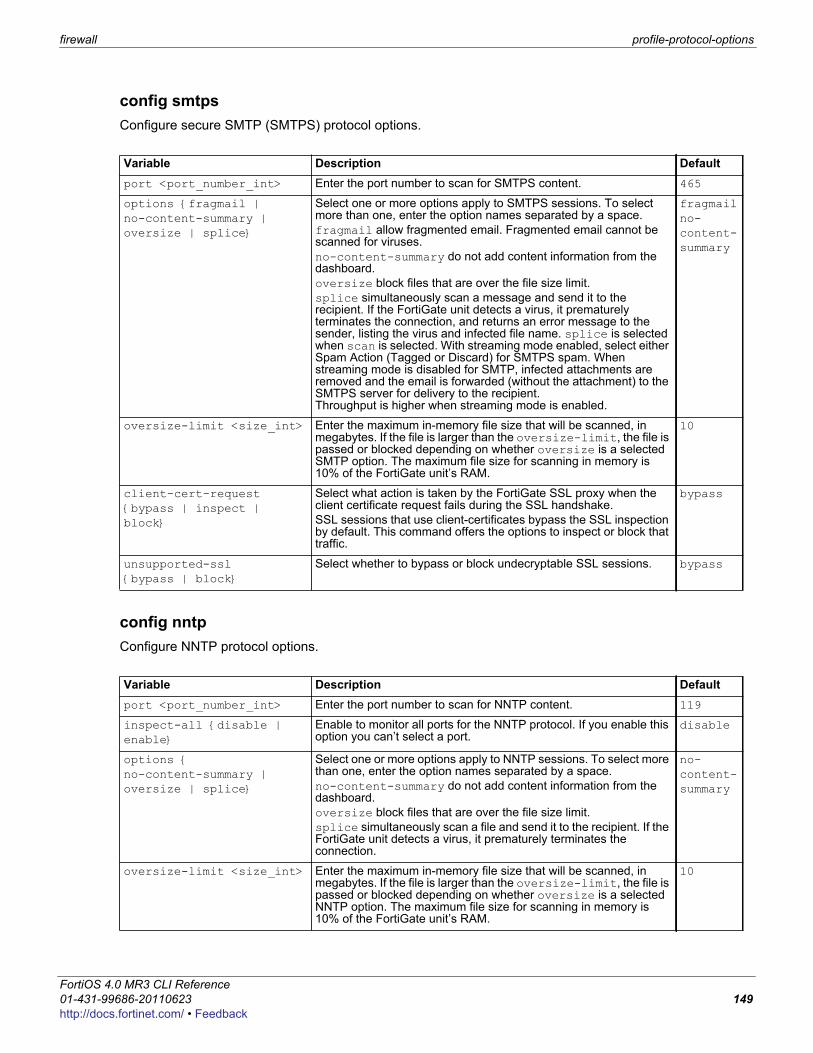
firewall profile-protocol-options
F0h
config smtpsConfigure secure SMTP (SMTPS) protocol options.
config nntpConfigure NNTP protocol options.
Variable Description Defaultport <port_number_int> Enter the port number to scan for SMTPS content. 465
options {fragmail | no-content-summary | oversize | splice}
Select one or more options apply to SMTPS sessions. To select more than one, enter the option names separated by a space.fragmail allow fragmented email. Fragmented email cannot be scanned for viruses.no-content-summary do not add content information from the dashboard.oversize block files that are over the file size limit.splice simultaneously scan a message and send it to the recipient. If the FortiGate unit detects a virus, it prematurely terminates the connection, and returns an error message to the sender, listing the virus and infected file name. splice is selected when scan is selected. With streaming mode enabled, select either Spam Action (Tagged or Discard) for SMTPS spam. When streaming mode is disabled for SMTP, infected attachments are removed and the email is forwarded (without the attachment) to the SMTPS server for delivery to the recipient. Throughput is higher when streaming mode is enabled.
fragmail no-content-summary
oversize-limit <size_int> Enter the maximum in-memory file size that will be scanned, in megabytes. If the file is larger than the oversize-limit, the file is passed or blocked depending on whether oversize is a selected SMTP option. The maximum file size for scanning in memory is 10% of the FortiGate unit’s RAM.
10
client-cert-request {bypass | inspect | block}
Select what action is taken by the FortiGate SSL proxy when the client certificate request fails during the SSL handshake.SSL sessions that use client-certificates bypass the SSL inspection by default. This command offers the options to inspect or block that traffic.
bypass
unsupported-ssl {bypass | block}
Select whether to bypass or block undecryptable SSL sessions. bypass
Variable Description Defaultport <port_number_int> Enter the port number to scan for NNTP content. 119
inspect-all {disable | enable}
Enable to monitor all ports for the NNTP protocol. If you enable this option you can’t select a port.
disable
options { no-content-summary | oversize | splice}
Select one or more options apply to NNTP sessions. To select more than one, enter the option names separated by a space.no-content-summary do not add content information from the dashboard.oversize block files that are over the file size limit.splice simultaneously scan a file and send it to the recipient. If the FortiGate unit detects a virus, it prematurely terminates the connection.
no-content-summary
oversize-limit <size_int> Enter the maximum in-memory file size that will be scanned, in megabytes. If the file is larger than the oversize-limit, the file is passed or blocked depending on whether oversize is a selected NNTP option. The maximum file size for scanning in memory is 10% of the FortiGate unit’s RAM.
10
ortiOS 4.0 MR3 CLI Reference1-431-99686-20110623 149ttp://docs.fortinet.com/ • Feedback
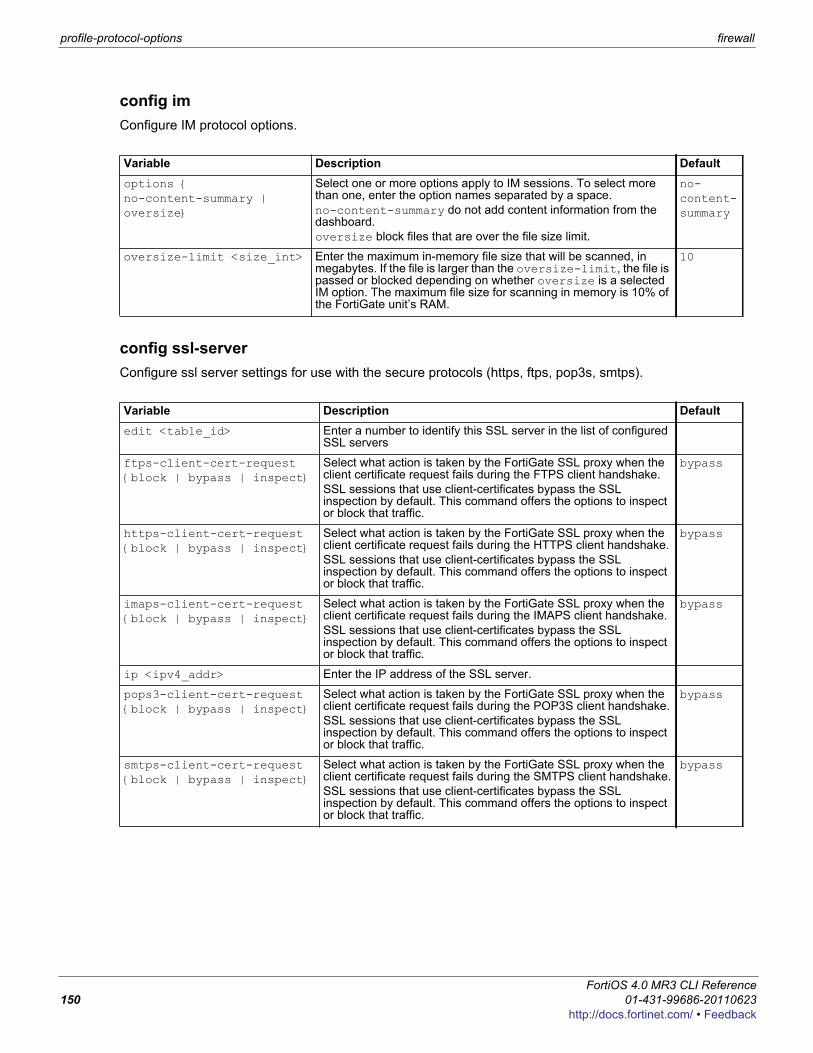
profile-protocol-options firewall
config imConfigure IM protocol options.
config ssl-serverConfigure ssl server settings for use with the secure protocols (https, ftps, pop3s, smtps).
Variable Description Defaultoptions { no-content-summary | oversize}
Select one or more options apply to IM sessions. To select more than one, enter the option names separated by a space.no-content-summary do not add content information from the dashboard.oversize block files that are over the file size limit.
no-content-summary
oversize-limit <size_int> Enter the maximum in-memory file size that will be scanned, in megabytes. If the file is larger than the oversize-limit, the file is passed or blocked depending on whether oversize is a selected IM option. The maximum file size for scanning in memory is 10% of the FortiGate unit’s RAM.
10
Variable Description Defaultedit <table_id> Enter a number to identify this SSL server in the list of configured
SSL servers
ftps-client-cert-request {block | bypass | inspect}
Select what action is taken by the FortiGate SSL proxy when the client certificate request fails during the FTPS client handshake.SSL sessions that use client-certificates bypass the SSL inspection by default. This command offers the options to inspect or block that traffic.
bypass
https-client-cert-request {block | bypass | inspect}
Select what action is taken by the FortiGate SSL proxy when the client certificate request fails during the HTTPS client handshake.SSL sessions that use client-certificates bypass the SSL inspection by default. This command offers the options to inspect or block that traffic.
bypass
imaps-client-cert-request {block | bypass | inspect}
Select what action is taken by the FortiGate SSL proxy when the client certificate request fails during the IMAPS client handshake.SSL sessions that use client-certificates bypass the SSL inspection by default. This command offers the options to inspect or block that traffic.
bypass
ip <ipv4_addr> Enter the IP address of the SSL server.
pops3-client-cert-request {block | bypass | inspect}
Select what action is taken by the FortiGate SSL proxy when the client certificate request fails during the POP3S client handshake.SSL sessions that use client-certificates bypass the SSL inspection by default. This command offers the options to inspect or block that traffic.
bypass
smtps-client-cert-request {block | bypass | inspect}
Select what action is taken by the FortiGate SSL proxy when the client certificate request fails during the SMTPS client handshake.SSL sessions that use client-certificates bypass the SSL inspection by default. This command offers the options to inspect or block that traffic.
bypass
FortiOS 4.0 MR3 CLI Reference150 01-431-99686-20110623
http://docs.fortinet.com/ • Feedback

firewall profile-protocol-options
F0h
config mail-signatureConfigure email signature options for SMTP.
Variable Description Defaultstatus {disable | enable} Enable or disable adding an email signature to SMTP email
messages as they pass through the FortiGate unit.disable
signature <text> Enter a signature to add to outgoing email. If the signature contains spaces, surround it with single or double quotes (‘ or ").
(null)
ortiOS 4.0 MR3 CLI Reference1-431-99686-20110623 151ttp://docs.fortinet.com/ • Feedback
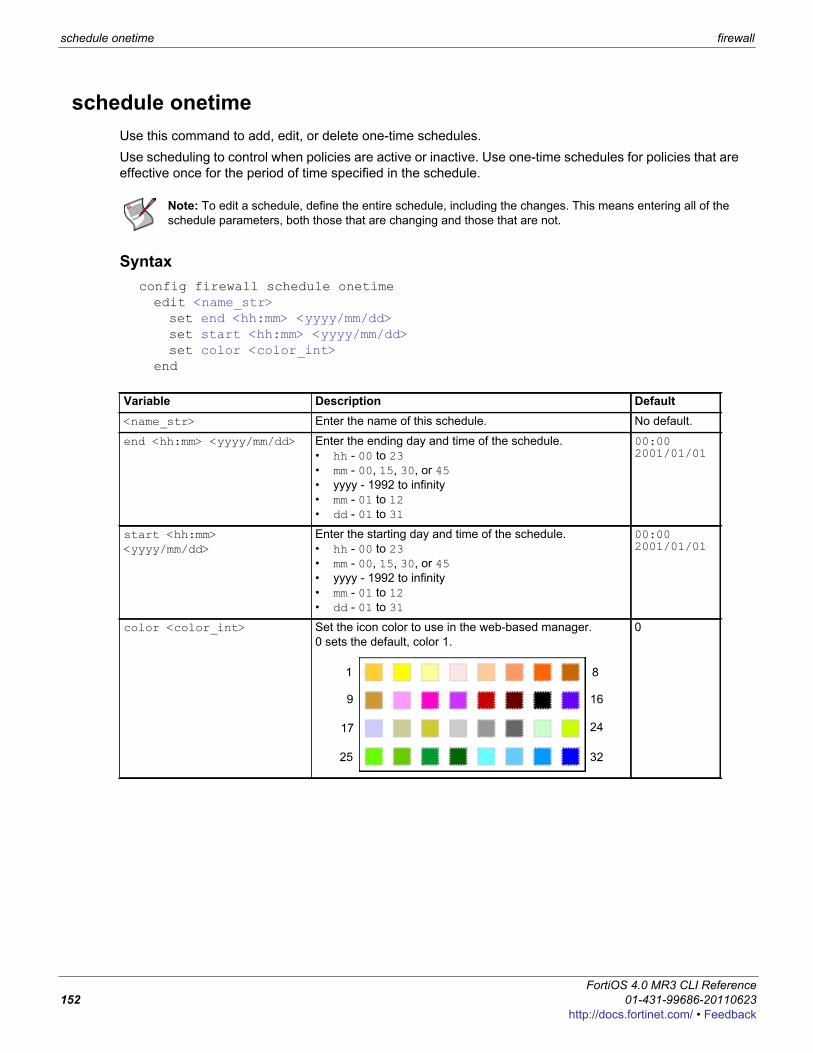
schedule onetime firewall
schedule onetimeUse this command to add, edit, or delete one-time schedules.Use scheduling to control when policies are active or inactive. Use one-time schedules for policies that are effective once for the period of time specified in the schedule.
Syntaxconfig firewall schedule onetimeedit <name_str>set end <hh:mm> <yyyy/mm/dd> set start <hh:mm> <yyyy/mm/dd> set color <color_int>
end
Note: To edit a schedule, define the entire schedule, including the changes. This means entering all of the schedule parameters, both those that are changing and those that are not.
Variable Description Default<name_str> Enter the name of this schedule. No default.
end <hh:mm> <yyyy/mm/dd> Enter the ending day and time of the schedule.• hh - 00 to 23• mm - 00, 15, 30, or 45• yyyy - 1992 to infinity • mm - 01 to 12• dd - 01 to 31
00:00 2001/01/01
start <hh:mm> <yyyy/mm/dd>
Enter the starting day and time of the schedule.• hh - 00 to 23• mm - 00, 15, 30, or 45• yyyy - 1992 to infinity• mm - 01 to 12• dd - 01 to 31
00:00 2001/01/01
color <color_int> Set the icon color to use in the web-based manager.0 sets the default, color 1.
0
1 8
9 16
17 24
25 32
FortiOS 4.0 MR3 CLI Reference152 01-431-99686-20110623
http://docs.fortinet.com/ • Feedback
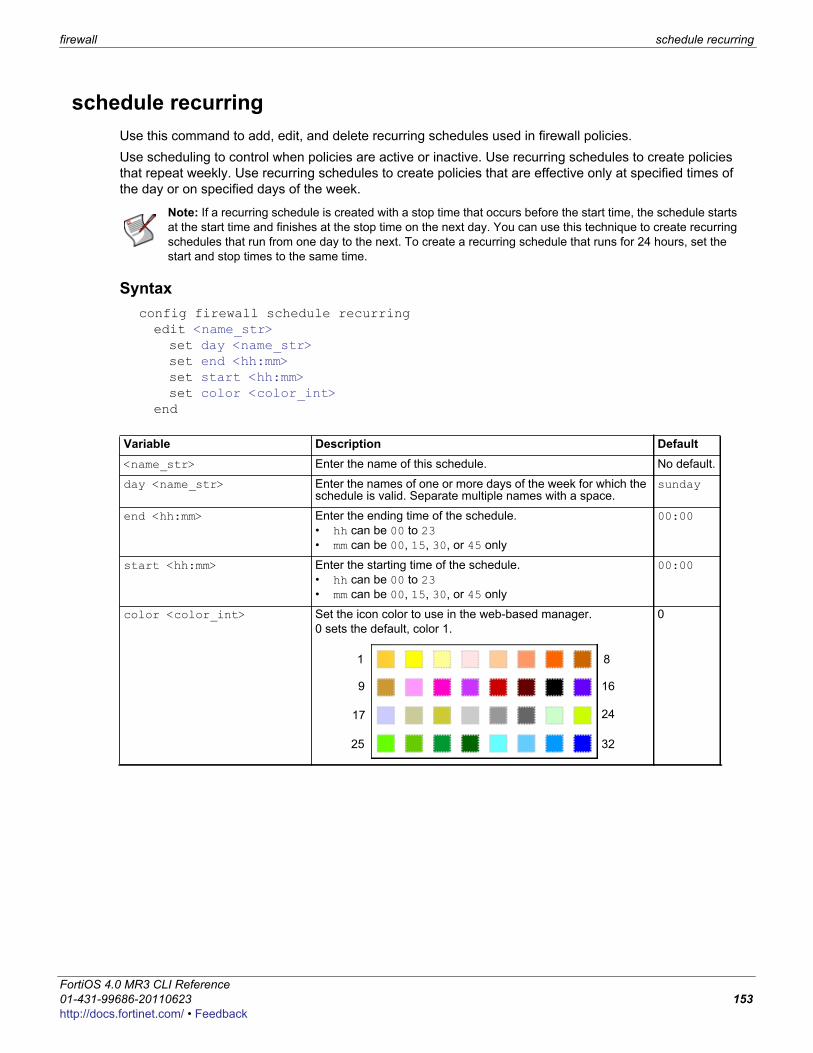
firewall schedule recurring
F0h
schedule recurringUse this command to add, edit, and delete recurring schedules used in firewall policies.Use scheduling to control when policies are active or inactive. Use recurring schedules to create policies that repeat weekly. Use recurring schedules to create policies that are effective only at specified times of the day or on specified days of the week.
Syntaxconfig firewall schedule recurringedit <name_str>set day <name_str>set end <hh:mm>set start <hh:mm>set color <color_int>
end
Note: If a recurring schedule is created with a stop time that occurs before the start time, the schedule starts at the start time and finishes at the stop time on the next day. You can use this technique to create recurring schedules that run from one day to the next. To create a recurring schedule that runs for 24 hours, set the start and stop times to the same time.
Variable Description Default<name_str> Enter the name of this schedule. No default.
day <name_str> Enter the names of one or more days of the week for which the schedule is valid. Separate multiple names with a space.
sunday
end <hh:mm> Enter the ending time of the schedule.• hh can be 00 to 23• mm can be 00, 15, 30, or 45 only
00:00
start <hh:mm> Enter the starting time of the schedule.• hh can be 00 to 23• mm can be 00, 15, 30, or 45 only
00:00
color <color_int> Set the icon color to use in the web-based manager.0 sets the default, color 1.
0
1 8
9 16
17 24
25 32
ortiOS 4.0 MR3 CLI Reference1-431-99686-20110623 153ttp://docs.fortinet.com/ • Feedback
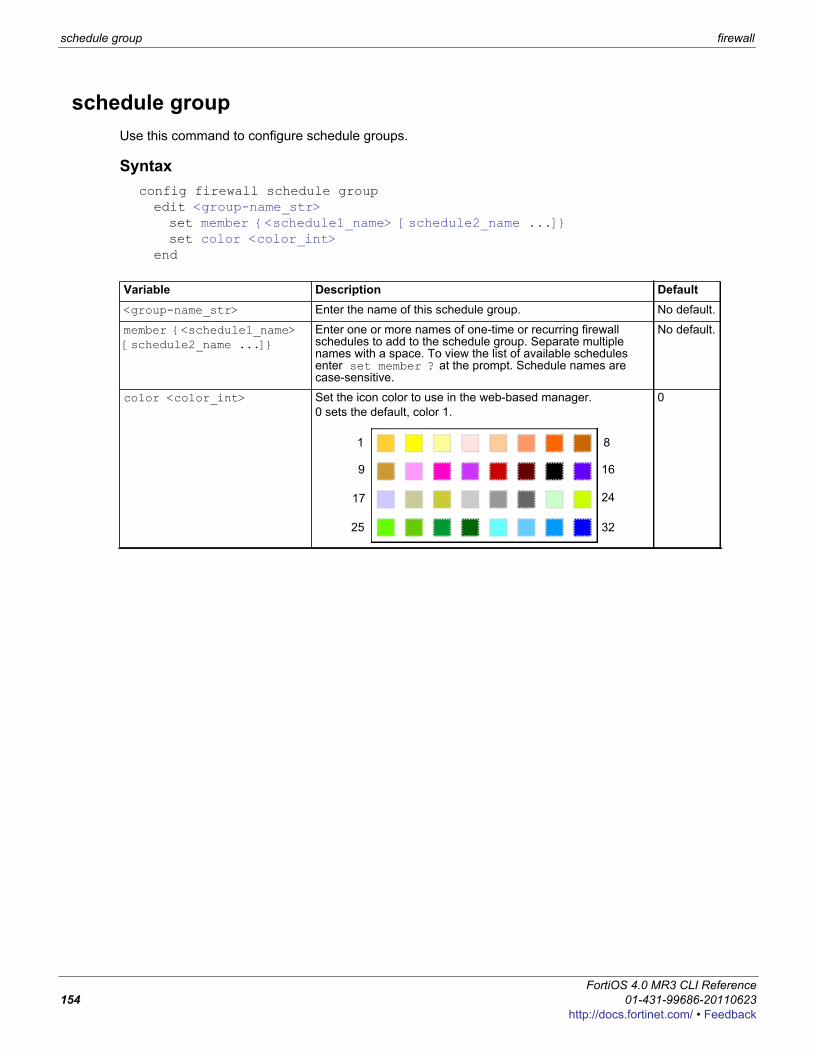
schedule group firewall
schedule groupUse this command to configure schedule groups.
Syntaxconfig firewall schedule groupedit <group-name_str>set member {<schedule1_name> [schedule2_name ...]}set color <color_int>
end
Variable Description Default<group-name_str> Enter the name of this schedule group. No default.
member {<schedule1_name> [schedule2_name ...]}
Enter one or more names of one-time or recurring firewall schedules to add to the schedule group. Separate multiple names with a space. To view the list of available schedules enter set member ? at the prompt. Schedule names are case-sensitive.
No default.
color <color_int> Set the icon color to use in the web-based manager.0 sets the default, color 1.
0
1 8
9 16
17 24
25 32
FortiOS 4.0 MR3 CLI Reference154 01-431-99686-20110623
http://docs.fortinet.com/ • Feedback
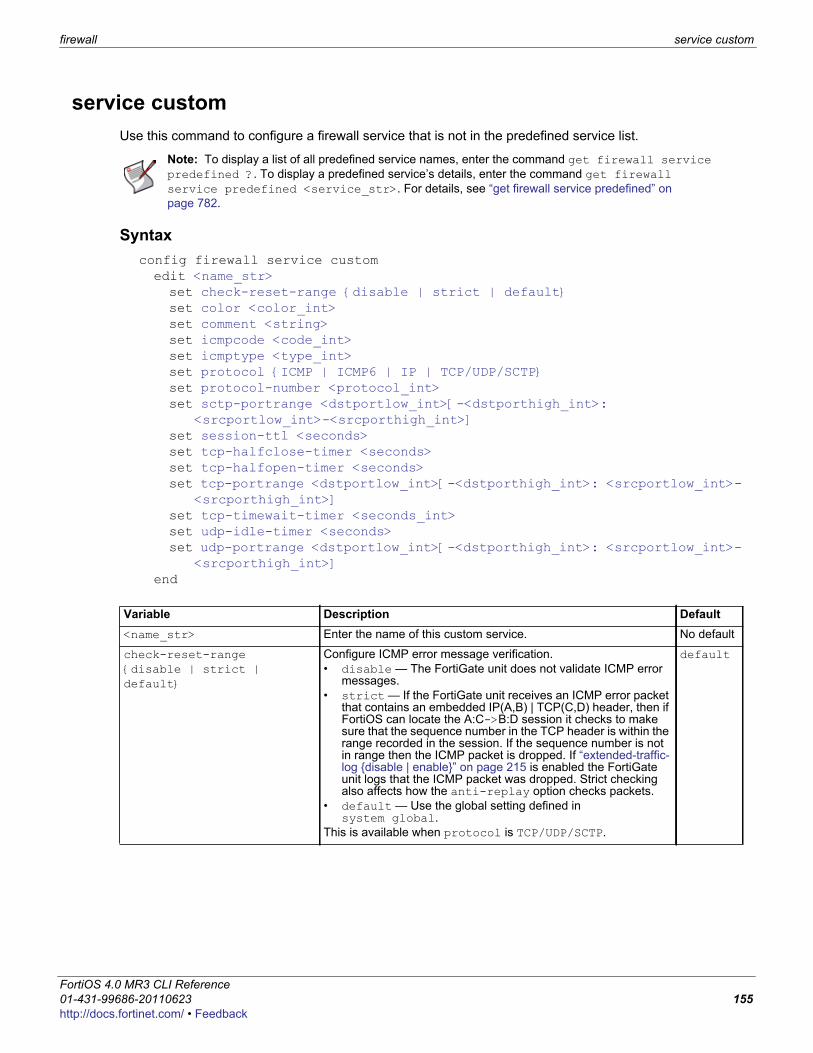
firewall service custom
F0h
service customUse this command to configure a firewall service that is not in the predefined service list.
Syntaxconfig firewall service customedit <name_str>set check-reset-range {disable | strict | default}set color <color_int>set comment <string>set icmpcode <code_int>set icmptype <type_int>set protocol {ICMP | ICMP6 | IP | TCP/UDP/SCTP}set protocol-number <protocol_int>set sctp-portrange <dstportlow_int>[-<dstporthigh_int>:
<srcportlow_int>-<srcporthigh_int>]set session-ttl <seconds>set tcp-halfclose-timer <seconds>set tcp-halfopen-timer <seconds>set tcp-portrange <dstportlow_int>[-<dstporthigh_int>: <srcportlow_int>-
<srcporthigh_int>]set tcp-timewait-timer <seconds_int>set udp-idle-timer <seconds>set udp-portrange <dstportlow_int>[-<dstporthigh_int>: <srcportlow_int>-
<srcporthigh_int>]end
Note: To display a list of all predefined service names, enter the command get firewall service predefined ?. To display a predefined service’s details, enter the command get firewall service predefined <service_str>. For details, see “get firewall service predefined” on page 782.
Variable Description Default<name_str> Enter the name of this custom service. No default
check-reset-range {disable | strict | default}
Configure ICMP error message verification.• disable — The FortiGate unit does not validate ICMP error
messages.• strict — If the FortiGate unit receives an ICMP error packet
that contains an embedded IP(A,B) | TCP(C,D) header, then if FortiOS can locate the A:C->B:D session it checks to make sure that the sequence number in the TCP header is within the range recorded in the session. If the sequence number is not in range then the ICMP packet is dropped. If “extended-traffic-log {disable | enable}” on page 215 is enabled the FortiGate unit logs that the ICMP packet was dropped. Strict checking also affects how the anti-replay option checks packets.
• default — Use the global setting defined in system global.
This is available when protocol is TCP/UDP/SCTP.
default
ortiOS 4.0 MR3 CLI Reference1-431-99686-20110623 155ttp://docs.fortinet.com/ • Feedback
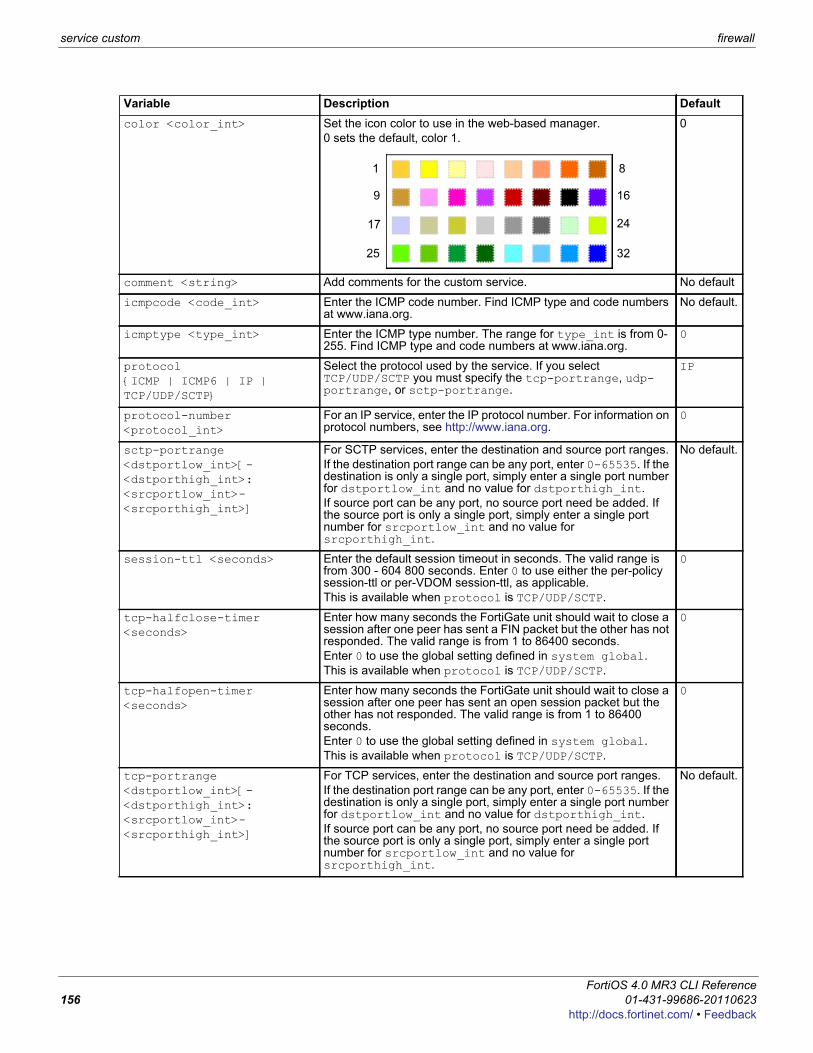
service custom firewall
color <color_int> Set the icon color to use in the web-based manager.0 sets the default, color 1.
0
comment <string> Add comments for the custom service. No default
icmpcode <code_int> Enter the ICMP code number. Find ICMP type and code numbers at www.iana.org.
No default.
icmptype <type_int> Enter the ICMP type number. The range for type_int is from 0-255. Find ICMP type and code numbers at www.iana.org.
0
protocol {ICMP | ICMP6 | IP | TCP/UDP/SCTP}
Select the protocol used by the service. If you select TCP/UDP/SCTP you must specify the tcp-portrange, udp-portrange, or sctp-portrange.
IP
protocol-number <protocol_int>
For an IP service, enter the IP protocol number. For information on protocol numbers, see http://www.iana.org.
0
sctp-portrange <dstportlow_int>[-<dstporthigh_int>: <srcportlow_int>-<srcporthigh_int>]
For SCTP services, enter the destination and source port ranges.If the destination port range can be any port, enter 0-65535. If the destination is only a single port, simply enter a single port number for dstportlow_int and no value for dstporthigh_int.If source port can be any port, no source port need be added. If the source port is only a single port, simply enter a single port number for srcportlow_int and no value for srcporthigh_int.
No default.
session-ttl <seconds> Enter the default session timeout in seconds. The valid range is from 300 - 604 800 seconds. Enter 0 to use either the per-policy session-ttl or per-VDOM session-ttl, as applicable.This is available when protocol is TCP/UDP/SCTP.
0
tcp-halfclose-timer <seconds>
Enter how many seconds the FortiGate unit should wait to close a session after one peer has sent a FIN packet but the other has not responded. The valid range is from 1 to 86400 seconds.Enter 0 to use the global setting defined in system global.This is available when protocol is TCP/UDP/SCTP.
0
tcp-halfopen-timer <seconds>
Enter how many seconds the FortiGate unit should wait to close a session after one peer has sent an open session packet but the other has not responded. The valid range is from 1 to 86400 seconds. Enter 0 to use the global setting defined in system global.This is available when protocol is TCP/UDP/SCTP.
0
tcp-portrange <dstportlow_int>[-<dstporthigh_int>: <srcportlow_int>-<srcporthigh_int>]
For TCP services, enter the destination and source port ranges.If the destination port range can be any port, enter 0-65535. If the destination is only a single port, simply enter a single port number for dstportlow_int and no value for dstporthigh_int.If source port can be any port, no source port need be added. If the source port is only a single port, simply enter a single port number for srcportlow_int and no value for srcporthigh_int.
No default.
Variable Description Default
1 8
9 16
17 24
25 32
FortiOS 4.0 MR3 CLI Reference156 01-431-99686-20110623
http://docs.fortinet.com/ • Feedback
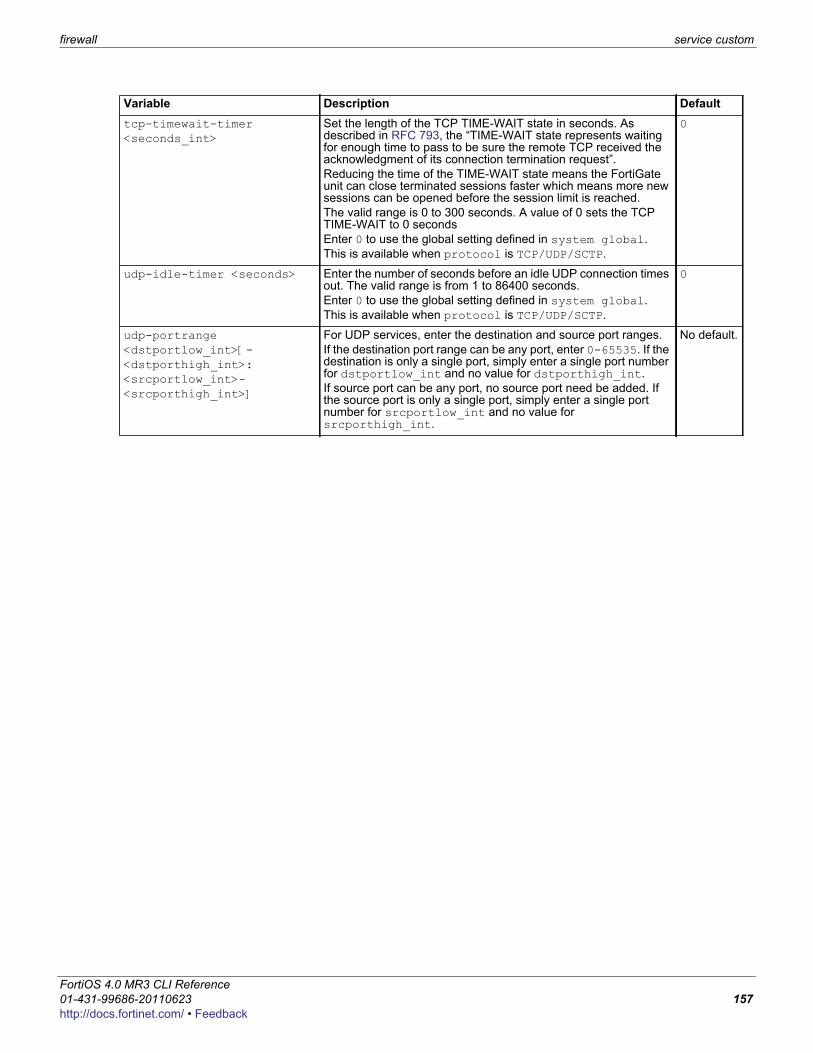
firewall service custom
F0h
tcp-timewait-timer <seconds_int>
Set the length of the TCP TIME-WAIT state in seconds. As described in RFC 793, the “TIME-WAIT state represents waiting for enough time to pass to be sure the remote TCP received the acknowledgment of its connection termination request”. Reducing the time of the TIME-WAIT state means the FortiGate unit can close terminated sessions faster which means more new sessions can be opened before the session limit is reached.The valid range is 0 to 300 seconds. A value of 0 sets the TCP TIME-WAIT to 0 secondsEnter 0 to use the global setting defined in system global.This is available when protocol is TCP/UDP/SCTP.
0
udp-idle-timer <seconds> Enter the number of seconds before an idle UDP connection times out. The valid range is from 1 to 86400 seconds.Enter 0 to use the global setting defined in system global.This is available when protocol is TCP/UDP/SCTP.
0
udp-portrange <dstportlow_int>[-<dstporthigh_int>: <srcportlow_int>-<srcporthigh_int>]
For UDP services, enter the destination and source port ranges.If the destination port range can be any port, enter 0-65535. If the destination is only a single port, simply enter a single port number for dstportlow_int and no value for dstporthigh_int.If source port can be any port, no source port need be added. If the source port is only a single port, simply enter a single port number for srcportlow_int and no value for srcporthigh_int.
No default.
Variable Description Default
ortiOS 4.0 MR3 CLI Reference1-431-99686-20110623 157ttp://docs.fortinet.com/ • Feedback
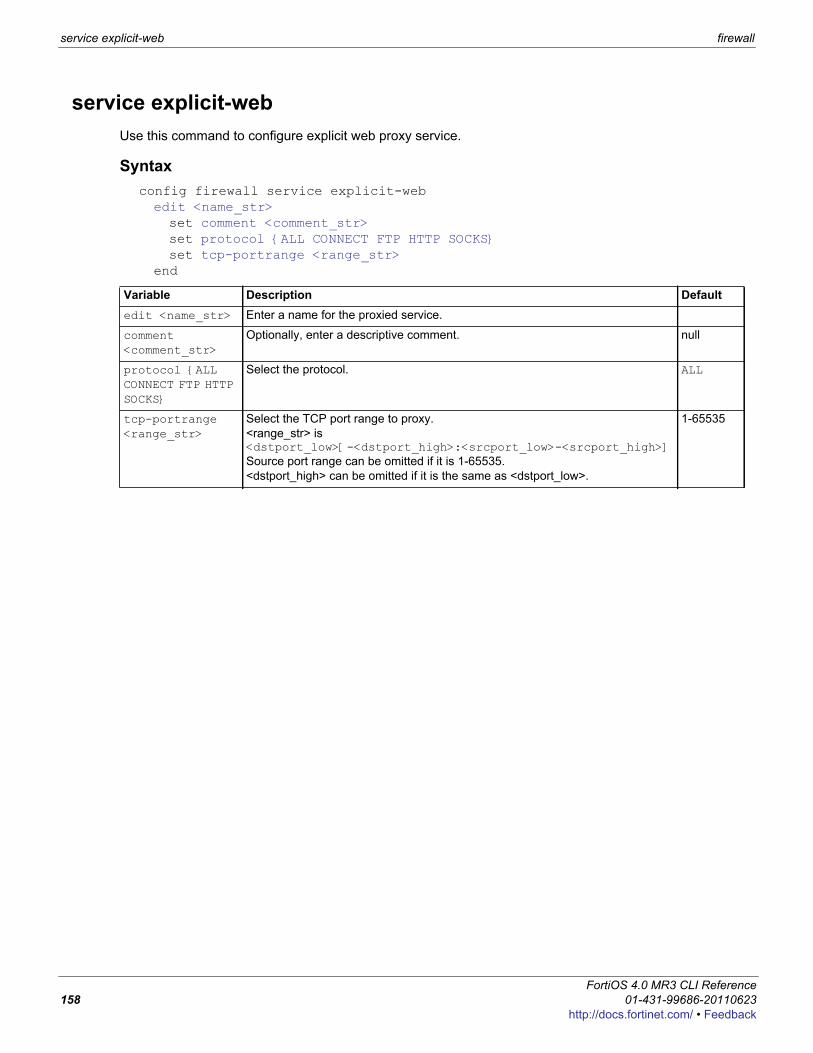
service explicit-web firewall
service explicit-webUse this command to configure explicit web proxy service.
Syntaxconfig firewall service explicit-webedit <name_str>set comment <comment_str>set protocol {ALL CONNECT FTP HTTP SOCKS}set tcp-portrange <range_str>
end
Variable Description Defaultedit <name_str> Enter a name for the proxied service.
comment <comment_str>
Optionally, enter a descriptive comment. null
protocol {ALL CONNECT FTP HTTP SOCKS}
Select the protocol. ALL
tcp-portrange <range_str>
Select the TCP port range to proxy.<range_str> is <dstport_low>[-<dstport_high>:<srcport_low>-<srcport_high>]Source port range can be omitted if it is 1-65535.<dstport_high> can be omitted if it is the same as <dstport_low>.
1-65535
FortiOS 4.0 MR3 CLI Reference158 01-431-99686-20110623
http://docs.fortinet.com/ • Feedback
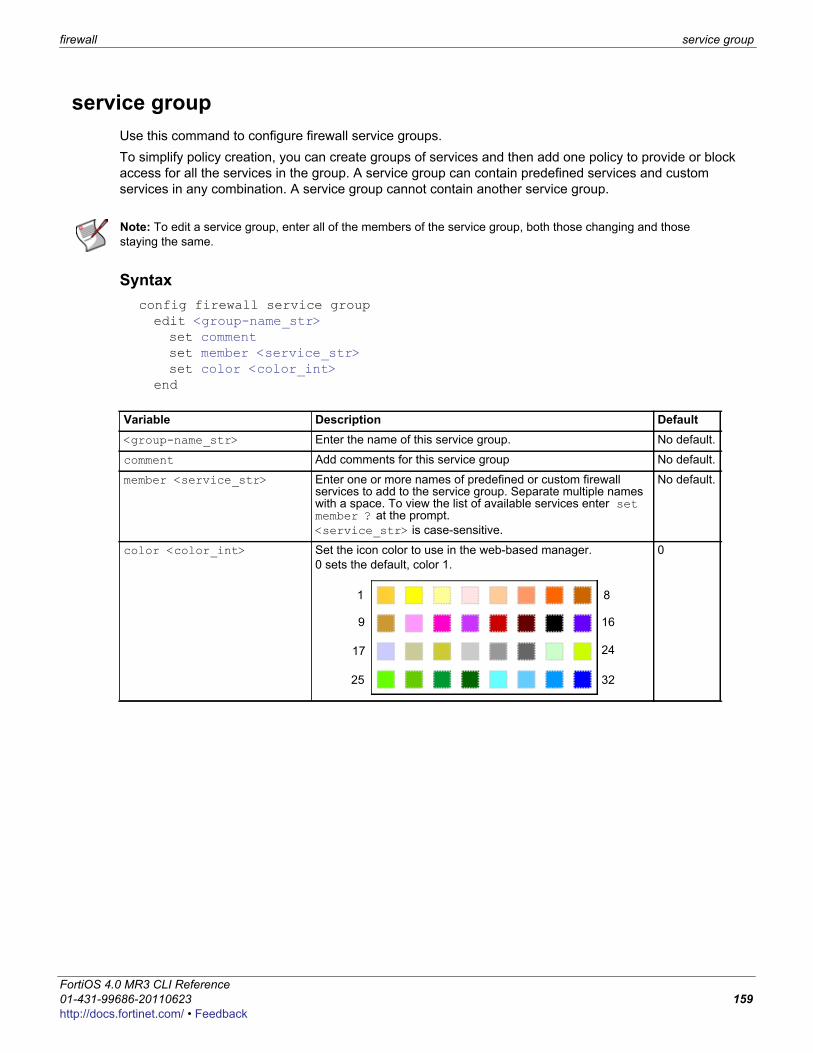
firewall service group
F0h
service groupUse this command to configure firewall service groups.To simplify policy creation, you can create groups of services and then add one policy to provide or block access for all the services in the group. A service group can contain predefined services and custom services in any combination. A service group cannot contain another service group.
Syntaxconfig firewall service groupedit <group-name_str>set commentset member <service_str>set color <color_int>
end
Note: To edit a service group, enter all of the members of the service group, both those changing and those staying the same.
Variable Description Default<group-name_str> Enter the name of this service group. No default.
comment Add comments for this service group No default.
member <service_str> Enter one or more names of predefined or custom firewall services to add to the service group. Separate multiple names with a space. To view the list of available services enter set member ? at the prompt. <service_str> is case-sensitive.
No default.
color <color_int> Set the icon color to use in the web-based manager. 0 sets the default, color 1.
0
1 8
9 16
17 24
25 32
ortiOS 4.0 MR3 CLI Reference1-431-99686-20110623 159ttp://docs.fortinet.com/ • Feedback
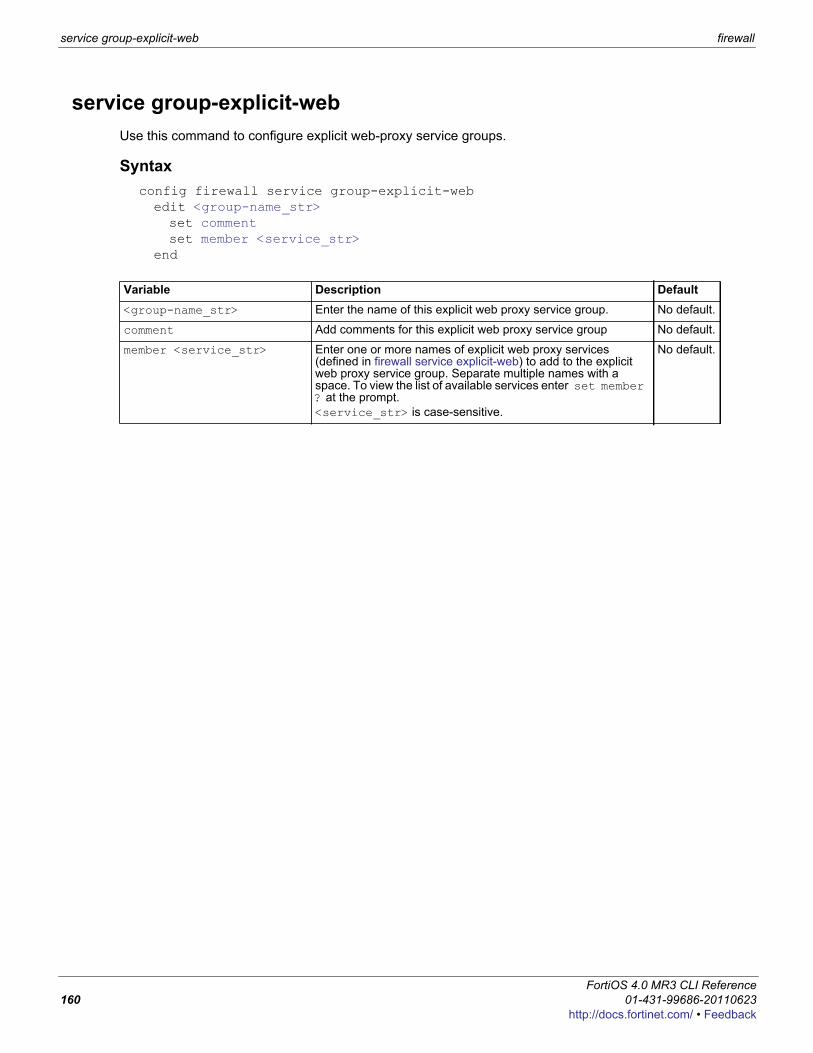
service group-explicit-web firewall
service group-explicit-webUse this command to configure explicit web-proxy service groups.
Syntaxconfig firewall service group-explicit-webedit <group-name_str>set commentset member <service_str>
end
Variable Description Default<group-name_str> Enter the name of this explicit web proxy service group. No default.
comment Add comments for this explicit web proxy service group No default.
member <service_str> Enter one or more names of explicit web proxy services (defined in firewall service explicit-web) to add to the explicit web proxy service group. Separate multiple names with a space. To view the list of available services enter set member ? at the prompt. <service_str> is case-sensitive.
No default.
FortiOS 4.0 MR3 CLI Reference160 01-431-99686-20110623
http://docs.fortinet.com/ • Feedback
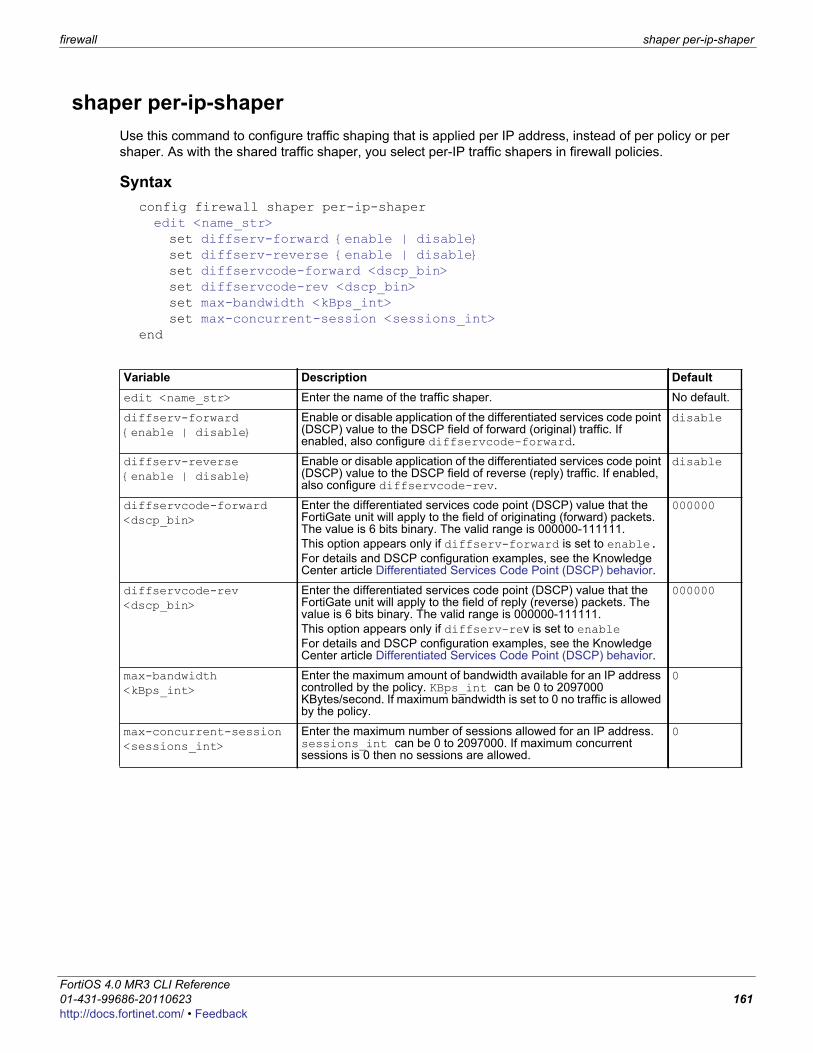
firewall shaper per-ip-shaper
F0h
shaper per-ip-shaperUse this command to configure traffic shaping that is applied per IP address, instead of per policy or per shaper. As with the shared traffic shaper, you select per-IP traffic shapers in firewall policies.
Syntaxconfig firewall shaper per-ip-shaperedit <name_str>set diffserv-forward {enable | disable}set diffserv-reverse {enable | disable}set diffservcode-forward <dscp_bin>set diffservcode-rev <dscp_bin>set max-bandwidth <kBps_int>set max-concurrent-session <sessions_int>
end
Variable Description Defaultedit <name_str> Enter the name of the traffic shaper. No default.
diffserv-forward{enable | disable}
Enable or disable application of the differentiated services code point (DSCP) value to the DSCP field of forward (original) traffic. If enabled, also configure diffservcode-forward.
disable
diffserv-reverse{enable | disable}
Enable or disable application of the differentiated services code point (DSCP) value to the DSCP field of reverse (reply) traffic. If enabled, also configure diffservcode-rev.
disable
diffservcode-forward <dscp_bin>
Enter the differentiated services code point (DSCP) value that the FortiGate unit will apply to the field of originating (forward) packets. The value is 6 bits binary. The valid range is 000000-111111.This option appears only if diffserv-forward is set to enable.For details and DSCP configuration examples, see the Knowledge Center article Differentiated Services Code Point (DSCP) behavior.
000000
diffservcode-rev <dscp_bin>
Enter the differentiated services code point (DSCP) value that the FortiGate unit will apply to the field of reply (reverse) packets. The value is 6 bits binary. The valid range is 000000-111111.This option appears only if diffserv-rev is set to enableFor details and DSCP configuration examples, see the Knowledge Center article Differentiated Services Code Point (DSCP) behavior.
000000
max-bandwidth <kBps_int>
Enter the maximum amount of bandwidth available for an IP address controlled by the policy. KBps_int can be 0 to 2097000 KBytes/second. If maximum bandwidth is set to 0 no traffic is allowed by the policy.
0
max-concurrent-session <sessions_int>
Enter the maximum number of sessions allowed for an IP address. sessions_int can be 0 to 2097000. If maximum concurrent sessions is 0 then no sessions are allowed.
0
ortiOS 4.0 MR3 CLI Reference1-431-99686-20110623 161ttp://docs.fortinet.com/ • Feedback
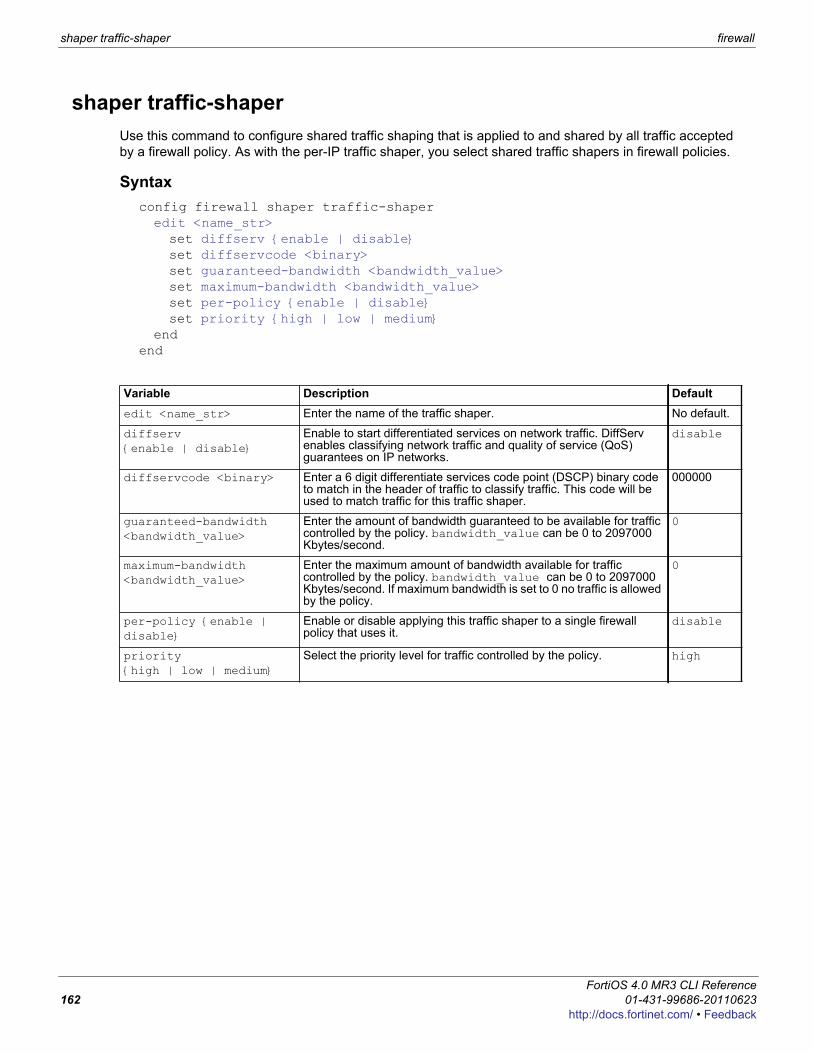
shaper traffic-shaper firewall
shaper traffic-shaperUse this command to configure shared traffic shaping that is applied to and shared by all traffic accepted by a firewall policy. As with the per-IP traffic shaper, you select shared traffic shapers in firewall policies.
Syntaxconfig firewall shaper traffic-shaperedit <name_str>set diffserv {enable | disable}set diffservcode <binary>set guaranteed-bandwidth <bandwidth_value>set maximum-bandwidth <bandwidth_value>set per-policy {enable | disable}set priority {high | low | medium}
endend
Variable Description Defaultedit <name_str> Enter the name of the traffic shaper. No default.
diffserv {enable | disable}
Enable to start differentiated services on network traffic. DiffServ enables classifying network traffic and quality of service (QoS) guarantees on IP networks.
disable
diffservcode <binary> Enter a 6 digit differentiate services code point (DSCP) binary code to match in the header of traffic to classify traffic. This code will be used to match traffic for this traffic shaper.
000000
guaranteed-bandwidth <bandwidth_value>
Enter the amount of bandwidth guaranteed to be available for traffic controlled by the policy. bandwidth_value can be 0 to 2097000 Kbytes/second.
0
maximum-bandwidth <bandwidth_value>
Enter the maximum amount of bandwidth available for traffic controlled by the policy. bandwidth_value can be 0 to 2097000 Kbytes/second. If maximum bandwidth is set to 0 no traffic is allowed by the policy.
0
per-policy {enable | disable}
Enable or disable applying this traffic shaper to a single firewall policy that uses it.
disable
priority {high | low | medium}
Select the priority level for traffic controlled by the policy. high
FortiOS 4.0 MR3 CLI Reference162 01-431-99686-20110623
http://docs.fortinet.com/ • Feedback
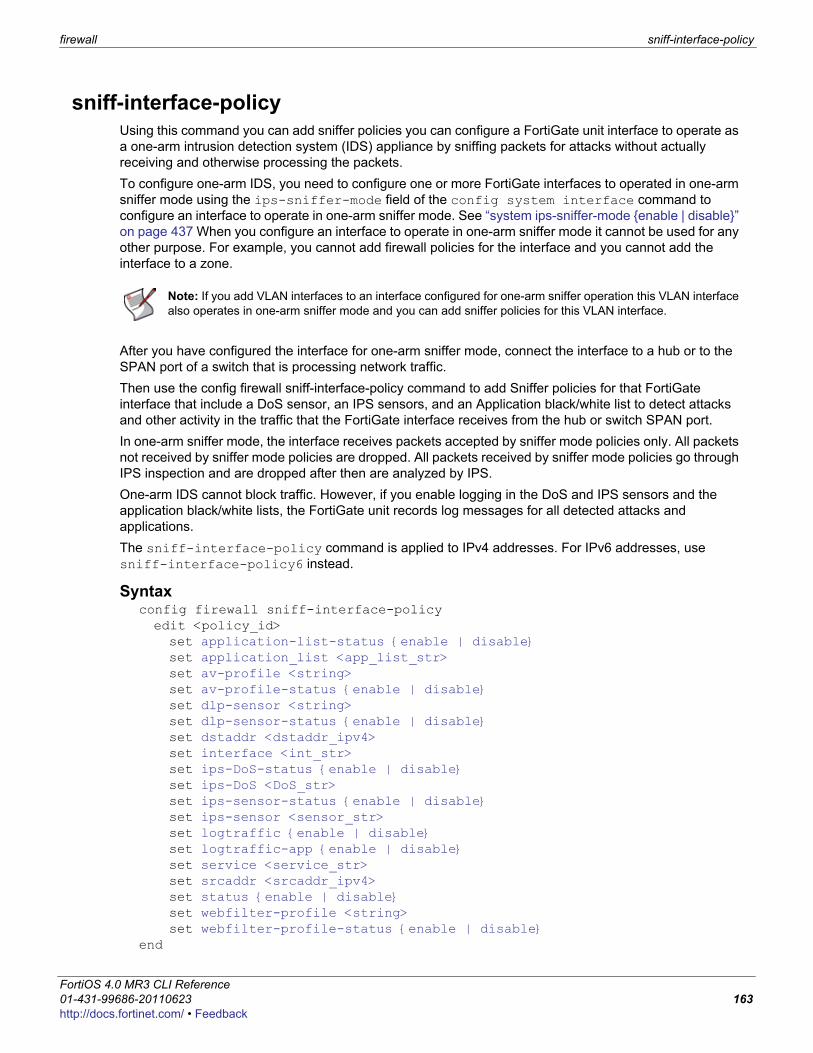
firewall sniff-interface-policy
F0h
sniff-interface-policyUsing this command you can add sniffer policies you can configure a FortiGate unit interface to operate as a one-arm intrusion detection system (IDS) appliance by sniffing packets for attacks without actually receiving and otherwise processing the packets. To configure one-arm IDS, you need to configure one or more FortiGate interfaces to operated in one-arm sniffer mode using the ips-sniffer-mode field of the config system interface command to configure an interface to operate in one-arm sniffer mode. See “system ips-sniffer-mode {enable | disable}” on page 437 When you configure an interface to operate in one-arm sniffer mode it cannot be used for any other purpose. For example, you cannot add firewall policies for the interface and you cannot add the interface to a zone.
After you have configured the interface for one-arm sniffer mode, connect the interface to a hub or to the SPAN port of a switch that is processing network traffic. Then use the config firewall sniff-interface-policy command to add Sniffer policies for that FortiGate interface that include a DoS sensor, an IPS sensors, and an Application black/white list to detect attacks and other activity in the traffic that the FortiGate interface receives from the hub or switch SPAN port.In one-arm sniffer mode, the interface receives packets accepted by sniffer mode policies only. All packets not received by sniffer mode policies are dropped. All packets received by sniffer mode policies go through IPS inspection and are dropped after then are analyzed by IPS.One-arm IDS cannot block traffic. However, if you enable logging in the DoS and IPS sensors and the application black/white lists, the FortiGate unit records log messages for all detected attacks and applications.The sniff-interface-policy command is applied to IPv4 addresses. For IPv6 addresses, use sniff-interface-policy6 instead.
Syntaxconfig firewall sniff-interface-policyedit <policy_id>set application-list-status {enable | disable}set application_list <app_list_str>set av-profile <string>set av-profile-status {enable | disable}set dlp-sensor <string>set dlp-sensor-status {enable | disable}set dstaddr <dstaddr_ipv4>set interface <int_str>set ips-DoS-status {enable | disable}set ips-DoS <DoS_str>set ips-sensor-status {enable | disable}set ips-sensor <sensor_str>set logtraffic {enable | disable}set logtraffic-app {enable | disable}set service <service_str>set srcaddr <srcaddr_ipv4>set status {enable | disable}set webfilter-profile <string>set webfilter-profile-status {enable | disable}
end
Note: If you add VLAN interfaces to an interface configured for one-arm sniffer operation this VLAN interface also operates in one-arm sniffer mode and you can add sniffer policies for this VLAN interface.
ortiOS 4.0 MR3 CLI Reference1-431-99686-20110623 163ttp://docs.fortinet.com/ • Feedback
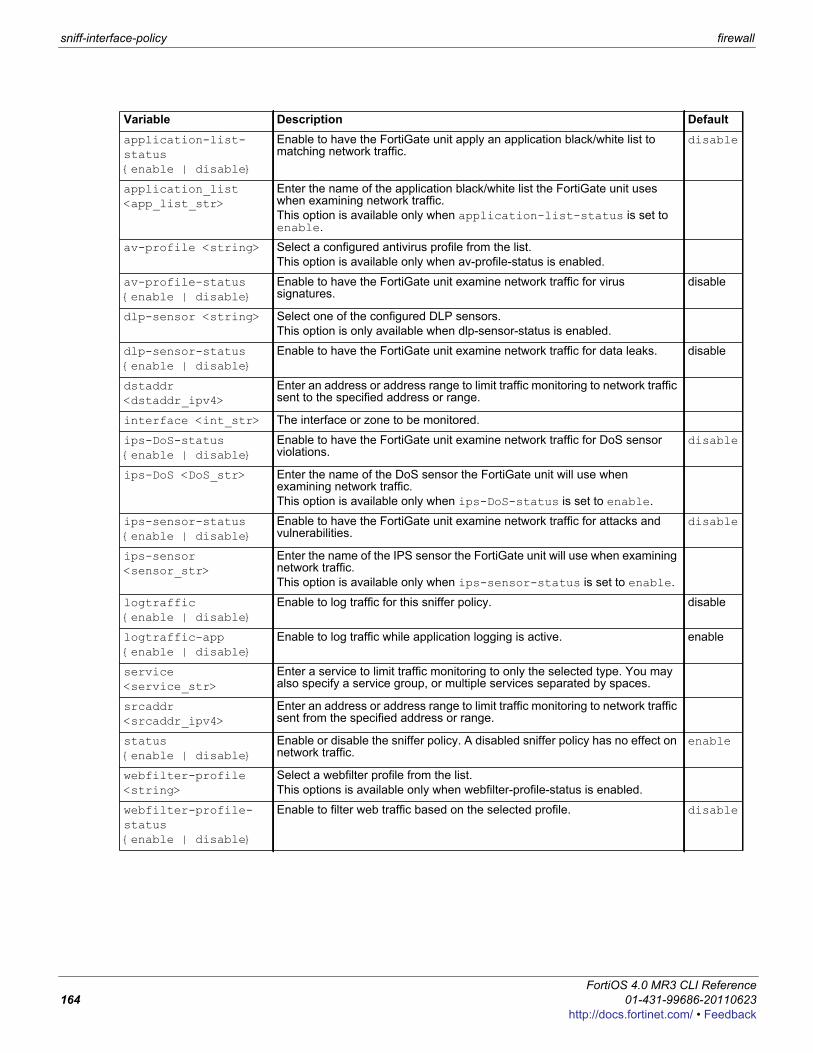
sniff-interface-policy firewall
Variable Description Defaultapplication-list-status {enable | disable}
Enable to have the FortiGate unit apply an application black/white list to matching network traffic.
disable
application_list <app_list_str>
Enter the name of the application black/white list the FortiGate unit uses when examining network traffic.This option is available only when application-list-status is set to enable.
av-profile <string> Select a configured antivirus profile from the list. This option is available only when av-profile-status is enabled.
av-profile-status {enable | disable}
Enable to have the FortiGate unit examine network traffic for virus signatures.
disable
dlp-sensor <string> Select one of the configured DLP sensors. This option is only available when dlp-sensor-status is enabled.
dlp-sensor-status {enable | disable}
Enable to have the FortiGate unit examine network traffic for data leaks. disable
dstaddr <dstaddr_ipv4>
Enter an address or address range to limit traffic monitoring to network traffic sent to the specified address or range.
interface <int_str> The interface or zone to be monitored.
ips-DoS-status {enable | disable}
Enable to have the FortiGate unit examine network traffic for DoS sensor violations.
disable
ips-DoS <DoS_str> Enter the name of the DoS sensor the FortiGate unit will use when examining network traffic.This option is available only when ips-DoS-status is set to enable.
ips-sensor-status {enable | disable}
Enable to have the FortiGate unit examine network traffic for attacks and vulnerabilities.
disable
ips-sensor <sensor_str>
Enter the name of the IPS sensor the FortiGate unit will use when examining network traffic.This option is available only when ips-sensor-status is set to enable.
logtraffic {enable | disable}
Enable to log traffic for this sniffer policy. disable
logtraffic-app {enable | disable}
Enable to log traffic while application logging is active. enable
service <service_str>
Enter a service to limit traffic monitoring to only the selected type. You may also specify a service group, or multiple services separated by spaces.
srcaddr <srcaddr_ipv4>
Enter an address or address range to limit traffic monitoring to network traffic sent from the specified address or range.
status {enable | disable}
Enable or disable the sniffer policy. A disabled sniffer policy has no effect on network traffic.
enable
webfilter-profile <string>
Select a webfilter profile from the list.This options is available only when webfilter-profile-status is enabled.
webfilter-profile-status {enable | disable}
Enable to filter web traffic based on the selected profile. disable
FortiOS 4.0 MR3 CLI Reference164 01-431-99686-20110623
http://docs.fortinet.com/ • Feedback
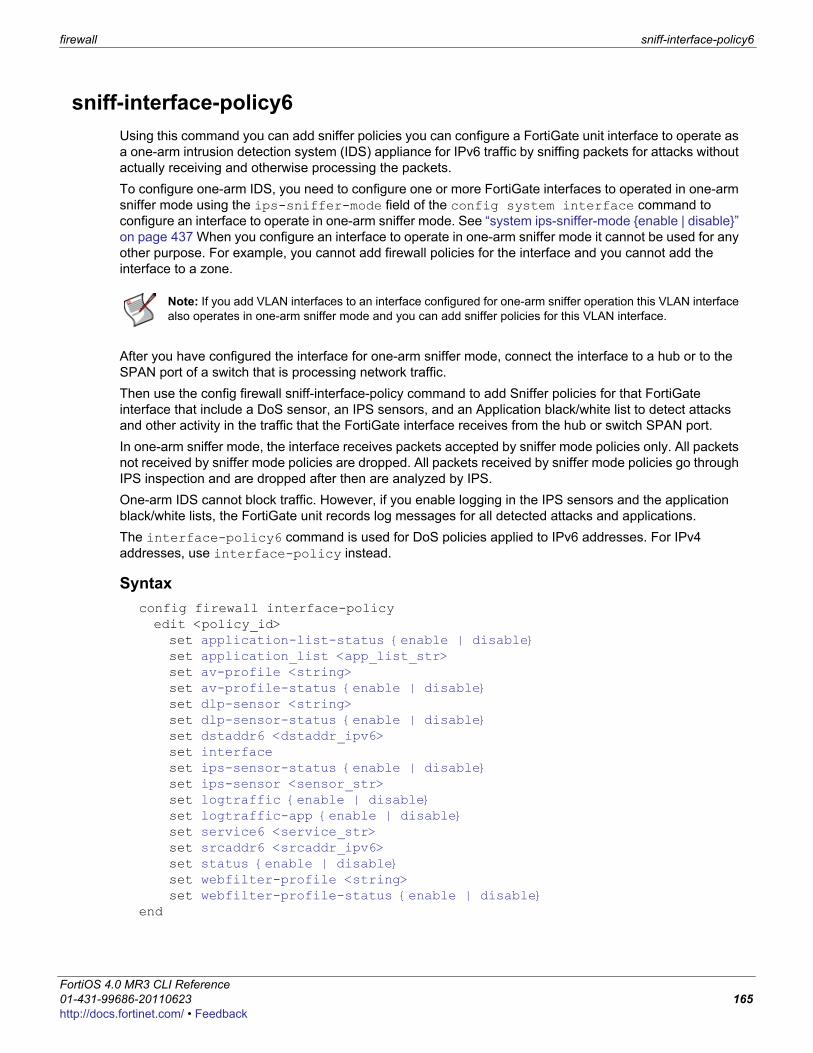
firewall sniff-interface-policy6
F0h
sniff-interface-policy6Using this command you can add sniffer policies you can configure a FortiGate unit interface to operate as a one-arm intrusion detection system (IDS) appliance for IPv6 traffic by sniffing packets for attacks without actually receiving and otherwise processing the packets. To configure one-arm IDS, you need to configure one or more FortiGate interfaces to operated in one-arm sniffer mode using the ips-sniffer-mode field of the config system interface command to configure an interface to operate in one-arm sniffer mode. See “system ips-sniffer-mode {enable | disable}” on page 437 When you configure an interface to operate in one-arm sniffer mode it cannot be used for any other purpose. For example, you cannot add firewall policies for the interface and you cannot add the interface to a zone.
After you have configured the interface for one-arm sniffer mode, connect the interface to a hub or to the SPAN port of a switch that is processing network traffic. Then use the config firewall sniff-interface-policy command to add Sniffer policies for that FortiGate interface that include a DoS sensor, an IPS sensors, and an Application black/white list to detect attacks and other activity in the traffic that the FortiGate interface receives from the hub or switch SPAN port.In one-arm sniffer mode, the interface receives packets accepted by sniffer mode policies only. All packets not received by sniffer mode policies are dropped. All packets received by sniffer mode policies go through IPS inspection and are dropped after then are analyzed by IPS.One-arm IDS cannot block traffic. However, if you enable logging in the IPS sensors and the application black/white lists, the FortiGate unit records log messages for all detected attacks and applications.The interface-policy6 command is used for DoS policies applied to IPv6 addresses. For IPv4 addresses, use interface-policy instead.
Syntaxconfig firewall interface-policyedit <policy_id>set application-list-status {enable | disable}set application_list <app_list_str>set av-profile <string>set av-profile-status {enable | disable}set dlp-sensor <string>set dlp-sensor-status {enable | disable}set dstaddr6 <dstaddr_ipv6>set interfaceset ips-sensor-status {enable | disable}set ips-sensor <sensor_str>set logtraffic {enable | disable}set logtraffic-app {enable | disable}set service6 <service_str>set srcaddr6 <srcaddr_ipv6>set status {enable | disable}set webfilter-profile <string>set webfilter-profile-status {enable | disable}
end
Note: If you add VLAN interfaces to an interface configured for one-arm sniffer operation this VLAN interface also operates in one-arm sniffer mode and you can add sniffer policies for this VLAN interface.
ortiOS 4.0 MR3 CLI Reference1-431-99686-20110623 165ttp://docs.fortinet.com/ • Feedback
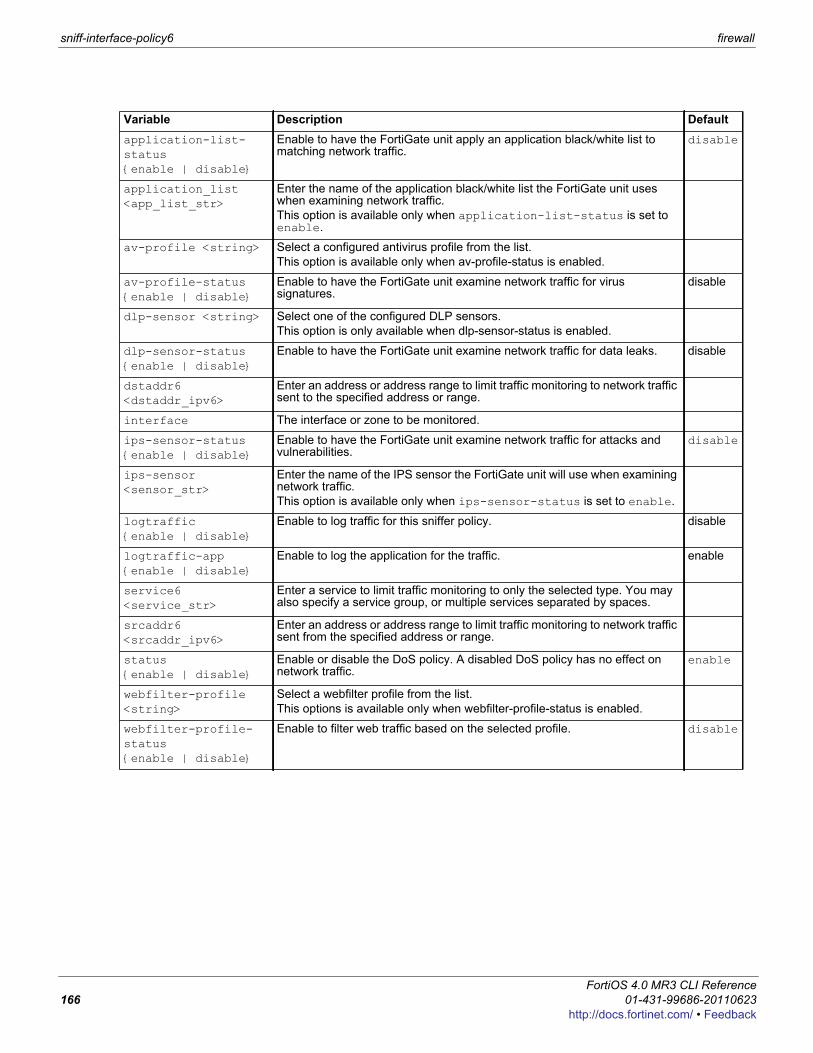
sniff-interface-policy6 firewall
Variable Description Defaultapplication-list-status {enable | disable}
Enable to have the FortiGate unit apply an application black/white list to matching network traffic.
disable
application_list <app_list_str>
Enter the name of the application black/white list the FortiGate unit uses when examining network traffic.This option is available only when application-list-status is set to enable.
av-profile <string> Select a configured antivirus profile from the list. This option is available only when av-profile-status is enabled.
av-profile-status {enable | disable}
Enable to have the FortiGate unit examine network traffic for virus signatures.
disable
dlp-sensor <string> Select one of the configured DLP sensors. This option is only available when dlp-sensor-status is enabled.
dlp-sensor-status {enable | disable}
Enable to have the FortiGate unit examine network traffic for data leaks. disable
dstaddr6 <dstaddr_ipv6>
Enter an address or address range to limit traffic monitoring to network traffic sent to the specified address or range.
interface The interface or zone to be monitored.
ips-sensor-status {enable | disable}
Enable to have the FortiGate unit examine network traffic for attacks and vulnerabilities.
disable
ips-sensor <sensor_str>
Enter the name of the IPS sensor the FortiGate unit will use when examining network traffic.This option is available only when ips-sensor-status is set to enable.
logtraffic {enable | disable}
Enable to log traffic for this sniffer policy. disable
logtraffic-app {enable | disable}
Enable to log the application for the traffic. enable
service6 <service_str>
Enter a service to limit traffic monitoring to only the selected type. You may also specify a service group, or multiple services separated by spaces.
srcaddr6 <srcaddr_ipv6>
Enter an address or address range to limit traffic monitoring to network traffic sent from the specified address or range.
status {enable | disable}
Enable or disable the DoS policy. A disabled DoS policy has no effect on network traffic.
enable
webfilter-profile <string>
Select a webfilter profile from the list.This options is available only when webfilter-profile-status is enabled.
webfilter-profile-status {enable | disable}
Enable to filter web traffic based on the selected profile. disable
FortiOS 4.0 MR3 CLI Reference166 01-431-99686-20110623
http://docs.fortinet.com/ • Feedback
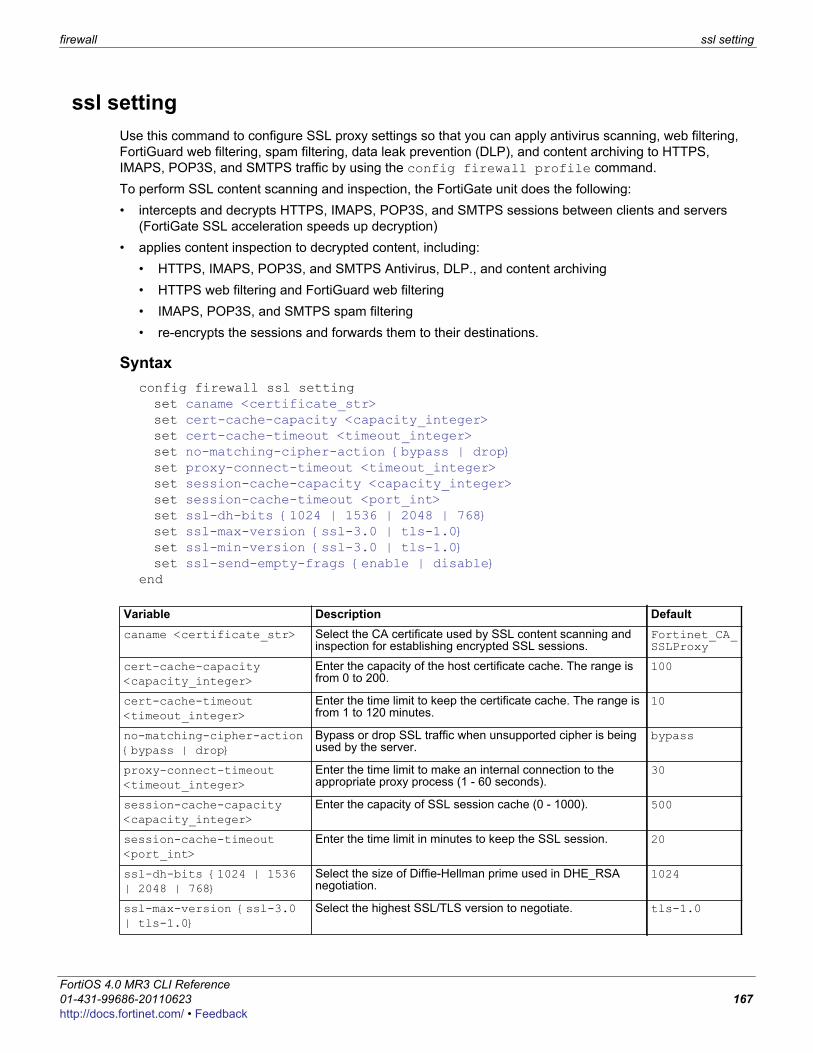
firewall ssl setting
F0h
ssl settingUse this command to configure SSL proxy settings so that you can apply antivirus scanning, web filtering, FortiGuard web filtering, spam filtering, data leak prevention (DLP), and content archiving to HTTPS, IMAPS, POP3S, and SMTPS traffic by using the config firewall profile command.To perform SSL content scanning and inspection, the FortiGate unit does the following:• intercepts and decrypts HTTPS, IMAPS, POP3S, and SMTPS sessions between clients and servers
(FortiGate SSL acceleration speeds up decryption)• applies content inspection to decrypted content, including:
• HTTPS, IMAPS, POP3S, and SMTPS Antivirus, DLP., and content archiving• HTTPS web filtering and FortiGuard web filtering• IMAPS, POP3S, and SMTPS spam filtering• re-encrypts the sessions and forwards them to their destinations.
Syntaxconfig firewall ssl settingset caname <certificate_str>set cert-cache-capacity <capacity_integer>set cert-cache-timeout <timeout_integer>set no-matching-cipher-action {bypass | drop}set proxy-connect-timeout <timeout_integer>set session-cache-capacity <capacity_integer>set session-cache-timeout <port_int>set ssl-dh-bits {1024 | 1536 | 2048 | 768}set ssl-max-version {ssl-3.0 | tls-1.0}set ssl-min-version {ssl-3.0 | tls-1.0}set ssl-send-empty-frags {enable | disable}
end
Variable Description Defaultcaname <certificate_str> Select the CA certificate used by SSL content scanning and
inspection for establishing encrypted SSL sessions.Fortinet_CA_SSLProxy
cert-cache-capacity <capacity_integer>
Enter the capacity of the host certificate cache. The range is from 0 to 200.
100
cert-cache-timeout <timeout_integer>
Enter the time limit to keep the certificate cache. The range is from 1 to 120 minutes.
10
no-matching-cipher-action {bypass | drop}
Bypass or drop SSL traffic when unsupported cipher is being used by the server.
bypass
proxy-connect-timeout <timeout_integer>
Enter the time limit to make an internal connection to the appropriate proxy process (1 - 60 seconds).
30
session-cache-capacity <capacity_integer>
Enter the capacity of SSL session cache (0 - 1000). 500
session-cache-timeout <port_int>
Enter the time limit in minutes to keep the SSL session. 20
ssl-dh-bits {1024 | 1536 | 2048 | 768}
Select the size of Diffie-Hellman prime used in DHE_RSA negotiation.
1024
ssl-max-version {ssl-3.0 | tls-1.0}
Select the highest SSL/TLS version to negotiate. tls-1.0
ortiOS 4.0 MR3 CLI Reference1-431-99686-20110623 167ttp://docs.fortinet.com/ • Feedback
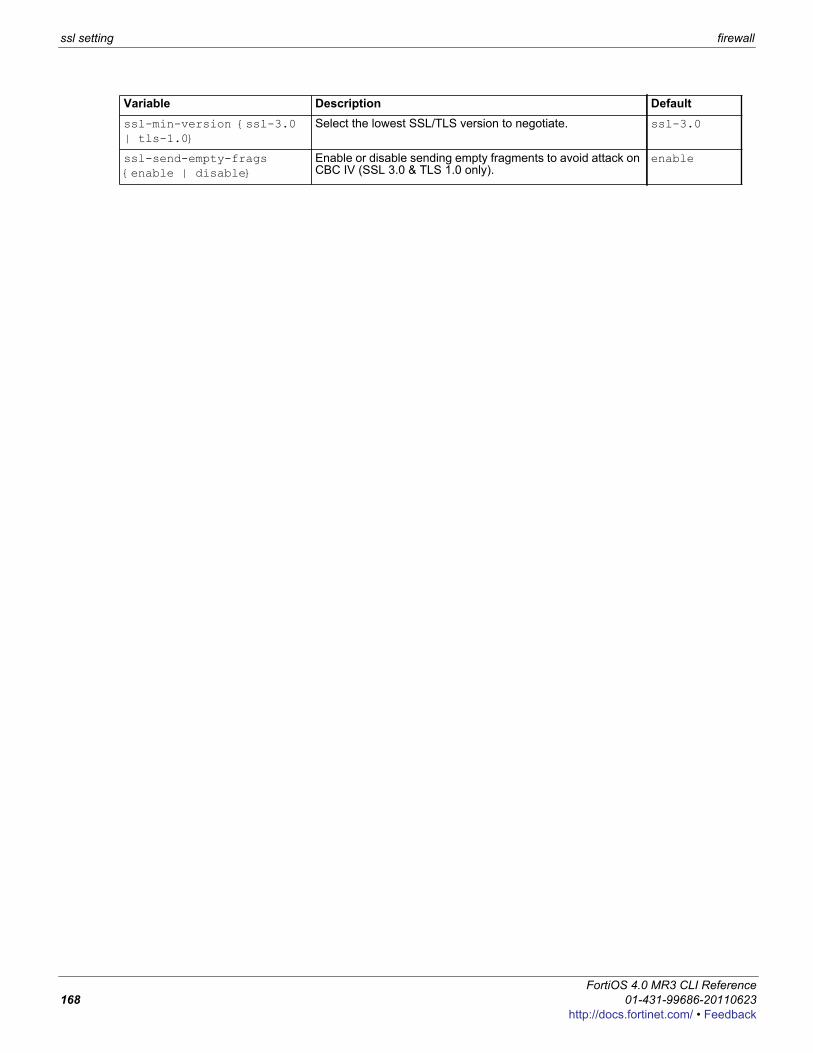
ssl setting firewall
ssl-min-version {ssl-3.0 | tls-1.0}
Select the lowest SSL/TLS version to negotiate. ssl-3.0
ssl-send-empty-frags{enable | disable}
Enable or disable sending empty fragments to avoid attack on CBC IV (SSL 3.0 & TLS 1.0 only).
enable
Variable Description Default
FortiOS 4.0 MR3 CLI Reference168 01-431-99686-20110623
http://docs.fortinet.com/ • Feedback
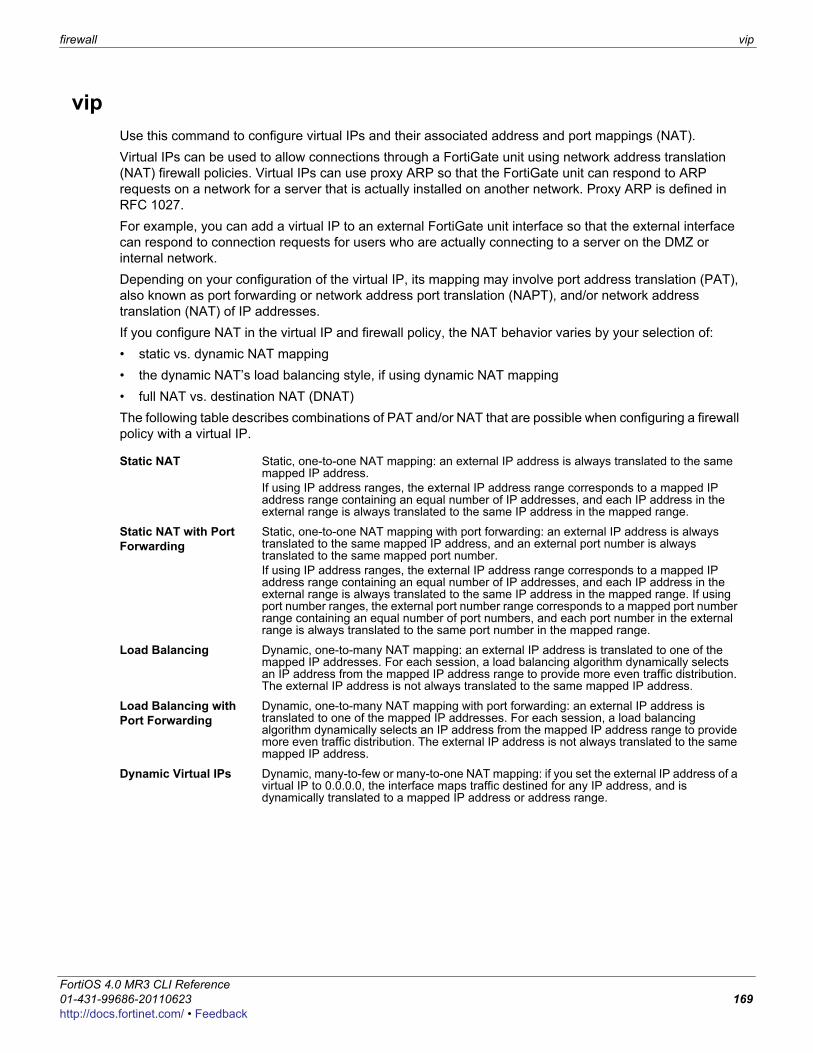
firewall vip
F0h
vipUse this command to configure virtual IPs and their associated address and port mappings (NAT). Virtual IPs can be used to allow connections through a FortiGate unit using network address translation (NAT) firewall policies. Virtual IPs can use proxy ARP so that the FortiGate unit can respond to ARP requests on a network for a server that is actually installed on another network. Proxy ARP is defined in RFC 1027.For example, you can add a virtual IP to an external FortiGate unit interface so that the external interface can respond to connection requests for users who are actually connecting to a server on the DMZ or internal network.Depending on your configuration of the virtual IP, its mapping may involve port address translation (PAT), also known as port forwarding or network address port translation (NAPT), and/or network address translation (NAT) of IP addresses.If you configure NAT in the virtual IP and firewall policy, the NAT behavior varies by your selection of:• static vs. dynamic NAT mapping • the dynamic NAT’s load balancing style, if using dynamic NAT mapping• full NAT vs. destination NAT (DNAT)The following table describes combinations of PAT and/or NAT that are possible when configuring a firewall policy with a virtual IP.
Static NAT Static, one-to-one NAT mapping: an external IP address is always translated to the same mapped IP address.If using IP address ranges, the external IP address range corresponds to a mapped IP address range containing an equal number of IP addresses, and each IP address in the external range is always translated to the same IP address in the mapped range.
Static NAT with Port Forwarding
Static, one-to-one NAT mapping with port forwarding: an external IP address is always translated to the same mapped IP address, and an external port number is always translated to the same mapped port number.If using IP address ranges, the external IP address range corresponds to a mapped IP address range containing an equal number of IP addresses, and each IP address in the external range is always translated to the same IP address in the mapped range. If using port number ranges, the external port number range corresponds to a mapped port number range containing an equal number of port numbers, and each port number in the external range is always translated to the same port number in the mapped range.
Load Balancing Dynamic, one-to-many NAT mapping: an external IP address is translated to one of the mapped IP addresses. For each session, a load balancing algorithm dynamically selects an IP address from the mapped IP address range to provide more even traffic distribution. The external IP address is not always translated to the same mapped IP address.
Load Balancing with Port Forwarding
Dynamic, one-to-many NAT mapping with port forwarding: an external IP address is translated to one of the mapped IP addresses. For each session, a load balancing algorithm dynamically selects an IP address from the mapped IP address range to provide more even traffic distribution. The external IP address is not always translated to the same mapped IP address.
Dynamic Virtual IPs Dynamic, many-to-few or many-to-one NAT mapping: if you set the external IP address of a virtual IP to 0.0.0.0, the interface maps traffic destined for any IP address, and is dynamically translated to a mapped IP address or address range.
ortiOS 4.0 MR3 CLI Reference1-431-99686-20110623 169ttp://docs.fortinet.com/ • Feedback
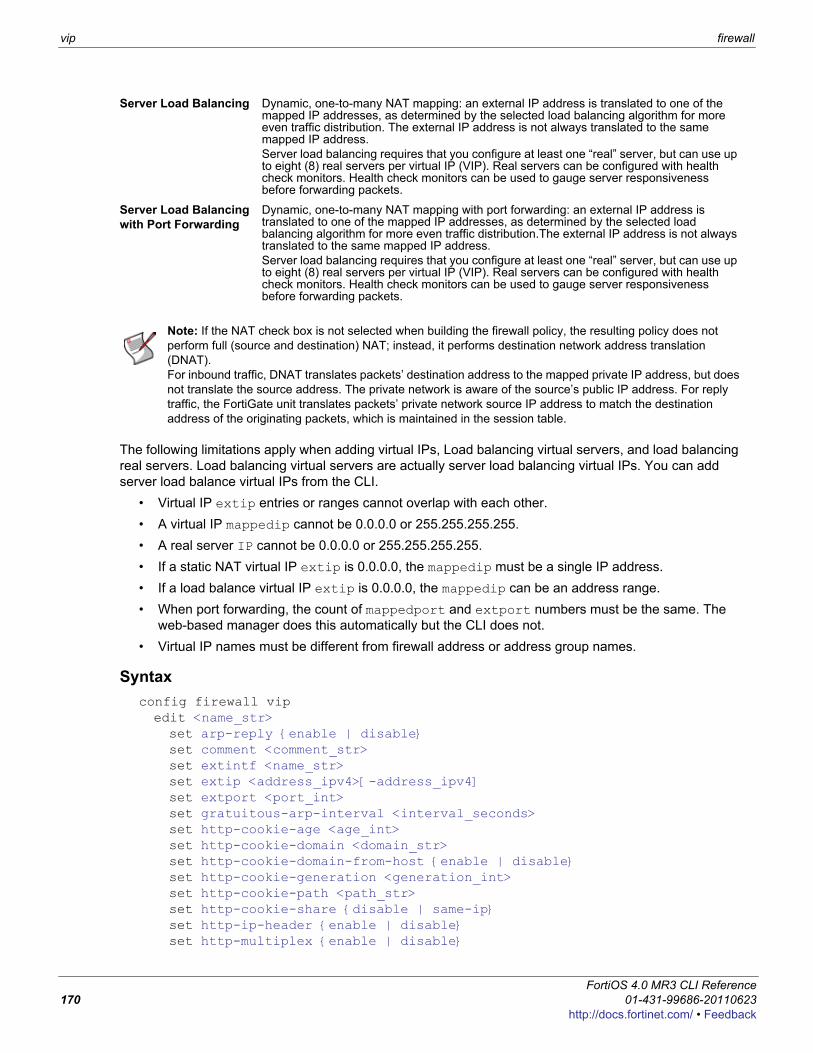
vip firewall
The following limitations apply when adding virtual IPs, Load balancing virtual servers, and load balancing real servers. Load balancing virtual servers are actually server load balancing virtual IPs. You can add server load balance virtual IPs from the CLI.
• Virtual IP extip entries or ranges cannot overlap with each other.• A virtual IP mappedip cannot be 0.0.0.0 or 255.255.255.255.• A real server IP cannot be 0.0.0.0 or 255.255.255.255.• If a static NAT virtual IP extip is 0.0.0.0, the mappedip must be a single IP address.• If a load balance virtual IP extip is 0.0.0.0, the mappedip can be an address range.• When port forwarding, the count of mappedport and extport numbers must be the same. The
web-based manager does this automatically but the CLI does not.• Virtual IP names must be different from firewall address or address group names.
Syntaxconfig firewall vipedit <name_str>set arp-reply {enable | disable}set comment <comment_str>set extintf <name_str>set extip <address_ipv4>[-address_ipv4]set extport <port_int>set gratuitous-arp-interval <interval_seconds>set http-cookie-age <age_int>set http-cookie-domain <domain_str>set http-cookie-domain-from-host {enable | disable}set http-cookie-generation <generation_int>set http-cookie-path <path_str>set http-cookie-share {disable | same-ip}set http-ip-header {enable | disable}set http-multiplex {enable | disable}
Server Load Balancing Dynamic, one-to-many NAT mapping: an external IP address is translated to one of the mapped IP addresses, as determined by the selected load balancing algorithm for more even traffic distribution. The external IP address is not always translated to the same mapped IP address.Server load balancing requires that you configure at least one “real” server, but can use up to eight (8) real servers per virtual IP (VIP). Real servers can be configured with health check monitors. Health check monitors can be used to gauge server responsiveness before forwarding packets.
Server Load Balancing with Port Forwarding
Dynamic, one-to-many NAT mapping with port forwarding: an external IP address is translated to one of the mapped IP addresses, as determined by the selected load balancing algorithm for more even traffic distribution.The external IP address is not always translated to the same mapped IP address.Server load balancing requires that you configure at least one “real” server, but can use up to eight (8) real servers per virtual IP (VIP). Real servers can be configured with health check monitors. Health check monitors can be used to gauge server responsiveness before forwarding packets.
Note: If the NAT check box is not selected when building the firewall policy, the resulting policy does not perform full (source and destination) NAT; instead, it performs destination network address translation (DNAT).For inbound traffic, DNAT translates packets’ destination address to the mapped private IP address, but does not translate the source address. The private network is aware of the source’s public IP address. For reply traffic, the FortiGate unit translates packets’ private network source IP address to match the destination address of the originating packets, which is maintained in the session table.
FortiOS 4.0 MR3 CLI Reference170 01-431-99686-20110623
http://docs.fortinet.com/ • Feedback
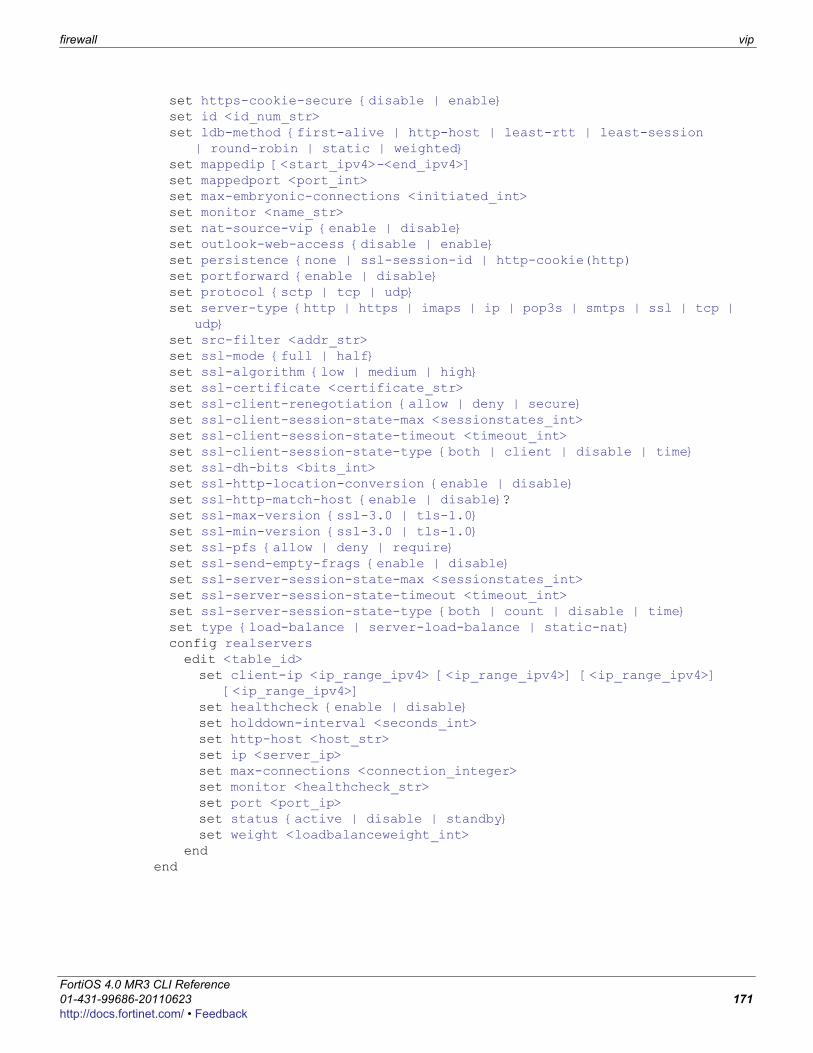
firewall vip
F0h
set https-cookie-secure {disable | enable}set id <id_num_str>set ldb-method {first-alive | http-host | least-rtt | least-session
| round-robin | static | weighted}set mappedip [<start_ipv4>-<end_ipv4>]set mappedport <port_int>set max-embryonic-connections <initiated_int>set monitor <name_str>set nat-source-vip {enable | disable}set outlook-web-access {disable | enable}set persistence {none | ssl-session-id | http-cookie(http)set portforward {enable | disable}set protocol {sctp | tcp | udp}set server-type {http | https | imaps | ip | pop3s | smtps | ssl | tcp |
udp}set src-filter <addr_str>set ssl-mode {full | half}set ssl-algorithm {low | medium | high}set ssl-certificate <certificate_str>set ssl-client-renegotiation {allow | deny | secure}set ssl-client-session-state-max <sessionstates_int>set ssl-client-session-state-timeout <timeout_int>set ssl-client-session-state-type {both | client | disable | time}set ssl-dh-bits <bits_int>set ssl-http-location-conversion {enable | disable}set ssl-http-match-host {enable | disable}?set ssl-max-version {ssl-3.0 | tls-1.0}set ssl-min-version {ssl-3.0 | tls-1.0}set ssl-pfs {allow | deny | require}set ssl-send-empty-frags {enable | disable}set ssl-server-session-state-max <sessionstates_int>set ssl-server-session-state-timeout <timeout_int>set ssl-server-session-state-type {both | count | disable | time}set type {load-balance | server-load-balance | static-nat}config realserversedit <table_id>set client-ip <ip_range_ipv4> [<ip_range_ipv4>] [<ip_range_ipv4>]
[<ip_range_ipv4>]set healthcheck {enable | disable}set holddown-interval <seconds_int>set http-host <host_str>set ip <server_ip>set max-connections <connection_integer>set monitor <healthcheck_str>set port <port_ip>set status {active | disable | standby}set weight <loadbalanceweight_int>
endend
ortiOS 4.0 MR3 CLI Reference1-431-99686-20110623 171ttp://docs.fortinet.com/ • Feedback
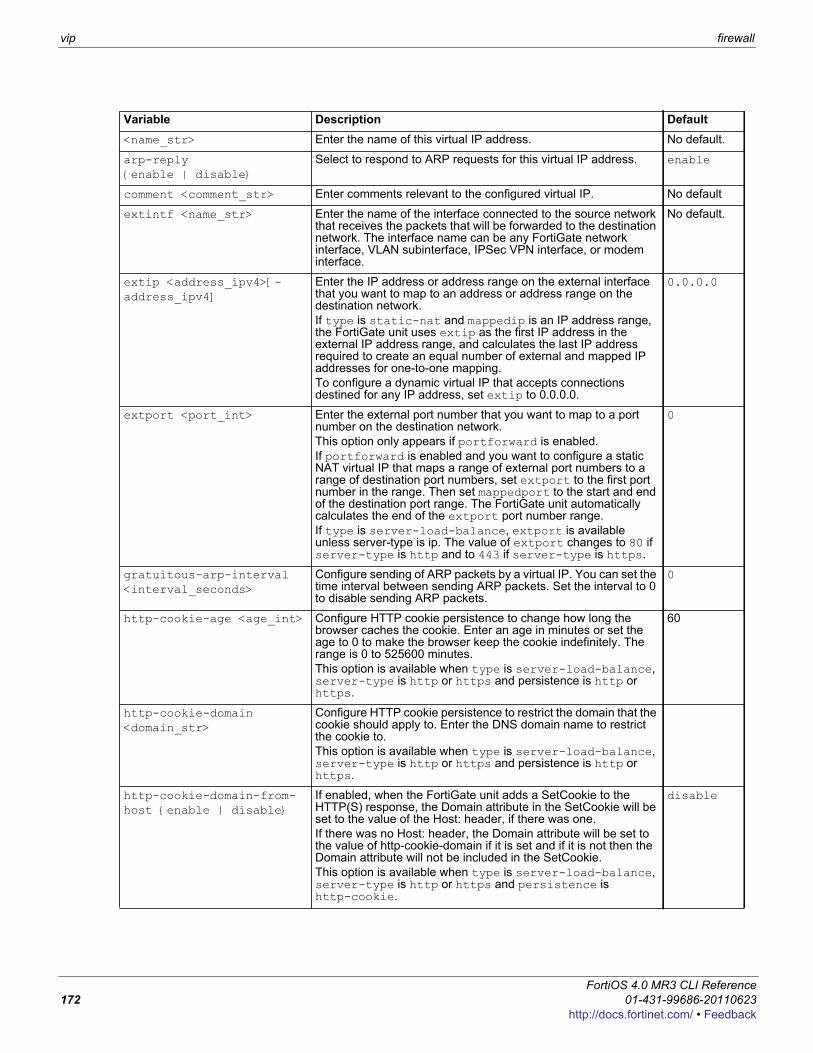
vip firewall
Variable Description Default<name_str> Enter the name of this virtual IP address. No default.
arp-reply {enable | disable}
Select to respond to ARP requests for this virtual IP address. enable
comment <comment_str> Enter comments relevant to the configured virtual IP. No default
extintf <name_str> Enter the name of the interface connected to the source network that receives the packets that will be forwarded to the destination network. The interface name can be any FortiGate network interface, VLAN subinterface, IPSec VPN interface, or modem interface.
No default.
extip <address_ipv4>[-address_ipv4]
Enter the IP address or address range on the external interface that you want to map to an address or address range on the destination network. If type is static-nat and mappedip is an IP address range, the FortiGate unit uses extip as the first IP address in the external IP address range, and calculates the last IP address required to create an equal number of external and mapped IP addresses for one-to-one mapping.To configure a dynamic virtual IP that accepts connections destined for any IP address, set extip to 0.0.0.0.
0.0.0.0
extport <port_int> Enter the external port number that you want to map to a port number on the destination network.This option only appears if portforward is enabled.If portforward is enabled and you want to configure a static NAT virtual IP that maps a range of external port numbers to a range of destination port numbers, set extport to the first port number in the range. Then set mappedport to the start and end of the destination port range. The FortiGate unit automatically calculates the end of the extport port number range.If type is server-load-balance, extport is available unless server-type is ip. The value of extport changes to 80 if server-type is http and to 443 if server-type is https.
0
gratuitous-arp-interval <interval_seconds>
Configure sending of ARP packets by a virtual IP. You can set the time interval between sending ARP packets. Set the interval to 0 to disable sending ARP packets.
0
http-cookie-age <age_int> Configure HTTP cookie persistence to change how long the browser caches the cookie. Enter an age in minutes or set the age to 0 to make the browser keep the cookie indefinitely. The range is 0 to 525600 minutes.This option is available when type is server-load-balance, server-type is http or https and persistence is http or https.
60
http-cookie-domain <domain_str>
Configure HTTP cookie persistence to restrict the domain that the cookie should apply to. Enter the DNS domain name to restrict the cookie to.This option is available when type is server-load-balance, server-type is http or https and persistence is http or https.
http-cookie-domain-from-host {enable | disable}
If enabled, when the FortiGate unit adds a SetCookie to the HTTP(S) response, the Domain attribute in the SetCookie will be set to the value of the Host: header, if there was one.If there was no Host: header, the Domain attribute will be set to the value of http-cookie-domain if it is set and if it is not then the Domain attribute will not be included in the SetCookie.This option is available when type is server-load-balance, server-type is http or https and persistence is http-cookie.
disable
FortiOS 4.0 MR3 CLI Reference172 01-431-99686-20110623
http://docs.fortinet.com/ • Feedback
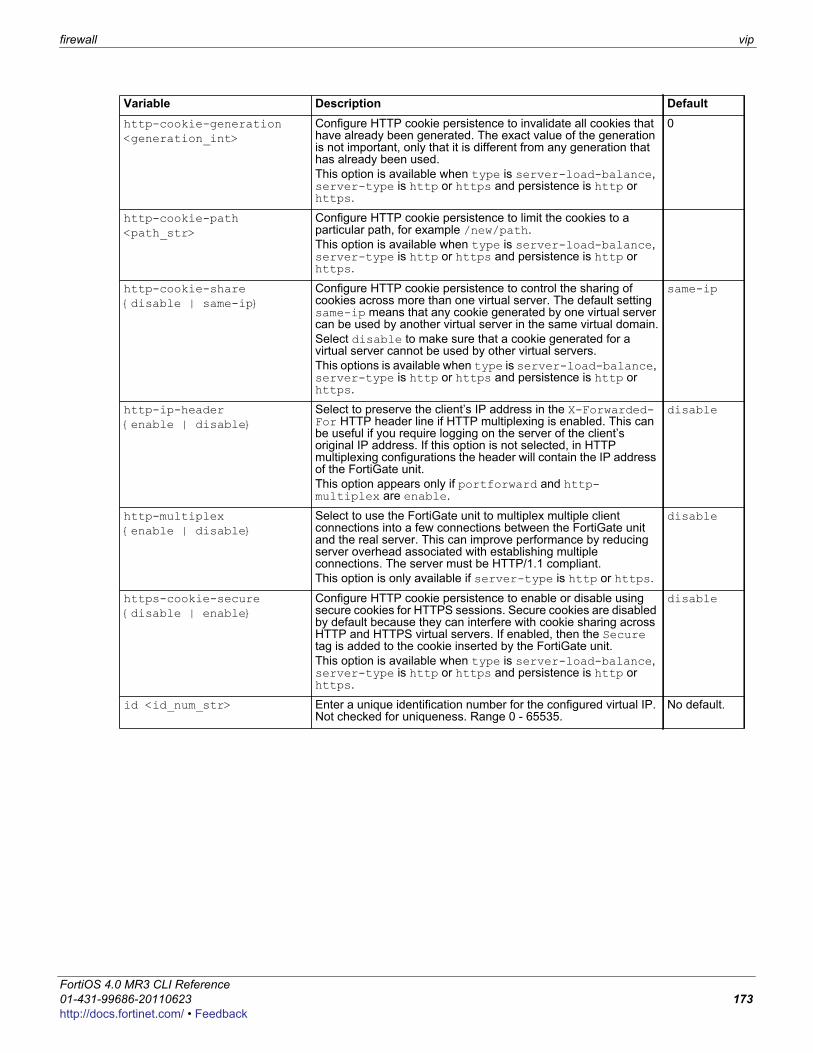
firewall vip
F0h
http-cookie-generation <generation_int>
Configure HTTP cookie persistence to invalidate all cookies that have already been generated. The exact value of the generation is not important, only that it is different from any generation that has already been used.This option is available when type is server-load-balance, server-type is http or https and persistence is http or https.
0
http-cookie-path <path_str>
Configure HTTP cookie persistence to limit the cookies to a particular path, for example /new/path.This option is available when type is server-load-balance, server-type is http or https and persistence is http or https.
http-cookie-share {disable | same-ip}
Configure HTTP cookie persistence to control the sharing of cookies across more than one virtual server. The default setting same-ip means that any cookie generated by one virtual server can be used by another virtual server in the same virtual domain.Select disable to make sure that a cookie generated for a virtual server cannot be used by other virtual servers.This options is available when type is server-load-balance, server-type is http or https and persistence is http or https.
same-ip
http-ip-header {enable | disable}
Select to preserve the client’s IP address in the X-Forwarded-For HTTP header line if HTTP multiplexing is enabled. This can be useful if you require logging on the server of the client’s original IP address. If this option is not selected, in HTTP multiplexing configurations the header will contain the IP address of the FortiGate unit.This option appears only if portforward and http-multiplex are enable.
disable
http-multiplex{enable | disable}
Select to use the FortiGate unit to multiplex multiple client connections into a few connections between the FortiGate unit and the real server. This can improve performance by reducing server overhead associated with establishing multiple connections. The server must be HTTP/1.1 compliant.This option is only available if server-type is http or https.
disable
https-cookie-secure {disable | enable}
Configure HTTP cookie persistence to enable or disable using secure cookies for HTTPS sessions. Secure cookies are disabled by default because they can interfere with cookie sharing across HTTP and HTTPS virtual servers. If enabled, then the Secure tag is added to the cookie inserted by the FortiGate unit.This option is available when type is server-load-balance, server-type is http or https and persistence is http or https.
disable
id <id_num_str> Enter a unique identification number for the configured virtual IP. Not checked for uniqueness. Range 0 - 65535.
No default.
Variable Description Default
ortiOS 4.0 MR3 CLI Reference1-431-99686-20110623 173ttp://docs.fortinet.com/ • Feedback
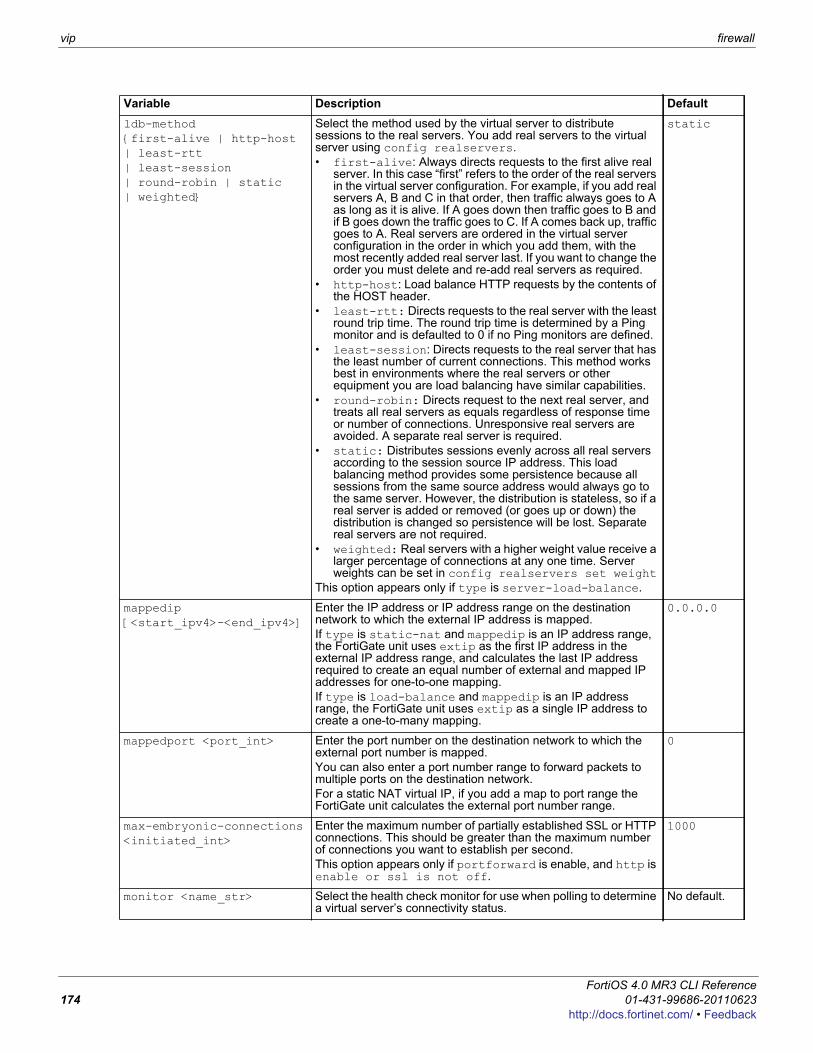
vip firewall
ldb-method {first-alive | http-host | least-rtt | least-session | round-robin | static | weighted}
Select the method used by the virtual server to distribute sessions to the real servers. You add real servers to the virtual server using config realservers.• first-alive: Always directs requests to the first alive real
server. In this case “first” refers to the order of the real servers in the virtual server configuration. For example, if you add real servers A, B and C in that order, then traffic always goes to A as long as it is alive. If A goes down then traffic goes to B and if B goes down the traffic goes to C. If A comes back up, traffic goes to A. Real servers are ordered in the virtual server configuration in the order in which you add them, with the most recently added real server last. If you want to change the order you must delete and re-add real servers as required.
• http-host: Load balance HTTP requests by the contents of the HOST header.
• least-rtt: Directs requests to the real server with the least round trip time. The round trip time is determined by a Ping monitor and is defaulted to 0 if no Ping monitors are defined.
• least-session: Directs requests to the real server that has the least number of current connections. This method works best in environments where the real servers or other equipment you are load balancing have similar capabilities.
• round-robin: Directs request to the next real server, and treats all real servers as equals regardless of response time or number of connections. Unresponsive real servers are avoided. A separate real server is required.
• static: Distributes sessions evenly across all real servers according to the session source IP address. This load balancing method provides some persistence because all sessions from the same source address would always go to the same server. However, the distribution is stateless, so if a real server is added or removed (or goes up or down) the distribution is changed so persistence will be lost. Separate real servers are not required.
• weighted: Real servers with a higher weight value receive a larger percentage of connections at any one time. Server weights can be set in config realservers set weight
This option appears only if type is server-load-balance.
static
mappedip [<start_ipv4>-<end_ipv4>]
Enter the IP address or IP address range on the destination network to which the external IP address is mapped.If type is static-nat and mappedip is an IP address range, the FortiGate unit uses extip as the first IP address in the external IP address range, and calculates the last IP address required to create an equal number of external and mapped IP addresses for one-to-one mapping.If type is load-balance and mappedip is an IP address range, the FortiGate unit uses extip as a single IP address to create a one-to-many mapping.
0.0.0.0
mappedport <port_int> Enter the port number on the destination network to which the external port number is mapped.You can also enter a port number range to forward packets to multiple ports on the destination network.For a static NAT virtual IP, if you add a map to port range the FortiGate unit calculates the external port number range.
0
max-embryonic-connections <initiated_int>
Enter the maximum number of partially established SSL or HTTP connections. This should be greater than the maximum number of connections you want to establish per second.This option appears only if portforward is enable, and http is enable or ssl is not off.
1000
monitor <name_str> Select the health check monitor for use when polling to determine a virtual server’s connectivity status.
No default.
Variable Description Default
FortiOS 4.0 MR3 CLI Reference174 01-431-99686-20110623
http://docs.fortinet.com/ • Feedback
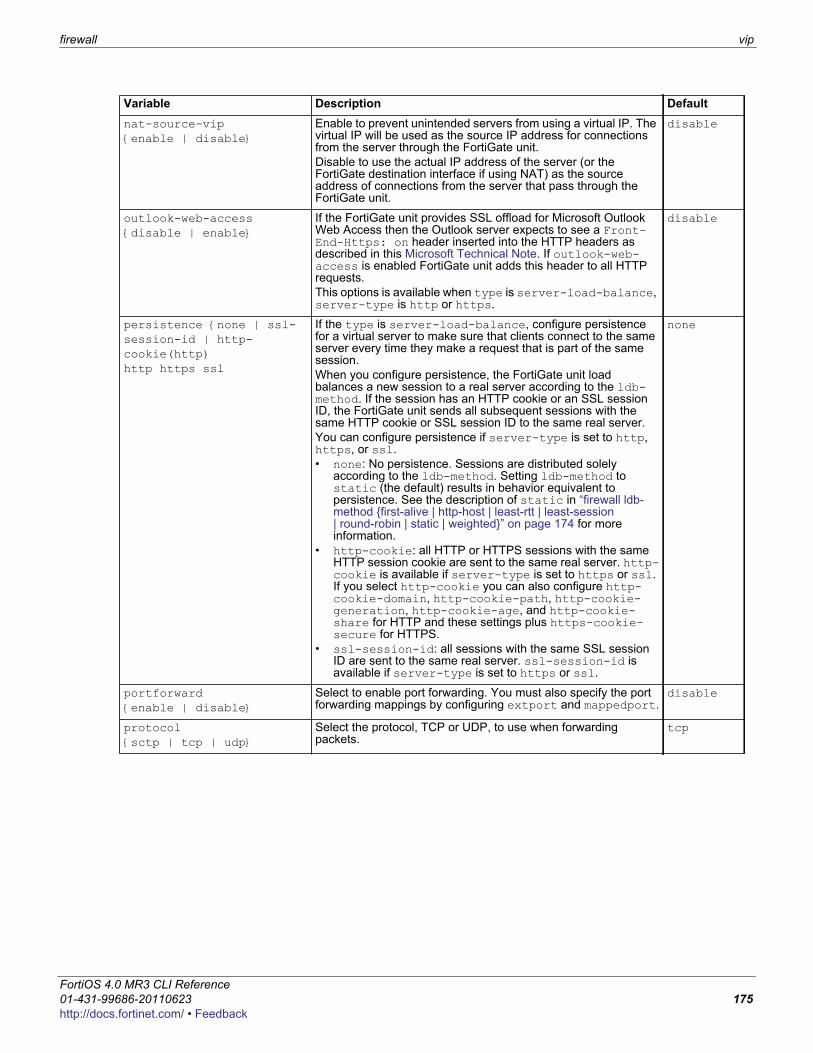
firewall vip
F0h
nat-source-vip {enable | disable}
Enable to prevent unintended servers from using a virtual IP. The virtual IP will be used as the source IP address for connections from the server through the FortiGate unit.Disable to use the actual IP address of the server (or the FortiGate destination interface if using NAT) as the source address of connections from the server that pass through the FortiGate unit.
disable
outlook-web-access {disable | enable}
If the FortiGate unit provides SSL offload for Microsoft Outlook Web Access then the Outlook server expects to see a Front-End-Https: on header inserted into the HTTP headers as described in this Microsoft Technical Note. If outlook-web-access is enabled FortiGate unit adds this header to all HTTP requests.This options is available when type is server-load-balance, server-type is http or https.
disable
persistence {none | ssl-session-id | http-cookie(http) http https ssl
If the type is server-load-balance, configure persistence for a virtual server to make sure that clients connect to the same server every time they make a request that is part of the same session. When you configure persistence, the FortiGate unit load balances a new session to a real server according to the ldb-method. If the session has an HTTP cookie or an SSL session ID, the FortiGate unit sends all subsequent sessions with the same HTTP cookie or SSL session ID to the same real server.You can configure persistence if server-type is set to http, https, or ssl. • none: No persistence. Sessions are distributed solely
according to the ldb-method. Setting ldb-method to static (the default) results in behavior equivalent to persistence. See the description of static in “firewall ldb-method {first-alive | http-host | least-rtt | least-session | round-robin | static | weighted}” on page 174 for more information.
• http-cookie: all HTTP or HTTPS sessions with the same HTTP session cookie are sent to the same real server. http-cookie is available if server-type is set to https or ssl. If you select http-cookie you can also configure http-cookie-domain, http-cookie-path, http-cookie-generation, http-cookie-age, and http-cookie-share for HTTP and these settings plus https-cookie-secure for HTTPS.
• ssl-session-id: all sessions with the same SSL session ID are sent to the same real server. ssl-session-id is available if server-type is set to https or ssl.
none
portforward {enable | disable}
Select to enable port forwarding. You must also specify the port forwarding mappings by configuring extport and mappedport.
disable
protocol {sctp | tcp | udp}
Select the protocol, TCP or UDP, to use when forwarding packets.
tcp
Variable Description Default
ortiOS 4.0 MR3 CLI Reference1-431-99686-20110623 175ttp://docs.fortinet.com/ • Feedback
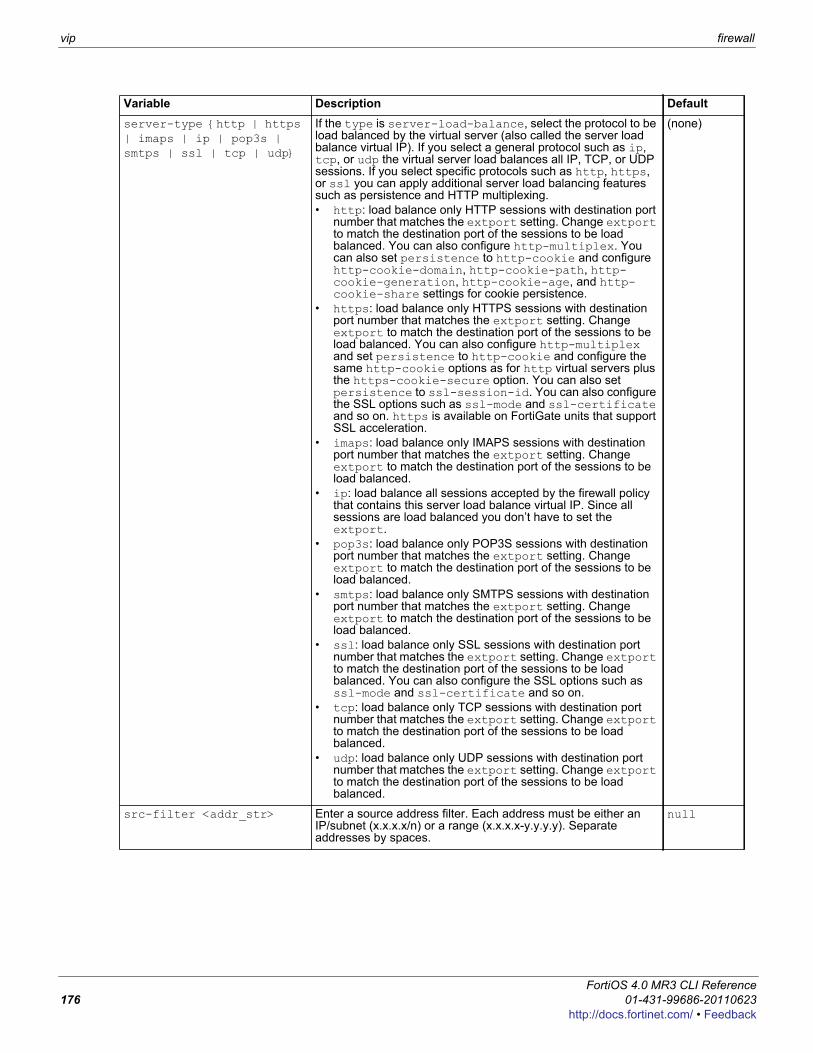
vip firewall
server-type {http | https | imaps | ip | pop3s | smtps | ssl | tcp | udp}
If the type is server-load-balance, select the protocol to be load balanced by the virtual server (also called the server load balance virtual IP). If you select a general protocol such as ip, tcp, or udp the virtual server load balances all IP, TCP, or UDP sessions. If you select specific protocols such as http, https, or ssl you can apply additional server load balancing features such as persistence and HTTP multiplexing.• http: load balance only HTTP sessions with destination port
number that matches the extport setting. Change extport to match the destination port of the sessions to be load balanced. You can also configure http-multiplex. You can also set persistence to http-cookie and configure http-cookie-domain, http-cookie-path, http-cookie-generation, http-cookie-age, and http-cookie-share settings for cookie persistence.
• https: load balance only HTTPS sessions with destination port number that matches the extport setting. Change extport to match the destination port of the sessions to be load balanced. You can also configure http-multiplex and set persistence to http-cookie and configure the same http-cookie options as for http virtual servers plus the https-cookie-secure option. You can also set persistence to ssl-session-id. You can also configure the SSL options such as ssl-mode and ssl-certificate and so on. https is available on FortiGate units that support SSL acceleration.
• imaps: load balance only IMAPS sessions with destination port number that matches the extport setting. Change extport to match the destination port of the sessions to be load balanced.
• ip: load balance all sessions accepted by the firewall policy that contains this server load balance virtual IP. Since all sessions are load balanced you don’t have to set the extport.
• pop3s: load balance only POP3S sessions with destination port number that matches the extport setting. Change extport to match the destination port of the sessions to be load balanced.
• smtps: load balance only SMTPS sessions with destination port number that matches the extport setting. Change extport to match the destination port of the sessions to be load balanced.
• ssl: load balance only SSL sessions with destination port number that matches the extport setting. Change extport to match the destination port of the sessions to be load balanced. You can also configure the SSL options such as ssl-mode and ssl-certificate and so on.
• tcp: load balance only TCP sessions with destination port number that matches the extport setting. Change extport to match the destination port of the sessions to be load balanced.
• udp: load balance only UDP sessions with destination port number that matches the extport setting. Change extport to match the destination port of the sessions to be load balanced.
(none)
src-filter <addr_str> Enter a source address filter. Each address must be either an IP/subnet (x.x.x.x/n) or a range (x.x.x.x-y.y.y.y). Separate addresses by spaces.
null
Variable Description Default
FortiOS 4.0 MR3 CLI Reference176 01-431-99686-20110623
http://docs.fortinet.com/ • Feedback
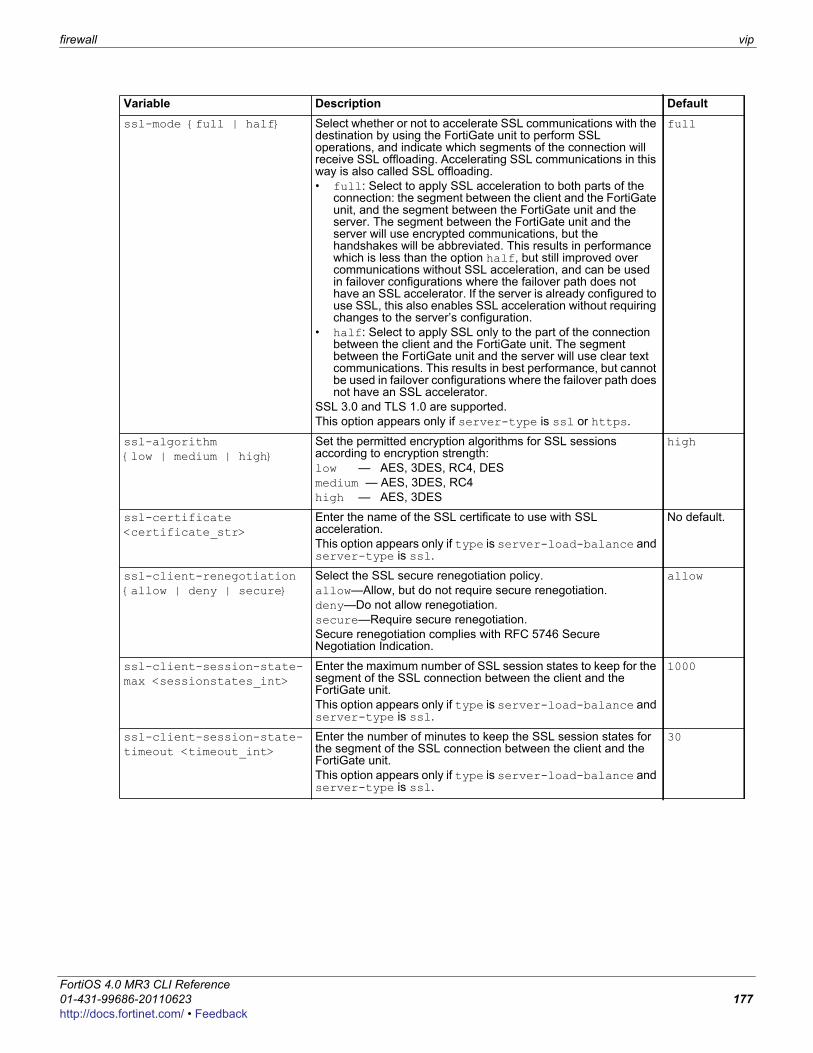
firewall vip
F0h
ssl-mode {full | half} Select whether or not to accelerate SSL communications with the destination by using the FortiGate unit to perform SSL operations, and indicate which segments of the connection will receive SSL offloading. Accelerating SSL communications in this way is also called SSL offloading.• full: Select to apply SSL acceleration to both parts of the
connection: the segment between the client and the FortiGate unit, and the segment between the FortiGate unit and the server. The segment between the FortiGate unit and the server will use encrypted communications, but the handshakes will be abbreviated. This results in performance which is less than the option half, but still improved over communications without SSL acceleration, and can be used in failover configurations where the failover path does not have an SSL accelerator. If the server is already configured to use SSL, this also enables SSL acceleration without requiring changes to the server’s configuration.
• half: Select to apply SSL only to the part of the connection between the client and the FortiGate unit. The segment between the FortiGate unit and the server will use clear text communications. This results in best performance, but cannot be used in failover configurations where the failover path does not have an SSL accelerator.
SSL 3.0 and TLS 1.0 are supported.This option appears only if server-type is ssl or https.
full
ssl-algorithm {low | medium | high}
Set the permitted encryption algorithms for SSL sessions according to encryption strength:low — AES, 3DES, RC4, DESmedium — AES, 3DES, RC4high — AES, 3DES
high
ssl-certificate <certificate_str>
Enter the name of the SSL certificate to use with SSL acceleration.This option appears only if type is server-load-balance and server-type is ssl.
No default.
ssl-client-renegotiation {allow | deny | secure}
Select the SSL secure renegotiation policy.allow—Allow, but do not require secure renegotiation.deny—Do not allow renegotiation.secure—Require secure renegotiation.Secure renegotiation complies with RFC 5746 Secure Negotiation Indication.
allow
ssl-client-session-state-max <sessionstates_int>
Enter the maximum number of SSL session states to keep for the segment of the SSL connection between the client and the FortiGate unit.This option appears only if type is server-load-balance and server-type is ssl.
1000
ssl-client-session-state-timeout <timeout_int>
Enter the number of minutes to keep the SSL session states for the segment of the SSL connection between the client and the FortiGate unit.This option appears only if type is server-load-balance and server-type is ssl.
30
Variable Description Default
ortiOS 4.0 MR3 CLI Reference1-431-99686-20110623 177ttp://docs.fortinet.com/ • Feedback
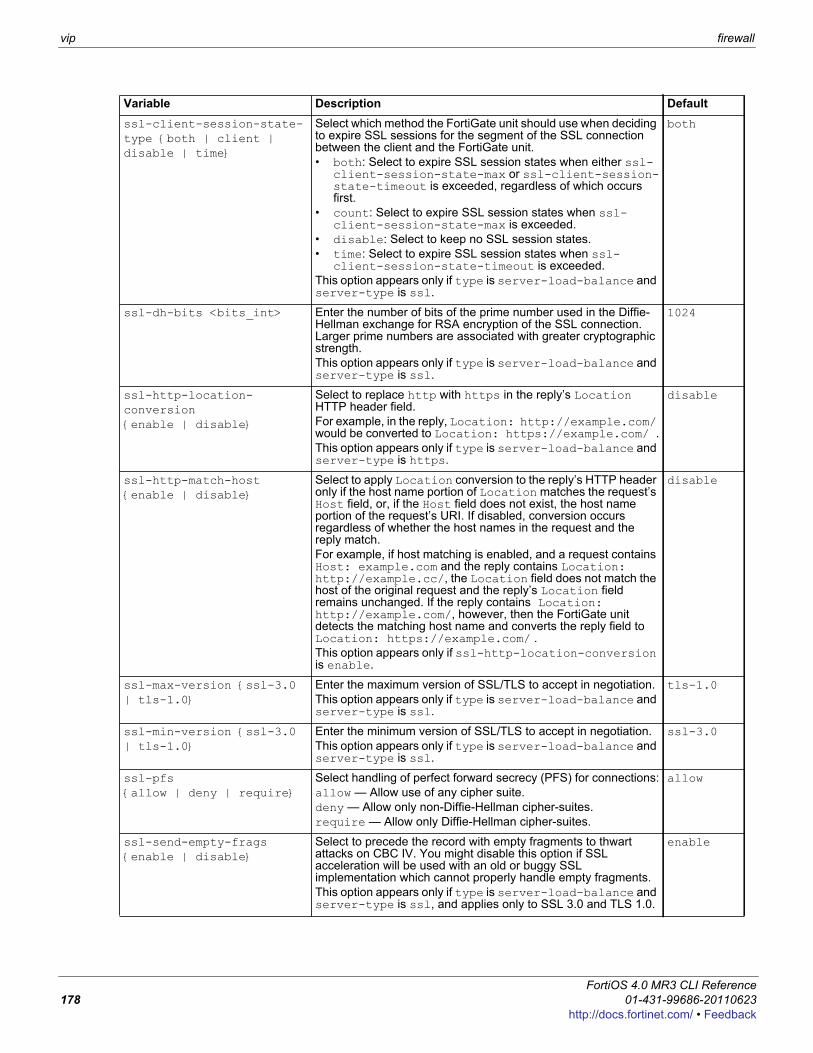
vip firewall
ssl-client-session-state-type {both | client | disable | time}
Select which method the FortiGate unit should use when deciding to expire SSL sessions for the segment of the SSL connection between the client and the FortiGate unit.• both: Select to expire SSL session states when either ssl-
client-session-state-max or ssl-client-session-state-timeout is exceeded, regardless of which occurs first.
• count: Select to expire SSL session states when ssl-client-session-state-max is exceeded.
• disable: Select to keep no SSL session states.• time: Select to expire SSL session states when ssl-
client-session-state-timeout is exceeded.This option appears only if type is server-load-balance and server-type is ssl.
both
ssl-dh-bits <bits_int> Enter the number of bits of the prime number used in the Diffie-Hellman exchange for RSA encryption of the SSL connection. Larger prime numbers are associated with greater cryptographic strength.This option appears only if type is server-load-balance and server-type is ssl.
1024
ssl-http-location-conversion {enable | disable}
Select to replace http with https in the reply’s Location HTTP header field.For example, in the reply, Location: http://example.com/ would be converted to Location: https://example.com/ .This option appears only if type is server-load-balance and server-type is https.
disable
ssl-http-match-host {enable | disable}
Select to apply Location conversion to the reply’s HTTP header only if the host name portion of Location matches the request’s Host field, or, if the Host field does not exist, the host name portion of the request’s URI. If disabled, conversion occurs regardless of whether the host names in the request and the reply match.For example, if host matching is enabled, and a request contains Host: example.com and the reply contains Location: http://example.cc/, the Location field does not match the host of the original request and the reply’s Location field remains unchanged. If the reply contains Location: http://example.com/, however, then the FortiGate unit detects the matching host name and converts the reply field to Location: https://example.com/ .This option appears only if ssl-http-location-conversion is enable.
disable
ssl-max-version {ssl-3.0 | tls-1.0}
Enter the maximum version of SSL/TLS to accept in negotiation.This option appears only if type is server-load-balance and server-type is ssl.
tls-1.0
ssl-min-version {ssl-3.0 | tls-1.0}
Enter the minimum version of SSL/TLS to accept in negotiation.This option appears only if type is server-load-balance and server-type is ssl.
ssl-3.0
ssl-pfs {allow | deny | require}
Select handling of perfect forward secrecy (PFS) for connections:allow — Allow use of any cipher suite.deny — Allow only non-Diffie-Hellman cipher-suites.require — Allow only Diffie-Hellman cipher-suites.
allow
ssl-send-empty-frags {enable | disable}
Select to precede the record with empty fragments to thwart attacks on CBC IV. You might disable this option if SSL acceleration will be used with an old or buggy SSL implementation which cannot properly handle empty fragments.This option appears only if type is server-load-balance and server-type is ssl, and applies only to SSL 3.0 and TLS 1.0.
enable
Variable Description Default
FortiOS 4.0 MR3 CLI Reference178 01-431-99686-20110623
http://docs.fortinet.com/ • Feedback
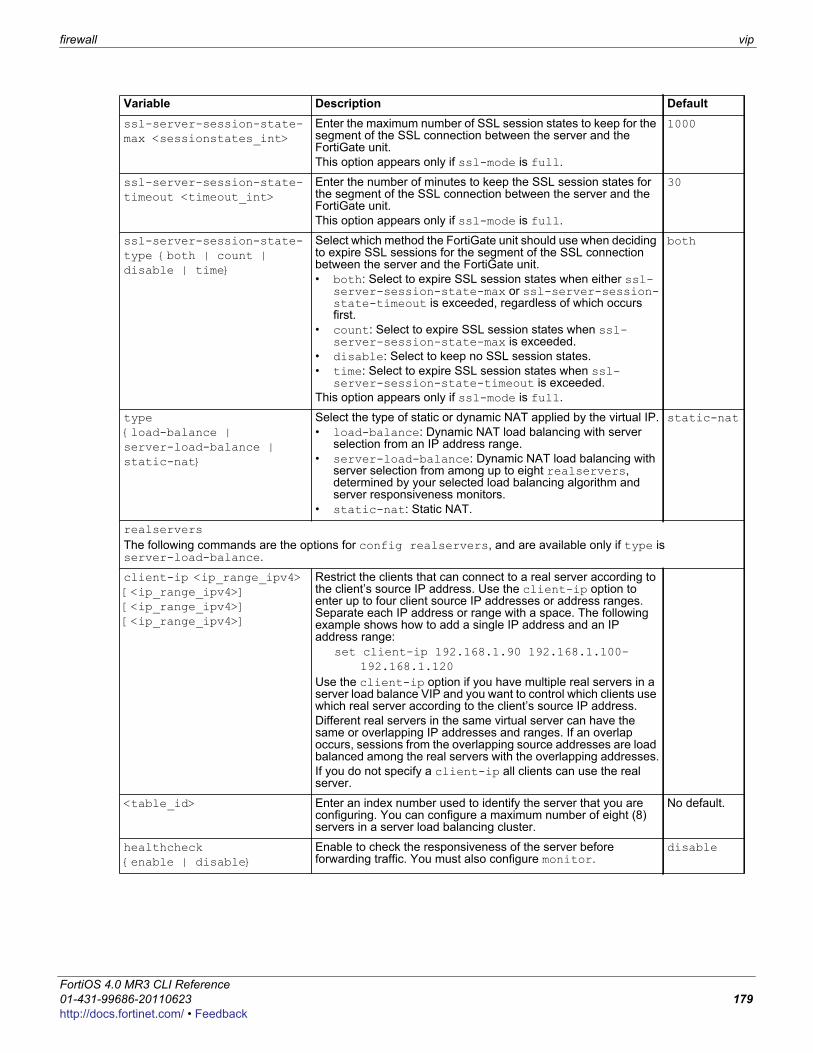
firewall vip
F0h
ssl-server-session-state-max <sessionstates_int>
Enter the maximum number of SSL session states to keep for the segment of the SSL connection between the server and the FortiGate unit.This option appears only if ssl-mode is full.
1000
ssl-server-session-state-timeout <timeout_int>
Enter the number of minutes to keep the SSL session states for the segment of the SSL connection between the server and the FortiGate unit.This option appears only if ssl-mode is full.
30
ssl-server-session-state-type {both | count | disable | time}
Select which method the FortiGate unit should use when deciding to expire SSL sessions for the segment of the SSL connection between the server and the FortiGate unit.• both: Select to expire SSL session states when either ssl-
server-session-state-max or ssl-server-session-state-timeout is exceeded, regardless of which occurs first.
• count: Select to expire SSL session states when ssl-server-session-state-max is exceeded.
• disable: Select to keep no SSL session states.• time: Select to expire SSL session states when ssl-
server-session-state-timeout is exceeded.This option appears only if ssl-mode is full.
both
type {load-balance | server-load-balance | static-nat}
Select the type of static or dynamic NAT applied by the virtual IP.• load-balance: Dynamic NAT load balancing with server
selection from an IP address range.• server-load-balance: Dynamic NAT load balancing with
server selection from among up to eight realservers, determined by your selected load balancing algorithm and server responsiveness monitors.
• static-nat: Static NAT.
static-nat
realserversThe following commands are the options for config realservers, and are available only if type is server-load-balance.
client-ip <ip_range_ipv4> [<ip_range_ipv4>] [<ip_range_ipv4>] [<ip_range_ipv4>]
Restrict the clients that can connect to a real server according to the client’s source IP address. Use the client-ip option to enter up to four client source IP addresses or address ranges. Separate each IP address or range with a space. The following example shows how to add a single IP address and an IP address range:
set client-ip 192.168.1.90 192.168.1.100-192.168.1.120
Use the client-ip option if you have multiple real servers in a server load balance VIP and you want to control which clients use which real server according to the client’s source IP address.Different real servers in the same virtual server can have the same or overlapping IP addresses and ranges. If an overlap occurs, sessions from the overlapping source addresses are load balanced among the real servers with the overlapping addresses.If you do not specify a client-ip all clients can use the real server.
<table_id> Enter an index number used to identify the server that you are configuring. You can configure a maximum number of eight (8) servers in a server load balancing cluster.
No default.
healthcheck {enable | disable}
Enable to check the responsiveness of the server before forwarding traffic. You must also configure monitor.
disable
Variable Description Default
ortiOS 4.0 MR3 CLI Reference1-431-99686-20110623 179ttp://docs.fortinet.com/ • Feedback
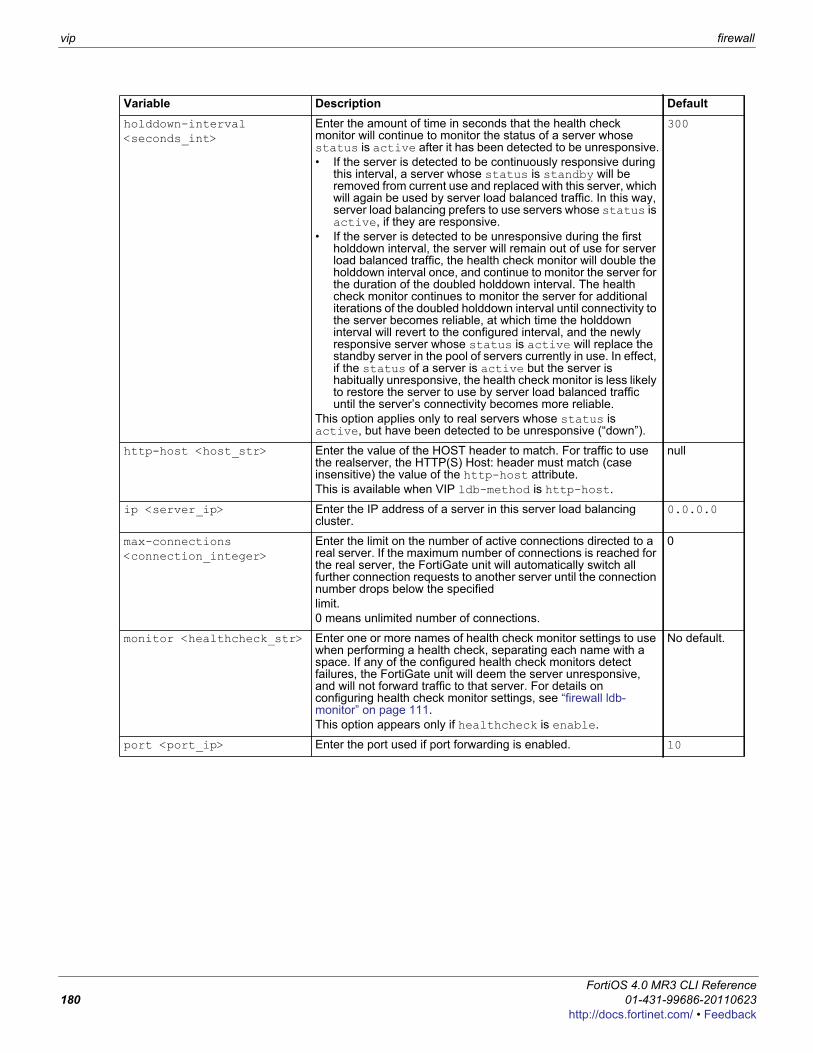
vip firewall
holddown-interval <seconds_int>
Enter the amount of time in seconds that the health check monitor will continue to monitor the status of a server whose status is active after it has been detected to be unresponsive.• If the server is detected to be continuously responsive during
this interval, a server whose status is standby will be removed from current use and replaced with this server, which will again be used by server load balanced traffic. In this way, server load balancing prefers to use servers whose status is active, if they are responsive.
• If the server is detected to be unresponsive during the first holddown interval, the server will remain out of use for server load balanced traffic, the health check monitor will double the holddown interval once, and continue to monitor the server for the duration of the doubled holddown interval. The health check monitor continues to monitor the server for additional iterations of the doubled holddown interval until connectivity to the server becomes reliable, at which time the holddown interval will revert to the configured interval, and the newly responsive server whose status is active will replace the standby server in the pool of servers currently in use. In effect, if the status of a server is active but the server is habitually unresponsive, the health check monitor is less likely to restore the server to use by server load balanced traffic until the server’s connectivity becomes more reliable.
This option applies only to real servers whose status is active, but have been detected to be unresponsive (“down”).
300
http-host <host_str> Enter the value of the HOST header to match. For traffic to use the realserver, the HTTP(S) Host: header must match (case insensitive) the value of the http-host attribute.This is available when VIP ldb-method is http-host.
null
ip <server_ip> Enter the IP address of a server in this server load balancing cluster.
0.0.0.0
max-connections <connection_integer>
Enter the limit on the number of active connections directed to a real server. If the maximum number of connections is reached for the real server, the FortiGate unit will automatically switch all further connection requests to another server until the connection number drops below the specifiedlimit.0 means unlimited number of connections.
0
monitor <healthcheck_str> Enter one or more names of health check monitor settings to use when performing a health check, separating each name with a space. If any of the configured health check monitors detect failures, the FortiGate unit will deem the server unresponsive, and will not forward traffic to that server. For details on configuring health check monitor settings, see “firewall ldb-monitor” on page 111.This option appears only if healthcheck is enable.
No default.
port <port_ip> Enter the port used if port forwarding is enabled. 10
Variable Description Default
FortiOS 4.0 MR3 CLI Reference180 01-431-99686-20110623
http://docs.fortinet.com/ • Feedback
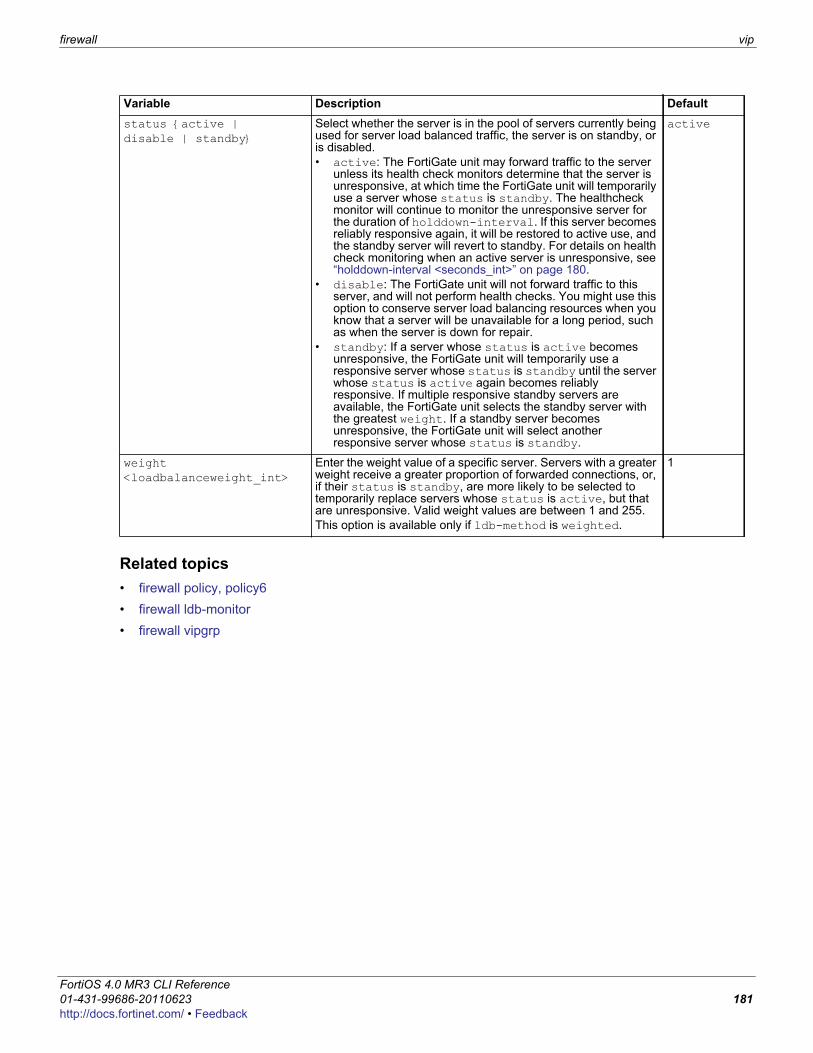
firewall vip
F0h
Related topics• firewall policy, policy6• firewall ldb-monitor• firewall vipgrp
status {active | disable | standby}
Select whether the server is in the pool of servers currently being used for server load balanced traffic, the server is on standby, or is disabled.• active: The FortiGate unit may forward traffic to the server
unless its health check monitors determine that the server is unresponsive, at which time the FortiGate unit will temporarily use a server whose status is standby. The healthcheck monitor will continue to monitor the unresponsive server for the duration of holddown-interval. If this server becomes reliably responsive again, it will be restored to active use, and the standby server will revert to standby. For details on health check monitoring when an active server is unresponsive, see “holddown-interval <seconds_int>” on page 180.
• disable: The FortiGate unit will not forward traffic to this server, and will not perform health checks. You might use this option to conserve server load balancing resources when you know that a server will be unavailable for a long period, such as when the server is down for repair.
• standby: If a server whose status is active becomes unresponsive, the FortiGate unit will temporarily use a responsive server whose status is standby until the server whose status is active again becomes reliably responsive. If multiple responsive standby servers are available, the FortiGate unit selects the standby server with the greatest weight. If a standby server becomes unresponsive, the FortiGate unit will select another responsive server whose status is standby.
active
weight <loadbalanceweight_int>
Enter the weight value of a specific server. Servers with a greater weight receive a greater proportion of forwarded connections, or, if their status is standby, are more likely to be selected to temporarily replace servers whose status is active, but that are unresponsive. Valid weight values are between 1 and 255. This option is available only if ldb-method is weighted.
1
Variable Description Default
ortiOS 4.0 MR3 CLI Reference1-431-99686-20110623 181ttp://docs.fortinet.com/ • Feedback
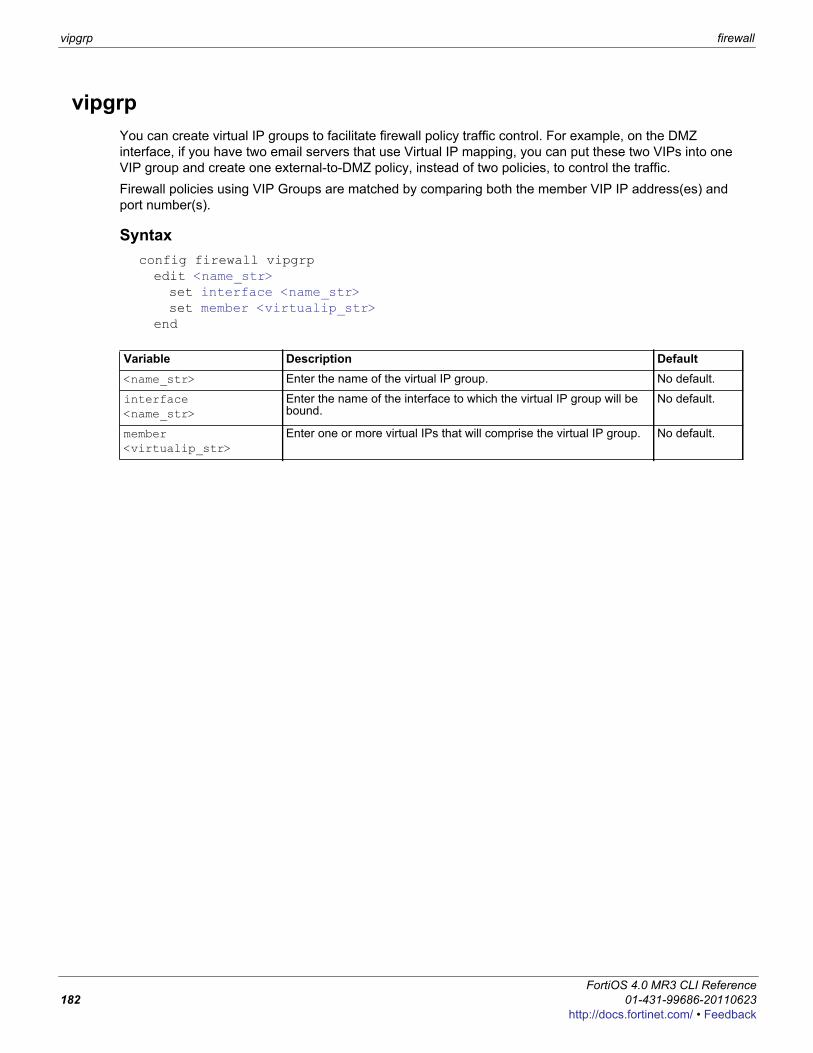
vipgrp firewall
vipgrpYou can create virtual IP groups to facilitate firewall policy traffic control. For example, on the DMZ interface, if you have two email servers that use Virtual IP mapping, you can put these two VIPs into one VIP group and create one external-to-DMZ policy, instead of two policies, to control the traffic.Firewall policies using VIP Groups are matched by comparing both the member VIP IP address(es) and port number(s).
Syntaxconfig firewall vipgrpedit <name_str>set interface <name_str>set member <virtualip_str>
end
Variable Description Default<name_str> Enter the name of the virtual IP group. No default.
interface <name_str>
Enter the name of the interface to which the virtual IP group will be bound.
No default.
member <virtualip_str>
Enter one or more virtual IPs that will comprise the virtual IP group. No default.
FortiOS 4.0 MR3 CLI Reference182 01-431-99686-20110623
http://docs.fortinet.com/ • Feedback
F0h
ftp-proxyUse ftp-proxy commands to configure the FortiGate explicit FTP proxy. You can use the FortiGate explicit FTP proxy and interface settings to enable explicit FTP proxying on one or more interfaces. When enabled, the FortiGate unit becomes a FTP proxy server. All FTP sessions received by interfaces with explicit FTP proxy enabled are intercepted by the explicit FTP proxy relayed to their destinations.To use the explicit FTP proxy, users must add the IP address of a FortiGate interface and the explicit proxy port number to the proxy configuration settings of their FTP clients.
explicit
ortiOS 4.0 MR3 CLI Reference1-431-99686-20110623 183ttp://docs.fortinet.com/ • Feedback
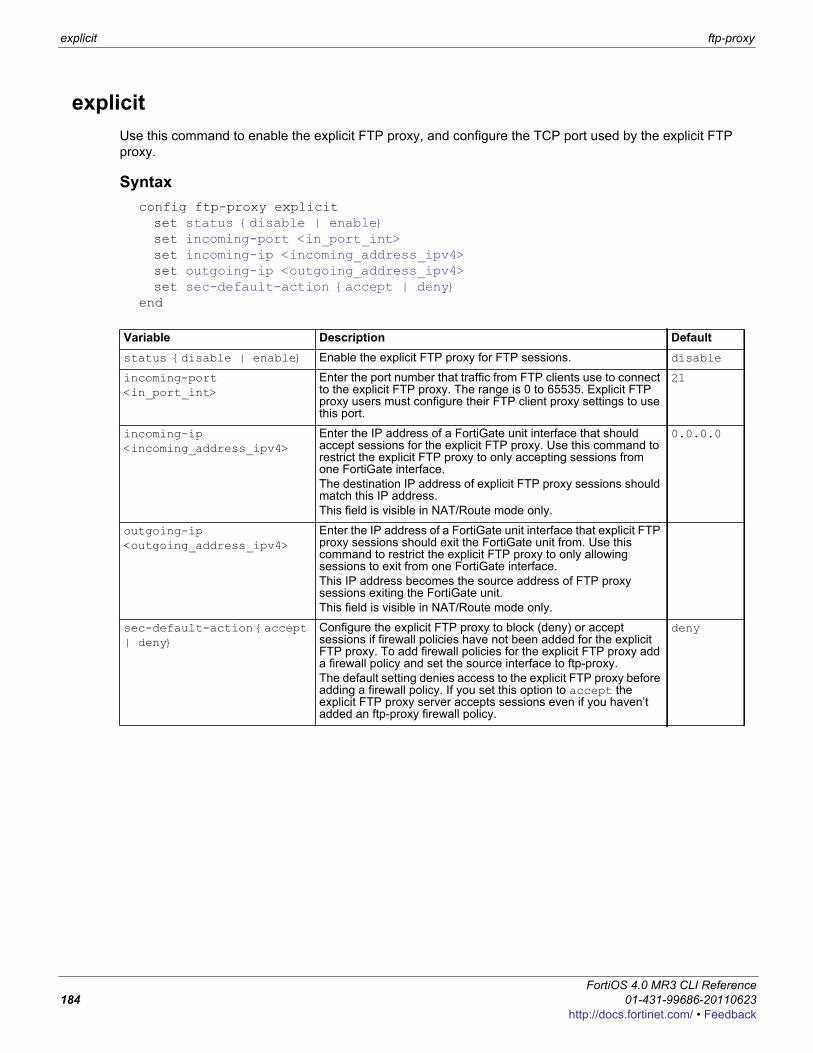
explicit ftp-proxy
explicitUse this command to enable the explicit FTP proxy, and configure the TCP port used by the explicit FTP proxy.
Syntaxconfig ftp-proxy explicitset status {disable | enable}set incoming-port <in_port_int>set incoming-ip <incoming_address_ipv4>set outgoing-ip <outgoing_address_ipv4>set sec-default-action {accept | deny}
end
Variable Description Defaultstatus {disable | enable} Enable the explicit FTP proxy for FTP sessions. disable
incoming-port <in_port_int>
Enter the port number that traffic from FTP clients use to connect to the explicit FTP proxy. The range is 0 to 65535. Explicit FTP proxy users must configure their FTP client proxy settings to use this port.
21
incoming-ip <incoming_address_ipv4>
Enter the IP address of a FortiGate unit interface that should accept sessions for the explicit FTP proxy. Use this command to restrict the explicit FTP proxy to only accepting sessions from one FortiGate interface.The destination IP address of explicit FTP proxy sessions should match this IP address. This field is visible in NAT/Route mode only.
0.0.0.0
outgoing-ip <outgoing_address_ipv4>
Enter the IP address of a FortiGate unit interface that explicit FTP proxy sessions should exit the FortiGate unit from. Use this command to restrict the explicit FTP proxy to only allowing sessions to exit from one FortiGate interface.This IP address becomes the source address of FTP proxy sessions exiting the FortiGate unit.This field is visible in NAT/Route mode only.
sec-default-action {accept | deny}
Configure the explicit FTP proxy to block (deny) or accept sessions if firewall policies have not been added for the explicit FTP proxy. To add firewall policies for the explicit FTP proxy add a firewall policy and set the source interface to ftp-proxy.The default setting denies access to the explicit FTP proxy before adding a firewall policy. If you set this option to accept the explicit FTP proxy server accepts sessions even if you haven’t added an ftp-proxy firewall policy.
deny
FortiOS 4.0 MR3 CLI Reference184 01-431-99686-20110623
http://docs.fortinet.com/ • Feedback

F0h
guiThis chapter contains the following section:
console
ortiOS 4.0 MR3 CLI Reference1-431-99686-20110623 185ttp://docs.fortinet.com/ • Feedback
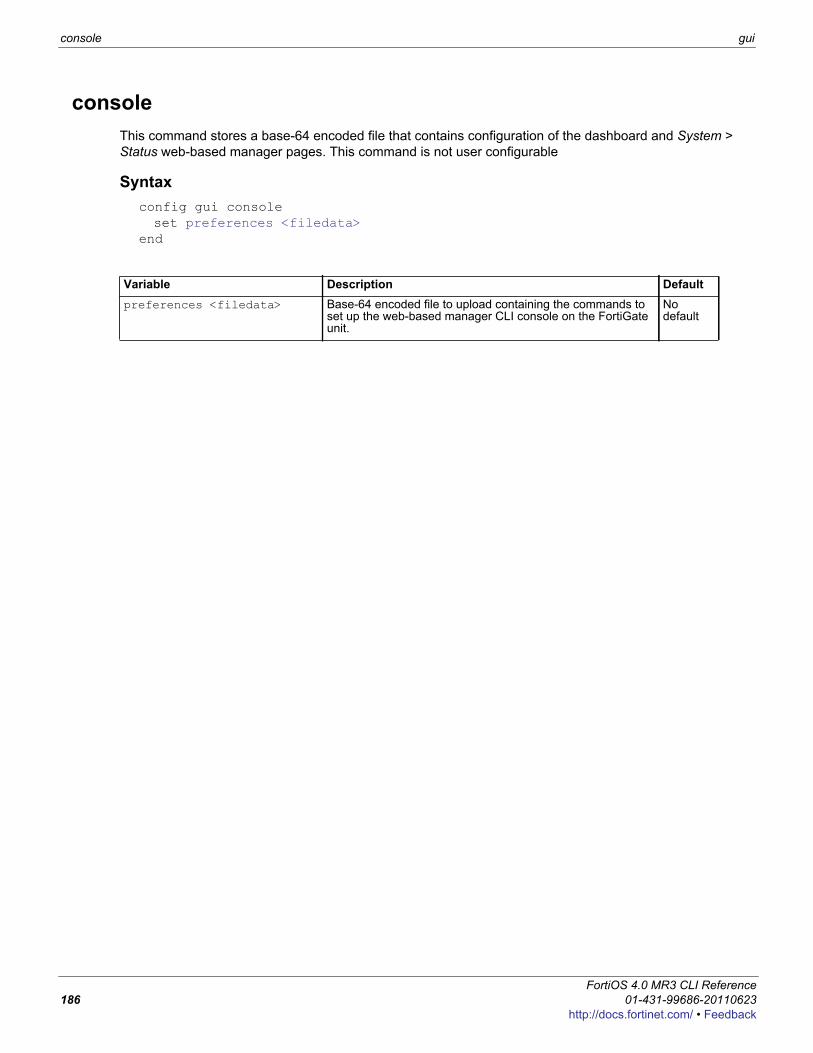
console gui
consoleThis command stores a base-64 encoded file that contains configuration of the dashboard and System > Status web-based manager pages. This command is not user configurable
Syntaxconfig gui consoleset preferences <filedata>
end
Variable Description Defaultpreferences <filedata> Base-64 encoded file to upload containing the commands to
set up the web-based manager CLI console on the FortiGate unit.
No default
FortiOS 4.0 MR3 CLI Reference186 01-431-99686-20110623
http://docs.fortinet.com/ • Feedback

F0h
icapThis chapter contains the following section:
profileserver
ortiOS 4.0 MR3 CLI Reference1-431-99686-20110623 187ttp://docs.fortinet.com/ • Feedback
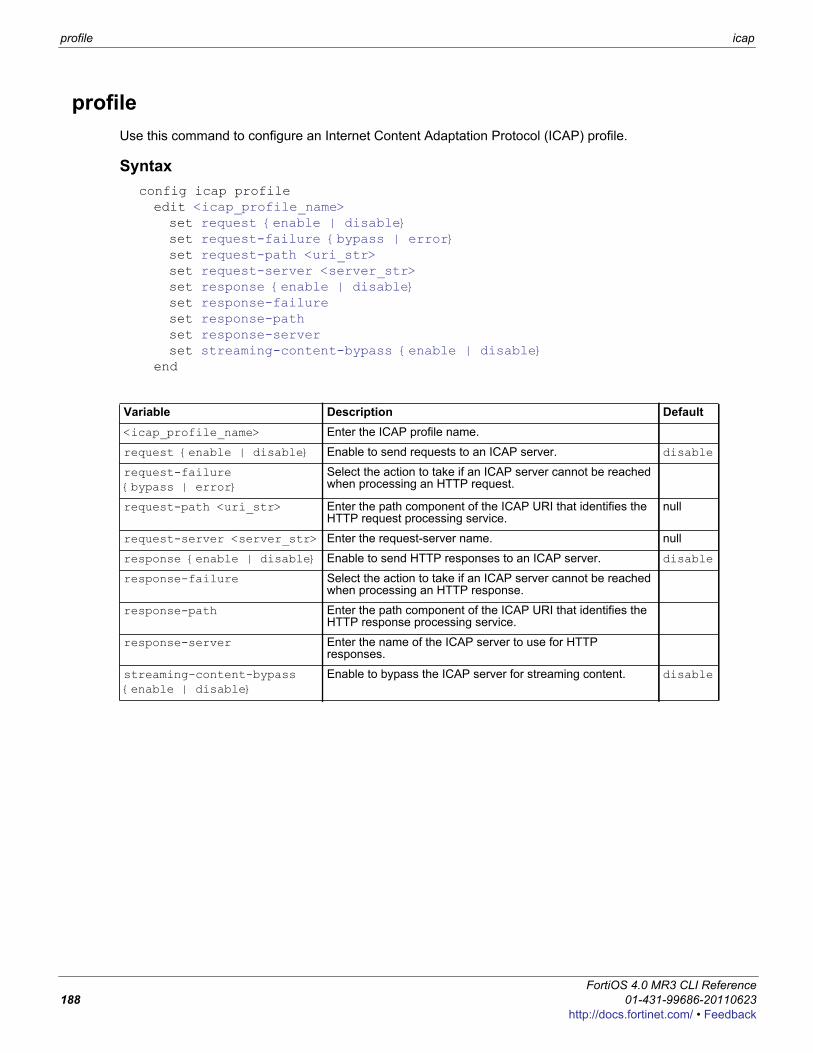
profile icap
profileUse this command to configure an Internet Content Adaptation Protocol (ICAP) profile.
Syntaxconfig icap profileedit <icap_profile_name>set request {enable | disable}set request-failure {bypass | error}set request-path <uri_str>set request-server <server_str>set response {enable | disable}set response-failureset response-pathset response-serverset streaming-content-bypass {enable | disable}
end
Variable Description Default<icap_profile_name> Enter the ICAP profile name.
request {enable | disable} Enable to send requests to an ICAP server. disable
request-failure {bypass | error}
Select the action to take if an ICAP server cannot be reached when processing an HTTP request.
request-path <uri_str> Enter the path component of the ICAP URI that identifies the HTTP request processing service.
null
request-server <server_str> Enter the request-server name. null
response {enable | disable} Enable to send HTTP responses to an ICAP server. disable
response-failure Select the action to take if an ICAP server cannot be reached when processing an HTTP response.
response-path Enter the path component of the ICAP URI that identifies the HTTP response processing service.
response-server Enter the name of the ICAP server to use for HTTP responses.
streaming-content-bypass {enable | disable}
Enable to bypass the ICAP server for streaming content. disable
FortiOS 4.0 MR3 CLI Reference188 01-431-99686-20110623
http://docs.fortinet.com/ • Feedback
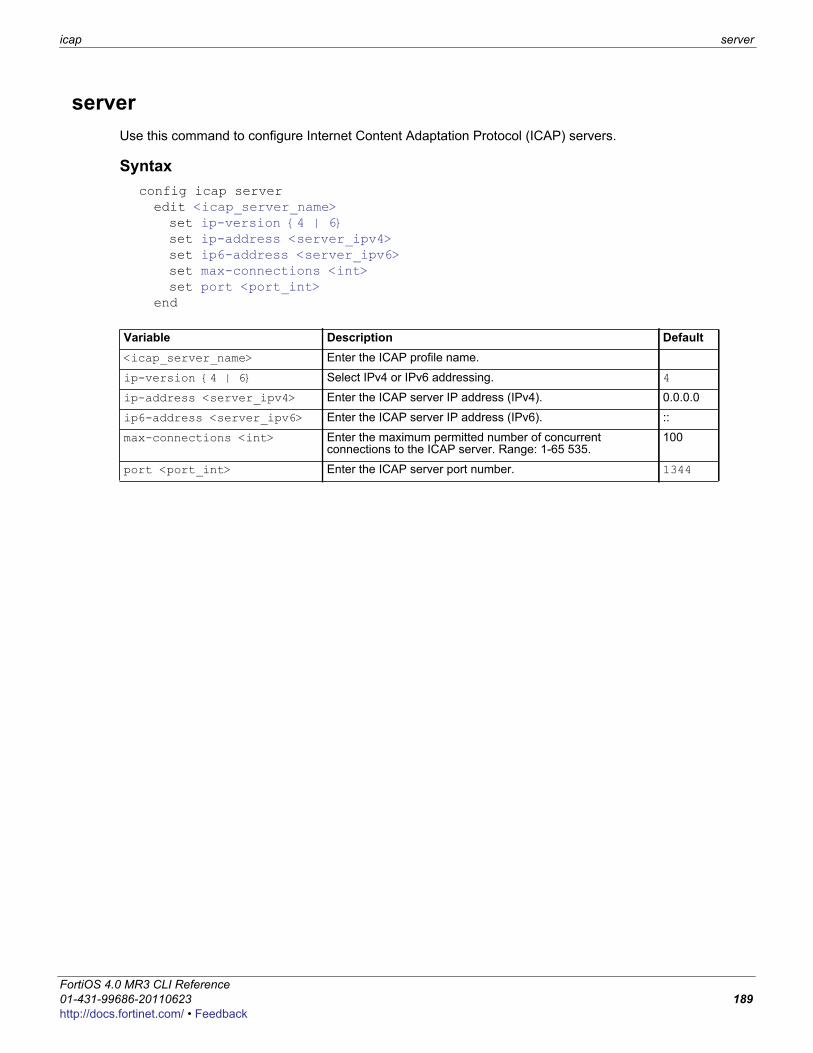
icap server
F0h
serverUse this command to configure Internet Content Adaptation Protocol (ICAP) servers.
Syntaxconfig icap serveredit <icap_server_name>set ip-version {4 | 6}set ip-address <server_ipv4>set ip6-address <server_ipv6>set max-connections <int>set port <port_int>
end
Variable Description Default<icap_server_name> Enter the ICAP profile name.
ip-version {4 | 6} Select IPv4 or IPv6 addressing. 4
ip-address <server_ipv4> Enter the ICAP server IP address (IPv4). 0.0.0.0
ip6-address <server_ipv6> Enter the ICAP server IP address (IPv6). ::
max-connections <int> Enter the maximum permitted number of concurrent connections to the ICAP server. Range: 1-65 535.
100
port <port_int> Enter the ICAP server port number. 1344
ortiOS 4.0 MR3 CLI Reference1-431-99686-20110623 189ttp://docs.fortinet.com/ • Feedback

server icap
FortiOS 4.0 MR3 CLI Reference190 01-431-99686-20110623
http://docs.fortinet.com/ • Feedback
F0h
imp2pUse imp2p commands to configure user access to Instant Messaging and Peer-to-Peer applications, and to configure a global policy for unknown users who might use these applications.This chapter contains the following sections:
aim-usericq-usermsn-userold-versionpolicyyahoo-user
ortiOS 4.0 MR3 CLI Reference1-431-99686-20110623 191ttp://docs.fortinet.com/ • Feedback
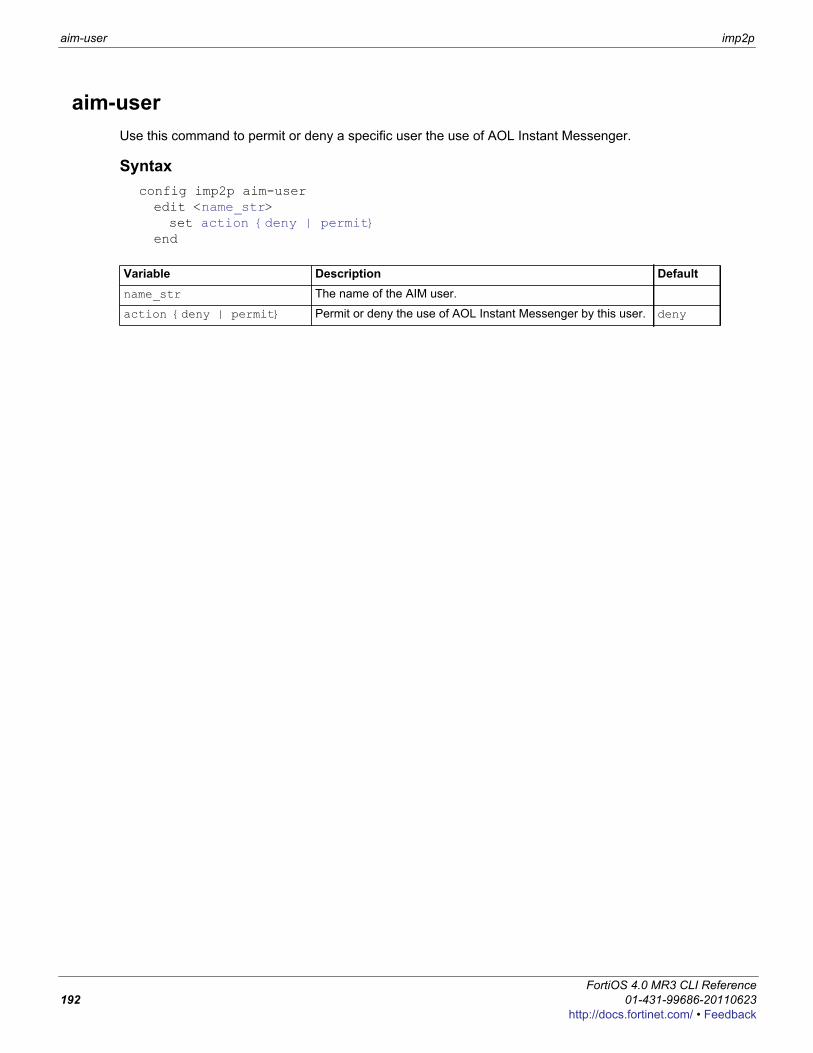
aim-user imp2p
aim-userUse this command to permit or deny a specific user the use of AOL Instant Messenger.
Syntaxconfig imp2p aim-useredit <name_str>set action {deny | permit}
end
Variable Description Defaultname_str The name of the AIM user.
action {deny | permit} Permit or deny the use of AOL Instant Messenger by this user. deny
FortiOS 4.0 MR3 CLI Reference192 01-431-99686-20110623
http://docs.fortinet.com/ • Feedback
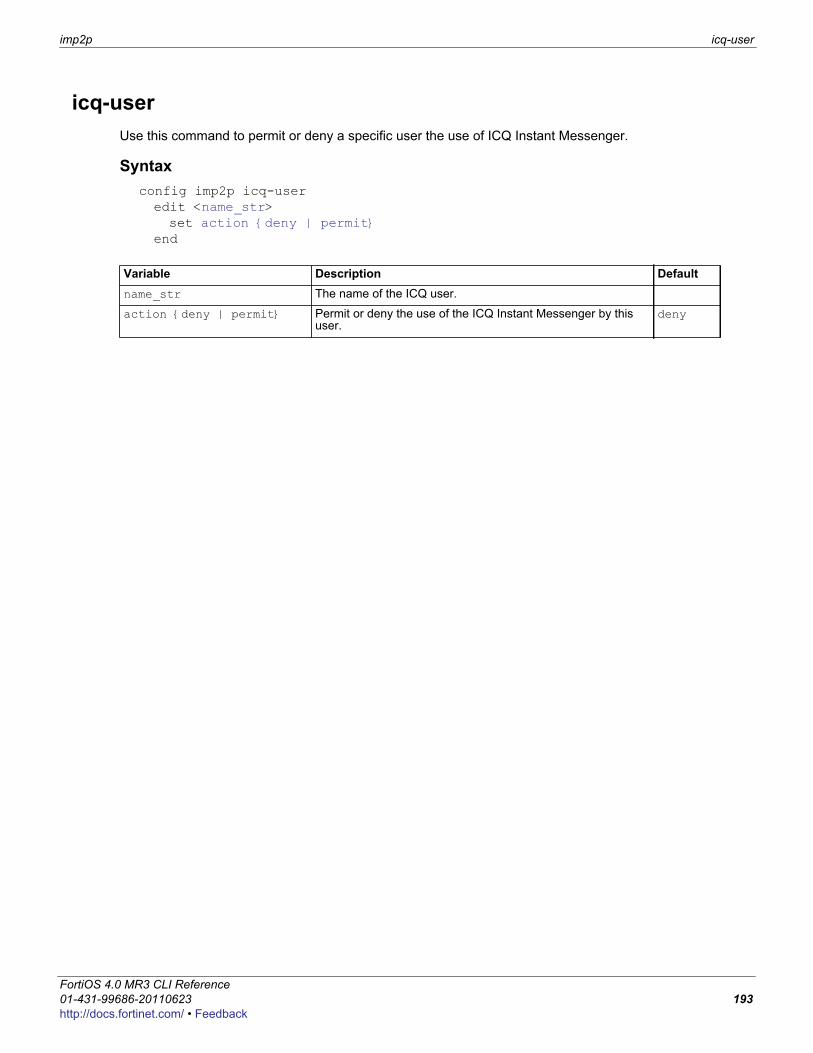
imp2p icq-user
F0h
icq-userUse this command to permit or deny a specific user the use of ICQ Instant Messenger.
Syntaxconfig imp2p icq-useredit <name_str>set action {deny | permit}
end
Variable Description Defaultname_str The name of the ICQ user.
action {deny | permit} Permit or deny the use of the ICQ Instant Messenger by this user.
deny
ortiOS 4.0 MR3 CLI Reference1-431-99686-20110623 193ttp://docs.fortinet.com/ • Feedback
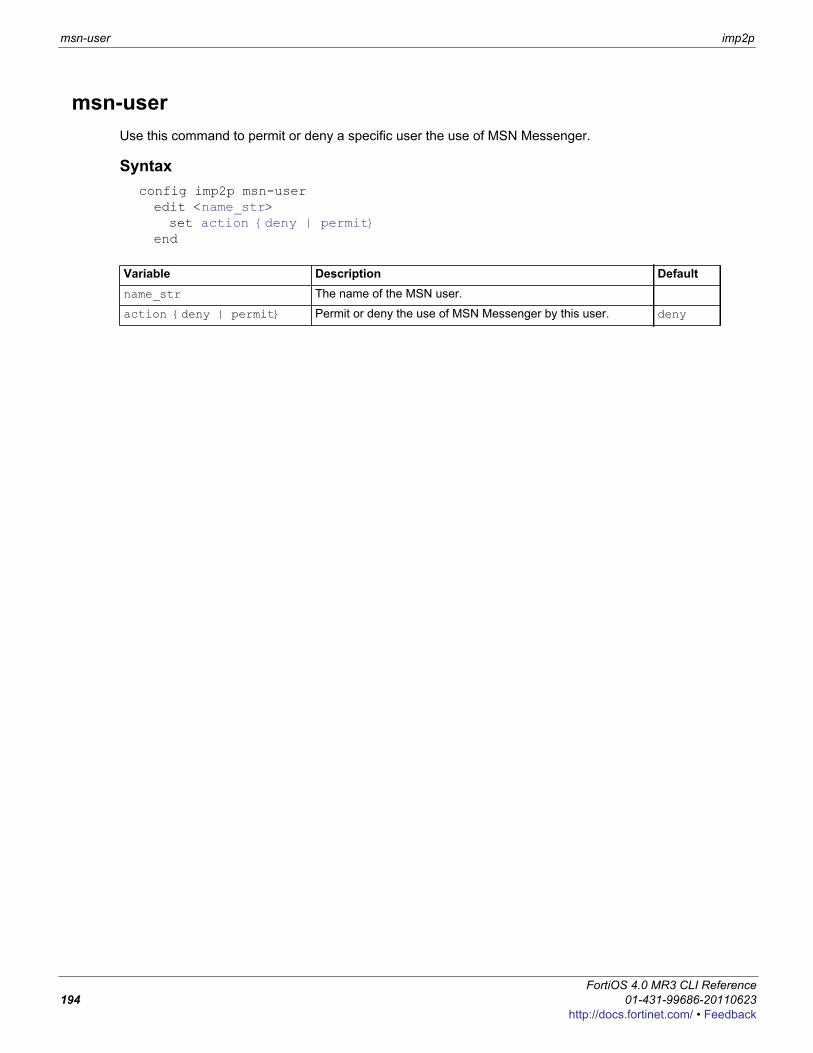
msn-user imp2p
msn-userUse this command to permit or deny a specific user the use of MSN Messenger.
Syntaxconfig imp2p msn-useredit <name_str>set action {deny | permit}
end
Variable Description Defaultname_str The name of the MSN user.
action {deny | permit} Permit or deny the use of MSN Messenger by this user. deny
FortiOS 4.0 MR3 CLI Reference194 01-431-99686-20110623
http://docs.fortinet.com/ • Feedback
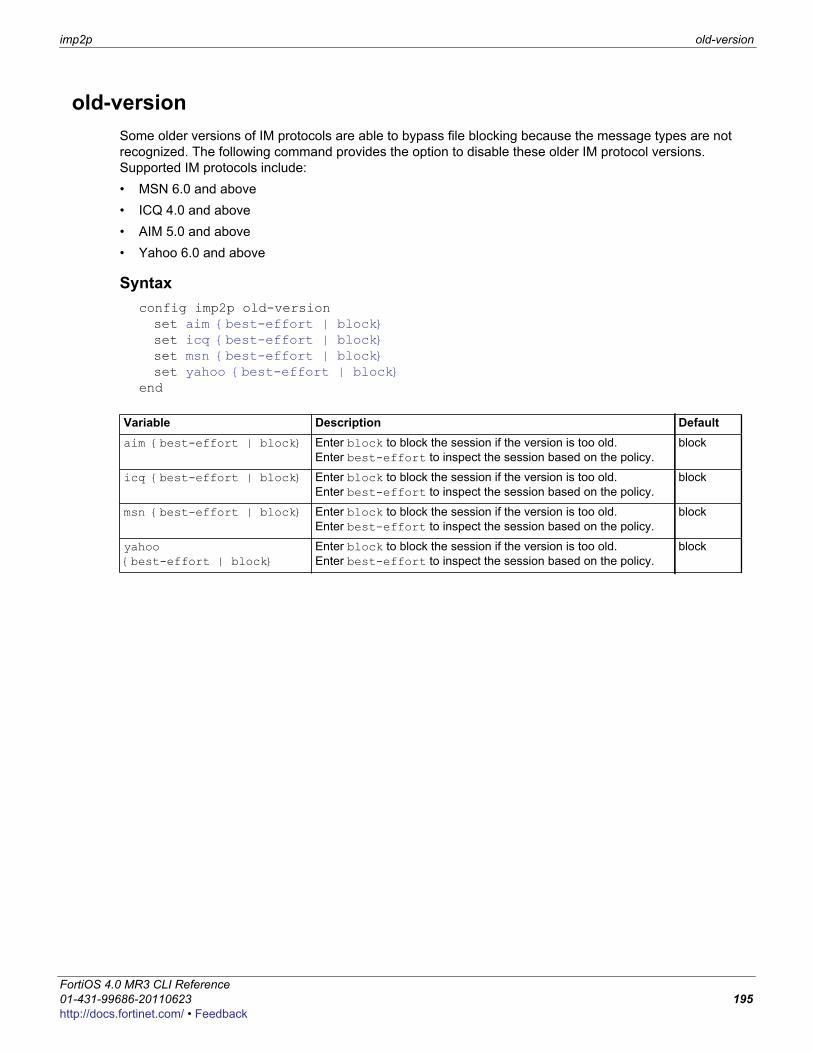
imp2p old-version
F0h
old-versionSome older versions of IM protocols are able to bypass file blocking because the message types are not recognized. The following command provides the option to disable these older IM protocol versions. Supported IM protocols include:• MSN 6.0 and above• ICQ 4.0 and above• AIM 5.0 and above• Yahoo 6.0 and above
Syntaxconfig imp2p old-versionset aim {best-effort | block}set icq {best-effort | block}set msn {best-effort | block}set yahoo {best-effort | block}
end
Variable Description Defaultaim {best-effort | block} Enter block to block the session if the version is too old.
Enter best-effort to inspect the session based on the policy.block
icq {best-effort | block} Enter block to block the session if the version is too old.Enter best-effort to inspect the session based on the policy.
block
msn {best-effort | block} Enter block to block the session if the version is too old.Enter best-effort to inspect the session based on the policy.
block
yahoo {best-effort | block}
Enter block to block the session if the version is too old.Enter best-effort to inspect the session based on the policy.
block
ortiOS 4.0 MR3 CLI Reference1-431-99686-20110623 195ttp://docs.fortinet.com/ • Feedback
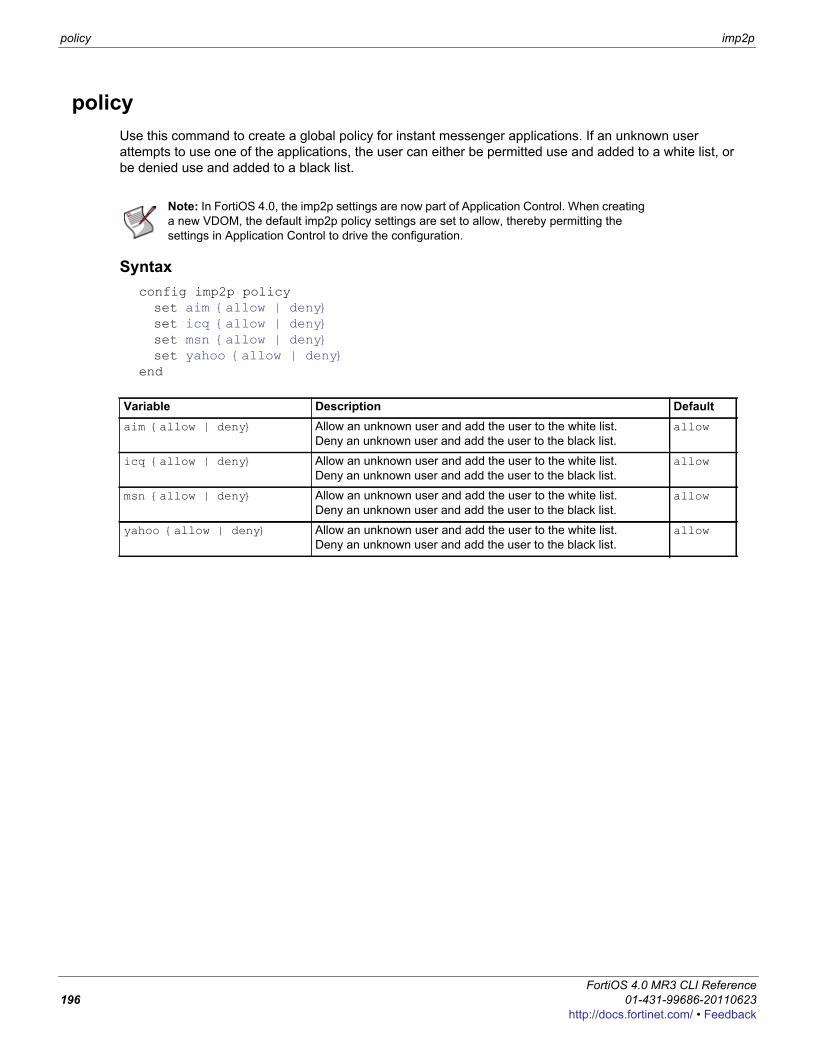
policy imp2p
policyUse this command to create a global policy for instant messenger applications. If an unknown user attempts to use one of the applications, the user can either be permitted use and added to a white list, or be denied use and added to a black list.
Syntaxconfig imp2p policyset aim {allow | deny}set icq {allow | deny}set msn {allow | deny}set yahoo {allow | deny}
end
Note: In FortiOS 4.0, the imp2p settings are now part of Application Control. When creating a new VDOM, the default imp2p policy settings are set to allow, thereby permitting the settings in Application Control to drive the configuration.
Variable Description Defaultaim {allow | deny} Allow an unknown user and add the user to the white list.
Deny an unknown user and add the user to the black list.allow
icq {allow | deny} Allow an unknown user and add the user to the white list.Deny an unknown user and add the user to the black list.
allow
msn {allow | deny} Allow an unknown user and add the user to the white list.Deny an unknown user and add the user to the black list.
allow
yahoo {allow | deny} Allow an unknown user and add the user to the white list.Deny an unknown user and add the user to the black list.
allow
FortiOS 4.0 MR3 CLI Reference196 01-431-99686-20110623
http://docs.fortinet.com/ • Feedback
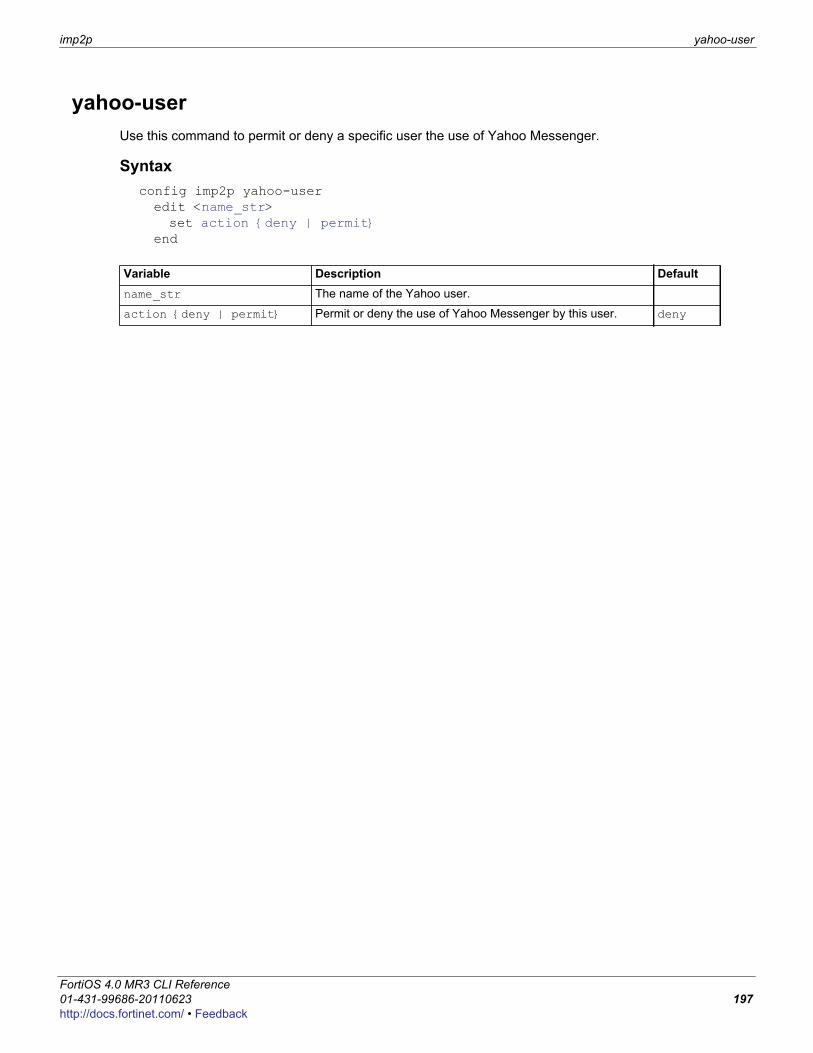
imp2p yahoo-user
F0h
yahoo-userUse this command to permit or deny a specific user the use of Yahoo Messenger.
Syntaxconfig imp2p yahoo-useredit <name_str>set action {deny | permit}
end
Variable Description Defaultname_str The name of the Yahoo user.
action {deny | permit} Permit or deny the use of Yahoo Messenger by this user. deny
ortiOS 4.0 MR3 CLI Reference1-431-99686-20110623 197ttp://docs.fortinet.com/ • Feedback

yahoo-user imp2p
FortiOS 4.0 MR3 CLI Reference198 01-431-99686-20110623
http://docs.fortinet.com/ • Feedback
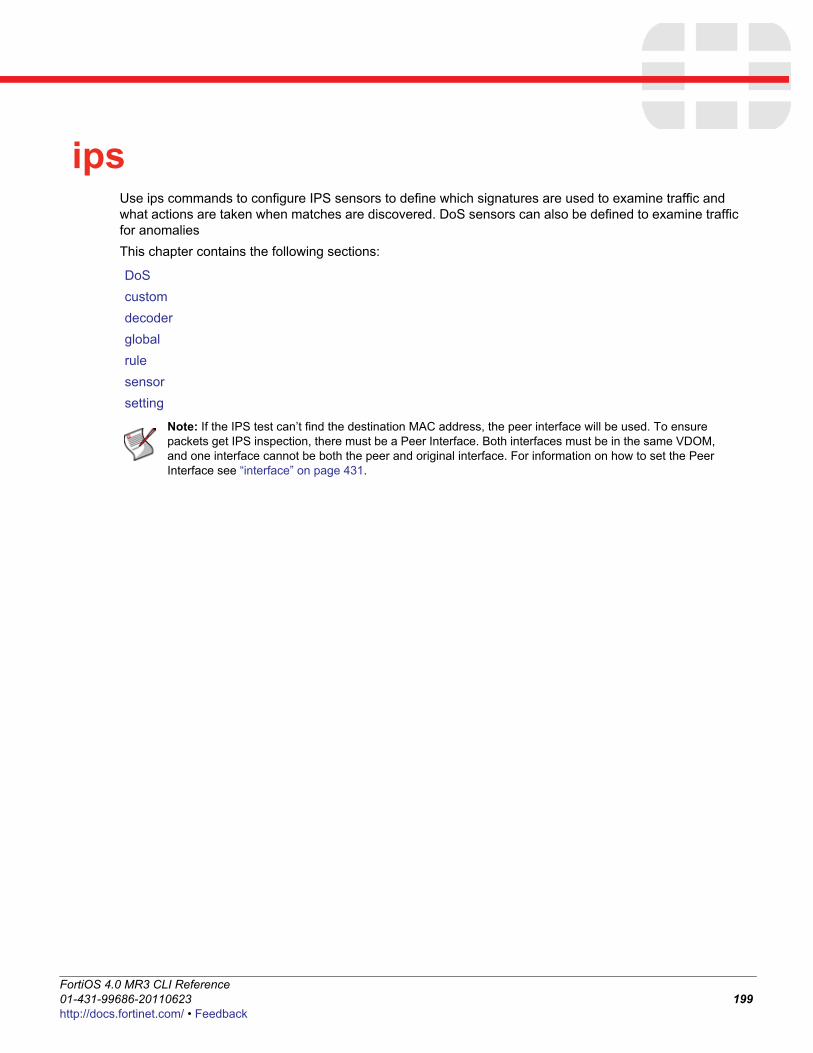
F0h
ipsUse ips commands to configure IPS sensors to define which signatures are used to examine traffic and what actions are taken when matches are discovered. DoS sensors can also be defined to examine traffic for anomaliesThis chapter contains the following sections:
DoScustomdecoderglobalrulesensorsetting
Note: If the IPS test can’t find the destination MAC address, the peer interface will be used. To ensure packets get IPS inspection, there must be a Peer Interface. Both interfaces must be in the same VDOM, and one interface cannot be both the peer and original interface. For information on how to set the Peer Interface see “interface” on page 431.
ortiOS 4.0 MR3 CLI Reference1-431-99686-20110623 199ttp://docs.fortinet.com/ • Feedback
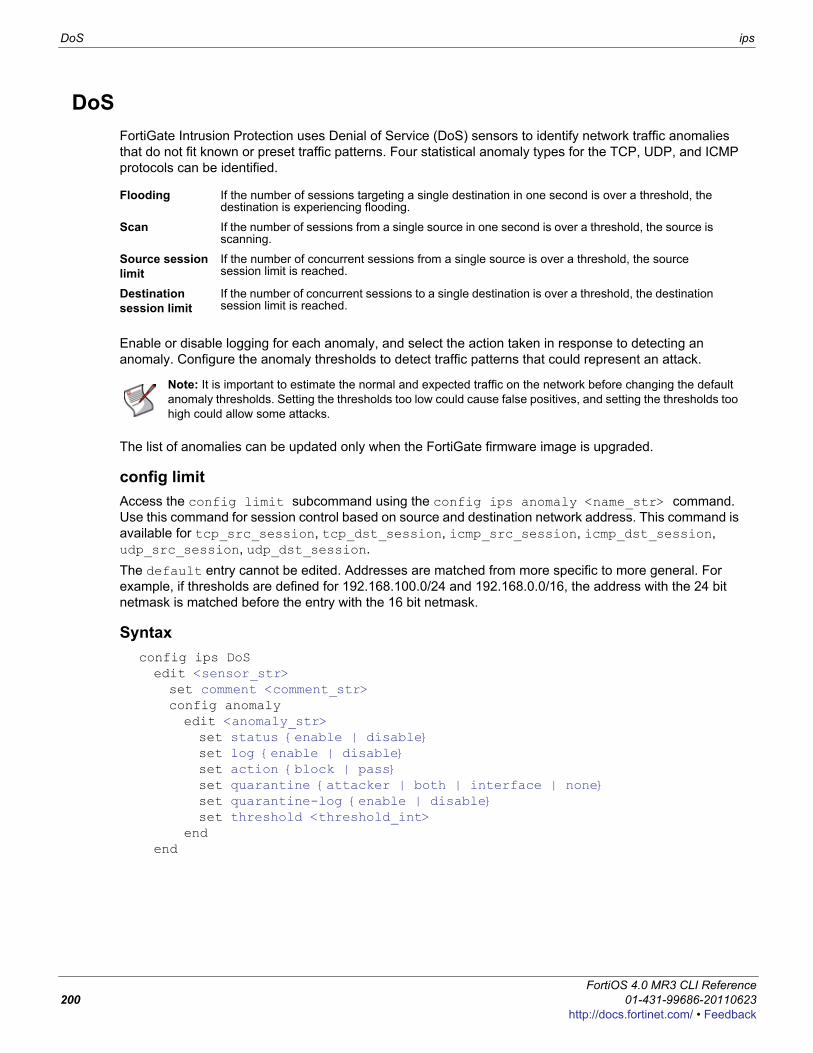
DoS ips
DoSFortiGate Intrusion Protection uses Denial of Service (DoS) sensors to identify network traffic anomalies that do not fit known or preset traffic patterns. Four statistical anomaly types for the TCP, UDP, and ICMP protocols can be identified.
Enable or disable logging for each anomaly, and select the action taken in response to detecting an anomaly. Configure the anomaly thresholds to detect traffic patterns that could represent an attack.
The list of anomalies can be updated only when the FortiGate firmware image is upgraded.
config limitAccess the config limit subcommand using the config ips anomaly <name_str> command. Use this command for session control based on source and destination network address. This command is available for tcp_src_session, tcp_dst_session, icmp_src_session, icmp_dst_session, udp_src_session, udp_dst_session.The default entry cannot be edited. Addresses are matched from more specific to more general. For example, if thresholds are defined for 192.168.100.0/24 and 192.168.0.0/16, the address with the 24 bit netmask is matched before the entry with the 16 bit netmask.
Syntaxconfig ips DoSedit <sensor_str>set comment <comment_str>config anomalyedit <anomaly_str>set status {enable | disable}set log {enable | disable}set action {block | pass}set quarantine {attacker | both | interface | none}set quarantine-log {enable | disable}set threshold <threshold_int>
endend
Flooding If the number of sessions targeting a single destination in one second is over a threshold, the destination is experiencing flooding.
Scan If the number of sessions from a single source in one second is over a threshold, the source is scanning.
Source session limit
If the number of concurrent sessions from a single source is over a threshold, the source session limit is reached.
Destination session limit
If the number of concurrent sessions to a single destination is over a threshold, the destination session limit is reached.
Note: It is important to estimate the normal and expected traffic on the network before changing the default anomaly thresholds. Setting the thresholds too low could cause false positives, and setting the thresholds too high could allow some attacks.
FortiOS 4.0 MR3 CLI Reference200 01-431-99686-20110623
http://docs.fortinet.com/ • Feedback
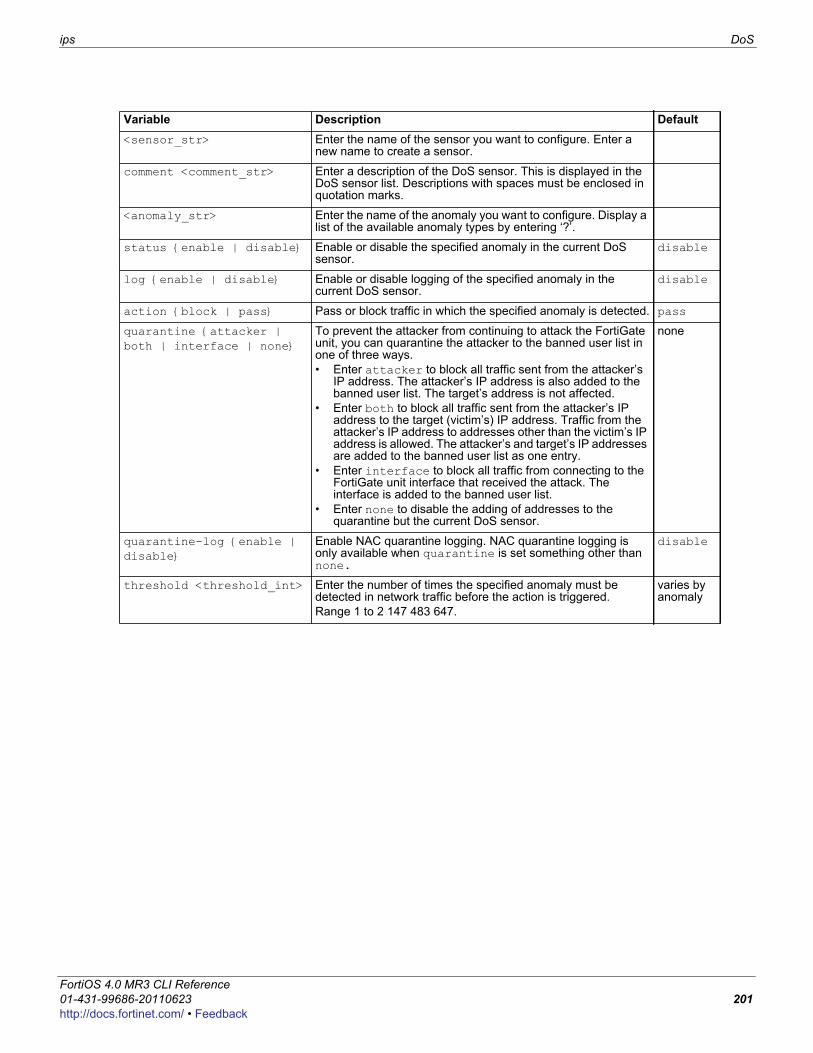
ips DoS
F0h
Variable Description Default<sensor_str> Enter the name of the sensor you want to configure. Enter a
new name to create a sensor.
comment <comment_str> Enter a description of the DoS sensor. This is displayed in the DoS sensor list. Descriptions with spaces must be enclosed in quotation marks.
<anomaly_str> Enter the name of the anomaly you want to configure. Display a list of the available anomaly types by entering ‘?’.
status {enable | disable} Enable or disable the specified anomaly in the current DoS sensor.
disable
log {enable | disable} Enable or disable logging of the specified anomaly in the current DoS sensor.
disable
action {block | pass} Pass or block traffic in which the specified anomaly is detected. pass
quarantine {attacker | both | interface | none}
To prevent the attacker from continuing to attack the FortiGate unit, you can quarantine the attacker to the banned user list in one of three ways.• Enter attacker to block all traffic sent from the attacker’s
IP address. The attacker’s IP address is also added to the banned user list. The target’s address is not affected.
• Enter both to block all traffic sent from the attacker’s IP address to the target (victim’s) IP address. Traffic from the attacker’s IP address to addresses other than the victim’s IP address is allowed. The attacker’s and target’s IP addresses are added to the banned user list as one entry.
• Enter interface to block all traffic from connecting to the FortiGate unit interface that received the attack. The interface is added to the banned user list.
• Enter none to disable the adding of addresses to the quarantine but the current DoS sensor.
none
quarantine-log {enable | disable}
Enable NAC quarantine logging. NAC quarantine logging is only available when quarantine is set something other than none.
disable
threshold <threshold_int> Enter the number of times the specified anomaly must be detected in network traffic before the action is triggered.Range 1 to 2 147 483 647.
varies by anomaly
ortiOS 4.0 MR3 CLI Reference1-431-99686-20110623 201ttp://docs.fortinet.com/ • Feedback
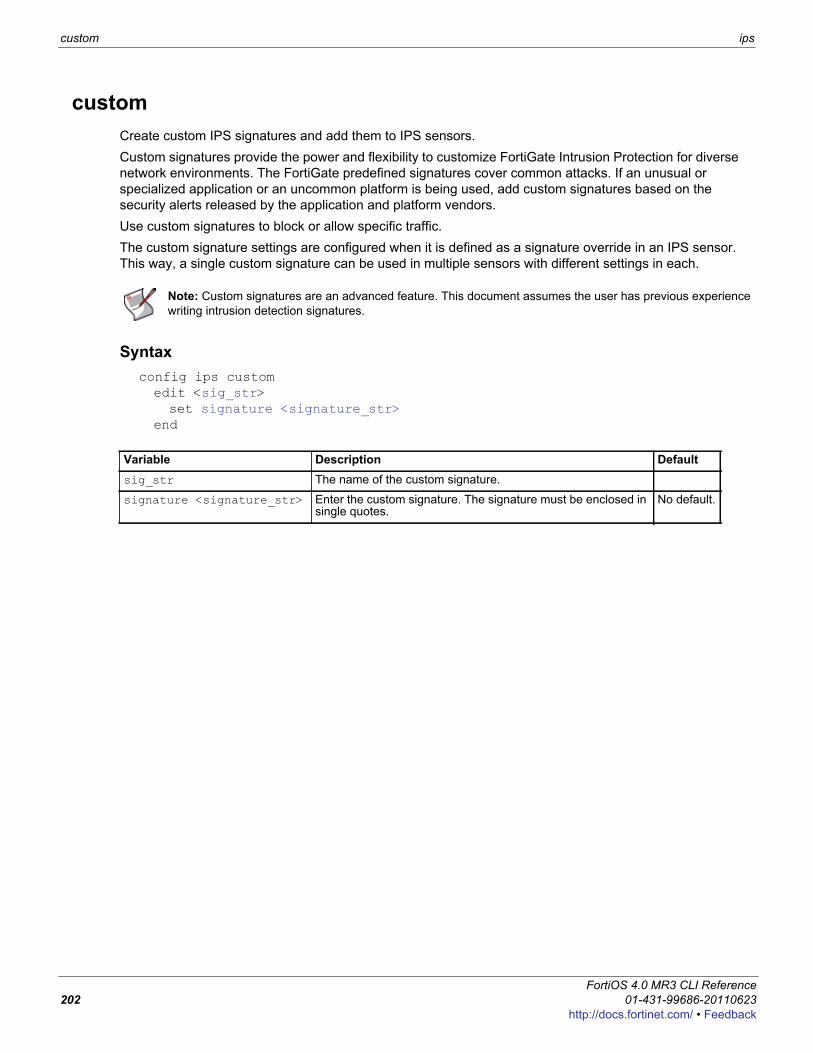
custom ips
customCreate custom IPS signatures and add them to IPS sensors. Custom signatures provide the power and flexibility to customize FortiGate Intrusion Protection for diverse network environments. The FortiGate predefined signatures cover common attacks. If an unusual or specialized application or an uncommon platform is being used, add custom signatures based on the security alerts released by the application and platform vendors. Use custom signatures to block or allow specific traffic. The custom signature settings are configured when it is defined as a signature override in an IPS sensor. This way, a single custom signature can be used in multiple sensors with different settings in each.
Syntaxconfig ips customedit <sig_str>set signature <signature_str>
end
Note: Custom signatures are an advanced feature. This document assumes the user has previous experience writing intrusion detection signatures.
Variable Description Defaultsig_str The name of the custom signature.
signature <signature_str> Enter the custom signature. The signature must be enclosed in single quotes.
No default.
FortiOS 4.0 MR3 CLI Reference202 01-431-99686-20110623
http://docs.fortinet.com/ • Feedback
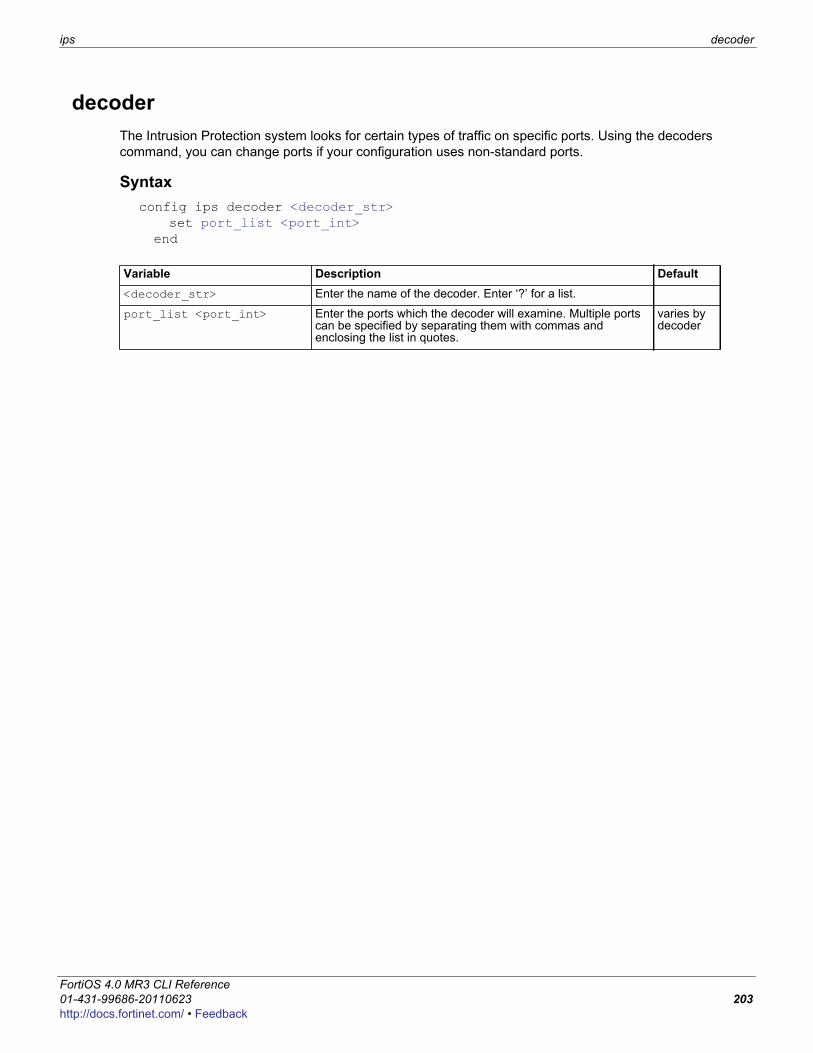
ips decoder
F0h
decoderThe Intrusion Protection system looks for certain types of traffic on specific ports. Using the decoders command, you can change ports if your configuration uses non-standard ports.
Syntaxconfig ips decoder <decoder_str>
set port_list <port_int>end
Variable Description Default<decoder_str> Enter the name of the decoder. Enter ‘?’ for a list.
port_list <port_int> Enter the ports which the decoder will examine. Multiple ports can be specified by separating them with commas and enclosing the list in quotes.
varies by decoder
ortiOS 4.0 MR3 CLI Reference1-431-99686-20110623 203ttp://docs.fortinet.com/ • Feedback

global ips
globalUse this command to ignore sessions after a set amount of traffic has passed.
Syntaxconfig ips globalset algorithm {engine-pick | high | low}set anomaly-mode {continuous | periodical}set engine-count <integer>set fail-open {enable | disable}set ignore-session-bytes <byte_integer>set session-limit-mode {accurate | heuristic}set socket-size <ips_buffer_size>set traffic-submit {enable | disable}
end
Variable Description Defaultalgorithm {engine-pick | high | low}
The IPS engine has two methods to determine whether traffic matches signatures.• high is a faster method that uses more memory• low is a slower method that uses less memory• engine-pick allows the IPS engine to choose the best
method on the fly.
engine-pick
anomaly-mode {continuous | periodical}
Enter continuous to start blocking packets once attack starts. Enter periodical to allow configured number of packets per second.
continuous
engine-count <integer> Enter the number of intrusion protection engines to run. Multi-processor FortiGate units can more efficiently process traffic with multiple engines running. When set to the default value of 0, the FortiGate unit determines the optimal number of intrusion protection engines.
0
fail-open {enable | disable}
If for any reason the IPS should cease to function, it will fail open by default. This means that crucial network traffic will not be blocked and the Firewall will continue to operate while the problem is resolved.
enable
ignore-session-bytes <byte_integer>
Set the number of bytes after which the session is ignored. 204800
session-limit-mode {accurate | heuristic}
Enter accurate to accurately count the concurrent sessions. This option demands more resources. Enter heuristic to heuristically count the concurrent sessions.
heuristic
socket-size <ips_buffer_size>
Set intrusion protection buffer size. The default value is correct in most cases.
model-dependent
traffic-submit{enable | disable}
Submit attack characteristics to FortiGuard Service disable
FortiOS 4.0 MR3 CLI Reference204 01-431-99686-20110623
http://docs.fortinet.com/ • Feedback
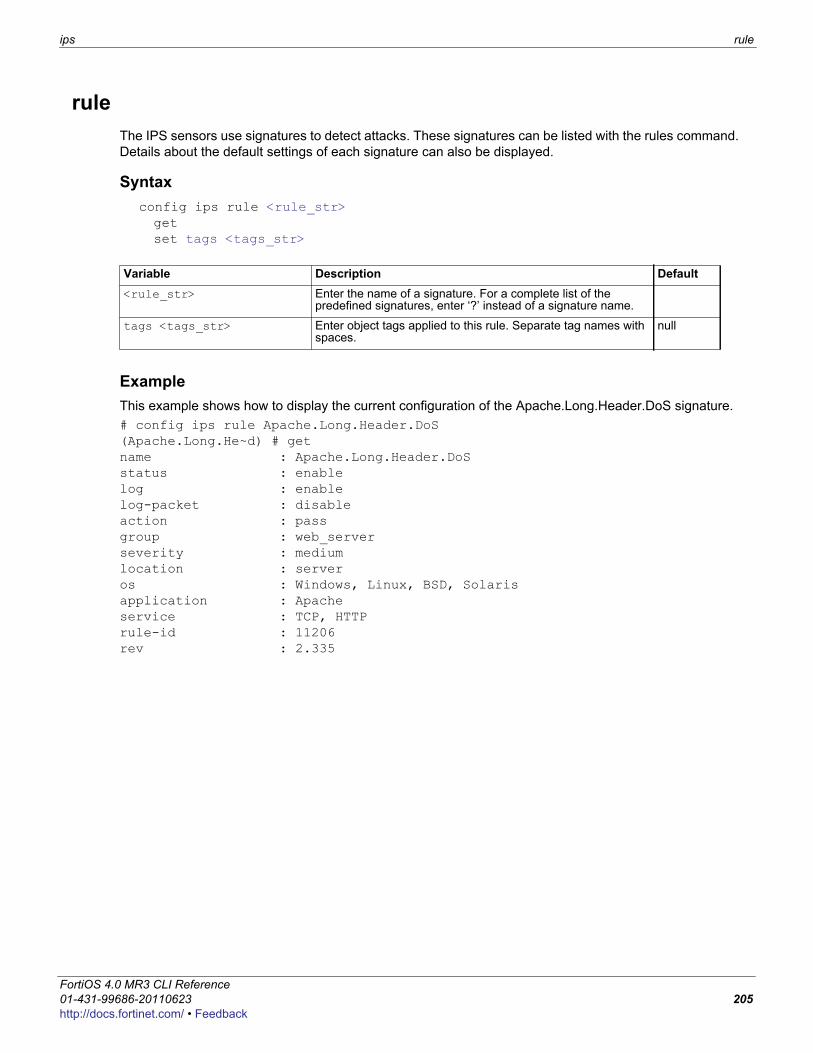
ips rule
F0h
ruleThe IPS sensors use signatures to detect attacks. These signatures can be listed with the rules command. Details about the default settings of each signature can also be displayed.
Syntaxconfig ips rule <rule_str>getset tags <tags_str>
ExampleThis example shows how to display the current configuration of the Apache.Long.Header.DoS signature.# config ips rule Apache.Long.Header.DoS(Apache.Long.He~d) # getname : Apache.Long.Header.DoSstatus : enablelog : enablelog-packet : disableaction : passgroup : web_serverseverity : mediumlocation : serveros : Windows, Linux, BSD, Solarisapplication : Apacheservice : TCP, HTTPrule-id : 11206rev : 2.335
Variable Description Default<rule_str> Enter the name of a signature. For a complete list of the
predefined signatures, enter ‘?’ instead of a signature name.
tags <tags_str> Enter object tags applied to this rule. Separate tag names with spaces.
null
ortiOS 4.0 MR3 CLI Reference1-431-99686-20110623 205ttp://docs.fortinet.com/ • Feedback
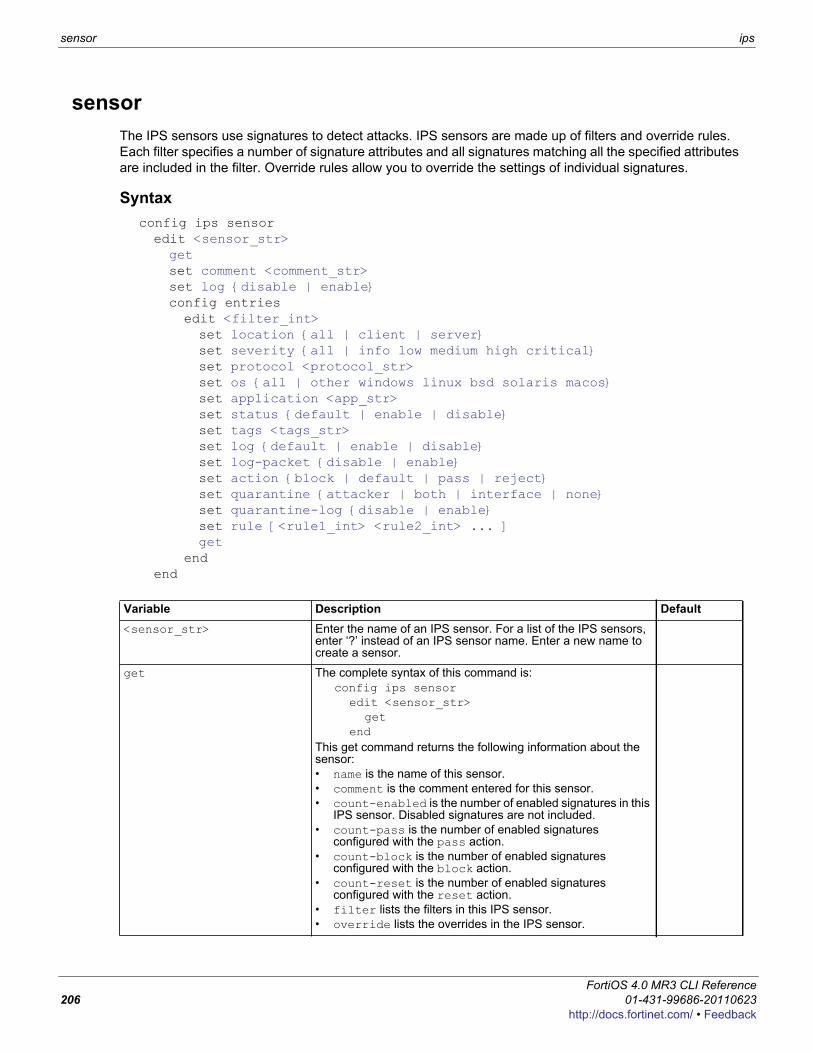
sensor ips
sensorThe IPS sensors use signatures to detect attacks. IPS sensors are made up of filters and override rules. Each filter specifies a number of signature attributes and all signatures matching all the specified attributes are included in the filter. Override rules allow you to override the settings of individual signatures.
Syntaxconfig ips sensoredit <sensor_str>getset comment <comment_str>set log {disable | enable}config entriesedit <filter_int>set location {all | client | server}set severity {all | info low medium high critical}set protocol <protocol_str>set os {all | other windows linux bsd solaris macos}set application <app_str>set status {default | enable | disable}set tags <tags_str>set log {default | enable | disable}set log-packet {disable | enable}set action {block | default | pass | reject}set quarantine {attacker | both | interface | none}set quarantine-log {disable | enable}set rule [<rule1_int> <rule2_int> ... ]get
endend
Variable Description Default<sensor_str> Enter the name of an IPS sensor. For a list of the IPS sensors,
enter ‘?’ instead of an IPS sensor name. Enter a new name to create a sensor.
get The complete syntax of this command is:config ips sensor
edit <sensor_str>get
endThis get command returns the following information about the sensor:• name is the name of this sensor.• comment is the comment entered for this sensor.• count-enabled is the number of enabled signatures in this
IPS sensor. Disabled signatures are not included.• count-pass is the number of enabled signatures
configured with the pass action.• count-block is the number of enabled signatures
configured with the block action.• count-reset is the number of enabled signatures
configured with the reset action.• filter lists the filters in this IPS sensor.• override lists the overrides in the IPS sensor.
FortiOS 4.0 MR3 CLI Reference206 01-431-99686-20110623
http://docs.fortinet.com/ • Feedback
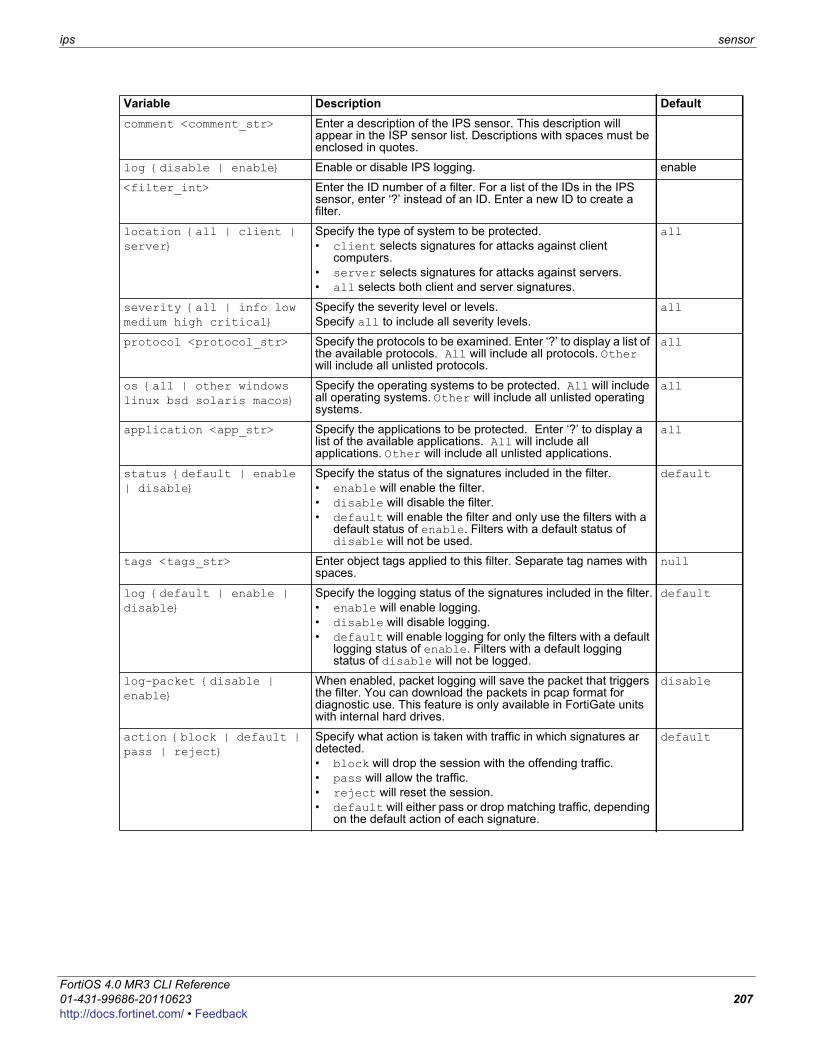
ips sensor
F0h
comment <comment_str> Enter a description of the IPS sensor. This description will appear in the ISP sensor list. Descriptions with spaces must be enclosed in quotes.
log {disable | enable} Enable or disable IPS logging. enable
<filter_int> Enter the ID number of a filter. For a list of the IDs in the IPS sensor, enter ‘?’ instead of an ID. Enter a new ID to create a filter.
location {all | client | server}
Specify the type of system to be protected.• client selects signatures for attacks against client
computers.• server selects signatures for attacks against servers.• all selects both client and server signatures.
all
severity {all | info low medium high critical}
Specify the severity level or levels.Specify all to include all severity levels.
all
protocol <protocol_str> Specify the protocols to be examined. Enter ‘?’ to display a list of the available protocols. All will include all protocols. Other will include all unlisted protocols.
all
os {all | other windows linux bsd solaris macos}
Specify the operating systems to be protected. All will include all operating systems. Other will include all unlisted operating systems.
all
application <app_str> Specify the applications to be protected. Enter ‘?’ to display a list of the available applications. All will include all applications. Other will include all unlisted applications.
all
status {default | enable | disable}
Specify the status of the signatures included in the filter.• enable will enable the filter.• disable will disable the filter.• default will enable the filter and only use the filters with a
default status of enable. Filters with a default status of disable will not be used.
default
tags <tags_str> Enter object tags applied to this filter. Separate tag names with spaces.
null
log {default | enable | disable}
Specify the logging status of the signatures included in the filter.• enable will enable logging.• disable will disable logging.• default will enable logging for only the filters with a default
logging status of enable. Filters with a default logging status of disable will not be logged.
default
log-packet {disable | enable}
When enabled, packet logging will save the packet that triggers the filter. You can download the packets in pcap format for diagnostic use. This feature is only available in FortiGate units with internal hard drives.
disable
action {block | default | pass | reject}
Specify what action is taken with traffic in which signatures ar detected.• block will drop the session with the offending traffic.• pass will allow the traffic.• reject will reset the session.• default will either pass or drop matching traffic, depending
on the default action of each signature.
default
Variable Description Default
ortiOS 4.0 MR3 CLI Reference1-431-99686-20110623 207ttp://docs.fortinet.com/ • Feedback
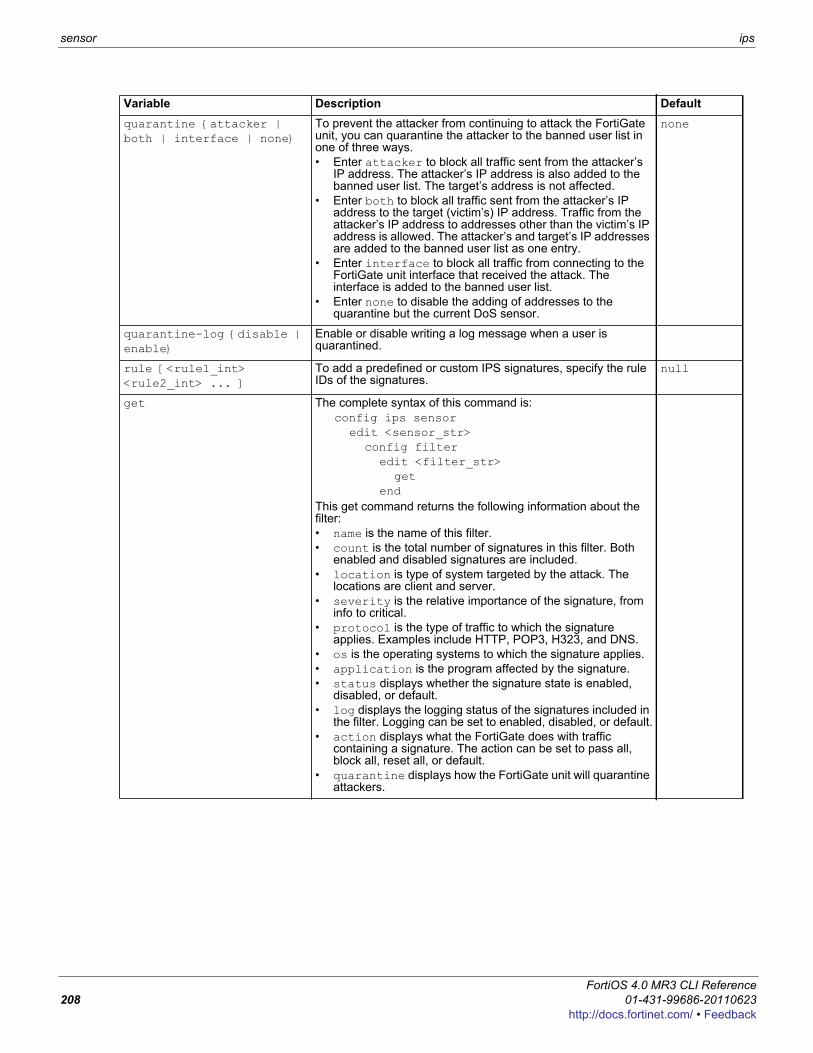
sensor ips
quarantine {attacker | both | interface | none}
To prevent the attacker from continuing to attack the FortiGate unit, you can quarantine the attacker to the banned user list in one of three ways.• Enter attacker to block all traffic sent from the attacker’s
IP address. The attacker’s IP address is also added to the banned user list. The target’s address is not affected.
• Enter both to block all traffic sent from the attacker’s IP address to the target (victim’s) IP address. Traffic from the attacker’s IP address to addresses other than the victim’s IP address is allowed. The attacker’s and target’s IP addresses are added to the banned user list as one entry.
• Enter interface to block all traffic from connecting to the FortiGate unit interface that received the attack. The interface is added to the banned user list.
• Enter none to disable the adding of addresses to the quarantine but the current DoS sensor.
none
quarantine-log {disable | enable}
Enable or disable writing a log message when a user is quarantined.
rule [<rule1_int> <rule2_int> ... ]
To add a predefined or custom IPS signatures, specify the rule IDs of the signatures.
null
get The complete syntax of this command is:config ips sensor
edit <sensor_str>config filter
edit <filter_str>get
endThis get command returns the following information about the filter:• name is the name of this filter.• count is the total number of signatures in this filter. Both
enabled and disabled signatures are included.• location is type of system targeted by the attack. The
locations are client and server.• severity is the relative importance of the signature, from
info to critical.• protocol is the type of traffic to which the signature
applies. Examples include HTTP, POP3, H323, and DNS.• os is the operating systems to which the signature applies.• application is the program affected by the signature.• status displays whether the signature state is enabled,
disabled, or default.• log displays the logging status of the signatures included in
the filter. Logging can be set to enabled, disabled, or default.• action displays what the FortiGate does with traffic
containing a signature. The action can be set to pass all, block all, reset all, or default.
• quarantine displays how the FortiGate unit will quarantine attackers.
Variable Description Default
FortiOS 4.0 MR3 CLI Reference208 01-431-99686-20110623
http://docs.fortinet.com/ • Feedback
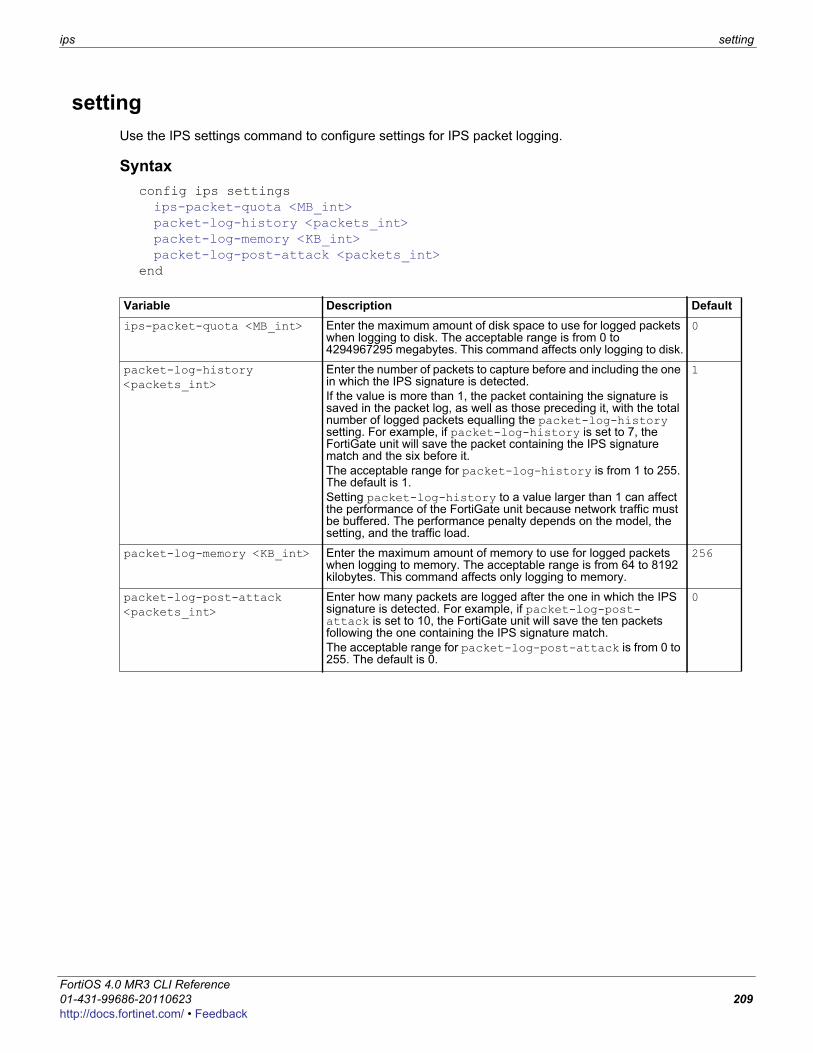
ips setting
F0h
settingUse the IPS settings command to configure settings for IPS packet logging.
Syntaxconfig ips settingsips-packet-quota <MB_int>packet-log-history <packets_int>packet-log-memory <KB_int>packet-log-post-attack <packets_int>
end
Variable Description Defaultips-packet-quota <MB_int> Enter the maximum amount of disk space to use for logged packets
when logging to disk. The acceptable range is from 0 to 4294967295 megabytes. This command affects only logging to disk.
0
packet-log-history <packets_int>
Enter the number of packets to capture before and including the one in which the IPS signature is detected.If the value is more than 1, the packet containing the signature is saved in the packet log, as well as those preceding it, with the total number of logged packets equalling the packet-log-history setting. For example, if packet-log-history is set to 7, the FortiGate unit will save the packet containing the IPS signature match and the six before it.The acceptable range for packet-log-history is from 1 to 255. The default is 1.Setting packet-log-history to a value larger than 1 can affect the performance of the FortiGate unit because network traffic must be buffered. The performance penalty depends on the model, the setting, and the traffic load.
1
packet-log-memory <KB_int> Enter the maximum amount of memory to use for logged packets when logging to memory. The acceptable range is from 64 to 8192 kilobytes. This command affects only logging to memory.
256
packet-log-post-attack <packets_int>
Enter how many packets are logged after the one in which the IPS signature is detected. For example, if packet-log-post- attack is set to 10, the FortiGate unit will save the ten packets following the one containing the IPS signature match.The acceptable range for packet-log-post-attack is from 0 to 255. The default is 0.
0
ortiOS 4.0 MR3 CLI Reference1-431-99686-20110623 209ttp://docs.fortinet.com/ • Feedback

setting ips
FortiOS 4.0 MR3 CLI Reference210 01-431-99686-20110623
http://docs.fortinet.com/ • Feedback
F0h
logUse the config log commands to set the logging type, the logging severity level, and the logging location for the FortiGate unit.
Note: In Transparent mode, certain log settings and options may not be available because certain features do not support logging or are not available in this mode. For example, SSL VPN events are not available in Transparent mode.
custom-field{disk | fortianalyzer | fortianalyzer2 | fortianalyzer3 | memory | syslogd | syslogd2 | syslogd3 | webtrends | fortiguard} filterdisk settingeventfilter{fortianalyzer | syslogd} override-filterfortianalyzer override-setting{fortianalyzer | fortianalyzer2 | fortianalyzer3} settingfortiguard settingguimemory settingmemory global-settingsyslogd override-setting{syslogd | syslogd2 | syslogd3} settingtrafficfilterwebtrends setting
ortiOS 4.0 MR3 CLI Reference1-431-99686-20110623 211ttp://docs.fortinet.com/ • Feedback
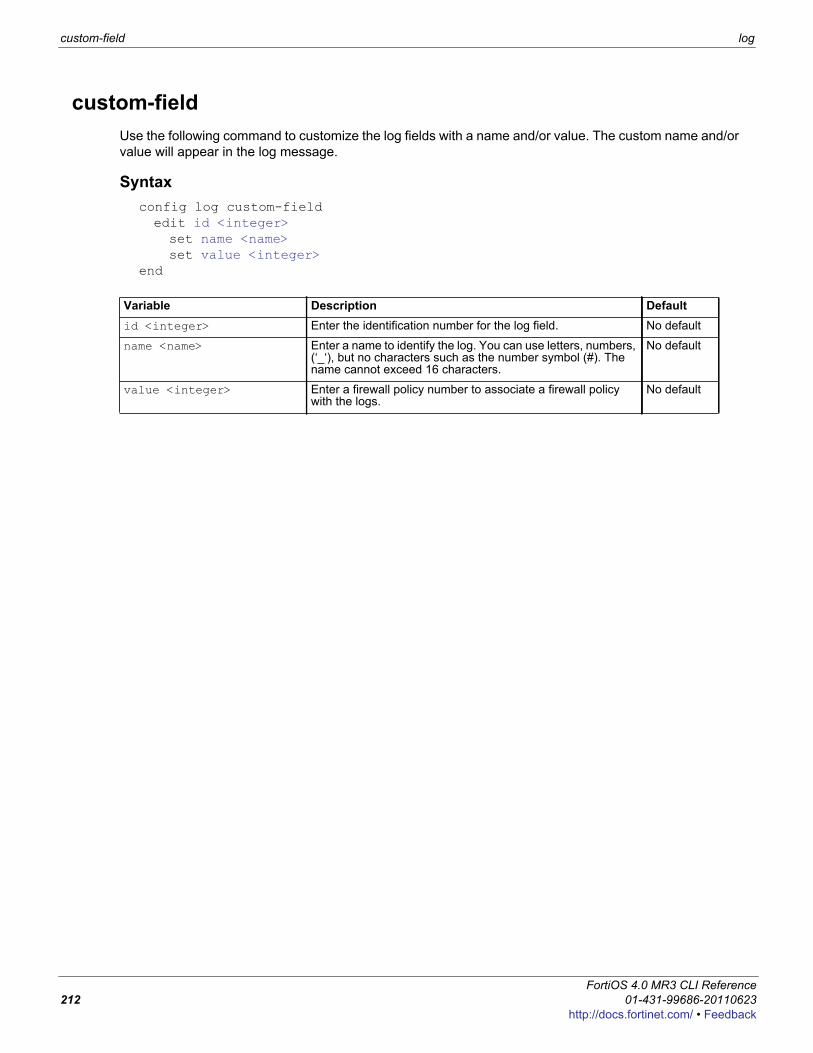
custom-field log
custom-fieldUse the following command to customize the log fields with a name and/or value. The custom name and/or value will appear in the log message.
Syntaxconfig log custom-fieldedit id <integer>set name <name>set value <integer>
end
Variable Description Defaultid <integer> Enter the identification number for the log field. No default
name <name> Enter a name to identify the log. You can use letters, numbers, (‘_‘), but no characters such as the number symbol (#). The name cannot exceed 16 characters.
No default
value <integer> Enter a firewall policy number to associate a firewall policy with the logs.
No default
FortiOS 4.0 MR3 CLI Reference212 01-431-99686-20110623
http://docs.fortinet.com/ • Feedback
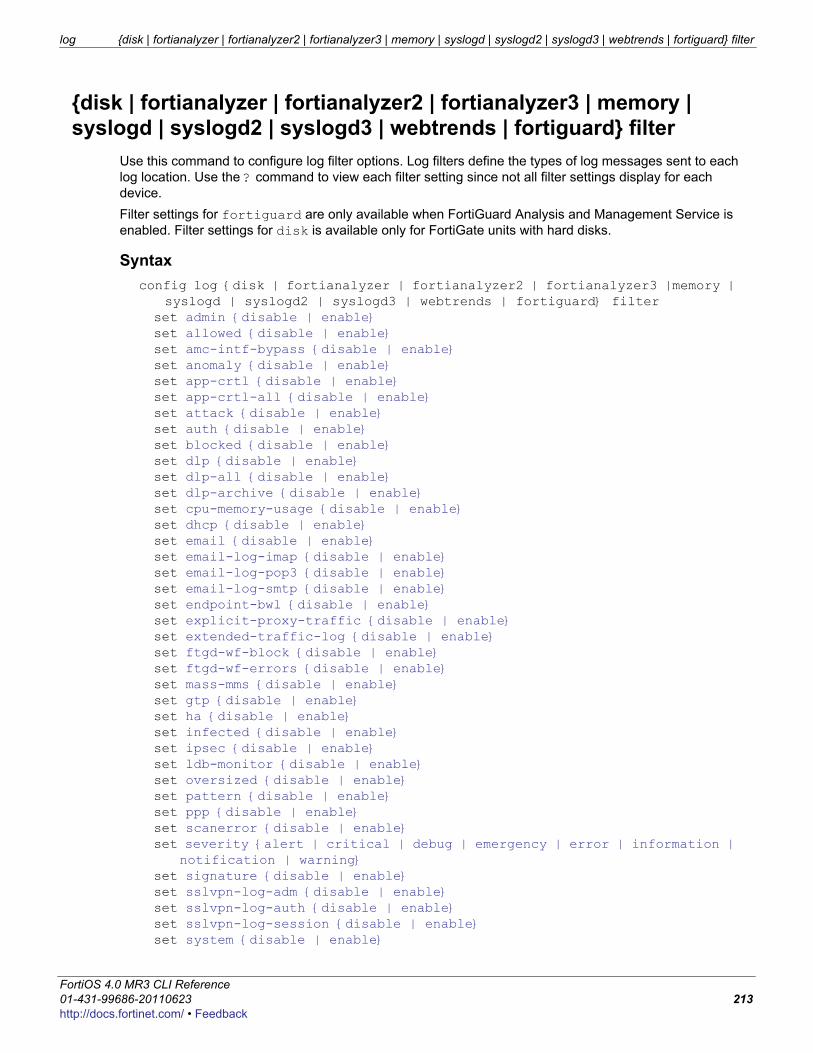
log {disk | fortianalyzer | fortianalyzer2 | fortianalyzer3 | memory | syslogd | syslogd2 | syslogd3 | webtrends | fortiguard} filter
F0h
{disk | fortianalyzer | fortianalyzer2 | fortianalyzer3 | memory | syslogd | syslogd2 | syslogd3 | webtrends | fortiguard} filter
Use this command to configure log filter options. Log filters define the types of log messages sent to each log location. Use the ? command to view each filter setting since not all filter settings display for each device. Filter settings for fortiguard are only available when FortiGuard Analysis and Management Service is enabled. Filter settings for disk is available only for FortiGate units with hard disks.
Syntaxconfig log {disk | fortianalyzer | fortianalyzer2 | fortianalyzer3 |memory |
syslogd | syslogd2 | syslogd3 | webtrends | fortiguard} filterset admin {disable | enable}set allowed {disable | enable}set amc-intf-bypass {disable | enable}set anomaly {disable | enable}set app-crtl {disable | enable}set app-crtl-all {disable | enable}set attack {disable | enable}set auth {disable | enable}set blocked {disable | enable}set dlp {disable | enable}set dlp-all {disable | enable}set dlp-archive {disable | enable}set cpu-memory-usage {disable | enable}set dhcp {disable | enable}set email {disable | enable}set email-log-imap {disable | enable}set email-log-pop3 {disable | enable}set email-log-smtp {disable | enable}set endpoint-bwl {disable | enable}set explicit-proxy-traffic {disable | enable}set extended-traffic-log {disable | enable}set ftgd-wf-block {disable | enable}set ftgd-wf-errors {disable | enable}set mass-mms {disable | enable}set gtp {disable | enable}set ha {disable | enable}set infected {disable | enable}set ipsec {disable | enable}set ldb-monitor {disable | enable}set oversized {disable | enable}set pattern {disable | enable}set ppp {disable | enable}set scanerror {disable | enable}set severity {alert | critical | debug | emergency | error | information |
notification | warning}set signature {disable | enable}set sslvpn-log-adm {disable | enable}set sslvpn-log-auth {disable | enable}set sslvpn-log-session {disable | enable}set system {disable | enable}
ortiOS 4.0 MR3 CLI Reference1-431-99686-20110623 213ttp://docs.fortinet.com/ • Feedback
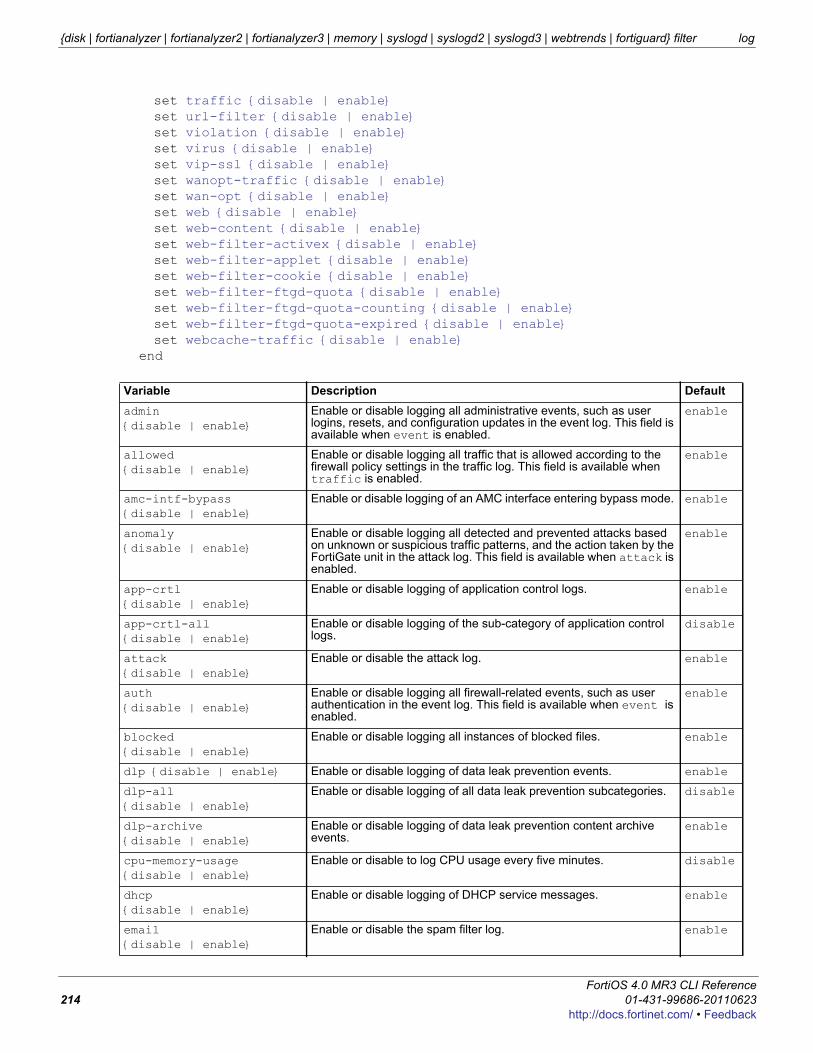
{disk | fortianalyzer | fortianalyzer2 | fortianalyzer3 | memory | syslogd | syslogd2 | syslogd3 | webtrends | fortiguard} filter log
set traffic {disable | enable}set url-filter {disable | enable}set violation {disable | enable}set virus {disable | enable}set vip-ssl {disable | enable}set wanopt-traffic {disable | enable}set wan-opt {disable | enable}set web {disable | enable}set web-content {disable | enable}set web-filter-activex {disable | enable}set web-filter-applet {disable | enable}set web-filter-cookie {disable | enable}set web-filter-ftgd-quota {disable | enable}set web-filter-ftgd-quota-counting {disable | enable}set web-filter-ftgd-quota-expired {disable | enable}set webcache-traffic {disable | enable}
end
Variable Description Defaultadmin {disable | enable}
Enable or disable logging all administrative events, such as user logins, resets, and configuration updates in the event log. This field is available when event is enabled.
enable
allowed {disable | enable}
Enable or disable logging all traffic that is allowed according to the firewall policy settings in the traffic log. This field is available when traffic is enabled.
enable
amc-intf-bypass{disable | enable}
Enable or disable logging of an AMC interface entering bypass mode. enable
anomaly {disable | enable}
Enable or disable logging all detected and prevented attacks based on unknown or suspicious traffic patterns, and the action taken by the FortiGate unit in the attack log. This field is available when attack is enabled.
enable
app-crtl {disable | enable}
Enable or disable logging of application control logs. enable
app-crtl-all {disable | enable}
Enable or disable logging of the sub-category of application control logs.
disable
attack {disable | enable}
Enable or disable the attack log. enable
auth {disable | enable}
Enable or disable logging all firewall-related events, such as user authentication in the event log. This field is available when event is enabled.
enable
blocked {disable | enable}
Enable or disable logging all instances of blocked files. enable
dlp {disable | enable} Enable or disable logging of data leak prevention events. enable
dlp-all {disable | enable}
Enable or disable logging of all data leak prevention subcategories. disable
dlp-archive {disable | enable}
Enable or disable logging of data leak prevention content archive events.
enable
cpu-memory-usage {disable | enable}
Enable or disable to log CPU usage every five minutes. disable
dhcp{disable | enable}
Enable or disable logging of DHCP service messages. enable
email {disable | enable}
Enable or disable the spam filter log. enable
FortiOS 4.0 MR3 CLI Reference214 01-431-99686-20110623
http://docs.fortinet.com/ • Feedback
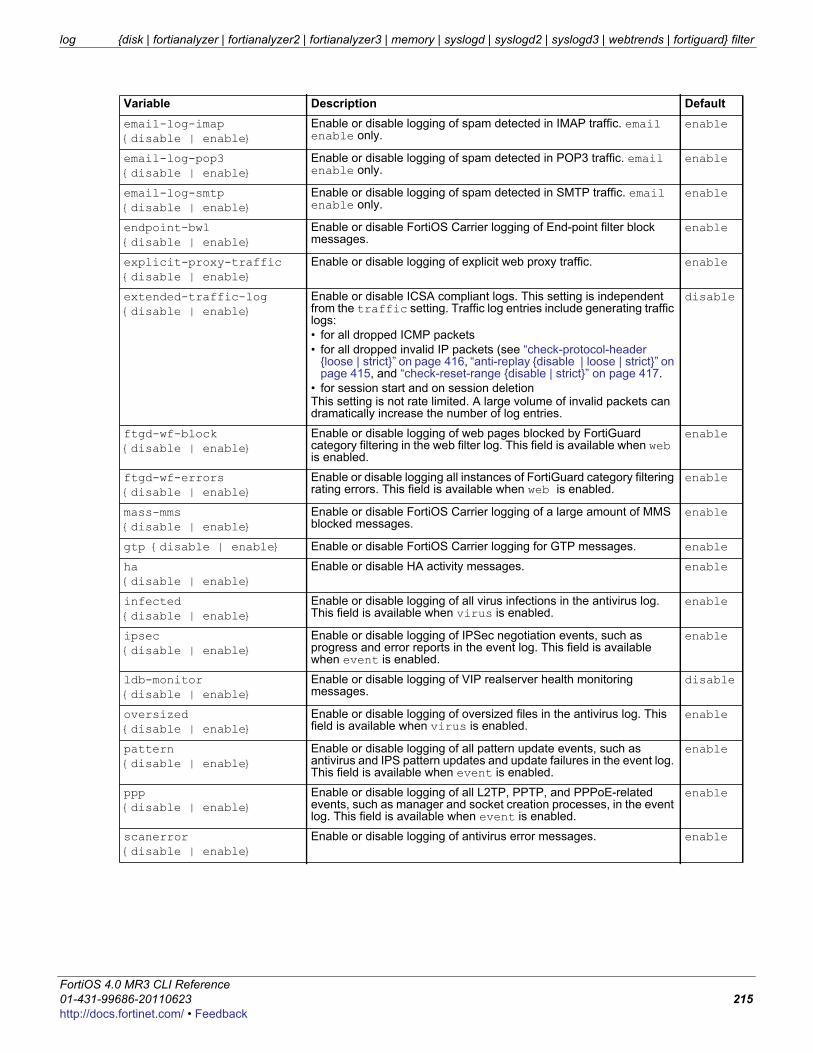
log {disk | fortianalyzer | fortianalyzer2 | fortianalyzer3 | memory | syslogd | syslogd2 | syslogd3 | webtrends | fortiguard} filter
F0h
email-log-imap {disable | enable}
Enable or disable logging of spam detected in IMAP traffic. email enable only.
enable
email-log-pop3 {disable | enable}
Enable or disable logging of spam detected in POP3 traffic. email enable only.
enable
email-log-smtp{disable | enable}
Enable or disable logging of spam detected in SMTP traffic. email enable only.
enable
endpoint-bwl {disable | enable}
Enable or disable FortiOS Carrier logging of End-point filter block messages.
enable
explicit-proxy-traffic {disable | enable}
Enable or disable logging of explicit web proxy traffic. enable
extended-traffic-log {disable | enable}
Enable or disable ICSA compliant logs. This setting is independent from the traffic setting. Traffic log entries include generating traffic logs:• for all dropped ICMP packets• for all dropped invalid IP packets (see “check-protocol-header
{loose | strict}” on page 416, “anti-replay {disable | loose | strict}” on page 415, and “check-reset-range {disable | strict}” on page 417.
• for session start and on session deletionThis setting is not rate limited. A large volume of invalid packets can dramatically increase the number of log entries.
disable
ftgd-wf-block {disable | enable}
Enable or disable logging of web pages blocked by FortiGuard category filtering in the web filter log. This field is available when web is enabled.
enable
ftgd-wf-errors {disable | enable}
Enable or disable logging all instances of FortiGuard category filtering rating errors. This field is available when web is enabled.
enable
mass-mms {disable | enable}
Enable or disable FortiOS Carrier logging of a large amount of MMS blocked messages.
enable
gtp {disable | enable} Enable or disable FortiOS Carrier logging for GTP messages. enable
ha{disable | enable}
Enable or disable HA activity messages. enable
infected {disable | enable}
Enable or disable logging of all virus infections in the antivirus log. This field is available when virus is enabled.
enable
ipsec {disable | enable}
Enable or disable logging of IPSec negotiation events, such as progress and error reports in the event log. This field is available when event is enabled.
enable
ldb-monitor {disable | enable}
Enable or disable logging of VIP realserver health monitoring messages.
disable
oversized {disable | enable}
Enable or disable logging of oversized files in the antivirus log. This field is available when virus is enabled.
enable
pattern {disable | enable}
Enable or disable logging of all pattern update events, such as antivirus and IPS pattern updates and update failures in the event log. This field is available when event is enabled.
enable
ppp {disable | enable}
Enable or disable logging of all L2TP, PPTP, and PPPoE-related events, such as manager and socket creation processes, in the event log. This field is available when event is enabled.
enable
scanerror {disable | enable}
Enable or disable logging of antivirus error messages. enable
Variable Description Default
ortiOS 4.0 MR3 CLI Reference1-431-99686-20110623 215ttp://docs.fortinet.com/ • Feedback
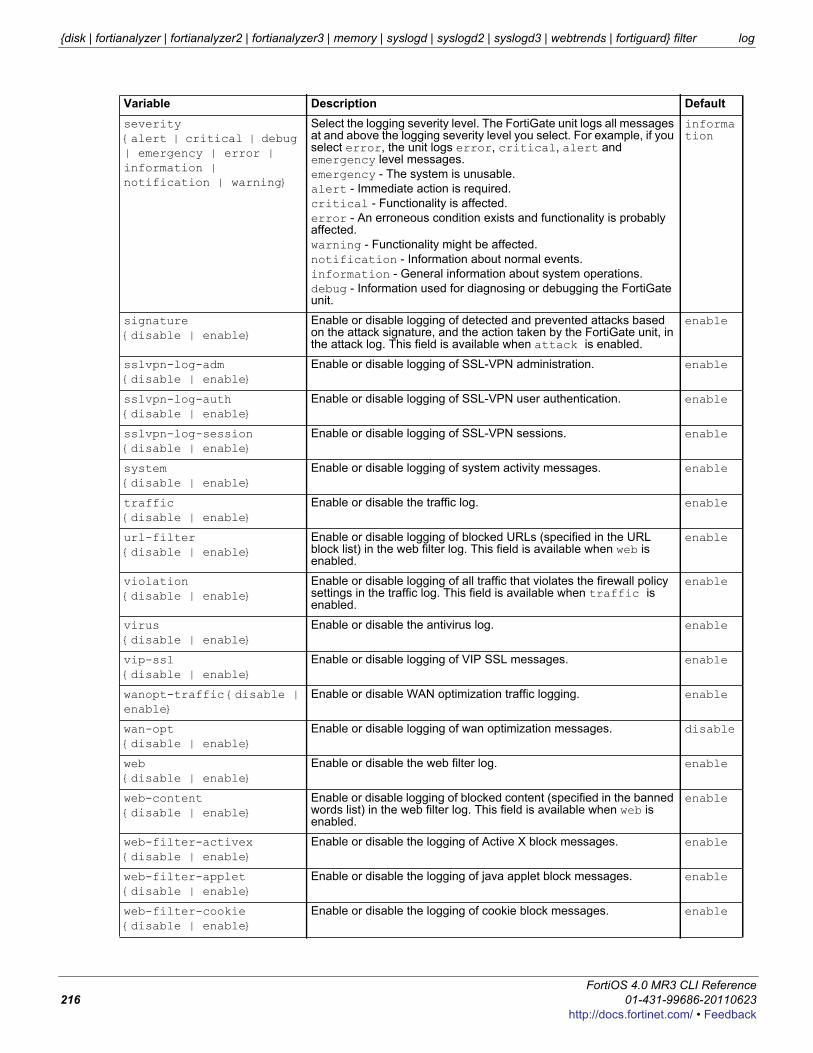
{disk | fortianalyzer | fortianalyzer2 | fortianalyzer3 | memory | syslogd | syslogd2 | syslogd3 | webtrends | fortiguard} filter log
severity {alert | critical | debug | emergency | error | information | notification | warning}
Select the logging severity level. The FortiGate unit logs all messages at and above the logging severity level you select. For example, if you select error, the unit logs error, critical, alert and emergency level messages. emergency - The system is unusable.alert - Immediate action is required.critical - Functionality is affected.error - An erroneous condition exists and functionality is probably affected.warning - Functionality might be affected.notification - Information about normal events.information - General information about system operations.debug - Information used for diagnosing or debugging the FortiGate unit.
information
signature {disable | enable}
Enable or disable logging of detected and prevented attacks based on the attack signature, and the action taken by the FortiGate unit, in the attack log. This field is available when attack is enabled.
enable
sslvpn-log-adm{disable | enable}
Enable or disable logging of SSL-VPN administration. enable
sslvpn-log-auth{disable | enable}
Enable or disable logging of SSL-VPN user authentication. enable
sslvpn-log-session{disable | enable}
Enable or disable logging of SSL-VPN sessions. enable
system {disable | enable}
Enable or disable logging of system activity messages. enable
traffic {disable | enable}
Enable or disable the traffic log. enable
url-filter {disable | enable}
Enable or disable logging of blocked URLs (specified in the URL block list) in the web filter log. This field is available when web is enabled.
enable
violation {disable | enable}
Enable or disable logging of all traffic that violates the firewall policy settings in the traffic log. This field is available when traffic is enabled.
enable
virus {disable | enable}
Enable or disable the antivirus log. enable
vip-ssl {disable | enable}
Enable or disable logging of VIP SSL messages. enable
wanopt-traffic {disable | enable}
Enable or disable WAN optimization traffic logging. enable
wan-opt {disable | enable}
Enable or disable logging of wan optimization messages. disable
web {disable | enable}
Enable or disable the web filter log. enable
web-content {disable | enable}
Enable or disable logging of blocked content (specified in the banned words list) in the web filter log. This field is available when web is enabled.
enable
web-filter-activex {disable | enable}
Enable or disable the logging of Active X block messages. enable
web-filter-applet {disable | enable}
Enable or disable the logging of java applet block messages. enable
web-filter-cookie {disable | enable}
Enable or disable the logging of cookie block messages. enable
Variable Description Default
FortiOS 4.0 MR3 CLI Reference216 01-431-99686-20110623
http://docs.fortinet.com/ • Feedback
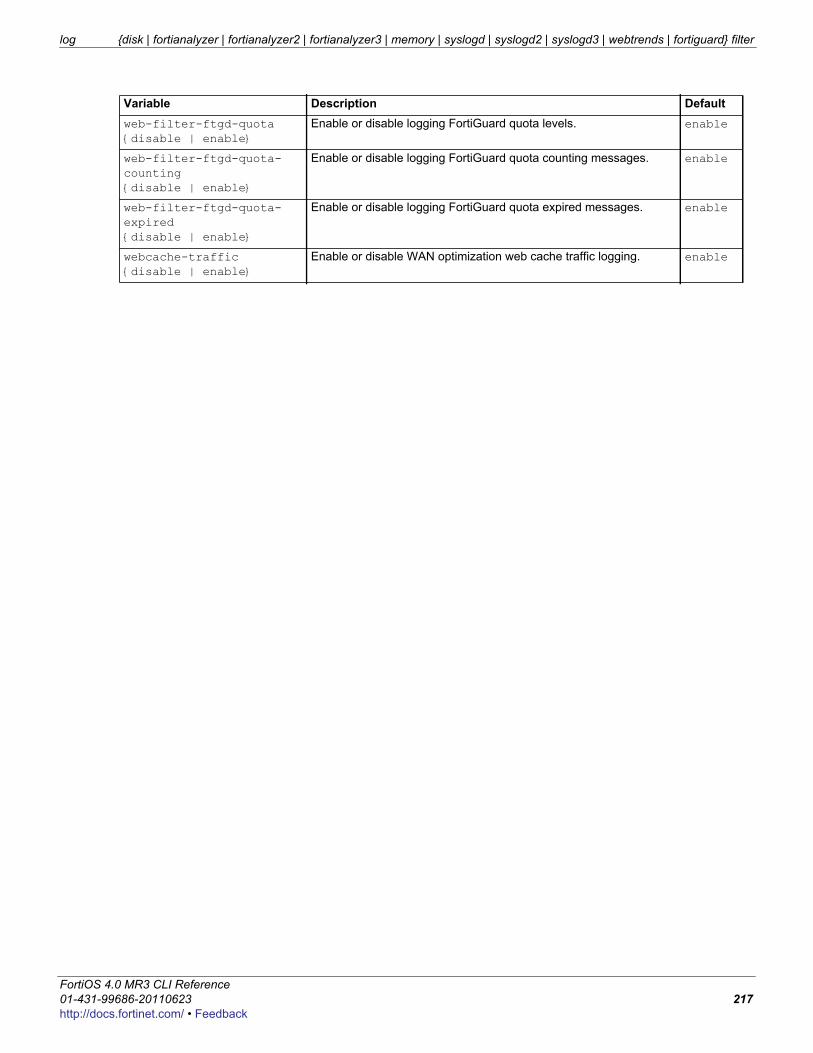
log {disk | fortianalyzer | fortianalyzer2 | fortianalyzer3 | memory | syslogd | syslogd2 | syslogd3 | webtrends | fortiguard} filter
F0h
web-filter-ftgd-quota {disable | enable}
Enable or disable logging FortiGuard quota levels. enable
web-filter-ftgd-quota-counting {disable | enable}
Enable or disable logging FortiGuard quota counting messages. enable
web-filter-ftgd-quota-expired {disable | enable}
Enable or disable logging FortiGuard quota expired messages. enable
webcache-traffic {disable | enable}
Enable or disable WAN optimization web cache traffic logging. enable
Variable Description Default
ortiOS 4.0 MR3 CLI Reference1-431-99686-20110623 217ttp://docs.fortinet.com/ • Feedback
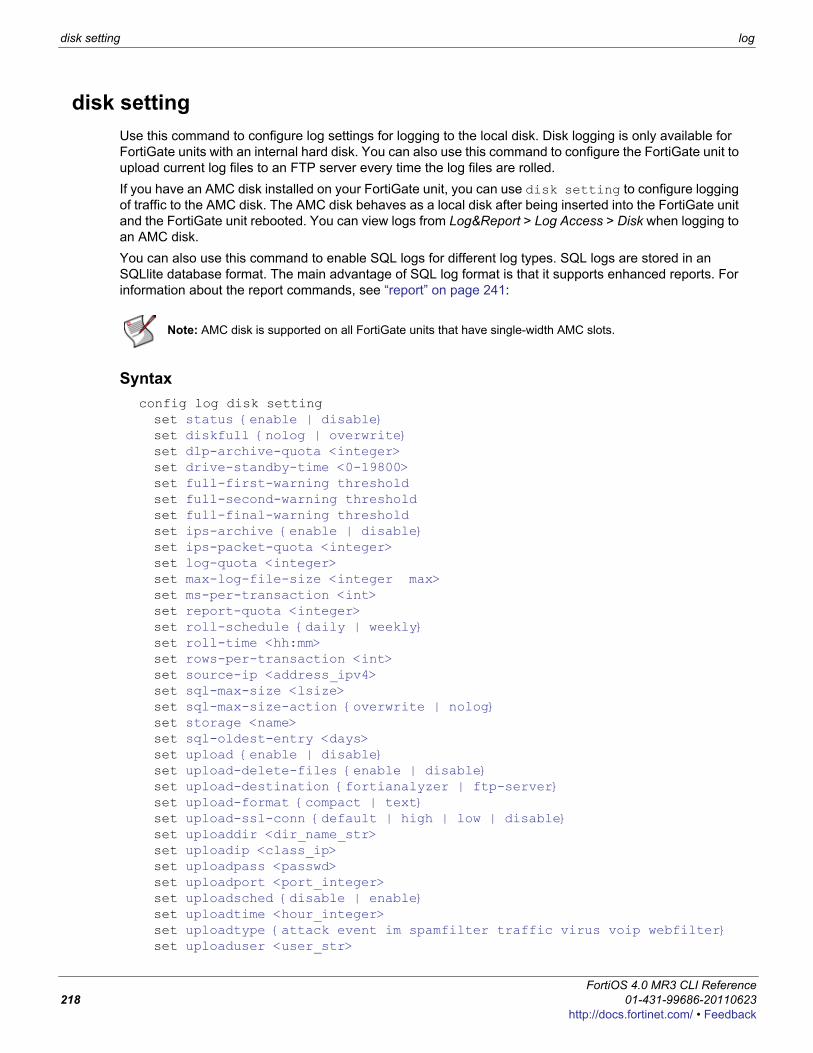
disk setting log
disk settingUse this command to configure log settings for logging to the local disk. Disk logging is only available for FortiGate units with an internal hard disk. You can also use this command to configure the FortiGate unit to upload current log files to an FTP server every time the log files are rolled. If you have an AMC disk installed on your FortiGate unit, you can use disk setting to configure logging of traffic to the AMC disk. The AMC disk behaves as a local disk after being inserted into the FortiGate unit and the FortiGate unit rebooted. You can view logs from Log&Report > Log Access > Disk when logging to an AMC disk. You can also use this command to enable SQL logs for different log types. SQL logs are stored in an SQLlite database format. The main advantage of SQL log format is that it supports enhanced reports. For information about the report commands, see “report” on page 241:
Syntaxconfig log disk settingset status {enable | disable}set diskfull {nolog | overwrite}set dlp-archive-quota <integer>set drive-standby-time <0-19800>set full-first-warning thresholdset full-second-warning thresholdset full-final-warning thresholdset ips-archive {enable | disable}set ips-packet-quota <integer>set log-quota <integer>set max-log-file-size <integer max>set ms-per-transaction <int>set report-quota <integer>set roll-schedule {daily | weekly}set roll-time <hh:mm>set rows-per-transaction <int>set source-ip <address_ipv4>set sql-max-size <lsize>set sql-max-size-action {overwrite | nolog}set storage <name>set sql-oldest-entry <days>set upload {enable | disable}set upload-delete-files {enable | disable}set upload-destination {fortianalyzer | ftp-server}set upload-format {compact | text}set upload-ssl-conn {default | high | low | disable}set uploaddir <dir_name_str>set uploadip <class_ip>set uploadpass <passwd>set uploadport <port_integer>set uploadsched {disable | enable}set uploadtime <hour_integer>set uploadtype {attack event im spamfilter traffic virus voip webfilter}set uploaduser <user_str>
Note: AMC disk is supported on all FortiGate units that have single-width AMC slots.
FortiOS 4.0 MR3 CLI Reference218 01-431-99686-20110623
http://docs.fortinet.com/ • Feedback
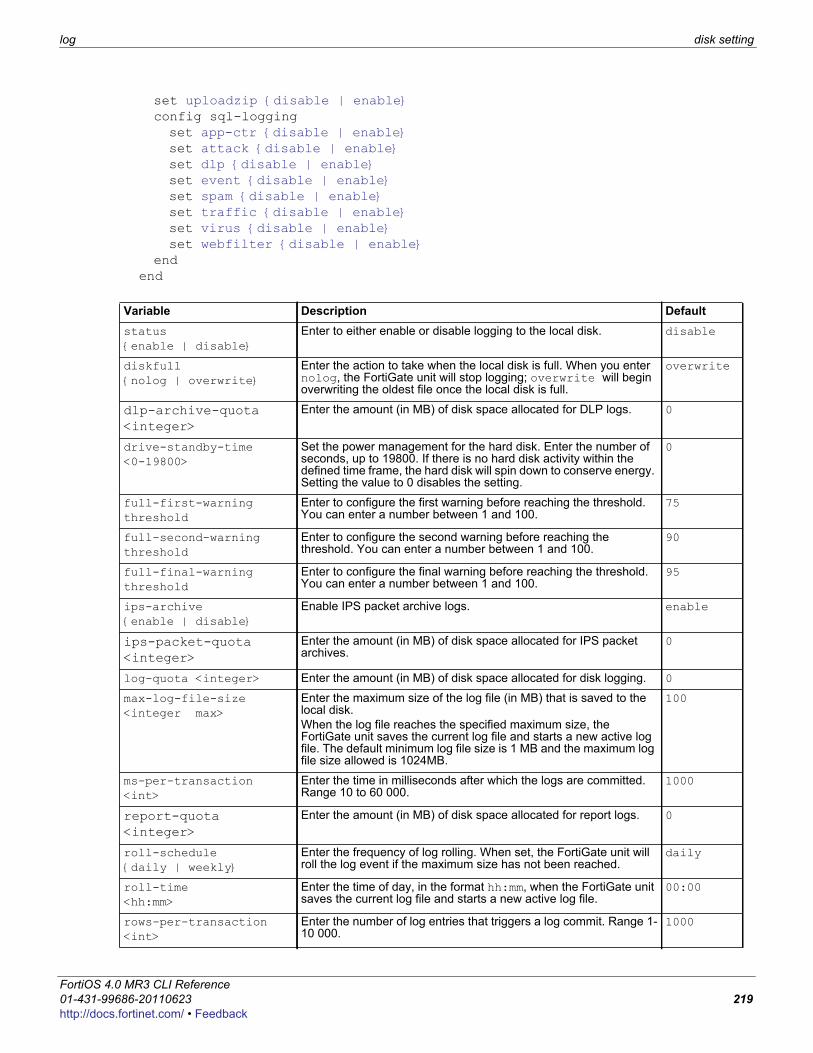
log disk setting
F0h
set uploadzip {disable | enable}config sql-loggingset app-ctr {disable | enable}set attack {disable | enable}set dlp {disable | enable}set event {disable | enable}set spam {disable | enable}set traffic {disable | enable}set virus {disable | enable}set webfilter {disable | enable}
endend
Variable Description Defaultstatus{enable | disable}
Enter to either enable or disable logging to the local disk. disable
diskfull{nolog | overwrite}
Enter the action to take when the local disk is full. When you enter nolog, the FortiGate unit will stop logging; overwrite will begin overwriting the oldest file once the local disk is full.
overwrite
dlp-archive-quota <integer>
Enter the amount (in MB) of disk space allocated for DLP logs. 0
drive-standby-time<0-19800>
Set the power management for the hard disk. Enter the number of seconds, up to 19800. If there is no hard disk activity within the defined time frame, the hard disk will spin down to conserve energy. Setting the value to 0 disables the setting.
0
full-first-warning threshold
Enter to configure the first warning before reaching the threshold. You can enter a number between 1 and 100.
75
full-second-warning threshold
Enter to configure the second warning before reaching the threshold. You can enter a number between 1 and 100.
90
full-final-warning threshold
Enter to configure the final warning before reaching the threshold. You can enter a number between 1 and 100.
95
ips-archive {enable | disable}
Enable IPS packet archive logs. enable
ips-packet-quota <integer>
Enter the amount (in MB) of disk space allocated for IPS packet archives.
0
log-quota <integer> Enter the amount (in MB) of disk space allocated for disk logging. 0
max-log-file-size<integer max>
Enter the maximum size of the log file (in MB) that is saved to the local disk. When the log file reaches the specified maximum size, the FortiGate unit saves the current log file and starts a new active log file. The default minimum log file size is 1 MB and the maximum log file size allowed is 1024MB.
100
ms-per-transaction <int>
Enter the time in milliseconds after which the logs are committed. Range 10 to 60 000.
1000
report-quota <integer>
Enter the amount (in MB) of disk space allocated for report logs. 0
roll-schedule{daily | weekly}
Enter the frequency of log rolling. When set, the FortiGate unit will roll the log event if the maximum size has not been reached.
daily
roll-time<hh:mm>
Enter the time of day, in the format hh:mm, when the FortiGate unit saves the current log file and starts a new active log file.
00:00
rows-per-transaction <int>
Enter the number of log entries that triggers a log commit. Range 1-10 000.
1000
ortiOS 4.0 MR3 CLI Reference1-431-99686-20110623 219ttp://docs.fortinet.com/ • Feedback

disk setting log
source-ip<address_ipv4>
Enter the source IP address of the disk log uploading. 0.0.0.0
sql-max-size <lsize> Set maximum size of SQL logs. Range 1 to 65 536. 100
sql-max-size-action {overwrite | nolog}
Select action when maximum log size is reached:overwrite — Overwrite oldest logs firstnolog — Discontinue logging
overwrite
storage <name> Enter a name for the storage log file. This option is only available when the current vdom is the management vdom.
sql-oldest-entry <days> Enter number of days to keep log entries. Use 0 to keep indefinitely. 0
upload{enable | disable}
Enable or disable uploading log files to a remote directory. Enable upload to upload log files to an FTP server whenever a log file rolls. Use the uploaddir, uploadip, uploadpass, uploadport, and uploaduser fields to add this information required to connect to the FTP server and upload the log files to a specific location on the server. Use the uploadtype field to select the type of log files to upload. Use the upload-delete-files field to delete the files from the hard disk once the FortiGate unit completes the file transfer. All upload fields are available after enabling the upload command.
disable
upload-delete-files{enable | disable}
Enable or disable the removal of the log files once the FortiGate unit has uploaded the log file to the FTP server.
enable
upload-destination {fortianalyzer | ftp-server}
Select to upload log files directly to a FortiAnalyzer unit or to an FTP server. When you select to upload log files directly to a FortiAnalyzer unit, you can also schedule when to upload the log files, when the log file rolls, and so on.
disable
upload-format {compact | text}
Select the upload format for the logs.text means the logs will be in plain text format.compact means the logs will be compressed to save space.
compact
upload-ssl-conn {default | high | low | disable}
Set encryption strength for communications between the FortiGate unit and FortiAnalyzer. Available when upload-destination is fortianalyzer.high—use SSL with 128-bit and larger key length algorithms: DHE-RSA-AES256-SHA, AES256-SHA, EDH-RSA-DES-CBC3-SHA, DES-CBC3-SHA, DES-CBC3-MD5, DHE-RSA-AES128-SHA, AES128-SHAlow—use SSL with 64-bit or 56-bit key length algorithms without export restrictions: EDH-RSA-DES-CDBC-SHA, DES-CBC-SHA, DES-CBC-MD5default—use SSL with high strength algorithms and these medium-strength 128-bit key length algorithms: RC4-SHA, RC4-MD5, RC4-MDdisable—disable the use of SSL.
default
uploaddir<dir_name_str>
Enter the name of the path on the FTP server where the log files will be transferred to. If you do not specify a remote directory, the log files are uploaded to the root directory of the FTP server.
No default
uploadip<class_ip>
Enter the IP address of the FTP server. This is required. 0.0.0.0
uploadpass<passwd>
Enter the password required to connect to the FTP server. This is required.
No default
uploadport<port_integer>
Enter the port number used by the FTP server. The default port is 21. Port 21 is the standard FTP port.
21
uploadsched{disable | enable}
Enable log uploads at a specific time of the day. When set to disable, the FortiGate unit uploads the logs when the logs are rolled.
disable
Variable Description Default
FortiOS 4.0 MR3 CLI Reference220 01-431-99686-20110623
http://docs.fortinet.com/ • Feedback
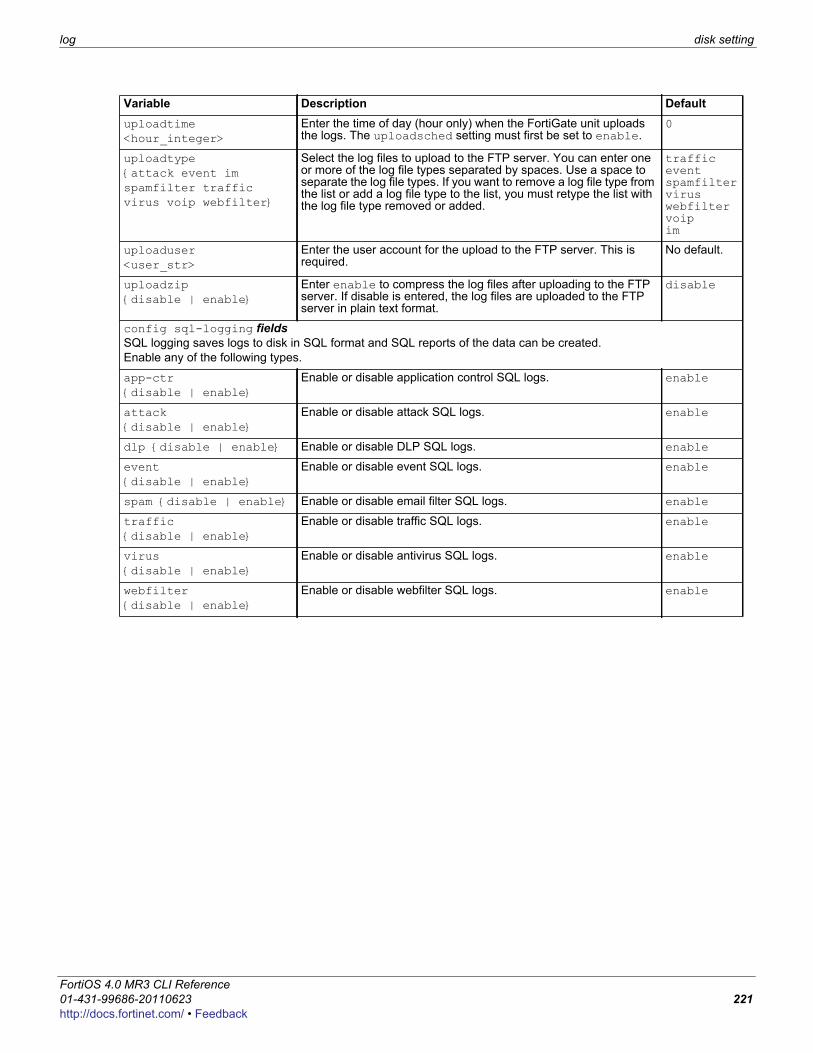
log disk setting
F0h
uploadtime<hour_integer>
Enter the time of day (hour only) when the FortiGate unit uploads the logs. The uploadsched setting must first be set to enable.
0
uploadtype{attack event im spamfilter traffic virus voip webfilter}
Select the log files to upload to the FTP server. You can enter one or more of the log file types separated by spaces. Use a space to separate the log file types. If you want to remove a log file type from the list or add a log file type to the list, you must retype the list with the log file type removed or added.
trafficeventspamfilterviruswebfiltervoipim
uploaduser<user_str>
Enter the user account for the upload to the FTP server. This is required.
No default.
uploadzip{disable | enable}
Enter enable to compress the log files after uploading to the FTP server. If disable is entered, the log files are uploaded to the FTP server in plain text format.
disable
config sql-logging fieldsSQL logging saves logs to disk in SQL format and SQL reports of the data can be created. Enable any of the following types.
app-ctr {disable | enable}
Enable or disable application control SQL logs. enable
attack {disable | enable}
Enable or disable attack SQL logs. enable
dlp {disable | enable} Enable or disable DLP SQL logs. enable
event {disable | enable}
Enable or disable event SQL logs. enable
spam {disable | enable} Enable or disable email filter SQL logs. enable
traffic {disable | enable}
Enable or disable traffic SQL logs. enable
virus {disable | enable}
Enable or disable antivirus SQL logs. enable
webfilter {disable | enable}
Enable or disable webfilter SQL logs. enable
Variable Description Default
ortiOS 4.0 MR3 CLI Reference1-431-99686-20110623 221ttp://docs.fortinet.com/ • Feedback
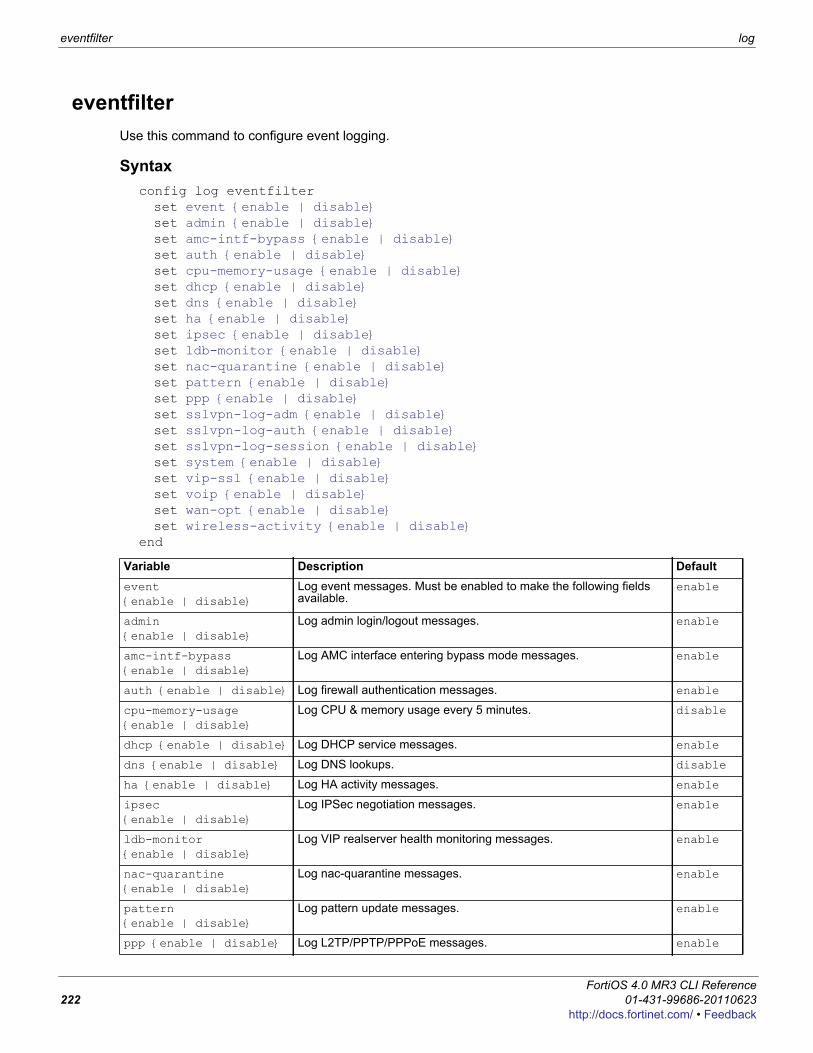
eventfilter log
eventfilterUse this command to configure event logging.
Syntaxconfig log eventfilterset event {enable | disable}set admin {enable | disable}set amc-intf-bypass {enable | disable}set auth {enable | disable}set cpu-memory-usage {enable | disable}set dhcp {enable | disable}set dns {enable | disable}set ha {enable | disable}set ipsec {enable | disable}set ldb-monitor {enable | disable}set nac-quarantine {enable | disable}set pattern {enable | disable}set ppp {enable | disable}set sslvpn-log-adm {enable | disable}set sslvpn-log-auth {enable | disable}set sslvpn-log-session {enable | disable}set system {enable | disable}set vip-ssl {enable | disable}set voip {enable | disable}set wan-opt {enable | disable}set wireless-activity {enable | disable}
end
Variable Description Defaultevent {enable | disable}
Log event messages. Must be enabled to make the following fields available.
enable
admin {enable | disable}
Log admin login/logout messages. enable
amc-intf-bypass {enable | disable}
Log AMC interface entering bypass mode messages. enable
auth {enable | disable} Log firewall authentication messages. enable
cpu-memory-usage {enable | disable}
Log CPU & memory usage every 5 minutes. disable
dhcp {enable | disable} Log DHCP service messages. enable
dns {enable | disable} Log DNS lookups. disable
ha {enable | disable} Log HA activity messages. enable
ipsec {enable | disable}
Log IPSec negotiation messages. enable
ldb-monitor {enable | disable}
Log VIP realserver health monitoring messages. enable
nac-quarantine {enable | disable}
Log nac-quarantine messages. enable
pattern {enable | disable}
Log pattern update messages. enable
ppp {enable | disable} Log L2TP/PPTP/PPPoE messages. enable
FortiOS 4.0 MR3 CLI Reference222 01-431-99686-20110623
http://docs.fortinet.com/ • Feedback
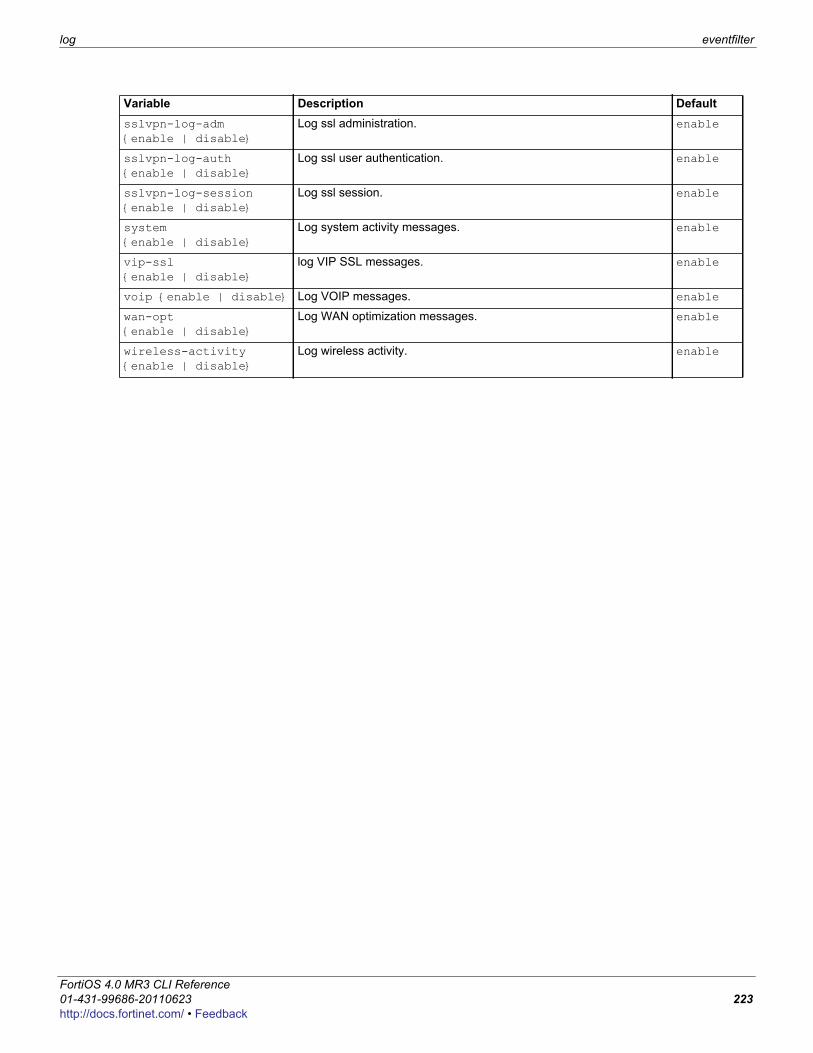
log eventfilter
F0h
sslvpn-log-adm {enable | disable}
Log ssl administration. enable
sslvpn-log-auth {enable | disable}
Log ssl user authentication. enable
sslvpn-log-session {enable | disable}
Log ssl session. enable
system {enable | disable}
Log system activity messages. enable
vip-ssl {enable | disable}
log VIP SSL messages. enable
voip {enable | disable} Log VOIP messages. enable
wan-opt {enable | disable}
Log WAN optimization messages. enable
wireless-activity {enable | disable}
Log wireless activity. enable
Variable Description Default
ortiOS 4.0 MR3 CLI Reference1-431-99686-20110623 223ttp://docs.fortinet.com/ • Feedback

{fortianalyzer | syslogd} override-filter log
{fortianalyzer | syslogd} override-filterUse this command within a VDOM to override the global configuration created with the config log {fortianalyzer | syslogd} filter command. The filter determines which types of log messages are sent to the FortiAnalyzer unit or syslog server. For syntax and descriptions, see “{disk | fortianalyzer | fortianalyzer2 | fortianalyzer3 | memory | syslogd | syslogd2 | syslogd3 | webtrends | fortiguard} filter” on page 213.
FortiOS 4.0 MR3 CLI Reference224 01-431-99686-20110623
http://docs.fortinet.com/ • Feedback
log fortianalyzer override-setting
F0h
fortianalyzer override-settingUse this command within a VDOM to override the global configuration created with the config log fortianalyzer setting command. These settings configure the connection to the FortiAnalyzer unit. For syntax and descriptions, see “{fortianalyzer | fortianalyzer2 | fortianalyzer3} setting” on page 226.
ortiOS 4.0 MR3 CLI Reference1-431-99686-20110623 225ttp://docs.fortinet.com/ • Feedback
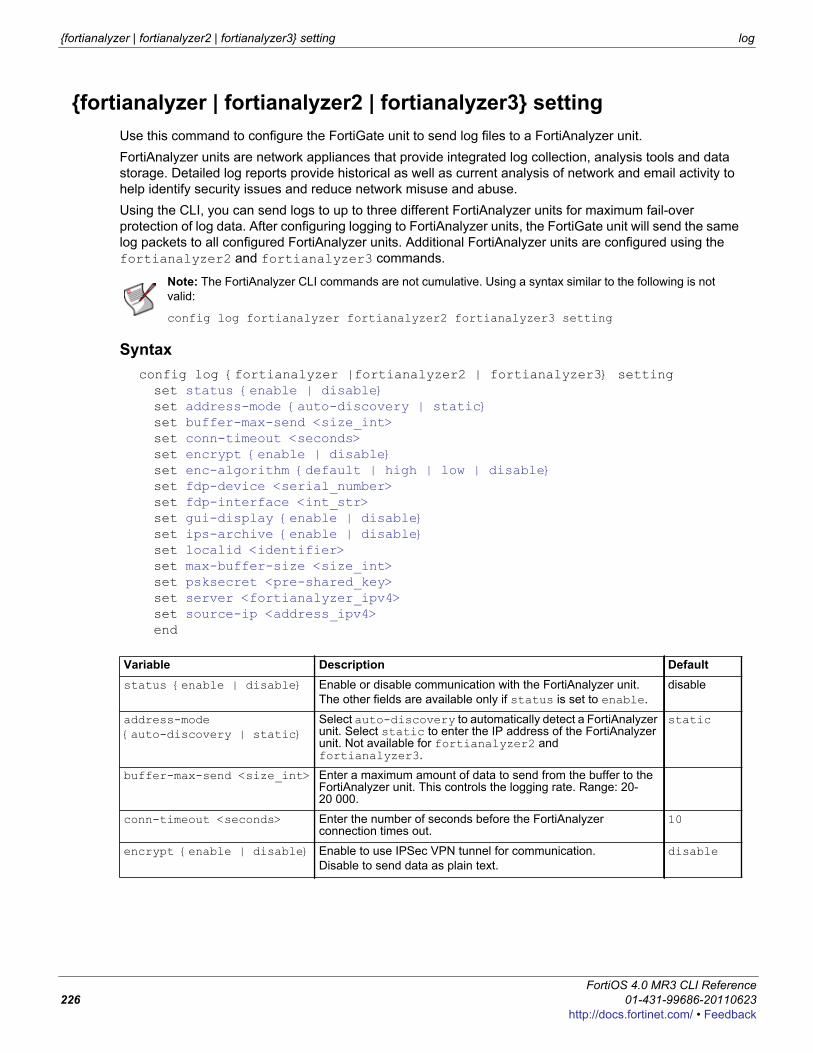
{fortianalyzer | fortianalyzer2 | fortianalyzer3} setting log
{fortianalyzer | fortianalyzer2 | fortianalyzer3} settingUse this command to configure the FortiGate unit to send log files to a FortiAnalyzer unit.FortiAnalyzer units are network appliances that provide integrated log collection, analysis tools and data storage. Detailed log reports provide historical as well as current analysis of network and email activity to help identify security issues and reduce network misuse and abuse.Using the CLI, you can send logs to up to three different FortiAnalyzer units for maximum fail-over protection of log data. After configuring logging to FortiAnalyzer units, the FortiGate unit will send the same log packets to all configured FortiAnalyzer units. Additional FortiAnalyzer units are configured using the fortianalyzer2 and fortianalyzer3 commands.
Syntaxconfig log {fortianalyzer |fortianalyzer2 | fortianalyzer3} settingset status {enable | disable}set address-mode {auto-discovery | static}set buffer-max-send <size_int>set conn-timeout <seconds>set encrypt {enable | disable}set enc-algorithm {default | high | low | disable}set fdp-device <serial_number>set fdp-interface <int_str>set gui-display {enable | disable}set ips-archive {enable | disable}set localid <identifier>set max-buffer-size <size_int>set psksecret <pre-shared_key>set server <fortianalyzer_ipv4>set source-ip <address_ipv4>end
Note: The FortiAnalyzer CLI commands are not cumulative. Using a syntax similar to the following is not valid:
config log fortianalyzer fortianalyzer2 fortianalyzer3 setting
Variable Description Defaultstatus {enable | disable} Enable or disable communication with the FortiAnalyzer unit.
The other fields are available only if status is set to enable.disable
address-mode {auto-discovery | static}
Select auto-discovery to automatically detect a FortiAnalyzer unit. Select static to enter the IP address of the FortiAnalyzer unit. Not available for fortianalyzer2 and fortianalyzer3.
static
buffer-max-send <size_int> Enter a maximum amount of data to send from the buffer to the FortiAnalyzer unit. This controls the logging rate. Range: 20-20 000.
conn-timeout <seconds> Enter the number of seconds before the FortiAnalyzer connection times out.
10
encrypt {enable | disable} Enable to use IPSec VPN tunnel for communication.Disable to send data as plain text.
disable
FortiOS 4.0 MR3 CLI Reference226 01-431-99686-20110623
http://docs.fortinet.com/ • Feedback
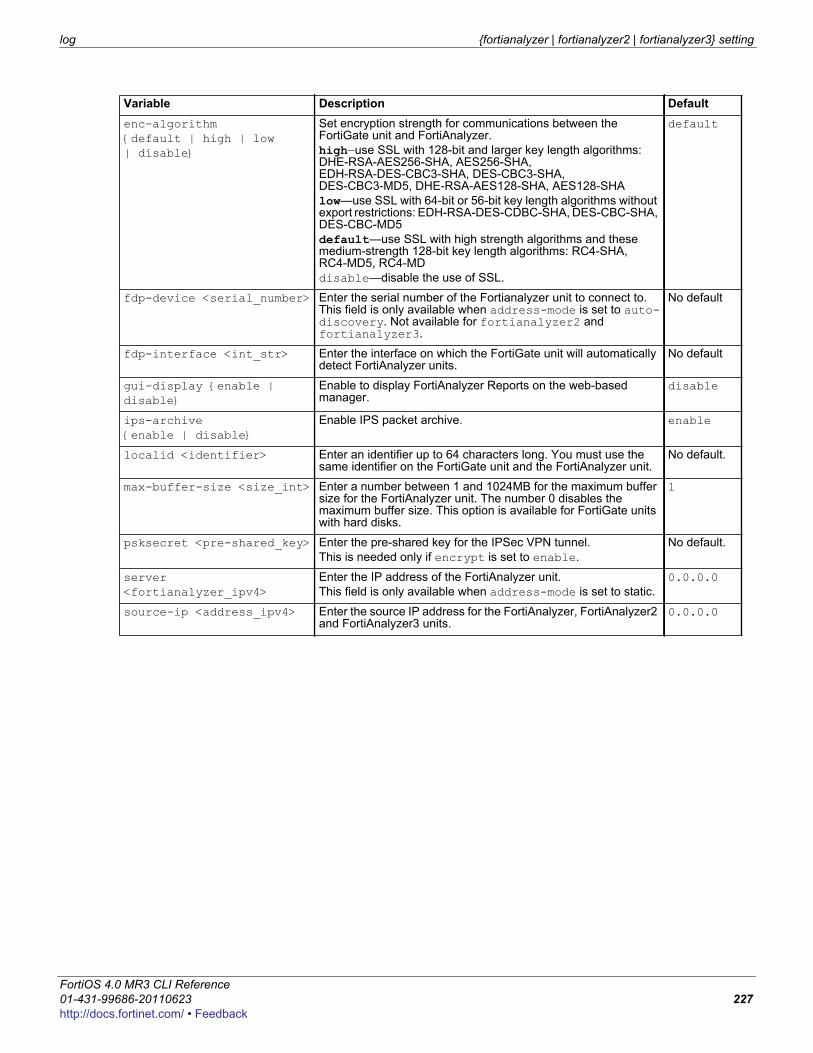
log {fortianalyzer | fortianalyzer2 | fortianalyzer3} setting
F0h
enc-algorithm {default | high | low | disable}
Set encryption strength for communications between the FortiGate unit and FortiAnalyzer.high—use SSL with 128-bit and larger key length algorithms: DHE-RSA-AES256-SHA, AES256-SHA, EDH-RSA-DES-CBC3-SHA, DES-CBC3-SHA, DES-CBC3-MD5, DHE-RSA-AES128-SHA, AES128-SHAlow—use SSL with 64-bit or 56-bit key length algorithms without export restrictions: EDH-RSA-DES-CDBC-SHA, DES-CBC-SHA, DES-CBC-MD5default—use SSL with high strength algorithms and these medium-strength 128-bit key length algorithms: RC4-SHA, RC4-MD5, RC4-MDdisable—disable the use of SSL.
default
fdp-device <serial_number> Enter the serial number of the Fortianalyzer unit to connect to. This field is only available when address-mode is set to auto-discovery. Not available for fortianalyzer2 and fortianalyzer3.
No default
fdp-interface <int_str> Enter the interface on which the FortiGate unit will automatically detect FortiAnalyzer units.
No default
gui-display {enable | disable}
Enable to display FortiAnalyzer Reports on the web-based manager.
disable
ips-archive {enable | disable}
Enable IPS packet archive. enable
localid <identifier> Enter an identifier up to 64 characters long. You must use the same identifier on the FortiGate unit and the FortiAnalyzer unit.
No default.
max-buffer-size <size_int> Enter a number between 1 and 1024MB for the maximum buffer size for the FortiAnalyzer unit. The number 0 disables the maximum buffer size. This option is available for FortiGate units with hard disks.
1
psksecret <pre-shared_key> Enter the pre-shared key for the IPSec VPN tunnel.This is needed only if encrypt is set to enable.
No default.
server <fortianalyzer_ipv4>
Enter the IP address of the FortiAnalyzer unit. This field is only available when address-mode is set to static.
0.0.0.0
source-ip <address_ipv4> Enter the source IP address for the FortiAnalyzer, FortiAnalyzer2 and FortiAnalyzer3 units.
0.0.0.0
Variable Description Default
ortiOS 4.0 MR3 CLI Reference1-431-99686-20110623 227ttp://docs.fortinet.com/ • Feedback
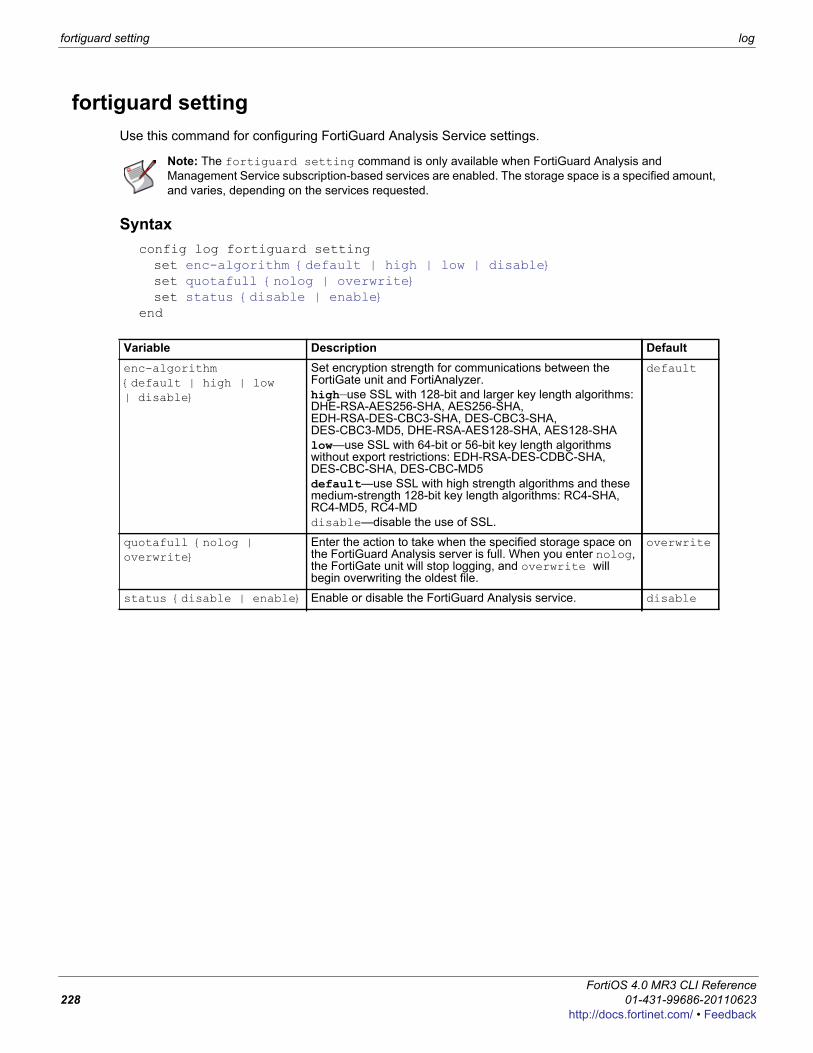
fortiguard setting log
fortiguard settingUse this command for configuring FortiGuard Analysis Service settings.
Syntaxconfig log fortiguard settingset enc-algorithm {default | high | low | disable}set quotafull {nolog | overwrite}set status {disable | enable}
end
Note: The fortiguard setting command is only available when FortiGuard Analysis and Management Service subscription-based services are enabled. The storage space is a specified amount, and varies, depending on the services requested.
Variable Description Defaultenc-algorithm {default | high | low | disable}
Set encryption strength for communications between the FortiGate unit and FortiAnalyzer.high—use SSL with 128-bit and larger key length algorithms: DHE-RSA-AES256-SHA, AES256-SHA, EDH-RSA-DES-CBC3-SHA, DES-CBC3-SHA, DES-CBC3-MD5, DHE-RSA-AES128-SHA, AES128-SHAlow—use SSL with 64-bit or 56-bit key length algorithms without export restrictions: EDH-RSA-DES-CDBC-SHA, DES-CBC-SHA, DES-CBC-MD5default—use SSL with high strength algorithms and these medium-strength 128-bit key length algorithms: RC4-SHA, RC4-MD5, RC4-MDdisable—disable the use of SSL.
default
quotafull {nolog | overwrite}
Enter the action to take when the specified storage space on the FortiGuard Analysis server is full. When you enter nolog, the FortiGate unit will stop logging, and overwrite will begin overwriting the oldest file.
overwrite
status {disable | enable} Enable or disable the FortiGuard Analysis service. disable
FortiOS 4.0 MR3 CLI Reference228 01-431-99686-20110623
http://docs.fortinet.com/ • Feedback
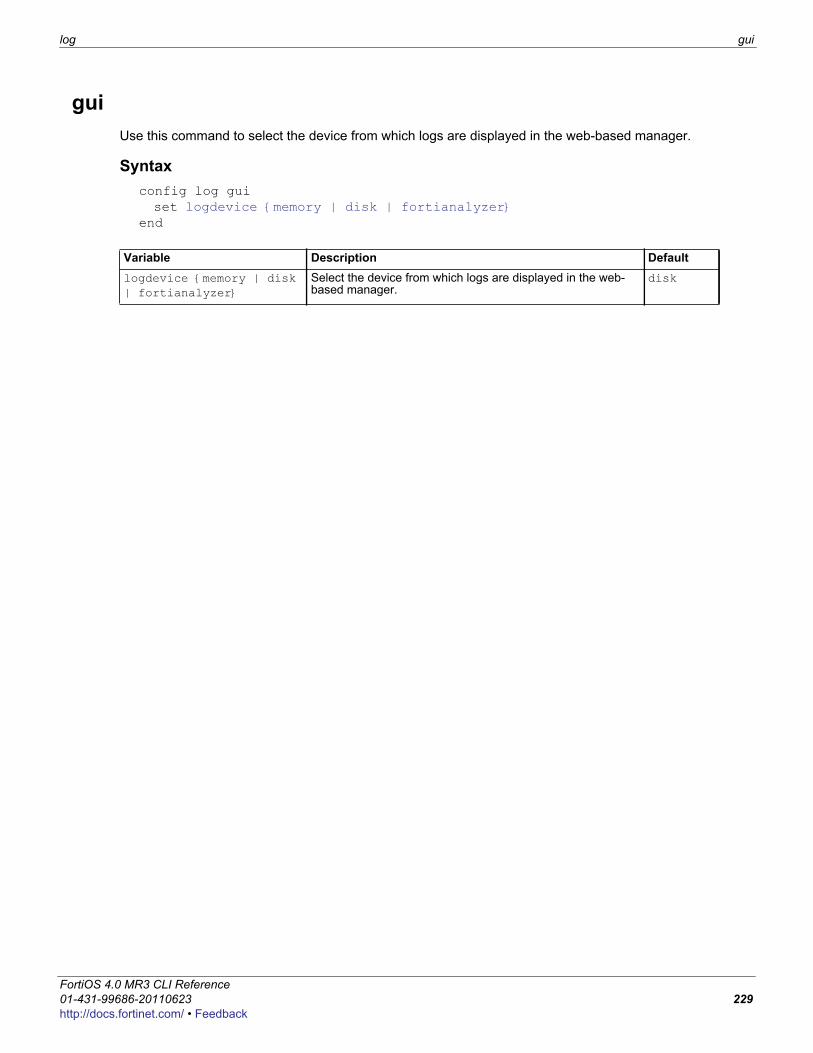
log gui
F0h
guiUse this command to select the device from which logs are displayed in the web-based manager.
Syntaxconfig log guiset logdevice {memory | disk | fortianalyzer}
end
Variable Description Defaultlogdevice {memory | disk | fortianalyzer}
Select the device from which logs are displayed in the web-based manager.
disk
ortiOS 4.0 MR3 CLI Reference1-431-99686-20110623 229ttp://docs.fortinet.com/ • Feedback
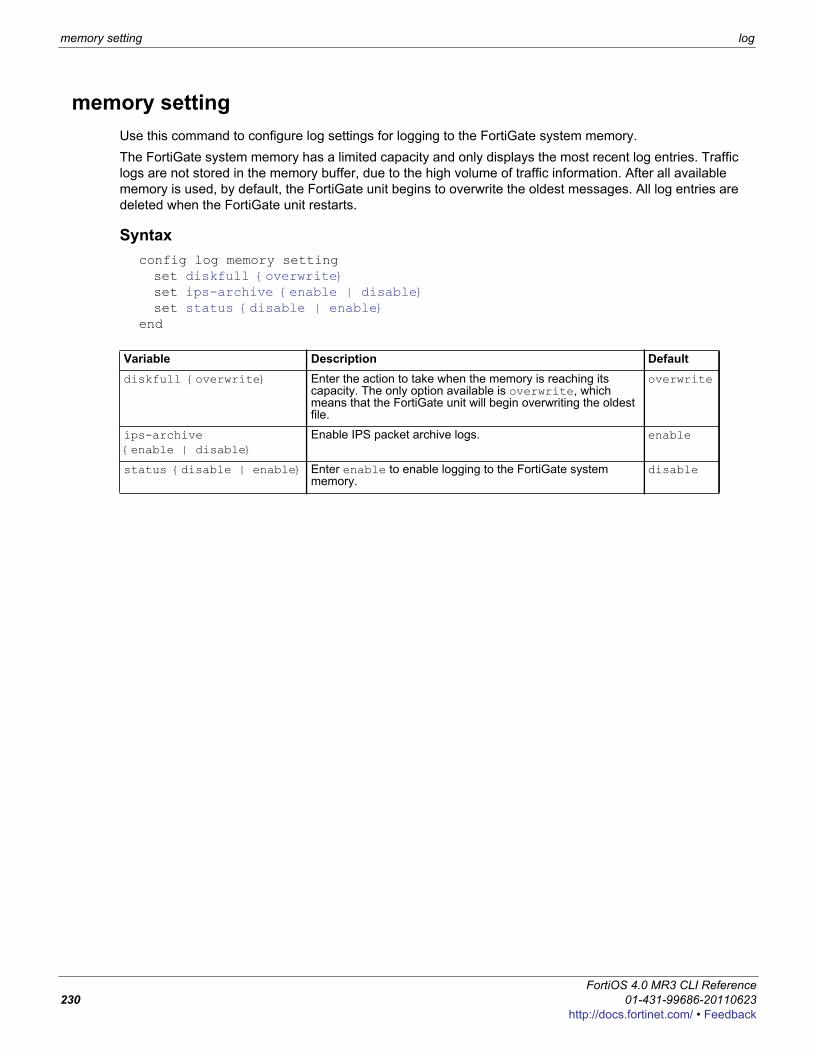
memory setting log
memory settingUse this command to configure log settings for logging to the FortiGate system memory.The FortiGate system memory has a limited capacity and only displays the most recent log entries. Traffic logs are not stored in the memory buffer, due to the high volume of traffic information. After all available memory is used, by default, the FortiGate unit begins to overwrite the oldest messages. All log entries are deleted when the FortiGate unit restarts.
Syntaxconfig log memory settingset diskfull {overwrite}set ips-archive {enable | disable}set status {disable | enable}
end
Variable Description Defaultdiskfull {overwrite} Enter the action to take when the memory is reaching its
capacity. The only option available is overwrite, which means that the FortiGate unit will begin overwriting the oldest file.
overwrite
ips-archive {enable | disable}
Enable IPS packet archive logs. enable
status {disable | enable} Enter enable to enable logging to the FortiGate system memory.
disable
FortiOS 4.0 MR3 CLI Reference230 01-431-99686-20110623
http://docs.fortinet.com/ • Feedback
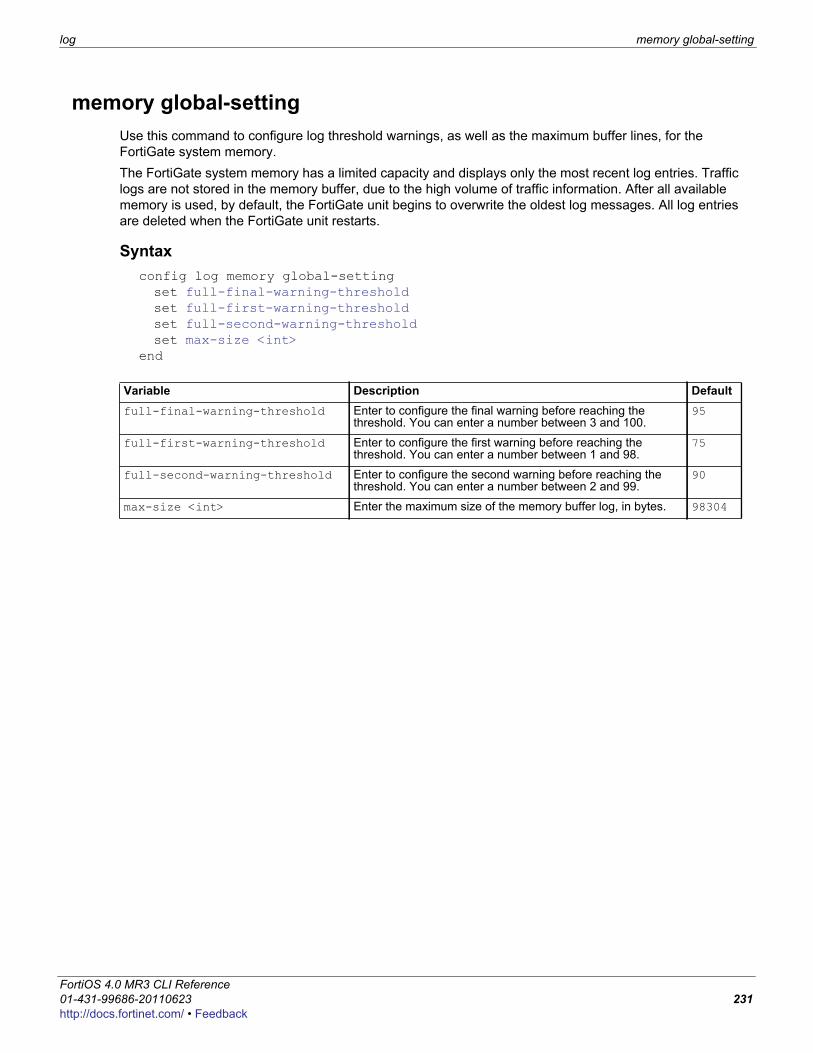
log memory global-setting
F0h
memory global-settingUse this command to configure log threshold warnings, as well as the maximum buffer lines, for the FortiGate system memory. The FortiGate system memory has a limited capacity and displays only the most recent log entries. Traffic logs are not stored in the memory buffer, due to the high volume of traffic information. After all available memory is used, by default, the FortiGate unit begins to overwrite the oldest log messages. All log entries are deleted when the FortiGate unit restarts.
Syntaxconfig log memory global-settingset full-final-warning-thresholdset full-first-warning-thresholdset full-second-warning-thresholdset max-size <int>
end
Variable Description Defaultfull-final-warning-threshold Enter to configure the final warning before reaching the
threshold. You can enter a number between 3 and 100. 95
full-first-warning-threshold Enter to configure the first warning before reaching the threshold. You can enter a number between 1 and 98.
75
full-second-warning-threshold Enter to configure the second warning before reaching the threshold. You can enter a number between 2 and 99.
90
max-size <int> Enter the maximum size of the memory buffer log, in bytes. 98304
ortiOS 4.0 MR3 CLI Reference1-431-99686-20110623 231ttp://docs.fortinet.com/ • Feedback

syslogd override-setting log
syslogd override-settingUse this command within a VDOM to override the global configuration created with the config log syslogd setting command. These settings configure the connection to a syslog server. For syntax and descriptions, see “{syslogd | syslogd2 | syslogd3} setting” on page 233.
FortiOS 4.0 MR3 CLI Reference232 01-431-99686-20110623
http://docs.fortinet.com/ • Feedback
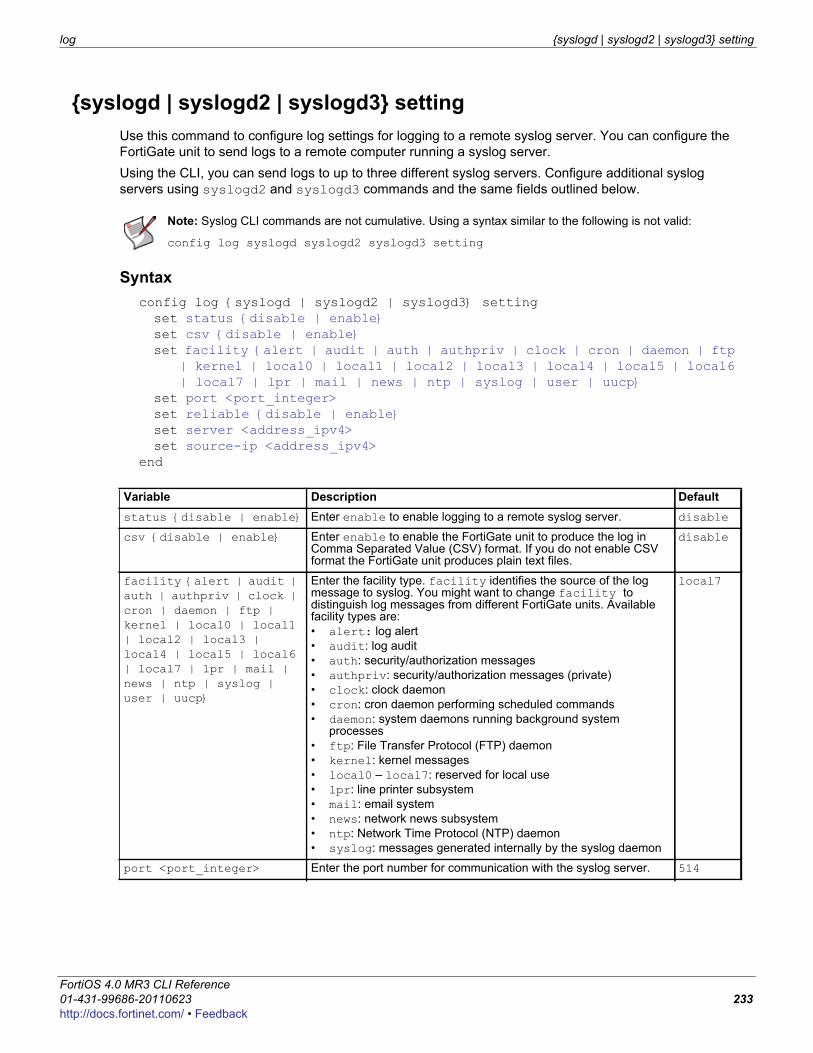
log {syslogd | syslogd2 | syslogd3} setting
F0h
{syslogd | syslogd2 | syslogd3} settingUse this command to configure log settings for logging to a remote syslog server. You can configure the FortiGate unit to send logs to a remote computer running a syslog server.Using the CLI, you can send logs to up to three different syslog servers. Configure additional syslog servers using syslogd2 and syslogd3 commands and the same fields outlined below.
Syntaxconfig log {syslogd | syslogd2 | syslogd3} settingset status {disable | enable}set csv {disable | enable}set facility {alert | audit | auth | authpriv | clock | cron | daemon | ftp
| kernel | local0 | local1 | local2 | local3 | local4 | local5 | local6 | local7 | lpr | mail | news | ntp | syslog | user | uucp}
set port <port_integer>set reliable {disable | enable}set server <address_ipv4>set source-ip <address_ipv4>
end
Note: Syslog CLI commands are not cumulative. Using a syntax similar to the following is not valid:
config log syslogd syslogd2 syslogd3 setting
Variable Description Defaultstatus {disable | enable} Enter enable to enable logging to a remote syslog server. disable
csv {disable | enable} Enter enable to enable the FortiGate unit to produce the log in Comma Separated Value (CSV) format. If you do not enable CSV format the FortiGate unit produces plain text files.
disable
facility {alert | audit | auth | authpriv | clock | cron | daemon | ftp | kernel | local0 | local1 | local2 | local3 | local4 | local5 | local6 | local7 | lpr | mail | news | ntp | syslog | user | uucp}
Enter the facility type. facility identifies the source of the log message to syslog. You might want to change facility to distinguish log messages from different FortiGate units. Available facility types are:• alert: log alert• audit: log audit• auth: security/authorization messages• authpriv: security/authorization messages (private)• clock: clock daemon• cron: cron daemon performing scheduled commands• daemon: system daemons running background system
processes• ftp: File Transfer Protocol (FTP) daemon• kernel: kernel messages• local0 – local7: reserved for local use• lpr: line printer subsystem• mail: email system• news: network news subsystem• ntp: Network Time Protocol (NTP) daemon• syslog: messages generated internally by the syslog daemon
local7
port <port_integer> Enter the port number for communication with the syslog server. 514
ortiOS 4.0 MR3 CLI Reference1-431-99686-20110623 233ttp://docs.fortinet.com/ • Feedback
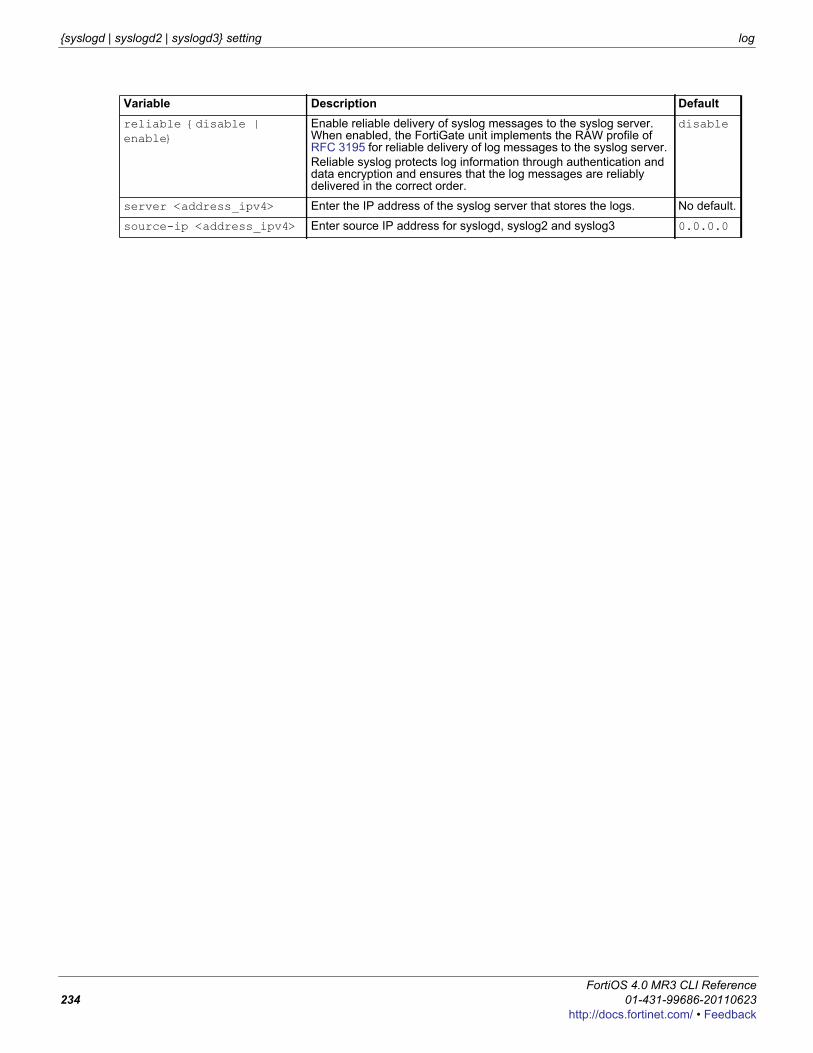
{syslogd | syslogd2 | syslogd3} setting log
reliable {disable | enable}
Enable reliable delivery of syslog messages to the syslog server. When enabled, the FortiGate unit implements the RAW profile of RFC 3195 for reliable delivery of log messages to the syslog server. Reliable syslog protects log information through authentication and data encryption and ensures that the log messages are reliably delivered in the correct order.
disable
server <address_ipv4> Enter the IP address of the syslog server that stores the logs. No default.
source-ip <address_ipv4> Enter source IP address for syslogd, syslog2 and syslog3 0.0.0.0
Variable Description Default
FortiOS 4.0 MR3 CLI Reference234 01-431-99686-20110623
http://docs.fortinet.com/ • Feedback
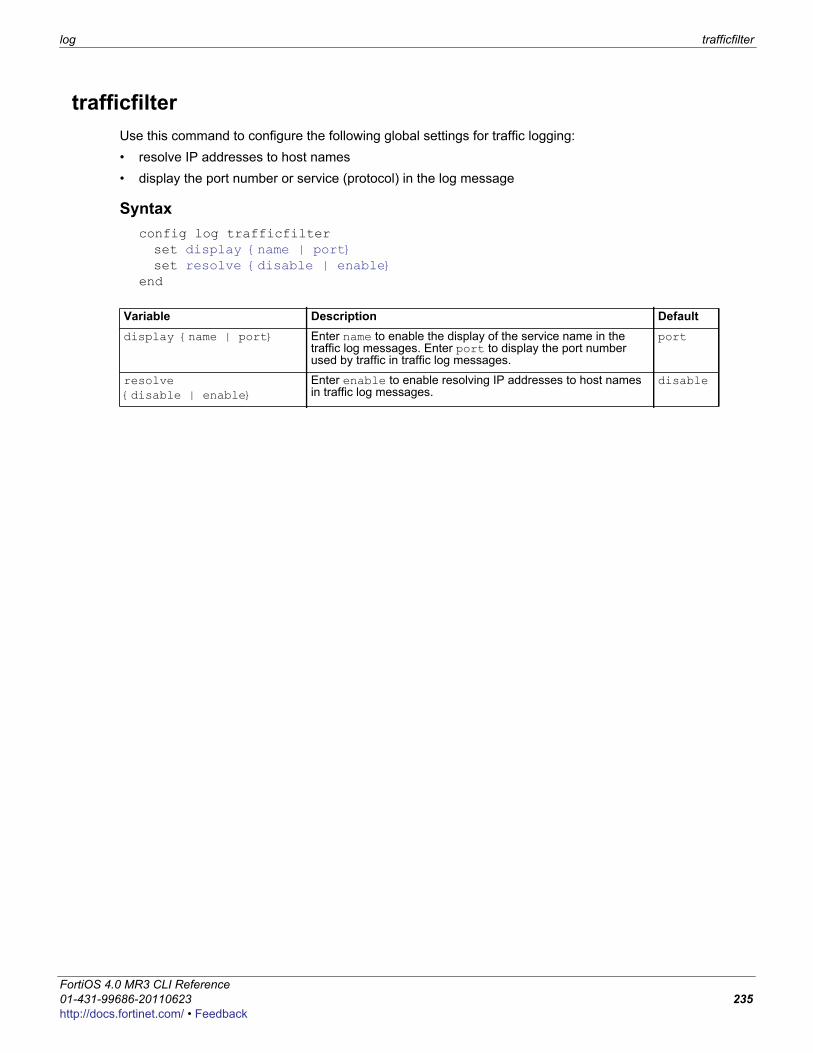
log trafficfilter
F0h
trafficfilterUse this command to configure the following global settings for traffic logging:• resolve IP addresses to host names• display the port number or service (protocol) in the log message
Syntaxconfig log trafficfilterset display {name | port}set resolve {disable | enable}
end
Variable Description Defaultdisplay {name | port} Enter name to enable the display of the service name in the
traffic log messages. Enter port to display the port number used by traffic in traffic log messages.
port
resolve {disable | enable}
Enter enable to enable resolving IP addresses to host names in traffic log messages.
disable
ortiOS 4.0 MR3 CLI Reference1-431-99686-20110623 235ttp://docs.fortinet.com/ • Feedback
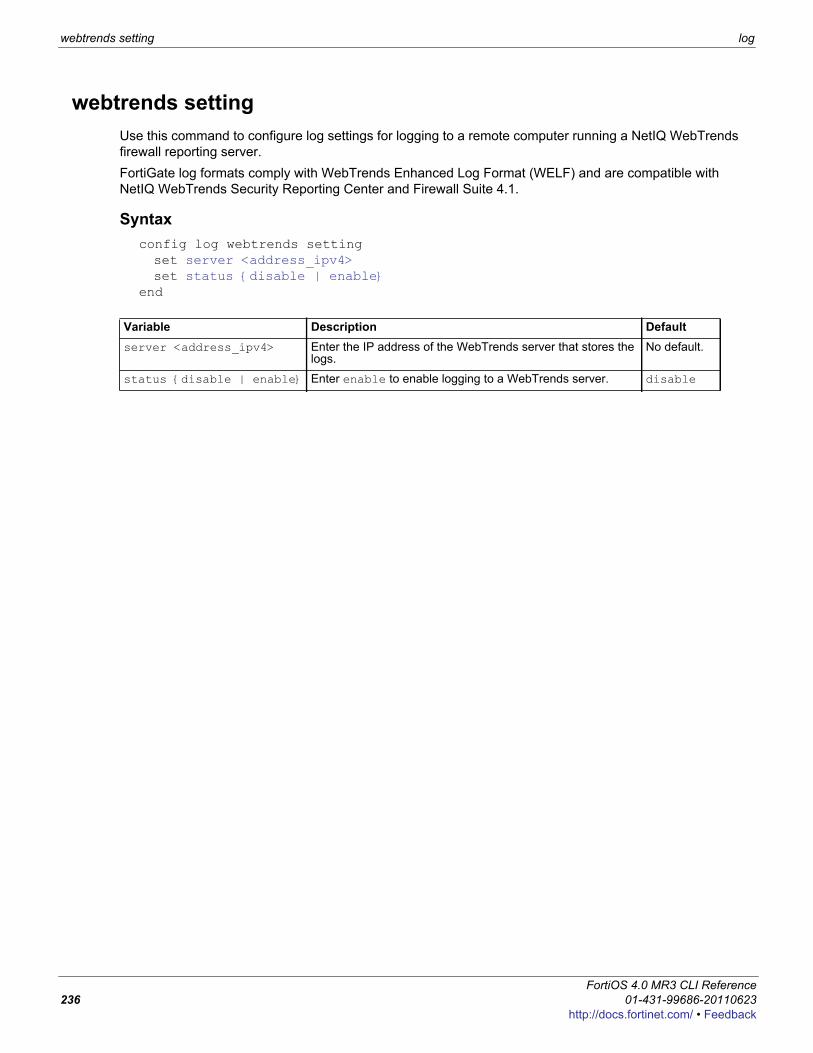
webtrends setting log
webtrends settingUse this command to configure log settings for logging to a remote computer running a NetIQ WebTrends firewall reporting server.FortiGate log formats comply with WebTrends Enhanced Log Format (WELF) and are compatible with NetIQ WebTrends Security Reporting Center and Firewall Suite 4.1.
Syntaxconfig log webtrends settingset server <address_ipv4>set status {disable | enable}
end
Variable Description Defaultserver <address_ipv4> Enter the IP address of the WebTrends server that stores the
logs.No default.
status {disable | enable} Enter enable to enable logging to a WebTrends server. disable
FortiOS 4.0 MR3 CLI Reference236 01-431-99686-20110623
http://docs.fortinet.com/ • Feedback
F0h
netscanUse these commands to configure the Endpoint network vulnerability scanner.
assetssettings
ortiOS 4.0 MR3 CLI Reference1-431-99686-20110623 237ttp://docs.fortinet.com/ • Feedback
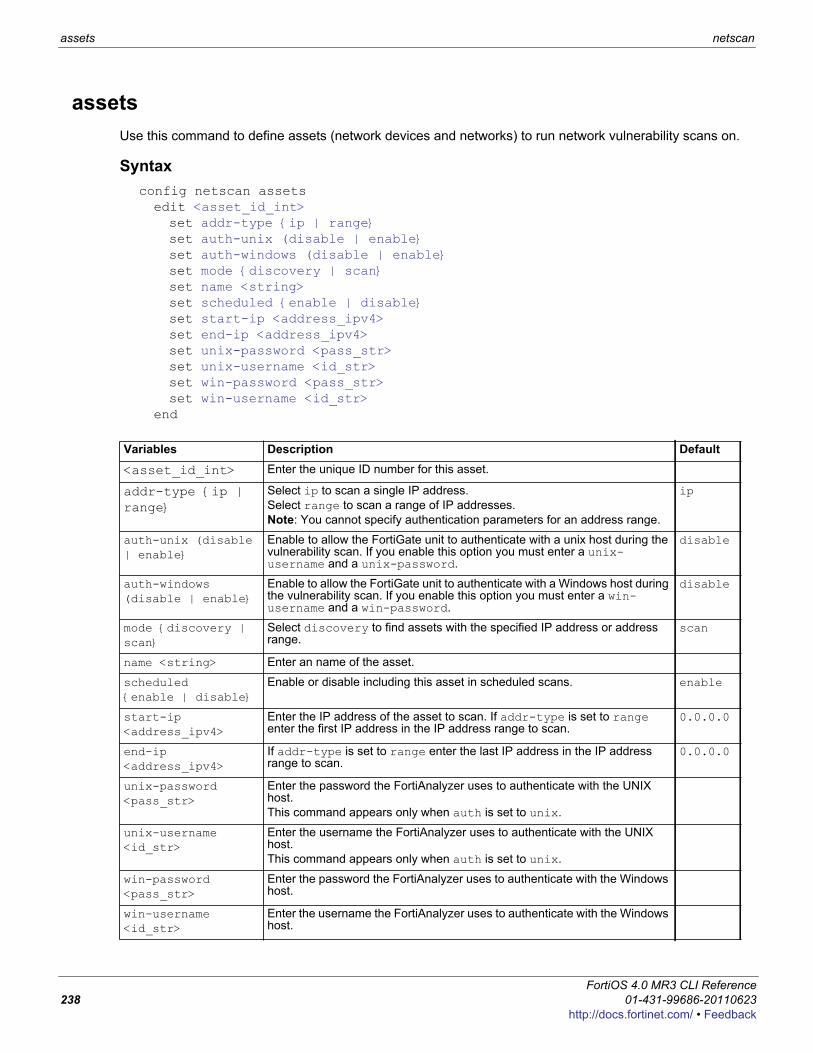
assets netscan
assetsUse this command to define assets (network devices and networks) to run network vulnerability scans on.
Syntaxconfig netscan assetsedit <asset_id_int>set addr-type {ip | range}set auth-unix (disable | enable}set auth-windows (disable | enable}set mode {discovery | scan}set name <string>set scheduled {enable | disable}set start-ip <address_ipv4>set end-ip <address_ipv4>set unix-password <pass_str>set unix-username <id_str>set win-password <pass_str>set win-username <id_str>
end
Variables Description Default
<asset_id_int> Enter the unique ID number for this asset.
addr-type {ip | range}
Select ip to scan a single IP address. Select range to scan a range of IP addresses.Note: You cannot specify authentication parameters for an address range.
ip
auth-unix (disable | enable}
Enable to allow the FortiGate unit to authenticate with a unix host during the vulnerability scan. If you enable this option you must enter a unix-username and a unix-password.
disable
auth-windows (disable | enable}
Enable to allow the FortiGate unit to authenticate with a Windows host during the vulnerability scan. If you enable this option you must enter a win-username and a win-password.
disable
mode {discovery | scan}
Select discovery to find assets with the specified IP address or address range.
scan
name <string> Enter an name of the asset.
scheduled {enable | disable}
Enable or disable including this asset in scheduled scans. enable
start-ip <address_ipv4>
Enter the IP address of the asset to scan. If addr-type is set to range enter the first IP address in the IP address range to scan.
0.0.0.0
end-ip <address_ipv4>
If addr-type is set to range enter the last IP address in the IP address range to scan.
0.0.0.0
unix-password <pass_str>
Enter the password the FortiAnalyzer uses to authenticate with the UNIX host.This command appears only when auth is set to unix.
unix-username <id_str>
Enter the username the FortiAnalyzer uses to authenticate with the UNIX host.This command appears only when auth is set to unix.
win-password <pass_str>
Enter the password the FortiAnalyzer uses to authenticate with the Windows host.
win-username <id_str>
Enter the username the FortiAnalyzer uses to authenticate with the Windows host.
FortiOS 4.0 MR3 CLI Reference238 01-431-99686-20110623
http://docs.fortinet.com/ • Feedback
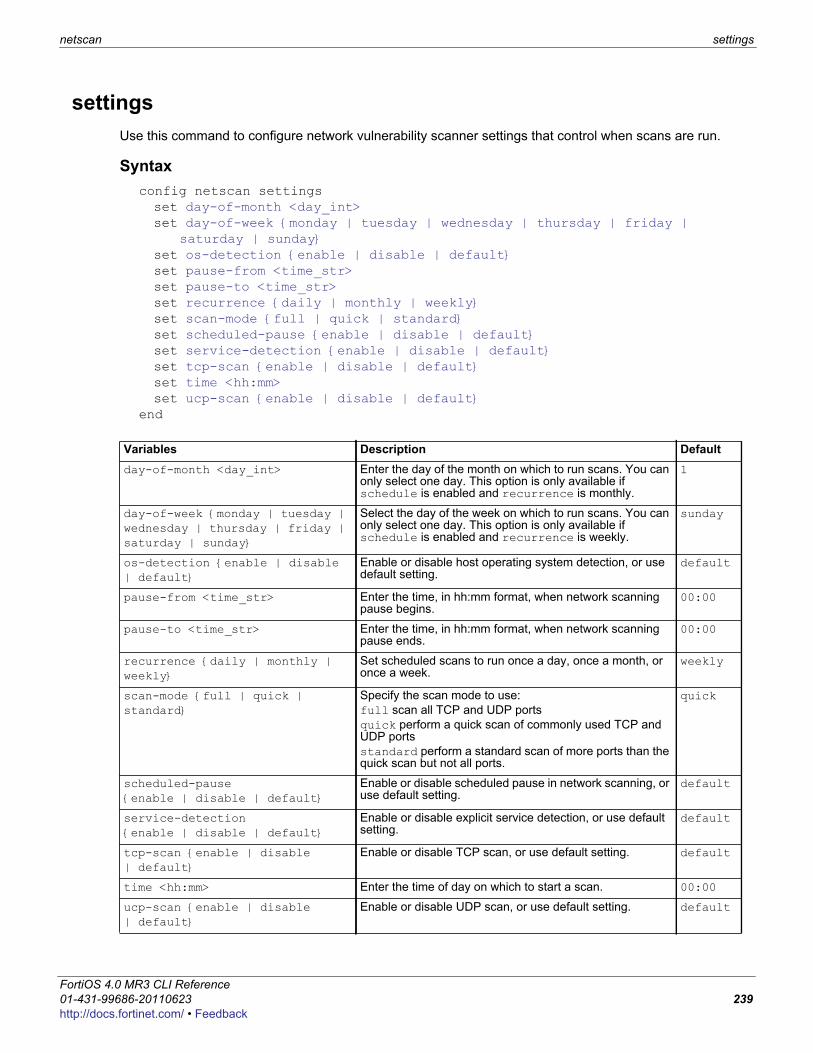
netscan settings
F0h
settingsUse this command to configure network vulnerability scanner settings that control when scans are run.
Syntaxconfig netscan settingsset day-of-month <day_int>set day-of-week {monday | tuesday | wednesday | thursday | friday |
saturday | sunday}set os-detection {enable | disable | default}set pause-from <time_str>set pause-to <time_str>set recurrence {daily | monthly | weekly}set scan-mode {full | quick | standard}set scheduled-pause {enable | disable | default}set service-detection {enable | disable | default}set tcp-scan {enable | disable | default}set time <hh:mm>set ucp-scan {enable | disable | default}
end
Variables Description Defaultday-of-month <day_int> Enter the day of the month on which to run scans. You can
only select one day. This option is only available if schedule is enabled and recurrence is monthly.
1
day-of-week {monday | tuesday | wednesday | thursday | friday | saturday | sunday}
Select the day of the week on which to run scans. You can only select one day. This option is only available if schedule is enabled and recurrence is weekly.
sunday
os-detection {enable | disable | default}
Enable or disable host operating system detection, or use default setting.
default
pause-from <time_str> Enter the time, in hh:mm format, when network scanning pause begins.
00:00
pause-to <time_str> Enter the time, in hh:mm format, when network scanning pause ends.
00:00
recurrence {daily | monthly | weekly}
Set scheduled scans to run once a day, once a month, or once a week.
weekly
scan-mode {full | quick | standard}
Specify the scan mode to use:full scan all TCP and UDP portsquick perform a quick scan of commonly used TCP and UDP portsstandard perform a standard scan of more ports than the quick scan but not all ports.
quick
scheduled-pause {enable | disable | default}
Enable or disable scheduled pause in network scanning, or use default setting.
default
service-detection {enable | disable | default}
Enable or disable explicit service detection, or use default setting.
default
tcp-scan {enable | disable | default}
Enable or disable TCP scan, or use default setting. default
time <hh:mm> Enter the time of day on which to start a scan. 00:00
ucp-scan {enable | disable | default}
Enable or disable UDP scan, or use default setting. default
ortiOS 4.0 MR3 CLI Reference1-431-99686-20110623 239ttp://docs.fortinet.com/ • Feedback

settings netscan
FortiOS 4.0 MR3 CLI Reference240 01-431-99686-20110623
http://docs.fortinet.com/ • Feedback
F0h
reportUse these commands to configure SQL reports. You can use the get report database schema to display the FortiGate SQL reporting database schema.
Note: The command descriptions in this chapter have not been updated for FortiOS 4.0 MR2. This chapter will be updated for a future version of this document.
chartdatasetlayoutstylesummarytheme
ortiOS 4.0 MR3 CLI Reference1-431-99686-20110623 241ttp://docs.fortinet.com/ • Feedback
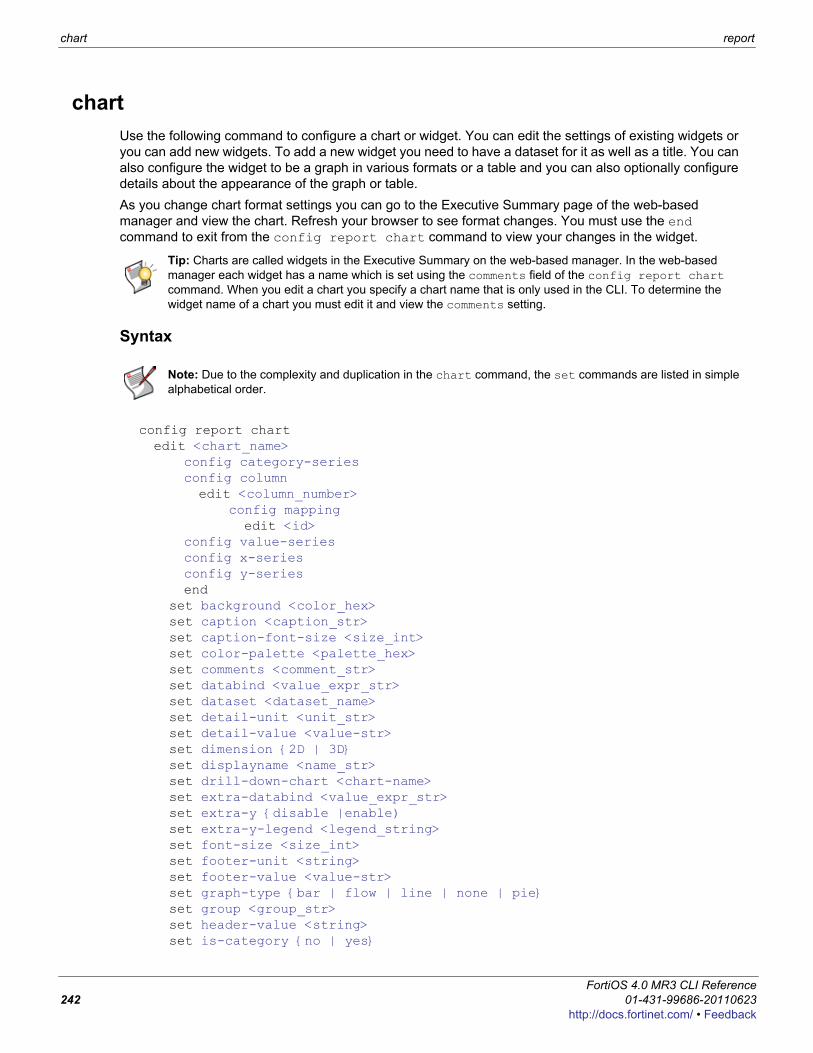
chart report
chartUse the following command to configure a chart or widget. You can edit the settings of existing widgets or you can add new widgets. To add a new widget you need to have a dataset for it as well as a title. You can also configure the widget to be a graph in various formats or a table and you can also optionally configure details about the appearance of the graph or table. As you change chart format settings you can go to the Executive Summary page of the web-based manager and view the chart. Refresh your browser to see format changes. You must use the end command to exit from the config report chart command to view your changes in the widget.
Syntax
config report chartedit <chart_name>
config category-seriesconfig columnedit <column_number>
config mappingedit <id>
config value-seriesconfig x-seriesconfig y-seriesend
set background <color_hex>set caption <caption_str>set caption-font-size <size_int>set color-palette <palette_hex>set comments <comment_str>set databind <value_expr_str>set dataset <dataset_name>set detail-unit <unit_str>set detail-value <value-str>set dimension {2D | 3D}set displayname <name_str>set drill-down-chart <chart-name>set extra-databind <value_expr_str>set extra-y {disable |enable)set extra-y-legend <legend_string>set font-size <size_int>set footer-unit <string>set footer-value <value-str>set graph-type {bar | flow | line | none | pie}set group <group_str>set header-value <string>set is-category {no | yes}
Tip: Charts are called widgets in the Executive Summary on the web-based manager. In the web-based manager each widget has a name which is set using the comments field of the config report chart command. When you edit a chart you specify a chart name that is only used in the CLI. To determine the widget name of a chart you must edit it and view the comments setting.
Note: Due to the complexity and duplication in the chart command, the set commands are listed in simple alphabetical order.
FortiOS 4.0 MR3 CLI Reference242 01-431-99686-20110623
http://docs.fortinet.com/ • Feedback
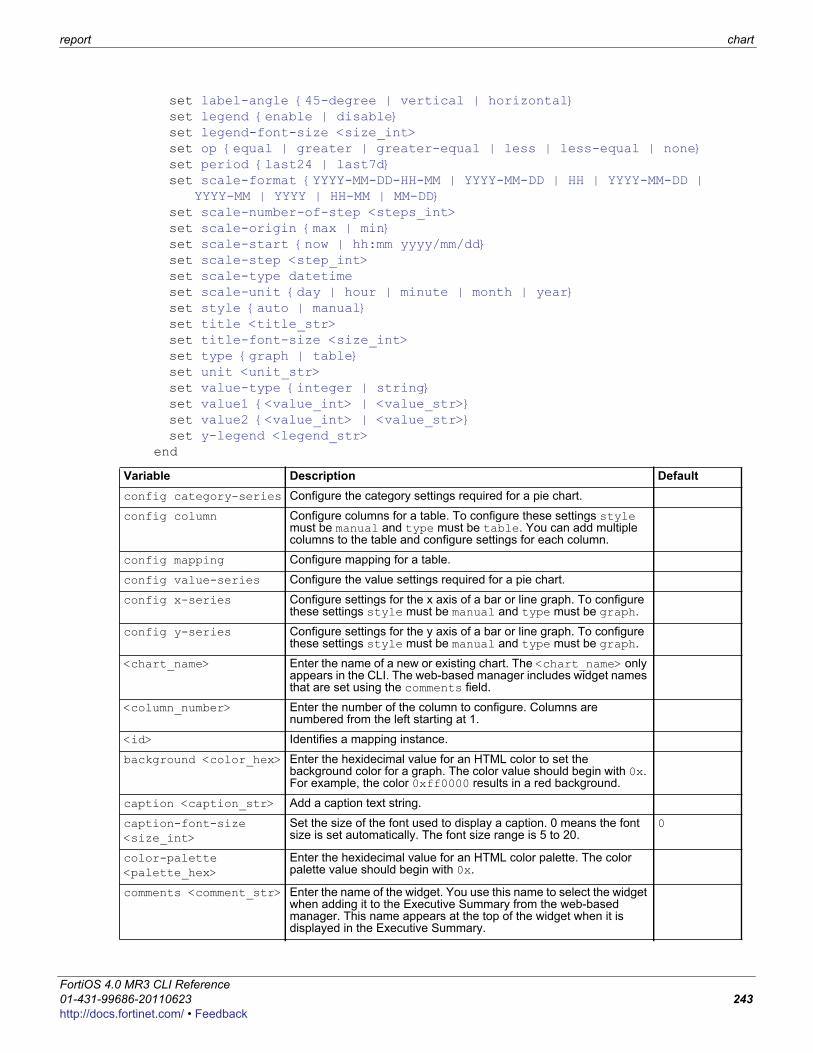
report chart
F0h
set label-angle {45-degree | vertical | horizontal}set legend {enable | disable}set legend-font-size <size_int>set op {equal | greater | greater-equal | less | less-equal | none}set period {last24 | last7d}set scale-format {YYYY-MM-DD-HH-MM | YYYY-MM-DD | HH | YYYY-MM-DD |
YYYY-MM | YYYY | HH-MM | MM-DD}set scale-number-of-step <steps_int>set scale-origin {max | min}set scale-start {now | hh:mm yyyy/mm/dd}set scale-step <step_int>set scale-type datetimeset scale-unit {day | hour | minute | month | year}set style {auto | manual}set title <title_str>set title-font-size <size_int>set type {graph | table}set unit <unit_str>set value-type {integer | string}set value1 {<value_int> | <value_str>}set value2 {<value_int> | <value_str>}set y-legend <legend_str>
end
Variable Description Defaultconfig category-series Configure the category settings required for a pie chart.
config column Configure columns for a table. To configure these settings style must be manual and type must be table. You can add multiple columns to the table and configure settings for each column.
config mapping Configure mapping for a table.
config value-series Configure the value settings required for a pie chart.
config x-series Configure settings for the x axis of a bar or line graph. To configure these settings style must be manual and type must be graph.
config y-series Configure settings for the y axis of a bar or line graph. To configure these settings style must be manual and type must be graph.
<chart_name> Enter the name of a new or existing chart. The <chart_name> only appears in the CLI. The web-based manager includes widget names that are set using the comments field.
<column_number> Enter the number of the column to configure. Columns are numbered from the left starting at 1.
<id> Identifies a mapping instance.
background <color_hex> Enter the hexidecimal value for an HTML color to set the background color for a graph. The color value should begin with 0x. For example, the color 0xff0000 results in a red background.
caption <caption_str> Add a caption text string.
caption-font-size <size_int>
Set the size of the font used to display a caption. 0 means the font size is set automatically. The font size range is 5 to 20.
0
color-palette <palette_hex>
Enter the hexidecimal value for an HTML color palette. The color palette value should begin with 0x.
comments <comment_str> Enter the name of the widget. You use this name to select the widget when adding it to the Executive Summary from the web-based manager. This name appears at the top of the widget when it is displayed in the Executive Summary.
ortiOS 4.0 MR3 CLI Reference1-431-99686-20110623 243ttp://docs.fortinet.com/ • Feedback
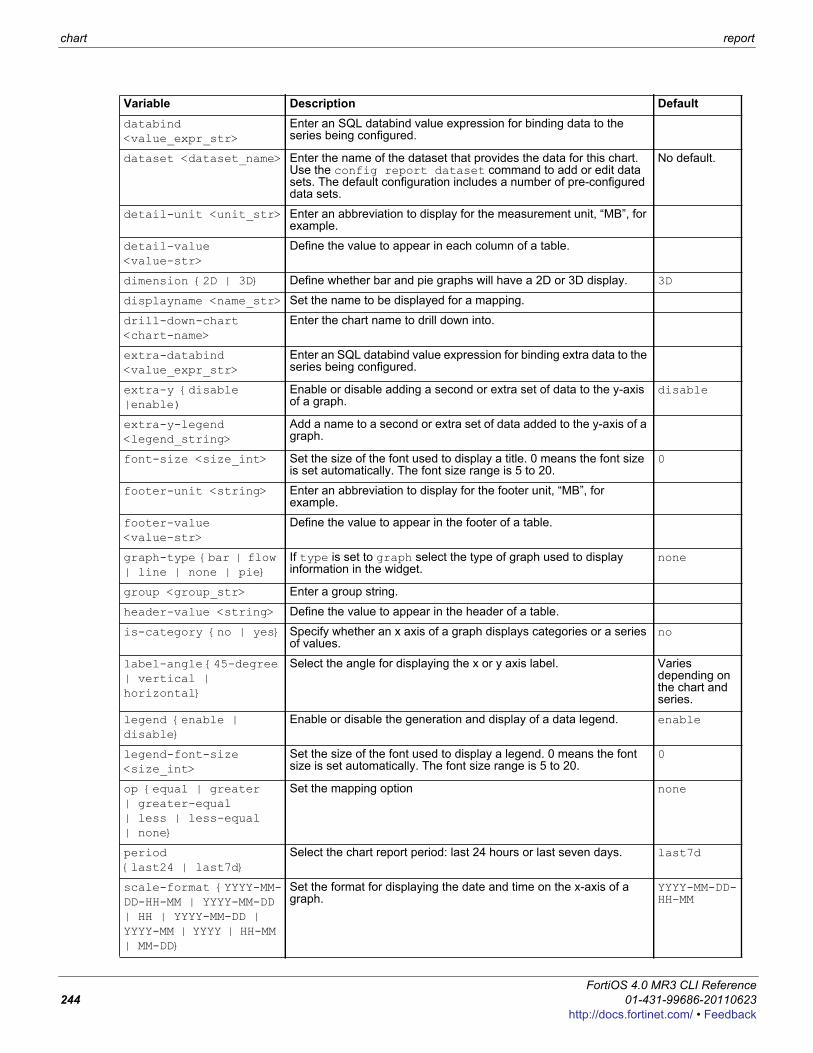
chart report
databind <value_expr_str>
Enter an SQL databind value expression for binding data to the series being configured.
dataset <dataset_name> Enter the name of the dataset that provides the data for this chart. Use the config report dataset command to add or edit data sets. The default configuration includes a number of pre-configured data sets.
No default.
detail-unit <unit_str> Enter an abbreviation to display for the measurement unit, “MB”, for example.
detail-value <value-str>
Define the value to appear in each column of a table.
dimension {2D | 3D} Define whether bar and pie graphs will have a 2D or 3D display. 3D
displayname <name_str> Set the name to be displayed for a mapping.
drill-down-chart <chart-name>
Enter the chart name to drill down into.
extra-databind <value_expr_str>
Enter an SQL databind value expression for binding extra data to the series being configured.
extra-y {disable |enable)
Enable or disable adding a second or extra set of data to the y-axis of a graph.
disable
extra-y-legend <legend_string>
Add a name to a second or extra set of data added to the y-axis of a graph.
font-size <size_int> Set the size of the font used to display a title. 0 means the font size is set automatically. The font size range is 5 to 20.
0
footer-unit <string> Enter an abbreviation to display for the footer unit, “MB”, for example.
footer-value <value-str>
Define the value to appear in the footer of a table.
graph-type {bar | flow | line | none | pie}
If type is set to graph select the type of graph used to display information in the widget.
none
group <group_str> Enter a group string.
header-value <string> Define the value to appear in the header of a table.
is-category {no | yes} Specify whether an x axis of a graph displays categories or a series of values.
no
label-angle {45-degree | vertical | horizontal}
Select the angle for displaying the x or y axis label. Varies depending on the chart and series.
legend {enable | disable}
Enable or disable the generation and display of a data legend. enable
legend-font-size <size_int>
Set the size of the font used to display a legend. 0 means the font size is set automatically. The font size range is 5 to 20.
0
op {equal | greater | greater-equal | less | less-equal | none}
Set the mapping option none
period {last24 | last7d}
Select the chart report period: last 24 hours or last seven days. last7d
scale-format {YYYY-MM-DD-HH-MM | YYYY-MM-DD | HH | YYYY-MM-DD | YYYY-MM | YYYY | HH-MM | MM-DD}
Set the format for displaying the date and time on the x-axis of a graph.
YYYY-MM-DD-HH-MM
Variable Description Default
FortiOS 4.0 MR3 CLI Reference244 01-431-99686-20110623
http://docs.fortinet.com/ • Feedback
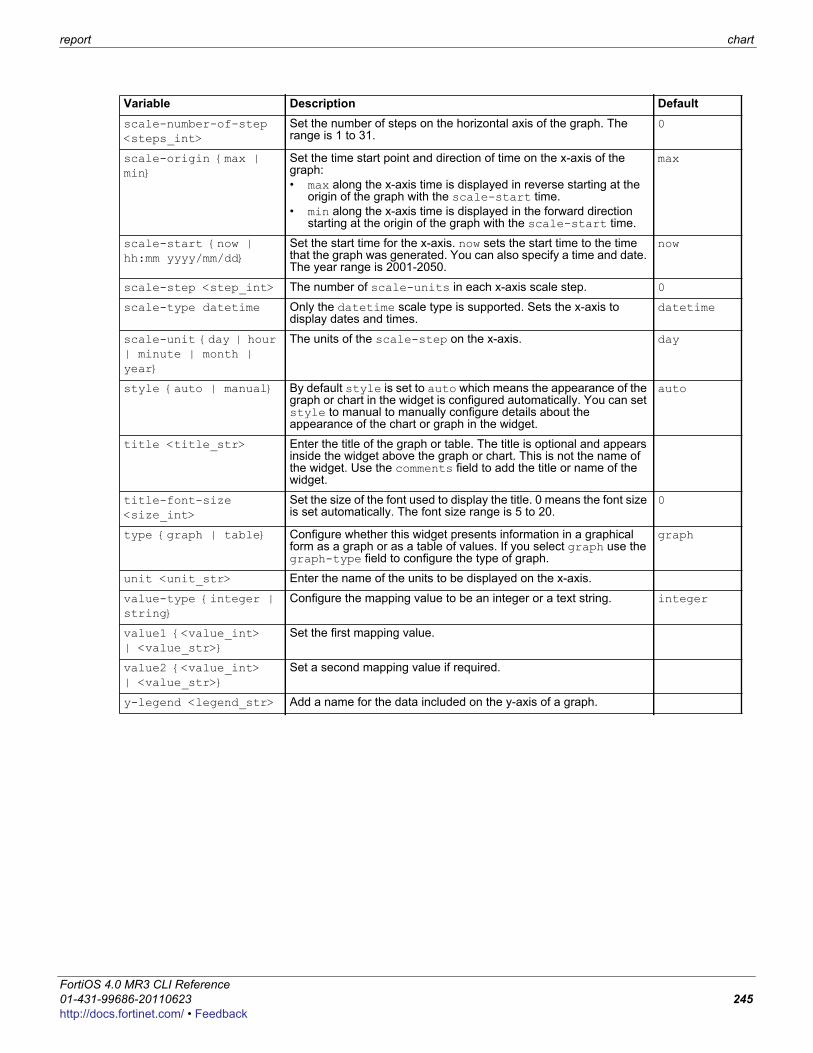
report chart
F0h
scale-number-of-step <steps_int>
Set the number of steps on the horizontal axis of the graph. The range is 1 to 31.
0
scale-origin {max | min}
Set the time start point and direction of time on the x-axis of the graph:• max along the x-axis time is displayed in reverse starting at the
origin of the graph with the scale-start time.• min along the x-axis time is displayed in the forward direction
starting at the origin of the graph with the scale-start time.
max
scale-start {now | hh:mm yyyy/mm/dd}
Set the start time for the x-axis. now sets the start time to the time that the graph was generated. You can also specify a time and date. The year range is 2001-2050.
now
scale-step <step_int> The number of scale-units in each x-axis scale step. 0
scale-type datetime Only the datetime scale type is supported. Sets the x-axis to display dates and times.
datetime
scale-unit {day | hour | minute | month | year}
The units of the scale-step on the x-axis. day
style {auto | manual} By default style is set to auto which means the appearance of the graph or chart in the widget is configured automatically. You can set style to manual to manually configure details about the appearance of the chart or graph in the widget.
auto
title <title_str> Enter the title of the graph or table. The title is optional and appears inside the widget above the graph or chart. This is not the name of the widget. Use the comments field to add the title or name of the widget.
title-font-size <size_int>
Set the size of the font used to display the title. 0 means the font size is set automatically. The font size range is 5 to 20.
0
type {graph | table} Configure whether this widget presents information in a graphical form as a graph or as a table of values. If you select graph use the graph-type field to configure the type of graph.
graph
unit <unit_str> Enter the name of the units to be displayed on the x-axis.
value-type {integer | string}
Configure the mapping value to be an integer or a text string. integer
value1 {<value_int> | <value_str>}
Set the first mapping value.
value2 {<value_int> | <value_str>}
Set a second mapping value if required.
y-legend <legend_str> Add a name for the data included on the y-axis of a graph.
Variable Description Default
ortiOS 4.0 MR3 CLI Reference1-431-99686-20110623 245ttp://docs.fortinet.com/ • Feedback
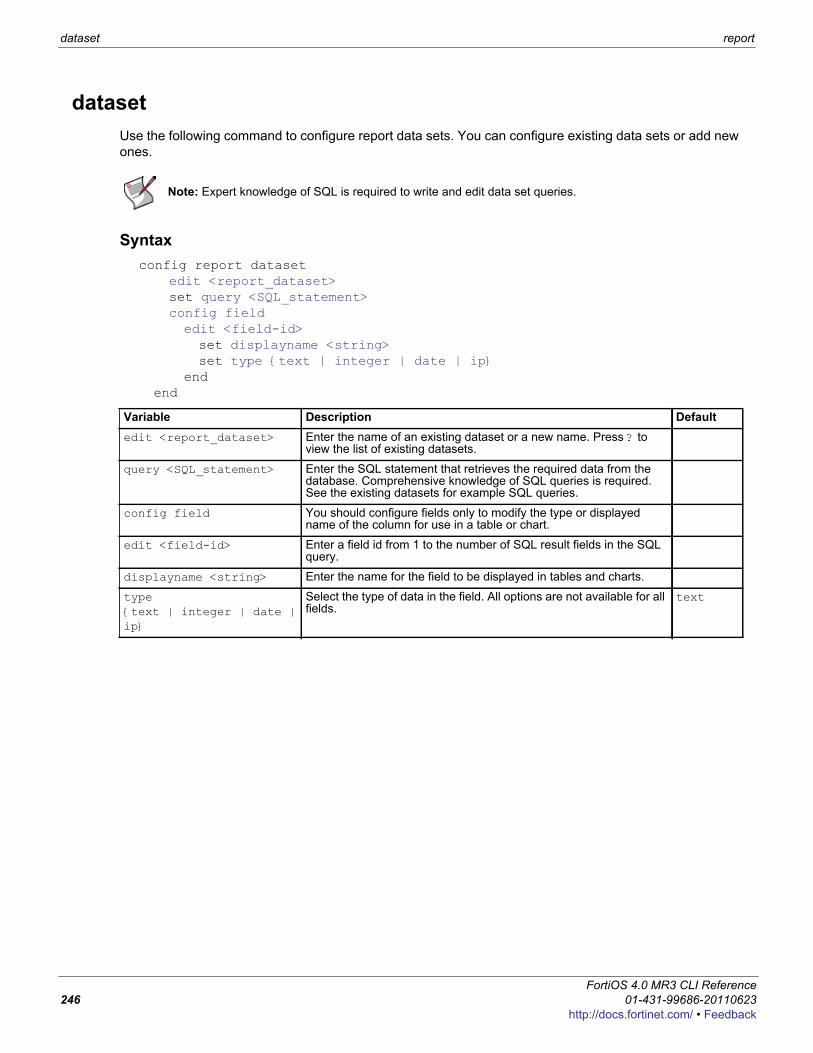
dataset report
datasetUse the following command to configure report data sets. You can configure existing data sets or add new ones.
Syntaxconfig report dataset
edit <report_dataset>set query <SQL_statement>config fieldedit <field-id>set displayname <string>set type {text | integer | date | ip}
endend
Note: Expert knowledge of SQL is required to write and edit data set queries.
Variable Description Defaultedit <report_dataset> Enter the name of an existing dataset or a new name. Press ? to
view the list of existing datasets.
query <SQL_statement> Enter the SQL statement that retrieves the required data from the database. Comprehensive knowledge of SQL queries is required. See the existing datasets for example SQL queries.
config field You should configure fields only to modify the type or displayed name of the column for use in a table or chart.
edit <field-id> Enter a field id from 1 to the number of SQL result fields in the SQL query.
displayname <string> Enter the name for the field to be displayed in tables and charts.
type {text | integer | date | ip}
Select the type of data in the field. All options are not available for all fields.
text
FortiOS 4.0 MR3 CLI Reference246 01-431-99686-20110623
http://docs.fortinet.com/ • Feedback
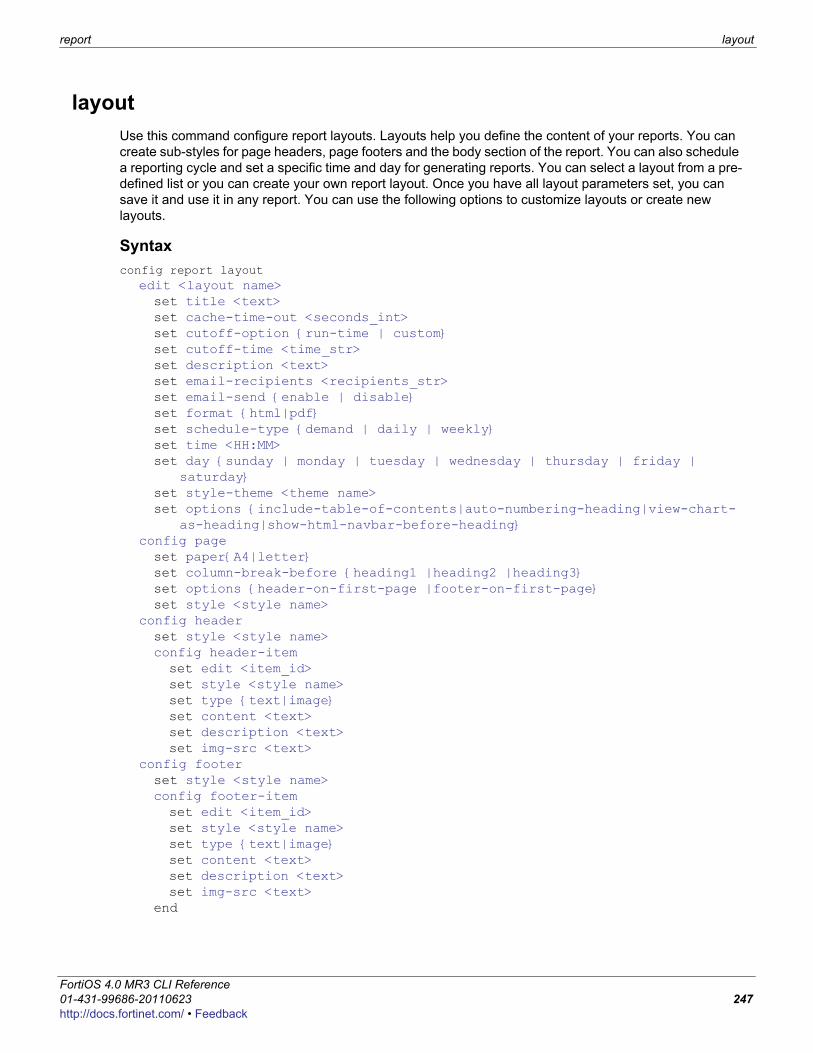
report layout
F0h
layoutUse this command configure report layouts. Layouts help you define the content of your reports. You can create sub-styles for page headers, page footers and the body section of the report. You can also schedule a reporting cycle and set a specific time and day for generating reports. You can select a layout from a pre-defined list or you can create your own report layout. Once you have all layout parameters set, you can save it and use it in any report. You can use the following options to customize layouts or create new layouts.
Syntaxconfig report layout
edit <layout name>set title <text>set cache-time-out <seconds_int>set cutoff-option {run-time | custom}set cutoff-time <time_str>set description <text>set email-recipients <recipients_str>set email-send {enable | disable}set format {html|pdf}set schedule-type {demand | daily | weekly}set time <HH:MM>set day {sunday | monday | tuesday | wednesday | thursday | friday |
saturday}set style-theme <theme name>set options {include-table-of-contents|auto-numbering-heading|view-chart-
as-heading|show-html-navbar-before-heading}config pageset paper{A4|letter}set column-break-before {heading1 |heading2 |heading3}set options {header-on-first-page |footer-on-first-page}set style <style name>
config headerset style <style name>config header-itemset edit <item_id>set style <style name>set type {text|image}set content <text>set description <text>set img-src <text>
config footerset style <style name>config footer-itemset edit <item_id>set style <style name>set type {text|image}set content <text>set description <text>set img-src <text>
end
ortiOS 4.0 MR3 CLI Reference1-431-99686-20110623 247ttp://docs.fortinet.com/ • Feedback
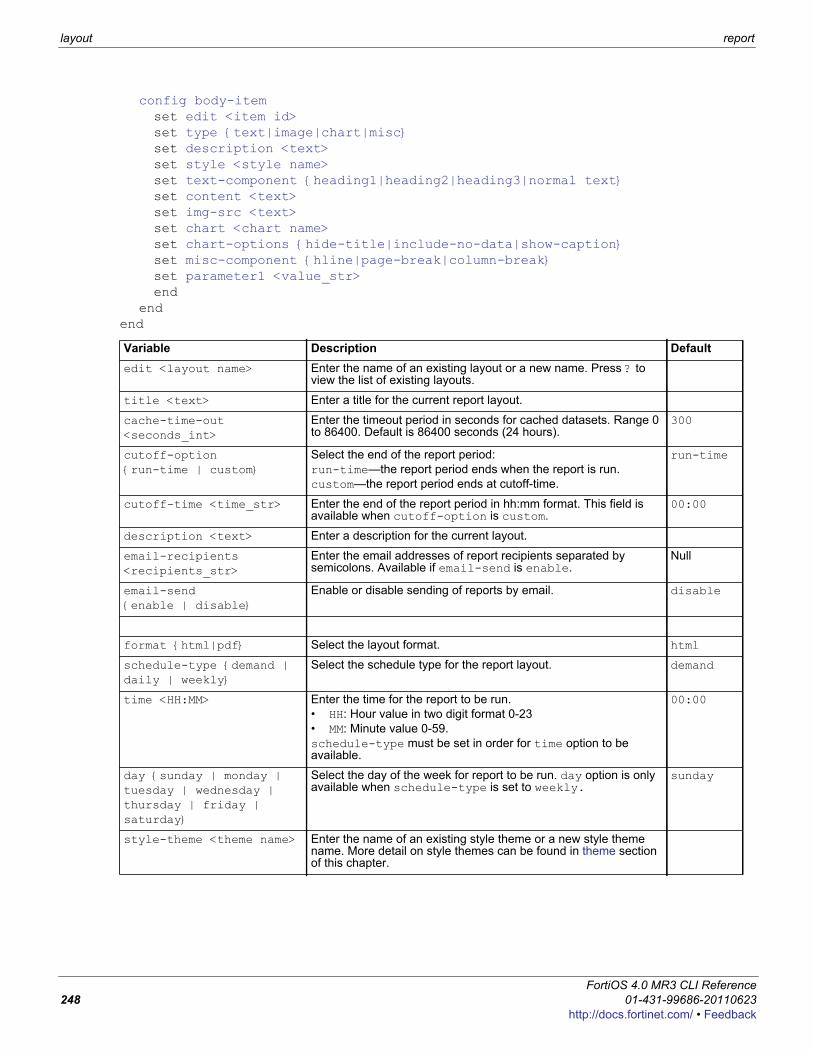
layout report
config body-itemset edit <item id>set type {text|image|chart|misc}set description <text>set style <style name>set text-component {heading1|heading2|heading3|normal text}set content <text>set img-src <text>set chart <chart name>set chart-options {hide-title|include-no-data|show-caption}set misc-component {hline|page-break|column-break}set parameter1 <value_str>end
endend
Variable Description Defaultedit <layout name> Enter the name of an existing layout or a new name. Press ? to
view the list of existing layouts.
title <text> Enter a title for the current report layout.
cache-time-out <seconds_int>
Enter the timeout period in seconds for cached datasets. Range 0 to 86400. Default is 86400 seconds (24 hours).
300
cutoff-option {run-time | custom}
Select the end of the report period:run-time—the report period ends when the report is run.custom—the report period ends at cutoff-time.
run-time
cutoff-time <time_str> Enter the end of the report period in hh:mm format. This field is available when cutoff-option is custom.
00:00
description <text> Enter a description for the current layout.
email-recipients <recipients_str>
Enter the email addresses of report recipients separated by semicolons. Available if email-send is enable.
Null
email-send {enable | disable}
Enable or disable sending of reports by email. disable
format {html|pdf} Select the layout format. html
schedule-type {demand | daily | weekly}
Select the schedule type for the report layout. demand
time <HH:MM> Enter the time for the report to be run.• HH: Hour value in two digit format 0-23• MM: Minute value 0-59.schedule-type must be set in order for time option to be available.
00:00
day {sunday | monday | tuesday | wednesday | thursday | friday | saturday}
Select the day of the week for report to be run. day option is only available when schedule-type is set to weekly.
sunday
style-theme <theme name> Enter the name of an existing style theme or a new style theme name. More detail on style themes can be found in theme section of this chapter.
FortiOS 4.0 MR3 CLI Reference248 01-431-99686-20110623
http://docs.fortinet.com/ • Feedback
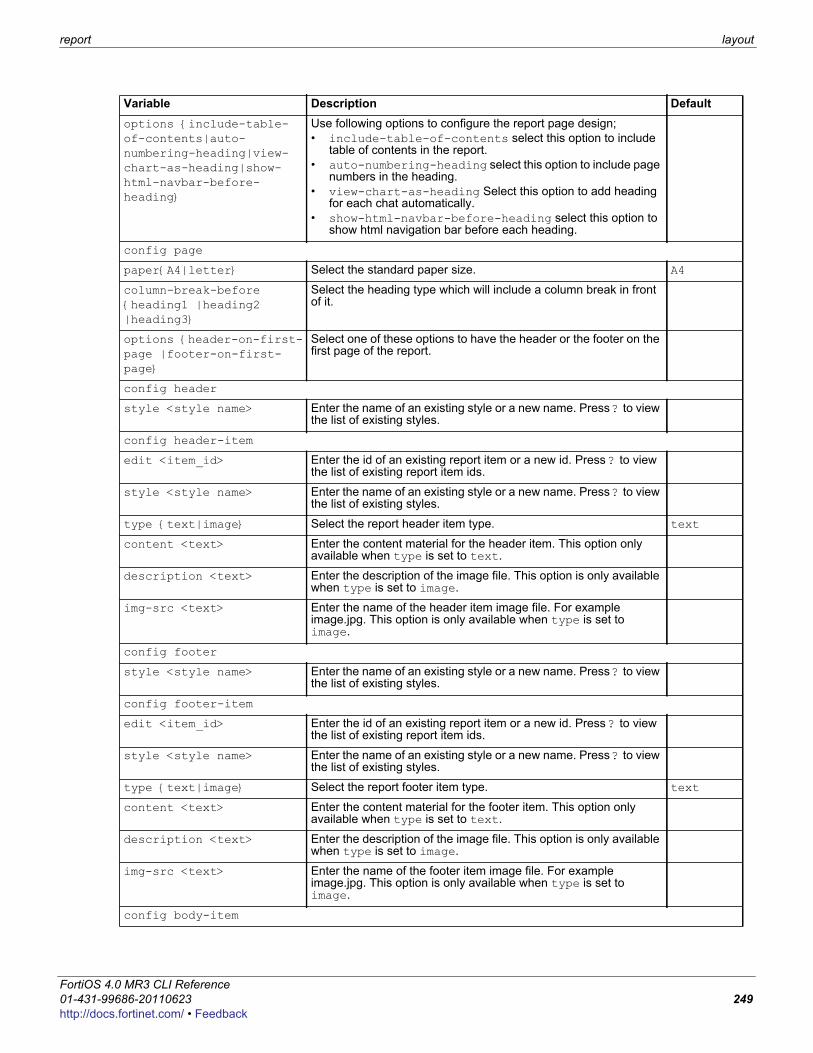
report layout
F0h
options {include-table-of-contents|auto-numbering-heading|view-chart-as-heading|show-html-navbar-before-heading}
Use following options to configure the report page design;• include-table-of-contents select this option to include
table of contents in the report.• auto-numbering-heading select this option to include page
numbers in the heading.• view-chart-as-heading Select this option to add heading
for each chat automatically.• show-html-navbar-before-heading select this option to
show html navigation bar before each heading.
config page
paper{A4|letter} Select the standard paper size. A4
column-break-before {heading1 |heading2 |heading3}
Select the heading type which will include a column break in front of it.
options {header-on-first-page |footer-on-first-page}
Select one of these options to have the header or the footer on the first page of the report.
config header
style <style name> Enter the name of an existing style or a new name. Press ? to view the list of existing styles.
config header-item
edit <item_id> Enter the id of an existing report item or a new id. Press ? to view the list of existing report item ids.
style <style name> Enter the name of an existing style or a new name. Press ? to view the list of existing styles.
type {text|image} Select the report header item type. text
content <text> Enter the content material for the header item. This option only available when type is set to text.
description <text> Enter the description of the image file. This option is only available when type is set to image.
img-src <text> Enter the name of the header item image file. For example image.jpg. This option is only available when type is set to image.
config footer
style <style name> Enter the name of an existing style or a new name. Press ? to view the list of existing styles.
config footer-item
edit <item_id> Enter the id of an existing report item or a new id. Press ? to view the list of existing report item ids.
style <style name> Enter the name of an existing style or a new name. Press ? to view the list of existing styles.
type {text|image} Select the report footer item type. text
content <text> Enter the content material for the footer item. This option only available when type is set to text.
description <text> Enter the description of the image file. This option is only available when type is set to image.
img-src <text> Enter the name of the footer item image file. For example image.jpg. This option is only available when type is set to image.
config body-item
Variable Description Default
ortiOS 4.0 MR3 CLI Reference1-431-99686-20110623 249ttp://docs.fortinet.com/ • Feedback
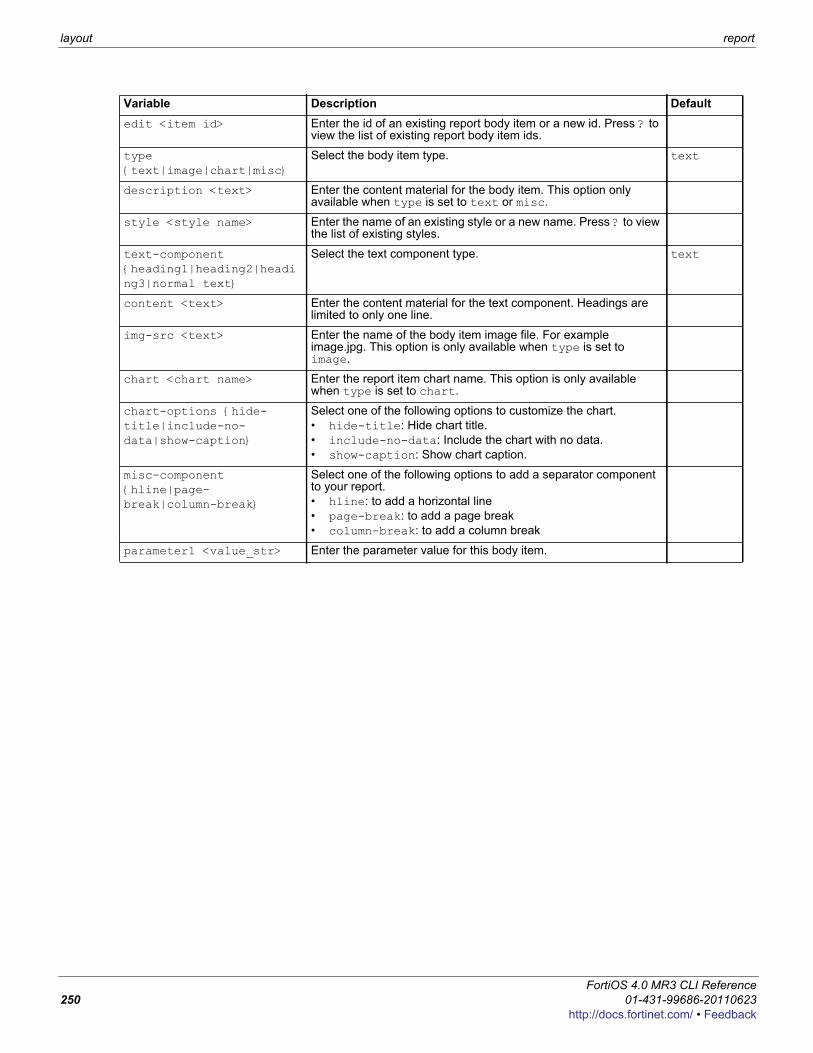
layout report
edit <item id> Enter the id of an existing report body item or a new id. Press ? to view the list of existing report body item ids.
type {text|image|chart|misc}
Select the body item type. text
description <text> Enter the content material for the body item. This option only available when type is set to text or misc.
style <style name> Enter the name of an existing style or a new name. Press ? to view the list of existing styles.
text-component {heading1|heading2|heading3|normal text}
Select the text component type. text
content <text> Enter the content material for the text component. Headings are limited to only one line.
img-src <text> Enter the name of the body item image file. For example image.jpg. This option is only available when type is set to image.
chart <chart name> Enter the report item chart name. This option is only available when type is set to chart.
chart-options {hide-title|include-no-data|show-caption}
Select one of the following options to customize the chart.• hide-title: Hide chart title.• include-no-data: Include the chart with no data.• show-caption: Show chart caption.
misc-component {hline|page-break|column-break}
Select one of the following options to add a separator component to your report.• hline: to add a horizontal line• page-break: to add a page break• column-break: to add a column break
parameter1 <value_str> Enter the parameter value for this body item.
Variable Description Default
FortiOS 4.0 MR3 CLI Reference250 01-431-99686-20110623
http://docs.fortinet.com/ • Feedback
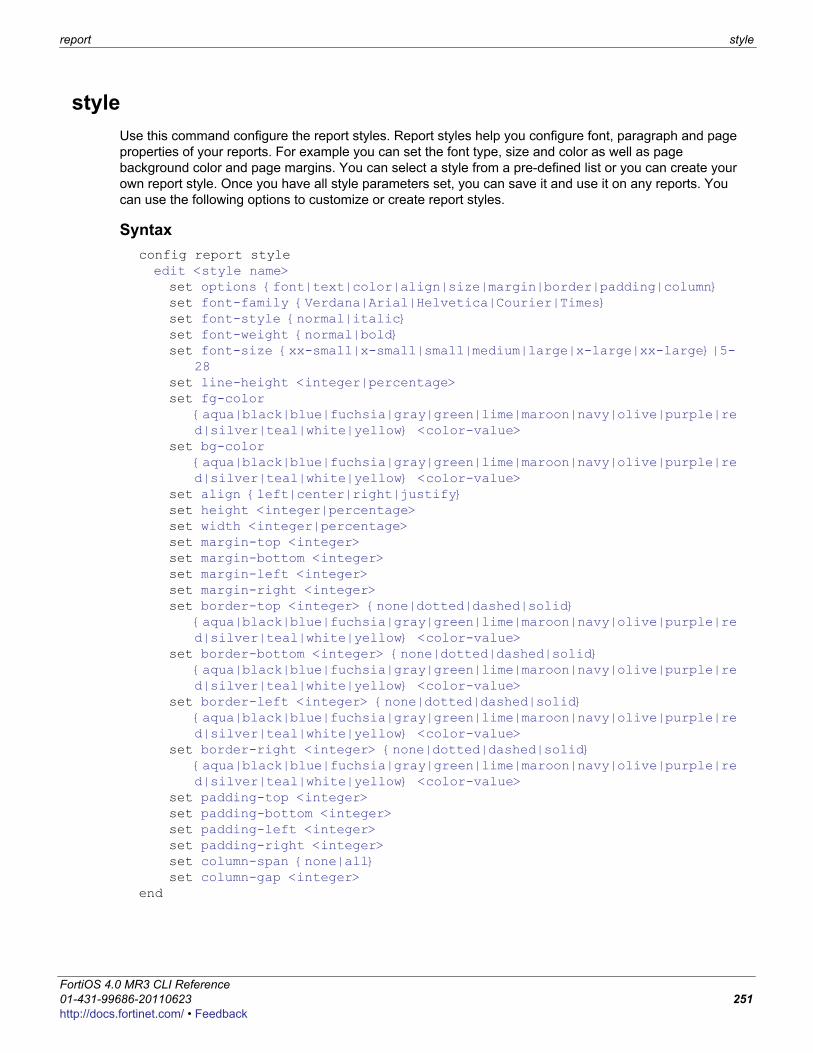
report style
F0h
styleUse this command configure the report styles. Report styles help you configure font, paragraph and page properties of your reports. For example you can set the font type, size and color as well as page background color and page margins. You can select a style from a pre-defined list or you can create your own report style. Once you have all style parameters set, you can save it and use it on any reports. You can use the following options to customize or create report styles.
Syntaxconfig report styleedit <style name>set options {font|text|color|align|size|margin|border|padding|column}set font-family {Verdana|Arial|Helvetica|Courier|Times}set font-style {normal|italic}set font-weight {normal|bold}set font-size {xx-small|x-small|small|medium|large|x-large|xx-large}|5-
28set line-height <integer|percentage>set fg-color
{aqua|black|blue|fuchsia|gray|green|lime|maroon|navy|olive|purple|red|silver|teal|white|yellow} <color-value>
set bg-color {aqua|black|blue|fuchsia|gray|green|lime|maroon|navy|olive|purple|red|silver|teal|white|yellow} <color-value>
set align {left|center|right|justify}set height <integer|percentage>set width <integer|percentage>set margin-top <integer>set margin-bottom <integer>set margin-left <integer>set margin-right <integer>set border-top <integer> {none|dotted|dashed|solid}
{aqua|black|blue|fuchsia|gray|green|lime|maroon|navy|olive|purple|red|silver|teal|white|yellow} <color-value>
set border-bottom <integer> {none|dotted|dashed|solid} {aqua|black|blue|fuchsia|gray|green|lime|maroon|navy|olive|purple|red|silver|teal|white|yellow} <color-value>
set border-left <integer> {none|dotted|dashed|solid} {aqua|black|blue|fuchsia|gray|green|lime|maroon|navy|olive|purple|red|silver|teal|white|yellow} <color-value>
set border-right <integer> {none|dotted|dashed|solid} {aqua|black|blue|fuchsia|gray|green|lime|maroon|navy|olive|purple|red|silver|teal|white|yellow} <color-value>
set padding-top <integer>set padding-bottom <integer>set padding-left <integer>set padding-right <integer>set column-span {none|all}set column-gap <integer>
end
ortiOS 4.0 MR3 CLI Reference1-431-99686-20110623 251ttp://docs.fortinet.com/ • Feedback
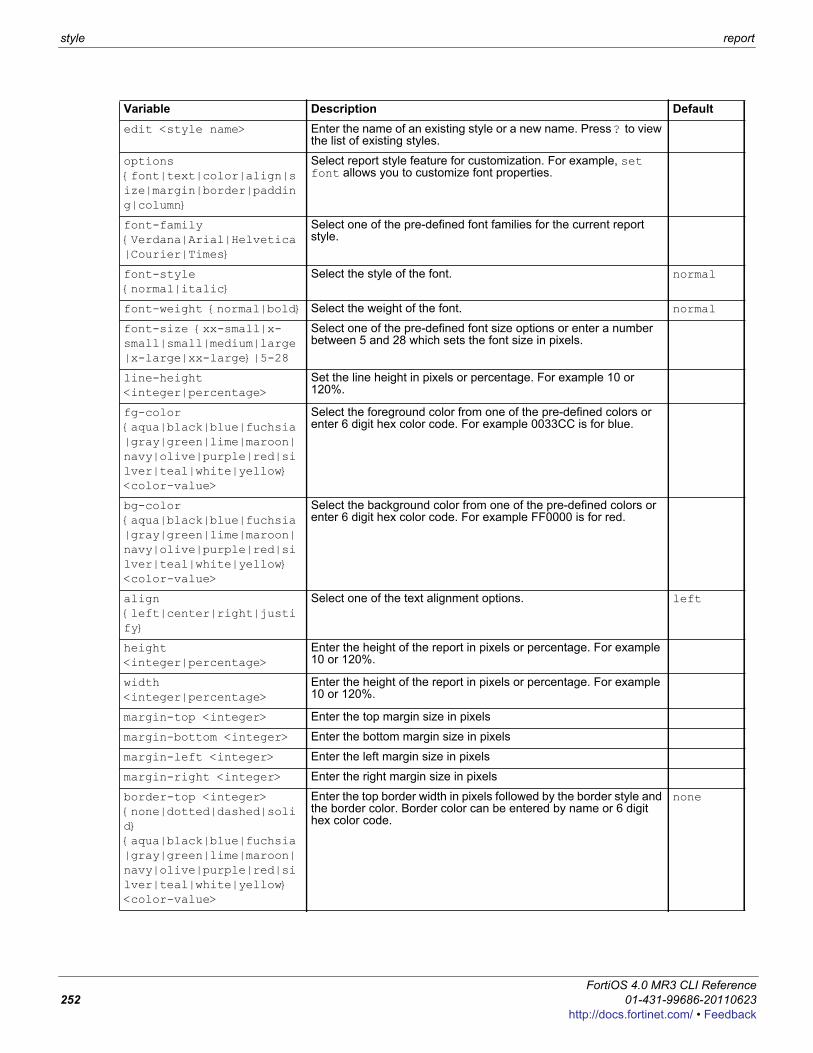
style report
Variable Description Defaultedit <style name> Enter the name of an existing style or a new name. Press ? to view
the list of existing styles.
options {font|text|color|align|size|margin|border|padding|column}
Select report style feature for customization. For example, set font allows you to customize font properties.
font-family {Verdana|Arial|Helvetica|Courier|Times}
Select one of the pre-defined font families for the current report style.
font-style {normal|italic}
Select the style of the font. normal
font-weight {normal|bold} Select the weight of the font. normal
font-size {xx-small|x-small|small|medium|large|x-large|xx-large}|5-28
Select one of the pre-defined font size options or enter a number between 5 and 28 which sets the font size in pixels.
line-height <integer|percentage>
Set the line height in pixels or percentage. For example 10 or 120%.
fg-color {aqua|black|blue|fuchsia|gray|green|lime|maroon|navy|olive|purple|red|silver|teal|white|yellow} <color-value>
Select the foreground color from one of the pre-defined colors or enter 6 digit hex color code. For example 0033CC is for blue.
bg-color {aqua|black|blue|fuchsia|gray|green|lime|maroon|navy|olive|purple|red|silver|teal|white|yellow} <color-value>
Select the background color from one of the pre-defined colors or enter 6 digit hex color code. For example FF0000 is for red.
align {left|center|right|justify}
Select one of the text alignment options. left
height <integer|percentage>
Enter the height of the report in pixels or percentage. For example 10 or 120%.
width <integer|percentage>
Enter the height of the report in pixels or percentage. For example 10 or 120%.
margin-top <integer> Enter the top margin size in pixels
margin-bottom <integer> Enter the bottom margin size in pixels
margin-left <integer> Enter the left margin size in pixels
margin-right <integer> Enter the right margin size in pixels
border-top <integer> {none|dotted|dashed|solid} {aqua|black|blue|fuchsia|gray|green|lime|maroon|navy|olive|purple|red|silver|teal|white|yellow} <color-value>
Enter the top border width in pixels followed by the border style and the border color. Border color can be entered by name or 6 digit hex color code.
none
FortiOS 4.0 MR3 CLI Reference252 01-431-99686-20110623
http://docs.fortinet.com/ • Feedback
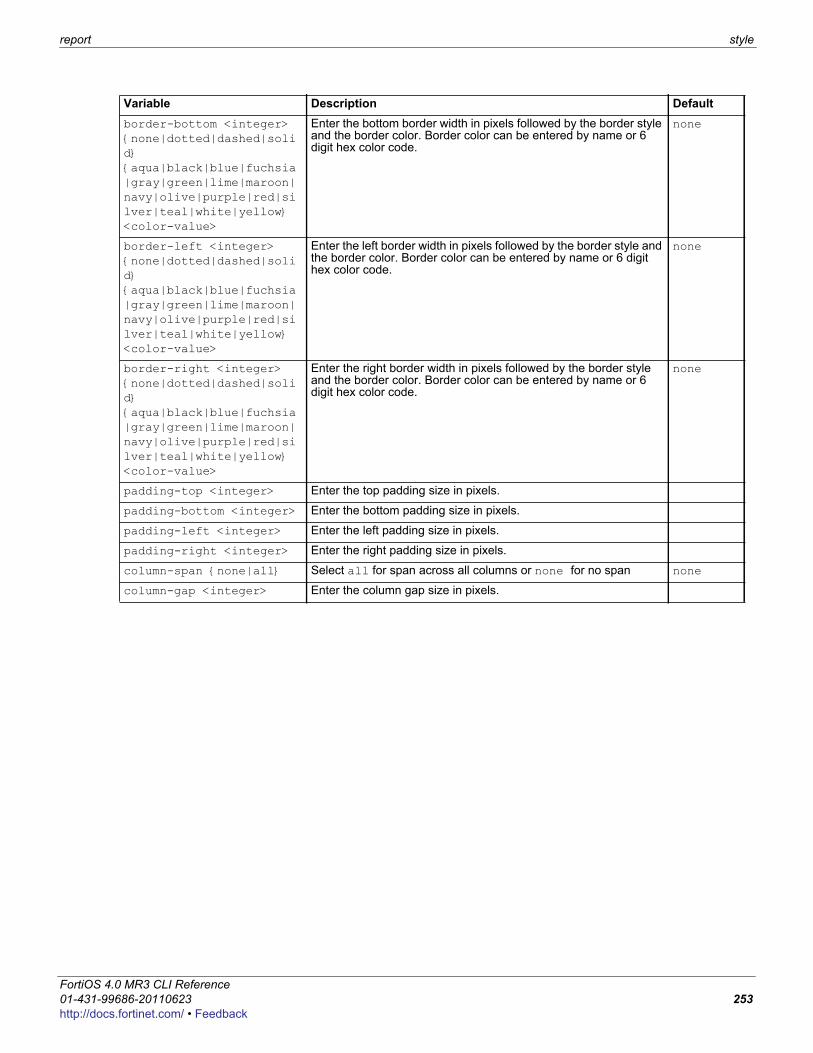
report style
F0h
border-bottom <integer> {none|dotted|dashed|solid} {aqua|black|blue|fuchsia|gray|green|lime|maroon|navy|olive|purple|red|silver|teal|white|yellow} <color-value>
Enter the bottom border width in pixels followed by the border style and the border color. Border color can be entered by name or 6 digit hex color code.
none
border-left <integer> {none|dotted|dashed|solid} {aqua|black|blue|fuchsia|gray|green|lime|maroon|navy|olive|purple|red|silver|teal|white|yellow} <color-value>
Enter the left border width in pixels followed by the border style and the border color. Border color can be entered by name or 6 digit hex color code.
none
border-right <integer> {none|dotted|dashed|solid} {aqua|black|blue|fuchsia|gray|green|lime|maroon|navy|olive|purple|red|silver|teal|white|yellow} <color-value>
Enter the right border width in pixels followed by the border style and the border color. Border color can be entered by name or 6 digit hex color code.
none
padding-top <integer> Enter the top padding size in pixels.
padding-bottom <integer> Enter the bottom padding size in pixels.
padding-left <integer> Enter the left padding size in pixels.
padding-right <integer> Enter the right padding size in pixels.
column-span {none|all} Select all for span across all columns or none for no span none
column-gap <integer> Enter the column gap size in pixels.
Variable Description Default
ortiOS 4.0 MR3 CLI Reference1-431-99686-20110623 253ttp://docs.fortinet.com/ • Feedback
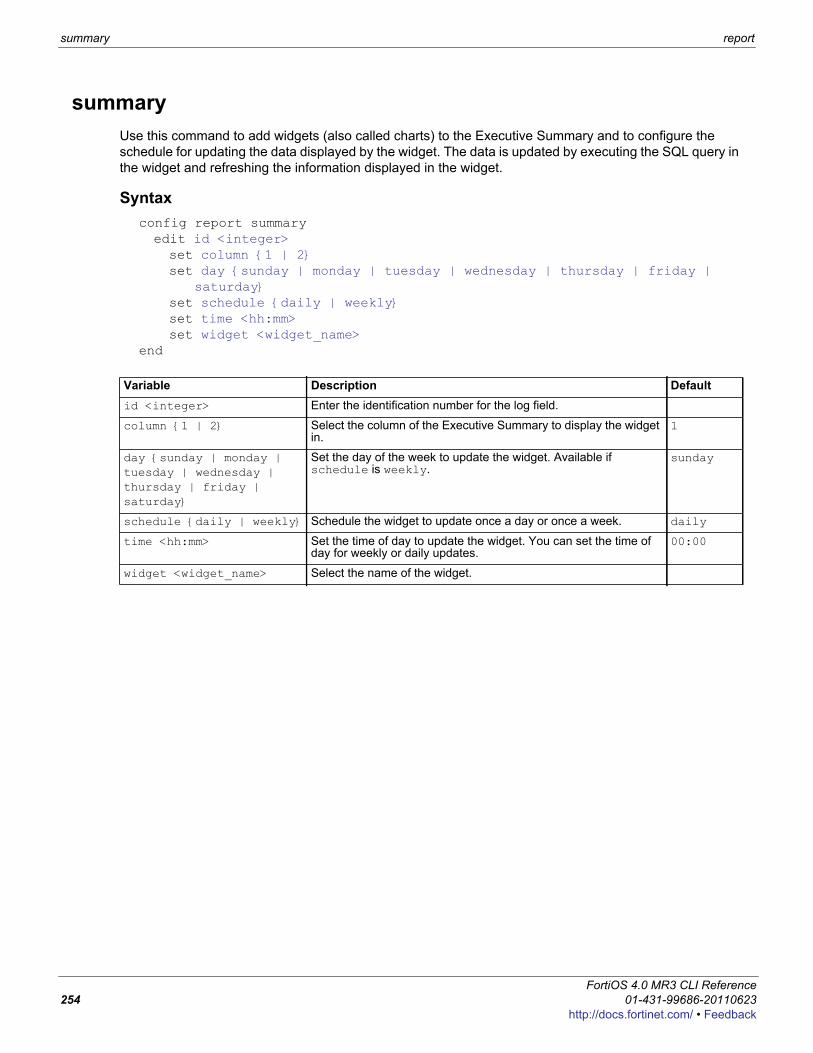
summary report
summaryUse this command to add widgets (also called charts) to the Executive Summary and to configure the schedule for updating the data displayed by the widget. The data is updated by executing the SQL query in the widget and refreshing the information displayed in the widget.
Syntaxconfig report summaryedit id <integer>set column {1 | 2}set day {sunday | monday | tuesday | wednesday | thursday | friday |
saturday}set schedule {daily | weekly}set time <hh:mm>set widget <widget_name>
end
Variable Description Defaultid <integer> Enter the identification number for the log field.
column {1 | 2} Select the column of the Executive Summary to display the widget in.
1
day {sunday | monday | tuesday | wednesday | thursday | friday | saturday}
Set the day of the week to update the widget. Available if schedule is weekly.
sunday
schedule {daily | weekly} Schedule the widget to update once a day or once a week. daily
time <hh:mm> Set the time of day to update the widget. You can set the time of day for weekly or daily updates.
00:00
widget <widget_name> Select the name of the widget.
FortiOS 4.0 MR3 CLI Reference254 01-431-99686-20110623
http://docs.fortinet.com/ • Feedback
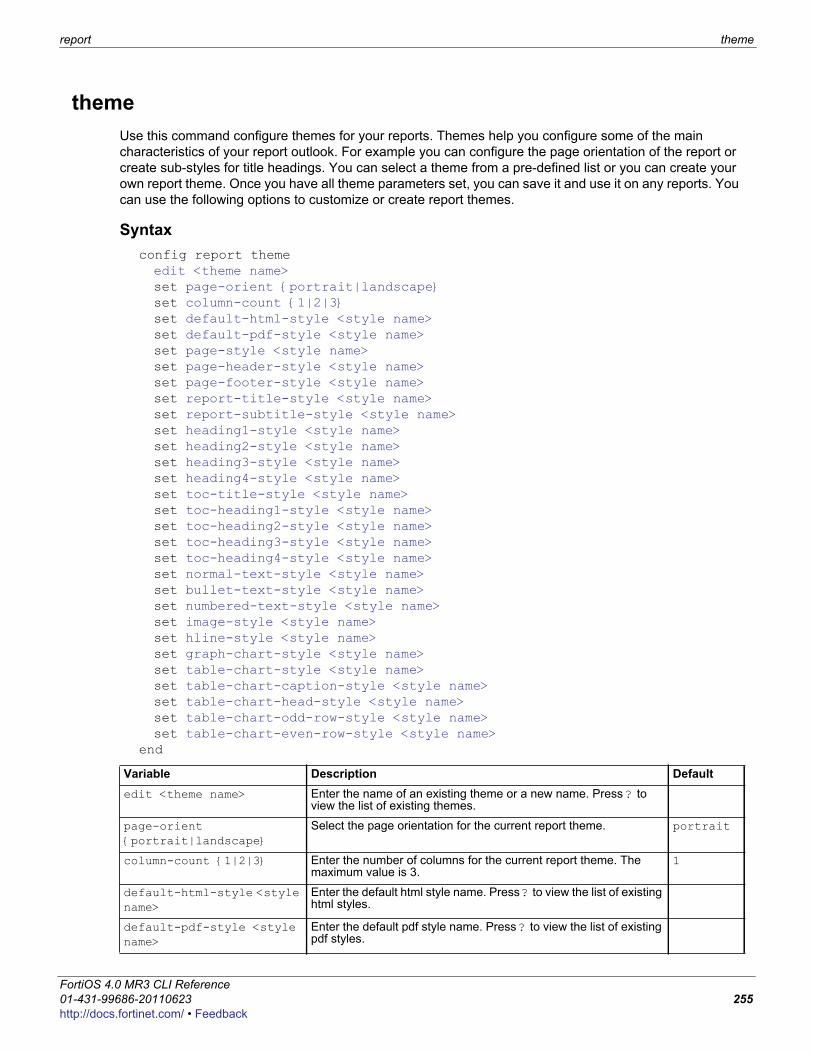
report theme
F0h
themeUse this command configure themes for your reports. Themes help you configure some of the main characteristics of your report outlook. For example you can configure the page orientation of the report or create sub-styles for title headings. You can select a theme from a pre-defined list or you can create your own report theme. Once you have all theme parameters set, you can save it and use it on any reports. You can use the following options to customize or create report themes.
Syntaxconfig report themeedit <theme name>set page-orient {portrait|landscape}set column-count {1|2|3}set default-html-style <style name>set default-pdf-style <style name>set page-style <style name>set page-header-style <style name>set page-footer-style <style name>set report-title-style <style name>set report-subtitle-style <style name>set heading1-style <style name>set heading2-style <style name>set heading3-style <style name>set heading4-style <style name>set toc-title-style <style name>set toc-heading1-style <style name>set toc-heading2-style <style name>set toc-heading3-style <style name>set toc-heading4-style <style name>set normal-text-style <style name>set bullet-text-style <style name>set numbered-text-style <style name>set image-style <style name>set hline-style <style name>set graph-chart-style <style name>set table-chart-style <style name>set table-chart-caption-style <style name>set table-chart-head-style <style name>set table-chart-odd-row-style <style name>set table-chart-even-row-style <style name>
end
Variable Description Defaultedit <theme name> Enter the name of an existing theme or a new name. Press ? to
view the list of existing themes.
page-orient {portrait|landscape}
Select the page orientation for the current report theme. portrait
column-count {1|2|3} Enter the number of columns for the current report theme. The maximum value is 3.
1
default-html-style <style name>
Enter the default html style name. Press ? to view the list of existing html styles.
default-pdf-style <style name>
Enter the default pdf style name. Press ? to view the list of existing pdf styles.
ortiOS 4.0 MR3 CLI Reference1-431-99686-20110623 255ttp://docs.fortinet.com/ • Feedback
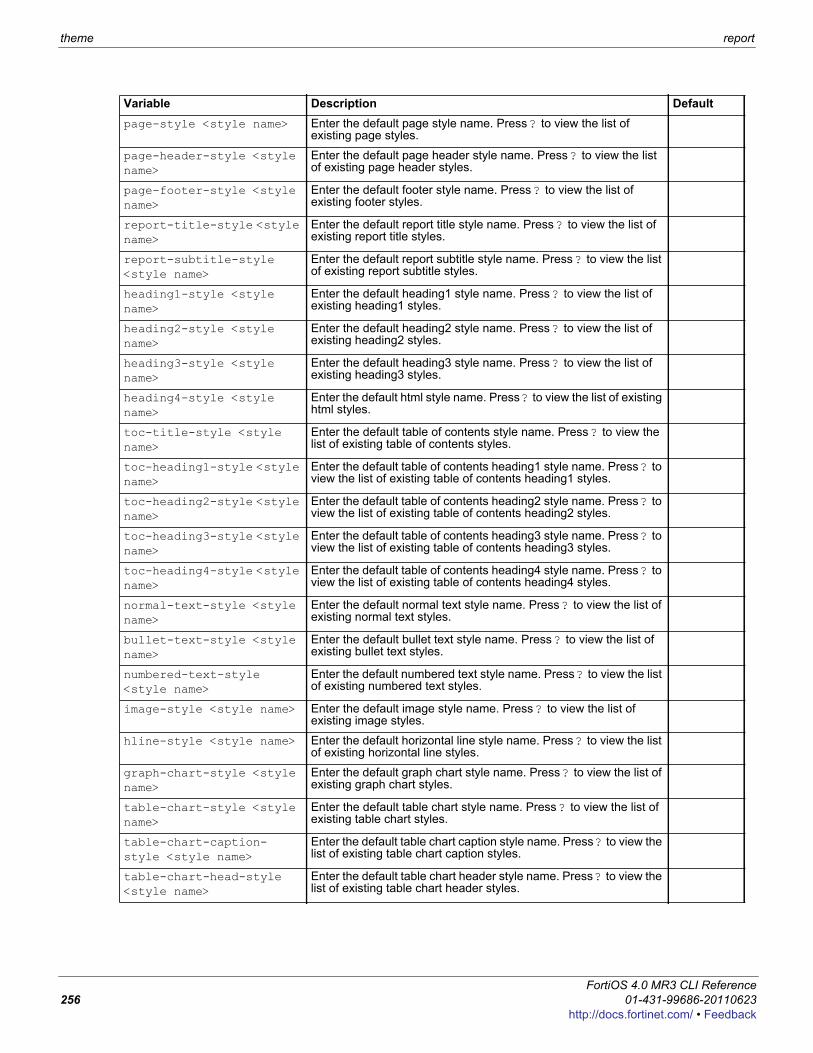
theme report
page-style <style name> Enter the default page style name. Press ? to view the list of existing page styles.
page-header-style <style name>
Enter the default page header style name. Press ? to view the list of existing page header styles.
page-footer-style <style name>
Enter the default footer style name. Press ? to view the list of existing footer styles.
report-title-style <style name>
Enter the default report title style name. Press ? to view the list of existing report title styles.
report-subtitle-style <style name>
Enter the default report subtitle style name. Press ? to view the list of existing report subtitle styles.
heading1-style <style name>
Enter the default heading1 style name. Press ? to view the list of existing heading1 styles.
heading2-style <style name>
Enter the default heading2 style name. Press ? to view the list of existing heading2 styles.
heading3-style <style name>
Enter the default heading3 style name. Press ? to view the list of existing heading3 styles.
heading4-style <style name>
Enter the default html style name. Press ? to view the list of existing html styles.
toc-title-style <style name>
Enter the default table of contents style name. Press ? to view the list of existing table of contents styles.
toc-heading1-style <style name>
Enter the default table of contents heading1 style name. Press ? to view the list of existing table of contents heading1 styles.
toc-heading2-style <style name>
Enter the default table of contents heading2 style name. Press ? to view the list of existing table of contents heading2 styles.
toc-heading3-style <style name>
Enter the default table of contents heading3 style name. Press ? to view the list of existing table of contents heading3 styles.
toc-heading4-style <style name>
Enter the default table of contents heading4 style name. Press ? to view the list of existing table of contents heading4 styles.
normal-text-style <style name>
Enter the default normal text style name. Press ? to view the list of existing normal text styles.
bullet-text-style <style name>
Enter the default bullet text style name. Press ? to view the list of existing bullet text styles.
numbered-text-style <style name>
Enter the default numbered text style name. Press ? to view the list of existing numbered text styles.
image-style <style name> Enter the default image style name. Press ? to view the list of existing image styles.
hline-style <style name> Enter the default horizontal line style name. Press ? to view the list of existing horizontal line styles.
graph-chart-style <style name>
Enter the default graph chart style name. Press ? to view the list of existing graph chart styles.
table-chart-style <style name>
Enter the default table chart style name. Press ? to view the list of existing table chart styles.
table-chart-caption-style <style name>
Enter the default table chart caption style name. Press ? to view the list of existing table chart caption styles.
table-chart-head-style <style name>
Enter the default table chart header style name. Press ? to view the list of existing table chart header styles.
Variable Description Default
FortiOS 4.0 MR3 CLI Reference256 01-431-99686-20110623
http://docs.fortinet.com/ • Feedback

report theme
F0h
table-chart-odd-row-style <style name>
Enter the default table chart odd row style name. Press ? to view the list of existing table chart odd row styles.
table-chart-even-row-style <style name>
Enter the default table chart even row style name. Press ? to view the list of existing table chart even row styles.
Variable Description Default
ortiOS 4.0 MR3 CLI Reference1-431-99686-20110623 257ttp://docs.fortinet.com/ • Feedback

theme report
FortiOS 4.0 MR3 CLI Reference258 01-431-99686-20110623
http://docs.fortinet.com/ • Feedback
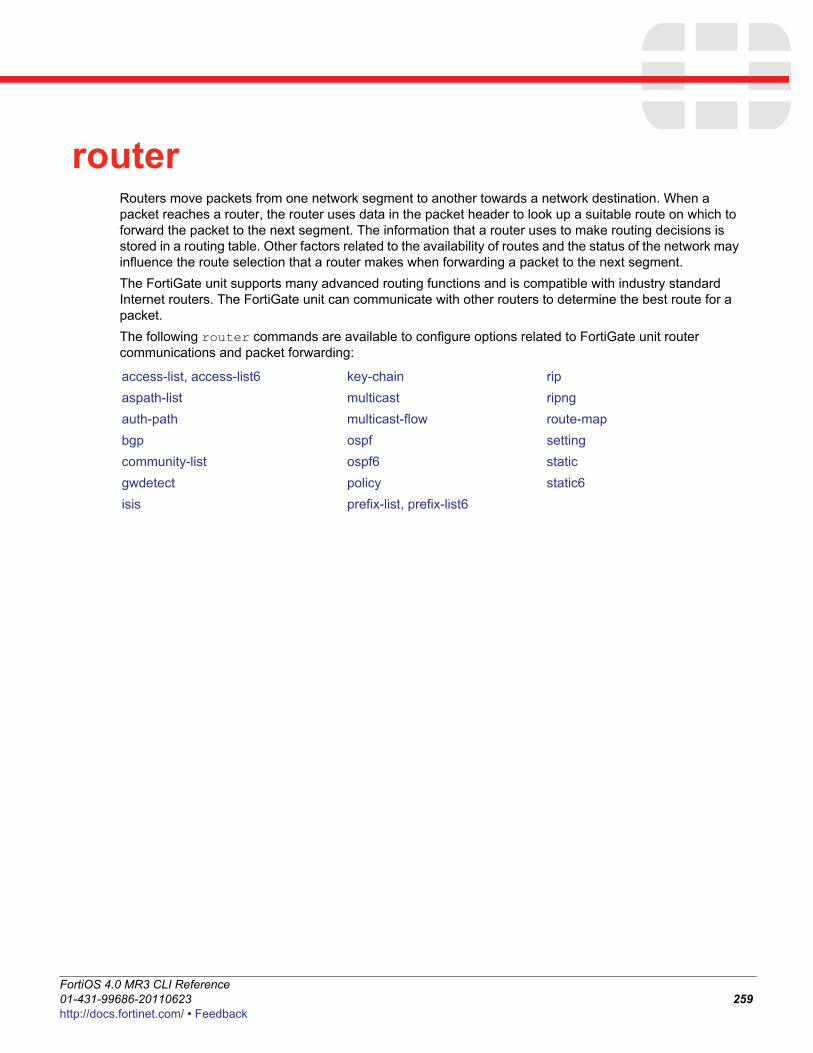
F0h
routerRouters move packets from one network segment to another towards a network destination. When a packet reaches a router, the router uses data in the packet header to look up a suitable route on which to forward the packet to the next segment. The information that a router uses to make routing decisions is stored in a routing table. Other factors related to the availability of routes and the status of the network may influence the route selection that a router makes when forwarding a packet to the next segment.The FortiGate unit supports many advanced routing functions and is compatible with industry standard Internet routers. The FortiGate unit can communicate with other routers to determine the best route for a packet. The following router commands are available to configure options related to FortiGate unit router communications and packet forwarding:
access-list, access-list6aspath-listauth-pathbgpcommunity-listgwdetectisis
key-chainmulticastmulticast-flowospfospf6policyprefix-list, prefix-list6
ripripngroute-mapsettingstaticstatic6
ortiOS 4.0 MR3 CLI Reference1-431-99686-20110623 259ttp://docs.fortinet.com/ • Feedback
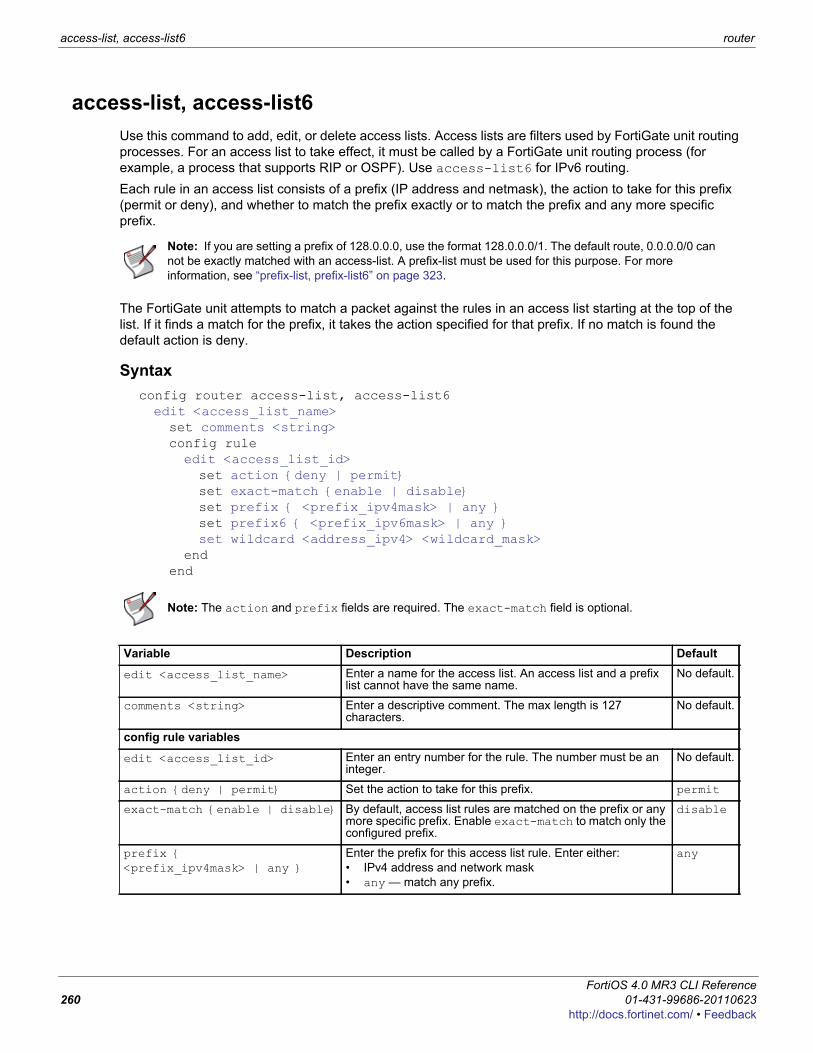
access-list, access-list6 router
access-list, access-list6Use this command to add, edit, or delete access lists. Access lists are filters used by FortiGate unit routing processes. For an access list to take effect, it must be called by a FortiGate unit routing process (for example, a process that supports RIP or OSPF). Use access-list6 for IPv6 routing.Each rule in an access list consists of a prefix (IP address and netmask), the action to take for this prefix (permit or deny), and whether to match the prefix exactly or to match the prefix and any more specific prefix.
The FortiGate unit attempts to match a packet against the rules in an access list starting at the top of the list. If it finds a match for the prefix, it takes the action specified for that prefix. If no match is found the default action is deny.
Syntaxconfig router access-list, access-list6edit <access_list_name>set comments <string>config ruleedit <access_list_id>set action {deny | permit}set exact-match {enable | disable}set prefix { <prefix_ipv4mask> | any }set prefix6 { <prefix_ipv6mask> | any }set wildcard <address_ipv4> <wildcard_mask>
endend
Note: If you are setting a prefix of 128.0.0.0, use the format 128.0.0.0/1. The default route, 0.0.0.0/0 can not be exactly matched with an access-list. A prefix-list must be used for this purpose. For more information, see “prefix-list, prefix-list6” on page 323.
Note: The action and prefix fields are required. The exact-match field is optional.
Variable Description Default
edit <access_list_name> Enter a name for the access list. An access list and a prefix list cannot have the same name.
No default.
comments <string> Enter a descriptive comment. The max length is 127 characters.
No default.
config rule variables
edit <access_list_id> Enter an entry number for the rule. The number must be an integer.
No default.
action {deny | permit} Set the action to take for this prefix. permit
exact-match {enable | disable} By default, access list rules are matched on the prefix or any more specific prefix. Enable exact-match to match only the configured prefix.
disable
prefix { <prefix_ipv4mask> | any }
Enter the prefix for this access list rule. Enter either:• IPv4 address and network mask• any — match any prefix.
any
FortiOS 4.0 MR3 CLI Reference260 01-431-99686-20110623
http://docs.fortinet.com/ • Feedback
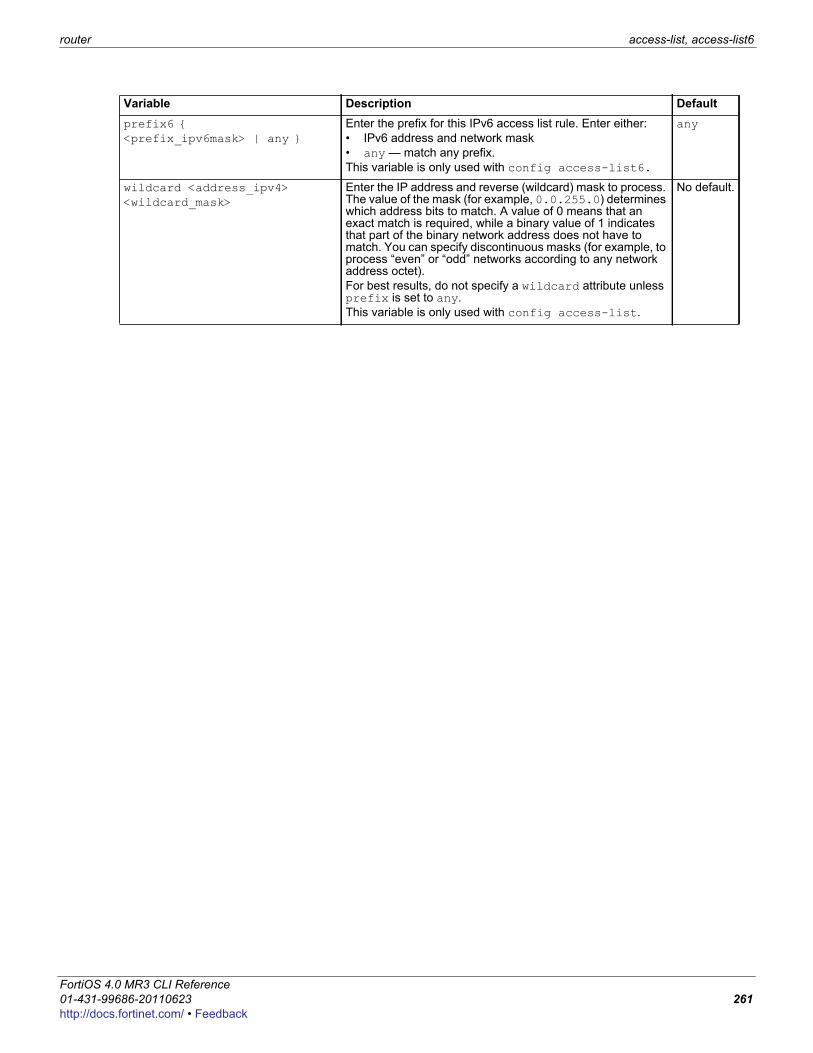
router access-list, access-list6
F0h
prefix6 { <prefix_ipv6mask> | any }
Enter the prefix for this IPv6 access list rule. Enter either:• IPv6 address and network mask• any — match any prefix.This variable is only used with config access-list6.
any
wildcard <address_ipv4> <wildcard_mask>
Enter the IP address and reverse (wildcard) mask to process. The value of the mask (for example, 0.0.255.0) determines which address bits to match. A value of 0 means that an exact match is required, while a binary value of 1 indicates that part of the binary network address does not have to match. You can specify discontinuous masks (for example, to process “even” or “odd” networks according to any network address octet).For best results, do not specify a wildcard attribute unless prefix is set to any.This variable is only used with config access-list.
No default.
Variable Description Default
ortiOS 4.0 MR3 CLI Reference1-431-99686-20110623 261ttp://docs.fortinet.com/ • Feedback
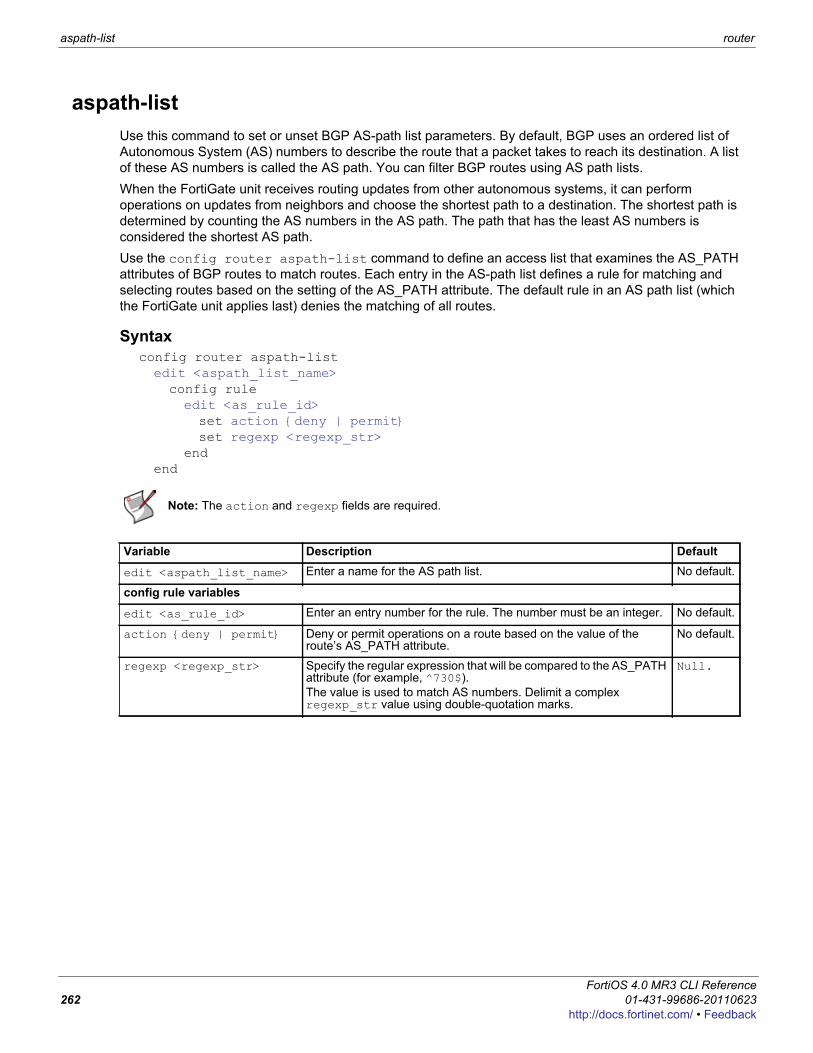
aspath-list router
aspath-listUse this command to set or unset BGP AS-path list parameters. By default, BGP uses an ordered list of Autonomous System (AS) numbers to describe the route that a packet takes to reach its destination. A list of these AS numbers is called the AS path. You can filter BGP routes using AS path lists.When the FortiGate unit receives routing updates from other autonomous systems, it can perform operations on updates from neighbors and choose the shortest path to a destination. The shortest path is determined by counting the AS numbers in the AS path. The path that has the least AS numbers is considered the shortest AS path.Use the config router aspath-list command to define an access list that examines the AS_PATH attributes of BGP routes to match routes. Each entry in the AS-path list defines a rule for matching and selecting routes based on the setting of the AS_PATH attribute. The default rule in an AS path list (which the FortiGate unit applies last) denies the matching of all routes.
Syntaxconfig router aspath-listedit <aspath_list_name>config ruleedit <as_rule_id>set action {deny | permit}set regexp <regexp_str>
endend
Note: The action and regexp fields are required.
Variable Description Default
edit <aspath_list_name> Enter a name for the AS path list. No default.
config rule variables
edit <as_rule_id> Enter an entry number for the rule. The number must be an integer. No default.
action {deny | permit} Deny or permit operations on a route based on the value of the route’s AS_PATH attribute.
No default.
regexp <regexp_str> Specify the regular expression that will be compared to the AS_PATH attribute (for example, ^730$).The value is used to match AS numbers. Delimit a complex regexp_str value using double-quotation marks.
Null.
FortiOS 4.0 MR3 CLI Reference262 01-431-99686-20110623
http://docs.fortinet.com/ • Feedback
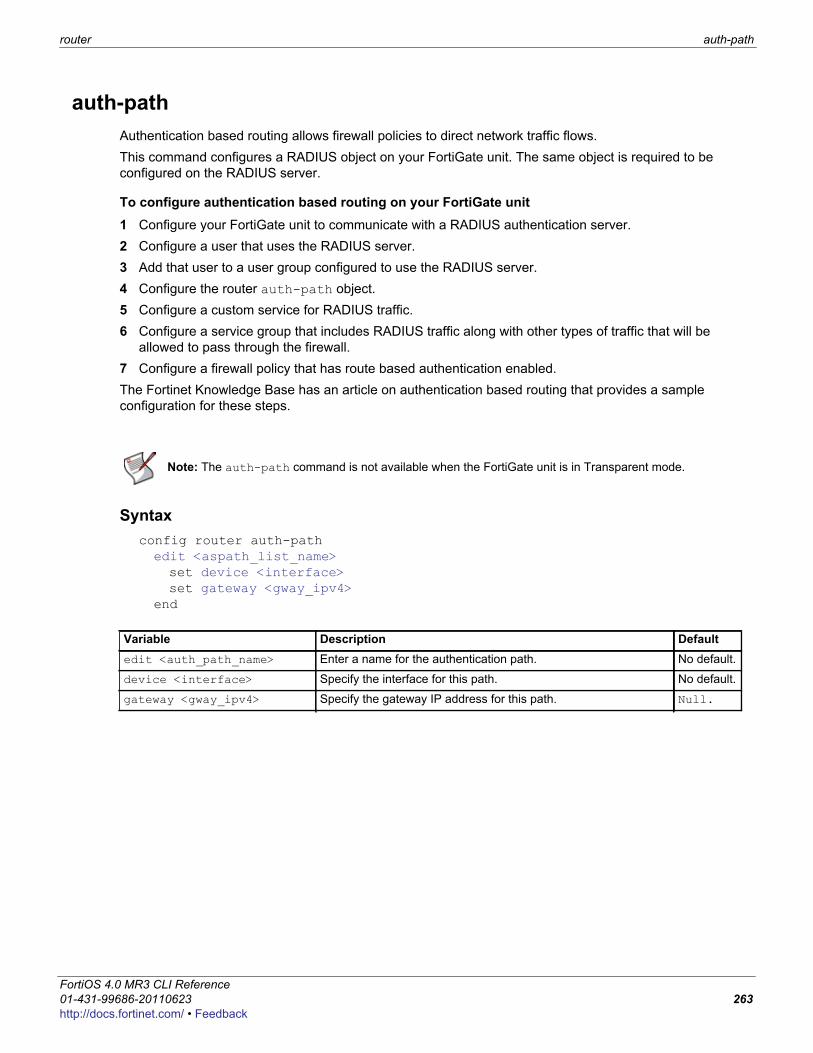
router auth-path
F0h
auth-pathAuthentication based routing allows firewall policies to direct network traffic flows.This command configures a RADIUS object on your FortiGate unit. The same object is required to be configured on the RADIUS server.
To configure authentication based routing on your FortiGate unit1 Configure your FortiGate unit to communicate with a RADIUS authentication server.2 Configure a user that uses the RADIUS server.3 Add that user to a user group configured to use the RADIUS server.4 Configure the router auth-path object.5 Configure a custom service for RADIUS traffic.6 Configure a service group that includes RADIUS traffic along with other types of traffic that will be
allowed to pass through the firewall.7 Configure a firewall policy that has route based authentication enabled.The Fortinet Knowledge Base has an article on authentication based routing that provides a sample configuration for these steps.
Syntaxconfig router auth-pathedit <aspath_list_name>set device <interface>set gateway <gway_ipv4>
end
Note: The auth-path command is not available when the FortiGate unit is in Transparent mode.
Variable Description Defaultedit <auth_path_name> Enter a name for the authentication path. No default.
device <interface> Specify the interface for this path. No default.
gateway <gway_ipv4> Specify the gateway IP address for this path. Null.
ortiOS 4.0 MR3 CLI Reference1-431-99686-20110623 263ttp://docs.fortinet.com/ • Feedback
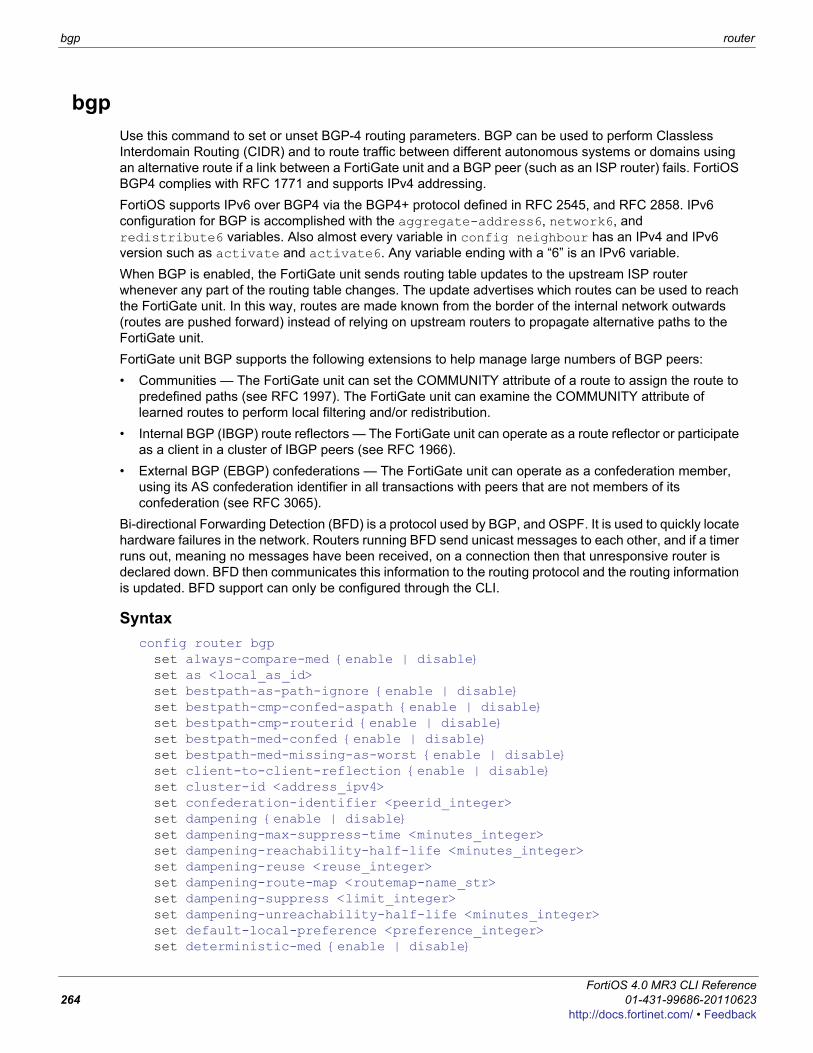
bgp router
bgpUse this command to set or unset BGP-4 routing parameters. BGP can be used to perform Classless Interdomain Routing (CIDR) and to route traffic between different autonomous systems or domains using an alternative route if a link between a FortiGate unit and a BGP peer (such as an ISP router) fails. FortiOS BGP4 complies with RFC 1771 and supports IPv4 addressing. FortiOS supports IPv6 over BGP4 via the BGP4+ protocol defined in RFC 2545, and RFC 2858. IPv6 configuration for BGP is accomplished with the aggregate-address6, network6, and redistribute6 variables. Also almost every variable in config neighbour has an IPv4 and IPv6 version such as activate and activate6. Any variable ending with a “6” is an IPv6 variable.When BGP is enabled, the FortiGate unit sends routing table updates to the upstream ISP router whenever any part of the routing table changes. The update advertises which routes can be used to reach the FortiGate unit. In this way, routes are made known from the border of the internal network outwards (routes are pushed forward) instead of relying on upstream routers to propagate alternative paths to the FortiGate unit. FortiGate unit BGP supports the following extensions to help manage large numbers of BGP peers:• Communities — The FortiGate unit can set the COMMUNITY attribute of a route to assign the route to
predefined paths (see RFC 1997). The FortiGate unit can examine the COMMUNITY attribute of learned routes to perform local filtering and/or redistribution.
• Internal BGP (IBGP) route reflectors — The FortiGate unit can operate as a route reflector or participate as a client in a cluster of IBGP peers (see RFC 1966).
• External BGP (EBGP) confederations — The FortiGate unit can operate as a confederation member, using its AS confederation identifier in all transactions with peers that are not members of its confederation (see RFC 3065).
Bi-directional Forwarding Detection (BFD) is a protocol used by BGP, and OSPF. It is used to quickly locate hardware failures in the network. Routers running BFD send unicast messages to each other, and if a timer runs out, meaning no messages have been received, on a connection then that unresponsive router is declared down. BFD then communicates this information to the routing protocol and the routing information is updated. BFD support can only be configured through the CLI.
Syntaxconfig router bgpset always-compare-med {enable | disable}set as <local_as_id>set bestpath-as-path-ignore {enable | disable}set bestpath-cmp-confed-aspath {enable | disable}set bestpath-cmp-routerid {enable | disable}set bestpath-med-confed {enable | disable}set bestpath-med-missing-as-worst {enable | disable}set client-to-client-reflection {enable | disable}set cluster-id <address_ipv4>set confederation-identifier <peerid_integer>set dampening {enable | disable}set dampening-max-suppress-time <minutes_integer>set dampening-reachability-half-life <minutes_integer>set dampening-reuse <reuse_integer>set dampening-route-map <routemap-name_str>set dampening-suppress <limit_integer>set dampening-unreachability-half-life <minutes_integer>set default-local-preference <preference_integer>set deterministic-med {enable | disable}
FortiOS 4.0 MR3 CLI Reference264 01-431-99686-20110623
http://docs.fortinet.com/ • Feedback
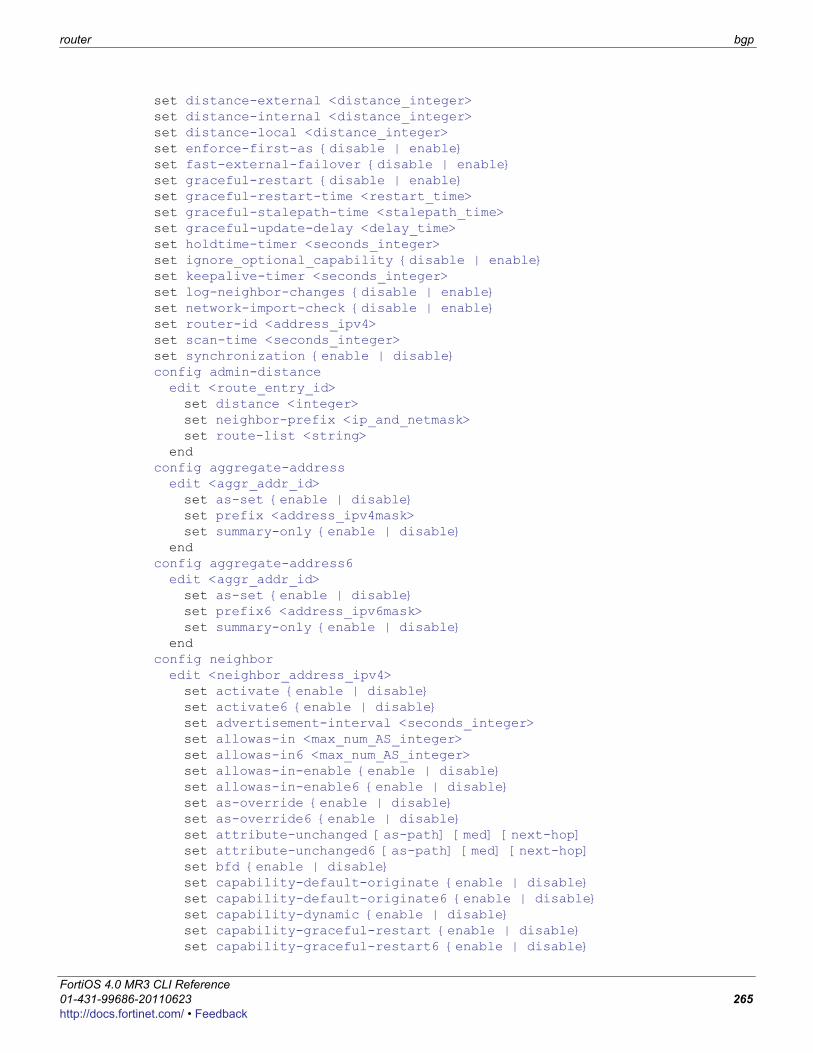
router bgp
F0h
set distance-external <distance_integer>set distance-internal <distance_integer>set distance-local <distance_integer>set enforce-first-as {disable | enable}set fast-external-failover {disable | enable}set graceful-restart {disable | enable}set graceful-restart-time <restart_time>set graceful-stalepath-time <stalepath_time>set graceful-update-delay <delay_time>set holdtime-timer <seconds_integer>set ignore_optional_capability {disable | enable} set keepalive-timer <seconds_integer>set log-neighbor-changes {disable | enable}set network-import-check {disable | enable}set router-id <address_ipv4>set scan-time <seconds_integer>set synchronization {enable | disable}config admin-distanceedit <route_entry_id>set distance <integer>set neighbor-prefix <ip_and_netmask>set route-list <string>
endconfig aggregate-addressedit <aggr_addr_id>set as-set {enable | disable}set prefix <address_ipv4mask>set summary-only {enable | disable}
endconfig aggregate-address6edit <aggr_addr_id>set as-set {enable | disable}set prefix6 <address_ipv6mask>set summary-only {enable | disable}
endconfig neighboredit <neighbor_address_ipv4>set activate {enable | disable}set activate6 {enable | disable}set advertisement-interval <seconds_integer>set allowas-in <max_num_AS_integer>set allowas-in6 <max_num_AS_integer>set allowas-in-enable {enable | disable}set allowas-in-enable6 {enable | disable}set as-override {enable | disable}set as-override6 {enable | disable}set attribute-unchanged [as-path] [med] [next-hop]set attribute-unchanged6 [as-path] [med] [next-hop]set bfd {enable | disable}set capability-default-originate {enable | disable}set capability-default-originate6 {enable | disable}set capability-dynamic {enable | disable}set capability-graceful-restart {enable | disable}set capability-graceful-restart6 {enable | disable}
ortiOS 4.0 MR3 CLI Reference1-431-99686-20110623 265ttp://docs.fortinet.com/ • Feedback
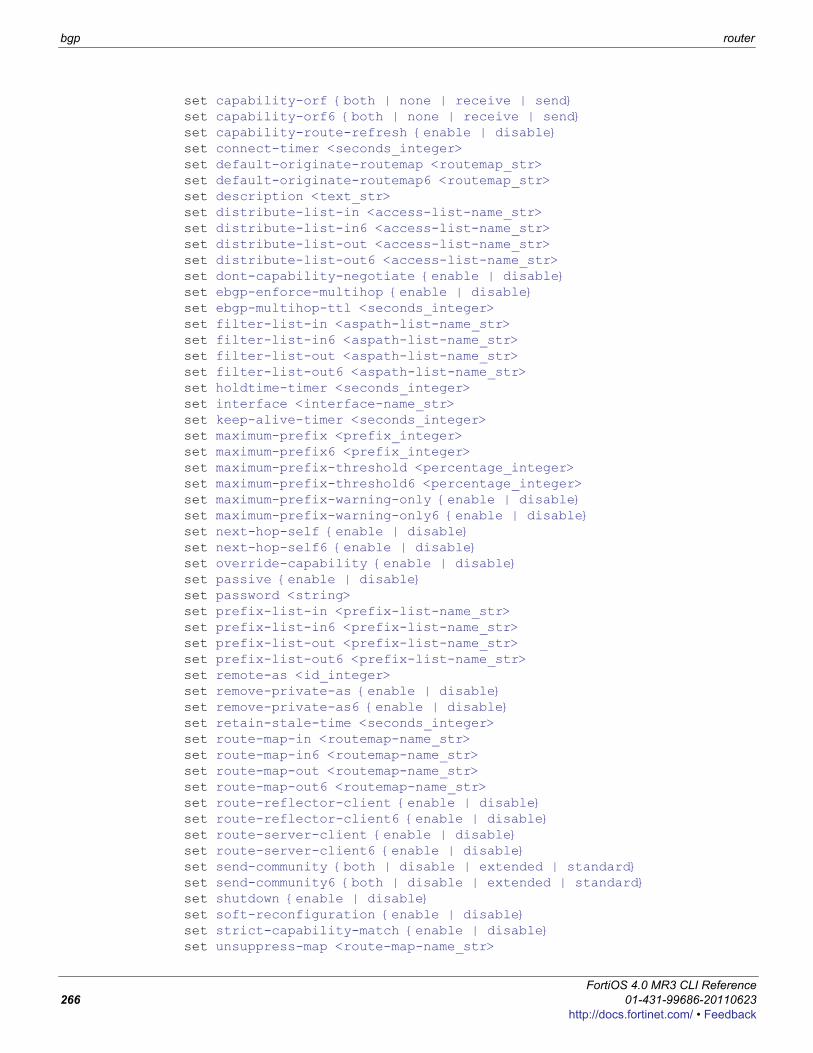
bgp router
set capability-orf {both | none | receive | send}set capability-orf6 {both | none | receive | send}set capability-route-refresh {enable | disable}set connect-timer <seconds_integer>set default-originate-routemap <routemap_str>set default-originate-routemap6 <routemap_str>set description <text_str>set distribute-list-in <access-list-name_str>set distribute-list-in6 <access-list-name_str>set distribute-list-out <access-list-name_str>set distribute-list-out6 <access-list-name_str>set dont-capability-negotiate {enable | disable}set ebgp-enforce-multihop {enable | disable}set ebgp-multihop-ttl <seconds_integer>set filter-list-in <aspath-list-name_str>set filter-list-in6 <aspath-list-name_str>set filter-list-out <aspath-list-name_str>set filter-list-out6 <aspath-list-name_str>set holdtime-timer <seconds_integer>set interface <interface-name_str>set keep-alive-timer <seconds_integer>set maximum-prefix <prefix_integer>set maximum-prefix6 <prefix_integer>set maximum-prefix-threshold <percentage_integer>set maximum-prefix-threshold6 <percentage_integer>set maximum-prefix-warning-only {enable | disable}set maximum-prefix-warning-only6 {enable | disable}set next-hop-self {enable | disable}set next-hop-self6 {enable | disable}set override-capability {enable | disable}set passive {enable | disable}set password <string>set prefix-list-in <prefix-list-name_str>set prefix-list-in6 <prefix-list-name_str>set prefix-list-out <prefix-list-name_str>set prefix-list-out6 <prefix-list-name_str>set remote-as <id_integer>set remove-private-as {enable | disable}set remove-private-as6 {enable | disable}set retain-stale-time <seconds_integer>set route-map-in <routemap-name_str>set route-map-in6 <routemap-name_str>set route-map-out <routemap-name_str>set route-map-out6 <routemap-name_str>set route-reflector-client {enable | disable}set route-reflector-client6 {enable | disable}set route-server-client {enable | disable}set route-server-client6 {enable | disable}set send-community {both | disable | extended | standard}set send-community6 {both | disable | extended | standard}set shutdown {enable | disable}set soft-reconfiguration {enable | disable}set strict-capability-match {enable | disable}set unsuppress-map <route-map-name_str>
FortiOS 4.0 MR3 CLI Reference266 01-431-99686-20110623
http://docs.fortinet.com/ • Feedback
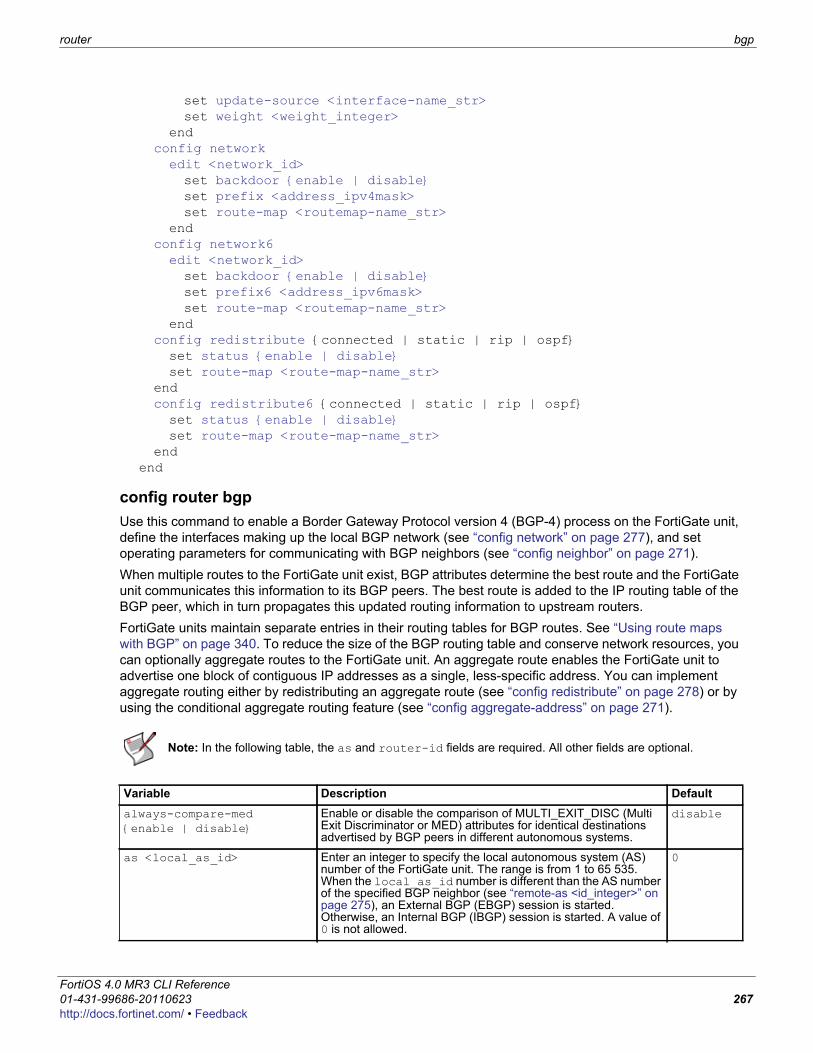
router bgp
F0h
set update-source <interface-name_str>set weight <weight_integer>
endconfig networkedit <network_id>set backdoor {enable | disable}set prefix <address_ipv4mask>set route-map <routemap-name_str>
endconfig network6edit <network_id>set backdoor {enable | disable}set prefix6 <address_ipv6mask>set route-map <routemap-name_str>
endconfig redistribute {connected | static | rip | ospf}set status {enable | disable}set route-map <route-map-name_str>
endconfig redistribute6 {connected | static | rip | ospf}set status {enable | disable}set route-map <route-map-name_str>
endend
config router bgpUse this command to enable a Border Gateway Protocol version 4 (BGP-4) process on the FortiGate unit, define the interfaces making up the local BGP network (see “config network” on page 277), and set operating parameters for communicating with BGP neighbors (see “config neighbor” on page 271). When multiple routes to the FortiGate unit exist, BGP attributes determine the best route and the FortiGate unit communicates this information to its BGP peers. The best route is added to the IP routing table of the BGP peer, which in turn propagates this updated routing information to upstream routers.FortiGate units maintain separate entries in their routing tables for BGP routes. See “Using route maps with BGP” on page 340. To reduce the size of the BGP routing table and conserve network resources, you can optionally aggregate routes to the FortiGate unit. An aggregate route enables the FortiGate unit to advertise one block of contiguous IP addresses as a single, less-specific address. You can implement aggregate routing either by redistributing an aggregate route (see “config redistribute” on page 278) or by using the conditional aggregate routing feature (see “config aggregate-address” on page 271).
Note: In the following table, the as and router-id fields are required. All other fields are optional.
Variable Description Defaultalways-compare-med{enable | disable}
Enable or disable the comparison of MULTI_EXIT_DISC (Multi Exit Discriminator or MED) attributes for identical destinations advertised by BGP peers in different autonomous systems.
disable
as <local_as_id> Enter an integer to specify the local autonomous system (AS) number of the FortiGate unit. The range is from 1 to 65 535. When the local_as_id number is different than the AS number of the specified BGP neighbor (see “remote-as <id_integer>” on page 275), an External BGP (EBGP) session is started. Otherwise, an Internal BGP (IBGP) session is started. A value of 0 is not allowed.
0
ortiOS 4.0 MR3 CLI Reference1-431-99686-20110623 267ttp://docs.fortinet.com/ • Feedback
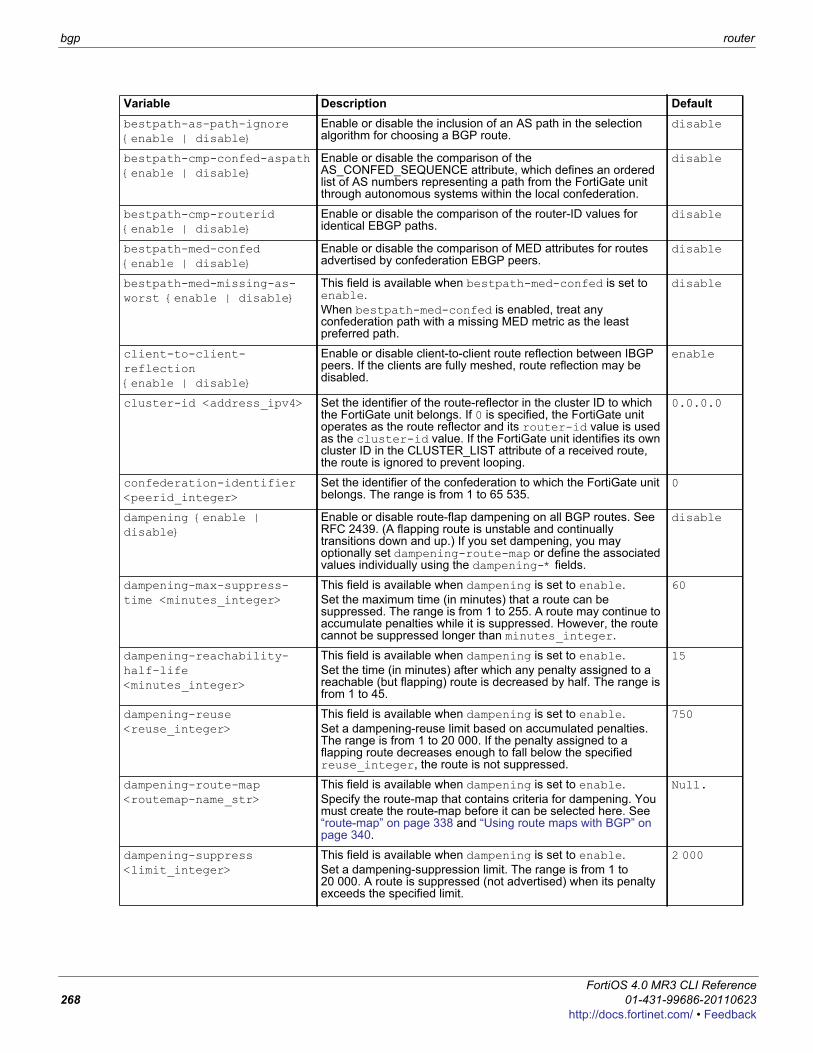
bgp router
bestpath-as-path-ignore{enable | disable}
Enable or disable the inclusion of an AS path in the selection algorithm for choosing a BGP route.
disable
bestpath-cmp-confed-aspath {enable | disable}
Enable or disable the comparison of the AS_CONFED_SEQUENCE attribute, which defines an ordered list of AS numbers representing a path from the FortiGate unit through autonomous systems within the local confederation.
disable
bestpath-cmp-routerid{enable | disable}
Enable or disable the comparison of the router-ID values for identical EBGP paths.
disable
bestpath-med-confed{enable | disable}
Enable or disable the comparison of MED attributes for routes advertised by confederation EBGP peers.
disable
bestpath-med-missing-as-worst {enable | disable}
This field is available when bestpath-med-confed is set to enable.When bestpath-med-confed is enabled, treat any confederation path with a missing MED metric as the least preferred path.
disable
client-to-client-reflection{enable | disable}
Enable or disable client-to-client route reflection between IBGP peers. If the clients are fully meshed, route reflection may be disabled.
enable
cluster-id <address_ipv4> Set the identifier of the route-reflector in the cluster ID to which the FortiGate unit belongs. If 0 is specified, the FortiGate unit operates as the route reflector and its router-id value is used as the cluster-id value. If the FortiGate unit identifies its own cluster ID in the CLUSTER_LIST attribute of a received route, the route is ignored to prevent looping.
0.0.0.0
confederation-identifier<peerid_integer>
Set the identifier of the confederation to which the FortiGate unit belongs. The range is from 1 to 65 535.
0
dampening {enable | disable}
Enable or disable route-flap dampening on all BGP routes. See RFC 2439. (A flapping route is unstable and continually transitions down and up.) If you set dampening, you may optionally set dampening-route-map or define the associated values individually using the dampening-* fields.
disable
dampening-max-suppress-time <minutes_integer>
This field is available when dampening is set to enable.Set the maximum time (in minutes) that a route can be suppressed. The range is from 1 to 255. A route may continue to accumulate penalties while it is suppressed. However, the route cannot be suppressed longer than minutes_integer.
60
dampening-reachability-half-life <minutes_integer>
This field is available when dampening is set to enable.Set the time (in minutes) after which any penalty assigned to a reachable (but flapping) route is decreased by half. The range is from 1 to 45.
15
dampening-reuse<reuse_integer>
This field is available when dampening is set to enable.Set a dampening-reuse limit based on accumulated penalties. The range is from 1 to 20 000. If the penalty assigned to a flapping route decreases enough to fall below the specified reuse_integer, the route is not suppressed.
750
dampening-route-map<routemap-name_str>
This field is available when dampening is set to enable.Specify the route-map that contains criteria for dampening. You must create the route-map before it can be selected here. See “route-map” on page 338 and “Using route maps with BGP” on page 340.
Null.
dampening-suppress<limit_integer>
This field is available when dampening is set to enable.Set a dampening-suppression limit. The range is from 1 to 20 000. A route is suppressed (not advertised) when its penalty exceeds the specified limit.
2 000
Variable Description Default
FortiOS 4.0 MR3 CLI Reference268 01-431-99686-20110623
http://docs.fortinet.com/ • Feedback
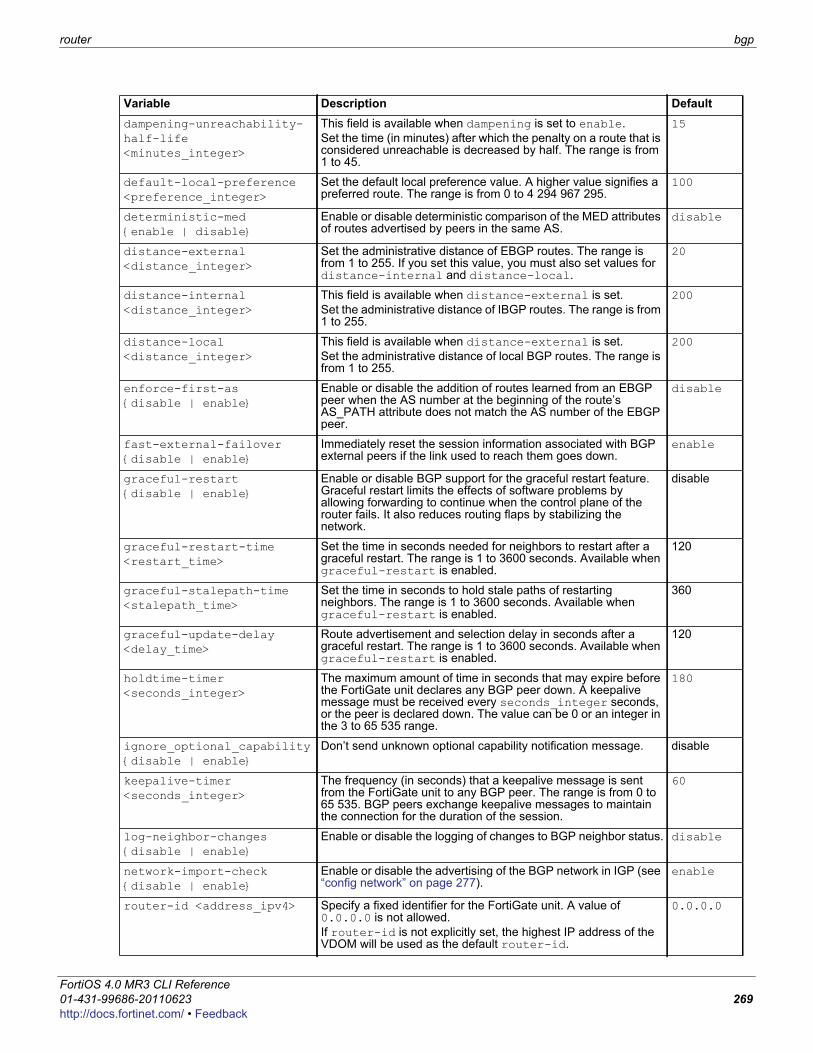
router bgp
F0h
dampening-unreachability-half-life <minutes_integer>
This field is available when dampening is set to enable.Set the time (in minutes) after which the penalty on a route that is considered unreachable is decreased by half. The range is from 1 to 45.
15
default-local-preference<preference_integer>
Set the default local preference value. A higher value signifies a preferred route. The range is from 0 to 4 294 967 295.
100
deterministic-med{enable | disable}
Enable or disable deterministic comparison of the MED attributes of routes advertised by peers in the same AS.
disable
distance-external<distance_integer>
Set the administrative distance of EBGP routes. The range is from 1 to 255. If you set this value, you must also set values for distance-internal and distance-local.
20
distance-internal<distance_integer>
This field is available when distance-external is set.Set the administrative distance of IBGP routes. The range is from 1 to 255.
200
distance-local<distance_integer>
This field is available when distance-external is set.Set the administrative distance of local BGP routes. The range is from 1 to 255.
200
enforce-first-as{disable | enable}
Enable or disable the addition of routes learned from an EBGP peer when the AS number at the beginning of the route’s AS_PATH attribute does not match the AS number of the EBGP peer.
disable
fast-external-failover{disable | enable}
Immediately reset the session information associated with BGP external peers if the link used to reach them goes down.
enable
graceful-restart {disable | enable}
Enable or disable BGP support for the graceful restart feature. Graceful restart limits the effects of software problems by allowing forwarding to continue when the control plane of the router fails. It also reduces routing flaps by stabilizing the network.
disable
graceful-restart-time <restart_time>
Set the time in seconds needed for neighbors to restart after a graceful restart. The range is 1 to 3600 seconds. Available when graceful-restart is enabled.
120
graceful-stalepath-time <stalepath_time>
Set the time in seconds to hold stale paths of restarting neighbors. The range is 1 to 3600 seconds. Available when graceful-restart is enabled.
360
graceful-update-delay <delay_time>
Route advertisement and selection delay in seconds after a graceful restart. The range is 1 to 3600 seconds. Available when graceful-restart is enabled.
120
holdtime-timer<seconds_integer>
The maximum amount of time in seconds that may expire before the FortiGate unit declares any BGP peer down. A keepalive message must be received every seconds_integer seconds, or the peer is declared down. The value can be 0 or an integer in the 3 to 65 535 range.
180
ignore_optional_capability {disable | enable}
Don’t send unknown optional capability notification message. disable
keepalive-timer<seconds_integer>
The frequency (in seconds) that a keepalive message is sent from the FortiGate unit to any BGP peer. The range is from 0 to 65 535. BGP peers exchange keepalive messages to maintain the connection for the duration of the session.
60
log-neighbor-changes{disable | enable}
Enable or disable the logging of changes to BGP neighbor status. disable
network-import-check{disable | enable}
Enable or disable the advertising of the BGP network in IGP (see “config network” on page 277).
enable
router-id <address_ipv4> Specify a fixed identifier for the FortiGate unit. A value of 0.0.0.0 is not allowed.If router-id is not explicitly set, the highest IP address of the VDOM will be used as the default router-id.
0.0.0.0
Variable Description Default
ortiOS 4.0 MR3 CLI Reference1-431-99686-20110623 269ttp://docs.fortinet.com/ • Feedback
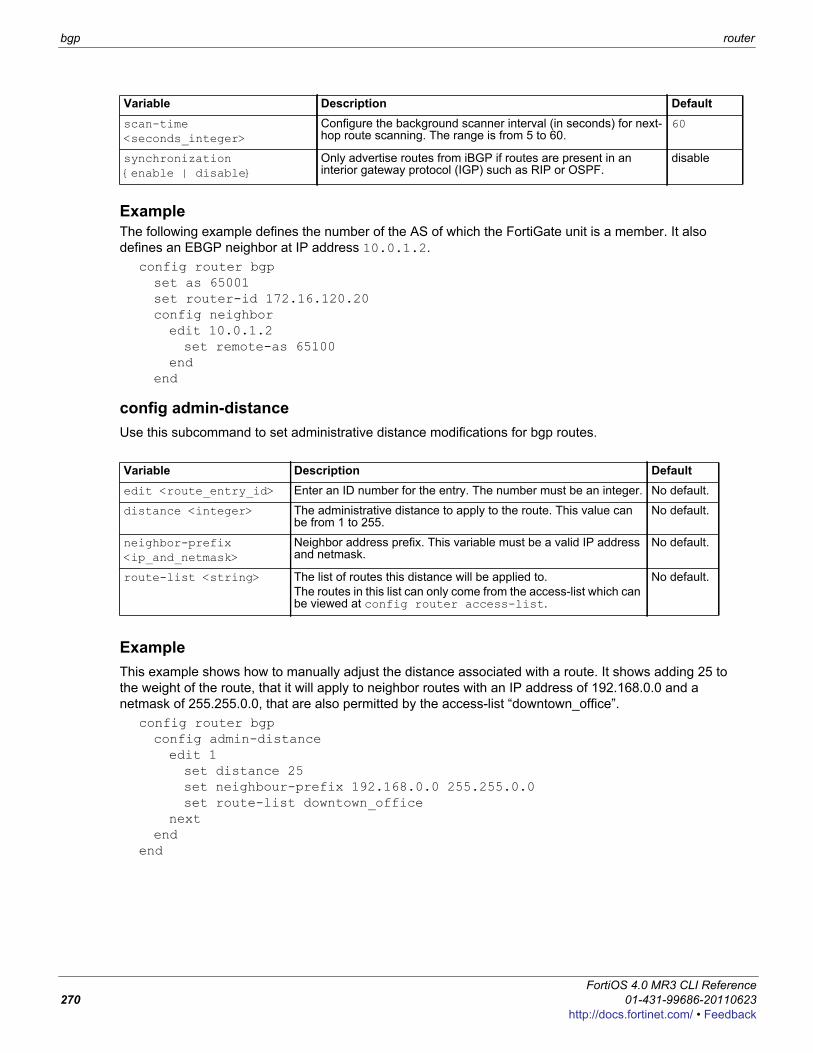
bgp router
ExampleThe following example defines the number of the AS of which the FortiGate unit is a member. It also defines an EBGP neighbor at IP address 10.0.1.2.
config router bgpset as 65001set router-id 172.16.120.20config neighboredit 10.0.1.2set remote-as 65100
endend
config admin-distanceUse this subcommand to set administrative distance modifications for bgp routes.
ExampleThis example shows how to manually adjust the distance associated with a route. It shows adding 25 to the weight of the route, that it will apply to neighbor routes with an IP address of 192.168.0.0 and a netmask of 255.255.0.0, that are also permitted by the access-list “downtown_office”.
config router bgpconfig admin-distanceedit 1set distance 25set neighbour-prefix 192.168.0.0 255.255.0.0set route-list downtown_office
nextend
end
scan-time <seconds_integer>
Configure the background scanner interval (in seconds) for next-hop route scanning. The range is from 5 to 60.
60
synchronization {enable | disable}
Only advertise routes from iBGP if routes are present in an interior gateway protocol (IGP) such as RIP or OSPF.
disable
Variable Description Defaultedit <route_entry_id> Enter an ID number for the entry. The number must be an integer. No default.
distance <integer> The administrative distance to apply to the route. This value can be from 1 to 255.
No default.
neighbor-prefix <ip_and_netmask>
Neighbor address prefix. This variable must be a valid IP address and netmask.
No default.
route-list <string> The list of routes this distance will be applied to. The routes in this list can only come from the access-list which can be viewed at config router access-list.
No default.
Variable Description Default
FortiOS 4.0 MR3 CLI Reference270 01-431-99686-20110623
http://docs.fortinet.com/ • Feedback
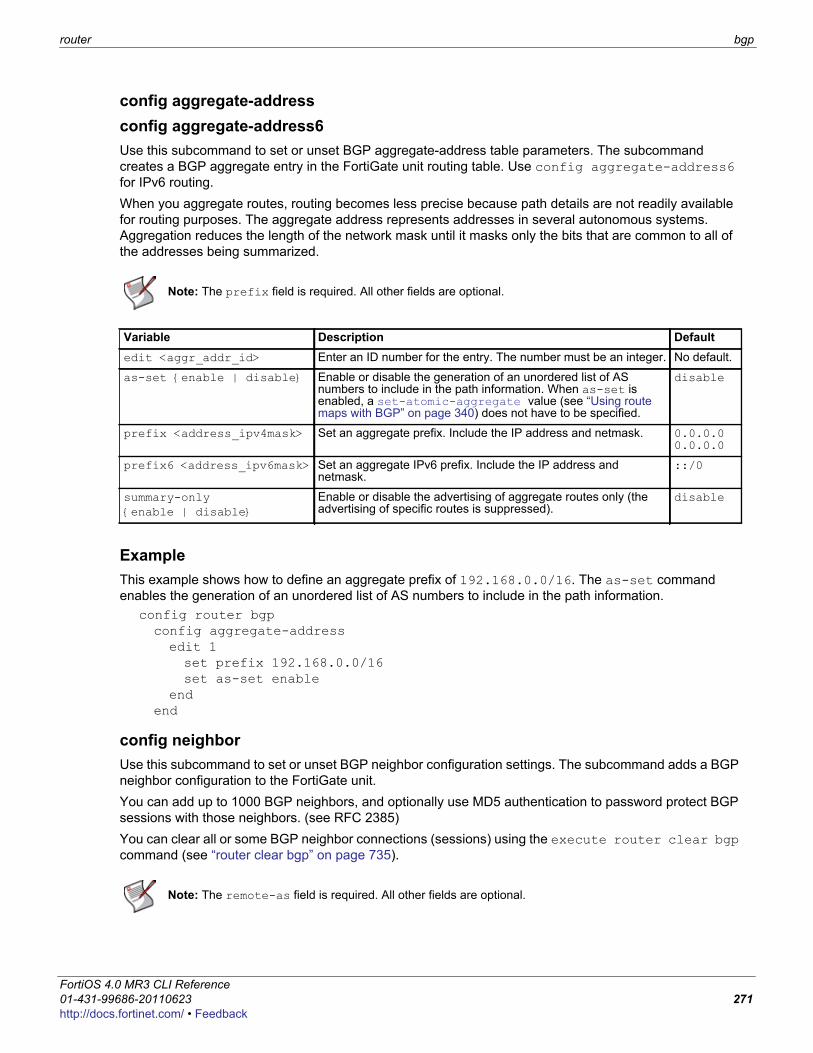
router bgp
F0h
config aggregate-addressconfig aggregate-address6Use this subcommand to set or unset BGP aggregate-address table parameters. The subcommand creates a BGP aggregate entry in the FortiGate unit routing table. Use config aggregate-address6 for IPv6 routing.When you aggregate routes, routing becomes less precise because path details are not readily available for routing purposes. The aggregate address represents addresses in several autonomous systems. Aggregation reduces the length of the network mask until it masks only the bits that are common to all of the addresses being summarized.
ExampleThis example shows how to define an aggregate prefix of 192.168.0.0/16. The as-set command enables the generation of an unordered list of AS numbers to include in the path information.
config router bgpconfig aggregate-addressedit 1set prefix 192.168.0.0/16set as-set enable
endend
config neighborUse this subcommand to set or unset BGP neighbor configuration settings. The subcommand adds a BGP neighbor configuration to the FortiGate unit. You can add up to 1000 BGP neighbors, and optionally use MD5 authentication to password protect BGP sessions with those neighbors. (see RFC 2385)You can clear all or some BGP neighbor connections (sessions) using the execute router clear bgp command (see “router clear bgp” on page 735).
Note: The prefix field is required. All other fields are optional.
Variable Description Defaultedit <aggr_addr_id> Enter an ID number for the entry. The number must be an integer. No default.
as-set {enable | disable} Enable or disable the generation of an unordered list of AS numbers to include in the path information. When as-set is enabled, a set-atomic-aggregate value (see “Using route maps with BGP” on page 340) does not have to be specified.
disable
prefix <address_ipv4mask> Set an aggregate prefix. Include the IP address and netmask. 0.0.0.00.0.0.0
prefix6 <address_ipv6mask> Set an aggregate IPv6 prefix. Include the IP address and netmask.
::/0
summary-only{enable | disable}
Enable or disable the advertising of aggregate routes only (the advertising of specific routes is suppressed).
disable
Note: The remote-as field is required. All other fields are optional.
ortiOS 4.0 MR3 CLI Reference1-431-99686-20110623 271ttp://docs.fortinet.com/ • Feedback
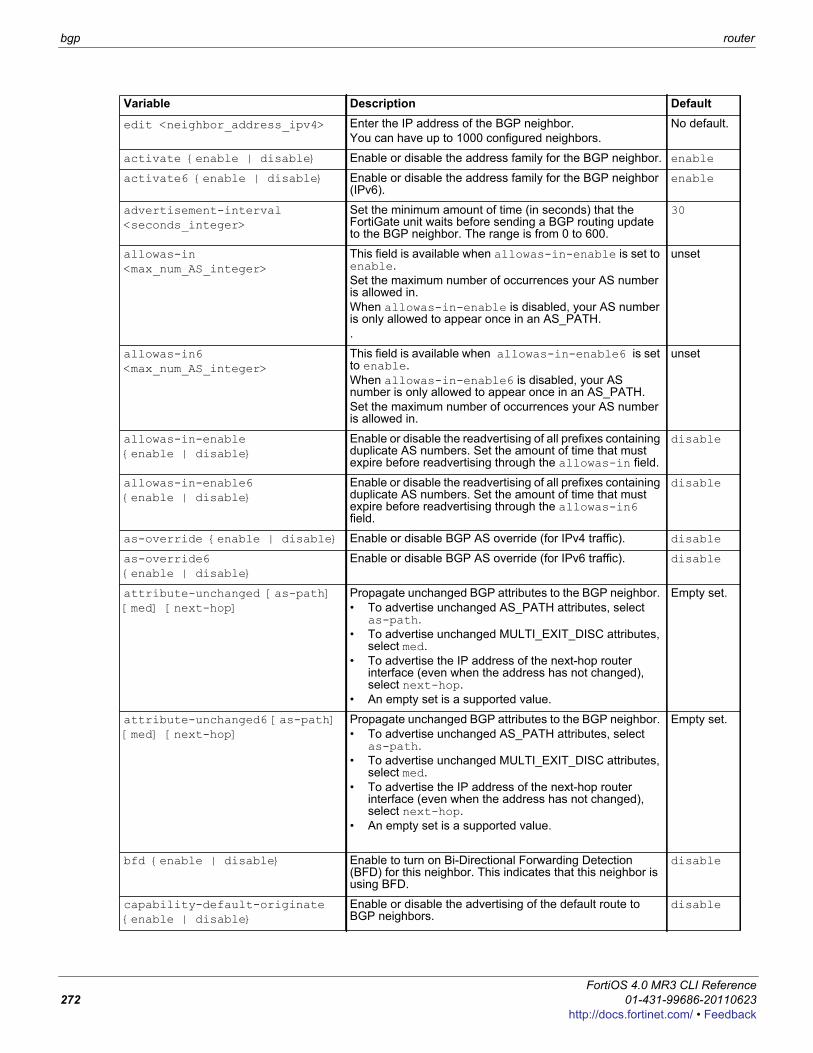
bgp router
Variable Description Default
edit <neighbor_address_ipv4> Enter the IP address of the BGP neighbor.You can have up to 1000 configured neighbors.
No default.
activate {enable | disable} Enable or disable the address family for the BGP neighbor. enable
activate6 {enable | disable} Enable or disable the address family for the BGP neighbor (IPv6).
enable
advertisement-interval<seconds_integer>
Set the minimum amount of time (in seconds) that the FortiGate unit waits before sending a BGP routing update to the BGP neighbor. The range is from 0 to 600.
30
allowas-in <max_num_AS_integer>
This field is available when allowas-in-enable is set to enable.Set the maximum number of occurrences your AS number is allowed in.When allowas-in-enable is disabled, your AS number is only allowed to appear once in an AS_PATH..
unset
allowas-in6 <max_num_AS_integer>
This field is available when allowas-in-enable6 is set to enable.When allowas-in-enable6 is disabled, your AS number is only allowed to appear once in an AS_PATH.Set the maximum number of occurrences your AS number is allowed in.
unset
allowas-in-enable{enable | disable}
Enable or disable the readvertising of all prefixes containing duplicate AS numbers. Set the amount of time that must expire before readvertising through the allowas-in field.
disable
allowas-in-enable6{enable | disable}
Enable or disable the readvertising of all prefixes containing duplicate AS numbers. Set the amount of time that must expire before readvertising through the allowas-in6 field.
disable
as-override {enable | disable} Enable or disable BGP AS override (for IPv4 traffic). disable
as-override6 {enable | disable}
Enable or disable BGP AS override (for IPv6 traffic). disable
attribute-unchanged [as-path] [med] [next-hop]
Propagate unchanged BGP attributes to the BGP neighbor. • To advertise unchanged AS_PATH attributes, select
as-path.• To advertise unchanged MULTI_EXIT_DISC attributes,
select med.• To advertise the IP address of the next-hop router
interface (even when the address has not changed), select next-hop.
• An empty set is a supported value.
Empty set.
attribute-unchanged6 [as-path] [med] [next-hop]
Propagate unchanged BGP attributes to the BGP neighbor. • To advertise unchanged AS_PATH attributes, select
as-path.• To advertise unchanged MULTI_EXIT_DISC attributes,
select med.• To advertise the IP address of the next-hop router
interface (even when the address has not changed), select next-hop.
• An empty set is a supported value.
Empty set.
bfd {enable | disable} Enable to turn on Bi-Directional Forwarding Detection (BFD) for this neighbor. This indicates that this neighbor is using BFD.
disable
capability-default-originate{enable | disable}
Enable or disable the advertising of the default route to BGP neighbors.
disable
FortiOS 4.0 MR3 CLI Reference272 01-431-99686-20110623
http://docs.fortinet.com/ • Feedback
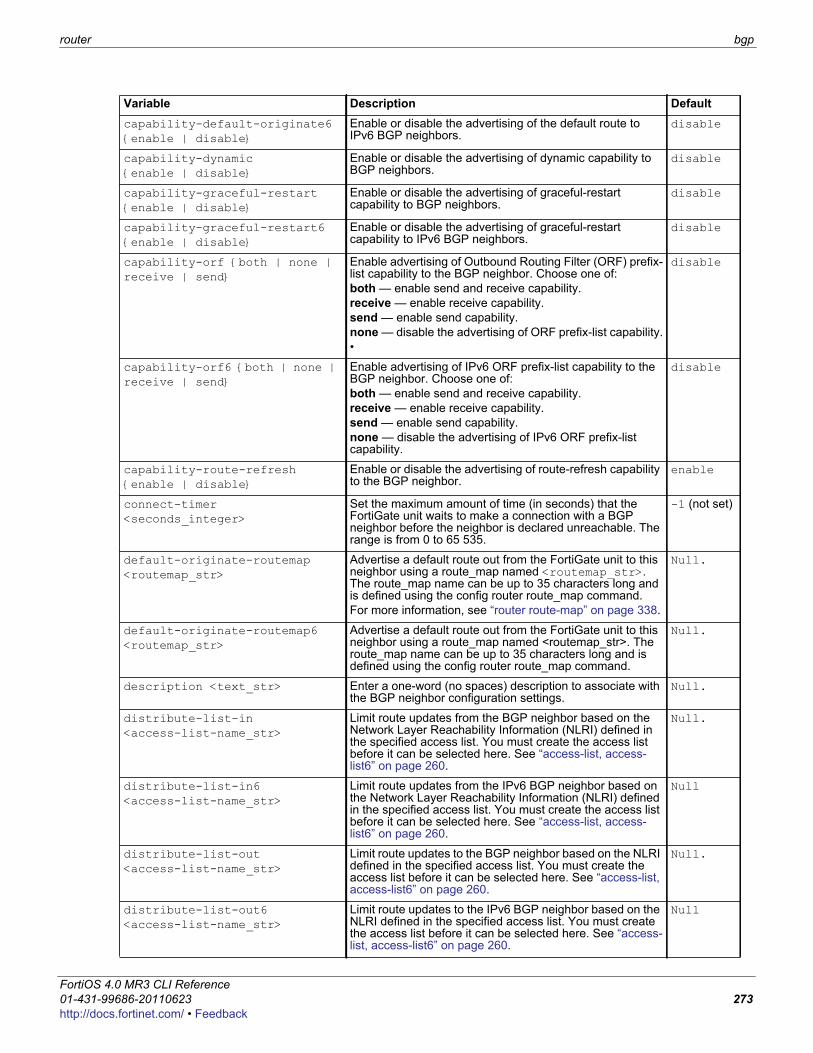
router bgp
F0h
capability-default-originate6 {enable | disable}
Enable or disable the advertising of the default route to IPv6 BGP neighbors.
disable
capability-dynamic{enable | disable}
Enable or disable the advertising of dynamic capability to BGP neighbors.
disable
capability-graceful-restart {enable | disable}
Enable or disable the advertising of graceful-restart capability to BGP neighbors.
disable
capability-graceful-restart6 {enable | disable}
Enable or disable the advertising of graceful-restart capability to IPv6 BGP neighbors.
disable
capability-orf {both | none | receive | send}
Enable advertising of Outbound Routing Filter (ORF) prefix-list capability to the BGP neighbor. Choose one of:both — enable send and receive capability.receive — enable receive capability.send — enable send capability.none — disable the advertising of ORF prefix-list capability.•
disable
capability-orf6 {both | none | receive | send}
Enable advertising of IPv6 ORF prefix-list capability to the BGP neighbor. Choose one of:both — enable send and receive capability.receive — enable receive capability.send — enable send capability.none — disable the advertising of IPv6 ORF prefix-list capability.
disable
capability-route-refresh {enable | disable}
Enable or disable the advertising of route-refresh capability to the BGP neighbor.
enable
connect-timer<seconds_integer>
Set the maximum amount of time (in seconds) that the FortiGate unit waits to make a connection with a BGP neighbor before the neighbor is declared unreachable. The range is from 0 to 65 535.
-1 (not set)
default-originate-routemap <routemap_str>
Advertise a default route out from the FortiGate unit to this neighbor using a route_map named <routemap_str>. The route_map name can be up to 35 characters long and is defined using the config router route_map command. For more information, see “router route-map” on page 338.
Null.
default-originate-routemap6 <routemap_str>
Advertise a default route out from the FortiGate unit to this neighbor using a route_map named <routemap_str>. The route_map name can be up to 35 characters long and is defined using the config router route_map command.
Null.
description <text_str> Enter a one-word (no spaces) description to associate with the BGP neighbor configuration settings.
Null.
distribute-list-in<access-list-name_str>
Limit route updates from the BGP neighbor based on the Network Layer Reachability Information (NLRI) defined in the specified access list. You must create the access list before it can be selected here. See “access-list, access-list6” on page 260.
Null.
distribute-list-in6<access-list-name_str>
Limit route updates from the IPv6 BGP neighbor based on the Network Layer Reachability Information (NLRI) defined in the specified access list. You must create the access list before it can be selected here. See “access-list, access-list6” on page 260.
Null
distribute-list-out<access-list-name_str>
Limit route updates to the BGP neighbor based on the NLRI defined in the specified access list. You must create the access list before it can be selected here. See “access-list, access-list6” on page 260.
Null.
distribute-list-out6<access-list-name_str>
Limit route updates to the IPv6 BGP neighbor based on the NLRI defined in the specified access list. You must create the access list before it can be selected here. See “access-list, access-list6” on page 260.
Null
Variable Description Default
ortiOS 4.0 MR3 CLI Reference1-431-99686-20110623 273ttp://docs.fortinet.com/ • Feedback
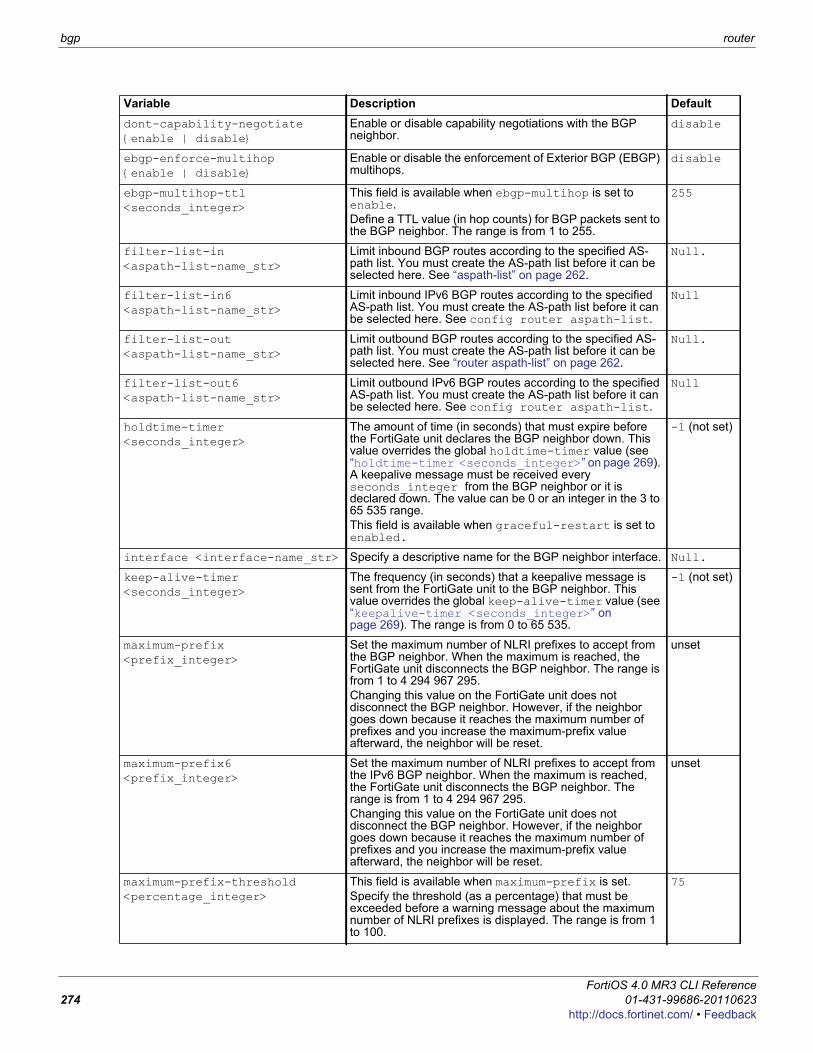
bgp router
dont-capability-negotiate{enable | disable}
Enable or disable capability negotiations with the BGP neighbor.
disable
ebgp-enforce-multihop{enable | disable}
Enable or disable the enforcement of Exterior BGP (EBGP) multihops.
disable
ebgp-multihop-ttl<seconds_integer>
This field is available when ebgp-multihop is set to enable.Define a TTL value (in hop counts) for BGP packets sent to the BGP neighbor. The range is from 1 to 255.
255
filter-list-in <aspath-list-name_str>
Limit inbound BGP routes according to the specified AS-path list. You must create the AS-path list before it can be selected here. See “aspath-list” on page 262.
Null.
filter-list-in6 <aspath-list-name_str>
Limit inbound IPv6 BGP routes according to the specified AS-path list. You must create the AS-path list before it can be selected here. See config router aspath-list.
Null
filter-list-out<aspath-list-name_str>
Limit outbound BGP routes according to the specified AS-path list. You must create the AS-path list before it can be selected here. See “router aspath-list” on page 262.
Null.
filter-list-out6<aspath-list-name_str>
Limit outbound IPv6 BGP routes according to the specified AS-path list. You must create the AS-path list before it can be selected here. See config router aspath-list.
Null
holdtime-timer<seconds_integer>
The amount of time (in seconds) that must expire before the FortiGate unit declares the BGP neighbor down. This value overrides the global holdtime-timer value (see “holdtime-timer <seconds_integer>” on page 269). A keepalive message must be received every seconds_integer from the BGP neighbor or it is declared down. The value can be 0 or an integer in the 3 to 65 535 range. This field is available when graceful-restart is set to enabled.
-1 (not set)
interface <interface-name_str> Specify a descriptive name for the BGP neighbor interface. Null.
keep-alive-timer<seconds_integer>
The frequency (in seconds) that a keepalive message is sent from the FortiGate unit to the BGP neighbor. This value overrides the global keep-alive-timer value (see “keepalive-timer <seconds_integer>” on page 269). The range is from 0 to 65 535.
-1 (not set)
maximum-prefix<prefix_integer>
Set the maximum number of NLRI prefixes to accept from the BGP neighbor. When the maximum is reached, the FortiGate unit disconnects the BGP neighbor. The range is from 1 to 4 294 967 295. Changing this value on the FortiGate unit does not disconnect the BGP neighbor. However, if the neighbor goes down because it reaches the maximum number of prefixes and you increase the maximum-prefix value afterward, the neighbor will be reset.
unset
maximum-prefix6 <prefix_integer>
Set the maximum number of NLRI prefixes to accept from the IPv6 BGP neighbor. When the maximum is reached, the FortiGate unit disconnects the BGP neighbor. The range is from 1 to 4 294 967 295. Changing this value on the FortiGate unit does not disconnect the BGP neighbor. However, if the neighbor goes down because it reaches the maximum number of prefixes and you increase the maximum-prefix value afterward, the neighbor will be reset.
unset
maximum-prefix-threshold<percentage_integer>
This field is available when maximum-prefix is set.Specify the threshold (as a percentage) that must be exceeded before a warning message about the maximum number of NLRI prefixes is displayed. The range is from 1 to 100.
75
Variable Description Default
FortiOS 4.0 MR3 CLI Reference274 01-431-99686-20110623
http://docs.fortinet.com/ • Feedback

router bgp
F0h
maximum-prefix-threshold6<percentage_integer>
This field is available when maximum-prefix6 is set.Specify the threshold (as a percentage) that must be exceeded before a warning message about the maximum number of NLRI prefixes is displayed. The range is from 1 to 100.
75
maximum-prefix-warning-only{enable | disable}
This field is available when maximum-prefix is set.Enable or disable the display of a warning when the maximum-prefix-threshold has been reached.
disable
maximum-prefix-warning-only6 {enable | disable}
This field is available when maximum-prefix6 is set.Enable or disable the display of a warning when the maximum-prefix-threshold6 has been reached.
disable
next-hop-self{enable | disable}
Enable or disable advertising of the FortiGate unit’s IP address (instead of the neighbor’s IP address) in the NEXT_HOP information that is sent to IBGP peers.
disable
next-hop-self6 {enable | disable}
Enable or disable advertising of the FortiGate unit’s IP address (instead of the neighbor’s IP address) in the NEXT_HOP information that is sent to IBGP peers.
disable
override-capability{enable | disable}
Enable or disable IPv6 addressing for a BGP neighbor that does not support capability negotiation.
disable
passive {enable | disable} Enable or disable the sending of Open messages to BGP neighbors.
disable
password <string> Enter password used in MD5 authentication to protect BGP sessions. (RFC 2385)
Null.
prefix-list-in<prefix-list-name_str>
Limit route updates from a BGP neighbor based on the Network Layer Reachability Information (NLRI) in the specified prefix list. The prefix list defines the NLRI prefix and length advertised in a route. You must create the prefix list before it can be selected here. See “router prefix-list, prefix-list6” on page 323.
Null.
prefix-list-in6<prefix-list-name_str>
Limit route updates from an IPv6 BGP neighbor based on the Network Layer Reachability Information (NLRI) in the specified prefix list. The prefix list defines the NLRI prefix and length advertised in a route. You must create the prefix list before it can be selected here. See “router prefix-list, prefix-list6” on page 323.
Null
prefix-list-out<prefix-list-name_str>
Limit route updates to a BGP neighbor based on the NLRI in the specified prefix list. The prefix list defines the NLRI prefix and length advertised in a route. You must create the prefix list before it can be selected here. See “router prefix-list, prefix-list6” on page 323.
Null.
prefix-list-out6<prefix-list-name_str>
Limit route updates to an IPv6 BGP neighbor based on the NLRI in the specified prefix list. The prefix list defines the NLRI prefix and length advertised in a route. You must create the prefix list before it can be selected here. See “router prefix-list, prefix-list6” on page 323.
Null
remote-as <id_integer> Adds a BGP neighbor to the FortiGate unit configuration and sets the AS number of the neighbor. The range is from 1 to 65 535. If the number is identical to the FortiGate unit AS number, the FortiGate unit communicates with the neighbor using internal BGP (IBGP). Otherwise, the neighbor is an external peer and the FortiGate unit uses EBGP to communicate with the neighbor.
unset
remove-private-as{enable | disable}
Remove the private AS numbers from outbound updates to the BGP neighbor.
disable
remove-private-as6 {enable | disable}
Remove the private AS numbers from outbound updates to the IPv6 BGP neighbor.
disable
restart_time <seconds_integer> Sets the time until a restart happens. The time until the restart can be from 0 to 3600 seconds.
0
Variable Description Default
ortiOS 4.0 MR3 CLI Reference1-431-99686-20110623 275ttp://docs.fortinet.com/ • Feedback
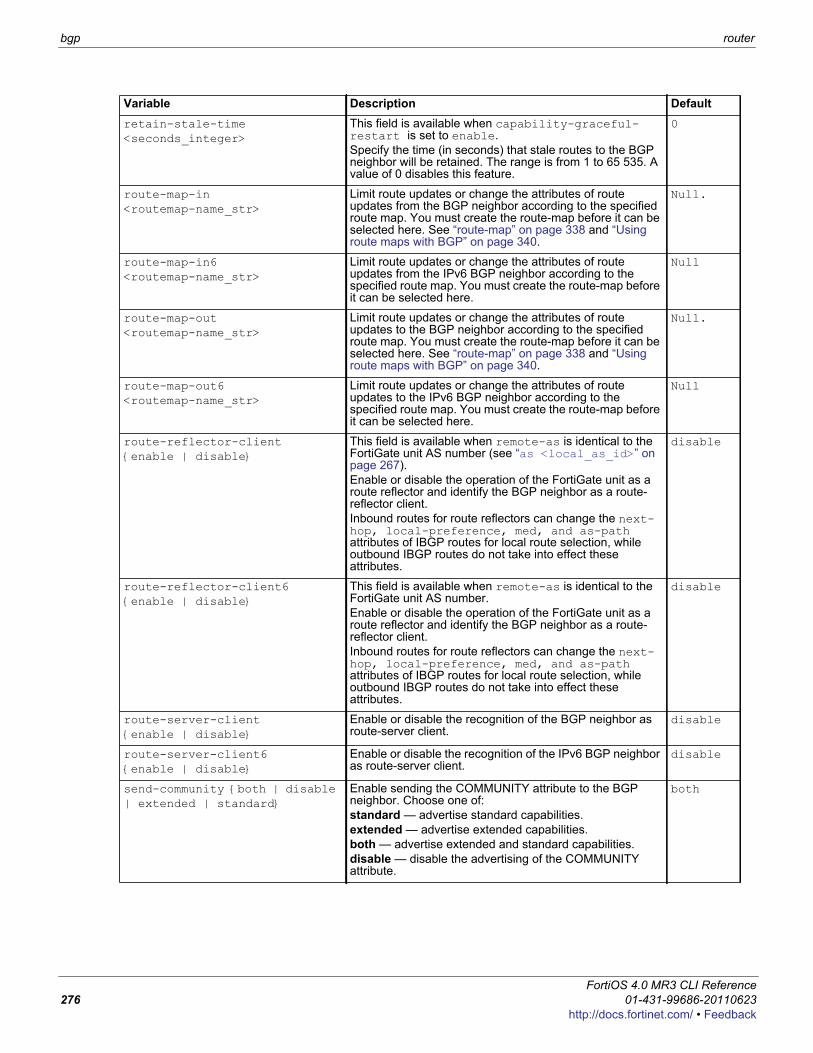
bgp router
retain-stale-time<seconds_integer>
This field is available when capability-graceful-restart is set to enable.Specify the time (in seconds) that stale routes to the BGP neighbor will be retained. The range is from 1 to 65 535. A value of 0 disables this feature.
0
route-map-in<routemap-name_str>
Limit route updates or change the attributes of route updates from the BGP neighbor according to the specified route map. You must create the route-map before it can be selected here. See “route-map” on page 338 and “Using route maps with BGP” on page 340.
Null.
route-map-in6<routemap-name_str>
Limit route updates or change the attributes of route updates from the IPv6 BGP neighbor according to the specified route map. You must create the route-map before it can be selected here.
Null
route-map-out<routemap-name_str>
Limit route updates or change the attributes of route updates to the BGP neighbor according to the specified route map. You must create the route-map before it can be selected here. See “route-map” on page 338 and “Using route maps with BGP” on page 340.
Null.
route-map-out6<routemap-name_str>
Limit route updates or change the attributes of route updates to the IPv6 BGP neighbor according to the specified route map. You must create the route-map before it can be selected here.
Null
route-reflector-client{enable | disable}
This field is available when remote-as is identical to the FortiGate unit AS number (see “as <local_as_id>” on page 267).Enable or disable the operation of the FortiGate unit as a route reflector and identify the BGP neighbor as a route-reflector client.Inbound routes for route reflectors can change the next-hop, local-preference, med, and as-path attributes of IBGP routes for local route selection, while outbound IBGP routes do not take into effect these attributes.
disable
route-reflector-client6{enable | disable}
This field is available when remote-as is identical to the FortiGate unit AS number.Enable or disable the operation of the FortiGate unit as a route reflector and identify the BGP neighbor as a route-reflector client.Inbound routes for route reflectors can change the next-hop, local-preference, med, and as-path attributes of IBGP routes for local route selection, while outbound IBGP routes do not take into effect these attributes.
disable
route-server-client{enable | disable}
Enable or disable the recognition of the BGP neighbor as route-server client.
disable
route-server-client6{enable | disable}
Enable or disable the recognition of the IPv6 BGP neighbor as route-server client.
disable
send-community {both | disable | extended | standard}
Enable sending the COMMUNITY attribute to the BGP neighbor. Choose one of:standard — advertise standard capabilities.extended — advertise extended capabilities.both — advertise extended and standard capabilities.disable — disable the advertising of the COMMUNITY attribute.
both
Variable Description Default
FortiOS 4.0 MR3 CLI Reference276 01-431-99686-20110623
http://docs.fortinet.com/ • Feedback
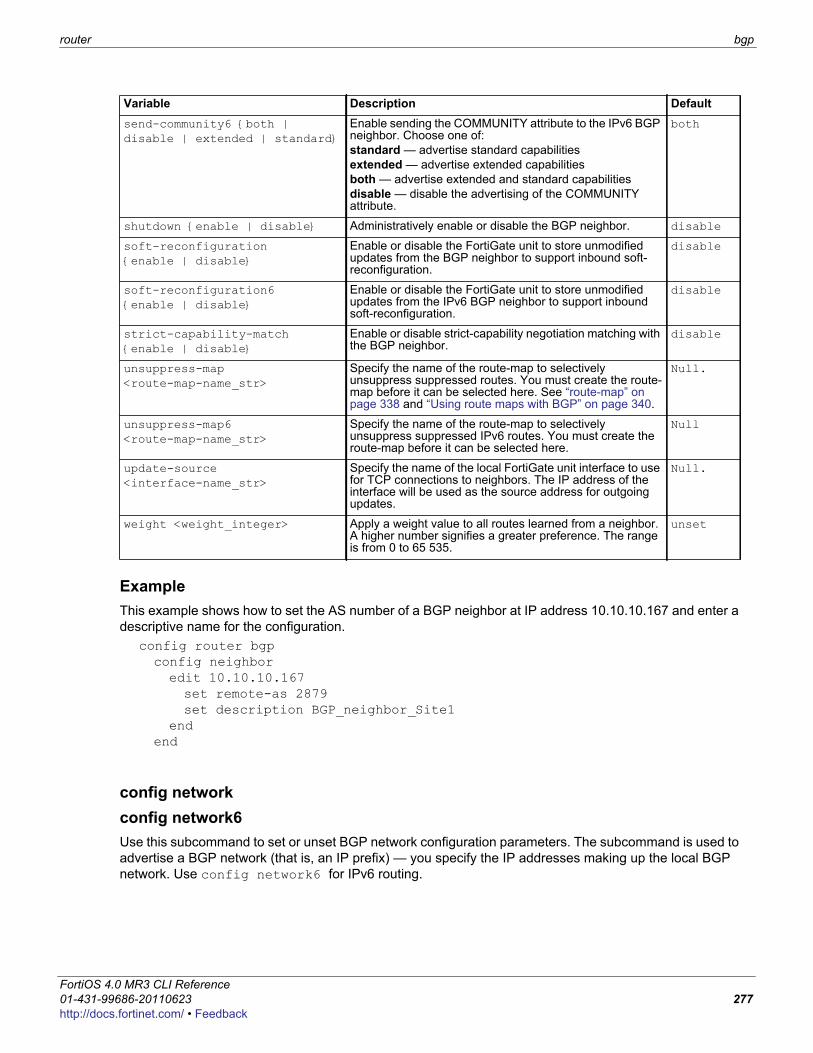
router bgp
F0h
ExampleThis example shows how to set the AS number of a BGP neighbor at IP address 10.10.10.167 and enter a descriptive name for the configuration.
config router bgpconfig neighboredit 10.10.10.167set remote-as 2879set description BGP_neighbor_Site1
endend
config networkconfig network6Use this subcommand to set or unset BGP network configuration parameters. The subcommand is used to advertise a BGP network (that is, an IP prefix) — you specify the IP addresses making up the local BGP network. Use config network6 for IPv6 routing.
send-community6 {both | disable | extended | standard}
Enable sending the COMMUNITY attribute to the IPv6 BGP neighbor. Choose one of:standard — advertise standard capabilitiesextended — advertise extended capabilitiesboth — advertise extended and standard capabilitiesdisable — disable the advertising of the COMMUNITY attribute.
both
shutdown {enable | disable} Administratively enable or disable the BGP neighbor. disable
soft-reconfiguration{enable | disable}
Enable or disable the FortiGate unit to store unmodified updates from the BGP neighbor to support inbound soft-reconfiguration.
disable
soft-reconfiguration6 {enable | disable}
Enable or disable the FortiGate unit to store unmodified updates from the IPv6 BGP neighbor to support inbound soft-reconfiguration.
disable
strict-capability-match{enable | disable}
Enable or disable strict-capability negotiation matching with the BGP neighbor.
disable
unsuppress-map <route-map-name_str>
Specify the name of the route-map to selectively unsuppress suppressed routes. You must create the route-map before it can be selected here. See “route-map” on page 338 and “Using route maps with BGP” on page 340.
Null.
unsuppress-map6 <route-map-name_str>
Specify the name of the route-map to selectively unsuppress suppressed IPv6 routes. You must create the route-map before it can be selected here.
Null
update-source <interface-name_str>
Specify the name of the local FortiGate unit interface to use for TCP connections to neighbors. The IP address of the interface will be used as the source address for outgoing updates.
Null.
weight <weight_integer> Apply a weight value to all routes learned from a neighbor. A higher number signifies a greater preference. The range is from 0 to 65 535.
unset
Variable Description Default
ortiOS 4.0 MR3 CLI Reference1-431-99686-20110623 277ttp://docs.fortinet.com/ • Feedback
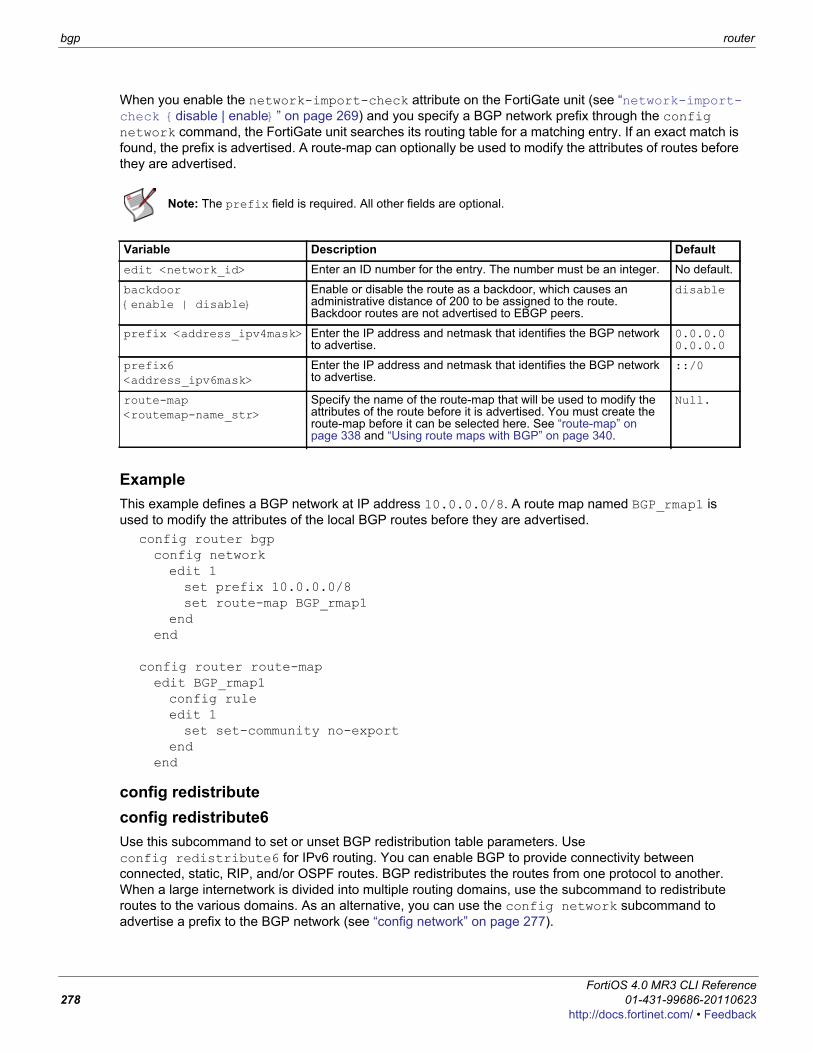
bgp router
When you enable the network-import-check attribute on the FortiGate unit (see “network-import-check {disable | enable}” on page 269) and you specify a BGP network prefix through the config network command, the FortiGate unit searches its routing table for a matching entry. If an exact match is found, the prefix is advertised. A route-map can optionally be used to modify the attributes of routes before they are advertised.
ExampleThis example defines a BGP network at IP address 10.0.0.0/8. A route map named BGP_rmap1 is used to modify the attributes of the local BGP routes before they are advertised.
config router bgpconfig networkedit 1set prefix 10.0.0.0/8set route-map BGP_rmap1
endend
config router route-mapedit BGP_rmap1config ruleedit 1set set-community no-export
endend
config redistributeconfig redistribute6Use this subcommand to set or unset BGP redistribution table parameters. Use config redistribute6 for IPv6 routing. You can enable BGP to provide connectivity between connected, static, RIP, and/or OSPF routes. BGP redistributes the routes from one protocol to another. When a large internetwork is divided into multiple routing domains, use the subcommand to redistribute routes to the various domains. As an alternative, you can use the config network subcommand to advertise a prefix to the BGP network (see “config network” on page 277).
Note: The prefix field is required. All other fields are optional.
Variable Description Defaultedit <network_id> Enter an ID number for the entry. The number must be an integer. No default.
backdoor{enable | disable}
Enable or disable the route as a backdoor, which causes an administrative distance of 200 to be assigned to the route. Backdoor routes are not advertised to EBGP peers.
disable
prefix <address_ipv4mask> Enter the IP address and netmask that identifies the BGP network to advertise.
0.0.0.00.0.0.0
prefix6 <address_ipv6mask>
Enter the IP address and netmask that identifies the BGP network to advertise.
::/0
route-map<routemap-name_str>
Specify the name of the route-map that will be used to modify the attributes of the route before it is advertised. You must create the route-map before it can be selected here. See “route-map” on page 338 and “Using route maps with BGP” on page 340.
Null.
FortiOS 4.0 MR3 CLI Reference278 01-431-99686-20110623
http://docs.fortinet.com/ • Feedback
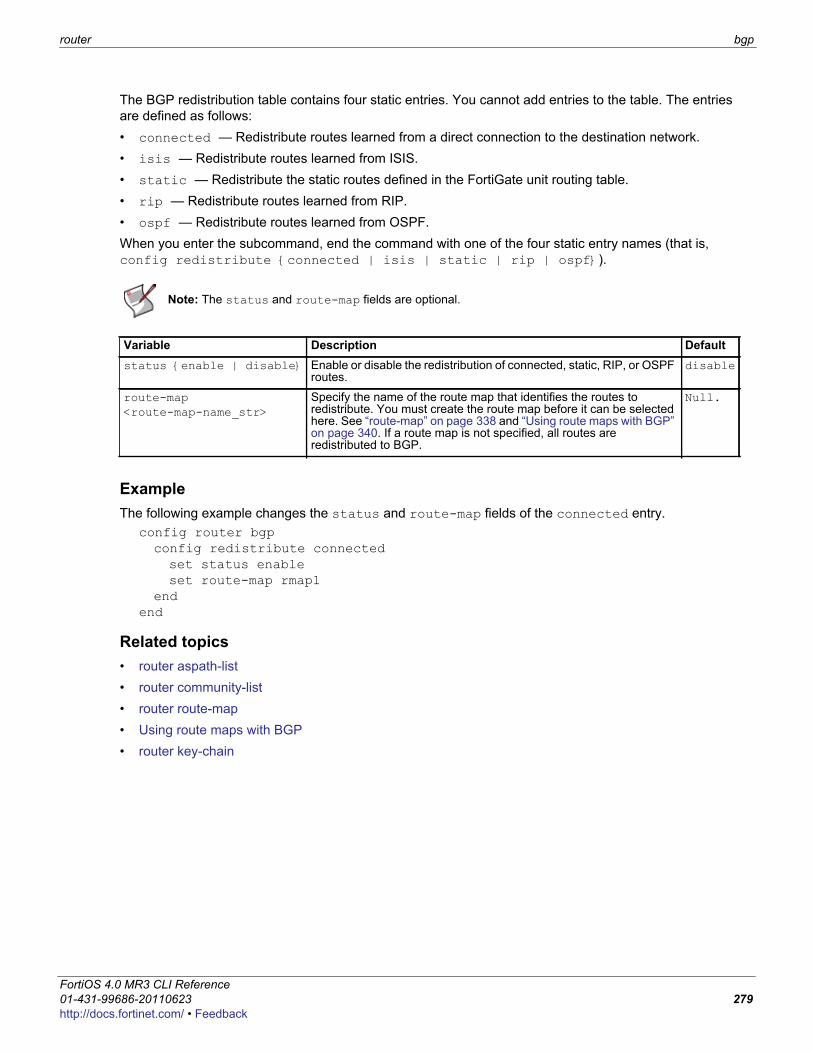
router bgp
F0h
The BGP redistribution table contains four static entries. You cannot add entries to the table. The entries are defined as follows:• connected — Redistribute routes learned from a direct connection to the destination network.• isis — Redistribute routes learned from ISIS.• static — Redistribute the static routes defined in the FortiGate unit routing table.• rip — Redistribute routes learned from RIP.• ospf — Redistribute routes learned from OSPF.When you enter the subcommand, end the command with one of the four static entry names (that is, config redistribute {connected | isis | static | rip | ospf}).
ExampleThe following example changes the status and route-map fields of the connected entry.
config router bgpconfig redistribute connectedset status enableset route-map rmap1
endend
Related topics• router aspath-list• router community-list• router route-map• Using route maps with BGP• router key-chain
Note: The status and route-map fields are optional.
Variable Description Defaultstatus {enable | disable} Enable or disable the redistribution of connected, static, RIP, or OSPF
routes.disable
route-map<route-map-name_str>
Specify the name of the route map that identifies the routes to redistribute. You must create the route map before it can be selected here. See “route-map” on page 338 and “Using route maps with BGP” on page 340. If a route map is not specified, all routes are redistributed to BGP.
Null.
ortiOS 4.0 MR3 CLI Reference1-431-99686-20110623 279ttp://docs.fortinet.com/ • Feedback
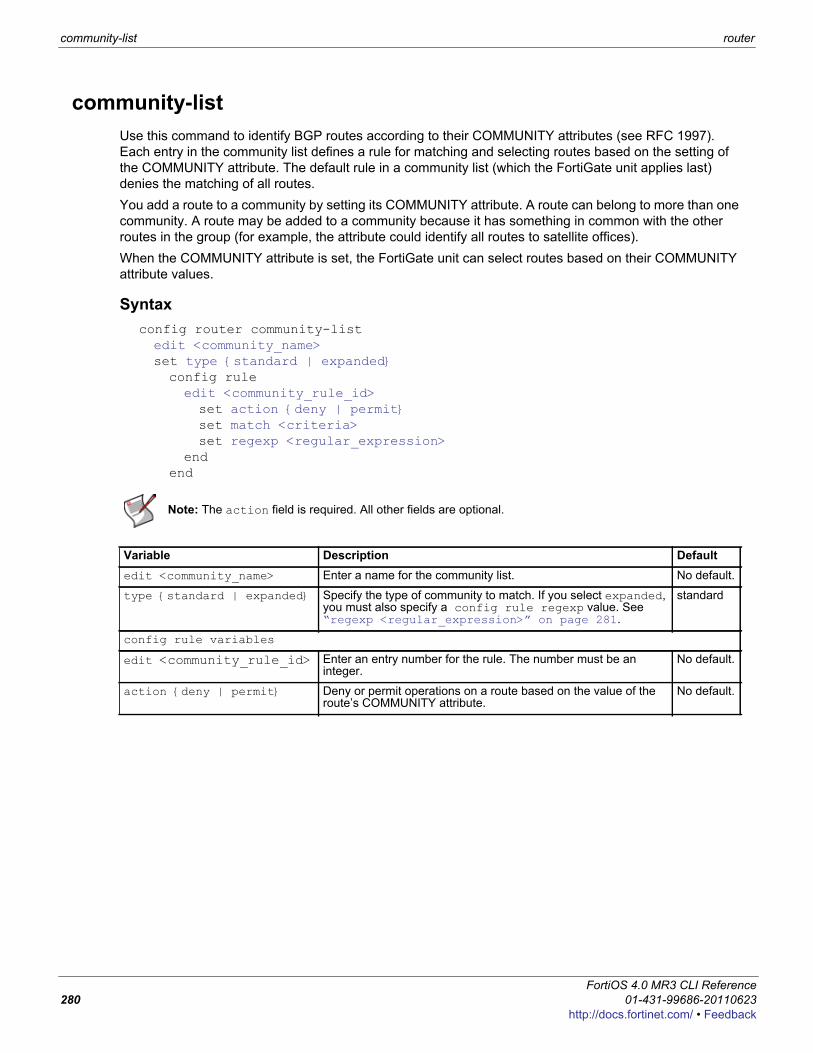
community-list router
community-listUse this command to identify BGP routes according to their COMMUNITY attributes (see RFC 1997). Each entry in the community list defines a rule for matching and selecting routes based on the setting of the COMMUNITY attribute. The default rule in a community list (which the FortiGate unit applies last) denies the matching of all routes.You add a route to a community by setting its COMMUNITY attribute. A route can belong to more than one community. A route may be added to a community because it has something in common with the other routes in the group (for example, the attribute could identify all routes to satellite offices). When the COMMUNITY attribute is set, the FortiGate unit can select routes based on their COMMUNITY attribute values.
Syntaxconfig router community-listedit <community_name>set type {standard | expanded}config ruleedit <community_rule_id>set action {deny | permit}set match <criteria>set regexp <regular_expression>
endend
Note: The action field is required. All other fields are optional.
Variable Description Defaultedit <community_name> Enter a name for the community list. No default.
type {standard | expanded} Specify the type of community to match. If you select expanded, you must also specify a config rule regexp value. See “regexp <regular_expression>” on page 281.
standard
config rule variables
edit <community_rule_id> Enter an entry number for the rule. The number must be an integer.
No default.
action {deny | permit} Deny or permit operations on a route based on the value of the route’s COMMUNITY attribute.
No default.
FortiOS 4.0 MR3 CLI Reference280 01-431-99686-20110623
http://docs.fortinet.com/ • Feedback
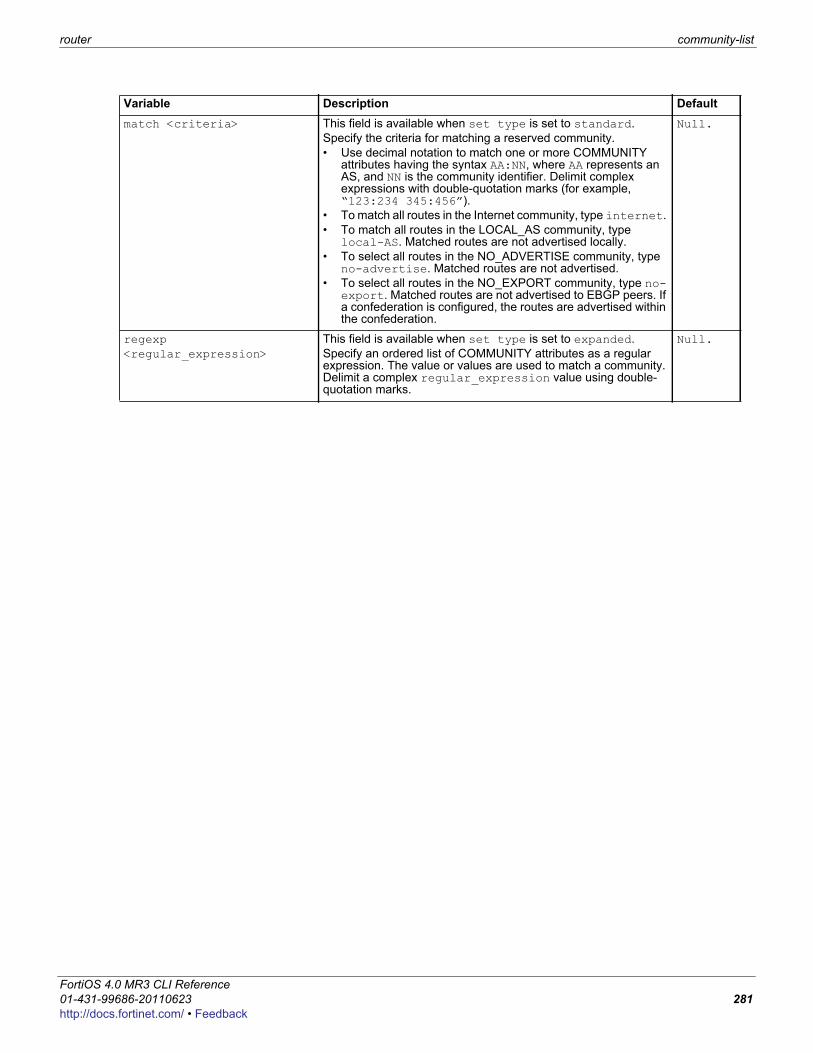
router community-list
F0h
match <criteria> This field is available when set type is set to standard.Specify the criteria for matching a reserved community. • Use decimal notation to match one or more COMMUNITY
attributes having the syntax AA:NN, where AA represents an AS, and NN is the community identifier. Delimit complex expressions with double-quotation marks (for example, “123:234 345:456”).
• To match all routes in the Internet community, type internet. • To match all routes in the LOCAL_AS community, type
local-AS. Matched routes are not advertised locally.• To select all routes in the NO_ADVERTISE community, type
no-advertise. Matched routes are not advertised.• To select all routes in the NO_EXPORT community, type no-
export. Matched routes are not advertised to EBGP peers. If a confederation is configured, the routes are advertised within the confederation.
Null.
regexp <regular_expression>
This field is available when set type is set to expanded.Specify an ordered list of COMMUNITY attributes as a regular expression. The value or values are used to match a community. Delimit a complex regular_expression value using double-quotation marks.
Null.
Variable Description Default
ortiOS 4.0 MR3 CLI Reference1-431-99686-20110623 281ttp://docs.fortinet.com/ • Feedback

gwdetect router
gwdetectUse this command to verify a valid connection with one or more servers. Dead gateway detection, or interface status detection, consists of the unit confirming that packets sent from an interface result in a response from a server. You can use up to three different protocols to confirm that an interface can connect to the server. Usually the server is the next-hop router that leads to an external network or the Internet. Interface status detection sends a packet using the configured protocols. If a response is received from the server, the unit assumes the interface can connect to the network. If a response is not received, the unit assumes that the interface cannot connect to the network.
Syntaxconfig router gwdetectedit <interface_name>set server <servername1_string>set source-ip <ipv4_addr>set protocol {ping |tcp-echo | udp-echo}set interval <seconds_int>set failtime <attempts_int>set ha-priority <priority_int>
end
Note: The action field is required. All other fields are optional.
Variable Description Defaultedit <interface_name> Select an interface connected to the server that will be checked. No default.
server <servername1_string>
Enter one or more server addresses No default.
source-ip <ipv4_addr> Enter the IP address that is checking the gateway. If none is selected, one will be automatically selected from the interface
0.0.0.0
protocol {ping |tcp-echo | udp-echo}
Select the protocol to be used when contacting the server. ping
interval <seconds_int> Enter the seconds between attempts to contact the server. 5
failtime <attempts_int> Enter the number of failed attempts to contact the server for declaring the ping server lost.
5
ha-priority <priority_int> Select the HA election priority. Valid range is 1 to 50.The default is 1.
1
FortiOS 4.0 MR3 CLI Reference282 01-431-99686-20110623
http://docs.fortinet.com/ • Feedback
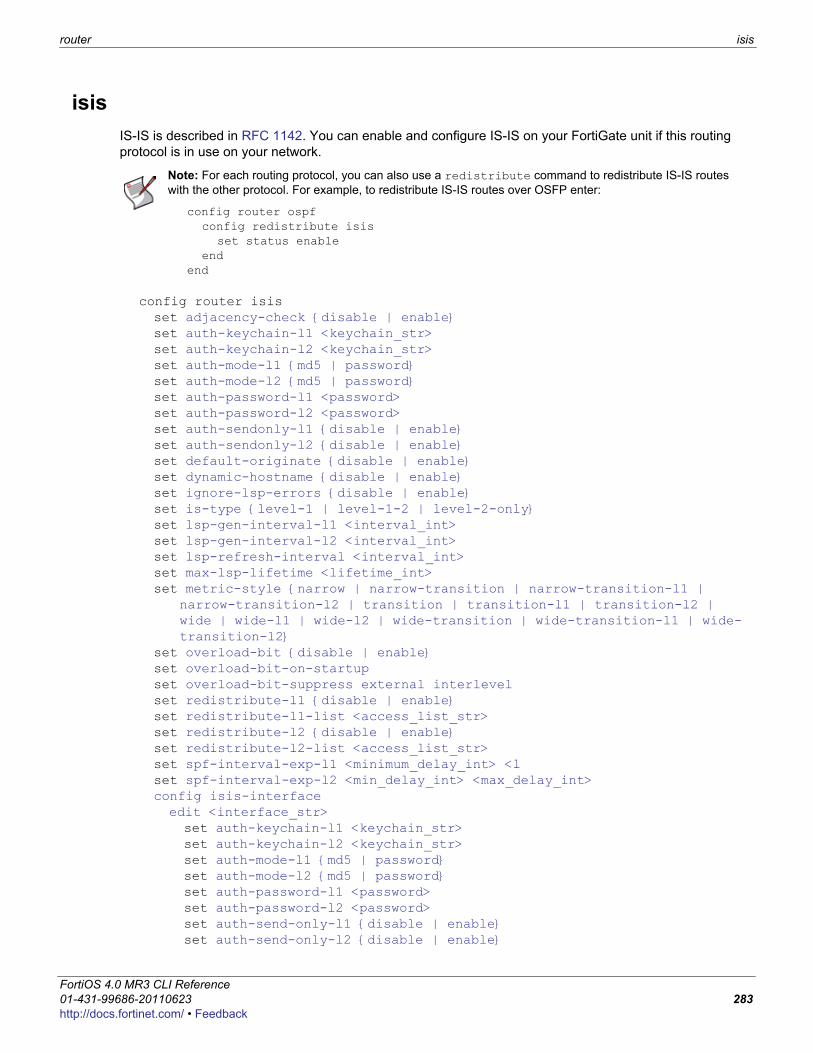
router isis
F0h
isisIS-IS is described in RFC 1142. You can enable and configure IS-IS on your FortiGate unit if this routing protocol is in use on your network.
config router isisset adjacency-check {disable | enable}set auth-keychain-l1 <keychain_str>set auth-keychain-l2 <keychain_str>set auth-mode-l1 {md5 | password}set auth-mode-l2 {md5 | password}set auth-password-l1 <password>set auth-password-l2 <password>set auth-sendonly-l1 {disable | enable}set auth-sendonly-l2 {disable | enable}set default-originate {disable | enable}set dynamic-hostname {disable | enable}set ignore-lsp-errors {disable | enable}set is-type {level-1 | level-1-2 | level-2-only}set lsp-gen-interval-l1 <interval_int>set lsp-gen-interval-l2 <interval_int>set lsp-refresh-interval <interval_int>set max-lsp-lifetime <lifetime_int>set metric-style {narrow | narrow-transition | narrow-transition-l1 |
narrow-transition-l2 | transition | transition-l1 | transition-l2 | wide | wide-l1 | wide-l2 | wide-transition | wide-transition-l1 | wide-transition-l2}
set overload-bit {disable | enable}set overload-bit-on-startupset overload-bit-suppress external interlevelset redistribute-l1 {disable | enable}set redistribute-l1-list <access_list_str>set redistribute-l2 {disable | enable}set redistribute-l2-list <access_list_str>set spf-interval-exp-l1 <minimum_delay_int> <lset spf-interval-exp-l2 <min_delay_int> <max_delay_int>config isis-interfaceedit <interface_str>set auth-keychain-l1 <keychain_str>set auth-keychain-l2 <keychain_str>set auth-mode-l1 {md5 | password}set auth-mode-l2 {md5 | password}set auth-password-l1 <password>set auth-password-l2 <password>set auth-send-only-l1 {disable | enable}set auth-send-only-l2 {disable | enable}
Note: For each routing protocol, you can also use a redistribute command to redistribute IS-IS routes with the other protocol. For example, to redistribute IS-IS routes over OSFP enter:
config router ospfconfig redistribute isis
set status enableend
end
ortiOS 4.0 MR3 CLI Reference1-431-99686-20110623 283ttp://docs.fortinet.com/ • Feedback
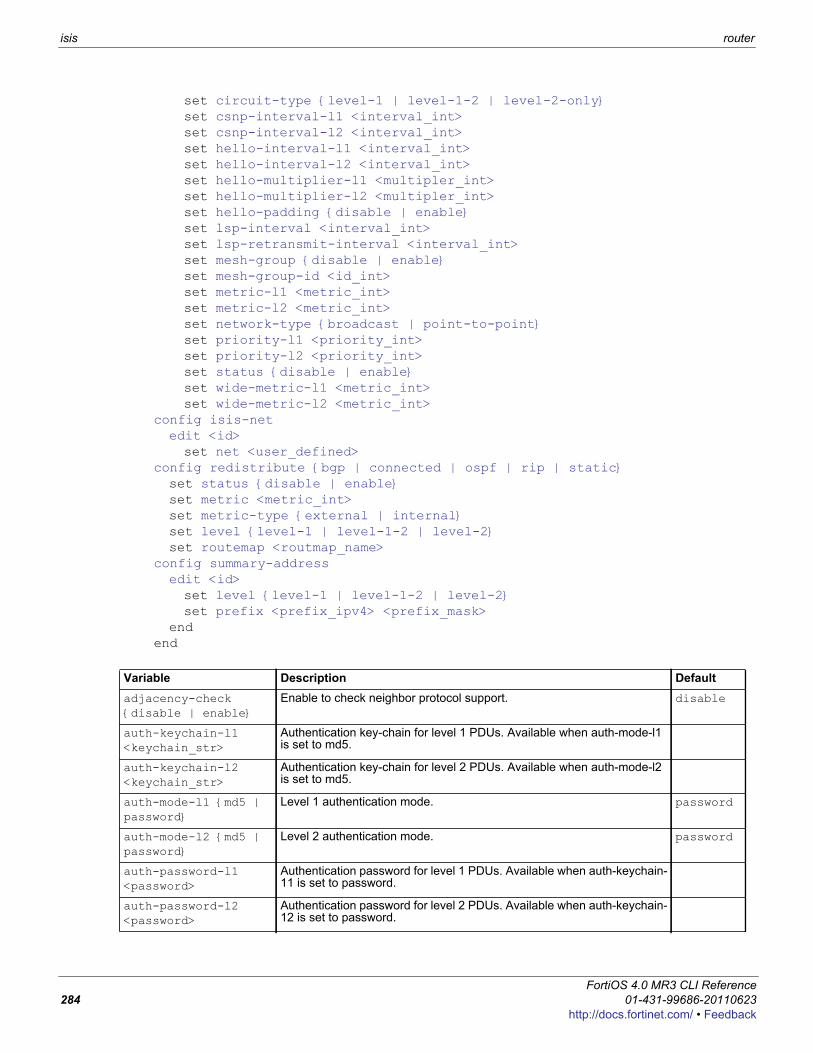
isis router
set circuit-type {level-1 | level-1-2 | level-2-only}set csnp-interval-l1 <interval_int>set csnp-interval-l2 <interval_int>set hello-interval-l1 <interval_int>set hello-interval-l2 <interval_int>set hello-multiplier-l1 <multipler_int>set hello-multiplier-l2 <multipler_int>set hello-padding {disable | enable}set lsp-interval <interval_int>set lsp-retransmit-interval <interval_int>set mesh-group {disable | enable}set mesh-group-id <id_int>set metric-l1 <metric_int>set metric-l2 <metric_int>set network-type {broadcast | point-to-point}set priority-l1 <priority_int>set priority-l2 <priority_int>set status {disable | enable}set wide-metric-l1 <metric_int>set wide-metric-l2 <metric_int>
config isis-netedit <id>set net <user_defined>
config redistribute {bgp | connected | ospf | rip | static}set status {disable | enable}set metric <metric_int>set metric-type {external | internal}set level {level-1 | level-1-2 | level-2}set routemap <routmap_name>
config summary-addressedit <id>set level {level-1 | level-1-2 | level-2}set prefix <prefix_ipv4> <prefix_mask>
endend
Variable Description Defaultadjacency-check {disable | enable}
Enable to check neighbor protocol support. disable
auth-keychain-l1 <keychain_str>
Authentication key-chain for level 1 PDUs. Available when auth-mode-l1 is set to md5.
auth-keychain-l2 <keychain_str>
Authentication key-chain for level 2 PDUs. Available when auth-mode-l2 is set to md5.
auth-mode-l1 {md5 | password}
Level 1 authentication mode. password
auth-mode-l2 {md5 | password}
Level 2 authentication mode. password
auth-password-l1 <password>
Authentication password for level 1 PDUs. Available when auth-keychain-11 is set to password.
auth-password-l2 <password>
Authentication password for level 2 PDUs. Available when auth-keychain-12 is set to password.
FortiOS 4.0 MR3 CLI Reference284 01-431-99686-20110623
http://docs.fortinet.com/ • Feedback
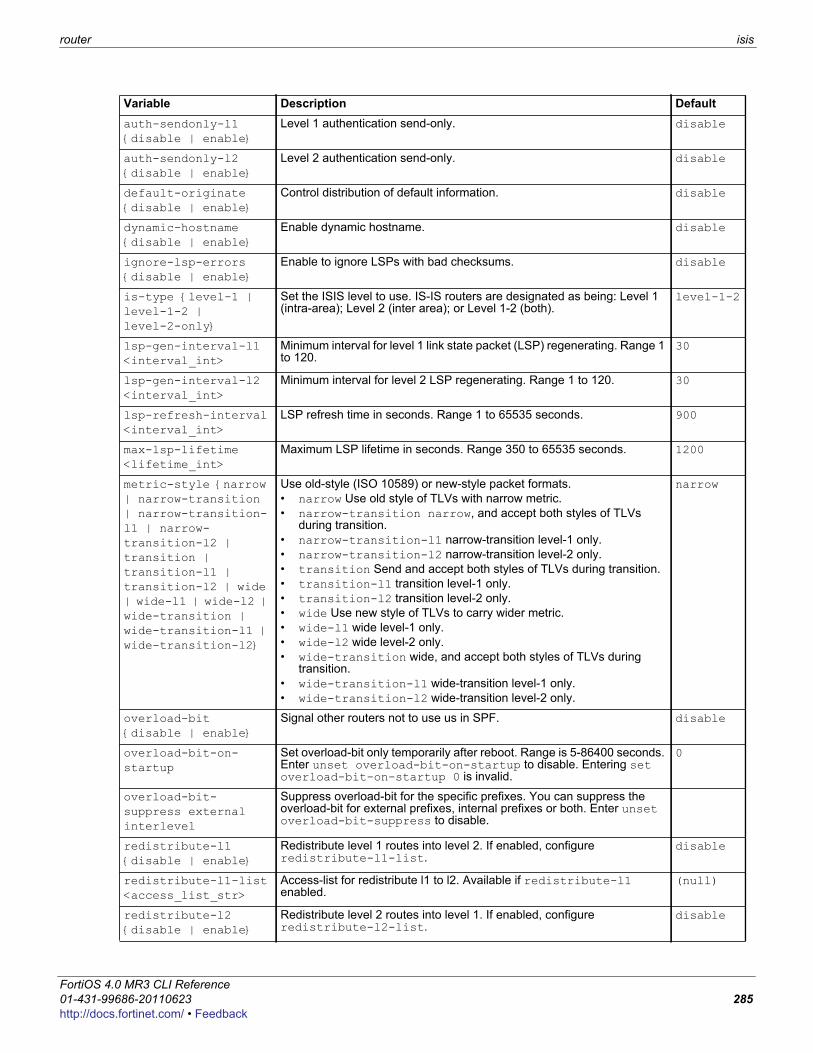
router isis
F0h
auth-sendonly-l1 {disable | enable}
Level 1 authentication send-only. disable
auth-sendonly-l2 {disable | enable}
Level 2 authentication send-only. disable
default-originate {disable | enable}
Control distribution of default information. disable
dynamic-hostname {disable | enable}
Enable dynamic hostname. disable
ignore-lsp-errors {disable | enable}
Enable to ignore LSPs with bad checksums. disable
is-type {level-1 | level-1-2 | level-2-only}
Set the ISIS level to use. IS-IS routers are designated as being: Level 1 (intra-area); Level 2 (inter area); or Level 1-2 (both).
level-1-2
lsp-gen-interval-l1 <interval_int>
Minimum interval for level 1 link state packet (LSP) regenerating. Range 1 to 120.
30
lsp-gen-interval-l2 <interval_int>
Minimum interval for level 2 LSP regenerating. Range 1 to 120. 30
lsp-refresh-interval <interval_int>
LSP refresh time in seconds. Range 1 to 65535 seconds. 900
max-lsp-lifetime <lifetime_int>
Maximum LSP lifetime in seconds. Range 350 to 65535 seconds. 1200
metric-style {narrow | narrow-transition | narrow-transition-l1 | narrow-transition-l2 | transition | transition-l1 | transition-l2 | wide | wide-l1 | wide-l2 | wide-transition | wide-transition-l1 | wide-transition-l2}
Use old-style (ISO 10589) or new-style packet formats.• narrow Use old style of TLVs with narrow metric.• narrow-transition narrow, and accept both styles of TLVs
during transition.• narrow-transition-l1 narrow-transition level-1 only.• narrow-transition-l2 narrow-transition level-2 only.• transition Send and accept both styles of TLVs during transition.• transition-l1 transition level-1 only.• transition-l2 transition level-2 only.• wide Use new style of TLVs to carry wider metric.• wide-l1 wide level-1 only.• wide-l2 wide level-2 only.• wide-transition wide, and accept both styles of TLVs during
transition.• wide-transition-l1 wide-transition level-1 only.• wide-transition-l2 wide-transition level-2 only.
narrow
overload-bit {disable | enable}
Signal other routers not to use us in SPF. disable
overload-bit-on-startup
Set overload-bit only temporarily after reboot. Range is 5-86400 seconds. Enter unset overload-bit-on-startup to disable. Entering set overload-bit-on-startup 0 is invalid.
0
overload-bit-suppress external interlevel
Suppress overload-bit for the specific prefixes. You can suppress the overload-bit for external prefixes, internal prefixes or both. Enter unset overload-bit-suppress to disable.
redistribute-l1 {disable | enable}
Redistribute level 1 routes into level 2. If enabled, configure redistribute-l1-list.
disable
redistribute-l1-list <access_list_str>
Access-list for redistribute l1 to l2. Available if redistribute-l1 enabled.
(null)
redistribute-l2 {disable | enable}
Redistribute level 2 routes into level 1. If enabled, configure redistribute-l2-list.
disable
Variable Description Default
ortiOS 4.0 MR3 CLI Reference1-431-99686-20110623 285ttp://docs.fortinet.com/ • Feedback
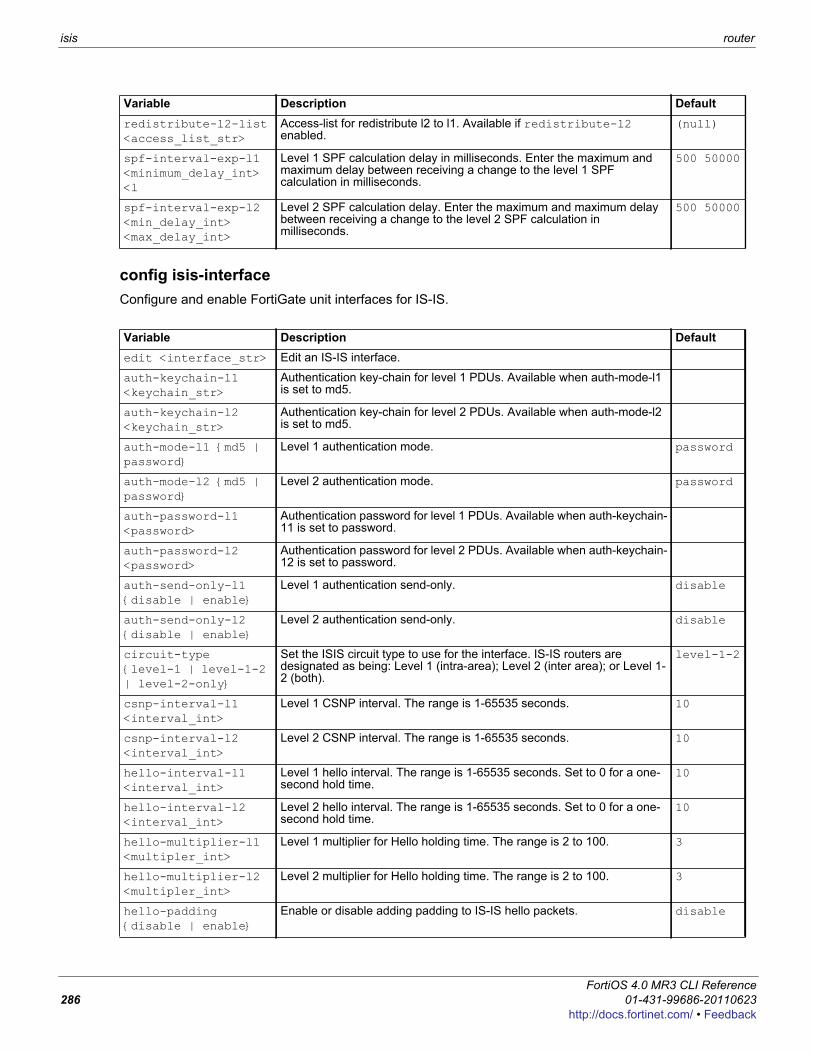
isis router
config isis-interfaceConfigure and enable FortiGate unit interfaces for IS-IS.
redistribute-l2-list <access_list_str>
Access-list for redistribute l2 to l1. Available if redistribute-l2 enabled.
(null)
spf-interval-exp-l1 <minimum_delay_int> <l
Level 1 SPF calculation delay in milliseconds. Enter the maximum and maximum delay between receiving a change to the level 1 SPF calculation in milliseconds.
500 50000
spf-interval-exp-l2 <min_delay_int> <max_delay_int>
Level 2 SPF calculation delay. Enter the maximum and maximum delay between receiving a change to the level 2 SPF calculation in milliseconds.
500 50000
Variable Description Defaultedit <interface_str> Edit an IS-IS interface.
auth-keychain-l1 <keychain_str>
Authentication key-chain for level 1 PDUs. Available when auth-mode-l1 is set to md5.
auth-keychain-l2 <keychain_str>
Authentication key-chain for level 2 PDUs. Available when auth-mode-l2 is set to md5.
auth-mode-l1 {md5 | password}
Level 1 authentication mode. password
auth-mode-l2 {md5 | password}
Level 2 authentication mode. password
auth-password-l1 <password>
Authentication password for level 1 PDUs. Available when auth-keychain-11 is set to password.
auth-password-l2 <password>
Authentication password for level 2 PDUs. Available when auth-keychain-12 is set to password.
auth-send-only-l1 {disable | enable}
Level 1 authentication send-only. disable
auth-send-only-l2 {disable | enable}
Level 2 authentication send-only. disable
circuit-type {level-1 | level-1-2 | level-2-only}
Set the ISIS circuit type to use for the interface. IS-IS routers are designated as being: Level 1 (intra-area); Level 2 (inter area); or Level 1-2 (both).
level-1-2
csnp-interval-l1 <interval_int>
Level 1 CSNP interval. The range is 1-65535 seconds. 10
csnp-interval-l2 <interval_int>
Level 2 CSNP interval. The range is 1-65535 seconds. 10
hello-interval-l1 <interval_int>
Level 1 hello interval. The range is 1-65535 seconds. Set to 0 for a one-second hold time.
10
hello-interval-l2 <interval_int>
Level 2 hello interval. The range is 1-65535 seconds. Set to 0 for a one-second hold time.
10
hello-multiplier-l1 <multipler_int>
Level 1 multiplier for Hello holding time. The range is 2 to 100. 3
hello-multiplier-l2 <multipler_int>
Level 2 multiplier for Hello holding time. The range is 2 to 100. 3
hello-padding {disable | enable}
Enable or disable adding padding to IS-IS hello packets. disable
Variable Description Default
FortiOS 4.0 MR3 CLI Reference286 01-431-99686-20110623
http://docs.fortinet.com/ • Feedback
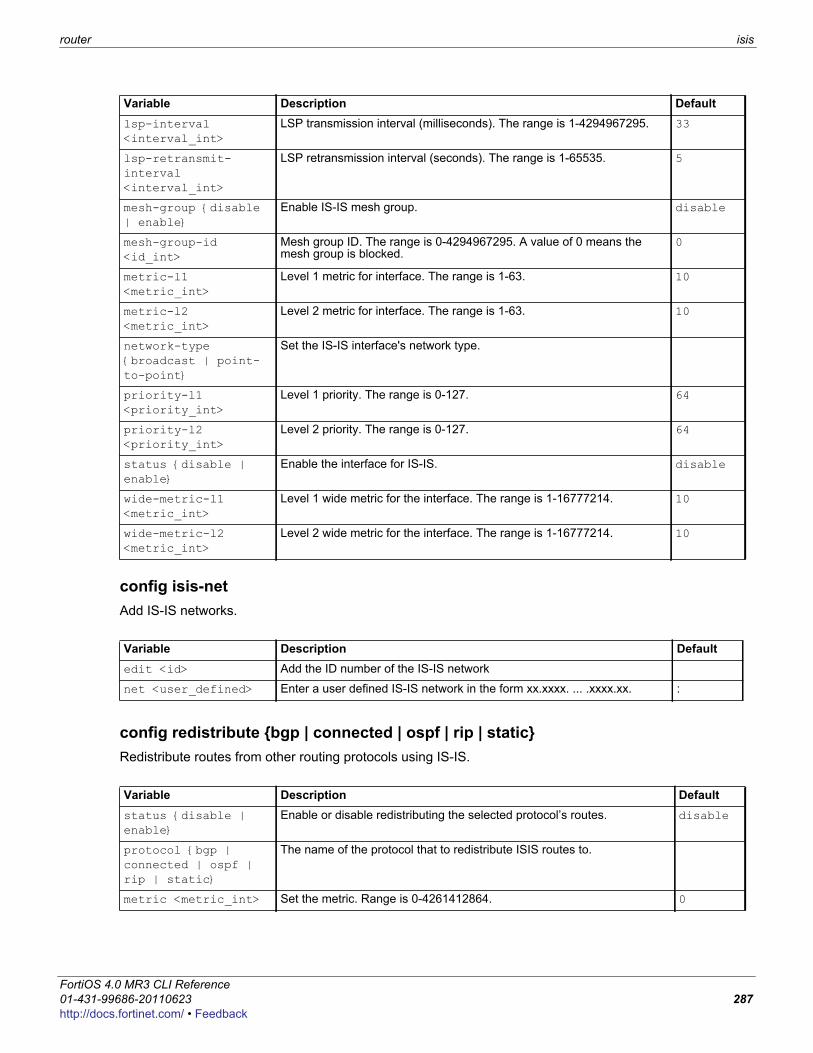
router isis
F0h
config isis-netAdd IS-IS networks.
config redistribute {bgp | connected | ospf | rip | static}Redistribute routes from other routing protocols using IS-IS.
lsp-interval <interval_int>
LSP transmission interval (milliseconds). The range is 1-4294967295. 33
lsp-retransmit-interval <interval_int>
LSP retransmission interval (seconds). The range is 1-65535. 5
mesh-group {disable | enable}
Enable IS-IS mesh group. disable
mesh-group-id <id_int>
Mesh group ID. The range is 0-4294967295. A value of 0 means the mesh group is blocked.
0
metric-l1 <metric_int>
Level 1 metric for interface. The range is 1-63. 10
metric-l2 <metric_int>
Level 2 metric for interface. The range is 1-63. 10
network-type {broadcast | point-to-point}
Set the IS-IS interface's network type.
priority-l1 <priority_int>
Level 1 priority. The range is 0-127. 64
priority-l2 <priority_int>
Level 2 priority. The range is 0-127. 64
status {disable | enable}
Enable the interface for IS-IS. disable
wide-metric-l1 <metric_int>
Level 1 wide metric for the interface. The range is 1-16777214. 10
wide-metric-l2 <metric_int>
Level 2 wide metric for the interface. The range is 1-16777214. 10
Variable Description Defaultedit <id> Add the ID number of the IS-IS network
net <user_defined> Enter a user defined IS-IS network in the form xx.xxxx. ... .xxxx.xx. :
Variable Description Defaultstatus {disable | enable}
Enable or disable redistributing the selected protocol’s routes. disable
protocol {bgp | connected | ospf | rip | static}
The name of the protocol that to redistribute ISIS routes to.
metric <metric_int> Set the metric. Range is 0-4261412864. 0
Variable Description Default
ortiOS 4.0 MR3 CLI Reference1-431-99686-20110623 287ttp://docs.fortinet.com/ • Feedback
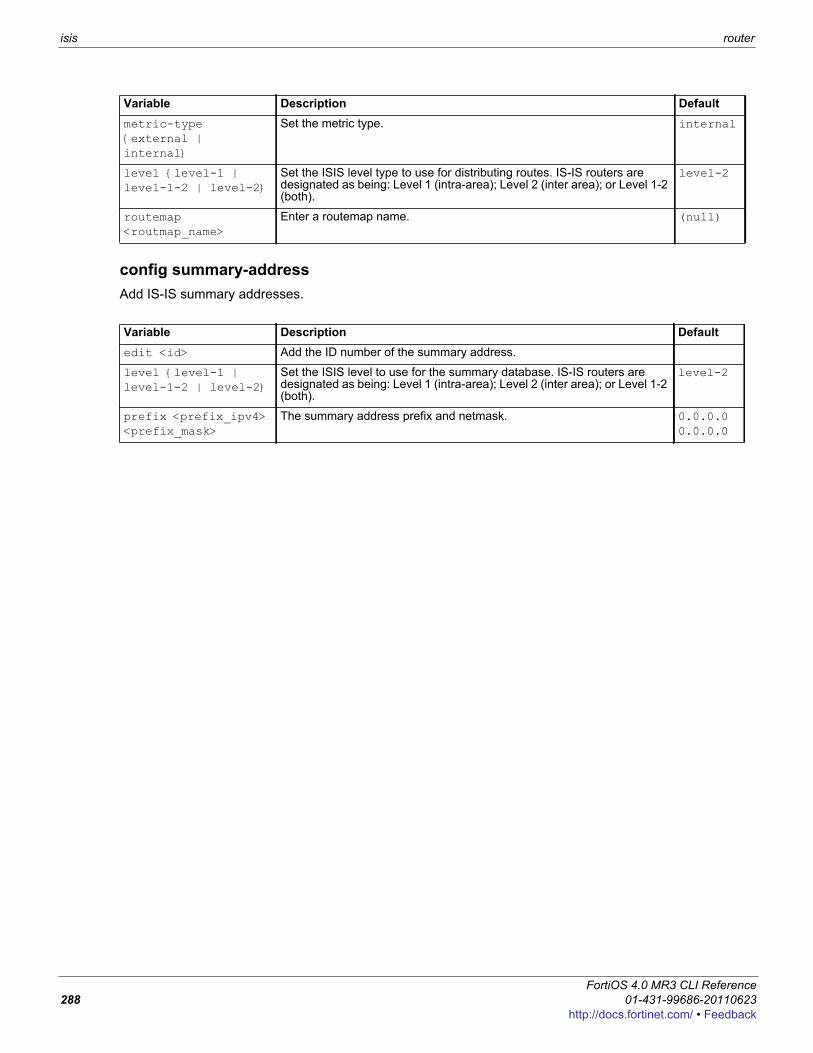
isis router
config summary-addressAdd IS-IS summary addresses.
metric-type {external | internal}
Set the metric type. internal
level {level-1 | level-1-2 | level-2}
Set the ISIS level type to use for distributing routes. IS-IS routers are designated as being: Level 1 (intra-area); Level 2 (inter area); or Level 1-2 (both).
level-2
routemap <routmap_name>
Enter a routemap name. (null)
Variable Description Defaultedit <id> Add the ID number of the summary address.
level {level-1 | level-1-2 | level-2}
Set the ISIS level to use for the summary database. IS-IS routers are designated as being: Level 1 (intra-area); Level 2 (inter area); or Level 1-2 (both).
level-2
prefix <prefix_ipv4> <prefix_mask>
The summary address prefix and netmask. 0.0.0.0 0.0.0.0
Variable Description Default
FortiOS 4.0 MR3 CLI Reference288 01-431-99686-20110623
http://docs.fortinet.com/ • Feedback
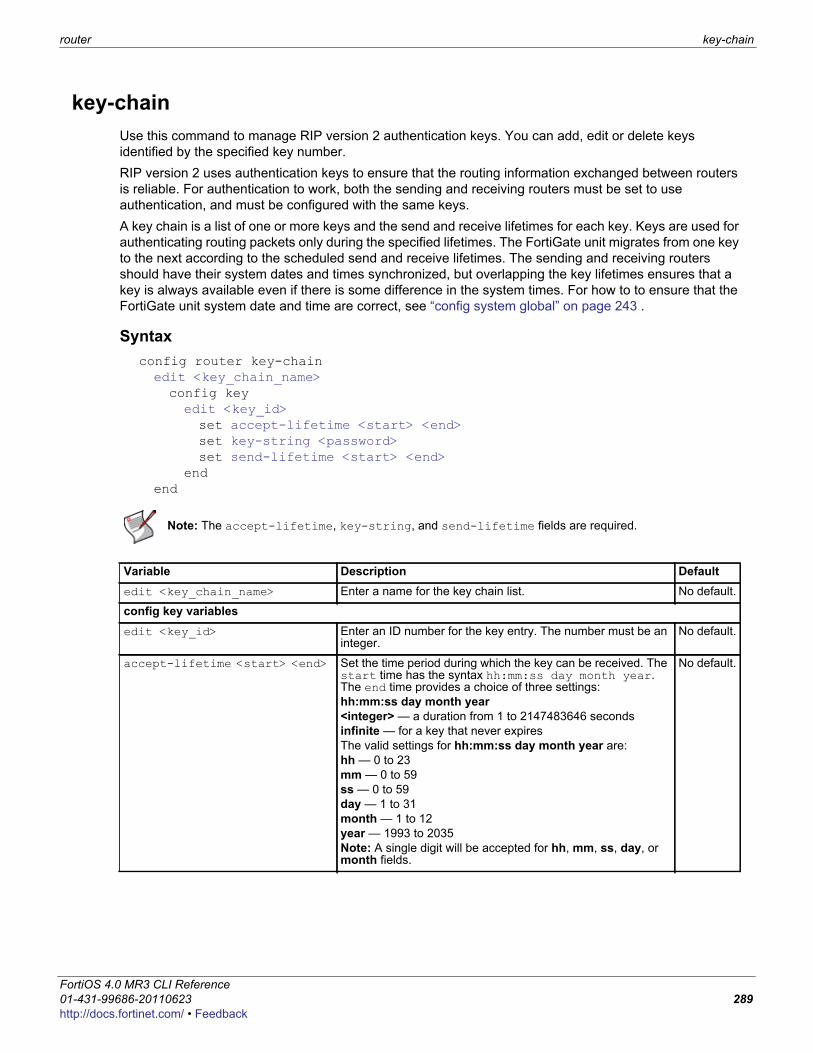
router key-chain
F0h
key-chainUse this command to manage RIP version 2 authentication keys. You can add, edit or delete keys identified by the specified key number.RIP version 2 uses authentication keys to ensure that the routing information exchanged between routers is reliable. For authentication to work, both the sending and receiving routers must be set to use authentication, and must be configured with the same keys. A key chain is a list of one or more keys and the send and receive lifetimes for each key. Keys are used for authenticating routing packets only during the specified lifetimes. The FortiGate unit migrates from one key to the next according to the scheduled send and receive lifetimes. The sending and receiving routers should have their system dates and times synchronized, but overlapping the key lifetimes ensures that a key is always available even if there is some difference in the system times. For how to to ensure that the FortiGate unit system date and time are correct, see “config system global” on page 243 .
Syntaxconfig router key-chainedit <key_chain_name>config keyedit <key_id>set accept-lifetime <start> <end>set key-string <password>set send-lifetime <start> <end>
endend
Note: The accept-lifetime, key-string, and send-lifetime fields are required.
Variable Description Defaultedit <key_chain_name> Enter a name for the key chain list. No default.
config key variablesedit <key_id> Enter an ID number for the key entry. The number must be an
integer.No default.
accept-lifetime <start> <end> Set the time period during which the key can be received. The start time has the syntax hh:mm:ss day month year. The end time provides a choice of three settings:hh:mm:ss day month year<integer> — a duration from 1 to 2147483646 secondsinfinite — for a key that never expiresThe valid settings for hh:mm:ss day month year are:hh — 0 to 23mm — 0 to 59ss — 0 to 59day — 1 to 31month — 1 to 12year — 1993 to 2035Note: A single digit will be accepted for hh, mm, ss, day, or month fields.
No default.
ortiOS 4.0 MR3 CLI Reference1-431-99686-20110623 289ttp://docs.fortinet.com/ • Feedback
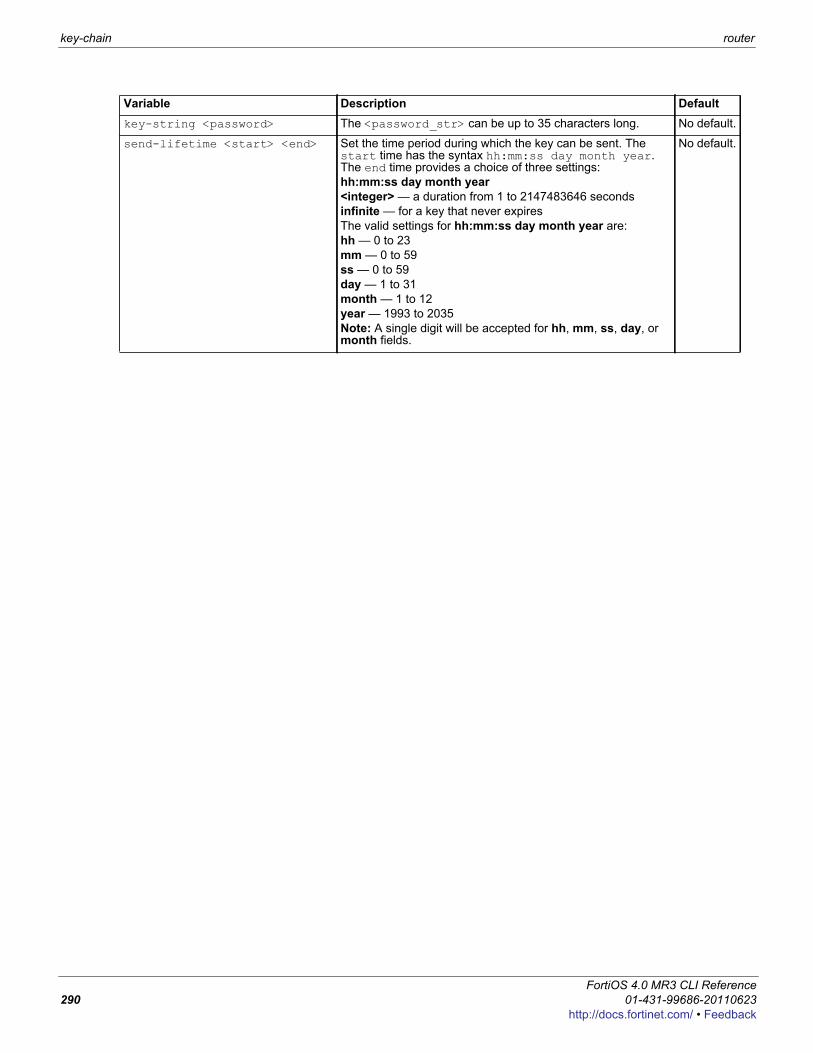
key-chain router
key-string <password> The <password_str> can be up to 35 characters long. No default.
send-lifetime <start> <end> Set the time period during which the key can be sent. The start time has the syntax hh:mm:ss day month year. The end time provides a choice of three settings:hh:mm:ss day month year<integer> — a duration from 1 to 2147483646 secondsinfinite — for a key that never expiresThe valid settings for hh:mm:ss day month year are:hh — 0 to 23mm — 0 to 59ss — 0 to 59day — 1 to 31month — 1 to 12year — 1993 to 2035Note: A single digit will be accepted for hh, mm, ss, day, or month fields.
No default.
Variable Description Default
FortiOS 4.0 MR3 CLI Reference290 01-431-99686-20110623
http://docs.fortinet.com/ • Feedback
router multicast
F0h
multicastA FortiGate unit can operate as a Protocol Independent Multicast (PIM) version 2 router. FortiGate units support PIM sparse mode (RFC 4601) and PIM dense mode (RFC 3973) and can service multicast servers or receivers on the network segment to which a FortiGate unit interface is connected. Multicast routing is not supported in Transparent mode (TP mode).
A PIM domain is a logical area comprising a number of contiguous networks. The domain contains at least one Boot Strap Router (BSR), and if sparse mode is enabled, a number of Rendezvous Points (RPs) and Designated Routers (DRs). When PIM is enabled on a FortiGate unit, the FortiGate unit can perform any of these functions at any time as configured.
Sparse modeInitially, all candidate BSRs in a PIM domain exchange bootstrap messages to select one BSR to which each RP sends the multicast address or addresses of the multicast group(s) that it can service. The selected BSR chooses one RP per multicast group and makes this information available to all of the PIM routers in the domain through bootstrap messages. PIM routers use the information to build packet distribution trees, which map each multicast group to a specific RP. Packet distribution trees may also contain information about the sources and receivers associated with particular multicast groups.
An RP represents the root of a non-source-specific distribution tree to a multicast group. By joining and pruning the information contained in distribution trees, a single stream of multicast packets (for example, a video feed) originating from the source can be forwarded to a certain RP to reach a multicast destination.Each PIM router maintains a Multicast Routing Information Base (MRIB) that determines to which neighboring PIM router join and prune messages are sent. An MRIB contains reverse-path information that reveals the path of a multicast packet from its source to the PIM router that maintains the MRIB. To send multicast traffic, a server application sends IP traffic to a multicast group address. The locally elected DR registers the sender with the RP that is associated with the target multicast group. The RP uses its MRIB to forward a single stream of IP packets from the source to the members of the multicast group. The IP packets are replicated only when necessary to distribute the data to branches of the RP’s distribution tree.To receive multicast traffic, a client application can use Internet Group Management Protocol (IGMP) version 1 (RFC 1112), 2 (RFC 2236), or 3 (RFC 3376) control messages to request the traffic for a particular multicast group. The locally elected DR receives the request and adds the host to the multicast group that is associated with the connected network segment by sending a join message towards the RP for the group. Afterward, the DR queries the hosts on the connected network segment continually to determine whether the hosts are active. When the DR no longer receives confirmation that at least one member of the multicast group is still active, the DR sends a prune message towards the RP for the group.
Note: To support PIM communications, the sending/receiving applications and all connecting PIM routers in between must be enabled with PIM version 2. PIM can use static routes, RIP, OSPF, or BGP to forward multicast packets to their destinations. To enable source-to-destination packet delivery, either sparse mode or dense mode must be enabled on the PIM-router interfaces. Sparse mode routers cannot send multicast messages to dense mode routers. In addition, if a FortiGate unit is located between a source and a PIM router, two PIM routers, or is connected directly to a receiver, you must create a firewall policy manually to pass encapsulated (multicast) packets or decapsulated data (IP traffic) between the source and destination.
Note: When a FortiGate unit interface is configured as a multicast interface, sparse mode is enabled on it by default to ensure that distribution trees are not built unless at least one downstream receiver requests multicast traffic from a specific source. If the sources of multicast traffic and their receivers are close to each other and the PIM domain contains a dense population of active receivers, you may choose to enable dense mode throughout the PIM domain instead.
ortiOS 4.0 MR3 CLI Reference1-431-99686-20110623 291ttp://docs.fortinet.com/ • Feedback
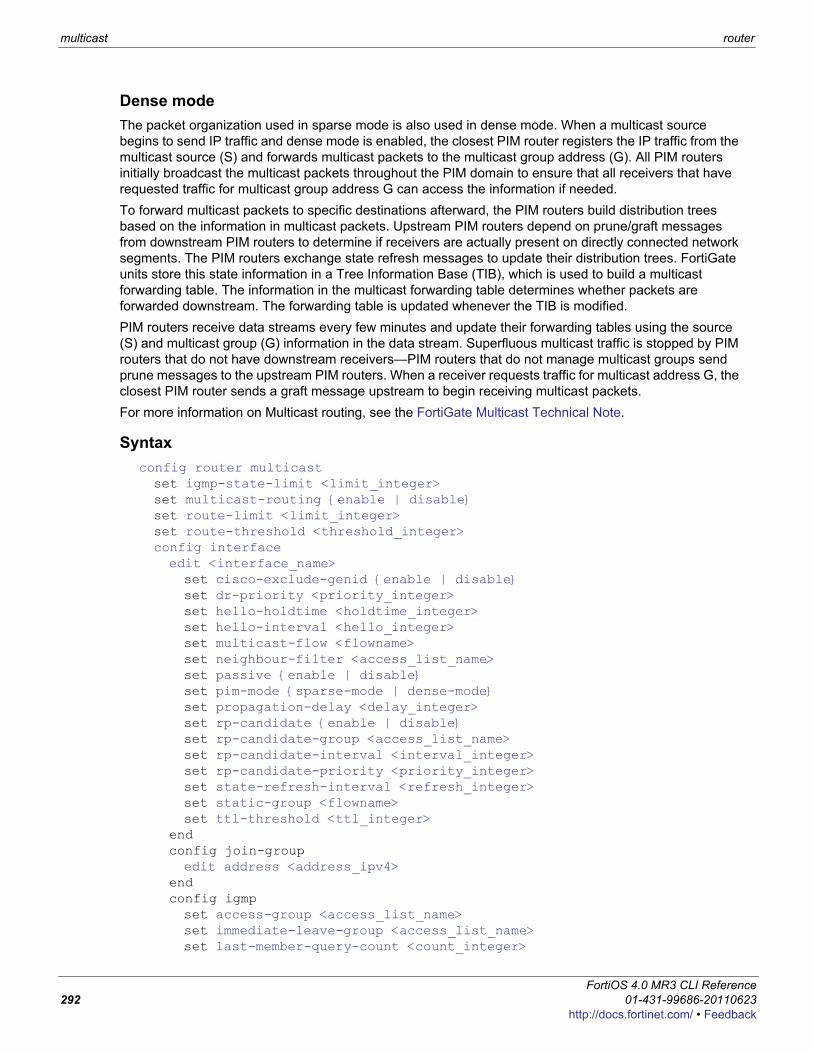
multicast router
Dense modeThe packet organization used in sparse mode is also used in dense mode. When a multicast source begins to send IP traffic and dense mode is enabled, the closest PIM router registers the IP traffic from the multicast source (S) and forwards multicast packets to the multicast group address (G). All PIM routers initially broadcast the multicast packets throughout the PIM domain to ensure that all receivers that have requested traffic for multicast group address G can access the information if needed. To forward multicast packets to specific destinations afterward, the PIM routers build distribution trees based on the information in multicast packets. Upstream PIM routers depend on prune/graft messages from downstream PIM routers to determine if receivers are actually present on directly connected network segments. The PIM routers exchange state refresh messages to update their distribution trees. FortiGate units store this state information in a Tree Information Base (TIB), which is used to build a multicast forwarding table. The information in the multicast forwarding table determines whether packets are forwarded downstream. The forwarding table is updated whenever the TIB is modified.PIM routers receive data streams every few minutes and update their forwarding tables using the source (S) and multicast group (G) information in the data stream. Superfluous multicast traffic is stopped by PIM routers that do not have downstream receivers—PIM routers that do not manage multicast groups send prune messages to the upstream PIM routers. When a receiver requests traffic for multicast address G, the closest PIM router sends a graft message upstream to begin receiving multicast packets.For more information on Multicast routing, see the FortiGate Multicast Technical Note.
Syntaxconfig router multicastset igmp-state-limit <limit_integer>set multicast-routing {enable | disable}set route-limit <limit_integer>set route-threshold <threshold_integer>config interfaceedit <interface_name>set cisco-exclude-genid {enable | disable}set dr-priority <priority_integer>set hello-holdtime <holdtime_integer>set hello-interval <hello_integer>set multicast-flow <flowname>set neighbour-filter <access_list_name>set passive {enable | disable}set pim-mode {sparse-mode | dense-mode}set propagation-delay <delay_integer>set rp-candidate {enable | disable}set rp-candidate-group <access_list_name>set rp-candidate-interval <interval_integer>set rp-candidate-priority <priority_integer>set state-refresh-interval <refresh_integer>set static-group <flowname>set ttl-threshold <ttl_integer>
endconfig join-groupedit address <address_ipv4>
endconfig igmpset access-group <access_list_name>set immediate-leave-group <access_list_name>set last-member-query-count <count_integer>
FortiOS 4.0 MR3 CLI Reference292 01-431-99686-20110623
http://docs.fortinet.com/ • Feedback
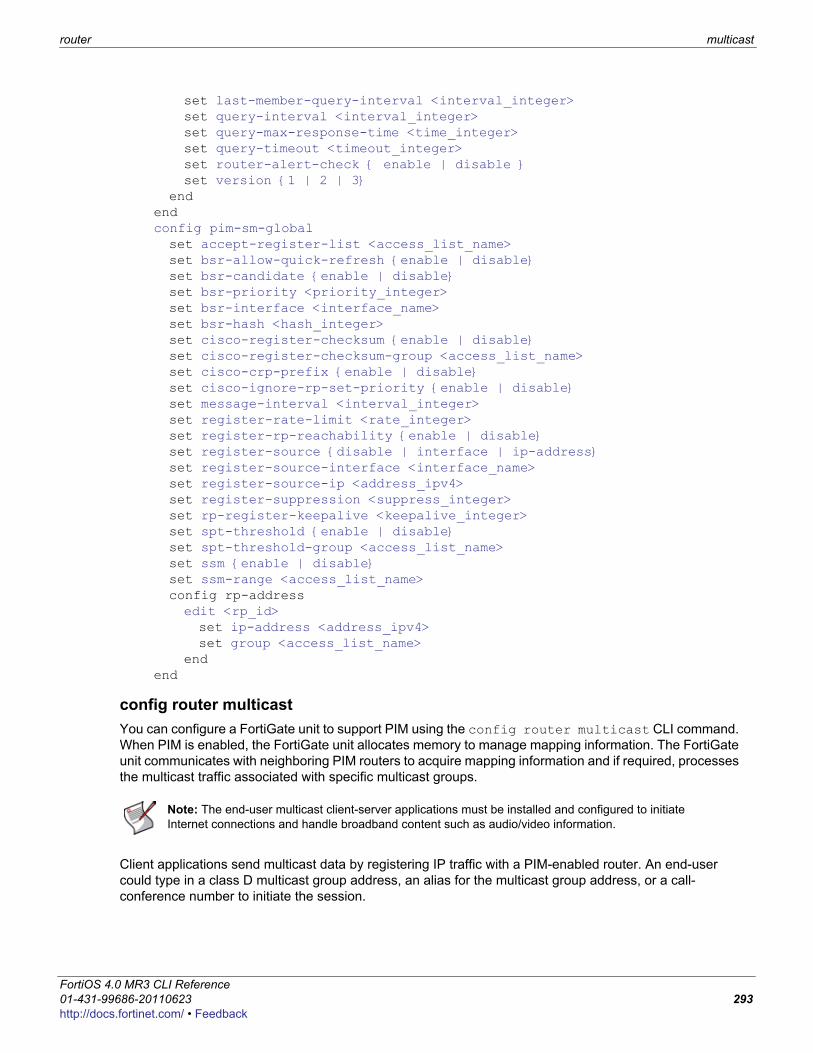
router multicast
F0h
set last-member-query-interval <interval_integer>set query-interval <interval_integer>set query-max-response-time <time_integer>set query-timeout <timeout_integer>set router-alert-check { enable | disable }set version {1 | 2 | 3}
endendconfig pim-sm-globalset accept-register-list <access_list_name>set bsr-allow-quick-refresh {enable | disable}set bsr-candidate {enable | disable}set bsr-priority <priority_integer>set bsr-interface <interface_name>set bsr-hash <hash_integer>set cisco-register-checksum {enable | disable}set cisco-register-checksum-group <access_list_name>set cisco-crp-prefix {enable | disable}set cisco-ignore-rp-set-priority {enable | disable}set message-interval <interval_integer>set register-rate-limit <rate_integer>set register-rp-reachability {enable | disable}set register-source {disable | interface | ip-address}set register-source-interface <interface_name>set register-source-ip <address_ipv4>set register-suppression <suppress_integer>set rp-register-keepalive <keepalive_integer>set spt-threshold {enable | disable}set spt-threshold-group <access_list_name>set ssm {enable | disable}set ssm-range <access_list_name>config rp-addressedit <rp_id>set ip-address <address_ipv4>set group <access_list_name>
endend
config router multicastYou can configure a FortiGate unit to support PIM using the config router multicast CLI command. When PIM is enabled, the FortiGate unit allocates memory to manage mapping information. The FortiGate unit communicates with neighboring PIM routers to acquire mapping information and if required, processes the multicast traffic associated with specific multicast groups.
Client applications send multicast data by registering IP traffic with a PIM-enabled router. An end-user could type in a class D multicast group address, an alias for the multicast group address, or a call-conference number to initiate the session.
Note: The end-user multicast client-server applications must be installed and configured to initiate Internet connections and handle broadband content such as audio/video information.
ortiOS 4.0 MR3 CLI Reference1-431-99686-20110623 293ttp://docs.fortinet.com/ • Feedback
multicast router
Rather than sending multiple copies of generated IP traffic to more than one specific IP destination address, PIM-enabled routers encapsulate the data and use the one multicast group address to forward multicast packets to multiple destinations. Because one destination address is used, a single stream of data can be sent. Client applications receive multicast data by requesting that the traffic destined for a certain multicast group address be delivered to them— end-users may use phone books, a menu of ongoing or future sessions, or some other method through a user interface to select the address of interest. A class D address in the 224.0.0.0 to 239.255.255.255 range may be used as a multicast group address, subject to the rules assigned by the Internet Assigned Numbers Authority (IANA). All class D addresses must be assigned in advance. Because there is no way to determine in advance if a certain multicast group address is in use, collisions may occur (to resolve this problem, end-users may switch to a different multicast address).
To configure a PIM domain1 If you will be using sparse mode, determine appropriate paths for multicast packets.2 Make a note of the interfaces that will be PIM-enabled. These interfaces may run a unicast routing
protocol.3 If you will be using sparse mode and want multicast packets to be handled by specific (static) RPs,
record the IP addresses of the PIM-enabled interfaces on those RPs.4 Enable PIM version 2 on all participating routers between the source and receivers. On FortiGate units,
use the config router multicast command to set global operating parameters.5 Configure the PIM routers that have good connections throughout the PIM domain to be candidate
BSRs.6 If sparse mode is enabled, configure one or more of the PIM routers to be candidate RPs. 7 If required, adjust the default settings of PIM-enabled interface(s).
Note: All fields are optional.
Variable Description Defaultigmp-state-limit <limit_integer>
If memory consumption is an issue, specify a limit on the number of IGMP states (multicast memberships) that the FortiGate unit will store. This value represents the maximum combined number of IGMP states (multicast memberships) that can be handled by all interfaces. Traffic associated with excess IGMP membership reports is not delivered. The range is from 96 to 64 000.
3200
multicast-routing {enable | disable}
Enable or disable PIM routing. disable
route-limit <limit_integer>
If memory consumption is an issue, set a limit on the number of multicast routes that can be added to the FortiGate unit routing table. The range is from 1 to 2 147 483 674.
2147483674
route-threshold <threshold_integer>
Specify the number of multicast routes that can be added to the FortiGate unit’s routing table before a warning message is displayed. The route-threshold value must be lower than the route-limit value. The range is from 1 to 2 147 483 674.
2147483674
FortiOS 4.0 MR3 CLI Reference294 01-431-99686-20110623
http://docs.fortinet.com/ • Feedback
router multicast
F0h
config interfaceUse this subcommand to change interface-related PIM settings, including the mode of operation (sparse or dense). Global settings do not override interface-specific settings.
Note: All fields are optional.
Variable Description Defaultedit <interface_name> Enter the name of the FortiGate unit interface on which to enable
PIM protocols.No default.
cisco-exclude-genid {enable | disable}
This field applies only when pim-mode is sparse-mode.Enable or disable including a generation ID in hello messages sent to neighboring PIM routers. A GenID value may be included for compatibility with older Cisco IOS routers.
disable
dr-priority <priority_integer>
This field applies only when pim-mode is sparse-mode.Assign a priority to FortiGate unit Designated Router (DR) candidacy. The range is from 1 to 4 294 967 294. The value is compared to that of other DR interfaces connected to the same network segment, and the router having the highest DR priority is selected to be the DR. If two DR priority values are the same, the interface having the highest IP address is selected.
1
hello-holdtime <holdtime_integer>
Specify the amount of time (in seconds) that a PIM neighbor may consider the information in a hello message to be valid. The range is from 1 to 65 535. If the hello-interval attribute is modified and the hello-holdtime attribute has never been set explicitly, the hello-holdtime attribute is automatically set to 3.5 x hello-interval.
105
hello-interval <hello_integer>
Set the amount of time (in seconds) that the FortiGate unit waits between sending hello messages to neighboring PIM routers. The range is from 1 to 65 535. Changing the hello-interval attribute may automatically update the hello-holdtime attribute .
30
multicast-flow <flowname> Connect the named multicast flow to this interface. Multicast flows are defined in the router multicast-flow command.
No default.
neighbour-filter <access_list_name>
Establish or terminate adjacency with PIM neighbors having the IP addresses given in the specified access list. For more information on access lists, see “access-list, access-list6” on page 260.
Null.
passive {enable | disable}
Enable or disable PIM communications on the interface without affecting IGMP communications.
disable
pim-mode {sparse-mode | dense-mode}
Select the PIM mode of operation. Choose one of:sparse-mode — manage PIM packets through distribution trees and multicast groups. dense-mode — enable multicast flooding.
sparse-mode
propagation-delay <delay_integer>
This field is available when pim-mode is set to dense-mode.Specify the amount of time (in milliseconds) that the FortiGate unit waits to send prune-override messages. The range is from 100 to 5 000.
500
rp-candidate {enable | disable}
This field is available when pim-mode is set to sparse-mode.Enable or disable the FortiGate unit interface to offer Rendezvous Point (RP) services.
disable
ortiOS 4.0 MR3 CLI Reference1-431-99686-20110623 295ttp://docs.fortinet.com/ • Feedback
multicast router
rp-candidate-group <access_list_name>
RP candidacy is advertised to certain multicast groups. These groups are based on the multicast group prefixes given in the specified access list. For more information on access lists, see “access-list, access-list6” on page 260.This field is available when rp-candidate is set to enable and pim-mode is set to sparse-mode.
Null.
rp-candidate-interval <interval_integer>
This field is available when rp-candidate is set to enable and pim-mode is set to sparse-mode.Set the amount of time (in seconds) that the FortiGate unit waits between sending RP announcement messages. The range is from 1 to 16 383.
60
rp-candidate-priority <priority_integer>
This field is available when rp-candidate is set to enable and pim-mode is set to sparse-mode.Assign a priority to FortiGate unit Rendezvous Point (RP) candidacy. The range is from 0 to 255. The BSR compares the value to that of other RP candidates that can service the same multicast group, and the router having the highest RP priority is selected to be the RP for that multicast group. If two RP priority values are the same, the RP candidate having the highest IP address on its RP interface is selected.
192
state-refresh-interval <refresh_integer>
This field is available when pim-mode is set to dense-mode.This attribute is used when the FortiGate unit is connected directly to the multicast source. Set the amount of time (in seconds) that the FortiGate unit waits between sending state-refresh messages. The range is from 1 to 100. When a state-refresh message is received by a downstream router, the prune state on the downstream router is refreshed.
60
static-group <flowname> Statically join this interface to the named multicast group. The interface does not need to have seen any IGMP joins from any host. Multicast flows are defined in the router multicast-flow command.
No default.
ttl-threshold <ttl_integer>
Specify the minimum Time-To-Live (TTL) value (in hops) that an outbound multicast packet must have in order to be forwarded from this interface. The range is from 0 to 255.Specifying a high value (for example, 195) prevents PIM packets from being forwarded through the interface.
1
config join-group variablesedit address <address_ipv4>
Cause the FortiGate unit interface to activate (IGMP join) the multicast group associated with the specified multicast group address.
No default.
config igmp variablesaccess-group <access_list_name>
Specify which multicast groups that hosts on the connected network segment may join based on the multicast addresses given in the specified access list. For more information on access lists, see “access-list, access-list6” on page 260.
Null.
immediate-leave-group <access_list_name>
This field applies when version is set to 2 or 3.Configure a FortiGate unit DR to stop sending traffic and IGMP queries to receivers after receiving an IGMP version 2 group-leave message from any member of the multicast groups identified in the specified access list. For more information on access lists, see “access-list, access-list6” on page 260.
Null.
last-member-query-count <count_integer>
This field applies when version is set to 2 or 3.Specify the number of times that a FortiGate unit DR sends an IGMP query to the last member of a multicast group after receiving an IGMP version 2 group-leave message.
2
Variable Description Default
FortiOS 4.0 MR3 CLI Reference296 01-431-99686-20110623
http://docs.fortinet.com/ • Feedback
router multicast
F0h
config pim-sm-globalThese global settings apply only to sparse mode PIM-enabled interfaces. Global PIM settings do not override interface-specific PIM settings.If sparse mode is enabled, you can configure a DR to send multicast packets to a particular RP by specifying the IP address of the RP through the config rp-address variable. The IP address must be directly accessible to the DR. If multicast packets from more than one multicast group can pass through the same RP, you can use an access list to specify the associated multicast group addresses.
last-member-query-interval <interval_integer>
This field applies when version is set to 2 or 3.Set the amount of time (in milliseconds) that a FortiGate unit DR waits for the last member of a multicast group to respond to an IGMP query. The range is from 1000 to 25 500. If no response is received before the specified time expires and the FortiGate unit DR has already sent an IGMP query last-member-query-count times, the FortiGate unit DR removes the member from the group and sends a prune message to the associated RP.
1000
query-interval <interval_integer>
Set the amount of time (in seconds) that a FortiGate unit DR waits between sending IGMP queries to determine which members of a multicast group are active. The range is from 1 to 65 535.
125
query-max-response-time <time_integer>
Set the maximum amount of time (in seconds) that a FortiGate unit DR waits for a member of a multicast group to respond to an IGMP query. The range is from 1 to 25. If no response is received before the specified time expires, the FortiGate unit DR removes the member from the group.
10
query-timeout <timeout_integer>
Set the amount of time (in seconds) that must expire before a FortiGate unit begins sending IGMP queries to the multicast group that is managed through the interface. The range is from 60 to 300. A FortiGate unit begins sending IGMP queries if it does not receive regular IGMP queries from another DR through the interface.
255
router-alert-check { enable | disable }
Enable to require the Router Alert option in IGMP packets. disabled
version {1 | 2 | 3} Specify the version number of IGMP to run on the interface. The value can be 1, 2, or 3. The value must match the version used by all other PIM routers on the connected network segment.
3
Note: To send multicast packets to a particular RP using the config rp-address subcommand, the ip-address field is required. All other fields are optional.
Variable Description Defaultaccept-register-list <access_list_name>
Cause a FortiGate unit RP to accept or deny register packets from the source IP addresses given in the specified access list. For more information on access lists, see “access-list, access-list6” on page 260.
Null.
bsr-allow-quick-refresh {enable | disable}
Enable or disable accepting BSR quick refresh packets from neighbors.
disable
bsr-candidate {enable | disable}
Enable or disable the FortiGate unit to offer its services as a Boot Strap Router (BSR) when required.
disable
Variable Description Default
ortiOS 4.0 MR3 CLI Reference1-431-99686-20110623 297ttp://docs.fortinet.com/ • Feedback
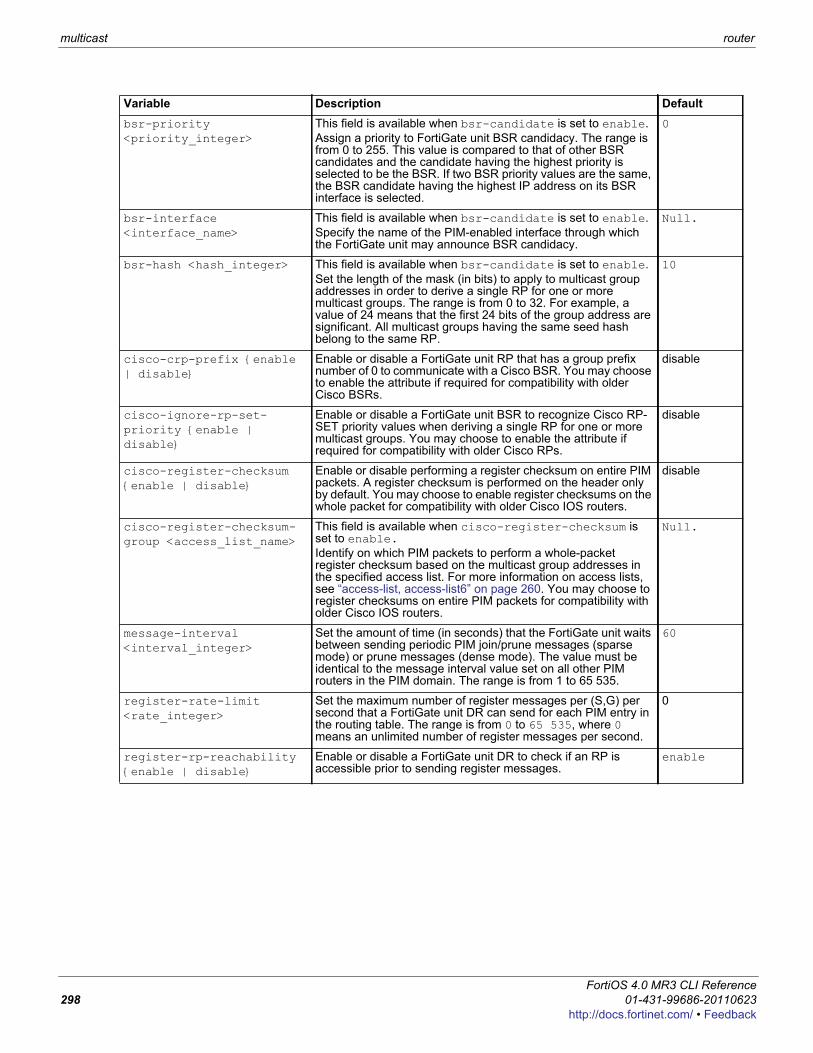
multicast router
bsr-priority <priority_integer>
This field is available when bsr-candidate is set to enable.Assign a priority to FortiGate unit BSR candidacy. The range is from 0 to 255. This value is compared to that of other BSR candidates and the candidate having the highest priority is selected to be the BSR. If two BSR priority values are the same, the BSR candidate having the highest IP address on its BSR interface is selected.
0
bsr-interface <interface_name>
This field is available when bsr-candidate is set to enable.Specify the name of the PIM-enabled interface through which the FortiGate unit may announce BSR candidacy.
Null.
bsr-hash <hash_integer> This field is available when bsr-candidate is set to enable.Set the length of the mask (in bits) to apply to multicast group addresses in order to derive a single RP for one or more multicast groups. The range is from 0 to 32. For example, a value of 24 means that the first 24 bits of the group address are significant. All multicast groups having the same seed hash belong to the same RP.
10
cisco-crp-prefix {enable | disable}
Enable or disable a FortiGate unit RP that has a group prefix number of 0 to communicate with a Cisco BSR. You may choose to enable the attribute if required for compatibility with older Cisco BSRs.
disable
cisco-ignore-rp-set-priority {enable | disable}
Enable or disable a FortiGate unit BSR to recognize Cisco RP-SET priority values when deriving a single RP for one or more multicast groups. You may choose to enable the attribute if required for compatibility with older Cisco RPs.
disable
cisco-register-checksum {enable | disable}
Enable or disable performing a register checksum on entire PIM packets. A register checksum is performed on the header only by default. You may choose to enable register checksums on the whole packet for compatibility with older Cisco IOS routers.
disable
cisco-register-checksum-group <access_list_name>
This field is available when cisco-register-checksum is set to enable.Identify on which PIM packets to perform a whole-packet register checksum based on the multicast group addresses in the specified access list. For more information on access lists, see “access-list, access-list6” on page 260. You may choose to register checksums on entire PIM packets for compatibility with older Cisco IOS routers.
Null.
message-interval <interval_integer>
Set the amount of time (in seconds) that the FortiGate unit waits between sending periodic PIM join/prune messages (sparse mode) or prune messages (dense mode). The value must be identical to the message interval value set on all other PIM routers in the PIM domain. The range is from 1 to 65 535.
60
register-rate-limit <rate_integer>
Set the maximum number of register messages per (S,G) per second that a FortiGate unit DR can send for each PIM entry in the routing table. The range is from 0 to 65 535, where 0 means an unlimited number of register messages per second.
0
register-rp-reachability {enable | disable}
Enable or disable a FortiGate unit DR to check if an RP is accessible prior to sending register messages.
enable
Variable Description Default
FortiOS 4.0 MR3 CLI Reference298 01-431-99686-20110623
http://docs.fortinet.com/ • Feedback
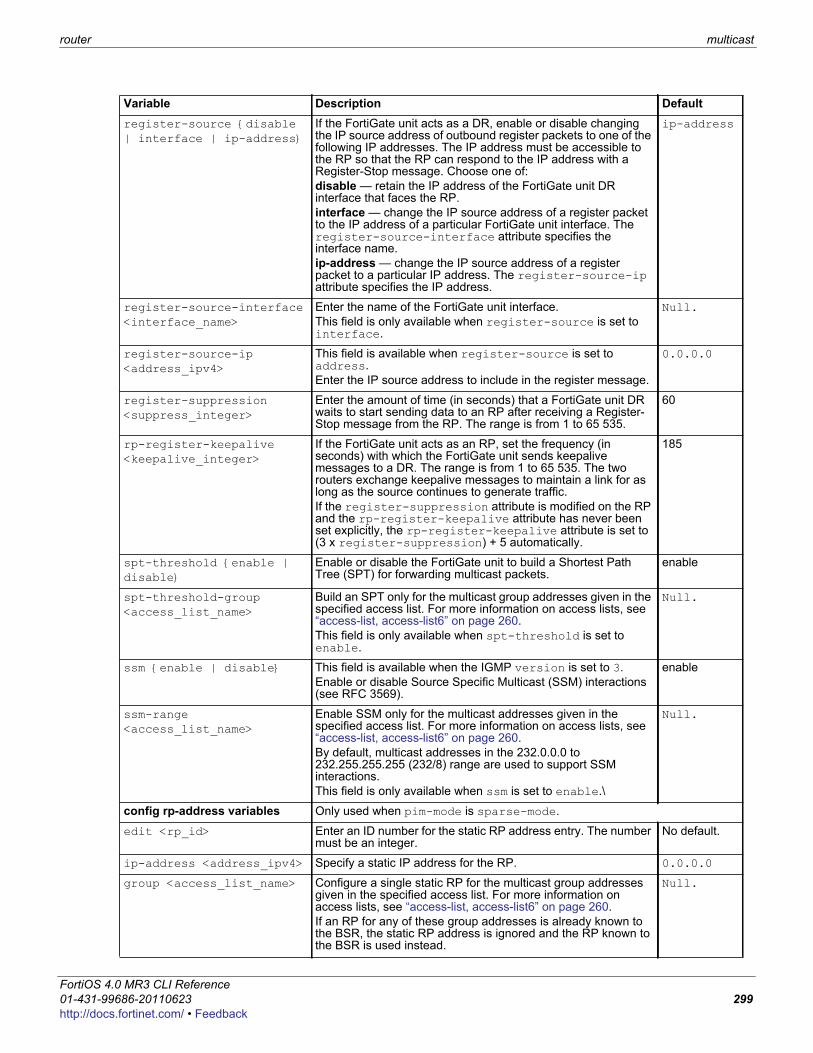
router multicast
F0h
register-source {disable | interface | ip-address}
If the FortiGate unit acts as a DR, enable or disable changing the IP source address of outbound register packets to one of the following IP addresses. The IP address must be accessible to the RP so that the RP can respond to the IP address with a Register-Stop message. Choose one of:disable — retain the IP address of the FortiGate unit DR interface that faces the RP.interface — change the IP source address of a register packet to the IP address of a particular FortiGate unit interface. The register-source-interface attribute specifies the interface name.ip-address — change the IP source address of a register packet to a particular IP address. The register-source-ip attribute specifies the IP address.
ip-address
register-source-interface <interface_name>
Enter the name of the FortiGate unit interface. This field is only available when register-source is set to interface.
Null.
register-source-ip <address_ipv4>
This field is available when register-source is set to address.Enter the IP source address to include in the register message.
0.0.0.0
register-suppression <suppress_integer>
Enter the amount of time (in seconds) that a FortiGate unit DR waits to start sending data to an RP after receiving a Register-Stop message from the RP. The range is from 1 to 65 535.
60
rp-register-keepalive <keepalive_integer>
If the FortiGate unit acts as an RP, set the frequency (in seconds) with which the FortiGate unit sends keepalive messages to a DR. The range is from 1 to 65 535. The two routers exchange keepalive messages to maintain a link for as long as the source continues to generate traffic.If the register-suppression attribute is modified on the RP and the rp-register-keepalive attribute has never been set explicitly, the rp-register-keepalive attribute is set to (3 x register-suppression) + 5 automatically.
185
spt-threshold {enable | disable}
Enable or disable the FortiGate unit to build a Shortest Path Tree (SPT) for forwarding multicast packets.
enable
spt-threshold-group <access_list_name>
Build an SPT only for the multicast group addresses given in the specified access list. For more information on access lists, see “access-list, access-list6” on page 260. This field is only available when spt-threshold is set to enable.
Null.
ssm {enable | disable} This field is available when the IGMP version is set to 3. Enable or disable Source Specific Multicast (SSM) interactions (see RFC 3569).
enable
ssm-range <access_list_name>
Enable SSM only for the multicast addresses given in the specified access list. For more information on access lists, see “access-list, access-list6” on page 260. By default, multicast addresses in the 232.0.0.0 to 232.255.255.255 (232/8) range are used to support SSM interactions.This field is only available when ssm is set to enable.\
Null.
config rp-address variables Only used when pim-mode is sparse-mode.
edit <rp_id> Enter an ID number for the static RP address entry. The number must be an integer.
No default.
ip-address <address_ipv4> Specify a static IP address for the RP. 0.0.0.0
group <access_list_name> Configure a single static RP for the multicast group addresses given in the specified access list. For more information on access lists, see “access-list, access-list6” on page 260. If an RP for any of these group addresses is already known to the BSR, the static RP address is ignored and the RP known to the BSR is used instead.
Null.
Variable Description Default
ortiOS 4.0 MR3 CLI Reference1-431-99686-20110623 299ttp://docs.fortinet.com/ • Feedback
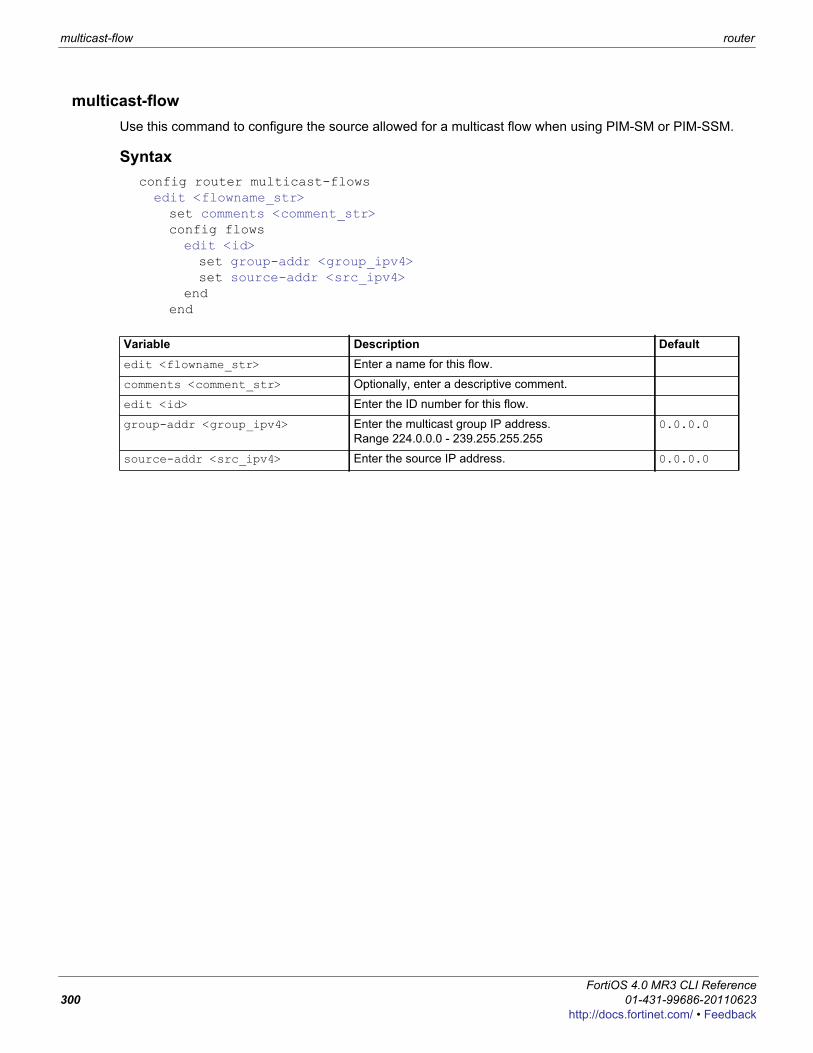
multicast-flow router
multicast-flowUse this command to configure the source allowed for a multicast flow when using PIM-SM or PIM-SSM.
Syntaxconfig router multicast-flowsedit <flowname_str>set comments <comment_str>config flowsedit <id>set group-addr <group_ipv4>set source-addr <src_ipv4>
endend
Variable Description Defaultedit <flowname_str> Enter a name for this flow.
comments <comment_str> Optionally, enter a descriptive comment.
edit <id> Enter the ID number for this flow.
group-addr <group_ipv4> Enter the multicast group IP address.Range 224.0.0.0 - 239.255.255.255
0.0.0.0
source-addr <src_ipv4> Enter the source IP address. 0.0.0.0
FortiOS 4.0 MR3 CLI Reference300 01-431-99686-20110623
http://docs.fortinet.com/ • Feedback
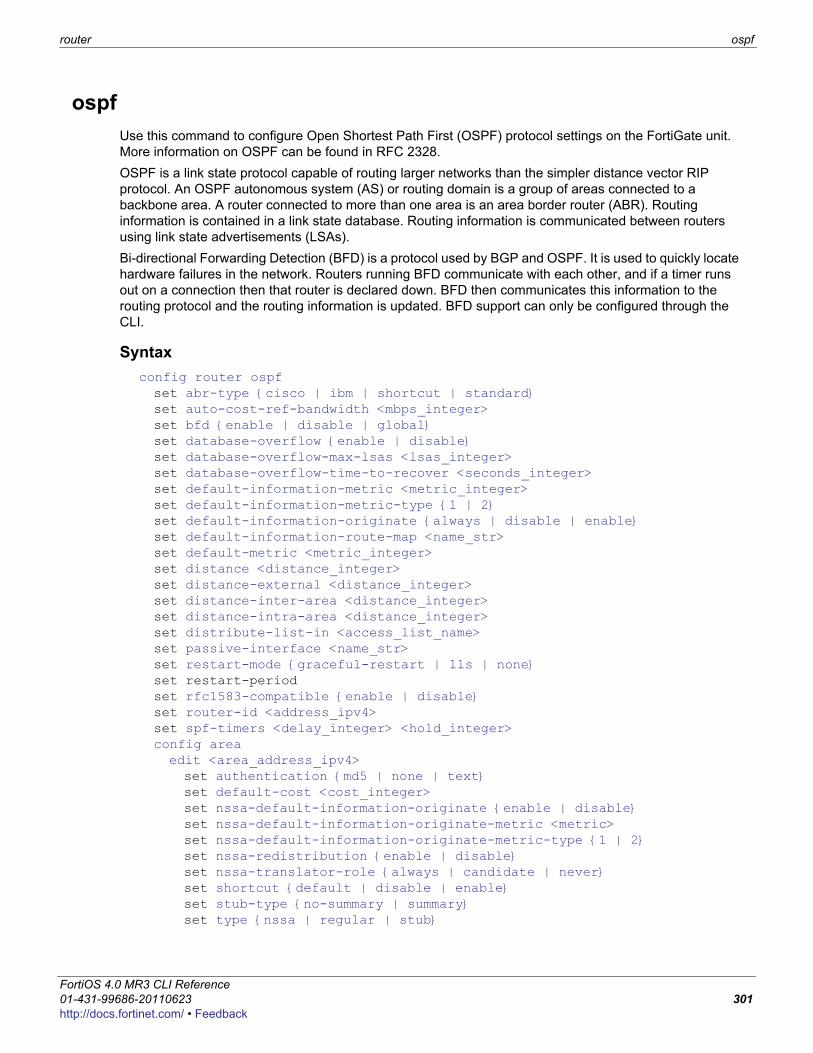
router ospf
F0h
ospfUse this command to configure Open Shortest Path First (OSPF) protocol settings on the FortiGate unit. More information on OSPF can be found in RFC 2328.OSPF is a link state protocol capable of routing larger networks than the simpler distance vector RIP protocol. An OSPF autonomous system (AS) or routing domain is a group of areas connected to a backbone area. A router connected to more than one area is an area border router (ABR). Routing information is contained in a link state database. Routing information is communicated between routers using link state advertisements (LSAs). Bi-directional Forwarding Detection (BFD) is a protocol used by BGP and OSPF. It is used to quickly locate hardware failures in the network. Routers running BFD communicate with each other, and if a timer runs out on a connection then that router is declared down. BFD then communicates this information to the routing protocol and the routing information is updated. BFD support can only be configured through the CLI.
Syntaxconfig router ospfset abr-type {cisco | ibm | shortcut | standard}set auto-cost-ref-bandwidth <mbps_integer>set bfd {enable | disable | global}set database-overflow {enable | disable}set database-overflow-max-lsas <lsas_integer>set database-overflow-time-to-recover <seconds_integer>set default-information-metric <metric_integer>set default-information-metric-type {1 | 2}set default-information-originate {always | disable | enable}set default-information-route-map <name_str>set default-metric <metric_integer>set distance <distance_integer>set distance-external <distance_integer>set distance-inter-area <distance_integer>set distance-intra-area <distance_integer>set distribute-list-in <access_list_name>set passive-interface <name_str>set restart-mode {graceful-restart | lls | none}set restart-periodset rfc1583-compatible {enable | disable}set router-id <address_ipv4>set spf-timers <delay_integer> <hold_integer>config areaedit <area_address_ipv4>set authentication {md5 | none | text}set default-cost <cost_integer>set nssa-default-information-originate {enable | disable}set nssa-default-information-originate-metric <metric>set nssa-default-information-originate-metric-type {1 | 2}set nssa-redistribution {enable | disable}set nssa-translator-role {always | candidate | never}set shortcut {default | disable | enable}set stub-type {no-summary | summary}set type {nssa | regular | stub}
ortiOS 4.0 MR3 CLI Reference1-431-99686-20110623 301ttp://docs.fortinet.com/ • Feedback
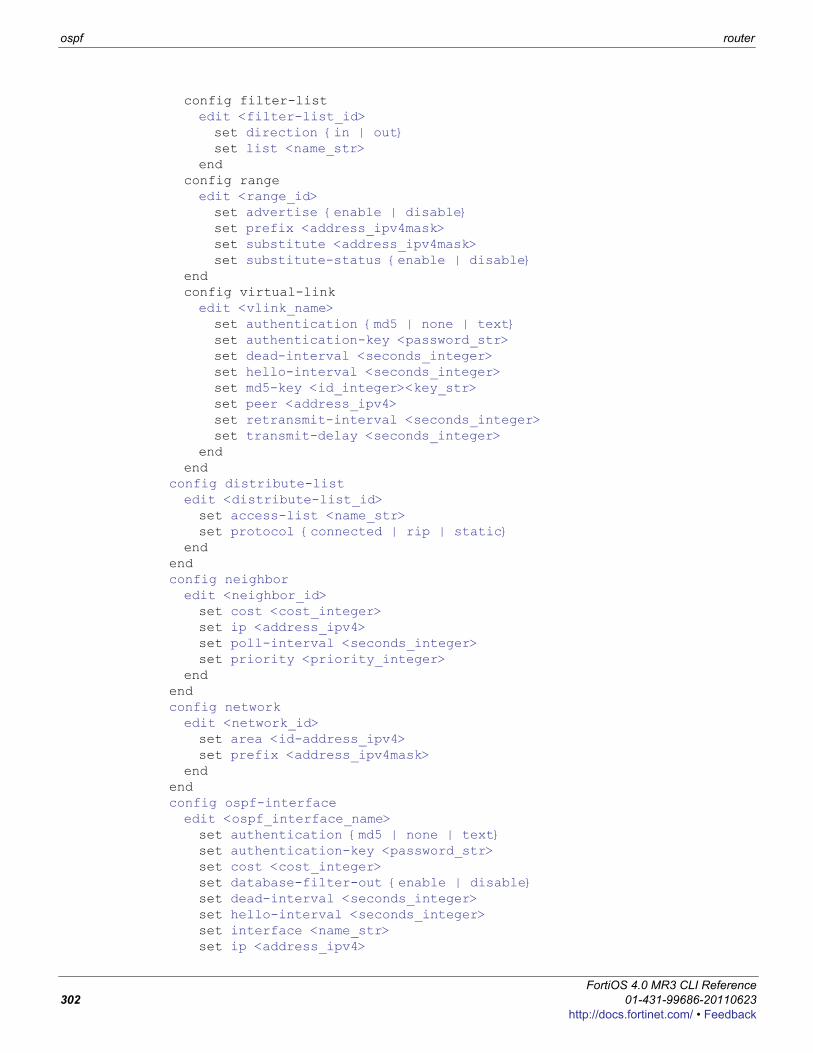
ospf router
config filter-listedit <filter-list_id>set direction {in | out}set list <name_str>
endconfig rangeedit <range_id>set advertise {enable | disable}set prefix <address_ipv4mask>set substitute <address_ipv4mask>set substitute-status {enable | disable}
endconfig virtual-linkedit <vlink_name>set authentication {md5 | none | text}set authentication-key <password_str>set dead-interval <seconds_integer>set hello-interval <seconds_integer>set md5-key <id_integer><key_str>set peer <address_ipv4>set retransmit-interval <seconds_integer>set transmit-delay <seconds_integer>
endend
config distribute-listedit <distribute-list_id>set access-list <name_str>set protocol {connected | rip | static}
endendconfig neighboredit <neighbor_id>set cost <cost_integer>set ip <address_ipv4>set poll-interval <seconds_integer>set priority <priority_integer>
endendconfig networkedit <network_id>set area <id-address_ipv4>set prefix <address_ipv4mask>
endendconfig ospf-interfaceedit <ospf_interface_name>set authentication {md5 | none | text}set authentication-key <password_str>set cost <cost_integer>set database-filter-out {enable | disable}set dead-interval <seconds_integer>set hello-interval <seconds_integer>set interface <name_str>set ip <address_ipv4>
FortiOS 4.0 MR3 CLI Reference302 01-431-99686-20110623
http://docs.fortinet.com/ • Feedback
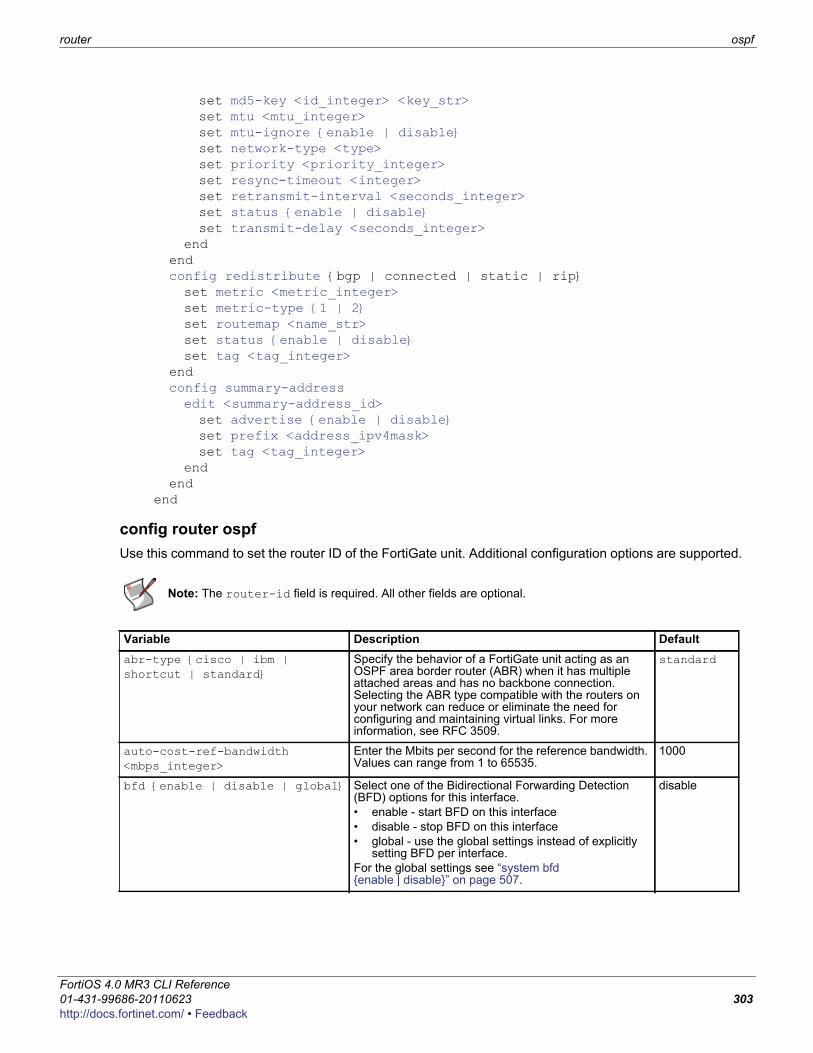
router ospf
F0h
set md5-key <id_integer> <key_str>set mtu <mtu_integer>set mtu-ignore {enable | disable}set network-type <type>set priority <priority_integer>set resync-timeout <integer>set retransmit-interval <seconds_integer>set status {enable | disable}set transmit-delay <seconds_integer>
endendconfig redistribute {bgp | connected | static | rip}set metric <metric_integer>set metric-type {1 | 2}set routemap <name_str>set status {enable | disable}set tag <tag_integer>
endconfig summary-addressedit <summary-address_id>set advertise {enable | disable}set prefix <address_ipv4mask>set tag <tag_integer>
endend
end
config router ospfUse this command to set the router ID of the FortiGate unit. Additional configuration options are supported.
Note: The router-id field is required. All other fields are optional.
Variable Description Defaultabr-type {cisco | ibm | shortcut | standard}
Specify the behavior of a FortiGate unit acting as an OSPF area border router (ABR) when it has multiple attached areas and has no backbone connection. Selecting the ABR type compatible with the routers on your network can reduce or eliminate the need for configuring and maintaining virtual links. For more information, see RFC 3509.
standard
auto-cost-ref-bandwidth <mbps_integer>
Enter the Mbits per second for the reference bandwidth. Values can range from 1 to 65535.
1000
bfd {enable | disable | global} Select one of the Bidirectional Forwarding Detection (BFD) options for this interface.• enable - start BFD on this interface• disable - stop BFD on this interface• global - use the global settings instead of explicitly
setting BFD per interface.For the global settings see “system bfd {enable | disable}” on page 507.
disable
ortiOS 4.0 MR3 CLI Reference1-431-99686-20110623 303ttp://docs.fortinet.com/ • Feedback
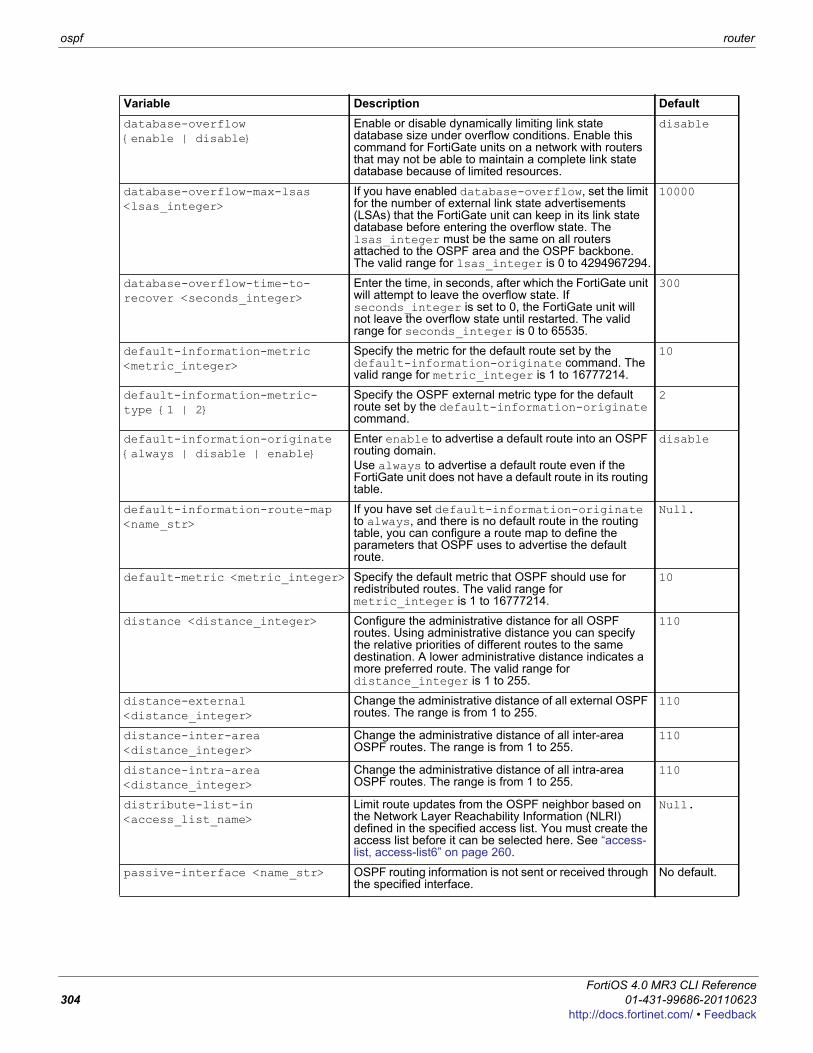
ospf router
database-overflow {enable | disable}
Enable or disable dynamically limiting link state database size under overflow conditions. Enable this command for FortiGate units on a network with routers that may not be able to maintain a complete link state database because of limited resources.
disable
database-overflow-max-lsas <lsas_integer>
If you have enabled database-overflow, set the limit for the number of external link state advertisements (LSAs) that the FortiGate unit can keep in its link state database before entering the overflow state. The lsas_integer must be the same on all routers attached to the OSPF area and the OSPF backbone. The valid range for lsas_integer is 0 to 4294967294.
10000
database-overflow-time-to-recover <seconds_integer>
Enter the time, in seconds, after which the FortiGate unit will attempt to leave the overflow state. If seconds_integer is set to 0, the FortiGate unit will not leave the overflow state until restarted. The valid range for seconds_integer is 0 to 65535.
300
default-information-metric <metric_integer>
Specify the metric for the default route set by the default-information-originate command. The valid range for metric_integer is 1 to 16777214.
10
default-information-metric-type {1 | 2}
Specify the OSPF external metric type for the default route set by the default-information-originate command.
2
default-information-originate {always | disable | enable}
Enter enable to advertise a default route into an OSPF routing domain.Use always to advertise a default route even if the FortiGate unit does not have a default route in its routing table.
disable
default-information-route-map <name_str>
If you have set default-information-originate to always, and there is no default route in the routing table, you can configure a route map to define the parameters that OSPF uses to advertise the default route.
Null.
default-metric <metric_integer> Specify the default metric that OSPF should use for redistributed routes. The valid range for metric_integer is 1 to 16777214.
10
distance <distance_integer> Configure the administrative distance for all OSPF routes. Using administrative distance you can specify the relative priorities of different routes to the same destination. A lower administrative distance indicates a more preferred route. The valid range for distance_integer is 1 to 255.
110
distance-external <distance_integer>
Change the administrative distance of all external OSPF routes. The range is from 1 to 255.
110
distance-inter-area <distance_integer>
Change the administrative distance of all inter-area OSPF routes. The range is from 1 to 255.
110
distance-intra-area <distance_integer>
Change the administrative distance of all intra-area OSPF routes. The range is from 1 to 255.
110
distribute-list-in <access_list_name>
Limit route updates from the OSPF neighbor based on the Network Layer Reachability Information (NLRI) defined in the specified access list. You must create the access list before it can be selected here. See “access-list, access-list6” on page 260.
Null.
passive-interface <name_str> OSPF routing information is not sent or received through the specified interface.
No default.
Variable Description Default
FortiOS 4.0 MR3 CLI Reference304 01-431-99686-20110623
http://docs.fortinet.com/ • Feedback
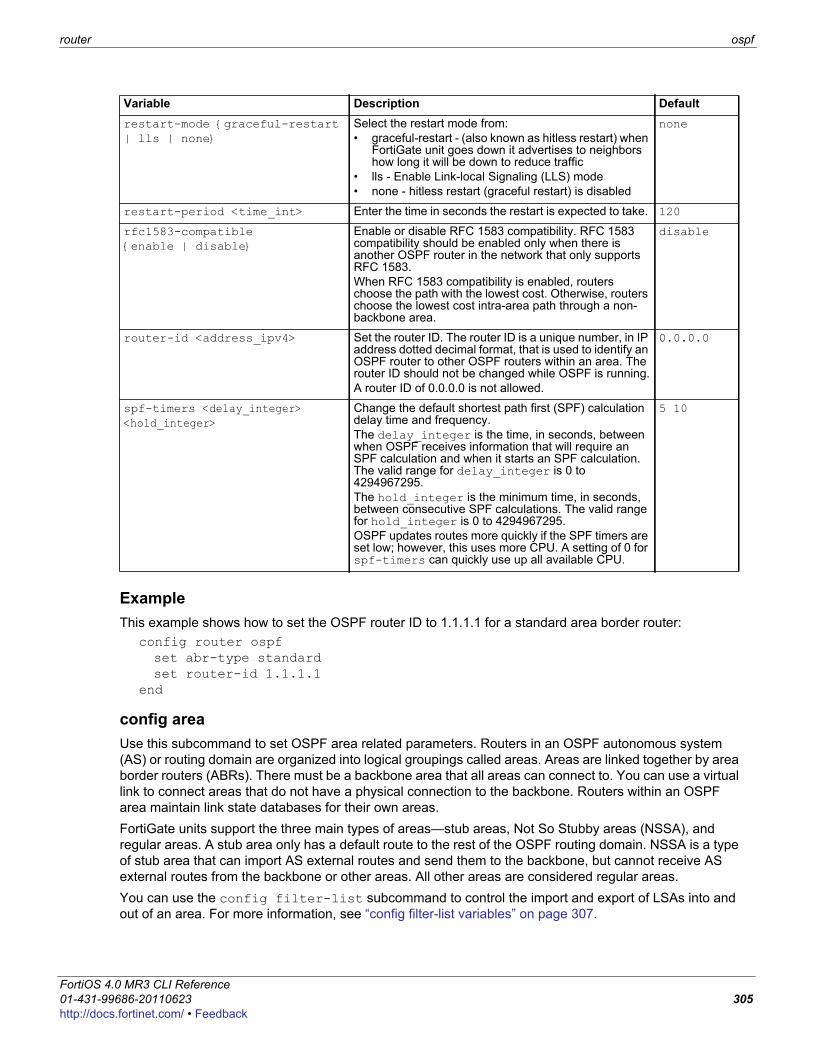
router ospf
F0h
ExampleThis example shows how to set the OSPF router ID to 1.1.1.1 for a standard area border router:
config router ospfset abr-type standardset router-id 1.1.1.1
end
config areaUse this subcommand to set OSPF area related parameters. Routers in an OSPF autonomous system (AS) or routing domain are organized into logical groupings called areas. Areas are linked together by area border routers (ABRs). There must be a backbone area that all areas can connect to. You can use a virtual link to connect areas that do not have a physical connection to the backbone. Routers within an OSPF area maintain link state databases for their own areas. FortiGate units support the three main types of areas—stub areas, Not So Stubby areas (NSSA), and regular areas. A stub area only has a default route to the rest of the OSPF routing domain. NSSA is a type of stub area that can import AS external routes and send them to the backbone, but cannot receive AS external routes from the backbone or other areas. All other areas are considered regular areas.You can use the config filter-list subcommand to control the import and export of LSAs into and out of an area. For more information, see “config filter-list variables” on page 307.
restart-mode {graceful-restart | lls | none}
Select the restart mode from:• graceful-restart - (also known as hitless restart) when
FortiGate unit goes down it advertises to neighbors how long it will be down to reduce traffic
• lls - Enable Link-local Signaling (LLS) mode• none - hitless restart (graceful restart) is disabled
none
restart-period <time_int> Enter the time in seconds the restart is expected to take. 120
rfc1583-compatible {enable | disable}
Enable or disable RFC 1583 compatibility. RFC 1583 compatibility should be enabled only when there is another OSPF router in the network that only supports RFC 1583. When RFC 1583 compatibility is enabled, routers choose the path with the lowest cost. Otherwise, routers choose the lowest cost intra-area path through a non-backbone area.
disable
router-id <address_ipv4> Set the router ID. The router ID is a unique number, in IP address dotted decimal format, that is used to identify an OSPF router to other OSPF routers within an area. The router ID should not be changed while OSPF is running.A router ID of 0.0.0.0 is not allowed.
0.0.0.0
spf-timers <delay_integer> <hold_integer>
Change the default shortest path first (SPF) calculation delay time and frequency. The delay_integer is the time, in seconds, between when OSPF receives information that will require an SPF calculation and when it starts an SPF calculation. The valid range for delay_integer is 0 to 4294967295.The hold_integer is the minimum time, in seconds, between consecutive SPF calculations. The valid range for hold_integer is 0 to 4294967295.OSPF updates routes more quickly if the SPF timers are set low; however, this uses more CPU. A setting of 0 for spf-timers can quickly use up all available CPU.
5 10
Variable Description Default
ortiOS 4.0 MR3 CLI Reference1-431-99686-20110623 305ttp://docs.fortinet.com/ • Feedback
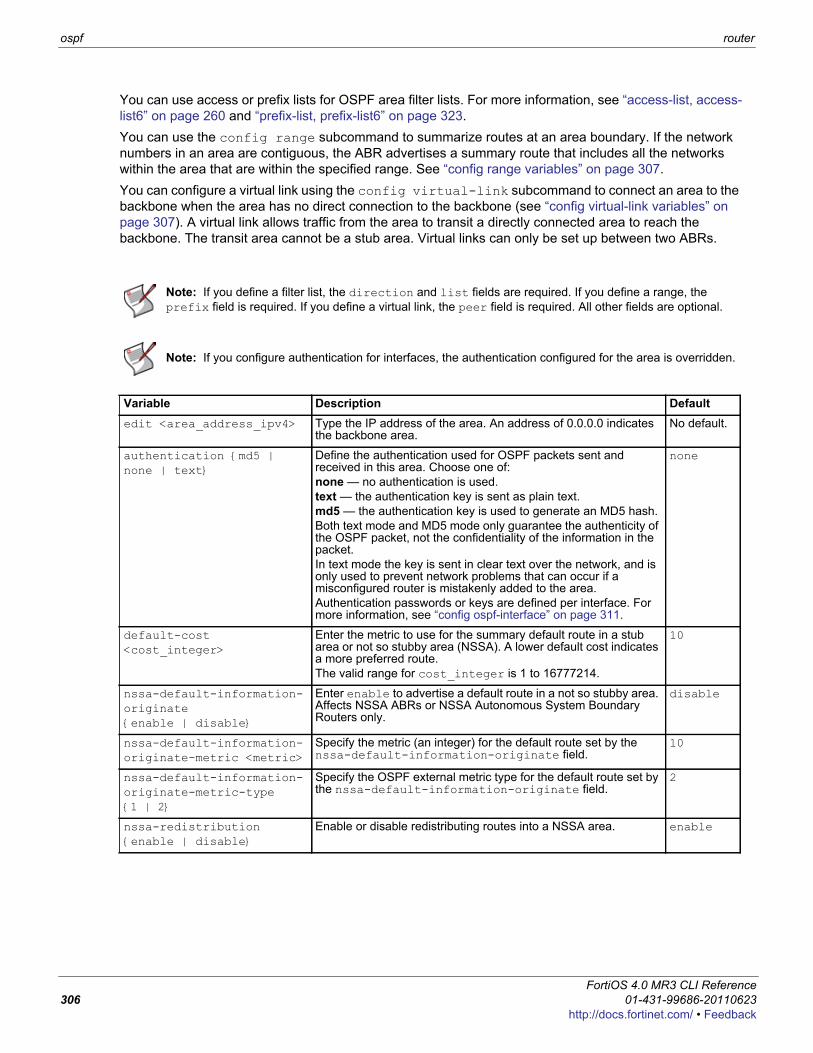
ospf router
You can use access or prefix lists for OSPF area filter lists. For more information, see “access-list, access-list6” on page 260 and “prefix-list, prefix-list6” on page 323.You can use the config range subcommand to summarize routes at an area boundary. If the network numbers in an area are contiguous, the ABR advertises a summary route that includes all the networks within the area that are within the specified range. See “config range variables” on page 307.You can configure a virtual link using the config virtual-link subcommand to connect an area to the backbone when the area has no direct connection to the backbone (see “config virtual-link variables” on page 307). A virtual link allows traffic from the area to transit a directly connected area to reach the backbone. The transit area cannot be a stub area. Virtual links can only be set up between two ABRs.
Note: If you define a filter list, the direction and list fields are required. If you define a range, the prefix field is required. If you define a virtual link, the peer field is required. All other fields are optional.
Note: If you configure authentication for interfaces, the authentication configured for the area is overridden.
Variable Description Defaultedit <area_address_ipv4> Type the IP address of the area. An address of 0.0.0.0 indicates
the backbone area.No default.
authentication {md5 | none | text}
Define the authentication used for OSPF packets sent and received in this area. Choose one of:none — no authentication is used. text — the authentication key is sent as plain text.md5 — the authentication key is used to generate an MD5 hash. Both text mode and MD5 mode only guarantee the authenticity of the OSPF packet, not the confidentiality of the information in the packet.In text mode the key is sent in clear text over the network, and is only used to prevent network problems that can occur if a misconfigured router is mistakenly added to the area.Authentication passwords or keys are defined per interface. For more information, see “config ospf-interface” on page 311.
none
default-cost <cost_integer>
Enter the metric to use for the summary default route in a stub area or not so stubby area (NSSA). A lower default cost indicates a more preferred route.The valid range for cost_integer is 1 to 16777214.
10
nssa-default-information-originate {enable | disable}
Enter enable to advertise a default route in a not so stubby area. Affects NSSA ABRs or NSSA Autonomous System Boundary Routers only.
disable
nssa-default-information-originate-metric <metric>
Specify the metric (an integer) for the default route set by the nssa-default-information-originate field.
10
nssa-default-information-originate-metric-type {1 | 2}
Specify the OSPF external metric type for the default route set by the nssa-default-information-originate field.
2
nssa-redistribution {enable | disable}
Enable or disable redistributing routes into a NSSA area. enable
FortiOS 4.0 MR3 CLI Reference306 01-431-99686-20110623
http://docs.fortinet.com/ • Feedback
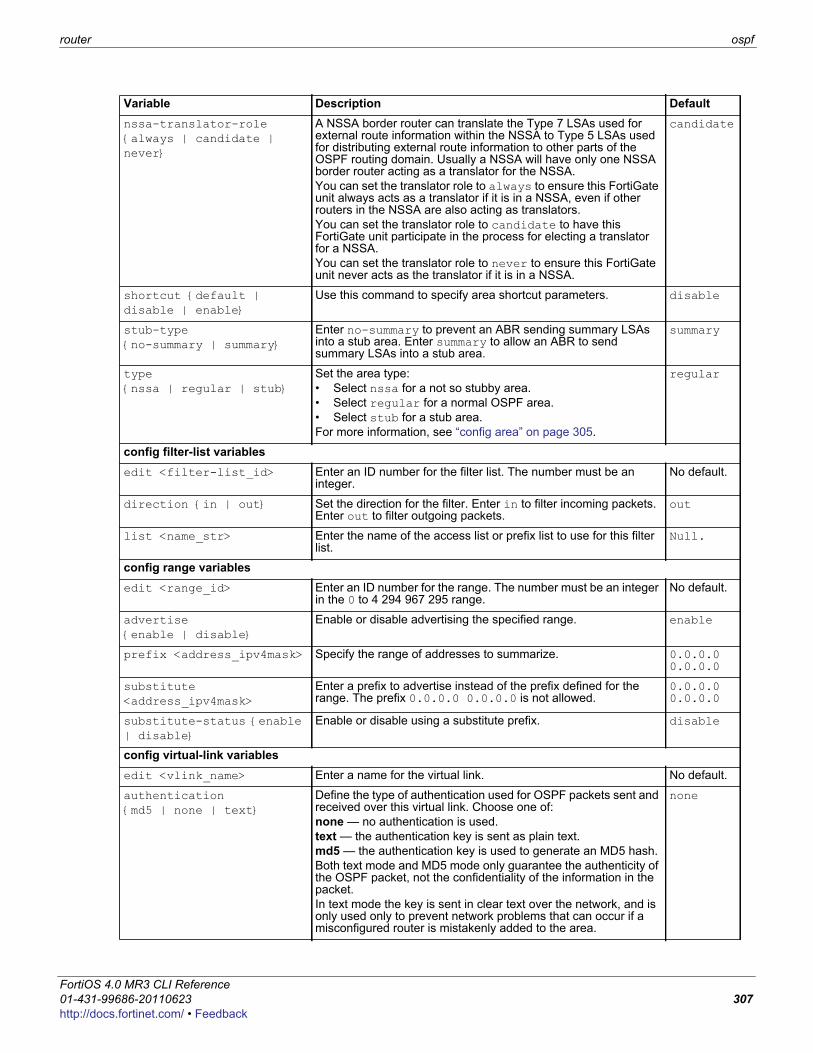
router ospf
F0h
nssa-translator-role {always | candidate | never}
A NSSA border router can translate the Type 7 LSAs used for external route information within the NSSA to Type 5 LSAs used for distributing external route information to other parts of the OSPF routing domain. Usually a NSSA will have only one NSSA border router acting as a translator for the NSSA.You can set the translator role to always to ensure this FortiGate unit always acts as a translator if it is in a NSSA, even if other routers in the NSSA are also acting as translators.You can set the translator role to candidate to have this FortiGate unit participate in the process for electing a translator for a NSSA.You can set the translator role to never to ensure this FortiGate unit never acts as the translator if it is in a NSSA.
candidate
shortcut {default | disable | enable}
Use this command to specify area shortcut parameters. disable
stub-type {no-summary | summary}
Enter no-summary to prevent an ABR sending summary LSAs into a stub area. Enter summary to allow an ABR to send summary LSAs into a stub area.
summary
type {nssa | regular | stub}
Set the area type:• Select nssa for a not so stubby area.• Select regular for a normal OSPF area.• Select stub for a stub area.For more information, see “config area” on page 305.
regular
config filter-list variablesedit <filter-list_id> Enter an ID number for the filter list. The number must be an
integer.No default.
direction {in | out} Set the direction for the filter. Enter in to filter incoming packets. Enter out to filter outgoing packets.
out
list <name_str> Enter the name of the access list or prefix list to use for this filter list.
Null.
config range variablesedit <range_id> Enter an ID number for the range. The number must be an integer
in the 0 to 4 294 967 295 range.No default.
advertise {enable | disable}
Enable or disable advertising the specified range. enable
prefix <address_ipv4mask> Specify the range of addresses to summarize. 0.0.0.0 0.0.0.0
substitute <address_ipv4mask>
Enter a prefix to advertise instead of the prefix defined for the range. The prefix 0.0.0.0 0.0.0.0 is not allowed.
0.0.0.0 0.0.0.0
substitute-status {enable | disable}
Enable or disable using a substitute prefix. disable
config virtual-link variablesedit <vlink_name> Enter a name for the virtual link. No default.
authentication {md5 | none | text}
Define the type of authentication used for OSPF packets sent and received over this virtual link. Choose one of:none — no authentication is used. text — the authentication key is sent as plain text.md5 — the authentication key is used to generate an MD5 hash. Both text mode and MD5 mode only guarantee the authenticity of the OSPF packet, not the confidentiality of the information in the packet.In text mode the key is sent in clear text over the network, and is only used only to prevent network problems that can occur if a misconfigured router is mistakenly added to the area.
none
Variable Description Default
ortiOS 4.0 MR3 CLI Reference1-431-99686-20110623 307ttp://docs.fortinet.com/ • Feedback
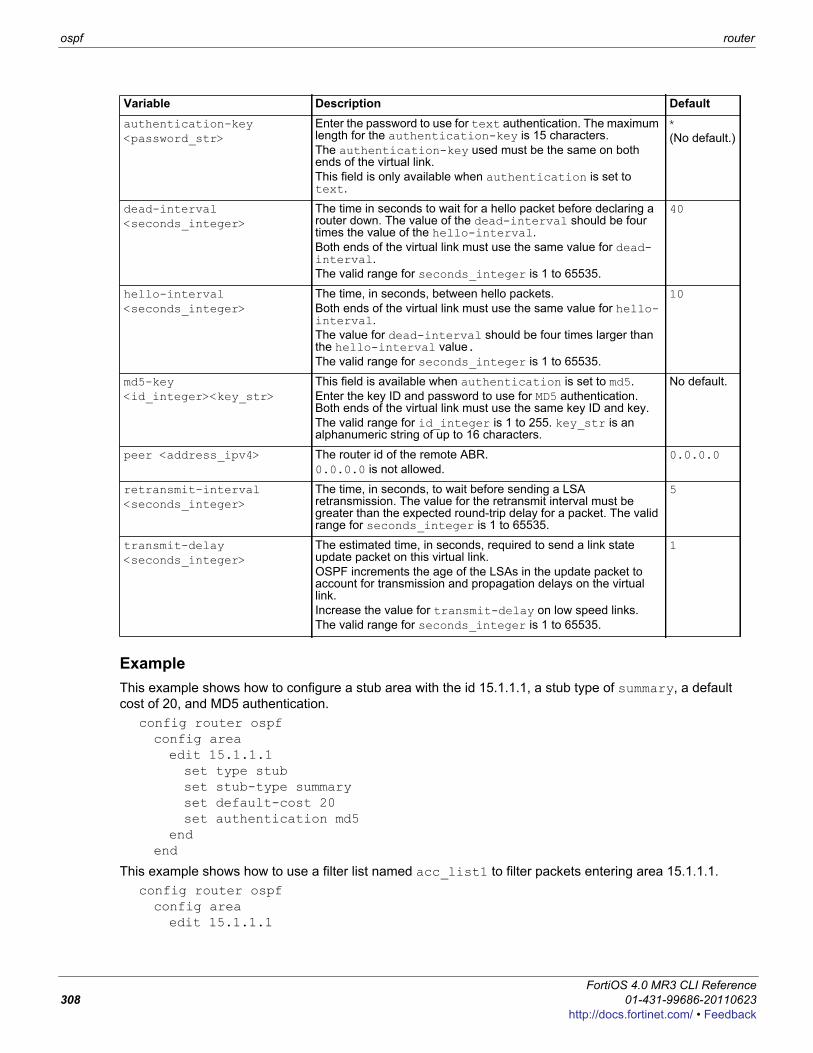
ospf router
ExampleThis example shows how to configure a stub area with the id 15.1.1.1, a stub type of summary, a default cost of 20, and MD5 authentication.
config router ospfconfig areaedit 15.1.1.1set type stubset stub-type summaryset default-cost 20set authentication md5
endend
This example shows how to use a filter list named acc_list1 to filter packets entering area 15.1.1.1.config router ospfconfig areaedit 15.1.1.1
authentication-key <password_str>
Enter the password to use for text authentication. The maximum length for the authentication-key is 15 characters.The authentication-key used must be the same on both ends of the virtual link. This field is only available when authentication is set to text.
*(No default.)
dead-interval <seconds_integer>
The time in seconds to wait for a hello packet before declaring a router down. The value of the dead-interval should be four times the value of the hello-interval. Both ends of the virtual link must use the same value for dead-interval.The valid range for seconds_integer is 1 to 65535.
40
hello-interval <seconds_integer>
The time, in seconds, between hello packets. Both ends of the virtual link must use the same value for hello-interval.The value for dead-interval should be four times larger than the hello-interval value.The valid range for seconds_integer is 1 to 65535.
10
md5-key <id_integer><key_str>
This field is available when authentication is set to md5.Enter the key ID and password to use for MD5 authentication. Both ends of the virtual link must use the same key ID and key.The valid range for id_integer is 1 to 255. key_str is an alphanumeric string of up to 16 characters.
No default.
peer <address_ipv4> The router id of the remote ABR.0.0.0.0 is not allowed.
0.0.0.0
retransmit-interval <seconds_integer>
The time, in seconds, to wait before sending a LSA retransmission. The value for the retransmit interval must be greater than the expected round-trip delay for a packet. The valid range for seconds_integer is 1 to 65535.
5
transmit-delay <seconds_integer>
The estimated time, in seconds, required to send a link state update packet on this virtual link. OSPF increments the age of the LSAs in the update packet to account for transmission and propagation delays on the virtual link.Increase the value for transmit-delay on low speed links.The valid range for seconds_integer is 1 to 65535.
1
Variable Description Default
FortiOS 4.0 MR3 CLI Reference308 01-431-99686-20110623
http://docs.fortinet.com/ • Feedback
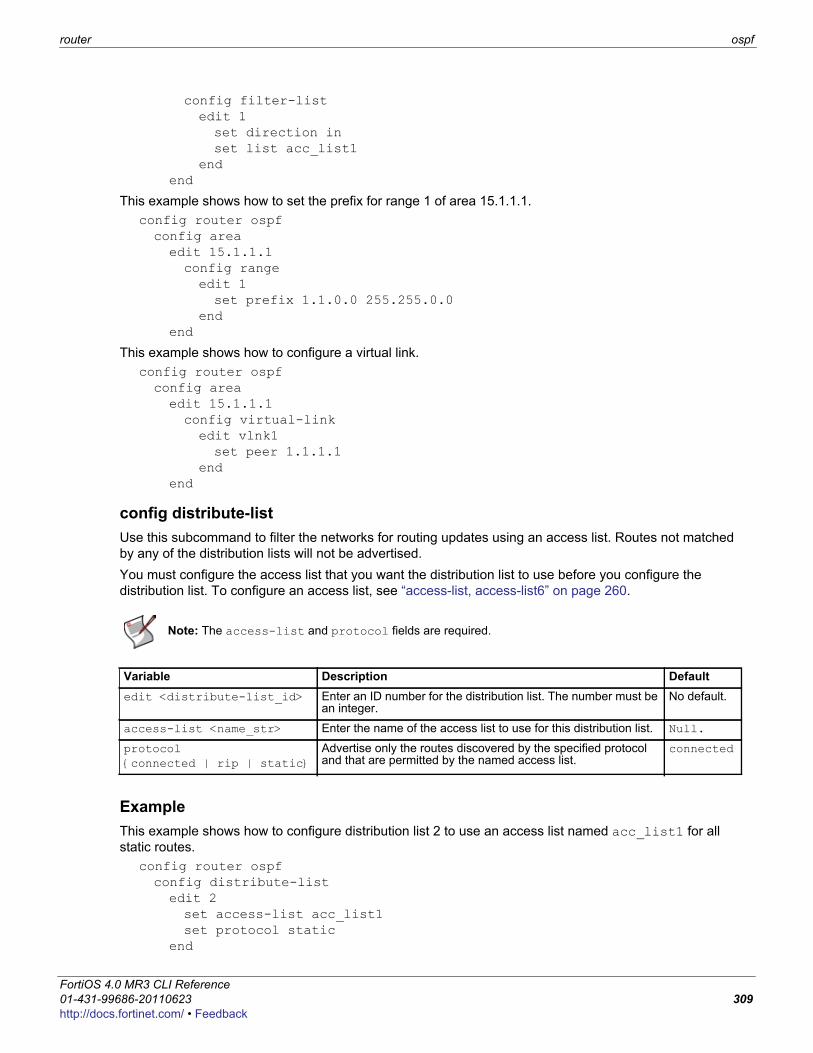
router ospf
F0h
config filter-listedit 1set direction inset list acc_list1
endend
This example shows how to set the prefix for range 1 of area 15.1.1.1.config router ospfconfig areaedit 15.1.1.1config rangeedit 1set prefix 1.1.0.0 255.255.0.0
endend
This example shows how to configure a virtual link.config router ospfconfig areaedit 15.1.1.1config virtual-linkedit vlnk1set peer 1.1.1.1
endend
config distribute-listUse this subcommand to filter the networks for routing updates using an access list. Routes not matched by any of the distribution lists will not be advertised.You must configure the access list that you want the distribution list to use before you configure the distribution list. To configure an access list, see “access-list, access-list6” on page 260.
ExampleThis example shows how to configure distribution list 2 to use an access list named acc_list1 for all static routes.
config router ospfconfig distribute-listedit 2set access-list acc_list1set protocol static
end
Note: The access-list and protocol fields are required.
Variable Description Defaultedit <distribute-list_id> Enter an ID number for the distribution list. The number must be
an integer.No default.
access-list <name_str> Enter the name of the access list to use for this distribution list. Null.
protocol {connected | rip | static}
Advertise only the routes discovered by the specified protocol and that are permitted by the named access list.
connected
ortiOS 4.0 MR3 CLI Reference1-431-99686-20110623 309ttp://docs.fortinet.com/ • Feedback
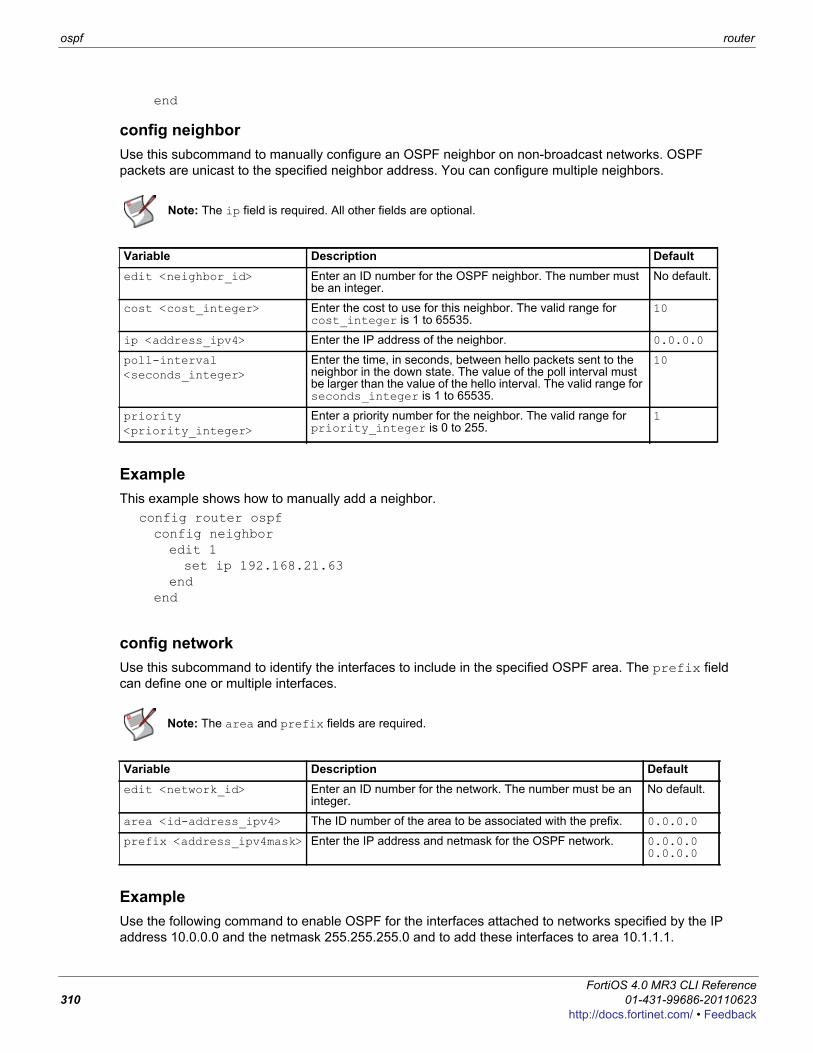
ospf router
end
config neighborUse this subcommand to manually configure an OSPF neighbor on non-broadcast networks. OSPF packets are unicast to the specified neighbor address. You can configure multiple neighbors.
ExampleThis example shows how to manually add a neighbor.
config router ospfconfig neighboredit 1set ip 192.168.21.63
endend
config networkUse this subcommand to identify the interfaces to include in the specified OSPF area. The prefix field can define one or multiple interfaces.
ExampleUse the following command to enable OSPF for the interfaces attached to networks specified by the IP address 10.0.0.0 and the netmask 255.255.255.0 and to add these interfaces to area 10.1.1.1.
Note: The ip field is required. All other fields are optional.
Variable Description Defaultedit <neighbor_id> Enter an ID number for the OSPF neighbor. The number must
be an integer.No default.
cost <cost_integer> Enter the cost to use for this neighbor. The valid range for cost_integer is 1 to 65535.
10
ip <address_ipv4> Enter the IP address of the neighbor. 0.0.0.0
poll-interval <seconds_integer>
Enter the time, in seconds, between hello packets sent to the neighbor in the down state. The value of the poll interval must be larger than the value of the hello interval. The valid range for seconds_integer is 1 to 65535.
10
priority <priority_integer>
Enter a priority number for the neighbor. The valid range for priority_integer is 0 to 255.
1
Note: The area and prefix fields are required.
Variable Description Defaultedit <network_id> Enter an ID number for the network. The number must be an
integer.No default.
area <id-address_ipv4> The ID number of the area to be associated with the prefix. 0.0.0.0
prefix <address_ipv4mask> Enter the IP address and netmask for the OSPF network. 0.0.0.0 0.0.0.0
FortiOS 4.0 MR3 CLI Reference310 01-431-99686-20110623
http://docs.fortinet.com/ • Feedback
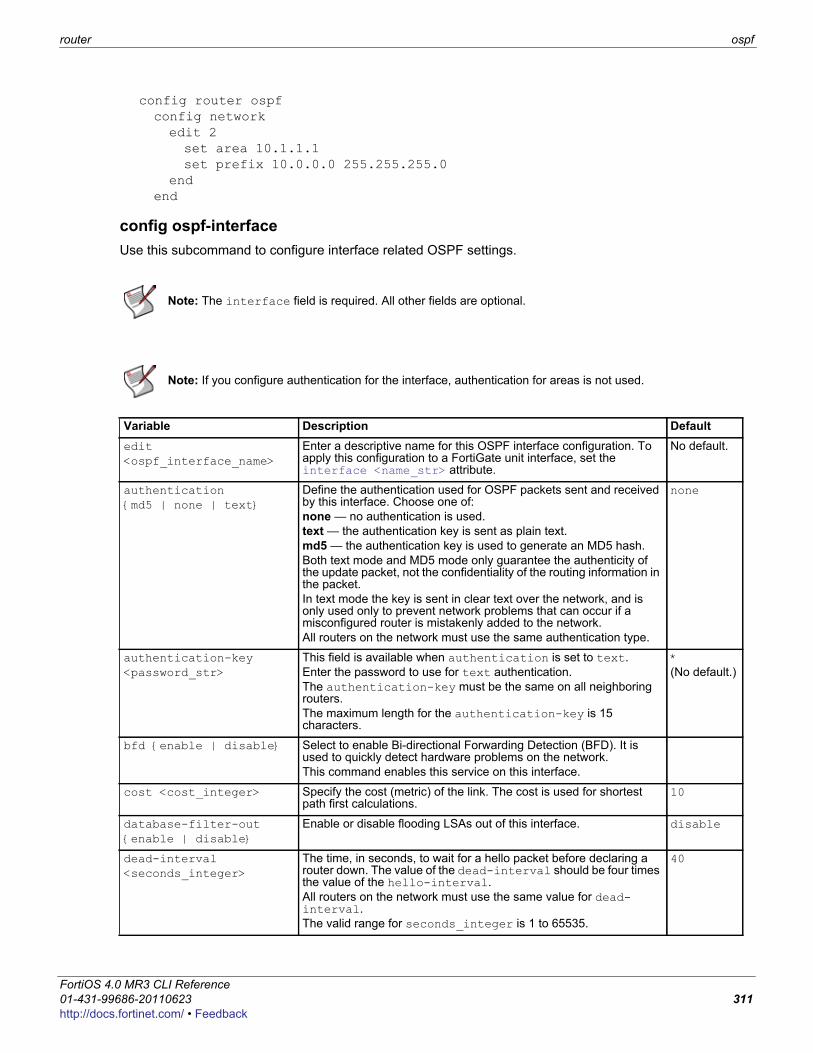
router ospf
F0h
config router ospfconfig networkedit 2set area 10.1.1.1set prefix 10.0.0.0 255.255.255.0
endend
config ospf-interfaceUse this subcommand to configure interface related OSPF settings.
Note: The interface field is required. All other fields are optional.
Note: If you configure authentication for the interface, authentication for areas is not used.
Variable Description Defaultedit <ospf_interface_name>
Enter a descriptive name for this OSPF interface configuration. To apply this configuration to a FortiGate unit interface, set the interface <name_str> attribute.
No default.
authentication {md5 | none | text}
Define the authentication used for OSPF packets sent and received by this interface. Choose one of:none — no authentication is used. text — the authentication key is sent as plain text.md5 — the authentication key is used to generate an MD5 hash. Both text mode and MD5 mode only guarantee the authenticity of the update packet, not the confidentiality of the routing information in the packet.In text mode the key is sent in clear text over the network, and is only used only to prevent network problems that can occur if a misconfigured router is mistakenly added to the network.All routers on the network must use the same authentication type.
none
authentication-key <password_str>
This field is available when authentication is set to text.Enter the password to use for text authentication.The authentication-key must be the same on all neighboring routers. The maximum length for the authentication-key is 15 characters.
*(No default.)
bfd {enable | disable} Select to enable Bi-directional Forwarding Detection (BFD). It is used to quickly detect hardware problems on the network.This command enables this service on this interface.
cost <cost_integer> Specify the cost (metric) of the link. The cost is used for shortest path first calculations.
10
database-filter-out {enable | disable}
Enable or disable flooding LSAs out of this interface. disable
dead-interval <seconds_integer>
The time, in seconds, to wait for a hello packet before declaring a router down. The value of the dead-interval should be four times the value of the hello-interval. All routers on the network must use the same value for dead-interval.The valid range for seconds_integer is 1 to 65535.
40
ortiOS 4.0 MR3 CLI Reference1-431-99686-20110623 311ttp://docs.fortinet.com/ • Feedback
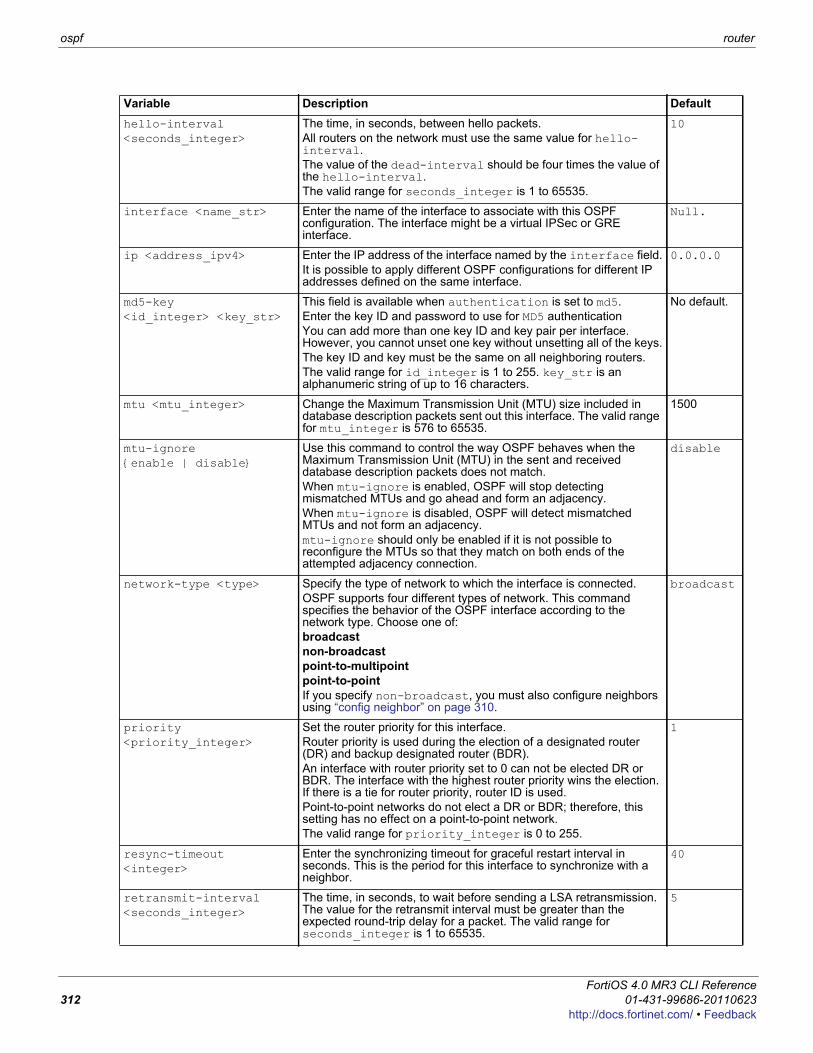
ospf router
hello-interval <seconds_integer>
The time, in seconds, between hello packets. All routers on the network must use the same value for hello-interval.The value of the dead-interval should be four times the value of the hello-interval.The valid range for seconds_integer is 1 to 65535.
10
interface <name_str> Enter the name of the interface to associate with this OSPF configuration. The interface might be a virtual IPSec or GRE interface.
Null.
ip <address_ipv4> Enter the IP address of the interface named by the interface field.It is possible to apply different OSPF configurations for different IP addresses defined on the same interface.
0.0.0.0
md5-key <id_integer> <key_str>
This field is available when authentication is set to md5.Enter the key ID and password to use for MD5 authenticationYou can add more than one key ID and key pair per interface. However, you cannot unset one key without unsetting all of the keys.The key ID and key must be the same on all neighboring routers.The valid range for id_integer is 1 to 255. key_str is an alphanumeric string of up to 16 characters.
No default.
mtu <mtu_integer> Change the Maximum Transmission Unit (MTU) size included in database description packets sent out this interface. The valid range for mtu_integer is 576 to 65535.
1500
mtu-ignore {enable | disable}
Use this command to control the way OSPF behaves when the Maximum Transmission Unit (MTU) in the sent and received database description packets does not match.When mtu-ignore is enabled, OSPF will stop detecting mismatched MTUs and go ahead and form an adjacency.When mtu-ignore is disabled, OSPF will detect mismatched MTUs and not form an adjacency.mtu-ignore should only be enabled if it is not possible to reconfigure the MTUs so that they match on both ends of the attempted adjacency connection.
disable
network-type <type> Specify the type of network to which the interface is connected.OSPF supports four different types of network. This command specifies the behavior of the OSPF interface according to the network type. Choose one of:broadcastnon-broadcastpoint-to-multipointpoint-to-pointIf you specify non-broadcast, you must also configure neighbors using “config neighbor” on page 310.
broadcast
priority <priority_integer>
Set the router priority for this interface.Router priority is used during the election of a designated router (DR) and backup designated router (BDR).An interface with router priority set to 0 can not be elected DR or BDR. The interface with the highest router priority wins the election. If there is a tie for router priority, router ID is used. Point-to-point networks do not elect a DR or BDR; therefore, this setting has no effect on a point-to-point network.The valid range for priority_integer is 0 to 255.
1
resync-timeout <integer>
Enter the synchronizing timeout for graceful restart interval in seconds. This is the period for this interface to synchronize with a neighbor.
40
retransmit-interval <seconds_integer>
The time, in seconds, to wait before sending a LSA retransmission. The value for the retransmit interval must be greater than the expected round-trip delay for a packet. The valid range for seconds_integer is 1 to 65535.
5
Variable Description Default
FortiOS 4.0 MR3 CLI Reference312 01-431-99686-20110623
http://docs.fortinet.com/ • Feedback
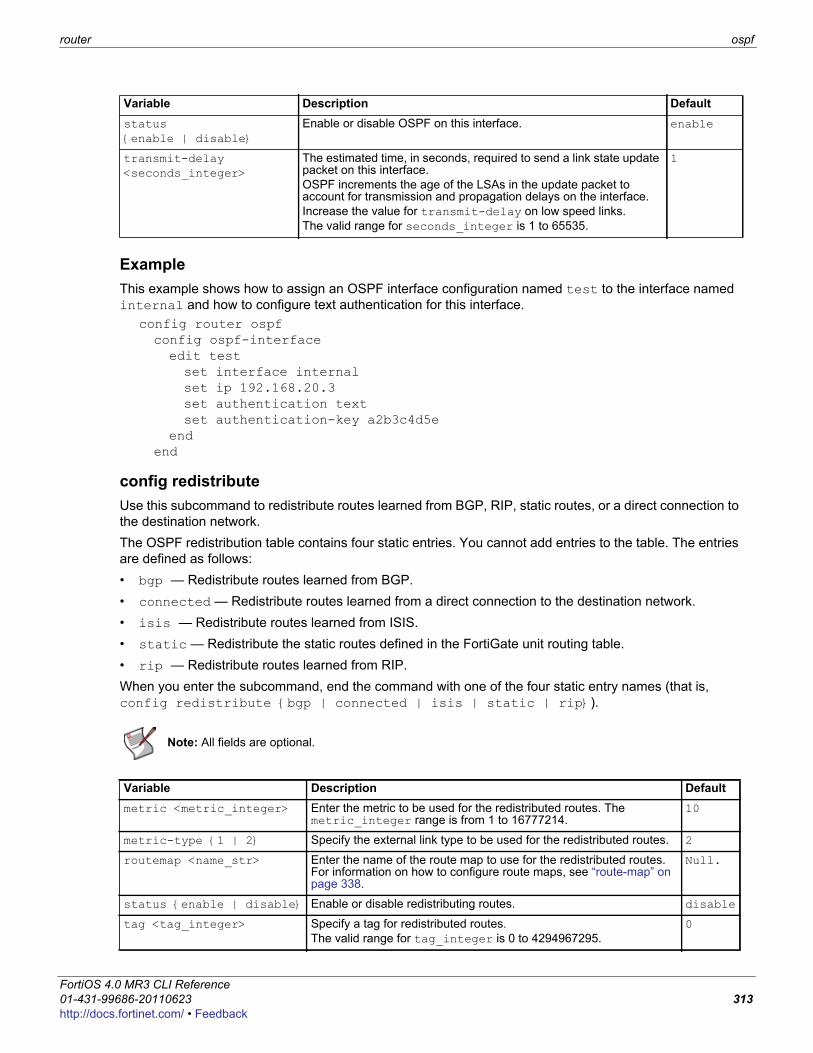
router ospf
F0h
ExampleThis example shows how to assign an OSPF interface configuration named test to the interface named internal and how to configure text authentication for this interface.
config router ospfconfig ospf-interfaceedit testset interface internalset ip 192.168.20.3set authentication textset authentication-key a2b3c4d5e
endend
config redistributeUse this subcommand to redistribute routes learned from BGP, RIP, static routes, or a direct connection to the destination network.The OSPF redistribution table contains four static entries. You cannot add entries to the table. The entries are defined as follows:• bgp — Redistribute routes learned from BGP.• connected — Redistribute routes learned from a direct connection to the destination network.• isis — Redistribute routes learned from ISIS.• static — Redistribute the static routes defined in the FortiGate unit routing table.• rip — Redistribute routes learned from RIP.When you enter the subcommand, end the command with one of the four static entry names (that is, config redistribute {bgp | connected | isis | static | rip}).
status {enable | disable}
Enable or disable OSPF on this interface. enable
transmit-delay <seconds_integer>
The estimated time, in seconds, required to send a link state update packet on this interface. OSPF increments the age of the LSAs in the update packet to account for transmission and propagation delays on the interface.Increase the value for transmit-delay on low speed links.The valid range for seconds_integer is 1 to 65535.
1
Note: All fields are optional.
Variable Description Defaultmetric <metric_integer> Enter the metric to be used for the redistributed routes. The
metric_integer range is from 1 to 16777214.10
metric-type {1 | 2} Specify the external link type to be used for the redistributed routes. 2
routemap <name_str> Enter the name of the route map to use for the redistributed routes. For information on how to configure route maps, see “route-map” on page 338.
Null.
status {enable | disable} Enable or disable redistributing routes. disable
tag <tag_integer> Specify a tag for redistributed routes. The valid range for tag_integer is 0 to 4294967295.
0
Variable Description Default
ortiOS 4.0 MR3 CLI Reference1-431-99686-20110623 313ttp://docs.fortinet.com/ • Feedback
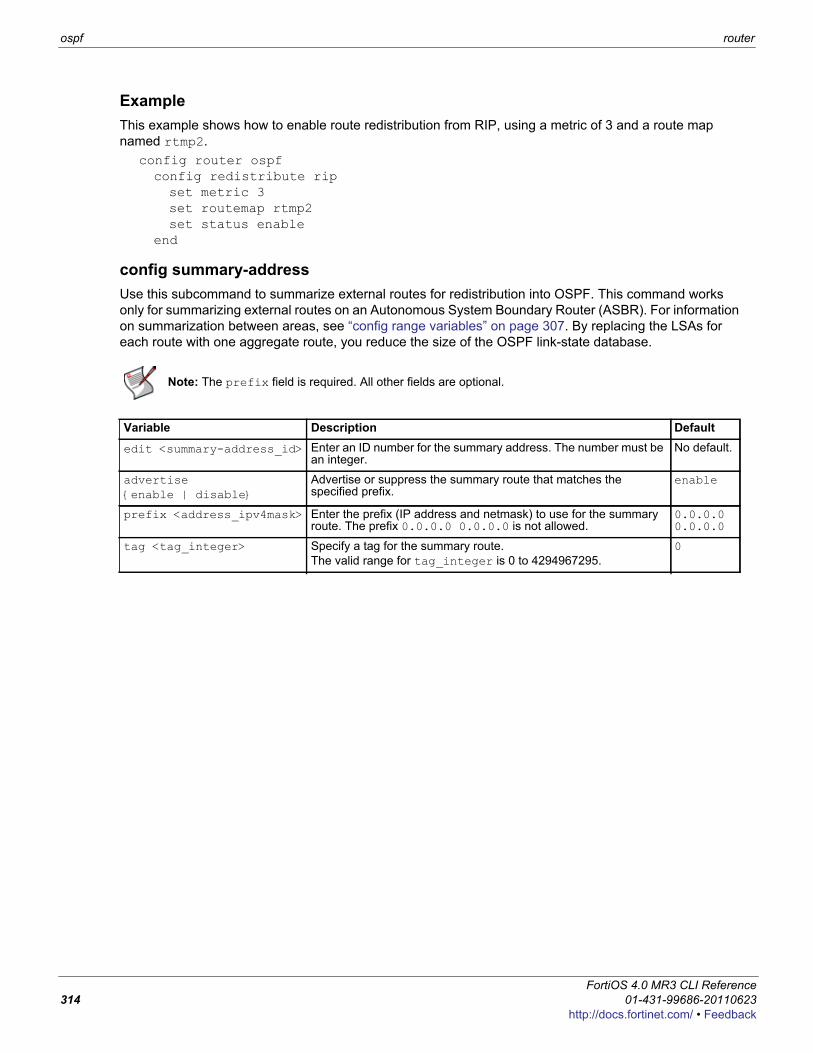
ospf router
ExampleThis example shows how to enable route redistribution from RIP, using a metric of 3 and a route map named rtmp2.
config router ospfconfig redistribute ripset metric 3set routemap rtmp2set status enable
end
config summary-addressUse this subcommand to summarize external routes for redistribution into OSPF. This command works only for summarizing external routes on an Autonomous System Boundary Router (ASBR). For information on summarization between areas, see “config range variables” on page 307. By replacing the LSAs for each route with one aggregate route, you reduce the size of the OSPF link-state database.
Note: The prefix field is required. All other fields are optional.
Variable Description Default
edit <summary-address_id> Enter an ID number for the summary address. The number must be an integer.
No default.
advertise {enable | disable}
Advertise or suppress the summary route that matches the specified prefix.
enable
prefix <address_ipv4mask> Enter the prefix (IP address and netmask) to use for the summary route. The prefix 0.0.0.0 0.0.0.0 is not allowed.
0.0.0.0 0.0.0.0
tag <tag_integer> Specify a tag for the summary route. The valid range for tag_integer is 0 to 4294967295.
0
FortiOS 4.0 MR3 CLI Reference314 01-431-99686-20110623
http://docs.fortinet.com/ • Feedback
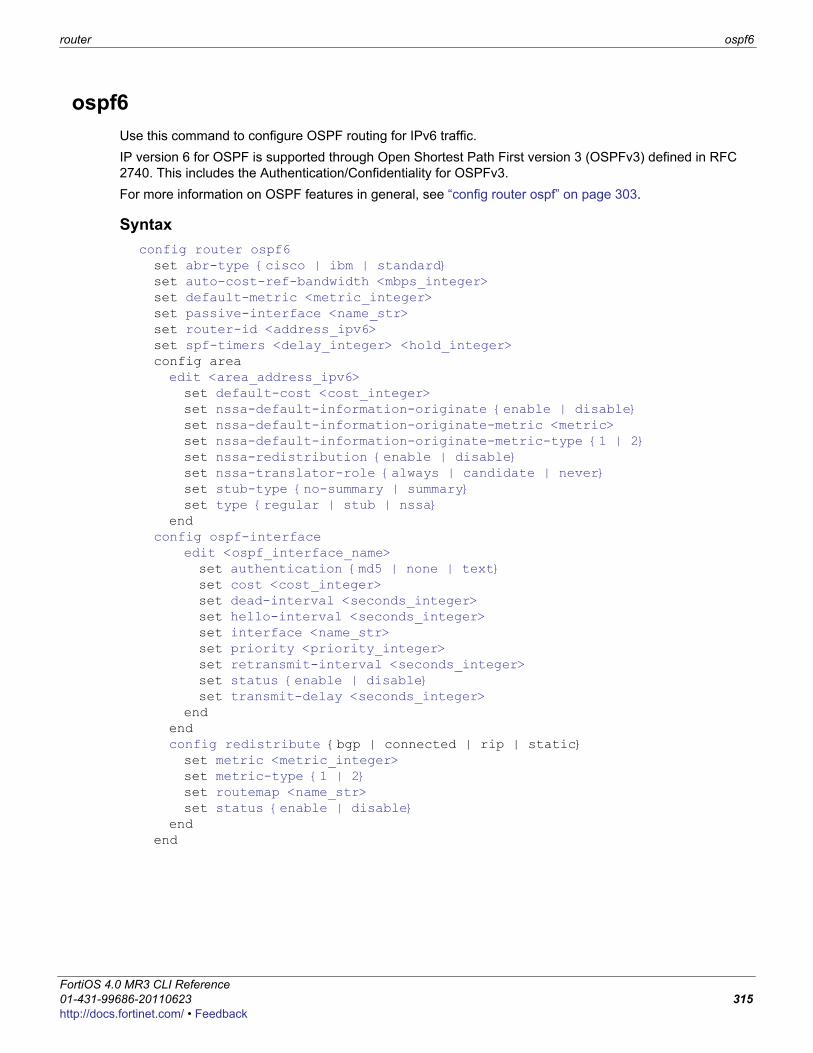
router ospf6
F0h
ospf6Use this command to configure OSPF routing for IPv6 traffic. IP version 6 for OSPF is supported through Open Shortest Path First version 3 (OSPFv3) defined in RFC 2740. This includes the Authentication/Confidentiality for OSPFv3.For more information on OSPF features in general, see “config router ospf” on page 303.
Syntaxconfig router ospf6set abr-type {cisco | ibm | standard}set auto-cost-ref-bandwidth <mbps_integer>set default-metric <metric_integer>set passive-interface <name_str>set router-id <address_ipv6>set spf-timers <delay_integer> <hold_integer>config areaedit <area_address_ipv6>set default-cost <cost_integer>set nssa-default-information-originate {enable | disable}set nssa-default-information-originate-metric <metric>set nssa-default-information-originate-metric-type {1 | 2}set nssa-redistribution {enable | disable}set nssa-translator-role {always | candidate | never}set stub-type {no-summary | summary}set type {regular | stub | nssa}
endconfig ospf-interface
edit <ospf_interface_name>set authentication {md5 | none | text}set cost <cost_integer>set dead-interval <seconds_integer>set hello-interval <seconds_integer>set interface <name_str>set priority <priority_integer>set retransmit-interval <seconds_integer>set status {enable | disable}set transmit-delay <seconds_integer>
endendconfig redistribute {bgp | connected | rip | static}set metric <metric_integer>set metric-type {1 | 2}set routemap <name_str>set status {enable | disable}
endend
ortiOS 4.0 MR3 CLI Reference1-431-99686-20110623 315ttp://docs.fortinet.com/ • Feedback
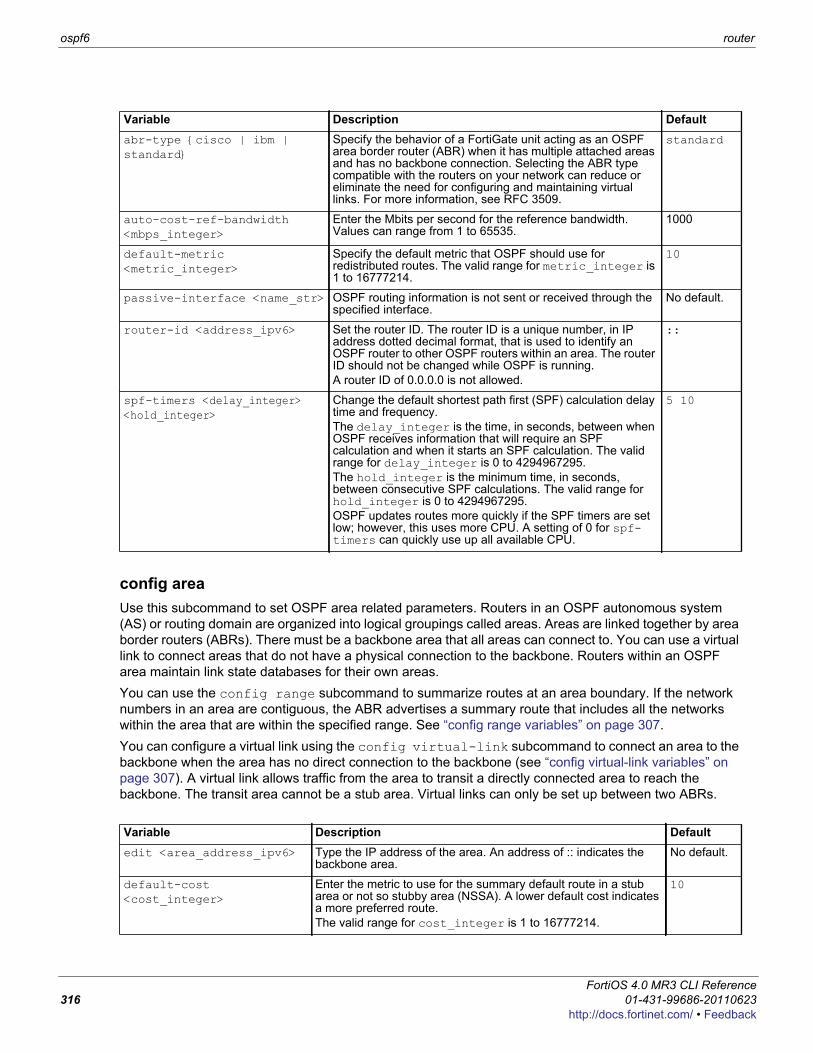
ospf6 router
config areaUse this subcommand to set OSPF area related parameters. Routers in an OSPF autonomous system (AS) or routing domain are organized into logical groupings called areas. Areas are linked together by area border routers (ABRs). There must be a backbone area that all areas can connect to. You can use a virtual link to connect areas that do not have a physical connection to the backbone. Routers within an OSPF area maintain link state databases for their own areas. You can use the config range subcommand to summarize routes at an area boundary. If the network numbers in an area are contiguous, the ABR advertises a summary route that includes all the networks within the area that are within the specified range. See “config range variables” on page 307.You can configure a virtual link using the config virtual-link subcommand to connect an area to the backbone when the area has no direct connection to the backbone (see “config virtual-link variables” on page 307). A virtual link allows traffic from the area to transit a directly connected area to reach the backbone. The transit area cannot be a stub area. Virtual links can only be set up between two ABRs.
Variable Description Defaultabr-type {cisco | ibm | standard}
Specify the behavior of a FortiGate unit acting as an OSPF area border router (ABR) when it has multiple attached areas and has no backbone connection. Selecting the ABR type compatible with the routers on your network can reduce or eliminate the need for configuring and maintaining virtual links. For more information, see RFC 3509.
standard
auto-cost-ref-bandwidth <mbps_integer>
Enter the Mbits per second for the reference bandwidth. Values can range from 1 to 65535.
1000
default-metric <metric_integer>
Specify the default metric that OSPF should use for redistributed routes. The valid range for metric_integer is 1 to 16777214.
10
passive-interface <name_str> OSPF routing information is not sent or received through the specified interface.
No default.
router-id <address_ipv6> Set the router ID. The router ID is a unique number, in IP address dotted decimal format, that is used to identify an OSPF router to other OSPF routers within an area. The router ID should not be changed while OSPF is running.A router ID of 0.0.0.0 is not allowed.
::
spf-timers <delay_integer> <hold_integer>
Change the default shortest path first (SPF) calculation delay time and frequency. The delay_integer is the time, in seconds, between when OSPF receives information that will require an SPF calculation and when it starts an SPF calculation. The valid range for delay_integer is 0 to 4294967295.The hold_integer is the minimum time, in seconds, between consecutive SPF calculations. The valid range for hold_integer is 0 to 4294967295.OSPF updates routes more quickly if the SPF timers are set low; however, this uses more CPU. A setting of 0 for spf-timers can quickly use up all available CPU.
5 10
Variable Description Defaultedit <area_address_ipv6> Type the IP address of the area. An address of :: indicates the
backbone area.No default.
default-cost <cost_integer>
Enter the metric to use for the summary default route in a stub area or not so stubby area (NSSA). A lower default cost indicates a more preferred route.The valid range for cost_integer is 1 to 16777214.
10
FortiOS 4.0 MR3 CLI Reference316 01-431-99686-20110623
http://docs.fortinet.com/ • Feedback
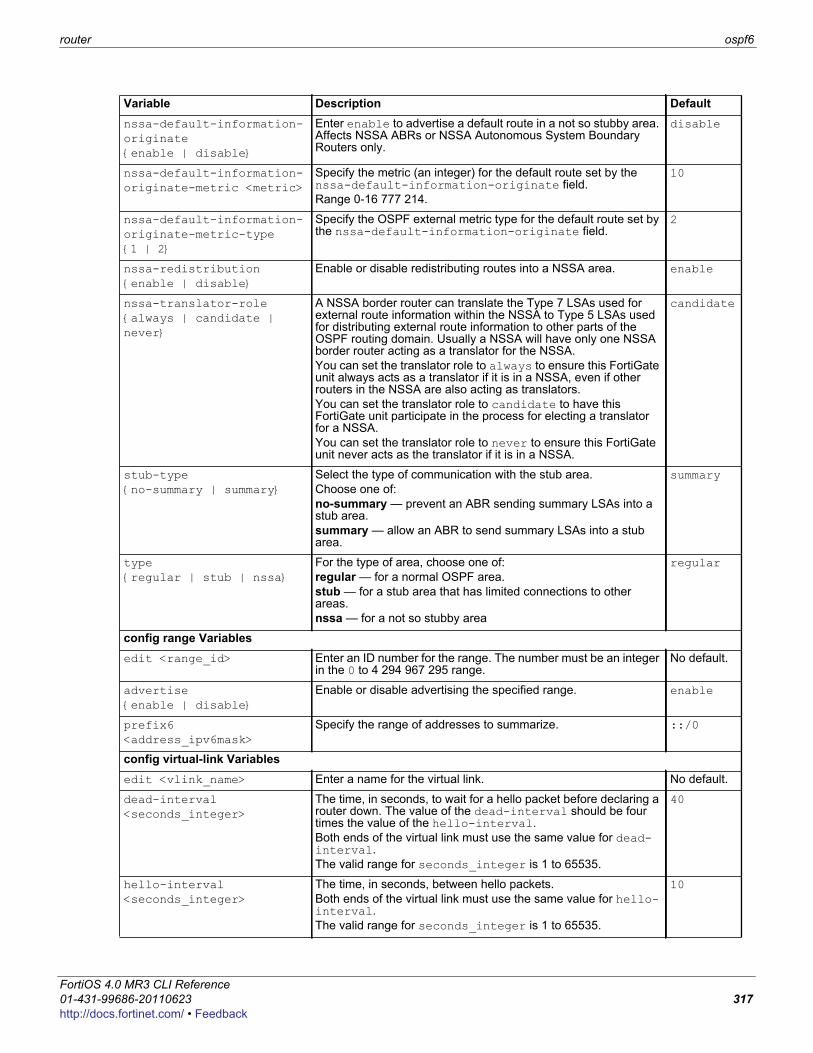
router ospf6
F0h
nssa-default-information-originate {enable | disable}
Enter enable to advertise a default route in a not so stubby area. Affects NSSA ABRs or NSSA Autonomous System Boundary Routers only.
disable
nssa-default-information-originate-metric <metric>
Specify the metric (an integer) for the default route set by the nssa-default-information-originate field. Range 0-16 777 214.
10
nssa-default-information-originate-metric-type {1 | 2}
Specify the OSPF external metric type for the default route set by the nssa-default-information-originate field.
2
nssa-redistribution {enable | disable}
Enable or disable redistributing routes into a NSSA area. enable
nssa-translator-role {always | candidate | never}
A NSSA border router can translate the Type 7 LSAs used for external route information within the NSSA to Type 5 LSAs used for distributing external route information to other parts of the OSPF routing domain. Usually a NSSA will have only one NSSA border router acting as a translator for the NSSA.You can set the translator role to always to ensure this FortiGate unit always acts as a translator if it is in a NSSA, even if other routers in the NSSA are also acting as translators.You can set the translator role to candidate to have this FortiGate unit participate in the process for electing a translator for a NSSA.You can set the translator role to never to ensure this FortiGate unit never acts as the translator if it is in a NSSA.
candidate
stub-type {no-summary | summary}
Select the type of communication with the stub area. Choose one of:no-summary — prevent an ABR sending summary LSAs into a stub area. summary — allow an ABR to send summary LSAs into a stub area.
summary
type {regular | stub | nssa}
For the type of area, choose one of:regular — for a normal OSPF area.stub — for a stub area that has limited connections to other areas.nssa — for a not so stubby area
regular
config range Variablesedit <range_id> Enter an ID number for the range. The number must be an integer
in the 0 to 4 294 967 295 range.No default.
advertise {enable | disable}
Enable or disable advertising the specified range. enable
prefix6 <address_ipv6mask>
Specify the range of addresses to summarize. ::/0
config virtual-link Variablesedit <vlink_name> Enter a name for the virtual link. No default.
dead-interval <seconds_integer>
The time, in seconds, to wait for a hello packet before declaring a router down. The value of the dead-interval should be four times the value of the hello-interval. Both ends of the virtual link must use the same value for dead-interval.The valid range for seconds_integer is 1 to 65535.
40
hello-interval <seconds_integer>
The time, in seconds, between hello packets. Both ends of the virtual link must use the same value for hello-interval.The valid range for seconds_integer is 1 to 65535.
10
Variable Description Default
ortiOS 4.0 MR3 CLI Reference1-431-99686-20110623 317ttp://docs.fortinet.com/ • Feedback
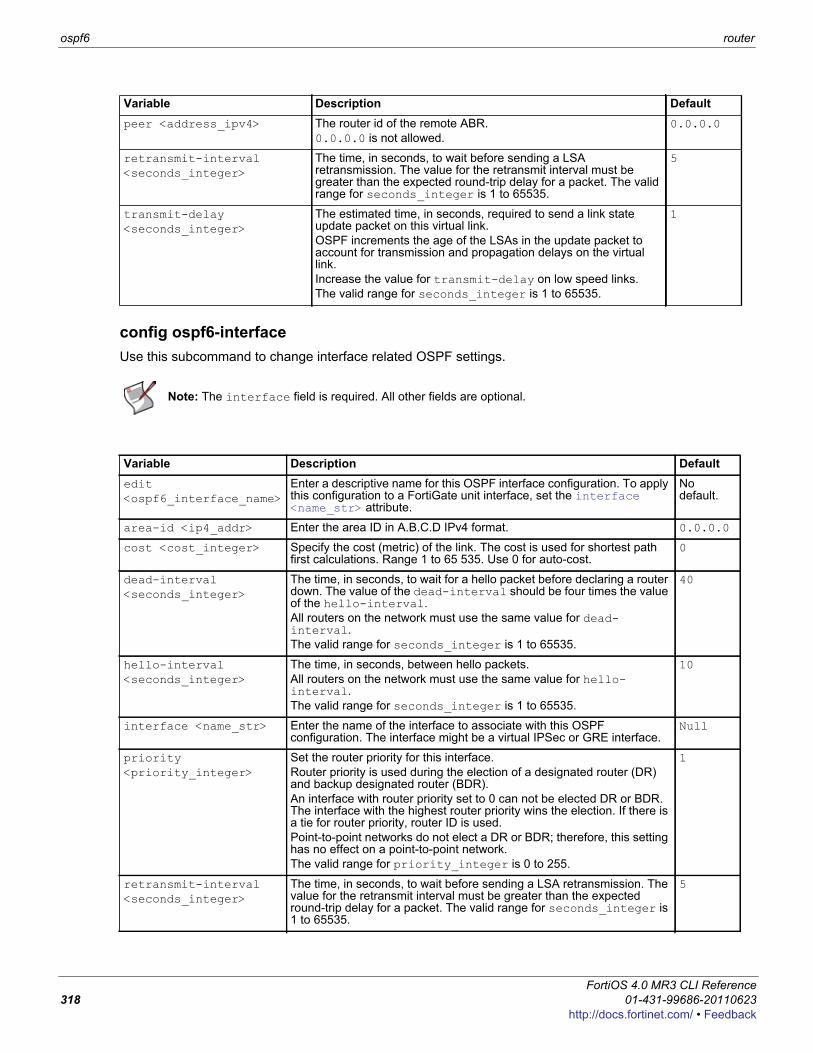
ospf6 router
config ospf6-interfaceUse this subcommand to change interface related OSPF settings.
peer <address_ipv4> The router id of the remote ABR.0.0.0.0 is not allowed.
0.0.0.0
retransmit-interval <seconds_integer>
The time, in seconds, to wait before sending a LSA retransmission. The value for the retransmit interval must be greater than the expected round-trip delay for a packet. The valid range for seconds_integer is 1 to 65535.
5
transmit-delay <seconds_integer>
The estimated time, in seconds, required to send a link state update packet on this virtual link. OSPF increments the age of the LSAs in the update packet to account for transmission and propagation delays on the virtual link.Increase the value for transmit-delay on low speed links.The valid range for seconds_integer is 1 to 65535.
1
Note: The interface field is required. All other fields are optional.
Variable Description Defaultedit <ospf6_interface_name>
Enter a descriptive name for this OSPF interface configuration. To apply this configuration to a FortiGate unit interface, set the interface <name_str> attribute.
No default.
area-id <ip4_addr> Enter the area ID in A.B.C.D IPv4 format. 0.0.0.0
cost <cost_integer> Specify the cost (metric) of the link. The cost is used for shortest path first calculations. Range 1 to 65 535. Use 0 for auto-cost.
0
dead-interval <seconds_integer>
The time, in seconds, to wait for a hello packet before declaring a router down. The value of the dead-interval should be four times the value of the hello-interval. All routers on the network must use the same value for dead-interval.The valid range for seconds_integer is 1 to 65535.
40
hello-interval <seconds_integer>
The time, in seconds, between hello packets. All routers on the network must use the same value for hello-interval.The valid range for seconds_integer is 1 to 65535.
10
interface <name_str> Enter the name of the interface to associate with this OSPF configuration. The interface might be a virtual IPSec or GRE interface.
Null
priority <priority_integer>
Set the router priority for this interface.Router priority is used during the election of a designated router (DR) and backup designated router (BDR).An interface with router priority set to 0 can not be elected DR or BDR. The interface with the highest router priority wins the election. If there is a tie for router priority, router ID is used. Point-to-point networks do not elect a DR or BDR; therefore, this setting has no effect on a point-to-point network.The valid range for priority_integer is 0 to 255.
1
retransmit-interval <seconds_integer>
The time, in seconds, to wait before sending a LSA retransmission. The value for the retransmit interval must be greater than the expected round-trip delay for a packet. The valid range for seconds_integer is 1 to 65535.
5
Variable Description Default
FortiOS 4.0 MR3 CLI Reference318 01-431-99686-20110623
http://docs.fortinet.com/ • Feedback
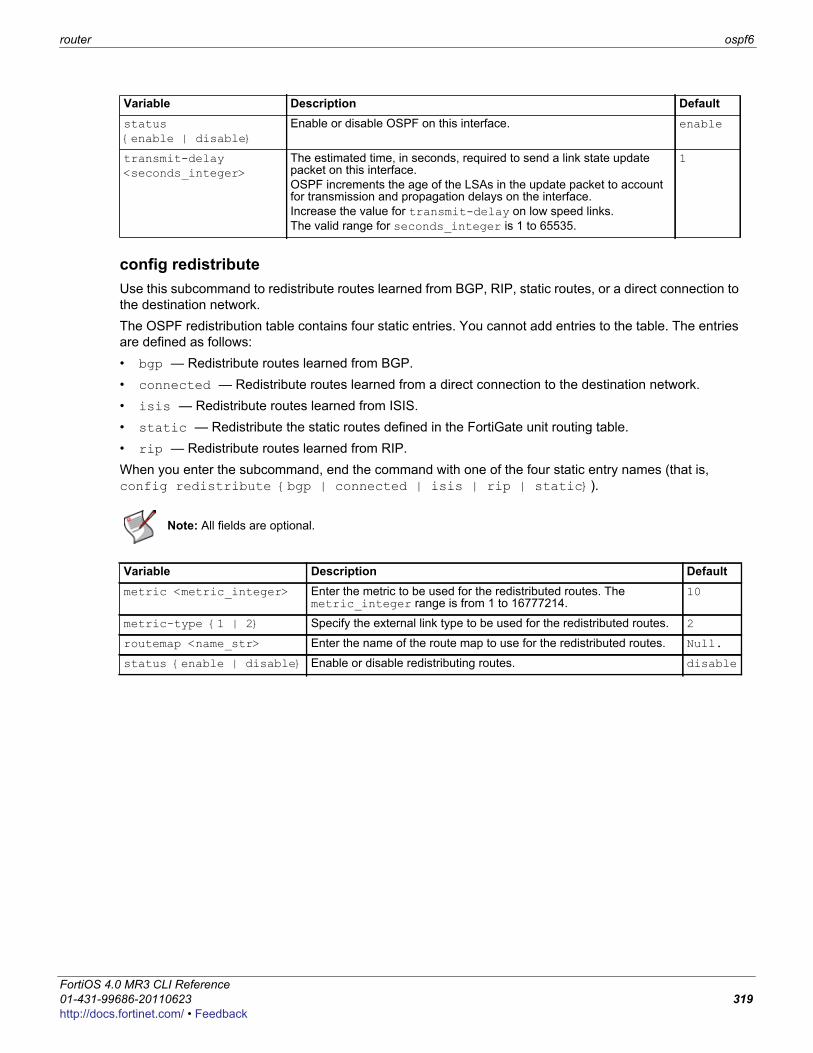
router ospf6
F0h
config redistributeUse this subcommand to redistribute routes learned from BGP, RIP, static routes, or a direct connection to the destination network.The OSPF redistribution table contains four static entries. You cannot add entries to the table. The entries are defined as follows:• bgp — Redistribute routes learned from BGP.• connected — Redistribute routes learned from a direct connection to the destination network.• isis — Redistribute routes learned from ISIS.• static — Redistribute the static routes defined in the FortiGate unit routing table.• rip — Redistribute routes learned from RIP.When you enter the subcommand, end the command with one of the four static entry names (that is, config redistribute {bgp | connected | isis | rip | static}).
status {enable | disable}
Enable or disable OSPF on this interface. enable
transmit-delay <seconds_integer>
The estimated time, in seconds, required to send a link state update packet on this interface. OSPF increments the age of the LSAs in the update packet to account for transmission and propagation delays on the interface.Increase the value for transmit-delay on low speed links.The valid range for seconds_integer is 1 to 65535.
1
Note: All fields are optional.
Variable Description Defaultmetric <metric_integer> Enter the metric to be used for the redistributed routes. The
metric_integer range is from 1 to 16777214.10
metric-type {1 | 2} Specify the external link type to be used for the redistributed routes. 2
routemap <name_str> Enter the name of the route map to use for the redistributed routes. Null.
status {enable | disable} Enable or disable redistributing routes. disable
Variable Description Default
ortiOS 4.0 MR3 CLI Reference1-431-99686-20110623 319ttp://docs.fortinet.com/ • Feedback
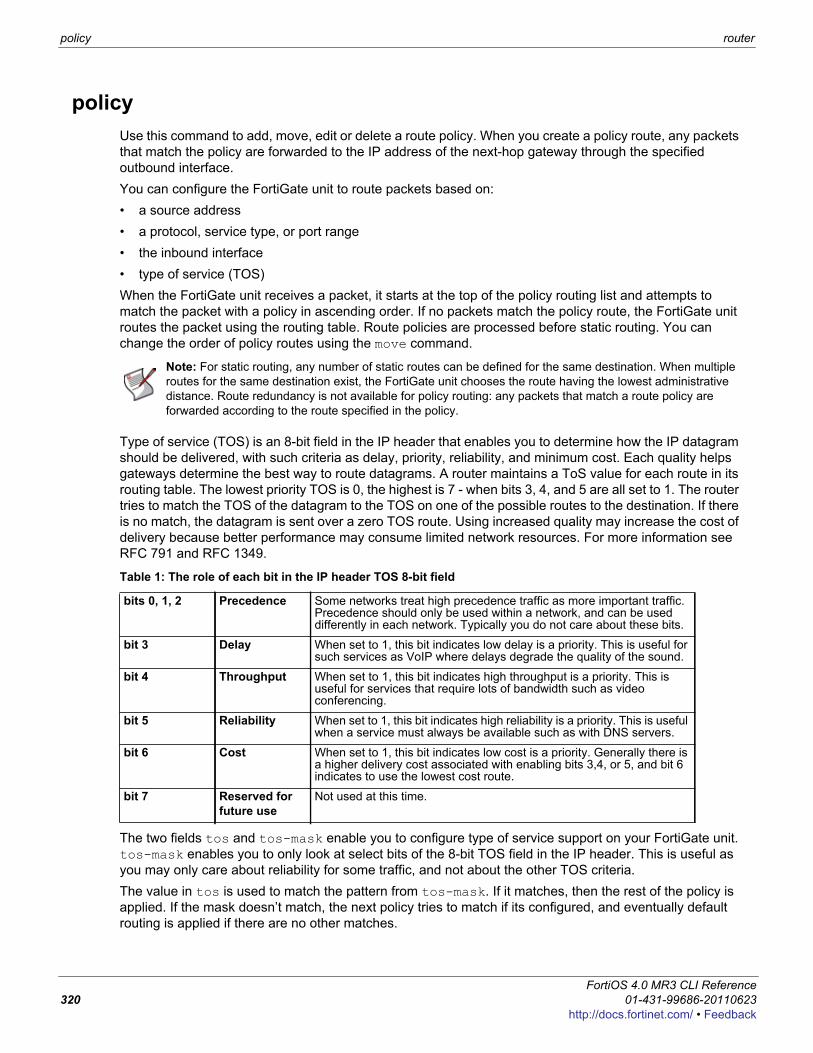
policy router
policyUse this command to add, move, edit or delete a route policy. When you create a policy route, any packets that match the policy are forwarded to the IP address of the next-hop gateway through the specified outbound interface.You can configure the FortiGate unit to route packets based on:• a source address• a protocol, service type, or port range• the inbound interface• type of service (TOS)When the FortiGate unit receives a packet, it starts at the top of the policy routing list and attempts to match the packet with a policy in ascending order. If no packets match the policy route, the FortiGate unit routes the packet using the routing table. Route policies are processed before static routing. You can change the order of policy routes using the move command.
Type of service (TOS) is an 8-bit field in the IP header that enables you to determine how the IP datagram should be delivered, with such criteria as delay, priority, reliability, and minimum cost. Each quality helps gateways determine the best way to route datagrams. A router maintains a ToS value for each route in its routing table. The lowest priority TOS is 0, the highest is 7 - when bits 3, 4, and 5 are all set to 1. The router tries to match the TOS of the datagram to the TOS on one of the possible routes to the destination. If there is no match, the datagram is sent over a zero TOS route. Using increased quality may increase the cost of delivery because better performance may consume limited network resources. For more information see RFC 791 and RFC 1349.
The two fields tos and tos-mask enable you to configure type of service support on your FortiGate unit. tos-mask enables you to only look at select bits of the 8-bit TOS field in the IP header. This is useful as you may only care about reliability for some traffic, and not about the other TOS criteria.The value in tos is used to match the pattern from tos-mask. If it matches, then the rest of the policy is applied. If the mask doesn’t match, the next policy tries to match if its configured, and eventually default routing is applied if there are no other matches.
Note: For static routing, any number of static routes can be defined for the same destination. When multiple routes for the same destination exist, the FortiGate unit chooses the route having the lowest administrative distance. Route redundancy is not available for policy routing: any packets that match a route policy are forwarded according to the route specified in the policy.
Table 1: The role of each bit in the IP header TOS 8-bit field
bits 0, 1, 2 Precedence Some networks treat high precedence traffic as more important traffic. Precedence should only be used within a network, and can be used differently in each network. Typically you do not care about these bits.
bit 3 Delay When set to 1, this bit indicates low delay is a priority. This is useful for such services as VoIP where delays degrade the quality of the sound.
bit 4 Throughput When set to 1, this bit indicates high throughput is a priority. This is useful for services that require lots of bandwidth such as video conferencing.
bit 5 Reliability When set to 1, this bit indicates high reliability is a priority. This is useful when a service must always be available such as with DNS servers.
bit 6 Cost When set to 1, this bit indicates low cost is a priority. Generally there is a higher delivery cost associated with enabling bits 3,4, or 5, and bit 6 indicates to use the lowest cost route.
bit 7 Reserved for future use
Not used at this time.
FortiOS 4.0 MR3 CLI Reference320 01-431-99686-20110623
http://docs.fortinet.com/ • Feedback
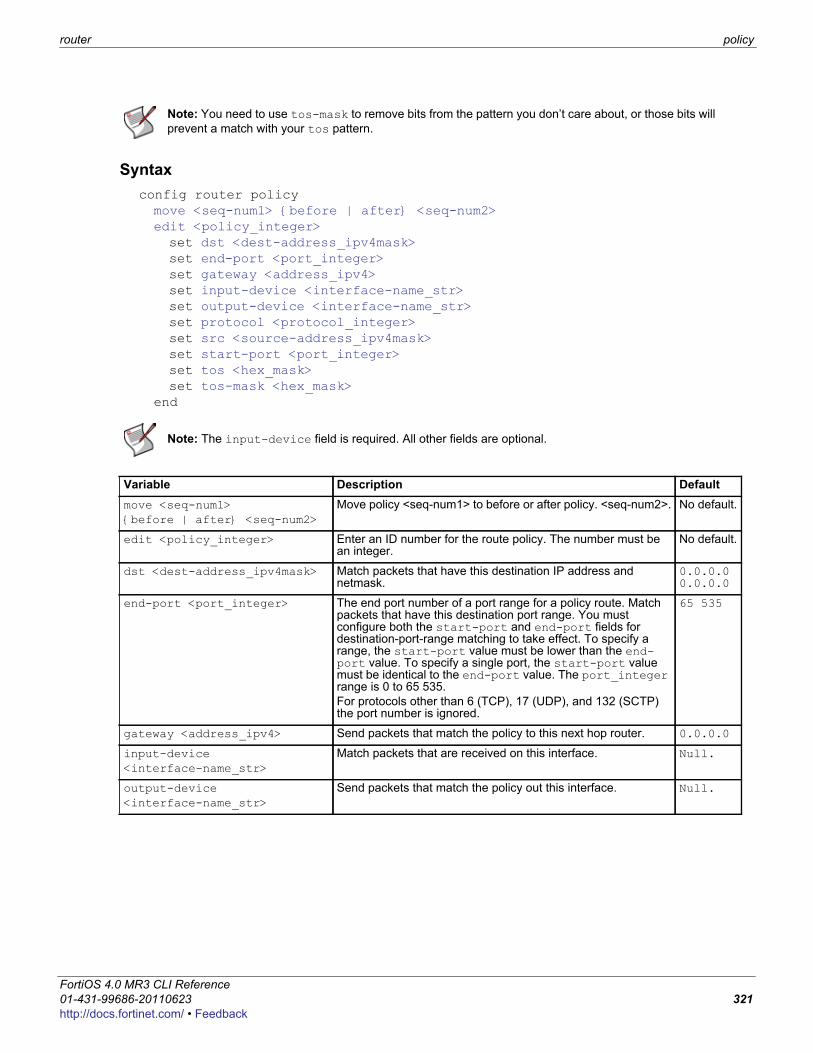
router policy
F0h
Syntaxconfig router policymove <seq-num1> {before | after} <seq-num2>edit <policy_integer>set dst <dest-address_ipv4mask>set end-port <port_integer>set gateway <address_ipv4>set input-device <interface-name_str>set output-device <interface-name_str>set protocol <protocol_integer>set src <source-address_ipv4mask>set start-port <port_integer>set tos <hex_mask>set tos-mask <hex_mask>
end
Note: You need to use tos-mask to remove bits from the pattern you don’t care about, or those bits will prevent a match with your tos pattern.
Note: The input-device field is required. All other fields are optional.
Variable Description Defaultmove <seq-num1> {before | after} <seq-num2>
Move policy <seq-num1> to before or after policy. <seq-num2>. No default.
edit <policy_integer> Enter an ID number for the route policy. The number must be an integer.
No default.
dst <dest-address_ipv4mask> Match packets that have this destination IP address and netmask.
0.0.0.0 0.0.0.0
end-port <port_integer> The end port number of a port range for a policy route. Match packets that have this destination port range. You must configure both the start-port and end-port fields for destination-port-range matching to take effect. To specify a range, the start-port value must be lower than the end-port value. To specify a single port, the start-port value must be identical to the end-port value. The port_integer range is 0 to 65 535.For protocols other than 6 (TCP), 17 (UDP), and 132 (SCTP) the port number is ignored.
65 535
gateway <address_ipv4> Send packets that match the policy to this next hop router. 0.0.0.0
input-device <interface-name_str>
Match packets that are received on this interface. Null.
output-device <interface-name_str>
Send packets that match the policy out this interface. Null.
ortiOS 4.0 MR3 CLI Reference1-431-99686-20110623 321ttp://docs.fortinet.com/ • Feedback
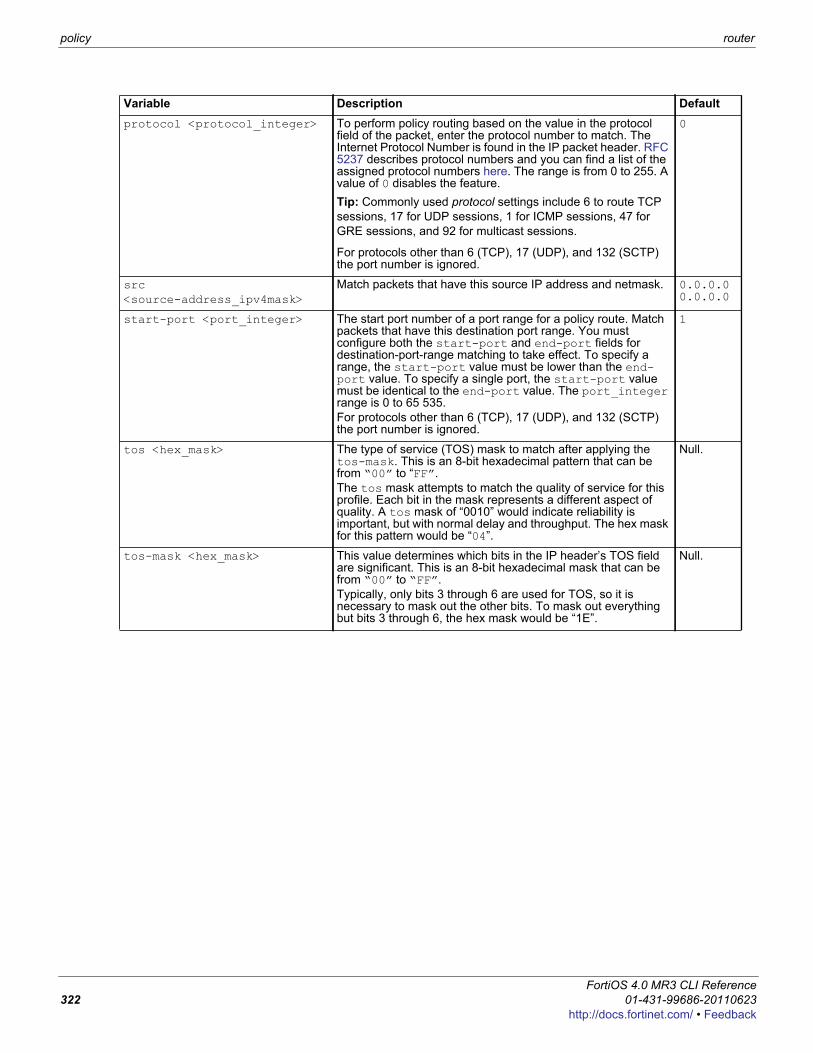
policy router
protocol <protocol_integer> To perform policy routing based on the value in the protocol field of the packet, enter the protocol number to match. The Internet Protocol Number is found in the IP packet header. RFC 5237 describes protocol numbers and you can find a list of the assigned protocol numbers here. The range is from 0 to 255. A value of 0 disables the feature.Tip: Commonly used protocol settings include 6 to route TCP sessions, 17 for UDP sessions, 1 for ICMP sessions, 47 for GRE sessions, and 92 for multicast sessions.
For protocols other than 6 (TCP), 17 (UDP), and 132 (SCTP) the port number is ignored.
0
src <source-address_ipv4mask>
Match packets that have this source IP address and netmask. 0.0.0.0 0.0.0.0
start-port <port_integer> The start port number of a port range for a policy route. Match packets that have this destination port range. You must configure both the start-port and end-port fields for destination-port-range matching to take effect. To specify a range, the start-port value must be lower than the end-port value. To specify a single port, the start-port value must be identical to the end-port value. The port_integer range is 0 to 65 535.For protocols other than 6 (TCP), 17 (UDP), and 132 (SCTP) the port number is ignored.
1
tos <hex_mask> The type of service (TOS) mask to match after applying the tos-mask. This is an 8-bit hexadecimal pattern that can be from “00” to “FF”. The tos mask attempts to match the quality of service for this profile. Each bit in the mask represents a different aspect of quality. A tos mask of “0010” would indicate reliability is important, but with normal delay and throughput. The hex mask for this pattern would be “04”.
Null.
tos-mask <hex_mask> This value determines which bits in the IP header’s TOS field are significant. This is an 8-bit hexadecimal mask that can be from “00” to “FF”.Typically, only bits 3 through 6 are used for TOS, so it is necessary to mask out the other bits. To mask out everything but bits 3 through 6, the hex mask would be “1E”.
Null.
Variable Description Default
FortiOS 4.0 MR3 CLI Reference322 01-431-99686-20110623
http://docs.fortinet.com/ • Feedback
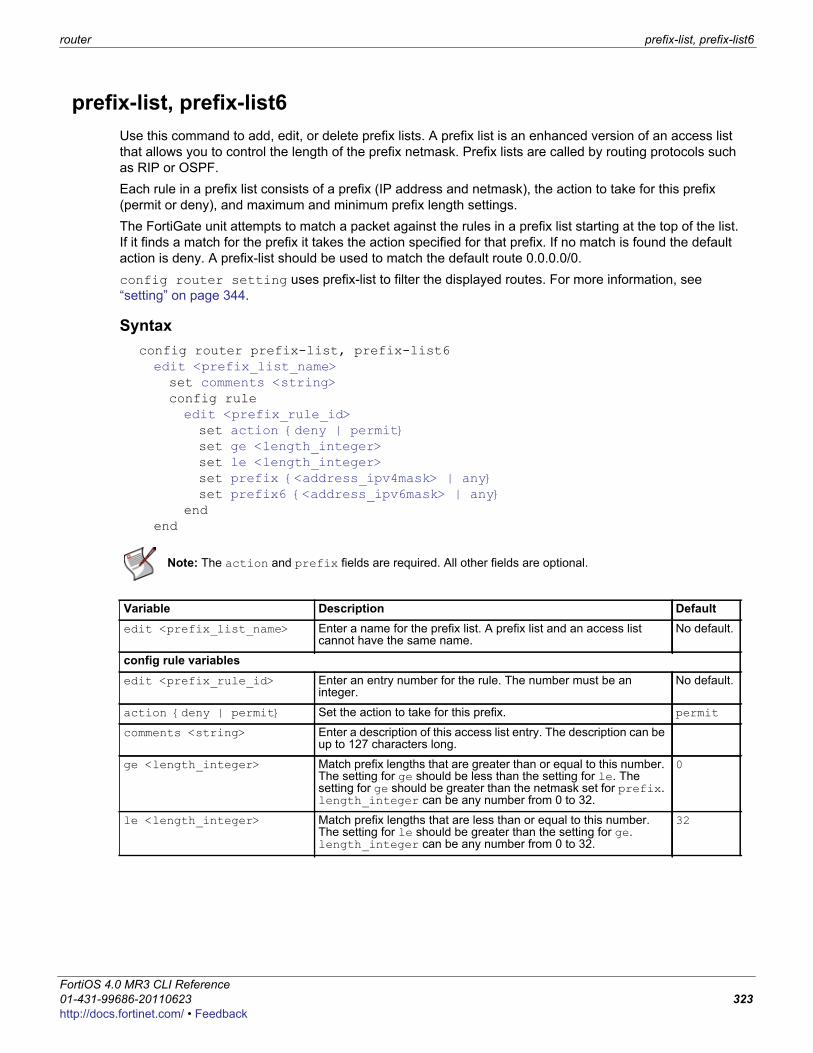
router prefix-list, prefix-list6
F0h
prefix-list, prefix-list6Use this command to add, edit, or delete prefix lists. A prefix list is an enhanced version of an access list that allows you to control the length of the prefix netmask. Prefix lists are called by routing protocols such as RIP or OSPF.Each rule in a prefix list consists of a prefix (IP address and netmask), the action to take for this prefix (permit or deny), and maximum and minimum prefix length settings. The FortiGate unit attempts to match a packet against the rules in a prefix list starting at the top of the list. If it finds a match for the prefix it takes the action specified for that prefix. If no match is found the default action is deny. A prefix-list should be used to match the default route 0.0.0.0/0.config router setting uses prefix-list to filter the displayed routes. For more information, see “setting” on page 344.
Syntaxconfig router prefix-list, prefix-list6edit <prefix_list_name>set comments <string>config ruleedit <prefix_rule_id>set action {deny | permit}set ge <length_integer>set le <length_integer>set prefix {<address_ipv4mask> | any}set prefix6 {<address_ipv6mask> | any}
endend
Note: The action and prefix fields are required. All other fields are optional.
Variable Description Defaultedit <prefix_list_name> Enter a name for the prefix list. A prefix list and an access list
cannot have the same name.No default.
config rule variablesedit <prefix_rule_id> Enter an entry number for the rule. The number must be an
integer.No default.
action {deny | permit} Set the action to take for this prefix. permit
comments <string> Enter a description of this access list entry. The description can be up to 127 characters long.
ge <length_integer> Match prefix lengths that are greater than or equal to this number. The setting for ge should be less than the setting for le. The setting for ge should be greater than the netmask set for prefix. length_integer can be any number from 0 to 32.
0
le <length_integer> Match prefix lengths that are less than or equal to this number. The setting for le should be greater than the setting for ge. length_integer can be any number from 0 to 32.
32
ortiOS 4.0 MR3 CLI Reference1-431-99686-20110623 323ttp://docs.fortinet.com/ • Feedback
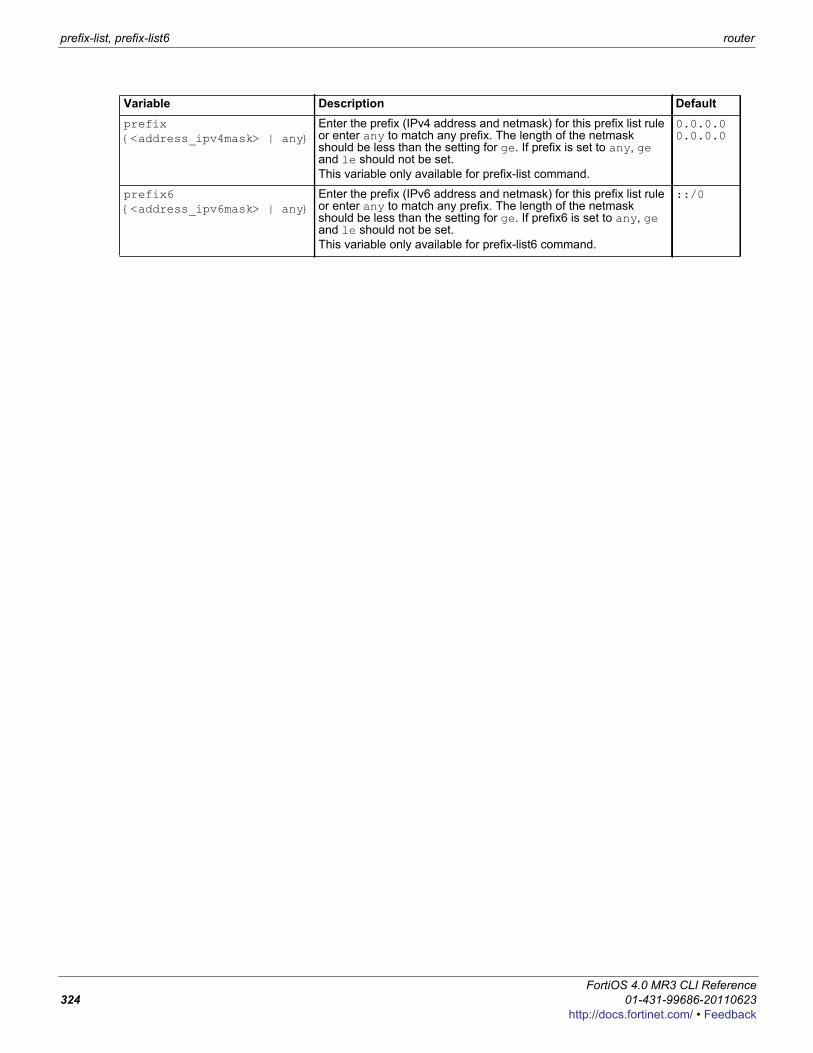
prefix-list, prefix-list6 router
prefix {<address_ipv4mask> | any}
Enter the prefix (IPv4 address and netmask) for this prefix list rule or enter any to match any prefix. The length of the netmask should be less than the setting for ge. If prefix is set to any, ge and le should not be set.This variable only available for prefix-list command.
0.0.0.00.0.0.0
prefix6 {<address_ipv6mask> | any}
Enter the prefix (IPv6 address and netmask) for this prefix list rule or enter any to match any prefix. The length of the netmask should be less than the setting for ge. If prefix6 is set to any, ge and le should not be set.This variable only available for prefix-list6 command.
::/0
Variable Description Default
FortiOS 4.0 MR3 CLI Reference324 01-431-99686-20110623
http://docs.fortinet.com/ • Feedback

router rip
F0h
ripUse this command to configure the Routing Information Protocol (RIP) on the FortiGate unit. RIP is a distance-vector routing protocol intended for small, relatively homogeneous networks. RIP uses hop count as its routing metric. Each network is usually counted as one hop. The network diameter is limited to 15 hops with 16 hops.The FortiOS implementation of RIP supports RIP version 1 (see RFC 1058) and RIP version 2 (see RFC 2453). RIP version 2 enables RIP messages to carry more information, and to support simple authentication and subnet masks.
Syntaxconfig router ripset default-information-originate {enable | disable}set default-metric <metric_integer>set garbage-timer <timer_integer>set passive-interface <name_str>set timeout-timer <timer_integer>set update-timer <timer_integer>set version {1 2}config distanceedit <distance_id>set access-list <name_str>set distance <distance_integer>set prefix <address_ipv4mask>
endconfig distribute-listedit <distribute_list_id>set direction {in | out}set interface <name_str>set listname <access/prefix-listname_str>set status {enable | disable}
endconfig interfaceedit <interface_name>set auth-keychain <name_str>set auth-mode {none | text | md5}set auth-string <password_str>set receive-version {1 2}set send-version {1 2}set send-version2-broadcast {enable | disable}set split-horizon {poisoned | regular}set split-horizon-status {enable | disable}
endconfig neighboredit <neighbor_id>set ip <address_ipv4>
end
Note: update_timer cannot be larger than timeout_timer and garbage_timer. Attempts to do so will generate an error.
ortiOS 4.0 MR3 CLI Reference1-431-99686-20110623 325ttp://docs.fortinet.com/ • Feedback
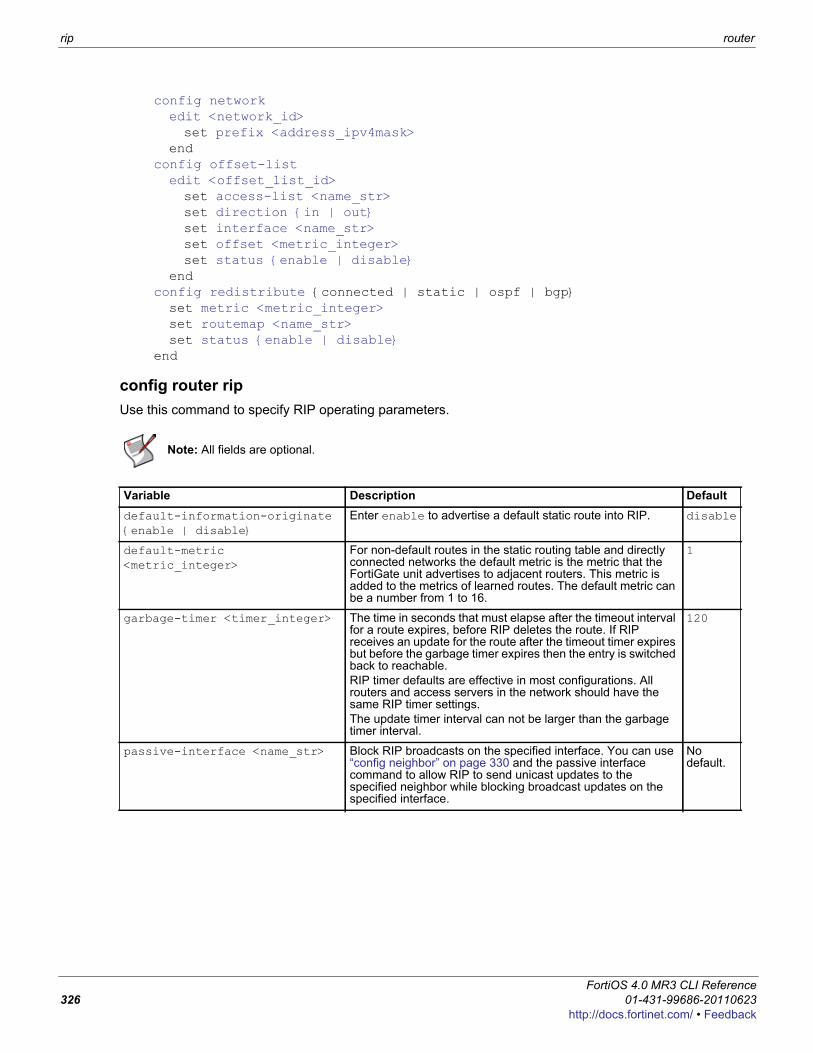
rip router
config networkedit <network_id>set prefix <address_ipv4mask>
endconfig offset-listedit <offset_list_id>set access-list <name_str>set direction {in | out}set interface <name_str>set offset <metric_integer>set status {enable | disable}
endconfig redistribute {connected | static | ospf | bgp}set metric <metric_integer>set routemap <name_str>set status {enable | disable}
end
config router ripUse this command to specify RIP operating parameters.
Note: All fields are optional.
Variable Description Defaultdefault-information-originate {enable | disable}
Enter enable to advertise a default static route into RIP. disable
default-metric <metric_integer>
For non-default routes in the static routing table and directly connected networks the default metric is the metric that the FortiGate unit advertises to adjacent routers. This metric is added to the metrics of learned routes. The default metric can be a number from 1 to 16.
1
garbage-timer <timer_integer> The time in seconds that must elapse after the timeout interval for a route expires, before RIP deletes the route. If RIP receives an update for the route after the timeout timer expires but before the garbage timer expires then the entry is switched back to reachable.RIP timer defaults are effective in most configurations. All routers and access servers in the network should have the same RIP timer settings.The update timer interval can not be larger than the garbage timer interval.
120
passive-interface <name_str> Block RIP broadcasts on the specified interface. You can use “config neighbor” on page 330 and the passive interface command to allow RIP to send unicast updates to the specified neighbor while blocking broadcast updates on the specified interface.
No default.
FortiOS 4.0 MR3 CLI Reference326 01-431-99686-20110623
http://docs.fortinet.com/ • Feedback
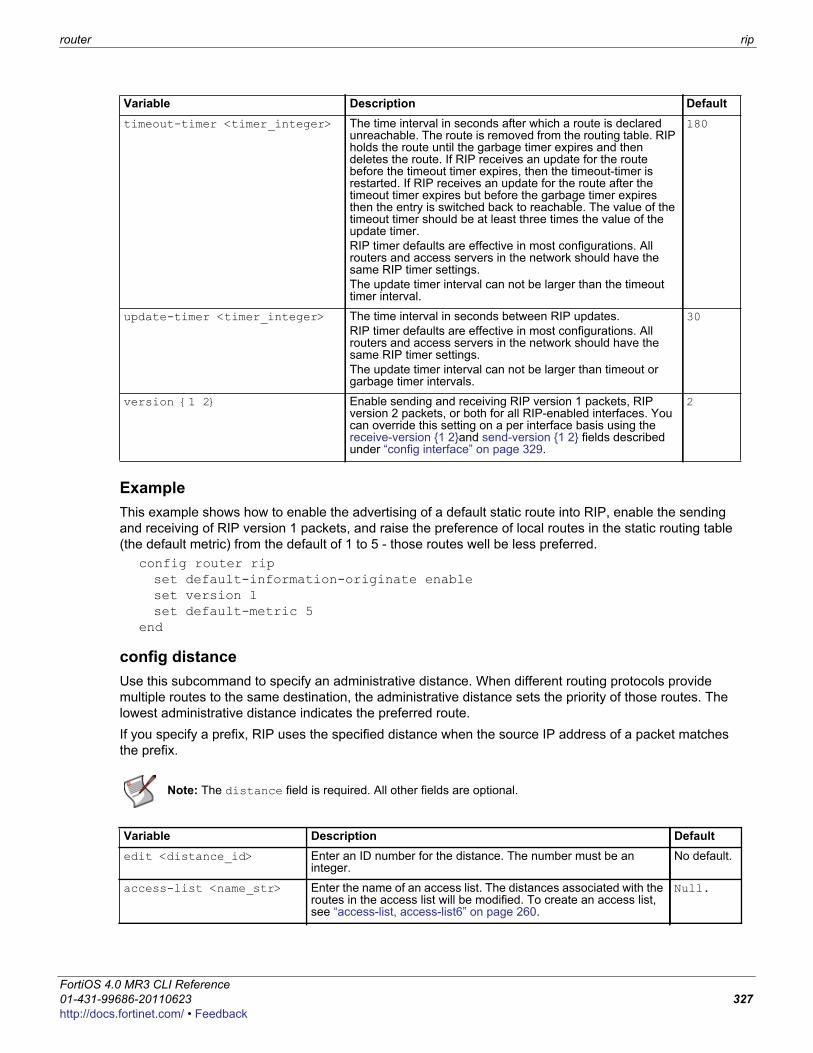
router rip
F0h
ExampleThis example shows how to enable the advertising of a default static route into RIP, enable the sending and receiving of RIP version 1 packets, and raise the preference of local routes in the static routing table (the default metric) from the default of 1 to 5 - those routes well be less preferred.
config router ripset default-information-originate enableset version 1set default-metric 5
end
config distanceUse this subcommand to specify an administrative distance. When different routing protocols provide multiple routes to the same destination, the administrative distance sets the priority of those routes. The lowest administrative distance indicates the preferred route. If you specify a prefix, RIP uses the specified distance when the source IP address of a packet matches the prefix.
timeout-timer <timer_integer> The time interval in seconds after which a route is declared unreachable. The route is removed from the routing table. RIP holds the route until the garbage timer expires and then deletes the route. If RIP receives an update for the route before the timeout timer expires, then the timeout-timer is restarted. If RIP receives an update for the route after the timeout timer expires but before the garbage timer expires then the entry is switched back to reachable. The value of the timeout timer should be at least three times the value of the update timer. RIP timer defaults are effective in most configurations. All routers and access servers in the network should have the same RIP timer settings.The update timer interval can not be larger than the timeout timer interval.
180
update-timer <timer_integer> The time interval in seconds between RIP updates.RIP timer defaults are effective in most configurations. All routers and access servers in the network should have the same RIP timer settings.The update timer interval can not be larger than timeout or garbage timer intervals.
30
version {1 2} Enable sending and receiving RIP version 1 packets, RIP version 2 packets, or both for all RIP-enabled interfaces. You can override this setting on a per interface basis using the receive-version {1 2}and send-version {1 2} fields described under “config interface” on page 329.
2
Note: The distance field is required. All other fields are optional.
Variable Description Defaultedit <distance_id> Enter an ID number for the distance. The number must be an
integer. No default.
access-list <name_str> Enter the name of an access list. The distances associated with the routes in the access list will be modified. To create an access list, see “access-list, access-list6” on page 260.
Null.
Variable Description Default
ortiOS 4.0 MR3 CLI Reference1-431-99686-20110623 327ttp://docs.fortinet.com/ • Feedback

rip router
ExampleThis example shows how to change the administrative distance to 10 for all IP addresses that match the internal_example access-list.
config router ripconfig distanceedit 1set distance 10set access-list internal_example
endend
config distribute-listUse this subcommand to filter incoming or outgoing updates using an access list or a prefix list. If you do not specify an interface, the filter will be applied to all interfaces. You must configure the access list or prefix list that you want the distribution list to use before you configure the distribution list. For more information on configuring access lists and prefix lists, see “access-list, access-list6” on page 260 and “prefix-list, prefix-list6” on page 323.
ExampleThis example shows how to configure and enable a distribution list to use an access list named allowed_routers for incoming updates on the external interface.
config router ripconfig distribute-listedit 1set direction in
distance <distance_integer>
Enter a number from 1 to 255, to set the administrative distance.This field is required.
0
prefix <address_ipv4mask>
Optionally enter a prefix to apply the administrative distance to. 0.0.0.0 0.0.0.0
Note: The direction and listname fields are required. All other fields are optional.
Variable Description Defaultedit <distribute_list_id> Enter an ID number for the distribution list. The number must be
an integer.No default.
direction {in | out} Set the direction for the filter. Enter in to filter incoming packets that originate from other routers. Enter out to filter outgoing packets the FortiGate unit is sending to other routers.
out
interface <name_str> Enter the name of the interface to apply this distribution list to. If you do not specify an interface, this distribution list will be used for all interfaces.
Null.
listname <access/prefix-listname_str>
Enter the name of the access list or prefix list to use for this distribution list.The prefix or access list used must be configured before configuring the distribute-list.
Null.
status {enable | disable} Enable or disable this distribution list. disable
Variable Description Default
FortiOS 4.0 MR3 CLI Reference328 01-431-99686-20110623
http://docs.fortinet.com/ • Feedback
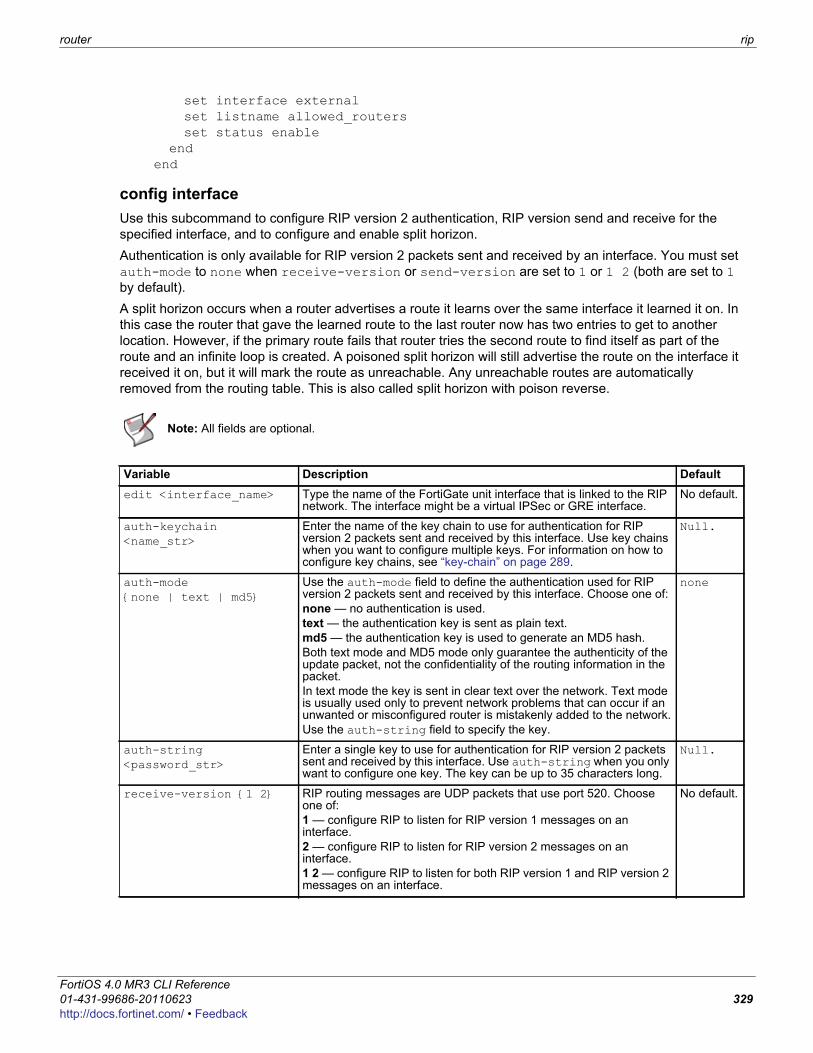
router rip
F0h
set interface externalset listname allowed_routersset status enable
endend
config interfaceUse this subcommand to configure RIP version 2 authentication, RIP version send and receive for the specified interface, and to configure and enable split horizon. Authentication is only available for RIP version 2 packets sent and received by an interface. You must set auth-mode to none when receive-version or send-version are set to 1 or 1 2 (both are set to 1 by default).A split horizon occurs when a router advertises a route it learns over the same interface it learned it on. In this case the router that gave the learned route to the last router now has two entries to get to another location. However, if the primary route fails that router tries the second route to find itself as part of the route and an infinite loop is created. A poisoned split horizon will still advertise the route on the interface it received it on, but it will mark the route as unreachable. Any unreachable routes are automatically removed from the routing table. This is also called split horizon with poison reverse.
Note: All fields are optional.
Variable Description Defaultedit <interface_name> Type the name of the FortiGate unit interface that is linked to the RIP
network. The interface might be a virtual IPSec or GRE interface.No default.
auth-keychain <name_str>
Enter the name of the key chain to use for authentication for RIP version 2 packets sent and received by this interface. Use key chains when you want to configure multiple keys. For information on how to configure key chains, see “key-chain” on page 289.
Null.
auth-mode {none | text | md5}
Use the auth-mode field to define the authentication used for RIP version 2 packets sent and received by this interface. Choose one of:none — no authentication is used. text — the authentication key is sent as plain text.md5 — the authentication key is used to generate an MD5 hash. Both text mode and MD5 mode only guarantee the authenticity of the update packet, not the confidentiality of the routing information in the packet.In text mode the key is sent in clear text over the network. Text mode is usually used only to prevent network problems that can occur if an unwanted or misconfigured router is mistakenly added to the network.Use the auth-string field to specify the key.
none
auth-string <password_str>
Enter a single key to use for authentication for RIP version 2 packets sent and received by this interface. Use auth-string when you only want to configure one key. The key can be up to 35 characters long.
Null.
receive-version {1 2} RIP routing messages are UDP packets that use port 520. Choose one of:1 — configure RIP to listen for RIP version 1 messages on an interface. 2 — configure RIP to listen for RIP version 2 messages on an interface. 1 2 — configure RIP to listen for both RIP version 1 and RIP version 2 messages on an interface.
No default.
ortiOS 4.0 MR3 CLI Reference1-431-99686-20110623 329ttp://docs.fortinet.com/ • Feedback
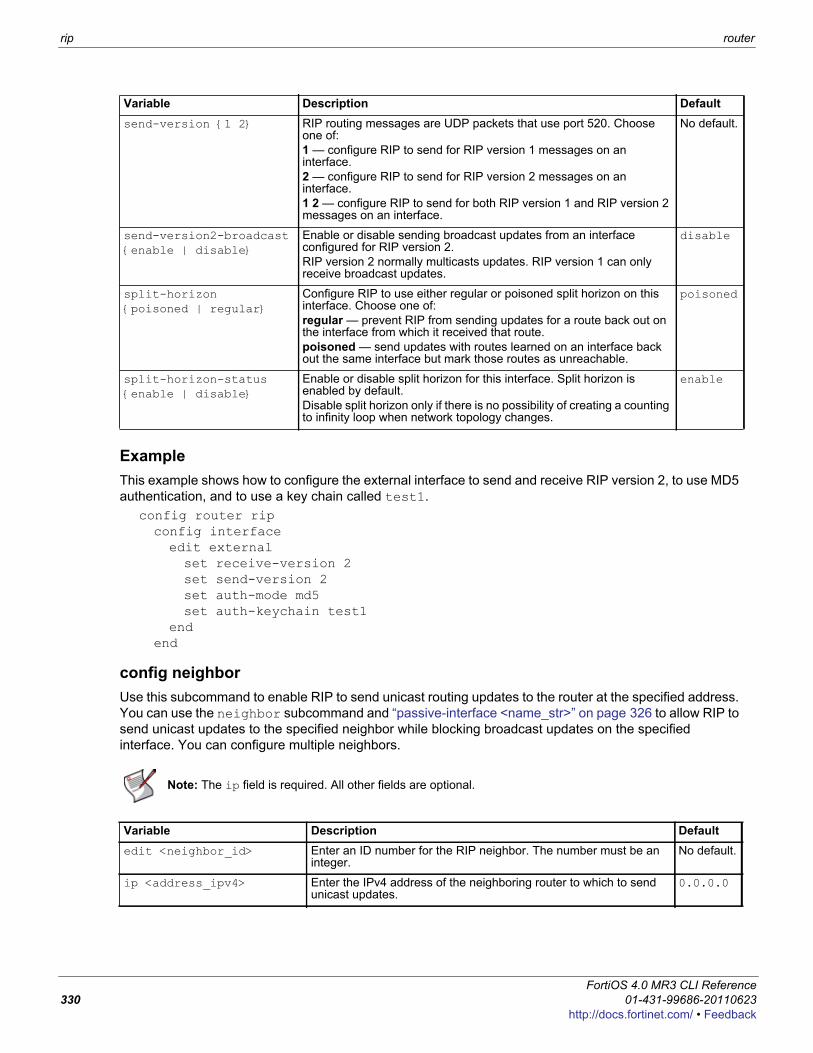
rip router
ExampleThis example shows how to configure the external interface to send and receive RIP version 2, to use MD5 authentication, and to use a key chain called test1.
config router ripconfig interfaceedit externalset receive-version 2set send-version 2set auth-mode md5set auth-keychain test1
endend
config neighborUse this subcommand to enable RIP to send unicast routing updates to the router at the specified address. You can use the neighbor subcommand and “passive-interface <name_str>” on page 326 to allow RIP to send unicast updates to the specified neighbor while blocking broadcast updates on the specified interface. You can configure multiple neighbors.
send-version {1 2} RIP routing messages are UDP packets that use port 520. Choose one of:1 — configure RIP to send for RIP version 1 messages on an interface. 2 — configure RIP to send for RIP version 2 messages on an interface. 1 2 — configure RIP to send for both RIP version 1 and RIP version 2 messages on an interface.
No default.
send-version2-broadcast {enable | disable}
Enable or disable sending broadcast updates from an interface configured for RIP version 2. RIP version 2 normally multicasts updates. RIP version 1 can only receive broadcast updates.
disable
split-horizon {poisoned | regular}
Configure RIP to use either regular or poisoned split horizon on this interface. Choose one of:regular — prevent RIP from sending updates for a route back out on the interface from which it received that route. poisoned — send updates with routes learned on an interface back out the same interface but mark those routes as unreachable.
poisoned
split-horizon-status {enable | disable}
Enable or disable split horizon for this interface. Split horizon is enabled by default. Disable split horizon only if there is no possibility of creating a counting to infinity loop when network topology changes.
enable
Note: The ip field is required. All other fields are optional.
Variable Description Defaultedit <neighbor_id> Enter an ID number for the RIP neighbor. The number must be an
integer.No default.
ip <address_ipv4> Enter the IPv4 address of the neighboring router to which to send unicast updates.
0.0.0.0
Variable Description Default
FortiOS 4.0 MR3 CLI Reference330 01-431-99686-20110623
http://docs.fortinet.com/ • Feedback
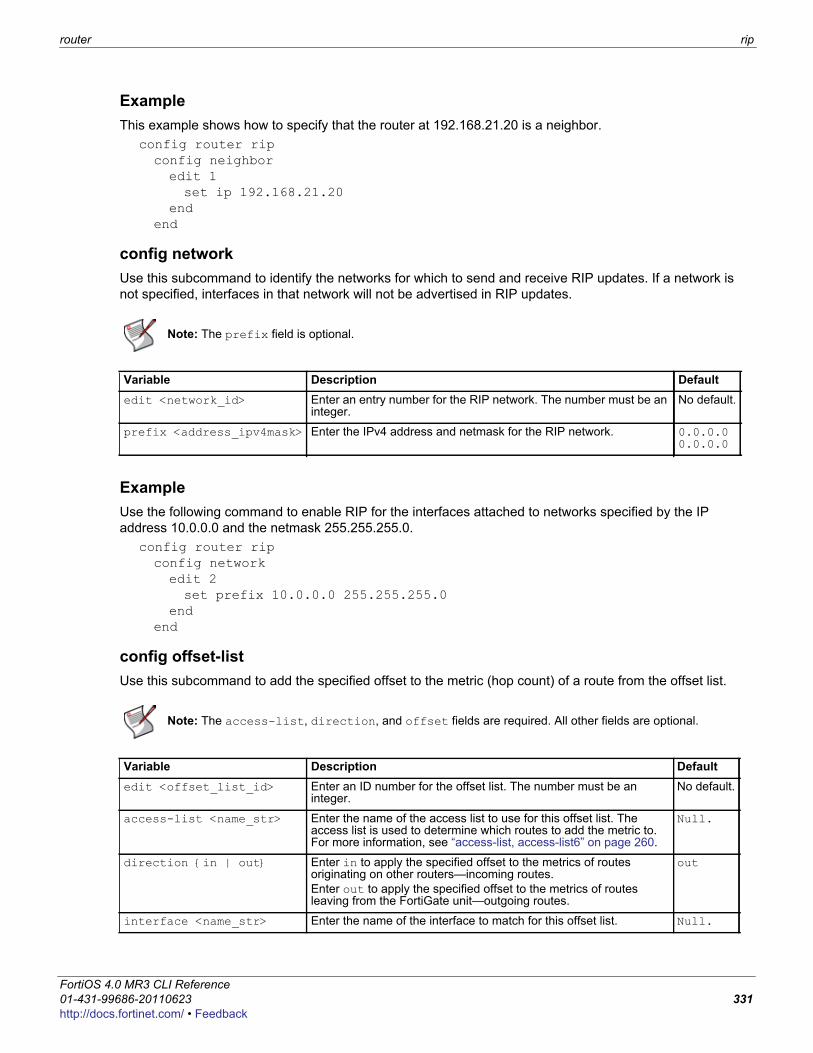
router rip
F0h
ExampleThis example shows how to specify that the router at 192.168.21.20 is a neighbor.
config router ripconfig neighboredit 1set ip 192.168.21.20
endend
config networkUse this subcommand to identify the networks for which to send and receive RIP updates. If a network is not specified, interfaces in that network will not be advertised in RIP updates.
ExampleUse the following command to enable RIP for the interfaces attached to networks specified by the IP address 10.0.0.0 and the netmask 255.255.255.0.
config router ripconfig networkedit 2set prefix 10.0.0.0 255.255.255.0
endend
config offset-list Use this subcommand to add the specified offset to the metric (hop count) of a route from the offset list.
Note: The prefix field is optional.
Variable Description Defaultedit <network_id> Enter an entry number for the RIP network. The number must be an
integer.No default.
prefix <address_ipv4mask> Enter the IPv4 address and netmask for the RIP network. 0.0.0.00.0.0.0
Note: The access-list, direction, and offset fields are required. All other fields are optional.
Variable Description Defaultedit <offset_list_id> Enter an ID number for the offset list. The number must be an
integer.No default.
access-list <name_str> Enter the name of the access list to use for this offset list. The access list is used to determine which routes to add the metric to. For more information, see “access-list, access-list6” on page 260.
Null.
direction {in | out} Enter in to apply the specified offset to the metrics of routes originating on other routers—incoming routes. Enter out to apply the specified offset to the metrics of routes leaving from the FortiGate unit—outgoing routes.
out
interface <name_str> Enter the name of the interface to match for this offset list. Null.
ortiOS 4.0 MR3 CLI Reference1-431-99686-20110623 331ttp://docs.fortinet.com/ • Feedback
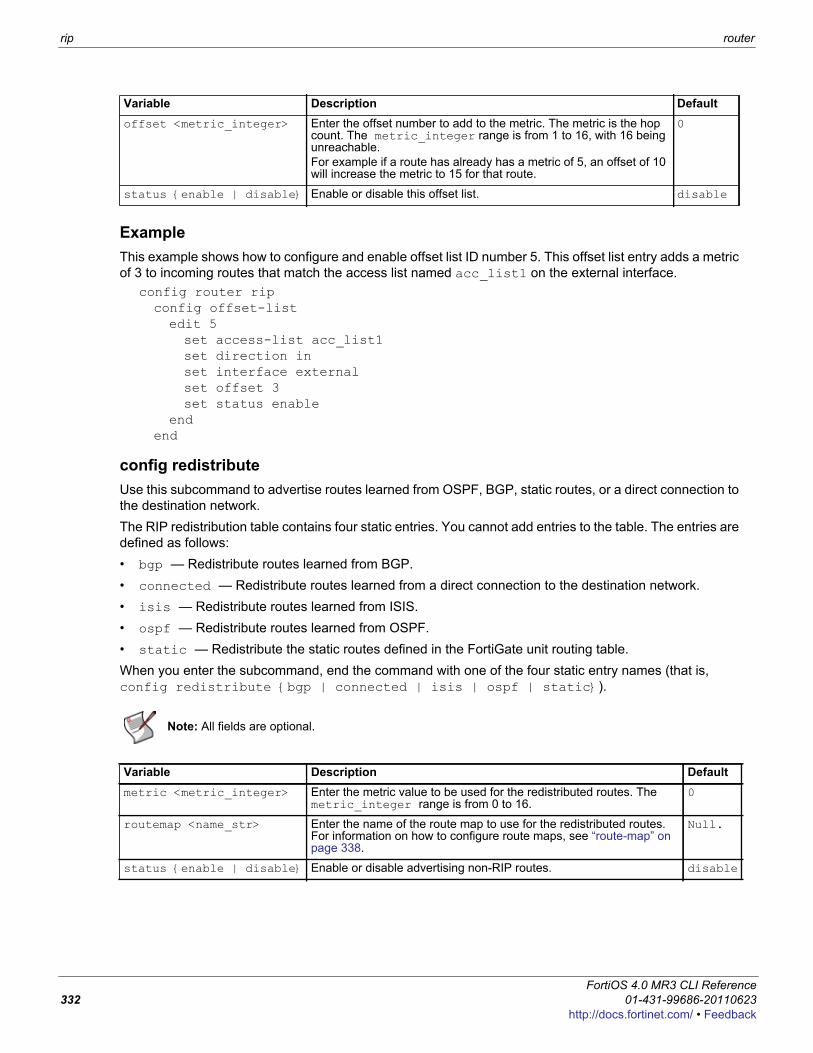
rip router
ExampleThis example shows how to configure and enable offset list ID number 5. This offset list entry adds a metric of 3 to incoming routes that match the access list named acc_list1 on the external interface.
config router ripconfig offset-listedit 5set access-list acc_list1set direction inset interface externalset offset 3set status enable
endend
config redistributeUse this subcommand to advertise routes learned from OSPF, BGP, static routes, or a direct connection to the destination network.The RIP redistribution table contains four static entries. You cannot add entries to the table. The entries are defined as follows:• bgp — Redistribute routes learned from BGP.• connected — Redistribute routes learned from a direct connection to the destination network.• isis — Redistribute routes learned from ISIS.• ospf — Redistribute routes learned from OSPF.• static — Redistribute the static routes defined in the FortiGate unit routing table.When you enter the subcommand, end the command with one of the four static entry names (that is, config redistribute {bgp | connected | isis | ospf | static}).
offset <metric_integer> Enter the offset number to add to the metric. The metric is the hop count. The metric_integer range is from 1 to 16, with 16 being unreachable.For example if a route has already has a metric of 5, an offset of 10 will increase the metric to 15 for that route.
0
status {enable | disable} Enable or disable this offset list. disable
Note: All fields are optional.
Variable Description Defaultmetric <metric_integer> Enter the metric value to be used for the redistributed routes. The
metric_integer range is from 0 to 16.0
routemap <name_str> Enter the name of the route map to use for the redistributed routes. For information on how to configure route maps, see “route-map” on page 338.
Null.
status {enable | disable} Enable or disable advertising non-RIP routes. disable
Variable Description Default
FortiOS 4.0 MR3 CLI Reference332 01-431-99686-20110623
http://docs.fortinet.com/ • Feedback
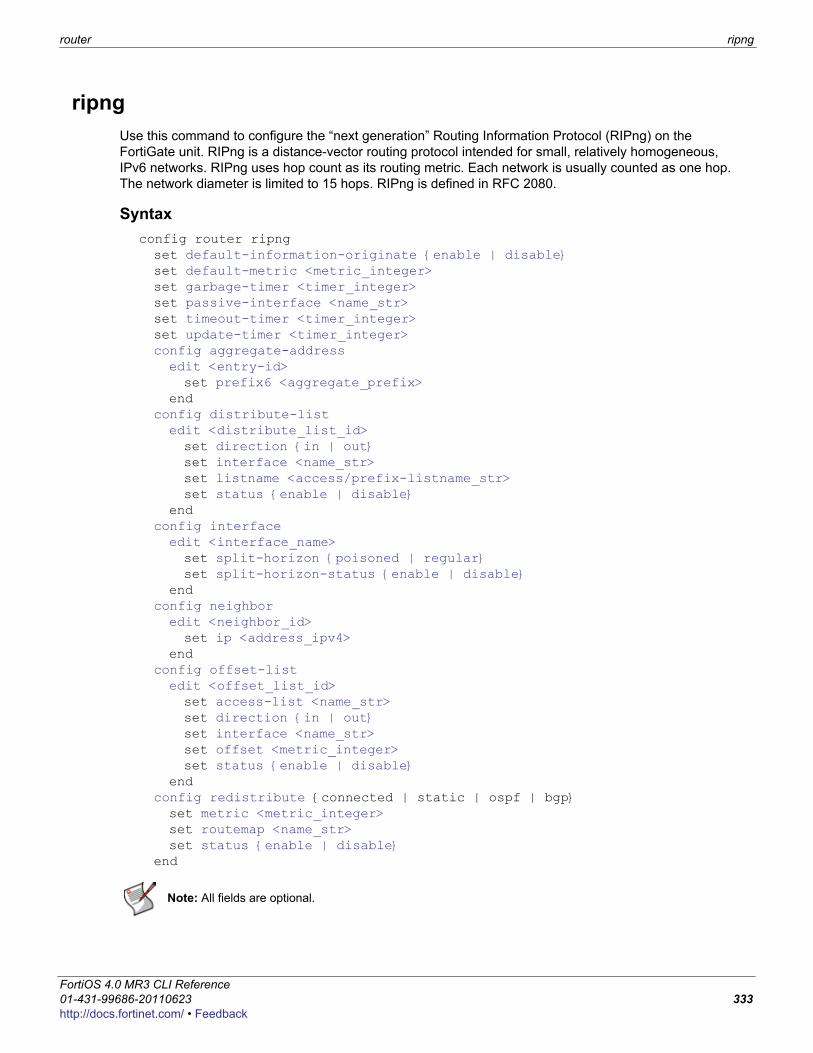
router ripng
F0h
ripngUse this command to configure the “next generation” Routing Information Protocol (RIPng) on the FortiGate unit. RIPng is a distance-vector routing protocol intended for small, relatively homogeneous, IPv6 networks. RIPng uses hop count as its routing metric. Each network is usually counted as one hop. The network diameter is limited to 15 hops. RIPng is defined in RFC 2080.
Syntaxconfig router ripngset default-information-originate {enable | disable}set default-metric <metric_integer>set garbage-timer <timer_integer>set passive-interface <name_str>set timeout-timer <timer_integer>set update-timer <timer_integer>config aggregate-addressedit <entry-id>set prefix6 <aggregate_prefix>
endconfig distribute-listedit <distribute_list_id>set direction {in | out}set interface <name_str>set listname <access/prefix-listname_str>set status {enable | disable}
endconfig interfaceedit <interface_name>set split-horizon {poisoned | regular}set split-horizon-status {enable | disable}
endconfig neighboredit <neighbor_id>set ip <address_ipv4>
endconfig offset-listedit <offset_list_id>set access-list <name_str>set direction {in | out}set interface <name_str>set offset <metric_integer>set status {enable | disable}
endconfig redistribute {connected | static | ospf | bgp}set metric <metric_integer>set routemap <name_str>set status {enable | disable}
end
Note: All fields are optional.
ortiOS 4.0 MR3 CLI Reference1-431-99686-20110623 333ttp://docs.fortinet.com/ • Feedback
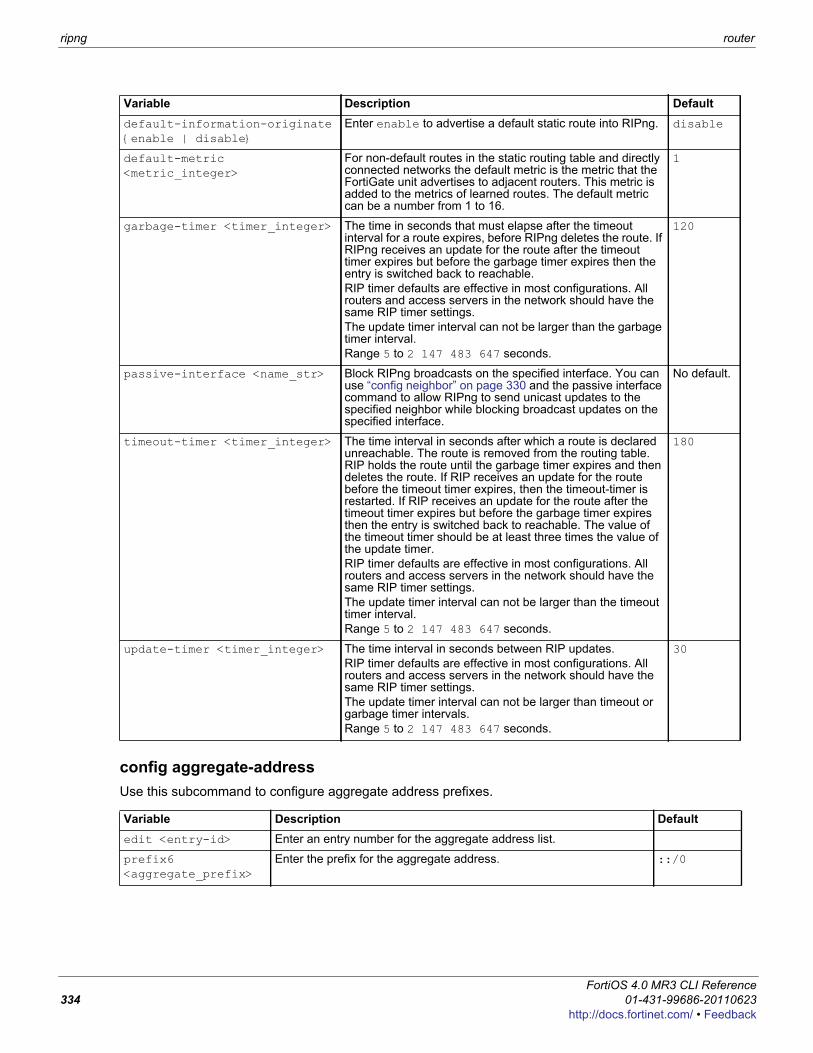
ripng router
config aggregate-addressUse this subcommand to configure aggregate address prefixes.
Variable Description Defaultdefault-information-originate {enable | disable}
Enter enable to advertise a default static route into RIPng. disable
default-metric <metric_integer>
For non-default routes in the static routing table and directly connected networks the default metric is the metric that the FortiGate unit advertises to adjacent routers. This metric is added to the metrics of learned routes. The default metric can be a number from 1 to 16.
1
garbage-timer <timer_integer> The time in seconds that must elapse after the timeout interval for a route expires, before RIPng deletes the route. If RIPng receives an update for the route after the timeout timer expires but before the garbage timer expires then the entry is switched back to reachable.RIP timer defaults are effective in most configurations. All routers and access servers in the network should have the same RIP timer settings.The update timer interval can not be larger than the garbage timer interval.Range 5 to 2 147 483 647 seconds.
120
passive-interface <name_str> Block RIPng broadcasts on the specified interface. You can use “config neighbor” on page 330 and the passive interface command to allow RIPng to send unicast updates to the specified neighbor while blocking broadcast updates on the specified interface.
No default.
timeout-timer <timer_integer> The time interval in seconds after which a route is declared unreachable. The route is removed from the routing table. RIP holds the route until the garbage timer expires and then deletes the route. If RIP receives an update for the route before the timeout timer expires, then the timeout-timer is restarted. If RIP receives an update for the route after the timeout timer expires but before the garbage timer expires then the entry is switched back to reachable. The value of the timeout timer should be at least three times the value of the update timer. RIP timer defaults are effective in most configurations. All routers and access servers in the network should have the same RIP timer settings.The update timer interval can not be larger than the timeout timer interval.Range 5 to 2 147 483 647 seconds.
180
update-timer <timer_integer> The time interval in seconds between RIP updates.RIP timer defaults are effective in most configurations. All routers and access servers in the network should have the same RIP timer settings.The update timer interval can not be larger than timeout or garbage timer intervals.Range 5 to 2 147 483 647 seconds.
30
Variable Description Defaultedit <entry-id> Enter an entry number for the aggregate address list.
prefix6 <aggregate_prefix>
Enter the prefix for the aggregate address. ::/0
FortiOS 4.0 MR3 CLI Reference334 01-431-99686-20110623
http://docs.fortinet.com/ • Feedback
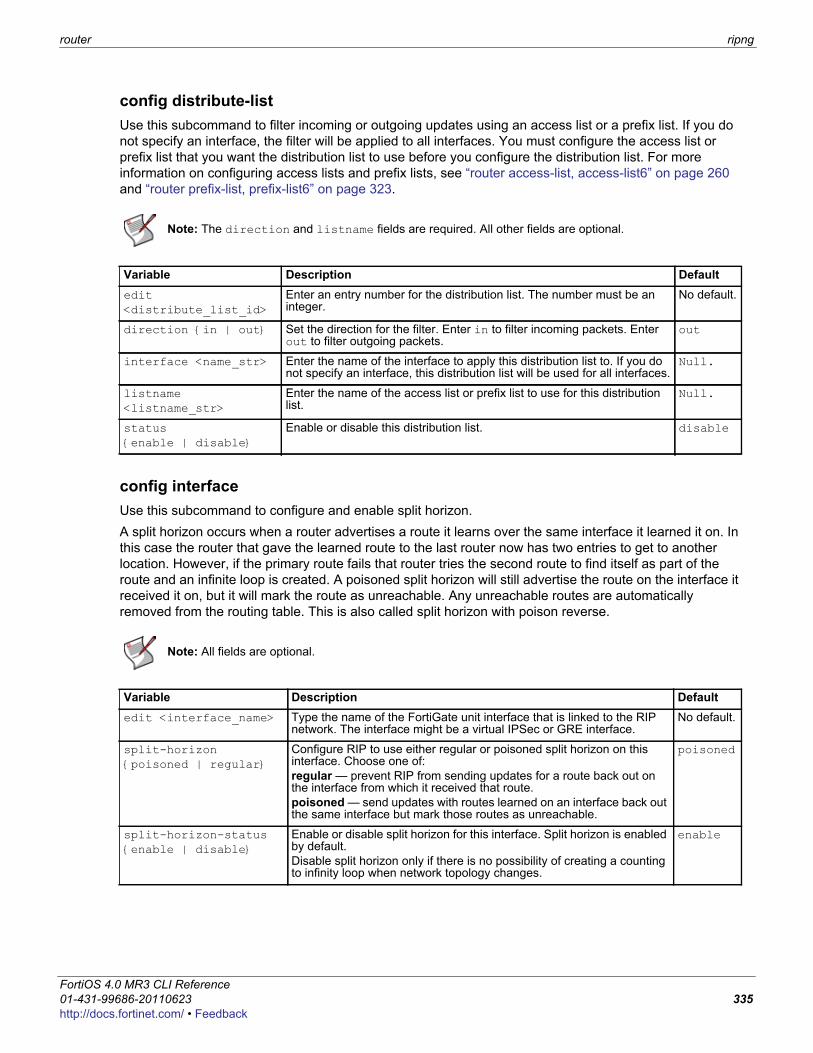
router ripng
F0h
config distribute-listUse this subcommand to filter incoming or outgoing updates using an access list or a prefix list. If you do not specify an interface, the filter will be applied to all interfaces. You must configure the access list or prefix list that you want the distribution list to use before you configure the distribution list. For more information on configuring access lists and prefix lists, see “router access-list, access-list6” on page 260 and “router prefix-list, prefix-list6” on page 323.
config interfaceUse this subcommand to configure and enable split horizon. A split horizon occurs when a router advertises a route it learns over the same interface it learned it on. In this case the router that gave the learned route to the last router now has two entries to get to another location. However, if the primary route fails that router tries the second route to find itself as part of the route and an infinite loop is created. A poisoned split horizon will still advertise the route on the interface it received it on, but it will mark the route as unreachable. Any unreachable routes are automatically removed from the routing table. This is also called split horizon with poison reverse.
Note: The direction and listname fields are required. All other fields are optional.
Variable Description Defaultedit <distribute_list_id>
Enter an entry number for the distribution list. The number must be an integer.
No default.
direction {in | out} Set the direction for the filter. Enter in to filter incoming packets. Enter out to filter outgoing packets.
out
interface <name_str> Enter the name of the interface to apply this distribution list to. If you do not specify an interface, this distribution list will be used for all interfaces.
Null.
listname <listname_str>
Enter the name of the access list or prefix list to use for this distribution list.
Null.
status {enable | disable}
Enable or disable this distribution list. disable
Note: All fields are optional.
Variable Description Defaultedit <interface_name> Type the name of the FortiGate unit interface that is linked to the RIP
network. The interface might be a virtual IPSec or GRE interface.No default.
split-horizon {poisoned | regular}
Configure RIP to use either regular or poisoned split horizon on this interface. Choose one of:regular — prevent RIP from sending updates for a route back out on the interface from which it received that route. poisoned — send updates with routes learned on an interface back out the same interface but mark those routes as unreachable.
poisoned
split-horizon-status {enable | disable}
Enable or disable split horizon for this interface. Split horizon is enabled by default. Disable split horizon only if there is no possibility of creating a counting to infinity loop when network topology changes.
enable
ortiOS 4.0 MR3 CLI Reference1-431-99686-20110623 335ttp://docs.fortinet.com/ • Feedback
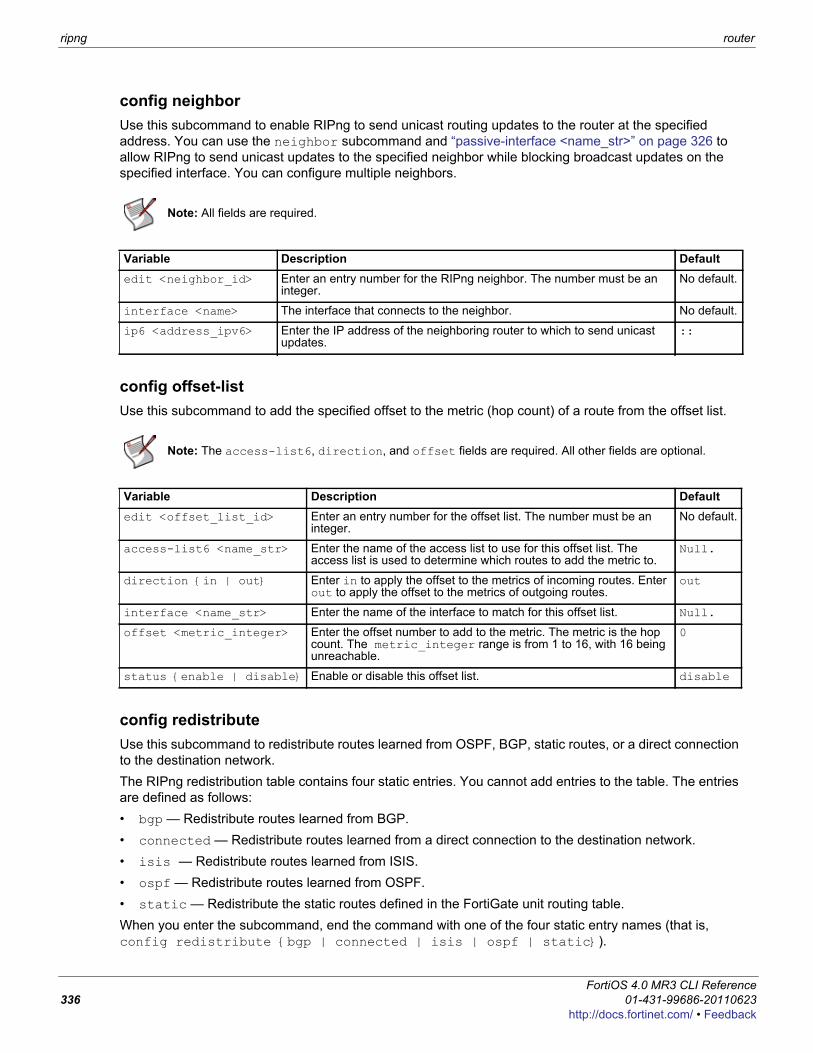
ripng router
config neighborUse this subcommand to enable RIPng to send unicast routing updates to the router at the specified address. You can use the neighbor subcommand and “passive-interface <name_str>” on page 326 to allow RIPng to send unicast updates to the specified neighbor while blocking broadcast updates on the specified interface. You can configure multiple neighbors.
config offset-list Use this subcommand to add the specified offset to the metric (hop count) of a route from the offset list.
config redistributeUse this subcommand to redistribute routes learned from OSPF, BGP, static routes, or a direct connection to the destination network.The RIPng redistribution table contains four static entries. You cannot add entries to the table. The entries are defined as follows:• bgp — Redistribute routes learned from BGP.• connected — Redistribute routes learned from a direct connection to the destination network.• isis — Redistribute routes learned from ISIS.• ospf — Redistribute routes learned from OSPF.• static — Redistribute the static routes defined in the FortiGate unit routing table.When you enter the subcommand, end the command with one of the four static entry names (that is, config redistribute {bgp | connected | isis | ospf | static}).
Note: All fields are required.
Variable Description Defaultedit <neighbor_id> Enter an entry number for the RIPng neighbor. The number must be an
integer.No default.
interface <name> The interface that connects to the neighbor. No default.
ip6 <address_ipv6> Enter the IP address of the neighboring router to which to send unicast updates.
::
Note: The access-list6, direction, and offset fields are required. All other fields are optional.
Variable Description Defaultedit <offset_list_id> Enter an entry number for the offset list. The number must be an
integer.No default.
access-list6 <name_str> Enter the name of the access list to use for this offset list. The access list is used to determine which routes to add the metric to.
Null.
direction {in | out} Enter in to apply the offset to the metrics of incoming routes. Enter out to apply the offset to the metrics of outgoing routes.
out
interface <name_str> Enter the name of the interface to match for this offset list. Null.
offset <metric_integer> Enter the offset number to add to the metric. The metric is the hop count. The metric_integer range is from 1 to 16, with 16 being unreachable.
0
status {enable | disable} Enable or disable this offset list. disable
FortiOS 4.0 MR3 CLI Reference336 01-431-99686-20110623
http://docs.fortinet.com/ • Feedback
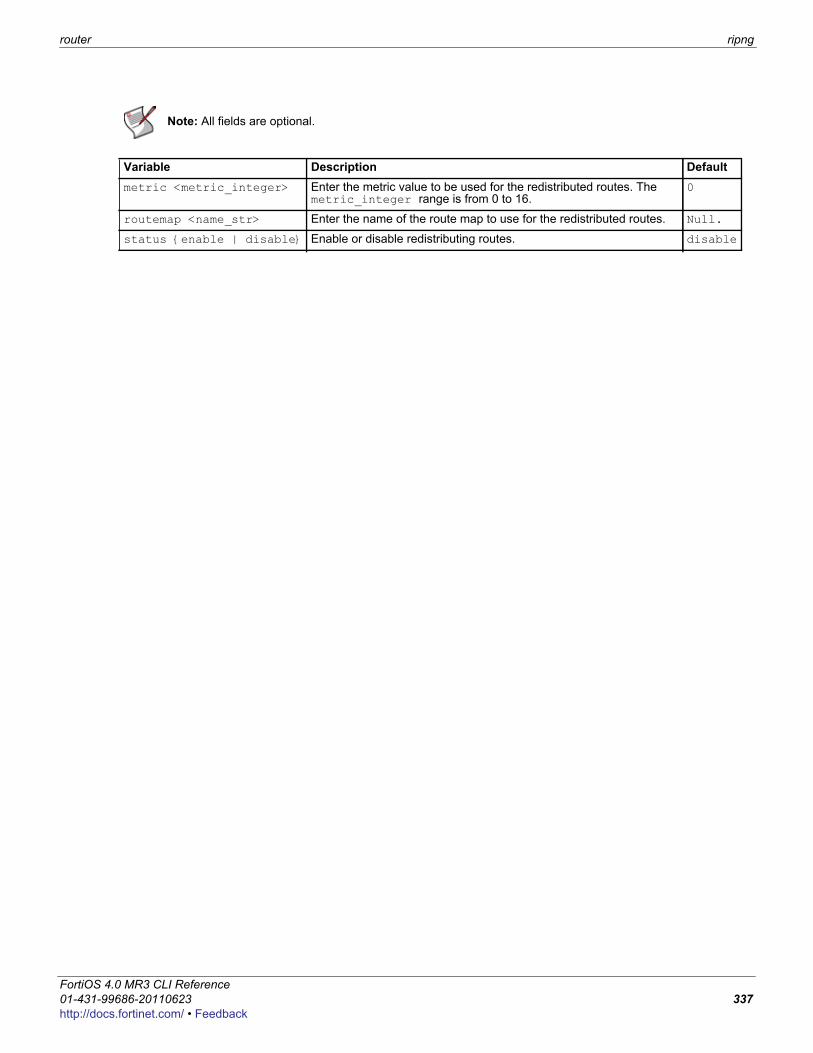
router ripng
F0h
Note: All fields are optional.
Variable Description Defaultmetric <metric_integer> Enter the metric value to be used for the redistributed routes. The
metric_integer range is from 0 to 16.0
routemap <name_str> Enter the name of the route map to use for the redistributed routes. Null.
status {enable | disable} Enable or disable redistributing routes. disable
ortiOS 4.0 MR3 CLI Reference1-431-99686-20110623 337ttp://docs.fortinet.com/ • Feedback
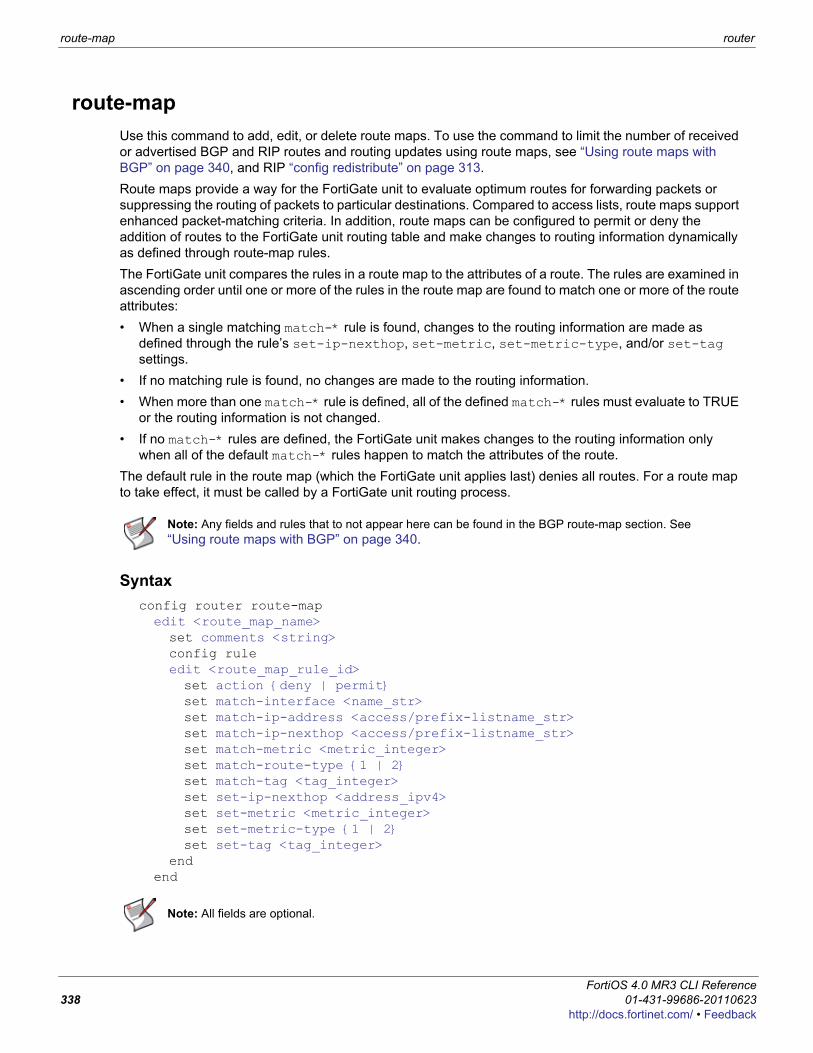
route-map router
route-mapUse this command to add, edit, or delete route maps. To use the command to limit the number of received or advertised BGP and RIP routes and routing updates using route maps, see “Using route maps with BGP” on page 340, and RIP “config redistribute” on page 313.Route maps provide a way for the FortiGate unit to evaluate optimum routes for forwarding packets or suppressing the routing of packets to particular destinations. Compared to access lists, route maps support enhanced packet-matching criteria. In addition, route maps can be configured to permit or deny the addition of routes to the FortiGate unit routing table and make changes to routing information dynamically as defined through route-map rules.The FortiGate unit compares the rules in a route map to the attributes of a route. The rules are examined in ascending order until one or more of the rules in the route map are found to match one or more of the route attributes:• When a single matching match-* rule is found, changes to the routing information are made as
defined through the rule’s set-ip-nexthop, set-metric, set-metric-type, and/or set-tag settings.
• If no matching rule is found, no changes are made to the routing information. • When more than one match-* rule is defined, all of the defined match-* rules must evaluate to TRUE
or the routing information is not changed.• If no match-* rules are defined, the FortiGate unit makes changes to the routing information only
when all of the default match-* rules happen to match the attributes of the route.The default rule in the route map (which the FortiGate unit applies last) denies all routes. For a route map to take effect, it must be called by a FortiGate unit routing process.
Syntaxconfig router route-mapedit <route_map_name>set comments <string>config ruleedit <route_map_rule_id>set action {deny | permit}set match-interface <name_str>set match-ip-address <access/prefix-listname_str>set match-ip-nexthop <access/prefix-listname_str>set match-metric <metric_integer>set match-route-type {1 | 2}set match-tag <tag_integer>set set-ip-nexthop <address_ipv4>set set-metric <metric_integer>set set-metric-type {1 | 2}set set-tag <tag_integer>
endend
Note: Any fields and rules that to not appear here can be found in the BGP route-map section. See “Using route maps with BGP” on page 340.
Note: All fields are optional.
FortiOS 4.0 MR3 CLI Reference338 01-431-99686-20110623
http://docs.fortinet.com/ • Feedback
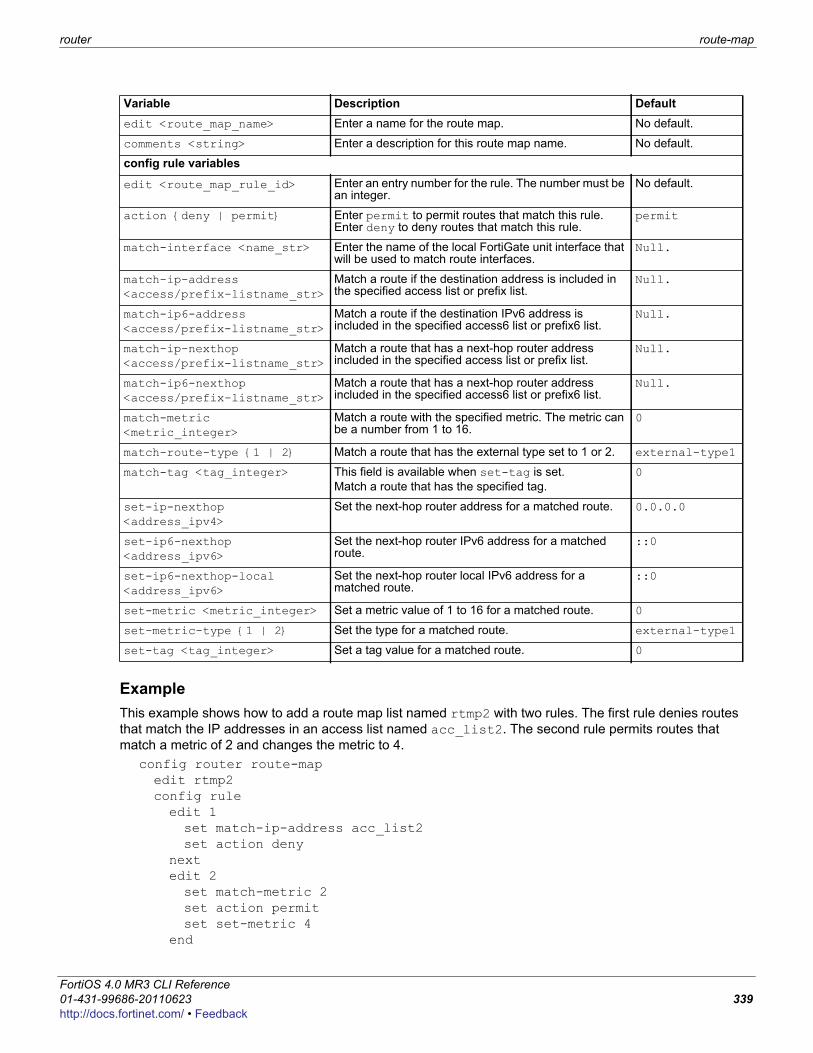
router route-map
F0h
ExampleThis example shows how to add a route map list named rtmp2 with two rules. The first rule denies routes that match the IP addresses in an access list named acc_list2. The second rule permits routes that match a metric of 2 and changes the metric to 4.
config router route-mapedit rtmp2config ruleedit 1set match-ip-address acc_list2set action deny
nextedit 2set match-metric 2set action permitset set-metric 4
end
Variable Description Defaultedit <route_map_name> Enter a name for the route map. No default.
comments <string> Enter a description for this route map name. No default.
config rule variables
edit <route_map_rule_id> Enter an entry number for the rule. The number must be an integer.
No default.
action {deny | permit} Enter permit to permit routes that match this rule. Enter deny to deny routes that match this rule.
permit
match-interface <name_str> Enter the name of the local FortiGate unit interface that will be used to match route interfaces.
Null.
match-ip-address <access/prefix-listname_str>
Match a route if the destination address is included in the specified access list or prefix list.
Null.
match-ip6-address <access/prefix-listname_str>
Match a route if the destination IPv6 address is included in the specified access6 list or prefix6 list.
Null.
match-ip-nexthop <access/prefix-listname_str>
Match a route that has a next-hop router address included in the specified access list or prefix list.
Null.
match-ip6-nexthop <access/prefix-listname_str>
Match a route that has a next-hop router address included in the specified access6 list or prefix6 list.
Null.
match-metric <metric_integer>
Match a route with the specified metric. The metric can be a number from 1 to 16.
0
match-route-type {1 | 2} Match a route that has the external type set to 1 or 2. external-type1
match-tag <tag_integer> This field is available when set-tag is set.Match a route that has the specified tag.
0
set-ip-nexthop <address_ipv4>
Set the next-hop router address for a matched route. 0.0.0.0
set-ip6-nexthop <address_ipv6>
Set the next-hop router IPv6 address for a matched route.
::0
set-ip6-nexthop-local <address_ipv6>
Set the next-hop router local IPv6 address for a matched route.
::0
set-metric <metric_integer> Set a metric value of 1 to 16 for a matched route. 0
set-metric-type {1 | 2} Set the type for a matched route. external-type1
set-tag <tag_integer> Set a tag value for a matched route. 0
ortiOS 4.0 MR3 CLI Reference1-431-99686-20110623 339ttp://docs.fortinet.com/ • Feedback
route-map router
end
Using route maps with BGPWhen a connection is established between BGP peers, the two peers exchange all of their BGP route entries. Afterward, they exchange updates that only include changes to the existing routing information. Several BGP entries may be present in a route-map table. You can limit the number of received or advertised BGP route and routing updates using route maps. Use the config router route-map command to create, edit, or delete a route map.
Syntaxconfig router route-mapedit <route_map_name>set comments <string>config ruleedit <route_map_rule_id>set match-as-path <aspath-list-name_str>set match-community <community-list-name_str>set match-community-exact {enable | disable}set match-origin {egp | igp | incomplete | none}set set-aggregator-as <id_integer>set set-aggregator-ip <address_ipv4>set set-aspath <id_integer> <id_integer> <id_integer> ...set set-atomic-aggregate {enable | disable}set set-community-delete <community-list-name_str>set set-community <criteria>set set-community-additive {enable | disable}set set-dampening-reachability-half-life <minutes>set set-dampening-reuse <reuse_integer>set set-dampening-suppress <suppress_integer>set set-dampening-max-suppress <minutes>set set-dampening-unreachability-half-life <minutes>set set-extcommunity-rt <AA:NN> <AA:NN> <AA:NN> ...set set-extcommunity-soo <AA:NN> <AA:NN> <AA:NN> ...set set-local-preference <preference_integer>set set-originator-id <address_ipv4>set set-origin {egp | igp | incomplete | none}set set-weight <weight_integer>
end
Note: When you specify a route map for the dampening-route-map value through the config router bgp command (see “dampening-route-map <routemap-name_str>” on page 268), the FortiGate unit ignores global dampening settings. You cannot set global dampening settings for the FortiGate unit and then override those values through a route map.
Note: All fields are optional.
Variable Description Defaultedit <route_map_name> Enter a name for the route map. No default.
comments <string> Enter a description for this route map name. No default.
config rule variables
FortiOS 4.0 MR3 CLI Reference340 01-431-99686-20110623
http://docs.fortinet.com/ • Feedback
router route-map
F0h
edit <route_map_rule_id> Enter an entry number for the rule. The number must be an integer.
No default.
match-as-path<aspath-list-name_str>
Enter the AS-path list name that will be used to match BGP route prefixes. You must create the AS-path list before it can be selected here. See “aspath-list” on page 262.
Null.
match-community<community-list-name_str>
Enter the community list name that will be used to match BGP routes according to their COMMUNITY attributes. You must create the community list before it can be selected here. See “community-list” on page 280.
Null.
match-community-exact{enable | disable}
This field is only available when match-community is set.Enable or disable an exact match of the BGP route community specified by the match-community field.
disable
match-origin {egp | igp | incomplete | none}
Enter a value to compare to the ORIGIN attribute of a routing update:egp — set the value to the NLRI learned from the Exterior Gateway Protocol (EGP). The FortiGate unit has the second-highest preference for routes of this type.igp — set the value to the NLRI learned from a protocol internal to the originating AS. The FortiGate unit has the highest preference for routes learned through Internal Gateway Protocol (IGP).incomplete — match routes that were learned some other way (for example, through redistribution).none — disable the matching of BGP routes based on the origin of the route.
none
set-aggregator-as<id_integer>
Set the originating AS of an aggregated route. The value specifies at which AS the aggregate route originated. The range is from 1 to 65 535. The set-aggregator-ip value must also be set to further identify the originating AS.
unset
set-aggregator-ip<address_ipv4>
This field is available when set-aggregator-as is set.Set the IP address of the BGP router that originated the aggregate route. The value should be identical to the FortiGate unit router-id value (see “router-id <address_ipv4>” on page 269).
0.0.0.0
set-aspath<id_integer> <id_integer> <id_integer> ...
Modify the FortiGate unit AS_PATH attribute and add to it the AS numbers of the AS path belonging to a BGP route. The resulting path describes the autonomous systems along the route to the destination specified by the NLRI. The range is from 1 to 65 535. The set-aspath value is added to the beginning of the AS_SEQUENCE segment of the AS_PATH attribute of incoming routes, or to the end of the AS_SEQUENCE segment of the AS_PATH attribute of outgoing routes.Enclose all AS numbers in quotes if there are multiple occurrences of the same id_integer. Otherwise the AS path may be incomplete.
No default.
set-atomic-aggregate{enable | disable}
Enable or disable a warning to upstream routers through the ATOMIC_AGGREGATE attribute that address aggregation has occurred on an aggregate route. This value does not have to be specified when an as-set value is specified in the aggregate-address table (see “config aggregate-address” on page 271).
disable
set-community-delete<community-list-name_str>
Remove the COMMUNITY attributes from the BGP routes identified in the specified community list. You must create the community list first before it can be selected here (see “community-list” on page 280).
Null.
Variable Description Default
ortiOS 4.0 MR3 CLI Reference1-431-99686-20110623 341ttp://docs.fortinet.com/ • Feedback
route-map router
set-community <criteria> Set the COMMUNITY attribute of a BGP route.• Use decimal notation to set a specific COMMUNITY
attribute for the route. The value has the syntax AA:NN, where AA represents an AS, and NN is the community identifier. Delimit complex expressions with double-quotation marks (for example, “123:234 345:456”).
• To make the route part of the Internet community, select internet.
• To make the route part of the LOCAL_AS community, select local-AS.
• To make the route part of the NO_ADVERTISE community, select no-advertise.
• To make the route part of the NO_EXPORT community, select no-export.
No default.
set-community-additive{enable | disable}
This field is available when set-community is set.Enable or disable the appending of the set-community value to a BGP route.
disable
set-dampening-reachability-half-life<minutes>
Set the dampening reachability half-life of a BGP route (in minutes). The range is from 1 to 45.
0
set-dampening-reuse<reuse_integer>
Set the value at which a dampened BGP route will be reused. The range is from 1 to 20 000. If you set set-dampening-reuse, you must also set set-dampening-suppress and set-dampening-max-suppress.
0
set-dampening-suppress<suppress_integer>
Set the limit at which a BGP route may be suppressed. The range is from 1 to 20 000. See also “dampening-suppress <limit_integer>” on page 268.
0
set-dampening-max-suppress<minutes>
Set maximum time (in minutes) that a BGP route can be suppressed. The range is from 1 to 255. See also “dampening-max-suppress-time” in “dampening-max-suppress-time <minutes_integer>” on page 268.
0
set-dampening-unreachability-half-life<minutes>
Set the unreachability half-life of a BGP route (in minutes). The range is from 1 to 45. See also “dampening-unreachability-half-life <minutes_integer>” on page 269.
0
set-extcommunity-rt<AA:NN> <AA:NN> <AA:NN> ...
Set the target extended community (in decimal notation) of a BGP route. The COMMUNITY attribute value has the syntax AA:NN, where AA represents an AS, and NN is the community identifier.
No default.
set-extcommunity-soo<AA:NN> <AA:NN> <AA:NN> ...
Set the site-of-origin extended community (in decimal notation) of a BGP route. The COMMUNITY attribute value has the syntax AA:NN, where AA represents an AS, and NN is the community identifier.
No default.
set-local-preference<preference_integer>
Set the LOCAL_PREF value of an IBGP route. The value is advertised to IBGP peers. The range is from 0 to 4 294 967 295. A higher number signifies a preferred route among multiple routes to the same destination.
0
set-originator-id<address_ipv4>
Set the ORIGINATOR_ID attribute, which is equivalent to the router-id of the originator of the route in the local AS. Route reflectors use this value to prevent routing loops.
0.0.0.0
Variable Description Default
FortiOS 4.0 MR3 CLI Reference342 01-431-99686-20110623
http://docs.fortinet.com/ • Feedback
router route-map
F0h
set-origin {egp | igp | incomplete | none}
Set the ORIGIN attribute of a local BGP route. Choose one of:egp — set the value to the NLRI learned from the Exterior Gateway Protocol (EGP).igp — set the value to the NLRI learned from a protocol internal to the originating AS.incomplete — if not egp or igp.none — disable the ORIGIN attribute.
none
set-weight<weight_integer>
Set the weight of a BGP route. A route’s weight has the most influence when two identical BGP routes are compared. A higher number signifies a greater preference. The range is from 0 to 2 147 483 647.
0
Variable Description Default
ortiOS 4.0 MR3 CLI Reference1-431-99686-20110623 343ttp://docs.fortinet.com/ • Feedback
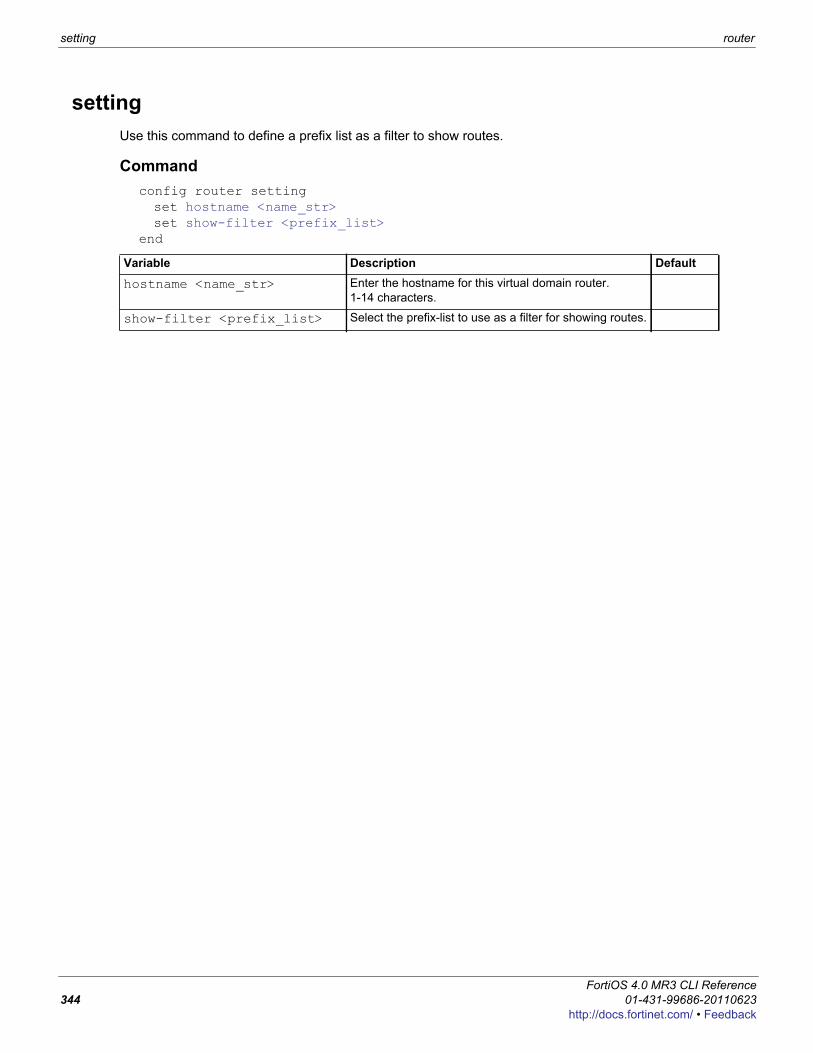
setting router
settingUse this command to define a prefix list as a filter to show routes.
Commandconfig router settingset hostname <name_str>set show-filter <prefix_list>
end
Variable Description Default
hostname <name_str> Enter the hostname for this virtual domain router.1-14 characters.
show-filter <prefix_list> Select the prefix-list to use as a filter for showing routes.
FortiOS 4.0 MR3 CLI Reference344 01-431-99686-20110623
http://docs.fortinet.com/ • Feedback
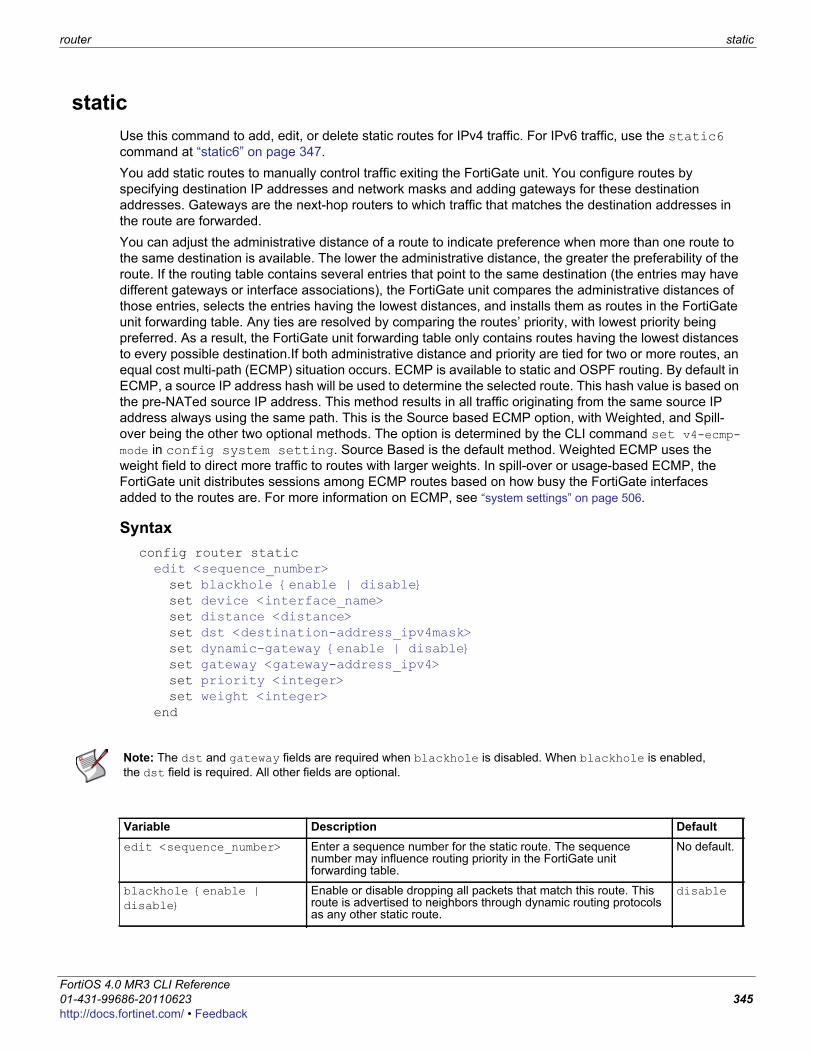
router static
F0h
staticUse this command to add, edit, or delete static routes for IPv4 traffic. For IPv6 traffic, use the static6 command at “static6” on page 347. You add static routes to manually control traffic exiting the FortiGate unit. You configure routes by specifying destination IP addresses and network masks and adding gateways for these destination addresses. Gateways are the next-hop routers to which traffic that matches the destination addresses in the route are forwarded. You can adjust the administrative distance of a route to indicate preference when more than one route to the same destination is available. The lower the administrative distance, the greater the preferability of the route. If the routing table contains several entries that point to the same destination (the entries may have different gateways or interface associations), the FortiGate unit compares the administrative distances of those entries, selects the entries having the lowest distances, and installs them as routes in the FortiGate unit forwarding table. Any ties are resolved by comparing the routes’ priority, with lowest priority being preferred. As a result, the FortiGate unit forwarding table only contains routes having the lowest distances to every possible destination.If both administrative distance and priority are tied for two or more routes, an equal cost multi-path (ECMP) situation occurs. ECMP is available to static and OSPF routing. By default in ECMP, a source IP address hash will be used to determine the selected route. This hash value is based on the pre-NATed source IP address. This method results in all traffic originating from the same source IP address always using the same path. This is the Source based ECMP option, with Weighted, and Spill-over being the other two optional methods. The option is determined by the CLI command set v4-ecmp-mode in config system setting. Source Based is the default method. Weighted ECMP uses the weight field to direct more traffic to routes with larger weights. In spill-over or usage-based ECMP, the FortiGate unit distributes sessions among ECMP routes based on how busy the FortiGate interfaces added to the routes are. For more information on ECMP, see “system settings” on page 506.
Syntaxconfig router staticedit <sequence_number>set blackhole {enable | disable}set device <interface_name>set distance <distance>set dst <destination-address_ipv4mask>set dynamic-gateway {enable | disable}set gateway <gateway-address_ipv4>set priority <integer>set weight <integer>
end
Note: The dst and gateway fields are required when blackhole is disabled. When blackhole is enabled, the dst field is required. All other fields are optional.
Variable Description Defaultedit <sequence_number> Enter a sequence number for the static route. The sequence
number may influence routing priority in the FortiGate unit forwarding table.
No default.
blackhole {enable | disable}
Enable or disable dropping all packets that match this route. This route is advertised to neighbors through dynamic routing protocols as any other static route.
disable
ortiOS 4.0 MR3 CLI Reference1-431-99686-20110623 345ttp://docs.fortinet.com/ • Feedback

static router
device <interface_name> This field is available when blackhole is set to disable.Enter the name of the FortiGate unit interface through which to route traffic. Use ‘?’ to see a list of interfaces.
Null.
distance <distance> Enter the administrative distance for the route. The distance value may influence route preference in the FortiGate unit routing table. The range is an integer from 1-255. See also config system interface “distance <distance_integer>” on page 259.
10
dst <destination-address_ipv4mask>
Enter the destination IPv4 address and network mask for this route. You can enter 0.0.0.0 0.0.0.0 to create a new static default route.
0.0.0.0 0.0.0.0
dynamic-gateway {enable | disable}
When enabled, dynamic-gateway hides the gateway variable for a dynamic interface, such as a DHCP or PPPoE interface. When the interface connects or disconnects, the corresponding routing entries are updated to reflect the change.
disable
gateway <gateway-address_ipv4>
This field is available when blackhole is set to disable.Enter the IPv4 address of the next-hop router to which traffic is forwarded.
0.0.0.0
priority <integer> The administrative priority value is used to resolve ties in route selection. In the case where both routes have the same priority, such as equal cost multi-path (ECMP), the IP source hash (based on the pre-NATed IP address) for the routes will be used to determine which route is selected.The priority range is an integer from 0 to 4294967295. Lower priority routes are preferred routes.This field is only accessible through the CLI.
0
weight <integer> Add weights to ECMP static routes if the ECMP route failover and load balance method is set to weighted. Enter weights for ECMP routes. More traffic is directed to routes with higher weights.This option is available when the v4-ecmp-mode field of the config system settings command is set to weight-based. For more information, see “system settings” on page 506.
0
Variable Description Default
FortiOS 4.0 MR3 CLI Reference346 01-431-99686-20110623
http://docs.fortinet.com/ • Feedback
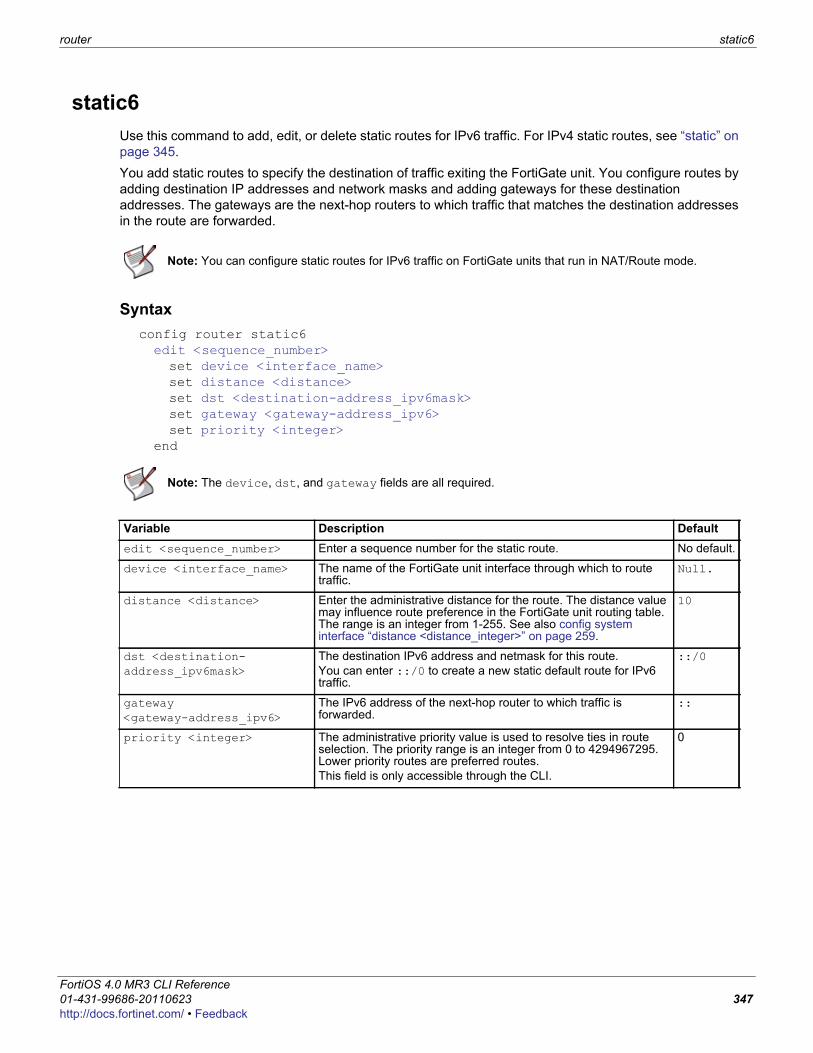
router static6
F0h
static6Use this command to add, edit, or delete static routes for IPv6 traffic. For IPv4 static routes, see “static” on page 345. You add static routes to specify the destination of traffic exiting the FortiGate unit. You configure routes by adding destination IP addresses and network masks and adding gateways for these destination addresses. The gateways are the next-hop routers to which traffic that matches the destination addresses in the route are forwarded.
Syntaxconfig router static6edit <sequence_number>set device <interface_name>set distance <distance>set dst <destination-address_ipv6mask>set gateway <gateway-address_ipv6>set priority <integer>
end
Note: You can configure static routes for IPv6 traffic on FortiGate units that run in NAT/Route mode.
Note: The device, dst, and gateway fields are all required.
Variable Description Defaultedit <sequence_number> Enter a sequence number for the static route. No default.
device <interface_name> The name of the FortiGate unit interface through which to route traffic.
Null.
distance <distance> Enter the administrative distance for the route. The distance value may influence route preference in the FortiGate unit routing table. The range is an integer from 1-255. See also config system interface “distance <distance_integer>” on page 259.
10
dst <destination-address_ipv6mask>
The destination IPv6 address and netmask for this route. You can enter ::/0 to create a new static default route for IPv6 traffic.
::/0
gateway <gateway-address_ipv6>
The IPv6 address of the next-hop router to which traffic is forwarded.
::
priority <integer> The administrative priority value is used to resolve ties in route selection. The priority range is an integer from 0 to 4294967295. Lower priority routes are preferred routes.This field is only accessible through the CLI.
0
ortiOS 4.0 MR3 CLI Reference1-431-99686-20110623 347ttp://docs.fortinet.com/ • Feedback

static6 router
FortiOS 4.0 MR3 CLI Reference348 01-431-99686-20110623
http://docs.fortinet.com/ • Feedback
F0h
spamfilterUse email filter commands to create a banned word list, configure filters based on email addresses, ip addresses, and MIME headers, and to configure the FortiGuard-Antispam service.This chapter contains the following sections:
bworddnsblemailbwlfortishieldipbwliptrustmheaderoptionsprofile
ortiOS 4.0 MR3 CLI Reference1-431-99686-20110623 349ttp://docs.fortinet.com/ • Feedback
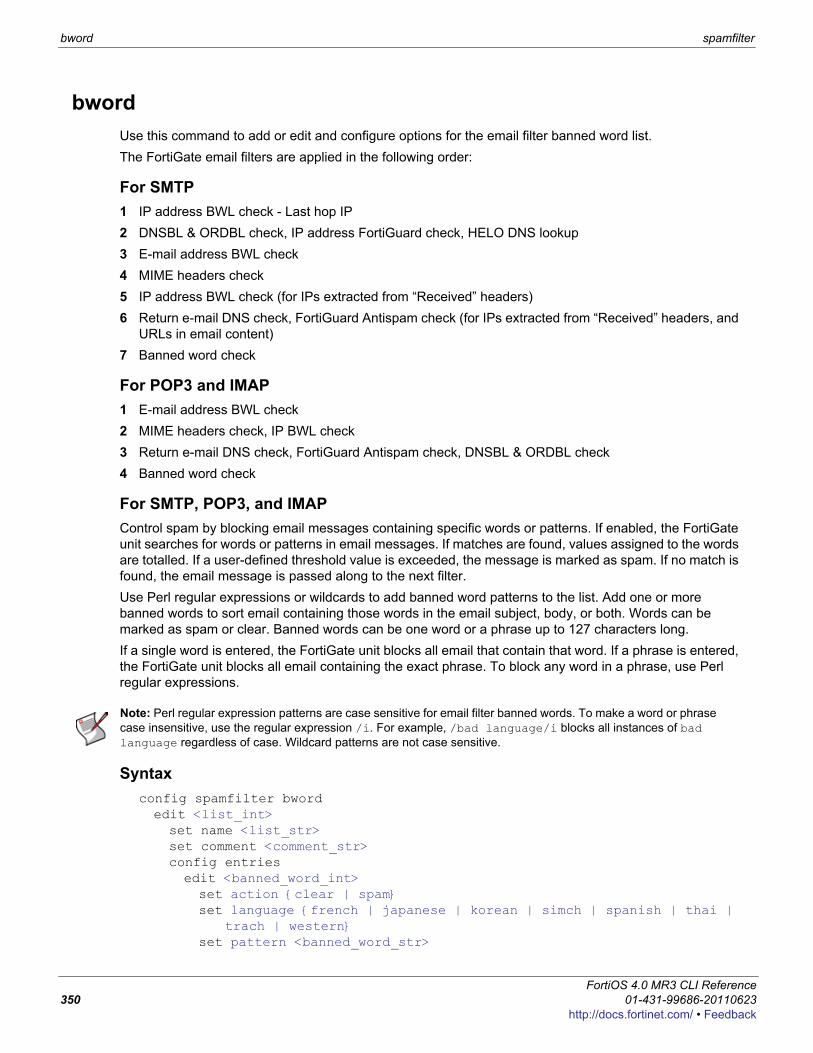
bword spamfilter
bwordUse this command to add or edit and configure options for the email filter banned word list.The FortiGate email filters are applied in the following order:
For SMTP1 IP address BWL check - Last hop IP2 DNSBL & ORDBL check, IP address FortiGuard check, HELO DNS lookup3 E-mail address BWL check4 MIME headers check5 IP address BWL check (for IPs extracted from “Received” headers)6 Return e-mail DNS check, FortiGuard Antispam check (for IPs extracted from “Received” headers, and
URLs in email content)7 Banned word check
For POP3 and IMAP1 E-mail address BWL check2 MIME headers check, IP BWL check3 Return e-mail DNS check, FortiGuard Antispam check, DNSBL & ORDBL check4 Banned word check
For SMTP, POP3, and IMAPControl spam by blocking email messages containing specific words or patterns. If enabled, the FortiGate unit searches for words or patterns in email messages. If matches are found, values assigned to the words are totalled. If a user-defined threshold value is exceeded, the message is marked as spam. If no match is found, the email message is passed along to the next filter.Use Perl regular expressions or wildcards to add banned word patterns to the list. Add one or more banned words to sort email containing those words in the email subject, body, or both. Words can be marked as spam or clear. Banned words can be one word or a phrase up to 127 characters long.If a single word is entered, the FortiGate unit blocks all email that contain that word. If a phrase is entered, the FortiGate unit blocks all email containing the exact phrase. To block any word in a phrase, use Perl regular expressions.
Syntaxconfig spamfilter bwordedit <list_int>set name <list_str>set comment <comment_str>config entriesedit <banned_word_int>set action {clear | spam}set language {french | japanese | korean | simch | spanish | thai |
trach | western}set pattern <banned_word_str>
Note: Perl regular expression patterns are case sensitive for email filter banned words. To make a word or phrase case insensitive, use the regular expression /i. For example, /bad language/i blocks all instances of bad language regardless of case. Wildcard patterns are not case sensitive.
FortiOS 4.0 MR3 CLI Reference350 01-431-99686-20110623
http://docs.fortinet.com/ • Feedback
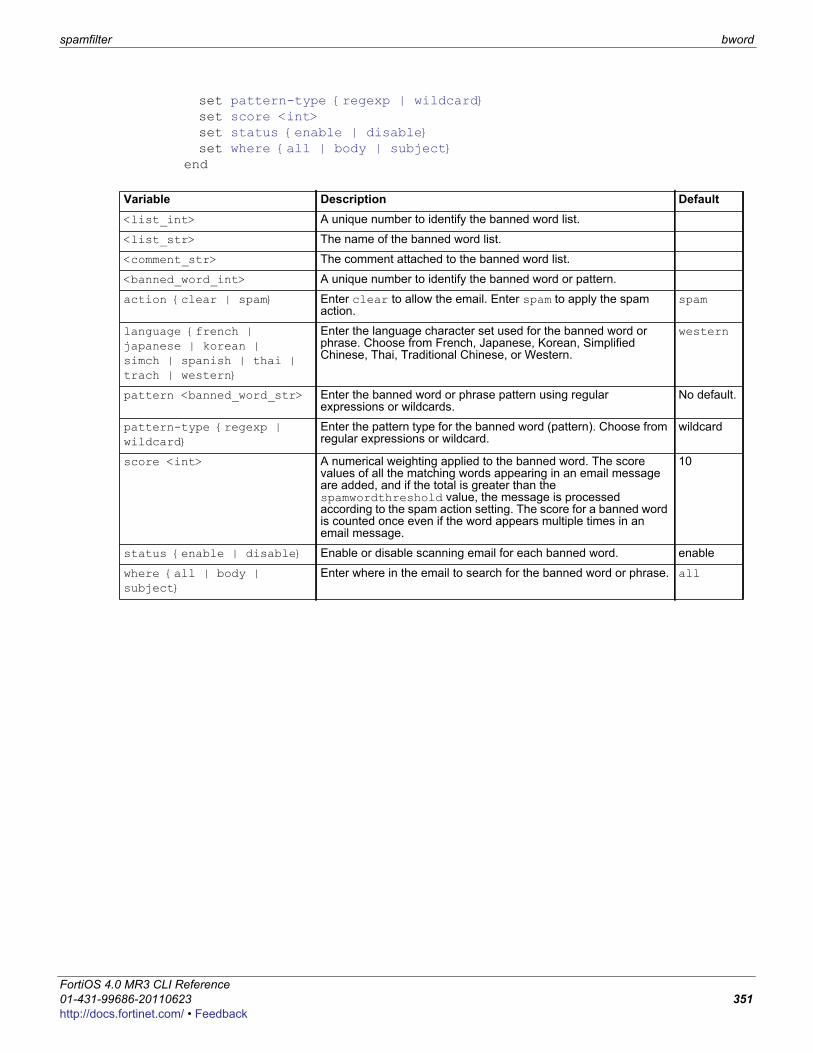
spamfilter bword
F0h
set pattern-type {regexp | wildcard}set score <int>set status {enable | disable}set where {all | body | subject}
end
Variable Description Default<list_int> A unique number to identify the banned word list.
<list_str> The name of the banned word list.
<comment_str> The comment attached to the banned word list.
<banned_word_int> A unique number to identify the banned word or pattern.
action {clear | spam} Enter clear to allow the email. Enter spam to apply the spam action.
spam
language {french | japanese | korean | simch | spanish | thai | trach | western}
Enter the language character set used for the banned word or phrase. Choose from French, Japanese, Korean, Simplified Chinese, Thai, Traditional Chinese, or Western.
western
pattern <banned_word_str> Enter the banned word or phrase pattern using regular expressions or wildcards.
No default.
pattern-type {regexp | wildcard}
Enter the pattern type for the banned word (pattern). Choose from regular expressions or wildcard.
wildcard
score <int> A numerical weighting applied to the banned word. The score values of all the matching words appearing in an email message are added, and if the total is greater than the spamwordthreshold value, the message is processed according to the spam action setting. The score for a banned word is counted once even if the word appears multiple times in an email message.
10
status {enable | disable} Enable or disable scanning email for each banned word. enable
where {all | body | subject}
Enter where in the email to search for the banned word or phrase. all
ortiOS 4.0 MR3 CLI Reference1-431-99686-20110623 351ttp://docs.fortinet.com/ • Feedback
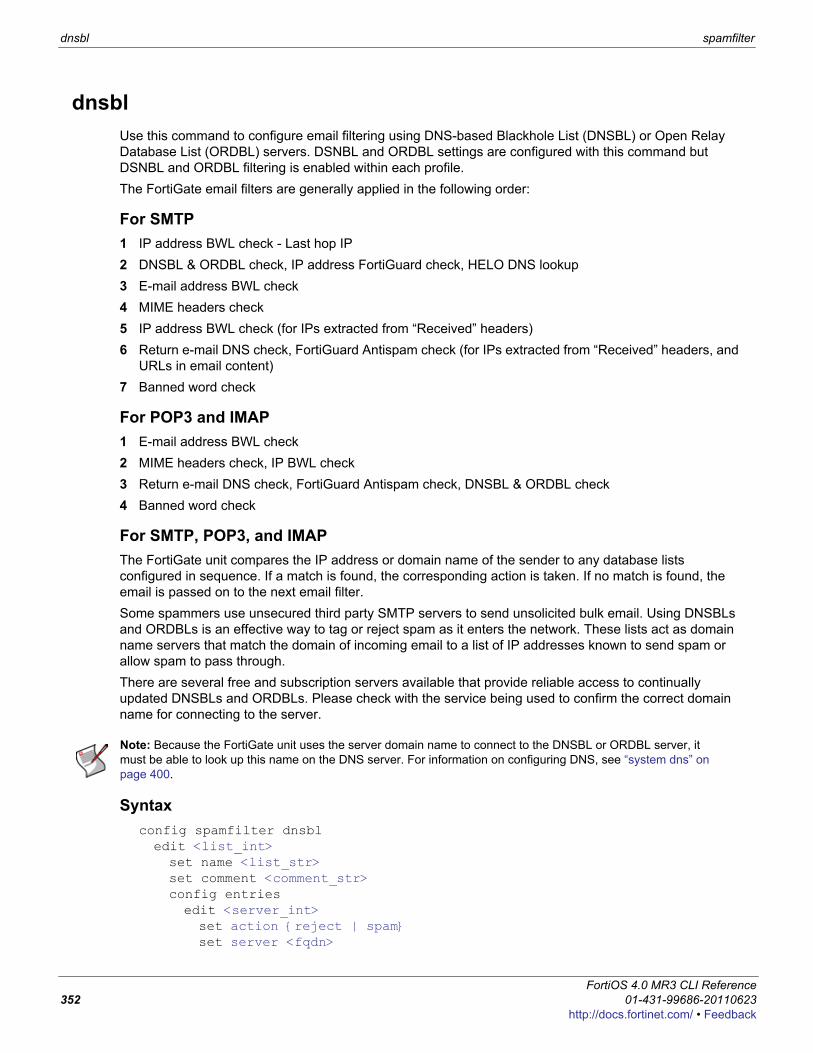
dnsbl spamfilter
dnsblUse this command to configure email filtering using DNS-based Blackhole List (DNSBL) or Open Relay Database List (ORDBL) servers. DSNBL and ORDBL settings are configured with this command but DSNBL and ORDBL filtering is enabled within each profile.The FortiGate email filters are generally applied in the following order:
For SMTP1 IP address BWL check - Last hop IP2 DNSBL & ORDBL check, IP address FortiGuard check, HELO DNS lookup3 E-mail address BWL check4 MIME headers check5 IP address BWL check (for IPs extracted from “Received” headers)6 Return e-mail DNS check, FortiGuard Antispam check (for IPs extracted from “Received” headers, and
URLs in email content)7 Banned word check
For POP3 and IMAP1 E-mail address BWL check2 MIME headers check, IP BWL check3 Return e-mail DNS check, FortiGuard Antispam check, DNSBL & ORDBL check4 Banned word check
For SMTP, POP3, and IMAPThe FortiGate unit compares the IP address or domain name of the sender to any database lists configured in sequence. If a match is found, the corresponding action is taken. If no match is found, the email is passed on to the next email filter.Some spammers use unsecured third party SMTP servers to send unsolicited bulk email. Using DNSBLs and ORDBLs is an effective way to tag or reject spam as it enters the network. These lists act as domain name servers that match the domain of incoming email to a list of IP addresses known to send spam or allow spam to pass through.There are several free and subscription servers available that provide reliable access to continually updated DNSBLs and ORDBLs. Please check with the service being used to confirm the correct domain name for connecting to the server.
Syntaxconfig spamfilter dnsbledit <list_int>set name <list_str>set comment <comment_str>config entriesedit <server_int>set action {reject | spam}set server <fqdn>
Note: Because the FortiGate unit uses the server domain name to connect to the DNSBL or ORDBL server, it must be able to look up this name on the DNS server. For information on configuring DNS, see “system dns” on page 400.
FortiOS 4.0 MR3 CLI Reference352 01-431-99686-20110623
http://docs.fortinet.com/ • Feedback
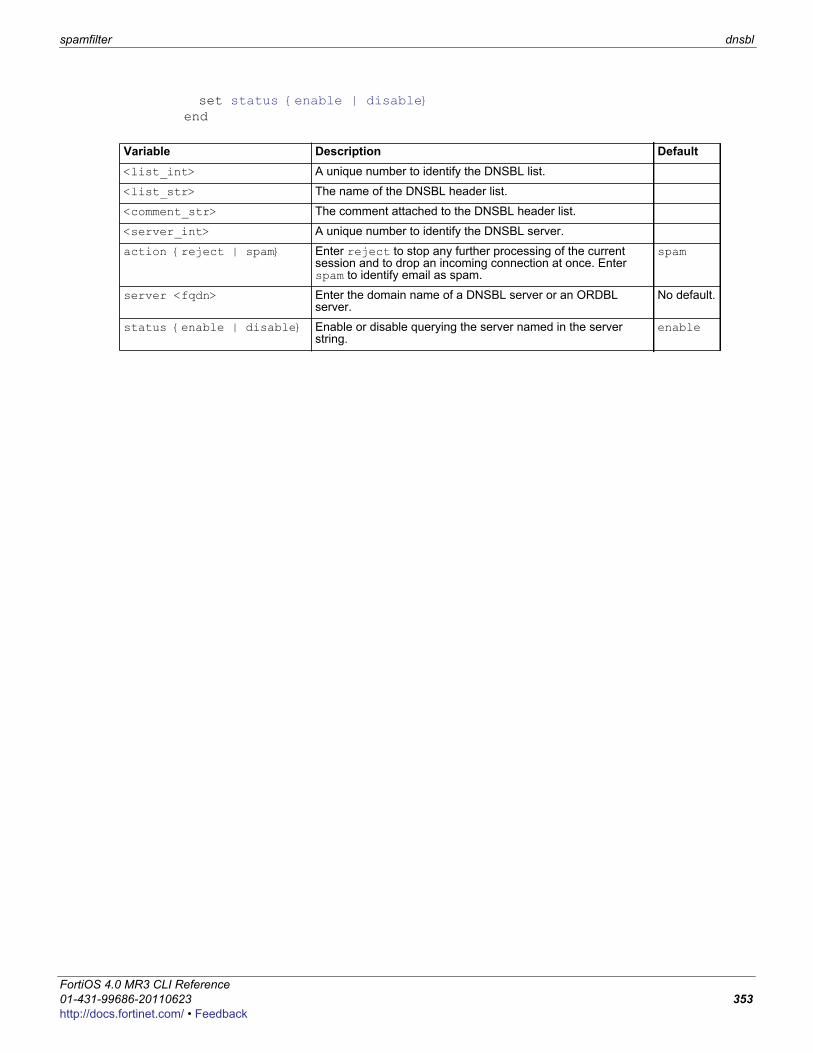
spamfilter dnsbl
F0h
set status {enable | disable}end
Variable Description Default<list_int> A unique number to identify the DNSBL list.
<list_str> The name of the DNSBL header list.
<comment_str> The comment attached to the DNSBL header list.
<server_int> A unique number to identify the DNSBL server.
action {reject | spam} Enter reject to stop any further processing of the current session and to drop an incoming connection at once. Enter spam to identify email as spam.
spam
server <fqdn> Enter the domain name of a DNSBL server or an ORDBL server.
No default.
status {enable | disable} Enable or disable querying the server named in the server string.
enable
ortiOS 4.0 MR3 CLI Reference1-431-99686-20110623 353ttp://docs.fortinet.com/ • Feedback
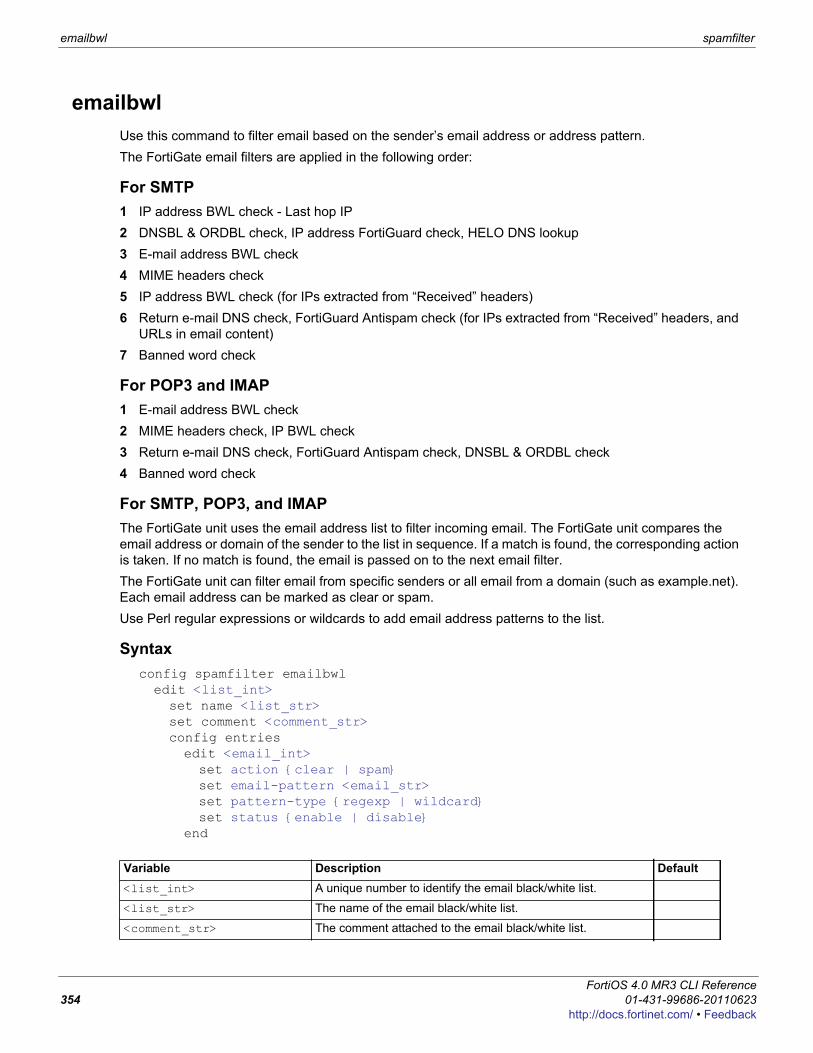
emailbwl spamfilter
emailbwlUse this command to filter email based on the sender’s email address or address pattern.The FortiGate email filters are applied in the following order:
For SMTP1 IP address BWL check - Last hop IP2 DNSBL & ORDBL check, IP address FortiGuard check, HELO DNS lookup3 E-mail address BWL check4 MIME headers check5 IP address BWL check (for IPs extracted from “Received” headers)6 Return e-mail DNS check, FortiGuard Antispam check (for IPs extracted from “Received” headers, and
URLs in email content)7 Banned word check
For POP3 and IMAP1 E-mail address BWL check2 MIME headers check, IP BWL check3 Return e-mail DNS check, FortiGuard Antispam check, DNSBL & ORDBL check4 Banned word check
For SMTP, POP3, and IMAPThe FortiGate unit uses the email address list to filter incoming email. The FortiGate unit compares the email address or domain of the sender to the list in sequence. If a match is found, the corresponding action is taken. If no match is found, the email is passed on to the next email filter. The FortiGate unit can filter email from specific senders or all email from a domain (such as example.net). Each email address can be marked as clear or spam. Use Perl regular expressions or wildcards to add email address patterns to the list.
Syntax config spamfilter emailbwledit <list_int>set name <list_str>set comment <comment_str>config entriesedit <email_int>set action {clear | spam}set email-pattern <email_str>set pattern-type {regexp | wildcard}set status {enable | disable}
end
Variable Description Default<list_int> A unique number to identify the email black/white list.
<list_str> The name of the email black/white list.
<comment_str> The comment attached to the email black/white list.
FortiOS 4.0 MR3 CLI Reference354 01-431-99686-20110623
http://docs.fortinet.com/ • Feedback
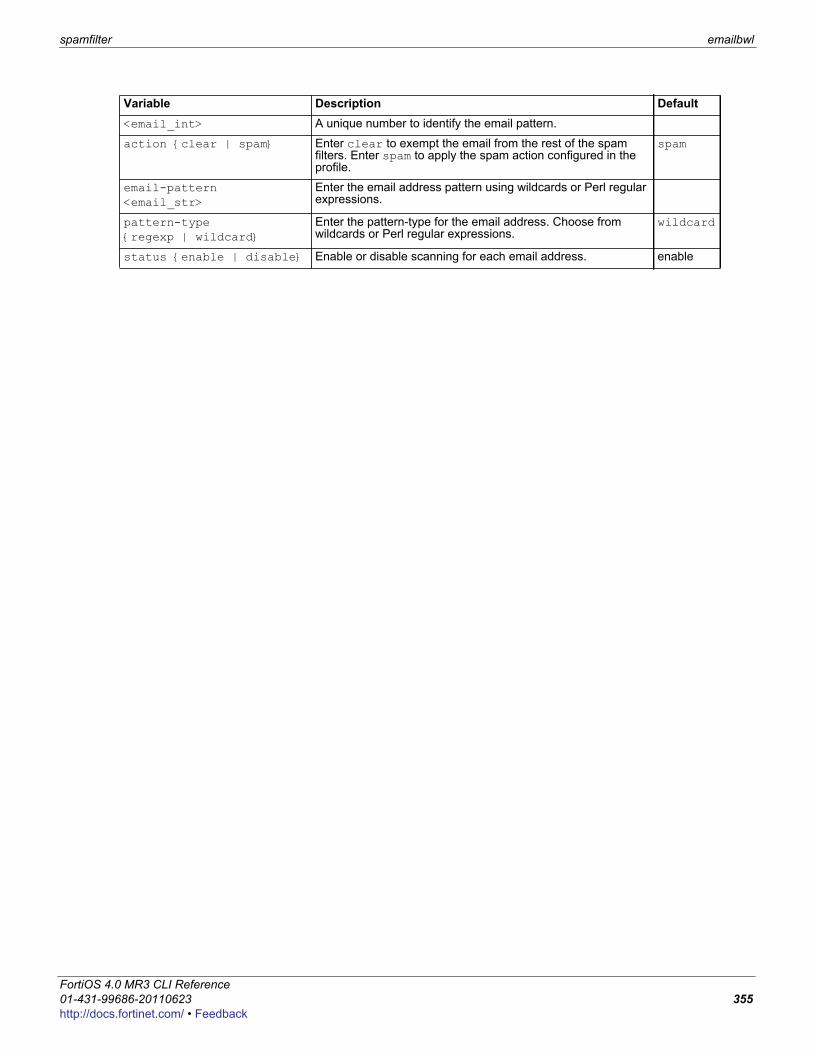
spamfilter emailbwl
F0h
<email_int> A unique number to identify the email pattern.
action {clear | spam} Enter clear to exempt the email from the rest of the spam filters. Enter spam to apply the spam action configured in the profile.
spam
email-pattern <email_str>
Enter the email address pattern using wildcards or Perl regular expressions.
pattern-type {regexp | wildcard}
Enter the pattern-type for the email address. Choose from wildcards or Perl regular expressions.
wildcard
status {enable | disable} Enable or disable scanning for each email address. enable
Variable Description Default
ortiOS 4.0 MR3 CLI Reference1-431-99686-20110623 355ttp://docs.fortinet.com/ • Feedback
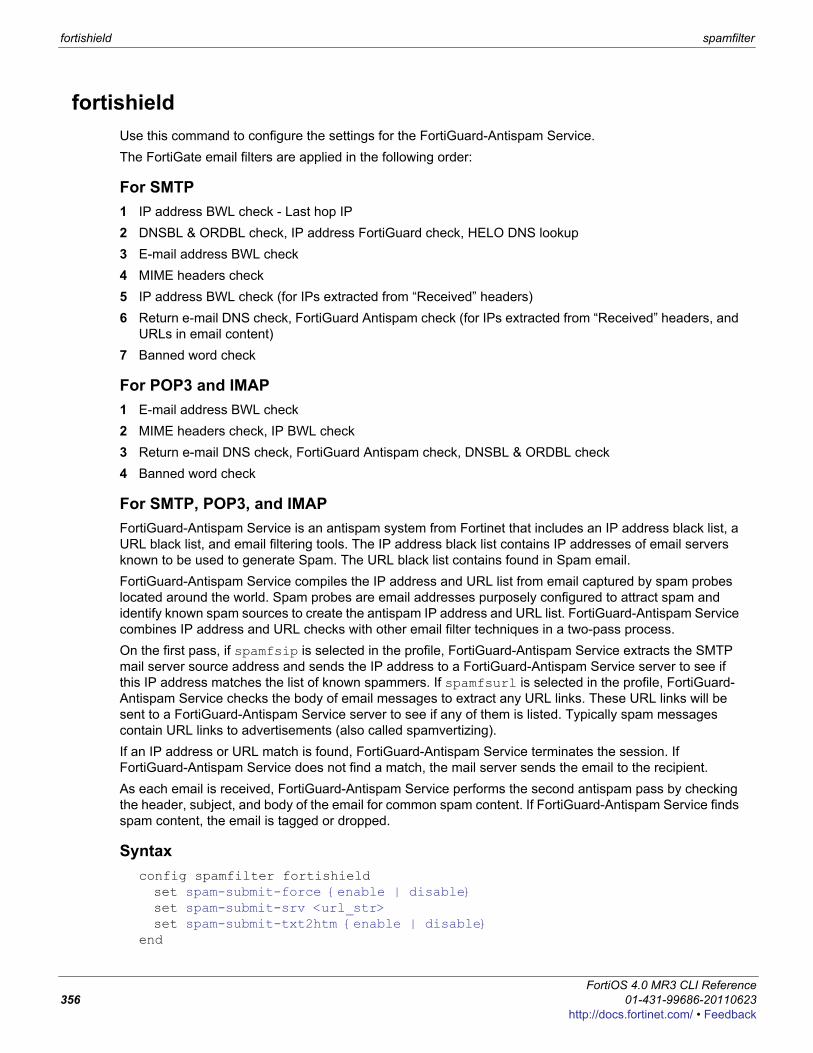
fortishield spamfilter
fortishieldUse this command to configure the settings for the FortiGuard-Antispam Service.The FortiGate email filters are applied in the following order:
For SMTP1 IP address BWL check - Last hop IP2 DNSBL & ORDBL check, IP address FortiGuard check, HELO DNS lookup3 E-mail address BWL check4 MIME headers check5 IP address BWL check (for IPs extracted from “Received” headers)6 Return e-mail DNS check, FortiGuard Antispam check (for IPs extracted from “Received” headers, and
URLs in email content)7 Banned word check
For POP3 and IMAP1 E-mail address BWL check2 MIME headers check, IP BWL check3 Return e-mail DNS check, FortiGuard Antispam check, DNSBL & ORDBL check4 Banned word check
For SMTP, POP3, and IMAPFortiGuard-Antispam Service is an antispam system from Fortinet that includes an IP address black list, a URL black list, and email filtering tools. The IP address black list contains IP addresses of email servers known to be used to generate Spam. The URL black list contains found in Spam email.FortiGuard-Antispam Service compiles the IP address and URL list from email captured by spam probes located around the world. Spam probes are email addresses purposely configured to attract spam and identify known spam sources to create the antispam IP address and URL list. FortiGuard-Antispam Service combines IP address and URL checks with other email filter techniques in a two-pass process. On the first pass, if spamfsip is selected in the profile, FortiGuard-Antispam Service extracts the SMTP mail server source address and sends the IP address to a FortiGuard-Antispam Service server to see if this IP address matches the list of known spammers. If spamfsurl is selected in the profile, FortiGuard-Antispam Service checks the body of email messages to extract any URL links. These URL links will be sent to a FortiGuard-Antispam Service server to see if any of them is listed. Typically spam messages contain URL links to advertisements (also called spamvertizing).If an IP address or URL match is found, FortiGuard-Antispam Service terminates the session. If FortiGuard-Antispam Service does not find a match, the mail server sends the email to the recipient.As each email is received, FortiGuard-Antispam Service performs the second antispam pass by checking the header, subject, and body of the email for common spam content. If FortiGuard-Antispam Service finds spam content, the email is tagged or dropped.
Syntaxconfig spamfilter fortishieldset spam-submit-force {enable | disable}set spam-submit-srv <url_str>set spam-submit-txt2htm {enable | disable}
end
FortiOS 4.0 MR3 CLI Reference356 01-431-99686-20110623
http://docs.fortinet.com/ • Feedback
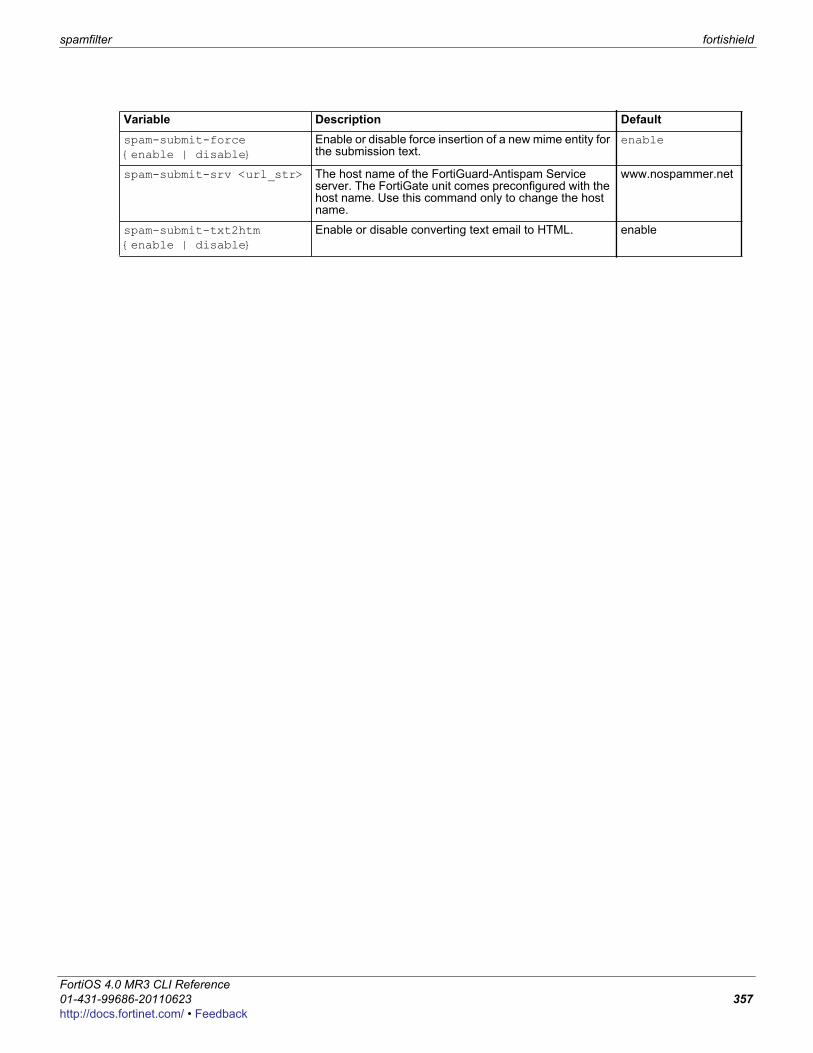
spamfilter fortishield
F0h
Variable Description Defaultspam-submit-force {enable | disable}
Enable or disable force insertion of a new mime entity for the submission text.
enable
spam-submit-srv <url_str> The host name of the FortiGuard-Antispam Service server. The FortiGate unit comes preconfigured with the host name. Use this command only to change the host name.
www.nospammer.net
spam-submit-txt2htm {enable | disable}
Enable or disable converting text email to HTML. enable
ortiOS 4.0 MR3 CLI Reference1-431-99686-20110623 357ttp://docs.fortinet.com/ • Feedback

ipbwl spamfilter
ipbwlUse this command to filter email based on the IP or subnet address.The FortiGate email filters are generally applied in the following order:
For SMTP1 IP address BWL check - Last hop IP2 DNSBL & ORDBL check, IP address FortiGuard check, HELO DNS lookup3 E-mail address BWL check4 MIME headers check5 IP address BWL check (for IPs extracted from “Received” headers)6 Return e-mail DNS check, FortiGuard Antispam check (for IPs extracted from “Received” headers, and
URLs in email content)7 Banned word check
For POP3 and IMAP1 E-mail address BWL check2 MIME headers check, IP BWL check3 Return e-mail DNS check, FortiGuard Antispam check, DNSBL & ORDBL check4 Banned word check
For SMTP, POP3, and IMAPThe FortiGate unit uses the IP address list to filter incoming email. The FortiGate unit compares the IP address of the sender to the list in sequence. If a match is found, the corresponding action is taken. If no match is found, the email is passed on to the next email filter.Enter an IP address and mask in one of two formats:• x.x.x.x/x.x.x.x, for example 192.168.10.23/255.255.255.0• x.x.x.x/x, for example 192.168.10.23/24Configure the FortiGate unit to filter email from specific IP addresses. Mark each IP address as clear, spam, or reject. Filter single IP addresses, or a range of addresses at the network level by configuring an address and mask.
Syntaxconfig spamfilter ipbwledit <list_int>set name <list_str>set comment <comment_str>config entriesedit <address_int>set action {clear | reject | spam}set addr-type {ipv4 | ipv6}set ip4-subnet {<address_ipv4mask>}set ip6-subnet {<address_ipv6mask>}set status {enable | disable}
end
FortiOS 4.0 MR3 CLI Reference358 01-431-99686-20110623
http://docs.fortinet.com/ • Feedback
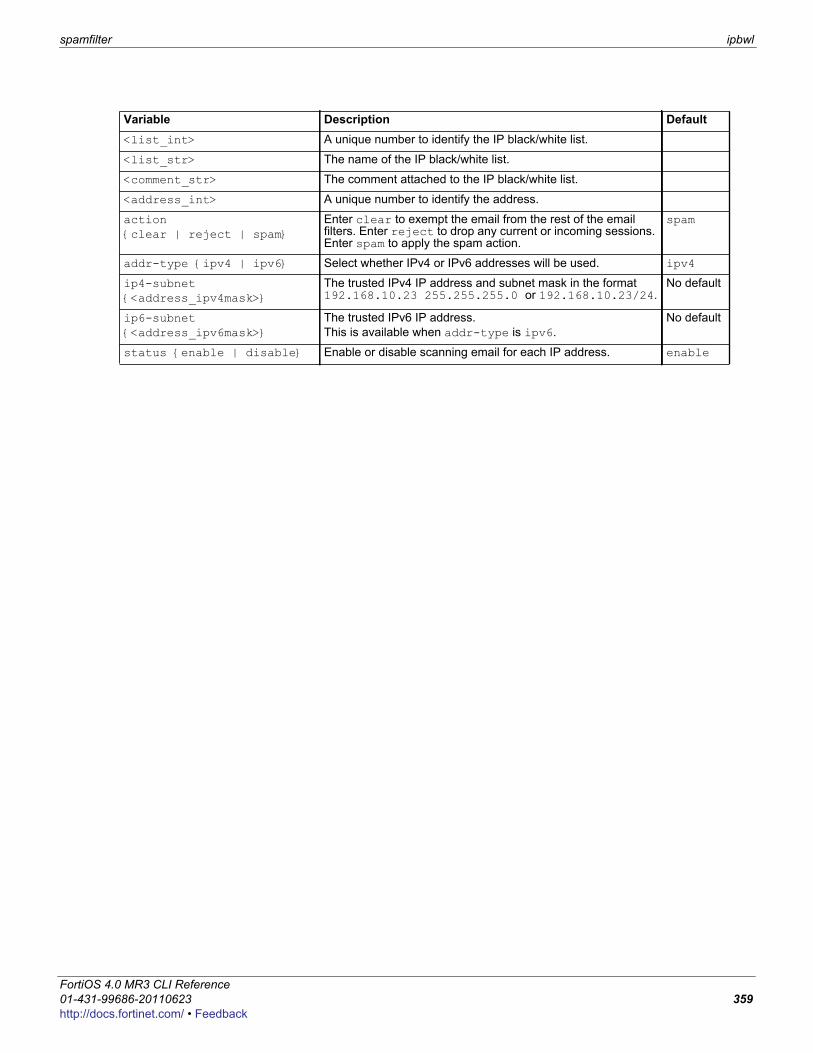
spamfilter ipbwl
F0h
Variable Description Default<list_int> A unique number to identify the IP black/white list.
<list_str> The name of the IP black/white list.
<comment_str> The comment attached to the IP black/white list.
<address_int> A unique number to identify the address.
action {clear | reject | spam}
Enter clear to exempt the email from the rest of the email filters. Enter reject to drop any current or incoming sessions. Enter spam to apply the spam action.
spam
addr-type {ipv4 | ipv6} Select whether IPv4 or IPv6 addresses will be used. ipv4
ip4-subnet {<address_ipv4mask>}
The trusted IPv4 IP address and subnet mask in the format 192.168.10.23 255.255.255.0 or 192.168.10.23/24.
No default
ip6-subnet {<address_ipv6mask>}
The trusted IPv6 IP address.This is available when addr-type is ipv6.
No default
status {enable | disable} Enable or disable scanning email for each IP address. enable
ortiOS 4.0 MR3 CLI Reference1-431-99686-20110623 359ttp://docs.fortinet.com/ • Feedback
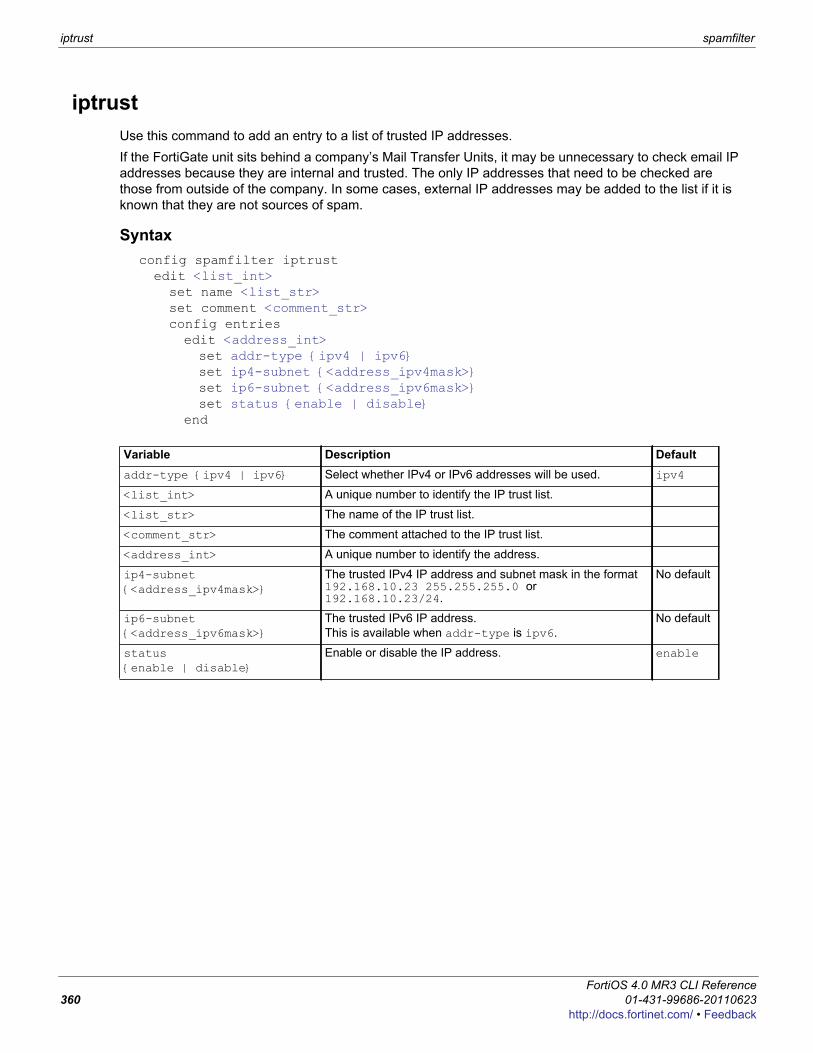
iptrust spamfilter
iptrustUse this command to add an entry to a list of trusted IP addresses.If the FortiGate unit sits behind a company’s Mail Transfer Units, it may be unnecessary to check email IP addresses because they are internal and trusted. The only IP addresses that need to be checked are those from outside of the company. In some cases, external IP addresses may be added to the list if it is known that they are not sources of spam.
Syntaxconfig spamfilter iptrustedit <list_int>set name <list_str>set comment <comment_str>config entriesedit <address_int>set addr-type {ipv4 | ipv6}set ip4-subnet {<address_ipv4mask>}set ip6-subnet {<address_ipv6mask>}set status {enable | disable}
end
Variable Description Defaultaddr-type {ipv4 | ipv6} Select whether IPv4 or IPv6 addresses will be used. ipv4
<list_int> A unique number to identify the IP trust list.
<list_str> The name of the IP trust list.
<comment_str> The comment attached to the IP trust list.
<address_int> A unique number to identify the address.
ip4-subnet {<address_ipv4mask>}
The trusted IPv4 IP address and subnet mask in the format 192.168.10.23 255.255.255.0 or 192.168.10.23/24.
No default
ip6-subnet {<address_ipv6mask>}
The trusted IPv6 IP address.This is available when addr-type is ipv6.
No default
status {enable | disable}
Enable or disable the IP address. enable
FortiOS 4.0 MR3 CLI Reference360 01-431-99686-20110623
http://docs.fortinet.com/ • Feedback
spamfilter mheader
F0h
mheaderUse this command to configure email filtering based on the MIME header. MIME header settings are configured with this command but MIME header filtering is enabled within each profile.The FortiGate email filters are applied in the following order:
For SMTP1 IP address BWL check - Last hop IP2 DNSBL & ORDBL check, IP address FortiGuard check, HELO DNS lookup3 E-mail address BWL check4 MIME headers check5 IP address BWL check (for IPs extracted from “Received” headers)6 Return e-mail DNS check, FortiGuard Antispam check (for IPs extracted from “Received” headers, and
URLs in email content)7 Banned word check
For POP3 and IMAP1 E-mail address BWL check2 MIME headers check, IP BWL check3 Return e-mail DNS check, FortiGuard Antispam check, DNSBL & ORDBL check4 Banned word check
For SMTP, POP3, and IMAPThe FortiGate unit compares the MIME header key-value pair of incoming email to the list pair in sequence. If a match is found, the corresponding action is taken. If no match is found, the email is passed on to the next email filter.MIME (Multipurpose Internet Mail Extensions) headers are added to email to describe content type and content encoding, such as the type of text in the email body or the program that generated the email. Some examples of MIME headers include:• X-mailer: outgluck• X-Distribution: bulk• Content_Type: text/html• Content_Type: image/jpgThe first part of the MIME header is called the header key, or just header. The second part is called the value. Spammers often insert comments into header values or leave them blank. These malformed headers can fool some spam and virus filters.Use the MIME headers list to mark email from certain bulk mail programs or with certain types of content that are common in spam messages. Mark the email as spam or clear for each header configured. Use Perl regular expressions or wildcards to add MIME header patterns to the list.
Note: MIME header entries are case sensitive.
ortiOS 4.0 MR3 CLI Reference1-431-99686-20110623 361ttp://docs.fortinet.com/ • Feedback
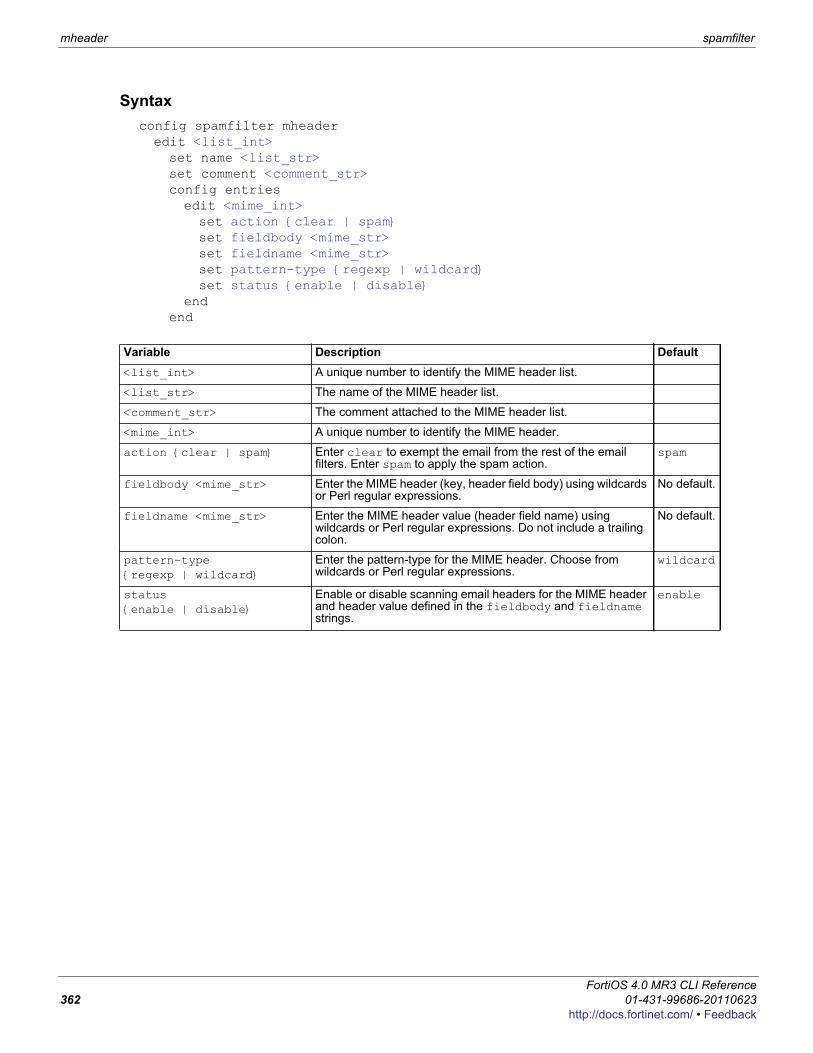
mheader spamfilter
Syntax config spamfilter mheaderedit <list_int>set name <list_str>set comment <comment_str>config entriesedit <mime_int>set action {clear | spam}set fieldbody <mime_str>set fieldname <mime_str>set pattern-type {regexp | wildcard}set status {enable | disable}
endend
Variable Description Default<list_int> A unique number to identify the MIME header list.
<list_str> The name of the MIME header list.
<comment_str> The comment attached to the MIME header list.
<mime_int> A unique number to identify the MIME header.
action {clear | spam} Enter clear to exempt the email from the rest of the email filters. Enter spam to apply the spam action.
spam
fieldbody <mime_str> Enter the MIME header (key, header field body) using wildcards or Perl regular expressions.
No default.
fieldname <mime_str> Enter the MIME header value (header field name) using wildcards or Perl regular expressions. Do not include a trailing colon.
No default.
pattern-type {regexp | wildcard}
Enter the pattern-type for the MIME header. Choose from wildcards or Perl regular expressions.
wildcard
status {enable | disable}
Enable or disable scanning email headers for the MIME header and header value defined in the fieldbody and fieldname strings.
enable
FortiOS 4.0 MR3 CLI Reference362 01-431-99686-20110623
http://docs.fortinet.com/ • Feedback
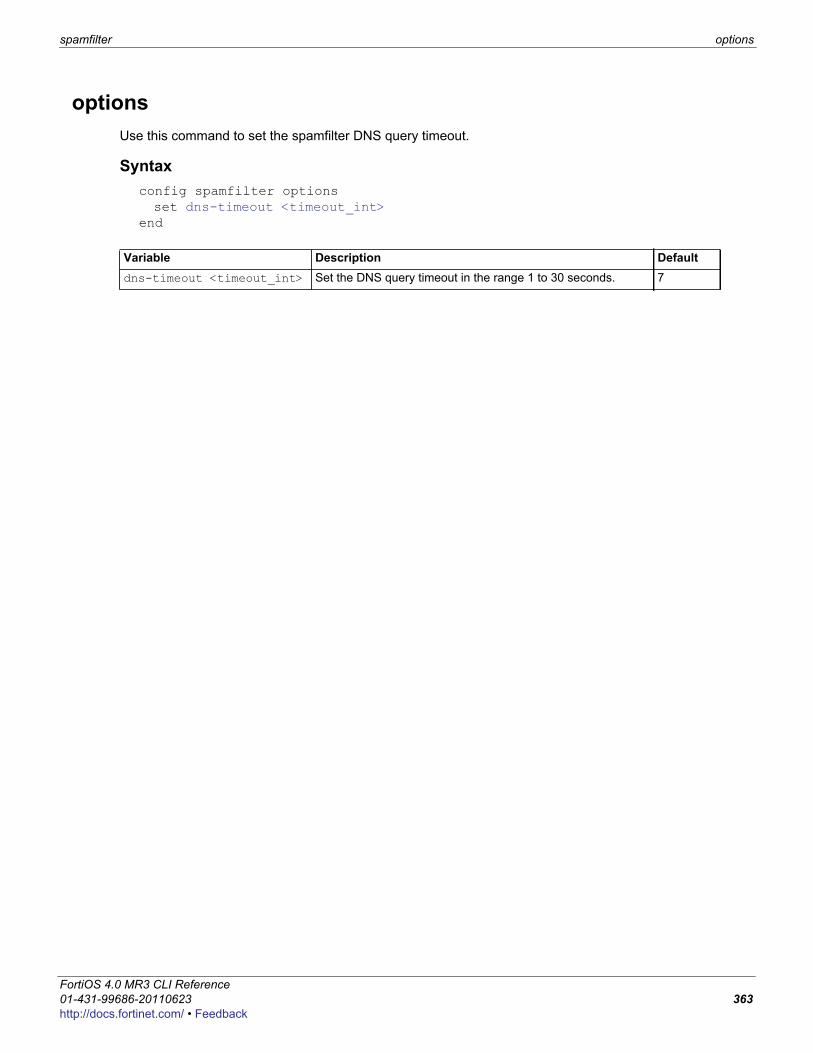
spamfilter options
F0h
optionsUse this command to set the spamfilter DNS query timeout.
Syntaxconfig spamfilter optionsset dns-timeout <timeout_int>
end
Variable Description Defaultdns-timeout <timeout_int> Set the DNS query timeout in the range 1 to 30 seconds. 7
ortiOS 4.0 MR3 CLI Reference1-431-99686-20110623 363ttp://docs.fortinet.com/ • Feedback
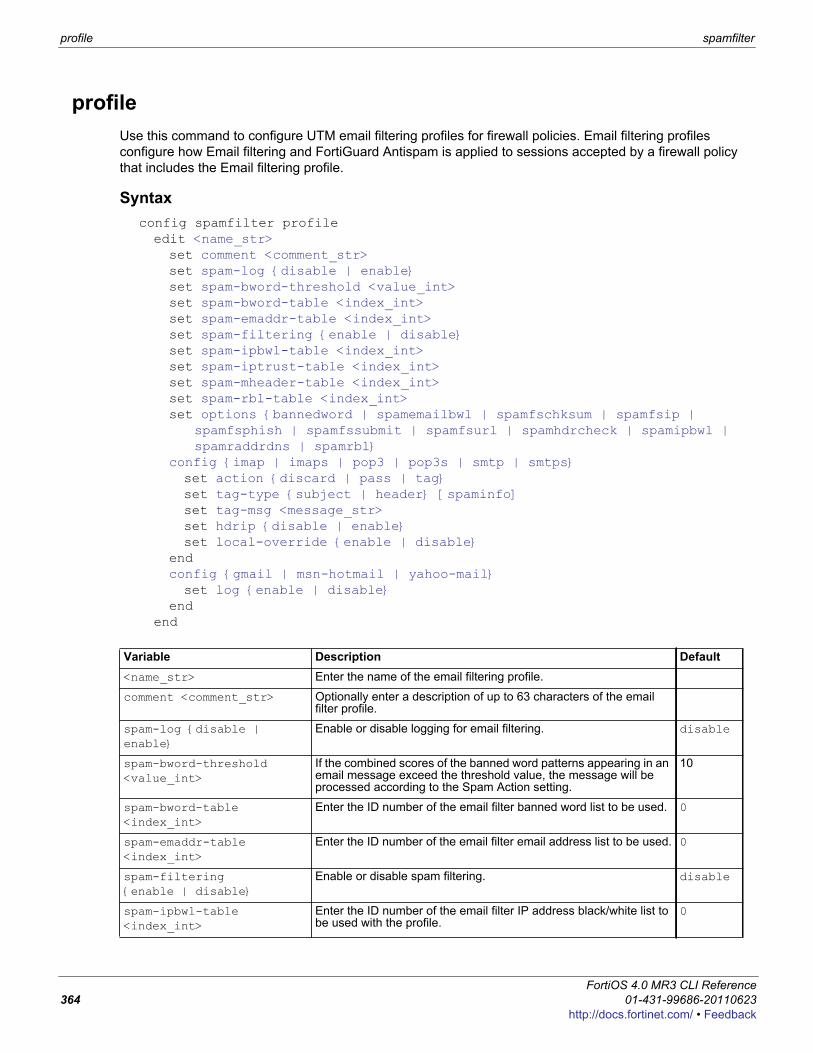
profile spamfilter
profileUse this command to configure UTM email filtering profiles for firewall policies. Email filtering profiles configure how Email filtering and FortiGuard Antispam is applied to sessions accepted by a firewall policy that includes the Email filtering profile.
Syntaxconfig spamfilter profileedit <name_str>set comment <comment_str>set spam-log {disable | enable}set spam-bword-threshold <value_int>set spam-bword-table <index_int>set spam-emaddr-table <index_int>set spam-filtering {enable | disable}set spam-ipbwl-table <index_int>set spam-iptrust-table <index_int>set spam-mheader-table <index_int>set spam-rbl-table <index_int>set options {bannedword | spamemailbwl | spamfschksum | spamfsip |
spamfsphish | spamfssubmit | spamfsurl | spamhdrcheck | spamipbwl | spamraddrdns | spamrbl}
config {imap | imaps | pop3 | pop3s | smtp | smtps}set action {discard | pass | tag}set tag-type {subject | header} [spaminfo]set tag-msg <message_str>set hdrip {disable | enable}set local-override {enable | disable}
endconfig {gmail | msn-hotmail | yahoo-mail}set log {enable | disable}
endend
Variable Description Default<name_str> Enter the name of the email filtering profile.
comment <comment_str> Optionally enter a description of up to 63 characters of the email filter profile.
spam-log {disable | enable}
Enable or disable logging for email filtering. disable
spam-bword-threshold <value_int>
If the combined scores of the banned word patterns appearing in an email message exceed the threshold value, the message will be processed according to the Spam Action setting.
10
spam-bword-table <index_int>
Enter the ID number of the email filter banned word list to be used. 0
spam-emaddr-table <index_int>
Enter the ID number of the email filter email address list to be used. 0
spam-filtering {enable | disable}
Enable or disable spam filtering. disable
spam-ipbwl-table <index_int>
Enter the ID number of the email filter IP address black/white list to be used with the profile.
0
FortiOS 4.0 MR3 CLI Reference364 01-431-99686-20110623
http://docs.fortinet.com/ • Feedback
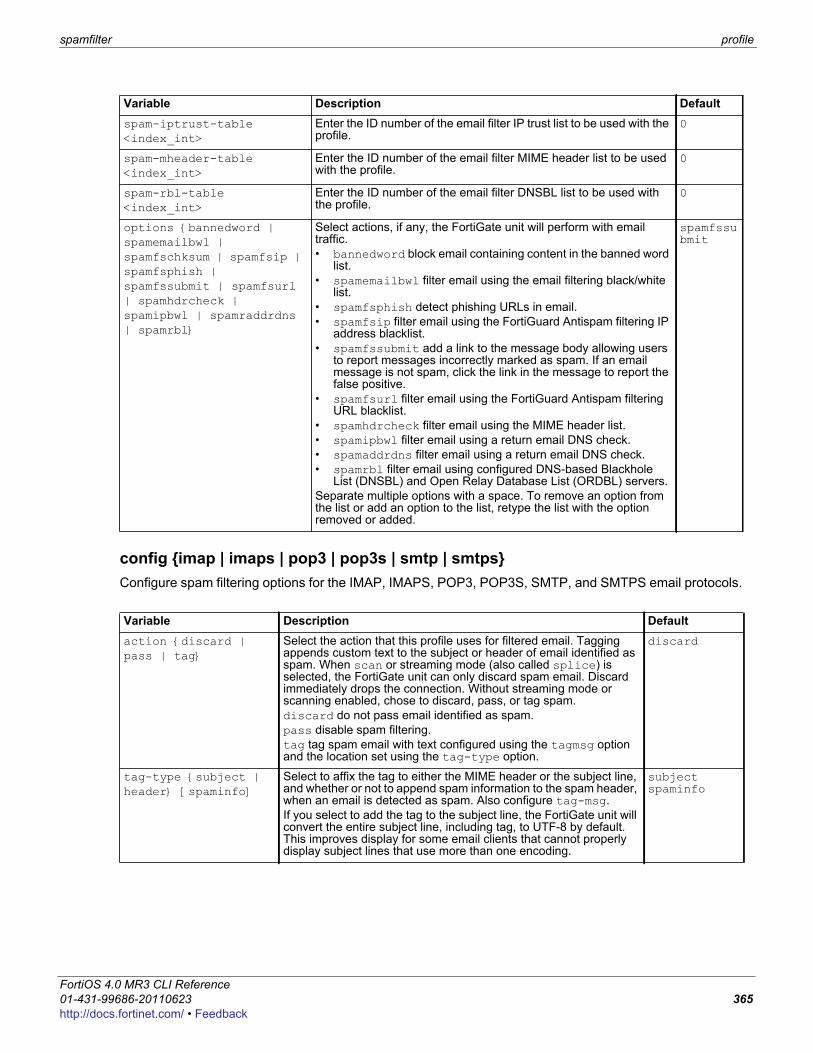
spamfilter profile
F0h
config {imap | imaps | pop3 | pop3s | smtp | smtps}Configure spam filtering options for the IMAP, IMAPS, POP3, POP3S, SMTP, and SMTPS email protocols.
spam-iptrust-table <index_int>
Enter the ID number of the email filter IP trust list to be used with the profile.
0
spam-mheader-table <index_int>
Enter the ID number of the email filter MIME header list to be used with the profile.
0
spam-rbl-table <index_int>
Enter the ID number of the email filter DNSBL list to be used with the profile.
0
options {bannedword | spamemailbwl | spamfschksum | spamfsip | spamfsphish | spamfssubmit | spamfsurl | spamhdrcheck | spamipbwl | spamraddrdns | spamrbl}
Select actions, if any, the FortiGate unit will perform with email traffic.• bannedword block email containing content in the banned word
list. • spamemailbwl filter email using the email filtering black/white
list.• spamfsphish detect phishing URLs in email.• spamfsip filter email using the FortiGuard Antispam filtering IP
address blacklist.• spamfssubmit add a link to the message body allowing users
to report messages incorrectly marked as spam. If an email message is not spam, click the link in the message to report the false positive.
• spamfsurl filter email using the FortiGuard Antispam filtering URL blacklist.
• spamhdrcheck filter email using the MIME header list.• spamipbwl filter email using a return email DNS check.• spamaddrdns filter email using a return email DNS check.• spamrbl filter email using configured DNS-based Blackhole
List (DNSBL) and Open Relay Database List (ORDBL) servers.Separate multiple options with a space. To remove an option from the list or add an option to the list, retype the list with the option removed or added.
spamfssubmit
Variable Description Defaultaction {discard | pass | tag}
Select the action that this profile uses for filtered email. Tagging appends custom text to the subject or header of email identified as spam. When scan or streaming mode (also called splice) is selected, the FortiGate unit can only discard spam email. Discard immediately drops the connection. Without streaming mode or scanning enabled, chose to discard, pass, or tag spam.discard do not pass email identified as spam.pass disable spam filtering.tag tag spam email with text configured using the tagmsg option and the location set using the tag-type option.
discard
tag-type {subject | header} [spaminfo]
Select to affix the tag to either the MIME header or the subject line, and whether or not to append spam information to the spam header, when an email is detected as spam. Also configure tag-msg.If you select to add the tag to the subject line, the FortiGate unit will convert the entire subject line, including tag, to UTF-8 by default. This improves display for some email clients that cannot properly display subject lines that use more than one encoding.
subject spaminfo
Variable Description Default
ortiOS 4.0 MR3 CLI Reference1-431-99686-20110623 365ttp://docs.fortinet.com/ • Feedback
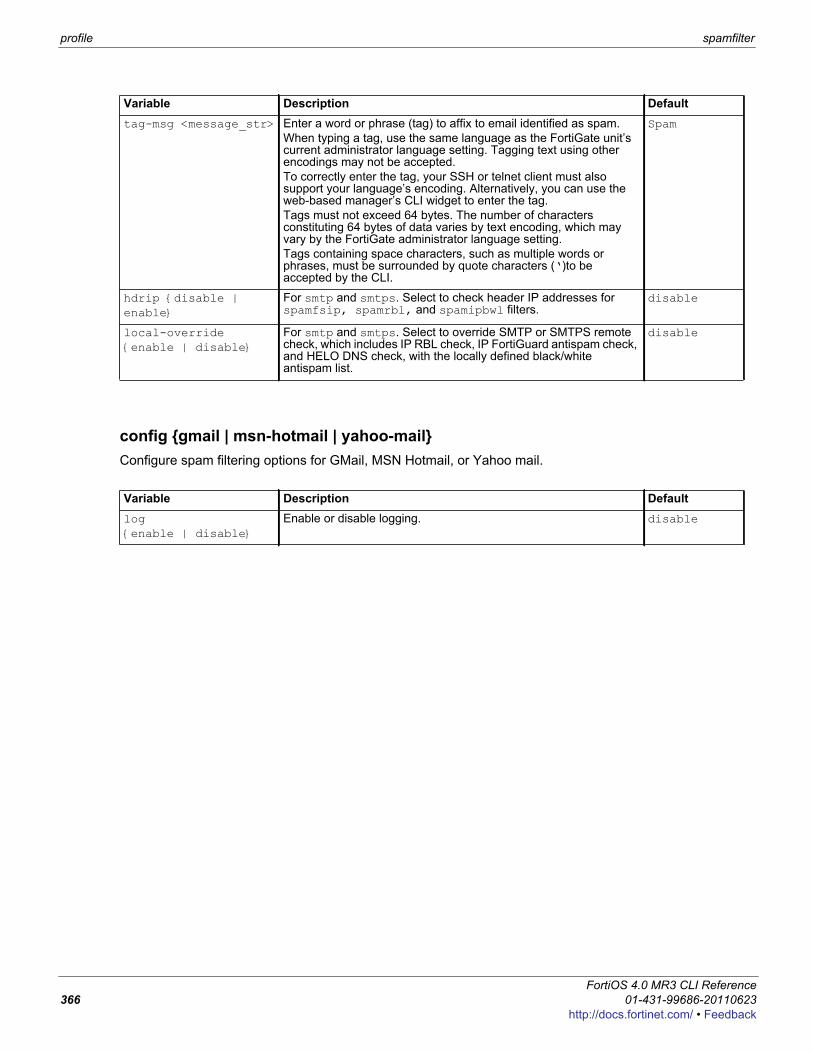
profile spamfilter
config {gmail | msn-hotmail | yahoo-mail}Configure spam filtering options for GMail, MSN Hotmail, or Yahoo mail.
tag-msg <message_str> Enter a word or phrase (tag) to affix to email identified as spam.When typing a tag, use the same language as the FortiGate unit’s current administrator language setting. Tagging text using other encodings may not be accepted.To correctly enter the tag, your SSH or telnet client must also support your language’s encoding. Alternatively, you can use the web-based manager’s CLI widget to enter the tag.Tags must not exceed 64 bytes. The number of characters constituting 64 bytes of data varies by text encoding, which may vary by the FortiGate administrator language setting.Tags containing space characters, such as multiple words or phrases, must be surrounded by quote characters (‘)to be accepted by the CLI.
Spam
hdrip {disable | enable}
For smtp and smtps. Select to check header IP addresses for spamfsip, spamrbl, and spamipbwl filters.
disable
local-override{enable | disable}
For smtp and smtps. Select to override SMTP or SMTPS remote check, which includes IP RBL check, IP FortiGuard antispam check, and HELO DNS check, with the locally defined black/white antispam list.
disable
Variable Description Defaultlog {enable | disable}
Enable or disable logging. disable
Variable Description Default
FortiOS 4.0 MR3 CLI Reference366 01-431-99686-20110623
http://docs.fortinet.com/ • Feedback
F0h
systemUse system commands to configure options related to the overall operation of the FortiGate unit, including. This chapter contains the following sections:
3g-modem customaccprofileadminalertemailamcarp-table auto-installautoupdate clientoverrideautoupdate overrideautoupdate push-updateautoupdate scheduleautoupdate tunnelingauxbug-reportcentral-managementconsoleddnsdhcp reserved-addressdhcp serverdhcp6 serverdnsdns-databasedns-serverelbcfips-ccfortiguardfortiguard-loggi-gkglobal
gre-tunnelhainterfaceipv6-tunnelmac-address-tablemodemmonitorsnpuntpobject-tagpassword-policyport-pairproxy-arp replacemsg adminreplacemsg alertmailreplacemsg authreplacemsg ecreplacemsg fortiguard-wfreplacemsg ftpreplacemsg httpreplacemsg imreplacemsg mailreplacemsg mm1replacemsg mm3replacemsg mm4replacemsg mm7replacemsg-groupreplacemsg-image
replacemsg nac-quarreplacemsg nntpreplacemsg spamreplacemsg sslvpnreplacemsg traffic-quotareplacemsg webproxyresource-limitssession-helpersession-syncsession-ttlsettingssit-tunnelsflowsnmp communitysnmp sysinfosnmp userspstorageswitch-interfacetos-based-priorityvdom-dnsvdom-linkvdom-propertyvdom-sflowwccpzone
ortiOS 4.0 MR3 CLI Reference1-431-99686-20110623 367ttp://docs.fortinet.com/ • Feedback
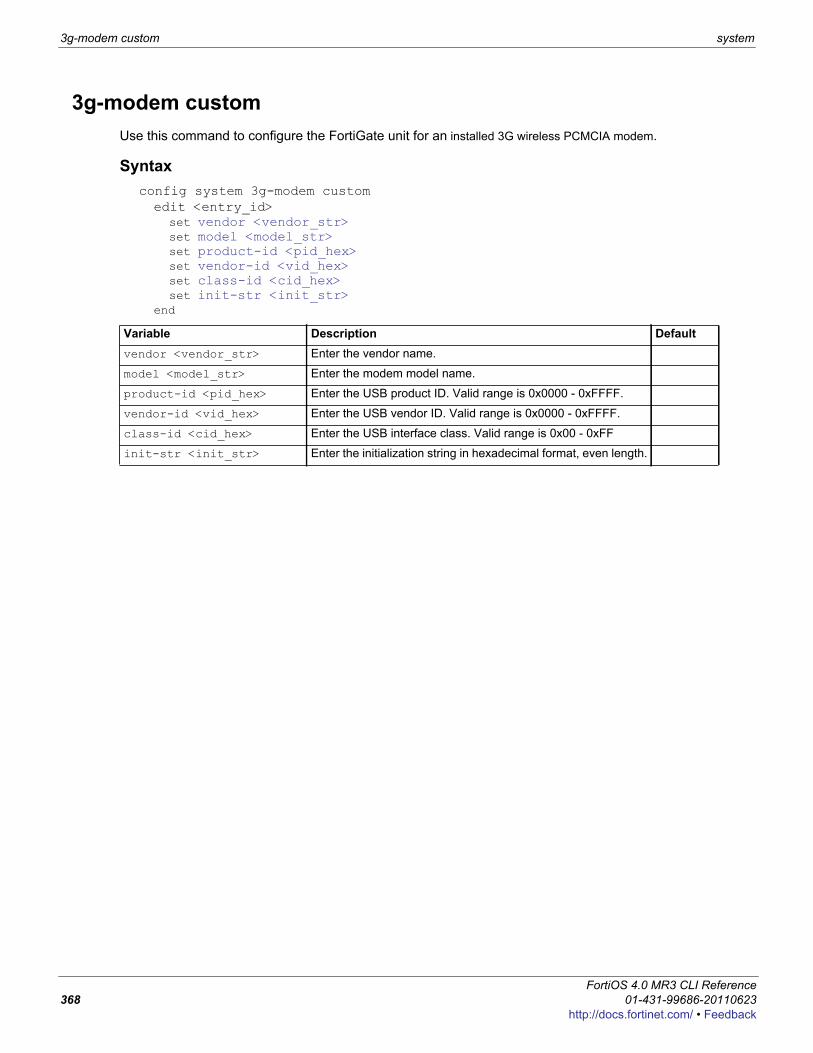
3g-modem custom system
3g-modem customUse this command to configure the FortiGate unit for an installed 3G wireless PCMCIA modem.
Syntaxconfig system 3g-modem customedit <entry_id>
set vendor <vendor_str>set model <model_str>set product-id <pid_hex>set vendor-id <vid_hex>set class-id <cid_hex>set init-str <init_str>
end
Variable Description Defaultvendor <vendor_str> Enter the vendor name.
model <model_str> Enter the modem model name.
product-id <pid_hex> Enter the USB product ID. Valid range is 0x0000 - 0xFFFF.
vendor-id <vid_hex> Enter the USB vendor ID. Valid range is 0x0000 - 0xFFFF.
class-id <cid_hex> Enter the USB interface class. Valid range is 0x00 - 0xFF
init-str <init_str> Enter the initialization string in hexadecimal format, even length.
FortiOS 4.0 MR3 CLI Reference368 01-431-99686-20110623
http://docs.fortinet.com/ • Feedback
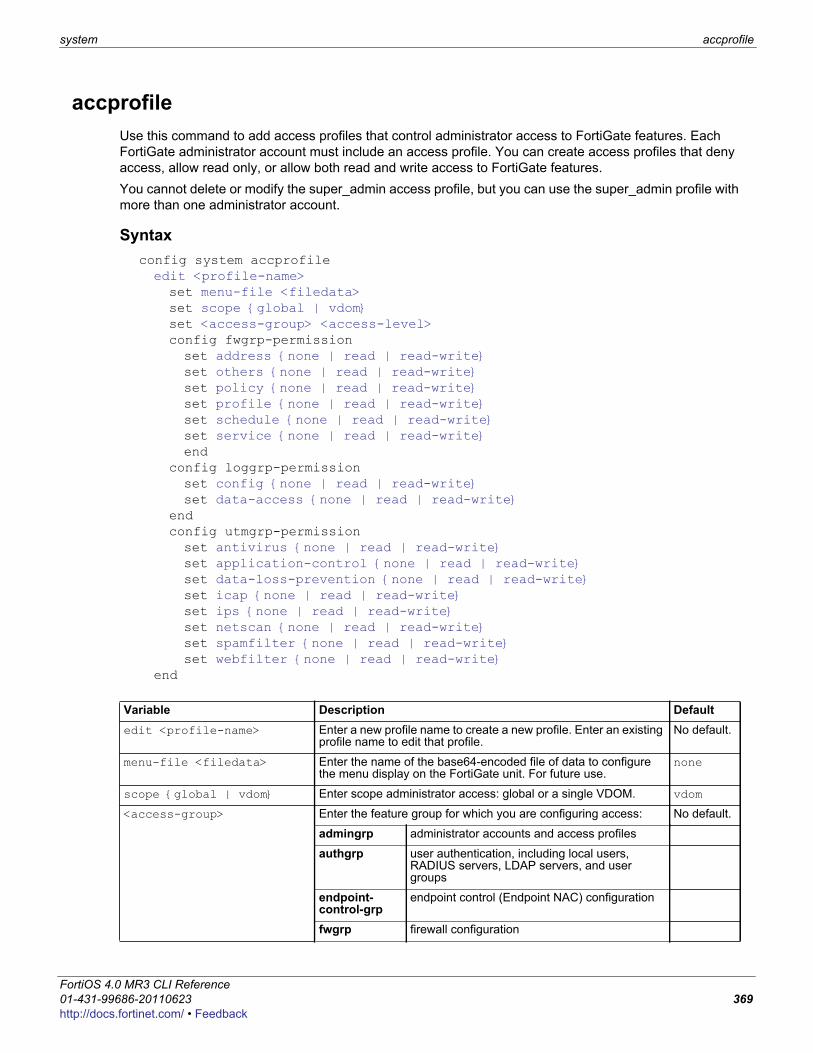
system accprofile
F0h
accprofileUse this command to add access profiles that control administrator access to FortiGate features. Each FortiGate administrator account must include an access profile. You can create access profiles that deny access, allow read only, or allow both read and write access to FortiGate features.You cannot delete or modify the super_admin access profile, but you can use the super_admin profile with more than one administrator account.
Syntaxconfig system accprofileedit <profile-name>set menu-file <filedata>set scope {global | vdom}set <access-group> <access-level>config fwgrp-permissionset address {none | read | read-write}set others {none | read | read-write}set policy {none | read | read-write}set profile {none | read | read-write}set schedule {none | read | read-write}set service {none | read | read-write}end
config loggrp-permissionset config {none | read | read-write}set data-access {none | read | read-write}
endconfig utmgrp-permissionset antivirus {none | read | read-write}set application-control {none | read | read-write}set data-loss-prevention {none | read | read-write}set icap {none | read | read-write}set ips {none | read | read-write}set netscan {none | read | read-write}set spamfilter {none | read | read-write}set webfilter {none | read | read-write}
end
Variable Description Defaultedit <profile-name> Enter a new profile name to create a new profile. Enter an existing
profile name to edit that profile.No default.
menu-file <filedata> Enter the name of the base64-encoded file of data to configure the menu display on the FortiGate unit. For future use.
none
scope {global | vdom} Enter scope administrator access: global or a single VDOM. vdom
<access-group> Enter the feature group for which you are configuring access: No default.
admingrp administrator accounts and access profiles
authgrp user authentication, including local users, RADIUS servers, LDAP servers, and user groups
endpoint-control-grp
endpoint control (Endpoint NAC) configuration
fwgrp firewall configuration
ortiOS 4.0 MR3 CLI Reference1-431-99686-20110623 369ttp://docs.fortinet.com/ • Feedback
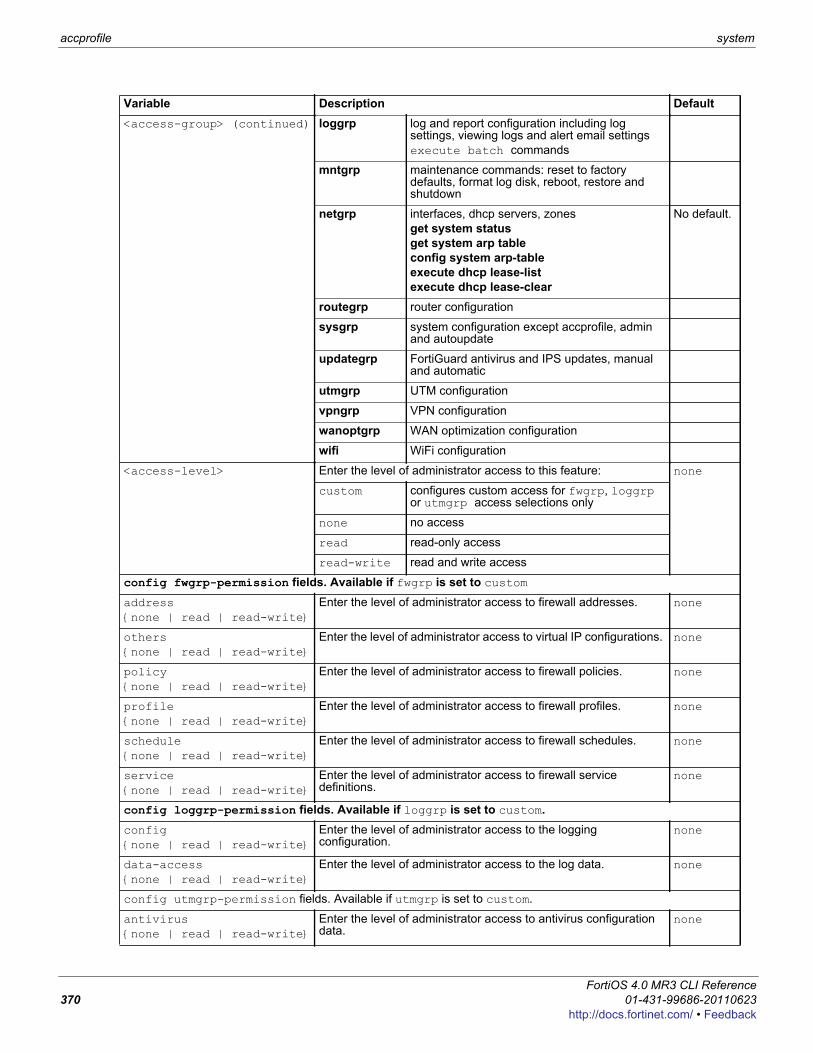
accprofile system
<access-group> (continued) loggrp log and report configuration including log settings, viewing logs and alert email settingsexecute batch commands
mntgrp maintenance commands: reset to factory defaults, format log disk, reboot, restore and shutdown
netgrp interfaces, dhcp servers, zonesget system status get system arp tableconfig system arp-tableexecute dhcp lease-listexecute dhcp lease-clear
No default.
routegrp router configuration
sysgrp system configuration except accprofile, admin and autoupdate
updategrp FortiGuard antivirus and IPS updates, manual and automatic
utmgrp UTM configuration
vpngrp VPN configuration
wanoptgrp WAN optimization configuration
wifi WiFi configuration
<access-level> Enter the level of administrator access to this feature: none
custom configures custom access for fwgrp, loggrp or utmgrp access selections only
none no access
read read-only access
read-write read and write access
config fwgrp-permission fields. Available if fwgrp is set to custom address {none | read | read-write}
Enter the level of administrator access to firewall addresses. none
others {none | read | read-write}
Enter the level of administrator access to virtual IP configurations. none
policy {none | read | read-write}
Enter the level of administrator access to firewall policies. none
profile {none | read | read-write}
Enter the level of administrator access to firewall profiles. none
schedule {none | read | read-write}
Enter the level of administrator access to firewall schedules. none
service {none | read | read-write}
Enter the level of administrator access to firewall service definitions.
none
config loggrp-permission fields. Available if loggrp is set to custom.config {none | read | read-write}
Enter the level of administrator access to the logging configuration.
none
data-access {none | read | read-write}
Enter the level of administrator access to the log data. none
config utmgrp-permission fields. Available if utmgrp is set to custom.
antivirus {none | read | read-write}
Enter the level of administrator access to antivirus configuration data.
none
Variable Description Default
FortiOS 4.0 MR3 CLI Reference370 01-431-99686-20110623
http://docs.fortinet.com/ • Feedback
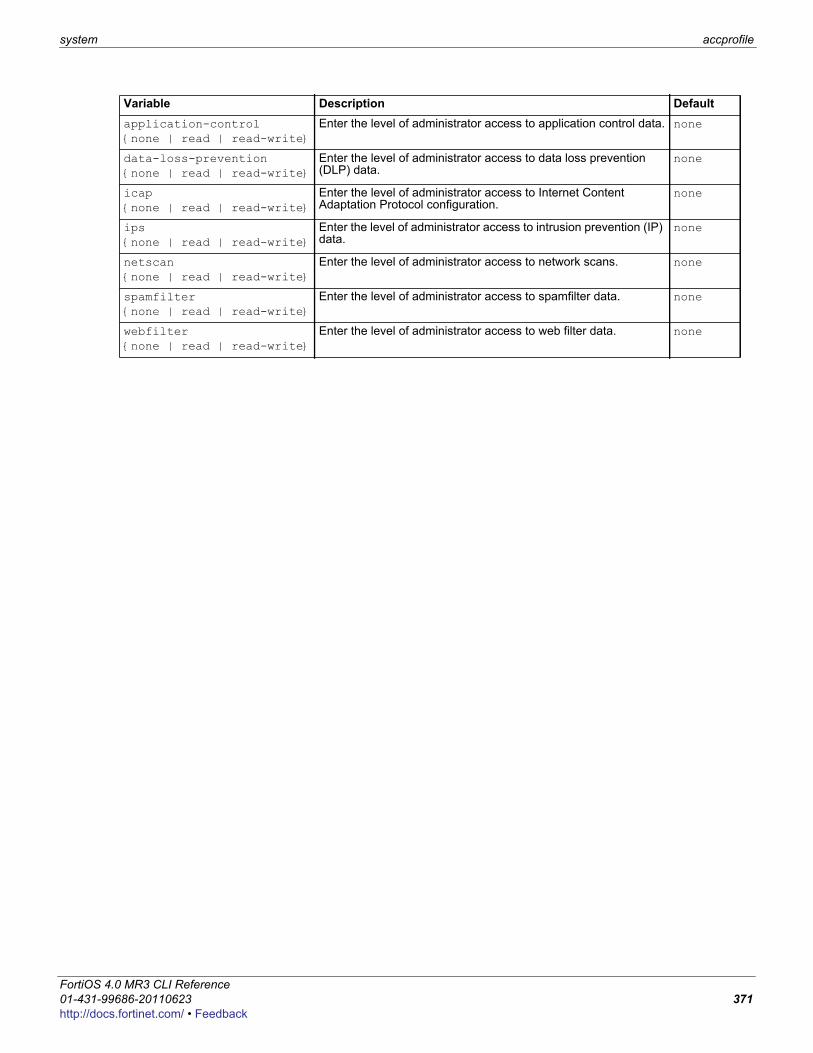
system accprofile
F0h
application-control {none | read | read-write}
Enter the level of administrator access to application control data. none
data-loss-prevention {none | read | read-write}
Enter the level of administrator access to data loss prevention (DLP) data.
none
icap {none | read | read-write}
Enter the level of administrator access to Internet Content Adaptation Protocol configuration.
none
ips {none | read | read-write}
Enter the level of administrator access to intrusion prevention (IP) data.
none
netscan {none | read | read-write}
Enter the level of administrator access to network scans. none
spamfilter {none | read | read-write}
Enter the level of administrator access to spamfilter data. none
webfilter {none | read | read-write}
Enter the level of administrator access to web filter data. none
Variable Description Default
ortiOS 4.0 MR3 CLI Reference1-431-99686-20110623 371ttp://docs.fortinet.com/ • Feedback
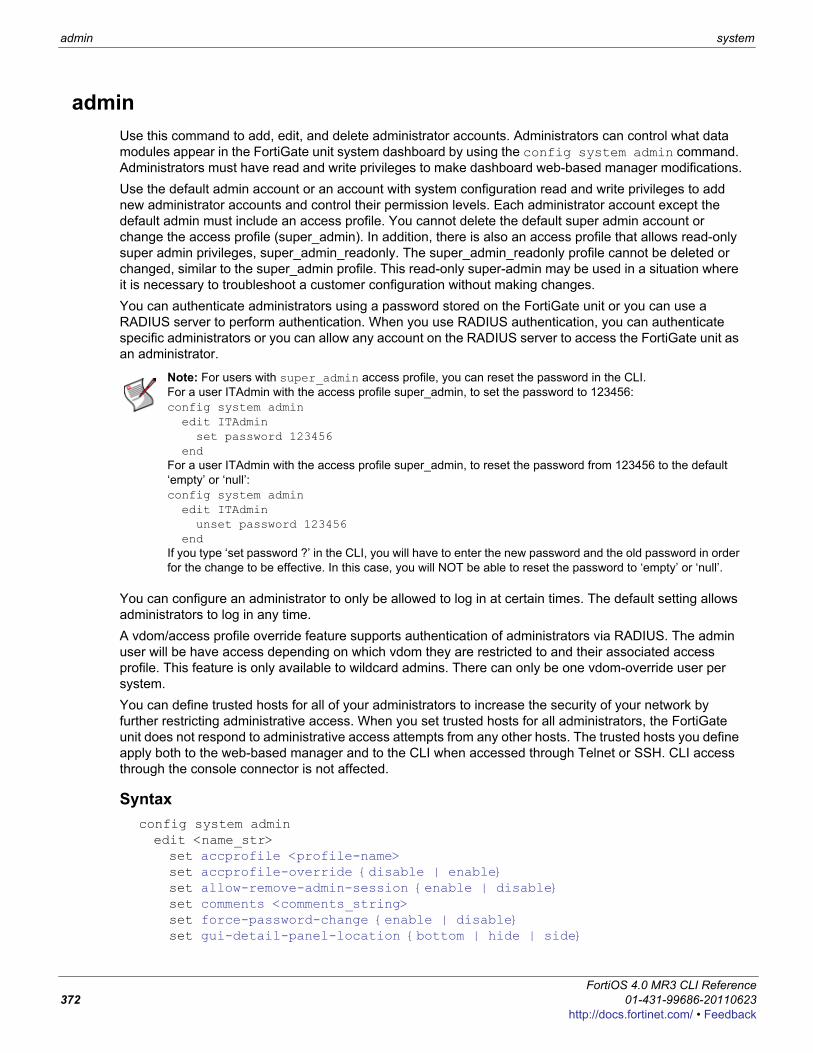
admin system
adminUse this command to add, edit, and delete administrator accounts. Administrators can control what data modules appear in the FortiGate unit system dashboard by using the config system admin command. Administrators must have read and write privileges to make dashboard web-based manager modifications.Use the default admin account or an account with system configuration read and write privileges to add new administrator accounts and control their permission levels. Each administrator account except the default admin must include an access profile. You cannot delete the default super admin account or change the access profile (super_admin). In addition, there is also an access profile that allows read-only super admin privileges, super_admin_readonly. The super_admin_readonly profile cannot be deleted or changed, similar to the super_admin profile. This read-only super-admin may be used in a situation where it is necessary to troubleshoot a customer configuration without making changes.You can authenticate administrators using a password stored on the FortiGate unit or you can use a RADIUS server to perform authentication. When you use RADIUS authentication, you can authenticate specific administrators or you can allow any account on the RADIUS server to access the FortiGate unit as an administrator.
You can configure an administrator to only be allowed to log in at certain times. The default setting allows administrators to log in any time.A vdom/access profile override feature supports authentication of administrators via RADIUS. The admin user will be have access depending on which vdom they are restricted to and their associated access profile. This feature is only available to wildcard admins. There can only be one vdom-override user per system.You can define trusted hosts for all of your administrators to increase the security of your network by further restricting administrative access. When you set trusted hosts for all administrators, the FortiGate unit does not respond to administrative access attempts from any other hosts. The trusted hosts you define apply both to the web-based manager and to the CLI when accessed through Telnet or SSH. CLI access through the console connector is not affected.
Syntaxconfig system adminedit <name_str>set accprofile <profile-name>set accprofile-override {disable | enable}set allow-remove-admin-session {enable | disable}set comments <comments_string>set force-password-change {enable | disable}set gui-detail-panel-location {bottom | hide | side}
Note: For users with super_admin access profile, you can reset the password in the CLI.For a user ITAdmin with the access profile super_admin, to set the password to 123456:config system admin edit ITAdmin set password 123456 endFor a user ITAdmin with the access profile super_admin, to reset the password from 123456 to the default ‘empty’ or ‘null’:config system admin edit ITAdmin unset password 123456 endIf you type ‘set password ?’ in the CLI, you will have to enter the new password and the old password in order for the change to be effective. In this case, you will NOT be able to reset the password to ‘empty’ or ‘null’.
FortiOS 4.0 MR3 CLI Reference372 01-431-99686-20110623
http://docs.fortinet.com/ • Feedback

system admin
F0h
set {ip6-trusthost1 | ip6-trusthost2 | ip6-trusthost3 | ip6-trusthost4 | ip6-trusthost5 | ip6-trusthost6 | ip6-trusthost7 | ip6-trusthost8 | ip6-trusthost9 | ip6-trusthost10} <address_ipv6mask>
set password <admin_password>set password-expire <date> <time>set peer-auth {disable | enable}set peer-group <peer-grp>set radius-vdom-override {disable | enable}set remote-auth {enable | disable}set remote-group <name>set schedule <schedule-name>set sms-phone <cell_phone_number>set sms-provider <string>set ssh-public-key1 "<key-type> <key-value>"set ssh-public-key2 "<key-type> <key-value>"set ssh-public-key3 "<key-type> <key-value>"set {trusthost1 | trusthost2 | trusthost3 | trusthost4 | trusthost5 |
trusthost6 | trusthost7 | trusthost8 | trusthost9 | trusthost10} <address_ipv4mask>
set two-factor {enable | disable}set vdom <vdom_name>set wildcard {enable | disable}config dashboardedit <id>set widget-type <module_name>set column <column_number>set status {close | open}set <custom_options>
endend
end
Variable Description Defaultaccprofile <profile-name> Enter the name of the access profile to assign to this
administrator account. Access profiles control administrator access to FortiGate features.
No default.
accprofile-override {disable | enable}
Enable authentication server override of the administrator access profile.
disable
allow-remove-admin-session {enable | disable}
Disable to prevent other administrators from closing the session. This field is available for accounts with the super_admin profile.
enable
comments <comments_string>
Enter the last name, first name, email address, phone number, mobile phone number, and pager number for this administrator. Separate each attribute with a comma, and enclose the string in double-quotes. The total length of the string can be up to 128 characters. (Optional)
null
force-password-change {enable | disable}
Enable to require this administrator to change password at next login. Disabling this option does not prevent required password change due to password policy violation or expiry.
disable
gui-detail-panel-location {bottom | hide | side}
Choose the position of the log detail window. bottom
ortiOS 4.0 MR3 CLI Reference1-431-99686-20110623 373ttp://docs.fortinet.com/ • Feedback
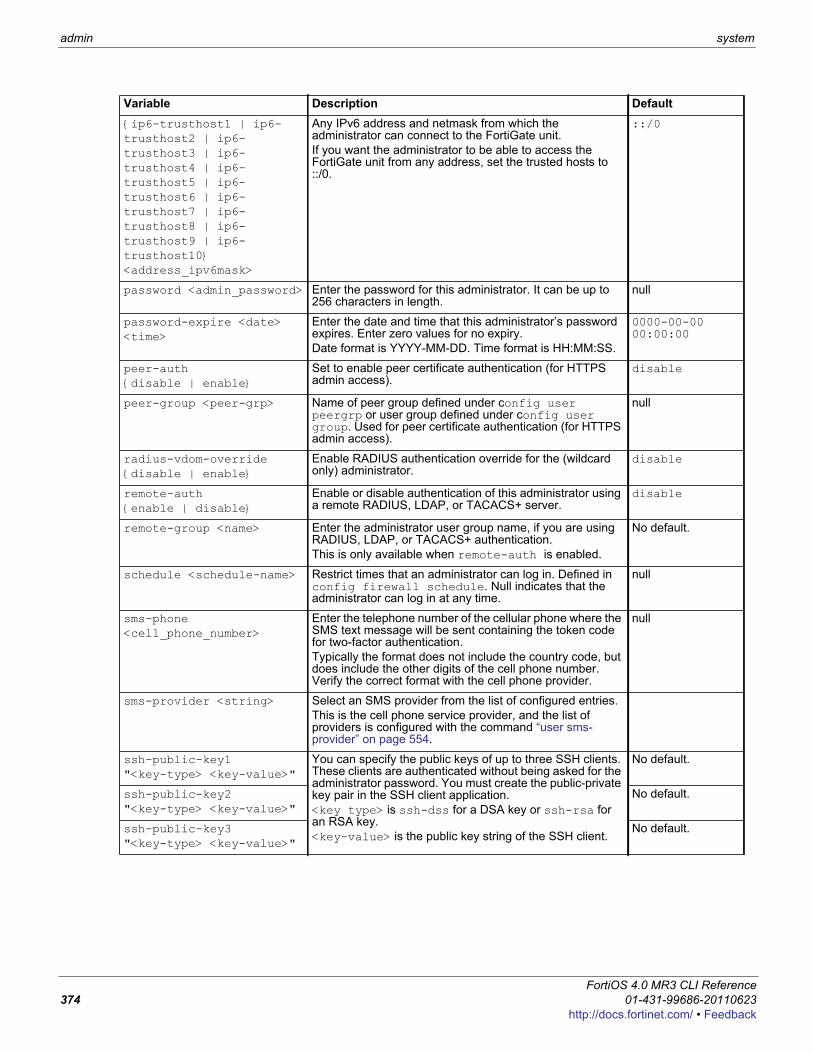
admin system
{ip6-trusthost1 | ip6-trusthost2 | ip6-trusthost3 | ip6-trusthost4 | ip6-trusthost5 | ip6-trusthost6 | ip6-trusthost7 | ip6-trusthost8 | ip6-trusthost9 | ip6-trusthost10} <address_ipv6mask>
Any IPv6 address and netmask from which the administrator can connect to the FortiGate unit.If you want the administrator to be able to access the FortiGate unit from any address, set the trusted hosts to ::/0.
::/0
password <admin_password> Enter the password for this administrator. It can be up to 256 characters in length.
null
password-expire <date> <time>
Enter the date and time that this administrator’s password expires. Enter zero values for no expiry.Date format is YYYY-MM-DD. Time format is HH:MM:SS.
0000-00-00 00:00:00
peer-auth {disable | enable}
Set to enable peer certificate authentication (for HTTPS admin access).
disable
peer-group <peer-grp> Name of peer group defined under config user peergrp or user group defined under config user group. Used for peer certificate authentication (for HTTPS admin access).
null
radius-vdom-override {disable | enable}
Enable RADIUS authentication override for the (wildcard only) administrator.
disable
remote-auth{enable | disable}
Enable or disable authentication of this administrator using a remote RADIUS, LDAP, or TACACS+ server.
disable
remote-group <name> Enter the administrator user group name, if you are using RADIUS, LDAP, or TACACS+ authentication.This is only available when remote-auth is enabled.
No default.
schedule <schedule-name> Restrict times that an administrator can log in. Defined in config firewall schedule. Null indicates that the administrator can log in at any time.
null
sms-phone <cell_phone_number>
Enter the telephone number of the cellular phone where the SMS text message will be sent containing the token code for two-factor authentication. Typically the format does not include the country code, but does include the other digits of the cell phone number. Verify the correct format with the cell phone provider.
null
sms-provider <string> Select an SMS provider from the list of configured entries. This is the cell phone service provider, and the list of providers is configured with the command “user sms-provider” on page 554.
ssh-public-key1 "<key-type> <key-value>"
You can specify the public keys of up to three SSH clients. These clients are authenticated without being asked for the administrator password. You must create the public-private key pair in the SSH client application.<key type> is ssh-dss for a DSA key or ssh-rsa for an RSA key.<key-value> is the public key string of the SSH client.
No default.
ssh-public-key2 "<key-type> <key-value>"
No default.
ssh-public-key3 "<key-type> <key-value>"
No default.
Variable Description Default
FortiOS 4.0 MR3 CLI Reference374 01-431-99686-20110623
http://docs.fortinet.com/ • Feedback
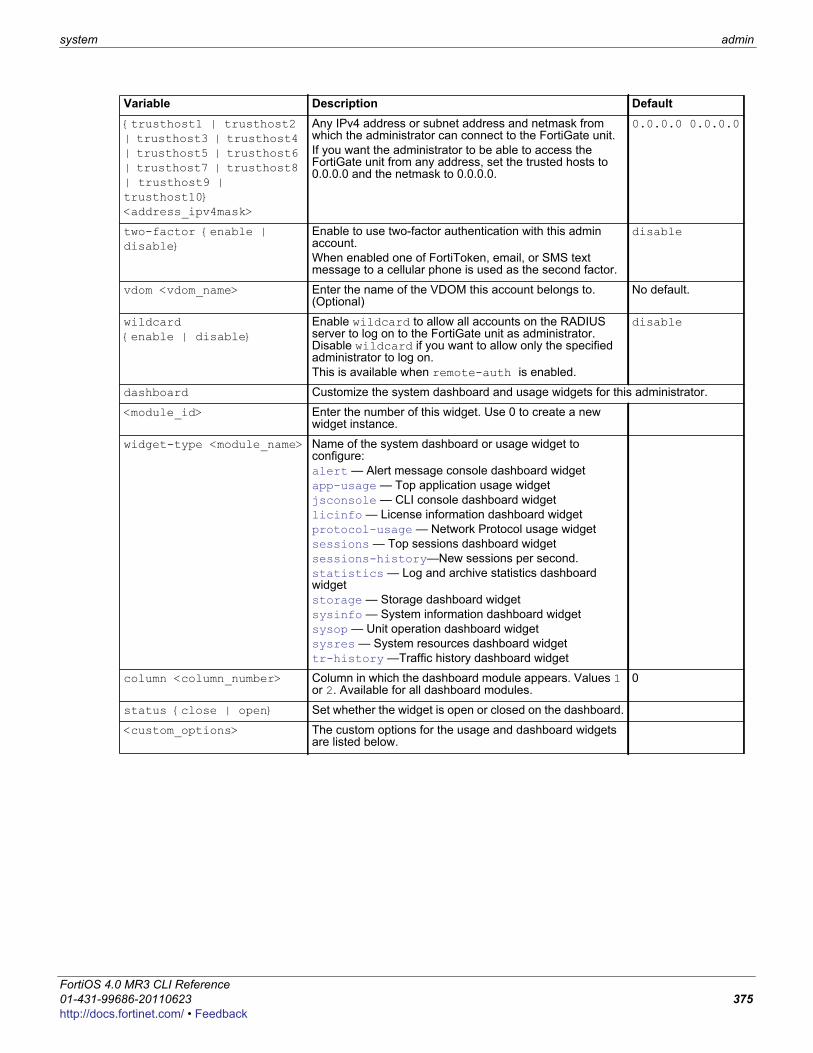
system admin
F0h
{trusthost1 | trusthost2 | trusthost3 | trusthost4 | trusthost5 | trusthost6 | trusthost7 | trusthost8 | trusthost9 | trusthost10} <address_ipv4mask>
Any IPv4 address or subnet address and netmask from which the administrator can connect to the FortiGate unit.If you want the administrator to be able to access the FortiGate unit from any address, set the trusted hosts to 0.0.0.0 and the netmask to 0.0.0.0.
0.0.0.0 0.0.0.0
two-factor {enable | disable}
Enable to use two-factor authentication with this admin account. When enabled one of FortiToken, email, or SMS text message to a cellular phone is used as the second factor.
disable
vdom <vdom_name> Enter the name of the VDOM this account belongs to. (Optional)
No default.
wildcard {enable | disable}
Enable wildcard to allow all accounts on the RADIUS server to log on to the FortiGate unit as administrator. Disable wildcard if you want to allow only the specified administrator to log on.This is available when remote-auth is enabled.
disable
dashboard Customize the system dashboard and usage widgets for this administrator.
<module_id> Enter the number of this widget. Use 0 to create a new widget instance.
widget-type <module_name> Name of the system dashboard or usage widget to configure:alert — Alert message console dashboard widgetapp-usage — Top application usage widgetjsconsole — CLI console dashboard widgetlicinfo — License information dashboard widgetprotocol-usage — Network Protocol usage widgetsessions — Top sessions dashboard widgetsessions-history—New sessions per second.statistics — Log and archive statistics dashboard widgetstorage — Storage dashboard widgetsysinfo — System information dashboard widgetsysop — Unit operation dashboard widgetsysres — System resources dashboard widgettr-history —Traffic history dashboard widget
column <column_number> Column in which the dashboard module appears. Values 1 or 2. Available for all dashboard modules.
0
status {close | open} Set whether the widget is open or closed on the dashboard.
<custom_options> The custom options for the usage and dashboard widgets are listed below.
Variable Description Default
ortiOS 4.0 MR3 CLI Reference1-431-99686-20110623 375ttp://docs.fortinet.com/ • Feedback
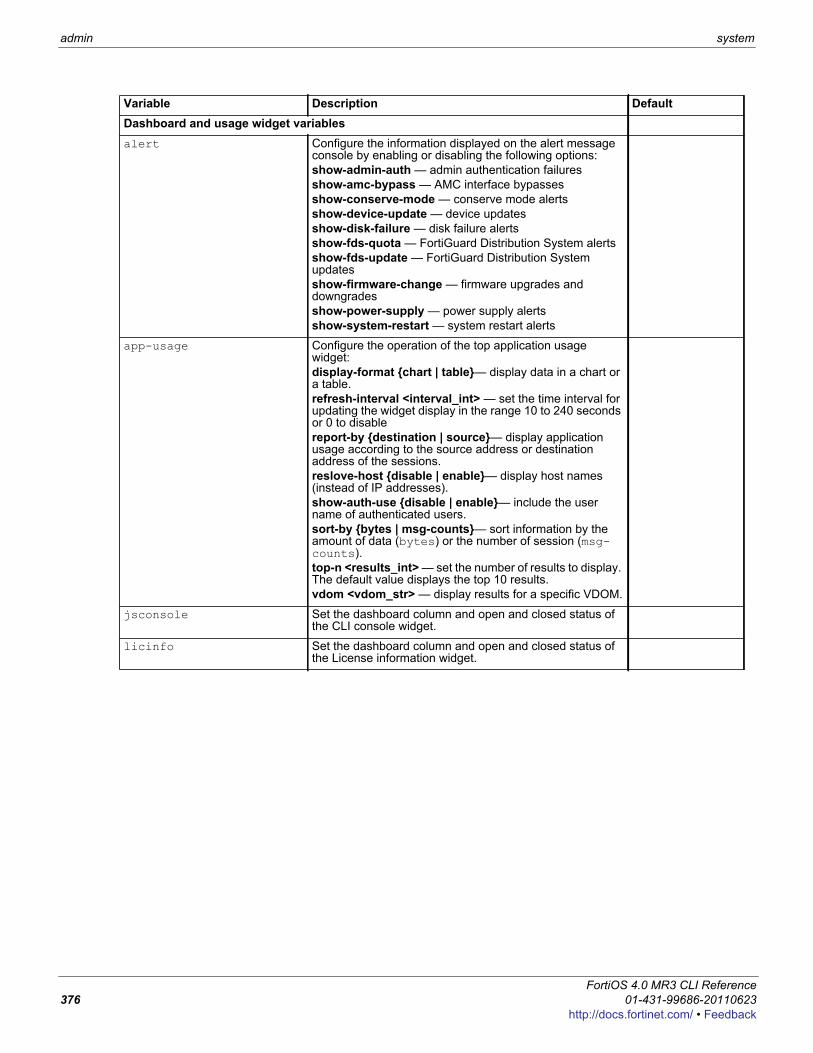
admin system
Dashboard and usage widget variablesalert Configure the information displayed on the alert message
console by enabling or disabling the following options:show-admin-auth — admin authentication failuresshow-amc-bypass — AMC interface bypassesshow-conserve-mode — conserve mode alertsshow-device-update — device updatesshow-disk-failure — disk failure alertsshow-fds-quota — FortiGuard Distribution System alertsshow-fds-update — FortiGuard Distribution System updatesshow-firmware-change — firmware upgrades and downgradesshow-power-supply — power supply alertsshow-system-restart — system restart alerts
app-usage Configure the operation of the top application usage widget:display-format {chart | table}— display data in a chart or a table.refresh-interval <interval_int> — set the time interval for updating the widget display in the range 10 to 240 seconds or 0 to disablereport-by {destination | source}— display application usage according to the source address or destination address of the sessions.reslove-host {disable | enable}— display host names (instead of IP addresses).show-auth-use {disable | enable}— include the user name of authenticated users.sort-by {bytes | msg-counts}— sort information by the amount of data (bytes) or the number of session (msg-counts).top-n <results_int> — set the number of results to display. The default value displays the top 10 results.vdom <vdom_str> — display results for a specific VDOM.
jsconsole Set the dashboard column and open and closed status of the CLI console widget.
licinfo Set the dashboard column and open and closed status of the License information widget.
Variable Description Default
FortiOS 4.0 MR3 CLI Reference376 01-431-99686-20110623
http://docs.fortinet.com/ • Feedback
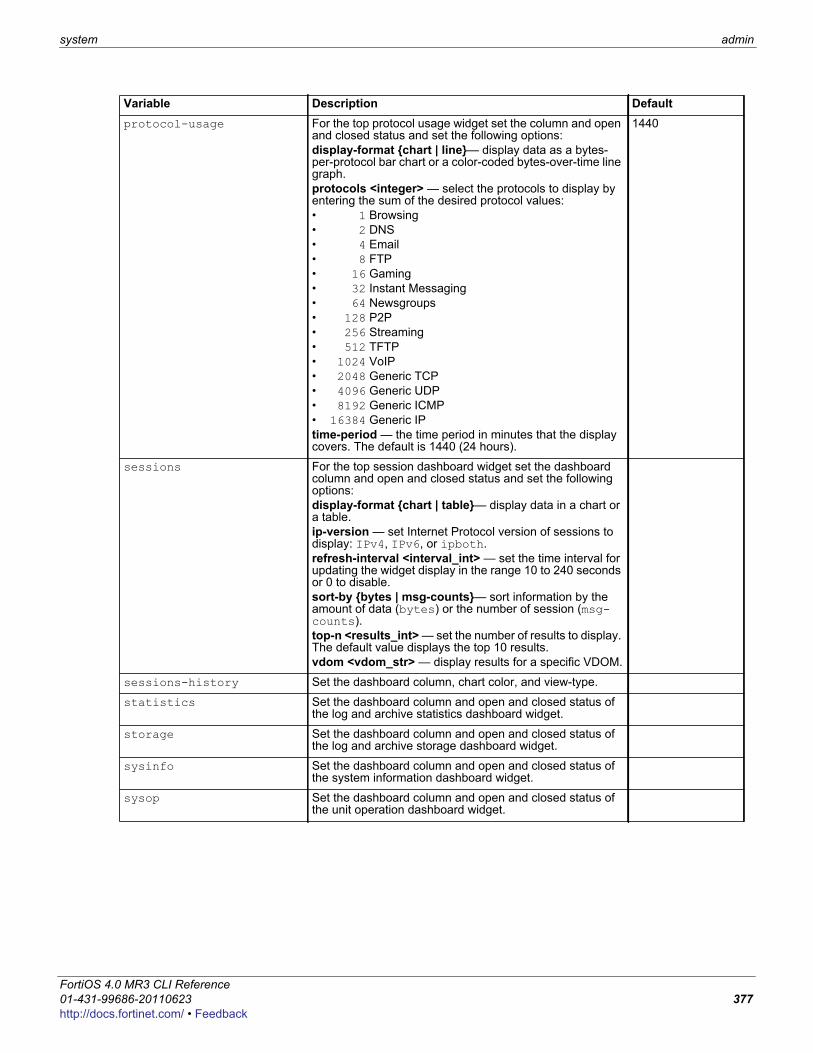
system admin
F0h
protocol-usage For the top protocol usage widget set the column and open and closed status and set the following options:display-format {chart | line}— display data as a bytes-per-protocol bar chart or a color-coded bytes-over-time line graph.protocols <integer> — select the protocols to display by entering the sum of the desired protocol values:• 1 Browsing• 2 DNS• 4 Email• 8 FTP• 16 Gaming• 32 Instant Messaging• 64 Newsgroups• 128 P2P• 256 Streaming• 512 TFTP• 1024 VoIP• 2048 Generic TCP• 4096 Generic UDP• 8192 Generic ICMP• 16384 Generic IPtime-period — the time period in minutes that the display covers. The default is 1440 (24 hours).
1440
sessions For the top session dashboard widget set the dashboard column and open and closed status and set the following options:display-format {chart | table}— display data in a chart or a table.ip-version — set Internet Protocol version of sessions to display: IPv4, IPv6, or ipboth.refresh-interval <interval_int> — set the time interval for updating the widget display in the range 10 to 240 seconds or 0 to disable.sort-by {bytes | msg-counts}— sort information by the amount of data (bytes) or the number of session (msg-counts).top-n <results_int> — set the number of results to display. The default value displays the top 10 results.vdom <vdom_str> — display results for a specific VDOM.
sessions-history Set the dashboard column, chart color, and view-type.
statistics Set the dashboard column and open and closed status of the log and archive statistics dashboard widget.
storage Set the dashboard column and open and closed status of the log and archive storage dashboard widget.
sysinfo Set the dashboard column and open and closed status of the system information dashboard widget.
sysop Set the dashboard column and open and closed status of the unit operation dashboard widget.
Variable Description Default
ortiOS 4.0 MR3 CLI Reference1-431-99686-20110623 377ttp://docs.fortinet.com/ • Feedback

admin system
sysres For the system resources dashboard widget set the dashboard column and open and closed status and set the following options:chart-color <color_int> — select the chart color for the historical display. Default is 1.
view-type {historical | real-time} — select historical graph or current value dial display.time-period <minutes_int> — set time period in minutes for historical display
tr-history For the traffic history dashboard widget set the dashboard column and open and closed status and set the following options:refresh {disable | enable}— enable automatically refreshing the displayinterface <interface_name> — name of interface monitored for traffic history data.tr-history-period1, tr-history-period2, tr-history-period3 — time period (seconds) for each of the three history graphs. To disable a graph, set its period to 0.
Variable Description Default
1 8
9 16
17 24
25 32
FortiOS 4.0 MR3 CLI Reference378 01-431-99686-20110623
http://docs.fortinet.com/ • Feedback
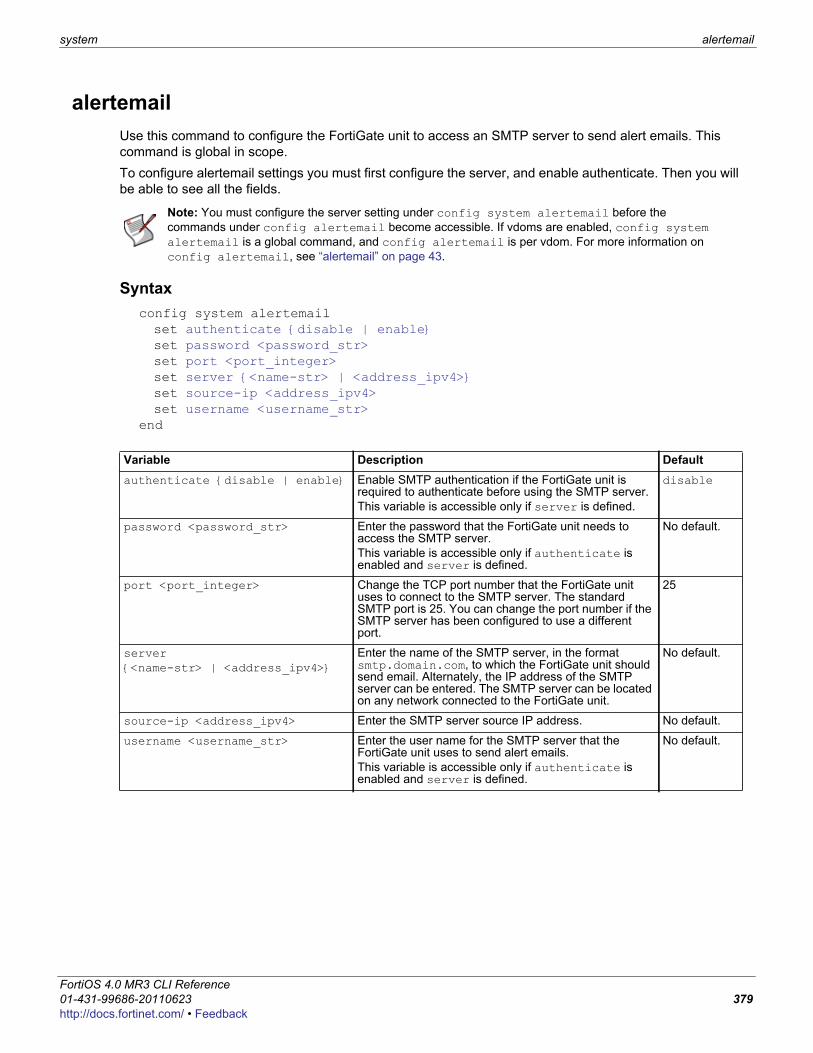
system alertemail
F0h
alertemailUse this command to configure the FortiGate unit to access an SMTP server to send alert emails. This command is global in scope.To configure alertemail settings you must first configure the server, and enable authenticate. Then you will be able to see all the fields.
Syntaxconfig system alertemailset authenticate {disable | enable}set password <password_str>set port <port_integer>set server {<name-str> | <address_ipv4>}set source-ip <address_ipv4>set username <username_str>
end
Note: You must configure the server setting under config system alertemail before the commands under config alertemail become accessible. If vdoms are enabled, config system alertemail is a global command, and config alertemail is per vdom. For more information on config alertemail, see “alertemail” on page 43.
Variable Description Defaultauthenticate {disable | enable} Enable SMTP authentication if the FortiGate unit is
required to authenticate before using the SMTP server.This variable is accessible only if server is defined.
disable
password <password_str> Enter the password that the FortiGate unit needs to access the SMTP server. This variable is accessible only if authenticate is enabled and server is defined.
No default.
port <port_integer> Change the TCP port number that the FortiGate unit uses to connect to the SMTP server. The standard SMTP port is 25. You can change the port number if the SMTP server has been configured to use a different port.
25
server {<name-str> | <address_ipv4>}
Enter the name of the SMTP server, in the format smtp.domain.com, to which the FortiGate unit should send email. Alternately, the IP address of the SMTP server can be entered. The SMTP server can be located on any network connected to the FortiGate unit.
No default.
source-ip <address_ipv4> Enter the SMTP server source IP address. No default.
username <username_str> Enter the user name for the SMTP server that the FortiGate unit uses to send alert emails.This variable is accessible only if authenticate is enabled and server is defined.
No default.
ortiOS 4.0 MR3 CLI Reference1-431-99686-20110623 379ttp://docs.fortinet.com/ • Feedback
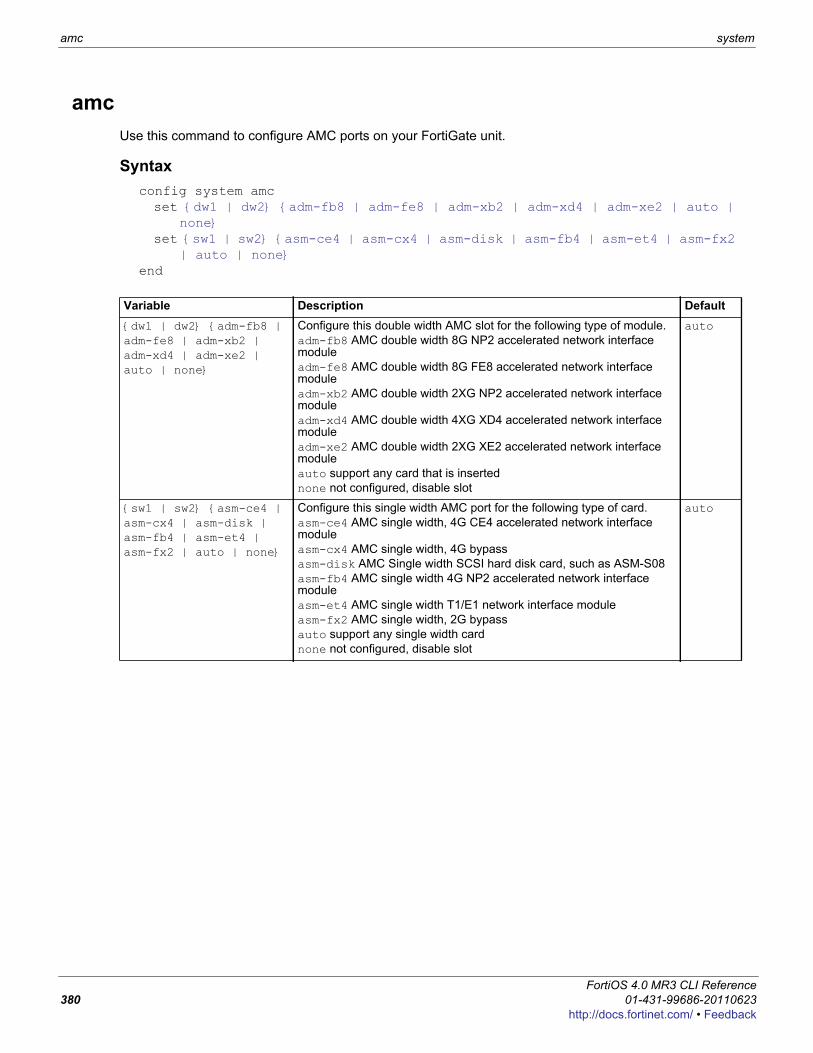
amc system
amcUse this command to configure AMC ports on your FortiGate unit.
Syntaxconfig system amcset {dw1 | dw2} {adm-fb8 | adm-fe8 | adm-xb2 | adm-xd4 | adm-xe2 | auto |
none}set {sw1 | sw2} {asm-ce4 | asm-cx4 | asm-disk | asm-fb4 | asm-et4 | asm-fx2
| auto | none}end
Variable Description Default{dw1 | dw2} {adm-fb8 | adm-fe8 | adm-xb2 | adm-xd4 | adm-xe2 | auto | none}
Configure this double width AMC slot for the following type of module.adm-fb8 AMC double width 8G NP2 accelerated network interface moduleadm-fe8 AMC double width 8G FE8 accelerated network interface moduleadm-xb2 AMC double width 2XG NP2 accelerated network interface moduleadm-xd4 AMC double width 4XG XD4 accelerated network interface moduleadm-xe2 AMC double width 2XG XE2 accelerated network interface moduleauto support any card that is insertednone not configured, disable slot
auto
{sw1 | sw2} {asm-ce4 | asm-cx4 | asm-disk | asm-fb4 | asm-et4 | asm-fx2 | auto | none}
Configure this single width AMC port for the following type of card.asm-ce4 AMC single width, 4G CE4 accelerated network interface moduleasm-cx4 AMC single width, 4G bypassasm-disk AMC Single width SCSI hard disk card, such as ASM-S08asm-fb4 AMC single width 4G NP2 accelerated network interface moduleasm-et4 AMC single width T1/E1 network interface moduleasm-fx2 AMC single width, 2G bypassauto support any single width cardnone not configured, disable slot
auto
FortiOS 4.0 MR3 CLI Reference380 01-431-99686-20110623
http://docs.fortinet.com/ • Feedback
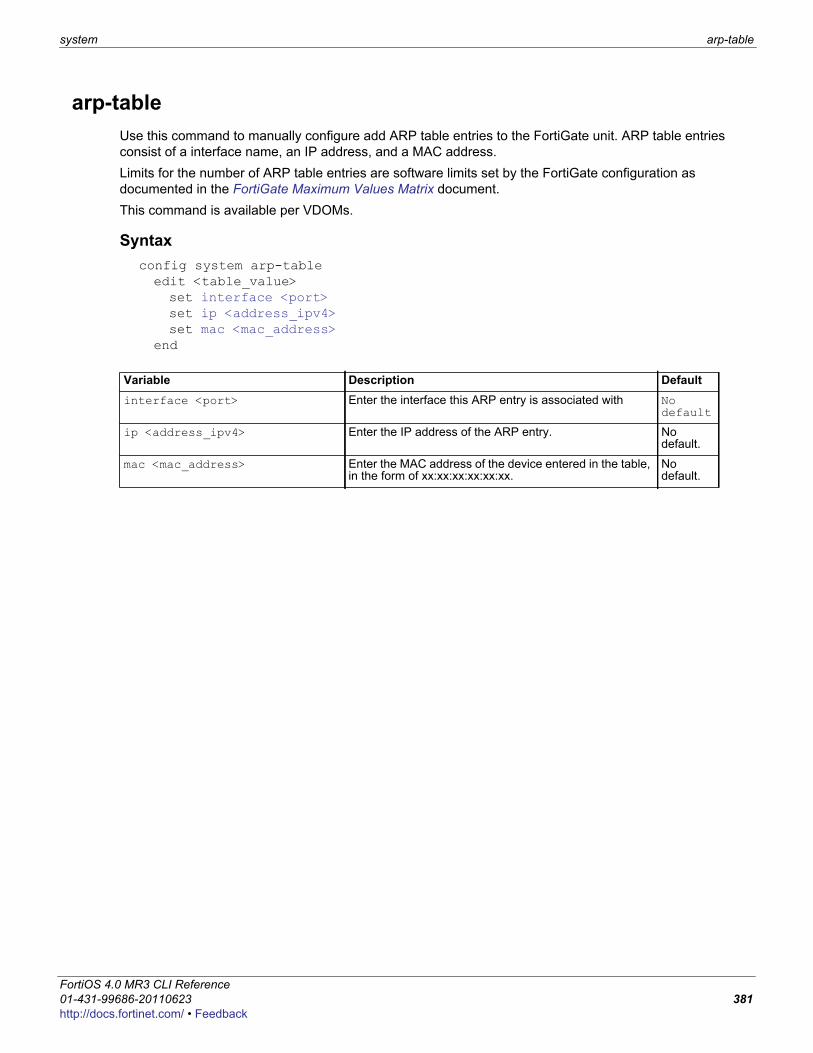
system arp-table
F0h
arp-tableUse this command to manually configure add ARP table entries to the FortiGate unit. ARP table entries consist of a interface name, an IP address, and a MAC address.Limits for the number of ARP table entries are software limits set by the FortiGate configuration as documented in the FortiGate Maximum Values Matrix document.This command is available per VDOMs.
Syntaxconfig system arp-tableedit <table_value>set interface <port>set ip <address_ipv4>set mac <mac_address>
end
Variable Description Defaultinterface <port> Enter the interface this ARP entry is associated with No
default
ip <address_ipv4> Enter the IP address of the ARP entry. No default.
mac <mac_address> Enter the MAC address of the device entered in the table, in the form of xx:xx:xx:xx:xx:xx.
No default.
ortiOS 4.0 MR3 CLI Reference1-431-99686-20110623 381ttp://docs.fortinet.com/ • Feedback
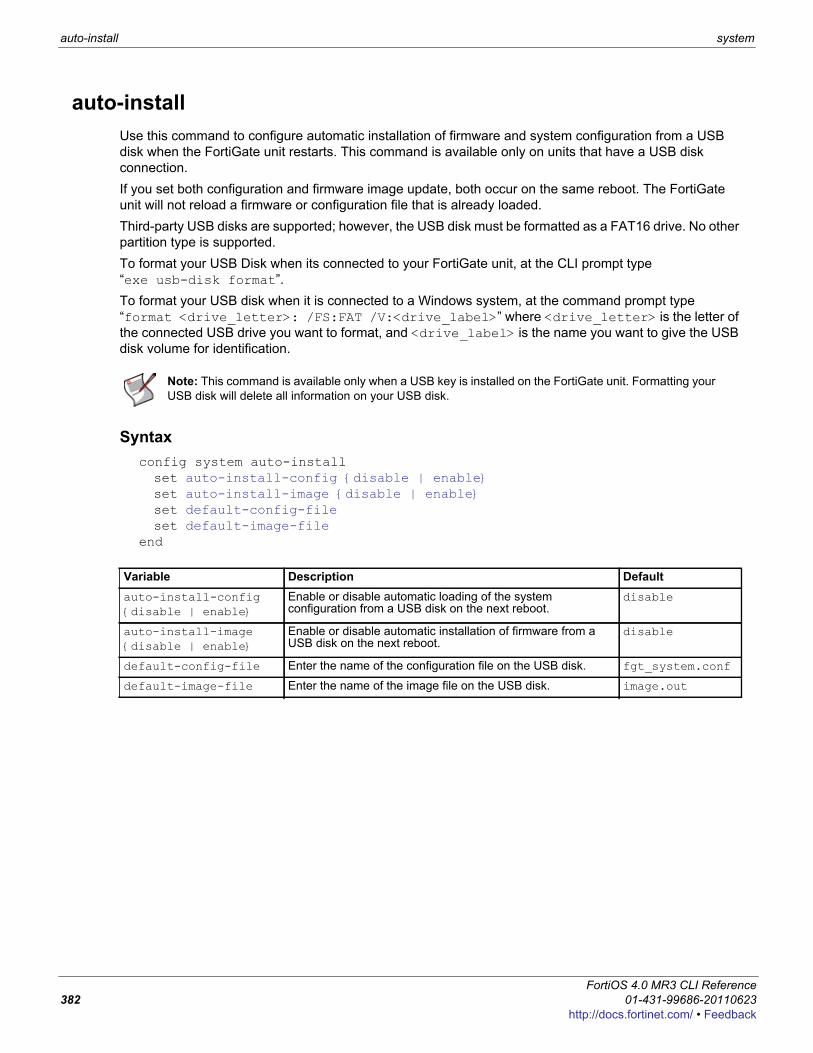
auto-install system
auto-installUse this command to configure automatic installation of firmware and system configuration from a USB disk when the FortiGate unit restarts. This command is available only on units that have a USB disk connection.If you set both configuration and firmware image update, both occur on the same reboot. The FortiGate unit will not reload a firmware or configuration file that is already loaded.Third-party USB disks are supported; however, the USB disk must be formatted as a FAT16 drive. No other partition type is supported. To format your USB Disk when its connected to your FortiGate unit, at the CLI prompt type “exe usb-disk format”. To format your USB disk when it is connected to a Windows system, at the command prompt type “format <drive_letter>: /FS:FAT /V:<drive_label>” where <drive_letter> is the letter of the connected USB drive you want to format, and <drive_label> is the name you want to give the USB disk volume for identification.
Syntaxconfig system auto-installset auto-install-config {disable | enable}set auto-install-image {disable | enable}set default-config-fileset default-image-file
end
Note: This command is available only when a USB key is installed on the FortiGate unit. Formatting your USB disk will delete all information on your USB disk.
Variable Description Defaultauto-install-config {disable | enable}
Enable or disable automatic loading of the system configuration from a USB disk on the next reboot.
disable
auto-install-image {disable | enable}
Enable or disable automatic installation of firmware from a USB disk on the next reboot.
disable
default-config-file Enter the name of the configuration file on the USB disk. fgt_system.conf
default-image-file Enter the name of the image file on the USB disk. image.out
FortiOS 4.0 MR3 CLI Reference382 01-431-99686-20110623
http://docs.fortinet.com/ • Feedback
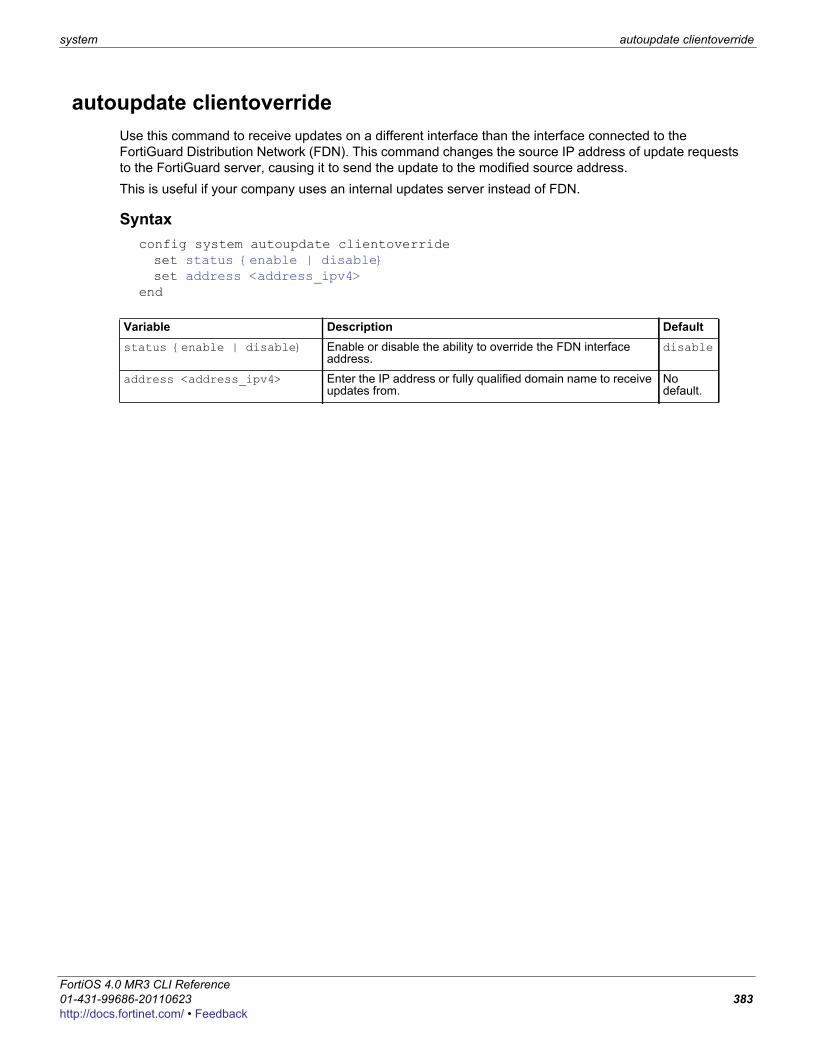
system autoupdate clientoverride
F0h
autoupdate clientoverrideUse this command to receive updates on a different interface than the interface connected to the FortiGuard Distribution Network (FDN). This command changes the source IP address of update requests to the FortiGuard server, causing it to send the update to the modified source address. This is useful if your company uses an internal updates server instead of FDN.
Syntaxconfig system autoupdate clientoverrideset status {enable | disable}set address <address_ipv4>
end
Variable Description Defaultstatus {enable | disable} Enable or disable the ability to override the FDN interface
address.disable
address <address_ipv4> Enter the IP address or fully qualified domain name to receive updates from.
No default.
ortiOS 4.0 MR3 CLI Reference1-431-99686-20110623 383ttp://docs.fortinet.com/ • Feedback
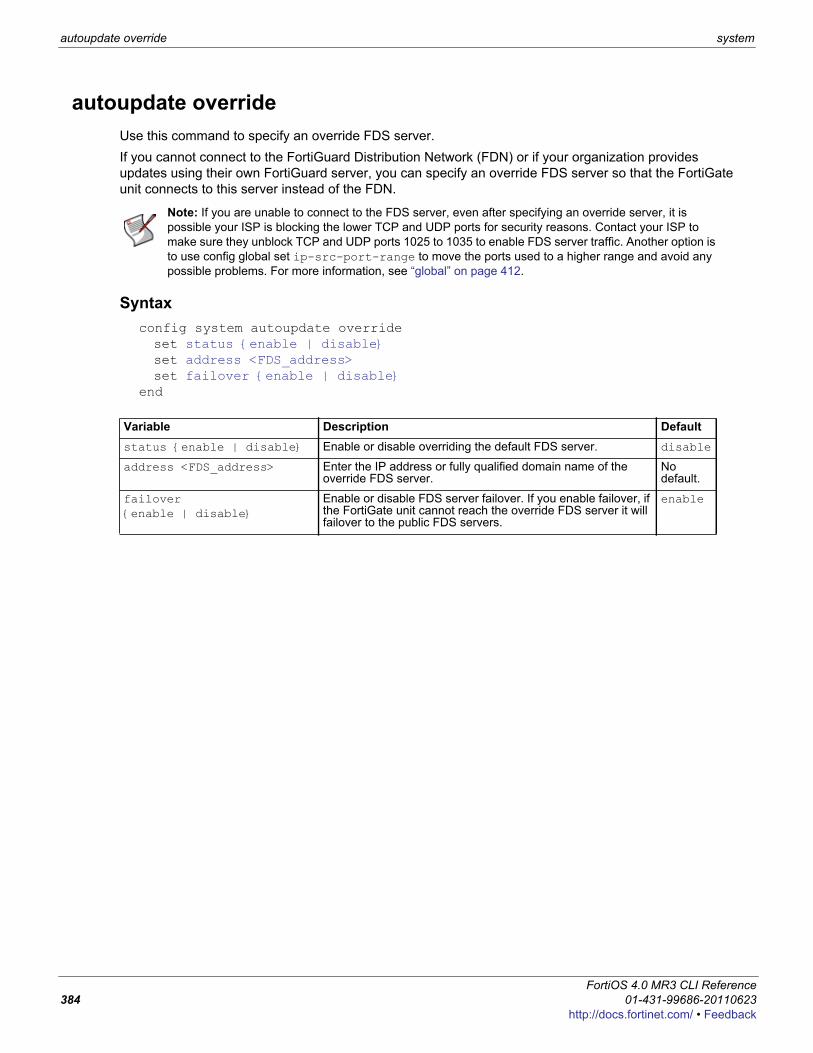
autoupdate override system
autoupdate overrideUse this command to specify an override FDS server. If you cannot connect to the FortiGuard Distribution Network (FDN) or if your organization provides updates using their own FortiGuard server, you can specify an override FDS server so that the FortiGate unit connects to this server instead of the FDN.
Syntaxconfig system autoupdate overrideset status {enable | disable}set address <FDS_address>set failover {enable | disable}
end
Note: If you are unable to connect to the FDS server, even after specifying an override server, it is possible your ISP is blocking the lower TCP and UDP ports for security reasons. Contact your ISP to make sure they unblock TCP and UDP ports 1025 to 1035 to enable FDS server traffic. Another option is to use config global set ip-src-port-range to move the ports used to a higher range and avoid any possible problems. For more information, see “global” on page 412.
Variable Description Defaultstatus {enable | disable} Enable or disable overriding the default FDS server. disable
address <FDS_address> Enter the IP address or fully qualified domain name of the override FDS server.
No default.
failover {enable | disable}
Enable or disable FDS server failover. If you enable failover, if the FortiGate unit cannot reach the override FDS server it will failover to the public FDS servers.
enable
FortiOS 4.0 MR3 CLI Reference384 01-431-99686-20110623
http://docs.fortinet.com/ • Feedback
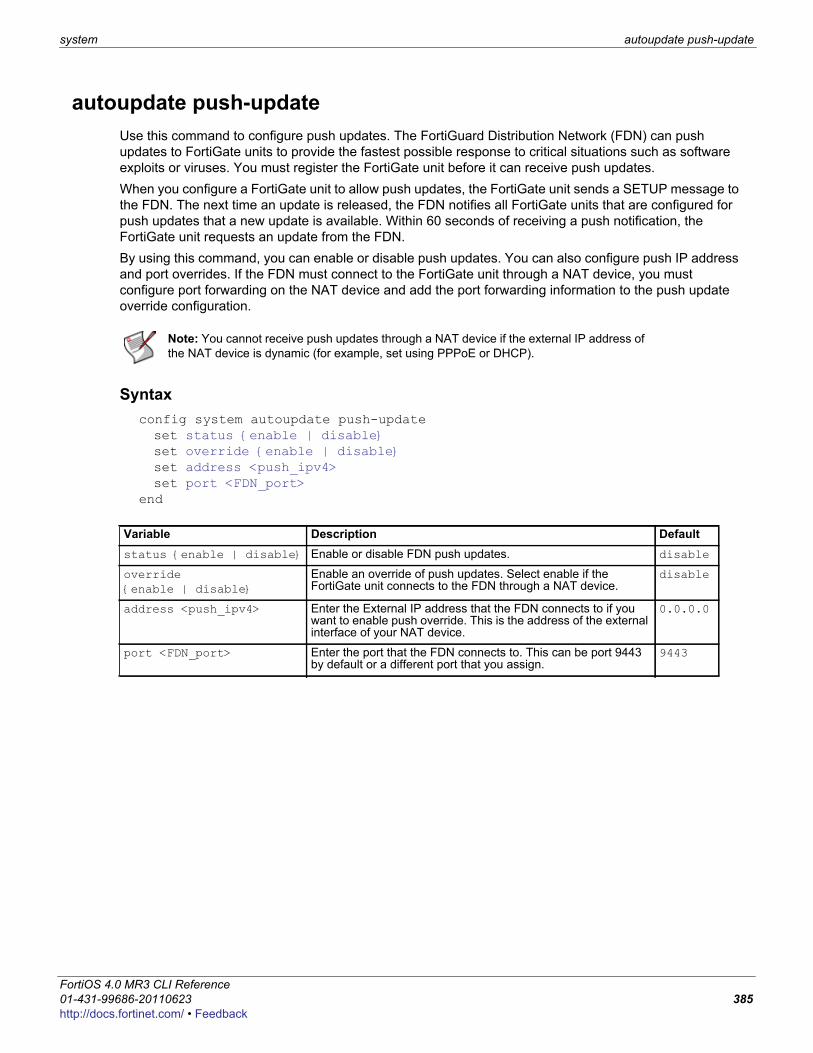
system autoupdate push-update
F0h
autoupdate push-updateUse this command to configure push updates. The FortiGuard Distribution Network (FDN) can push updates to FortiGate units to provide the fastest possible response to critical situations such as software exploits or viruses. You must register the FortiGate unit before it can receive push updates.When you configure a FortiGate unit to allow push updates, the FortiGate unit sends a SETUP message to the FDN. The next time an update is released, the FDN notifies all FortiGate units that are configured for push updates that a new update is available. Within 60 seconds of receiving a push notification, the FortiGate unit requests an update from the FDN.By using this command, you can enable or disable push updates. You can also configure push IP address and port overrides. If the FDN must connect to the FortiGate unit through a NAT device, you must configure port forwarding on the NAT device and add the port forwarding information to the push update override configuration.
Syntaxconfig system autoupdate push-updateset status {enable | disable}set override {enable | disable}set address <push_ipv4>set port <FDN_port>
end
Note: You cannot receive push updates through a NAT device if the external IP address of the NAT device is dynamic (for example, set using PPPoE or DHCP).
Variable Description Defaultstatus {enable | disable} Enable or disable FDN push updates. disable
override {enable | disable}
Enable an override of push updates. Select enable if the FortiGate unit connects to the FDN through a NAT device.
disable
address <push_ipv4> Enter the External IP address that the FDN connects to if you want to enable push override. This is the address of the external interface of your NAT device.
0.0.0.0
port <FDN_port> Enter the port that the FDN connects to. This can be port 9443 by default or a different port that you assign.
9443
ortiOS 4.0 MR3 CLI Reference1-431-99686-20110623 385ttp://docs.fortinet.com/ • Feedback
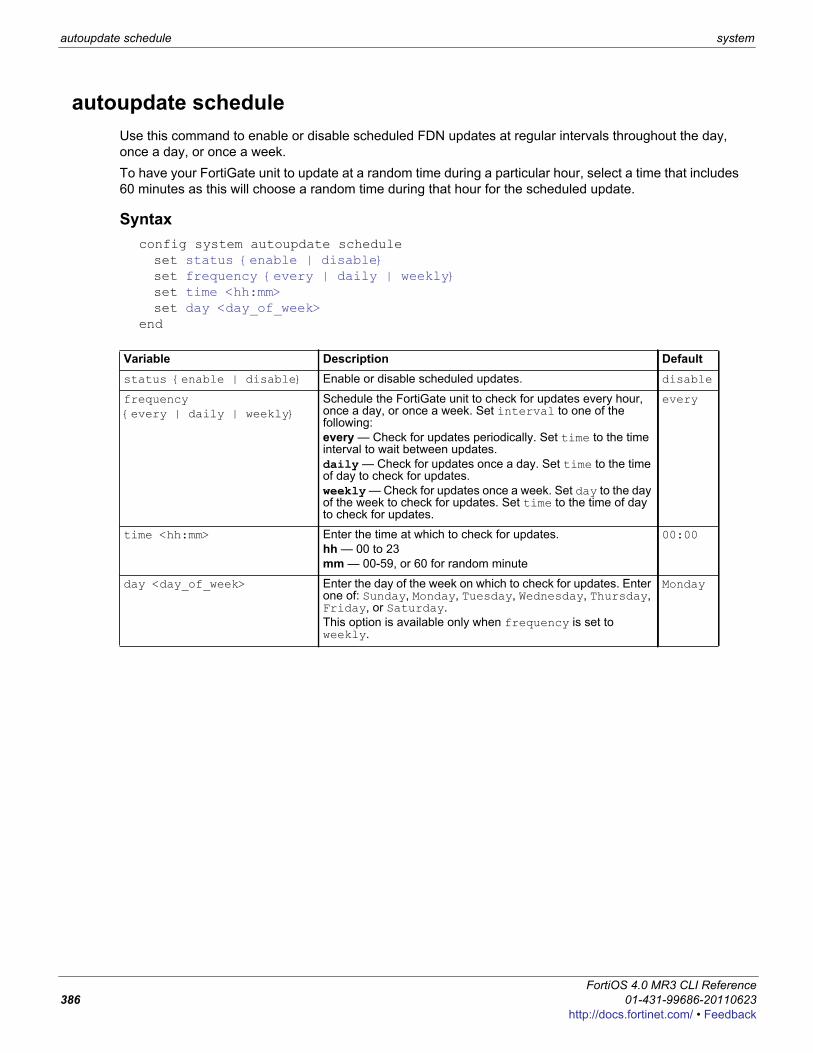
autoupdate schedule system
autoupdate scheduleUse this command to enable or disable scheduled FDN updates at regular intervals throughout the day, once a day, or once a week.To have your FortiGate unit to update at a random time during a particular hour, select a time that includes 60 minutes as this will choose a random time during that hour for the scheduled update.
Syntaxconfig system autoupdate scheduleset status {enable | disable}set frequency {every | daily | weekly}set time <hh:mm>set day <day_of_week>
end
Variable Description Defaultstatus {enable | disable} Enable or disable scheduled updates. disable
frequency {every | daily | weekly}
Schedule the FortiGate unit to check for updates every hour, once a day, or once a week. Set interval to one of the following:every — Check for updates periodically. Set time to the time interval to wait between updates.daily — Check for updates once a day. Set time to the time of day to check for updates.weekly — Check for updates once a week. Set day to the day of the week to check for updates. Set time to the time of day to check for updates.
every
time <hh:mm> Enter the time at which to check for updates.hh — 00 to 23mm — 00-59, or 60 for random minute
00:00
day <day_of_week> Enter the day of the week on which to check for updates. Enter one of: Sunday, Monday, Tuesday, Wednesday, Thursday, Friday, or Saturday.This option is available only when frequency is set to weekly.
Monday
FortiOS 4.0 MR3 CLI Reference386 01-431-99686-20110623
http://docs.fortinet.com/ • Feedback
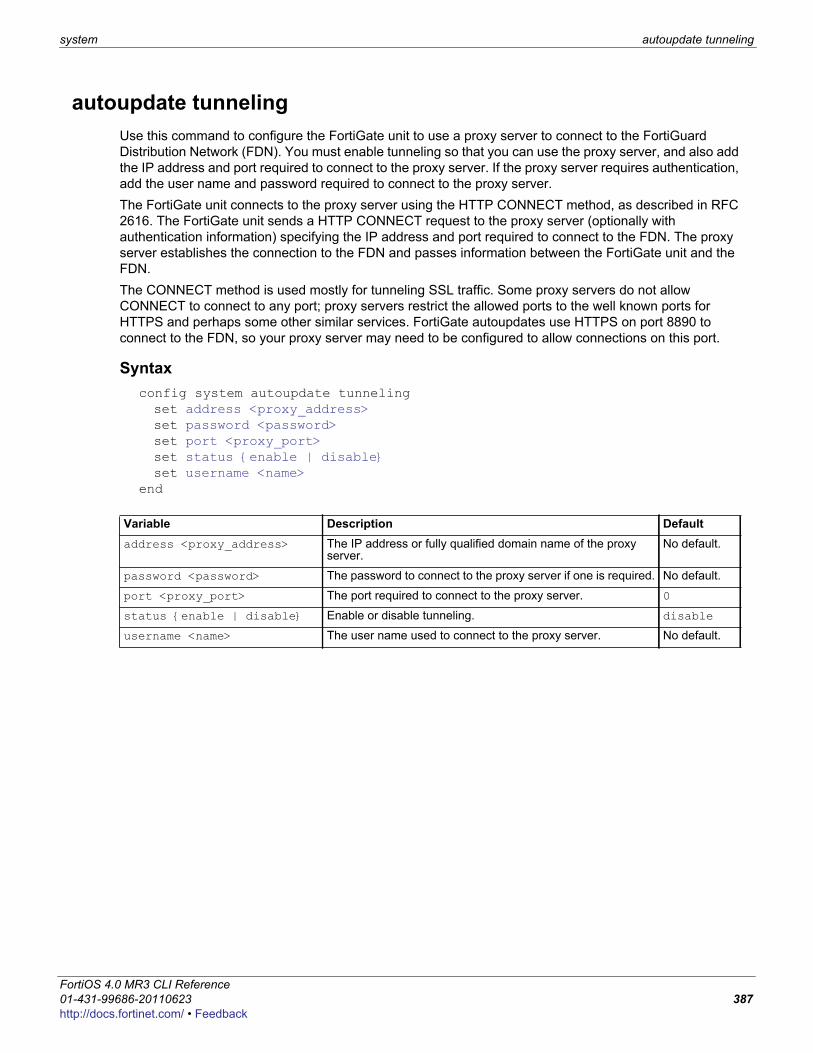
system autoupdate tunneling
F0h
autoupdate tunnelingUse this command to configure the FortiGate unit to use a proxy server to connect to the FortiGuard Distribution Network (FDN). You must enable tunneling so that you can use the proxy server, and also add the IP address and port required to connect to the proxy server. If the proxy server requires authentication, add the user name and password required to connect to the proxy server. The FortiGate unit connects to the proxy server using the HTTP CONNECT method, as described in RFC 2616. The FortiGate unit sends a HTTP CONNECT request to the proxy server (optionally with authentication information) specifying the IP address and port required to connect to the FDN. The proxy server establishes the connection to the FDN and passes information between the FortiGate unit and the FDN.The CONNECT method is used mostly for tunneling SSL traffic. Some proxy servers do not allow CONNECT to connect to any port; proxy servers restrict the allowed ports to the well known ports for HTTPS and perhaps some other similar services. FortiGate autoupdates use HTTPS on port 8890 to connect to the FDN, so your proxy server may need to be configured to allow connections on this port.
Syntaxconfig system autoupdate tunnelingset address <proxy_address>set password <password>set port <proxy_port>set status {enable | disable}set username <name>
end
Variable Description Defaultaddress <proxy_address> The IP address or fully qualified domain name of the proxy
server.No default.
password <password> The password to connect to the proxy server if one is required. No default.
port <proxy_port> The port required to connect to the proxy server. 0
status {enable | disable} Enable or disable tunneling. disable
username <name> The user name used to connect to the proxy server. No default.
ortiOS 4.0 MR3 CLI Reference1-431-99686-20110623 387ttp://docs.fortinet.com/ • Feedback
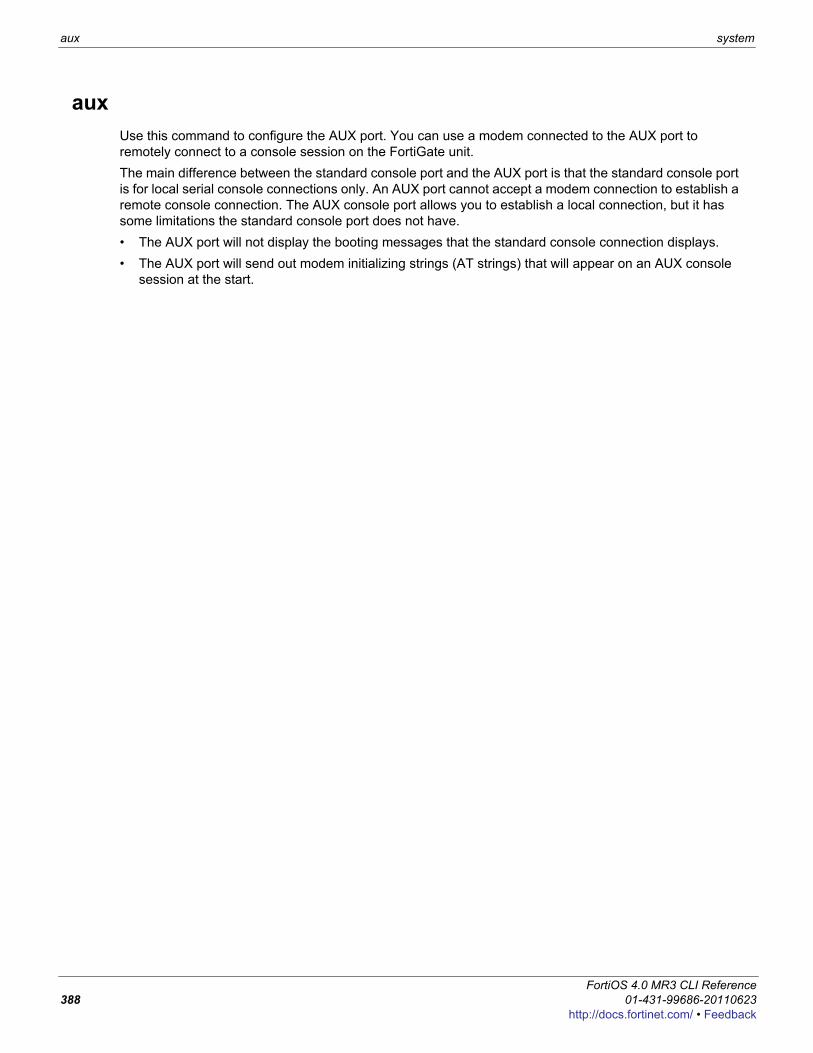
aux system
auxUse this command to configure the AUX port. You can use a modem connected to the AUX port to remotely connect to a console session on the FortiGate unit.The main difference between the standard console port and the AUX port is that the standard console port is for local serial console connections only. An AUX port cannot accept a modem connection to establish a remote console connection. The AUX console port allows you to establish a local connection, but it has some limitations the standard console port does not have.• The AUX port will not display the booting messages that the standard console connection displays.• The AUX port will send out modem initializing strings (AT strings) that will appear on an AUX console
session at the start.
FortiOS 4.0 MR3 CLI Reference388 01-431-99686-20110623
http://docs.fortinet.com/ • Feedback
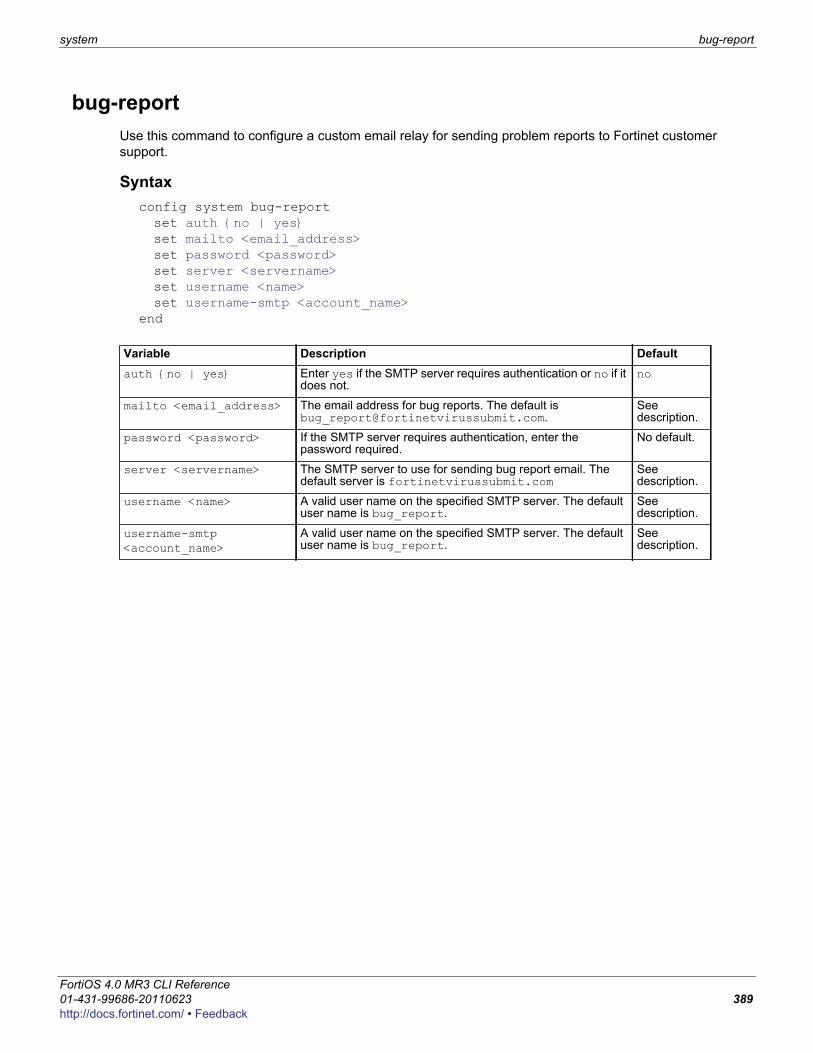
system bug-report
F0h
bug-reportUse this command to configure a custom email relay for sending problem reports to Fortinet customer support.
Syntaxconfig system bug-reportset auth {no | yes}set mailto <email_address>set password <password>set server <servername>set username <name>set username-smtp <account_name>
end
Variable Description Defaultauth {no | yes} Enter yes if the SMTP server requires authentication or no if it
does not. no
mailto <email_address> The email address for bug reports. The default is [email protected].
See description.
password <password> If the SMTP server requires authentication, enter the password required.
No default.
server <servername> The SMTP server to use for sending bug report email. The default server is fortinetvirussubmit.com
See description.
username <name> A valid user name on the specified SMTP server. The default user name is bug_report.
See description.
username-smtp <account_name>
A valid user name on the specified SMTP server. The default user name is bug_report.
See description.
ortiOS 4.0 MR3 CLI Reference1-431-99686-20110623 389ttp://docs.fortinet.com/ • Feedback
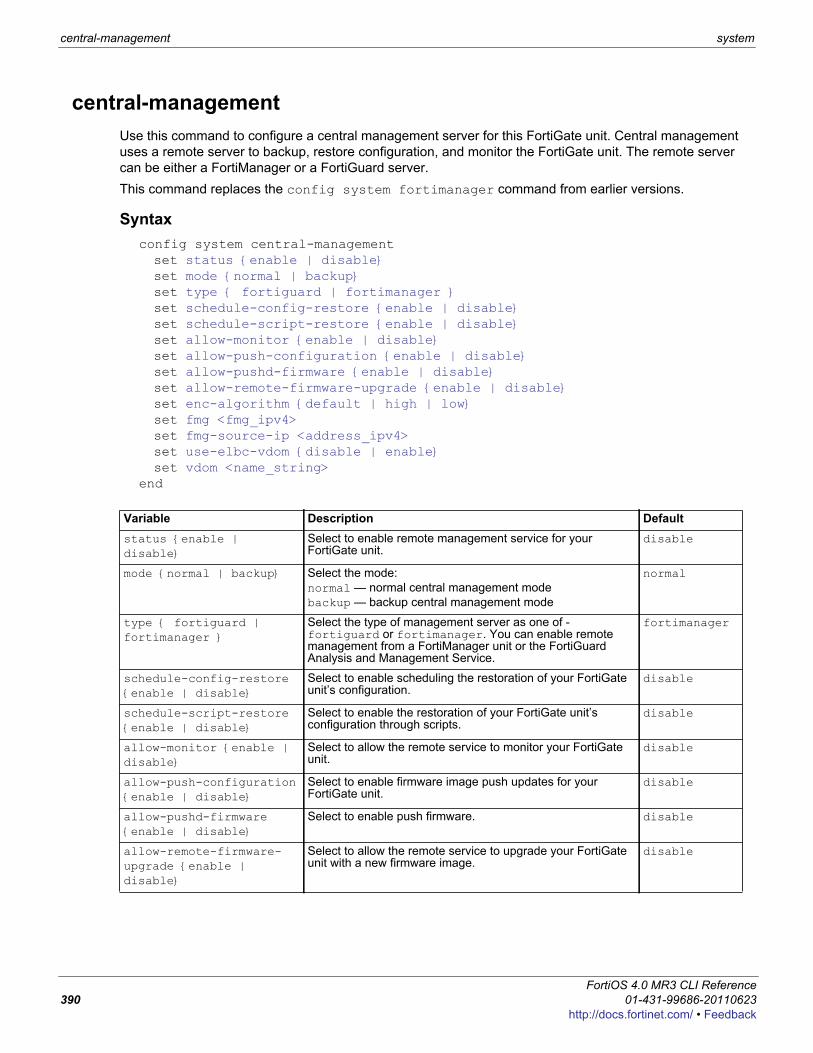
central-management system
central-managementUse this command to configure a central management server for this FortiGate unit. Central management uses a remote server to backup, restore configuration, and monitor the FortiGate unit. The remote server can be either a FortiManager or a FortiGuard server.This command replaces the config system fortimanager command from earlier versions.
Syntaxconfig system central-managementset status {enable | disable}set mode {normal | backup}set type { fortiguard | fortimanager }set schedule-config-restore {enable | disable}set schedule-script-restore {enable | disable}set allow-monitor {enable | disable}set allow-push-configuration {enable | disable}set allow-pushd-firmware {enable | disable}set allow-remote-firmware-upgrade {enable | disable}set enc-algorithm {default | high | low}set fmg <fmg_ipv4>set fmg-source-ip <address_ipv4>set use-elbc-vdom {disable | enable}set vdom <name_string>
end
Variable Description Defaultstatus {enable | disable}
Select to enable remote management service for your FortiGate unit.
disable
mode {normal | backup} Select the mode:normal — normal central management modebackup — backup central management mode
normal
type { fortiguard | fortimanager }
Select the type of management server as one of - fortiguard or fortimanager. You can enable remote management from a FortiManager unit or the FortiGuard Analysis and Management Service.
fortimanager
schedule-config-restore {enable | disable}
Select to enable scheduling the restoration of your FortiGate unit’s configuration.
disable
schedule-script-restore {enable | disable}
Select to enable the restoration of your FortiGate unit’s configuration through scripts.
disable
allow-monitor {enable | disable}
Select to allow the remote service to monitor your FortiGate unit.
disable
allow-push-configuration {enable | disable}
Select to enable firmware image push updates for your FortiGate unit.
disable
allow-pushd-firmware {enable | disable}
Select to enable push firmware. disable
allow-remote-firmware-upgrade {enable | disable}
Select to allow the remote service to upgrade your FortiGate unit with a new firmware image.
disable
FortiOS 4.0 MR3 CLI Reference390 01-431-99686-20110623
http://docs.fortinet.com/ • Feedback
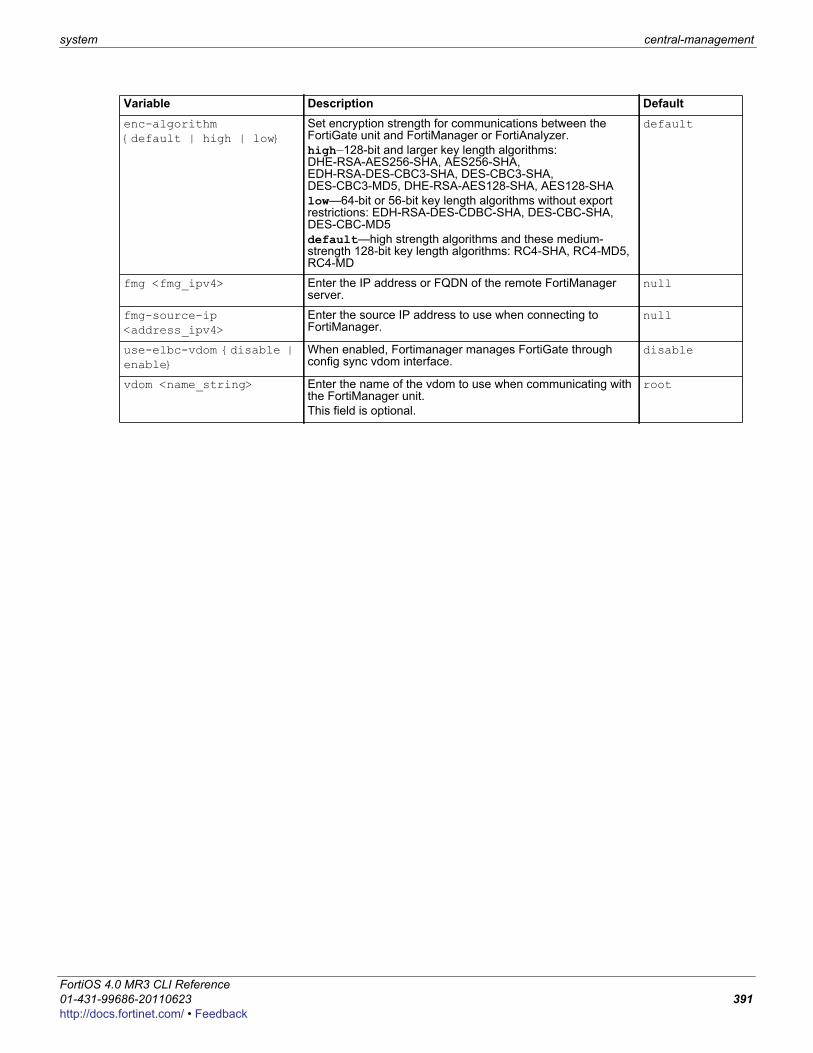
system central-management
F0h
enc-algorithm {default | high | low}
Set encryption strength for communications between the FortiGate unit and FortiManager or FortiAnalyzer.high—128-bit and larger key length algorithms: DHE-RSA-AES256-SHA, AES256-SHA, EDH-RSA-DES-CBC3-SHA, DES-CBC3-SHA, DES-CBC3-MD5, DHE-RSA-AES128-SHA, AES128-SHAlow—64-bit or 56-bit key length algorithms without export restrictions: EDH-RSA-DES-CDBC-SHA, DES-CBC-SHA, DES-CBC-MD5default—high strength algorithms and these medium-strength 128-bit key length algorithms: RC4-SHA, RC4-MD5, RC4-MD
default
fmg <fmg_ipv4> Enter the IP address or FQDN of the remote FortiManager server.
null
fmg-source-ip <address_ipv4>
Enter the source IP address to use when connecting to FortiManager.
null
use-elbc-vdom {disable | enable}
When enabled, Fortimanager manages FortiGate through config sync vdom interface.
disable
vdom <name_string> Enter the name of the vdom to use when communicating with the FortiManager unit.This field is optional.
root
Variable Description Default
ortiOS 4.0 MR3 CLI Reference1-431-99686-20110623 391ttp://docs.fortinet.com/ • Feedback
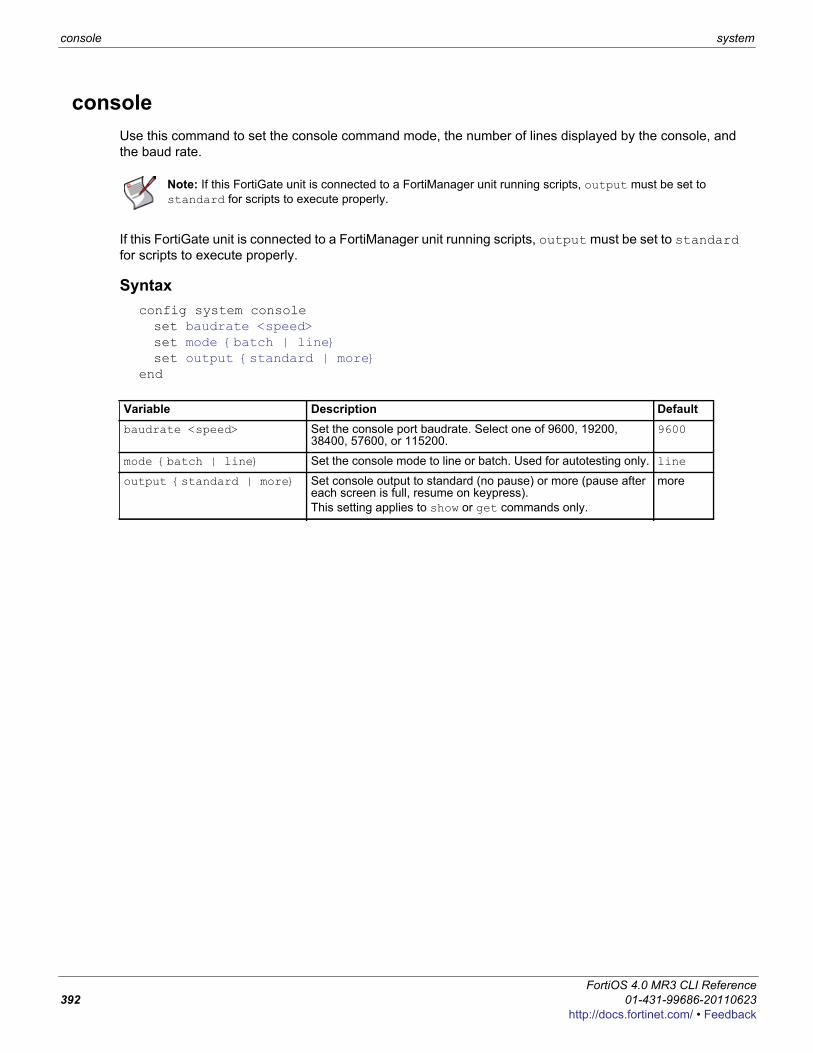
console system
consoleUse this command to set the console command mode, the number of lines displayed by the console, and the baud rate.
If this FortiGate unit is connected to a FortiManager unit running scripts, output must be set to standard for scripts to execute properly.
Syntaxconfig system consoleset baudrate <speed>set mode {batch | line}set output {standard | more}
end
Note: If this FortiGate unit is connected to a FortiManager unit running scripts, output must be set to standard for scripts to execute properly.
Variable Description Defaultbaudrate <speed> Set the console port baudrate. Select one of 9600, 19200,
38400, 57600, or 115200.9600
mode {batch | line} Set the console mode to line or batch. Used for autotesting only. line
output {standard | more} Set console output to standard (no pause) or more (pause after each screen is full, resume on keypress).This setting applies to show or get commands only.
more
FortiOS 4.0 MR3 CLI Reference392 01-431-99686-20110623
http://docs.fortinet.com/ • Feedback
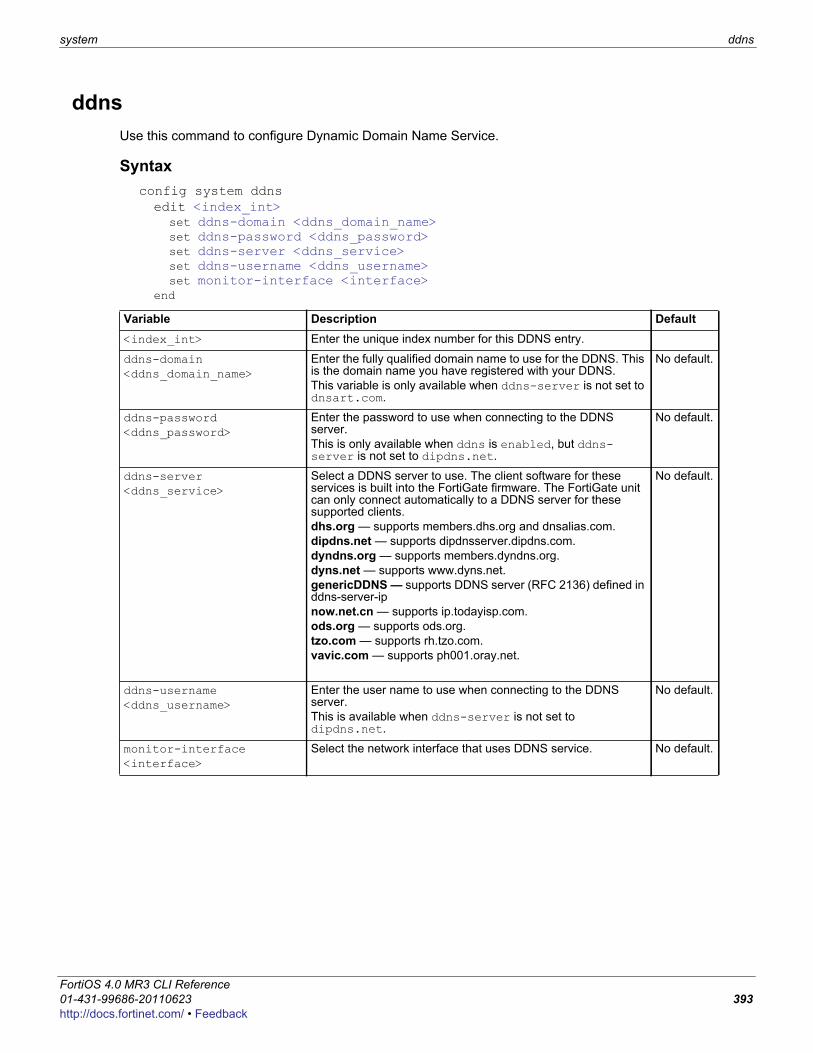
system ddns
F0h
ddnsUse this command to configure Dynamic Domain Name Service.
Syntaxconfig system ddnsedit <index_int>
set ddns-domain <ddns_domain_name>set ddns-password <ddns_password>set ddns-server <ddns_service>set ddns-username <ddns_username>set monitor-interface <interface>
end
Variable Description Default<index_int> Enter the unique index number for this DDNS entry.
ddns-domain <ddns_domain_name>
Enter the fully qualified domain name to use for the DDNS. This is the domain name you have registered with your DDNS.This variable is only available when ddns-server is not set to dnsart.com.
No default.
ddns-password <ddns_password>
Enter the password to use when connecting to the DDNS server.This is only available when ddns is enabled, but ddns-server is not set to dipdns.net.
No default.
ddns-server <ddns_service>
Select a DDNS server to use. The client software for these services is built into the FortiGate firmware. The FortiGate unit can only connect automatically to a DDNS server for these supported clients.dhs.org — supports members.dhs.org and dnsalias.com.dipdns.net — supports dipdnsserver.dipdns.com.dyndns.org — supports members.dyndns.org.dyns.net — supports www.dyns.net.genericDDNS — supports DDNS server (RFC 2136) defined in ddns-server-ip now.net.cn — supports ip.todayisp.com.ods.org — supports ods.org.tzo.com — supports rh.tzo.com.vavic.com — supports ph001.oray.net.
No default.
ddns-username <ddns_username>
Enter the user name to use when connecting to the DDNS server.This is available when ddns-server is not set to dipdns.net.
No default.
monitor-interface <interface>
Select the network interface that uses DDNS service. No default.
ortiOS 4.0 MR3 CLI Reference1-431-99686-20110623 393ttp://docs.fortinet.com/ • Feedback
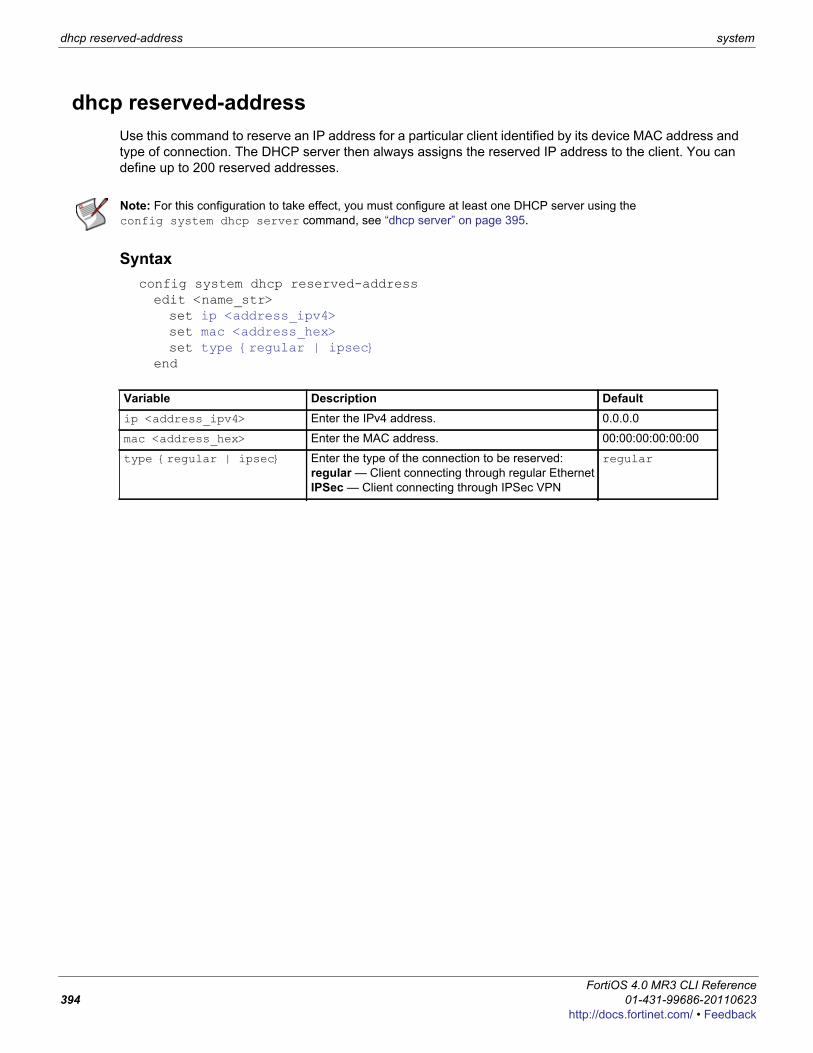
dhcp reserved-address system
dhcp reserved-addressUse this command to reserve an IP address for a particular client identified by its device MAC address and type of connection. The DHCP server then always assigns the reserved IP address to the client. You can define up to 200 reserved addresses.
Syntaxconfig system dhcp reserved-addressedit <name_str>set ip <address_ipv4>set mac <address_hex>set type {regular | ipsec}
end
Note: For this configuration to take effect, you must configure at least one DHCP server using the config system dhcp server command, see “dhcp server” on page 395.
Variable Description Defaultip <address_ipv4> Enter the IPv4 address. 0.0.0.0
mac <address_hex> Enter the MAC address. 00:00:00:00:00:00
type {regular | ipsec} Enter the type of the connection to be reserved: regular — Client connecting through regular EthernetIPSec — Client connecting through IPSec VPN
regular
FortiOS 4.0 MR3 CLI Reference394 01-431-99686-20110623
http://docs.fortinet.com/ • Feedback
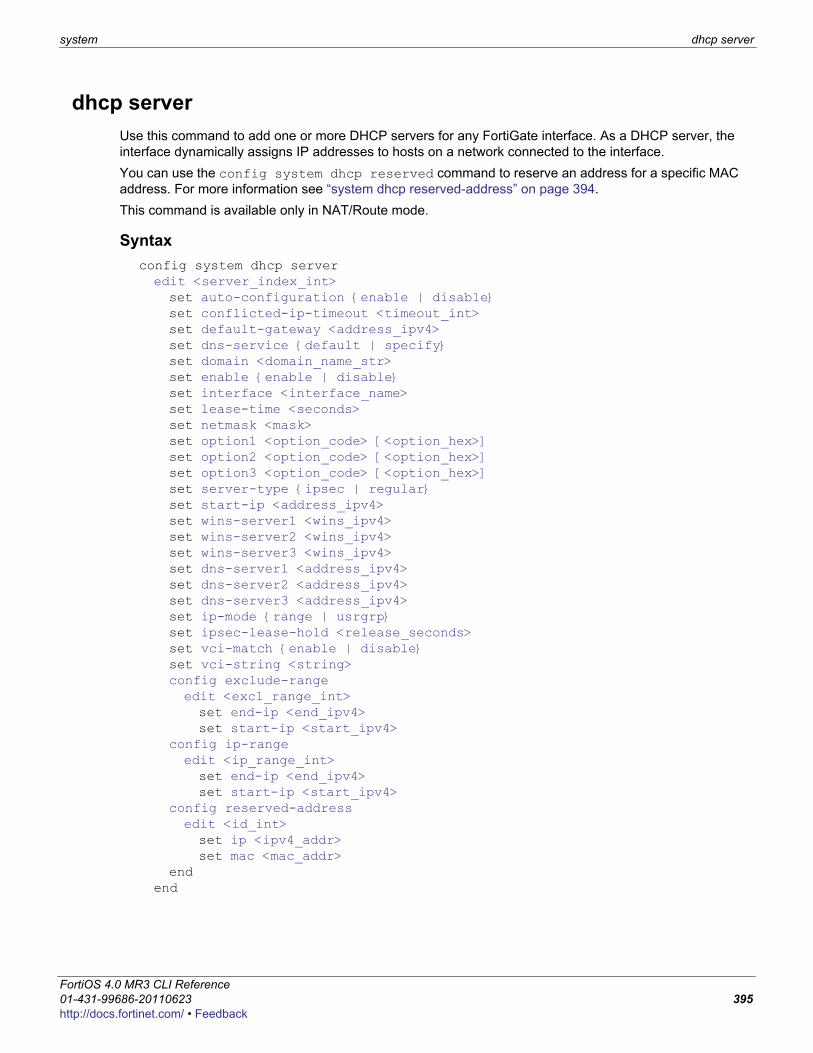
system dhcp server
F0h
dhcp serverUse this command to add one or more DHCP servers for any FortiGate interface. As a DHCP server, the interface dynamically assigns IP addresses to hosts on a network connected to the interface.You can use the config system dhcp reserved command to reserve an address for a specific MAC address. For more information see “system dhcp reserved-address” on page 394.This command is available only in NAT/Route mode.
Syntaxconfig system dhcp serveredit <server_index_int>set auto-configuration {enable | disable}set conflicted-ip-timeout <timeout_int>set default-gateway <address_ipv4>set dns-service {default | specify}set domain <domain_name_str>set enable {enable | disable}set interface <interface_name>set lease-time <seconds>set netmask <mask>set option1 <option_code> [<option_hex>]set option2 <option_code> [<option_hex>]set option3 <option_code> [<option_hex>]set server-type {ipsec | regular}set start-ip <address_ipv4>set wins-server1 <wins_ipv4>set wins-server2 <wins_ipv4>set wins-server3 <wins_ipv4>set dns-server1 <address_ipv4>set dns-server2 <address_ipv4>set dns-server3 <address_ipv4>set ip-mode {range | usrgrp}set ipsec-lease-hold <release_seconds>set vci-match {enable | disable}set vci-string <string>config exclude-rangeedit <excl_range_int>set end-ip <end_ipv4>set start-ip <start_ipv4>
config ip-rangeedit <ip_range_int>set end-ip <end_ipv4>set start-ip <start_ipv4>
config reserved-addressedit <id_int>set ip <ipv4_addr>set mac <mac_addr>
endend
ortiOS 4.0 MR3 CLI Reference1-431-99686-20110623 395ttp://docs.fortinet.com/ • Feedback
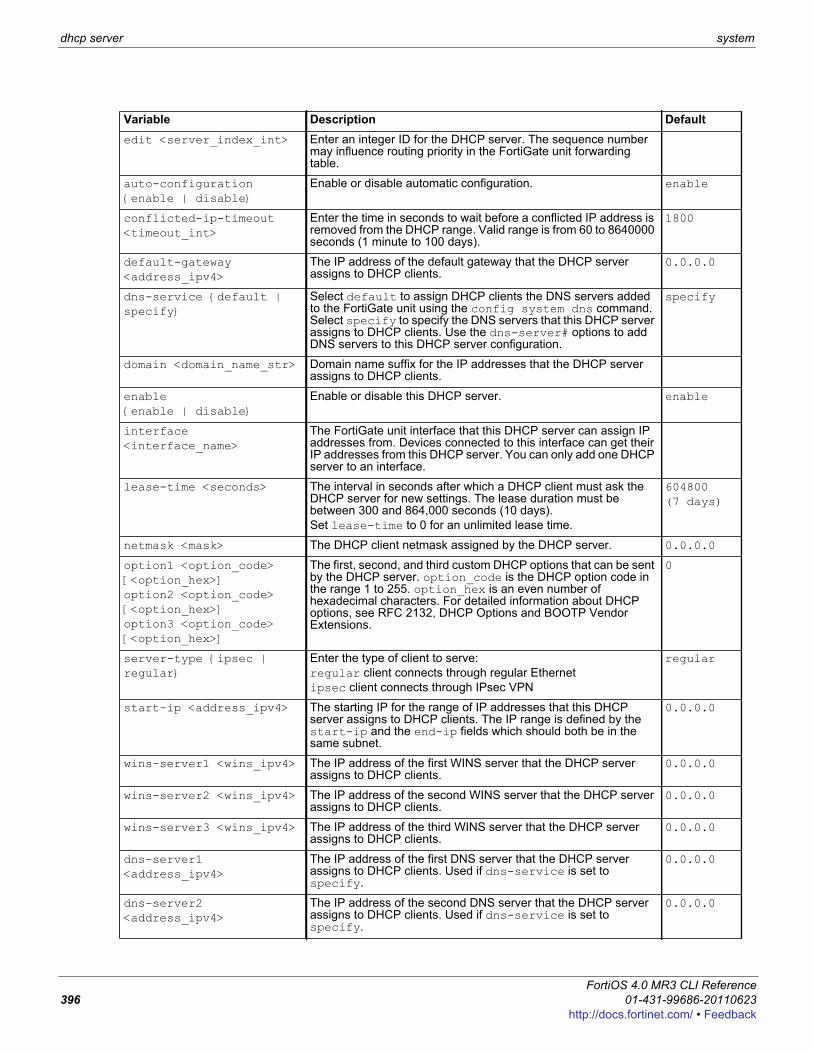
dhcp server system
Variable Description Defaultedit <server_index_int> Enter an integer ID for the DHCP server. The sequence number
may influence routing priority in the FortiGate unit forwarding table.
auto-configuration {enable | disable}
Enable or disable automatic configuration. enable
conflicted-ip-timeout <timeout_int>
Enter the time in seconds to wait before a conflicted IP address is removed from the DHCP range. Valid range is from 60 to 8640000 seconds (1 minute to 100 days).
1800
default-gateway <address_ipv4>
The IP address of the default gateway that the DHCP server assigns to DHCP clients.
0.0.0.0
dns-service {default | specify}
Select default to assign DHCP clients the DNS servers added to the FortiGate unit using the config system dns command. Select specify to specify the DNS servers that this DHCP server assigns to DHCP clients. Use the dns-server# options to add DNS servers to this DHCP server configuration.
specify
domain <domain_name_str> Domain name suffix for the IP addresses that the DHCP server assigns to DHCP clients.
enable {enable | disable}
Enable or disable this DHCP server. enable
interface <interface_name>
The FortiGate unit interface that this DHCP server can assign IP addresses from. Devices connected to this interface can get their IP addresses from this DHCP server. You can only add one DHCP server to an interface.
lease-time <seconds> The interval in seconds after which a DHCP client must ask the DHCP server for new settings. The lease duration must be between 300 and 864,000 seconds (10 days). Set lease-time to 0 for an unlimited lease time.
604800 (7 days)
netmask <mask> The DHCP client netmask assigned by the DHCP server. 0.0.0.0
option1 <option_code> [<option_hex>]option2 <option_code> [<option_hex>]option3 <option_code> [<option_hex>]
The first, second, and third custom DHCP options that can be sent by the DHCP server. option_code is the DHCP option code in the range 1 to 255. option_hex is an even number of hexadecimal characters. For detailed information about DHCP options, see RFC 2132, DHCP Options and BOOTP Vendor Extensions.
0
server-type {ipsec | regular}
Enter the type of client to serve: regular client connects through regular Ethernetipsec client connects through IPsec VPN
regular
start-ip <address_ipv4> The starting IP for the range of IP addresses that this DHCP server assigns to DHCP clients. The IP range is defined by the start-ip and the end-ip fields which should both be in the same subnet.
0.0.0.0
wins-server1 <wins_ipv4> The IP address of the first WINS server that the DHCP server assigns to DHCP clients.
0.0.0.0
wins-server2 <wins_ipv4> The IP address of the second WINS server that the DHCP server assigns to DHCP clients.
0.0.0.0
wins-server3 <wins_ipv4> The IP address of the third WINS server that the DHCP server assigns to DHCP clients.
0.0.0.0
dns-server1 <address_ipv4>
The IP address of the first DNS server that the DHCP server assigns to DHCP clients. Used if dns-service is set to specify.
0.0.0.0
dns-server2 <address_ipv4>
The IP address of the second DNS server that the DHCP server assigns to DHCP clients. Used if dns-service is set to specify.
0.0.0.0
FortiOS 4.0 MR3 CLI Reference396 01-431-99686-20110623
http://docs.fortinet.com/ • Feedback
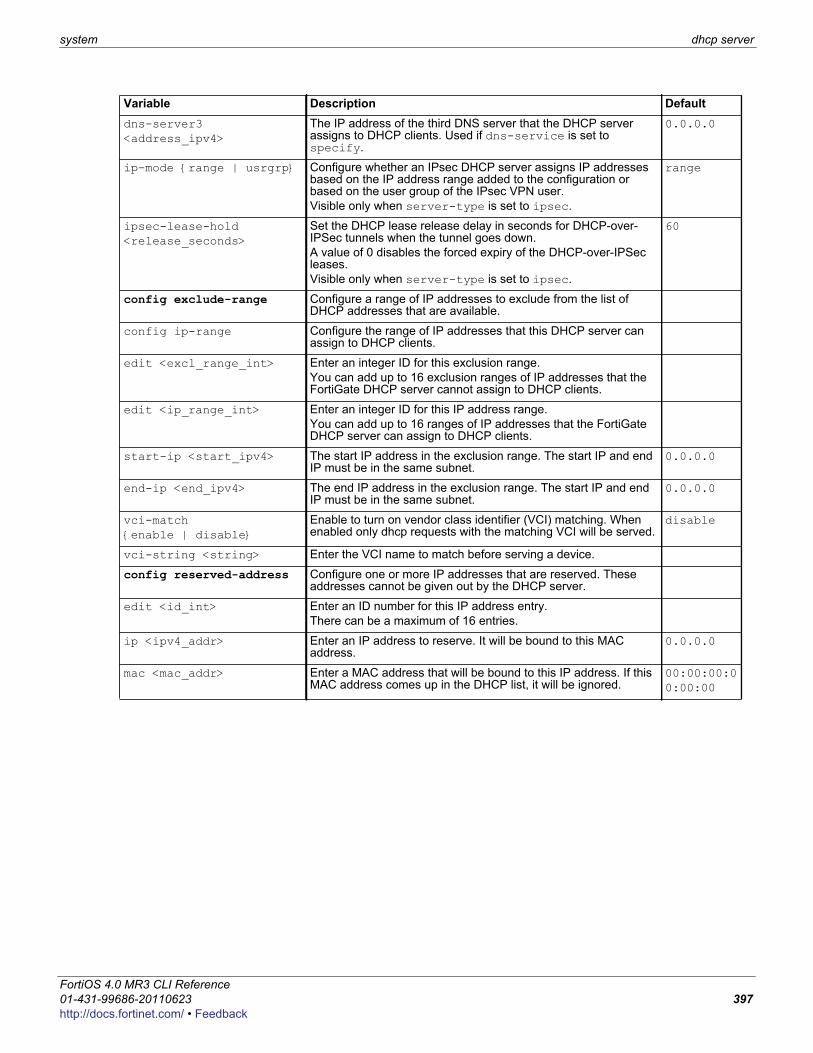
system dhcp server
F0h
dns-server3 <address_ipv4>
The IP address of the third DNS server that the DHCP server assigns to DHCP clients. Used if dns-service is set to specify.
0.0.0.0
ip-mode {range | usrgrp} Configure whether an IPsec DHCP server assigns IP addresses based on the IP address range added to the configuration or based on the user group of the IPsec VPN user.Visible only when server-type is set to ipsec.
range
ipsec-lease-hold <release_seconds>
Set the DHCP lease release delay in seconds for DHCP-over-IPSec tunnels when the tunnel goes down.A value of 0 disables the forced expiry of the DHCP-over-IPSec leases. Visible only when server-type is set to ipsec.
60
config exclude-range Configure a range of IP addresses to exclude from the list of DHCP addresses that are available.
config ip-range Configure the range of IP addresses that this DHCP server can assign to DHCP clients.
edit <excl_range_int> Enter an integer ID for this exclusion range.You can add up to 16 exclusion ranges of IP addresses that the FortiGate DHCP server cannot assign to DHCP clients.
edit <ip_range_int> Enter an integer ID for this IP address range.You can add up to 16 ranges of IP addresses that the FortiGate DHCP server can assign to DHCP clients.
start-ip <start_ipv4> The start IP address in the exclusion range. The start IP and end IP must be in the same subnet.
0.0.0.0
end-ip <end_ipv4> The end IP address in the exclusion range. The start IP and end IP must be in the same subnet.
0.0.0.0
vci-match {enable | disable}
Enable to turn on vendor class identifier (VCI) matching. When enabled only dhcp requests with the matching VCI will be served.
disable
vci-string <string> Enter the VCI name to match before serving a device.
config reserved-address Configure one or more IP addresses that are reserved. These addresses cannot be given out by the DHCP server.
edit <id_int> Enter an ID number for this IP address entry.There can be a maximum of 16 entries.
ip <ipv4_addr> Enter an IP address to reserve. It will be bound to this MAC address.
0.0.0.0
mac <mac_addr> Enter a MAC address that will be bound to this IP address. If this MAC address comes up in the DHCP list, it will be ignored.
00:00:00:00:00:00
Variable Description Default
ortiOS 4.0 MR3 CLI Reference1-431-99686-20110623 397ttp://docs.fortinet.com/ • Feedback
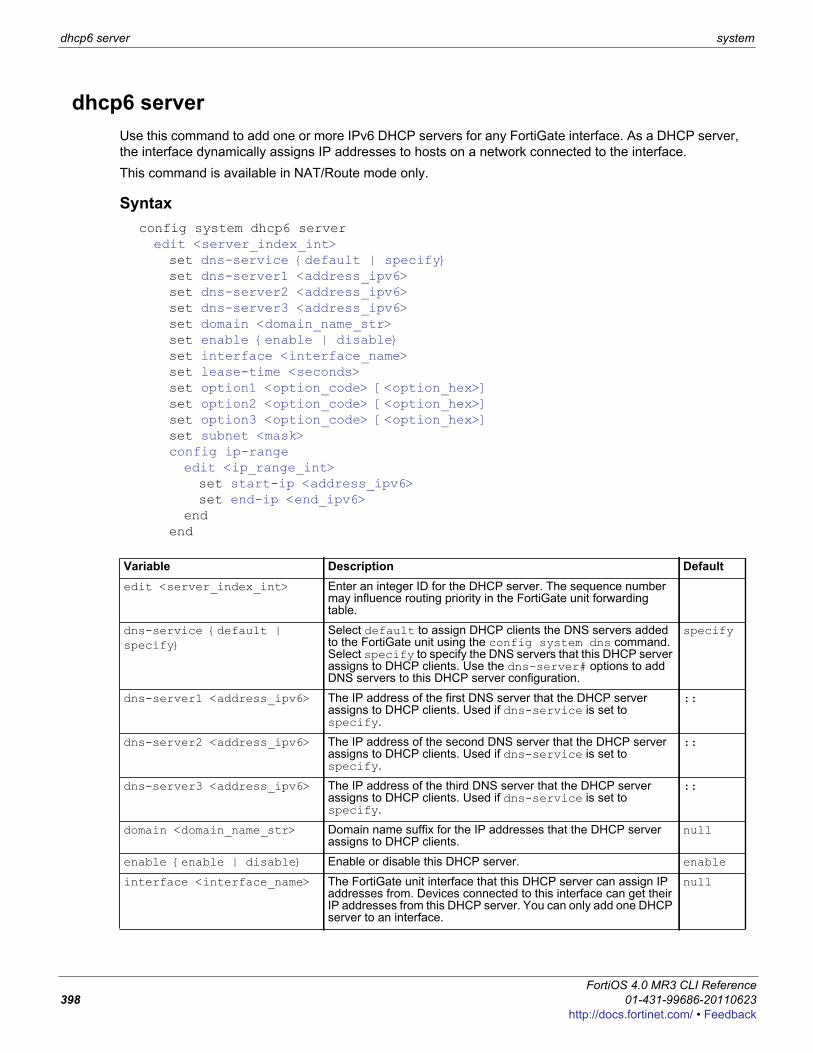
dhcp6 server system
dhcp6 serverUse this command to add one or more IPv6 DHCP servers for any FortiGate interface. As a DHCP server, the interface dynamically assigns IP addresses to hosts on a network connected to the interface.This command is available in NAT/Route mode only.
Syntaxconfig system dhcp6 serveredit <server_index_int>set dns-service {default | specify}set dns-server1 <address_ipv6>set dns-server2 <address_ipv6>set dns-server3 <address_ipv6>set domain <domain_name_str>set enable {enable | disable}set interface <interface_name>set lease-time <seconds>set option1 <option_code> [<option_hex>]set option2 <option_code> [<option_hex>]set option3 <option_code> [<option_hex>]set subnet <mask>config ip-rangeedit <ip_range_int>set start-ip <address_ipv6>set end-ip <end_ipv6>
endend
Variable Description Defaultedit <server_index_int> Enter an integer ID for the DHCP server. The sequence number
may influence routing priority in the FortiGate unit forwarding table.
dns-service {default | specify}
Select default to assign DHCP clients the DNS servers added to the FortiGate unit using the config system dns command. Select specify to specify the DNS servers that this DHCP server assigns to DHCP clients. Use the dns-server# options to add DNS servers to this DHCP server configuration.
specify
dns-server1 <address_ipv6> The IP address of the first DNS server that the DHCP server assigns to DHCP clients. Used if dns-service is set to specify.
::
dns-server2 <address_ipv6> The IP address of the second DNS server that the DHCP server assigns to DHCP clients. Used if dns-service is set to specify.
::
dns-server3 <address_ipv6> The IP address of the third DNS server that the DHCP server assigns to DHCP clients. Used if dns-service is set to specify.
::
domain <domain_name_str> Domain name suffix for the IP addresses that the DHCP server assigns to DHCP clients.
null
enable {enable | disable} Enable or disable this DHCP server. enable
interface <interface_name> The FortiGate unit interface that this DHCP server can assign IP addresses from. Devices connected to this interface can get their IP addresses from this DHCP server. You can only add one DHCP server to an interface.
null
FortiOS 4.0 MR3 CLI Reference398 01-431-99686-20110623
http://docs.fortinet.com/ • Feedback
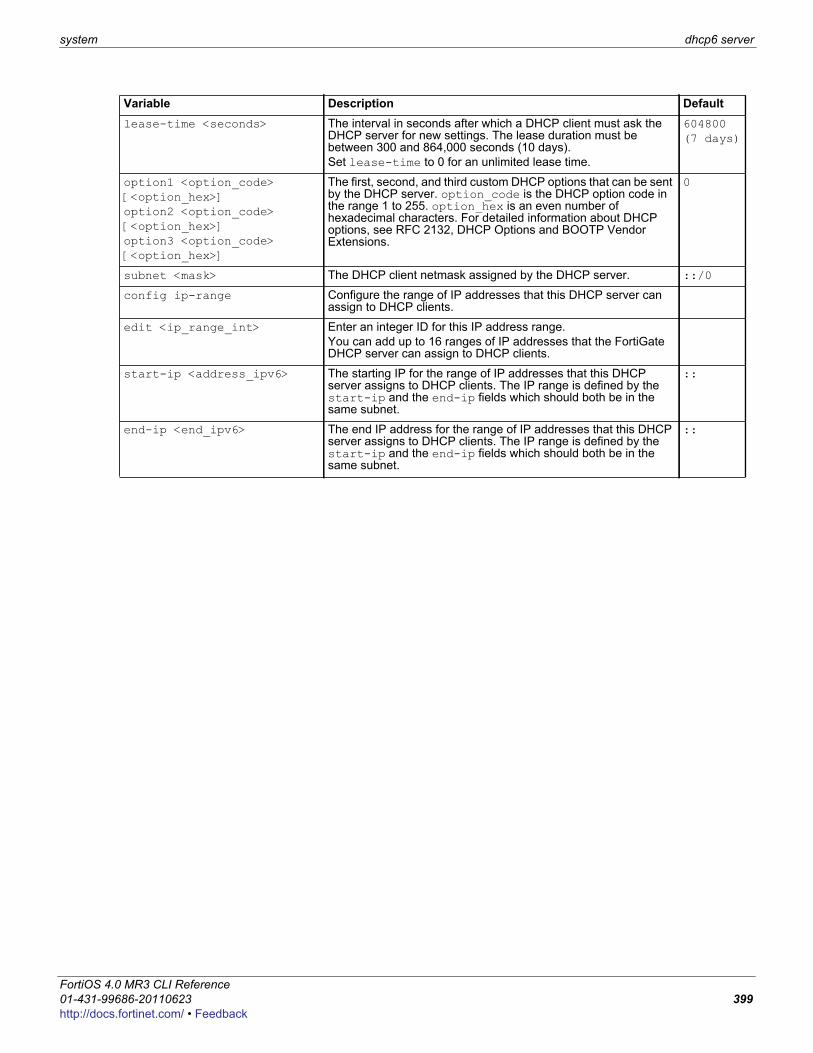
system dhcp6 server
F0h
lease-time <seconds> The interval in seconds after which a DHCP client must ask the DHCP server for new settings. The lease duration must be between 300 and 864,000 seconds (10 days). Set lease-time to 0 for an unlimited lease time.
604800 (7 days)
option1 <option_code> [<option_hex>]option2 <option_code> [<option_hex>]option3 <option_code> [<option_hex>]
The first, second, and third custom DHCP options that can be sent by the DHCP server. option_code is the DHCP option code in the range 1 to 255. option_hex is an even number of hexadecimal characters. For detailed information about DHCP options, see RFC 2132, DHCP Options and BOOTP Vendor Extensions.
0
subnet <mask> The DHCP client netmask assigned by the DHCP server. ::/0
config ip-range Configure the range of IP addresses that this DHCP server can assign to DHCP clients.
edit <ip_range_int> Enter an integer ID for this IP address range.You can add up to 16 ranges of IP addresses that the FortiGate DHCP server can assign to DHCP clients.
start-ip <address_ipv6> The starting IP for the range of IP addresses that this DHCP server assigns to DHCP clients. The IP range is defined by the start-ip and the end-ip fields which should both be in the same subnet.
::
end-ip <end_ipv6> The end IP address for the range of IP addresses that this DHCP server assigns to DHCP clients. The IP range is defined by the start-ip and the end-ip fields which should both be in the same subnet.
::
Variable Description Default
ortiOS 4.0 MR3 CLI Reference1-431-99686-20110623 399ttp://docs.fortinet.com/ • Feedback
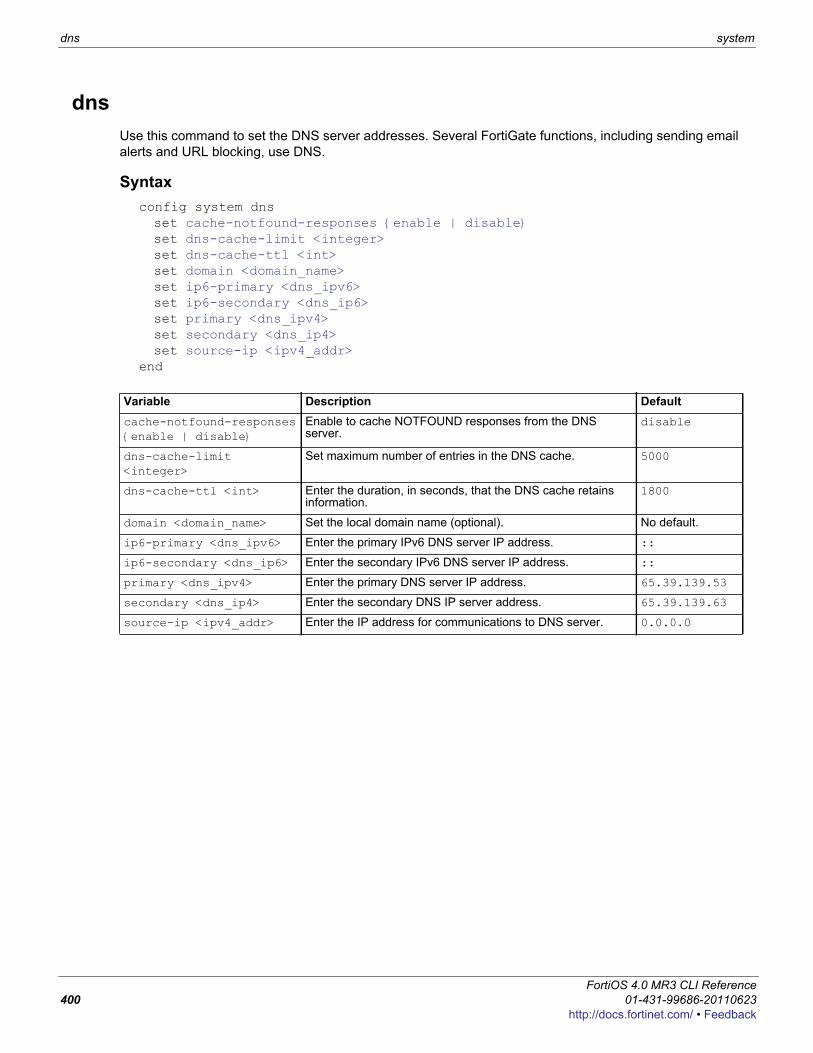
dns system
dnsUse this command to set the DNS server addresses. Several FortiGate functions, including sending email alerts and URL blocking, use DNS.
Syntaxconfig system dnsset cache-notfound-responses {enable | disable}set dns-cache-limit <integer>set dns-cache-ttl <int>set domain <domain_name>set ip6-primary <dns_ipv6>set ip6-secondary <dns_ip6>set primary <dns_ipv4>set secondary <dns_ip4>set source-ip <ipv4_addr>
end
Variable Description Defaultcache-notfound-responses {enable | disable}
Enable to cache NOTFOUND responses from the DNS server.
disable
dns-cache-limit <integer>
Set maximum number of entries in the DNS cache. 5000
dns-cache-ttl <int> Enter the duration, in seconds, that the DNS cache retains information.
1800
domain <domain_name> Set the local domain name (optional). No default.
ip6-primary <dns_ipv6> Enter the primary IPv6 DNS server IP address. ::
ip6-secondary <dns_ip6> Enter the secondary IPv6 DNS server IP address. ::
primary <dns_ipv4> Enter the primary DNS server IP address. 65.39.139.53
secondary <dns_ip4> Enter the secondary DNS IP server address. 65.39.139.63
source-ip <ipv4_addr> Enter the IP address for communications to DNS server. 0.0.0.0
FortiOS 4.0 MR3 CLI Reference400 01-431-99686-20110623
http://docs.fortinet.com/ • Feedback
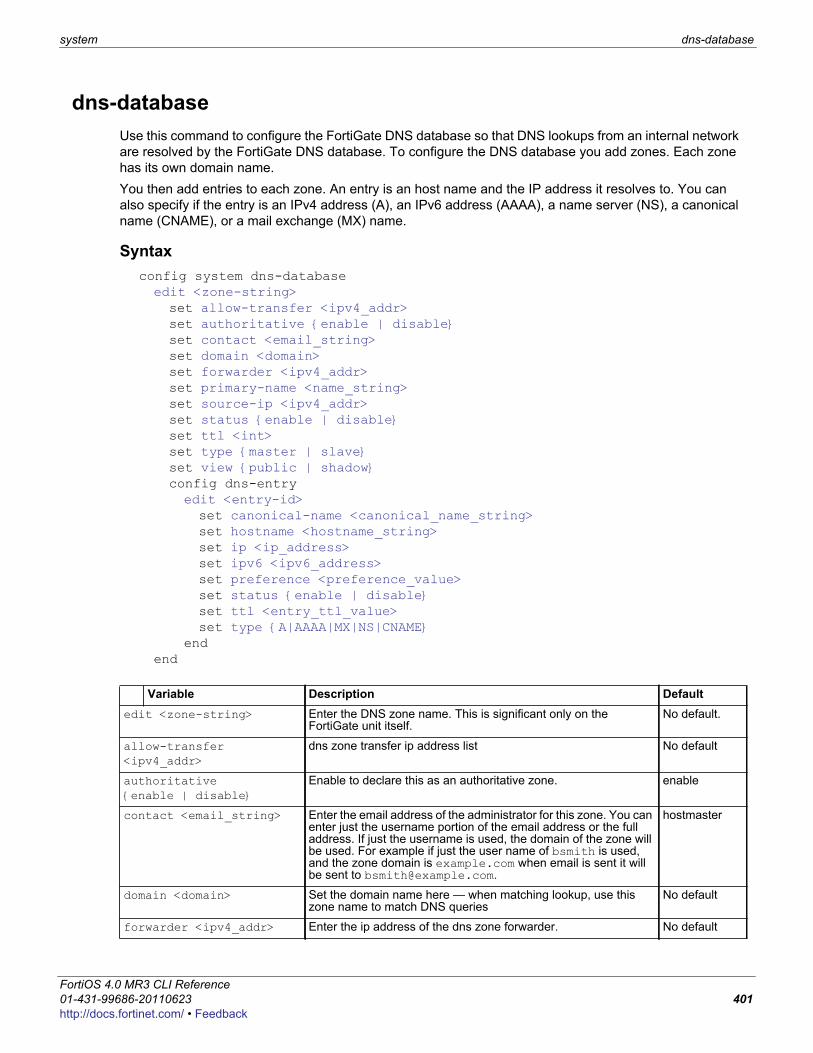
system dns-database
F0h
dns-databaseUse this command to configure the FortiGate DNS database so that DNS lookups from an internal network are resolved by the FortiGate DNS database. To configure the DNS database you add zones. Each zone has its own domain name.You then add entries to each zone. An entry is an host name and the IP address it resolves to. You can also specify if the entry is an IPv4 address (A), an IPv6 address (AAAA), a name server (NS), a canonical name (CNAME), or a mail exchange (MX) name.
Syntaxconfig system dns-databaseedit <zone-string>set allow-transfer <ipv4_addr>set authoritative {enable | disable}set contact <email_string>set domain <domain>set forwarder <ipv4_addr>set primary-name <name_string>set source-ip <ipv4_addr>set status {enable | disable}set ttl <int>set type {master | slave}set view {public | shadow}config dns-entryedit <entry-id>set canonical-name <canonical_name_string>set hostname <hostname_string>set ip <ip_address>set ipv6 <ipv6_address>set preference <preference_value>set status {enable | disable}set ttl <entry_ttl_value>set type {A|AAAA|MX|NS|CNAME}
endend
Variable Description Defaultedit <zone-string> Enter the DNS zone name. This is significant only on the
FortiGate unit itself.No default.
allow-transfer <ipv4_addr>
dns zone transfer ip address list No default
authoritative {enable | disable}
Enable to declare this as an authoritative zone. enable
contact <email_string> Enter the email address of the administrator for this zone. You can enter just the username portion of the email address or the full address. If just the username is used, the domain of the zone will be used. For example if just the user name of bsmith is used, and the zone domain is example.com when email is sent it will be sent to [email protected].
hostmaster
domain <domain> Set the domain name here — when matching lookup, use this zone name to match DNS queries
No default
forwarder <ipv4_addr> Enter the ip address of the dns zone forwarder. No default
ortiOS 4.0 MR3 CLI Reference1-431-99686-20110623 401ttp://docs.fortinet.com/ • Feedback

dns-database system
primary-name <name_string>
Enter the domain name of the default DNS server for this zone. dns
source-ip <ipv4_addr> Enter the source IP address to use when forwarding to the DNS server.
0.0.0.0
status {enable | disable}
Select to enable this DNS zone entry. enable
ttl <int> Set the packet time-to-live in seconds. Range 0 to 2 147 483 647. 86400
type {master | slave} Select the type of this zone. master — manage entries directly.slave — import entries from outside source
master
view {public | shadow} Select the type of view for this zone to one of public or shadow. shadow
config dns-entry variables edit <entry-id>
canonical-name <canonical_name_string>
Enter the canonical name of the host. This is available if type is CNAME.
Null
hostname <hostname_string>
Enter the name of the host. Null
ip <ip_address> Enter the IP address (IPv4) of the host. This is available if type is A.
0.0.0.0
ipv6 <ipv6_address> Enter the IP address (IPv6) of the host. This is available if type is AAAA.
::
preference <preference_value>
Enter the preference level. 0 is the highest preference. This is available if type is MX.
10
status {enable | disable}
Enable the DNS entry. enable
ttl <entry_ttl_value> Optionally, override the zone time-to-live value. Range 0 to 2 147 483 647 seconds.Set to 0 to use zone ttl value.
0
type {A|AAAA|MX|NS|CNAME}
A — IPv4 hostAAAA — IPv6 hostCNAME — aliasMX — mail serverNS — name server
A
Variable Description Default
FortiOS 4.0 MR3 CLI Reference402 01-431-99686-20110623
http://docs.fortinet.com/ • Feedback
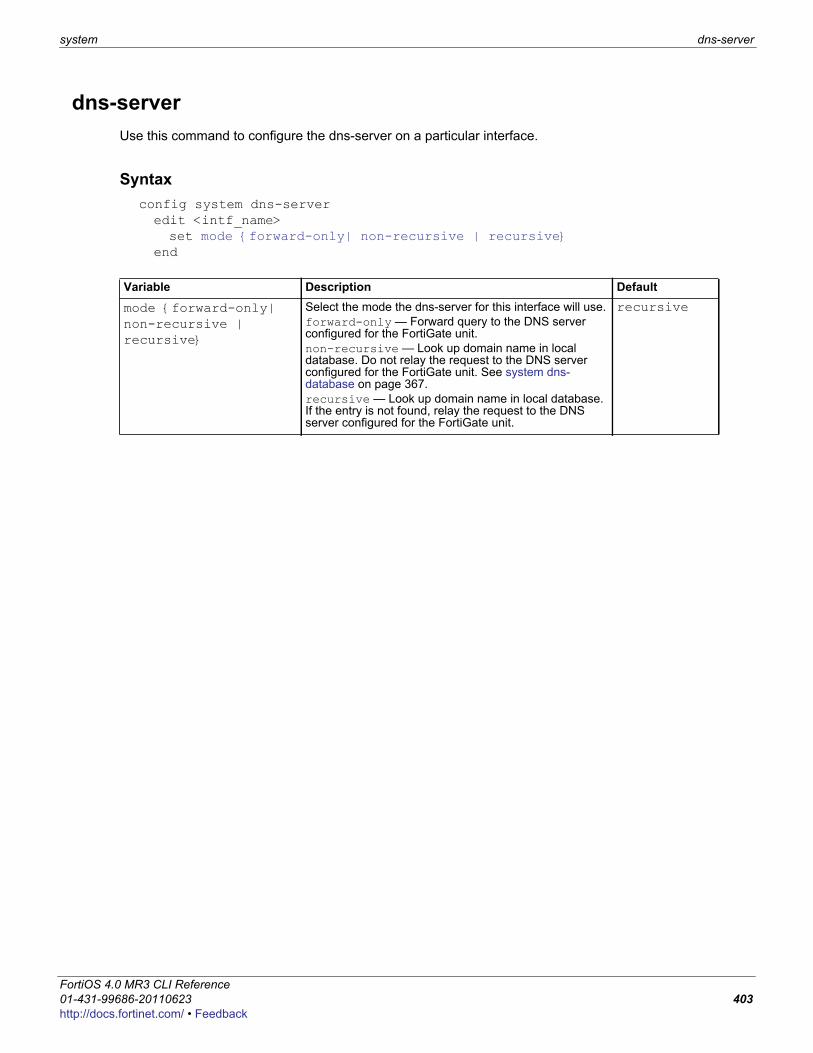
system dns-server
F0h
dns-serverUse this command to configure the dns-server on a particular interface.
Syntaxconfig system dns-serveredit <intf_name>set mode {forward-only| non-recursive | recursive}
end
Variable Description Default
mode {forward-only| non-recursive | recursive}
Select the mode the dns-server for this interface will use.forward-only — Forward query to the DNS server configured for the FortiGate unit.non-recursive — Look up domain name in local database. Do not relay the request to the DNS server configured for the FortiGate unit. See system dns-database on page 367.recursive — Look up domain name in local database. If the entry is not found, relay the request to the DNS server configured for the FortiGate unit.
recursive
ortiOS 4.0 MR3 CLI Reference1-431-99686-20110623 403ttp://docs.fortinet.com/ • Feedback
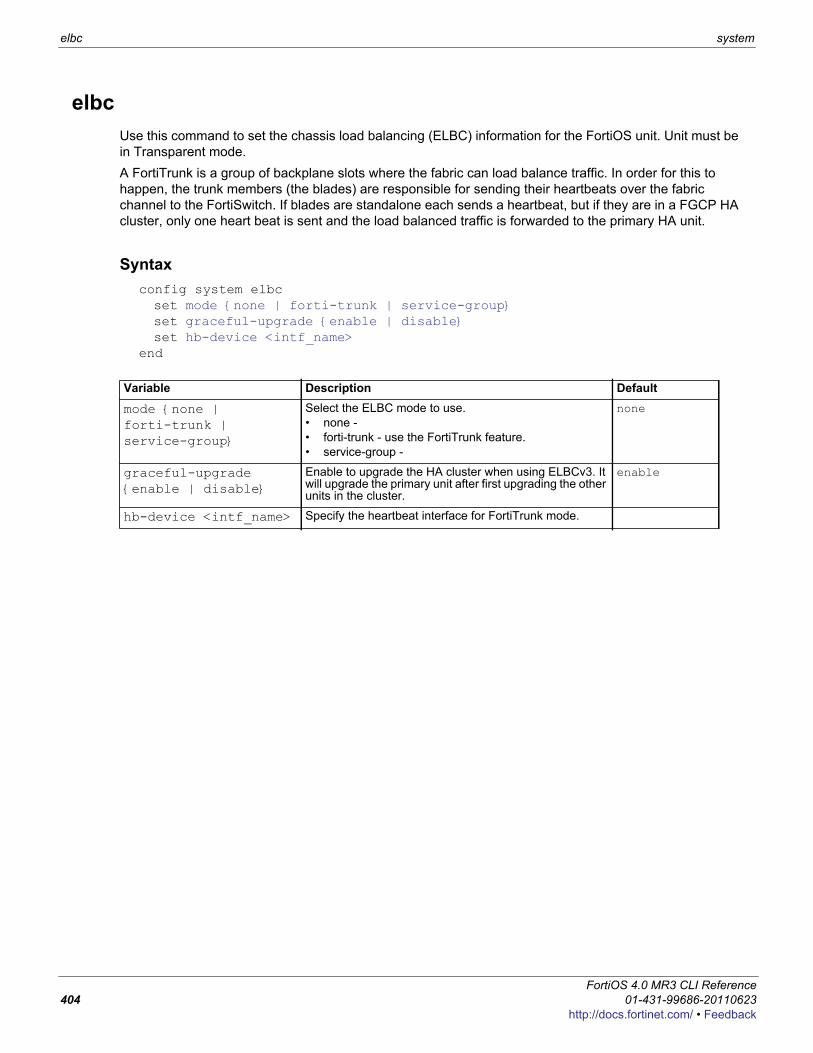
elbc system
elbcUse this command to set the chassis load balancing (ELBC) information for the FortiOS unit. Unit must be in Transparent mode.A FortiTrunk is a group of backplane slots where the fabric can load balance traffic. In order for this to happen, the trunk members (the blades) are responsible for sending their heartbeats over the fabric channel to the FortiSwitch. If blades are standalone each sends a heartbeat, but if they are in a FGCP HA cluster, only one heart beat is sent and the load balanced traffic is forwarded to the primary HA unit.
Syntaxconfig system elbcset mode {none | forti-trunk | service-group}set graceful-upgrade {enable | disable}set hb-device <intf_name>
end
Variable Description Default
mode {none | forti-trunk | service-group}
Select the ELBC mode to use. • none - • forti-trunk - use the FortiTrunk feature.• service-group -
none
graceful-upgrade {enable | disable}
Enable to upgrade the HA cluster when using ELBCv3. It will upgrade the primary unit after first upgrading the other units in the cluster.
enable
hb-device <intf_name> Specify the heartbeat interface for FortiTrunk mode.
FortiOS 4.0 MR3 CLI Reference404 01-431-99686-20110623
http://docs.fortinet.com/ • Feedback
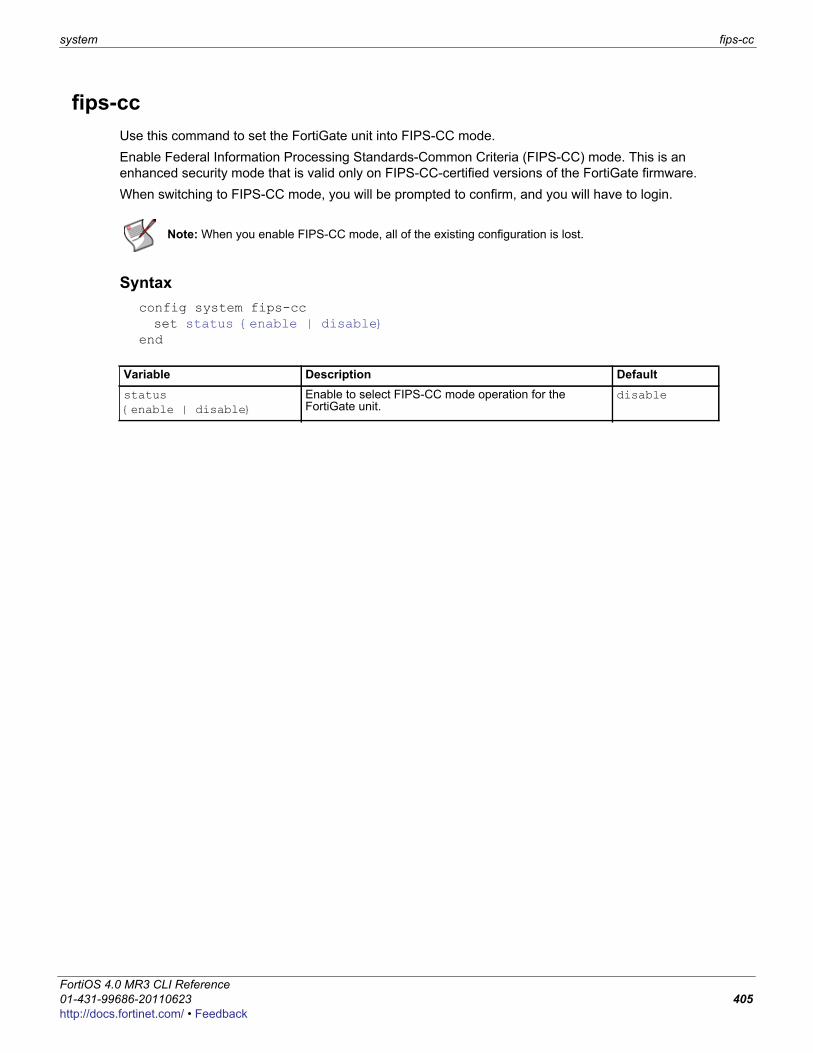
system fips-cc
F0h
fips-ccUse this command to set the FortiGate unit into FIPS-CC mode. Enable Federal Information Processing Standards-Common Criteria (FIPS-CC) mode. This is an enhanced security mode that is valid only on FIPS-CC-certified versions of the FortiGate firmware.When switching to FIPS-CC mode, you will be prompted to confirm, and you will have to login.
Syntaxconfig system fips-ccset status {enable | disable}
end
Note: When you enable FIPS-CC mode, all of the existing configuration is lost.
Variable Description Defaultstatus {enable | disable}
Enable to select FIPS-CC mode operation for the FortiGate unit.
disable
ortiOS 4.0 MR3 CLI Reference1-431-99686-20110623 405ttp://docs.fortinet.com/ • Feedback

fortiguard system
fortiguardUse this command to configure communications with the FortiGuard Distribution Network (FDN) for FortiGuard subscription services such as:• FortiGuard Antivirus and IPS• FortiGuard Web Filtering and Antispam• FortiGuard Analysis and Management ServiceFor FortiGuard Antivirus and IPS, Web Filtering and Antispam, you can alternatively use this command to configure the FortiGate unit to communicate with a FortiManager system, which can act as a private FortiGuard Distribution Server (FDS) for those services.By default, FortiGate units connect to the FDN using a set of default connection settings. You can override these settings to use IP addresses and port numbers other than the defaults. For example, if you have a FortiManager unit, you might download a local copy of FortiGuard service updates to the FortiManager unit, then redistribute those updates by configuring each FortiGate unit’s server override feature to connect to the FortiManager unit’s private FDS IP address. IP address and port number overrides for FortiGuard Analysis and Management Service are configured separately from other FortiGuard services. For more information, see “system fortiguard-log” on page 410.
Syntaxconfig system fortiguardset hostname <url_str>set port {53 | 8888}set srv-ovrd {enable | disable}set client-override-ip <ovrd_ipv4>set client-override-status {enable | disable}set service-account-id <id_str>set load-balance-servers <number>set analysis-service {enable | disable}set antispam-cache {enable | disable}set antispam-cache-ttl <ttl_int>set antispam-cache-mpercent <ram_int>set antispam-expirationset antispam-licenseset antispam-timeout <timeout_int>set avquery-status {enable | disable}set avquery-cache {enable | disable}set avquery-cache-ttl <ttl_int>set avquery-cache-mpercent <max_int>set avquery-licenseset avquery-expirationset avquery-timeout <timeout_int>set central-mgmt-auto-backup {enable | disable}set central-mgmt-scheduled-config-restore {enable | disable}set central-mgmt-scheduled-upgrade {enable | disable}
Note: If the FortiGate unit is unable to connect to the FDN, verify connectivity on required ports. For a list of required ports, see the Fortinet Knowledge Center article Traffic Types and TCP/UDP Ports Used by Fortinet Products.
Remote administration by a FortiManager system is mutually exclusive with remote administration by FortiGuard Analysis and Management Service. For information about configuring remote administration by a FortiManager system instead, see “system central-management” on page 390.
FortiOS 4.0 MR3 CLI Reference406 01-431-99686-20110623
http://docs.fortinet.com/ • Feedback
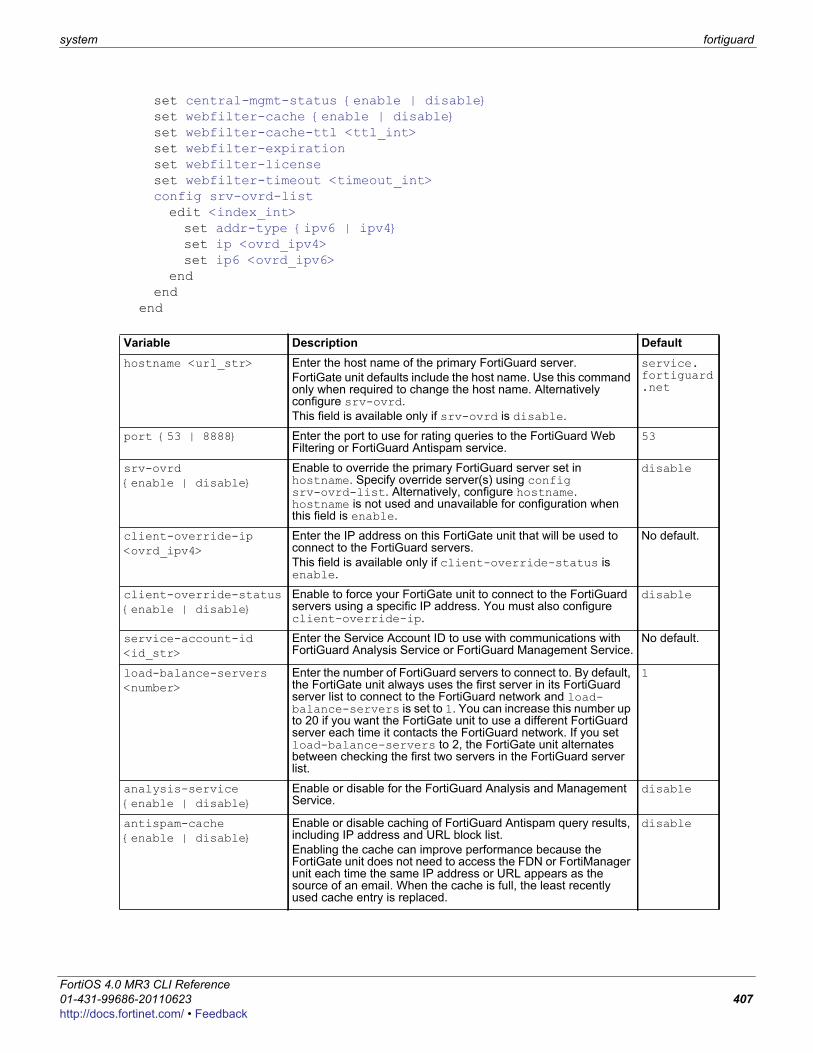
system fortiguard
F0h
set central-mgmt-status {enable | disable}set webfilter-cache {enable | disable}set webfilter-cache-ttl <ttl_int>set webfilter-expirationset webfilter-licenseset webfilter-timeout <timeout_int>config srv-ovrd-listedit <index_int>set addr-type {ipv6 | ipv4}set ip <ovrd_ipv4>set ip6 <ovrd_ipv6>
endend
end
Variable Description Defaulthostname <url_str> Enter the host name of the primary FortiGuard server.
FortiGate unit defaults include the host name. Use this command only when required to change the host name. Alternatively configure srv-ovrd.This field is available only if srv-ovrd is disable.
service.fortiguard.net
port {53 | 8888} Enter the port to use for rating queries to the FortiGuard Web Filtering or FortiGuard Antispam service.
53
srv-ovrd {enable | disable}
Enable to override the primary FortiGuard server set in hostname. Specify override server(s) using config srv-ovrd-list. Alternatively, configure hostname. hostname is not used and unavailable for configuration when this field is enable.
disable
client-override-ip <ovrd_ipv4>
Enter the IP address on this FortiGate unit that will be used to connect to the FortiGuard servers. This field is available only if client-override-status is enable.
No default.
client-override-status {enable | disable}
Enable to force your FortiGate unit to connect to the FortiGuard servers using a specific IP address. You must also configure client-override-ip.
disable
service-account-id <id_str>
Enter the Service Account ID to use with communications with FortiGuard Analysis Service or FortiGuard Management Service.
No default.
load-balance-servers <number>
Enter the number of FortiGuard servers to connect to. By default, the FortiGate unit always uses the first server in its FortiGuard server list to connect to the FortiGuard network and load-balance-servers is set to 1. You can increase this number up to 20 if you want the FortiGate unit to use a different FortiGuard server each time it contacts the FortiGuard network. If you set load-balance-servers to 2, the FortiGate unit alternates between checking the first two servers in the FortiGuard server list.
1
analysis-service {enable | disable}
Enable or disable for the FortiGuard Analysis and Management Service.
disable
antispam-cache {enable | disable}
Enable or disable caching of FortiGuard Antispam query results, including IP address and URL block list.Enabling the cache can improve performance because the FortiGate unit does not need to access the FDN or FortiManager unit each time the same IP address or URL appears as the source of an email. When the cache is full, the least recently used cache entry is replaced.
disable
ortiOS 4.0 MR3 CLI Reference1-431-99686-20110623 407ttp://docs.fortinet.com/ • Feedback
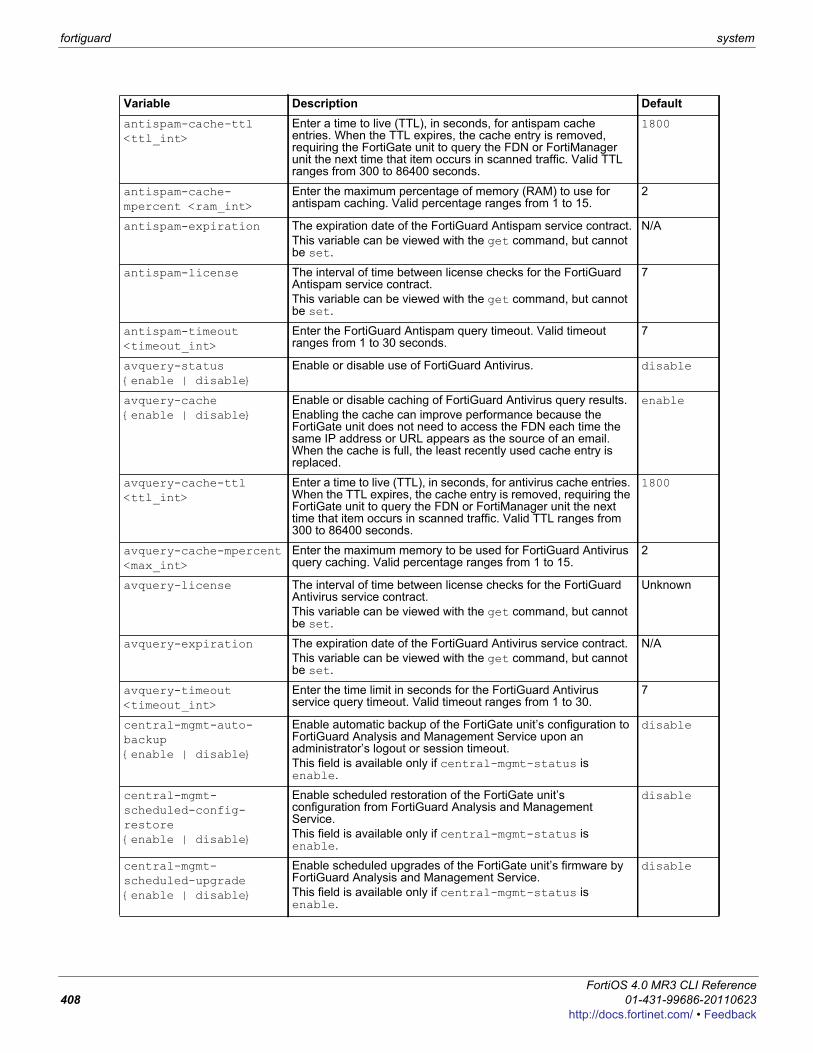
fortiguard system
antispam-cache-ttl <ttl_int>
Enter a time to live (TTL), in seconds, for antispam cache entries. When the TTL expires, the cache entry is removed, requiring the FortiGate unit to query the FDN or FortiManager unit the next time that item occurs in scanned traffic. Valid TTL ranges from 300 to 86400 seconds.
1800
antispam-cache-mpercent <ram_int>
Enter the maximum percentage of memory (RAM) to use for antispam caching. Valid percentage ranges from 1 to 15.
2
antispam-expiration The expiration date of the FortiGuard Antispam service contract.This variable can be viewed with the get command, but cannot be set.
N/A
antispam-license The interval of time between license checks for the FortiGuard Antispam service contract.This variable can be viewed with the get command, but cannot be set.
7
antispam-timeout <timeout_int>
Enter the FortiGuard Antispam query timeout. Valid timeout ranges from 1 to 30 seconds.
7
avquery-status {enable | disable}
Enable or disable use of FortiGuard Antivirus. disable
avquery-cache {enable | disable}
Enable or disable caching of FortiGuard Antivirus query results.Enabling the cache can improve performance because the FortiGate unit does not need to access the FDN each time the same IP address or URL appears as the source of an email. When the cache is full, the least recently used cache entry is replaced.
enable
avquery-cache-ttl <ttl_int>
Enter a time to live (TTL), in seconds, for antivirus cache entries. When the TTL expires, the cache entry is removed, requiring the FortiGate unit to query the FDN or FortiManager unit the next time that item occurs in scanned traffic. Valid TTL ranges from 300 to 86400 seconds.
1800
avquery-cache-mpercent <max_int>
Enter the maximum memory to be used for FortiGuard Antivirus query caching. Valid percentage ranges from 1 to 15.
2
avquery-license The interval of time between license checks for the FortiGuard Antivirus service contract.This variable can be viewed with the get command, but cannot be set.
Unknown
avquery-expiration The expiration date of the FortiGuard Antivirus service contract.This variable can be viewed with the get command, but cannot be set.
N/A
avquery-timeout <timeout_int>
Enter the time limit in seconds for the FortiGuard Antivirus service query timeout. Valid timeout ranges from 1 to 30.
7
central-mgmt-auto-backup {enable | disable}
Enable automatic backup of the FortiGate unit’s configuration to FortiGuard Analysis and Management Service upon an administrator’s logout or session timeout.This field is available only if central-mgmt-status is enable.
disable
central-mgmt-scheduled-config-restore {enable | disable}
Enable scheduled restoration of the FortiGate unit’s configuration from FortiGuard Analysis and Management Service.This field is available only if central-mgmt-status is enable.
disable
central-mgmt-scheduled-upgrade {enable | disable}
Enable scheduled upgrades of the FortiGate unit’s firmware by FortiGuard Analysis and Management Service.This field is available only if central-mgmt-status is enable.
disable
Variable Description Default
FortiOS 4.0 MR3 CLI Reference408 01-431-99686-20110623
http://docs.fortinet.com/ • Feedback
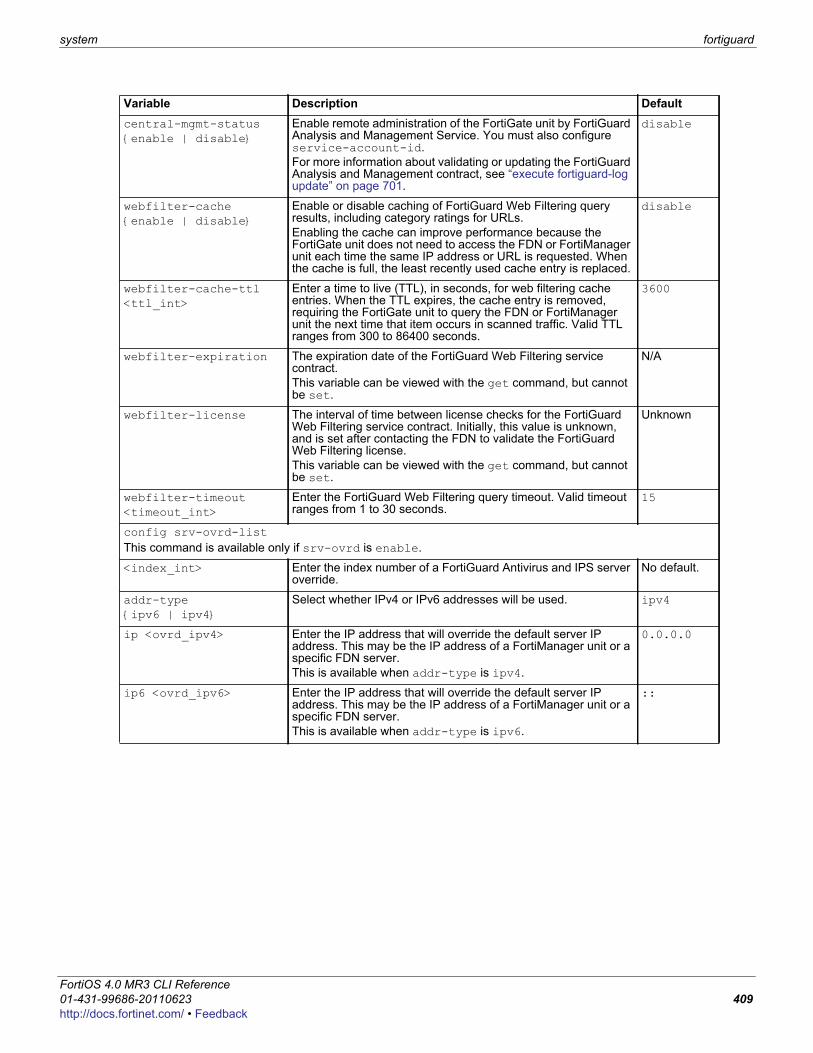
system fortiguard
F0h
central-mgmt-status {enable | disable}
Enable remote administration of the FortiGate unit by FortiGuard Analysis and Management Service. You must also configure service-account-id.For more information about validating or updating the FortiGuard Analysis and Management contract, see “execute fortiguard-log update” on page 701.
disable
webfilter-cache {enable | disable}
Enable or disable caching of FortiGuard Web Filtering query results, including category ratings for URLs.Enabling the cache can improve performance because the FortiGate unit does not need to access the FDN or FortiManager unit each time the same IP address or URL is requested. When the cache is full, the least recently used cache entry is replaced.
disable
webfilter-cache-ttl <ttl_int>
Enter a time to live (TTL), in seconds, for web filtering cache entries. When the TTL expires, the cache entry is removed, requiring the FortiGate unit to query the FDN or FortiManager unit the next time that item occurs in scanned traffic. Valid TTL ranges from 300 to 86400 seconds.
3600
webfilter-expiration The expiration date of the FortiGuard Web Filtering service contract.This variable can be viewed with the get command, but cannot be set.
N/A
webfilter-license The interval of time between license checks for the FortiGuard Web Filtering service contract. Initially, this value is unknown, and is set after contacting the FDN to validate the FortiGuard Web Filtering license.This variable can be viewed with the get command, but cannot be set.
Unknown
webfilter-timeout <timeout_int>
Enter the FortiGuard Web Filtering query timeout. Valid timeout ranges from 1 to 30 seconds.
15
config srv-ovrd-listThis command is available only if srv-ovrd is enable.
<index_int> Enter the index number of a FortiGuard Antivirus and IPS server override.
No default.
addr-type {ipv6 | ipv4}
Select whether IPv4 or IPv6 addresses will be used. ipv4
ip <ovrd_ipv4> Enter the IP address that will override the default server IP address. This may be the IP address of a FortiManager unit or a specific FDN server.This is available when addr-type is ipv4.
0.0.0.0
ip6 <ovrd_ipv6> Enter the IP address that will override the default server IP address. This may be the IP address of a FortiManager unit or a specific FDN server.This is available when addr-type is ipv6.
::
Variable Description Default
ortiOS 4.0 MR3 CLI Reference1-431-99686-20110623 409ttp://docs.fortinet.com/ • Feedback
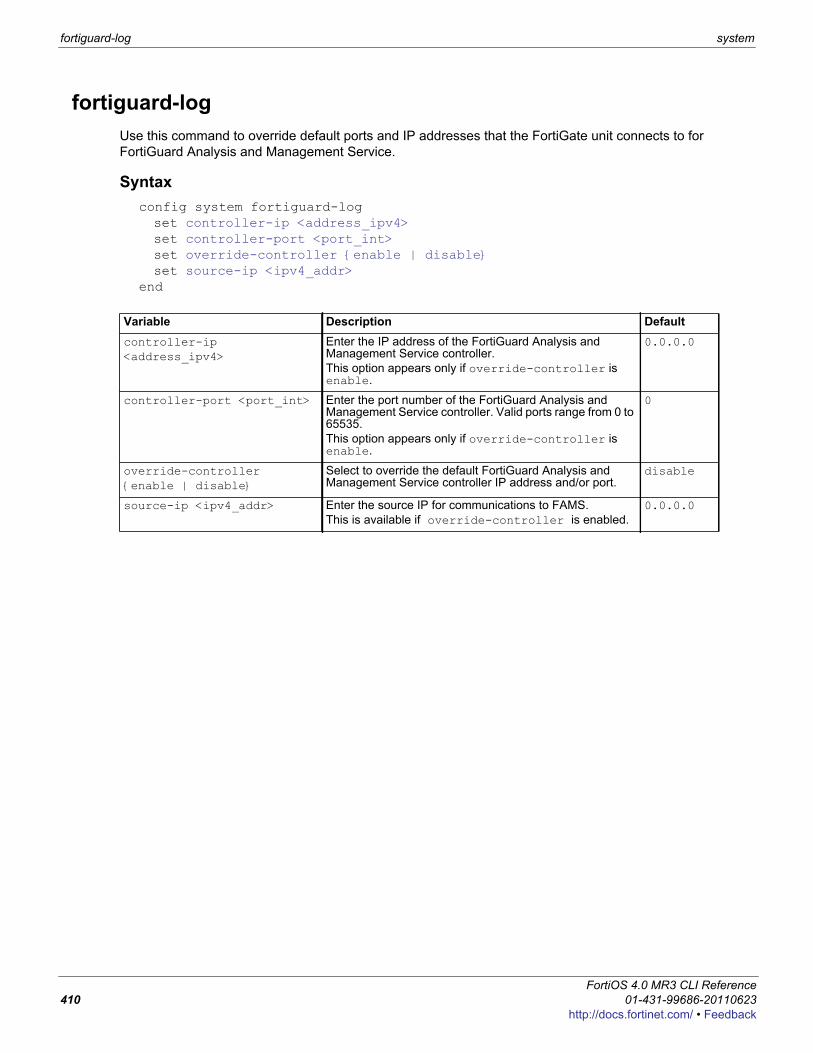
fortiguard-log system
fortiguard-logUse this command to override default ports and IP addresses that the FortiGate unit connects to for FortiGuard Analysis and Management Service.
Syntaxconfig system fortiguard-logset controller-ip <address_ipv4>set controller-port <port_int>set override-controller {enable | disable}set source-ip <ipv4_addr>
end
Variable Description Defaultcontroller-ip <address_ipv4>
Enter the IP address of the FortiGuard Analysis and Management Service controller.This option appears only if override-controller is enable.
0.0.0.0
controller-port <port_int> Enter the port number of the FortiGuard Analysis and Management Service controller. Valid ports range from 0 to 65535.This option appears only if override-controller is enable.
0
override-controller {enable | disable}
Select to override the default FortiGuard Analysis and Management Service controller IP address and/or port.
disable
source-ip <ipv4_addr> Enter the source IP for communications to FAMS.This is available if override-controller is enabled.
0.0.0.0
FortiOS 4.0 MR3 CLI Reference410 01-431-99686-20110623
http://docs.fortinet.com/ • Feedback
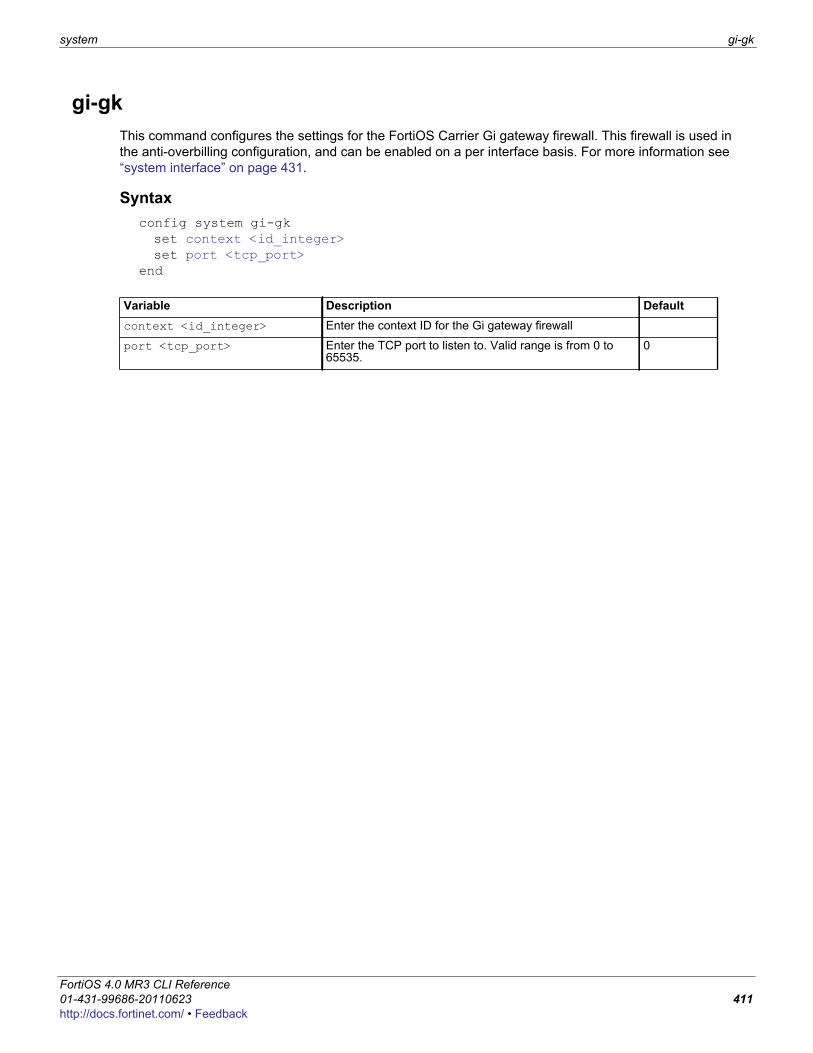
system gi-gk
F0h
gi-gkThis command configures the settings for the FortiOS Carrier Gi gateway firewall. This firewall is used in the anti-overbilling configuration, and can be enabled on a per interface basis. For more information see “system interface” on page 431.
Syntaxconfig system gi-gkset context <id_integer>set port <tcp_port>
end
Variable Description Defaultcontext <id_integer> Enter the context ID for the Gi gateway firewall
port <tcp_port> Enter the TCP port to listen to. Valid range is from 0 to 65535.
0
ortiOS 4.0 MR3 CLI Reference1-431-99686-20110623 411ttp://docs.fortinet.com/ • Feedback

global system
globalUse this command to configure global settings that affect various FortiGate systems and configurations.Runtime-only config mode was introduced in FortiOS v3.0 MR2. This mode allows you to try out commands that may put your FortiGate unit into an unrecoverable state normally requiring a physical reboot. In runtime-only config mode you can set a timeout so after a period of no input activity the FortiGate unit will reboot with the last saved configuration. Another option in runtime-only configuration mode is to manually save your configuration periodically to preserve your changes. For more information see set cfg-save {automatic | manual | revert}, set cfg-revert-timeout <seconds>, and execute cfg reload.
Syntaxconfig system globalset access-banner {enable | disable}set admin-concurrent {enable | disable}set admin-https-pki-required {enable | disable}set admin-lockout-duration <time_int>set admin-lockout-threshold <failed_int>set admin-maintainer {enable | disable}set admin-port <port_number>set admin-scp {enable | disable}set admin-server-cert { self-sign | <certificate> }set admin-sport <port_number>set admin-ssh-grace-time <time_int>set admin-ssh-port <port_number>set admin-ssh-v1 {enable | disable}set admin-telnet-port <port_number>set admintimeout <admin_timeout_minutes>set anti-replay {disable | loose | strict}set auth-cert <cert-name>set auth-http-port <http_port>set auth-https-port <https_port>set auth-keepalive {enable | disable}set auth-policy-exact-match {enable | disable}set av-failopen {idledrop | off | one-shot | pass}set av-failopen-session {enable | disable}set av-failopen-session {enable | disable}set batch-cmdb {enable | disable}set cfg-save {automatic | manual | revert}set cfg-revert-timeout <seconds>set check-protocol-header {loose | strict}set check-reset-range {disable | strict}set clt-cert-req {enable | disable}set csr-ca-attribute {enable | disable}set daily-restart {enable | disable}set detection-summary {enable | disable}set dst {enable | disable}set elbc-status {enable | disable}set endpoint-control-fds-access {enable | disable}set endpoint-control-portal-port <endpoint_port>set explicit-proxy-auth-timeout <seconds_int>set fds-statistics {enable | disable}set fds-statistics-period <minutes>
FortiOS 4.0 MR3 CLI Reference412 01-431-99686-20110623
http://docs.fortinet.com/ • Feedback
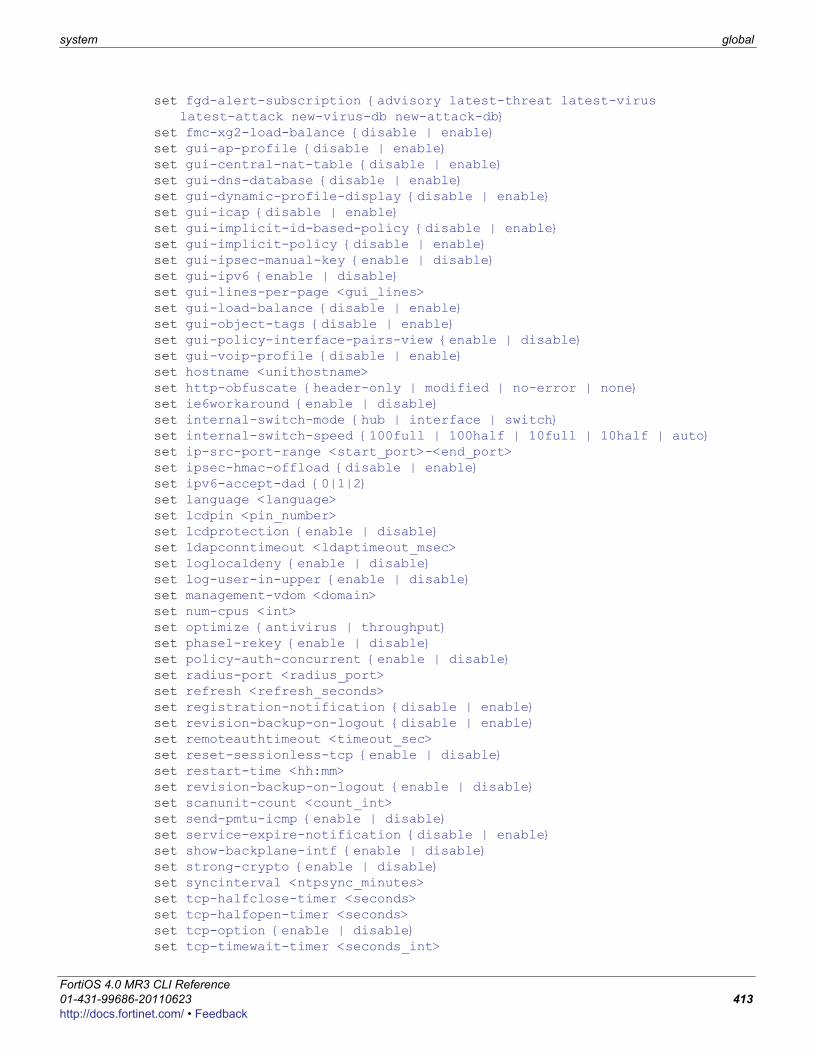
system global
F0h
set fgd-alert-subscription {advisory latest-threat latest-virus latest-attack new-virus-db new-attack-db}
set fmc-xg2-load-balance {disable | enable}set gui-ap-profile {disable | enable}set gui-central-nat-table {disable | enable}set gui-dns-database {disable | enable}set gui-dynamic-profile-display {disable | enable}set gui-icap {disable | enable}set gui-implicit-id-based-policy {disable | enable}set gui-implicit-policy {disable | enable}set gui-ipsec-manual-key {enable | disable}set gui-ipv6 {enable | disable}set gui-lines-per-page <gui_lines>set gui-load-balance {disable | enable}set gui-object-tags {disable | enable}set gui-policy-interface-pairs-view {enable | disable}set gui-voip-profile {disable | enable}set hostname <unithostname>set http-obfuscate {header-only | modified | no-error | none}set ie6workaround {enable | disable}set internal-switch-mode {hub | interface | switch}set internal-switch-speed {100full | 100half | 10full | 10half | auto}set ip-src-port-range <start_port>-<end_port>set ipsec-hmac-offload {disable | enable}set ipv6-accept-dad {0|1|2}set language <language>set lcdpin <pin_number>set lcdprotection {enable | disable}set ldapconntimeout <ldaptimeout_msec>set loglocaldeny {enable | disable}set log-user-in-upper {enable | disable}set management-vdom <domain>set num-cpus <int>set optimize {antivirus | throughput}set phase1-rekey {enable | disable}set policy-auth-concurrent {enable | disable}set radius-port <radius_port>set refresh <refresh_seconds>set registration-notification {disable | enable}set revision-backup-on-logout {disable | enable}set remoteauthtimeout <timeout_sec>set reset-sessionless-tcp {enable | disable}set restart-time <hh:mm>set revision-backup-on-logout {enable | disable}set scanunit-count <count_int>set send-pmtu-icmp {enable | disable}set service-expire-notification {disable | enable}set show-backplane-intf {enable | disable}set strong-crypto {enable | disable}set syncinterval <ntpsync_minutes>set tcp-halfclose-timer <seconds>set tcp-halfopen-timer <seconds>set tcp-option {enable | disable}set tcp-timewait-timer <seconds_int>
ortiOS 4.0 MR3 CLI Reference1-431-99686-20110623 413ttp://docs.fortinet.com/ • Feedback

global system
set timezone <timezone_number>set tos-based-priority {low | medium | high}set tp-mc-skip-policy {enable | disable}set udp-idle-timer <seconds>set user-server-cert <cert_name>set vdom-admin {enable | disable}set vip-arp-range {unlimited | restricted}set wifi-certificate <cert-name>set wifi-ca-certificate <ca_cert-name>set wimax-4g-usb {enable | disable}set wireless-controller-port <port_int>set wireless-mode {ac | client | wtp}
end
Variable Description Defaultaccess-banner {enable | disable}
Enable to display the admin access disclaimer message.For more information see “system replacemsg admin” on page 462.
disable
admin-concurrent {enable | disable}
Enable to enforce concurrent administrator logins. When enabled, the FortiGate restricts concurrent access from the same admin user name but on different IP addresses. Use policy-auth-concurrent for firewall authenticated users.
admin-https-pki-required {enable | disable}
Enable to allow user to login by providing a valid certificate if PKI is enabled for HTTPS administrative access. Default setting disable allows admin users to log in by providing a valid certificate or password.
disable
admin-lockout-duration <time_int>
Set the administration account’s lockout duration in seconds for the firewall. Repeated failed login attempts will enable the lockout. Use admin-lockout-threshold to set the number of failed attempts that will trigger the lockout.
60
admin-lockout-threshold <failed_int>
Set the threshold, or number of failed attempts, before the account is locked out for the admin-lockout-duration.
3
admin-maintainer {enable | disable}
Enabled by default. Disable for CC. enable
admin-port <port_number> Enter the port to use for HTTP administrative access. 80
admin-scp {enable | disable}
Enable to allow system configuration download by the secure copy (SCP) protocol.
disable
admin-server-cert { self-sign | <certificate> }
Select the admin https server certificate to use. Choices include self-sign, and the filename of any installed certificates. Default setting is Fortinet_Factory, if available, otherwise self-sign.
See definition under Description.
admin-sport <port_number> Enter the port to use for HTTPS administrative access. 443
admin-ssh-grace-time <time_int>
Enter the maximum time permitted between making an SSH connection to the FortiGate unit and authenticating. Range is 10 to 3600 seconds.
120
admin-ssh-port <port_number>
Enter the port to use for SSH administrative access. 22
admin-ssh-v1 {enable | disable}
Enable compatibility with SSH v1.0. disable
admin-telnet-port <port_number>
Enter the port to use for telnet administrative access. 21
FortiOS 4.0 MR3 CLI Reference414 01-431-99686-20110623
http://docs.fortinet.com/ • Feedback
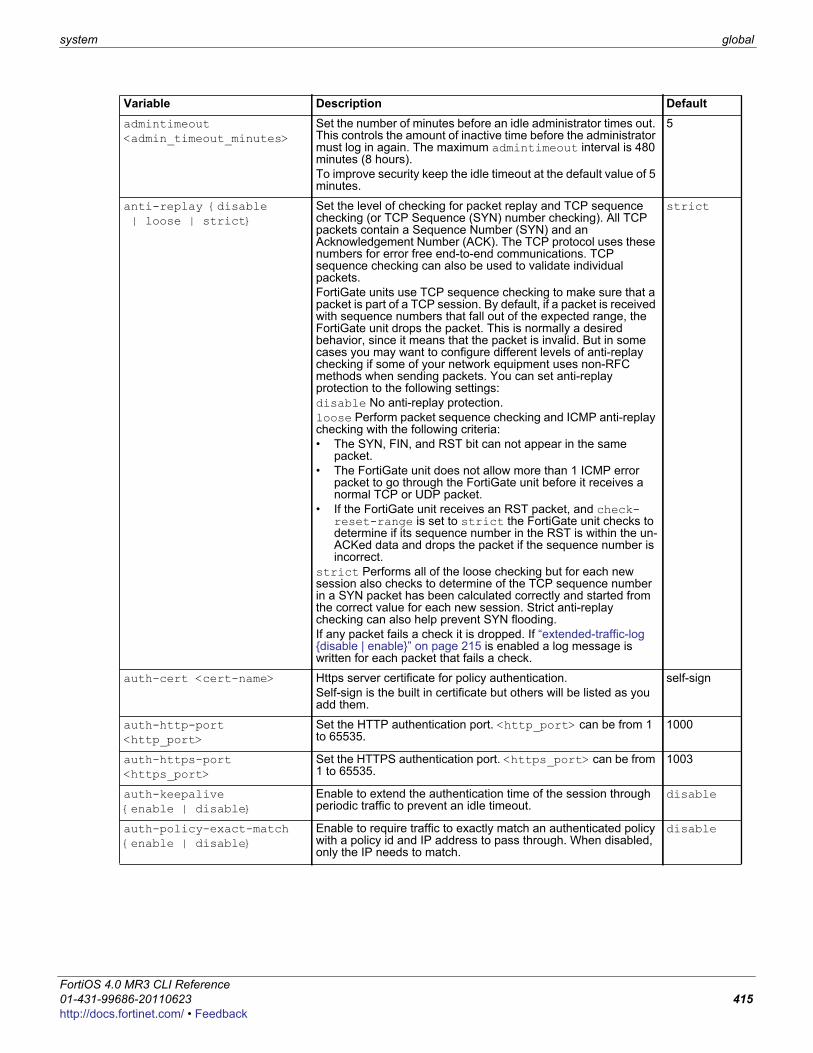
system global
F0h
admintimeout <admin_timeout_minutes>
Set the number of minutes before an idle administrator times out. This controls the amount of inactive time before the administrator must log in again. The maximum admintimeout interval is 480 minutes (8 hours). To improve security keep the idle timeout at the default value of 5 minutes.
5
anti-replay {disable | loose | strict}
Set the level of checking for packet replay and TCP sequence checking (or TCP Sequence (SYN) number checking). All TCP packets contain a Sequence Number (SYN) and an Acknowledgement Number (ACK). The TCP protocol uses these numbers for error free end-to-end communications. TCP sequence checking can also be used to validate individual packets.FortiGate units use TCP sequence checking to make sure that a packet is part of a TCP session. By default, if a packet is received with sequence numbers that fall out of the expected range, the FortiGate unit drops the packet. This is normally a desired behavior, since it means that the packet is invalid. But in some cases you may want to configure different levels of anti-replay checking if some of your network equipment uses non-RFC methods when sending packets. You can set anti-replay protection to the following settings:disable No anti-replay protection.loose Perform packet sequence checking and ICMP anti-replay checking with the following criteria:• The SYN, FIN, and RST bit can not appear in the same
packet.• The FortiGate unit does not allow more than 1 ICMP error
packet to go through the FortiGate unit before it receives a normal TCP or UDP packet.
• If the FortiGate unit receives an RST packet, and check-reset-range is set to strict the FortiGate unit checks to determine if its sequence number in the RST is within the un-ACKed data and drops the packet if the sequence number is incorrect.
strict Performs all of the loose checking but for each new session also checks to determine of the TCP sequence number in a SYN packet has been calculated correctly and started from the correct value for each new session. Strict anti-replay checking can also help prevent SYN flooding.If any packet fails a check it is dropped. If “extended-traffic-log {disable | enable}” on page 215 is enabled a log message is written for each packet that fails a check.
strict
auth-cert <cert-name> Https server certificate for policy authentication.Self-sign is the built in certificate but others will be listed as you add them.
self-sign
auth-http-port <http_port>
Set the HTTP authentication port. <http_port> can be from 1 to 65535.
1000
auth-https-port <https_port>
Set the HTTPS authentication port. <https_port> can be from 1 to 65535.
1003
auth-keepalive {enable | disable}
Enable to extend the authentication time of the session through periodic traffic to prevent an idle timeout.
disable
auth-policy-exact-match {enable | disable}
Enable to require traffic to exactly match an authenticated policy with a policy id and IP address to pass through. When disabled, only the IP needs to match.
disable
Variable Description Default
ortiOS 4.0 MR3 CLI Reference1-431-99686-20110623 415ttp://docs.fortinet.com/ • Feedback
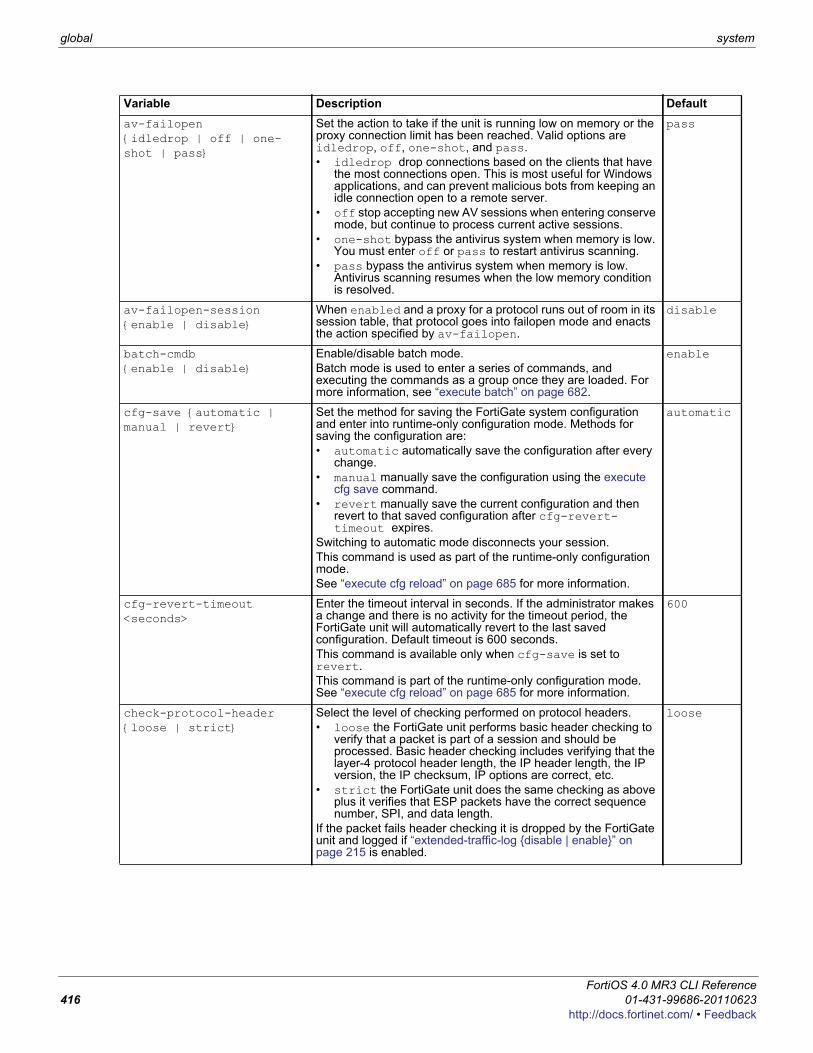
global system
av-failopen {idledrop | off | one-shot | pass}
Set the action to take if the unit is running low on memory or the proxy connection limit has been reached. Valid options are idledrop, off, one-shot, and pass.• idledrop drop connections based on the clients that have
the most connections open. This is most useful for Windows applications, and can prevent malicious bots from keeping an idle connection open to a remote server.
• off stop accepting new AV sessions when entering conserve mode, but continue to process current active sessions.
• one-shot bypass the antivirus system when memory is low. You must enter off or pass to restart antivirus scanning.
• pass bypass the antivirus system when memory is low. Antivirus scanning resumes when the low memory condition is resolved.
pass
av-failopen-session {enable | disable}
When enabled and a proxy for a protocol runs out of room in its session table, that protocol goes into failopen mode and enacts the action specified by av-failopen.
disable
batch-cmdb {enable | disable}
Enable/disable batch mode. Batch mode is used to enter a series of commands, and executing the commands as a group once they are loaded. For more information, see “execute batch” on page 682.
enable
cfg-save {automatic | manual | revert}
Set the method for saving the FortiGate system configuration and enter into runtime-only configuration mode. Methods for saving the configuration are:• automatic automatically save the configuration after every
change.• manual manually save the configuration using the execute
cfg save command.• revert manually save the current configuration and then
revert to that saved configuration after cfg-revert-timeout expires.
Switching to automatic mode disconnects your session.This command is used as part of the runtime-only configuration mode. See “execute cfg reload” on page 685 for more information.
automatic
cfg-revert-timeout <seconds>
Enter the timeout interval in seconds. If the administrator makes a change and there is no activity for the timeout period, the FortiGate unit will automatically revert to the last saved configuration. Default timeout is 600 seconds.This command is available only when cfg-save is set to revert.This command is part of the runtime-only configuration mode. See “execute cfg reload” on page 685 for more information.
600
check-protocol-header {loose | strict}
Select the level of checking performed on protocol headers. • loose the FortiGate unit performs basic header checking to
verify that a packet is part of a session and should be processed. Basic header checking includes verifying that the layer-4 protocol header length, the IP header length, the IP version, the IP checksum, IP options are correct, etc.
• strict the FortiGate unit does the same checking as above plus it verifies that ESP packets have the correct sequence number, SPI, and data length.
If the packet fails header checking it is dropped by the FortiGate unit and logged if “extended-traffic-log {disable | enable}” on page 215 is enabled.
loose
Variable Description Default
FortiOS 4.0 MR3 CLI Reference416 01-431-99686-20110623
http://docs.fortinet.com/ • Feedback
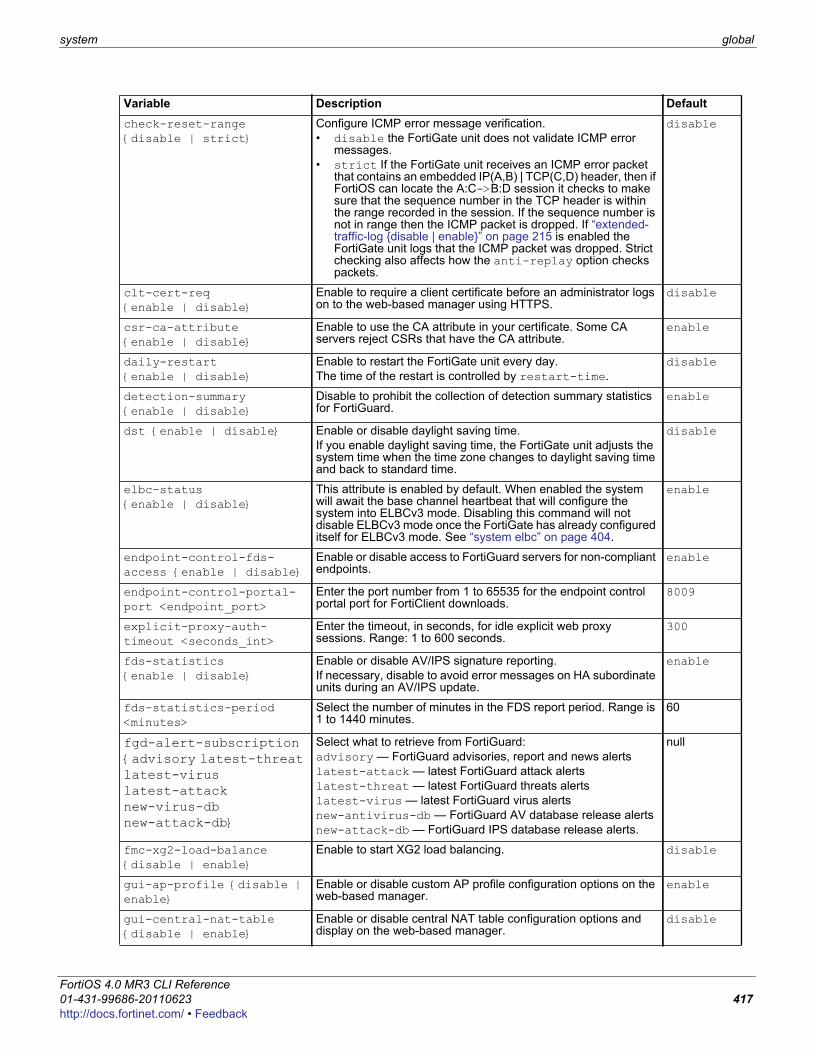
system global
F0h
check-reset-range {disable | strict}
Configure ICMP error message verification.• disable the FortiGate unit does not validate ICMP error
messages.• strict If the FortiGate unit receives an ICMP error packet
that contains an embedded IP(A,B) | TCP(C,D) header, then if FortiOS can locate the A:C->B:D session it checks to make sure that the sequence number in the TCP header is within the range recorded in the session. If the sequence number is not in range then the ICMP packet is dropped. If “extended-traffic-log {disable | enable}” on page 215 is enabled the FortiGate unit logs that the ICMP packet was dropped. Strict checking also affects how the anti-replay option checks packets.
disable
clt-cert-req {enable | disable}
Enable to require a client certificate before an administrator logs on to the web-based manager using HTTPS.
disable
csr-ca-attribute {enable | disable}
Enable to use the CA attribute in your certificate. Some CA servers reject CSRs that have the CA attribute.
enable
daily-restart {enable | disable}
Enable to restart the FortiGate unit every day.The time of the restart is controlled by restart-time.
disable
detection-summary {enable | disable}
Disable to prohibit the collection of detection summary statistics for FortiGuard.
enable
dst {enable | disable} Enable or disable daylight saving time.If you enable daylight saving time, the FortiGate unit adjusts the system time when the time zone changes to daylight saving time and back to standard time.
disable
elbc-status {enable | disable}
This attribute is enabled by default. When enabled the system will await the base channel heartbeat that will configure the system into ELBCv3 mode. Disabling this command will not disable ELBCv3 mode once the FortiGate has already configured itself for ELBCv3 mode. See “system elbc” on page 404.
enable
endpoint-control-fds-access {enable | disable}
Enable or disable access to FortiGuard servers for non-compliant endpoints.
enable
endpoint-control-portal-port <endpoint_port>
Enter the port number from 1 to 65535 for the endpoint control portal port for FortiClient downloads.
8009
explicit-proxy-auth-timeout <seconds_int>
Enter the timeout, in seconds, for idle explicit web proxy sessions. Range: 1 to 600 seconds.
300
fds-statistics {enable | disable}
Enable or disable AV/IPS signature reporting.If necessary, disable to avoid error messages on HA subordinate units during an AV/IPS update.
enable
fds-statistics-period <minutes>
Select the number of minutes in the FDS report period. Range is 1 to 1440 minutes.
60
fgd-alert-subscription {advisory latest-threat latest-virus latest-attack new-virus-db new-attack-db}
Select what to retrieve from FortiGuard:advisory — FortiGuard advisories, report and news alertslatest-attack — latest FortiGuard attack alertslatest-threat — latest FortiGuard threats alertslatest-virus — latest FortiGuard virus alertsnew-antivirus-db — FortiGuard AV database release alertsnew-attack-db — FortiGuard IPS database release alerts.
null
fmc-xg2-load-balance {disable | enable}
Enable to start XG2 load balancing. disable
gui-ap-profile {disable | enable}
Enable or disable custom AP profile configuration options on the web-based manager.
enable
gui-central-nat-table {disable | enable}
Enable or disable central NAT table configuration options and display on the web-based manager.
disable
Variable Description Default
ortiOS 4.0 MR3 CLI Reference1-431-99686-20110623 417ttp://docs.fortinet.com/ • Feedback
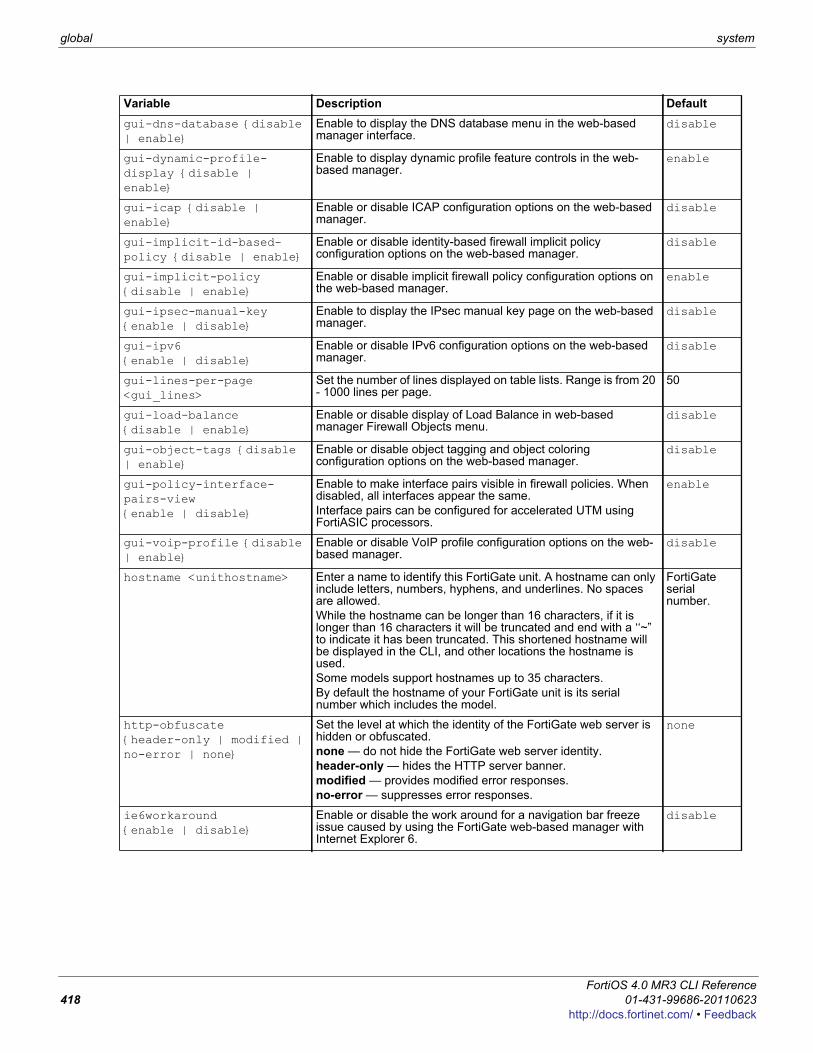
global system
gui-dns-database {disable | enable}
Enable to display the DNS database menu in the web-based manager interface.
disable
gui-dynamic-profile-display {disable | enable}
Enable to display dynamic profile feature controls in the web-based manager.
enable
gui-icap {disable | enable}
Enable or disable ICAP configuration options on the web-based manager.
disable
gui-implicit-id-based-policy {disable | enable}
Enable or disable identity-based firewall implicit policy configuration options on the web-based manager.
disable
gui-implicit-policy {disable | enable}
Enable or disable implicit firewall policy configuration options on the web-based manager.
enable
gui-ipsec-manual-key {enable | disable}
Enable to display the IPsec manual key page on the web-based manager.
disable
gui-ipv6 {enable | disable}
Enable or disable IPv6 configuration options on the web-based manager.
disable
gui-lines-per-page <gui_lines>
Set the number of lines displayed on table lists. Range is from 20 - 1000 lines per page.
50
gui-load-balance {disable | enable}
Enable or disable display of Load Balance in web-based manager Firewall Objects menu.
disable
gui-object-tags {disable | enable}
Enable or disable object tagging and object coloring configuration options on the web-based manager.
disable
gui-policy-interface-pairs-view {enable | disable}
Enable to make interface pairs visible in firewall policies. When disabled, all interfaces appear the same. Interface pairs can be configured for accelerated UTM using FortiASIC processors.
enable
gui-voip-profile {disable | enable}
Enable or disable VoIP profile configuration options on the web-based manager.
disable
hostname <unithostname> Enter a name to identify this FortiGate unit. A hostname can only include letters, numbers, hyphens, and underlines. No spaces are allowed.While the hostname can be longer than 16 characters, if it is longer than 16 characters it will be truncated and end with a ‘‘~” to indicate it has been truncated. This shortened hostname will be displayed in the CLI, and other locations the hostname is used.Some models support hostnames up to 35 characters.By default the hostname of your FortiGate unit is its serial number which includes the model.
FortiGate serial number.
http-obfuscate {header-only | modified | no-error | none}
Set the level at which the identity of the FortiGate web server is hidden or obfuscated. none — do not hide the FortiGate web server identity.header-only — hides the HTTP server banner.modified — provides modified error responses.no-error — suppresses error responses.
none
ie6workaround {enable | disable}
Enable or disable the work around for a navigation bar freeze issue caused by using the FortiGate web-based manager with Internet Explorer 6.
disable
Variable Description Default
FortiOS 4.0 MR3 CLI Reference418 01-431-99686-20110623
http://docs.fortinet.com/ • Feedback
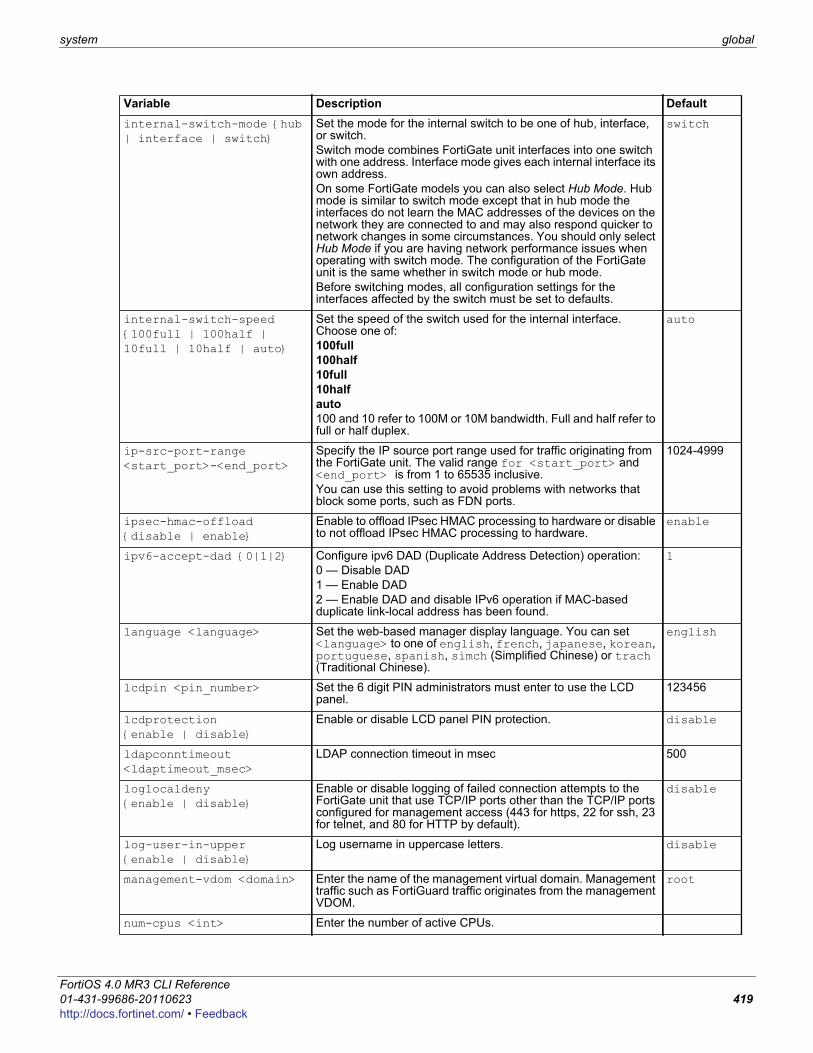
system global
F0h
internal-switch-mode {hub | interface | switch}
Set the mode for the internal switch to be one of hub, interface, or switch.Switch mode combines FortiGate unit interfaces into one switch with one address. Interface mode gives each internal interface its own address.On some FortiGate models you can also select Hub Mode. Hub mode is similar to switch mode except that in hub mode the interfaces do not learn the MAC addresses of the devices on the network they are connected to and may also respond quicker to network changes in some circumstances. You should only select Hub Mode if you are having network performance issues when operating with switch mode. The configuration of the FortiGate unit is the same whether in switch mode or hub mode.Before switching modes, all configuration settings for the interfaces affected by the switch must be set to defaults.
switch
internal-switch-speed {100full | 100half | 10full | 10half | auto}
Set the speed of the switch used for the internal interface. Choose one of:100full100half10full10halfauto100 and 10 refer to 100M or 10M bandwidth. Full and half refer to full or half duplex.
auto
ip-src-port-range <start_port>-<end_port>
Specify the IP source port range used for traffic originating from the FortiGate unit. The valid range for <start_port> and <end_port> is from 1 to 65535 inclusive. You can use this setting to avoid problems with networks that block some ports, such as FDN ports.
1024-4999
ipsec-hmac-offload {disable | enable}
Enable to offload IPsec HMAC processing to hardware or disable to not offload IPsec HMAC processing to hardware.
enable
ipv6-accept-dad {0|1|2} Configure ipv6 DAD (Duplicate Address Detection) operation:0 — Disable DAD1 — Enable DAD2 — Enable DAD and disable IPv6 operation if MAC-based duplicate link-local address has been found.
1
language <language> Set the web-based manager display language. You can set <language> to one of english, french, japanese, korean, portuguese, spanish, simch (Simplified Chinese) or trach (Traditional Chinese).
english
lcdpin <pin_number> Set the 6 digit PIN administrators must enter to use the LCD panel.
123456
lcdprotection {enable | disable}
Enable or disable LCD panel PIN protection. disable
ldapconntimeout <ldaptimeout_msec>
LDAP connection timeout in msec 500
loglocaldeny {enable | disable}
Enable or disable logging of failed connection attempts to the FortiGate unit that use TCP/IP ports other than the TCP/IP ports configured for management access (443 for https, 22 for ssh, 23 for telnet, and 80 for HTTP by default).
disable
log-user-in-upper {enable | disable}
Log username in uppercase letters. disable
management-vdom <domain> Enter the name of the management virtual domain. Management traffic such as FortiGuard traffic originates from the management VDOM.
root
num-cpus <int> Enter the number of active CPUs.
Variable Description Default
ortiOS 4.0 MR3 CLI Reference1-431-99686-20110623 419ttp://docs.fortinet.com/ • Feedback
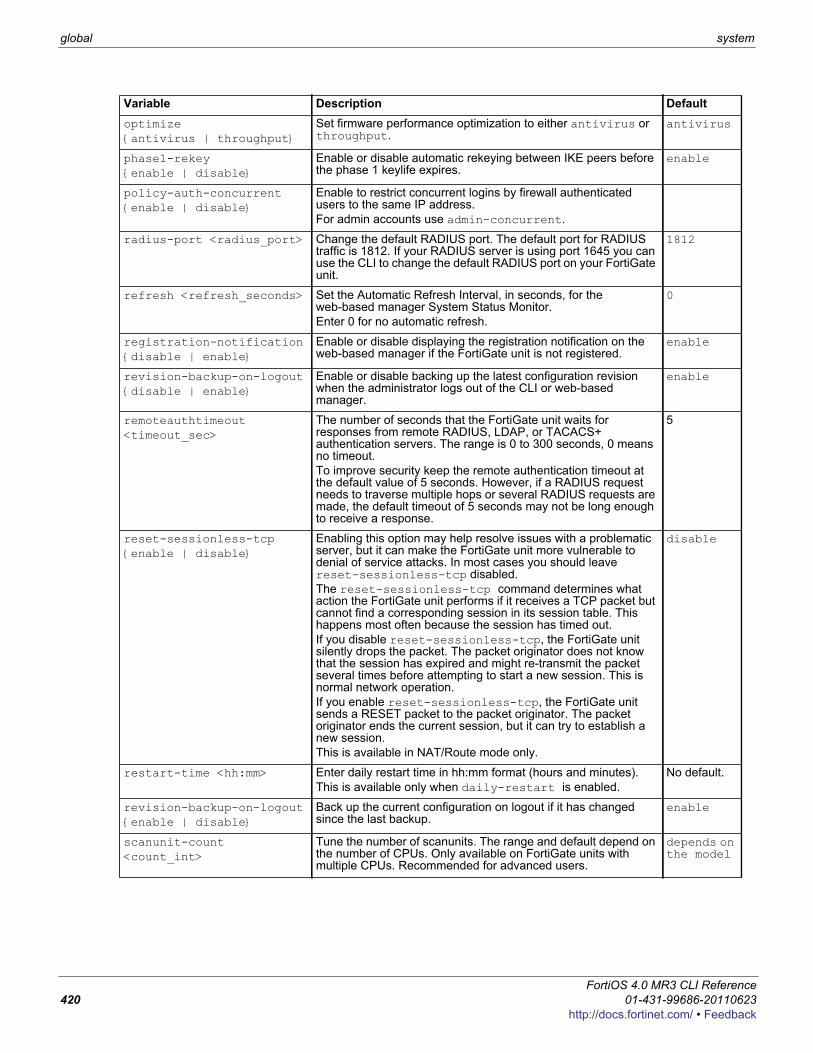
global system
optimize {antivirus | throughput}
Set firmware performance optimization to either antivirus or throughput.
antivirus
phase1-rekey {enable | disable}
Enable or disable automatic rekeying between IKE peers before the phase 1 keylife expires.
enable
policy-auth-concurrent {enable | disable}
Enable to restrict concurrent logins by firewall authenticated users to the same IP address. For admin accounts use admin-concurrent.
radius-port <radius_port> Change the default RADIUS port. The default port for RADIUS traffic is 1812. If your RADIUS server is using port 1645 you can use the CLI to change the default RADIUS port on your FortiGate unit.
1812
refresh <refresh_seconds> Set the Automatic Refresh Interval, in seconds, for the web-based manager System Status Monitor. Enter 0 for no automatic refresh.
0
registration-notification {disable | enable}
Enable or disable displaying the registration notification on the web-based manager if the FortiGate unit is not registered.
enable
revision-backup-on-logout {disable | enable}
Enable or disable backing up the latest configuration revision when the administrator logs out of the CLI or web-based manager.
enable
remoteauthtimeout <timeout_sec>
The number of seconds that the FortiGate unit waits for responses from remote RADIUS, LDAP, or TACACS+ authentication servers. The range is 0 to 300 seconds, 0 means no timeout.To improve security keep the remote authentication timeout at the default value of 5 seconds. However, if a RADIUS request needs to traverse multiple hops or several RADIUS requests are made, the default timeout of 5 seconds may not be long enough to receive a response.
5
reset-sessionless-tcp {enable | disable}
Enabling this option may help resolve issues with a problematic server, but it can make the FortiGate unit more vulnerable to denial of service attacks. In most cases you should leave reset-sessionless-tcp disabled. The reset-sessionless-tcp command determines what action the FortiGate unit performs if it receives a TCP packet but cannot find a corresponding session in its session table. This happens most often because the session has timed out.If you disable reset-sessionless-tcp, the FortiGate unit silently drops the packet. The packet originator does not know that the session has expired and might re-transmit the packet several times before attempting to start a new session. This is normal network operation.If you enable reset-sessionless-tcp, the FortiGate unit sends a RESET packet to the packet originator. The packet originator ends the current session, but it can try to establish a new session.This is available in NAT/Route mode only.
disable
restart-time <hh:mm> Enter daily restart time in hh:mm format (hours and minutes).This is available only when daily-restart is enabled.
No default.
revision-backup-on-logout {enable | disable}
Back up the current configuration on logout if it has changed since the last backup.
enable
scanunit-count <count_int>
Tune the number of scanunits. The range and default depend on the number of CPUs. Only available on FortiGate units with multiple CPUs. Recommended for advanced users.
depends on the model
Variable Description Default
FortiOS 4.0 MR3 CLI Reference420 01-431-99686-20110623
http://docs.fortinet.com/ • Feedback
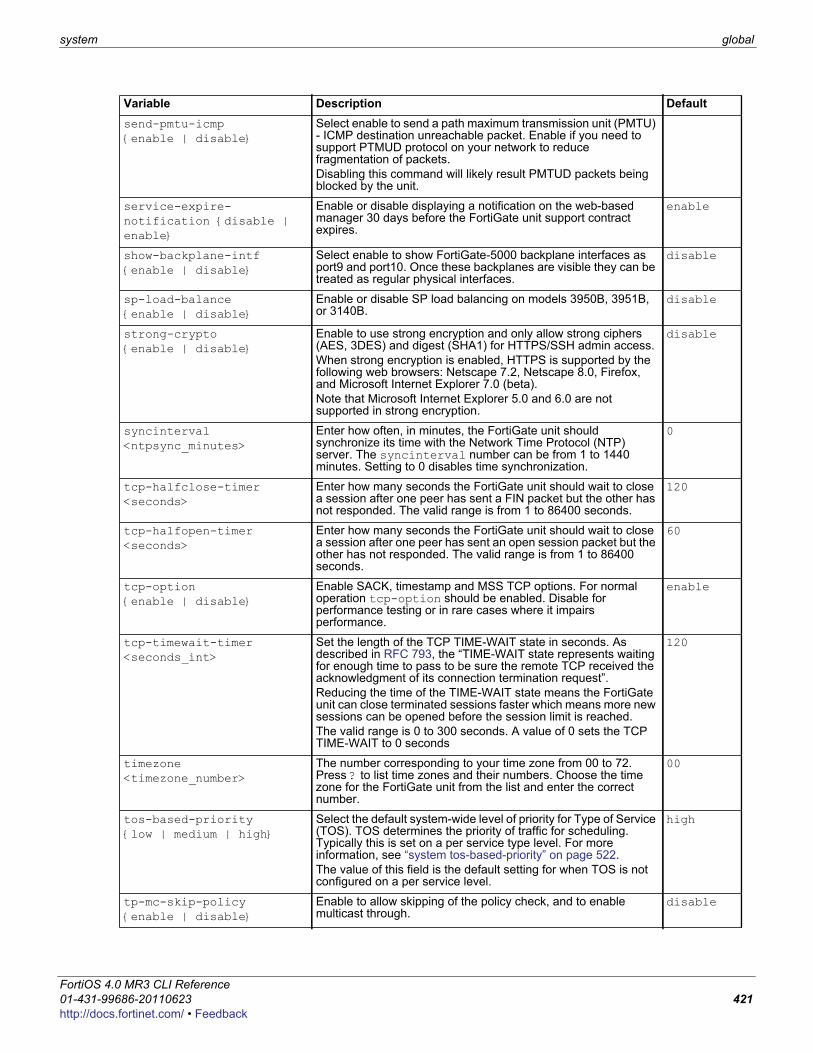
system global
F0h
send-pmtu-icmp {enable | disable}
Select enable to send a path maximum transmission unit (PMTU) - ICMP destination unreachable packet. Enable if you need to support PTMUD protocol on your network to reduce fragmentation of packets. Disabling this command will likely result PMTUD packets being blocked by the unit.
service-expire-notification {disable | enable}
Enable or disable displaying a notification on the web-based manager 30 days before the FortiGate unit support contract expires.
enable
show-backplane-intf {enable | disable}
Select enable to show FortiGate-5000 backplane interfaces as port9 and port10. Once these backplanes are visible they can be treated as regular physical interfaces.
disable
sp-load-balance {enable | disable}
Enable or disable SP load balancing on models 3950B, 3951B, or 3140B.
disable
strong-crypto {enable | disable}
Enable to use strong encryption and only allow strong ciphers (AES, 3DES) and digest (SHA1) for HTTPS/SSH admin access.When strong encryption is enabled, HTTPS is supported by the following web browsers: Netscape 7.2, Netscape 8.0, Firefox, and Microsoft Internet Explorer 7.0 (beta). Note that Microsoft Internet Explorer 5.0 and 6.0 are not supported in strong encryption.
disable
syncinterval <ntpsync_minutes>
Enter how often, in minutes, the FortiGate unit should synchronize its time with the Network Time Protocol (NTP) server. The syncinterval number can be from 1 to 1440 minutes. Setting to 0 disables time synchronization.
0
tcp-halfclose-timer <seconds>
Enter how many seconds the FortiGate unit should wait to close a session after one peer has sent a FIN packet but the other has not responded. The valid range is from 1 to 86400 seconds.
120
tcp-halfopen-timer <seconds>
Enter how many seconds the FortiGate unit should wait to close a session after one peer has sent an open session packet but the other has not responded. The valid range is from 1 to 86400 seconds.
60
tcp-option {enable | disable}
Enable SACK, timestamp and MSS TCP options. For normal operation tcp-option should be enabled. Disable for performance testing or in rare cases where it impairs performance.
enable
tcp-timewait-timer <seconds_int>
Set the length of the TCP TIME-WAIT state in seconds. As described in RFC 793, the “TIME-WAIT state represents waiting for enough time to pass to be sure the remote TCP received the acknowledgment of its connection termination request”. Reducing the time of the TIME-WAIT state means the FortiGate unit can close terminated sessions faster which means more new sessions can be opened before the session limit is reached.The valid range is 0 to 300 seconds. A value of 0 sets the TCP TIME-WAIT to 0 seconds
120
timezone <timezone_number>
The number corresponding to your time zone from 00 to 72. Press ? to list time zones and their numbers. Choose the time zone for the FortiGate unit from the list and enter the correct number.
00
tos-based-priority {low | medium | high}
Select the default system-wide level of priority for Type of Service (TOS). TOS determines the priority of traffic for scheduling. Typically this is set on a per service type level. For more information, see “system tos-based-priority” on page 522.The value of this field is the default setting for when TOS is not configured on a per service level.
high
tp-mc-skip-policy {enable | disable}
Enable to allow skipping of the policy check, and to enable multicast through.
disable
Variable Description Default
ortiOS 4.0 MR3 CLI Reference1-431-99686-20110623 421ttp://docs.fortinet.com/ • Feedback
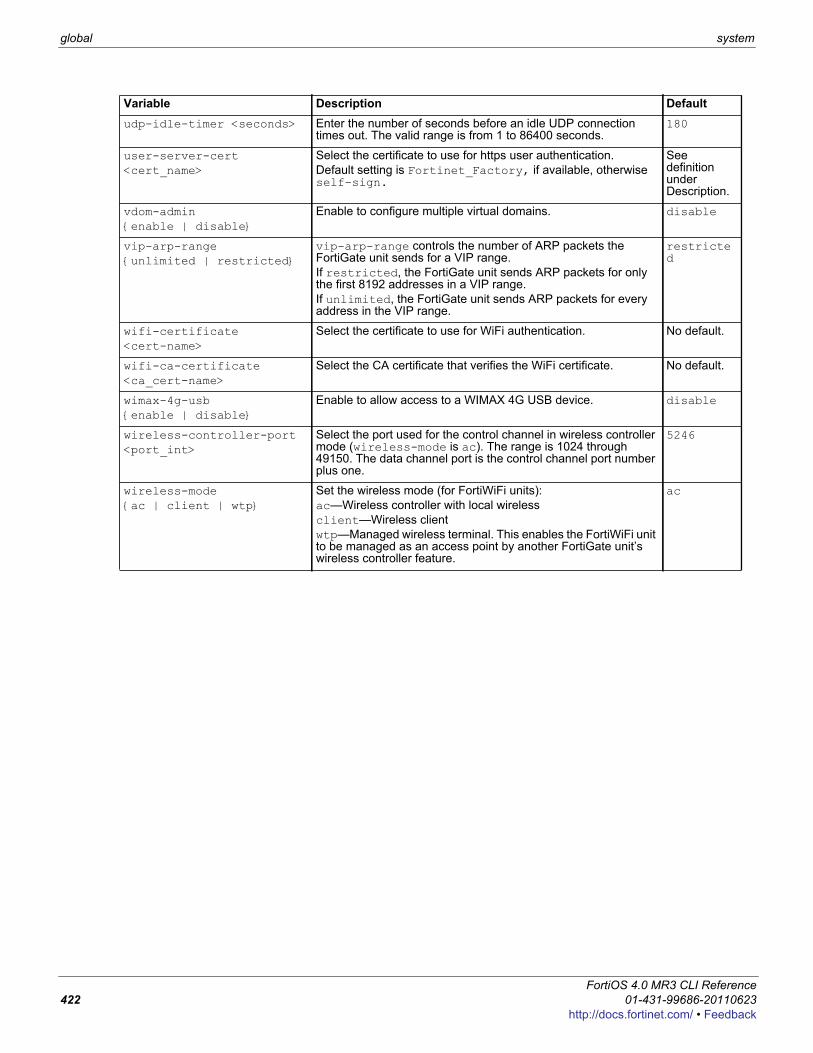
global system
udp-idle-timer <seconds> Enter the number of seconds before an idle UDP connection times out. The valid range is from 1 to 86400 seconds.
180
user-server-cert <cert_name>
Select the certificate to use for https user authentication.Default setting is Fortinet_Factory, if available, otherwise self-sign.
See definition under Description.
vdom-admin {enable | disable}
Enable to configure multiple virtual domains. disable
vip-arp-range {unlimited | restricted}
vip-arp-range controls the number of ARP packets the FortiGate unit sends for a VIP range. If restricted, the FortiGate unit sends ARP packets for only the first 8192 addresses in a VIP range. If unlimited, the FortiGate unit sends ARP packets for every address in the VIP range.
restricted
wifi-certificate <cert-name>
Select the certificate to use for WiFi authentication. No default.
wifi-ca-certificate <ca_cert-name>
Select the CA certificate that verifies the WiFi certificate. No default.
wimax-4g-usb {enable | disable}
Enable to allow access to a WIMAX 4G USB device. disable
wireless-controller-port <port_int>
Select the port used for the control channel in wireless controller mode (wireless-mode is ac). The range is 1024 through 49150. The data channel port is the control channel port number plus one.
5246
wireless-mode {ac | client | wtp}
Set the wireless mode (for FortiWiFi units):ac—Wireless controller with local wirelessclient—Wireless clientwtp—Managed wireless terminal. This enables the FortiWiFi unit to be managed as an access point by another FortiGate unit’s wireless controller feature.
ac
Variable Description Default
FortiOS 4.0 MR3 CLI Reference422 01-431-99686-20110623
http://docs.fortinet.com/ • Feedback
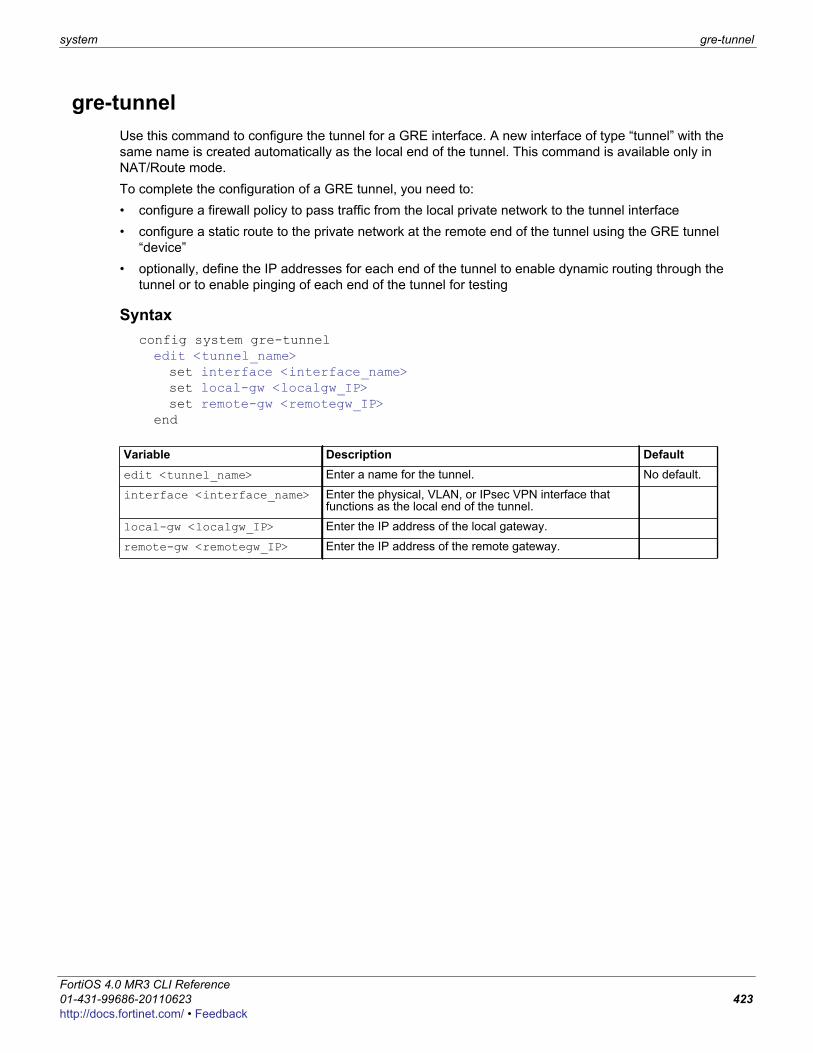
system gre-tunnel
F0h
gre-tunnelUse this command to configure the tunnel for a GRE interface. A new interface of type “tunnel” with the same name is created automatically as the local end of the tunnel. This command is available only in NAT/Route mode.To complete the configuration of a GRE tunnel, you need to:• configure a firewall policy to pass traffic from the local private network to the tunnel interface• configure a static route to the private network at the remote end of the tunnel using the GRE tunnel
“device”• optionally, define the IP addresses for each end of the tunnel to enable dynamic routing through the
tunnel or to enable pinging of each end of the tunnel for testing
Syntaxconfig system gre-tunneledit <tunnel_name>set interface <interface_name>set local-gw <localgw_IP>set remote-gw <remotegw_IP>
end
Variable Description Defaultedit <tunnel_name> Enter a name for the tunnel. No default.
interface <interface_name> Enter the physical, VLAN, or IPsec VPN interface that functions as the local end of the tunnel.
local-gw <localgw_IP> Enter the IP address of the local gateway.
remote-gw <remotegw_IP> Enter the IP address of the remote gateway.
ortiOS 4.0 MR3 CLI Reference1-431-99686-20110623 423ttp://docs.fortinet.com/ • Feedback
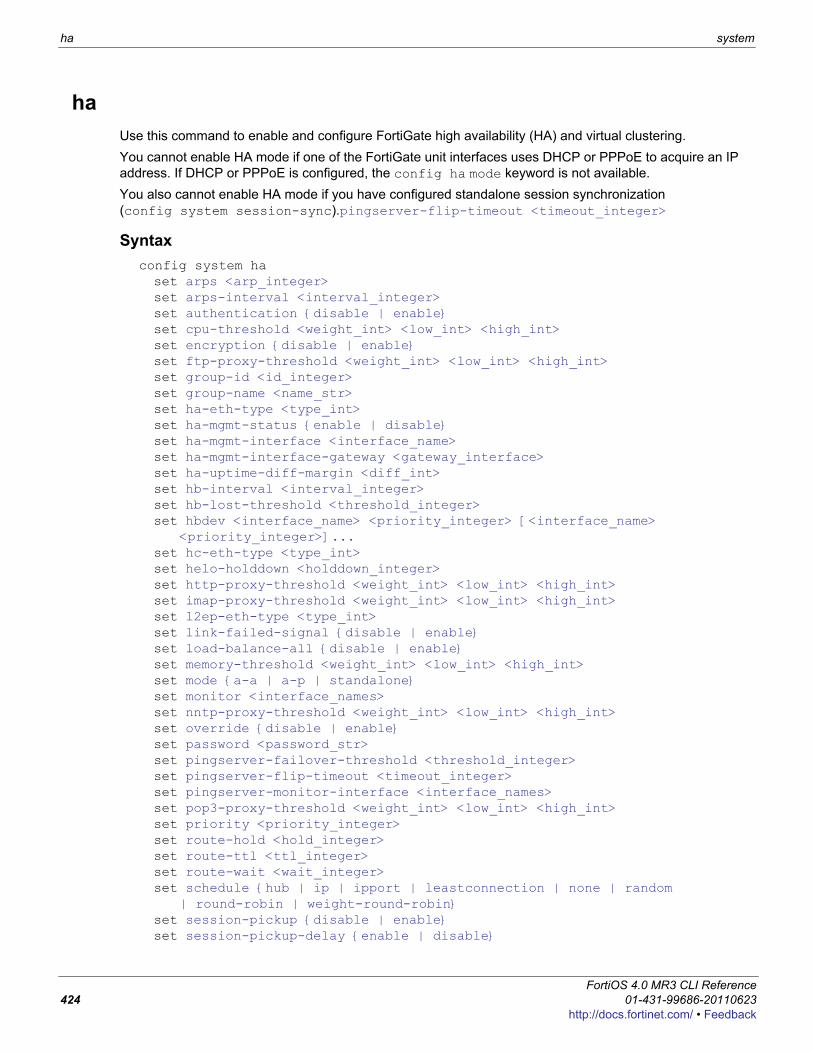
ha system
haUse this command to enable and configure FortiGate high availability (HA) and virtual clustering.You cannot enable HA mode if one of the FortiGate unit interfaces uses DHCP or PPPoE to acquire an IP address. If DHCP or PPPoE is configured, the config ha mode keyword is not available. You also cannot enable HA mode if you have configured standalone session synchronization (config system session-sync).pingserver-flip-timeout <timeout_integer>
Syntaxconfig system haset arps <arp_integer>set arps-interval <interval_integer>set authentication {disable | enable}set cpu-threshold <weight_int> <low_int> <high_int>set encryption {disable | enable}set ftp-proxy-threshold <weight_int> <low_int> <high_int>set group-id <id_integer>set group-name <name_str>set ha-eth-type <type_int>set ha-mgmt-status {enable | disable}set ha-mgmt-interface <interface_name>set ha-mgmt-interface-gateway <gateway_interface>set ha-uptime-diff-margin <diff_int>set hb-interval <interval_integer>set hb-lost-threshold <threshold_integer>set hbdev <interface_name> <priority_integer> [<interface_name>
<priority_integer>]...set hc-eth-type <type_int>set helo-holddown <holddown_integer>set http-proxy-threshold <weight_int> <low_int> <high_int>set imap-proxy-threshold <weight_int> <low_int> <high_int>set l2ep-eth-type <type_int>set link-failed-signal {disable | enable}set load-balance-all {disable | enable}set memory-threshold <weight_int> <low_int> <high_int>set mode {a-a | a-p | standalone}set monitor <interface_names>set nntp-proxy-threshold <weight_int> <low_int> <high_int>set override {disable | enable}set password <password_str>set pingserver-failover-threshold <threshold_integer>set pingserver-flip-timeout <timeout_integer>set pingserver-monitor-interface <interface_names>set pop3-proxy-threshold <weight_int> <low_int> <high_int>set priority <priority_integer>set route-hold <hold_integer>set route-ttl <ttl_integer>set route-wait <wait_integer>set schedule {hub | ip | ipport | leastconnection | none | random
| round-robin | weight-round-robin}set session-pickup {disable | enable}set session-pickup-delay {enable | disable}
FortiOS 4.0 MR3 CLI Reference424 01-431-99686-20110623
http://docs.fortinet.com/ • Feedback
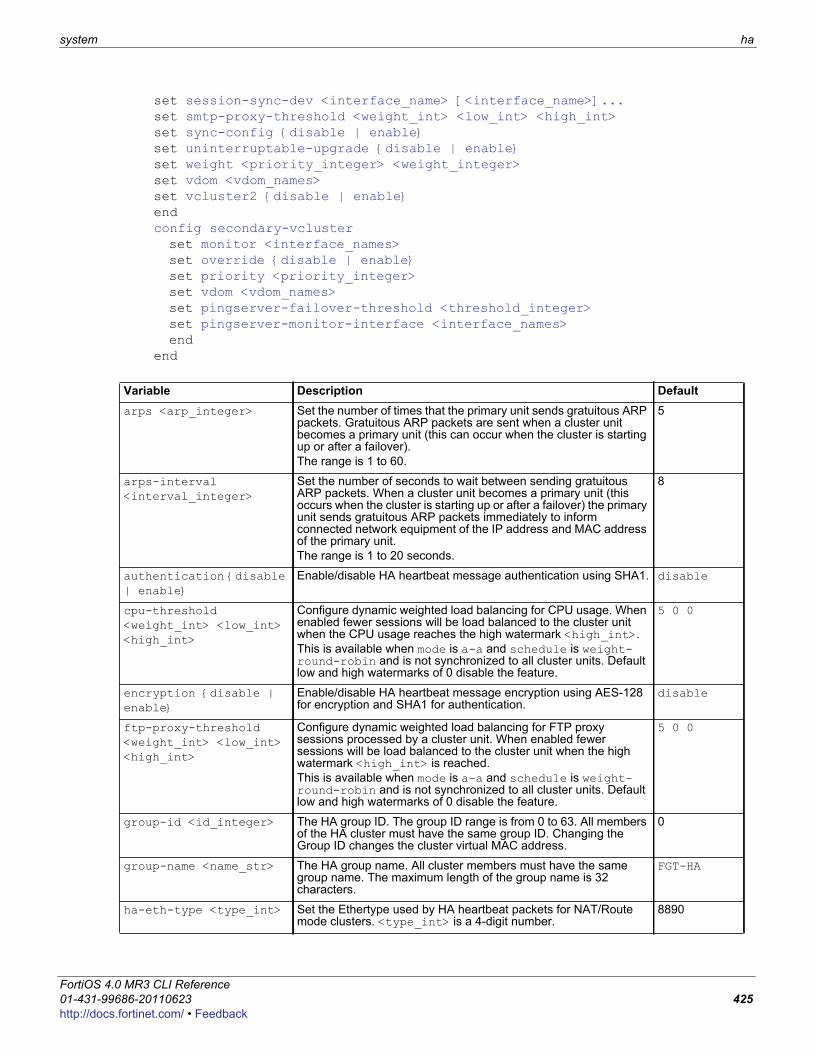
system ha
F0h
set session-sync-dev <interface_name> [<interface_name>]...set smtp-proxy-threshold <weight_int> <low_int> <high_int>set sync-config {disable | enable}set uninterruptable-upgrade {disable | enable}set weight <priority_integer> <weight_integer>set vdom <vdom_names>set vcluster2 {disable | enable}endconfig secondary-vclusterset monitor <interface_names>set override {disable | enable}set priority <priority_integer>set vdom <vdom_names>set pingserver-failover-threshold <threshold_integer>set pingserver-monitor-interface <interface_names>end
end
Variable Description Defaultarps <arp_integer> Set the number of times that the primary unit sends gratuitous ARP
packets. Gratuitous ARP packets are sent when a cluster unit becomes a primary unit (this can occur when the cluster is starting up or after a failover). The range is 1 to 60.
5
arps-interval <interval_integer>
Set the number of seconds to wait between sending gratuitous ARP packets. When a cluster unit becomes a primary unit (this occurs when the cluster is starting up or after a failover) the primary unit sends gratuitous ARP packets immediately to inform connected network equipment of the IP address and MAC address of the primary unit. The range is 1 to 20 seconds.
8
authentication {disable | enable}
Enable/disable HA heartbeat message authentication using SHA1. disable
cpu-threshold <weight_int> <low_int> <high_int>
Configure dynamic weighted load balancing for CPU usage. When enabled fewer sessions will be load balanced to the cluster unit when the CPU usage reaches the high watermark <high_int>.This is available when mode is a-a and schedule is weight-round-robin and is not synchronized to all cluster units. Default low and high watermarks of 0 disable the feature.
5 0 0
encryption {disable | enable}
Enable/disable HA heartbeat message encryption using AES-128 for encryption and SHA1 for authentication.
disable
ftp-proxy-threshold <weight_int> <low_int> <high_int>
Configure dynamic weighted load balancing for FTP proxy sessions processed by a cluster unit. When enabled fewer sessions will be load balanced to the cluster unit when the high watermark <high_int> is reached.This is available when mode is a-a and schedule is weight-round-robin and is not synchronized to all cluster units. Default low and high watermarks of 0 disable the feature.
5 0 0
group-id <id_integer> The HA group ID. The group ID range is from 0 to 63. All members of the HA cluster must have the same group ID. Changing the Group ID changes the cluster virtual MAC address.
0
group-name <name_str> The HA group name. All cluster members must have the same group name. The maximum length of the group name is 32 characters.
FGT-HA
ha-eth-type <type_int> Set the Ethertype used by HA heartbeat packets for NAT/Route mode clusters. <type_int> is a 4-digit number.
8890
ortiOS 4.0 MR3 CLI Reference1-431-99686-20110623 425ttp://docs.fortinet.com/ • Feedback
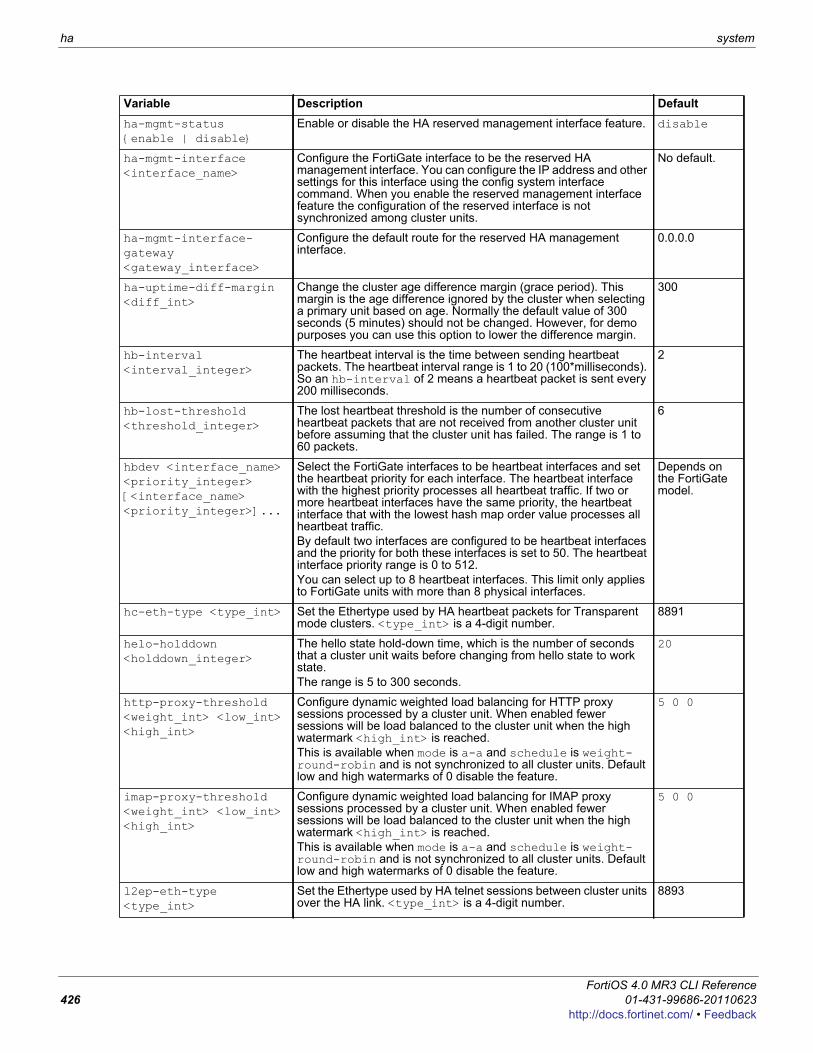
ha system
ha-mgmt-status {enable | disable}
Enable or disable the HA reserved management interface feature. disable
ha-mgmt-interface <interface_name>
Configure the FortiGate interface to be the reserved HA management interface. You can configure the IP address and other settings for this interface using the config system interface command. When you enable the reserved management interface feature the configuration of the reserved interface is not synchronized among cluster units.
No default.
ha-mgmt-interface-gateway <gateway_interface>
Configure the default route for the reserved HA management interface.
0.0.0.0
ha-uptime-diff-margin <diff_int>
Change the cluster age difference margin (grace period). This margin is the age difference ignored by the cluster when selecting a primary unit based on age. Normally the default value of 300 seconds (5 minutes) should not be changed. However, for demo purposes you can use this option to lower the difference margin.
300
hb-interval <interval_integer>
The heartbeat interval is the time between sending heartbeat packets. The heartbeat interval range is 1 to 20 (100*milliseconds). So an hb-interval of 2 means a heartbeat packet is sent every 200 milliseconds.
2
hb-lost-threshold <threshold_integer>
The lost heartbeat threshold is the number of consecutive heartbeat packets that are not received from another cluster unit before assuming that the cluster unit has failed. The range is 1 to 60 packets.
6
hbdev <interface_name> <priority_integer> [<interface_name> <priority_integer>]...
Select the FortiGate interfaces to be heartbeat interfaces and set the heartbeat priority for each interface. The heartbeat interface with the highest priority processes all heartbeat traffic. If two or more heartbeat interfaces have the same priority, the heartbeat interface that with the lowest hash map order value processes all heartbeat traffic. By default two interfaces are configured to be heartbeat interfaces and the priority for both these interfaces is set to 50. The heartbeat interface priority range is 0 to 512. You can select up to 8 heartbeat interfaces. This limit only applies to FortiGate units with more than 8 physical interfaces.
Depends on the FortiGate model.
hc-eth-type <type_int> Set the Ethertype used by HA heartbeat packets for Transparent mode clusters. <type_int> is a 4-digit number.
8891
helo-holddown <holddown_integer>
The hello state hold-down time, which is the number of seconds that a cluster unit waits before changing from hello state to work state.The range is 5 to 300 seconds.
20
http-proxy-threshold <weight_int> <low_int> <high_int>
Configure dynamic weighted load balancing for HTTP proxy sessions processed by a cluster unit. When enabled fewer sessions will be load balanced to the cluster unit when the high watermark <high_int> is reached.This is available when mode is a-a and schedule is weight-round-robin and is not synchronized to all cluster units. Default low and high watermarks of 0 disable the feature.
5 0 0
imap-proxy-threshold <weight_int> <low_int> <high_int>
Configure dynamic weighted load balancing for IMAP proxy sessions processed by a cluster unit. When enabled fewer sessions will be load balanced to the cluster unit when the high watermark <high_int> is reached.This is available when mode is a-a and schedule is weight-round-robin and is not synchronized to all cluster units. Default low and high watermarks of 0 disable the feature.
5 0 0
l2ep-eth-type <type_int>
Set the Ethertype used by HA telnet sessions between cluster units over the HA link. <type_int> is a 4-digit number.
8893
Variable Description Default
FortiOS 4.0 MR3 CLI Reference426 01-431-99686-20110623
http://docs.fortinet.com/ • Feedback
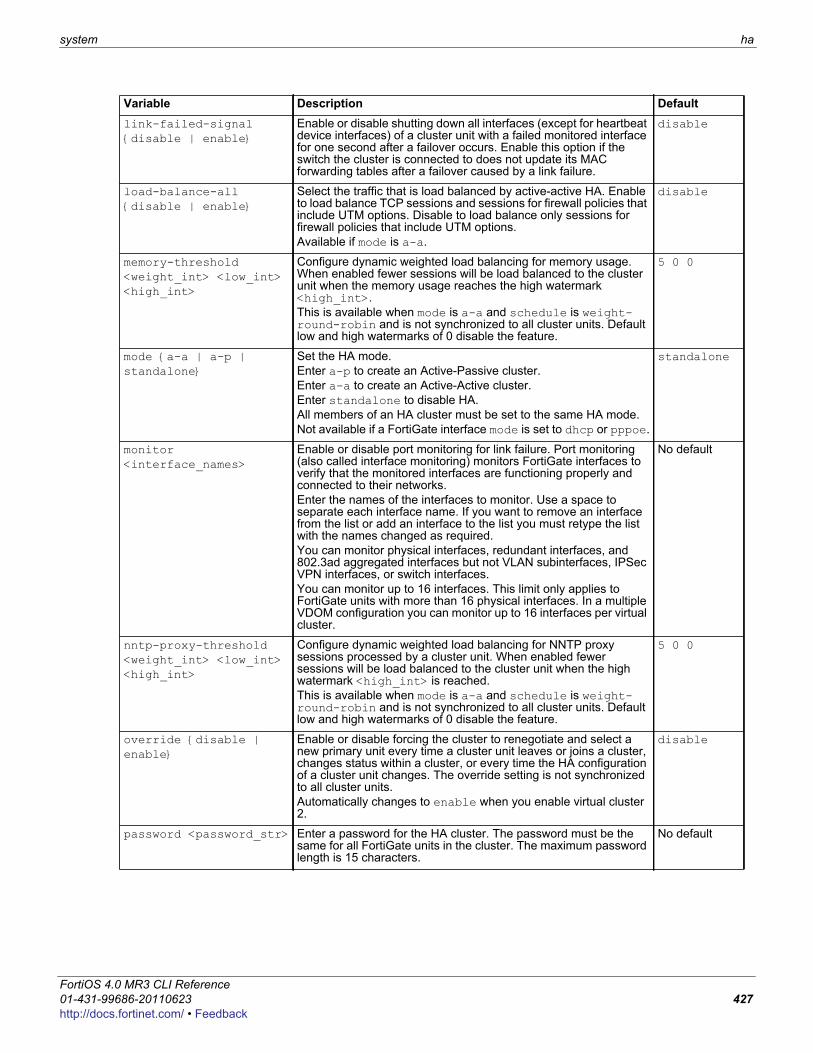
system ha
F0h
link-failed-signal {disable | enable}
Enable or disable shutting down all interfaces (except for heartbeat device interfaces) of a cluster unit with a failed monitored interface for one second after a failover occurs. Enable this option if the switch the cluster is connected to does not update its MAC forwarding tables after a failover caused by a link failure.
disable
load-balance-all {disable | enable}
Select the traffic that is load balanced by active-active HA. Enable to load balance TCP sessions and sessions for firewall policies that include UTM options. Disable to load balance only sessions for firewall policies that include UTM options. Available if mode is a-a.
disable
memory-threshold <weight_int> <low_int> <high_int>
Configure dynamic weighted load balancing for memory usage. When enabled fewer sessions will be load balanced to the cluster unit when the memory usage reaches the high watermark <high_int>.This is available when mode is a-a and schedule is weight-round-robin and is not synchronized to all cluster units. Default low and high watermarks of 0 disable the feature.
5 0 0
mode {a-a | a-p | standalone}
Set the HA mode.Enter a-p to create an Active-Passive cluster.Enter a-a to create an Active-Active cluster.Enter standalone to disable HA.All members of an HA cluster must be set to the same HA mode.Not available if a FortiGate interface mode is set to dhcp or pppoe.
standalone
monitor <interface_names>
Enable or disable port monitoring for link failure. Port monitoring (also called interface monitoring) monitors FortiGate interfaces to verify that the monitored interfaces are functioning properly and connected to their networks.Enter the names of the interfaces to monitor. Use a space to separate each interface name. If you want to remove an interface from the list or add an interface to the list you must retype the list with the names changed as required.You can monitor physical interfaces, redundant interfaces, and 802.3ad aggregated interfaces but not VLAN subinterfaces, IPSec VPN interfaces, or switch interfaces.You can monitor up to 16 interfaces. This limit only applies to FortiGate units with more than 16 physical interfaces. In a multiple VDOM configuration you can monitor up to 16 interfaces per virtual cluster.
No default
nntp-proxy-threshold <weight_int> <low_int> <high_int>
Configure dynamic weighted load balancing for NNTP proxy sessions processed by a cluster unit. When enabled fewer sessions will be load balanced to the cluster unit when the high watermark <high_int> is reached.This is available when mode is a-a and schedule is weight-round-robin and is not synchronized to all cluster units. Default low and high watermarks of 0 disable the feature.
5 0 0
override {disable | enable}
Enable or disable forcing the cluster to renegotiate and select a new primary unit every time a cluster unit leaves or joins a cluster, changes status within a cluster, or every time the HA configuration of a cluster unit changes. The override setting is not synchronized to all cluster units.Automatically changes to enable when you enable virtual cluster 2.
disable
password <password_str> Enter a password for the HA cluster. The password must be the same for all FortiGate units in the cluster. The maximum password length is 15 characters.
No default
Variable Description Default
ortiOS 4.0 MR3 CLI Reference1-431-99686-20110623 427ttp://docs.fortinet.com/ • Feedback
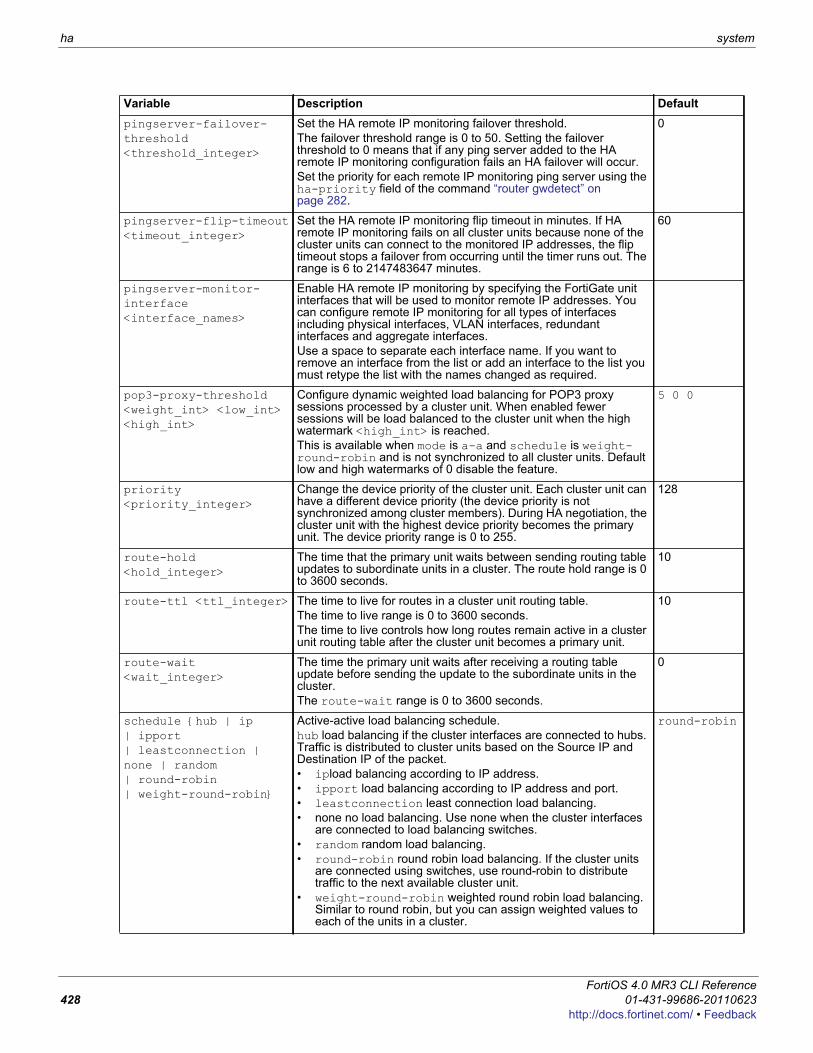
ha system
pingserver-failover-threshold <threshold_integer>
Set the HA remote IP monitoring failover threshold. The failover threshold range is 0 to 50. Setting the failover threshold to 0 means that if any ping server added to the HA remote IP monitoring configuration fails an HA failover will occur.Set the priority for each remote IP monitoring ping server using the ha-priority field of the command “router gwdetect” on page 282.
0
pingserver-flip-timeout <timeout_integer>
Set the HA remote IP monitoring flip timeout in minutes. If HA remote IP monitoring fails on all cluster units because none of the cluster units can connect to the monitored IP addresses, the flip timeout stops a failover from occurring until the timer runs out. The range is 6 to 2147483647 minutes.
60
pingserver-monitor-interface <interface_names>
Enable HA remote IP monitoring by specifying the FortiGate unit interfaces that will be used to monitor remote IP addresses. You can configure remote IP monitoring for all types of interfaces including physical interfaces, VLAN interfaces, redundant interfaces and aggregate interfaces.Use a space to separate each interface name. If you want to remove an interface from the list or add an interface to the list you must retype the list with the names changed as required.
pop3-proxy-threshold <weight_int> <low_int> <high_int>
Configure dynamic weighted load balancing for POP3 proxy sessions processed by a cluster unit. When enabled fewer sessions will be load balanced to the cluster unit when the high watermark <high_int> is reached.This is available when mode is a-a and schedule is weight-round-robin and is not synchronized to all cluster units. Default low and high watermarks of 0 disable the feature.
5 0 0
priority <priority_integer>
Change the device priority of the cluster unit. Each cluster unit can have a different device priority (the device priority is not synchronized among cluster members). During HA negotiation, the cluster unit with the highest device priority becomes the primary unit. The device priority range is 0 to 255.
128
route-hold <hold_integer>
The time that the primary unit waits between sending routing table updates to subordinate units in a cluster. The route hold range is 0 to 3600 seconds.
10
route-ttl <ttl_integer> The time to live for routes in a cluster unit routing table.The time to live range is 0 to 3600 seconds.The time to live controls how long routes remain active in a cluster unit routing table after the cluster unit becomes a primary unit.
10
route-wait <wait_integer>
The time the primary unit waits after receiving a routing table update before sending the update to the subordinate units in the cluster.The route-wait range is 0 to 3600 seconds.
0
schedule {hub | ip | ipport | leastconnection | none | random | round-robin | weight-round-robin}
Active-active load balancing schedule.hub load balancing if the cluster interfaces are connected to hubs. Traffic is distributed to cluster units based on the Source IP and Destination IP of the packet.• ipload balancing according to IP address.• ipport load balancing according to IP address and port.• leastconnection least connection load balancing.• none no load balancing. Use none when the cluster interfaces
are connected to load balancing switches.• random random load balancing.• round-robin round robin load balancing. If the cluster units
are connected using switches, use round-robin to distribute traffic to the next available cluster unit.
• weight-round-robin weighted round robin load balancing. Similar to round robin, but you can assign weighted values to each of the units in a cluster.
round-robin
Variable Description Default
FortiOS 4.0 MR3 CLI Reference428 01-431-99686-20110623
http://docs.fortinet.com/ • Feedback

system ha
F0h
session-pickup {disable | enable}
Enable or disable session pickup. Enable session-pickup so that if the primary unit fails, all sessions are picked up by the new primary unit.If you enable session pickup the subordinate units maintain session tables that match the primary unit session table. If the primary unit fails, the new primary unit can maintain all active communication sessions.If you do not enable session pickup the subordinate units do not maintain session tables. If the primary unit fails all sessions are interrupted and must be restarted when the new primary unit is operating.
disable
session-pickup-delay {enable | disable}
Enable to synchronize sessions only if they remain active for more than 30 seconds. This option improves performance when session-pickup is enabled by reducing the number of sessions that are synchronized.
disable
session-sync-dev <interface_name> [<interface_name>]...
Select FortiGate interfaces to be used for session synchronization between cluster units instead of using the heartbeat interface. You can select up to 8 session synchronization interfaces. Session synchronization packets are load balanced among these interfaces.
smtp-proxy-threshold <weight_int> <low_int> <high_int>
Configure dynamic weighted load balancing for SMTP proxy sessions processed by a cluster unit. When enabled fewer sessions will be load balanced to the cluster unit when the high watermark <high_int> is reached.This is available when mode is a-a and schedule is weight-round-robin and is not synchronized to all cluster units. Default low and high watermarks of 0 disable the feature.
5 0 0
sync-config {disable | enable}
Enable or disable automatic synchronization of primary unit configuration changes to all cluster units.
enable
uninterruptable-upgrade {disable | enable}
Enable or disable upgrading the cluster without interrupting cluster traffic processing. If uninterruptable-upgrade is enabled, traffic processing is not interrupted during a normal firmware upgrade. This process can take some time and may reduce the capacity of the cluster for a short time.If uninterruptable-upgrade is disabled, traffic processing is interrupted during a normal firmware upgrade (similar to upgrading the firmware operating on a standalone FortiGate unit).
enable
weight <priority_integer> <weight_integer>
The weighted round robin load balancing weight to assign to each cluster unit in an active-active cluster. When you set schedule to weight-round-robin you can use the weight field to set the weight of each cluster unit. The weight is set according to the priority of the unit in the cluster. A FortiGate HA cluster can contain up to 16 FortiGate units so you can set up to 16 weights.The default weight means that the 16 possible units in the cluster all have the same weight of 40. The cluster units are numbered 0 to 15.priority_integer is a number from 0 to 15 that identifies the priority of the cluster unit.weight-integer is a number between 0 and 255 that is the weight assigned to the cluster units according to their priority in the cluster. Increase the weight to increase the number of connections processed by the cluster unit with that priority.You enter the weight for each unit separately. For example, if you have a cluster of 4 FortiGate units you can set the weights for each unit as follows:
set weight 0 5set weight 1 10set weight 2 15set weight 3 20
40 40 40 40 40 40 40 40 40 40 40 40 40 40 40 40
Variable Description Default
ortiOS 4.0 MR3 CLI Reference1-431-99686-20110623 429ttp://docs.fortinet.com/ • Feedback
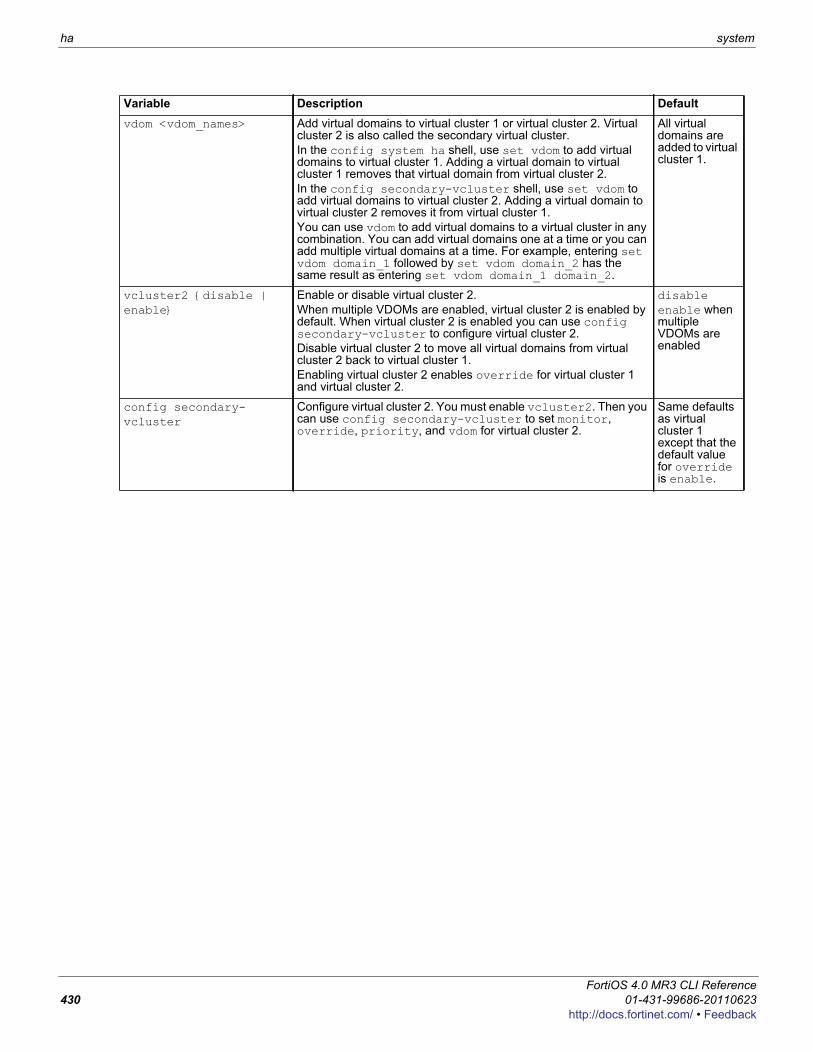
ha system
vdom <vdom_names> Add virtual domains to virtual cluster 1 or virtual cluster 2. Virtual cluster 2 is also called the secondary virtual cluster.In the config system ha shell, use set vdom to add virtual domains to virtual cluster 1. Adding a virtual domain to virtual cluster 1 removes that virtual domain from virtual cluster 2.In the config secondary-vcluster shell, use set vdom to add virtual domains to virtual cluster 2. Adding a virtual domain to virtual cluster 2 removes it from virtual cluster 1.You can use vdom to add virtual domains to a virtual cluster in any combination. You can add virtual domains one at a time or you can add multiple virtual domains at a time. For example, entering set vdom domain_1 followed by set vdom domain_2 has the same result as entering set vdom domain_1 domain_2.
All virtual domains are added to virtual cluster 1.
vcluster2 {disable | enable}
Enable or disable virtual cluster 2.When multiple VDOMs are enabled, virtual cluster 2 is enabled by default. When virtual cluster 2 is enabled you can use config secondary-vcluster to configure virtual cluster 2.Disable virtual cluster 2 to move all virtual domains from virtual cluster 2 back to virtual cluster 1.Enabling virtual cluster 2 enables override for virtual cluster 1 and virtual cluster 2.
disableenable when multiple VDOMs are enabled
config secondary-vcluster
Configure virtual cluster 2. You must enable vcluster2. Then you can use config secondary-vcluster to set monitor, override, priority, and vdom for virtual cluster 2.
Same defaults as virtual cluster 1 except that the default value for override is enable.
Variable Description Default
FortiOS 4.0 MR3 CLI Reference430 01-431-99686-20110623
http://docs.fortinet.com/ • Feedback
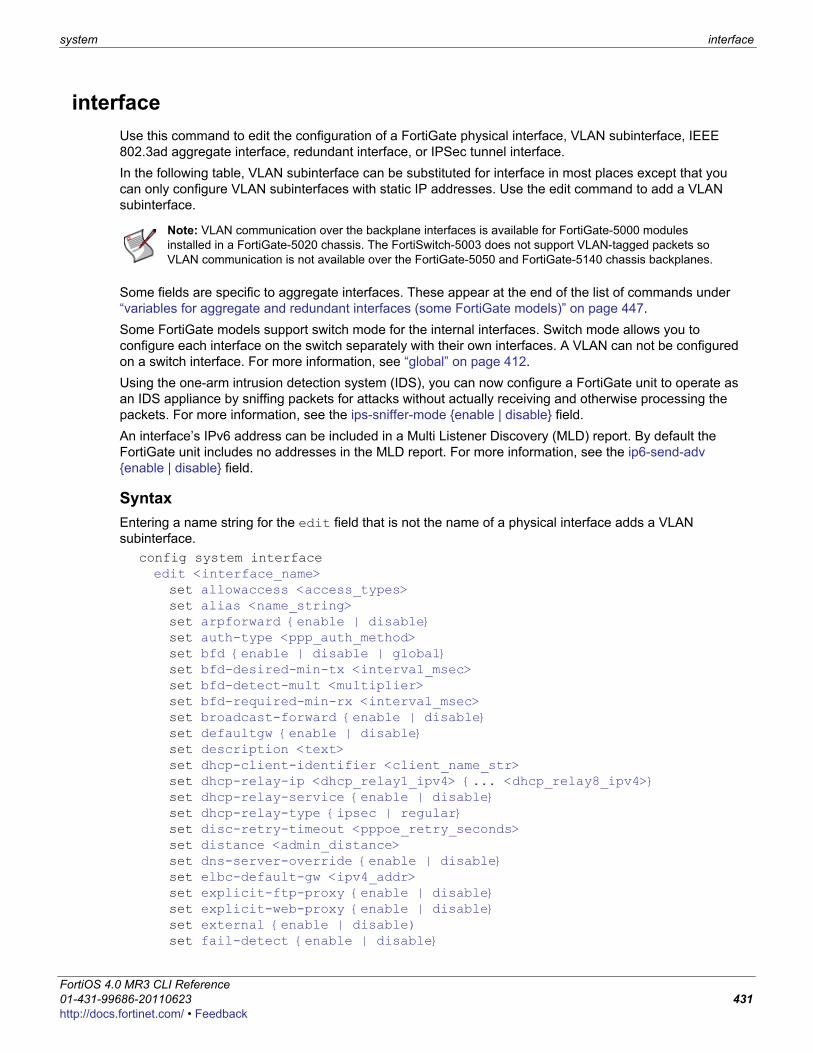
system interface
F0h
interfaceUse this command to edit the configuration of a FortiGate physical interface, VLAN subinterface, IEEE 802.3ad aggregate interface, redundant interface, or IPSec tunnel interface.In the following table, VLAN subinterface can be substituted for interface in most places except that you can only configure VLAN subinterfaces with static IP addresses. Use the edit command to add a VLAN subinterface.
Some fields are specific to aggregate interfaces. These appear at the end of the list of commands under “variables for aggregate and redundant interfaces (some FortiGate models)” on page 447.Some FortiGate models support switch mode for the internal interfaces. Switch mode allows you to configure each interface on the switch separately with their own interfaces. A VLAN can not be configured on a switch interface. For more information, see “global” on page 412.Using the one-arm intrusion detection system (IDS), you can now configure a FortiGate unit to operate as an IDS appliance by sniffing packets for attacks without actually receiving and otherwise processing the packets. For more information, see the ips-sniffer-mode {enable | disable} field.An interface’s IPv6 address can be included in a Multi Listener Discovery (MLD) report. By default the FortiGate unit includes no addresses in the MLD report. For more information, see the ip6-send-adv {enable | disable} field.
SyntaxEntering a name string for the edit field that is not the name of a physical interface adds a VLAN subinterface.
config system interface edit <interface_name> set allowaccess <access_types>set alias <name_string>set arpforward {enable | disable}set auth-type <ppp_auth_method>set bfd {enable | disable | global}set bfd-desired-min-tx <interval_msec>set bfd-detect-mult <multiplier>set bfd-required-min-rx <interval_msec>set broadcast-forward {enable | disable}set defaultgw {enable | disable}set description <text>set dhcp-client-identifier <client_name_str>set dhcp-relay-ip <dhcp_relay1_ipv4> {... <dhcp_relay8_ipv4>}set dhcp-relay-service {enable | disable}set dhcp-relay-type {ipsec | regular}set disc-retry-timeout <pppoe_retry_seconds>set distance <admin_distance>set dns-server-override {enable | disable}set elbc-default-gw <ipv4_addr>set explicit-ftp-proxy {enable | disable}set explicit-web-proxy {enable | disable}set external {enable | disable)set fail-detect {enable | disable}
Note: VLAN communication over the backplane interfaces is available for FortiGate-5000 modules installed in a FortiGate-5020 chassis. The FortiSwitch-5003 does not support VLAN-tagged packets so VLAN communication is not available over the FortiGate-5050 and FortiGate-5140 chassis backplanes.
ortiOS 4.0 MR3 CLI Reference1-431-99686-20110623 431ttp://docs.fortinet.com/ • Feedback
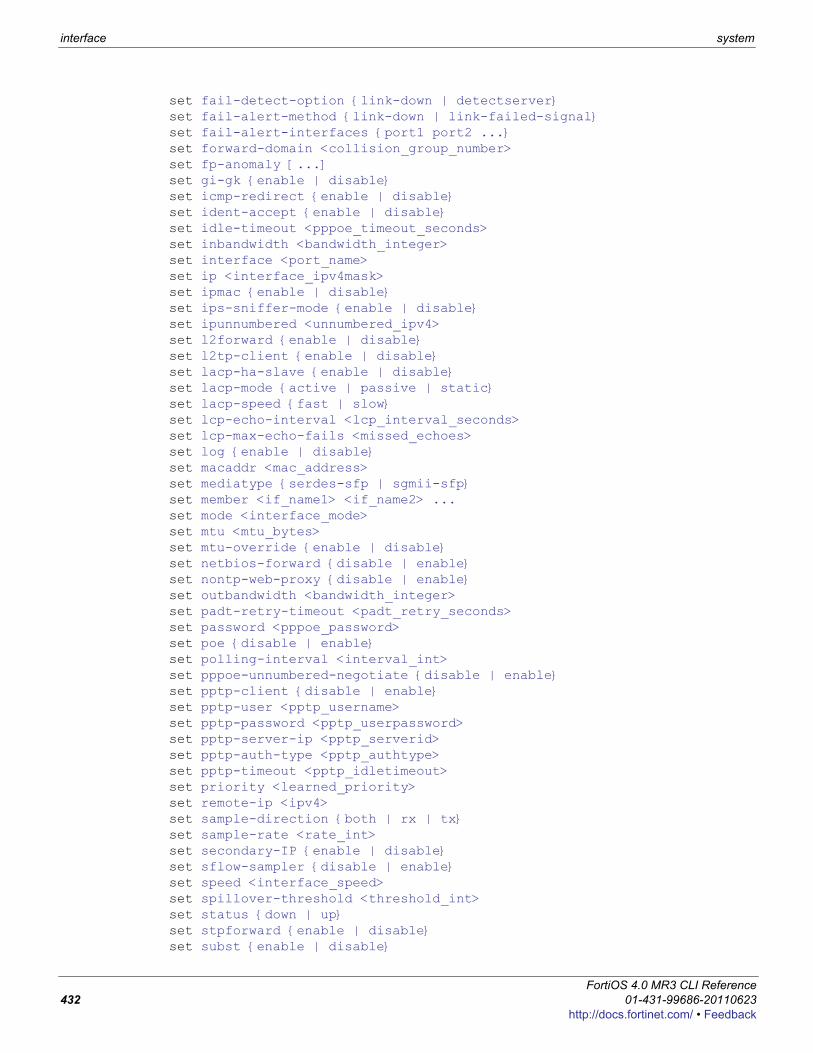
interface system
set fail-detect-option {link-down | detectserver}set fail-alert-method {link-down | link-failed-signal}set fail-alert-interfaces {port1 port2 ...}set forward-domain <collision_group_number>set fp-anomaly [...]set gi-gk {enable | disable}set icmp-redirect {enable | disable}set ident-accept {enable | disable}set idle-timeout <pppoe_timeout_seconds>set inbandwidth <bandwidth_integer>set interface <port_name>set ip <interface_ipv4mask>set ipmac {enable | disable}set ips-sniffer-mode {enable | disable}set ipunnumbered <unnumbered_ipv4>set l2forward {enable | disable}set l2tp-client {enable | disable}set lacp-ha-slave {enable | disable}set lacp-mode {active | passive | static}set lacp-speed {fast | slow}set lcp-echo-interval <lcp_interval_seconds>set lcp-max-echo-fails <missed_echoes>set log {enable | disable}set macaddr <mac_address>set mediatype {serdes-sfp | sgmii-sfp}set member <if_name1> <if_name2> ...set mode <interface_mode>set mtu <mtu_bytes>set mtu-override {enable | disable}set netbios-forward {disable | enable}set nontp-web-proxy {disable | enable}set outbandwidth <bandwidth_integer>set padt-retry-timeout <padt_retry_seconds>set password <pppoe_password>set poe {disable | enable}set polling-interval <interval_int>set pppoe-unnumbered-negotiate {disable | enable}set pptp-client {disable | enable}set pptp-user <pptp_username>set pptp-password <pptp_userpassword>set pptp-server-ip <pptp_serverid>set pptp-auth-type <pptp_authtype>set pptp-timeout <pptp_idletimeout>set priority <learned_priority>set remote-ip <ipv4>set sample-direction {both | rx | tx}set sample-rate <rate_int>set secondary-IP {enable | disable}set sflow-sampler {disable | enable}set speed <interface_speed>set spillover-threshold <threshold_int>set status {down | up}set stpforward {enable | disable}set subst {enable | disable}
FortiOS 4.0 MR3 CLI Reference432 01-431-99686-20110623
http://docs.fortinet.com/ • Feedback

system interface
F0h
set substitute-dst-mac <destination_mac_addres>set tcp-mss <max_send_bytes>set type {aggregate | hard-switch | hdlc | loopback | physical |
redundant | tunnel | vap-switch | vdom-link | vlan | wireless}set username <pppoe_username>set vdom <vdom_name>set vlanforward {enable | disable}set vlanid <id_number>set vrrp-virtual-mac {enable | disable}set wccp {enable | disable}set weight <int>set wifi-acl {allow | deny}set wifi-auth {PSK | radius | usergroup}set wifi-broadcast_ssid {enable | disable}set wifi-encrypt {AES | TKIP}set wifi-fragment_threshold <packet_size>set wifi-key <hex_key>set wifi-mac-filter {enable | disable}set wifi-passphrase <pass_str>set wifi-radius-server <server_name>set wifi-rts_threshold <integer>set wifi-security <sec_mode>set wifi-ssid <id_str>set wins-ip <wins_server_ip>config ipv6set autoconf {enable | disable}set ip6-address <if_ipv6mask>set ip6-allowaccess <access_types>set ip6-default-life <ipv6_life_seconds>set ip6-hop-limit <ipv6_hops_limit>set ip6-link-mtu <ipv6_mtu>set ip6-manage-flag {disable | enable}set ip6-max-interval <adverts_max_seconds>set ip6-min-interval <adverts_min_seconds>set ip6-other-flag {disable | enable}set ip6-reachable-time <reachable_msecs>set ip6-retrans-time <retrans_msecs>set ip6-send-adv {enable | disable}config ip6-prefix-list edit <ipv6_prefix> set autonomous-flag {enable | disable}set onlink-flag {enable | disable}set preferred-life-time <seconds>set valid-life-time <seconds>
endendconfig ip6-extra-addressedit <prefix_ipv6>end
endconfig l2tp-client-settingsset auth-type {auto | chap | mschapv1 | mschapv2 | pap}set defaultgw {enable | disable}set distance <admin_distance>
ortiOS 4.0 MR3 CLI Reference1-431-99686-20110623 433ttp://docs.fortinet.com/ • Feedback
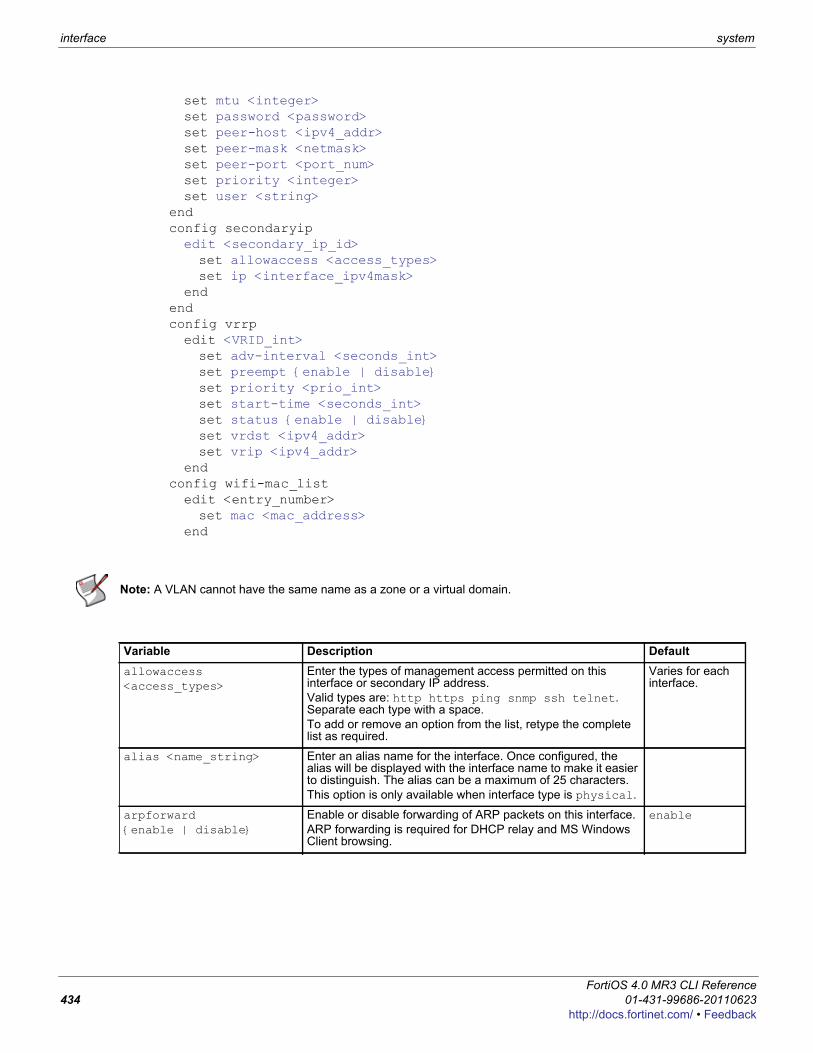
interface system
set mtu <integer>set password <password>set peer-host <ipv4_addr>set peer-mask <netmask>set peer-port <port_num>set priority <integer>set user <string>
endconfig secondaryipedit <secondary_ip_id>set allowaccess <access_types>set ip <interface_ipv4mask>
endendconfig vrrpedit <VRID_int>set adv-interval <seconds_int>set preempt {enable | disable}set priority <prio_int>set start-time <seconds_int>set status {enable | disable}set vrdst <ipv4_addr>set vrip <ipv4_addr>
endconfig wifi-mac_listedit <entry_number>set mac <mac_address>
end
Note: A VLAN cannot have the same name as a zone or a virtual domain.
Variable Description Defaultallowaccess <access_types>
Enter the types of management access permitted on this interface or secondary IP address. Valid types are: http https ping snmp ssh telnet. Separate each type with a space. To add or remove an option from the list, retype the complete list as required.
Varies for each interface.
alias <name_string> Enter an alias name for the interface. Once configured, the alias will be displayed with the interface name to make it easier to distinguish. The alias can be a maximum of 25 characters.This option is only available when interface type is physical.
arpforward {enable | disable}
Enable or disable forwarding of ARP packets on this interface. ARP forwarding is required for DHCP relay and MS Windows Client browsing.
enable
FortiOS 4.0 MR3 CLI Reference434 01-431-99686-20110623
http://docs.fortinet.com/ • Feedback
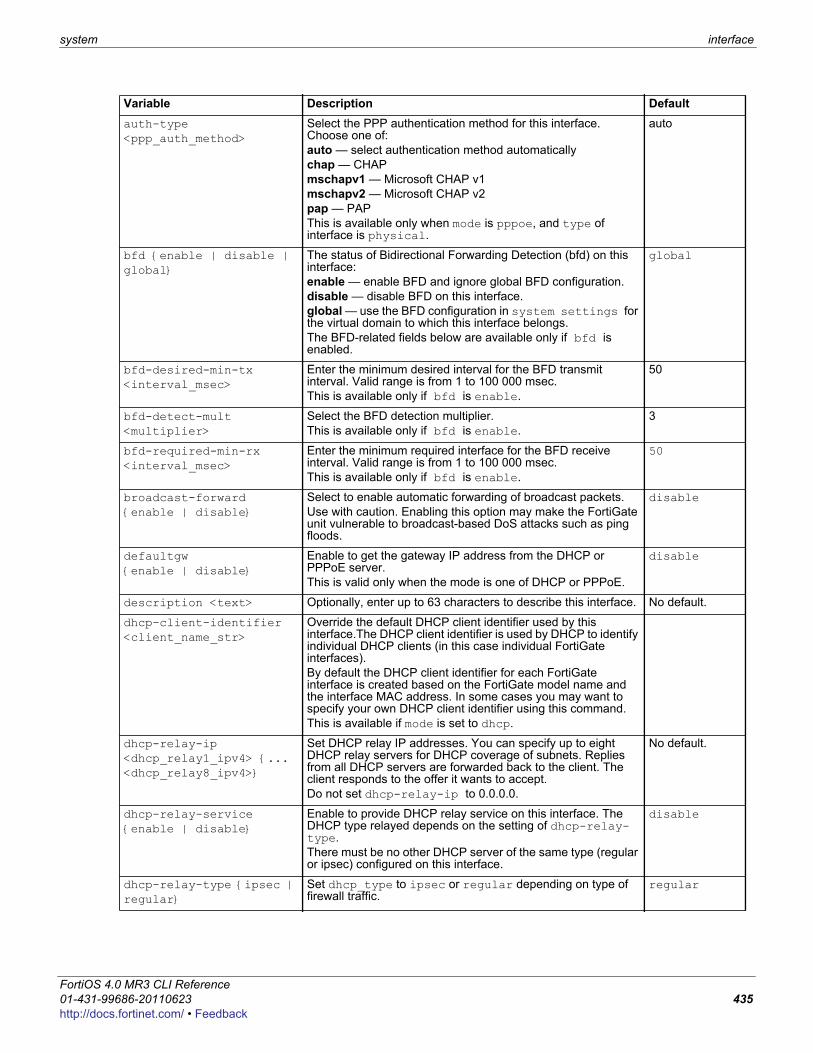
system interface
F0h
auth-type <ppp_auth_method>
Select the PPP authentication method for this interface. Choose one of:auto — select authentication method automaticallychap — CHAPmschapv1 — Microsoft CHAP v1mschapv2 — Microsoft CHAP v2pap — PAPThis is available only when mode is pppoe, and type of interface is physical.
auto
bfd {enable | disable | global}
The status of Bidirectional Forwarding Detection (bfd) on this interface:enable — enable BFD and ignore global BFD configuration.disable — disable BFD on this interface.global — use the BFD configuration in system settings for the virtual domain to which this interface belongs.The BFD-related fields below are available only if bfd is enabled.
global
bfd-desired-min-tx <interval_msec>
Enter the minimum desired interval for the BFD transmit interval. Valid range is from 1 to 100 000 msec.This is available only if bfd is enable.
50
bfd-detect-mult <multiplier>
Select the BFD detection multiplier.This is available only if bfd is enable.
3
bfd-required-min-rx <interval_msec>
Enter the minimum required interface for the BFD receive interval. Valid range is from 1 to 100 000 msec.This is available only if bfd is enable.
50
broadcast-forward {enable | disable}
Select to enable automatic forwarding of broadcast packets. Use with caution. Enabling this option may make the FortiGate unit vulnerable to broadcast-based DoS attacks such as ping floods.
disable
defaultgw {enable | disable}
Enable to get the gateway IP address from the DHCP or PPPoE server.This is valid only when the mode is one of DHCP or PPPoE.
disable
description <text> Optionally, enter up to 63 characters to describe this interface. No default.
dhcp-client-identifier <client_name_str>
Override the default DHCP client identifier used by this interface.The DHCP client identifier is used by DHCP to identify individual DHCP clients (in this case individual FortiGate interfaces). By default the DHCP client identifier for each FortiGate interface is created based on the FortiGate model name and the interface MAC address. In some cases you may want to specify your own DHCP client identifier using this command.This is available if mode is set to dhcp.
dhcp-relay-ip <dhcp_relay1_ipv4> {... <dhcp_relay8_ipv4>}
Set DHCP relay IP addresses. You can specify up to eight DHCP relay servers for DHCP coverage of subnets. Replies from all DHCP servers are forwarded back to the client. The client responds to the offer it wants to accept. Do not set dhcp-relay-ip to 0.0.0.0.
No default.
dhcp-relay-service {enable | disable}
Enable to provide DHCP relay service on this interface. The DHCP type relayed depends on the setting of dhcp-relay-type. There must be no other DHCP server of the same type (regular or ipsec) configured on this interface.
disable
dhcp-relay-type {ipsec | regular}
Set dhcp_type to ipsec or regular depending on type of firewall traffic.
regular
Variable Description Default
ortiOS 4.0 MR3 CLI Reference1-431-99686-20110623 435ttp://docs.fortinet.com/ • Feedback
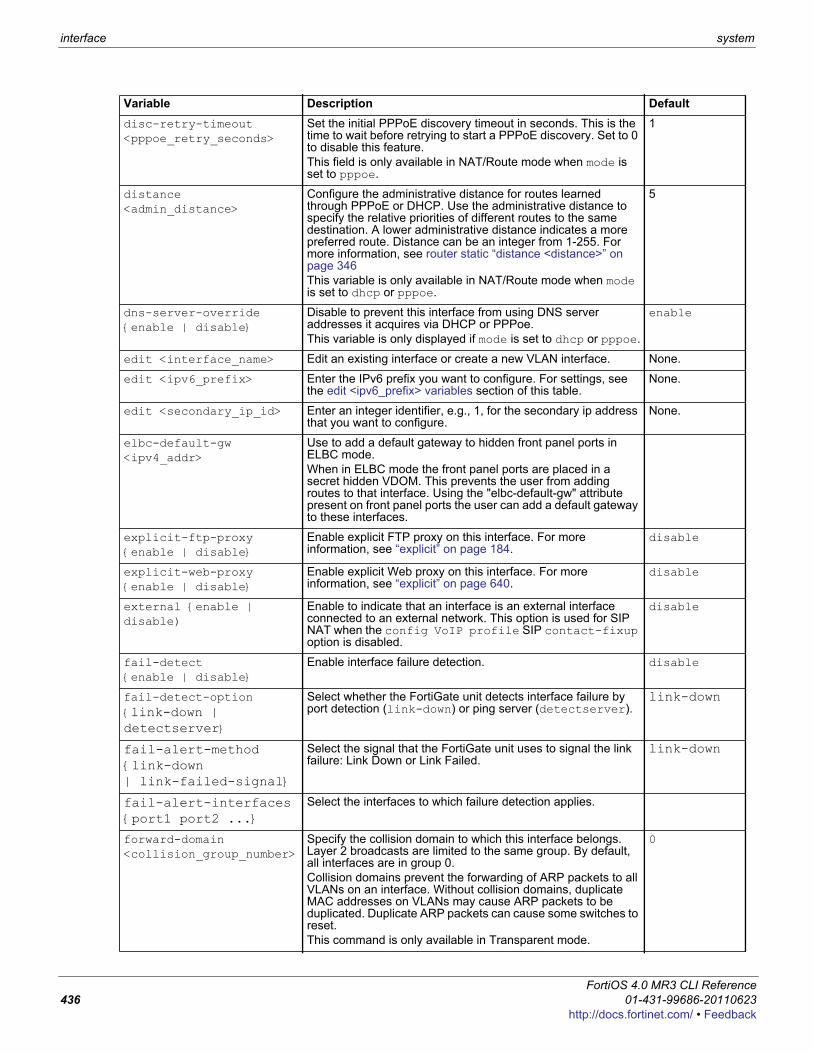
interface system
disc-retry-timeout <pppoe_retry_seconds>
Set the initial PPPoE discovery timeout in seconds. This is the time to wait before retrying to start a PPPoE discovery. Set to 0 to disable this feature.This field is only available in NAT/Route mode when mode is set to pppoe.
1
distance <admin_distance>
Configure the administrative distance for routes learned through PPPoE or DHCP. Use the administrative distance to specify the relative priorities of different routes to the same destination. A lower administrative distance indicates a more preferred route. Distance can be an integer from 1-255. For more information, see router static “distance <distance>” on page 346This variable is only available in NAT/Route mode when mode is set to dhcp or pppoe.
5
dns-server-override {enable | disable}
Disable to prevent this interface from using DNS server addresses it acquires via DHCP or PPPoe.This variable is only displayed if mode is set to dhcp or pppoe.
enable
edit <interface_name> Edit an existing interface or create a new VLAN interface. None.
edit <ipv6_prefix> Enter the IPv6 prefix you want to configure. For settings, see the edit <ipv6_prefix> variables section of this table.
None.
edit <secondary_ip_id> Enter an integer identifier, e.g., 1, for the secondary ip address that you want to configure.
None.
elbc-default-gw <ipv4_addr>
Use to add a default gateway to hidden front panel ports in ELBC mode. When in ELBC mode the front panel ports are placed in a secret hidden VDOM. This prevents the user from adding routes to that interface. Using the "elbc-default-gw" attribute present on front panel ports the user can add a default gateway to these interfaces.
explicit-ftp-proxy {enable | disable}
Enable explicit FTP proxy on this interface. For more information, see “explicit” on page 184.
disable
explicit-web-proxy {enable | disable}
Enable explicit Web proxy on this interface. For more information, see “explicit” on page 640.
disable
external {enable | disable)
Enable to indicate that an interface is an external interface connected to an external network. This option is used for SIP NAT when the config VoIP profile SIP contact-fixup option is disabled.
disable
fail-detect {enable | disable}
Enable interface failure detection. disable
fail-detect-option {link-down | detectserver}
Select whether the FortiGate unit detects interface failure by port detection (link-down) or ping server (detectserver).
link-down
fail-alert-method {link-down | link-failed-signal}
Select the signal that the FortiGate unit uses to signal the link failure: Link Down or Link Failed.
link-down
fail-alert-interfaces {port1 port2 ...}
Select the interfaces to which failure detection applies.
forward-domain <collision_group_number>
Specify the collision domain to which this interface belongs. Layer 2 broadcasts are limited to the same group. By default, all interfaces are in group 0. Collision domains prevent the forwarding of ARP packets to all VLANs on an interface. Without collision domains, duplicate MAC addresses on VLANs may cause ARP packets to be duplicated. Duplicate ARP packets can cause some switches to reset. This command is only available in Transparent mode.
0
Variable Description Default
FortiOS 4.0 MR3 CLI Reference436 01-431-99686-20110623
http://docs.fortinet.com/ • Feedback

system interface
F0h
fp-anomaly [...] Enable NP2 hardware fast path anomaly checking on an interface and specify whether to drop or allow (pass) different types of anomalies.When no options are specified, anomaly checking performed by the network processor is disabled. If pass options are specified, packets may still be rejected by other anomaly checks, including policy-required IPS performed using the FortiGate unit main processing resources.Log messages are generated when packets are dropped due to options in this setting.The fp-anomaly option is available for NP2-enabled interfaces.
No options specified (disabled)
gi-gk {enable | disable} Enable FortiOS Carrier Gi Gatekeeper to enable the Gi firewall on this interface as part of the anti-overbilling configuration.
disable
icmp-redirect {enable | disable}
Disable to stop ICMP redirect from sending from this interface.ICMP redirect messages are sent by a router to notify the original sender of packets that there is a better route available.
enable
ident-accept {enable | disable}
Enable or disable passing ident packets (TCP port 113) to the firewall policy. If set to disable, the FortiGate unit sends a TCP reset packet in response to an ident packet.
disable
idle-timeout <pppoe_timeout_seconds>
Disconnect if the PPPoE connection is idle for the specified number of seconds. Set to zero to disable this feature.This is available when mode is set to pppoe.
0
inbandwidth <bandwidth_integer>
Enter the KB/sec limit for incoming traffic for this interface.Use this command to configure inbound traffic shaping for an interface. Inbound traffic shaping limits the bandwidth accepted by the interface. Limiting inbound traffic takes precedence over traffic shaping applied by firewall policies. You can set inbound traffic shaping for any FortiGate unit interface and it can be active for more than one FortiGate unit interface at a time. Setting <bandwidth_integer> to 0 (the default) means unlimited bandwidth or no traffic shaping.
0
interface <port_name> Enter the physical interface this virtual interface is linked to. This is available only when adding virtual interfaces such as VLANs and VPNs.
None.
ip <interface_ipv4mask> Enter the interface IP address and netmask.This is not available if mode is set to dhcp or pppoe. You can set the IP and netmask, but it will not display.This is only available in NAT/Route mode.The IP address cannot be on the same subnet as any other FortiGate unit interface.
Varies for each interface.
ipmac {enable | disable} Enable or disable IP/MAC binding for the specified interface. For information about configuring IP/MAC binding settings, see “ipmacbinding setting” on page 108 and “ipmacbinding table” on page 109.
disable
ips-sniffer-mode {enable | disable}
Enable to configure this interface to operate as a one-armed sniffer as part of configuring a FortiGate unit to operate as an IDS appliance by sniffing packets for attacks without actually receiving and otherwise processing the packets. Once the interface is enabled for sniffing you cannot use the interface for other traffic. You must add sniffer policies for the interface to actually sniff packets.For more information on one-armed IPS, see “firewall sniff-interface-policy” on page 163 and “firewall sniff-interface-policy6” on page 165.
disable
Variable Description Default
ortiOS 4.0 MR3 CLI Reference1-431-99686-20110623 437ttp://docs.fortinet.com/ • Feedback
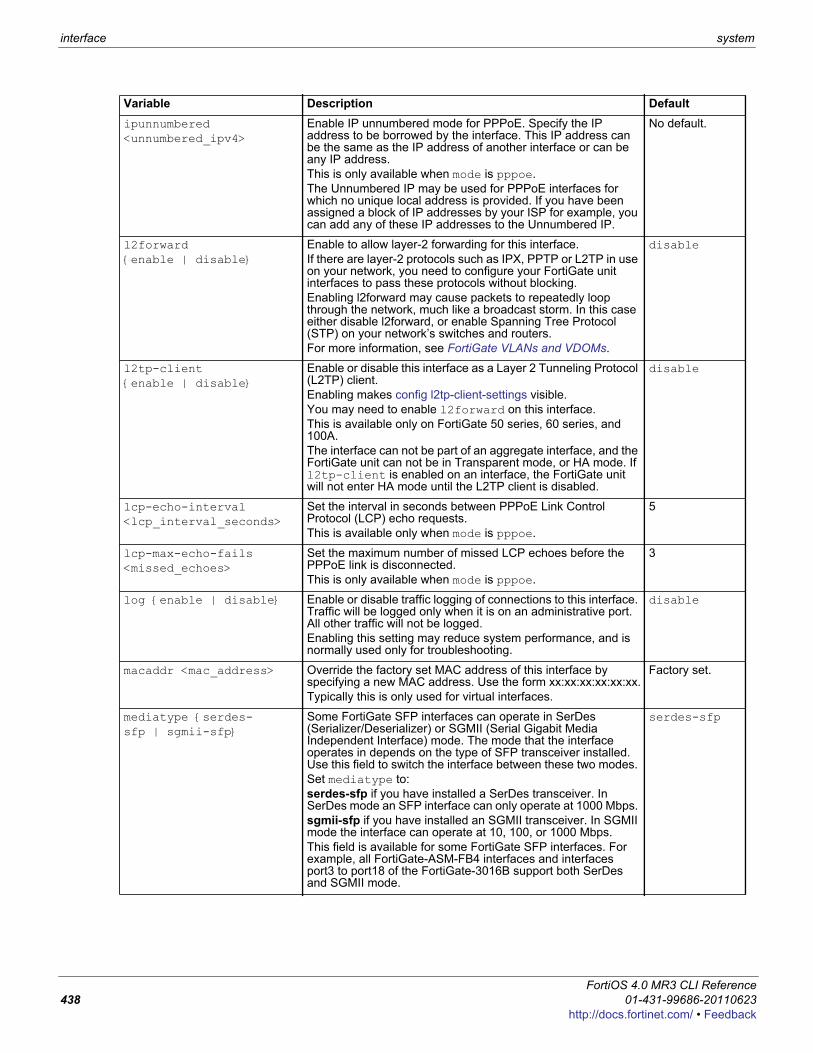
interface system
ipunnumbered <unnumbered_ipv4>
Enable IP unnumbered mode for PPPoE. Specify the IP address to be borrowed by the interface. This IP address can be the same as the IP address of another interface or can be any IP address.This is only available when mode is pppoe.The Unnumbered IP may be used for PPPoE interfaces for which no unique local address is provided. If you have been assigned a block of IP addresses by your ISP for example, you can add any of these IP addresses to the Unnumbered IP.
No default.
l2forward {enable | disable}
Enable to allow layer-2 forwarding for this interface. If there are layer-2 protocols such as IPX, PPTP or L2TP in use on your network, you need to configure your FortiGate unit interfaces to pass these protocols without blocking.Enabling l2forward may cause packets to repeatedly loop through the network, much like a broadcast storm. In this case either disable l2forward, or enable Spanning Tree Protocol (STP) on your network’s switches and routers.For more information, see FortiGate VLANs and VDOMs.
disable
l2tp-client {enable | disable}
Enable or disable this interface as a Layer 2 Tunneling Protocol (L2TP) client. Enabling makes config l2tp-client-settings visible.You may need to enable l2forward on this interface.This is available only on FortiGate 50 series, 60 series, and 100A. The interface can not be part of an aggregate interface, and the FortiGate unit can not be in Transparent mode, or HA mode. If l2tp-client is enabled on an interface, the FortiGate unit will not enter HA mode until the L2TP client is disabled.
disable
lcp-echo-interval <lcp_interval_seconds>
Set the interval in seconds between PPPoE Link Control Protocol (LCP) echo requests.This is available only when mode is pppoe.
5
lcp-max-echo-fails <missed_echoes>
Set the maximum number of missed LCP echoes before the PPPoE link is disconnected.This is only available when mode is pppoe.
3
log {enable | disable} Enable or disable traffic logging of connections to this interface. Traffic will be logged only when it is on an administrative port. All other traffic will not be logged.Enabling this setting may reduce system performance, and is normally used only for troubleshooting.
disable
macaddr <mac_address> Override the factory set MAC address of this interface by specifying a new MAC address. Use the form xx:xx:xx:xx:xx:xx.Typically this is only used for virtual interfaces.
Factory set.
mediatype {serdes-sfp | sgmii-sfp}
Some FortiGate SFP interfaces can operate in SerDes (Serializer/Deserializer) or SGMII (Serial Gigabit Media Independent Interface) mode. The mode that the interface operates in depends on the type of SFP transceiver installed. Use this field to switch the interface between these two modes. Set mediatype to:serdes-sfp if you have installed a SerDes transceiver. In SerDes mode an SFP interface can only operate at 1000 Mbps. sgmii-sfp if you have installed an SGMII transceiver. In SGMII mode the interface can operate at 10, 100, or 1000 Mbps.This field is available for some FortiGate SFP interfaces. For example, all FortiGate-ASM-FB4 interfaces and interfaces port3 to port18 of the FortiGate-3016B support both SerDes and SGMII mode.
serdes-sfp
Variable Description Default
FortiOS 4.0 MR3 CLI Reference438 01-431-99686-20110623
http://docs.fortinet.com/ • Feedback
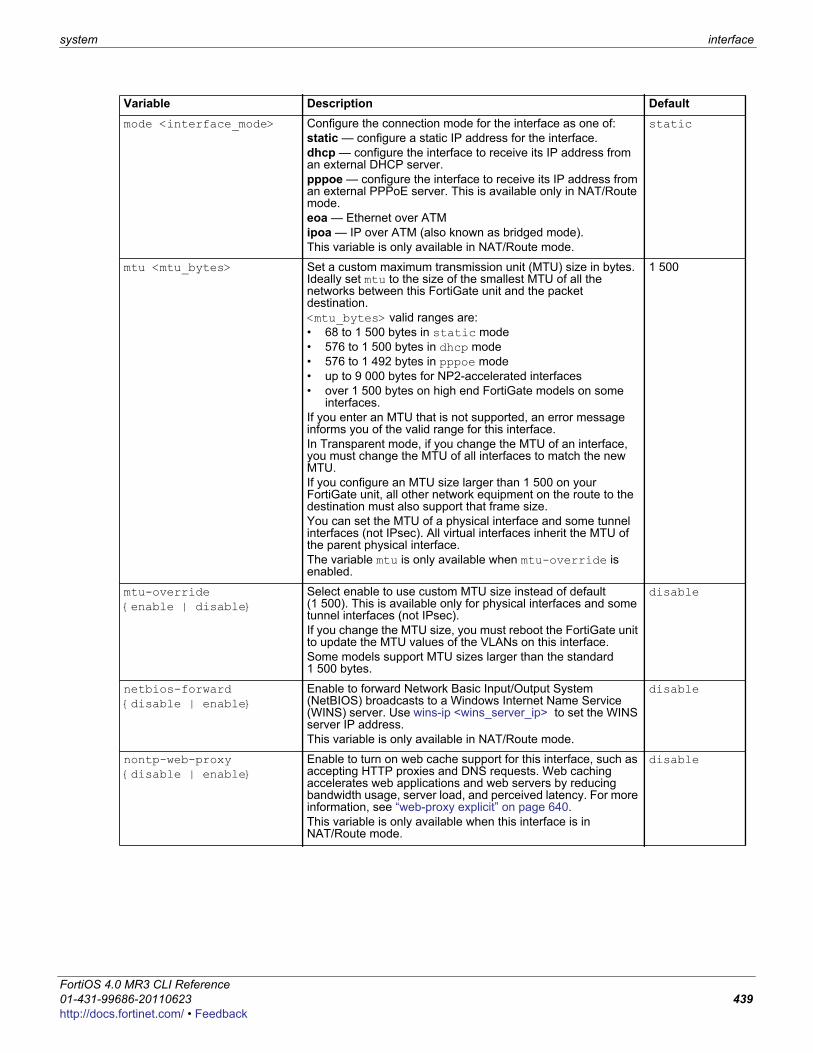
system interface
F0h
mode <interface_mode> Configure the connection mode for the interface as one of:static — configure a static IP address for the interface.dhcp — configure the interface to receive its IP address from an external DHCP server.pppoe — configure the interface to receive its IP address from an external PPPoE server. This is available only in NAT/Route mode.eoa — Ethernet over ATMipoa — IP over ATM (also known as bridged mode).This variable is only available in NAT/Route mode.
static
mtu <mtu_bytes> Set a custom maximum transmission unit (MTU) size in bytes. Ideally set mtu to the size of the smallest MTU of all the networks between this FortiGate unit and the packet destination.<mtu_bytes> valid ranges are: • 68 to 1 500 bytes in static mode• 576 to 1 500 bytes in dhcp mode• 576 to 1 492 bytes in pppoe mode• up to 9 000 bytes for NP2-accelerated interfaces• over 1 500 bytes on high end FortiGate models on some
interfaces.If you enter an MTU that is not supported, an error message informs you of the valid range for this interface.In Transparent mode, if you change the MTU of an interface, you must change the MTU of all interfaces to match the new MTU.If you configure an MTU size larger than 1 500 on your FortiGate unit, all other network equipment on the route to the destination must also support that frame size.You can set the MTU of a physical interface and some tunnel interfaces (not IPsec). All virtual interfaces inherit the MTU of the parent physical interface.The variable mtu is only available when mtu-override is enabled.
1 500
mtu-override {enable | disable}
Select enable to use custom MTU size instead of default (1 500). This is available only for physical interfaces and some tunnel interfaces (not IPsec).If you change the MTU size, you must reboot the FortiGate unit to update the MTU values of the VLANs on this interface.Some models support MTU sizes larger than the standard 1 500 bytes.
disable
netbios-forward {disable | enable}
Enable to forward Network Basic Input/Output System (NetBIOS) broadcasts to a Windows Internet Name Service (WINS) server. Use wins-ip <wins_server_ip> to set the WINS server IP address.This variable is only available in NAT/Route mode.
disable
nontp-web-proxy {disable | enable}
Enable to turn on web cache support for this interface, such as accepting HTTP proxies and DNS requests. Web caching accelerates web applications and web servers by reducing bandwidth usage, server load, and perceived latency. For more information, see “web-proxy explicit” on page 640.This variable is only available when this interface is in NAT/Route mode.
disable
Variable Description Default
ortiOS 4.0 MR3 CLI Reference1-431-99686-20110623 439ttp://docs.fortinet.com/ • Feedback

interface system
outbandwidth <bandwidth_integer>
Enter the KB/sec limit for outgoing (egress) traffic for this interface.Use this command to configure outbound traffic shaping for an interface. Outbound traffic shaping limits the bandwidth accepted by the interface. Limiting outbound traffic takes precedence over traffic shaping applied by firewall policies. You can set outbound traffic shaping for any FortiGate interface and it can be active for more than one FortiGate interface at a time. Setting <bandwidth_integer> to 0 (the default) means unlimited bandwidth or no traffic shaping.
0
padt-retry-timeout <padt_retry_seconds>
Initial PPPoE Active Discovery Terminate (PADT) timeout in seconds. Use this timeout to shut down the PPPoE session if it is idle for this number of seconds. PADT must be supported by your ISP. This is available in NAT/Route mode when mode is pppoe.
1
password <pppoe_password>
Enter the password to connect to the PPPoE server.This is available in NAT/Route mode when mode is pppoe.
No default.
poe {disable | enable} Enable or disable PoE (Power over Ethernet). This option is only available on models with PoE feature.
disable
polling-interval <interval_int>
Set the amount of time in seconds that the sFlow agent waits between sending collected data to the sFlow collector. The range is 1 to 255 seconds.A higher polling-interval means less data is sent across the network but also means that the sFlow collector’s picture of the network may be out of date.
20
pppoe-unnumbered-negotiate {disable | enable}
Disable to resolve problems when mode is set to PPPoE, and ipunnumbered is set. The default configuration may not work in some regions, such as Japan.This is only available when mode is pppoe and ipunnumbered is set.
enable
pptp-client {disable | enable}
Enable to configure and use a point-to-point tunneling protocol (PPTP) client.You may need to enable l2forward on this interface.This command is not available when in HA mode. If the pptp-client is enabled on an interface, the FortiGate unit will not enter HA mode until that pptp-client is disabled.
disable
pptp-user <pptp_username>
Enter the name of the PPTP user. No default.
pptp-password <pptp_userpassword>
Enter the password for the PPTP user. No default.
pptp-server-ip <pptp_serverid>
Enter the IP address for the PPTP server. No default.
pptp-auth-type <pptp_authtype>
Enter the authentication type for the PPTP user. No default.
pptp-timeout <pptp_idletimeout>
Enter the idle timeout in minutes. Use this timeout to shut down the PPTP user session if it is idle for this number of seconds. 0 for disabled.
No default.
priority <learned_priority>
Enter the priority of routes using this interface.For more information on priority, see “router static” on page 345.This is only available when mode is pppoe or dhcp.
No default.
Variable Description Default
FortiOS 4.0 MR3 CLI Reference440 01-431-99686-20110623
http://docs.fortinet.com/ • Feedback
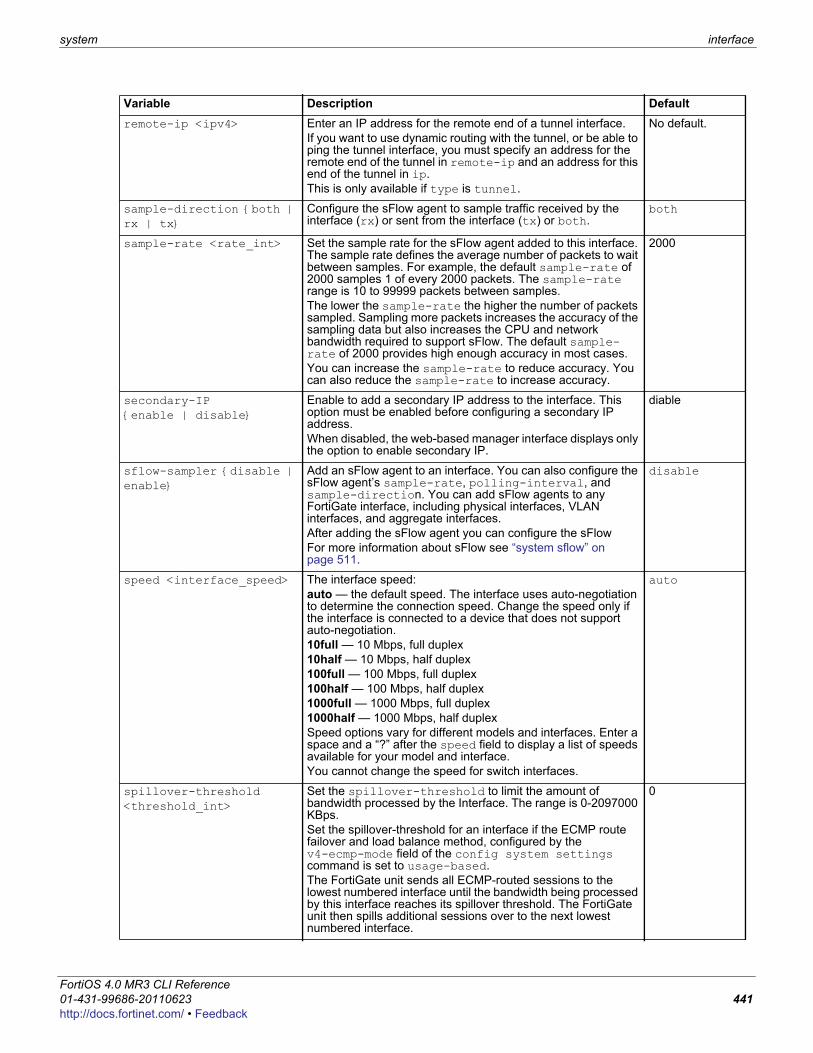
system interface
F0h
remote-ip <ipv4> Enter an IP address for the remote end of a tunnel interface.If you want to use dynamic routing with the tunnel, or be able to ping the tunnel interface, you must specify an address for the remote end of the tunnel in remote-ip and an address for this end of the tunnel in ip.This is only available if type is tunnel.
No default.
sample-direction {both | rx | tx}
Configure the sFlow agent to sample traffic received by the interface (rx) or sent from the interface (tx) or both.
both
sample-rate <rate_int> Set the sample rate for the sFlow agent added to this interface. The sample rate defines the average number of packets to wait between samples. For example, the default sample-rate of 2000 samples 1 of every 2000 packets. The sample-rate range is 10 to 99999 packets between samples.The lower the sample-rate the higher the number of packets sampled. Sampling more packets increases the accuracy of the sampling data but also increases the CPU and network bandwidth required to support sFlow. The default sample-rate of 2000 provides high enough accuracy in most cases. You can increase the sample-rate to reduce accuracy. You can also reduce the sample-rate to increase accuracy.
2000
secondary-IP {enable | disable}
Enable to add a secondary IP address to the interface. This option must be enabled before configuring a secondary IP address. When disabled, the web-based manager interface displays only the option to enable secondary IP.
diable
sflow-sampler {disable | enable}
Add an sFlow agent to an interface. You can also configure the sFlow agent’s sample-rate, polling-interval, and sample-direction. You can add sFlow agents to any FortiGate interface, including physical interfaces, VLAN interfaces, and aggregate interfaces.After adding the sFlow agent you can configure the sFlow For more information about sFlow see “system sflow” on page 511.
disable
speed <interface_speed> The interface speed:auto — the default speed. The interface uses auto-negotiation to determine the connection speed. Change the speed only if the interface is connected to a device that does not support auto-negotiation.10full — 10 Mbps, full duplex10half — 10 Mbps, half duplex100full — 100 Mbps, full duplex100half — 100 Mbps, half duplex1000full — 1000 Mbps, full duplex1000half — 1000 Mbps, half duplexSpeed options vary for different models and interfaces. Enter a space and a “?” after the speed field to display a list of speeds available for your model and interface.You cannot change the speed for switch interfaces.
auto
spillover-threshold <threshold_int>
Set the spillover-threshold to limit the amount of bandwidth processed by the Interface. The range is 0-2097000 KBps. Set the spillover-threshold for an interface if the ECMP route failover and load balance method, configured by the v4-ecmp-mode field of the config system settings command is set to usage-based.The FortiGate unit sends all ECMP-routed sessions to the lowest numbered interface until the bandwidth being processed by this interface reaches its spillover threshold. The FortiGate unit then spills additional sessions over to the next lowest numbered interface.
0
Variable Description Default
ortiOS 4.0 MR3 CLI Reference1-431-99686-20110623 441ttp://docs.fortinet.com/ • Feedback

interface system
status {down | up} Start or stop the interface. If the interface is stopped, it does not accept or send packets.If you stop a physical interface, associated virtual interfaces such as VLAN interfaces will also stop.
up(down for VLANs)
stpforward {enable | disable}
Enable to forward Spanning Tree Protocol (STP) packets through this interface. STP maps the network to provide the least-cost-path from point to point while blocking all other ports for that path. This prevents any loops which would flood the network.If your network uses layer-2 protocols, and has looping issues STP will stop this. For more information, see FortiGate VLANs and VDOMs.
disable
subst {enable | disable} Enable to use a substitute destination MAC address for this address.This feature may be used with virtual interfaces to prevent network loops.
disable
substitute-dst-mac <destination_mac_addres>
Enter the substitute destination MAC address to use when subst is enabled. Use the xx:xx:xx:xx:xx:xx format.
No default.
tcp-mss <max_send_bytes> Enter the FortiGate unit’s maximum sending size for TCP packets.
No default.
Variable Description Default
FortiOS 4.0 MR3 CLI Reference442 01-431-99686-20110623
http://docs.fortinet.com/ • Feedback
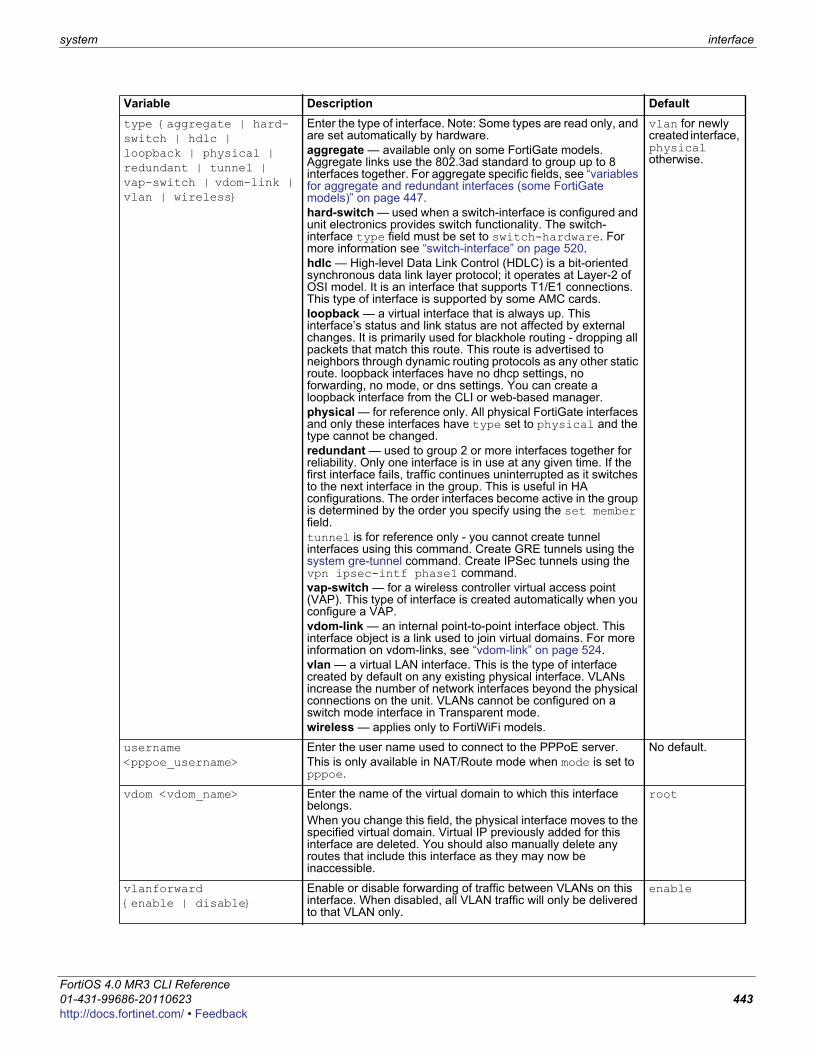
system interface
F0h
type {aggregate | hard-switch | hdlc | loopback | physical | redundant | tunnel | vap-switch | vdom-link | vlan | wireless}
Enter the type of interface. Note: Some types are read only, and are set automatically by hardware.aggregate — available only on some FortiGate models. Aggregate links use the 802.3ad standard to group up to 8 interfaces together. For aggregate specific fields, see “variables for aggregate and redundant interfaces (some FortiGate models)” on page 447.hard-switch — used when a switch-interface is configured and unit electronics provides switch functionality. The switch-interface type field must be set to switch-hardware. For more information see “switch-interface” on page 520.hdlc — High-level Data Link Control (HDLC) is a bit-oriented synchronous data link layer protocol; it operates at Layer-2 of OSI model. It is an interface that supports T1/E1 connections. This type of interface is supported by some AMC cards.loopback — a virtual interface that is always up. This interface’s status and link status are not affected by external changes. It is primarily used for blackhole routing - dropping all packets that match this route. This route is advertised to neighbors through dynamic routing protocols as any other static route. loopback interfaces have no dhcp settings, no forwarding, no mode, or dns settings. You can create a loopback interface from the CLI or web-based manager. physical — for reference only. All physical FortiGate interfaces and only these interfaces have type set to physical and the type cannot be changed.redundant — used to group 2 or more interfaces together for reliability. Only one interface is in use at any given time. If the first interface fails, traffic continues uninterrupted as it switches to the next interface in the group. This is useful in HA configurations. The order interfaces become active in the group is determined by the order you specify using the set member field.tunnel is for reference only - you cannot create tunnel interfaces using this command. Create GRE tunnels using the system gre-tunnel command. Create IPSec tunnels using the vpn ipsec-intf phase1 command.vap-switch — for a wireless controller virtual access point (VAP). This type of interface is created automatically when you configure a VAP.vdom-link — an internal point-to-point interface object. This interface object is a link used to join virtual domains. For more information on vdom-links, see “vdom-link” on page 524.vlan — a virtual LAN interface. This is the type of interface created by default on any existing physical interface. VLANs increase the number of network interfaces beyond the physical connections on the unit. VLANs cannot be configured on a switch mode interface in Transparent mode.wireless — applies only to FortiWiFi models.
vlan for newly created interface, physical otherwise.
username <pppoe_username>
Enter the user name used to connect to the PPPoE server.This is only available in NAT/Route mode when mode is set to pppoe.
No default.
vdom <vdom_name> Enter the name of the virtual domain to which this interface belongs.When you change this field, the physical interface moves to the specified virtual domain. Virtual IP previously added for this interface are deleted. You should also manually delete any routes that include this interface as they may now be inaccessible.
root
vlanforward {enable | disable}
Enable or disable forwarding of traffic between VLANs on this interface. When disabled, all VLAN traffic will only be delivered to that VLAN only.
enable
Variable Description Default
ortiOS 4.0 MR3 CLI Reference1-431-99686-20110623 443ttp://docs.fortinet.com/ • Feedback
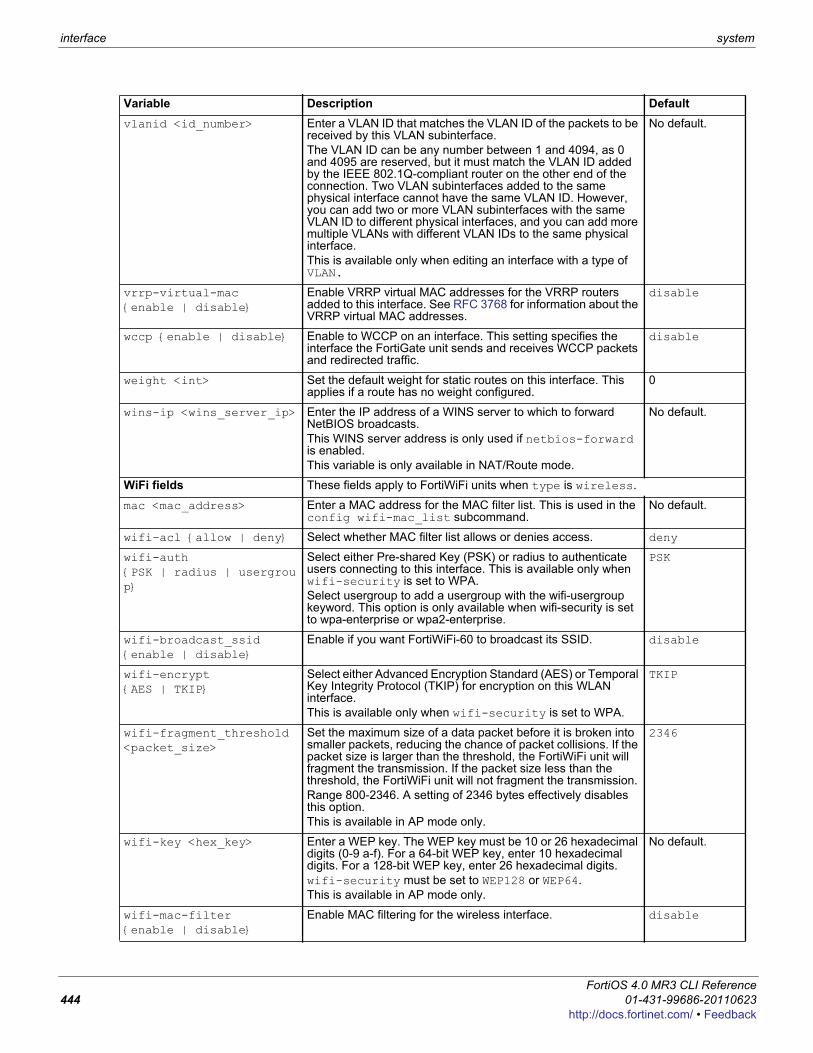
interface system
vlanid <id_number> Enter a VLAN ID that matches the VLAN ID of the packets to be received by this VLAN subinterface. The VLAN ID can be any number between 1 and 4094, as 0 and 4095 are reserved, but it must match the VLAN ID added by the IEEE 802.1Q-compliant router on the other end of the connection. Two VLAN subinterfaces added to the same physical interface cannot have the same VLAN ID. However, you can add two or more VLAN subinterfaces with the same VLAN ID to different physical interfaces, and you can add more multiple VLANs with different VLAN IDs to the same physical interface.This is available only when editing an interface with a type of VLAN.
No default.
vrrp-virtual-mac {enable | disable}
Enable VRRP virtual MAC addresses for the VRRP routers added to this interface. See RFC 3768 for information about the VRRP virtual MAC addresses.
disable
wccp {enable | disable} Enable to WCCP on an interface. This setting specifies the interface the FortiGate unit sends and receives WCCP packets and redirected traffic.
disable
weight <int> Set the default weight for static routes on this interface. This applies if a route has no weight configured.
0
wins-ip <wins_server_ip> Enter the IP address of a WINS server to which to forward NetBIOS broadcasts. This WINS server address is only used if netbios-forward is enabled.This variable is only available in NAT/Route mode.
No default.
WiFi fields These fields apply to FortiWiFi units when type is wireless.
mac <mac_address> Enter a MAC address for the MAC filter list. This is used in the config wifi-mac_list subcommand.
No default.
wifi-acl {allow | deny} Select whether MAC filter list allows or denies access. deny
wifi-auth {PSK | radius | usergroup}
Select either Pre-shared Key (PSK) or radius to authenticate users connecting to this interface. This is available only when wifi-security is set to WPA.Select usergroup to add a usergroup with the wifi-usergroup keyword. This option is only available when wifi-security is set to wpa-enterprise or wpa2-enterprise.
PSK
wifi-broadcast_ssid {enable | disable}
Enable if you want FortiWiFi-60 to broadcast its SSID. disable
wifi-encrypt {AES | TKIP}
Select either Advanced Encryption Standard (AES) or Temporal Key Integrity Protocol (TKIP) for encryption on this WLAN interface.This is available only when wifi-security is set to WPA.
TKIP
wifi-fragment_threshold <packet_size>
Set the maximum size of a data packet before it is broken into smaller packets, reducing the chance of packet collisions. If the packet size is larger than the threshold, the FortiWiFi unit will fragment the transmission. If the packet size less than the threshold, the FortiWiFi unit will not fragment the transmission.Range 800-2346. A setting of 2346 bytes effectively disables this option.This is available in AP mode only.
2346
wifi-key <hex_key> Enter a WEP key. The WEP key must be 10 or 26 hexadecimal digits (0-9 a-f). For a 64-bit WEP key, enter 10 hexadecimal digits. For a 128-bit WEP key, enter 26 hexadecimal digits.wifi-security must be set to WEP128 or WEP64.This is available in AP mode only.
No default.
wifi-mac-filter {enable | disable}
Enable MAC filtering for the wireless interface. disable
Variable Description Default
FortiOS 4.0 MR3 CLI Reference444 01-431-99686-20110623
http://docs.fortinet.com/ • Feedback
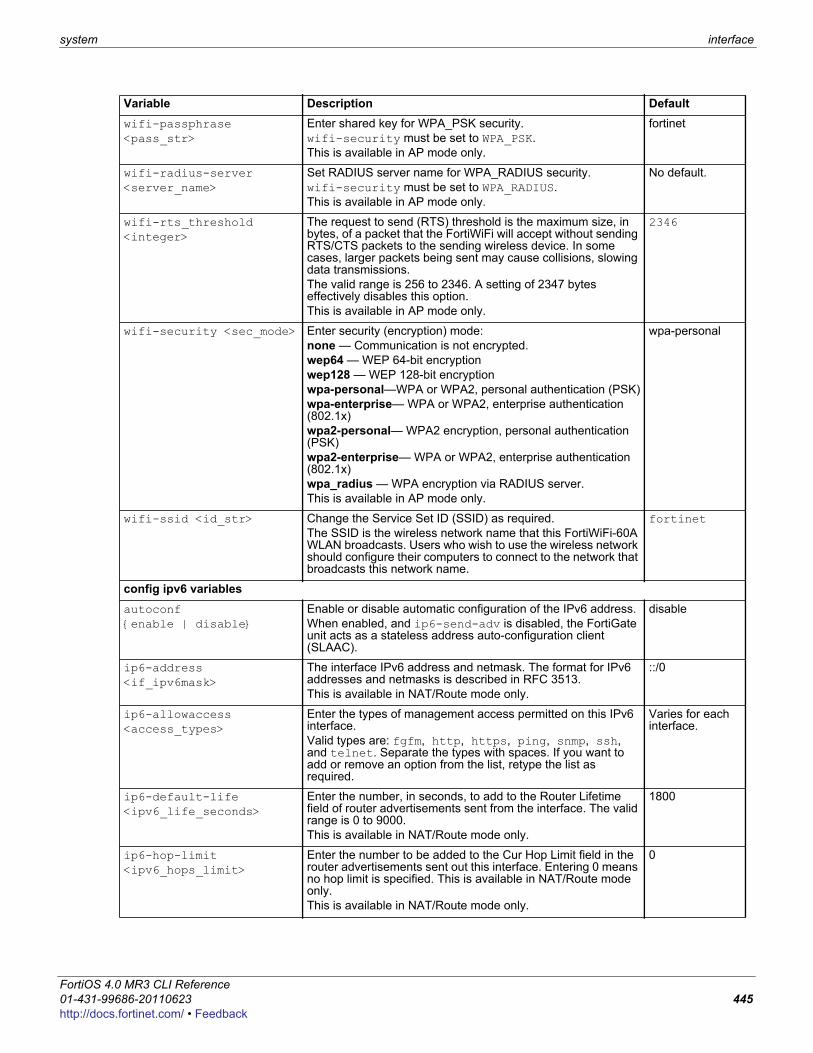
system interface
F0h
wifi-passphrase <pass_str>
Enter shared key for WPA_PSK security.wifi-security must be set to WPA_PSK.This is available in AP mode only.
fortinet
wifi-radius-server <server_name>
Set RADIUS server name for WPA_RADIUS security.wifi-security must be set to WPA_RADIUS.This is available in AP mode only.
No default.
wifi-rts_threshold <integer>
The request to send (RTS) threshold is the maximum size, in bytes, of a packet that the FortiWiFi will accept without sending RTS/CTS packets to the sending wireless device. In some cases, larger packets being sent may cause collisions, slowing data transmissions. The valid range is 256 to 2346. A setting of 2347 bytes effectively disables this option.This is available in AP mode only.
2346
wifi-security <sec_mode> Enter security (encryption) mode:none — Communication is not encrypted.wep64 — WEP 64-bit encryptionwep128 — WEP 128-bit encryptionwpa-personal—WPA or WPA2, personal authentication (PSK)wpa-enterprise— WPA or WPA2, enterprise authentication (802.1x)wpa2-personal— WPA2 encryption, personal authentication (PSK)wpa2-enterprise— WPA or WPA2, enterprise authentication (802.1x)wpa_radius — WPA encryption via RADIUS server.This is available in AP mode only.
wpa-personal
wifi-ssid <id_str> Change the Service Set ID (SSID) as required.The SSID is the wireless network name that this FortiWiFi-60A WLAN broadcasts. Users who wish to use the wireless network should configure their computers to connect to the network that broadcasts this network name.
fortinet
config ipv6 variablesautoconf {enable | disable}
Enable or disable automatic configuration of the IPv6 address.When enabled, and ip6-send-adv is disabled, the FortiGate unit acts as a stateless address auto-configuration client (SLAAC).
disable
ip6-address <if_ipv6mask>
The interface IPv6 address and netmask. The format for IPv6 addresses and netmasks is described in RFC 3513.This is available in NAT/Route mode only.
::/0
ip6-allowaccess <access_types>
Enter the types of management access permitted on this IPv6 interface. Valid types are: fgfm, http, https, ping, snmp, ssh, and telnet. Separate the types with spaces. If you want to add or remove an option from the list, retype the list as required.
Varies for each interface.
ip6-default-life <ipv6_life_seconds>
Enter the number, in seconds, to add to the Router Lifetime field of router advertisements sent from the interface. The valid range is 0 to 9000.This is available in NAT/Route mode only.
1800
ip6-hop-limit <ipv6_hops_limit>
Enter the number to be added to the Cur Hop Limit field in the router advertisements sent out this interface. Entering 0 means no hop limit is specified. This is available in NAT/Route mode only.This is available in NAT/Route mode only.
0
Variable Description Default
ortiOS 4.0 MR3 CLI Reference1-431-99686-20110623 445ttp://docs.fortinet.com/ • Feedback
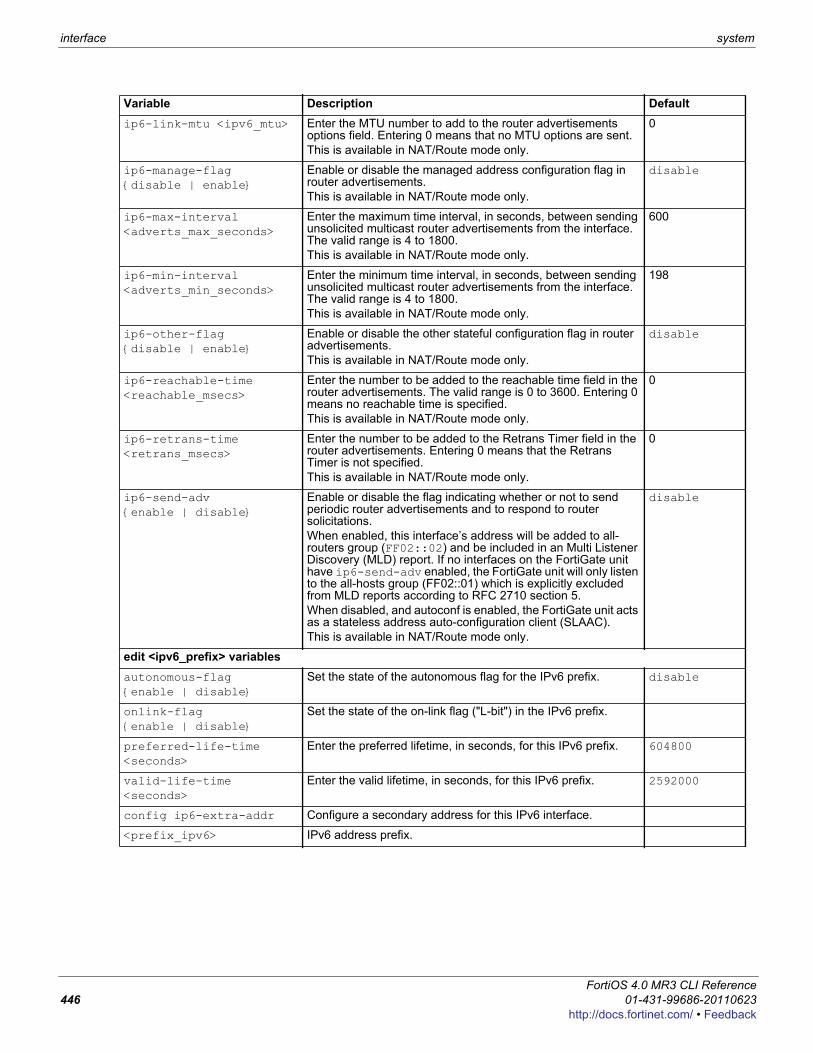
interface system
ip6-link-mtu <ipv6_mtu> Enter the MTU number to add to the router advertisements options field. Entering 0 means that no MTU options are sent.This is available in NAT/Route mode only.
0
ip6-manage-flag {disable | enable}
Enable or disable the managed address configuration flag in router advertisements.This is available in NAT/Route mode only.
disable
ip6-max-interval <adverts_max_seconds>
Enter the maximum time interval, in seconds, between sending unsolicited multicast router advertisements from the interface. The valid range is 4 to 1800.This is available in NAT/Route mode only.
600
ip6-min-interval <adverts_min_seconds>
Enter the minimum time interval, in seconds, between sending unsolicited multicast router advertisements from the interface. The valid range is 4 to 1800.This is available in NAT/Route mode only.
198
ip6-other-flag {disable | enable}
Enable or disable the other stateful configuration flag in router advertisements.This is available in NAT/Route mode only.
disable
ip6-reachable-time <reachable_msecs>
Enter the number to be added to the reachable time field in the router advertisements. The valid range is 0 to 3600. Entering 0 means no reachable time is specified.This is available in NAT/Route mode only.
0
ip6-retrans-time <retrans_msecs>
Enter the number to be added to the Retrans Timer field in the router advertisements. Entering 0 means that the Retrans Timer is not specified.This is available in NAT/Route mode only.
0
ip6-send-adv {enable | disable}
Enable or disable the flag indicating whether or not to send periodic router advertisements and to respond to router solicitations.When enabled, this interface’s address will be added to all-routers group (FF02::02) and be included in an Multi Listener Discovery (MLD) report. If no interfaces on the FortiGate unit have ip6-send-adv enabled, the FortiGate unit will only listen to the all-hosts group (FF02::01) which is explicitly excluded from MLD reports according to RFC 2710 section 5.When disabled, and autoconf is enabled, the FortiGate unit acts as a stateless address auto-configuration client (SLAAC).This is available in NAT/Route mode only.
disable
edit <ipv6_prefix> variablesautonomous-flag {enable | disable}
Set the state of the autonomous flag for the IPv6 prefix. disable
onlink-flag {enable | disable}
Set the state of the on-link flag ("L-bit") in the IPv6 prefix.
preferred-life-time <seconds>
Enter the preferred lifetime, in seconds, for this IPv6 prefix. 604800
valid-life-time <seconds>
Enter the valid lifetime, in seconds, for this IPv6 prefix. 2592000
config ip6-extra-addr Configure a secondary address for this IPv6 interface.
<prefix_ipv6> IPv6 address prefix.
Variable Description Default
FortiOS 4.0 MR3 CLI Reference446 01-431-99686-20110623
http://docs.fortinet.com/ • Feedback
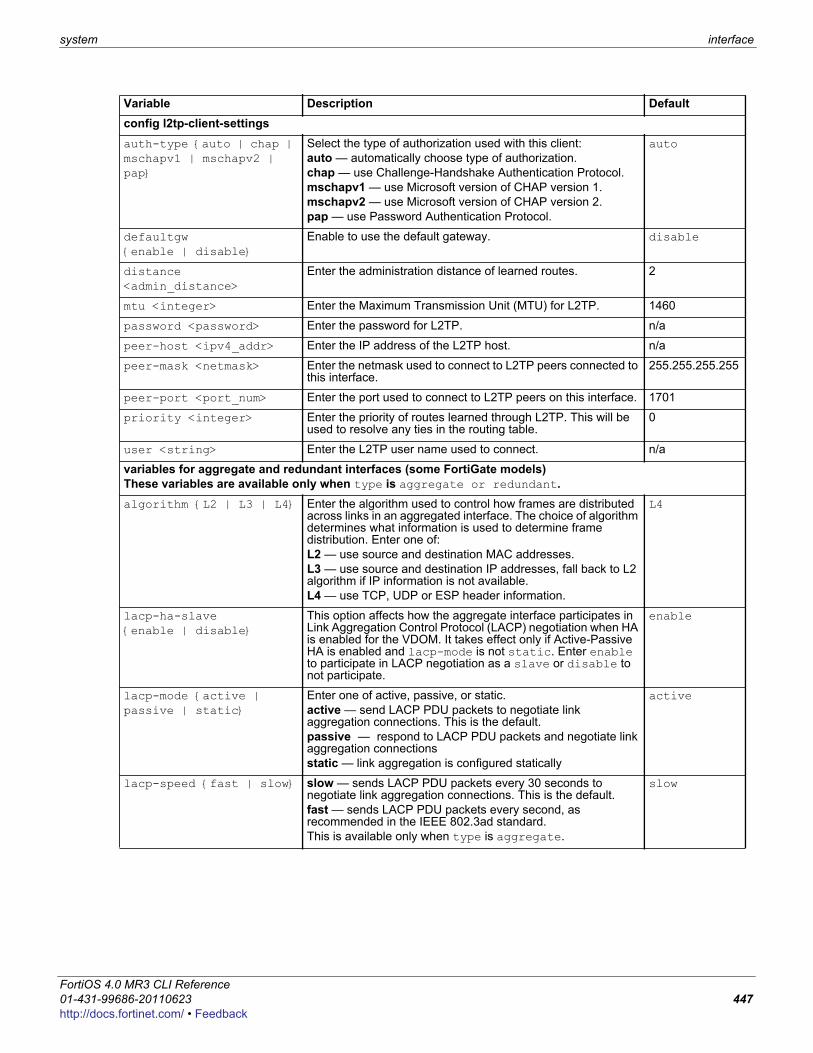
system interface
F0h
config l2tp-client-settingsauth-type {auto | chap | mschapv1 | mschapv2 | pap}
Select the type of authorization used with this client:auto — automatically choose type of authorization.chap — use Challenge-Handshake Authentication Protocol.mschapv1 — use Microsoft version of CHAP version 1.mschapv2 — use Microsoft version of CHAP version 2.pap — use Password Authentication Protocol.
auto
defaultgw {enable | disable}
Enable to use the default gateway. disable
distance <admin_distance>
Enter the administration distance of learned routes. 2
mtu <integer> Enter the Maximum Transmission Unit (MTU) for L2TP. 1460
password <password> Enter the password for L2TP. n/a
peer-host <ipv4_addr> Enter the IP address of the L2TP host. n/a
peer-mask <netmask> Enter the netmask used to connect to L2TP peers connected to this interface.
255.255.255.255
peer-port <port_num> Enter the port used to connect to L2TP peers on this interface. 1701
priority <integer> Enter the priority of routes learned through L2TP. This will be used to resolve any ties in the routing table.
0
user <string> Enter the L2TP user name used to connect. n/a
variables for aggregate and redundant interfaces (some FortiGate models)These variables are available only when type is aggregate or redundant.algorithm {L2 | L3 | L4} Enter the algorithm used to control how frames are distributed
across links in an aggregated interface. The choice of algorithm determines what information is used to determine frame distribution. Enter one of:L2 — use source and destination MAC addresses.L3 — use source and destination IP addresses, fall back to L2 algorithm if IP information is not available.L4 — use TCP, UDP or ESP header information.
L4
lacp-ha-slave {enable | disable}
This option affects how the aggregate interface participates in Link Aggregation Control Protocol (LACP) negotiation when HA is enabled for the VDOM. It takes effect only if Active-Passive HA is enabled and lacp-mode is not static. Enter enable to participate in LACP negotiation as a slave or disable to not participate.
enable
lacp-mode {active | passive | static}
Enter one of active, passive, or static.active — send LACP PDU packets to negotiate link aggregation connections. This is the default.passive — respond to LACP PDU packets and negotiate link aggregation connectionsstatic — link aggregation is configured statically
active
lacp-speed {fast | slow} slow — sends LACP PDU packets every 30 seconds to negotiate link aggregation connections. This is the default.fast — sends LACP PDU packets every second, as recommended in the IEEE 802.3ad standard.This is available only when type is aggregate.
slow
Variable Description Default
ortiOS 4.0 MR3 CLI Reference1-431-99686-20110623 447ttp://docs.fortinet.com/ • Feedback
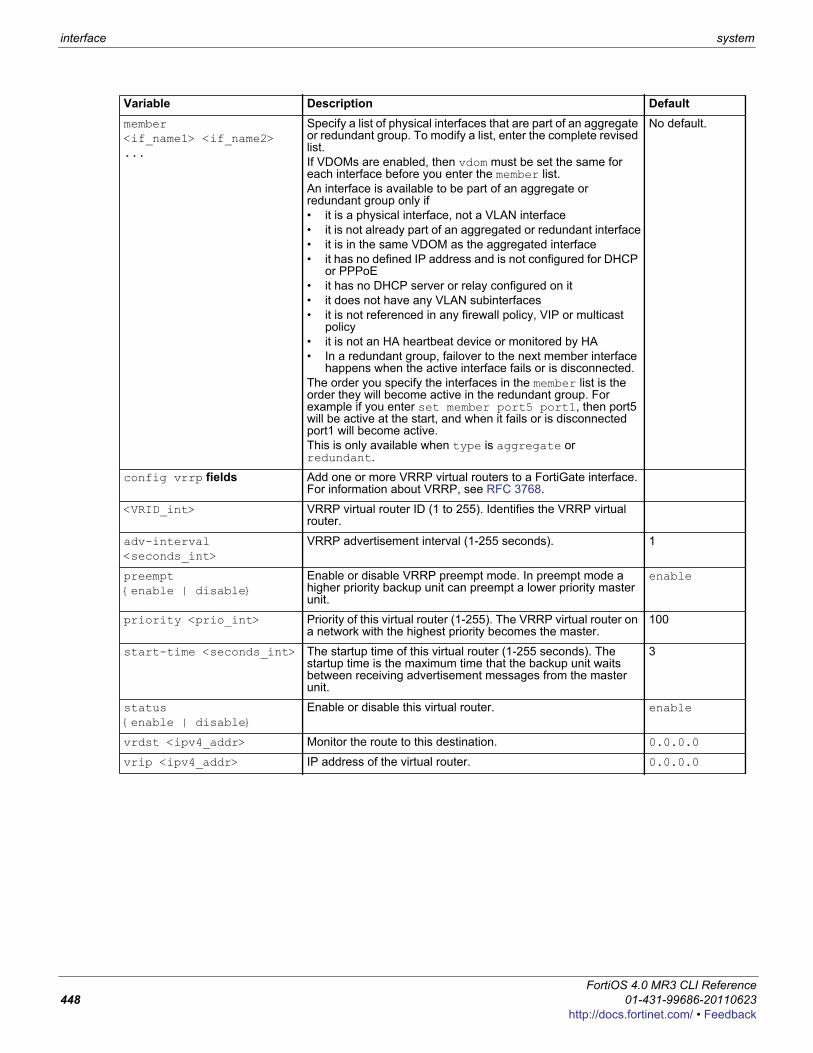
interface system
member <if_name1> <if_name2> ...
Specify a list of physical interfaces that are part of an aggregate or redundant group. To modify a list, enter the complete revised list. If VDOMs are enabled, then vdom must be set the same for each interface before you enter the member list.An interface is available to be part of an aggregate or redundant group only if • it is a physical interface, not a VLAN interface• it is not already part of an aggregated or redundant interface• it is in the same VDOM as the aggregated interface• it has no defined IP address and is not configured for DHCP
or PPPoE• it has no DHCP server or relay configured on it• it does not have any VLAN subinterfaces• it is not referenced in any firewall policy, VIP or multicast
policy• it is not an HA heartbeat device or monitored by HA• In a redundant group, failover to the next member interface
happens when the active interface fails or is disconnected.The order you specify the interfaces in the member list is the order they will become active in the redundant group. For example if you enter set member port5 port1, then port5 will be active at the start, and when it fails or is disconnected port1 will become active. This is only available when type is aggregate or redundant.
No default.
config vrrp fields Add one or more VRRP virtual routers to a FortiGate interface. For information about VRRP, see RFC 3768.
<VRID_int> VRRP virtual router ID (1 to 255). Identifies the VRRP virtual router.
adv-interval <seconds_int>
VRRP advertisement interval (1-255 seconds). 1
preempt {enable | disable}
Enable or disable VRRP preempt mode. In preempt mode a higher priority backup unit can preempt a lower priority master unit.
enable
priority <prio_int> Priority of this virtual router (1-255). The VRRP virtual router on a network with the highest priority becomes the master.
100
start-time <seconds_int> The startup time of this virtual router (1-255 seconds). The startup time is the maximum time that the backup unit waits between receiving advertisement messages from the master unit.
3
status {enable | disable}
Enable or disable this virtual router. enable
vrdst <ipv4_addr> Monitor the route to this destination. 0.0.0.0
vrip <ipv4_addr> IP address of the virtual router. 0.0.0.0
Variable Description Default
FortiOS 4.0 MR3 CLI Reference448 01-431-99686-20110623
http://docs.fortinet.com/ • Feedback
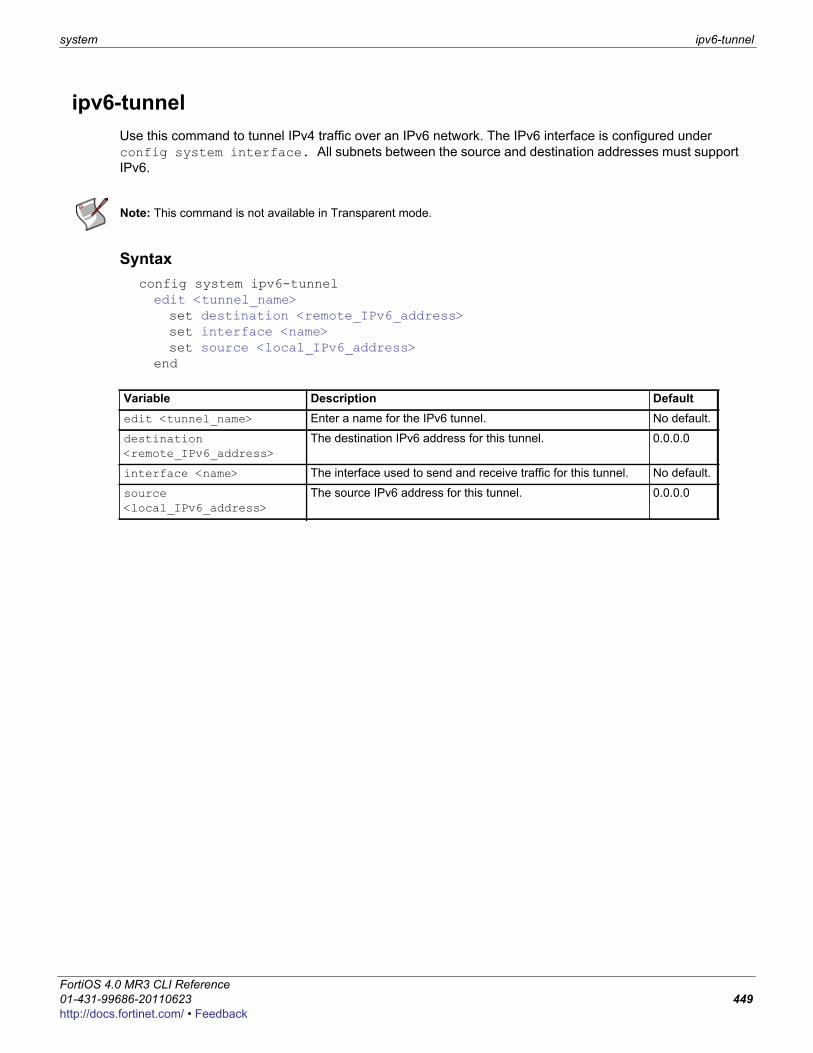
system ipv6-tunnel
F0h
ipv6-tunnelUse this command to tunnel IPv4 traffic over an IPv6 network. The IPv6 interface is configured under config system interface. All subnets between the source and destination addresses must support IPv6.
Syntaxconfig system ipv6-tunneledit <tunnel_name>set destination <remote_IPv6_address>set interface <name>set source <local_IPv6_address>
end
Note: This command is not available in Transparent mode.
Variable Description Defaultedit <tunnel_name> Enter a name for the IPv6 tunnel. No default.
destination <remote_IPv6_address>
The destination IPv6 address for this tunnel. 0.0.0.0
interface <name> The interface used to send and receive traffic for this tunnel. No default.
source <local_IPv6_address>
The source IPv6 address for this tunnel. 0.0.0.0
ortiOS 4.0 MR3 CLI Reference1-431-99686-20110623 449ttp://docs.fortinet.com/ • Feedback
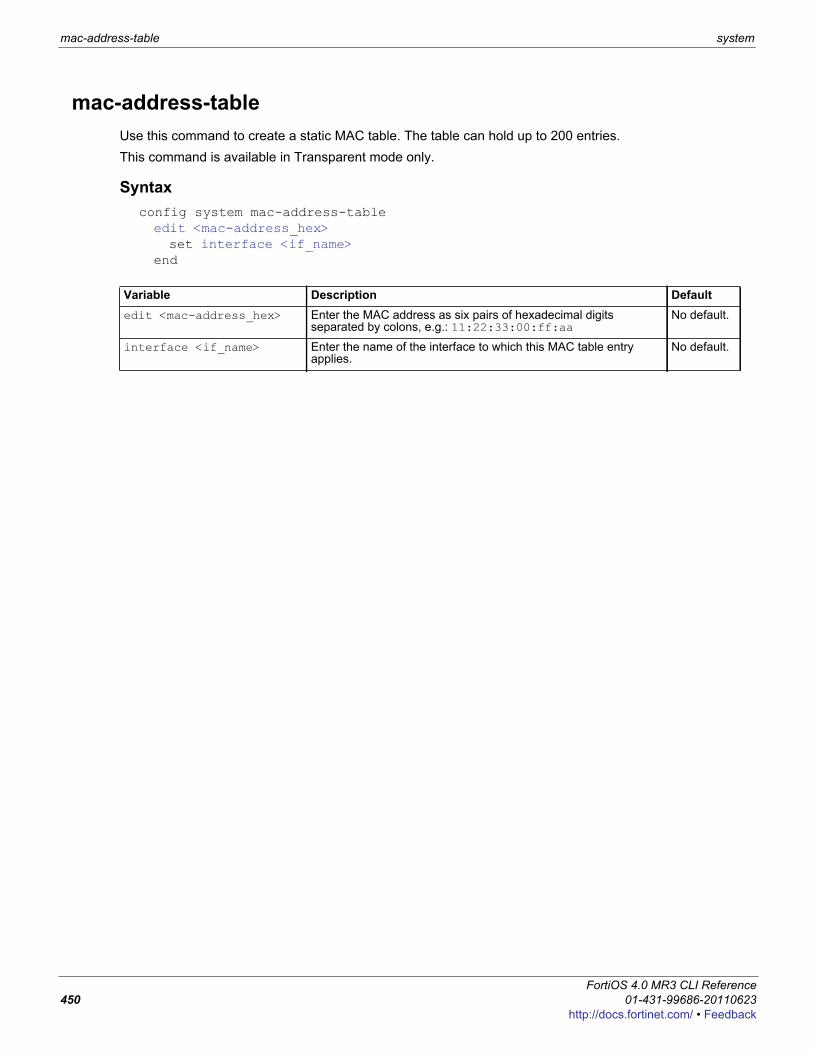
mac-address-table system
mac-address-tableUse this command to create a static MAC table. The table can hold up to 200 entries. This command is available in Transparent mode only.
Syntaxconfig system mac-address-tableedit <mac-address_hex>set interface <if_name>
end
Variable Description Defaultedit <mac-address_hex> Enter the MAC address as six pairs of hexadecimal digits
separated by colons, e.g.: 11:22:33:00:ff:aaNo default.
interface <if_name> Enter the name of the interface to which this MAC table entry applies.
No default.
FortiOS 4.0 MR3 CLI Reference450 01-431-99686-20110623
http://docs.fortinet.com/ • Feedback
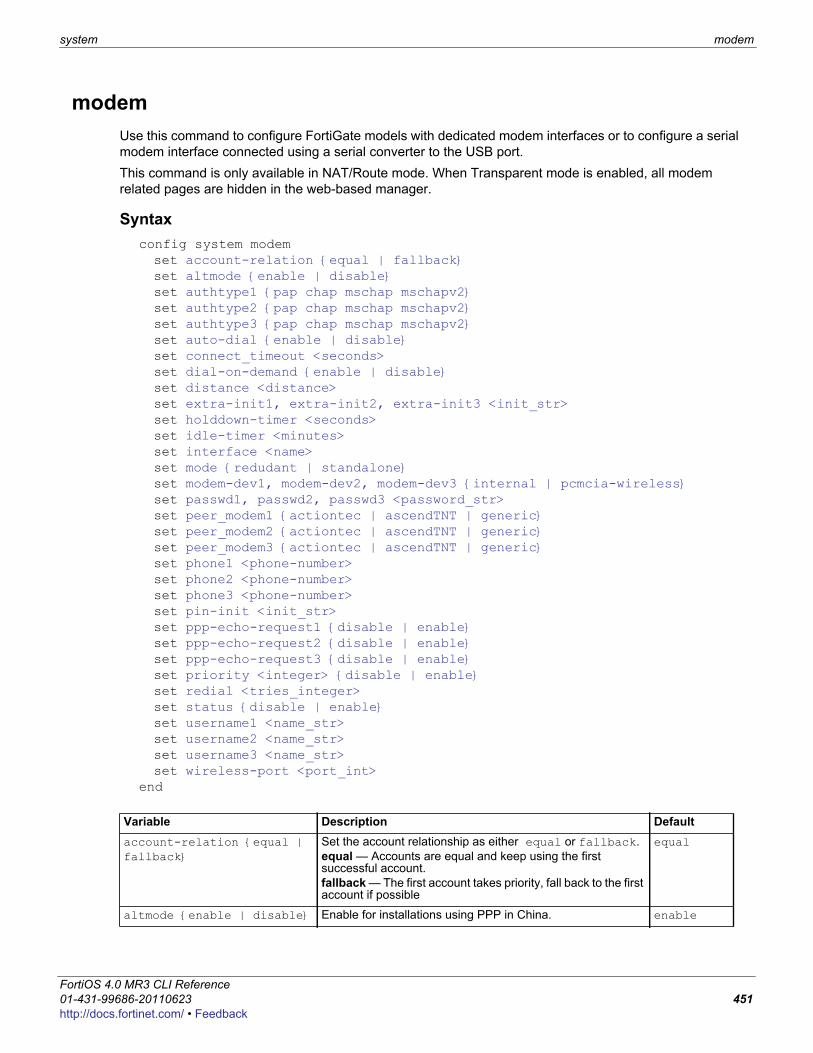
system modem
F0h
modemUse this command to configure FortiGate models with dedicated modem interfaces or to configure a serial modem interface connected using a serial converter to the USB port. This command is only available in NAT/Route mode. When Transparent mode is enabled, all modem related pages are hidden in the web-based manager.
Syntaxconfig system modem set account-relation {equal | fallback}set altmode {enable | disable}set authtype1 {pap chap mschap mschapv2}set authtype2 {pap chap mschap mschapv2}set authtype3 {pap chap mschap mschapv2}set auto-dial {enable | disable}set connect_timeout <seconds>set dial-on-demand {enable | disable}set distance <distance>set extra-init1, extra-init2, extra-init3 <init_str>set holddown-timer <seconds>set idle-timer <minutes>set interface <name>set mode {redudant | standalone}set modem-dev1, modem-dev2, modem-dev3 {internal | pcmcia-wireless}set passwd1, passwd2, passwd3 <password_str> set peer_modem1 {actiontec | ascendTNT | generic}set peer_modem2 {actiontec | ascendTNT | generic}set peer_modem3 {actiontec | ascendTNT | generic}set phone1 <phone-number>set phone2 <phone-number>set phone3 <phone-number>set pin-init <init_str>set ppp-echo-request1 {disable | enable}set ppp-echo-request2 {disable | enable}set ppp-echo-request3 {disable | enable}set priority <integer> {disable | enable}set redial <tries_integer>set status {disable | enable}set username1 <name_str>set username2 <name_str>set username3 <name_str>set wireless-port <port_int>
end
Variable Description Defaultaccount-relation {equal | fallback}
Set the account relationship as either equal or fallback.equal — Accounts are equal and keep using the first successful account.fallback — The first account takes priority, fall back to the first account if possible
equal
altmode {enable | disable} Enable for installations using PPP in China. enable
ortiOS 4.0 MR3 CLI Reference1-431-99686-20110623 451ttp://docs.fortinet.com/ • Feedback
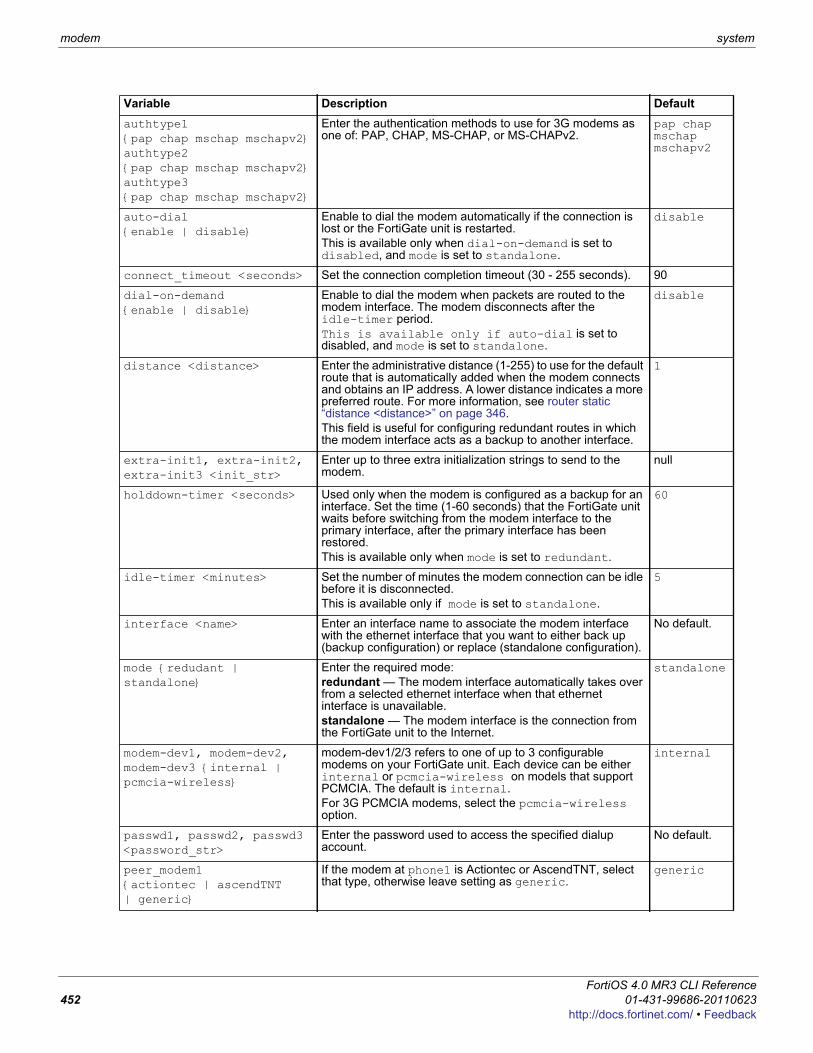
modem system
authtype1 {pap chap mschap mschapv2}authtype2 {pap chap mschap mschapv2}authtype3 {pap chap mschap mschapv2}
Enter the authentication methods to use for 3G modems as one of: PAP, CHAP, MS-CHAP, or MS-CHAPv2.
pap chap mschap mschapv2
auto-dial {enable | disable}
Enable to dial the modem automatically if the connection is lost or the FortiGate unit is restarted. This is available only when dial-on-demand is set to disabled, and mode is set to standalone.
disable
connect_timeout <seconds> Set the connection completion timeout (30 - 255 seconds). 90
dial-on-demand {enable | disable}
Enable to dial the modem when packets are routed to the modem interface. The modem disconnects after the idle-timer period. This is available only if auto-dial is set to disabled, and mode is set to standalone.
disable
distance <distance> Enter the administrative distance (1-255) to use for the default route that is automatically added when the modem connects and obtains an IP address. A lower distance indicates a more preferred route. For more information, see router static “distance <distance>” on page 346.This field is useful for configuring redundant routes in which the modem interface acts as a backup to another interface.
1
extra-init1, extra-init2, extra-init3 <init_str>
Enter up to three extra initialization strings to send to the modem.
null
holddown-timer <seconds> Used only when the modem is configured as a backup for an interface. Set the time (1-60 seconds) that the FortiGate unit waits before switching from the modem interface to the primary interface, after the primary interface has been restored.This is available only when mode is set to redundant.
60
idle-timer <minutes> Set the number of minutes the modem connection can be idle before it is disconnected.This is available only if mode is set to standalone.
5
interface <name> Enter an interface name to associate the modem interface with the ethernet interface that you want to either back up (backup configuration) or replace (standalone configuration).
No default.
mode {redudant | standalone}
Enter the required mode:redundant — The modem interface automatically takes over from a selected ethernet interface when that ethernet interface is unavailable.standalone — The modem interface is the connection from the FortiGate unit to the Internet.
standalone
modem-dev1, modem-dev2, modem-dev3 {internal | pcmcia-wireless}
modem-dev1/2/3 refers to one of up to 3 configurable modems on your FortiGate unit. Each device can be either internal or pcmcia-wireless on models that support PCMCIA. The default is internal.For 3G PCMCIA modems, select the pcmcia-wireless option.
internal
passwd1, passwd2, passwd3 <password_str>
Enter the password used to access the specified dialup account.
No default.
peer_modem1 {actiontec | ascendTNT | generic}
If the modem at phone1 is Actiontec or AscendTNT, select that type, otherwise leave setting as generic.
generic
Variable Description Default
FortiOS 4.0 MR3 CLI Reference452 01-431-99686-20110623
http://docs.fortinet.com/ • Feedback
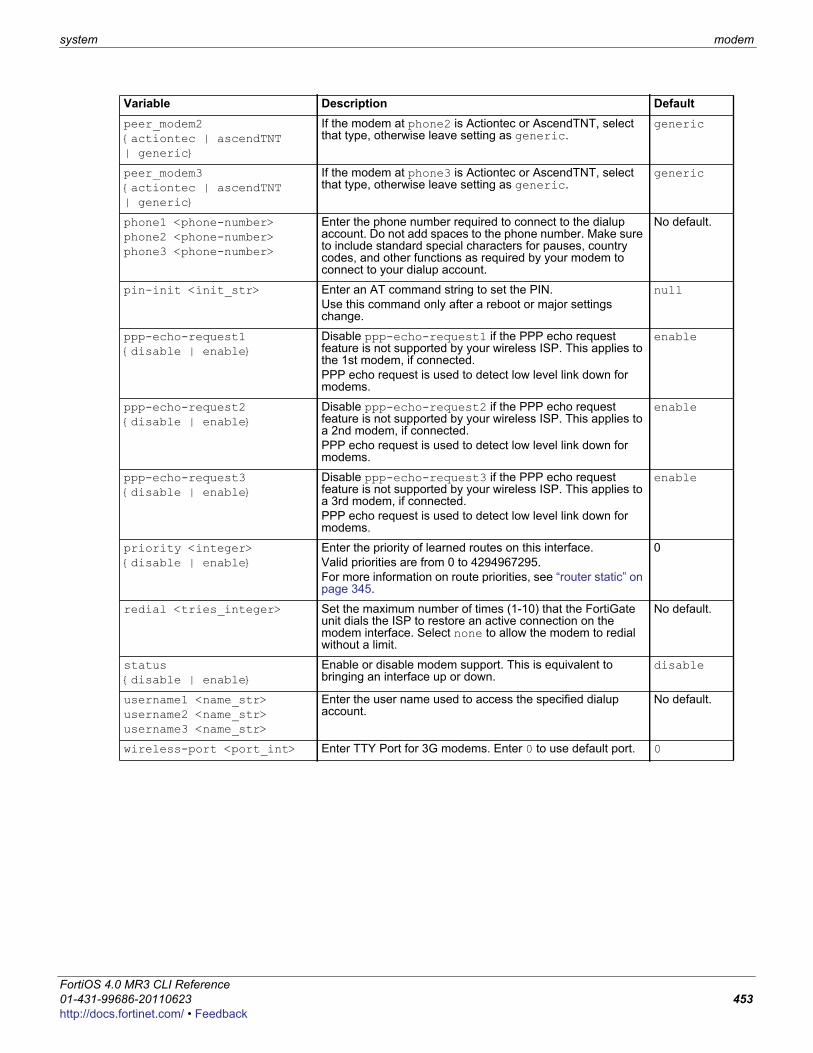
system modem
F0h
peer_modem2 {actiontec | ascendTNT | generic}
If the modem at phone2 is Actiontec or AscendTNT, select that type, otherwise leave setting as generic.
generic
peer_modem3 {actiontec | ascendTNT | generic}
If the modem at phone3 is Actiontec or AscendTNT, select that type, otherwise leave setting as generic.
generic
phone1 <phone-number>phone2 <phone-number>phone3 <phone-number>
Enter the phone number required to connect to the dialup account. Do not add spaces to the phone number. Make sure to include standard special characters for pauses, country codes, and other functions as required by your modem to connect to your dialup account.
No default.
pin-init <init_str> Enter an AT command string to set the PIN. Use this command only after a reboot or major settings change.
null
ppp-echo-request1 {disable | enable}
Disable ppp-echo-request1 if the PPP echo request feature is not supported by your wireless ISP. This applies to the 1st modem, if connected.PPP echo request is used to detect low level link down for modems.
enable
ppp-echo-request2 {disable | enable}
Disable ppp-echo-request2 if the PPP echo request feature is not supported by your wireless ISP. This applies to a 2nd modem, if connected.PPP echo request is used to detect low level link down for modems.
enable
ppp-echo-request3 {disable | enable}
Disable ppp-echo-request3 if the PPP echo request feature is not supported by your wireless ISP. This applies to a 3rd modem, if connected.PPP echo request is used to detect low level link down for modems.
enable
priority <integer> {disable | enable}
Enter the priority of learned routes on this interface. Valid priorities are from 0 to 4294967295. For more information on route priorities, see “router static” on page 345.
0
redial <tries_integer> Set the maximum number of times (1-10) that the FortiGate unit dials the ISP to restore an active connection on the modem interface. Select none to allow the modem to redial without a limit.
No default.
status {disable | enable}
Enable or disable modem support. This is equivalent to bringing an interface up or down.
disable
username1 <name_str>username2 <name_str>username3 <name_str>
Enter the user name used to access the specified dialup account.
No default.
wireless-port <port_int> Enter TTY Port for 3G modems. Enter 0 to use default port. 0
Variable Description Default
ortiOS 4.0 MR3 CLI Reference1-431-99686-20110623 453ttp://docs.fortinet.com/ • Feedback
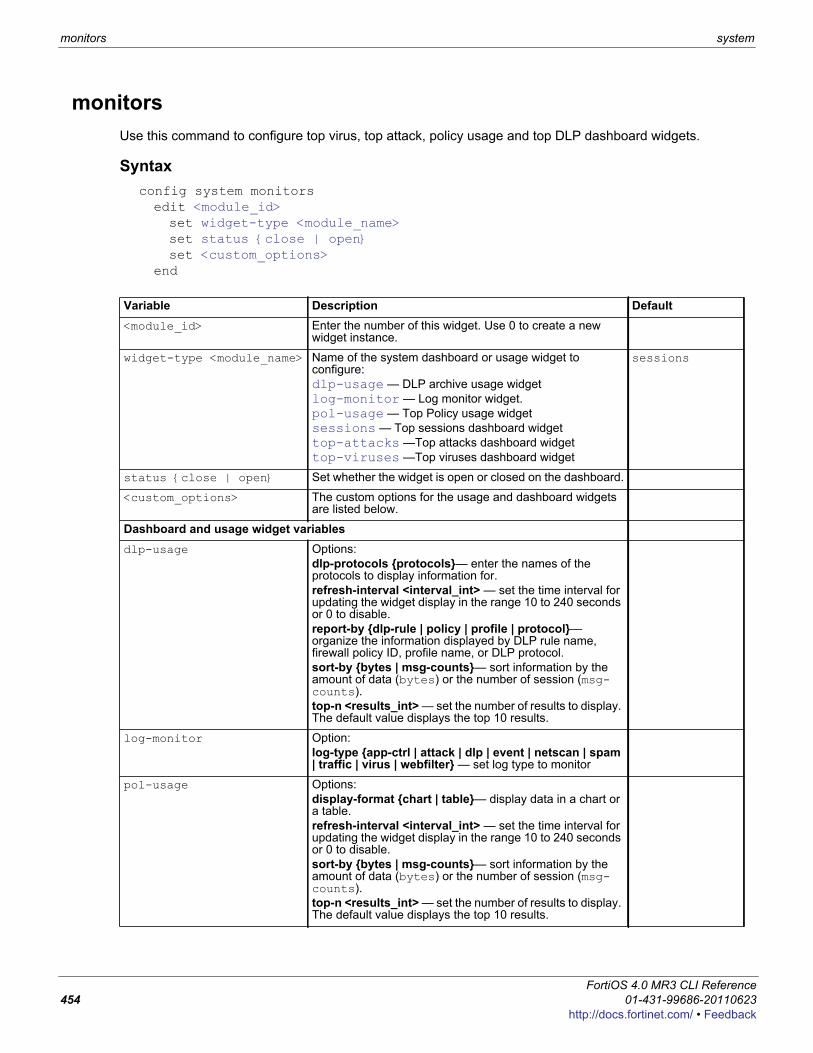
monitors system
monitorsUse this command to configure top virus, top attack, policy usage and top DLP dashboard widgets.
Syntaxconfig system monitorsedit <module_id>set widget-type <module_name>set status {close | open}set <custom_options>
end
Variable Description Default<module_id> Enter the number of this widget. Use 0 to create a new
widget instance.
widget-type <module_name> Name of the system dashboard or usage widget to configure:dlp-usage — DLP archive usage widgetlog-monitor — Log monitor widget.pol-usage — Top Policy usage widgetsessions — Top sessions dashboard widgettop-attacks —Top attacks dashboard widgettop-viruses —Top viruses dashboard widget
sessions
status {close | open} Set whether the widget is open or closed on the dashboard.
<custom_options> The custom options for the usage and dashboard widgets are listed below.
Dashboard and usage widget variablesdlp-usage Options:
dlp-protocols {protocols}— enter the names of the protocols to display information for.refresh-interval <interval_int> — set the time interval for updating the widget display in the range 10 to 240 seconds or 0 to disable.report-by {dlp-rule | policy | profile | protocol}— organize the information displayed by DLP rule name, firewall policy ID, profile name, or DLP protocol.sort-by {bytes | msg-counts}— sort information by the amount of data (bytes) or the number of session (msg-counts).top-n <results_int> — set the number of results to display. The default value displays the top 10 results.
log-monitor Option:log-type {app-ctrl | attack | dlp | event | netscan | spam | traffic | virus | webfilter} — set log type to monitor
pol-usage Options:display-format {chart | table}— display data in a chart or a table.refresh-interval <interval_int> — set the time interval for updating the widget display in the range 10 to 240 seconds or 0 to disable.sort-by {bytes | msg-counts}— sort information by the amount of data (bytes) or the number of session (msg-counts).top-n <results_int> — set the number of results to display. The default value displays the top 10 results.
FortiOS 4.0 MR3 CLI Reference454 01-431-99686-20110623
http://docs.fortinet.com/ • Feedback
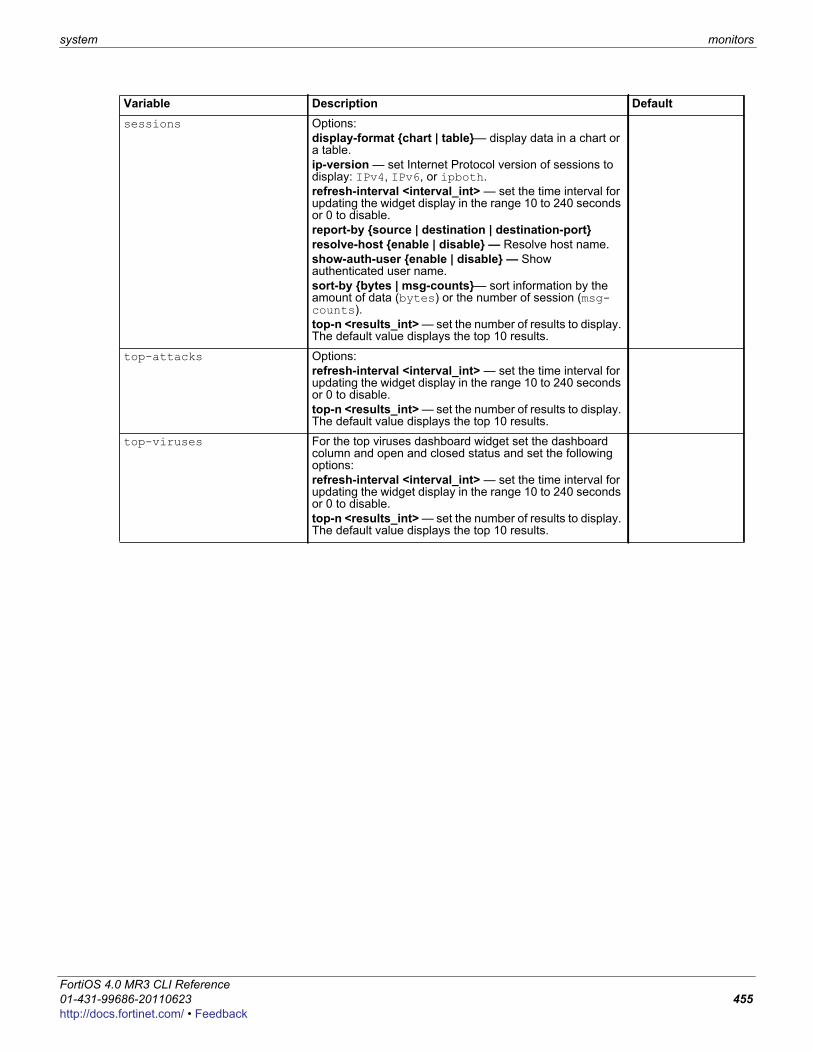
system monitors
F0h
sessions Options:display-format {chart | table}— display data in a chart or a table.ip-version — set Internet Protocol version of sessions to display: IPv4, IPv6, or ipboth.refresh-interval <interval_int> — set the time interval for updating the widget display in the range 10 to 240 seconds or 0 to disable.report-by {source | destination | destination-port}resolve-host {enable | disable} — Resolve host name.show-auth-user {enable | disable} — Show authenticated user name.sort-by {bytes | msg-counts}— sort information by the amount of data (bytes) or the number of session (msg-counts).top-n <results_int> — set the number of results to display. The default value displays the top 10 results.
top-attacks Options:refresh-interval <interval_int> — set the time interval for updating the widget display in the range 10 to 240 seconds or 0 to disable.top-n <results_int> — set the number of results to display. The default value displays the top 10 results.
top-viruses For the top viruses dashboard widget set the dashboard column and open and closed status and set the following options:refresh-interval <interval_int> — set the time interval for updating the widget display in the range 10 to 240 seconds or 0 to disable.top-n <results_int> — set the number of results to display. The default value displays the top 10 results.
Variable Description Default
ortiOS 4.0 MR3 CLI Reference1-431-99686-20110623 455ttp://docs.fortinet.com/ • Feedback
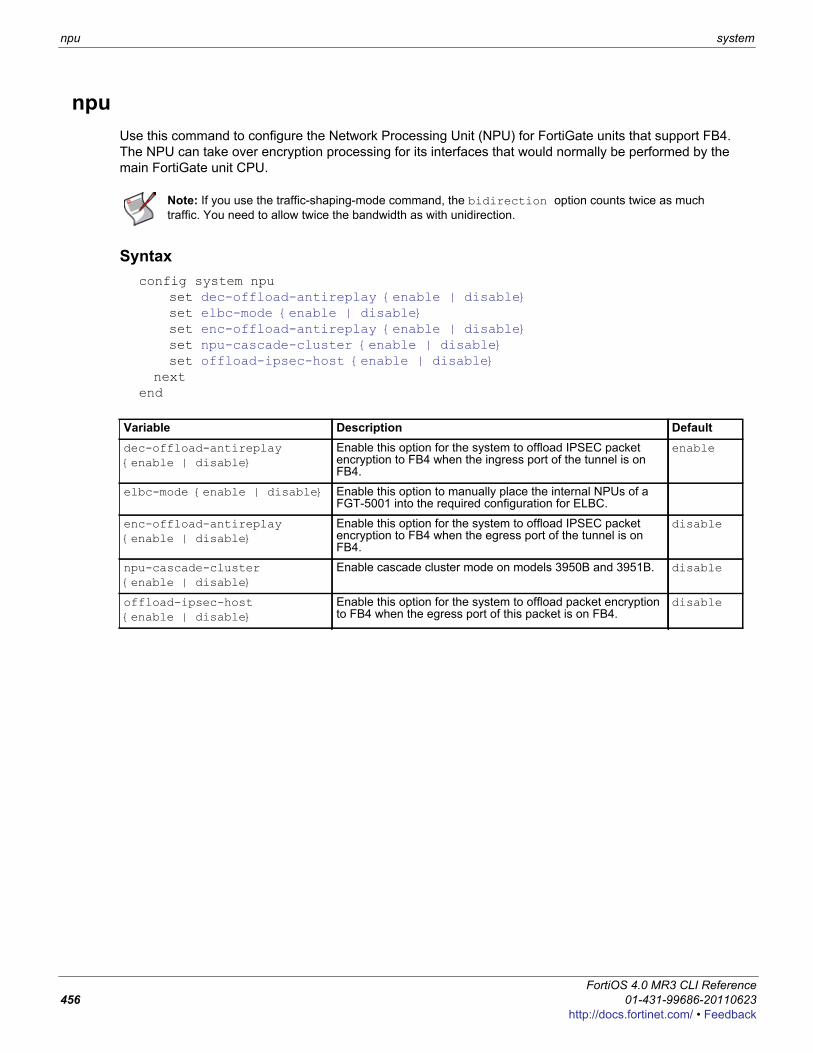
npu system
npuUse this command to configure the Network Processing Unit (NPU) for FortiGate units that support FB4. The NPU can take over encryption processing for its interfaces that would normally be performed by the main FortiGate unit CPU.
Syntaxconfig system npu
set dec-offload-antireplay {enable | disable}set elbc-mode {enable | disable}set enc-offload-antireplay {enable | disable}set npu-cascade-cluster {enable | disable}set offload-ipsec-host {enable | disable}
nextend
Note: If you use the traffic-shaping-mode command, the bidirection option counts twice as much traffic. You need to allow twice the bandwidth as with unidirection.
Variable Description Defaultdec-offload-antireplay {enable | disable}
Enable this option for the system to offload IPSEC packet encryption to FB4 when the ingress port of the tunnel is on FB4.
enable
elbc-mode {enable | disable} Enable this option to manually place the internal NPUs of a FGT-5001 into the required configuration for ELBC.
enc-offload-antireplay {enable | disable}
Enable this option for the system to offload IPSEC packet encryption to FB4 when the egress port of the tunnel is on FB4.
disable
npu-cascade-cluster {enable | disable}
Enable cascade cluster mode on models 3950B and 3951B. disable
offload-ipsec-host {enable | disable}
Enable this option for the system to offload packet encryption to FB4 when the egress port of this packet is on FB4.
disable
FortiOS 4.0 MR3 CLI Reference456 01-431-99686-20110623
http://docs.fortinet.com/ • Feedback
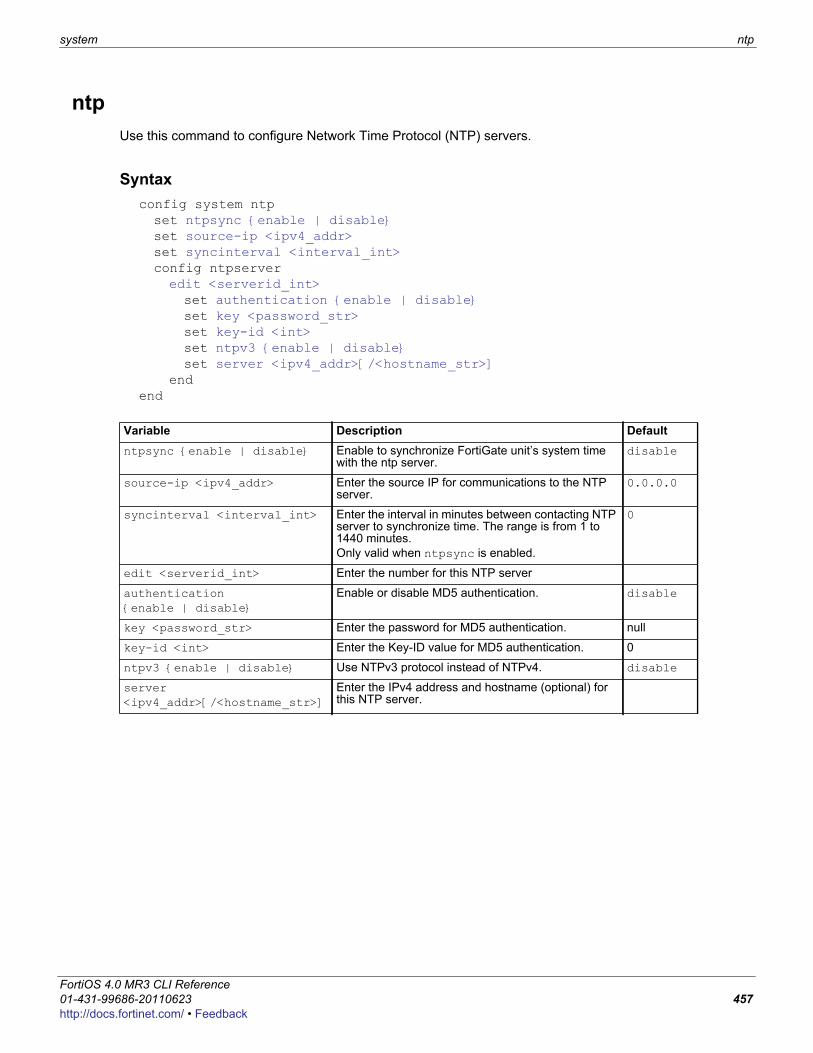
system ntp
F0h
ntpUse this command to configure Network Time Protocol (NTP) servers.
Syntaxconfig system ntpset ntpsync {enable | disable}set source-ip <ipv4_addr>set syncinterval <interval_int>config ntpserveredit <serverid_int>set authentication {enable | disable}set key <password_str>set key-id <int>set ntpv3 {enable | disable}set server <ipv4_addr>[/<hostname_str>]
endend
Variable Description Defaultntpsync {enable | disable} Enable to synchronize FortiGate unit’s system time
with the ntp server.disable
source-ip <ipv4_addr> Enter the source IP for communications to the NTP server.
0.0.0.0
syncinterval <interval_int> Enter the interval in minutes between contacting NTP server to synchronize time. The range is from 1 to 1440 minutes.Only valid when ntpsync is enabled.
0
edit <serverid_int> Enter the number for this NTP server
authentication {enable | disable}
Enable or disable MD5 authentication. disable
key <password_str> Enter the password for MD5 authentication. null
key-id <int> Enter the Key-ID value for MD5 authentication. 0
ntpv3 {enable | disable} Use NTPv3 protocol instead of NTPv4. disable
server <ipv4_addr>[/<hostname_str>]
Enter the IPv4 address and hostname (optional) for this NTP server.
ortiOS 4.0 MR3 CLI Reference1-431-99686-20110623 457ttp://docs.fortinet.com/ • Feedback
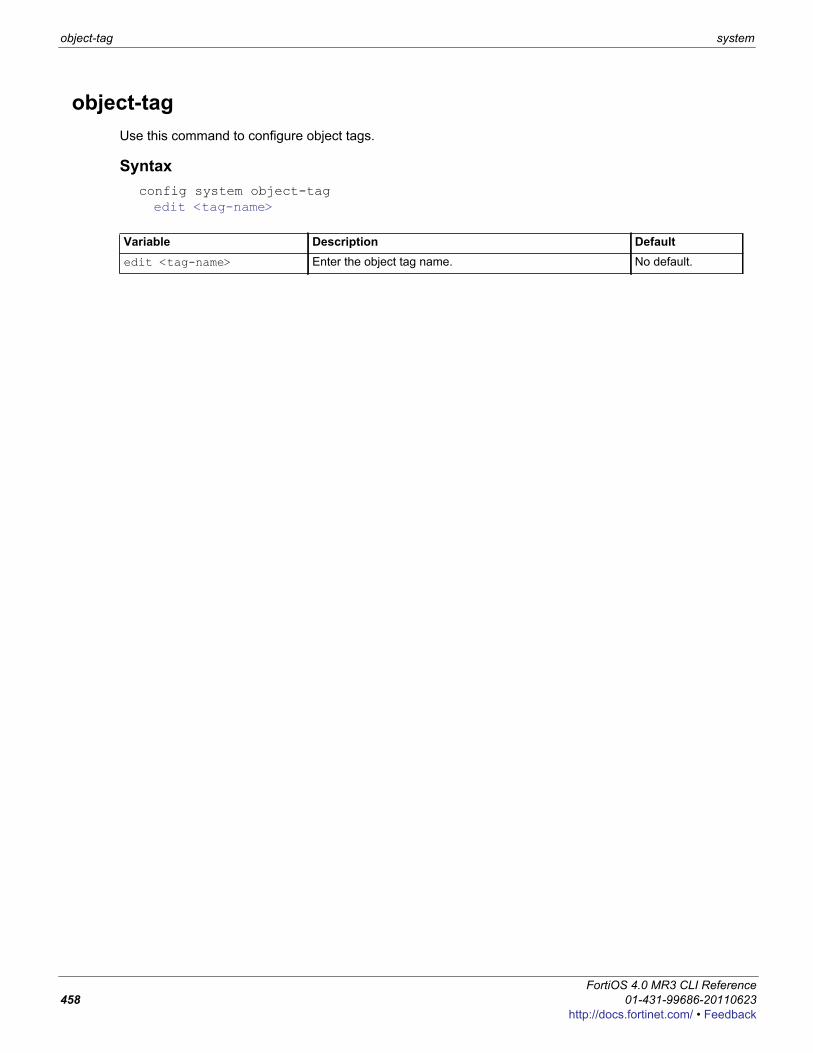
object-tag system
object-tagUse this command to configure object tags.
Syntaxconfig system object-tagedit <tag-name>
Variable Description Defaultedit <tag-name> Enter the object tag name. No default.
FortiOS 4.0 MR3 CLI Reference458 01-431-99686-20110623
http://docs.fortinet.com/ • Feedback
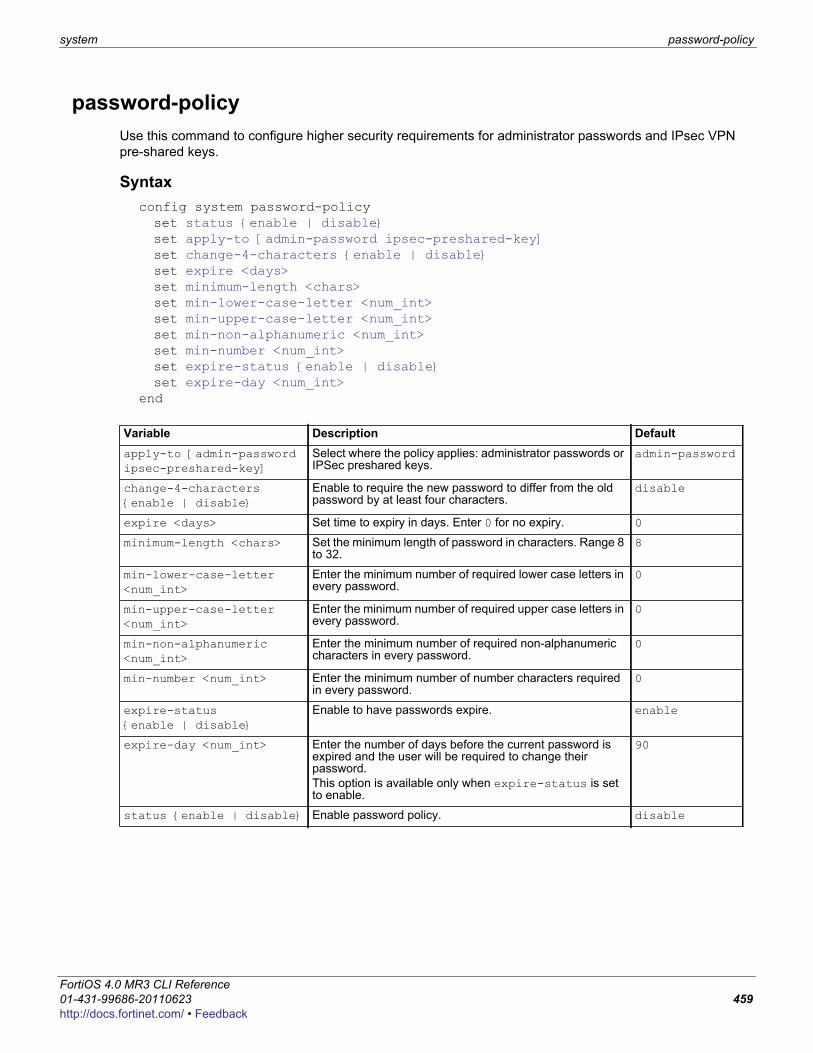
system password-policy
F0h
password-policyUse this command to configure higher security requirements for administrator passwords and IPsec VPN pre-shared keys.
Syntaxconfig system password-policyset status {enable | disable}set apply-to [admin-password ipsec-preshared-key]set change-4-characters {enable | disable}set expire <days>set minimum-length <chars>set min-lower-case-letter <num_int>set min-upper-case-letter <num_int>set min-non-alphanumeric <num_int>set min-number <num_int>set expire-status {enable | disable}set expire-day <num_int>
end
Variable Description Defaultapply-to [admin-password ipsec-preshared-key]
Select where the policy applies: administrator passwords or IPSec preshared keys.
admin-password
change-4-characters {enable | disable}
Enable to require the new password to differ from the old password by at least four characters.
disable
expire <days> Set time to expiry in days. Enter 0 for no expiry. 0
minimum-length <chars> Set the minimum length of password in characters. Range 8 to 32.
8
min-lower-case-letter <num_int>
Enter the minimum number of required lower case letters in every password.
0
min-upper-case-letter <num_int>
Enter the minimum number of required upper case letters in every password.
0
min-non-alphanumeric <num_int>
Enter the minimum number of required non-alphanumeric characters in every password.
0
min-number <num_int> Enter the minimum number of number characters required in every password.
0
expire-status {enable | disable}
Enable to have passwords expire. enable
expire-day <num_int> Enter the number of days before the current password is expired and the user will be required to change their password.This option is available only when expire-status is set to enable.
90
status {enable | disable} Enable password policy. disable
ortiOS 4.0 MR3 CLI Reference1-431-99686-20110623 459ttp://docs.fortinet.com/ • Feedback
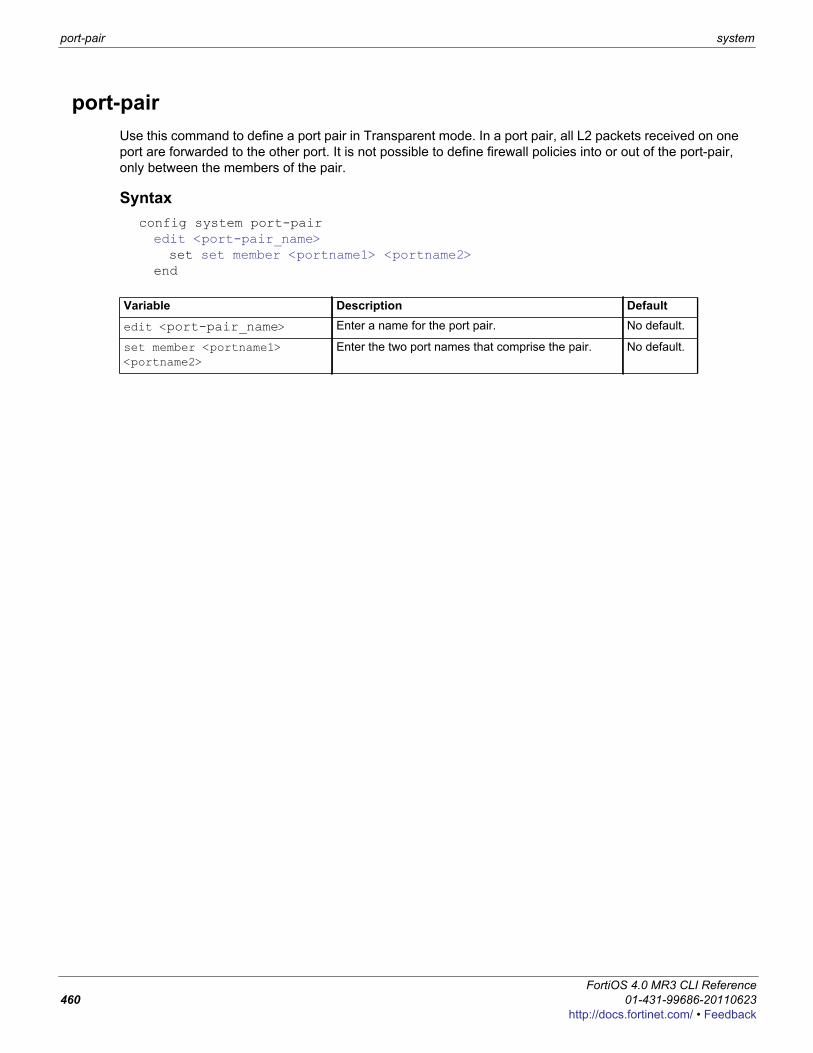
port-pair system
port-pairUse this command to define a port pair in Transparent mode. In a port pair, all L2 packets received on one port are forwarded to the other port. It is not possible to define firewall policies into or out of the port-pair, only between the members of the pair.
Syntaxconfig system port-pairedit <port-pair_name>set set member <portname1> <portname2>
end
Variable Description Default
edit <port-pair_name> Enter a name for the port pair. No default.
set member <portname1> <portname2>
Enter the two port names that comprise the pair. No default.
FortiOS 4.0 MR3 CLI Reference460 01-431-99686-20110623
http://docs.fortinet.com/ • Feedback
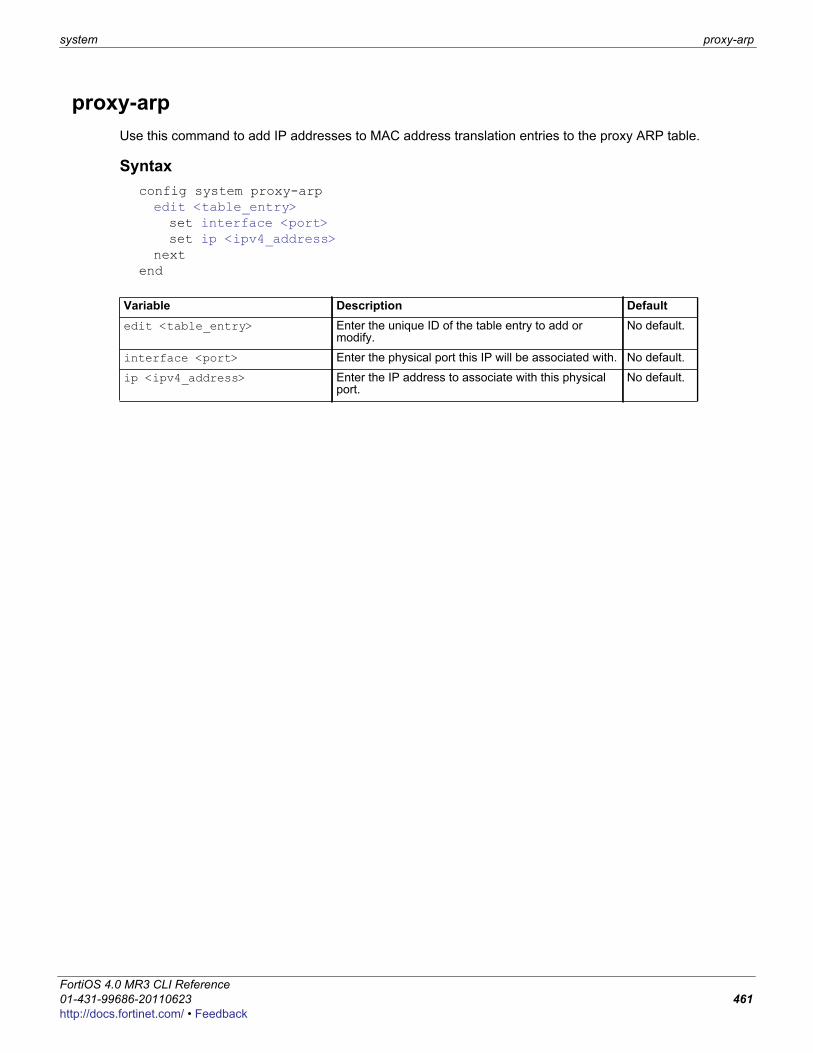
system proxy-arp
F0h
proxy-arpUse this command to add IP addresses to MAC address translation entries to the proxy ARP table.
Syntaxconfig system proxy-arpedit <table_entry>set interface <port>set ip <ipv4_address>
nextend
Variable Description Defaultedit <table_entry> Enter the unique ID of the table entry to add or
modify.No default.
interface <port> Enter the physical port this IP will be associated with. No default.
ip <ipv4_address> Enter the IP address to associate with this physical port.
No default.
ortiOS 4.0 MR3 CLI Reference1-431-99686-20110623 461ttp://docs.fortinet.com/ • Feedback
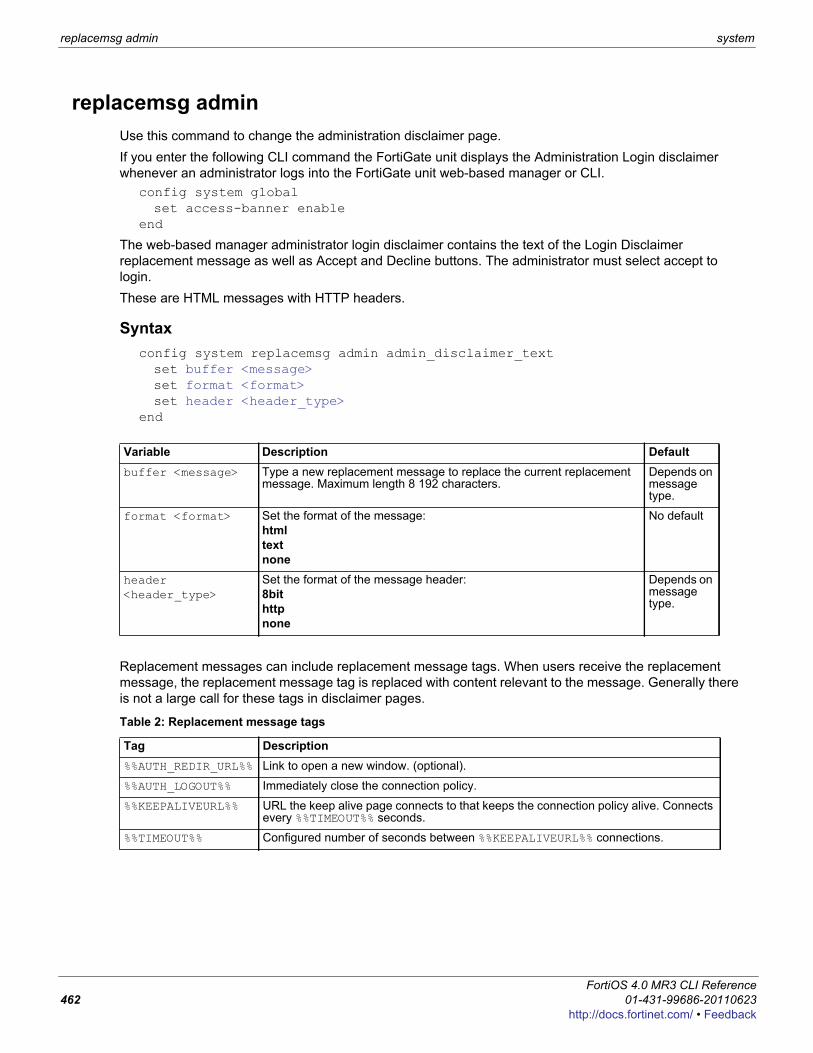
replacemsg admin system
replacemsg adminUse this command to change the administration disclaimer page.If you enter the following CLI command the FortiGate unit displays the Administration Login disclaimer whenever an administrator logs into the FortiGate unit web-based manager or CLI.
config system globalset access-banner enable
end
The web-based manager administrator login disclaimer contains the text of the Login Disclaimer replacement message as well as Accept and Decline buttons. The administrator must select accept to login.These are HTML messages with HTTP headers.
Syntaxconfig system replacemsg admin admin_disclaimer_textset buffer <message>set format <format>set header <header_type>
end
Replacement messages can include replacement message tags. When users receive the replacement message, the replacement message tag is replaced with content relevant to the message. Generally there is not a large call for these tags in disclaimer pages.
Variable Description Defaultbuffer <message> Type a new replacement message to replace the current replacement
message. Maximum length 8 192 characters.Depends on message type.
format <format> Set the format of the message: html text none
No default
header <header_type>
Set the format of the message header:8bithttpnone
Depends on message type.
Table 2: Replacement message tags
Tag Description%%AUTH_REDIR_URL%% Link to open a new window. (optional).
%%AUTH_LOGOUT%% Immediately close the connection policy.
%%KEEPALIVEURL%% URL the keep alive page connects to that keeps the connection policy alive. Connects every %%TIMEOUT%% seconds.
%%TIMEOUT%% Configured number of seconds between %%KEEPALIVEURL%% connections.
FortiOS 4.0 MR3 CLI Reference462 01-431-99686-20110623
http://docs.fortinet.com/ • Feedback
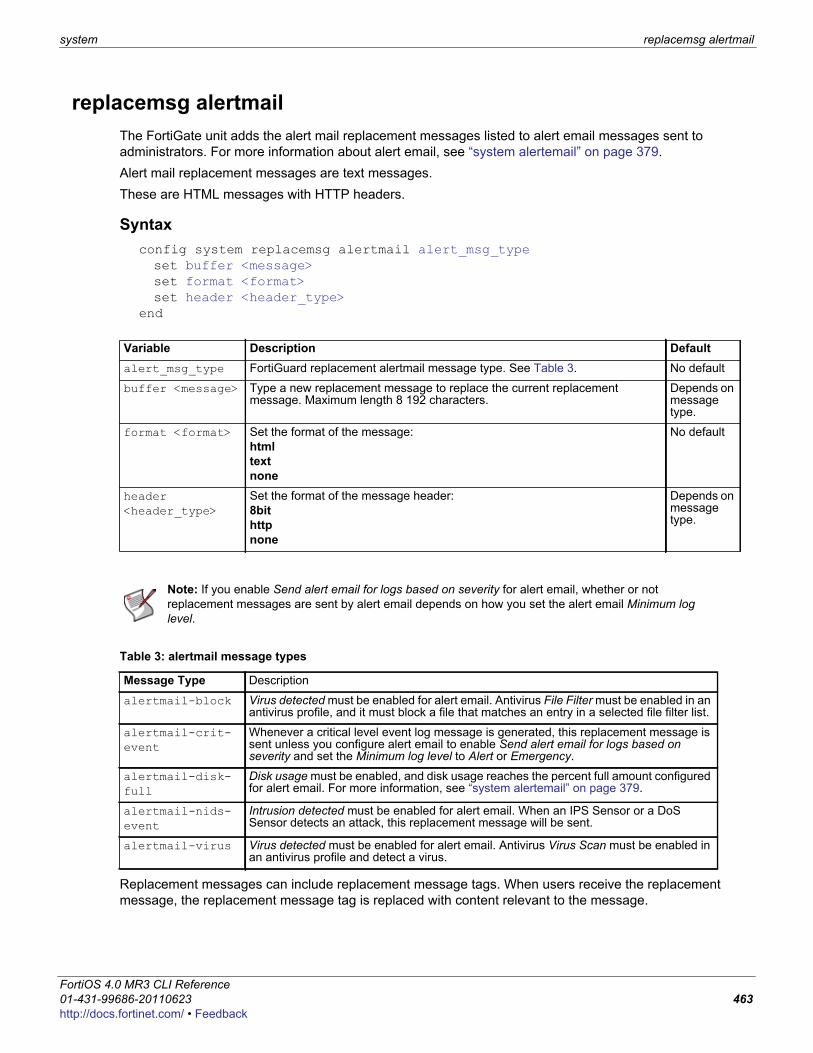
system replacemsg alertmail
F0h
replacemsg alertmailThe FortiGate unit adds the alert mail replacement messages listed to alert email messages sent to administrators. For more information about alert email, see “system alertemail” on page 379. Alert mail replacement messages are text messages.These are HTML messages with HTTP headers.
Syntaxconfig system replacemsg alertmail alert_msg_typeset buffer <message>set format <format>set header <header_type>
end
Replacement messages can include replacement message tags. When users receive the replacement message, the replacement message tag is replaced with content relevant to the message.
Variable Description Defaultalert_msg_type FortiGuard replacement alertmail message type. See Table 3. No default
buffer <message> Type a new replacement message to replace the current replacement message. Maximum length 8 192 characters.
Depends on message type.
format <format> Set the format of the message: html text none
No default
header <header_type>
Set the format of the message header:8bithttpnone
Depends on message type.
Note: If you enable Send alert email for logs based on severity for alert email, whether or not replacement messages are sent by alert email depends on how you set the alert email Minimum log level.
Table 3: alertmail message types
Message Type Description
alertmail-block Virus detected must be enabled for alert email. Antivirus File Filter must be enabled in an antivirus profile, and it must block a file that matches an entry in a selected file filter list.
alertmail-crit-event
Whenever a critical level event log message is generated, this replacement message is sent unless you configure alert email to enable Send alert email for logs based on severity and set the Minimum log level to Alert or Emergency.
alertmail-disk-full
Disk usage must be enabled, and disk usage reaches the percent full amount configured for alert email. For more information, see “system alertemail” on page 379.
alertmail-nids-event
Intrusion detected must be enabled for alert email. When an IPS Sensor or a DoS Sensor detects an attack, this replacement message will be sent.
alertmail-virus Virus detected must be enabled for alert email. Antivirus Virus Scan must be enabled in an antivirus profile and detect a virus.
ortiOS 4.0 MR3 CLI Reference1-431-99686-20110623 463ttp://docs.fortinet.com/ • Feedback
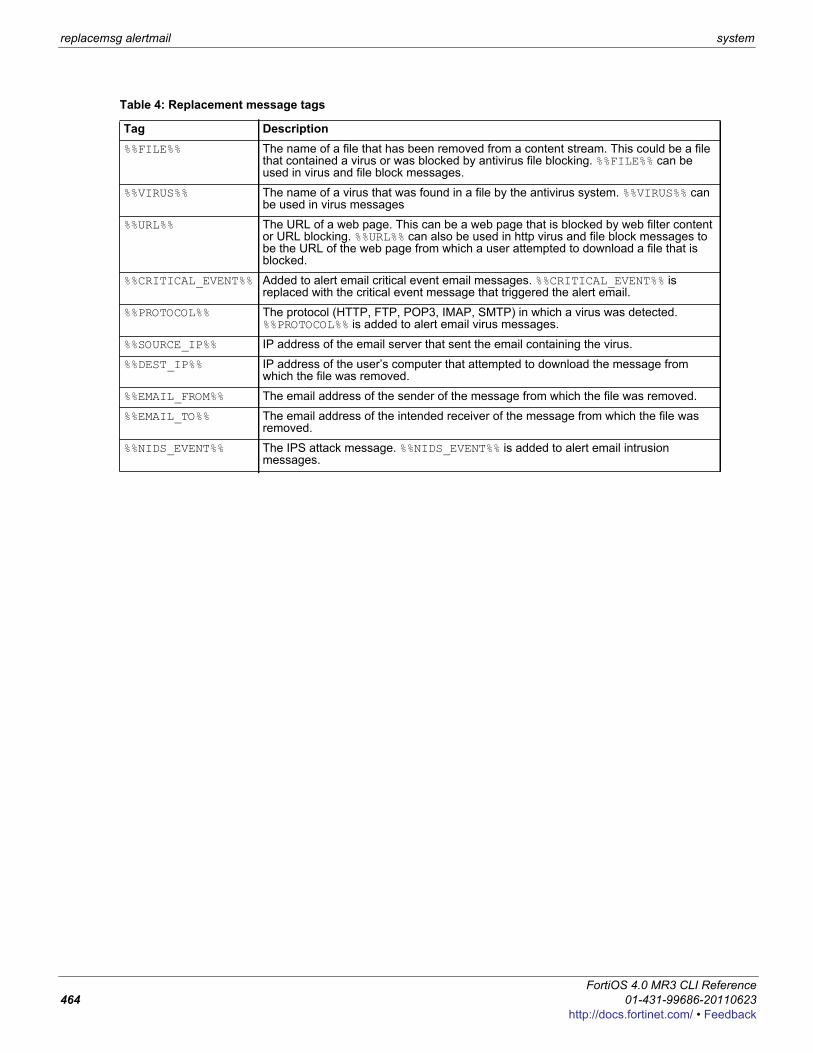
replacemsg alertmail system
Table 4: Replacement message tags
Tag Description%%FILE%% The name of a file that has been removed from a content stream. This could be a file
that contained a virus or was blocked by antivirus file blocking. %%FILE%% can be used in virus and file block messages.
%%VIRUS%% The name of a virus that was found in a file by the antivirus system. %%VIRUS%% can be used in virus messages
%%URL%% The URL of a web page. This can be a web page that is blocked by web filter content or URL blocking. %%URL%% can also be used in http virus and file block messages to be the URL of the web page from which a user attempted to download a file that is blocked.
%%CRITICAL_EVENT%% Added to alert email critical event email messages. %%CRITICAL_EVENT%% is replaced with the critical event message that triggered the alert email.
%%PROTOCOL%% The protocol (HTTP, FTP, POP3, IMAP, SMTP) in which a virus was detected. %%PROTOCOL%% is added to alert email virus messages.
%%SOURCE_IP%% IP address of the email server that sent the email containing the virus.
%%DEST_IP%% IP address of the user’s computer that attempted to download the message from which the file was removed.
%%EMAIL_FROM%% The email address of the sender of the message from which the file was removed.
%%EMAIL_TO%% The email address of the intended receiver of the message from which the file was removed.
%%NIDS_EVENT%% The IPS attack message. %%NIDS_EVENT%% is added to alert email intrusion messages.
FortiOS 4.0 MR3 CLI Reference464 01-431-99686-20110623
http://docs.fortinet.com/ • Feedback
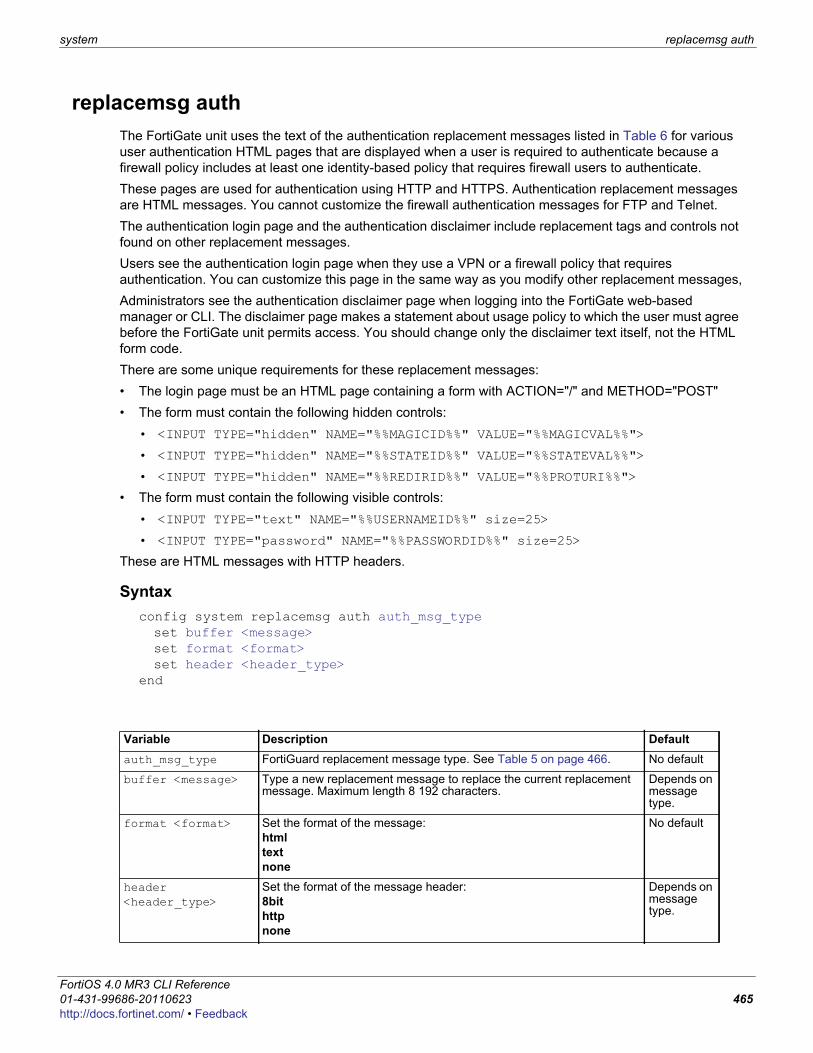
system replacemsg auth
F0h
replacemsg authThe FortiGate unit uses the text of the authentication replacement messages listed in Table 6 for various user authentication HTML pages that are displayed when a user is required to authenticate because a firewall policy includes at least one identity-based policy that requires firewall users to authenticate. These pages are used for authentication using HTTP and HTTPS. Authentication replacement messages are HTML messages. You cannot customize the firewall authentication messages for FTP and Telnet.The authentication login page and the authentication disclaimer include replacement tags and controls not found on other replacement messages.Users see the authentication login page when they use a VPN or a firewall policy that requires authentication. You can customize this page in the same way as you modify other replacement messages,Administrators see the authentication disclaimer page when logging into the FortiGate web-based manager or CLI. The disclaimer page makes a statement about usage policy to which the user must agree before the FortiGate unit permits access. You should change only the disclaimer text itself, not the HTML form code.There are some unique requirements for these replacement messages:• The login page must be an HTML page containing a form with ACTION="/" and METHOD="POST"• The form must contain the following hidden controls:
• <INPUT TYPE="hidden" NAME="%%MAGICID%%" VALUE="%%MAGICVAL%%">
• <INPUT TYPE="hidden" NAME="%%STATEID%%" VALUE="%%STATEVAL%%">
• <INPUT TYPE="hidden" NAME="%%REDIRID%%" VALUE="%%PROTURI%%">
• The form must contain the following visible controls:• <INPUT TYPE="text" NAME="%%USERNAMEID%%" size=25>
• <INPUT TYPE="password" NAME="%%PASSWORDID%%" size=25>
These are HTML messages with HTTP headers.
Syntaxconfig system replacemsg auth auth_msg_typeset buffer <message>set format <format>set header <header_type>
end
Variable Description Defaultauth_msg_type FortiGuard replacement message type. See Table 5 on page 466. No default
buffer <message> Type a new replacement message to replace the current replacement message. Maximum length 8 192 characters.
Depends on message type.
format <format> Set the format of the message: html text none
No default
header <header_type>
Set the format of the message header:8bithttpnone
Depends on message type.
ortiOS 4.0 MR3 CLI Reference1-431-99686-20110623 465ttp://docs.fortinet.com/ • Feedback
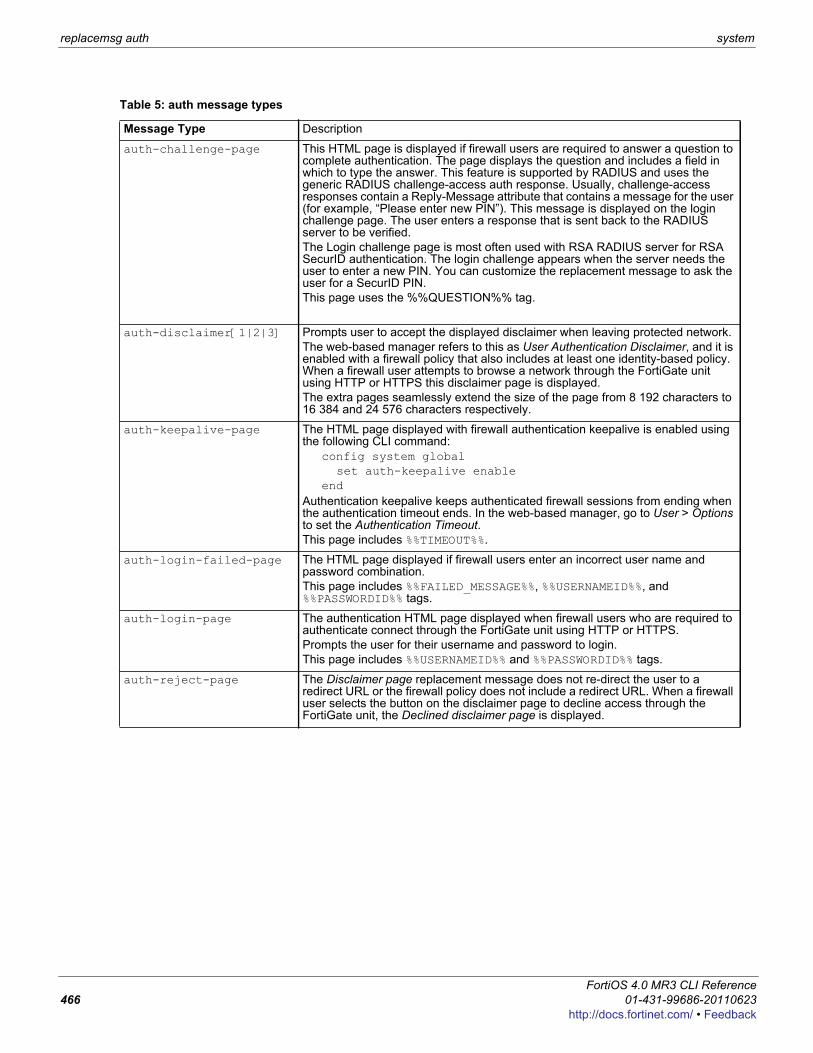
replacemsg auth system
Table 5: auth message types
Message Type Description
auth-challenge-page This HTML page is displayed if firewall users are required to answer a question to complete authentication. The page displays the question and includes a field in which to type the answer. This feature is supported by RADIUS and uses the generic RADIUS challenge-access auth response. Usually, challenge-access responses contain a Reply-Message attribute that contains a message for the user (for example, “Please enter new PIN”). This message is displayed on the login challenge page. The user enters a response that is sent back to the RADIUS server to be verified.The Login challenge page is most often used with RSA RADIUS server for RSA SecurID authentication. The login challenge appears when the server needs the user to enter a new PIN. You can customize the replacement message to ask the user for a SecurID PIN.This page uses the %%QUESTION%% tag.
auth-disclaimer[1|2|3] Prompts user to accept the displayed disclaimer when leaving protected network. The web-based manager refers to this as User Authentication Disclaimer, and it is enabled with a firewall policy that also includes at least one identity-based policy. When a firewall user attempts to browse a network through the FortiGate unit using HTTP or HTTPS this disclaimer page is displayed.The extra pages seamlessly extend the size of the page from 8 192 characters to 16 384 and 24 576 characters respectively.
auth-keepalive-page The HTML page displayed with firewall authentication keepalive is enabled using the following CLI command:
config system globalset auth-keepalive enable
endAuthentication keepalive keeps authenticated firewall sessions from ending when the authentication timeout ends. In the web-based manager, go to User > Options to set the Authentication Timeout.This page includes %%TIMEOUT%%.
auth-login-failed-page The HTML page displayed if firewall users enter an incorrect user name and password combination.This page includes %%FAILED_MESSAGE%%, %%USERNAMEID%%, and %%PASSWORDID%% tags.
auth-login-page The authentication HTML page displayed when firewall users who are required to authenticate connect through the FortiGate unit using HTTP or HTTPS.Prompts the user for their username and password to login.This page includes %%USERNAMEID%% and %%PASSWORDID%% tags.
auth-reject-page The Disclaimer page replacement message does not re-direct the user to a redirect URL or the firewall policy does not include a redirect URL. When a firewall user selects the button on the disclaimer page to decline access through the FortiGate unit, the Declined disclaimer page is displayed.
FortiOS 4.0 MR3 CLI Reference466 01-431-99686-20110623
http://docs.fortinet.com/ • Feedback
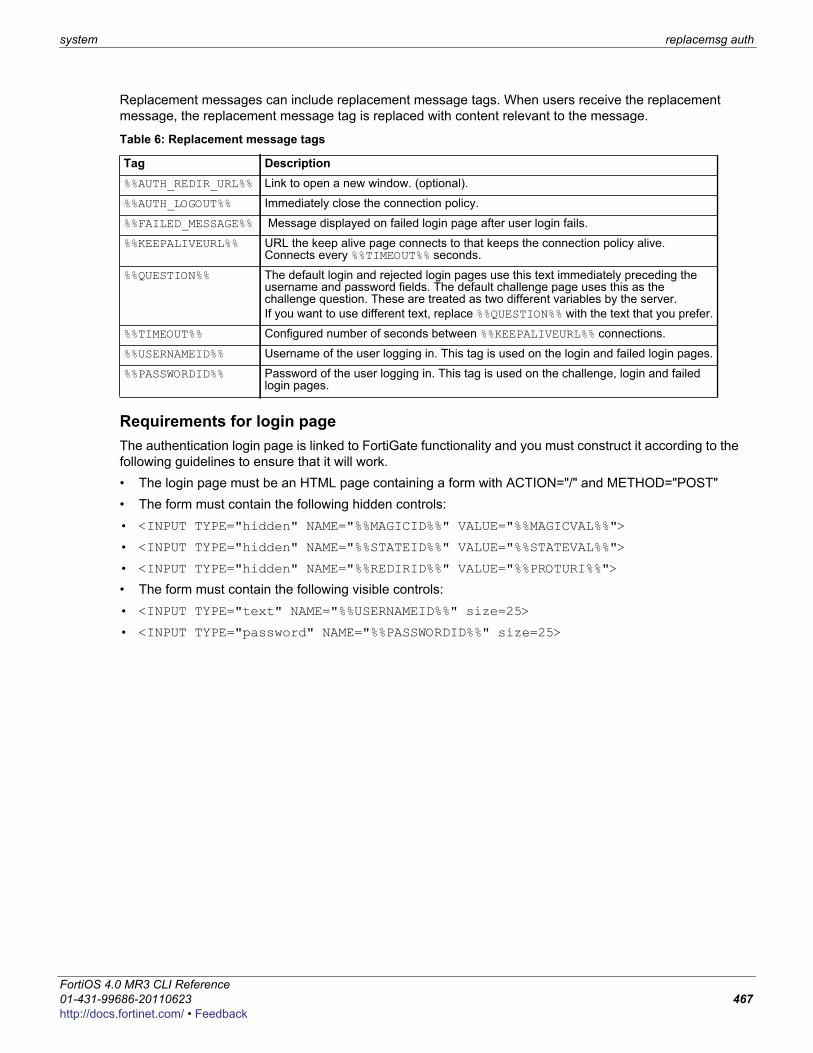
system replacemsg auth
F0h
Replacement messages can include replacement message tags. When users receive the replacement message, the replacement message tag is replaced with content relevant to the message.
Requirements for login pageThe authentication login page is linked to FortiGate functionality and you must construct it according to the following guidelines to ensure that it will work.• The login page must be an HTML page containing a form with ACTION="/" and METHOD="POST"• The form must contain the following hidden controls:• <INPUT TYPE="hidden" NAME="%%MAGICID%%" VALUE="%%MAGICVAL%%">
• <INPUT TYPE="hidden" NAME="%%STATEID%%" VALUE="%%STATEVAL%%">
• <INPUT TYPE="hidden" NAME="%%REDIRID%%" VALUE="%%PROTURI%%">
• The form must contain the following visible controls:• <INPUT TYPE="text" NAME="%%USERNAMEID%%" size=25>
• <INPUT TYPE="password" NAME="%%PASSWORDID%%" size=25>
Table 6: Replacement message tags
Tag Description%%AUTH_REDIR_URL%% Link to open a new window. (optional).
%%AUTH_LOGOUT%% Immediately close the connection policy.
%%FAILED_MESSAGE%% Message displayed on failed login page after user login fails.
%%KEEPALIVEURL%% URL the keep alive page connects to that keeps the connection policy alive. Connects every %%TIMEOUT%% seconds.
%%QUESTION%% The default login and rejected login pages use this text immediately preceding the username and password fields. The default challenge page uses this as the challenge question. These are treated as two different variables by the server.If you want to use different text, replace %%QUESTION%% with the text that you prefer.
%%TIMEOUT%% Configured number of seconds between %%KEEPALIVEURL%% connections.
%%USERNAMEID%% Username of the user logging in. This tag is used on the login and failed login pages.
%%PASSWORDID%% Password of the user logging in. This tag is used on the challenge, login and failed login pages.
ortiOS 4.0 MR3 CLI Reference1-431-99686-20110623 467ttp://docs.fortinet.com/ • Feedback
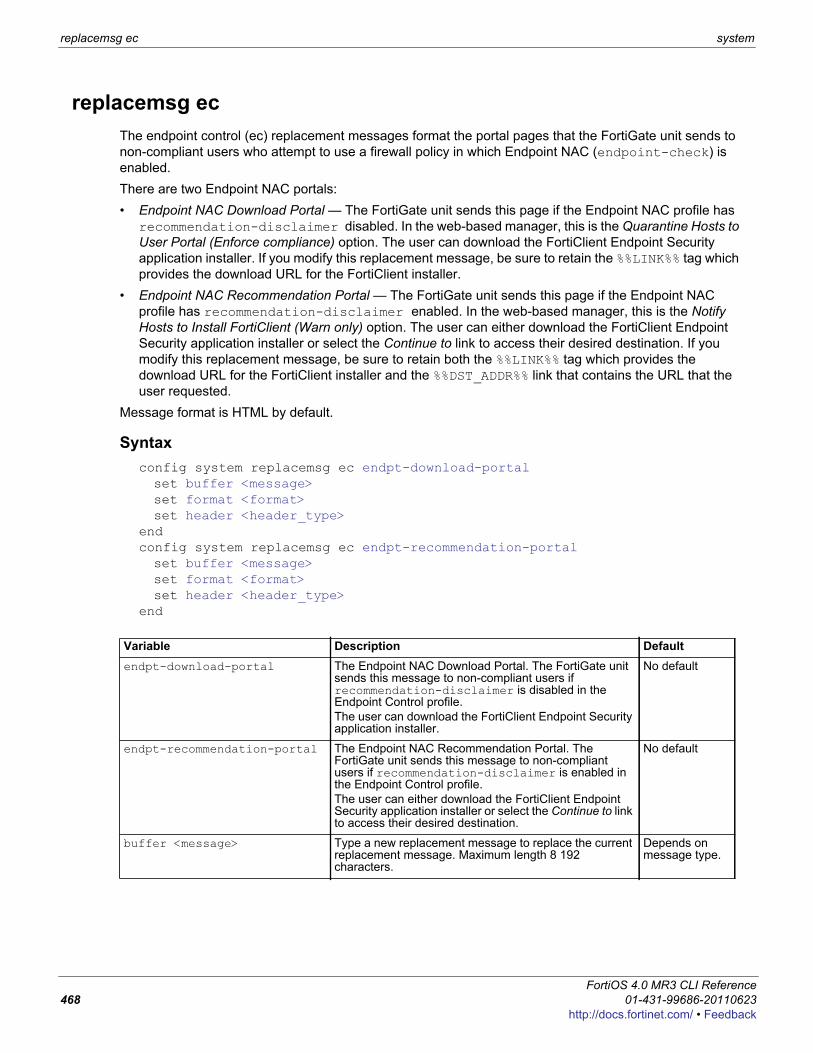
replacemsg ec system
replacemsg ecThe endpoint control (ec) replacement messages format the portal pages that the FortiGate unit sends to non-compliant users who attempt to use a firewall policy in which Endpoint NAC (endpoint-check) is enabled.There are two Endpoint NAC portals:• Endpoint NAC Download Portal — The FortiGate unit sends this page if the Endpoint NAC profile has
recommendation-disclaimer disabled. In the web-based manager, this is the Quarantine Hosts to User Portal (Enforce compliance) option. The user can download the FortiClient Endpoint Security application installer. If you modify this replacement message, be sure to retain the %%LINK%% tag which provides the download URL for the FortiClient installer.
• Endpoint NAC Recommendation Portal — The FortiGate unit sends this page if the Endpoint NAC profile has recommendation-disclaimer enabled. In the web-based manager, this is the Notify Hosts to Install FortiClient (Warn only) option. The user can either download the FortiClient Endpoint Security application installer or select the Continue to link to access their desired destination. If you modify this replacement message, be sure to retain both the %%LINK%% tag which provides the download URL for the FortiClient installer and the %%DST_ADDR%% link that contains the URL that the user requested.
Message format is HTML by default.
Syntaxconfig system replacemsg ec endpt-download-portalset buffer <message>set format <format>set header <header_type>
endconfig system replacemsg ec endpt-recommendation-portalset buffer <message>set format <format>set header <header_type>
end
Variable Description Defaultendpt-download-portal The Endpoint NAC Download Portal. The FortiGate unit
sends this message to non-compliant users if recommendation-disclaimer is disabled in the Endpoint Control profile. The user can download the FortiClient Endpoint Security application installer.
No default
endpt-recommendation-portal The Endpoint NAC Recommendation Portal. The FortiGate unit sends this message to non-compliant users if recommendation-disclaimer is enabled in the Endpoint Control profile.The user can either download the FortiClient Endpoint Security application installer or select the Continue to link to access their desired destination.
No default
buffer <message> Type a new replacement message to replace the current replacement message. Maximum length 8 192 characters.
Depends on message type.
FortiOS 4.0 MR3 CLI Reference468 01-431-99686-20110623
http://docs.fortinet.com/ • Feedback
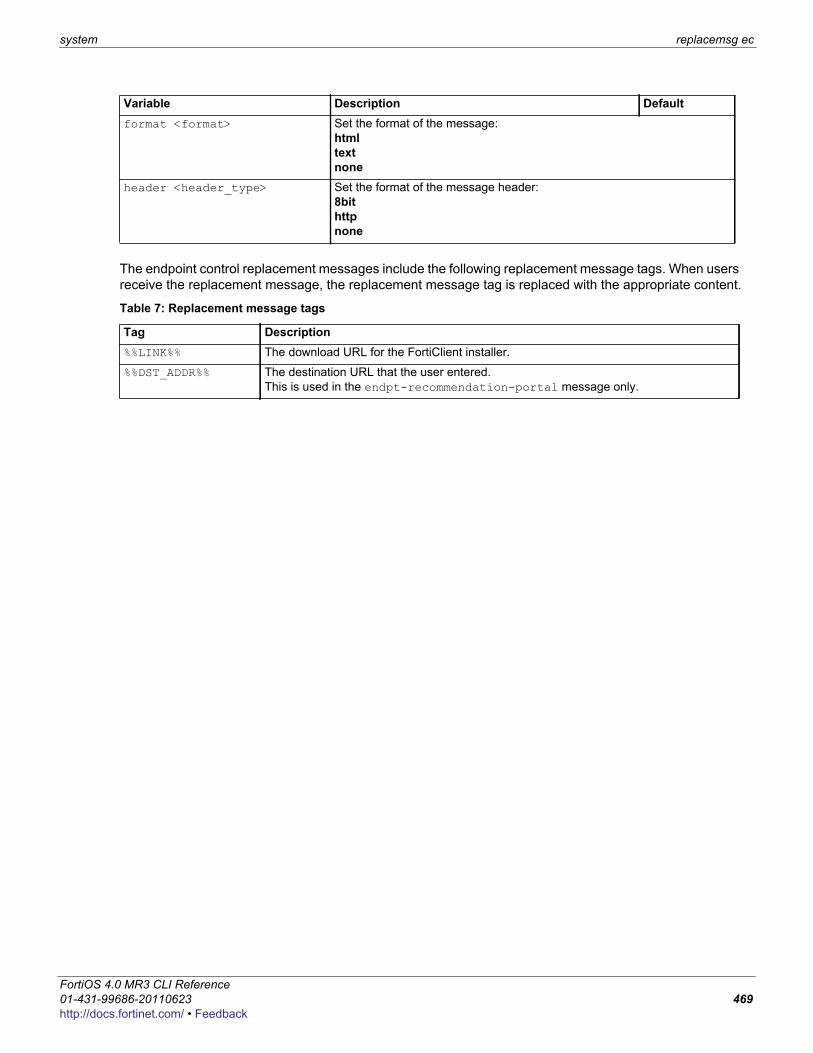
system replacemsg ec
F0h
The endpoint control replacement messages include the following replacement message tags. When users receive the replacement message, the replacement message tag is replaced with the appropriate content.
format <format> Set the format of the message: html text none
header <header_type> Set the format of the message header:8bithttpnone
Table 7: Replacement message tags
Tag Description%%LINK%% The download URL for the FortiClient installer.
%%DST_ADDR%% The destination URL that the user entered. This is used in the endpt-recommendation-portal message only.
Variable Description Default
ortiOS 4.0 MR3 CLI Reference1-431-99686-20110623 469ttp://docs.fortinet.com/ • Feedback
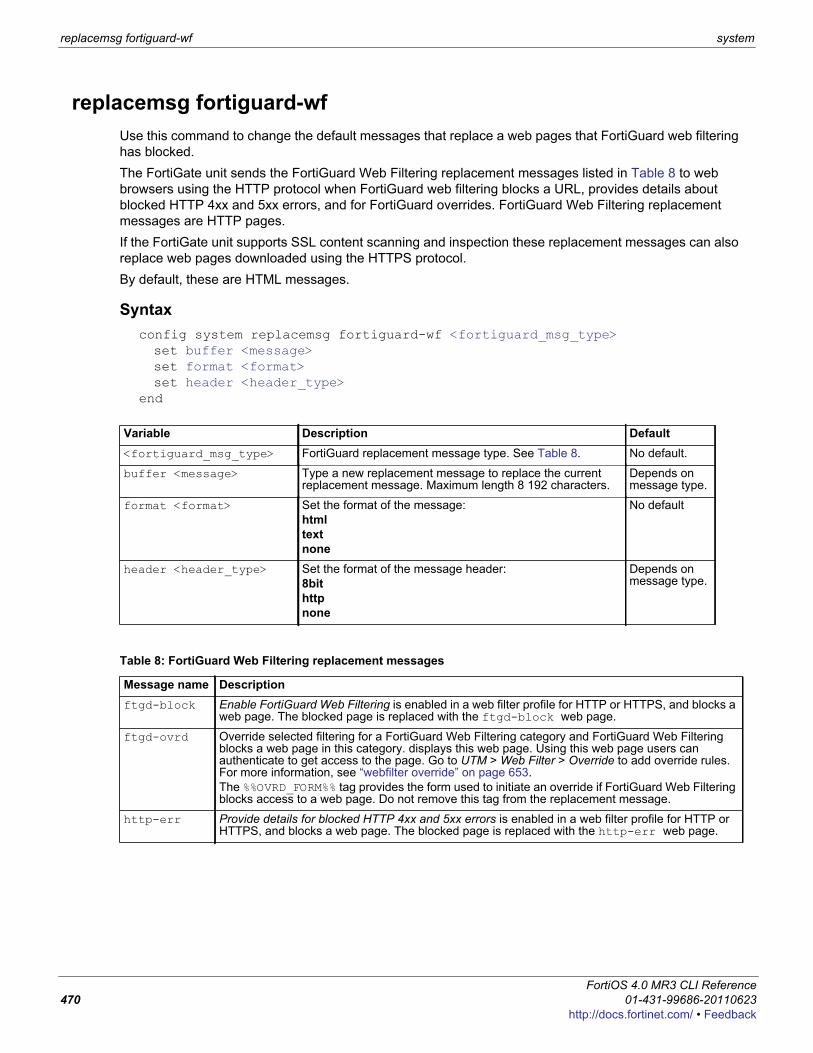
replacemsg fortiguard-wf system
replacemsg fortiguard-wfUse this command to change the default messages that replace a web pages that FortiGuard web filtering has blocked.The FortiGate unit sends the FortiGuard Web Filtering replacement messages listed in Table 8 to web browsers using the HTTP protocol when FortiGuard web filtering blocks a URL, provides details about blocked HTTP 4xx and 5xx errors, and for FortiGuard overrides. FortiGuard Web Filtering replacement messages are HTTP pages.If the FortiGate unit supports SSL content scanning and inspection these replacement messages can also replace web pages downloaded using the HTTPS protocol.By default, these are HTML messages.
Syntaxconfig system replacemsg fortiguard-wf <fortiguard_msg_type>set buffer <message>set format <format>set header <header_type>
end
Variable Description Default<fortiguard_msg_type> FortiGuard replacement message type. See Table 8. No default.
buffer <message> Type a new replacement message to replace the current replacement message. Maximum length 8 192 characters.
Depends on message type.
format <format> Set the format of the message: html text none
No default
header <header_type> Set the format of the message header:8bithttpnone
Depends on message type.
Table 8: FortiGuard Web Filtering replacement messages
Message name Descriptionftgd-block Enable FortiGuard Web Filtering is enabled in a web filter profile for HTTP or HTTPS, and blocks a
web page. The blocked page is replaced with the ftgd-block web page.
ftgd-ovrd Override selected filtering for a FortiGuard Web Filtering category and FortiGuard Web Filtering blocks a web page in this category. displays this web page. Using this web page users can authenticate to get access to the page. Go to UTM > Web Filter > Override to add override rules. For more information, see “webfilter override” on page 653.The %%OVRD_FORM%% tag provides the form used to initiate an override if FortiGuard Web Filtering blocks access to a web page. Do not remove this tag from the replacement message.
http-err Provide details for blocked HTTP 4xx and 5xx errors is enabled in a web filter profile for HTTP or HTTPS, and blocks a web page. The blocked page is replaced with the http-err web page.
FortiOS 4.0 MR3 CLI Reference470 01-431-99686-20110623
http://docs.fortinet.com/ • Feedback
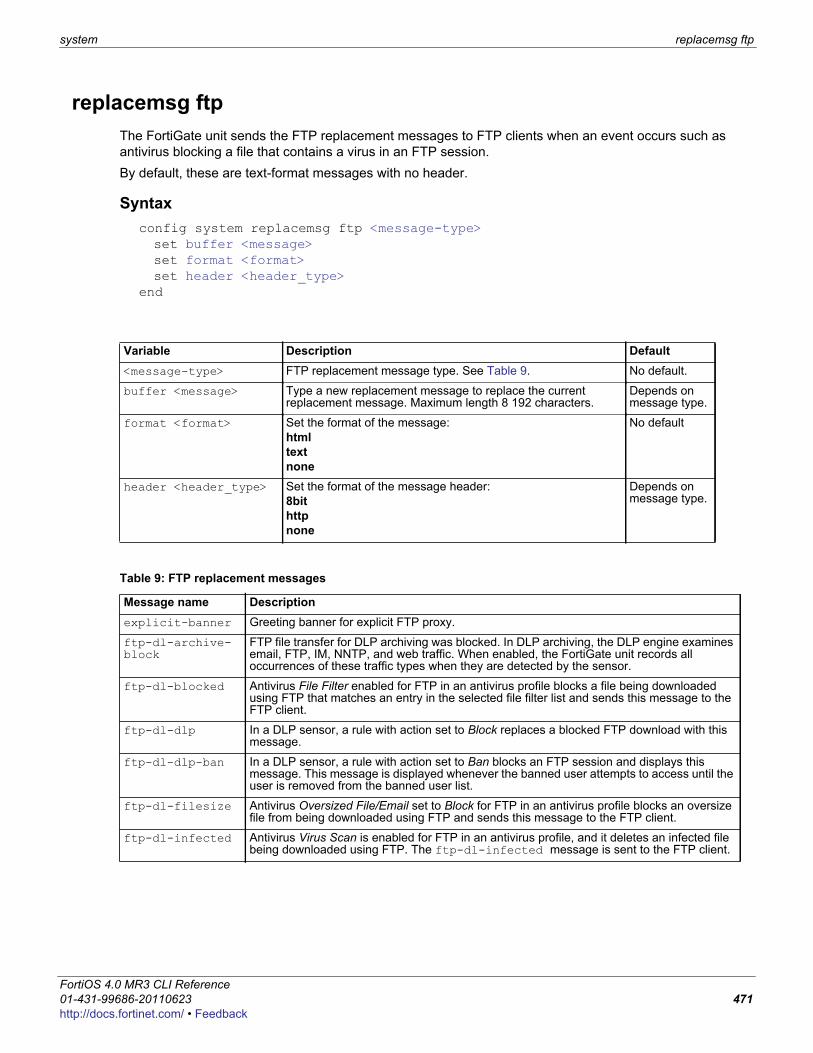
system replacemsg ftp
F0h
replacemsg ftpThe FortiGate unit sends the FTP replacement messages to FTP clients when an event occurs such as antivirus blocking a file that contains a virus in an FTP session. By default, these are text-format messages with no header.
Syntaxconfig system replacemsg ftp <message-type>set buffer <message>set format <format>set header <header_type>
end
Variable Description Default<message-type> FTP replacement message type. See Table 9. No default.
buffer <message> Type a new replacement message to replace the current replacement message. Maximum length 8 192 characters.
Depends on message type.
format <format> Set the format of the message: html text none
No default
header <header_type> Set the format of the message header:8bithttpnone
Depends on message type.
Table 9: FTP replacement messages
Message name Descriptionexplicit-banner Greeting banner for explicit FTP proxy.
ftp-dl-archive-block
FTP file transfer for DLP archiving was blocked. In DLP archiving, the DLP engine examines email, FTP, IM, NNTP, and web traffic. When enabled, the FortiGate unit records all occurrences of these traffic types when they are detected by the sensor.
ftp-dl-blocked Antivirus File Filter enabled for FTP in an antivirus profile blocks a file being downloaded using FTP that matches an entry in the selected file filter list and sends this message to the FTP client.
ftp-dl-dlp In a DLP sensor, a rule with action set to Block replaces a blocked FTP download with this message.
ftp-dl-dlp-ban In a DLP sensor, a rule with action set to Ban blocks an FTP session and displays this message. This message is displayed whenever the banned user attempts to access until the user is removed from the banned user list.
ftp-dl-filesize Antivirus Oversized File/Email set to Block for FTP in an antivirus profile blocks an oversize file from being downloaded using FTP and sends this message to the FTP client.
ftp-dl-infected Antivirus Virus Scan is enabled for FTP in an antivirus profile, and it deletes an infected file being downloaded using FTP. The ftp-dl-infected message is sent to the FTP client.
ortiOS 4.0 MR3 CLI Reference1-431-99686-20110623 471ttp://docs.fortinet.com/ • Feedback

replacemsg ftp system
Replacement messages can include replacement message tags. When users receive the replacement message, the replacement message tag is replaced with content relevant to the message.
Table 10: Replacement message tags
Tag Description%%FILE%% The name of a file that has been removed from a content stream. This could be a file
that contained a virus or was blocked by antivirus file blocking. %%FILE%% can be used in virus and file block messages.
%%VIRUS%% The name of a virus that was found in a file by the antivirus system. %%VIRUS%% can be used in virus messages
%%QUARFILENAME%% The name of a file that has been removed from a content stream and added to the quarantine. This could be a file that contained a virus or was blocked by antivirus file blocking. %%QUARFILENAME%% can be used in virus and file block messages. Quarantining is only available on FortiGate units with a local disk.
%%URL%% The URL of a web page. This can be a web page that is blocked by web filter content or URL blocking. %%URL%% can also be used in http virus and file block messages to be the URL of the web page from which a user attempted to download a file that is blocked.
%%PROTOCOL%% The protocol (HTTP, FTP, POP3, IMAP, SMTP) in which a virus was detected. %%PROTOCOL%% is added to alert email virus messages.
%%SOURCE_IP%% The IP address from which a virus was received. For email this is the IP address of the email server that sent the email containing the virus. For HTTP this is the IP address of the web page that sent the virus.
%%DEST_IP%% The IP address of the computer that would have received the blocked file. For email this is the IP address of the user’s computer that attempted to download the message from which the file was removed.
FortiOS 4.0 MR3 CLI Reference472 01-431-99686-20110623
http://docs.fortinet.com/ • Feedback
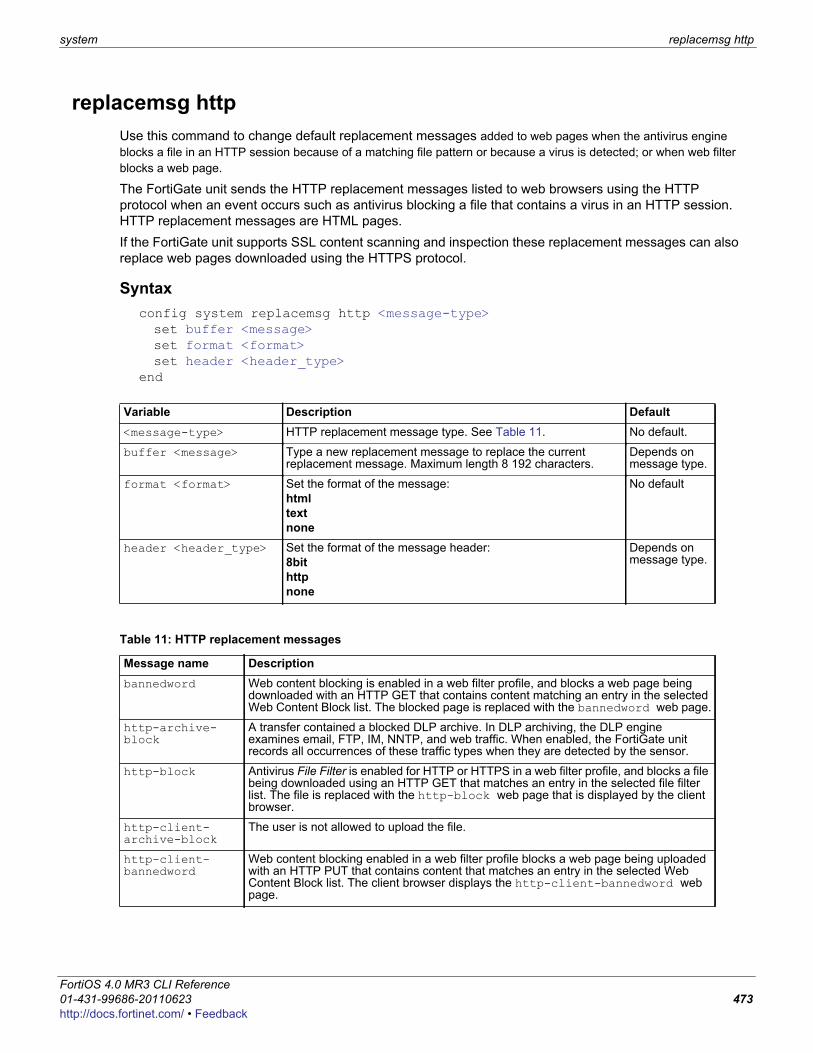
system replacemsg http
F0h
replacemsg httpUse this command to change default replacement messages added to web pages when the antivirus engine blocks a file in an HTTP session because of a matching file pattern or because a virus is detected; or when web filter blocks a web page. The FortiGate unit sends the HTTP replacement messages listed to web browsers using the HTTP protocol when an event occurs such as antivirus blocking a file that contains a virus in an HTTP session. HTTP replacement messages are HTML pages.If the FortiGate unit supports SSL content scanning and inspection these replacement messages can also replace web pages downloaded using the HTTPS protocol.
Syntaxconfig system replacemsg http <message-type>set buffer <message>set format <format>set header <header_type>
end
Variable Description Default<message-type> HTTP replacement message type. See Table 11. No default.
buffer <message> Type a new replacement message to replace the current replacement message. Maximum length 8 192 characters.
Depends on message type.
format <format> Set the format of the message: html text none
No default
header <header_type> Set the format of the message header:8bithttpnone
Depends on message type.
Table 11: HTTP replacement messages
Message name Descriptionbannedword Web content blocking is enabled in a web filter profile, and blocks a web page being
downloaded with an HTTP GET that contains content matching an entry in the selected Web Content Block list. The blocked page is replaced with the bannedword web page.
http-archive-block
A transfer contained a blocked DLP archive. In DLP archiving, the DLP engine examines email, FTP, IM, NNTP, and web traffic. When enabled, the FortiGate unit records all occurrences of these traffic types when they are detected by the sensor.
http-block Antivirus File Filter is enabled for HTTP or HTTPS in a web filter profile, and blocks a file being downloaded using an HTTP GET that matches an entry in the selected file filter list. The file is replaced with the http-block web page that is displayed by the client browser.
http-client-archive-block
The user is not allowed to upload the file.
http-client-bannedword
Web content blocking enabled in a web filter profile blocks a web page being uploaded with an HTTP PUT that contains content that matches an entry in the selected Web Content Block list. The client browser displays the http-client-bannedword web page.
ortiOS 4.0 MR3 CLI Reference1-431-99686-20110623 473ttp://docs.fortinet.com/ • Feedback
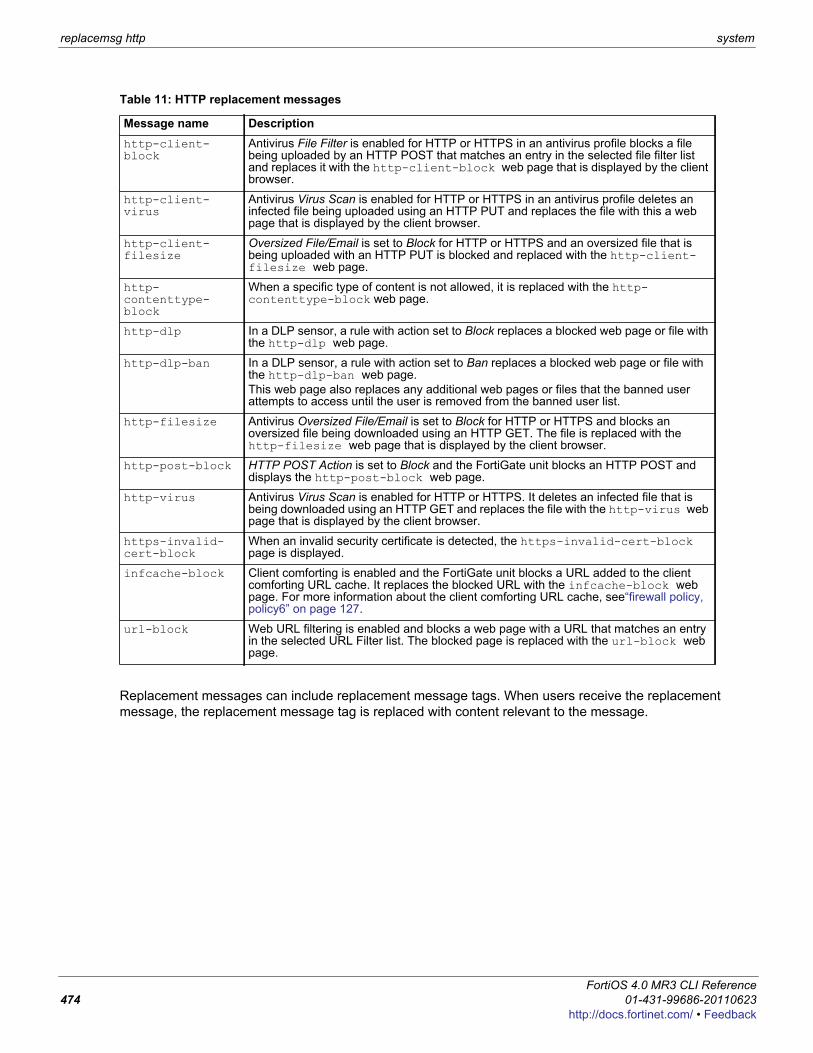
replacemsg http system
Replacement messages can include replacement message tags. When users receive the replacement message, the replacement message tag is replaced with content relevant to the message.
http-client-block
Antivirus File Filter is enabled for HTTP or HTTPS in an antivirus profile blocks a file being uploaded by an HTTP POST that matches an entry in the selected file filter list and replaces it with the http-client-block web page that is displayed by the client browser.
http-client-virus
Antivirus Virus Scan is enabled for HTTP or HTTPS in an antivirus profile deletes an infected file being uploaded using an HTTP PUT and replaces the file with this a web page that is displayed by the client browser.
http-client-filesize
Oversized File/Email is set to Block for HTTP or HTTPS and an oversized file that is being uploaded with an HTTP PUT is blocked and replaced with the http-client-filesize web page.
http-contenttype-block
When a specific type of content is not allowed, it is replaced with the http-contenttype-block web page.
http-dlp In a DLP sensor, a rule with action set to Block replaces a blocked web page or file with the http-dlp web page.
http-dlp-ban In a DLP sensor, a rule with action set to Ban replaces a blocked web page or file with the http-dlp-ban web page. This web page also replaces any additional web pages or files that the banned user attempts to access until the user is removed from the banned user list.
http-filesize Antivirus Oversized File/Email is set to Block for HTTP or HTTPS and blocks an oversized file being downloaded using an HTTP GET. The file is replaced with the http-filesize web page that is displayed by the client browser.
http-post-block HTTP POST Action is set to Block and the FortiGate unit blocks an HTTP POST and displays the http-post-block web page.
http-virus Antivirus Virus Scan is enabled for HTTP or HTTPS. It deletes an infected file that is being downloaded using an HTTP GET and replaces the file with the http-virus web page that is displayed by the client browser.
https-invalid-cert-block
When an invalid security certificate is detected, the https-invalid-cert-block page is displayed.
infcache-block Client comforting is enabled and the FortiGate unit blocks a URL added to the client comforting URL cache. It replaces the blocked URL with the infcache-block web page. For more information about the client comforting URL cache, see“firewall policy, policy6” on page 127.
url-block Web URL filtering is enabled and blocks a web page with a URL that matches an entry in the selected URL Filter list. The blocked page is replaced with the url-block web page.
Table 11: HTTP replacement messages
Message name Description
FortiOS 4.0 MR3 CLI Reference474 01-431-99686-20110623
http://docs.fortinet.com/ • Feedback

system replacemsg http
F0h
Table 12: Replacement message tags
Tag Description%%FILE%% The name of a file that has been removed from a content stream. This could be a file
that contained a virus or was blocked by antivirus file blocking. %%FILE%% can be used in virus and file block messages.
%%VIRUS%% The name of a virus that was found in a file by the antivirus system. %%VIRUS%% can be used in virus messages
%%QUARFILENAME%% The name of a file that has been removed from a content stream and added to the quarantine. This could be a file that contained a virus or was blocked by antivirus file blocking. %%QUARFILENAME%% can be used in virus and file block messages. Quarantining is only available on FortiGate units with a local disk.
%%URL%% The URL of a web page. This can be a web page that is blocked by web filter content or URL blocking. %%URL%% can also be used in http virus and file block messages to be the URL of the web page from which a user attempted to download a file that is blocked.
%%PROTOCOL%% The protocol (HTTP, FTP, POP3, IMAP, SMTP) in which a virus was detected. %%PROTOCOL%% is added to alert email virus messages.
%%SOURCE_IP%% The IP address of the web page from which a virus was received.
%%DEST_IP%% The IP address of the computer that would have received the blocked file. For email this is the IP address of the user’s computer that attempted to download the message from which the file was removed.
ortiOS 4.0 MR3 CLI Reference1-431-99686-20110623 475ttp://docs.fortinet.com/ • Feedback
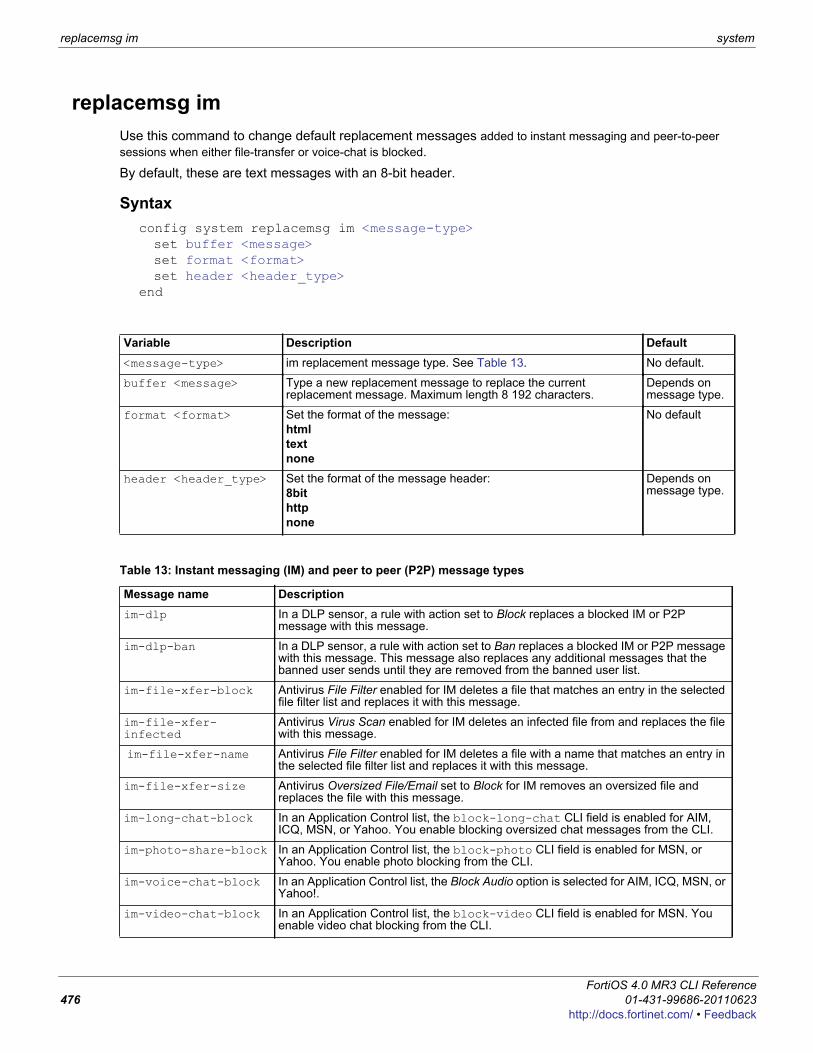
replacemsg im system
replacemsg imUse this command to change default replacement messages added to instant messaging and peer-to-peer sessions when either file-transfer or voice-chat is blocked. By default, these are text messages with an 8-bit header.
Syntaxconfig system replacemsg im <message-type>set buffer <message>set format <format>set header <header_type>
end
Variable Description Default<message-type> im replacement message type. See Table 13. No default.
buffer <message> Type a new replacement message to replace the current replacement message. Maximum length 8 192 characters.
Depends on message type.
format <format> Set the format of the message: html text none
No default
header <header_type> Set the format of the message header:8bithttpnone
Depends on message type.
Table 13: Instant messaging (IM) and peer to peer (P2P) message types
Message name Descriptionim-dlp In a DLP sensor, a rule with action set to Block replaces a blocked IM or P2P
message with this message.
im-dlp-ban In a DLP sensor, a rule with action set to Ban replaces a blocked IM or P2P message with this message. This message also replaces any additional messages that the banned user sends until they are removed from the banned user list.
im-file-xfer-block Antivirus File Filter enabled for IM deletes a file that matches an entry in the selected file filter list and replaces it with this message.
im-file-xfer-infected
Antivirus Virus Scan enabled for IM deletes an infected file from and replaces the file with this message.
im-file-xfer-name Antivirus File Filter enabled for IM deletes a file with a name that matches an entry in the selected file filter list and replaces it with this message.
im-file-xfer-size Antivirus Oversized File/Email set to Block for IM removes an oversized file and replaces the file with this message.
im-long-chat-block In an Application Control list, the block-long-chat CLI field is enabled for AIM, ICQ, MSN, or Yahoo. You enable blocking oversized chat messages from the CLI.
im-photo-share-block In an Application Control list, the block-photo CLI field is enabled for MSN, or Yahoo. You enable photo blocking from the CLI.
im-voice-chat-block In an Application Control list, the Block Audio option is selected for AIM, ICQ, MSN, or Yahoo!.
im-video-chat-block In an Application Control list, the block-video CLI field is enabled for MSN. You enable video chat blocking from the CLI.
FortiOS 4.0 MR3 CLI Reference476 01-431-99686-20110623
http://docs.fortinet.com/ • Feedback
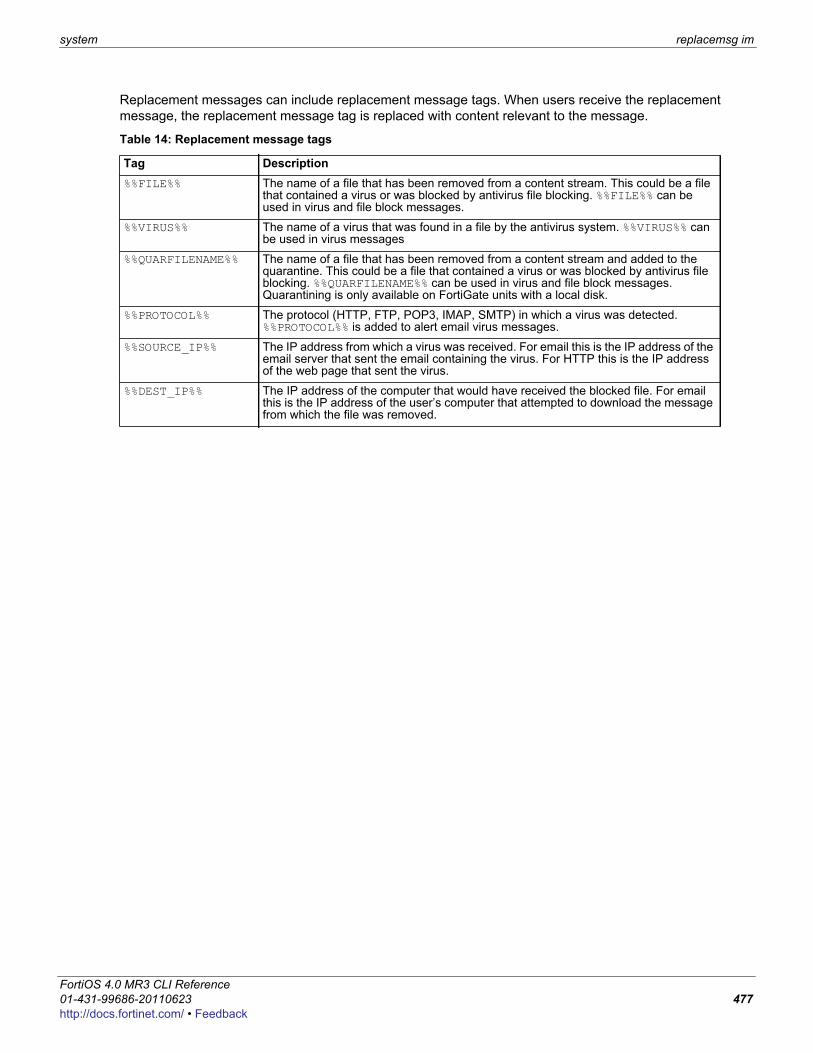
system replacemsg im
F0h
Replacement messages can include replacement message tags. When users receive the replacement message, the replacement message tag is replaced with content relevant to the message.
Table 14: Replacement message tags
Tag Description%%FILE%% The name of a file that has been removed from a content stream. This could be a file
that contained a virus or was blocked by antivirus file blocking. %%FILE%% can be used in virus and file block messages.
%%VIRUS%% The name of a virus that was found in a file by the antivirus system. %%VIRUS%% can be used in virus messages
%%QUARFILENAME%% The name of a file that has been removed from a content stream and added to the quarantine. This could be a file that contained a virus or was blocked by antivirus file blocking. %%QUARFILENAME%% can be used in virus and file block messages. Quarantining is only available on FortiGate units with a local disk.
%%PROTOCOL%% The protocol (HTTP, FTP, POP3, IMAP, SMTP) in which a virus was detected. %%PROTOCOL%% is added to alert email virus messages.
%%SOURCE_IP%% The IP address from which a virus was received. For email this is the IP address of the email server that sent the email containing the virus. For HTTP this is the IP address of the web page that sent the virus.
%%DEST_IP%% The IP address of the computer that would have received the blocked file. For email this is the IP address of the user’s computer that attempted to download the message from which the file was removed.
ortiOS 4.0 MR3 CLI Reference1-431-99686-20110623 477ttp://docs.fortinet.com/ • Feedback
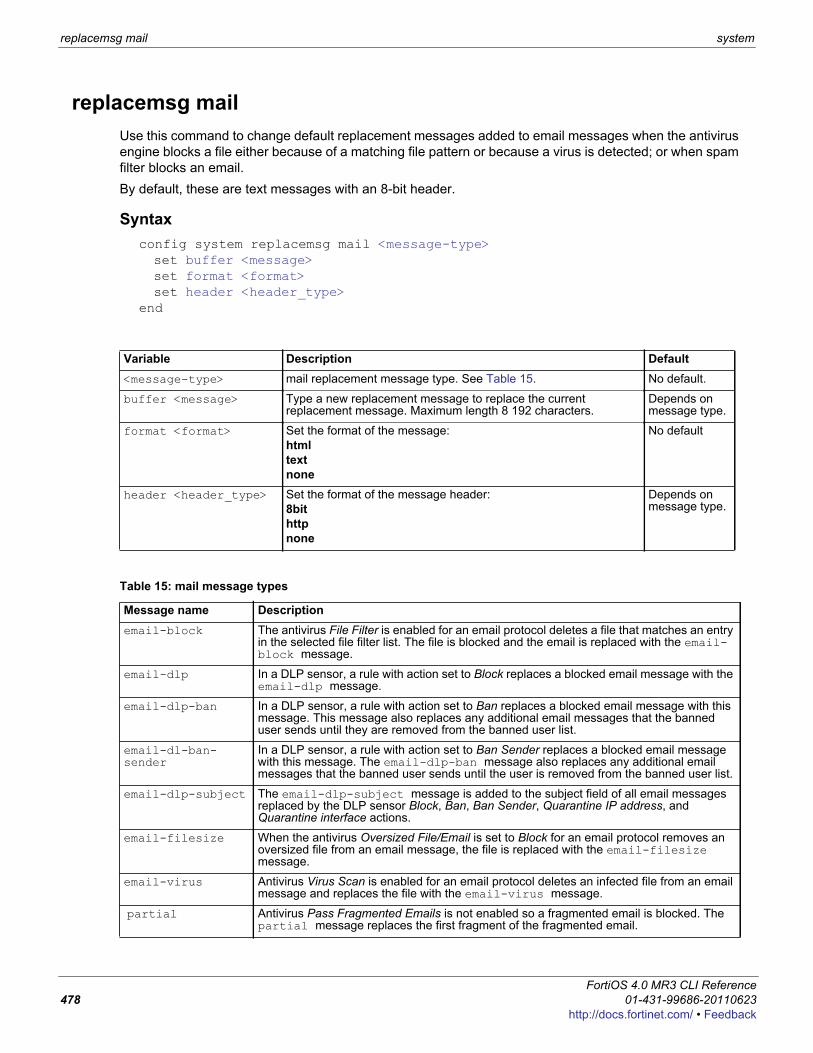
replacemsg mail system
replacemsg mailUse this command to change default replacement messages added to email messages when the antivirus engine blocks a file either because of a matching file pattern or because a virus is detected; or when spam filter blocks an email.By default, these are text messages with an 8-bit header.
Syntaxconfig system replacemsg mail <message-type>set buffer <message>set format <format>set header <header_type>
end
Variable Description Default<message-type> mail replacement message type. See Table 15. No default.
buffer <message> Type a new replacement message to replace the current replacement message. Maximum length 8 192 characters.
Depends on message type.
format <format> Set the format of the message: html text none
No default
header <header_type> Set the format of the message header:8bithttpnone
Depends on message type.
Table 15: mail message types
Message name Descriptionemail-block The antivirus File Filter is enabled for an email protocol deletes a file that matches an entry
in the selected file filter list. The file is blocked and the email is replaced with the email-block message.
email-dlp In a DLP sensor, a rule with action set to Block replaces a blocked email message with the email-dlp message.
email-dlp-ban In a DLP sensor, a rule with action set to Ban replaces a blocked email message with this message. This message also replaces any additional email messages that the banned user sends until they are removed from the banned user list.
email-dl-ban-sender
In a DLP sensor, a rule with action set to Ban Sender replaces a blocked email message with this message. The email-dlp-ban message also replaces any additional email messages that the banned user sends until the user is removed from the banned user list.
email-dlp-subject The email-dlp-subject message is added to the subject field of all email messages replaced by the DLP sensor Block, Ban, Ban Sender, Quarantine IP address, and Quarantine interface actions.
email-filesize When the antivirus Oversized File/Email is set to Block for an email protocol removes an oversized file from an email message, the file is replaced with the email-filesize message.
email-virus Antivirus Virus Scan is enabled for an email protocol deletes an infected file from an email message and replaces the file with the email-virus message.
partial Antivirus Pass Fragmented Emails is not enabled so a fragmented email is blocked. The partial message replaces the first fragment of the fragmented email.
FortiOS 4.0 MR3 CLI Reference478 01-431-99686-20110623
http://docs.fortinet.com/ • Feedback
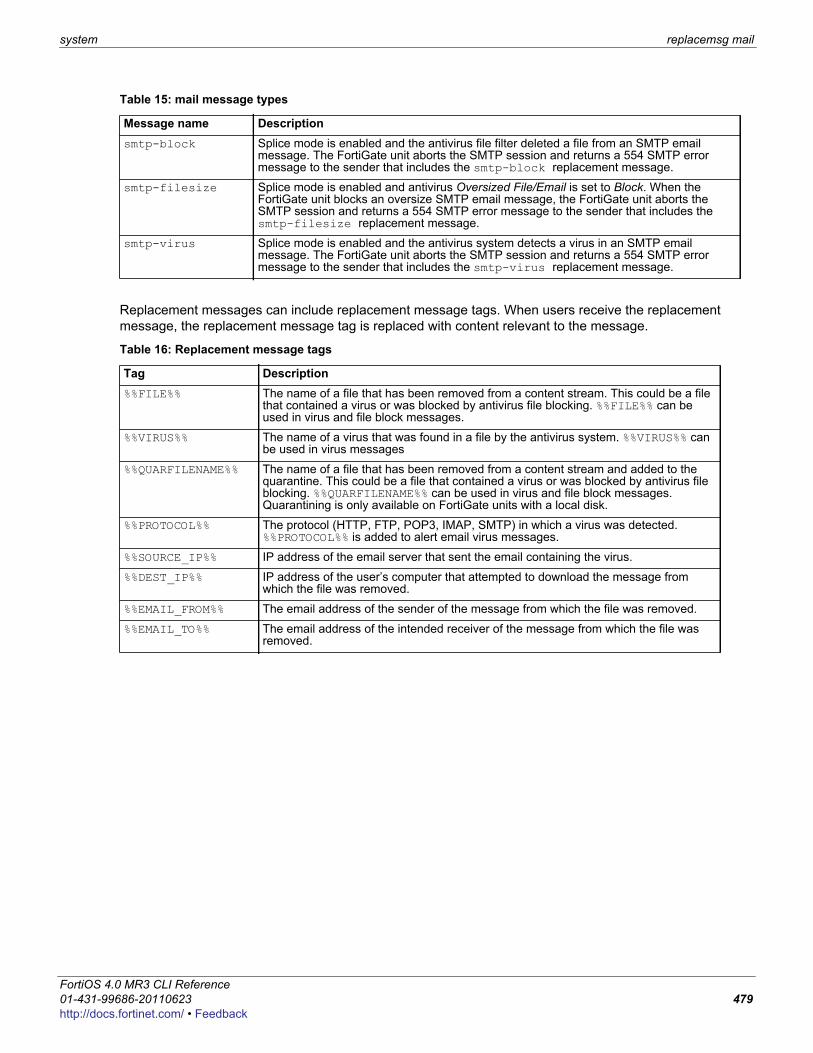
system replacemsg mail
F0h
Replacement messages can include replacement message tags. When users receive the replacement message, the replacement message tag is replaced with content relevant to the message.
smtp-block Splice mode is enabled and the antivirus file filter deleted a file from an SMTP email message. The FortiGate unit aborts the SMTP session and returns a 554 SMTP error message to the sender that includes the smtp-block replacement message.
smtp-filesize Splice mode is enabled and antivirus Oversized File/Email is set to Block. When the FortiGate unit blocks an oversize SMTP email message, the FortiGate unit aborts the SMTP session and returns a 554 SMTP error message to the sender that includes the smtp-filesize replacement message.
smtp-virus Splice mode is enabled and the antivirus system detects a virus in an SMTP email message. The FortiGate unit aborts the SMTP session and returns a 554 SMTP error message to the sender that includes the smtp-virus replacement message.
Table 16: Replacement message tags
Tag Description%%FILE%% The name of a file that has been removed from a content stream. This could be a file
that contained a virus or was blocked by antivirus file blocking. %%FILE%% can be used in virus and file block messages.
%%VIRUS%% The name of a virus that was found in a file by the antivirus system. %%VIRUS%% can be used in virus messages
%%QUARFILENAME%% The name of a file that has been removed from a content stream and added to the quarantine. This could be a file that contained a virus or was blocked by antivirus file blocking. %%QUARFILENAME%% can be used in virus and file block messages. Quarantining is only available on FortiGate units with a local disk.
%%PROTOCOL%% The protocol (HTTP, FTP, POP3, IMAP, SMTP) in which a virus was detected. %%PROTOCOL%% is added to alert email virus messages.
%%SOURCE_IP%% IP address of the email server that sent the email containing the virus.
%%DEST_IP%% IP address of the user’s computer that attempted to download the message from which the file was removed.
%%EMAIL_FROM%% The email address of the sender of the message from which the file was removed.
%%EMAIL_TO%% The email address of the intended receiver of the message from which the file was removed.
Table 15: mail message types
Message name Description
ortiOS 4.0 MR3 CLI Reference1-431-99686-20110623 479ttp://docs.fortinet.com/ • Feedback
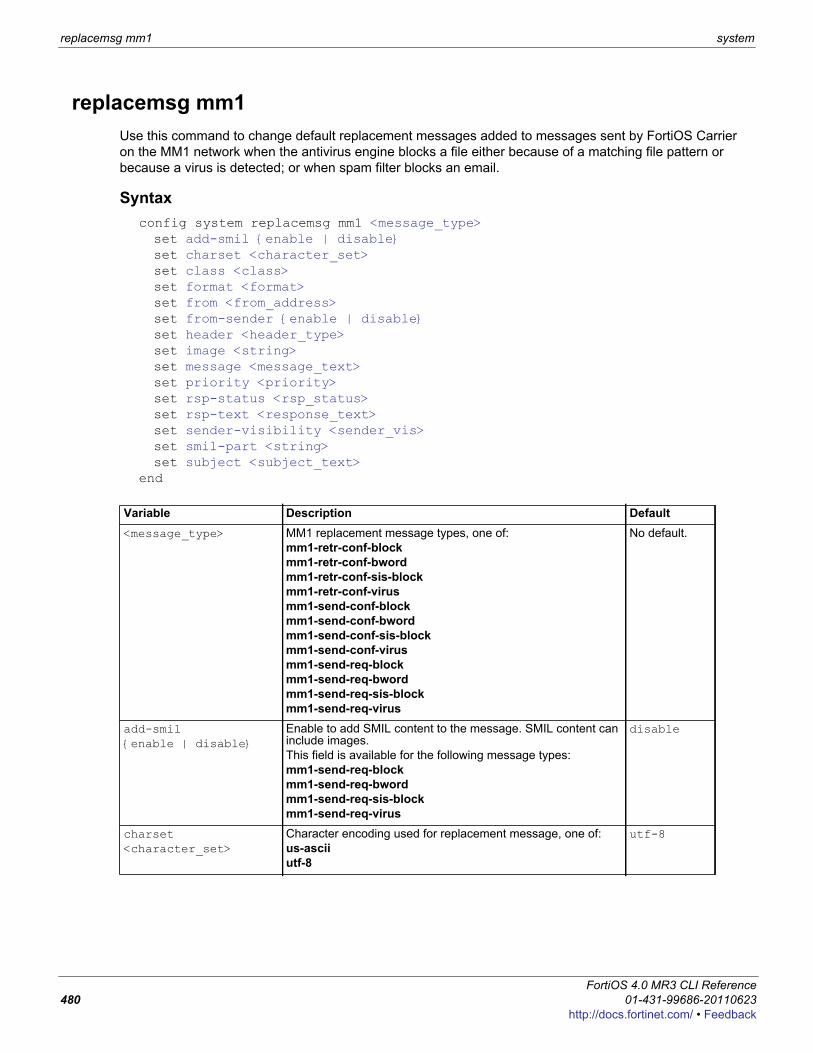
replacemsg mm1 system
replacemsg mm1Use this command to change default replacement messages added to messages sent by FortiOS Carrier on the MM1 network when the antivirus engine blocks a file either because of a matching file pattern or because a virus is detected; or when spam filter blocks an email.
Syntaxconfig system replacemsg mm1 <message_type>set add-smil {enable | disable}set charset <character_set>set class <class>set format <format>set from <from_address>set from-sender {enable | disable}set header <header_type>set image <string>set message <message_text>set priority <priority>set rsp-status <rsp_status>set rsp-text <response_text>set sender-visibility <sender_vis>set smil-part <string>set subject <subject_text>
end
Variable Description Default<message_type> MM1 replacement message types, one of:
mm1-retr-conf-blockmm1-retr-conf-bwordmm1-retr-conf-sis-blockmm1-retr-conf-virusmm1-send-conf-blockmm1-send-conf-bwordmm1-send-conf-sis-blockmm1-send-conf-virusmm1-send-req-blockmm1-send-req-bwordmm1-send-req-sis-blockmm1-send-req-virus
No default.
add-smil {enable | disable}
Enable to add SMIL content to the message. SMIL content can include images.This field is available for the following message types:mm1-send-req-blockmm1-send-req-bwordmm1-send-req-sis-blockmm1-send-req-virus
disable
charset <character_set>
Character encoding used for replacement message, one of:us-asciiutf-8
utf-8
FortiOS 4.0 MR3 CLI Reference480 01-431-99686-20110623
http://docs.fortinet.com/ • Feedback
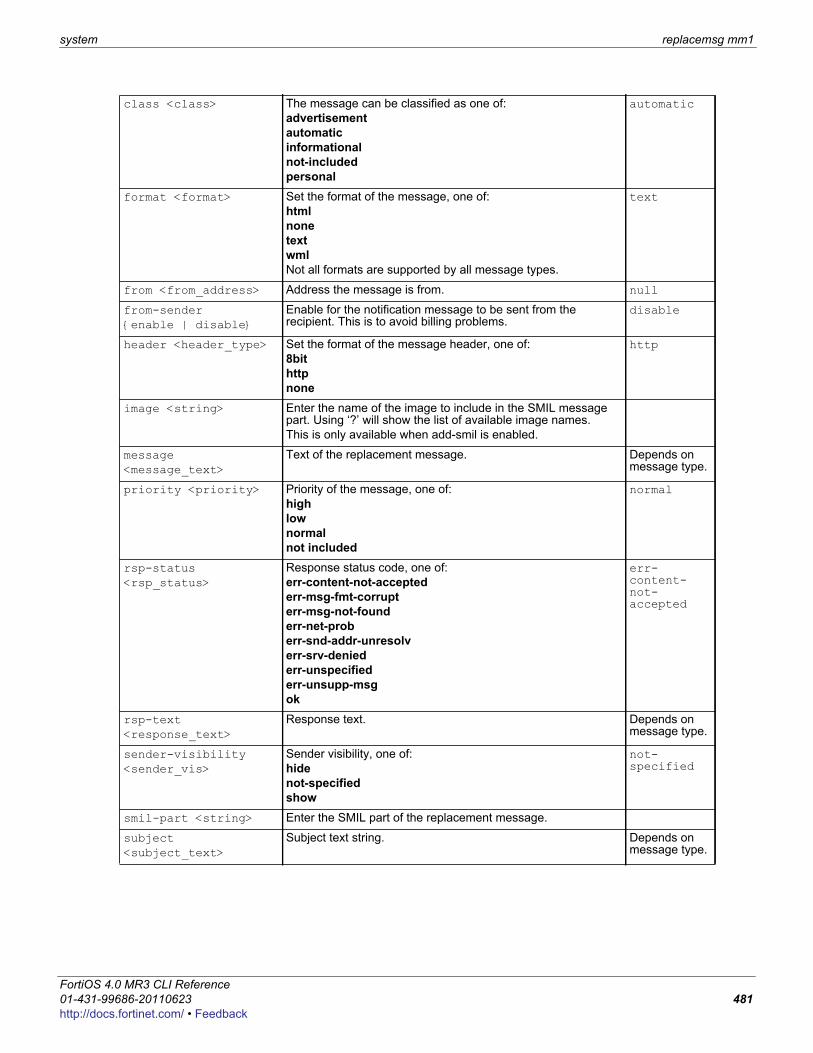
system replacemsg mm1
F0h
class <class> The message can be classified as one of:advertisementautomaticinformationalnot-includedpersonal
automatic
format <format> Set the format of the message, one of:htmlnonetextwmlNot all formats are supported by all message types.
text
from <from_address> Address the message is from. null
from-sender {enable | disable}
Enable for the notification message to be sent from the recipient. This is to avoid billing problems.
disable
header <header_type> Set the format of the message header, one of:8bithttpnone
http
image <string> Enter the name of the image to include in the SMIL message part. Using ‘?’ will show the list of available image names.This is only available when add-smil is enabled.
message <message_text>
Text of the replacement message. Depends on message type.
priority <priority> Priority of the message, one of:highlownormalnot included
normal
rsp-status <rsp_status>
Response status code, one of:err-content-not-acceptederr-msg-fmt-corrupt err-msg-not-founderr-net-proberr-snd-addr-unresolverr-srv-deniederr-unspecifiederr-unsupp-msgok
err-content-not-accepted
rsp-text <response_text>
Response text. Depends on message type.
sender-visibility <sender_vis>
Sender visibility, one of:hidenot-specifiedshow
not-specified
smil-part <string> Enter the SMIL part of the replacement message.
subject <subject_text>
Subject text string. Depends on message type.
ortiOS 4.0 MR3 CLI Reference1-431-99686-20110623 481ttp://docs.fortinet.com/ • Feedback
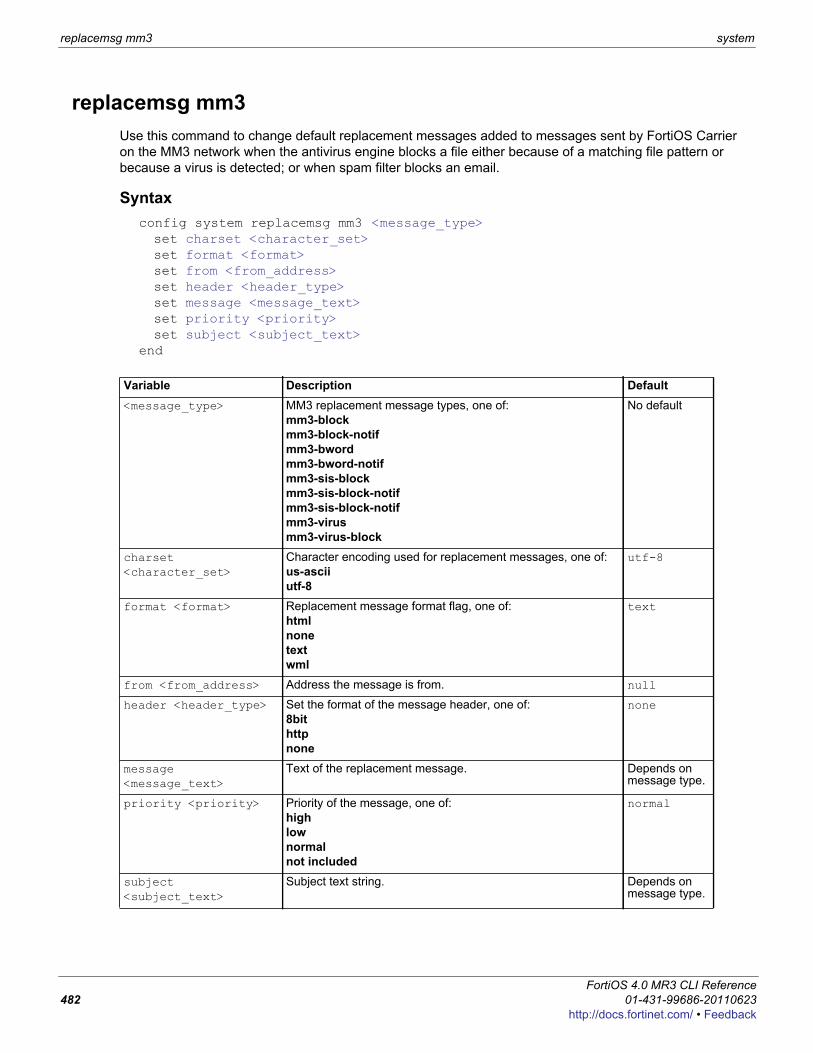
replacemsg mm3 system
replacemsg mm3Use this command to change default replacement messages added to messages sent by FortiOS Carrier on the MM3 network when the antivirus engine blocks a file either because of a matching file pattern or because a virus is detected; or when spam filter blocks an email.
Syntaxconfig system replacemsg mm3 <message_type>set charset <character_set>set format <format>set from <from_address>set header <header_type>set message <message_text>set priority <priority>set subject <subject_text>
end
Variable Description Default<message_type> MM3 replacement message types, one of:
mm3-blockmm3-block-notifmm3-bwordmm3-bword-notifmm3-sis-blockmm3-sis-block-notifmm3-sis-block-notifmm3-virusmm3-virus-block
No default
charset <character_set>
Character encoding used for replacement messages, one of:us-asciiutf-8
utf-8
format <format> Replacement message format flag, one of:htmlnonetextwml
text
from <from_address> Address the message is from. null
header <header_type> Set the format of the message header, one of:8bithttpnone
none
message <message_text>
Text of the replacement message. Depends on message type.
priority <priority> Priority of the message, one of:highlownormalnot included
normal
subject <subject_text>
Subject text string. Depends on message type.
FortiOS 4.0 MR3 CLI Reference482 01-431-99686-20110623
http://docs.fortinet.com/ • Feedback
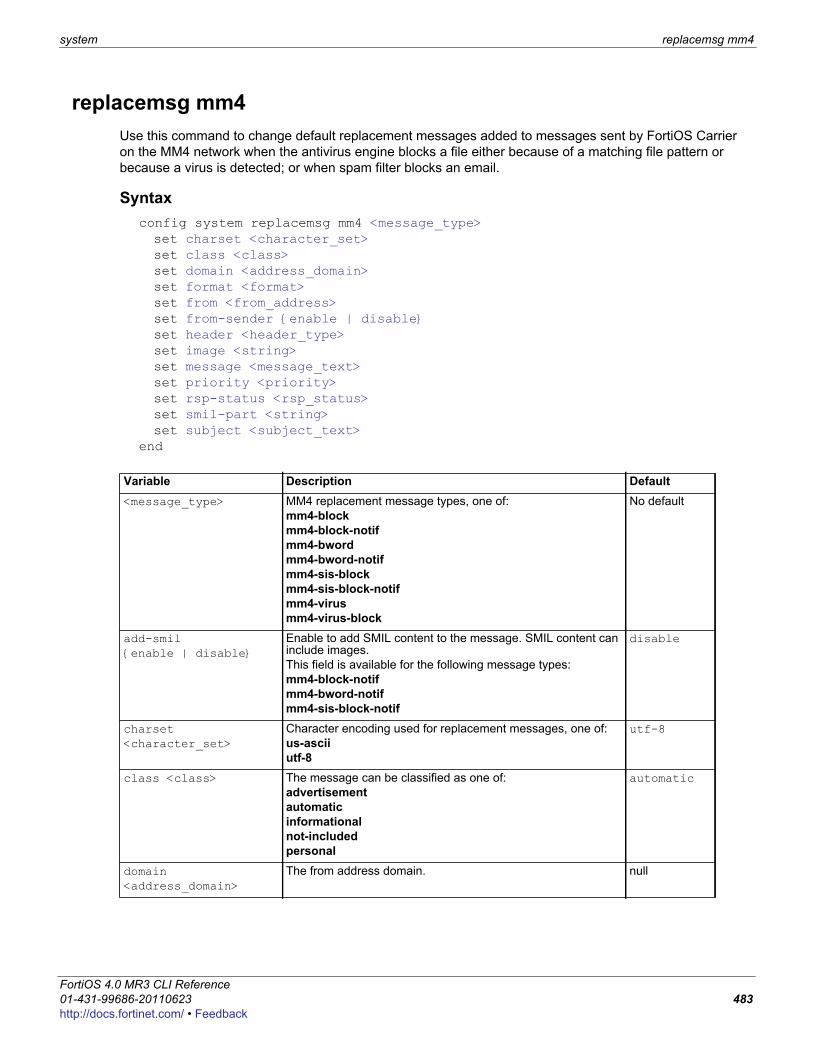
system replacemsg mm4
F0h
replacemsg mm4Use this command to change default replacement messages added to messages sent by FortiOS Carrier on the MM4 network when the antivirus engine blocks a file either because of a matching file pattern or because a virus is detected; or when spam filter blocks an email.
Syntaxconfig system replacemsg mm4 <message_type>set charset <character_set>set class <class>set domain <address_domain>set format <format>set from <from_address>set from-sender {enable | disable}set header <header_type>set image <string>set message <message_text>set priority <priority>set rsp-status <rsp_status>set smil-part <string>set subject <subject_text>
end
Variable Description Default<message_type> MM4 replacement message types, one of:
mm4-blockmm4-block-notifmm4-bwordmm4-bword-notifmm4-sis-blockmm4-sis-block-notifmm4-virusmm4-virus-block
No default
add-smil {enable | disable}
Enable to add SMIL content to the message. SMIL content can include images.This field is available for the following message types:mm4-block-notifmm4-bword-notifmm4-sis-block-notif
disable
charset <character_set>
Character encoding used for replacement messages, one of:us-asciiutf-8
utf-8
class <class> The message can be classified as one of:advertisementautomaticinformationalnot-includedpersonal
automatic
domain <address_domain>
The from address domain. null
ortiOS 4.0 MR3 CLI Reference1-431-99686-20110623 483ttp://docs.fortinet.com/ • Feedback
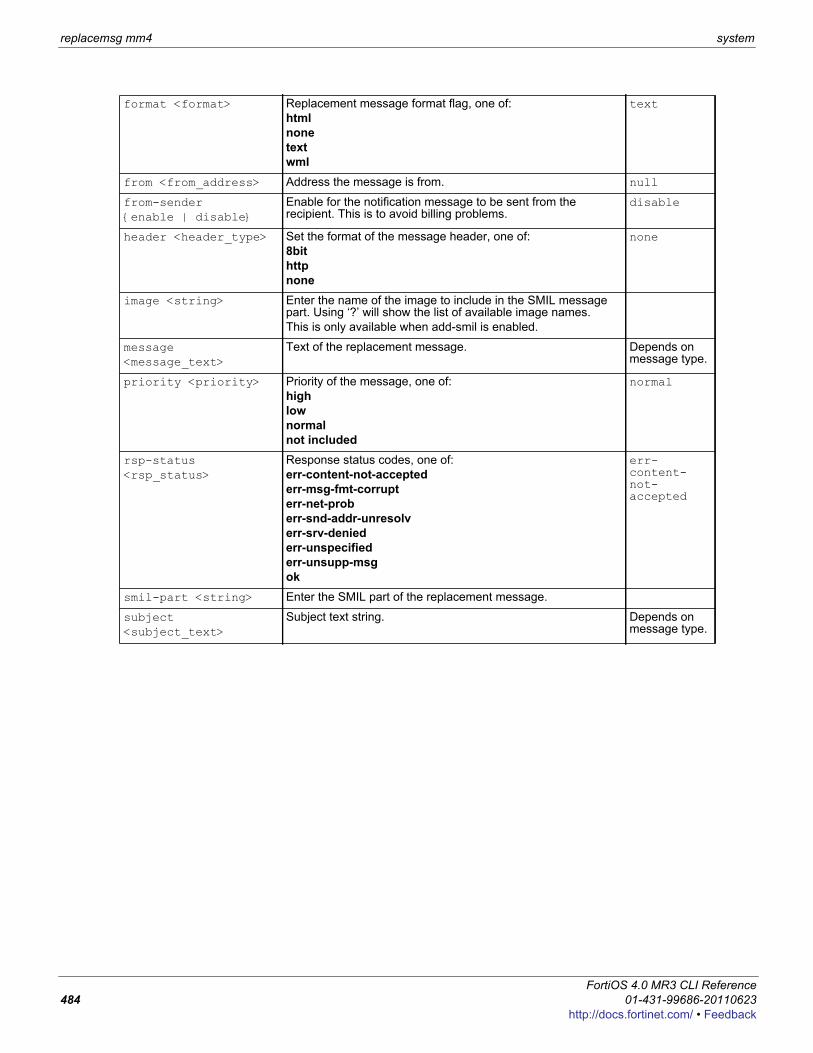
replacemsg mm4 system
format <format> Replacement message format flag, one of:htmlnonetextwml
text
from <from_address> Address the message is from. null
from-sender {enable | disable}
Enable for the notification message to be sent from the recipient. This is to avoid billing problems.
disable
header <header_type> Set the format of the message header, one of:8bithttpnone
none
image <string> Enter the name of the image to include in the SMIL message part. Using ‘?’ will show the list of available image names.This is only available when add-smil is enabled.
message <message_text>
Text of the replacement message. Depends on message type.
priority <priority> Priority of the message, one of:highlownormalnot included
normal
rsp-status <rsp_status>
Response status codes, one of:err-content-not-acceptederr-msg-fmt-corrupt err-net-proberr-snd-addr-unresolverr-srv-deniederr-unspecifiederr-unsupp-msgok
err-content-not-accepted
smil-part <string> Enter the SMIL part of the replacement message.
subject <subject_text>
Subject text string. Depends on message type.
FortiOS 4.0 MR3 CLI Reference484 01-431-99686-20110623
http://docs.fortinet.com/ • Feedback
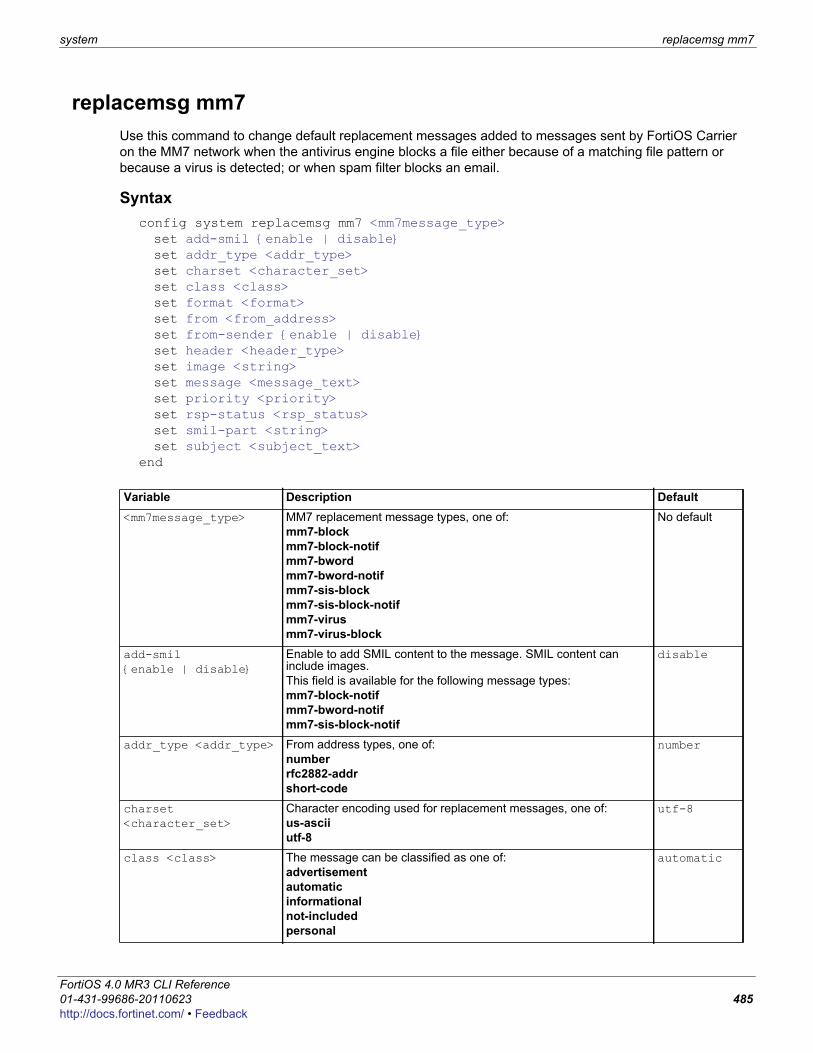
system replacemsg mm7
F0h
replacemsg mm7Use this command to change default replacement messages added to messages sent by FortiOS Carrier on the MM7 network when the antivirus engine blocks a file either because of a matching file pattern or because a virus is detected; or when spam filter blocks an email.
Syntaxconfig system replacemsg mm7 <mm7message_type>set add-smil {enable | disable}set addr_type <addr_type>set charset <character_set>set class <class>set format <format>set from <from_address>set from-sender {enable | disable}set header <header_type>set image <string>set message <message_text>set priority <priority>set rsp-status <rsp_status>set smil-part <string>set subject <subject_text>
end
Variable Description Default<mm7message_type> MM7 replacement message types, one of:
mm7-blockmm7-block-notifmm7-bwordmm7-bword-notifmm7-sis-blockmm7-sis-block-notifmm7-virusmm7-virus-block
No default
add-smil {enable | disable}
Enable to add SMIL content to the message. SMIL content can include images.This field is available for the following message types:mm7-block-notifmm7-bword-notifmm7-sis-block-notif
disable
addr_type <addr_type> From address types, one of:numberrfc2882-addrshort-code
number
charset <character_set>
Character encoding used for replacement messages, one of:us-asciiutf-8
utf-8
class <class> The message can be classified as one of:advertisementautomaticinformationalnot-includedpersonal
automatic
ortiOS 4.0 MR3 CLI Reference1-431-99686-20110623 485ttp://docs.fortinet.com/ • Feedback
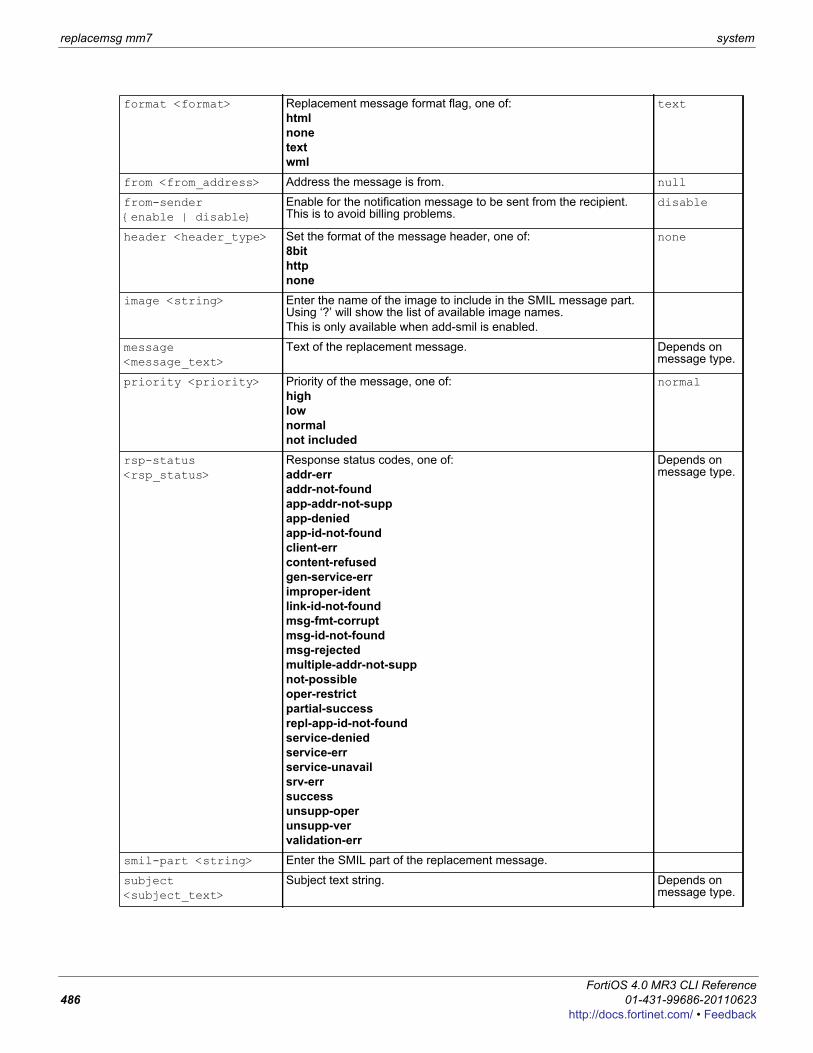
replacemsg mm7 system
format <format> Replacement message format flag, one of:htmlnonetextwml
text
from <from_address> Address the message is from. null
from-sender {enable | disable}
Enable for the notification message to be sent from the recipient. This is to avoid billing problems.
disable
header <header_type> Set the format of the message header, one of:8bithttpnone
none
image <string> Enter the name of the image to include in the SMIL message part. Using ‘?’ will show the list of available image names.This is only available when add-smil is enabled.
message <message_text>
Text of the replacement message. Depends on message type.
priority <priority> Priority of the message, one of:highlownormalnot included
normal
rsp-status <rsp_status>
Response status codes, one of:addr-err addr-not-foundapp-addr-not-supp app-denied app-id-not-found client-err content-refused gen-service-err improper-ident link-id-not-found msg-fmt-corrupt msg-id-not-found msg-rejected multiple-addr-not-supp not-possible oper-restrict partial-success repl-app-id-not-found service-denied service-err service-unavail srv-errsuccessunsupp-operunsupp-vervalidation-err
Depends on message type.
smil-part <string> Enter the SMIL part of the replacement message.
subject <subject_text>
Subject text string. Depends on message type.
FortiOS 4.0 MR3 CLI Reference486 01-431-99686-20110623
http://docs.fortinet.com/ • Feedback

system replacemsg-group
F0h
replacemsg-groupUse this command to define replacement messages for your VDOM, overriding the corresponding global replacement messages.
SyntaxTo create a VDOM-specific replacement message:
config system replacemsg-groupedit defaultconfig <msg_category>edit <msg_type>set buffer <message>set format <format>set header <header_type>
endend
To remove a VDOM-specific replacement message, restoring the global replacement message:config system replacemsg-groupedit defaultconfig <msg_category>delete <msg_type>
end
Variable Description Defaultbuffer <message> Type a new replacement message to replace the current
replacement message. Maximum length 8 192 characters.Depends on message type.
comment <comment_str> Optionally, enter a descriptive comment. No default
format <format> Set the format of the message: html text none
No default
header <header_type> Set the format of the message header:8bithttpnone
Depends on message type.
<msg_category> The category of replacement message. This corresponds to the field following replacemsg in the global system replacemsg command. For example, the http category includes the messages defined globally in the system replacemsg http command.
No default
<msg_type> The message type. This corresponds to the final field in the global system replacemsg command. For example, to create a new login message for your SSL VPN, you would set <msg_category> to sslvpn and <msg_type> to sslvpn-login.
No default
ortiOS 4.0 MR3 CLI Reference1-431-99686-20110623 487ttp://docs.fortinet.com/ • Feedback
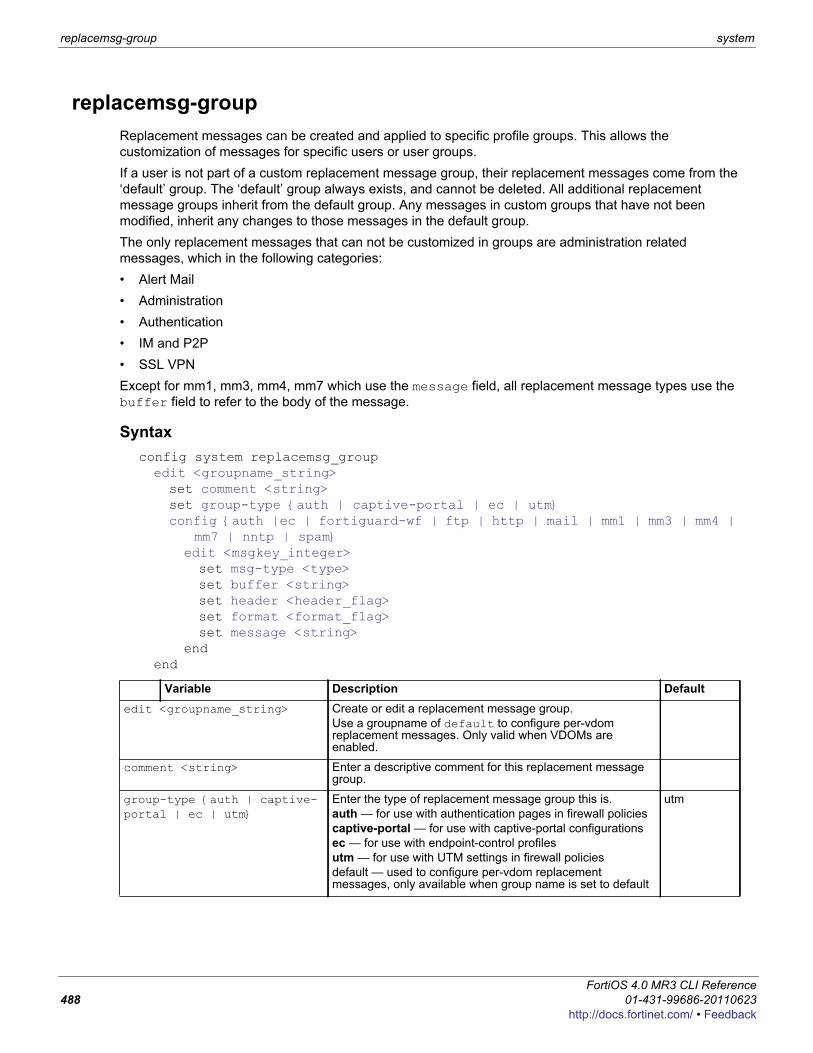
replacemsg-group system
replacemsg-groupReplacement messages can be created and applied to specific profile groups. This allows the customization of messages for specific users or user groups.If a user is not part of a custom replacement message group, their replacement messages come from the ‘default’ group. The ‘default’ group always exists, and cannot be deleted. All additional replacement message groups inherit from the default group. Any messages in custom groups that have not been modified, inherit any changes to those messages in the default group.The only replacement messages that can not be customized in groups are administration related messages, which in the following categories:• Alert Mail• Administration• Authentication• IM and P2P• SSL VPNExcept for mm1, mm3, mm4, mm7 which use the message field, all replacement message types use the buffer field to refer to the body of the message.
Syntaxconfig system replacemsg_groupedit <groupname_string>set comment <string>set group-type {auth | captive-portal | ec | utm}config {auth |ec | fortiguard-wf | ftp | http | mail | mm1 | mm3 | mm4 |
mm7 | nntp | spam}edit <msgkey_integer>set msg-type <type>set buffer <string>set header <header_flag>set format <format_flag>set message <string>
endend
Variable Description Defaultedit <groupname_string> Create or edit a replacement message group.
Use a groupname of default to configure per-vdom replacement messages. Only valid when VDOMs are enabled.
comment <string> Enter a descriptive comment for this replacement message group.
group-type {auth | captive-portal | ec | utm}
Enter the type of replacement message group this is.auth — for use with authentication pages in firewall policiescaptive-portal — for use with captive-portal configurationsec — for use with endpoint-control profilesutm — for use with UTM settings in firewall policiesdefault — used to configure per-vdom replacement messages, only available when group name is set to default
utm
FortiOS 4.0 MR3 CLI Reference488 01-431-99686-20110623
http://docs.fortinet.com/ • Feedback
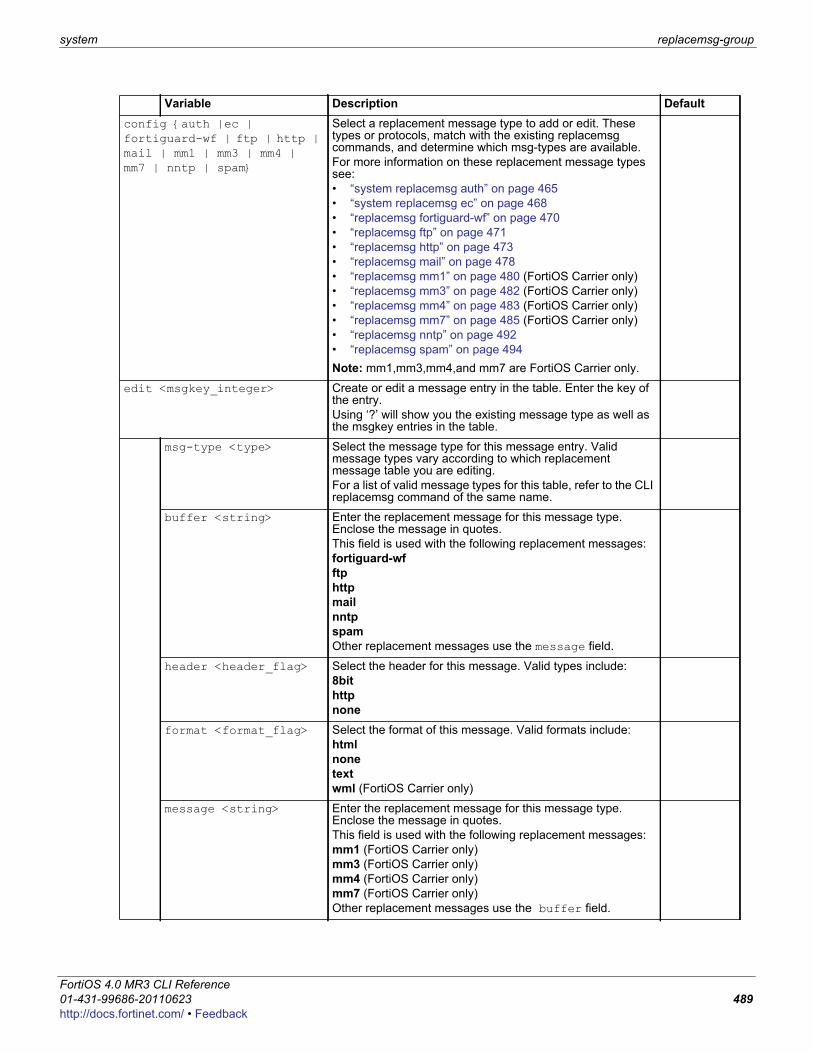
system replacemsg-group
F0h
config {auth |ec | fortiguard-wf | ftp | http | mail | mm1 | mm3 | mm4 | mm7 | nntp | spam}
Select a replacement message type to add or edit. These types or protocols, match with the existing replacemsg commands, and determine which msg-types are available.For more information on these replacement message types see:• “system replacemsg auth” on page 465• “system replacemsg ec” on page 468• “replacemsg fortiguard-wf” on page 470• “replacemsg ftp” on page 471• “replacemsg http” on page 473 • “replacemsg mail” on page 478• “replacemsg mm1” on page 480 (FortiOS Carrier only)• “replacemsg mm3” on page 482 (FortiOS Carrier only)• “replacemsg mm4” on page 483 (FortiOS Carrier only)• “replacemsg mm7” on page 485 (FortiOS Carrier only)• “replacemsg nntp” on page 492• “replacemsg spam” on page 494Note: mm1,mm3,mm4,and mm7 are FortiOS Carrier only.
edit <msgkey_integer> Create or edit a message entry in the table. Enter the key of the entry. Using ‘?’ will show you the existing message type as well as the msgkey entries in the table.
msg-type <type> Select the message type for this message entry. Valid message types vary according to which replacement message table you are editing. For a list of valid message types for this table, refer to the CLI replacemsg command of the same name.
buffer <string> Enter the replacement message for this message type. Enclose the message in quotes.This field is used with the following replacement messages:fortiguard-wfftphttpmailnntpspamOther replacement messages use the message field.
header <header_flag> Select the header for this message. Valid types include:8bithttpnone
format <format_flag> Select the format of this message. Valid formats include:htmlnonetextwml (FortiOS Carrier only)
message <string> Enter the replacement message for this message type. Enclose the message in quotes.This field is used with the following replacement messages:mm1 (FortiOS Carrier only)mm3 (FortiOS Carrier only)mm4 (FortiOS Carrier only)mm7 (FortiOS Carrier only)Other replacement messages use the buffer field.
Variable Description Default
ortiOS 4.0 MR3 CLI Reference1-431-99686-20110623 489ttp://docs.fortinet.com/ • Feedback
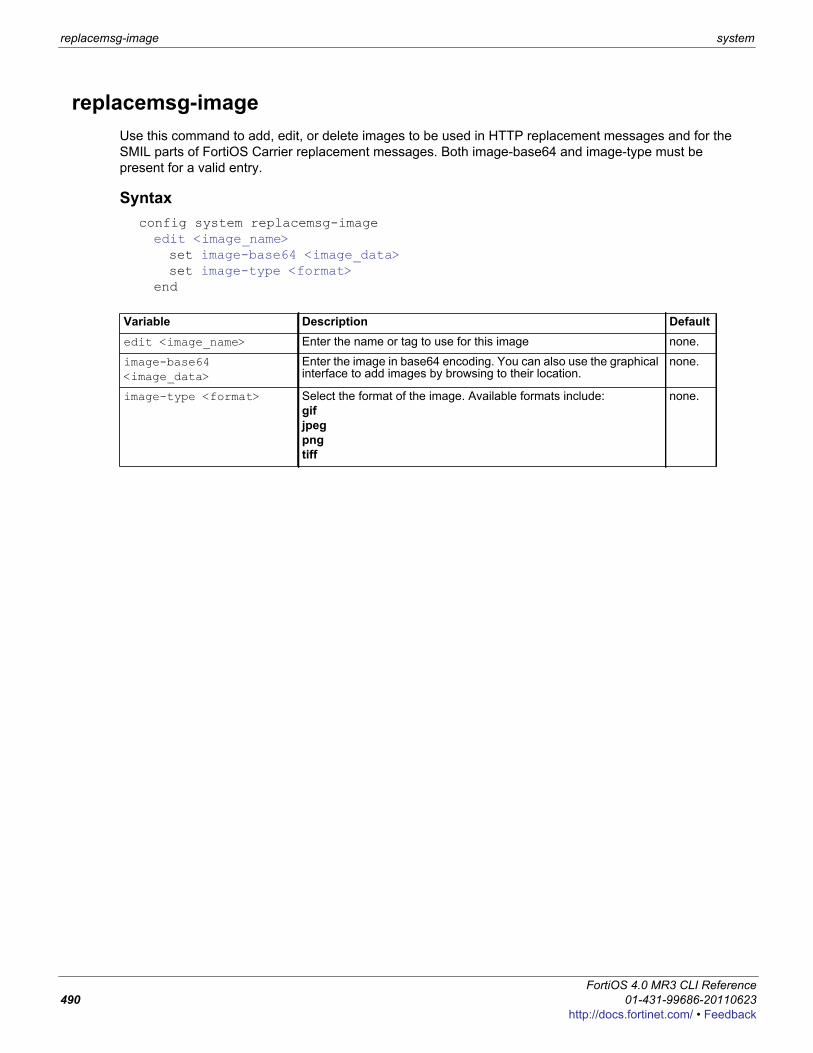
replacemsg-image system
replacemsg-imageUse this command to add, edit, or delete images to be used in HTTP replacement messages and for the SMIL parts of FortiOS Carrier replacement messages. Both image-base64 and image-type must be present for a valid entry.
Syntaxconfig system replacemsg-imageedit <image_name>set image-base64 <image_data>set image-type <format>
end
Variable Description Defaultedit <image_name> Enter the name or tag to use for this image none.
image-base64 <image_data>
Enter the image in base64 encoding. You can also use the graphical interface to add images by browsing to their location.
none.
image-type <format> Select the format of the image. Available formats include:gifjpegpngtiff
none.
FortiOS 4.0 MR3 CLI Reference490 01-431-99686-20110623
http://docs.fortinet.com/ • Feedback
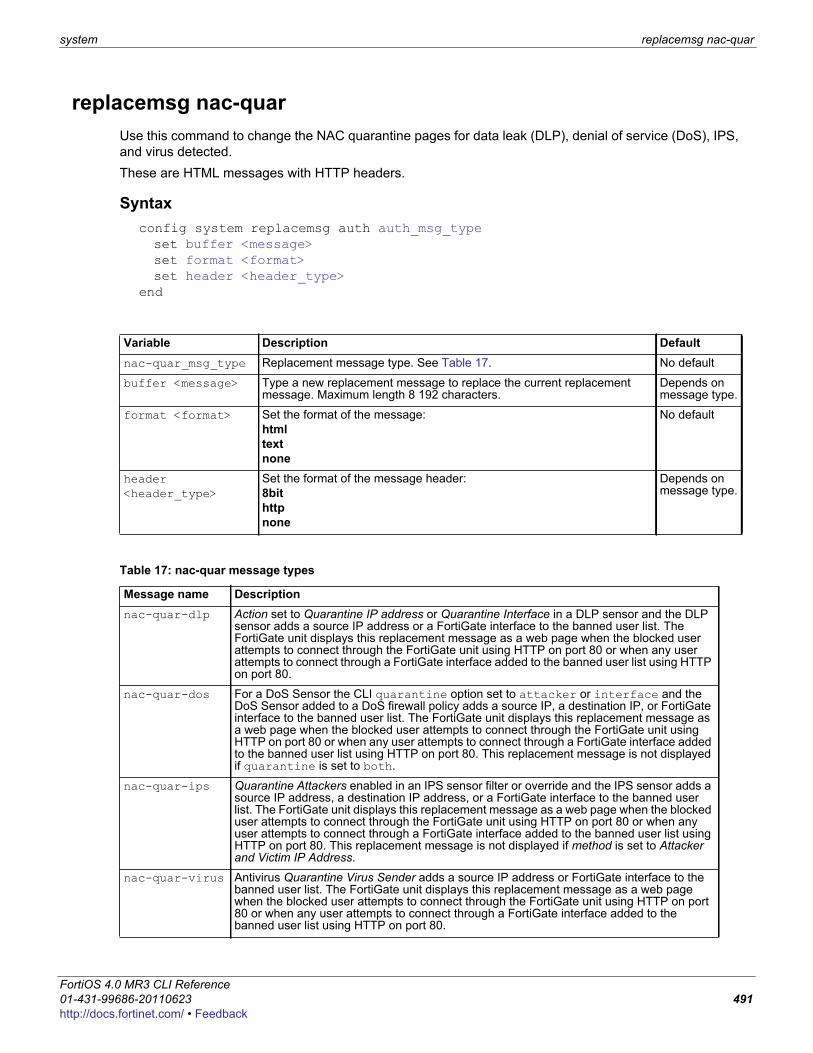
system replacemsg nac-quar
F0h
replacemsg nac-quarUse this command to change the NAC quarantine pages for data leak (DLP), denial of service (DoS), IPS, and virus detected.These are HTML messages with HTTP headers.
Syntaxconfig system replacemsg auth auth_msg_typeset buffer <message>set format <format>set header <header_type>
end
Variable Description Defaultnac-quar_msg_type Replacement message type. See Table 17. No default
buffer <message> Type a new replacement message to replace the current replacement message. Maximum length 8 192 characters.
Depends on message type.
format <format> Set the format of the message: html text none
No default
header <header_type>
Set the format of the message header:8bithttpnone
Depends on message type.
Table 17: nac-quar message types
Message name Descriptionnac-quar-dlp Action set to Quarantine IP address or Quarantine Interface in a DLP sensor and the DLP
sensor adds a source IP address or a FortiGate interface to the banned user list. The FortiGate unit displays this replacement message as a web page when the blocked user attempts to connect through the FortiGate unit using HTTP on port 80 or when any user attempts to connect through a FortiGate interface added to the banned user list using HTTP on port 80.
nac-quar-dos For a DoS Sensor the CLI quarantine option set to attacker or interface and the DoS Sensor added to a DoS firewall policy adds a source IP, a destination IP, or FortiGate interface to the banned user list. The FortiGate unit displays this replacement message as a web page when the blocked user attempts to connect through the FortiGate unit using HTTP on port 80 or when any user attempts to connect through a FortiGate interface added to the banned user list using HTTP on port 80. This replacement message is not displayed if quarantine is set to both.
nac-quar-ips Quarantine Attackers enabled in an IPS sensor filter or override and the IPS sensor adds a source IP address, a destination IP address, or a FortiGate interface to the banned user list. The FortiGate unit displays this replacement message as a web page when the blocked user attempts to connect through the FortiGate unit using HTTP on port 80 or when any user attempts to connect through a FortiGate interface added to the banned user list using HTTP on port 80. This replacement message is not displayed if method is set to Attacker and Victim IP Address.
nac-quar-virus Antivirus Quarantine Virus Sender adds a source IP address or FortiGate interface to the banned user list. The FortiGate unit displays this replacement message as a web page when the blocked user attempts to connect through the FortiGate unit using HTTP on port 80 or when any user attempts to connect through a FortiGate interface added to the banned user list using HTTP on port 80.
ortiOS 4.0 MR3 CLI Reference1-431-99686-20110623 491ttp://docs.fortinet.com/ • Feedback
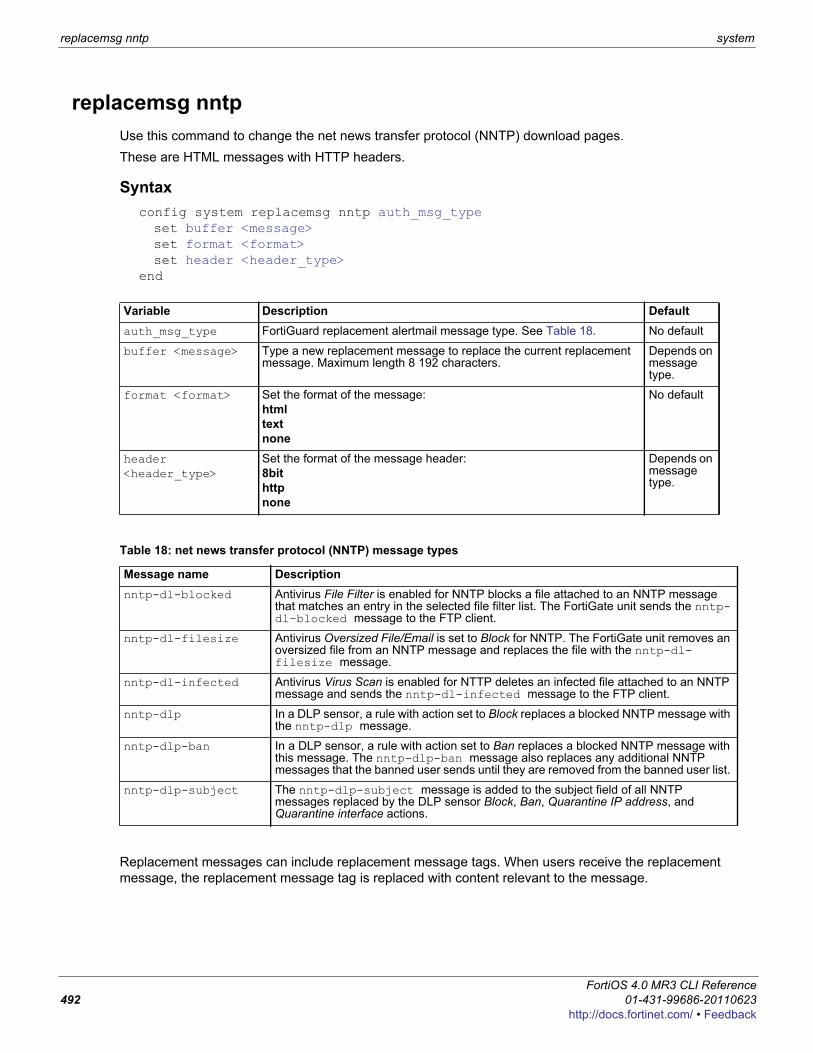
replacemsg nntp system
replacemsg nntpUse this command to change the net news transfer protocol (NNTP) download pages.These are HTML messages with HTTP headers.
Syntaxconfig system replacemsg nntp auth_msg_typeset buffer <message>set format <format>set header <header_type>
end
Replacement messages can include replacement message tags. When users receive the replacement message, the replacement message tag is replaced with content relevant to the message.
Variable Description Defaultauth_msg_type FortiGuard replacement alertmail message type. See Table 18. No default
buffer <message> Type a new replacement message to replace the current replacement message. Maximum length 8 192 characters.
Depends on message type.
format <format> Set the format of the message: html text none
No default
header <header_type>
Set the format of the message header:8bithttpnone
Depends on message type.
Table 18: net news transfer protocol (NNTP) message types
Message name Descriptionnntp-dl-blocked Antivirus File Filter is enabled for NNTP blocks a file attached to an NNTP message
that matches an entry in the selected file filter list. The FortiGate unit sends the nntp-dl-blocked message to the FTP client.
nntp-dl-filesize Antivirus Oversized File/Email is set to Block for NNTP. The FortiGate unit removes an oversized file from an NNTP message and replaces the file with the nntp-dl-filesize message.
nntp-dl-infected Antivirus Virus Scan is enabled for NTTP deletes an infected file attached to an NNTP message and sends the nntp-dl-infected message to the FTP client.
nntp-dlp In a DLP sensor, a rule with action set to Block replaces a blocked NNTP message with the nntp-dlp message.
nntp-dlp-ban In a DLP sensor, a rule with action set to Ban replaces a blocked NNTP message with this message. The nntp-dlp-ban message also replaces any additional NNTP messages that the banned user sends until they are removed from the banned user list.
nntp-dlp-subject The nntp-dlp-subject message is added to the subject field of all NNTP messages replaced by the DLP sensor Block, Ban, Quarantine IP address, and Quarantine interface actions.
FortiOS 4.0 MR3 CLI Reference492 01-431-99686-20110623
http://docs.fortinet.com/ • Feedback
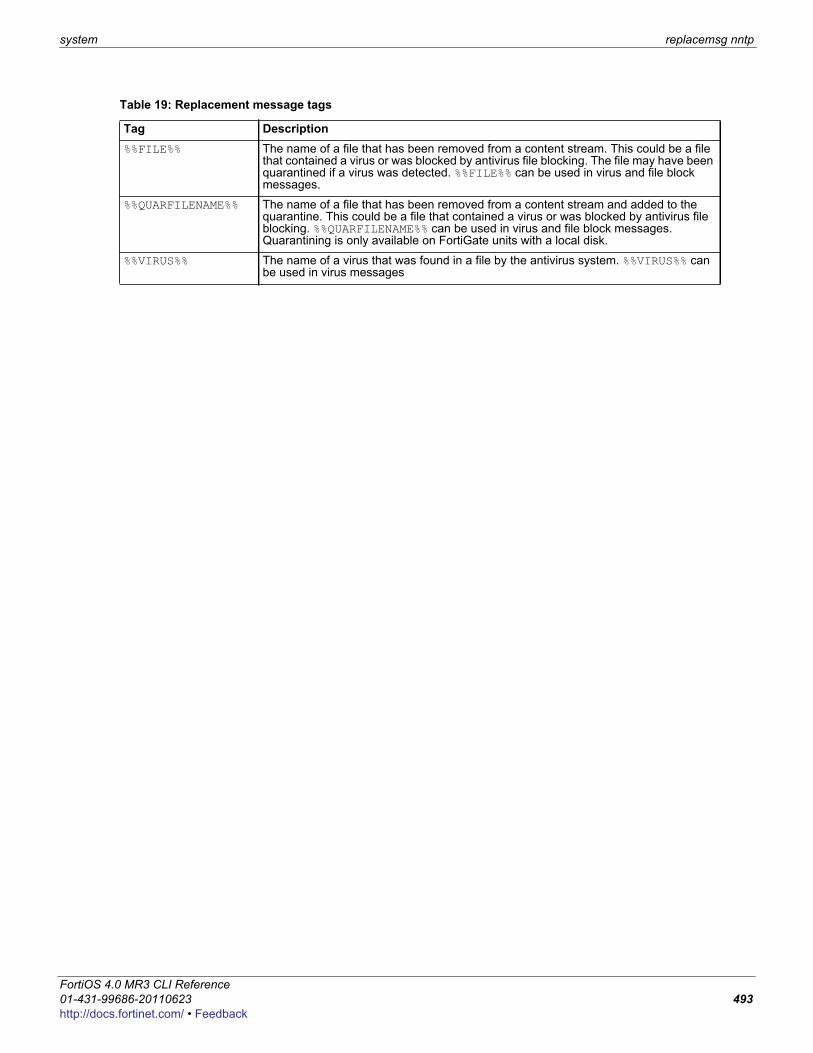
system replacemsg nntp
F0h
Table 19: Replacement message tags
Tag Description%%FILE%% The name of a file that has been removed from a content stream. This could be a file
that contained a virus or was blocked by antivirus file blocking. The file may have been quarantined if a virus was detected. %%FILE%% can be used in virus and file block messages.
%%QUARFILENAME%% The name of a file that has been removed from a content stream and added to the quarantine. This could be a file that contained a virus or was blocked by antivirus file blocking. %%QUARFILENAME%% can be used in virus and file block messages. Quarantining is only available on FortiGate units with a local disk.
%%VIRUS%% The name of a virus that was found in a file by the antivirus system. %%VIRUS%% can be used in virus messages
ortiOS 4.0 MR3 CLI Reference1-431-99686-20110623 493ttp://docs.fortinet.com/ • Feedback
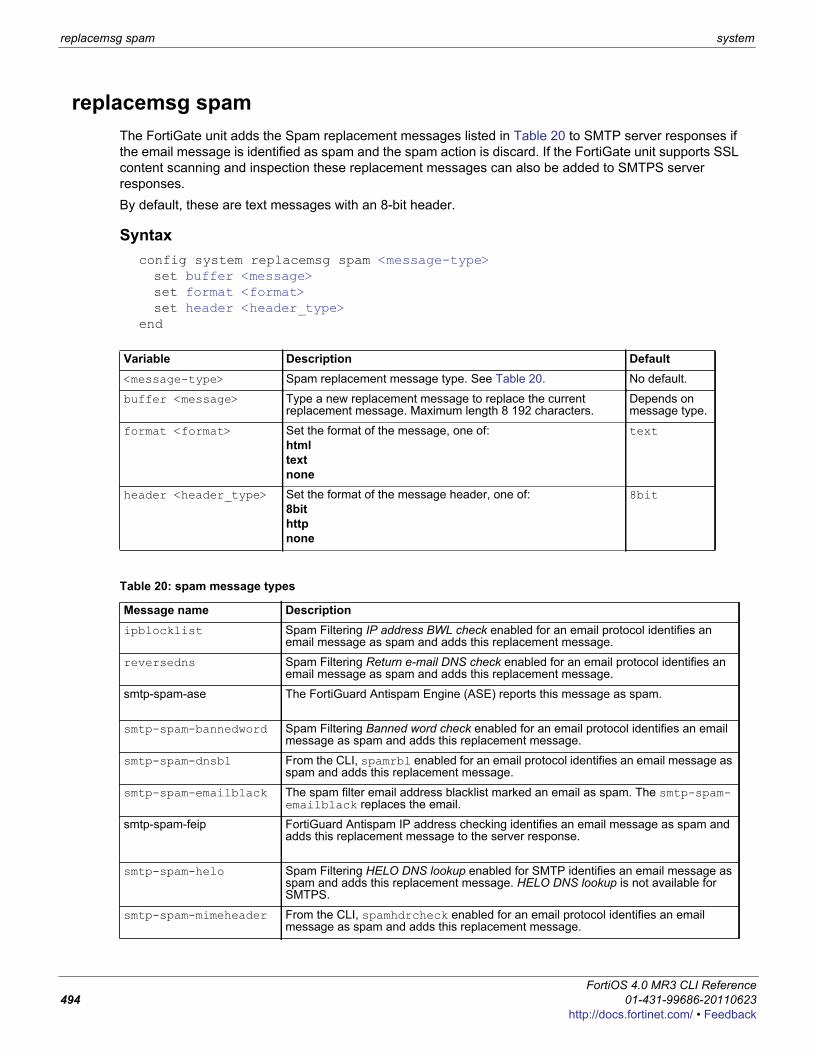
replacemsg spam system
replacemsg spamThe FortiGate unit adds the Spam replacement messages listed in Table 20 to SMTP server responses if the email message is identified as spam and the spam action is discard. If the FortiGate unit supports SSL content scanning and inspection these replacement messages can also be added to SMTPS server responses. By default, these are text messages with an 8-bit header.
Syntaxconfig system replacemsg spam <message-type>set buffer <message>set format <format>set header <header_type>
end
Variable Description Default<message-type> Spam replacement message type. See Table 20. No default.
buffer <message> Type a new replacement message to replace the current replacement message. Maximum length 8 192 characters.
Depends on message type.
format <format> Set the format of the message, one of:html text none
text
header <header_type> Set the format of the message header, one of:8bithttpnone
8bit
Table 20: spam message types
Message name Descriptionipblocklist Spam Filtering IP address BWL check enabled for an email protocol identifies an
email message as spam and adds this replacement message.
reversedns Spam Filtering Return e-mail DNS check enabled for an email protocol identifies an email message as spam and adds this replacement message.
smtp-spam-ase The FortiGuard Antispam Engine (ASE) reports this message as spam.
smtp-spam-bannedword Spam Filtering Banned word check enabled for an email protocol identifies an email message as spam and adds this replacement message.
smtp-spam-dnsbl From the CLI, spamrbl enabled for an email protocol identifies an email message as spam and adds this replacement message.
smtp-spam-emailblack The spam filter email address blacklist marked an email as spam. The smtp-spam-emailblack replaces the email.
smtp-spam-feip FortiGuard Antispam IP address checking identifies an email message as spam and adds this replacement message to the server response.
smtp-spam-helo Spam Filtering HELO DNS lookup enabled for SMTP identifies an email message as spam and adds this replacement message. HELO DNS lookup is not available for SMTPS.
smtp-spam-mimeheader From the CLI, spamhdrcheck enabled for an email protocol identifies an email message as spam and adds this replacement message.
FortiOS 4.0 MR3 CLI Reference494 01-431-99686-20110623
http://docs.fortinet.com/ • Feedback

system replacemsg spam
F0h
Replacement messages can include replacement message tags. When users receive the replacement message, the replacement message tag is replaced with content relevant to the message.
submit Any Spam Filtering option enabled for an email protocol identifies an email message as spam and adds this replacement message. Spam Filtering adds this message to all email tagged as spam. The message describes a button that the recipient of the message can select to submit the email signatures to the FortiGuard Antispam service if the email was incorrectly tagged as spam (a false positive).
Table 21: Replacement message tags
Tag Description%%QUARFILENAME%% The name of a file that has been removed from a content stream and added to the
quarantine. This could be a file that contained a virus or was blocked by antivirus file blocking. %%QUARFILENAME%% can be used in virus and file block messages. Quarantining is only available on FortiGate units with a local disk.
%%SOURCE_IP%% The IP address from which a virus was received. For email this is the IP address of the email server that sent the email containing the virus. For HTTP this is the IP address of the web page that sent the virus.
%%DEST_IP%% The IP address of the computer that would have received the blocked file. For email this is the IP address of the user’s computer that attempted to download the message from which the file was removed.
%%EMAIL_FROM%% The email address of the sender of the message from which the file was removed.
%%EMAIL_TO%% The email address of the intended receiver of the message from which the file was removed.
Table 20: spam message types
Message name Description
ortiOS 4.0 MR3 CLI Reference1-431-99686-20110623 495ttp://docs.fortinet.com/ • Feedback
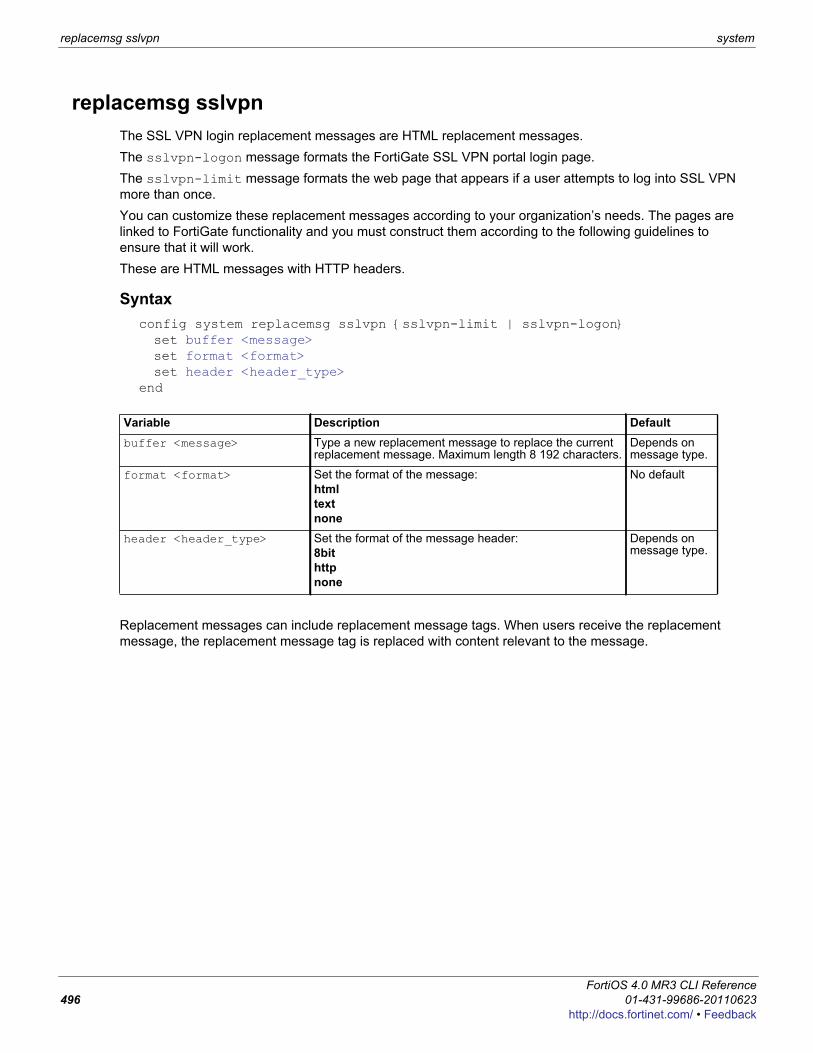
replacemsg sslvpn system
replacemsg sslvpnThe SSL VPN login replacement messages are HTML replacement messages. The sslvpn-logon message formats the FortiGate SSL VPN portal login page. The sslvpn-limit message formats the web page that appears if a user attempts to log into SSL VPN more than once.You can customize these replacement messages according to your organization’s needs. The pages are linked to FortiGate functionality and you must construct them according to the following guidelines to ensure that it will work.These are HTML messages with HTTP headers.
Syntaxconfig system replacemsg sslvpn {sslvpn-limit | sslvpn-logon}set buffer <message>set format <format>set header <header_type>
end
Replacement messages can include replacement message tags. When users receive the replacement message, the replacement message tag is replaced with content relevant to the message.
Variable Description Defaultbuffer <message> Type a new replacement message to replace the current
replacement message. Maximum length 8 192 characters.Depends on message type.
format <format> Set the format of the message: html text none
No default
header <header_type> Set the format of the message header:8bithttpnone
Depends on message type.
FortiOS 4.0 MR3 CLI Reference496 01-431-99686-20110623
http://docs.fortinet.com/ • Feedback
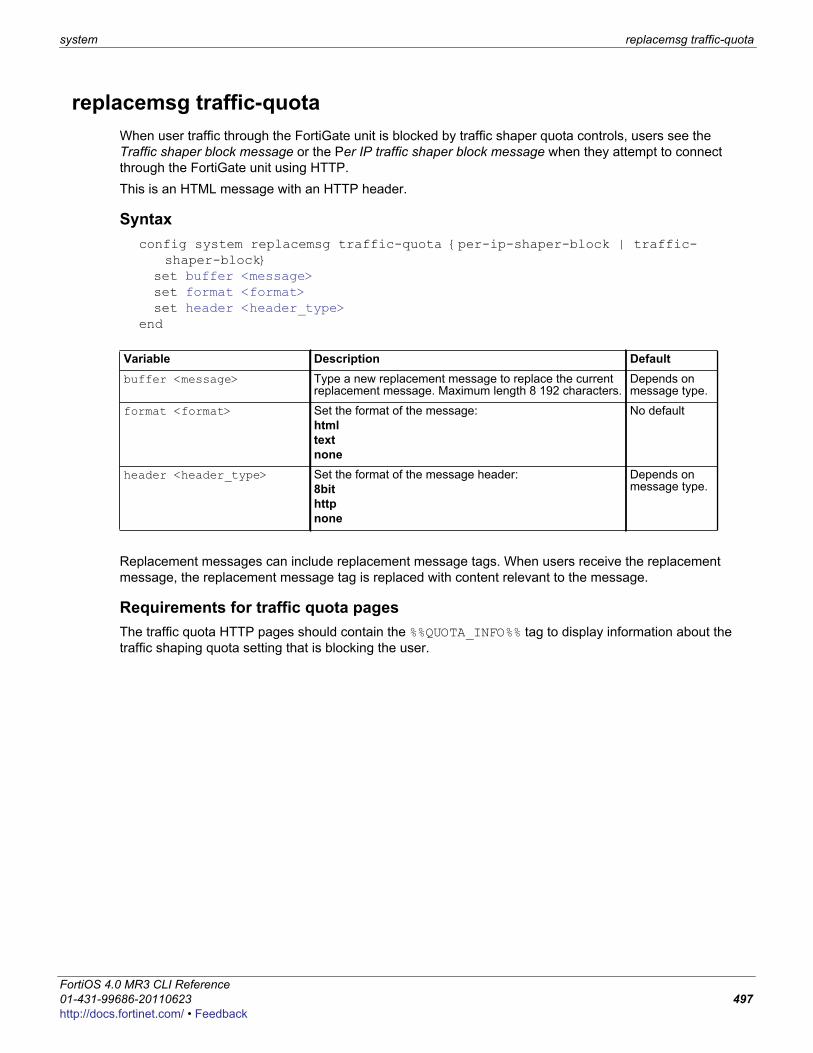
system replacemsg traffic-quota
F0h
replacemsg traffic-quotaWhen user traffic through the FortiGate unit is blocked by traffic shaper quota controls, users see the Traffic shaper block message or the Per IP traffic shaper block message when they attempt to connect through the FortiGate unit using HTTP. This is an HTML message with an HTTP header.
Syntaxconfig system replacemsg traffic-quota {per-ip-shaper-block | traffic-
shaper-block}set buffer <message>set format <format>set header <header_type>
end
Replacement messages can include replacement message tags. When users receive the replacement message, the replacement message tag is replaced with content relevant to the message.
Requirements for traffic quota pagesThe traffic quota HTTP pages should contain the %%QUOTA_INFO%% tag to display information about the traffic shaping quota setting that is blocking the user.
Variable Description Defaultbuffer <message> Type a new replacement message to replace the current
replacement message. Maximum length 8 192 characters.Depends on message type.
format <format> Set the format of the message: html text none
No default
header <header_type> Set the format of the message header:8bithttpnone
Depends on message type.
ortiOS 4.0 MR3 CLI Reference1-431-99686-20110623 497ttp://docs.fortinet.com/ • Feedback
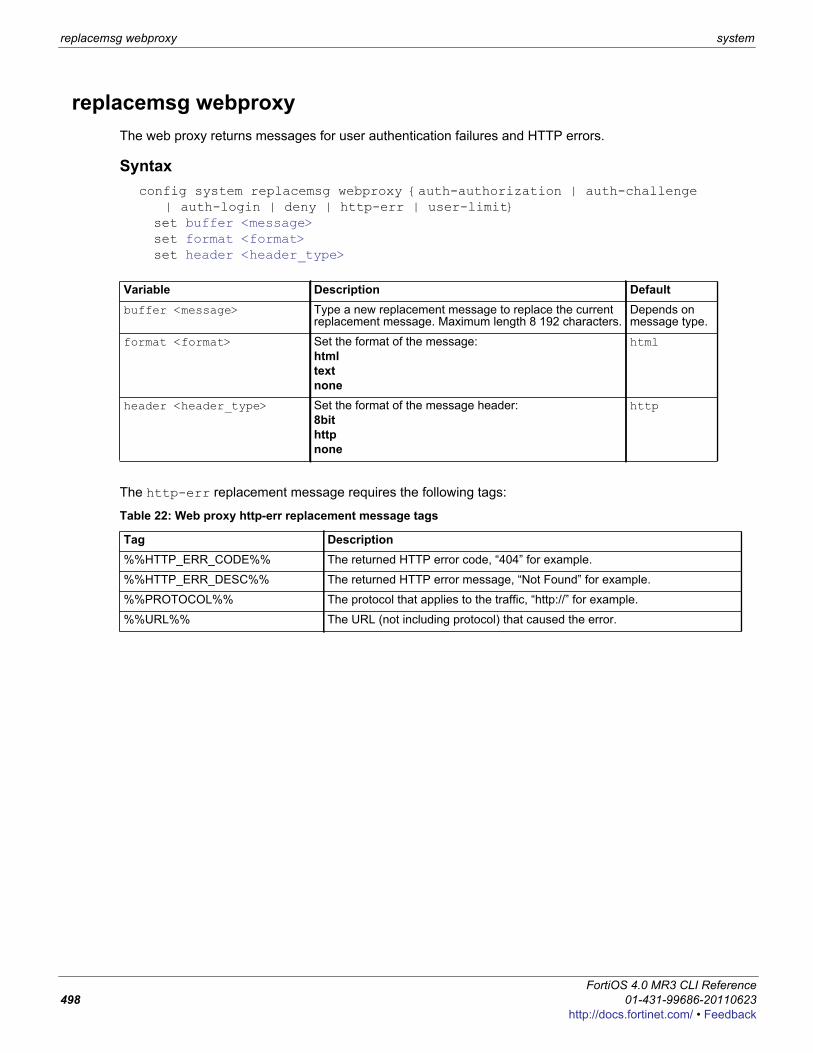
replacemsg webproxy system
replacemsg webproxyThe web proxy returns messages for user authentication failures and HTTP errors.
Syntaxconfig system replacemsg webproxy {auth-authorization | auth-challenge
| auth-login | deny | http-err | user-limit}set buffer <message>set format <format>set header <header_type>
The http-err replacement message requires the following tags:
Variable Description Defaultbuffer <message> Type a new replacement message to replace the current
replacement message. Maximum length 8 192 characters.Depends on message type.
format <format> Set the format of the message: html text none
html
header <header_type> Set the format of the message header:8bithttpnone
http
Table 22: Web proxy http-err replacement message tags
Tag Description%%HTTP_ERR_CODE%% The returned HTTP error code, “404” for example.
%%HTTP_ERR_DESC%% The returned HTTP error message, “Not Found” for example.
%%PROTOCOL%% The protocol that applies to the traffic, “http://” for example.
%%URL%% The URL (not including protocol) that caused the error.
FortiOS 4.0 MR3 CLI Reference498 01-431-99686-20110623
http://docs.fortinet.com/ • Feedback

system resource-limits
F0h
resource-limitsUse this command to configure resource limits that will apply to all VDOMs. When you set a global resource limit, you cannot exceed that resource limit in any VDOM. For example, enter the following command to limit all VDOMS to 100 VPN IPSec Phase 1 Tunnels:
config globalconfig system resource-limitsset ipsec-phase1 100
endend
With this global limit set you can only add a maximum of 100 VPN IPSec Phase 1 Tunnels to any VDOM. You can also edit the resource limits for individual VDOMs to further limit the number of resources that you can add to individual VDOMs. See “system vdom-property” on page 525.A resource limit of 0 means no limit. No limit means the resource is not being limited by the resource limit configuration. Instead the resource is being limited by other factors. The FortiGate unit limits dynamic resources by the capacity of the FortiGate unit and can vary depending on how busy the system is. Limits for static resources are set by limitations in the FortiGate configuration as documented in the FortiGate Maximum Values Matrix document.The default maximum value for each resource depends on the FortiGate model. Dynamic resources (Sessions, Dial-up Tunnels, and SSL VPN) do not have default maximums so the default maximum for dynamic resources is always 0 (meaning unlimited). Static resources may have a limit set or many be set to 0 meaning they are limited by the resource limit configuration.
This command is available only when VDOMs are enabled.
Syntaxconfig globalconfig system resource-limitsset custom-service <max_int> set dialup-tunnel <max_int> set firewall-address <max_int> set firewall-addrgrp <max_int> set firewall-policy <max_int> set ipsec-phase1 <max_int> set ipsec-phase2 <max_int> set log-disk-quota <max_int> set onetime-schedule <max_int> set recurring-schedule <max_int> set service-group <max_int> set session <max_int> set sslvpn <max_int> set user <max_int> set user-group <max_int> set web-proxy <max_int>
endend
Note: If you set the maximum resource usage for a VDOM you cannot reduce the default maximum global limit for all VDOMs below this maximum.
ortiOS 4.0 MR3 CLI Reference1-431-99686-20110623 499ttp://docs.fortinet.com/ • Feedback

resource-limits system
Variable Description Defaultcustom-service <max_int> Enter the maximum number of firewall custom services.
dialup-tunnel <max_int> Enter the maximum number of dialup-tunnels.
firewall-address <max_int> Enter the maximum number of firewall addresses.
firewall-addrgrp <max_int> Enter the maximum number of firewall address groups.
firewall-policy <max_int> Enter the maximum number of firewall policies.
ipsec-phase1 <max_int> Enter the maximum number of IPSec phase1 tunnels.
ipsec-phase2 <max_int> Enter the maximum number of IPSec phase2 tunnels.
log-disk-quota <max_int> Enter the maximum amount of log disk space available in MBytes for global log messages. The range depends on the amount of hard disk space available.
onetime-schedule <max_int> Enter the maximum number of onetime schedules.
recurring-schedule <max_int>
Enter the maximum number of recurring schedules.
service-group <max_int> Enter the maximum number of firewall service groups.
session <max_int> Enter the maximum number of sessions.
sslvpn <max_int> Enter the maximum number of sessions.
user <max_int> Enter the maximum number of users.
user-group <max_int> Enter the maximum number of user groups.
web-proxy <max_int> Enter the maximum number of users that can be using the explicit web proxy at one time.How the number of concurrent explicit proxy users is determined depends on their authentication method:• For session-based authenticated users, each authenticated
user is counted as a single user. Since multiple users can have the same user name, the proxy attempts to identify users according to their authentication membership (based upon whether they were authenticated using RADIUS, LADAP, FSSO, local database etc.). If a user of one session has the same name and membership as a user of another session, the explicit proxy assumes this is one user.
• For IP Based authentication, or no authentication, or if no web-proxy firewall policy has been added, the source IP address is used to determine a user. All sessions from a single source address are assumed to be from the same user.
FortiOS 4.0 MR3 CLI Reference500 01-431-99686-20110623
http://docs.fortinet.com/ • Feedback
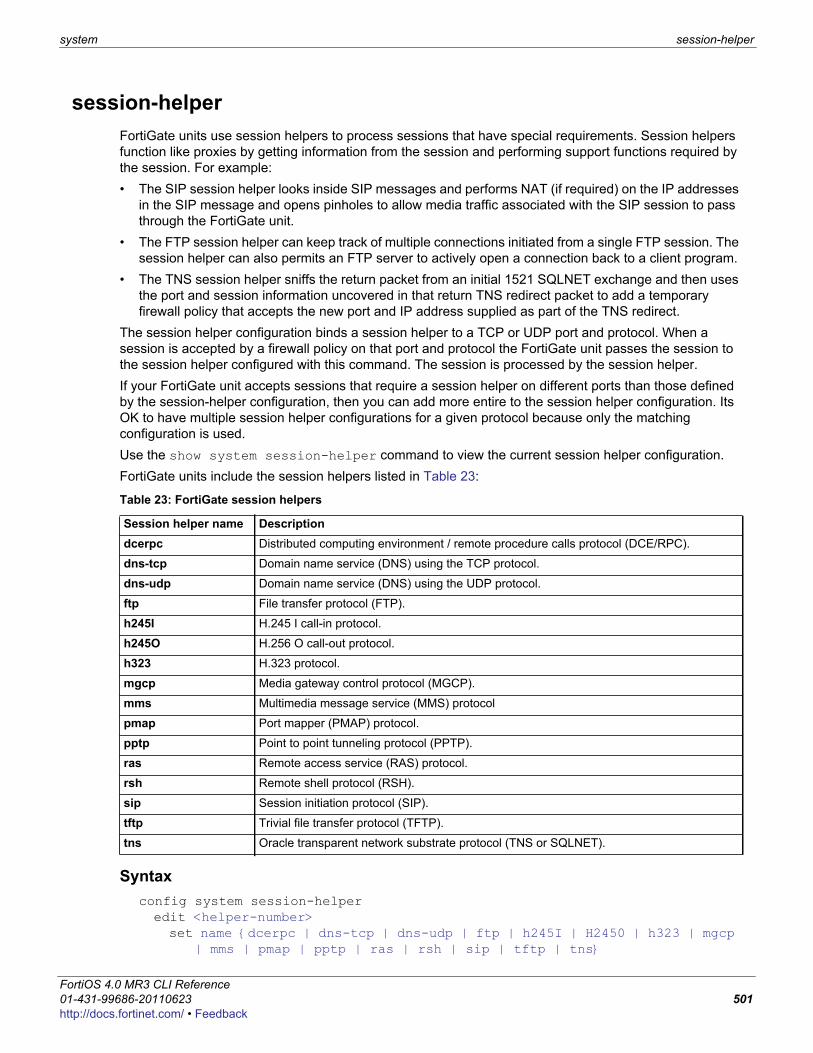
system session-helper
F0h
session-helperFortiGate units use session helpers to process sessions that have special requirements. Session helpers function like proxies by getting information from the session and performing support functions required by the session. For example:• The SIP session helper looks inside SIP messages and performs NAT (if required) on the IP addresses
in the SIP message and opens pinholes to allow media traffic associated with the SIP session to pass through the FortiGate unit.
• The FTP session helper can keep track of multiple connections initiated from a single FTP session. The session helper can also permits an FTP server to actively open a connection back to a client program.
• The TNS session helper sniffs the return packet from an initial 1521 SQLNET exchange and then uses the port and session information uncovered in that return TNS redirect packet to add a temporary firewall policy that accepts the new port and IP address supplied as part of the TNS redirect.
The session helper configuration binds a session helper to a TCP or UDP port and protocol. When a session is accepted by a firewall policy on that port and protocol the FortiGate unit passes the session to the session helper configured with this command. The session is processed by the session helper.If your FortiGate unit accepts sessions that require a session helper on different ports than those defined by the session-helper configuration, then you can add more entire to the session helper configuration. Its OK to have multiple session helper configurations for a given protocol because only the matching configuration is used.Use the show system session-helper command to view the current session helper configuration.FortiGate units include the session helpers listed in Table 23:
Syntaxconfig system session-helperedit <helper-number>set name {dcerpc | dns-tcp | dns-udp | ftp | h245I | H2450 | h323 | mgcp
| mms | pmap | pptp | ras | rsh | sip | tftp | tns}
Table 23: FortiGate session helpers
Session helper name Descriptiondcerpc Distributed computing environment / remote procedure calls protocol (DCE/RPC).
dns-tcp Domain name service (DNS) using the TCP protocol.
dns-udp Domain name service (DNS) using the UDP protocol.
ftp File transfer protocol (FTP).
h245I H.245 I call-in protocol.
h245O H.256 O call-out protocol.
h323 H.323 protocol.
mgcp Media gateway control protocol (MGCP).
mms Multimedia message service (MMS) protocol
pmap Port mapper (PMAP) protocol.
pptp Point to point tunneling protocol (PPTP).
ras Remote access service (RAS) protocol.
rsh Remote shell protocol (RSH).
sip Session initiation protocol (SIP).
tftp Trivial file transfer protocol (TFTP).
tns Oracle transparent network substrate protocol (TNS or SQLNET).
ortiOS 4.0 MR3 CLI Reference1-431-99686-20110623 501ttp://docs.fortinet.com/ • Feedback
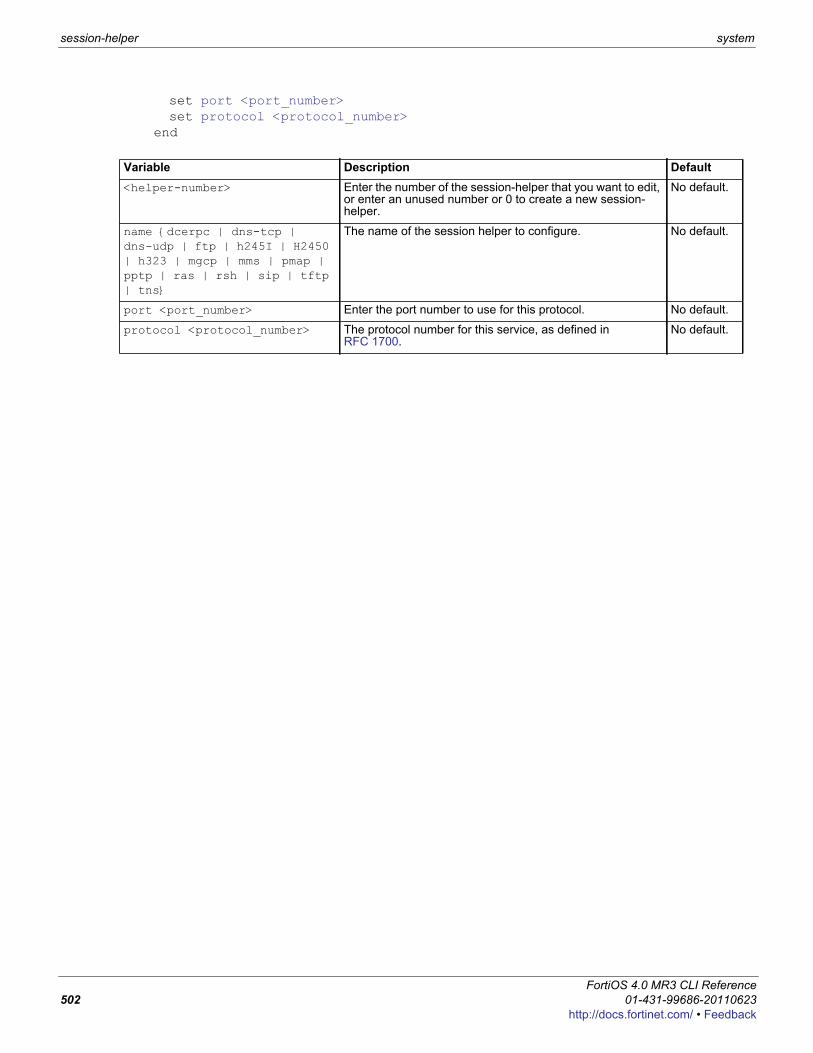
session-helper system
set port <port_number>set protocol <protocol_number>
end
Variable Description Default<helper-number> Enter the number of the session-helper that you want to edit,
or enter an unused number or 0 to create a new session-helper.
No default.
name {dcerpc | dns-tcp | dns-udp | ftp | h245I | H2450 | h323 | mgcp | mms | pmap | pptp | ras | rsh | sip | tftp | tns}
The name of the session helper to configure. No default.
port <port_number> Enter the port number to use for this protocol. No default.
protocol <protocol_number> The protocol number for this service, as defined in RFC 1700.
No default.
FortiOS 4.0 MR3 CLI Reference502 01-431-99686-20110623
http://docs.fortinet.com/ • Feedback
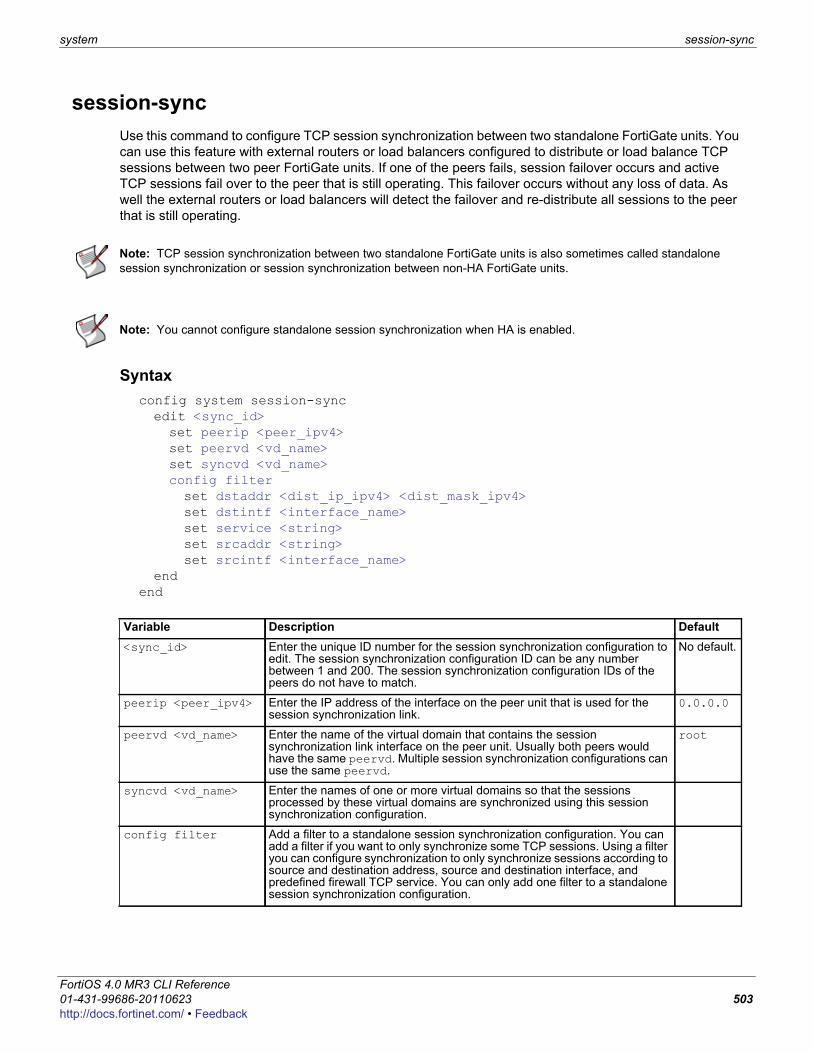
system session-sync
F0h
session-syncUse this command to configure TCP session synchronization between two standalone FortiGate units. You can use this feature with external routers or load balancers configured to distribute or load balance TCP sessions between two peer FortiGate units. If one of the peers fails, session failover occurs and active TCP sessions fail over to the peer that is still operating. This failover occurs without any loss of data. As well the external routers or load balancers will detect the failover and re-distribute all sessions to the peer that is still operating.
Syntaxconfig system session-syncedit <sync_id>set peerip <peer_ipv4>set peervd <vd_name>set syncvd <vd_name>config filterset dstaddr <dist_ip_ipv4> <dist_mask_ipv4>set dstintf <interface_name>set service <string>set srcaddr <string>set srcintf <interface_name>
endend
Note: TCP session synchronization between two standalone FortiGate units is also sometimes called standalone session synchronization or session synchronization between non-HA FortiGate units.
Note: You cannot configure standalone session synchronization when HA is enabled.
Variable Description Default<sync_id> Enter the unique ID number for the session synchronization configuration to
edit. The session synchronization configuration ID can be any number between 1 and 200. The session synchronization configuration IDs of the peers do not have to match.
No default.
peerip <peer_ipv4> Enter the IP address of the interface on the peer unit that is used for the session synchronization link.
0.0.0.0
peervd <vd_name> Enter the name of the virtual domain that contains the session synchronization link interface on the peer unit. Usually both peers would have the same peervd. Multiple session synchronization configurations can use the same peervd.
root
syncvd <vd_name> Enter the names of one or more virtual domains so that the sessions processed by these virtual domains are synchronized using this session synchronization configuration.
config filter Add a filter to a standalone session synchronization configuration. You can add a filter if you want to only synchronize some TCP sessions. Using a filter you can configure synchronization to only synchronize sessions according to source and destination address, source and destination interface, and predefined firewall TCP service. You can only add one filter to a standalone session synchronization configuration.
ortiOS 4.0 MR3 CLI Reference1-431-99686-20110623 503ttp://docs.fortinet.com/ • Feedback
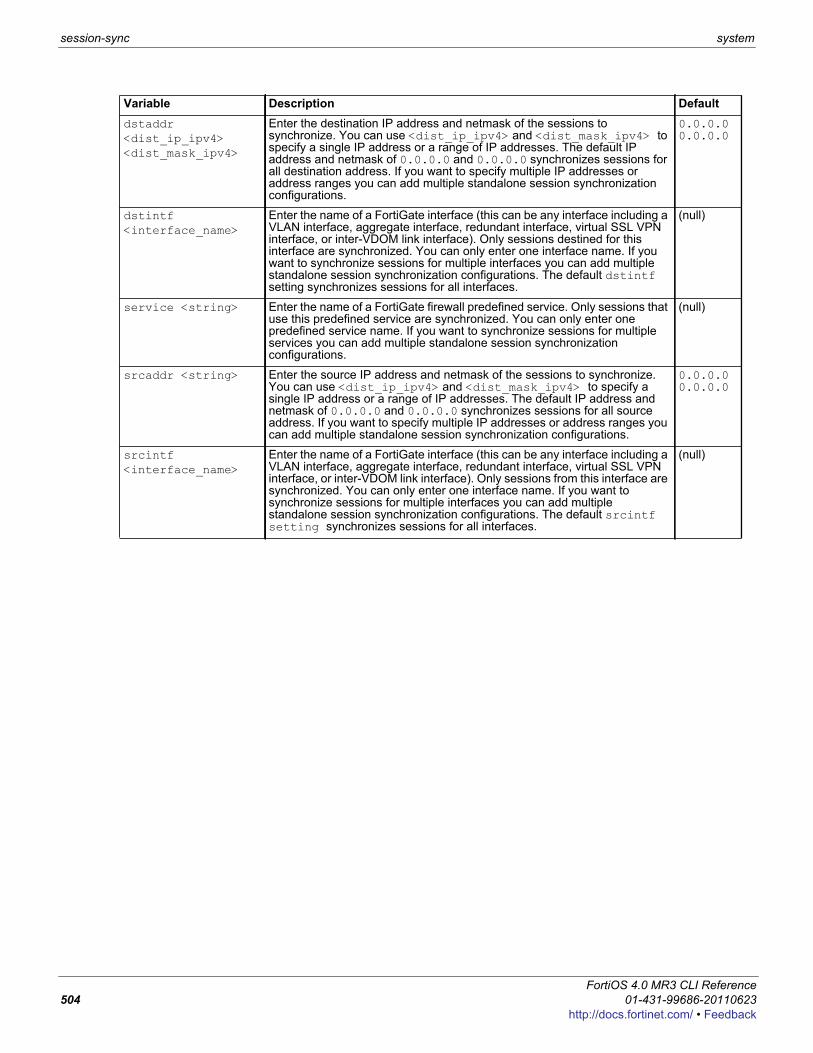
session-sync system
dstaddr <dist_ip_ipv4> <dist_mask_ipv4>
Enter the destination IP address and netmask of the sessions to synchronize. You can use <dist_ip_ipv4> and <dist_mask_ipv4> to specify a single IP address or a range of IP addresses. The default IP address and netmask of 0.0.0.0 and 0.0.0.0 synchronizes sessions for all destination address. If you want to specify multiple IP addresses or address ranges you can add multiple standalone session synchronization configurations.
0.0.0.0 0.0.0.0
dstintf <interface_name>
Enter the name of a FortiGate interface (this can be any interface including a VLAN interface, aggregate interface, redundant interface, virtual SSL VPN interface, or inter-VDOM link interface). Only sessions destined for this interface are synchronized. You can only enter one interface name. If you want to synchronize sessions for multiple interfaces you can add multiple standalone session synchronization configurations. The default dstintf setting synchronizes sessions for all interfaces.
(null)
service <string> Enter the name of a FortiGate firewall predefined service. Only sessions that use this predefined service are synchronized. You can only enter one predefined service name. If you want to synchronize sessions for multiple services you can add multiple standalone session synchronization configurations.
(null)
srcaddr <string> Enter the source IP address and netmask of the sessions to synchronize. You can use <dist_ip_ipv4> and <dist_mask_ipv4> to specify a single IP address or a range of IP addresses. The default IP address and netmask of 0.0.0.0 and 0.0.0.0 synchronizes sessions for all source address. If you want to specify multiple IP addresses or address ranges you can add multiple standalone session synchronization configurations.
0.0.0.0 0.0.0.0
srcintf <interface_name>
Enter the name of a FortiGate interface (this can be any interface including a VLAN interface, aggregate interface, redundant interface, virtual SSL VPN interface, or inter-VDOM link interface). Only sessions from this interface are synchronized. You can only enter one interface name. If you want to synchronize sessions for multiple interfaces you can add multiple standalone session synchronization configurations. The default srcintf setting synchronizes sessions for all interfaces.
(null)
Variable Description Default
FortiOS 4.0 MR3 CLI Reference504 01-431-99686-20110623
http://docs.fortinet.com/ • Feedback
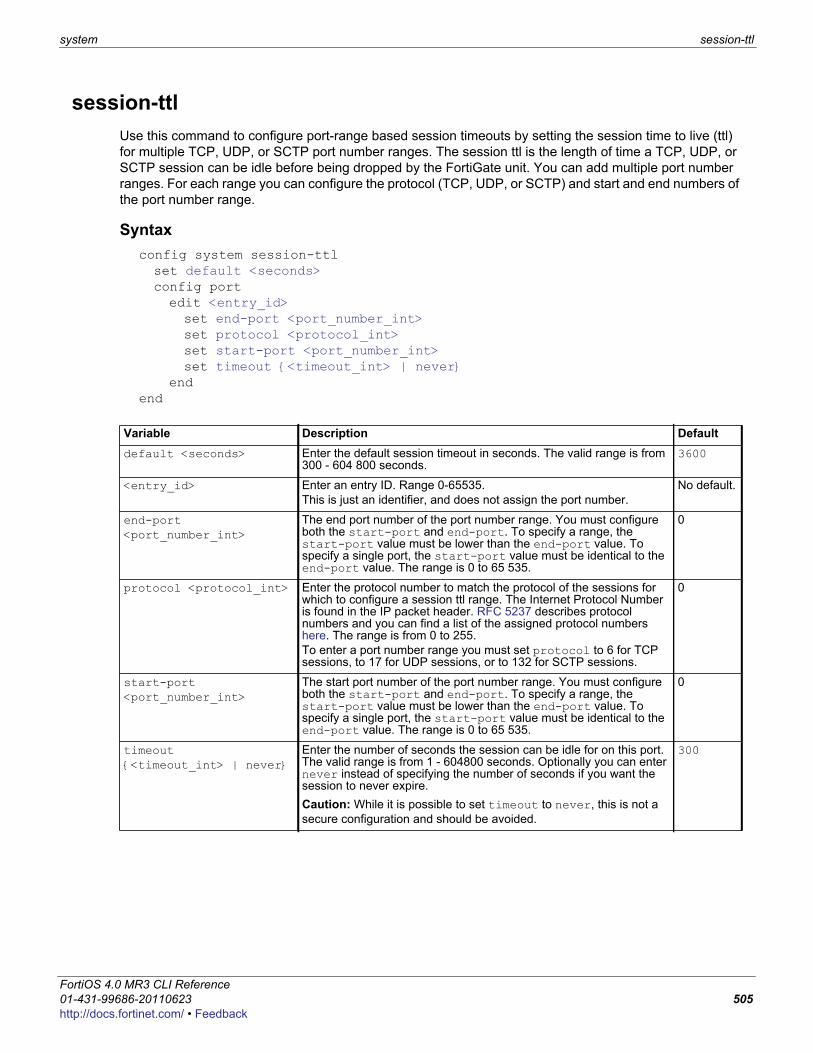
system session-ttl
F0h
session-ttlUse this command to configure port-range based session timeouts by setting the session time to live (ttl) for multiple TCP, UDP, or SCTP port number ranges. The session ttl is the length of time a TCP, UDP, or SCTP session can be idle before being dropped by the FortiGate unit. You can add multiple port number ranges. For each range you can configure the protocol (TCP, UDP, or SCTP) and start and end numbers of the port number range.
Syntaxconfig system session-ttlset default <seconds>config portedit <entry_id>set end-port <port_number_int>set protocol <protocol_int>set start-port <port_number_int>set timeout {<timeout_int> | never}
endend
Variable Description Defaultdefault <seconds> Enter the default session timeout in seconds. The valid range is from
300 - 604 800 seconds.3600
<entry_id> Enter an entry ID. Range 0-65535. This is just an identifier, and does not assign the port number.
No default.
end-port <port_number_int>
The end port number of the port number range. You must configure both the start-port and end-port. To specify a range, the start-port value must be lower than the end-port value. To specify a single port, the start-port value must be identical to the end-port value. The range is 0 to 65 535.
0
protocol <protocol_int> Enter the protocol number to match the protocol of the sessions for which to configure a session ttl range. The Internet Protocol Number is found in the IP packet header. RFC 5237 describes protocol numbers and you can find a list of the assigned protocol numbers here. The range is from 0 to 255.To enter a port number range you must set protocol to 6 for TCP sessions, to 17 for UDP sessions, or to 132 for SCTP sessions.
0
start-port <port_number_int>
The start port number of the port number range. You must configure both the start-port and end-port. To specify a range, the start-port value must be lower than the end-port value. To specify a single port, the start-port value must be identical to the end-port value. The range is 0 to 65 535.
0
timeout {<timeout_int> | never}
Enter the number of seconds the session can be idle for on this port. The valid range is from 1 - 604800 seconds. Optionally you can enter never instead of specifying the number of seconds if you want the session to never expire. Caution: While it is possible to set timeout to never, this is not a secure configuration and should be avoided.
300
ortiOS 4.0 MR3 CLI Reference1-431-99686-20110623 505ttp://docs.fortinet.com/ • Feedback
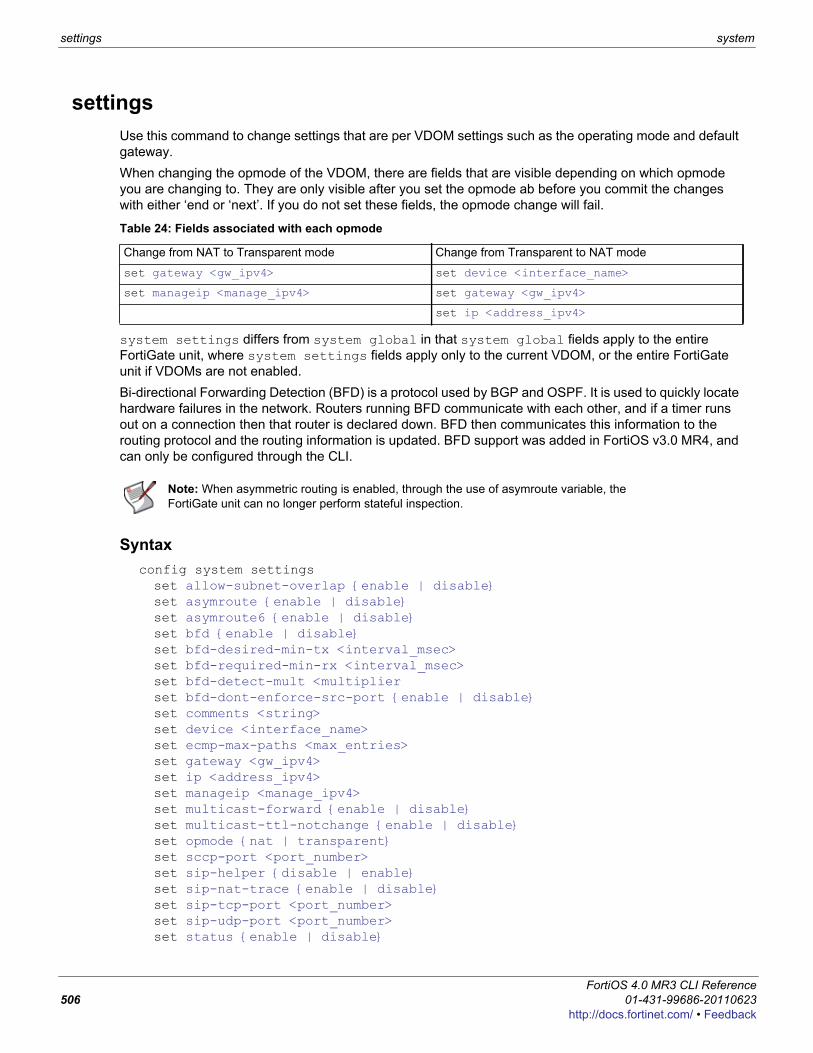
settings system
settingsUse this command to change settings that are per VDOM settings such as the operating mode and default gateway. When changing the opmode of the VDOM, there are fields that are visible depending on which opmode you are changing to. They are only visible after you set the opmode ab before you commit the changes with either ‘end or ‘next’. If you do not set these fields, the opmode change will fail.
system settings differs from system global in that system global fields apply to the entire FortiGate unit, where system settings fields apply only to the current VDOM, or the entire FortiGate unit if VDOMs are not enabled.Bi-directional Forwarding Detection (BFD) is a protocol used by BGP and OSPF. It is used to quickly locate hardware failures in the network. Routers running BFD communicate with each other, and if a timer runs out on a connection then that router is declared down. BFD then communicates this information to the routing protocol and the routing information is updated. BFD support was added in FortiOS v3.0 MR4, and can only be configured through the CLI.
Syntaxconfig system settingsset allow-subnet-overlap {enable | disable}set asymroute {enable | disable}set asymroute6 {enable | disable}set bfd {enable | disable}set bfd-desired-min-tx <interval_msec>set bfd-required-min-rx <interval_msec>set bfd-detect-mult <multiplierset bfd-dont-enforce-src-port {enable | disable}set comments <string>set device <interface_name>set ecmp-max-paths <max_entries>set gateway <gw_ipv4>set ip <address_ipv4>set manageip <manage_ipv4>set multicast-forward {enable | disable}set multicast-ttl-notchange {enable | disable}set opmode {nat | transparent}set sccp-port <port_number>set sip-helper {disable | enable}set sip-nat-trace {enable | disable}set sip-tcp-port <port_number>set sip-udp-port <port_number>set status {enable | disable}
Table 24: Fields associated with each opmode
Change from NAT to Transparent mode Change from Transparent to NAT mode
set gateway <gw_ipv4> set device <interface_name>
set manageip <manage_ipv4> set gateway <gw_ipv4>
set ip <address_ipv4>
Note: When asymmetric routing is enabled, through the use of asymroute variable, the FortiGate unit can no longer perform stateful inspection.
FortiOS 4.0 MR3 CLI Reference506 01-431-99686-20110623
http://docs.fortinet.com/ • Feedback
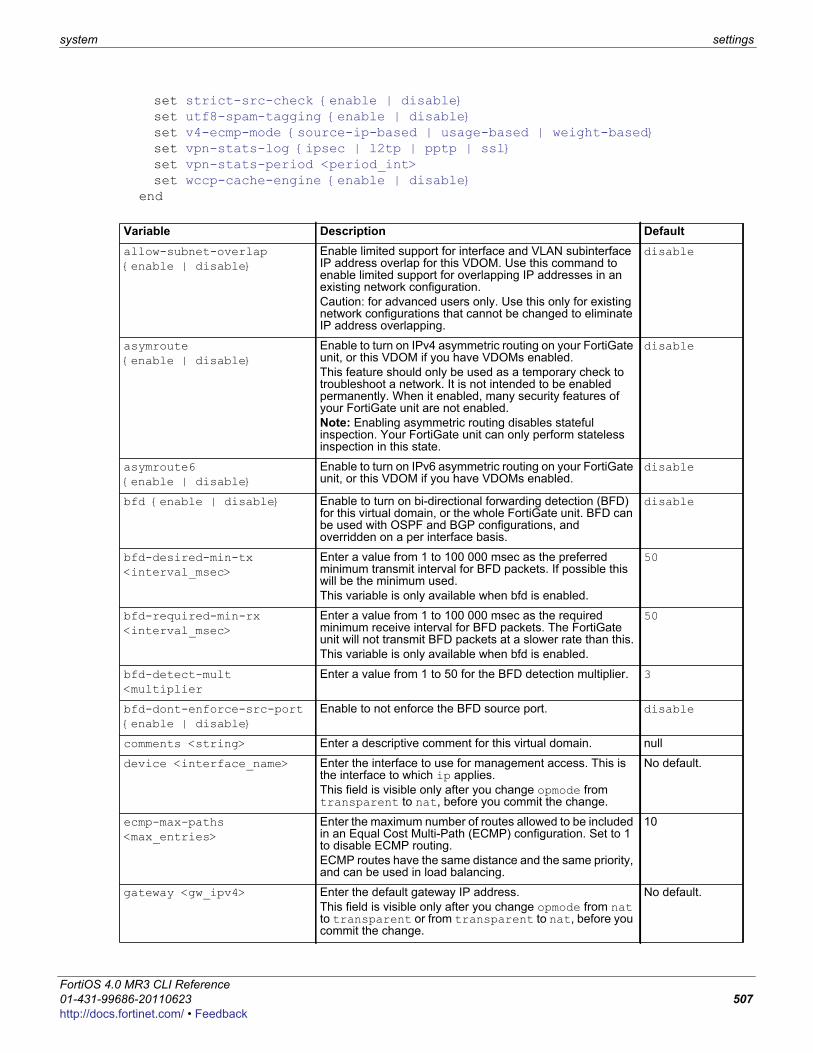
system settings
F0h
set strict-src-check {enable | disable}set utf8-spam-tagging {enable | disable}set v4-ecmp-mode {source-ip-based | usage-based | weight-based}set vpn-stats-log {ipsec | l2tp | pptp | ssl}set vpn-stats-period <period_int>set wccp-cache-engine {enable | disable}
end
Variable Description Defaultallow-subnet-overlap {enable | disable}
Enable limited support for interface and VLAN subinterface IP address overlap for this VDOM. Use this command to enable limited support for overlapping IP addresses in an existing network configuration. Caution: for advanced users only. Use this only for existing network configurations that cannot be changed to eliminate IP address overlapping.
disable
asymroute {enable | disable}
Enable to turn on IPv4 asymmetric routing on your FortiGate unit, or this VDOM if you have VDOMs enabled.This feature should only be used as a temporary check to troubleshoot a network. It is not intended to be enabled permanently. When it enabled, many security features of your FortiGate unit are not enabled. Note: Enabling asymmetric routing disables stateful inspection. Your FortiGate unit can only perform stateless inspection in this state.
disable
asymroute6 {enable | disable}
Enable to turn on IPv6 asymmetric routing on your FortiGate unit, or this VDOM if you have VDOMs enabled.
disable
bfd {enable | disable} Enable to turn on bi-directional forwarding detection (BFD) for this virtual domain, or the whole FortiGate unit. BFD can be used with OSPF and BGP configurations, and overridden on a per interface basis.
disable
bfd-desired-min-tx <interval_msec>
Enter a value from 1 to 100 000 msec as the preferred minimum transmit interval for BFD packets. If possible this will be the minimum used. This variable is only available when bfd is enabled.
50
bfd-required-min-rx <interval_msec>
Enter a value from 1 to 100 000 msec as the required minimum receive interval for BFD packets. The FortiGate unit will not transmit BFD packets at a slower rate than this.This variable is only available when bfd is enabled.
50
bfd-detect-mult <multiplier
Enter a value from 1 to 50 for the BFD detection multiplier. 3
bfd-dont-enforce-src-port {enable | disable}
Enable to not enforce the BFD source port. disable
comments <string> Enter a descriptive comment for this virtual domain. null
device <interface_name> Enter the interface to use for management access. This is the interface to which ip applies. This field is visible only after you change opmode from transparent to nat, before you commit the change.
No default.
ecmp-max-paths <max_entries>
Enter the maximum number of routes allowed to be included in an Equal Cost Multi-Path (ECMP) configuration. Set to 1 to disable ECMP routing.ECMP routes have the same distance and the same priority, and can be used in load balancing.
10
gateway <gw_ipv4> Enter the default gateway IP address. This field is visible only after you change opmode from nat to transparent or from transparent to nat, before you commit the change.
No default.
ortiOS 4.0 MR3 CLI Reference1-431-99686-20110623 507ttp://docs.fortinet.com/ • Feedback
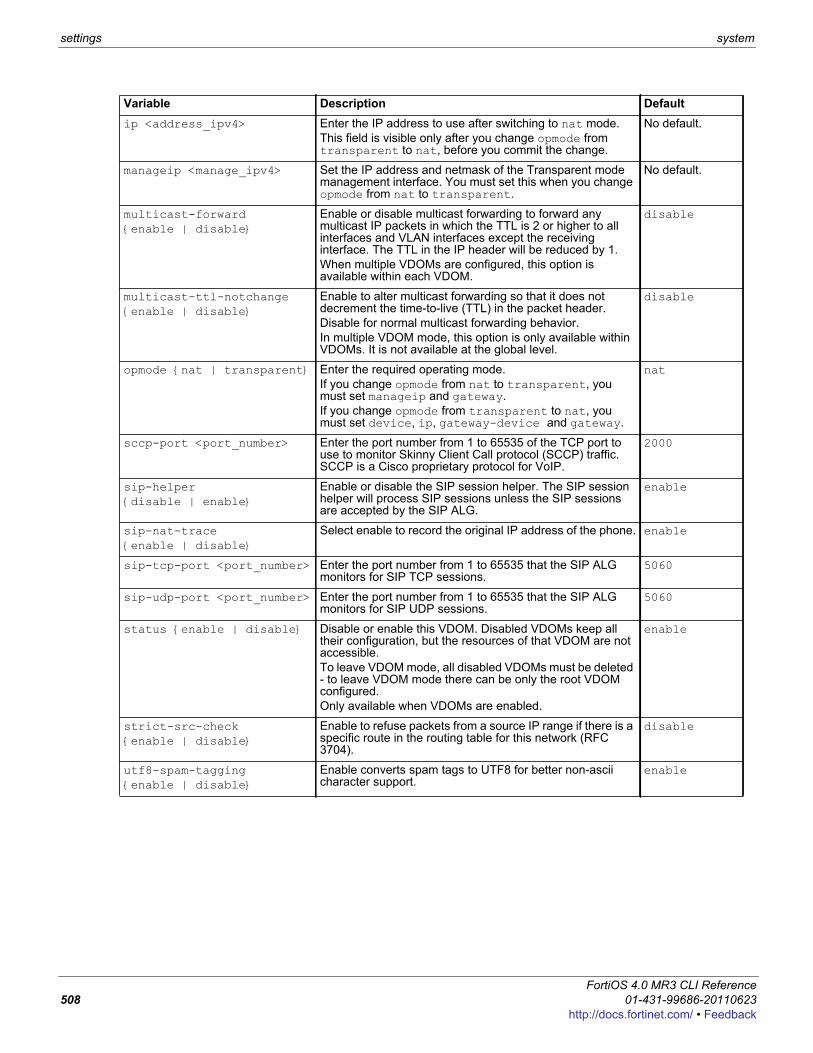
settings system
ip <address_ipv4> Enter the IP address to use after switching to nat mode. This field is visible only after you change opmode from transparent to nat, before you commit the change.
No default.
manageip <manage_ipv4> Set the IP address and netmask of the Transparent mode management interface. You must set this when you change opmode from nat to transparent.
No default.
multicast-forward {enable | disable}
Enable or disable multicast forwarding to forward any multicast IP packets in which the TTL is 2 or higher to all interfaces and VLAN interfaces except the receiving interface. The TTL in the IP header will be reduced by 1.When multiple VDOMs are configured, this option is available within each VDOM.
disable
multicast-ttl-notchange {enable | disable}
Enable to alter multicast forwarding so that it does not decrement the time-to-live (TTL) in the packet header. Disable for normal multicast forwarding behavior.In multiple VDOM mode, this option is only available within VDOMs. It is not available at the global level.
disable
opmode {nat | transparent} Enter the required operating mode.If you change opmode from nat to transparent, you must set manageip and gateway.If you change opmode from transparent to nat, you must set device, ip, gateway-device and gateway.
nat
sccp-port <port_number> Enter the port number from 1 to 65535 of the TCP port to use to monitor Skinny Client Call protocol (SCCP) traffic. SCCP is a Cisco proprietary protocol for VoIP.
2000
sip-helper {disable | enable}
Enable or disable the SIP session helper. The SIP session helper will process SIP sessions unless the SIP sessions are accepted by the SIP ALG.
enable
sip-nat-trace {enable | disable}
Select enable to record the original IP address of the phone. enable
sip-tcp-port <port_number> Enter the port number from 1 to 65535 that the SIP ALG monitors for SIP TCP sessions.
5060
sip-udp-port <port_number> Enter the port number from 1 to 65535 that the SIP ALG monitors for SIP UDP sessions.
5060
status {enable | disable} Disable or enable this VDOM. Disabled VDOMs keep all their configuration, but the resources of that VDOM are not accessible.To leave VDOM mode, all disabled VDOMs must be deleted - to leave VDOM mode there can be only the root VDOM configured.Only available when VDOMs are enabled.
enable
strict-src-check {enable | disable}
Enable to refuse packets from a source IP range if there is a specific route in the routing table for this network (RFC 3704).
disable
utf8-spam-tagging {enable | disable}
Enable converts spam tags to UTF8 for better non-ascii character support.
enable
Variable Description Default
FortiOS 4.0 MR3 CLI Reference508 01-431-99686-20110623
http://docs.fortinet.com/ • Feedback
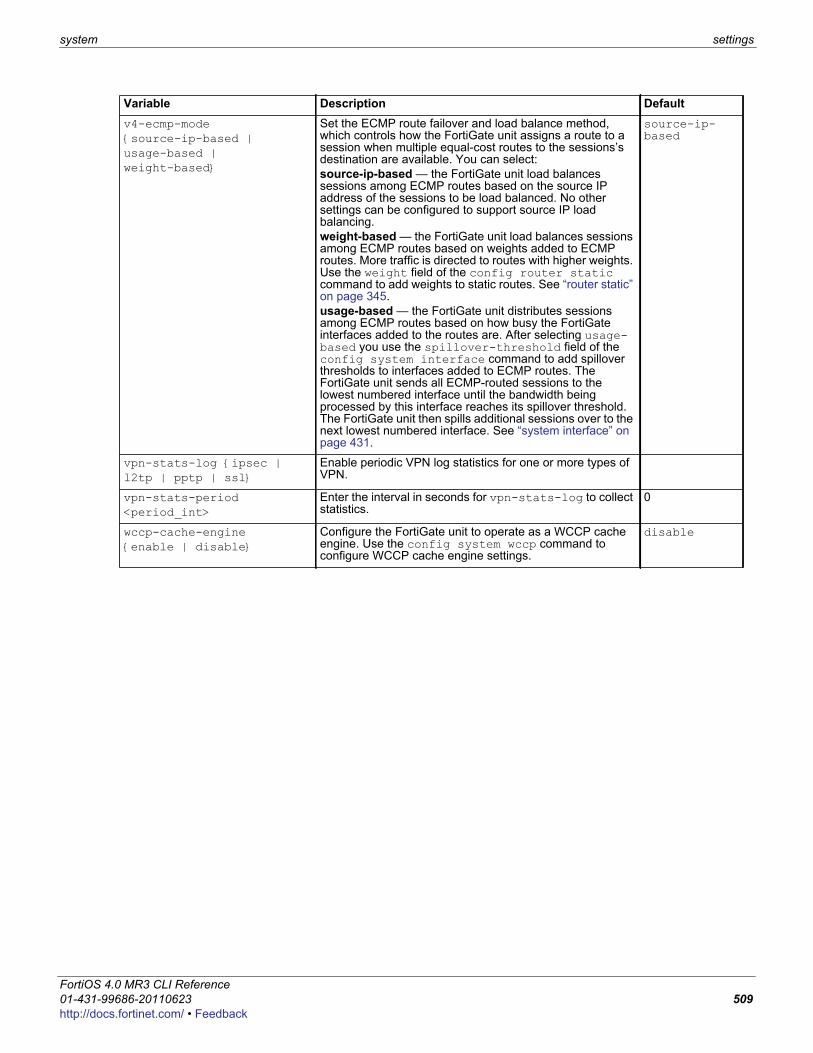
system settings
F0h
v4-ecmp-mode {source-ip-based | usage-based | weight-based}
Set the ECMP route failover and load balance method, which controls how the FortiGate unit assigns a route to a session when multiple equal-cost routes to the sessions’s destination are available. You can select:source-ip-based — the FortiGate unit load balances sessions among ECMP routes based on the source IP address of the sessions to be load balanced. No other settings can be configured to support source IP load balancing.weight-based — the FortiGate unit load balances sessions among ECMP routes based on weights added to ECMP routes. More traffic is directed to routes with higher weights. Use the weight field of the config router static command to add weights to static routes. See “router static” on page 345.usage-based — the FortiGate unit distributes sessions among ECMP routes based on how busy the FortiGate interfaces added to the routes are. After selecting usage-based you use the spillover-threshold field of the config system interface command to add spillover thresholds to interfaces added to ECMP routes. The FortiGate unit sends all ECMP-routed sessions to the lowest numbered interface until the bandwidth being processed by this interface reaches its spillover threshold. The FortiGate unit then spills additional sessions over to the next lowest numbered interface. See “system interface” on page 431.
source-ip-based
vpn-stats-log {ipsec | l2tp | pptp | ssl}
Enable periodic VPN log statistics for one or more types of VPN.
vpn-stats-period <period_int>
Enter the interval in seconds for vpn-stats-log to collect statistics.
0
wccp-cache-engine {enable | disable}
Configure the FortiGate unit to operate as a WCCP cache engine. Use the config system wccp command to configure WCCP cache engine settings.
disable
Variable Description Default
ortiOS 4.0 MR3 CLI Reference1-431-99686-20110623 509ttp://docs.fortinet.com/ • Feedback
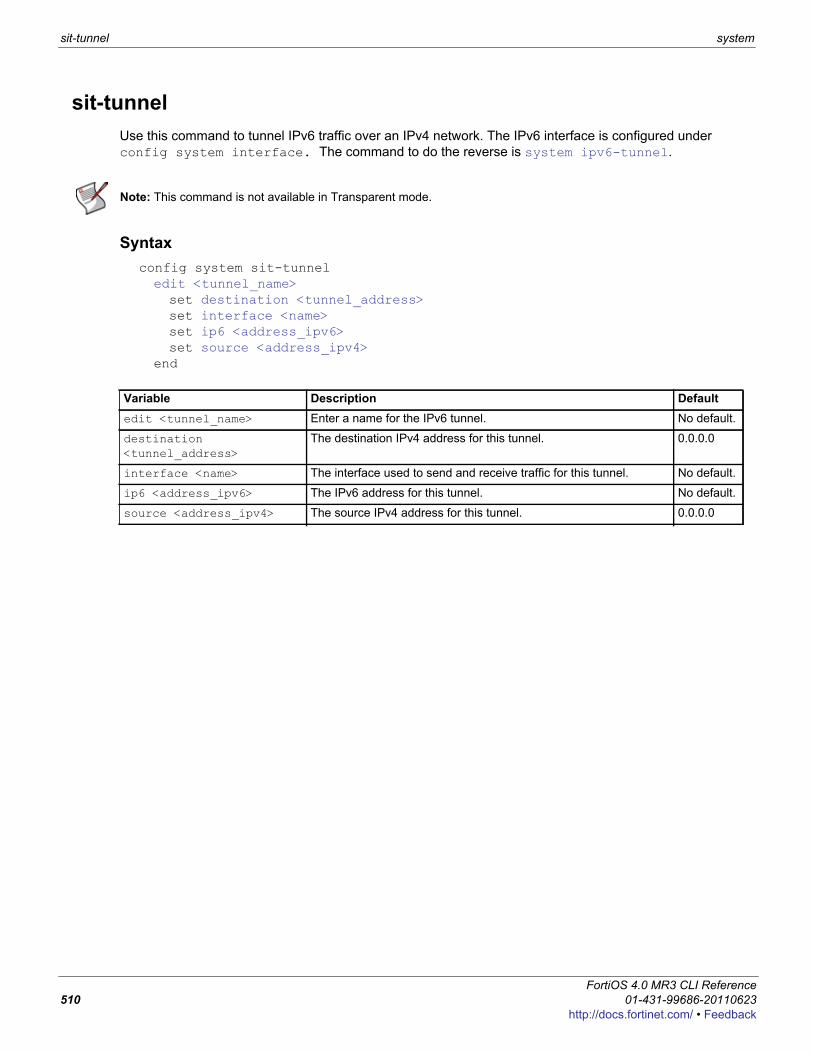
sit-tunnel system
sit-tunnelUse this command to tunnel IPv6 traffic over an IPv4 network. The IPv6 interface is configured under config system interface. The command to do the reverse is system ipv6-tunnel.
Syntaxconfig system sit-tunneledit <tunnel_name>set destination <tunnel_address>set interface <name>set ip6 <address_ipv6>set source <address_ipv4>
end
Note: This command is not available in Transparent mode.
Variable Description Defaultedit <tunnel_name> Enter a name for the IPv6 tunnel. No default.
destination <tunnel_address>
The destination IPv4 address for this tunnel. 0.0.0.0
interface <name> The interface used to send and receive traffic for this tunnel. No default.
ip6 <address_ipv6> The IPv6 address for this tunnel. No default.
source <address_ipv4> The source IPv4 address for this tunnel. 0.0.0.0
FortiOS 4.0 MR3 CLI Reference510 01-431-99686-20110623
http://docs.fortinet.com/ • Feedback
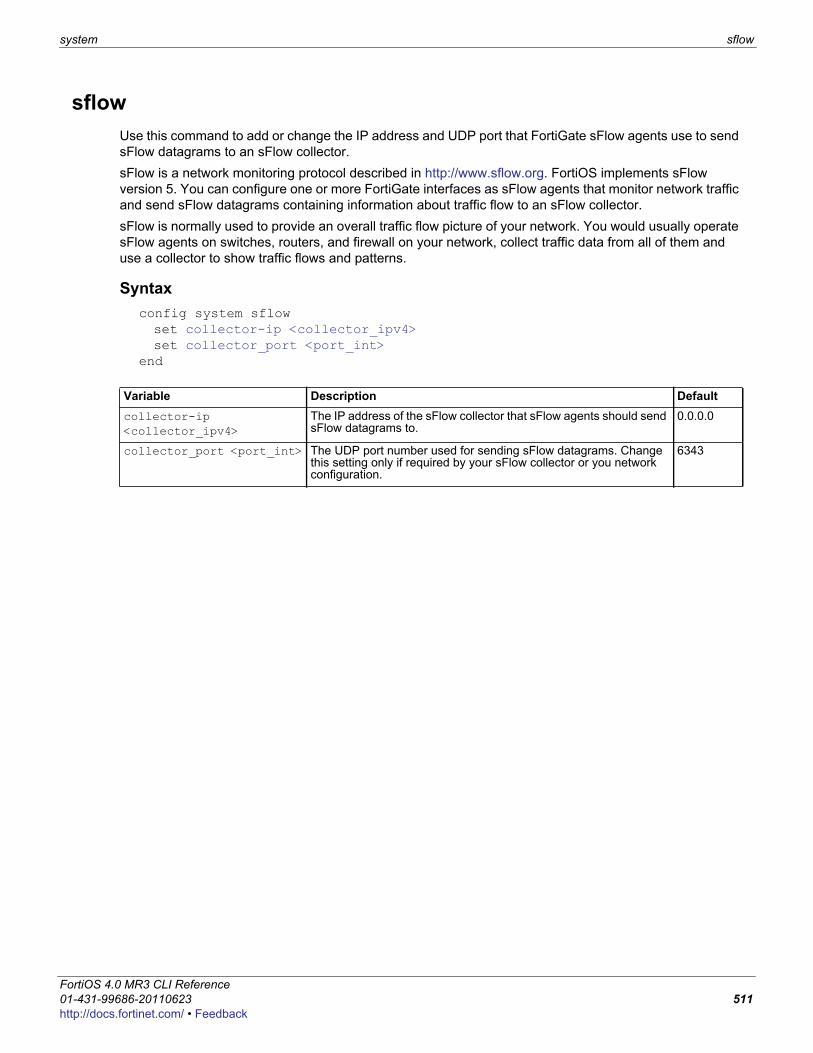
system sflow
F0h
sflowUse this command to add or change the IP address and UDP port that FortiGate sFlow agents use to send sFlow datagrams to an sFlow collector.sFlow is a network monitoring protocol described in http://www.sflow.org. FortiOS implements sFlow version 5. You can configure one or more FortiGate interfaces as sFlow agents that monitor network traffic and send sFlow datagrams containing information about traffic flow to an sFlow collector. sFlow is normally used to provide an overall traffic flow picture of your network. You would usually operate sFlow agents on switches, routers, and firewall on your network, collect traffic data from all of them and use a collector to show traffic flows and patterns.
Syntaxconfig system sflowset collector-ip <collector_ipv4>set collector_port <port_int>
end
Variable Description Defaultcollector-ip <collector_ipv4>
The IP address of the sFlow collector that sFlow agents should send sFlow datagrams to.
0.0.0.0
collector_port <port_int> The UDP port number used for sending sFlow datagrams. Change this setting only if required by your sFlow collector or you network configuration.
6343
ortiOS 4.0 MR3 CLI Reference1-431-99686-20110623 511ttp://docs.fortinet.com/ • Feedback
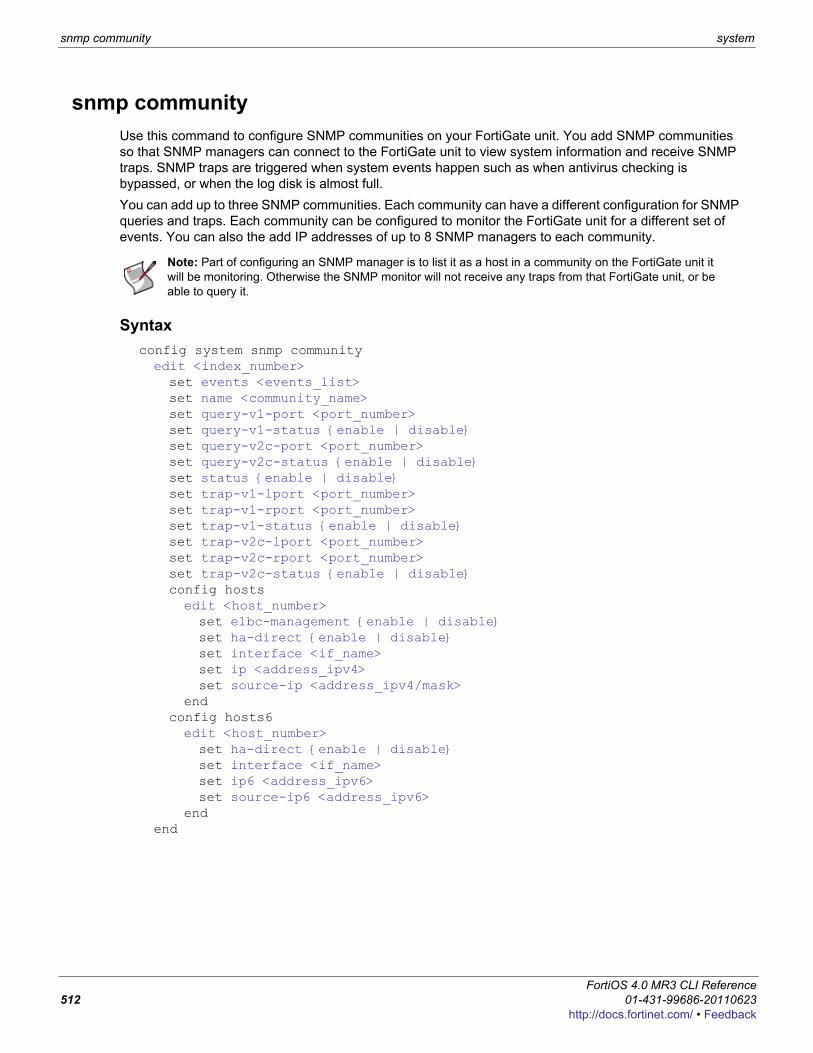
snmp community system
snmp communityUse this command to configure SNMP communities on your FortiGate unit. You add SNMP communities so that SNMP managers can connect to the FortiGate unit to view system information and receive SNMP traps. SNMP traps are triggered when system events happen such as when antivirus checking is bypassed, or when the log disk is almost full.You can add up to three SNMP communities. Each community can have a different configuration for SNMP queries and traps. Each community can be configured to monitor the FortiGate unit for a different set of events. You can also the add IP addresses of up to 8 SNMP managers to each community.
Syntaxconfig system snmp communityedit <index_number>set events <events_list>set name <community_name>set query-v1-port <port_number>set query-v1-status {enable | disable}set query-v2c-port <port_number>set query-v2c-status {enable | disable}set status {enable | disable}set trap-v1-lport <port_number>set trap-v1-rport <port_number>set trap-v1-status {enable | disable}set trap-v2c-lport <port_number>set trap-v2c-rport <port_number>set trap-v2c-status {enable | disable}config hostsedit <host_number>set elbc-management {enable | disable}set ha-direct {enable | disable}set interface <if_name>set ip <address_ipv4>set source-ip <address_ipv4/mask>
endconfig hosts6edit <host_number>set ha-direct {enable | disable}set interface <if_name>set ip6 <address_ipv6>set source-ip6 <address_ipv6>
endend
Note: Part of configuring an SNMP manager is to list it as a host in a community on the FortiGate unit it will be monitoring. Otherwise the SNMP monitor will not receive any traps from that FortiGate unit, or be able to query it.
FortiOS 4.0 MR3 CLI Reference512 01-431-99686-20110623
http://docs.fortinet.com/ • Feedback
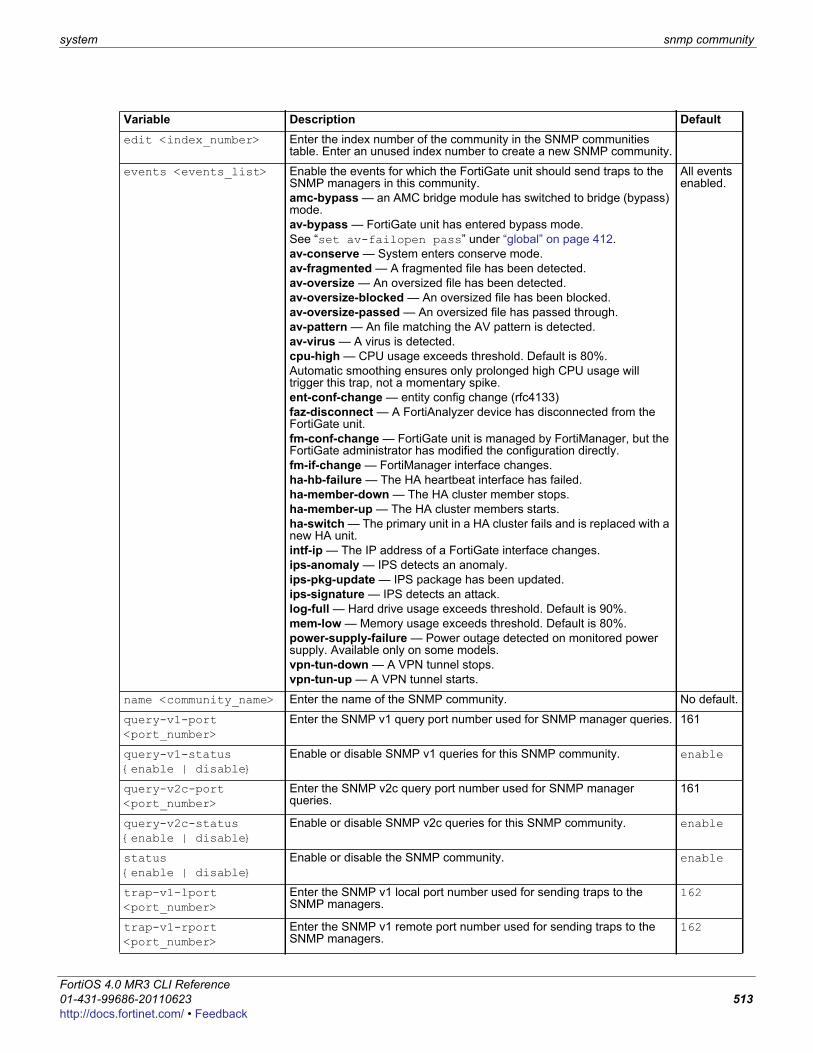
system snmp community
F0h
Variable Description Defaultedit <index_number> Enter the index number of the community in the SNMP communities
table. Enter an unused index number to create a new SNMP community.
events <events_list> Enable the events for which the FortiGate unit should send traps to the SNMP managers in this community.amc-bypass — an AMC bridge module has switched to bridge (bypass) mode.av-bypass — FortiGate unit has entered bypass mode.See “set av-failopen pass” under “global” on page 412.av-conserve — System enters conserve mode.av-fragmented — A fragmented file has been detected.av-oversize — An oversized file has been detected.av-oversize-blocked — An oversized file has been blocked.av-oversize-passed — An oversized file has passed through.av-pattern — An file matching the AV pattern is detected.av-virus — A virus is detected.cpu-high — CPU usage exceeds threshold. Default is 80%.Automatic smoothing ensures only prolonged high CPU usage will trigger this trap, not a momentary spike.ent-conf-change — entity config change (rfc4133)faz-disconnect — A FortiAnalyzer device has disconnected from the FortiGate unit.fm-conf-change — FortiGate unit is managed by FortiManager, but the FortiGate administrator has modified the configuration directly.fm-if-change — FortiManager interface changes.ha-hb-failure — The HA heartbeat interface has failed.ha-member-down — The HA cluster member stops.ha-member-up — The HA cluster members starts.ha-switch — The primary unit in a HA cluster fails and is replaced with a new HA unit.intf-ip — The IP address of a FortiGate interface changes.ips-anomaly — IPS detects an anomaly.ips-pkg-update — IPS package has been updated.ips-signature — IPS detects an attack.log-full — Hard drive usage exceeds threshold. Default is 90%.mem-low — Memory usage exceeds threshold. Default is 80%.power-supply-failure — Power outage detected on monitored power supply. Available only on some models.vpn-tun-down — A VPN tunnel stops.vpn-tun-up — A VPN tunnel starts.
All events enabled.
name <community_name> Enter the name of the SNMP community. No default.
query-v1-port <port_number>
Enter the SNMP v1 query port number used for SNMP manager queries. 161
query-v1-status {enable | disable}
Enable or disable SNMP v1 queries for this SNMP community. enable
query-v2c-port <port_number>
Enter the SNMP v2c query port number used for SNMP manager queries.
161
query-v2c-status {enable | disable}
Enable or disable SNMP v2c queries for this SNMP community. enable
status {enable | disable}
Enable or disable the SNMP community. enable
trap-v1-lport <port_number>
Enter the SNMP v1 local port number used for sending traps to the SNMP managers.
162
trap-v1-rport <port_number>
Enter the SNMP v1 remote port number used for sending traps to the SNMP managers.
162
ortiOS 4.0 MR3 CLI Reference1-431-99686-20110623 513ttp://docs.fortinet.com/ • Feedback
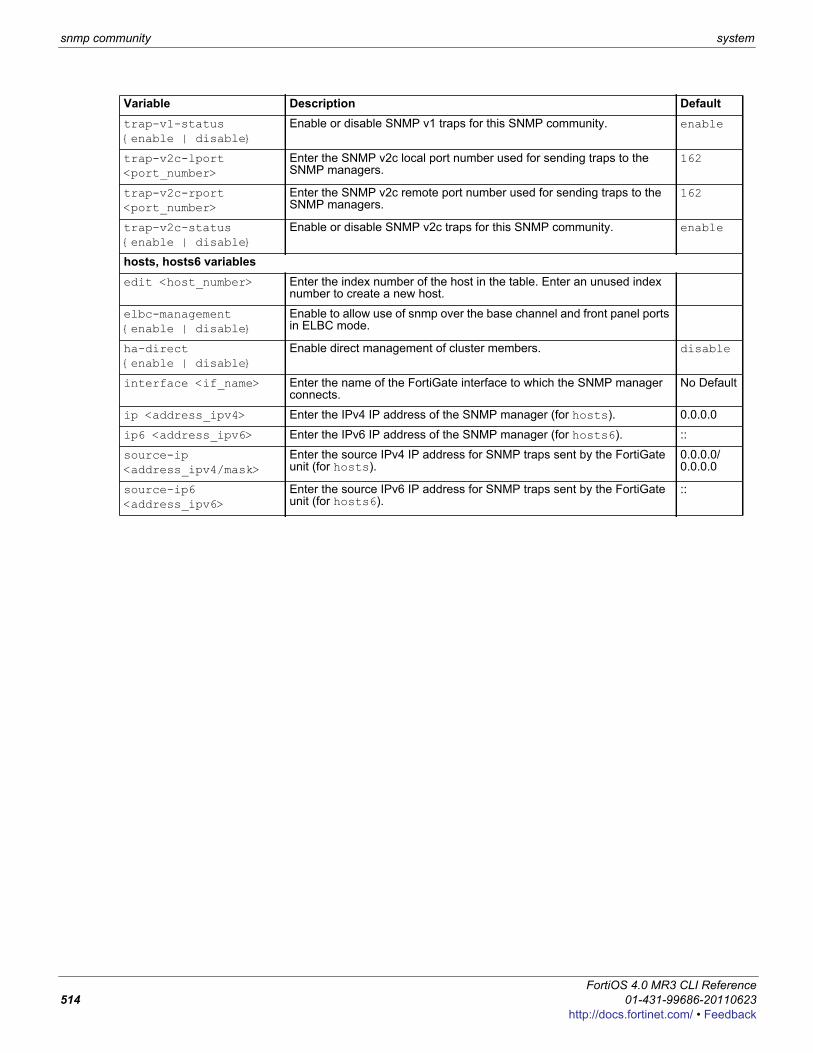
snmp community system
trap-v1-status {enable | disable}
Enable or disable SNMP v1 traps for this SNMP community. enable
trap-v2c-lport <port_number>
Enter the SNMP v2c local port number used for sending traps to the SNMP managers.
162
trap-v2c-rport <port_number>
Enter the SNMP v2c remote port number used for sending traps to the SNMP managers.
162
trap-v2c-status {enable | disable}
Enable or disable SNMP v2c traps for this SNMP community. enable
hosts, hosts6 variablesedit <host_number> Enter the index number of the host in the table. Enter an unused index
number to create a new host.
elbc-management {enable | disable}
Enable to allow use of snmp over the base channel and front panel ports in ELBC mode.
ha-direct {enable | disable}
Enable direct management of cluster members. disable
interface <if_name> Enter the name of the FortiGate interface to which the SNMP manager connects.
No Default
ip <address_ipv4> Enter the IPv4 IP address of the SNMP manager (for hosts). 0.0.0.0
ip6 <address_ipv6> Enter the IPv6 IP address of the SNMP manager (for hosts6). ::
source-ip <address_ipv4/mask>
Enter the source IPv4 IP address for SNMP traps sent by the FortiGate unit (for hosts).
0.0.0.0/ 0.0.0.0
source-ip6 <address_ipv6>
Enter the source IPv6 IP address for SNMP traps sent by the FortiGate unit (for hosts6).
::
Variable Description Default
FortiOS 4.0 MR3 CLI Reference514 01-431-99686-20110623
http://docs.fortinet.com/ • Feedback
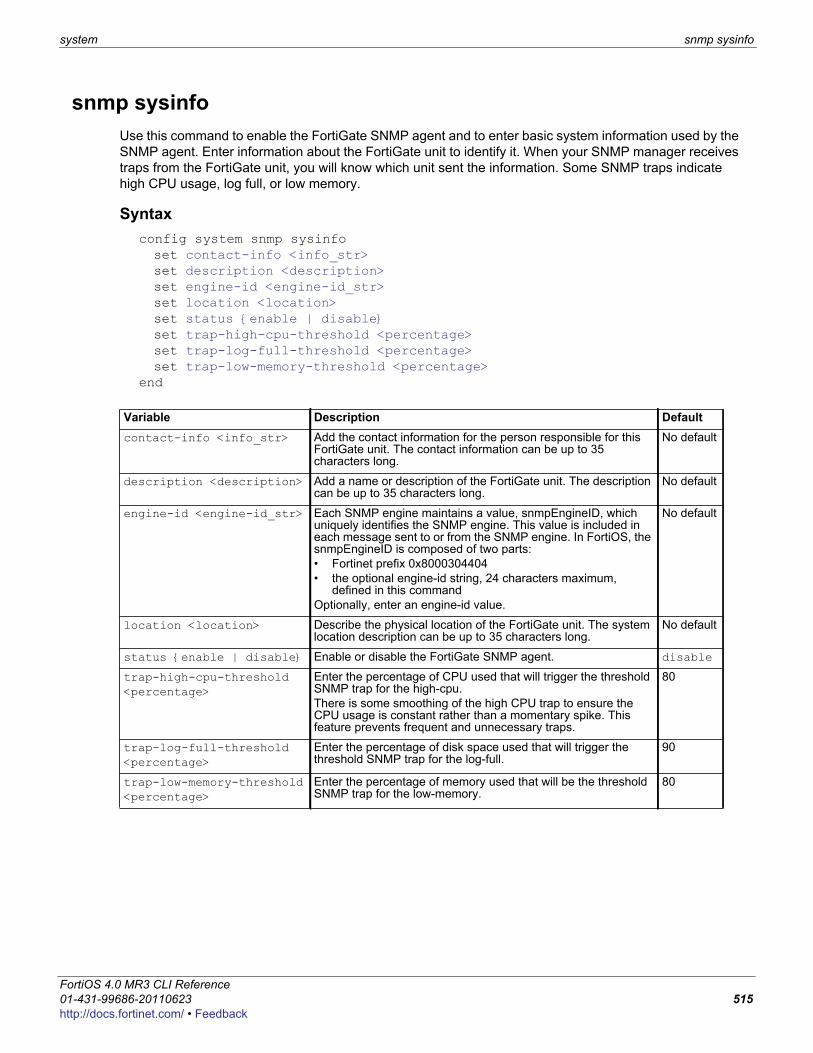
system snmp sysinfo
F0h
snmp sysinfoUse this command to enable the FortiGate SNMP agent and to enter basic system information used by the SNMP agent. Enter information about the FortiGate unit to identify it. When your SNMP manager receives traps from the FortiGate unit, you will know which unit sent the information. Some SNMP traps indicate high CPU usage, log full, or low memory.
Syntaxconfig system snmp sysinfoset contact-info <info_str>set description <description>set engine-id <engine-id_str>set location <location>set status {enable | disable}set trap-high-cpu-threshold <percentage> set trap-log-full-threshold <percentage> set trap-low-memory-threshold <percentage>
end
Variable Description Defaultcontact-info <info_str> Add the contact information for the person responsible for this
FortiGate unit. The contact information can be up to 35 characters long.
No default
description <description> Add a name or description of the FortiGate unit. The description can be up to 35 characters long.
No default
engine-id <engine-id_str> Each SNMP engine maintains a value, snmpEngineID, which uniquely identifies the SNMP engine. This value is included in each message sent to or from the SNMP engine. In FortiOS, the snmpEngineID is composed of two parts: • Fortinet prefix 0x8000304404• the optional engine-id string, 24 characters maximum,
defined in this commandOptionally, enter an engine-id value.
No default
location <location> Describe the physical location of the FortiGate unit. The system location description can be up to 35 characters long.
No default
status {enable | disable} Enable or disable the FortiGate SNMP agent. disable
trap-high-cpu-threshold <percentage>
Enter the percentage of CPU used that will trigger the threshold SNMP trap for the high-cpu. There is some smoothing of the high CPU trap to ensure the CPU usage is constant rather than a momentary spike. This feature prevents frequent and unnecessary traps.
80
trap-log-full-threshold <percentage>
Enter the percentage of disk space used that will trigger the threshold SNMP trap for the log-full.
90
trap-low-memory-threshold <percentage>
Enter the percentage of memory used that will be the threshold SNMP trap for the low-memory.
80
ortiOS 4.0 MR3 CLI Reference1-431-99686-20110623 515ttp://docs.fortinet.com/ • Feedback
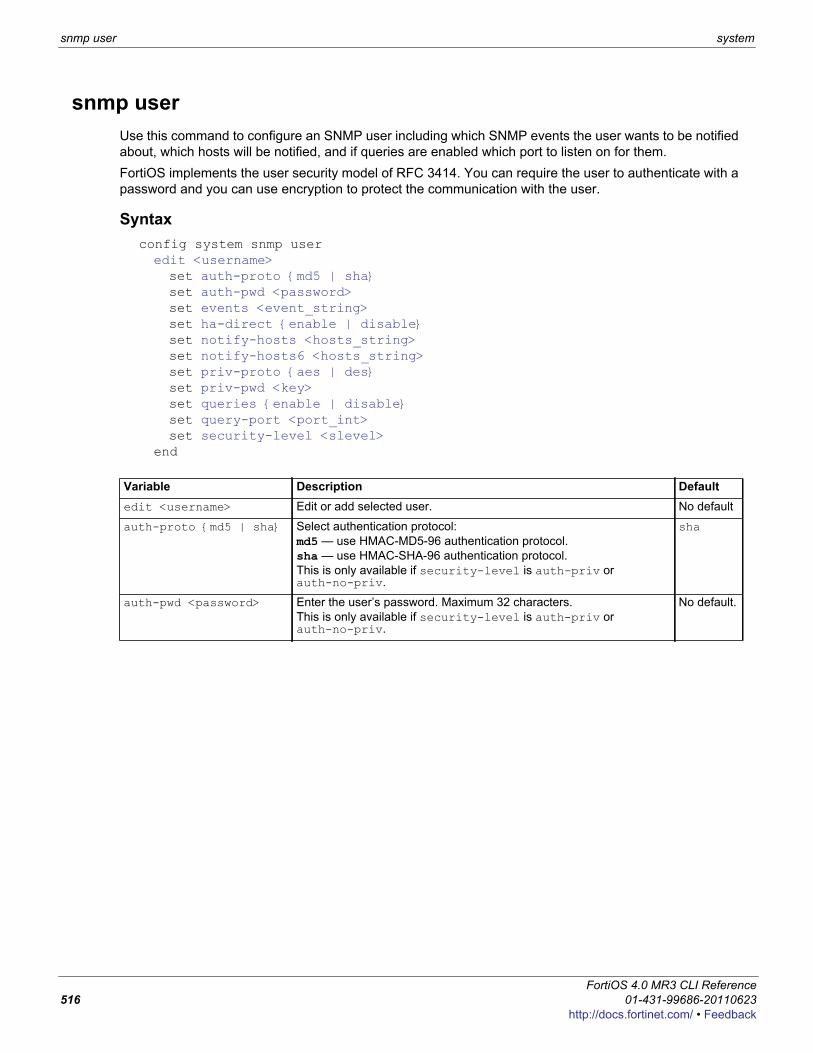
snmp user system
snmp userUse this command to configure an SNMP user including which SNMP events the user wants to be notified about, which hosts will be notified, and if queries are enabled which port to listen on for them.FortiOS implements the user security model of RFC 3414. You can require the user to authenticate with a password and you can use encryption to protect the communication with the user.
Syntaxconfig system snmp useredit <username>set auth-proto {md5 | sha}set auth-pwd <password>set events <event_string>set ha-direct {enable | disable}set notify-hosts <hosts_string>set notify-hosts6 <hosts_string>set priv-proto {aes | des}set priv-pwd <key>set queries {enable | disable}set query-port <port_int>set security-level <slevel>
end
Variable Description Defaultedit <username> Edit or add selected user. No default
auth-proto {md5 | sha} Select authentication protocol:md5 — use HMAC-MD5-96 authentication protocol.sha — use HMAC-SHA-96 authentication protocol.This is only available if security-level is auth-priv or auth-no-priv.
sha
auth-pwd <password> Enter the user’s password. Maximum 32 characters.This is only available if security-level is auth-priv or auth-no-priv.
No default.
FortiOS 4.0 MR3 CLI Reference516 01-431-99686-20110623
http://docs.fortinet.com/ • Feedback
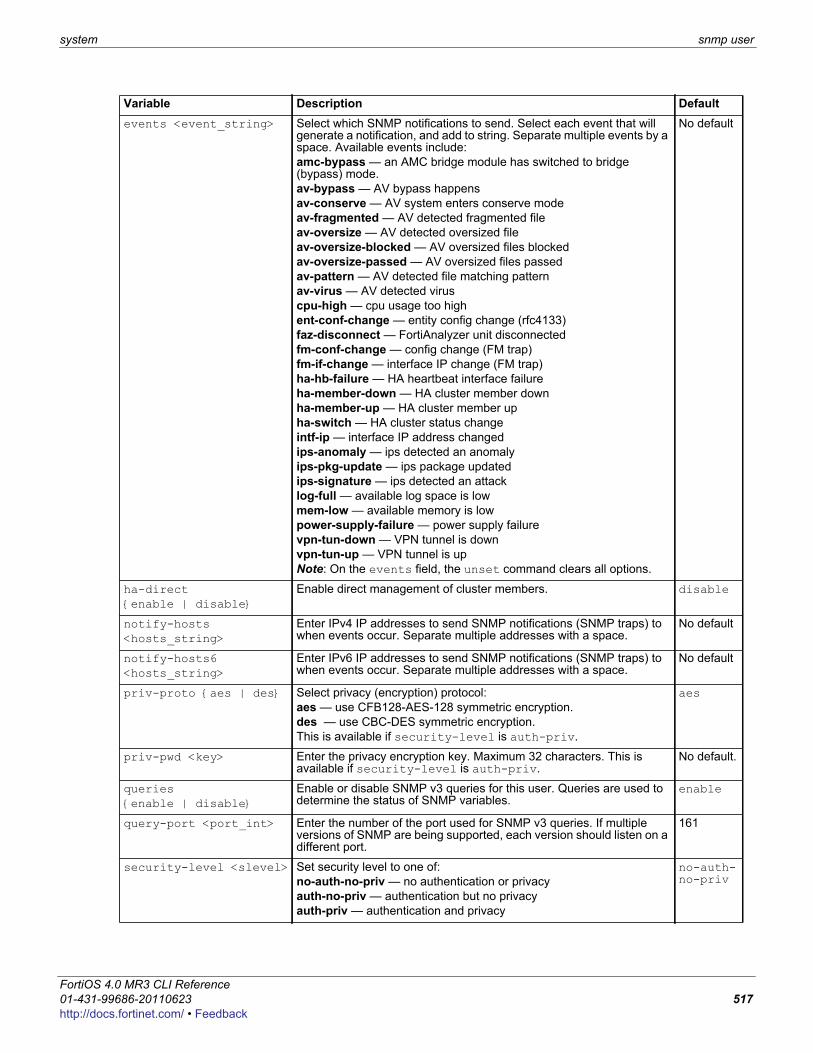
system snmp user
F0h
events <event_string> Select which SNMP notifications to send. Select each event that will generate a notification, and add to string. Separate multiple events by a space. Available events include:amc-bypass — an AMC bridge module has switched to bridge (bypass) mode.av-bypass — AV bypass happensav-conserve — AV system enters conserve modeav-fragmented — AV detected fragmented fileav-oversize — AV detected oversized fileav-oversize-blocked — AV oversized files blockedav-oversize-passed — AV oversized files passedav-pattern — AV detected file matching patternav-virus — AV detected viruscpu-high — cpu usage too highent-conf-change — entity config change (rfc4133)faz-disconnect — FortiAnalyzer unit disconnectedfm-conf-change — config change (FM trap)fm-if-change — interface IP change (FM trap)ha-hb-failure — HA heartbeat interface failureha-member-down — HA cluster member downha-member-up — HA cluster member upha-switch — HA cluster status changeintf-ip — interface IP address changedips-anomaly — ips detected an anomalyips-pkg-update — ips package updatedips-signature — ips detected an attacklog-full — available log space is lowmem-low — available memory is lowpower-supply-failure — power supply failurevpn-tun-down — VPN tunnel is downvpn-tun-up — VPN tunnel is upNote: On the events field, the unset command clears all options.
No default
ha-direct {enable | disable}
Enable direct management of cluster members. disable
notify-hosts <hosts_string>
Enter IPv4 IP addresses to send SNMP notifications (SNMP traps) to when events occur. Separate multiple addresses with a space.
No default
notify-hosts6 <hosts_string>
Enter IPv6 IP addresses to send SNMP notifications (SNMP traps) to when events occur. Separate multiple addresses with a space.
No default
priv-proto {aes | des} Select privacy (encryption) protocol:aes — use CFB128-AES-128 symmetric encryption.des — use CBC-DES symmetric encryption.This is available if security-level is auth-priv.
aes
priv-pwd <key> Enter the privacy encryption key. Maximum 32 characters. This is available if security-level is auth-priv.
No default.
queries {enable | disable}
Enable or disable SNMP v3 queries for this user. Queries are used to determine the status of SNMP variables.
enable
query-port <port_int> Enter the number of the port used for SNMP v3 queries. If multiple versions of SNMP are being supported, each version should listen on a different port.
161
security-level <slevel> Set security level to one of:no-auth-no-priv — no authentication or privacyauth-no-priv — authentication but no privacyauth-priv — authentication and privacy
no-auth-no-priv
Variable Description Default
ortiOS 4.0 MR3 CLI Reference1-431-99686-20110623 517ttp://docs.fortinet.com/ • Feedback
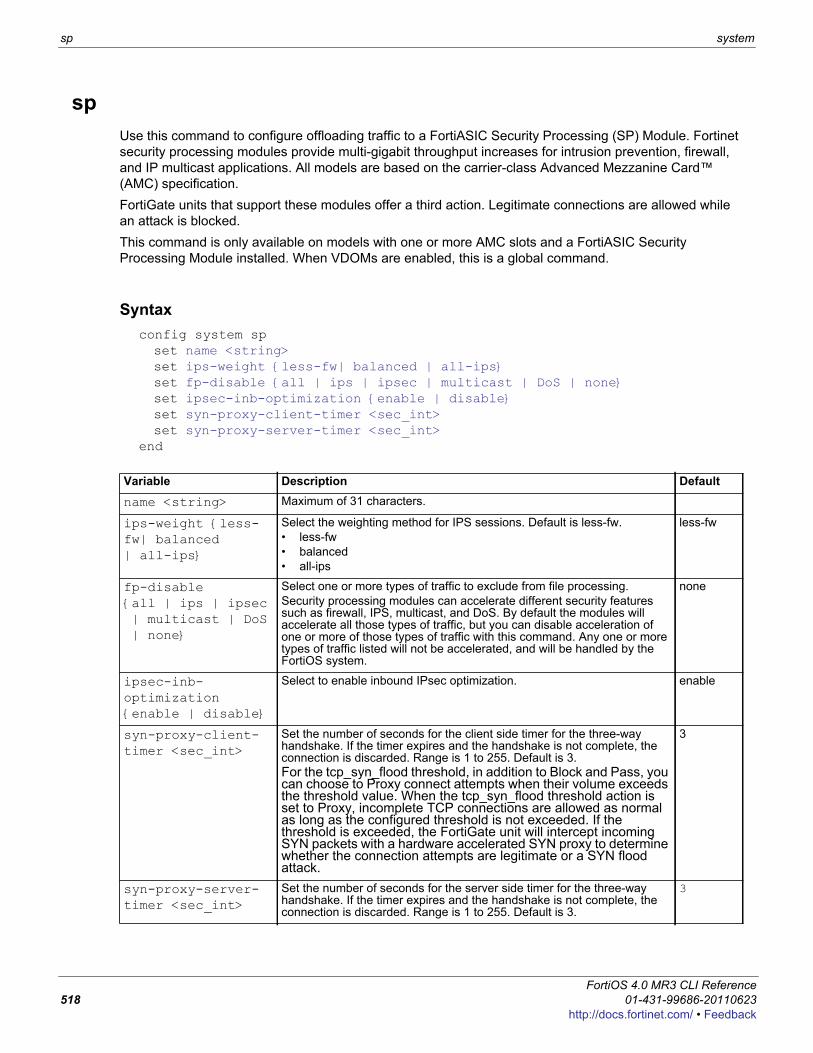
sp system
spUse this command to configure offloading traffic to a FortiASIC Security Processing (SP) Module. Fortinet security processing modules provide multi-gigabit throughput increases for intrusion prevention, firewall, and IP multicast applications. All models are based on the carrier-class Advanced Mezzanine Card™ (AMC) specification.FortiGate units that support these modules offer a third action. Legitimate connections are allowed while an attack is blocked.This command is only available on models with one or more AMC slots and a FortiASIC Security Processing Module installed. When VDOMs are enabled, this is a global command.
Syntaxconfig system spset name <string>set ips-weight {less-fw| balanced | all-ips}set fp-disable {all | ips | ipsec | multicast | DoS | none}set ipsec-inb-optimization {enable | disable}set syn-proxy-client-timer <sec_int>set syn-proxy-server-timer <sec_int>
end
Variable Description Default
name <string> Maximum of 31 characters.
ips-weight {less-fw| balanced | all-ips}
Select the weighting method for IPS sessions. Default is less-fw.• less-fw • balanced• all-ips
less-fw
fp-disable {all | ips | ipsec | multicast | DoS | none}
Select one or more types of traffic to exclude from file processing.Security processing modules can accelerate different security features such as firewall, IPS, multicast, and DoS. By default the modules will accelerate all those types of traffic, but you can disable acceleration of one or more of those types of traffic with this command. Any one or more types of traffic listed will not be accelerated, and will be handled by the FortiOS system.
none
ipsec-inb-optimization {enable | disable}
Select to enable inbound IPsec optimization. enable
syn-proxy-client-timer <sec_int>
Set the number of seconds for the client side timer for the three-way handshake. If the timer expires and the handshake is not complete, the connection is discarded. Range is 1 to 255. Default is 3.For the tcp_syn_flood threshold, in addition to Block and Pass, you can choose to Proxy connect attempts when their volume exceeds the threshold value. When the tcp_syn_flood threshold action is set to Proxy, incomplete TCP connections are allowed as normal as long as the configured threshold is not exceeded. If the threshold is exceeded, the FortiGate unit will intercept incoming SYN packets with a hardware accelerated SYN proxy to determine whether the connection attempts are legitimate or a SYN flood attack.
3
syn-proxy-server-timer <sec_int>
Set the number of seconds for the server side timer for the three-way handshake. If the timer expires and the handshake is not complete, the connection is discarded. Range is 1 to 255. Default is 3.
3
FortiOS 4.0 MR3 CLI Reference518 01-431-99686-20110623
http://docs.fortinet.com/ • Feedback
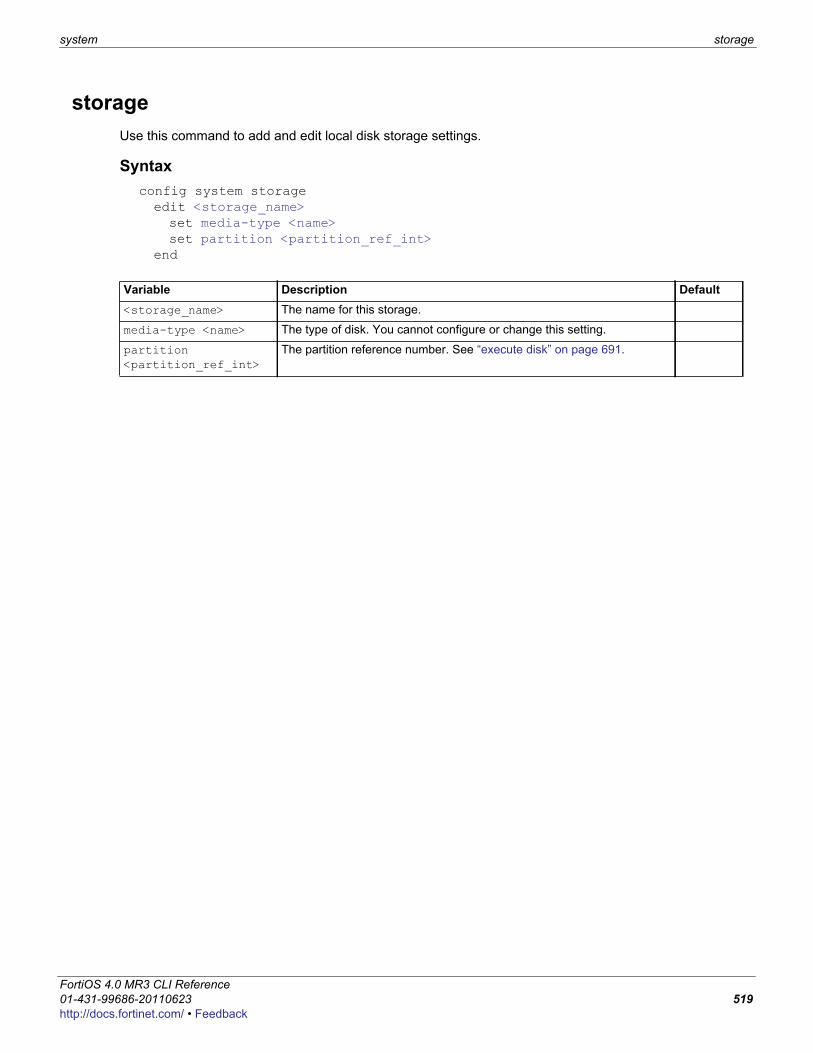
system storage
F0h
storageUse this command to add and edit local disk storage settings.
Syntaxconfig system storageedit <storage_name>set media-type <name>set partition <partition_ref_int>
end
Variable Description Default<storage_name> The name for this storage.
media-type <name> The type of disk. You cannot configure or change this setting.
partition <partition_ref_int>
The partition reference number. See “execute disk” on page 691.
ortiOS 4.0 MR3 CLI Reference1-431-99686-20110623 519ttp://docs.fortinet.com/ • Feedback
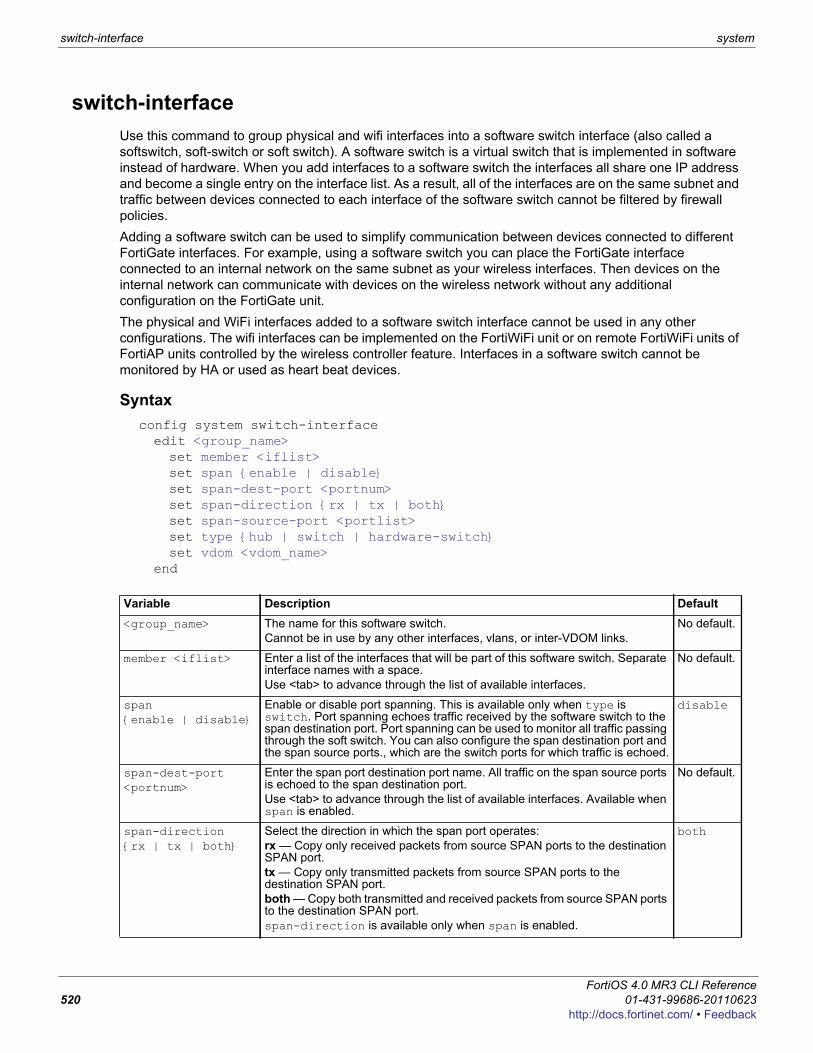
switch-interface system
switch-interfaceUse this command to group physical and wifi interfaces into a software switch interface (also called a softswitch, soft-switch or soft switch). A software switch is a virtual switch that is implemented in software instead of hardware. When you add interfaces to a software switch the interfaces all share one IP address and become a single entry on the interface list. As a result, all of the interfaces are on the same subnet and traffic between devices connected to each interface of the software switch cannot be filtered by firewall policies.Adding a software switch can be used to simplify communication between devices connected to different FortiGate interfaces. For example, using a software switch you can place the FortiGate interface connected to an internal network on the same subnet as your wireless interfaces. Then devices on the internal network can communicate with devices on the wireless network without any additional configuration on the FortiGate unit. The physical and WiFi interfaces added to a software switch interface cannot be used in any other configurations. The wifi interfaces can be implemented on the FortiWiFi unit or on remote FortiWiFi units of FortiAP units controlled by the wireless controller feature. Interfaces in a software switch cannot be monitored by HA or used as heart beat devices.
Syntaxconfig system switch-interfaceedit <group_name>set member <iflist>set span {enable | disable}set span-dest-port <portnum>set span-direction {rx | tx | both}set span-source-port <portlist>set type {hub | switch | hardware-switch}set vdom <vdom_name>
end
Variable Description Default<group_name> The name for this software switch.
Cannot be in use by any other interfaces, vlans, or inter-VDOM links.No default.
member <iflist> Enter a list of the interfaces that will be part of this software switch. Separate interface names with a space.Use <tab> to advance through the list of available interfaces.
No default.
span {enable | disable}
Enable or disable port spanning. This is available only when type is switch. Port spanning echoes traffic received by the software switch to the span destination port. Port spanning can be used to monitor all traffic passing through the soft switch. You can also configure the span destination port and the span source ports., which are the switch ports for which traffic is echoed.
disable
span-dest-port <portnum>
Enter the span port destination port name. All traffic on the span source ports is echoed to the span destination port.Use <tab> to advance through the list of available interfaces. Available when span is enabled.
No default.
span-direction {rx | tx | both}
Select the direction in which the span port operates: rx — Copy only received packets from source SPAN ports to the destination SPAN port.tx — Copy only transmitted packets from source SPAN ports to the destination SPAN port.both — Copy both transmitted and received packets from source SPAN ports to the destination SPAN port.span-direction is available only when span is enabled.
both
FortiOS 4.0 MR3 CLI Reference520 01-431-99686-20110623
http://docs.fortinet.com/ • Feedback
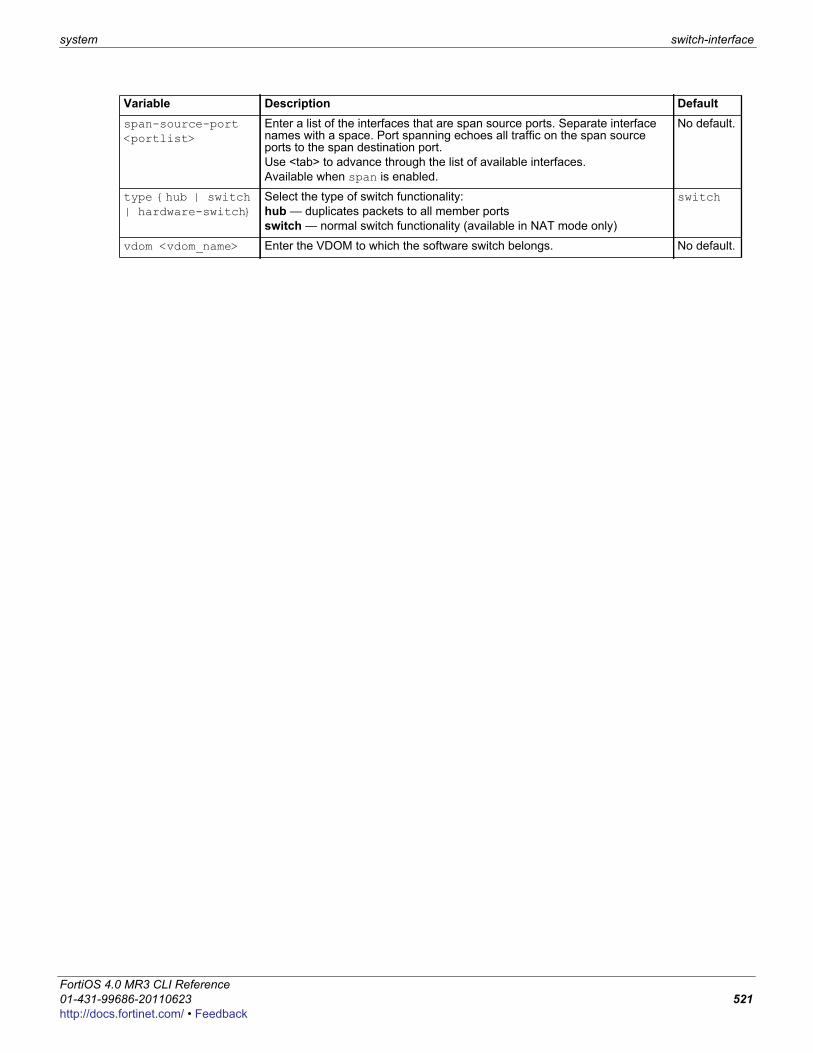
system switch-interface
F0h
span-source-port <portlist>
Enter a list of the interfaces that are span source ports. Separate interface names with a space. Port spanning echoes all traffic on the span source ports to the span destination port.Use <tab> to advance through the list of available interfaces.Available when span is enabled.
No default.
type {hub | switch | hardware-switch}
Select the type of switch functionality:hub — duplicates packets to all member portsswitch — normal switch functionality (available in NAT mode only)
switch
vdom <vdom_name> Enter the VDOM to which the software switch belongs. No default.
Variable Description Default
ortiOS 4.0 MR3 CLI Reference1-431-99686-20110623 521ttp://docs.fortinet.com/ • Feedback
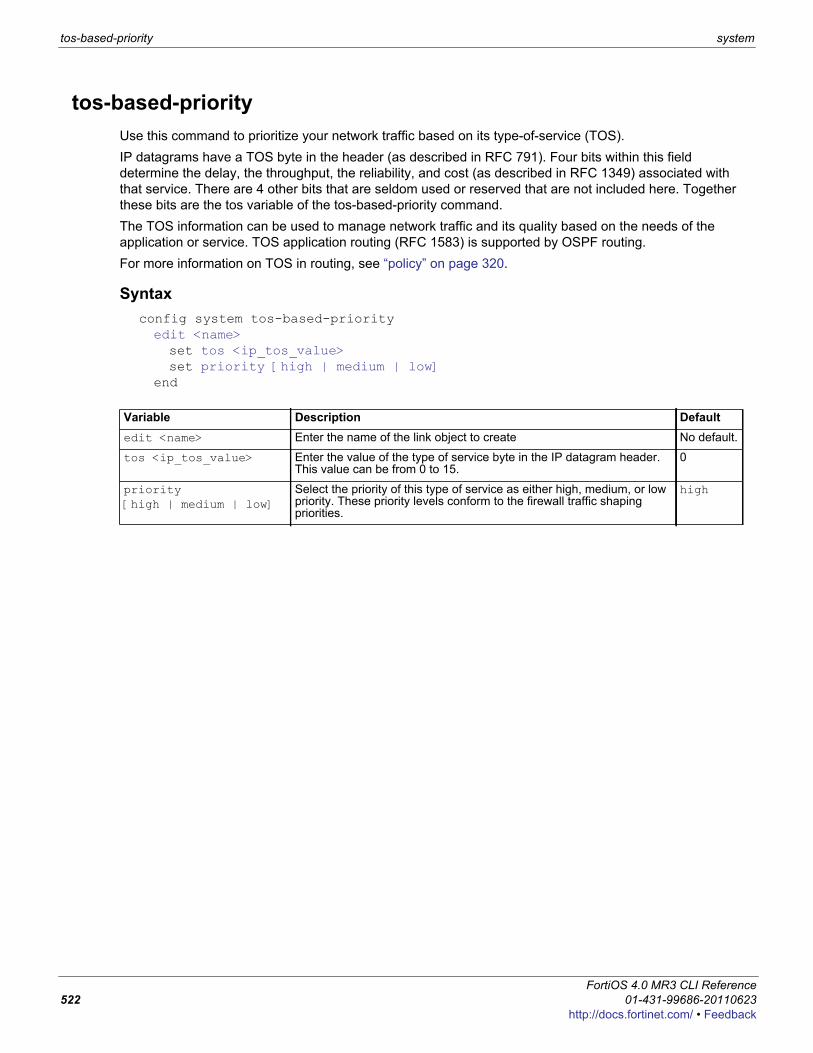
tos-based-priority system
tos-based-priorityUse this command to prioritize your network traffic based on its type-of-service (TOS).IP datagrams have a TOS byte in the header (as described in RFC 791). Four bits within this field determine the delay, the throughput, the reliability, and cost (as described in RFC 1349) associated with that service. There are 4 other bits that are seldom used or reserved that are not included here. Together these bits are the tos variable of the tos-based-priority command.The TOS information can be used to manage network traffic and its quality based on the needs of the application or service. TOS application routing (RFC 1583) is supported by OSPF routing.For more information on TOS in routing, see “policy” on page 320.
Syntaxconfig system tos-based-priorityedit <name>set tos <ip_tos_value>set priority [high | medium | low]
end
Variable Description Defaultedit <name> Enter the name of the link object to create No default.
tos <ip_tos_value> Enter the value of the type of service byte in the IP datagram header. This value can be from 0 to 15.
0
priority [high | medium | low]
Select the priority of this type of service as either high, medium, or low priority. These priority levels conform to the firewall traffic shaping priorities.
high
FortiOS 4.0 MR3 CLI Reference522 01-431-99686-20110623
http://docs.fortinet.com/ • Feedback
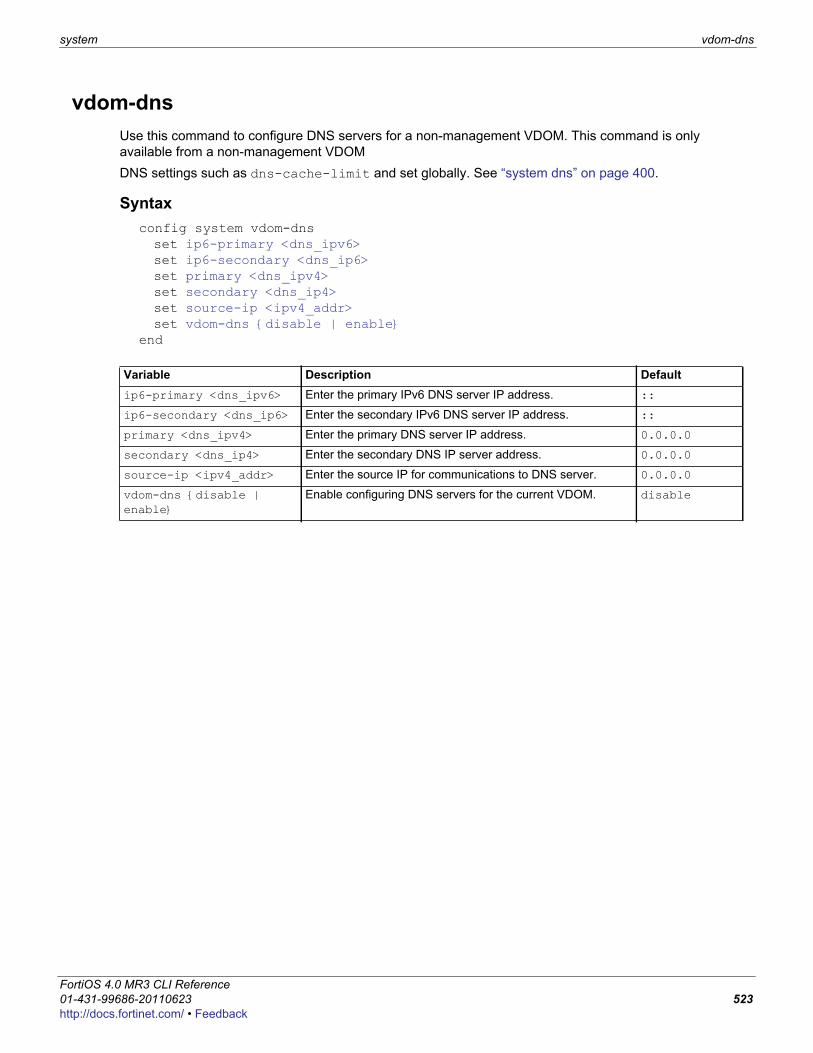
system vdom-dns
F0h
vdom-dnsUse this command to configure DNS servers for a non-management VDOM. This command is only available from a non-management VDOMDNS settings such as dns-cache-limit and set globally. See “system dns” on page 400.
Syntaxconfig system vdom-dnsset ip6-primary <dns_ipv6>set ip6-secondary <dns_ip6>set primary <dns_ipv4>set secondary <dns_ip4>set source-ip <ipv4_addr>set vdom-dns {disable | enable}
end
Variable Description Defaultip6-primary <dns_ipv6> Enter the primary IPv6 DNS server IP address. ::
ip6-secondary <dns_ip6> Enter the secondary IPv6 DNS server IP address. ::
primary <dns_ipv4> Enter the primary DNS server IP address. 0.0.0.0
secondary <dns_ip4> Enter the secondary DNS IP server address. 0.0.0.0
source-ip <ipv4_addr> Enter the source IP for communications to DNS server. 0.0.0.0
vdom-dns {disable | enable}
Enable configuring DNS servers for the current VDOM. disable
ortiOS 4.0 MR3 CLI Reference1-431-99686-20110623 523ttp://docs.fortinet.com/ • Feedback
vdom-link system
vdom-linkUse this command to create an internal point-to-point interface object. This object is a link used to join virtual domains. Inter-VDOM links support BGP routing, and DHCP.Creating the interface object also creates 2 new interface objects by the name of <name>0 and <name>1. For example if your object was named v_link, the 2 interface objects would be named v_link0 and v_link1. You can then configure these new interfaces as you would any other virtual interface using config system interface.When using vdom-links in HA, you can only have vdom-links in one vcluster. If you have vclusters defined, you must use the vcluster field to determine which vcluster will be allowed to contain the vdom-links.Vdom-links support IPSec DHCP, but not regular DHCP.A packet can pass through an inter-VDOM link a maximum of three times. This is to prevent a loop. When traffic is encrypted or decrypted it changes the content of the packets and this resets the inter-VDOM counter. However using IPIP or GRE tunnels do not reset the counter.
Syntaxconfig system vdom-linkedit <name>
end
Variable Description Defaultedit <name> Enter the name of the link object to create. You are limited
to 8 characters maximum for the name.No default.
vcluster {1|2} Select vcluster 1 or 2 as the only vcluster to have inter-VDOM links. This option is available only when HA and vclusters are configured, and there are VDOMs in both vclusters.
FortiOS 4.0 MR3 CLI Reference524 01-431-99686-20110623
http://docs.fortinet.com/ • Feedback
system vdom-property
F0h
vdom-propertyUse this command to enter a description of a VDOM and to configure resource usage for the VDOM that overrides global limits and specifies guaranteed resource usage for the VDOM.When configuring resource usage for a VDOM you can set the Maximum and Guaranteed value for each resource.• The Maximum value limits the amount of the resource that can be used by the VDOM. When you add a
VDOM, all maximum resource usage settings are 0 indicating that resource limits for this VDOM are controlled by the global resource limits. You do not have to override the maximum settings unless you need to override global limits to further limit the resources available for the VDOM. You cannot set maximum resource usage higher in a VDOM than the corresponding global resource limit. For each resource you can override the global limit to reduce the amount of each resource available for this VDOM. The maximum must the same as or lower than the global limit. The default value is 0, which means the maximum is the same as the global limit.
• The Guaranteed value represents the minimum amount of the resource available for that VDOM. Setting the guaranteed value makes sure that other VDOMs do not use all of a resource. A guaranteed value of 0 means that an amount of this resource is not guaranteed for this VDOM. You only have to change guaranteed settings if your FortiGate may become low on resources and you want to guarantee that a minimum level is available for this VDOM. For each resource you can enter the minimum amount of the resource available to this VDOM regardless of usage by other VDOMs. The default value is 0, which means that an amount of this resource is not guaranteed for this VDOM.
Syntaxconfig globalconfig system vdom-propertyedit <vdom_name>set custom-service <max_int> [<guaranteed_int>]set description <description_str>set dialup-tunnel <max_int> [<guaranteed_int>]set firewall-policy <max_int> [<guaranteed_int>]set firewall-profile <max_int> [<guaranteed_int>]set firewall-address <max_int> [<guaranteed_int>]set firewall-addrgrp <max_int> [<guaranteed_int>]set ipsec-phase1 <max_int> [<guaranteed_int>]set ipsec-phase2 <max_int> [<guaranteed_int>]set log-disk-quota <max_int>set onetime-schedule <max_int> [<guaranteed_int>]set recurring-schedule <max_int> [<guaranteed_int>]set service-group <max_int> [<guaranteed_int>]set session <max_int> [<guaranteed_int>]set user <max_int> [<guaranteed_int>]set user-group <max_int> [<guaranteed_int>]set web-proxy <max_int>
endend
Note: Use the command “system resource-limits” on page 499 to set global resource limits.
ortiOS 4.0 MR3 CLI Reference1-431-99686-20110623 525ttp://docs.fortinet.com/ • Feedback
vdom-property system
Variable Description Defaultedit <vdom_name> Select the VDOM to set the limits for.
custom-service <max_int> [<guaranteed_int>]
Enter the maximum and guaranteed number of firewall custom services.
0 0
description <description_str>
Enter a description of the VDOM. The description can be up to 63 characters long.
dialup-tunnel <max_int> [<guaranteed_int>]
Enter the maximum and guaranteed number of dialup-tunnels. 0 0
firewall-policy <max_int> [<guaranteed_int>]
Enter the maximum and guaranteed number of firewall policies. 0 0
firewall-profile <max_int> [<guaranteed_int>]
Enter the maximum and guaranteed number of firewall profiles. 0 0
firewall-address <max_int> [<guaranteed_int>]
Enter the maximum and guaranteed number of firewall addresses. 0 0
firewall-addrgrp <max_int> [<guaranteed_int>]
Enter the maximum and guaranteed number of firewall address groups.
0 0
ipsec-phase1 <max_int> [<guaranteed_int>]
Enter the maximum and guaranteed number of IPSec phase1 tunnels.
0 0
ipsec-phase2 <max_int> [<guaranteed_int>]
Enter the maximum and guaranteed number of IPSec phase2 tunnels.
0 0
log-disk-quota <max_int> Enter the maximum amount of log disk space available in MBytes for log messages for this VDOM. The range depends on the amount of hard disk space available.
0 0
onetime-schedule <max_int> [<guaranteed_int>]
Enter the maximum and guaranteed number of onetime schedules.
0 0
recurring-schedule <max_int> [<guaranteed_int>]
Enter the maximum and guaranteed number of recurring schedules.
0 0
service-group <max_int> [<guaranteed_int>]
Enter the maximum and guaranteed number of firewall service groups.
0 0
session <max_int> [<guaranteed_int>]
Enter the maximum and guaranteed number of sessions. 0 0
user <max_int> [<guaranteed_int>]
Enter the maximum and guaranteed number of users. 0 0
user-group <max_int> [<guaranteed_int>]
Enter the maximum and guaranteed number of user groups. 0 0
web-proxy <max_int> Enter the maximum number of users that can be using the explicit web proxy at one time from this VDOM.How the number of concurrent explicit proxy users is determined depends on their authentication method:• For session-based authenticated users, each authenticated
user is counted as a single user. Since multiple users can have the same user name, the proxy attempts to identify users according to their authentication membership (based upon whether they were authenticated using RADIUS, LADAP, FSSO, local database etc.). If a user of one session has the same name and membership as a user of another session, the explicit proxy assumes this is one user.
• For IP Based authentication, or no authentication, or if no web-proxy firewall policy has been added, the source IP address is used to determine a user. All sessions from a single source address are assumed to be from the same user.
0 0
FortiOS 4.0 MR3 CLI Reference526 01-431-99686-20110623
http://docs.fortinet.com/ • Feedback
system vdom-sflow
F0h
vdom-sflowUse this command to add or change the IP address and UDP port that FortiGate sFlow agents operating on interfaces in a non-management VDOM use to send sFlow datagrams to an sFlow collector.
Syntaxconfig system sit-tunnelset collector-ip <collector_ipv4>set collector-ip <collector_ipv4>set vdom-sflow {disable | enable}
end
Variable Description Defaultcollector-ip <collector_ipv4>
The IP address of the sFlow collector that sFlow agents added to interfaces in this VDOM should send sFlow datagrams to.
0.0.0.0
collector_port <port_int> The UDP port number used for sending sFlow datagrams. Change this setting only if required by your sFlow collector or you network configuration.
6343
vdom-sflow {disable | enable}
Enable configuring sFlow settings for the current VDOM. enable
ortiOS 4.0 MR3 CLI Reference1-431-99686-20110623 527ttp://docs.fortinet.com/ • Feedback
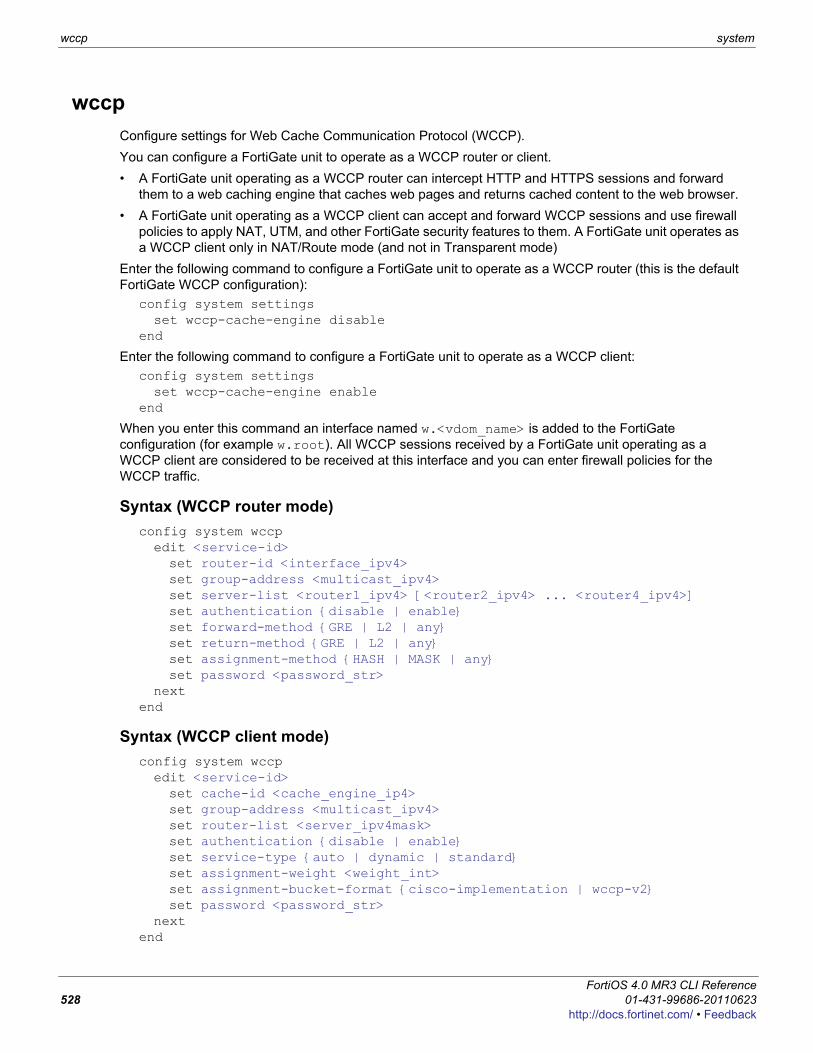
wccp system
wccpConfigure settings for Web Cache Communication Protocol (WCCP).You can configure a FortiGate unit to operate as a WCCP router or client. • A FortiGate unit operating as a WCCP router can intercept HTTP and HTTPS sessions and forward
them to a web caching engine that caches web pages and returns cached content to the web browser. • A FortiGate unit operating as a WCCP client can accept and forward WCCP sessions and use firewall
policies to apply NAT, UTM, and other FortiGate security features to them. A FortiGate unit operates as a WCCP client only in NAT/Route mode (and not in Transparent mode)
Enter the following command to configure a FortiGate unit to operate as a WCCP router (this is the default FortiGate WCCP configuration):
config system settingsset wccp-cache-engine disable
end
Enter the following command to configure a FortiGate unit to operate as a WCCP client:config system settingsset wccp-cache-engine enable
end
When you enter this command an interface named w.<vdom_name> is added to the FortiGate configuration (for example w.root). All WCCP sessions received by a FortiGate unit operating as a WCCP client are considered to be received at this interface and you can enter firewall policies for the WCCP traffic.
Syntax (WCCP router mode)config system wccpedit <service-id>set router-id <interface_ipv4>set group-address <multicast_ipv4>set server-list <router1_ipv4> [<router2_ipv4> ... <router4_ipv4>]set authentication {disable | enable}set forward-method {GRE | L2 | any}set return-method {GRE | L2 | any}set assignment-method {HASH | MASK | any}set password <password_str>
nextend
Syntax (WCCP client mode)config system wccpedit <service-id>set cache-id <cache_engine_ip4>set group-address <multicast_ipv4>set router-list <server_ipv4mask>set authentication {disable | enable}set service-type {auto | dynamic | standard}set assignment-weight <weight_int>set assignment-bucket-format {cisco-implementation | wccp-v2}set password <password_str>
nextend
FortiOS 4.0 MR3 CLI Reference528 01-431-99686-20110623
http://docs.fortinet.com/ • Feedback
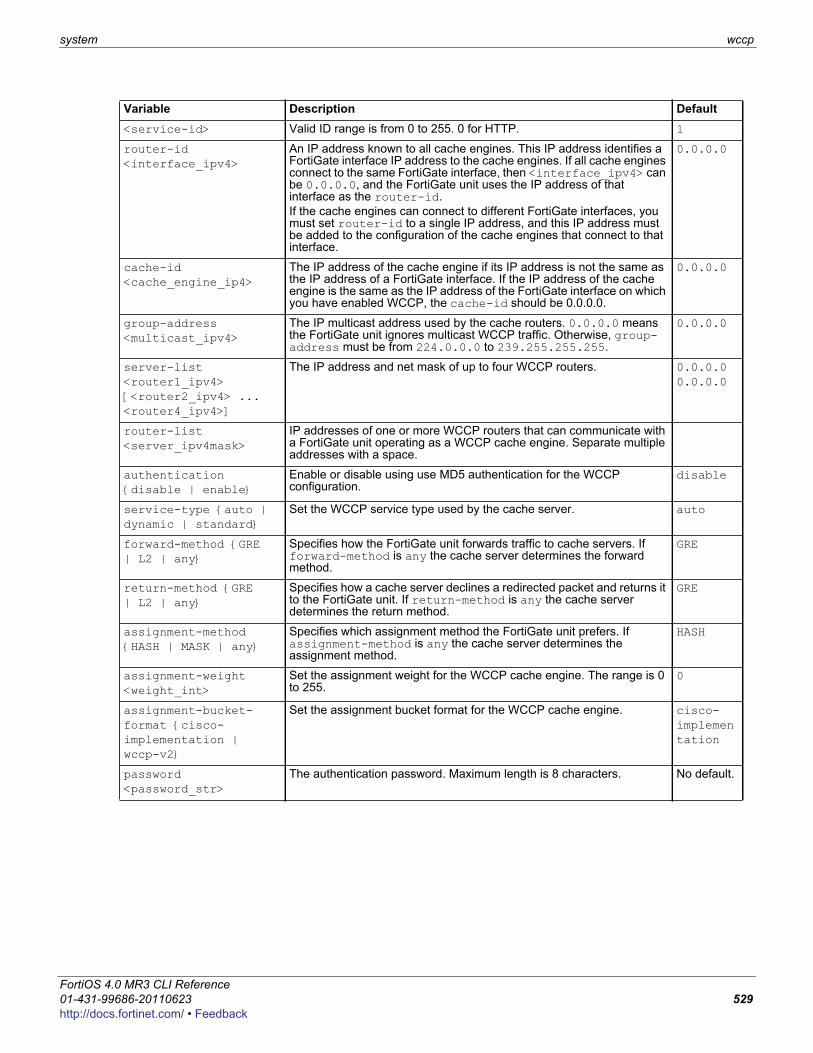
system wccp
F0h
Variable Description Default<service-id> Valid ID range is from 0 to 255. 0 for HTTP. 1
router-id <interface_ipv4>
An IP address known to all cache engines. This IP address identifies a FortiGate interface IP address to the cache engines. If all cache engines connect to the same FortiGate interface, then <interface_ipv4> can be 0.0.0.0, and the FortiGate unit uses the IP address of that interface as the router-id. If the cache engines can connect to different FortiGate interfaces, you must set router-id to a single IP address, and this IP address must be added to the configuration of the cache engines that connect to that interface.
0.0.0.0
cache-id <cache_engine_ip4>
The IP address of the cache engine if its IP address is not the same as the IP address of a FortiGate interface. If the IP address of the cache engine is the same as the IP address of the FortiGate interface on which you have enabled WCCP, the cache-id should be 0.0.0.0.
0.0.0.0
group-address <multicast_ipv4>
The IP multicast address used by the cache routers. 0.0.0.0 means the FortiGate unit ignores multicast WCCP traffic. Otherwise, group-address must be from 224.0.0.0 to 239.255.255.255.
0.0.0.0
server-list <router1_ipv4> [<router2_ipv4> ... <router4_ipv4>]
The IP address and net mask of up to four WCCP routers. 0.0.0.0 0.0.0.0
router-list <server_ipv4mask>
IP addresses of one or more WCCP routers that can communicate with a FortiGate unit operating as a WCCP cache engine. Separate multiple addresses with a space.
authentication {disable | enable}
Enable or disable using use MD5 authentication for the WCCP configuration.
disable
service-type {auto | dynamic | standard}
Set the WCCP service type used by the cache server. auto
forward-method {GRE | L2 | any}
Specifies how the FortiGate unit forwards traffic to cache servers. If forward-method is any the cache server determines the forward method.
GRE
return-method {GRE | L2 | any}
Specifies how a cache server declines a redirected packet and returns it to the FortiGate unit. If return-method is any the cache server determines the return method.
GRE
assignment-method {HASH | MASK | any}
Specifies which assignment method the FortiGate unit prefers. If assignment-method is any the cache server determines the assignment method.
HASH
assignment-weight <weight_int>
Set the assignment weight for the WCCP cache engine. The range is 0 to 255.
0
assignment-bucket-format {cisco-implementation | wccp-v2}
Set the assignment bucket format for the WCCP cache engine. cisco-implementation
password <password_str>
The authentication password. Maximum length is 8 characters. No default.
ortiOS 4.0 MR3 CLI Reference1-431-99686-20110623 529ttp://docs.fortinet.com/ • Feedback
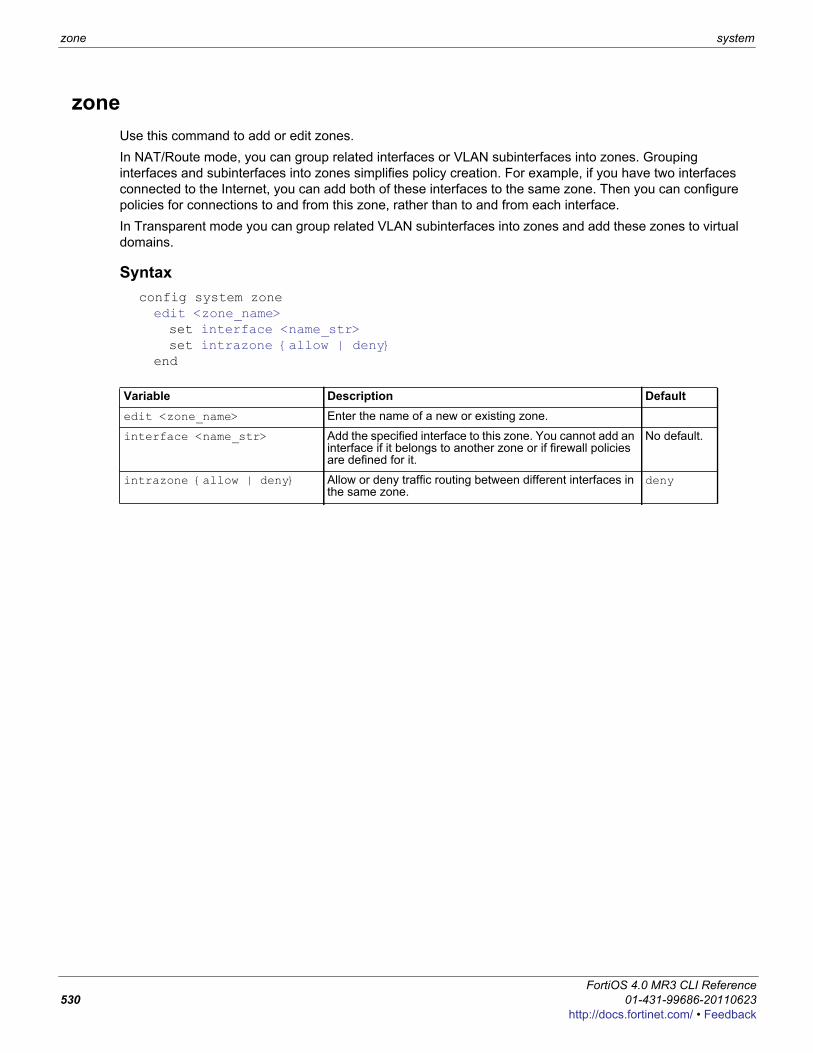
zone system
zone Use this command to add or edit zones.In NAT/Route mode, you can group related interfaces or VLAN subinterfaces into zones. Grouping interfaces and subinterfaces into zones simplifies policy creation. For example, if you have two interfaces connected to the Internet, you can add both of these interfaces to the same zone. Then you can configure policies for connections to and from this zone, rather than to and from each interface.In Transparent mode you can group related VLAN subinterfaces into zones and add these zones to virtual domains.
Syntaxconfig system zoneedit <zone_name>set interface <name_str>set intrazone {allow | deny}
end
Variable Description Defaultedit <zone_name> Enter the name of a new or existing zone.
interface <name_str> Add the specified interface to this zone. You cannot add an interface if it belongs to another zone or if firewall policies are defined for it.
No default.
intrazone {allow | deny} Allow or deny traffic routing between different interfaces in the same zone.
deny
FortiOS 4.0 MR3 CLI Reference530 01-431-99686-20110623
http://docs.fortinet.com/ • Feedback
F0h
userThis chapter covers:• configuration of the FortiGate unit to use external authentication servers, including
Windows Active Directory or other Directory Service servers
• configuration of user accounts and user groups for firewall policy authentication, administrator authentication and some types of VPN authentication
• configuration of peers and peer groups for IPSec VPN authentication and PKI user authenticationThis chapter contains the following sections:
Configuring users for authenticationbanfortitokenfssogroupldaplocal
peerpeergrpradiussettingsms-providertacacs+
ortiOS 4.0 MR3 CLI Reference1-431-99686-20110623 531ttp://docs.fortinet.com/ • Feedback
Configuring users for authentication user
Configuring users for authenticationThis chapter covers two types of user configuration:• users authenticated by password• users, sites or computers (peers) authenticated by certificate
Configuring users for password authenticationYou need to set up authentication in the following order:1 If external authentication is needed, configure the required servers.
• See “user radius” on page 547.• See “user ldap” on page 541.• See “user tacacs+” on page 555• For Directory Service, see “user fsso” on page 538.
2 Configure local user identities.For each user, you can choose whether the FortiGate unit or an external authentication server verifies the password.• See “user local” on page 543.
3 Create user groups.Add local users to each user group as appropriate. You can also add an authentication server to a user group. In this case, all users in the server’s database can authenticate to the FortiGate unit.• See “user group” on page 540.• For Directory Service, also see “user ban” on page 533.
Configuring peers for certificate authenticationIf your FortiGate unit will host IPSec VPNs that authenticate clients using certificates, you need to prepare for certificate authentication as follows:1 Import the CA certificates for clients who authenticate with a FortiGate unit VPN using certificates.
• See “vpn certificate ca” on page 568.2 Enter the certificate information for each VPN client (peer).
• See “user peer” on page 544.3 Create peer groups, if you have VPNs that authenticate by peer group. Assign the appropriate peers to
each peer group.• See “user peergrp” on page 546.
FortiOS 4.0 MR3 CLI Reference532 01-431-99686-20110623
http://docs.fortinet.com/ • Feedback

user ban
F0h
banThe FortiGate unit compiles a list of all users, IP addresses, or interfaces that have a quarantine/ban rule applied to them. The Banned User list in the FortiGate web-based interface shows all IP addresses and interfaces blocked by NAC (Network Access Control) quarantine, and all IP addresses, authenticated users, senders and interfaces blocked by DLP (Data Leak Prevention). All users or IP addresses on the Banned User list are blocked until they are removed from the list, and all sessions to an interface on the list are blocked until the interface is removed from the list. Each banned user configuration can have an expiry time/date to automatically remove it from the Banned User list, or the user must be removed from the list manually by the system administrator.
Syntax (view only, cannot be configured)config user banedit banid <ban_int>set source {dlp-rule | dlp-compound | IPS | AV | DoS}set type {quarantine-src-ip | quarantine-dst-ip | quarantine-src-dst-ip
| quarantine-intf | dlp-user | dlp-ip | dlp-sender | dlp-im}set cause {IPS (Intrusion Protection Sensor)) | Antivirus (AV) | Data
Leak Prevention (DLP)}set src-ip-addr <src_ip_addr>set protocol {smtp | pop3 | imap | http-post | http-get | ftp-put |
ftp-get | nntp | aim | icq | msn | ym | smtps | pop3s | imaps | https-post | https_get}
set dst-ip-addr <dst_ip_addr>set interface <interface_name>set ip-addr <ip_addr>set user <user_name>set sender <sender_name>set im-type {aim | icq | msn | yahoo}set im-name <im_name>set expires <ban_expiry_date>set created <system_date>
endend
Caution: You cannot configure items in the Banned user list with the CLI, you must use the web-based manager. In the CLI, you can display the list items in the Banned User list using get user ban, and remove items from the list using the following command:
config user bandelete banid <ban_int>
end
Variable Description (or variable/description) Defaultbanid <ban_int> Enter the unique ID number of the banned user configuration.
0,0.No default
ortiOS 4.0 MR3 CLI Reference1-431-99686-20110623 533ttp://docs.fortinet.com/ • Feedback
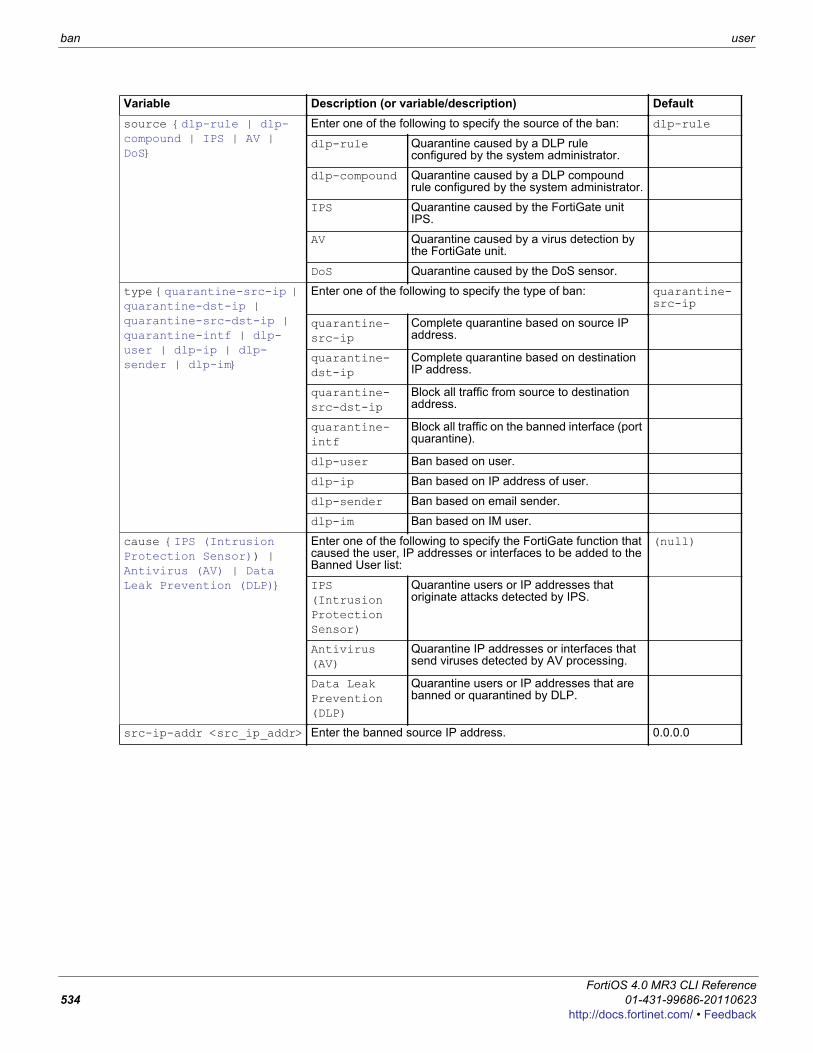
ban user
source {dlp-rule | dlp-compound | IPS | AV | DoS}
Enter one of the following to specify the source of the ban: dlp-rule
dlp-rule Quarantine caused by a DLP rule configured by the system administrator.
dlp-compound Quarantine caused by a DLP compound rule configured by the system administrator.
IPS Quarantine caused by the FortiGate unit IPS.
AV Quarantine caused by a virus detection by the FortiGate unit.
DoS Quarantine caused by the DoS sensor.
type {quarantine-src-ip | quarantine-dst-ip | quarantine-src-dst-ip | quarantine-intf | dlp-user | dlp-ip | dlp-sender | dlp-im}
Enter one of the following to specify the type of ban: quarantine-src-ip
quarantine-src-ip
Complete quarantine based on source IP address.
quarantine-dst-ip
Complete quarantine based on destination IP address.
quarantine-src-dst-ip
Block all traffic from source to destination address.
quarantine-intf
Block all traffic on the banned interface (port quarantine).
dlp-user Ban based on user.
dlp-ip Ban based on IP address of user.
dlp-sender Ban based on email sender.
dlp-im Ban based on IM user.
cause {IPS (Intrusion Protection Sensor)) | Antivirus (AV) | Data Leak Prevention (DLP)}
Enter one of the following to specify the FortiGate function that caused the user, IP addresses or interfaces to be added to the Banned User list:
(null)
IPS (Intrusion Protection Sensor)
Quarantine users or IP addresses that originate attacks detected by IPS.
Antivirus (AV)
Quarantine IP addresses or interfaces that send viruses detected by AV processing.
Data Leak Prevention (DLP)
Quarantine users or IP addresses that are banned or quarantined by DLP.
src-ip-addr <src_ip_addr> Enter the banned source IP address. 0.0.0.0
Variable Description (or variable/description) Default
FortiOS 4.0 MR3 CLI Reference534 01-431-99686-20110623
http://docs.fortinet.com/ • Feedback

user ban
F0h
protocol {smtp | pop3 | imap | http-post | http-get | ftp-put | ftp-get | nntp | aim | icq | msn | ym | smtps | pop3s | imaps | https-post | https_get}
Enter the protocol used by the user or IP addresses added to the Banned User list (ban type dlp-ip, dlp-sender, dlp-im, dlp-user).
No default
smtp smtp
pop3 pop3
imap imap
http-post http post
http-get http get
ftp-put ftp put
ftp-get ftp get
nntp nntp
aim AOL instant messenger
icq ICQ
msn MSN messenger
ym Yahoo! messenger
smtps smtps
pop3s pop3s
imaps imaps
https-post https post
https-get https get
dst-ip-addr <dst_ip_addr> Enter the destination IP address to be quarantined/banned (ban type quarantine-dst-ip, quarantine-src-dst-ip).
interface <interface_name>
Enter the interface to be quarantined/banned (ban type quarantine-intf). Available list of interfaces depends on FortiGate unit interface configuration.
null
modem ()
interface1 ()
interface2 ()
interface3 ()
interface4 ()
interface5 ()
ssl.root ()
ip-addr <ip_addr> Enter the banned IP address (ban type dlp-ip) 0.0.0.0
user <user_name> Enter the name of the user to be banned (ban type dlp-user). null
sender <sender_name> Enter the name of the sender to be banned (ban type dlp-sender).
null
im-type {aim | icq | msn | yahoo}
Enter the type of instant messenger to be banned (ban type dlp-im).
aim
aim AOL instant messenger
icq ICQ
msn MSN messenger
yahoo Yahoo! messenger
im-name <im_name> Enter the name of the instant messenger to be banned (ban type dlp-im).
null
Variable Description (or variable/description) Default
ortiOS 4.0 MR3 CLI Reference1-431-99686-20110623 535ttp://docs.fortinet.com/ • Feedback

ban user
expires <ban_expiry_date> Specify when the ban is lifted by the FortiGate unit. Date and time <yyyy/mm/dd hh:mm:ss>. Range from 5 minutes to 365 days or indefinite. If set to indefinite, the ban must be manually removed from the Banned User list.
indefinite
created <system_date> System-generated time that the ban was created by the system administrator. Format Wed Dec 31 16:00:00 1969.
No default
Variable Description (or variable/description) Default
FortiOS 4.0 MR3 CLI Reference536 01-431-99686-20110623
http://docs.fortinet.com/ • Feedback
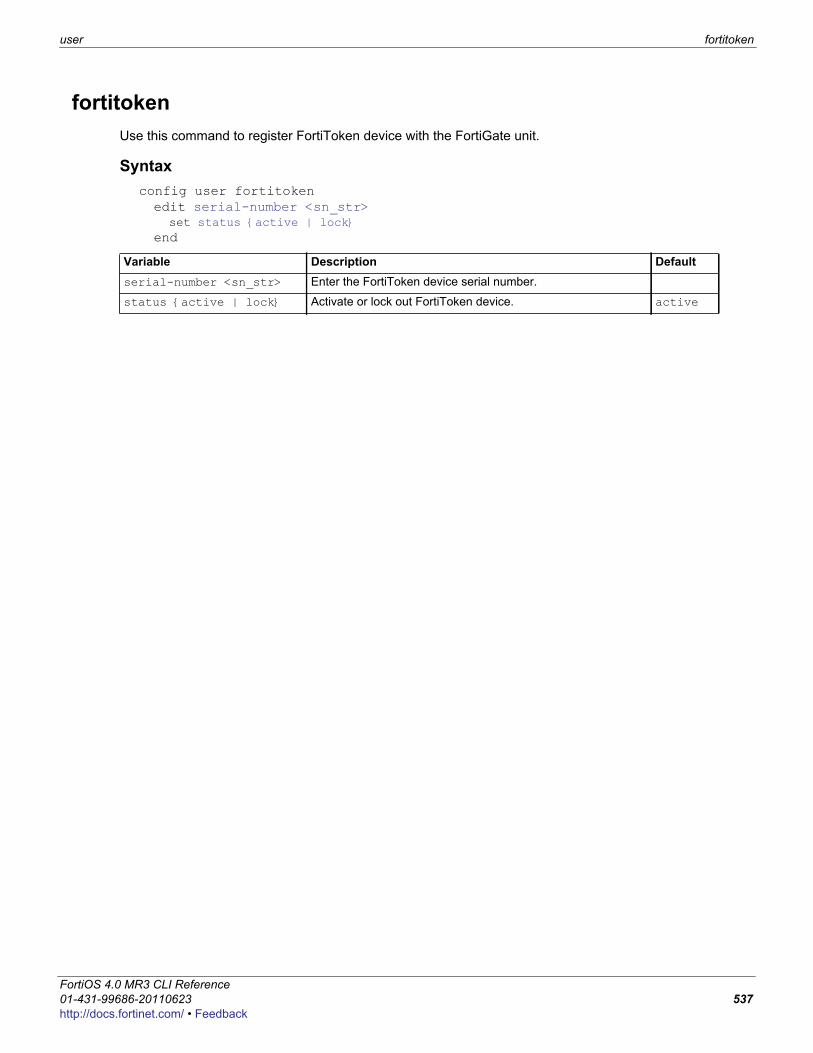
user fortitoken
F0h
fortitokenUse this command to register FortiToken device with the FortiGate unit.
Syntaxconfig user fortitokenedit serial-number <sn_str>
set status {active | lock}end
Variable Description Defaultserial-number <sn_str> Enter the FortiToken device serial number.
status {active | lock} Activate or lock out FortiToken device. active
ortiOS 4.0 MR3 CLI Reference1-431-99686-20110623 537ttp://docs.fortinet.com/ • Feedback
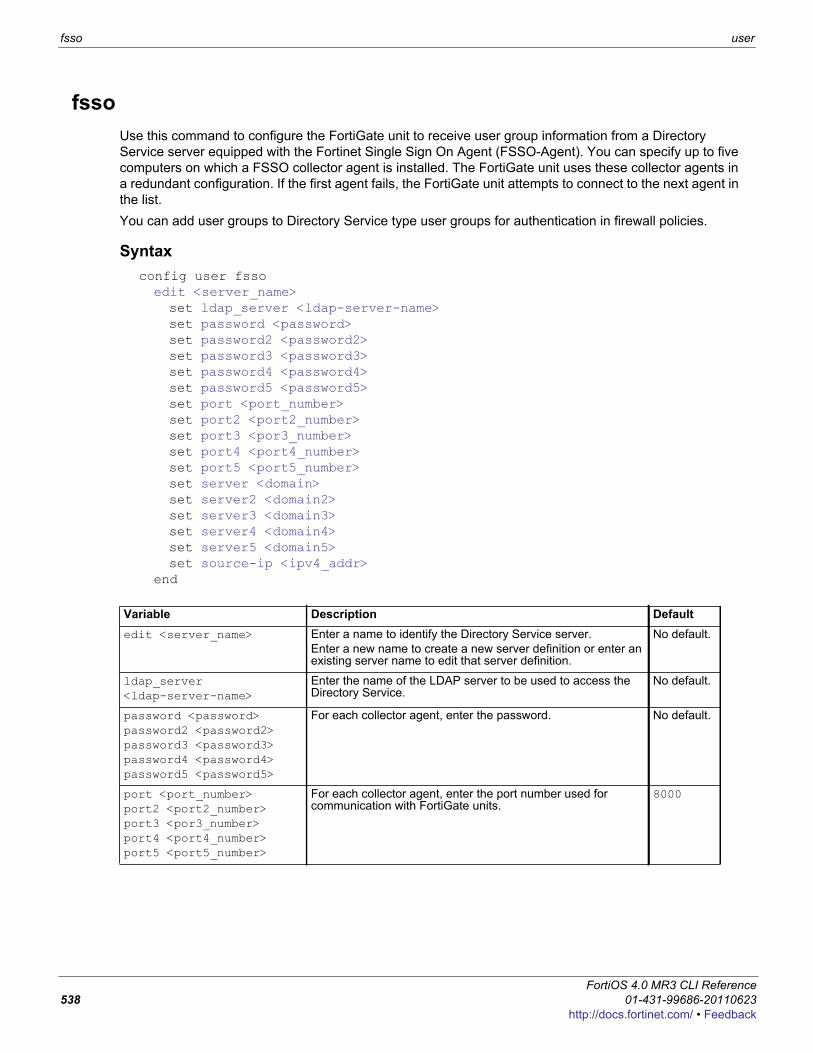
fsso user
fssoUse this command to configure the FortiGate unit to receive user group information from a Directory Service server equipped with the Fortinet Single Sign On Agent (FSSO-Agent). You can specify up to five computers on which a FSSO collector agent is installed. The FortiGate unit uses these collector agents in a redundant configuration. If the first agent fails, the FortiGate unit attempts to connect to the next agent in the list.You can add user groups to Directory Service type user groups for authentication in firewall policies.
Syntaxconfig user fssoedit <server_name>set ldap_server <ldap-server-name>set password <password>set password2 <password2>set password3 <password3>set password4 <password4>set password5 <password5>set port <port_number>set port2 <port2_number>set port3 <por3_number>set port4 <port4_number>set port5 <port5_number>set server <domain>set server2 <domain2>set server3 <domain3>set server4 <domain4>set server5 <domain5>set source-ip <ipv4_addr>
end
Variable Description Defaultedit <server_name> Enter a name to identify the Directory Service server.
Enter a new name to create a new server definition or enter an existing server name to edit that server definition.
No default.
ldap_server <ldap-server-name>
Enter the name of the LDAP server to be used to access the Directory Service.
No default.
password <password>password2 <password2>password3 <password3>password4 <password4>password5 <password5>
For each collector agent, enter the password. No default.
port <port_number>port2 <port2_number>port3 <por3_number>port4 <port4_number>port5 <port5_number>
For each collector agent, enter the port number used for communication with FortiGate units.
8000
FortiOS 4.0 MR3 CLI Reference538 01-431-99686-20110623
http://docs.fortinet.com/ • Feedback

user fsso
F0h
server <domain>server2 <domain2>server3 <domain3>server4 <domain4>server5 <domain5>
Enter the domain name or IP address for up to five collector agents. Range from 1 to 63 characters.
No default.
source-ip <ipv4_addr> Enter the source IP for communications to FSSO server. 0.0.0.0
Variable Description Default
ortiOS 4.0 MR3 CLI Reference1-431-99686-20110623 539ttp://docs.fortinet.com/ • Feedback
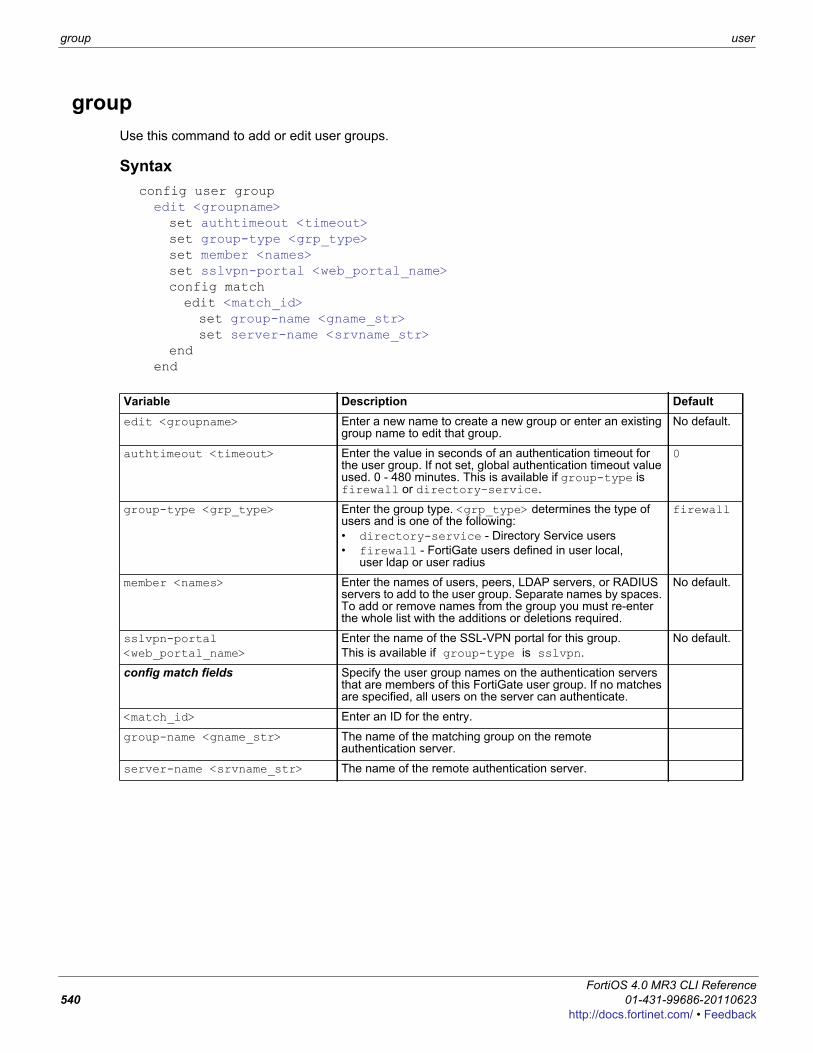
group user
groupUse this command to add or edit user groups.
Syntaxconfig user groupedit <groupname>set authtimeout <timeout>set group-type <grp_type>set member <names>set sslvpn-portal <web_portal_name>config matchedit <match_id>set group-name <gname_str>set server-name <srvname_str>
endend
Variable Description Defaultedit <groupname> Enter a new name to create a new group or enter an existing
group name to edit that group. No default.
authtimeout <timeout> Enter the value in seconds of an authentication timeout for the user group. If not set, global authentication timeout value used. 0 - 480 minutes. This is available if group-type is firewall or directory-service.
0
group-type <grp_type> Enter the group type. <grp_type> determines the type of users and is one of the following:• directory-service - Directory Service users• firewall - FortiGate users defined in user local,
user ldap or user radius
firewall
member <names> Enter the names of users, peers, LDAP servers, or RADIUS servers to add to the user group. Separate names by spaces. To add or remove names from the group you must re-enter the whole list with the additions or deletions required.
No default.
sslvpn-portal <web_portal_name>
Enter the name of the SSL-VPN portal for this group.This is available if group-type is sslvpn.
No default.
config match fields Specify the user group names on the authentication servers that are members of this FortiGate user group. If no matches are specified, all users on the server can authenticate.
<match_id> Enter an ID for the entry.
group-name <gname_str> The name of the matching group on the remote authentication server.
server-name <srvname_str> The name of the remote authentication server.
FortiOS 4.0 MR3 CLI Reference540 01-431-99686-20110623
http://docs.fortinet.com/ • Feedback
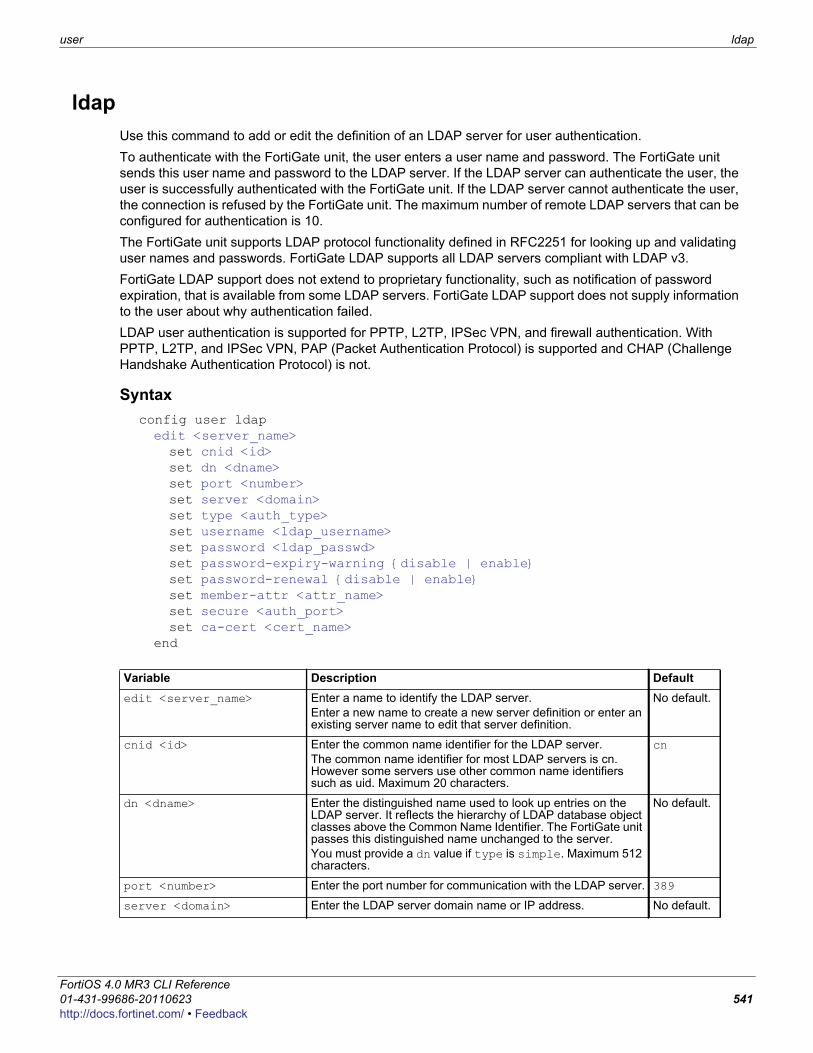
user ldap
F0h
ldapUse this command to add or edit the definition of an LDAP server for user authentication.To authenticate with the FortiGate unit, the user enters a user name and password. The FortiGate unit sends this user name and password to the LDAP server. If the LDAP server can authenticate the user, the user is successfully authenticated with the FortiGate unit. If the LDAP server cannot authenticate the user, the connection is refused by the FortiGate unit. The maximum number of remote LDAP servers that can be configured for authentication is 10.The FortiGate unit supports LDAP protocol functionality defined in RFC2251 for looking up and validating user names and passwords. FortiGate LDAP supports all LDAP servers compliant with LDAP v3.FortiGate LDAP support does not extend to proprietary functionality, such as notification of password expiration, that is available from some LDAP servers. FortiGate LDAP support does not supply information to the user about why authentication failed.LDAP user authentication is supported for PPTP, L2TP, IPSec VPN, and firewall authentication. With PPTP, L2TP, and IPSec VPN, PAP (Packet Authentication Protocol) is supported and CHAP (Challenge Handshake Authentication Protocol) is not.
Syntaxconfig user ldapedit <server_name>set cnid <id>set dn <dname>set port <number>set server <domain>set type <auth_type>set username <ldap_username>set password <ldap_passwd>set password-expiry-warning {disable | enable}set password-renewal {disable | enable}set member-attr <attr_name>set secure <auth_port>set ca-cert <cert_name>
end
Variable Description Defaultedit <server_name> Enter a name to identify the LDAP server.
Enter a new name to create a new server definition or enter an existing server name to edit that server definition.
No default.
cnid <id> Enter the common name identifier for the LDAP server.The common name identifier for most LDAP servers is cn. However some servers use other common name identifiers such as uid. Maximum 20 characters.
cn
dn <dname> Enter the distinguished name used to look up entries on the LDAP server. It reflects the hierarchy of LDAP database object classes above the Common Name Identifier. The FortiGate unit passes this distinguished name unchanged to the server.You must provide a dn value if type is simple. Maximum 512 characters.
No default.
port <number> Enter the port number for communication with the LDAP server. 389
server <domain> Enter the LDAP server domain name or IP address. No default.
ortiOS 4.0 MR3 CLI Reference1-431-99686-20110623 541ttp://docs.fortinet.com/ • Feedback
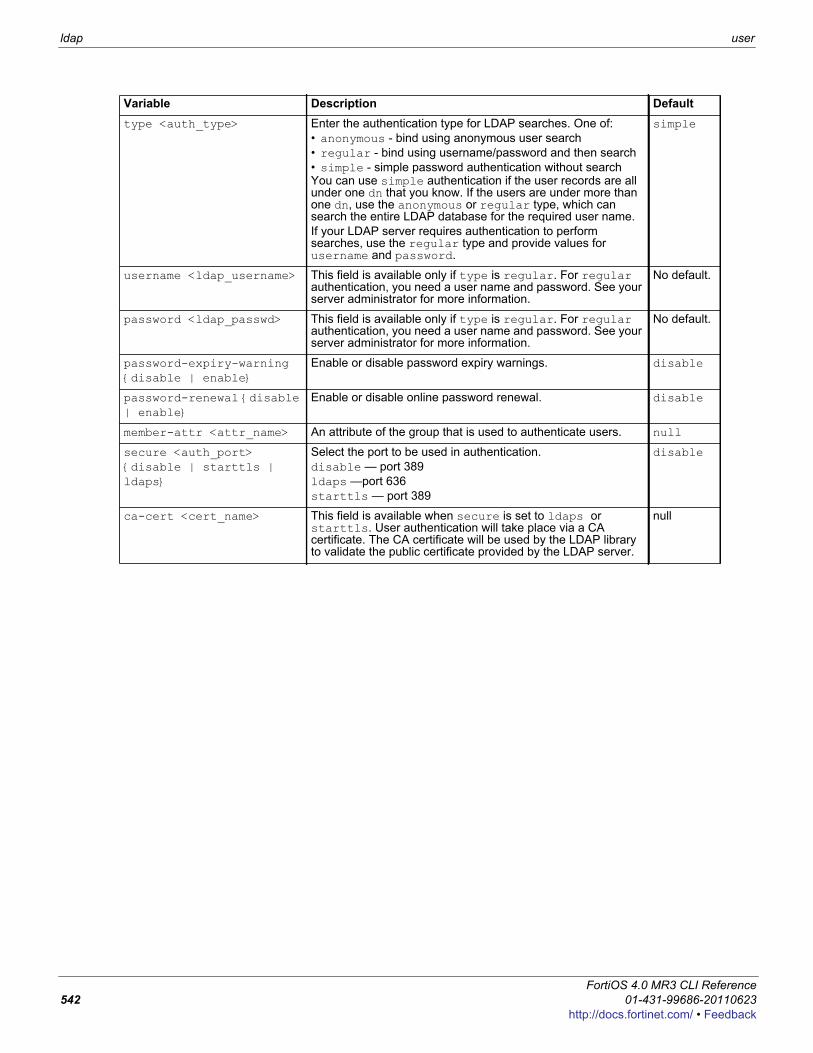
ldap user
type <auth_type> Enter the authentication type for LDAP searches. One of:• anonymous - bind using anonymous user search• regular - bind using username/password and then search• simple - simple password authentication without searchYou can use simple authentication if the user records are all under one dn that you know. If the users are under more than one dn, use the anonymous or regular type, which can search the entire LDAP database for the required user name.If your LDAP server requires authentication to perform searches, use the regular type and provide values for username and password.
simple
username <ldap_username> This field is available only if type is regular. For regular authentication, you need a user name and password. See your server administrator for more information.
No default.
password <ldap_passwd> This field is available only if type is regular. For regular authentication, you need a user name and password. See your server administrator for more information.
No default.
password-expiry-warning {disable | enable}
Enable or disable password expiry warnings. disable
password-renewal {disable | enable}
Enable or disable online password renewal. disable
member-attr <attr_name> An attribute of the group that is used to authenticate users. null
secure <auth_port>{disable | starttls | ldaps}
Select the port to be used in authentication.disable — port 389ldaps —port 636starttls — port 389
disable
ca-cert <cert_name> This field is available when secure is set to ldaps or starttls. User authentication will take place via a CA certificate. The CA certificate will be used by the LDAP library to validate the public certificate provided by the LDAP server.
null
Variable Description Default
FortiOS 4.0 MR3 CLI Reference542 01-431-99686-20110623
http://docs.fortinet.com/ • Feedback
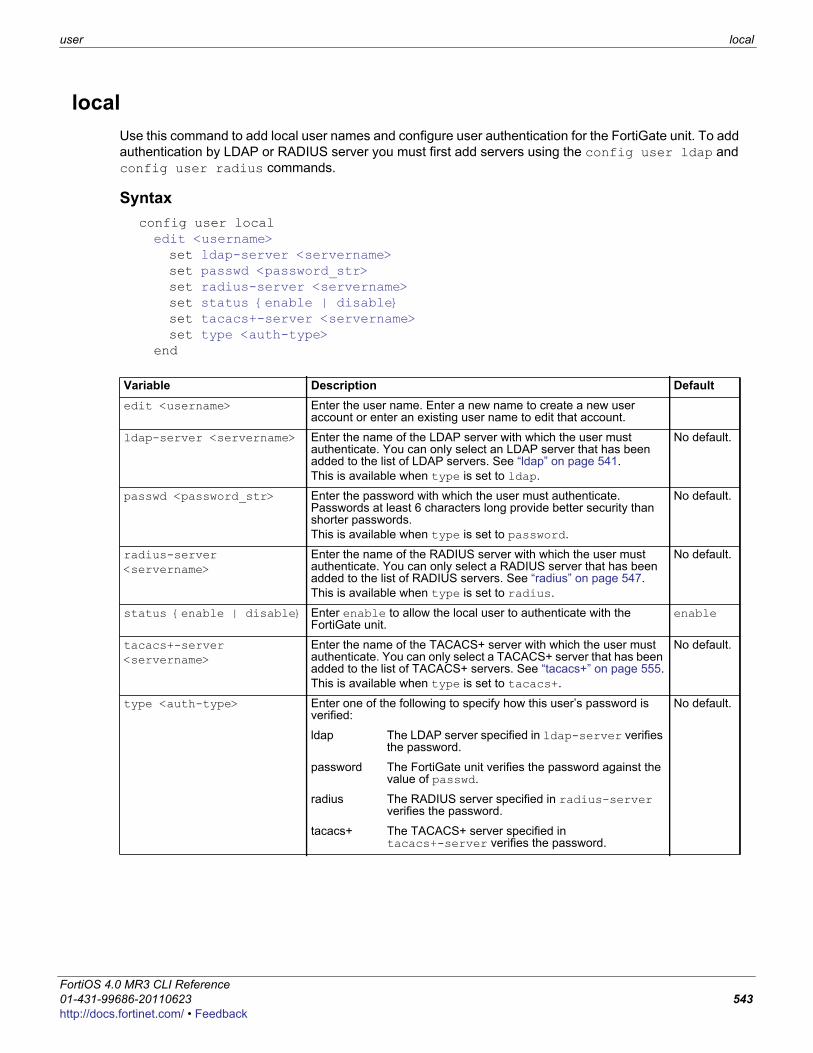
user local
F0h
localUse this command to add local user names and configure user authentication for the FortiGate unit. To add authentication by LDAP or RADIUS server you must first add servers using the config user ldap and config user radius commands.
Syntaxconfig user localedit <username>set ldap-server <servername>set passwd <password_str>set radius-server <servername>set status {enable | disable}set tacacs+-server <servername>set type <auth-type>
end
Variable Description Defaultedit <username> Enter the user name. Enter a new name to create a new user
account or enter an existing user name to edit that account.
ldap-server <servername> Enter the name of the LDAP server with which the user must authenticate. You can only select an LDAP server that has been added to the list of LDAP servers. See “ldap” on page 541.This is available when type is set to ldap.
No default.
passwd <password_str> Enter the password with which the user must authenticate. Passwords at least 6 characters long provide better security than shorter passwords.This is available when type is set to password.
No default.
radius-server <servername>
Enter the name of the RADIUS server with which the user must authenticate. You can only select a RADIUS server that has been added to the list of RADIUS servers. See “radius” on page 547.This is available when type is set to radius.
No default.
status {enable | disable} Enter enable to allow the local user to authenticate with the FortiGate unit.
enable
tacacs+-server <servername>
Enter the name of the TACACS+ server with which the user must authenticate. You can only select a TACACS+ server that has been added to the list of TACACS+ servers. See “tacacs+” on page 555.This is available when type is set to tacacs+.
No default.
type <auth-type> Enter one of the following to specify how this user’s password is verified:
No default.
ldap The LDAP server specified in ldap-server verifies the password.
password The FortiGate unit verifies the password against the value of passwd.
radius The RADIUS server specified in radius-server verifies the password.
tacacs+ The TACACS+ server specified in tacacs+-server verifies the password.
ortiOS 4.0 MR3 CLI Reference1-431-99686-20110623 543ttp://docs.fortinet.com/ • Feedback
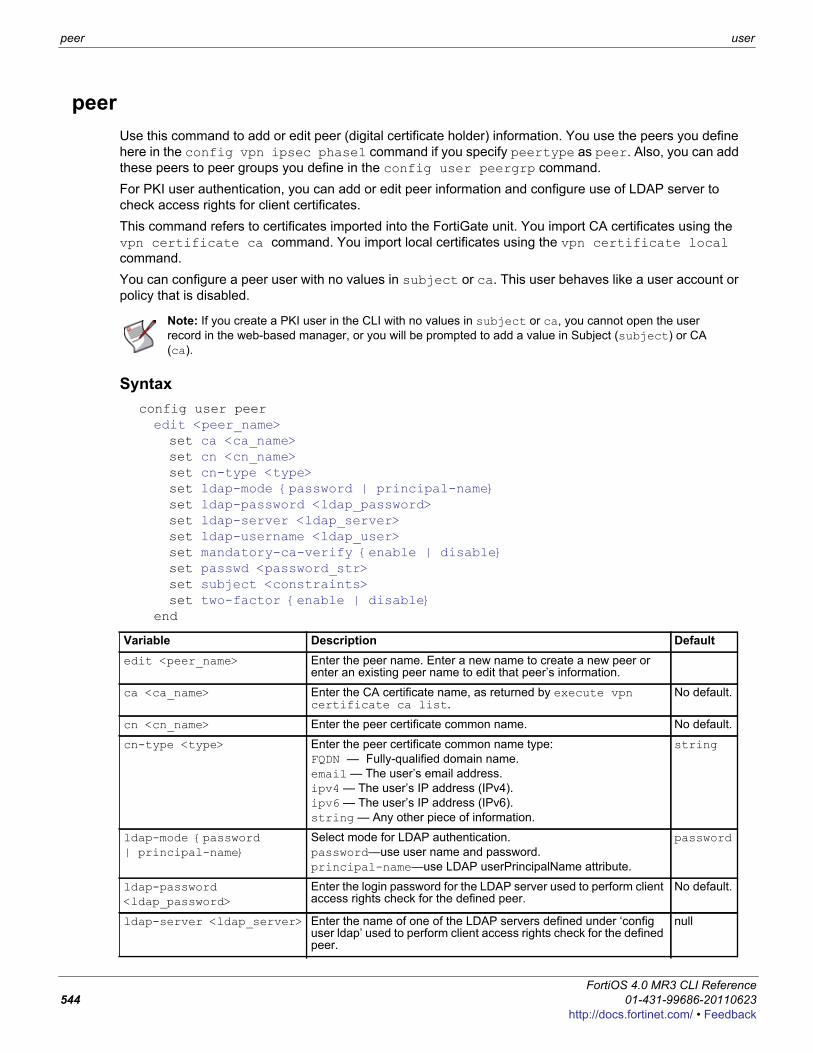
peer user
peerUse this command to add or edit peer (digital certificate holder) information. You use the peers you define here in the config vpn ipsec phase1 command if you specify peertype as peer. Also, you can add these peers to peer groups you define in the config user peergrp command.For PKI user authentication, you can add or edit peer information and configure use of LDAP server to check access rights for client certificates.This command refers to certificates imported into the FortiGate unit. You import CA certificates using the vpn certificate ca command. You import local certificates using the vpn certificate local command.You can configure a peer user with no values in subject or ca. This user behaves like a user account or policy that is disabled.
Syntaxconfig user peeredit <peer_name>set ca <ca_name>set cn <cn_name>set cn-type <type>set ldap-mode {password | principal-name}set ldap-password <ldap_password>set ldap-server <ldap_server>set ldap-username <ldap_user>set mandatory-ca-verify {enable | disable}set passwd <password_str>set subject <constraints>set two-factor {enable | disable}
end
Note: If you create a PKI user in the CLI with no values in subject or ca, you cannot open the user record in the web-based manager, or you will be prompted to add a value in Subject (subject) or CA (ca).
Variable Description Defaultedit <peer_name> Enter the peer name. Enter a new name to create a new peer or
enter an existing peer name to edit that peer’s information.
ca <ca_name> Enter the CA certificate name, as returned by execute vpn certificate ca list.
No default.
cn <cn_name> Enter the peer certificate common name. No default.
cn-type <type> Enter the peer certificate common name type:FQDN — Fully-qualified domain name.email — The user’s email address.ipv4 — The user’s IP address (IPv4).ipv6 — The user’s IP address (IPv6).string — Any other piece of information.
string
ldap-mode {password | principal-name}
Select mode for LDAP authentication.password—use user name and password.principal-name—use LDAP userPrincipalName attribute.
password
ldap-password <ldap_password>
Enter the login password for the LDAP server used to perform client access rights check for the defined peer.
No default.
ldap-server <ldap_server> Enter the name of one of the LDAP servers defined under ‘config user ldap’ used to perform client access rights check for the defined peer.
null
FortiOS 4.0 MR3 CLI Reference544 01-431-99686-20110623
http://docs.fortinet.com/ • Feedback
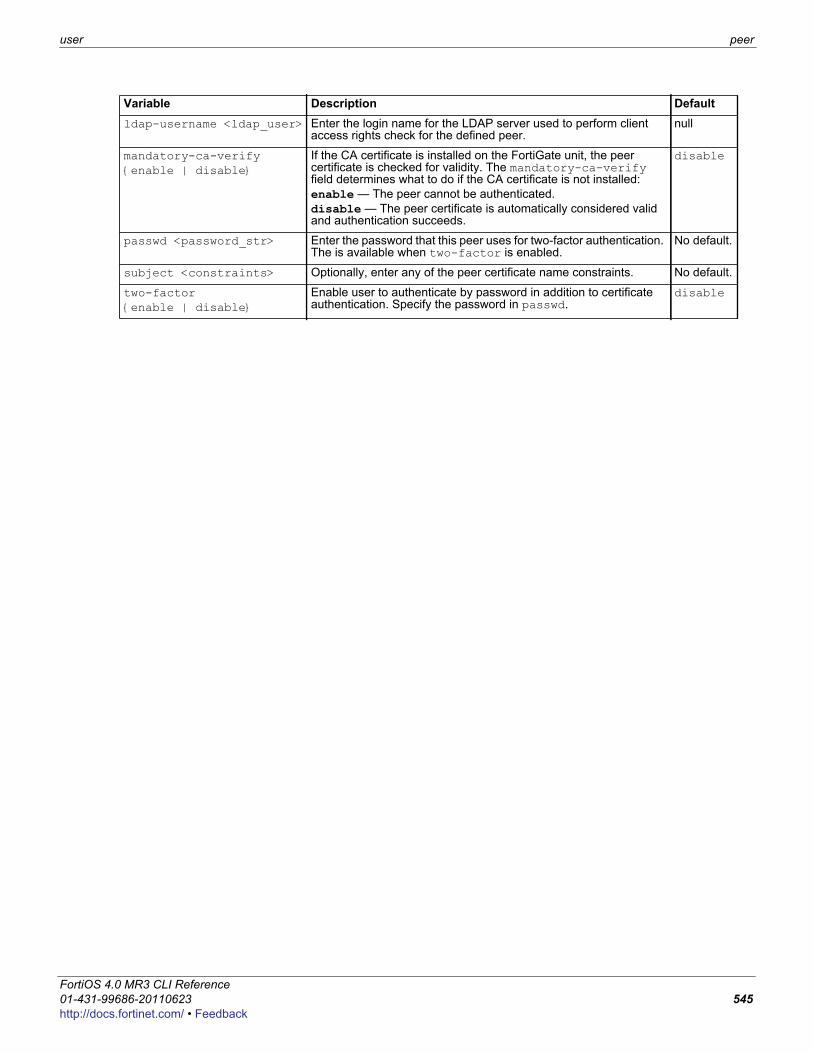
user peer
F0h
ldap-username <ldap_user> Enter the login name for the LDAP server used to perform client access rights check for the defined peer.
null
mandatory-ca-verify {enable | disable}
If the CA certificate is installed on the FortiGate unit, the peer certificate is checked for validity. The mandatory-ca-verify field determines what to do if the CA certificate is not installed:enable — The peer cannot be authenticated.disable — The peer certificate is automatically considered valid and authentication succeeds.
disable
passwd <password_str> Enter the password that this peer uses for two-factor authentication. The is available when two-factor is enabled.
No default.
subject <constraints> Optionally, enter any of the peer certificate name constraints. No default.
two-factor {enable | disable}
Enable user to authenticate by password in addition to certificate authentication. Specify the password in passwd.
disable
Variable Description Default
ortiOS 4.0 MR3 CLI Reference1-431-99686-20110623 545ttp://docs.fortinet.com/ • Feedback
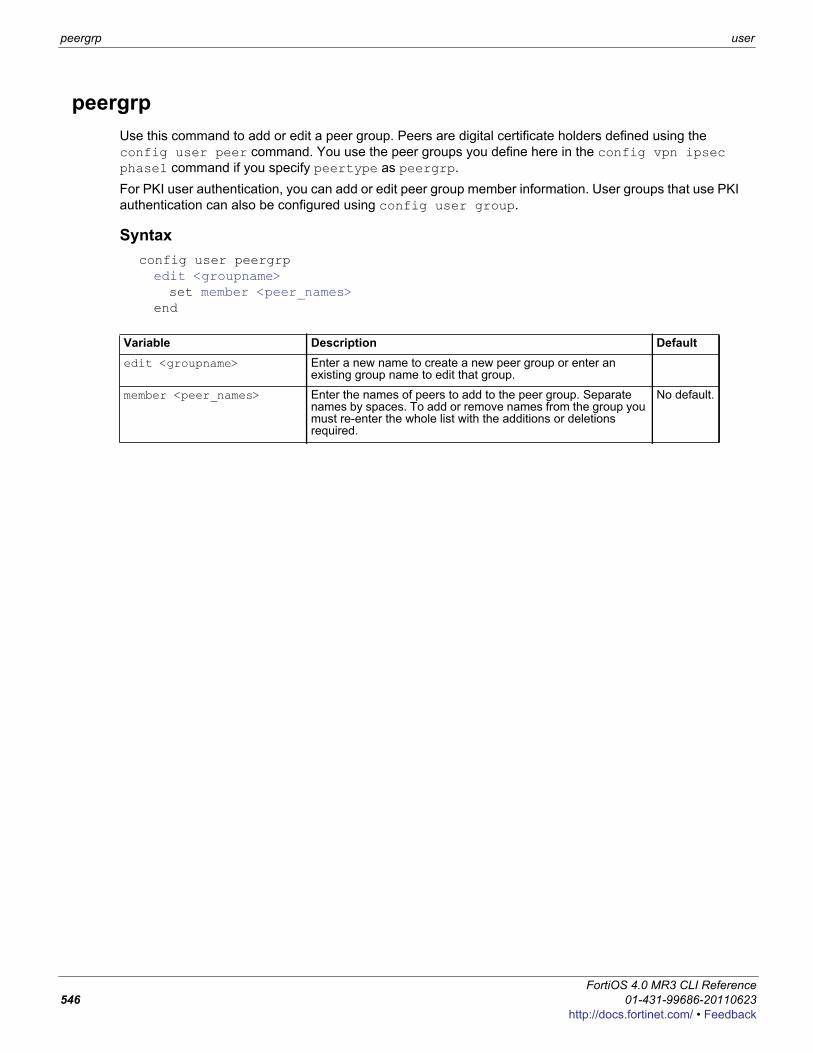
peergrp user
peergrpUse this command to add or edit a peer group. Peers are digital certificate holders defined using the config user peer command. You use the peer groups you define here in the config vpn ipsec phase1 command if you specify peertype as peergrp.For PKI user authentication, you can add or edit peer group member information. User groups that use PKI authentication can also be configured using config user group.
Syntaxconfig user peergrpedit <groupname>set member <peer_names>
end
Variable Description Defaultedit <groupname> Enter a new name to create a new peer group or enter an
existing group name to edit that group.
member <peer_names> Enter the names of peers to add to the peer group. Separate names by spaces. To add or remove names from the group you must re-enter the whole list with the additions or deletions required.
No default.
FortiOS 4.0 MR3 CLI Reference546 01-431-99686-20110623
http://docs.fortinet.com/ • Feedback
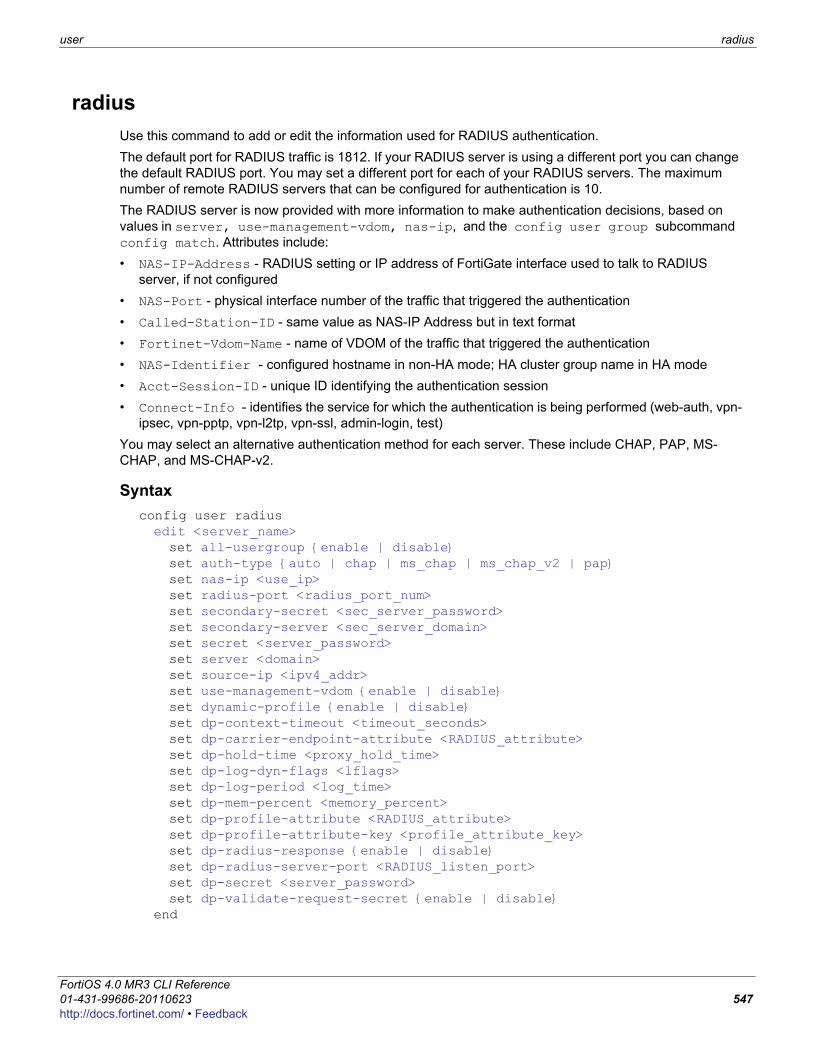
user radius
F0h
radiusUse this command to add or edit the information used for RADIUS authentication.The default port for RADIUS traffic is 1812. If your RADIUS server is using a different port you can change the default RADIUS port. You may set a different port for each of your RADIUS servers. The maximum number of remote RADIUS servers that can be configured for authentication is 10.The RADIUS server is now provided with more information to make authentication decisions, based on values in server, use-management-vdom, nas-ip, and the config user group subcommand config match. Attributes include:• NAS-IP-Address - RADIUS setting or IP address of FortiGate interface used to talk to RADIUS
server, if not configured• NAS-Port - physical interface number of the traffic that triggered the authentication• Called-Station-ID - same value as NAS-IP Address but in text format• Fortinet-Vdom-Name - name of VDOM of the traffic that triggered the authentication• NAS-Identifier - configured hostname in non-HA mode; HA cluster group name in HA mode• Acct-Session-ID - unique ID identifying the authentication session• Connect-Info - identifies the service for which the authentication is being performed (web-auth, vpn-
ipsec, vpn-pptp, vpn-l2tp, vpn-ssl, admin-login, test)You may select an alternative authentication method for each server. These include CHAP, PAP, MS-CHAP, and MS-CHAP-v2.
Syntaxconfig user radiusedit <server_name>set all-usergroup {enable | disable}set auth-type {auto | chap | ms_chap | ms_chap_v2 | pap}set nas-ip <use_ip>set radius-port <radius_port_num>set secondary-secret <sec_server_password>set secondary-server <sec_server_domain>set secret <server_password>set server <domain>set source-ip <ipv4_addr>set use-management-vdom {enable | disable}set dynamic-profile {enable | disable}set dp-context-timeout <timeout_seconds>set dp-carrier-endpoint-attribute <RADIUS_attribute>set dp-hold-time <proxy_hold_time>set dp-log-dyn-flags <lflags>set dp-log-period <log_time>set dp-mem-percent <memory_percent>set dp-profile-attribute <RADIUS_attribute>set dp-profile-attribute-key <profile_attribute_key>set dp-radius-response {enable | disable}set dp-radius-server-port <RADIUS_listen_port>set dp-secret <server_password>set dp-validate-request-secret {enable | disable}
end
ortiOS 4.0 MR3 CLI Reference1-431-99686-20110623 547ttp://docs.fortinet.com/ • Feedback
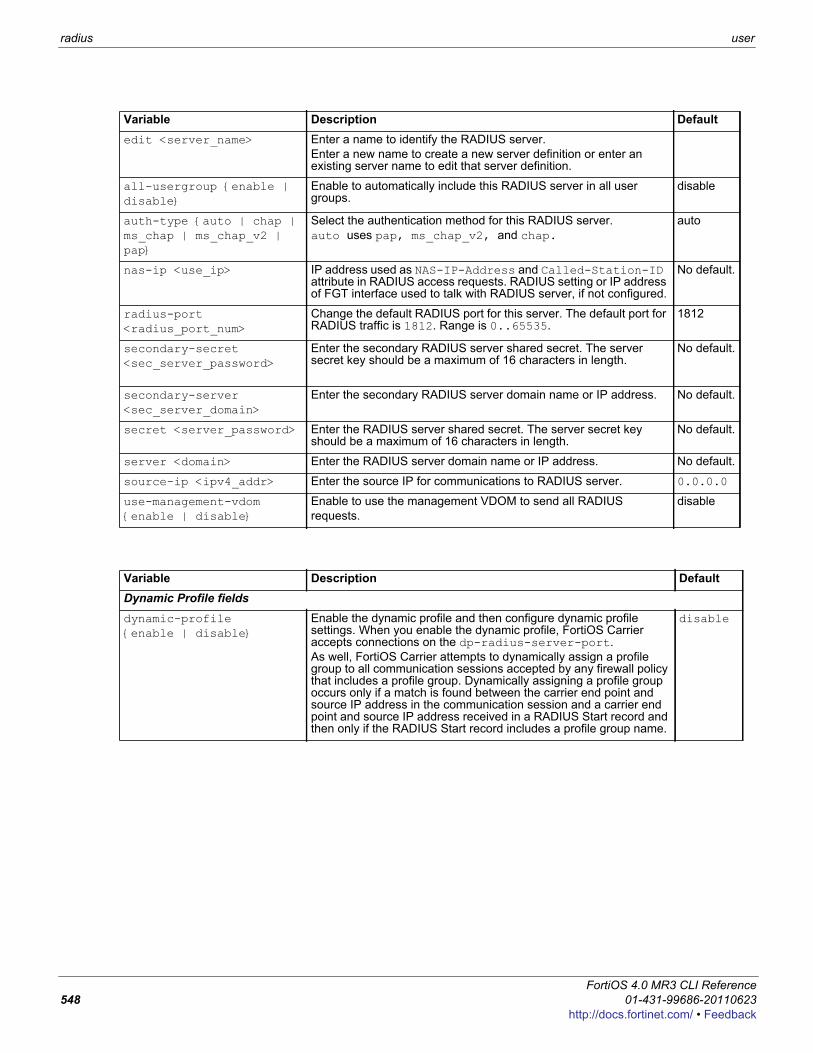
radius user
Variable Description Defaultedit <server_name> Enter a name to identify the RADIUS server.
Enter a new name to create a new server definition or enter an existing server name to edit that server definition.
all-usergroup {enable | disable}
Enable to automatically include this RADIUS server in all user groups.
disable
auth-type {auto | chap | ms_chap | ms_chap_v2 | pap}
Select the authentication method for this RADIUS server. auto uses pap, ms_chap_v2, and chap.
auto
nas-ip <use_ip> IP address used as NAS-IP-Address and Called-Station-ID attribute in RADIUS access requests. RADIUS setting or IP address of FGT interface used to talk with RADIUS server, if not configured.
No default.
radius-port <radius_port_num>
Change the default RADIUS port for this server. The default port for RADIUS traffic is 1812. Range is 0..65535.
1812
secondary-secret <sec_server_password>
Enter the secondary RADIUS server shared secret. The server secret key should be a maximum of 16 characters in length.
No default.
secondary-server <sec_server_domain>
Enter the secondary RADIUS server domain name or IP address. No default.
secret <server_password> Enter the RADIUS server shared secret. The server secret key should be a maximum of 16 characters in length.
No default.
server <domain> Enter the RADIUS server domain name or IP address. No default.
source-ip <ipv4_addr> Enter the source IP for communications to RADIUS server. 0.0.0.0
use-management-vdom{enable | disable}
Enable to use the management VDOM to send all RADIUSrequests.
disable
Variable Description DefaultDynamic Profile fieldsdynamic-profile {enable | disable}
Enable the dynamic profile and then configure dynamic profile settings. When you enable the dynamic profile, FortiOS Carrier accepts connections on the dp-radius-server-port.As well, FortiOS Carrier attempts to dynamically assign a profile group to all communication sessions accepted by any firewall policy that includes a profile group. Dynamically assigning a profile group occurs only if a match is found between the carrier end point and source IP address in the communication session and a carrier end point and source IP address received in a RADIUS Start record and then only if the RADIUS Start record includes a profile group name.
disable
FortiOS 4.0 MR3 CLI Reference548 01-431-99686-20110623
http://docs.fortinet.com/ • Feedback
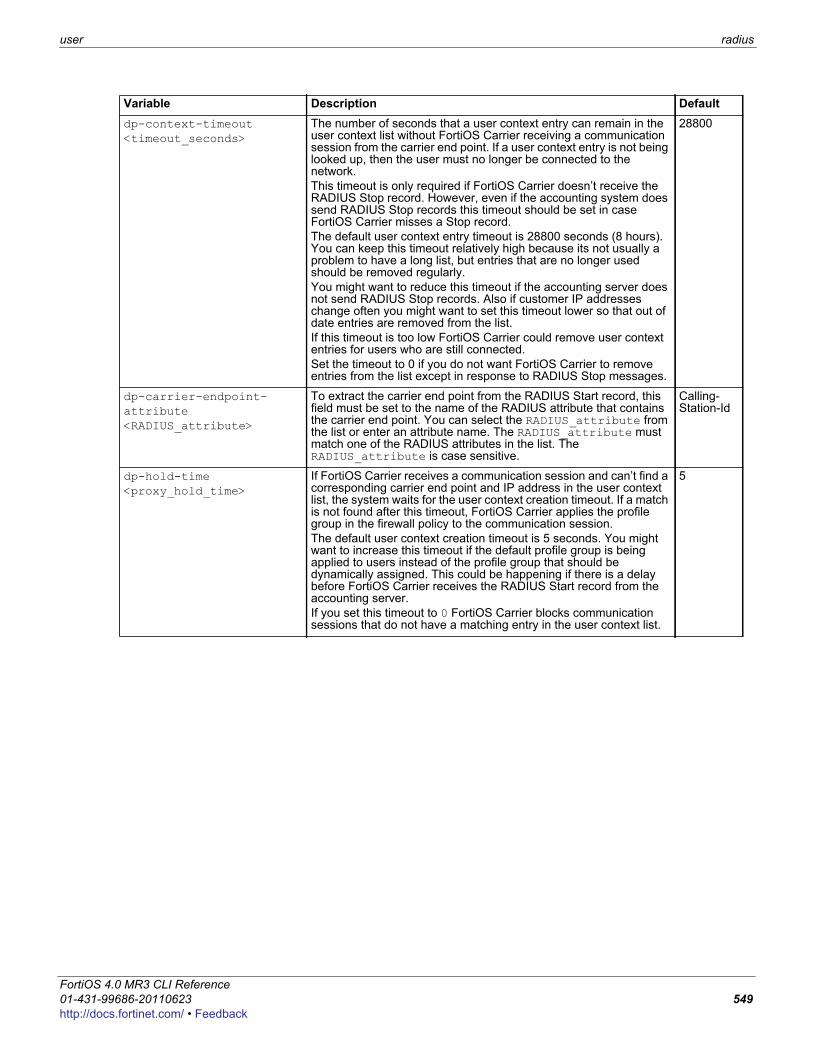
user radius
F0h
dp-context-timeout <timeout_seconds>
The number of seconds that a user context entry can remain in the user context list without FortiOS Carrier receiving a communication session from the carrier end point. If a user context entry is not being looked up, then the user must no longer be connected to the network. This timeout is only required if FortiOS Carrier doesn’t receive the RADIUS Stop record. However, even if the accounting system does send RADIUS Stop records this timeout should be set in case FortiOS Carrier misses a Stop record.The default user context entry timeout is 28800 seconds (8 hours). You can keep this timeout relatively high because its not usually a problem to have a long list, but entries that are no longer used should be removed regularly. You might want to reduce this timeout if the accounting server does not send RADIUS Stop records. Also if customer IP addresses change often you might want to set this timeout lower so that out of date entries are removed from the list.If this timeout is too low FortiOS Carrier could remove user context entries for users who are still connected.Set the timeout to 0 if you do not want FortiOS Carrier to remove entries from the list except in response to RADIUS Stop messages.
28800
dp-carrier-endpoint-attribute <RADIUS_attribute>
To extract the carrier end point from the RADIUS Start record, this field must be set to the name of the RADIUS attribute that contains the carrier end point. You can select the RADIUS_attribute from the list or enter an attribute name. The RADIUS_attribute must match one of the RADIUS attributes in the list. The RADIUS_attribute is case sensitive.
Calling-Station-Id
dp-hold-time <proxy_hold_time>
If FortiOS Carrier receives a communication session and can’t find a corresponding carrier end point and IP address in the user context list, the system waits for the user context creation timeout. If a match is not found after this timeout, FortiOS Carrier applies the profile group in the firewall policy to the communication session. The default user context creation timeout is 5 seconds. You might want to increase this timeout if the default profile group is being applied to users instead of the profile group that should be dynamically assigned. This could be happening if there is a delay before FortiOS Carrier receives the RADIUS Start record from the accounting server. If you set this timeout to 0 FortiOS Carrier blocks communication sessions that do not have a matching entry in the user context list.
5
Variable Description Default
ortiOS 4.0 MR3 CLI Reference1-431-99686-20110623 549ttp://docs.fortinet.com/ • Feedback

radius user
dp-log-dyn-flags <lflags> Enter one or more of the following options to configure FortiOS Carrier to write event log messages for dynamic profile events. You can enter multiple options. Separate the options with a space.
All options except none.
none—Disable writing event log messages for dynamic profile events.
accounting-event—Enable to write an event log message when FortiOS Carrier does not find the expected information in a RADIUS Record. For example, if a RADIUS record contains more than the expected number of addresses.
accounting-stop-missed—Enable to write an event log message whenever a user context entry timeout expires indicating that FortiOS Carrier removed an entry from the user context list without receiving a RADIUS Stop message.
context-missing—Enable to write an event log message whenever a user context creation timeout expires indicating that FortiOS Carrier was not able to match a communication session because a matching entry was not found in the user context list.
profile-missing—Enable to write an event log message whenever FortiOS Carrier cannot find a profile group name in a RADIUS start message that matches the name of a profile group added to FortiOS Carrier.
protocol-error—Enable to write an event log message if RADIUS protocol errors occur. For example, if a RADIUS record contains a RADIUS secret that does not match the one added to the dynamic profile.
radiusd-other—Enable to write event log messages for other events. The event is described in the log message. For example, write a log message if the memory limit for the user context list is reached and the oldest entries in the table have been dropped.
dp-log-period <log_time> The time in seconds to group event log messages for dynamic profile events. For example, if the log message period is 30 seconds, FortiOS Carrier generates groups of event log messages every 30 seconds instead of generating event log messages continuously. And the log messages generated each period contain a count of how many events of that type occurred.If set to 0, FortiOS Carrier generates all event log messages in real time.
0
dp-mem-percent <memory_percent>
Maximum percentage of system memory to use for the user context tables. CLI only. The range is 1 to 25%.
4
dp-profile-attribute <RADIUS_attribute>
To extract a profile group name from the RADIUS Start record, this field must be set to the name of the RADIUS attribute that contains the profile group name. You can select the RADIUS_attribute from the list or enter an attribute name. The RADIUS_attribute must match one of the RADIUS attributes in the list. The RADIUS_attribute is case sensitive.
Class
dp-profile-attribute-key <profile_attribute_key>
Enter a string if the profile attribute contains more data than just the profile group name. The profile key is a text string that always comes directly before the profile group name in the profile attribute. For example, if the profile group name always follows the text string profile, the class attribute could include the string: profile=<profile_name_str>. Where <profile_name_str> is the name of the profile group. Maximum 36 characters.
No default.
dp-radius-response {enable | disable}
Enable if you want FortiOS Carrier to send RADIUS responses after receiving RADIUS Start and Stop records. This setting may be required by your accounting system.
disable
dp-radius-server-port <RADIUS_listen_port>
If required, change the UDP port number used by the RADIUS accounting server for sending RADIUS records. FortiOS Carrier listens for RADIUS Start and Stop records on this port.
1813
Variable Description Default
FortiOS 4.0 MR3 CLI Reference550 01-431-99686-20110623
http://docs.fortinet.com/ • Feedback
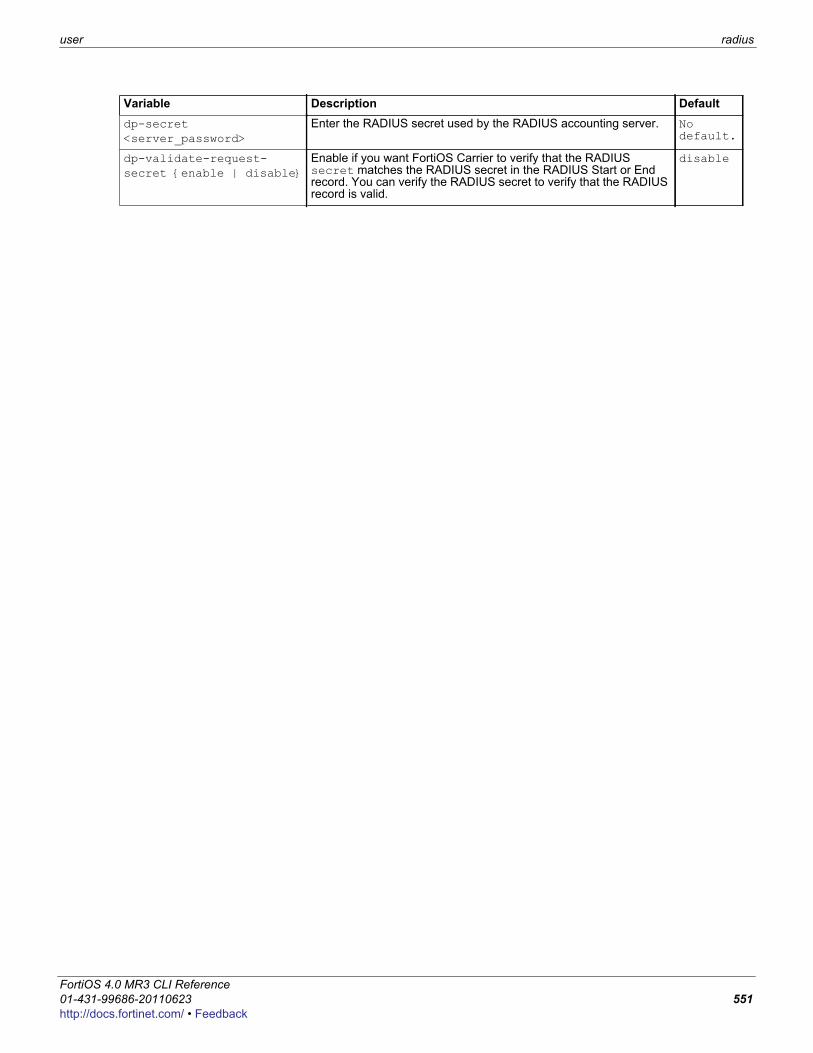
user radius
F0h
dp-secret <server_password>
Enter the RADIUS secret used by the RADIUS accounting server. No default.
dp-validate-request-secret {enable | disable}
Enable if you want FortiOS Carrier to verify that the RADIUS secret matches the RADIUS secret in the RADIUS Start or End record. You can verify the RADIUS secret to verify that the RADIUS record is valid.
disable
Variable Description Default
ortiOS 4.0 MR3 CLI Reference1-431-99686-20110623 551ttp://docs.fortinet.com/ • Feedback
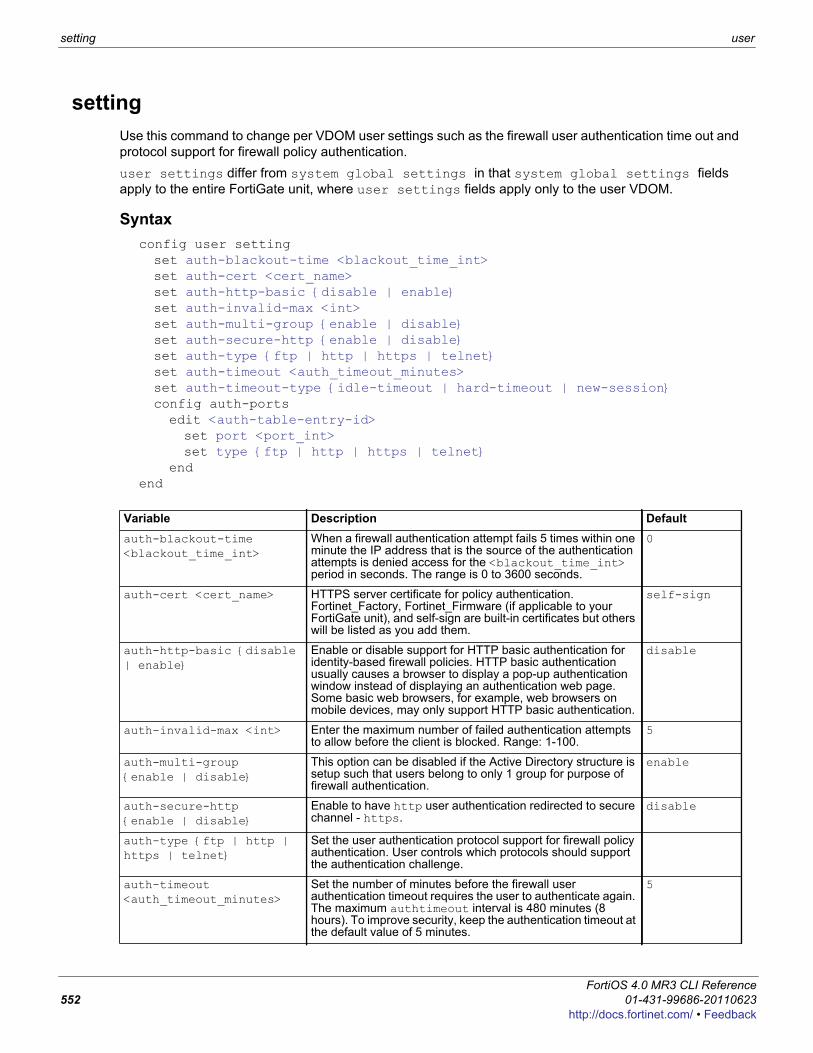
setting user
settingUse this command to change per VDOM user settings such as the firewall user authentication time out and protocol support for firewall policy authentication.user settings differ from system global settings in that system global settings fields apply to the entire FortiGate unit, where user settings fields apply only to the user VDOM.
Syntaxconfig user settingset auth-blackout-time <blackout_time_int>set auth-cert <cert_name>set auth-http-basic {disable | enable}set auth-invalid-max <int>set auth-multi-group {enable | disable}set auth-secure-http {enable | disable}set auth-type {ftp | http | https | telnet}set auth-timeout <auth_timeout_minutes>set auth-timeout-type {idle-timeout | hard-timeout | new-session}config auth-portsedit <auth-table-entry-id>set port <port_int>set type {ftp | http | https | telnet}
endend
Variable Description Defaultauth-blackout-time <blackout_time_int>
When a firewall authentication attempt fails 5 times within one minute the IP address that is the source of the authentication attempts is denied access for the <blackout_time_int> period in seconds. The range is 0 to 3600 seconds.
0
auth-cert <cert_name> HTTPS server certificate for policy authentication. Fortinet_Factory, Fortinet_Firmware (if applicable to your FortiGate unit), and self-sign are built-in certificates but others will be listed as you add them.
self-sign
auth-http-basic {disable | enable}
Enable or disable support for HTTP basic authentication for identity-based firewall policies. HTTP basic authentication usually causes a browser to display a pop-up authentication window instead of displaying an authentication web page. Some basic web browsers, for example, web browsers on mobile devices, may only support HTTP basic authentication.
disable
auth-invalid-max <int> Enter the maximum number of failed authentication attempts to allow before the client is blocked. Range: 1-100.
5
auth-multi-group {enable | disable}
This option can be disabled if the Active Directory structure is setup such that users belong to only 1 group for purpose of firewall authentication.
enable
auth-secure-http {enable | disable}
Enable to have http user authentication redirected to secure channel - https.
disable
auth-type {ftp | http | https | telnet}
Set the user authentication protocol support for firewall policy authentication. User controls which protocols should support the authentication challenge.
auth-timeout <auth_timeout_minutes>
Set the number of minutes before the firewall user authentication timeout requires the user to authenticate again. The maximum authtimeout interval is 480 minutes (8 hours). To improve security, keep the authentication timeout at the default value of 5 minutes.
5
FortiOS 4.0 MR3 CLI Reference552 01-431-99686-20110623
http://docs.fortinet.com/ • Feedback
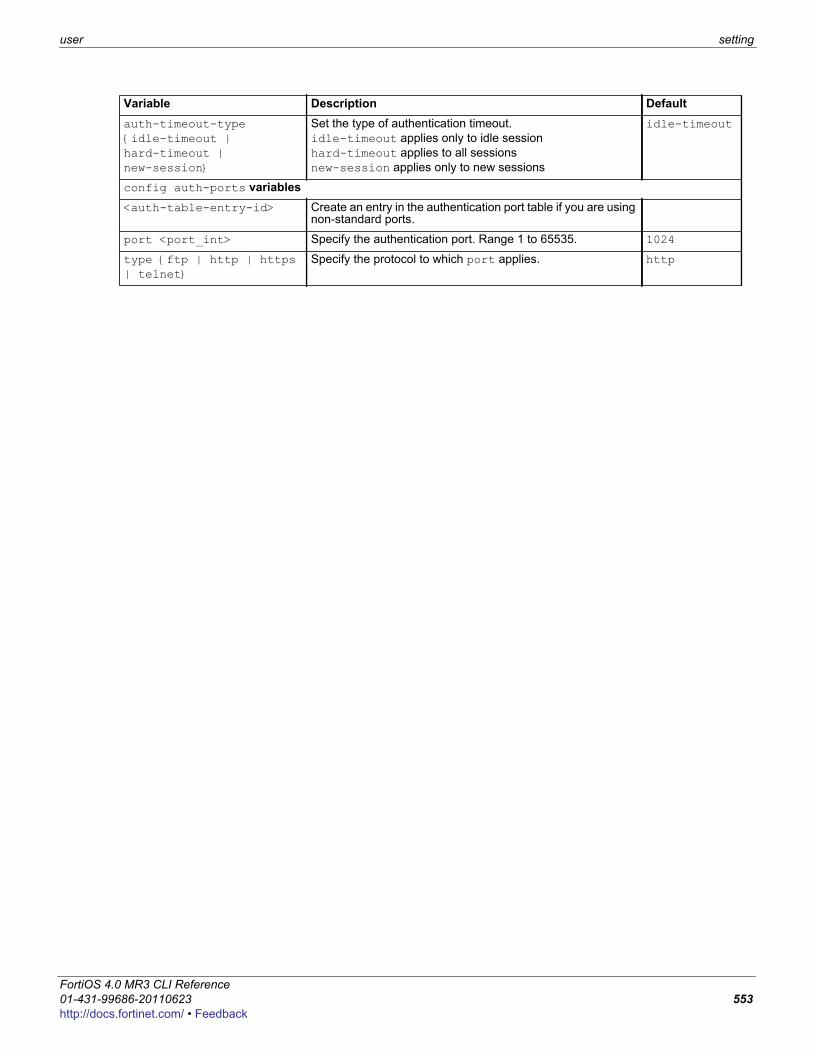
user setting
F0h
auth-timeout-type {idle-timeout | hard-timeout | new-session}
Set the type of authentication timeout. idle-timeout applies only to idle session hard-timeout applies to all sessionsnew-session applies only to new sessions
idle-timeout
config auth-ports variables<auth-table-entry-id> Create an entry in the authentication port table if you are using
non-standard ports.
port <port_int> Specify the authentication port. Range 1 to 65535. 1024
type {ftp | http | https | telnet}
Specify the protocol to which port applies. http
Variable Description Default
ortiOS 4.0 MR3 CLI Reference1-431-99686-20110623 553ttp://docs.fortinet.com/ • Feedback
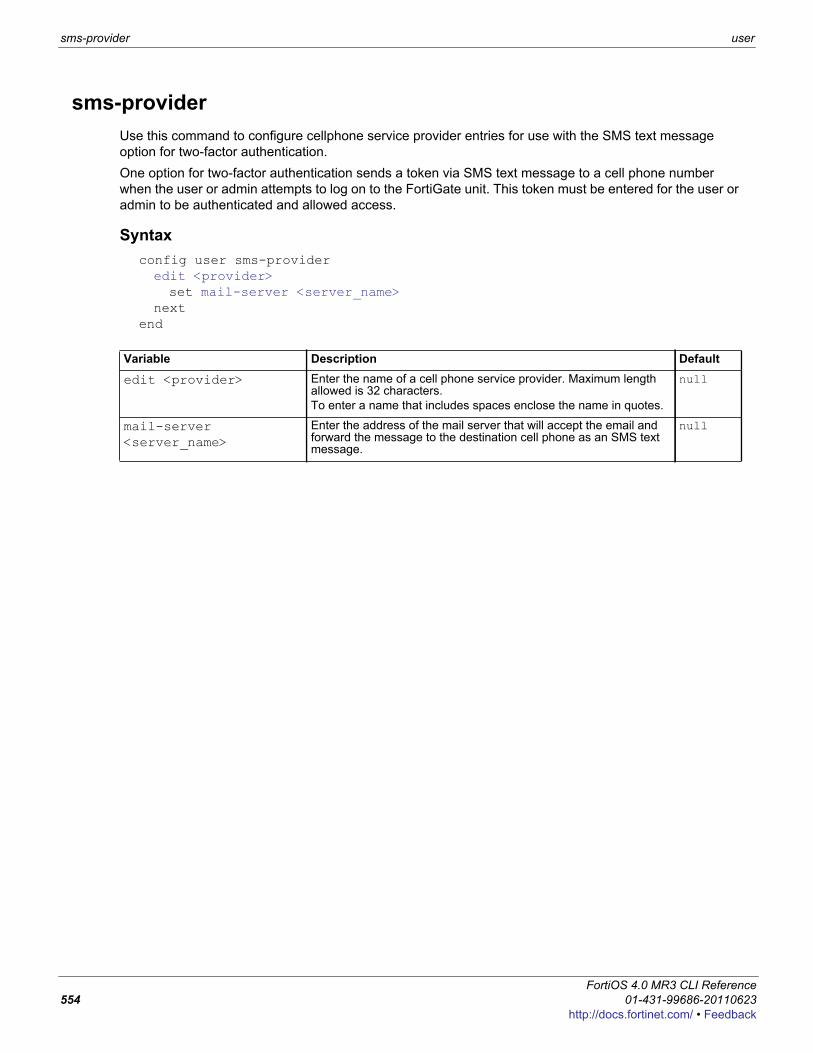
sms-provider user
sms-providerUse this command to configure cellphone service provider entries for use with the SMS text message option for two-factor authentication.One option for two-factor authentication sends a token via SMS text message to a cell phone number when the user or admin attempts to log on to the FortiGate unit. This token must be entered for the user or admin to be authenticated and allowed access.
Syntaxconfig user sms-provideredit <provider>set mail-server <server_name>
nextend
Variable Description Default
edit <provider> Enter the name of a cell phone service provider. Maximum length allowed is 32 characters.To enter a name that includes spaces enclose the name in quotes.
null
mail-server <server_name>
Enter the address of the mail server that will accept the email and forward the message to the destination cell phone as an SMS text message.
null
FortiOS 4.0 MR3 CLI Reference554 01-431-99686-20110623
http://docs.fortinet.com/ • Feedback
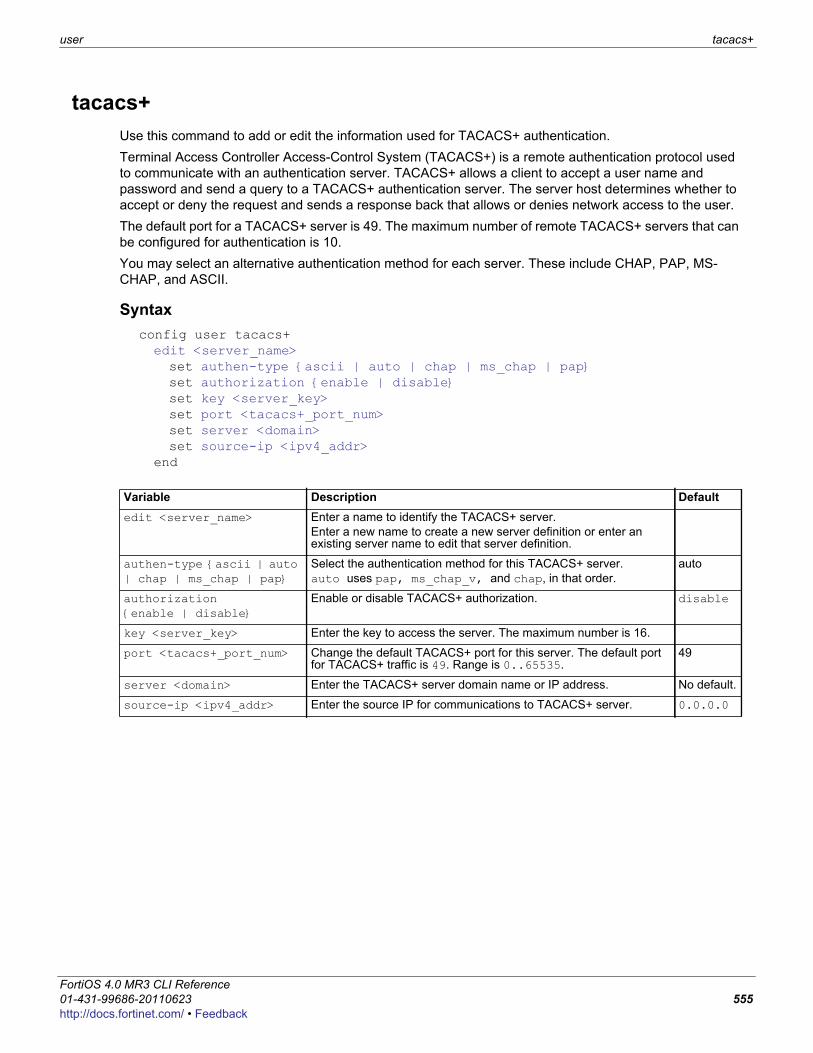
user tacacs+
F0h
tacacs+Use this command to add or edit the information used for TACACS+ authentication.Terminal Access Controller Access-Control System (TACACS+) is a remote authentication protocol used to communicate with an authentication server. TACACS+ allows a client to accept a user name and password and send a query to a TACACS+ authentication server. The server host determines whether to accept or deny the request and sends a response back that allows or denies network access to the user.The default port for a TACACS+ server is 49. The maximum number of remote TACACS+ servers that can be configured for authentication is 10.You may select an alternative authentication method for each server. These include CHAP, PAP, MS-CHAP, and ASCII.
Syntaxconfig user tacacs+edit <server_name>set authen-type {ascii | auto | chap | ms_chap | pap}set authorization {enable | disable}set key <server_key>set port <tacacs+_port_num>set server <domain>set source-ip <ipv4_addr>
end
Variable Description Defaultedit <server_name> Enter a name to identify the TACACS+ server.
Enter a new name to create a new server definition or enter an existing server name to edit that server definition.
authen-type {ascii | auto | chap | ms_chap | pap}
Select the authentication method for this TACACS+ server. auto uses pap, ms_chap_v, and chap, in that order.
auto
authorization {enable | disable}
Enable or disable TACACS+ authorization. disable
key <server_key> Enter the key to access the server. The maximum number is 16.
port <tacacs+_port_num> Change the default TACACS+ port for this server. The default port for TACACS+ traffic is 49. Range is 0..65535.
49
server <domain> Enter the TACACS+ server domain name or IP address. No default.
source-ip <ipv4_addr> Enter the source IP for communications to TACACS+ server. 0.0.0.0
ortiOS 4.0 MR3 CLI Reference1-431-99686-20110623 555ttp://docs.fortinet.com/ • Feedback

tacacs+ user
FortiOS 4.0 MR3 CLI Reference556 01-431-99686-20110623
http://docs.fortinet.com/ • Feedback
F0h
voipUse VoIP commands to configure VoIP profiles for firewall policies.This chapter describes the following command:
profile
ortiOS 4.0 MR3 CLI Reference1-431-99686-20110623 557ttp://docs.fortinet.com/ • Feedback
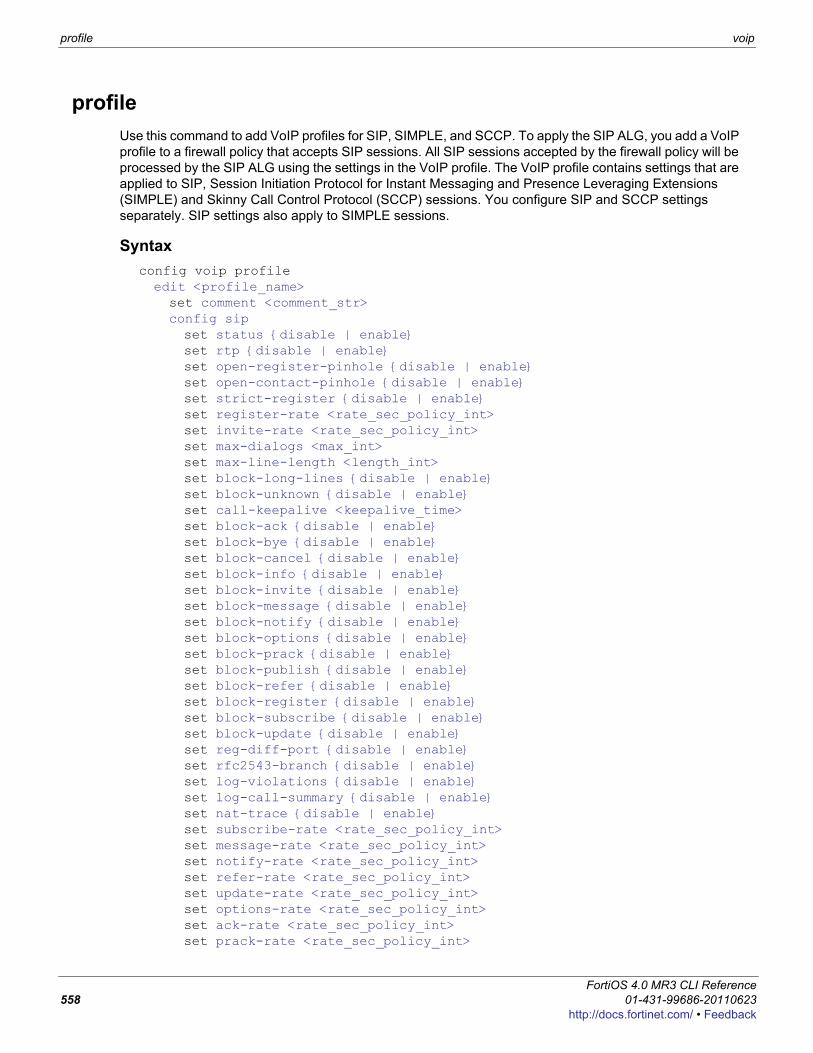
profile voip
profileUse this command to add VoIP profiles for SIP, SIMPLE, and SCCP. To apply the SIP ALG, you add a VoIP profile to a firewall policy that accepts SIP sessions. All SIP sessions accepted by the firewall policy will be processed by the SIP ALG using the settings in the VoIP profile. The VoIP profile contains settings that are applied to SIP, Session Initiation Protocol for Instant Messaging and Presence Leveraging Extensions (SIMPLE) and Skinny Call Control Protocol (SCCP) sessions. You configure SIP and SCCP settings separately. SIP settings also apply to SIMPLE sessions.
Syntax config voip profileedit <profile_name>set comment <comment_str>config sipset status {disable | enable}set rtp {disable | enable}set open-register-pinhole {disable | enable}set open-contact-pinhole {disable | enable}set strict-register {disable | enable}set register-rate <rate_sec_policy_int>set invite-rate <rate_sec_policy_int>set max-dialogs <max_int>set max-line-length <length_int>set block-long-lines {disable | enable}set block-unknown {disable | enable}set call-keepalive <keepalive_time>set block-ack {disable | enable}set block-bye {disable | enable}set block-cancel {disable | enable}set block-info {disable | enable}set block-invite {disable | enable}set block-message {disable | enable}set block-notify {disable | enable}set block-options {disable | enable}set block-prack {disable | enable}set block-publish {disable | enable}set block-refer {disable | enable}set block-register {disable | enable}set block-subscribe {disable | enable}set block-update {disable | enable}set reg-diff-port {disable | enable}set rfc2543-branch {disable | enable}set log-violations {disable | enable}set log-call-summary {disable | enable}set nat-trace {disable | enable}set subscribe-rate <rate_sec_policy_int>set message-rate <rate_sec_policy_int>set notify-rate <rate_sec_policy_int>set refer-rate <rate_sec_policy_int>set update-rate <rate_sec_policy_int>set options-rate <rate_sec_policy_int>set ack-rate <rate_sec_policy_int>set prack-rate <rate_sec_policy_int>
FortiOS 4.0 MR3 CLI Reference558 01-431-99686-20110623
http://docs.fortinet.com/ • Feedback
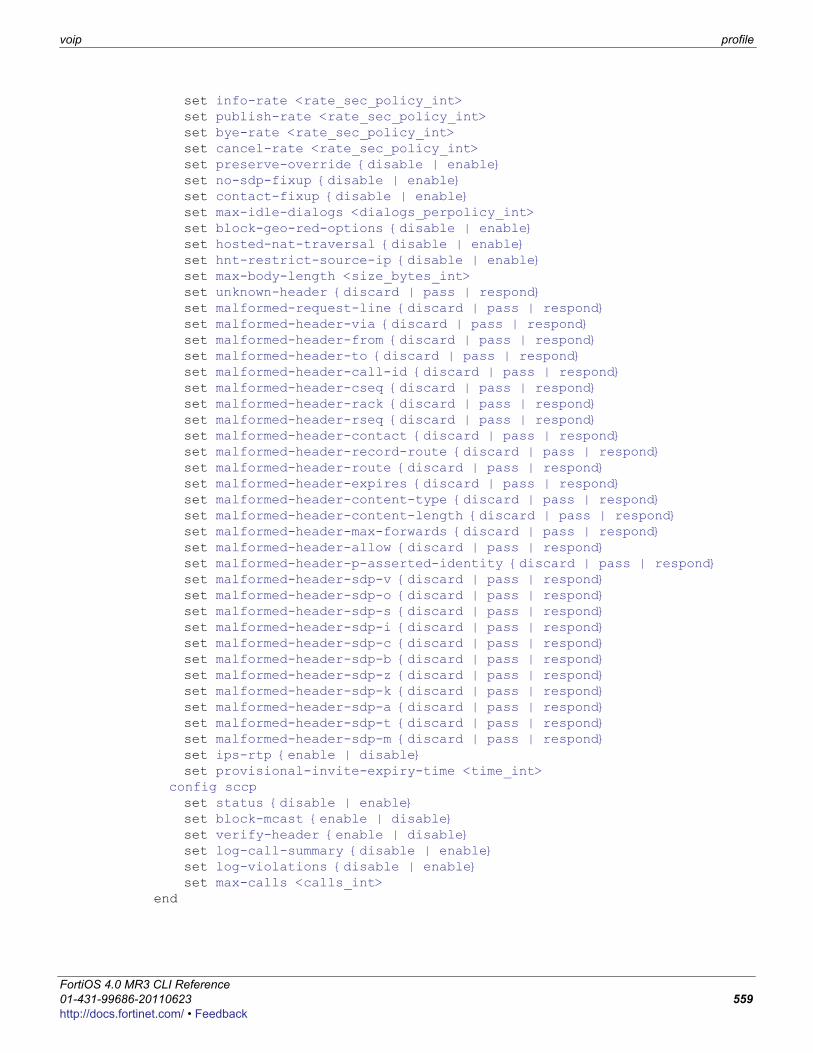
voip profile
F0h
set info-rate <rate_sec_policy_int>set publish-rate <rate_sec_policy_int>set bye-rate <rate_sec_policy_int>set cancel-rate <rate_sec_policy_int>set preserve-override {disable | enable}set no-sdp-fixup {disable | enable}set contact-fixup {disable | enable}set max-idle-dialogs <dialogs_perpolicy_int>set block-geo-red-options {disable | enable}set hosted-nat-traversal {disable | enable}set hnt-restrict-source-ip {disable | enable}set max-body-length <size_bytes_int>set unknown-header {discard | pass | respond}set malformed-request-line {discard | pass | respond}set malformed-header-via {discard | pass | respond}set malformed-header-from {discard | pass | respond}set malformed-header-to {discard | pass | respond}set malformed-header-call-id {discard | pass | respond}set malformed-header-cseq {discard | pass | respond}set malformed-header-rack {discard | pass | respond}set malformed-header-rseq {discard | pass | respond}set malformed-header-contact {discard | pass | respond}set malformed-header-record-route {discard | pass | respond}set malformed-header-route {discard | pass | respond}set malformed-header-expires {discard | pass | respond}set malformed-header-content-type {discard | pass | respond}set malformed-header-content-length {discard | pass | respond}set malformed-header-max-forwards {discard | pass | respond}set malformed-header-allow {discard | pass | respond}set malformed-header-p-asserted-identity {discard | pass | respond}set malformed-header-sdp-v {discard | pass | respond}set malformed-header-sdp-o {discard | pass | respond}set malformed-header-sdp-s {discard | pass | respond}set malformed-header-sdp-i {discard | pass | respond}set malformed-header-sdp-c {discard | pass | respond}set malformed-header-sdp-b {discard | pass | respond}set malformed-header-sdp-z {discard | pass | respond}set malformed-header-sdp-k {discard | pass | respond}set malformed-header-sdp-a {discard | pass | respond}set malformed-header-sdp-t {discard | pass | respond}set malformed-header-sdp-m {discard | pass | respond}set ips-rtp {enable | disable}set provisional-invite-expiry-time <time_int>
config sccpset status {disable | enable}set block-mcast {enable | disable}set verify-header {enable | disable}set log-call-summary {disable | enable}set log-violations {disable | enable}set max-calls <calls_int>
end
ortiOS 4.0 MR3 CLI Reference1-431-99686-20110623 559ttp://docs.fortinet.com/ • Feedback
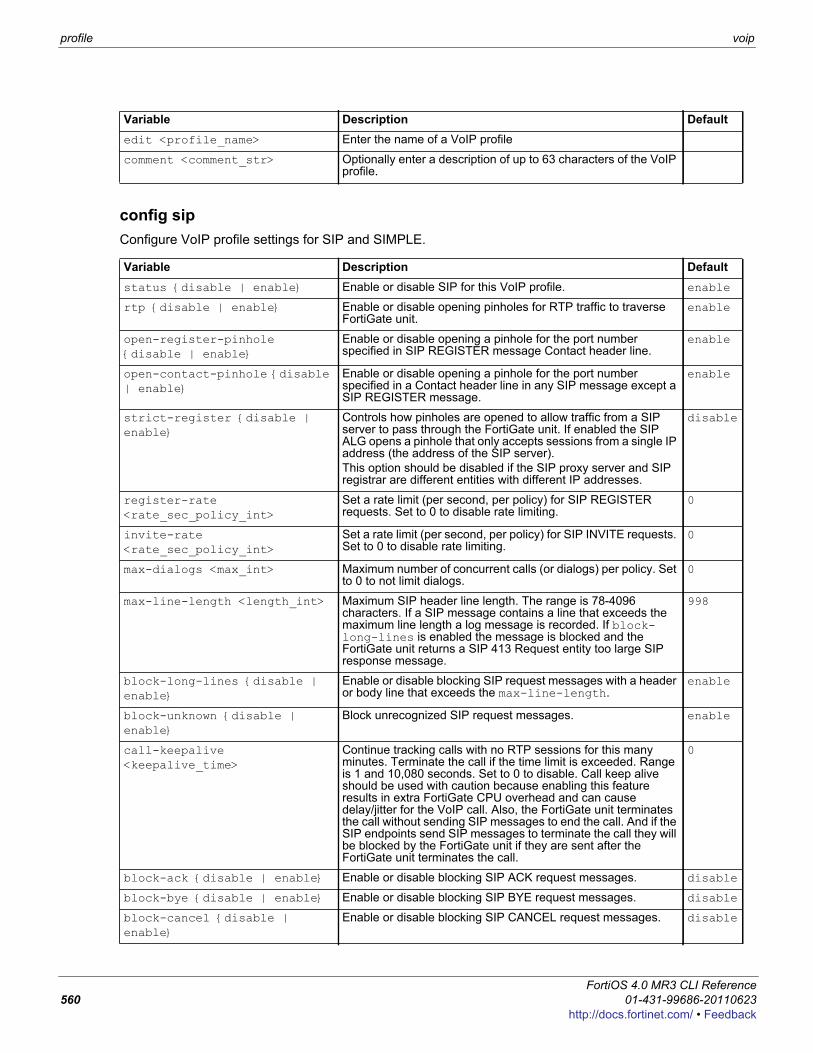
profile voip
config sipConfigure VoIP profile settings for SIP and SIMPLE.
Variable Description Defaultedit <profile_name> Enter the name of a VoIP profile
comment <comment_str> Optionally enter a description of up to 63 characters of the VoIP profile.
Variable Description Defaultstatus {disable | enable} Enable or disable SIP for this VoIP profile. enable
rtp {disable | enable} Enable or disable opening pinholes for RTP traffic to traverse FortiGate unit.
enable
open-register-pinhole {disable | enable}
Enable or disable opening a pinhole for the port number specified in SIP REGISTER message Contact header line.
enable
open-contact-pinhole {disable | enable}
Enable or disable opening a pinhole for the port number specified in a Contact header line in any SIP message except a SIP REGISTER message.
enable
strict-register {disable | enable}
Controls how pinholes are opened to allow traffic from a SIP server to pass through the FortiGate unit. If enabled the SIP ALG opens a pinhole that only accepts sessions from a single IP address (the address of the SIP server).This option should be disabled if the SIP proxy server and SIP registrar are different entities with different IP addresses.
disable
register-rate <rate_sec_policy_int>
Set a rate limit (per second, per policy) for SIP REGISTER requests. Set to 0 to disable rate limiting.
0
invite-rate <rate_sec_policy_int>
Set a rate limit (per second, per policy) for SIP INVITE requests. Set to 0 to disable rate limiting.
0
max-dialogs <max_int> Maximum number of concurrent calls (or dialogs) per policy. Set to 0 to not limit dialogs.
0
max-line-length <length_int> Maximum SIP header line length. The range is 78-4096 characters. If a SIP message contains a line that exceeds the maximum line length a log message is recorded. If block-long-lines is enabled the message is blocked and the FortiGate unit returns a SIP 413 Request entity too large SIP response message.
998
block-long-lines {disable | enable}
Enable or disable blocking SIP request messages with a header or body line that exceeds the max-line-length.
enable
block-unknown {disable | enable}
Block unrecognized SIP request messages. enable
call-keepalive <keepalive_time>
Continue tracking calls with no RTP sessions for this many minutes. Terminate the call if the time limit is exceeded. Range is 1 and 10,080 seconds. Set to 0 to disable. Call keep alive should be used with caution because enabling this feature results in extra FortiGate CPU overhead and can cause delay/jitter for the VoIP call. Also, the FortiGate unit terminates the call without sending SIP messages to end the call. And if the SIP endpoints send SIP messages to terminate the call they will be blocked by the FortiGate unit if they are sent after the FortiGate unit terminates the call.
0
block-ack {disable | enable} Enable or disable blocking SIP ACK request messages. disable
block-bye {disable | enable} Enable or disable blocking SIP BYE request messages. disable
block-cancel {disable | enable}
Enable or disable blocking SIP CANCEL request messages. disable
FortiOS 4.0 MR3 CLI Reference560 01-431-99686-20110623
http://docs.fortinet.com/ • Feedback
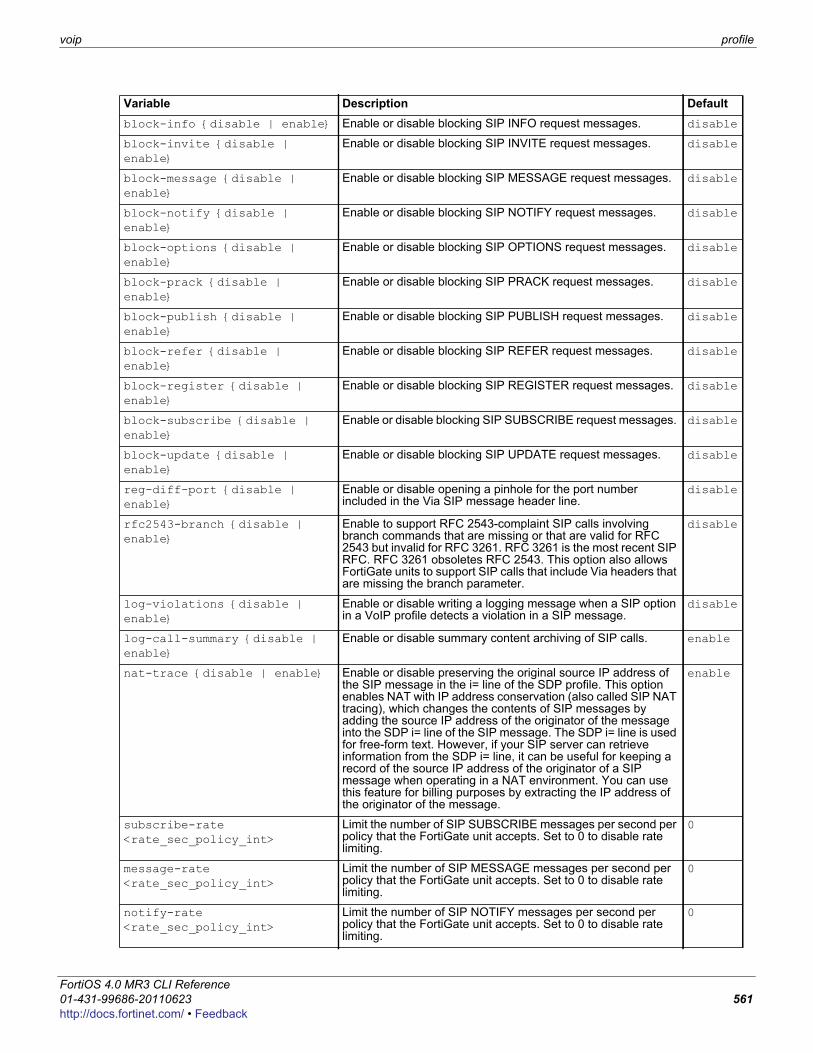
voip profile
F0h
block-info {disable | enable} Enable or disable blocking SIP INFO request messages. disable
block-invite {disable | enable}
Enable or disable blocking SIP INVITE request messages. disable
block-message {disable | enable}
Enable or disable blocking SIP MESSAGE request messages. disable
block-notify {disable | enable}
Enable or disable blocking SIP NOTIFY request messages. disable
block-options {disable | enable}
Enable or disable blocking SIP OPTIONS request messages. disable
block-prack {disable | enable}
Enable or disable blocking SIP PRACK request messages. disable
block-publish {disable | enable}
Enable or disable blocking SIP PUBLISH request messages. disable
block-refer {disable | enable}
Enable or disable blocking SIP REFER request messages. disable
block-register {disable | enable}
Enable or disable blocking SIP REGISTER request messages. disable
block-subscribe {disable | enable}
Enable or disable blocking SIP SUBSCRIBE request messages. disable
block-update {disable | enable}
Enable or disable blocking SIP UPDATE request messages. disable
reg-diff-port {disable | enable}
Enable or disable opening a pinhole for the port number included in the Via SIP message header line.
disable
rfc2543-branch {disable | enable}
Enable to support RFC 2543-complaint SIP calls involving branch commands that are missing or that are valid for RFC 2543 but invalid for RFC 3261. RFC 3261 is the most recent SIP RFC. RFC 3261 obsoletes RFC 2543. This option also allows FortiGate units to support SIP calls that include Via headers that are missing the branch parameter.
disable
log-violations {disable | enable}
Enable or disable writing a logging message when a SIP option in a VoIP profile detects a violation in a SIP message.
disable
log-call-summary {disable | enable}
Enable or disable summary content archiving of SIP calls. enable
nat-trace {disable | enable} Enable or disable preserving the original source IP address of the SIP message in the i= line of the SDP profile. This option enables NAT with IP address conservation (also called SIP NAT tracing), which changes the contents of SIP messages by adding the source IP address of the originator of the message into the SDP i= line of the SIP message. The SDP i= line is used for free-form text. However, if your SIP server can retrieve information from the SDP i= line, it can be useful for keeping a record of the source IP address of the originator of a SIP message when operating in a NAT environment. You can use this feature for billing purposes by extracting the IP address of the originator of the message.
enable
subscribe-rate <rate_sec_policy_int>
Limit the number of SIP SUBSCRIBE messages per second per policy that the FortiGate unit accepts. Set to 0 to disable rate limiting.
0
message-rate <rate_sec_policy_int>
Limit the number of SIP MESSAGE messages per second per policy that the FortiGate unit accepts. Set to 0 to disable rate limiting.
0
notify-rate <rate_sec_policy_int>
Limit the number of SIP NOTIFY messages per second per policy that the FortiGate unit accepts. Set to 0 to disable rate limiting.
0
Variable Description Default
ortiOS 4.0 MR3 CLI Reference1-431-99686-20110623 561ttp://docs.fortinet.com/ • Feedback
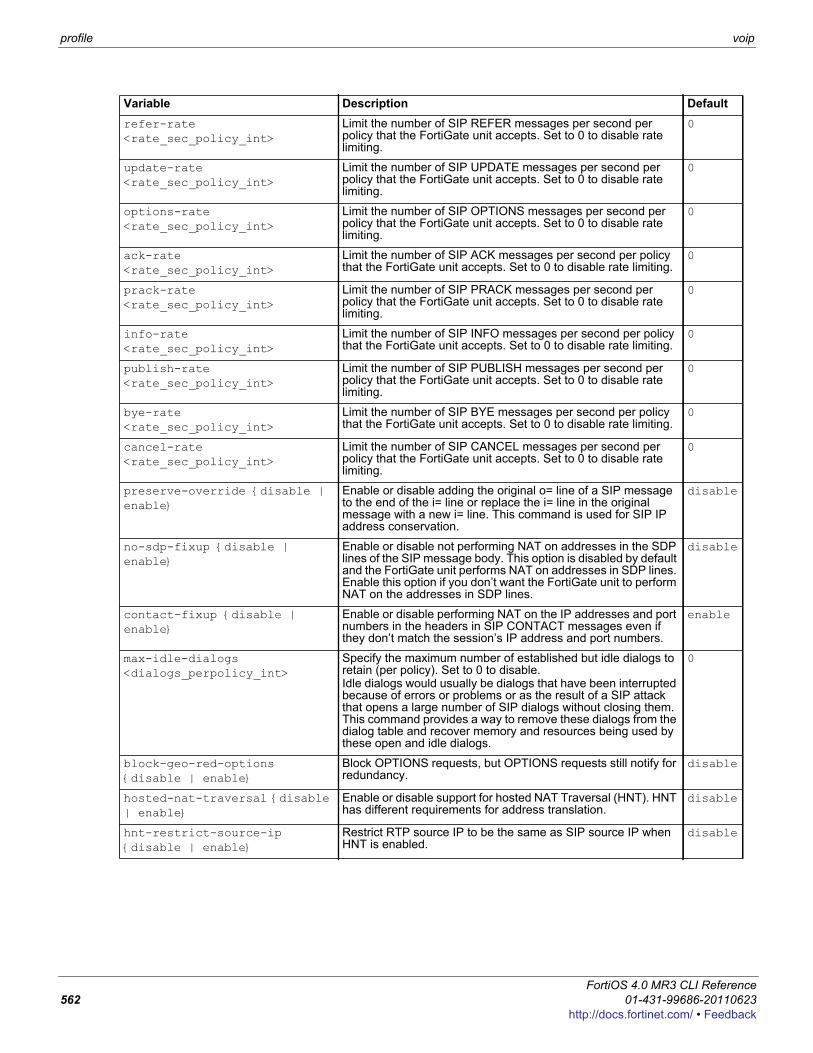
profile voip
refer-rate <rate_sec_policy_int>
Limit the number of SIP REFER messages per second per policy that the FortiGate unit accepts. Set to 0 to disable rate limiting.
0
update-rate <rate_sec_policy_int>
Limit the number of SIP UPDATE messages per second per policy that the FortiGate unit accepts. Set to 0 to disable rate limiting.
0
options-rate <rate_sec_policy_int>
Limit the number of SIP OPTIONS messages per second per policy that the FortiGate unit accepts. Set to 0 to disable rate limiting.
0
ack-rate <rate_sec_policy_int>
Limit the number of SIP ACK messages per second per policy that the FortiGate unit accepts. Set to 0 to disable rate limiting.
0
prack-rate <rate_sec_policy_int>
Limit the number of SIP PRACK messages per second per policy that the FortiGate unit accepts. Set to 0 to disable rate limiting.
0
info-rate <rate_sec_policy_int>
Limit the number of SIP INFO messages per second per policy that the FortiGate unit accepts. Set to 0 to disable rate limiting.
0
publish-rate <rate_sec_policy_int>
Limit the number of SIP PUBLISH messages per second per policy that the FortiGate unit accepts. Set to 0 to disable rate limiting.
0
bye-rate <rate_sec_policy_int>
Limit the number of SIP BYE messages per second per policy that the FortiGate unit accepts. Set to 0 to disable rate limiting.
0
cancel-rate <rate_sec_policy_int>
Limit the number of SIP CANCEL messages per second per policy that the FortiGate unit accepts. Set to 0 to disable rate limiting.
0
preserve-override {disable | enable}
Enable or disable adding the original o= line of a SIP message to the end of the i= line or replace the i= line in the original message with a new i= line. This command is used for SIP IP address conservation.
disable
no-sdp-fixup {disable | enable}
Enable or disable not performing NAT on addresses in the SDP lines of the SIP message body. This option is disabled by default and the FortiGate unit performs NAT on addresses in SDP lines. Enable this option if you don’t want the FortiGate unit to perform NAT on the addresses in SDP lines.
disable
contact-fixup {disable | enable}
Enable or disable performing NAT on the IP addresses and port numbers in the headers in SIP CONTACT messages even if they don’t match the session’s IP address and port numbers.
enable
max-idle-dialogs <dialogs_perpolicy_int>
Specify the maximum number of established but idle dialogs to retain (per policy). Set to 0 to disable.Idle dialogs would usually be dialogs that have been interrupted because of errors or problems or as the result of a SIP attack that opens a large number of SIP dialogs without closing them. This command provides a way to remove these dialogs from the dialog table and recover memory and resources being used by these open and idle dialogs.
0
block-geo-red-options {disable | enable}
Block OPTIONS requests, but OPTIONS requests still notify for redundancy.
disable
hosted-nat-traversal {disable | enable}
Enable or disable support for hosted NAT Traversal (HNT). HNT has different requirements for address translation.
disable
hnt-restrict-source-ip {disable | enable}
Restrict RTP source IP to be the same as SIP source IP when HNT is enabled.
disable
Variable Description Default
FortiOS 4.0 MR3 CLI Reference562 01-431-99686-20110623
http://docs.fortinet.com/ • Feedback
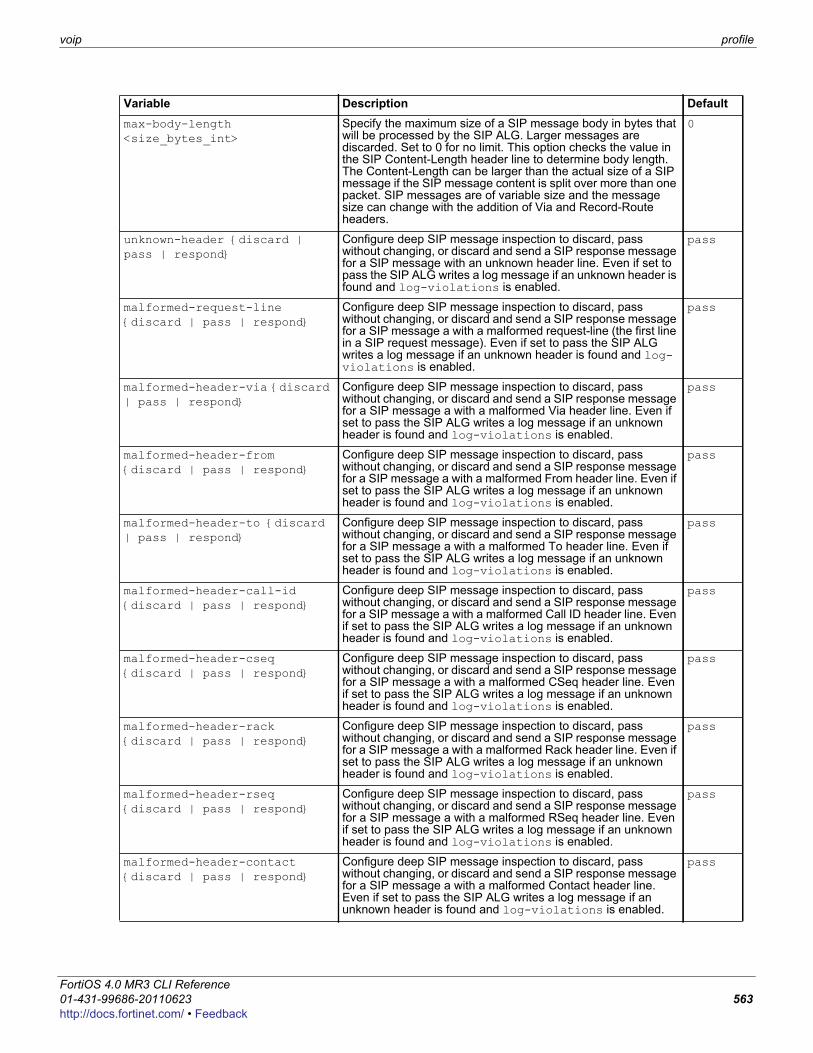
voip profile
F0h
max-body-length <size_bytes_int>
Specify the maximum size of a SIP message body in bytes that will be processed by the SIP ALG. Larger messages are discarded. Set to 0 for no limit. This option checks the value in the SIP Content-Length header line to determine body length. The Content-Length can be larger than the actual size of a SIP message if the SIP message content is split over more than one packet. SIP messages are of variable size and the message size can change with the addition of Via and Record-Route headers.
0
unknown-header {discard | pass | respond}
Configure deep SIP message inspection to discard, pass without changing, or discard and send a SIP response message for a SIP message with an unknown header line. Even if set to pass the SIP ALG writes a log message if an unknown header is found and log-violations is enabled.
pass
malformed-request-line {discard | pass | respond}
Configure deep SIP message inspection to discard, pass without changing, or discard and send a SIP response message for a SIP message a with a malformed request-line (the first line in a SIP request message). Even if set to pass the SIP ALG writes a log message if an unknown header is found and log-violations is enabled.
pass
malformed-header-via {discard | pass | respond}
Configure deep SIP message inspection to discard, pass without changing, or discard and send a SIP response message for a SIP message a with a malformed Via header line. Even if set to pass the SIP ALG writes a log message if an unknown header is found and log-violations is enabled.
pass
malformed-header-from {discard | pass | respond}
Configure deep SIP message inspection to discard, pass without changing, or discard and send a SIP response message for a SIP message a with a malformed From header line. Even if set to pass the SIP ALG writes a log message if an unknown header is found and log-violations is enabled.
pass
malformed-header-to {discard | pass | respond}
Configure deep SIP message inspection to discard, pass without changing, or discard and send a SIP response message for a SIP message a with a malformed To header line. Even if set to pass the SIP ALG writes a log message if an unknown header is found and log-violations is enabled.
pass
malformed-header-call-id {discard | pass | respond}
Configure deep SIP message inspection to discard, pass without changing, or discard and send a SIP response message for a SIP message a with a malformed Call ID header line. Even if set to pass the SIP ALG writes a log message if an unknown header is found and log-violations is enabled.
pass
malformed-header-cseq {discard | pass | respond}
Configure deep SIP message inspection to discard, pass without changing, or discard and send a SIP response message for a SIP message a with a malformed CSeq header line. Even if set to pass the SIP ALG writes a log message if an unknown header is found and log-violations is enabled.
pass
malformed-header-rack {discard | pass | respond}
Configure deep SIP message inspection to discard, pass without changing, or discard and send a SIP response message for a SIP message a with a malformed Rack header line. Even if set to pass the SIP ALG writes a log message if an unknown header is found and log-violations is enabled.
pass
malformed-header-rseq {discard | pass | respond}
Configure deep SIP message inspection to discard, pass without changing, or discard and send a SIP response message for a SIP message a with a malformed RSeq header line. Even if set to pass the SIP ALG writes a log message if an unknown header is found and log-violations is enabled.
pass
malformed-header-contact {discard | pass | respond}
Configure deep SIP message inspection to discard, pass without changing, or discard and send a SIP response message for a SIP message a with a malformed Contact header line. Even if set to pass the SIP ALG writes a log message if an unknown header is found and log-violations is enabled.
pass
Variable Description Default
ortiOS 4.0 MR3 CLI Reference1-431-99686-20110623 563ttp://docs.fortinet.com/ • Feedback
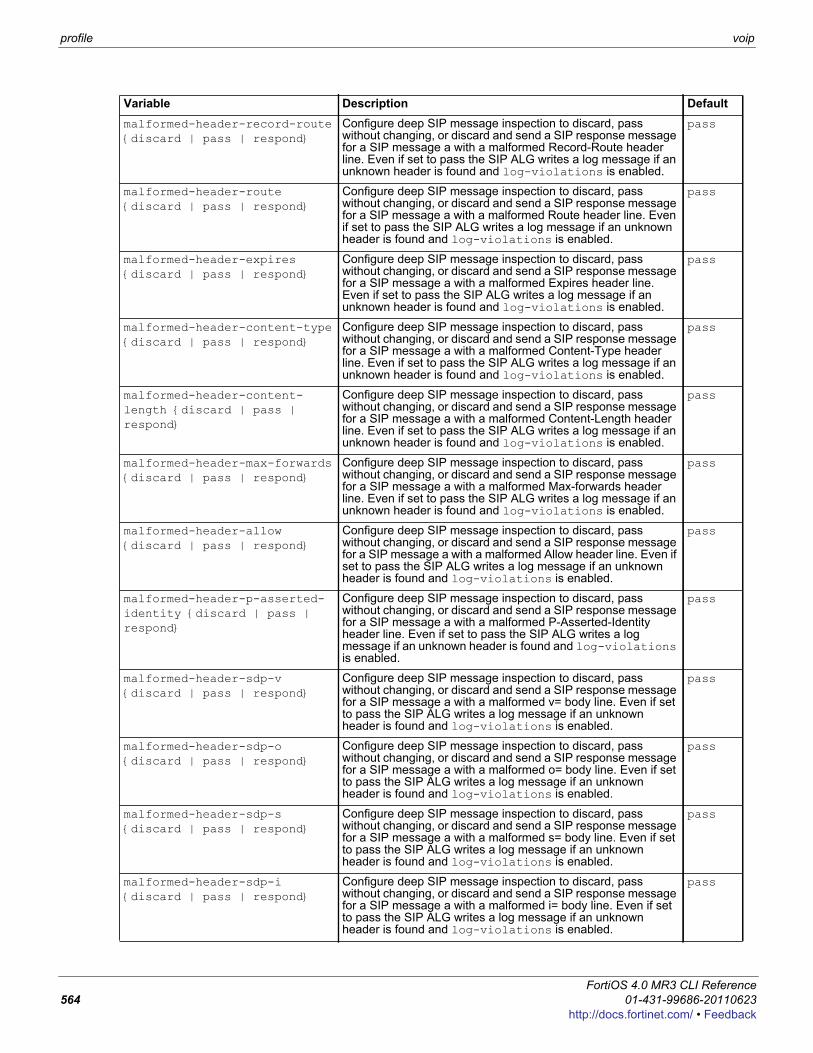
profile voip
malformed-header-record-route {discard | pass | respond}
Configure deep SIP message inspection to discard, pass without changing, or discard and send a SIP response message for a SIP message a with a malformed Record-Route header line. Even if set to pass the SIP ALG writes a log message if an unknown header is found and log-violations is enabled.
pass
malformed-header-route {discard | pass | respond}
Configure deep SIP message inspection to discard, pass without changing, or discard and send a SIP response message for a SIP message a with a malformed Route header line. Even if set to pass the SIP ALG writes a log message if an unknown header is found and log-violations is enabled.
pass
malformed-header-expires {discard | pass | respond}
Configure deep SIP message inspection to discard, pass without changing, or discard and send a SIP response message for a SIP message a with a malformed Expires header line. Even if set to pass the SIP ALG writes a log message if an unknown header is found and log-violations is enabled.
pass
malformed-header-content-type {discard | pass | respond}
Configure deep SIP message inspection to discard, pass without changing, or discard and send a SIP response message for a SIP message a with a malformed Content-Type header line. Even if set to pass the SIP ALG writes a log message if an unknown header is found and log-violations is enabled.
pass
malformed-header-content-length {discard | pass | respond}
Configure deep SIP message inspection to discard, pass without changing, or discard and send a SIP response message for a SIP message a with a malformed Content-Length header line. Even if set to pass the SIP ALG writes a log message if an unknown header is found and log-violations is enabled.
pass
malformed-header-max-forwards {discard | pass | respond}
Configure deep SIP message inspection to discard, pass without changing, or discard and send a SIP response message for a SIP message a with a malformed Max-forwards header line. Even if set to pass the SIP ALG writes a log message if an unknown header is found and log-violations is enabled.
pass
malformed-header-allow {discard | pass | respond}
Configure deep SIP message inspection to discard, pass without changing, or discard and send a SIP response message for a SIP message a with a malformed Allow header line. Even if set to pass the SIP ALG writes a log message if an unknown header is found and log-violations is enabled.
pass
malformed-header-p-asserted-identity {discard | pass | respond}
Configure deep SIP message inspection to discard, pass without changing, or discard and send a SIP response message for a SIP message a with a malformed P-Asserted-Identity header line. Even if set to pass the SIP ALG writes a log message if an unknown header is found and log-violations is enabled.
pass
malformed-header-sdp-v {discard | pass | respond}
Configure deep SIP message inspection to discard, pass without changing, or discard and send a SIP response message for a SIP message a with a malformed v= body line. Even if set to pass the SIP ALG writes a log message if an unknown header is found and log-violations is enabled.
pass
malformed-header-sdp-o {discard | pass | respond}
Configure deep SIP message inspection to discard, pass without changing, or discard and send a SIP response message for a SIP message a with a malformed o= body line. Even if set to pass the SIP ALG writes a log message if an unknown header is found and log-violations is enabled.
pass
malformed-header-sdp-s {discard | pass | respond}
Configure deep SIP message inspection to discard, pass without changing, or discard and send a SIP response message for a SIP message a with a malformed s= body line. Even if set to pass the SIP ALG writes a log message if an unknown header is found and log-violations is enabled.
pass
malformed-header-sdp-i {discard | pass | respond}
Configure deep SIP message inspection to discard, pass without changing, or discard and send a SIP response message for a SIP message a with a malformed i= body line. Even if set to pass the SIP ALG writes a log message if an unknown header is found and log-violations is enabled.
pass
Variable Description Default
FortiOS 4.0 MR3 CLI Reference564 01-431-99686-20110623
http://docs.fortinet.com/ • Feedback
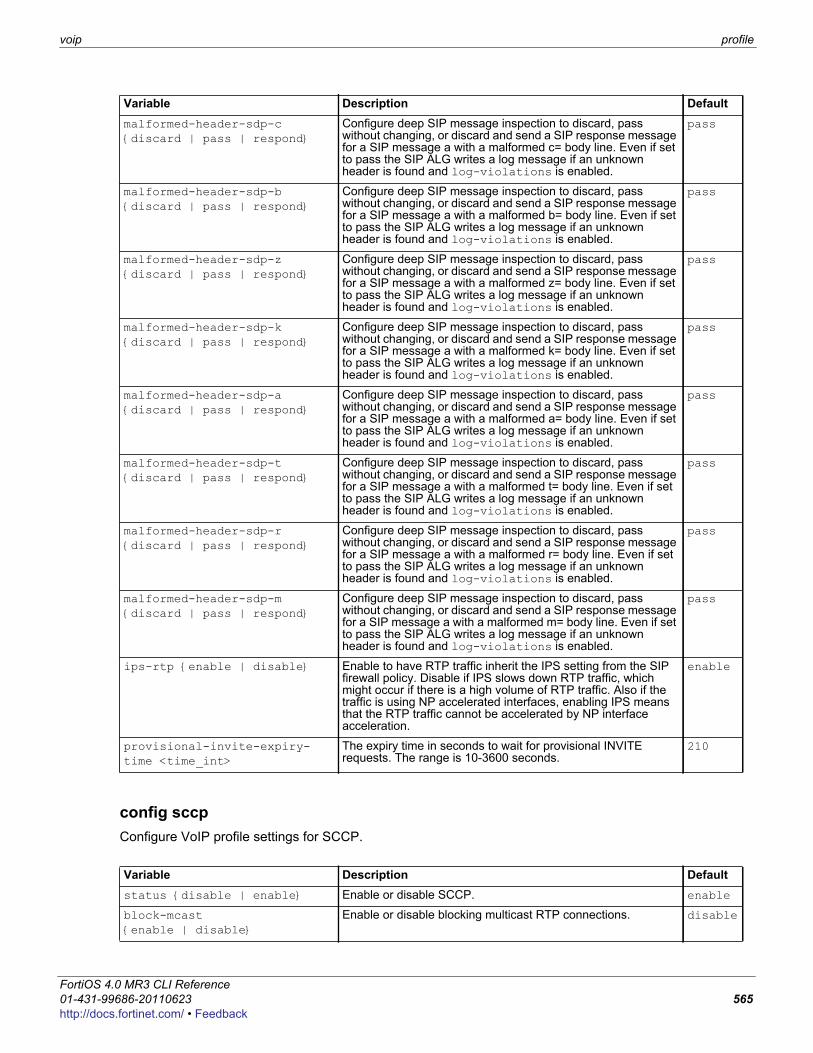
voip profile
F0h
config sccpConfigure VoIP profile settings for SCCP.
malformed-header-sdp-c {discard | pass | respond}
Configure deep SIP message inspection to discard, pass without changing, or discard and send a SIP response message for a SIP message a with a malformed c= body line. Even if set to pass the SIP ALG writes a log message if an unknown header is found and log-violations is enabled.
pass
malformed-header-sdp-b {discard | pass | respond}
Configure deep SIP message inspection to discard, pass without changing, or discard and send a SIP response message for a SIP message a with a malformed b= body line. Even if set to pass the SIP ALG writes a log message if an unknown header is found and log-violations is enabled.
pass
malformed-header-sdp-z {discard | pass | respond}
Configure deep SIP message inspection to discard, pass without changing, or discard and send a SIP response message for a SIP message a with a malformed z= body line. Even if set to pass the SIP ALG writes a log message if an unknown header is found and log-violations is enabled.
pass
malformed-header-sdp-k {discard | pass | respond}
Configure deep SIP message inspection to discard, pass without changing, or discard and send a SIP response message for a SIP message a with a malformed k= body line. Even if set to pass the SIP ALG writes a log message if an unknown header is found and log-violations is enabled.
pass
malformed-header-sdp-a {discard | pass | respond}
Configure deep SIP message inspection to discard, pass without changing, or discard and send a SIP response message for a SIP message a with a malformed a= body line. Even if set to pass the SIP ALG writes a log message if an unknown header is found and log-violations is enabled.
pass
malformed-header-sdp-t {discard | pass | respond}
Configure deep SIP message inspection to discard, pass without changing, or discard and send a SIP response message for a SIP message a with a malformed t= body line. Even if set to pass the SIP ALG writes a log message if an unknown header is found and log-violations is enabled.
pass
malformed-header-sdp-r {discard | pass | respond}
Configure deep SIP message inspection to discard, pass without changing, or discard and send a SIP response message for a SIP message a with a malformed r= body line. Even if set to pass the SIP ALG writes a log message if an unknown header is found and log-violations is enabled.
pass
malformed-header-sdp-m {discard | pass | respond}
Configure deep SIP message inspection to discard, pass without changing, or discard and send a SIP response message for a SIP message a with a malformed m= body line. Even if set to pass the SIP ALG writes a log message if an unknown header is found and log-violations is enabled.
pass
ips-rtp {enable | disable} Enable to have RTP traffic inherit the IPS setting from the SIP firewall policy. Disable if IPS slows down RTP traffic, which might occur if there is a high volume of RTP traffic. Also if the traffic is using NP accelerated interfaces, enabling IPS means that the RTP traffic cannot be accelerated by NP interface acceleration.
enable
provisional-invite-expiry-time <time_int>
The expiry time in seconds to wait for provisional INVITE requests. The range is 10-3600 seconds.
210
Variable Description Defaultstatus {disable | enable} Enable or disable SCCP. enable
block-mcast {enable | disable}
Enable or disable blocking multicast RTP connections. disable
Variable Description Default
ortiOS 4.0 MR3 CLI Reference1-431-99686-20110623 565ttp://docs.fortinet.com/ • Feedback
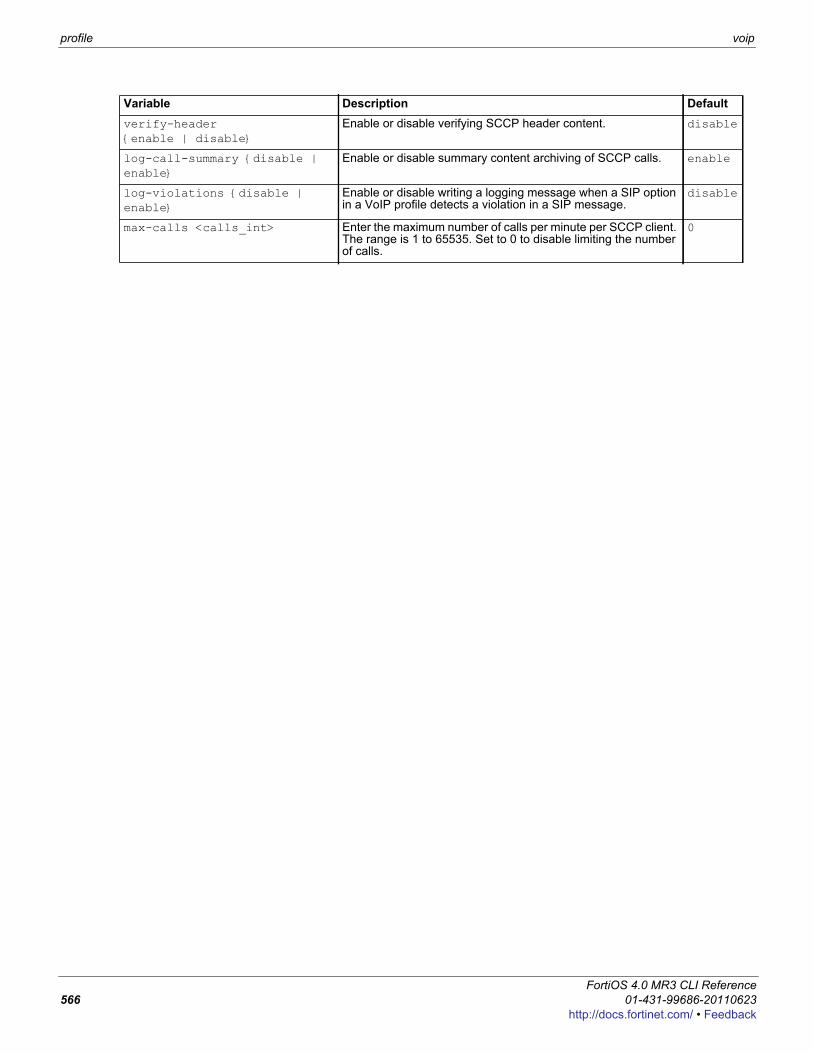
profile voip
verify-header {enable | disable}
Enable or disable verifying SCCP header content. disable
log-call-summary {disable | enable}
Enable or disable summary content archiving of SCCP calls. enable
log-violations {disable | enable}
Enable or disable writing a logging message when a SIP option in a VoIP profile detects a violation in a SIP message.
disable
max-calls <calls_int> Enter the maximum number of calls per minute per SCCP client. The range is 1 to 65535. Set to 0 to disable limiting the number of calls.
0
Variable Description Default
FortiOS 4.0 MR3 CLI Reference566 01-431-99686-20110623
http://docs.fortinet.com/ • Feedback
F0h
vpnUse vpn commands to configure options related to virtual private networking through the FortiGate unit, including:• IPSec operating parameters• a local address range for PPTP or L2TP clients• SSL VPN configuration settingsThis chapter contains the following sections:
certificate cacertificate crlcertificate localcertificate ocspcertificate remoteipsec concentratoripsec forticlientipsec manualkeyipsec manualkey-interfaceipsec phase1ipsec phase1-interfaceipsec phase2ipsec phase2-interface
l2tppptpssl settingsssl web host-check-softwaressl web portalssl web virtual-desktop-app-list
ortiOS 4.0 MR3 CLI Reference1-431-99686-20110623 567ttp://docs.fortinet.com/ • Feedback
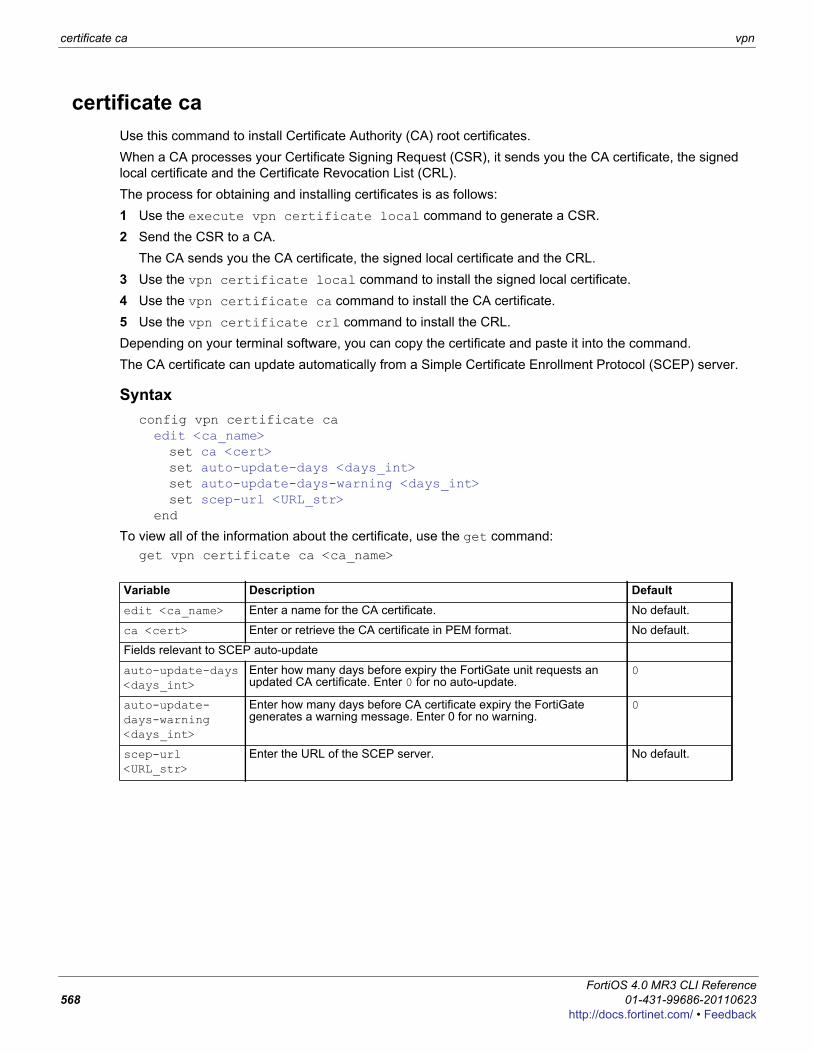
certificate ca vpn
certificate caUse this command to install Certificate Authority (CA) root certificates. When a CA processes your Certificate Signing Request (CSR), it sends you the CA certificate, the signed local certificate and the Certificate Revocation List (CRL).The process for obtaining and installing certificates is as follows:1 Use the execute vpn certificate local command to generate a CSR. 2 Send the CSR to a CA.
The CA sends you the CA certificate, the signed local certificate and the CRL.3 Use the vpn certificate local command to install the signed local certificate.4 Use the vpn certificate ca command to install the CA certificate.5 Use the vpn certificate crl command to install the CRL.Depending on your terminal software, you can copy the certificate and paste it into the command.The CA certificate can update automatically from a Simple Certificate Enrollment Protocol (SCEP) server.
Syntaxconfig vpn certificate caedit <ca_name>set ca <cert>set auto-update-days <days_int>set auto-update-days-warning <days_int>set scep-url <URL_str>
end
To view all of the information about the certificate, use the get command:get vpn certificate ca <ca_name>
Variable Description Defaultedit <ca_name> Enter a name for the CA certificate. No default.
ca <cert> Enter or retrieve the CA certificate in PEM format. No default.
Fields relevant to SCEP auto-update
auto-update-days <days_int>
Enter how many days before expiry the FortiGate unit requests an updated CA certificate. Enter 0 for no auto-update.
0
auto-update-days-warning <days_int>
Enter how many days before CA certificate expiry the FortiGate generates a warning message. Enter 0 for no warning.
0
scep-url <URL_str>
Enter the URL of the SCEP server. No default.
FortiOS 4.0 MR3 CLI Reference568 01-431-99686-20110623
http://docs.fortinet.com/ • Feedback
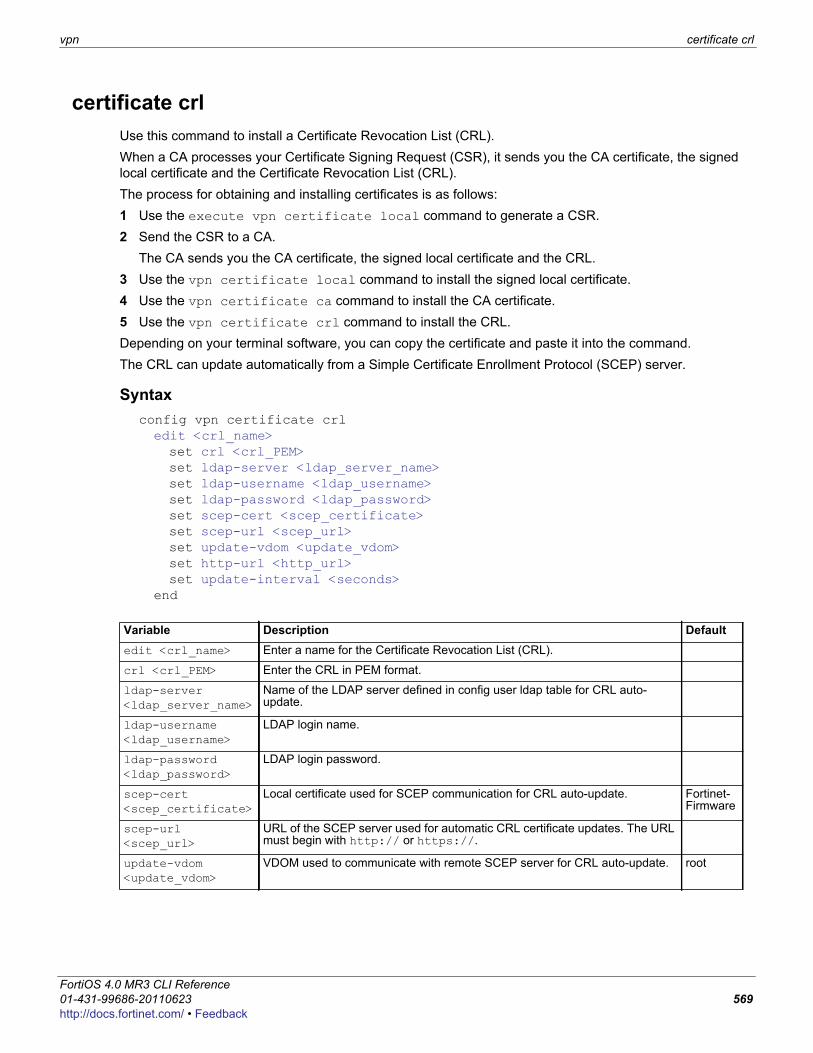
vpn certificate crl
F0h
certificate crlUse this command to install a Certificate Revocation List (CRL).When a CA processes your Certificate Signing Request (CSR), it sends you the CA certificate, the signed local certificate and the Certificate Revocation List (CRL).The process for obtaining and installing certificates is as follows:1 Use the execute vpn certificate local command to generate a CSR. 2 Send the CSR to a CA.
The CA sends you the CA certificate, the signed local certificate and the CRL.3 Use the vpn certificate local command to install the signed local certificate.4 Use the vpn certificate ca command to install the CA certificate.5 Use the vpn certificate crl command to install the CRL.Depending on your terminal software, you can copy the certificate and paste it into the command.The CRL can update automatically from a Simple Certificate Enrollment Protocol (SCEP) server.
Syntaxconfig vpn certificate crledit <crl_name>set crl <crl_PEM>set ldap-server <ldap_server_name>set ldap-username <ldap_username>set ldap-password <ldap_password>set scep-cert <scep_certificate>set scep-url <scep_url>set update-vdom <update_vdom>set http-url <http_url>set update-interval <seconds>
end
Variable Description Defaultedit <crl_name> Enter a name for the Certificate Revocation List (CRL).
crl <crl_PEM> Enter the CRL in PEM format.
ldap-server <ldap_server_name>
Name of the LDAP server defined in config user ldap table for CRL auto-update.
ldap-username <ldap_username>
LDAP login name.
ldap-password <ldap_password>
LDAP login password.
scep-cert <scep_certificate>
Local certificate used for SCEP communication for CRL auto-update. Fortinet-Firmware
scep-url <scep_url>
URL of the SCEP server used for automatic CRL certificate updates. The URL must begin with http:// or https://.
update-vdom <update_vdom>
VDOM used to communicate with remote SCEP server for CRL auto-update. root
ortiOS 4.0 MR3 CLI Reference1-431-99686-20110623 569ttp://docs.fortinet.com/ • Feedback
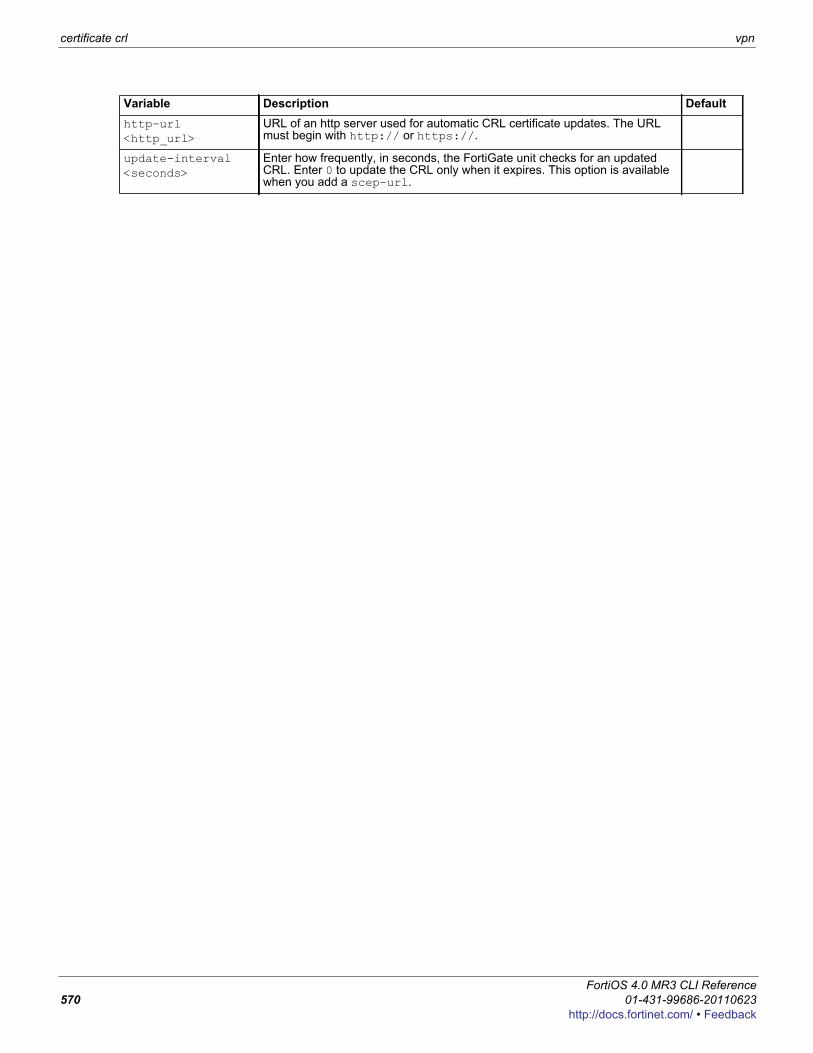
certificate crl vpn
http-url <http_url>
URL of an http server used for automatic CRL certificate updates. The URL must begin with http:// or https://.
update-interval <seconds>
Enter how frequently, in seconds, the FortiGate unit checks for an updated CRL. Enter 0 to update the CRL only when it expires. This option is available when you add a scep-url.
Variable Description Default
FortiOS 4.0 MR3 CLI Reference570 01-431-99686-20110623
http://docs.fortinet.com/ • Feedback
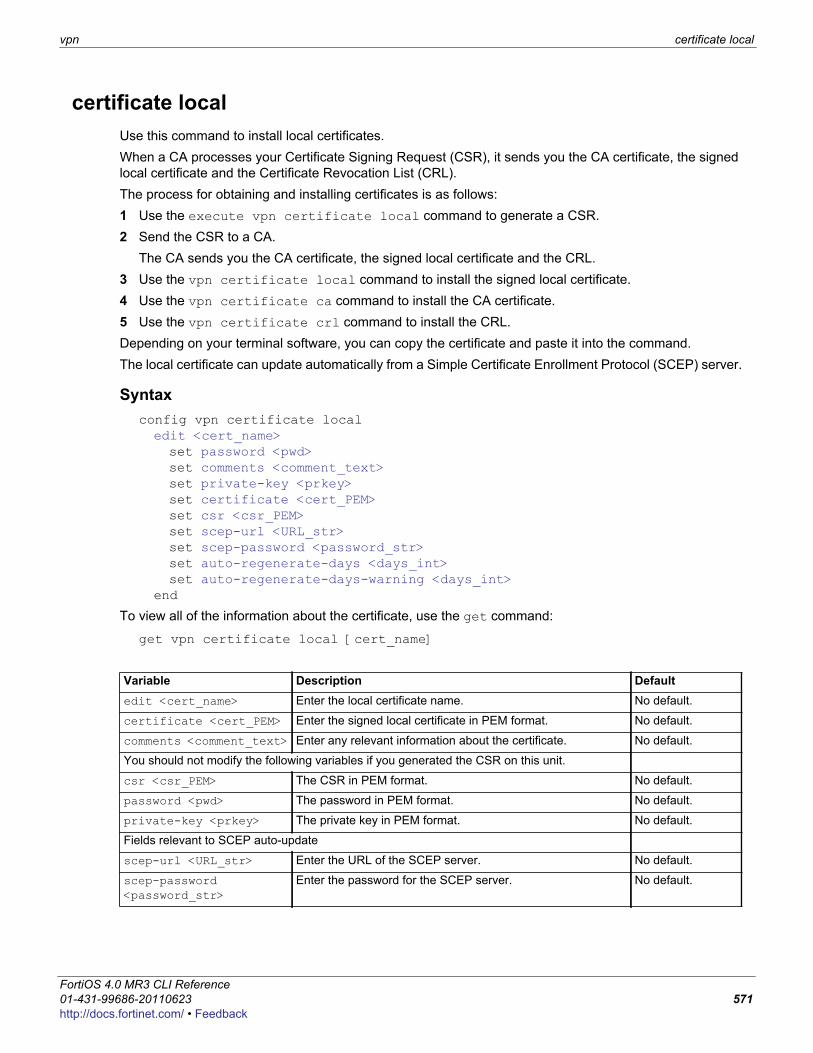
vpn certificate local
F0h
certificate localUse this command to install local certificates.When a CA processes your Certificate Signing Request (CSR), it sends you the CA certificate, the signed local certificate and the Certificate Revocation List (CRL).The process for obtaining and installing certificates is as follows:1 Use the execute vpn certificate local command to generate a CSR. 2 Send the CSR to a CA.
The CA sends you the CA certificate, the signed local certificate and the CRL.3 Use the vpn certificate local command to install the signed local certificate.4 Use the vpn certificate ca command to install the CA certificate.5 Use the vpn certificate crl command to install the CRL.Depending on your terminal software, you can copy the certificate and paste it into the command.The local certificate can update automatically from a Simple Certificate Enrollment Protocol (SCEP) server.
Syntaxconfig vpn certificate localedit <cert_name>set password <pwd>set comments <comment_text>set private-key <prkey>set certificate <cert_PEM>set csr <csr_PEM>set scep-url <URL_str>set scep-password <password_str>set auto-regenerate-days <days_int>set auto-regenerate-days-warning <days_int>
end
To view all of the information about the certificate, use the get command:
get vpn certificate local [cert_name]
Variable Description Defaultedit <cert_name> Enter the local certificate name. No default.
certificate <cert_PEM> Enter the signed local certificate in PEM format. No default.
comments <comment_text> Enter any relevant information about the certificate. No default.
You should not modify the following variables if you generated the CSR on this unit.
csr <csr_PEM> The CSR in PEM format. No default.
password <pwd> The password in PEM format. No default.
private-key <prkey> The private key in PEM format. No default.
Fields relevant to SCEP auto-update
scep-url <URL_str> Enter the URL of the SCEP server. No default.
scep-password <password_str>
Enter the password for the SCEP server. No default.
ortiOS 4.0 MR3 CLI Reference1-431-99686-20110623 571ttp://docs.fortinet.com/ • Feedback
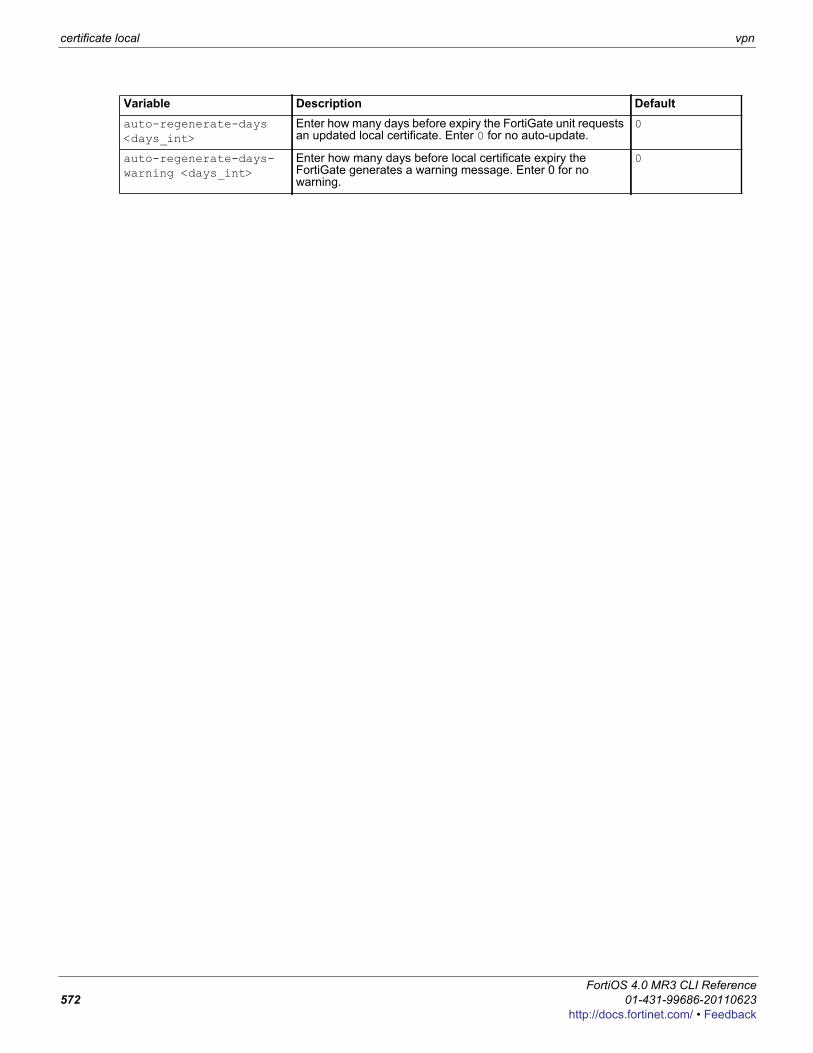
certificate local vpn
auto-regenerate-days <days_int>
Enter how many days before expiry the FortiGate unit requests an updated local certificate. Enter 0 for no auto-update.
0
auto-regenerate-days-warning <days_int>
Enter how many days before local certificate expiry the FortiGate generates a warning message. Enter 0 for no warning.
0
Variable Description Default
FortiOS 4.0 MR3 CLI Reference572 01-431-99686-20110623
http://docs.fortinet.com/ • Feedback
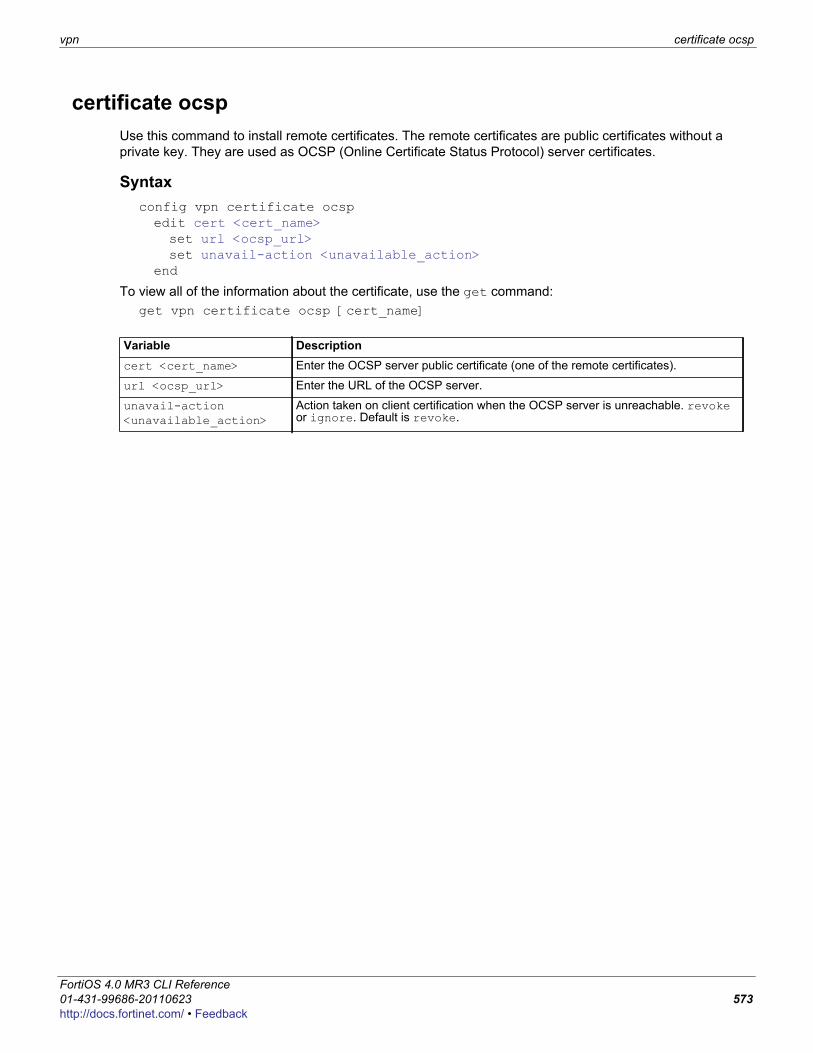
vpn certificate ocsp
F0h
certificate ocspUse this command to install remote certificates. The remote certificates are public certificates without a private key. They are used as OCSP (Online Certificate Status Protocol) server certificates.
Syntaxconfig vpn certificate ocspedit cert <cert_name>set url <ocsp_url>set unavail-action <unavailable_action>
end
To view all of the information about the certificate, use the get command:get vpn certificate ocsp [cert_name]
Variable Descriptioncert <cert_name> Enter the OCSP server public certificate (one of the remote certificates).
url <ocsp_url> Enter the URL of the OCSP server.
unavail-action <unavailable_action>
Action taken on client certification when the OCSP server is unreachable. revoke or ignore. Default is revoke.
ortiOS 4.0 MR3 CLI Reference1-431-99686-20110623 573ttp://docs.fortinet.com/ • Feedback
certificate remote vpn
certificate remoteUse this command to install remote certificates. The remote certificates are public certificates without a private key. They are used as OCSP (Online Certificate Status Protocol) server certificates.
Syntaxconfig vpn certificate remoteedit cert <cert_name>set remote <remote_cert_detail>
end
To view all of the information about the certificate, use the get command:get vpn certificate remote [cert_name]
Variable Descriptioncert <cert_name> Enter the name of the public certificate.
remote <remote_cert_detail>
Details/description of the remote certificate.
FortiOS 4.0 MR3 CLI Reference574 01-431-99686-20110623
http://docs.fortinet.com/ • Feedback
vpn ipsec concentrator
F0h
ipsec concentratorUse this command to add IPSec policy-based VPN tunnels to a VPN concentrator. The VPN concentrator collects hub-and-spoke tunnels into a group. The concentrator allows VPN traffic to pass from one tunnel to the other through the FortiGate unit. The FortiGate unit functions as a concentrator, or hub, in a hub-and-spoke network.
Syntaxconfig vpn ipsec concentratoredit <concentrator_name>set member <member_name> [member_name] [member_name]set src-check {enable | disable}
end
Note: VPN concentrators are not available in Transparent mode.
Note: The member field is required.
Variable Description Defaultedit <concentrator_name> Enter a name for the concentrator. No default.
member <member_name> [member_name] [member_name]
Enter the names of up to three VPN tunnels to add to the concentrator. Separate the tunnel names with spaces. Members can be tunnels defined in vpn ipsec phase1 or vpn ipsec manual-key. To add or remove tunnels from the concentrator you must re-enter the whole list with the required additions or deletions.
No default.
src-check {enable | disable}
Enable to check the source address of the phase2 selector when locating the best matching phase2 in a concentrator. The default is to check only the destination selector.
disable
ortiOS 4.0 MR3 CLI Reference1-431-99686-20110623 575ttp://docs.fortinet.com/ • Feedback
ipsec forticlient vpn
ipsec forticlientUse this command to configure automatic VPN configuration for FortiClient Host Security application users.The FortiClient users who will use automatic configuration must be members of a user group. The config vpn ipsec forticlient command creates a “realm” that associates the user group with the phase 2 VPN configuration. You can create multiple realms to associate different user groups with different phase 2 configurations.The user group identifies the user name and password settings that the dialup client’s credentials must match in order for authentication to be successful. The phase 2 tunnel definition and its associated firewall encryption policy provides the configuration parameters to download to the FortiClient Host Security application.
SyntaxSet or unset VPN policy distribution parameters.
config vpn ipsec forticlientedit <realm_name>set phase2name <tunnel_name>set status {disable | enable}set usergroupname <group_name>
end
Variable Description Defaultedit <realm_name> Enter a name for the FortiClient realm. This is also referred to as
the policy name.No default.
phase2name <tunnel_name> Enter the name of the phase 2 tunnel configuration that you defined as part of the dialup-client configuration.
Null
status {disable | enable} Enable or disable IPSec VPN policy distribution. enable
usergroupname <group_name> Enter the name of the user group that you created for dialup clients. This group must already exist.
Null
FortiOS 4.0 MR3 CLI Reference576 01-431-99686-20110623
http://docs.fortinet.com/ • Feedback
vpn ipsec manualkey
F0h
ipsec manualkeyUse this command to configure manual keys for IPSec tunnel-mode VPN tunnels. You configure a manual key tunnel to create an IPSec tunnel-mode VPN tunnel between the FortiGate unit and a remote IPSec VPN client or gateway that is also using manual key. A manual key VPN tunnel consists of a name for the tunnel, the IP address of the VPN gateway or client at the opposite end of the tunnel, and the encryption and authentication algorithms to use for the tunnel. Because the keys are created when you configure the tunnel, no negotiation is required for the VPN tunnel to start. However, the VPN gateway or client that connects to this tunnel must use the same encryption and authentication algorithms and must have the same encryption and authentication keys.
Syntaxconfig vpn ipsec manualkeyedit <tunnel_name>set authentication <authentication_algorithm>set authkey <authentication_key>set encryption <method>set enckey <encryption_key>set interface <interface_name>set localspi <local_spi_number>set local-gw <address_ipv4>set remote-gw <address_ipv4>set remotespi <remote_spi_number>
end
Note: The authentication, encryption, interface, remote-gw, localspi, and remotespi fields are required. All other fields are optional.
Variable Description Defaultedit <tunnel_name> Enter a name for the tunnel. No default.
authentication <authentication_algorithm>
Enter one of the following authentication algorithms:• md5• null• sha1• sha256• sha384• sha512Make sure you use the same algorithm at both ends of the tunnel.Note: encryption and authentication cannot both be null.
null
ortiOS 4.0 MR3 CLI Reference1-431-99686-20110623 577ttp://docs.fortinet.com/ • Feedback
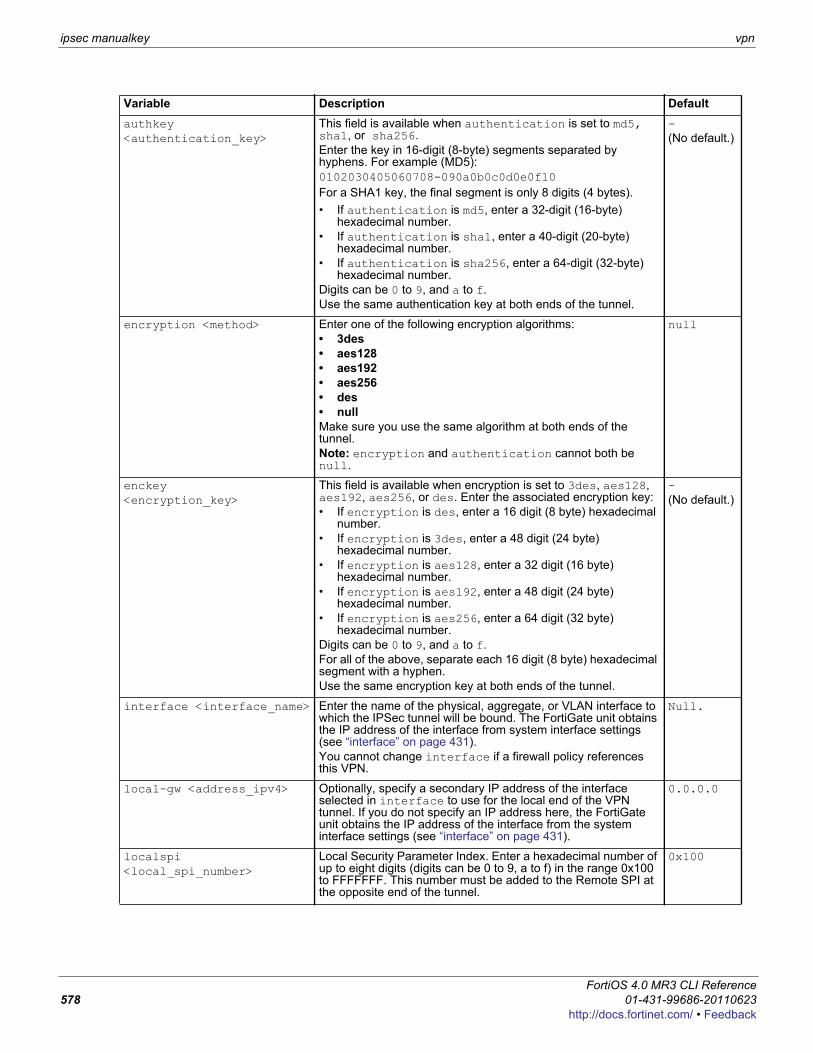
ipsec manualkey vpn
authkey <authentication_key>
This field is available when authentication is set to md5, sha1, or sha256. Enter the key in 16-digit (8-byte) segments separated by hyphens. For example (MD5):0102030405060708-090a0b0c0d0e0f10For a SHA1 key, the final segment is only 8 digits (4 bytes). • If authentication is md5, enter a 32-digit (16-byte)
hexadecimal number. • If authentication is sha1, enter a 40-digit (20-byte)
hexadecimal number. • If authentication is sha256, enter a 64-digit (32-byte)
hexadecimal number. Digits can be 0 to 9, and a to f.Use the same authentication key at both ends of the tunnel.
-(No default.)
encryption <method> Enter one of the following encryption algorithms:• 3des• aes128• aes192• aes256• des• nullMake sure you use the same algorithm at both ends of the tunnel.Note: encryption and authentication cannot both be null.
null
enckey <encryption_key>
This field is available when encryption is set to 3des, aes128, aes192, aes256, or des. Enter the associated encryption key:• If encryption is des, enter a 16 digit (8 byte) hexadecimal
number. • If encryption is 3des, enter a 48 digit (24 byte)
hexadecimal number.• If encryption is aes128, enter a 32 digit (16 byte)
hexadecimal number.• If encryption is aes192, enter a 48 digit (24 byte)
hexadecimal number.• If encryption is aes256, enter a 64 digit (32 byte)
hexadecimal number. Digits can be 0 to 9, and a to f.For all of the above, separate each 16 digit (8 byte) hexadecimal segment with a hyphen.Use the same encryption key at both ends of the tunnel.
-(No default.)
interface <interface_name> Enter the name of the physical, aggregate, or VLAN interface to which the IPSec tunnel will be bound. The FortiGate unit obtains the IP address of the interface from system interface settings (see “interface” on page 431).You cannot change interface if a firewall policy references this VPN.
Null.
local-gw <address_ipv4> Optionally, specify a secondary IP address of the interface selected in interface to use for the local end of the VPN tunnel. If you do not specify an IP address here, the FortiGate unit obtains the IP address of the interface from the system interface settings (see “interface” on page 431).
0.0.0.0
localspi <local_spi_number>
Local Security Parameter Index. Enter a hexadecimal number of up to eight digits (digits can be 0 to 9, a to f) in the range 0x100 to FFFFFFF. This number must be added to the Remote SPI at the opposite end of the tunnel.
0x100
Variable Description Default
FortiOS 4.0 MR3 CLI Reference578 01-431-99686-20110623
http://docs.fortinet.com/ • Feedback

vpn ipsec manualkey
F0h
remote-gw <address_ipv4> The IP address of the remote gateway external interface. 0.0.0.0
remotespi <remote_spi_number>
Remote Security Parameter Index. Enter a hexadecimal number of up to eight digits in the range 0x100 to FFFFFFF. This number must be added to the Local SPI at the opposite end of the tunnel.
0x100
Variable Description Default
ortiOS 4.0 MR3 CLI Reference1-431-99686-20110623 579ttp://docs.fortinet.com/ • Feedback
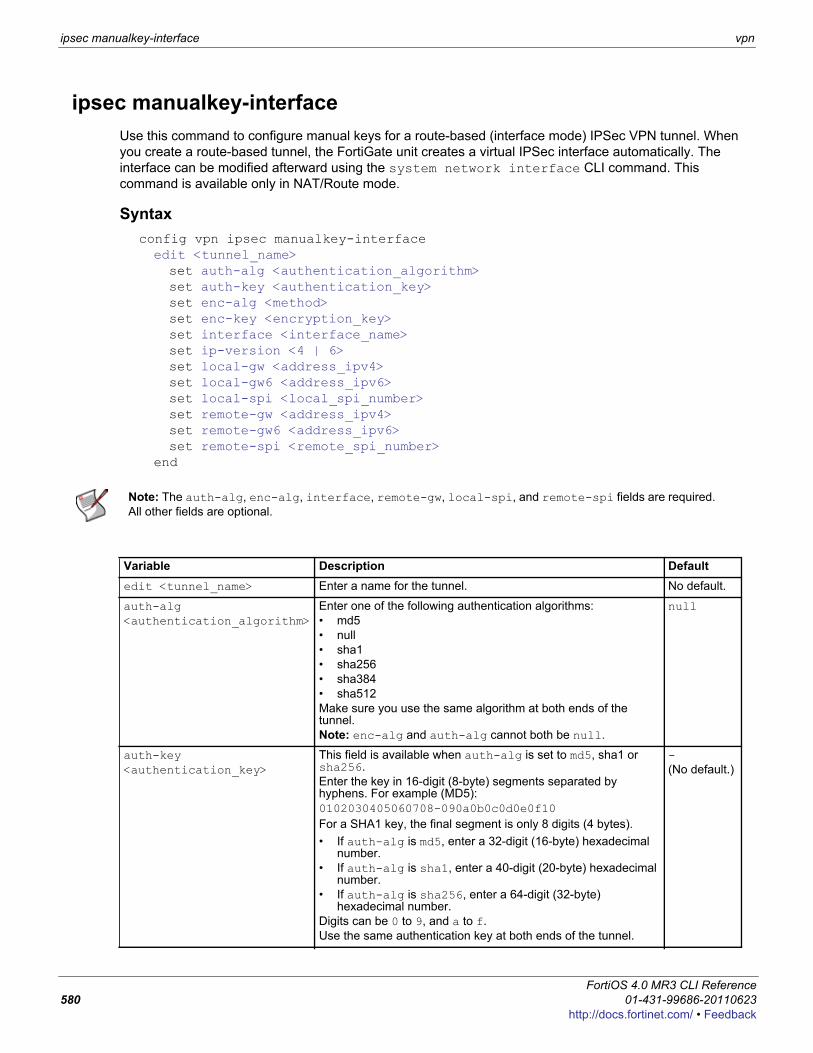
ipsec manualkey-interface vpn
ipsec manualkey-interfaceUse this command to configure manual keys for a route-based (interface mode) IPSec VPN tunnel. When you create a route-based tunnel, the FortiGate unit creates a virtual IPSec interface automatically. The interface can be modified afterward using the system network interface CLI command. This command is available only in NAT/Route mode.
Syntaxconfig vpn ipsec manualkey-interfaceedit <tunnel_name>set auth-alg <authentication_algorithm>set auth-key <authentication_key>set enc-alg <method>set enc-key <encryption_key>set interface <interface_name>set ip-version <4 | 6>set local-gw <address_ipv4>set local-gw6 <address_ipv6>set local-spi <local_spi_number>set remote-gw <address_ipv4>set remote-gw6 <address_ipv6>set remote-spi <remote_spi_number>
end
Note: The auth-alg, enc-alg, interface, remote-gw, local-spi, and remote-spi fields are required. All other fields are optional.
Variable Description Defaultedit <tunnel_name> Enter a name for the tunnel. No default.
auth-alg <authentication_algorithm>
Enter one of the following authentication algorithms:• md5• null• sha1• sha256• sha384• sha512Make sure you use the same algorithm at both ends of the tunnel.Note: enc-alg and auth-alg cannot both be null.
null
auth-key <authentication_key>
This field is available when auth-alg is set to md5, sha1 or sha256.Enter the key in 16-digit (8-byte) segments separated by hyphens. For example (MD5):0102030405060708-090a0b0c0d0e0f10For a SHA1 key, the final segment is only 8 digits (4 bytes). • If auth-alg is md5, enter a 32-digit (16-byte) hexadecimal
number. • If auth-alg is sha1, enter a 40-digit (20-byte) hexadecimal
number. • If auth-alg is sha256, enter a 64-digit (32-byte)
hexadecimal number. Digits can be 0 to 9, and a to f.Use the same authentication key at both ends of the tunnel.
-(No default.)
FortiOS 4.0 MR3 CLI Reference580 01-431-99686-20110623
http://docs.fortinet.com/ • Feedback
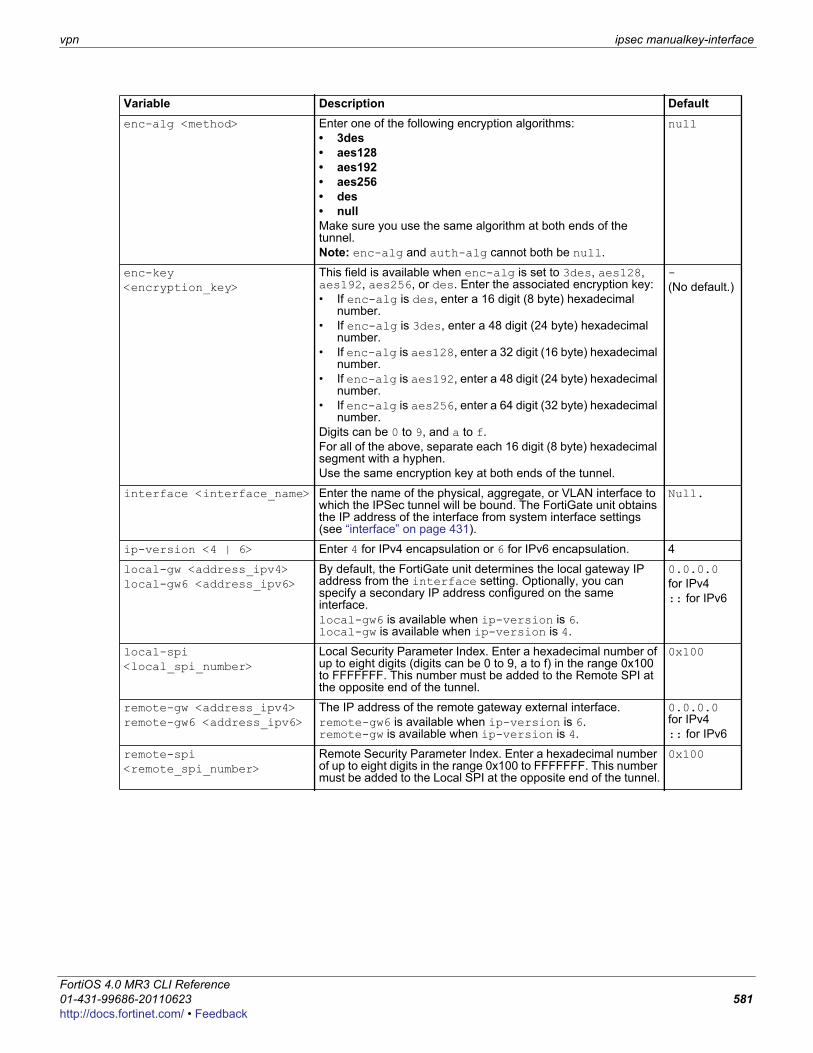
vpn ipsec manualkey-interface
F0h
enc-alg <method> Enter one of the following encryption algorithms:• 3des• aes128• aes192• aes256• des• nullMake sure you use the same algorithm at both ends of the tunnel.Note: enc-alg and auth-alg cannot both be null.
null
enc-key <encryption_key>
This field is available when enc-alg is set to 3des, aes128, aes192, aes256, or des. Enter the associated encryption key:• If enc-alg is des, enter a 16 digit (8 byte) hexadecimal
number. • If enc-alg is 3des, enter a 48 digit (24 byte) hexadecimal
number.• If enc-alg is aes128, enter a 32 digit (16 byte) hexadecimal
number.• If enc-alg is aes192, enter a 48 digit (24 byte) hexadecimal
number.• If enc-alg is aes256, enter a 64 digit (32 byte) hexadecimal
number. Digits can be 0 to 9, and a to f.For all of the above, separate each 16 digit (8 byte) hexadecimal segment with a hyphen.Use the same encryption key at both ends of the tunnel.
-(No default.)
interface <interface_name> Enter the name of the physical, aggregate, or VLAN interface to which the IPSec tunnel will be bound. The FortiGate unit obtains the IP address of the interface from system interface settings (see “interface” on page 431).
Null.
ip-version <4 | 6> Enter 4 for IPv4 encapsulation or 6 for IPv6 encapsulation. 4
local-gw <address_ipv4>local-gw6 <address_ipv6>
By default, the FortiGate unit determines the local gateway IP address from the interface setting. Optionally, you can specify a secondary IP address configured on the same interface.local-gw6 is available when ip-version is 6. local-gw is available when ip-version is 4.
0.0.0.0for IPv4:: for IPv6
local-spi <local_spi_number>
Local Security Parameter Index. Enter a hexadecimal number of up to eight digits (digits can be 0 to 9, a to f) in the range 0x100 to FFFFFFF. This number must be added to the Remote SPI at the opposite end of the tunnel.
0x100
remote-gw <address_ipv4>remote-gw6 <address_ipv6>
The IP address of the remote gateway external interface.remote-gw6 is available when ip-version is 6. remote-gw is available when ip-version is 4.
0.0.0.0 for IPv4:: for IPv6
remote-spi <remote_spi_number>
Remote Security Parameter Index. Enter a hexadecimal number of up to eight digits in the range 0x100 to FFFFFFF. This number must be added to the Local SPI at the opposite end of the tunnel.
0x100
Variable Description Default
ortiOS 4.0 MR3 CLI Reference1-431-99686-20110623 581ttp://docs.fortinet.com/ • Feedback
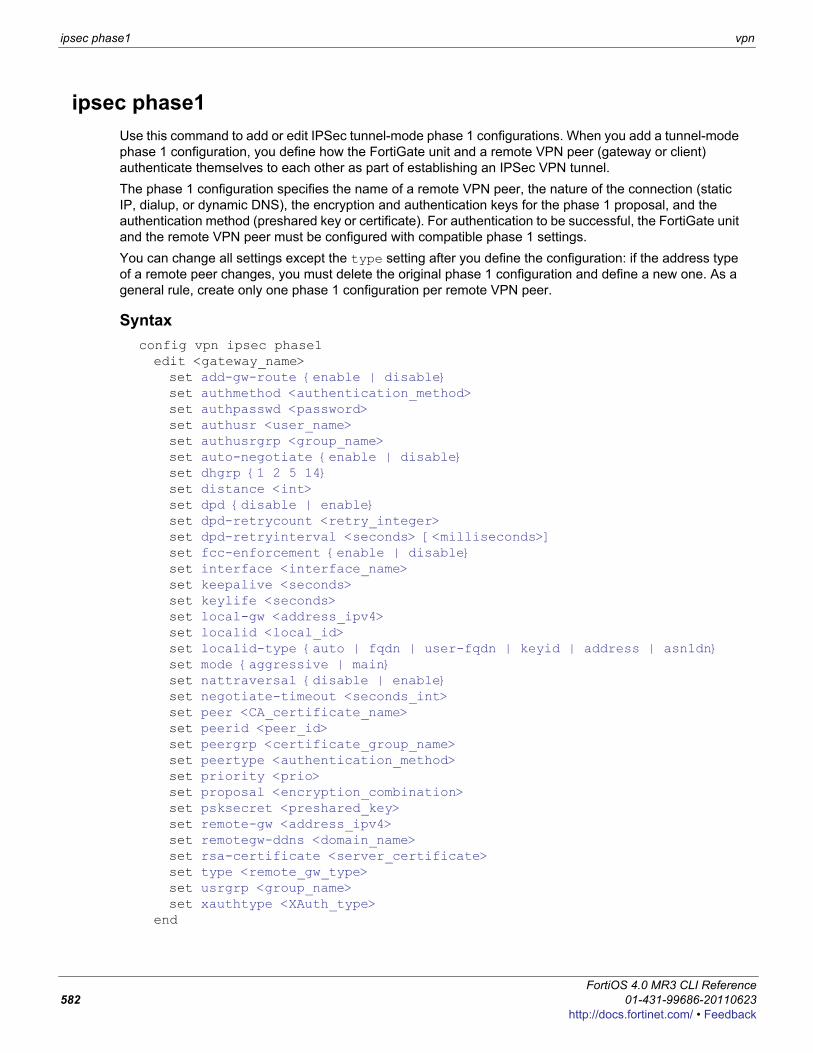
ipsec phase1 vpn
ipsec phase1Use this command to add or edit IPSec tunnel-mode phase 1 configurations. When you add a tunnel-mode phase 1 configuration, you define how the FortiGate unit and a remote VPN peer (gateway or client) authenticate themselves to each other as part of establishing an IPSec VPN tunnel.The phase 1 configuration specifies the name of a remote VPN peer, the nature of the connection (static IP, dialup, or dynamic DNS), the encryption and authentication keys for the phase 1 proposal, and the authentication method (preshared key or certificate). For authentication to be successful, the FortiGate unit and the remote VPN peer must be configured with compatible phase 1 settings.You can change all settings except the type setting after you define the configuration: if the address type of a remote peer changes, you must delete the original phase 1 configuration and define a new one. As a general rule, create only one phase 1 configuration per remote VPN peer.
Syntaxconfig vpn ipsec phase1edit <gateway_name>set add-gw-route {enable | disable}set authmethod <authentication_method>set authpasswd <password>set authusr <user_name>set authusrgrp <group_name>set auto-negotiate {enable | disable}set dhgrp {1 2 5 14}set distance <int>set dpd {disable | enable}set dpd-retrycount <retry_integer>set dpd-retryinterval <seconds> [<milliseconds>]set fcc-enforcement {enable | disable}set interface <interface_name>set keepalive <seconds>set keylife <seconds>set local-gw <address_ipv4>set localid <local_id>set localid-type {auto | fqdn | user-fqdn | keyid | address | asn1dn}set mode {aggressive | main}set nattraversal {disable | enable}set negotiate-timeout <seconds_int>set peer <CA_certificate_name>set peerid <peer_id>set peergrp <certificate_group_name>set peertype <authentication_method>set priority <prio>set proposal <encryption_combination>set psksecret <preshared_key>set remote-gw <address_ipv4>set remotegw-ddns <domain_name>set rsa-certificate <server_certificate>set type <remote_gw_type>set usrgrp <group_name>set xauthtype <XAuth_type>
end
FortiOS 4.0 MR3 CLI Reference582 01-431-99686-20110623
http://docs.fortinet.com/ • Feedback
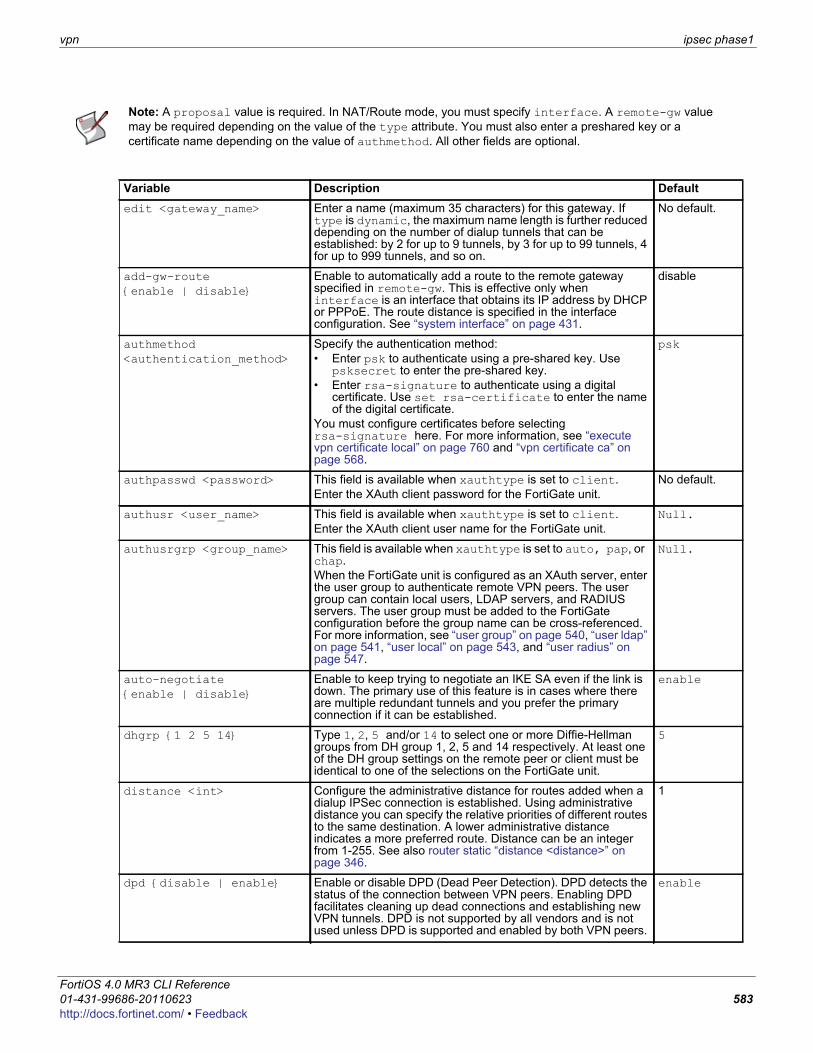
vpn ipsec phase1
F0h
Note: A proposal value is required. In NAT/Route mode, you must specify interface. A remote-gw value may be required depending on the value of the type attribute. You must also enter a preshared key or a certificate name depending on the value of authmethod. All other fields are optional.
Variable Description Defaultedit <gateway_name> Enter a name (maximum 35 characters) for this gateway. If
type is dynamic, the maximum name length is further reduced depending on the number of dialup tunnels that can be established: by 2 for up to 9 tunnels, by 3 for up to 99 tunnels, 4 for up to 999 tunnels, and so on.
No default.
add-gw-route {enable | disable}
Enable to automatically add a route to the remote gateway specified in remote-gw. This is effective only when interface is an interface that obtains its IP address by DHCP or PPPoE. The route distance is specified in the interface configuration. See “system interface” on page 431.
disable
authmethod <authentication_method>
Specify the authentication method:• Enter psk to authenticate using a pre-shared key. Use
psksecret to enter the pre-shared key.• Enter rsa-signature to authenticate using a digital
certificate. Use set rsa-certificate to enter the name of the digital certificate.
You must configure certificates before selecting rsa-signature here. For more information, see “execute vpn certificate local” on page 760 and “vpn certificate ca” on page 568.
psk
authpasswd <password> This field is available when xauthtype is set to client.Enter the XAuth client password for the FortiGate unit.
No default.
authusr <user_name> This field is available when xauthtype is set to client.Enter the XAuth client user name for the FortiGate unit.
Null.
authusrgrp <group_name> This field is available when xauthtype is set to auto, pap, or chap.When the FortiGate unit is configured as an XAuth server, enter the user group to authenticate remote VPN peers. The user group can contain local users, LDAP servers, and RADIUS servers. The user group must be added to the FortiGate configuration before the group name can be cross-referenced. For more information, see “user group” on page 540, “user ldap” on page 541, “user local” on page 543, and “user radius” on page 547.
Null.
auto-negotiate {enable | disable}
Enable to keep trying to negotiate an IKE SA even if the link is down. The primary use of this feature is in cases where there are multiple redundant tunnels and you prefer the primary connection if it can be established.
enable
dhgrp {1 2 5 14} Type 1, 2, 5 and/or 14 to select one or more Diffie-Hellman groups from DH group 1, 2, 5 and 14 respectively. At least one of the DH group settings on the remote peer or client must be identical to one of the selections on the FortiGate unit.
5
distance <int> Configure the administrative distance for routes added when a dialup IPSec connection is established. Using administrative distance you can specify the relative priorities of different routes to the same destination. A lower administrative distance indicates a more preferred route. Distance can be an integer from 1-255. See also router static “distance <distance>” on page 346.
1
dpd {disable | enable} Enable or disable DPD (Dead Peer Detection). DPD detects the status of the connection between VPN peers. Enabling DPD facilitates cleaning up dead connections and establishing new VPN tunnels. DPD is not supported by all vendors and is not used unless DPD is supported and enabled by both VPN peers.
enable
ortiOS 4.0 MR3 CLI Reference1-431-99686-20110623 583ttp://docs.fortinet.com/ • Feedback
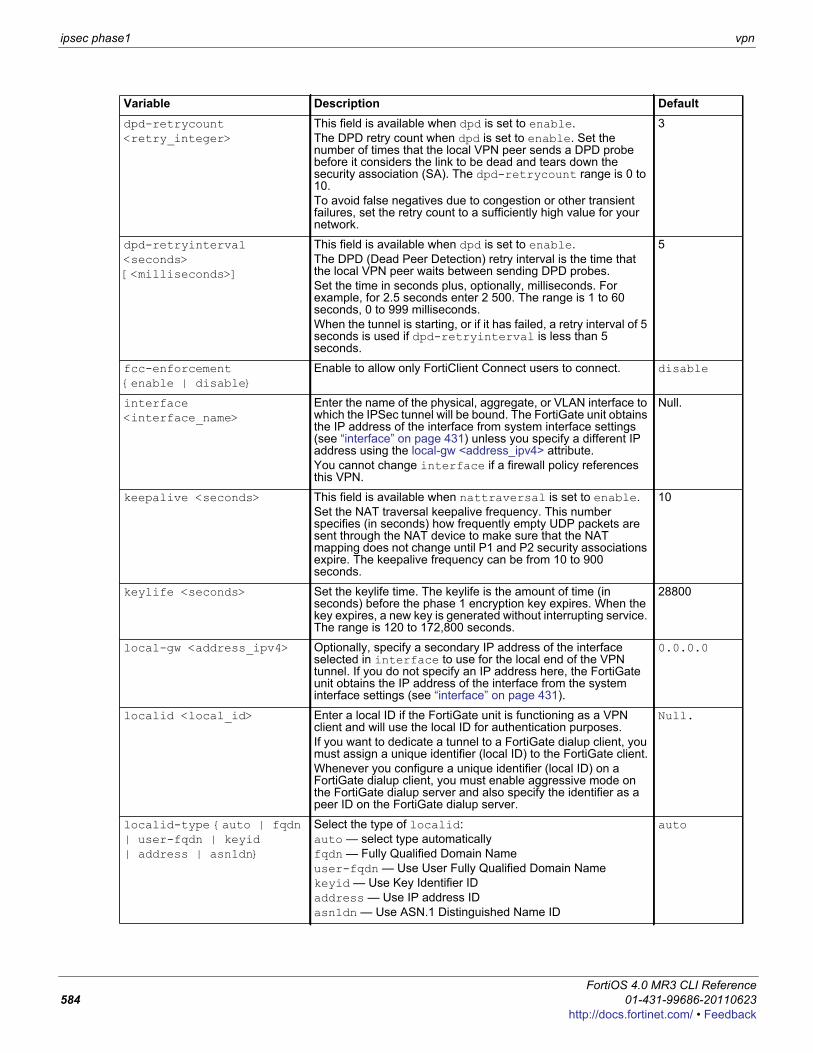
ipsec phase1 vpn
dpd-retrycount <retry_integer>
This field is available when dpd is set to enable.The DPD retry count when dpd is set to enable. Set the number of times that the local VPN peer sends a DPD probe before it considers the link to be dead and tears down the security association (SA). The dpd-retrycount range is 0 to 10.To avoid false negatives due to congestion or other transient failures, set the retry count to a sufficiently high value for your network.
3
dpd-retryinterval <seconds> [<milliseconds>]
This field is available when dpd is set to enable.The DPD (Dead Peer Detection) retry interval is the time that the local VPN peer waits between sending DPD probes. Set the time in seconds plus, optionally, milliseconds. For example, for 2.5 seconds enter 2 500. The range is 1 to 60 seconds, 0 to 999 milliseconds.When the tunnel is starting, or if it has failed, a retry interval of 5 seconds is used if dpd-retryinterval is less than 5 seconds.
5
fcc-enforcement {enable | disable}
Enable to allow only FortiClient Connect users to connect. disable
interface <interface_name>
Enter the name of the physical, aggregate, or VLAN interface to which the IPSec tunnel will be bound. The FortiGate unit obtains the IP address of the interface from system interface settings (see “interface” on page 431) unless you specify a different IP address using the local-gw <address_ipv4> attribute.You cannot change interface if a firewall policy references this VPN.
Null.
keepalive <seconds> This field is available when nattraversal is set to enable.Set the NAT traversal keepalive frequency. This number specifies (in seconds) how frequently empty UDP packets are sent through the NAT device to make sure that the NAT mapping does not change until P1 and P2 security associations expire. The keepalive frequency can be from 10 to 900 seconds.
10
keylife <seconds> Set the keylife time. The keylife is the amount of time (in seconds) before the phase 1 encryption key expires. When the key expires, a new key is generated without interrupting service. The range is 120 to 172,800 seconds.
28800
local-gw <address_ipv4> Optionally, specify a secondary IP address of the interface selected in interface to use for the local end of the VPN tunnel. If you do not specify an IP address here, the FortiGate unit obtains the IP address of the interface from the system interface settings (see “interface” on page 431).
0.0.0.0
localid <local_id> Enter a local ID if the FortiGate unit is functioning as a VPN client and will use the local ID for authentication purposes. If you want to dedicate a tunnel to a FortiGate dialup client, you must assign a unique identifier (local ID) to the FortiGate client.Whenever you configure a unique identifier (local ID) on a FortiGate dialup client, you must enable aggressive mode on the FortiGate dialup server and also specify the identifier as a peer ID on the FortiGate dialup server.
Null.
localid-type {auto | fqdn | user-fqdn | keyid | address | asn1dn}
Select the type of localid: auto — select type automaticallyfqdn — Fully Qualified Domain Nameuser-fqdn — Use User Fully Qualified Domain Namekeyid — Use Key Identifier IDaddress — Use IP address IDasn1dn — Use ASN.1 Distinguished Name ID
auto
Variable Description Default
FortiOS 4.0 MR3 CLI Reference584 01-431-99686-20110623
http://docs.fortinet.com/ • Feedback

vpn ipsec phase1
F0h
mode {aggressive | main} Enter aggressive or main (ID Protection) mode. Both modes establish a secure channel. In main mode, identifying information is hidden. Main mode is typically used when both VPN peers have static IP addresses. In aggressive mode, identifying information is exchanged in the clear. When the remote VPN peer or client has a dynamic IP address, or the remote VPN peer or client will be authenticated using an identifier (local ID), you must select Aggressive mode if there is more than one dialup phase 1 configuration for the interface IP address.
main
nattraversal {disable | enable}
Enable NAT traversal if you expect the IPSec VPN traffic to go through a gateway that performs NAT. If no NAT device is detected, enabling NAT traversal has no effect. Both ends of the VPN must have the same NAT traversal setting. If you enable NAT traversal you can set the keepalive frequency.
enable
negotiate-timeout <seconds_int>
Enter how long in seconds the FortiGate unit will wait for the IKE SA to be negotiated. Range: 1 to 300 seconds.
30
peer <CA_certificate_name>
This field is available when authmethod is set to rsa-signature and peertype is set to peer.Enter the name of the peer (CA) certificate that will be used to authenticate remote VPN clients or peers. Use the command config user peer to add peer certificates. Peer certificates must be added to the FortiGate configuration before they can be cross-referenced. For more information, see “user peer” on page 544.
Null.
peerid <peer_id> This field is available when peertype is set to one.Enter the peer ID that will be used to authenticate remote clients or peers by peer ID.
Null.
peergrp <certificate_group_name>
This field is available when type is set to dynamic, authmethod is set to rsa-signature, and peertype is set to peergrp.Enter the name of the peer certificate group that will be used to authenticate remote clients or peers. You must create the peer certificate group before the group name can be cross-referenced. For more information, see “user peergrp” on page 546.
Null.
Variable Description Default
ortiOS 4.0 MR3 CLI Reference1-431-99686-20110623 585ttp://docs.fortinet.com/ • Feedback
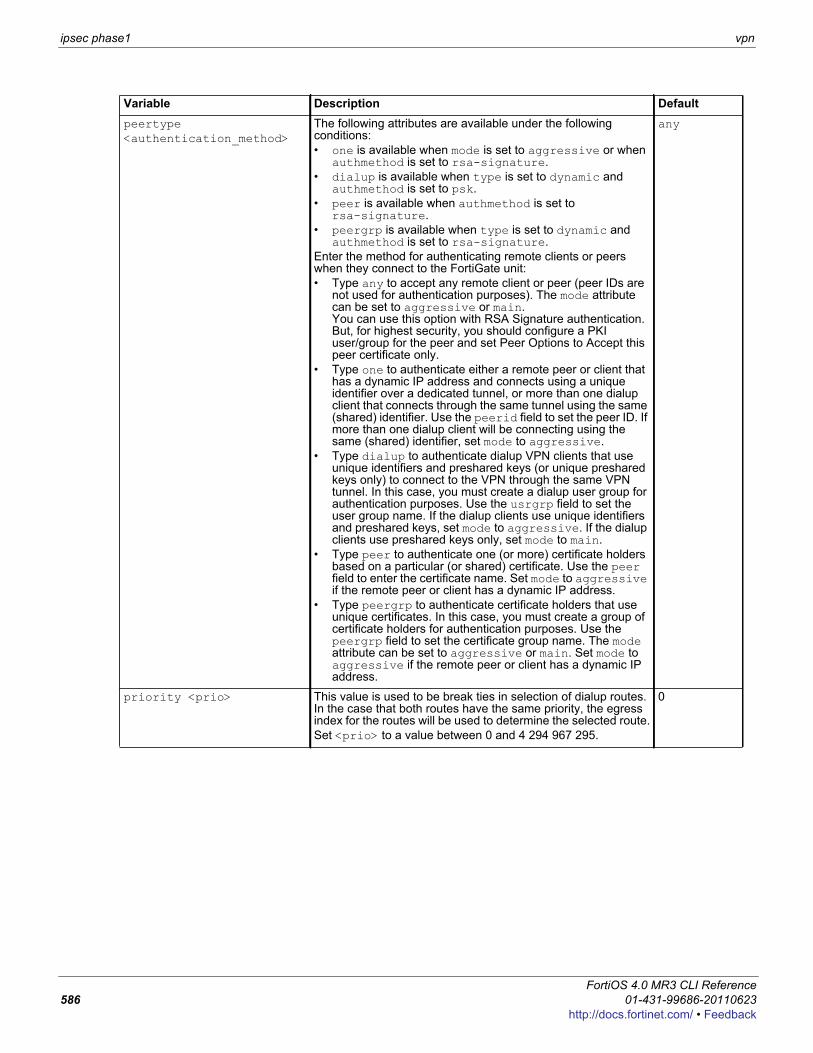
ipsec phase1 vpn
peertype <authentication_method>
The following attributes are available under the following conditions:• one is available when mode is set to aggressive or when
authmethod is set to rsa-signature.• dialup is available when type is set to dynamic and
authmethod is set to psk.• peer is available when authmethod is set to
rsa-signature.• peergrp is available when type is set to dynamic and
authmethod is set to rsa-signature.Enter the method for authenticating remote clients or peers when they connect to the FortiGate unit:• Type any to accept any remote client or peer (peer IDs are
not used for authentication purposes). The mode attribute can be set to aggressive or main. You can use this option with RSA Signature authentication. But, for highest security, you should configure a PKI user/group for the peer and set Peer Options to Accept this peer certificate only.
• Type one to authenticate either a remote peer or client that has a dynamic IP address and connects using a unique identifier over a dedicated tunnel, or more than one dialup client that connects through the same tunnel using the same (shared) identifier. Use the peerid field to set the peer ID. If more than one dialup client will be connecting using the same (shared) identifier, set mode to aggressive.
• Type dialup to authenticate dialup VPN clients that use unique identifiers and preshared keys (or unique preshared keys only) to connect to the VPN through the same VPN tunnel. In this case, you must create a dialup user group for authentication purposes. Use the usrgrp field to set the user group name. If the dialup clients use unique identifiers and preshared keys, set mode to aggressive. If the dialup clients use preshared keys only, set mode to main.
• Type peer to authenticate one (or more) certificate holders based on a particular (or shared) certificate. Use the peer field to enter the certificate name. Set mode to aggressive if the remote peer or client has a dynamic IP address.
• Type peergrp to authenticate certificate holders that use unique certificates. In this case, you must create a group of certificate holders for authentication purposes. Use the peergrp field to set the certificate group name. The mode attribute can be set to aggressive or main. Set mode to aggressive if the remote peer or client has a dynamic IP address.
any
priority <prio> This value is used to be break ties in selection of dialup routes. In the case that both routes have the same priority, the egress index for the routes will be used to determine the selected route.Set <prio> to a value between 0 and 4 294 967 295.
0
Variable Description Default
FortiOS 4.0 MR3 CLI Reference586 01-431-99686-20110623
http://docs.fortinet.com/ • Feedback
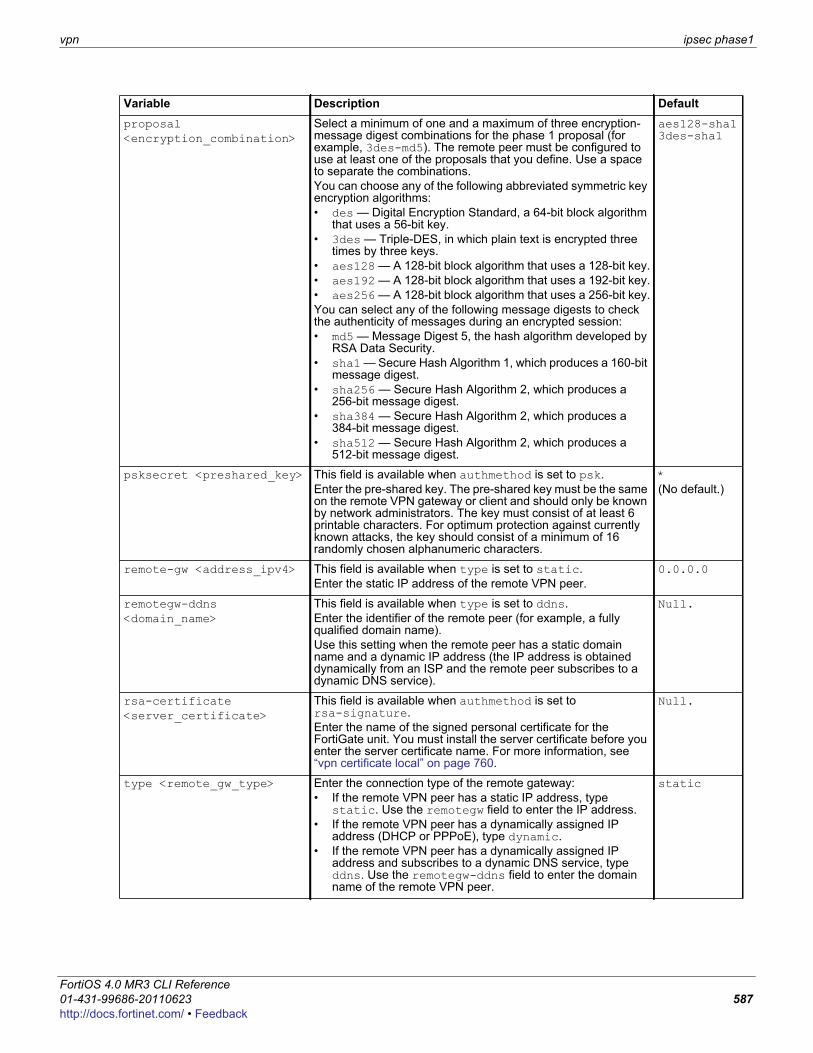
vpn ipsec phase1
F0h
proposal <encryption_combination>
Select a minimum of one and a maximum of three encryption-message digest combinations for the phase 1 proposal (for example, 3des-md5). The remote peer must be configured to use at least one of the proposals that you define. Use a space to separate the combinations.You can choose any of the following abbreviated symmetric key encryption algorithms:• des — Digital Encryption Standard, a 64-bit block algorithm
that uses a 56-bit key.• 3des — Triple-DES, in which plain text is encrypted three
times by three keys.• aes128 — A 128-bit block algorithm that uses a 128-bit key.• aes192 — A 128-bit block algorithm that uses a 192-bit key.• aes256 — A 128-bit block algorithm that uses a 256-bit key.You can select any of the following message digests to check the authenticity of messages during an encrypted session:• md5 — Message Digest 5, the hash algorithm developed by
RSA Data Security.• sha1 — Secure Hash Algorithm 1, which produces a 160-bit
message digest.• sha256 — Secure Hash Algorithm 2, which produces a
256-bit message digest.• sha384 — Secure Hash Algorithm 2, which produces a
384-bit message digest.• sha512 — Secure Hash Algorithm 2, which produces a
512-bit message digest.
aes128-sha1 3des-sha1
psksecret <preshared_key> This field is available when authmethod is set to psk.Enter the pre-shared key. The pre-shared key must be the same on the remote VPN gateway or client and should only be known by network administrators. The key must consist of at least 6 printable characters. For optimum protection against currently known attacks, the key should consist of a minimum of 16 randomly chosen alphanumeric characters.
*(No default.)
remote-gw <address_ipv4> This field is available when type is set to static.Enter the static IP address of the remote VPN peer.
0.0.0.0
remotegw-ddns <domain_name>
This field is available when type is set to ddns.Enter the identifier of the remote peer (for example, a fully qualified domain name).Use this setting when the remote peer has a static domain name and a dynamic IP address (the IP address is obtained dynamically from an ISP and the remote peer subscribes to a dynamic DNS service).
Null.
rsa-certificate <server_certificate>
This field is available when authmethod is set to rsa-signature.Enter the name of the signed personal certificate for the FortiGate unit. You must install the server certificate before you enter the server certificate name. For more information, see “vpn certificate local” on page 760.
Null.
type <remote_gw_type> Enter the connection type of the remote gateway:• If the remote VPN peer has a static IP address, type
static. Use the remotegw field to enter the IP address.• If the remote VPN peer has a dynamically assigned IP
address (DHCP or PPPoE), type dynamic. • If the remote VPN peer has a dynamically assigned IP
address and subscribes to a dynamic DNS service, type ddns. Use the remotegw-ddns field to enter the domain name of the remote VPN peer.
static
Variable Description Default
ortiOS 4.0 MR3 CLI Reference1-431-99686-20110623 587ttp://docs.fortinet.com/ • Feedback
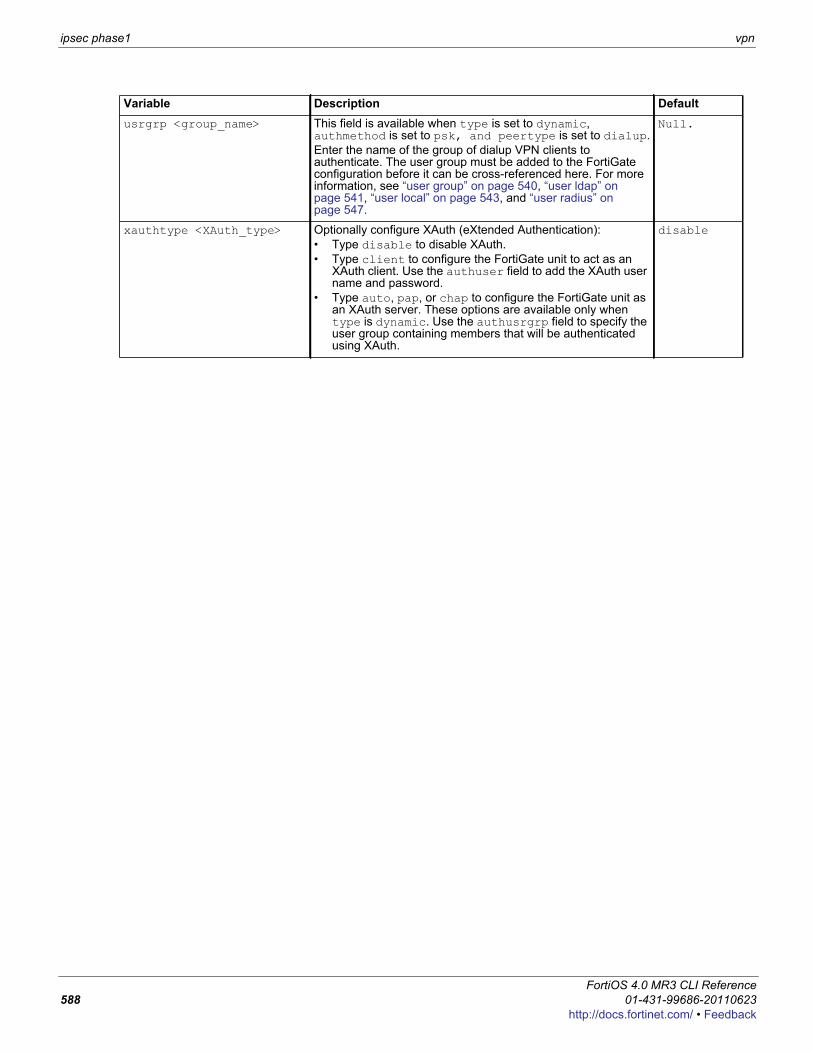
ipsec phase1 vpn
usrgrp <group_name> This field is available when type is set to dynamic, authmethod is set to psk, and peertype is set to dialup.Enter the name of the group of dialup VPN clients to authenticate. The user group must be added to the FortiGate configuration before it can be cross-referenced here. For more information, see “user group” on page 540, “user ldap” on page 541, “user local” on page 543, and “user radius” on page 547.
Null.
xauthtype <XAuth_type> Optionally configure XAuth (eXtended Authentication):• Type disable to disable XAuth.• Type client to configure the FortiGate unit to act as an
XAuth client. Use the authuser field to add the XAuth user name and password.
• Type auto, pap, or chap to configure the FortiGate unit as an XAuth server. These options are available only when type is dynamic. Use the authusrgrp field to specify the user group containing members that will be authenticated using XAuth.
disable
Variable Description Default
FortiOS 4.0 MR3 CLI Reference588 01-431-99686-20110623
http://docs.fortinet.com/ • Feedback

vpn ipsec phase1-interface
F0h
ipsec phase1-interfaceUse this command to define a phase 1 definition for a route-based (interface mode) IPSec VPN tunnel that generates authentication and encryption keys automatically. A new interface of type “tunnel” with the same name is created automatically as the local end of the tunnel.Optionally, you can create a route-based phase 1 definition to act as a backup for another IPSec interface. See the monitor-phase1 <phase1> field.To complete the configuration of an IPSec tunnel, you need to:• configure phase 2 settings (see “ipsec phase2-interface” on page 604)• configure a firewall policy to pass traffic from the local private network to the tunnel interface• configure a static route via the IPSec interface to the private network at the remote end of the tunnel• optionally, define the IP addresses for each end of the tunnel to enable dynamic routing through the
tunnel or to enable pinging of each end of the tunnel for testing
Syntaxconfig vpn ipsec phase1-interfaceedit <gateway_name>set add-gw-route {enable | disable}set add-route {enable | disable}set assign-ip {enable | disable}set assign-ip-from {range | usrgrp}set assign-ip-type {ip | subnet}set authmethod <authentication_method>set authpasswd <password>set authusr <user_name>set authusrgrp <group_name>set auto-negotiate {enable | disable}set banner <string>set default-gw <gw_ip>set default-gw-priority <int>set dhgrp {1 2 5 14}set distance <int>set dns-mode {auto | manual}set domain <string>set dpd {disable | enable}set dpd-retrycount <retry_integer>set dpd-retryinterval <seconds> [<milliseconds]set fcc-enforcement {enable | disable}set ike-version {1 | 2}set interface <interface_name>set ip-version <4 | 6>set ipv4-dns-server1set ipv6-dns-server1set ipv4-dns-server2set ipv6-dns-server2set ipv4-dns-server3set ipv6-dns-server3set ipv4-end-ip <ip4addr>set ipv6-end-ip <ip6addr>set ipv4-netmask <ip4mask>set ipv4-split-include <address_name>
ortiOS 4.0 MR3 CLI Reference1-431-99686-20110623 589ttp://docs.fortinet.com/ • Feedback
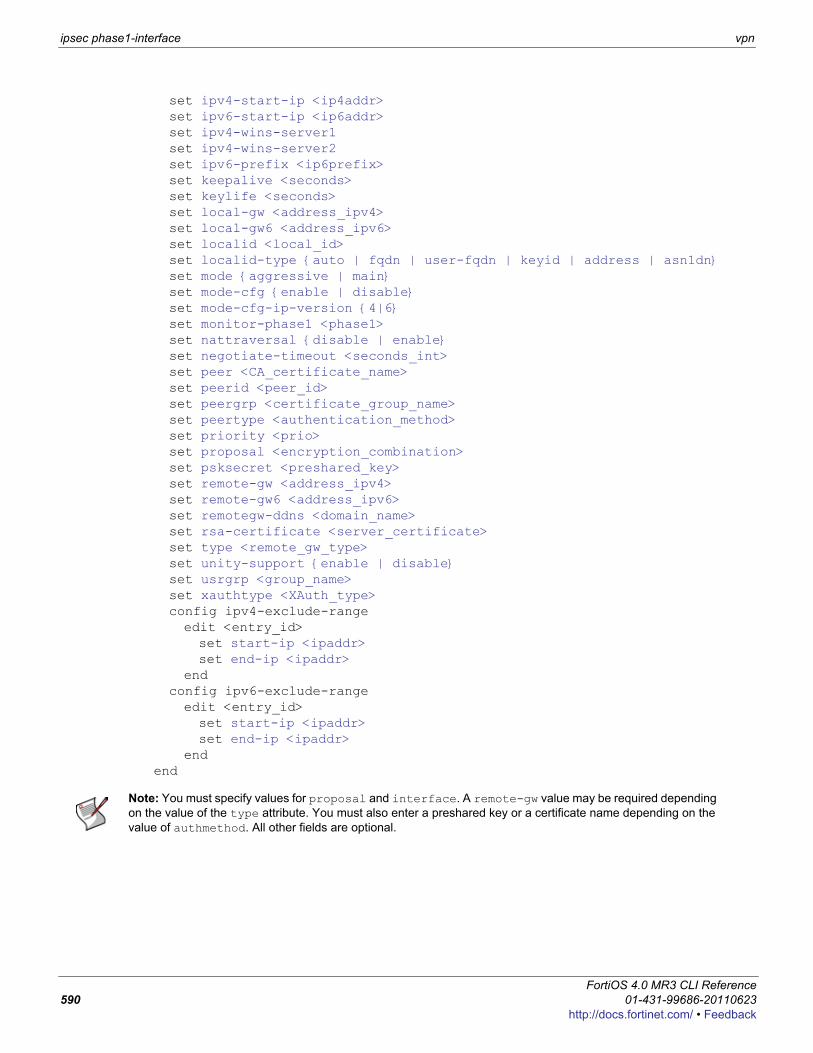
ipsec phase1-interface vpn
set ipv4-start-ip <ip4addr>set ipv6-start-ip <ip6addr>set ipv4-wins-server1set ipv4-wins-server2set ipv6-prefix <ip6prefix>set keepalive <seconds>set keylife <seconds>set local-gw <address_ipv4>set local-gw6 <address_ipv6>set localid <local_id>set localid-type {auto | fqdn | user-fqdn | keyid | address | asn1dn}set mode {aggressive | main}set mode-cfg {enable | disable}set mode-cfg-ip-version {4|6}set monitor-phase1 <phase1>set nattraversal {disable | enable}set negotiate-timeout <seconds_int>set peer <CA_certificate_name>set peerid <peer_id>set peergrp <certificate_group_name>set peertype <authentication_method>set priority <prio>set proposal <encryption_combination>set psksecret <preshared_key>set remote-gw <address_ipv4>set remote-gw6 <address_ipv6>set remotegw-ddns <domain_name>set rsa-certificate <server_certificate>set type <remote_gw_type>set unity-support {enable | disable}set usrgrp <group_name>set xauthtype <XAuth_type>config ipv4-exclude-rangeedit <entry_id>set start-ip <ipaddr>set end-ip <ipaddr>
endconfig ipv6-exclude-rangeedit <entry_id>set start-ip <ipaddr>set end-ip <ipaddr>
endend
Note: You must specify values for proposal and interface. A remote-gw value may be required depending on the value of the type attribute. You must also enter a preshared key or a certificate name depending on the value of authmethod. All other fields are optional.
FortiOS 4.0 MR3 CLI Reference590 01-431-99686-20110623
http://docs.fortinet.com/ • Feedback
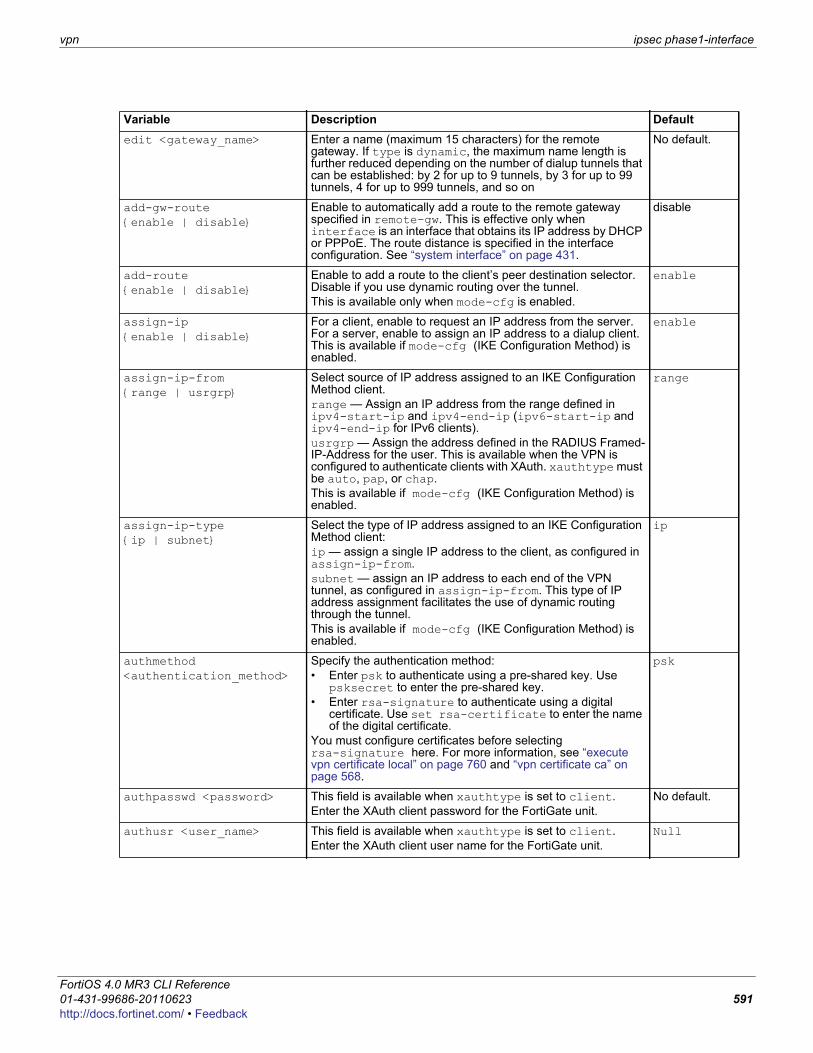
vpn ipsec phase1-interface
F0h
Variable Description Defaultedit <gateway_name> Enter a name (maximum 15 characters) for the remote
gateway. If type is dynamic, the maximum name length is further reduced depending on the number of dialup tunnels that can be established: by 2 for up to 9 tunnels, by 3 for up to 99 tunnels, 4 for up to 999 tunnels, and so on
No default.
add-gw-route {enable | disable}
Enable to automatically add a route to the remote gateway specified in remote-gw. This is effective only when interface is an interface that obtains its IP address by DHCP or PPPoE. The route distance is specified in the interface configuration. See “system interface” on page 431.
disable
add-route {enable | disable}
Enable to add a route to the client’s peer destination selector. Disable if you use dynamic routing over the tunnel.This is available only when mode-cfg is enabled.
enable
assign-ip {enable | disable}
For a client, enable to request an IP address from the server. For a server, enable to assign an IP address to a dialup client. This is available if mode-cfg (IKE Configuration Method) is enabled.
enable
assign-ip-from {range | usrgrp}
Select source of IP address assigned to an IKE Configuration Method client.range — Assign an IP address from the range defined in ipv4-start-ip and ipv4-end-ip (ipv6-start-ip and ipv4-end-ip for IPv6 clients).usrgrp — Assign the address defined in the RADIUS Framed-IP-Address for the user. This is available when the VPN is configured to authenticate clients with XAuth. xauthtype must be auto, pap, or chap.This is available if mode-cfg (IKE Configuration Method) is enabled.
range
assign-ip-type {ip | subnet}
Select the type of IP address assigned to an IKE Configuration Method client:ip — assign a single IP address to the client, as configured in assign-ip-from. subnet — assign an IP address to each end of the VPN tunnel, as configured in assign-ip-from. This type of IP address assignment facilitates the use of dynamic routing through the tunnel.This is available if mode-cfg (IKE Configuration Method) is enabled.
ip
authmethod <authentication_method>
Specify the authentication method:• Enter psk to authenticate using a pre-shared key. Use
psksecret to enter the pre-shared key.• Enter rsa-signature to authenticate using a digital
certificate. Use set rsa-certificate to enter the name of the digital certificate.
You must configure certificates before selecting rsa-signature here. For more information, see “execute vpn certificate local” on page 760 and “vpn certificate ca” on page 568.
psk
authpasswd <password> This field is available when xauthtype is set to client.Enter the XAuth client password for the FortiGate unit.
No default.
authusr <user_name> This field is available when xauthtype is set to client.Enter the XAuth client user name for the FortiGate unit.
Null
ortiOS 4.0 MR3 CLI Reference1-431-99686-20110623 591ttp://docs.fortinet.com/ • Feedback
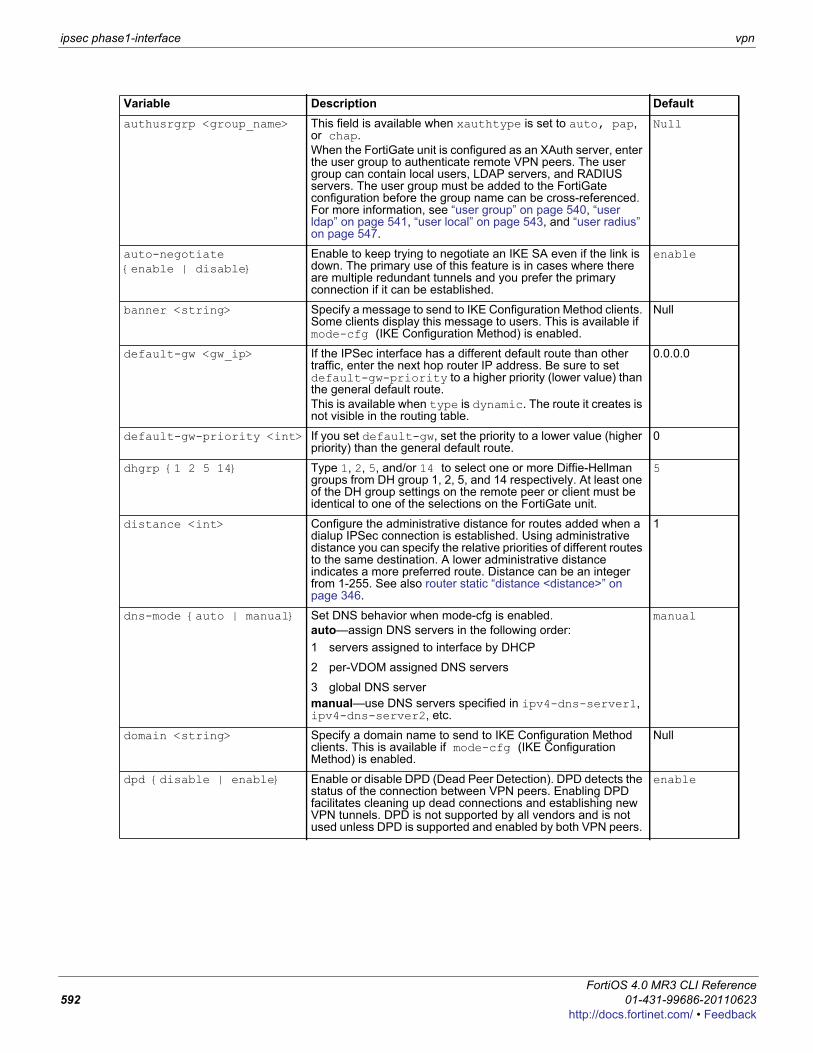
ipsec phase1-interface vpn
authusrgrp <group_name> This field is available when xauthtype is set to auto, pap, or chap.When the FortiGate unit is configured as an XAuth server, enter the user group to authenticate remote VPN peers. The user group can contain local users, LDAP servers, and RADIUS servers. The user group must be added to the FortiGate configuration before the group name can be cross-referenced. For more information, see “user group” on page 540, “user ldap” on page 541, “user local” on page 543, and “user radius” on page 547.
Null
auto-negotiate {enable | disable}
Enable to keep trying to negotiate an IKE SA even if the link is down. The primary use of this feature is in cases where there are multiple redundant tunnels and you prefer the primary connection if it can be established.
enable
banner <string> Specify a message to send to IKE Configuration Method clients. Some clients display this message to users. This is available if mode-cfg (IKE Configuration Method) is enabled.
Null
default-gw <gw_ip> If the IPSec interface has a different default route than other traffic, enter the next hop router IP address. Be sure to set default-gw-priority to a higher priority (lower value) than the general default route.This is available when type is dynamic. The route it creates is not visible in the routing table.
0.0.0.0
default-gw-priority <int> If you set default-gw, set the priority to a lower value (higher priority) than the general default route.
0
dhgrp {1 2 5 14} Type 1, 2, 5, and/or 14 to select one or more Diffie-Hellman groups from DH group 1, 2, 5, and 14 respectively. At least one of the DH group settings on the remote peer or client must be identical to one of the selections on the FortiGate unit.
5
distance <int> Configure the administrative distance for routes added when a dialup IPSec connection is established. Using administrative distance you can specify the relative priorities of different routes to the same destination. A lower administrative distance indicates a more preferred route. Distance can be an integer from 1-255. See also router static “distance <distance>” on page 346.
1
dns-mode {auto | manual} Set DNS behavior when mode-cfg is enabled.auto—assign DNS servers in the following order:1 servers assigned to interface by DHCP
2 per-VDOM assigned DNS servers
3 global DNS servermanual—use DNS servers specified in ipv4-dns-server1, ipv4-dns-server2, etc.
manual
domain <string> Specify a domain name to send to IKE Configuration Method clients. This is available if mode-cfg (IKE Configuration Method) is enabled.
Null
dpd {disable | enable} Enable or disable DPD (Dead Peer Detection). DPD detects the status of the connection between VPN peers. Enabling DPD facilitates cleaning up dead connections and establishing new VPN tunnels. DPD is not supported by all vendors and is not used unless DPD is supported and enabled by both VPN peers.
enable
Variable Description Default
FortiOS 4.0 MR3 CLI Reference592 01-431-99686-20110623
http://docs.fortinet.com/ • Feedback
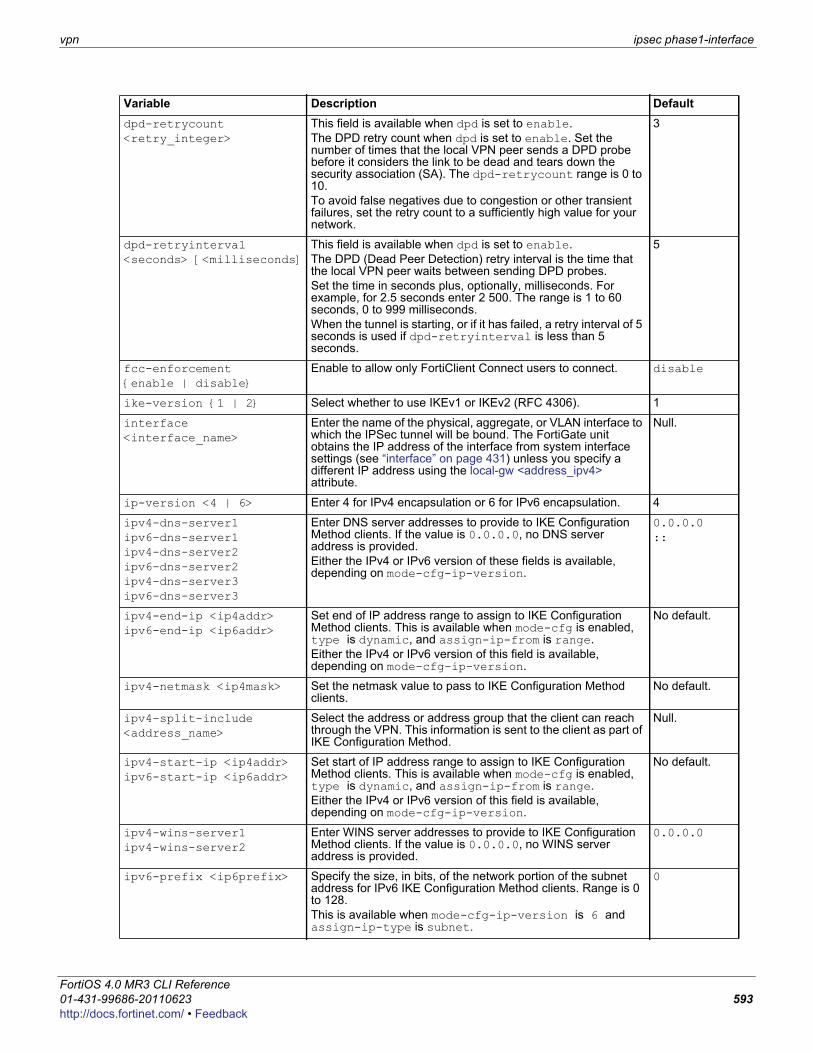
vpn ipsec phase1-interface
F0h
dpd-retrycount <retry_integer>
This field is available when dpd is set to enable.The DPD retry count when dpd is set to enable. Set the number of times that the local VPN peer sends a DPD probe before it considers the link to be dead and tears down the security association (SA). The dpd-retrycount range is 0 to 10.To avoid false negatives due to congestion or other transient failures, set the retry count to a sufficiently high value for your network.
3
dpd-retryinterval <seconds> [<milliseconds]
This field is available when dpd is set to enable.The DPD (Dead Peer Detection) retry interval is the time that the local VPN peer waits between sending DPD probes. Set the time in seconds plus, optionally, milliseconds. For example, for 2.5 seconds enter 2 500. The range is 1 to 60 seconds, 0 to 999 milliseconds.When the tunnel is starting, or if it has failed, a retry interval of 5 seconds is used if dpd-retryinterval is less than 5 seconds.
5
fcc-enforcement {enable | disable}
Enable to allow only FortiClient Connect users to connect. disable
ike-version {1 | 2} Select whether to use IKEv1 or IKEv2 (RFC 4306). 1
interface <interface_name>
Enter the name of the physical, aggregate, or VLAN interface to which the IPSec tunnel will be bound. The FortiGate unit obtains the IP address of the interface from system interface settings (see “interface” on page 431) unless you specify a different IP address using the local-gw <address_ipv4> attribute.
Null.
ip-version <4 | 6> Enter 4 for IPv4 encapsulation or 6 for IPv6 encapsulation. 4
ipv4-dns-server1ipv6-dns-server1ipv4-dns-server2ipv6-dns-server2ipv4-dns-server3ipv6-dns-server3
Enter DNS server addresses to provide to IKE Configuration Method clients. If the value is 0.0.0.0, no DNS server address is provided.Either the IPv4 or IPv6 version of these fields is available, depending on mode-cfg-ip-version.
0.0.0.0::
ipv4-end-ip <ip4addr>ipv6-end-ip <ip6addr>
Set end of IP address range to assign to IKE Configuration Method clients. This is available when mode-cfg is enabled, type is dynamic, and assign-ip-from is range.Either the IPv4 or IPv6 version of this field is available, depending on mode-cfg-ip-version.
No default.
ipv4-netmask <ip4mask> Set the netmask value to pass to IKE Configuration Method clients.
No default.
ipv4-split-include <address_name>
Select the address or address group that the client can reach through the VPN. This information is sent to the client as part of IKE Configuration Method.
Null.
ipv4-start-ip <ip4addr>ipv6-start-ip <ip6addr>
Set start of IP address range to assign to IKE Configuration Method clients. This is available when mode-cfg is enabled, type is dynamic, and assign-ip-from is range.Either the IPv4 or IPv6 version of this field is available, depending on mode-cfg-ip-version.
No default.
ipv4-wins-server1ipv4-wins-server2
Enter WINS server addresses to provide to IKE Configuration Method clients. If the value is 0.0.0.0, no WINS server address is provided.
0.0.0.0
ipv6-prefix <ip6prefix> Specify the size, in bits, of the network portion of the subnet address for IPv6 IKE Configuration Method clients. Range is 0 to 128.This is available when mode-cfg-ip-version is 6 and assign-ip-type is subnet.
0
Variable Description Default
ortiOS 4.0 MR3 CLI Reference1-431-99686-20110623 593ttp://docs.fortinet.com/ • Feedback
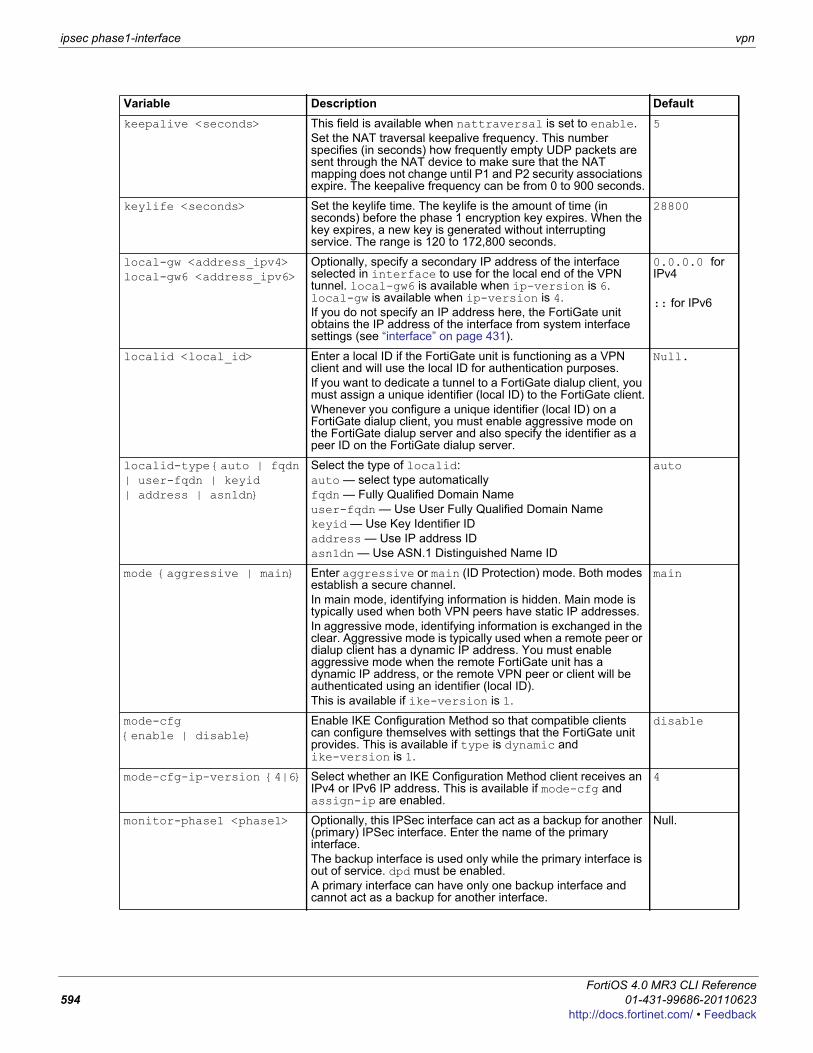
ipsec phase1-interface vpn
keepalive <seconds> This field is available when nattraversal is set to enable.Set the NAT traversal keepalive frequency. This number specifies (in seconds) how frequently empty UDP packets are sent through the NAT device to make sure that the NAT mapping does not change until P1 and P2 security associations expire. The keepalive frequency can be from 0 to 900 seconds.
5
keylife <seconds> Set the keylife time. The keylife is the amount of time (in seconds) before the phase 1 encryption key expires. When the key expires, a new key is generated without interrupting service. The range is 120 to 172,800 seconds.
28800
local-gw <address_ipv4>local-gw6 <address_ipv6>
Optionally, specify a secondary IP address of the interface selected in interface to use for the local end of the VPN tunnel. local-gw6 is available when ip-version is 6. local-gw is available when ip-version is 4. If you do not specify an IP address here, the FortiGate unit obtains the IP address of the interface from system interface settings (see “interface” on page 431).
0.0.0.0 for IPv4
:: for IPv6
localid <local_id> Enter a local ID if the FortiGate unit is functioning as a VPN client and will use the local ID for authentication purposes. If you want to dedicate a tunnel to a FortiGate dialup client, you must assign a unique identifier (local ID) to the FortiGate client.Whenever you configure a unique identifier (local ID) on a FortiGate dialup client, you must enable aggressive mode on the FortiGate dialup server and also specify the identifier as a peer ID on the FortiGate dialup server.
Null.
localid-type {auto | fqdn | user-fqdn | keyid | address | asn1dn}
Select the type of localid: auto — select type automaticallyfqdn — Fully Qualified Domain Nameuser-fqdn — Use User Fully Qualified Domain Namekeyid — Use Key Identifier IDaddress — Use IP address IDasn1dn — Use ASN.1 Distinguished Name ID
auto
mode {aggressive | main} Enter aggressive or main (ID Protection) mode. Both modes establish a secure channel. In main mode, identifying information is hidden. Main mode is typically used when both VPN peers have static IP addresses. In aggressive mode, identifying information is exchanged in the clear. Aggressive mode is typically used when a remote peer or dialup client has a dynamic IP address. You must enable aggressive mode when the remote FortiGate unit has a dynamic IP address, or the remote VPN peer or client will be authenticated using an identifier (local ID).This is available if ike-version is 1.
main
mode-cfg {enable | disable}
Enable IKE Configuration Method so that compatible clients can configure themselves with settings that the FortiGate unit provides. This is available if type is dynamic and ike-version is 1.
disable
mode-cfg-ip-version {4|6} Select whether an IKE Configuration Method client receives an IPv4 or IPv6 IP address. This is available if mode-cfg and assign-ip are enabled.
4
monitor-phase1 <phase1> Optionally, this IPSec interface can act as a backup for another (primary) IPSec interface. Enter the name of the primary interface. The backup interface is used only while the primary interface is out of service. dpd must be enabled.A primary interface can have only one backup interface and cannot act as a backup for another interface.
Null.
Variable Description Default
FortiOS 4.0 MR3 CLI Reference594 01-431-99686-20110623
http://docs.fortinet.com/ • Feedback
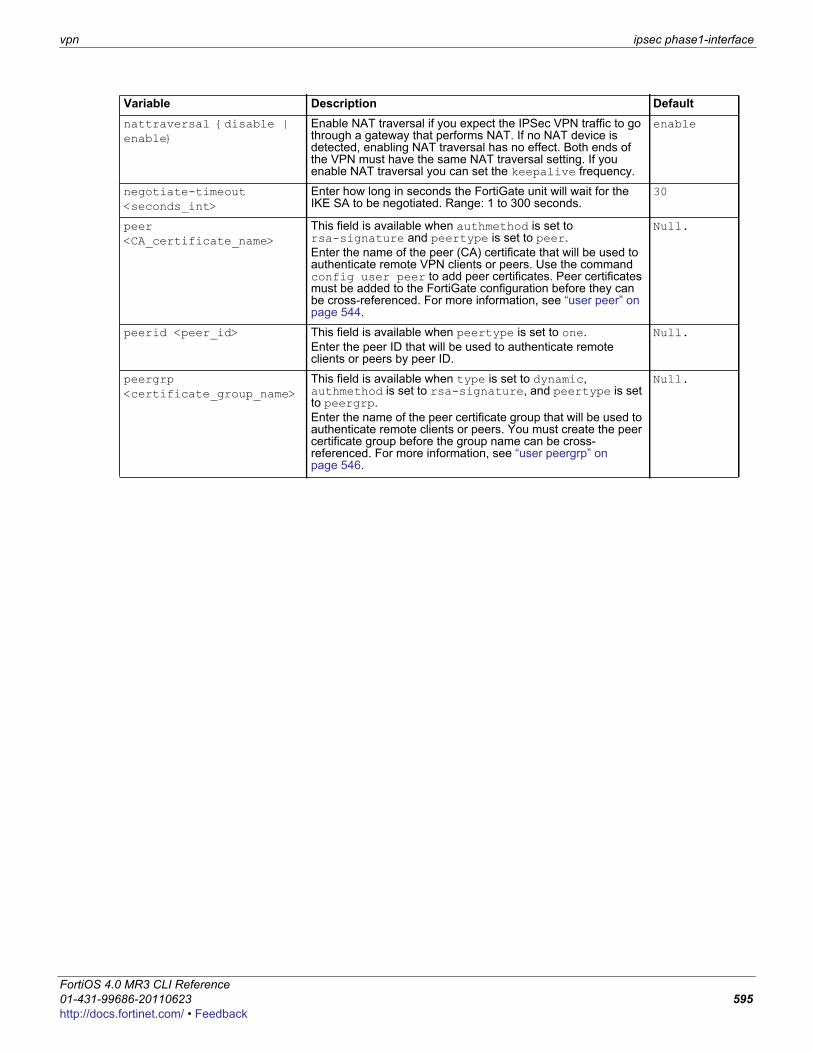
vpn ipsec phase1-interface
F0h
nattraversal {disable | enable}
Enable NAT traversal if you expect the IPSec VPN traffic to go through a gateway that performs NAT. If no NAT device is detected, enabling NAT traversal has no effect. Both ends of the VPN must have the same NAT traversal setting. If you enable NAT traversal you can set the keepalive frequency.
enable
negotiate-timeout <seconds_int>
Enter how long in seconds the FortiGate unit will wait for the IKE SA to be negotiated. Range: 1 to 300 seconds.
30
peer <CA_certificate_name>
This field is available when authmethod is set to rsa-signature and peertype is set to peer.Enter the name of the peer (CA) certificate that will be used to authenticate remote VPN clients or peers. Use the command config user peer to add peer certificates. Peer certificates must be added to the FortiGate configuration before they can be cross-referenced. For more information, see “user peer” on page 544.
Null.
peerid <peer_id> This field is available when peertype is set to one.Enter the peer ID that will be used to authenticate remote clients or peers by peer ID.
Null.
peergrp <certificate_group_name>
This field is available when type is set to dynamic, authmethod is set to rsa-signature, and peertype is set to peergrp.Enter the name of the peer certificate group that will be used to authenticate remote clients or peers. You must create the peer certificate group before the group name can be cross-referenced. For more information, see “user peergrp” on page 546.
Null.
Variable Description Default
ortiOS 4.0 MR3 CLI Reference1-431-99686-20110623 595ttp://docs.fortinet.com/ • Feedback
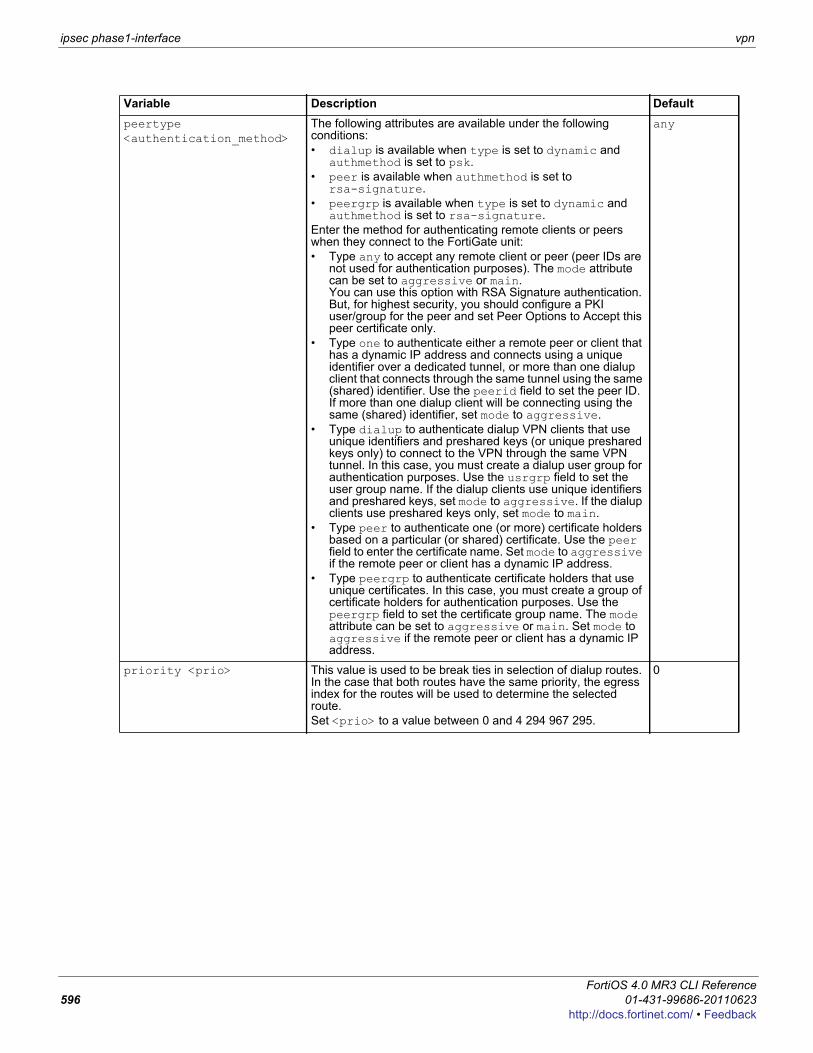
ipsec phase1-interface vpn
peertype <authentication_method>
The following attributes are available under the following conditions:• dialup is available when type is set to dynamic and
authmethod is set to psk.• peer is available when authmethod is set to
rsa-signature.• peergrp is available when type is set to dynamic and
authmethod is set to rsa-signature.Enter the method for authenticating remote clients or peers when they connect to the FortiGate unit:• Type any to accept any remote client or peer (peer IDs are
not used for authentication purposes). The mode attribute can be set to aggressive or main. You can use this option with RSA Signature authentication. But, for highest security, you should configure a PKI user/group for the peer and set Peer Options to Accept this peer certificate only.
• Type one to authenticate either a remote peer or client that has a dynamic IP address and connects using a unique identifier over a dedicated tunnel, or more than one dialup client that connects through the same tunnel using the same (shared) identifier. Use the peerid field to set the peer ID. If more than one dialup client will be connecting using the same (shared) identifier, set mode to aggressive.
• Type dialup to authenticate dialup VPN clients that use unique identifiers and preshared keys (or unique preshared keys only) to connect to the VPN through the same VPN tunnel. In this case, you must create a dialup user group for authentication purposes. Use the usrgrp field to set the user group name. If the dialup clients use unique identifiers and preshared keys, set mode to aggressive. If the dialup clients use preshared keys only, set mode to main.
• Type peer to authenticate one (or more) certificate holders based on a particular (or shared) certificate. Use the peer field to enter the certificate name. Set mode to aggressive if the remote peer or client has a dynamic IP address.
• Type peergrp to authenticate certificate holders that use unique certificates. In this case, you must create a group of certificate holders for authentication purposes. Use the peergrp field to set the certificate group name. The mode attribute can be set to aggressive or main. Set mode to aggressive if the remote peer or client has a dynamic IP address.
any
priority <prio> This value is used to be break ties in selection of dialup routes. In the case that both routes have the same priority, the egress index for the routes will be used to determine the selected route.Set <prio> to a value between 0 and 4 294 967 295.
0
Variable Description Default
FortiOS 4.0 MR3 CLI Reference596 01-431-99686-20110623
http://docs.fortinet.com/ • Feedback
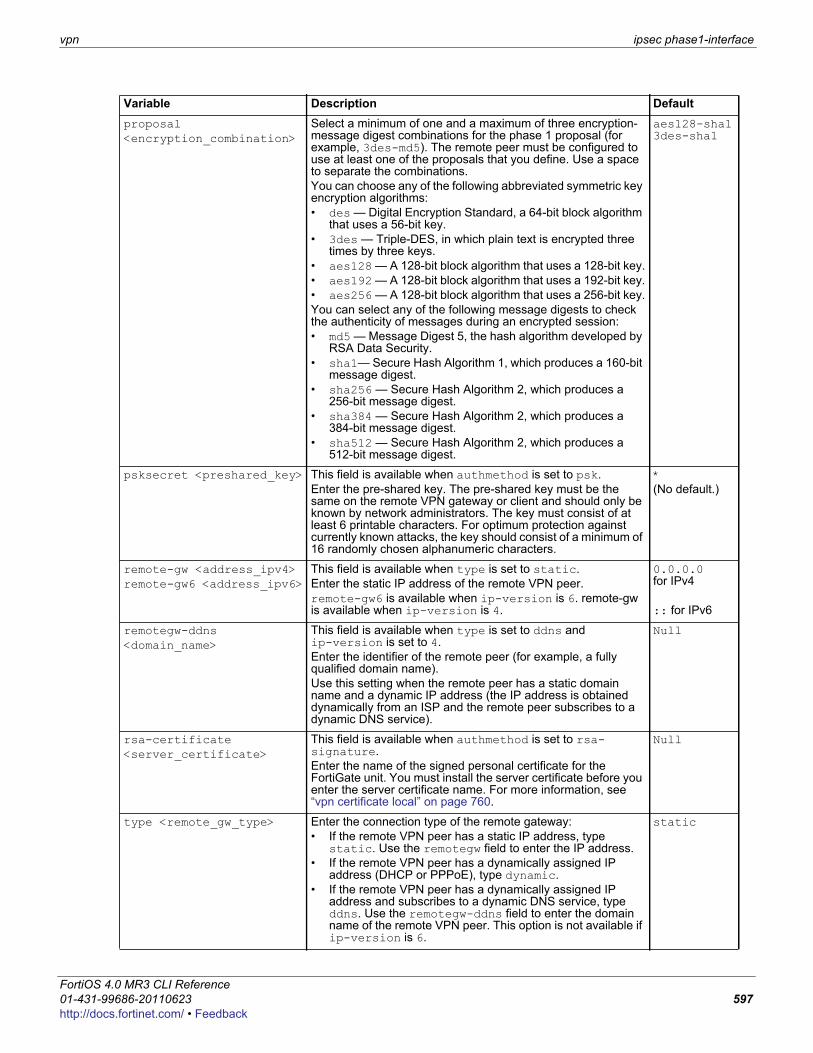
vpn ipsec phase1-interface
F0h
proposal <encryption_combination>
Select a minimum of one and a maximum of three encryption-message digest combinations for the phase 1 proposal (for example, 3des-md5). The remote peer must be configured to use at least one of the proposals that you define. Use a space to separate the combinations.You can choose any of the following abbreviated symmetric key encryption algorithms:• des — Digital Encryption Standard, a 64-bit block algorithm
that uses a 56-bit key.• 3des — Triple-DES, in which plain text is encrypted three
times by three keys.• aes128 — A 128-bit block algorithm that uses a 128-bit key.• aes192 — A 128-bit block algorithm that uses a 192-bit key.• aes256 — A 128-bit block algorithm that uses a 256-bit key.You can select any of the following message digests to check the authenticity of messages during an encrypted session:• md5 — Message Digest 5, the hash algorithm developed by
RSA Data Security.• sha1— Secure Hash Algorithm 1, which produces a 160-bit
message digest.• sha256 — Secure Hash Algorithm 2, which produces a
256-bit message digest.• sha384 — Secure Hash Algorithm 2, which produces a
384-bit message digest.• sha512 — Secure Hash Algorithm 2, which produces a
512-bit message digest.
aes128-sha1 3des-sha1
psksecret <preshared_key> This field is available when authmethod is set to psk.Enter the pre-shared key. The pre-shared key must be the same on the remote VPN gateway or client and should only be known by network administrators. The key must consist of at least 6 printable characters. For optimum protection against currently known attacks, the key should consist of a minimum of 16 randomly chosen alphanumeric characters.
*(No default.)
remote-gw <address_ipv4>remote-gw6 <address_ipv6>
This field is available when type is set to static.Enter the static IP address of the remote VPN peer.remote-gw6 is available when ip-version is 6. remote-gw is available when ip-version is 4.
0.0.0.0 for IPv4
:: for IPv6
remotegw-ddns <domain_name>
This field is available when type is set to ddns and ip-version is set to 4.Enter the identifier of the remote peer (for example, a fully qualified domain name).Use this setting when the remote peer has a static domain name and a dynamic IP address (the IP address is obtained dynamically from an ISP and the remote peer subscribes to a dynamic DNS service).
Null
rsa-certificate <server_certificate>
This field is available when authmethod is set to rsa-signature.Enter the name of the signed personal certificate for the FortiGate unit. You must install the server certificate before you enter the server certificate name. For more information, see “vpn certificate local” on page 760.
Null
type <remote_gw_type> Enter the connection type of the remote gateway:• If the remote VPN peer has a static IP address, type
static. Use the remotegw field to enter the IP address.• If the remote VPN peer has a dynamically assigned IP
address (DHCP or PPPoE), type dynamic. • If the remote VPN peer has a dynamically assigned IP
address and subscribes to a dynamic DNS service, type ddns. Use the remotegw-ddns field to enter the domain name of the remote VPN peer. This option is not available if ip-version is 6.
static
Variable Description Default
ortiOS 4.0 MR3 CLI Reference1-431-99686-20110623 597ttp://docs.fortinet.com/ • Feedback
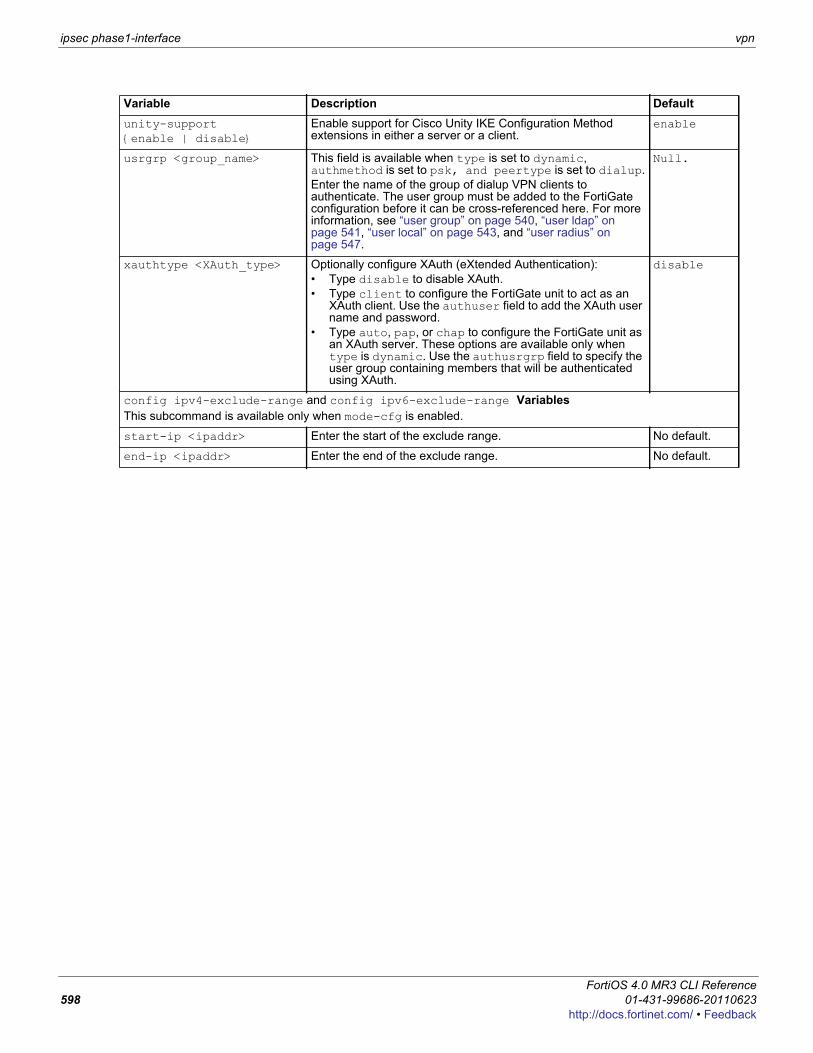
ipsec phase1-interface vpn
unity-support {enable | disable}
Enable support for Cisco Unity IKE Configuration Method extensions in either a server or a client.
enable
usrgrp <group_name> This field is available when type is set to dynamic, authmethod is set to psk, and peertype is set to dialup.Enter the name of the group of dialup VPN clients to authenticate. The user group must be added to the FortiGate configuration before it can be cross-referenced here. For more information, see “user group” on page 540, “user ldap” on page 541, “user local” on page 543, and “user radius” on page 547.
Null.
xauthtype <XAuth_type> Optionally configure XAuth (eXtended Authentication):• Type disable to disable XAuth.• Type client to configure the FortiGate unit to act as an
XAuth client. Use the authuser field to add the XAuth user name and password.
• Type auto, pap, or chap to configure the FortiGate unit as an XAuth server. These options are available only when type is dynamic. Use the authusrgrp field to specify the user group containing members that will be authenticated using XAuth.
disable
config ipv4-exclude-range and config ipv6-exclude-range VariablesThis subcommand is available only when mode-cfg is enabled.
start-ip <ipaddr> Enter the start of the exclude range. No default.
end-ip <ipaddr> Enter the end of the exclude range. No default.
Variable Description Default
FortiOS 4.0 MR3 CLI Reference598 01-431-99686-20110623
http://docs.fortinet.com/ • Feedback
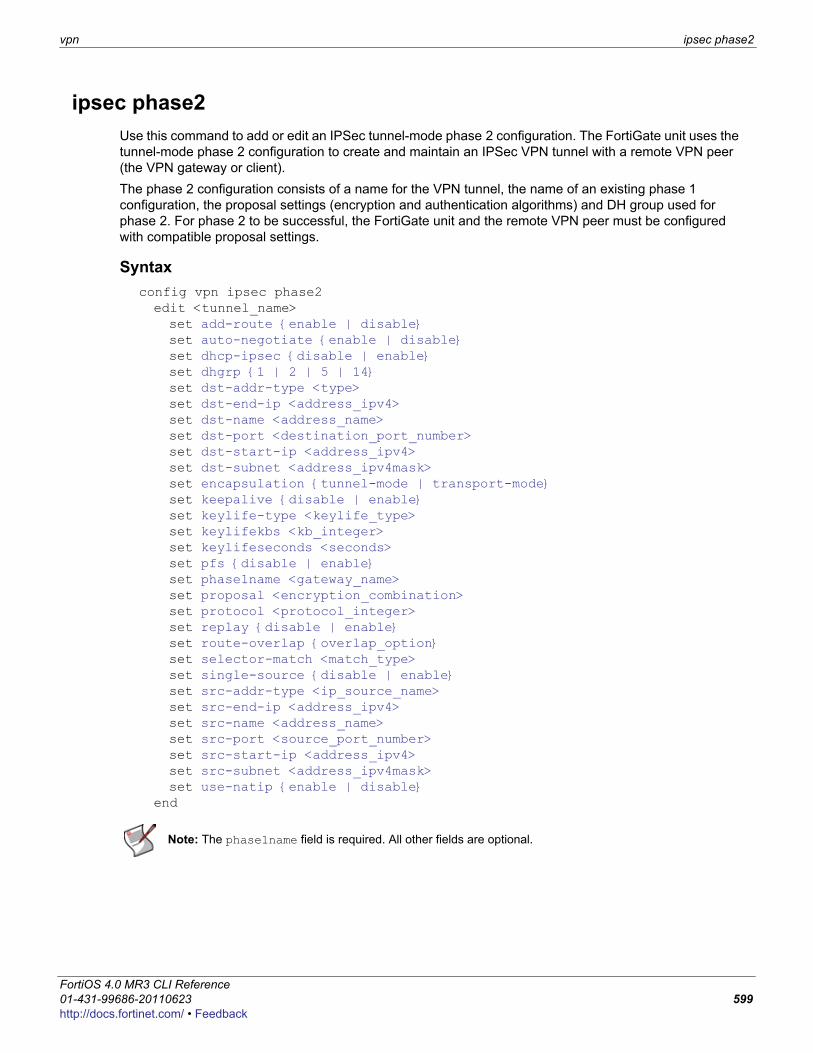
vpn ipsec phase2
F0h
ipsec phase2Use this command to add or edit an IPSec tunnel-mode phase 2 configuration. The FortiGate unit uses the tunnel-mode phase 2 configuration to create and maintain an IPSec VPN tunnel with a remote VPN peer (the VPN gateway or client). The phase 2 configuration consists of a name for the VPN tunnel, the name of an existing phase 1 configuration, the proposal settings (encryption and authentication algorithms) and DH group used for phase 2. For phase 2 to be successful, the FortiGate unit and the remote VPN peer must be configured with compatible proposal settings.
Syntaxconfig vpn ipsec phase2edit <tunnel_name>set add-route {enable | disable}set auto-negotiate {enable | disable}set dhcp-ipsec {disable | enable}set dhgrp {1 | 2 | 5 | 14}set dst-addr-type <type>set dst-end-ip <address_ipv4>set dst-name <address_name>set dst-port <destination_port_number>set dst-start-ip <address_ipv4>set dst-subnet <address_ipv4mask>set encapsulation {tunnel-mode | transport-mode}set keepalive {disable | enable}set keylife-type <keylife_type>set keylifekbs <kb_integer>set keylifeseconds <seconds>set pfs {disable | enable}set phase1name <gateway_name>set proposal <encryption_combination>set protocol <protocol_integer>set replay {disable | enable}set route-overlap {overlap_option}set selector-match <match_type>set single-source {disable | enable}set src-addr-type <ip_source_name>set src-end-ip <address_ipv4>set src-name <address_name>set src-port <source_port_number>set src-start-ip <address_ipv4>set src-subnet <address_ipv4mask>set use-natip {enable | disable}
end
Note: The phase1name field is required. All other fields are optional.
ortiOS 4.0 MR3 CLI Reference1-431-99686-20110623 599ttp://docs.fortinet.com/ • Feedback

ipsec phase2 vpn
Variable Description Defaultedit <tunnel_name> Enter a name for the tunnel. No default.
add-route {enable | disable}
Enable only if you are running a dynamic routing protocol (RIP, OSPF, or BGP) and want the routes to be propagated to routing peers.
disable
auto-negotiate {enable | disable}
Enable to negotiate the phase 2 security association (SA) automatically, even if there is no traffic. This repeats every five seconds until it succeeds.You can use this option on a dialup peer to ensure that the tunnel is available for peers at the server end to initiate traffic to the dialup peer. Otherwise, the tunnel does not exist until the dialup peer initiates traffic.
disable
dhcp-ipsec {disable | enable}
This field is available when phase1name names a dialup gateway configuration.Enable dhcp-ipsec if the FortiGate unit acts as a dialup server and FortiGate DHCP relay will be used to assign VIP addresses to FortiClient dialup clients. The DHCP relay parameters must be configured separately.If you configure the DHCP server to assign IP addresses based on RADIUS user group attributes, you must also set the peertype to dialup and specify the usrgrp in vpn ipsec phase1. For information about how to configure a DHCP server on a FortiGate interface, see “system dhcp server” on page 395. For information about FortiGate DHCP relay, see “system interface” on page 431.If the FortiGate unit acts as a dialup server and you manually assigned FortiClient dialup clients VIP addresses that match the network behind the dialup server, select Enable to cause the FortiGate unit to act as a proxy for the dialup clients.
disable
dhgrp {1 | 2 | 5 | 14} Type 1, 2, 5, or 14 to select the Diffie-Hellman group to propose for Phase 2 of the IPSec VPN connection. Both VPN peers must use the same DH Group.
5
dst-addr-type <type> Enter the type of destination address that corresponds to the recipient(s) or network behind the remote VPN peer or FortiGate dialup client:• To specify the IP address of a server or host, type ip. Enter
the IP address using the dst-start-ip field.• To specify a range of IP addresses, type range. Enter the
starting and ending addresses using the dst-start-ip, and dst-end-ip fields.
• To specify a network address, type subnet. Enter the network address using the dst-subnet field.
• To specify a firewall address or address group, type name. Enter the address or address group name using the dst-name field. You must also select the name option for src-addr-type. This option is intended for users upgrading VPN configurations created using FortiOS 2.80. For new VPNs that use firewall addresses or address groups as selectors, interface mode VPNs are recommended.
subnet
dst-end-ip <address_ipv4> This field is available when dst-addr-type is set to range. This field is not available if phase1name names a configuration that enables mode-cfg.
Enter the highest destination IP address in the range of IP addresses.
0.0.0.0
dst-name <address_name> This field is available when dst-addr-type is set to name. Enter the name of a firewall address or address group.
No default.
FortiOS 4.0 MR3 CLI Reference600 01-431-99686-20110623
http://docs.fortinet.com/ • Feedback
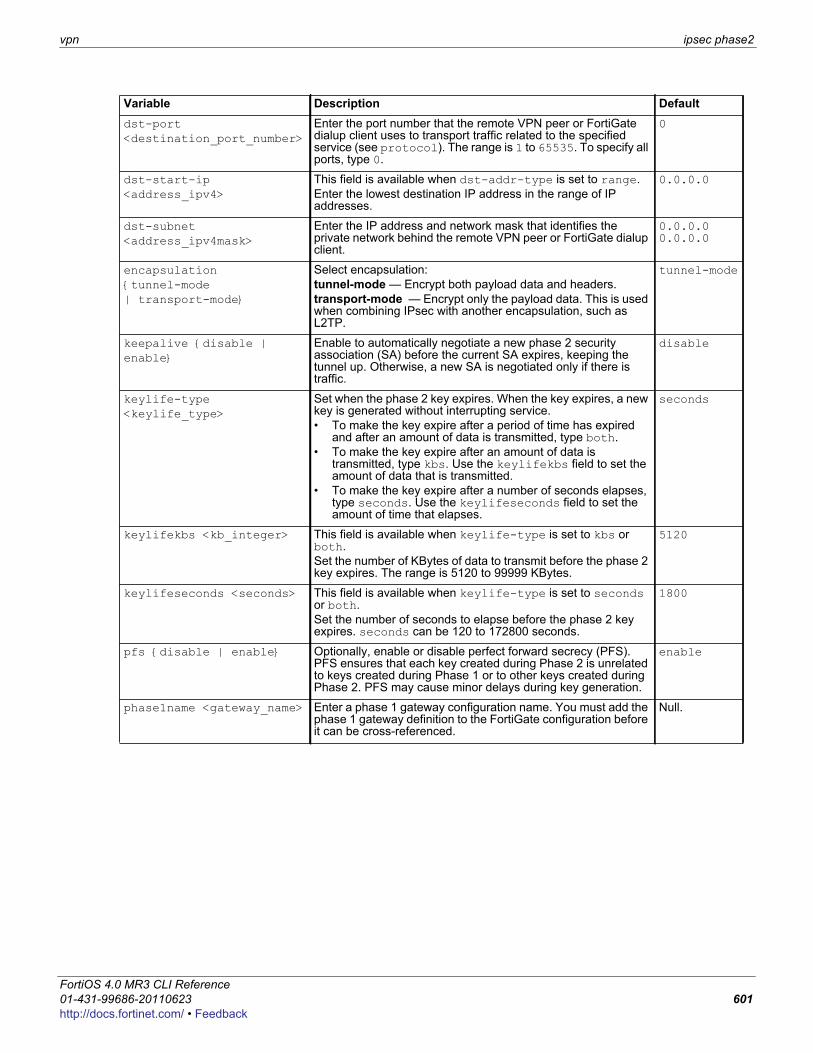
vpn ipsec phase2
F0h
dst-port <destination_port_number>
Enter the port number that the remote VPN peer or FortiGate dialup client uses to transport traffic related to the specified service (see protocol). The range is 1 to 65535. To specify all ports, type 0.
0
dst-start-ip <address_ipv4>
This field is available when dst-addr-type is set to range.Enter the lowest destination IP address in the range of IP addresses.
0.0.0.0
dst-subnet <address_ipv4mask>
Enter the IP address and network mask that identifies the private network behind the remote VPN peer or FortiGate dialup client.
0.0.0.00.0.0.0
encapsulation {tunnel-mode | transport-mode}
Select encapsulation:tunnel-mode — Encrypt both payload data and headers.transport-mode — Encrypt only the payload data. This is used when combining IPsec with another encapsulation, such as L2TP.
tunnel-mode
keepalive {disable | enable}
Enable to automatically negotiate a new phase 2 security association (SA) before the current SA expires, keeping the tunnel up. Otherwise, a new SA is negotiated only if there is traffic.
disable
keylife-type <keylife_type>
Set when the phase 2 key expires. When the key expires, a new key is generated without interrupting service.• To make the key expire after a period of time has expired
and after an amount of data is transmitted, type both.• To make the key expire after an amount of data is
transmitted, type kbs. Use the keylifekbs field to set the amount of data that is transmitted.
• To make the key expire after a number of seconds elapses, type seconds. Use the keylifeseconds field to set the amount of time that elapses.
seconds
keylifekbs <kb_integer> This field is available when keylife-type is set to kbs or both.Set the number of KBytes of data to transmit before the phase 2 key expires. The range is 5120 to 99999 KBytes.
5120
keylifeseconds <seconds> This field is available when keylife-type is set to seconds or both.Set the number of seconds to elapse before the phase 2 key expires. seconds can be 120 to 172800 seconds.
1800
pfs {disable | enable} Optionally, enable or disable perfect forward secrecy (PFS). PFS ensures that each key created during Phase 2 is unrelated to keys created during Phase 1 or to other keys created during Phase 2. PFS may cause minor delays during key generation.
enable
phase1name <gateway_name> Enter a phase 1 gateway configuration name. You must add the phase 1 gateway definition to the FortiGate configuration before it can be cross-referenced.
Null.
Variable Description Default
ortiOS 4.0 MR3 CLI Reference1-431-99686-20110623 601ttp://docs.fortinet.com/ • Feedback
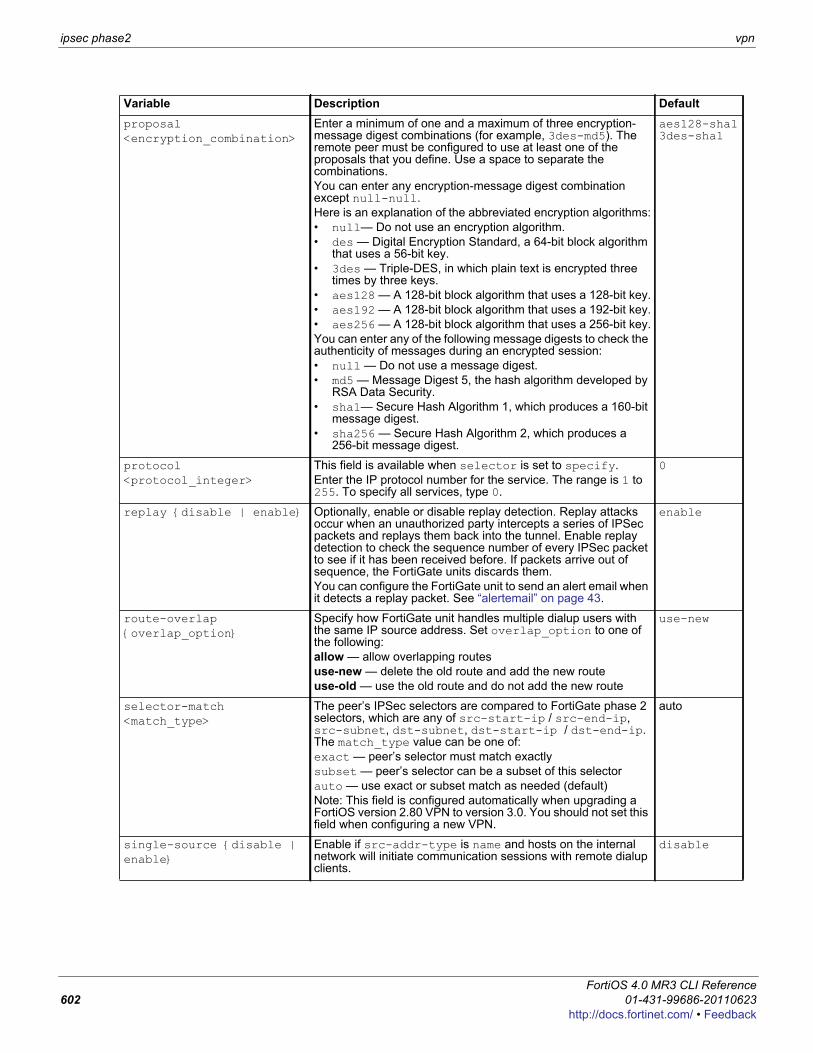
ipsec phase2 vpn
proposal <encryption_combination>
Enter a minimum of one and a maximum of three encryption-message digest combinations (for example, 3des-md5). The remote peer must be configured to use at least one of the proposals that you define. Use a space to separate the combinations.You can enter any encryption-message digest combination except null-null.Here is an explanation of the abbreviated encryption algorithms:• null— Do not use an encryption algorithm.• des — Digital Encryption Standard, a 64-bit block algorithm
that uses a 56-bit key.• 3des — Triple-DES, in which plain text is encrypted three
times by three keys.• aes128 — A 128-bit block algorithm that uses a 128-bit key.• aes192 — A 128-bit block algorithm that uses a 192-bit key.• aes256 — A 128-bit block algorithm that uses a 256-bit key.You can enter any of the following message digests to check the authenticity of messages during an encrypted session:• null — Do not use a message digest.• md5 — Message Digest 5, the hash algorithm developed by
RSA Data Security.• sha1— Secure Hash Algorithm 1, which produces a 160-bit
message digest.• sha256 — Secure Hash Algorithm 2, which produces a
256-bit message digest.
aes128-sha1 3des-sha1
protocol <protocol_integer>
This field is available when selector is set to specify.Enter the IP protocol number for the service. The range is 1 to 255. To specify all services, type 0.
0
replay {disable | enable} Optionally, enable or disable replay detection. Replay attacks occur when an unauthorized party intercepts a series of IPSec packets and replays them back into the tunnel. Enable replay detection to check the sequence number of every IPSec packet to see if it has been received before. If packets arrive out of sequence, the FortiGate units discards them.You can configure the FortiGate unit to send an alert email when it detects a replay packet. See “alertemail” on page 43.
enable
route-overlap {overlap_option}
Specify how FortiGate unit handles multiple dialup users with the same IP source address. Set overlap_option to one of the following:allow — allow overlapping routesuse-new — delete the old route and add the new routeuse-old — use the old route and do not add the new route
use-new
selector-match <match_type>
The peer’s IPSec selectors are compared to FortiGate phase 2 selectors, which are any of src-start-ip / src-end-ip, src-subnet, dst-subnet, dst-start-ip / dst-end-ip. The match_type value can be one of:exact — peer’s selector must match exactlysubset — peer’s selector can be a subset of this selectorauto — use exact or subset match as needed (default)Note: This field is configured automatically when upgrading a FortiOS version 2.80 VPN to version 3.0. You should not set this field when configuring a new VPN.
auto
single-source {disable | enable}
Enable if src-addr-type is name and hosts on the internal network will initiate communication sessions with remote dialup clients.
disable
Variable Description Default
FortiOS 4.0 MR3 CLI Reference602 01-431-99686-20110623
http://docs.fortinet.com/ • Feedback
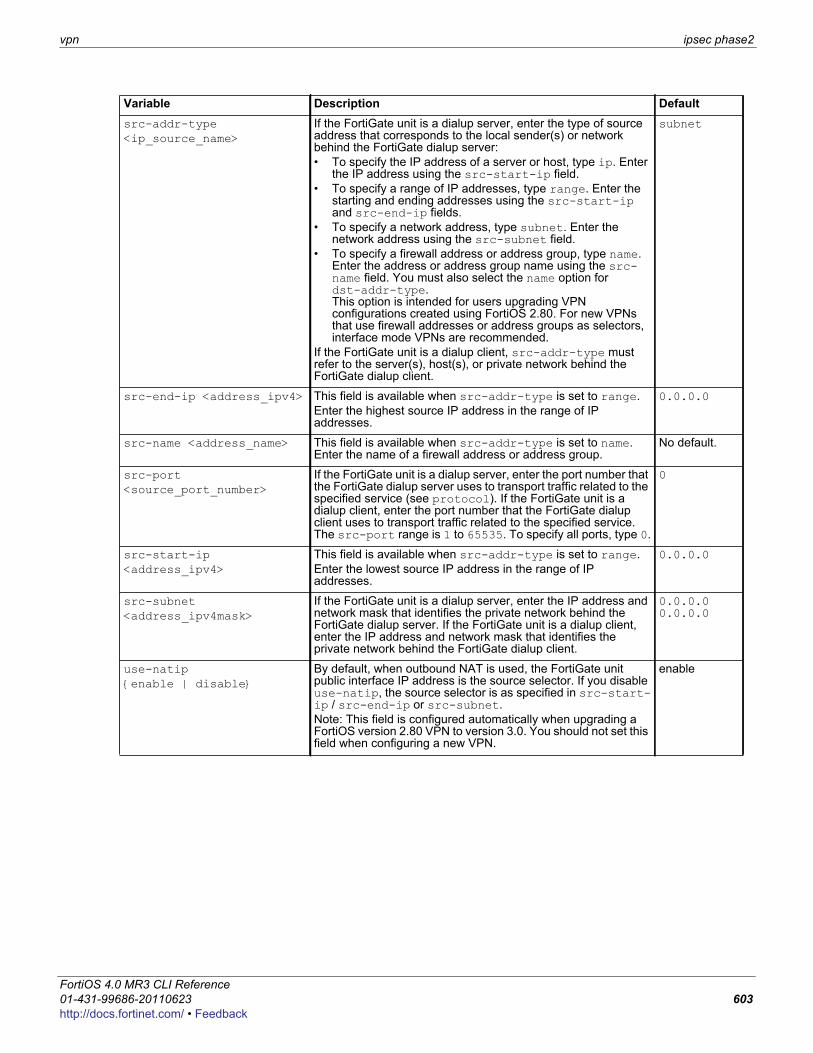
vpn ipsec phase2
F0h
src-addr-type <ip_source_name>
If the FortiGate unit is a dialup server, enter the type of source address that corresponds to the local sender(s) or network behind the FortiGate dialup server:• To specify the IP address of a server or host, type ip. Enter
the IP address using the src-start-ip field.• To specify a range of IP addresses, type range. Enter the
starting and ending addresses using the src-start-ip and src-end-ip fields.
• To specify a network address, type subnet. Enter the network address using the src-subnet field.
• To specify a firewall address or address group, type name. Enter the address or address group name using the src-name field. You must also select the name option for dst-addr-type. This option is intended for users upgrading VPN configurations created using FortiOS 2.80. For new VPNs that use firewall addresses or address groups as selectors, interface mode VPNs are recommended.
If the FortiGate unit is a dialup client, src-addr-type must refer to the server(s), host(s), or private network behind the FortiGate dialup client.
subnet
src-end-ip <address_ipv4> This field is available when src-addr-type is set to range.Enter the highest source IP address in the range of IP addresses.
0.0.0.0
src-name <address_name> This field is available when src-addr-type is set to name. Enter the name of a firewall address or address group.
No default.
src-port <source_port_number>
If the FortiGate unit is a dialup server, enter the port number that the FortiGate dialup server uses to transport traffic related to the specified service (see protocol). If the FortiGate unit is a dialup client, enter the port number that the FortiGate dialup client uses to transport traffic related to the specified service. The src-port range is 1 to 65535. To specify all ports, type 0.
0
src-start-ip <address_ipv4>
This field is available when src-addr-type is set to range.Enter the lowest source IP address in the range of IP addresses.
0.0.0.0
src-subnet <address_ipv4mask>
If the FortiGate unit is a dialup server, enter the IP address and network mask that identifies the private network behind the FortiGate dialup server. If the FortiGate unit is a dialup client, enter the IP address and network mask that identifies the private network behind the FortiGate dialup client.
0.0.0.00.0.0.0
use-natip {enable | disable}
By default, when outbound NAT is used, the FortiGate unit public interface IP address is the source selector. If you disable use-natip, the source selector is as specified in src-start-ip / src-end-ip or src-subnet.Note: This field is configured automatically when upgrading a FortiOS version 2.80 VPN to version 3.0. You should not set this field when configuring a new VPN.
enable
Variable Description Default
ortiOS 4.0 MR3 CLI Reference1-431-99686-20110623 603ttp://docs.fortinet.com/ • Feedback
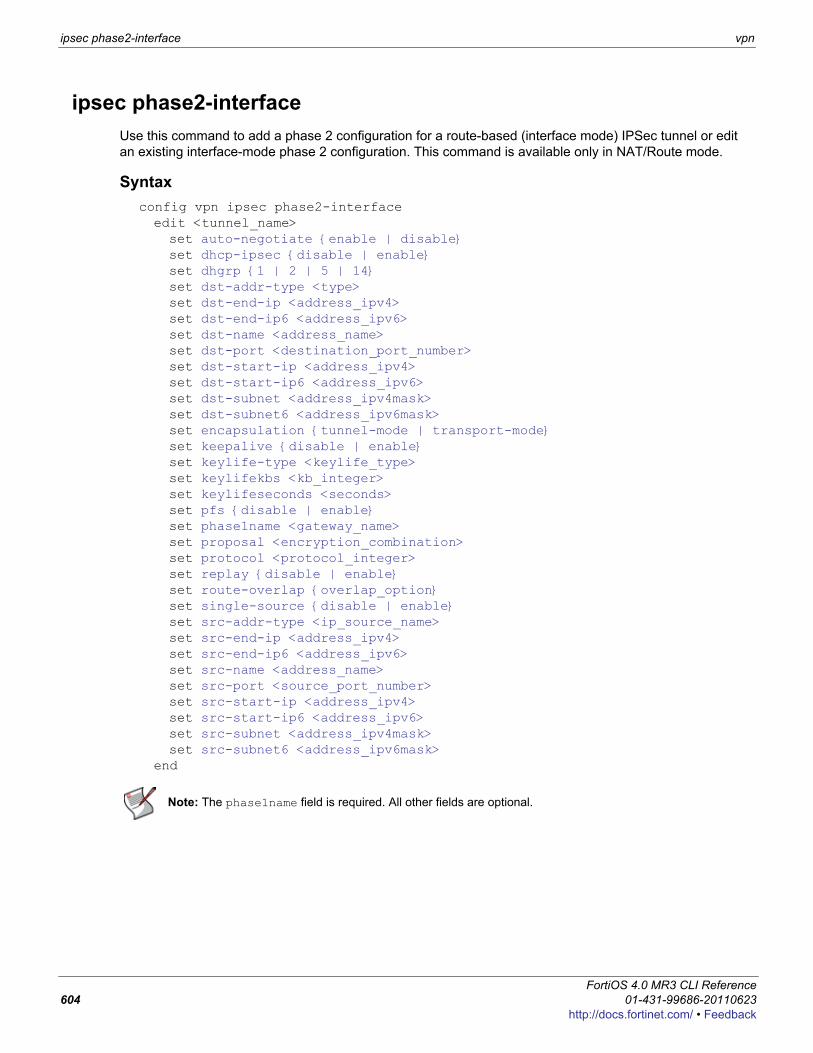
ipsec phase2-interface vpn
ipsec phase2-interfaceUse this command to add a phase 2 configuration for a route-based (interface mode) IPSec tunnel or edit an existing interface-mode phase 2 configuration. This command is available only in NAT/Route mode.
Syntaxconfig vpn ipsec phase2-interfaceedit <tunnel_name>set auto-negotiate {enable | disable}set dhcp-ipsec {disable | enable}set dhgrp {1 | 2 | 5 | 14}set dst-addr-type <type>set dst-end-ip <address_ipv4>set dst-end-ip6 <address_ipv6>set dst-name <address_name>set dst-port <destination_port_number>set dst-start-ip <address_ipv4>set dst-start-ip6 <address_ipv6>set dst-subnet <address_ipv4mask>set dst-subnet6 <address_ipv6mask>set encapsulation {tunnel-mode | transport-mode}set keepalive {disable | enable}set keylife-type <keylife_type>set keylifekbs <kb_integer>set keylifeseconds <seconds>set pfs {disable | enable}set phase1name <gateway_name>set proposal <encryption_combination>set protocol <protocol_integer>set replay {disable | enable}set route-overlap {overlap_option}set single-source {disable | enable}set src-addr-type <ip_source_name>set src-end-ip <address_ipv4>set src-end-ip6 <address_ipv6>set src-name <address_name>set src-port <source_port_number>set src-start-ip <address_ipv4>set src-start-ip6 <address_ipv6>set src-subnet <address_ipv4mask>set src-subnet6 <address_ipv6mask>
end
Note: The phase1name field is required. All other fields are optional.
FortiOS 4.0 MR3 CLI Reference604 01-431-99686-20110623
http://docs.fortinet.com/ • Feedback
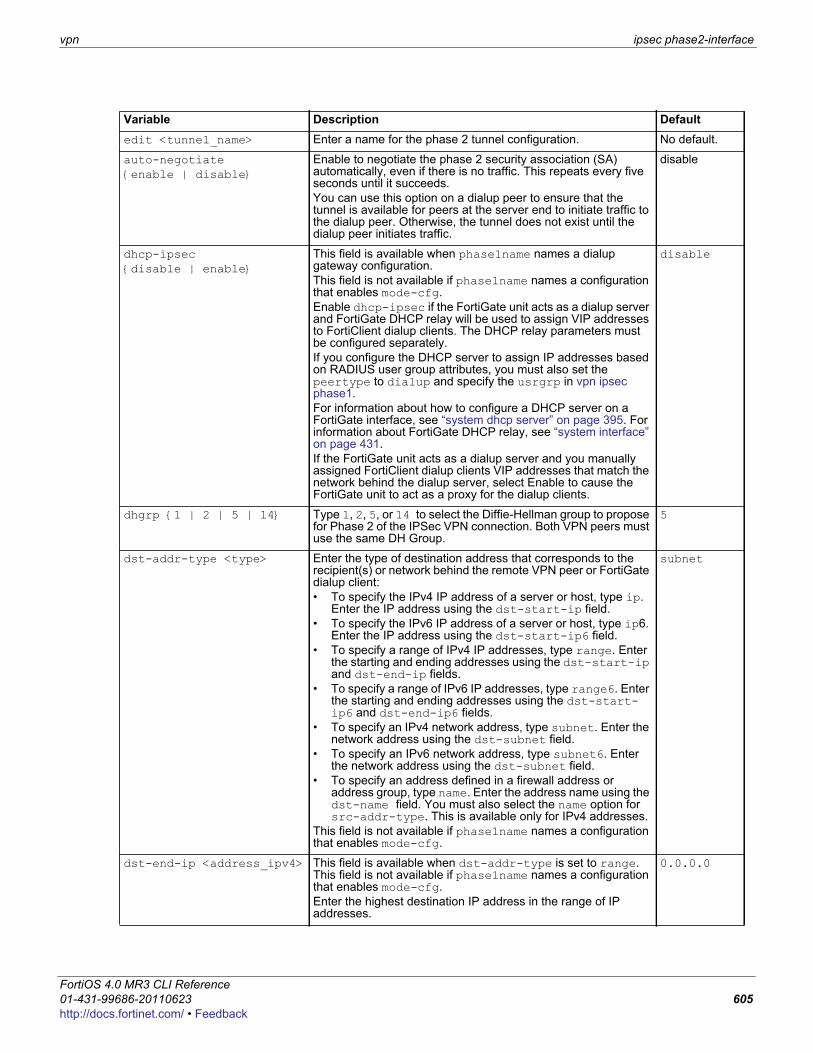
vpn ipsec phase2-interface
F0h
Variable Description Defaultedit <tunnel_name> Enter a name for the phase 2 tunnel configuration. No default.
auto-negotiate {enable | disable}
Enable to negotiate the phase 2 security association (SA) automatically, even if there is no traffic. This repeats every five seconds until it succeeds.You can use this option on a dialup peer to ensure that the tunnel is available for peers at the server end to initiate traffic to the dialup peer. Otherwise, the tunnel does not exist until the dialup peer initiates traffic.
disable
dhcp-ipsec {disable | enable}
This field is available when phase1name names a dialup gateway configuration.This field is not available if phase1name names a configuration that enables mode-cfg.Enable dhcp-ipsec if the FortiGate unit acts as a dialup server and FortiGate DHCP relay will be used to assign VIP addresses to FortiClient dialup clients. The DHCP relay parameters must be configured separately.If you configure the DHCP server to assign IP addresses based on RADIUS user group attributes, you must also set the peertype to dialup and specify the usrgrp in vpn ipsec phase1. For information about how to configure a DHCP server on a FortiGate interface, see “system dhcp server” on page 395. For information about FortiGate DHCP relay, see “system interface” on page 431.If the FortiGate unit acts as a dialup server and you manually assigned FortiClient dialup clients VIP addresses that match the network behind the dialup server, select Enable to cause the FortiGate unit to act as a proxy for the dialup clients.
disable
dhgrp {1 | 2 | 5 | 14} Type 1, 2, 5, or 14 to select the Diffie-Hellman group to propose for Phase 2 of the IPSec VPN connection. Both VPN peers must use the same DH Group.
5
dst-addr-type <type> Enter the type of destination address that corresponds to the recipient(s) or network behind the remote VPN peer or FortiGate dialup client:• To specify the IPv4 IP address of a server or host, type ip.
Enter the IP address using the dst-start-ip field.• To specify the IPv6 IP address of a server or host, type ip6.
Enter the IP address using the dst-start-ip6 field.• To specify a range of IPv4 IP addresses, type range. Enter
the starting and ending addresses using the dst-start-ip and dst-end-ip fields.
• To specify a range of IPv6 IP addresses, type range6. Enter the starting and ending addresses using the dst-start-ip6 and dst-end-ip6 fields.
• To specify an IPv4 network address, type subnet. Enter the network address using the dst-subnet field.
• To specify an IPv6 network address, type subnet6. Enter the network address using the dst-subnet field.
• To specify an address defined in a firewall address or address group, type name. Enter the address name using the dst-name field. You must also select the name option for src-addr-type. This is available only for IPv4 addresses.
This field is not available if phase1name names a configuration that enables mode-cfg.
subnet
dst-end-ip <address_ipv4> This field is available when dst-addr-type is set to range. This field is not available if phase1name names a configuration that enables mode-cfg.Enter the highest destination IP address in the range of IP addresses.
0.0.0.0
ortiOS 4.0 MR3 CLI Reference1-431-99686-20110623 605ttp://docs.fortinet.com/ • Feedback

ipsec phase2-interface vpn
dst-end-ip6 <address_ipv6>
This field is available when dst-addr-type is set to range6. This field is not available if phase1name names a configuration that enables mode-cfg.Enter the highest destination IP address in the range of IP addresses.
::
dst-name <address_name> This field is available when dst-addr-type is set to name. This field is not available if phase1name names a configuration that enables mode-cfg.Enter the firewall address or address group name.
No default.
dst-port <destination_port_number>
Enter the port number that the remote VPN peer or FortiGate dialup client uses to transport traffic related to the specified service (see protocol). The range is 1 to 65535. To specify all ports, type 0.This field is not available if phase1name names a configuration that enables mode-cfg.
0
dst-start-ip <address_ipv4>
This field is available when dst-addr-type is set to range. This field is not available if phase1name names a configuration that enables mode-cfg.Enter the lowest destination IP address in the range of IP addresses.
0.0.0.0
dst-start-ip6 <address_ipv6>
This field is available when dst-addr-type is set to range6. This field is not available if phase1name names a configuration that enables mode-cfg.Enter the lowest destination IP address in the range of IP addresses.
::
dst-subnet <address_ipv4mask>
Enter the IPv4 IP address and network mask that identifies the private network behind the remote VPN peer or FortiGate dialup client. This field is not available if phase1name names a configuration that enables mode-cfg.
0.0.0.00.0.0.0
dst-subnet6 <address_ipv6mask>
Enter the IPv6 IP address and network mask that identifies the private network behind the remote VPN peer or FortiGate dialup client. This field is not available if phase1name names a configuration that enables mode-cfg.
::/0
encapsulation {tunnel-mode | transport-mode}
Select encapsulation:tunnel-mode — Encrypt both payload data and headers.transport-mode — Encrypt only the payload data. This is used when combining IPsec with another encapsulation, such as GRE.
tunnel-mode
keepalive {disable | enable}
Enable to automatically negotiate a new phase 2 security association (SA) before the current SA expires, keeping the tunnel up. Otherwise, a new SA is negotiated only if there is traffic.
disable
keylife-type <keylife_type>
Set when the phase 2 key expires. When the key expires, a new key is generated without interrupting service.• To make the key expire after a period of time has expired and
after an amount of data is transmitted, type both.• To make the key expire after an amount of data is
transmitted, type kbs. Use the keylifekbs field to set the amount of data that is transmitted.
• To make the key expire after a number of seconds elapses, type seconds. Use the keylifeseconds field to set the amount of time that elapses.
seconds
keylifekbs <kb_integer> This field is available when keylife-type is set to kbs or both.Set the number of KBytes of data to transmit before the phase 2 key expires. The range is 5120 to 99999 KBytes.
5120
Variable Description Default
FortiOS 4.0 MR3 CLI Reference606 01-431-99686-20110623
http://docs.fortinet.com/ • Feedback
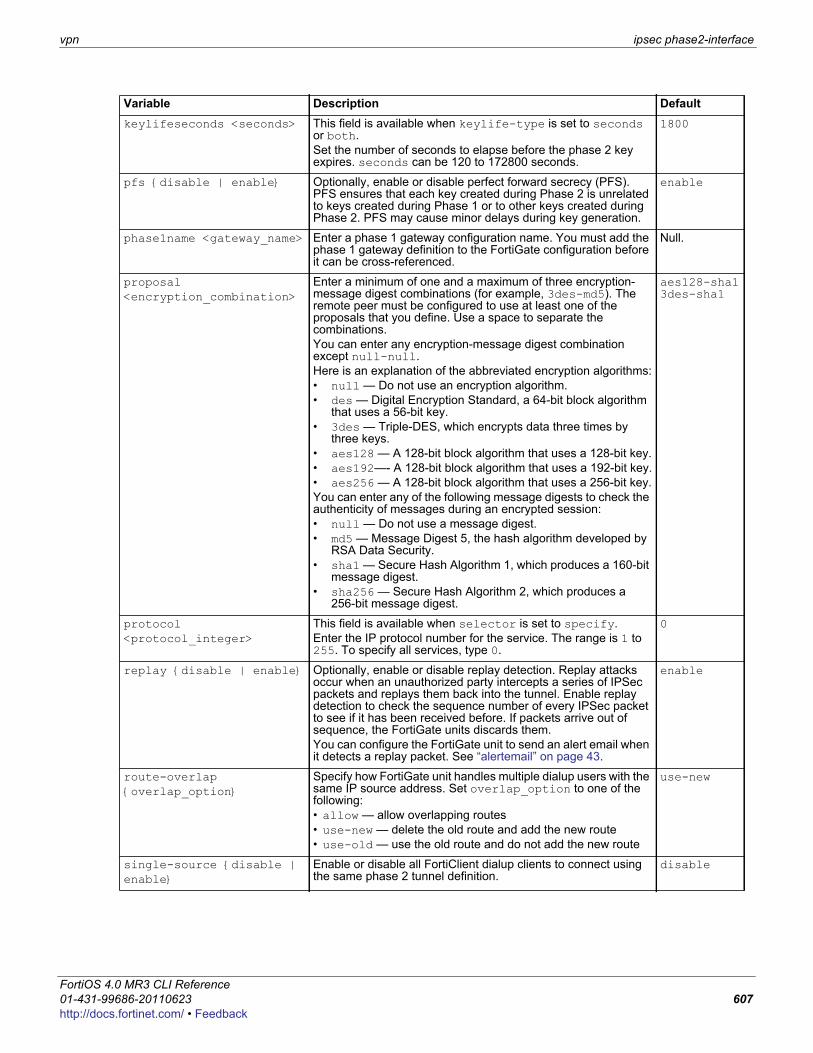
vpn ipsec phase2-interface
F0h
keylifeseconds <seconds> This field is available when keylife-type is set to seconds or both.Set the number of seconds to elapse before the phase 2 key expires. seconds can be 120 to 172800 seconds.
1800
pfs {disable | enable} Optionally, enable or disable perfect forward secrecy (PFS). PFS ensures that each key created during Phase 2 is unrelated to keys created during Phase 1 or to other keys created during Phase 2. PFS may cause minor delays during key generation.
enable
phase1name <gateway_name> Enter a phase 1 gateway configuration name. You must add the phase 1 gateway definition to the FortiGate configuration before it can be cross-referenced.
Null.
proposal <encryption_combination>
Enter a minimum of one and a maximum of three encryption-message digest combinations (for example, 3des-md5). The remote peer must be configured to use at least one of the proposals that you define. Use a space to separate the combinations.You can enter any encryption-message digest combination except null-null.Here is an explanation of the abbreviated encryption algorithms:• null — Do not use an encryption algorithm.• des — Digital Encryption Standard, a 64-bit block algorithm
that uses a 56-bit key.• 3des — Triple-DES, which encrypts data three times by
three keys.• aes128 — A 128-bit block algorithm that uses a 128-bit key.• aes192—- A 128-bit block algorithm that uses a 192-bit key.• aes256 — A 128-bit block algorithm that uses a 256-bit key.You can enter any of the following message digests to check the authenticity of messages during an encrypted session:• null — Do not use a message digest.• md5 — Message Digest 5, the hash algorithm developed by
RSA Data Security.• sha1 — Secure Hash Algorithm 1, which produces a 160-bit
message digest.• sha256 — Secure Hash Algorithm 2, which produces a
256-bit message digest.
aes128-sha1 3des-sha1
protocol <protocol_integer>
This field is available when selector is set to specify.Enter the IP protocol number for the service. The range is 1 to 255. To specify all services, type 0.
0
replay {disable | enable} Optionally, enable or disable replay detection. Replay attacks occur when an unauthorized party intercepts a series of IPSec packets and replays them back into the tunnel. Enable replay detection to check the sequence number of every IPSec packet to see if it has been received before. If packets arrive out of sequence, the FortiGate units discards them.You can configure the FortiGate unit to send an alert email when it detects a replay packet. See “alertemail” on page 43.
enable
route-overlap {overlap_option}
Specify how FortiGate unit handles multiple dialup users with the same IP source address. Set overlap_option to one of the following:• allow — allow overlapping routes• use-new — delete the old route and add the new route• use-old — use the old route and do not add the new route
use-new
single-source {disable | enable}
Enable or disable all FortiClient dialup clients to connect using the same phase 2 tunnel definition.
disable
Variable Description Default
ortiOS 4.0 MR3 CLI Reference1-431-99686-20110623 607ttp://docs.fortinet.com/ • Feedback
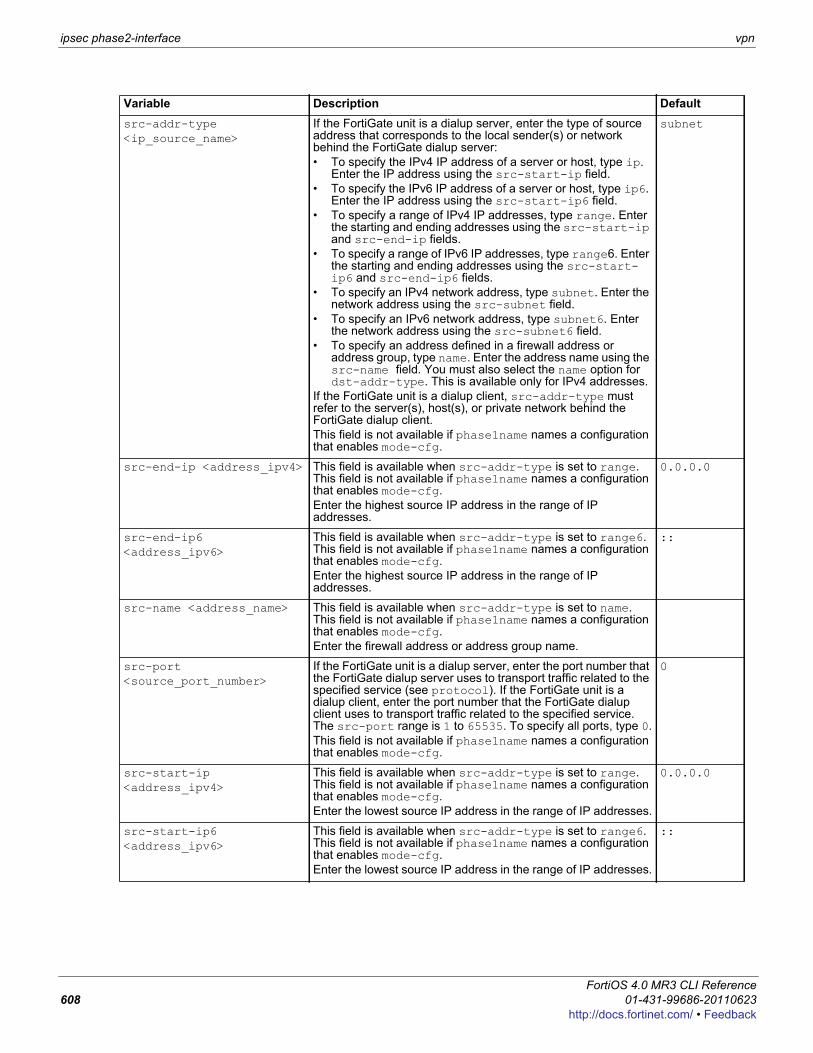
ipsec phase2-interface vpn
src-addr-type <ip_source_name>
If the FortiGate unit is a dialup server, enter the type of source address that corresponds to the local sender(s) or network behind the FortiGate dialup server:• To specify the IPv4 IP address of a server or host, type ip.
Enter the IP address using the src-start-ip field.• To specify the IPv6 IP address of a server or host, type ip6.
Enter the IP address using the src-start-ip6 field.• To specify a range of IPv4 IP addresses, type range. Enter
the starting and ending addresses using the src-start-ip and src-end-ip fields.
• To specify a range of IPv6 IP addresses, type range6. Enter the starting and ending addresses using the src-start-ip6 and src-end-ip6 fields.
• To specify an IPv4 network address, type subnet. Enter the network address using the src-subnet field.
• To specify an IPv6 network address, type subnet6. Enter the network address using the src-subnet6 field.
• To specify an address defined in a firewall address or address group, type name. Enter the address name using the src-name field. You must also select the name option for dst-addr-type. This is available only for IPv4 addresses.
If the FortiGate unit is a dialup client, src-addr-type must refer to the server(s), host(s), or private network behind the FortiGate dialup client.This field is not available if phase1name names a configuration that enables mode-cfg.
subnet
src-end-ip <address_ipv4> This field is available when src-addr-type is set to range. This field is not available if phase1name names a configuration that enables mode-cfg.Enter the highest source IP address in the range of IP addresses.
0.0.0.0
src-end-ip6 <address_ipv6>
This field is available when src-addr-type is set to range6. This field is not available if phase1name names a configuration that enables mode-cfg.Enter the highest source IP address in the range of IP addresses.
::
src-name <address_name> This field is available when src-addr-type is set to name. This field is not available if phase1name names a configuration that enables mode-cfg.Enter the firewall address or address group name.
src-port <source_port_number>
If the FortiGate unit is a dialup server, enter the port number that the FortiGate dialup server uses to transport traffic related to the specified service (see protocol). If the FortiGate unit is a dialup client, enter the port number that the FortiGate dialup client uses to transport traffic related to the specified service. The src-port range is 1 to 65535. To specify all ports, type 0.This field is not available if phase1name names a configuration that enables mode-cfg.
0
src-start-ip <address_ipv4>
This field is available when src-addr-type is set to range. This field is not available if phase1name names a configuration that enables mode-cfg.Enter the lowest source IP address in the range of IP addresses.
0.0.0.0
src-start-ip6 <address_ipv6>
This field is available when src-addr-type is set to range6. This field is not available if phase1name names a configuration that enables mode-cfg.Enter the lowest source IP address in the range of IP addresses.
::
Variable Description Default
FortiOS 4.0 MR3 CLI Reference608 01-431-99686-20110623
http://docs.fortinet.com/ • Feedback
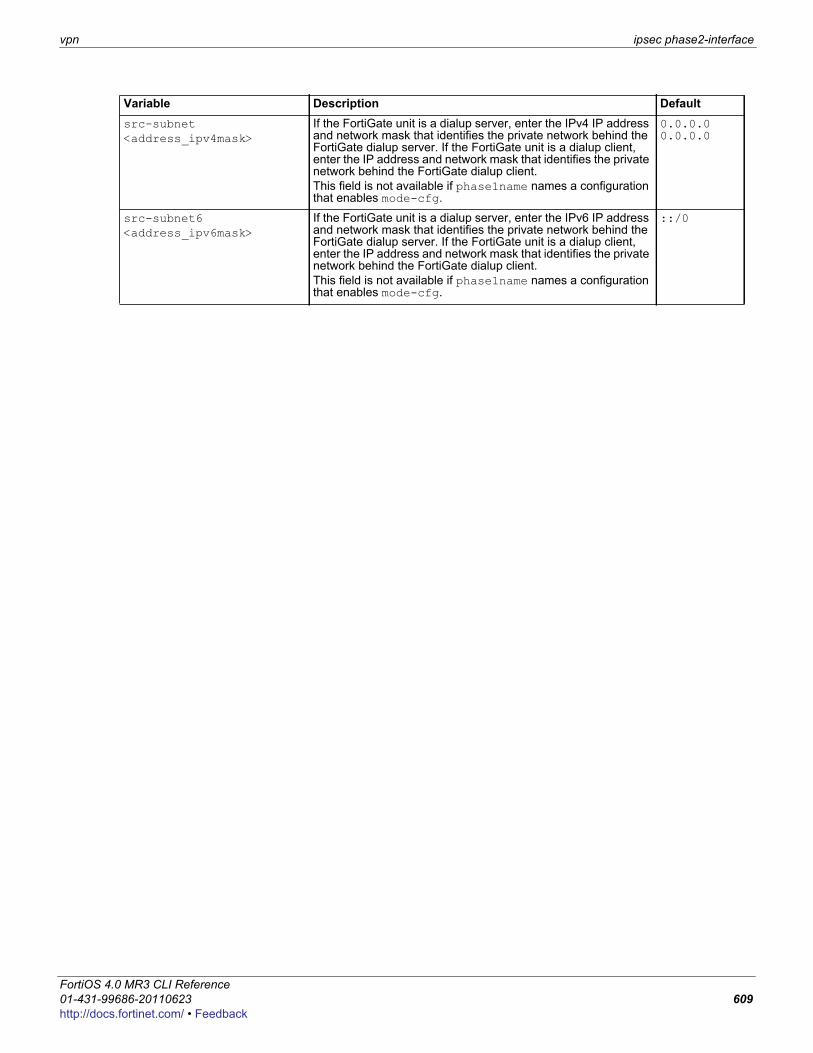
vpn ipsec phase2-interface
F0h
src-subnet <address_ipv4mask>
If the FortiGate unit is a dialup server, enter the IPv4 IP address and network mask that identifies the private network behind the FortiGate dialup server. If the FortiGate unit is a dialup client, enter the IP address and network mask that identifies the private network behind the FortiGate dialup client. This field is not available if phase1name names a configuration that enables mode-cfg.
0.0.0.00.0.0.0
src-subnet6 <address_ipv6mask>
If the FortiGate unit is a dialup server, enter the IPv6 IP address and network mask that identifies the private network behind the FortiGate dialup server. If the FortiGate unit is a dialup client, enter the IP address and network mask that identifies the private network behind the FortiGate dialup client. This field is not available if phase1name names a configuration that enables mode-cfg.
::/0
Variable Description Default
ortiOS 4.0 MR3 CLI Reference1-431-99686-20110623 609ttp://docs.fortinet.com/ • Feedback
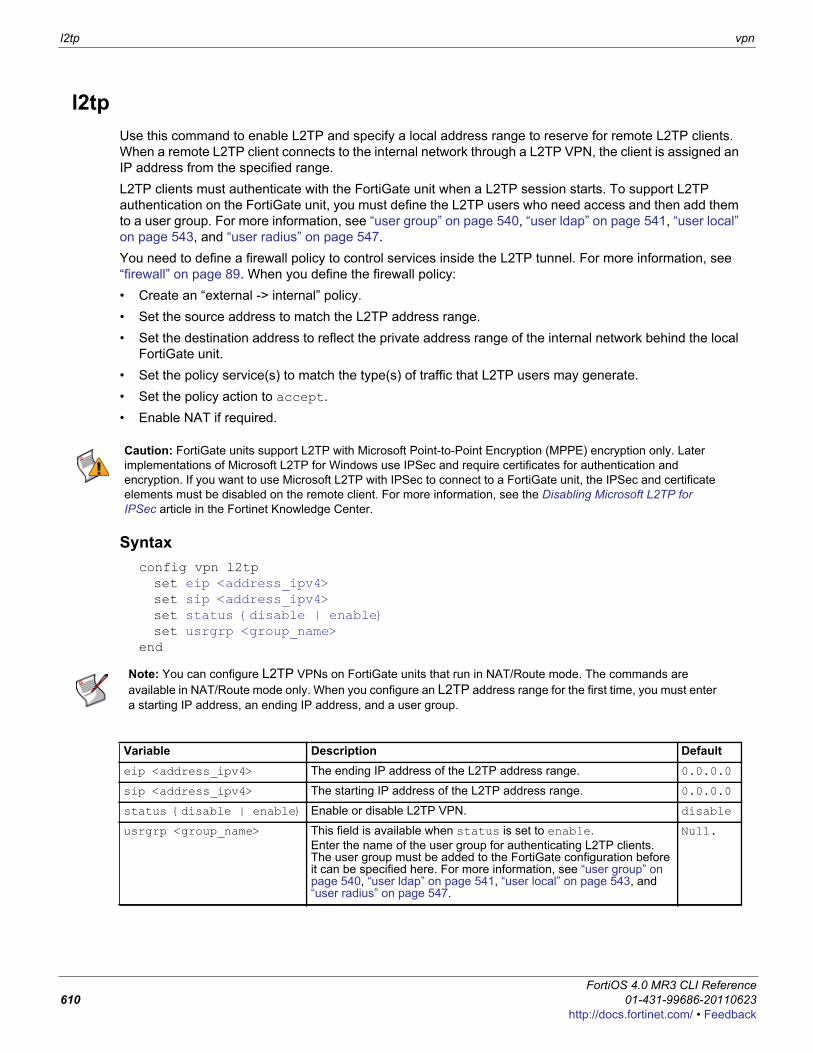
l2tp vpn
l2tpUse this command to enable L2TP and specify a local address range to reserve for remote L2TP clients. When a remote L2TP client connects to the internal network through a L2TP VPN, the client is assigned an IP address from the specified range.L2TP clients must authenticate with the FortiGate unit when a L2TP session starts. To support L2TP authentication on the FortiGate unit, you must define the L2TP users who need access and then add them to a user group. For more information, see “user group” on page 540, “user ldap” on page 541, “user local” on page 543, and “user radius” on page 547.You need to define a firewall policy to control services inside the L2TP tunnel. For more information, see “firewall” on page 89. When you define the firewall policy:• Create an “external -> internal” policy.• Set the source address to match the L2TP address range.• Set the destination address to reflect the private address range of the internal network behind the local
FortiGate unit. • Set the policy service(s) to match the type(s) of traffic that L2TP users may generate.• Set the policy action to accept.• Enable NAT if required.
Syntaxconfig vpn l2tpset eip <address_ipv4>set sip <address_ipv4>set status {disable | enable}set usrgrp <group_name>
end
Caution: FortiGate units support L2TP with Microsoft Point-to-Point Encryption (MPPE) encryption only. Later implementations of Microsoft L2TP for Windows use IPSec and require certificates for authentication and encryption. If you want to use Microsoft L2TP with IPSec to connect to a FortiGate unit, the IPSec and certificate elements must be disabled on the remote client. For more information, see the Disabling Microsoft L2TP for IPSec article in the Fortinet Knowledge Center.
Note: You can configure L2TP VPNs on FortiGate units that run in NAT/Route mode. The commands are available in NAT/Route mode only. When you configure an L2TP address range for the first time, you must enter a starting IP address, an ending IP address, and a user group.
Variable Description Defaulteip <address_ipv4> The ending IP address of the L2TP address range. 0.0.0.0
sip <address_ipv4> The starting IP address of the L2TP address range. 0.0.0.0
status {disable | enable} Enable or disable L2TP VPN. disable
usrgrp <group_name> This field is available when status is set to enable.Enter the name of the user group for authenticating L2TP clients. The user group must be added to the FortiGate configuration before it can be specified here. For more information, see “user group” on page 540, “user ldap” on page 541, “user local” on page 543, and “user radius” on page 547.
Null.
FortiOS 4.0 MR3 CLI Reference610 01-431-99686-20110623
http://docs.fortinet.com/ • Feedback
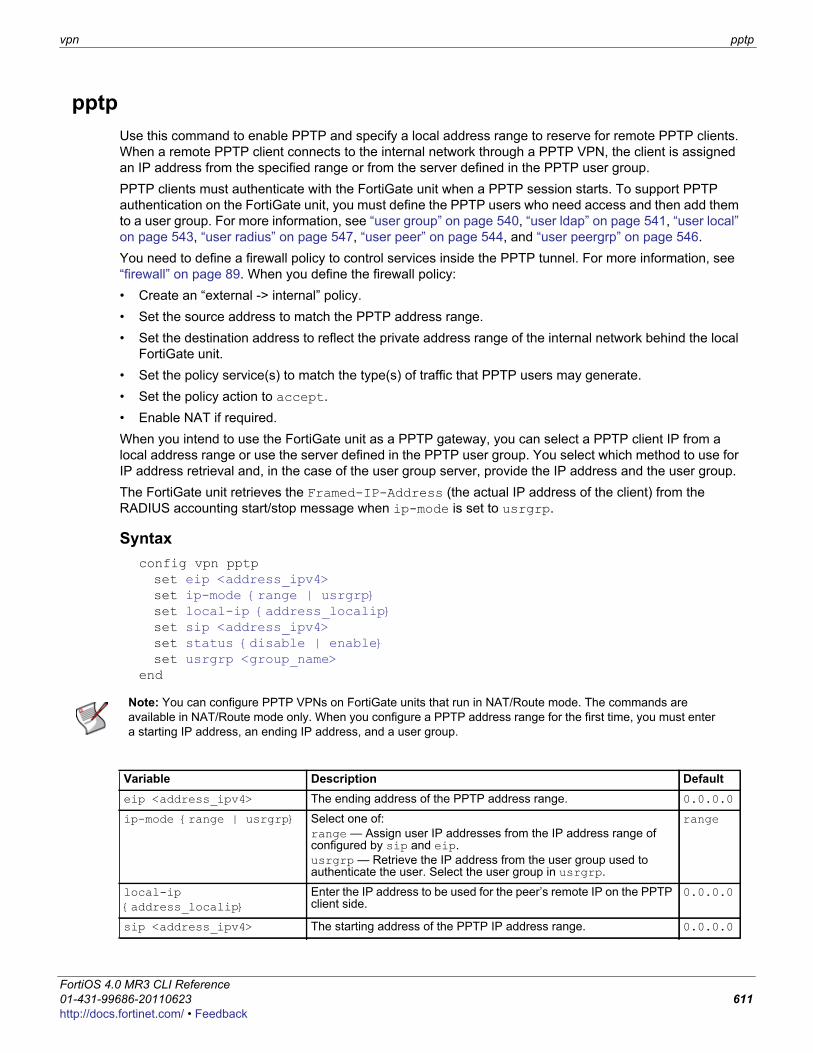
vpn pptp
F0h
pptpUse this command to enable PPTP and specify a local address range to reserve for remote PPTP clients. When a remote PPTP client connects to the internal network through a PPTP VPN, the client is assigned an IP address from the specified range or from the server defined in the PPTP user group.PPTP clients must authenticate with the FortiGate unit when a PPTP session starts. To support PPTP authentication on the FortiGate unit, you must define the PPTP users who need access and then add them to a user group. For more information, see “user group” on page 540, “user ldap” on page 541, “user local” on page 543, “user radius” on page 547, “user peer” on page 544, and “user peergrp” on page 546.You need to define a firewall policy to control services inside the PPTP tunnel. For more information, see “firewall” on page 89. When you define the firewall policy:• Create an “external -> internal” policy.• Set the source address to match the PPTP address range.• Set the destination address to reflect the private address range of the internal network behind the local
FortiGate unit. • Set the policy service(s) to match the type(s) of traffic that PPTP users may generate.• Set the policy action to accept.• Enable NAT if required.When you intend to use the FortiGate unit as a PPTP gateway, you can select a PPTP client IP from a local address range or use the server defined in the PPTP user group. You select which method to use for IP address retrieval and, in the case of the user group server, provide the IP address and the user group.The FortiGate unit retrieves the Framed-IP-Address (the actual IP address of the client) from the RADIUS accounting start/stop message when ip-mode is set to usrgrp.
Syntaxconfig vpn pptpset eip <address_ipv4>set ip-mode {range | usrgrp}set local-ip {address_localip}set sip <address_ipv4>set status {disable | enable}set usrgrp <group_name>
end
Note: You can configure PPTP VPNs on FortiGate units that run in NAT/Route mode. The commands are available in NAT/Route mode only. When you configure a PPTP address range for the first time, you must enter a starting IP address, an ending IP address, and a user group.
Variable Description Defaulteip <address_ipv4> The ending address of the PPTP address range. 0.0.0.0
ip-mode {range | usrgrp} Select one of:range — Assign user IP addresses from the IP address range of configured by sip and eip.usrgrp — Retrieve the IP address from the user group used to authenticate the user. Select the user group in usrgrp.
range
local-ip {address_localip}
Enter the IP address to be used for the peer’s remote IP on the PPTP client side.
0.0.0.0
sip <address_ipv4> The starting address of the PPTP IP address range. 0.0.0.0
ortiOS 4.0 MR3 CLI Reference1-431-99686-20110623 611ttp://docs.fortinet.com/ • Feedback
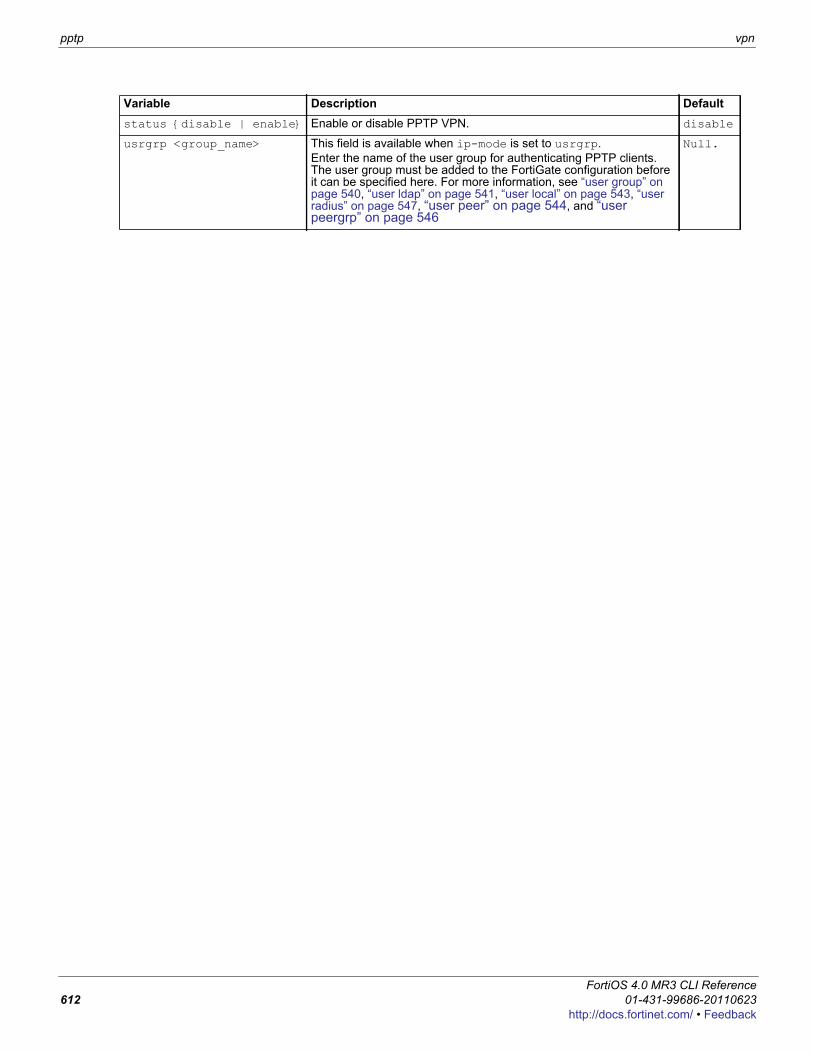
pptp vpn
status {disable | enable} Enable or disable PPTP VPN. disable
usrgrp <group_name> This field is available when ip-mode is set to usrgrp.Enter the name of the user group for authenticating PPTP clients. The user group must be added to the FortiGate configuration before it can be specified here. For more information, see “user group” on page 540, “user ldap” on page 541, “user local” on page 543, “user radius” on page 547, “user peer” on page 544, and “user peergrp” on page 546
Null.
Variable Description Default
FortiOS 4.0 MR3 CLI Reference612 01-431-99686-20110623
http://docs.fortinet.com/ • Feedback
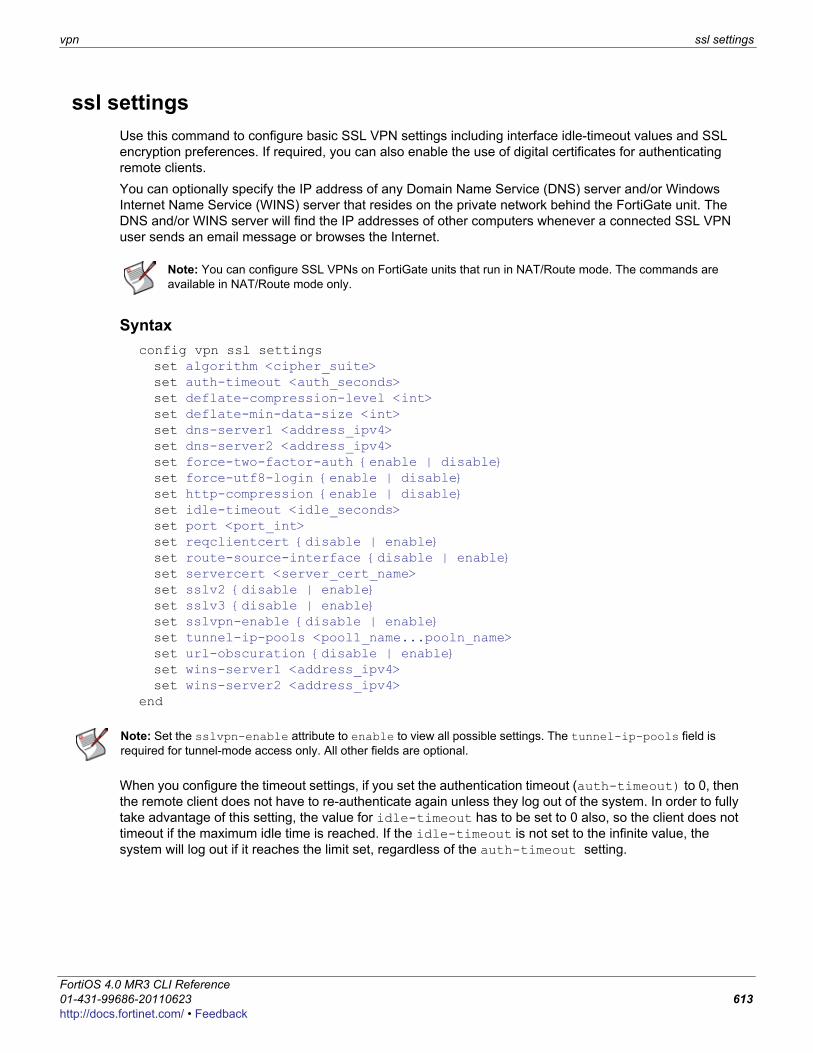
vpn ssl settings
F0h
ssl settingsUse this command to configure basic SSL VPN settings including interface idle-timeout values and SSL encryption preferences. If required, you can also enable the use of digital certificates for authenticating remote clients.You can optionally specify the IP address of any Domain Name Service (DNS) server and/or Windows Internet Name Service (WINS) server that resides on the private network behind the FortiGate unit. The DNS and/or WINS server will find the IP addresses of other computers whenever a connected SSL VPN user sends an email message or browses the Internet.
Syntaxconfig vpn ssl settingsset algorithm <cipher_suite>set auth-timeout <auth_seconds>set deflate-compression-level <int>set deflate-min-data-size <int>set dns-server1 <address_ipv4>set dns-server2 <address_ipv4>set force-two-factor-auth {enable | disable}set force-utf8-login {enable | disable}set http-compression {enable | disable}set idle-timeout <idle_seconds>set port <port_int>set reqclientcert {disable | enable}set route-source-interface {disable | enable}set servercert <server_cert_name>set sslv2 {disable | enable}set sslv3 {disable | enable}set sslvpn-enable {disable | enable}set tunnel-ip-pools <pool1_name...pooln_name>set url-obscuration {disable | enable}set wins-server1 <address_ipv4>set wins-server2 <address_ipv4>
end
When you configure the timeout settings, if you set the authentication timeout (auth-timeout) to 0, then the remote client does not have to re-authenticate again unless they log out of the system. In order to fully take advantage of this setting, the value for idle-timeout has to be set to 0 also, so the client does not timeout if the maximum idle time is reached. If the idle-timeout is not set to the infinite value, the system will log out if it reaches the limit set, regardless of the auth-timeout setting.
Note: You can configure SSL VPNs on FortiGate units that run in NAT/Route mode. The commands are available in NAT/Route mode only.
Note: Set the sslvpn-enable attribute to enable to view all possible settings. The tunnel-ip-pools field is required for tunnel-mode access only. All other fields are optional.
ortiOS 4.0 MR3 CLI Reference1-431-99686-20110623 613ttp://docs.fortinet.com/ • Feedback
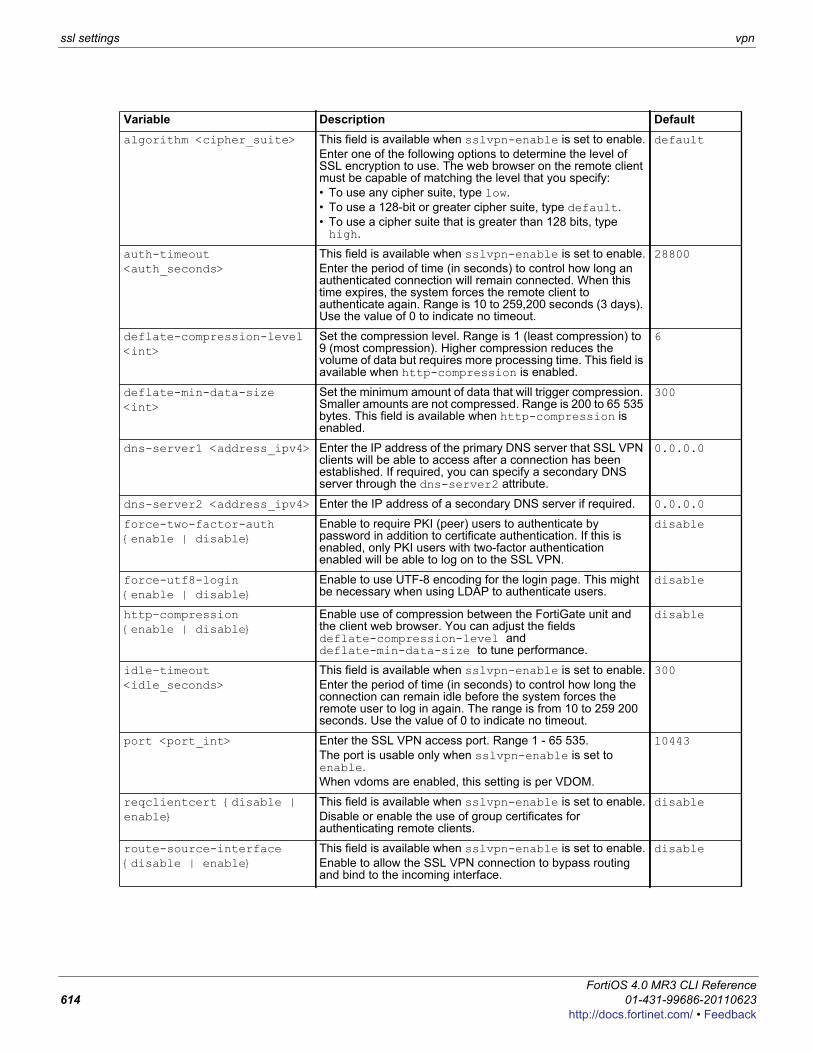
ssl settings vpn
Variable Description Defaultalgorithm <cipher_suite> This field is available when sslvpn-enable is set to enable.
Enter one of the following options to determine the level of SSL encryption to use. The web browser on the remote client must be capable of matching the level that you specify:• To use any cipher suite, type low.• To use a 128-bit or greater cipher suite, type default.• To use a cipher suite that is greater than 128 bits, type high.
default
auth-timeout<auth_seconds>
This field is available when sslvpn-enable is set to enable.Enter the period of time (in seconds) to control how long an authenticated connection will remain connected. When this time expires, the system forces the remote client to authenticate again. Range is 10 to 259,200 seconds (3 days). Use the value of 0 to indicate no timeout.
28800
deflate-compression-level <int>
Set the compression level. Range is 1 (least compression) to 9 (most compression). Higher compression reduces the volume of data but requires more processing time. This field is available when http-compression is enabled.
6
deflate-min-data-size <int>
Set the minimum amount of data that will trigger compression. Smaller amounts are not compressed. Range is 200 to 65 535 bytes. This field is available when http-compression is enabled.
300
dns-server1 <address_ipv4> Enter the IP address of the primary DNS server that SSL VPN clients will be able to access after a connection has been established. If required, you can specify a secondary DNS server through the dns-server2 attribute.
0.0.0.0
dns-server2 <address_ipv4> Enter the IP address of a secondary DNS server if required. 0.0.0.0
force-two-factor-auth {enable | disable}
Enable to require PKI (peer) users to authenticate by password in addition to certificate authentication. If this is enabled, only PKI users with two-factor authentication enabled will be able to log on to the SSL VPN.
disable
force-utf8-login {enable | disable}
Enable to use UTF-8 encoding for the login page. This might be necessary when using LDAP to authenticate users.
disable
http-compression {enable | disable}
Enable use of compression between the FortiGate unit and the client web browser. You can adjust the fields deflate-compression-level and deflate-min-data-size to tune performance.
disable
idle-timeout<idle_seconds>
This field is available when sslvpn-enable is set to enable.Enter the period of time (in seconds) to control how long the connection can remain idle before the system forces the remote user to log in again. The range is from 10 to 259 200 seconds. Use the value of 0 to indicate no timeout.
300
port <port_int> Enter the SSL VPN access port. Range 1 - 65 535.The port is usable only when sslvpn-enable is set to enable.When vdoms are enabled, this setting is per VDOM.
10443
reqclientcert {disable | enable}
This field is available when sslvpn-enable is set to enable.Disable or enable the use of group certificates for authenticating remote clients.
disable
route-source-interface {disable | enable}
This field is available when sslvpn-enable is set to enable.Enable to allow the SSL VPN connection to bypass routing and bind to the incoming interface.
disable
FortiOS 4.0 MR3 CLI Reference614 01-431-99686-20110623
http://docs.fortinet.com/ • Feedback
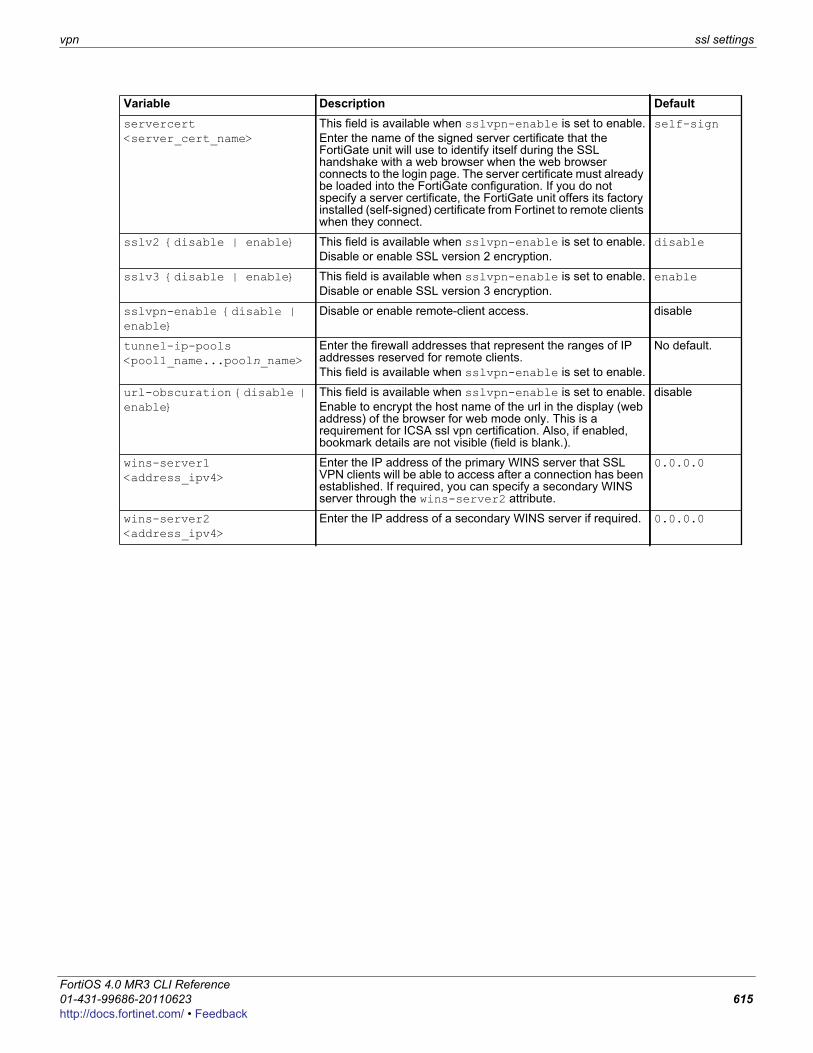
vpn ssl settings
F0h
servercert <server_cert_name>
This field is available when sslvpn-enable is set to enable.Enter the name of the signed server certificate that the FortiGate unit will use to identify itself during the SSL handshake with a web browser when the web browser connects to the login page. The server certificate must already be loaded into the FortiGate configuration. If you do not specify a server certificate, the FortiGate unit offers its factory installed (self-signed) certificate from Fortinet to remote clients when they connect.
self-sign
sslv2 {disable | enable} This field is available when sslvpn-enable is set to enable.Disable or enable SSL version 2 encryption.
disable
sslv3 {disable | enable} This field is available when sslvpn-enable is set to enable.Disable or enable SSL version 3 encryption.
enable
sslvpn-enable {disable | enable}
Disable or enable remote-client access. disable
tunnel-ip-pools <pool1_name...pooln_name>
Enter the firewall addresses that represent the ranges of IP addresses reserved for remote clients.This field is available when sslvpn-enable is set to enable.
No default.
url-obscuration {disable | enable}
This field is available when sslvpn-enable is set to enable.Enable to encrypt the host name of the url in the display (web address) of the browser for web mode only. This is a requirement for ICSA ssl vpn certification. Also, if enabled, bookmark details are not visible (field is blank.).
disable
wins-server1 <address_ipv4>
Enter the IP address of the primary WINS server that SSL VPN clients will be able to access after a connection has been established. If required, you can specify a secondary WINS server through the wins-server2 attribute.
0.0.0.0
wins-server2 <address_ipv4>
Enter the IP address of a secondary WINS server if required. 0.0.0.0
Variable Description Default
ortiOS 4.0 MR3 CLI Reference1-431-99686-20110623 615ttp://docs.fortinet.com/ • Feedback
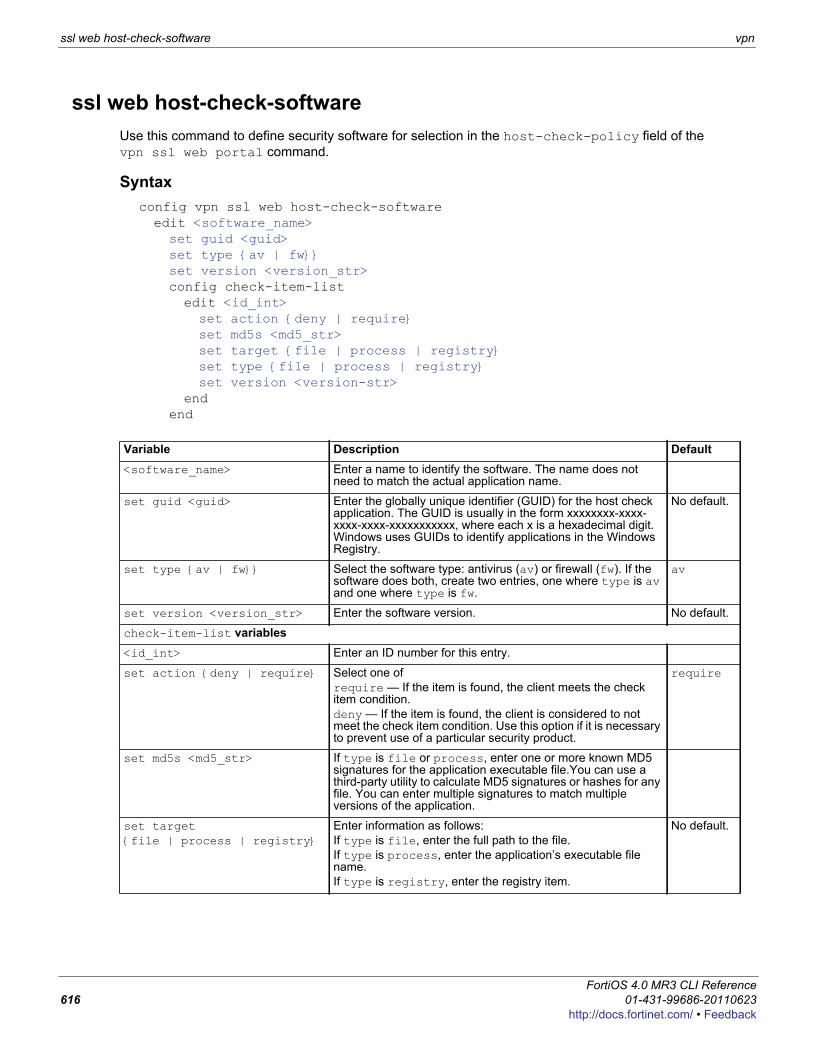
ssl web host-check-software vpn
ssl web host-check-softwareUse this command to define security software for selection in the host-check-policy field of the vpn ssl web portal command.
Syntaxconfig vpn ssl web host-check-softwareedit <software_name>set guid <guid>set type {av | fw}} set version <version_str> config check-item-listedit <id_int>set action {deny | require}set md5s <md5_str>set target {file | process | registry}set type {file | process | registry}set version <version-str>
endend
Variable Description Default<software_name> Enter a name to identify the software. The name does not
need to match the actual application name.
set guid <guid> Enter the globally unique identifier (GUID) for the host check application. The GUID is usually in the form xxxxxxxx-xxxx-xxxx-xxxx-xxxxxxxxxxx, where each x is a hexadecimal digit. Windows uses GUIDs to identify applications in the Windows Registry.
No default.
set type {av | fw}} Select the software type: antivirus (av) or firewall (fw). If the software does both, create two entries, one where type is av and one where type is fw.
av
set version <version_str> Enter the software version. No default.
check-item-list variables<id_int> Enter an ID number for this entry.
set action {deny | require} Select one of require — If the item is found, the client meets the check item condition.deny — If the item is found, the client is considered to not meet the check item condition. Use this option if it is necessary to prevent use of a particular security product.
require
set md5s <md5_str> If type is file or process, enter one or more known MD5 signatures for the application executable file.You can use a third-party utility to calculate MD5 signatures or hashes for any file. You can enter multiple signatures to match multiple versions of the application.
set target {file | process | registry}
Enter information as follows:If type is file, enter the full path to the file.If type is process, enter the application’s executable file name.If type is registry, enter the registry item.
No default.
FortiOS 4.0 MR3 CLI Reference616 01-431-99686-20110623
http://docs.fortinet.com/ • Feedback
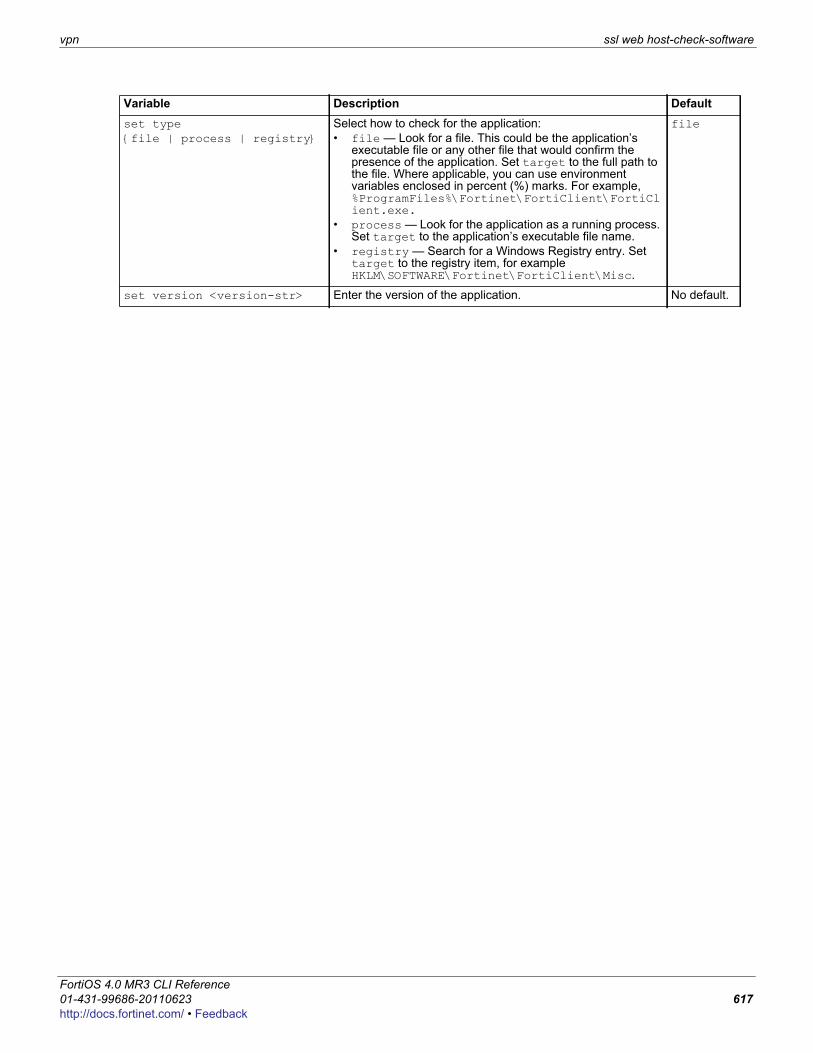
vpn ssl web host-check-software
F0h
set type {file | process | registry}
Select how to check for the application:• file — Look for a file. This could be the application’s
executable file or any other file that would confirm the presence of the application. Set target to the full path to the file. Where applicable, you can use environment variables enclosed in percent (%) marks. For example, %ProgramFiles%\Fortinet\FortiClient\FortiClient.exe.
• process — Look for the application as a running process. Set target to the application’s executable file name.
• registry — Search for a Windows Registry entry. Set target to the registry item, for example HKLM\SOFTWARE\Fortinet\FortiClient\Misc.
file
set version <version-str> Enter the version of the application. No default.
Variable Description Default
ortiOS 4.0 MR3 CLI Reference1-431-99686-20110623 617ttp://docs.fortinet.com/ • Feedback
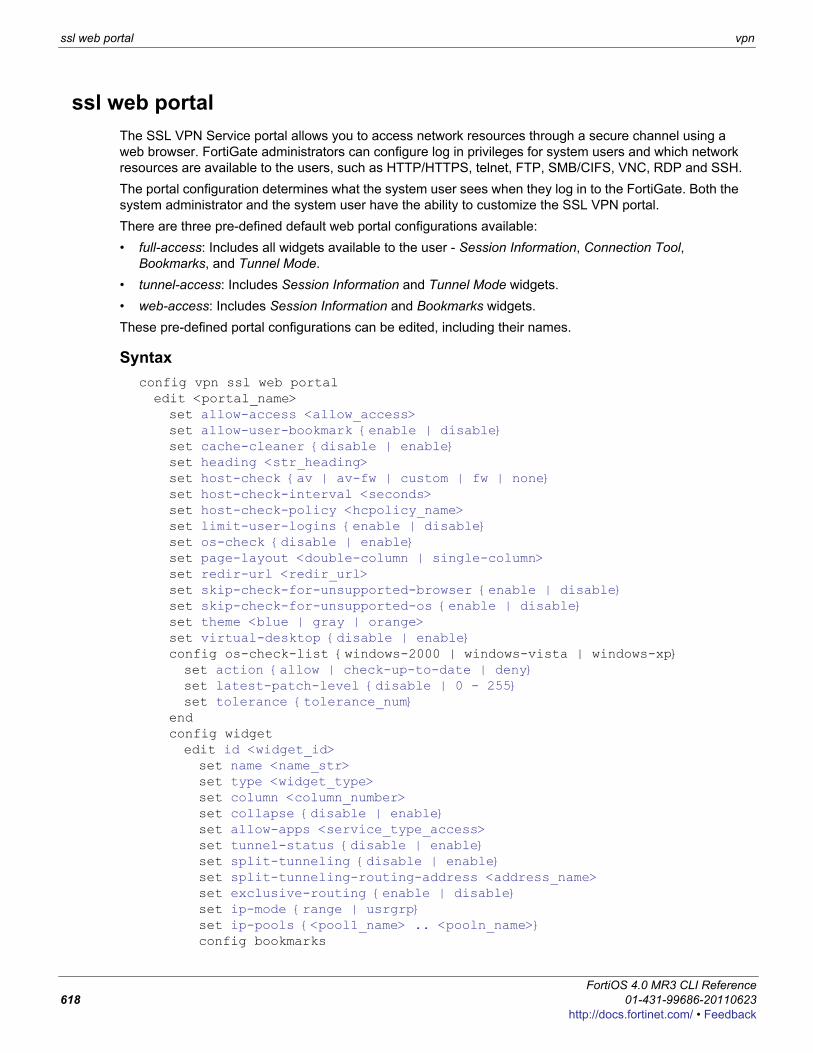
ssl web portal vpn
ssl web portalThe SSL VPN Service portal allows you to access network resources through a secure channel using a web browser. FortiGate administrators can configure log in privileges for system users and which network resources are available to the users, such as HTTP/HTTPS, telnet, FTP, SMB/CIFS, VNC, RDP and SSH.The portal configuration determines what the system user sees when they log in to the FortiGate. Both the system administrator and the system user have the ability to customize the SSL VPN portal.There are three pre-defined default web portal configurations available:• full-access: Includes all widgets available to the user - Session Information, Connection Tool,
Bookmarks, and Tunnel Mode.• tunnel-access: Includes Session Information and Tunnel Mode widgets.• web-access: Includes Session Information and Bookmarks widgets.These pre-defined portal configurations can be edited, including their names.
Syntaxconfig vpn ssl web portaledit <portal_name>set allow-access <allow_access>set allow-user-bookmark {enable | disable}set cache-cleaner {disable | enable}set heading <str_heading>set host-check {av | av-fw | custom | fw | none}set host-check-interval <seconds>set host-check-policy <hcpolicy_name>set limit-user-logins {enable | disable}set os-check {disable | enable}set page-layout <double-column | single-column>set redir-url <redir_url>set skip-check-for-unsupported-browser {enable | disable}set skip-check-for-unsupported-os {enable | disable}set theme <blue | gray | orange>set virtual-desktop {disable | enable}config os-check-list {windows-2000 | windows-vista | windows-xp}set action {allow | check-up-to-date | deny}set latest-patch-level {disable | 0 - 255}set tolerance {tolerance_num}
endconfig widgetedit id <widget_id>set name <name_str>set type <widget_type>set column <column_number>set collapse {disable | enable}set allow-apps <service_type_access>set tunnel-status {disable | enable}set split-tunneling {disable | enable}set split-tunneling-routing-address <address_name>set exclusive-routing {enable | disable}set ip-mode {range | usrgrp}set ip-pools {<pool1_name> .. <pooln_name>}config bookmarks
FortiOS 4.0 MR3 CLI Reference618 01-431-99686-20110623
http://docs.fortinet.com/ • Feedback
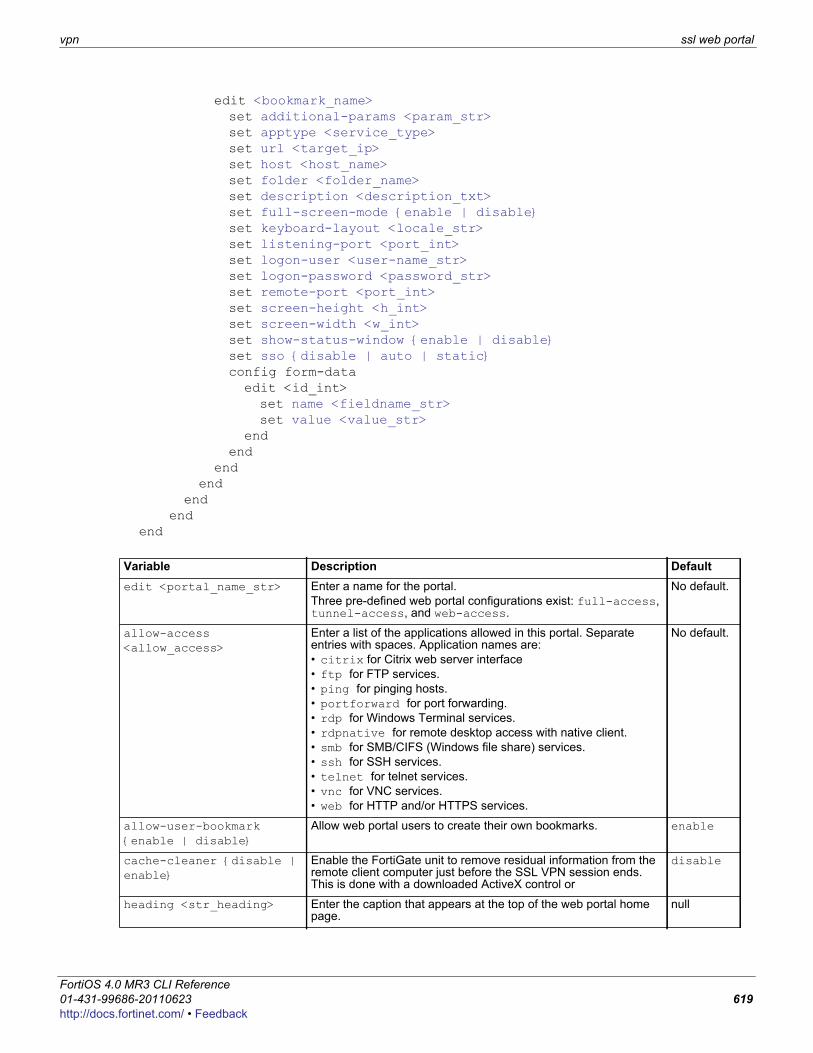
vpn ssl web portal
F0h
edit <bookmark_name>set additional-params <param_str>set apptype <service_type>set url <target_ip>set host <host_name>set folder <folder_name>set description <description_txt>set full-screen-mode {enable | disable}set keyboard-layout <locale_str>set listening-port <port_int>set logon-user <user-name_str>set logon-password <password_str>set remote-port <port_int>set screen-height <h_int>set screen-width <w_int>set show-status-window {enable | disable}set sso {disable | auto | static}config form-dataedit <id_int>set name <fieldname_str>set value <value_str>
endend
endend
endend
end
Variable Description Defaultedit <portal_name_str> Enter a name for the portal.
Three pre-defined web portal configurations exist: full-access, tunnel-access, and web-access.
No default.
allow-access <allow_access>
Enter a list of the applications allowed in this portal. Separate entries with spaces. Application names are:• citrix for Citrix web server interface• ftp for FTP services.• ping for pinging hosts.• portforward for port forwarding.• rdp for Windows Terminal services.• rdpnative for remote desktop access with native client.• smb for SMB/CIFS (Windows file share) services.• ssh for SSH services.• telnet for telnet services.• vnc for VNC services.• web for HTTP and/or HTTPS services.
No default.
allow-user-bookmark {enable | disable}
Allow web portal users to create their own bookmarks. enable
cache-cleaner {disable | enable}
Enable the FortiGate unit to remove residual information from the remote client computer just before the SSL VPN session ends. This is done with a downloaded ActiveX control or
disable
heading <str_heading> Enter the caption that appears at the top of the web portal home page.
null
ortiOS 4.0 MR3 CLI Reference1-431-99686-20110623 619ttp://docs.fortinet.com/ • Feedback
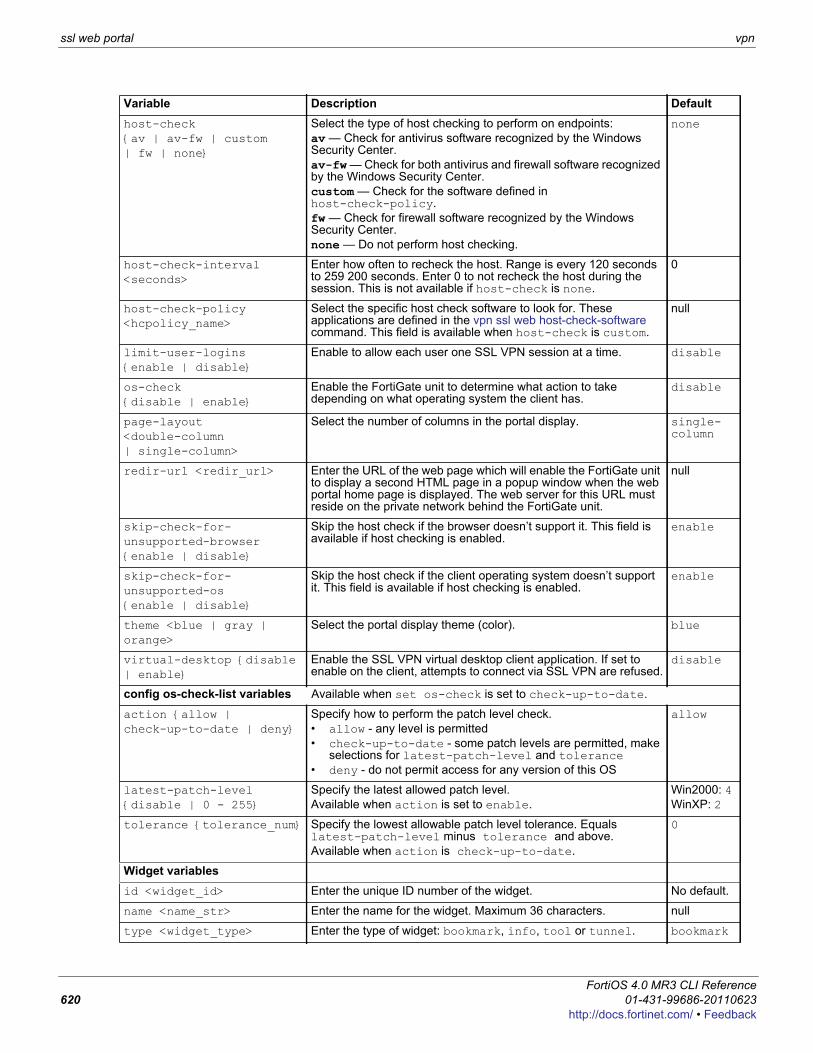
ssl web portal vpn
host-check {av | av-fw | custom | fw | none}
Select the type of host checking to perform on endpoints:av — Check for antivirus software recognized by the Windows Security Center.av-fw — Check for both antivirus and firewall software recognized by the Windows Security Center.custom — Check for the software defined in host-check-policy.fw — Check for firewall software recognized by the Windows Security Center.none — Do not perform host checking.
none
host-check-interval <seconds>
Enter how often to recheck the host. Range is every 120 seconds to 259 200 seconds. Enter 0 to not recheck the host during the session. This is not available if host-check is none.
0
host-check-policy <hcpolicy_name>
Select the specific host check software to look for. These applications are defined in the vpn ssl web host-check-software command. This field is available when host-check is custom.
null
limit-user-logins {enable | disable}
Enable to allow each user one SSL VPN session at a time. disable
os-check {disable | enable}
Enable the FortiGate unit to determine what action to take depending on what operating system the client has.
disable
page-layout <double-column | single-column>
Select the number of columns in the portal display. single-column
redir-url <redir_url> Enter the URL of the web page which will enable the FortiGate unit to display a second HTML page in a popup window when the web portal home page is displayed. The web server for this URL must reside on the private network behind the FortiGate unit.
null
skip-check-for-unsupported-browser {enable | disable}
Skip the host check if the browser doesn’t support it. This field is available if host checking is enabled.
enable
skip-check-for-unsupported-os {enable | disable}
Skip the host check if the client operating system doesn’t support it. This field is available if host checking is enabled.
enable
theme <blue | gray | orange>
Select the portal display theme (color). blue
virtual-desktop {disable | enable}
Enable the SSL VPN virtual desktop client application. If set to enable on the client, attempts to connect via SSL VPN are refused.
disable
config os-check-list variables Available when set os-check is set to check-up-to-date.
action {allow | check-up-to-date | deny}
Specify how to perform the patch level check.• allow - any level is permitted• check-up-to-date - some patch levels are permitted, make
selections for latest-patch-level and tolerance• deny - do not permit access for any version of this OS
allow
latest-patch-level {disable | 0 - 255}
Specify the latest allowed patch level. Available when action is set to enable.
Win2000: 4WinXP: 2
tolerance {tolerance_num} Specify the lowest allowable patch level tolerance. Equals latest-patch-level minus tolerance and above. Available when action is check-up-to-date.
0
Widget variablesid <widget_id> Enter the unique ID number of the widget. No default.
name <name_str> Enter the name for the widget. Maximum 36 characters. null
type <widget_type> Enter the type of widget: bookmark, info, tool or tunnel. bookmark
Variable Description Default
FortiOS 4.0 MR3 CLI Reference620 01-431-99686-20110623
http://docs.fortinet.com/ • Feedback
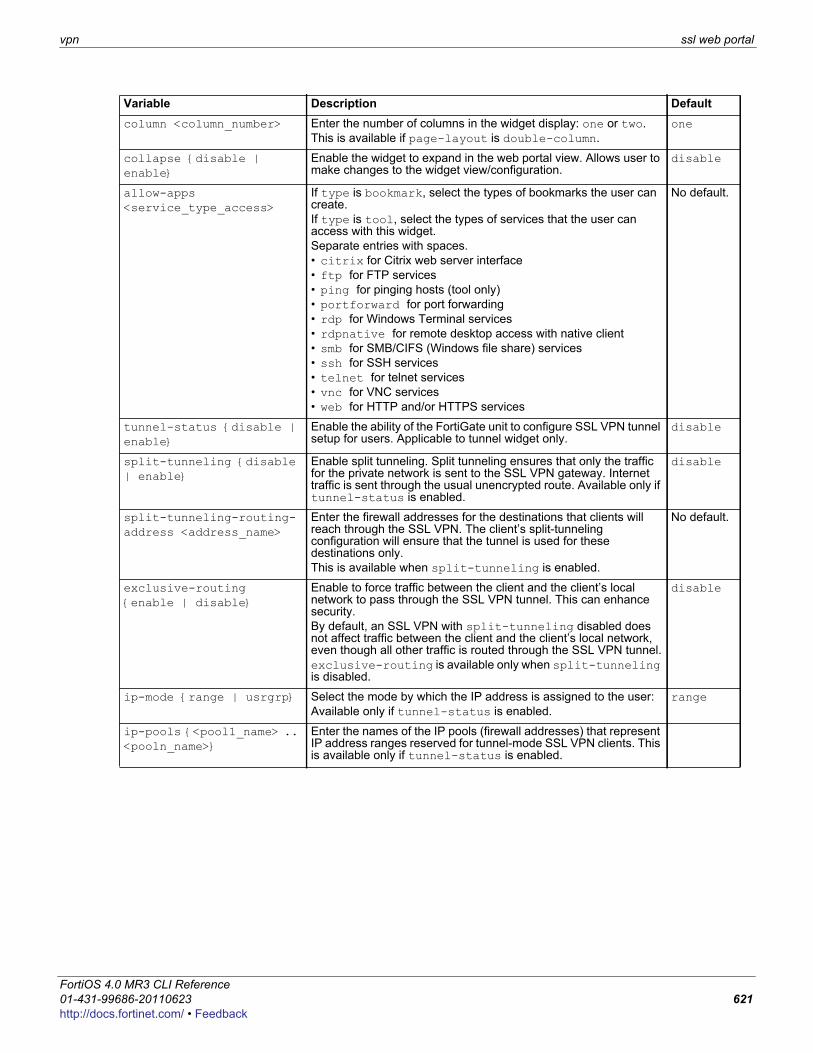
vpn ssl web portal
F0h
column <column_number> Enter the number of columns in the widget display: one or two.This is available if page-layout is double-column.
one
collapse {disable | enable}
Enable the widget to expand in the web portal view. Allows user to make changes to the widget view/configuration.
disable
allow-apps <service_type_access>
If type is bookmark, select the types of bookmarks the user can create.If type is tool, select the types of services that the user can access with this widget.Separate entries with spaces.• citrix for Citrix web server interface• ftp for FTP services• ping for pinging hosts (tool only)• portforward for port forwarding• rdp for Windows Terminal services• rdpnative for remote desktop access with native client• smb for SMB/CIFS (Windows file share) services• ssh for SSH services• telnet for telnet services• vnc for VNC services• web for HTTP and/or HTTPS services
No default.
tunnel-status {disable | enable}
Enable the ability of the FortiGate unit to configure SSL VPN tunnel setup for users. Applicable to tunnel widget only.
disable
split-tunneling {disable | enable}
Enable split tunneling. Split tunneling ensures that only the traffic for the private network is sent to the SSL VPN gateway. Internet traffic is sent through the usual unencrypted route. Available only if tunnel-status is enabled.
disable
split-tunneling-routing-address <address_name>
Enter the firewall addresses for the destinations that clients will reach through the SSL VPN. The client’s split-tunneling configuration will ensure that the tunnel is used for these destinations only.This is available when split-tunneling is enabled.
No default.
exclusive-routing {enable | disable}
Enable to force traffic between the client and the client’s local network to pass through the SSL VPN tunnel. This can enhance security. By default, an SSL VPN with split-tunneling disabled does not affect traffic between the client and the client’s local network, even though all other traffic is routed through the SSL VPN tunnel.exclusive-routing is available only when split-tunneling is disabled.
disable
ip-mode {range | usrgrp} Select the mode by which the IP address is assigned to the user:Available only if tunnel-status is enabled.
range
ip-pools {<pool1_name> .. <pooln_name>}
Enter the names of the IP pools (firewall addresses) that represent IP address ranges reserved for tunnel-mode SSL VPN clients. This is available only if tunnel-status is enabled.
Variable Description Default
ortiOS 4.0 MR3 CLI Reference1-431-99686-20110623 621ttp://docs.fortinet.com/ • Feedback
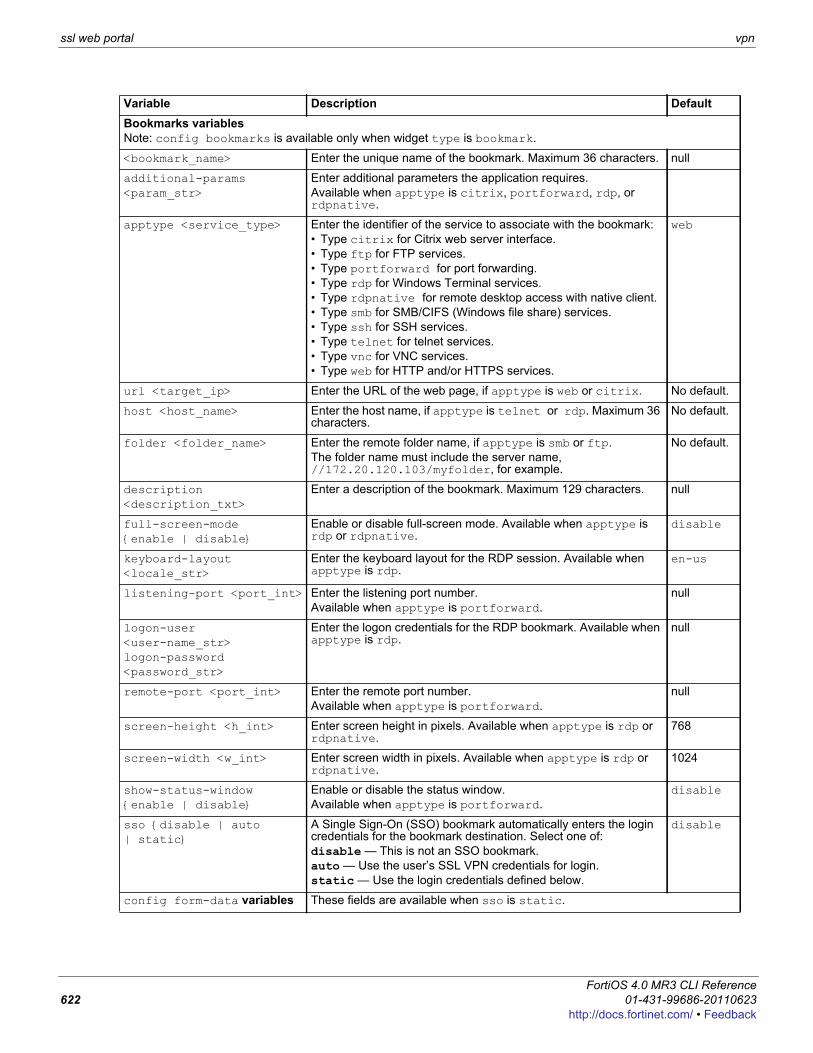
ssl web portal vpn
Bookmarks variablesNote: config bookmarks is available only when widget type is bookmark.
<bookmark_name> Enter the unique name of the bookmark. Maximum 36 characters. null
additional-params <param_str>
Enter additional parameters the application requires.Available when apptype is citrix, portforward, rdp, or rdpnative.
apptype <service_type> Enter the identifier of the service to associate with the bookmark:• Type citrix for Citrix web server interface.• Type ftp for FTP services.• Type portforward for port forwarding.• Type rdp for Windows Terminal services.• Type rdpnative for remote desktop access with native client.• Type smb for SMB/CIFS (Windows file share) services.• Type ssh for SSH services.• Type telnet for telnet services.• Type vnc for VNC services.• Type web for HTTP and/or HTTPS services.
web
url <target_ip> Enter the URL of the web page, if apptype is web or citrix. No default.
host <host_name> Enter the host name, if apptype is telnet or rdp. Maximum 36 characters.
No default.
folder <folder_name> Enter the remote folder name, if apptype is smb or ftp.The folder name must include the server name, //172.20.120.103/myfolder, for example.
No default.
description <description_txt>
Enter a description of the bookmark. Maximum 129 characters. null
full-screen-mode {enable | disable}
Enable or disable full-screen mode. Available when apptype is rdp or rdpnative.
disable
keyboard-layout <locale_str>
Enter the keyboard layout for the RDP session. Available when apptype is rdp.
en-us
listening-port <port_int> Enter the listening port number.Available when apptype is portforward.
null
logon-user <user-name_str>logon-password <password_str>
Enter the logon credentials for the RDP bookmark. Available when apptype is rdp.
null
remote-port <port_int> Enter the remote port number.Available when apptype is portforward.
null
screen-height <h_int> Enter screen height in pixels. Available when apptype is rdp or rdpnative.
768
screen-width <w_int> Enter screen width in pixels. Available when apptype is rdp or rdpnative.
1024
show-status-window {enable | disable}
Enable or disable the status window. Available when apptype is portforward.
disable
sso {disable | auto | static}
A Single Sign-On (SSO) bookmark automatically enters the login credentials for the bookmark destination. Select one of:disable — This is not an SSO bookmark.auto — Use the user’s SSL VPN credentials for login. static — Use the login credentials defined below.
disable
config form-data variables These fields are available when sso is static.
Variable Description Default
FortiOS 4.0 MR3 CLI Reference622 01-431-99686-20110623
http://docs.fortinet.com/ • Feedback

vpn ssl web portal
F0h
name <fieldname_str> Enter a required login page field name, “User Name” for example. No default.
value <value_str> Enter the value to enter in the field identified by name.If you are an administrator configuring a bookmark for users: • Enter %usrname% to represent the user’s SSL VPN user name.Enter %passwd% to represent the user’s SSL VPN password.
No default.
Variable Description Default
ortiOS 4.0 MR3 CLI Reference1-431-99686-20110623 623ttp://docs.fortinet.com/ • Feedback
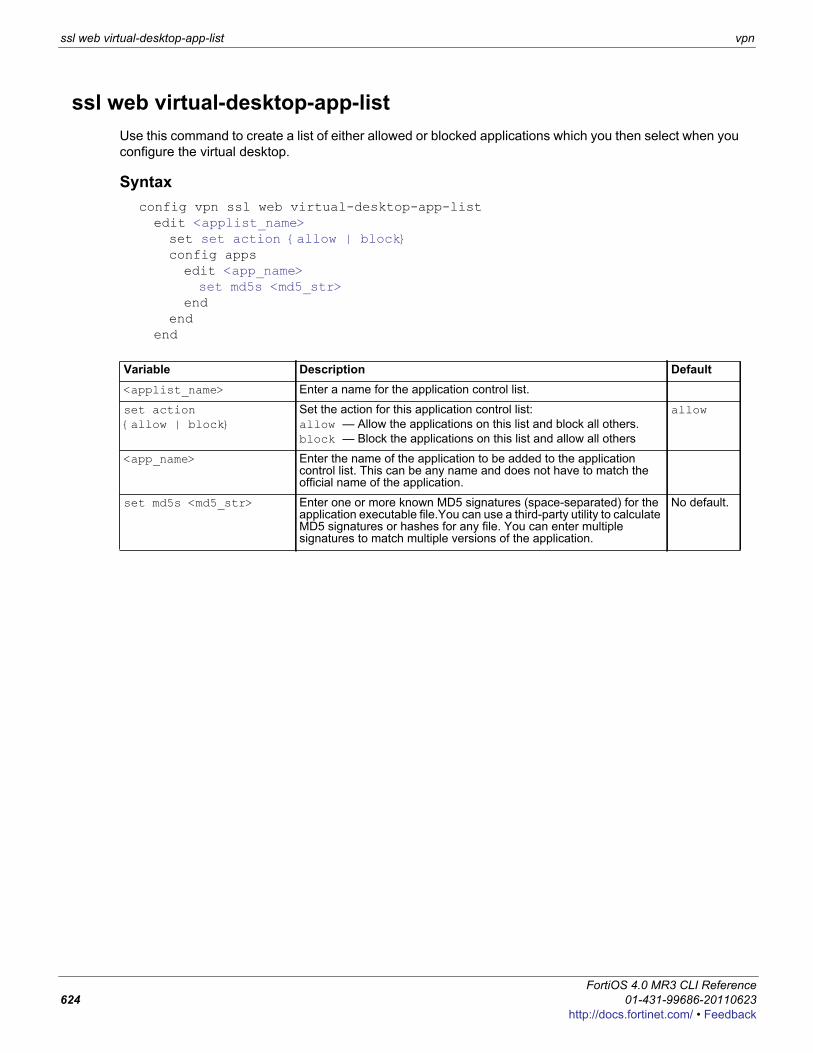
ssl web virtual-desktop-app-list vpn
ssl web virtual-desktop-app-listUse this command to create a list of either allowed or blocked applications which you then select when you configure the virtual desktop.
Syntaxconfig vpn ssl web virtual-desktop-app-listedit <applist_name>set set action {allow | block}config appsedit <app_name>set md5s <md5_str>
endend
end
Variable Description Default<applist_name> Enter a name for the application control list.
set action {allow | block}
Set the action for this application control list:allow — Allow the applications on this list and block all others.block — Block the applications on this list and allow all others
allow
<app_name> Enter the name of the application to be added to the application control list. This can be any name and does not have to match the official name of the application.
set md5s <md5_str> Enter one or more known MD5 signatures (space-separated) for the application executable file.You can use a third-party utility to calculate MD5 signatures or hashes for any file. You can enter multiple signatures to match multiple versions of the application.
No default.
FortiOS 4.0 MR3 CLI Reference624 01-431-99686-20110623
http://docs.fortinet.com/ • Feedback
F0h
wanoptUse these commands to configure FortiGate WAN optimization.
auth-grouppeerrule
settingsssl-serverstoragewebcache
ortiOS 4.0 MR3 CLI Reference1-431-99686-20110623 625ttp://docs.fortinet.com/ • Feedback
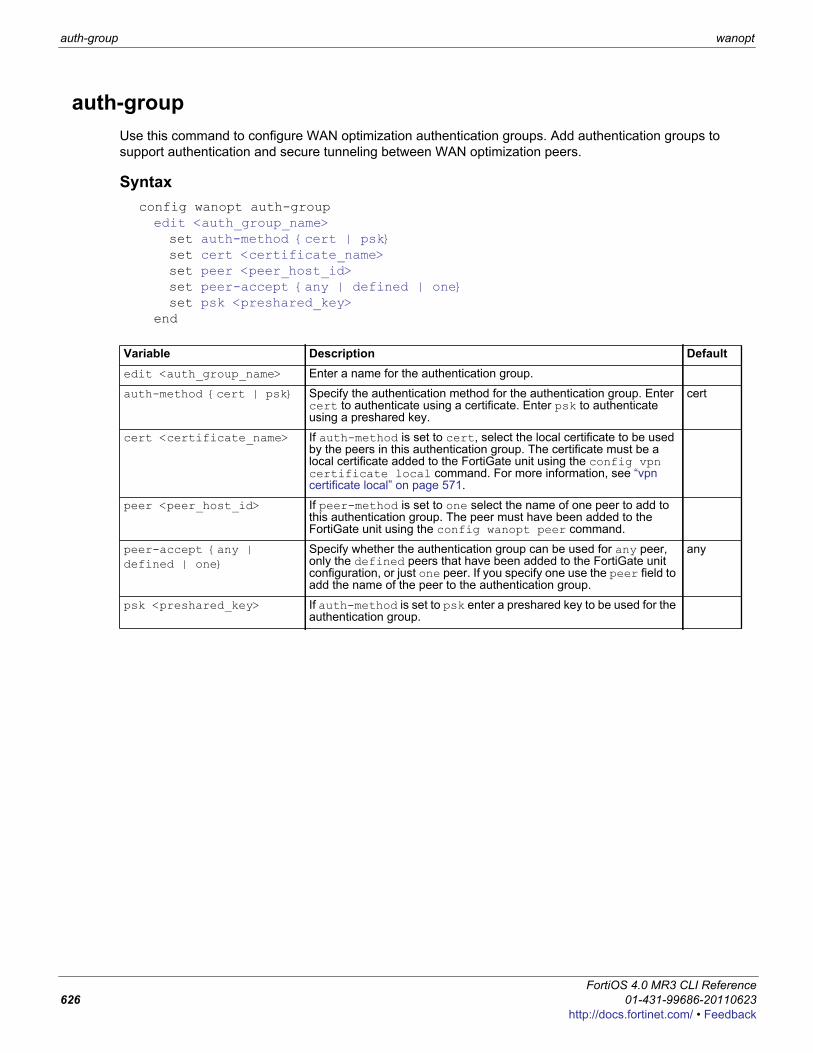
auth-group wanopt
auth-groupUse this command to configure WAN optimization authentication groups. Add authentication groups to support authentication and secure tunneling between WAN optimization peers.
Syntaxconfig wanopt auth-groupedit <auth_group_name>set auth-method {cert | psk}set cert <certificate_name>set peer <peer_host_id>set peer-accept {any | defined | one}set psk <preshared_key>
end
Variable Description Defaultedit <auth_group_name> Enter a name for the authentication group.
auth-method {cert | psk} Specify the authentication method for the authentication group. Enter cert to authenticate using a certificate. Enter psk to authenticate using a preshared key.
cert
cert <certificate_name> If auth-method is set to cert, select the local certificate to be used by the peers in this authentication group. The certificate must be a local certificate added to the FortiGate unit using the config vpn certificate local command. For more information, see “vpn certificate local” on page 571.
peer <peer_host_id> If peer-method is set to one select the name of one peer to add to this authentication group. The peer must have been added to the FortiGate unit using the config wanopt peer command.
peer-accept {any | defined | one}
Specify whether the authentication group can be used for any peer, only the defined peers that have been added to the FortiGate unit configuration, or just one peer. If you specify one use the peer field to add the name of the peer to the authentication group.
any
psk <preshared_key> If auth-method is set to psk enter a preshared key to be used for the authentication group.
FortiOS 4.0 MR3 CLI Reference626 01-431-99686-20110623
http://docs.fortinet.com/ • Feedback
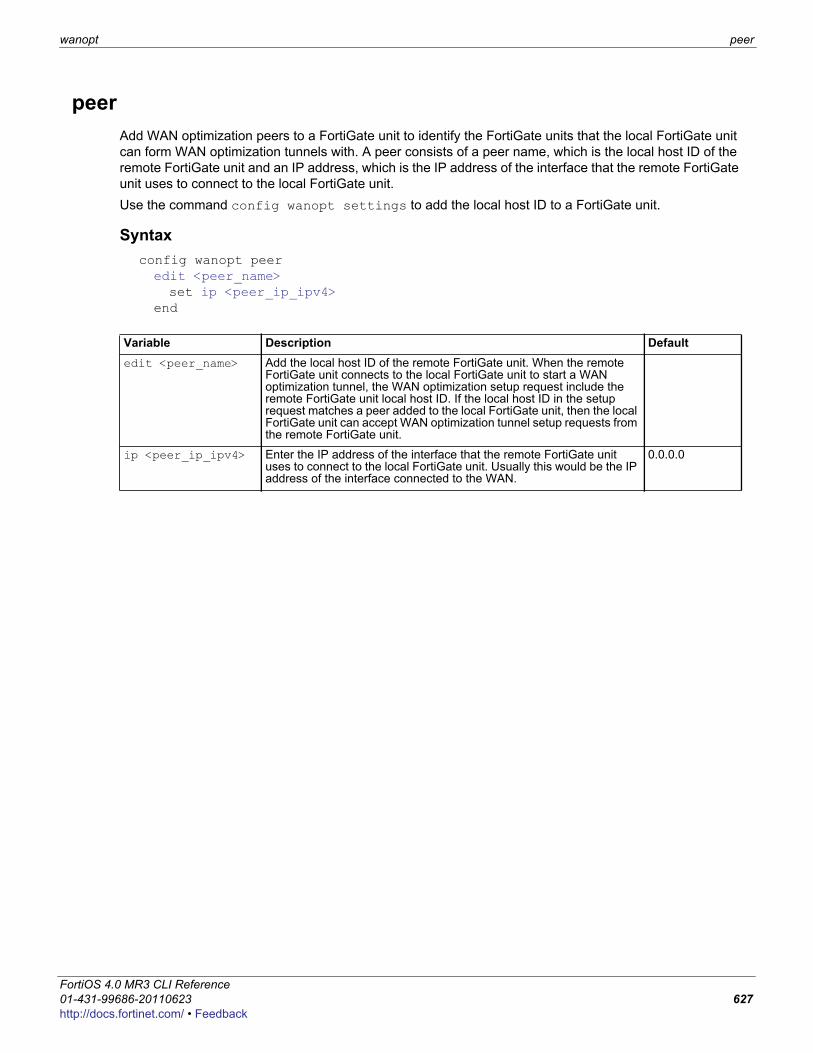
wanopt peer
F0h
peerAdd WAN optimization peers to a FortiGate unit to identify the FortiGate units that the local FortiGate unit can form WAN optimization tunnels with. A peer consists of a peer name, which is the local host ID of the remote FortiGate unit and an IP address, which is the IP address of the interface that the remote FortiGate unit uses to connect to the local FortiGate unit.Use the command config wanopt settings to add the local host ID to a FortiGate unit.
Syntaxconfig wanopt peeredit <peer_name>set ip <peer_ip_ipv4>
end
Variable Description Defaultedit <peer_name> Add the local host ID of the remote FortiGate unit. When the remote
FortiGate unit connects to the local FortiGate unit to start a WAN optimization tunnel, the WAN optimization setup request include the remote FortiGate unit local host ID. If the local host ID in the setup request matches a peer added to the local FortiGate unit, then the local FortiGate unit can accept WAN optimization tunnel setup requests from the remote FortiGate unit.
ip <peer_ip_ipv4> Enter the IP address of the interface that the remote FortiGate unit uses to connect to the local FortiGate unit. Usually this would be the IP address of the interface connected to the WAN.
0.0.0.0
ortiOS 4.0 MR3 CLI Reference1-431-99686-20110623 627ttp://docs.fortinet.com/ • Feedback
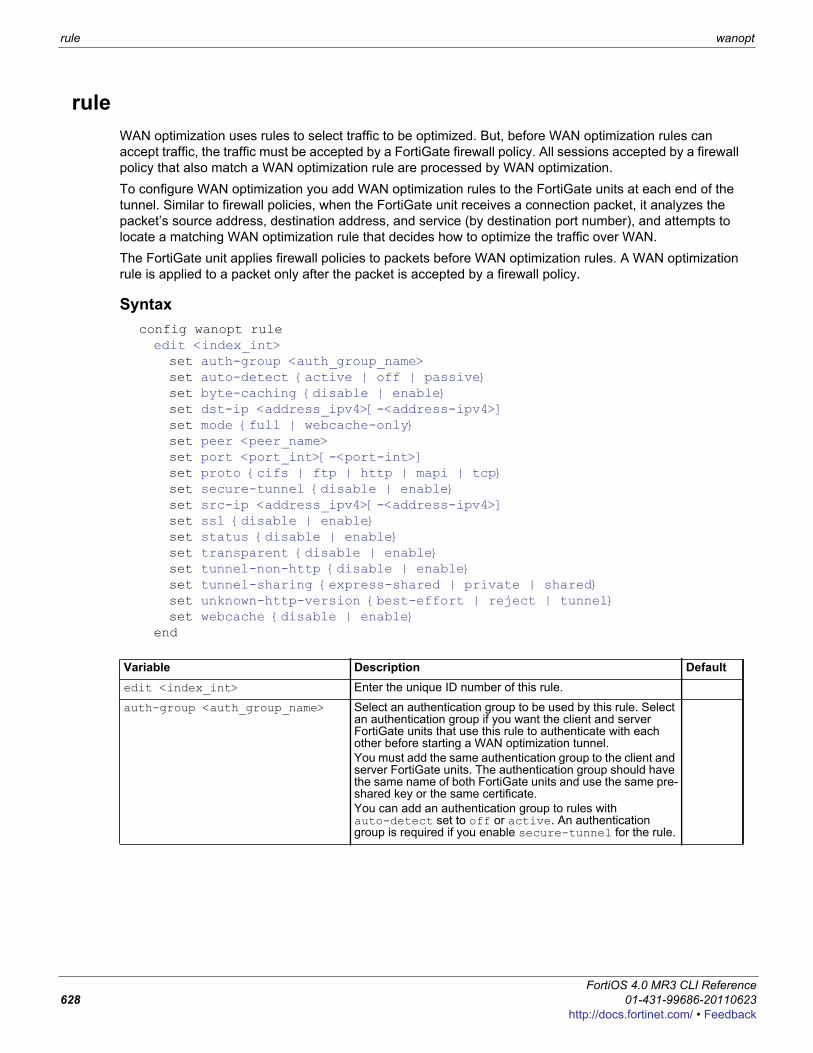
rule wanopt
ruleWAN optimization uses rules to select traffic to be optimized. But, before WAN optimization rules can accept traffic, the traffic must be accepted by a FortiGate firewall policy. All sessions accepted by a firewall policy that also match a WAN optimization rule are processed by WAN optimization.To configure WAN optimization you add WAN optimization rules to the FortiGate units at each end of the tunnel. Similar to firewall policies, when the FortiGate unit receives a connection packet, it analyzes the packet’s source address, destination address, and service (by destination port number), and attempts to locate a matching WAN optimization rule that decides how to optimize the traffic over WAN.The FortiGate unit applies firewall policies to packets before WAN optimization rules. A WAN optimization rule is applied to a packet only after the packet is accepted by a firewall policy.
Syntaxconfig wanopt ruleedit <index_int>set auth-group <auth_group_name>set auto-detect {active | off | passive}set byte-caching {disable | enable}set dst-ip <address_ipv4>[-<address-ipv4>]set mode {full | webcache-only}set peer <peer_name>set port <port_int>[-<port-int>]set proto {cifs | ftp | http | mapi | tcp}set secure-tunnel {disable | enable}set src-ip <address_ipv4>[-<address-ipv4>]set ssl {disable | enable}set status {disable | enable}set transparent {disable | enable}set tunnel-non-http {disable | enable}set tunnel-sharing {express-shared | private | shared}set unknown-http-version {best-effort | reject | tunnel}set webcache {disable | enable}
end
Variable Description Defaultedit <index_int> Enter the unique ID number of this rule.
auth-group <auth_group_name> Select an authentication group to be used by this rule. Select an authentication group if you want the client and server FortiGate units that use this rule to authenticate with each other before starting a WAN optimization tunnel. You must add the same authentication group to the client and server FortiGate units. The authentication group should have the same name of both FortiGate units and use the same pre-shared key or the same certificate.You can add an authentication group to rules with auto-detect set to off or active. An authentication group is required if you enable secure-tunnel for the rule.
FortiOS 4.0 MR3 CLI Reference628 01-431-99686-20110623
http://docs.fortinet.com/ • Feedback
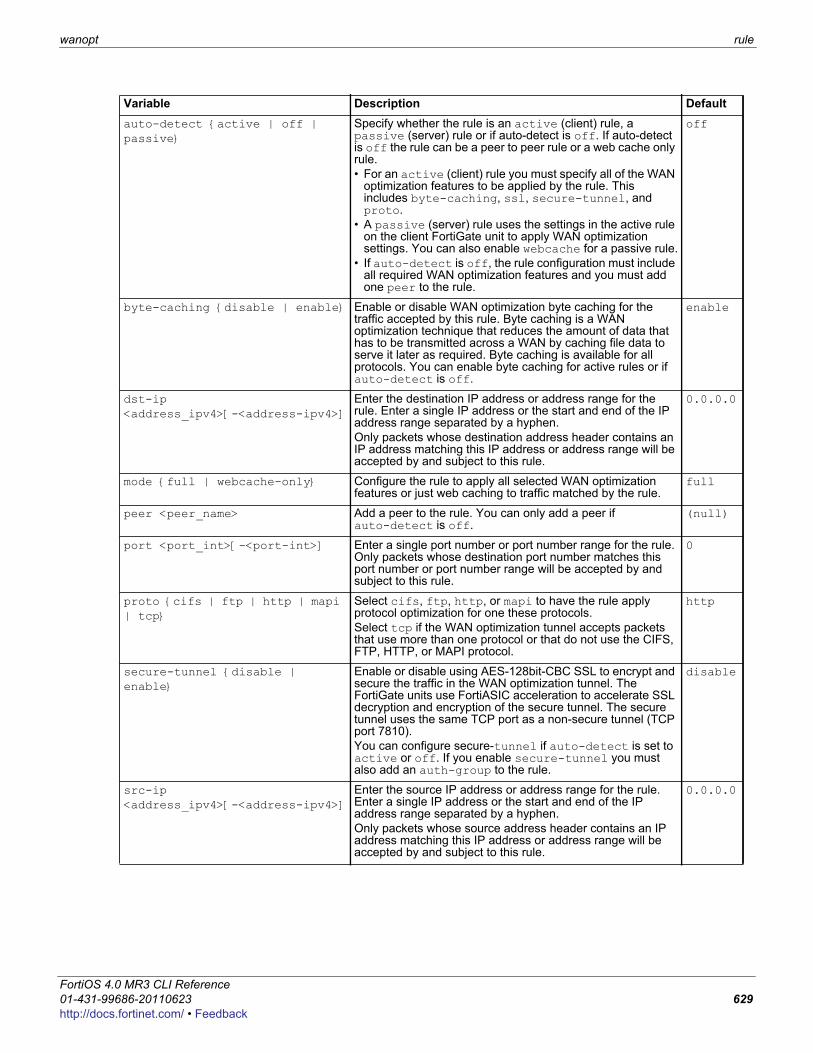
wanopt rule
F0h
auto-detect {active | off | passive}
Specify whether the rule is an active (client) rule, a passive (server) rule or if auto-detect is off. If auto-detect is off the rule can be a peer to peer rule or a web cache only rule.• For an active (client) rule you must specify all of the WAN
optimization features to be applied by the rule. This includes byte-caching, ssl, secure-tunnel, and proto.
• A passive (server) rule uses the settings in the active rule on the client FortiGate unit to apply WAN optimization settings. You can also enable webcache for a passive rule.
• If auto-detect is off, the rule configuration must include all required WAN optimization features and you must add one peer to the rule.
off
byte-caching {disable | enable} Enable or disable WAN optimization byte caching for the traffic accepted by this rule. Byte caching is a WAN optimization technique that reduces the amount of data that has to be transmitted across a WAN by caching file data to serve it later as required. Byte caching is available for all protocols. You can enable byte caching for active rules or if auto-detect is off.
enable
dst-ip <address_ipv4>[-<address-ipv4>]
Enter the destination IP address or address range for the rule. Enter a single IP address or the start and end of the IP address range separated by a hyphen.Only packets whose destination address header contains an IP address matching this IP address or address range will be accepted by and subject to this rule.
0.0.0.0
mode {full | webcache-only} Configure the rule to apply all selected WAN optimization features or just web caching to traffic matched by the rule.
full
peer <peer_name> Add a peer to the rule. You can only add a peer if auto-detect is off.
(null)
port <port_int>[-<port-int>] Enter a single port number or port number range for the rule. Only packets whose destination port number matches this port number or port number range will be accepted by and subject to this rule.
0
proto {cifs | ftp | http | mapi | tcp}
Select cifs, ftp, http, or mapi to have the rule apply protocol optimization for one these protocols.Select tcp if the WAN optimization tunnel accepts packets that use more than one protocol or that do not use the CIFS, FTP, HTTP, or MAPI protocol.
http
secure-tunnel {disable | enable}
Enable or disable using AES-128bit-CBC SSL to encrypt and secure the traffic in the WAN optimization tunnel. The FortiGate units use FortiASIC acceleration to accelerate SSL decryption and encryption of the secure tunnel. The secure tunnel uses the same TCP port as a non-secure tunnel (TCP port 7810). You can configure secure-tunnel if auto-detect is set to active or off. If you enable secure-tunnel you must also add an auth-group to the rule.
disable
src-ip <address_ipv4>[-<address-ipv4>]
Enter the source IP address or address range for the rule. Enter a single IP address or the start and end of the IP address range separated by a hyphen.Only packets whose source address header contains an IP address matching this IP address or address range will be accepted by and subject to this rule.
0.0.0.0
Variable Description Default
ortiOS 4.0 MR3 CLI Reference1-431-99686-20110623 629ttp://docs.fortinet.com/ • Feedback
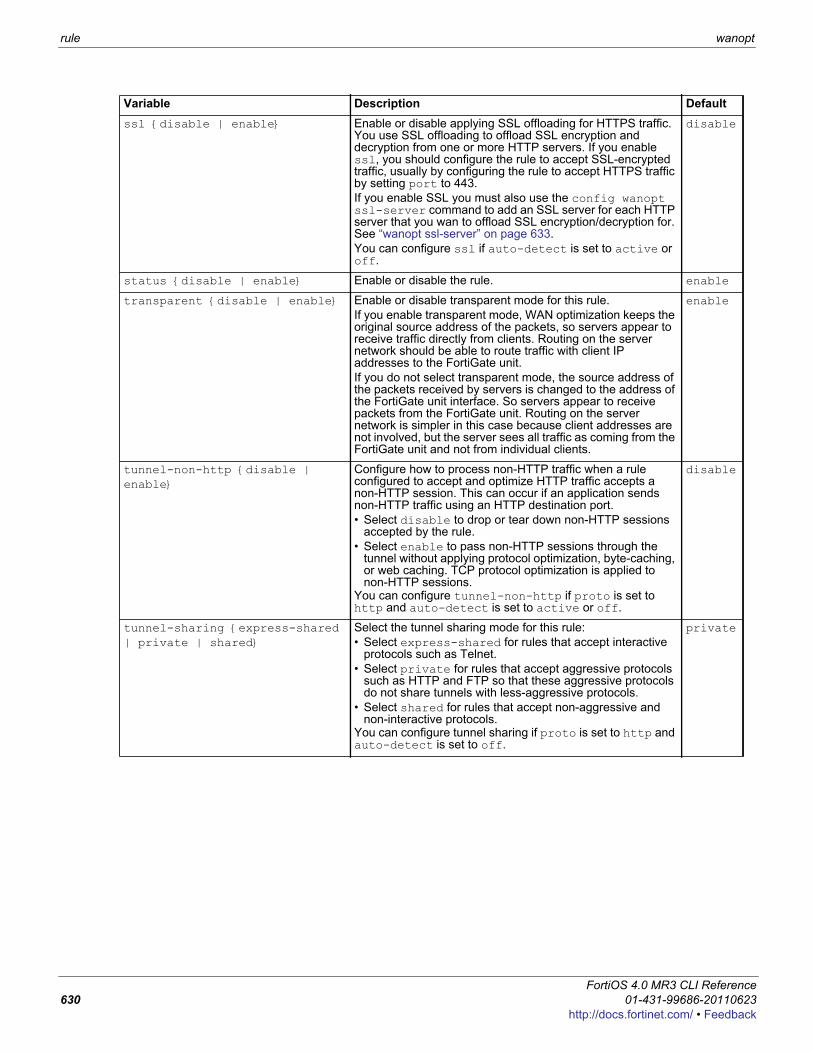
rule wanopt
ssl {disable | enable} Enable or disable applying SSL offloading for HTTPS traffic. You use SSL offloading to offload SSL encryption and decryption from one or more HTTP servers. If you enable ssl, you should configure the rule to accept SSL-encrypted traffic, usually by configuring the rule to accept HTTPS traffic by setting port to 443.If you enable SSL you must also use the config wanopt ssl-server command to add an SSL server for each HTTP server that you wan to offload SSL encryption/decryption for. See “wanopt ssl-server” on page 633.You can configure ssl if auto-detect is set to active or off.
disable
status {disable | enable} Enable or disable the rule. enable
transparent {disable | enable} Enable or disable transparent mode for this rule.If you enable transparent mode, WAN optimization keeps the original source address of the packets, so servers appear to receive traffic directly from clients. Routing on the server network should be able to route traffic with client IP addresses to the FortiGate unit.If you do not select transparent mode, the source address of the packets received by servers is changed to the address of the FortiGate unit interface. So servers appear to receive packets from the FortiGate unit. Routing on the server network is simpler in this case because client addresses are not involved, but the server sees all traffic as coming from the FortiGate unit and not from individual clients.
enable
tunnel-non-http {disable | enable}
Configure how to process non-HTTP traffic when a rule configured to accept and optimize HTTP traffic accepts a non-HTTP session. This can occur if an application sends non-HTTP traffic using an HTTP destination port.• Select disable to drop or tear down non-HTTP sessions
accepted by the rule.• Select enable to pass non-HTTP sessions through the
tunnel without applying protocol optimization, byte-caching, or web caching. TCP protocol optimization is applied to non-HTTP sessions.
You can configure tunnel-non-http if proto is set to http and auto-detect is set to active or off.
disable
tunnel-sharing {express-shared | private | shared}
Select the tunnel sharing mode for this rule:• Select express-shared for rules that accept interactive
protocols such as Telnet.• Select private for rules that accept aggressive protocols
such as HTTP and FTP so that these aggressive protocols do not share tunnels with less-aggressive protocols.
• Select shared for rules that accept non-aggressive and non-interactive protocols.
You can configure tunnel sharing if proto is set to http and auto-detect is set to off.
private
Variable Description Default
FortiOS 4.0 MR3 CLI Reference630 01-431-99686-20110623
http://docs.fortinet.com/ • Feedback
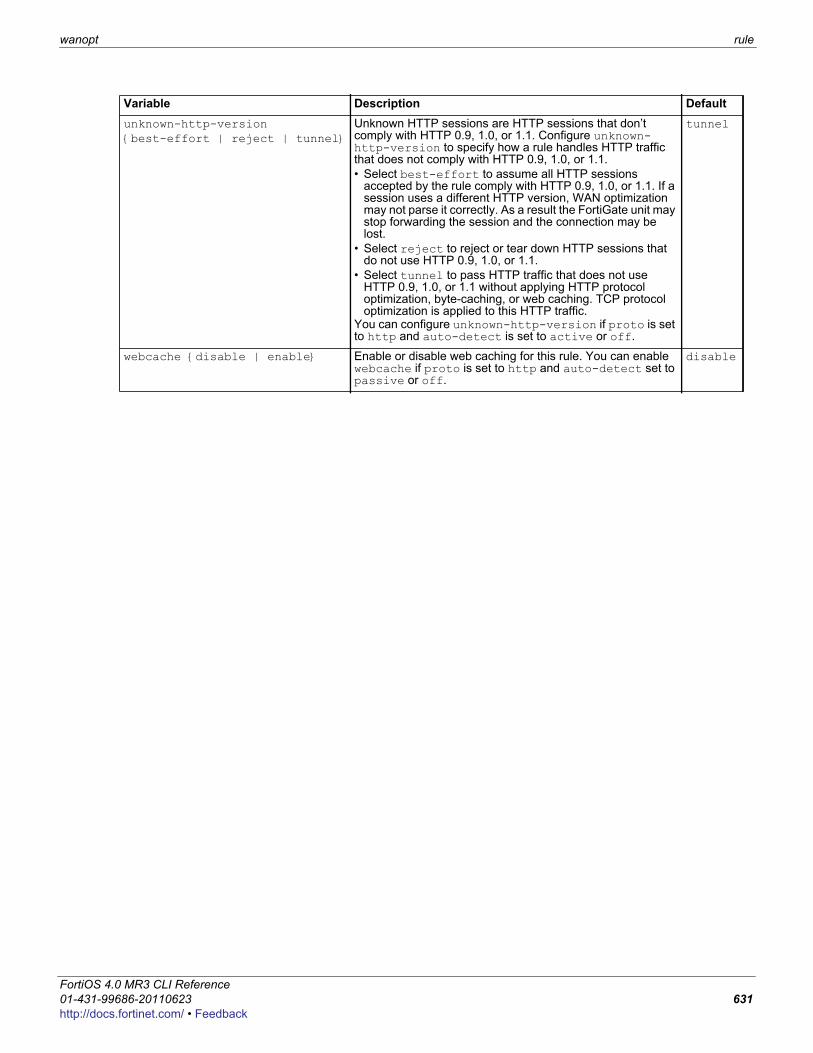
wanopt rule
F0h
unknown-http-version {best-effort | reject | tunnel}
Unknown HTTP sessions are HTTP sessions that don’t comply with HTTP 0.9, 1.0, or 1.1. Configure unknown-http-version to specify how a rule handles HTTP traffic that does not comply with HTTP 0.9, 1.0, or 1.1.• Select best-effort to assume all HTTP sessions
accepted by the rule comply with HTTP 0.9, 1.0, or 1.1. If a session uses a different HTTP version, WAN optimization may not parse it correctly. As a result the FortiGate unit may stop forwarding the session and the connection may be lost.
• Select reject to reject or tear down HTTP sessions that do not use HTTP 0.9, 1.0, or 1.1.
• Select tunnel to pass HTTP traffic that does not use HTTP 0.9, 1.0, or 1.1 without applying HTTP protocol optimization, byte-caching, or web caching. TCP protocol optimization is applied to this HTTP traffic.
You can configure unknown-http-version if proto is set to http and auto-detect is set to active or off.
tunnel
webcache {disable | enable} Enable or disable web caching for this rule. You can enable webcache if proto is set to http and auto-detect set to passive or off.
disable
Variable Description Default
ortiOS 4.0 MR3 CLI Reference1-431-99686-20110623 631ttp://docs.fortinet.com/ • Feedback
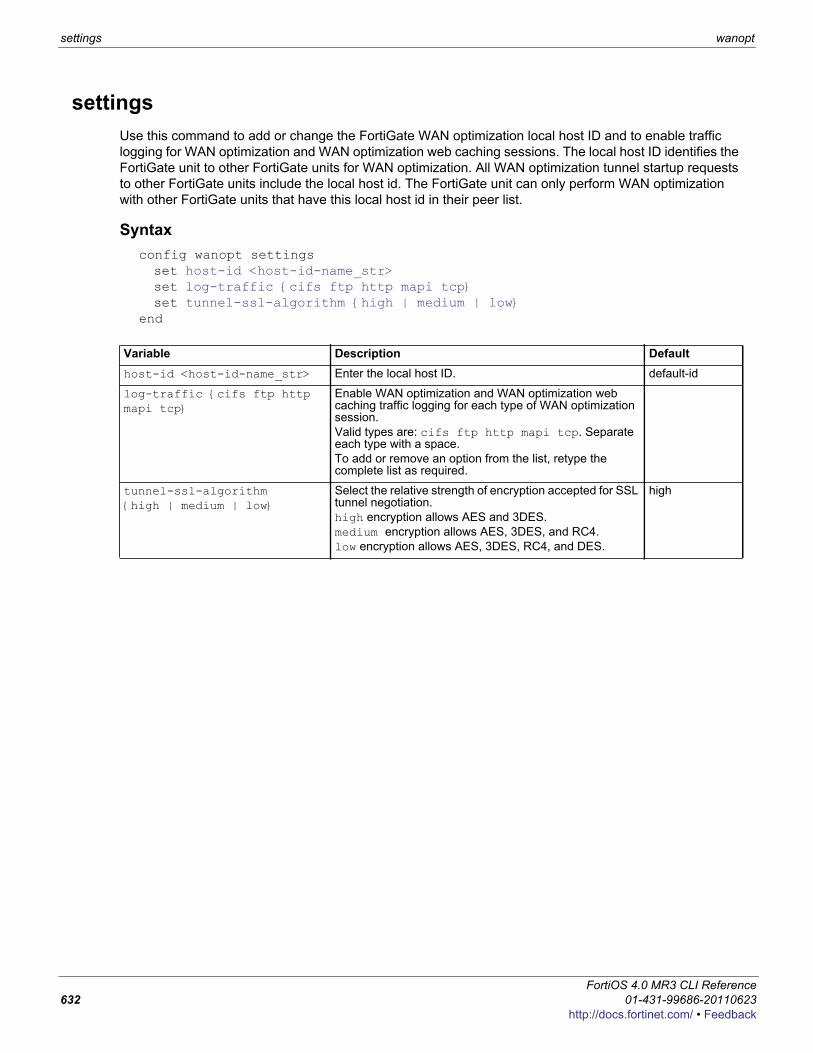
settings wanopt
settingsUse this command to add or change the FortiGate WAN optimization local host ID and to enable traffic logging for WAN optimization and WAN optimization web caching sessions. The local host ID identifies the FortiGate unit to other FortiGate units for WAN optimization. All WAN optimization tunnel startup requests to other FortiGate units include the local host id. The FortiGate unit can only perform WAN optimization with other FortiGate units that have this local host id in their peer list.
Syntaxconfig wanopt settingsset host-id <host-id-name_str>set log-traffic {cifs ftp http mapi tcp}set tunnel-ssl-algorithm {high | medium | low}
end
Variable Description Defaulthost-id <host-id-name_str> Enter the local host ID. default-id
log-traffic {cifs ftp http mapi tcp}
Enable WAN optimization and WAN optimization web caching traffic logging for each type of WAN optimization session.Valid types are: cifs ftp http mapi tcp. Separate each type with a space. To add or remove an option from the list, retype the complete list as required.
tunnel-ssl-algorithm {high | medium | low}
Select the relative strength of encryption accepted for SSL tunnel negotiation. high encryption allows AES and 3DES.medium encryption allows AES, 3DES, and RC4.low encryption allows AES, 3DES, RC4, and DES.
high
FortiOS 4.0 MR3 CLI Reference632 01-431-99686-20110623
http://docs.fortinet.com/ • Feedback
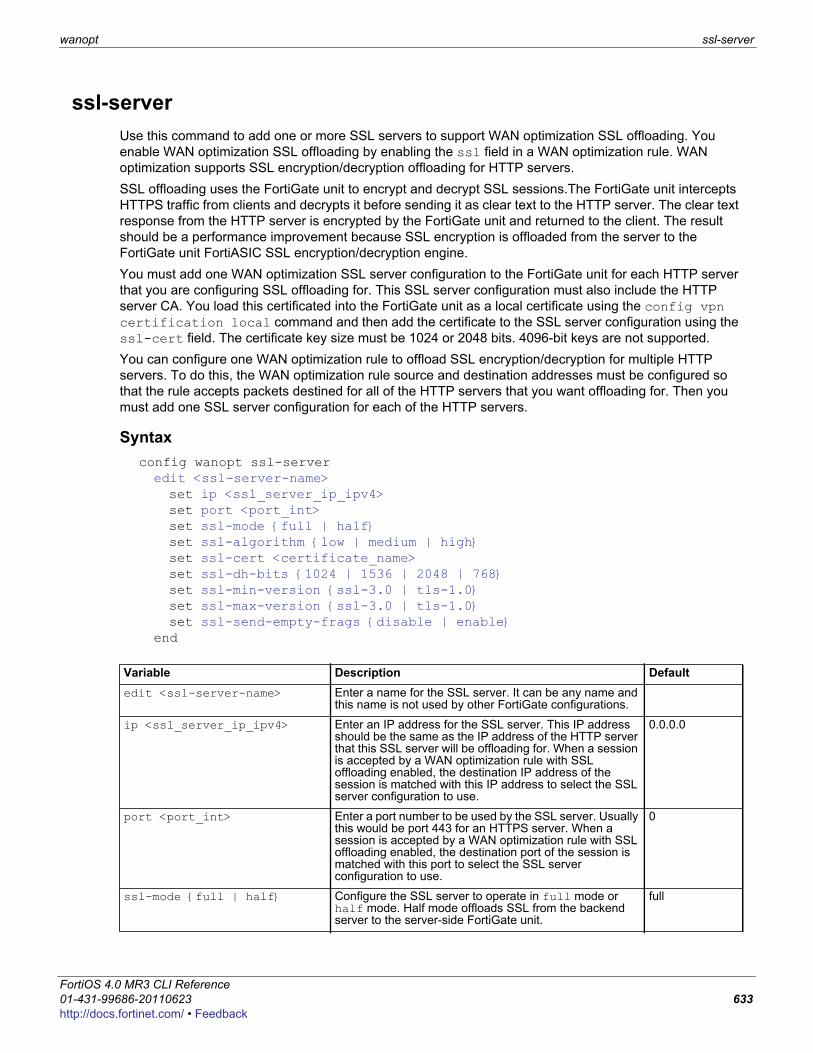
wanopt ssl-server
F0h
ssl-serverUse this command to add one or more SSL servers to support WAN optimization SSL offloading. You enable WAN optimization SSL offloading by enabling the ssl field in a WAN optimization rule. WAN optimization supports SSL encryption/decryption offloading for HTTP servers.SSL offloading uses the FortiGate unit to encrypt and decrypt SSL sessions.The FortiGate unit intercepts HTTPS traffic from clients and decrypts it before sending it as clear text to the HTTP server. The clear text response from the HTTP server is encrypted by the FortiGate unit and returned to the client. The result should be a performance improvement because SSL encryption is offloaded from the server to the FortiGate unit FortiASIC SSL encryption/decryption engine.You must add one WAN optimization SSL server configuration to the FortiGate unit for each HTTP server that you are configuring SSL offloading for. This SSL server configuration must also include the HTTP server CA. You load this certificated into the FortiGate unit as a local certificate using the config vpn certification local command and then add the certificate to the SSL server configuration using the ssl-cert field. The certificate key size must be 1024 or 2048 bits. 4096-bit keys are not supported. You can configure one WAN optimization rule to offload SSL encryption/decryption for multiple HTTP servers. To do this, the WAN optimization rule source and destination addresses must be configured so that the rule accepts packets destined for all of the HTTP servers that you want offloading for. Then you must add one SSL server configuration for each of the HTTP servers.
Syntaxconfig wanopt ssl-serveredit <ssl-server-name>set ip <ssl_server_ip_ipv4>set port <port_int>set ssl-mode {full | half}set ssl-algorithm {low | medium | high}set ssl-cert <certificate_name>set ssl-dh-bits {1024 | 1536 | 2048 | 768}set ssl-min-version {ssl-3.0 | tls-1.0}set ssl-max-version {ssl-3.0 | tls-1.0}set ssl-send-empty-frags {disable | enable}
end
Variable Description Defaultedit <ssl-server-name> Enter a name for the SSL server. It can be any name and
this name is not used by other FortiGate configurations.
ip <ssl_server_ip_ipv4> Enter an IP address for the SSL server. This IP address should be the same as the IP address of the HTTP server that this SSL server will be offloading for. When a session is accepted by a WAN optimization rule with SSL offloading enabled, the destination IP address of the session is matched with this IP address to select the SSL server configuration to use.
0.0.0.0
port <port_int> Enter a port number to be used by the SSL server. Usually this would be port 443 for an HTTPS server. When a session is accepted by a WAN optimization rule with SSL offloading enabled, the destination port of the session is matched with this port to select the SSL server configuration to use.
0
ssl-mode {full | half} Configure the SSL server to operate in full mode or half mode. Half mode offloads SSL from the backend server to the server-side FortiGate unit.
full
ortiOS 4.0 MR3 CLI Reference1-431-99686-20110623 633ttp://docs.fortinet.com/ • Feedback
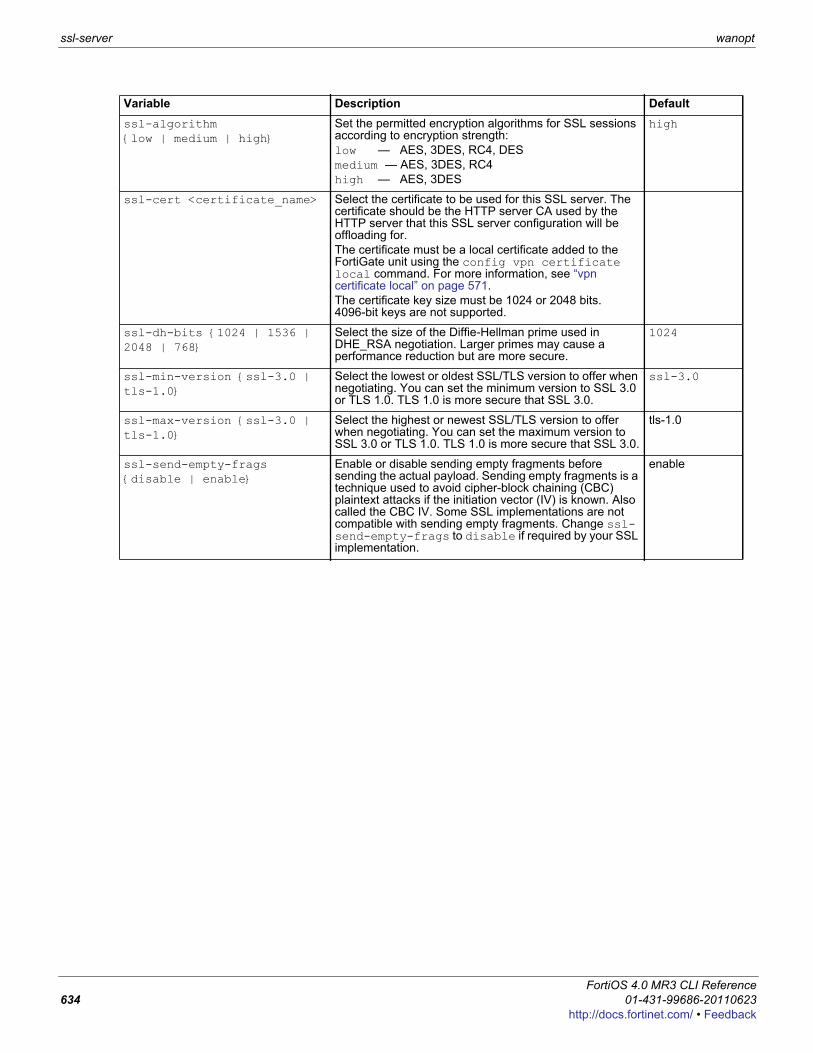
ssl-server wanopt
ssl-algorithm {low | medium | high}
Set the permitted encryption algorithms for SSL sessions according to encryption strength:low — AES, 3DES, RC4, DESmedium — AES, 3DES, RC4high — AES, 3DES
high
ssl-cert <certificate_name> Select the certificate to be used for this SSL server. The certificate should be the HTTP server CA used by the HTTP server that this SSL server configuration will be offloading for.The certificate must be a local certificate added to the FortiGate unit using the config vpn certificate local command. For more information, see “vpn certificate local” on page 571.The certificate key size must be 1024 or 2048 bits. 4096-bit keys are not supported.
ssl-dh-bits {1024 | 1536 | 2048 | 768}
Select the size of the Diffie-Hellman prime used in DHE_RSA negotiation. Larger primes may cause a performance reduction but are more secure.
1024
ssl-min-version {ssl-3.0 | tls-1.0}
Select the lowest or oldest SSL/TLS version to offer when negotiating. You can set the minimum version to SSL 3.0 or TLS 1.0. TLS 1.0 is more secure that SSL 3.0.
ssl-3.0
ssl-max-version {ssl-3.0 | tls-1.0}
Select the highest or newest SSL/TLS version to offer when negotiating. You can set the maximum version to SSL 3.0 or TLS 1.0. TLS 1.0 is more secure that SSL 3.0.
tls-1.0
ssl-send-empty-frags {disable | enable}
Enable or disable sending empty fragments before sending the actual payload. Sending empty fragments is a technique used to avoid cipher-block chaining (CBC) plaintext attacks if the initiation vector (IV) is known. Also called the CBC IV. Some SSL implementations are not compatible with sending empty fragments. Change ssl-send-empty-frags to disable if required by your SSL implementation.
enable
Variable Description Default
FortiOS 4.0 MR3 CLI Reference634 01-431-99686-20110623
http://docs.fortinet.com/ • Feedback
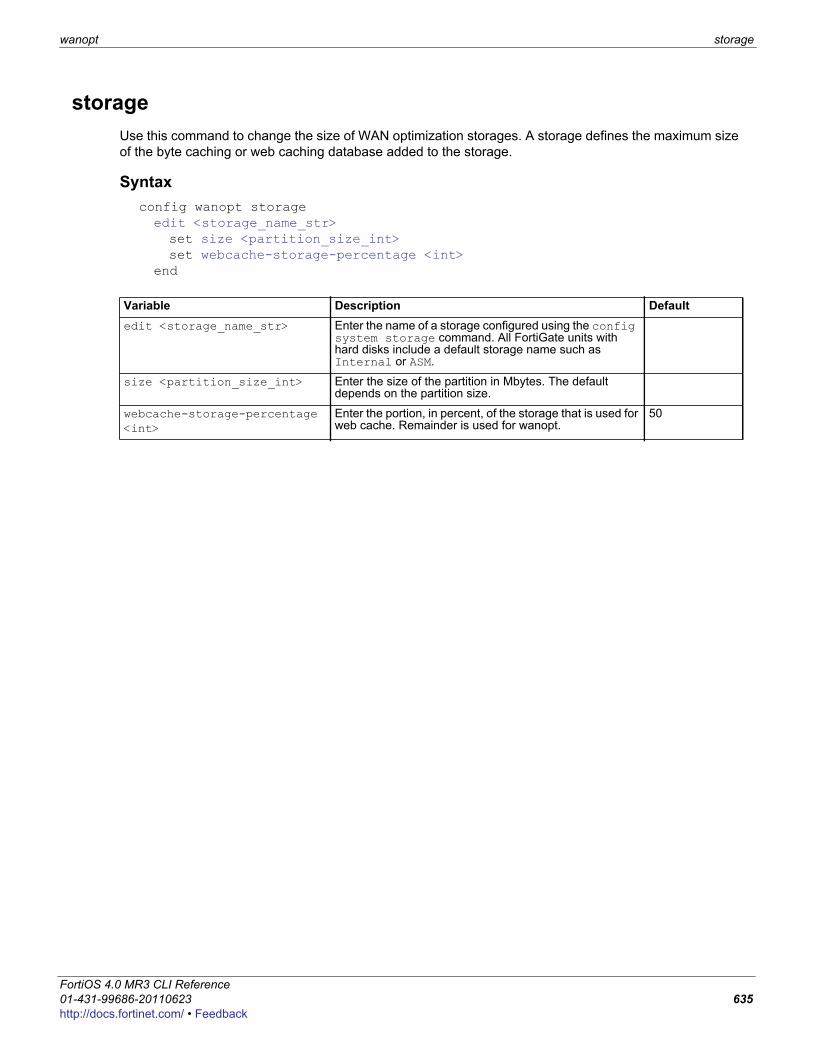
wanopt storage
F0h
storageUse this command to change the size of WAN optimization storages. A storage defines the maximum size of the byte caching or web caching database added to the storage.
Syntaxconfig wanopt storageedit <storage_name_str>set size <partition_size_int>set webcache-storage-percentage <int>
end
Variable Description Defaultedit <storage_name_str> Enter the name of a storage configured using the config
system storage command. All FortiGate units with hard disks include a default storage name such as Internal or ASM.
size <partition_size_int> Enter the size of the partition in Mbytes. The default depends on the partition size.
webcache-storage-percentage <int>
Enter the portion, in percent, of the storage that is used for web cache. Remainder is used for wanopt.
50
ortiOS 4.0 MR3 CLI Reference1-431-99686-20110623 635ttp://docs.fortinet.com/ • Feedback

webcache wanopt
webcacheUse this command to change how the WAN optimization web cache operates. In most cases the default settings are acceptable. However you may want to change these settings to improve performance or optimize the cache for your configuration.
Syntaxconfig wanopt webcacheset always-revalidate {disable | enable}set cache-exemption {disable | enable}set cache-expired {disable | enable}set default-ttl <expiry_time>set fresh-factor <fresh_percent>set ignore-conditional {disable | enable}set ignore-ie-reload {disable | enable}set ignore-ims {disable | enable}set ignore-pnc {disable | enable}set max-object-size <object_size>set max-ttl <expiry_time>set min-ttl <expiry_time>set neg-resp-time <response_time>set reval-pnc {disable | enable}config cache-exemption-listedit <url-id_int>set url-pattern <url-str>
endend
Variable Description Defaultalways-revalidate {disable | enable}
Enable to always to revalidate the requested cached object with content on the server before serving it to the client.
enable
cache-exemption {disable | enable}
Enable to set a cache exemption list. User defined URLs in the list will be exempted from caching.
disable
cache-expired {disable | enable}
Applies only to type-1 objects. When this setting is enabled, type-1 objects that are already expired at the time of acquisition are cached (if all other conditions make the object cachable). When this setting is disabled, already expired type-1 objects become non-cachable at the time of acquisition.
disable
default-ttl <expiry_time>
The default expiry time for objects that do not have an expiry time set by the web server. The default expiry time is 1440 minutes (24 hours).
1440
fresh-factor <fresh_percent>
Set the fresh factor as a percentage. The default is 100, and the range is 1 to 100. For cached objects that don’t have an expiry time, the web cache periodically checks the server to see if the object has expired. The higher the fresh factor the less often the checks occur.
100
ignore-conditional {disable | enable}
Enable or disable controlling the behavior of cache-control header values. HTTP 1.1 provides additional controls to the client over the behavior of caches concerning the staleness of the object. Depending on various Cache-Control headers, the FortiGate unit can be forced to consult the OCS before serving the object from the cache. For more information about the behavior of cache-control header values, see RFC 2616.
disable
FortiOS 4.0 MR3 CLI Reference636 01-431-99686-20110623
http://docs.fortinet.com/ • Feedback
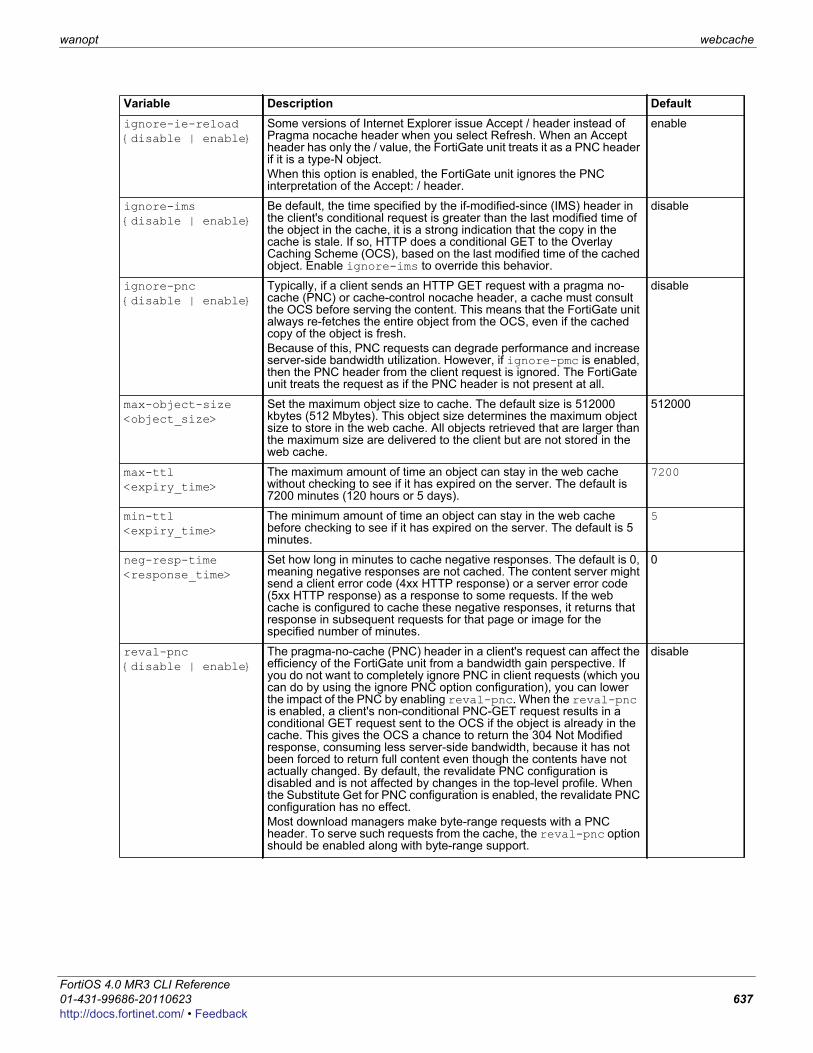
wanopt webcache
F0h
ignore-ie-reload {disable | enable}
Some versions of Internet Explorer issue Accept / header instead of Pragma nocache header when you select Refresh. When an Accept header has only the / value, the FortiGate unit treats it as a PNC header if it is a type-N object. When this option is enabled, the FortiGate unit ignores the PNC interpretation of the Accept: / header.
enable
ignore-ims {disable | enable}
Be default, the time specified by the if-modified-since (IMS) header in the client's conditional request is greater than the last modified time of the object in the cache, it is a strong indication that the copy in the cache is stale. If so, HTTP does a conditional GET to the Overlay Caching Scheme (OCS), based on the last modified time of the cached object. Enable ignore-ims to override this behavior.
disable
ignore-pnc {disable | enable}
Typically, if a client sends an HTTP GET request with a pragma no-cache (PNC) or cache-control nocache header, a cache must consult the OCS before serving the content. This means that the FortiGate unit always re-fetches the entire object from the OCS, even if the cached copy of the object is fresh. Because of this, PNC requests can degrade performance and increase server-side bandwidth utilization. However, if ignore-pmc is enabled, then the PNC header from the client request is ignored. The FortiGate unit treats the request as if the PNC header is not present at all.
disable
max-object-size <object_size>
Set the maximum object size to cache. The default size is 512000 kbytes (512 Mbytes). This object size determines the maximum object size to store in the web cache. All objects retrieved that are larger than the maximum size are delivered to the client but are not stored in the web cache.
512000
max-ttl <expiry_time>
The maximum amount of time an object can stay in the web cache without checking to see if it has expired on the server. The default is 7200 minutes (120 hours or 5 days).
7200
min-ttl <expiry_time>
The minimum amount of time an object can stay in the web cache before checking to see if it has expired on the server. The default is 5 minutes.
5
neg-resp-time <response_time>
Set how long in minutes to cache negative responses. The default is 0, meaning negative responses are not cached. The content server might send a client error code (4xx HTTP response) or a server error code (5xx HTTP response) as a response to some requests. If the web cache is configured to cache these negative responses, it returns that response in subsequent requests for that page or image for the specified number of minutes.
0
reval-pnc {disable | enable}
The pragma-no-cache (PNC) header in a client's request can affect the efficiency of the FortiGate unit from a bandwidth gain perspective. If you do not want to completely ignore PNC in client requests (which you can do by using the ignore PNC option configuration), you can lower the impact of the PNC by enabling reval-pnc. When the reval-pnc is enabled, a client's non-conditional PNC-GET request results in a conditional GET request sent to the OCS if the object is already in the cache. This gives the OCS a chance to return the 304 Not Modified response, consuming less server-side bandwidth, because it has not been forced to return full content even though the contents have not actually changed. By default, the revalidate PNC configuration is disabled and is not affected by changes in the top-level profile. When the Substitute Get for PNC configuration is enabled, the revalidate PNC configuration has no effect.Most download managers make byte-range requests with a PNC header. To serve such requests from the cache, the reval-pnc option should be enabled along with byte-range support.
disable
Variable Description Default
ortiOS 4.0 MR3 CLI Reference1-431-99686-20110623 637ttp://docs.fortinet.com/ • Feedback
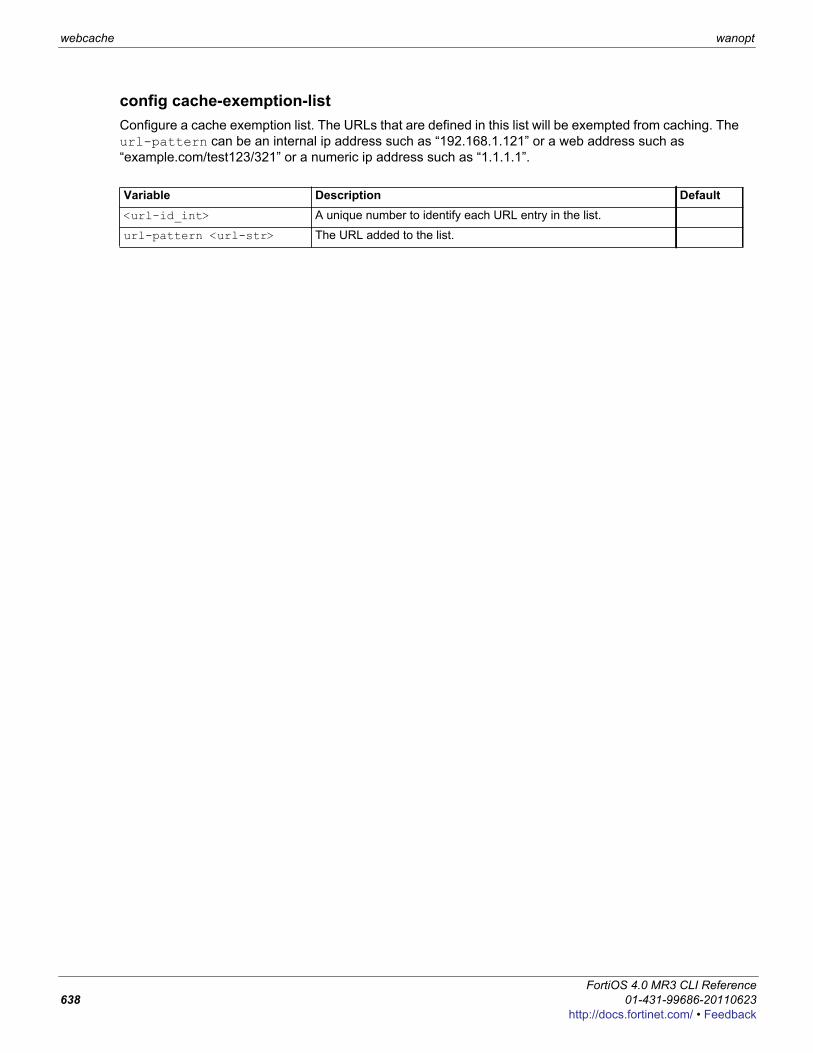
webcache wanopt
config cache-exemption-listConfigure a cache exemption list. The URLs that are defined in this list will be exempted from caching. The url-pattern can be an internal ip address such as “192.168.1.121” or a web address such as “example.com/test123/321” or a numeric ip address such as “1.1.1.1”.
Variable Description Default<url-id_int> A unique number to identify each URL entry in the list.
url-pattern <url-str> The URL added to the list.
FortiOS 4.0 MR3 CLI Reference638 01-431-99686-20110623
http://docs.fortinet.com/ • Feedback
F0h
web-proxyUse these commands to configure the FortiGate web proxy. You can use the FortiGate web proxy and interface settings to enable explicit HTTP and HTTPS proxying on one or more interfaces. When enabled, the FortiGate unit becomes a web proxy server. All HTTP and HTTPS session received by interfaces with explicit web proxy enabled are intercepted by the explicit web proxy relayed to their destinations.To use the explicit proxy, users must add the IP address of a FortiGate interface and the explicit proxy port number to the proxy configuration settings of their web browsers.On FortiGate units that support WAN optimization, you can also enable web caching for the explicit proxy.
explicitforward-serverglobal
ortiOS 4.0 MR3 CLI Reference1-431-99686-20110623 639ttp://docs.fortinet.com/ • Feedback
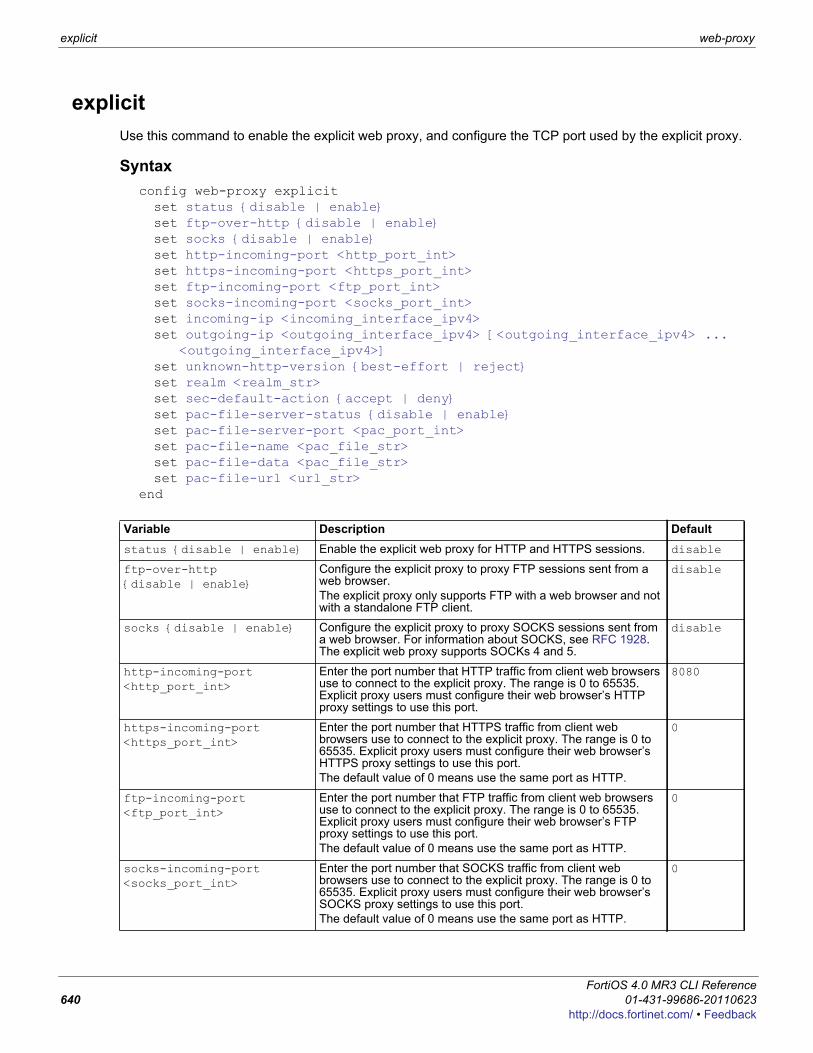
explicit web-proxy
explicitUse this command to enable the explicit web proxy, and configure the TCP port used by the explicit proxy.
Syntaxconfig web-proxy explicitset status {disable | enable}set ftp-over-http {disable | enable}set socks {disable | enable}set http-incoming-port <http_port_int>set https-incoming-port <https_port_int>set ftp-incoming-port <ftp_port_int>set socks-incoming-port <socks_port_int>set incoming-ip <incoming_interface_ipv4>set outgoing-ip <outgoing_interface_ipv4> [<outgoing_interface_ipv4> ...
<outgoing_interface_ipv4>]set unknown-http-version {best-effort | reject}set realm <realm_str>set sec-default-action {accept | deny}set pac-file-server-status {disable | enable}set pac-file-server-port <pac_port_int>set pac-file-name <pac_file_str>set pac-file-data <pac_file_str>set pac-file-url <url_str>
end
Variable Description Defaultstatus {disable | enable} Enable the explicit web proxy for HTTP and HTTPS sessions. disable
ftp-over-http {disable | enable}
Configure the explicit proxy to proxy FTP sessions sent from a web browser. The explicit proxy only supports FTP with a web browser and not with a standalone FTP client.
disable
socks {disable | enable} Configure the explicit proxy to proxy SOCKS sessions sent from a web browser. For information about SOCKS, see RFC 1928. The explicit web proxy supports SOCKs 4 and 5.
disable
http-incoming-port <http_port_int>
Enter the port number that HTTP traffic from client web browsers use to connect to the explicit proxy. The range is 0 to 65535. Explicit proxy users must configure their web browser’s HTTP proxy settings to use this port.
8080
https-incoming-port <https_port_int>
Enter the port number that HTTPS traffic from client web browsers use to connect to the explicit proxy. The range is 0 to 65535. Explicit proxy users must configure their web browser’s HTTPS proxy settings to use this port.The default value of 0 means use the same port as HTTP.
0
ftp-incoming-port <ftp_port_int>
Enter the port number that FTP traffic from client web browsers use to connect to the explicit proxy. The range is 0 to 65535. Explicit proxy users must configure their web browser’s FTP proxy settings to use this port.The default value of 0 means use the same port as HTTP.
0
socks-incoming-port <socks_port_int>
Enter the port number that SOCKS traffic from client web browsers use to connect to the explicit proxy. The range is 0 to 65535. Explicit proxy users must configure their web browser’s SOCKS proxy settings to use this port.The default value of 0 means use the same port as HTTP.
0
FortiOS 4.0 MR3 CLI Reference640 01-431-99686-20110623
http://docs.fortinet.com/ • Feedback
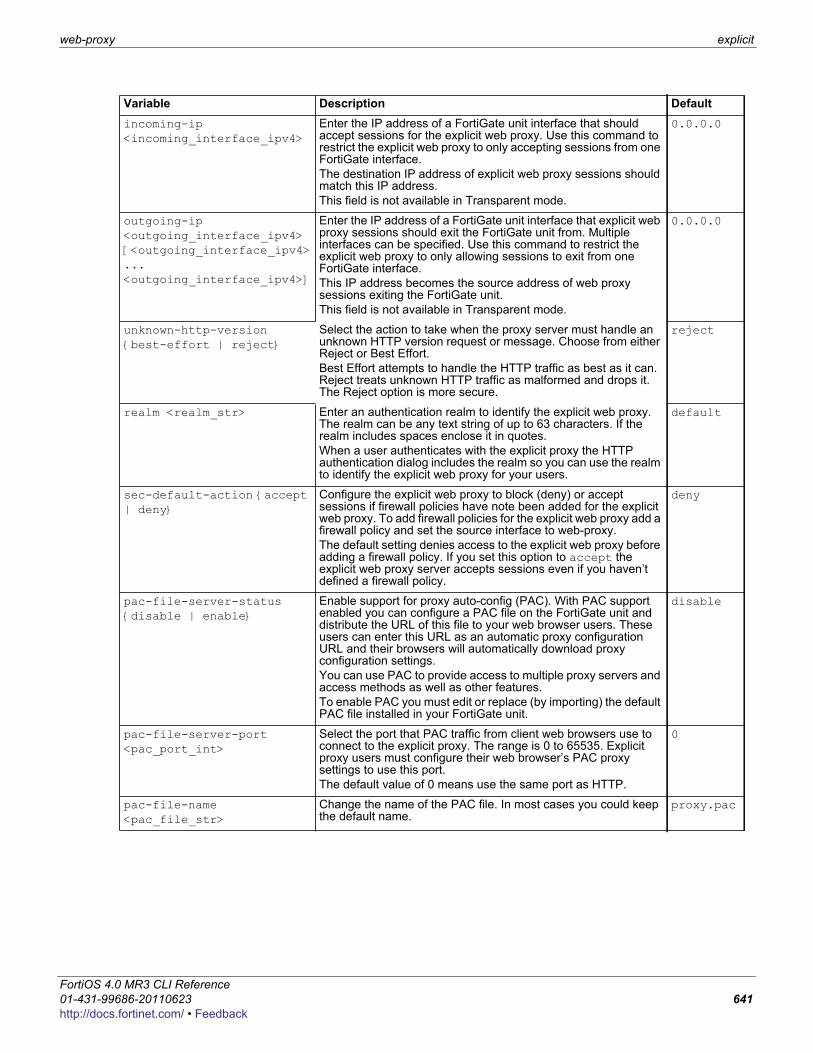
web-proxy explicit
F0h
incoming-ip <incoming_interface_ipv4>
Enter the IP address of a FortiGate unit interface that should accept sessions for the explicit web proxy. Use this command to restrict the explicit web proxy to only accepting sessions from one FortiGate interface.The destination IP address of explicit web proxy sessions should match this IP address. This field is not available in Transparent mode.
0.0.0.0
outgoing-ip <outgoing_interface_ipv4> [<outgoing_interface_ipv4> ... <outgoing_interface_ipv4>]
Enter the IP address of a FortiGate unit interface that explicit web proxy sessions should exit the FortiGate unit from. Multiple interfaces can be specified. Use this command to restrict the explicit web proxy to only allowing sessions to exit from one FortiGate interface.This IP address becomes the source address of web proxy sessions exiting the FortiGate unit.This field is not available in Transparent mode.
0.0.0.0
unknown-http-version {best-effort | reject}
Select the action to take when the proxy server must handle an unknown HTTP version request or message. Choose from either Reject or Best Effort. Best Effort attempts to handle the HTTP traffic as best as it can. Reject treats unknown HTTP traffic as malformed and drops it. The Reject option is more secure.
reject
realm <realm_str> Enter an authentication realm to identify the explicit web proxy. The realm can be any text string of up to 63 characters. If the realm includes spaces enclose it in quotes. When a user authenticates with the explicit proxy the HTTP authentication dialog includes the realm so you can use the realm to identify the explicit web proxy for your users.
default
sec-default-action {accept | deny}
Configure the explicit web proxy to block (deny) or accept sessions if firewall policies have note been added for the explicit web proxy. To add firewall policies for the explicit web proxy add a firewall policy and set the source interface to web-proxy.The default setting denies access to the explicit web proxy before adding a firewall policy. If you set this option to accept the explicit web proxy server accepts sessions even if you haven’t defined a firewall policy.
deny
pac-file-server-status {disable | enable}
Enable support for proxy auto-config (PAC). With PAC support enabled you can configure a PAC file on the FortiGate unit and distribute the URL of this file to your web browser users. These users can enter this URL as an automatic proxy configuration URL and their browsers will automatically download proxy configuration settings. You can use PAC to provide access to multiple proxy servers and access methods as well as other features.To enable PAC you must edit or replace (by importing) the default PAC file installed in your FortiGate unit.
disable
pac-file-server-port <pac_port_int>
Select the port that PAC traffic from client web browsers use to connect to the explicit proxy. The range is 0 to 65535. Explicit proxy users must configure their web browser’s PAC proxy settings to use this port.The default value of 0 means use the same port as HTTP.
0
pac-file-name <pac_file_str>
Change the name of the PAC file. In most cases you could keep the default name.
proxy.pac
Variable Description Default
ortiOS 4.0 MR3 CLI Reference1-431-99686-20110623 641ttp://docs.fortinet.com/ • Feedback
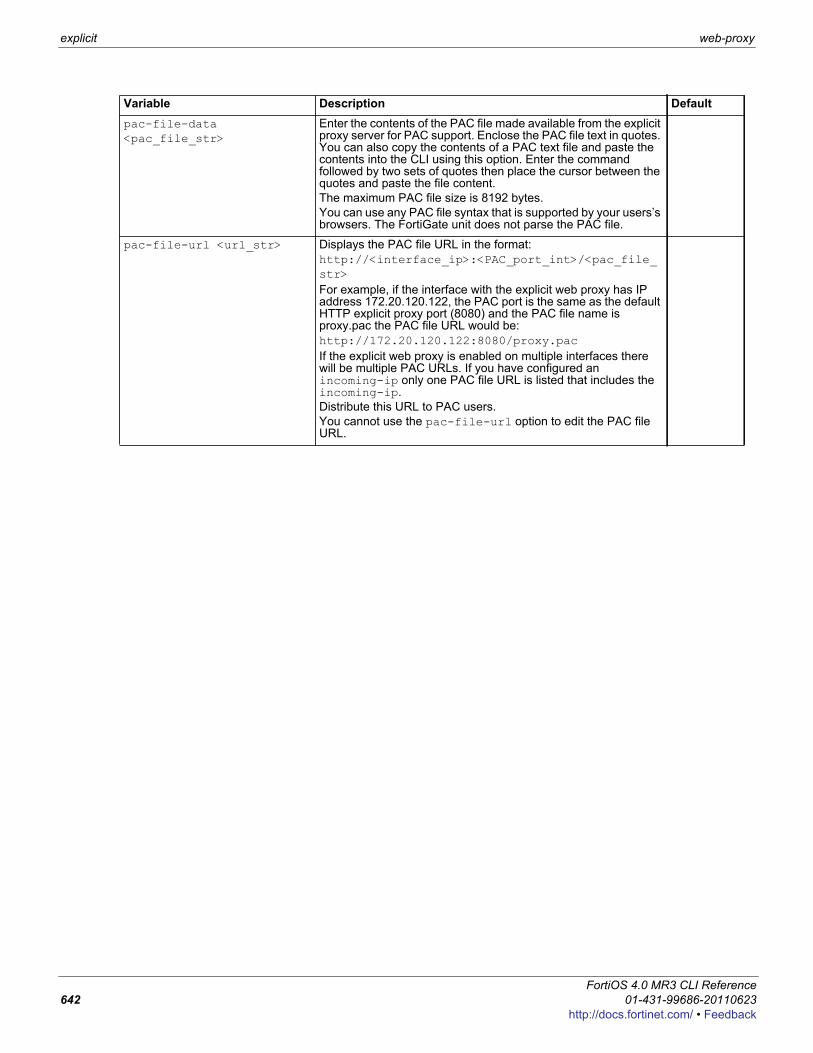
explicit web-proxy
pac-file-data <pac_file_str>
Enter the contents of the PAC file made available from the explicit proxy server for PAC support. Enclose the PAC file text in quotes. You can also copy the contents of a PAC text file and paste the contents into the CLI using this option. Enter the command followed by two sets of quotes then place the cursor between the quotes and paste the file content.The maximum PAC file size is 8192 bytes. You can use any PAC file syntax that is supported by your users’s browsers. The FortiGate unit does not parse the PAC file.
pac-file-url <url_str> Displays the PAC file URL in the format:http://<interface_ip>:<PAC_port_int>/<pac_file_str>For example, if the interface with the explicit web proxy has IP address 172.20.120.122, the PAC port is the same as the default HTTP explicit proxy port (8080) and the PAC file name is proxy.pac the PAC file URL would be:http://172.20.120.122:8080/proxy.pacIf the explicit web proxy is enabled on multiple interfaces there will be multiple PAC URLs. If you have configured an incoming-ip only one PAC file URL is listed that includes the incoming-ip.Distribute this URL to PAC users.You cannot use the pac-file-url option to edit the PAC file URL.
Variable Description Default
FortiOS 4.0 MR3 CLI Reference642 01-431-99686-20110623
http://docs.fortinet.com/ • Feedback
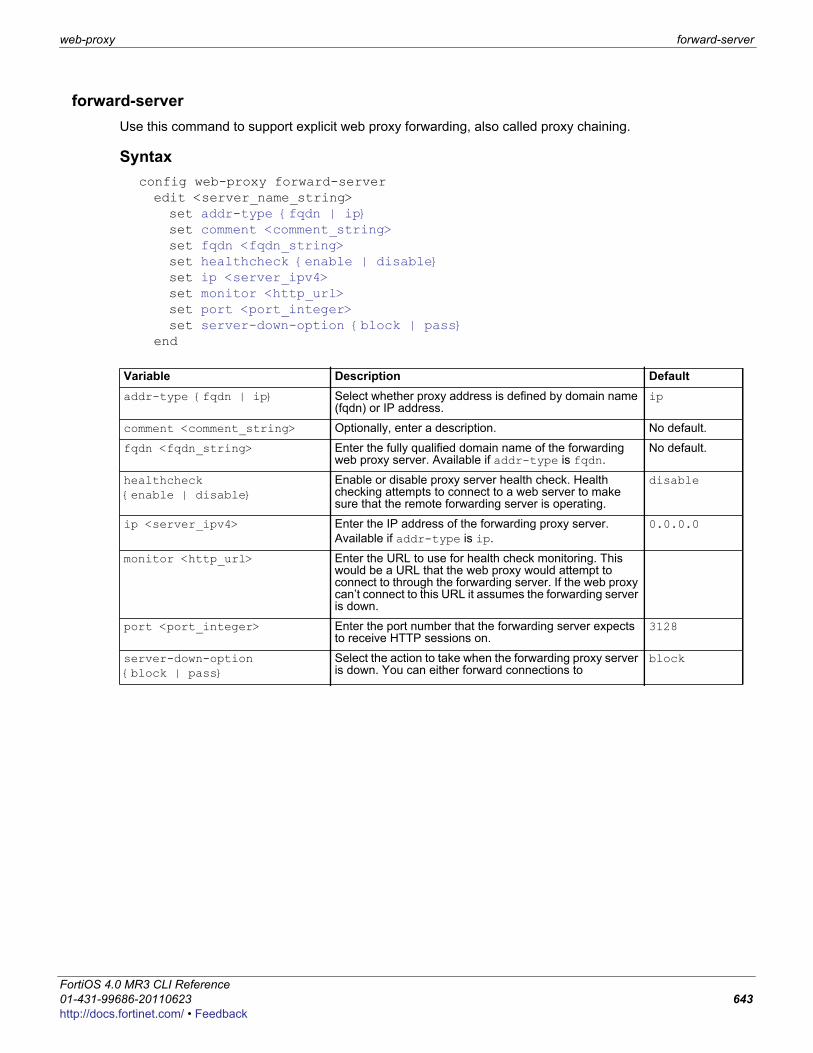
web-proxy forward-server
F0h
forward-serverUse this command to support explicit web proxy forwarding, also called proxy chaining.
Syntaxconfig web-proxy forward-serveredit <server_name_string>set addr-type {fqdn | ip}set comment <comment_string>set fqdn <fqdn_string>set healthcheck {enable | disable}set ip <server_ipv4>set monitor <http_url>set port <port_integer>set server-down-option {block | pass}
end
Variable Description Defaultaddr-type {fqdn | ip} Select whether proxy address is defined by domain name
(fqdn) or IP address.ip
comment <comment_string> Optionally, enter a description. No default.
fqdn <fqdn_string> Enter the fully qualified domain name of the forwarding web proxy server. Available if addr-type is fqdn.
No default.
healthcheck {enable | disable}
Enable or disable proxy server health check. Health checking attempts to connect to a web server to make sure that the remote forwarding server is operating.
disable
ip <server_ipv4> Enter the IP address of the forwarding proxy server. Available if addr-type is ip.
0.0.0.0
monitor <http_url> Enter the URL to use for health check monitoring. This would be a URL that the web proxy would attempt to connect to through the forwarding server. If the web proxy can’t connect to this URL it assumes the forwarding server is down.
port <port_integer> Enter the port number that the forwarding server expects to receive HTTP sessions on.
3128
server-down-option {block | pass}
Select the action to take when the forwarding proxy server is down. You can either forward connections to
block
ortiOS 4.0 MR3 CLI Reference1-431-99686-20110623 643ttp://docs.fortinet.com/ • Feedback
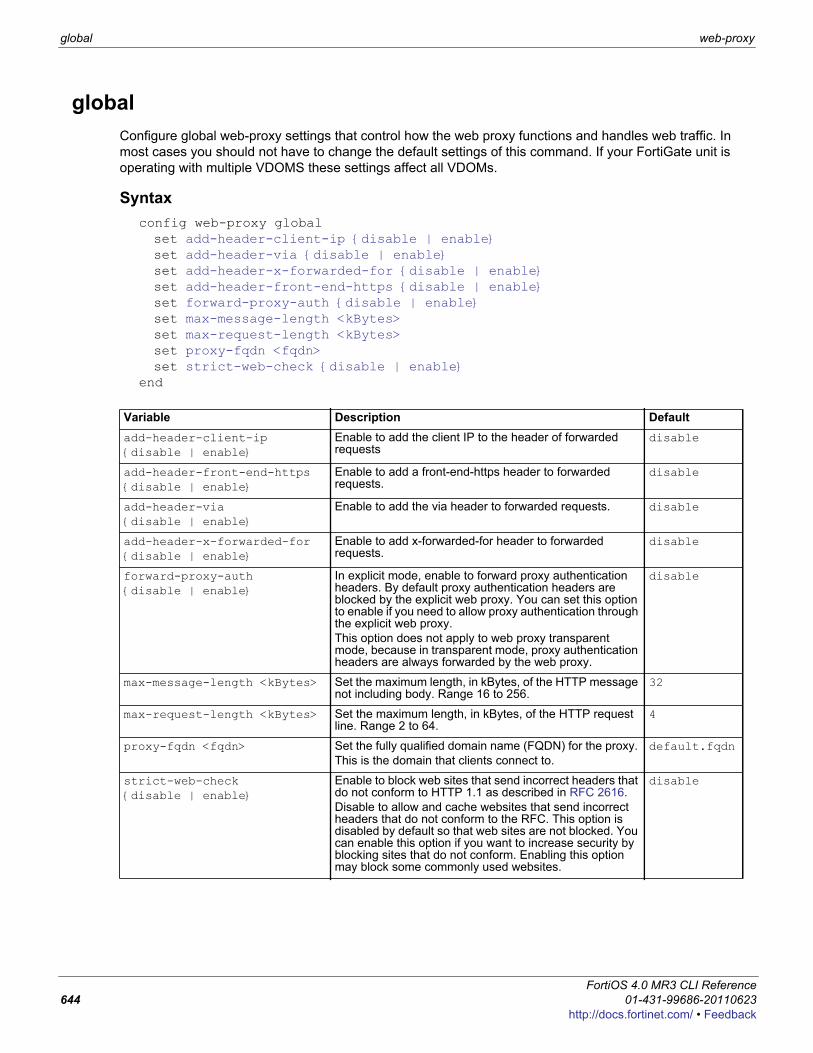
global web-proxy
globalConfigure global web-proxy settings that control how the web proxy functions and handles web traffic. In most cases you should not have to change the default settings of this command. If your FortiGate unit is operating with multiple VDOMS these settings affect all VDOMs.
Syntaxconfig web-proxy globalset add-header-client-ip {disable | enable}set add-header-via {disable | enable}set add-header-x-forwarded-for {disable | enable}set add-header-front-end-https {disable | enable}set forward-proxy-auth {disable | enable}set max-message-length <kBytes>set max-request-length <kBytes>set proxy-fqdn <fqdn>set strict-web-check {disable | enable}
end
Variable Description Defaultadd-header-client-ip {disable | enable}
Enable to add the client IP to the header of forwarded requests
disable
add-header-front-end-https {disable | enable}
Enable to add a front-end-https header to forwarded requests.
disable
add-header-via {disable | enable}
Enable to add the via header to forwarded requests. disable
add-header-x-forwarded-for {disable | enable}
Enable to add x-forwarded-for header to forwarded requests.
disable
forward-proxy-auth {disable | enable}
In explicit mode, enable to forward proxy authentication headers. By default proxy authentication headers are blocked by the explicit web proxy. You can set this option to enable if you need to allow proxy authentication through the explicit web proxy.This option does not apply to web proxy transparent mode, because in transparent mode, proxy authentication headers are always forwarded by the web proxy.
disable
max-message-length <kBytes> Set the maximum length, in kBytes, of the HTTP message not including body. Range 16 to 256.
32
max-request-length <kBytes> Set the maximum length, in kBytes, of the HTTP request line. Range 2 to 64.
4
proxy-fqdn <fqdn> Set the fully qualified domain name (FQDN) for the proxy. This is the domain that clients connect to.
default.fqdn
strict-web-check {disable | enable}
Enable to block web sites that send incorrect headers that do not conform to HTTP 1.1 as described in RFC 2616.Disable to allow and cache websites that send incorrect headers that do not conform to the RFC. This option is disabled by default so that web sites are not blocked. You can enable this option if you want to increase security by blocking sites that do not conform. Enabling this option may block some commonly used websites.
disable
FortiOS 4.0 MR3 CLI Reference644 01-431-99686-20110623
http://docs.fortinet.com/ • Feedback
F0h
webfilterUse webfilter commands to add banned words to the banned word list, filter URLs, and configure FortiGuard-Web category filtering.This chapter contains the following sections:
contentcontent-headerfortiguardftgd-local-catftgd-local-ratingftgd-warningoverrideoverride-userprofileurlfilter
ortiOS 4.0 MR3 CLI Reference1-431-99686-20110623 645ttp://docs.fortinet.com/ • Feedback
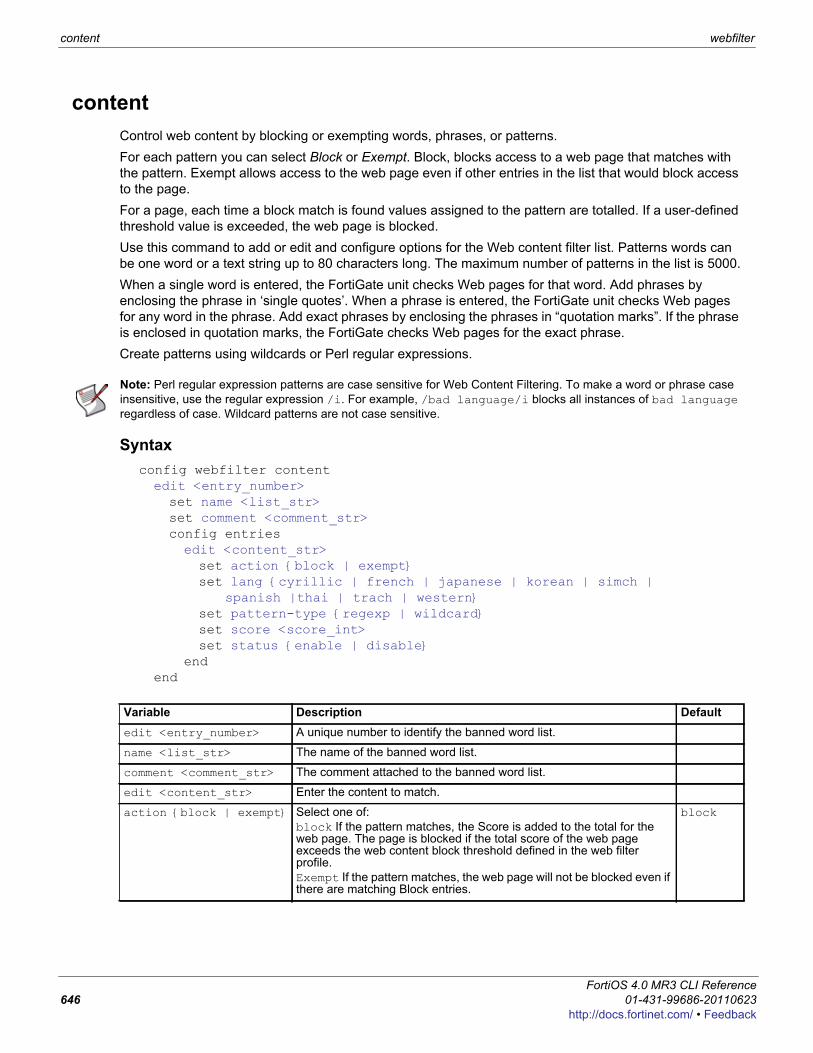
content webfilter
contentControl web content by blocking or exempting words, phrases, or patterns.For each pattern you can select Block or Exempt. Block, blocks access to a web page that matches with the pattern. Exempt allows access to the web page even if other entries in the list that would block access to the page.For a page, each time a block match is found values assigned to the pattern are totalled. If a user-defined threshold value is exceeded, the web page is blocked.Use this command to add or edit and configure options for the Web content filter list. Patterns words can be one word or a text string up to 80 characters long. The maximum number of patterns in the list is 5000.When a single word is entered, the FortiGate unit checks Web pages for that word. Add phrases by enclosing the phrase in ‘single quotes’. When a phrase is entered, the FortiGate unit checks Web pages for any word in the phrase. Add exact phrases by enclosing the phrases in “quotation marks”. If the phrase is enclosed in quotation marks, the FortiGate checks Web pages for the exact phrase.Create patterns using wildcards or Perl regular expressions.
Syntax config webfilter contentedit <entry_number>set name <list_str>set comment <comment_str>config entriesedit <content_str>set action {block | exempt}set lang {cyrillic | french | japanese | korean | simch |
spanish |thai | trach | western}set pattern-type {regexp | wildcard}set score <score_int>set status {enable | disable}
endend
Note: Perl regular expression patterns are case sensitive for Web Content Filtering. To make a word or phrase case insensitive, use the regular expression /i. For example, /bad language/i blocks all instances of bad language regardless of case. Wildcard patterns are not case sensitive.
Variable Description Defaultedit <entry_number> A unique number to identify the banned word list.
name <list_str> The name of the banned word list.
comment <comment_str> The comment attached to the banned word list.
edit <content_str> Enter the content to match.
action {block | exempt} Select one of:block If the pattern matches, the Score is added to the total for the web page. The page is blocked if the total score of the web page exceeds the web content block threshold defined in the web filter profile.Exempt If the pattern matches, the web page will not be blocked even if there are matching Block entries.
block
FortiOS 4.0 MR3 CLI Reference646 01-431-99686-20110623
http://docs.fortinet.com/ • Feedback
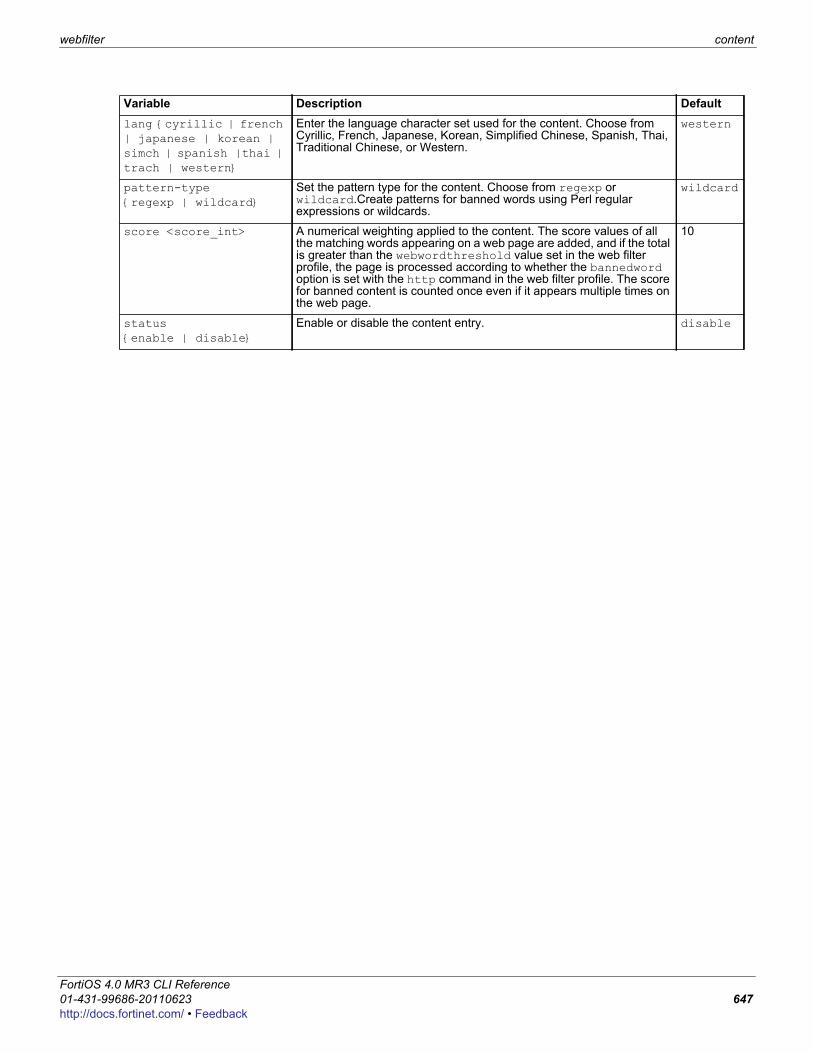
webfilter content
F0h
lang {cyrillic | french | japanese | korean | simch | spanish |thai | trach | western}
Enter the language character set used for the content. Choose from Cyrillic, French, Japanese, Korean, Simplified Chinese, Spanish, Thai, Traditional Chinese, or Western.
western
pattern-type {regexp | wildcard}
Set the pattern type for the content. Choose from regexp or wildcard.Create patterns for banned words using Perl regular expressions or wildcards.
wildcard
score <score_int> A numerical weighting applied to the content. The score values of all the matching words appearing on a web page are added, and if the total is greater than the webwordthreshold value set in the web filter profile, the page is processed according to whether the bannedword option is set with the http command in the web filter profile. The score for banned content is counted once even if it appears multiple times on the web page.
10
status {enable | disable}
Enable or disable the content entry. disable
Variable Description Default
ortiOS 4.0 MR3 CLI Reference1-431-99686-20110623 647ttp://docs.fortinet.com/ • Feedback
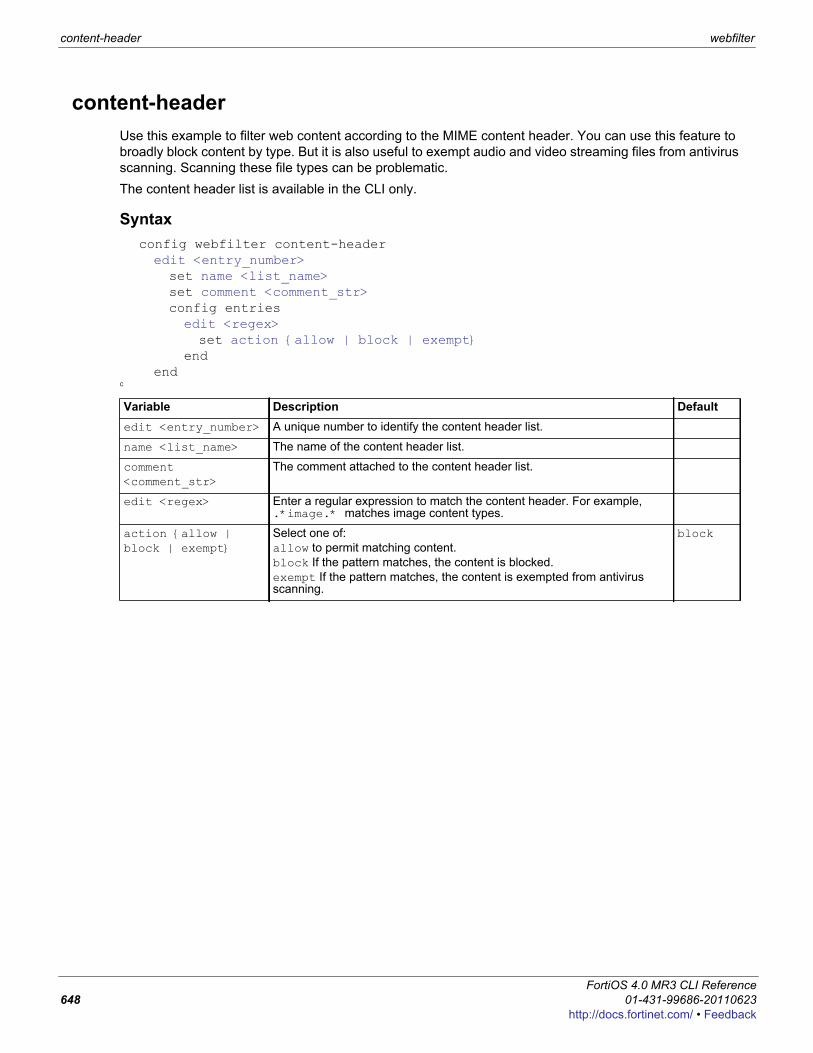
content-header webfilter
content-headerUse this example to filter web content according to the MIME content header. You can use this feature to broadly block content by type. But it is also useful to exempt audio and video streaming files from antivirus scanning. Scanning these file types can be problematic.The content header list is available in the CLI only.
Syntaxconfig webfilter content-headeredit <entry_number>set name <list_name>set comment <comment_str>config entriesedit <regex>set action {allow | block | exempt}
endend
C
Variable Description Defaultedit <entry_number> A unique number to identify the content header list.
name <list_name> The name of the content header list.
comment <comment_str>
The comment attached to the content header list.
edit <regex> Enter a regular expression to match the content header. For example, .*image.* matches image content types.
action {allow | block | exempt}
Select one of:allow to permit matching content.block If the pattern matches, the content is blocked.exempt If the pattern matches, the content is exempted from antivirus scanning.
block
FortiOS 4.0 MR3 CLI Reference648 01-431-99686-20110623
http://docs.fortinet.com/ • Feedback
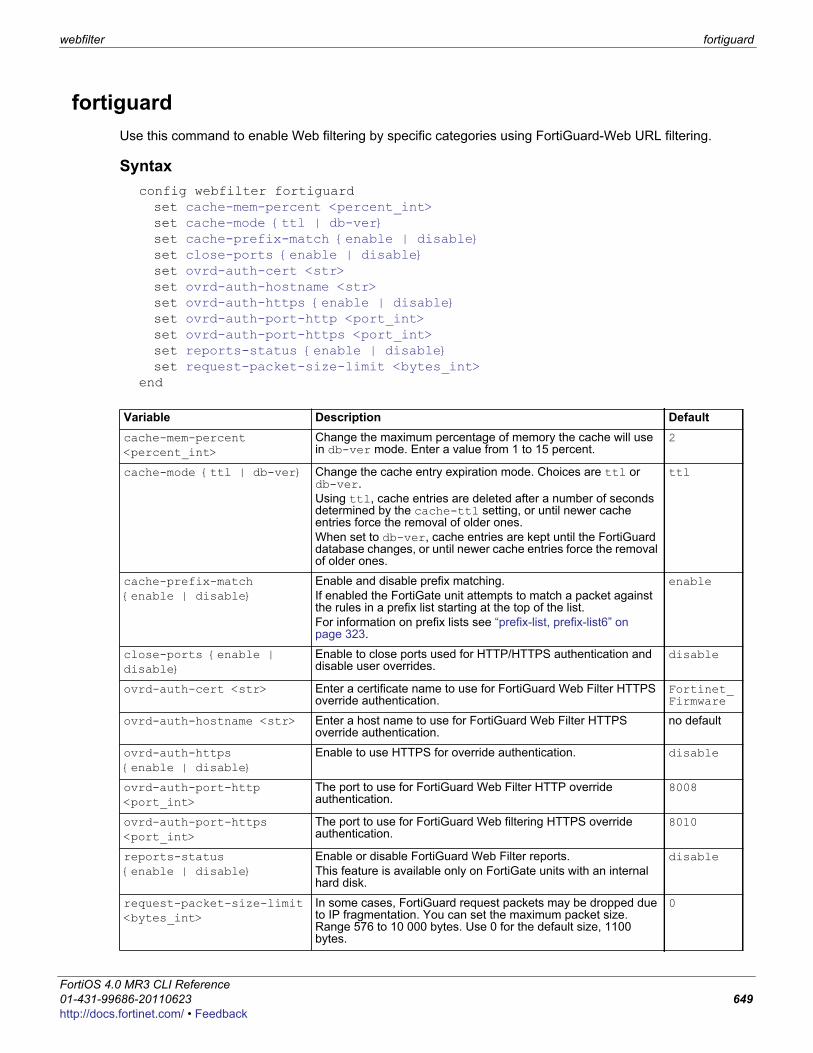
webfilter fortiguard
F0h
fortiguardUse this command to enable Web filtering by specific categories using FortiGuard-Web URL filtering.
Syntaxconfig webfilter fortiguardset cache-mem-percent <percent_int>set cache-mode {ttl | db-ver}set cache-prefix-match {enable | disable}set close-ports {enable | disable}set ovrd-auth-cert <str> set ovrd-auth-hostname <str> set ovrd-auth-https {enable | disable}set ovrd-auth-port-http <port_int>set ovrd-auth-port-https <port_int>set reports-status {enable | disable}set request-packet-size-limit <bytes_int>
end
Variable Description Defaultcache-mem-percent <percent_int>
Change the maximum percentage of memory the cache will use in db-ver mode. Enter a value from 1 to 15 percent.
2
cache-mode {ttl | db-ver} Change the cache entry expiration mode. Choices are ttl or db-ver.Using ttl, cache entries are deleted after a number of seconds determined by the cache-ttl setting, or until newer cache entries force the removal of older ones.When set to db-ver, cache entries are kept until the FortiGuard database changes, or until newer cache entries force the removal of older ones.
ttl
cache-prefix-match {enable | disable}
Enable and disable prefix matching. If enabled the FortiGate unit attempts to match a packet against the rules in a prefix list starting at the top of the list.For information on prefix lists see “prefix-list, prefix-list6” on page 323.
enable
close-ports {enable | disable}
Enable to close ports used for HTTP/HTTPS authentication and disable user overrides.
disable
ovrd-auth-cert <str> Enter a certificate name to use for FortiGuard Web Filter HTTPS override authentication.
Fortinet_Firmware
ovrd-auth-hostname <str> Enter a host name to use for FortiGuard Web Filter HTTPS override authentication.
no default
ovrd-auth-https {enable | disable}
Enable to use HTTPS for override authentication. disable
ovrd-auth-port-http <port_int>
The port to use for FortiGuard Web Filter HTTP override authentication.
8008
ovrd-auth-port-https<port_int>
The port to use for FortiGuard Web filtering HTTPS override authentication.
8010
reports-status {enable | disable}
Enable or disable FortiGuard Web Filter reports.This feature is available only on FortiGate units with an internal hard disk.
disable
request-packet-size-limit <bytes_int>
In some cases, FortiGuard request packets may be dropped due to IP fragmentation. You can set the maximum packet size. Range 576 to 10 000 bytes. Use 0 for the default size, 1100 bytes.
0
ortiOS 4.0 MR3 CLI Reference1-431-99686-20110623 649ttp://docs.fortinet.com/ • Feedback
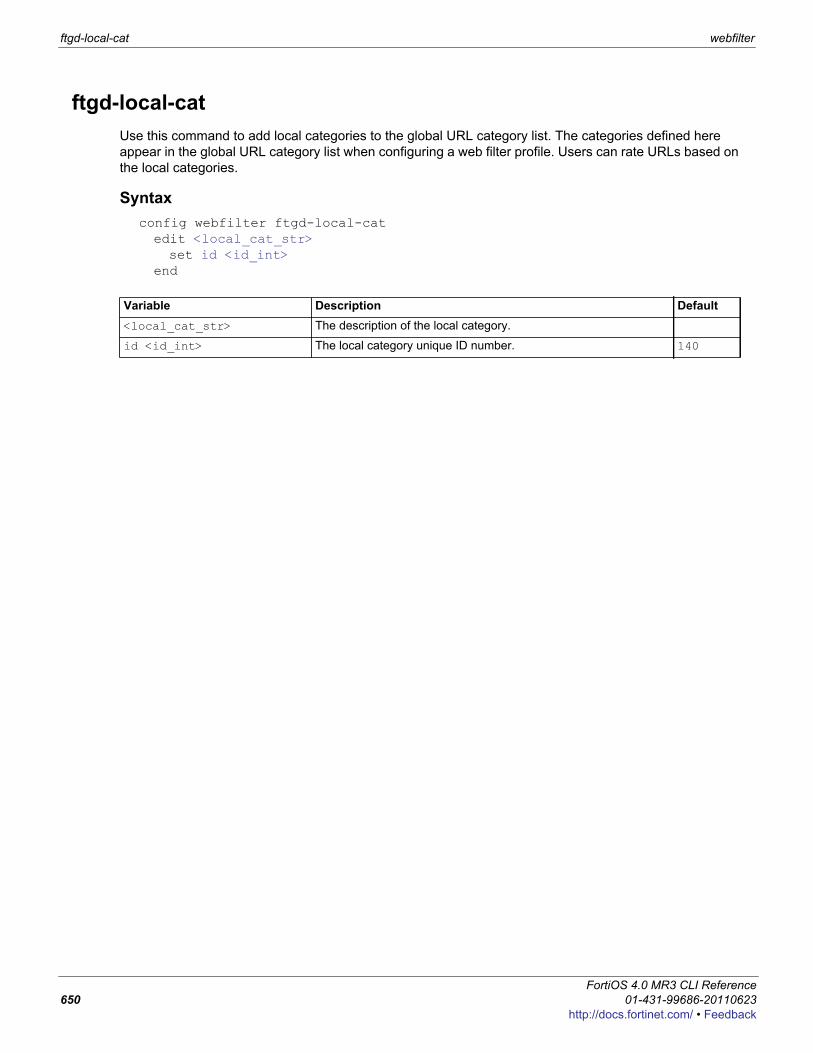
ftgd-local-cat webfilter
ftgd-local-catUse this command to add local categories to the global URL category list. The categories defined here appear in the global URL category list when configuring a web filter profile. Users can rate URLs based on the local categories.
Syntaxconfig webfilter ftgd-local-catedit <local_cat_str>set id <id_int>
end
Variable Description Default<local_cat_str> The description of the local category.
id <id_int> The local category unique ID number. 140
FortiOS 4.0 MR3 CLI Reference650 01-431-99686-20110623
http://docs.fortinet.com/ • Feedback
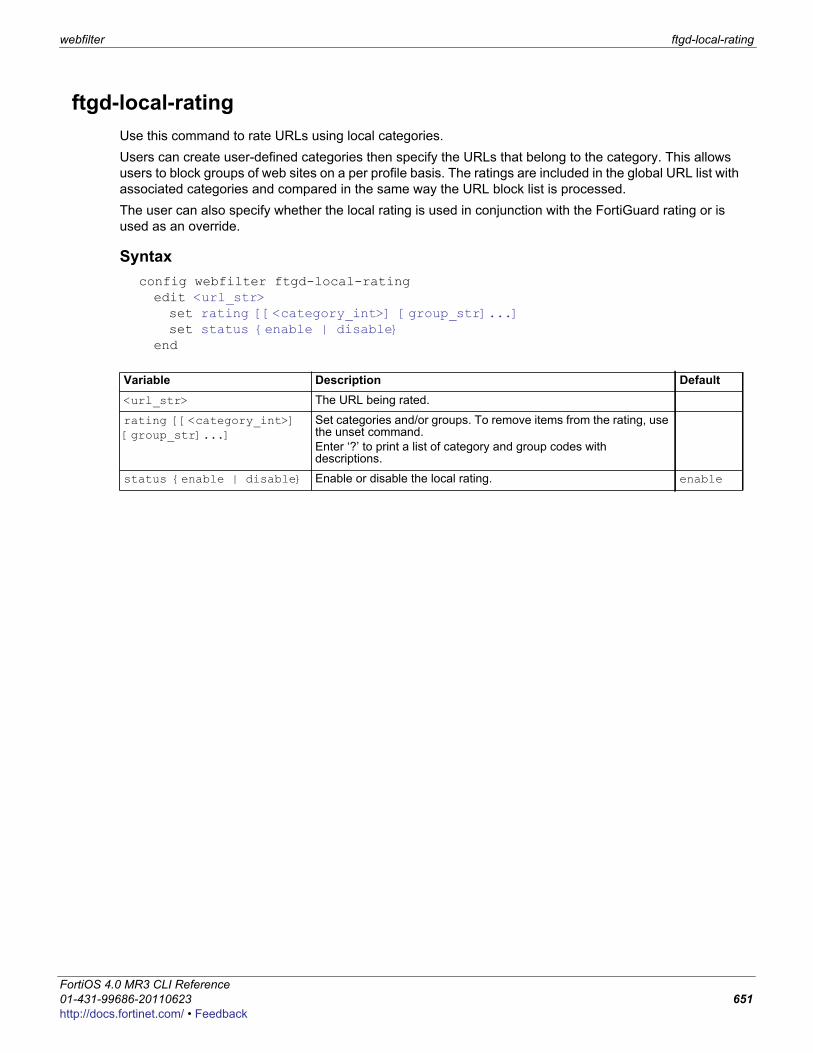
webfilter ftgd-local-rating
F0h
ftgd-local-ratingUse this command to rate URLs using local categories.Users can create user-defined categories then specify the URLs that belong to the category. This allows users to block groups of web sites on a per profile basis. The ratings are included in the global URL list with associated categories and compared in the same way the URL block list is processed.The user can also specify whether the local rating is used in conjunction with the FortiGuard rating or is used as an override.
Syntaxconfig webfilter ftgd-local-ratingedit <url_str>set rating [[<category_int>] [group_str]...]set status {enable | disable}
end
Variable Description Default<url_str> The URL being rated.
rating [[<category_int>] [group_str]...]
Set categories and/or groups. To remove items from the rating, use the unset command.Enter ‘?’ to print a list of category and group codes with descriptions.
status {enable | disable} Enable or disable the local rating. enable
ortiOS 4.0 MR3 CLI Reference1-431-99686-20110623 651ttp://docs.fortinet.com/ • Feedback
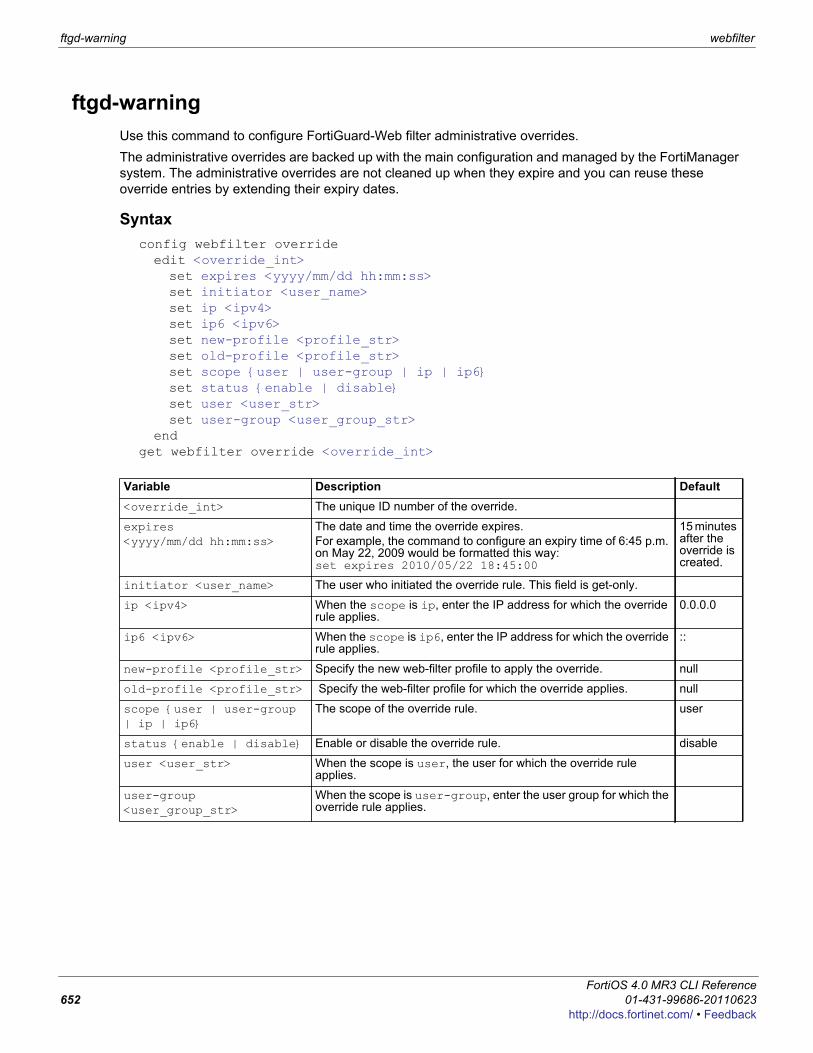
ftgd-warning webfilter
ftgd-warningUse this command to configure FortiGuard-Web filter administrative overrides.The administrative overrides are backed up with the main configuration and managed by the FortiManager system. The administrative overrides are not cleaned up when they expire and you can reuse these override entries by extending their expiry dates.
Syntaxconfig webfilter overrideedit <override_int>set expires <yyyy/mm/dd hh:mm:ss>set initiator <user_name>set ip <ipv4>set ip6 <ipv6>set new-profile <profile_str>set old-profile <profile_str>set scope {user | user-group | ip | ip6}set status {enable | disable}set user <user_str>set user-group <user_group_str>
endget webfilter override <override_int>
Variable Description Default<override_int> The unique ID number of the override.
expires <yyyy/mm/dd hh:mm:ss>
The date and time the override expires. For example, the command to configure an expiry time of 6:45 p.m. on May 22, 2009 would be formatted this way:set expires 2010/05/22 18:45:00
15 minutes after the override is created.
initiator <user_name> The user who initiated the override rule. This field is get-only.
ip <ipv4> When the scope is ip, enter the IP address for which the override rule applies.
0.0.0.0
ip6 <ipv6> When the scope is ip6, enter the IP address for which the override rule applies.
::
new-profile <profile_str> Specify the new web-filter profile to apply the override. null
old-profile <profile_str> Specify the web-filter profile for which the override applies. null
scope {user | user-group | ip | ip6}
The scope of the override rule. user
status {enable | disable} Enable or disable the override rule. disable
user <user_str> When the scope is user, the user for which the override rule applies.
user-group <user_group_str>
When the scope is user-group, enter the user group for which the override rule applies.
FortiOS 4.0 MR3 CLI Reference652 01-431-99686-20110623
http://docs.fortinet.com/ • Feedback
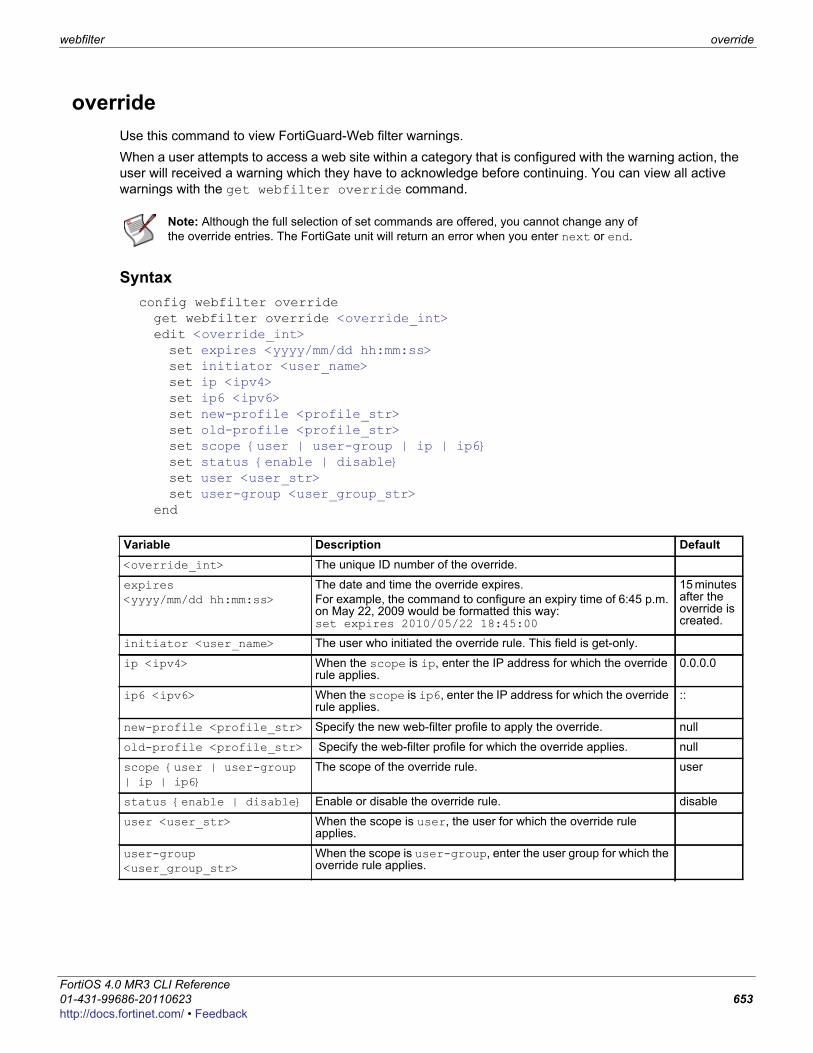
webfilter override
F0h
overrideUse this command to view FortiGuard-Web filter warnings.When a user attempts to access a web site within a category that is configured with the warning action, the user will received a warning which they have to acknowledge before continuing. You can view all active warnings with the get webfilter override command.
Syntaxconfig webfilter overrideget webfilter override <override_int>edit <override_int>set expires <yyyy/mm/dd hh:mm:ss>set initiator <user_name>set ip <ipv4>set ip6 <ipv6>set new-profile <profile_str>set old-profile <profile_str>set scope {user | user-group | ip | ip6}set status {enable | disable}set user <user_str>set user-group <user_group_str>
end
Note: Although the full selection of set commands are offered, you cannot change any of the override entries. The FortiGate unit will return an error when you enter next or end.
Variable Description Default<override_int> The unique ID number of the override.
expires <yyyy/mm/dd hh:mm:ss>
The date and time the override expires. For example, the command to configure an expiry time of 6:45 p.m. on May 22, 2009 would be formatted this way:set expires 2010/05/22 18:45:00
15 minutes after the override is created.
initiator <user_name> The user who initiated the override rule. This field is get-only.
ip <ipv4> When the scope is ip, enter the IP address for which the override rule applies.
0.0.0.0
ip6 <ipv6> When the scope is ip6, enter the IP address for which the override rule applies.
::
new-profile <profile_str> Specify the new web-filter profile to apply the override. null
old-profile <profile_str> Specify the web-filter profile for which the override applies. null
scope {user | user-group | ip | ip6}
The scope of the override rule. user
status {enable | disable} Enable or disable the override rule. disable
user <user_str> When the scope is user, the user for which the override rule applies.
user-group <user_group_str>
When the scope is user-group, enter the user group for which the override rule applies.
ortiOS 4.0 MR3 CLI Reference1-431-99686-20110623 653ttp://docs.fortinet.com/ • Feedback
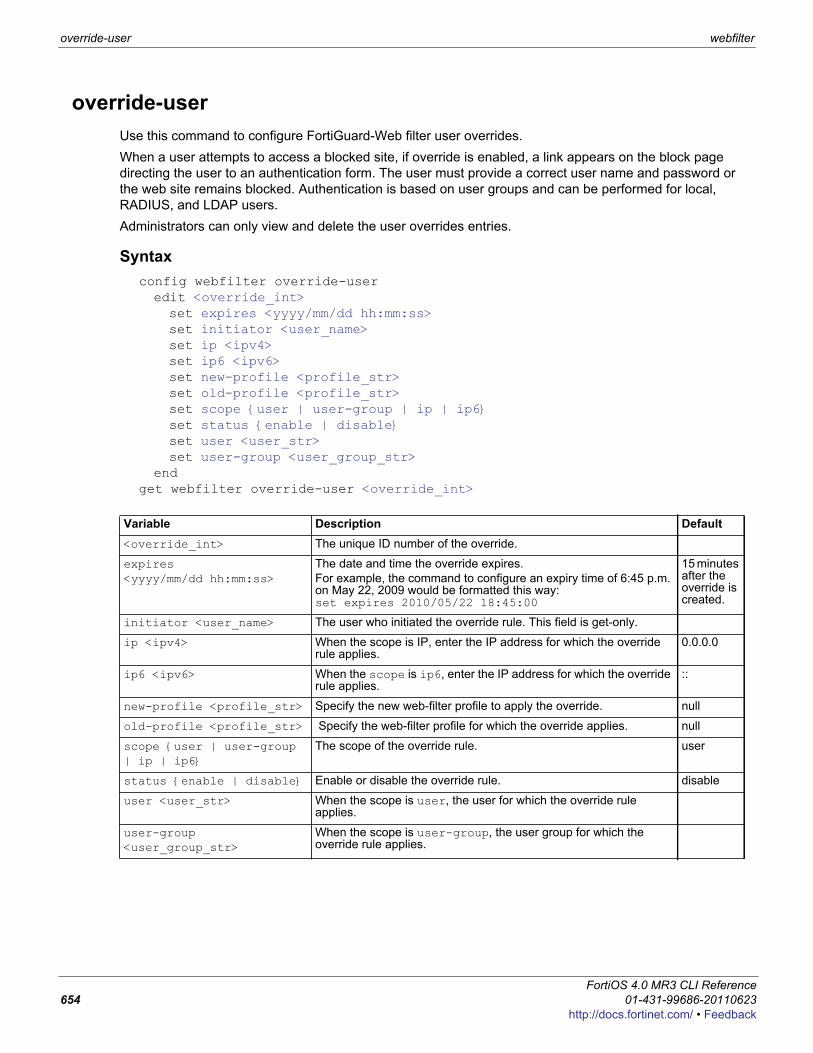
override-user webfilter
override-userUse this command to configure FortiGuard-Web filter user overrides. When a user attempts to access a blocked site, if override is enabled, a link appears on the block page directing the user to an authentication form. The user must provide a correct user name and password or the web site remains blocked. Authentication is based on user groups and can be performed for local, RADIUS, and LDAP users. Administrators can only view and delete the user overrides entries.
Syntaxconfig webfilter override-useredit <override_int>set expires <yyyy/mm/dd hh:mm:ss>set initiator <user_name>set ip <ipv4>set ip6 <ipv6>set new-profile <profile_str>set old-profile <profile_str>set scope {user | user-group | ip | ip6}set status {enable | disable}set user <user_str>set user-group <user_group_str>
endget webfilter override-user <override_int>
Variable Description Default<override_int> The unique ID number of the override.
expires <yyyy/mm/dd hh:mm:ss>
The date and time the override expires. For example, the command to configure an expiry time of 6:45 p.m. on May 22, 2009 would be formatted this way:set expires 2010/05/22 18:45:00
15 minutes after the override is created.
initiator <user_name> The user who initiated the override rule. This field is get-only.
ip <ipv4> When the scope is IP, enter the IP address for which the override rule applies.
0.0.0.0
ip6 <ipv6> When the scope is ip6, enter the IP address for which the override rule applies.
::
new-profile <profile_str> Specify the new web-filter profile to apply the override. null
old-profile <profile_str> Specify the web-filter profile for which the override applies. null
scope {user | user-group | ip | ip6}
The scope of the override rule. user
status {enable | disable} Enable or disable the override rule. disable
user <user_str> When the scope is user, the user for which the override rule applies.
user-group <user_group_str>
When the scope is user-group, the user group for which the override rule applies.
FortiOS 4.0 MR3 CLI Reference654 01-431-99686-20110623
http://docs.fortinet.com/ • Feedback
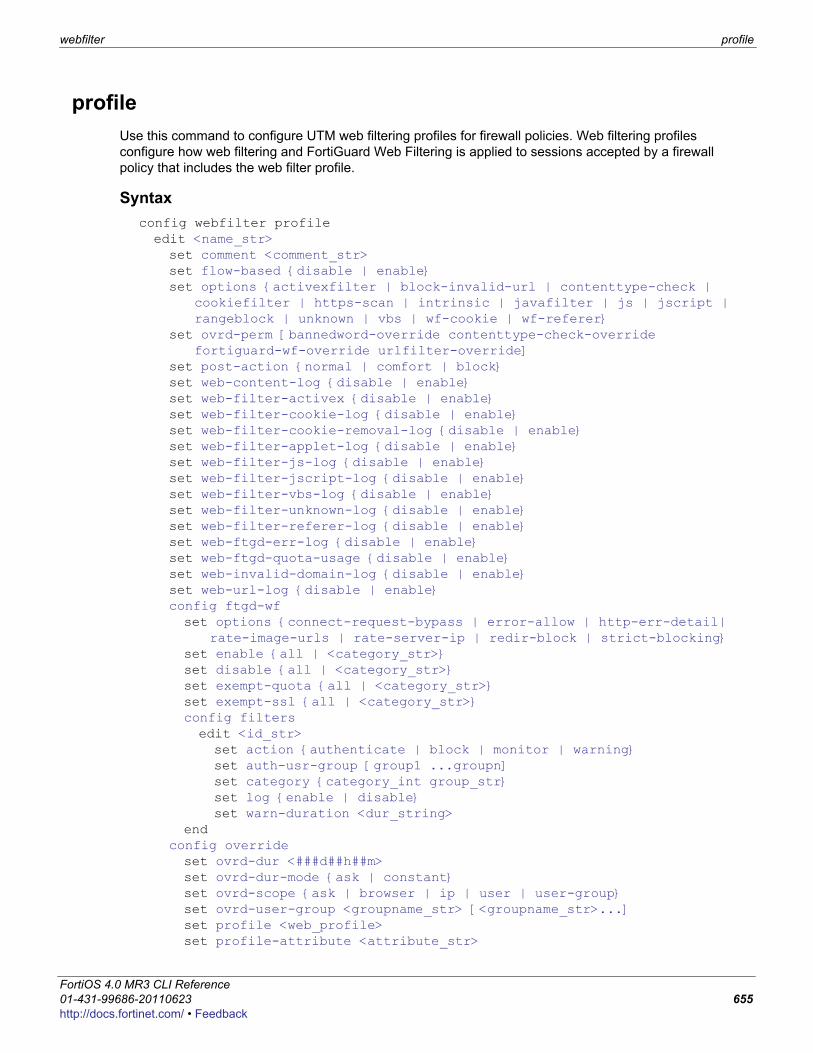
webfilter profile
F0h
profileUse this command to configure UTM web filtering profiles for firewall policies. Web filtering profiles configure how web filtering and FortiGuard Web Filtering is applied to sessions accepted by a firewall policy that includes the web filter profile.
Syntaxconfig webfilter profileedit <name_str>set comment <comment_str>set flow-based {disable | enable}set options {activexfilter | block-invalid-url | contenttype-check |
cookiefilter | https-scan | intrinsic | javafilter | js | jscript | rangeblock | unknown | vbs | wf-cookie | wf-referer}
set ovrd-perm [bannedword-override contenttype-check-override fortiguard-wf-override urlfilter-override]
set post-action {normal | comfort | block}set web-content-log {disable | enable}set web-filter-activex {disable | enable}set web-filter-cookie-log {disable | enable}set web-filter-cookie-removal-log {disable | enable}set web-filter-applet-log {disable | enable}set web-filter-js-log {disable | enable}set web-filter-jscript-log {disable | enable}set web-filter-vbs-log {disable | enable}set web-filter-unknown-log {disable | enable}set web-filter-referer-log {disable | enable}set web-ftgd-err-log {disable | enable}set web-ftgd-quota-usage {disable | enable}set web-invalid-domain-log {disable | enable}set web-url-log {disable | enable}config ftgd-wfset options {connect-request-bypass | error-allow | http-err-detail|
rate-image-urls | rate-server-ip | redir-block | strict-blocking}set enable {all | <category_str>}set disable {all | <category_str>}set exempt-quota {all | <category_str>}set exempt-ssl {all | <category_str>}config filtersedit <id_str>set action {authenticate | block | monitor | warning}set auth-usr-group [group1 ...groupn]set category {category_int group_str}set log {enable | disable}set warn-duration <dur_string>
endconfig overrideset ovrd-dur <###d##h##m>set ovrd-dur-mode {ask | constant}set ovrd-scope {ask | browser | ip | user | user-group}set ovrd-user-group <groupname_str> [<groupname_str>...]set profile <web_profile>set profile-attribute <attribute_str>
ortiOS 4.0 MR3 CLI Reference1-431-99686-20110623 655ttp://docs.fortinet.com/ • Feedback
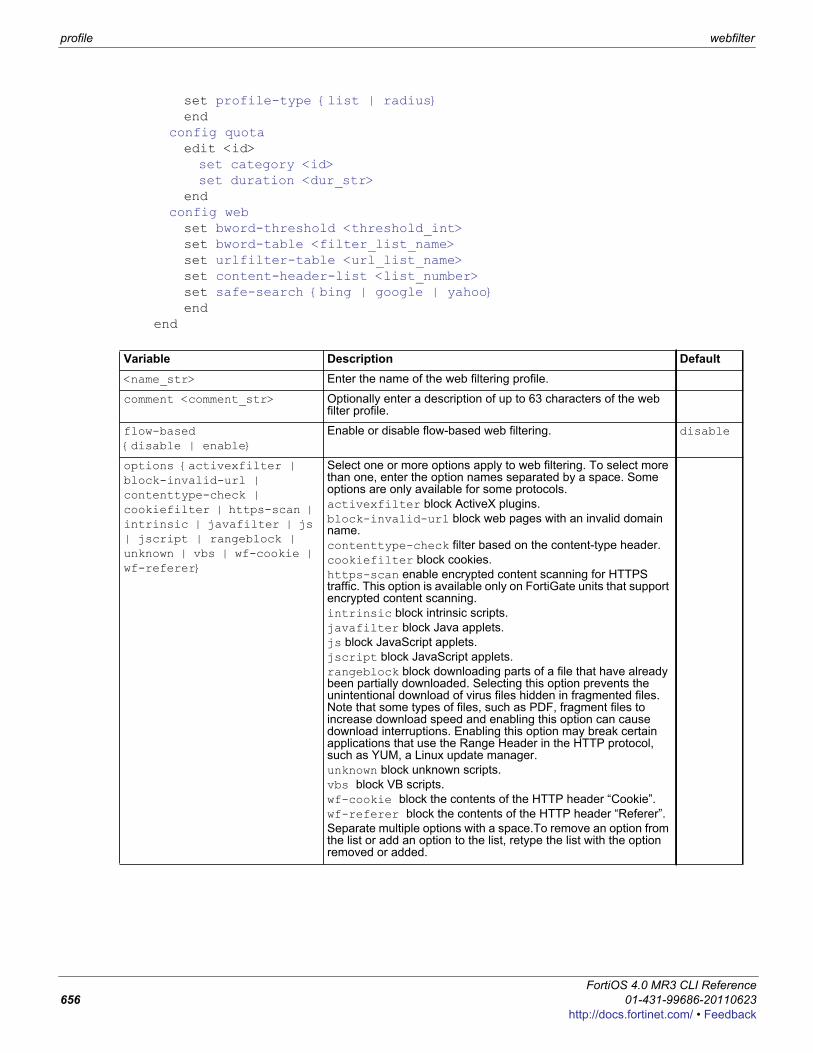
profile webfilter
set profile-type {list | radius}end
config quotaedit <id>set category <id>set duration <dur_str>
endconfig webset bword-threshold <threshold_int>set bword-table <filter_list_name>set urlfilter-table <url_list_name>set content-header-list <list_number>set safe-search {bing | google | yahoo}end
end
Variable Description Default<name_str> Enter the name of the web filtering profile.
comment <comment_str> Optionally enter a description of up to 63 characters of the web filter profile.
flow-based {disable | enable}
Enable or disable flow-based web filtering. disable
options {activexfilter | block-invalid-url | contenttype-check | cookiefilter | https-scan | intrinsic | javafilter | js | jscript | rangeblock | unknown | vbs | wf-cookie | wf-referer}
Select one or more options apply to web filtering. To select more than one, enter the option names separated by a space. Some options are only available for some protocols.activexfilter block ActiveX plugins.block-invalid-url block web pages with an invalid domain name.contenttype-check filter based on the content-type header.cookiefilter block cookies.https-scan enable encrypted content scanning for HTTPS traffic. This option is available only on FortiGate units that support encrypted content scanning.intrinsic block intrinsic scripts.javafilter block Java applets.js block JavaScript applets.jscript block JavaScript applets.rangeblock block downloading parts of a file that have already been partially downloaded. Selecting this option prevents the unintentional download of virus files hidden in fragmented files. Note that some types of files, such as PDF, fragment files to increase download speed and enabling this option can cause download interruptions. Enabling this option may break certain applications that use the Range Header in the HTTP protocol, such as YUM, a Linux update manager.unknown block unknown scripts.vbs block VB scripts.wf-cookie block the contents of the HTTP header “Cookie”.wf-referer block the contents of the HTTP header “Referer”.Separate multiple options with a space.To remove an option from the list or add an option to the list, retype the list with the option removed or added.
FortiOS 4.0 MR3 CLI Reference656 01-431-99686-20110623
http://docs.fortinet.com/ • Feedback
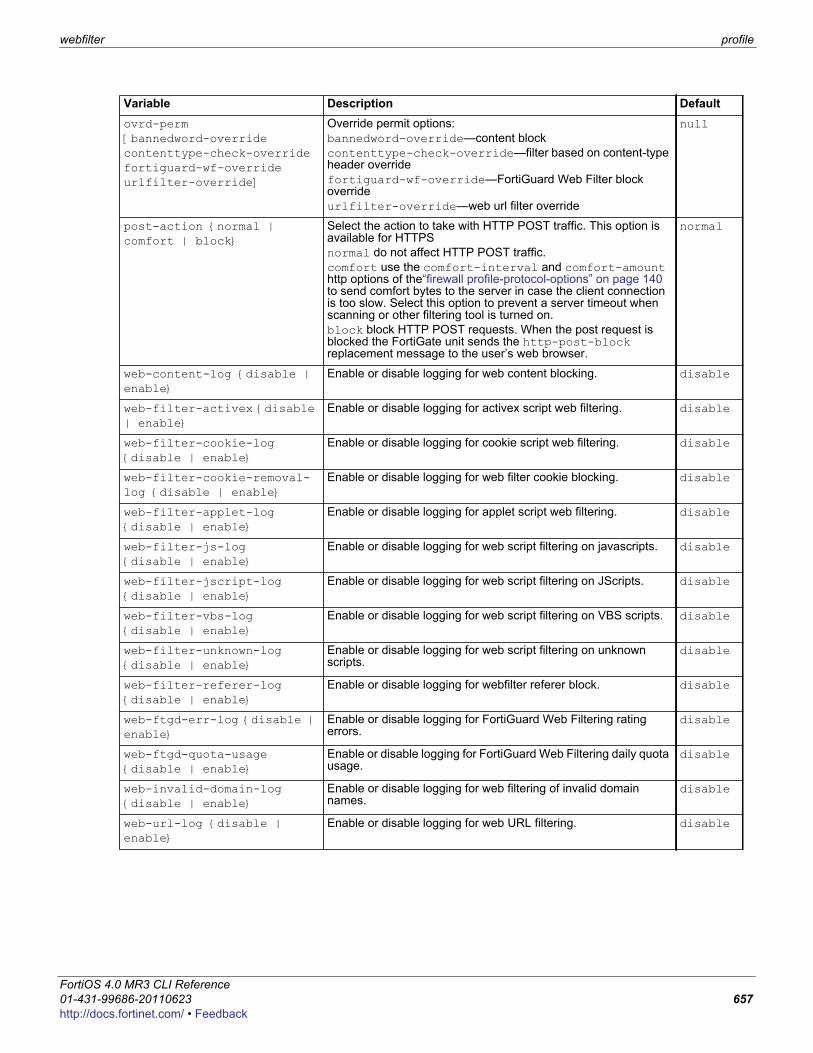
webfilter profile
F0h
ovrd-perm [bannedword-override contenttype-check-override fortiguard-wf-override urlfilter-override]
Override permit options:bannedword-override—content blockcontenttype-check-override—filter based on content-type header overridefortiguard-wf-override—FortiGuard Web Filter block overrideurlfilter-override—web url filter override
null
post-action {normal | comfort | block}
Select the action to take with HTTP POST traffic. This option is available for HTTPSnormal do not affect HTTP POST traffic.comfort use the comfort-interval and comfort-amount http options of the“firewall profile-protocol-options” on page 140 to send comfort bytes to the server in case the client connection is too slow. Select this option to prevent a server timeout when scanning or other filtering tool is turned on.block block HTTP POST requests. When the post request is blocked the FortiGate unit sends the http-post-block replacement message to the user’s web browser.
normal
web-content-log {disable | enable}
Enable or disable logging for web content blocking. disable
web-filter-activex {disable | enable}
Enable or disable logging for activex script web filtering. disable
web-filter-cookie-log {disable | enable}
Enable or disable logging for cookie script web filtering. disable
web-filter-cookie-removal-log {disable | enable}
Enable or disable logging for web filter cookie blocking. disable
web-filter-applet-log {disable | enable}
Enable or disable logging for applet script web filtering. disable
web-filter-js-log {disable | enable}
Enable or disable logging for web script filtering on javascripts. disable
web-filter-jscript-log {disable | enable}
Enable or disable logging for web script filtering on JScripts. disable
web-filter-vbs-log {disable | enable}
Enable or disable logging for web script filtering on VBS scripts. disable
web-filter-unknown-log {disable | enable}
Enable or disable logging for web script filtering on unknown scripts.
disable
web-filter-referer-log {disable | enable}
Enable or disable logging for webfilter referer block. disable
web-ftgd-err-log {disable | enable}
Enable or disable logging for FortiGuard Web Filtering rating errors.
disable
web-ftgd-quota-usage {disable | enable}
Enable or disable logging for FortiGuard Web Filtering daily quota usage.
disable
web-invalid-domain-log {disable | enable}
Enable or disable logging for web filtering of invalid domain names.
disable
web-url-log {disable | enable}
Enable or disable logging for web URL filtering. disable
Variable Description Default
ortiOS 4.0 MR3 CLI Reference1-431-99686-20110623 657ttp://docs.fortinet.com/ • Feedback
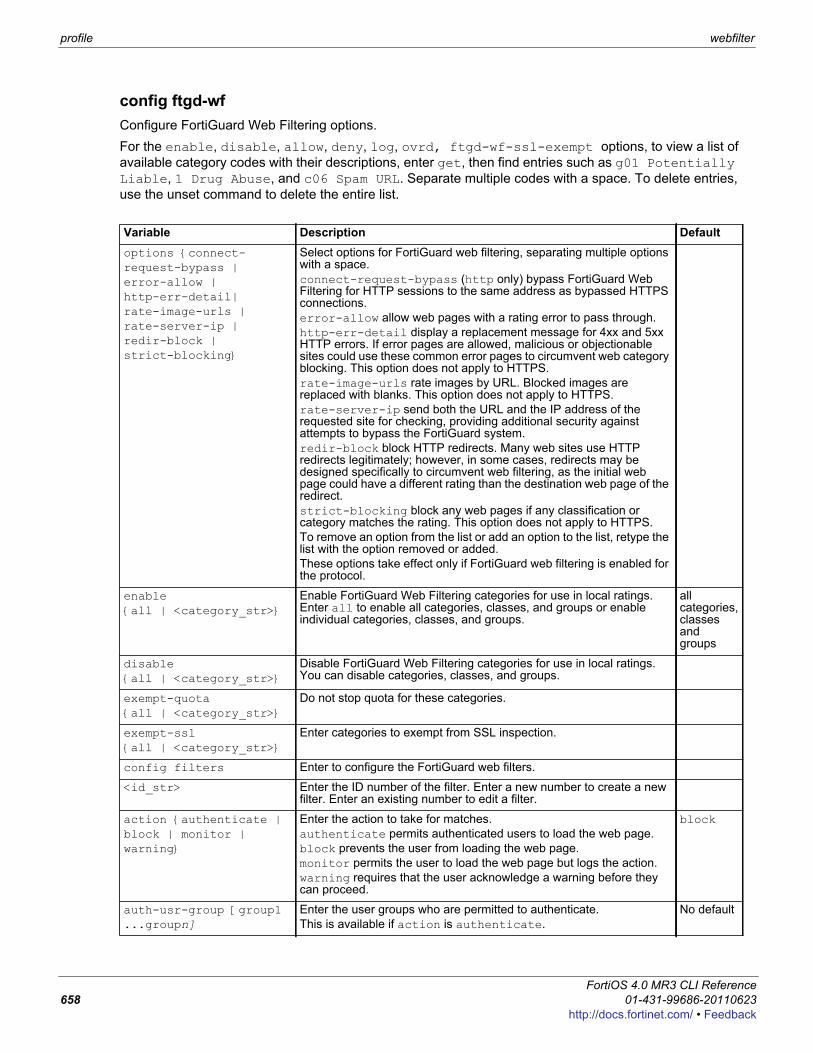
profile webfilter
config ftgd-wfConfigure FortiGuard Web Filtering options.For the enable, disable, allow, deny, log, ovrd, ftgd-wf-ssl-exempt options, to view a list of available category codes with their descriptions, enter get, then find entries such as g01 Potentially Liable, 1 Drug Abuse, and c06 Spam URL. Separate multiple codes with a space. To delete entries, use the unset command to delete the entire list.
Variable Description Defaultoptions {connect-request-bypass | error-allow | http-err-detail| rate-image-urls | rate-server-ip | redir-block | strict-blocking}
Select options for FortiGuard web filtering, separating multiple options with a space.connect-request-bypass (http only) bypass FortiGuard Web Filtering for HTTP sessions to the same address as bypassed HTTPS connections. error-allow allow web pages with a rating error to pass through.http-err-detail display a replacement message for 4xx and 5xx HTTP errors. If error pages are allowed, malicious or objectionable sites could use these common error pages to circumvent web category blocking. This option does not apply to HTTPS.rate-image-urls rate images by URL. Blocked images are replaced with blanks. This option does not apply to HTTPS.rate-server-ip send both the URL and the IP address of the requested site for checking, providing additional security against attempts to bypass the FortiGuard system.redir-block block HTTP redirects. Many web sites use HTTP redirects legitimately; however, in some cases, redirects may be designed specifically to circumvent web filtering, as the initial web page could have a different rating than the destination web page of the redirect.strict-blocking block any web pages if any classification or category matches the rating. This option does not apply to HTTPS.To remove an option from the list or add an option to the list, retype the list with the option removed or added.These options take effect only if FortiGuard web filtering is enabled for the protocol.
enable {all | <category_str>}
Enable FortiGuard Web Filtering categories for use in local ratings. Enter all to enable all categories, classes, and groups or enable individual categories, classes, and groups.
all categories, classes and groups
disable {all | <category_str>}
Disable FortiGuard Web Filtering categories for use in local ratings. You can disable categories, classes, and groups.
exempt-quota {all | <category_str>}
Do not stop quota for these categories.
exempt-ssl {all | <category_str>}
Enter categories to exempt from SSL inspection.
config filters Enter to configure the FortiGuard web filters.
<id_str> Enter the ID number of the filter. Enter a new number to create a new filter. Enter an existing number to edit a filter.
action {authenticate | block | monitor | warning}
Enter the action to take for matches.authenticate permits authenticated users to load the web page.block prevents the user from loading the web page.monitor permits the user to load the web page but logs the action.warning requires that the user acknowledge a warning before they can proceed.
block
auth-usr-group [group1 ...groupn]
Enter the user groups who are permitted to authenticate.This is available if action is authenticate.
No default
FortiOS 4.0 MR3 CLI Reference658 01-431-99686-20110623
http://docs.fortinet.com/ • Feedback
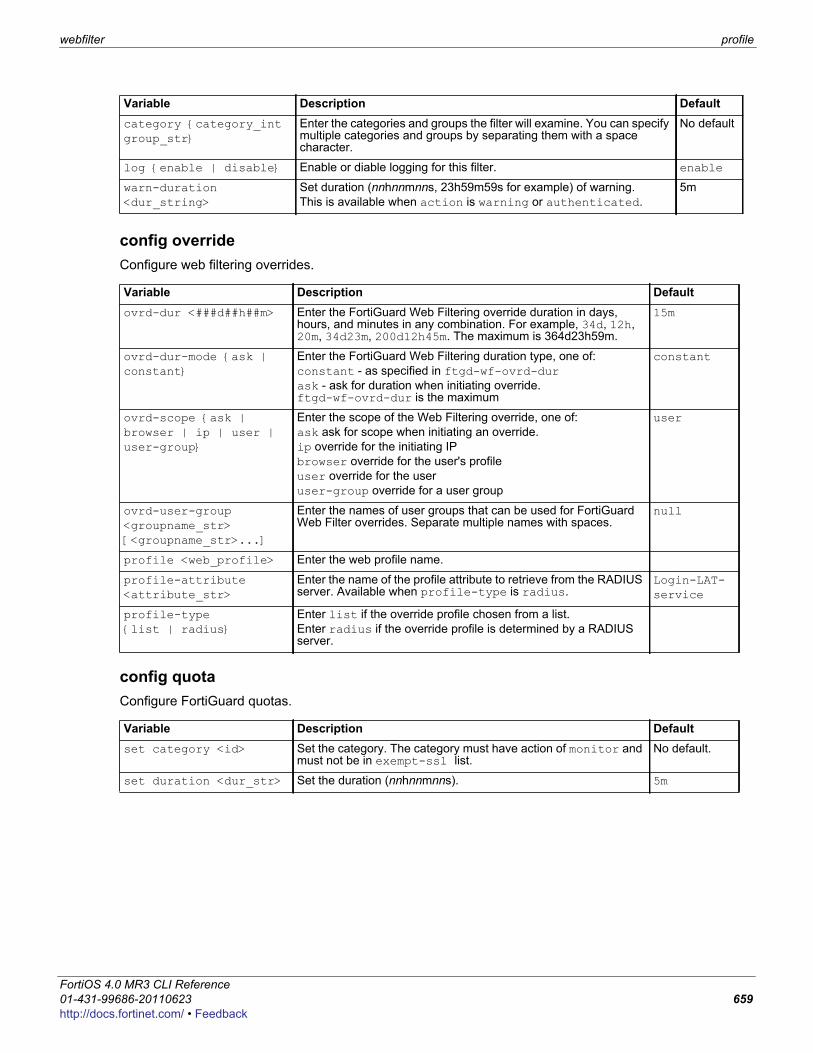
webfilter profile
F0h
config overrideConfigure web filtering overrides.
config quotaConfigure FortiGuard quotas.
category {category_int group_str}
Enter the categories and groups the filter will examine. You can specify multiple categories and groups by separating them with a space character.
No default
log {enable | disable} Enable or diable logging for this filter. enable
warn-duration <dur_string>
Set duration (nnhnnmnns, 23h59m59s for example) of warning.This is available when action is warning or authenticated.
5m
Variable Description Defaultovrd-dur <###d##h##m> Enter the FortiGuard Web Filtering override duration in days,
hours, and minutes in any combination. For example, 34d, 12h, 20m, 34d23m, 200d12h45m. The maximum is 364d23h59m.
15m
ovrd-dur-mode {ask | constant}
Enter the FortiGuard Web Filtering duration type, one of:constant - as specified in ftgd-wf-ovrd-durask - ask for duration when initiating override. ftgd-wf-ovrd-dur is the maximum
constant
ovrd-scope {ask | browser | ip | user | user-group}
Enter the scope of the Web Filtering override, one of:ask ask for scope when initiating an override.ip override for the initiating IPbrowser override for the user's profileuser override for the useruser-group override for a user group
user
ovrd-user-group <groupname_str> [<groupname_str>...]
Enter the names of user groups that can be used for FortiGuard Web Filter overrides. Separate multiple names with spaces.
null
profile <web_profile> Enter the web profile name.
profile-attribute <attribute_str>
Enter the name of the profile attribute to retrieve from the RADIUS server. Available when profile-type is radius.
Login-LAT-service
profile-type {list | radius}
Enter list if the override profile chosen from a list.Enter radius if the override profile is determined by a RADIUS server.
Variable Description Defaultset category <id> Set the category. The category must have action of monitor and
must not be in exempt-ssl list.No default.
set duration <dur_str> Set the duration (nnhnnmnns). 5m
Variable Description Default
ortiOS 4.0 MR3 CLI Reference1-431-99686-20110623 659ttp://docs.fortinet.com/ • Feedback
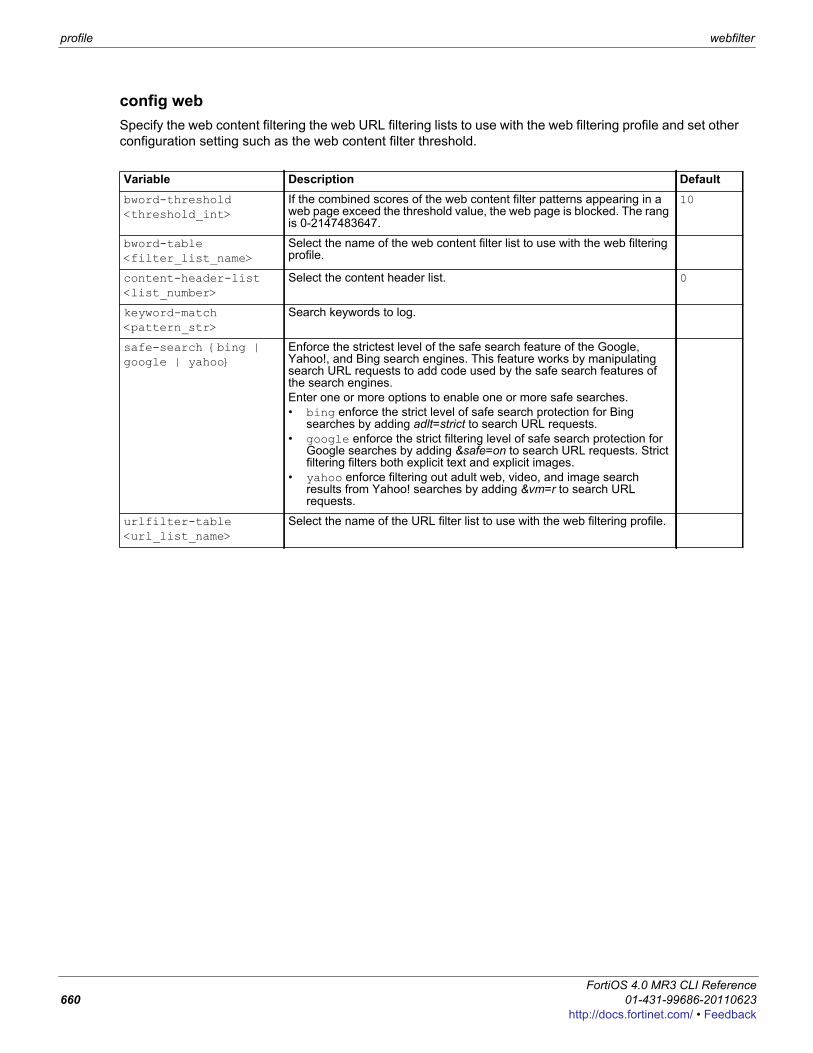
profile webfilter
config webSpecify the web content filtering the web URL filtering lists to use with the web filtering profile and set other configuration setting such as the web content filter threshold.
Variable Description Defaultbword-threshold <threshold_int>
If the combined scores of the web content filter patterns appearing in a web page exceed the threshold value, the web page is blocked. The rang is 0-2147483647.
10
bword-table <filter_list_name>
Select the name of the web content filter list to use with the web filtering profile.
content-header-list <list_number>
Select the content header list. 0
keyword-match <pattern_str>
Search keywords to log.
safe-search {bing | google | yahoo}
Enforce the strictest level of the safe search feature of the Google, Yahoo!, and Bing search engines. This feature works by manipulating search URL requests to add code used by the safe search features of the search engines. Enter one or more options to enable one or more safe searches.• bing enforce the strict level of safe search protection for Bing
searches by adding adlt=strict to search URL requests.• google enforce the strict filtering level of safe search protection for
Google searches by adding &safe=on to search URL requests. Strict filtering filters both explicit text and explicit images.
• yahoo enforce filtering out adult web, video, and image search results from Yahoo! searches by adding &vm=r to search URL requests.
urlfilter-table <url_list_name>
Select the name of the URL filter list to use with the web filtering profile.
FortiOS 4.0 MR3 CLI Reference660 01-431-99686-20110623
http://docs.fortinet.com/ • Feedback
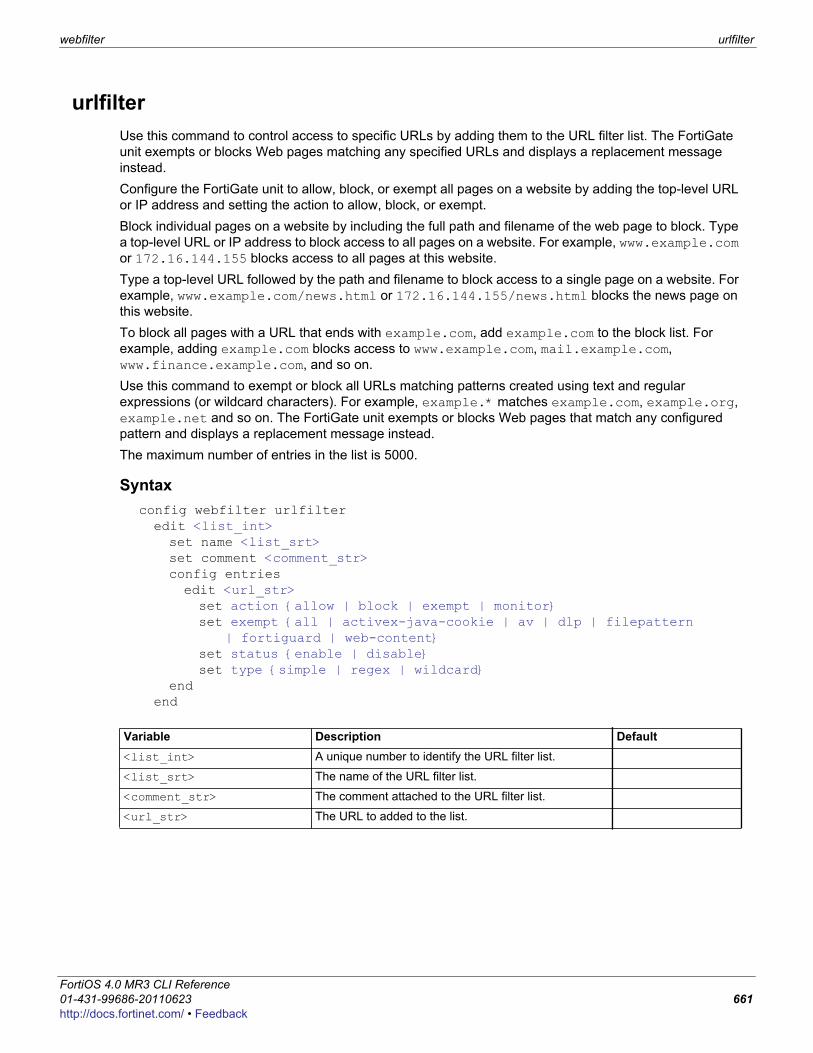
webfilter urlfilter
F0h
urlfilterUse this command to control access to specific URLs by adding them to the URL filter list. The FortiGate unit exempts or blocks Web pages matching any specified URLs and displays a replacement message instead.Configure the FortiGate unit to allow, block, or exempt all pages on a website by adding the top-level URL or IP address and setting the action to allow, block, or exempt. Block individual pages on a website by including the full path and filename of the web page to block. Type a top-level URL or IP address to block access to all pages on a website. For example, www.example.com or 172.16.144.155 blocks access to all pages at this website.Type a top-level URL followed by the path and filename to block access to a single page on a website. For example, www.example.com/news.html or 172.16.144.155/news.html blocks the news page on this website.To block all pages with a URL that ends with example.com, add example.com to the block list. For example, adding example.com blocks access to www.example.com, mail.example.com, www.finance.example.com, and so on.Use this command to exempt or block all URLs matching patterns created using text and regular expressions (or wildcard characters). For example, example.* matches example.com, example.org, example.net and so on. The FortiGate unit exempts or blocks Web pages that match any configured pattern and displays a replacement message instead.The maximum number of entries in the list is 5000.
Syntaxconfig webfilter urlfilteredit <list_int>set name <list_srt>set comment <comment_str>config entriesedit <url_str>set action {allow | block | exempt | monitor}set exempt {all | activex-java-cookie | av | dlp | filepattern
| fortiguard | web-content}set status {enable | disable}set type {simple | regex | wildcard}
endend
Variable Description Default<list_int> A unique number to identify the URL filter list.
<list_srt> The name of the URL filter list.
<comment_str> The comment attached to the URL filter list.
<url_str> The URL to added to the list.
ortiOS 4.0 MR3 CLI Reference1-431-99686-20110623 661ttp://docs.fortinet.com/ • Feedback
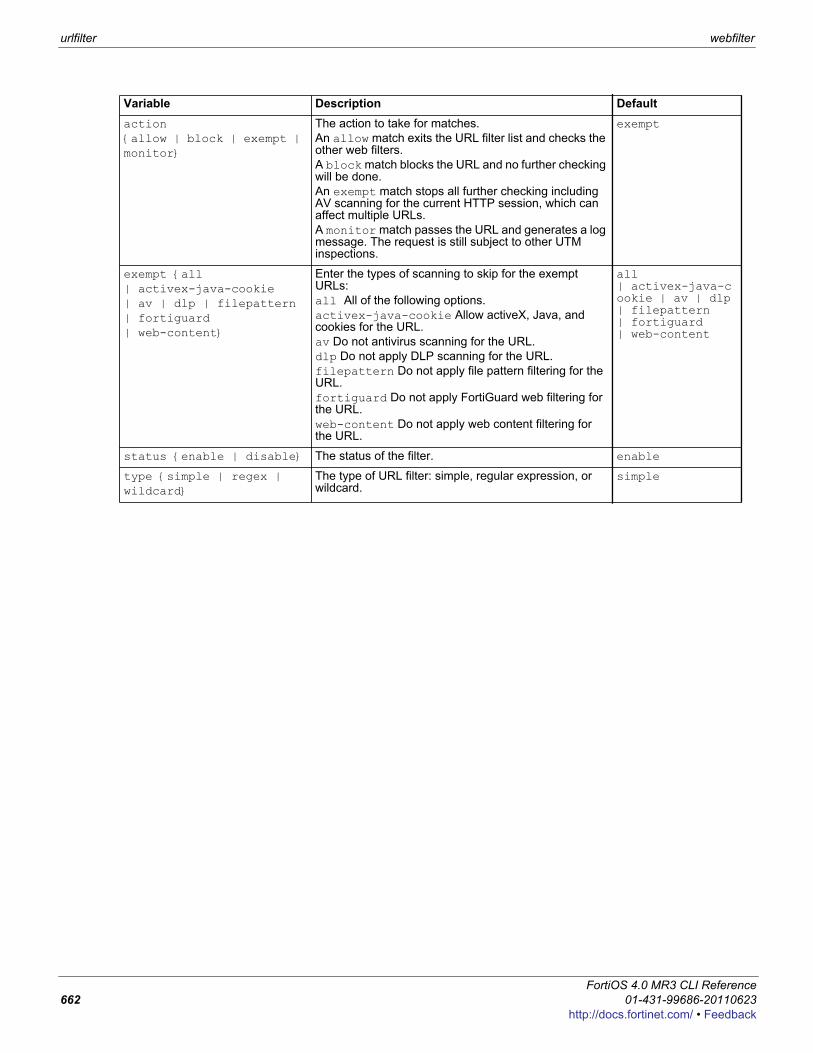
urlfilter webfilter
action {allow | block | exempt | monitor}
The action to take for matches.An allow match exits the URL filter list and checks the other web filters.A block match blocks the URL and no further checking will be done. An exempt match stops all further checking including AV scanning for the current HTTP session, which can affect multiple URLs. A monitor match passes the URL and generates a log message. The request is still subject to other UTM inspections.
exempt
exempt {all | activex-java-cookie | av | dlp | filepattern | fortiguard | web-content}
Enter the types of scanning to skip for the exempt URLs: all All of the following options.activex-java-cookie Allow activeX, Java, and cookies for the URL.av Do not antivirus scanning for the URL.dlp Do not apply DLP scanning for the URL.filepattern Do not apply file pattern filtering for the URL.fortiguard Do not apply FortiGuard web filtering for the URL.web-content Do not apply web content filtering for the URL.
all | activex-java-cookie | av | dlp | filepattern | fortiguard | web-content
status {enable | disable} The status of the filter. enable
type {simple | regex | wildcard}
The type of URL filter: simple, regular expression, or wildcard.
simple
Variable Description Default
FortiOS 4.0 MR3 CLI Reference662 01-431-99686-20110623
http://docs.fortinet.com/ • Feedback
F0h
wireless-controllerUse these commands to create virtual wireless access points that can be associated with multiple physical wireless access points. Clients can roam amongst the physical access points, extending the range of the wireless network. This chapter describes the following commands:
ap-statusglobalsettingtimersvapvap-groupwtpwtp-profile
ortiOS 4.0 MR3 CLI Reference1-431-99686-20110623 663ttp://docs.fortinet.com/ • Feedback
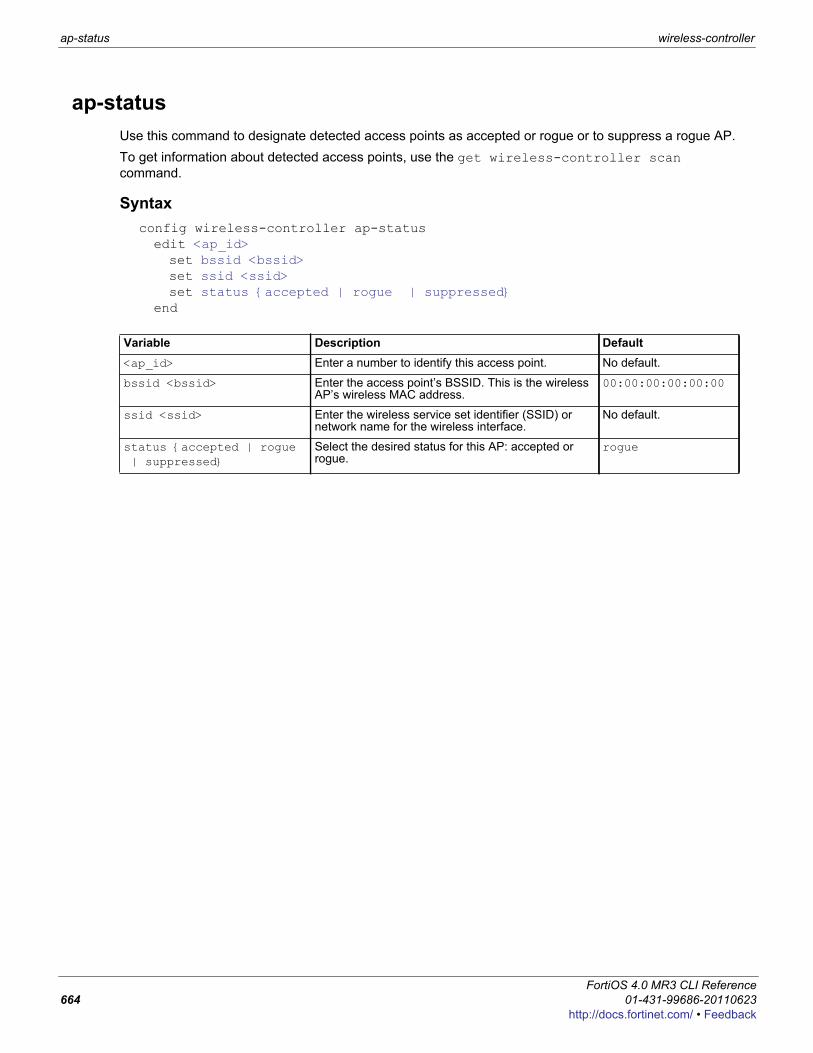
ap-status wireless-controller
ap-statusUse this command to designate detected access points as accepted or rogue or to suppress a rogue AP. To get information about detected access points, use the get wireless-controller scan command.
Syntaxconfig wireless-controller ap-statusedit <ap_id>set bssid <bssid>set ssid <ssid>set status {accepted | rogue | suppressed}
end
Variable Description Default<ap_id> Enter a number to identify this access point. No default.
bssid <bssid> Enter the access point’s BSSID. This is the wireless AP’s wireless MAC address.
00:00:00:00:00:00
ssid <ssid> Enter the wireless service set identifier (SSID) or network name for the wireless interface.
No default.
status {accepted | rogue | suppressed}
Select the desired status for this AP: accepted or rogue.
rogue
FortiOS 4.0 MR3 CLI Reference664 01-431-99686-20110623
http://docs.fortinet.com/ • Feedback
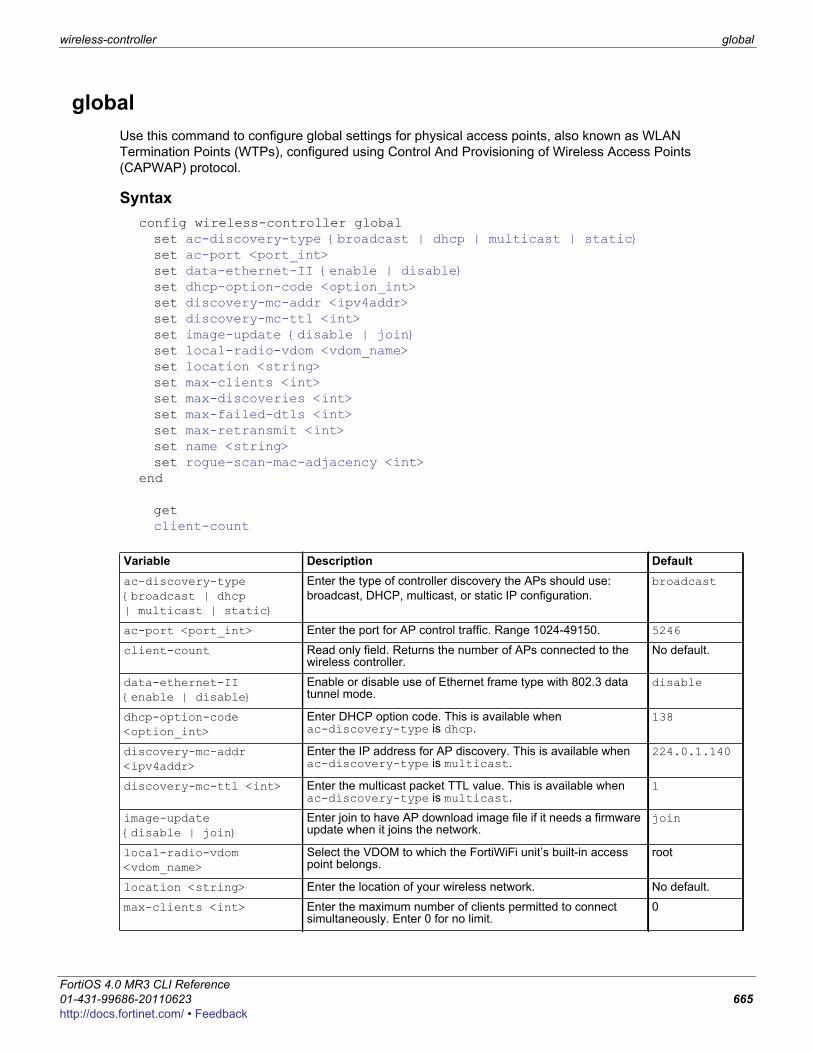
wireless-controller global
F0h
globalUse this command to configure global settings for physical access points, also known as WLAN Termination Points (WTPs), configured using Control And Provisioning of Wireless Access Points (CAPWAP) protocol.
Syntaxconfig wireless-controller globalset ac-discovery-type {broadcast | dhcp | multicast | static}set ac-port <port_int>set data-ethernet-II {enable | disable}set dhcp-option-code <option_int>set discovery-mc-addr <ipv4addr>set discovery-mc-ttl <int>set image-update {disable | join}set local-radio-vdom <vdom_name>set location <string>set max-clients <int>set max-discoveries <int>set max-failed-dtls <int>set max-retransmit <int>set name <string>set rogue-scan-mac-adjacency <int>
end
getclient-count
Variable Description Defaultac-discovery-type {broadcast | dhcp | multicast | static}
Enter the type of controller discovery the APs should use:broadcast, DHCP, multicast, or static IP configuration.
broadcast
ac-port <port_int> Enter the port for AP control traffic. Range 1024-49150. 5246
client-count Read only field. Returns the number of APs connected to the wireless controller.
No default.
data-ethernet-II {enable | disable}
Enable or disable use of Ethernet frame type with 802.3 data tunnel mode.
disable
dhcp-option-code <option_int>
Enter DHCP option code. This is available when ac-discovery-type is dhcp.
138
discovery-mc-addr <ipv4addr>
Enter the IP address for AP discovery. This is available when ac-discovery-type is multicast.
224.0.1.140
discovery-mc-ttl <int> Enter the multicast packet TTL value. This is available when ac-discovery-type is multicast.
1
image-update {disable | join}
Enter join to have AP download image file if it needs a firmware update when it joins the network.
join
local-radio-vdom <vdom_name>
Select the VDOM to which the FortiWiFi unit’s built-in access point belongs.
root
location <string> Enter the location of your wireless network. No default.
max-clients <int> Enter the maximum number of clients permitted to connect simultaneously. Enter 0 for no limit.
0
ortiOS 4.0 MR3 CLI Reference1-431-99686-20110623 665ttp://docs.fortinet.com/ • Feedback
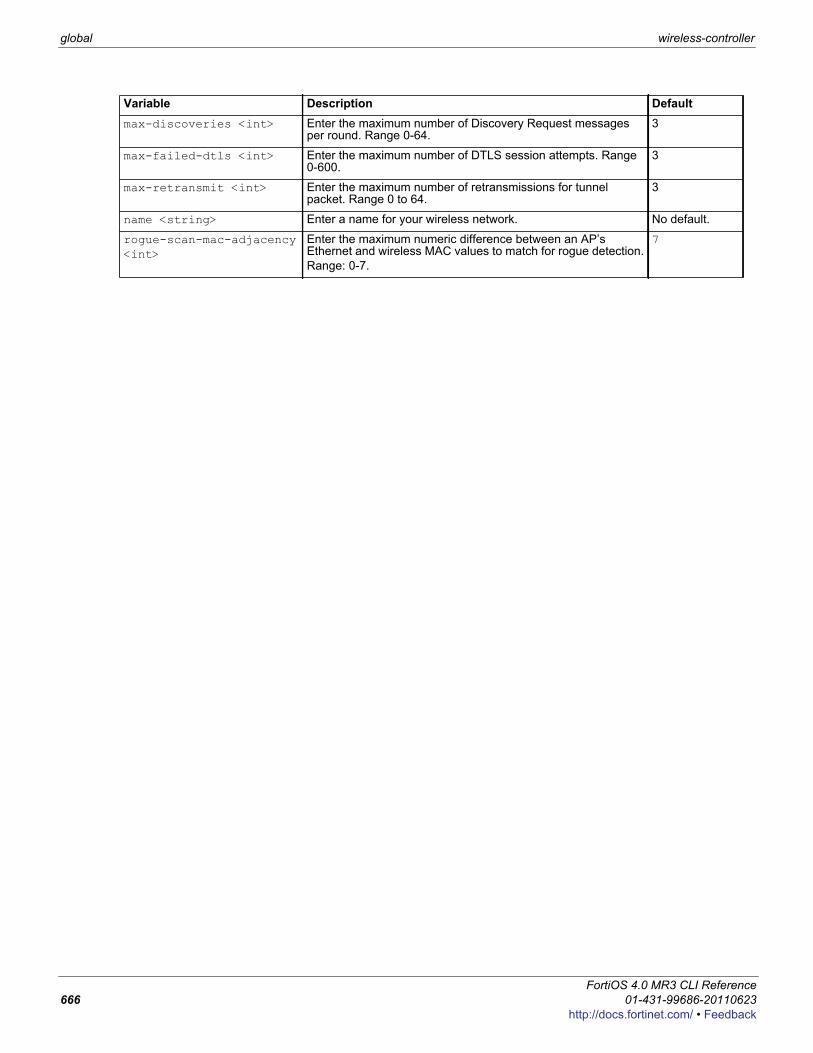
global wireless-controller
max-discoveries <int> Enter the maximum number of Discovery Request messages per round. Range 0-64.
3
max-failed-dtls <int> Enter the maximum number of DTLS session attempts. Range 0-600.
3
max-retransmit <int> Enter the maximum number of retransmissions for tunnel packet. Range 0 to 64.
3
name <string> Enter a name for your wireless network. No default.
rogue-scan-mac-adjacency <int>
Enter the maximum numeric difference between an AP’s Ethernet and wireless MAC values to match for rogue detection.Range: 0-7.
7
Variable Description Default
FortiOS 4.0 MR3 CLI Reference666 01-431-99686-20110623
http://docs.fortinet.com/ • Feedback
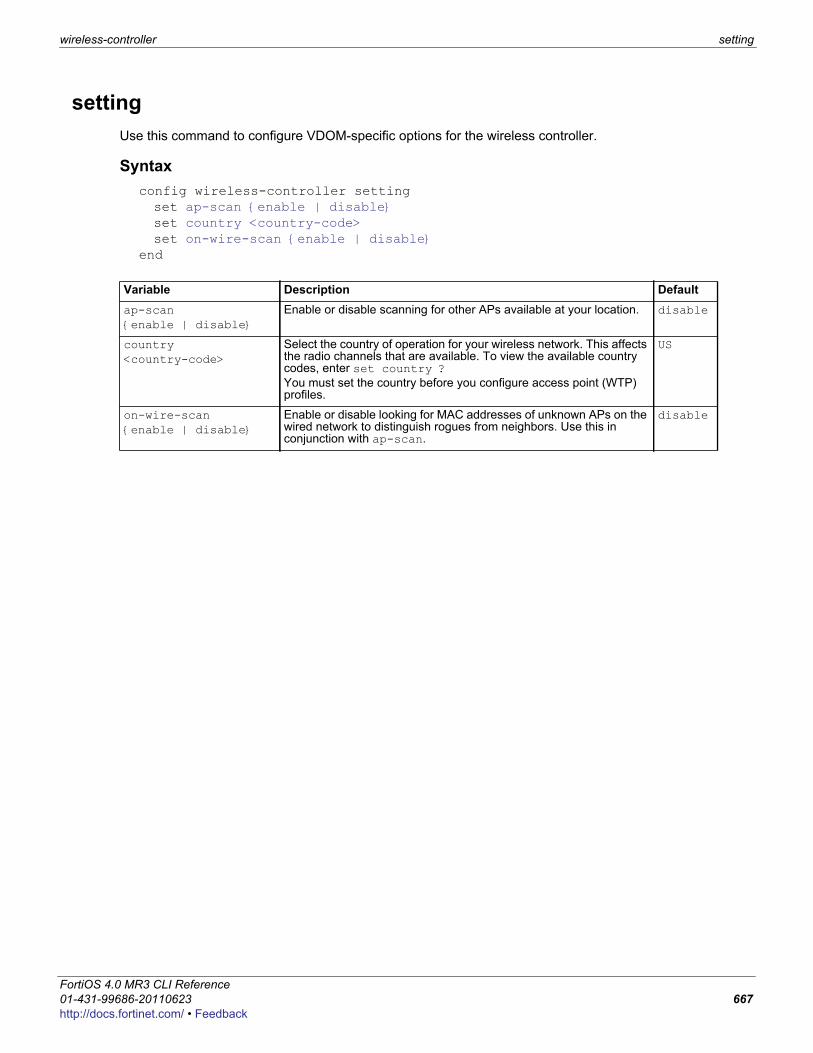
wireless-controller setting
F0h
settingUse this command to configure VDOM-specific options for the wireless controller.
Syntaxconfig wireless-controller settingset ap-scan {enable | disable}set country <country-code>set on-wire-scan {enable | disable}
end
Variable Description Defaultap-scan {enable | disable}
Enable or disable scanning for other APs available at your location. disable
country <country-code>
Select the country of operation for your wireless network. This affects the radio channels that are available. To view the available country codes, enter set country ?You must set the country before you configure access point (WTP) profiles.
US
on-wire-scan {enable | disable}
Enable or disable looking for MAC addresses of unknown APs on the wired network to distinguish rogues from neighbors. Use this in conjunction with ap-scan.
disable
ortiOS 4.0 MR3 CLI Reference1-431-99686-20110623 667ttp://docs.fortinet.com/ • Feedback
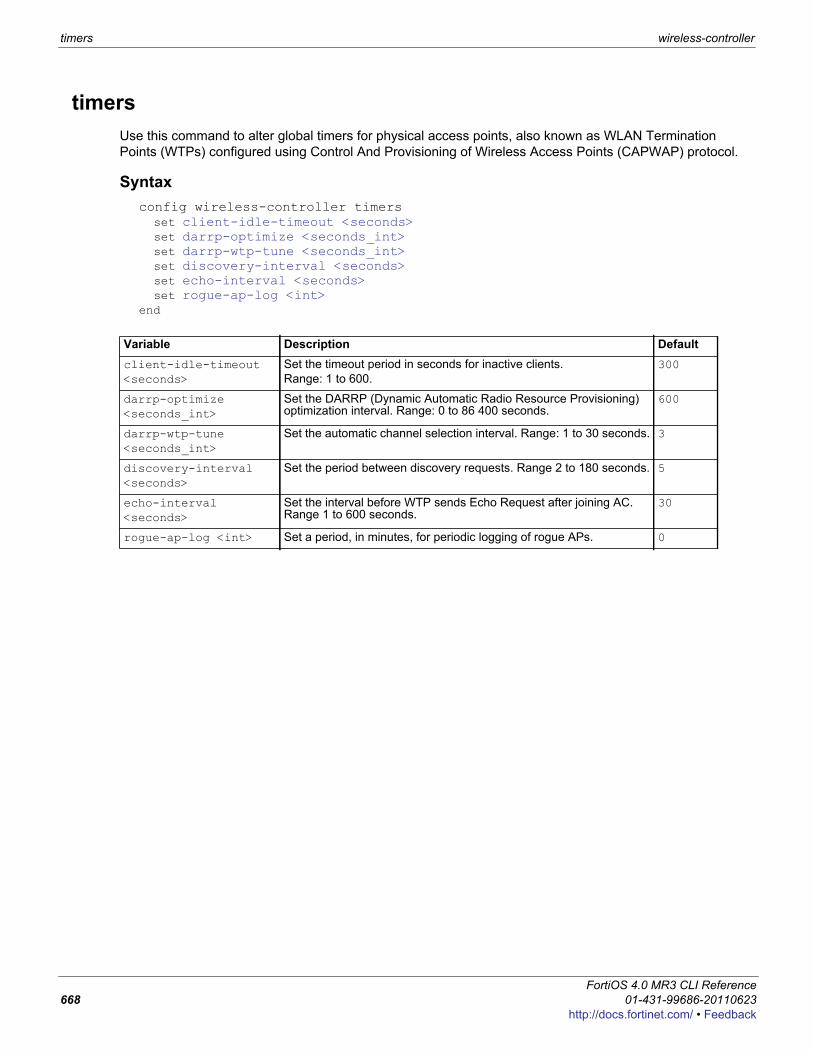
timers wireless-controller
timersUse this command to alter global timers for physical access points, also known as WLAN Termination Points (WTPs) configured using Control And Provisioning of Wireless Access Points (CAPWAP) protocol.
Syntaxconfig wireless-controller timers
set client-idle-timeout <seconds>set darrp-optimize <seconds_int>set darrp-wtp-tune <seconds_int>set discovery-interval <seconds>set echo-interval <seconds>set rogue-ap-log <int>
end
Variable Description Defaultclient-idle-timeout <seconds>
Set the timeout period in seconds for inactive clients. Range: 1 to 600.
300
darrp-optimize <seconds_int>
Set the DARRP (Dynamic Automatic Radio Resource Provisioning) optimization interval. Range: 0 to 86 400 seconds.
600
darrp-wtp-tune <seconds_int>
Set the automatic channel selection interval. Range: 1 to 30 seconds. 3
discovery-interval <seconds>
Set the period between discovery requests. Range 2 to 180 seconds. 5
echo-interval <seconds>
Set the interval before WTP sends Echo Request after joining AC. Range 1 to 600 seconds.
30
rogue-ap-log <int> Set a period, in minutes, for periodic logging of rogue APs. 0
FortiOS 4.0 MR3 CLI Reference668 01-431-99686-20110623
http://docs.fortinet.com/ • Feedback
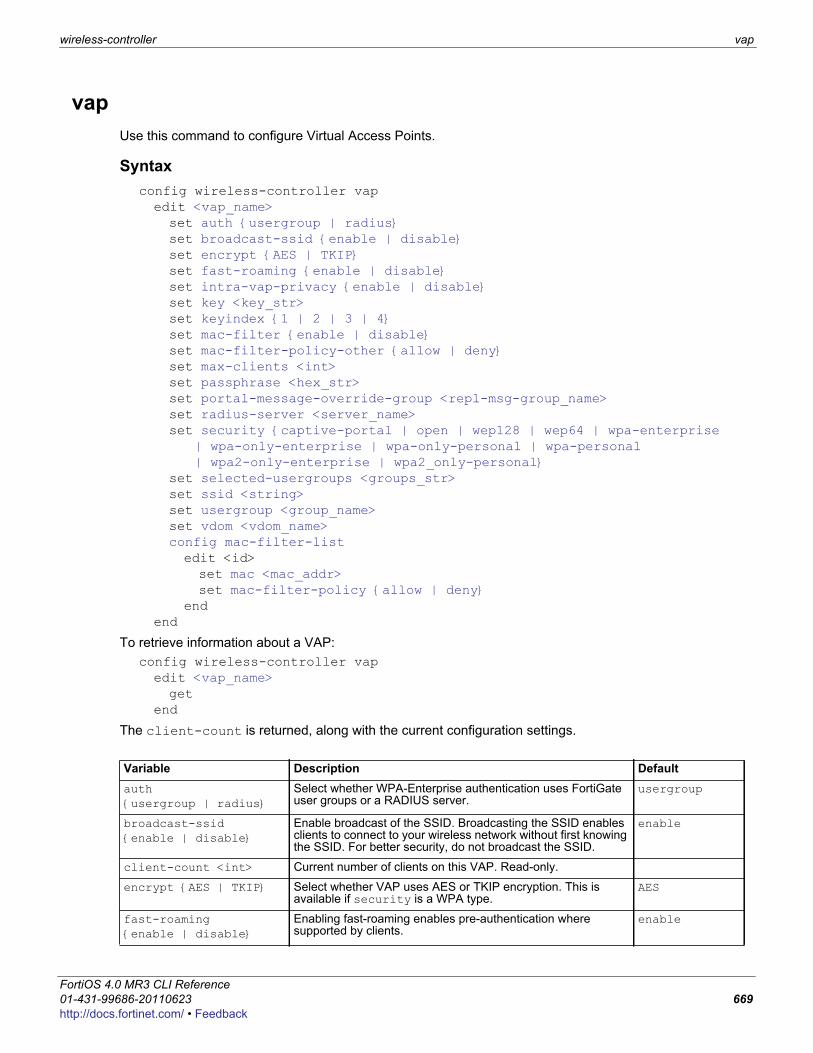
wireless-controller vap
F0h
vapUse this command to configure Virtual Access Points.
Syntaxconfig wireless-controller vapedit <vap_name>set auth {usergroup | radius}set broadcast-ssid {enable | disable}set encrypt {AES | TKIP}set fast-roaming {enable | disable}set intra-vap-privacy {enable | disable}set key <key_str>set keyindex {1 | 2 | 3 | 4}set mac-filter {enable | disable}set mac-filter-policy-other {allow | deny}set max-clients <int>set passphrase <hex_str>set portal-message-override-group <repl-msg-group_name>set radius-server <server_name>set security {captive-portal | open | wep128 | wep64 | wpa-enterprise
| wpa-only-enterprise | wpa-only-personal | wpa-personal | wpa2-only-enterprise | wpa2_only-personal}
set selected-usergroups <groups_str>set ssid <string>set usergroup <group_name>set vdom <vdom_name>config mac-filter-list edit <id>set mac <mac_addr>set mac-filter-policy {allow | deny}
endend
To retrieve information about a VAP:config wireless-controller vapedit <vap_name>get
end
The client-count is returned, along with the current configuration settings.
Variable Description Defaultauth {usergroup | radius}
Select whether WPA-Enterprise authentication uses FortiGate user groups or a RADIUS server.
usergroup
broadcast-ssid {enable | disable}
Enable broadcast of the SSID. Broadcasting the SSID enables clients to connect to your wireless network without first knowing the SSID. For better security, do not broadcast the SSID.
enable
client-count <int> Current number of clients on this VAP. Read-only.
encrypt {AES | TKIP} Select whether VAP uses AES or TKIP encryption. This is available if security is a WPA type.
AES
fast-roaming {enable | disable}
Enabling fast-roaming enables pre-authentication where supported by clients.
enable
ortiOS 4.0 MR3 CLI Reference1-431-99686-20110623 669ttp://docs.fortinet.com/ • Feedback
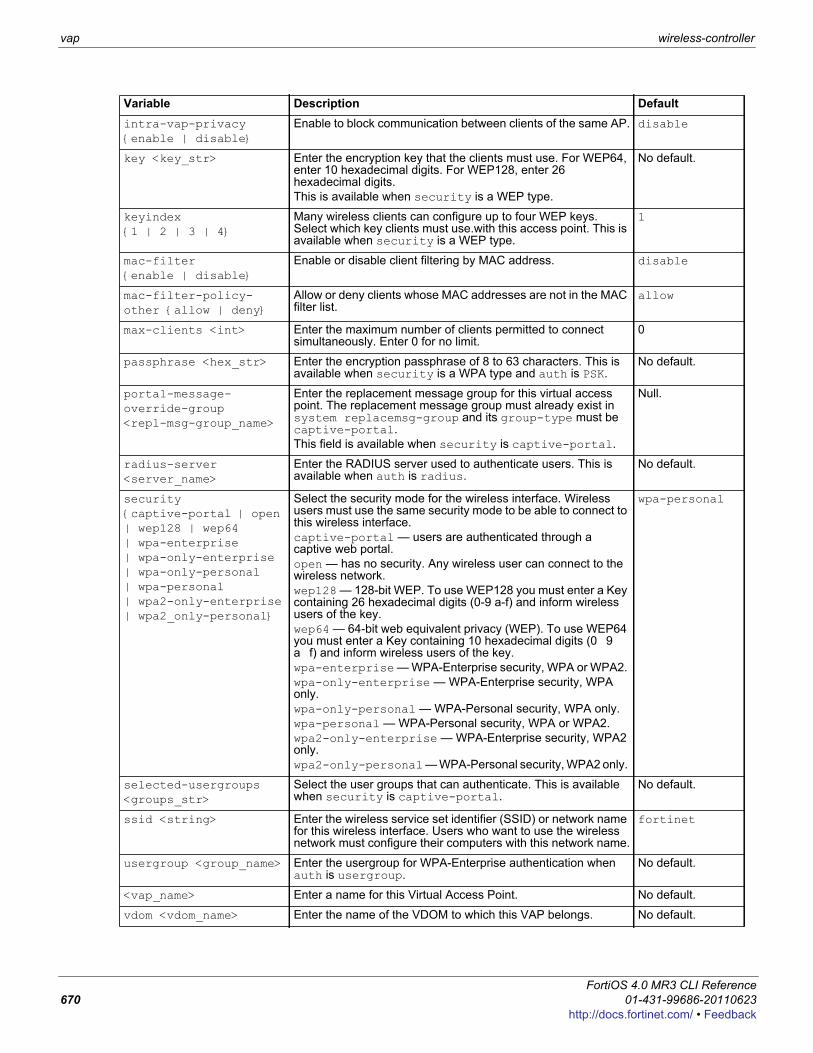
vap wireless-controller
intra-vap-privacy {enable | disable}
Enable to block communication between clients of the same AP. disable
key <key_str> Enter the encryption key that the clients must use. For WEP64, enter 10 hexadecimal digits. For WEP128, enter 26 hexadecimal digits. This is available when security is a WEP type.
No default.
keyindex {1 | 2 | 3 | 4}
Many wireless clients can configure up to four WEP keys. Select which key clients must use.with this access point. This is available when security is a WEP type.
1
mac-filter {enable | disable}
Enable or disable client filtering by MAC address. disable
mac-filter-policy-other {allow | deny}
Allow or deny clients whose MAC addresses are not in the MAC filter list.
allow
max-clients <int> Enter the maximum number of clients permitted to connect simultaneously. Enter 0 for no limit.
0
passphrase <hex_str> Enter the encryption passphrase of 8 to 63 characters. This is available when security is a WPA type and auth is PSK.
No default.
portal-message-override-group <repl-msg-group_name>
Enter the replacement message group for this virtual access point. The replacement message group must already exist in system replacemsg-group and its group-type must be captive-portal. This field is available when security is captive-portal.
Null.
radius-server <server_name>
Enter the RADIUS server used to authenticate users. This is available when auth is radius.
No default.
security {captive-portal | open | wep128 | wep64 | wpa-enterprise | wpa-only-enterprise | wpa-only-personal | wpa-personal | wpa2-only-enterprise | wpa2_only-personal}
Select the security mode for the wireless interface. Wireless users must use the same security mode to be able to connect to this wireless interface.captive-portal — users are authenticated through a captive web portal.open — has no security. Any wireless user can connect to the wireless network.wep128 — 128-bit WEP. To use WEP128 you must enter a Key containing 26 hexadecimal digits (0-9 a-f) and inform wireless users of the key.wep64 — 64-bit web equivalent privacy (WEP). To use WEP64 you must enter a Key containing 10 hexadecimal digits (0�9 a�f) and inform wireless users of the key.wpa-enterprise — WPA-Enterprise security, WPA or WPA2. wpa-only-enterprise — WPA-Enterprise security, WPA only. wpa-only-personal — WPA-Personal security, WPA only. wpa-personal — WPA-Personal security, WPA or WPA2. wpa2-only-enterprise — WPA-Enterprise security, WPA2 only. wpa2-only-personal — WPA-Personal security, WPA2 only.
wpa-personal
selected-usergroups <groups_str>
Select the user groups that can authenticate. This is available when security is captive-portal.
No default.
ssid <string> Enter the wireless service set identifier (SSID) or network name for this wireless interface. Users who want to use the wireless network must configure their computers with this network name.
fortinet
usergroup <group_name> Enter the usergroup for WPA-Enterprise authentication when auth is usergroup.
No default.
<vap_name> Enter a name for this Virtual Access Point. No default.
vdom <vdom_name> Enter the name of the VDOM to which this VAP belongs. No default.
Variable Description Default
FortiOS 4.0 MR3 CLI Reference670 01-431-99686-20110623
http://docs.fortinet.com/ • Feedback
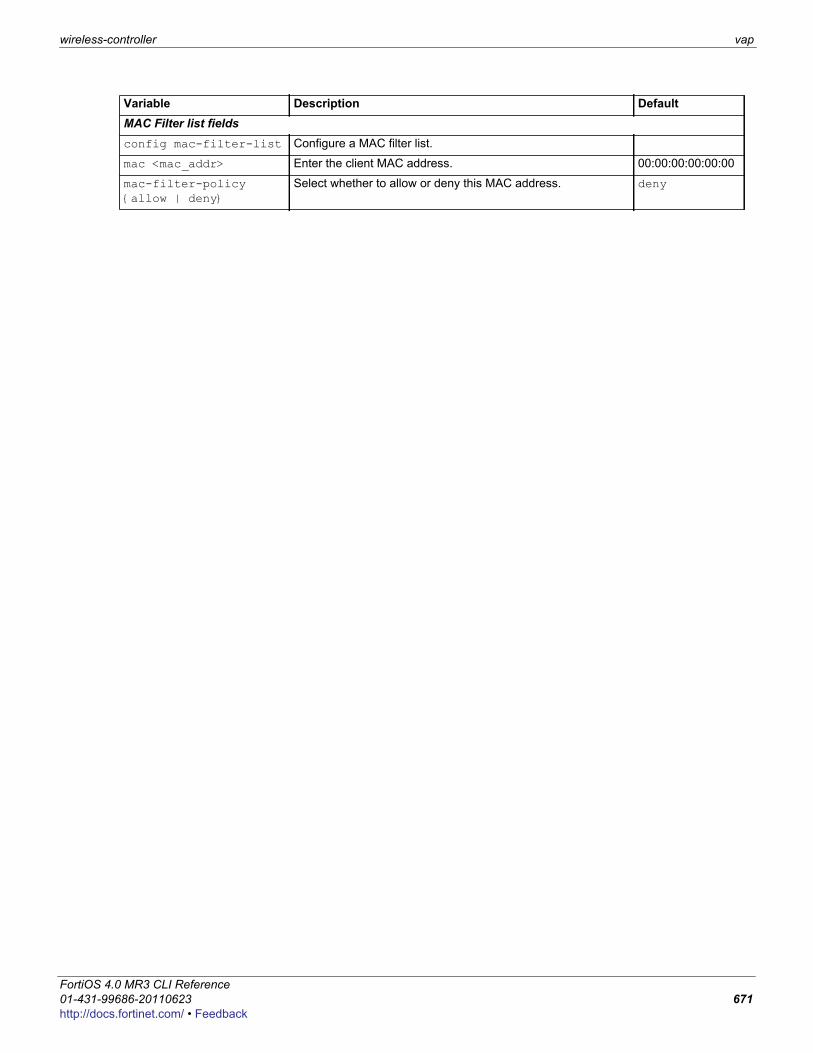
wireless-controller vap
F0h
MAC Filter list fields config mac-filter-list Configure a MAC filter list.
mac <mac_addr> Enter the client MAC address. 00:00:00:00:00:00
mac-filter-policy {allow | deny}
Select whether to allow or deny this MAC address. deny
Variable Description Default
ortiOS 4.0 MR3 CLI Reference1-431-99686-20110623 671ttp://docs.fortinet.com/ • Feedback

vap-group wireless-controller
vap-groupUse this command to configure VAP groups.
Syntaxconfig wireless-controller vap-groupedit <vap_group_name>set member {vap1 ... vapn}
end
Variable Description Defaultmember {vap1 ... vapn} Enter the members of this VAP group. No default.
<vap_group_name> Enter a name for this VAP group. No default.
FortiOS 4.0 MR3 CLI Reference672 01-431-99686-20110623
http://docs.fortinet.com/ • Feedback
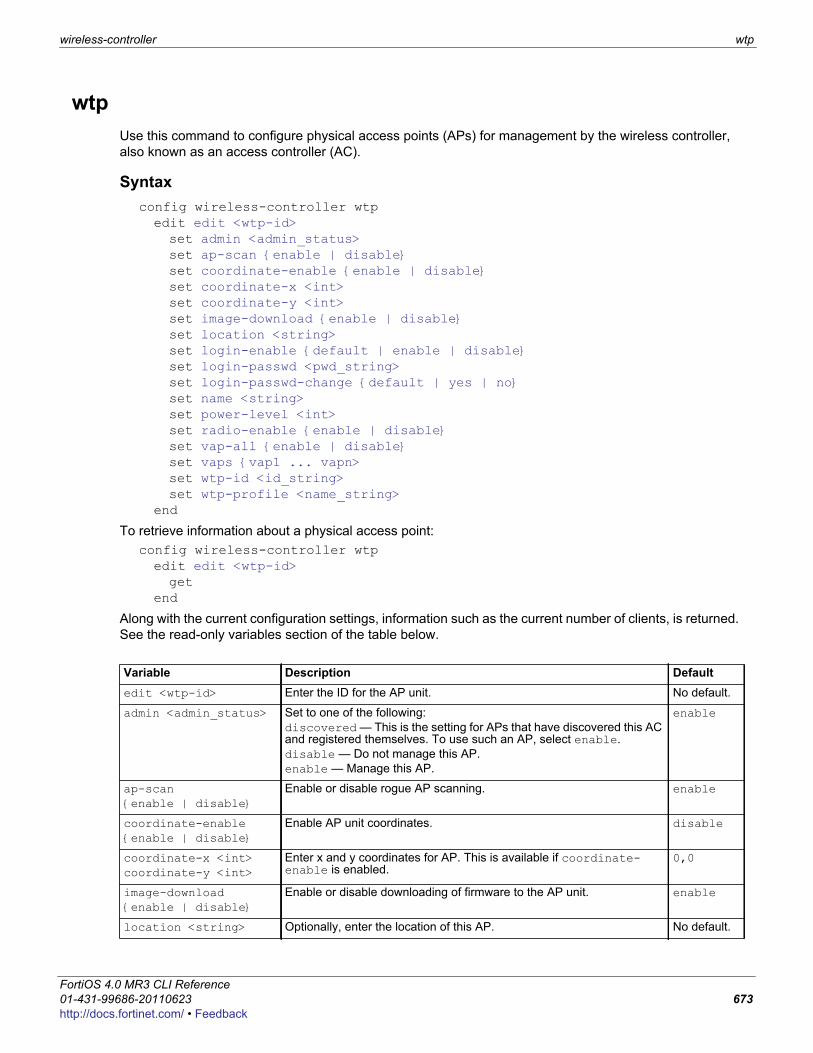
wireless-controller wtp
F0h
wtpUse this command to configure physical access points (APs) for management by the wireless controller, also known as an access controller (AC).
Syntaxconfig wireless-controller wtpedit edit <wtp-id>set admin <admin_status>set ap-scan {enable | disable}set coordinate-enable {enable | disable}set coordinate-x <int>set coordinate-y <int>set image-download {enable | disable}set location <string>set login-enable {default | enable | disable}set login-passwd <pwd_string>set login-passwd-change {default | yes | no}set name <string>set power-level <int>set radio-enable {enable | disable}set vap-all {enable | disable}set vaps {vap1 ... vapn>set wtp-id <id_string>set wtp-profile <name_string>
end
To retrieve information about a physical access point:config wireless-controller wtpedit edit <wtp-id>get
end
Along with the current configuration settings, information such as the current number of clients, is returned. See the read-only variables section of the table below.
Variable Description Defaultedit <wtp-id> Enter the ID for the AP unit. No default.
admin <admin_status> Set to one of the following:discovered — This is the setting for APs that have discovered this AC and registered themselves. To use such an AP, select enable.disable — Do not manage this AP.enable — Manage this AP.
enable
ap-scan {enable | disable}
Enable or disable rogue AP scanning. enable
coordinate-enable {enable | disable}
Enable AP unit coordinates. disable
coordinate-x <int>coordinate-y <int>
Enter x and y coordinates for AP. This is available if coordinate-enable is enabled.
0,0
image-download {enable | disable}
Enable or disable downloading of firmware to the AP unit. enable
location <string> Optionally, enter the location of this AP. No default.
ortiOS 4.0 MR3 CLI Reference1-431-99686-20110623 673ttp://docs.fortinet.com/ • Feedback
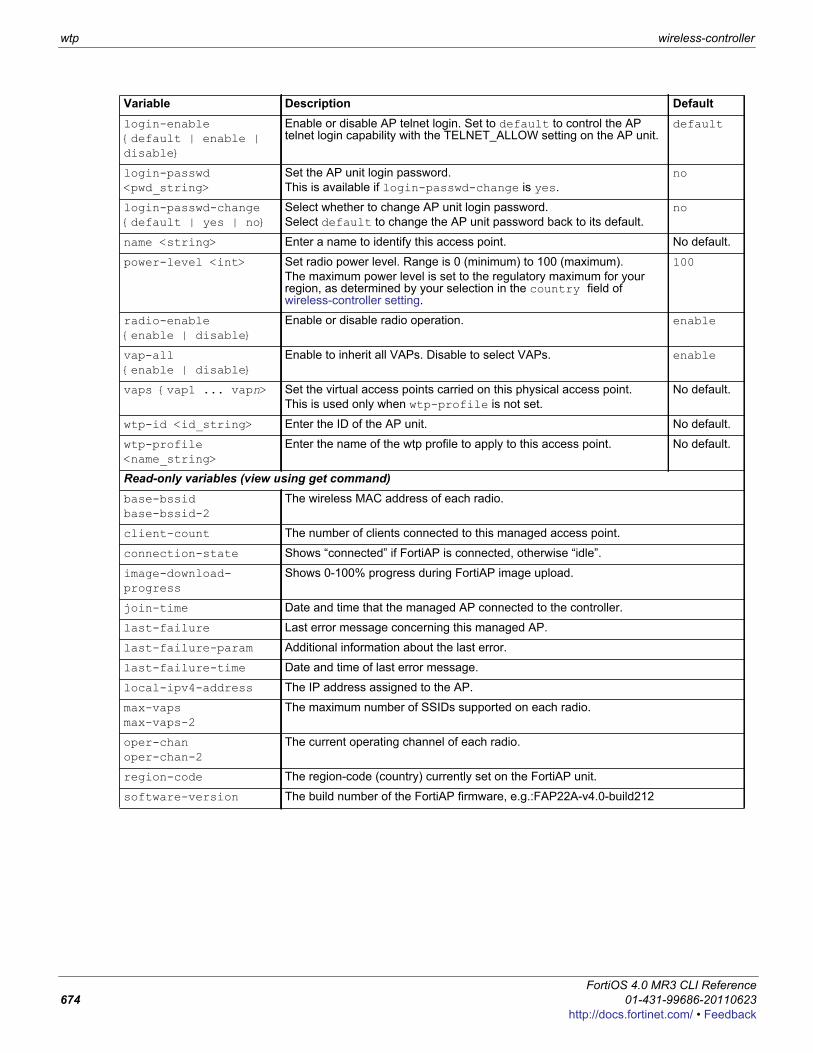
wtp wireless-controller
login-enable {default | enable | disable}
Enable or disable AP telnet login. Set to default to control the AP telnet login capability with the TELNET_ALLOW setting on the AP unit.
default
login-passwd <pwd_string>
Set the AP unit login password. This is available if login-passwd-change is yes.
no
login-passwd-change {default | yes | no}
Select whether to change AP unit login password. Select default to change the AP unit password back to its default.
no
name <string> Enter a name to identify this access point. No default.
power-level <int> Set radio power level. Range is 0 (minimum) to 100 (maximum).The maximum power level is set to the regulatory maximum for your region, as determined by your selection in the country field of wireless-controller setting.
100
radio-enable {enable | disable}
Enable or disable radio operation. enable
vap-all {enable | disable}
Enable to inherit all VAPs. Disable to select VAPs. enable
vaps {vap1 ... vapn> Set the virtual access points carried on this physical access point.This is used only when wtp-profile is not set.
No default.
wtp-id <id_string> Enter the ID of the AP unit. No default.
wtp-profile <name_string>
Enter the name of the wtp profile to apply to this access point. No default.
Read-only variables (view using get command)base-bssidbase-bssid-2
The wireless MAC address of each radio.
client-count The number of clients connected to this managed access point.
connection-state Shows “connected” if FortiAP is connected, otherwise “idle”.
image-download-progress
Shows 0-100% progress during FortiAP image upload.
join-time Date and time that the managed AP connected to the controller.
last-failure Last error message concerning this managed AP.
last-failure-param Additional information about the last error.
last-failure-time Date and time of last error message.
local-ipv4-address The IP address assigned to the AP.
max-vapsmax-vaps-2
The maximum number of SSIDs supported on each radio.
oper-chanoper-chan-2
The current operating channel of each radio.
region-code The region-code (country) currently set on the FortiAP unit.
software-version The build number of the FortiAP firmware, e.g.:FAP22A-v4.0-build212
Variable Description Default
FortiOS 4.0 MR3 CLI Reference674 01-431-99686-20110623
http://docs.fortinet.com/ • Feedback
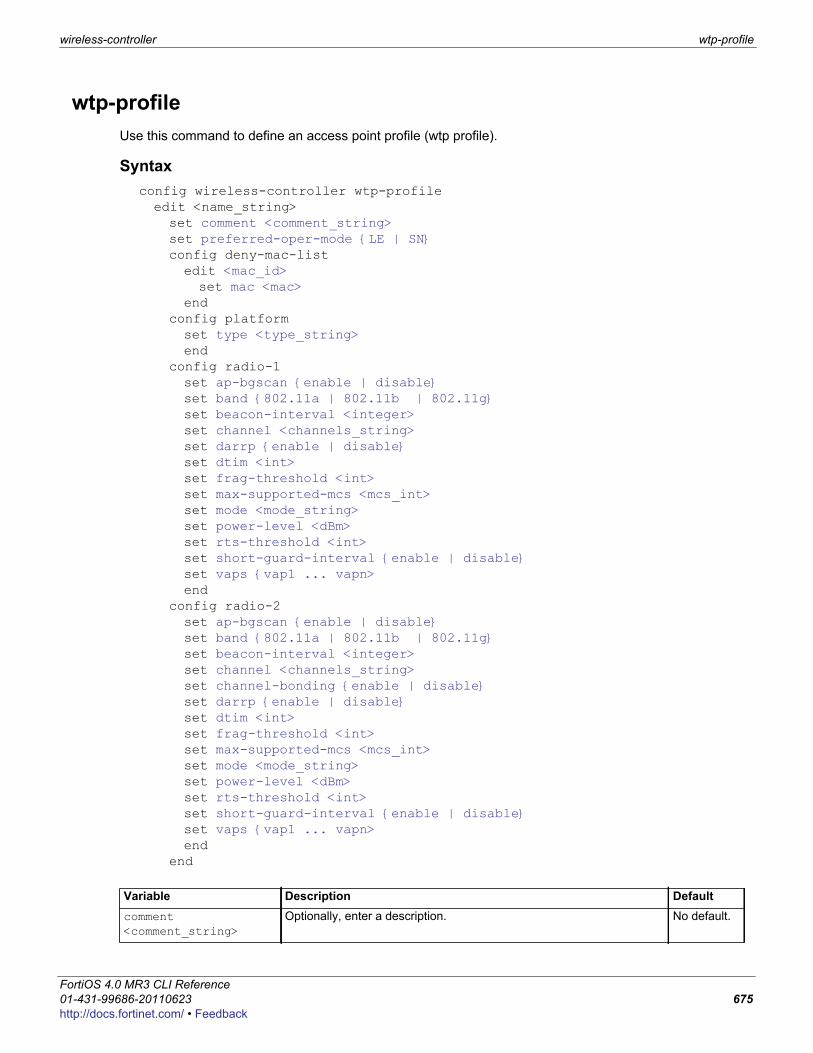
wireless-controller wtp-profile
F0h
wtp-profileUse this command to define an access point profile (wtp profile).
Syntaxconfig wireless-controller wtp-profileedit <name_string>set comment <comment_string>set preferred-oper-mode {LE | SN}config deny-mac-listedit <mac_id>set mac <mac>
endconfig platformset type <type_string>end
config radio-1set ap-bgscan {enable | disable}set band {802.11a | 802.11b | 802.11g}set beacon-interval <integer>set channel <channels_string>set darrp {enable | disable}set dtim <int>set frag-threshold <int>set max-supported-mcs <mcs_int>set mode <mode_string>set power-level <dBm>set rts-threshold <int>set short-guard-interval {enable | disable}set vaps {vap1 ... vapn>end
config radio-2set ap-bgscan {enable | disable}set band {802.11a | 802.11b | 802.11g}set beacon-interval <integer>set channel <channels_string>set channel-bonding {enable | disable}set darrp {enable | disable}set dtim <int>set frag-threshold <int>set max-supported-mcs <mcs_int>set mode <mode_string>set power-level <dBm>set rts-threshold <int>set short-guard-interval {enable | disable}set vaps {vap1 ... vapn>end
end
Variable Description Defaultcomment <comment_string>
Optionally, enter a description. No default.
ortiOS 4.0 MR3 CLI Reference1-431-99686-20110623 675ttp://docs.fortinet.com/ • Feedback
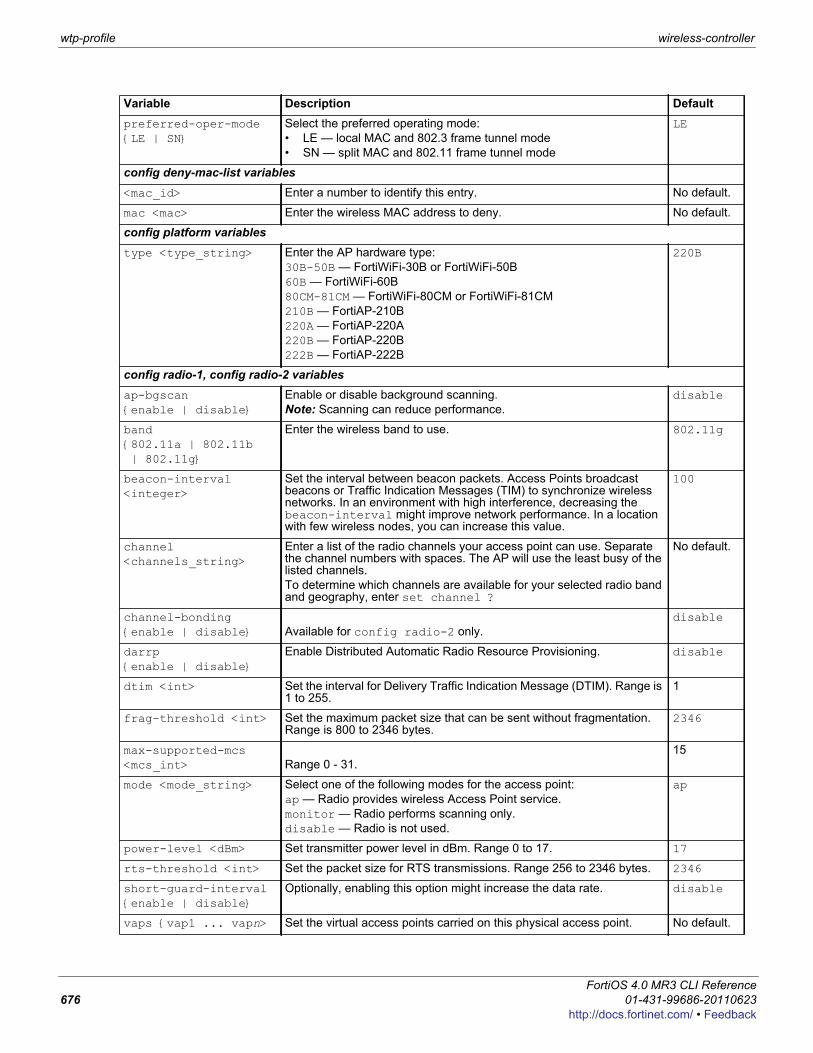
wtp-profile wireless-controller
preferred-oper-mode {LE | SN}
Select the preferred operating mode:• LE — local MAC and 802.3 frame tunnel mode• SN — split MAC and 802.11 frame tunnel mode
LE
config deny-mac-list variables<mac_id> Enter a number to identify this entry. No default.
mac <mac> Enter the wireless MAC address to deny. No default.
config platform variablestype <type_string> Enter the AP hardware type:
30B-50B — FortiWiFi-30B or FortiWiFi-50B60B — FortiWiFi-60B80CM-81CM — FortiWiFi-80CM or FortiWiFi-81CM210B — FortiAP-210B220A — FortiAP-220A220B — FortiAP-220B222B — FortiAP-222B
220B
config radio-1, config radio-2 variablesap-bgscan {enable | disable}
Enable or disable background scanning.Note: Scanning can reduce performance.
disable
band {802.11a | 802.11b | 802.11g}
Enter the wireless band to use. 802.11g
beacon-interval <integer>
Set the interval between beacon packets. Access Points broadcast beacons or Traffic Indication Messages (TIM) to synchronize wireless networks. In an environment with high interference, decreasing the beacon-interval might improve network performance. In a location with few wireless nodes, you can increase this value.
100
channel <channels_string>
Enter a list of the radio channels your access point can use. Separate the channel numbers with spaces. The AP will use the least busy of the listed channels.To determine which channels are available for your selected radio band and geography, enter set channel ?
No default.
channel-bonding {enable | disable} Available for config radio-2 only.
disable
darrp {enable | disable}
Enable Distributed Automatic Radio Resource Provisioning. disable
dtim <int> Set the interval for Delivery Traffic Indication Message (DTIM). Range is 1 to 255.
1
frag-threshold <int> Set the maximum packet size that can be sent without fragmentation. Range is 800 to 2346 bytes.
2346
max-supported-mcs <mcs_int> Range 0 - 31.
15
mode <mode_string> Select one of the following modes for the access point:ap — Radio provides wireless Access Point service.monitor — Radio performs scanning only.disable — Radio is not used.
ap
power-level <dBm> Set transmitter power level in dBm. Range 0 to 17. 17
rts-threshold <int> Set the packet size for RTS transmissions. Range 256 to 2346 bytes. 2346
short-guard-interval {enable | disable}
Optionally, enabling this option might increase the data rate. disable
vaps {vap1 ... vapn> Set the virtual access points carried on this physical access point. No default.
Variable Description Default
FortiOS 4.0 MR3 CLI Reference676 01-431-99686-20110623
http://docs.fortinet.com/ • Feedback
F0h
executeThe execute commands perform immediate operations on the FortiGate unit, including:• Back up and restore the system configuration, or reset the unit to factory settings.• Execute the run but not save feature• Set the unit date and time.• View and clear DHCP leases.• Clear arp table entries.• View and delete log messages. Delete old log files.• Use ping or traceroute to diagnose network problems.• Restart the router or the entire FortiGate unit.• Update the antivirus and attack definitions on demand.• Generate certificate requests and install certificates for VPN authentication.
ortiOS 4.0 MR3 CLI Reference1-431-99686-20110623 677ttp://docs.fortinet.com/ • Feedback
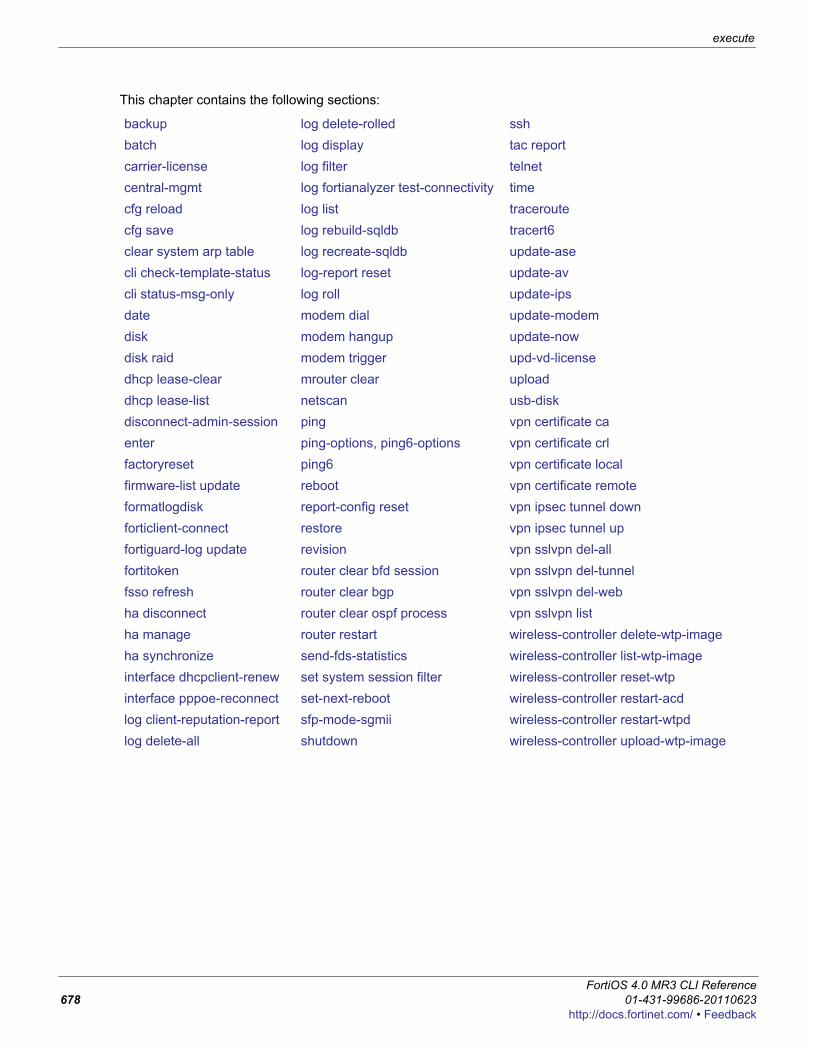
execute
This chapter contains the following sections:
backupbatchcarrier-licensecentral-mgmtcfg reloadcfg saveclear system arp tablecli check-template-statuscli status-msg-onlydatediskdisk raiddhcp lease-cleardhcp lease-listdisconnect-admin-sessionenterfactoryresetfirmware-list updateformatlogdiskforticlient-connectfortiguard-log updatefortitokenfsso refreshha disconnectha manageha synchronizeinterface dhcpclient-renewinterface pppoe-reconnectlog client-reputation-reportlog delete-all
log delete-rolledlog displaylog filterlog fortianalyzer test-connectivitylog listlog rebuild-sqldblog recreate-sqldblog-report resetlog rollmodem dialmodem hangupmodem triggermrouter clearnetscanpingping-options, ping6-optionsping6rebootreport-config resetrestorerevisionrouter clear bfd sessionrouter clear bgprouter clear ospf processrouter restartsend-fds-statisticsset system session filterset-next-rebootsfp-mode-sgmiishutdown
sshtac reporttelnettimetraceroutetracert6update-aseupdate-avupdate-ipsupdate-modemupdate-nowupd-vd-licenseuploadusb-diskvpn certificate cavpn certificate crlvpn certificate localvpn certificate remotevpn ipsec tunnel downvpn ipsec tunnel upvpn sslvpn del-allvpn sslvpn del-tunnelvpn sslvpn del-webvpn sslvpn listwireless-controller delete-wtp-imagewireless-controller list-wtp-imagewireless-controller reset-wtpwireless-controller restart-acdwireless-controller restart-wtpdwireless-controller upload-wtp-image
FortiOS 4.0 MR3 CLI Reference678 01-431-99686-20110623
http://docs.fortinet.com/ • Feedback
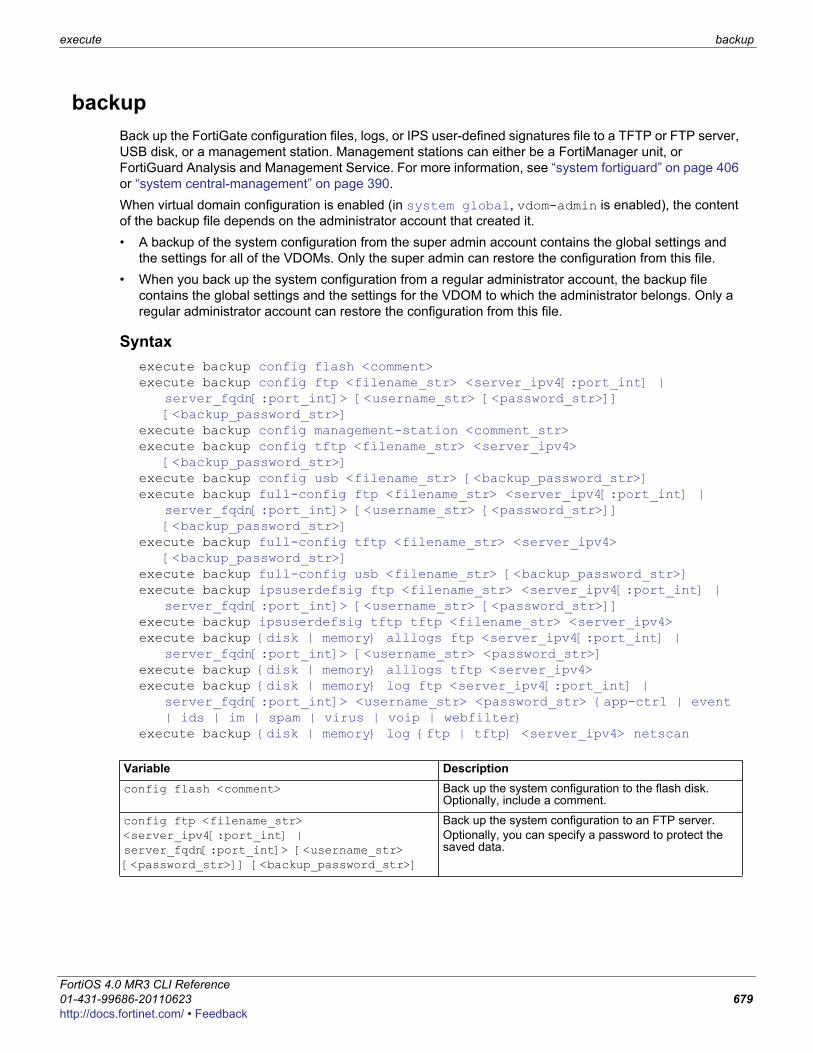
execute backup
F0h
backupBack up the FortiGate configuration files, logs, or IPS user-defined signatures file to a TFTP or FTP server, USB disk, or a management station. Management stations can either be a FortiManager unit, or FortiGuard Analysis and Management Service. For more information, see “system fortiguard” on page 406 or “system central-management” on page 390.When virtual domain configuration is enabled (in system global, vdom-admin is enabled), the content of the backup file depends on the administrator account that created it. • A backup of the system configuration from the super admin account contains the global settings and
the settings for all of the VDOMs. Only the super admin can restore the configuration from this file.• When you back up the system configuration from a regular administrator account, the backup file
contains the global settings and the settings for the VDOM to which the administrator belongs. Only a regular administrator account can restore the configuration from this file.
Syntaxexecute backup config flash <comment>execute backup config ftp <filename_str> <server_ipv4[:port_int] |
server_fqdn[:port_int]> [<username_str> [<password_str>]] [<backup_password_str>]
execute backup config management-station <comment_str>execute backup config tftp <filename_str> <server_ipv4>
[<backup_password_str>]execute backup config usb <filename_str> [<backup_password_str>]execute backup full-config ftp <filename_str> <server_ipv4[:port_int] |
server_fqdn[:port_int]> [<username_str> [<password_str>]] [<backup_password_str>]
execute backup full-config tftp <filename_str> <server_ipv4> [<backup_password_str>]
execute backup full-config usb <filename_str> [<backup_password_str>]execute backup ipsuserdefsig ftp <filename_str> <server_ipv4[:port_int] |
server_fqdn[:port_int]> [<username_str> [<password_str>]]execute backup ipsuserdefsig tftp tftp <filename_str> <server_ipv4>execute backup {disk | memory} alllogs ftp <server_ipv4[:port_int] |
server_fqdn[:port_int]> [<username_str> <password_str>]execute backup {disk | memory} alllogs tftp <server_ipv4>execute backup {disk | memory} log ftp <server_ipv4[:port_int] |
server_fqdn[:port_int]> <username_str> <password_str> {app-ctrl | event | ids | im | spam | virus | voip | webfilter}
execute backup {disk | memory} log {ftp | tftp} <server_ipv4> netscan
Variable Descriptionconfig flash <comment> Back up the system configuration to the flash disk.
Optionally, include a comment.
config ftp <filename_str> <server_ipv4[:port_int] | server_fqdn[:port_int]> [<username_str> [<password_str>]] [<backup_password_str>]
Back up the system configuration to an FTP server. Optionally, you can specify a password to protect the saved data.
ortiOS 4.0 MR3 CLI Reference1-431-99686-20110623 679ttp://docs.fortinet.com/ • Feedback
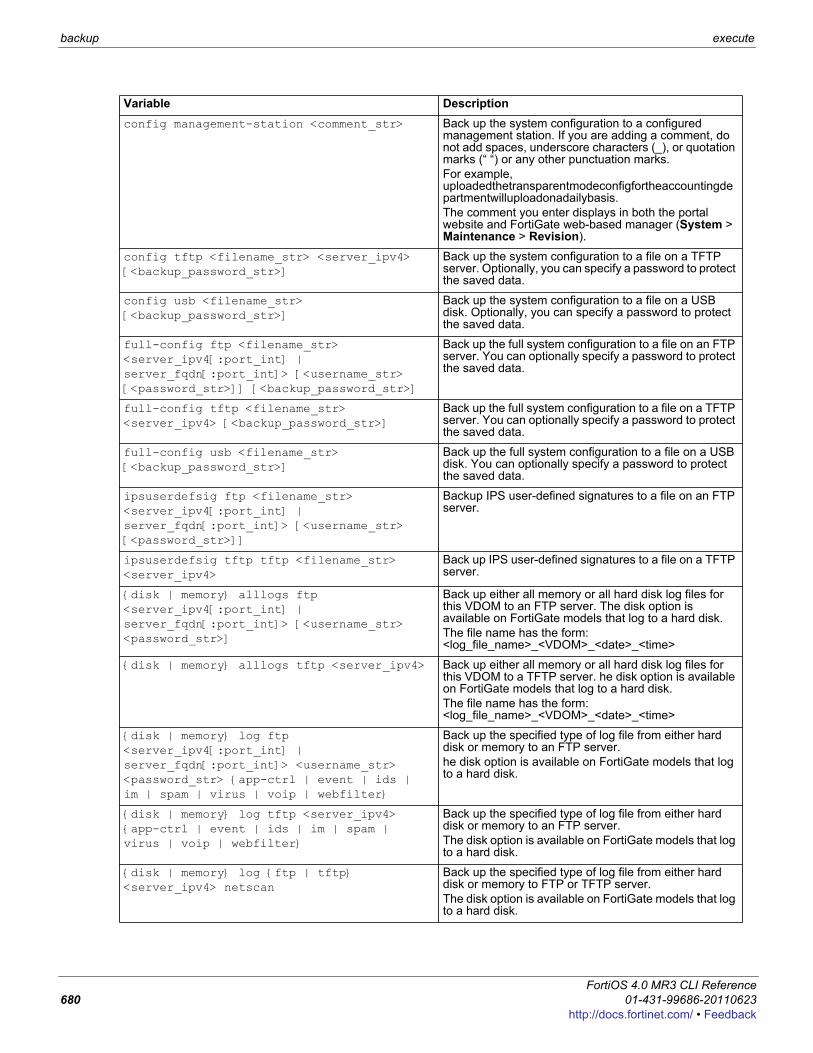
backup execute
config management-station <comment_str> Back up the system configuration to a configured management station. If you are adding a comment, do not add spaces, underscore characters (_), or quotation marks (“ “) or any other punctuation marks. For example, uploadedthetransparentmodeconfigfortheaccountingdepartmentwilluploadonadailybasis. The comment you enter displays in both the portal website and FortiGate web-based manager (System > Maintenance > Revision).
config tftp <filename_str> <server_ipv4> [<backup_password_str>]
Back up the system configuration to a file on a TFTP server. Optionally, you can specify a password to protect the saved data.
config usb <filename_str> [<backup_password_str>]
Back up the system configuration to a file on a USB disk. Optionally, you can specify a password to protect the saved data.
full-config ftp <filename_str> <server_ipv4[:port_int] | server_fqdn[:port_int]> [<username_str> [<password_str>]] [<backup_password_str>]
Back up the full system configuration to a file on an FTP server. You can optionally specify a password to protect the saved data.
full-config tftp <filename_str> <server_ipv4> [<backup_password_str>]
Back up the full system configuration to a file on a TFTP server. You can optionally specify a password to protect the saved data.
full-config usb <filename_str> [<backup_password_str>]
Back up the full system configuration to a file on a USB disk. You can optionally specify a password to protect the saved data.
ipsuserdefsig ftp <filename_str> <server_ipv4[:port_int] | server_fqdn[:port_int]> [<username_str> [<password_str>]]
Backup IPS user-defined signatures to a file on an FTP server.
ipsuserdefsig tftp tftp <filename_str> <server_ipv4>
Back up IPS user-defined signatures to a file on a TFTP server.
{disk | memory} alllogs ftp <server_ipv4[:port_int] | server_fqdn[:port_int]> [<username_str> <password_str>]
Back up either all memory or all hard disk log files for this VDOM to an FTP server. The disk option is available on FortiGate models that log to a hard disk.The file name has the form: <log_file_name>_<VDOM>_<date>_<time>
{disk | memory} alllogs tftp <server_ipv4> Back up either all memory or all hard disk log files for this VDOM to a TFTP server. he disk option is available on FortiGate models that log to a hard disk.The file name has the form: <log_file_name>_<VDOM>_<date>_<time>
{disk | memory} log ftp <server_ipv4[:port_int] | server_fqdn[:port_int]> <username_str> <password_str> {app-ctrl | event | ids | im | spam | virus | voip | webfilter}
Back up the specified type of log file from either hard disk or memory to an FTP server.he disk option is available on FortiGate models that log to a hard disk.
{disk | memory} log tftp <server_ipv4> {app-ctrl | event | ids | im | spam | virus | voip | webfilter}
Back up the specified type of log file from either hard disk or memory to an FTP server.The disk option is available on FortiGate models that log to a hard disk.
{disk | memory} log {ftp | tftp} <server_ipv4> netscan
Back up the specified type of log file from either hard disk or memory to FTP or TFTP server.The disk option is available on FortiGate models that log to a hard disk.
Variable Description
FortiOS 4.0 MR3 CLI Reference680 01-431-99686-20110623
http://docs.fortinet.com/ • Feedback

execute backup
F0h
ExampleThis example shows how to backup the FortiGate unit system configuration to a file named fgt.cfg on a TFTP server at IP address 192.168.1.23.
execute backup config tftp fgt.cfg 192.168.1.23
ortiOS 4.0 MR3 CLI Reference1-431-99686-20110623 681ttp://docs.fortinet.com/ • Feedback

batch execute
batchExecute a series of CLI commands.
Syntaxexecute batch [<cmd_cue>]
where <cmd_cue> is one of:• end - exit session and run the batch commands• lastlog - read the result of the last batch commands• start - start batch mode• status - batch mode status reporting if batch mode is running or stopped
ExampleTo start batch mode:
execute batch startEnter batch mode...
To enter commands to run in batch mode:config system globalset refresh 5
end
To execute the batch commands:execute batch end
Exit and run batch commands...
Note: execute batch commands are controlled by the Maintenance (mntgrp) access control group.
FortiOS 4.0 MR3 CLI Reference682 01-431-99686-20110623
http://docs.fortinet.com/ • Feedback

execute carrier-license
F0h
carrier-licensebd only available on fortigate hardware running a FOC build. But disappears after you have entered a FOC licenseUse this command to enter a l FortiOS Carrier license key if you are have installed a FortiOS Carrier build on a FortiGate unit and need to enter a license key to enable FortiOS Carrier functionality.Contact Fortinet Support for more information about this command.
Syntaxexecute carrier-license <license_key>
Variable Description<license_key> Enter the FortiOS Carrier license key supplied by Fortinet.
ortiOS 4.0 MR3 CLI Reference1-431-99686-20110623 683ttp://docs.fortinet.com/ • Feedback
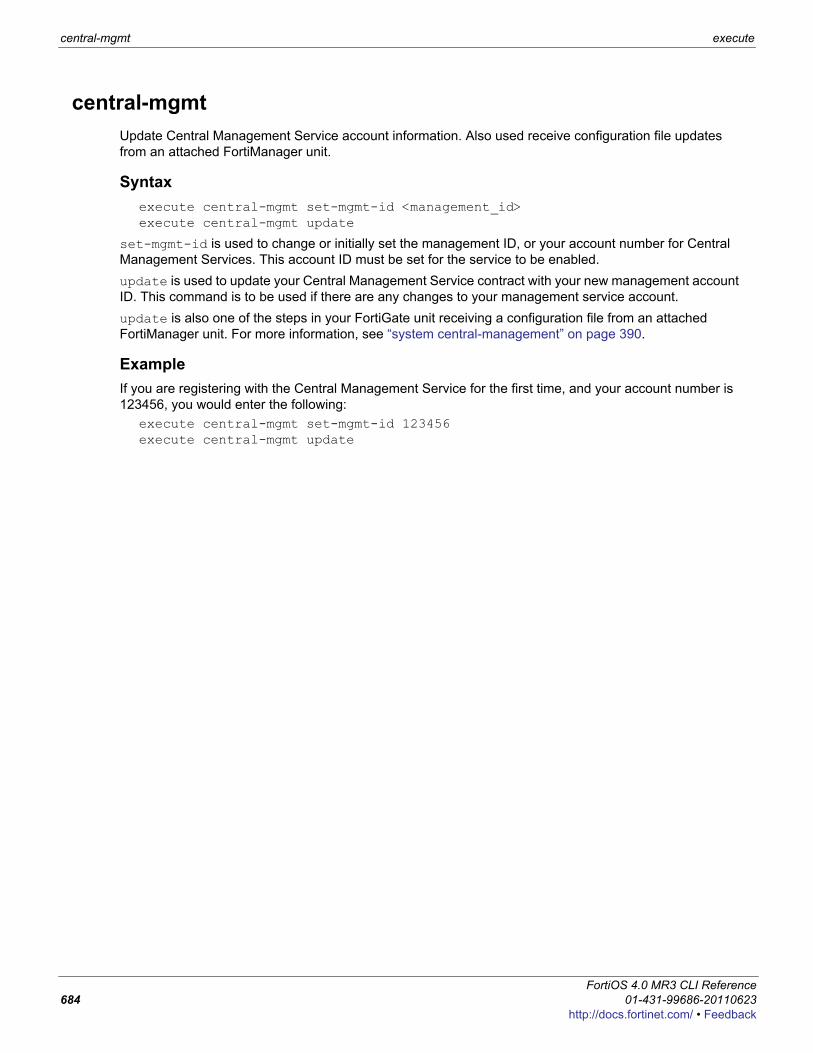
central-mgmt execute
central-mgmtUpdate Central Management Service account information. Also used receive configuration file updates from an attached FortiManager unit.
Syntaxexecute central-mgmt set-mgmt-id <management_id>execute central-mgmt update
set-mgmt-id is used to change or initially set the management ID, or your account number for Central Management Services. This account ID must be set for the service to be enabled.update is used to update your Central Management Service contract with your new management account ID. This command is to be used if there are any changes to your management service account.update is also one of the steps in your FortiGate unit receiving a configuration file from an attached FortiManager unit. For more information, see “system central-management” on page 390.
ExampleIf you are registering with the Central Management Service for the first time, and your account number is 123456, you would enter the following:
execute central-mgmt set-mgmt-id 123456execute central-mgmt update
FortiOS 4.0 MR3 CLI Reference684 01-431-99686-20110623
http://docs.fortinet.com/ • Feedback
execute cfg reload
F0h
cfg reloadUse this command to restore the saved configuration when the configuration change mode is manual or revert. This command has no effect if the mode is automatic, the default. The set cfg-save command in system global sets the configuration change mode. When you reload the saved system configuration, the your session ends and the FortiGate unit restarts. In the default configuration change mode, automatic, CLI commands become part of the saved unit configuration when you execute them by entering either next or end. In manual mode, commands take effect but do not become part of the saved configuration unless you execute the execute cfg save command. When the FortiGate unit restarts, the saved configuration is loaded. Configuration changes that were not saved are lost.The revert mode is similar to manual mode, except that configuration changes are saved automatically if the administrative session is idle for more than a specified timeout period. This provides a way to recover from an erroneous configuration change, such as changing the IP address of the interface you are using for administration. You set the timeout in system global using the set cfg-revert-timeout command.
Syntaxexecute cfg reload
ExampleThis is sample output from the command when successful:
# execute cfg reloadconfigs reloaded. system will reboot.This is sample output from the command
when not in runtime-only configuration mode:# execute cfg reloadno config to be reloaded.
ortiOS 4.0 MR3 CLI Reference1-431-99686-20110623 685ttp://docs.fortinet.com/ • Feedback
cfg save execute
cfg saveUse this command to save configuration changes when the configuration change mode is manual or revert. If the mode is automatic, the default, all changes are added to the saved configuration as you make them and this command has no effect. The set cfg-save command in system global sets the configuration change mode. In manual mode, commands take effect but do not become part of the saved configuration unless you execute the execute cfg save command. When the FortiGate unit restarts, the saved configuration is loaded. Configuration changes that were not saved are lost.The revert mode is similar to manual mode, except that configuration changes are saved automatically if the administrative session is idle for more than a specified timeout period. This provides a way to recover from an erroneous configuration change, such as changing the IP address of the interface you are using for administration. To change the timeout from the default of 600 seconds, go to system global and use the set cfg-revert-timeout command.
Syntaxexecute cfg save
ExampleThis is sample output from the command:
# execute cfg saveconfig saved.
This is sample output when not in runtime-only configuration mode. It also occurs when in runtime-only configuration mode and no changes have been made:
# execute cfg saveno config to be saved.
FortiOS 4.0 MR3 CLI Reference686 01-431-99686-20110623
http://docs.fortinet.com/ • Feedback

execute clear system arp table
F0h
clear system arp tableClear all the entries in the arp table.
Syntaxexecute clear system arp table
ortiOS 4.0 MR3 CLI Reference1-431-99686-20110623 687ttp://docs.fortinet.com/ • Feedback

cli check-template-status execute
cli check-template-statusReports the status of the secure copy protocol (SCP) script template.
Syntaxexecute cli check-template-status
FortiOS 4.0 MR3 CLI Reference688 01-431-99686-20110623
http://docs.fortinet.com/ • Feedback

execute cli status-msg-only
F0h
cli status-msg-onlyEnable or disable displaying standardized CLI error output messages. If executed, this command stops other debug messages from displaying in the current CLI session. This command is used for compatibility with FortiManager.
Syntaxexecute cli status-msg-only [enable | disable]
Variable Description Defaultstatus-msg-only [enable | disable]
Enable or disable standardized CLI error output messages. Entering the command without enable or disable disables displaying standardized output.
enable
ortiOS 4.0 MR3 CLI Reference1-431-99686-20110623 689ttp://docs.fortinet.com/ • Feedback
date execute
dateGet or set the system date.
Syntaxexecute date [<date_str>]
date_str has the form yyyy-mm-dd, where• yyyy is the year and can be 2001 to 2037• mm is the month and can be 01 to 12• dd is the day of the month and can be 01 to 31
If you do not specify a date, the command returns the current system date. Shortened values, such as ‘06’ instead of ‘2006’ for the year or ‘1’ instead of ‘01’ for month or day, are not valid.
ExampleThis example sets the date to 17 September 2004:
execute date 2004-09-17
FortiOS 4.0 MR3 CLI Reference690 01-431-99686-20110623
http://docs.fortinet.com/ • Feedback
execute disk
F0h
diskUse this command to list and format hard disks installed in FortiGate units or individual partitions on these hard disks.
Syntaxexecute disk format <partition1_ref_int> [...<partitionn_ref_int>]execute disk list
The execute disk format command formats the specified partitions or disks and then reboots the system if a reboot is required.In most cases you need to format the entire disk only if there is a problem with the partition. Formatting the partition removes all data from the partition. Formatting the disk removes all data from the entire disk and creates a single partition on the disk.
ExamplesUse the following command to list the disks and partitions. execute disk list
Device I1 29.9 GB ref: 256 SUPER TALENT (IDE) partition 1 29.9 GB ref: 257 label: 224E6EE7177E1652
In this example (for a FortiGate-51B), the disk (device) reference number is 256 and the reference number for the single partition is 257.Enter the following command to format the partition.
execute disk format 257
After a confirmation message the FortiGate unit formats the partition and restarts. This can take a few minutes.Enter the following command to format the entire disk.
execute disk format 256
After a confirmation message the FortiGate unit formats the disk, restores the original partition, and restarts. This can take a few minutes.
Variable Descriptionformat Format the referenced disk partitions or disks. Separate reference numbers with
spaces. If you enter a partition reference number the disk partition is formatted. If you enter a disk reference number the entire disk and all of its partitions are formatted.
list List the disks and partitions and the reference number for each one.
<ref_int> Disk (device) or partition reference number.
ortiOS 4.0 MR3 CLI Reference1-431-99686-20110623 691ttp://docs.fortinet.com/ • Feedback
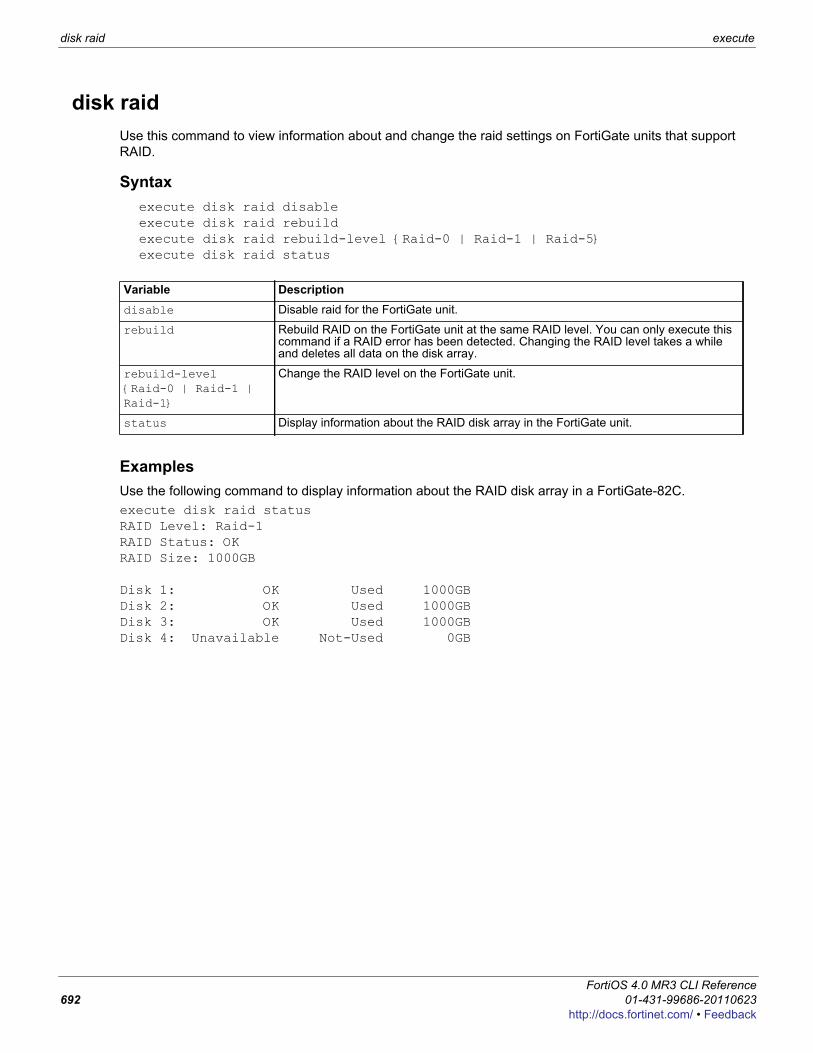
disk raid execute
disk raidUse this command to view information about and change the raid settings on FortiGate units that support RAID.
Syntaxexecute disk raid disableexecute disk raid rebuildexecute disk raid rebuild-level {Raid-0 | Raid-1 | Raid-5}execute disk raid status
ExamplesUse the following command to display information about the RAID disk array in a FortiGate-82C.execute disk raid statusRAID Level: Raid-1RAID Status: OKRAID Size: 1000GB
Disk 1: OK Used 1000GBDisk 2: OK Used 1000GBDisk 3: OK Used 1000GBDisk 4: Unavailable Not-Used 0GB
Variable Descriptiondisable Disable raid for the FortiGate unit.
rebuild Rebuild RAID on the FortiGate unit at the same RAID level. You can only execute this command if a RAID error has been detected. Changing the RAID level takes a while and deletes all data on the disk array.
rebuild-level {Raid-0 | Raid-1 | Raid-1}
Change the RAID level on the FortiGate unit.
status Display information about the RAID disk array in the FortiGate unit.
FortiOS 4.0 MR3 CLI Reference692 01-431-99686-20110623
http://docs.fortinet.com/ • Feedback

execute dhcp lease-clear
F0h
dhcp lease-clearClear all DHCP address leases.
SyntaxFor IPv4:
execute dhcp lease-clear
For IPv6execute dhcp6 lease-clear
ortiOS 4.0 MR3 CLI Reference1-431-99686-20110623 693ttp://docs.fortinet.com/ • Feedback
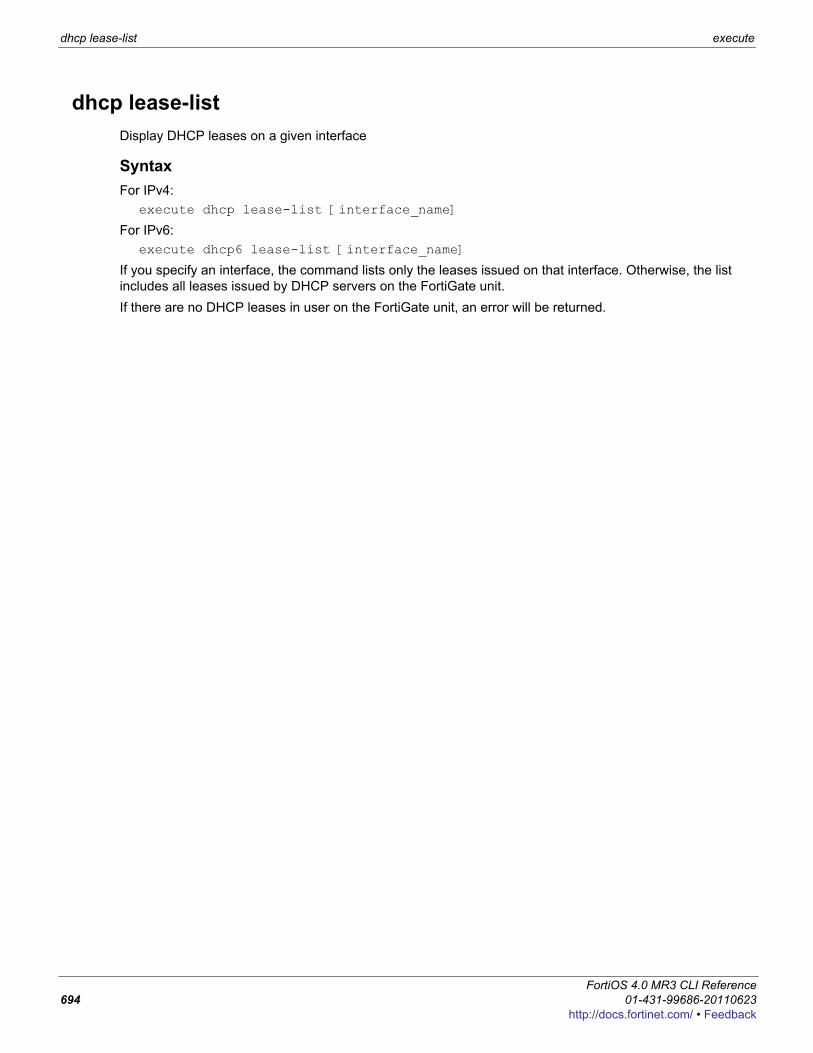
dhcp lease-list execute
dhcp lease-listDisplay DHCP leases on a given interface
SyntaxFor IPv4:
execute dhcp lease-list [interface_name]
For IPv6:execute dhcp6 lease-list [interface_name]
If you specify an interface, the command lists only the leases issued on that interface. Otherwise, the list includes all leases issued by DHCP servers on the FortiGate unit.If there are no DHCP leases in user on the FortiGate unit, an error will be returned.
FortiOS 4.0 MR3 CLI Reference694 01-431-99686-20110623
http://docs.fortinet.com/ • Feedback
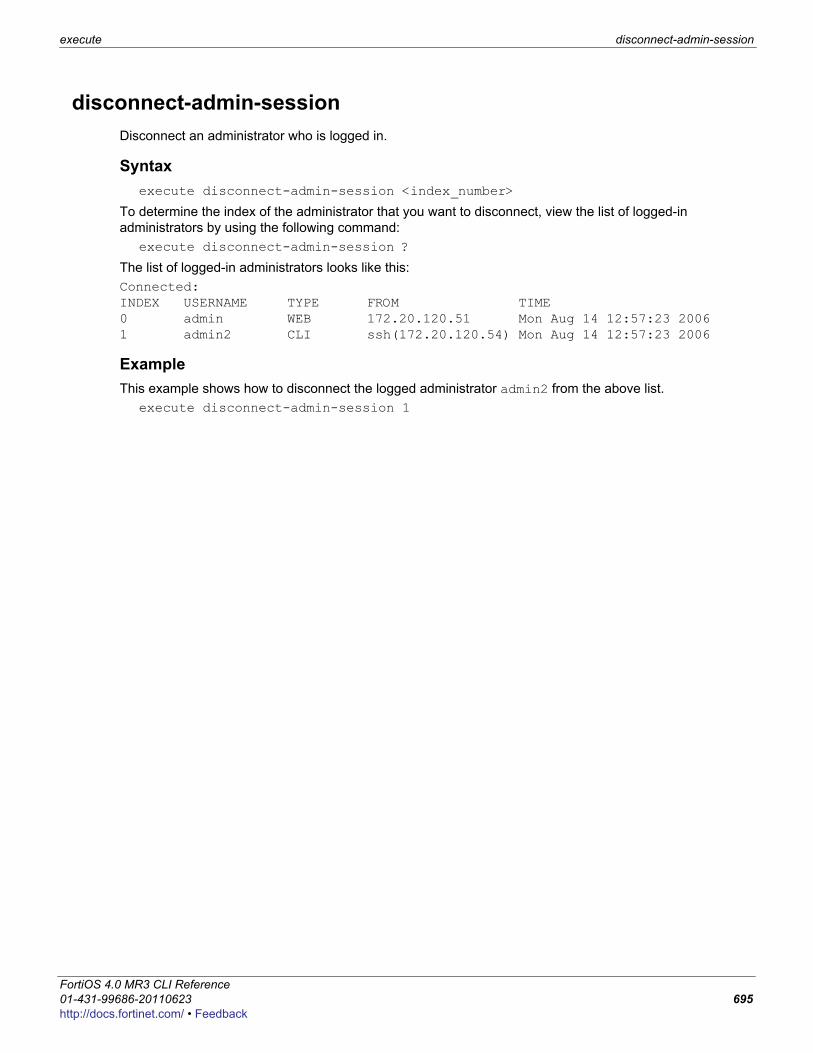
execute disconnect-admin-session
F0h
disconnect-admin-sessionDisconnect an administrator who is logged in.
Syntaxexecute disconnect-admin-session <index_number>
To determine the index of the administrator that you want to disconnect, view the list of logged-in administrators by using the following command:
execute disconnect-admin-session ?
The list of logged-in administrators looks like this:Connected:INDEX USERNAME TYPE FROM TIME0 admin WEB 172.20.120.51 Mon Aug 14 12:57:23 20061 admin2 CLI ssh(172.20.120.54) Mon Aug 14 12:57:23 2006
ExampleThis example shows how to disconnect the logged administrator admin2 from the above list.
execute disconnect-admin-session 1
ortiOS 4.0 MR3 CLI Reference1-431-99686-20110623 695ttp://docs.fortinet.com/ • Feedback

enter execute
enterUse this command to go from global commands to a specific virtual domain (VDOM).Only available when virtual domains are enabled and you are in config global. After you enter the VDOM, the prompt will not change from “(global)”. However you will be in the VDOM with all the commands that are normally available in VDOMs.
Syntaxexecute enter <vdom>
Use “?” to see a list of available VDOMs.
FortiOS 4.0 MR3 CLI Reference696 01-431-99686-20110623
http://docs.fortinet.com/ • Feedback
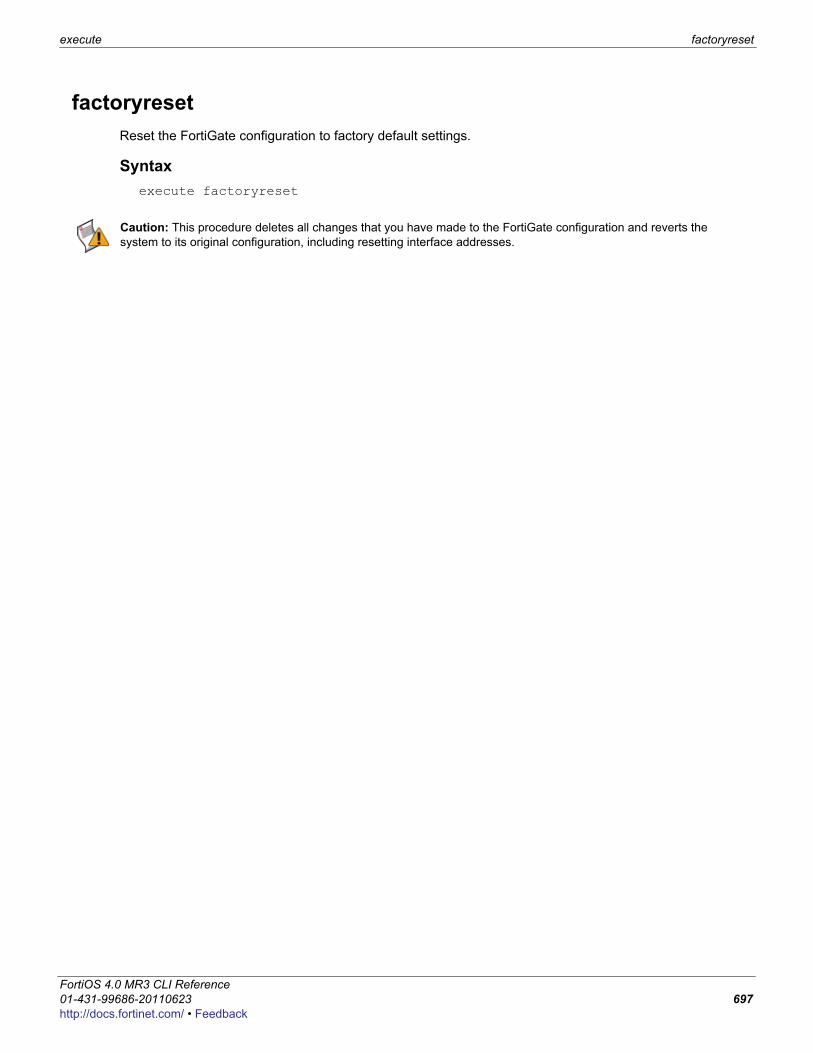
execute factoryreset
F0h
factoryresetReset the FortiGate configuration to factory default settings.
Syntaxexecute factoryreset
Caution: This procedure deletes all changes that you have made to the FortiGate configuration and reverts the system to its original configuration, including resetting interface addresses.
ortiOS 4.0 MR3 CLI Reference1-431-99686-20110623 697ttp://docs.fortinet.com/ • Feedback

firmware-list update execute
firmware-list updateUse this command to update the list of firmware.
Syntaxexecute firmware-list update
When the update is complete, the command reports:Updating Image List. Done.
FortiOS 4.0 MR3 CLI Reference698 01-431-99686-20110623
http://docs.fortinet.com/ • Feedback
execute formatlogdisk
F0h
formatlogdiskFormat the FortiGate hard disk to enhance performance for logging.
Syntaxexecute formatlogdisk
Caution: In addition to deleting logs, this operation will erase all other data on the disk, including system configuration, quarantine files, and databases for antivirus and IPS.
ortiOS 4.0 MR3 CLI Reference1-431-99686-20110623 699ttp://docs.fortinet.com/ • Feedback
forticlient-connect execute
forticlient-connectUse these commands to manage FortiClient Connect licensing.
Syntax
To view FortiClient Connect license informationexecute forticlient-connect info
To show current FortiClient Connect countexecute forticlient-connect list <connection_type>
where <connection_type> is one of:• 0 - IPsec• 1 - SSLVPN• 2 - NAC (Endpoint Security)• 3 - WAN optimization• 4 - Test
To upgrade FortiClient Connect licensesexecute forticlient-connect upgrade <license_key_str>
FortiOS 4.0 MR3 CLI Reference700 01-431-99686-20110623
http://docs.fortinet.com/ • Feedback

execute fortiguard-log update
F0h
fortiguard-log updateUpdate the FortiGuard Analysis and Management Service contract.
Syntaxexecute fortiguard-log update
ortiOS 4.0 MR3 CLI Reference1-431-99686-20110623 701ttp://docs.fortinet.com/ • Feedback
fortitoken execute
fortitokenUse these commands to activate and synchronize a FortiToken device. FortiToken devices are use in two-factor authentication of administrator and user account logons. The device generates a random six-digit code that you enter during the logon process along with user name and password.Before they can be used to authenticate account logins, FortiToken devices must be activated with the FortiGuard service. When successfully activated, the status of the FortiToken device will change from New to Active.Synchronization is sometimes needed due to the internal clock drift of the FortiToken device. It is not unusual for new FortiToken units to require synchronization before being put into service. Synchronization is accomplished by entering two sequential codes provided by the FortiToken.
Syntax
To activate one or more FortiToken devicesexecute fortitoken activate <serial_number> [serial_number2 ...
serial_numbern]
To synchronize a FortiToken deviceexecute fortitoken sync <serial_number> <code> <next code>
FortiOS 4.0 MR3 CLI Reference702 01-431-99686-20110623
http://docs.fortinet.com/ • Feedback

execute fsso refresh
F0h
fsso refreshUse this command to manually refresh user group information from Directory Service servers connected to the FortiGate unit using the Fortinet Single Sign On (FSSO) agent.
Syntaxexecute fsso refresh
ortiOS 4.0 MR3 CLI Reference1-431-99686-20110623 703ttp://docs.fortinet.com/ • Feedback
ha disconnect execute
ha disconnectUse this command to disconnect a FortiGate unit from a functioning cluster. You must specify the serial number of the unit to be disconnected. You must also specify an interface name and assign an IP address and netmask to this interface of the disconnected unit. You can disconnect any unit from the cluster even the primary unit. After the unit is disconnected the cluster responds as if the disconnected unit has failed. The cluster may renegotiate and may select a new primary unit.To disconnect the unit from the cluster, the execute ha disconnect command sets the HA mode of the disconnected unit to standalone. In addition, all interface IP addresses of the disconnected unit are set to 0.0.0.0. The interface specified in the command is set to the IP address and netmask that you specify in the command. In addition all management access to this interface is enabled. Once the FortiGate unit is disconnected you can use SSH, telnet, HTTPS, or HTTP to connect to and manage the FortiGate unit.
Syntaxexecute ha disconnect <cluster-member-serial_str> <interface_str>
<address_ipv4> <address_ipv4mask>
ExampleThis example shows how to disconnect a cluster unit with serial number FGT5002803033050. The internal interface of the disconnected unit is set to IP address 1.1.1.1 and netmask 255.255.255.0.
execute ha disconnect FGT5002803033050 internal 1.1.1.1 255.255.255.0
Variable Descriptioncluster-member-serial_str The serial number of the cluster unit to be disconnected.
interface_str The name of the interface to configure. The command configures the IP address and netmask for this interface and also enables all management access for this interface.
FortiOS 4.0 MR3 CLI Reference704 01-431-99686-20110623
http://docs.fortinet.com/ • Feedback
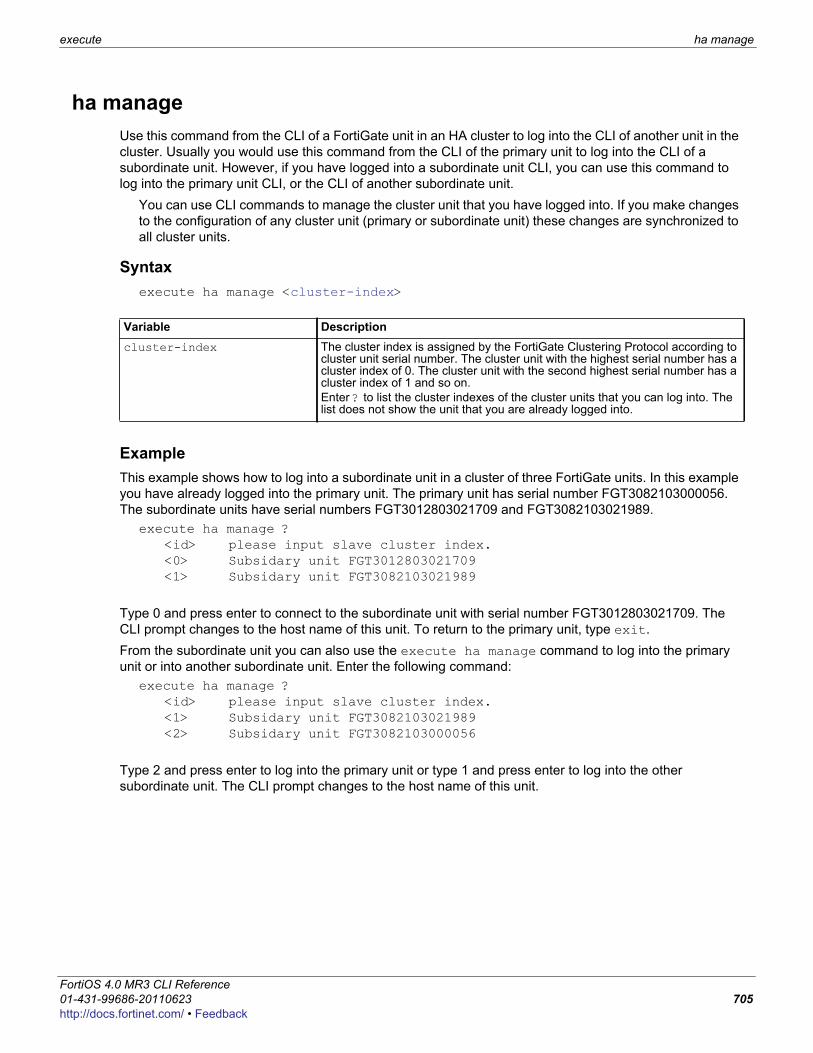
execute ha manage
F0h
ha manageUse this command from the CLI of a FortiGate unit in an HA cluster to log into the CLI of another unit in the cluster. Usually you would use this command from the CLI of the primary unit to log into the CLI of a subordinate unit. However, if you have logged into a subordinate unit CLI, you can use this command to log into the primary unit CLI, or the CLI of another subordinate unit.
You can use CLI commands to manage the cluster unit that you have logged into. If you make changes to the configuration of any cluster unit (primary or subordinate unit) these changes are synchronized to all cluster units.
Syntaxexecute ha manage <cluster-index>
ExampleThis example shows how to log into a subordinate unit in a cluster of three FortiGate units. In this example you have already logged into the primary unit. The primary unit has serial number FGT3082103000056. The subordinate units have serial numbers FGT3012803021709 and FGT3082103021989.
execute ha manage ?<id> please input slave cluster index.<0> Subsidary unit FGT3012803021709<1> Subsidary unit FGT3082103021989
Type 0 and press enter to connect to the subordinate unit with serial number FGT3012803021709. The CLI prompt changes to the host name of this unit. To return to the primary unit, type exit.From the subordinate unit you can also use the execute ha manage command to log into the primary unit or into another subordinate unit. Enter the following command:
execute ha manage ?<id> please input slave cluster index.<1> Subsidary unit FGT3082103021989<2> Subsidary unit FGT3082103000056
Type 2 and press enter to log into the primary unit or type 1 and press enter to log into the other subordinate unit. The CLI prompt changes to the host name of this unit.
Variable Descriptioncluster-index The cluster index is assigned by the FortiGate Clustering Protocol according to
cluster unit serial number. The cluster unit with the highest serial number has a cluster index of 0. The cluster unit with the second highest serial number has a cluster index of 1 and so on.Enter ? to list the cluster indexes of the cluster units that you can log into. The list does not show the unit that you are already logged into.
ortiOS 4.0 MR3 CLI Reference1-431-99686-20110623 705ttp://docs.fortinet.com/ • Feedback
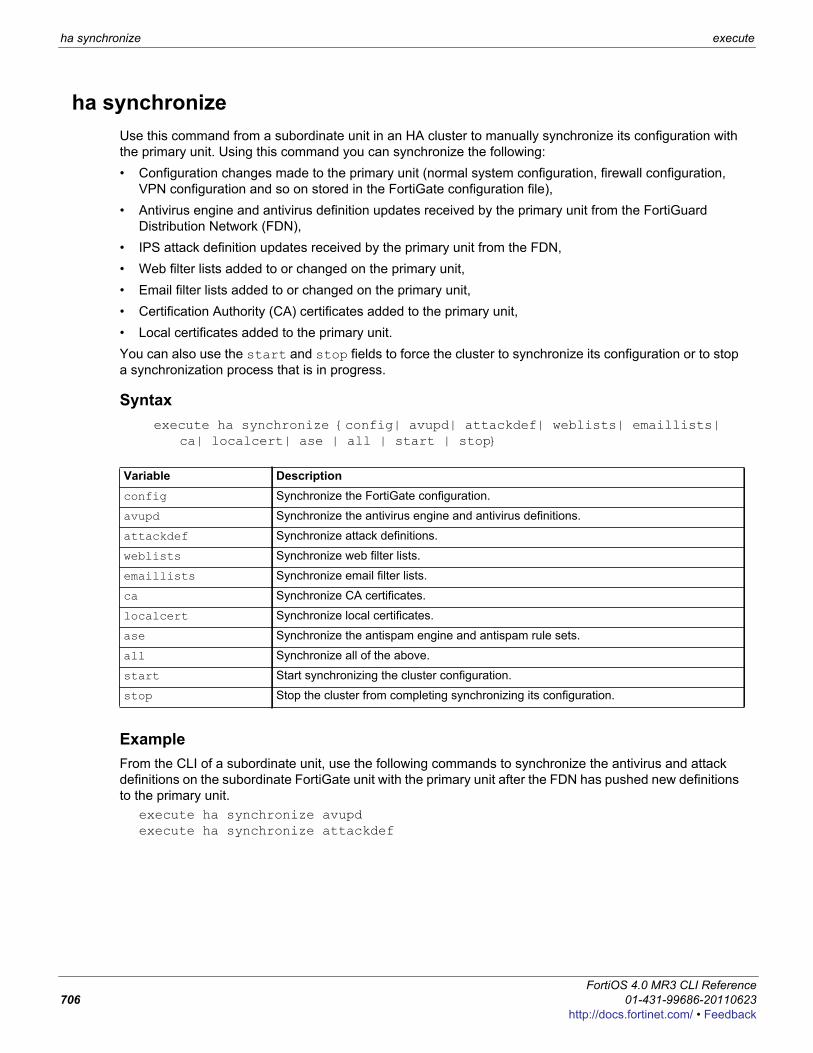
ha synchronize execute
ha synchronizeUse this command from a subordinate unit in an HA cluster to manually synchronize its configuration with the primary unit. Using this command you can synchronize the following:• Configuration changes made to the primary unit (normal system configuration, firewall configuration,
VPN configuration and so on stored in the FortiGate configuration file),• Antivirus engine and antivirus definition updates received by the primary unit from the FortiGuard
Distribution Network (FDN),• IPS attack definition updates received by the primary unit from the FDN,• Web filter lists added to or changed on the primary unit,• Email filter lists added to or changed on the primary unit,• Certification Authority (CA) certificates added to the primary unit,• Local certificates added to the primary unit.You can also use the start and stop fields to force the cluster to synchronize its configuration or to stop a synchronization process that is in progress.
Syntaxexecute ha synchronize {config| avupd| attackdef| weblists| emaillists|
ca| localcert| ase | all | start | stop}
ExampleFrom the CLI of a subordinate unit, use the following commands to synchronize the antivirus and attack definitions on the subordinate FortiGate unit with the primary unit after the FDN has pushed new definitions to the primary unit.
execute ha synchronize avupdexecute ha synchronize attackdef
Variable Descriptionconfig Synchronize the FortiGate configuration.
avupd Synchronize the antivirus engine and antivirus definitions.
attackdef Synchronize attack definitions.
weblists Synchronize web filter lists.
emaillists Synchronize email filter lists.
ca Synchronize CA certificates.
localcert Synchronize local certificates.
ase Synchronize the antispam engine and antispam rule sets.
all Synchronize all of the above.
start Start synchronizing the cluster configuration.
stop Stop the cluster from completing synchronizing its configuration.
FortiOS 4.0 MR3 CLI Reference706 01-431-99686-20110623
http://docs.fortinet.com/ • Feedback
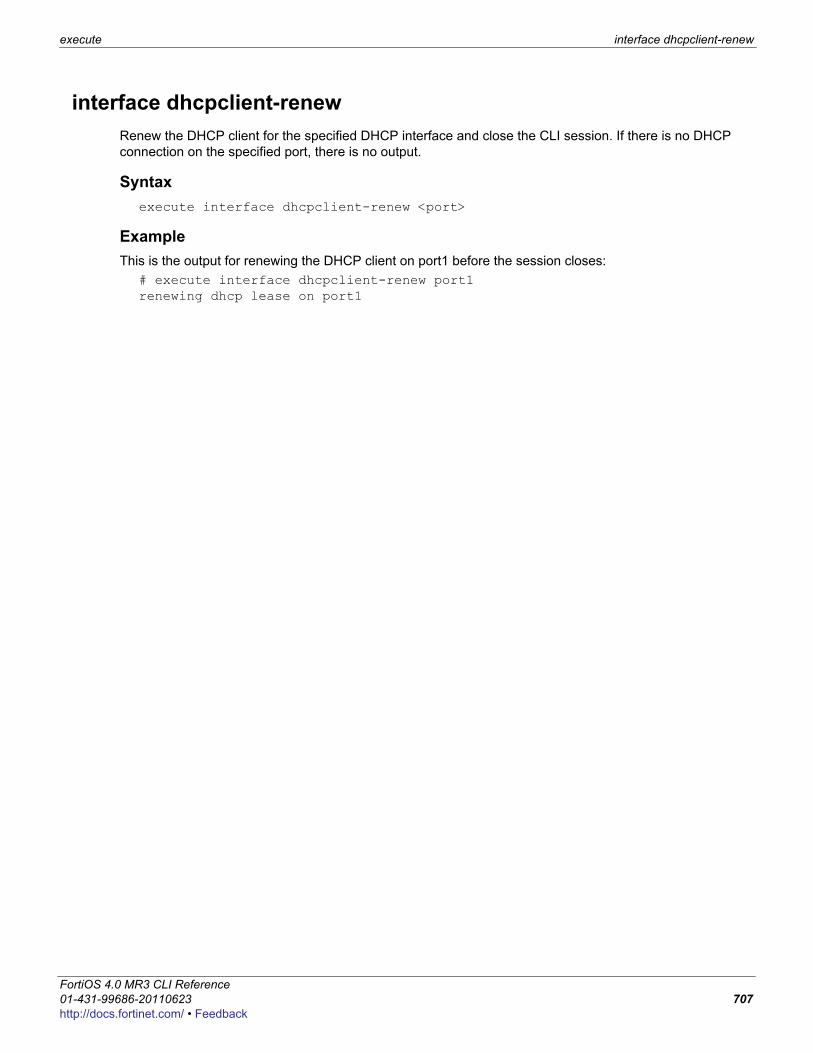
execute interface dhcpclient-renew
F0h
interface dhcpclient-renewRenew the DHCP client for the specified DHCP interface and close the CLI session. If there is no DHCP connection on the specified port, there is no output.
Syntaxexecute interface dhcpclient-renew <port>
ExampleThis is the output for renewing the DHCP client on port1 before the session closes:
# execute interface dhcpclient-renew port1 renewing dhcp lease on port1
ortiOS 4.0 MR3 CLI Reference1-431-99686-20110623 707ttp://docs.fortinet.com/ • Feedback

interface pppoe-reconnect execute
interface pppoe-reconnectReconnect to the PPPoE service on the specified PPPoE interface and close the CLI session. If there is no PPPoE connection on the specified port, there is no output.
Syntaxexecute interface pppoe-reconnect <port>
FortiOS 4.0 MR3 CLI Reference708 01-431-99686-20110623
http://docs.fortinet.com/ • Feedback
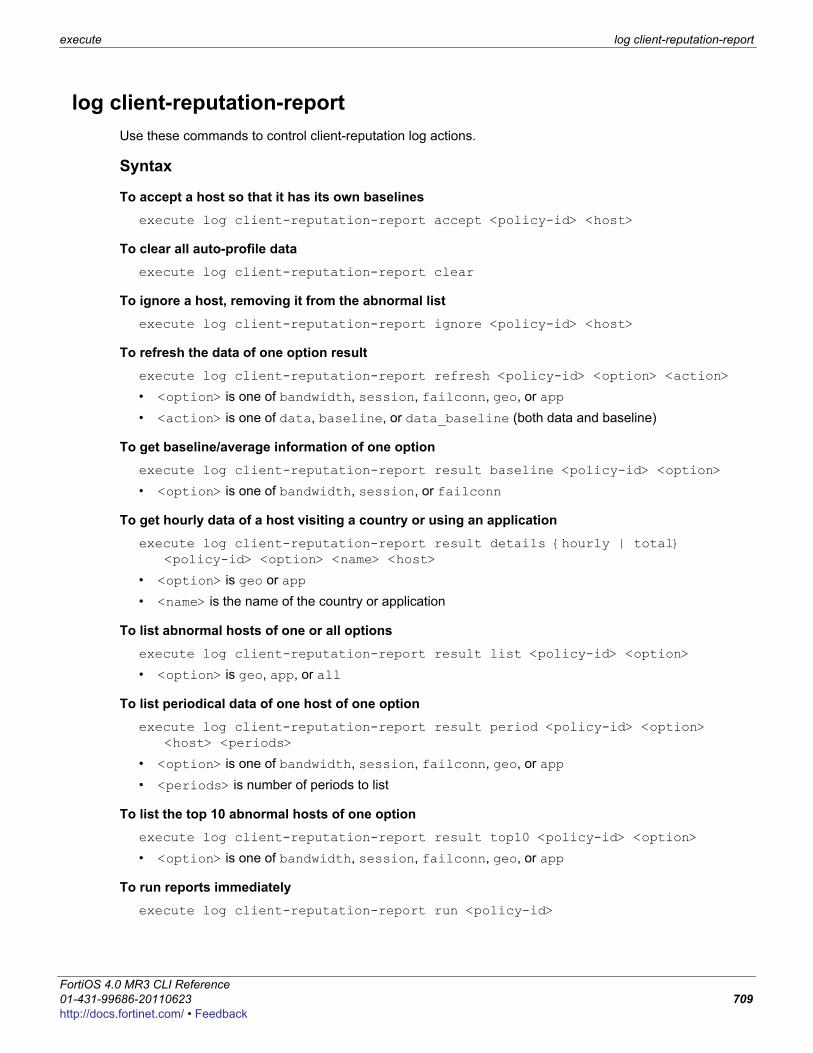
execute log client-reputation-report
F0h
log client-reputation-reportUse these commands to control client-reputation log actions.
Syntax
To accept a host so that it has its own baselinesexecute log client-reputation-report accept <policy-id> <host>
To clear all auto-profile dataexecute log client-reputation-report clear
To ignore a host, removing it from the abnormal listexecute log client-reputation-report ignore <policy-id> <host>
To refresh the data of one option resultexecute log client-reputation-report refresh <policy-id> <option> <action>
• <option> is one of bandwidth, session, failconn, geo, or app• <action> is one of data, baseline, or data_baseline (both data and baseline)
To get baseline/average information of one optionexecute log client-reputation-report result baseline <policy-id> <option>
• <option> is one of bandwidth, session, or failconn
To get hourly data of a host visiting a country or using an applicationexecute log client-reputation-report result details {hourly | total}
<policy-id> <option> <name> <host>
• <option> is geo or app• <name> is the name of the country or application
To list abnormal hosts of one or all optionsexecute log client-reputation-report result list <policy-id> <option>
• <option> is geo, app, or all
To list periodical data of one host of one optionexecute log client-reputation-report result period <policy-id> <option>
<host> <periods>
• <option> is one of bandwidth, session, failconn, geo, or app• <periods> is number of periods to list
To list the top 10 abnormal hosts of one optionexecute log client-reputation-report result top10 <policy-id> <option>
• <option> is one of bandwidth, session, failconn, geo, or app
To run reports immediatelyexecute log client-reputation-report run <policy-id>
ortiOS 4.0 MR3 CLI Reference1-431-99686-20110623 709ttp://docs.fortinet.com/ • Feedback

log delete-all execute
log delete-allUse this command to clear all log entries in memory and current log files on hard disk. If your FortiGate unit has no hard disk, only log entries in system memory will be cleared. You will be prompted to confirm the command.
Syntaxexecute log delete-all
FortiOS 4.0 MR3 CLI Reference710 01-431-99686-20110623
http://docs.fortinet.com/ • Feedback
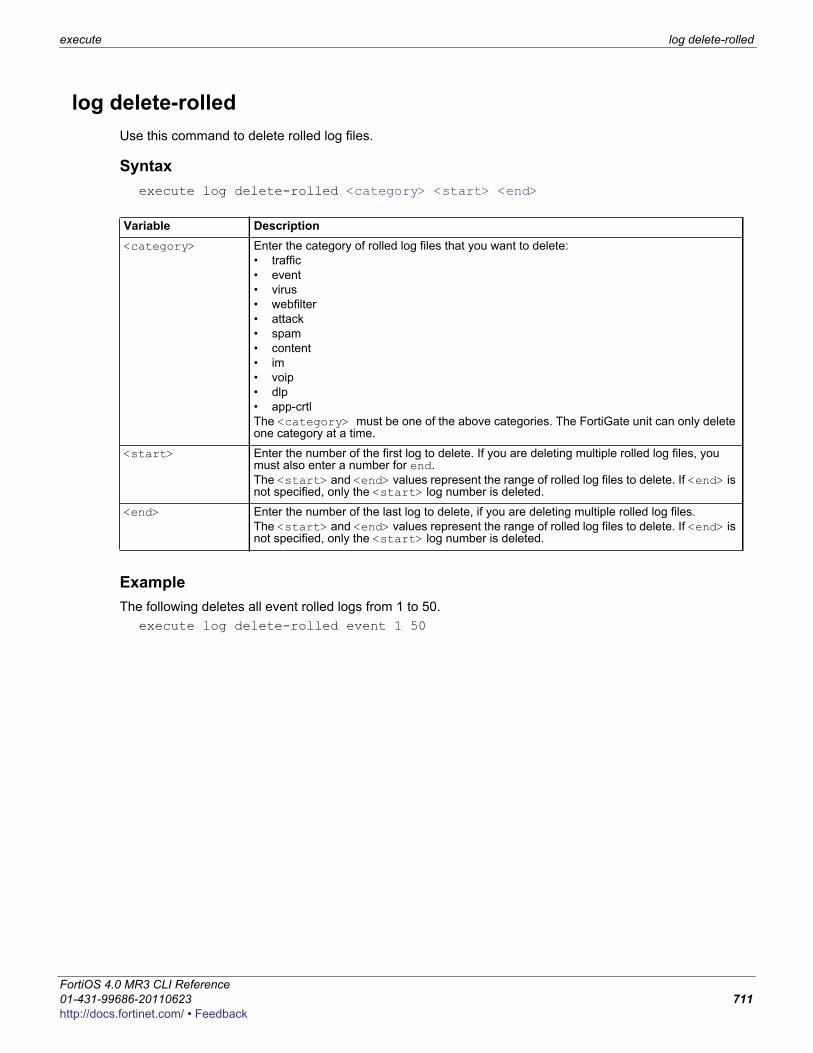
execute log delete-rolled
F0h
log delete-rolledUse this command to delete rolled log files.
Syntaxexecute log delete-rolled <category> <start> <end>
ExampleThe following deletes all event rolled logs from 1 to 50.
execute log delete-rolled event 1 50
Variable Description<category> Enter the category of rolled log files that you want to delete:
• traffic• event• virus • webfilter• attack• spam • content• im• voip• dlp• app-crtlThe <category> must be one of the above categories. The FortiGate unit can only delete one category at a time.
<start> Enter the number of the first log to delete. If you are deleting multiple rolled log files, you must also enter a number for end. The <start> and <end> values represent the range of rolled log files to delete. If <end> is not specified, only the <start> log number is deleted.
<end> Enter the number of the last log to delete, if you are deleting multiple rolled log files.The <start> and <end> values represent the range of rolled log files to delete. If <end> is not specified, only the <start> log number is deleted.
ortiOS 4.0 MR3 CLI Reference1-431-99686-20110623 711ttp://docs.fortinet.com/ • Feedback
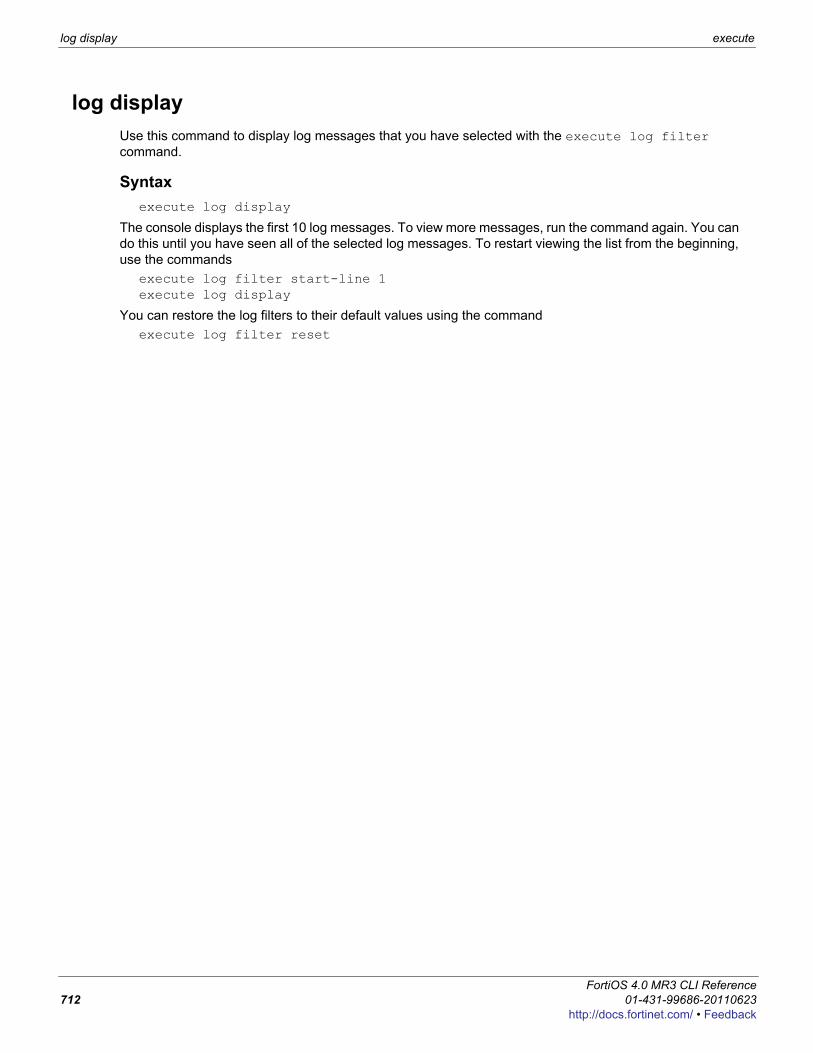
log display execute
log displayUse this command to display log messages that you have selected with the execute log filter command.
Syntaxexecute log display
The console displays the first 10 log messages. To view more messages, run the command again. You can do this until you have seen all of the selected log messages. To restart viewing the list from the beginning, use the commands
execute log filter start-line 1execute log display
You can restore the log filters to their default values using the commandexecute log filter reset
FortiOS 4.0 MR3 CLI Reference712 01-431-99686-20110623
http://docs.fortinet.com/ • Feedback
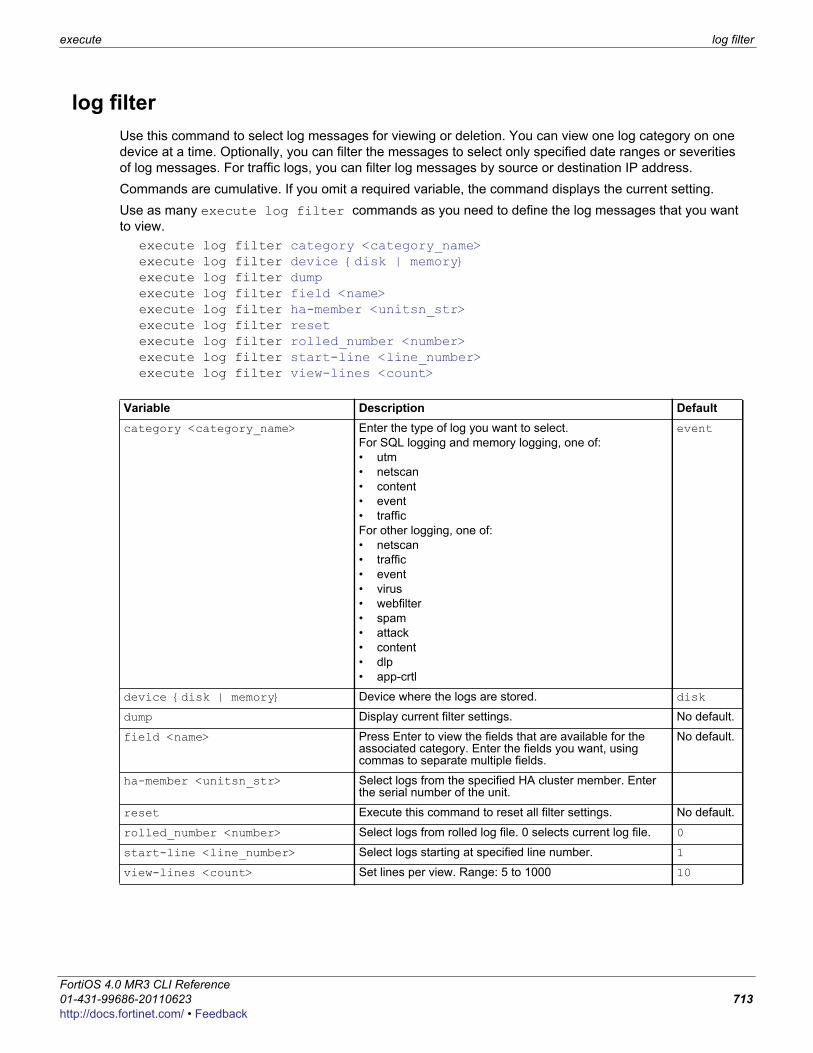
execute log filter
F0h
log filterUse this command to select log messages for viewing or deletion. You can view one log category on one device at a time. Optionally, you can filter the messages to select only specified date ranges or severities of log messages. For traffic logs, you can filter log messages by source or destination IP address.Commands are cumulative. If you omit a required variable, the command displays the current setting.Use as many execute log filter commands as you need to define the log messages that you want to view.
execute log filter category <category_name>execute log filter device {disk | memory}execute log filter dumpexecute log filter field <name>execute log filter ha-member <unitsn_str>execute log filter resetexecute log filter rolled_number <number>execute log filter start-line <line_number>execute log filter view-lines <count>
Variable Description Defaultcategory <category_name> Enter the type of log you want to select.
For SQL logging and memory logging, one of: • utm• netscan• content• event• trafficFor other logging, one of:• netscan• traffic• event• virus • webfilter• spam• attack• content• dlp • app-crtl
event
device {disk | memory} Device where the logs are stored. disk
dump Display current filter settings. No default.
field <name> Press Enter to view the fields that are available for the associated category. Enter the fields you want, using commas to separate multiple fields.
No default.
ha-member <unitsn_str> Select logs from the specified HA cluster member. Enter the serial number of the unit.
reset Execute this command to reset all filter settings. No default.
rolled_number <number> Select logs from rolled log file. 0 selects current log file. 0
start-line <line_number> Select logs starting at specified line number. 1
view-lines <count> Set lines per view. Range: 5 to 1000 10
ortiOS 4.0 MR3 CLI Reference1-431-99686-20110623 713ttp://docs.fortinet.com/ • Feedback
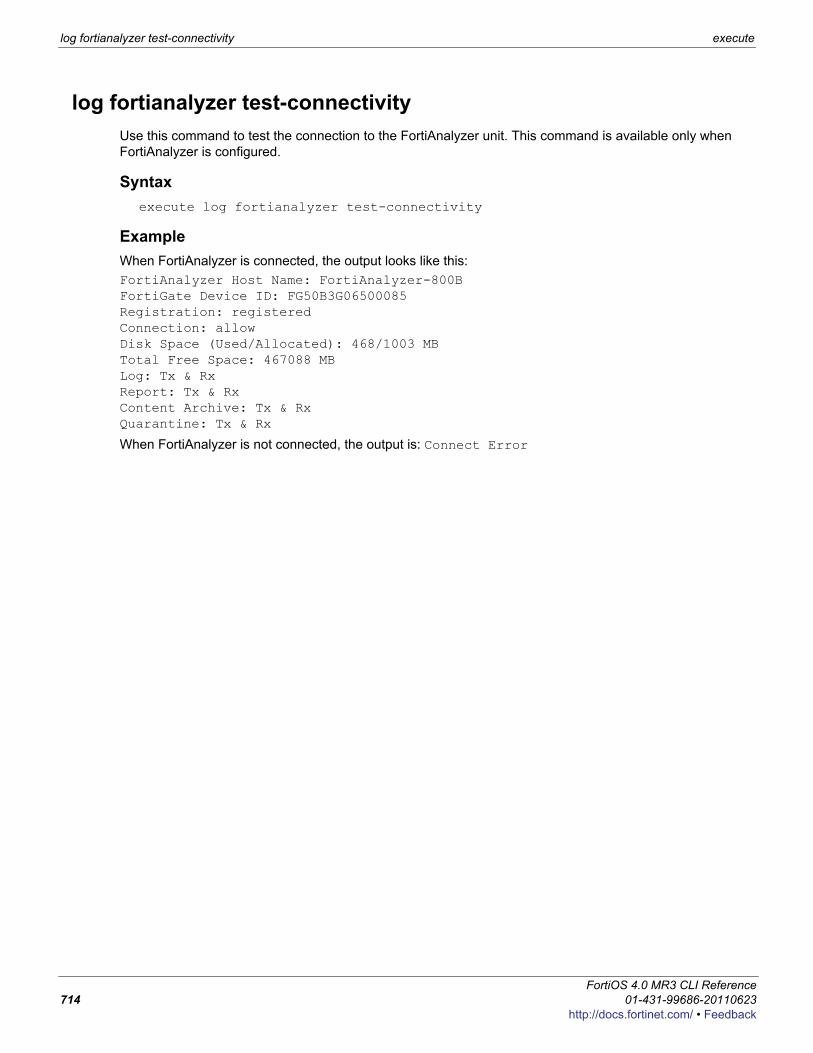
log fortianalyzer test-connectivity execute
log fortianalyzer test-connectivityUse this command to test the connection to the FortiAnalyzer unit. This command is available only when FortiAnalyzer is configured.
Syntaxexecute log fortianalyzer test-connectivity
ExampleWhen FortiAnalyzer is connected, the output looks like this:FortiAnalyzer Host Name: FortiAnalyzer-800BFortiGate Device ID: FG50B3G06500085Registration: registeredConnection: allowDisk Space (Used/Allocated): 468/1003 MBTotal Free Space: 467088 MBLog: Tx & RxReport: Tx & RxContent Archive: Tx & RxQuarantine: Tx & Rx
When FortiAnalyzer is not connected, the output is: Connect Error
FortiOS 4.0 MR3 CLI Reference714 01-431-99686-20110623
http://docs.fortinet.com/ • Feedback
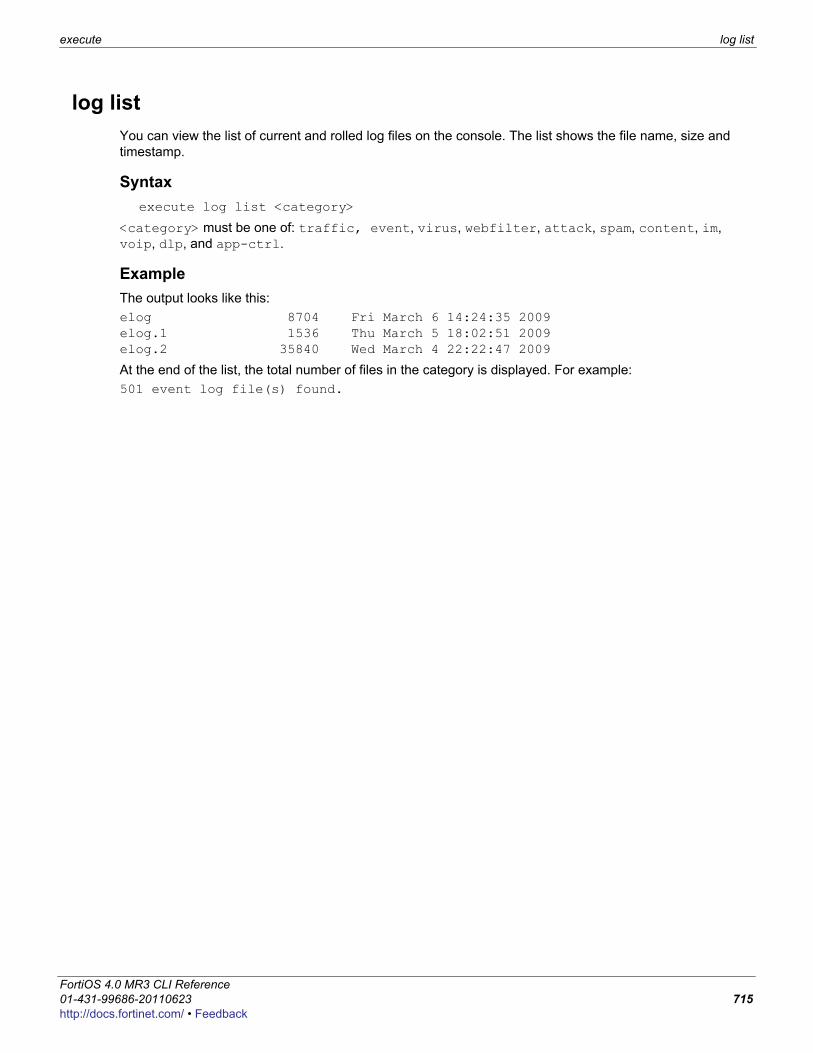
execute log list
F0h
log listYou can view the list of current and rolled log files on the console. The list shows the file name, size and timestamp.
Syntaxexecute log list <category>
<category> must be one of: traffic, event, virus, webfilter, attack, spam, content, im, voip, dlp, and app-ctrl.
ExampleThe output looks like this:elog 8704 Fri March 6 14:24:35 2009elog.1 1536 Thu March 5 18:02:51 2009elog.2 35840 Wed March 4 22:22:47 2009
At the end of the list, the total number of files in the category is displayed. For example:501 event log file(s) found.
ortiOS 4.0 MR3 CLI Reference1-431-99686-20110623 715ttp://docs.fortinet.com/ • Feedback

log rebuild-sqldb execute
log rebuild-sqldbUse this command to rebuild the SQL database from log files.If run in the VDOM context, only this VDOM’s SQL database is rebuilt. If run in the global context, the SQL database is rebuilt for all VDOMs.
Syntaxexecute log rebuild-sqldb
FortiOS 4.0 MR3 CLI Reference716 01-431-99686-20110623
http://docs.fortinet.com/ • Feedback

execute log recreate-sqldb
F0h
log recreate-sqldbUse this command to recreate SQL log database.
Syntaxexecute log recreate-sqldb
ortiOS 4.0 MR3 CLI Reference1-431-99686-20110623 717ttp://docs.fortinet.com/ • Feedback
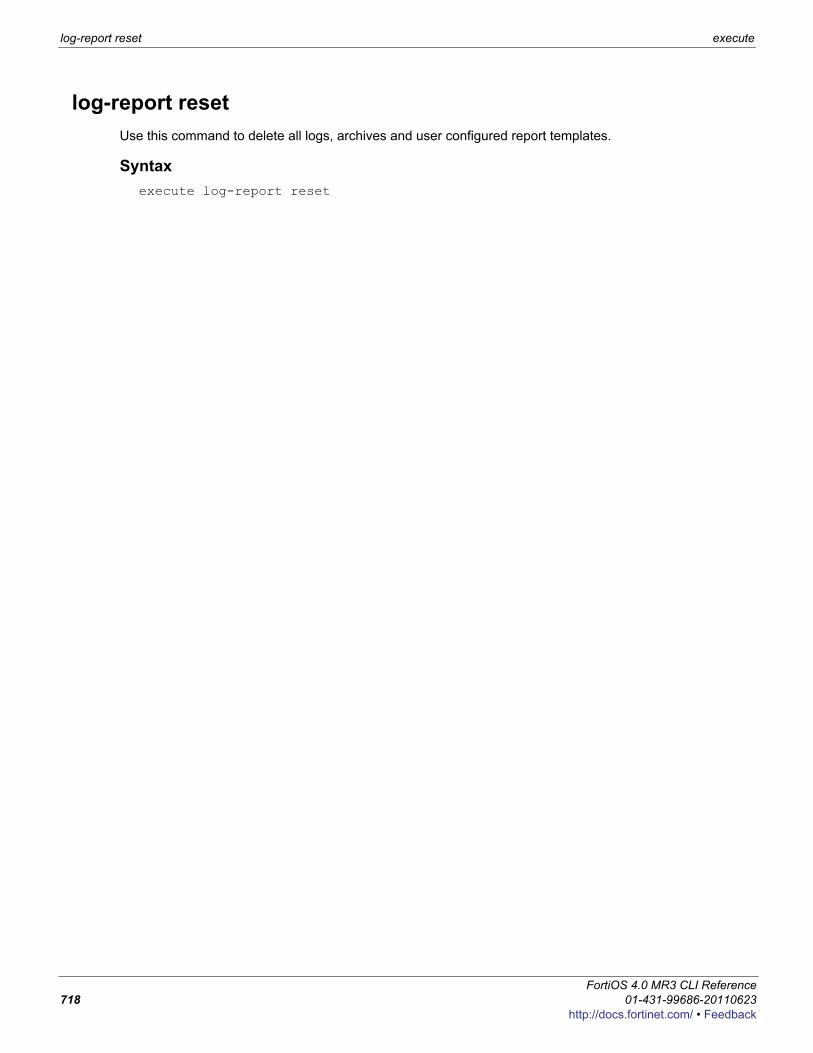
log-report reset execute
log-report resetUse this command to delete all logs, archives and user configured report templates.
Syntaxexecute log-report reset
FortiOS 4.0 MR3 CLI Reference718 01-431-99686-20110623
http://docs.fortinet.com/ • Feedback

execute log roll
F0h
log rollUse this command to roll all log files.
Syntaxexecute log roll
ortiOS 4.0 MR3 CLI Reference1-431-99686-20110623 719ttp://docs.fortinet.com/ • Feedback
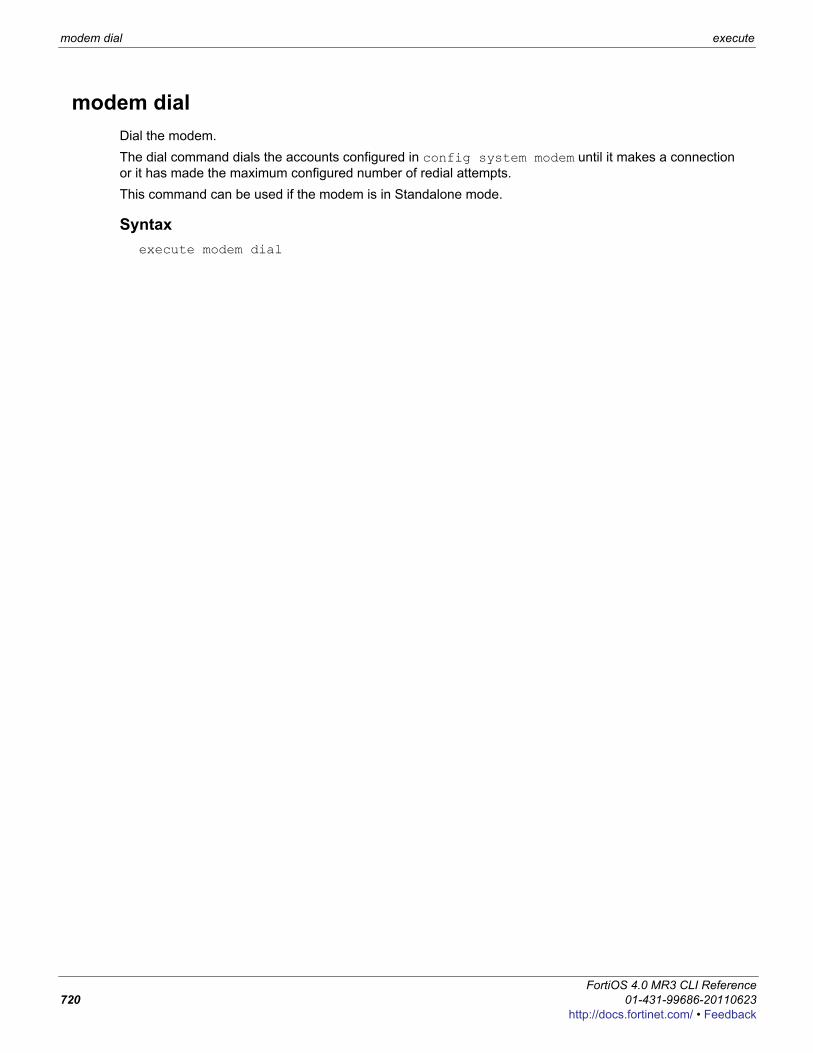
modem dial execute
modem dialDial the modem. The dial command dials the accounts configured in config system modem until it makes a connection or it has made the maximum configured number of redial attempts.This command can be used if the modem is in Standalone mode.
Syntaxexecute modem dial
FortiOS 4.0 MR3 CLI Reference720 01-431-99686-20110623
http://docs.fortinet.com/ • Feedback

execute modem hangup
F0h
modem hangupHang up the modem. This command can be used if the modem is in Standalone mode.
Syntaxexecute modem hangup
ortiOS 4.0 MR3 CLI Reference1-431-99686-20110623 721ttp://docs.fortinet.com/ • Feedback

modem trigger execute
modem triggerThis command sends a signal to the modem daemon, which causes the state machine to re-evaluate its current state. If for some reason the modem should be connected but isn't, then it will trigger a redial. If the modem should not be connected but is, this command will cause the modem to disconnect.
Syntaxexecute modem trigger
FortiOS 4.0 MR3 CLI Reference722 01-431-99686-20110623
http://docs.fortinet.com/ • Feedback
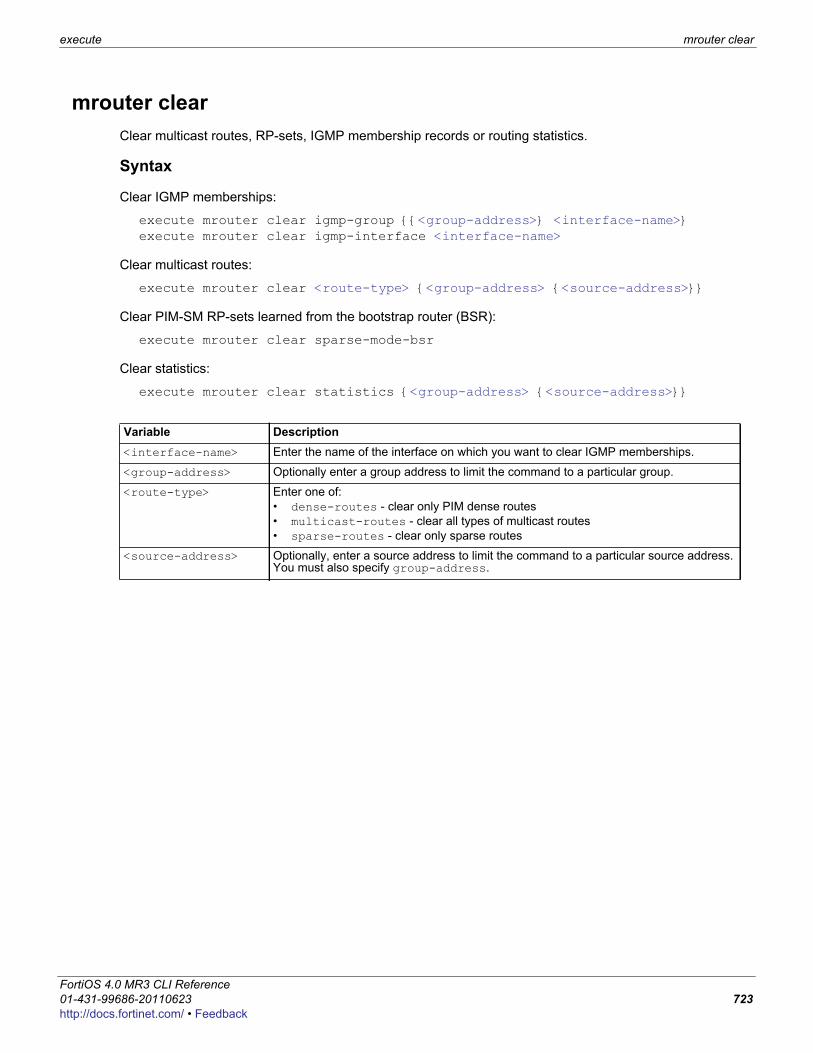
execute mrouter clear
F0h
mrouter clearClear multicast routes, RP-sets, IGMP membership records or routing statistics.
Syntax
Clear IGMP memberships:
execute mrouter clear igmp-group {{<group-address>} <interface-name>}execute mrouter clear igmp-interface <interface-name>
Clear multicast routes:
execute mrouter clear <route-type> {<group-address> {<source-address>}}
Clear PIM-SM RP-sets learned from the bootstrap router (BSR):
execute mrouter clear sparse-mode-bsr
Clear statistics:
execute mrouter clear statistics {<group-address> {<source-address>}}
Variable Description<interface-name> Enter the name of the interface on which you want to clear IGMP memberships.
<group-address> Optionally enter a group address to limit the command to a particular group.
<route-type> Enter one of:• dense-routes - clear only PIM dense routes• multicast-routes - clear all types of multicast routes• sparse-routes - clear only sparse routes
<source-address> Optionally, enter a source address to limit the command to a particular source address. You must also specify group-address.
ortiOS 4.0 MR3 CLI Reference1-431-99686-20110623 723ttp://docs.fortinet.com/ • Feedback
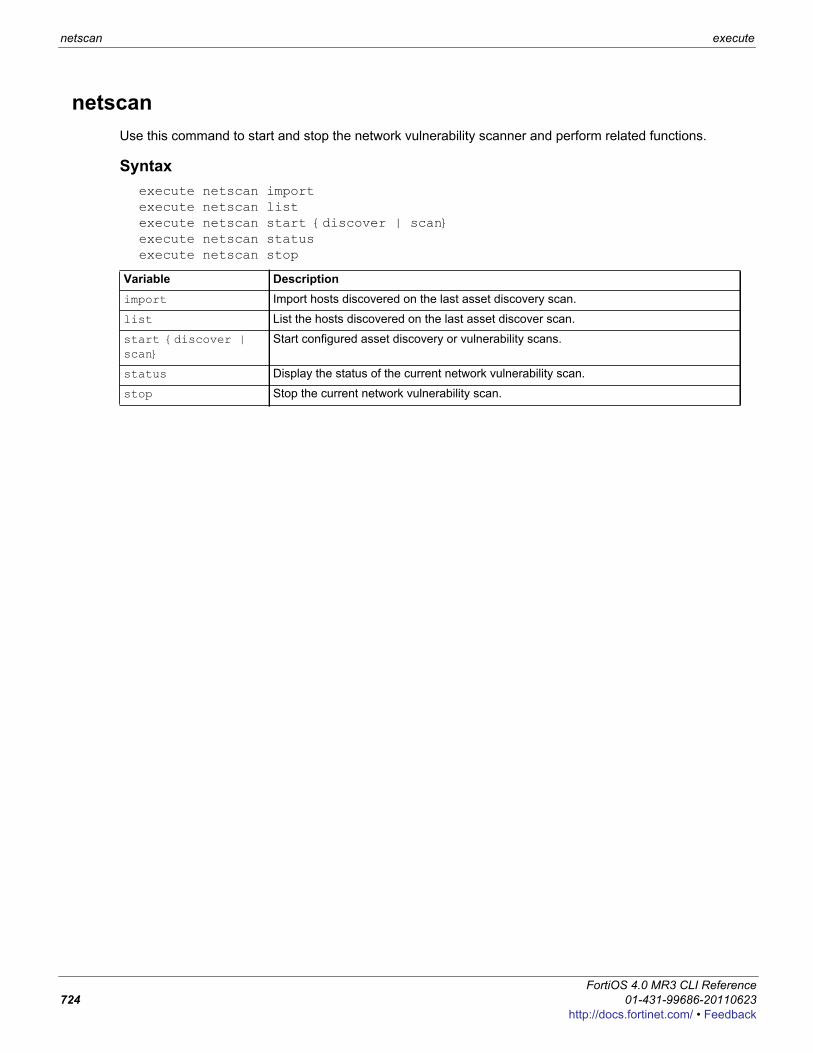
netscan execute
netscanUse this command to start and stop the network vulnerability scanner and perform related functions.
Syntaxexecute netscan importexecute netscan listexecute netscan start {discover | scan}execute netscan statusexecute netscan stop
Variable Descriptionimport Import hosts discovered on the last asset discovery scan.
list List the hosts discovered on the last asset discover scan.
start {discover | scan}
Start configured asset discovery or vulnerability scans.
status Display the status of the current network vulnerability scan.
stop Stop the current network vulnerability scan.
FortiOS 4.0 MR3 CLI Reference724 01-431-99686-20110623
http://docs.fortinet.com/ • Feedback
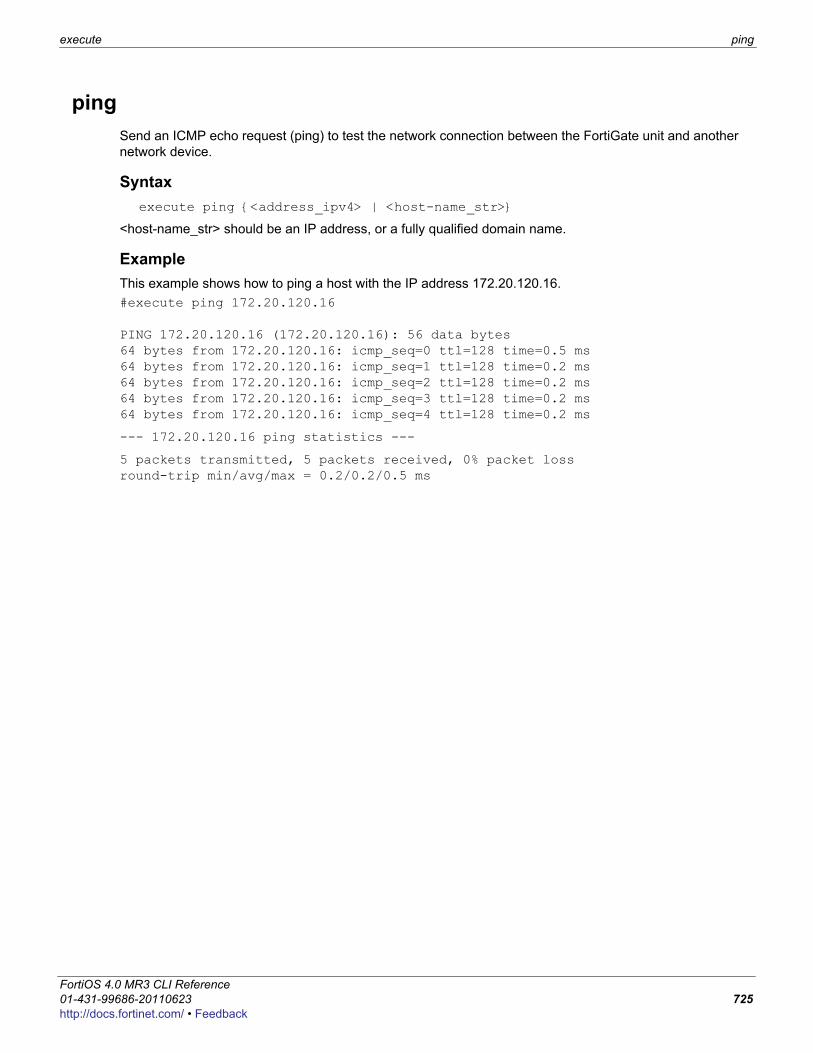
execute ping
F0h
pingSend an ICMP echo request (ping) to test the network connection between the FortiGate unit and another network device.
Syntaxexecute ping {<address_ipv4> | <host-name_str>}
<host-name_str> should be an IP address, or a fully qualified domain name.
ExampleThis example shows how to ping a host with the IP address 172.20.120.16.#execute ping 172.20.120.16
PING 172.20.120.16 (172.20.120.16): 56 data bytes64 bytes from 172.20.120.16: icmp_seq=0 ttl=128 time=0.5 ms64 bytes from 172.20.120.16: icmp_seq=1 ttl=128 time=0.2 ms64 bytes from 172.20.120.16: icmp_seq=2 ttl=128 time=0.2 ms64 bytes from 172.20.120.16: icmp_seq=3 ttl=128 time=0.2 ms64 bytes from 172.20.120.16: icmp_seq=4 ttl=128 time=0.2 ms
--- 172.20.120.16 ping statistics ---
5 packets transmitted, 5 packets received, 0% packet lossround-trip min/avg/max = 0.2/0.2/0.5 ms
ortiOS 4.0 MR3 CLI Reference1-431-99686-20110623 725ttp://docs.fortinet.com/ • Feedback
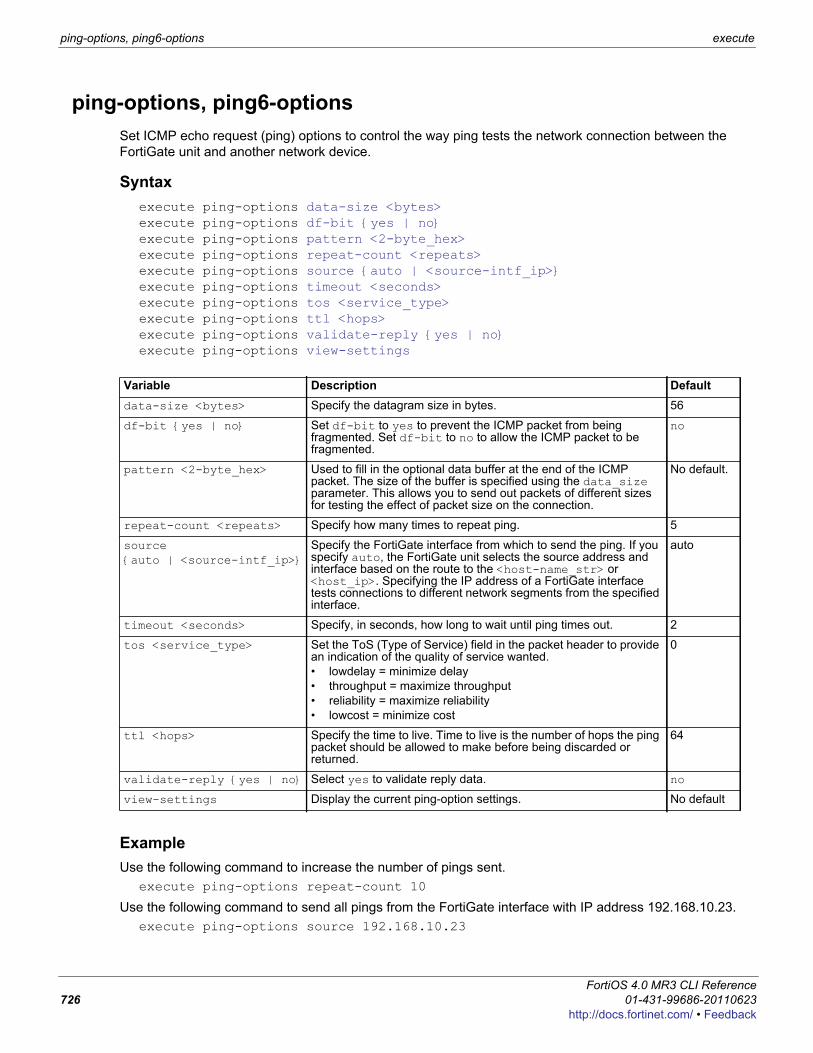
ping-options, ping6-options execute
ping-options, ping6-optionsSet ICMP echo request (ping) options to control the way ping tests the network connection between the FortiGate unit and another network device.
Syntaxexecute ping-options data-size <bytes>execute ping-options df-bit {yes | no}execute ping-options pattern <2-byte_hex>execute ping-options repeat-count <repeats>execute ping-options source {auto | <source-intf_ip>}execute ping-options timeout <seconds>execute ping-options tos <service_type>execute ping-options ttl <hops>execute ping-options validate-reply {yes | no}execute ping-options view-settings
ExampleUse the following command to increase the number of pings sent.
execute ping-options repeat-count 10
Use the following command to send all pings from the FortiGate interface with IP address 192.168.10.23.execute ping-options source 192.168.10.23
Variable Description Defaultdata-size <bytes> Specify the datagram size in bytes. 56
df-bit {yes | no} Set df-bit to yes to prevent the ICMP packet from being fragmented. Set df-bit to no to allow the ICMP packet to be fragmented.
no
pattern <2-byte_hex> Used to fill in the optional data buffer at the end of the ICMP packet. The size of the buffer is specified using the data_size parameter. This allows you to send out packets of different sizes for testing the effect of packet size on the connection.
No default.
repeat-count <repeats> Specify how many times to repeat ping. 5
source {auto | <source-intf_ip>}
Specify the FortiGate interface from which to send the ping. If you specify auto, the FortiGate unit selects the source address and interface based on the route to the <host-name_str> or <host_ip>. Specifying the IP address of a FortiGate interface tests connections to different network segments from the specified interface.
auto
timeout <seconds> Specify, in seconds, how long to wait until ping times out. 2
tos <service_type> Set the ToS (Type of Service) field in the packet header to provide an indication of the quality of service wanted. • lowdelay = minimize delay• throughput = maximize throughput• reliability = maximize reliability• lowcost = minimize cost
0
ttl <hops> Specify the time to live. Time to live is the number of hops the ping packet should be allowed to make before being discarded or returned.
64
validate-reply {yes | no} Select yes to validate reply data. no
view-settings Display the current ping-option settings. No default
FortiOS 4.0 MR3 CLI Reference726 01-431-99686-20110623
http://docs.fortinet.com/ • Feedback
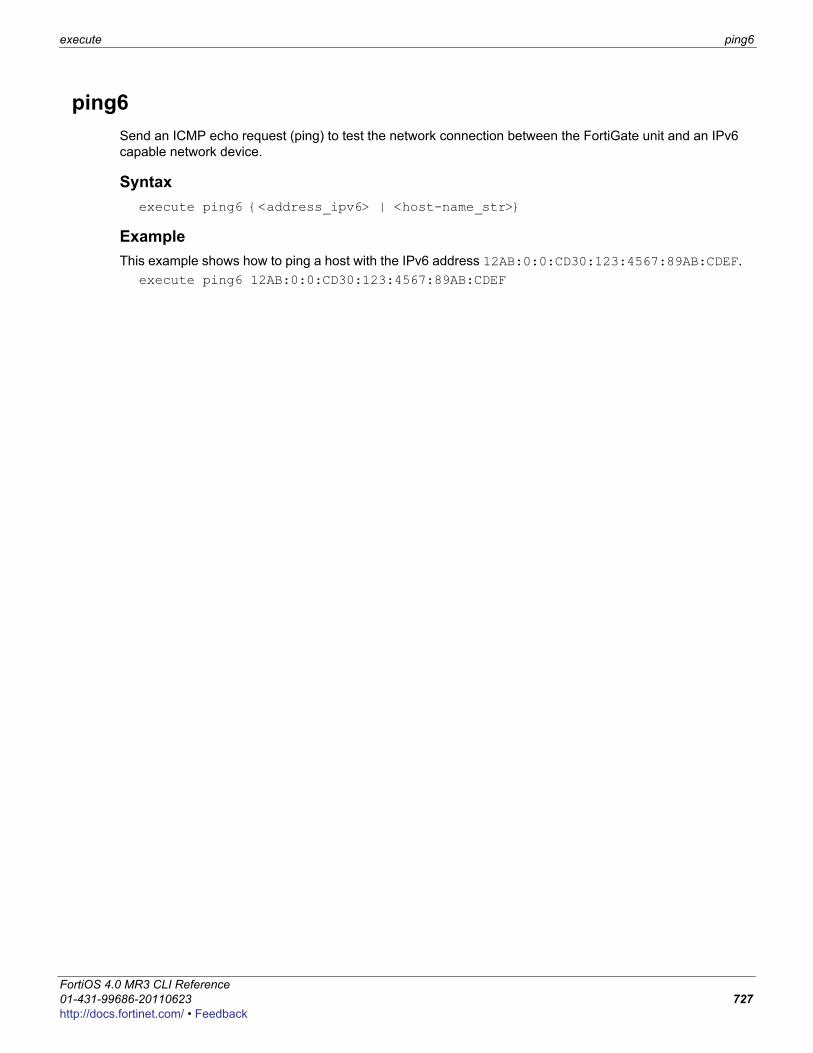
execute ping6
F0h
ping6Send an ICMP echo request (ping) to test the network connection between the FortiGate unit and an IPv6 capable network device.
Syntaxexecute ping6 {<address_ipv6> | <host-name_str>}
ExampleThis example shows how to ping a host with the IPv6 address 12AB:0:0:CD30:123:4567:89AB:CDEF.
execute ping6 12AB:0:0:CD30:123:4567:89AB:CDEF
ortiOS 4.0 MR3 CLI Reference1-431-99686-20110623 727ttp://docs.fortinet.com/ • Feedback
reboot execute
rebootRestart the FortiGate unit.
Syntaxexecute reboot <comment “comment_string”>
<comment “comment_string”> allows you to optionally add a message that will appear in the hard disk log indicating the reason for the reboot. If the message is more than one word it must be enclosed in quotes.
ExampleThis example shows the reboot command with a message included.
execute reboot comment “December monthly maintenance”
Caution: Abruptly powering off your FortiGate unit may corrupt its configuration. Using the reboot and shutdown options here or in the web-based manager ensure proper shutdown procedures are followed to prevent any loss of configuration.
FortiOS 4.0 MR3 CLI Reference728 01-431-99686-20110623
http://docs.fortinet.com/ • Feedback

execute report-config reset
F0h
report-config resetUse this command to reset report templates to the factory default. Logs are not deleted.
Syntaxexecute report-config reset
ortiOS 4.0 MR3 CLI Reference1-431-99686-20110623 729ttp://docs.fortinet.com/ • Feedback
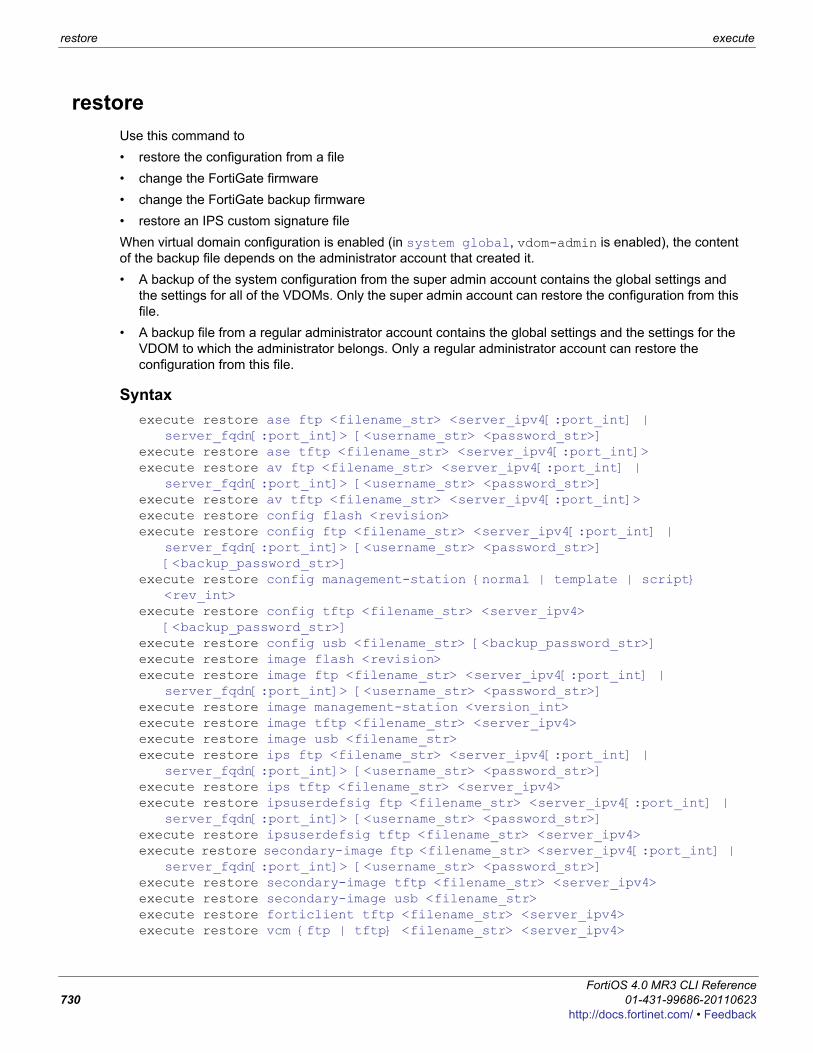
restore execute
restoreUse this command to • restore the configuration from a file• change the FortiGate firmware• change the FortiGate backup firmware• restore an IPS custom signature fileWhen virtual domain configuration is enabled (in system global, vdom-admin is enabled), the content of the backup file depends on the administrator account that created it. • A backup of the system configuration from the super admin account contains the global settings and
the settings for all of the VDOMs. Only the super admin account can restore the configuration from this file.
• A backup file from a regular administrator account contains the global settings and the settings for the VDOM to which the administrator belongs. Only a regular administrator account can restore the configuration from this file.
Syntaxexecute restore ase ftp <filename_str> <server_ipv4[:port_int] |
server_fqdn[:port_int]> [<username_str> <password_str>]execute restore ase tftp <filename_str> <server_ipv4[:port_int]>execute restore av ftp <filename_str> <server_ipv4[:port_int] |
server_fqdn[:port_int]> [<username_str> <password_str>]execute restore av tftp <filename_str> <server_ipv4[:port_int]>execute restore config flash <revision>execute restore config ftp <filename_str> <server_ipv4[:port_int] |
server_fqdn[:port_int]> [<username_str> <password_str>] [<backup_password_str>]
execute restore config management-station {normal | template | script} <rev_int>
execute restore config tftp <filename_str> <server_ipv4> [<backup_password_str>]
execute restore config usb <filename_str> [<backup_password_str>]execute restore image flash <revision>execute restore image ftp <filename_str> <server_ipv4[:port_int] |
server_fqdn[:port_int]> [<username_str> <password_str>]execute restore image management-station <version_int>execute restore image tftp <filename_str> <server_ipv4>execute restore image usb <filename_str>execute restore ips ftp <filename_str> <server_ipv4[:port_int] |
server_fqdn[:port_int]> [<username_str> <password_str>]execute restore ips tftp <filename_str> <server_ipv4>execute restore ipsuserdefsig ftp <filename_str> <server_ipv4[:port_int] |
server_fqdn[:port_int]> [<username_str> <password_str>]execute restore ipsuserdefsig tftp <filename_str> <server_ipv4>execute restore secondary-image ftp <filename_str> <server_ipv4[:port_int] |
server_fqdn[:port_int]> [<username_str> <password_str>]execute restore secondary-image tftp <filename_str> <server_ipv4>execute restore secondary-image usb <filename_str>execute restore forticlient tftp <filename_str> <server_ipv4>execute restore vcm {ftp | tftp} <filename_str> <server_ipv4>
FortiOS 4.0 MR3 CLI Reference730 01-431-99686-20110623
http://docs.fortinet.com/ • Feedback
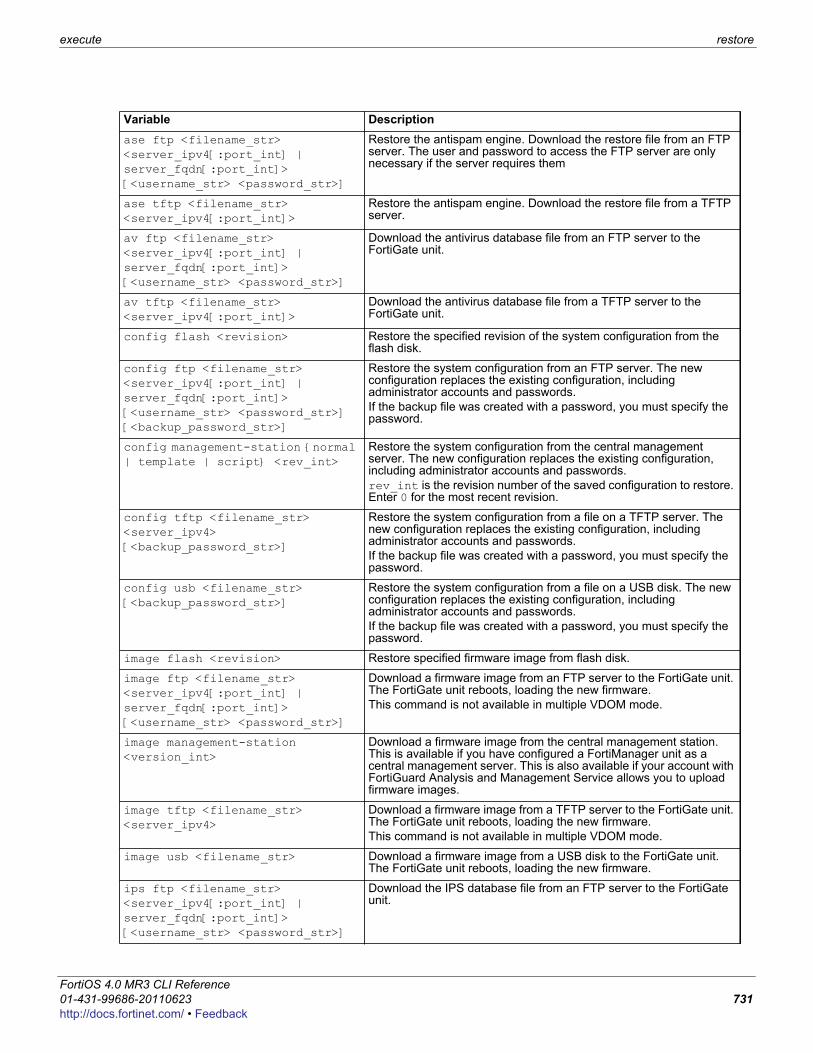
execute restore
F0h
Variable Descriptionase ftp <filename_str> <server_ipv4[:port_int] | server_fqdn[:port_int]> [<username_str> <password_str>]
Restore the antispam engine. Download the restore file from an FTP server. The user and password to access the FTP server are only necessary if the server requires them
ase tftp <filename_str> <server_ipv4[:port_int]>
Restore the antispam engine. Download the restore file from a TFTP server.
av ftp <filename_str> <server_ipv4[:port_int] | server_fqdn[:port_int]> [<username_str> <password_str>]
Download the antivirus database file from an FTP server to the FortiGate unit.
av tftp <filename_str> <server_ipv4[:port_int]>
Download the antivirus database file from a TFTP server to the FortiGate unit.
config flash <revision> Restore the specified revision of the system configuration from the flash disk.
config ftp <filename_str> <server_ipv4[:port_int] | server_fqdn[:port_int]> [<username_str> <password_str>] [<backup_password_str>]
Restore the system configuration from an FTP server. The new configuration replaces the existing configuration, including administrator accounts and passwords. If the backup file was created with a password, you must specify the password.
config management-station {normal | template | script} <rev_int>
Restore the system configuration from the central management server. The new configuration replaces the existing configuration, including administrator accounts and passwords.rev_int is the revision number of the saved configuration to restore. Enter 0 for the most recent revision.
config tftp <filename_str> <server_ipv4> [<backup_password_str>]
Restore the system configuration from a file on a TFTP server. The new configuration replaces the existing configuration, including administrator accounts and passwords. If the backup file was created with a password, you must specify the password.
config usb <filename_str> [<backup_password_str>]
Restore the system configuration from a file on a USB disk. The new configuration replaces the existing configuration, including administrator accounts and passwords. If the backup file was created with a password, you must specify the password.
image flash <revision> Restore specified firmware image from flash disk.
image ftp <filename_str> <server_ipv4[:port_int] | server_fqdn[:port_int]> [<username_str> <password_str>]
Download a firmware image from an FTP server to the FortiGate unit. The FortiGate unit reboots, loading the new firmware. This command is not available in multiple VDOM mode.
image management-station <version_int>
Download a firmware image from the central management station. This is available if you have configured a FortiManager unit as a central management server. This is also available if your account with FortiGuard Analysis and Management Service allows you to upload firmware images.
image tftp <filename_str> <server_ipv4>
Download a firmware image from a TFTP server to the FortiGate unit. The FortiGate unit reboots, loading the new firmware.This command is not available in multiple VDOM mode.
image usb <filename_str> Download a firmware image from a USB disk to the FortiGate unit. The FortiGate unit reboots, loading the new firmware.
ips ftp <filename_str> <server_ipv4[:port_int] | server_fqdn[:port_int]> [<username_str> <password_str>]
Download the IPS database file from an FTP server to the FortiGate unit.
ortiOS 4.0 MR3 CLI Reference1-431-99686-20110623 731ttp://docs.fortinet.com/ • Feedback
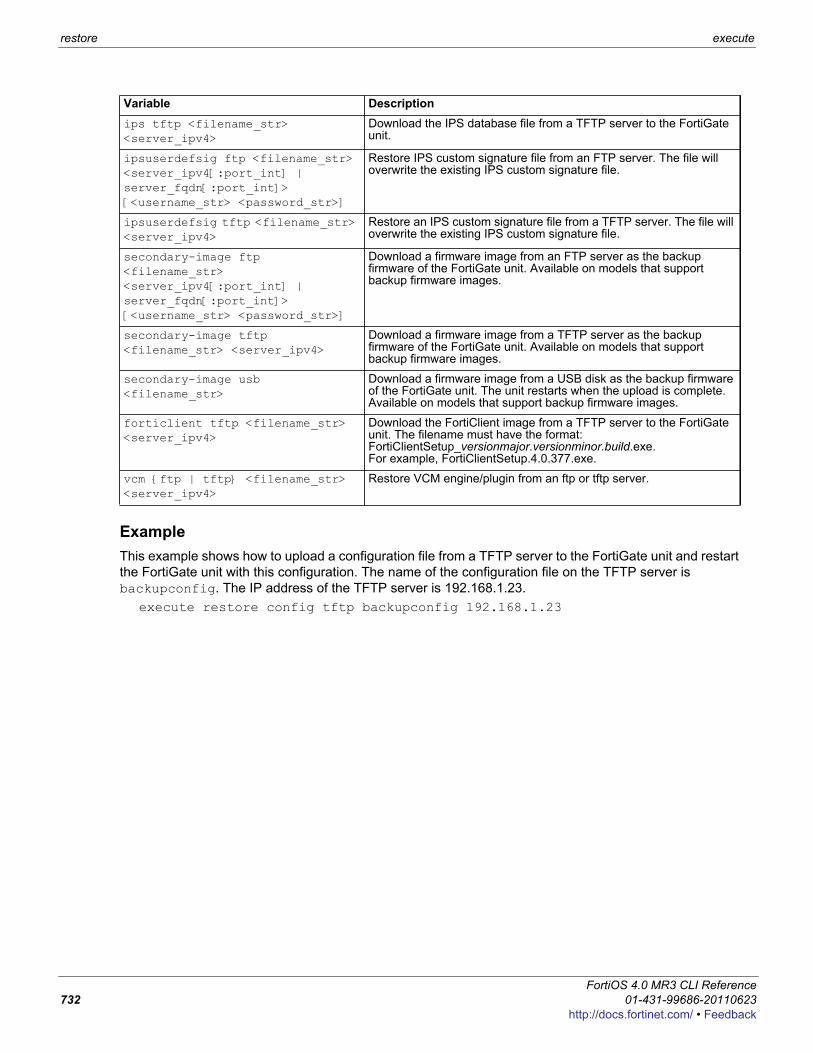
restore execute
ExampleThis example shows how to upload a configuration file from a TFTP server to the FortiGate unit and restart the FortiGate unit with this configuration. The name of the configuration file on the TFTP server is backupconfig. The IP address of the TFTP server is 192.168.1.23.
execute restore config tftp backupconfig 192.168.1.23
ips tftp <filename_str> <server_ipv4>
Download the IPS database file from a TFTP server to the FortiGate unit.
ipsuserdefsig ftp <filename_str> <server_ipv4[:port_int] | server_fqdn[:port_int]> [<username_str> <password_str>]
Restore IPS custom signature file from an FTP server. The file will overwrite the existing IPS custom signature file.
ipsuserdefsig tftp <filename_str> <server_ipv4>
Restore an IPS custom signature file from a TFTP server. The file will overwrite the existing IPS custom signature file.
secondary-image ftp <filename_str> <server_ipv4[:port_int] | server_fqdn[:port_int]> [<username_str> <password_str>]
Download a firmware image from an FTP server as the backup firmware of the FortiGate unit. Available on models that support backup firmware images.
secondary-image tftp <filename_str> <server_ipv4>
Download a firmware image from a TFTP server as the backup firmware of the FortiGate unit. Available on models that support backup firmware images.
secondary-image usb <filename_str>
Download a firmware image from a USB disk as the backup firmware of the FortiGate unit. The unit restarts when the upload is complete. Available on models that support backup firmware images.
forticlient tftp <filename_str> <server_ipv4>
Download the FortiClient image from a TFTP server to the FortiGate unit. The filename must have the format: FortiClientSetup_versionmajor.versionminor.build.exe. For example, FortiClientSetup.4.0.377.exe.
vcm {ftp | tftp} <filename_str> <server_ipv4>
Restore VCM engine/plugin from an ftp or tftp server.
Variable Description
FortiOS 4.0 MR3 CLI Reference732 01-431-99686-20110623
http://docs.fortinet.com/ • Feedback
execute revision
F0h
revisionUse these commands to manage configuration and firmware image files on the local disk.
Syntax
To delete a configuration fileexecute revision delete config <revision>
To delete a firmware image fileexecute revision delete image <revision>
To list the configuration filesexecute revision list config
To delete a firmware image fileexecute revision list image
ortiOS 4.0 MR3 CLI Reference1-431-99686-20110623 733ttp://docs.fortinet.com/ • Feedback
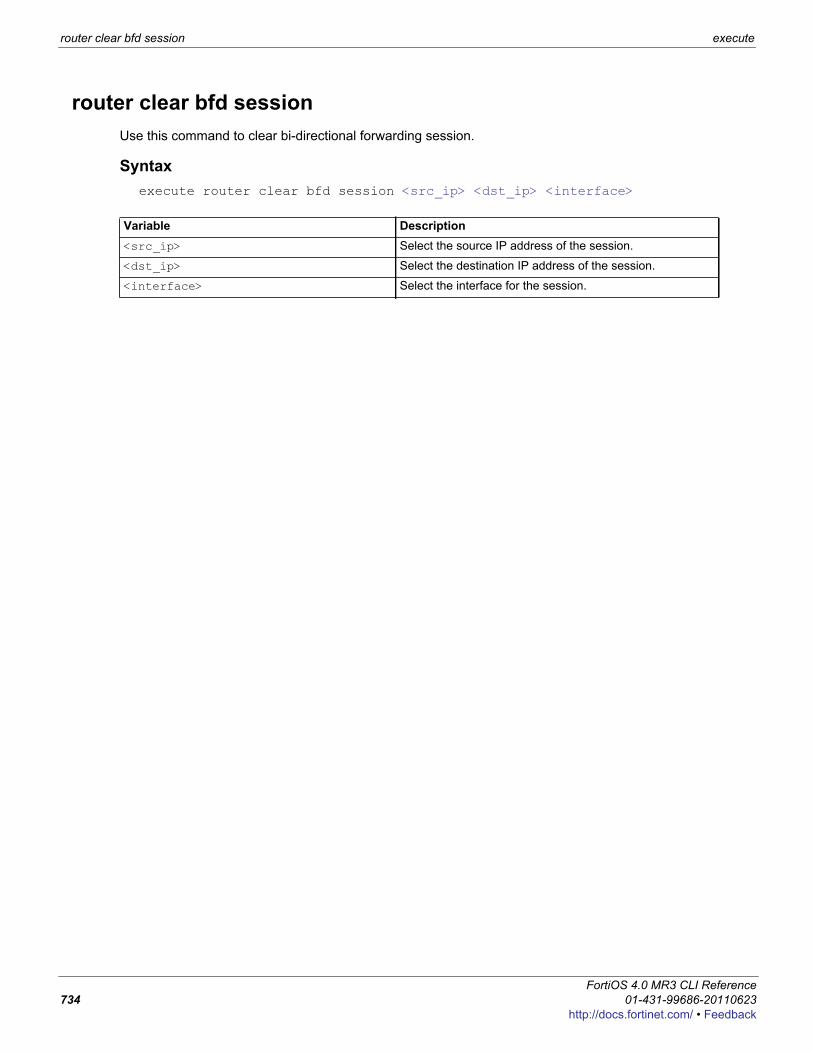
router clear bfd session execute
router clear bfd sessionUse this command to clear bi-directional forwarding session.
Syntaxexecute router clear bfd session <src_ip> <dst_ip> <interface>
Variable Description<src_ip> Select the source IP address of the session.
<dst_ip> Select the destination IP address of the session.
<interface> Select the interface for the session.
FortiOS 4.0 MR3 CLI Reference734 01-431-99686-20110623
http://docs.fortinet.com/ • Feedback
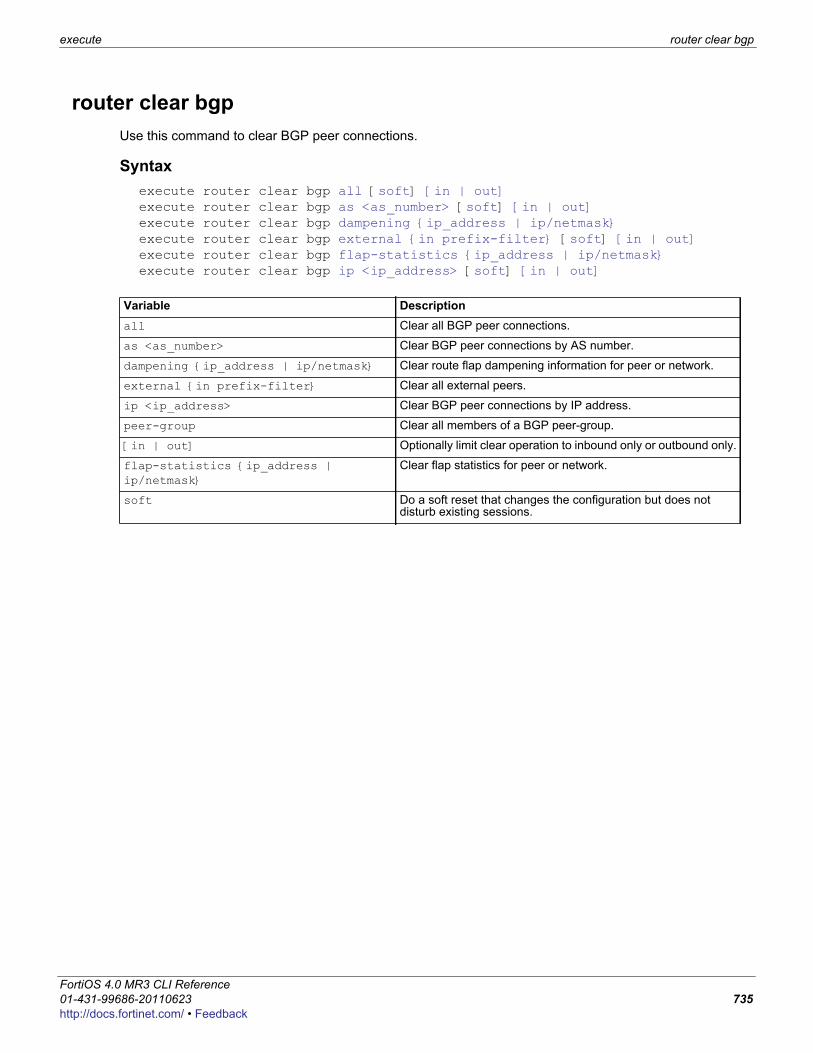
execute router clear bgp
F0h
router clear bgpUse this command to clear BGP peer connections.
Syntaxexecute router clear bgp all [soft] [in | out]execute router clear bgp as <as_number> [soft] [in | out]execute router clear bgp dampening {ip_address | ip/netmask}execute router clear bgp external {in prefix-filter} [soft] [in | out]execute router clear bgp flap-statistics {ip_address | ip/netmask}execute router clear bgp ip <ip_address> [soft] [in | out]
Variable Descriptionall Clear all BGP peer connections.
as <as_number> Clear BGP peer connections by AS number.
dampening {ip_address | ip/netmask} Clear route flap dampening information for peer or network.
external {in prefix-filter} Clear all external peers.
ip <ip_address> Clear BGP peer connections by IP address.
peer-group Clear all members of a BGP peer-group.
[in | out] Optionally limit clear operation to inbound only or outbound only.
flap-statistics {ip_address | ip/netmask}
Clear flap statistics for peer or network.
soft Do a soft reset that changes the configuration but does not disturb existing sessions.
ortiOS 4.0 MR3 CLI Reference1-431-99686-20110623 735ttp://docs.fortinet.com/ • Feedback
router clear ospf process execute
router clear ospf processUse this command to clear and restart the OSPF router.
SyntaxIPv4:
execute router clear ospf process
IPv6:execute router clear ospf6 process
FortiOS 4.0 MR3 CLI Reference736 01-431-99686-20110623
http://docs.fortinet.com/ • Feedback

execute router restart
F0h
router restartUse this command to restart the routing software.
Syntaxexecute router restart
ortiOS 4.0 MR3 CLI Reference1-431-99686-20110623 737ttp://docs.fortinet.com/ • Feedback

send-fds-statistics execute
send-fds-statisticsUse this command to send an FDS statistics report now, without waiting for the FDS statistics report interval to expire.
Syntaxexecute send-fds-statistics
FortiOS 4.0 MR3 CLI Reference738 01-431-99686-20110623
http://docs.fortinet.com/ • Feedback
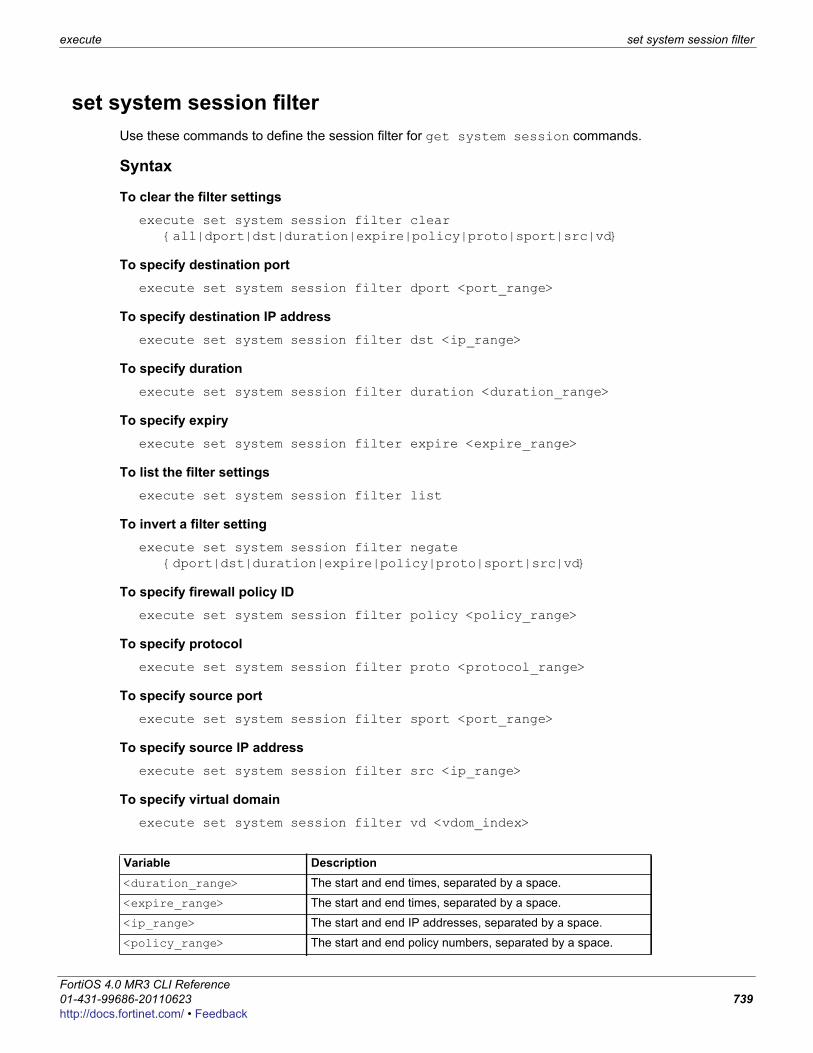
execute set system session filter
F0h
set system session filterUse these commands to define the session filter for get system session commands.
Syntax
To clear the filter settingsexecute set system session filter clear
{all|dport|dst|duration|expire|policy|proto|sport|src|vd}
To specify destination portexecute set system session filter dport <port_range>
To specify destination IP addressexecute set system session filter dst <ip_range>
To specify durationexecute set system session filter duration <duration_range>
To specify expiryexecute set system session filter expire <expire_range>
To list the filter settingsexecute set system session filter list
To invert a filter settingexecute set system session filter negate
{dport|dst|duration|expire|policy|proto|sport|src|vd}
To specify firewall policy IDexecute set system session filter policy <policy_range>
To specify protocolexecute set system session filter proto <protocol_range>
To specify source portexecute set system session filter sport <port_range>
To specify source IP addressexecute set system session filter src <ip_range>
To specify virtual domainexecute set system session filter vd <vdom_index>
Variable Description<duration_range> The start and end times, separated by a space.
<expire_range> The start and end times, separated by a space.
<ip_range> The start and end IP addresses, separated by a space.
<policy_range> The start and end policy numbers, separated by a space.
ortiOS 4.0 MR3 CLI Reference1-431-99686-20110623 739ttp://docs.fortinet.com/ • Feedback
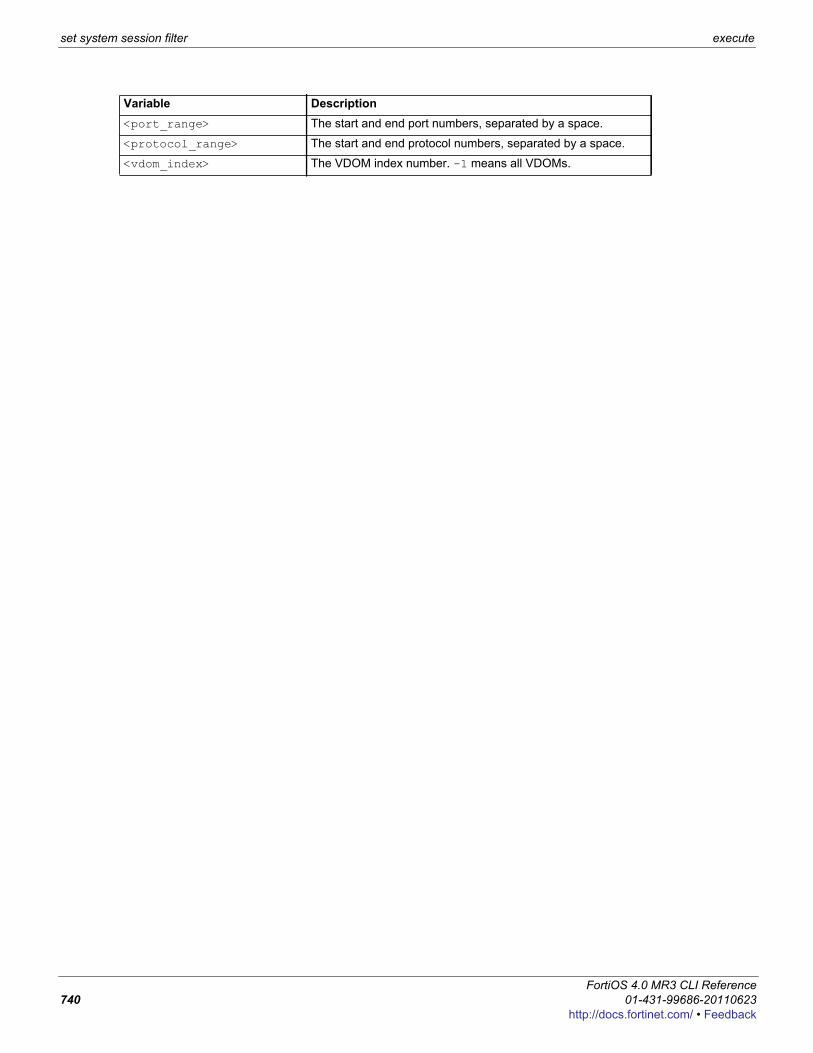
set system session filter execute
<port_range> The start and end port numbers, separated by a space.
<protocol_range> The start and end protocol numbers, separated by a space.
<vdom_index> The VDOM index number. -1 means all VDOMs.
Variable Description
FortiOS 4.0 MR3 CLI Reference740 01-431-99686-20110623
http://docs.fortinet.com/ • Feedback
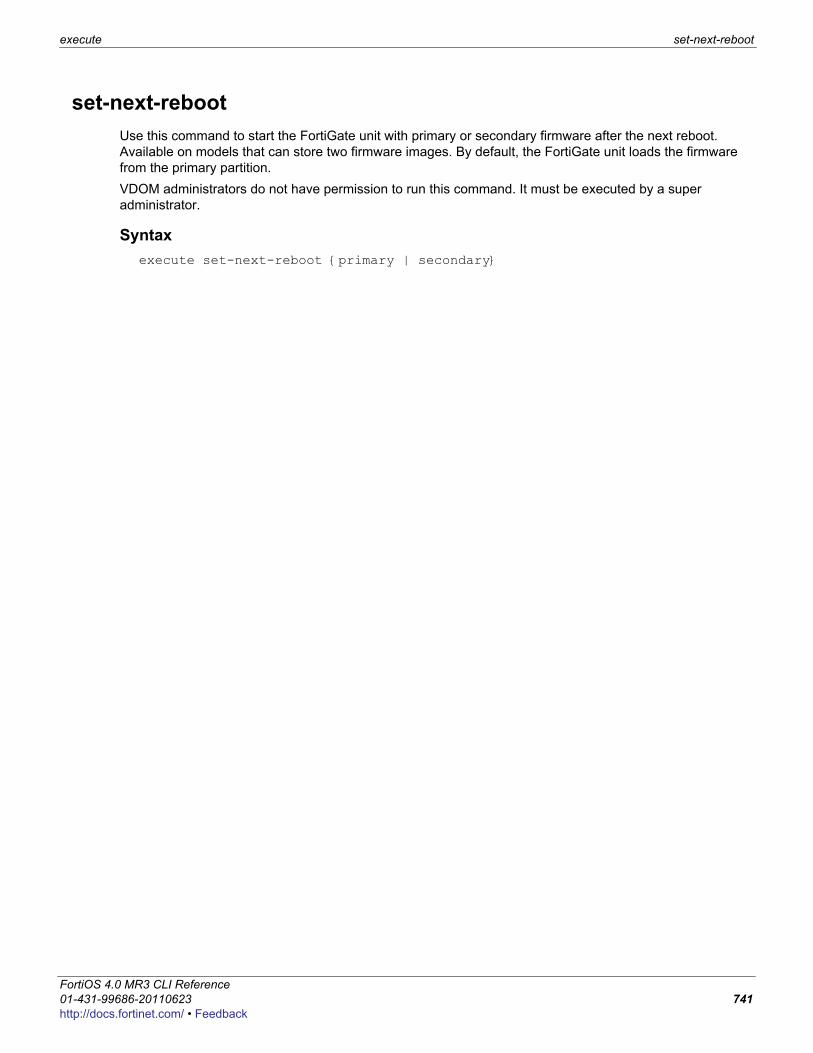
execute set-next-reboot
F0h
set-next-rebootUse this command to start the FortiGate unit with primary or secondary firmware after the next reboot. Available on models that can store two firmware images. By default, the FortiGate unit loads the firmware from the primary partition.VDOM administrators do not have permission to run this command. It must be executed by a super administrator.
Syntaxexecute set-next-reboot {primary | secondary}
ortiOS 4.0 MR3 CLI Reference1-431-99686-20110623 741ttp://docs.fortinet.com/ • Feedback
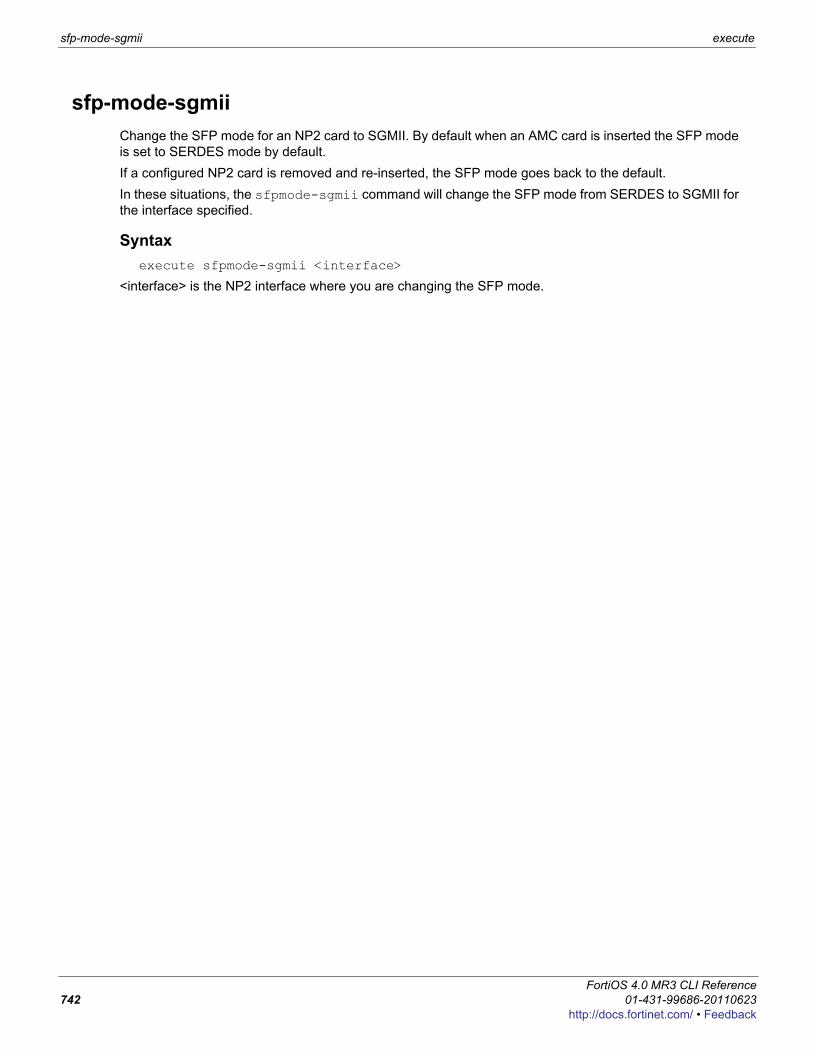
sfp-mode-sgmii execute
sfp-mode-sgmiiChange the SFP mode for an NP2 card to SGMII. By default when an AMC card is inserted the SFP mode is set to SERDES mode by default. If a configured NP2 card is removed and re-inserted, the SFP mode goes back to the default. In these situations, the sfpmode-sgmii command will change the SFP mode from SERDES to SGMII for the interface specified.
Syntaxexecute sfpmode-sgmii <interface>
<interface> is the NP2 interface where you are changing the SFP mode.
FortiOS 4.0 MR3 CLI Reference742 01-431-99686-20110623
http://docs.fortinet.com/ • Feedback
execute shutdown
F0h
shutdownShut down the FortiGate unit now. You will be prompted to confirm this command.
Syntaxexecute shutdown [comment <comment_string>]
comment is optional but you can use it to add a message that will appear in the event log message that records the shutdown. The comment message of the does not appear on the Alert Message console. If the message is more than one word it must be enclosed in quotes.
ExampleThis example shows the reboot command with a message included.
execute shutdown comment “emergency facility shutdown”
An event log message similar to the following is recorded:2009-09-08 11:12:31 critical admin 41986 ssh(172.20.120.11) shutdown User admin shutdown the device from ssh(172.20.120.11). The reason is 'emergency facility shutdown'
Caution: Abruptly powering off your FortiGate unit may corrupt its configuration. Using the reboot and shutdown options here or in the web-based manager ensure proper shutdown procedures are followed to prevent any loss of configuration.
ortiOS 4.0 MR3 CLI Reference1-431-99686-20110623 743ttp://docs.fortinet.com/ • Feedback
ssh execute
sshUse this command to establish an ssh session with another system.
Syntaxexecute ssh <destination>
<destination> - the destination in the form user@ip or user@host.
Exampleexecute ssh [email protected]
To end an ssh session, type exit:FGT-6028030112 # exitConnection to 172.20.120.122 closed.FGT-8002805000 #
FortiOS 4.0 MR3 CLI Reference744 01-431-99686-20110623
http://docs.fortinet.com/ • Feedback
execute tac report
F0h
tac reportUse this command to create a debug report to send to Fortinet Support. Normally you would only use this command if requested to by Fortinet Support.
Syntaxexecute tac report
ortiOS 4.0 MR3 CLI Reference1-431-99686-20110623 745ttp://docs.fortinet.com/ • Feedback

telnet execute
telnetUse telnet client. You can use this tool to test network connectivity.
Syntaxexecute telnet <telnet_ipv4>
<telnet_ipv4> is the address to connect with.Type exit to close the telnet session.
FortiOS 4.0 MR3 CLI Reference746 01-431-99686-20110623
http://docs.fortinet.com/ • Feedback
execute time
F0h
timeGet or set the system time.
Syntaxexecute time [<time_str>]
time_str has the form hh:mm:ss, where• hh is the hour and can be 00 to 23• mm is the minutes and can be 00 to 59• ss is the seconds and can be 00 to 59
If you do not specify a time, the command returns the current system time.You are allowed to shorten numbers to only one digit when setting the time. For example both 01:01:01 and 1:1:1 are allowed.
ExampleThis example sets the system time to 15:31:03:
execute time 15:31:03
ortiOS 4.0 MR3 CLI Reference1-431-99686-20110623 747ttp://docs.fortinet.com/ • Feedback
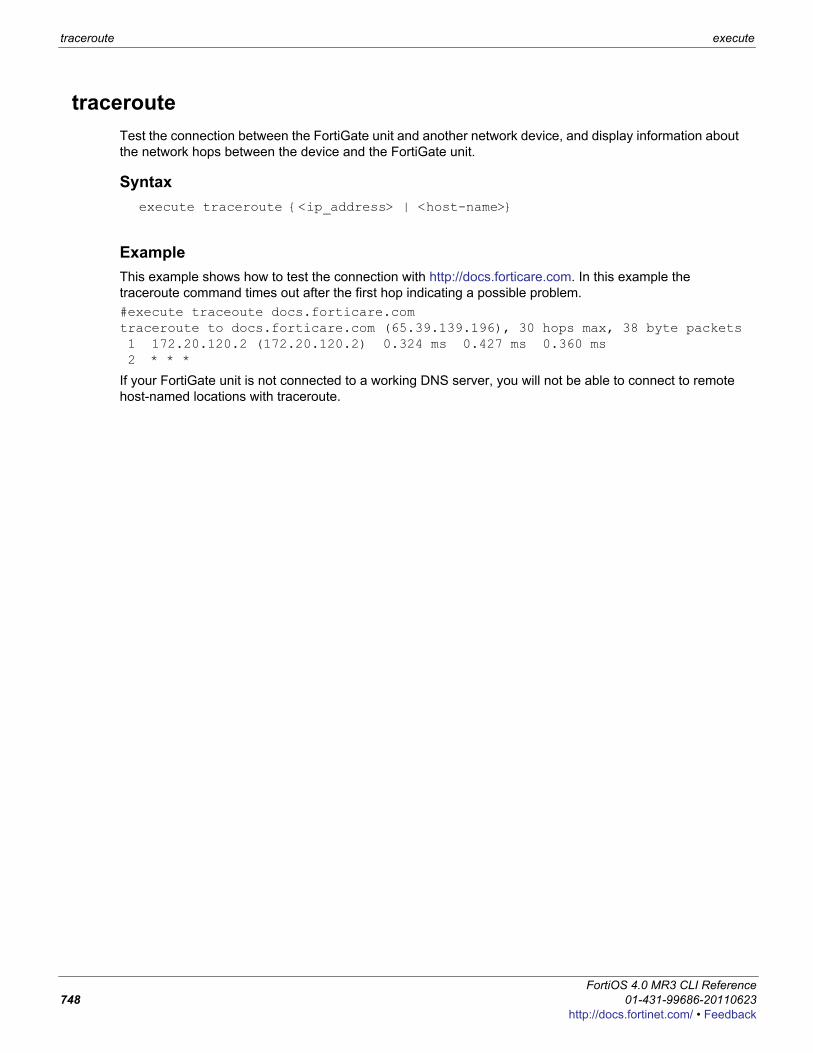
traceroute execute
tracerouteTest the connection between the FortiGate unit and another network device, and display information about the network hops between the device and the FortiGate unit.
Syntaxexecute traceroute {<ip_address> | <host-name>}
ExampleThis example shows how to test the connection with http://docs.forticare.com. In this example the traceroute command times out after the first hop indicating a possible problem.#execute traceoute docs.forticare.comtraceroute to docs.forticare.com (65.39.139.196), 30 hops max, 38 byte packets 1 172.20.120.2 (172.20.120.2) 0.324 ms 0.427 ms 0.360 ms 2 * * *
If your FortiGate unit is not connected to a working DNS server, you will not be able to connect to remote host-named locations with traceroute.
FortiOS 4.0 MR3 CLI Reference748 01-431-99686-20110623
http://docs.fortinet.com/ • Feedback
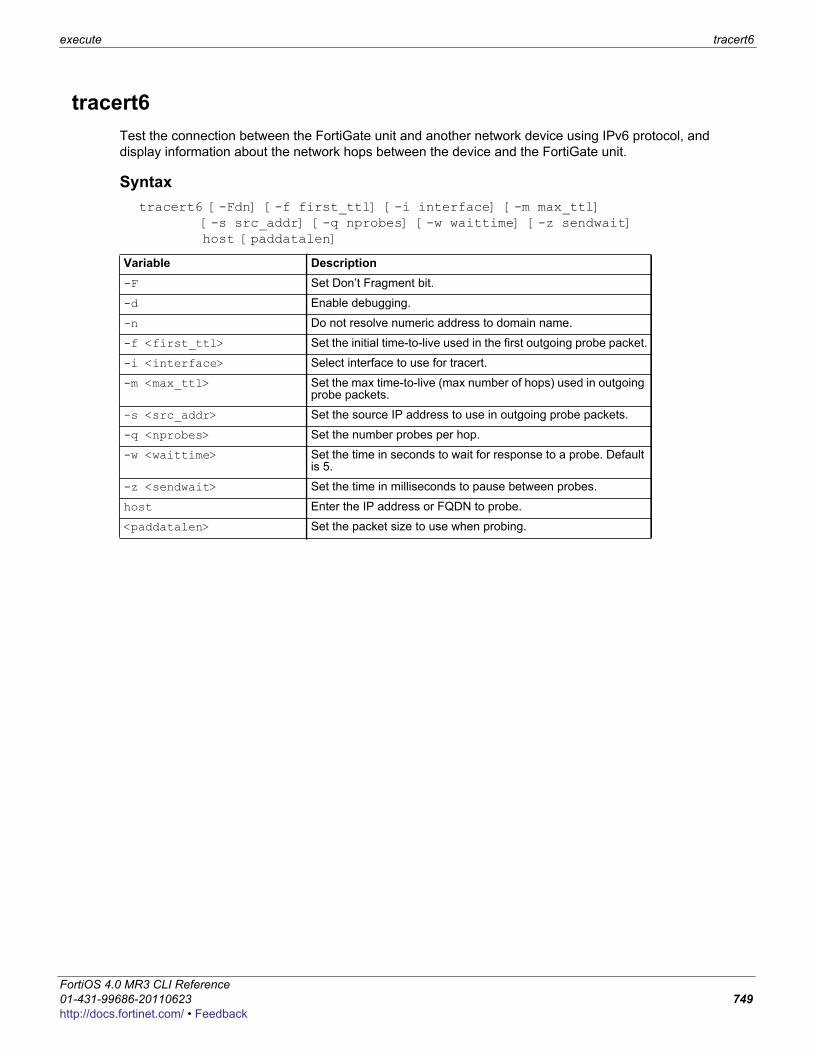
execute tracert6
F0h
tracert6Test the connection between the FortiGate unit and another network device using IPv6 protocol, and display information about the network hops between the device and the FortiGate unit.
Syntaxtracert6 [-Fdn] [-f first_ttl] [-i interface] [-m max_ttl] [-s src_addr] [-q nprobes] [-w waittime] [-z sendwait] host [paddatalen]
Variable Description-F Set Don’t Fragment bit.
-d Enable debugging.
-n Do not resolve numeric address to domain name.
-f <first_ttl> Set the initial time-to-live used in the first outgoing probe packet.
-i <interface> Select interface to use for tracert.
-m <max_ttl> Set the max time-to-live (max number of hops) used in outgoing probe packets.
-s <src_addr> Set the source IP address to use in outgoing probe packets.
-q <nprobes> Set the number probes per hop.
-w <waittime> Set the time in seconds to wait for response to a probe. Default is 5.
-z <sendwait> Set the time in milliseconds to pause between probes.
host Enter the IP address or FQDN to probe.
<paddatalen> Set the packet size to use when probing.
ortiOS 4.0 MR3 CLI Reference1-431-99686-20110623 749ttp://docs.fortinet.com/ • Feedback

update-ase execute
update-aseUse this command to manually initiate the antispam engine and rules update.
Syntaxexecute update-ase
FortiOS 4.0 MR3 CLI Reference750 01-431-99686-20110623
http://docs.fortinet.com/ • Feedback

execute update-av
F0h
update-avUse this command to manually initiate the virus definitions and engines update. To update both virus and attack definitions, use the execute update-now command.
Syntaxexecute update-av
ortiOS 4.0 MR3 CLI Reference1-431-99686-20110623 751ttp://docs.fortinet.com/ • Feedback

update-ips execute
update-ipsUse this command to manually initiate the Intrusion Prevention System (IPS) attack definitions and engine update. To update both virus and attack definitions, use the execute update-now command.
Syntaxexecute update-ips
FortiOS 4.0 MR3 CLI Reference752 01-431-99686-20110623
http://docs.fortinet.com/ • Feedback

execute update-modem
F0h
update-modemUse this command to update the modem list.
Syntaxexecute update-modem
ortiOS 4.0 MR3 CLI Reference1-431-99686-20110623 753ttp://docs.fortinet.com/ • Feedback

update-now execute
update-nowUse this command to manually initiate both virus and attack definitions and engine updates. To initiate only virus or attack definitions, use the execute update-av or execute update-ids command respectively.
Syntaxexecute update-now
FortiOS 4.0 MR3 CLI Reference754 01-431-99686-20110623
http://docs.fortinet.com/ • Feedback

execute upd-vd-license
F0h
upd-vd-licenseUse this command to enter a Virtual Domain (VDOM) license key. If you have a FortiGate- unit that supports VDOM licenses, you can purchase a license key from Fortinet to increase the maximum number of VDOMs to 25, 50, 100 or 500. By default, FortiGate units support a maximum of 10 VDOMs. Available on FortiGate models that can be licensed for more than 10 VDOMs.
Syntaxexecute upd-vd-license <license_key>
Variable Description<license_key> The license key is a 32-character string supplied by Fortinet. Fortinet requires your unit
serial number to generate the license key.
ortiOS 4.0 MR3 CLI Reference1-431-99686-20110623 755ttp://docs.fortinet.com/ • Feedback
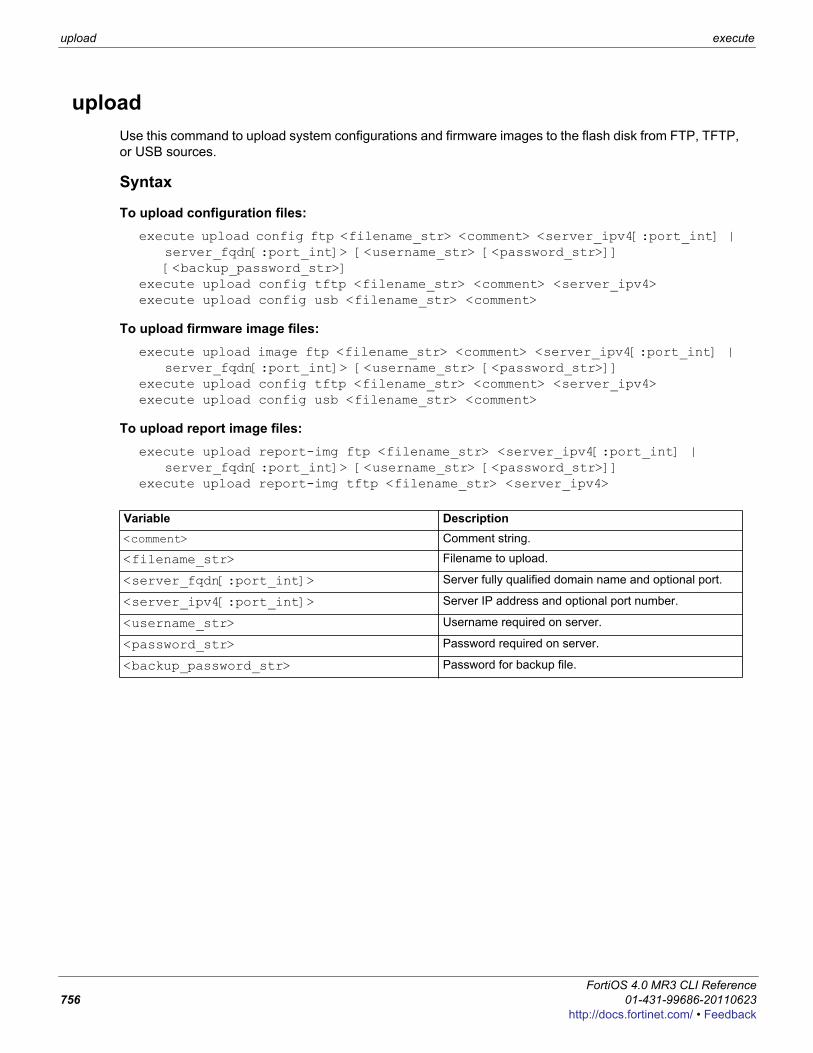
upload execute
uploadUse this command to upload system configurations and firmware images to the flash disk from FTP, TFTP, or USB sources.
Syntax
To upload configuration files:execute upload config ftp <filename_str> <comment> <server_ipv4[:port_int] |
server_fqdn[:port_int]> [<username_str> [<password_str>]] [<backup_password_str>]
execute upload config tftp <filename_str> <comment> <server_ipv4>execute upload config usb <filename_str> <comment>
To upload firmware image files:execute upload image ftp <filename_str> <comment> <server_ipv4[:port_int] |
server_fqdn[:port_int]> [<username_str> [<password_str>]]execute upload config tftp <filename_str> <comment> <server_ipv4>execute upload config usb <filename_str> <comment>
To upload report image files:execute upload report-img ftp <filename_str> <server_ipv4[:port_int] |
server_fqdn[:port_int]> [<username_str> [<password_str>]]execute upload report-img tftp <filename_str> <server_ipv4>
Variable Description<comment> Comment string.
<filename_str> Filename to upload.
<server_fqdn[:port_int]> Server fully qualified domain name and optional port.
<server_ipv4[:port_int]> Server IP address and optional port number.
<username_str> Username required on server.
<password_str> Password required on server.
<backup_password_str> Password for backup file.
FortiOS 4.0 MR3 CLI Reference756 01-431-99686-20110623
http://docs.fortinet.com/ • Feedback
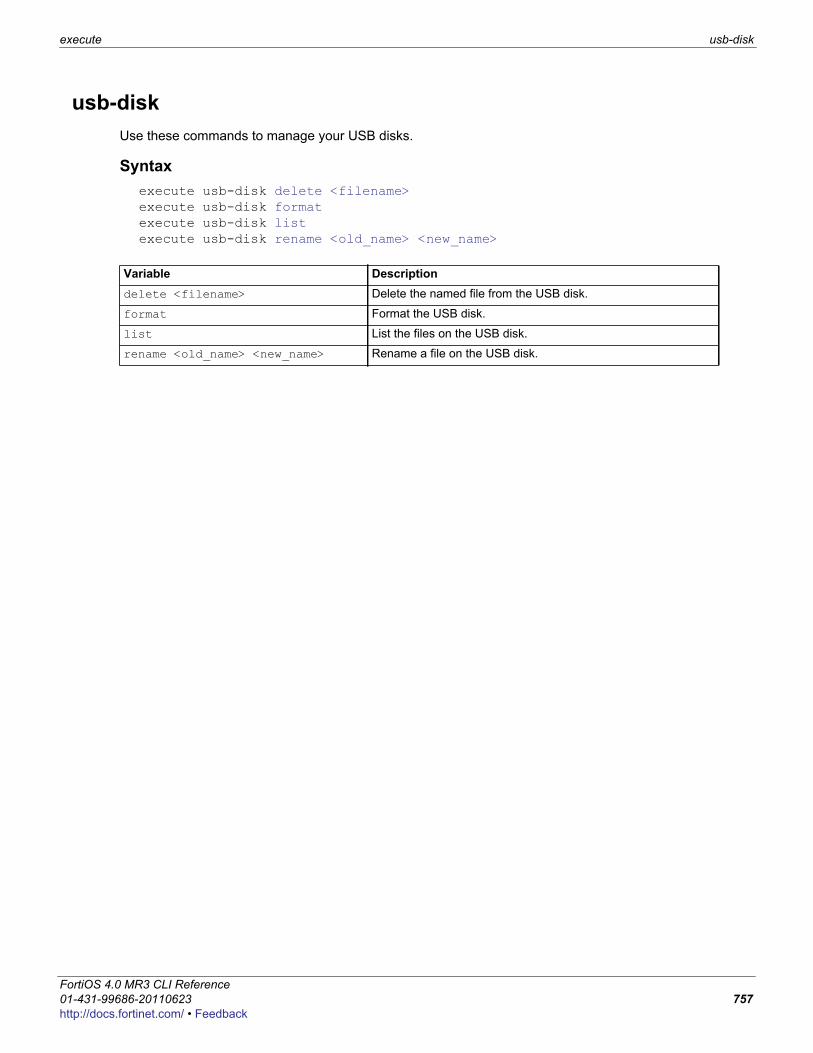
execute usb-disk
F0h
usb-diskUse these commands to manage your USB disks.
Syntaxexecute usb-disk delete <filename>execute usb-disk formatexecute usb-disk listexecute usb-disk rename <old_name> <new_name>
Variable Descriptiondelete <filename> Delete the named file from the USB disk.
format Format the USB disk.
list List the files on the USB disk.
rename <old_name> <new_name> Rename a file on the USB disk.
ortiOS 4.0 MR3 CLI Reference1-431-99686-20110623 757ttp://docs.fortinet.com/ • Feedback
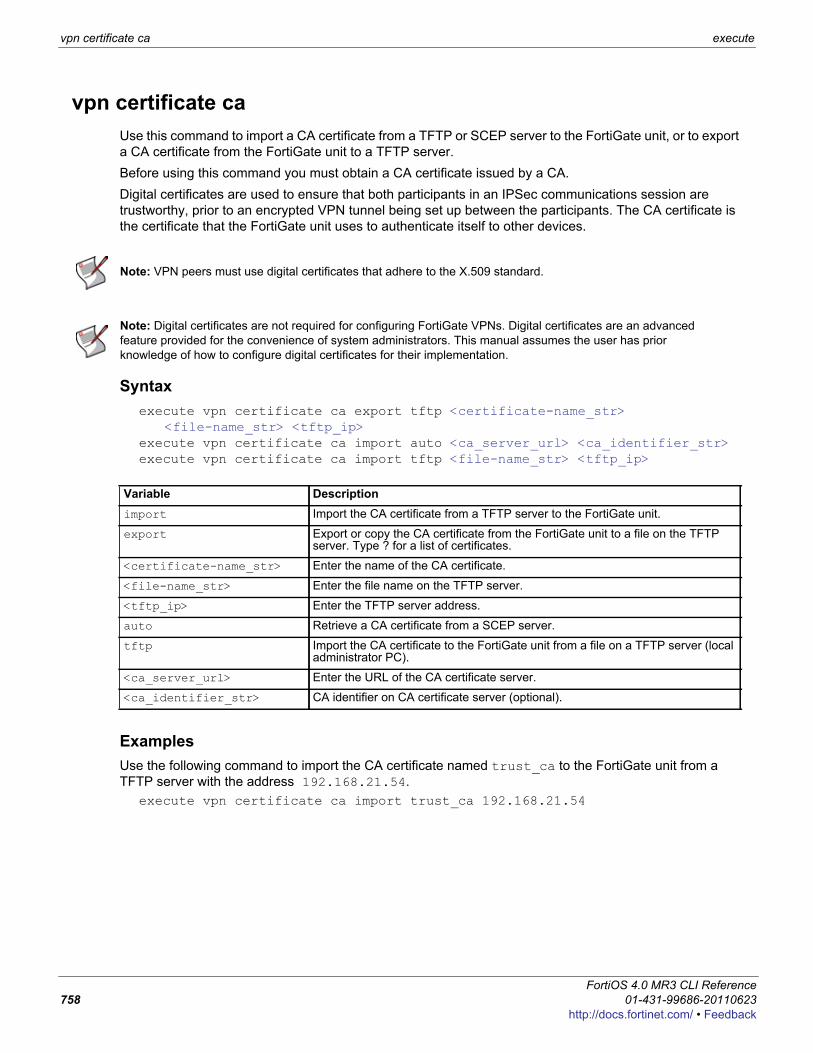
vpn certificate ca execute
vpn certificate caUse this command to import a CA certificate from a TFTP or SCEP server to the FortiGate unit, or to export a CA certificate from the FortiGate unit to a TFTP server.Before using this command you must obtain a CA certificate issued by a CA.Digital certificates are used to ensure that both participants in an IPSec communications session are trustworthy, prior to an encrypted VPN tunnel being set up between the participants. The CA certificate is the certificate that the FortiGate unit uses to authenticate itself to other devices.
Syntaxexecute vpn certificate ca export tftp <certificate-name_str>
<file-name_str> <tftp_ip>execute vpn certificate ca import auto <ca_server_url> <ca_identifier_str>execute vpn certificate ca import tftp <file-name_str> <tftp_ip>
ExamplesUse the following command to import the CA certificate named trust_ca to the FortiGate unit from a TFTP server with the address 192.168.21.54.
execute vpn certificate ca import trust_ca 192.168.21.54
Note: VPN peers must use digital certificates that adhere to the X.509 standard.
Note: Digital certificates are not required for configuring FortiGate VPNs. Digital certificates are an advanced feature provided for the convenience of system administrators. This manual assumes the user has prior knowledge of how to configure digital certificates for their implementation.
Variable Descriptionimport Import the CA certificate from a TFTP server to the FortiGate unit.
export Export or copy the CA certificate from the FortiGate unit to a file on the TFTP server. Type ? for a list of certificates.
<certificate-name_str> Enter the name of the CA certificate.
<file-name_str> Enter the file name on the TFTP server.
<tftp_ip> Enter the TFTP server address.
auto Retrieve a CA certificate from a SCEP server.
tftp Import the CA certificate to the FortiGate unit from a file on a TFTP server (local administrator PC).
<ca_server_url> Enter the URL of the CA certificate server.
<ca_identifier_str> CA identifier on CA certificate server (optional).
FortiOS 4.0 MR3 CLI Reference758 01-431-99686-20110623
http://docs.fortinet.com/ • Feedback
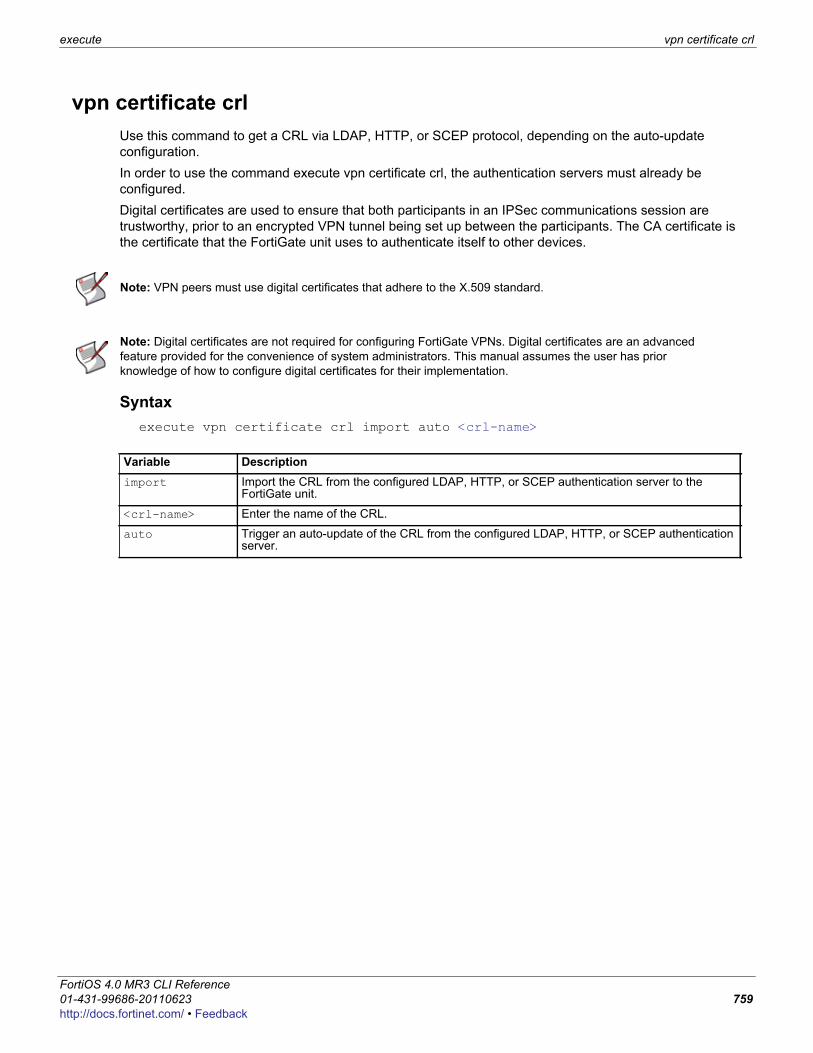
execute vpn certificate crl
F0h
vpn certificate crlUse this command to get a CRL via LDAP, HTTP, or SCEP protocol, depending on the auto-update configuration.In order to use the command execute vpn certificate crl, the authentication servers must already be configured.Digital certificates are used to ensure that both participants in an IPSec communications session are trustworthy, prior to an encrypted VPN tunnel being set up between the participants. The CA certificate is the certificate that the FortiGate unit uses to authenticate itself to other devices.
Syntaxexecute vpn certificate crl import auto <crl-name>
Note: VPN peers must use digital certificates that adhere to the X.509 standard.
Note: Digital certificates are not required for configuring FortiGate VPNs. Digital certificates are an advanced feature provided for the convenience of system administrators. This manual assumes the user has prior knowledge of how to configure digital certificates for their implementation.
Variable Descriptionimport Import the CRL from the configured LDAP, HTTP, or SCEP authentication server to the
FortiGate unit.
<crl-name> Enter the name of the CRL.
auto Trigger an auto-update of the CRL from the configured LDAP, HTTP, or SCEP authentication server.
ortiOS 4.0 MR3 CLI Reference1-431-99686-20110623 759ttp://docs.fortinet.com/ • Feedback
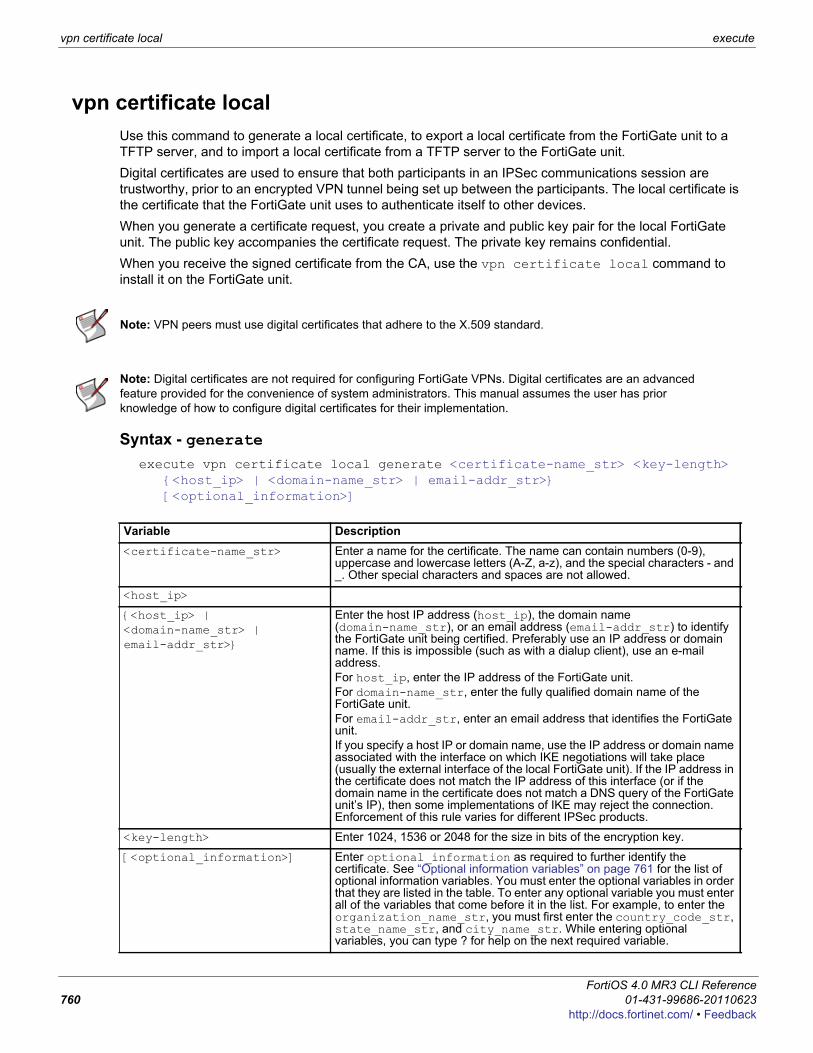
vpn certificate local execute
vpn certificate localUse this command to generate a local certificate, to export a local certificate from the FortiGate unit to a TFTP server, and to import a local certificate from a TFTP server to the FortiGate unit.Digital certificates are used to ensure that both participants in an IPSec communications session are trustworthy, prior to an encrypted VPN tunnel being set up between the participants. The local certificate is the certificate that the FortiGate unit uses to authenticate itself to other devices.When you generate a certificate request, you create a private and public key pair for the local FortiGate unit. The public key accompanies the certificate request. The private key remains confidential.When you receive the signed certificate from the CA, use the vpn certificate local command to install it on the FortiGate unit.
Syntax - generateexecute vpn certificate local generate <certificate-name_str> <key-length>
{<host_ip> | <domain-name_str> | email-addr_str>} [<optional_information>]
Note: VPN peers must use digital certificates that adhere to the X.509 standard.
Note: Digital certificates are not required for configuring FortiGate VPNs. Digital certificates are an advanced feature provided for the convenience of system administrators. This manual assumes the user has prior knowledge of how to configure digital certificates for their implementation.
Variable Description<certificate-name_str> Enter a name for the certificate. The name can contain numbers (0-9),
uppercase and lowercase letters (A-Z, a-z), and the special characters - and _. Other special characters and spaces are not allowed.
<host_ip>
{<host_ip> | <domain-name_str> | email-addr_str>}
Enter the host IP address (host_ip), the domain name (domain-name_str), or an email address (email-addr_str) to identify the FortiGate unit being certified. Preferably use an IP address or domain name. If this is impossible (such as with a dialup client), use an e-mail address.For host_ip, enter the IP address of the FortiGate unit.For domain-name_str, enter the fully qualified domain name of the FortiGate unit.For email-addr_str, enter an email address that identifies the FortiGate unit.If you specify a host IP or domain name, use the IP address or domain name associated with the interface on which IKE negotiations will take place (usually the external interface of the local FortiGate unit). If the IP address in the certificate does not match the IP address of this interface (or if the domain name in the certificate does not match a DNS query of the FortiGate unit’s IP), then some implementations of IKE may reject the connection. Enforcement of this rule varies for different IPSec products.
<key-length> Enter 1024, 1536 or 2048 for the size in bits of the encryption key.
[<optional_information>] Enter optional_information as required to further identify the certificate. See “Optional information variables” on page 761 for the list of optional information variables. You must enter the optional variables in order that they are listed in the table. To enter any optional variable you must enter all of the variables that come before it in the list. For example, to enter the organization_name_str, you must first enter the country_code_str, state_name_str, and city_name_str. While entering optional variables, you can type ? for help on the next required variable.
FortiOS 4.0 MR3 CLI Reference760 01-431-99686-20110623
http://docs.fortinet.com/ • Feedback
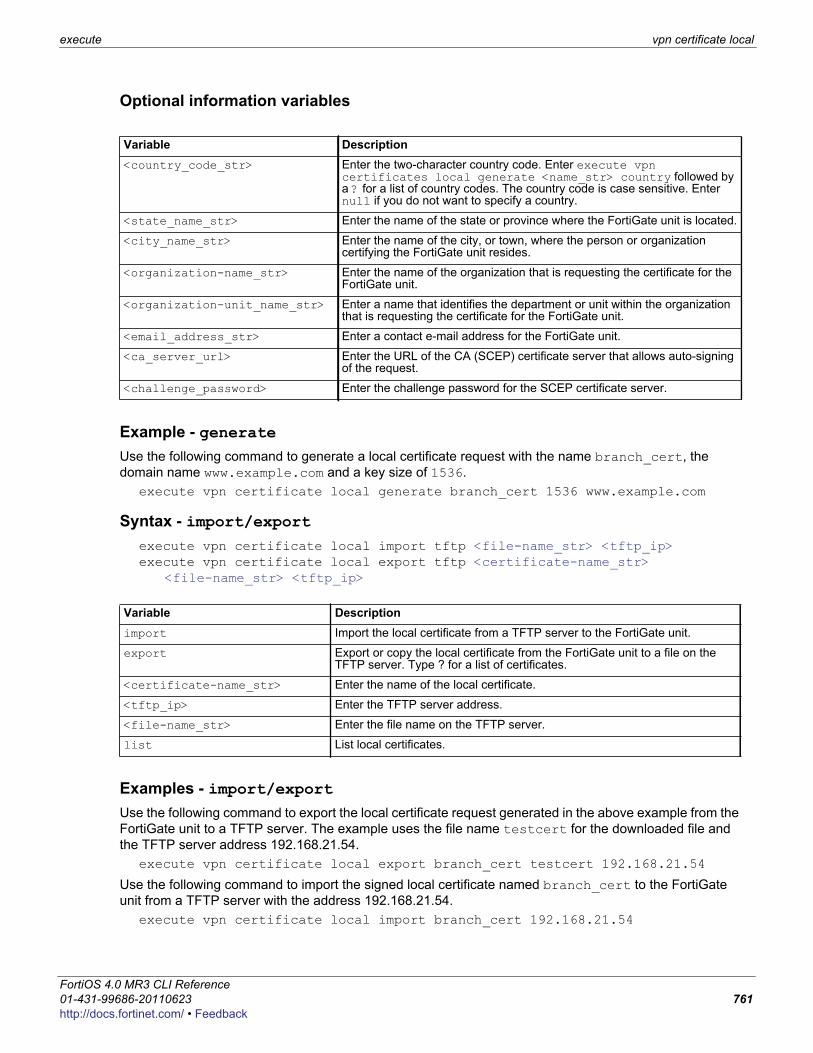
execute vpn certificate local
F0h
Optional information variables
Example - generateUse the following command to generate a local certificate request with the name branch_cert, the domain name www.example.com and a key size of 1536.
execute vpn certificate local generate branch_cert 1536 www.example.com
Syntax - import/exportexecute vpn certificate local import tftp <file-name_str> <tftp_ip>execute vpn certificate local export tftp <certificate-name_str>
<file-name_str> <tftp_ip>
Examples - import/exportUse the following command to export the local certificate request generated in the above example from the FortiGate unit to a TFTP server. The example uses the file name testcert for the downloaded file and the TFTP server address 192.168.21.54.
execute vpn certificate local export branch_cert testcert 192.168.21.54
Use the following command to import the signed local certificate named branch_cert to the FortiGate unit from a TFTP server with the address 192.168.21.54.
execute vpn certificate local import branch_cert 192.168.21.54
Variable Description<country_code_str> Enter the two-character country code. Enter execute vpn
certificates local generate <name_str> country followed by a ? for a list of country codes. The country code is case sensitive. Enter null if you do not want to specify a country.
<state_name_str> Enter the name of the state or province where the FortiGate unit is located.
<city_name_str> Enter the name of the city, or town, where the person or organization certifying the FortiGate unit resides.
<organization-name_str> Enter the name of the organization that is requesting the certificate for the FortiGate unit.
<organization-unit_name_str> Enter a name that identifies the department or unit within the organization that is requesting the certificate for the FortiGate unit.
<email_address_str> Enter a contact e-mail address for the FortiGate unit.
<ca_server_url> Enter the URL of the CA (SCEP) certificate server that allows auto-signing of the request.
<challenge_password> Enter the challenge password for the SCEP certificate server.
Variable Descriptionimport Import the local certificate from a TFTP server to the FortiGate unit.
export Export or copy the local certificate from the FortiGate unit to a file on the TFTP server. Type ? for a list of certificates.
<certificate-name_str> Enter the name of the local certificate.
<tftp_ip> Enter the TFTP server address.
<file-name_str> Enter the file name on the TFTP server.
list List local certificates.
ortiOS 4.0 MR3 CLI Reference1-431-99686-20110623 761ttp://docs.fortinet.com/ • Feedback
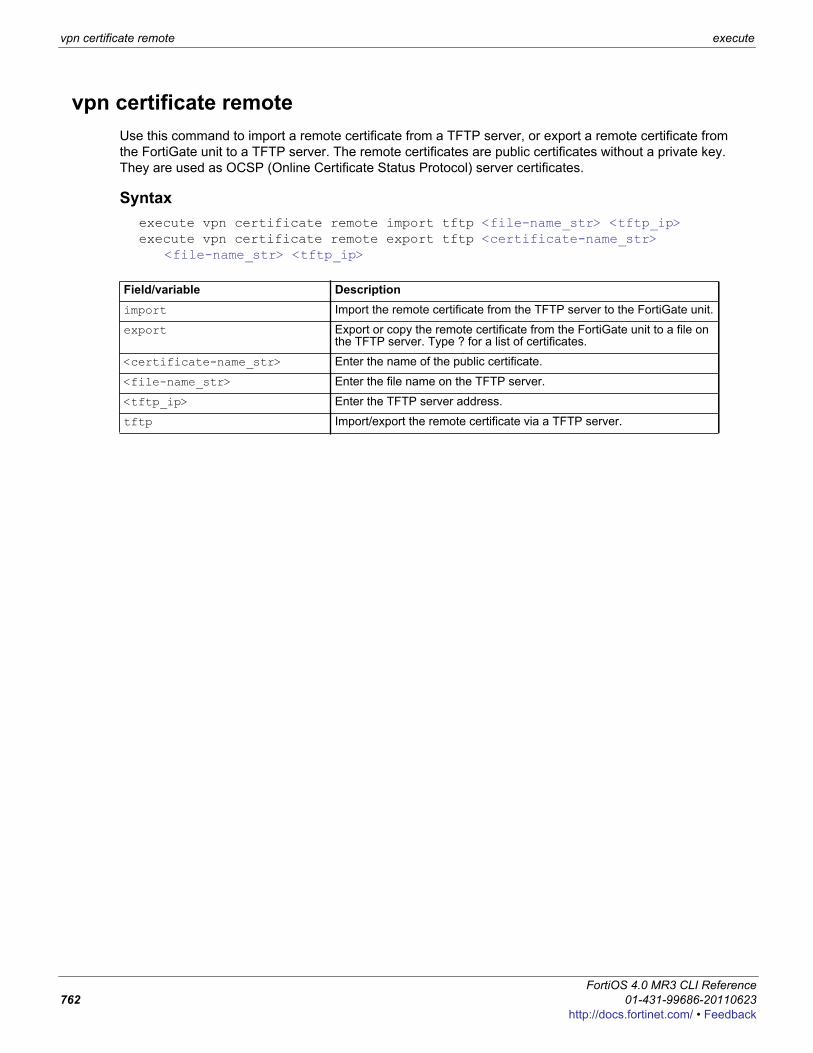
vpn certificate remote execute
vpn certificate remoteUse this command to import a remote certificate from a TFTP server, or export a remote certificate from the FortiGate unit to a TFTP server. The remote certificates are public certificates without a private key. They are used as OCSP (Online Certificate Status Protocol) server certificates.
Syntaxexecute vpn certificate remote import tftp <file-name_str> <tftp_ip>execute vpn certificate remote export tftp <certificate-name_str>
<file-name_str> <tftp_ip>
Field/variable Descriptionimport Import the remote certificate from the TFTP server to the FortiGate unit.
export Export or copy the remote certificate from the FortiGate unit to a file on the TFTP server. Type ? for a list of certificates.
<certificate-name_str> Enter the name of the public certificate.
<file-name_str> Enter the file name on the TFTP server.
<tftp_ip> Enter the TFTP server address.
tftp Import/export the remote certificate via a TFTP server.
FortiOS 4.0 MR3 CLI Reference762 01-431-99686-20110623
http://docs.fortinet.com/ • Feedback
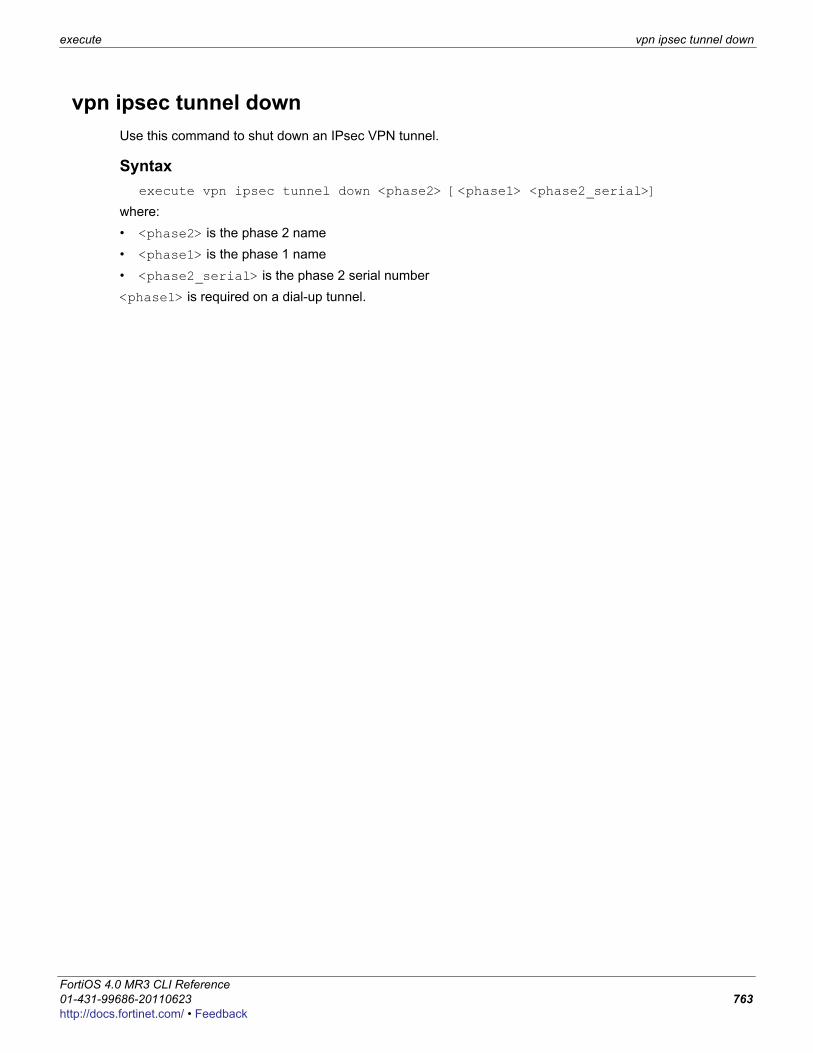
execute vpn ipsec tunnel down
F0h
vpn ipsec tunnel downUse this command to shut down an IPsec VPN tunnel.
Syntaxexecute vpn ipsec tunnel down <phase2> [<phase1> <phase2_serial>]
where: • <phase2> is the phase 2 name• <phase1> is the phase 1 name• <phase2_serial> is the phase 2 serial number<phase1> is required on a dial-up tunnel.
ortiOS 4.0 MR3 CLI Reference1-431-99686-20110623 763ttp://docs.fortinet.com/ • Feedback
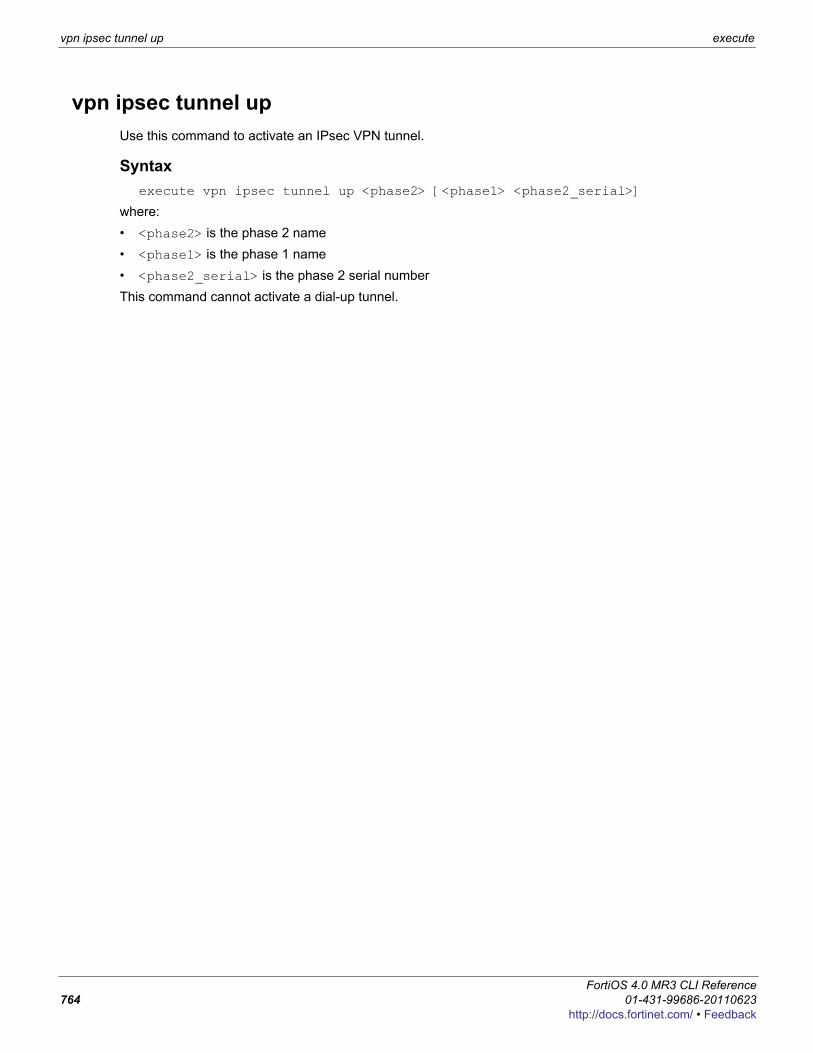
vpn ipsec tunnel up execute
vpn ipsec tunnel upUse this command to activate an IPsec VPN tunnel.
Syntaxexecute vpn ipsec tunnel up <phase2> [<phase1> <phase2_serial>]
where: • <phase2> is the phase 2 name• <phase1> is the phase 1 name• <phase2_serial> is the phase 2 serial numberThis command cannot activate a dial-up tunnel.
FortiOS 4.0 MR3 CLI Reference764 01-431-99686-20110623
http://docs.fortinet.com/ • Feedback
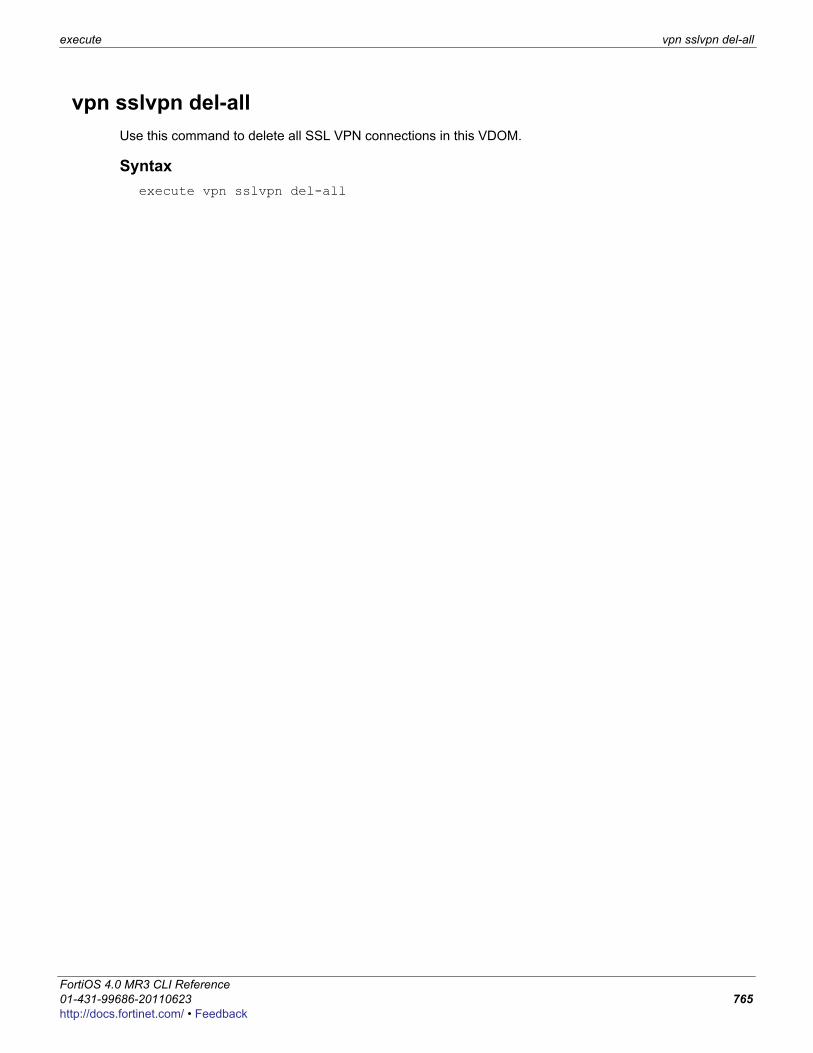
execute vpn sslvpn del-all
F0h
vpn sslvpn del-allUse this command to delete all SSL VPN connections in this VDOM.
Syntaxexecute vpn sslvpn del-all
ortiOS 4.0 MR3 CLI Reference1-431-99686-20110623 765ttp://docs.fortinet.com/ • Feedback
vpn sslvpn del-tunnel execute
vpn sslvpn del-tunnelUse this command to delete an SSL tunnel connection.
Syntaxexecute vpn sslvpn del-tunnel <tunnel_index>
<tunnel_index> identifies which tunnel to delete if there is more than one active tunnel.
FortiOS 4.0 MR3 CLI Reference766 01-431-99686-20110623
http://docs.fortinet.com/ • Feedback
execute vpn sslvpn del-web
F0h
vpn sslvpn del-webUse this command to delete an active SSL VPN web connection.
Syntaxexecute vpn sslvpn del-web <web_index>
<web_index> identifies which web connection to delete if there is more than one active connection.
ortiOS 4.0 MR3 CLI Reference1-431-99686-20110623 767ttp://docs.fortinet.com/ • Feedback

vpn sslvpn list execute
vpn sslvpn listUse this command to list current SSL VPN tunnel connections.
Syntaxexecute vpn sslvpn list {web | tunnel}
FortiOS 4.0 MR3 CLI Reference768 01-431-99686-20110623
http://docs.fortinet.com/ • Feedback

execute wireless-controller delete-wtp-image
F0h
wireless-controller delete-wtp-imageUse this command to delete all firmware images for WLAN Termination Points (WTPs), also known as physical access points.
Syntaxexecute wireless-controller delete-wtp-image
ortiOS 4.0 MR3 CLI Reference1-431-99686-20110623 769ttp://docs.fortinet.com/ • Feedback

wireless-controller list-wtp-image execute
wireless-controller list-wtp-imageUse this command to list all firmware images for WLAN Termination Points (WTPs), also known as WiFi physical access points.
Syntaxexecute wireless-controller list-wtp-image
Example outputWTP Images on AC:ImageName ImageSize(B) ImageInfo ImageMTime FAP22A-IMG.wtp 3711132 FAP22A-v4.0-build212 Mon Jun 6 12:26:41 2011
FortiOS 4.0 MR3 CLI Reference770 01-431-99686-20110623
http://docs.fortinet.com/ • Feedback
execute wireless-controller reset-wtp
F0h
wireless-controller reset-wtpUse this command to reset a physical access point (WTP). If the FortiGate unit has a more recent version of the FortiAP firmware, the FortiAP unit will download and install it. Use the command execute wireless-controller upload-wtp-image to upload FortiAP firmware to the FortiGate unit.
Syntaxexecute wireless-controller reset-wtp {<serialNumber_str> | all}
where <serialNumber_str> is the FortiWiFi unit serial number.Use the all option to reset all APs.
ortiOS 4.0 MR3 CLI Reference1-431-99686-20110623 771ttp://docs.fortinet.com/ • Feedback

wireless-controller restart-acd execute
wireless-controller restart-acdUse this command to restart the wireless-controller daemon.
Syntaxexecute wireless-controller restart-acd
FortiOS 4.0 MR3 CLI Reference772 01-431-99686-20110623
http://docs.fortinet.com/ • Feedback

execute wireless-controller restart-wtpd
F0h
wireless-controller restart-wtpdUse this command to restart the wireless access point daemon.
Syntaxexecute wireless-controller restart-wtpd
ortiOS 4.0 MR3 CLI Reference1-431-99686-20110623 773ttp://docs.fortinet.com/ • Feedback
wireless-controller upload-wtp-image execute
wireless-controller upload-wtp-imageUse this command to upload a FortiWiFi firmware image to the FortiGate unit. Wireless APs controlled by this wireless controller can download the image as needed. Use the execute wireless-controller reset-wtp command to trigger FortiAP units to update their firmware.
SyntaxFTP:
execute wireless-controller upload-wtp-image ftp <filename_str> <server_ipv4[:port_int]> [<username_str> <password_str>]
TFTP:execute wireless-controller upload-wtp-image tftp <filename_str>
<server_ipv4>
FortiOS 4.0 MR3 CLI Reference774 01-431-99686-20110623
http://docs.fortinet.com/ • Feedback
F0h
getThe get commands retrieve information about the operation and performance of your FortiGate unit.This chapter contains the following sections:
endpoint-control app-detectfirewall dnstranslationfirewall iprope appctrlfirewall iprope listfirewall proutefirewall service predefinedfirewall shapergrepgui console statusgui topology statushardware cpuhardware memoryhardware nichardware npuhardware statusips decoder statusips rule statusips sessionipsec tunnel listlog sql statusnetscan scannetscan settingsreport database schemarouter info bfd neighborrouter info bgprouter info gwdetectrouter info isisrouter info kernelrouter info multicastrouter info ospfrouter info protocolsrouter info riprouter info routing-table
router info vrrprouter info6 bgprouter info6 interfacerouter info6 kernelrouter info6 ospfrouter info6 protocolsrouter info6 riprouter info6 routing-tablesystem admin listsystem admin statussystem arpsystem auto-updatesystem central-managementsystem checksumsystem cmdb statussystem dashboardsystem fdp-fortianalyzersystem fortianalyzer-connectivitysystem fortiguard-log-service statussystem fortiguard-service statussystem ha-nonsync-csumsystem ha statussystem info admin sshsystem info admin statussystem interface physicalsystem mgmt-csumsystem mgmt-csumsystem performance firewallsystem performance statussystem performance topsystem session listsystem startup-error-log
system session statussystem session-helper-info listsystem session-infosystem statustestuser adgrpvpn ike gatewayvpn ipsec tunnel detailsvpn ipsec tunnel namevpn ipsec stats cryptovpn ipsec stats tunnelvpn ssl monitorvpn status l2tpvpn status pptpvpn status sslwebfilter ftgd-statisticswebfilter statuswireless-controller scan
ortiOS 4.0 MR3 CLI Reference1-431-99686-20110623 775ttp://docs.fortinet.com/ • Feedback
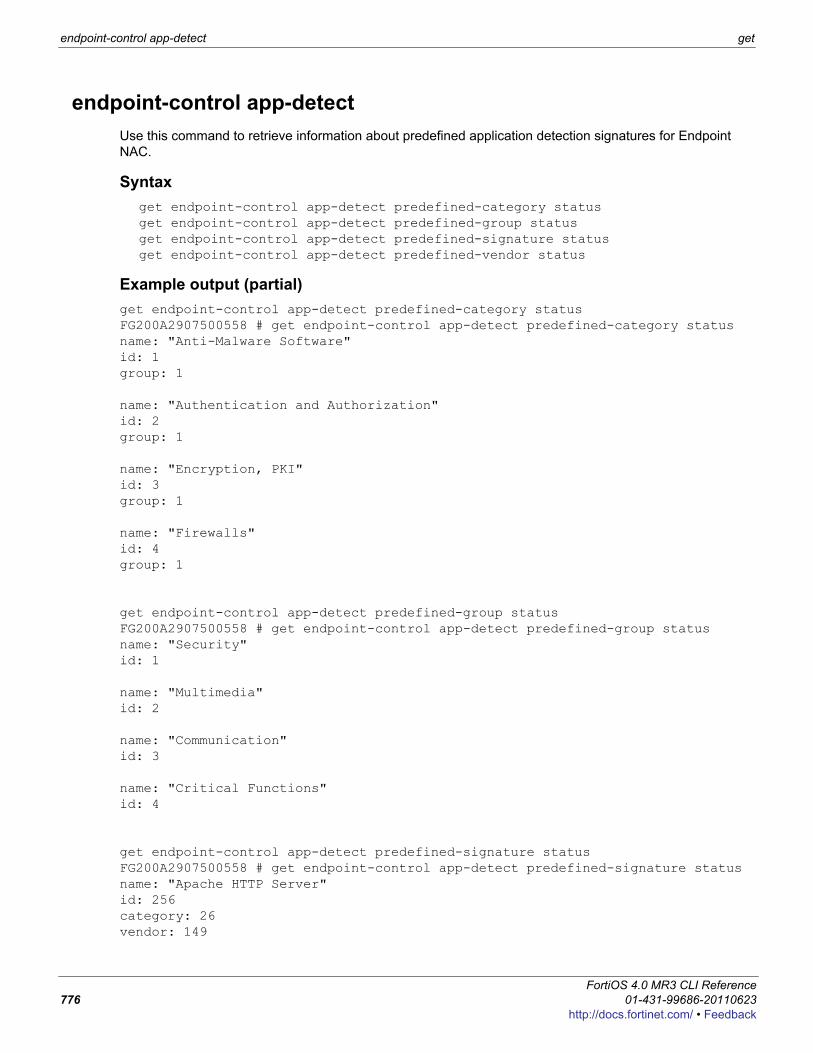
endpoint-control app-detect get
endpoint-control app-detectUse this command to retrieve information about predefined application detection signatures for Endpoint NAC.
Syntaxget endpoint-control app-detect predefined-category statusget endpoint-control app-detect predefined-group statusget endpoint-control app-detect predefined-signature statusget endpoint-control app-detect predefined-vendor status
Example output (partial)get endpoint-control app-detect predefined-category statusFG200A2907500558 # get endpoint-control app-detect predefined-category statusname: "Anti-Malware Software"id: 1group: 1
name: "Authentication and Authorization"id: 2group: 1
name: "Encryption, PKI"id: 3group: 1
name: "Firewalls"id: 4group: 1
get endpoint-control app-detect predefined-group statusFG200A2907500558 # get endpoint-control app-detect predefined-group statusname: "Security"id: 1
name: "Multimedia"id: 2
name: "Communication"id: 3
name: "Critical Functions"id: 4
get endpoint-control app-detect predefined-signature statusFG200A2907500558 # get endpoint-control app-detect predefined-signature statusname: "Apache HTTP Server"id: 256category: 26vendor: 149
FortiOS 4.0 MR3 CLI Reference776 01-431-99686-20110623
http://docs.fortinet.com/ • Feedback
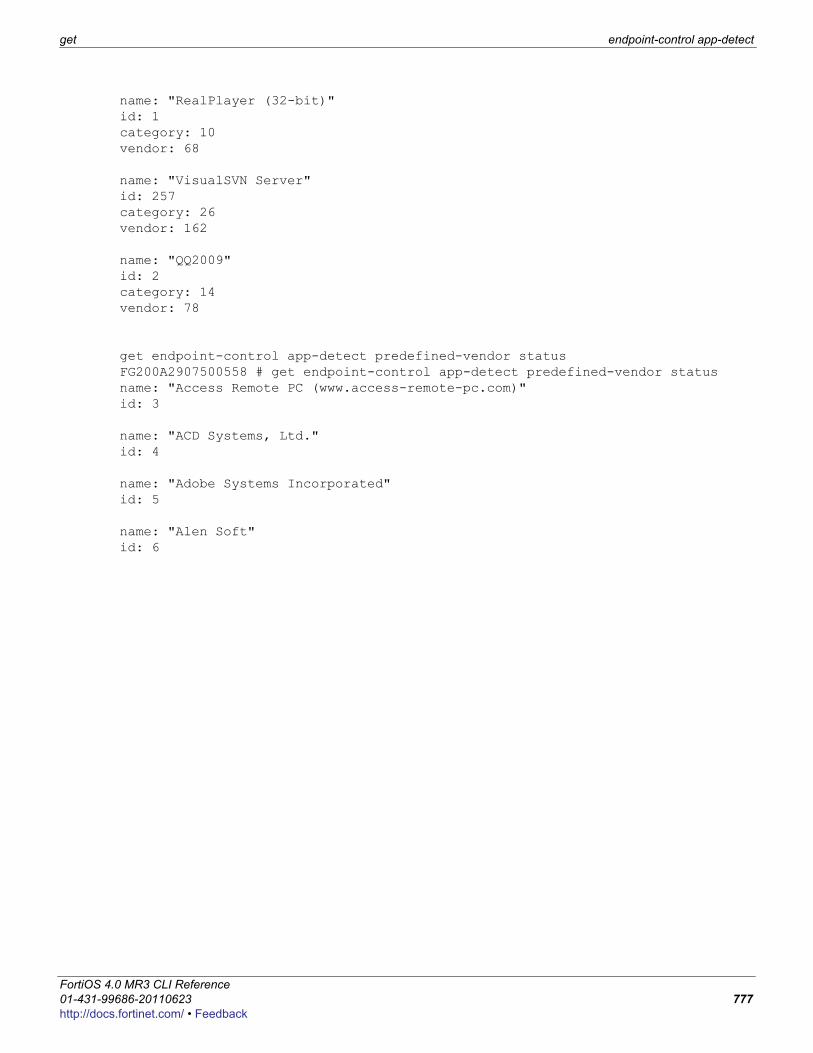
get endpoint-control app-detect
F0h
name: "RealPlayer (32-bit)"id: 1category: 10vendor: 68
name: "VisualSVN Server"id: 257category: 26vendor: 162
name: "QQ2009"id: 2category: 14vendor: 78
get endpoint-control app-detect predefined-vendor statusFG200A2907500558 # get endpoint-control app-detect predefined-vendor statusname: "Access Remote PC (www.access-remote-pc.com)"id: 3
name: "ACD Systems, Ltd."id: 4
name: "Adobe Systems Incorporated"id: 5
name: "Alen Soft"id: 6
ortiOS 4.0 MR3 CLI Reference1-431-99686-20110623 777ttp://docs.fortinet.com/ • Feedback
firewall dnstranslation get
firewall dnstranslationUse this command to display the firewall DNS translation table.
Syntaxget firewall dnstranslation
FortiOS 4.0 MR3 CLI Reference778 01-431-99686-20110623
http://docs.fortinet.com/ • Feedback

get firewall iprope appctrl
F0h
firewall iprope appctrlUse this command to list all application control signatures added to an application control list and display a summary of the application control configuration.
Syntaxget firewall iprope appctrl {list | status}
Example outputIn this example, the FortiGate unit includes one application control list that blocks the FTP application.get firewall iprope appctrl listapp-list=app_list_1/2000 other-action=Pass app-id=15896 list-id=2000 action=Block
get firewall iprope appctrl status appctrl table 3 list 1 app 1 shaper 0
ortiOS 4.0 MR3 CLI Reference1-431-99686-20110623 779ttp://docs.fortinet.com/ • Feedback
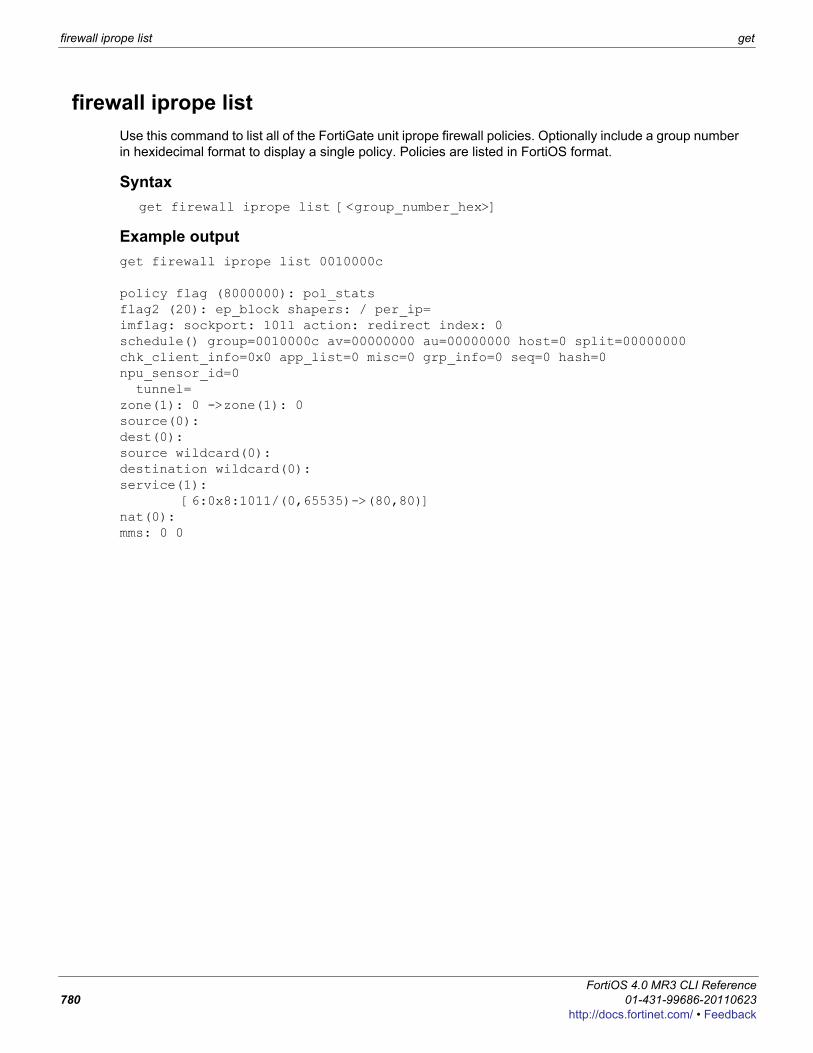
firewall iprope list get
firewall iprope listUse this command to list all of the FortiGate unit iprope firewall policies. Optionally include a group number in hexidecimal format to display a single policy. Policies are listed in FortiOS format.
Syntaxget firewall iprope list [<group_number_hex>]
Example outputget firewall iprope list 0010000c
policy flag (8000000): pol_stats flag2 (20): ep_block shapers: / per_ip=imflag: sockport: 1011 action: redirect index: 0 schedule() group=0010000c av=00000000 au=00000000 host=0 split=00000000chk_client_info=0x0 app_list=0 misc=0 grp_info=0 seq=0 hash=0npu_sensor_id=0 tunnel=zone(1): 0 ->zone(1): 0 source(0): dest(0): source wildcard(0): destination wildcard(0): service(1): [6:0x8:1011/(0,65535)->(80,80)]nat(0): mms: 0 0
FortiOS 4.0 MR3 CLI Reference780 01-431-99686-20110623
http://docs.fortinet.com/ • Feedback
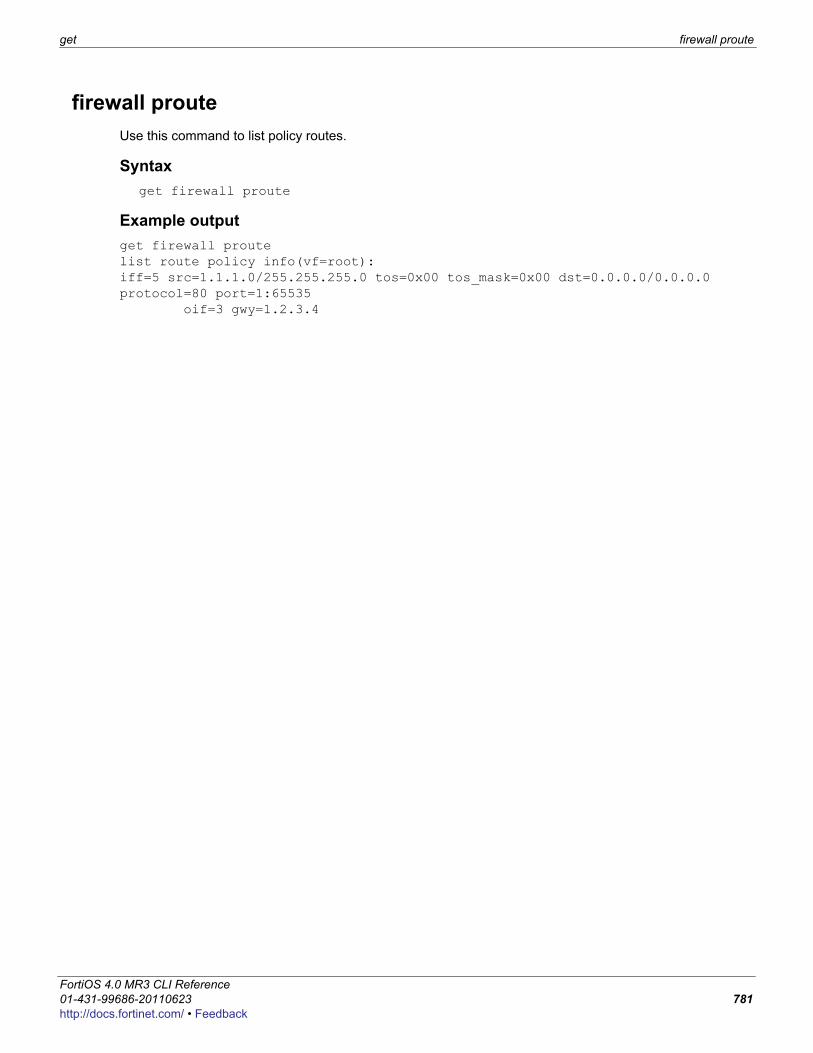
get firewall proute
F0h
firewall prouteUse this command to list policy routes.
Syntaxget firewall proute
Example outputget firewall proute list route policy info(vf=root):iff=5 src=1.1.1.0/255.255.255.0 tos=0x00 tos_mask=0x00 dst=0.0.0.0/0.0.0.0 protocol=80 port=1:65535 oif=3 gwy=1.2.3.4
ortiOS 4.0 MR3 CLI Reference1-431-99686-20110623 781ttp://docs.fortinet.com/ • Feedback
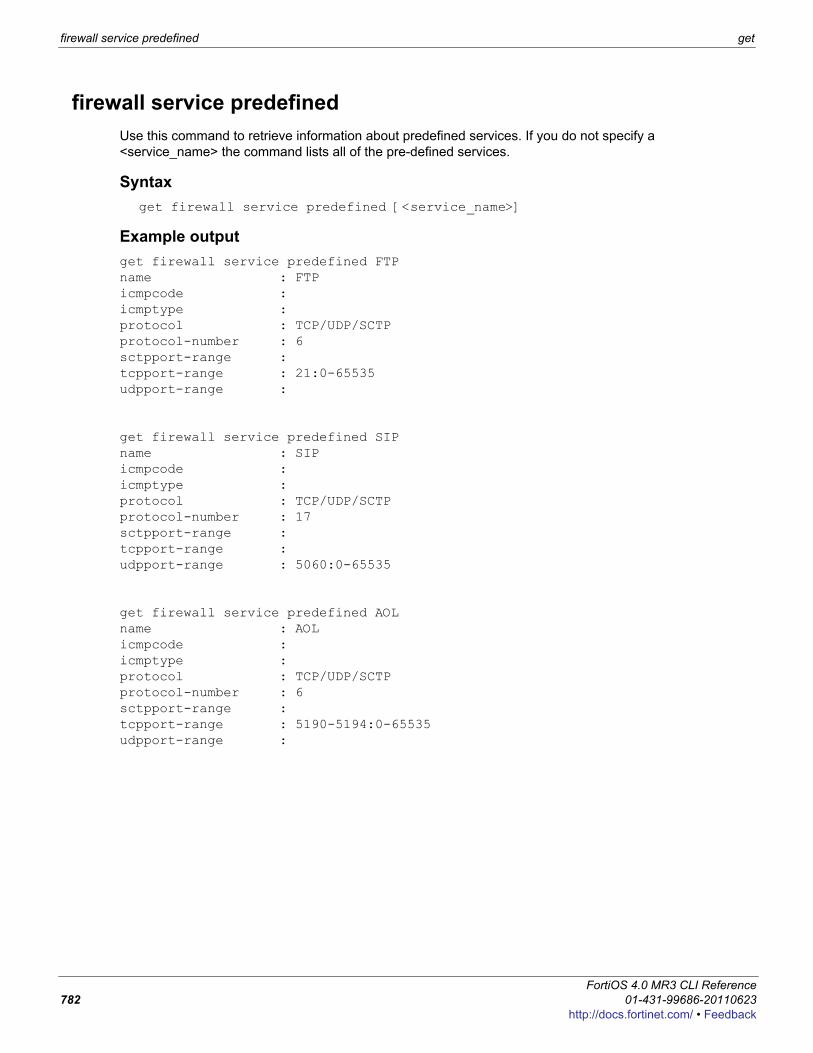
firewall service predefined get
firewall service predefinedUse this command to retrieve information about predefined services. If you do not specify a <service_name> the command lists all of the pre-defined services.
Syntaxget firewall service predefined [<service_name>]
Example outputget firewall service predefined FTPname : FTP icmpcode : icmptype : protocol : TCP/UDP/SCTP protocol-number : 6 sctpport-range : tcpport-range : 21:0-65535 udpport-range :
get firewall service predefined SIPname : SIP icmpcode : icmptype : protocol : TCP/UDP/SCTP protocol-number : 17 sctpport-range : tcpport-range : udpport-range : 5060:0-65535
get firewall service predefined AOLname : AOL icmpcode : icmptype : protocol : TCP/UDP/SCTP protocol-number : 6 sctpport-range : tcpport-range : 5190-5194:0-65535 udpport-range :
FortiOS 4.0 MR3 CLI Reference782 01-431-99686-20110623
http://docs.fortinet.com/ • Feedback
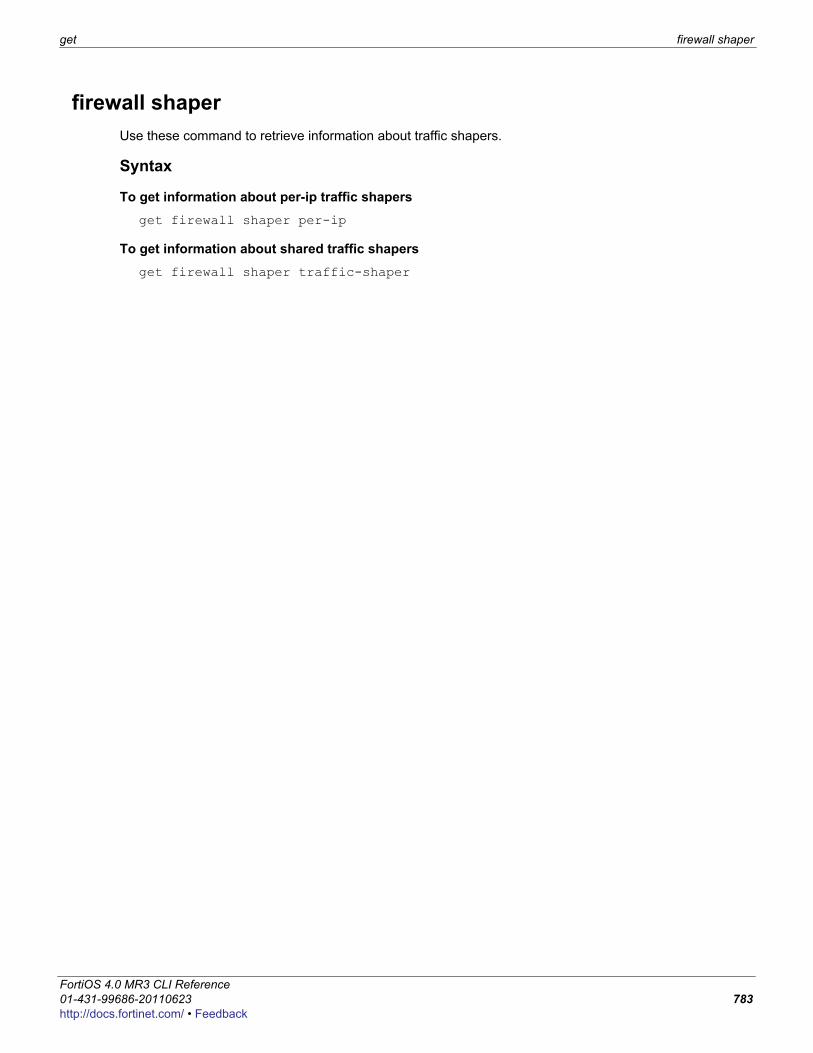
get firewall shaper
F0h
firewall shaperUse these command to retrieve information about traffic shapers.
Syntax
To get information about per-ip traffic shapersget firewall shaper per-ip
To get information about shared traffic shapersget firewall shaper traffic-shaper
ortiOS 4.0 MR3 CLI Reference1-431-99686-20110623 783ttp://docs.fortinet.com/ • Feedback

grep get
grepIn many cases the get and show (and diagnose) commands may produce a large amount of output. If you are looking for specific information in a large get or show command output you can use the grep command to filter the output to only display what you are looking for. The grep command is based on the standard UNIX grep, used for searching text output based on regular expressions.Information about how to use grep and regular expressions is available from the Internet. For example, see http://www.opengroup.org/onlinepubs/009695399/utilities/grep.html.
Syntax{get | show| diagnose} | grep <regular_expression>
Example outputUse the following command to display the MAC address of the FortiGate unit internal interface:
get hardware nic internal | grep Current_HWaddrCurrent_HWaddr 00:09:0f:cb:c2:75
Use the following command to display all TCP sessions in the session list and include the session list line number in the output
get system session list | grep -n tcp19:tcp 1110 10.31.101.10:1862 172.20.120.122:30670 69.111.193.57:1469
- 27:tcp 3599 10.31.101.10:2061 - 10.31.101.100:22 - 38:tcp 3594 10.31.101.10:4780 172.20.120.122:49700 172.20.120.100:445
- 43:tcp 3582 10.31.101.10:4398 172.20.120.122:49574
24.200.188.171:48726 -
Use the following command to display all lines in HTTP replacement message commands that contain URL (upper or lower case):
show system replacemsg http | grep -i urlset buffer "<HTML><BODY>The page you requested has been blocked because it
contains a banned word. URL = %%PROTOCOL%%%%URL%%</BODY></HTML>"config system replacemsg http "url-block" set buffer "<HTML><BODY>The URL you requested has been blocked. URL =
%%URL%%</BODY></HTML>"config system replacemsg http "urlfilter-err"...
FortiOS 4.0 MR3 CLI Reference784 01-431-99686-20110623
http://docs.fortinet.com/ • Feedback
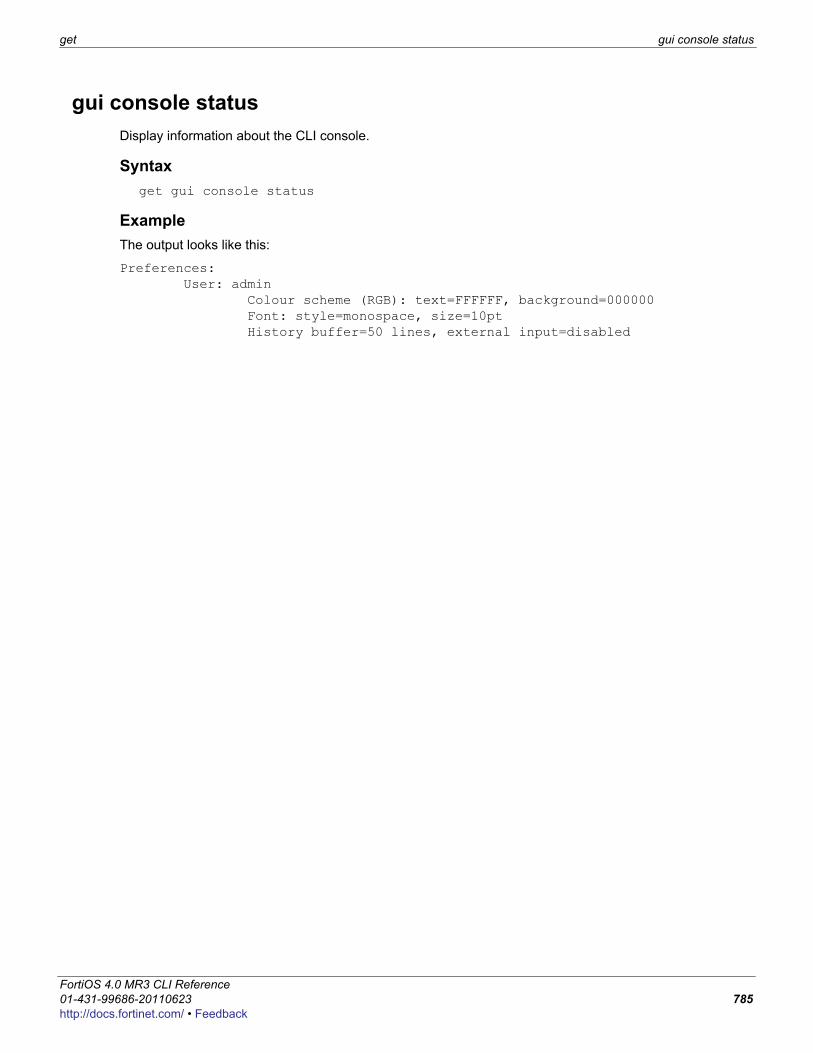
get gui console status
F0h
gui console statusDisplay information about the CLI console.
Syntaxget gui console status
ExampleThe output looks like this:
Preferences: User: admin Colour scheme (RGB): text=FFFFFF, background=000000 Font: style=monospace, size=10pt History buffer=50 lines, external input=disabled
ortiOS 4.0 MR3 CLI Reference1-431-99686-20110623 785ttp://docs.fortinet.com/ • Feedback
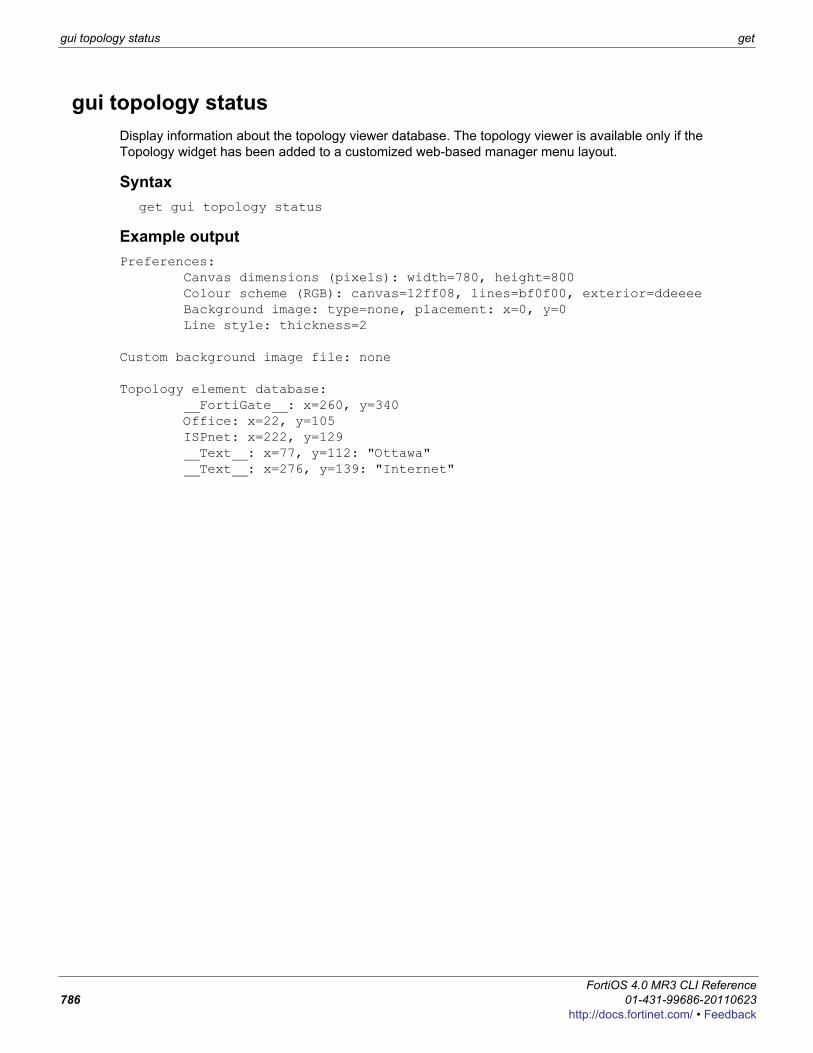
gui topology status get
gui topology statusDisplay information about the topology viewer database. The topology viewer is available only if the Topology widget has been added to a customized web-based manager menu layout.
Syntaxget gui topology status
Example outputPreferences: Canvas dimensions (pixels): width=780, height=800 Colour scheme (RGB): canvas=12ff08, lines=bf0f00, exterior=ddeeee Background image: type=none, placement: x=0, y=0 Line style: thickness=2
Custom background image file: none
Topology element database: __FortiGate__: x=260, y=340 Office: x=22, y=105 ISPnet: x=222, y=129 __Text__: x=77, y=112: "Ottawa" __Text__: x=276, y=139: "Internet"
FortiOS 4.0 MR3 CLI Reference786 01-431-99686-20110623
http://docs.fortinet.com/ • Feedback
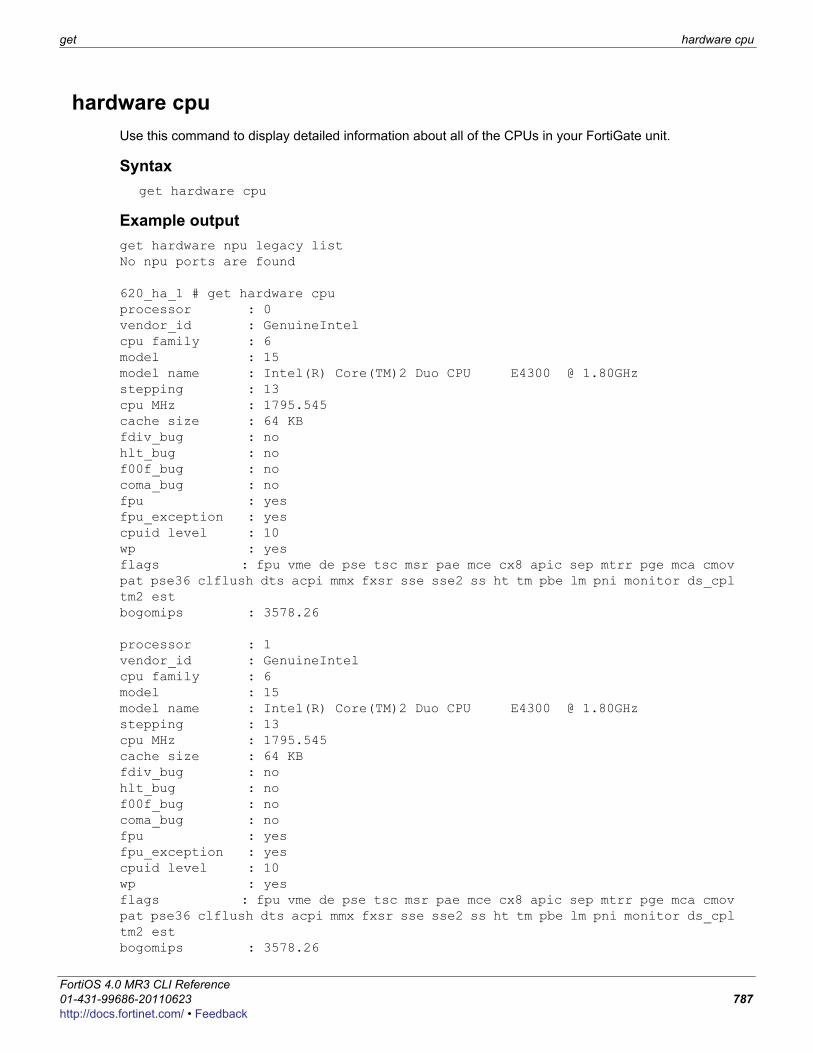
get hardware cpu
F0h
hardware cpuUse this command to display detailed information about all of the CPUs in your FortiGate unit.
Syntaxget hardware cpu
Example outputget hardware npu legacy list No npu ports are found
620_ha_1 # get hardware cpu processor : 0vendor_id : GenuineIntelcpu family : 6model : 15model name : Intel(R) Core(TM)2 Duo CPU E4300 @ 1.80GHzstepping : 13cpu MHz : 1795.545cache size : 64 KBfdiv_bug : nohlt_bug : nof00f_bug : nocoma_bug : nofpu : yesfpu_exception : yescpuid level : 10wp : yesflags : fpu vme de pse tsc msr pae mce cx8 apic sep mtrr pge mca cmov pat pse36 clflush dts acpi mmx fxsr sse sse2 ss ht tm pbe lm pni monitor ds_cpl tm2 estbogomips : 3578.26
processor : 1vendor_id : GenuineIntelcpu family : 6model : 15model name : Intel(R) Core(TM)2 Duo CPU E4300 @ 1.80GHzstepping : 13cpu MHz : 1795.545cache size : 64 KBfdiv_bug : nohlt_bug : nof00f_bug : nocoma_bug : nofpu : yesfpu_exception : yescpuid level : 10wp : yesflags : fpu vme de pse tsc msr pae mce cx8 apic sep mtrr pge mca cmov pat pse36 clflush dts acpi mmx fxsr sse sse2 ss ht tm pbe lm pni monitor ds_cpl tm2 estbogomips : 3578.26
ortiOS 4.0 MR3 CLI Reference1-431-99686-20110623 787ttp://docs.fortinet.com/ • Feedback
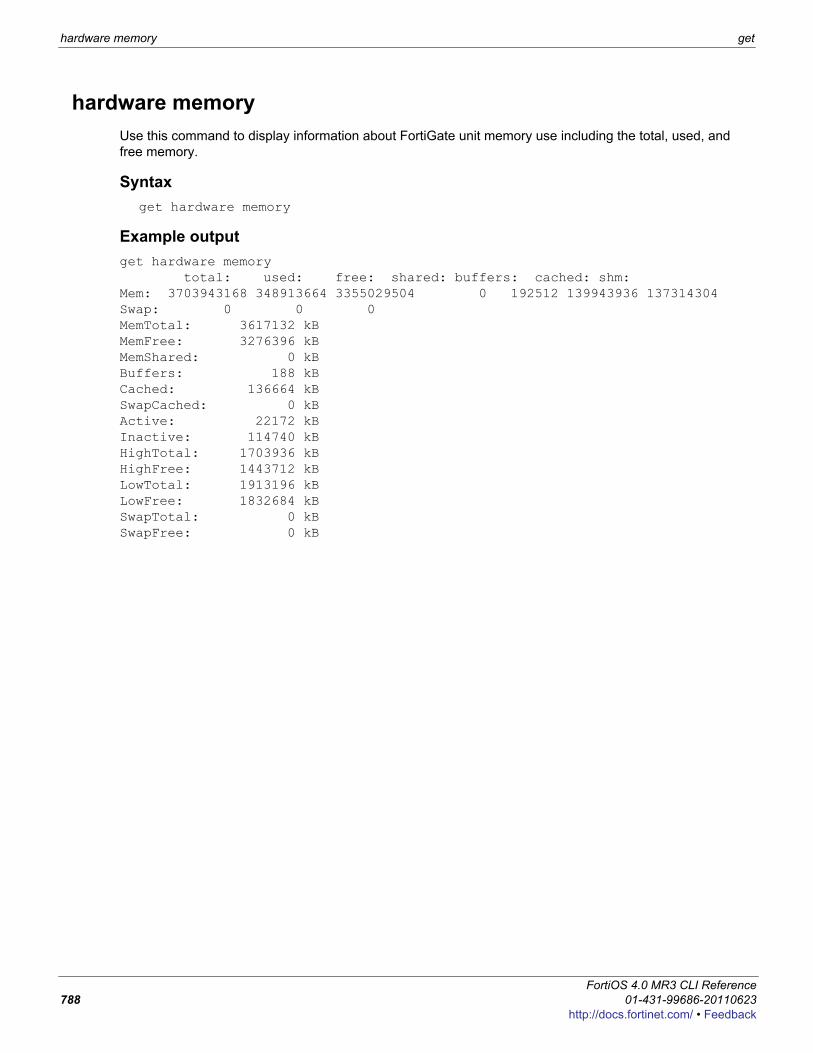
hardware memory get
hardware memoryUse this command to display information about FortiGate unit memory use including the total, used, and free memory.
Syntaxget hardware memory
Example outputget hardware memory total: used: free: shared: buffers: cached: shm:Mem: 3703943168 348913664 3355029504 0 192512 139943936 137314304Swap: 0 0 0MemTotal: 3617132 kBMemFree: 3276396 kBMemShared: 0 kBBuffers: 188 kBCached: 136664 kBSwapCached: 0 kBActive: 22172 kBInactive: 114740 kBHighTotal: 1703936 kBHighFree: 1443712 kBLowTotal: 1913196 kBLowFree: 1832684 kBSwapTotal: 0 kBSwapFree: 0 kB
FortiOS 4.0 MR3 CLI Reference788 01-431-99686-20110623
http://docs.fortinet.com/ • Feedback
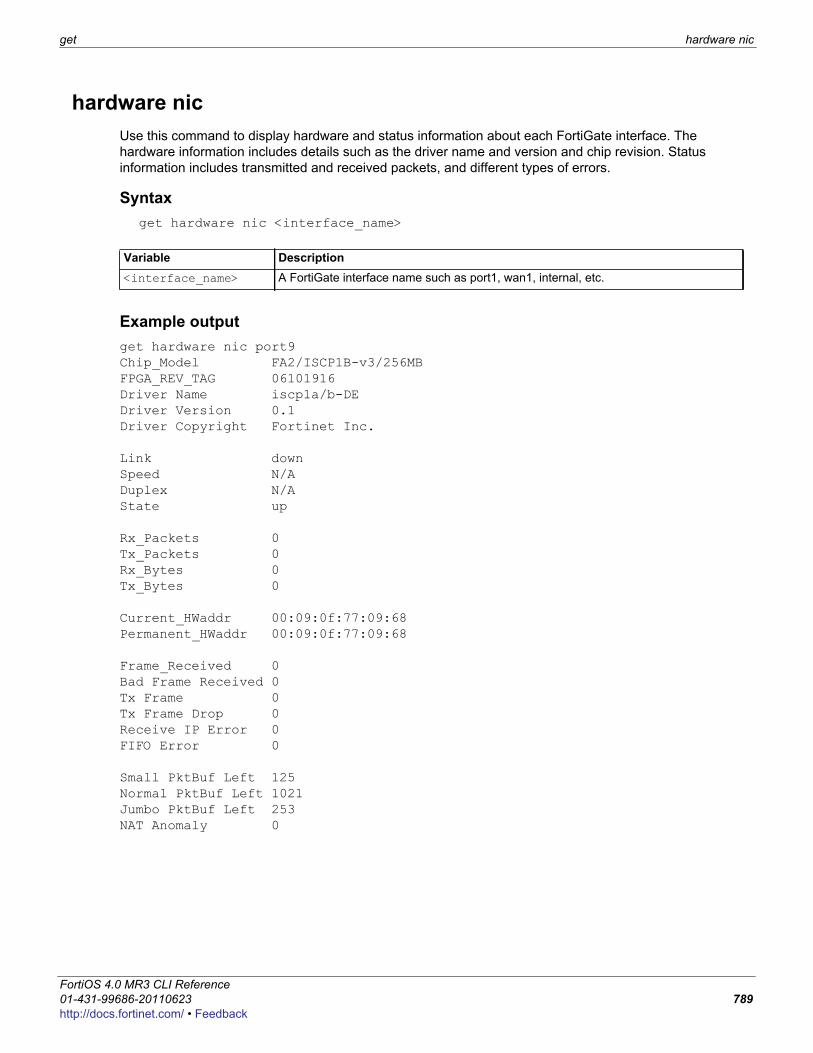
get hardware nic
F0h
hardware nicUse this command to display hardware and status information about each FortiGate interface. The hardware information includes details such as the driver name and version and chip revision. Status information includes transmitted and received packets, and different types of errors.
Syntaxget hardware nic <interface_name>
Example outputget hardware nic port9Chip_Model FA2/ISCP1B-v3/256MBFPGA_REV_TAG 06101916 Driver Name iscp1a/b-DEDriver Version 0.1Driver Copyright Fortinet Inc.
Link downSpeed N/ADuplex N/AState up
Rx_Packets 0Tx_Packets 0Rx_Bytes 0Tx_Bytes 0
Current_HWaddr 00:09:0f:77:09:68Permanent_HWaddr 00:09:0f:77:09:68
Frame_Received 0 Bad Frame Received 0 Tx Frame 0 Tx Frame Drop 0 Receive IP Error 0 FIFO Error 0
Small PktBuf Left 125 Normal PktBuf Left 1021 Jumbo PktBuf Left 253 NAT Anomaly 0
Variable Description<interface_name> A FortiGate interface name such as port1, wan1, internal, etc.
ortiOS 4.0 MR3 CLI Reference1-431-99686-20110623 789ttp://docs.fortinet.com/ • Feedback
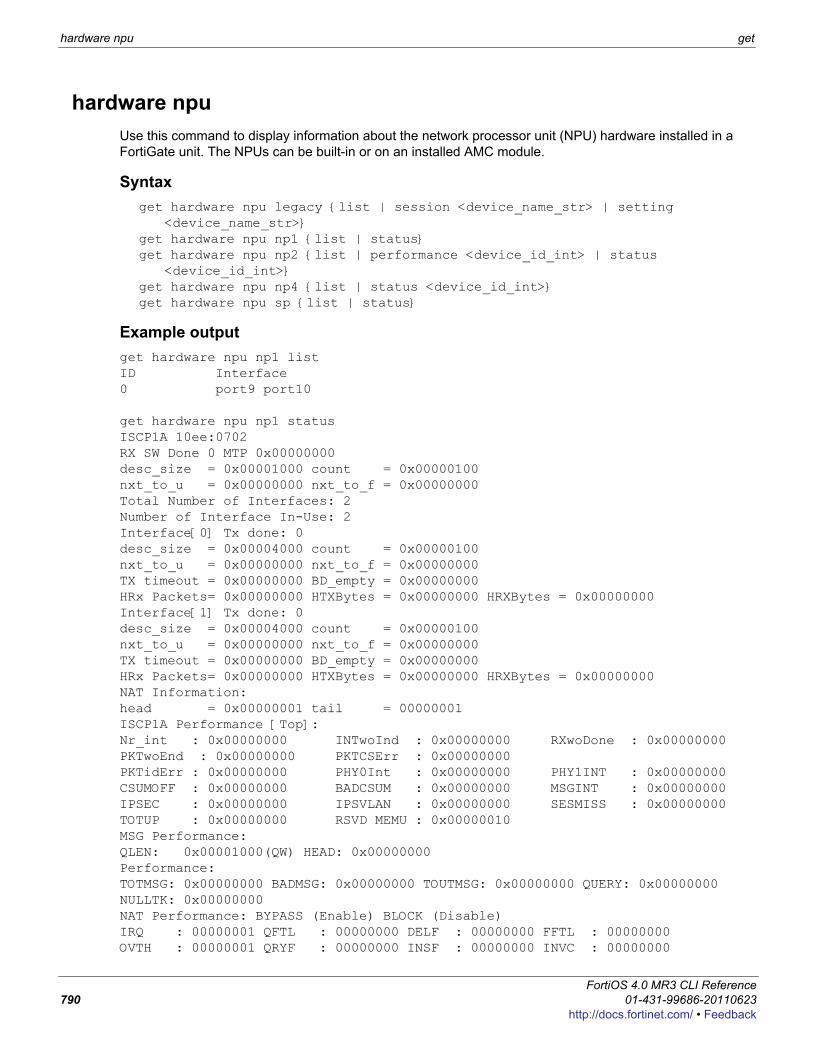
hardware npu get
hardware npuUse this command to display information about the network processor unit (NPU) hardware installed in a FortiGate unit. The NPUs can be built-in or on an installed AMC module.
Syntaxget hardware npu legacy {list | session <device_name_str> | setting
<device_name_str>} get hardware npu np1 {list | status}get hardware npu np2 {list | performance <device_id_int> | status
<device_id_int>}get hardware npu np4 {list | status <device_id_int>}get hardware npu sp {list | status}
Example outputget hardware npu np1 list ID Interface0 port9 port10
get hardware npu np1 status ISCP1A 10ee:0702RX SW Done 0 MTP 0x00000000 desc_size = 0x00001000 count = 0x00000100nxt_to_u = 0x00000000 nxt_to_f = 0x00000000Total Number of Interfaces: 2Number of Interface In-Use: 2Interface[0] Tx done: 0desc_size = 0x00004000 count = 0x00000100nxt_to_u = 0x00000000 nxt_to_f = 0x00000000TX timeout = 0x00000000 BD_empty = 0x00000000HRx Packets= 0x00000000 HTXBytes = 0x00000000 HRXBytes = 0x00000000Interface[1] Tx done: 0desc_size = 0x00004000 count = 0x00000100nxt_to_u = 0x00000000 nxt_to_f = 0x00000000TX timeout = 0x00000000 BD_empty = 0x00000000HRx Packets= 0x00000000 HTXBytes = 0x00000000 HRXBytes = 0x00000000NAT Information:head = 0x00000001 tail = 00000001ISCP1A Performance [Top]:Nr_int : 0x00000000 INTwoInd : 0x00000000 RXwoDone : 0x00000000PKTwoEnd : 0x00000000 PKTCSErr : 0x00000000PKTidErr : 0x00000000 PHY0Int : 0x00000000 PHY1INT : 0x00000000CSUMOFF : 0x00000000 BADCSUM : 0x00000000 MSGINT : 0x00000000IPSEC : 0x00000000 IPSVLAN : 0x00000000 SESMISS : 0x00000000TOTUP : 0x00000000 RSVD MEMU : 0x00000010MSG Performance:QLEN: 0x00001000(QW) HEAD: 0x00000000 Performance:TOTMSG: 0x00000000 BADMSG: 0x00000000 TOUTMSG: 0x00000000 QUERY: 0x00000000NULLTK: 0x00000000NAT Performance: BYPASS (Enable) BLOCK (Disable)IRQ : 00000001 QFTL : 00000000 DELF : 00000000 FFTL : 00000000OVTH : 00000001 QRYF : 00000000 INSF : 00000000 INVC : 00000000
FortiOS 4.0 MR3 CLI Reference790 01-431-99686-20110623
http://docs.fortinet.com/ • Feedback
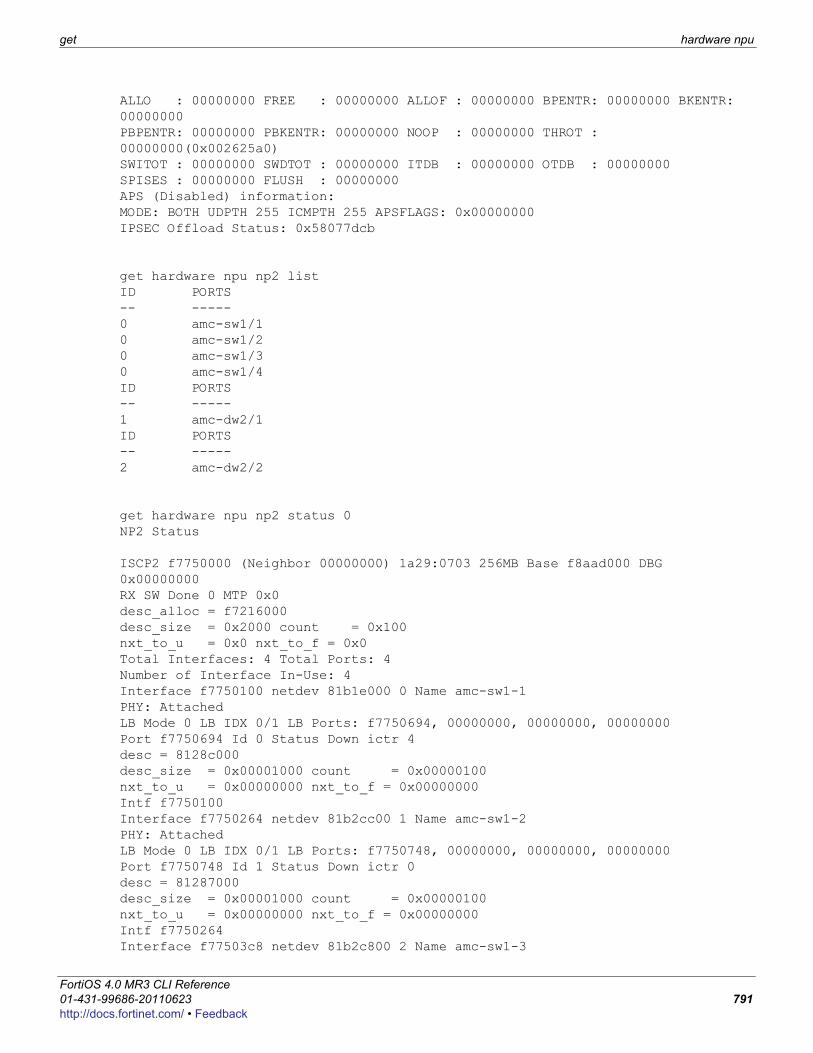
get hardware npu
F0h
ALLO : 00000000 FREE : 00000000 ALLOF : 00000000 BPENTR: 00000000 BKENTR: 00000000PBPENTR: 00000000 PBKENTR: 00000000 NOOP : 00000000 THROT : 00000000(0x002625a0)SWITOT : 00000000 SWDTOT : 00000000 ITDB : 00000000 OTDB : 00000000SPISES : 00000000 FLUSH : 00000000APS (Disabled) information:MODE: BOTH UDPTH 255 ICMPTH 255 APSFLAGS: 0x00000000IPSEC Offload Status: 0x58077dcb
get hardware npu np2 list ID PORTS-- -----0 amc-sw1/10 amc-sw1/20 amc-sw1/30 amc-sw1/4ID PORTS-- -----1 amc-dw2/1ID PORTS-- -----2 amc-dw2/2
get hardware npu np2 status 0NP2 Status
ISCP2 f7750000 (Neighbor 00000000) 1a29:0703 256MB Base f8aad000 DBG 0x00000000RX SW Done 0 MTP 0x0 desc_alloc = f7216000desc_size = 0x2000 count = 0x100nxt_to_u = 0x0 nxt_to_f = 0x0Total Interfaces: 4 Total Ports: 4Number of Interface In-Use: 4Interface f7750100 netdev 81b1e000 0 Name amc-sw1-1 PHY: AttachedLB Mode 0 LB IDX 0/1 LB Ports: f7750694, 00000000, 00000000, 00000000Port f7750694 Id 0 Status Down ictr 4desc = 8128c000desc_size = 0x00001000 count = 0x00000100nxt_to_u = 0x00000000 nxt_to_f = 0x00000000Intf f7750100Interface f7750264 netdev 81b2cc00 1 Name amc-sw1-2 PHY: AttachedLB Mode 0 LB IDX 0/1 LB Ports: f7750748, 00000000, 00000000, 00000000Port f7750748 Id 1 Status Down ictr 0desc = 81287000desc_size = 0x00001000 count = 0x00000100nxt_to_u = 0x00000000 nxt_to_f = 0x00000000Intf f7750264Interface f77503c8 netdev 81b2c800 2 Name amc-sw1-3
ortiOS 4.0 MR3 CLI Reference1-431-99686-20110623 791ttp://docs.fortinet.com/ • Feedback
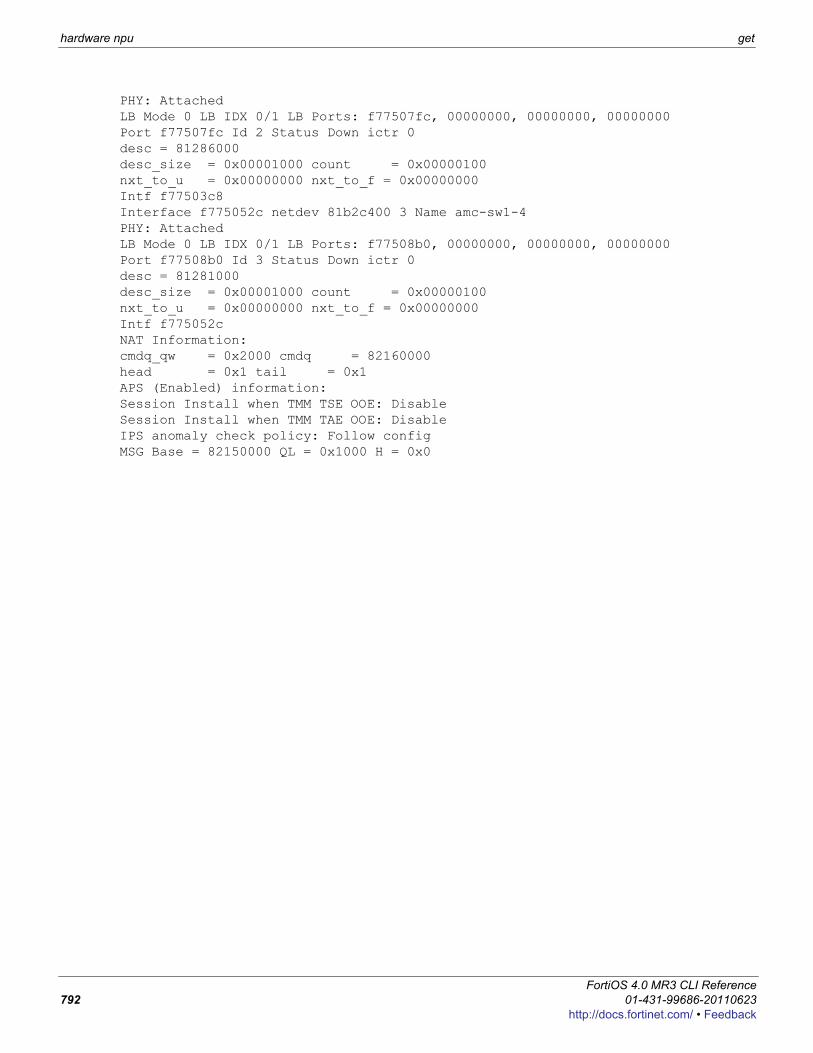
hardware npu get
PHY: AttachedLB Mode 0 LB IDX 0/1 LB Ports: f77507fc, 00000000, 00000000, 00000000Port f77507fc Id 2 Status Down ictr 0desc = 81286000desc_size = 0x00001000 count = 0x00000100nxt_to_u = 0x00000000 nxt_to_f = 0x00000000Intf f77503c8Interface f775052c netdev 81b2c400 3 Name amc-sw1-4 PHY: AttachedLB Mode 0 LB IDX 0/1 LB Ports: f77508b0, 00000000, 00000000, 00000000Port f77508b0 Id 3 Status Down ictr 0desc = 81281000desc_size = 0x00001000 count = 0x00000100nxt_to_u = 0x00000000 nxt_to_f = 0x00000000Intf f775052cNAT Information:cmdq_qw = 0x2000 cmdq = 82160000head = 0x1 tail = 0x1APS (Enabled) information:Session Install when TMM TSE OOE: DisableSession Install when TMM TAE OOE: DisableIPS anomaly check policy: Follow configMSG Base = 82150000 QL = 0x1000 H = 0x0
FortiOS 4.0 MR3 CLI Reference792 01-431-99686-20110623
http://docs.fortinet.com/ • Feedback
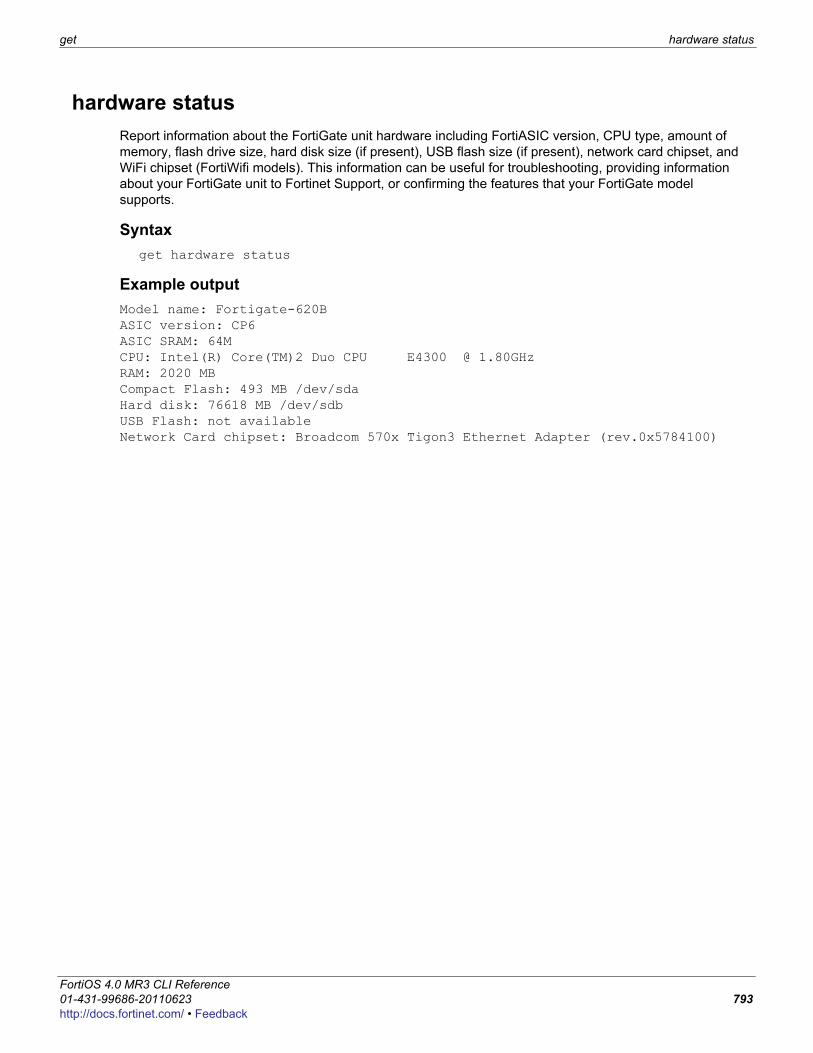
get hardware status
F0h
hardware statusReport information about the FortiGate unit hardware including FortiASIC version, CPU type, amount of memory, flash drive size, hard disk size (if present), USB flash size (if present), network card chipset, and WiFi chipset (FortiWifi models). This information can be useful for troubleshooting, providing information about your FortiGate unit to Fortinet Support, or confirming the features that your FortiGate model supports.
Syntaxget hardware status
Example outputModel name: Fortigate-620BASIC version: CP6ASIC SRAM: 64MCPU: Intel(R) Core(TM)2 Duo CPU E4300 @ 1.80GHzRAM: 2020 MBCompact Flash: 493 MB /dev/sdaHard disk: 76618 MB /dev/sdbUSB Flash: not availableNetwork Card chipset: Broadcom 570x Tigon3 Ethernet Adapter (rev.0x5784100)
ortiOS 4.0 MR3 CLI Reference1-431-99686-20110623 793ttp://docs.fortinet.com/ • Feedback
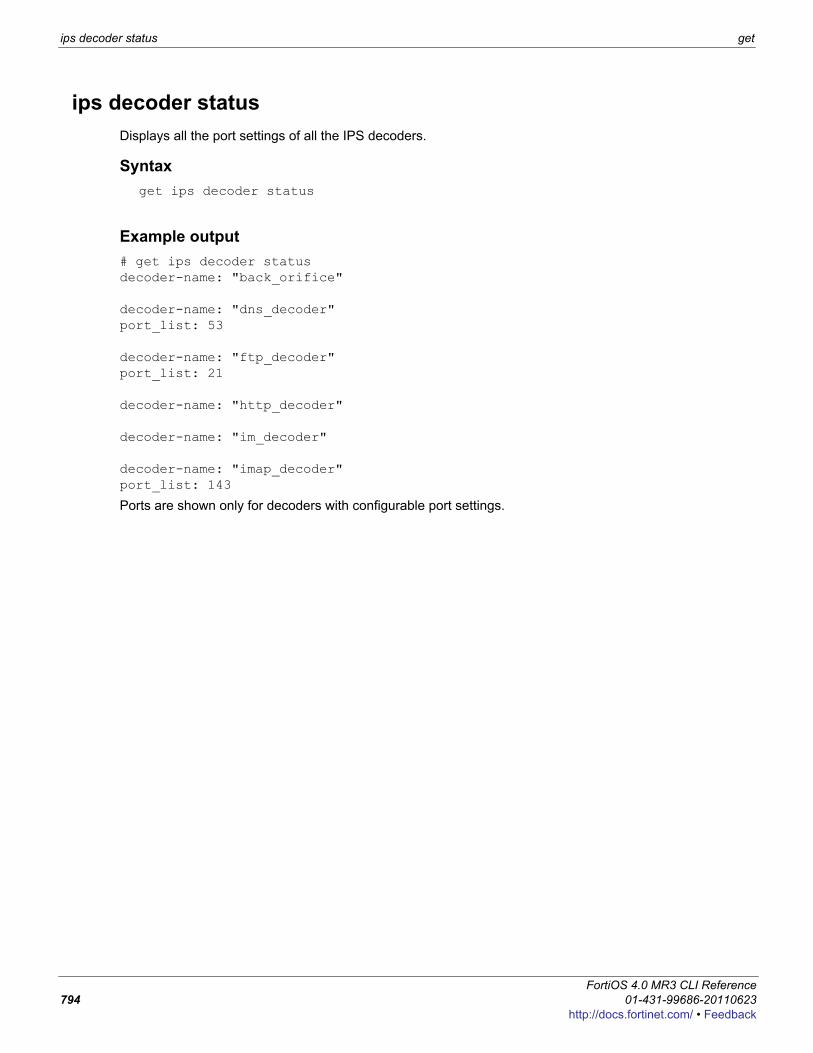
ips decoder status get
ips decoder statusDisplays all the port settings of all the IPS decoders.
Syntaxget ips decoder status
Example output# get ips decoder statusdecoder-name: "back_orifice"
decoder-name: "dns_decoder"port_list: 53
decoder-name: "ftp_decoder"port_list: 21
decoder-name: "http_decoder"
decoder-name: "im_decoder"
decoder-name: "imap_decoder"port_list: 143
Ports are shown only for decoders with configurable port settings.
FortiOS 4.0 MR3 CLI Reference794 01-431-99686-20110623
http://docs.fortinet.com/ • Feedback
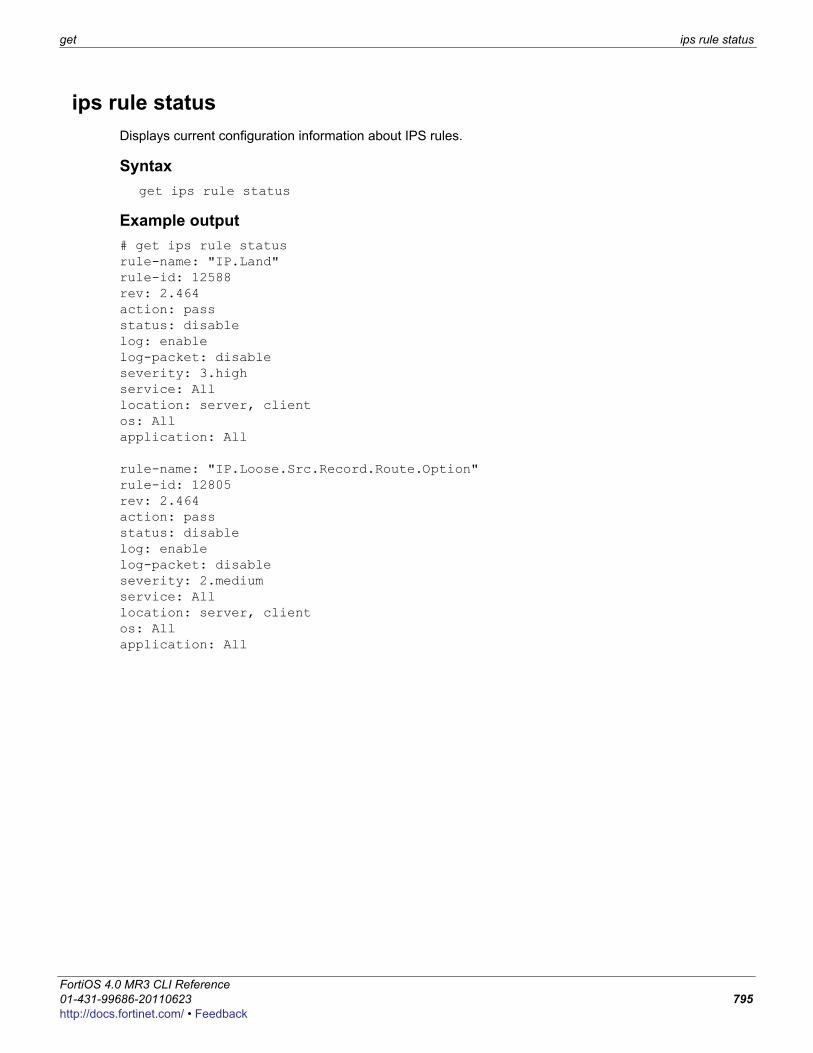
get ips rule status
F0h
ips rule statusDisplays current configuration information about IPS rules.
Syntaxget ips rule status
Example output# get ips rule statusrule-name: "IP.Land"rule-id: 12588rev: 2.464action: passstatus: disablelog: enablelog-packet: disableseverity: 3.highservice: Alllocation: server, clientos: Allapplication: All
rule-name: "IP.Loose.Src.Record.Route.Option"rule-id: 12805rev: 2.464action: passstatus: disablelog: enablelog-packet: disableseverity: 2.mediumservice: Alllocation: server, clientos: Allapplication: All
ortiOS 4.0 MR3 CLI Reference1-431-99686-20110623 795ttp://docs.fortinet.com/ • Feedback
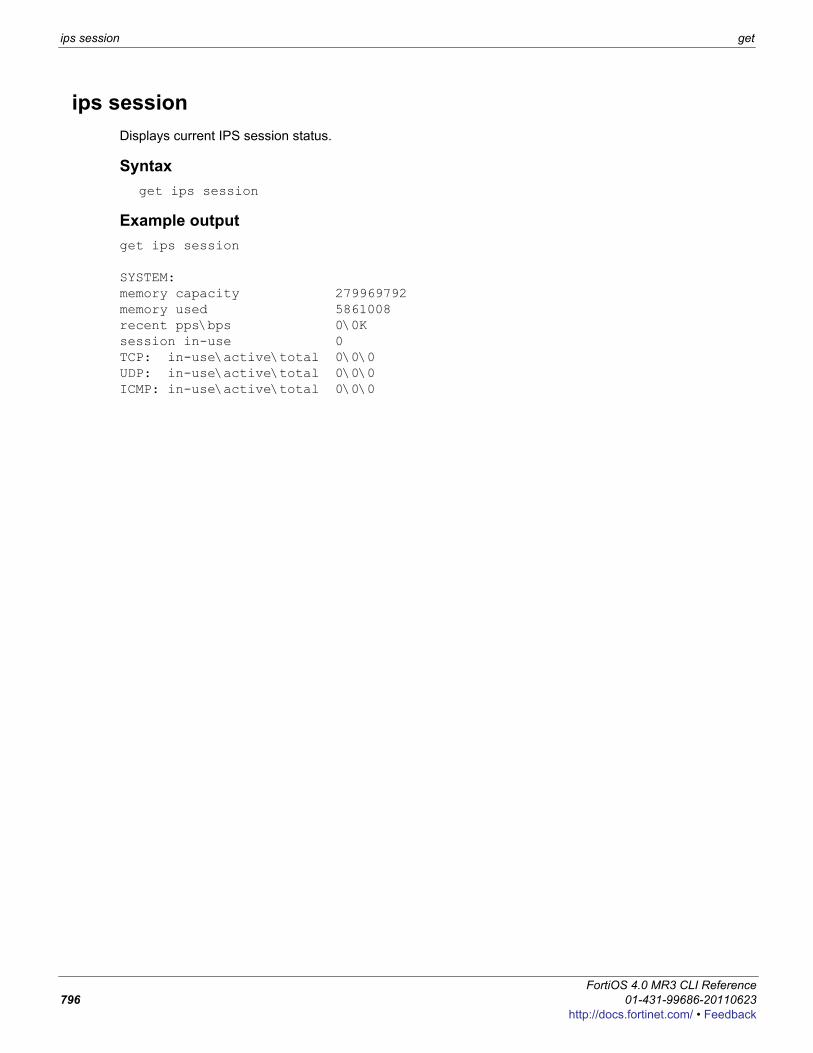
ips session get
ips sessionDisplays current IPS session status.
Syntaxget ips session
Example outputget ips session
SYSTEM:memory capacity 279969792memory used 5861008recent pps\bps 0\0Ksession in-use 0TCP: in-use\active\total 0\0\0UDP: in-use\active\total 0\0\0ICMP: in-use\active\total 0\0\0
FortiOS 4.0 MR3 CLI Reference796 01-431-99686-20110623
http://docs.fortinet.com/ • Feedback
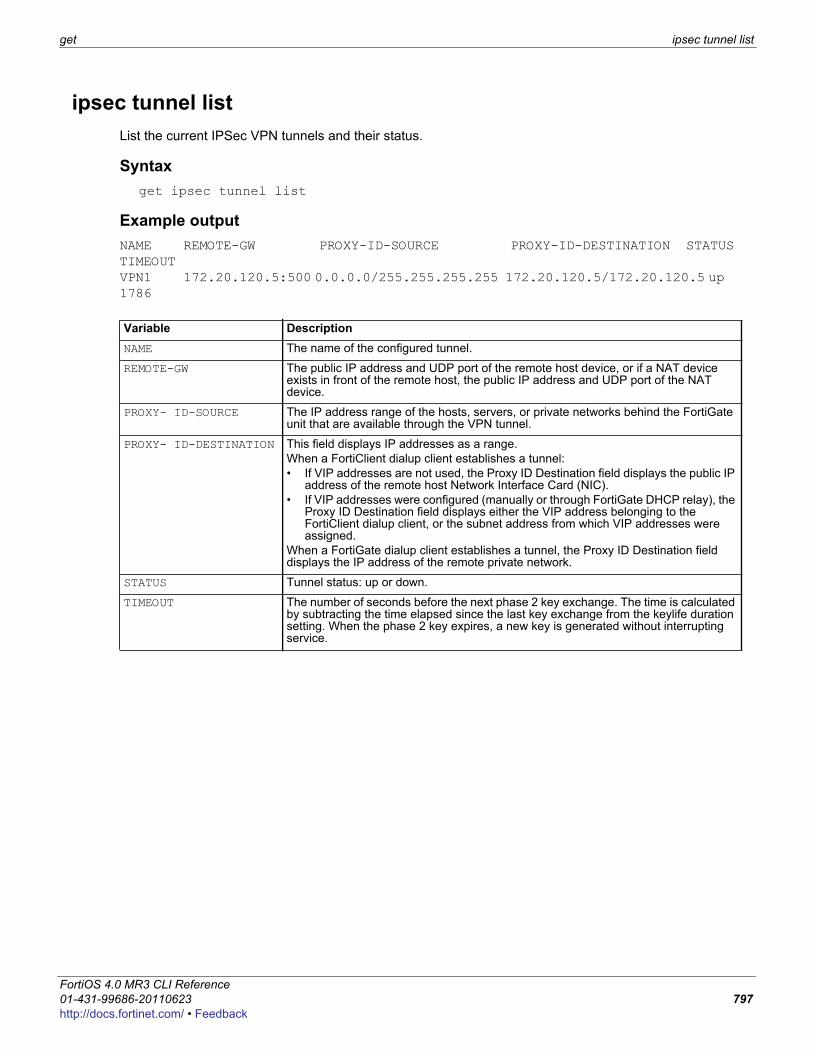
get ipsec tunnel list
F0h
ipsec tunnel listList the current IPSec VPN tunnels and their status.
Syntaxget ipsec tunnel list
Example outputNAME REMOTE-GW PROXY-ID-SOURCE PROXY-ID-DESTINATION STATUS TIMEOUTVPN1 172.20.120.5:500 0.0.0.0/255.255.255.255 172.20.120.5/172.20.120.5 up 1786
Variable DescriptionNAME The name of the configured tunnel.
REMOTE-GW The public IP address and UDP port of the remote host device, or if a NAT device exists in front of the remote host, the public IP address and UDP port of the NAT device.
PROXY- ID-SOURCE The IP address range of the hosts, servers, or private networks behind the FortiGate unit that are available through the VPN tunnel.
PROXY- ID-DESTINATION This field displays IP addresses as a range.When a FortiClient dialup client establishes a tunnel:• If VIP addresses are not used, the Proxy ID Destination field displays the public IP
address of the remote host Network Interface Card (NIC).• If VIP addresses were configured (manually or through FortiGate DHCP relay), the
Proxy ID Destination field displays either the VIP address belonging to the FortiClient dialup client, or the subnet address from which VIP addresses were assigned.
When a FortiGate dialup client establishes a tunnel, the Proxy ID Destination field displays the IP address of the remote private network.
STATUS Tunnel status: up or down.
TIMEOUT The number of seconds before the next phase 2 key exchange. The time is calculated by subtracting the time elapsed since the last key exchange from the keylife duration setting. When the phase 2 key expires, a new key is generated without interrupting service.
ortiOS 4.0 MR3 CLI Reference1-431-99686-20110623 797ttp://docs.fortinet.com/ • Feedback

log sql status get
log sql statusDisplay the size of the SQL reporting database.
Syntaxget log sql status
FortiOS 4.0 MR3 CLI Reference798 01-431-99686-20110623
http://docs.fortinet.com/ • Feedback
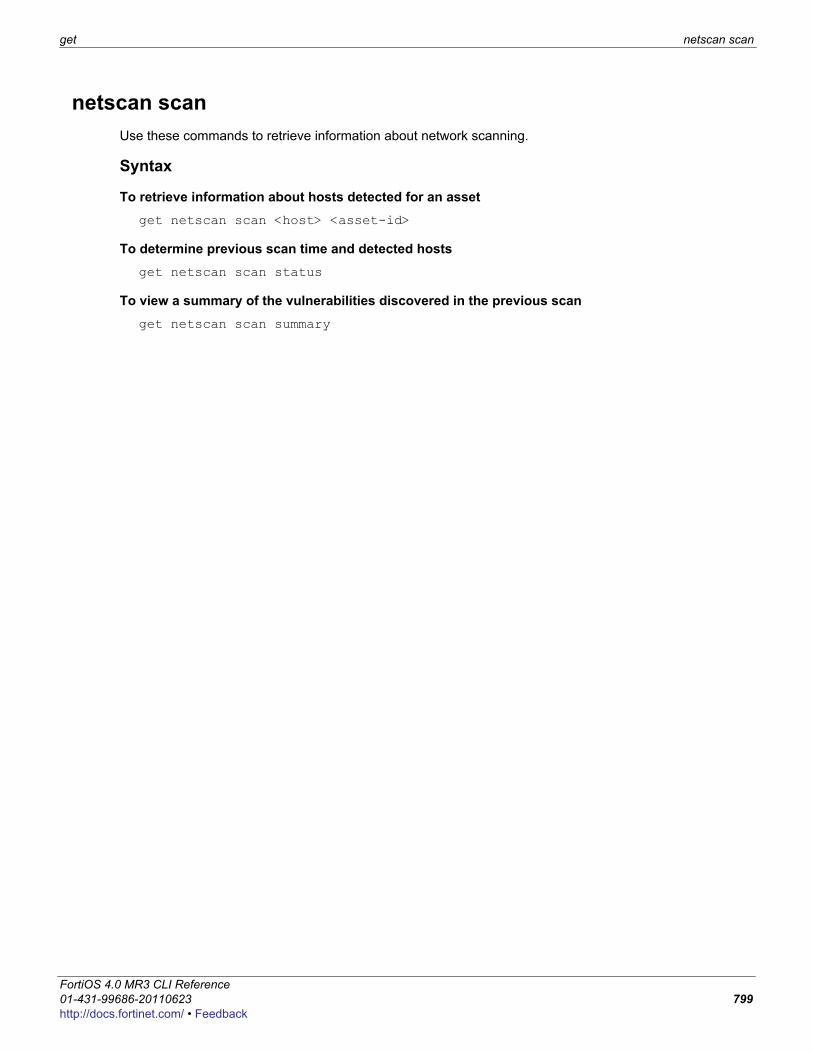
get netscan scan
F0h
netscan scanUse these commands to retrieve information about network scanning.
Syntax
To retrieve information about hosts detected for an assetget netscan scan <host> <asset-id>
To determine previous scan time and detected hostsget netscan scan status
To view a summary of the vulnerabilities discovered in the previous scanget netscan scan summary
ortiOS 4.0 MR3 CLI Reference1-431-99686-20110623 799ttp://docs.fortinet.com/ • Feedback
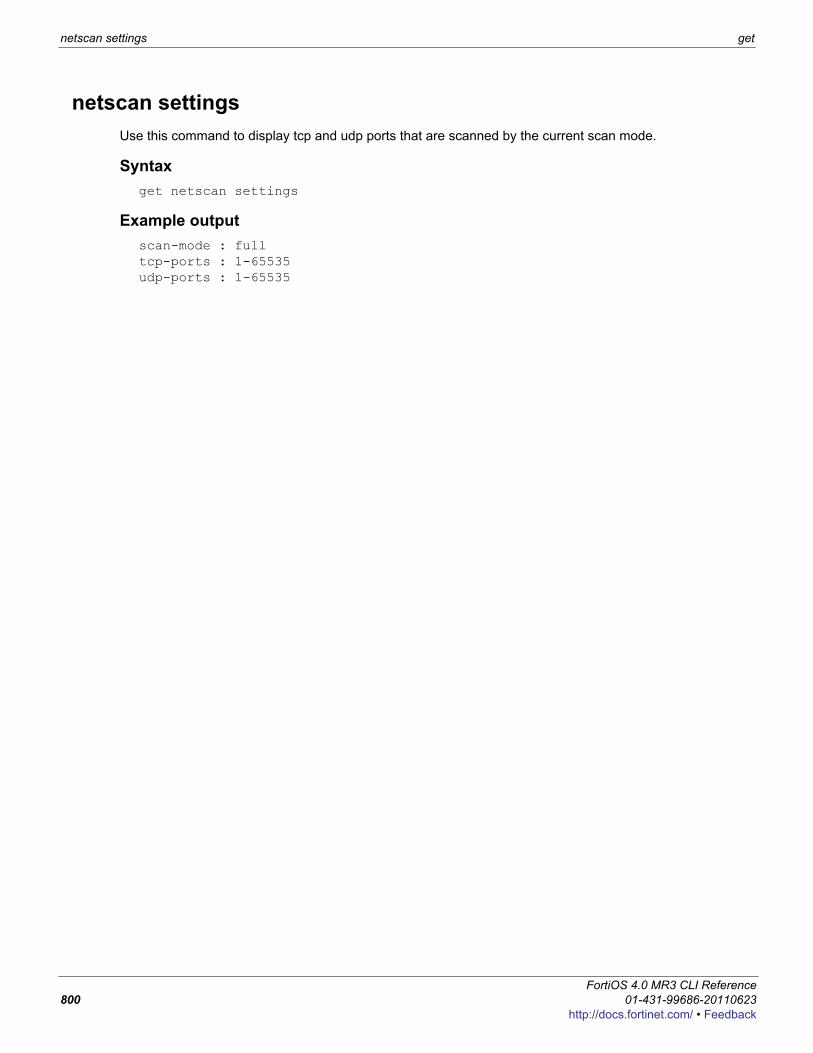
netscan settings get
netscan settingsUse this command to display tcp and udp ports that are scanned by the current scan mode.
Syntaxget netscan settings
Example outputscan-mode : fulltcp-ports : 1-65535udp-ports : 1-65535
FortiOS 4.0 MR3 CLI Reference800 01-431-99686-20110623
http://docs.fortinet.com/ • Feedback

get report database schema
F0h
report database schemaUse this command to display the FortiGate SQL reporting database schema.
Syntaxget report database schema
ortiOS 4.0 MR3 CLI Reference1-431-99686-20110623 801ttp://docs.fortinet.com/ • Feedback
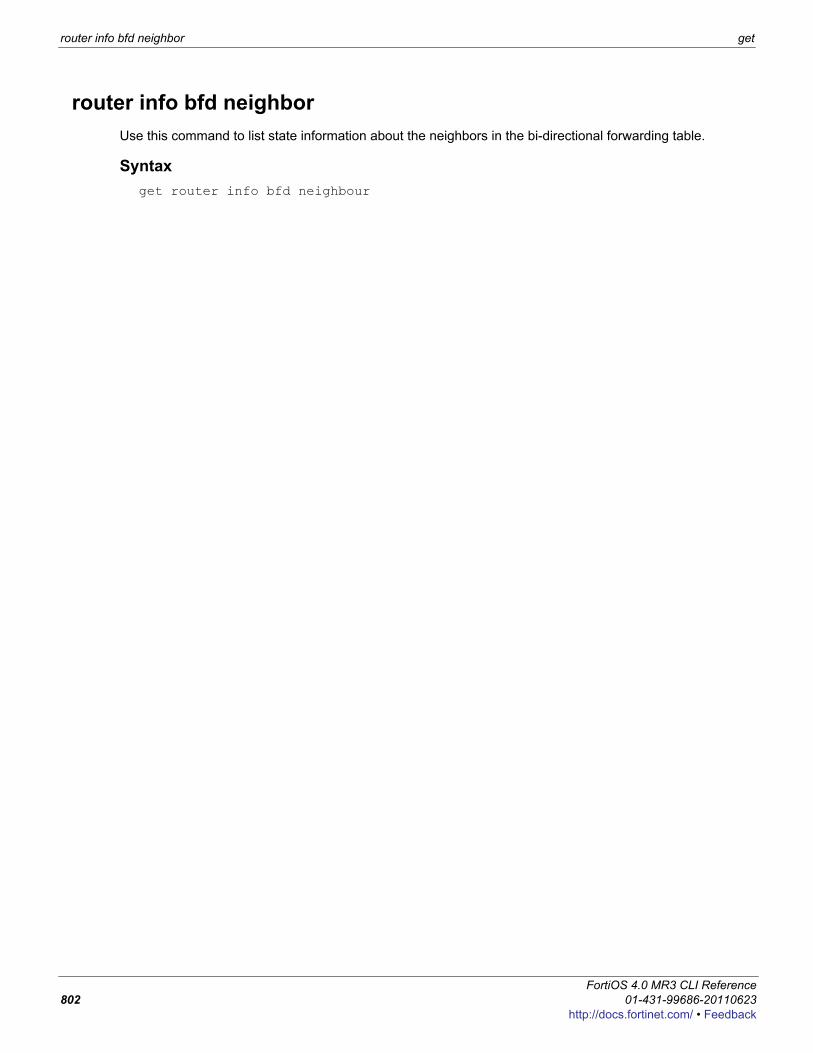
router info bfd neighbor get
router info bfd neighborUse this command to list state information about the neighbors in the bi-directional forwarding table.
Syntaxget router info bfd neighbour
FortiOS 4.0 MR3 CLI Reference802 01-431-99686-20110623
http://docs.fortinet.com/ • Feedback

get router info bgp
F0h
router info bgpUse this command to display information about the BGP configuration.
Syntaxget router info bgp <keyword>
Example outputget router info bgp memory
<keyword> Descriptioncidr-only Show all BGP routes having non-natural network masks.
community Show all BGP routes having their COMMUNITY attribute set.
community-info Show general information about the configured BGP communities, including the routes in each community and their associated network addresses.
community-list Show all routes belonging to configured BGP community lists.
dampening {dampened-paths | flap-statistics | parameters}
Display information about dampening:• Type dampened-paths to show all paths that have been
suppressed due to flapping.• Type flap-statistics to show flap statistics related to
BGP routes.• Type parameters to show the current dampening settings.
filter-list Show all routes matching configured AS-path lists.
inconsistent-as Show all routes associated with inconsistent autonomous systems of origin.
memory Show the BGP memory table.
neighbors [<address_ipv4> | <address_ipv4> advertised-routes | <address_ipv4> received prefix-filter |<address_ipv4> received-routes | <address_ipv4> routes]
Show information about connections to TCP and BGP neighbors.
network [<address_ipv4mask>] Show general information about the configured BGP networks, including their network addresses and associated prefixes.
network-longer-prefixes <address_ipv4mask>
Show general information about the BGP route that you specify (for example, 12.0.0.0/14) and any specific routes associated with the prefix.
paths Show general information about BGP AS paths, including their associated network addresses.
prefix-list <name> Show all routes matching configured prefix list <name>.
quote-regexp <regexp_str> Enter the regular expression to compare to the AS_PATH attribute of BGP routes (for example, ^730$) and enable the use of output modifiers (for example, include, exclude, and begin) to search the results.
regexp <regexp_str> Enter the regular expression to compare to the AS_PATH attribute of BGP routes (for example, ^730$).
route-map Show all routes matching configured route maps.
scan Show information about next-hop route scanning, including the scan interval setting.
summary Show information about BGP neighbor status.
ortiOS 4.0 MR3 CLI Reference1-431-99686-20110623 803ttp://docs.fortinet.com/ • Feedback
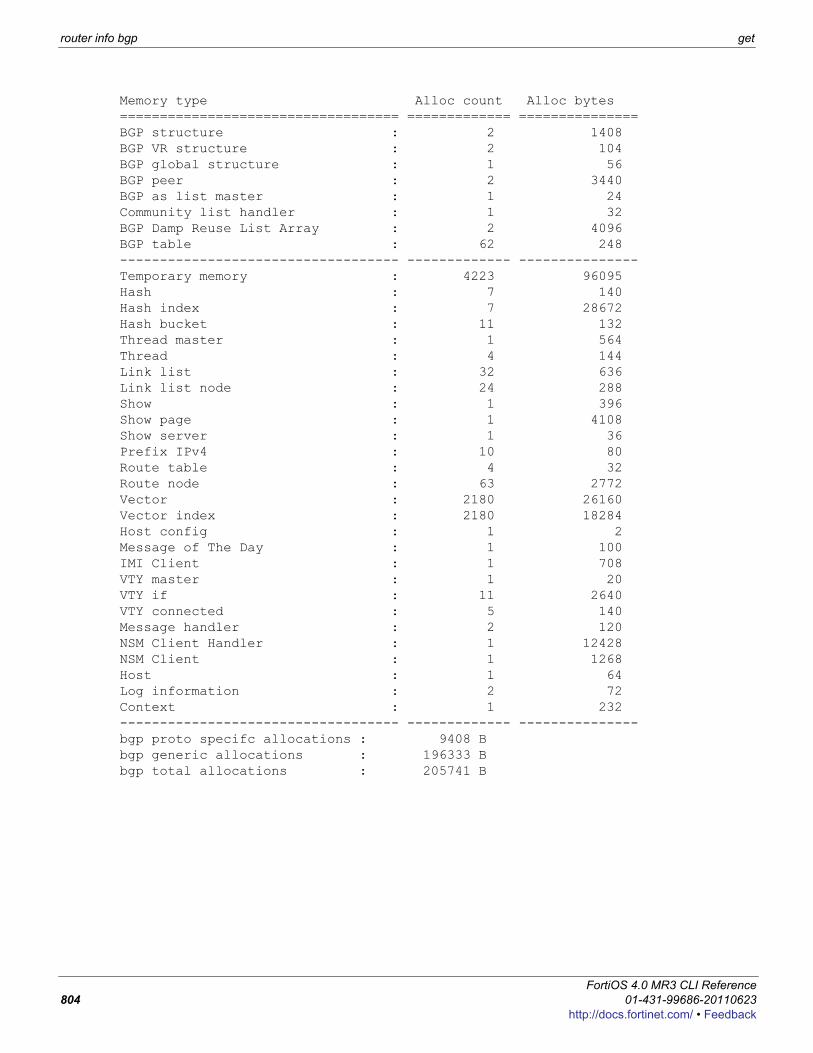
router info bgp get
Memory type Alloc count Alloc bytes =================================== ============= ===============BGP structure : 2 1408BGP VR structure : 2 104BGP global structure : 1 56BGP peer : 2 3440BGP as list master : 1 24Community list handler : 1 32BGP Damp Reuse List Array : 2 4096BGP table : 62 248----------------------------------- ------------- ---------------Temporary memory : 4223 96095Hash : 7 140Hash index : 7 28672Hash bucket : 11 132Thread master : 1 564Thread : 4 144Link list : 32 636Link list node : 24 288Show : 1 396Show page : 1 4108Show server : 1 36Prefix IPv4 : 10 80Route table : 4 32Route node : 63 2772Vector : 2180 26160Vector index : 2180 18284Host config : 1 2Message of The Day : 1 100IMI Client : 1 708VTY master : 1 20VTY if : 11 2640VTY connected : 5 140Message handler : 2 120NSM Client Handler : 1 12428NSM Client : 1 1268Host : 1 64Log information : 2 72Context : 1 232----------------------------------- ------------- ---------------bgp proto specifc allocations : 9408 Bbgp generic allocations : 196333 Bbgp total allocations : 205741 B
FortiOS 4.0 MR3 CLI Reference804 01-431-99686-20110623
http://docs.fortinet.com/ • Feedback

get router info gwdetect
F0h
router info gwdetectUse this command to view the status of gateway detection.
Syntaxget router info gwdetect
ortiOS 4.0 MR3 CLI Reference1-431-99686-20110623 805ttp://docs.fortinet.com/ • Feedback
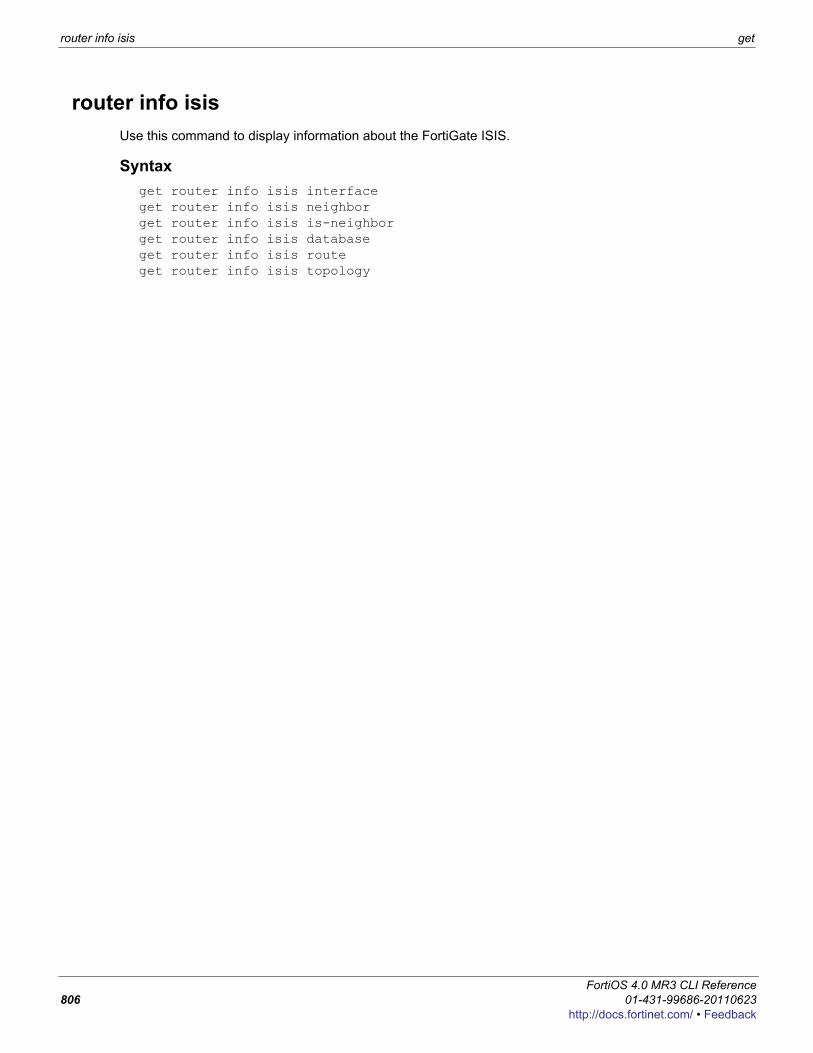
router info isis get
router info isisUse this command to display information about the FortiGate ISIS.
Syntaxget router info isis interfaceget router info isis neighborget router info isis is-neighborget router info isis databaseget router info isis routeget router info isis topology
FortiOS 4.0 MR3 CLI Reference806 01-431-99686-20110623
http://docs.fortinet.com/ • Feedback

get router info kernel
F0h
router info kernelUse this command to display the FortiGate kernel routing table. The kernel routing table displays information about all of the routes in the kernel.
Syntaxget router info kernel [<routing_type_int>]
ortiOS 4.0 MR3 CLI Reference1-431-99686-20110623 807ttp://docs.fortinet.com/ • Feedback
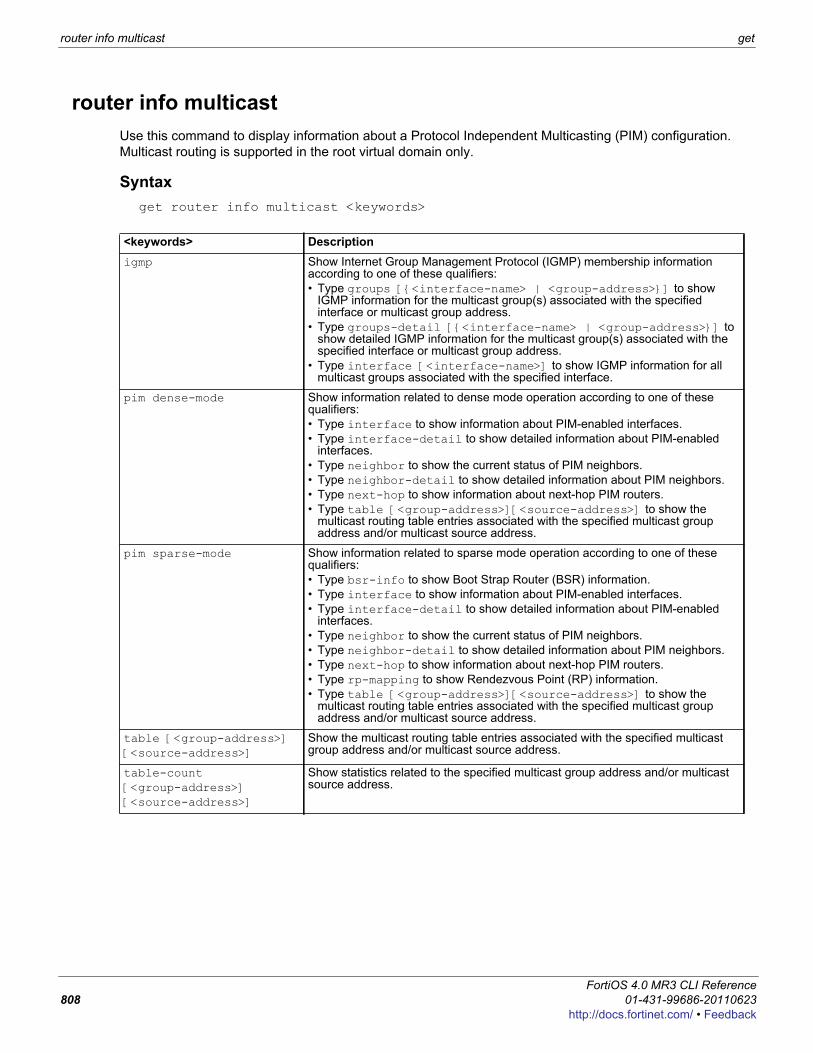
router info multicast get
router info multicastUse this command to display information about a Protocol Independent Multicasting (PIM) configuration. Multicast routing is supported in the root virtual domain only.
Syntaxget router info multicast <keywords>
<keywords> Descriptionigmp Show Internet Group Management Protocol (IGMP) membership information
according to one of these qualifiers:• Type groups [{<interface-name> | <group-address>}] to show
IGMP information for the multicast group(s) associated with the specified interface or multicast group address.
• Type groups-detail [{<interface-name> | <group-address>}] to show detailed IGMP information for the multicast group(s) associated with the specified interface or multicast group address.
• Type interface [<interface-name>] to show IGMP information for all multicast groups associated with the specified interface.
pim dense-mode Show information related to dense mode operation according to one of these qualifiers:• Type interface to show information about PIM-enabled interfaces.• Type interface-detail to show detailed information about PIM-enabled
interfaces.• Type neighbor to show the current status of PIM neighbors.• Type neighbor-detail to show detailed information about PIM neighbors.• Type next-hop to show information about next-hop PIM routers.• Type table [<group-address>][<source-address>] to show the
multicast routing table entries associated with the specified multicast group address and/or multicast source address.
pim sparse-mode Show information related to sparse mode operation according to one of these qualifiers:• Type bsr-info to show Boot Strap Router (BSR) information.• Type interface to show information about PIM-enabled interfaces.• Type interface-detail to show detailed information about PIM-enabled
interfaces.• Type neighbor to show the current status of PIM neighbors.• Type neighbor-detail to show detailed information about PIM neighbors.• Type next-hop to show information about next-hop PIM routers.• Type rp-mapping to show Rendezvous Point (RP) information.• Type table [<group-address>][<source-address>] to show the
multicast routing table entries associated with the specified multicast group address and/or multicast source address.
table [<group-address>] [<source-address>]
Show the multicast routing table entries associated with the specified multicast group address and/or multicast source address.
table-count [<group-address>][<source-address>]
Show statistics related to the specified multicast group address and/or multicast source address.
FortiOS 4.0 MR3 CLI Reference808 01-431-99686-20110623
http://docs.fortinet.com/ • Feedback
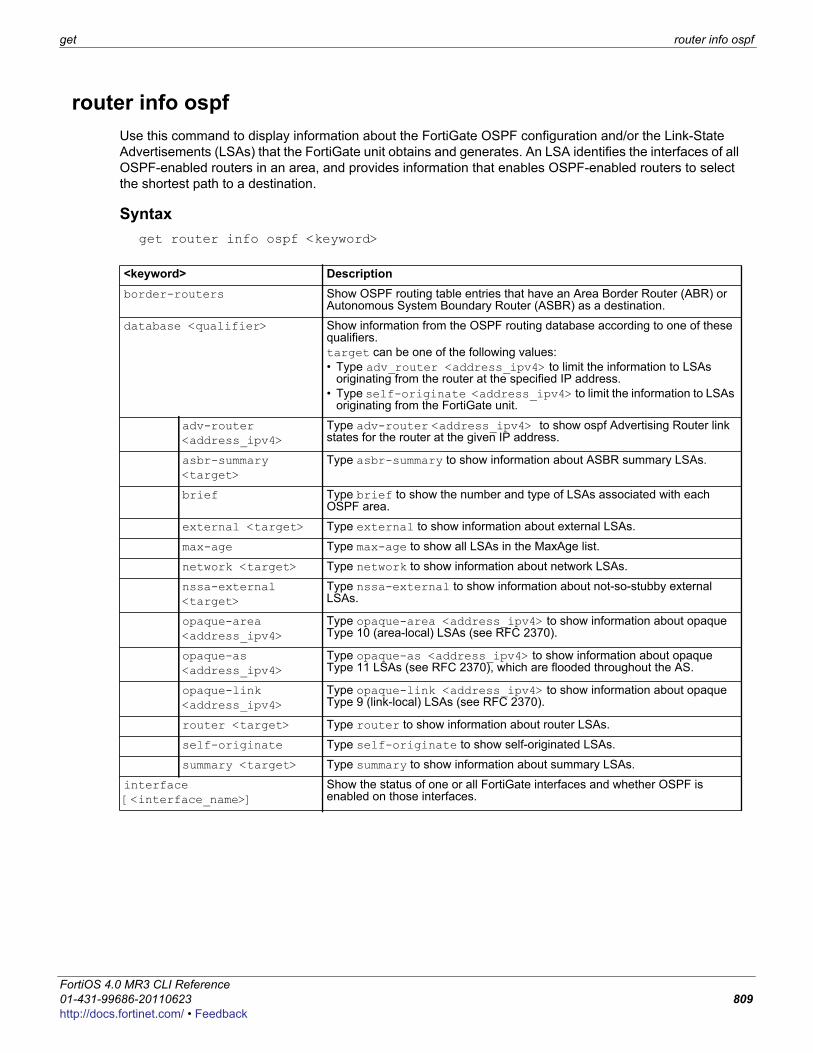
get router info ospf
F0h
router info ospfUse this command to display information about the FortiGate OSPF configuration and/or the Link-State Advertisements (LSAs) that the FortiGate unit obtains and generates. An LSA identifies the interfaces of all OSPF-enabled routers in an area, and provides information that enables OSPF-enabled routers to select the shortest path to a destination.
Syntaxget router info ospf <keyword>
<keyword> Descriptionborder-routers Show OSPF routing table entries that have an Area Border Router (ABR) or
Autonomous System Boundary Router (ASBR) as a destination.
database <qualifier> Show information from the OSPF routing database according to one of these qualifiers.target can be one of the following values:• Type adv_router <address_ipv4> to limit the information to LSAs
originating from the router at the specified IP address.• Type self-originate <address_ipv4> to limit the information to LSAs
originating from the FortiGate unit.
adv-router <address_ipv4>
Type adv-router <address_ipv4> to show ospf Advertising Router link states for the router at the given IP address.
asbr-summary <target>
Type asbr-summary to show information about ASBR summary LSAs.
brief Type brief to show the number and type of LSAs associated with each OSPF area.
external <target> Type external to show information about external LSAs.
max-age Type max-age to show all LSAs in the MaxAge list.
network <target> Type network to show information about network LSAs.
nssa-external <target>
Type nssa-external to show information about not-so-stubby external LSAs.
opaque-area <address_ipv4>
Type opaque-area <address_ipv4> to show information about opaque Type 10 (area-local) LSAs (see RFC 2370).
opaque-as <address_ipv4>
Type opaque-as <address_ipv4> to show information about opaque Type 11 LSAs (see RFC 2370), which are flooded throughout the AS.
opaque-link <address_ipv4>
Type opaque-link <address_ipv4> to show information about opaque Type 9 (link-local) LSAs (see RFC 2370).
router <target> Type router to show information about router LSAs.
self-originate Type self-originate to show self-originated LSAs.
summary <target> Type summary to show information about summary LSAs.
interface [<interface_name>]
Show the status of one or all FortiGate interfaces and whether OSPF is enabled on those interfaces.
ortiOS 4.0 MR3 CLI Reference1-431-99686-20110623 809ttp://docs.fortinet.com/ • Feedback

router info ospf get
neighbor [all | <neighbor_id> | detail | detail all | interface <address_ipv4>]
Show general information about OSPF neighbors, excluding down-status neighbors:• Type all to show information about all neighbors, including down-status
neighbors.• Type <neighbor_id> to show detailed information about the specified
neighbor only.• Type detail to show detailed information about all neighbors, excluding
down-status neighbors.• Type detail all to show detailed information about all neighbors,
including down-status neighbors.• Type interface <address_ipv4> to show neighbor information based
on the FortiGate interface IP address that was used to establish the neighbor’s relationship.
route Show the OSPF routing table.
status Show general information about the OSPF routing processes.
virtual-links Show information about OSPF virtual links.
<keyword> Description
FortiOS 4.0 MR3 CLI Reference810 01-431-99686-20110623
http://docs.fortinet.com/ • Feedback
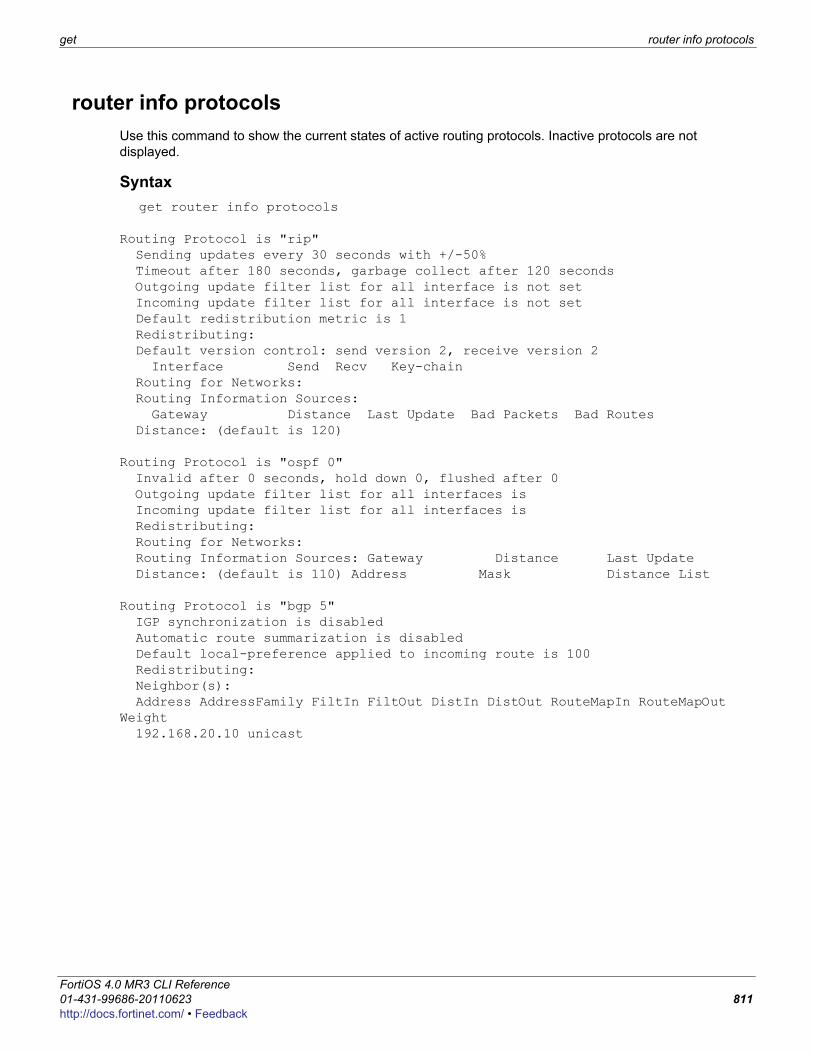
get router info protocols
F0h
router info protocolsUse this command to show the current states of active routing protocols. Inactive protocols are not displayed.
Syntaxget router info protocols
Routing Protocol is "rip" Sending updates every 30 seconds with +/-50% Timeout after 180 seconds, garbage collect after 120 seconds Outgoing update filter list for all interface is not set Incoming update filter list for all interface is not set Default redistribution metric is 1 Redistributing: Default version control: send version 2, receive version 2 Interface Send Recv Key-chain Routing for Networks: Routing Information Sources: Gateway Distance Last Update Bad Packets Bad Routes Distance: (default is 120)
Routing Protocol is "ospf 0" Invalid after 0 seconds, hold down 0, flushed after 0 Outgoing update filter list for all interfaces is Incoming update filter list for all interfaces is Redistributing: Routing for Networks: Routing Information Sources: Gateway Distance Last Update Distance: (default is 110) Address Mask Distance List
Routing Protocol is "bgp 5" IGP synchronization is disabled Automatic route summarization is disabled Default local-preference applied to incoming route is 100 Redistributing: Neighbor(s): Address AddressFamily FiltIn FiltOut DistIn DistOut RouteMapIn RouteMapOut Weight 192.168.20.10 unicast
ortiOS 4.0 MR3 CLI Reference1-431-99686-20110623 811ttp://docs.fortinet.com/ • Feedback
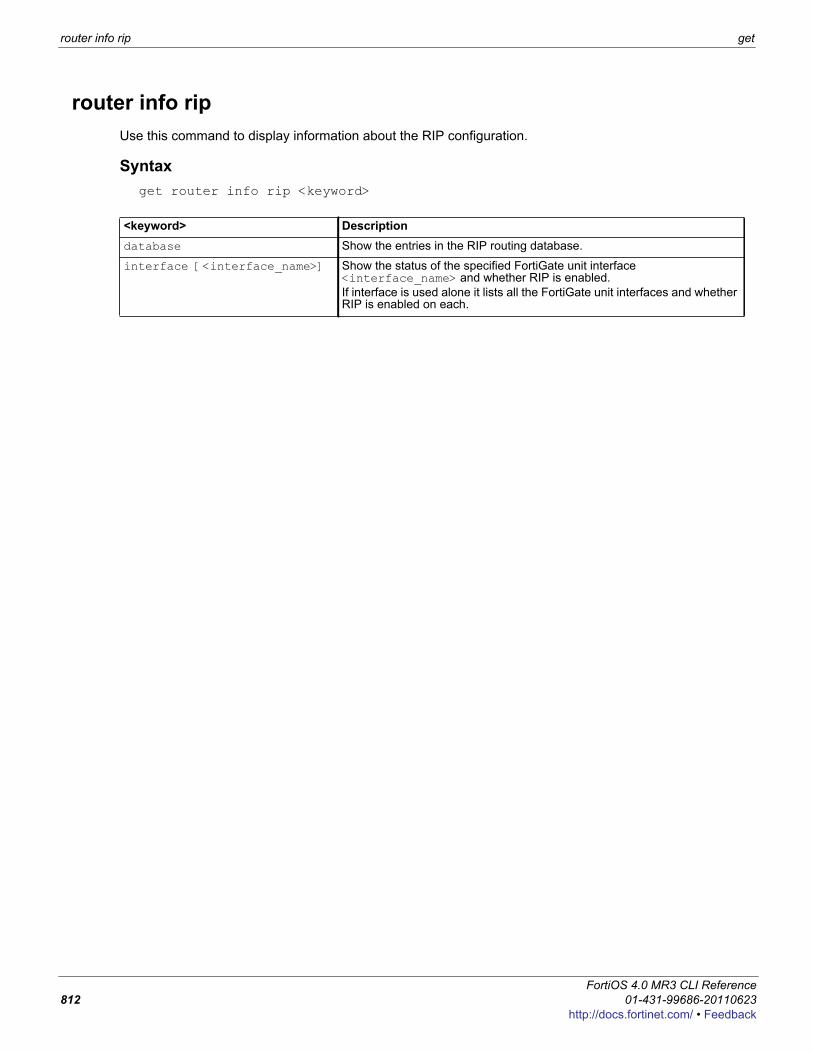
router info rip get
router info ripUse this command to display information about the RIP configuration.
Syntaxget router info rip <keyword>
<keyword> Descriptiondatabase Show the entries in the RIP routing database.
interface [<interface_name>] Show the status of the specified FortiGate unit interface <interface_name> and whether RIP is enabled.If interface is used alone it lists all the FortiGate unit interfaces and whether RIP is enabled on each.
FortiOS 4.0 MR3 CLI Reference812 01-431-99686-20110623
http://docs.fortinet.com/ • Feedback
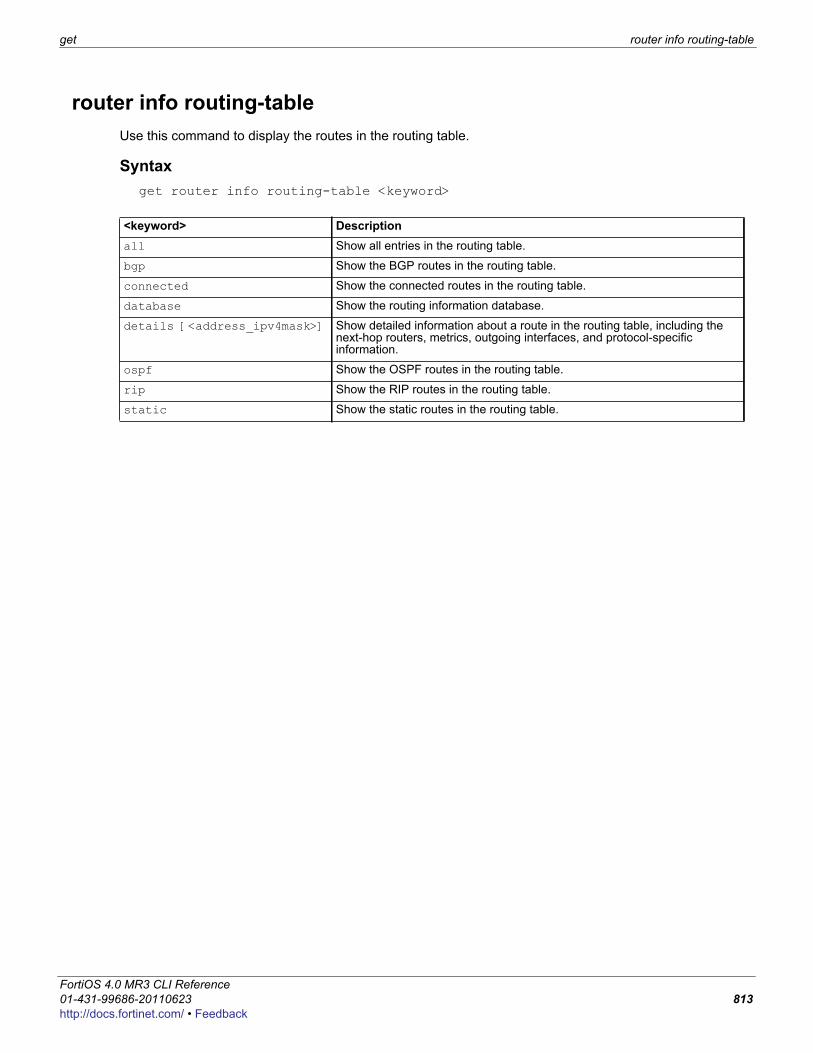
get router info routing-table
F0h
router info routing-table Use this command to display the routes in the routing table.
Syntaxget router info routing-table <keyword>
<keyword> Descriptionall Show all entries in the routing table.
bgp Show the BGP routes in the routing table.
connected Show the connected routes in the routing table.
database Show the routing information database.
details [<address_ipv4mask>] Show detailed information about a route in the routing table, including the next-hop routers, metrics, outgoing interfaces, and protocol-specific information.
ospf Show the OSPF routes in the routing table.
rip Show the RIP routes in the routing table.
static Show the static routes in the routing table.
ortiOS 4.0 MR3 CLI Reference1-431-99686-20110623 813ttp://docs.fortinet.com/ • Feedback
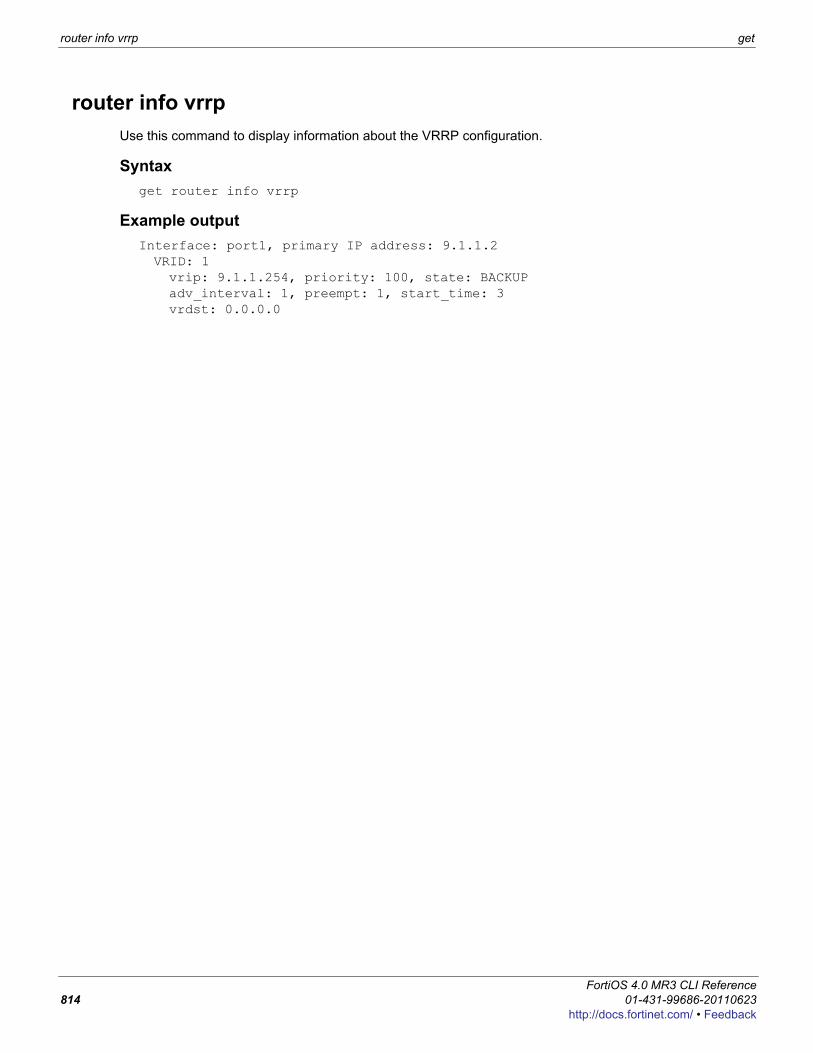
router info vrrp get
router info vrrpUse this command to display information about the VRRP configuration.
Syntaxget router info vrrp
Example outputInterface: port1, primary IP address: 9.1.1.2VRID: 1vrip: 9.1.1.254, priority: 100, state: BACKUPadv_interval: 1, preempt: 1, start_time: 3vrdst: 0.0.0.0
FortiOS 4.0 MR3 CLI Reference814 01-431-99686-20110623
http://docs.fortinet.com/ • Feedback
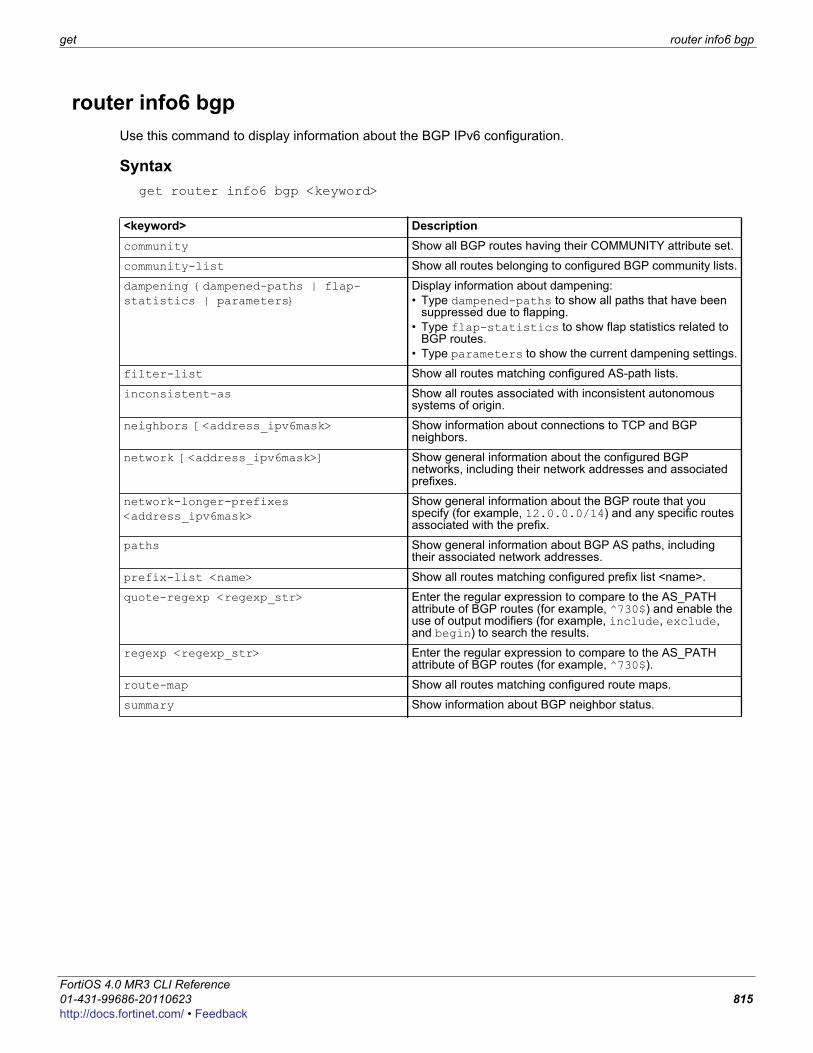
get router info6 bgp
F0h
router info6 bgpUse this command to display information about the BGP IPv6 configuration.
Syntaxget router info6 bgp <keyword>
<keyword> Descriptioncommunity Show all BGP routes having their COMMUNITY attribute set.
community-list Show all routes belonging to configured BGP community lists.
dampening {dampened-paths | flap-statistics | parameters}
Display information about dampening:• Type dampened-paths to show all paths that have been
suppressed due to flapping.• Type flap-statistics to show flap statistics related to
BGP routes.• Type parameters to show the current dampening settings.
filter-list Show all routes matching configured AS-path lists.
inconsistent-as Show all routes associated with inconsistent autonomous systems of origin.
neighbors [<address_ipv6mask> Show information about connections to TCP and BGP neighbors.
network [<address_ipv6mask>] Show general information about the configured BGP networks, including their network addresses and associated prefixes.
network-longer-prefixes <address_ipv6mask>
Show general information about the BGP route that you specify (for example, 12.0.0.0/14) and any specific routes associated with the prefix.
paths Show general information about BGP AS paths, including their associated network addresses.
prefix-list <name> Show all routes matching configured prefix list <name>.
quote-regexp <regexp_str> Enter the regular expression to compare to the AS_PATH attribute of BGP routes (for example, ^730$) and enable the use of output modifiers (for example, include, exclude, and begin) to search the results.
regexp <regexp_str> Enter the regular expression to compare to the AS_PATH attribute of BGP routes (for example, ^730$).
route-map Show all routes matching configured route maps.
summary Show information about BGP neighbor status.
ortiOS 4.0 MR3 CLI Reference1-431-99686-20110623 815ttp://docs.fortinet.com/ • Feedback
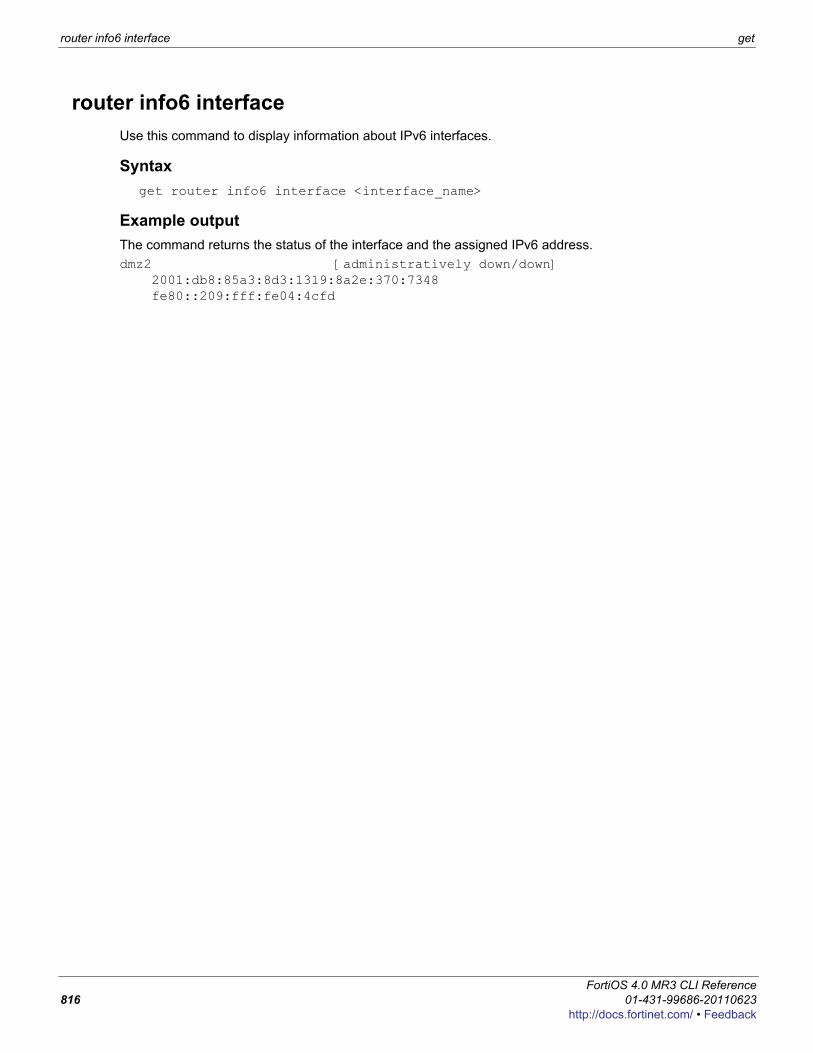
router info6 interface get
router info6 interfaceUse this command to display information about IPv6 interfaces.
Syntaxget router info6 interface <interface_name>
Example outputThe command returns the status of the interface and the assigned IPv6 address.dmz2 [administratively down/down] 2001:db8:85a3:8d3:1319:8a2e:370:7348 fe80::209:fff:fe04:4cfd
FortiOS 4.0 MR3 CLI Reference816 01-431-99686-20110623
http://docs.fortinet.com/ • Feedback

get router info6 kernel
F0h
router info6 kernelUse this command to display the FortiGate kernel routing table. The kernel routing table displays information about all of the routes in the kernel.
Syntaxget router info6 kernel
ortiOS 4.0 MR3 CLI Reference1-431-99686-20110623 817ttp://docs.fortinet.com/ • Feedback
router info6 ospf get
router info6 ospfUse this command to display information about the OSPF IPv6 configuration.
Syntaxget router info6 ospf
FortiOS 4.0 MR3 CLI Reference818 01-431-99686-20110623
http://docs.fortinet.com/ • Feedback
get router info6 protocols
F0h
router info6 protocolsUse this command to display information about the configuration of all IPv6 dynamic routing protocols.
Syntaxget router info6 protocols
ortiOS 4.0 MR3 CLI Reference1-431-99686-20110623 819ttp://docs.fortinet.com/ • Feedback

router info6 rip get
router info6 ripUse this command to display information about the RIPng configuration.
Syntaxget router info6 rip
FortiOS 4.0 MR3 CLI Reference820 01-431-99686-20110623
http://docs.fortinet.com/ • Feedback
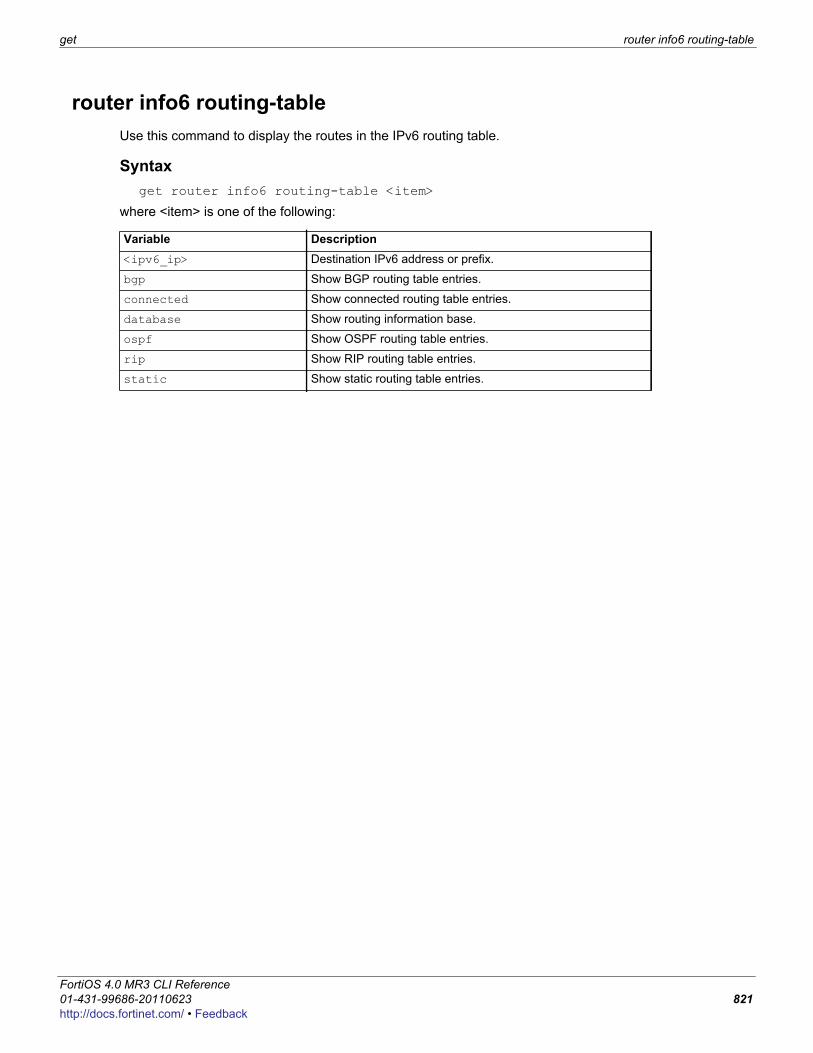
get router info6 routing-table
F0h
router info6 routing-tableUse this command to display the routes in the IPv6 routing table.
Syntaxget router info6 routing-table <item>
where <item> is one of the following:
Variable Description<ipv6_ip> Destination IPv6 address or prefix.
bgp Show BGP routing table entries.
connected Show connected routing table entries.
database Show routing information base.
ospf Show OSPF routing table entries.
rip Show RIP routing table entries.
static Show static routing table entries.
ortiOS 4.0 MR3 CLI Reference1-431-99686-20110623 821ttp://docs.fortinet.com/ • Feedback
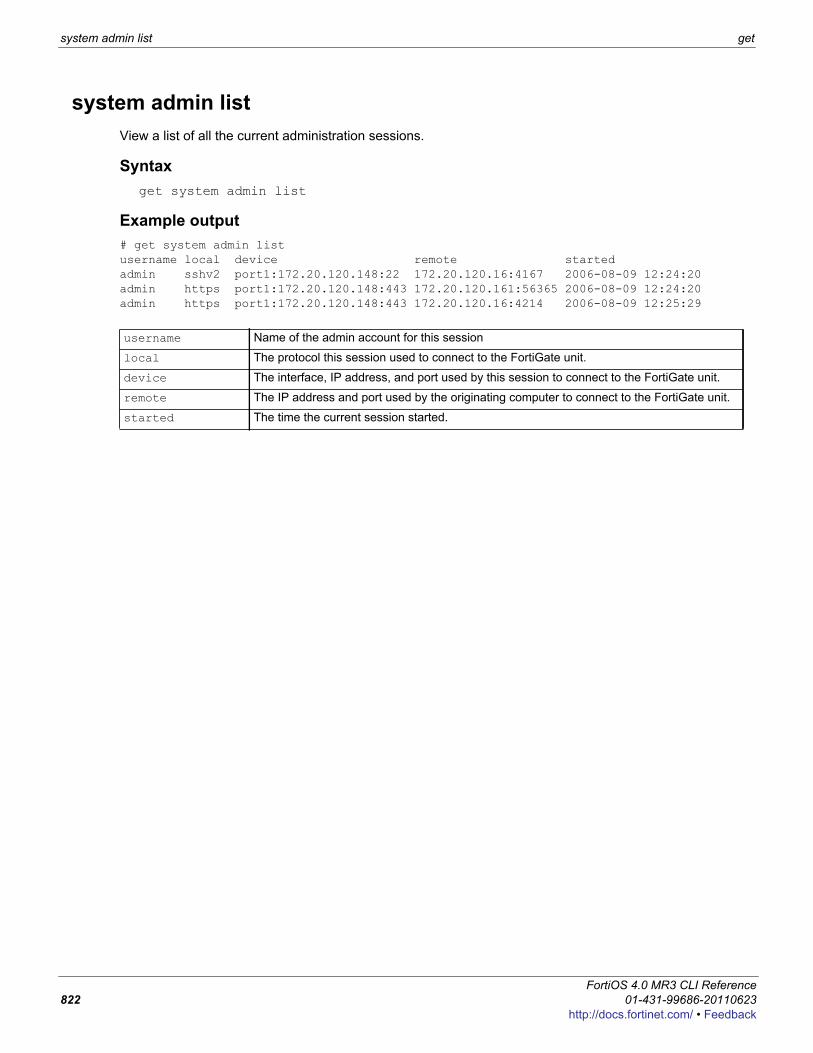
system admin list get
system admin listView a list of all the current administration sessions.
Syntaxget system admin list
Example output# get system admin listusername local device remote startedadmin sshv2 port1:172.20.120.148:22 172.20.120.16:4167 2006-08-09 12:24:20admin https port1:172.20.120.148:443 172.20.120.161:56365 2006-08-09 12:24:20admin https port1:172.20.120.148:443 172.20.120.16:4214 2006-08-09 12:25:29
username Name of the admin account for this session
local The protocol this session used to connect to the FortiGate unit.
device The interface, IP address, and port used by this session to connect to the FortiGate unit.
remote The IP address and port used by the originating computer to connect to the FortiGate unit.
started The time the current session started.
FortiOS 4.0 MR3 CLI Reference822 01-431-99686-20110623
http://docs.fortinet.com/ • Feedback
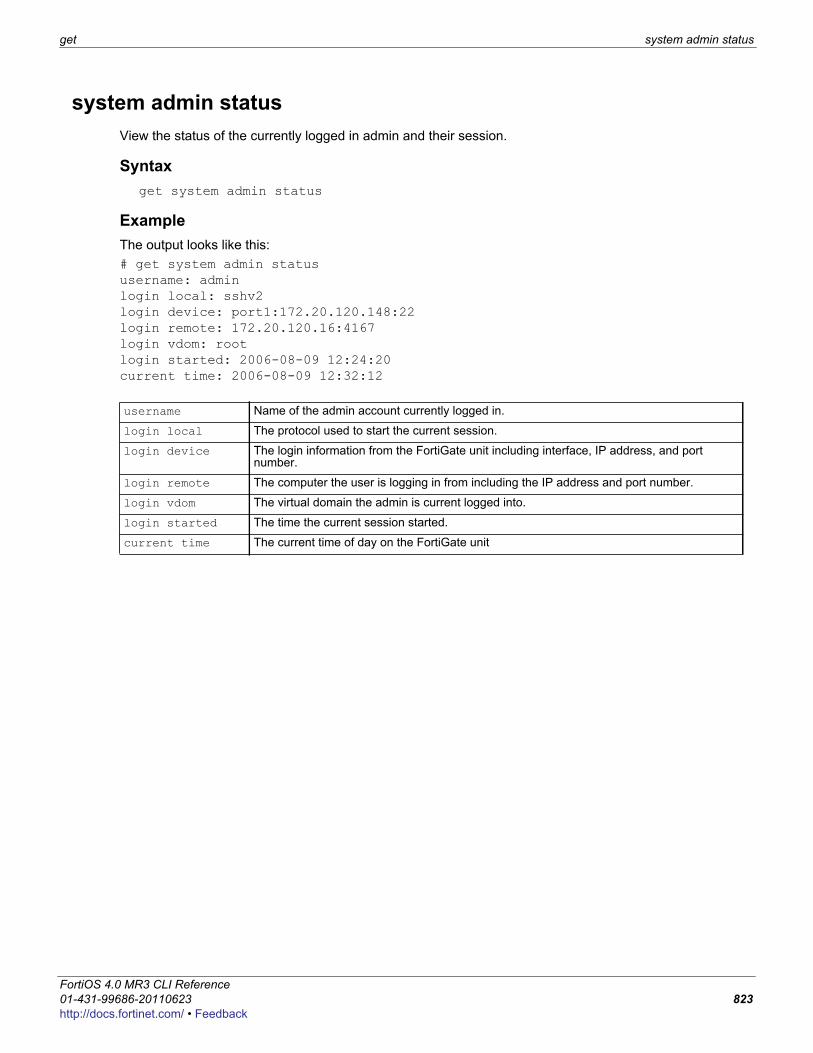
get system admin status
F0h
system admin statusView the status of the currently logged in admin and their session.
Syntaxget system admin status
ExampleThe output looks like this:# get system admin statususername: adminlogin local: sshv2login device: port1:172.20.120.148:22login remote: 172.20.120.16:4167login vdom: rootlogin started: 2006-08-09 12:24:20current time: 2006-08-09 12:32:12
username Name of the admin account currently logged in.
login local The protocol used to start the current session.
login device The login information from the FortiGate unit including interface, IP address, and port number.
login remote The computer the user is logging in from including the IP address and port number.
login vdom The virtual domain the admin is current logged into.
login started The time the current session started.
current time The current time of day on the FortiGate unit
ortiOS 4.0 MR3 CLI Reference1-431-99686-20110623 823ttp://docs.fortinet.com/ • Feedback
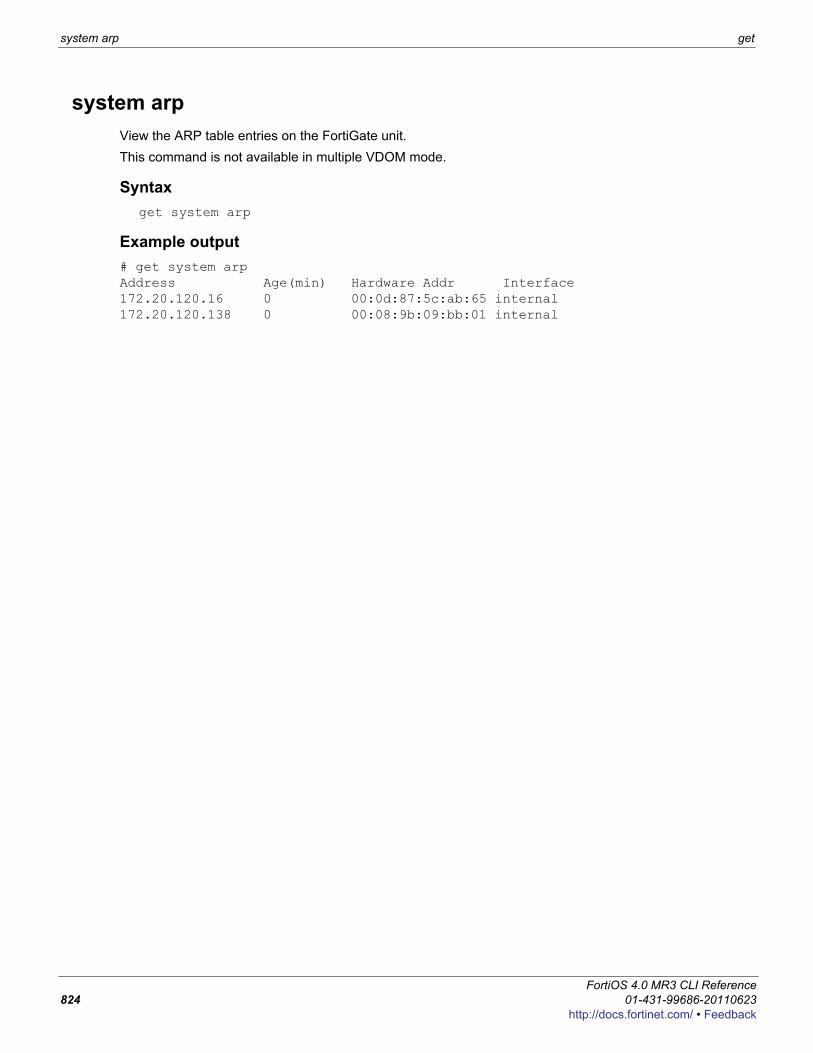
system arp get
system arpView the ARP table entries on the FortiGate unit.This command is not available in multiple VDOM mode.
Syntaxget system arp
Example output# get system arpAddress Age(min) Hardware Addr Interface172.20.120.16 0 00:0d:87:5c:ab:65 internal172.20.120.138 0 00:08:9b:09:bb:01 internal
FortiOS 4.0 MR3 CLI Reference824 01-431-99686-20110623
http://docs.fortinet.com/ • Feedback

get system auto-update
F0h
system auto-updateUse this command to display information about the status FortiGuard updates on the FortiGate unit.
Syntaxget system auto-update statusget system auto-update versions
Example outputget system auto-update statusFDN availability: available at Thu Apr 1 08:22:58 2010
Push update: disableScheduled update: enable
Update daily: 8:22Virus definitions update: enableIPS definitions update: enableServer override: disablePush address override: disableWeb proxy tunneling: disable
ortiOS 4.0 MR3 CLI Reference1-431-99686-20110623 825ttp://docs.fortinet.com/ • Feedback

system central-management get
system central-managementView information about the Central Management System configuration.
Syntaxget system central-management
ExampleThe output looks like this:FG600B3908600705 # get system central-management status : enable type : fortimanager auto-backup : disable schedule-config-restore: enable schedule-script-restore: enable allow-push-configuration: enable allow-pushd-firmware: enable allow-remote-firmware-upgrade: enable allow-monitor : enable fmg : 172.20.120.161 vdom : root authorized-manager-only: enable serial-number : "FMG-3K2404400063"
FortiOS 4.0 MR3 CLI Reference826 01-431-99686-20110623
http://docs.fortinet.com/ • Feedback
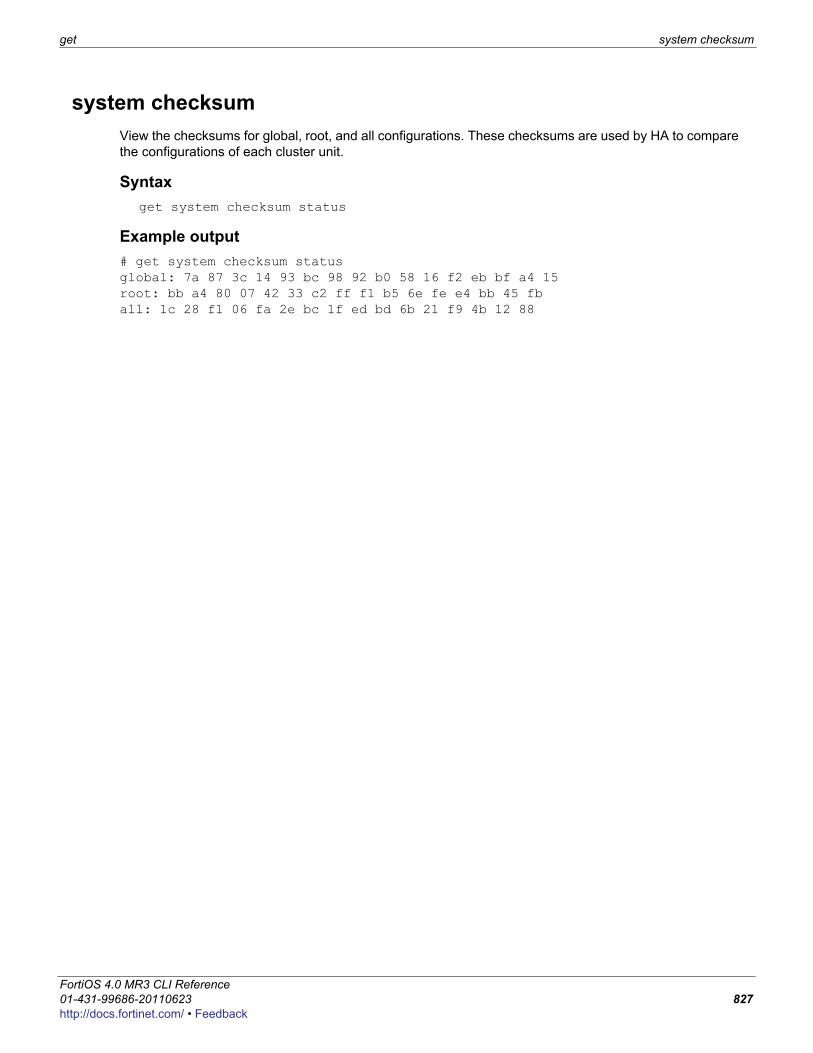
get system checksum
F0h
system checksumView the checksums for global, root, and all configurations. These checksums are used by HA to compare the configurations of each cluster unit.
Syntaxget system checksum status
Example output# get system checksum status global: 7a 87 3c 14 93 bc 98 92 b0 58 16 f2 eb bf a4 15 root: bb a4 80 07 42 33 c2 ff f1 b5 6e fe e4 bb 45 fb all: 1c 28 f1 06 fa 2e bc 1f ed bd 6b 21 f9 4b 12 88
ortiOS 4.0 MR3 CLI Reference1-431-99686-20110623 827ttp://docs.fortinet.com/ • Feedback
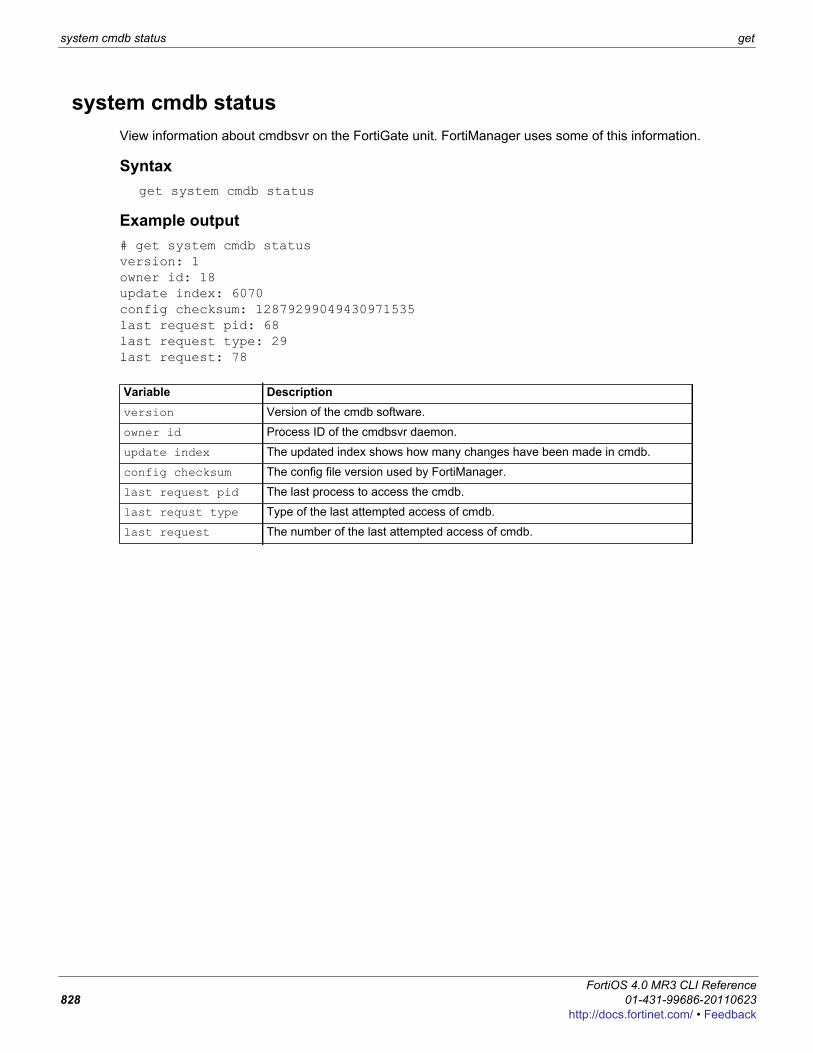
system cmdb status get
system cmdb statusView information about cmdbsvr on the FortiGate unit. FortiManager uses some of this information.
Syntaxget system cmdb status
Example output# get system cmdb statusversion: 1owner id: 18update index: 6070config checksum: 12879299049430971535last request pid: 68last request type: 29last request: 78
Variable Descriptionversion Version of the cmdb software.
owner id Process ID of the cmdbsvr daemon.
update index The updated index shows how many changes have been made in cmdb.
config checksum The config file version used by FortiManager.
last request pid The last process to access the cmdb.
last requst type Type of the last attempted access of cmdb.
last request The number of the last attempted access of cmdb.
FortiOS 4.0 MR3 CLI Reference828 01-431-99686-20110623
http://docs.fortinet.com/ • Feedback
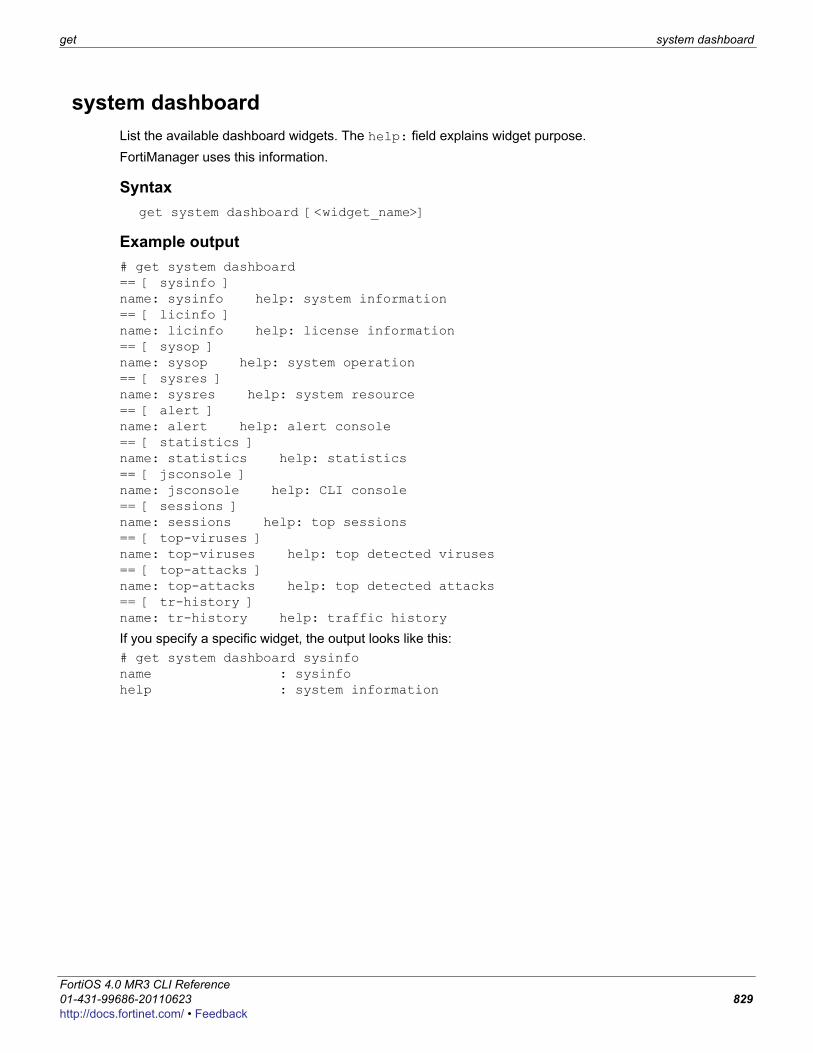
get system dashboard
F0h
system dashboardList the available dashboard widgets. The help: field explains widget purpose.FortiManager uses this information.
Syntaxget system dashboard [<widget_name>]
Example output# get system dashboard== [ sysinfo ]name: sysinfo help: system information== [ licinfo ]name: licinfo help: license information== [ sysop ]name: sysop help: system operation== [ sysres ]name: sysres help: system resource== [ alert ]name: alert help: alert console== [ statistics ]name: statistics help: statistics== [ jsconsole ]name: jsconsole help: CLI console== [ sessions ]name: sessions help: top sessions== [ top-viruses ]name: top-viruses help: top detected viruses== [ top-attacks ]name: top-attacks help: top detected attacks== [ tr-history ]name: tr-history help: traffic history
If you specify a specific widget, the output looks like this:# get system dashboard sysinfoname : sysinfohelp : system information
ortiOS 4.0 MR3 CLI Reference1-431-99686-20110623 829ttp://docs.fortinet.com/ • Feedback
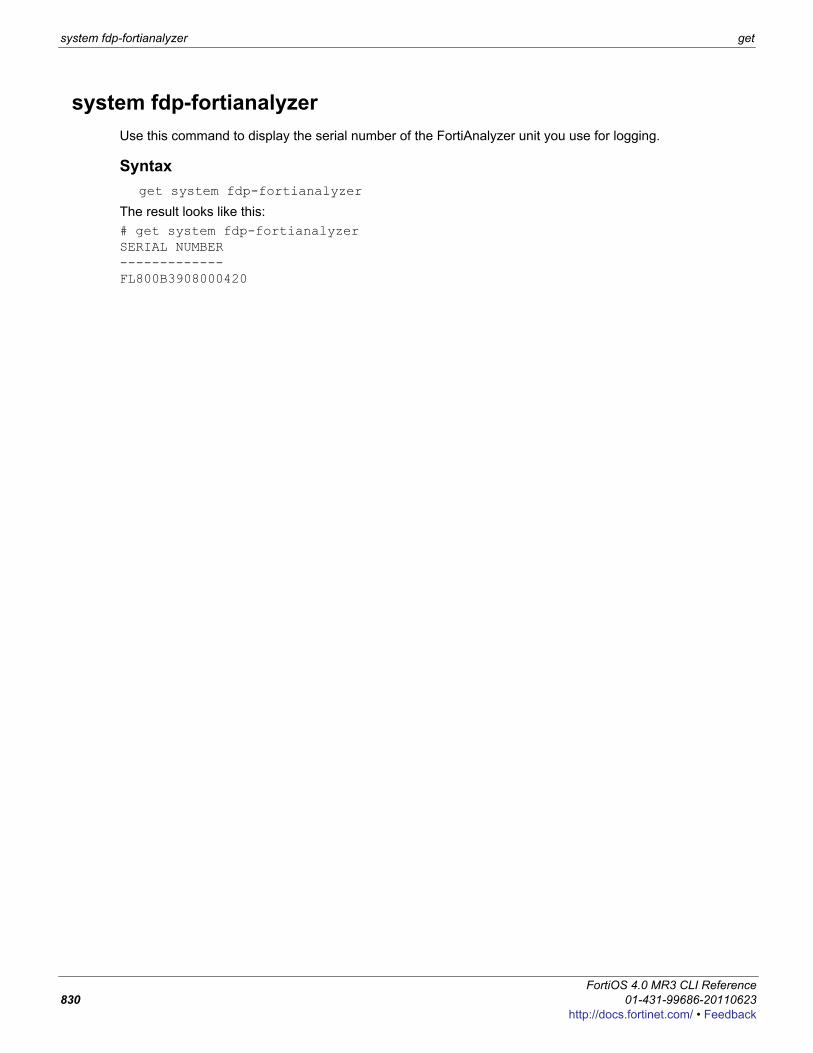
system fdp-fortianalyzer get
system fdp-fortianalyzerUse this command to display the serial number of the FortiAnalyzer unit you use for logging.
Syntaxget system fdp-fortianalyzer
The result looks like this:# get system fdp-fortianalyzerSERIAL NUMBER-------------FL800B3908000420
FortiOS 4.0 MR3 CLI Reference830 01-431-99686-20110623
http://docs.fortinet.com/ • Feedback

get system fortianalyzer-connectivity
F0h
system fortianalyzer-connectivityDisplay connection and remote disk usage information about a connected FortiAnalyzer unit.
Syntaxget fortianalyzer-connectivity status
Example output# get system fortianalyzer-connectivity statusStatus: connectedDisk Usage: 0%
ortiOS 4.0 MR3 CLI Reference1-431-99686-20110623 831ttp://docs.fortinet.com/ • Feedback
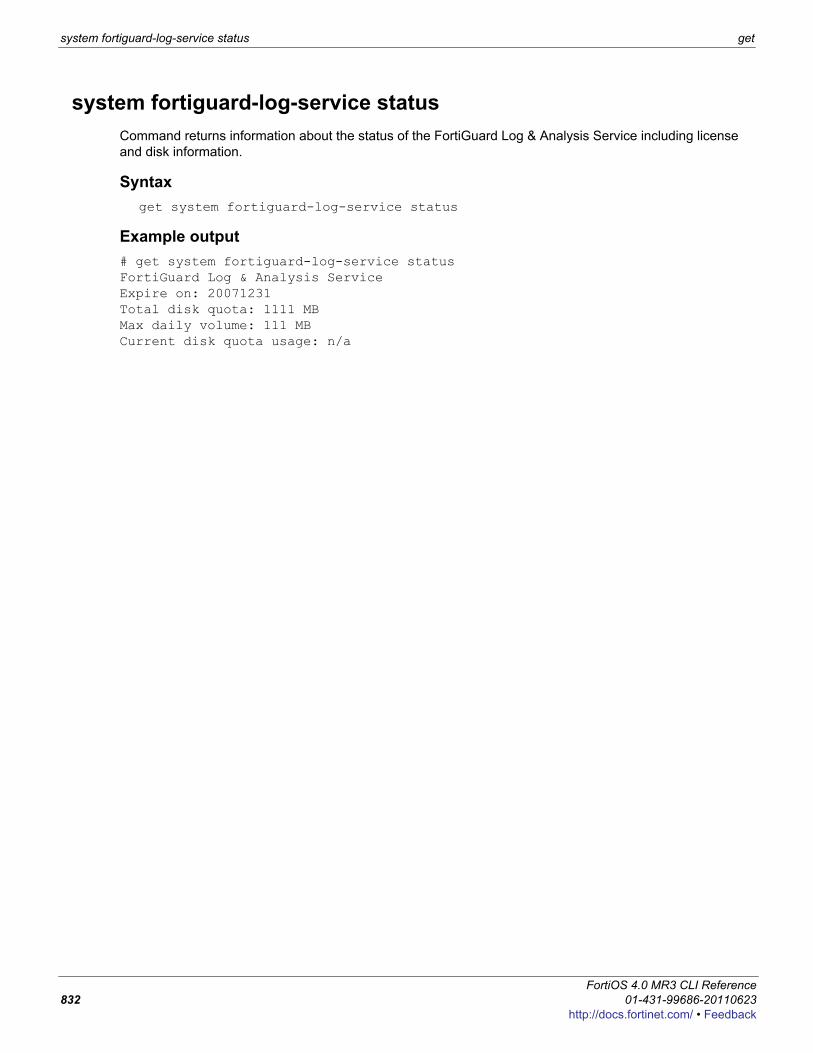
system fortiguard-log-service status get
system fortiguard-log-service statusCommand returns information about the status of the FortiGuard Log & Analysis Service including license and disk information.
Syntaxget system fortiguard-log-service status
Example output# get system fortiguard-log-service status FortiGuard Log & Analysis ServiceExpire on: 20071231Total disk quota: 1111 MBMax daily volume: 111 MBCurrent disk quota usage: n/a
FortiOS 4.0 MR3 CLI Reference832 01-431-99686-20110623
http://docs.fortinet.com/ • Feedback
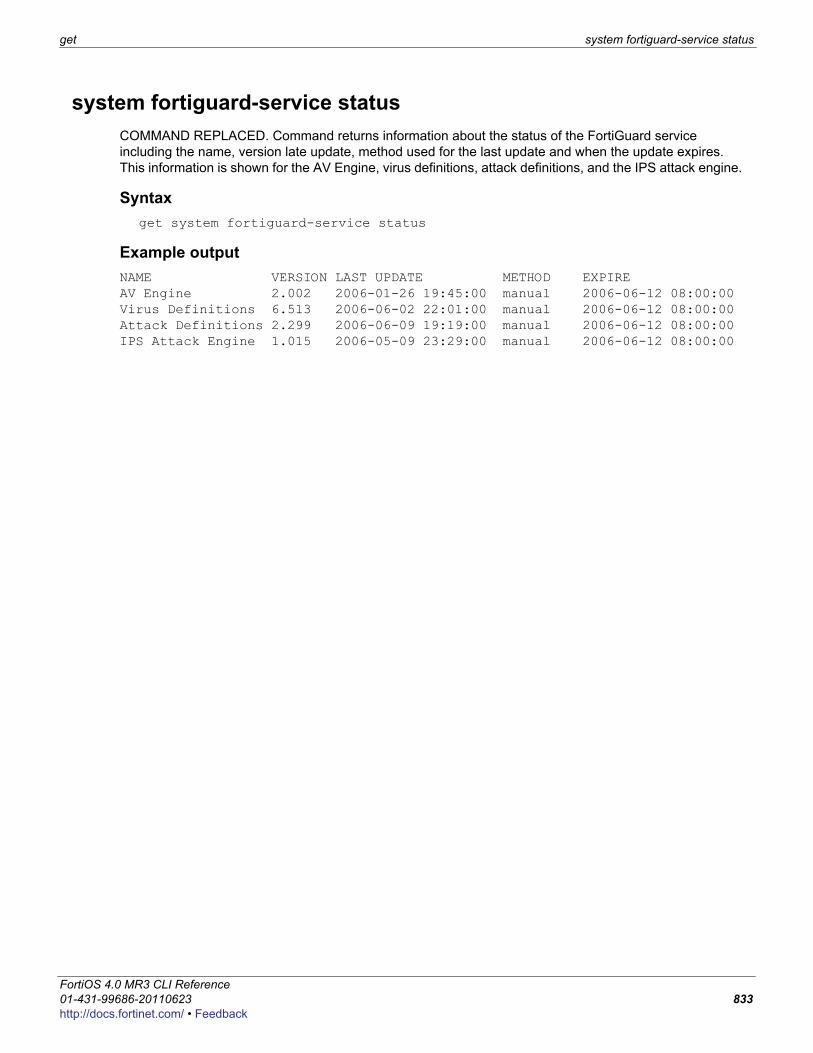
get system fortiguard-service status
F0h
system fortiguard-service statusCOMMAND REPLACED. Command returns information about the status of the FortiGuard service including the name, version late update, method used for the last update and when the update expires. This information is shown for the AV Engine, virus definitions, attack definitions, and the IPS attack engine.
Syntaxget system fortiguard-service status
Example outputNAME VERSION LAST UPDATE METHOD EXPIRE AV Engine 2.002 2006-01-26 19:45:00 manual 2006-06-12 08:00:00 Virus Definitions 6.513 2006-06-02 22:01:00 manual 2006-06-12 08:00:00 Attack Definitions 2.299 2006-06-09 19:19:00 manual 2006-06-12 08:00:00 IPS Attack Engine 1.015 2006-05-09 23:29:00 manual 2006-06-12 08:00:00
ortiOS 4.0 MR3 CLI Reference1-431-99686-20110623 833ttp://docs.fortinet.com/ • Feedback

system ha-nonsync-csum get
system ha-nonsync-csumFortiManager uses this command to obtain a system checksum.
Syntaxget system ha-nonsync-csum
FortiOS 4.0 MR3 CLI Reference834 01-431-99686-20110623
http://docs.fortinet.com/ • Feedback
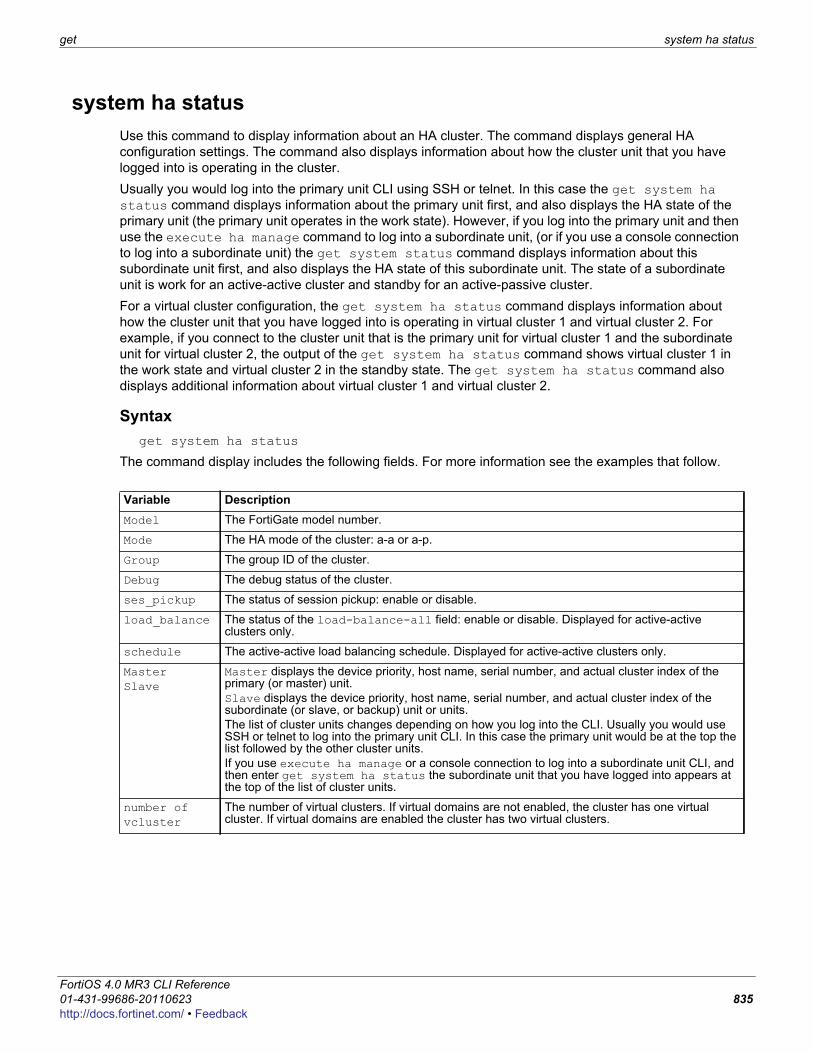
get system ha status
F0h
system ha statusUse this command to display information about an HA cluster. The command displays general HA configuration settings. The command also displays information about how the cluster unit that you have logged into is operating in the cluster. Usually you would log into the primary unit CLI using SSH or telnet. In this case the get system ha status command displays information about the primary unit first, and also displays the HA state of the primary unit (the primary unit operates in the work state). However, if you log into the primary unit and then use the execute ha manage command to log into a subordinate unit, (or if you use a console connection to log into a subordinate unit) the get system status command displays information about this subordinate unit first, and also displays the HA state of this subordinate unit. The state of a subordinate unit is work for an active-active cluster and standby for an active-passive cluster.For a virtual cluster configuration, the get system ha status command displays information about how the cluster unit that you have logged into is operating in virtual cluster 1 and virtual cluster 2. For example, if you connect to the cluster unit that is the primary unit for virtual cluster 1 and the subordinate unit for virtual cluster 2, the output of the get system ha status command shows virtual cluster 1 in the work state and virtual cluster 2 in the standby state. The get system ha status command also displays additional information about virtual cluster 1 and virtual cluster 2.
Syntaxget system ha status
The command display includes the following fields. For more information see the examples that follow.
Variable DescriptionModel The FortiGate model number.
Mode The HA mode of the cluster: a-a or a-p.
Group The group ID of the cluster.
Debug The debug status of the cluster.
ses_pickup The status of session pickup: enable or disable.
load_balance The status of the load-balance-all field: enable or disable. Displayed for active-active clusters only.
schedule The active-active load balancing schedule. Displayed for active-active clusters only.
MasterSlave
Master displays the device priority, host name, serial number, and actual cluster index of the primary (or master) unit.Slave displays the device priority, host name, serial number, and actual cluster index of the subordinate (or slave, or backup) unit or units.The list of cluster units changes depending on how you log into the CLI. Usually you would use SSH or telnet to log into the primary unit CLI. In this case the primary unit would be at the top the list followed by the other cluster units. If you use execute ha manage or a console connection to log into a subordinate unit CLI, and then enter get system ha status the subordinate unit that you have logged into appears at the top of the list of cluster units.
number of vcluster
The number of virtual clusters. If virtual domains are not enabled, the cluster has one virtual cluster. If virtual domains are enabled the cluster has two virtual clusters.
ortiOS 4.0 MR3 CLI Reference1-431-99686-20110623 835ttp://docs.fortinet.com/ • Feedback

system ha status get
vcluster 1 The HA state (hello, work, or standby) and HA heartbeat IP address of the cluster unit that you have logged into in virtual cluster 1. If virtual domains are not enabled, vcluster 1 displays information for the cluster. If virtual domains are enabled, vcluster 1 displays information for virtual cluster 1.The HA heartbeat IP address is 10.0.0.1 if you are logged into a the primary unit of virtual cluster 1 and 10.0.0.2 if you are logged into a subordinate unit of virtual cluster 1. vcluster 1 also lists the primary unit (master) and subordinate units (slave) in virtual cluster 1. The list includes the operating cluster index and serial number of each cluster unit in virtual cluster 1. The cluster unit that you have logged into is at the top of the list.If virtual domains are not enabled and you connect to the primary unit CLI, the HA state of the cluster unit in virtual cluster 1 is work. The display lists the cluster units starting with the primary unit.If virtual domains are not enabled and you connect to a subordinate unit CLI, the HA state of the cluster unit in virtual cluster 1 is standby. The display lists the cluster units starting with the subordinate unit that you have logged into.If virtual domains are enabled and you connect to the virtual cluster 1 primary unit CLI, the HA state of the cluster unit in virtual cluster 1 is work. The display lists the cluster units starting with the virtual cluster 1 primary unit.If virtual domains are enabled and you connect to the virtual cluster 1 subordinate unit CLI, the HA state of the cluster unit in virtual cluster 1 is standby. The display lists the cluster units starting with the subordinate unit that you are logged into.In a cluster consisting of two cluster units operating without virtual domains enabled all clustering actually takes place in virtual cluster 1. HA is designed to work this way to support virtual clustering. If this cluster was operating with virtual domains enabled, adding virtual cluster 2 is similar to adding a new copy of virtual cluster 1. Virtual cluster 2 is visible in the get system ha status command output when you add virtual domains to virtual cluster 2.
vcluster 2 vcluster 2 only appears if virtual domains are enabled. vcluster 2 displays the HA state (hello, work, or standby) and HA heartbeat IP address of the cluster unit that you have logged into in virtual cluster 2. The HA heartbeat IP address is 10.0.0.2 if you are logged into the primary unit of virtual cluster 2 and 10.0.0.1 if you are logged into a subordinate unit of virtual cluster 2.vcluster 2 also lists the primary unit (master) and subordinate units (slave) in virtual cluster 2. The list includes the cluster index and serial number of each cluster unit in virtual cluster 2. The cluster unit that you have logged into is at the top of the list.If you connect to the virtual cluster 2 primary unit CLI, the HA state of the cluster unit in virtual cluster 2 is work. The display lists the cluster units starting with the virtual cluster 2 primary unit.If you connect to the virtual cluster 2 subordinate unit CLI, the HA state of the cluster unit in virtual cluster 2 is standby. The display lists the cluster units starting with the subordinate unit that you are logged into.
Variable Description
FortiOS 4.0 MR3 CLI Reference836 01-431-99686-20110623
http://docs.fortinet.com/ • Feedback
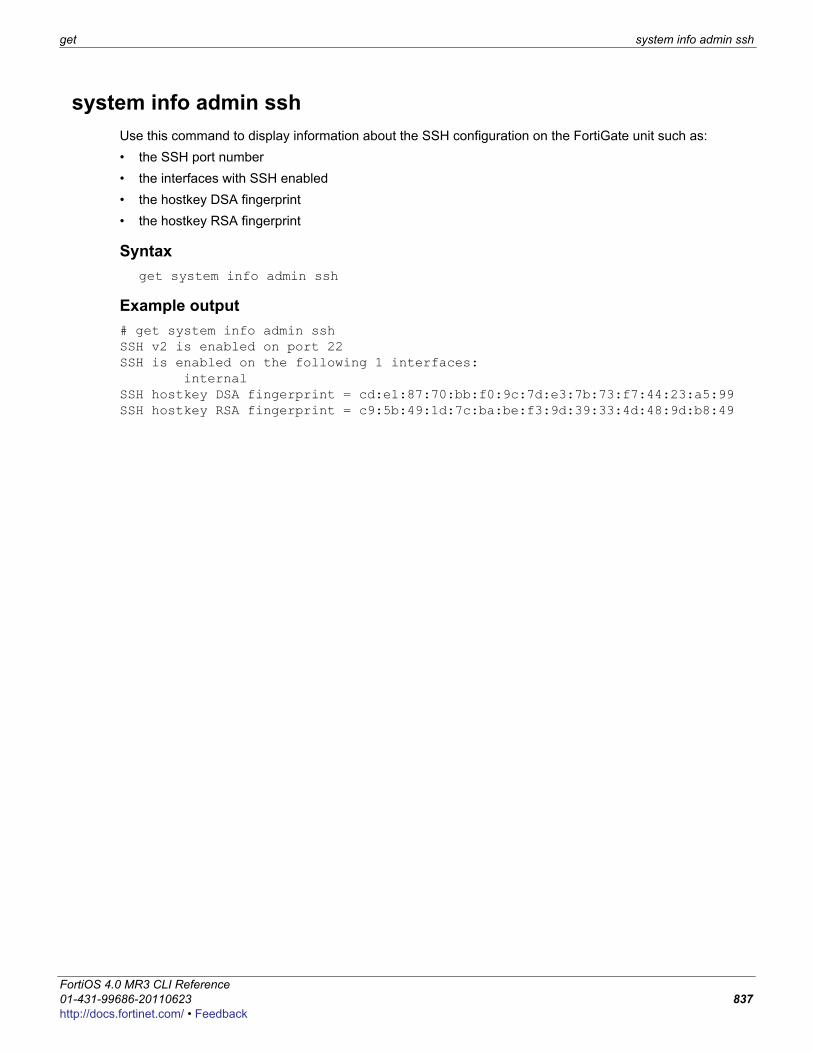
get system info admin ssh
F0h
system info admin sshUse this command to display information about the SSH configuration on the FortiGate unit such as:• the SSH port number• the interfaces with SSH enabled• the hostkey DSA fingerprint • the hostkey RSA fingerprint
Syntaxget system info admin ssh
Example output# get system info admin ssh SSH v2 is enabled on port 22SSH is enabled on the following 1 interfaces: internalSSH hostkey DSA fingerprint = cd:e1:87:70:bb:f0:9c:7d:e3:7b:73:f7:44:23:a5:99SSH hostkey RSA fingerprint = c9:5b:49:1d:7c:ba:be:f3:9d:39:33:4d:48:9d:b8:49
ortiOS 4.0 MR3 CLI Reference1-431-99686-20110623 837ttp://docs.fortinet.com/ • Feedback
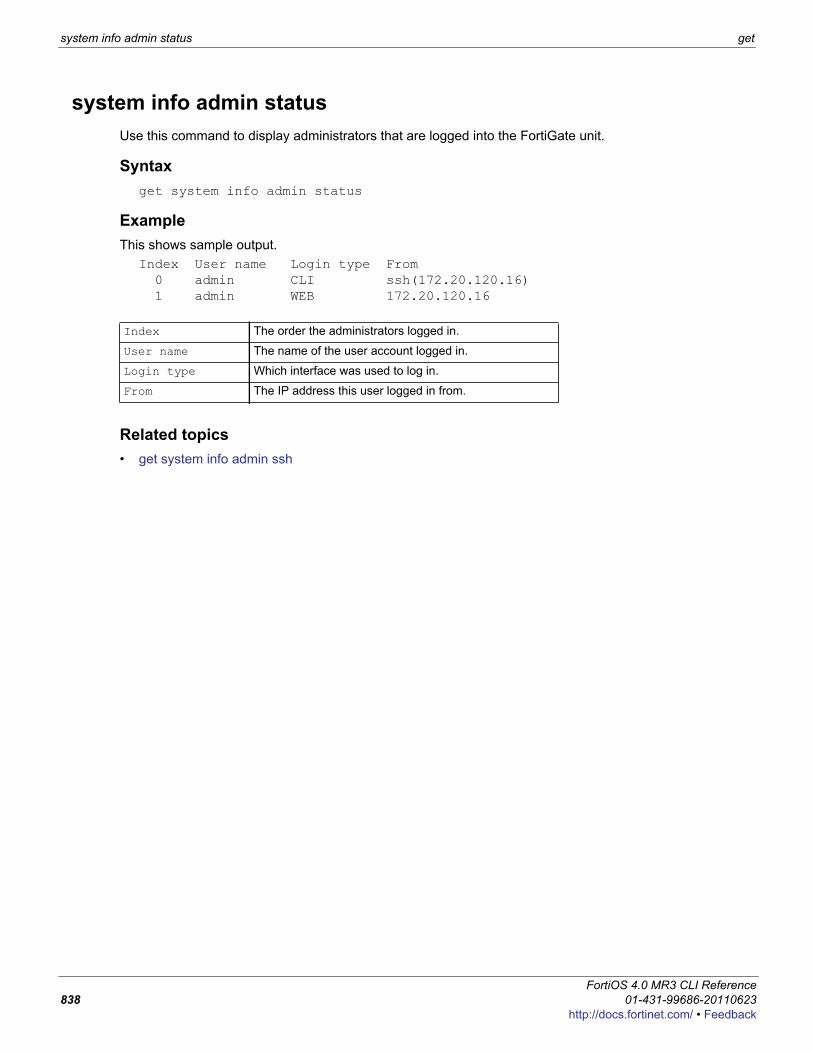
system info admin status get
system info admin statusUse this command to display administrators that are logged into the FortiGate unit.
Syntaxget system info admin status
ExampleThis shows sample output.
Index User name Login type From 0 admin CLI ssh(172.20.120.16) 1 admin WEB 172.20.120.16
Related topics• get system info admin ssh
Index The order the administrators logged in.
User name The name of the user account logged in.
Login type Which interface was used to log in.
From The IP address this user logged in from.
FortiOS 4.0 MR3 CLI Reference838 01-431-99686-20110623
http://docs.fortinet.com/ • Feedback
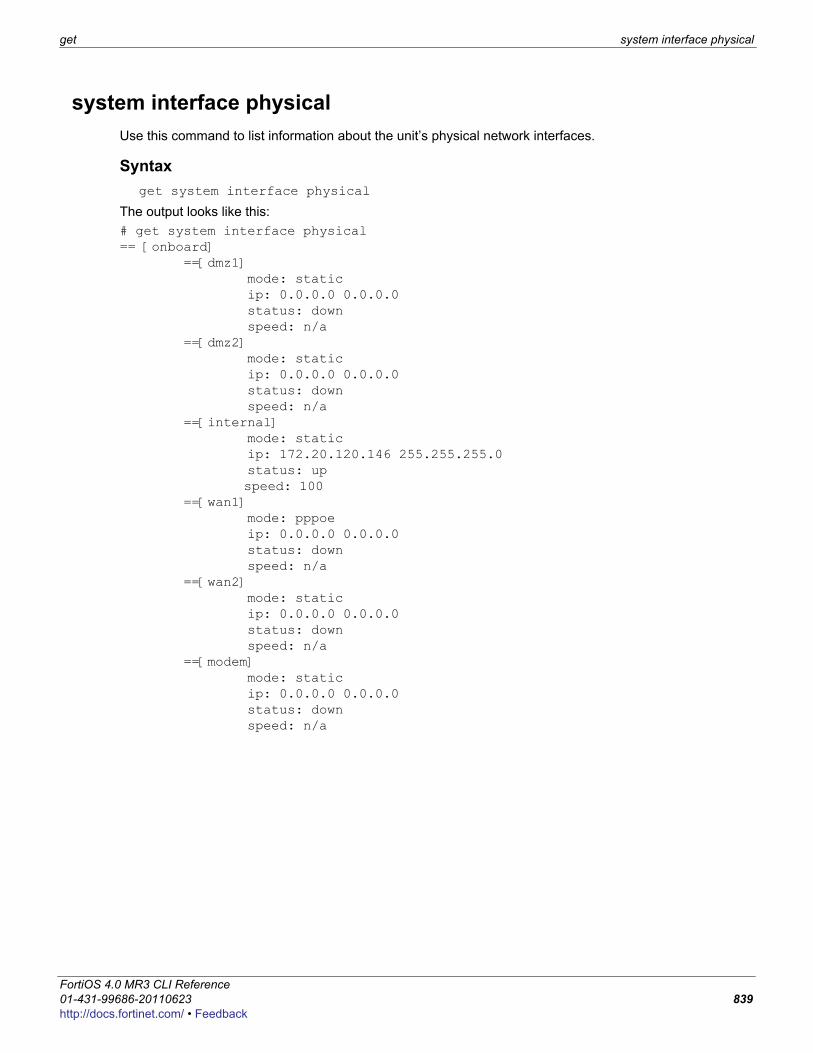
get system interface physical
F0h
system interface physicalUse this command to list information about the unit’s physical network interfaces.
Syntaxget system interface physical
The output looks like this:# get system interface physical== [onboard] ==[dmz1] mode: static ip: 0.0.0.0 0.0.0.0 status: down speed: n/a ==[dmz2] mode: static ip: 0.0.0.0 0.0.0.0 status: down speed: n/a ==[internal] mode: static ip: 172.20.120.146 255.255.255.0 status: up speed: 100 ==[wan1] mode: pppoe ip: 0.0.0.0 0.0.0.0 status: down speed: n/a ==[wan2] mode: static ip: 0.0.0.0 0.0.0.0 status: down speed: n/a ==[modem] mode: static ip: 0.0.0.0 0.0.0.0 status: down speed: n/a
ortiOS 4.0 MR3 CLI Reference1-431-99686-20110623 839ttp://docs.fortinet.com/ • Feedback
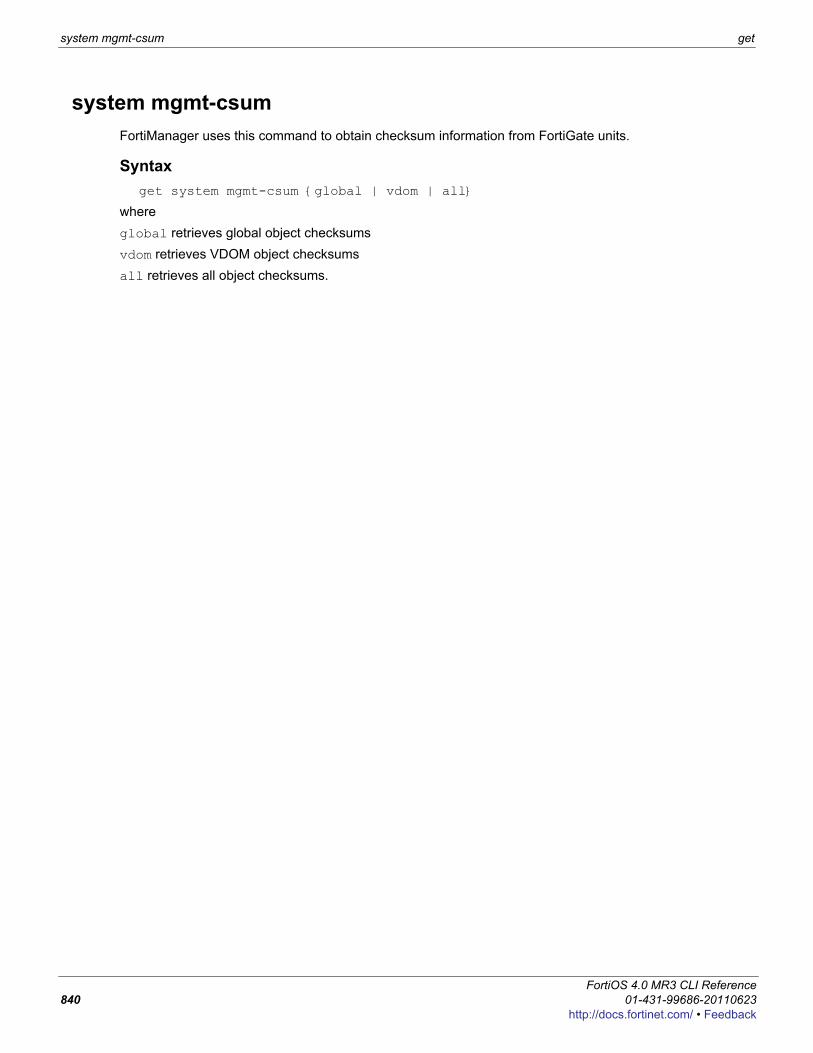
system mgmt-csum get
system mgmt-csumFortiManager uses this command to obtain checksum information from FortiGate units.
Syntaxget system mgmt-csum {global | vdom | all}
where global retrieves global object checksumsvdom retrieves VDOM object checksumsall retrieves all object checksums.
FortiOS 4.0 MR3 CLI Reference840 01-431-99686-20110623
http://docs.fortinet.com/ • Feedback
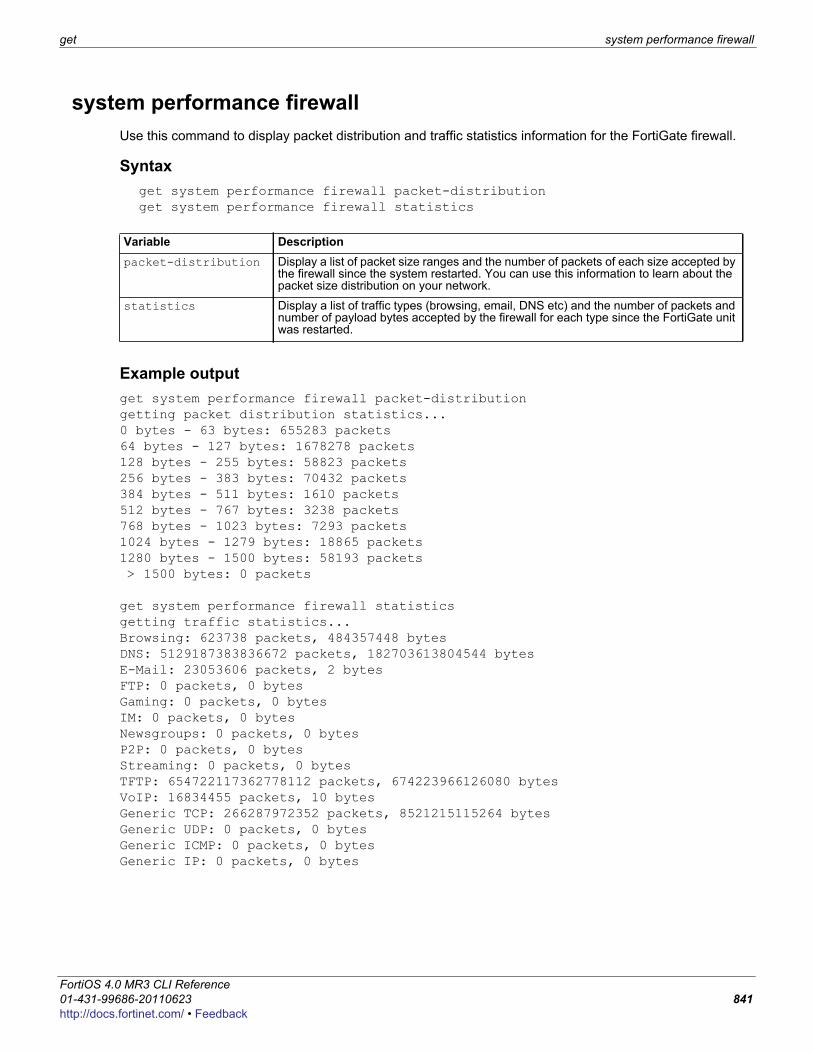
get system performance firewall
F0h
system performance firewall Use this command to display packet distribution and traffic statistics information for the FortiGate firewall.
Syntaxget system performance firewall packet-distributionget system performance firewall statistics
Example outputget system performance firewall packet-distribution getting packet distribution statistics...0 bytes - 63 bytes: 655283 packets64 bytes - 127 bytes: 1678278 packets128 bytes - 255 bytes: 58823 packets256 bytes - 383 bytes: 70432 packets384 bytes - 511 bytes: 1610 packets512 bytes - 767 bytes: 3238 packets768 bytes - 1023 bytes: 7293 packets1024 bytes - 1279 bytes: 18865 packets1280 bytes - 1500 bytes: 58193 packets > 1500 bytes: 0 packets
get system performance firewall statistics getting traffic statistics...Browsing: 623738 packets, 484357448 bytesDNS: 5129187383836672 packets, 182703613804544 bytesE-Mail: 23053606 packets, 2 bytesFTP: 0 packets, 0 bytesGaming: 0 packets, 0 bytesIM: 0 packets, 0 bytesNewsgroups: 0 packets, 0 bytesP2P: 0 packets, 0 bytesStreaming: 0 packets, 0 bytesTFTP: 654722117362778112 packets, 674223966126080 bytesVoIP: 16834455 packets, 10 bytesGeneric TCP: 266287972352 packets, 8521215115264 bytesGeneric UDP: 0 packets, 0 bytesGeneric ICMP: 0 packets, 0 bytesGeneric IP: 0 packets, 0 bytes
Variable Descriptionpacket-distribution Display a list of packet size ranges and the number of packets of each size accepted by
the firewall since the system restarted. You can use this information to learn about the packet size distribution on your network.
statistics Display a list of traffic types (browsing, email, DNS etc) and the number of packets and number of payload bytes accepted by the firewall for each type since the FortiGate unit was restarted.
ortiOS 4.0 MR3 CLI Reference1-431-99686-20110623 841ttp://docs.fortinet.com/ • Feedback
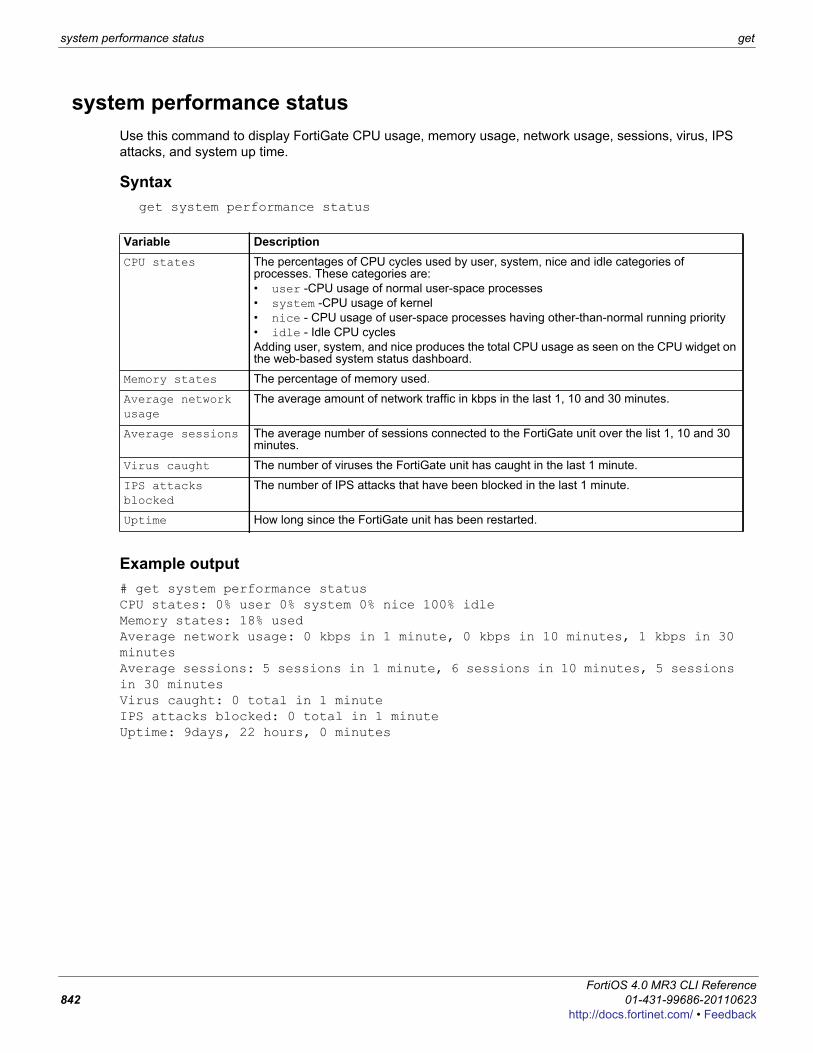
system performance status get
system performance statusUse this command to display FortiGate CPU usage, memory usage, network usage, sessions, virus, IPS attacks, and system up time.
Syntaxget system performance status
Example output# get system performance statusCPU states: 0% user 0% system 0% nice 100% idleMemory states: 18% usedAverage network usage: 0 kbps in 1 minute, 0 kbps in 10 minutes, 1 kbps in 30 minutesAverage sessions: 5 sessions in 1 minute, 6 sessions in 10 minutes, 5 sessions in 30 minutesVirus caught: 0 total in 1 minuteIPS attacks blocked: 0 total in 1 minuteUptime: 9days, 22 hours, 0 minutes
Variable DescriptionCPU states The percentages of CPU cycles used by user, system, nice and idle categories of
processes. These categories are:• user -CPU usage of normal user-space processes• system -CPU usage of kernel• nice - CPU usage of user-space processes having other-than-normal running priority• idle - Idle CPU cyclesAdding user, system, and nice produces the total CPU usage as seen on the CPU widget on the web-based system status dashboard.
Memory states The percentage of memory used.
Average network usage
The average amount of network traffic in kbps in the last 1, 10 and 30 minutes.
Average sessions The average number of sessions connected to the FortiGate unit over the list 1, 10 and 30 minutes.
Virus caught The number of viruses the FortiGate unit has caught in the last 1 minute.
IPS attacks blocked
The number of IPS attacks that have been blocked in the last 1 minute.
Uptime How long since the FortiGate unit has been restarted.
FortiOS 4.0 MR3 CLI Reference842 01-431-99686-20110623
http://docs.fortinet.com/ • Feedback
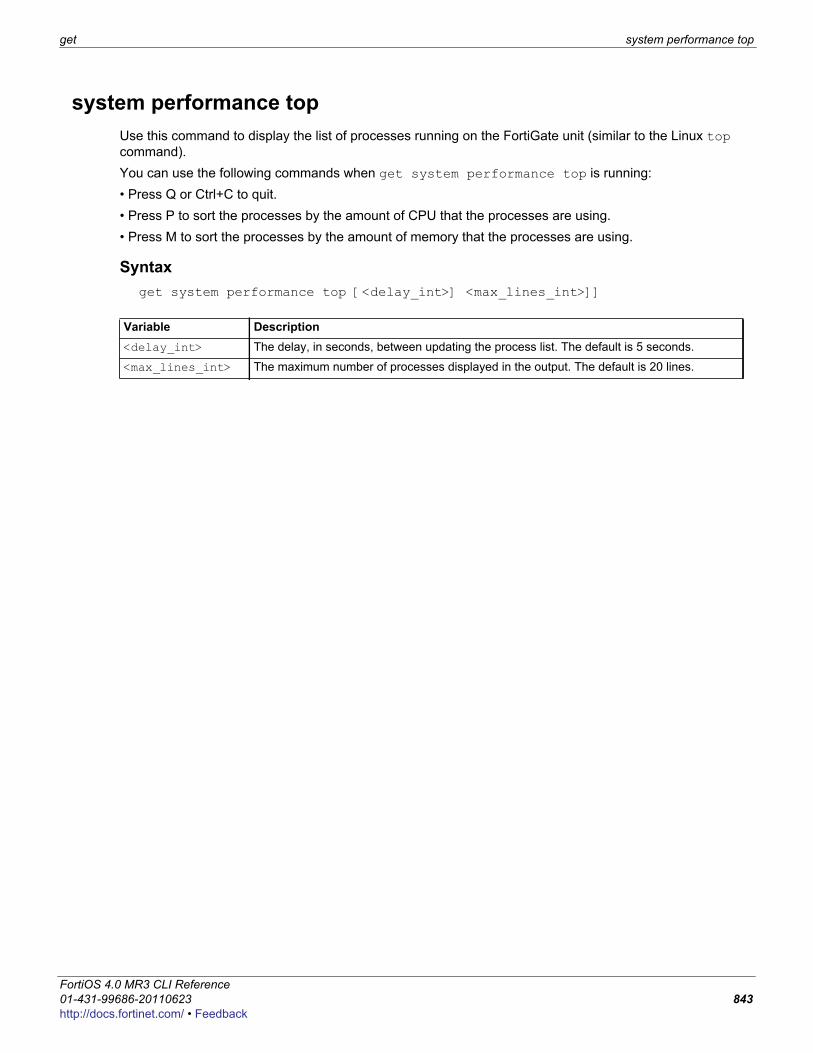
get system performance top
F0h
system performance topUse this command to display the list of processes running on the FortiGate unit (similar to the Linux top command). You can use the following commands when get system performance top is running:• Press Q or Ctrl+C to quit.• Press P to sort the processes by the amount of CPU that the processes are using.• Press M to sort the processes by the amount of memory that the processes are using.
Syntaxget system performance top [<delay_int>] <max_lines_int>]]
Variable Description<delay_int> The delay, in seconds, between updating the process list. The default is 5 seconds.
<max_lines_int> The maximum number of processes displayed in the output. The default is 20 lines.
ortiOS 4.0 MR3 CLI Reference1-431-99686-20110623 843ttp://docs.fortinet.com/ • Feedback
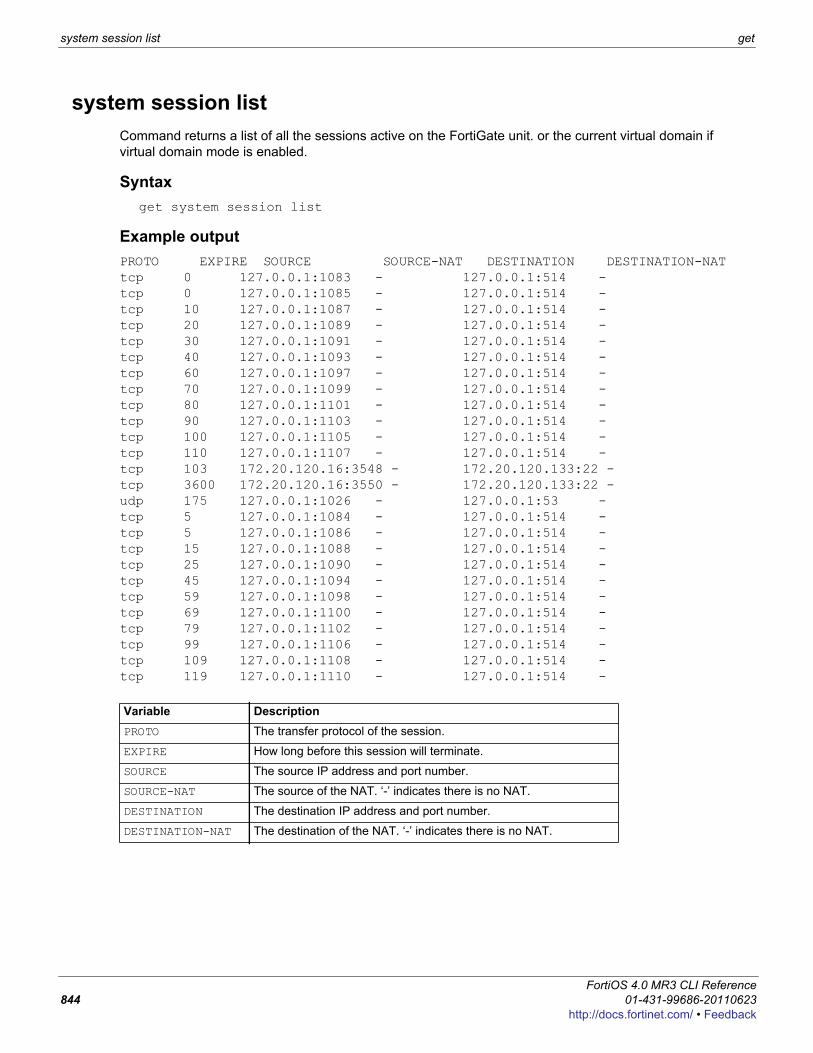
system session list get
system session listCommand returns a list of all the sessions active on the FortiGate unit. or the current virtual domain if virtual domain mode is enabled.
Syntaxget system session list
Example outputPROTO EXPIRE SOURCE SOURCE-NAT DESTINATION DESTINATION-NATtcp 0 127.0.0.1:1083 - 127.0.0.1:514 - tcp 0 127.0.0.1:1085 - 127.0.0.1:514 - tcp 10 127.0.0.1:1087 - 127.0.0.1:514 - tcp 20 127.0.0.1:1089 - 127.0.0.1:514 - tcp 30 127.0.0.1:1091 - 127.0.0.1:514 - tcp 40 127.0.0.1:1093 - 127.0.0.1:514 - tcp 60 127.0.0.1:1097 - 127.0.0.1:514 - tcp 70 127.0.0.1:1099 - 127.0.0.1:514 - tcp 80 127.0.0.1:1101 - 127.0.0.1:514 - tcp 90 127.0.0.1:1103 - 127.0.0.1:514 - tcp 100 127.0.0.1:1105 - 127.0.0.1:514 - tcp 110 127.0.0.1:1107 - 127.0.0.1:514 - tcp 103 172.20.120.16:3548 - 172.20.120.133:22 - tcp 3600 172.20.120.16:3550 - 172.20.120.133:22 - udp 175 127.0.0.1:1026 - 127.0.0.1:53 - tcp 5 127.0.0.1:1084 - 127.0.0.1:514 - tcp 5 127.0.0.1:1086 - 127.0.0.1:514 - tcp 15 127.0.0.1:1088 - 127.0.0.1:514 - tcp 25 127.0.0.1:1090 - 127.0.0.1:514 - tcp 45 127.0.0.1:1094 - 127.0.0.1:514 - tcp 59 127.0.0.1:1098 - 127.0.0.1:514 - tcp 69 127.0.0.1:1100 - 127.0.0.1:514 - tcp 79 127.0.0.1:1102 - 127.0.0.1:514 - tcp 99 127.0.0.1:1106 - 127.0.0.1:514 - tcp 109 127.0.0.1:1108 - 127.0.0.1:514 - tcp 119 127.0.0.1:1110 - 127.0.0.1:514 -
Variable DescriptionPROTO The transfer protocol of the session.
EXPIRE How long before this session will terminate.
SOURCE The source IP address and port number.
SOURCE-NAT The source of the NAT. ‘-’ indicates there is no NAT.
DESTINATION The destination IP address and port number.
DESTINATION-NAT The destination of the NAT. ‘-’ indicates there is no NAT.
FortiOS 4.0 MR3 CLI Reference844 01-431-99686-20110623
http://docs.fortinet.com/ • Feedback

get system startup-error-log
F0h
system startup-error-logUse this command to display information about system startup errors. This command only displays information if an error occurs when the FortiGate unit starts up.
Syntaxget system startup-error-log
ortiOS 4.0 MR3 CLI Reference1-431-99686-20110623 845ttp://docs.fortinet.com/ • Feedback
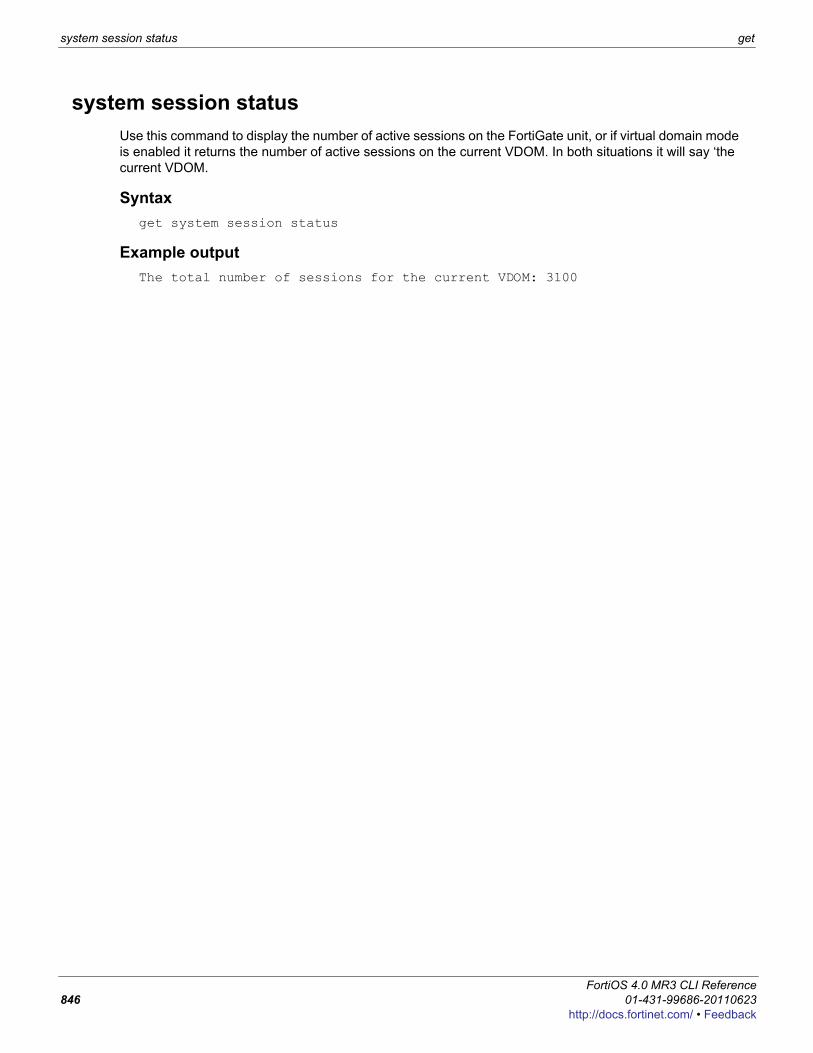
system session status get
system session statusUse this command to display the number of active sessions on the FortiGate unit, or if virtual domain mode is enabled it returns the number of active sessions on the current VDOM. In both situations it will say ‘the current VDOM.
Syntaxget system session status
Example outputThe total number of sessions for the current VDOM: 3100
FortiOS 4.0 MR3 CLI Reference846 01-431-99686-20110623
http://docs.fortinet.com/ • Feedback
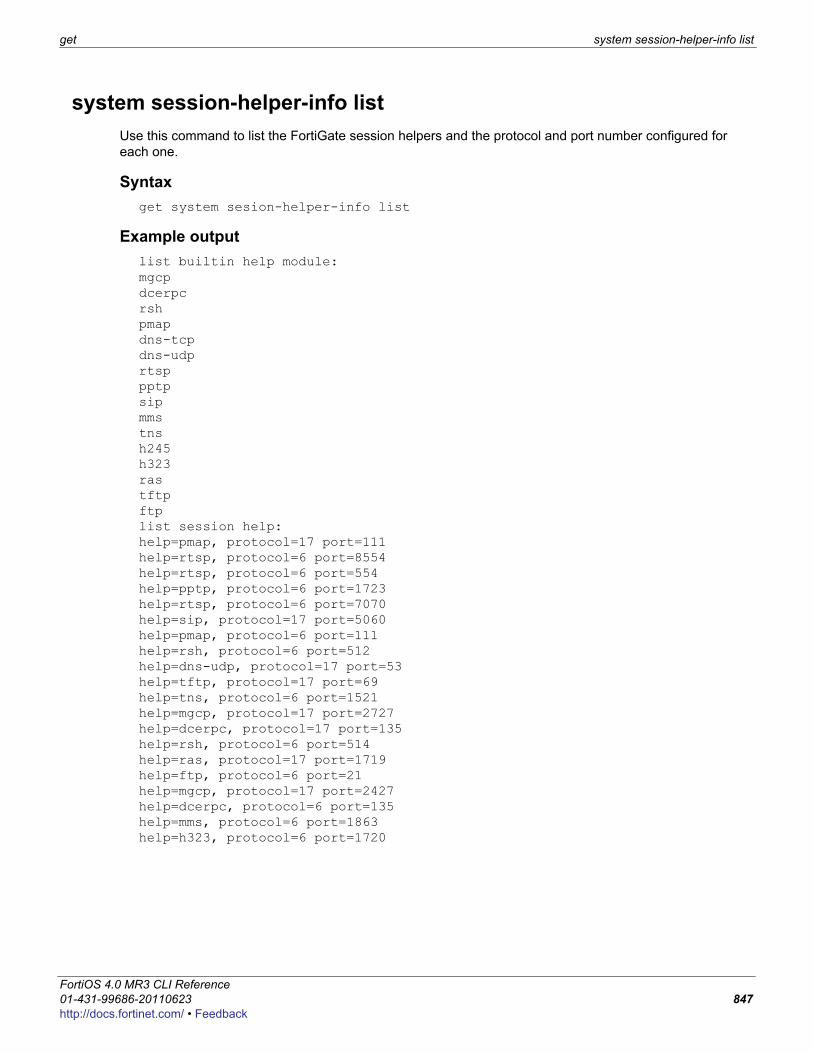
get system session-helper-info list
F0h
system session-helper-info listUse this command to list the FortiGate session helpers and the protocol and port number configured for each one.
Syntaxget system sesion-helper-info list
Example outputlist builtin help module:mgcpdcerpcrshpmapdns-tcpdns-udprtsppptpsipmmstnsh245h323rastftpftplist session help:help=pmap, protocol=17 port=111help=rtsp, protocol=6 port=8554help=rtsp, protocol=6 port=554help=pptp, protocol=6 port=1723help=rtsp, protocol=6 port=7070help=sip, protocol=17 port=5060help=pmap, protocol=6 port=111help=rsh, protocol=6 port=512help=dns-udp, protocol=17 port=53help=tftp, protocol=17 port=69help=tns, protocol=6 port=1521help=mgcp, protocol=17 port=2727help=dcerpc, protocol=17 port=135help=rsh, protocol=6 port=514help=ras, protocol=17 port=1719help=ftp, protocol=6 port=21help=mgcp, protocol=17 port=2427help=dcerpc, protocol=6 port=135help=mms, protocol=6 port=1863help=h323, protocol=6 port=1720
ortiOS 4.0 MR3 CLI Reference1-431-99686-20110623 847ttp://docs.fortinet.com/ • Feedback
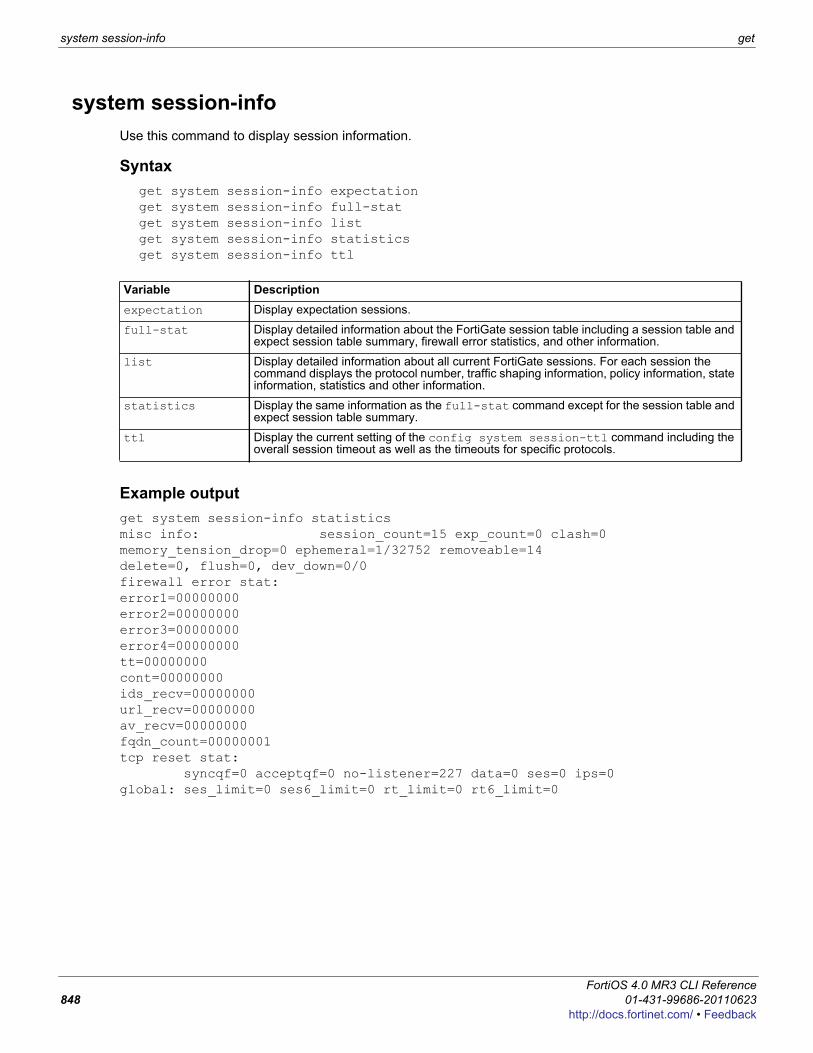
system session-info get
system session-infoUse this command to display session information.
Syntaxget system session-info expectation get system session-info full-stat get system session-info list get system session-info statisticsget system session-info ttl
Example outputget system session-info statistics misc info: session_count=15 exp_count=0 clash=0 memory_tension_drop=0 ephemeral=1/32752 removeable=14delete=0, flush=0, dev_down=0/0firewall error stat:error1=00000000error2=00000000error3=00000000error4=00000000tt=00000000cont=00000000ids_recv=00000000url_recv=00000000av_recv=00000000fqdn_count=00000001tcp reset stat: syncqf=0 acceptqf=0 no-listener=227 data=0 ses=0 ips=0global: ses_limit=0 ses6_limit=0 rt_limit=0 rt6_limit=0
Variable Descriptionexpectation Display expectation sessions.
full-stat Display detailed information about the FortiGate session table including a session table and expect session table summary, firewall error statistics, and other information.
list Display detailed information about all current FortiGate sessions. For each session the command displays the protocol number, traffic shaping information, policy information, state information, statistics and other information.
statistics Display the same information as the full-stat command except for the session table and expect session table summary.
ttl Display the current setting of the config system session-ttl command including the overall session timeout as well as the timeouts for specific protocols.
FortiOS 4.0 MR3 CLI Reference848 01-431-99686-20110623
http://docs.fortinet.com/ • Feedback
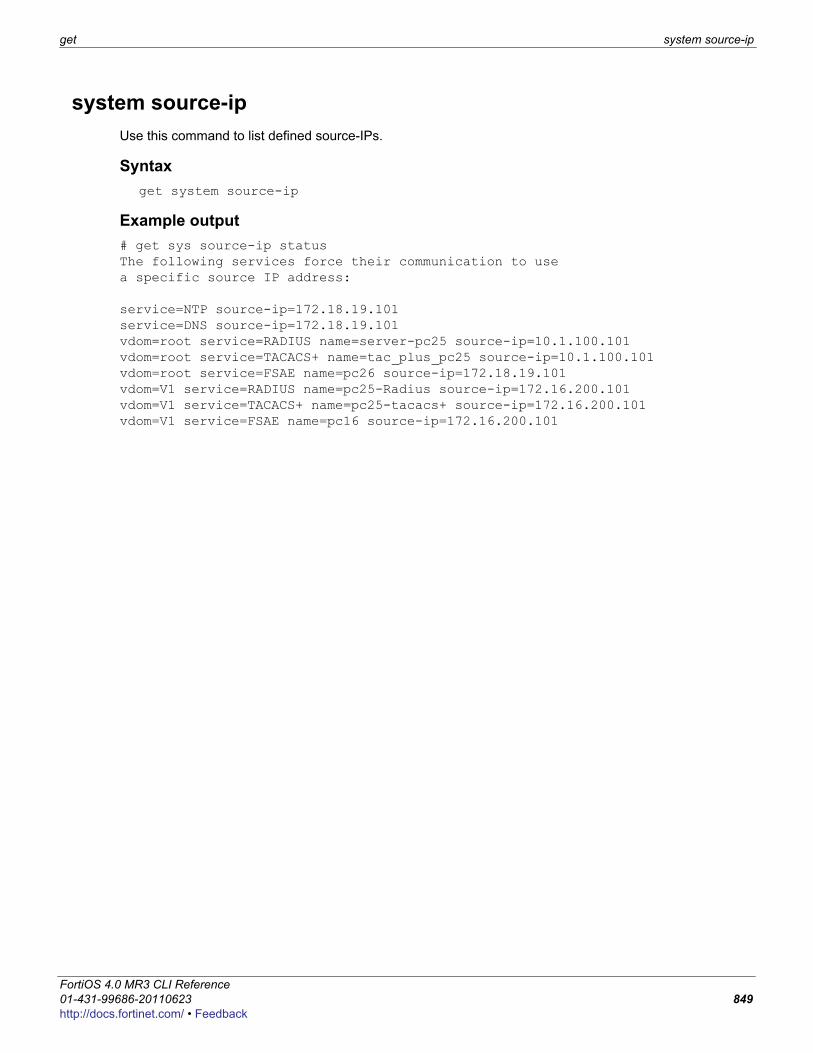
get system source-ip
F0h
system source-ipUse this command to list defined source-IPs.
Syntaxget system source-ip
Example output# get sys source-ip statusThe following services force their communication to usea specific source IP address:
service=NTP source-ip=172.18.19.101service=DNS source-ip=172.18.19.101vdom=root service=RADIUS name=server-pc25 source-ip=10.1.100.101vdom=root service=TACACS+ name=tac_plus_pc25 source-ip=10.1.100.101vdom=root service=FSAE name=pc26 source-ip=172.18.19.101vdom=V1 service=RADIUS name=pc25-Radius source-ip=172.16.200.101vdom=V1 service=TACACS+ name=pc25-tacacs+ source-ip=172.16.200.101vdom=V1 service=FSAE name=pc16 source-ip=172.16.200.101
ortiOS 4.0 MR3 CLI Reference1-431-99686-20110623 849ttp://docs.fortinet.com/ • Feedback
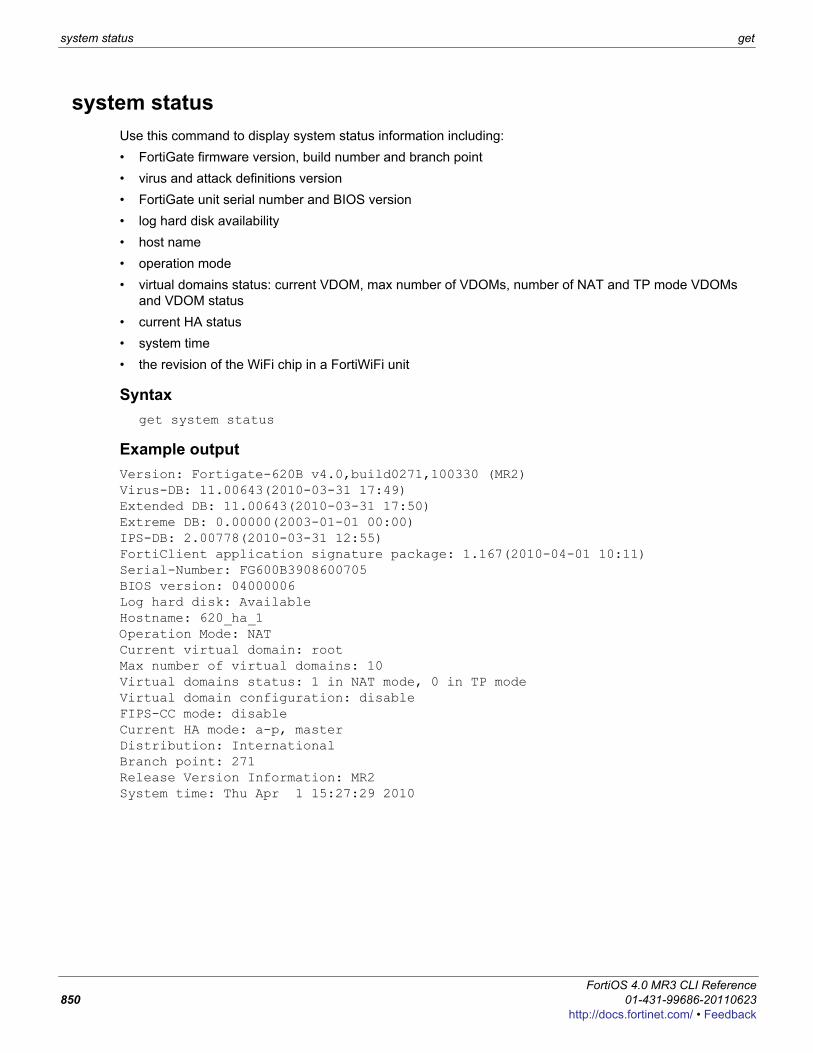
system status get
system statusUse this command to display system status information including:• FortiGate firmware version, build number and branch point• virus and attack definitions version• FortiGate unit serial number and BIOS version• log hard disk availability• host name• operation mode• virtual domains status: current VDOM, max number of VDOMs, number of NAT and TP mode VDOMs
and VDOM status• current HA status• system time• the revision of the WiFi chip in a FortiWiFi unit
Syntaxget system status
Example outputVersion: Fortigate-620B v4.0,build0271,100330 (MR2)Virus-DB: 11.00643(2010-03-31 17:49)Extended DB: 11.00643(2010-03-31 17:50)Extreme DB: 0.00000(2003-01-01 00:00)IPS-DB: 2.00778(2010-03-31 12:55)FortiClient application signature package: 1.167(2010-04-01 10:11)Serial-Number: FG600B3908600705BIOS version: 04000006Log hard disk: AvailableHostname: 620_ha_1Operation Mode: NATCurrent virtual domain: rootMax number of virtual domains: 10Virtual domains status: 1 in NAT mode, 0 in TP modeVirtual domain configuration: disableFIPS-CC mode: disableCurrent HA mode: a-p, masterDistribution: InternationalBranch point: 271Release Version Information: MR2System time: Thu Apr 1 15:27:29 2010
FortiOS 4.0 MR3 CLI Reference850 01-431-99686-20110623
http://docs.fortinet.com/ • Feedback
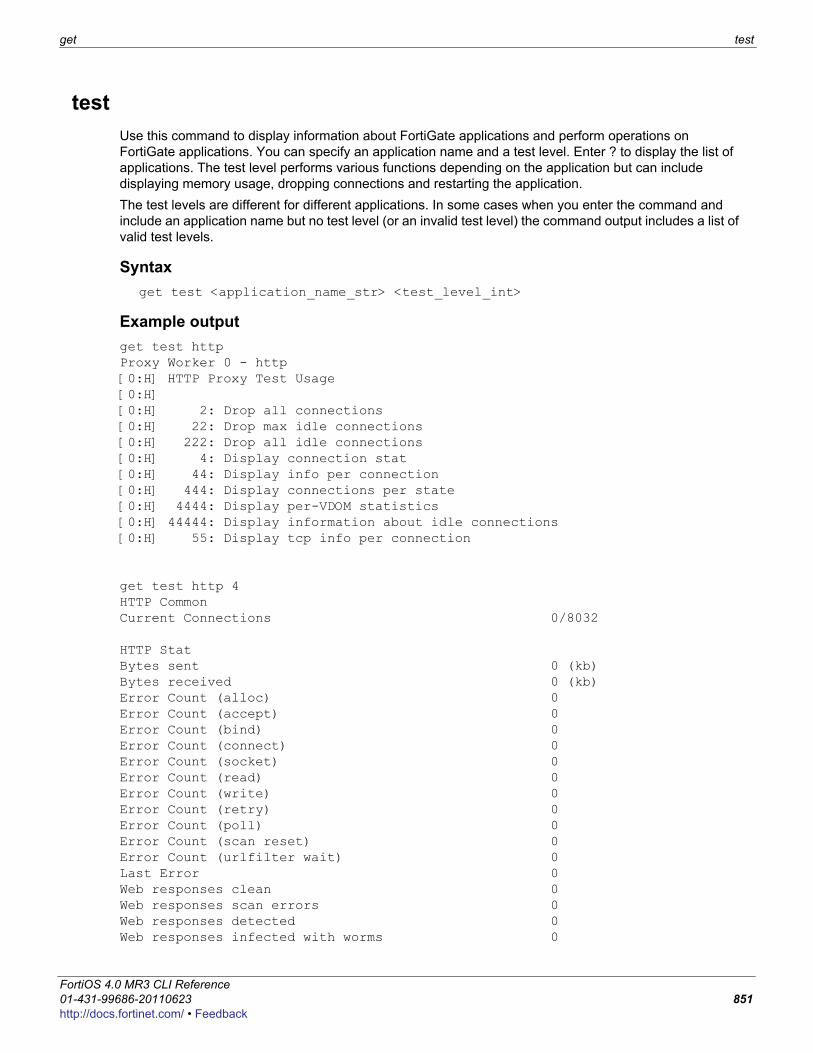
get test
F0h
testUse this command to display information about FortiGate applications and perform operations on FortiGate applications. You can specify an application name and a test level. Enter ? to display the list of applications. The test level performs various functions depending on the application but can include displaying memory usage, dropping connections and restarting the application. The test levels are different for different applications. In some cases when you enter the command and include an application name but no test level (or an invalid test level) the command output includes a list of valid test levels.
Syntaxget test <application_name_str> <test_level_int>
Example outputget test http Proxy Worker 0 - http[0:H] HTTP Proxy Test Usage[0:H] [0:H] 2: Drop all connections[0:H] 22: Drop max idle connections[0:H] 222: Drop all idle connections[0:H] 4: Display connection stat[0:H] 44: Display info per connection[0:H] 444: Display connections per state[0:H] 4444: Display per-VDOM statistics[0:H] 44444: Display information about idle connections[0:H] 55: Display tcp info per connection
get test http 4HTTP CommonCurrent Connections 0/8032
HTTP StatBytes sent 0 (kb)Bytes received 0 (kb)Error Count (alloc) 0Error Count (accept) 0Error Count (bind) 0Error Count (connect) 0Error Count (socket) 0Error Count (read) 0Error Count (write) 0Error Count (retry) 0Error Count (poll) 0Error Count (scan reset) 0Error Count (urlfilter wait) 0Last Error 0Web responses clean 0Web responses scan errors 0Web responses detected 0Web responses infected with worms 0
ortiOS 4.0 MR3 CLI Reference1-431-99686-20110623 851ttp://docs.fortinet.com/ • Feedback
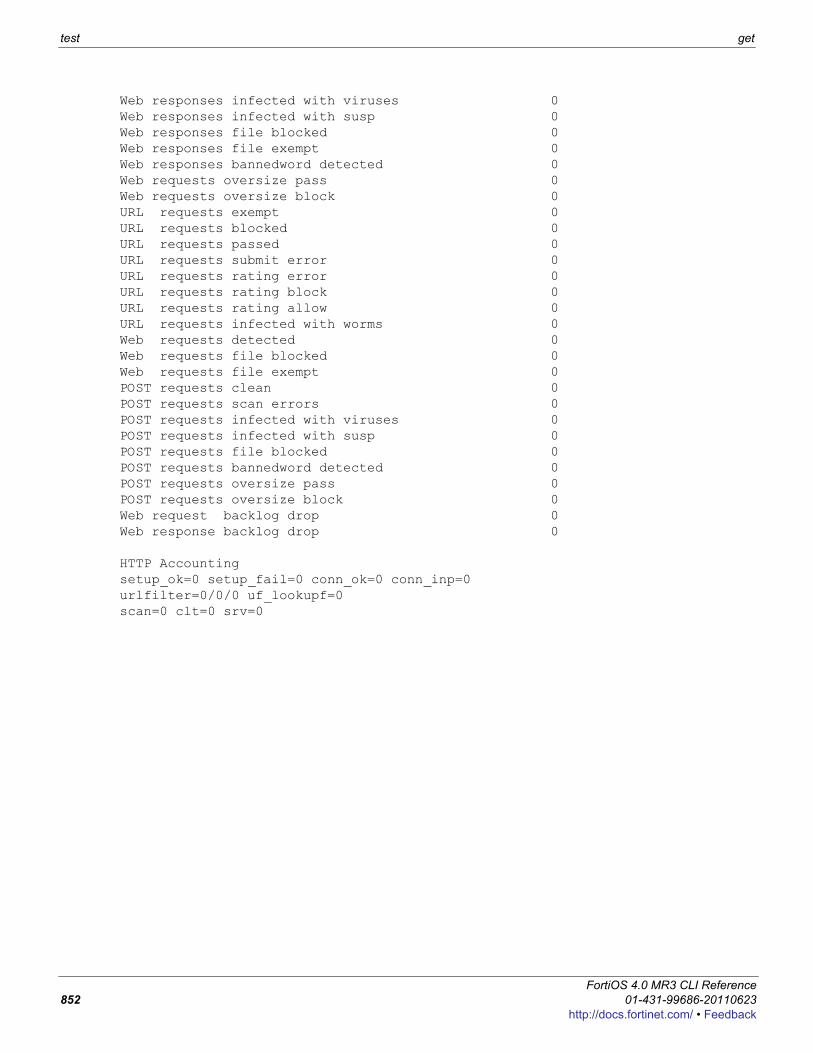
test get
Web responses infected with viruses 0Web responses infected with susp 0Web responses file blocked 0Web responses file exempt 0Web responses bannedword detected 0Web requests oversize pass 0Web requests oversize block 0URL requests exempt 0URL requests blocked 0URL requests passed 0URL requests submit error 0URL requests rating error 0URL requests rating block 0URL requests rating allow 0URL requests infected with worms 0Web requests detected 0Web requests file blocked 0Web requests file exempt 0POST requests clean 0POST requests scan errors 0POST requests infected with viruses 0POST requests infected with susp 0POST requests file blocked 0POST requests bannedword detected 0POST requests oversize pass 0POST requests oversize block 0Web request backlog drop 0Web response backlog drop 0
HTTP Accountingsetup_ok=0 setup_fail=0 conn_ok=0 conn_inp=0urlfilter=0/0/0 uf_lookupf=0scan=0 clt=0 srv=0
FortiOS 4.0 MR3 CLI Reference852 01-431-99686-20110623
http://docs.fortinet.com/ • Feedback
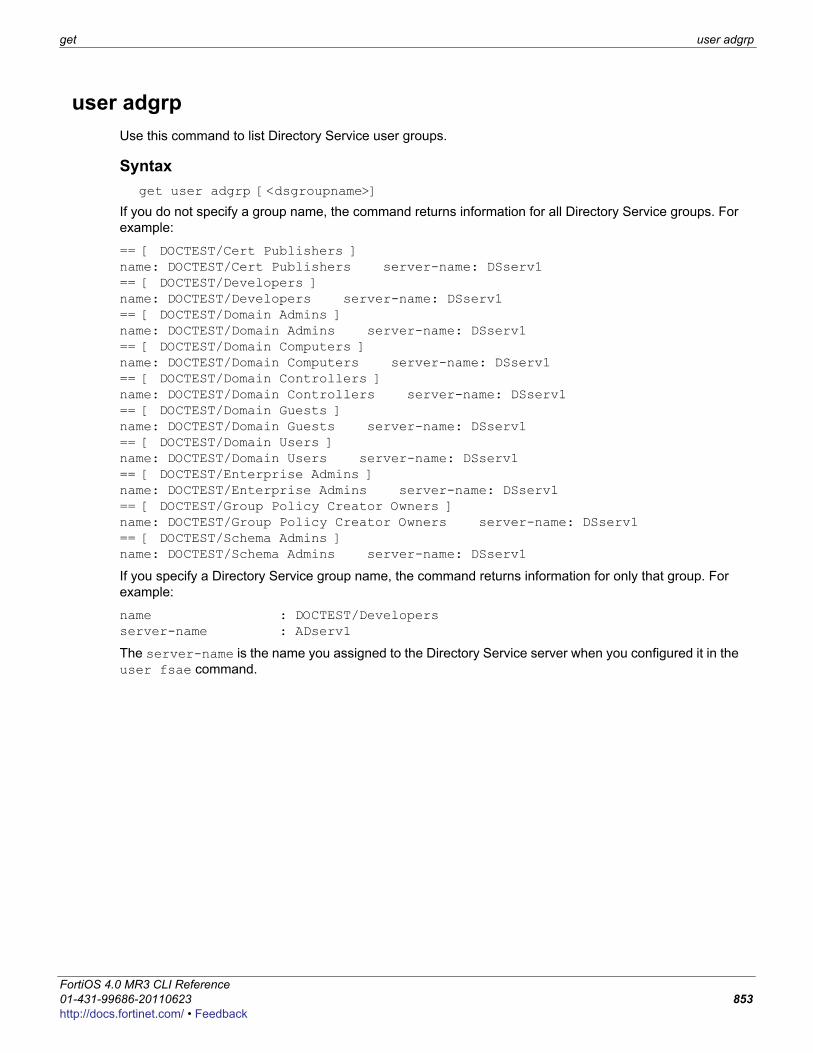
get user adgrp
F0h
user adgrpUse this command to list Directory Service user groups.
Syntaxget user adgrp [<dsgroupname>]
If you do not specify a group name, the command returns information for all Directory Service groups. For example:
== [ DOCTEST/Cert Publishers ]name: DOCTEST/Cert Publishers server-name: DSserv1 == [ DOCTEST/Developers ]name: DOCTEST/Developers server-name: DSserv1 == [ DOCTEST/Domain Admins ]name: DOCTEST/Domain Admins server-name: DSserv1 == [ DOCTEST/Domain Computers ]name: DOCTEST/Domain Computers server-name: DSserv1 == [ DOCTEST/Domain Controllers ]name: DOCTEST/Domain Controllers server-name: DSserv1 == [ DOCTEST/Domain Guests ]name: DOCTEST/Domain Guests server-name: DSserv1 == [ DOCTEST/Domain Users ]name: DOCTEST/Domain Users server-name: DSserv1 == [ DOCTEST/Enterprise Admins ]name: DOCTEST/Enterprise Admins server-name: DSserv1 == [ DOCTEST/Group Policy Creator Owners ]name: DOCTEST/Group Policy Creator Owners server-name: DSserv1 == [ DOCTEST/Schema Admins ]name: DOCTEST/Schema Admins server-name: DSserv1
If you specify a Directory Service group name, the command returns information for only that group. For example:
name : DOCTEST/Developers server-name : ADserv1
The server-name is the name you assigned to the Directory Service server when you configured it in the user fsae command.
ortiOS 4.0 MR3 CLI Reference1-431-99686-20110623 853ttp://docs.fortinet.com/ • Feedback

vpn ike gateway get
vpn ike gatewayUse this command to display information about FortiGate IPsec VPN IKE gateways.
Syntaxget vpn ike gateway [<gateway_name_str>]
FortiOS 4.0 MR3 CLI Reference854 01-431-99686-20110623
http://docs.fortinet.com/ • Feedback

get vpn ipsec tunnel details
F0h
vpn ipsec tunnel detailsUse this command to display information about IPsec tunnels.
Syntaxget vpn ipsec tunnel details
ortiOS 4.0 MR3 CLI Reference1-431-99686-20110623 855ttp://docs.fortinet.com/ • Feedback

vpn ipsec tunnel name get
vpn ipsec tunnel nameUse this command to display information about a specified IPsec VPN tunnel.
Syntaxget vpn ipsec tunnel name <tunnel_name_str>
FortiOS 4.0 MR3 CLI Reference856 01-431-99686-20110623
http://docs.fortinet.com/ • Feedback
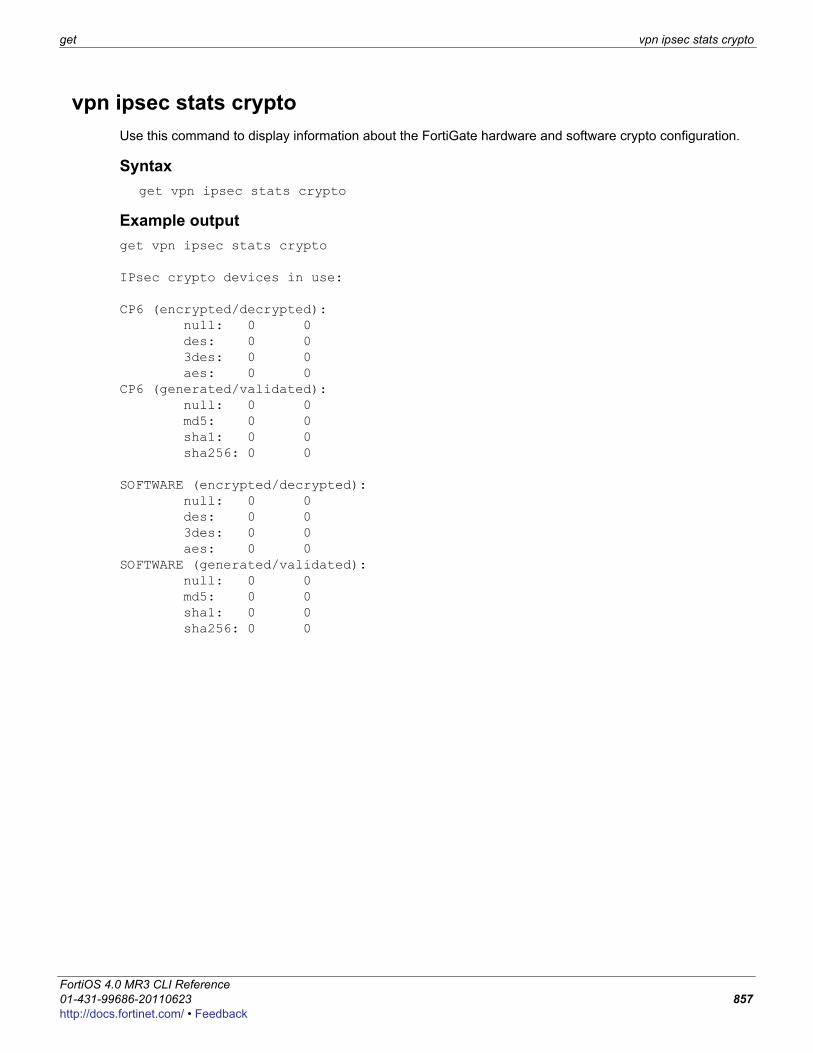
get vpn ipsec stats crypto
F0h
vpn ipsec stats cryptoUse this command to display information about the FortiGate hardware and software crypto configuration.
Syntaxget vpn ipsec stats crypto
Example outputget vpn ipsec stats crypto
IPsec crypto devices in use:
CP6 (encrypted/decrypted): null: 0 0 des: 0 0 3des: 0 0 aes: 0 0CP6 (generated/validated): null: 0 0 md5: 0 0 sha1: 0 0 sha256: 0 0
SOFTWARE (encrypted/decrypted): null: 0 0 des: 0 0 3des: 0 0 aes: 0 0SOFTWARE (generated/validated): null: 0 0 md5: 0 0 sha1: 0 0 sha256: 0 0
ortiOS 4.0 MR3 CLI Reference1-431-99686-20110623 857ttp://docs.fortinet.com/ • Feedback
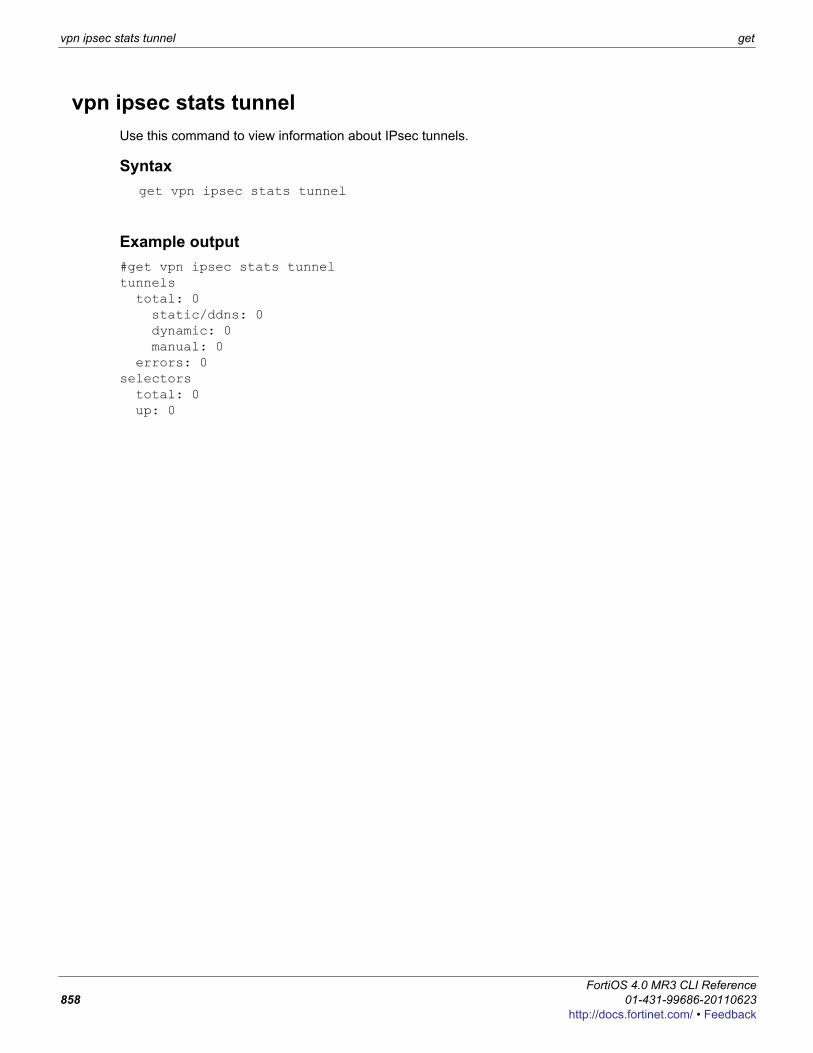
vpn ipsec stats tunnel get
vpn ipsec stats tunnelUse this command to view information about IPsec tunnels.
Syntaxget vpn ipsec stats tunnel
Example output#get vpn ipsec stats tunnel tunnels total: 0 static/ddns: 0 dynamic: 0 manual: 0 errors: 0selectors total: 0 up: 0
FortiOS 4.0 MR3 CLI Reference858 01-431-99686-20110623
http://docs.fortinet.com/ • Feedback
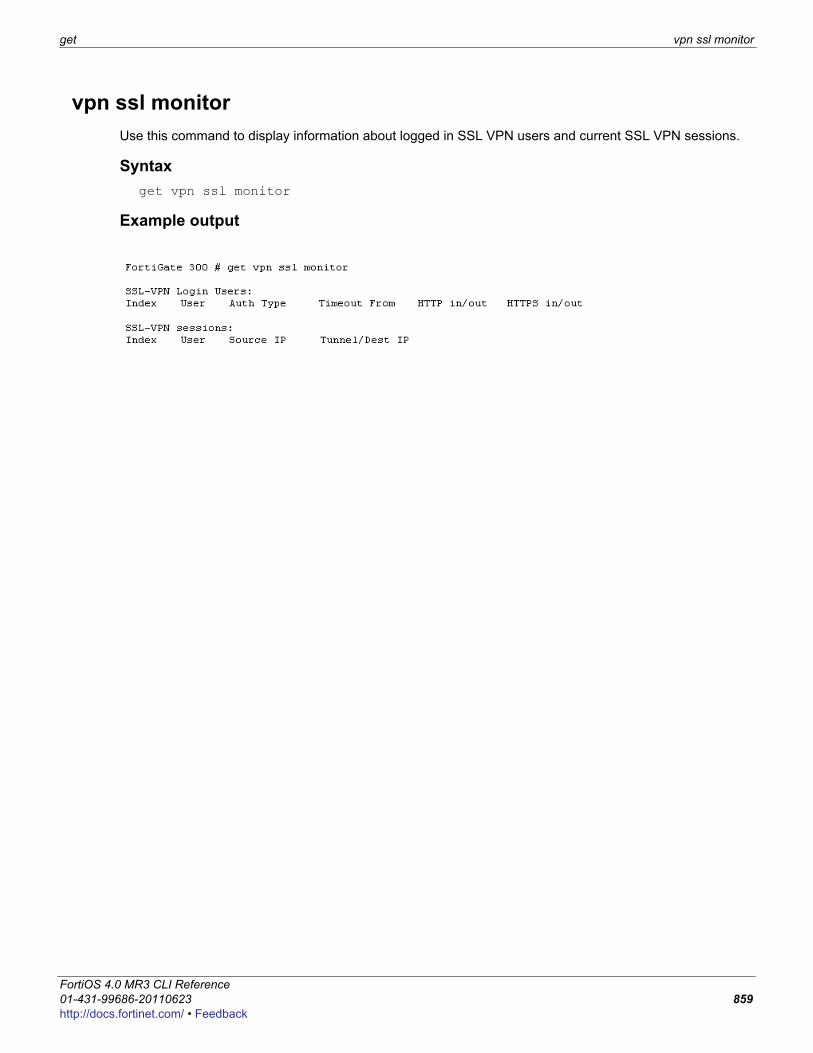
get vpn ssl monitor
F0h
vpn ssl monitorUse this command to display information about logged in SSL VPN users and current SSL VPN sessions.
Syntaxget vpn ssl monitor
Example output
ortiOS 4.0 MR3 CLI Reference1-431-99686-20110623 859ttp://docs.fortinet.com/ • Feedback
vpn status l2tp get
vpn status l2tpUse this command to display information about L2TP tunnels.
Syntaxget vpn status l2tp
FortiOS 4.0 MR3 CLI Reference860 01-431-99686-20110623
http://docs.fortinet.com/ • Feedback
get vpn status pptp
F0h
vpn status pptpUse this command to display information about PPTP tunnels.
Syntaxget vpn status pptp
ortiOS 4.0 MR3 CLI Reference1-431-99686-20110623 861ttp://docs.fortinet.com/ • Feedback
vpn status ssl get
vpn status sslUse this command to display SSL VPN tunnels and to also verify that the FortiGate unit includes the CP6 or greater FortiASIC device that supports SSL acceleration.
Syntaxget vpn status ssl hw-acceleration-statusget vpn status ssl list
Variable Descriptionhw-acceleration-status
Display whether or not the FortiGate unit contains a FortiASIC device that supports SSL acceleration.
list Display information about all configured SSL VPN tunnels.
FortiOS 4.0 MR3 CLI Reference862 01-431-99686-20110623
http://docs.fortinet.com/ • Feedback

get webfilter ftgd-statistics
F0h
webfilter ftgd-statisticsUse this command to display FortiGuard Web Filtering rating cache and daemon statistics.
Syntaxget webfilter ftgd-statistics
Example outputget webfilter ftgd-statistics
Rating Statistics:=====================DNS failures : 0DNS lookups : 0Data send failures : 0Data read failures : 0Wrong package type : 0Hash table miss : 0Unknown server : 0Incorrect CRC : 0Proxy request failures : 0Request timeout : 0Total requests : 0Requests to FortiGuard servers : 0Server errored responses : 0Relayed rating : 0Invalid profile : 0
Allowed : 0Blocked : 0Logged : 0Errors : 0
Cache Statistics:=====================Maximum memory : 0Memory usage : 0
Nodes : 0 Leaves : 0 Prefix nodes : 0 Exact nodes : 0
Requests : 0Misses : 0Hits : 0 Prefix hits : 0 Exact hits : 0
No cache directives : 0Add after prefix : 0Invalid DB put : 0DB updates : 0
ortiOS 4.0 MR3 CLI Reference1-431-99686-20110623 863ttp://docs.fortinet.com/ • Feedback
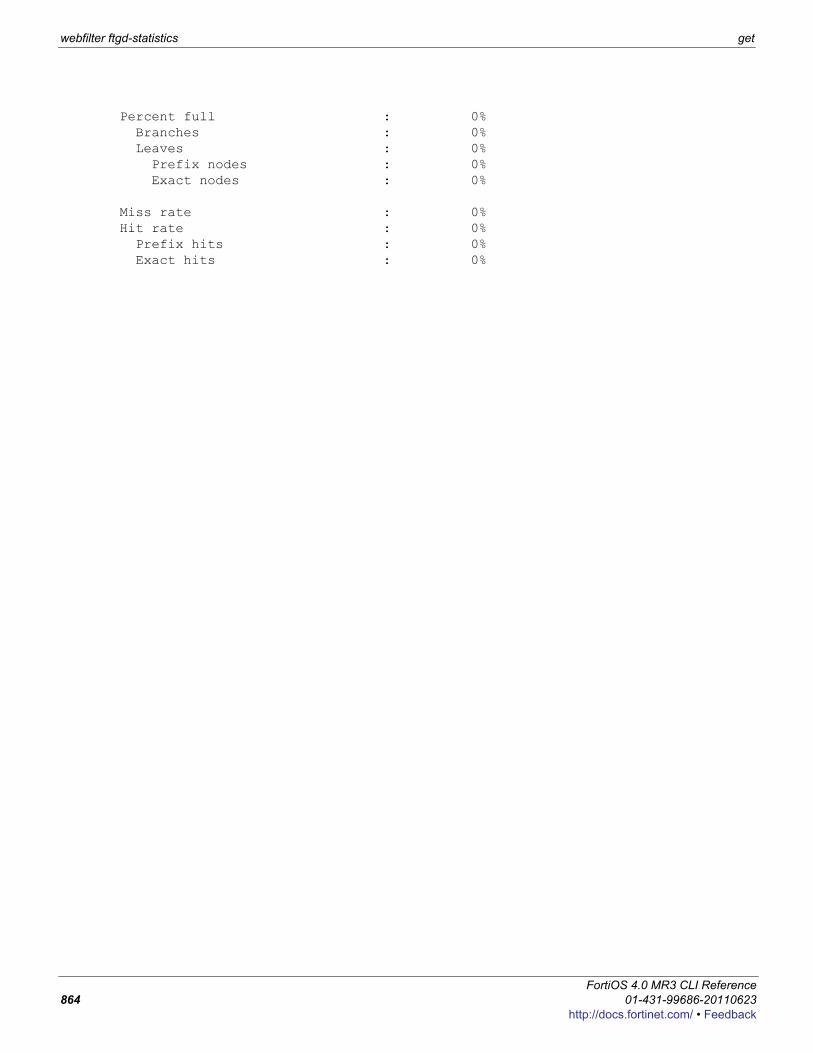
webfilter ftgd-statistics get
Percent full : 0% Branches : 0% Leaves : 0% Prefix nodes : 0% Exact nodes : 0%
Miss rate : 0%Hit rate : 0% Prefix hits : 0% Exact hits : 0%
FortiOS 4.0 MR3 CLI Reference864 01-431-99686-20110623
http://docs.fortinet.com/ • Feedback
get webfilter status
F0h
webfilter statusUse this command to display FortiGate Web Filtering rating information.
Syntaxget webfilter status [<refresh-rate_int>]
ortiOS 4.0 MR3 CLI Reference1-431-99686-20110623 865ttp://docs.fortinet.com/ • Feedback
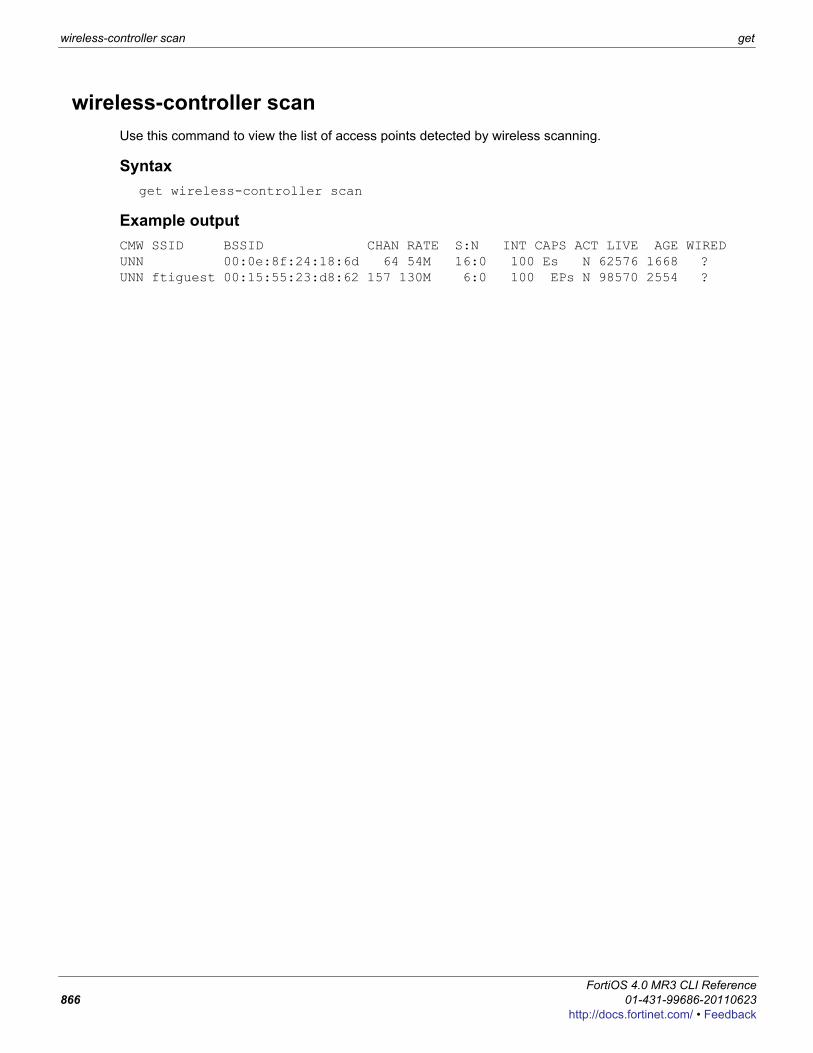
wireless-controller scan get
wireless-controller scanUse this command to view the list of access points detected by wireless scanning.
Syntaxget wireless-controller scan
Example outputCMW SSID BSSID CHAN RATE S:N INT CAPS ACT LIVE AGE WIREDUNN 00:0e:8f:24:18:6d 64 54M 16:0 100 Es N 62576 1668 ? UNN ftiguest 00:15:55:23:d8:62 157 130M 6:0 100 EPs N 98570 2554 ?
FortiOS 4.0 MR3 CLI Reference866 01-431-99686-20110623
http://docs.fortinet.com/ • Feedback
F0h
treeThe tree command displays FortiOS config CLI commands in a tree structure called the configuration tree. Each configuration command forms a branch of the tree.
Syntaxtree [branch] [sub-branch]
You can enter the tree command from the top of the configuration tree the command displays the complete configuration tree. Commands are displayed in the order that they are processed when the FortiGate unit starts up. For example, the following output shows the first 10 lines of tree command output:
tree-- -- system -- [vdom] --*name (12) +- vcluster-id (0,0) |- <global> -- language |- gui-ipv6 |- gui-voip-profile |- gui-lines-per-page (20,1000) |- admintimeout (0,0) |- admin-concurrent |- admin-lockout-threshold (0,0) |- admin-lockout-duration (1,2147483647) |- refresh (0,2147483647) |- interval (0,0) |- failtime (0,0) |- daily-restart |- restart-time
...
You can include a branch name with the tree command to view the commands in that branch:tree user-- user -- [radius] --*name (36) |- server (64) |- secret |- secondary-server (64) |- secondary-secret |- all-usergroup |- use-management-vdom |- nas-ip |- radius-port (0,0) +- auth-type |- [tacacs+] --*name (36)
...
ortiOS 4.0 MR3 CLI Reference1-431-99686-20110623 867ttp://docs.fortinet.com/ • Feedback
tree
You can include a branch and sub branch name with the tree command to view the commands in that sub branch:
tree user local-- [local] --*name (36) |- status |- type |- passwd |- ldap-server (36) |- radius-server (36) +- tacacs+-server (36)
...
If you enter the tree command from inside the configuration tree the command displays the tree for the current command:
config user ldap tree-- [ldap] --*name (36) |- server (64) |- cnid (21) |- dn (512) |- port (1,65535) |- type |- username (512) |- password |- filter (512 xss) |- secure |- ca-cert (64) |- password-expiry-warning |- password-renewal +- member-attr (64)
You can use the tree command to view the number of characters that are allowed in a configuration parameter text string. For example, firewall address names can contain up to 64 characters. When you add a firewall address to the web-based manager you are limited to entering 64 characters in the firewall address name field. From the CLI you can do the following to confirm that the firewall address name field allows 64 characters.
config firewall addresstree-- [address] --*name (64) |- subnet |- type |- start-ip |- end-ip |- fqdn (256) |- cache-ttl (0,86400) |- wildcard |- comment (64 xss) |- associated-interface (16) +- color (0,32)
Note that the tree command output also shows the number of characters allowed for other firewall address name settings. For example, the fully-qualified domain name (fqdn) field can contain up to 256 characters.
FortiOS 4.0 MR3 CLI Reference868 01-431-99686-20110623
http://docs.fortinet.com/ • Feedback

tree
F0h
ortiOS 4.0 MR3 CLI Reference1-431-99686-20110623 869ttp://docs.fortinet.com/ • Feedback
F0h
AppendixDocument conventions
Fortinet technical documentation uses the conventions described below.
IP addressesTo avoid publication of public IP addresses that belong to Fortinet or any other organization, the IP addresses used in Fortinet technical documentation are fictional and follow the documentation guidelines specific to Fortinet. The addresses used are from the private IP address ranges defined in RFC 1918: Address Allocation for Private Internets, available at http://ietf.org/rfc/rfc1918.txt?number-1918.Most of the examples in this document use the following IP addressing:• IP addresses are made up of A.B.C.D• A - can be one of 192, 172, or 10 - the non-public addresses covered in RFC 1918.• B - 168, or the branch / device / virtual device number.
• Branch number can be 0xx, 1xx, 2xx - 0 is Head office, 1 is remote, 2 is other.• Device or virtual device - allows multiple FortiGate units in this address space
(VDOMs).• Devices can be from x01 to x99.
• C - interface - FortiGate units can have up to 40 interfaces, potentially more than one on the same subnet • 001 - 099- physical address ports, and non -virtual interfaces• 100-255 - VLANs, tunnels, aggregate links, redundant links, vdom-links, etc.
ortiOS 4.0 MR31-431-99686-20110623 870ttp://docs.fortinet.com/ • Feedback
Appendix Document conventions
F0h
• D - usage based addresses, this part is determined by what device is doing• The following gives 16 reserved, 140 users, and 100 servers in the subnet.• 001 - 009 - reserved for networking hardware, like routers, gateways, etc.• 010 - 099 - DHCP range - users• 100 - 109 - FortiGate devices - typically only use 100• 110 - 199 - servers in general (see later for details)• 200 - 249 - static range - users• 250 - 255 - reserved (255 is broadcast, 000 not used)• The D segment servers can be farther broken down into:
• 110 - 119 - Email servers• 120 - 129 - Web servers• 130 - 139 - Syslog servers• 140 - 149 - Authentication (RADIUS, LDAP, TACACS+, FSAE, etc)• 150 - 159 - VoIP / SIP servers / managers• 160 - 169 - FortiAnalyzers• 170 - 179 - FortiManagers• 180 - 189 - Other Fortinet products (FortiScan, FortiDB, etc.)• 190 - 199 - Other non-Fortinet servers (NAS, SQL, DNS, DDNS, etc.)• Fortinet products, non-FortiGate, are found from 160 - 189.
The following table shows some examples of how to choose an IP number for a device based on the information given. For internal and dmz, it is assumed in this case there is only one interface being used.
Table 25: Examples of the IP numbering
Location and device Internal Dmz ExternalHead Office, one FortiGate 10.011.101.100 10.011.201.100 172.20.120.191
Head Office, second FortiGate 10.012.101.100 10.012.201.100 172.20.120.192
Branch Office, one FortiGate 10.021.101.100 10.021.201.100 172.20.120.193
Office 7, one FortiGate with 9 VDOMs
10.079.101.100 10.079.101.100 172.20.120.194
Office 3, one FortiGate, web server
n/a 10.031.201.110 n/a
Bob in accounting on the corporate user network (dhcp) at Head Office, one FortiGate
10.0.11.101.200 n/a n/a
Router outside the FortiGate n/a n/a 172.20.120.195
ortiOS 4.0 MR31-431-99686-20110623 871ttp://docs.fortinet.com/ • Feedback
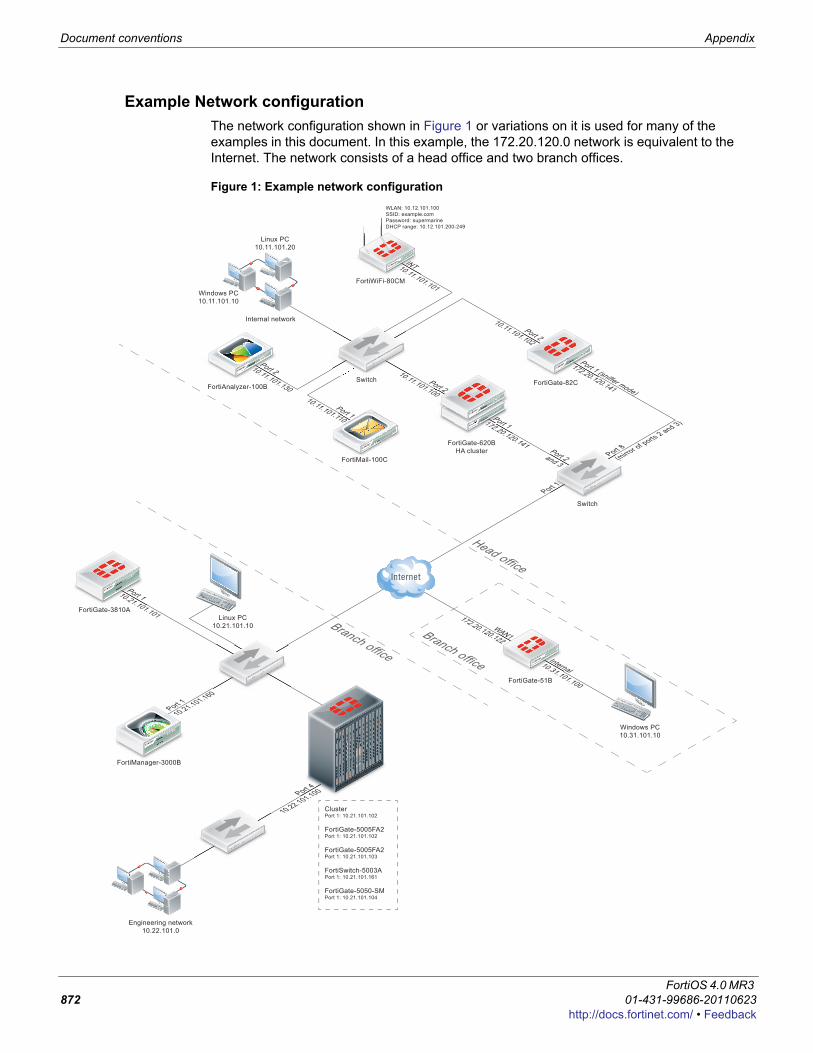
Document conventions Appendix
Example Network configurationThe network configuration shown in Figure 1 or variations on it is used for many of the examples in this document. In this example, the 172.20.120.0 network is equivalent to the Internet. The network consists of a head office and two branch offices.
Figure 1: Example network configuration
FortiGate-620BHA cluster
Port 1172.20.120.141
Port 2
10.11.101.100
Port 2and 3
Switch
10
Internal network
FortiMail-100C
INT10.11.101.101FortiWiFi-80CM
WLAN: 10.12.101.100SSID: example.comPassword: supermarineDHCP range: 10.12.101.200-249
Port 2
10.11.101.102
Port 1 (sniffer mode)
172.20.120.141
Port 8(mirro
r of ports 2 and 3)
FortiGate-82CSwitchFortiAnalyzer-100B
Port 210.11.101.130
Port 1
10.11.101.110
Port 1
Linux PC10.21.101.10
Port 110.21.101.101
Port 110.21.101.160
FortiGate-3810A
FortiManager-3000B
Engineering network10.22.101.0
Port 4
10.22.101.100
ClusterPort 1: 10.21.101.102
FortiGate-5005FA2Port 1: 10.21.101.102
FortiGate-5005FA2Port 1: 10.21.101.103
FortiSwitch-5003APort 1: 10.21.101.161
FortiGate-5050-SMPort 1: 10.21.101.104
WAN1
172.20.120.122
Internal10.31.101.100
Windows PC10.31.101.10
FortiGate-51B
Linux PC10.11.101.20
Windows PC10.11.101.10
Branch office
Branch office
Head office
FortiOS 4.0 MR3 872 01-431-99686-20110623
http://docs.fortinet.com/ • Feedback
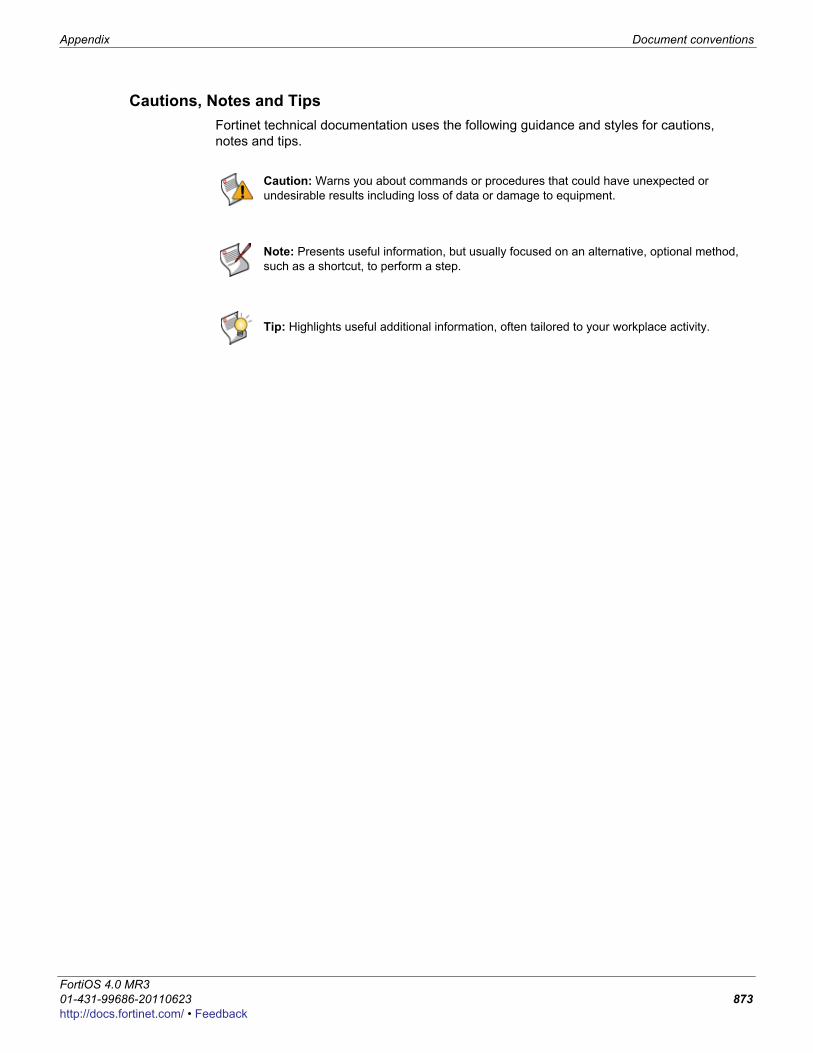
Appendix Document conventions
F0h
Cautions, Notes and TipsFortinet technical documentation uses the following guidance and styles for cautions, notes and tips.
Caution: Warns you about commands or procedures that could have unexpected or undesirable results including loss of data or damage to equipment.
Note: Presents useful information, but usually focused on an alternative, optional method, such as a shortcut, to perform a step.
Tip: Highlights useful additional information, often tailored to your workplace activity.
ortiOS 4.0 MR31-431-99686-20110623 873ttp://docs.fortinet.com/ • Feedback
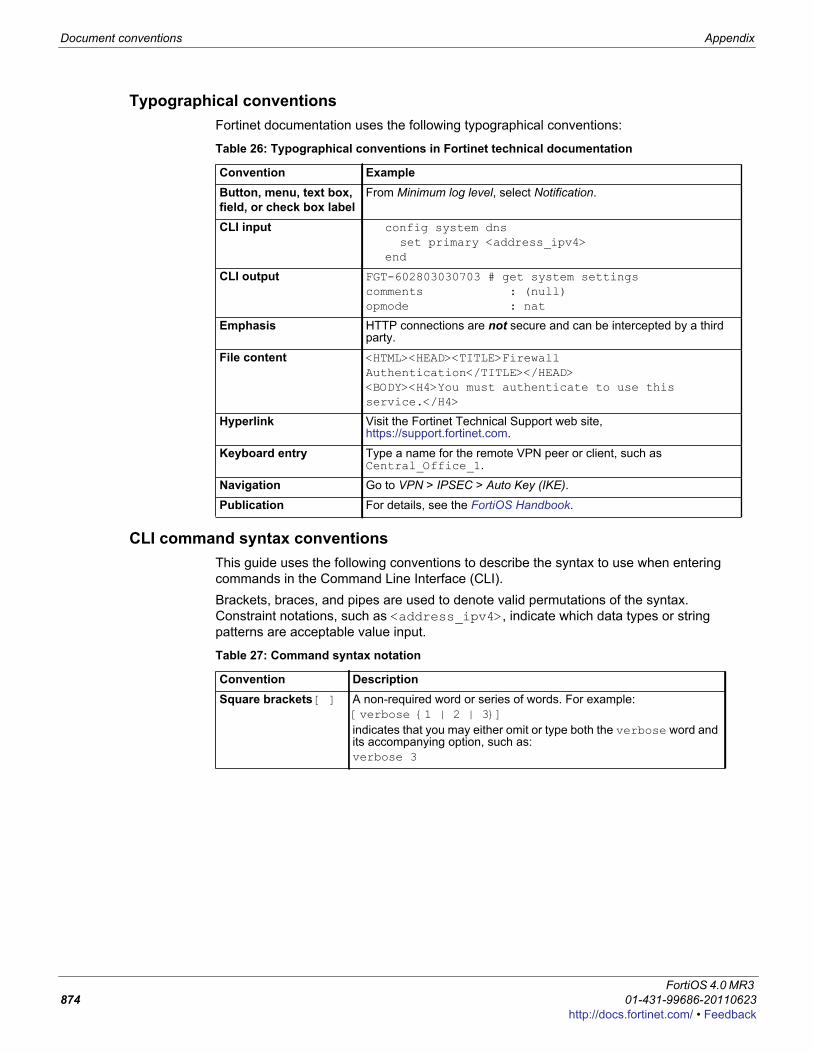
Document conventions Appendix
Typographical conventionsFortinet documentation uses the following typographical conventions:
CLI command syntax conventionsThis guide uses the following conventions to describe the syntax to use when entering commands in the Command Line Interface (CLI).Brackets, braces, and pipes are used to denote valid permutations of the syntax. Constraint notations, such as <address_ipv4>, indicate which data types or string patterns are acceptable value input.
Table 26: Typographical conventions in Fortinet technical documentation
Convention ExampleButton, menu, text box, field, or check box label
From Minimum log level, select Notification.
CLI input config system dnsset primary <address_ipv4>
end
CLI output FGT-602803030703 # get system settingscomments : (null)opmode : nat
Emphasis HTTP connections are not secure and can be intercepted by a third party.
File content <HTML><HEAD><TITLE>Firewall Authentication</TITLE></HEAD><BODY><H4>You must authenticate to use this service.</H4>
Hyperlink Visit the Fortinet Technical Support web site, https://support.fortinet.com.
Keyboard entry Type a name for the remote VPN peer or client, such as Central_Office_1.
Navigation Go to VPN > IPSEC > Auto Key (IKE).
Publication For details, see the FortiOS Handbook.
Table 27: Command syntax notation
Convention DescriptionSquare brackets [ ] A non-required word or series of words. For example:
[verbose {1 | 2 | 3}]indicates that you may either omit or type both the verbose word and its accompanying option, such as:verbose 3
FortiOS 4.0 MR3 874 01-431-99686-20110623
http://docs.fortinet.com/ • Feedback
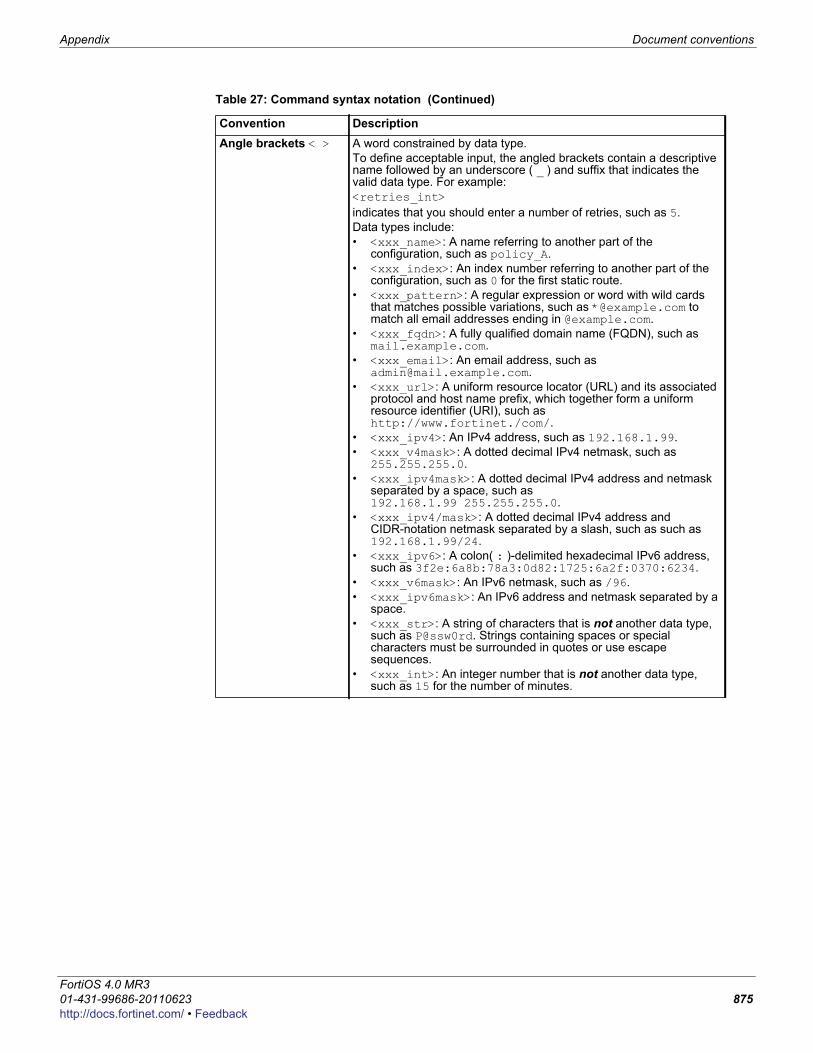
Appendix Document conventions
F0h
Angle brackets < > A word constrained by data type.To define acceptable input, the angled brackets contain a descriptive name followed by an underscore ( _ ) and suffix that indicates the valid data type. For example:<retries_int>indicates that you should enter a number of retries, such as 5.Data types include:• <xxx_name>: A name referring to another part of the
configuration, such as policy_A.• <xxx_index>: An index number referring to another part of the
configuration, such as 0 for the first static route.• <xxx_pattern>: A regular expression or word with wild cards
that matches possible variations, such as *@example.com to match all email addresses ending in @example.com.
• <xxx_fqdn>: A fully qualified domain name (FQDN), such as mail.example.com.
• <xxx_email>: An email address, such as [email protected].
• <xxx_url>: A uniform resource locator (URL) and its associated protocol and host name prefix, which together form a uniform resource identifier (URI), such as http://www.fortinet./com/.
• <xxx_ipv4>: An IPv4 address, such as 192.168.1.99.• <xxx_v4mask>: A dotted decimal IPv4 netmask, such as
255.255.255.0.• <xxx_ipv4mask>: A dotted decimal IPv4 address and netmask
separated by a space, such as 192.168.1.99 255.255.255.0.
• <xxx_ipv4/mask>: A dotted decimal IPv4 address and CIDR-notation netmask separated by a slash, such as such as 192.168.1.99/24.
• <xxx_ipv6>: A colon( : )-delimited hexadecimal IPv6 address, such as 3f2e:6a8b:78a3:0d82:1725:6a2f:0370:6234.
• <xxx_v6mask>: An IPv6 netmask, such as /96.• <xxx_ipv6mask>: An IPv6 address and netmask separated by a
space.• <xxx_str>: A string of characters that is not another data type,
such as P@ssw0rd. Strings containing spaces or special characters must be surrounded in quotes or use escape sequences.
• <xxx_int>: An integer number that is not another data type, such as 15 for the number of minutes.
Table 27: Command syntax notation (Continued)
Convention Description
ortiOS 4.0 MR31-431-99686-20110623 875ttp://docs.fortinet.com/ • Feedback
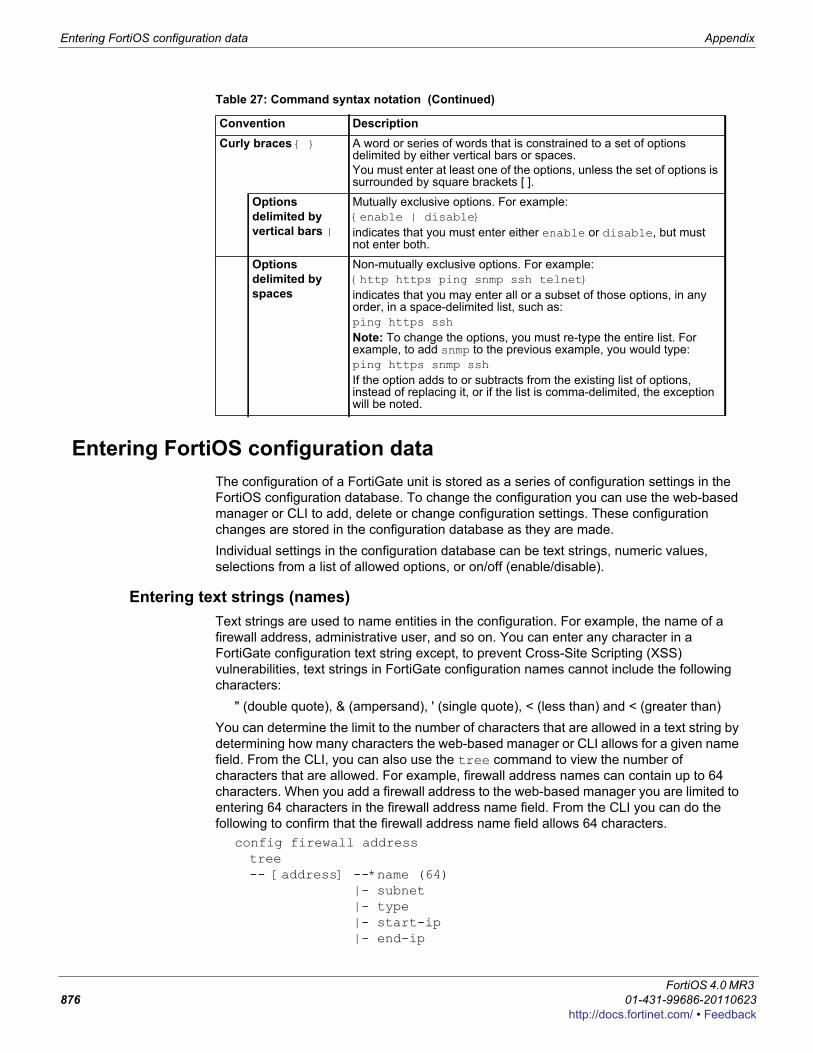
Entering FortiOS configuration data Appendix
Entering FortiOS configuration dataThe configuration of a FortiGate unit is stored as a series of configuration settings in the FortiOS configuration database. To change the configuration you can use the web-based manager or CLI to add, delete or change configuration settings. These configuration changes are stored in the configuration database as they are made. Individual settings in the configuration database can be text strings, numeric values, selections from a list of allowed options, or on/off (enable/disable).
Entering text strings (names)Text strings are used to name entities in the configuration. For example, the name of a firewall address, administrative user, and so on. You can enter any character in a FortiGate configuration text string except, to prevent Cross-Site Scripting (XSS) vulnerabilities, text strings in FortiGate configuration names cannot include the following characters:
" (double quote), & (ampersand), ' (single quote), < (less than) and < (greater than)You can determine the limit to the number of characters that are allowed in a text string by determining how many characters the web-based manager or CLI allows for a given name field. From the CLI, you can also use the tree command to view the number of characters that are allowed. For example, firewall address names can contain up to 64 characters. When you add a firewall address to the web-based manager you are limited to entering 64 characters in the firewall address name field. From the CLI you can do the following to confirm that the firewall address name field allows 64 characters.
config firewall addresstree-- [address] --*name (64) |- subnet |- type |- start-ip |- end-ip
Curly braces { } A word or series of words that is constrained to a set of options delimited by either vertical bars or spaces.You must enter at least one of the options, unless the set of options is surrounded by square brackets [ ].
Options delimited by vertical bars |
Mutually exclusive options. For example:{enable | disable}indicates that you must enter either enable or disable, but must not enter both.
Options delimited by spaces
Non-mutually exclusive options. For example:{http https ping snmp ssh telnet}indicates that you may enter all or a subset of those options, in any order, in a space-delimited list, such as:ping https sshNote: To change the options, you must re-type the entire list. For example, to add snmp to the previous example, you would type:ping https snmp sshIf the option adds to or subtracts from the existing list of options, instead of replacing it, or if the list is comma-delimited, the exception will be noted.
Table 27: Command syntax notation (Continued)
Convention Description
FortiOS 4.0 MR3 876 01-431-99686-20110623
http://docs.fortinet.com/ • Feedback
Appendix Registering your Fortinet product
F0h
|- fqdn (256) |- cache-ttl (0,86400) |- wildcard |- comment (64 xss) |- associated-interface (16) +- color (0,32)
Note that the tree command output also shows the number of characters allowed for other firewall address name settings. For example, the fully-qualified domain name (fqdn) field can contain up to 256 characters.
Entering numeric valuesNumeric values are used to configure various sizes, rates, numeric addresses, or other numeric values. For example, a static routing priority of 10, a port number of 8080, or an IP address of 10.10.10.1. Numeric values can be entered as a series of digits without spaces or commas (for example, 10 or 64400), in dotted decimal format (for example the IP address 10.10.10.1) or as in the case of MAC or IPv6 addresses separated by colons (for example, the MAC address 00:09:0F:B7:37:00). Most numeric values are standard base-10 numbers, but some fields (again such as MAC addresses) require hexadecimal numbers.Most web-based manager numeric value configuration fields limit the number of numeric digits that you can add or contain extra information to make it easier to add the acceptable number of digits and to add numbers in the allowed range. CLI help includes information about allowed numeric value ranges. Both the web-based manager and the CLI prevent you from entering invalid numbers.
Selecting options from a listIf a configuration field can only contain one of a number of selected options, the web-based manager and CLI present you a list of acceptable options and you can select one from the list. No other input is allowed. From the CLI you must spell the selection name correctly.
Enabling or disabling optionsIf a configuration field can only be on or off (enabled or disabled) the web-based manager presents a check box or other control that can only be enabled or disabled. From the CLI you can set the option to enable or disable.
Registering your Fortinet productBefore you begin configuring and customizing features, take a moment to register your Fortinet product at the Fortinet Technical Support web site, https://support.fortinet.com.Many Fortinet customer services, such as firmware updates, technical support, and FortiGuard Antivirus and other FortiGuard services, require product registration.For more information, see the Fortinet Knowledge Center article Registration Frequently Asked Questions.
Fortinet products End User License AgreementSee the Fortinet products End User License Agreement.
ortiOS 4.0 MR31-431-99686-20110623 877ttp://docs.fortinet.com/ • Feedback
Training Appendix
TrainingFortinet Training Services provides courses that orient you quickly to your new equipment, and certifications to verify your knowledge level. Fortinet provides a variety of training programs to serve the needs of our customers and partners world-wide.To learn about the training services that Fortinet provides, visit the Fortinet Training Services web site at http://campus.training.fortinet.com, or email [email protected].
Documentation The Fortinet Technical Documentation web site, http://docs.fortinet.com, provides the most up-to-date versions of Fortinet publications, as well as additional technical documentation such as technical notes.In addition to the Fortinet Technical Documentation web site, you can find Fortinet technical documentation on the Fortinet Tools and Documentation CD, and on the Fortinet Knowledge Center.
Fortinet Tools and Documentation CDMany Fortinet publications are available on the Fortinet Tools and Documentation CD shipped with your Fortinet product. The documents on this CD are current at shipping time. For current versions of Fortinet documentation, visit the Fortinet Technical Documentation web site, http://docs.fortinet.com.
Fortinet Knowledge Base The Fortinet Knowledge Base provides additional Fortinet technical documentation, such as troubleshooting and how-to-articles, examples, FAQs, technical notes, a glossary, and more. Visit the Fortinet Knowledge Base at http://kb.fortinet.com.
Comments on Fortinet technical documentation Please send information about any errors or omissions in this or any Fortinet technical document to [email protected].
Customer service and technical supportFortinet Technical Support provides services designed to make sure that your Fortinet products install quickly, configure easily, and operate reliably in your network. To learn about the technical support services that Fortinet provides, visit the Fortinet Technical Support web site at https://support.fortinet.com.You can dramatically improve the time that it takes to resolve your technical support ticket by providing your configuration file, a network diagram, and other specific information. For a list of required information, see the Fortinet Knowledge Base article FortiGate Troubleshooting Guide - Technical Support Requirements.
FortiOS 4.0 MR3 878 01-431-99686-20110623
http://docs.fortinet.com/ • Feedback