Embed Size (px)
Citation preview
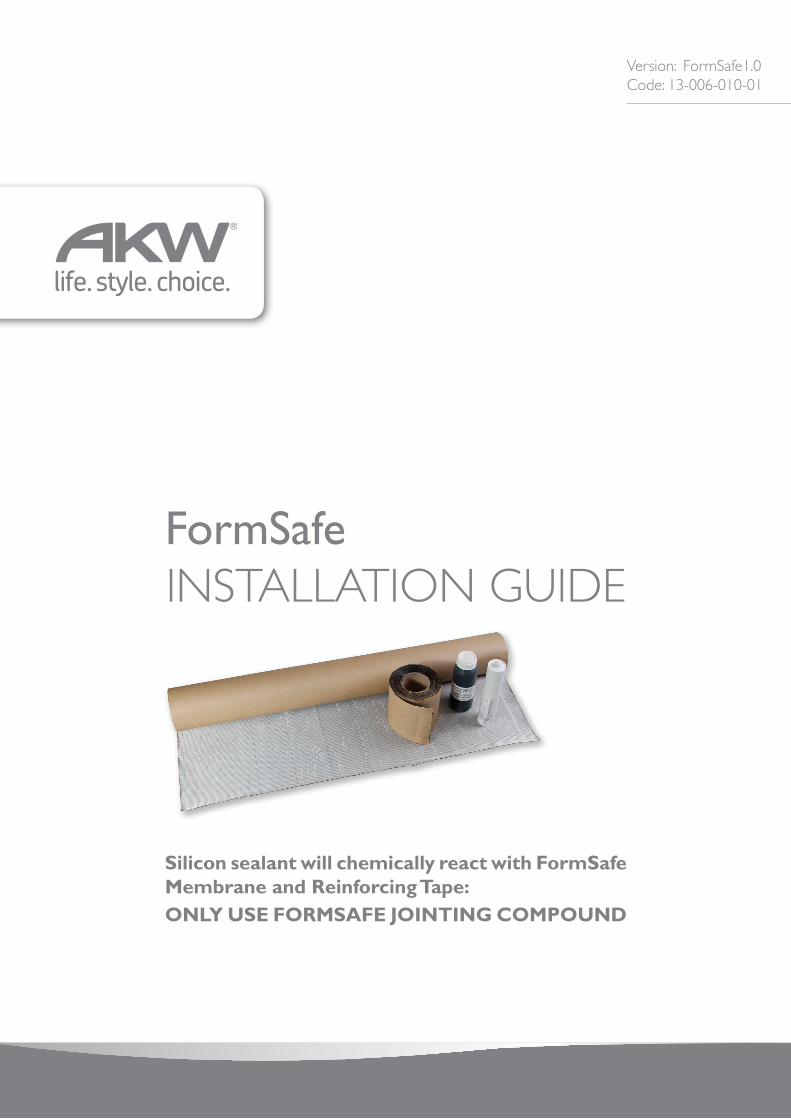
Version: FormSafe1.0Code: 13-006-010-01
FormSafeINSTALLATION GUIDE
Silicon sealant will chemically react with FormSafeMembrane and Reinforcing Tape:ONLY USE FORMSAFE JOINTING COMPOUND
WE’RE HERE TO HELP01905 560219&2
FORMSAFE INSTALLATION GUIDE
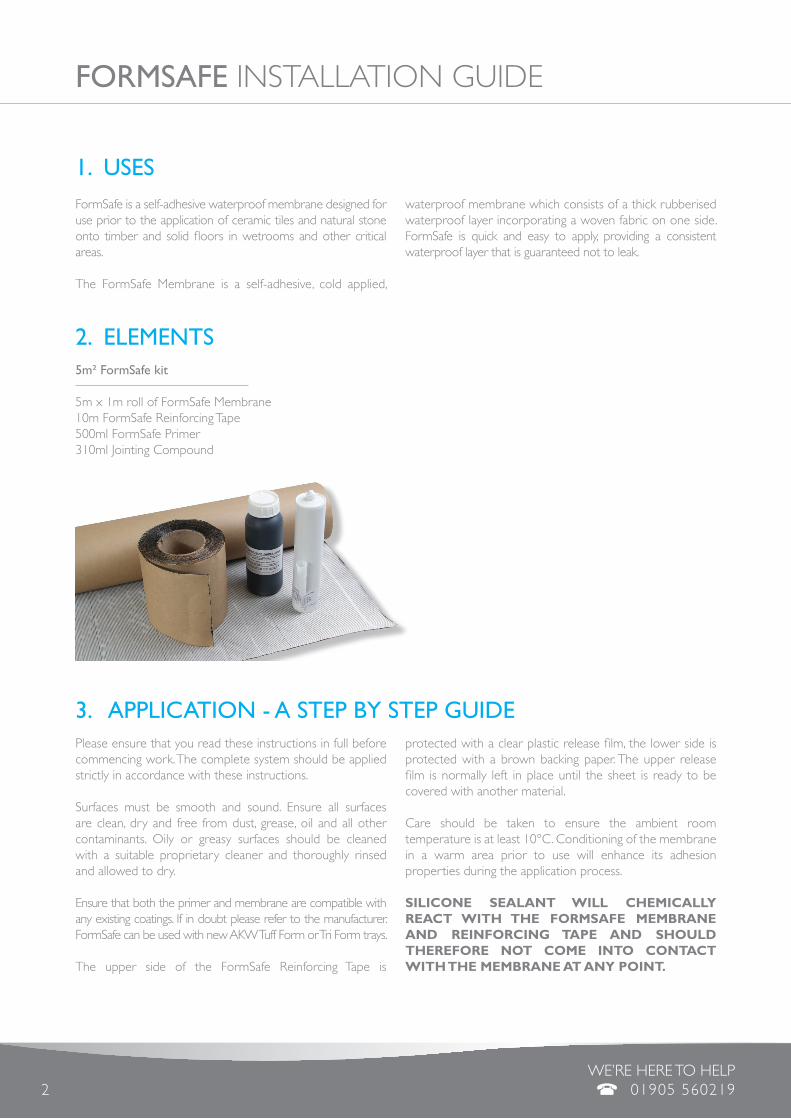
FormSafe is a self-adhesive waterproof membrane designed for use prior to the application of ceramic tiles and natural stone onto timber and solid floors in wetrooms and other critical areas.
The FormSafe Membrane is a self-adhesive, cold applied,
waterproof membrane which consists of a thick rubberised waterproof layer incorporating a woven fabric on one side. FormSafe is quick and easy to apply, providing a consistent waterproof layer that is guaranteed not to leak.
1. USES
5m² FormSafe kit
5m x 1m roll of FormSafe Membrane10m FormSafe Reinforcing Tape500ml FormSafe Primer310ml Jointing Compound
2. ELEMENTS
Please ensure that you read these instructions in full before commencing work. The complete system should be applied strictly in accordance with these instructions.
Surfaces must be smooth and sound. Ensure all surfaces are clean, dry and free from dust, grease, oil and all other contaminants. Oily or greasy surfaces should be cleaned with a suitable proprietary cleaner and thoroughly rinsed and allowed to dry.
Ensure that both the primer and membrane are compatible with any existing coatings. If in doubt please refer to the manufacturer. FormSafe can be used with new AKW Tuff Form or Tri Form trays.
The upper side of the FormSafe Reinforcing Tape is
protected with a clear plastic release film, the lower side is protected with a brown backing paper. The upper release film is normally left in place until the sheet is ready to be covered with another material.
Care should be taken to ensure the ambient room temperature is at least 10°C. Conditioning of the membrane in a warm area prior to use will enhance its adhesion properties during the application process.
SILICONE SEALANT WILL CHEMICALLY REACT WITH THE FORMSAFE MEMBRANE AND REINFORCING TAPE AND SHOULD THEREFORE NOT COME INTO CONTACT WITH THE MEMBRANE AT ANY POINT.
3. APPLICATION - A STEP BY STEP GUIDE
FORMSAFE INSTALLATION GUIDE01905 560219 & 3
FORMSAFE INSTALLATION GUIDE
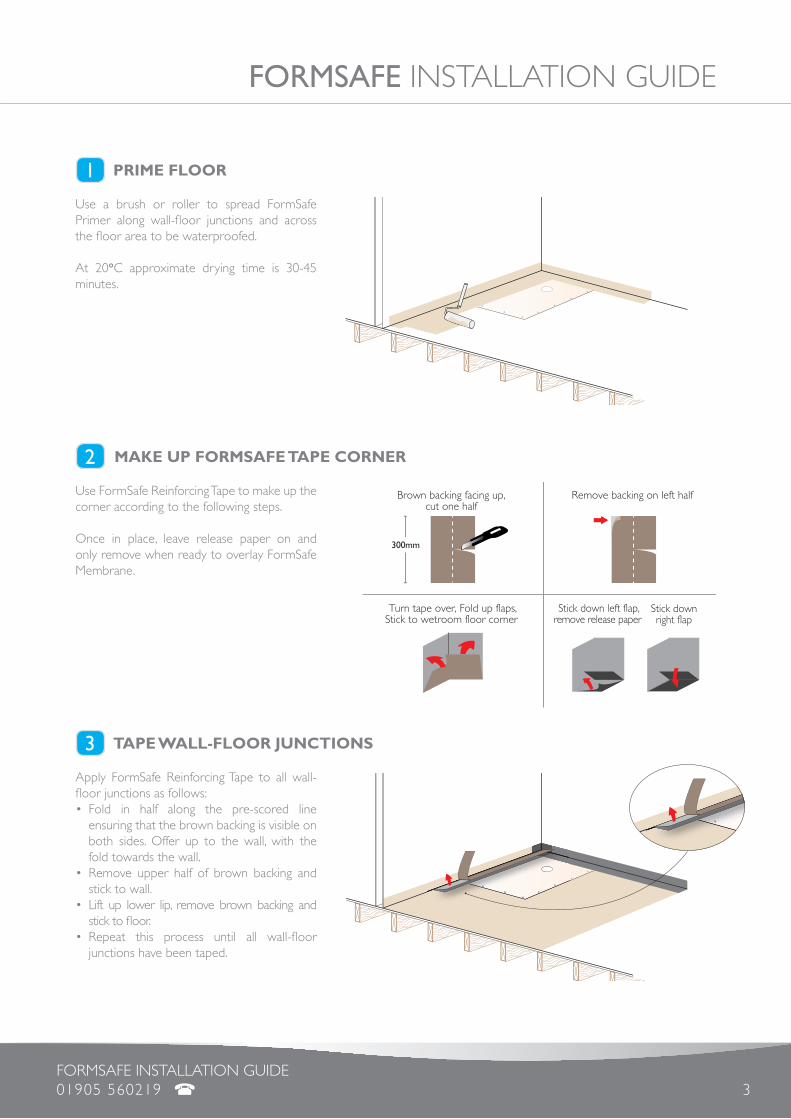
Use a brush or roller to spread FormSafe Primer along wall-floor junctions and across the floor area to be waterproofed.
At 20°C approximate drying time is 30-45 minutes.
Apply FormSafe Reinforcing Tape to all wall-floor junctions as follows:• Fold in half along the pre-scored line
ensuring that the brown backing is visible on both sides. Offer up to the wall, with the fold towards the wall.
• Remove upper half of brown backing andstick to wall.
• Lift up lower lip, remove brown backing andstick to floor.
• Repeat this process until all wall-floorjunctions have been taped.
Use FormSafe Reinforcing Tape to make up the corner according to the following steps.
Once in place, leave release paper on and only remove when ready to overlay FormSafe Membrane.
1 PRIME FLOOR
Brown backing facing up, cut one half
Remove backing on left half
Turn tape over, Fold up flaps,Stick to wetroom floor corner
Stick down left flap,remove release paper
Stick downright flap
300mm
2 MAKE UP FORMSAFE TAPE CORNER
3 TAPE WALL-FLOOR JUNCTIONS
WE’RE HERE TO HELP01905 560219&4
FORMSAFE INSTALLATION GUIDE
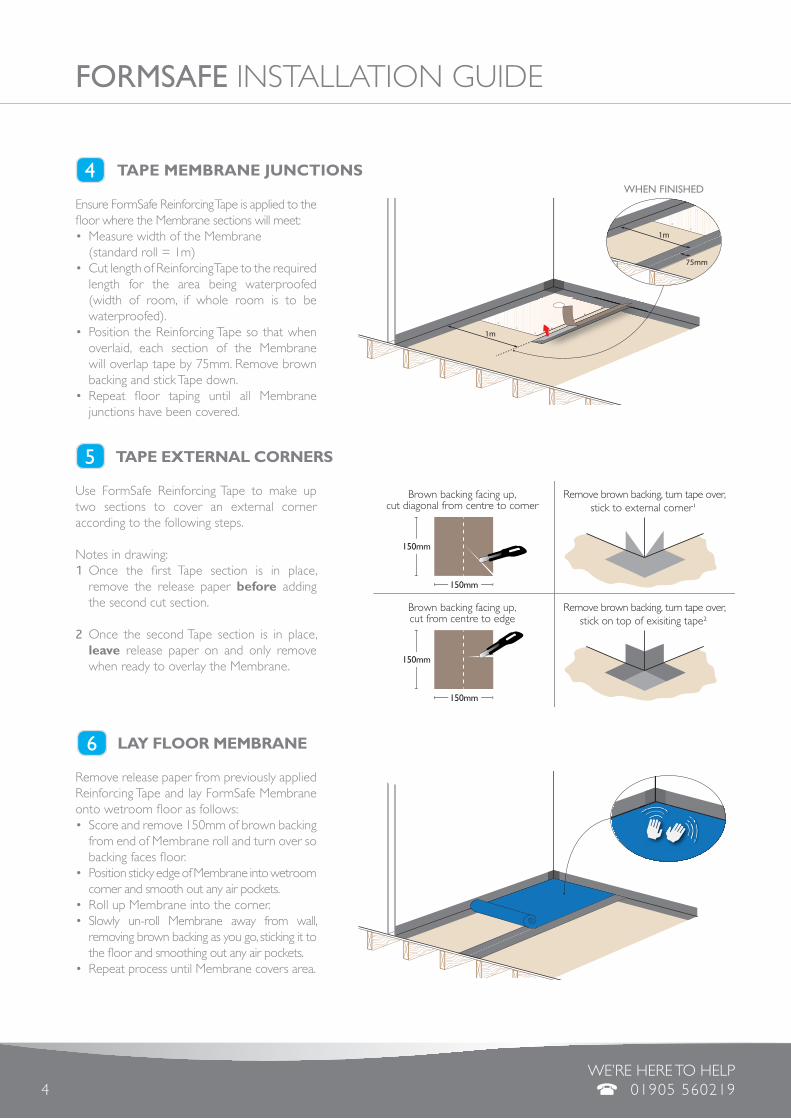
Use FormSafe Reinforcing Tape to make up two sections to cover an external corner according to the following steps.
Notes in drawing:1 Once the first Tape section is in place,
remove the release paper before adding the second cut section.
2 Once the second Tape section is in place, leave release paper on and only remove when ready to overlay the Membrane.
Brown backing facing up, cut diagonal from centre to corner
Remove brown backing, turn tape over,stick to external corner¹
Brown backing facing up, cut from centre to edge
150mm
150mm
Remove brown backing, turn tape over,stick on top of exisiting tape²
150mm
150mm
5 TAPE EXTERNAL CORNERS
Remove release paper from previously applied Reinforcing Tape and lay FormSafe Membrane onto wetroom floor as follows:• Scoreandremove150mmofbrownbacking
from end of Membrane roll and turn over so backing faces floor.
• PositionstickyedgeofMembraneintowetroomcorner and smooth out any air pockets.
• RollupMembraneintothecorner.• Slowly un-roll Membrane away from wall,
removing brown backing as you go, sticking it to the floor and smoothing out any air pockets.
• RepeatprocessuntilMembranecoversarea.
6 LAY FLOOR MEMBRANE
Ensure FormSafe Reinforcing Tape is applied to the floor where the Membrane sections will meet:• MeasurewidthoftheMembrane (standard roll = 1m)• CutlengthofReinforcingTapetotherequired
length for the area being waterproofed (width of room, if whole room is to be waterproofed).
• PositiontheReinforcingTapesothatwhenoverlaid, each section of the Membrane will overlap tape by 75mm. Remove brown backing and stick Tape down.
• Repeat floor taping until all Membranejunctions have been covered.
4 TAPE MEMBRANE JUNCTIONS
1m
1m
75mm
WHEN FINISHED

FORMSAFE INSTALLATION GUIDE01905 560219 & 5
FORMSAFE INSTALLATION GUIDE
To reveal drain, use a sharp knife to cut around the INNER EDGE of the the drain and remove the inner section of the Membrane.
The wetproofing process is now complete and the floor is ready for tiling / floor covering.
For the wall surfaces within the shower area, we recommend the application of our LWM (Liquid Wall Membrane). See separate instruction guide.
IMPORTANT NOTE: when installing a waste or drain, silicone sealers must not be used where they are likely to come into contact with the membrane.
NOTE: AKW TF75 and PGTF wastes can be used with AKW shower trays and FormSafe. Note use Jointing Compound to seal waste as silicon based sealer can react with FormSafe.
When all floor area has been covered with the Membrane the floor is then ready for application of FormSafe Jointing Compound.• Using an applicator gun, apply the Jointing
Compound at butt joints, pipe entries and all wall to wall and wall to floor junctions.
DO NOT USE SILICON SEALANT
7
8 CUT TO REVEAL DRAIN
APPLY JOINTING COMPOUND
PGTF AKW TF75
WE’RE HERE TO HELP01905 560219&6
FORMSAFE INSTALLATION GUIDE
4. INSTALLING A GLASS SCREEN ONTO A FORMSAFE MEMBRANE
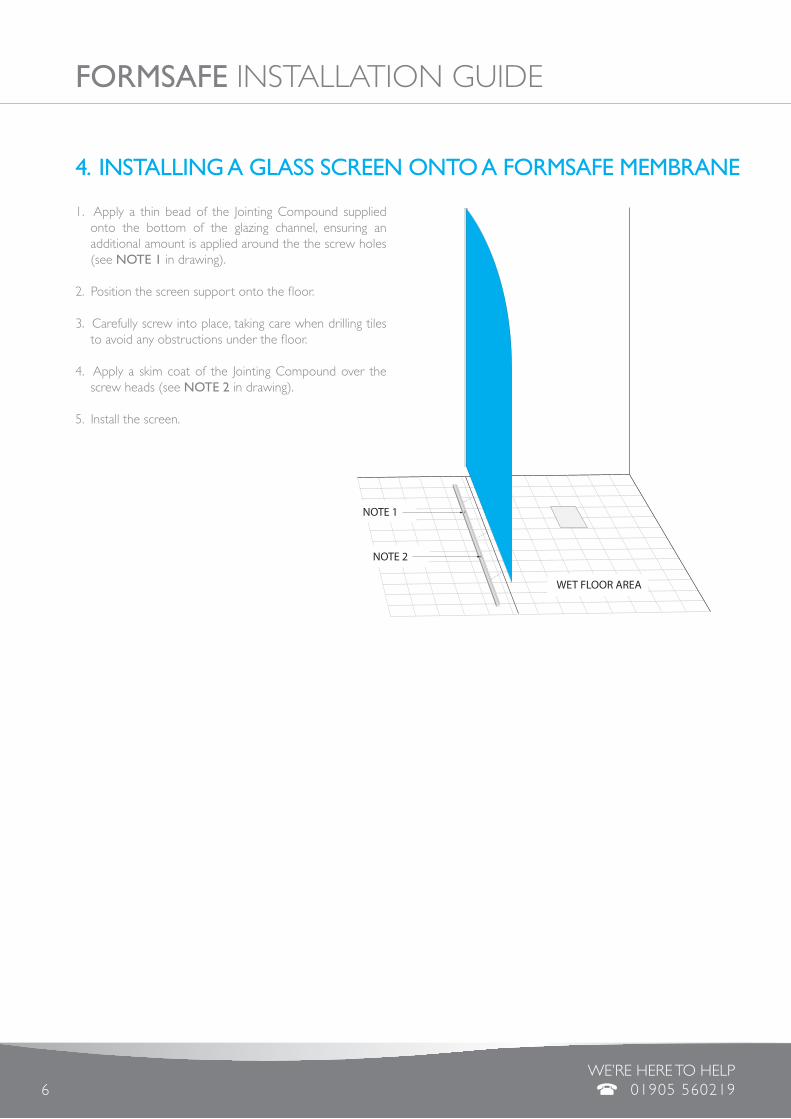
1. Apply a thin bead of the Jointing Compound supplied onto the bottom of the glazing channel, ensuring an additional amount is applied around the the screw holes (see NOTE 1 in drawing).
2. Position the screen support onto the floor.
3. Carefully screw into place, taking care when drilling tiles to avoid any obstructions under the floor.
4. Apply a skim coat of the Jointing Compound over the screw heads (see NOTE 2 in drawing).
5. Install the screen.
WET FLOOR AREA
NOTE 1
NOTE 2
FORMSAFE INSTALLATION GUIDE01905 560219 & 7
FORMSAFE INSTALLATION GUIDE
TIMBER FLOORS (SMALL EN-SUITE)
FormSafe Membrane to be applied, in accordance with the manufacturer’s recommendations, to the entire floor area. Additional FormSafe Reinforcing Tape to be applied to all wall junctions, soap recesses etc, within the shower area.
All pipe penetrations to be sealed with FormSafe Jointing Compound.
LARGE TIMBER FLOORS AND SOLID FLOORS
FormSafe Membrane to be applied, in accordance with the manufacturer’s recommendations, to the floor area finishing a minimum of 1 metre outside the shower area in all directions. Additional FormSafe Reinforcing Tape to be applied to all wall to wall junctions, soap recesses etc, within the shower area.
All pipe penetrations to be sealed with FormSafe Jointing Compound.
6. WETROOM WATERPROOFING SPECIFICATION
FORMSAFE PERFORMANCE & COMPOSITION
FormSafe is a unique, pre-formed flexible self-adhesive waterproof membrane.
It is ideal for use on substrates, such as timber, masonry, concrete, plasterboards, gypsum and existing ceramic or natural stones. Once applied, FormSafe is ready to tile immediately.
FormSafe is cold applied, consisting of a 1mm thick rubberised waterproof layer, incorporating a fabric mesh on one side. It has been developed for use prior to the fixing of ceramic tiles and natural stone, applied using a flexible rapid-set tile adhesive, which keys to the fabric. As the adhesive dries it forms a strong permanent bond to the membrane.
FormSafe and ancillary products should be stored in the original cartons, upright and out of direct sunlight, below 35°C. Protect from frost, Cartons should not be over stacked.
UNDERFLOOR HEATING
When using electric underfloor heating, ensure that it does not exceed 150W/m2..
Membrane thickness 1mm
Joint Tape thickness 1mm
Tensile Strength (ASTM D1000) 8.7N/mm
Puncture Resistance (ASTM E154) 346N
Pull Off Adhesion¹ (ASTM C907) 84N
Elongation at maximum force (ASTM D1000) 4.1%
5. TECHNICAL DATA
¹ Pull off adhesion was determined using the following assembly• AluminiumDisk/EpoxyAdhesive/WallTileAdhesive/Membrane/AluminiumDisk• 40mmDiameterDisk,1mm/MinuteSeparation.
Orderline
01905 823299
General Enquiries
01905 823298
Technical Help line
01905 [email protected]
Fax
01905 823297
Website
www.akw-ltd.co.uk
Quotes & orders email
Enquiries email
PostAKW, Pointon Way, Hampton Lovett, Droitwich Spa, WR9 0LRFor the lastest AKW products and news, scan this qr code with your phone
© 2013 AKW
CODE: 13-006-010-01
What to do if something goes wrong?
In the unlikely event that you should encounter a problem with this product, please contact AKW technical team who will provide further advice and if necessary arrange for our service engineer to visit or discuss our comprehensive after-sales service. As part of our quality and training program calls may be monitored or recorded.None of the forgoing affects your statutory rights.
or the making of unauthorised
Failure to install this AKW product in
modifications will invalidate any
accordance with supplied instructions
warranty and will affectproduct safety.
This Product is Guaranteed for life. Guaranteed for life covers all FormSafe Membrane Kits against faulty material or workmanship. This warranty is in addition to your statutory and other legal rights. Guarantee becomes effective from date of purchase or delivery, to validate return the card within 30 days.
Not Covered by this Guarantee: Damage or defects that result from incorrect installation, improper use, accidental damage or lack of maintenance including the buildup of limescale or waterborne debris. Damage resulting from inappropriate cleaning or waterfreezing. Damage or defects that result from repairs, modifications undertaken by unauthorised persons who are not AKW authorised service staff or agents. The guarantee applies only to manufacturing or material defects only and does not apply to normal wear and tear, inappropriate use or accidental damage. If you need any advice or if you have any questions please contact AKW Ltd.


![[424] LAYING SAGA CONNECT TILES · Saga2 Connect tiles can be bonded, but they are essentially intended for loose (non-adhesive) laying, in single pieces limited to 150 m 2 . For](https://img.pdfslide.us/doc/110x75/5e612b348cb2de4c6148c06d/424-laying-saga-connect-tiles-saga2-connect-tiles-can-be-bonded-but-they-are.jpg)