Embed Size (px)
Citation preview
MICROSOFT EXCEL
COMPUTER TECH PROBLEM 6
You decide to do a science project working with plants and the amount of light they receive to see how much they grow. You decide to use EXCEL to do your project.
Getting Started
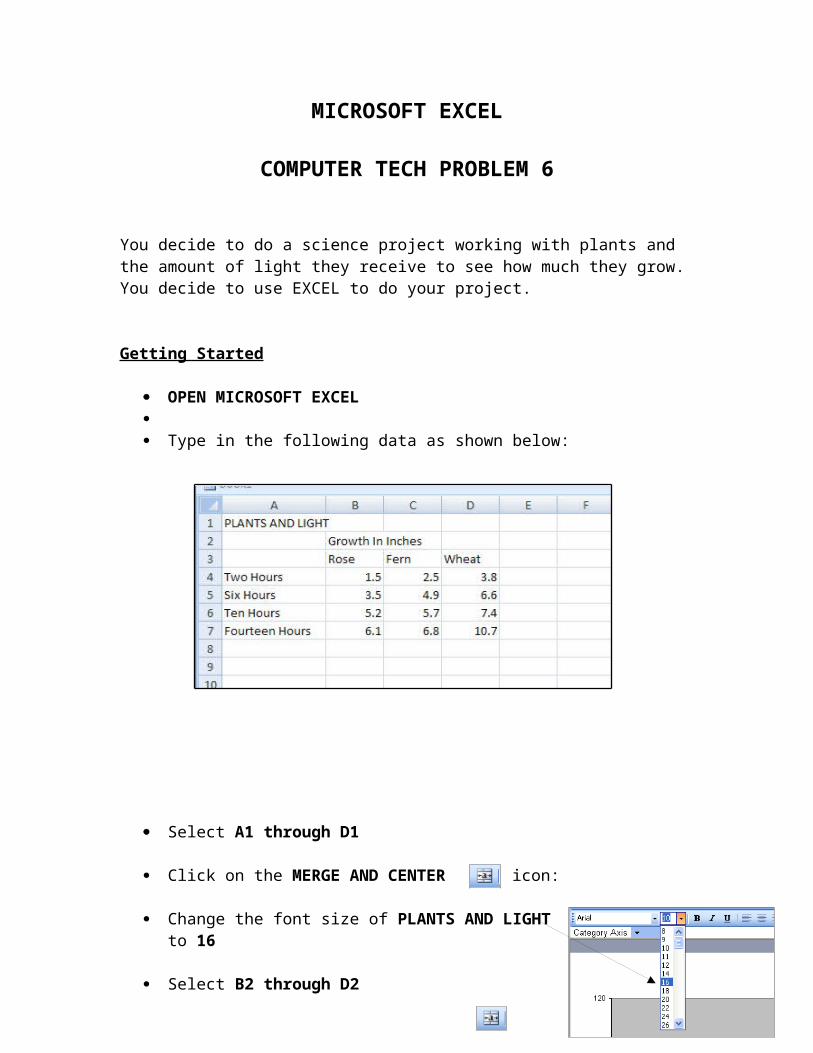
OPEN MICROSOFT EXCEL Type in the following data as shown below:
Select A1 through D1
Click on the MERGE AND CENTER icon:
Change the font size of PLANTS AND LIGHT to 16
Select B2 through D2
Click on the MERGE AND CENTER icon:
Change the font size of GROWTH IN INCHES to 14

Formatting the Spreadsheet
Click on OFFICE button and PRINT, PRINT PREVIEW, and PAGE SETUP
On the PAGE tab, under SCALING, choose 150% size
Click on the MARGIN tab at the top of the box and click on the boxes for HORIZONTAL and VERTICAL centering
Click on the HEADER/FOOTER tab and click on CUSTOM HEADER
Type in your NAME in the left box, the DATE in the center box, your PERIOD # in the right box
Click OK
PRINT, get the spreadsheet from the printer, and take back to your seat. Don’t turn it in the printout yet!
Creating the Chart
On the same spreadsheet you were working on, select A3 through D7
On the INSERT Tab, choose COLUMN or BAR and click any style you want
On the DESIGN Tab, click on MOVE CHART and click on NEW SHEET
Click on the LAYOUT Tab, click CHART TITLE and type a title for your chart
On the LAYOUT Tab, click on AXIS TITLE and choose PRIMARY HORIZONTAL AXIS and type a title you think describes this axis.
On the LAYOUT Tab, click on AXIS TITLE and choose PRIMARY VERTICAL AXIS and type a title you think describes this axis.
Click OK

Formatting the Chart
Click once on any one of the plant names on the axis
On the HOME Tab, change the font size to 16
Click once on any one of the hour numbers on the axis
Change the font size to 16
Click once on the title of your chart
Change the font size to 24
Getting COLOR for Chart
Click once on ANY of the parts of the charts: gray background, white background beyond the chart, color bars, etc.
On the HOME tab, click on the PAINTBUCKET, to change colors:
CHANGE AT LEAST 3 colors on any of the parts of your chart
Printing the Chart
Click on OFFICE button and PRINT and PRINT PREVIEW and PAGE SETUP
Click on HEADER AND FOOTER Tab and go to CUSTOM HEADER
Type your NAME, DATE, and PERIOD
Click OK and OK
Go to OFFICE button and PRINT
Staple the chart to your spreadsheet and turn in together! You should be turning in 2 printouts: the SPREADSHEET and the CHART!
Read Carefully!