Embed Size (px)
Citation preview
319
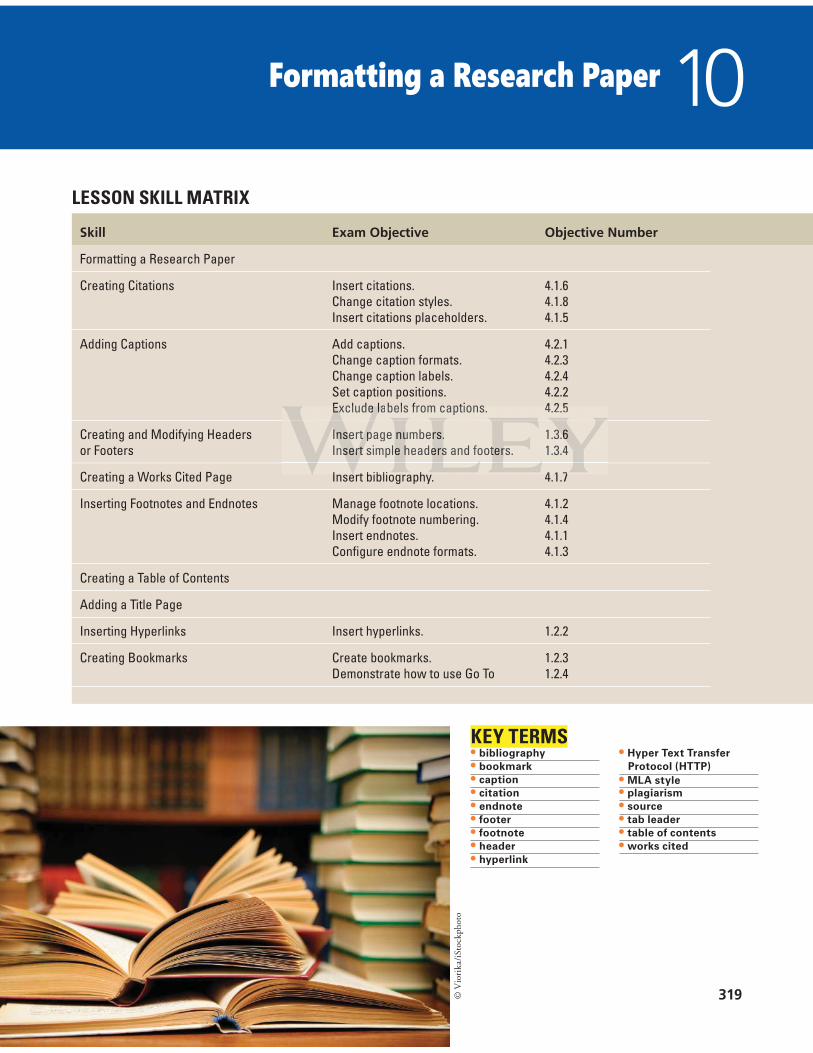
Formatting a Research Paper 10 LESSON SKILL MATRIX
Skill Exam Objective Objective Number
Formatting a Research Paper
Creating Citations Insert citations.Change citation styles.Insert citations placeholders.
4.1.64.1.84.1.5
Adding Captions Add captions.Change caption formats.Change caption labels.Set caption positions.Exclude labels from captions.
4.2.14.2.34.2.44.2.24.2.5
Creating and Modifying Headers or Footers
Insert page numbers.Insert simple headers and footers.
1.3.61.3.4
Creating a Works Cited Page Insert bibliography. 4.1.7
Inserting Footnotes and Endnotes Manage footnote locations.Modify footnote numbering.Insert endnotes.Confi gure endnote formats.
4.1.24.1.44.1.14.1.3
Creating a Table of Contents
Adding a Title Page
Inserting Hyperlinks Insert hyperlinks. 1.2.2
Creating Bookmarks Create bookmarks.Demonstrate how to use Go To
1.2.31.2.4
KEY TERMS • bibliography
• bookmark
• caption
• citation
• endnote
• footer
• footnote
• header
• hyperlink
© V
iori
ka/i
Stoc
kpho
to
• Hyper Text Transfer
Protocol (HTTP)
• MLA style
• plagiarism
• source
• tab leader
• table of contents
• works cited
ExExExcludeee lalalabels from captions. 4.2.5
InInInseseerttt ppppage nuumbers...Insesesertrtrt simple hheadeeersss and foottterrs.
1.3.33 6661.3.4
I t bibli h 4 1 7
Lesson 10320
You are working a full-time job at Northwind Traders and taking night
courses at the local college to complete your degree. The courses you
have registered for require that you submit a research paper. You will
follow the Modern Language Association (MLA) style for your research
paper, but it would be in your best interest to also learn about the other
available styles. Your instructor will require that you learn how to insert
hyperlinks and bookmarks and prepare the document for sharing. You
have completed your paper and now you need to format your document.
In this lesson, you will learn to format a research paper using the MLA
style, apply a hyperlink to text and graphics, and apply bookmarks. © Viorika/iStockphoto
FORMATTING A RESEARCH PAPER The Modern Language Association (MLA) style has been adopted as the style of choice by many colleges and universities. In this section we use MLA style to show how a research paper is for-matted. The MLA style guidelines continue to be updated for standardization to accommodate documentation for websites, digital publications, interviews, electronic sources, and more. Later in this lesson we discuss alternative styles and show you how to format in one of those (APA style).
Formatting a Research Paper As a college student, you most likely have to take a technical writing class for one of your human-ities or liberal arts courses. As you begin working on your research paper, you will outline it to make it more manageable and help keep you organized. In a later lesson, you will learn more about
The Bottom Line
SOFTWARE ORIENTATION
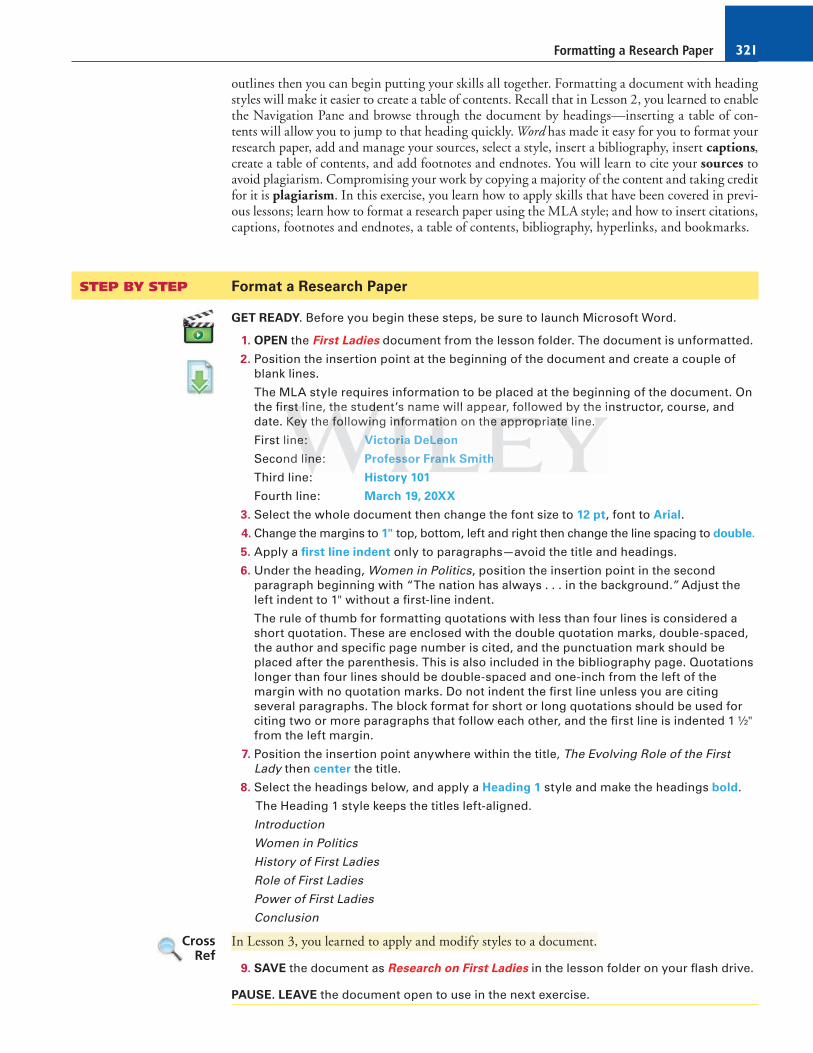
References Tab
Commands on the References tab are used to create a table of contents, footnotes and end-notes, citations and bibliography, captions, index, and table of authorities.
Use this fi gure as a reference throughout this lesson as well as the rest of this book.
Add text to theTable ofContents
Table of Contents.Content containinga heading will beapplied to theTable of Contents
Update Tableof Contents
InsertEndnote
ManageSources
InsertCaption
InsertTable ofFigures
InsertIndex
Insert Tableof Authorities
MarkCitation
UpdateTable
InsertFootnote
NextFootnote
Style.Select a
writing style
Bibliog-raphy
Cross-reference
MarkEntry
UpdateTable
UpdateIndex
InsertCitation
Figure 10-1References tab
ononn ttthe RRRefefefeere encececes taaabbb are uuusededed to creaaate aaa tttababablelele ooof f f f cocococ ntennntststs,ons andndnd bbbibbbliiiogogograraraaphy, caaptionnns, index, aaand d tatatablblble of autututhohohohoririritties
ure as aaa referenenennce throuououggghouuuttt thththisisis lllesesessssonnn asasas wwwelelellll aasa theee rrresesest of
Formatting a Research Paper 321
outlines then you can begin putting your skills all together. Formatting a document with heading styles will make it easier to create a table of contents. Recall that in Lesson 2, you learned to enable the Navigation Pane and browse through the document by headings—inserting a table of con-tents will allow you to jump to that heading quickly. Word has made it easy for you to format your research paper, add and manage your sources, select a style, insert a bibliography, insert captions , create a table of contents, and add footnotes and endnotes. You will learn to cite your sources to avoid plagiarism. Compromising your work by copying a majority of the content and taking credit for it is plagiarism . In this exercise, you learn how to apply skills that have been covered in previ-ous lessons; learn how to format a research paper using the MLA style; and how to insert citations, captions, footnotes and endnotes, a table of contents, bibliography, hyperlinks, and bookmarks.
STEP BY STEP Format a Research Paper
GET READY . Before you begin these ste ps, be sure to launch Microsoft Word .
1. OPEN the First Ladies document from the lesson folder. The document is unformatted.
2. Position the insertion point at the beginning of the document and create a couple of blank lines.
The MLA style requires information to be placed at the beginning of the document. On the fi rst line, the student’s name will appear, followed by the instructor, course, and date. Key the following information on the appropriate line.
First line: Victoria DeLeon
Second line: Professor Frank Smith
Third line: History 101
Fourth line: March 1 9 , 20XX
3. Select the whole document then change the font size to 12 pt , font to Arial.
4. Change the margins to 1" top, bottom, left and right then change the line spacing to double.
5. Apply a fi rst line indent only to paragraphs—avoid the title and headings.
6. Under the heading, Women in Politics , position the insertion point in the second paragraph beginning with “The nation has always . . . in the background .” Adjust the left indent to 1" without a fi rst-line indent.
The rule of thumb for formatting quotations with less than four lines is considered a short quotation. These are enclosed with the double quotation marks, double-spaced, the author and specifi c page number is cited, and the punctuation mark should be placed after the parenthesis. This is also included in the bibliography page. Quotations longer than four lines should be double-spaced and one-inch from the left of the margin with no quotation marks. Do not indent the fi rst line unless you are citing several paragraphs. The block format for short or long quotations should be used for citing two or more paragraphs that follow each other, and the fi rst line is indented 1 ½" from the left margin.
7. Position the insertion point anywhere within the title, The Evolving Role of the First Lady then center the title.
8. Select the headings below, and apply a Heading 1 style and make the headings bold.
The Heading 1 style keeps the titles left-aligned.
Introduction
Women in Politics
History of First Ladies
Role of First Ladies
Power of First Ladies
Conclusion
In Lesson 3, you learned to apply and modify styles to a document.
9. SAVE the document as Research on First Ladies in the lesson folder on your fl ash drive.
PAUSE. LEAVE the document open to use in the next exercise.
Cross Ref
rrrrstst llline, thehh studededent s name will appear, followed by the iKKKeyyy theee fofofollll owwwinining inininfofoformatatatioioion on thehehe aaapppppprororopppriaiaiatetetete line...
lineee: VViV ctooriaa DeLLLeon
nd linii eee: Profeesssor Frrrannnk Smitii hh
d li Hi t 101
Lesson 10322
CREATING CITATIONS Now that you formatted your research paper, citations should be placed in the document. Citing sources should be included in documents, such as research papers, articles, or reports that analyze or describe research you have completed on a topic . W hen you cite a source, you do so at the rele-vant location within the text. Word enables you to insert a citation and create a source at the same time. These can be managed, modifi ed, or delete d when necessary.
Creating Citations A citation is a note mentioning the source of information . There are many rules that can be applied to a specifi c citation. In this lesson, you will learn to use the basic in-text citation, which places parentheses after a quote that includes the author’s name and page number. Note, you can also modify citations.
A source includes all the information about where specifi c information comes from so the reader can fi nd the original work. It could be a book, report, journal article, or website .
When you add a new citation to a document, you also create a new source that will appear in the bibliography. A bibliography is a list of sources and is placed at the end of a document . This is also referred to as a w orks c ited page.
Each time you create a new source in any document, the information is saved on your computer in a master list, so you can fi nd and use any source previously used in other documents . Word also creates a current list, which contains all sources within your current document. This list can be modifi ed at any time.
When you have not gathered all the data for a source, you can insert a placeholder that can be fi lled in at a later time . To add a placeholder, click Add New Placeholder on the Insert Citation menu. In this exercise you learn to create a citation.
STEP BY STEP Create Citations
Y ou can choose from many different reference styles when formatting your citations, sources, and bibliography. American P s yc h ological Association (APA) and Modern Language Association (MLA) are the most common. Additional formats are also available so make sure you check with your instructor on the style. The selected format inserts the information in the correct layout.
USE the document that is open from the previous exercise.
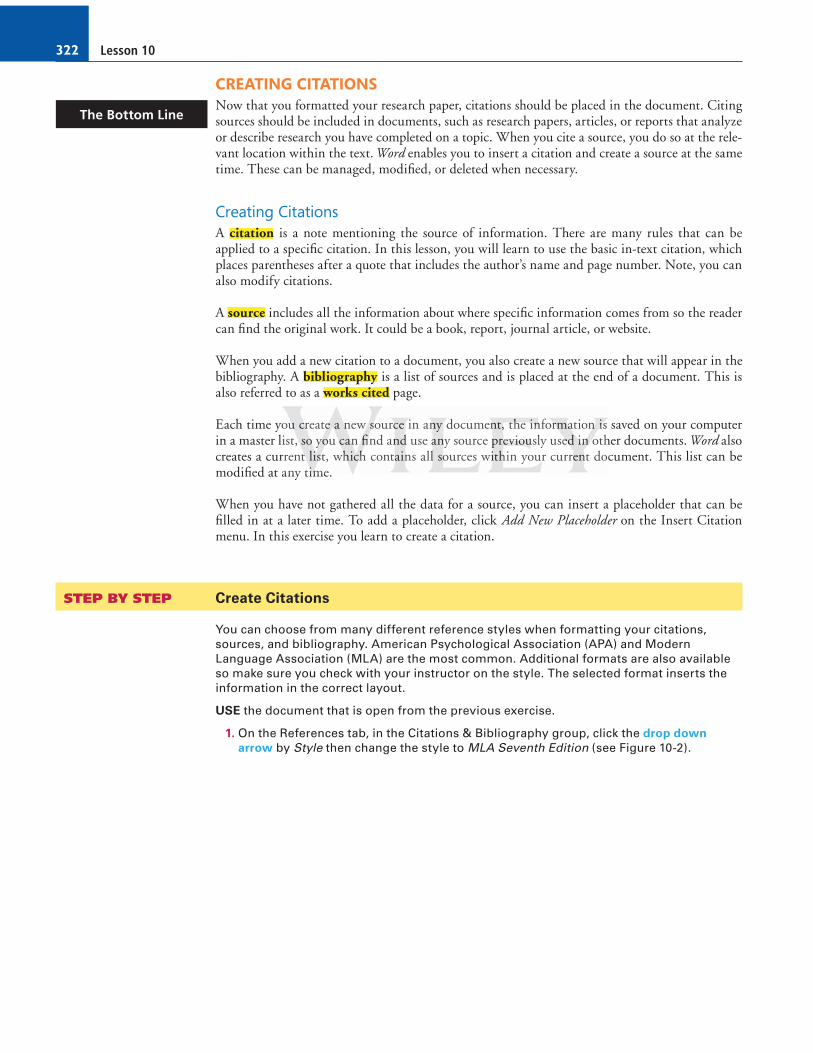
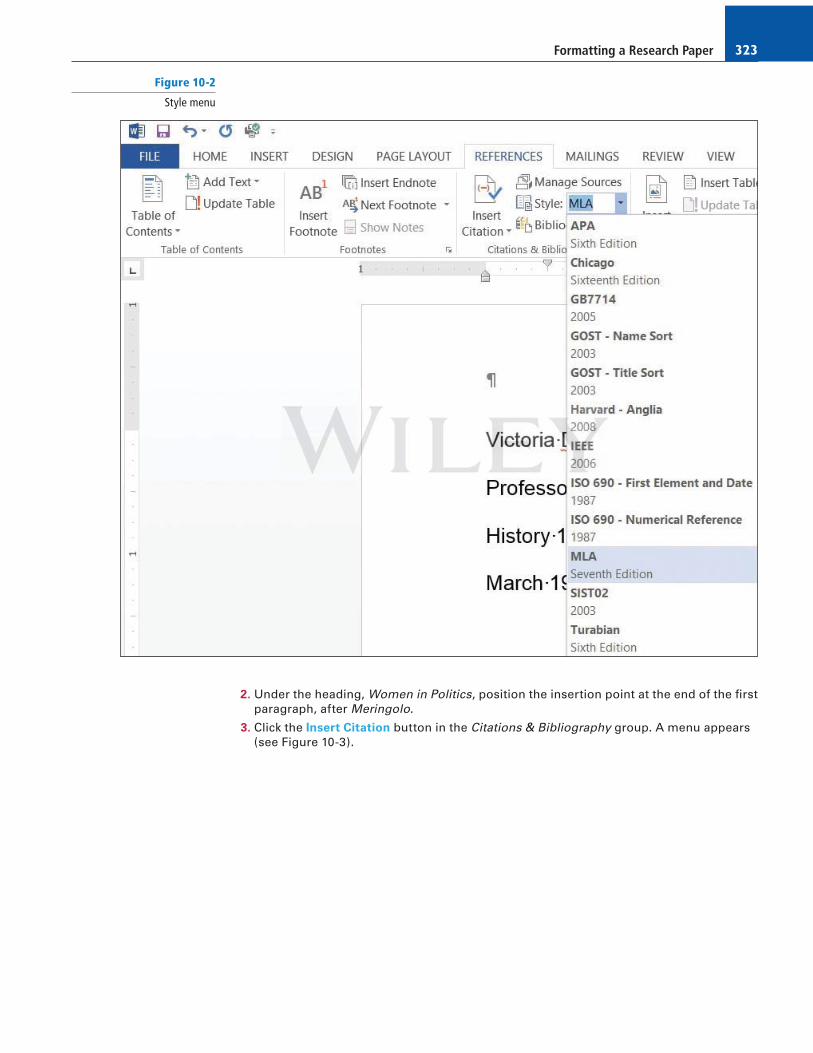
1. On the References tab, in the Citations & Bibliography group, click the drop down
arrow by Style then change the style to MLA Seventh Edition (see Figure 10-2).
The Bottom Line
ouu u crcrcreateee a nnneww sssourccce in annyn ddocumennnt,, ttthhhe iiinnnforrrrmamamationnn iiiss ist, sooo yyyouoo cccananan fififi nd annndd use ananany source pppreeeviviviououously usededed iiin n n othfififirrent tt liiiststst, whhhhiccchhh containns allll sooources wiiithhin your currennnt doany timimime
Formatting a Research Paper 323
2. Under the heading, Women in Politics , position the insertion point at the end of the fi rst paragraph, after Meringolo.
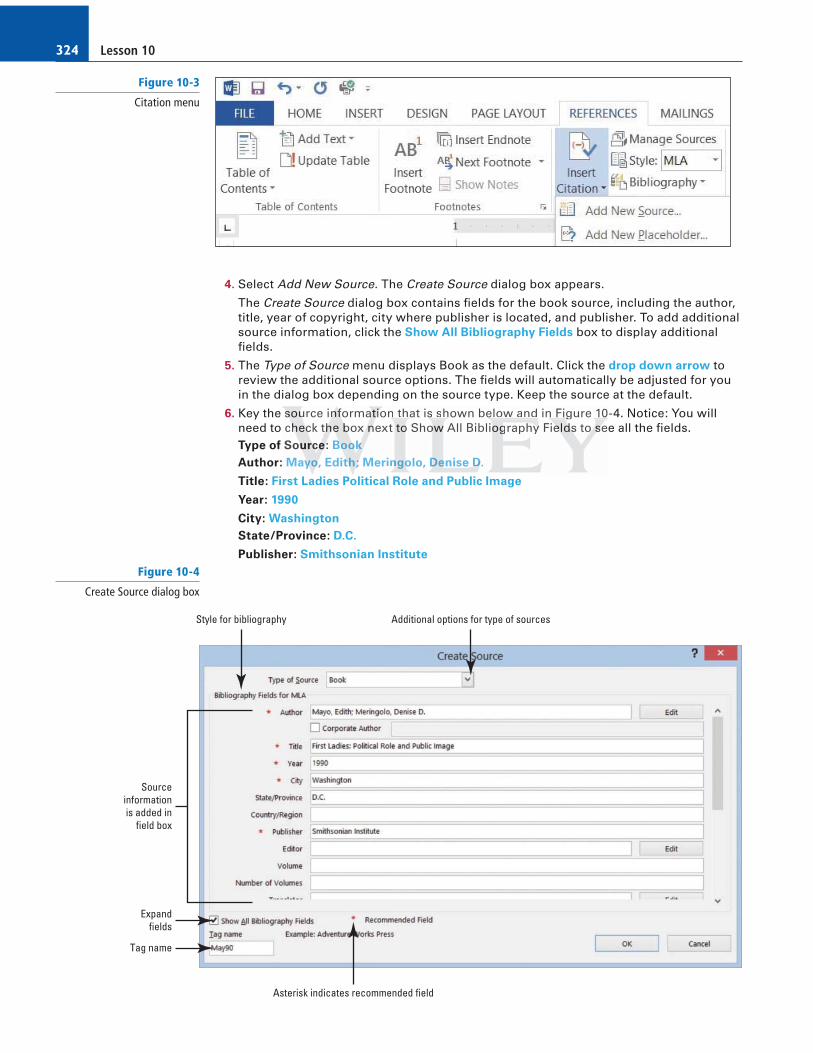
3. Click the Insert Citation button in the Citations & Bibliography group. A menu appears (see Figure 10-3).
Figure 10-2
Style menu
Lesson 10324
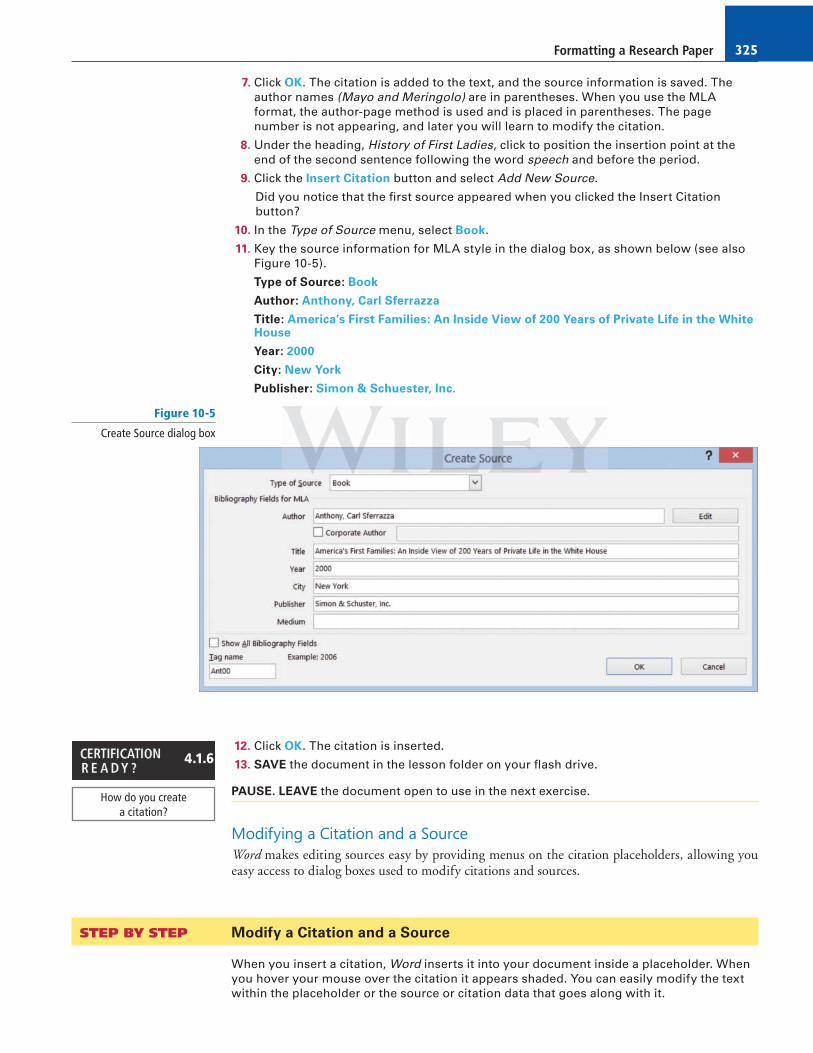
4. Select Add New Source . The Create Source dialog box appears.
The Create Source dialog box contains fi elds for the book source, including the author, title, year of copyright, city where publisher is located, and publisher. To add additional source information, click the Show All Bibliography Fields bo x to display additional fi elds.
5. The Type of Source menu displays Book as the default. Click the drop down arrow to review the additional source options. The fi elds will automatically be adjusted for you in the dialog box depending on the source type. Keep the source at the default.
6. Key the source information that is shown below and in Figure 10-4. Notice: You will need to check the box next to Show All Bibliography Fields to see all the fi elds. Type of Source: Book
Author: Mayo, Edith; Meringolo, Denise D.
Title: First Ladies Political Role and Public Image
Year: 1990
City: Washington State/Province: D.C.
Publisher: Smithsonian Institute
Figure 10-3
Citation menu
Figure 10-4
Create Source dialog box
Expandfields
Tag name
Asterisk indicates recommended field
Style for bibliography Additional options for type of sources
Sourceinformationis added in
field box
sssouuurce infnfnformaaatititionon that iss shown bele ow and in Figugg re 100chhheccck thhthe ee bbbox nnnext tooo Showowow All Bibliooggraphhhy yy Fielelee dsdsds to o o ssseSourururcecece: BoBoBookokok
Mayoyoyo, Edittth;h;h; Merinnngooolo, DeDeDenise DDD.
Formatting a Research Paper 325
7. Click OK . The citation is added to the text, and the source information is saved. The author names ( Mayo and Meringolo ) are in parentheses. When you use the MLA format, the author-page method is used and is placed in parentheses. The page number is not appearing, and later you will learn to modify the citation.
8. Under the heading, History of First Ladies , click to position the insertion point at the end of the second sentence following the word speech and before the period.
9. Click the Insert Citation button and select Add New Source .
Did you notice that the fi rst source appeared when you clicked the Insert Citation button?
10. In the Type of Source menu, select Book.
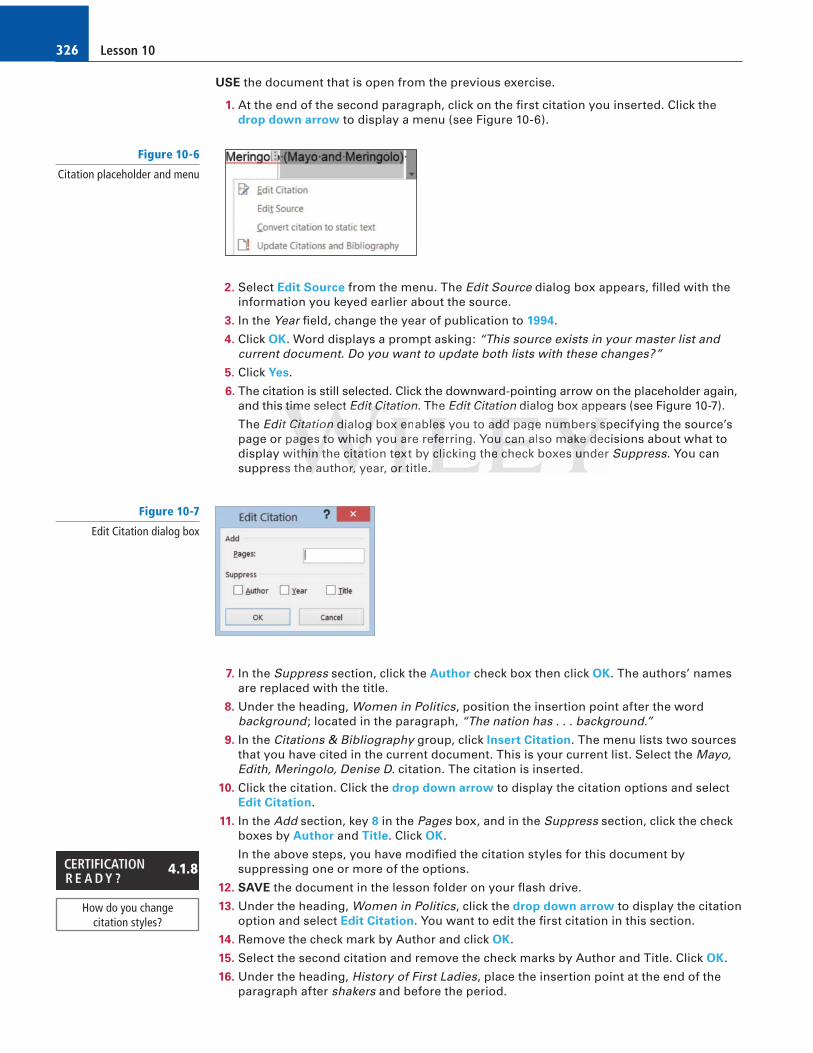
11. Key the source information for MLA style in the dialog box, as shown below (see also Figure 10-5).
Type of Source: Book
Author: Anthony, Carl Sferrazza
Title: America’s First Families: An Inside View of 200 Years of Private Life in the White House
Year: 2000
City: New York
Publisher: Simon & Schuester, Inc.
Figure 10-5
Create Source dialog box
12. Click OK . The citation is inserted.
13. SAVE the document in the lesson folder on your fl ash drive.
PAUSE. LEAVE the document open to use in the next exercise.
Modifying a Citation and a Source Word makes editing sources easy by providing menus on the citation placeholders, allowing you easy access to dialog boxes used to modify citations and sources.
STEP BY STEP Modify a Citation and a Source
When you insert a citation, Word inserts it into your document inside a placeholder. When you hover your mouse over the citation it appears shaded. You can easily modify the text within the placeholder or the source or citatio n data that goes along with it .
How do you create a citation?
4.1.6
Lesson 10326
USE the document that is open from the previous exercise.
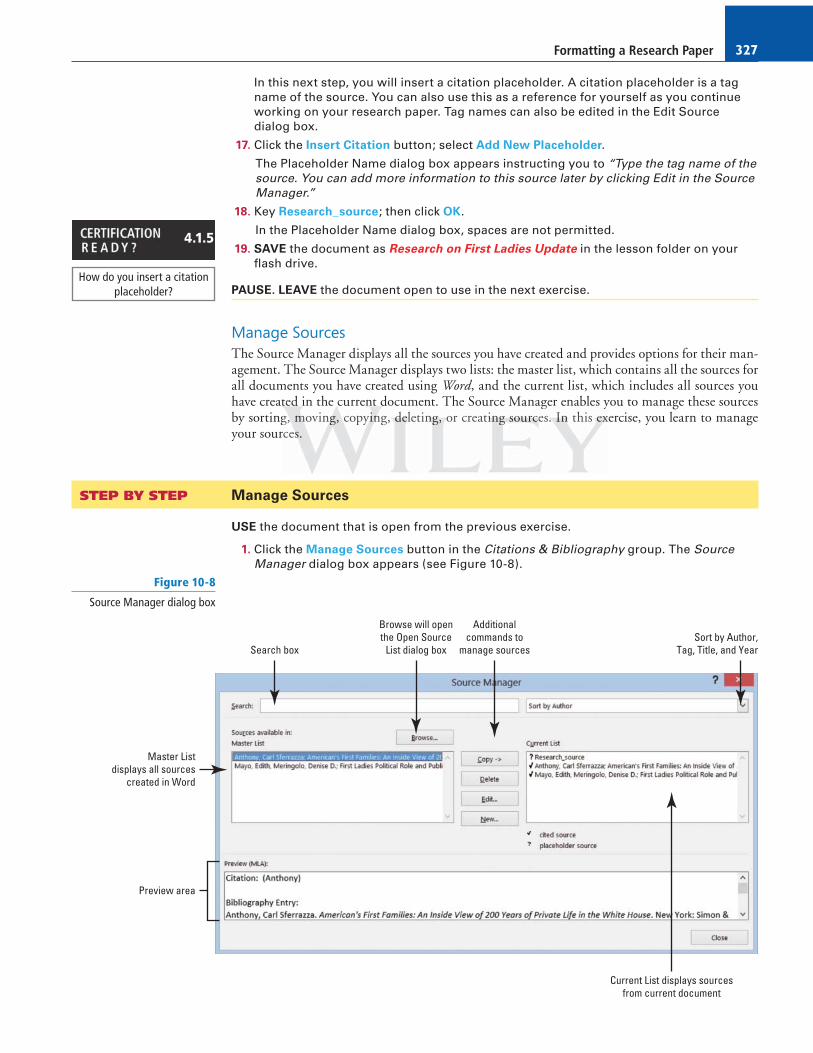
1. At the end of the second paragraph, click on the fi rst citation you inserted. Click the drop down arrow to display a menu (see Figure 10-6).
Figure 10-6
Citation placeholder and menu
2. Select Edit Source from the menu. The Edit Source dialog box appears, fi lled with the information you keyed earlier about the source .
3. In the Year fi eld, change the year of publication to 1994 .
4. Click OK . Word displays a prompt asking: “This source exists in your master list and current document. Do you want to update both lists with these changes?”
5. Click Yes .
6. The citation is still selected. Click the downward-pointing arrow on the placeholder again, and this time select Edit Citation . The Edit Citation dialog box appears (see Figure 10-7).
The Edit Citation dialog box enables you to add page numbers specifying the source’s page or pages to which you are referring. You can also make decisions about what to display within the citation text by clicking the check boxes under Suppress . You can suppress the author , year , or title .
Figure 10-7
Edit Citation dialog box
7. In the Suppress section, click the Author check box then click OK . The authors’ names are replaced with the title.
8. Under the heading, Women in Politics , position the insertion point after the word background ; located in the paragraph, “The nation has . . . background.”
9. In the Citations & Bibliography group, click Insert Citation . The menu lists two sources that you have cited in the current document. This is your current list. Select the Mayo, Edith, Meringolo, Denise D. citation. The citation is inserted.
10. Click the citation. Click the drop down arrow to display the citation options and select Edit Citation .
11. In the Add section, key 8 in the Pages box, and in the Suppress section, click the check boxes by Author and Title . Click OK .
In the above steps, you have modifi ed the citation styles for this document by suppressing one or more of the options.
12. SAVE the document in the lesson folder on your fl ash drive.
13. Under the heading, Women in Politics , click the drop down arrow to display the citation option and select Edit Citation . You want to edit the fi rst citation in this section.
14. Remove the check mark by Author and click OK .
15. Select the second citation and remove the check marks by Author and Title. Click OK .
16. Under the heading, History of First Ladies , place the insertion point at the end of the paragraph after shakers and before the period.
How do you change citation styles?
4.1.8
ttimmime seleeeccct Edittt CCCitation. The Edit Citation dialog box appe
t CCCitttataa ioon n n dddiaii log g g boxx x eeenablllesss you to aaaddd pppagagageee nuuuummmbersss ssspnnn paaagegeges tototo wwwhihh chchch youuu aare reeefeeerring. Yooou cacacannn alaa so mmmakakake e e ddedd cwithhhinnn ttthe cccitttaaation teexxt by cliicking theee ccheckkk boxes unndn er
ss thee e aaauthorrr ,,, r year , ororo tttitle ...
Formatting a Research Paper 327
In this next step, you will insert a citation placeholder. A citation placeholder is a tag name of the source. You can also use this as a reference for yourself as you continue working on your research paper. Tag names can also be edited in the Edit Source dialog box.
17. Click the Insert Citation button; select Add New Placeholder .
The Placeholder Name dialog box appears instructing you to “Type the tag name of the source. You can add more information to this source later by clicking Edit in the Source Manager.”
18. Key Research_source ; then click OK .
In the Placeholder Name dialog box, spaces are not permitted.
19. SAVE the document as Research on First Ladies Update in the lesson folder on your fl ash drive.
PAUSE. LEAVE the document open to use in the next exercise.
Manage Sources The Source Manager displays all the sources you have created and provides options for their man-agement. The Source Manager displays two lists: the master list, which contains all the sources for all documents you have created using Word , and the current list, which includes all sources you have created in the current document. The Source Manager enables you to manage these sources by sorting, moving, copying, deleting, or creating sources. In th is exercise, you learn to manage your sources.
STEP BY STEP Manage Sources
USE the document that is open from the previous exercise.
1. Click the Manage Sources button in the Citations & Bibliography group. The Source Manager dialog box appears (see Figure 10-8).
How do you insert a citation placeholder?
4.1.5
Figure 10-8
Source Manager dialog box
Search box
Preview area
Master Listdisplays all sources
created in Word
Sort by Author,Tag, Title, and Year
Current List displays sourcesfrom current document
Browse will openthe Open Source
List dialog box
Additionalcommands to
manage sources
g yg, mmom vingngng, copyyyinining, dddelelelletinnnngg,g, ooor creatiiingngng sssououourcrcrces. InInInn th is exexexrcesss.
Lesson 10328
2. In the Master List section, select the Anthony source.
3. Click the Edit button. The Edit Source dialog box appears. Using the Source Manager allows you to edit your sources.
4. Click the check box by Show All Bibliography Fields . The Edit Source dialog box expands to include additional fi elds.
5. Key NY in the State/Province fi eld; and click OK to close the Edit Source dialog box.
6. Word displays a prompt asking: “This source exists in your master list and current document. Do you want to update both lists with these changes?”. Click Yes .
7. Click the Close button on the Source Manager dialog box.
8. SAVE the document in the lesson folder on your fl ash drive.
PAUSE. LEAVE Word open for the next exercise.
Removing a Citation You can remove a citation from your document without removing the source data. The source data remains saved in the current document list and in the master list ; therefore , if you decide you need to cite that source in another location, you can choose it from the Insert Citation menu. If you want to remove the citations permanently, you would complete this action by opening the Source Manager dialog box; then select the source; and then click the Delete button. In this exercise, you learn to remove a citation without removing the source.
STEP BY STEP Remove a Citation
USE the document that is open from the previous exercise.
1. Under the heading, History of First Ladies , p osition the insertion point after Anthony in the second sentence.
2. Click the citation placeholder tab to select the entire citation. Hint, at the beginning of the placeholder, you will see a tab with three vertical dots—it makes it easier to select.
3. Press Delete to remove the citation from the document.
4. Open the Source Manager dialog box, Notice the source is still in both lists. When you are done, close the dialog box.
5. Click the Undo button on the Quick Access Toolbar .
6. SAVE the document in the lesson folder on your fl ash drive.
PAUSE. LEAVE Word open for the next exercise.
Another WayYou can remove
a source from the master or current list and from the bibli-ography by selecting the source in Source Manager and clicking the Delete button.
ovovo e e a citatitition wititithohohout removing the source.
a Citaaation
Formatting a Research Paper 329
ADDING CAPTIONS W ord can automatically add captions in your document when you have tables, fi gures, or other objects or you can manually add captions.
Adding Captions A caption is a line o f text that describes an object and can appear above or below the object it describes. As you continue working on your paper, you decide to add a table and insert a picture. Adding a caption below or above the table would be informative to anyone who reads your report. As you continue working with captions, you also learn that captions can be used for fi gures and equations. For this exercise, you will be provided steps for creating one of these types of captions but will not actually use them in your paper. In this exercise, you learn to add a caption to a fi gure, table, and equation.
STEP BY STEP Add Captions to a Table
USE the document that is open from the previous exercise.
1. On the View tab, enable the Navigation Pane.
2. Under the heading, Power of First Ladies , position the insertion point at the end of the last paragraph ending with hurt her husband’s career and add a blank line.
3. Close the Navigation Pane.
4. Insert a 2x3 table at the blank line. Key the following information in the table. First column fi rst row: First Ladies
Second column fi rst row: Year in White House
Second column second row: 1981, January 20 – 1989, January 20
Second column third row: 1993, January 20 – 2001, January 20
The Bottom Line
SOFTWARE ORIENTATION
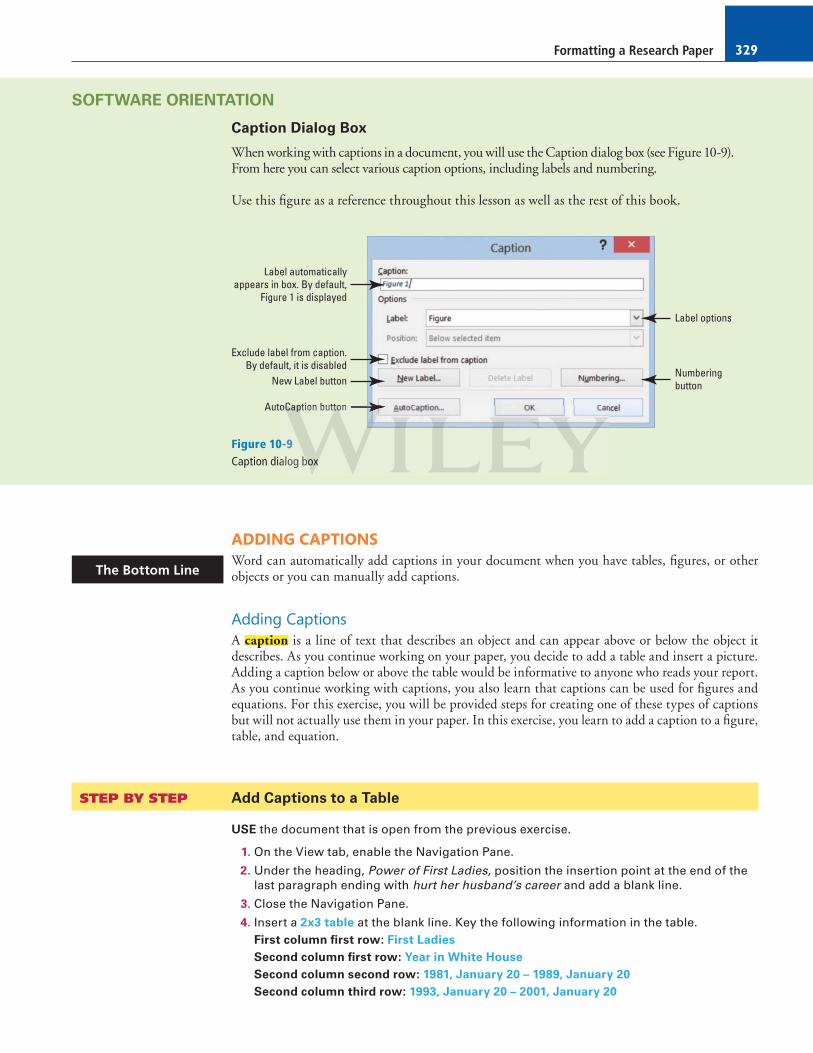
Caption Dialog Box
When working with captions in a document, you will use the Caption dialog box (see Figure 10-9). From here you can select various caption options, including labels and numbering.
Use this fi gure as a reference throughout this lesson as well as the rest of this book.
Label automaticallyappears in box. By default,
Figure 1 is displayed
Exclude label from caption.By default, it is disabled
New Label button
AutoCaption button
Label options
Numberingbutton
Figure 10-9Caption dialog box
oooCaCaCC ptptption buttttooon
-9alog bbboxoxox
Lesson 10330
5. From the lesson folder, insert the Nancy Reagon image in the fi rst column second row from the lesson folder.
6. From the lesson folder, insert the Hillary Clinton image in the fi rst column third row from the lesson folder.
7. The height for both images should be adjusted to 1.27" .
8. Apply the AutoFit to Contents command to the whole table.
In Lesson 8, you learned to insert pictures.
9. Position the insertion point below the table at a blank line.
10. On the References tab, in the Captions group, click the Insert Caption button to open the Caption dialog box.
11. Click the drop down arrow by the Label box to display the various labels then select Table. This changes the label option in the Caption box. The Caption box now displays Table 1 .
12. Place the insertion point in the Caption box after 1 then press the spacebar once. Key First Ladies then click OK . The caption is inserted below the table.
13. SAVE the document as Research on First Ladies Update1 in the lesson folder on your fl ash drive.
PAUSE . LEAVE Word open to use in the next exercise.
Adding Captions to a Figure The same process you used to add captions to a table is used for fi gures and any other object. Your research paper contains two images, and you would like to insert a caption for each image. In this exercise, you will insert a caption for the images you inserted earlier.
STEP BY STEP Add Captions to a Figure
USE the document that is open from the previous exercise.
1. Select the fi rst image, Nancy Reagan .
2. Click the Insert Caption button then change the label to Figure .
3. Add a check mark by Exclude label from caption . Did you notice that Figure 1 was replaced with a 1 ?
Adding a check by Exclude label from caption will allow you to customize your own label.
4. Click the New Label button then key Nancy Reagan . Click OK. A 1 appears after her name. Click OK . Click the drop down arrow by Position; then select Above selected
item. Click OK. The caption appears above her image.
5. Select the second image, Hillary Clinton .
6. Click the Insert Caption button. In the Caption box, you will see Nancy Reagan’s name. If you were to use another picture of Mrs. Reagan, then you would select her label. Word automatically numbers each label.
7. Change the label to Figure .
8. Click the New Label button, then key Hillary Clinton . Click OK.
As mentioned in step 6, if you were to add another picture of Mrs. Clinton, then you would use her label. Word will automatically number each caption even for new labels.
9. Click the drop down arrow by Position; then select Above selected item . Click OK .
10. SAVE the document in the lesson folder on your fl ash drive.
PAUSE. LEAVE the document open for another exercise. You will return to this document later in the lesson.
Cross Ref
How would you add a caption to a table?
4.2.1
How would you add a caption to a fi gure?
4.2.1
How would you change the label to a caption?
4.2.4
Another WayTo insert a picture
into the document, double-click the name of the fi le in the Insert Picture box.
appptitt ononons ss tototo a FFFiguree ocessssss yyyoouo ussses d d d to adddd ccaptiooonsss to a tabllle iis used for figggurrres anfier connntains twwwwo imagggeseses anddd yoyoyouuu wowowouuulddd lilikeke tttooo inininsert aaaa cccaaaptio

Formatting a Research Paper 331
Adding Captions to an Equation The same method for adding a caption to a table and fi gure is used for equations by s imply se-lect ing a different item in the Label list—or creat ing a new label. If you were writing a paper that contained equations, you would want to add a description for each equation. This document does not contain an equation, so a new document will be created. When you reopen the Caption dialog box, the previously selected label and numbering format will be displayed along with the next sequential number. Fo r example, if you inserted the caption “ Figure 1 ,” the next time you open the Caption dialog box in that document, “ Figure 2 ” will be displayed. In this exercise, you learn to add a caption, reposition, and change the numbering format.
STEP BY STEP Add Captions to an Equation
OPEN a blank Word document.
1. Press Enter to create a blank line.
2. On the Insert menu, in the Symbols group, click the drop down arrow next to the Equation button to display the menu.
In Lesson 7, you learned to insert equations from the Ribbon and from the Building Blocks Organizer.
3. Click Area of a Circle to insert the equation into the document.
4. Click the shortcut drop down arrow by the equation, select Justifi cation then click Left . The equation is placed at the left side of the document.
5. Move the insertion point to the blank line above the equation.
6. On the References tab, in the Captions group, click the Insert Caption button to display the Caption dialog box.
7. In the Label box, select Equation and in the Position box, the caption is already set to Below selected item .
The equation was not selected . Selecting the equation would provide you options to change to A bove or B elow selected item . The insertion point is above the equation; therefore, the caption will be placed on the blank line above the equation.
8. Click the check box by Exclude label from caption to add a check mark. The text, Equation , is removed from the Caption box.
9. Click the Numbering button to display the Caption Numbering dialog box (see Figure 10-10).
Cross Ref
How would you add a caption to an equation?
4.2.1
How would you change the position of a caption?
4.2.2
Figure 10-10
Caption Numbering dialog box Option tochange formatAdd check mark
to enable the Chapterstarts with style and
Use separator options Change style optionsOptions to selecta separator
10. In the Format box, select A, B, C . . . then click the box by Include chapter number to view the options. Your research paper must contain heading styles to use this option as well as adding a separator.
11. Remove the check mark by Include chapter number . Click OK . How would you change the
caption format?
4.2.3
rrr.
Areaeaea ooof f f a CiCiCircrcrclelele to inssert theee equation iintntntooo thtt e dooocucucumemement
the shshshortcuutuu dddrop ddowwn arrrrooow byyy ttttheee eequatiooon, seleccct Juequatitition is plplplaced aattt ththhe leeeftft ssididee oof ttthehe ddococumument
Lesson 10332
12. A new numbering caption appears in the Caption box. Click the check box by Exclude label from caption to disable this feature. Did you notice that the text, Equation A , appears in the Caption box?
In step 10, you changed the number format to letters which will now be included in the caption.
13. In the Caption box, place the insertion point after A then key a colon, press the Sp acebar once, and then key Area of a Circle .
14. Click OK .
15. Place the insertion point at the end of the equation and press Enter twice.
16. Insert the Binomial Theorem equation.
17. Select the equation then click the Insert Caption button to display the Caption dialog box. In the Caption box, Equation B is automatically added. Word tracks which caption you are using and renumbers for you.
18. Position the insertion point after B then key a colon followed by a space ; then key Binomial Theorem Equation .
19. Position the caption, Above selected item . Click OK.
20. SAVE the document as Equation s with Caption in the lesson folder on your fl ash drive.
PAUSE. LEAVE the document open to use in the next exercise.
Word inserts captions as text, but the sequential caption number is inserted as a fi eld. If your caption looks similar to {SEQ Figure \* ALPHABETIC}, Word is displaying fi eld codes instead of fi eld results. To see the fi eld results, press Alt 1 F9.
Editing and Deleting Captions When a new caption is inserted, Word automatically updates all caption numbers. However, when a caption is moved or deleted, all captions will need to be manually updated. To update all cap-tions after making changes, press Ctrl 1 A to select the entire document, right-click on a caption, and then click Update Field on the shortcut menu. To make changes to a caption, you could select a different label, such as changing “ Equation 1 ” to “ Figure 1 ” . In this exercise, you learn to edit and delete captions.
STEP BY STEP Edit and Delete Captions
USE the document that is open from the previous exercise.
1. Select the caption, Equation A: Area of a Circle ; then open the Caption dialog box.
2. Change the label and select Figure.
3. In the Caption box, the text Figure 1: Area of a Circle now appears. Click OK .
4. Select the second equation along with the caption, then press Delete . The caption is removed from the document.
5. SAVE the document as Equations Update in the lesson folder on your fl ash drive then CLOSE the fi le.
PAUSE. LEAVE Word open to use in the next exercise.
CREATING AND MODIFYING HEADERS AND FOOTERS A header appears on the top of a document’s page, and a footer appears at the bottom. The Header & Footer group is found on the Insert tab and contains commands for inserting built-in headers, footers, and page numbers into a Word document.
The Page Number button in the Header & Footer group has commands for inserting page numbers in the header, the footer, or the side margin of a page using the built-in gallery. In this exercise, you learn to insert page numbers in a document.
How do you exclude labels from captions?
4.2.5
Troubleshooting
The Bottom Line
How would you change a label in a caption?
4.2.4
s cccapapaptitt onononsss asss texexext, butuut the ssseqquential caaptpp iooonnn numbmbmbm eeer iiiis s s inks siiimimimilalalar tooo {{{SESESEQ Figggurre \* ALALALPHABETIC},}}, WWWoroo d is disisisplplplayin. To ssseeeeee the fififieeeld resuuulttst , prrresesssss AlAlttt fi 111F9F9FF9.
Formatting a Research Paper 333
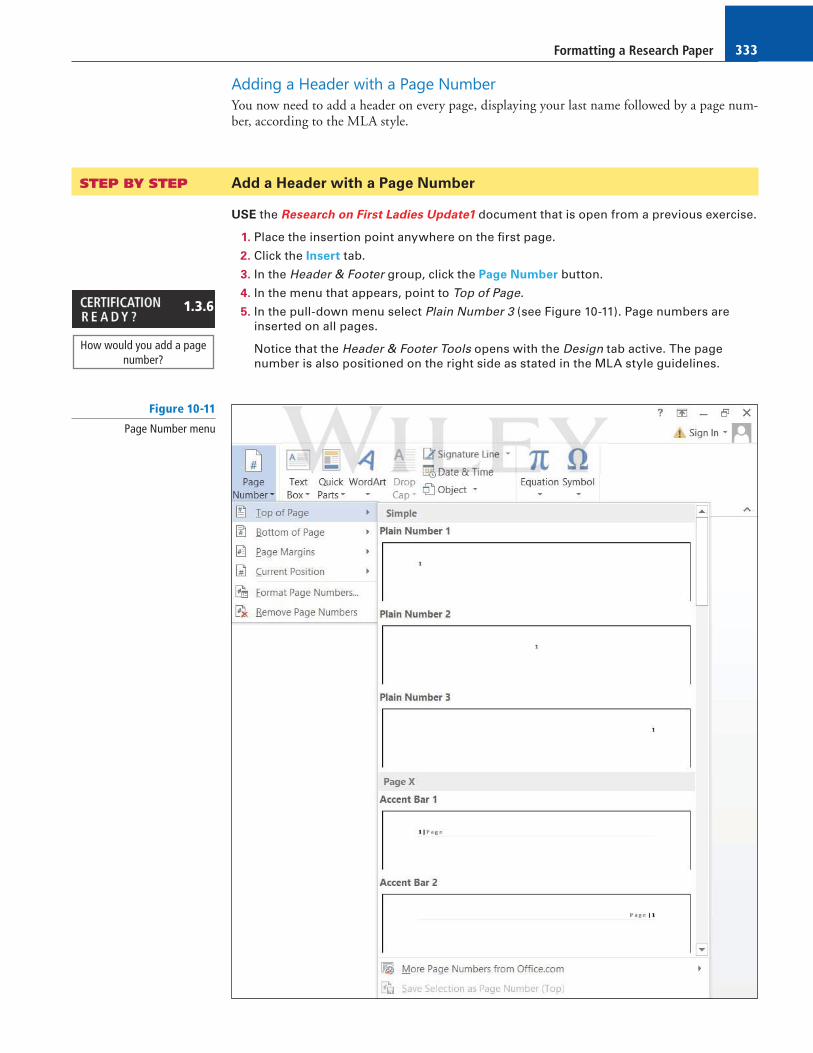
Adding a Header with a Page Number You now need to add a header on every page, displaying your last name followed by a page num-ber, according to the MLA style.
STEP BY STEP Add a Header with a Page Number
USE the Research on First Ladies Update1 document that is open from a previous exercise.
1. Place the insertion point anywhere on the fi rst page.
2. Click the Insert tab.
3. In the Header & Footer group, click the Page Number button.
4. In the menu that appears, point to Top of Page .
5. In the pull-down menu select Plain Number 3 (see Figure 10-11). Page numbers are inserted on all pages.
Notice that the Header & Footer Tools opens with the Design tab active. The page number is also positioned on the right side as stated in the MLA style guidelines.
How would you add a page number?
1.3.6
Figure 10-11
Page Number menu
Lesson 10334
6. Make sure the insertion point is resting in front of the Page Number fi eld. Key the last name: DeLeon ; then press the Spacebar once. A page header will be inserted on every page in the document.
7. Click the Close Header and Footer button in the Close group.
8. SAVE the document in the lesson folder on your fl ash drive.
PAUSE. LEAVE the document open to use in the next exercise.
CREATING A WORKS CITED PAGE Word provides a gallery of bibliograph y formats from which to choose and enables you to auto-matically generate a bibliography from the sources in the Current List of the Source Manager dialog box . A bibiliography is a page that lists all sources in your paper. Make sure you follow your in-structor’s instruction as to which format to use. You can choose to insert a bibliography at the end of the document or you can insert a page break to create a new page for the bibliography. After you insert the b ibliography, Word allows you to update by adding and deleting sources or removing the bibliography . A bibliography is the same as creating a works cited page. In this exercise, you learn to insert a works cited page.
STEP BY STEP Insert a Works Cited Page
USE the document that is open from the previous exercise.
1. Press Ctrl + End to get to the end of the document. The insertion point is positioned after the last sentence of the document.
2. Press Ctrl + Enter to insert a page break.
3. Remove the fi rst line indent.
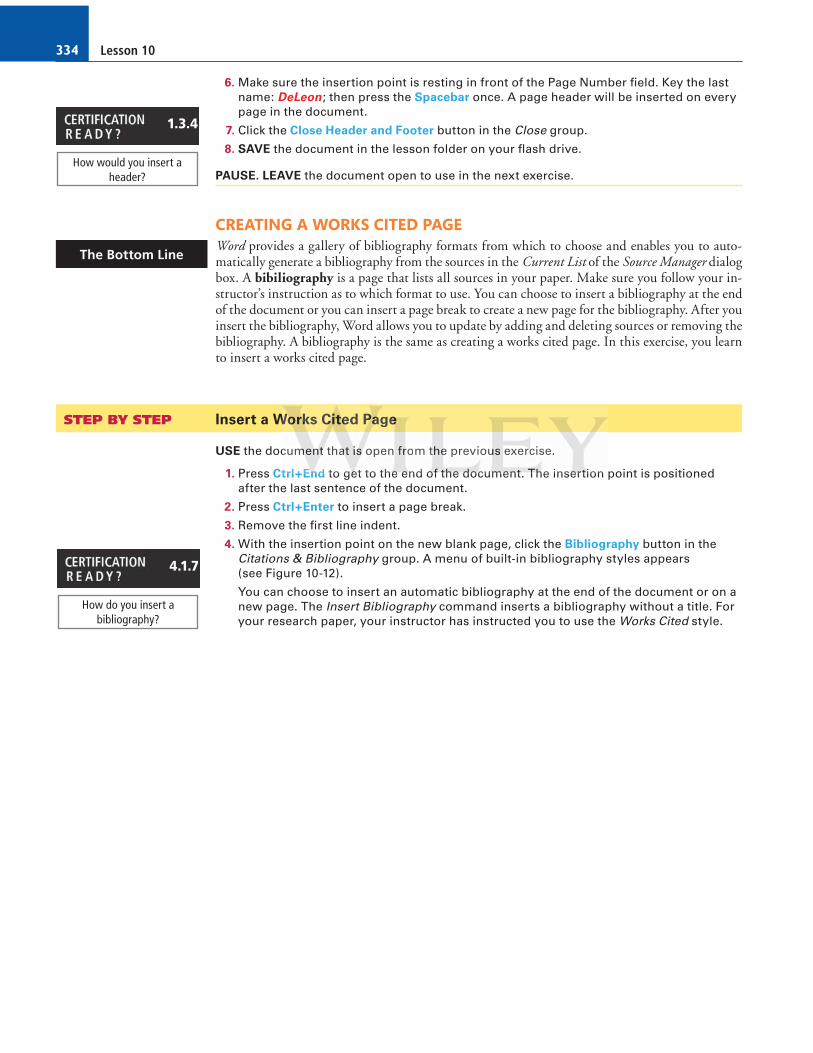
4. With the insertion point on the new blank page, click the Bibliography button in the Citations & Bibliography group. A menu of built-in bibliography styles appears (see Figure 10-12).
You can choose to insert an automatic bibliography at the end of the document or on a new page. The Insert Bibliography command inserts a bibliography without a title. For your research paper, your instructor has instructed you to use the Works Cited style.
How would you insert a header?
1.3.4
The Bottom Line
How do you insert a bibliography?
4.1.7
Worororkskk CCCitititedee PPPaaga e e e
cummmenennttt thaata iiisss open frrom tttheee previouuus exercrcrcise.
trl+Ennnd to geeete to theee enenend ofofof ttthehehe dddocococumumumenenenttt TTThheh insssererertitition
Formatting a Research Paper 335
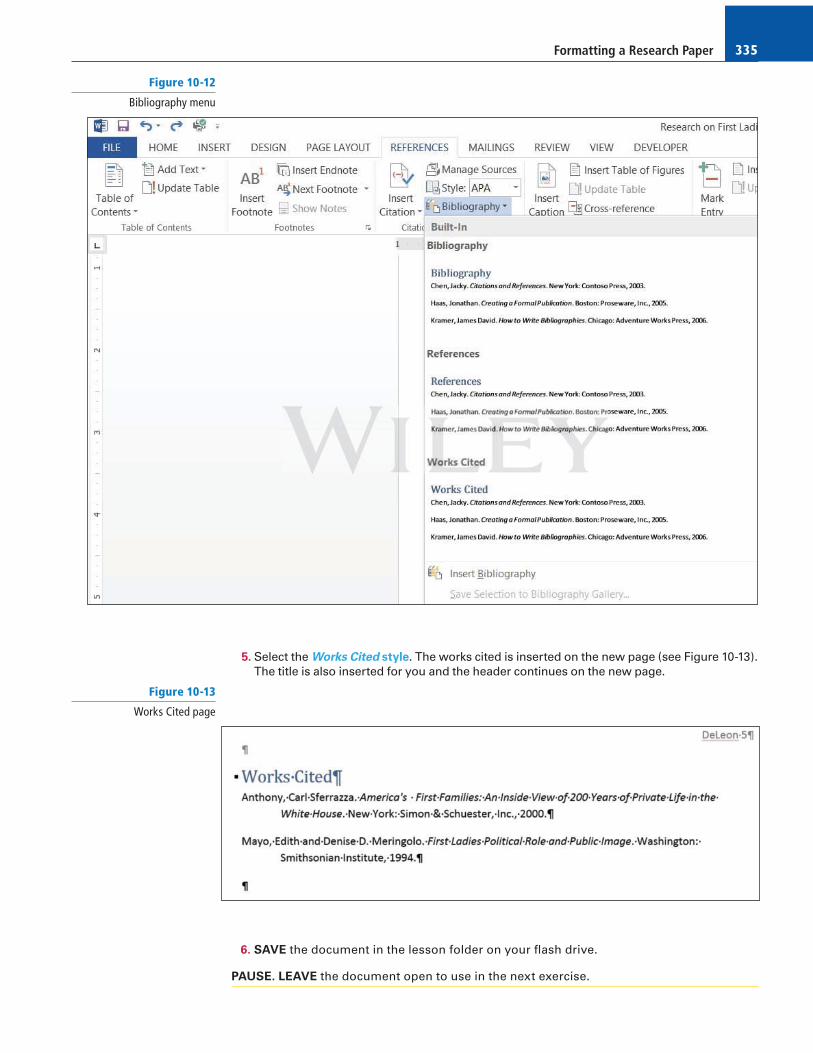
5. Select the Works Cited style. The works cited is inserted on the new page (see Figure 10-13). The title is also inserted for you and the header continues on the new page.
Figure 10-12
Bibliography menu
Figure 10-13
Works Cited page
6. SAVE the document in the lesson folder on your fl ash drive.
PAUSE. LEAVE the document open to use in the next exercise.
Lesson 10336
Updating a Works Cited Page After adding new sources or modifying sources, you need to update the bibliography to refl ect the changes or additions you have made. When you hover your insertion point over the bibliography, Word shows the placeholder, similar to the way it inserts citations. Thus, you can select the bi bli-ography using the placeholder tab—to display the placeholder, place your insertion point by the bibliography heading and a solid arrow pointing down will appear; click the icon to display the placeholder tab. In this exercise, you learn to update your works cited page.
STEP BY STEP Update a Works Cited Page
USE the document that is open from the previous exercise.
1. Under the heading, Role of First Ladies , position the insertion point in the fi rst paragraph, at the beginning of the fi fth sentence, after the word Gutin.
2. Click Insert Citation and select Add New Source . The Create Source dialog box appears.
3. Click the Show All Bibliography Fields box. The dialog box expands to include more fi elds.
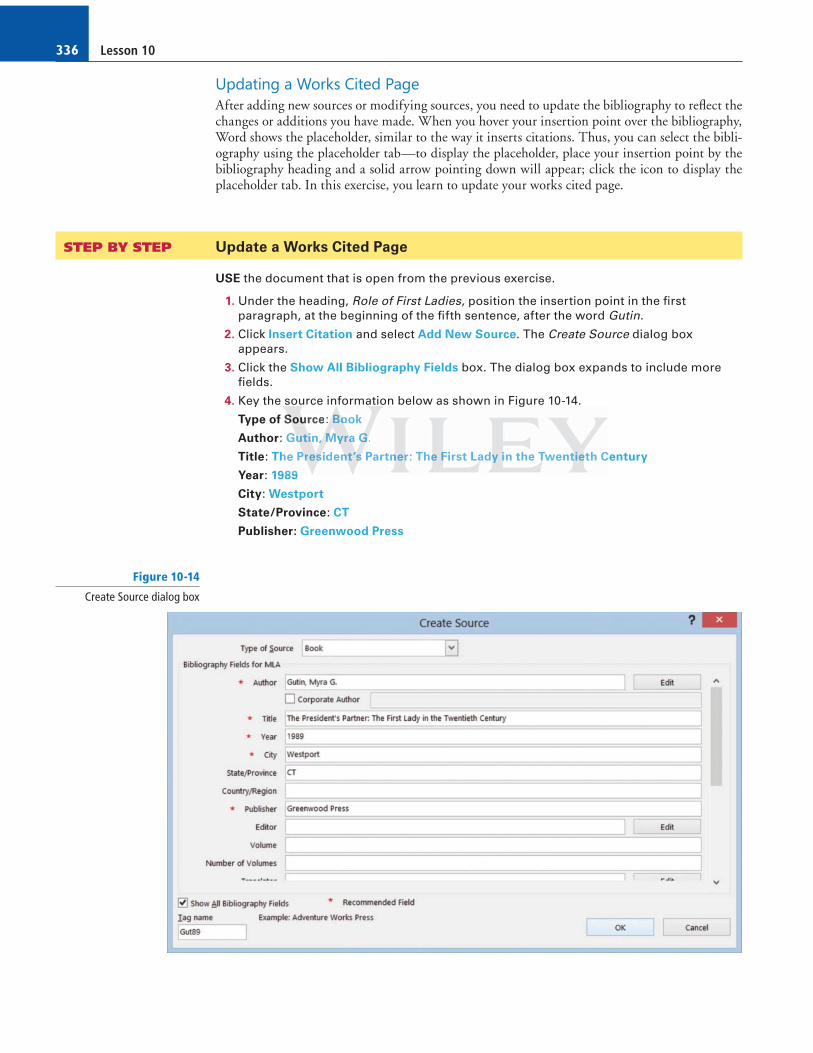
4. Key the source information below as shown in Figure 10-14.
Type of Source: Book
Author: Gutin, Myra G.
Title: The President’s Partner: The First Lady in the Twentieth Century
Year: 1989
City: Westport
State/Province: CT
Publisher: Greenwood Press
Figure 10-14
Create Source dialog box
g
SSoS uuurce: Booook
Guuutiiin,n,n, MMMyryy aaa G.G.G.
he PrPrPresssidennnt’t’’sss Partnnerr: Theee FFFirst Lada yy iin the Twentttieeeth C
989
Formatting a Research Paper 337
5. Click OK . The citation is inserted.
6. Scroll to the works cited page to update with the new source.
7. Place your insertion point by the works cited heading and solid arrow pointing downward will appear; click the icon to display the placeholder tab. The Works Cited heading collapses the content.
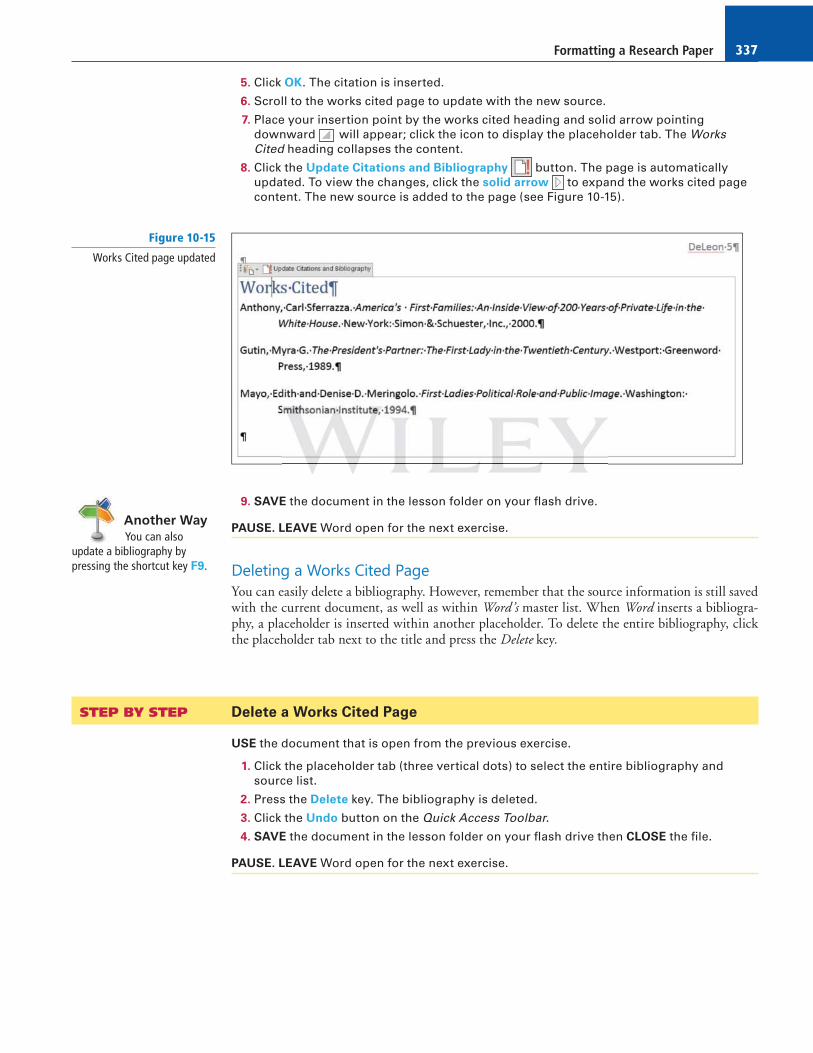
8. Click the Update Citations and Bibliography button. The page is automatically updated. To view the changes, click the solid arrow to expand the works cited page content. The new source is added to the page (see Figure 10-15).
9. SAVE the document in the lesson folder on your fl ash drive.
PAUSE. LEAVE Word open for the next exercise.
Deleting a Works Cited Page You can easily delete a bibliography. However, remember that the source information is still saved with the current document, as well as within Word’s master list. When Word inserts a bibliogra-phy, a placeholder is inserted within another placeholder. T o delete the entire bibliography, click the placeholder tab next to the title and press the Delete key.
STEP BY STEP Delete a Works Cited Page
USE the document that is open from the previous exercise.
1. Click the placeholder tab (three vertical dots) to select the entire bibliography and source list.
2. Press the Delete key. The bibliography is deleted.
3. Click the Undo button on the Quick Access Toolbar .
4. SAVE the document in the lesson folder on your fl ash drive then CLOSE the fi le.
PAUSE. LEAVE Word open for the next exercise.
Another WayYou can also
update a bibliography by pressing the shortcut key F9.
Figure 10-15
Works Cited page updated
Lesson 10338
INSERTING FOOTNOTES AND ENDNOTES The exercises you completed above demonstrated how to format your research paper using MLA style. You will apply the skills that you have learned in the exercises below by inserting footnotes, endnotes, a table of contents, and a title page. A title page is created and if your instructor instruct-ed you to insert a table of contents, Word easily inserts this into your document. A table of contents page follows the title page and should be separated with a next page section break so that headers, footers, and page numbers can be formatted correctly.
Inserting Footnotes in a Document Both endnotes and footnotes are types of citations in a document where additional information is inserted, and they also serve as references to the source. A footnote is placed at the bottom of the page in the document on which the citation is located, while an endnote is placed at the end of the document. Footnotes and endnotes are automatically numbered. Editing a footnote or end-note is done within the text, and deleting a footnote or endnote will automatically renumber the remaining footnotes or endnotes. As a student, you will use these in your research papers. In this lesson, you learn to insert a footnote and endnote into a document.
STEP BY STEP Create Footnotes and Endnotes
OPEN the First Ladies Research document from the lesson folder.
1. This document has already been formatted. Your instructions are to insert footnotes or endnotes in your document.
2. Under the heading, Women in Politics , position the insertion point at the end of the second paragraph.
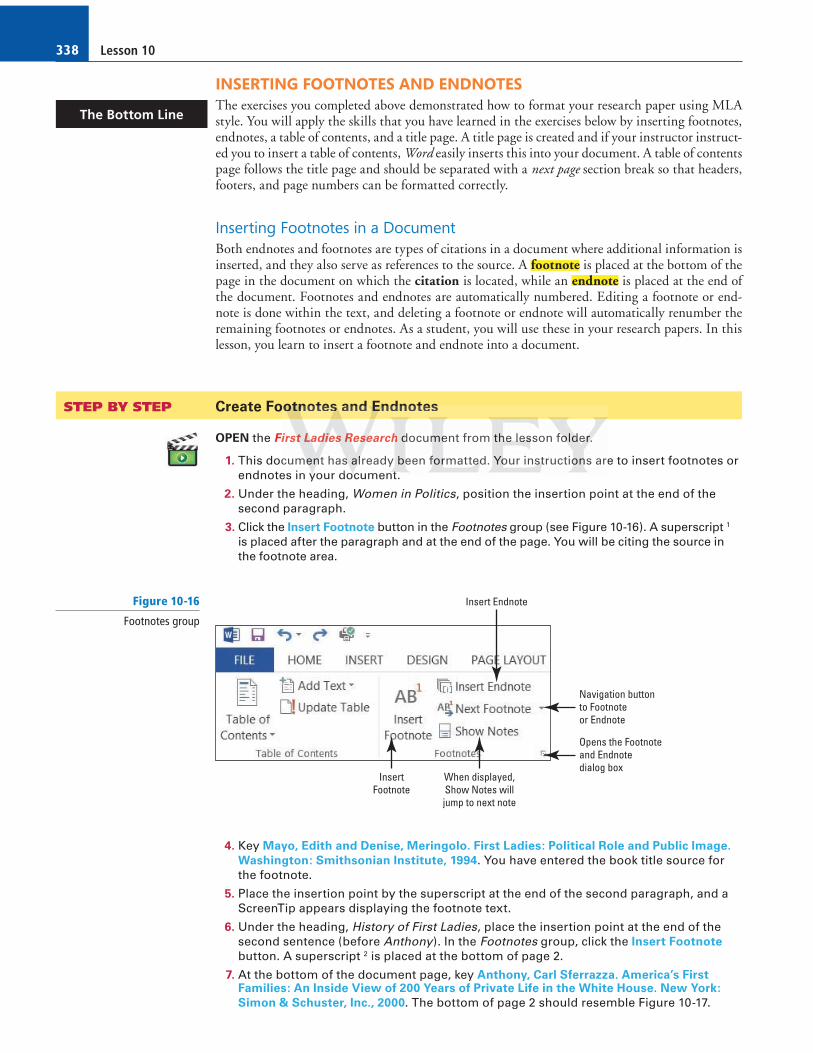
3. Click the Insert Footnote button in the Footnotes group (see Figure 10-16). A superscript 1 is placed after the paragraph and at the end of the page. You will be citing the source in the footnote area.
The Bottom Line
InsertFootnote
Opens the Footnoteand Endnotedialog box
Navigation buttonto Footnoteor Endnote
Insert Endnote
When displayed,Show Notes willjump to next note
Figure 10-16
Footnotes group
4. Key Mayo, Edith and Denise, Meringolo. First Ladies: Political Role and Public Image.
Washington: Smithsonian Institute, 1994 . You have entered the book title source for the footnote.
5. Place the insertion point by the superscript at the end of the second paragraph, and a ScreenTip appears displaying the footnote text.
6. Under the heading, History of First Ladies , place the insertion point at the end of the second sentence (before Anthony ). In the Footnotes group, click the Insert Footnote button. A superscript 2 is placed at the bottom of page 2.
7. At the bottom of the document page, key Anthony, Carl Sferrazza. America’s First Families: An Inside View of 200 Years of Private Life in the White House. New York:
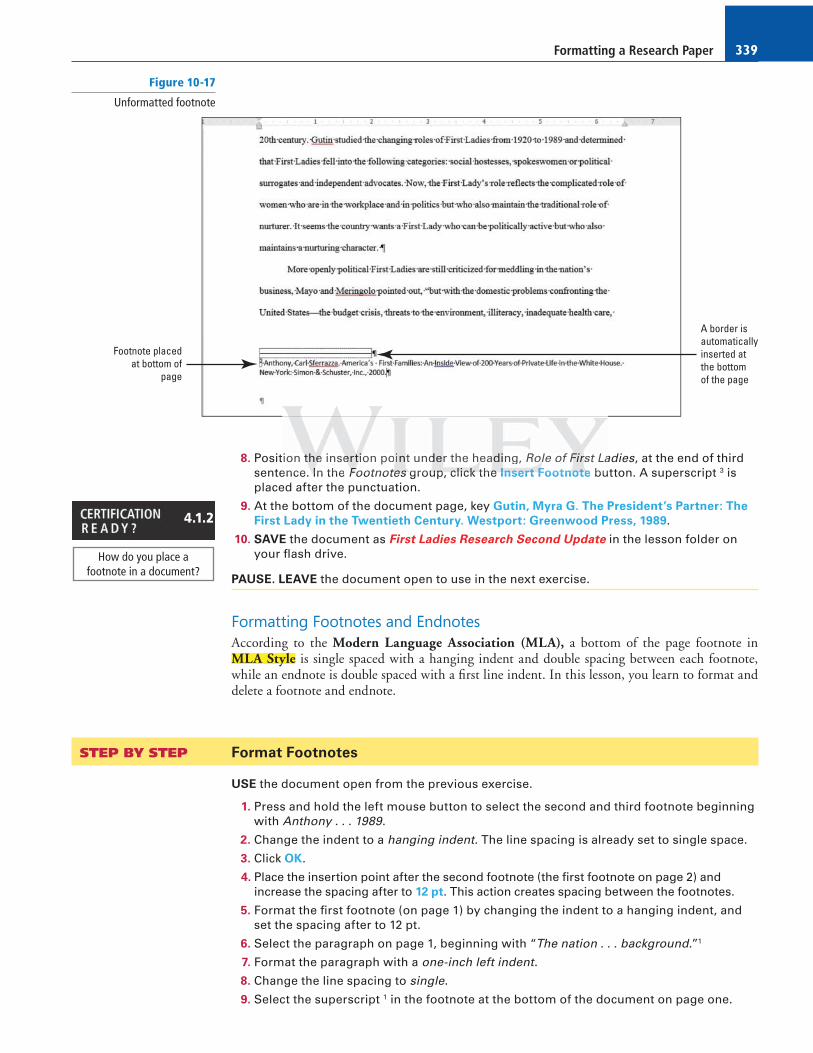
Simon & Schuster, Inc., 2000 . The bottom of page 2 should resemble Figure 10-17.
oootnntnotesss and EEEnndn notes
irststst LLLadadadieieiesss RRRessseeae rchh s ddocummmeeent from thehehe lllesesesson foooldddererer. h
cumenenentt has sss alallready beeeen ffforrrmattededded. Yoour inssstrtt uctiononons arees in yoyy ur docococumenttt
Formatting a Research Paper 339
8. Position the insertion point under the heading, Role of First Ladies , at the end of third sentence. In the Footnotes group, click the Insert Footnote button. A superscript 3 is placed after the punctuation.
9. At the bottom of the document page, key Gutin, Myra G. The President’s Partner: The
First Lady in the Twentieth Century. Westport: Greenwood Press, 1989 .
10. SAVE the document as First Ladies Research Second Update in the lesson folder on your fl ash drive.
PAUSE. LEAVE the document open to use in the next exercise.
Formatting Footnotes and Endnotes According to the Modern Language Association (MLA), a bottom of the page footnote in MLA Style is single spaced with a hanging indent and double spacing between each footnote, while an endnote is double spaced with a fi rst line indent. In this lesson, you learn to format and delete a footnote and endnote.
STEP BY STEP Format Footnotes
USE the document open from the previous exercise.
1. Press and hold the left mouse button to select the second and third footnote beginning with Anthony . . . 1989 .
2. Change the indent to a hanging indent . The line spacing is already set to single space.
3. Click OK .
4. Place the insertion point after the second footnote (the fi rst footnote on page 2) and increase the spacing after to 12 pt . This action creates spacing between the footnotes.
5. Format the fi rst footnote (on page 1) by changing the indent to a hanging indent, and set the spacing after to 12 pt.
6. Select the paragraph on page 1, beginning with “ The nation . . . background . ”1
7. Format the paragraph with a one-inch left indent .
8. Change the line spacing to single .
9. Select the superscript 1 in the footnote at the bottom of the document on page one.
How do you place a footnote in a document?
4.1.2
Figure 10-17
Unformatted footnote
A border isautomaticallyinserted atthe bottomof the page
Footnote placedat bottom of
page
ion tttheee inseeree titition pooint unddder the heaeee ding, Rooolell of FFirrrst Laence IIIn the FoFoFoF otnotetetesss groupupup clclclicicickkk ththheeesss InInInsesesertrtrt FFFootnnnotototeee bu

Lesson 10340
10. On the References tab in the Footnotes group, launch the Footnote and Endnote dialog box.
11. The Footnote and Endnote dialog box opens. In the Format section by the Number format click the drop down arrow and select the uppercase Roman numerals (see Figure 10-18).
Apply a custommark by clicking
the Symbol button
Convert button.Converts to anEndnote
Footnoteplacement
Footnote layoutoptions
Number formatoptions
Apply changesoptions
Determine StartnumberDetermine hownumberingshould be set
Figure 10-18
Footnote and Endnotedialog box
12. Click Apply . Notice the numbering format has changed for the footnotes in the document .
13. SAVE the document in the lesson folder on your fl ash drive.
14. Place the insertion point after the second footnote in the text under the heading, History of First Ladies . Delete the footnote.
Notice that the footnote disappeared from page two. When there are more footnotes in your document and you delete one, the rest of the footnotes are automatically renumbered.
15. Click Undo .
16. SAVE the document in the lesson folder on your fl ash drive.
PAUSE. LEAVE the document open to use in the next exercise.
Converting Footnotes and Endnotes It is easy to convert from a footnote to an endnote or from an endnote to a footnote. In this exer-cise, you learn to convert from footnotes to endnotes and to format the endnote.
STEP BY STEP Convert Footnotes and Endnotes
USE the document open from the previous exercise.
1. Place the insertion point at the beginning of the fi rst footnote below the horizontal line.
2. In the Footnotes group, click the arrow to launch the Footnote and Endnote dialog box.
3. Click the Convert button. The Convert Notes dialog box opens. The fi rst option C onvert all footnotes to endnotes is selected (see Figure 10-19).
How do you modify footnote numbering?
4.1.4
How would you insert an endnote?
4.1.1
Figure 10-19
Convert Notes dialog box
Apply choptionnnsss
Formatting a Research Paper 341
4. Click OK to convert the notes and close the Convert Notes dialog box.
5. Click Insert OR Apply to close the Footnote and Endnote dialog box. Scroll through to the end of the document and notice the footnotes are no longer positioned at the end of the page. The endnotes display at the end of the document in lowercase roman numerals.
6. Place the insertion point after the last paragraph in the document and insert a page break to separate the Endnotes from the document and place on a new page.
7. Select the fi rst endnote and change the format to 1, 2, 3… —the endnotes are renumbered with the new format. Change the spacing to a double space and fi rst line indent for the endnotes.
8. SAVE the document as Fi rst L adies Research with Endnotes in the lesson folder on your fl ash drive.
PAUSE. LEAVE the document open to use in the next exercise.
How would you convert a footnote to an endnote?
4.1.3
SOFTWARE ORIENTATION
Table of Figures Dialog Box
When working with your research paper, adding a table of contents would make it easy for the reader to locate a section of your paper quickly. The table of contents makes it easy to jump from one location in your document to another. Links are automatically created for you, and should you decide to present online, the links will be in your document.
Use this fi gure as a reference throughout this lesson as well as the rest of this book.
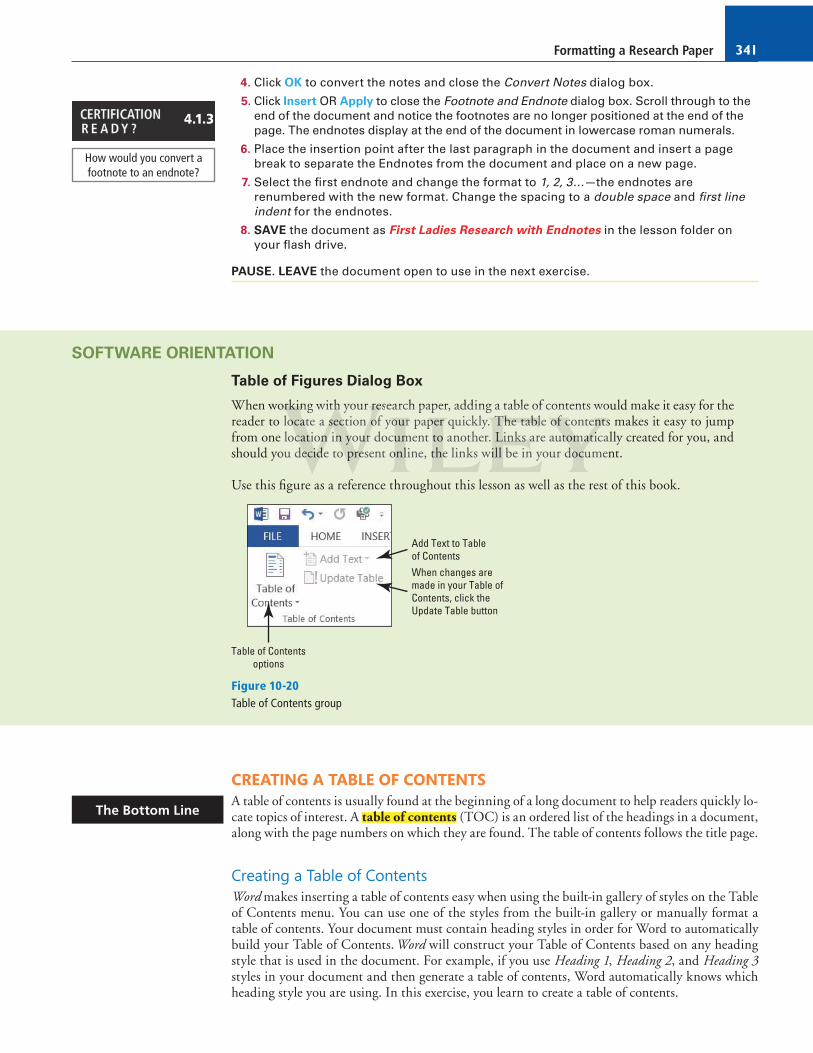
Table of Contentsoptions
When changes aremade in your Table ofContents, click theUpdate Table button
Add Text to Tableof Contents
Figure 10-20Table of Contents group
CREATING A TABLE OF CONTENTS A table of contents is usually found at the beginning of a long document to help readers quickly lo-cate topics of interest. A table of contents (TOC) is an ordered list of the headings in a document, along with the page numbers on which they are found. The table of contents follows the title page.
Creating a Table of Contents Word makes inserting a table of contents easy when using the built-in gallery of styles on the Table of Contents menu. You can use one of the styles from the built-in gallery or manual ly format a table of contents . Your document must contain heading styles in order for Word to automatically build your Table of Contents. Word will construct your Table of Contents based on any heading style that is used in the document. For example, if you use Heading 1 , Heading 2 , and Heading 3 styles in your document and then generate a table of contents, Word automatically knows which heading style you are using. In this exercise, you learn to create a table of contents.
The Bottom Line
orororkikinngn withhh your rresesesearch paper, adding a table of contents wolooocaaate a ssseccctitt on ooof yoyoourrr pappperrr quickly. ThThTheee tatatablblble ofofof ccccontentntntssslocccatttioii n n n innn yyyououourr rr docuuumment to another. Linininksksks aaare autttomomomatatatiici a
ou dddeeecidididde to prereresent ooonlline, tttheee links wiiill be in yoy ur dddooccume
Lesson 10342
STEP BY STEP Create a Table of Contents
USE the document open from the previous exercise.
1. Position the insertion point at the beginning of the document. Add a next page section break and then move the insertion point to the fi rst page.
By inserting a section break, you separate the Table of Contents from the rest of the document because you may need to insert page numbers differently.
2. Press Enter twice to create a blank line above the section break.
3. Place the insertion point on line one.
In Lesson 5, you learned to insert different types of breaks in a document.
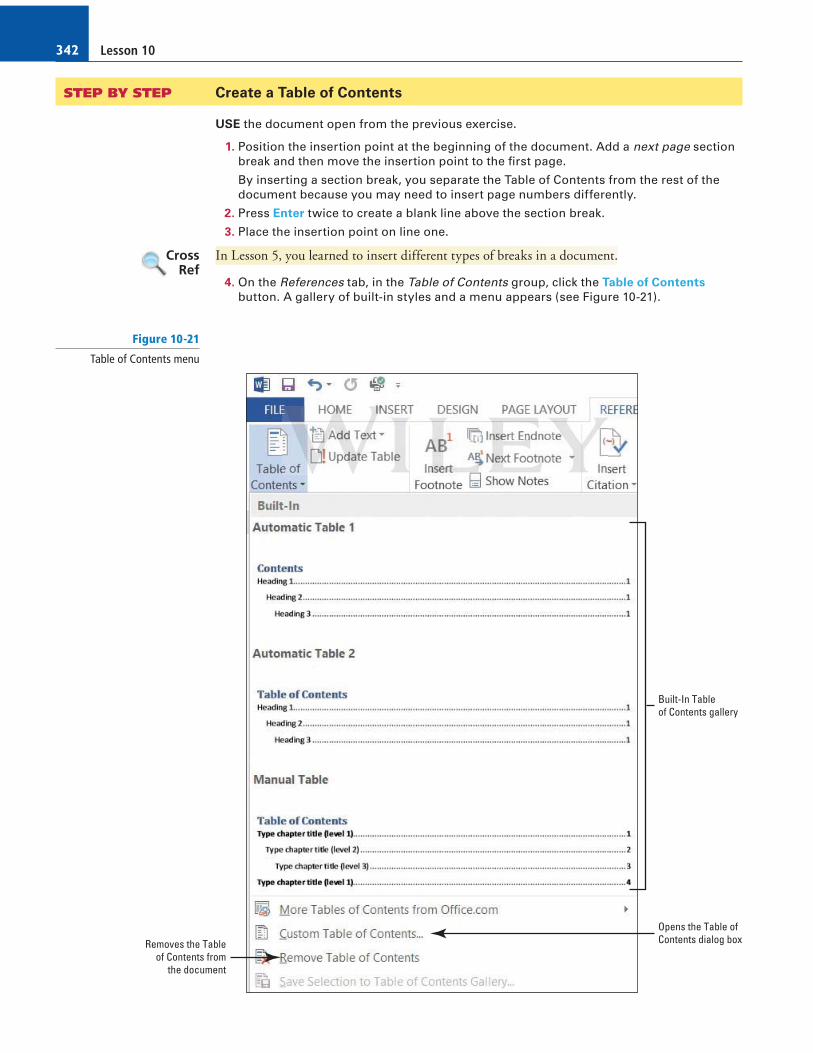
4. On the References tab, in the Table of Contents group, click the Table of Contents
button. A gallery of built-in styles and a menu appears (see Figure 10-21).
Cross Ref
Built-In Tableof Contents gallery
Opens the Table ofContents dialog boxRemoves the Table
of Contents fromthe document
Figure 10-21
Table of Contents menu
Formatting a Research Paper 343
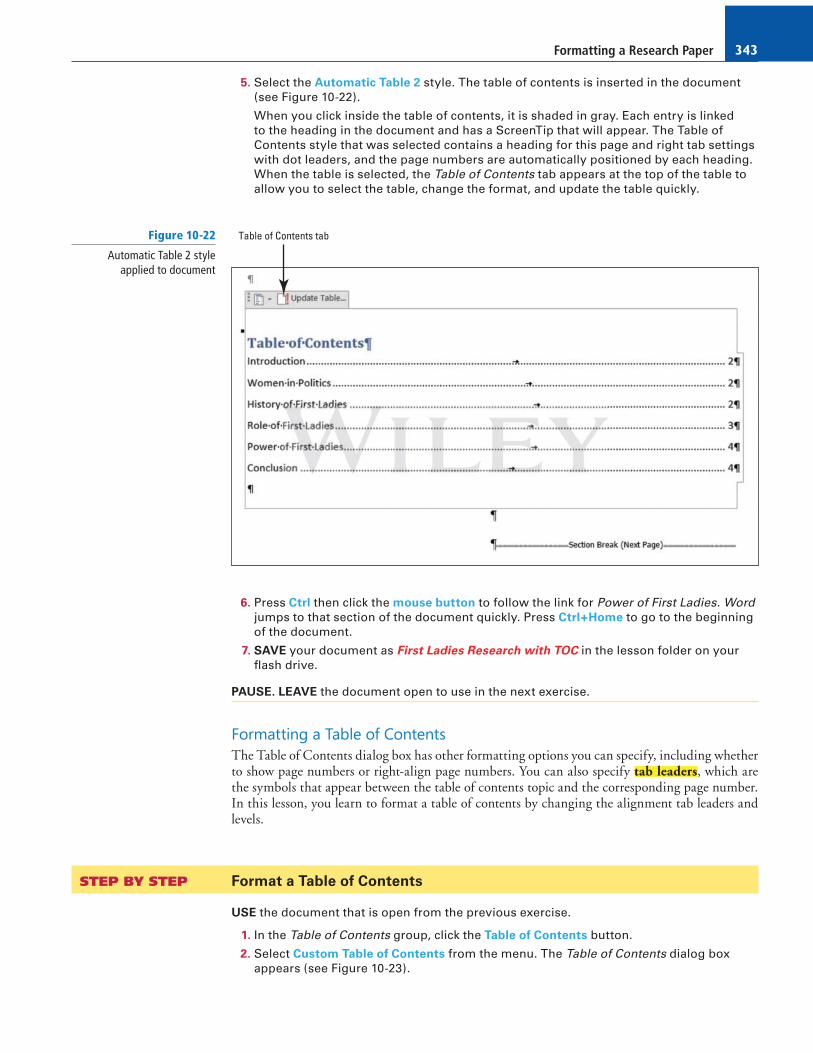
5. Select the Automatic Table 2 style. The table of contents is inserted in the document (see Figure 10-22).
When you click inside the table of contents, it is shaded in gray. Each entry is linked to the heading in the document and has a ScreenTip that will appear. The Table of Contents style that was selected contains a heading for this page and right tab settings with dot leaders, and the page numbers are automatically positioned by each heading. When the table is selected, the Table of Contents tab appears at the top of the table to allow you to select the table, change the format, and update the table quickly.
Figure 10-22
Automatic Table 2 style applied to document
Table of Contents tab
6. Press Ctrl then click the mouse button to follow the link for Power of First Ladies . Word jumps to that section of the document quickly. Press Ctrl + Home to go to the beginning of the document.
7. SAVE your document as Fi rst L adies Research with TOC in the lesson folder on your fl ash drive.
PAUSE. LEAVE the document open to use in the next exercise.
Formatting a Table of Contents The Table of Contents dialog box has other formatting options you can specify, including whether to show page numbers or right-align page numbers. You can also specify tab leaders , which are the symbols that appear between the table of contents topic and the corresponding page number. In this lesson, you learn to format a table of contents by changing the alignment tab leaders and levels.
STEP BY STEP Format a Table of Contents
USE the document that is open from the previous exercise.
1. In the Table of Contents group, click the Table of Contents button.
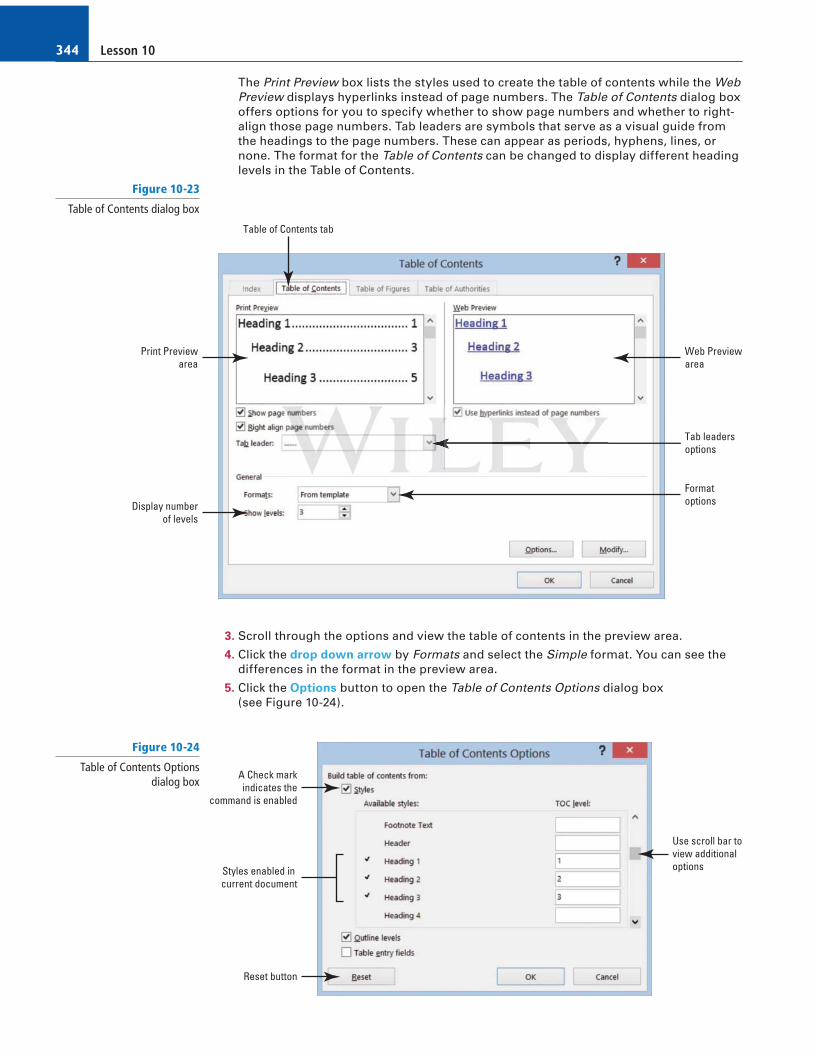
2. Select Custom Table of Contents from the menu. The Table of Contents dialog box appears (see Figure 10-23).
Lesson 10344
The Print Preview box lists the styles used to create the table of contents while the Web Preview displays hyperlinks instead of page numbers. The Table of Contents dialog box offers options for you to specify whether to show page numbers and whether to right- align those page numbers. Tab leaders are symbols that serve as a visual guide from the headings to the page numbers. These can appear as periods, hyphens, lines, or none. The format for the Table of Contents can be changed to display different heading levels in the Table of Contents.
Print Previewarea
Table of Contents tab
Display numberof levels
Formatoptions
Tab leadersoptions
Web Previewarea
Figure 10-23
Table of Contents dialog box
3. Scroll through the options and view the table of contents in the preview area.
4. Click the drop down arrow by Formats and select the Simple format. You can see the differences in the format in the preview area.
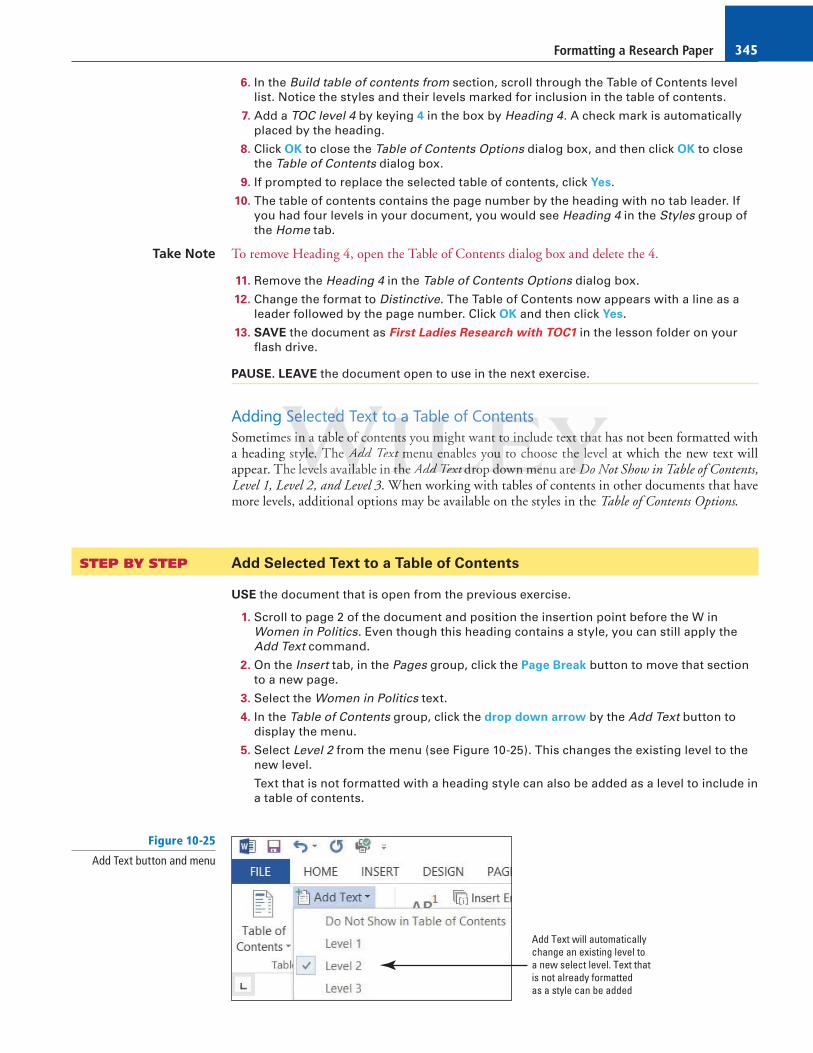
5. Click the Options button to open the Table of Contents Options dialog box (see Figure 10-24).
Figure 10-24
Table of Contents Options dialog box
A Check markindicates the
command is enabled
Reset button
Use scroll bar toview additionaloptionsStyles enabled in
current document
Formatting a Research Paper 345
6. In the Build table of contents from section, scroll through the Table of Contents level list. Notice the styles and their levels marked for inclusion in the table of contents.
7. Add a TOC level 4 by keying 4 in the box by Heading 4 . A check mark is automatically placed by the heading.
8. Click OK to close the Table of Contents Options dialog box, and then click OK to close the Table of Contents dialog box.
9. If prompted to replace the selected table of contents, click Yes .
10. The table of contents contains the page number by the heading with no tab leader. If you had four levels in your document, you would see Heading 4 in the Styles group of the Home tab.
To remove Heading 4, open the Table of Contents dialog box and delete the 4.
11. Remove the Heading 4 in the Table of Contents Options dialog box.
12. Change the format to Distinctive . The Table of Contents now appears with a line as a leader followed by the page number. Click OK and then click Yes.
13. SAVE the document as Fi rst L adies Research with TOC1 in the lesson folder on your fl ash drive.
PAUSE. LEAVE the document open to use in the next exercise.
Adding Selected Text to a Table of Contents Sometimes in a table of contents you might want to include text that has not been formatted with a heading style. The Add Text menu enables you to choose the level at which the new text will appear. The levels available in the Add Text drop down menu are Do Not Show in Table of Contents, Level 1, Level 2, and Level 3 . When working with tables of contents in other documents that have more levels, additional options may be available on the styles in the Table of Contents Options .
STEP BY STEP Add Selected Text to a Table of Contents
USE the document that is open from the previous exercise.
1. Scroll to page 2 of the document and position the insertion point before the W in Women in Politics . Even though this heading contains a style, you can still apply the Add Text command.
2. On the Insert tab, in the Pages group, click the Page Break button to move that section to a new page.
3. Select the Women in Politics text.
4. In the Table of Contents group, click the drop down arrow by the Add Text button to display the menu.
5. Select Level 2 from the menu (see Figure 10-25). This changes the existing level to the new level.
Text that is not formatted with a heading style can also be added as a level to include in a table of contents.
Take Note
Add Text will automaticallychange an existing level toa new select level. Text thatis not already formattedas a style can be added
Figure 10-25
Add Text button and menu
SSSeelelecteeeddd Textxtxt tooo aaa Tablblble ee of Cononontetetentntntssses iiin nn aa a tatatablblble ee oofo cccoonoo tennntss you mmmight wanttt tooo inininclclclude teeextxtxt ttthahahat hg stylylyle. TTThe ee AdAdAdd Texxt mmenuuu ennables yoyoyou to chohh ose thhhe llel vel t
The levevevels availililaaba le in thththeee Adddd dd TeTeTextxtxt dddrororoppp dodownwnwn mmmeeenu arrre eee ttt DDDo N
Lesson 10346
6. Select the heading “ The Evolving Role of the First Lady . ” Click the Add Text button and select Level 1 . The heading moves to the left of the document.
7. SAVE the document as Fi rst L adies Research with TOC2 in the lesson folder on your fl ash drive.
PAUSE. LEAVE the document open to use in the next exercise.
Updating a Table of Contents After adding new text, a new page, or modifying the table of contents; the next step is to update the table of contents. You can update the entire table or only the page numbers. In this exercise, you learn to update the table of contents.
STEP BY STEP Update a Table of Contents
USE the document that is open from the previous exercise.
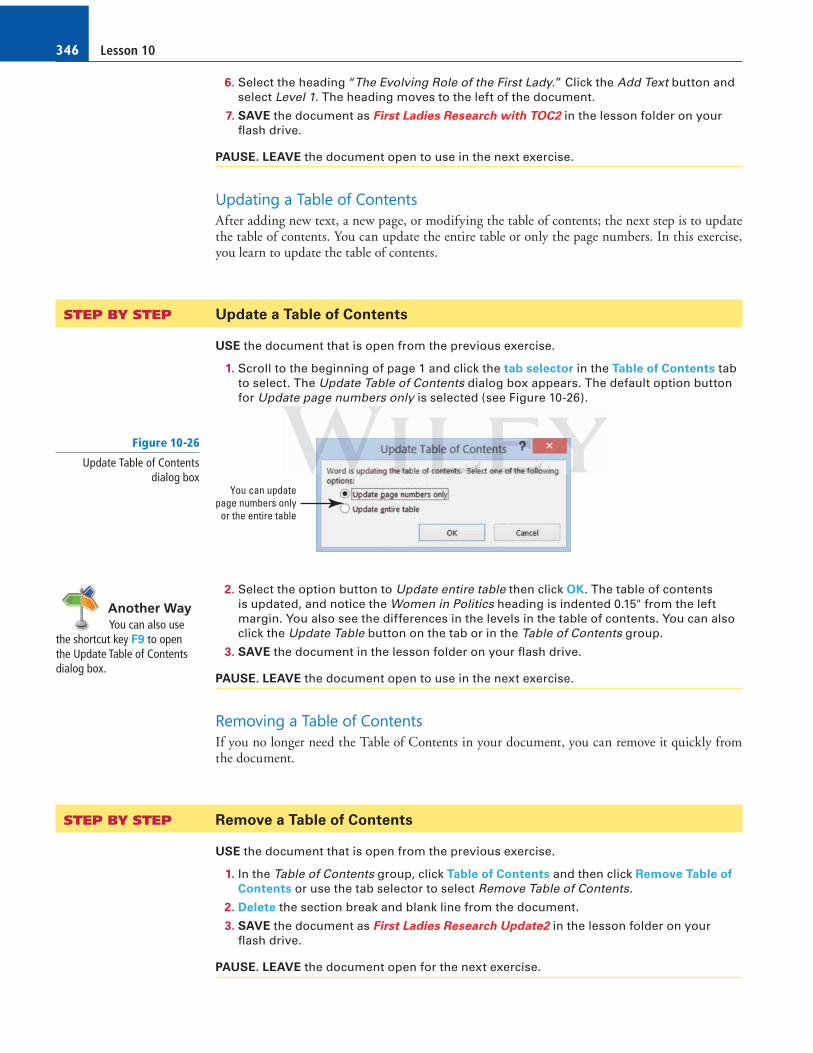
1. Scroll to the beginning of page 1 and click the tab selector in the Table of Contents tab to select. The Update Table of Contents dialog box appears. The default option button for Update page numbers only is selected (see Figure 10-26).
2. Select the option button to Update entire table then click OK . The table of contents is updated, and notice the Women in Politics heading is indented 0.15" from the left margin. You also see the differences in the levels in the table of contents. You can also click the Update Table button on the tab or in the Table of Contents group.
3. SAVE the document in the lesson folder on your fl ash drive.
PAUSE. LEAVE the document open to use in the next exercise.
Removing a Table of Contents If you no longer need the Table of Contents in your document, you can remove it quickly from the document.
STEP BY STEP Remove a Table of Contents
USE the document that is open from the previous exercise.
1. In the Table of Contents group, click Table of Contents and then click Remove Table of
Contents or use the tab selector to select Remove Table of Contents .
2. Delete the section break and blank line from the document.
3. SAVE the document as Fi rst L adies Research Update2 in the lesson folder on your fl ash drive.
PAUSE. LEAVE the document open for the next exercise.
Another Way You can also use
the shortcut key F9 to open the Update Table of Contents dialog box.
You can updatepage numbers only
or the entire table
Figure 10-26
Update Table of Contentsdialog box
Formatting a Research Paper 347
ADDING A TITLE PAGE A title page appears at the beginning of the document with the title of the document, followed by your name and school name.
Adding a Title Page A title page should be separated from the rest of the document with a section break, so you can apply formatting that will not affect the whole document. Always check with your instructor as to which style you will be using for your report and whether a title page is required. A title page is placed before the table of contents. Always separate your title page with a section breaks to avoid formatting errors. In this exercise, you learn to add a title page.
STEP BY STEP Add a Title Page
USE the document that is open from the previous exercise.
1. Position the insertion point at the beginning of the document, and then select the heading The Evolving Role of the First Lady .
2. Earlier in the lesson, you changed the heading to a Level 1 so that it would appear in the Table of Contents. In the Table of Contents group, select Add Text and then select Do Not Show in Table of Contents.
3. Position the insertion point at the end of the line and insert a Next Page section break . The heading is moved to the beginning of the document.
4. Press Enter three times to create blank lines after the heading and before the section break.
In Lesson 5, you learned to insert different types of breaks in a document.
5. On the blank line, key Victoria DeLeon and then press Enter .
6. Key Local College as your school’s name. Make sure that the font and font size is the same. It should be Times New Roman, 12 pt.
7. Center the three lines and change the page layout to center vertically on the page. Change the spacing after the title to 162 pt.
8. SAVE the document as Fi rst L adies Research Update3 in the lesson folder on your fl ash drive.
9. Position the insertion point on the blank line above Introduction .
10. Insert a page break and move the insertion point to where the page break appears and insert a blank line before the page break.
11. Insert the Automatic Table 1 table of contents.
12. SAVE the document in the lesson folder on your fl ash drive then CLOSE the fi le.
PAUSE. LEAVE Word open for the next exercise.
INSERTING HYPERLINKS Hyperlinks can also be added to a research paper or any documents that require a link to help the reader quickly fi nd the source you are referring to in your document. Your instructor may require you to share your document online with others; which will allow your readers to follow links in your document. In another lesson, you will learn to use the Present Online command which will automatically create a link to your document. A hyperlink is a way to jump from one location to another. It can be in the same document or to an external location. To follow the link, you would press the Ctrl key with left mouse button on the hyperlink. Hyperlinks can be applied to text or graphics. Hyperlinks can be external links to a web page on the Internet to a specifi c target location within the document as a bookmark or heading, to an email address, or to a different document.
The Bottom Line
Cross Ref
The Bottom Line
Taaableee of CCConoontents.s.s. In the Table of Contents gggrouppp,,, selects ANottt SSShohh w w w ininin Tabbblelele of ff CoCoContennntststs.
ionnn thhheee iini sssertrtrtioioion pooint at thehee end of tttheee lilinenene and insnsnserererttt a Nheadddininingg g is mmmmoooved tooo thhhe beeeginninggg offf thhe docccumuu ent.
Lesson 10348
Inserting a Hyperlink A hyperlink quickly takes you to a location within the document, web page, a different document, or email address. In this exercise, you learn to insert a hyperlink in text and an image, add a Screen-Tip, and remove a hyperlink and ScreenTip.
STEP BY STEP Insert a Hyperlink
OPEN the Research on First Ladies Update1 document from a previous exercise.
1. Go to page four and select the Nancy Reagan picture.
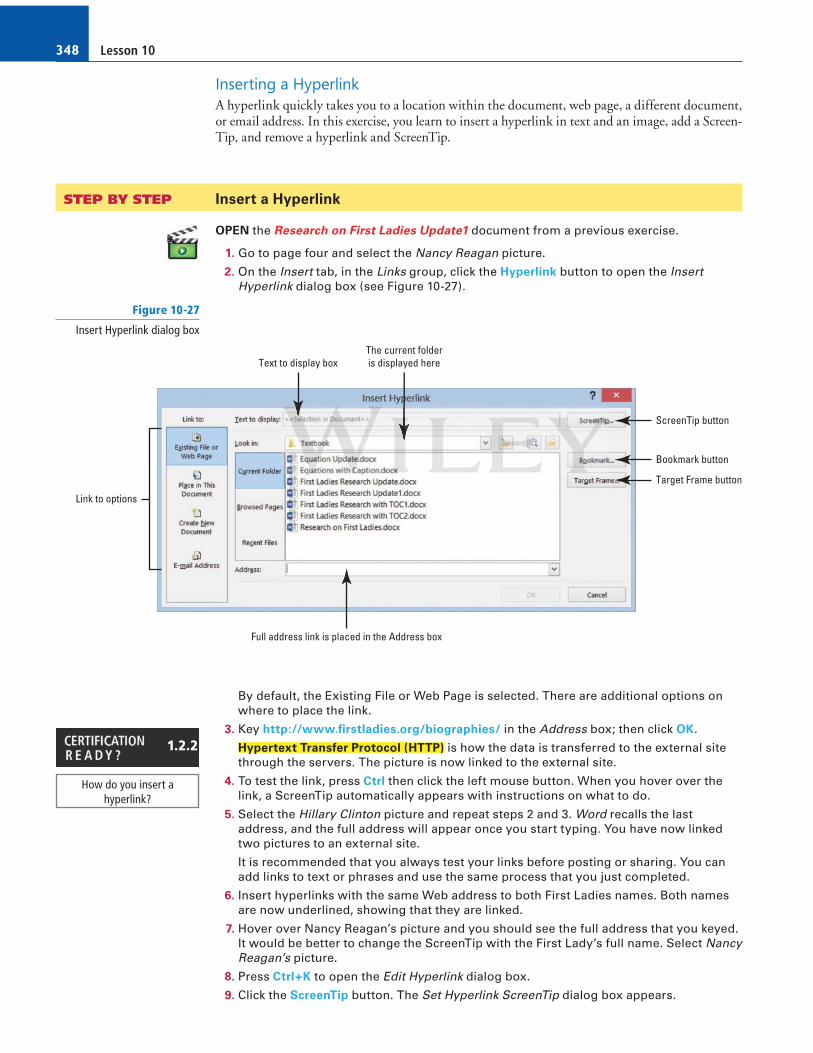
2. On the Insert tab, in the Links group, click the Hyperlink button to open the Insert Hyperlink dialog box (see Figure 10-27).
Link to options
Text to display box
Full address link is placed in the Address box
ScreenTip button
The current folderis displayed here
Bookmark button
Target Frame button
Figure 10-27
Insert Hyperlink dialog box
By default, the Existing File or Web Page is selected. There are additional options on where to place the link.
3. Key http://www.fi rstladies.org/biographies/ in the Address box; then click OK .
Hypertext T ransfer P rotocol (HTTP) is how the data is transferred to the external site through the servers. The picture is now linked to the external site.
4. To test the link, press Ctrl then click the left mouse button. When you hover over the link, a ScreenTip automatically appears with instructions on what to do.
5. Select the Hillary Clinton picture and repeat steps 2 and 3. Word recalls the last address, and the full address will appear once you start typing. You have now linked two pictures to an external site.
It is recommended that you always test your links before posting or sharing. You can add links to text or phrases and use the same process that you just completed.
6. Insert hyperlinks with the same Web address to both First Ladies names. Both names are now underlined, showing that they are linked.
7. Hover over Nancy Reagan’s picture and you should see the full address that you keyed. It would be better to change the ScreenTip with the First Lady’s full name. Select Nancy Reagan’s picture.
8. Press Ctrl + K to open the Edit Hyperlink dialog box.
9. Click the ScreenTip button. The Set Hyperlink ScreenTip dialog box appears.
How do you insert a hyperlink?
1.2.2
Formatting a Research Paper 349
10. Key First Lady Nancy Reagan .
11. Click OK to close the dialog box. Click OK to close the Edit Hyperlink dialog box.
12. Place your insertion point over the image and notice the ScreenTip; it now appears as First Lady Nancy Reagan .
13. Repeat steps 7–11 for First Lady Hillary Clinton and review your ScreenTip.
14. SAVE the document as Research on First Ladies with Links in the lesson folder on your fl ash drive.
PAUSE. LEAVE the document open to use in the next exercise.
Removing a Hyperlink and ScreenTip Once a hyperlink is removed, it will no longer be linked to a document or external web location. Hyperlinks are removed the same way for text and images. After a ScreenTip is deleted, it will no longer be displayed in the hyperlink; however, the link will remain active. In this exercise, you learn to remove a hyperlink and ScreenTip.
STEP BY STEP Remove a Hyperlink and ScreenTip
USE the document open from the previous exercise.
1. Select the image of Hillary Clinton.
2. Use the shortcut method, Ctrl + K , to access the Edit Hyperlink dialog box.
3. Click Remove Link to remove the hyperlink.
4. Hover over the image and notice that the ScreenTip no longer appears and the hyperlink has been removed.
5. Select the image of Nancy Reagan, and on the Links group, click the Hyperlink button.
6. Click the ScreenTip button; then select and d elete First Lady Nancy Reagan .
7. Click OK twice.
8. Hover over the image and the ScreenTip is no longer showing but the image is still linked to an external site.
9. Use the right mouse button to open the shortcut menu and remove the links on the two text hyperlinks and on the image.
10. SAVE the document as Research on First Ladies with no Links in the lesson folder on your fl ash drive.
PAUSE. LEAVE the document open to use in the next exercise.
Adding an Email as a Hyperlink An email address link is used to provide contact information, elicit feedback, or request informa-tion. In this exercise, you learn to add an email as a hyperlink.
STEP BY STEP Add an Email as a Hyperlink
USE the document open from the previous exercise.
1. Press Ctrl + Home to move to the beginning of the document.
2. Select Victoria DeLeon .
Email links can be applied to text or images.
3. Click the Hyperlink button or press Ctrl + K . The Insert Hyperlink dialog box opens.
Victoria is the manager at Proseware and would prefer to receive her email notifi cations at work.
Another Way Right-click to open
the Insert Hyperlink or Edit Hyperlink dialog box.
Take Note
dooocuuumenntn ooopennn fffromomm ttthe pppprererevivv ous exxxererercicicisesese...
ct thehehe imamm ggge ooof f f Hillaryy Clinttton.
the sshshooro tcutttt mmmethoddd, CCtC rl +++K ,, to acccceccc ssss the Edddit Hyppperrrlink t
Lesson 10350
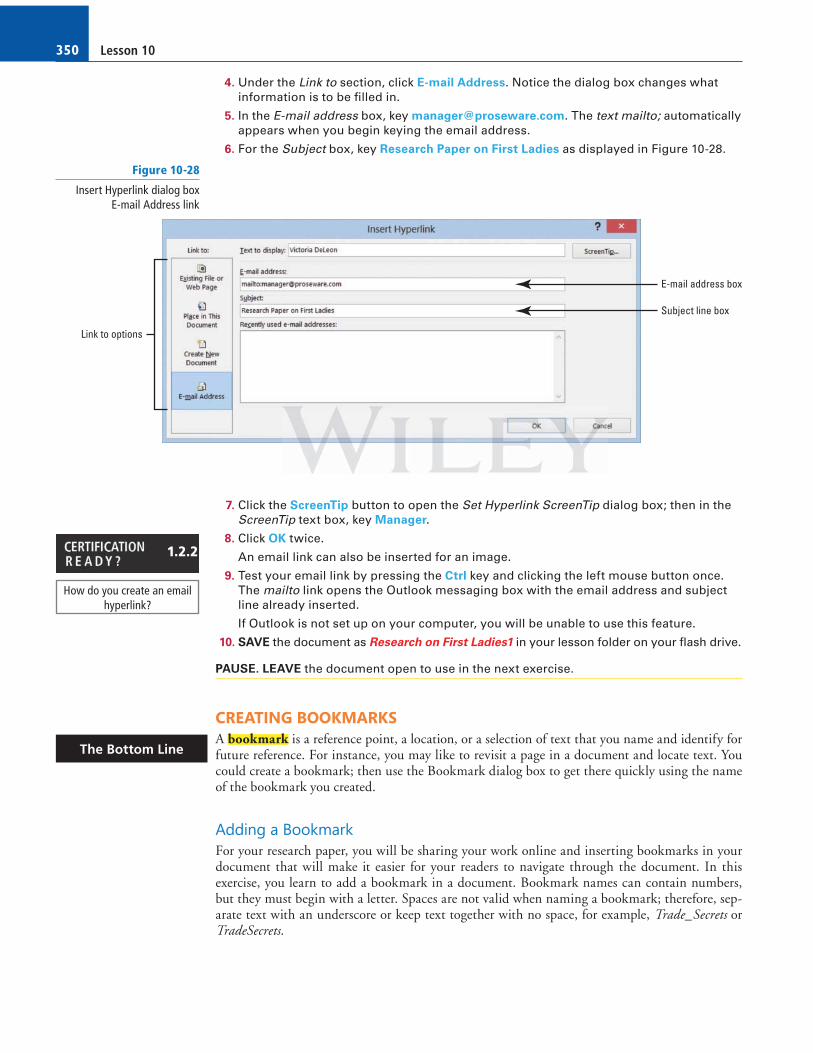
4. Under the Link to section, click E-mail Address . Notice the dialog box changes what information is to be fi lled in.
5. In the E-mail address box, key [email protected] . The text mailto; automatically appears when you begin keying the email address.
6. For the Subject box, key Research Paper on First Ladies as displayed in Figure 10-28.
7. Click the ScreenTip button to open the Set Hyperlink Screen Tip dialog box; then in the ScreenTip text box, key Manager .
8. Click OK twice.
An email link can also be inserted for an image.
9. Test your email link by pressing the Ctrl key and clicking the left mouse button once. The mailto link opens the Outlook messaging box with the email address and subject line already inserted.
If Outlook is not set up on your computer, you will be unable to use this feature.
10. SAVE the document as Research on First Ladies1 in your lesson folder on your fl ash drive.
PAUSE. LEAVE the document open to use in the next exercise.
CREATING BOOKMARKS A bookmark is a reference point, a location, or a selection of text that you name and identify for future reference. For instance, you may like to revisit a page in a document and locate text. You could create a bookmark; then use the Bookmark dialog box to get there quickly using the name of the bookmark you created.
Adding a Bookmark For your research paper, you will be sharing your work online and inserting bookmarks in your document that will make it easier for your readers to navigate through the document. In this exercise, you learn to add a bookmark in a document. Bookmark names can contain numbers, but they must begin with a letter. Spaces are not valid when naming a bookmark; therefore, sep-arate text with an underscore or keep text together with no space, for example, Trade_Secrets or TradeSecrets .
How do you create an email hyperlink?
1.2.2
The Bottom Line
Link to options
E-mail address box
Subject line box
Figure 10-28
Insert Hyperlink dialog boxE-mail Address link
Formatting a Research Paper 351
STEP BY STEP Add Bookmark
USE the document open from the previous exercise.
1. Select the The Evolving Role of the First Lady text.
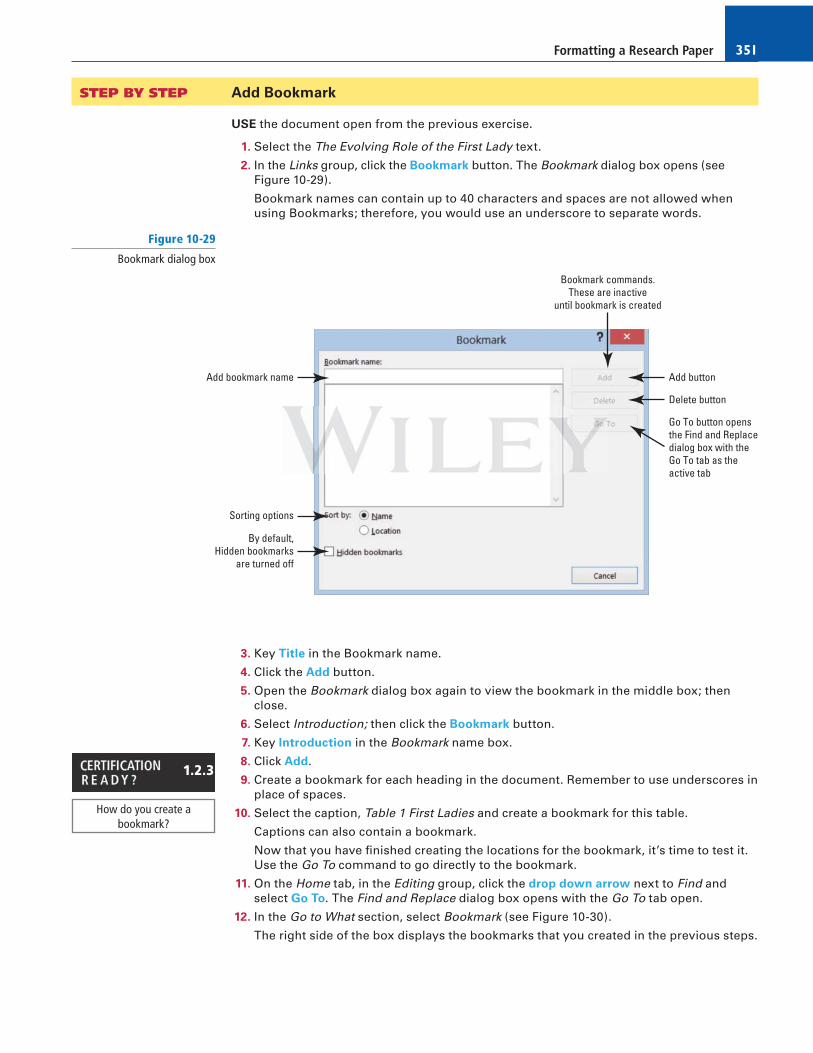
2. In the Links group, click the Bookmark button. The Bookmark dialog box opens (see Figure 10-29).
Bookmark names can contain up to 40 characters and spaces are not allowed when using Bookmarks; therefore, you would use an underscore to separate words.
Add buttonAdd bookmark name
Bookmark commands.These are inactive
until bookmark is created
Sorting options
By default,Hidden bookmarks
are turned off
Go To button opensthe Find and Replacedialog box with theGo To tab as theactive tab
Delete button
Figure 10-29
Bookmark dialog box
3. Key Title in the Bookmark name.
4. Click the Add button.
5. Open the Bookmark dialog box again to view the bookmark in the middle box; then close.
6. Select Introduction ; then click the Bookmark button.
7. Key Introduction in the Bookmark name box.
8. Click Add .
9. Create a bookmark for each heading in the document. Remember to use underscores in place of spaces.
10. Select the caption, Table 1 First Ladies and create a bookmark for this table.
Captions can also contain a bookmark.
Now that you have fi nished creating the locations for the bookmark, it’s time to test it. Use the Go To command to go directly to the bookmark.
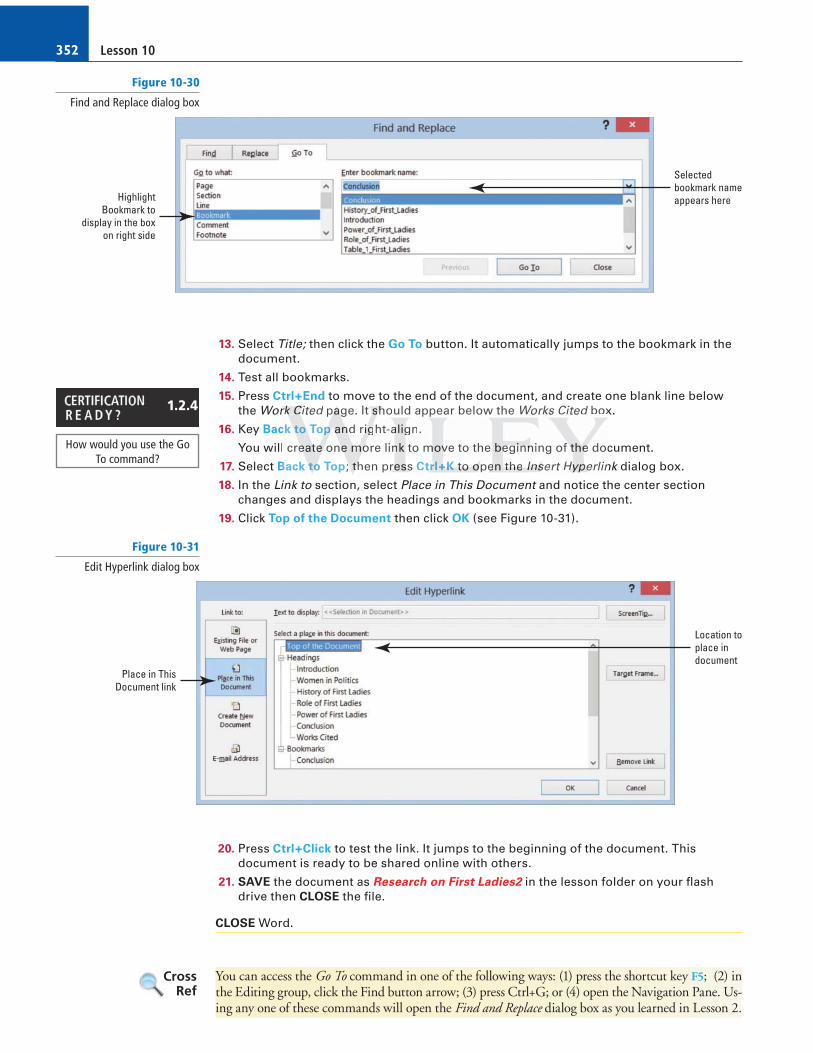
11. On the Home tab, in the Editing group, click the drop down arrow next to Find and select Go To . The Find and Replace dialog box opens with the Go To tab open.
12. In the Go to What section, select Bookmark (see Figure 10-30).
The right side of the box displays the bookmarks that you created in the previous steps.
How do you create a bookmark?
1.2.3
Lesson 10352
13. Select Title; then click the Go To button. It automatically jumps to the bookmark in the document.
14. Test all bookmarks.
15. Press Ctrl + End to move to the end of the document, and create one blank line below the Work Cited page. It should appear below the Works Cited box.
16. Key Back to Top and right-align.
You will create one more link to move to the beginning of the document.
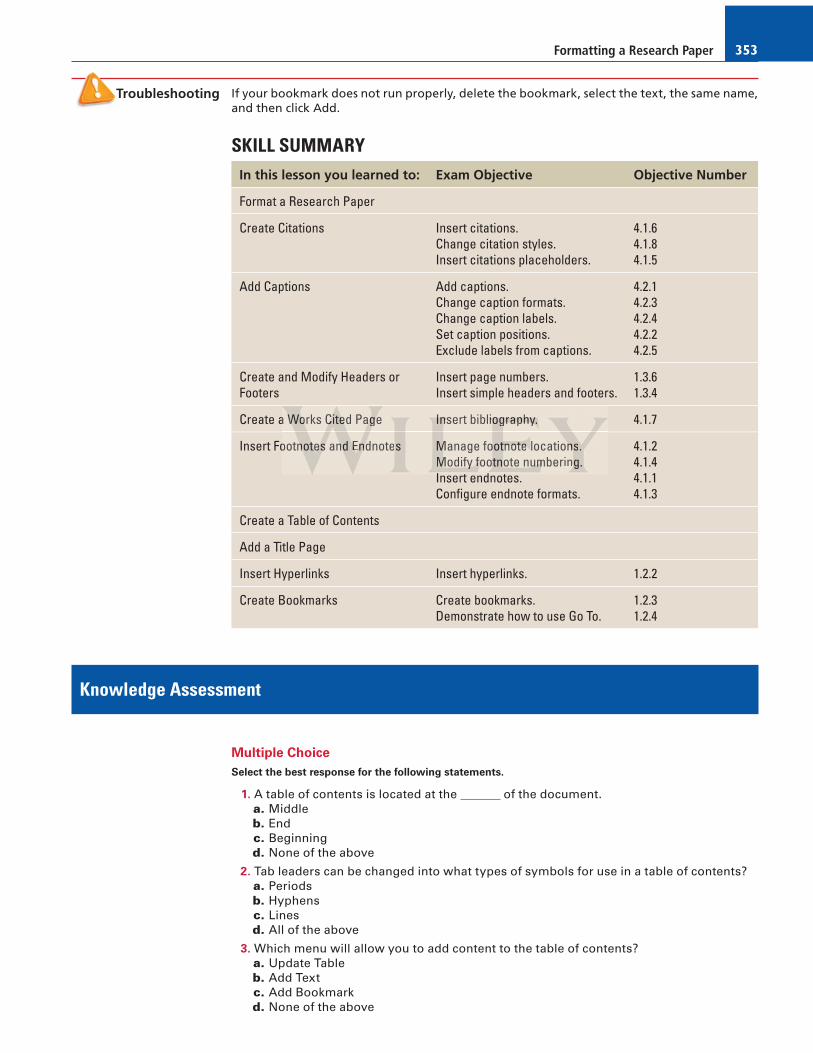
17. Select Back to Top ; then press Ctrl + K to open the Insert Hyperlink dialog box.
18. In the Link to section, select Place in This Document and notice the center section changes and displays the headings and bookmarks in the document.
19. Click Top of the Document then click OK (see Figure 10-31).
How would you use the Go To command?
1.2.4
Selectedbookmark nameappears hereHighlight
Bookmark todisplay in the box
on right side
Figure 10-30
Find and Replace dialog box
Location toplace indocument
Place in ThisDocument link
Figure 10-31
Edit Hyperlink dialog box
20. Press Ctrl + Click to test the link. It jumps to the beginning of the document. This document is ready to be shared online with others.
21. SAVE the document as Research on First Ladies2 in the lesson folder on your fl ash drive then CLOSE the fi le.
CLOSE Word.
You can access the Go To command in one of the following ways: (1) press the shortcut key F5 ; (2) in the Editing group, click the Find button arrow; (3) press Ctrl+G; or (4) open the Navigation Pane. Us-ing any one of these commands will open the Find and Replace dialog box as you learned in Lesson 2.
Cross Ref
rrk k kk CiCiCited papapagegg . It ssshhoh uld appear below the Works Cited boxd
ck tttooo Toppp aaannnd rigigight-aaaliggn.
creeeattte e e oneee momomore linnnk to mmmovvve to the begeeginininnnning of thththee e doc
Back tttoo o Top ;;; thththen prreressssss Ctrrrl +++KK tototo ooopeeen ththeeeKK InInInsess rt HHHHypypyperee lin
Formatting a Research Paper 353
If your bookmark does not run properly, delete the bookmark, select the text, the same name, and then click Add.
Troubleshooting
SKILL SUMMARYIn this lesson you learned to: Exam Objective Objective Number
Format a Research Paper
Create Citations Insert citations.Change citation styles.Insert citations placeholders.
4.1.64.1.84.1.5
Add Captions Add captions.Change caption formats.Change caption labels.Set caption positions.Exclude labels from captions.
4.2.14.2.34.2.44.2.24.2.5
Create and Modify Headers or Footers
Insert page numbers.Insert simple headers and footers.
1.3.61.3.4
Create a Works Cited Page Insert bibliography. 4.1.7
Insert Footnotes and Endnotes Manage footnote locations.Modify footnote numbering.Insert endnotes.Confi gure endnote formats.
4.1.24.1.4 4.1.14.1.3
Create a Table of Contents
Add a Title Page
Insert Hyperlinks Insert hyperlinks. 1.2.2
Create Bookmarks Create bookmarks.Demonstrate how to use Go To.
1.2.31.2.4
Knowledge Assessment
Multiple Choice
Select the best response for the following statements.
1. A table of contents is located at the of the document. a. Middle b. End c. Beginning d. None of the above
2. Tab leaders can be changed into what types of symbols for use in a table of contents? a. Periods b. Hyphens c. Lines d. All of the above
3. Which menu will allow you to add content to the table of contents? a. Update Table b. Add Text c. Add Bookmark d. None of the above
a WWWooorks CCCiiteede Pagagage Ie Ie Insnsnsert biblioioiogrgrgrapapaphyhyhy.
ootnnnottteseses andndnd EEEndndndnotees MMManage fooootttnonotetete locationnns.MMoModifyfyfy fffoooooootnote nununumbmm ering.I t d t
Lesson 10354
4. When adding a page or text to a table of contents, it is recommended that you a. Click the Update Table button on the Ribbon b. Press F9 c. Click the Update Table button above the table of contents d. All of the above
5. By default, a footnote is placed a. At the beginning of the document b. At the end of the document c. At the end of the page d. Below text
6. Formatting a footnote in a document, per MLA style, should be a. single spaced with a hanging indent and triple spaced between each footnote b. single spaced with a hanging indent and doubled spaced between each footnote c. doubled spaced with a hanging indent and single spaced between each footnote d. No format is needed.
7. Hyperlinks can be linked a. From one page to another page b. To a website c. To an email d. All of the above
8. Reference points in a document are created using which command? a. Bookmark b. Hyperlink c. Email d. All of the above
9. The Footnote and Endnote dialog box contains an option to change the page number format to a. Uppercase Roman numerals b. A1, A2, A3, etc. c. a and b d. This is not an option.
10. Endnotes can be converted to which of the following? a. Table of contents b. Footnotes c. Hyperlinks d. They cannot be converted
True/False
Circle T if the statement is true or F if the statement is false.
T F 1. A table of contents is usually found at the end of a document.
T F 2. The Custom Table of Contents option allows you to create a table of contents on your own.
T F 3. You can choose a hyphen as tab leaders for a table of contents.
T F 4. Only text formatted with a heading style can be included in a table of contents.
T F 5. You can choose to update only the page numbers in a table of contents.
T F 6. Hyperlinks can be applied to text or graphics.
T F 7. When you create an email link, the Outlook application will automatically open.
T F 8. A bookmark is a reference point in a document.
T F 9. An endnote is a citation that is placed at the end of the document.
T F 10. Deleting a footnote or endnote will automatically renumber the remaining footnotes or endnotes.
mamam rrkr rlllininink kkl f theee aaboboboveee
otnote e e and EnEnEndnote diddiaala ogg boxoxox cccononontatatainiinsss ananan oooptpp ion tototot ccchan
Formatting a Research Paper 355
Competency Assessment
Project 10-1: Mom’s Favorite Recipes
You know that your mom will be sending you more recipes for her cookbook. You decide to create a table of contents using headings in the cookbook, making it easy to update as recipes are added.
GET READY. LAUNCH Word if it is not already running.
1. OPEN Moms Favorites Recipes from the data fi les for this lesson.
2. On the Home tab, turn on your Show/Hide command.
3. SAVE the document as 10-1 Moms Recipes TOC in the lesson folder on your fl ash drive.
4. Use the Go To command to go to page 3.
5. Select the Breads heading and apply the Heading 1 style.
6. Select the Banana Nut Bread/Chocolate Chip Muffi ns heading and apply the Heading 2 style.
7. Apply the Heading 2 style to the remaining recipe headings under the Breads section.
8. Position the insertion point before the M in Main Dishes on the fi rst page.
9. On the References tab, in the Table of Contents group, click the Table of Contents button.
10. Select Automatic Table 1 from the menu.
11. Center the title, Contents , make it bold, and apply the Title style.
12. Select the table tab and click the Update Table button.
13. Update the page numbers only.
14. SAVE the document in the lesson folder on your fl ash drive, and then CLOSE the fi le.
PAUSE. LEAVE Word open for the next project.
Project 10-2: Margie’s Travel
You will be updating the Family Vacation8 fl yer created in an earlier lesson. Since this fl yer will be shared by email, you want to insert hyperlinks and Margie’s email address.
GET READY. LAUNCH Word if it is not already running.
1. OPEN the Family Vacation8 document from the lesson folder.
2. SAVE the document as 10-2 Vacation Flyer Update in the lesson folder on your fl ash drive.
3. Select the text Margie’s Travel Agency . On the Insert tab in the Links group, select Hyperlink .
4. In the Address box, key http://www.margiestravel.com . Click OK .
5. Place the insertion point at the end of the body paragraph, and press Enter .
6. Key Contact: Margie and align right .
7. Select Margie and in the Links group, click Hyperlink , then select E- mail address .
8. For the E-mail address , key [email protected] .
9. Key More information on Travel Plans in the Subject box.
10. Click OK .
11. SAVE the document in the lesson folder on your fl ash drive then CLOSE the fi le.
LEAVE Word open for the next project.
iiionon the insssertioonon pppoint before the M in M Main Dishes on ths
he ee ReReRefereeenccces taaabb,b innn thththe TaTaTablblble of Connntetetentntntsss gggrrroupupupp, clcc ick k thththsss on.
ct AuAuAutooomatititic TaTT ble 111c frrom ttthe menu.
er theee title CoCoContentststs mmmakeee ititit bbbolololddd andndnd aaapppppplylyly the TiTiTiTitltltleee styeee
Lesson 10356
Profi ciency Assessment
Project 10-3: Real Estate
You will be updating one of the marketing fl yers that you created. This fl yer will be posted in the newspaper, school papers, and real estate brochures. A caption is needed.
GET READY. LAUNCH Word if it is not already running.
1. OPEN the Marketing Flyer document from the lesson folder.
2. SAVE the document as 10-3 Marketing Flyer Update in the lesson folder on your fl ash drive.
3. Apply a shadow page border and select Green, Accent 6, Darker 50%. Select the ninth option from the Style list.
4. Add a page color and select Green, Accent 6, Lighter 80% .
5. Insert a fi gure caption to the SmartArt graphic and key Tech Terrace Real Estate helped
the Loston’s purchase their new home.
6. SAVE the document in the lesson folder on your fl ash drive then CLOSE the fi le.
LEAVE Word open for the next project.
Project 10-4: British Novel – Mothers and Daughters of Bleak House
You and your friend are taking a British Literature class. Elizabeth has fi nished her paper, but you noticed that formatting needs to be corrected, and you have agreed to format the document for her and insert a header with a page number.
GET READY. LAUNCH Word if it is not already running.
1. OPEN Mothers and Daughters of Bleak House from the lesson folder.
2. SAVE the document as 10-4 Bleak House – British Novel in the lesson folder on your fl ash drive.
3. Change the style to MLA .
4. Change the font to Times New Roman and font size to 12 pt for the entire document.
5. Change the line spacing to double .
6. C enter the title.
7. I ndent the fi rst line for all paragraphs.
8. Key the following information on the appropriate line.
First line: Elizabeth Steele
Second line: ENG 5306: British Novel
Third line: Dr. P. Hartman
Fourth line: May 6, 20XX
9. Insert a header with her last name followed by the page number —apply the Plain Number 3 .
10. Format the header to Times New Roman and change the font size to 12 pt.
11. SAVE the document in the lesson folder on your fl ash drive then CLOSE the fi le.
PAUSE. LEAVE Word open for the next project.
d opopopen fffooro ttthe nnneexe t prrrojoo eccct.t.t.
-4: BBBririritish NNNoovo el – MMMotoo heeersrsrs aaanddnd DDDauuughghtetetersrsrs ooof Bleaeaeakkk Hou
Formatting a Research Paper 357
Mastery Assessment
Project 10-5: USA Proposal
You have completed a course at the local community college and learned how easy it is to add a table of contents in a document. However, this document was created without any heading styles. Use the Add Text command to create a table of contents.
GET READY. LAUNCH Word if it is not already running.
1. OPEN USA P roposal from the data fi les for this lesson.
2. SAVE the document as 10-5 USA P roposal Update in your fl ash drive in the lesson folder.
3. Apply the Add Text command to create a table of contents with three levels. Level 1 — Proposal Description, Level 2 — the three Options , and Level 3 — the cities listed under each option.
4. Add a Next Page section break at the beginning of the document and remove the formatting.
5. Key Table of Contents and press Enter two times.
6. Change the font to Arial , font size 14 pt , spacing after to 12 pt and center .
7. Create a Custom Table of Contents using the Formal format.
8. Add a page break at the beginning of each option then update the entire table.
9. SAVE the document in the lesson folder on your fl ash drive then CLOSE the fi le.
PAUSE . LEAVE Word open for the next exercise.
Project 10-6: Bleak House – British Novel
You are continuing with Project 10-4. Elizabeth added her sources of references to the document manually. As you two were discussing your papers, you mentioned there was an easier way to in-sert footnotes. You will show her how to add a few footnotes and how easy it is to convert them to an endnotes page. Format the footnotes according to the MLA guidelines. Use the Line Numbers to assist you in fi nding the paragraphs.
GET READY. LAUNCH Word if it is not already running.
1. OPEN the 10-4 Bleak House – British Novel document.
2. SAVE the document as 10-6 Bleak House – British Novel in the lesson folder on your fl ash drive.
3. Follow the instruction in the table below and key the information (making sure to format the footnotes according to the MLA guidelines):
TaTaTablblble of CCCoono tentntntsss and press Enter two times.
nge ee thththe fofofonttt to ArArArial , fooont siiizee e 14 pt , spppaciiing afafafterr r r tooo t 12 pppttt t
te aaa CuCuCustststommm TTTabaable ooof CConteeents using ttthees FoFoForrrmal fororormamamat. l
a pagegege breakakak aaat the bebebeginnnninnnggg of eeeacaaa hhh opopptiononon ttthen upupupdate
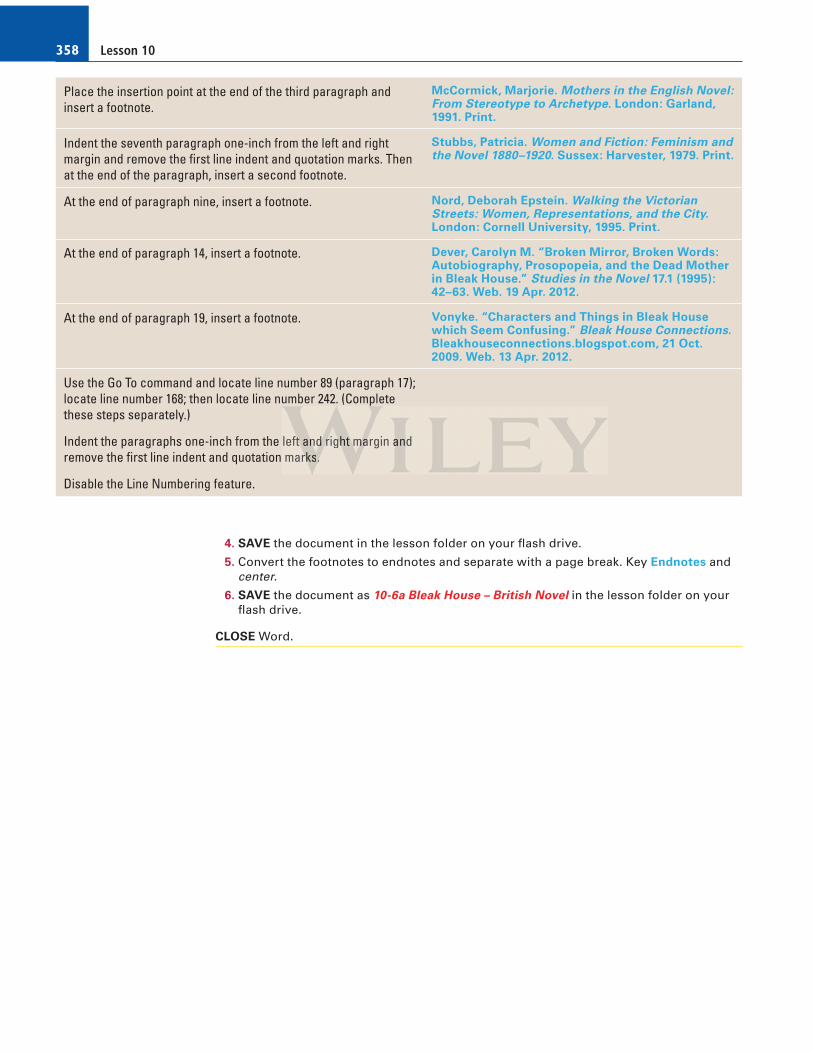
Lesson 10358
Place the insertion point at the end of the third paragraph and insert a footnote.
McCormick, Marjorie. Mothers in the English Novel: From Stereotype to Archetype. London: Garland, 1991. Print.
Indent the seventh paragraph one-inch from the left and right margin and remove the fi rst line indent and quotation marks. Then at the end of the paragraph, insert a second footnote.
Stubbs, Patricia. Women and Fiction: Feminism and the Novel 1880–1920. Sussex: Harvester, 1979. Print.
At the end of paragraph nine, insert a footnote. Nord, Deborah Epstein. Walking the Victorian Streets: Women, Representations, and the City. London: Cornell University, 1995. Print.
At the end of paragraph 14, insert a footnote. Dever, Carolyn M. “Broken Mirror, Broken Words: Autobiography, Prosopopeia, and the Dead Mother in Bleak House.” Studies in the Novel 17.1 (1995): 42–63. Web. 19 Apr. 2012.
At the end of paragraph 19, insert a footnote. Vonyke. “Characters and Things in Bleak House which Seem Confusing.” Bleak House Connections. Bleakhouseconnections.blogspot.com, 21 Oct. 2009. Web. 13 Apr. 2012.
Use the Go To command and locate line number 89 (paragraph 17); locate line number 168; then locate line number 242. (Complete these steps separately.)
Indent the paragraphs one-inch from the left and right margin and remove the fi rst line indent and quotation marks.
Disable the Line Numbering feature.
4. SAVE the document in the lesson folder on your fl ash drive.
5. Convert the footnotes to endnotes and separate with a page break. Key Endnotes and center .
6. SAVE the document as 10-6a Bleak House – British Novel in the lesson folder on your fl ash drive.
CLOSE Word.
lefttt andndnd rrriggghththt mmmaaargin anaandmarrrksksks...