Embed Size (px)
Citation preview

Chapter 4
Displaying Data and Modifying Data Actions
After using recipes in previous chapters that help you modifythe look and feel of Salesforce or inspect existing data, you
In this chapter ...
• Creating a Many-to-ManyRelationship may wish to modify how specific data is presented, or change
the behavior of data actions. Use the recipes in this chapter• Storing and DisplayingConfidential Information to explore the Force Platform: change how confidential
information is displayed, change the default behavior of• Averaging Aggregated
Databulk processing of records, handling of duplicate records,and many other data display or data action modifications.
• Displaying Fields from aRelated Record on aDetail Page
• Blocking Record Creationwith Cross-ObjectValidation Rules
• Validating Data Based onFields in Other Records
• Using Query StringParameters in aVisualforce Page
• Using AJAX in aVisualforce Page
• Using Properties in Apex• Mass Updating Contacts
When an AccountChanges
• Bulk Processing Recordsin a Trigger
119

• Controlling RecursiveTriggers
• Comparing QueriesAgainst Trigger.old andTrigger.new
• Preventing DuplicateRecords from Saving
• Creating a Child RecordWhen a Parent Record isCreated
• Using System.runAs inTest Methods
120
Chapter 4: Displaying Data and Modifying Data Actions
Creating a Many-to-Many Relationship
Problem
You want to model a many-to-many relationship between objects in which each record of oneobject can be related to many records of the other object, and vice versa. For example, a customercase can require many bug fixes, and a bug fix can resolve multiple customer cases.
Note: This recipe has been provided by salesforce.com Training & Certification andis drawn from the expert-led training courses available around the world. Salesforce.comtraining courses provide an opportunity to get hands-on experience with the ForcePlatform and Salesforce applications as well as to prepare you to become Salesforce.comCertified. Register for a course at www.salesforce.com/training.
Solution
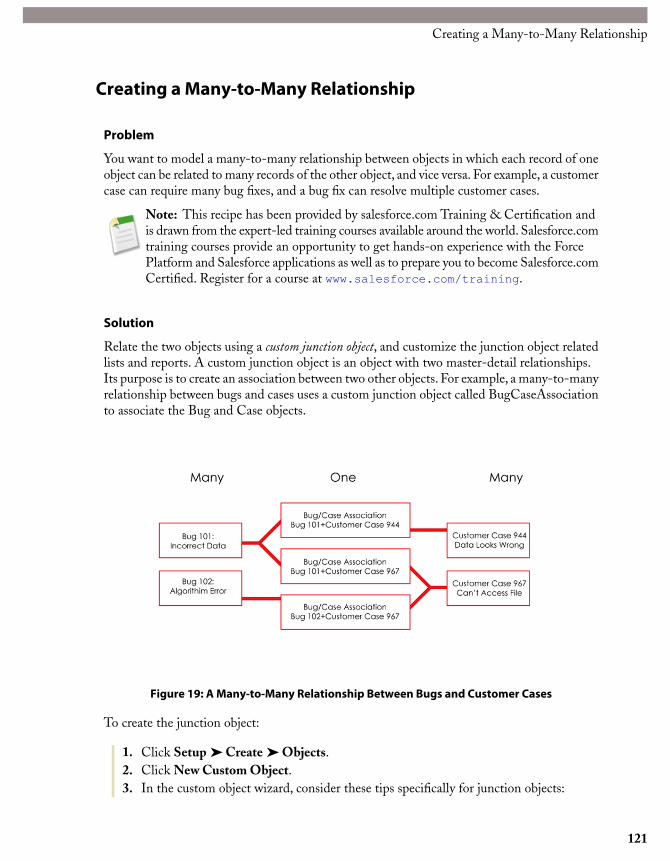
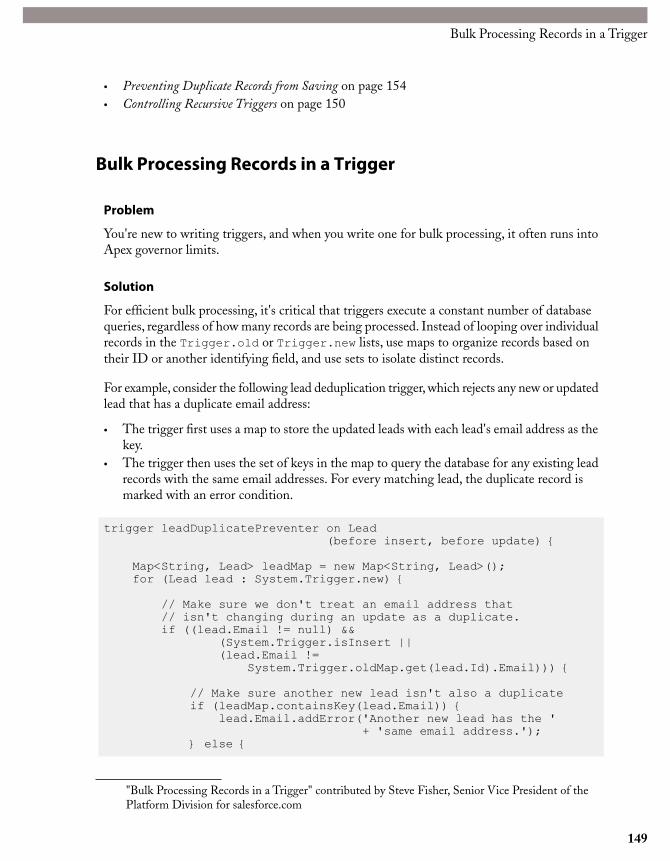
Relate the two objects using a custom junction object, and customize the junction object relatedlists and reports. A custom junction object is an object with two master-detail relationships.Its purpose is to create an association between two other objects. For example, a many-to-manyrelationship between bugs and cases uses a custom junction object called BugCaseAssociationto associate the Bug and Case objects.
Figure 19: A Many-to-Many Relationship Between Bugs and Customer Cases
To create the junction object:
1. Click Setup ➤ Create ➤ Objects.2. Click New Custom Object.3. In the custom object wizard, consider these tips specifically for junction objects:
121
Creating a Many-to-Many Relationship
• Name the object with a label that indicates its purpose, such asBugCaseAssociation.
• For the Record Name field, use the auto-number data type.• Do not launch the custom tab wizard before clicking Save. Junction objects do
not need a tab.
To create the two master-detail relationships:
1. Verify that the two objects you want to relate to each other already exist. For example,you may want to relate the standard case object to a custom bug object.
2. On the junction object, create the first master-detail relationship field. In the customfield wizard:
a. Choose Master-Detail Relationship as the field type.b. Select one of the objects to relate to your junction object. For example,
select Case.
The first master-detail relationship you create on your junction objectbecomes the primary relationship.This affects the following for the junctionobject records:
• Look and feel: The junction object's detail and edit pages use the colorand any associated icon of the primary master object.
• Record ownership: The junction object records inherit the value of theOwner field from their associated primary master record. Because objectson the detail side of a relationship do not have a visible Owner field,this is only relevant if you later delete both master-detail relationshipson your junction object.
• Division: If your organization uses divisions to segment data, thejunction object records inherit their division from their associatedprimary master record. Similar to the record ownership, this is onlyrelevant if you later delete both master-detail relationships.
c. Select a Sharing Setting option. For master-detail relationship fields,the Sharing Setting attribute determines the sharing access that usersmust have to a master record in order to create, edit, or delete its associateddetail records.
d. For the Related List Label that will display on the page layout of themaster object, do not accept the default. Change this to use the name ofthe other master object in your many-to-many relationship. For example,change this to Bugs so users will see a Bugs related list on the case detailpage.
3. On the junction object, create the second master-detail relationship. In the customfield wizard:
122
Chapter 4: Displaying Data and Modifying Data Actions

a. Choose Master-Detail Relationship as the field type.b. Select the other desired master object to relate to your junction object. For
example, select Bug.
The second master-detail relationship you create on your junction objectbecomes the secondary relationship. If you delete the primary master-detailrelationship or convert it to a lookup relationship, the secondary masterobject becomes primary.
c. Select a Sharing Setting option. For master-detail relationship fields,the Sharing Setting attribute determines the sharing access that usersmust have to a master record in order to create, edit, or delete its associateddetail records.
d. For the Related List Label that will display on the page layout of themaster object, do not accept the default. Change this to use the name ofthe other master object in your many-to-many relationship. For example,change this to Cases so users will see a Cases related list on the bug detailpage.
To customize the fields that display in the junction object related list on each master objectpage layout:
1. Edit the page layout of each master object that is related to the junction object. Forexample, to modify the BugCaseAssociations related list for case records, edit thepage layout for cases at Setup ➤ Customize ➤ Cases ➤ Page Layouts.
2. Select the related list you want to modify and click Edit Properties to open therelated list popup window. For example, on cases the BugCaseAssociations relatedlist was renamed to Bugs, so select the Bugs related list.
3. Add the fields to display in the related list. You can add fields from the junctionobject itself, but more importantly, you can add fields from the other master object.
Each field is prefixed with its object name in the popup window. In the related listitself, only fields from the junction object are prefixed with the object name; fieldsfrom the other master object are not.
Note: The junction object related list does not include an icon on the master record'sdetail pages because the junction object does not have a custom tab. If you make a tabfor the junction object, the icon is included.
Discussion
For a many-to-many relationship in Salesforce, each master object record displays a relatedlist of the associated junction object records. To create a seamless user experience, you canchange the name of the junction object related list on each of the master object page layouts
123
Creating a Many-to-Many Relationship
to have the name of the other master object. For example, you might change theBugCaseAssociations related list to Cases on the bugs page layout and to Bugs on the casespage layout. You can further customize these related lists to display fields from the other masterobject.
Review the following considerations before creating many-to-many relationships betweenobjects:
• Junction object records are deleted when either associated master record is deleted. If bothassociated master records are deleted, the junction object record is deleted permanently andcannot be restored.
• Sharing access to a junction object record is determined by a user's sharing access to bothassociated master records and the Sharing Setting option on the relationship field. Forexample, if the sharing setting on both parents is Read/Write, then the user must haveRead/Write access to both parents in order to have Read/Write access to the junction object.
• In a many-to-many relationship, a user cannot delete a parent record if there are more than200 junction object records associated with it and if the junction object has a roll-up summaryfield that rolls up to the other parent. To delete this object, manually delete junction objectrecords until the count is fewer than 200.
• Roll-up summary fields that summarize data from the junction object can be created onboth master objects.
• Formula fields and validation rules on the junction object can reference fields on bothmaster objects.
• You can define Apex triggers on both master objects and the junction object.• A junction object cannot be on the master side of another master-detail relationship.• Junction objects cannot be on the subscriber side of a Salesforce to Salesforce connection.• You cannot create a many-to-many self relationship, that is, the two master-detail
relationships on the junction object cannot have the same master object.
Many-to-many relationships provide two standard report types that join the master objectsand the junction object. The report types are:
• "Primary master with junction object and secondary master" in the primary master object'sreport category
• "Secondary master with junction object and primary master" in the secondary master object'sreport category
The order of the master objects in the report type is important. The master object listed firstdetermines the scope of records that can be displayed in the report.
You can create custom reports based on these standard report types. In addition, you can createcustom report types to customize which related objects are joined in the report.
See Also
• "Considerations for Relationships" in the Salesforce online help
124
Chapter 4: Displaying Data and Modifying Data Actions

• "Customizing Page Layouts" in the Salesforce online help• "What is a Custom Report Type?" in the Salesforce online help
Storing and Displaying Confidential Information
Problem
You want to store employee Social Security numbers as encrypted data as required bygovernment regulations or industry standards. Only select certain users should be able to viewthe entire social security number; all other users should only be able to view the last four digits.In addition, you want to ensure that users enter the numbers in the standard social securitynumber format, including the dashes after the third and fifth digits.
Solution
On the standard user object, create an encrypted custom field to store the user's Social Securitynumber. Set the field's Mask Type attribute to hide the first five digits of the social securitynumber, and add field-level help to inform users of the required format.Then, create a validationrule that uses the REGEX() function to verify that the value of the custom field is in the correctformat. Finally, create a new custom profile that allows a select group of users to the see theSocial Security numbers unmasked.
Note: To enable encrypted fields for your organization, contact salesforce.comCustomer Support.
1. Define the encrypted custom field.
a. Click Setup ➤ Customize ➤ Users ➤ Fields.b. In the User Custom Fields related list, click New.c. Select Text (Encrypted), and click Next.d. In the Field Label field, enter Social Security Number.e. In the Length field, enter 11. This allows the field to accept all nine digits
of the Social Security number plus the dashes after the third and fifth digits.f. In the Description field, enter Encrypted Social Security Number
field.g. In the Help Text field, enter information to help your users understand
what value to type. For example, Enter your Social Securitynumber. Remember to include dashes after the third andfifth digits.
h. In the Mask Type field, select Social Security Number. This optionhides the first five digits (it hides the first 7 characters) and displays thelast four. Only users with profiles that have the "View Encrypted Data"
125
Storing and Displaying Confidential Information
permission selected are able to view all nine digits of the Social Securitynumber.
i. In the Mask Character field, select the character, either an asterisk (*)or an X, to use for hidden characters.
j. Click Next.k. In Enterprise, Unlimited, and Developer Editions, set the field-level security
to determine whether the field should be visible or read only for specificprofiles. These settings determine whether or not the field itself is visible,but do not affect whether or not the user sees the masked or full SocialSecurity number. You will specify the type of masking when you create thecustom profile.
l. Click Next.m. Leave the Add Field and User Layout checkboxes selected.n. Click Save.
2. Create the validation rule.
a. Click Setup ➤ Customize ➤ Users ➤ Validation Rules.b. Click New.c. In the Rule Name field, enter Social Security Number Format
Check.d. In the Description field, enter Validates that the Social
Security Number is in the correct format.
e. Enter the following error condition formula:
NOT(OR(LEN (Social_Security_Number__c) = 0,REGEX( Social_Security_Number__c ,"[0-9]{3}-[0-9]{2}-[0-9]{4}")))
f. Click Check Syntax to make sure the syntax is correct.g. In the Error Message field, enter a message that appears if the user enters
a Social Security number in an invalid format. For example, the messagemight read: The Social Security number you entered is notin the correct format. The correct format is 999-99-9999.
h. In the Error Location field, specify whether you want the error messageyou entered above to appear at the top of the page or next to the field. Ifyou choose Field, select the Social Security Number field in theadjacent drop-down list.
i. Click Save.
3. Create the custom profile.
126
Chapter 4: Displaying Data and Modifying Data Actions
a. Click Setup ➤ Manage Users ➤ Profiles.b. Click New.c. Select an existing profile to copy.d. Name the new custom profile.e. Click Save.f. Click Edit.g. In the General User Permissions section, select the View Encrypted
Data checkbox. This allows users with this profile to see the completevalue of encrypted fields instead of the masking characters.
h. Click Save.
4. Assign the new custom profile to the users allowed to view the encrypted data.
Discussion
Government regulations and industry standards require many companies to use encryption toprotect their most sensitive employee and customer data. Encrypted custom fields can helpcompanies comply with these regulations. Salesforce encrypts these fields with 128-bit keysand uses the AES (Advanced Encryption Standard) algorithm which has been adopted as anencryption standard by the U.S. government. Encrypted custom fields should only be usedwhen regulations require encryption because they involve additional processing and havesearch-related limitations.
To further protect the confidentiality of encrypted custom field values, Salesforce requires youto specify a mask type for each encrypted field you create. Character masking lets you hide thecharacters in encrypted field values, allowing users to see the full value of an encrypted customfield only if their profile has the "View Encrypted Data" permission. If your company usesparts of confidential data, such as the last four digits of a person's Social Security or credit cardnumber, to verify the identity of customers, configure your encrypted custom fields to use amask type that reveals only the those digits, such as the Last Four Characters Clearmask type.
In addition to ensuring your data's confidentiality, you also want to ensure its accuracy.Validation rules improve the quality of your data by verifying that the data a user enters in arecord meets the standards you specify before the user can save the record. A validation rulecontains a formula expression that evaluates the data in one or more fields and returns a valueof "True" or "False." If the validation rule returns "True," Salesforce lets the user save therecord; otherwise, Salesforce displays an error message.
The validation rule in this recipe uses the REGEX() function, which compares the custom fieldto a regular expression. A regular expression is a string used to describe a format of a stringaccording to certain syntax rules. Salesforce regular expression syntax is based on Java PlatformSE 6 syntax; however, backslash characters (\) must be changed to double backslashes (\\)because backslash is an escape character in Salesforce.
127
Storing and Displaying Confidential Information

See Also
• Validating Data Based on Fields in Other Records on page 136• "About Validation Rules" in the Salesforce online help• "Operators and Functions" in the Salesforce online help• "About Encrypted Custom Fields" in the Salesforce online help
Averaging Aggregated Data
Problem
You want to calculate the average value of a numeric field on a set of detail records in amaster-detail relationship.
Note: This recipe has been provided by salesforce.com Training & Certification andis drawn from the expert-led training courses available around the world. Salesforce.comtraining courses provide an opportunity to get hands-on experience with the ForcePlatform and Salesforce applications as well as to prepare you to become Salesforce.comCertified. Register for a course at www.salesforce.com/training.
Solution
Create two roll-up summary fields: one that sums a numeric field on a detail record and anotherthat counts the number of detail records. Then use a formula field that divides the first roll-upsummary field by the second.
To illustrate this example, we'll look at the Job Application and Review objects in the sampleRecruiting application.The Job Application object is the master in a master-detail relationshipwith the Review object. The Review object has a 1-5 rating system. We want to display theaverage rating on the job application.
To create the first roll-up summary field:
1. Click Setup ➤ Create ➤ Objects.2. Click Job Application.3. In the Custom Fields & Relationships related list, click New.4. Select the Roll-Up Summary data type, and click Next.5. In the Field Label field, enter Total Rating. Once you move your cursor, the
Field Name text box should be automatically populated with Total_Rating.6. Click Next.7. In the Summarized Object drop-down list, choose Reviews.8. Under Select Roll-Up Type, select SUM.
128
Chapter 4: Displaying Data and Modifying Data Actions
9. In the Field to Aggregate drop-down list, select Rating.10. Leave All records should be included in the calculation selected,
and click Next.11. Configure the remaining field-level security and page layout settings as desired.12. Click Save.
To create the second roll-up summary field:
1. Click Setup ➤ Create ➤ Objects.2. Click Job Application.3. In the Custom Fields & Relationships related list, click New.4. Select the Roll-Up Summary data type, and click Next.5. In the Field Label field, enter Number of Reviews. Once you move your cursor,
the Field Name text box should be automatically populated withNumber_of_Reviews.
6. Click Next.7. In the Summarized Object drop-down list, choose Reviews.8. Under Select Roll-Up Type, select COUNT.9. Leave All records should be included in the calculation selected,
and click Next.10. Configure the remaining field-level security and page layout settings as desired.11. Click Save.
To create the formula field:
1. Click Setup ➤ Create ➤ Objects.2. Click Job Application.3. In the Custom Fields & Relationships related list, click New.4. Select the Formula data type, and click Next.5. In the Field Label field, enter Average Rating. Once you move your cursor,
the Field Name text box should be automatically populated with Average_Rating.6. Select the Number formula return type and click Next.7. Enter the following formula:
IF(Number_of_Reviews__c > 0, Total_Rating__c /Number_of_Reviews__c, 0)
8. Click Next.9. Configure the remaining field-level security and page layout settings as desired.10. Click Save.
129
Averaging Aggregated Data

Discussion
Roll-up summary fields let you easily display values from a set of detail records. Use roll-upsummary fields to display the total number of detail records, the sum of all the values in a detailrecord field, or the highest or lowest value of a detail field.
Before you begin working with roll-up summary fields, note that they are only available on themaster object in a master-detail relationship.
When working with merge fields in formulas, use the IF function to ensure that the formulafield displays correctly even if they have an invalid value. (For example, an invalid value mayoccur if the formula divides by zero.) The IF function in this recipe ensures that the formuladisplays a value when there are one or more reviews, and displays a zero if there are no reviews;otherwise, the formula field might display #Error.
See Also
• Blocking Record Creation with Cross-Object Validation Rules on page 133• "About Roll-Up Summary Fields" in the Salesforce online help• "Useful Advanced Formula Fields" in the Salesforce online help• "Considerations for Relationships" in the Salesforce online help
Displaying Fields from a Related Record on a Detail Page
Problem
You want to show field values from a related object on a detail page.
Solution
Use a cross-object formula field to retrieve and display the field values from a related object.
To illustrate this example, we'll look at the Review object in the sample Recruiting application.The Review object is the detail record of the Job Application object. The Job Applicationobject has lookup relationships to the Position and Candidate objects. Using cross-objectformulas, we will display the title of the related position and the name of the related candidateon each review record.
1. Click Setup ➤ Create ➤ Objects.2. Click Review.3. In the Custom Fields & Relationships related list, click New.4. Select the Formula data type, and click Next.
130
Chapter 4: Displaying Data and Modifying Data Actions
5. In the Field Label field, enter Position. Once you move your cursor, the FieldName text box should be automatically populated with Position.
6. Select the Text formula return type and click Next.7. Click the Advanced Formula tab.
Note: You can create cross-object formulas only on the Advanced Formulatab.
8. Click the Insert Field button.9. Select Review > in the first column. The second column displays all of the Review
object's fields as well as its related objects, which are denoted by a greater-than (>)sign .
10. Select Job Application > in the second column. The third column displays thefields of the Job Application object.
11. Select Position> in the third column. The fourth column displays the fields of thePosition object.
Be sure that you select Position > (with the greater-than sign) and not Position.The one with the greater-than sign is the Position object, while the one without thegreater-than sign is the Position lookup field on the Job Application object.
12. Choose Position Title in the fourth column.13. Click Insert.
Your formula now looks like this:
Job_Application__r.Position__r.Name
14. Click Next.15. Configure the remaining field-level security and page layout settings as desired.16. Click Save.
The Review object now displays the value of the Position Title field from the relatedposition record. Next, create a cross-object formula field on the Review object that displaysthe first and last names of the candidate being reviewed, and we'll use the HYPERLINK functionso that users can access the candidate's record by clicking the formula field.
1. Click Setup ➤ Create ➤ Objects.2. Click Review.3. In the Custom Fields & Relationships related list, click New.4. Select the Formula data type, and click Next.5. In the Field Label field, enter Candidate. Once you move your cursor, the
Field Name text box should be automatically populated with Candidate.6. Select the Text formula return type and click Next.
131
Displaying Fields from a Related Record on a Detail Page

7. Click the Advanced Formula tab.8. From the Functions list, double-click HYPERLINK.9. Delete url from the HYPERLINK function you just inserted, but leave your cursor
there.10. Click the Insert Field button, select Review >,Job Application >,Candidate
>, Record ID, and click Insert.11. Delete friendly_name from the HYPERLINK function, but leave your cursor there.12. Click the Insert Field button, select Review >,Job Application >,Candidate
>, First Name, and click Insert.13. Enter a space, click the Insert Operator button, and choose Concatenate.14. Enter another space, then type a blank space enclosed in quotes:
" "
This appends a blank space after the first name of the candidate.15. Enter a space, click the Insert Operator button, and choose Concatenate once more
to add a second ampersand in your formula.16. Click the Insert Field button, select Review >,Job Application >,Candidate
>, and Last Name, then click Insert.17. Delete [ target ] from the HYPERLINK function. This is an optional parameter
that isn't necessary for our formula field.18. Click Check Syntax to check your formula for errors.
Your finished formula should look like this:
HYPERLINK( Job_Application__r.Candidate__r.Id ,Job_Application__r.Candidate__r.First_Name__c & " " &Job_Application__r.Candidate__r.Last_Name__c )
19. Click Next.20. Configure the remaining field-level security and page layout settings as desired.21. Click Save.
Discussion
Cross-object formulas are formulas that span two or more objects by referencing merge fieldsfrom related records.They are available anywhere you can use formulas except for default valuesand summary reports. Use them in calculations or simply to display fields from related objectson detail pages, list views, related lists, and reports.
Each formula can reference up to five related objects, and can span to an object that is fiverelationships away. For example, consider the following formula we created in the first set ofsolution steps:
Job_Application__r.Position__r.Name
132
Chapter 4: Displaying Data and Modifying Data Actions

This formula spans two relationships: first it spans to the review's related job application(Job_Application__r), then to the job application's related position (Position__r). Theformula ultimately references the position's title (Name) on the Position object. Notice thateach part of the formula is separated by a period, and that the relationship names consist ofthe related object followed by __r.
In the second cross-object formula field we created, we used the Concatenate (&) operator tojoin two separate fields (First_Name__c and Last_Name__c) and inserted a space betweenthem. We also used the HYPERLINK function, which lets you to create a hyperlink to any URLor record in Salesforce. Note that the label of the hyperlink can differ from the URL itself,which is especially useful when working with a cross-object formula field that displays a valuethat a user will want to click. In this recipe, we used the HYPERLINK function to let usersconveniently access the candidate's record by clicking the Candidate's Name field on theReview object.
See Also
• Validating Data Based on Fields in Other Records on page 136• Averaging Aggregated Data on page 128• The Sample Recruiting App on page 3• "About Formulas" in the Salesforce online help• "Useful Advanced Formula Fields" in the Salesforce online help• "Formulas: How Do I..." in the Salesforce online help• "Operators and Functions" in the Salesforce online help
Blocking Record Creation with Cross-Object Validation Rules
Problem
You want to prevent a subset of users from saving a record if certain conditions exist on arelated record.
For example, the Recruiting app has the following custom objects:
• Employment Website Information about the cost of posting a position on a particularemployment website, such as Monster.com, and the budget the company has allocated forposting on that website.
• Position An open employment opportunity in the company.• Job Posting A custom junction object between the Employment Website and Position
objects that represents a single posting on an employment website.
133
Blocking Record Creation with Cross-Object Validation Rules

You want to prevent users from creating a Job Posting record if the record will cause thecompany to go over its budget for an employment website unless the position was created bythe CEO.
Note: This recipe has been provided by salesforce.com Training & Certification andis drawn from the expert-led training courses available around the world. Salesforce.comtraining courses provide an opportunity to get hands-on experience with the ForcePlatform and Salesforce applications as well as to prepare you to become Salesforce.comCertified. Register for a course at www.salesforce.com/training.
Solution
Create a cross-object validation rule on the Job Posting object that references one roll-upsummary field and two currency fields on the Employment Website object.
Create the roll-up summary field.
1. Click Setup ➤ Create ➤ Objects.2. Click Employment Website.3. In the Custom Fields & Relationships related list, click New.4. Select the Roll-Up Summary data type, and click Next.5. In the Field Label field, enter Current Number of Posts. Once you move
your cursor, the Field Name text box should be automatically populated withCurrent_Number_of_Posts.
6. Click Next.7. In the Summarized Object drop-down list, choose Job Postings.8. Under Select Roll-Up Type, select COUNT.9. Leave All records should be included in the calculation selected,
and click Next.10. Configure the remaining field-level security and page layout settings as desired.11. Click Save.
Create the currency field that stores the price per post.
1. Click Setup ➤ Create ➤ Objects.2. Click Employment Website.3. In the Custom Fields & Relationships related list, click New.4. Select the Currency data type, and click Next.5. In the Field Label field, enter Price Per Post. Once you move your cursor,
the Field Name text box should be automatically populated with Price_Per_Post.6. In the Length field, enter 7.7. In the Decimal Places field, enter 2.8. Click Next.
134
Chapter 4: Displaying Data and Modifying Data Actions
9. Configure the remaining field-level security and page layout settings as desired.10. Click Save.
Create the currency field that stores the maximum budget.
1. Click Setup ➤ Create ➤ Objects.2. Click Employment Website.3. In the Custom Fields & Relationships related list, click New.4. Select the Currency data type, and click Next.5. In the Field Label field, enter Maximum Budget. Once you move your cursor,
the Field Name text box is automatically populated with Maximum_Budget.6. In the Length field, enter 7.7. In the Decimal Places field, enter 2.8. Click Next.9. Configure the remaining field-level security and page layout settings as desired.10. Click Save.
Create the validation rule.
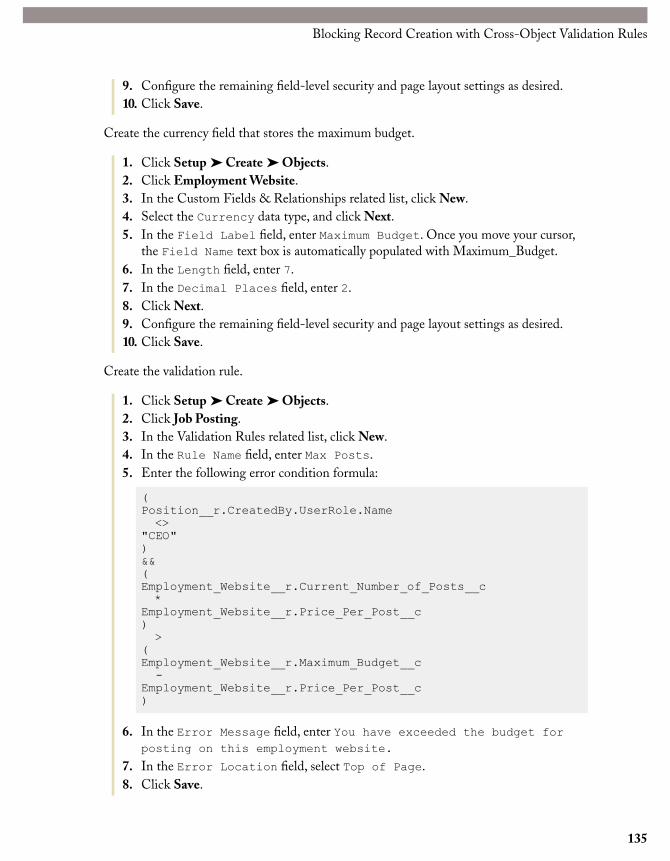
1. Click Setup ➤ Create ➤ Objects.2. Click Job Posting.3. In the Validation Rules related list, click New.4. In the Rule Name field, enter Max Posts.5. Enter the following error condition formula:
(Position__r.CreatedBy.UserRole.Name<>
"CEO")&&(Employment_Website__r.Current_Number_of_Posts__c*
Employment_Website__r.Price_Per_Post__c)>
(Employment_Website__r.Maximum_Budget__c-
Employment_Website__r.Price_Per_Post__c)
6. In the Error Message field, enter You have exceeded the budget forposting on this employment website.
7. In the Error Location field, select Top of Page.8. Click Save.
135
Blocking Record Creation with Cross-Object Validation Rules

Discussion
The first part of the validation rule formula spans to the Positions object to verify that the userwho created the position is not the CEO. This gives users the flexibility of going over budgeton job postings for positions that the CEO has created.
The second part of the validation rule formula spans to the Employment Website object toretrieve three values that are essential to the calculation. First, the formula references the rollup summary field to count how many Job Posting records have been saved for the associatedEmployment Website record. Then the formula references the currency field that stores theprice per post, and multiplies this value by the job record count to anticipate what the totalamount spent on this website will be if the job posting is saved. Finally, the formula referencesthe currency field that stores the maximum budget, and subtracts the price per post from thisvalue. Subtracting the price per post from the maximum budget compensates for the fact thatSalesforce cannot determine if the record exceeds the budget until after the record is saved.
See Also
• Validating Data Based on Fields in Other Records on page 136• Averaging Aggregated Data on page 128• The Sample Recruiting App on page 3• "About Validation Rules" in the Salesforce online help• "About Roll-Up Summary Fields" in the Salesforce online help• "Useful Advanced Formula Fields" in the Salesforce online help• "Considerations for Relationships" in the Salesforce online help
Validating Data Based on Fields in Other Records
Problem
You want to validate a candidate's ZIP code before saving a candidate record.
Solution
On the Candidate object in the Recruiting app, create a validation rule that uses the VLOOKUP()function to verify the value of the ZIP Code field against a list of valid ZIP codes stored ona custom object.
1. Create a custom object called ZIP Code with the following settings:
ValueField
ZIP CodeLabel
136
Chapter 4: Displaying Data and Modifying Data Actions

ValueField
ZIP CodesPlural Label
ZIP_CodeObject Name
Represents a ZIP codeDescription
Open the standard Salesforce Help &Training window
Context-Sensitive Help Setting
ZIP CodeRecord Name
TextData Type
NoAllow Reports
NoAllow Activities
NoTrack Field History
DeployedDeployment Status
NoAdd Notes & Attachments relatedlist to default page layout
YesLaunch New Custom Tab Wizardafter saving this custom object
2. Add the following custom fields to the ZIP code object:
Data TypeField Label
Text (Length: 20)City
NumberLatitude
NumberLongitude
Text (Length: 20)State
Text (Length: 2)State Abbreviation
3. Create a validation rule on the Candidate object that uses the following formula:
LEN(ZIP_Code__c) > 0 &&(Country__c = "USA" || Country__c = "US") &&VLOOKUP($ObjectType.ZIP_Code__c.Fields.City__c,$ObjectType.ZIP_Code__c.Fields.Name,LEFT(ZIP_Code__c,5))
137
Validating Data Based on Fields in Other Records

<> City__c)
Set the Error Message to The ZIP Code you entered is incorrect.
4. Download the compressed file from http://zips.sourceforge.net. It contains theUnited States zip codes in Comma-Separated Values (CSV) file format. Extract itscontents.
5. Click Setup ➤ Data Management ➤ Data Loader ➤ Download the Data Loader.6. Follow the on-screen instructions to download and install the Data Loader.7. Use the Data Loader to load the CSV file data into Salesforce.
a. Launch the Data Loader.b. Click Insert.c. Enter your Salesforce username and password, and click Login.d. After Salesforce verifies your login credentials, click Next.e. A popup window appears that displays the record count. Click OK.f. Select ZIP Code (ZIP_Code_c) and click Next.g. Click Create or Edit a Map.h. Map the Salesforce fields to the fields in the CSV file by dragging the
Salesforce fields from the top table to the bottom table.i. Click OK.j. Click Next.k. Click Finish.l. A popup appears that asks if you want to create new records. Click Yes.
Discussion
The VLOOKUP() function returns a value by looking up a related value on a custom object. Inthis recipe, the validation rule uses the VLOOKUP() function to search the Name field on allthe ZIP code records. It searchesuntil it finds one that matches the value of the ZIP Codefield on the candidate record that the user is trying to save. After finding the matching ZIPcode record, the VLOOKUP() function checks the record's City field to see if it is not equal tothe City field on the candidate record. If the search for a matching ZIP code record isunsuccessful, or if the values of the City fields on either record do not match, the validationrule prevents the candidate record from being saved, and returns the message The ZIP Codeyou entered is incorrect.
See Also
• "About Validation Rules" in the Salesforce online help• Storing and Displaying Confidential Information on page 125• "Operators and Functions" in the Salesforce online help
138
Chapter 4: Displaying Data and Modifying Data Actions

• The Sample Recruiting App on page 3• "Useful Advanced Formula Fields" in the Salesforce online help
Using Query String Parameters in a Visualforce Page
Problem
You want to read and set query string parameters in a Visualforce page, either in a customcontroller or in the page itself.
Solution
The way to read and set query string parameters depends on whether you access them from acustom controller or directly from a Visualforce page.
To read a query string parameter:
• If you're writing a custom controller, use the ApexPages global object variable andcurrentPage() and getParameters() methods to get query string parameters. Forexample, to get the value of the name query parameter in the URL:https://na1.salesforce.com/001/e?name=value, use the following line in yourcustom controller:
String value = ApexPages.currentPage().getParameters().get('name');
• If you're editing a page, use the $PageContext global variable in a merge field.
For example, suppose you want to add the Open Activities related list to an account detailpage, but instead of showing the account's activities, you want to show the activities of aspecified contact. To specify the contact, the following page looks for a query stringparameter for the contact's ID under the name relatedId:
<apex:page standardController="Account"><apex:pageBlock title="Hello {!$User.FirstName}!">
You belong to the {!account.name} account.<br/>You're also a nice person.
</apex:pageBlock><apex:detail subject="{!account}" relatedList="false"/><apex:relatedList list="OpenActivities"
subject="{!$CurrentPage.parameters.relatedId}"/></apex:page>
For this related list to render in a saved page, valid account and contact IDs must be specifiedin the URL. For example, if 001D000000HRgU6 is the account ID and 003D000000OXDIxis the contact ID, use the URL
139
Using Query String Parameters in a Visualforce Page
https://na3.salesforce.com/apex/MyFirstPage?id=001D000000HRgU6&relatedId=003D000000OXDIx.
To set a query string parameter:
• If you're writing a custom controller, use the setParameters() method withApexPages.currentPage() to add a query parameter in a test method. For example:
String key = 'name';String value = 'Caroline';ApexPages.currentPage().setParameters().put(key, value);
Note: The setParameters() method is only valid inside test methods.
• If you're editing a page, you can either construct a URL manually:
<apex:outputLink value="http://google.com/search?q={!account.name}">
Search Google</apex:outputLink>
Or you can use the <apex:param> tag as a child tag to write cleaner code:
<apex:outputLink value="http://google.com/search">Search Google<apex:param name="q" value="{!account.name}"/>
</apex:outputLink>
Note: In addition to <apex:outputLink>, <apex:param> can be a child ofother tags such as <apex:include> and <apex:commandLink>.
See Also
• Building a Table of Data in a Visualforce Page on page 31• Building a Form in a Visualforce Page on page 33• Creating a Wizard with Visualforce Pages on page 35• Using AJAX in a Visualforce Page on page 141
140
Chapter 4: Displaying Data and Modifying Data Actions

Using AJAX in a Visualforce Page
Problem
You want to use AJAX in a Visualforce page so that only part of the page needs to be refreshedwhen a user clicks a button or link.
Solution
Use the reRender attribute on an <apex:commandLink> or <apex:commandButton> tagto identify the component that should be refreshed. When a user clicks the button or link, onlythe identified component and all of its child components are refreshed.
For example, the following page shows a list of contacts. When a user clicks the name of acontact, only the area below the list refreshes, showing the details for the contact:
Figure 20: Developers Can Use Embedded AJAX to Refresh Part of a Page
The following markup defines the page from the previous example:
<apex:page controller="contactController" showHeader="true"tabStyle="Contact">
<apex:form><apex:dataTable value="{!contacts}" var="c"
cellpadding="4" border="1"><apex:column><apex:facet name="header"><b>Name</b></apex:facet><apex:commandLink reRender="detail">{!c.name}
141
Using AJAX in a Visualforce Page
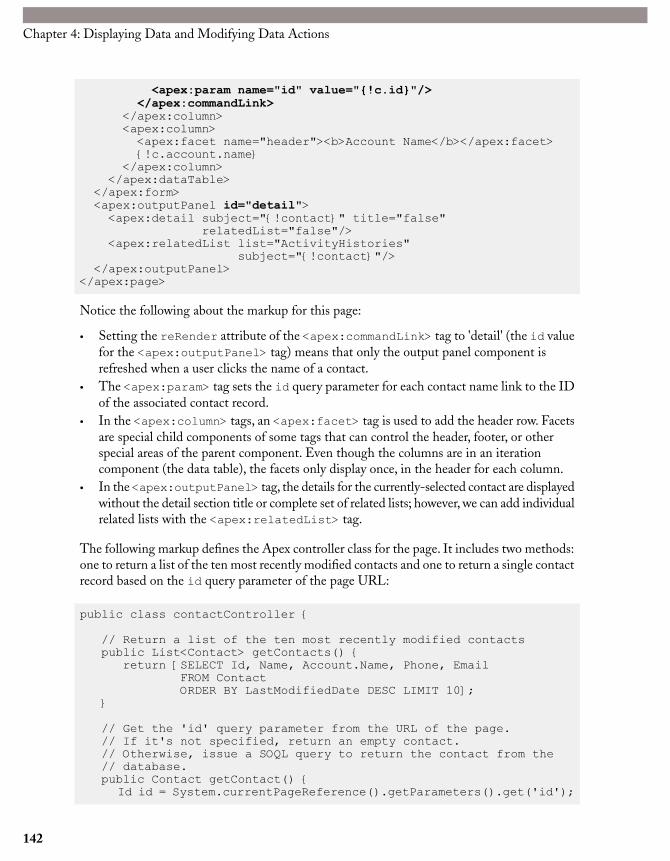
<apex:param name="id" value="{!c.id}"/></apex:commandLink>
</apex:column><apex:column><apex:facet name="header"><b>Account Name</b></apex:facet>{!c.account.name}
</apex:column></apex:dataTable>
</apex:form><apex:outputPanel id="detail"><apex:detail subject="{!contact}" title="false"
relatedList="false"/><apex:relatedList list="ActivityHistories"
subject="{!contact}"/></apex:outputPanel>
</apex:page>
Notice the following about the markup for this page:
• Setting the reRender attribute of the <apex:commandLink> tag to 'detail' (the id valuefor the <apex:outputPanel> tag) means that only the output panel component isrefreshed when a user clicks the name of a contact.
• The <apex:param> tag sets the id query parameter for each contact name link to the IDof the associated contact record.
• In the <apex:column> tags, an <apex:facet> tag is used to add the header row. Facetsare special child components of some tags that can control the header, footer, or otherspecial areas of the parent component. Even though the columns are in an iterationcomponent (the data table), the facets only display once, in the header for each column.
• In the <apex:outputPanel> tag, the details for the currently-selected contact are displayedwithout the detail section title or complete set of related lists; however, we can add individualrelated lists with the <apex:relatedList> tag.
The following markup defines the Apex controller class for the page. It includes two methods:one to return a list of the ten most recently modified contacts and one to return a single contactrecord based on the id query parameter of the page URL:
public class contactController {
// Return a list of the ten most recently modified contactspublic List<Contact> getContacts() {
return [SELECT Id, Name, Account.Name, Phone, EmailFROM ContactORDER BY LastModifiedDate DESC LIMIT 10];
}
// Get the 'id' query parameter from the URL of the page.// If it's not specified, return an empty contact.// Otherwise, issue a SOQL query to return the contact from the// database.public Contact getContact() {
Id id = System.currentPageReference().getParameters().get('id');
142
Chapter 4: Displaying Data and Modifying Data Actions

return id == null ? new Contact() : [SELECT Id, NameFROM ContactWHERE Id = :id];
}
}
See Also
• Using Query String Parameters in a Visualforce Page on page 139• Building a Table of Data in a Visualforce Page on page 31• Building a Form in a Visualforce Page on page 33• Creating a Wizard with Visualforce Pages on page 35
Using Properties in Apex
Problem
You want to create a page that captures input from users, and that input spans multiple sObjects.
Solution
Use a Visualforce page with a custom Apex controller, and give it properties to represent theinput fields from Accounts and Contacts.
1. Create a custom controller with a simple getName method.
a. Click Setup ➤ Develop ➤ Apex Classes.b. Click New.c. In the editor, add the following content:
/** This class is the controller for the* NewCustomer VisualForce page.* It uses properties to hold values entered* by the user. These values* will used to construct multiple SObjects.*/public class Customer {
// Add properties here
/* Required method in a VisualForce controller */public String getName() {
return 'Customer';}
143
Using Properties in Apex
// Add methods here// Add queries here}
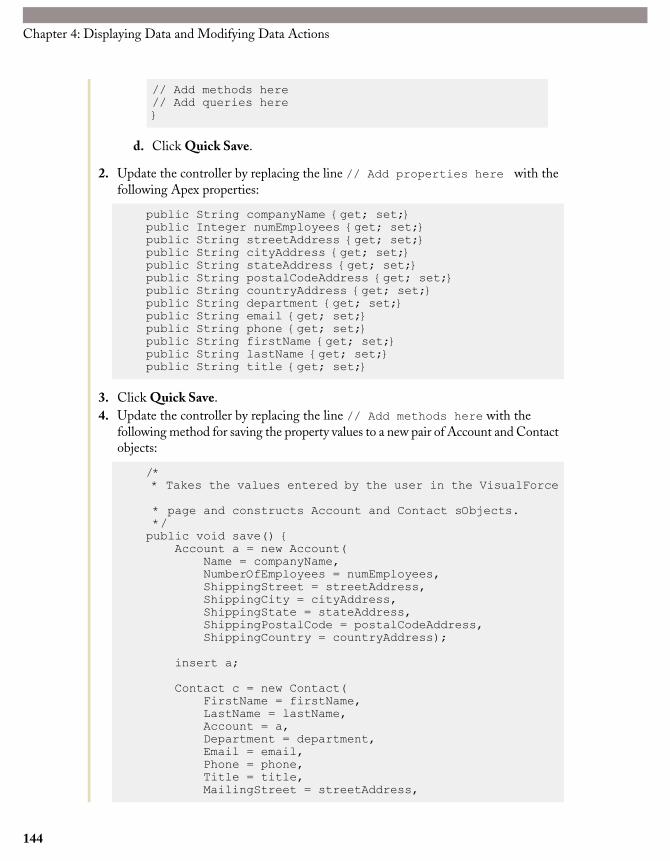
d. Click Quick Save.
2. Update the controller by replacing the line // Add properties here with thefollowing Apex properties:
public String companyName {get; set;}public Integer numEmployees {get; set;}public String streetAddress {get; set;}public String cityAddress {get; set;}public String stateAddress {get; set;}public String postalCodeAddress {get; set;}public String countryAddress {get; set;}public String department {get; set;}public String email {get; set;}public String phone {get; set;}public String firstName {get; set;}public String lastName {get; set;}public String title {get; set;}
3. Click Quick Save.4. Update the controller by replacing the line // Add methods here with the
following method for saving the property values to a new pair of Account and Contactobjects:
/** Takes the values entered by the user in the VisualForce
* page and constructs Account and Contact sObjects.*/public void save() {
Account a = new Account(Name = companyName,NumberOfEmployees = numEmployees,ShippingStreet = streetAddress,ShippingCity = cityAddress,ShippingState = stateAddress,ShippingPostalCode = postalCodeAddress,ShippingCountry = countryAddress);
insert a;
Contact c = new Contact(FirstName = firstName,LastName = lastName,Account = a,Department = department,Email = email,Phone = phone,Title = title,MailingStreet = streetAddress,
144
Chapter 4: Displaying Data and Modifying Data Actions
MailingCity = cityAddress,MailingState = stateAddress,MailingPostalCode = postalCodeAddress,MailingCountry = countryAddress);
insert c;}
5. Click Quick Save.6. Update the controller by replacing the line // Add queries here with queries
for displaying Accounts and Contacts related lists:
/* Used for the Account list at the end of theVisualForce page
*/public List<Account> getAccountList() {
return [select name, numberofemployees from account];}
/* Used for the Contact list at the end of theVisualForce page
*/public List<Contact> getContactList() {
return [select name, title, department, email, phonefrom contact];
}
7. Click Save.8. Click SetupDevelop ➤ Pages.9. Click New.10. In the name field, enter newCustomerEntry.11. Optionally enter a label and description.12. In the editor, enter the following markup:
<apex:page controller="Customer"><apex:form >
<apex:pageBlock title="New Customer Entry"><p>First Name:
<apex:inputText value="{!firstName}"/></p><p>Last Name:
<apex:inputText value="{!lastName}"/></p><p>Company Name:
<apex:inputText value="{!companyName}"/></p><p># Employees:
<apex:inputText value="{!numEmployees}"/></p><p>Department:
<apex:inputText value="{!department}"/></p><p>Email:
<apex:inputText value="{!email}"/></p><p>Phone:
<apex:inputText value="{!phone}"/></p>
145
Using Properties in Apex
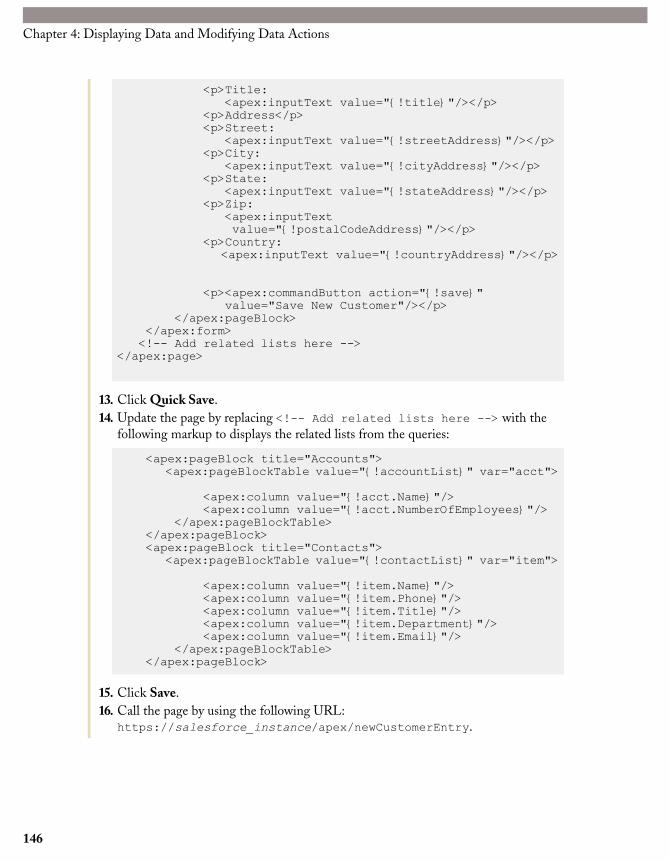
<p>Title:<apex:inputText value="{!title}"/></p>
<p>Address</p><p>Street:
<apex:inputText value="{!streetAddress}"/></p><p>City:
<apex:inputText value="{!cityAddress}"/></p><p>State:
<apex:inputText value="{!stateAddress}"/></p><p>Zip:
<apex:inputTextvalue="{!postalCodeAddress}"/></p>
<p>Country:<apex:inputText value="{!countryAddress}"/></p>
<p><apex:commandButton action="{!save}"value="Save New Customer"/></p>
</apex:pageBlock></apex:form><!-- Add related lists here -->
</apex:page>
13. Click Quick Save.14. Update the page by replacing <!-- Add related lists here --> with the
following markup to displays the related lists from the queries:
<apex:pageBlock title="Accounts"><apex:pageBlockTable value="{!accountList}" var="acct">
<apex:column value="{!acct.Name}"/><apex:column value="{!acct.NumberOfEmployees}"/>
</apex:pageBlockTable></apex:pageBlock><apex:pageBlock title="Contacts">
<apex:pageBlockTable value="{!contactList}" var="item">
<apex:column value="{!item.Name}"/><apex:column value="{!item.Phone}"/><apex:column value="{!item.Title}"/><apex:column value="{!item.Department}"/><apex:column value="{!item.Email}"/>
</apex:pageBlockTable></apex:pageBlock>
15. Click Save.16. Call the page by using the following URL:
https://salesforce_instance/apex/newCustomerEntry.
146
Chapter 4: Displaying Data and Modifying Data Actions
Discussion
You want to ask the user to enter information about a new customer. The fields are used tocreate both a new account and a new contact associated with that account. Using a Visualforcepage lets you present whatever user interface you want, using HTML and Visualforce markup;however, each standard controller in Visualforce corresponds to a single sObject type, such asAccount or Contact. To work with more than on sObject type, you need to use a customcontroller.
When using a Apex custom controller, the easiest way to do to access data on exposed by thecontroller is to use Apex properties.The syntax for Apex properties is similar to C# properties.Java-style bean properties (with getters and setters that you create for each property) also work;however, the property syntax used above is much more readable, and makes it easier todistinguish the controller's properties from its actions.
Queries in a custom controller can be used to present data to the user. In this example, queriesare used to create two tables that mimic related lists.
Since the form is simple HTML, you can modify it to your style either using HTML orVisualforce components.
Note that when you add a new customer and click Save, the account and contact informationis displayed in the related lists on the page.
See Also
• Creating a Child Record When a Parent Record is Created on page 160• Using Dynamic Apex on page 73
Mass Updating Contacts When an Account Changes
Problem
You want to update the address of all contacts associated with an account whenever the account'saddress changes.
Solution
Write a trigger in Apex that updates associated contacts when an account is updated. Forexample:
trigger updateContactsOnAddressChange on Account(before update) {
// The map allows us to keep track of the accounts that have
147
Mass Updating Contacts When an Account Changes
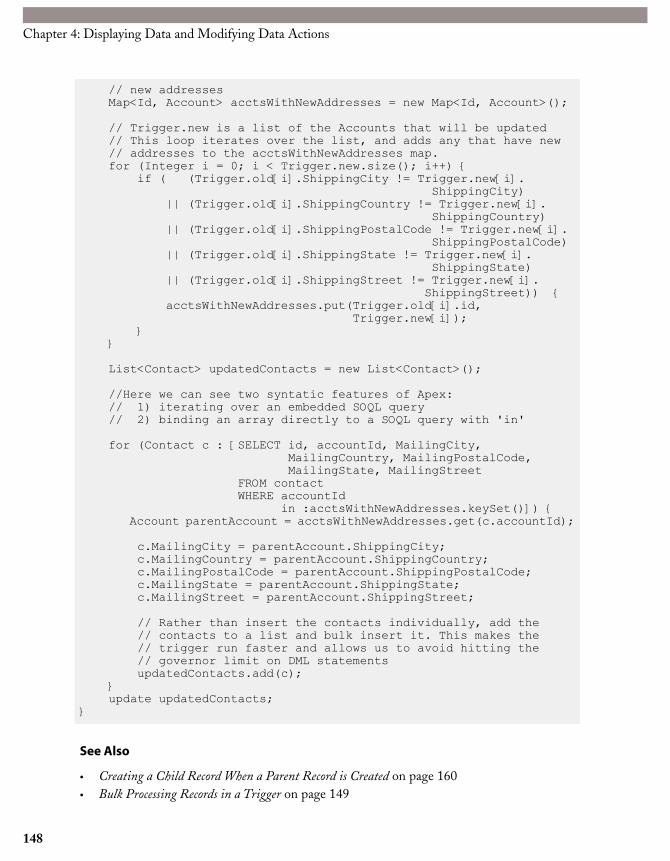
// new addressesMap<Id, Account> acctsWithNewAddresses = new Map<Id, Account>();
// Trigger.new is a list of the Accounts that will be updated// This loop iterates over the list, and adds any that have new// addresses to the acctsWithNewAddresses map.for (Integer i = 0; i < Trigger.new.size(); i++) {
if ( (Trigger.old[i].ShippingCity != Trigger.new[i].ShippingCity)
|| (Trigger.old[i].ShippingCountry != Trigger.new[i].ShippingCountry)
|| (Trigger.old[i].ShippingPostalCode != Trigger.new[i].ShippingPostalCode)
|| (Trigger.old[i].ShippingState != Trigger.new[i].ShippingState)
|| (Trigger.old[i].ShippingStreet != Trigger.new[i].ShippingStreet)) {
acctsWithNewAddresses.put(Trigger.old[i].id,Trigger.new[i]);
}}
List<Contact> updatedContacts = new List<Contact>();
//Here we can see two syntatic features of Apex:// 1) iterating over an embedded SOQL query// 2) binding an array directly to a SOQL query with 'in'
for (Contact c : [SELECT id, accountId, MailingCity,MailingCountry, MailingPostalCode,MailingState, MailingStreet
FROM contactWHERE accountId
in :acctsWithNewAddresses.keySet()]) {Account parentAccount = acctsWithNewAddresses.get(c.accountId);
c.MailingCity = parentAccount.ShippingCity;c.MailingCountry = parentAccount.ShippingCountry;c.MailingPostalCode = parentAccount.ShippingPostalCode;c.MailingState = parentAccount.ShippingState;c.MailingStreet = parentAccount.ShippingStreet;
// Rather than insert the contacts individually, add the// contacts to a list and bulk insert it. This makes the// trigger run faster and allows us to avoid hitting the// governor limit on DML statementsupdatedContacts.add(c);
}update updatedContacts;
}
See Also
• Creating a Child Record When a Parent Record is Created on page 160• Bulk Processing Records in a Trigger on page 149
148
Chapter 4: Displaying Data and Modifying Data Actions
• Preventing Duplicate Records from Saving on page 154• Controlling Recursive Triggers on page 150
Bulk Processing Records in a Trigger
Problem
You're new to writing triggers, and when you write one for bulk processing, it often runs intoApex governor limits.
Solution
For efficient bulk processing, it's critical that triggers execute a constant number of databasequeries, regardless of how many records are being processed. Instead of looping over individualrecords in the Trigger.old or Trigger.new lists, use maps to organize records based ontheir ID or another identifying field, and use sets to isolate distinct records.
For example, consider the following lead deduplication trigger, which rejects any new or updatedlead that has a duplicate email address:
• The trigger first uses a map to store the updated leads with each lead's email address as thekey.
• The trigger then uses the set of keys in the map to query the database for any existing leadrecords with the same email addresses. For every matching lead, the duplicate record ismarked with an error condition.
trigger leadDuplicatePreventer on Lead(before insert, before update) {
Map<String, Lead> leadMap = new Map<String, Lead>();for (Lead lead : System.Trigger.new) {
// Make sure we don't treat an email address that// isn't changing during an update as a duplicate.if ((lead.Email != null) &&
(System.Trigger.isInsert ||(lead.Email !=
System.Trigger.oldMap.get(lead.Id).Email))) {
// Make sure another new lead isn't also a duplicateif (leadMap.containsKey(lead.Email)) {
lead.Email.addError('Another new lead has the '+ 'same email address.');
} else {
"Bulk Processing Records in a Trigger" contributed by Steve Fisher, Senior Vice President of thePlatform Division for salesforce.com
149
Bulk Processing Records in a Trigger
leadMap.put(lead.Email, lead);}
}}
// Using a single database query, find all the leads in// the database that have the same email address as any// of the leads being inserted or updated.for (Lead lead : [SELECT Email FROM Lead
WHERE Email IN :leadMap.KeySet()]) {Lead newLead = leadMap.get(lead.Email);newLead.Email.addError('A lead with this email '
+ 'address already exists.');}
}
See Also
• Preventing Duplicate Records from Saving on page 154 contains further discussion of theApex trigger in this recipe.
• Controlling Recursive Triggers on page 150
Controlling Recursive Triggers
Problem
You want to write a trigger that creates a new record as part of its processing logic; however,that record may then cause another trigger to fire, which in turn causes another to fire, and soon. You don't know how to stop that recursion.
Solution
Use a static variable in an Apex class to avoid an infinite loop. Static variables are local to thecontext of a Web request (or test method during a call to runTests()), so all triggers thatfire as a result of a user's action have access to it.
For example, consider the following scenario: frequently a Salesforce user wants to follow upwith a customer the day after logging a call with that customer. Because this is such a commonuse case, you want to provide your users with a helpful checkbox on a task that allows them toautomatically create a follow-up task scheduled for the next day.
You can use a before insert trigger on Task to insert the follow-up task, but this, in turn,refires the before insert trigger before the follow-up task is inserted. To exit out of thisrecursion, set a static class boolean variable during the first pass through the trigger to informthe second trigger that it should not insert another follow-up task:
150
Chapter 4: Displaying Data and Modifying Data Actions
Note: For this Apex script to work properly, you first must define a custom checkboxfield on Task. In this example, this field is named Create_Follow_Up_Task__c.
The following code defines the class with the static class variable:
public class FollowUpTaskHelper {
// Static variables are local to the context of a Web request// (or testMethod during a runTests call)// Therefore, this variable will be initialized as false// at the beginning of each Web request which accesses it.
private static boolean alreadyCreatedTasks = false;
public static boolean hasAlreadyCreatedFollowUpTasks() {return alreadyCreatedTasks;
}
// By setting the variable to true, it maintains this// new value throughout the duration of the request// (or testMethod)public static void setAlreadyCreatedFollowUpTasks() {
alreadyCreatedTasks = true;}
public static String getFollowUpSubject(String subject) {return 'Follow Up: ' + subject;
}
}
The following code defines the trigger:
trigger AutoCreateFollowUpTasks on Task (before insert) {
// Before cloning and inserting the follow-up tasks,// make sure the current trigger context isn't operating// on a set of cloned follow-up tasks.if (!FollowUpTaskHelper.hasAlreadyCreatedFollowUpTasks()) {
List<Task> followUpTasks = new List<Task>();
for (Task t : Trigger.new) {if (t.Create_Follow_Up_Task__c) {
// False indicates that the ID should NOT// be preservedTask followUpTask = t.clone(false);System.assertEquals(null, followUpTask.id);
151
Controlling Recursive Triggers

followUpTask.subject =
FollowUpTaskHelper.getFollowUpSubect(followUpTask.subject);if (followUpTask.ActivityDate != null) {
followUpTask.ActivityDate =followUpTask.ActivityDate + 1; //The day after
}followUpTasks.add(followUpTask);
}}FollowUpTaskHelper.setAlreadyCreatedFollowUpTasks();insert followUpTasks;
}}
The following code defines the test methods:
// This class includes the test methods for the// AutoCreateFollowUpTasks trigger.
public class FollowUpTaskTester {private static integer NUMBER_TO_CREATE = 4;private static String UNIQUE_SUBJECT =
'Testing follow-up tasks';
static testMethod void testCreateFollowUpTasks() {List<Task> tasksToCreate = new List<Task>();for (Integer i = 0; i < NUMBER_TO_CREATE; i++) {
Task newTask = new Task(subject = UNIQUE_SUBJECT,ActivityDate = System.today(),Create_Follow_Up_Task__c = true );
System.assert(newTask.Create_Follow_Up_Task__c);tasksToCreate.add(newTask);
}
insert tasksToCreate;System.assertEquals(NUMBER_TO_CREATE,
[select count()from Taskwhere subject = :UNIQUE_SUBJECTand ActivityDate = :System.today()]);
// Make sure there are follow-up tasks createdSystem.assertEquals(NUMBER_TO_CREATE,
[select count()from Taskwhere subject =:FollowUpTaskHelper.getFollowUpSubject(UNIQUE_SUBJECT)and ActivityDate = :System.today()+1]);
}
static testMethod void assertNormalTasksArentFollowedUp() {List<Task> tasksToCreate = new List<Task>();for (integer i = 0; i < NUMBER_TO_CREATE; i++) {
Task newTask = new Task(subject=UNIQUE_SUBJECT,
152
Chapter 4: Displaying Data and Modifying Data Actions
ActivityDate = System.today(),Create_Follow_Up_Task__c = false);
tasksToCreate.add(newTask);}
insert tasksToCreate;System.assertEquals(NUMBER_TO_CREATE,
[select count()from Taskwhere subject=:UNIQUE_SUBJECTand ActivityDate =:System.today()]);
// There should be no follow-up tasks createdSystem.assertEquals(0,
[select count()from Taskwhere subject=:FollowUpTaskHelper.getFollowUpSubject(UNIQUE_SUBJECT)
and ActivityDate =:(System.today() +1)]);}
}
See Also
• Bulk Processing Records in a Trigger on page 149• Comparing Queries Against Trigger.old and Trigger.new on page 153
Comparing Queries Against Trigger.old and Trigger.new
Problem
You're writing a before update or before delete trigger and need to issue a SOQLquery to get related data for records in the Trigger.new and Trigger.old lists.
Solution
Correlate records and query results with the Trigger.newMap and Trigger.oldMapID-to-SObject maps.
For example, the following trigger uses Trigger.oldMap to create a set of unique IDs(Trigger.oldMap.keySet()). The set is then used as part of a query to create a list of jobapplications associated with the candidates being processed by the trigger. For every job
153
Comparing Queries Against Trigger.old and Trigger.new

application returned by the query, the related candidate is retrieved from Trigger.oldMapand prevented from being deleted.
trigger candidateTrigger on Candidate__c (before delete) {for (Job_Application__c jobApp : [SELECT Candidate__c
FROM Job_Application__cWHERE Candidate__cIN :Trigger.oldMap.keySet()]) {
Trigger.oldMap.get(jobApp.Candidate__c).addError('Cannot delete candidate with a job application');
}}
Discussion
It's a better practice to use Trigger.newMap and Trigger.oldMap because you can't assumethat directly querying the Trigger.new and Trigger.old lists will return the same numberof records in the same order. Even though these lists are sorted by ID, external operationsmight change the number of records that are returned and make parallel list processingdangerous.
See Also
• Bulk Processing Records in a Trigger on page 149• Controlling Recursive Triggers on page 150
Preventing Duplicate Records from Saving
Problem
You want to prevent users from saving duplicate records based on the value of one or morefields.
Solution
If you can determine whether a record is a duplicate based on the value of a single custom field,select the Unique and Required checkboxes on that field's definition:
• To edit a custom field on a standard object:
1. Click Setup ➤ Customize.
"Preventing Duplicate Records from Saving" contributed by Steve Fisher, Senior Vice President ofthe Platform Division for salesforce.com
154
Chapter 4: Displaying Data and Modifying Data Actions
2. Select the link for the desired object, and click Fields.3. Click Edit next to the name of the appropriate field.
• To edit a custom field on a custom object:
1. Click Setup ➤ Develop ➤ Objects.2. Click the name of the object on which the field appears.3. Click Edit next to the name of the field in the Custom Fields and Relationships
related list.
The Unique and Required checkboxes are only available on custom fields. If you want tocheck for uniqueness based on the value of a single standard field and your edition can't useApex, you can also use the following workaround:
1. Create a custom field with the same type and label as the standard field. Select theUnique and Required checkboxes on the custom field's definition page.
2. Replace the standard field with your new custom field on all page layouts.3. Use field-level security to make the standard field read-only for all user profiles.This
prevents any user from mistakenly modifying the standard field through the API,unless the user has the "Modify All Data" profile permission.
4. Define a workflow rule that automatically updates the value of the standard fieldwith the value of the custom field whenever the custom field changes. This ensuresthat any application functionality that relies on the value of the standard fieldcontinues to work properly. (For example, the Send An Email button on the ActivityHistory related list relies on the standard Email field for a lead or contact.)
Note: Because this is a less-elegant solution than using Apex, creating a trigger onlead is the preferred solution for Unlimited Edition and Developer Edition.
If you need to require uniqueness based on the value of two or more fields, or a single standardfield, write an Apex before insert and before update trigger. For example, the followingtrigger prevents leads from being saved if they have a matching Email field:
• The trigger first uses a map to store the updated leads with each lead's email address as thekey.
• The trigger then uses the set of keys in the map to query the database for any existing leadrecords with the same email addresses. For every matching lead, the duplicate record ismarked with an error condition.
trigger leadDuplicatePreventer on Lead(before insert, before update) {
Map<String, Lead> leadMap = new Map<String, Lead>();for (Lead lead : System.Trigger.new) {
155
Preventing Duplicate Records from Saving

// Make sure we don't treat an email address that// isn't changing during an update as a duplicate.if ((lead.Email != null) &&
(System.Trigger.isInsert ||(lead.Email !=
System.Trigger.oldMap.get(lead.Id).Email))) {
// Make sure another new lead isn't also a duplicateif (leadMap.containsKey(lead.Email)) {
lead.Email.addError('Another new lead has the '+ 'same email address.');
} else {leadMap.put(lead.Email, lead);
}}
}
// Using a single database query, find all the leads in// the database that have the same email address as any// of the leads being inserted or updated.for (Lead lead : [SELECT Email FROM Lead
WHERE Email IN :leadMap.KeySet()]) {Lead newLead = leadMap.get(lead.Email);newLead.Email.addError('A lead with this email '
+ 'address already exists.');}
}
The following class can be used to test the trigger for both single- and bulk-record inserts andupdates.
public class leadDupePreventerTests{static testMethod void testLeadDupPreventer() {
// First make sure there are no leads already in the system// that have the email addresses used for testingSet<String> testEmailAddress = new Set<String>();testEmailAddress.add('[email protected]');testEmailAddress.add('[email protected]');testEmailAddress.add('[email protected]');testEmailAddress.add('[email protected]');testEmailAddress.add('[email protected]');System.assert([SELECT count() FROM Lead
WHERE Email IN :testEmailAddress] == 0);
// Seed the database with some leads, and make sure they can// be bulk inserted successfully.Lead lead1 = new Lead(LastName='Test1', Company='Test1 Inc.',
Email='[email protected]');Lead lead2 = new Lead(LastName='Test2', Company='Test2 Inc.',
Email='[email protected]');Lead lead3 = new Lead(LastName='Test3', Company='Test3 Inc.',
Email='[email protected]');Lead[] leads = new Lead[] {lead1, lead2, lead3};insert leads;
156
Chapter 4: Displaying Data and Modifying Data Actions

// Now make sure that some of these leads can be changed and// then bulk updated successfully. Note that lead1 is not// being changed, but is still being passed to the update// call. This should be OK.lead2.Email = '[email protected]';lead3.Email = '[email protected]';update leads;
// Make sure that single row lead duplication prevention works// on insert.Lead dup1 = new Lead(LastName='Test1Dup',
Company='Test1Dup Inc.',Email='[email protected]');
try {insert dup1;System.assert(false);
} catch (DmlException e) {System.assert(e.getNumDml() == 1);System.assert(e.getDmlIndex(0) == 0);System.assert(e.getDmlFields(0).size() == 1);System.assert(e.getDmlFields(0)[0] == 'Email');System.assert(e.getDmlMessage(0).indexOf(
'A lead with this email address already exists.') > -1);}
// Make sure that single row lead duplication prevention works// on update.dup1 = new Lead(Id = lead1.Id, LastName='Test1Dup',
Company='Test1Dup Inc.',Email='[email protected]');
try {update dup1;System.assert(false);
} catch (DmlException e) {System.assert(e.getNumDml() == 1);System.assert(e.getDmlIndex(0) == 0);System.assert(e.getDmlFields(0).size() == 1);System.assert(e.getDmlFields(0)[0] == 'Email');System.assert(e.getDmlMessage(0).indexOf(
'A lead with this email address already exists.') > -1);}
// Make sure that bulk lead duplication prevention works on// insert. Note that the first item being inserted is fine,// but the second and third items are duplicates. Note also// that since at least one record insert fails, the entire// transaction will be rolled back.dup1 = new Lead(LastName='Test1Dup', Company='Test1Dup Inc.',
Email='[email protected]');Lead dup2 = new Lead(LastName='Test2Dup',
Company='Test2Dup Inc.',Email='[email protected]');
Lead dup3 = new Lead(LastName='Test3Dup',Company='Test3Dup Inc.',Email='[email protected]');
157
Preventing Duplicate Records from Saving
Lead[] dups = new Lead[] {dup1, dup2, dup3};try {
insert dups;System.assert(false);
} catch (DmlException e) {System.assert(e.getNumDml() == 2);System.assert(e.getDmlIndex(0) == 1);System.assert(e.getDmlFields(0).size() == 1);System.assert(e.getDmlFields(0)[0] == 'Email');System.assert(e.getDmlMessage(0).indexOf(
'A lead with this email address already exists.') > -1);System.assert(e.getDmlIndex(1) == 2);System.assert(e.getDmlFields(1).size() == 1);System.assert(e.getDmlFields(1)[0] == 'Email');System.assert(e.getDmlMessage(1).indexOf(
'A lead with this email address already exists.') > -1);}
// Make sure that bulk lead duplication prevention works on// update. Note that the first item being updated is fine,// because the email address is new, and the second item is// also fine, but in this case it's because the email// address doesn't change. The third case is flagged as an// error because it is a duplicate of the email address of the// first lead's value in the database, even though that value// is changing in this same update call. It would be an// interesting exercise to rewrite the trigger to allow this// case. Note also that since at least one record update// fails, the entire transaction will be rolled back.dup1 = new Lead(Id=lead1.Id, Email='[email protected]');dup2 = new Lead(Id=lead2.Id, Email='[email protected]');dup3 = new Lead(Id=lead3.Id, Email='[email protected]');dups = new Lead[] {dup1, dup2, dup3};try {
update dups;System.assert(false);
} catch (DmlException e) {System.debug(e.getNumDml());System.debug(e.getDmlMessage(0));System.assert(e.getNumDml() == 1);System.assert(e.getDmlIndex(0) == 2);System.assert(e.getDmlFields(0).size() == 1);System.assert(e.getDmlFields(0)[0] == 'Email');System.assert(e.getDmlMessage(0).indexOf(
'A lead with this email address already exists.') > -1);}
// Make sure that duplicates in the submission are caught when// inserting leads. Note that this test also catches an// attempt to insert a lead where there is an existing// duplicate.dup1 = new Lead(LastName='Test1Dup', Company='Test1Dup Inc.',
Email='[email protected]');dup2 = new Lead(LastName='Test2Dup', Company='Test2Dup Inc.',
Email='[email protected]');dup3 = new Lead(LastName='Test3Dup', Company='Test3Dup Inc.',
158
Chapter 4: Displaying Data and Modifying Data Actions

Email='[email protected]');dups = new Lead[] {dup1, dup2, dup3};try {
insert dups;System.assert(false);
} catch (DmlException e) {System.assert(e.getNumDml() == 2);System.assert(e.getDmlIndex(0) == 1);System.assert(e.getDmlFields(0).size() == 1);System.assert(e.getDmlFields(0)[0] == 'Email');System.assert(e.getDmlMessage(0).indexOf(
'Another new lead has the same email address.') > -1);System.assert(e.getDmlIndex(1) == 2);System.assert(e.getDmlFields(1).size() == 1);System.assert(e.getDmlFields(1)[0] == 'Email');System.assert(e.getDmlMessage(1).indexOf(
'A lead with this email address already exists.') > -1);}
// Make sure that duplicates in the submission are caught when// updating leads. Note that this test also catches an attempt// to update a lead where there is an existing duplicate.dup1 = new Lead(Id=lead1.Id, Email='[email protected]');dup2 = new Lead(Id=lead2.Id, Email='[email protected]');dup3 = new Lead(Id=lead3.Id, Email='[email protected]');dups = new Lead[] {dup1, dup2, dup3};try {
update dups;System.assert(false);
} catch (DmlException e) {System.assert(e.getNumDml() == 2);System.assert(e.getDmlIndex(0) == 1);System.assert(e.getDmlFields(0).size() == 1);System.assert(e.getDmlFields(0)[0] == 'Email');System.assert(e.getDmlMessage(0).indexOf(
'Another new lead has the same email address.') > -1);System.assert(e.getDmlIndex(1) == 2);System.assert(e.getDmlFields(1).size() == 1);System.assert(e.getDmlFields(1)[0] == 'Email');System.assert(e.getDmlMessage(1).indexOf(
'A lead with this email address already exists.') > -1);}
}}
Discussion
The first and most important lesson to learn from this recipe is that you should generally takeadvantage of native Force Platform functionality if it can solve your problem, rather thanwriting code. By using the point-and-click tools that are provided, you leverage the power ofthe platform. Why reinvent the wheel if you can take advantage of a native feature that performsthe same functionality? As a result, we indicate in this recipe that you should first determinewhether you can simply use the Unique and Required checkboxes on a single custom fielddefinition to prevent duplicates.
159
Preventing Duplicate Records from Saving

If you do need to check for duplicates based on the value of a single standard field, or morethan one field, Apex is the best way to accomplish this. Because Apex runs natively on theForce Platform servers, it's far more efficient than a deduplication algorithm that runs in ans-control or Web control. Additionally, Apex can execute every time a record is inserted orupdated in the database, regardless of whether the database operation occurs as a result of auser clicking Save in the user interface, or as a result of a bulk upsert call to the API. S-controlsand Web controls can only be triggered when a record is saved through the user interface.
The included trigger is production-ready because it meets the following criteria:
• The trigger only makes a single database query, regardless of the number of leads beinginserted or updated.
• The trigger catches duplicates that are in the list of leads being inserted or updated.• The trigger handles updates properly. That is, leads that are being updated with email
addresses that haven't changed are not flagged as duplicates.• The trigger has full unit test coverage, including tests for both single- and bulk-record
inserts and updates.
See Also
Controlling Recursive Triggers on page 150
Creating a Child Record When a Parent Record is Created
Problem
You want to automatically create a new child record when you create a parent record. Thechild record should be populated with default values from the position.
Solution
Use an Apex trigger to automatically create the child record when a new parent record iscreated.
For this example, let's automatically create a new interviewer record (child) for the specifiedhiring manager whenever a new position (parent) is created.
trigger AutoCreateInterviewer on Position__c (after insert) {List<Interviewer__c> interviewers = new List<Interviewer__c>();
//For each position processed by the trigger, add a new//interviewer record for the specified hiring manager.//Note that Trigger.New is a list of all the new positions//that are being created.for (Position__c newPosition: Trigger.New) {
160
Chapter 4: Displaying Data and Modifying Data Actions
if (newPosition.Hiring_Manager__c != null) {interviewers.add(new Interviewer__c(
Name = '1',Position__c = newPosition.Id,Employee__c = newPosition.Hiring_Manager__c,Role__c = 'Managerial'));
}}insert interviewers;
}
See Also
• Bulk Processing Records in a Trigger on page 149• Controlling Recursive Triggers on page 150• Comparing Queries Against Trigger.old and Trigger.new on page 153
Using System.runAs in Test Methods
Problem
Generally, all Apex scripts run in system mode. The permissions and record sharing of thecurrent user are not taken into account; however, you need to verify if a specific user has accessto a specific object.
Solution
The system method runAs enables you to write test methods that change user contexts toeither an existing user or a new user. All of that user's record sharing is then enforced.
In the following example, a new user is created, based on the standard user profile. In addition,a second user is instantiated, based on the system administrator profile, to demonstrate bothways of generating users for tests. Two accounts are created, and then runAs verifies that thestandard user cannot view the administrator account.
@isTestprivate class MyTestClass {
static testMethod void test1(){
// Retrieve two profiles, for the standard user and the system
// administrator, then populate a map with them.
Map<String,ID> profiles = new Map<String,ID>();List<Profile> ps = [select id, name from Profile where name =
161
Using System.runAs in Test Methods
'Standard User' or name = 'System Administrator'];
for(Profile p : ps){profiles.put(p.name, p.id);
}
// Create the users to be used in this test.// First make a new user.
User standard = new User(alias = 'standt',email='[email protected]',emailencodingkey='UTF-8',lastname='Testing', languagelocalekey='en_US',localesidkey='en_US',profileid = profiles.get('Standard User'),timezonesidkey='America/Los_Angeles',username='[email protected]');
insert standard;
// Then instantiate a user from an existing profile
User admin = [SELECT Id FROM user WHERE profileid =:profiles.get('System Administrator')];
// Create some test data for testing these two users
List<Account> accnts = new List<Account>();Account a1 =
new Account(name='Admin Account', ownerid = admin.id);Account a2 =
new Account(name='Standard Account', ownerid = standard.id);
accnts.add(a1);accnts.add(a2);insert accnts;
// Confirm that the standard user cannot see the admin account
system.runas(standard){accnts.clear();accnts = [select id, name from account where id = :a1.id];system.debug(accnts.isEmpty() + ' really'+accnts);System.assertEquals(accnts.isEmpty(), true);
}// Confirm that the admin user can see the standard account
system.runas(admin){accnts.clear();accnts = [select id, name from account where id = :a2.id];System.assertEquals(accnts.isEmpty(), false);
}
162
Chapter 4: Displaying Data and Modifying Data Actions
}}
Discussion
Note that this class is defined as isTest. Classes defined with the isTest annotation do notcount against your organization limit of 1 MB for all Apex scripts.
You can only use runAs in a test method.
Only the following items use the permissions granted by the user specified with runAs:
• dynamic Apex• methods using with sharing or without sharing
• shared records
The original permissions are reset after runAs completes.
See Also
"Testing and Code Coverage" in the Apex Language Reference available atwww.salesforce.com/us/developer/docs/apexcode/index_CSH.htm#apex_testing.htm
163
Using System.runAs in Test Methods