Embed Size (px)
Citation preview

The Magnifier
for Windows
Area and FullScreen Magnifier
Version 1.50Release 5
User’s Guide
The Magnifier: for Windows; Area and FullScreen Magnifier; Version 1.50 Release 5;User’s Guide
IMG Real World Press179 Niblick Road #454Paso Robles, CA 934461-800-889-0987 (US & Canada)+1-818-701-1579+1-818-936-0200 (fax)Website: http://www.imgpresents.comTo report errors, please send a note to [email protected] Real World Press is a division of Innovation Management Group, Inc.The Magnifier, Version 1.50 Release 5, 9/17/2012Copyright © 1997-2012 by Innovation Management Group, Inc.Production/Editing/Composition/Indexing/Publishing: IMG Real World Press
Notice of RightsAll Rights Reserved. No part of this book may be reproduced
or transmitted in any form by any means, electronic,
mechanical, photocopying, recording, or otherwise, without
the prior written permission of the publisher. For information
on obtaining permission for reprints, excerpts, or other uses,
please contact [email protected]
TrademarksMy-T-Mouse®, My-T-Pen®, My-T-Touch® and My-T-Soft®
are registered trademarks of Innovation Management Group,
Inc.
Any other product name, service, or company identified
within the book is used for informational or editorial
purposes only, and with no intention of infringment of any
trademark. No such use is intended to convey endorsement or
other affiliation with this book.
Notice of liabilityThe information in this book is distributed on an "As is"
basis, without warranty. While every precaution has been
taken in the preparation of this book, IMG Real World Press
shall not have any liability to any person or entity with
respect to any loss or damage caused or alleged to be caused
directly or indirectly by any information contained in this
book or the product(s) described. The publisher takes no
responsibility for any errors or omissions.
ISBN 978-0-557-88454-4

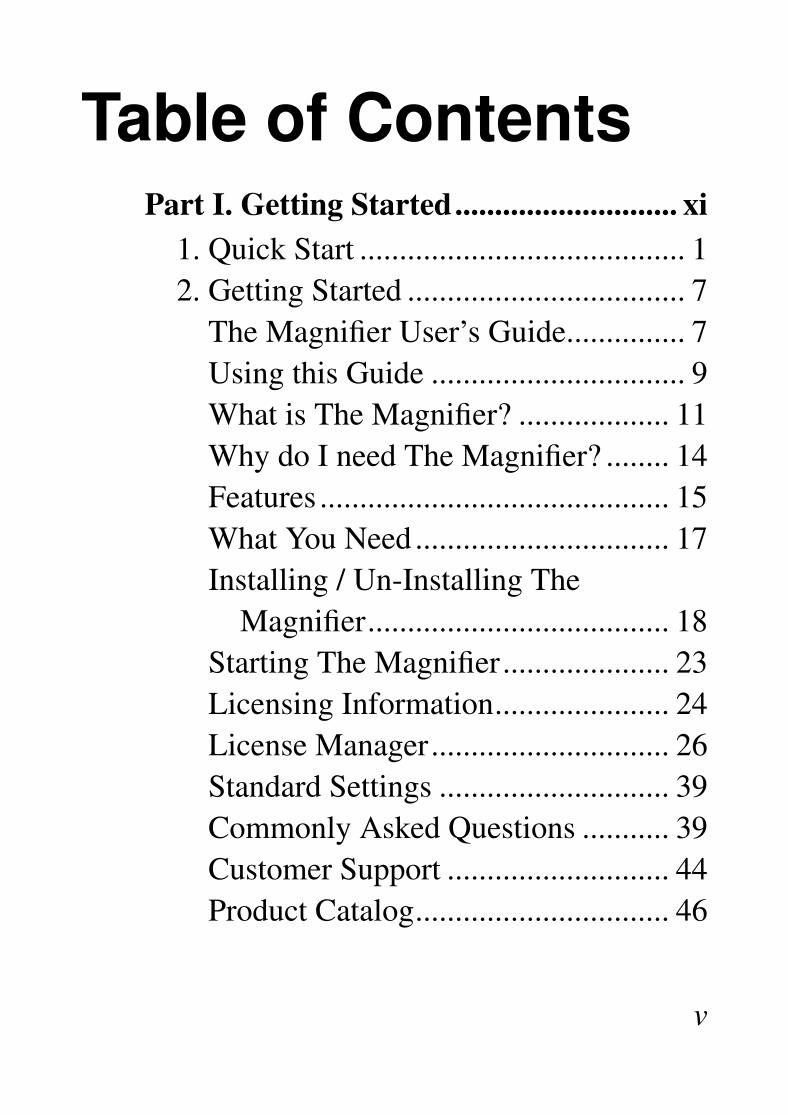
Table of ContentsPart I. Getting Started............................ xi
1. Quick Start ......................................... 12. Getting Started ................................... 7
The Magnifier User’s Guide............... 7Using this Guide ................................ 9What is The Magnifier? ................... 11Why do I need The Magnifier? ........ 14Features ............................................ 15What You Need ................................ 17Installing / Un-Installing The
Magnifier...................................... 18Starting The Magnifier..................... 23Licensing Information...................... 24License Manager.............................. 26Standard Settings ............................. 39Commonly Asked Questions ........... 39Customer Support ............................ 44Product Catalog................................ 46
v

Part II. Using The Magnifier................. 523. Common Configurations.................. 54
The Magnifier CommonConfigurations Overview ............. 54
The Magnifier Basic Operation Notes54
The Magnifier Toolbar ..................... 58The Magnifier Complete List of
Shortcut Keys............................... 63The Magnifier Shortcut Keys by
Function ....................................... 83The Magnifier Full Screen Operation -
Common Configurations.............. 88The Magnifier Color Inversion
Operation - CommonConfigurations.............................. 90
The Magnifier Return to Defaults -Common Configurations.............. 92
The Magnifier tracks Mouse Cursor -Common Configurations.............. 93
The Magnifier Starts with Windows -Common Configurations.............. 95
vi
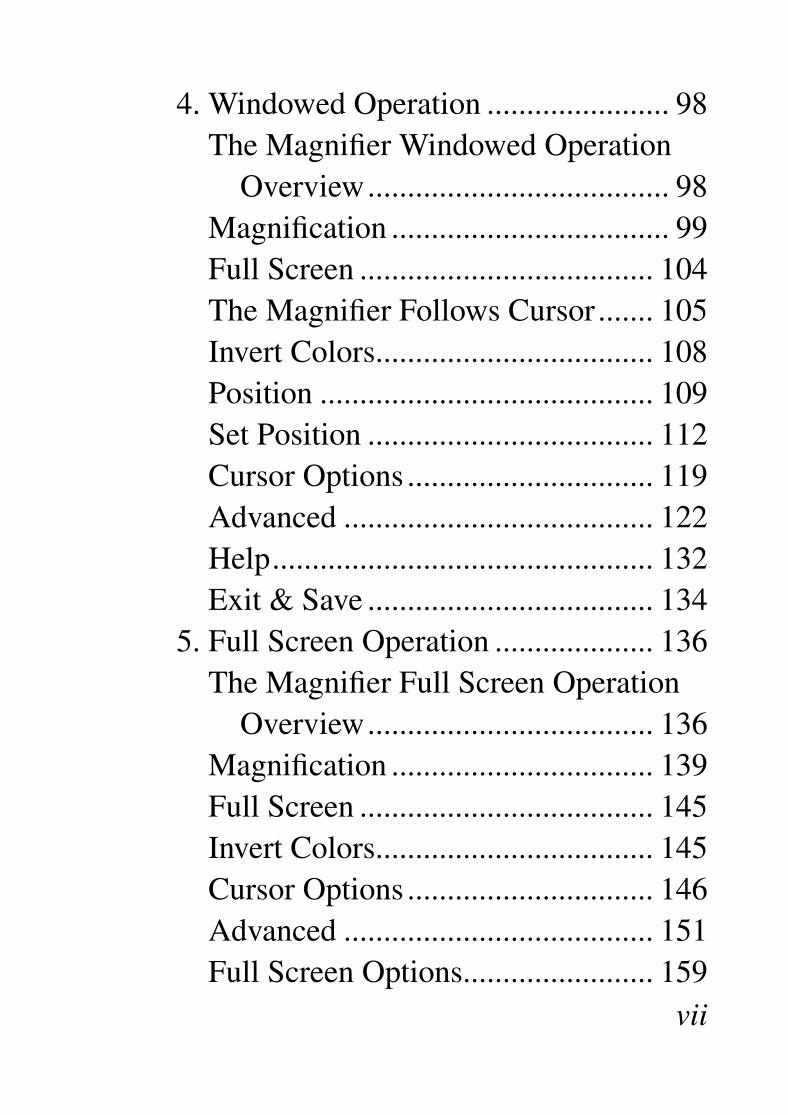
4. Windowed Operation ....................... 98The Magnifier Windowed Operation
Overview...................................... 98Magnification ................................... 99Full Screen ..................................... 104The Magnifier Follows Cursor....... 105Invert Colors................................... 108Position .......................................... 109Set Position .................................... 112Cursor Options ............................... 119Advanced ....................................... 122Help................................................ 132Exit & Save .................................... 134
5. Full Screen Operation .................... 136The Magnifier Full Screen Operation
Overview.................................... 136Magnification ................................. 139Full Screen ..................................... 145Invert Colors................................... 145Cursor Options ............................... 146Advanced ....................................... 151Full Screen Options........................ 159
vii
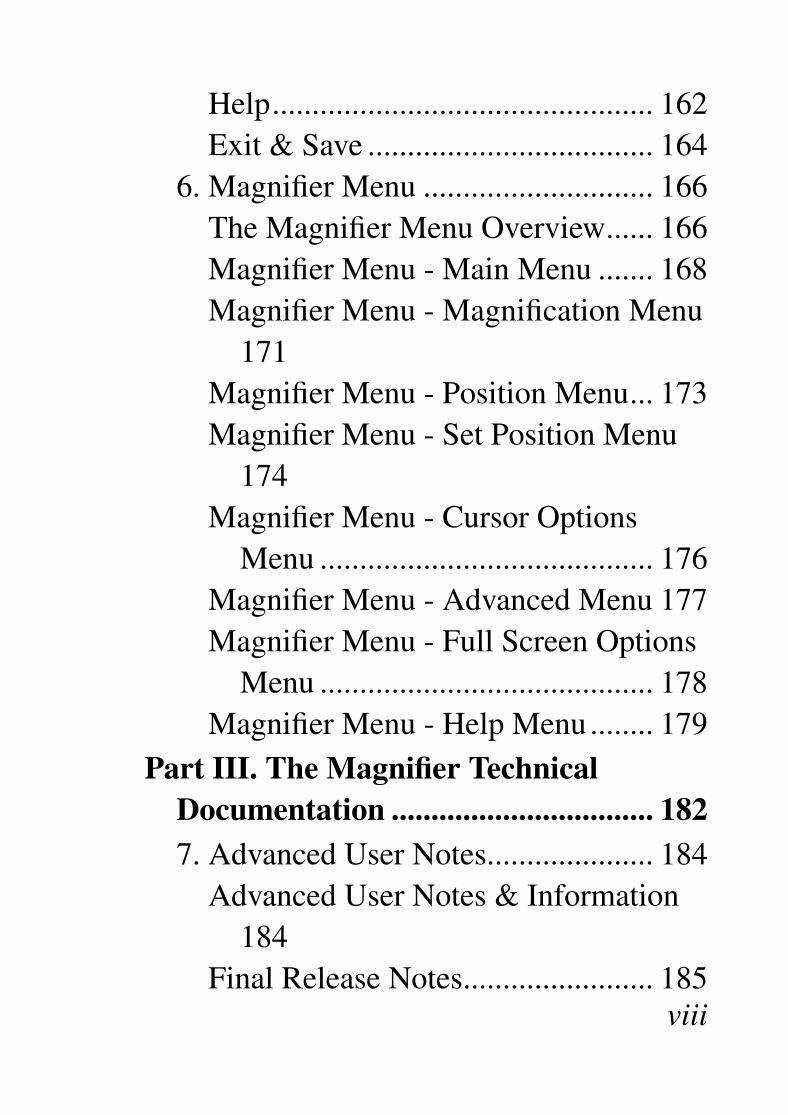
Help................................................ 162Exit & Save .................................... 164
6. Magnifier Menu ............................. 166The Magnifier Menu Overview...... 166Magnifier Menu - Main Menu ....... 168Magnifier Menu - Magnification Menu
171Magnifier Menu - Position Menu... 173Magnifier Menu - Set Position Menu
174Magnifier Menu - Cursor Options
Menu .......................................... 176Magnifier Menu - Advanced Menu 177Magnifier Menu - Full Screen Options
Menu .......................................... 178Magnifier Menu - Help Menu........ 179
Part III. The Magnifier TechnicalDocumentation ................................. 1827. Advanced User Notes..................... 184
Advanced User Notes & Information184
Final Release Notes........................ 185viii
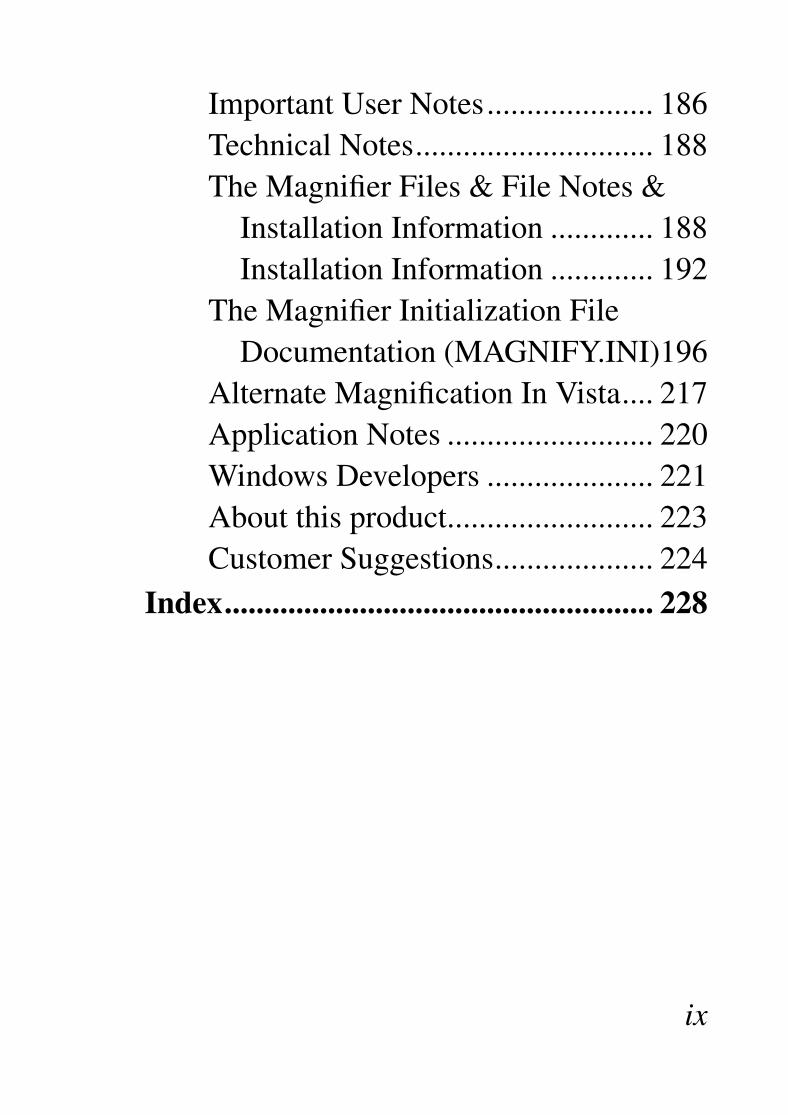
Important User Notes..................... 186Technical Notes.............................. 188The Magnifier Files & File Notes &
Installation Information ............. 188Installation Information ............. 192
The Magnifier Initialization FileDocumentation (MAGNIFY.INI)196
Alternate Magnification In Vista.... 217Application Notes .......................... 220Windows Developers ..................... 221About this product.......................... 223Customer Suggestions.................... 224
Index...................................................... 228
ix

List of Tables3-1. Keyboard Shortcut Quick Reference 64
x

Part I. GettingStarted
General informationabout this guide,
the product,installation, andgetting started(how to get The
Magnifier running).Chapter 1 - Quick Start contains details
on the fastest way to install & begin usingThe Magnifier
Chapter 2 - Getting Started has moreinformation about this guide, The Magnifierfeatures, Installing / Un-Installing,Licensing Information, Standard Settings,using The Magnifier Setup, CommonlyAsked Questions, and information aboutCustomer Support.
Chapter 1. QuickStart
Install The Magnifier
There are various ways to obtain IMGsoftware, including (but not limited to):
• Web based / Internet download fromIMG’s web site(http://www.imgpresents.com/demo.htm)
• Shipped CD / DVD physical media -IMG Product Disc
• Download ISO image file and burn IMGProduct Disc CD / DVD
• USB Flash Drive (pre-installed orinstalled from USB media webdownload)
• Single file install (from local network /1
Chapter 1. Quick Startinternet / other media)
• IMG on-line account
Note: IMG Software is built byproduct and major version with minorreleases. There is only 1 uniquebuild, but can be packaged /delivered / obtained in various ways.When unlicensed, the software actsas a demonstration / evaluation copy,and operation will be limited in lengthor run-time or capabilities. Oncelicensed (typically via License Keyand Serial Number, or OEM /Company-wide / Enterpriselicensing), the software will operatewith no limitations.
Recommendation: The quickestand easiest method for obtaining
2
Chapter 1. Quick Start
IMG software is to download thecurrent version from IMG’s web site(http://www.imgpresents.com/demo.htm).Download, then run the file to install.Test, review, play with, and verify thesoftware meets your needs andrequirements. When ready topurchase, go to the IMG LicenseManager, and click on the "PurchaseLicense Now" button. If working on amachine without internet access, usethe Standard or MSI single filedownload, or use a Product Discoption. Separately, purchase thelicense for the product directly on thewebsite - once you have yourLicense Key and Serial Number, youcan install and license the software.
The following outlines a standard retailProduct Disc based install. For other
3

Chapter 1. Quick Start
options, refer to notes and details availableat the source. In general, the approach is toinstall the software, then license thesoftware. The Product Disc InstallationAssistant provides an easy way toaccomplish these two tasks.
• In Windows, insert the CD or DVD - theAutoRun feature will load the InstallationAssistant - you may Install a licensedproduct , Install other product demos, orview Release Information. If you have aCertificate of Authenticity, enter yourLicense Key, Serial Number, and Nameto Install and automatically License.
• If AutoRun is not enabled:
• In Windows, Click on the Start Button
• Select Run
• Select D:SETUP, or type D:SETUP (orE:SETUP if CD/DVD drive E:, etc.)
4
Chapter 1. Quick Start
• Press (ENTER) or click on OK
• In Windows Vista, you may not have theRun Option - select Computer, yourCD/DVD drive, and open Setup
• Answer the questions and follow theinstructions on your screen
Note: You may also Un-Install TheMagnifier by running SETUP.EXEAfter The Magnifier has beenproperly installed. (The MagnifierSetup will ask you if you wish toUn-Install.) This has been providedas a convenience to the user. It isrecommended that you use theControl Panel | Add/RemovePrograms Icon to remove TheMagnifier.
Start The Magnifier
5
Chapter 1. Quick Start
Click on the Start Button, and open the StartMenu.
Select (All) Programs, then Select TheMagnifier. The Magnifier menu will haveselections corresponding to the icons in thegroup. Select The Magnifier to beginoperation.
The Magnifier will automatically run afterinstall. You will see a window in the centerof your screen with the default settings. Youcan right-click on The Magnifier to openThe Magnifier menu. You may also click onthe small icon in the tray (near the clock)for The Magnifier menu. You can use thekeyboard shortcut Alt-K to see the list ofkeyboard shortcuts and get access to TheMagnifier help files. Refer to the on-linehelp, and the User’s guide for features andcapabilities of The Magnifier.
6
Chapter 2. GettingStarted
The Magnifier User’sGuide
Version 1.50 Release 5
9/17/2012
A Utility for Windows
Information in this document is subject tochange without notice and does notrepresent a commitment on the part ofInnovation Management Group, Inc. Thesoftware described in this document isfurnished under a license agreement ornondisclosure agreement. The software anddocumentation may be used or copied only
7

Chapter 2. Getting Startedin accordance with the terms of thisagreement. It is against the law to copy thesoftware on any medium except asspecifically allowed in the license ornondisclosure agreement. The purchasermay be allowed to make a back-up copy. Nopart of this manual or guide may bereproduced or transmitted in any form or byany means, electronic or mechanical,including photocopying, recording, orinformation storage and retrieval systems,for any purpose other than the purchaserspersonal use, without the express writtenpermission of Innovation ManagementGroup, Inc.
This manual and product represent over 15years of on-going development, testing, andsupport. Licensed users of the software arethe most important aspect of the entireprocess that brings this manual and productinto existence. Please be respectful of allparties involved.
8
Chapter 2. Getting Started
Trademarks:
Microsoft Windows is a trademark ofMicrosoft Corporation.
My-T-Mouse®, My-T-Pen®, My-T-Touch®
and My-T-Soft® are registered trademarksof Innovation Management Group, Inc.
Copyrights
The Magnifier Copyright © 1997-2012Innovation Management Group, Inc.
The Magnifier User’s Guide Copyright ©1997-2012 Innovation Management Group,Inc.
All Rights Reserved. Software Subject toRestricted Rights.
Using this GuideThis guide is a comprehensive collection of
9
Chapter 2. Getting Started
details, notes, and information about TheMagnifier. Portions are incorporated withinthe product itself, and it is also available invarious forms (e.g. printed, on-line, PDF,etc.).
Important User Information
This guide is for users who are familiar withWindows, its basic concepts, and how tooperate within Windows. If you are not, theinformation you may need to fully utilizeThe Magnifier and this guide may belimited. You may wish to review Windowshelp, tutorials, and other availableinformation on using and operatingWindows before continuing using thisguide.
Conventions used within this guide
Note: Notes and other additionalinformation will be indicated in thisway
10
Chapter 2. Getting Started
WarningSpecial and otherimportant details to payclose attention to willappear this way
What is The Magnifier?The Magnifier is an easy to operate utilitythat magnifies the screen area below thecurrent position of the mouse cursor(pointer) within Windows. New featuresinclude the ability to track the text caret(text cursor), follow dialogs and keyboardfocus, and the often requested full screenoperation (with support for multiplemonitors (if available)). Quick & easy
11
Chapter 2. Getting Started
keyboard shortcuts allow access to differentmagnification factors; to toggle colors; totoggle visibility; to toggle full-screen vs.window mode operation; and to accessmany other features & capabilities. TheMagnifier allows individuals to clearly seedetails that otherwise may be difficult to seedue to screen sizing, differing resolutions,graphic detail, or vision impairment.
Note: The Magnifier started as apanel on IMG’s My-T-Mouse®, andbecame a stand-alone product in1997. In 2007, to support newmagnification interfaces available inWindows Vista, The Magnifier wasupdated to provide even morecapabilities, and to incorporate usersuggestions.
12
Chapter 2. Getting Started
Intended uses: The Magnifierprovides all types of useful tools andcapabilities for individuals with visualimpairments, graphic artists, andgeneral computer users who mayneed a quick & easy way to magnifysome or all of their display. Thewhole design, intent, and result ofthe engineering decisions behindwhat The Magnifier is, and itspurpose, has been focused oncreating an affordable magnifier foreveryone. For individuals withspecific requirements, who needscreen reading capability, or who findthe limitations of this productproblematic, then this product isprobably not for you. There arenumerous other screenmagnification products available thatmay provide alternate, moreadvanced, or additional capabilitiesbeyond what The Magnifier provides.
13

Chapter 2. Getting Started
Note that some of these products aresignificantly more expensive, andany comparison should be made interms of utility and cost-basis value.When it comes to usability,affordability, and value, TheMagnifier provides an incrediblesolution that results in many satisfiedcustomers.
Why do I need TheMagnifier?
The Magnifier is easy and fun to use,provides full screen magnification, alongwith numerous other user-requestedfeatures. Just point, type, or move aroundwith your keyboard and it automatically
14
Chapter 2. Getting Started
magnifies. If you spend a lot of time staringat the screen, want to operate farther fromthe screen, have any visual impairment, orwant to relax while using your computer,The Magnifier provides everything youneed. The Magnifier contains numeroususer-requested options, has been enhancedto provide simple & straightforwardmagnification capabilities, and includessimple, sophisticated, and advanced toolsfor all types of users. There is also a set ofintegration tools for developers.
Features
• Up to 40x Magnifier for ALL windowsapplications
• Full screen operation (supports multiplemonitors)
15

Chapter 2. Getting Started
• Resizable window(s) for completeflexibility.
• Up to 7 windowed Magnifiers can berunning at the same time
• The Magnifier tracks mouse cursor andtracks text caret while typing
• The Magnifier also can track dialogs andthe keyboard focus through lists, menus,icons, and other selectable items
• 400 different Magnification settings 1x,1.1x, 1.2x ... 39.9x, 40x
• The special Magnifier Menu is easy toread.
• Cursor location lines to find cursor
• Cursor Location Lines are sizeable, coloris selectable, and can even animate
• Auto Position option to move away fromcursor
• Lock position to magnify fixed screen16

Chapter 2. Getting Started
location
• Lens View Mode
• Useful aid for visually impairedindividuals
• Inverted colors option for high-contrastviewing
• Optional cursor display in magnifiedwindow
• Developer Tool Kit and Extensions
• Microsoft Windows 2000 / XP / Vista / 7Compatible
• Keyboard Interface for managing andcontrolling The Magnifier
• End-user and Developer Support
17

Chapter 2. Getting Started
What You NeedTo run The Magnifier you need thefollowing equipment (hardwarerequirements):
• IBM 80386 or higher or compatible
• 25 mb hard disk space available
• 128 mb memory or higher
• Windows 2000 / XP / Vista / 7
• VGA or SVGA recommended
• Any Windows supported pointing device
Installing / Un-InstallingThe Magnifier
There are various ways to obtain IMGsoftware, including (but not limited to):
18
Chapter 2. Getting Started
• Web based / Internet download fromIMG’s web site(http://www.imgpresents.com/demo.htm)
• Shipped CD / DVD physical media -IMG Product Disc
• Download ISO image file and burn IMGProduct Disc CD / DVD
• USB Flash Drive (pre-installed orinstalled from USB media webdownload)
• Single file install (from local network /internet / other media)
• IMG on-line account
Note: IMG Software is built byproduct and major version with minorreleases. There is only 1 uniquebuild, but can be packaged /delivered / obtained in various ways.When unlicensed, the software acts
19
Chapter 2. Getting Started
as a demonstration / evaluation copy,and operation will be limited in lengthor run-time or capabilities. Oncelicensed (typically via License Keyand Serial Number, or OEM /Company-wide / Enterpriselicensing), the software will operatewith no limitations.
Recommendation: The quickestand easiest method for obtainingIMG software is to download thecurrent version from IMG’s web site(http://www.imgpresents.com/demo.htm).Download, then run the file to install.Test, review, play with, and verify thesoftware meets your needs andrequirements. When ready topurchase, go to the IMG LicenseManager, and click on the "PurchaseLicense Now" button. If working on a
20

Chapter 2. Getting Started
machine without internet access, usethe Standard or MSI single filedownload, or use a Product Discoption. Separately, purchase thelicense for the product directly on thewebsite - once you have yourLicense Key and Serial Number, youcan install and license the software.
The following outlines a standard retailProduct Disc based install. For otheroptions, refer to notes and details availableat the source. In general, the approach is toinstall the software, then license thesoftware. The Product Disc InstallationAssistant provides an easy way toaccomplish these two tasks.
• In Windows, insert the CD or DVD - theAutoRun feature will load the InstallationAssistant - you may Install a licensed
21
Chapter 2. Getting Started
product , Install other product demos, orview Release Information. If you have aCertificate of Authenticity, enter yourLicense Key, Serial Number, and Nameto Install and automatically License.
• If AutoRun is not enabled:
• In Windows, Click on the Start Button
• Select Run
• Select D:SETUP, or type D:SETUP (orE:SETUP if CD / DVD drive E:, etc.)
• Press (ENTER) or click on OK
• In Windows Vista, you may not have theRun Option - select Computer, yourCD/DVD drive, and open Setup
• Answer the questions and follow theinstructions on your screen
Note: You may also Un-Install TheMagnifier by running SETUP.EXE
22
Chapter 2. Getting Started
After The Magnifier has beenproperly installed. (The MagnifierSetup will ask you if you wish toUn-Install.) This has been providedas a convenience to the user. It isrecommended that you use theControl Panel | Add/RemovePrograms Icon to remove TheMagnifier.
Starting The MagnifierClick on the Start Button, and open the StartMenu. Select (All) Programs, then SelectThe Magnifier. The Magnifier menu willhave selections corresponding to the iconsin the group. Select The Magnifier to beginoperation.
The following icons will also be available in23
Chapter 2. Getting Started
The Magnifier group:
The Magnifier - runs The Magnifier
The Magnifier Help - opens The MagnifierHelp (opens this document)
Licensing Information - Displays currentlicense status of The Magnifier, allowsinstant licensing
Refer to The Magnifier Basic OperationNotes for a quick overview of TheMagnifier. You can also use the keyboardshortcut Alt-K to see a list of availablekeyboard shortcuts for controlling TheMagnifier.
Licensing InformationThe Magnifier uses the IMG LicenseManager to manage the licensed use of thisproduct. If unlicensed, the product will run
24
Chapter 2. Getting Started
as demo (i.e. a demonstration version). Inthe demo (unlicensed) mode, The Magnifierwill run for about an hour, and then exit,displaying the license manager (announcingthat it is unlicensed). You may restart TheMagnifier up to 100 times (thedemonstration period limit). After thedemonstration period is over, The Magnifierwill not operate unless it is licensed. Forextended evaluation and testing purposes,please contact IMG Customer Service foran evaluation license. Once licensed, theoperation will not be limited in any way.
The most common methods of licensing areelectronic (web/e-mail based) and bycertificate (Certificate of Authenticity). Inboth cases, there will be a registered serialnumber, and a license key made availableonce a license has been purchased - theseneed to be entered into the IMG LicenseManager to activate a valid license. Forfurther details, refer to the IMG License
25

Chapter 2. Getting Started
Manager. There is also USB storage devicelicensing, so The Magnifier can be run fromthe USB device, simply by inserting thelicensed device into any system.
Note: There are numerous licenseschemes (including OEM, site, &enterprise licenses) available tomeet the needs of all our customers.If you have any licensing questions,please contact InnovationManagement Group, Inc. directly.
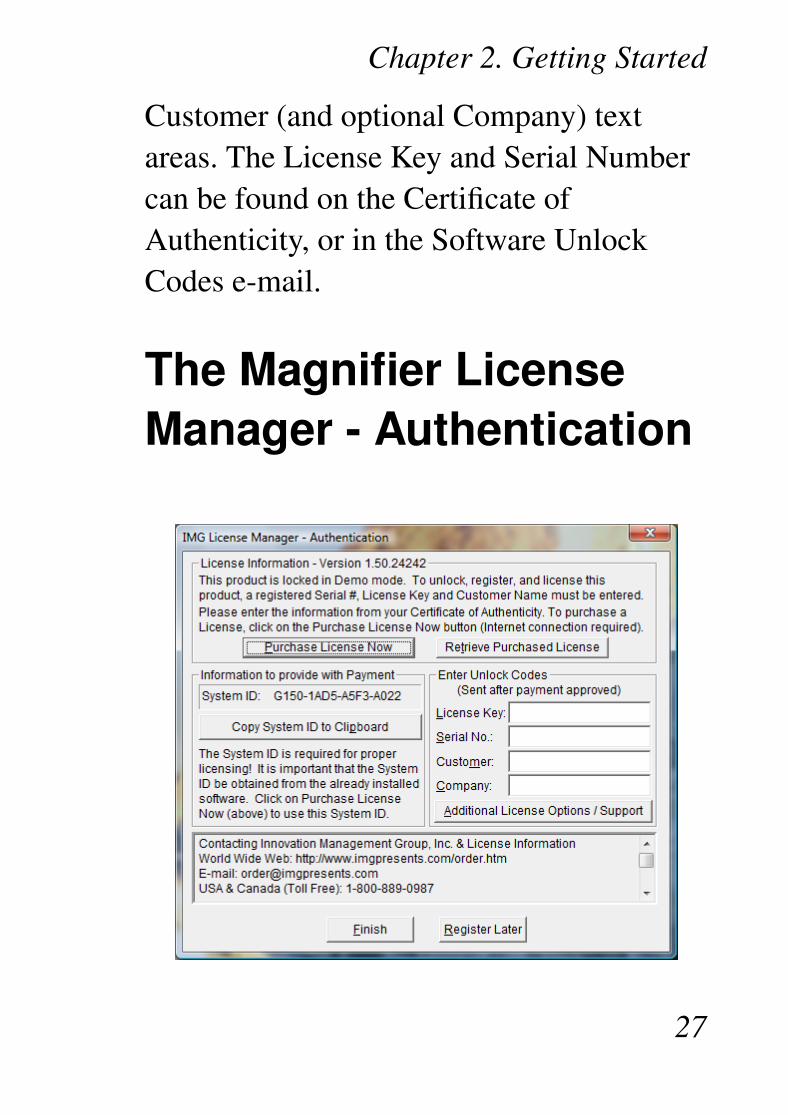
License ManagerIn order to License The Magnifier, thecorrect License Key and Serial Numbermust be entered into the IMG LicenseManager, along with some text for the
26
Chapter 2. Getting Started
Customer (and optional Company) textareas. The License Key and Serial Numbercan be found on the Certificate ofAuthenticity, or in the Software UnlockCodes e-mail.
The Magnifier LicenseManager - Authentication
27
Chapter 2. Getting Started
The License Key and Serial No. entries area matched pair, and will work together tounlock the software. The Customer entry isrequired (i.e. some text must be entered inthe Customer text area), but is not part ofthe license unlock process. The Companytext area is optional, and will be shown asthe Source when the product is licensed.
To quickly and easily license the software(on a system that has internet access),simply click on the "Purchase LicenseNow" button. Once connected to IMG’swebsite, you will be asked to enter billinginformation and payment information. Oncepaid, your order will be processed, and youwill receive a confirmation e-mail and aseparate e-mail with license information.Once the order is fully processed, you canthen click the "Retrieve Purchased License"button to automatically license your system.
28
Chapter 2. Getting Started
System ID Note: The System ID isused to accurately match the Productand Version you wish to license withthe License Information provided. Ifthe system you wish to License doesnot have Internet Access, you canuse the Copy System ID to Clipboardto accurately copy the System ID tothe clipboard (which can be saved ina text file or other document andmoved to a system that does haveInternet Access).
Note: The "Retrieve PurchasedLicense" uses a unique identifier toautomatically license your system(which is only sent if the "PurchaseLicense Now" is used). If you try thison a different system, or after asystem update or re-install (or after achange to this unique ID), the
29
Chapter 2. Getting Started
software will not licenseautomatically. You will either need toenter the License Key and SerialNumber, or go into AdditionalLicense Options (see below) and useyour Order Confirmation Numberand Order E-mail to retrieve thelicense.
Important Note: Be sure to saveand/or print your Order Confirmationnumber (with Order E-mail), alongwith your License Key and SerialNumber in case you need tore-license the software in the future(Operating System Re-install, harddisk reformat, new system, etc.)
Certificate of Authenticity Note:30
Chapter 2. Getting Started
For Electronic Licenses, andCertificate of Authenticity can beretrieved on IMG’s website:https://www.imgpresents.com/orders/account/licmanager.htm.This requires a valid License Keyand Serial Number. Once entered,you may view a PDF of theCertificate, or download theCertificate of Authenticity PDF file(for printing or saving).
The Magnifier LicenseManager - Additional
31
Chapter 2. Getting Started
License Options
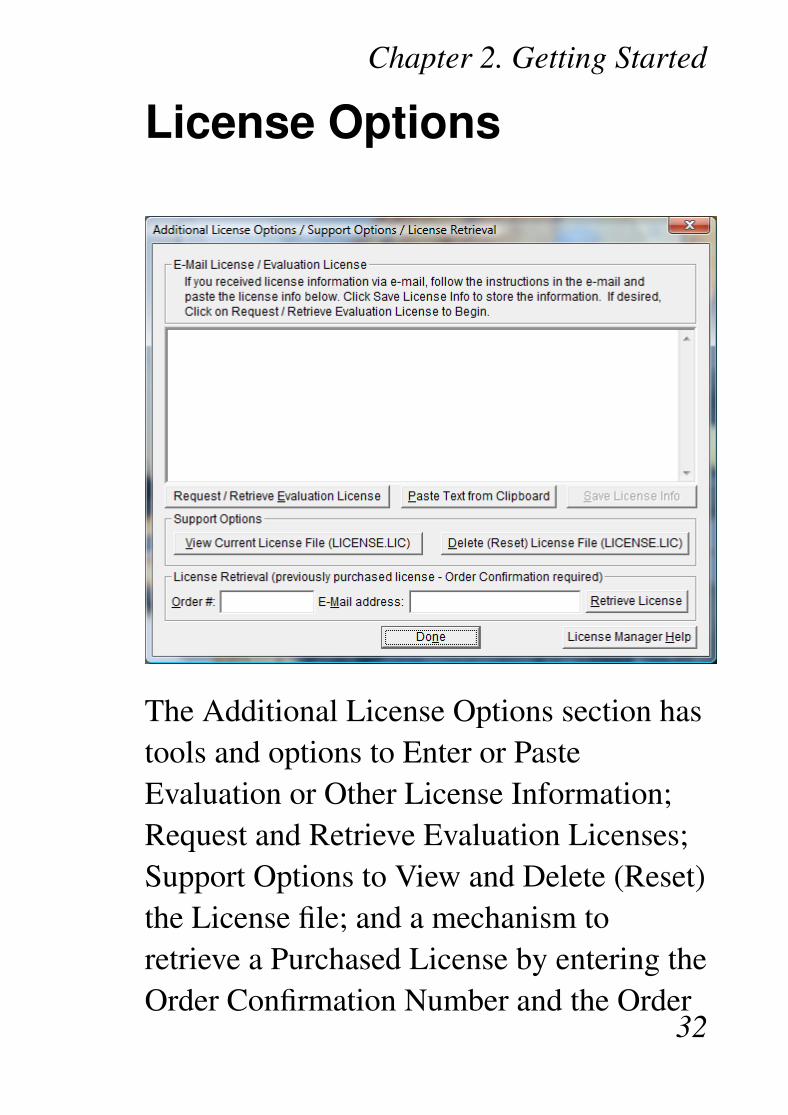
The Additional License Options section hastools and options to Enter or PasteEvaluation or Other License Information;Request and Retrieve Evaluation Licenses;Support Options to View and Delete (Reset)the License file; and a mechanism toretrieve a Purchased License by entering theOrder Confirmation Number and the Order
32

Chapter 2. Getting Started
E-mail address.
Often, interested parties want to review ortest the software without the demonstrationlicense limitations, and to accommodatethis, IMG makes available EvaluationLicenses. These Evaluation Licenses arefully functional licenses, but with a datelimit (when the evaluation date has passed,the software will return back to theUnlicensed, Demonstration mode).
Evaluation Licenses may be requested at theProduct Download pages on the website, orby using the Request / Retrieve EvaluationLicense button here. Note that allEvaluation License requests are reviewed,and Evaluation Licenses must be created byIMG personnel (generation is notautomated).
An Evaluation License sent via e-mailcontains a block of text that has the licensedetails for the License Manager. When sent
33
Chapter 2. Getting Started
via e-mail, the text can be copied andsubsequently pasted into the text area here(Paste Text from Clipboard), then saved toenable (set) the License Information (SaveLicense Info).
Alternatively, if an Evaluation License isRequested, then after processing, it may beautomatically Retrieved directly by clickingthe Request / Retrieve Evaluation Licensebutton. Please refer to any additionalinformation provided by the messagesshown when using this approach.
The View Current License File(LICENSE.LIC) button will load the fileLICENSE.LIC from the installation folder.This file contains the actual licenseinformation for the product, or the licenseinformation used to validate a License Keyand Serial Number.
Note: Because an Evaluation
34
Chapter 2. Getting Started
License uses this same file, theDelete (Reset) option should beused if Licensing the product afterusing an Evaluation License.
The Delete (Reset) License File(LICENSE.LIC) will remove the existingLICENSE.LIC, then copy the fileLICENSE.ORG to LICENSE.LIC (both inthe installation folder). The fileLICENSE.ORG is the "as shipped" licensefile, and should be the License File whenusing a License Key and Serial Number tolicense the software.
Note: For License Purposes, usingthe Support Option to Delete (Reset)the License File is essentially thesame as un-installing, thenre-installing the software. Becausethis option is quicker and simpler, it
35
Chapter 2. Getting Started
is the preferred approach to resolveany license issues. Note thatmanually copying the fileLICENSE.ORG to LICENSE.LIC (inthe installation folder) performs thesame operation as this option.
The License Retrieval Option will retrieveLicense Information from IMG’s Websitefor electronically purchased licenses. TheOrder Confirmation Number and OrderE-mail is required (which appear on theOrder Confirmation page provided aftersuccessfully placing an on-line order, andare provided separately via an OrderConfirmation E-mail).
Note: For Retrieved Licenses (viaRetrieve Purchased License, and viathe Retrieve License SupportOption), License Key and Serial
36

Chapter 2. Getting Started
Number information is processedexactly as if this information wasdirectly entered in the Authenticationarea. Therefore, all issues that mayaffect licensing also apply to theseautomated options (e.g. License Filestatus, User permissions, etc.)
The Magnifier LicenseManager - Licensed
37
Chapter 2. Getting Started
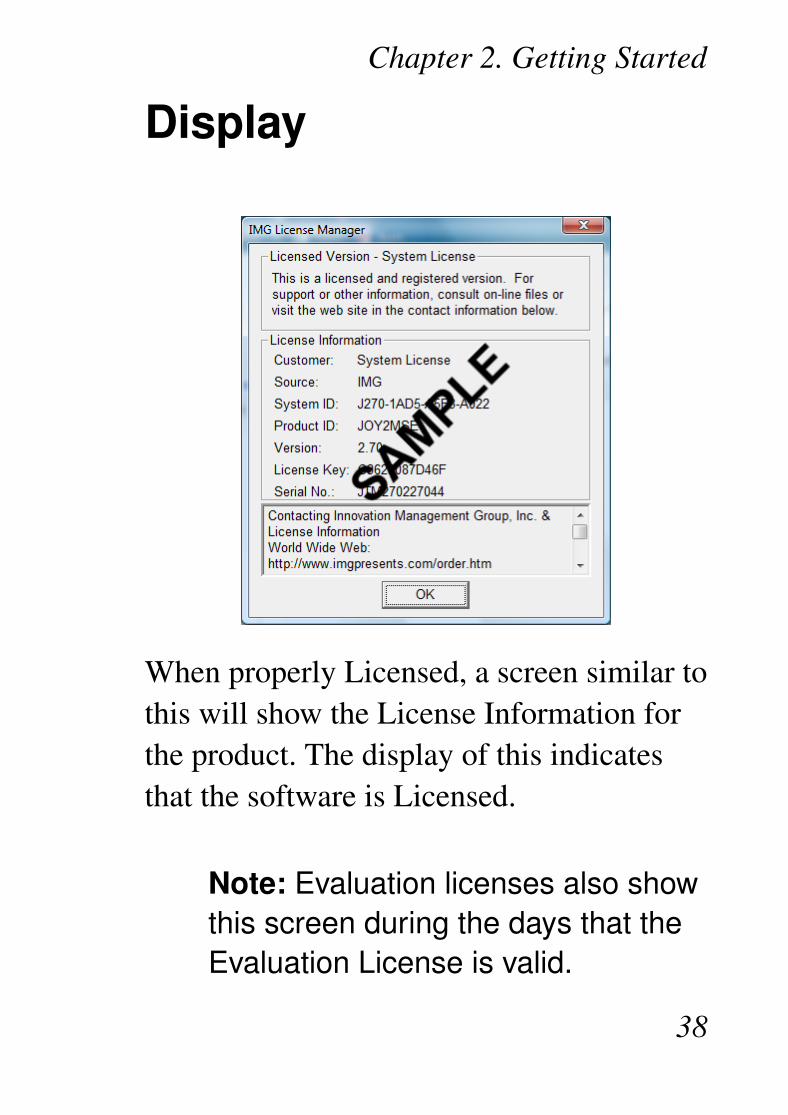
Display
When properly Licensed, a screen similar tothis will show the License Information forthe product. The display of this indicatesthat the software is Licensed.
Note: Evaluation licenses also showthis screen during the days that theEvaluation License is valid.
38

Chapter 2. Getting Started
Standard SettingsSettings in the standard configuration
The Magnifier starts in the window mode ofoperation in the default size and position.Refer to the next chapter for CommonConfigurations and how to set them up.
Commonly AskedQuestions
Compatibility
1. Does The Magnifier work with allWindows Applications?
Yes.39
Chapter 2. Getting Started
Display
2. The Magnifier covers too much of myWindow. What can I do?
Resize and/or reconfigure The Magnifier.Enable the Auto-Position option. Switch tothe Full Screen mode of operation. Workwith Developer’s Kit to allow on-demanddisplay.
The Magnifier Operation
3. Can The Magnifier do full screenmagnification?
Yes. You can use the Alt-Z keyboardshortcut to toggle between the Full Screenmode of operation and the Windowed mode.
4. Can I see the complete list shortcutkeys?
Yes, use the keyboard shortcut Alt-K toopen the help that shows the Complete Listof Shortcut Keys.
40
Chapter 2. Getting Started
5. How do I view the Cursor in theMagnifier?
The Magnifier Cursor indicator is selectablein menu, or you can use the keyboardshortcut Alt-C to toggle the display of thecursor within The Magnifier window.
6. In Full Screen mode, why does thecursor appear twice (different sizes)?
This is a result of the design of TheMagnifier. The Full Screen modesynchronizes the magnified window relativeto the underlying display, and the system’sdisplay of the cursor is unmodified. You cantoggle the display of the magnified cursor(e.g. from the menu, or using Alt-C). Forpresentations or other uses, you can alsotoggle the display of the system mousecursor using Alt-G. For best results, youmay wish to display a magnified cursortheme (available in Mouse Properties |Pointers) and disable the magnified cursor
41
Chapter 2. Getting Started
display. Systems with higher quality displaysubsystems (video adapter/videomemory/monitor) may reduce theseparation between the actual cursor and themagnified cursor display.
7. Why does magnification point jumparound so much?
This is a result of the 3 events that canposition the magnification point, the MouseCursor, the Text Caret, and the KeyboardFocus. The Text Caret and Dialogs &Keyboard Focus options are available fromthe Advanced Menu. You can toggle theText and Keyboard tracking On and Offusing Alt-J. Depending on these settingsand your actions within Windows, themagnification point will adjust and trackthese events, which will override the normalmouse cursor magnification point. You canrefer to the Advanced Notes for additionalinformation.
42
Chapter 2. Getting Started
System
8. How Much Memory does TheMagnifier use while running?
This depends on your screen display colors,Windows version, and the currentconfiguration. Normal operation requiresless than 100K RAM.
9. Does The Magnifier require anyspecial drivers?
No. The Magnifier works with all standardWindows drivers. Unlike othermagnification products that must install at avery low level, The Magnifier was designedto work as a standard windows application,and will operate seamlessly with anyWindows system. Because the productrelies almost exclusively on the displaysubsystem, the best, most up-to-date driversfor your video adapter is highlyrecommended. Using a higher quality video
43

Chapter 2. Getting Started
adapter (with larger amounts of high-speedvideo RAM) in your system will providesmoother & cleaner operation.
Customer SupportThe Magnifier Software is backed by asupport staff trained to provide you withfast, courteous service. Over the years, IMGhas astounded individuals at the quality of itsoftware and its support. So that we cancontinue to focus our resources ondevelopment and providing high-qualityproducts & support, we do appreciate yourassistance in reviewing the help, manual,and support information available at ourwebsite to see if the problem or questionhas already been addressed. However, ifyou need assistance beyond what themanual, tutorial, help files, and on-line
44

Chapter 2. Getting Started
support database provide, please contactIMG Customer Service:
Innovation Management Group, Inc.Customer Service179 Niblick Road #454Paso Robles, CA 93446USA1-800-889-0987 (US & Canada)+1-818-701-1579+1-818-936-0200 (fax)<[email protected]>http://www.imgpresents.com
To open a Technical Support case and createa support ticket, please refer tohttps://www.imgpresents.com/orders/support/techsupport.htm.
Please provide, or have the followinginformation ready when you ask forassistance:
45
Chapter 2. Getting Started
• The Magnifier version number, updatelevel.
• Registered serial number (or if runningdemo)
• Make and Model of your computer.
• Windows version number, any ServicePacks or major updates.
• A description of the problem.
• If possible, a list of the steps required torecreate the problem.
• If you have seen an error code, recordand report the number.
• Additional information may be required,such as monitor type, type of pointingdevice, amount of RAM in your system,other software running (anti-virus,spyware, virtual machine, etc.).
46
Chapter 2. Getting Started
Product CatalogInnovation Management Group, Inc.’sProducts
Commercial DivisionProducts...Indestructible Keyboards & IndispensableUtilities!
My-T-Soft® Build-A-Board
The Ultimate Tool for creating andmodifying On-Screen Keyboards, buttons,and Panels. My-T-Soft Family, plusCross-Platform Support
My-T-Pen® for Windows
On-Screen Keyboards & Utilities for PenBased Systems
My-T-Touch® for Windows
47
Chapter 2. Getting Started
On-Screen Keyboards & Utilities forTouchsreens
My-T-Soft® for Windows
On-Screen Keyboards & Utilities for anypointing device
My-T-Soft® TS for Terminal Services
On-Screen Keyboards for Terminal Server /Terminal Services
TouchRight Utilities
Right Click Access for Pens &Touchscreens
Assistive TechnologyDivision Products...Enabling Tools for Special Needs
AT Accessibility Suite
IMG’s Assistive Technology Software withsite license options
48
Chapter 2. Getting Started
Joystick-To-Mouse
The Software That Lets You Run WindowsWith A Joystick!
My-T-Mouse®
The Software That Makes Your Mouse aMouse That Types! Indispensable &Utilities for any Mouse or Trackball
OnScreen
Special Features for disabled & impairedusers Word Prediction / Word Completion /Window Control / Scanning
OnScreen with CrossScanner
Complete control of Windows from a singleswitch! Support for Keyboard, Mouse,Joystick interfaces
SmartClick
Operate Windows without the need toPress/Click a Button
49
Chapter 2. Getting Started
The Magnifier
Area and Full Screen Magnifier, CursorLocator, Visual Aids
WordComplete
Word Completion, adaptive wordprediction, Word List Management, etc.Type Better, Type Less - we do the rest!
For further information...Contact your Local Software Dealer
or
Innovation Management Group, Inc.179 Niblick Road #454Paso Robles, CA 93446USA1-800-889-0987 (US & Canada)+1-818-701-1579+1-818-936-0200 (fax)
50
Chapter 2. Getting Started
<[email protected]>http://www.imgpresents.comhttp://www.my-t-mouse.comhttp://www.my-t-pen.comhttp://www.my-t-soft.comhttp://www.my-t-touch.comhttp://www.onscreen-keyboard.comhttp://www.build-a-board.comhttp://www.joystick-to-mouse.comhttp://www.themagnifier.us
For International Contacts, please see WebSite...
My-T-Mouse®, My-T-Pen®, My-T-Touch®
and My-T-Soft® are registered trademarksof Innovation Management Group, Inc.
51
Part II. UsingThe Magnifier
Description ofhow to operateand configureThe Magnifier.
Description of how to operate andconfigure The Magnifier.
Chapter 3 - Common Configurationscontains basic operation notes, and detailson commonly used configurations & how toquickly setup these usage scenarios.
Chapter 4 - Windowed Operation
contains general operation informationwhen operating with one or moremagnification windows.
Chapter 5 - Full Screen Operationcontains general operation informationwhen operating in the full screen mode
Chapter 6 - Magnifier Menu covers thealternate Magnifier Menu
Chapter 3. CommonConfigurations
The Magnifier CommonConfigurationsOverview
This section begins by covering basicoperation options of The Magnifier, andthen outlines basic configurations and howto configure the product (from startupdefaults) to get there.
The Magnifier Basic
54
Chapter 3. Common Configurations
Operation NotesWhen running The Magnifier, there are 2main modes of operation - as a window(with up to 7 magnifiers runningconcurrently), or in full screen mode.Because of the differences in these 2 modesof operation, some features are notavailable, or do not apply depending on thecurrent mode in use. For detailedinformation, you can refer to the chaptersthat cover these 2 modes in detail(Windowed and Full Screen).
Whenever The Magnifier is running, therewill be a small magnifying glass icon in thesystem tray (next to the clock in thetaskbar). You can always access TheMagnifier menu by left or right clicking onthis small icon.
When The Magnifier is in the windowmode, double-clicking on The Magnifier
55
Chapter 3. Common Configurations
window will switch to the Full Screen modeof operation. When the Full Screen mode ofoperation is in use, only 1 instance of TheMagnifier will be running. If there is morethan one instance of The Magnifier runningprior to the switch to Full Screen mode, allbut one will be closed before the switch tothe Full Screen mode occurs.
The best way to read using The Magnifier isto use the Arrow keys as panning tools. Forleft-to-right reading material, position yourmouse cursor at the left-most part of thetext, then let go of the mouse, and use theCtrl-Right Arrow to pan to the right. Onceyou reach the end of the page (and need togo back to the left) let go of the keyboard(this will snap you back to the beginning).When you need to go down, use theAlt-Down Arrow to move the mouse cursordown (or simply reposition the mouse asappropriate).
56
Chapter 3. Common Configurations
Note: Depending on themagnification that works best foryou, and other applications in use,enabling the MouseKeysaccessibility in Windows may bebeneficial (MouseKeys allows theNumeric keypad to move the mousecursor). For further details onMouseKeys, refer to the Accessibilityoptions in Windows (Ease of Accessin Windows Vista).
By default, The Magnifier tracks the textcaret (text cursor), dialogs, and keyboardfocus (menus, icons, selections, etc.), alongwith tracking the mouse cursor. Whentracking the keyboard, the mouse tracking isdisabled - to re-enable the mouse tracking,the mouse needs to move away from itscurrent position. The keyboard options canbe disabled within the Advanced Menu.
57
Chapter 3. Common Configurations
The Magnifier uses a standard menu for allavailable options (with other capabilitiesavailable through keyboard shortcuts). As aspecial feature within The Magnifier, thereis also a Magnifier Menu that uses the entirescreen for its display and uses large type.This large type menu has the same optionsas the standard menu, but may be preferableto some individuals. This is selectable in theAdvanced Menu.
The Magnifier’s basic operation isstraightforward, and you can becomeproficient by reviewing this chapter alone,but there are numerous enhancements andadvanced features available. Please refer tothe following chapters, Advanced Notes,and the Developer’s Kit utilities for evenmore details on The Magnifier capabilities.
58
Chapter 3. Common Configurations
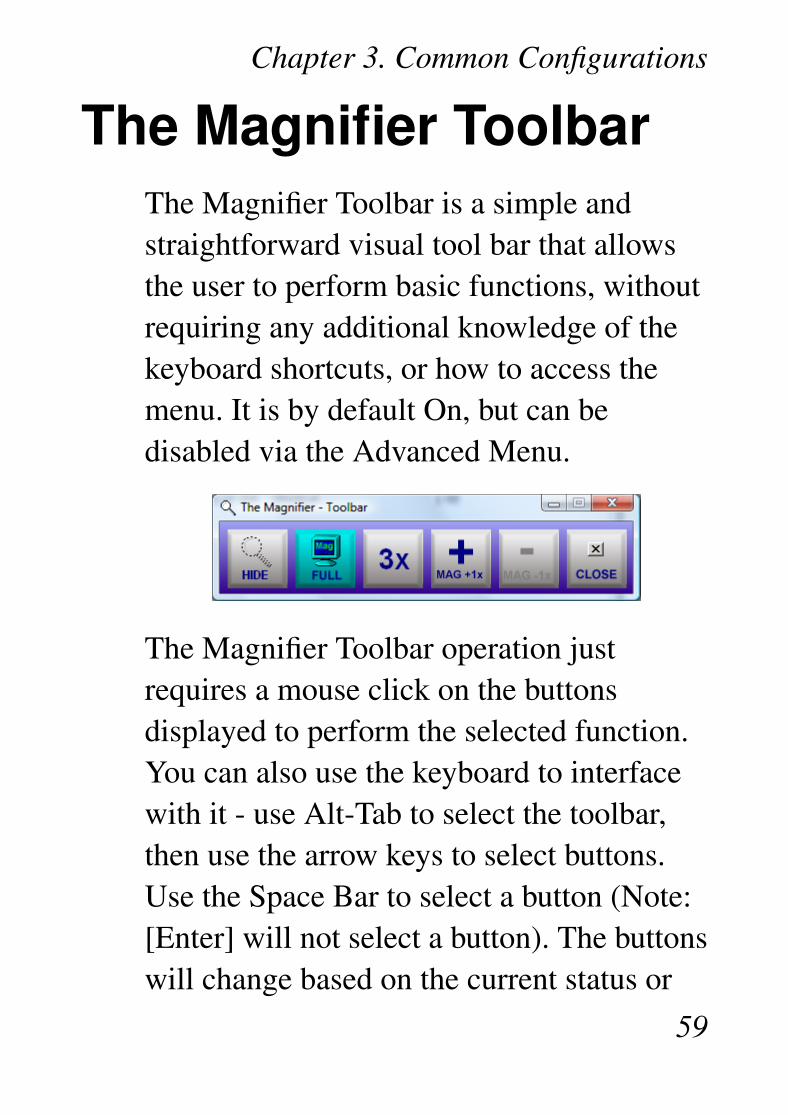
The Magnifier ToolbarThe Magnifier Toolbar is a simple andstraightforward visual tool bar that allowsthe user to perform basic functions, withoutrequiring any additional knowledge of thekeyboard shortcuts, or how to access themenu. It is by default On, but can bedisabled via the Advanced Menu.
The Magnifier Toolbar operation justrequires a mouse click on the buttonsdisplayed to perform the selected function.You can also use the keyboard to interfacewith it - use Alt-Tab to select the toolbar,then use the arrow keys to select buttons.Use the Space Bar to select a button (Note:[Enter] will not select a button). The buttonswill change based on the current status or
59
Chapter 3. Common Configurations
The Magnifier (to reflect available options).The available options are as follows:
• Show / Hide If The Magnifier is visible,hide it. If hidden, show it.
• Full Screen / Window Toggles betweenthe Full Screen mode and the Windowedmode of operation.
• 2X / 3X If greater than 2X, go to 2Xmagnification. If at 2X magnification, goto 3X magnification.
• Increase Magnification 1X Increase themagnification up to 9X magnification.
• Decrease Magnification 1X decrease thecurrent magnification down to 2Xmagnification
• Close Close the Toolbar and TheMagnifier.
60
Chapter 3. Common Configurations
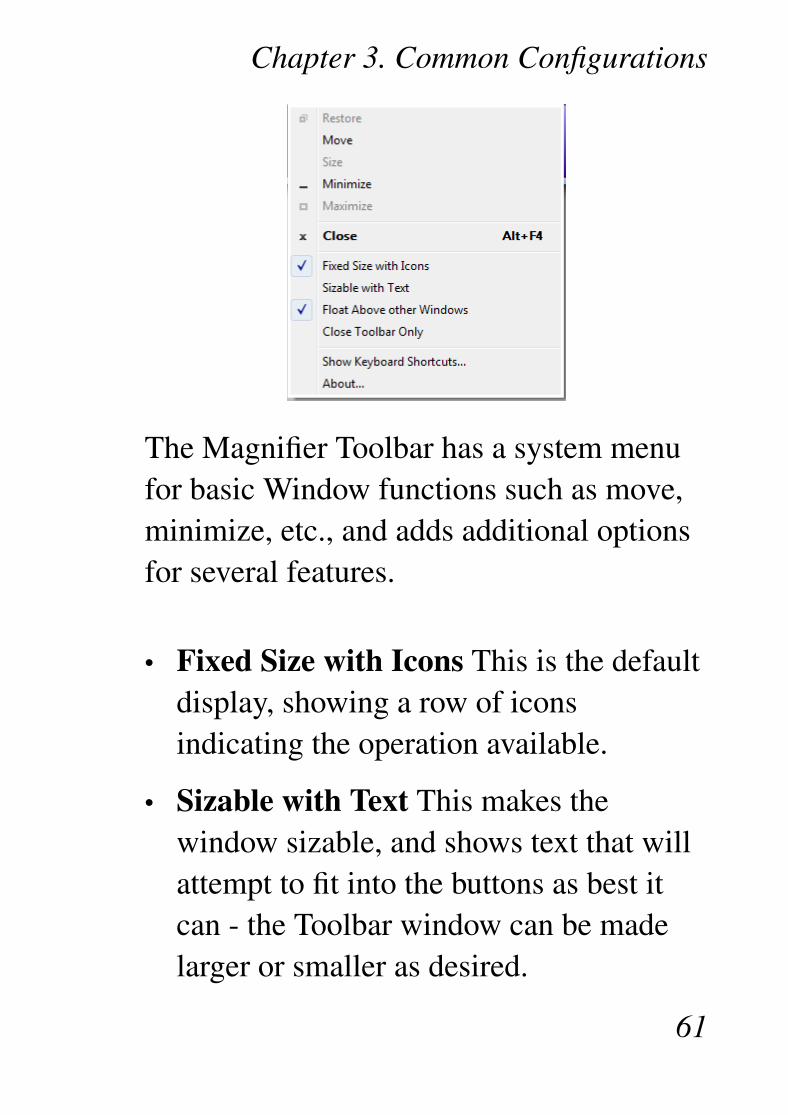
The Magnifier Toolbar has a system menufor basic Window functions such as move,minimize, etc., and adds additional optionsfor several features.
• Fixed Size with Icons This is the defaultdisplay, showing a row of iconsindicating the operation available.
• Sizable with Text This makes thewindow sizable, and shows text that willattempt to fit into the buttons as best itcan - the Toolbar window can be madelarger or smaller as desired.
61
Chapter 3. Common Configurations
• Float Above other Windows This keepsthe window Topmost, which will place itabove most windows in the system.
• Close Toolbar Only This will close theToolbar for the lifetime of The Magnifier.The next time The Magnifier is run, theToolbar will also be shown, unlessdisabled from the Advanced Menu in TheMagnifier.
• Show Keyboard Shortcuts... This opensthe Keyboard Shortcut List from the helpfile.
• About... A message showing informationabout The Magnifier Toolbar.
62
Chapter 3. Common Configurations
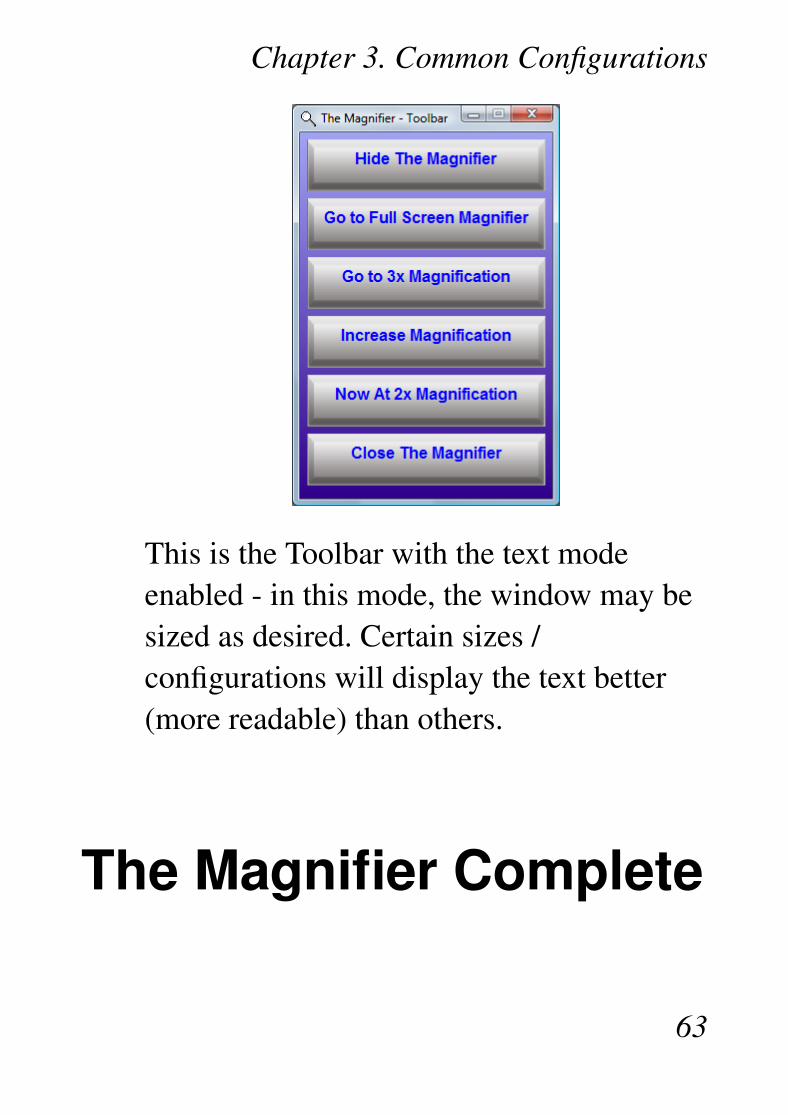
This is the Toolbar with the text modeenabled - in this mode, the window may besized as desired. Certain sizes /configurations will display the text better(more readable) than others.
The Magnifier Complete
63
Chapter 3. Common Configurations
List of Shortcut Keys
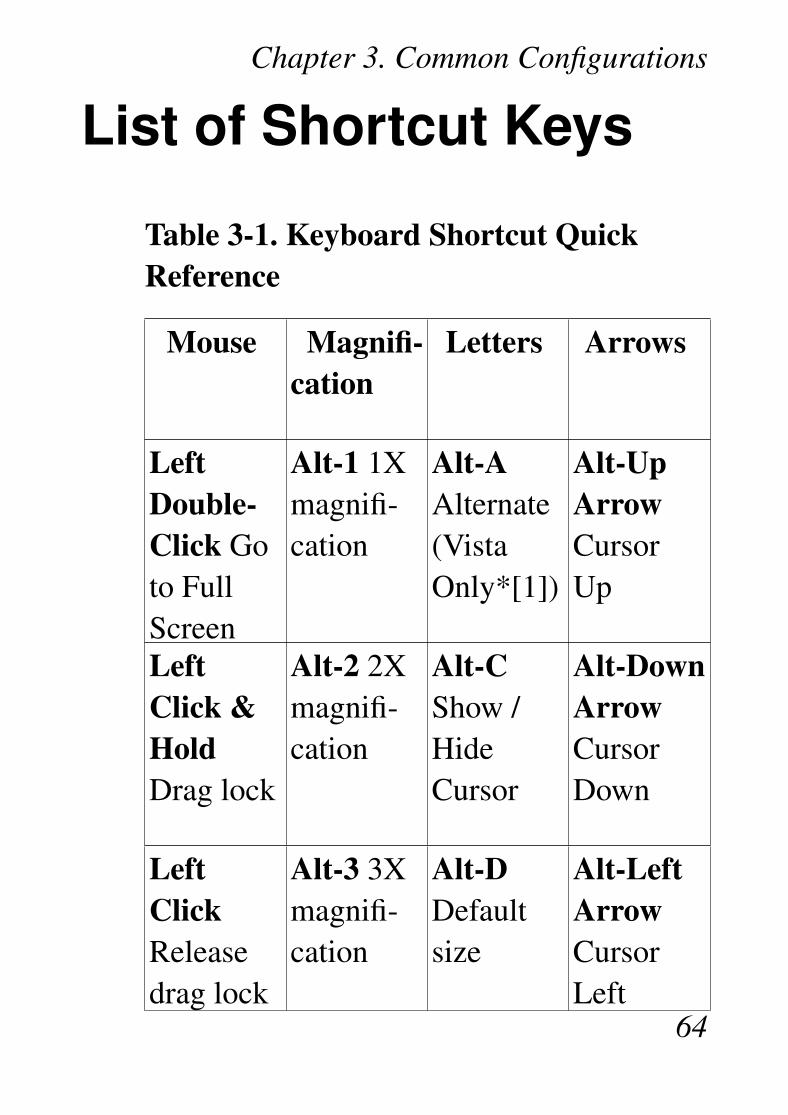
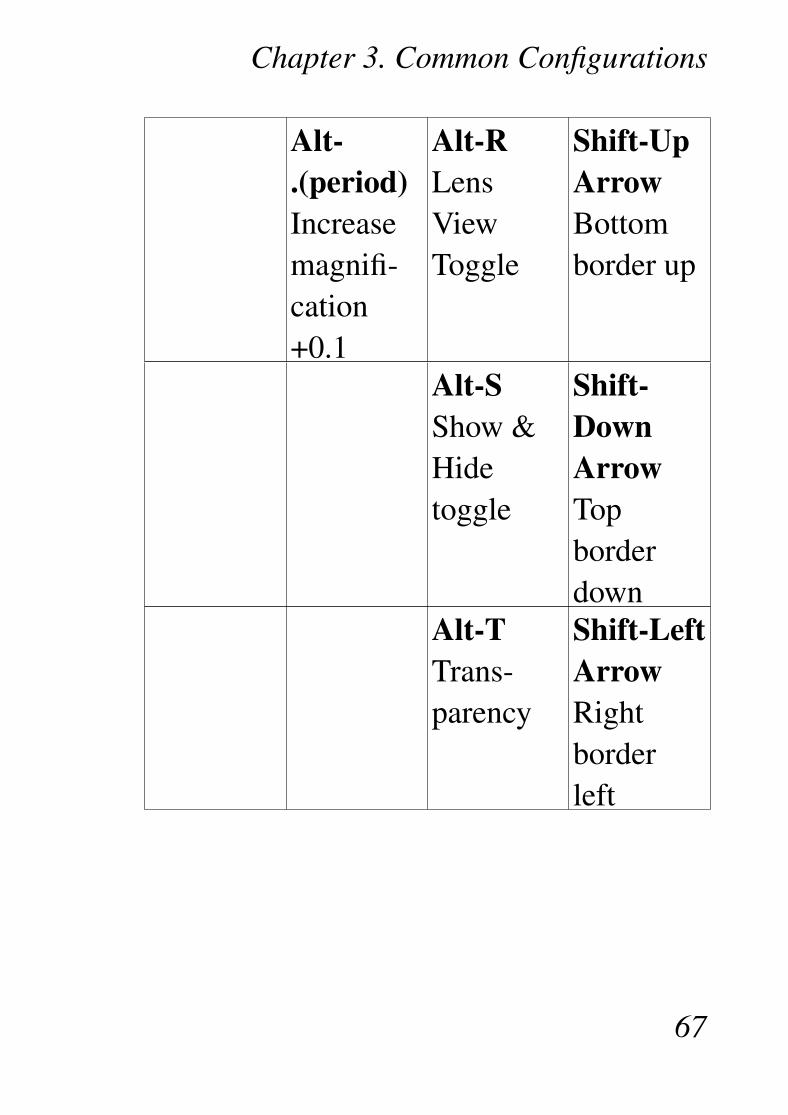
Table 3-1. Keyboard Shortcut QuickReference
Mouse Magnifi-cation
Letters Arrows
LeftDouble-Click Goto FullScreen
Alt-1 1Xmagnifi-cation
Alt-AAlternate(VistaOnly*[1])
Alt-UpArrowCursorUp
LeftClick &HoldDrag lock
Alt-2 2Xmagnifi-cation
Alt-CShow /HideCursor
Alt-DownArrowCursorDown
LeftClickReleasedrag lock
Alt-3 3Xmagnifi-cation
Alt-DDefaultsize
Alt-LeftArrowCursorLeft
64

Chapter 3. Common Configurations
RightClickOpenMenu
Alt-4 4Xmagnifi-cation
Alt-GPresenta-tion Mode
Alt-RightArrowCursorRight
Alt-5 5Xmagnifi-cation
Alt-IInvertColors
Ctrl-UpArrowPan Up
Edit Keys Alt-6 6Xmagnifi-cation
Alt-JToggleTexttracking
Ctrl-DownArrowPan Down
Alt-HomeWindowLeft
Alt-7 7Xmagnifi-cation
Alt-KThis List(Shortcutkeys)
Ctrl-LeftArrowPan Left
Alt-DeleteWindowLeft
Alt-8 8Xmagnifi-cation
Alt-LLockPosition
Ctrl-RightArrowPan Right
65

Chapter 3. Common Configurations
Alt-EndWindowRight
Alt-9 9Xmagnifi-cation
Alt-MMagnifi-cationdialog
UpArrowTopborder up
Alt-PgUpWindowUp
Alt--(_)Decreasemagnifi-cation-0.1
Alt-NCursorLines
DownArrowBottomborderdown
Alt-PgDnWindowDown
Alt-=(+)Increasemagnifi-cation+0.1
Alt-OFollowscursortoggle
LeftArrowLeftborderleft
Alt-,(comma)Decreasemagnifi-cation-0.1
Alt-QExit &Save
RightArrowRightborderright
66
Chapter 3. Common Configurations
Alt-.(period)Increasemagnifi-cation+0.1
Alt-RLensViewToggle
Shift-UpArrowBottomborder up
Alt-SShow &Hidetoggle
Shift-DownArrowTopborderdown
Alt-TTrans-parency
Shift-LeftArrowRightborderleft
67
Chapter 3. Common Configurations
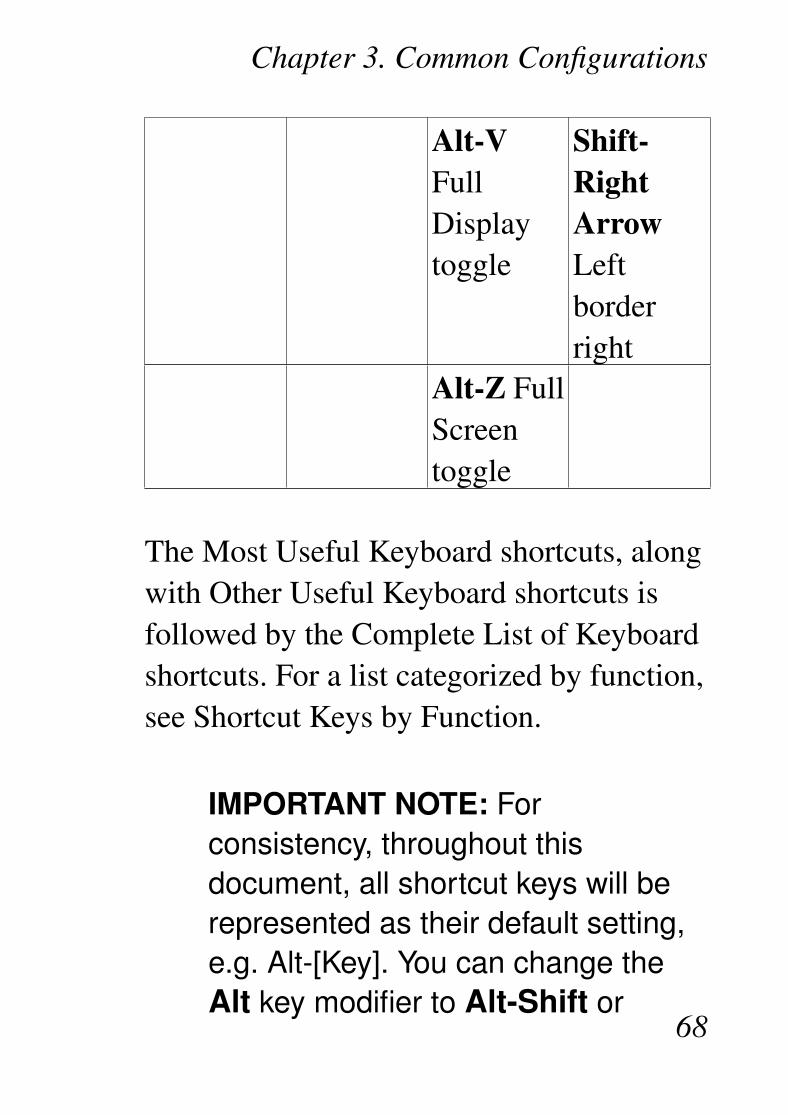
Alt-VFullDisplaytoggle
Shift-RightArrowLeftborderright
Alt-Z FullScreentoggle
The Most Useful Keyboard shortcuts, alongwith Other Useful Keyboard shortcuts isfollowed by the Complete List of Keyboardshortcuts. For a list categorized by function,see Shortcut Keys by Function.
IMPORTANT NOTE: Forconsistency, throughout thisdocument, all shortcut keys will berepresented as their default setting,e.g. Alt-[Key]. You can change theAlt key modifier to Alt-Shift or
68
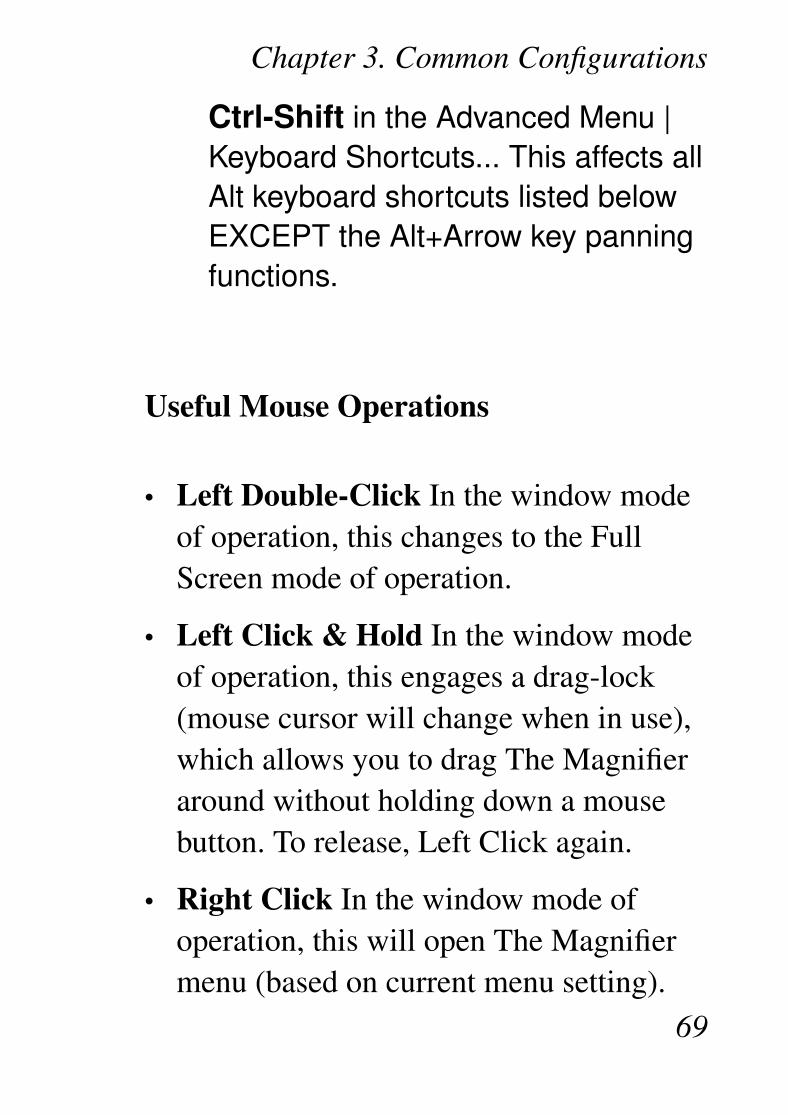
Chapter 3. Common Configurations
Ctrl-Shift in the Advanced Menu |Keyboard Shortcuts... This affects allAlt keyboard shortcuts listed belowEXCEPT the Alt+Arrow key panningfunctions.
Useful Mouse Operations
• Left Double-Click In the window modeof operation, this changes to the FullScreen mode of operation.
• Left Click & Hold In the window modeof operation, this engages a drag-lock(mouse cursor will change when in use),which allows you to drag The Magnifieraround without holding down a mousebutton. To release, Left Click again.
• Right Click In the window mode ofoperation, this will open The Magnifiermenu (based on current menu setting).
69
Chapter 3. Common Configurations
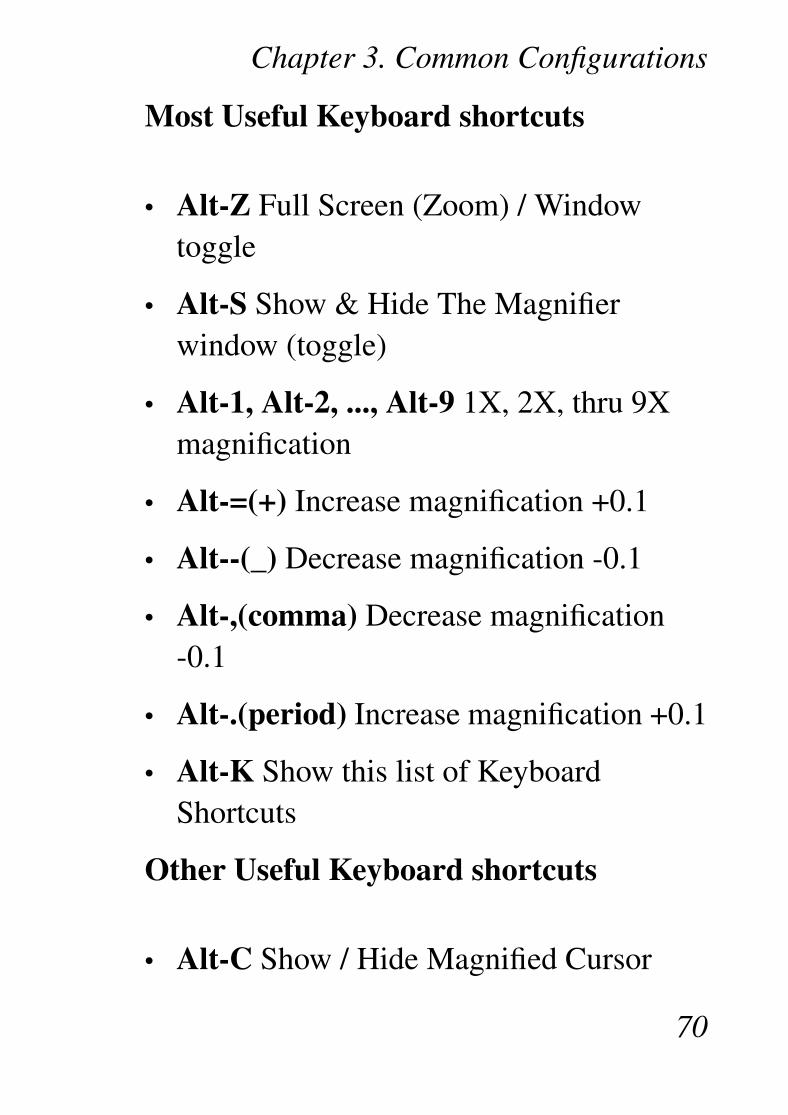
Most Useful Keyboard shortcuts
• Alt-Z Full Screen (Zoom) / Windowtoggle
• Alt-S Show & Hide The Magnifierwindow (toggle)
• Alt-1, Alt-2, ..., Alt-9 1X, 2X, thru 9Xmagnification
• Alt-=(+) Increase magnification +0.1
• Alt--(_) Decrease magnification -0.1
• Alt-,(comma) Decrease magnification-0.1
• Alt-.(period) Increase magnification +0.1
• Alt-K Show this list of KeyboardShortcuts
Other Useful Keyboard shortcuts
• Alt-C Show / Hide Magnified Cursor
70
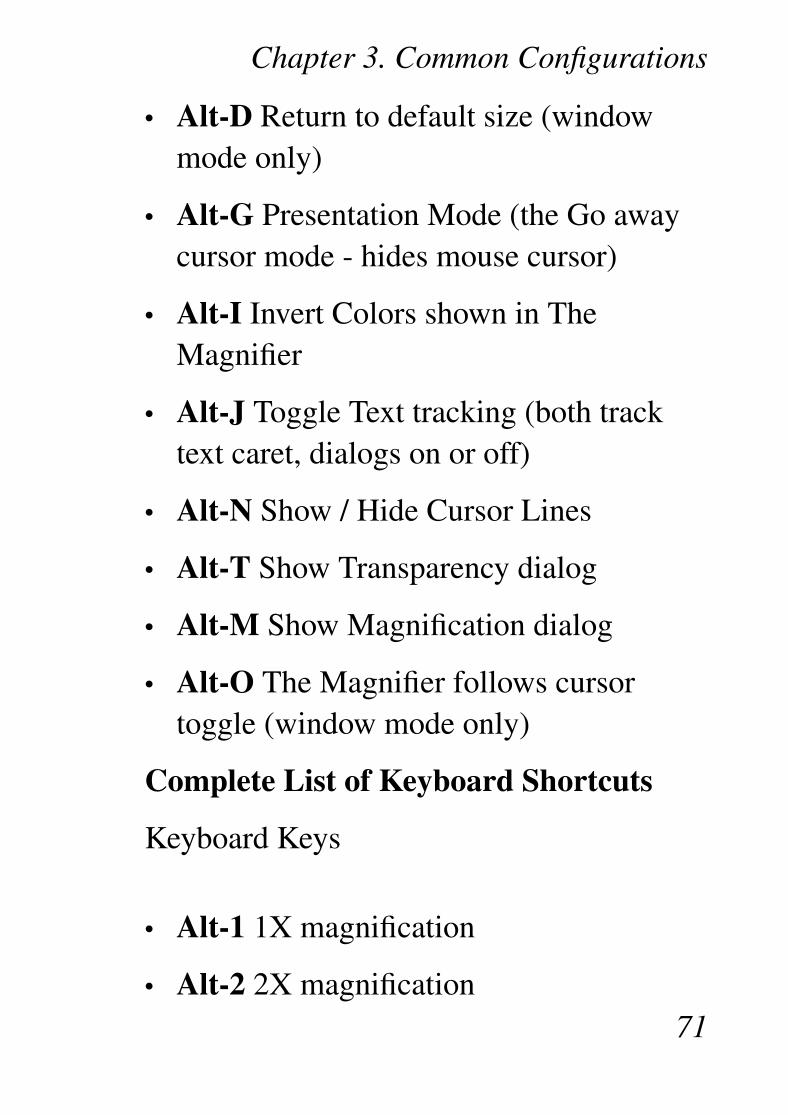
Chapter 3. Common Configurations
• Alt-D Return to default size (windowmode only)
• Alt-G Presentation Mode (the Go awaycursor mode - hides mouse cursor)
• Alt-I Invert Colors shown in TheMagnifier
• Alt-J Toggle Text tracking (both tracktext caret, dialogs on or off)
• Alt-N Show / Hide Cursor Lines
• Alt-T Show Transparency dialog
• Alt-M Show Magnification dialog
• Alt-O The Magnifier follows cursortoggle (window mode only)
Complete List of Keyboard Shortcuts
Keyboard Keys
• Alt-1 1X magnification
• Alt-2 2X magnification71
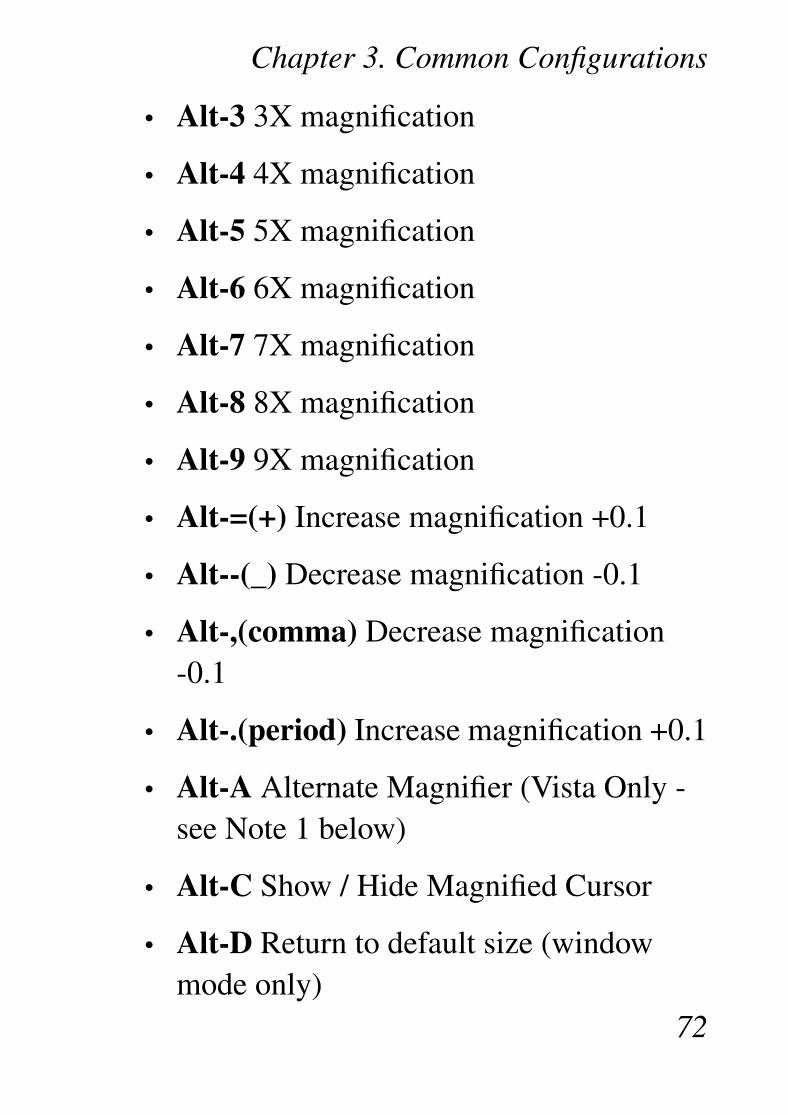
Chapter 3. Common Configurations
• Alt-3 3X magnification
• Alt-4 4X magnification
• Alt-5 5X magnification
• Alt-6 6X magnification
• Alt-7 7X magnification
• Alt-8 8X magnification
• Alt-9 9X magnification
• Alt-=(+) Increase magnification +0.1
• Alt--(_) Decrease magnification -0.1
• Alt-,(comma) Decrease magnification-0.1
• Alt-.(period) Increase magnification +0.1
• Alt-A Alternate Magnifier (Vista Only -see Note 1 below)
• Alt-C Show / Hide Magnified Cursor
• Alt-D Return to default size (windowmode only)
72

Chapter 3. Common Configurations
• Alt-G Presentation Mode (the Go awaycursor mode - hides mouse cursor)
• Alt-I Invert Colors shown in TheMagnifier
• Alt-J Toggle Text tracking (both tracktext caret, dialogs on or off)
• Alt-K Show this list of KeyboardShortcuts
• Alt-L Lock Magnified Position
• Alt-M Show Magnification dialog
• Alt-N Show / Hide Cursor Lines
• Alt-O The Magnifier follows cursortoggle (window mode only)
• Alt-Q Close (Exit) The Magnifier
• Alt-R Lens View Mode (RoundMagnifier) Toggle
• Alt-S Show & Hide The Magnifierwindow (toggle)
73

Chapter 3. Common Configurations
• Alt-T Show Transparency dialog
• Alt-V Full Display (entire Virtualdesktop) toggle
• Alt-Z Full Screen (Zoom) / Windowtoggle
Edit Keys
• Alt-Home Move Window Left
• Alt-Delete Move Window Left
• Alt-End Move Window Right
• Alt-PgUp Move Window Up
• Alt-PgDn Move Window Down
Arrow Keys
Note: The Arrow Key combinationsremain the same whether the Alt,Alt-Shift, or Ctrl-Shift modifier is inuse (i.e. Alt-Up Arrow will alwaysperform the same operation
74

Chapter 3. Common Configurations
regardless of which modifiercombination is in use).
Note: The Alt-Arrow keys moves themouse cursor to change themagnification point. This is forfine-tuning or zeroing in on a specificpoint, especially when themagnification is rather large. Alsonote there is an accessibility featureto control the mouse cursor from theNumeric keypad (MouseKeys). Alsonote that these Alt keys are notcontrolled by the Keyboard Shortcutssetting in The Magnifier
Note: The Alt-Left Arrow andAlt-Right Arrow keys are shortcuts tomove Forward and Backward in
75
Chapter 3. Common Configurations
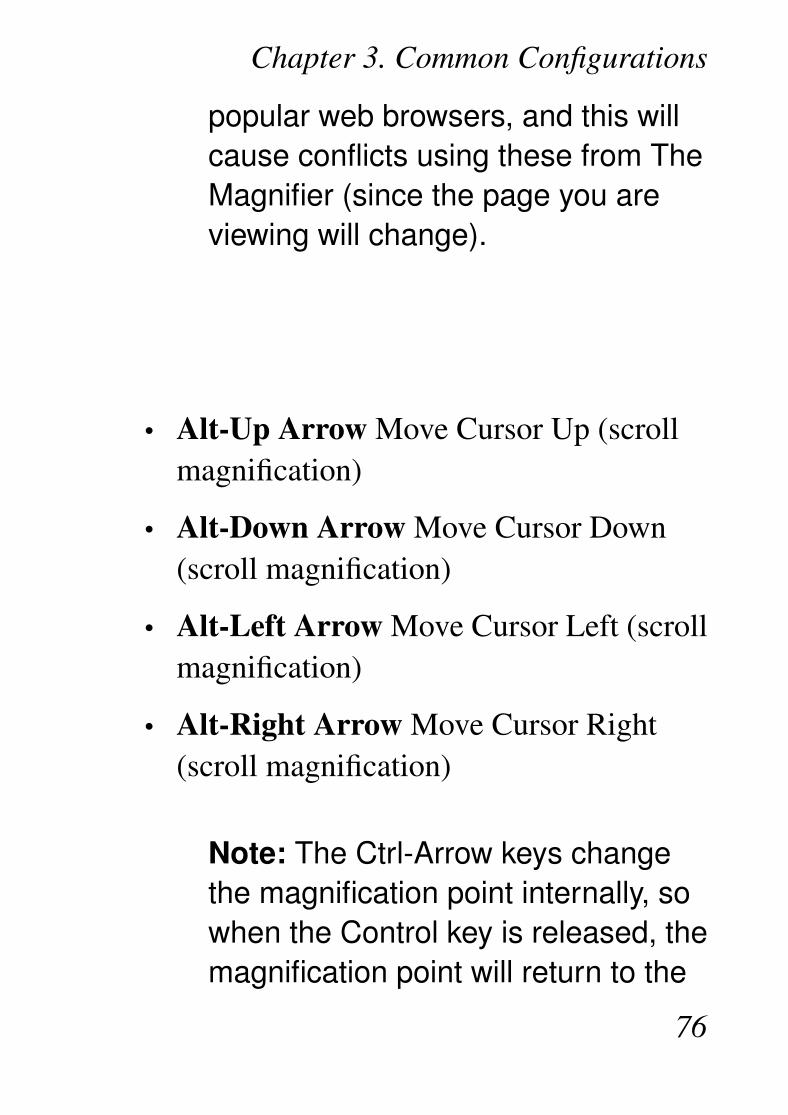
popular web browsers, and this willcause conflicts using these from TheMagnifier (since the page you areviewing will change).
• Alt-Up Arrow Move Cursor Up (scrollmagnification)
• Alt-Down Arrow Move Cursor Down(scroll magnification)
• Alt-Left Arrow Move Cursor Left (scrollmagnification)
• Alt-Right Arrow Move Cursor Right(scroll magnification)
Note: The Ctrl-Arrow keys changethe magnification point internally, sowhen the Control key is released, themagnification point will return to the
76

Chapter 3. Common Configurations
mouse cursor position (snaps back).This is an alternate approach to panor scroll the magnification withoutaffecting anything else in the systembut what is shown in The Magnifier’sdisplay.
• Ctrl-Up Arrow Move Magnificationpoint Up (temporarily scrollmagnification)
• Ctrl-Down Arrow Move Magnificationpoint Down (temporarily scrollmagnification)
• Ctrl-Left Arrow Move Magnificationpoint Left (temporarily scrollmagnification)
• Ctrl-Right Arrow Move Magnificationpoint Right (temporarily scroll
77
Chapter 3. Common Configurations
magnification)
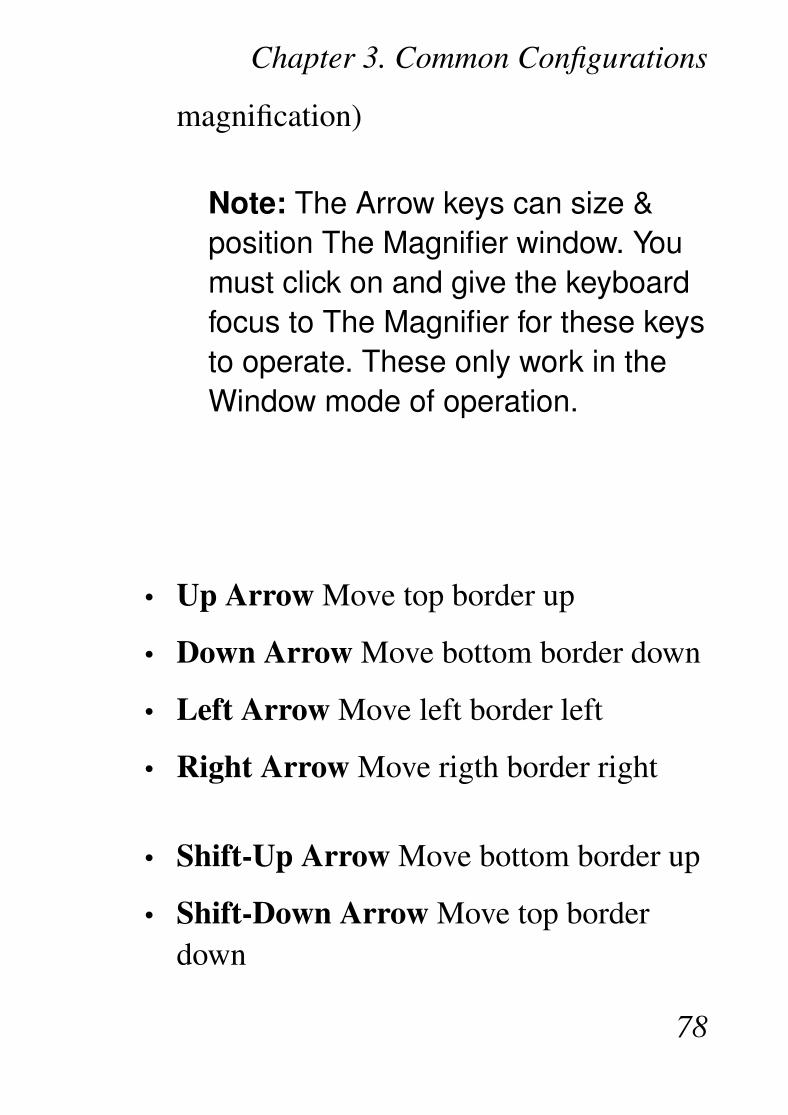
Note: The Arrow keys can size &position The Magnifier window. Youmust click on and give the keyboardfocus to The Magnifier for these keysto operate. These only work in theWindow mode of operation.
• Up Arrow Move top border up
• Down Arrow Move bottom border down
• Left Arrow Move left border left
• Right Arrow Move rigth border right
• Shift-Up Arrow Move bottom border up
• Shift-Down Arrow Move top borderdown
78
Chapter 3. Common Configurations
• Shift-Left Arrow Move right border left
• Shift-Right Arrow Move left borderright
Note 1 (Vista Only): In WindowsVista, Microsoft has created amagnification interface that creates auseful mechanism for doing thescreen magnification while in Vista.Depending on your systemconfiguration, video adapter, videoadapter driver, monitor resolution,and display settings, thismagnification may not render. In allcases, it is recommended youupdate your system or drivers toenable Vista to work correctly. Whenthe magnification subsystem is notoperating in Vista, The Magnifier’sbackground window will be visible,and text will be displayed outliningthe option of using an alternate
79
Chapter 3. Common Configurations
magnification scheme (accessibleusing Alt-A). This is provided only asan alternate, failsafe typemagnification option for users of TheMagnifier. Refer to Advanced Notesregarding the Alternate Magnificationin Vista.
Note 2 - Keyboard Focus & TheMagnifier: Because The Magnifier isa user-interface enhancement, andoperates alongside the user’s normaluse of basic programs andapplications, the user will most oftenhave the keyboard focus everywherebut The Magnifier. Becausecustomers asked for a way to control& modify The Magnifier whileworking within Windows, TheMagnifier must monitor the keyboardindependently of the normal way
80
Chapter 3. Common Configurations
programs work within Windows (i.e.where only the program withkeystroke focus sees/reacts to thekeyboard). This all workswonderfully, and makes everyonehappy, up until there is a conflictbetween a keystroke combinationThe Magnifier reacts to, and whenthat particular keystroke combinationis used within the program the useris currently working with. In somecases, the problem may only be aminor annoyance - at other times, itmay be a serious impediment. Ifthere is a serious conflict, thenselecting one of alternate shortcutmodifiers is the best option (and willreduce the possibility of a conflict).You can choose from the Alt key, theAlt+Shift keys, or Control+Shift keymodifiers.
81
Chapter 3. Common Configurations
Note 3 - Operation Notes: Whenmultiple magnifiers are running,some of the keyboard shortcuts willaffect ALL magnifiers running. Insome cases, using the menu optionswhen multiple magnifiers are runningmay be more effective (e.g.positioning, setting features, etc.).
Note 4 - Advanced Notes: Thekeyboard shortcuts are implementedin 2 distinct ways. 1 approach uses 3sets of Keyboard Accelerators (forAlt, Alt-Shift, and Ctrl-Shift), that areused when The Magnifier has thekeyboard focus. The other is akeyboard monitoring approach(using the GetAsyncKeyStateWindows API) for the combinationkey and the shortcut key. The sizingoptions using the arrow keys (and
82
Chapter 3. Common Configurations
shift-arrow keys) are onlyimplemented as keyboardaccelerators (requiring focus to beon The Magnifier).
The Magnifier ShortcutKeys by Function
This lists the keyboard shortcuts by functionin various categories. For the complete list,with operation notes, see the Complete Listof Keyboard Shortcuts.
Keyboard Shortcuts by FunctionCategory
Magnification Factor control
• Alt-1 1X magnification
83

Chapter 3. Common Configurations
• Alt-2 2X magnification
• Alt-3 3X magnification
• Alt-4 4X magnification
• Alt-5 5X magnification
• Alt-6 6X magnification
• Alt-7 7X magnification
• Alt-8 8X magnification
• Alt-9 9X magnification
• Alt-=(+) Increase magnification +0.1
• Alt--(_) Decrease magnification -0.1
• Alt-,(comma) Decrease magnification-0.1
• Alt-.(period) Increase magnification +0.1
• Alt-M Show Magnification dialog
Important Display Options
• Alt-C Show / Hide Magnified Cursor84
Chapter 3. Common Configurations
• Alt-D Return to default size (windowmode only)
• Alt-I Invert Colors shown in TheMagnifier
• Alt-R Lens View Mode (RoundMagnifier) Toggle
• Alt-S Show & Hide The Magnifierwindow (toggle)
• Alt-V Full Display (entire Virtualdesktop) toggle
• Alt-Z Full Screen (Zoom) / Windowtoggle
Special Display Options
• Alt-G Presentation Mode (Go awaycursor - hides mouse cursor temporarily)
• Alt-L Lock Magnified Position
• Alt-N Show / Hide Cursor Lines
85
Chapter 3. Common Configurations
• Alt-O The Magnifier follows cursortoggle (window mode only)
• Alt-T Show Transparency dialog
Move / Size The Magnifier in WindowMode
• Alt-Home Move Window Left
• Alt-Delete Move Window Left
• Alt-End Move Window Right
• Alt-PgUp Move Window Up
• Alt-PgDn Move Window Down
• Up Arrow Move top border up
• Down Arrow Move bottom border down
• Left Arrow Move left border left
• Right Arrow Move rigth border right
• Shift-Up Arrow Move bottom border up
• Shift-Down Arrow Move top border
86
Chapter 3. Common Configurations
down
• Shift-Left Arrow Move right border left
• Shift-Right Arrow Move left borderright
Control Magnification Point
• Alt-Up Arrow Move Cursor Up (scrollmagnification)
• Alt-Down Arrow Move Cursor Down(scroll magnification)
• Alt-Left Arrow Move Cursor Left (scrollmagnification)
• Alt-Right Arrow Move Cursor Right(scroll magnification)
• Ctrl-Up Arrow Move Magnificationpoint Up (temporarily scrollmagnification)
• Ctrl-Down Arrow Move Magnificationpoint Down (temporarily scroll
87
Chapter 3. Common Configurations
magnification)
• Ctrl-Left Arrow Move Magnificationpoint Left (temporarily scrollmagnification)
• Ctrl-Right Arrow Move Magnificationpoint Right (temporarily scrollmagnification)
Miscellaneous Options
• Alt-A Alternate Magnifier (Vista Only -see Note 1 (Complete List))
• Alt-J Toggle Text tracking
• Alt-K Show this list of KeyboardShortcuts
• Alt-Q Close (Exit) The Magnifier
The Magnifier Full88
Chapter 3. Common Configurations
Screen Operation -CommonConfigurations
Alt-Z Full Screen (Zoom) / Window toggle
Without a doubt, the most commonquestion about The Magnifier is: "Can itoperate as a Full Screen magnifier?" Prior tothe 1.50 Release, this capability was notpresent. Now we are pleased to offer anaffordable, simple to use, powerful FullScreen magnifier!
After Installation, when you start TheMagnifier, the default operation is an areamagnifier, displayed in a window, centeredon your screen. To quickly & easily turn on(or off) the Full Screen magnification, useAlt-Z
Shortcut Keys: For consistency,89
Chapter 3. Common Configurations
throughout this document, allshortcut keys will be represented astheir default setting, e.g. Alt-[Key].Please note that there are 3selectable keystroke combinationsavailable for all these keys - Alt-[Key],Alt-Shift-[Key], and Ctrl-Shift-[Key](this is configurable in the Advancedmenu). See the Complete List ofShortcut Keys for more information.
The Magnifier ColorInversion Operation -CommonConfigurations
Some people find the color inversion option90
Chapter 3. Common Configurations
helpful and it makes reading easier. To turnThe Magnifier into a quick color inversiontoggle tool, configure it as follows:
After Installation, when you start TheMagnifier, the default operation is an areamagnifier, displayed in a window, centeredon your screen. Use Alt-Z to turn on theFull Screen magnification. Use Alt-1 to set1x Magnification (no magnification). UseAlt-I to turn on the Color Inversion. Nowyou can use Alt-S to toggle color inversionof your screen. If helpful, othermagnification settings can be used - UseAlt-+ (=) to step up by 0.1x magnification.
Shortcut Keys: For consistency,throughout this document, allshortcut keys will be represented astheir default setting, e.g. Alt-[Key].Please note that there are 3selectable keystroke combinationsavailable for all these keys - Alt-[Key],
91
Chapter 3. Common Configurations
Alt-Shift-[Key], and Ctrl-Shift-[Key](this is configurable in the Advancedmenu). See the Complete List ofShortcut Keys for more information.
The Magnifier Return toDefaults - CommonConfigurations
Alt-D Return to default size (window modeonly)
Most users appreciate the quick & easyshortcut keys that allow rapid changes &access to all of The Magnifier’s feature.However, there can arise conflict with otherapplications, and unexpected actions ifthese shortcut keys are used separately from
92

Chapter 3. Common Configurations
The Magnifier. To quickly & easily returnto the default settings with The Magnifier,use Alt-D
Shortcut Keys: For consistency,throughout this document, allshortcut keys will be represented astheir default setting, e.g. Alt-[Key].Please note that there are 3selectable keystroke combinationsavailable for all these keys - Alt-[Key],Alt-Shift-[Key], and Ctrl-Shift-[Key](this is configurable in the Advancedmenu). See the Complete List ofShortcut Keys for more information.
The Magnifier tracksMouse Cursor -
93
Chapter 3. Common Configurations
CommonConfigurations
Alt-O Toggles tracking (following) theMouse Cursor
When operating in the Window mode, theactual positioning of The Magnifier windowcan sometimes be problematic, dependingon the actual application being used and itsrequirements. By enabling the Track Cursormode (or The Magnifier window followsthe mouse cursor), The Magnifier windowis able to "tag along" with the mouse cursor.To enable or cancel this mode, use Alt-O
Shortcut Keys: For consistency,throughout this document, allshortcut keys will be represented astheir default setting, e.g. Alt-[Key].Please note that there are 3selectable keystroke combinations
94
Chapter 3. Common Configurations
available for all these keys - Alt-[Key],Alt-Shift-[Key], and Ctrl-Shift-[Key](this is configurable in the Advancedmenu). See the Complete List ofShortcut Keys for more information.
The Magnifier Startswith Windows -CommonConfigurations
When you install using the IMG installationfiles, you have the option of selecting "Addto Startup Group" - if you have alreadyinstalled, used the MSI (Windows) installer,or need to remove or add to the StartUpgroup, please refer to these notes.
95
Chapter 3. Common Configurations
The quickest and easiest way to access theStartUp group is to do the following:
• Right-click on the Start Menu button
• Select Explore all users
• Double-click (select) the Programs folder
• Double-click (select) the StartUp folder
• If The Magnifier’s icon is there and youwant to remove it, you can delete it.
• If you want to add The Magnifier’s icon,you can right-click, and select New |Shortcut - then select The Magnifier fromthe \Program Files\The Magnifier folder.Alternatively, you can copy the Desktopicon, then paste it into this folder.
Note: The actual location changesbased on which version of Windowsyou use. The above outlines how toadd to the All Users section (so All
96
Chapter 3. Common Configurations
Users will be affected). You can alsoonly add the icon to your StartUpfiles. The details of Windows, andhow to configure various versions ofWindows is beyond the scope of thisHelp document.
97
Chapter 4.WindowedOperation
The MagnifierWindowed OperationOverview
The Magnifier Windowed OperationOverview outlines all options for running asa window.
98
Chapter 4. Windowed Operation
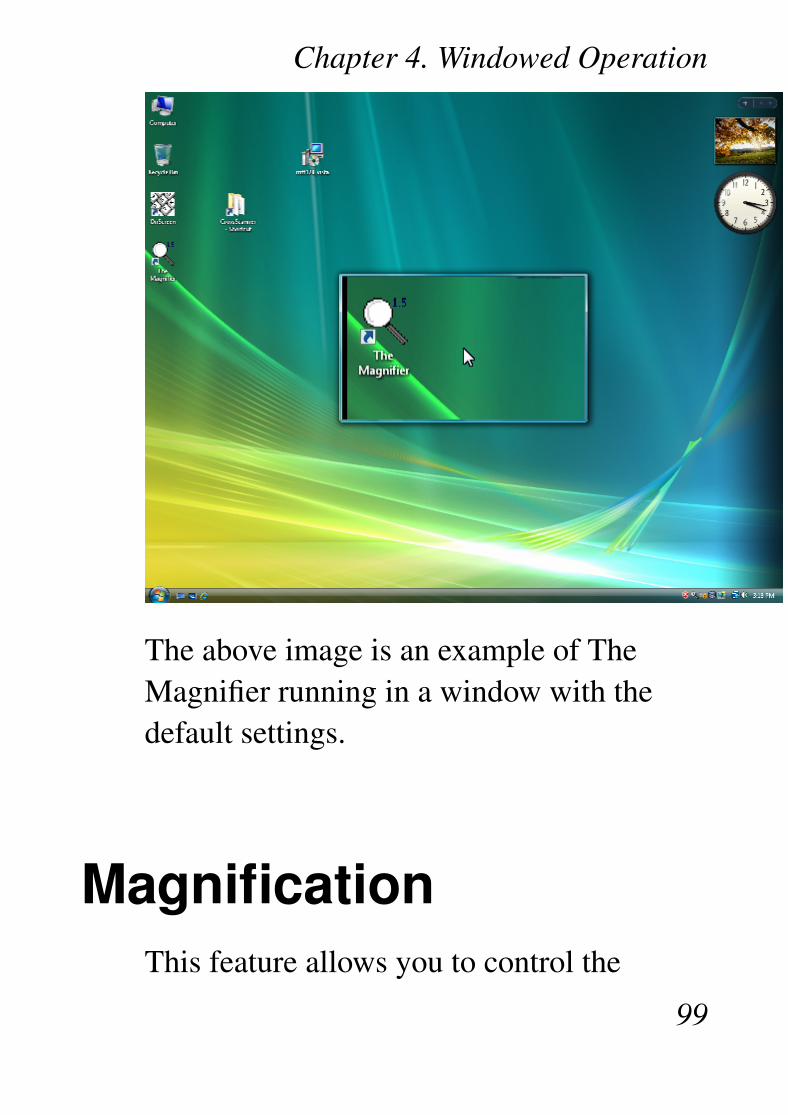
The above image is an example of TheMagnifier running in a window with thedefault settings.
MagnificationThis feature allows you to control the
99

Chapter 4. Windowed Operation
magnification of your screen. You can selectthe magnification via the menu or by usingAlt-1, Alt-2, Alt-3, Alt-4, Alt-5, Alt-6,Alt-7, Alt-8, Alt-9, or by using Alt-M forthe Magnification dialog.
1x Magnification This selection does notchange the image on your computer screen.By making this selection you will simply be
100
Chapter 4. Windowed Operation
able to view the screen without anymagnification (exactly as it appears).Keyboard Shortcut: Alt-1
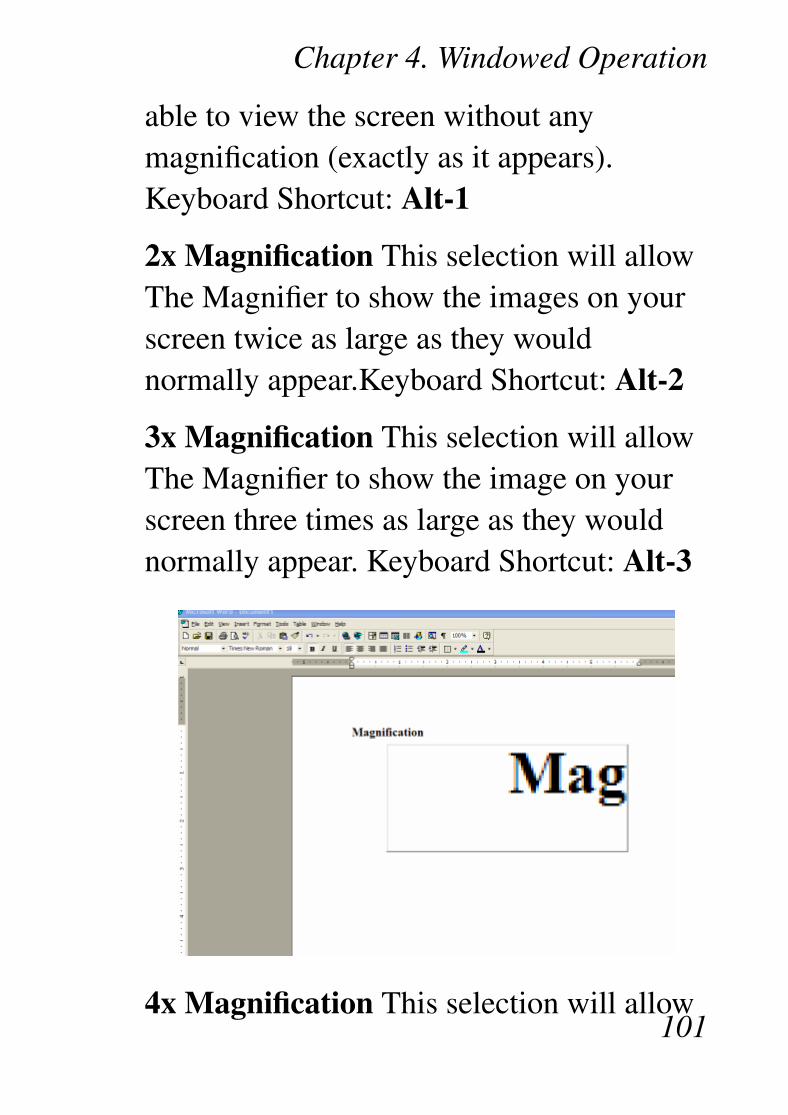
2x Magnification This selection will allowThe Magnifier to show the images on yourscreen twice as large as they wouldnormally appear.Keyboard Shortcut: Alt-2
3x Magnification This selection will allowThe Magnifier to show the image on yourscreen three times as large as they wouldnormally appear. Keyboard Shortcut: Alt-3
4x Magnification This selection will allow101
Chapter 4. Windowed Operation
The Magnifier to show the image on yourscreen four times as large as they wouldnormally appear. Keyboard Shortcut: Alt-4
5x Magnification This selection will allowThe Magnifier to show the image on yourscreen five times as large as they wouldnormally appear. Keyboard Shortcut: Alt-5
6x Magnification This selection will allowThe Magnifier to show the image on yourscreen six times as large as they wouldnormally appear. Keyboard Shortcut: Alt-6
7x Magnification This selection will allowThe Magnifier to show the image on your
102
Chapter 4. Windowed Operation
screen seven times as large as they wouldnormally appear. Keyboard Shortcut: Alt-7
8x Magnification This selection will allowThe Magnifier to show the image on yourscreen eight times as large as they wouldnormally appear. Keyboard Shortcut: Alt-8
9x Magnification This selection will allowThe Magnifier to show the image on yourscreen nine times as large as they wouldnormally appear. Keyboard Shortcut: Alt-9
Custom Magnification This selection
103
Chapter 4. Windowed Operation
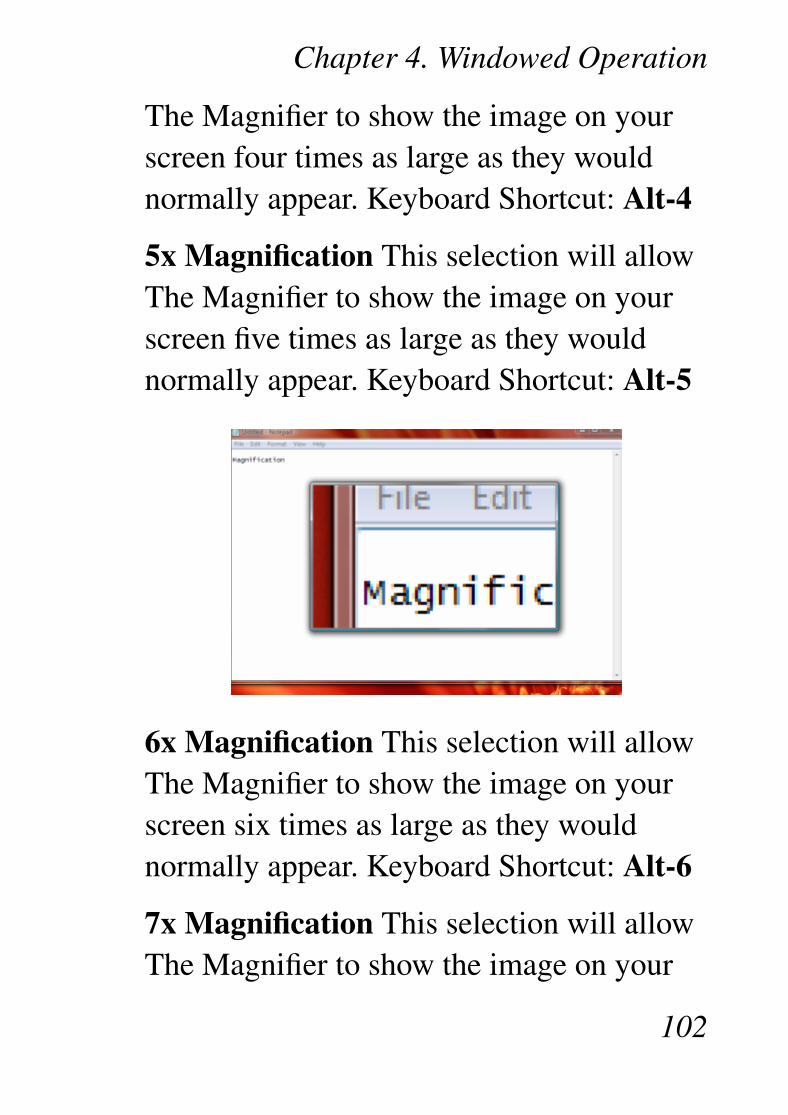
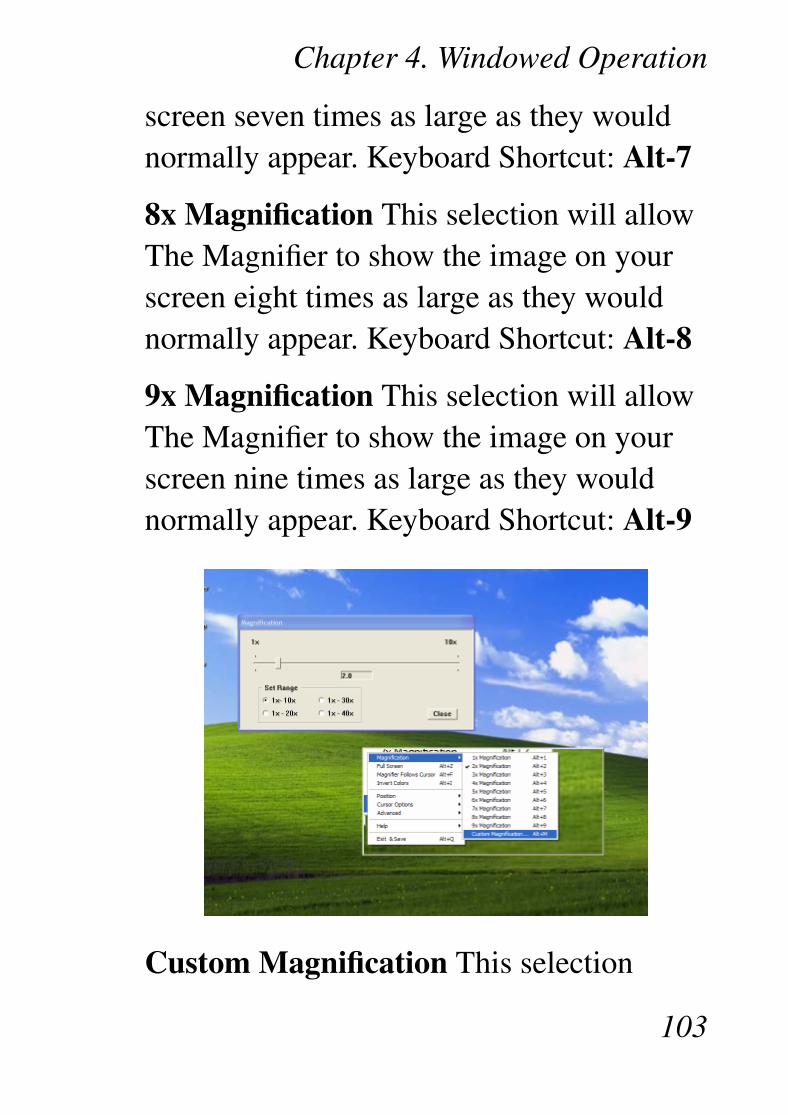
allows you to customize your screenmagnification. The default settings on thismenu will be a range of 1x-10x’s themagnification of the original image, but ifyou wish to magnify more, there is a dialoglabeled ’Set Range’ which will allow you tochose 1x-10x’s, 1x-20x’s, 1x-30x’s, or1x-40x’s. Once you have selected theproper range, move the slider to yourdesired magnification settings then click toclose. Keyboard Shortcut: Alt-M
104
Chapter 4. Windowed Operation
Full Screen
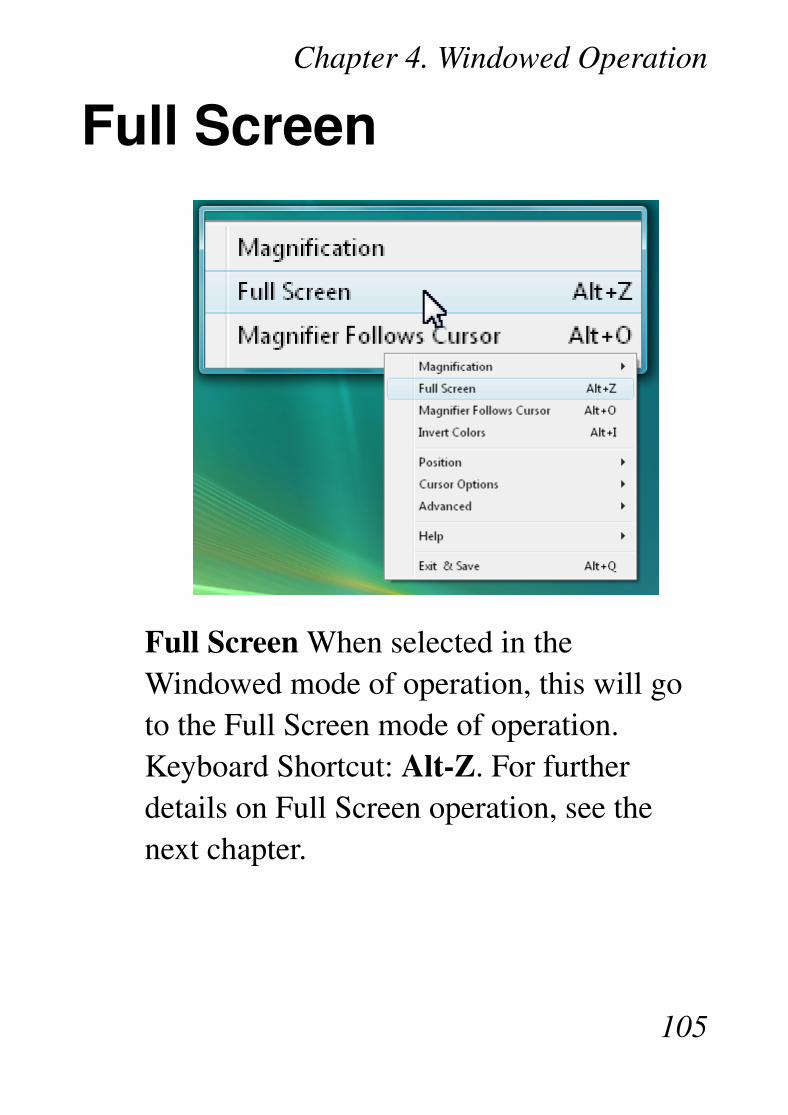
Full Screen When selected in theWindowed mode of operation, this will goto the Full Screen mode of operation.Keyboard Shortcut: Alt-Z. For furtherdetails on Full Screen operation, see thenext chapter.
105
Chapter 4. Windowed Operation
The Magnifier FollowsCursor
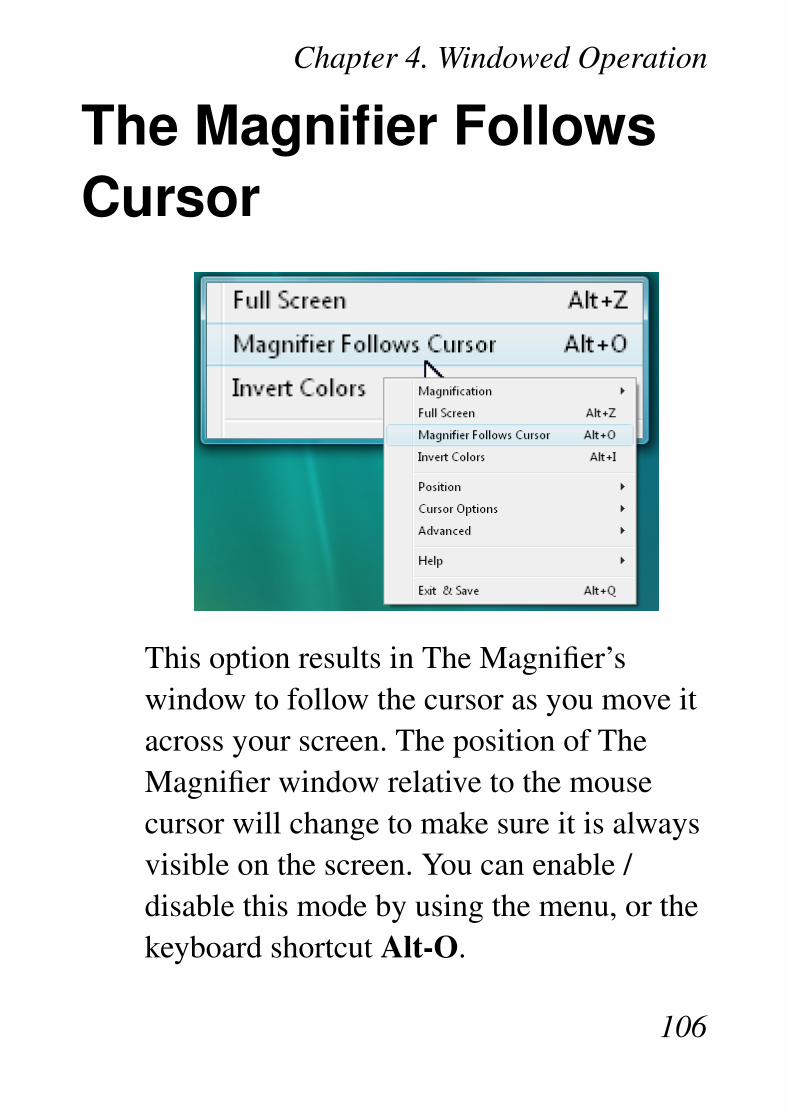
This option results in The Magnifier’swindow to follow the cursor as you move itacross your screen. The position of TheMagnifier window relative to the mousecursor will change to make sure it is alwaysvisible on the screen. You can enable /disable this mode by using the menu, or thekeyboard shortcut Alt-O.
106
Chapter 4. Windowed Operation
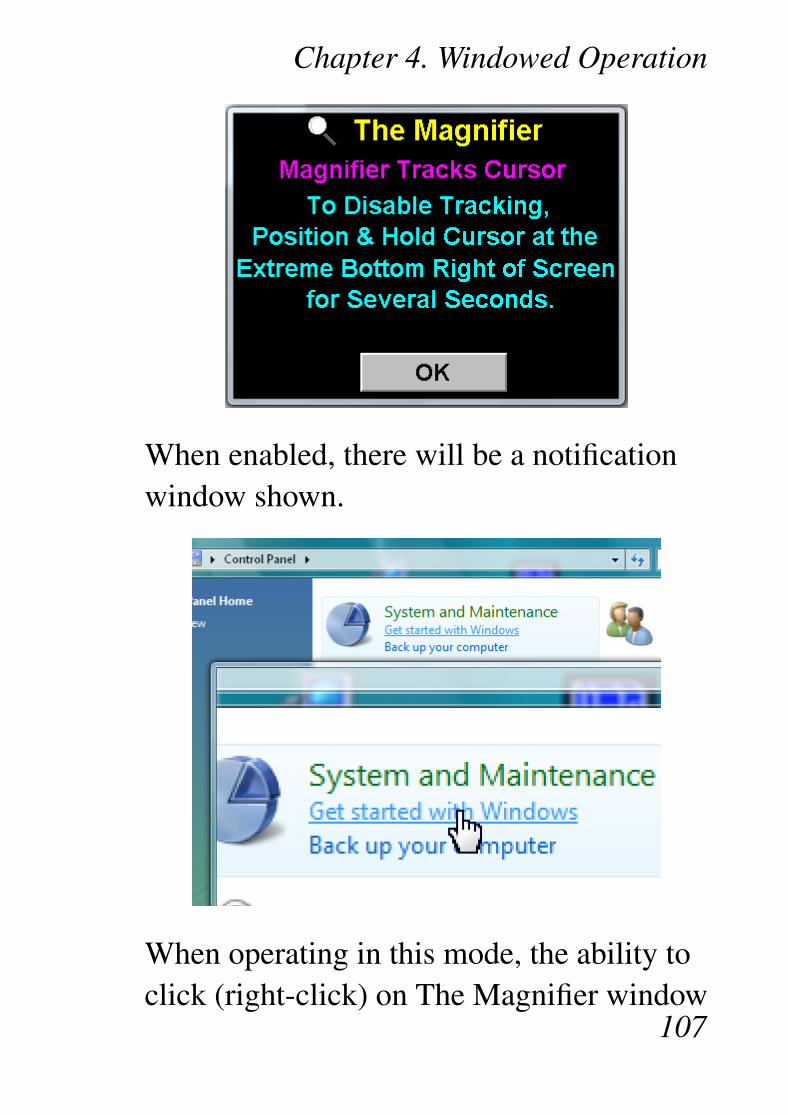
When enabled, there will be a notificationwindow shown.
When operating in this mode, the ability toclick (right-click) on The Magnifier window
107
Chapter 4. Windowed Operation
is impossible (since The Magnifier windowconstantly repositions based on the actualmouse cursor position). To disable thismode, you can click on the small icon in thetray to access the menu and toggle the modeby selecting the menu option, or you canuse the keyboard shortcut Alt-O, or you canhold the mouse cursor at the bottom right ofthe screen for several seconds.
108
Chapter 4. Windowed Operation
Invert Colors
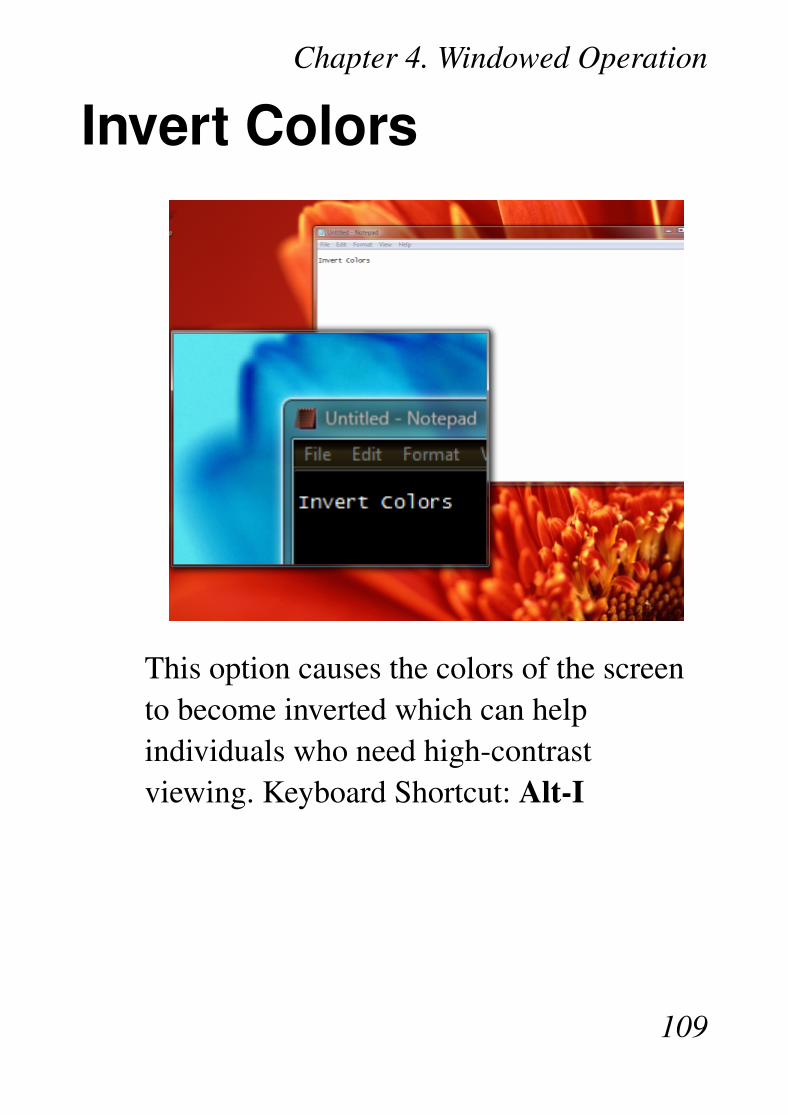
This option causes the colors of the screento become inverted which can helpindividuals who need high-contrastviewing. Keyboard Shortcut: Alt-I
109
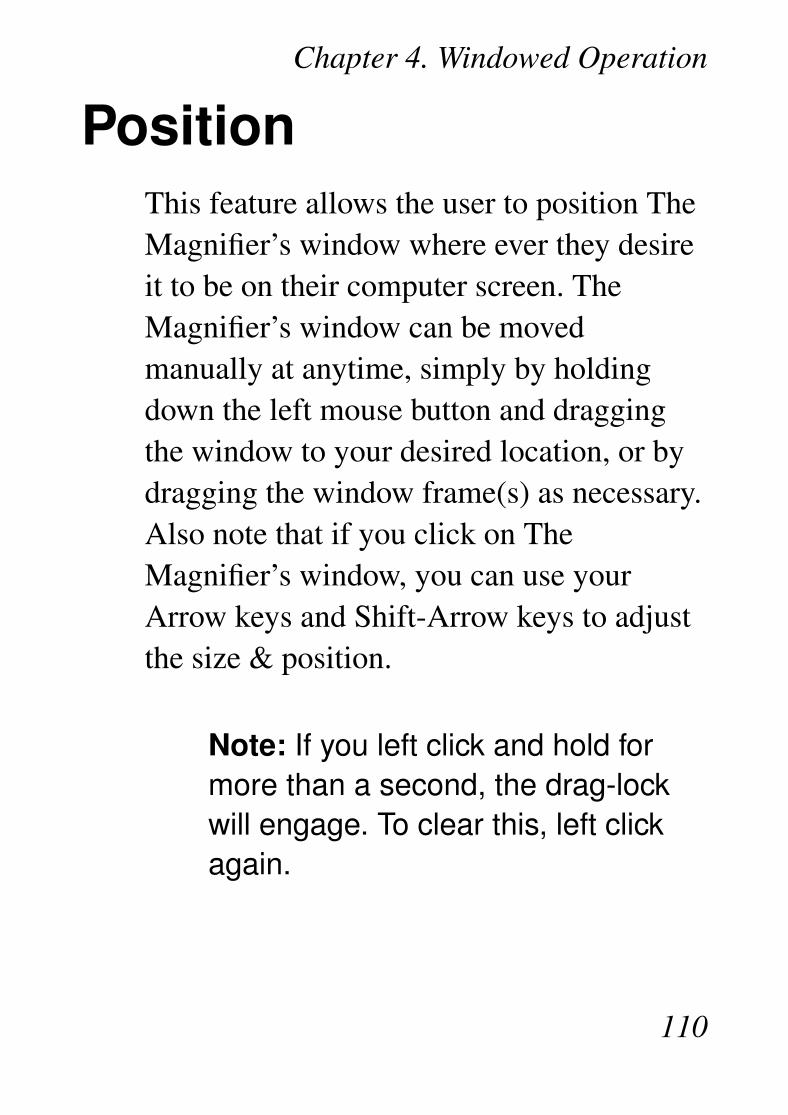
Chapter 4. Windowed Operation
PositionThis feature allows the user to position TheMagnifier’s window where ever they desireit to be on their computer screen. TheMagnifier’s window can be movedmanually at anytime, simply by holdingdown the left mouse button and draggingthe window to your desired location, or bydragging the window frame(s) as necessary.Also note that if you click on TheMagnifier’s window, you can use yourArrow keys and Shift-Arrow keys to adjustthe size & position.
Note: If you left click and hold formore than a second, the drag-lockwill engage. To clear this, left clickagain.
110
Chapter 4. Windowed Operation
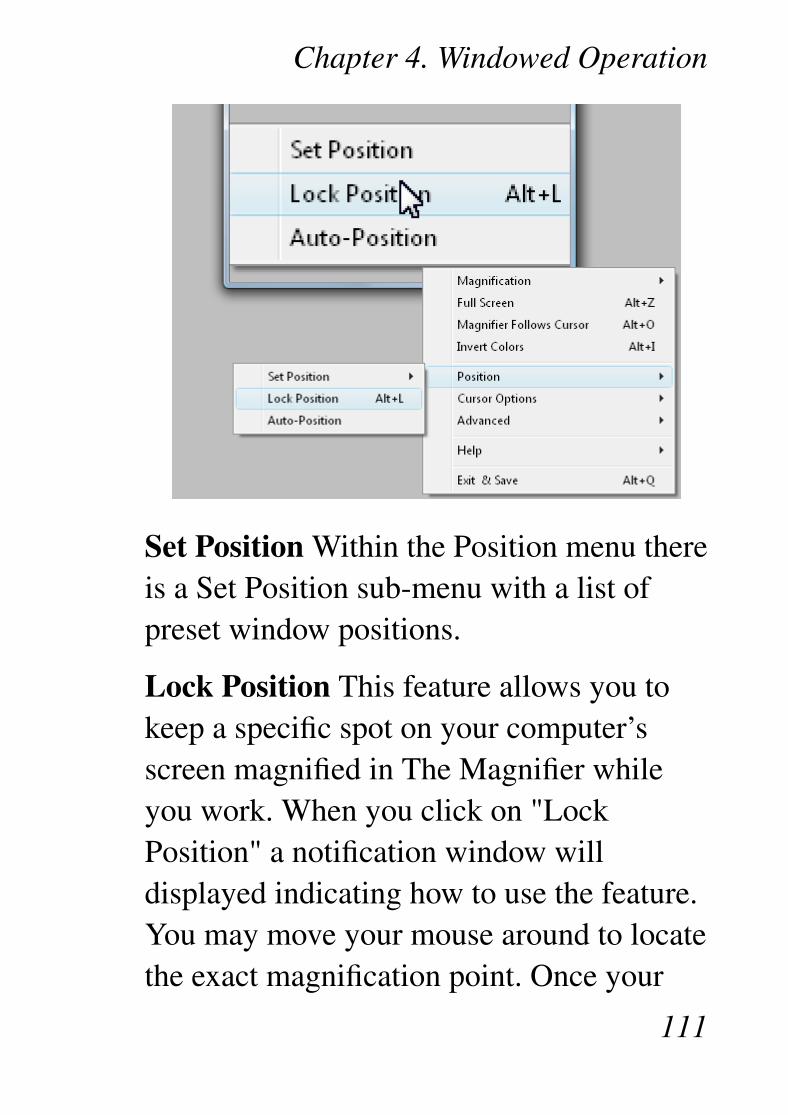
Set Position Within the Position menu thereis a Set Position sub-menu with a list ofpreset window positions.
Lock Position This feature allows you tokeep a specific spot on your computer’sscreen magnified in The Magnifier whileyou work. When you click on "LockPosition" a notification window willdisplayed indicating how to use the feature.You may move your mouse around to locatethe exact magnification point. Once your
111
Chapter 4. Windowed Operation
mouse cursor is positioned at the desiredlocation, click the with your left-mousebutton. This will lock the area that is beingmagnified. To clear the lock, use Alt-Lagain, or clear the check mark in thePosition menu.
Auto-Position This feature, when enabled,allows you to see under The Magnifier’swindow automatically. When you hoverover The Magnifier’s window with yourcursor for a few seconds, it willautomatically reposition to another screenlocation. The sequence is top-left totop-right to bottom-left to bottom-right. Ifyou are in one of the "Split Screen" optionsthis feature allows you to hover over TheMagnifier’s window to have it automaticallymove to the other half of your screen.
112

Chapter 4. Windowed Operation
Set Position
This menu is where the pre-set positions forThe Magnifier’s window can be found.
Default The default option sets TheMagnifier’s window back to the center ofyour computer’s screen. You can also useAlt-D keyboard shortcut to return to thedefault position.
113

Chapter 4. Windowed Operation
Top-Left The top-left option will take TheMagnifier’s window to the top-left corner ofyour screen.
Top-Center This option sets TheMagnifier’s window to the top-center ofyour screen.
Top-Right This option sets The Magnifier’swindow to the top-right corner of yourscreen.
114
Chapter 4. Windowed Operation
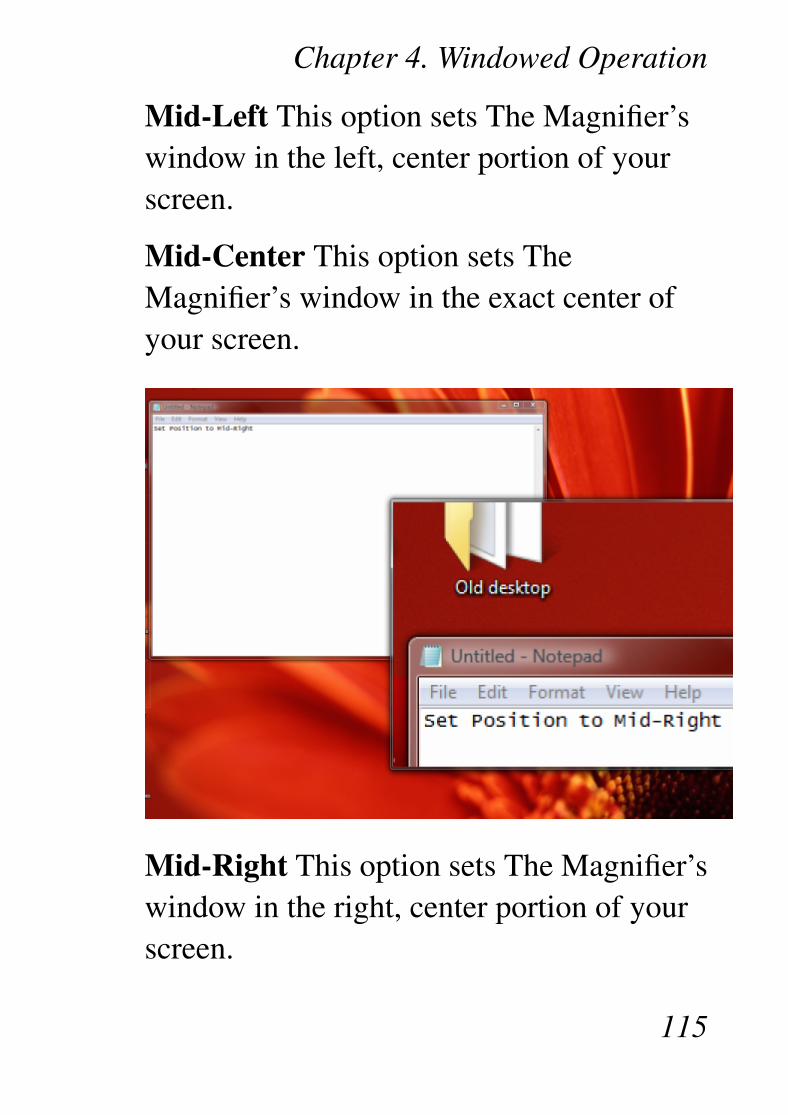
Mid-Left This option sets The Magnifier’swindow in the left, center portion of yourscreen.
Mid-Center This option sets TheMagnifier’s window in the exact center ofyour screen.
Mid-Right This option sets The Magnifier’swindow in the right, center portion of yourscreen.
115
Chapter 4. Windowed Operation
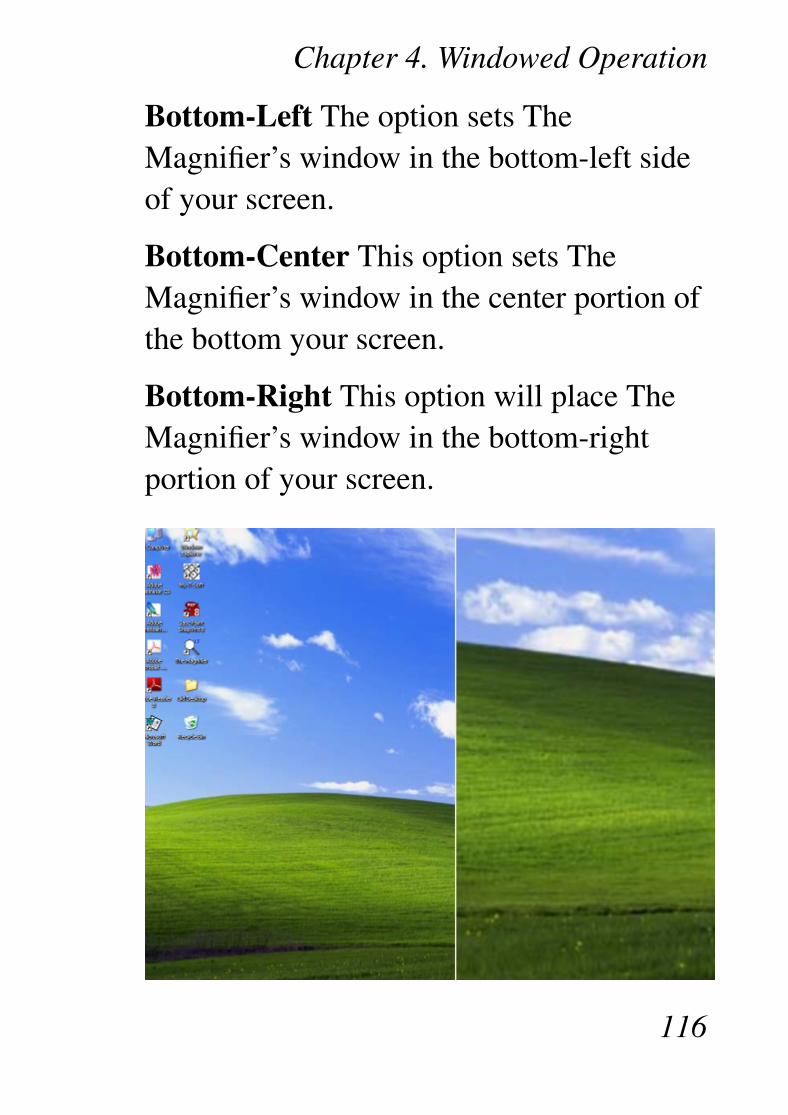
Bottom-Left The option sets TheMagnifier’s window in the bottom-left sideof your screen.
Bottom-Center This option sets TheMagnifier’s window in the center portion ofthe bottom your screen.
Bottom-Right This option will place TheMagnifier’s window in the bottom-rightportion of your screen.
116
Chapter 4. Windowed Operation
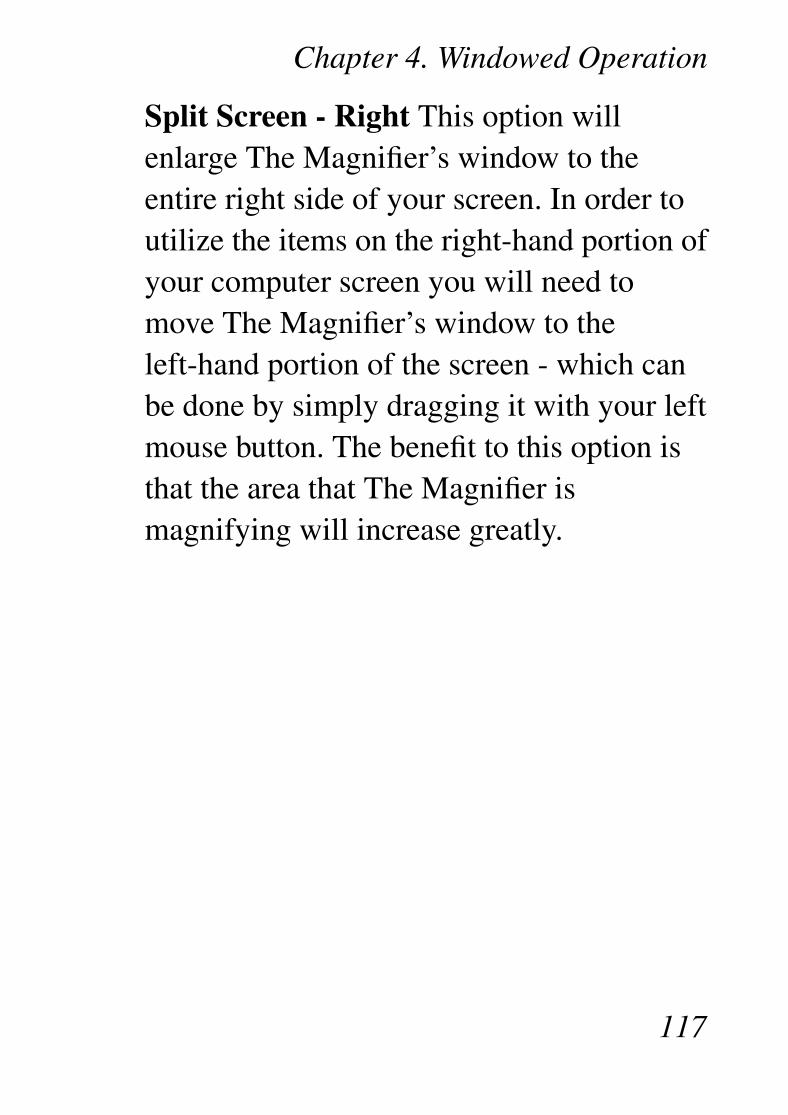
Split Screen - Right This option willenlarge The Magnifier’s window to theentire right side of your screen. In order toutilize the items on the right-hand portion ofyour computer screen you will need tomove The Magnifier’s window to theleft-hand portion of the screen - which canbe done by simply dragging it with your leftmouse button. The benefit to this option isthat the area that The Magnifier ismagnifying will increase greatly.
117

Chapter 4. Windowed Operation
Split-Screen - Bottom This option willenlarge The Magnifier’s window to theentire bottom portion of your screen. Inorder to utilize the items normally found onthe bottom of your screen, you must dragThe Magnifier’s window using your leftmouse button. The benefit to this option isthat it enlarges the area The Magnifier ismagnifying.
118
Chapter 4. Windowed Operation
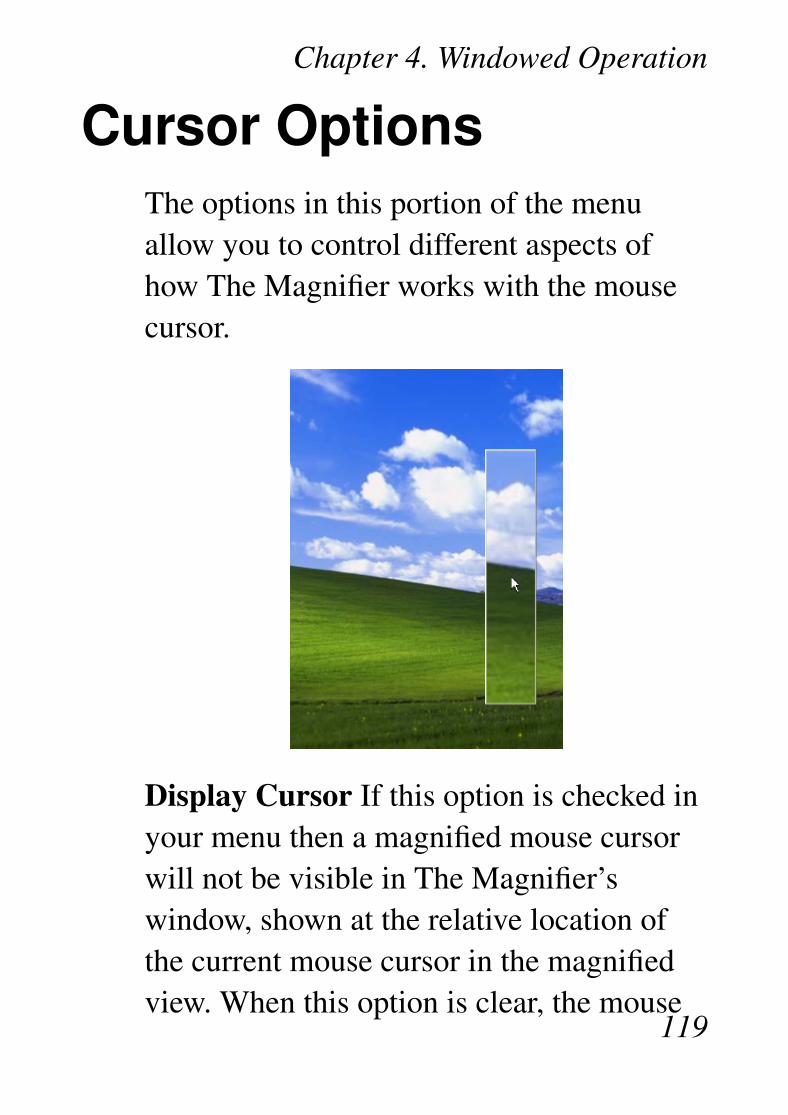
Cursor OptionsThe options in this portion of the menuallow you to control different aspects ofhow The Magnifier works with the mousecursor.
Display Cursor If this option is checked inyour menu then a magnified mouse cursorwill not be visible in The Magnifier’swindow, shown at the relative location ofthe current mouse cursor in the magnifiedview. When this option is clear, the mouse
119
Chapter 4. Windowed Operation
cursor will not be shown in The Magnifier’swindow. Keyboard Shortcut: Alt-C
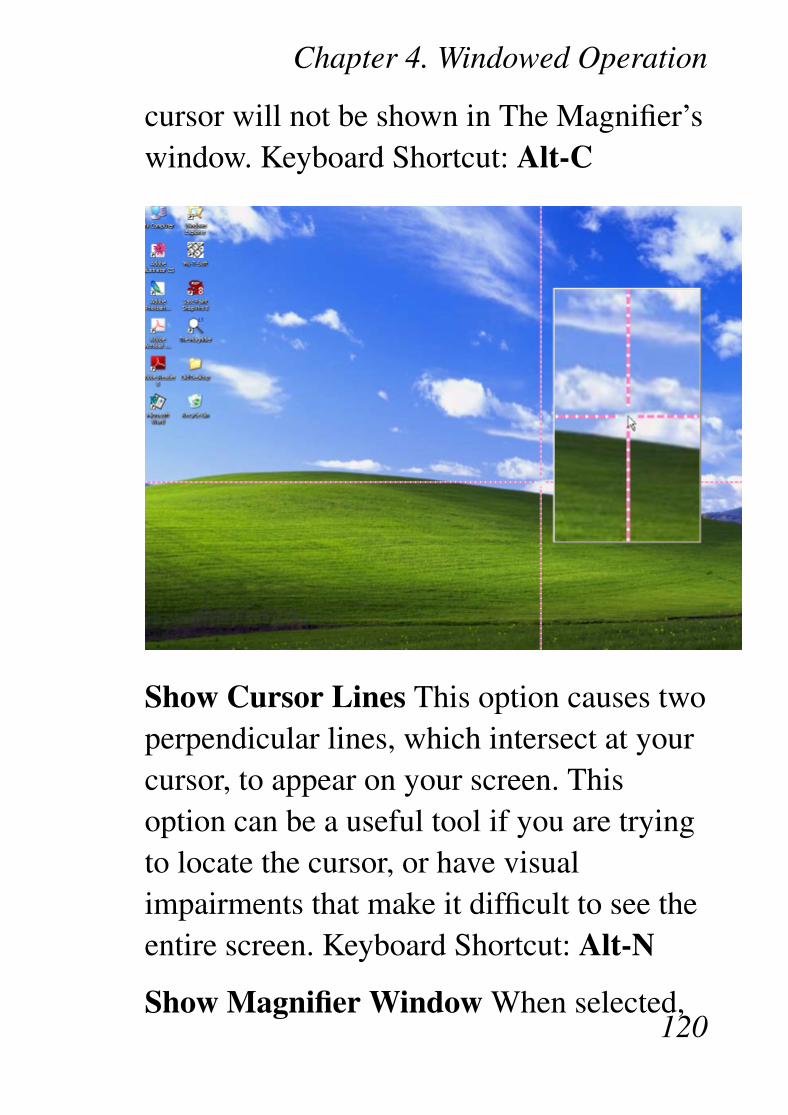
Show Cursor Lines This option causes twoperpendicular lines, which intersect at yourcursor, to appear on your screen. Thisoption can be a useful tool if you are tryingto locate the cursor, or have visualimpairments that make it difficult to see theentire screen. Keyboard Shortcut: Alt-N
Show Magnifier Window When selected,120
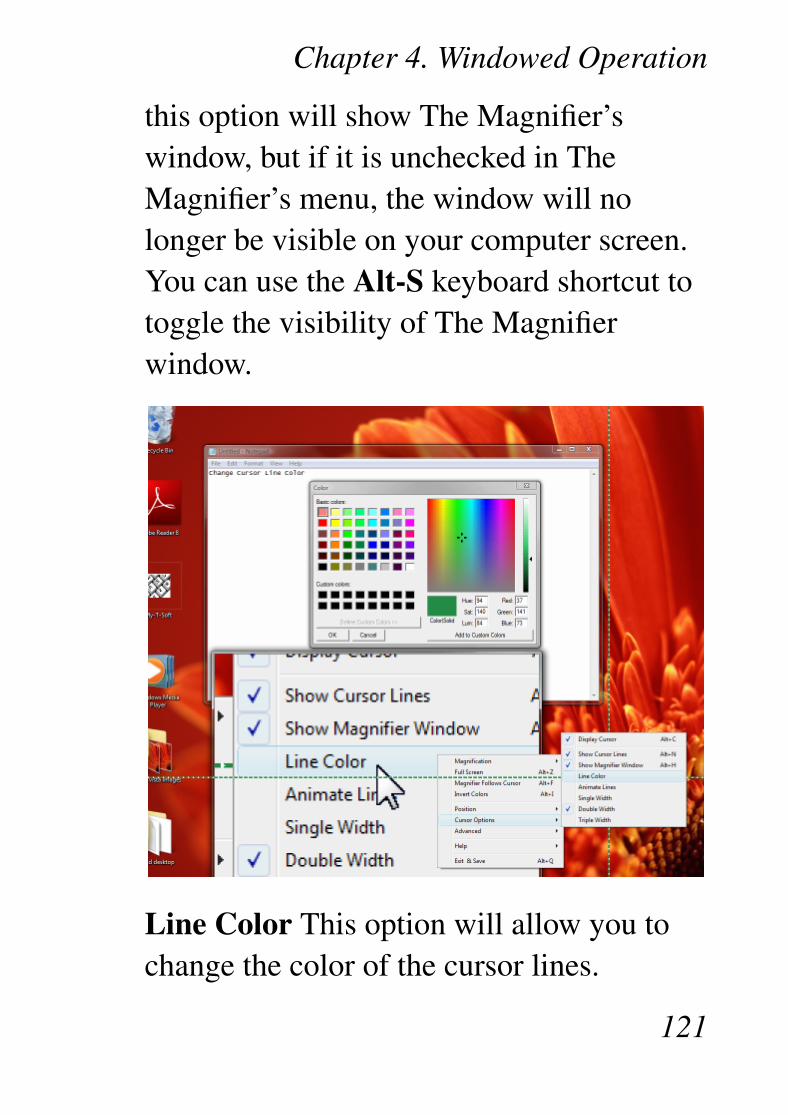
Chapter 4. Windowed Operation
this option will show The Magnifier’swindow, but if it is unchecked in TheMagnifier’s menu, the window will nolonger be visible on your computer screen.You can use the Alt-S keyboard shortcut totoggle the visibility of The Magnifierwindow.
Line Color This option will allow you tochange the color of the cursor lines.
121
Chapter 4. Windowed Operation
Animate Lines This option animates themovement of the cursor lines, which maymake it easier to find for certain individuals.
Single Width This option controls thewidth of your cursor lines, making them thedefault - and smallest - size The Magnifieroffers.
Double Width This option makes thecursor lines twice the size of the defaultoption.
Triple Width This option makes the cursorlines three times the size of the defaultoption.
AdvancedThe Advanced Menu contains varioussettings & options that are more advancedor address specialized settings and features.
122
Chapter 4. Windowed Operation
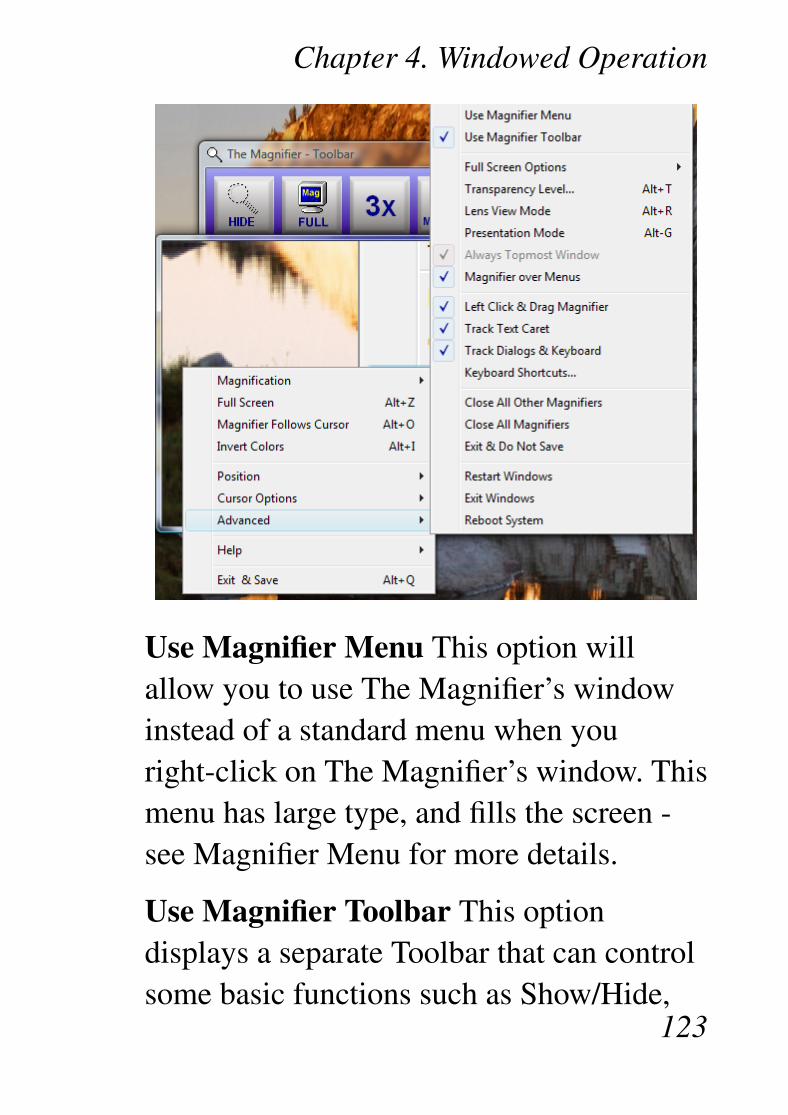
Use Magnifier Menu This option willallow you to use The Magnifier’s windowinstead of a standard menu when youright-click on The Magnifier’s window. Thismenu has large type, and fills the screen -see Magnifier Menu for more details.
Use Magnifier Toolbar This optiondisplays a separate Toolbar that can controlsome basic functions such as Show/Hide,
123
Chapter 4. Windowed Operation
Full Screen/Windowed, 2X/3X, increase ordecrease magnification. This is by defaultOn. By selecting this option, you can turnoff or turn on the Toolbar. The Toolbarprovides a first time user a visual tool thatallows them to perform basic functions,without having to learn the keyboardshortcuts or how to access the menu. Thiswas originally suggested for situationswhere The Magnifier was used in a publiclocations, and new/unfamiliar users wouldbe exposed to The Magnifier without anyprevious knowledge on how to operate TheMagnifier. There are various options - seeThe Magnifier Toolbar for more details.
Full Screen Options This menu has optionsfor the Full Screen mode of operation - referto the next chapter for these options.
124
Chapter 4. Windowed Operation
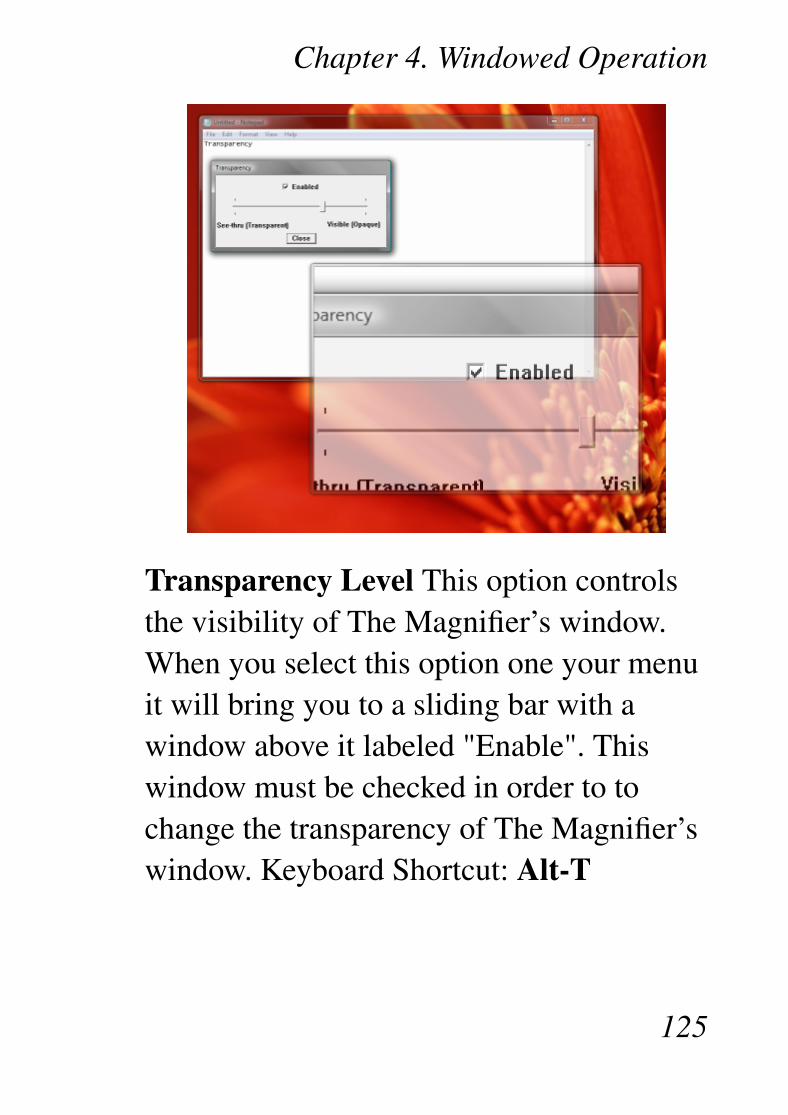
Transparency Level This option controlsthe visibility of The Magnifier’s window.When you select this option one your menuit will bring you to a sliding bar with awindow above it labeled "Enable". Thiswindow must be checked in order to tochange the transparency of The Magnifier’swindow. Keyboard Shortcut: Alt-T
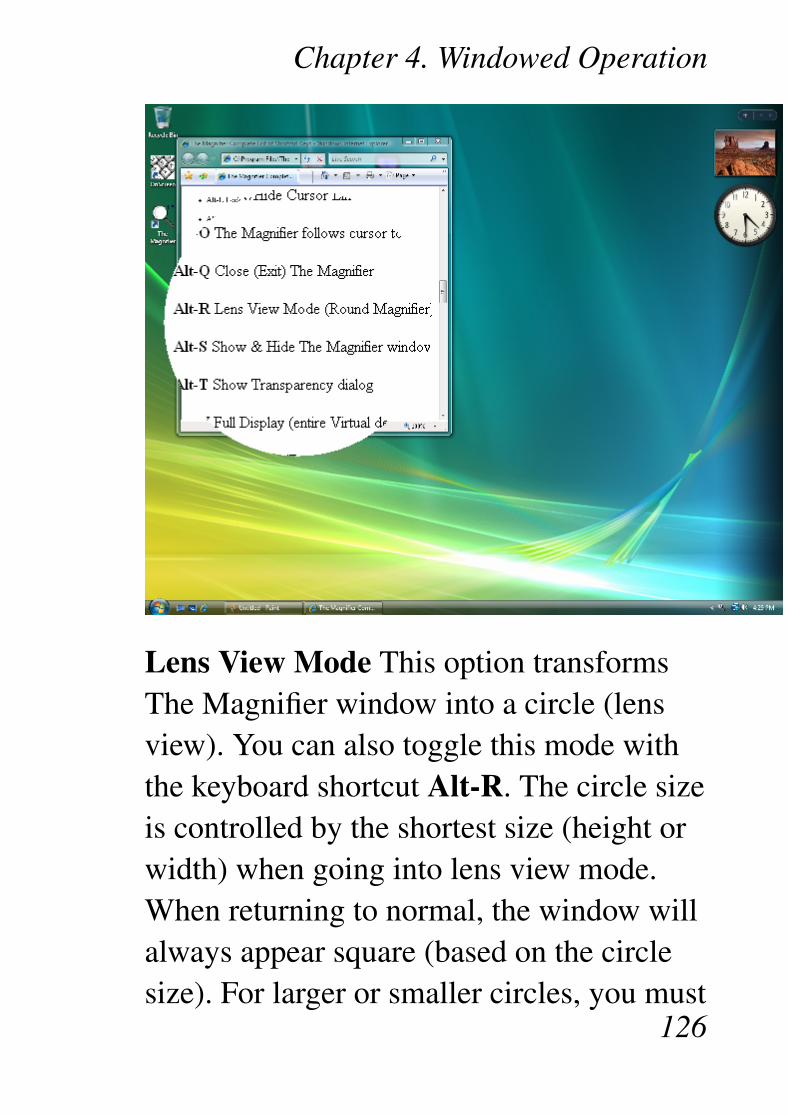
125
Chapter 4. Windowed Operation
Lens View Mode This option transformsThe Magnifier window into a circle (lensview). You can also toggle this mode withthe keyboard shortcut Alt-R. The circle sizeis controlled by the shortest size (height orwidth) when going into lens view mode.When returning to normal, the window willalways appear square (based on the circlesize). For larger or smaller circles, you must
126
Chapter 4. Windowed Operation
size The Magnifier window prior tochanging modes. The memory mnemonicfor Alt-R is "Go to a Round Lens(window)"
Presentation Mode This mode temporarilyhides the actual mouse cursor so duringpresentations an unobstructed screen imagecan be shown. You can also toggle thismode with the keyboard shortcut Alt-G.When first enabled, you may need to movethe mouse cursor to hide it. When operatingin this mode, a normal mouse click willre-enable the view of the mouse cursor, orusing Alt-G again. Note that this onlyaffects the cursor OVER The Magnifierwindow. The memory mnemonic for Alt-Gis "Go away cursor"
Always Topmost Window This optiontoggles whether The Magnifier window willbe topmost (shown over all other windows).This option is set on and not accessible if
127
Chapter 4. Windowed Operation
the Magnifier over Menus is set on. Whenthis option is clear, The Magnifier windowcan fall behind other windows in the system.
Magnifier Over Menus When this optionis on, The Magnifier window will be shownover all menus on your computer. If thisoption is clear, The Magnifier window willbe displayed behind menus.
Left Click & Drag The Magnifier Set thisoption on so you will be able to drag yourThe Magnifier’s window using yourleft-mouse button. When this option iscleared, the left button will open the menuwhen The Magnifier window is clicked on.
Track Text Caret When enabled, thisoption will track the position of the textcaret, and magnify based on this position(rather than the mouse cursor). To return themagnification point to the mouse cursor,you must move your mouse. If you do notwant to have the text & edit fields override
128
Chapter 4. Windowed Operation
the magnification point, clear this option.
Track Dialogs & Keyboard When enabled,this option reacts to dialogs being shown,and tracks keyboard focus on dialogs,menus, the desktop, and other windows. Toreturn the magnification point to the mousecursor, you must move your mouse.
Note: The Track Text Caret andTrack Dialogs & Keyboard optionsuses Windows events to gatherinformation about these types ofactivities. Older applications, andchanges in versions of Windows mayaffect how well these operate for you.You should make sure all updatesare applied for best results. If theoperation is not useful to you, thenyou can clear one or both of theseoptions.
129
Chapter 4. Windowed Operation
Note: You can also toggle these 2options (Track Text Caret, and TrackDialogs & Keyboard) On and Off withthe keyboard shortcut Alt-J. Incertain cases, when typing or doingdifferent actions, having TheMagnifier track the keyboard may beproblematic - this keyboard shortcutallows you to disable this trackingtemporarily. Also, if the feature is off,and you start typing, you can quicklyturn it back on. The memorymnemonic for Alt-J is "Stop Jumpingfor the Keyboard"
130

Chapter 4. Windowed Operation
Keyboard Shortcuts This option will allowyou to control the hot key options for TheMagnifier.
Close All Other Magnifiers This optionwill close all but the current instance of TheMagnifier with one easy click.
Close All Magnifiers This option will closeThe Magnifier with one easy click.
Exit & Do Not Save This option will closeThe Magnifier without saving the changes
131
Chapter 4. Windowed Operation
you have made for your preferences sincethe last time it has been opened.
Restart Windows This option allows youto restart windows without using the Startmenu.
Exit Windows This option allows you toexit windows (Log off) without using theStart menu.
Reboot System This option will close yoursystem (Log off) without using the Startmenu.
132
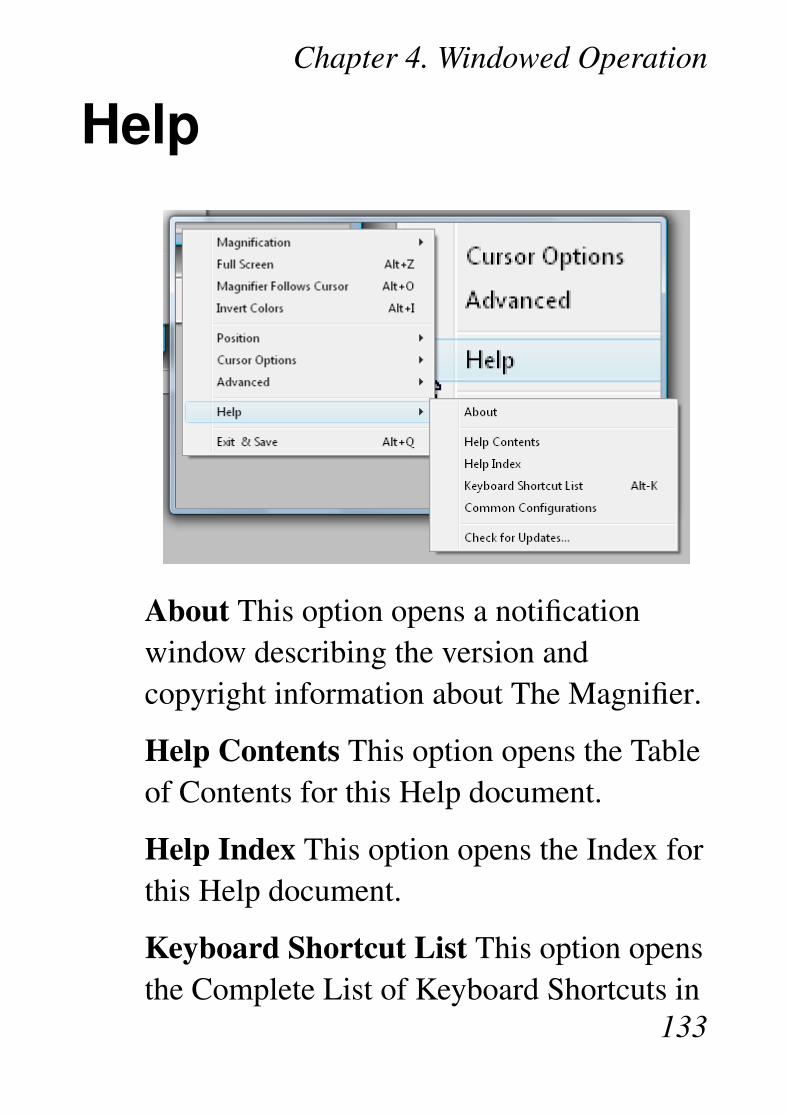
Chapter 4. Windowed Operation
Help
About This option opens a notificationwindow describing the version andcopyright information about The Magnifier.
Help Contents This option opens the Tableof Contents for this Help document.
Help Index This option opens the Index forthis Help document.
Keyboard Shortcut List This option opensthe Complete List of Keyboard Shortcuts in
133
Chapter 4. Windowed Operation
this Help document. Keyboard Shortcut:Alt-K
Common Configurations This optionopens the Basic Operations and CommonConfigurations sections in this Helpdocument.
Check for Updates This option checks theInternet for updates that have been providedfor your copy of The Magnifier. Beforeselecting this option, make sure that you areusing a computer with access to the Web.
134
Chapter 4. Windowed Operation
Exit & Save
Exit & Save This option will allow you toexit The Magnifier and save the personalsettings you have set up while using theproduct. Keyboard Shortcut: Alt-Q
135

Chapter 5. FullScreen Operation
The Magnifier FullScreen OperationOverview
This chapter outlines the features availablewhen running The Magnifier in the FullScreen mode.
136
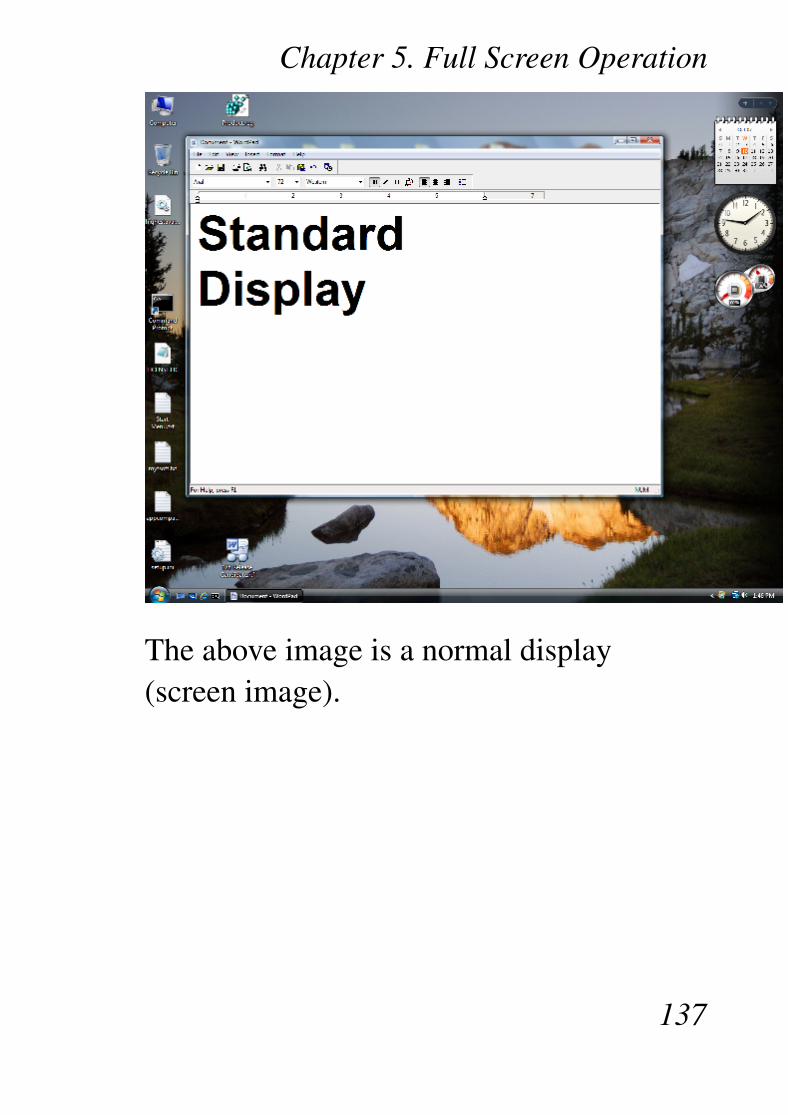
Chapter 5. Full Screen Operation
The above image is a normal display(screen image).
137
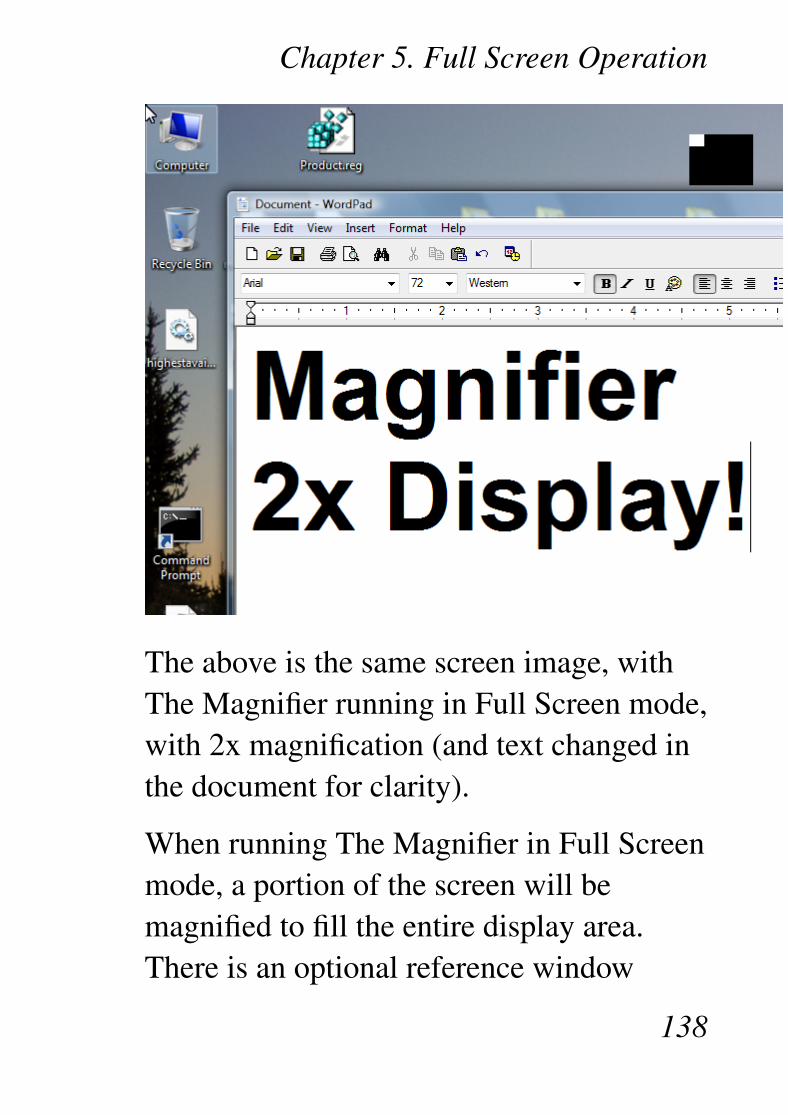
Chapter 5. Full Screen Operation
The above is the same screen image, withThe Magnifier running in Full Screen mode,with 2x magnification (and text changed inthe document for clarity).
When running The Magnifier in Full Screenmode, a portion of the screen will bemagnified to fill the entire display area.There is an optional reference window
138

Chapter 5. Full Screen Operation
(default on) shown in the upper-right(which will hop out of the way if you mouseover it to the upper-left), which indicatesthe area of the screen being magnified. Notethat as you increase your magnification, lessand less of the actual display gets shown. At2x magnification, only one-quarter of yourentire display is visible in the magnifiedimage. At 4x magnification, onlyone-sixteenth of your entire display isvisible in the magnified image. By using thereference window, you can quickly see whatarea is being magnified. For someindividuals, in certain cases, it may beuseful to switch to single-magnification(Alt-1) or hide the magnified window(Alt-S) to see the entire display area.
139
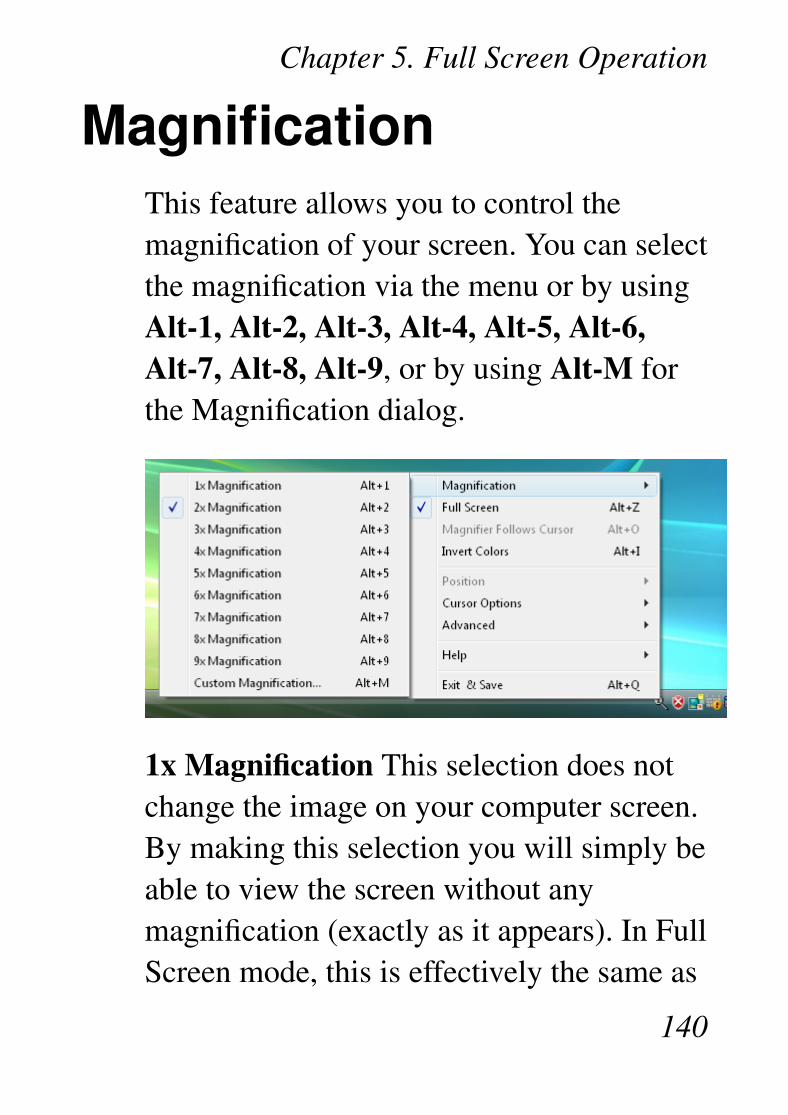
Chapter 5. Full Screen Operation
MagnificationThis feature allows you to control themagnification of your screen. You can selectthe magnification via the menu or by usingAlt-1, Alt-2, Alt-3, Alt-4, Alt-5, Alt-6,Alt-7, Alt-8, Alt-9, or by using Alt-M forthe Magnification dialog.
1x Magnification This selection does notchange the image on your computer screen.By making this selection you will simply beable to view the screen without anymagnification (exactly as it appears). In FullScreen mode, this is effectively the same as
140

Chapter 5. Full Screen Operation
using Alt-S to hide The Magnifier window.Keyboard Shortcut: Alt-1
2x Magnification This selection will allowThe Magnifier to show the images on yourscreen twice as large as they wouldnormally appear.Keyboard Shortcut: Alt-2
3x Magnification This selection will allowThe Magnifier to show the image on yourscreen three times as large as they wouldnormally appear. Keyboard Shortcut: Alt-3
4x Magnification This selection will allowThe Magnifier to show the image on yourscreen four times as large as they wouldnormally appear. Keyboard Shortcut: Alt-4
141
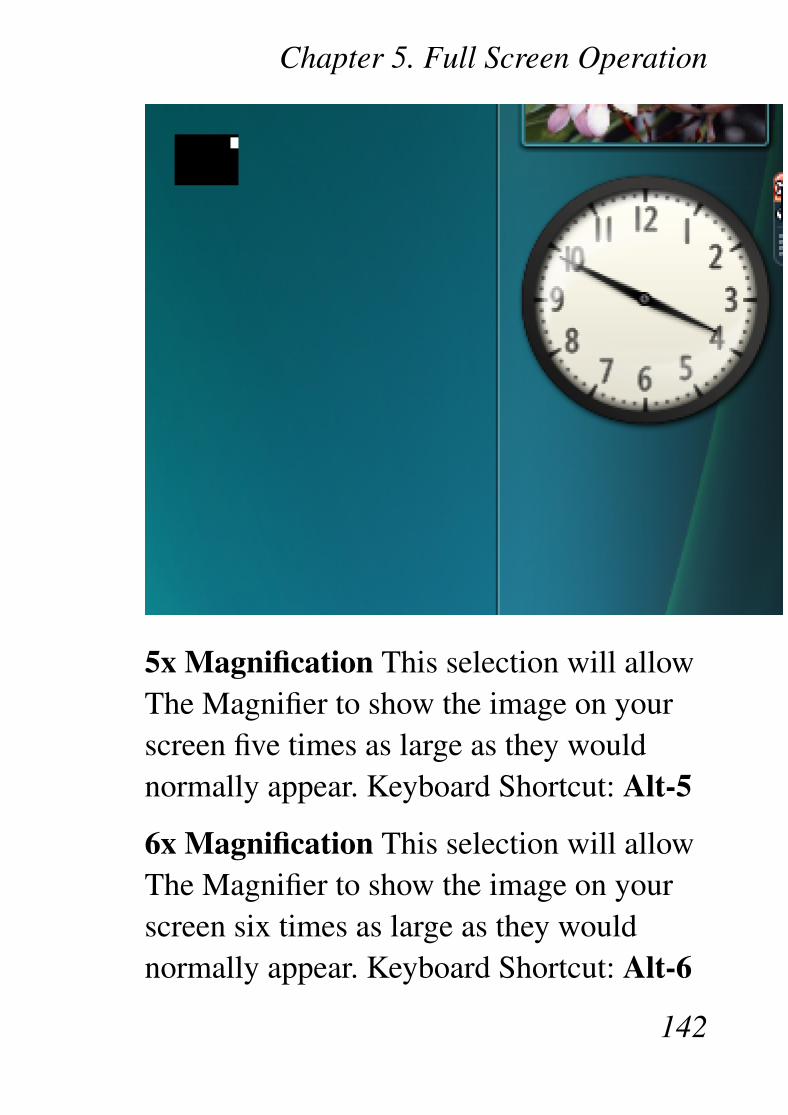
Chapter 5. Full Screen Operation
5x Magnification This selection will allowThe Magnifier to show the image on yourscreen five times as large as they wouldnormally appear. Keyboard Shortcut: Alt-5
6x Magnification This selection will allowThe Magnifier to show the image on yourscreen six times as large as they wouldnormally appear. Keyboard Shortcut: Alt-6
142
Chapter 5. Full Screen Operation
7x Magnification This selection will allowThe Magnifier to show the image on yourscreen seven times as large as they wouldnormally appear. Keyboard Shortcut: Alt-7
8x Magnification This selection will allowThe Magnifier to show the image on yourscreen eight times as large as they wouldnormally appear. Keyboard Shortcut: Alt-8
9x Magnification This selection will allowThe Magnifier to show the image on yourscreen nine times as large as they wouldnormally appear. Keyboard Shortcut: Alt-9
143
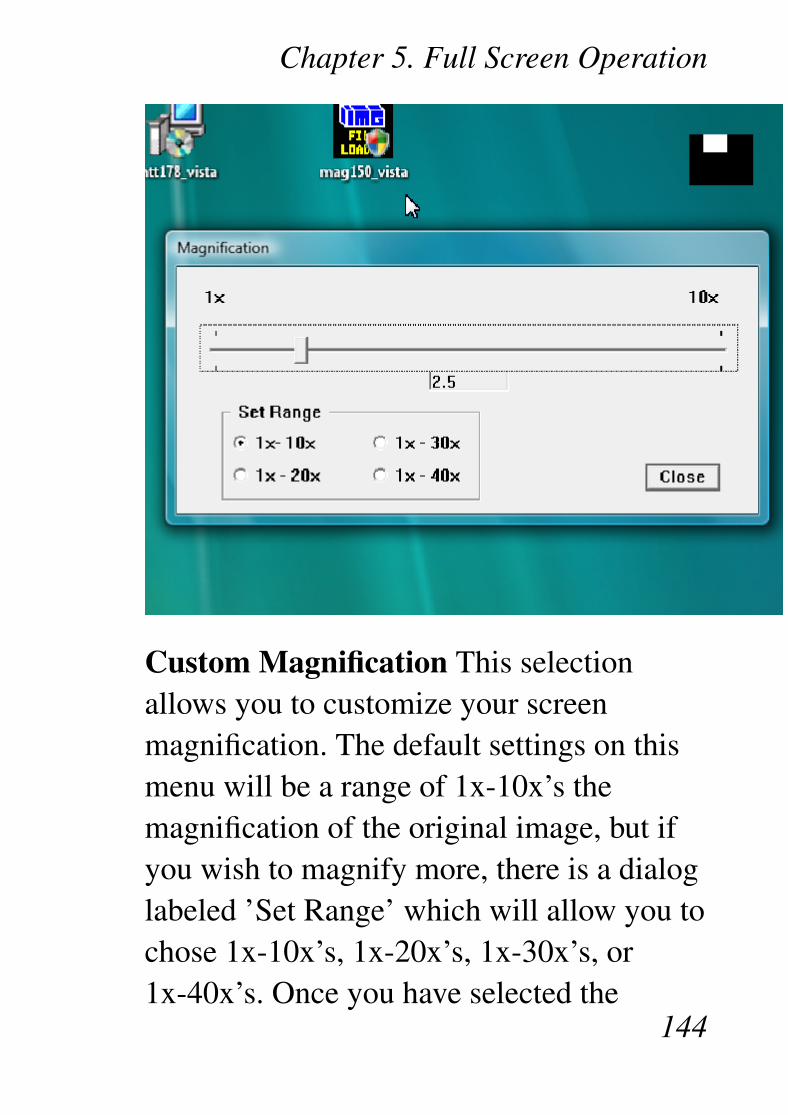
Chapter 5. Full Screen Operation
Custom Magnification This selectionallows you to customize your screenmagnification. The default settings on thismenu will be a range of 1x-10x’s themagnification of the original image, but ifyou wish to magnify more, there is a dialoglabeled ’Set Range’ which will allow you tochose 1x-10x’s, 1x-20x’s, 1x-30x’s, or1x-40x’s. Once you have selected the
144
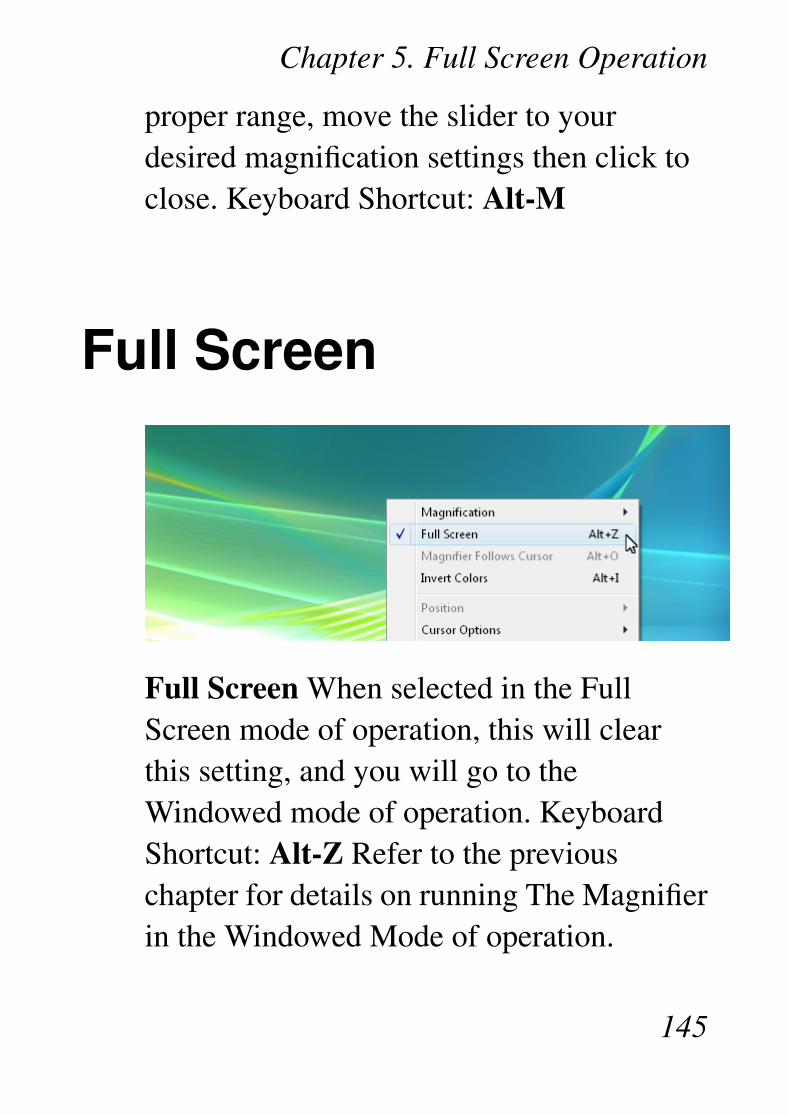
Chapter 5. Full Screen Operation
proper range, move the slider to yourdesired magnification settings then click toclose. Keyboard Shortcut: Alt-M
Full Screen
Full Screen When selected in the FullScreen mode of operation, this will clearthis setting, and you will go to theWindowed mode of operation. KeyboardShortcut: Alt-Z Refer to the previouschapter for details on running The Magnifierin the Windowed Mode of operation.
145

Chapter 5. Full Screen Operation
Invert Colors
This option causes the colors of the screento become inverted which can helpindividuals who need high-contrastviewing. Keyboard Shortcut: Alt-I
146
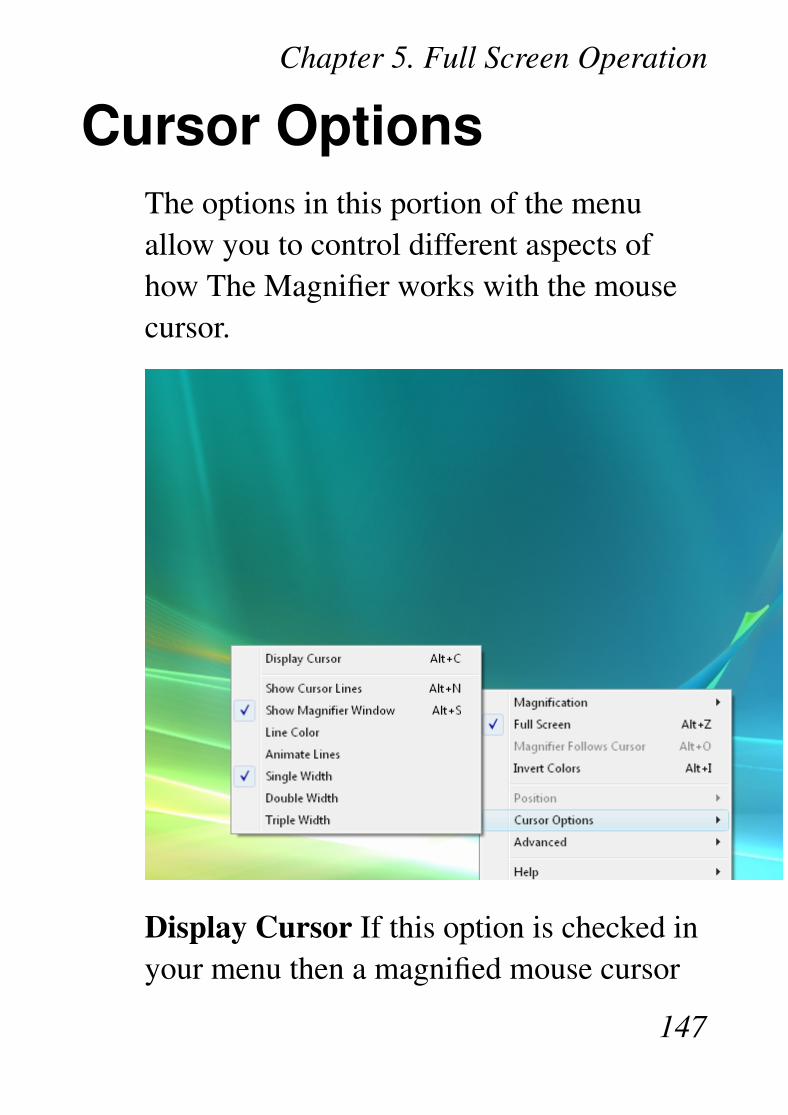
Chapter 5. Full Screen Operation
Cursor OptionsThe options in this portion of the menuallow you to control different aspects ofhow The Magnifier works with the mousecursor.
Display Cursor If this option is checked inyour menu then a magnified mouse cursor
147
Chapter 5. Full Screen Operation
will not be visible in The Magnifier’swindow, shown at the relative location ofthe current mouse cursor in the magnifiedview. When this option is clear, the mousecursor will not be shown in The Magnifier’swindow. Keyboard Shortcut: Alt-C
IMPORTANT NOTE: Whenoperating in the Full Screen mode, ifthe cursor is displayed, you will see 2cursors - the system cursor and themagnified cursor displayed in TheMagnifier. Depending on yoursystem capabilities, there may be anoticeable separation between the 2cursor images at times. You can turnoff the Display Cursor option in thismenu, or use the Alt-C keyboardshortcut. You may also control thesystem mouse cursor display in theMouse Properties (available from theControl Panel).
148
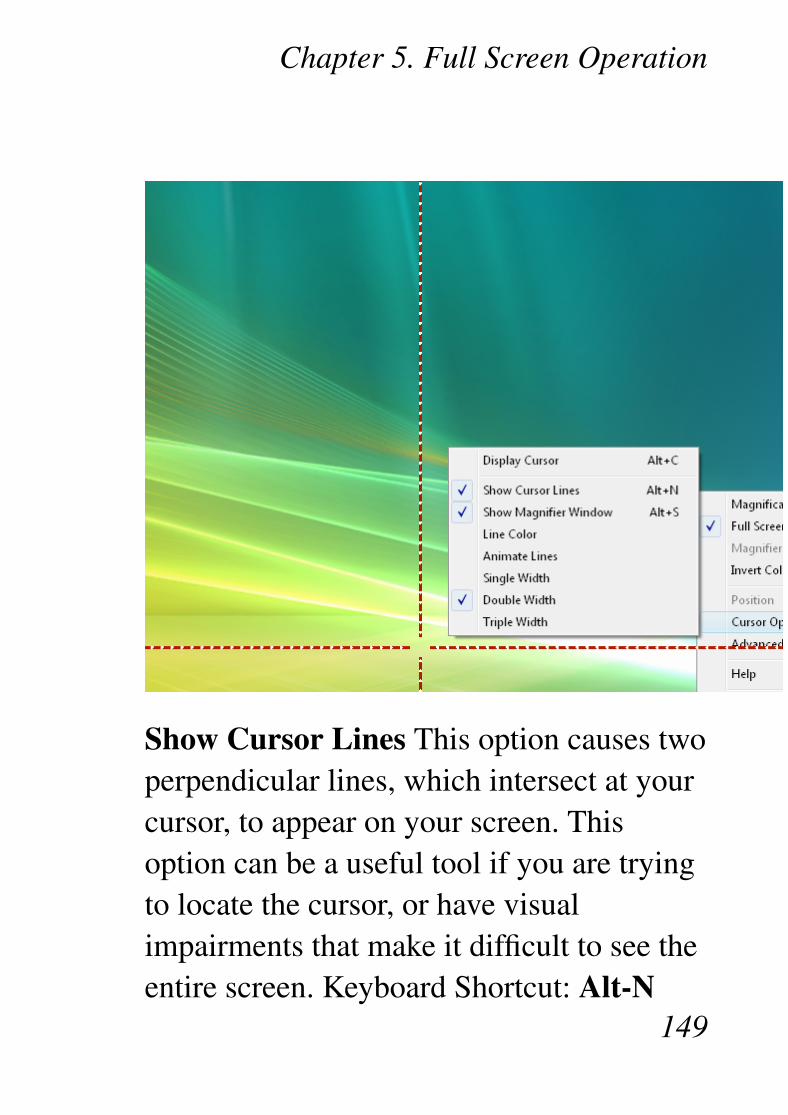
Chapter 5. Full Screen Operation
Show Cursor Lines This option causes twoperpendicular lines, which intersect at yourcursor, to appear on your screen. Thisoption can be a useful tool if you are tryingto locate the cursor, or have visualimpairments that make it difficult to see theentire screen. Keyboard Shortcut: Alt-N
149
Chapter 5. Full Screen Operation
FULL SCREEN NOTE: Whenoperating in the Full Screen mode,when the Cursor Lines are visible,you have the Track Text Caretenabled, and you are typing in adocument (so the text caret trackingis occurring), there will be adisconnect between the magnifiedimage and the cursor lines. If this iscauses visual display problems, youcan toggle the Cursor Line displayduring text input by using the Alt-Nkeyboard shortcut.
Show Magnifier Window When selected,this option will show The Magnifier’swindow, but if it is unchecked in TheMagnifier’s menu, the window will nolonger be visible on your computer screen.You can use the Alt-S keyboard shortcut totoggle the visibility of The Magnifier
150
Chapter 5. Full Screen Operation
window.
Line Color This option will allow you tochange the color of the cursor lines.
Animate Lines This option animates themovement of the cursor lines, which maymake it easier to find for certain individuals.
Single Width This option controls thewidth of your cursor lines, making them thedefault - and smallest - size The Magnifieroffers.
Double Width This option makes thecursor lines twice the size of the defaultoption.
Triple Width This option makes the cursorlines three times the size of the defaultoption.
151
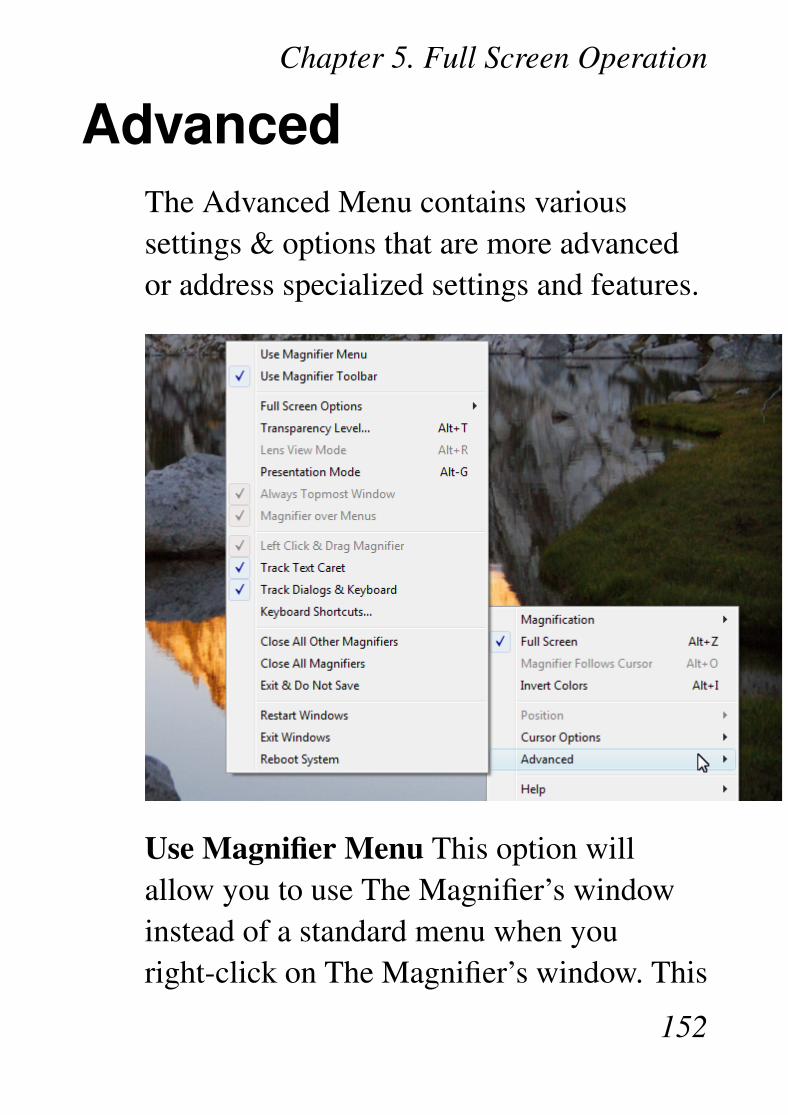
Chapter 5. Full Screen Operation
AdvancedThe Advanced Menu contains varioussettings & options that are more advancedor address specialized settings and features.
Use Magnifier Menu This option willallow you to use The Magnifier’s windowinstead of a standard menu when youright-click on The Magnifier’s window. This
152
Chapter 5. Full Screen Operation
menu has large type, and fills the screen -see Magnifier Menu for more details.
Use Magnifier Toolbar This optiondisplays a separate Toolbar that can controlsome basic functions such as Show/Hide,Full Screen/Windowed, 2X/3X, increase ordecrease magnification. This is by defaultOn. By selecting this option, you can turnoff or turn on the Toolbar. The Toolbarprovides a first time user a visual tool thatallows them to perform basic functions,without having to learn the keyboardshortcuts or how to access the menu. Thiswas originally suggested for situationswhere The Magnifier was used in a publiclocations, and new/unfamiliar users wouldbe exposed to The Magnifier without anyprevious knowledge on how to operate TheMagnifier. There are various options - seeThe Magnifier Toolbar for more details.
Full Screen Options This opens a sub
153
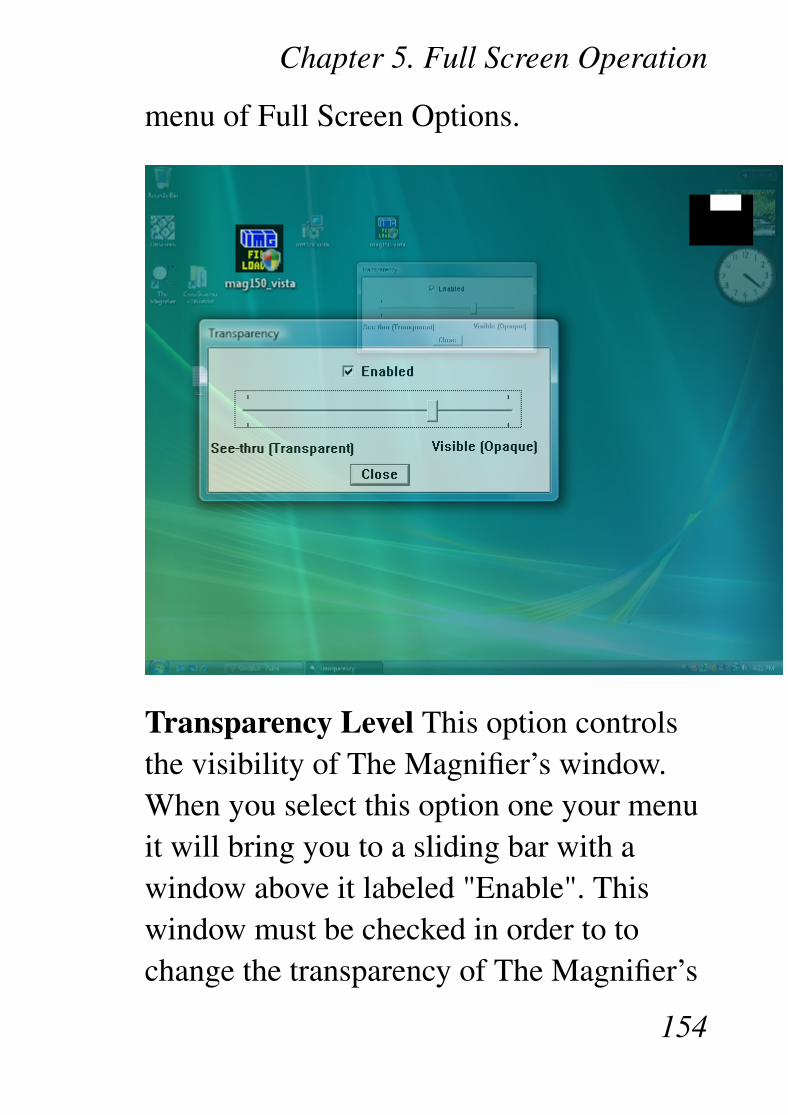
Chapter 5. Full Screen Operation
menu of Full Screen Options.
Transparency Level This option controlsthe visibility of The Magnifier’s window.When you select this option one your menuit will bring you to a sliding bar with awindow above it labeled "Enable". Thiswindow must be checked in order to tochange the transparency of The Magnifier’s
154
Chapter 5. Full Screen Operation
window. Keyboard Shortcut: Alt-T
Lens View Mode This option is notavailable in Full Screen mode.
Presentation Mode This mode temporarilyhides the actual mouse cursor so duringpresentations an unobstructed screen imagecan be shown. You can also toggle thismode with the keyboard shortcut Alt-G.When first enabled, you may need to movethe mouse cursor to hide it. When operatingin this mode, a normal mouse click willre-enable the view of the mouse cursor, orby using Alt-G again. In the Full Screenmode, when this is enabled, you cannotoperate as normal - however, the next mouseclick will disable this mode. The memorymnemonic for Alt-G is "Go away cursor"
Always Topmost Window This option isnot available in Full Screen mode.
Magnifier Over Menus This option is not
155
Chapter 5. Full Screen Operation
available in Full Screen mode.
Left Click & Drag The Magnifier Thisoption is not available in Full Screen mode.
Track Text Caret When enabled, thisoption will track the position of the textcaret, and magnify based on this position(rather than the mouse cursor). To return themagnification point to the mouse cursor,you must move your mouse. If you do notwant to have the text & edit fields overridethe magnification point, clear this option.
Track Dialogs & Keyboard When enabled,this option reacts to dialogs being shown,and tracks keyboard focus on dialogs,menus, the desktop, and other windows. Toreturn the magnification point to the mousecursor, you must move your mouse.
Note: The Track Text Caret andTrack Dialogs & Keyboard optionsuses Windows events to gather
156
Chapter 5. Full Screen Operation
information about these types ofactivities. Older applications, andchanges in versions of Windows mayaffect how well these operate for you.You should make sure all updatesare applied for best results. If theoperation is not useful to you, thenyou can clear one or both of theseoptions.
Note: You can also toggle these 2options (Track Text Caret, and TrackDialogs & Keyboard) On and Off withthe keyboard shortcut Alt-J. Incertain cases, when typing or doingdifferent actions, having TheMagnifier track the keyboard may beproblematic - this keyboard shortcutallows you to disable this trackingtemporarily. Also, if the feature is off,and you start typing, you can quickly
157
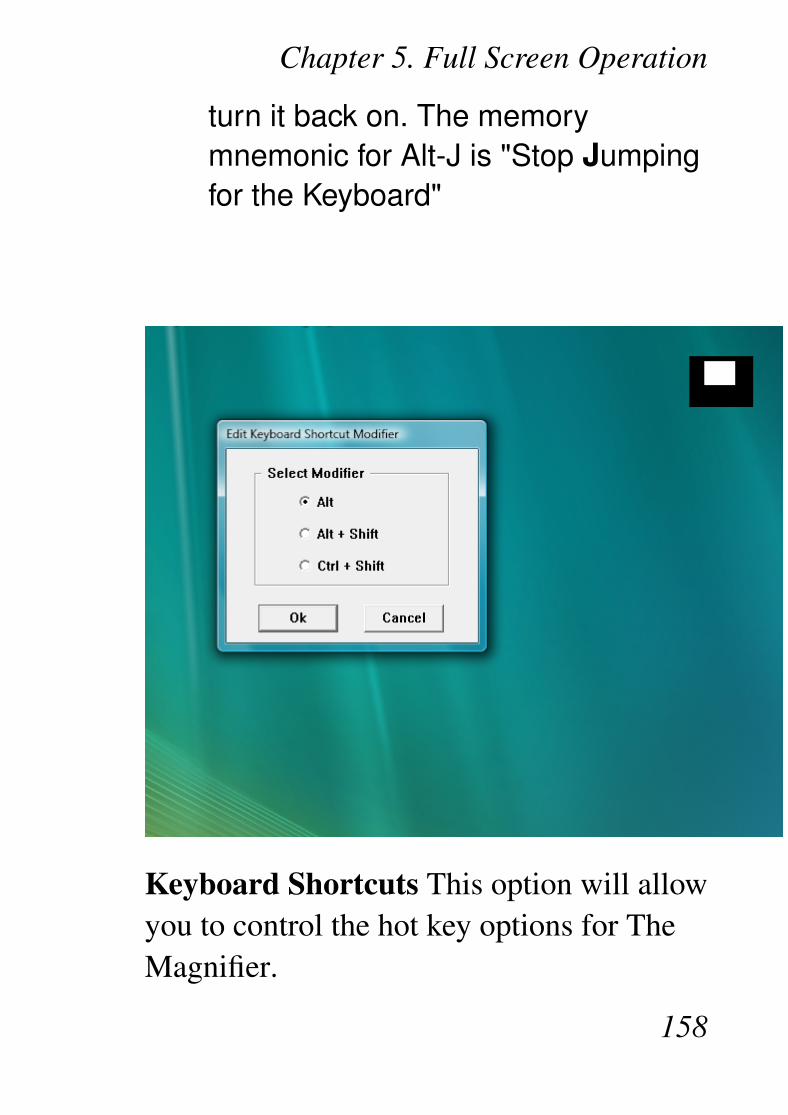
Chapter 5. Full Screen Operation
turn it back on. The memorymnemonic for Alt-J is "Stop Jumpingfor the Keyboard"
Keyboard Shortcuts This option will allowyou to control the hot key options for TheMagnifier.
158
Chapter 5. Full Screen Operation
Close All Other Magnifiers This optionwill close all but the current instance of TheMagnifier with one easy click. In the FullScreen mode of operation, there is only 1instance running, so this will have no effect.
Close All Magnifiers This option will closeThe Magnifier with one easy click.
Exit & Do Not Save This option will closeThe Magnifier without saving the changesyou have made for your preferences sincethe last time it has been opened.
Restart Windows This option allows youto restart windows without using the Startmenu.
Exit Windows This option allows you toexit windows (Log off) without using theStart menu.
Reboot System This option will close yoursystem (Log off) without using the Startmenu.
159
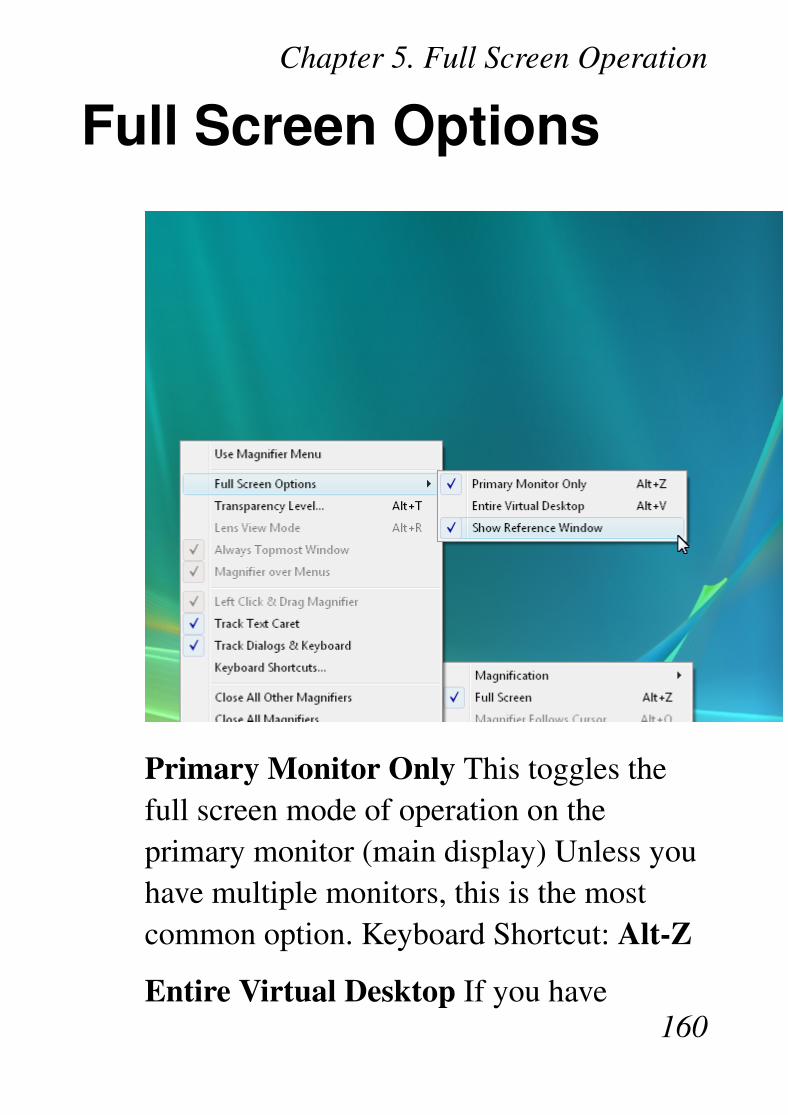
Chapter 5. Full Screen Operation
Full Screen Options
Primary Monitor Only This toggles thefull screen mode of operation on theprimary monitor (main display) Unless youhave multiple monitors, this is the mostcommon option. Keyboard Shortcut: Alt-Z
Entire Virtual Desktop If you have160
Chapter 5. Full Screen Operation
multiple monitors, this option uses theentire virtual desktop space as your "FullScreen" magnifier. Keyboard Shortcut:Alt-V
Show Reference Window This toggles thedisplay of the Full Screen reference window(upper-right/upper-left).
Note: The Reference window willreact to the mouse cursor - if youslide the mouse cursor over thewindow, it will reposition to theopposite side of the display. Thisallows you to view underneath thewindow in an easy manner - justslide the mouse over the window andit will move between the upper-rightand upper-left. If you do not want thewindow at all, select the menu optionto clear the Show ReferenceWindow.
161
Chapter 5. Full Screen Operation
Note: When using multiple monitors,for best results using a sequentiallayout (e.g. [1][2], rather than [2][1])will work better, especially inWindows Vista. This has to do withthe system’s virtual space origin - 0,0will work better than a negative origin(refer to Windows multiple monitordesktop implementation for moredetails). For best results, use monitor1 as the left-most / top-most monitor.
162
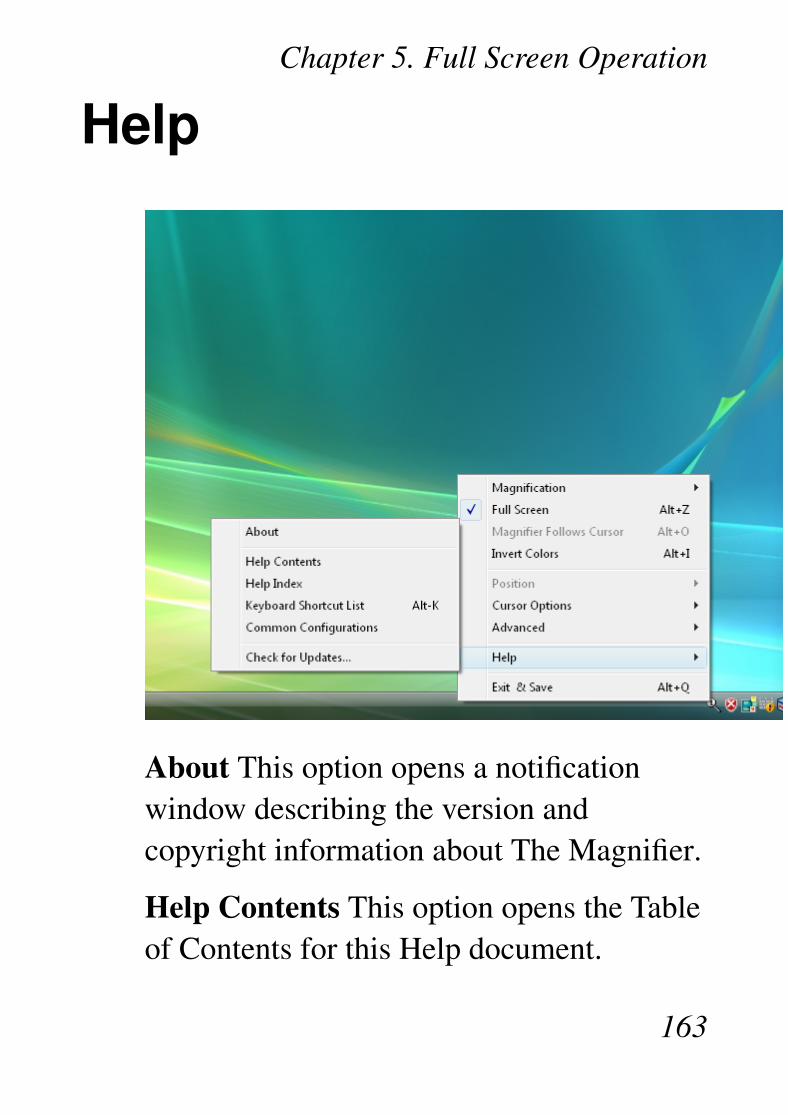
Chapter 5. Full Screen Operation
Help
About This option opens a notificationwindow describing the version andcopyright information about The Magnifier.
Help Contents This option opens the Tableof Contents for this Help document.
163
Chapter 5. Full Screen Operation
Help Index This option opens the Index forthis Help document.
Keyboard Shortcut List This option opensthe Complete List of Keyboard Shortcuts inthis Help document. Keyboard Shortcut:Alt-K
Common Configurations This optionopens the Basic Operations and CommonConfigurations sections in this Helpdocument.
Check for Updates This option checks theInternet for updates that have been providedfor your copy of The Magnifier. Beforeselecting this option, make sure that you areusing a computer with access to the Web.
164
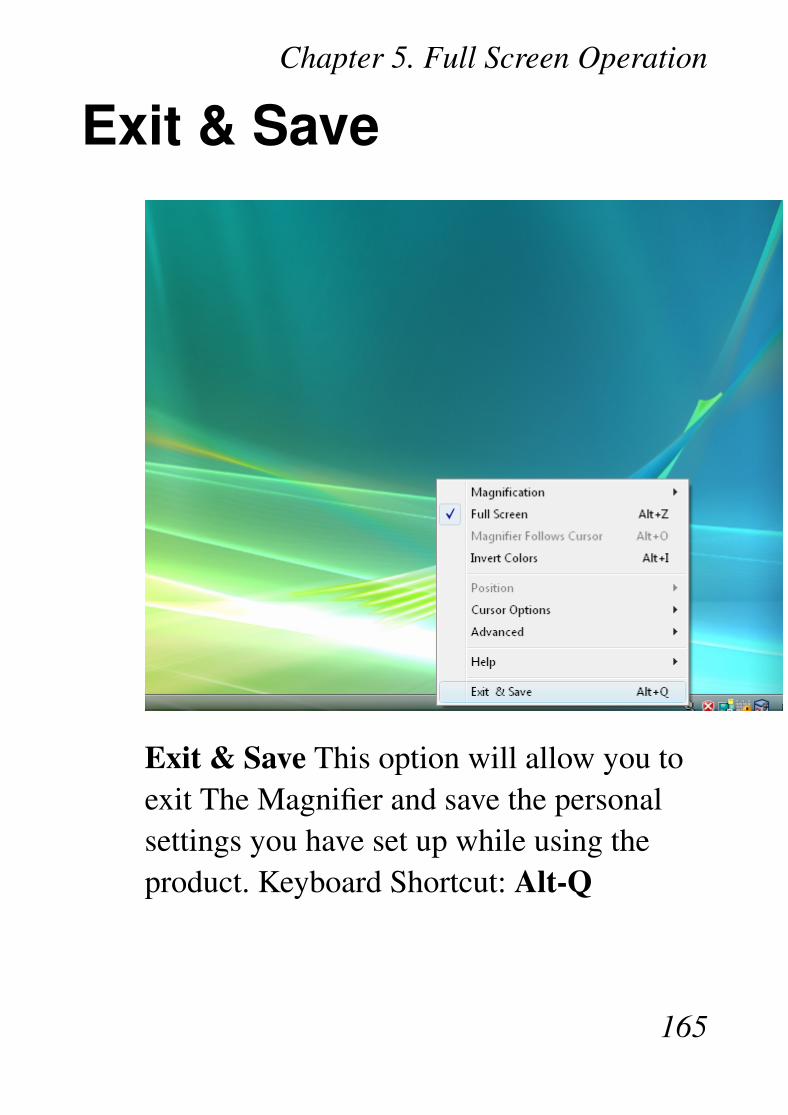
Chapter 5. Full Screen Operation
Exit & Save
Exit & Save This option will allow you toexit The Magnifier and save the personalsettings you have set up while using theproduct. Keyboard Shortcut: Alt-Q
165
Chapter 6.Magnifier Menu
The Magnifier MenuOverview
The Magnifier provides 2 menu modes.There is a special Magnifier Menu (whichuses your whole screen for the menuing anduses very large text), and the standardWindows menu system. This chapterprovides a reference for the full screenMagnifier Menu.
166
Chapter 6. Magnifier Menu
The above image is the Magnifier menu.
167

Chapter 6. Magnifier Menu
The above image is the standard Windowsmenu.
Magnifier Menu - Main
168
Chapter 6. Magnifier Menu
Menu
This chapter covers the options availablefrom within the menuing system, using theMagnifier menu as an example of all menuoptions.
When selected in the Advanced Menu, thelarge-type, full-screen Magnifier Menu will
169
Chapter 6. Magnifier Menu
be displayed whenever the menu is accessed(right-clicking on the window in thewindowed mode of operation, or clickingon the small icon in the tray). To return tothe standard Windows menu, go into theAdvanced menu again, and select "StandardMenu".
When using the Magnifier Menu, theinterface is straightforward. The menuselection highlights as you move yourmouse cursor over the items, and to selectyou left click. If you want to exit the menu,at any time click on The Magnifier area atthe bottom right. On sub-menus, there willbe a "Back" button which will revert to theprevious menu. There is no keyboardinterface for the Magnifier menus.
Magnification... opens the MagnificationMenu.
Full Screen toggles the Full Screen /Windowed modes of operation. See
170
Chapter 6. Magnifier Menu
Windowed Operation or Full ScreenOperation.
Track Cursor toggles Cursor Tracking. SeeWindowed Operation. Not available in FullScreen mode.
Invert Colors inverts colors in themagnified display. See WindowedOperation or Full Screen Operation.
Help... opens the Help Menu.
Position... opens the Position Menu.
Cursor Options... opens the CursorOptions Menu.
Advanced... opens the Advanced Menu.
Exit & Save exits The Magnifier and savessettings. See Windowed Operation or FullScreen Operation.
171
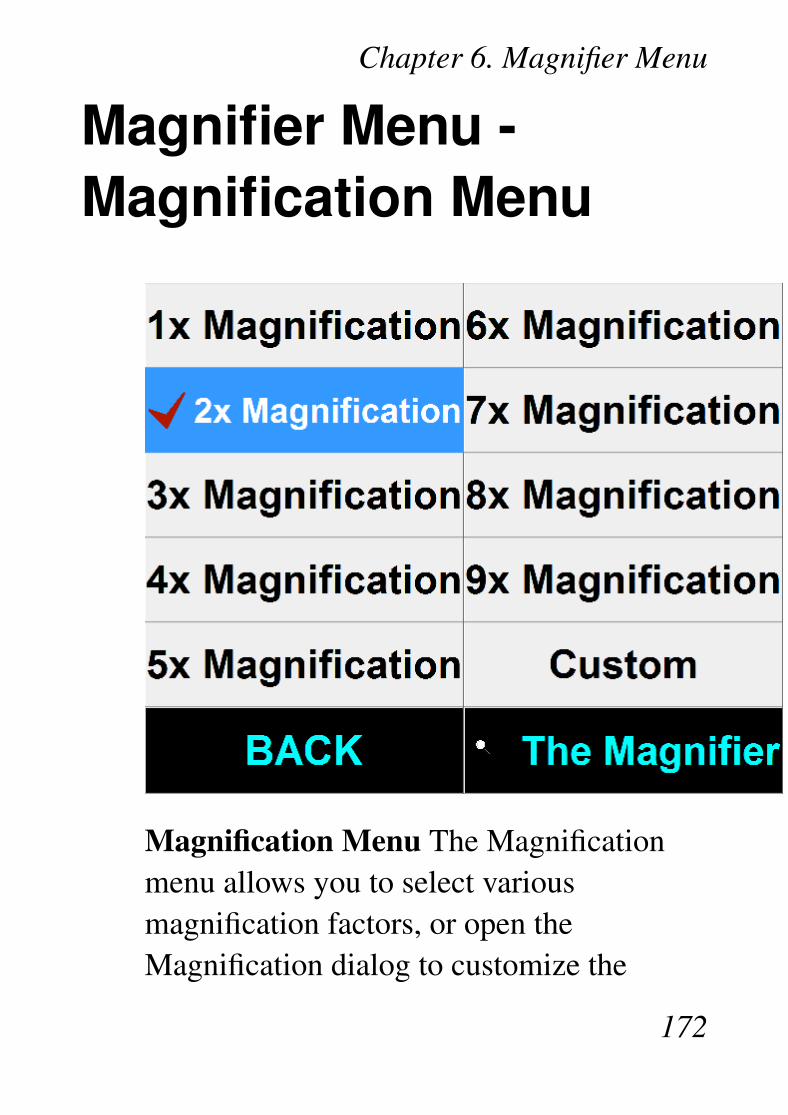
Chapter 6. Magnifier Menu
Magnifier Menu -Magnification Menu
Magnification Menu The Magnificationmenu allows you to select variousmagnification factors, or open theMagnification dialog to customize the
172

Chapter 6. Magnifier Menu
magnification level. See WindowedOperation or Full Screen Operation.
Magnifier Menu -Position Menu
173
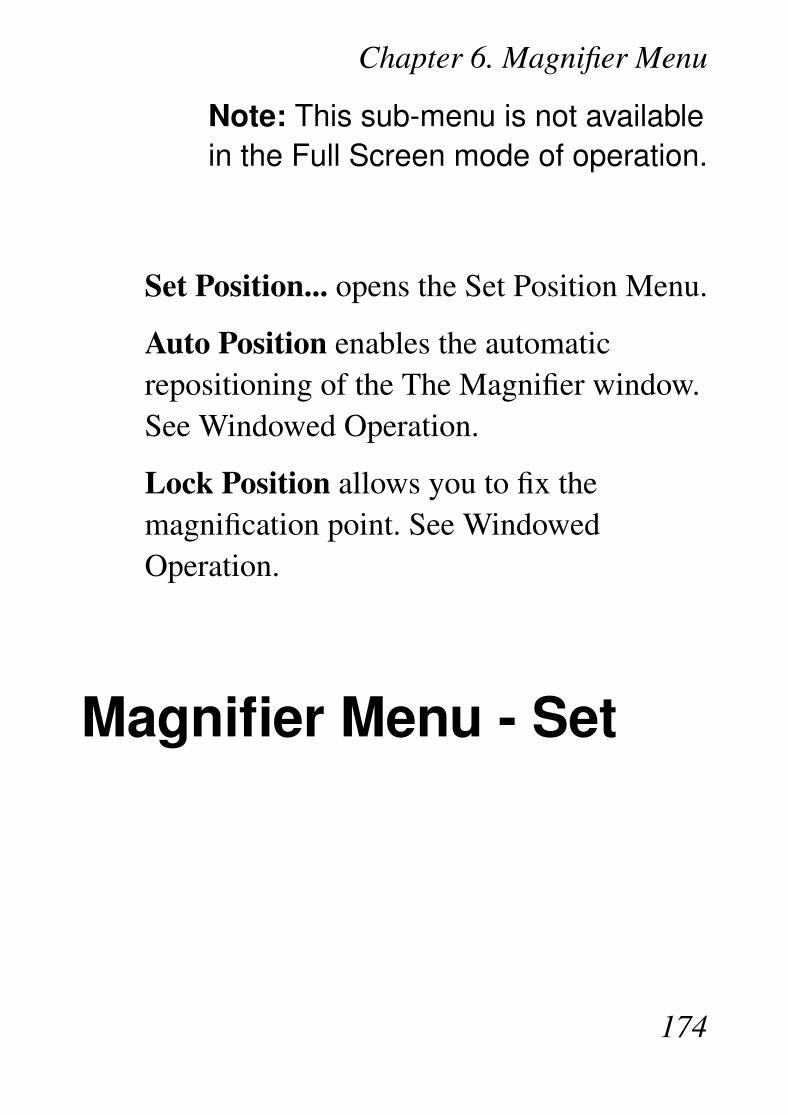
Chapter 6. Magnifier Menu
Note: This sub-menu is not availablein the Full Screen mode of operation.
Set Position... opens the Set Position Menu.
Auto Position enables the automaticrepositioning of the The Magnifier window.See Windowed Operation.
Lock Position allows you to fix themagnification point. See WindowedOperation.
Magnifier Menu - Set
174
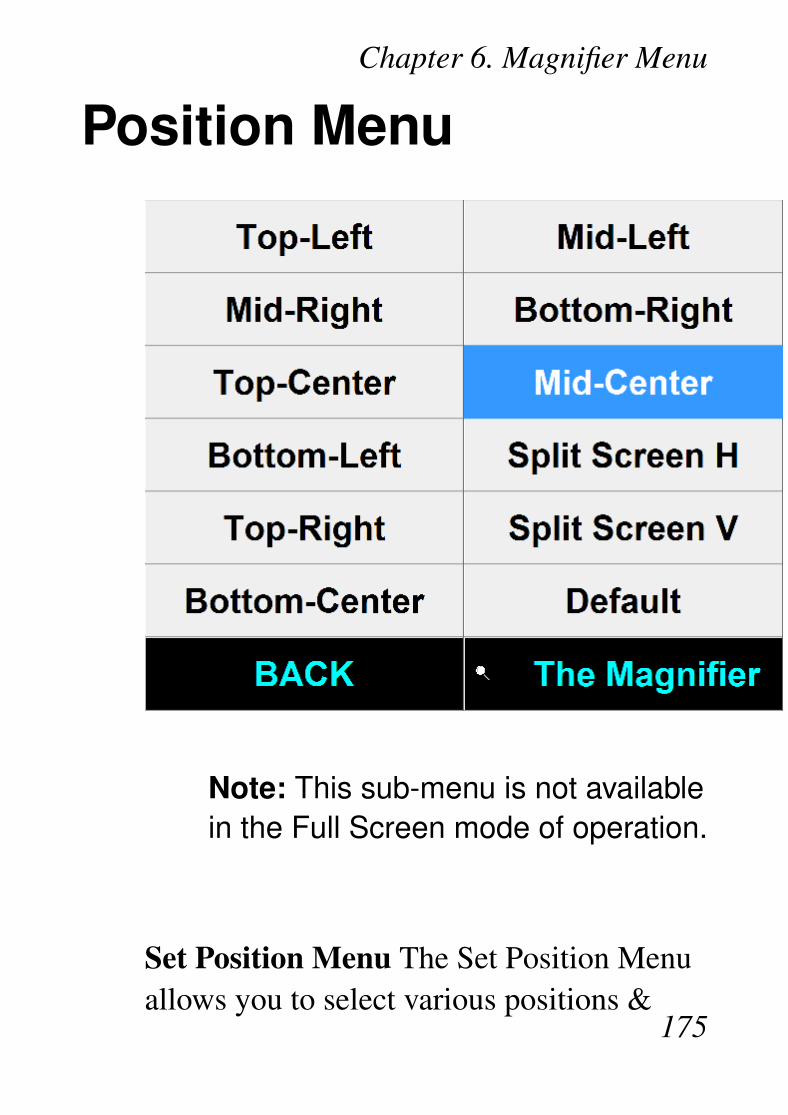
Chapter 6. Magnifier Menu
Position Menu
Note: This sub-menu is not availablein the Full Screen mode of operation.
Set Position Menu The Set Position Menuallows you to select various positions &
175
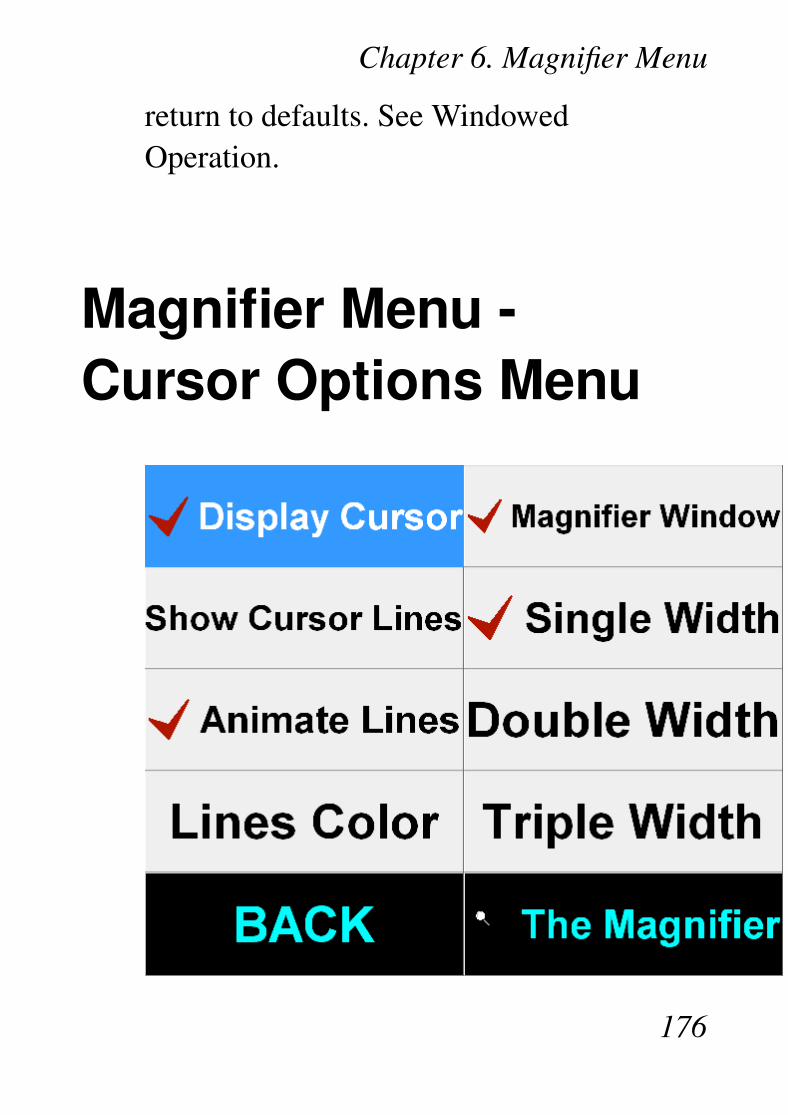
Chapter 6. Magnifier Menu
return to defaults. See WindowedOperation.
Magnifier Menu -Cursor Options Menu
176
Chapter 6. Magnifier Menu
Cursor Options Menu The Cursor Optionsmenu allows you to select cursor lines anddisplay options. See Windowed Operationor Full Screen Operation.
Magnifier Menu -
177
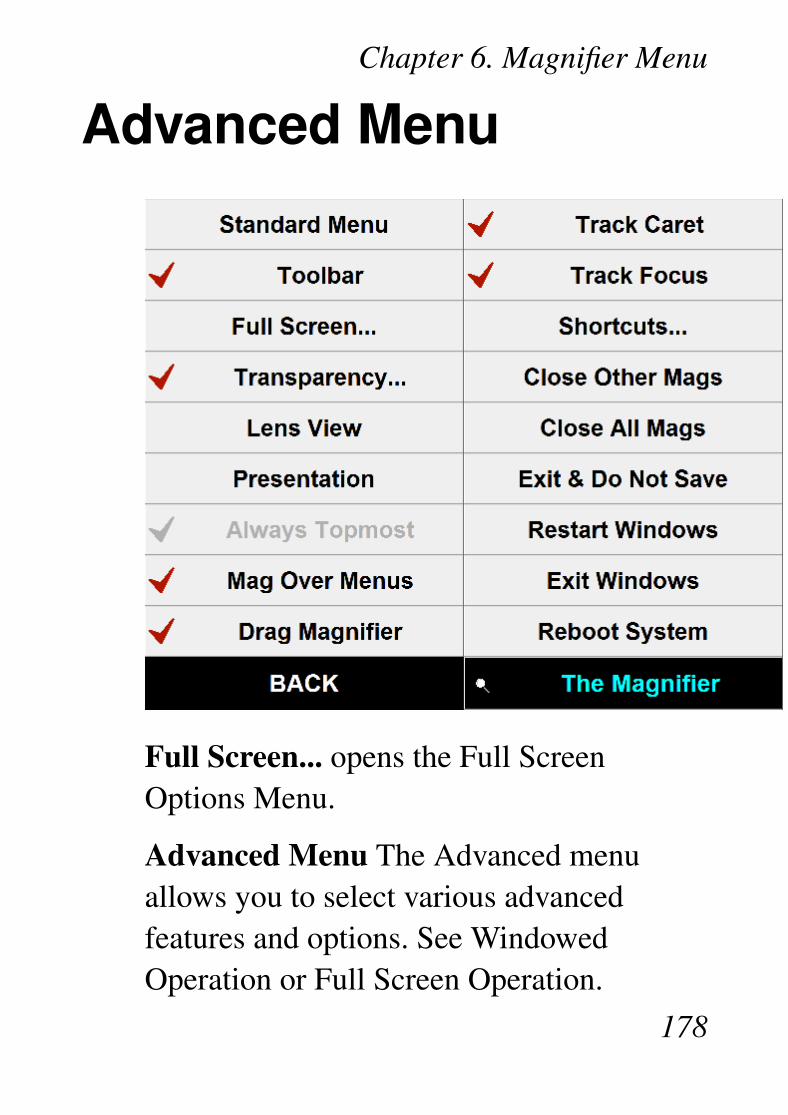
Chapter 6. Magnifier Menu
Advanced Menu
Full Screen... opens the Full ScreenOptions Menu.
Advanced Menu The Advanced menuallows you to select various advancedfeatures and options. See WindowedOperation or Full Screen Operation.
178
Chapter 6. Magnifier Menu
Magnifier Menu - FullScreen Options Menu
Full Screen Options Menu The FullScreen Options menu allows you to selectadvanced full screen features and options.See Full Screen Options.
179
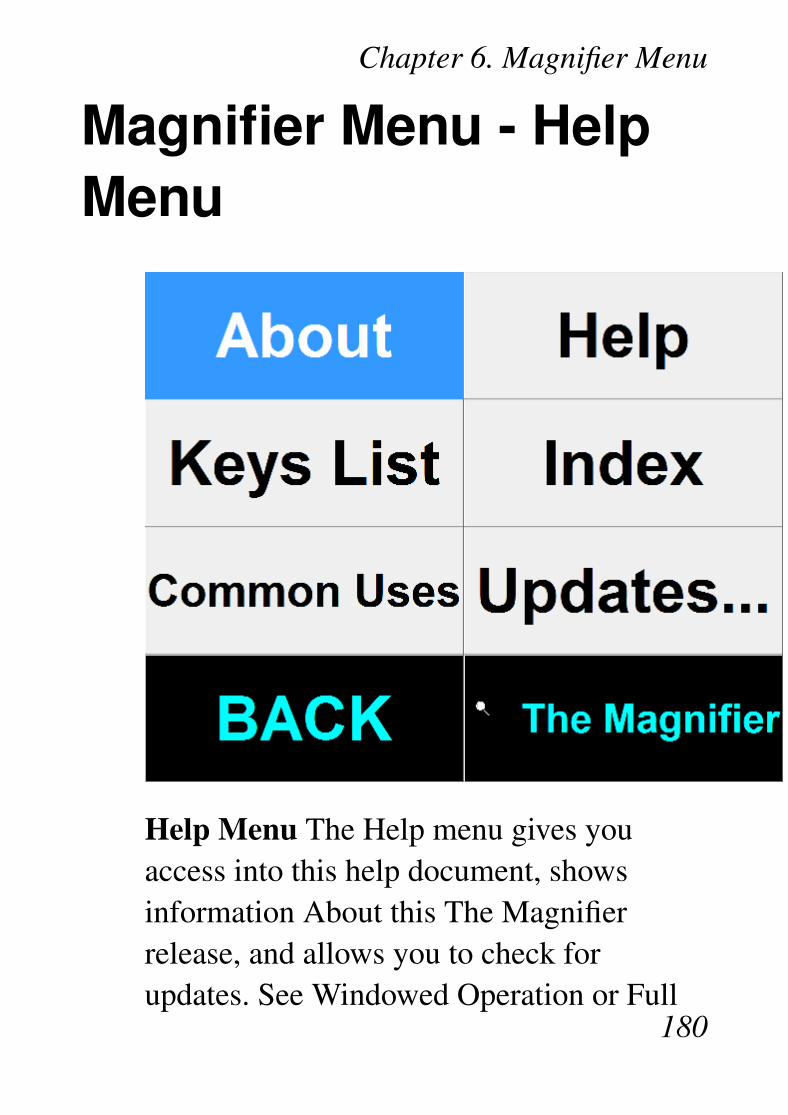
Chapter 6. Magnifier Menu
Magnifier Menu - HelpMenu
Help Menu The Help menu gives youaccess into this help document, showsinformation About this The Magnifierrelease, and allows you to check forupdates. See Windowed Operation or Full
180
Chapter 6. Magnifier Menu
Screen Operation.
181
Part III. TheMagnifier
Technical Doc-umentation
Advanced UserNotes, TechnicalDocumentation,File Information,
and various Other
Information aboutThe Magnifier.
Chapter 7 - Advanced User Notes detailsadditional product information, FinalRelease Notes, Technical Notes, AdvancedUser Notes, Initialization FileDocumentation, Application Notes,Developer information, and CustomerSuggestions.

Chapter 7.Advanced UserNotes
Advanced User Notes &Information
The Advanced User Notes and TechnicalDocumentation covers a wide-range oftopics & information. It is important tounderstand that most users will simply &quickly find the most useful way to magnifywith the software, so detailing all of thefeatures, options, settings mixed in with thestandard product help would overwhelm themajority of users.
184
Chapter 7. Advanced User NotesNote: For up-to-date information,and other specific technical issues, itwill always be important to refer tothe on-line support database at
http://www.imgpresents.com/imgfaq.htm
If you have been referred to this section, orhave been unable to resolve yourquestion(s) or problems within this manual,on-line help, and tutorial, or are anadvanced user familiar with WindowsInitialization files (INI type files), theRegistry, and wish to learn all of TheMagnifier configuration Options, pleaseread the following chapter. For developers,integrators, or technicians, the followinginformation should be read in its entirety -also refer to the IMG Developer’s Kit foreven more options & other advancedinformation.
185
Chapter 7. Advanced User Notes
Final Release NotesVersion 1.10 - Product release 1997
Version 1.20 - Product release 1998
Version 1.50 - Updates for Windows Vista,Full Screen Magnifier options. October 17,2007
Version 1.50 Release 2 - maintenanceupdates, help updates. March 5, 2008
Version 1.50 Release 3 - added Toolbar,maintenance updates, suggested features,help updates. July 16, 2009
Version 1.50 Release 4 - Windows 7compatibility. November 24, 2009
Version 1.50 Release 5 - License Managerupdates.
Version 1.50 Release 5 - 9/17/2012
186
Chapter 7. Advanced User Notes
Important User NotesThe Magnifier uses built-in Windows video& window display APIs (ApplicationProgramming (Programmer) Interfaces) anddoes not pretend to be anything but usefulutility for some users while operatingwithin Windows.
The Magnifier attempts to provide usefulmagnification & other user-suggestedapproaches that enable users with somevisual impairments to better operate & useapplications within Windows. Forindividuals with serious visual impairments,we strongly recommend that professionalopinions be sought.
The Magnifier uses available capabilitieswithin Windows to provide requestedutilities and capabilities. In essence, TheMagnifier is just a standard Windowsapplication that provides special
187
Chapter 7. Advanced User Notes
functionality.
Technical NotesThe Magnifier is a standard WindowsApplication and does not require anyspecial drivers, and should work with allkeyboard, mouse, and video drivers that arecompatible with the ones that ship withMicrosoft Windows.
The Magnifier Files &File Notes & InstallationInformation
The Magnifier Files & File Notes
Files located in the The Magnifier188
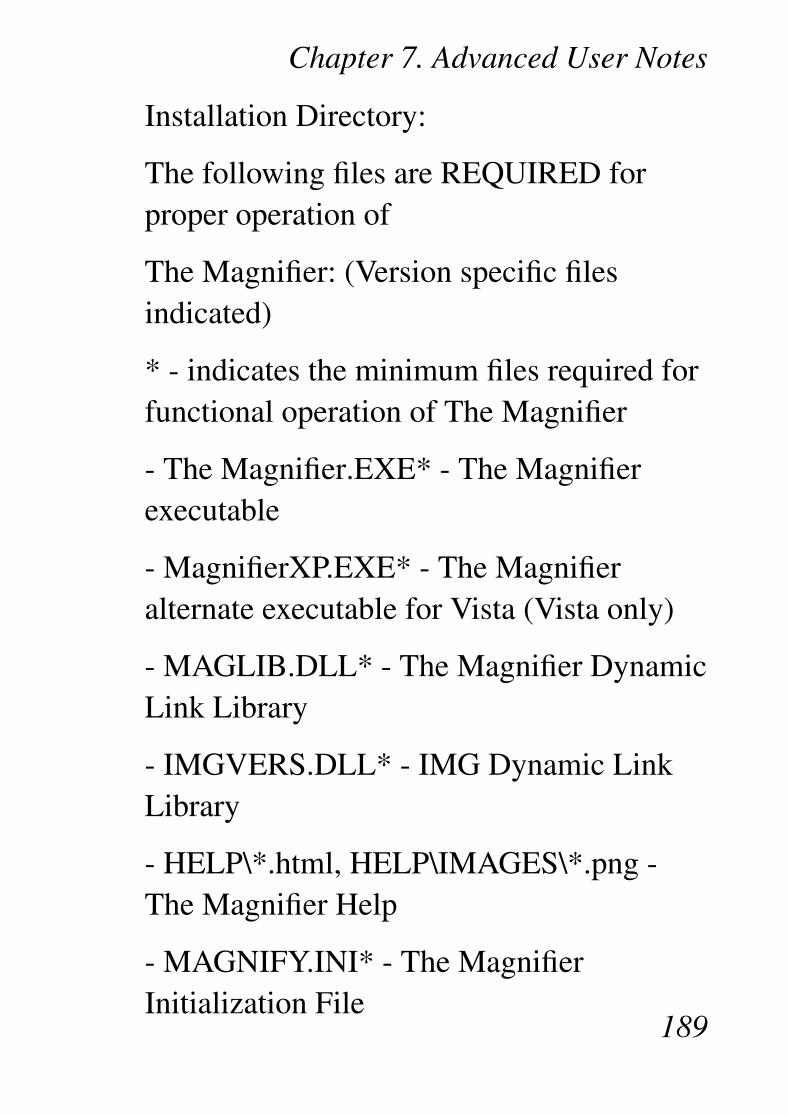
Chapter 7. Advanced User Notes
Installation Directory:
The following files are REQUIRED forproper operation of
The Magnifier: (Version specific filesindicated)
* - indicates the minimum files required forfunctional operation of The Magnifier
- The Magnifier.EXE* - The Magnifierexecutable
- MagnifierXP.EXE* - The Magnifieralternate executable for Vista (Vista only)
- MAGLIB.DLL* - The Magnifier DynamicLink Library
- IMGVERS.DLL* - IMG Dynamic LinkLibrary
- HELP\*.html, HELP\IMAGES\*.png -The Magnifier Help
- MAGNIFY.INI* - The MagnifierInitialization File
189
Chapter 7. Advanced User Notes
- MAGNIFY.ORG - Original The MagnifierInitialization File
- LICENSE.EXE* - IMG License Manager
- LICENSE2.EXE* - IMG Licenseverification only (read-only access)
- LICENSE.LIC* - IMG License File
- LICENSE.ORG - Original IMG LicenseFile
- LICENSE.TXT - IMG End User LicenseAgreement
- README.TXT - Product Installation textfile
- MANIFEST.TXT - Reference File fromBuild
- IMGUTIL.EXE - used for installation anduninstallation of software
- UNZIP32S.DLL - Dynamic Link Libraryfor installation and updates
190
Chapter 7. Advanced User Notes
- uninstall.exe - Used for un-installationlink (MSI Installs)
- MANAGER\ESTABLISH.EXE - this is apost installation utility that establishes orupdates the IMG Download Manager andIMG License Manager files as outlinedbelow.
Located in \Program Files\CommonFiles\Innovation ManagementGroup\Download Manager directory:
- IMGCLEAN.EXE - used to completeuninstall of software, required for ControlPanel Add/Remove Programs
- IMGDLM.EXE - The IMG DownloadManager - Installed byMANAGER\ESTABLISH.EXE
- IMGNET.DLL - The IMG DownloadManager Library - Installed byMANAGER\ESTABLISH.EXE
Located in \Program Files\Common191
Chapter 7. Advanced User Notes
Files\Innovation ManagementGroup\License Manager directory:
- LICENSE.DLL - library used by the IMGLicense Manager and IMG DownloadManager
Installation InformationCD/DVD may contain:
SETUP.EXE - Installation Assistant todetermine platform / install files
AUTORUN.INF - AutoRun for AutoPlayCD/DVD
RELEASE.TXT - Release information
Located on the The Magnifier Distributionmedia:
Compressed Files of the The MagnifierInstallation Files and:
README.TXT - For the Experienced User192
Chapter 7. Advanced User Notes
LICENSE.TXT - The Magnifier LicenseAgreement
SETUP.EXE - Setup Utility to Install TheMagnifier onto your Hard Drive
The IMG installer can support theseoptions:
/? Displays a message box with info aboutoptions
/Q (Quiet install) runs a quiet install (nodialogs/user interaction)
/I (Install) runs a quiet install (nodialogs/user interaction)
/U runs a quiet un-install (no dialogs/userinteraction)
/Q and /I are handled the same (customerrequested /Q)
The following information is for those userswho are curious and want to know, or wishto Uninstall The Magnifier & do not have
193
Chapter 7. Advanced User Notes
the original distribution media.
There are 2 approaches to Setup, an IMGinstaller and the Windows Installer (MSI).The reason 2 installers are available is forflexibility and support purposes. Installingany product is a relatively easy process, butcan become complicated as more & morefeatures and capabilities are included. Inany complicated sequential process, it isinevitable that some sequence or step is nothandled properly. By using a secondapproach, a verifiable comparison basedmechanism is created where a definitiveend-result of files & settings can beattained, ensuring the integrity of theinstallation steps.
Post Installation information:IMGUTIL.EXE performs various postinstallation tasks. For reference, ifthe installation media hasLICENSE.LIC in the same folder as
194
Chapter 7. Advanced User Notes
SETUP.EXE, or in the \LICENSEfolder, IMGUTIL will copy this into theinstallation folder (this is useful forevaluation and other types oflicensing). If the installation mediahas a DK??????.ZIP file in the samefolder as SETUP.EXE, or in the\DEVKIT folder, it will be copied tothe installation folder.
For reference information, you canrefer to the INSTALL.XML used bythe IMG SETUP.EXE for all postinstallation operations. In WindowsInstaller (MSI) installs, these sameactions occur.
SETUP.EXE will sense if The Magnifier isInstalled or not. If The Magnifier is notinstalled, then Install must be checked toInstall the The Magnifier software. If TheMagnifier is already installed, you may
195
Chapter 7. Advanced User Notes
Un-Install by selecting the Un-Install optionand selecting OK throughout the followingscreens.
The MagnifierInitialization FileDocumentation(MAGNIFY.INI)
Listed below are settings and informationfor specific applications that require specialactions by The Magnifier, along with theConfiguration settings for The Magnifier.The Brackets [ ] denote the area in theMAGNIFY.INI file corresponding to theinstance of The Magnifier. Internally thecount starts at 0, so the first instance uses
196
Chapter 7. Advanced User Notes
the [Settings], the second [Settings1], etc.
Note: The default setting ofDoNotUseRegistry=0 means TheMagnifier will check the registry forthe existence of the settings. If theyare there, then the registry settingsare used for the current user (e.g.HKEY_CURRENT_USER \Software\Innovation Management Group \TheMagnifier). If the registry settings donot exist, then the settings fromMAGNIFY.INI are used as defaults,and when the user closes TheMagnifier, the settings are saved tothe registry. When the settingDoNotUseRegistry=1 is in use, thenall settings will be saved in theMAGNIFY.INI file (location based onthe ConfigPath setting). Whenmultiple magnifiers are in use(window mode), the sections are[Settings], [Settings1], [Settings2],
197
Chapter 7. Advanced User Notes
etc.
IMPORTANT NOTE: TheDoNotUseRegistry and ConfigPathsettings are always initially read fromthe MAGNIFY.INI in the installationfolder (location of The Magnifier.exe).Only if DoNotUseRegistry=1 will theConfigPath be evaluated todetermine where to read the user’ssettings from.
Note: For USB licensing, thesettings are ConfigPath=0, andDoNotUseRegistry=1. This uses thelocation on the USB device, and notthe registry (so settings are carriedfrom system to system on the USBdevice).
198
Chapter 7. Advanced User Notes
All Settings are the default Settings of TheMagnifier.
[Settings]
The following are the default settings forThe Magnifier at Install.
ConfigPath=1
This setting determines where theMAGNIFY.INI file will be located.ConfigPath=0 means the MAGNIFY.INIwill be in the installation folder - there areno per user configuration files with thissetting and user permissions must allowread-write access to MAGNIFY.INI, orusers must run with a fixed (read-only)configuration. When ConfigPath=1 orConfigPath=2, each user will have their ownconfiguration files. If ConfigPath=3, theseare in shared among all users in a publiclocation (this is the preferred setting if
199
Chapter 7. Advanced User Notes
global settings for all users is desired).
Note: When DoNotUseRegistry=0(default), the ConfigPath setting isnot used.
Note that the MAGNIFY.INI file in theinstallation folder determines the location ofnew users’ configuration files, and if anadministrator changes this after TheMagnifier has already been used by otherusers, their existing individual configurationfiles will NOT be transferred to the newlocation. What will happen is the softwarewill be unable to find configuration files forthe current user in the current specifiedpath, and a copy of the current configurationfiles will be used as a starting point for thisnew location.
This is a breakdown by Operating System of
200
Chapter 7. Advanced User Notes
the specific locations used - [User] indicatesthe actual user logged onto the system, and[ProductDir] indicates the Product’sdirectory name, e.g. The Magnifier folder.
ConfigPath Locations
ConfigPath: 0Windows 2000/XP: \Program Files\[ProductDir]Windows Vista: \Program Files\[ProductDir]
ConfigPath: 1Windows 2000/XP: C:\Documents andSettings \[User] \Application Data\Innovation Management Group\[ProductDir]Windows Vista: C:\Users \[User]\AppData \Roaming \InnovationManagement Group \[ProductDir]
ConfigPath: 2
201
Chapter 7. Advanced User Notes
Windows 2000/XP: C:\Documents andSettings \[User] \Local Settings\Application Data \Innovation ManagementGroup \[ProductDir]Windows Vista: C:\Users \[User]\AppData \Local \Innovation ManagementGroup \[ProductDir]
ConfigPath: 3Windows 2000/XP: C:\Documents andSettings \All Users \Application Data\Innovation Management Group\[ProductDir]Windows Vista: C:\ProgramData\Innovation Management Group\[ProductDir]
DoNotUseRegistry=0
If DoNotUseRegistry=0, then the registry isused for each user(HKEY_CURRENT_USER). The locationis at [HKEY_CURRENT_USER \Software\Innovation Management Group \The
202
Chapter 7. Advanced User Notes
Magnifier \Settings]. IfDoNotUseRegistry=1, then the INI file isused (as specified by the ConfigPathsetting).
TopMost=1
Window is Always on Top if TopMost=1The Magnifier is a normal sizable popupwindow if TopMost=0
ForceTopmost=1
ForceTopmost is not available from TheMagnifier menu. The default is 1. IfForceTopmost=1 then The Magnifier willreposition itself above every other Windowevery 50 milliseconds. In 1.50, this wasre-worked to sort windows in a sensiblemanner. Using AutoPosition=1 may behelpful if you set ForceTopmost=1.
AutoPosition=0
If AutoPosition=1 then The Magnifier willautomatically reposition to the next logical
203
Chapter 7. Advanced User Notes
screen corner when the mouse cursor is heldover The Magnifier window for severalseconds. AutoPosition=0 disables thisaction. Screen positions: Top-Left,Top-Right, Bottom-Left, Bottom-Right
ShowCursor=1
If ShowCursor=1 then a cursor image willbe displayed over the magnified screen areawithin The Magnifier window.ShowCursor=0 disables the cursor image,and The Magnifier only displays the screenarea.
OpenPositionX=0
OpenPositionY=0
OpenPositionX and OpenPositionY indicatewhere on screen The Magnifier shouldOpen - X & Y indicate Top Left Corner.Default is center of screen. 0 indicates usedefault. Therefore, the window cannot openat position 0,0 - use -1,-1 or 1,1
204
Chapter 7. Advanced User Notes
OpenWidth=0
OpenHeight=0
OpenWidth and OpenHeight indicate sizeof window. Default window is based on thecurrent screen resolution. 0 indicates usedefault. Do not use values below 10.
TimerInterval=50
The TimerInterval setting is used to set thenumber of milliseconds between eachMagnifier update. This can affect thesystem performance and should be set asslow as possible while still being useful tothe user. Higher values indicate slowerupdates. A setting of 1000 means TheMagnifier updates once every second.
MagnifierMenu=0
This indicates which menu is used. IfMagnifierMenu=1 then the large button /large font Magnifier Menu is used. IfMagnifierMenu=0 then the windows
205
Chapter 7. Advanced User Notes
menu’s are used, and the display settings arecontrolled via the Display Properties |Appearance options.
MagnificationFactor=2
This is the Magnification factor that is usedwithin the Magnifier window to magnifyfrom the center of either the current cursorposition or the locked screen position. Validvalues are 2 through 10.
AllowDrag=1
This is used to track whether the Left Click& Drag is active. If AllowDrag=1 then aLeft Double Click will open the menu. IfAllowDrag=0 then the drag is not available,and a single Left Click will open the menu.
LockPosition=0
If LockPosition=1 then the Magnifier nolonger track the mouse cursor position, butmagnifies the screen position indicated bythe LockPos settings below.
206
Chapter 7. Advanced User Notes
LockPosX=457
LockPosY=180
These indicate the screen position X and Ythat is magnified when the Magnifier isLocked on a position.
TrackCursor=0
This indicates whether the Magnifier istracking the mouse cursor or not. IfTrackCursor=1 then the Magnifier movesalong with the mouse cursor, repositioningautomatically as needed.
TrackPosX=101
TrackPosY=225
These are used internally for the TrackCursor Option. They should not bemodified.
ShowLines=0
This setting indicates whether the CursorPosition Indicator Lines are shown. If
207
Chapter 7. Advanced User Notes
ShowLines=1 then these 4 lines pointtowards the current position of the mousecursor.
AnimateLines=1
This setting only applies if ShowLines=1. IfAnimateLines=1 then the Cursor PositionIndicator Lines will animate. This mayassist finding the lines.
LineWidth=1
This setting indicates the line width of theCursor Position Indicator Lines. Validvalues are 1, 3, or 5.
NoMagWindow=0
If ShowLines=1, and NoMagWindow=1then ONLY the cursor lines will be shownwithout the Magnifier window.
LinesTopmost=1
This is an internal setting, and shouldremain LinesTopmost=1 This is used to
208
Chapter 7. Advanced User Notes
keep the Cursor Position Indicator linesabove other windows so they are alwaysvisible.
LayeredPct=255
This is the transparency level for the"Layered" window setting It can range from1-255, with 255 being opaque (NOTtransparent) At lower levels, the windowsbecomes more & more transparentInternally, if set at 255, transparency isdisabled entirely.
FullScreenPrimary=0
If FullScreenPrimary=1, then the full screenoperation on the primary monitor isenabled. If FullScreenPrimary=0, then theMagnifier is operating as a window.
ShowReferenceWindow=1
This only applies when operating in fullscreen mode. If ShowReferenceWindow=1,then a reference window showing a
209

Chapter 7. Advanced User Notes
representation of the area being magnifiedis shown in the upper right (or toggles toupper left if the mouse moves over thewindow). The white area is displayed on ablack background, where the backgroundrepresents the entire screen area that can bemagnified, and the white area represents thearea that is currently being magnified.
FullScreenVirt=0
When FullScreenVirt=1, then the entirevirtual area (multiple monitors) is used inthe full screen magnfication mode. This canonly be true if the system indicates there ismore than 1 monitor available and is in use.
TextCaretTracking=1
When TextCaretTracking=1, theMAGLIB.DLL enables a windowsaccessibility event hook and overrides themouse cursor as the magnification point,shifting the magnification point to the text
210

Chapter 7. Advanced User Notes
caret. Wen TextCaretTracking=0, thistracking is disabled.
DialogsAndFocus=1
This is similar in operation to the Text Carettracking, but it monitors the dialog start anddialog end events, along with keyboardfocus events. DialogsAndFocus=1 meansthe mouse cursor location is ignored, andthe magnification point is moved to theobject in focus. If DialogsAndFocus=0,then this tracking is disabled. This ispartially controlled by the FocusWaitTimeinternally (see below to override this).
;FocusWaitTime=500
This entry is an override settings for thelockout period used to prevent conflictsbetween the mouse operation and trackingthe DialogsAndFocus events. The time is inmilliseconds and 500 is the internal default.You may notice this if you start using the
211
Chapter 7. Advanced User Notes
keyboard, then use the mouse, and go backto the keyboard - the wait time period mustelapse before the keyboard events overridethe mouse (and the mouse must remainstationary). You may wish to make this timeshorter for a more responsive keyboard, butunderstand that the mouse and keyboardfocus events may conflict if this delay is tooshort.
LensViewMode=0
When LensViewMode=1, (in windowmode), a circle region is created so theMagnifier appears as a round lens. This isnot available in full screen mode.LensViewMode=0 means the window is anormal, sizable window.
InvertColors=0
InvertColors=1 means the actual screendisplay is inverted in the Magnifier display,and InvertColors=0 means it is normal.
212
Chapter 7. Advanced User Notes
AltShortcuts=1
AltShiftShortcuts=0
CtrlShiftShortcuts=0
Only 1 of these can be set to 1, the othersshould be at 0. These determine whichkeystroke combination is required to get atthe Magnifier’s shortcuts. By default, it isthe Alt key, but this can conflict with someapplications (e.g. Alt-O will open the optionmenu, but will also toggle the Follow cursor(track cursor) mode. If this is problematic,set AltShiftShortcuts=1 to use theAlt-Shift-[Key] combination, orCtrlShiftShortcuts=1 to useCtrl-Shift-[Key].
rgbLines=7346
This is a decimal representation of thecolors used by the cursor lines using thehexadecimal 0x00FFFFFF COLORREFtype internally for 0x00BBGGRR.
213
Chapter 7. Advanced User Notes
RangeSlider=100
This is used to track the range setting in theMagnification dialog (10x, 20x, 30x, 40x)
MagnVista=20
This records the setting for incrementalmagnification values, e.g. the realmagnification internally is this valuedivided by 10, i.e. MagnVista/10 =Magnification.
UseFocusEdge=1
PctFocusEdgeX=8
PctFocusEdgeY=16
If UseFocusEdge=1, then an internalcalculation takes place (based on thePctFocusEdgeX and PctFocusEdgeYvalues) that take the current positionprovided by the system for the object infocus (e.g. menu item, icon, dialog control,etc.), and if it is within that percentage of
214
Chapter 7. Advanced User Notes
the edge of the screen, then the edge of thescreen is used (rather than the actualposition). This helps make things visible,especially at higher magnification values.
If UseFocusEdge=0, then the actualposition is used directly, and thePctFocusEdge values mean nothing. ThePctFocusEdgeX and PctFocusEdgeY valuesare used internally as a percentagecalculation for pixels (based on the primarymonitor resolution). If the position providedby the system is within the number of pixelscalculated of the edge, then the edge isused. The best values depend on themonitor resolution, the magnification factor,and usage. The values chosen were basedon experimentation for lower magnificationfactors.
UseCaretEdge=1
PctCaretEdgeX=8
215
Chapter 7. Advanced User Notes
PctCaretEdgeY=8
If UseCaretEdge=1, then an internalcalculation takes place (based on thePctCaretEdgeX and PctCaretEdgeY values)that take the current position provided bythe system for the text caret, and if it iswithin that percentage of the edge of thescreen, then the edge of the screen is used(rather than the actual position). This helpsmake things visible, especially at highermagnification values.
If UseCaretEdge=0, then the actual positionis used directly, and the PctCaretEdgevalues mean nothing. The PctCaretEdgeXand PctCaretEdgeY values are usedinternally as a percentage calculation forpixels (based on the primary monitorresolution). If the position provided by thesystem is within the number of pixelscalculated of the edge, then the edge isused. The best values depend on the
216
Chapter 7. Advanced User Notes
monitor resolution, the magnification factor,and usage. The values chosen were basedon experimentation for lower magnificationfactors.
Alternate MagnificationIn Vista
When running in Windows Vista, Microsofthas a built in magnification interface that isused to magnify the screen display withinThe Magnifier, to be compatible with theentire operating system. In certain instances(lack of correct video driver, insufficientvideo display hardware, incorrect displaysettings, etc.), this interface will not operateas intended. The Magnifier’s windowbackground displays a few statementsoutlining important Vista information:
217
Chapter 7. Advanced User Notes
• Magnifying magnifier windows is notpossible in Windows Vista
• If the text is seen with no magnificationdisplay at all, then the magnificationinterface is not currently operable. It isstrongly recommended that you checksettings, update drivers, upgrade yourhardware, etc. to allow Vista to operate asintended.
• You can use the special keyboard shortcutAlt-A to access an Alternate Magnifier.
This outlines what is happening when Alt-Ais used within Vista.
• The Vista compatible version of TheMagnifier is closed (all instances)
• The Windows XP compatible version isstarted. (Named MagnifierXP.exe,location in the installation folder).
218

Chapter 7. Advanced User Notes
Notes: If you are forced to use theXP compatible version of TheMagnifier in Windows Vista, you willwant to select any other Appearanceoption other than the Windows Aerodisplay (Personalize | Appearance |View Classic options). Whenoperating with the Aero appearanceselected, you are not able to view"through" The Magnifier window, andfull screen operation is not usable.You may also want to change (orcreate a new shortcut icon to launchMagnifierXP.exe (rather than thedefault The Magnifier) Otherwise,anytime you run The Magnifier.exe,you will need to use Alt-A to start thealternate program. The licenseremains the same, and the alternatemagnifier should be effective if yoursystem cannot use the Vistaapproach, and you do not run theAero appearance setting.
219
Chapter 7. Advanced User Notes
Application NotesGames using DirectX
Publisher: various
Version: many
By design, these "applications" directlyaccess the video hardware, and bypassnormal Windows video & screen displayapproaches. By design, The Magnifier willnot work with any non-standard applicationsoftware that uses these approaches. TheMagnifier is designed to work with normalWindows applications that follow the rules& guidelines offered by Microsoft foroperation within the normal Windowsenvironment.
Full Screen Video220
Chapter 7. Advanced User Notes
Publisher: various
Version: many
In general, similar issues to DirectX (above)also apply to full-screen video, where thedisplay is being drawn to directly,bypassing the application software andpreventing the use of The Magnifier. Insome cases, the video display may beaffected by The Magnifier (especially onVista/7) (dependent on the capabilities ofthe video adapter in the system). You mayneed to hide (Alt-S), or close The Magnifierwhen viewing full-screen video.
Windows Developers
Note: In the 1.50 version, availablein the IMG Developer’s Kit 1.78Release 3, there are samples of
221
Chapter 7. Advanced User Notes
controlling and communicating withThe Magnifier through stand-aloneutilities, C/C++, Visual Basic, and C#(.NET). Refer to the link below togain access to the IMG Developer’sKit.
Developers Notes, downloadable files,sample code, and other useful integrationand programming information is availableat Innovation Management Group, Inc.’sWeb Site:
http://www.imgpresents.com/imgdev.htm
Developers wishing more technicalinformation about The Magnifier,messaging information, and details howapplications can interface with TheMagnifier should contact InnovationManagement Group, Inc.
For Questions or other information you maycontact:
222
Chapter 7. Advanced User Notes
Innovation Management Group, Inc.Customer Service179 Niblick Road #454Paso Robles, CA 93446USA1-800-889-0987 (US & Canada)+1-818-701-1579+1-818-936-0200 (fax)<[email protected]>http://www.imgpresents.com
About this productThe Magnifier started as a panel on IMG’sMy-T-Mouse®, and by user suggestion, wasspun off as a stand-alone product in 1997.An initial round of suggestions and updatesresulted in the 1.20 release in 1998. Overthe years, The Magnifier continued to be indemand, but there were always questions if
223
Chapter 7. Advanced User Notes
The Magnifier could provide full-screenmagnification. When Windows Vista wasreleased, Microsoft added a a newmagnification API (ApplicationProgramming (Programmer’s) Interface),and it was decided that a much overdueupdate was necessary. Using new tools andcapabilities within Windows, The Magnifierwas updated utilizing all available options,and full screen magnification becamepossible, without having to resort tocomplicated driver interfaces. This designand approach results in a very cost effectiveimplementation that is of great benefit to themajority users that have some need for amagnification utility.
Customer SuggestionsWe appreciate and welcome suggestions
224

Chapter 7. Advanced User Notes
from our users for features that you wouldlike to see in future versions of TheMagnifier. Please feel free to send us anycomments you may have that would makeour product more useful to you. Allsuggestions and ideas become the propertyof Innovation Management Group, Inc.
Send to:
Innovation Management Group, Inc.Customer Service179 Niblick Road #454Paso Robles, CA 93446USA
Or contact us directly:
1-800-889-0987 (US & Canada)+1-818-701-1579+1-818-936-0200 (fax)<[email protected]>http://www.imgpresents.com
225
Chapter 7. Advanced User Notes
Date:_____________________
Name:_____________________
Address:___________________
City:______________________
State:____Zip:_____________
The Magnifier Comments and Suggestions:
__________________________
__________________________
__________________________
__________________________
Version 1.50 Release 5
9/17/2012
Copyright © 1997-2012 by InnovationManagement Group, Inc.
All Rights Reserved.
My-T-Mouse®, My-T-Pen®, My-T-Touch®
and My-T-Soft® are registered trademarks226

Chapter 7. Advanced User Notes
of Innovation Management Group, Inc.
227
Index
Symbols2x Full ScreenOperation, 138
AAbout, 133, 163
About this product,223
Add/RemovePrograms, 5, 22
Advanced Menu,122, 152
Advanced UserNotes, 184
AllowDrag - INIsetting, 206
Alt Keys - ShortcutKeys, 64
Alt-,(comma) -decreasemagnification, 71
Alt--(_) - decreasemagnification, 71
Alt-.(period) -increasemagnification, 71
Alt-1 - 1Xmagnification, 71
Alt-2 - 2Xmagnification, 71
Alt-3 - 3Xmagnification, 71
Alt-4 - 4Xmagnification, 71
Alt-5 - 5Xmagnification, 71
228

IndexAlt-6 - 6Xmagnification, 71
Alt-7 - 7Xmagnification, 71
Alt-8 - 8Xmagnification, 71
Alt-9 - 9Xmagnification, 71
Alt-=(+) - increasemagnification, 71
Alt-A - alternatemagnifier, 71
Alt-C - Show /Hide MagnifiedCursor, 71
Alt-D - Return todefault size, 71
Alt-Delete - MoveWindow Left, 74
Alt-Down Arrow -Move CursorDown, 76
Alt-End - MoveWindow Right, 74
Alt-G -Presentation Mode,71
Alt-Home - MoveWindow Left, 74
Alt-I - InvertColors, 71
Alt-J - Toggle Texttracking, 71, 129,157
Alt-K - Show listof KeyboardShortcuts, 71
Alt-L - LockMagnified Position,71
Alt-Left Arrow -Move Cursor Left,76
Alt-M - Show229
Index
Magnified dialog,71
Alt-N - Show /Hide Cursor Lines,71
Alt-O - Followscursor toggle, 71
Alt-PgDn - MoveWindow Down, 74
Alt-PgUp - MoveWindow Up, 74
Alt-Q - Close TheMagnifier, 71
Alt-R - Lens ViewMode toggle, 71
Alt-Right Arrow -Move CursorRight, 76
Alt-S - Show /Hide window, 71
Alt-T - ShowTransparency
dialog, 71
Alt-Up Arrow -Move Cursor Up,76
Alt-V - Full display(Virtual display),71
Alt-Z - Full Screen(Zoom) toggle, 71
AlternateMagnification(Vista), 217
AltShiftShortcuts -INI setting, 213
AltShortcuts - INIsetting, 212
Always TopmostWindow, 127
Animate (CursorLines), 121, 151
AnimateLines - INIsetting, 208
230
Index
Application Notes,220
Arrow Keys, 74
AutoPosition - INIsetting, 203
BBasic OperationNotes - CommonConfigurations, 55
CCatalog, 47
CD (CD-ROM orDVD), 1, 18
Certificate ofAuthenticity, 1, 18
Check for Updates,134, 164
Circle (Lens View),126
Close (All/AllOther), 131, 158
Color (CursorLines), 121, 151
Color Inversion -CommonConfigurations, 90
CommonConfigurations, 54,134, 164
Commonly AskedQuestions, 39
Complete List ofShortcut Keys, 64
ConfigPath - INIsetting, 199
Contacting IMG,221
231
Index
Copyrights, 9
Ctrl-Down Arrow -MoveMagnificationpoint Down, 77
Ctrl-Left Arrow -MoveMagnificationpoint Left, 77
Ctrl-Right Arrow -MoveMagnificationpoint Right, 77
Ctrl-Up Arrow -MoveMagnificationpoint Up, 77
CtrlShiftShortcuts -INI setting, 213
Cursor Display,119, 147
Cursor Lines, 120,
149Cursor LinesColor, 121, 151Cursor Options,119, 147CustomMagnificationSetting, 103, 144Customer Service,45CustomerSuggestions, 224Customer Support,44
DDefaults (return to)- CommonConfigurations, 92Developers, 221
232
Index
Dialogs tracking,129, 156
DialogsAndFocus -INI setting, 211
Display, 40
Display Cursor,119, 147
DoNotUseRegistry- INI setting, 202
Down Arrow -Move bottomborder down, 78
Dragging, 128
Drivers, 43
DVD (CD-ROM orDVD), 1, 18
Eequipment, 18
EvaulationLicense, 32Exit (No Save),131, 158Exit (Saving), 135,165Exit Windows,132, 159
FFeatures, 15File Notes, 188Files - ProductFiles Installed, 188Final ReleaseNotes, 186Focus (keyboard)tracking, 129, 156FocusWaitTime -INI setting, 211
233
Index
Follows Cursor,106
ForceTopmost -INI setting, 203
Full Screen, 105,145
Full ScreenOperation, 136
Full ScreenOperation -CommonConfigurations, 89
Full ScreenOptions, 124, 153
FullScreenPrimary- INI setting, 209
FullScreenVirt -INI setting, 210
GGuide (Using), 9
Hhard disk space, 18hardwarerequirements, 18Help Contents,133, 163Hot-keys, 131, 158
IIMG, 24, 26Important UserInformation, 10incompatibilities,187
234
Index
INI - FileDocumentation(MAGNIFY.INI),196
Initialization FileDocumentation(MAGNIFY.INI),196
InnovationManagementGroup, Inc., 45
input device, 187
Install
Installing, 4, 22
Installing /Un-Installing,18
Install - Silent, 192
InstallationInformation, 192
Invert Colors, 109,146
InvertColors - INIsetting, 212
KKeyboard Focus,80Keyboard focustracking, 129, 156Keyboard ShortcutList, 133, 164KeyboardShortcuts, 131, 158Keyboard tracking,129, 156Keys - Shortcuts -by Function, 83Keys - Shortcuts -CommonConfigurations, 64
235
Index
LLayeredPct - INIsetting, 209Left Arrow - Moveleft border left, 78Left Click & Drag,128Lens View Mode,126LensViewMode -INI setting, 212License Key, 1, 18,26License Manager,26Licensing, 26LicensingInformation, 24Lines (cursor)Color, 121, 151LinesTopmost -
INI setting, 208LineWidth - INIsetting, 208List of ShortcutKeys, 64LockPosition - INIsetting, 206LockPosX - INIsetting, 206LockPosY - INIsetting, 207
MMagnification, 99,140MagnificationFactor- INI setting, 206Magnifier Menu,123, 152Magnifier Menu -
236
Index
Advanced Menu,178
Magnifier Menu -Cursor OptionsMenu, 176
Magnifier Menu -Full ScreenOptions Menu, 179
Magnifier Menu -Help Menu, 180
Magnifier Menu -MagnificationMenu, 172
Magnifier Menu -Main Menu, 169
Magnifier Menu -Position Menu, 173
Magnifier Menu -Set Position Menu,175
Magnifier OverMenus, 128
Magnifier Windowshow / hide, 120,150
MagnifierMenu -INI setting, 205
MAGNIFY.INIFileDocumentation,196
MagnVista - INIsetting, 214
messaginginformation, 221
Monitor, primary(Full Screen), 160
Monitors, multiple(Full Screen), 160
Mouse Operations,69
Moving, 128
Multiple Monitors(Full Screen), 161
237
Index
NNoMagWindow -INI setting, 208
OOpenHeight - INIsetting, 205OpenPositionX -INI setting, 204OpenPositionY -INI setting, 204OpenWidth - INIsetting, 204
PPctCaretEdgeX -INI setting, 215
PctCaretEdgeY -INI setting, 215PctFocusEdgeX -INI setting, 214PctFocusEdgeY -INI setting, 214Position Menu, 110Presentation Mode,127, 155Primary Monitor(Full Screen), 160Product Catalog,47ProgrammingInformation, 221
QQuestions
CommonlyAsked
238
Index
Questions, 39Quick Start, 1
RRangeSlider - INIsetting, 213Reboot Windows,132, 159Reference Window(Full Screen), 160ReleaseInformation, 4, 22,192Release Notes, 186requirements, 18Restart Windows,132, 159rgbLines - INIsetting, 213Right Arrow -
Move right borderright, 78Round (LensView), 126
SSerial Number, 1,18, 26Set Position Menu,113Settings section[Settings] (INIfile), 199Setup, 4
InstallationOptions, 192ProductInstallation, 192Quiet Install,192
239
Index
Shift-Down Arrow- Move top borderdown, 78
Shift-Left Arrow -Move right borderleft, 78
Shift-Right Arrow- Move left borderright, 78
Shift-Up Arrow -Move bottomborder up, 78
Short-Cut, 15
Shortcut Keys - byFunctions, 83
Shortcut Keys -CommonConfigurations, 64
Shortcuts(keyboard), 131,158
Show Cursor, 119,
147
Show MagnifierWindow, 120, 150
Show ReferenceWindow (FullScreen), 160
ShowCursor - INIsetting, 204
ShowLines - INIsetting, 207
ShowReferenceWindow- INI setting, 209
Split Screen -Bottom, 118
Split Screen -Right, 116
standardconfiguration, 39
Standard Menu,123, 152
standard settings,39
240
Index
Suggestions, 224Support
CustomerSupport, 44website, 44
Systemrequirements, 18
TTechnicalDocumentationSection, 184Technical Notes,188Text Carettracking, 128, 156TextCaretTracking- INI setting, 210The MagnifierStarts with
Windows -CommonConfigurations, 95
The MagnifierToolbar, 59
TimerInterval - INIsetting, 205
Toolbar, 59
TopMost - INIsetting, 203
Topmost Window,127
Track Dialogs &Keyboard, 129, 156
Track Text Caret,128, 156
TrackCursor - INIsetting, 207
TrackPosX - INIsetting, 207
TrackPosY - INIsetting, 207
241
Index
Tracks (follows)Mouse Cursor -CommonConfigurations, 94Tracks Cursor, 106Trademarks, 8Transparency, 125,154Typing(magnifying), 128,156
UUn-Install, 22Up Arrow - Movetop border up, 78Updates (checkfor), 134, 164Use MagnifierToolbar, 123, 153
UseCaretEdge -INI setting, 215
UseFocusEdge -INI setting, 214
User Notes, 187
Using this guide, 9
VVersion (history),186
Video - Drivers, 43
view the cursor, 40
Virtual Desktop(Full Screen), 160
Vista - AlternateMagnification, 79,217
242
Index
Wwebsite, 44What is TheMagnifier, 11What You Need, 18Why Do I NeedThe Magnifier?, 14Width (CursorLines), 121, 151Window(Magnifier) show /hide, 120, 150WindowedOperation, 98WindowsApplications, 39WindowsDevelopers, 221
243


![INDEX [] · 6 Application S.F. FOOD INDUSTRY Cereal Cooker 1.25 Dough Mixer 1.50 Meat Grinder 1.50 Slicers 1.50 GENERATORS AND EXITORS 1.25 HAMMER MILLS 2.00 …](https://img.pdfslide.us/doc/110x75/5b3f84f17f8b9a3a138c3442/index-6-application-sf-food-industry-cereal-cooker-125-dough-mixer-150.jpg)


![Recommendations Resolutions - Login Book.pdf[1.75]2% [1.50]1.75% All other employment under Federation -negotiated Electronic Media Agreements [1.50]1.75% [1.25]1.50% 37 BE IT FURTHER](https://img.pdfslide.us/doc/110x75/5f0fd3e07e708231d44614a9/recommendations-resolutions-login-bookpdf-1752-150175-all-other-employment.jpg)