Embed Size (px)
Citation preview

1
Installation Instructionsfor Vinyl Windows with Integral Nailing Fin (JII001)
Thank you for selecting JELD-WEN products. Attached are JELD-WEN’s recommended installation instructions for Vinyl windows with an integral nail fin. Not all window types may be installed into every wall condition in all areas. Consult your local building code official for applicable building codes and regulations. Local building code requirements supersede recommended installation instructions. Areas such as Florida and the Texas TDI region have different anchoring requirements based on product certification. For information on specific products, visit www.floridabuilding.org or www.tdi.texas.gov and follow the anchoring schedule given in the drawings for the product instead of the anchoring schedule in this document.
Double Hung
Casement
Single Hung (Tilt)
Picture Awning
Horizontal SliderSingle Hung (Side Load)

important information | table of contents | glossary
safety and Handling
Installation Instructionsfor Vinyl Windows with Integral Nailing Fin (JII001)
2
PLEASE NoTE: Installations where the sill is higher than 35 feet above ground level, or any product installation into a wall condition not specifically addressed in these instructions, must be designed by an architect or structural engineer. Failure to install windows into a square, level, and plumb openings could result in denial of warranty claims for operational or performance problems.
NoTE To INSTALLEr: Provide a copy of these instructions to the building owner. By installing this product, you acknowledge the terms and conditions of the limited product warranty as part of the terms of the sale.
glossaryBuckA wood framework attached to the masonry inside a window or patio door rough opening.
Mull JointThe joint where two or more window units are structurally joined together.
Mulled UnitTwo or more window units structurally joined together.
Self-Adhered FlashingAn adhesive backed tape material used to waterproof the rough opening and/or used to seal a window to the building’s weather barrier.
ShiplapThe layering method in which each layer overlaps the layer below it so that water runs down the outside.
Weep Hole (weep channel)The visible exit or entry part of a water drainage system used to drain water out of a window.
safety• Read and fully understand ALL manufacturers’ instructions before
beginning. Failure to follow proper installation instructions may result in the denial of warranty claims for operational or performance problems.
• Do not work alone. Two or more people are required. Use safe lifting techniques.
• Use caution when handling glass. Broken or cracked glass can cause serious injury.
• Wear protective gear (e.g. safety glasses, gloves, ear protection, etc.).
• Operate hand/power tools safely and follow the manufacturer’s operating instructions.
• Use caution when working at elevated heights.
• If disturbing existing paint, take proper precautions if lead paint is suspected (commonly used before 1979). Your regional EPA (www.epa.gov/lead) or Consumer Product Safety Commission offices provide information regarding regulations and lead protection.
WArNING: Drilling, sawing, sanding or machining wood products can expose you to wood dust, a substance known to the State of California to cause cancer. Avoid inhaling wood dust or use a dust mask or other safeguards for personal protection. For more information go to www.P65Warnings.ca.gov/wood.
Window Handling• Make sure operable windows are locked prior to installation.
• Heed material manufacturers’ handling and application instructions.
• Handle in a vertical position; do not carry flat or drag on the floor.
• Do not put stress on joints, corners or frames.
• Store window in a dry, well-ventilated area in vertical, leaning position to allow air circulation; do not stack horizontally.
• Protect from exposure to direct sunlight during storage.
• Install only into vertical walls and when conditions and sheathing are dry.
IF INJUry oCCUrS, IMMEDIATELy SEEk MEDICAL ATTENTIoN!
table of contentssafety and Handling . . . . . . . . . . . . . . . . . . . . . . . . . . . . . . . . . . . . . . .2materials and tools . . . . . . . . . . . . . . . . . . . . . . . . . . . . . . . . . . . . . . .3inspect rough opening (r.o.) . . . . . . . . . . . . . . . . . . . . . . . . . . . . . . .4install sill pan . . . . . . . . . . . . . . . . . . . . . . . . . . . . . . . . . . . . . . . . . . . .5temporarily fasten and shim product . . . . . . . . . . . . . . . . . . . . . . . . .5fasten product (size and spacing) . . . . . . . . . . . . . . . . . . . . . . . . . . . .6install drip cap . . . . . . . . . . . . . . . . . . . . . . . . . . . . . . . . . . . . . . . . . . .8create “interior” air seal . . . . . . . . . . . . . . . . . . . . . . . . . . . . . . . . . . .8

materials and tools
inspect product1
Installation Instructionsfor Vinyl Windows with Integral Nailing Fin (JII001)
3
needed materialsNoTE: JELD-WEN exterior window and door products should be installed in accordance with JELD-WEN’s recommended installation instructions, which are printed on the product label or can be found on our website: www.jeld-wen.com.
NoTE: Alternative installation methods and flashing systems may be utilized at the installer’s or owner’s discretion and, in such situations the installation should be done in accordance with the flashing manufacturer’s instructions. Follow all material manufacturers’ instructions for proper use and compatibility. When using flashing, spray adhesive/primer, sealant and foam products, we recommend using the same manufacturer and verifying compatibility. It is the End User’s responsibility to determine if dissimilar materials are compatible with the substrates in the application.
• #8 pan-head or washer head, corrosion resistant screw. Minimum embedment of 1 1/4" into the structural framing (or as required by local code).
• For Wind Zone 3 (WZ3) Products (Tilt Single Hung, Side Load Single Hung, Tilt Double Hung and Horizontal Slider Windows): #8 x 2 1/2" flat head screws (stainless steel recommended) are needed to go through and anchor the bracket to the rough framing (two screws per bracket).
• Sealant: We recommend OSI® QUAD® Max Sealant or equivalent (for interior air seal). This can be used in any application and can be painted or ordered in a color matched product, if desired.
• Polyurethane low expansion Window and Door foam: We recommend OSI® QUAD® Foam or equivalent (for interior air seal).
• Backer rod: 1/8" larger than the widest portion of the gap (used in conjunction with sealant bead for interior air seal).
• Non-compressible or non-water degradable shims.• Drip cap (if not supplied).
potential needed tools• Utility knife/shears
• J-roller
• Hammer
• Tape measure
• Caulking gun
• Level (4' minimum recommended)
• Drill with bits
• Pry bar
remove packaging• Remove shipping materials such as corner covers, shipping blocks,
shrink wrap or pads. If there is a protective film on the glass, do not remove it until installation and construction is complete.
• Do not remove the installation label until after the inspection of the job is complete.
inspect Window• Cosmetic damage.
• Product squareness (diagonal measurements not more than 1/4" different).
• Correct product (size, color, grid pattern, handing, glazing, energy-efficiency requirements, etc.).
• Cracked frame welds or other frame damage.
• Splits, cracks, holes, missing sections or other damage to the nailing fin longer than 6" and/or within 1/2" of the window frame.
• For side-by-side mulled units, a drip cap that extends the length of the frame plus 1/8" overhang on each end is required.
If any of the above conditions represent a concern, or if you expect environmental conditions to exceed the window’s performance rating, do not install the window. Contact your dealer or distributor for recommendations.

inspect rougH opening (r.o.)2
A
D
C E
B
Installation Instructionsfor Vinyl Windows with Integral Nailing Fin (JII001)
4
This installation guide only addresses masonry/block wall, sheathed wall and open-stud construction. If installing into an opening other than what is identified, consult a building professional.
masonry/block Wall constructionThis installation assumes that a framework of studs (often called a buck) has already been properly fastened in a weatherproof manner to the concrete/masonry wall.
fully sheathed Wall constructionSheathing is applied to the exterior of the wall framing. The window will be mounted flush against the sheathing or building wrap in a weatherproof manner.
open-stud constructionSheathing is absent and building wrap is applied atop of the wall framing. The window will be mounted flush against building wrap and/or framing members (studs).
• Verify the width and height of the rough opening is 1/2"- 5/8" larger than the window width and height. Openings for mulled units should be 3/4" larger than the window width and height.
• Verify the rough opening is square. The (A) and (B) measurements should be the same. Suggested deviation from square is no more than 1/4".
• Verify the rough opening is level and plumb (C, D and E). Suggested deviation from square is no more than 1/8".
• The rough opening sill should not be crowned or sagged (D), but rather level or sloped (positive slope) to the exterior.
• The exterior face of the rough opening should be in a single plane (E) with less than 1/8" twist from corner to corner.
• Minimum double studs (king and jack/trimmer) should be used to support the header at all rough openings.
for retrofit installationsAfter removing the old window, remove sufficient cladding (siding, stucco etc.) to expose enough intact building wrap to install the window in a weatherproof manner. If damaged, apply new building wrap in shiplap manner. Verify the rough opening framing is structurally sound. Contact your local waste management entities for proper disposal or recycling of products being removed.
Verify Square, Level and Plumb
buck
Header
trimmer studs
sheathingKing stud

temporarily fasten and sHim product4
install sill pan3
center
WArNING! To avoid injury, use at least two people to install. Adequately support the window until completely fastened.
1. Place the window onto the shims and tilt into the rough opening. The shims must fully and evenly support the sill of the window. Adjust the shims as needed.
2. From the exterior, temporarily fasten window through the nailing fin between 3"- 7" from one upper corner.
Installation Instructionsfor Vinyl Windows with Integral Nailing Fin (JII001)
5
prepare sill1. Install a sill pan in a
weatherproof manner on the rough sill (refer to ASTM 2112 for types of sill pans). Always allow water to drain out of the pan and onto the building wrap, drainage plane or to the exterior.
2. Apply a continuous bead of sealant to the interior of the upturned leg of the sill pan (if using a rigid sill pan).
shim the sill 1. Place the shims in the
sill pan as needed to level the window and prevent sagging or bowing. Shims should be aligned as defined by the label on the window or as stated below:
• Shims (1/4" maximum) should be placed near the exterior edge of the sill pan.
• Place one shim 3/4" to 1" from each side of the rough opening (if the rough opening is sized correctly, this should be approximately 1/2" from the corner of the window).
• Shims should be no more than 24" on-center.
• For mulled units, ensure there is a shim located 1/2" on each side of the mull joint (see comments below).
• There should always be a drainage path to the exterior out of the sill pan.
• Shims can be held in place with sealant.
NoTE: For large, heavy or mulled units, shim at 8" on-center and no more than 2" from each corner to maintain proper sill alignment. This shimming schedule also pertains to regions where the ambient air temperature reaches or exceeds 95°F (35°C).
NoTE: On some double-hung operating units only, jamb adjuster hardware is mounted in the middle installation holes to allow for some jamb adjustment. Install jamb adjuster screws until captured (first ‘click’), the screw may then be screwed in or out to adjust the jamb as needed.
3. Shim at each interlock of hung windows or in the center for other style windows.
4. Shim within 4"- 6" of each corner on the side and head jambs. Apply additional shims to the side and head jambs as necessary to ensure window position within the opening is plumb, level, and square. Larger windows usually need additional shims. Shims can be secured with sealant or adhesive.
5. Inspect window for level, square and twist. Test for proper operation (remove and reinstall if necessary).
3/4" - 1"
24" o.c.
Jamb Adjuster
turn clockwise to first click and adjust as needed
interlock
shimWindow frame
1/4" sealant gap
interior
3"- 7"
fasten product (size and spacing)5
Window Window
Installation Instructionsfor Vinyl Windows with Integral Nailing Fin (JII001)
6
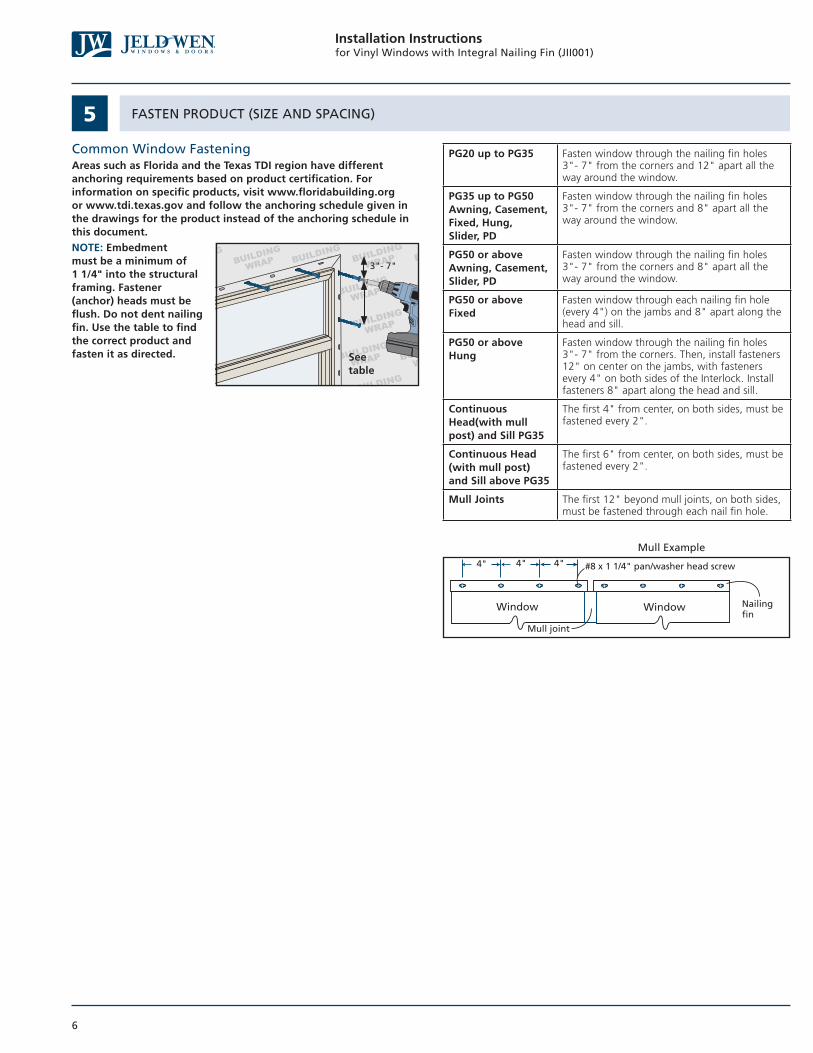
common Window fastening Areas such as Florida and the Texas TDI region have different anchoring requirements based on product certification. For information on specific products, visit www.floridabuilding.org or www.tdi.texas.gov and follow the anchoring schedule given in the drawings for the product instead of the anchoring schedule in this document.NoTE: Embedment must be a minimum of 1 1/4" into the structural framing. Fastener (anchor) heads must be flush. Do not dent nailing fin. Use the table to find the correct product and fasten it as directed.
PG20 up to PG35 Fasten window through the nailing fin holes 3"- 7" from the corners and 12" apart all the way around the window.
PG35 up to PG50 Awning, Casement, Fixed, Hung, Slider, PD
Fasten window through the nailing fin holes 3"- 7" from the corners and 8" apart all the way around the window.
PG50 or above Awning, Casement, Slider, PD
Fasten window through the nailing fin holes 3"- 7" from the corners and 8" apart all the way around the window.
PG50 or above Fixed
Fasten window through each nailing fin hole (every 4") on the jambs and 8" apart along the head and sill.
PG50 or above Hung
Fasten window through the nailing fin holes 3"- 7" from the corners. Then, install fasteners 12" on center on the jambs, with fasteners every 4" on both sides of the Interlock. Install fasteners 8" apart along the head and sill.
Continuous Head(with mull post) and Sill PG35
The first 4" from center, on both sides, must be fastened every 2".
Continuous Head (with mull post) and Sill above PG35
The first 6" from center, on both sides, must be fastened every 2".
Mull Joints The first 12" beyond mull joints, on both sides, must be fastened through each nail fin hole.
mull joint
nailing fin
#8 x 1 1/4" pan/washer head screw4" 4" 4"
mull example
See table
3"- 7"

fasten product (size and spacing) continued5
Installation Instructionsfor Vinyl Windows with Integral Nailing Fin (JII001)
7
1. Double check that the windows are installed level, square and without twist.
2. Operate the window to verify bracket location is correct and there are no clearance issue. If a clearance issue is identified adjust brackets as necessary for proper operation.
3. Remove one of the factory applied screws. Apply enough sealant to the bracket hole to cover the existing screw hole and so there will be adequate squeeze out around the head of the fastener to be applied next.
4. Place shim between the window frame and rough opening, in-line with the bracket. Align the shim so that the fasteners go through the bracket and hold the shim in place.
5. Apply a #8 x 2 1/2" screw through the bracket hole. Tighten until snug and squeeze out is observed around the screw head. Wipe off excess sealant and repeat for the other screw.
6. Repeat for any remaining brackets.
special fastening requirements For PG50 or ABoVE Tilt Hung Windows oNLy
1. From the interior, just above the interlock (where the sashes meet at center), align with shims and drill a 3/8" clearance hole through oNLy the first wall of the interior jamb (as shown). This will allow the screw head to pass through.
2. Drive one #8 pan/washer head screw through the jamb and shim. Repeat for opposite side. Ensure to achieve a minimum of 1 1/4" embedment into the structural framing.
For WZ3-IMPACT Tilt Single Hung, Tilt Double Hung and Horizontal Slider Windows oNLyAdditional brackets are applied to the Wind Zone 3 (WZ3) products listed below. The factory screws must be backed out of the bracket and replaced with a #8 x 2 1/2" flat head screw (stainless steel recommended).
opposing shims
3/8" clearance hole
Double-Hung Jamb Cutaway from Top
framing
screw
nail fin
Jamb
exterior
single Hung (tilt) Horizontal slidersingle Hung (side load)double Hung

create “interior” air seal7
install drip cap6
©2019 JELD-WEN, Inc. This publication and its contents are owned by or licensed to JELD-WEN, Inc. or its affiliates or third parties, and are protected by copyright, trademark, and other laws. Unauthorized use or duplication is prohibited. JELD-WEN reserves the right to change product specifications without notice. Please visit our website at jeld-wen.com for current information. All rights reserved.
Installation Instructionsfor Vinyl Windows with Integral Nailing Fin (JII001)
Please visit jeld-wen.com for warrantyand care and maintenance information.
Thank you for choosing
JII001 05/19
NoTE: A drip cap is required for all vertically mulled units and recommended for all products.
1. Apply a continuous bead of sealant to the top of the window frame. See drawing.
2. Position the drip cap on top of the window frame and seat into position with the aid of a wooden block and hammer or non-marring mallet.
NoTE: Barb maybe trimmed back 1/4" on each end to better assist in seating the drip cap into the accessory groove.
continuous air sealNoTE: Shims may need to be cut back, so the interior air seal is “continuous” between the window frame and the rough opening.
Create a continuous air seal on the interior by integrating the rough opening and the window frame with low expansion polyurethane foam or backer rod and sealant. If needed, apply additional sealant between the sill pan or rough sill and the window frame.
after installation• Ensure weep holes/channels are clear of debris for proper water
drainage. Do not seal weep holes/channels.• Install exterior wall surface per manufacturer’s guidelines.
• Leave an expansion/contraction gap of approximately 3/8" between the window frame and final exterior wall surface (siding, stucco, etc.). For a finished look and additional protection, seal this gap on the sides with backer rod and sealant. If sealant is applied above the drip cap ensure the sealant bead is discontinuous to allow for drainage.
• Protect recently installed units from damage from plaster, paint, etc.
sill pan
sealant
low expansion foam