Embed Size (px)
Citation preview

© 2019 Collection Inédith
CI-AOTC-L&G
www.facebook.com/Collection.Inedithedith_choiniere@videotron.cawww.collectioninedith.com
Landscape & Gondolas For the series ‘’Amsterdam On The Canal’’
Size: 100’’ X 60’’Raw Edge Appliqué & Free Motion Quilting Design
Don’t miss the free tutorial on YouTube. Look for: ‘’Quilt BOM for June 2019 - Landscape for the project Amsterdam on the Canal Collection Inédith’’
This landscape was designed for the series ‘’Amsterdam on the Canal. The completed project will be approximatively 96’’ wide x 50’’ high and will include all the elements you see in this design. The series of six houses will be part of the whole design in the end.
VRIJHEID
VRIJDOM
Edith ChoinièreDesigner

Graphic illustrations pictures and page set up by Édith Choinière
Email: [email protected]: www.facebook.com/Collection.Inedith
Web site: www.collectioninedith.comYouTube Channel: Collection Inedith
Instagram: collection_inedith
© 2019 Collection Inédith
All rights reserved No part of this publication may be reproduced or transmitted by any means,
electronic, mechanical, photocopying or otherwise, without the prior permission of the author.
Copying killsthe creative spirit
Landscape & GondolasFor the series ‘’Amsterdam On The Canal’’
Raw Edge Appliqué & Free Motion Quilting DesignSize: 100’’ X 60’’
Table of contents Pages
Background (sky, water & sidewalk) 2
Gondola Vrijdom (Freedom) 3
Gondola Vrijheid (Liberty) 17
Trees & grass 31
Streetlights 40
Posts for guard rails 41
Brick wall & bridge 42

Landscape & GondolasRaw Edge Appliqué & Free Motion Quilting Design
This pattern is for the landscape as it appears in the wall quilt design ‘’Amsterdam on the Canal’’ but does not includes the houses.
The document contains instructions, templates and the FMQ design for the following designs: the sky and water, trees and grass, brick wall and bridge, streetlights, posts for guard rails and sidewalk.
The FMQ part of this project can be done on a domestic sewing machine or a mid-arm machine. I use my Soprano or my Tiara from Babylock and both do a wonderful job.
The final size of the landscape will be adjusted at the end. But to make sure we cover all of the details, the landscape should be at least 100’’ wide x 60’’ high. We will get back to the real size when all the houses and landscape are placed against the sky and water background.
If you wish to purchase the pattern for one or more houses but do not want to make the ‘’Amsterdam on the Canal’’ project, they are available on my website: www.collectioninedith.com click on the tab ‘’Shop for patterns’’.
IMPORTANT: Do not build the landscape until the last house is ready. Some appliqués must be placed in front or behind another. Here’s how the project will be put together:
1. Sew the sky and the water together 2. Then you will have to place the side walk and the brick wall & bridge3. Place the trees and the grass 4. Place houses 3 on the left side of the bridge and place houses 4 on the right side of the bridge 5. Place houses 1 and 2 on the left side of house 3 and houses 5 and 6 on the right side of house 46. Place the streetlights7. Place the posts for the guard rails8. Place both gondolas on the water
If it’s your first experience working with this product, look for my tutorial on how to work with Lite Steam-A-Seam 2 as well as tips on how to place the appliqués on the background fabric perfectly and in just a few minutes. To find the tutorial on my YouTube Channel, look for: Collection Inédith - Steam-A-Seam 2 - Helpful tips
Materials required for the landscape1. To trace the FMQ design and to position the appliqués, you need a lightbox or a glass table top under which you can place a lamp.
2. 1.5 meters/yards x 18‘’ wide Lite Steam-A-Seam 2 and a roll of 1/4’’ of the same product. You can also use any fusible web available in your country as long as it adheres well to the fabric and doesn’t shift when you sew.
1

Fabrics and threadsNote that Batik fabrics are best for any Raw Edge Appliqué as they fray less.
1. The fabric selection will be presented at the beginning of each design.
2. For the FMQ part, I will use the SuperB Polyester embroidery thread, 40 weight.
The Selection of thread colors will be given in the last part of the project when I start the FMQ design.
I will use thread colors that will contrast with the fabric for visual impact. For example, gold threads on purple fabric, red threads on orange fabric, white threads on dark blue fabric etc.
Measurement references2.5 cm = 1’’ 10 cm = 4’’ 91.5 cm = 1 yard 1 meter = 39‘’ 1 yard = 36‘’
Assembling the background & sidewalk
1. Cut 3 meters/yards of each color by the width of the fabric.2. Sew them together lengthwise and press open the seam. Banyan Batik Ketan
81000-1013
Artisan Spirit Shimmer20425M-45
3 meters/yards
3 meters/yards
Sky
Water
Assembling the sky and water
100’’
88’’
3. Mark the center.
Stonehenge39382-41
Banyan Batik Shadow81300-44
1/4 meter/yard
1/4 meter/yard
1. Light blue: cut 2 strips of 44’’ x ½’’ wide2. Dark blue: cut 2 strips of 44’’ x ½’’ wide3. Sew together 2 sets of one light blue with one dark blue and press open the seamThese two sets of sidewalk, will be placed on each side of the bridge. Part of the sidewalk will be placed behind the houses foundation.
Assembling the sidewalk
Set 1
Set 2
2

Gon
dola
VR
IJD
OM
(Fre
edom
)Ap
pliq
ué in
stru
ctio
ns
1. P
rint q
uadr
ants
1 to
3 o
n pa
ges
5 to
7 a
nd ta
pe th
em to
geth
er. T
hese
qua
dran
ts w
ill be
use
d to
pos
ition
ned
the
appl
iqué
s at
the
right
pla
ce a
nd q
uick
ly.
2. P
rint t
he A
ppliq
ué te
mpl
ates
on
page
s 8
to 1
2 an
d tra
ce th
em o
n Li
te S
team
-A-S
eam
2.
3. W
hene
ver p
ossi
ble,
cut
out
the
inte
rior o
f the
Ste
am-A
-Sea
m th
at y
ou d
on’t
need
, but
kee
p be
twee
n ¼
’’ and
¾’’ f
or th
e ed
ges
on
all
side
s.
4. P
lace
the
Stea
m-A
-Sea
m te
mpl
ates
on
the
wro
ng s
ide
of th
e fa
bric
and
pre
ss. T
hen,
cut
eac
h ap
pliq
ué in
divi
dual
ly.
5. B
efor
e yo
u pl
ace
the
appl
iqué
s on
the
back
grou
nd fa
bric
, tra
ce th
e Fr
ee M
otio
n Q
uilti
ng d
esig
n on
the
appl
iqué
s.
F
or th
ese
inst
ruct
ions
, go
to p
age
13.
2
1
3
4
1
87
77
5 6
5 6
5 6
5 6
129
1110
1110
1110
11109
14 13
Qua
dran
t 1Q
uadr
ant 2
Qua
dran
t 3
3

2
13
4
1
87
77
5 6
5 6
5 6
5 6
129
11101110
11101110
9
14 13
Ban
yan
Bat
ik S
hado
w81
300-
48A
rtis
an S
him
mer
2025
4M-5
90
Ban
yan
Bat
ik K
etan
8100
0-83
0Si
mpl
y N
eutr
al W
hite
2213
7-10
¼ m
eter
/yar
d
Ston
ehen
ge39
302-
72
Ban
yan
Bat
ik S
hado
w81
300-
24
¼ m
eter
/yar
d¼
met
er/y
ard
One
fat q
uart
er o
r sc
raps
of f
abric
¼ m
eter
/yar
dO
ne fa
t qua
rter
or
scra
ps o
f fab
ric
App
liqué
s 2-
3-7-
12-1
4A
ppliq
ué 1
0A
ppliq
ués
6-8
App
liqué
s 5-
11-1
3A
ppliq
ués
4-9
App
liqué
1
Gon
dola
VR
IJD
OM
(Fre
edom
)Fa
bric
sel
ectio
n
The
amou
nt o
f fab
rics
requ
ired
for e
ach
colo
r is
for b
oth
gond
olas
.
4

1
37
5 6
5 6
1110
11109
7
4 2
14 13
Qua
ndra
nt 1
VR
IJD
OM
Parts
of t
he g
ondo
la a
re to
o sm
all t
o be
app
lique
d, s
oth
e fre
e m
otio
n qu
iltin
g (F
MQ
) tec
hniq
ue is
bet
ter
suite
d to
cov
er s
mal
l are
as.
FMQ
5
24
1
87
75 6
5 6
91110
1110
14 13Qua
ndra
nt 2
FMQ
6
VR
IJD
OM

12
14 13
4
Qua
ndra
nt 3
FMQ
7
VR
IJD
OM

2a
1a
4a 14a
13a
VR
IJD
OM
VR
IJD
OM
VR
IJD
OM
VR
IJD
OM
VR
IJD
OM
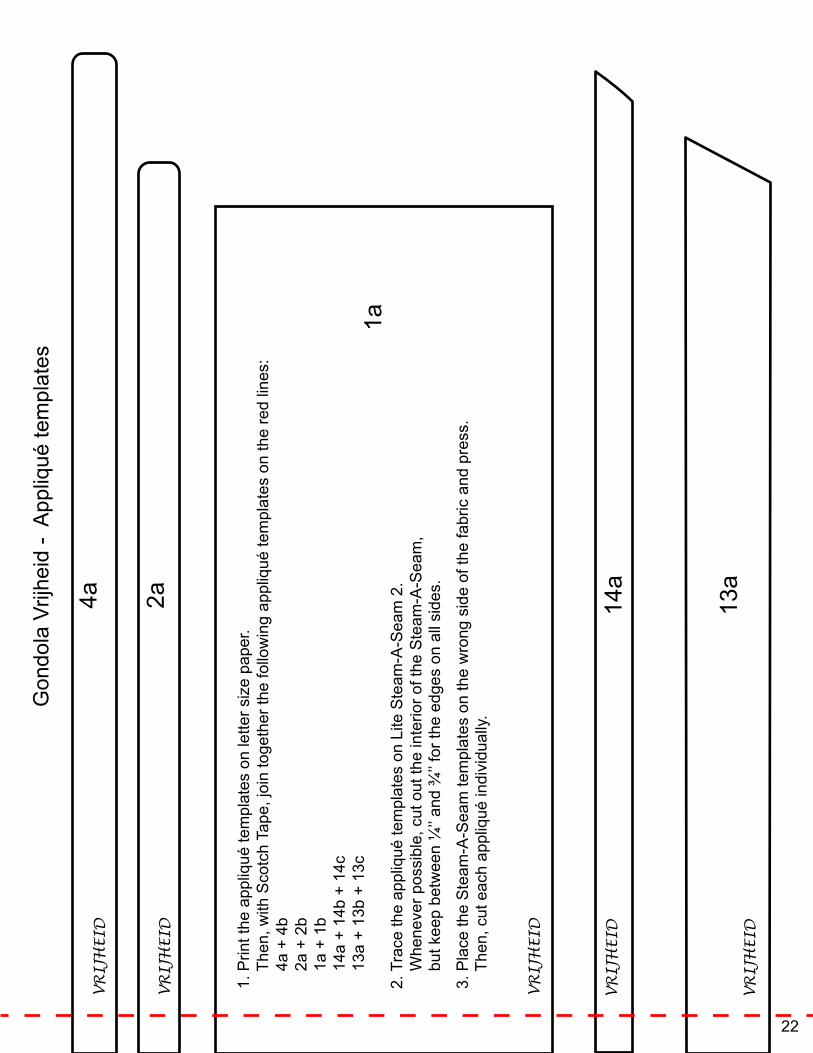
1. P
rint t
he a
ppliq
ué te
mpl
ates
on
lette
r siz
e pa
per.
T
hen,
with
Sco
tch
Tape
, joi
n to
geth
er th
e fo
llow
ing
appl
iqué
s te
mpl
ates
on
the
red
lines
:
4a
+ 4b
2a
+ 2b
1
a +
1b
14a
+ 1
4b +
14c
1
3a +
13b
+ 1
3c
2. T
race
the
appl
iqué
tem
plat
es o
n Li
te S
team
-A-S
eam
2.
W
hene
ver p
ossi
ble,
cut
out
the
inte
rior o
f the
Ste
am-A
-Sea
m,
bu
t kee
p be
twee
n ¼
’’ and
¾’’ f
or th
e ed
ges
on a
ll si
des.
3. P
lace
the
Stea
m-A
-Sea
m te
mpl
ates
on
the
wro
ng s
ide
of th
e fa
bric
and
pre
ss.
T
hen,
cut
eac
h ap
pliq
ué in
divi
dual
ly.
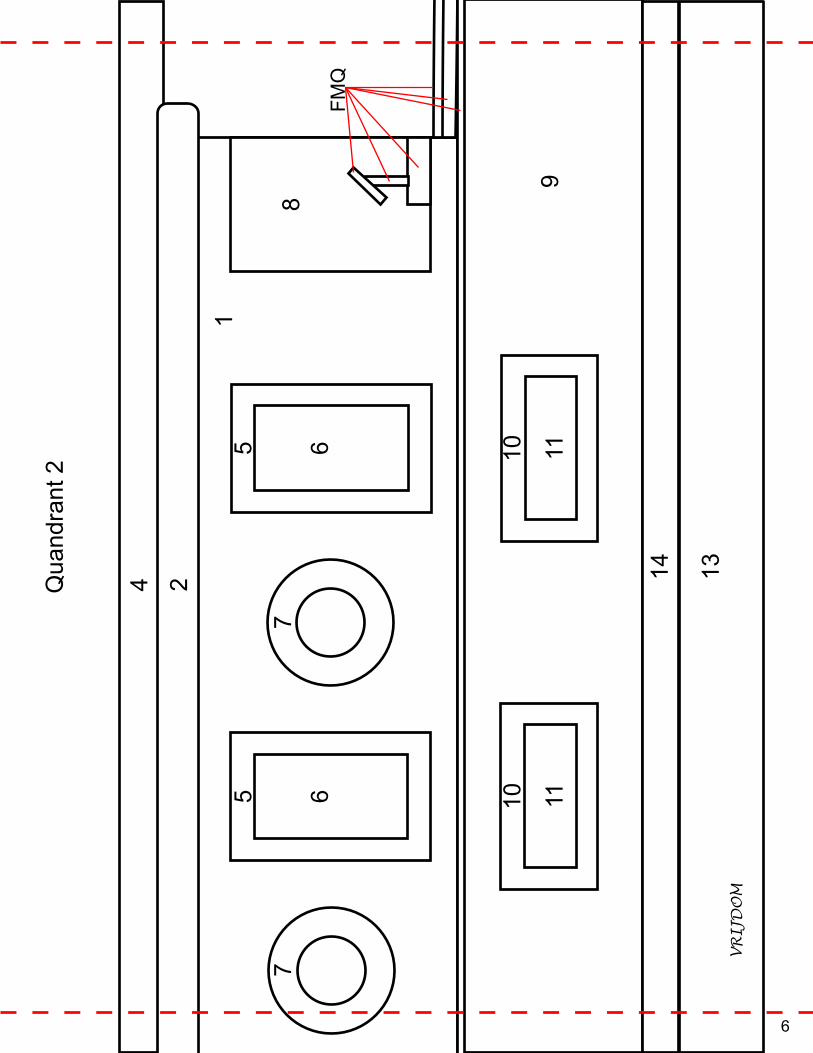
Gon
dola
Vrij
dom
- A
ppliq
ué te
mpl
ates
8

2b4b 14b
13b
1b
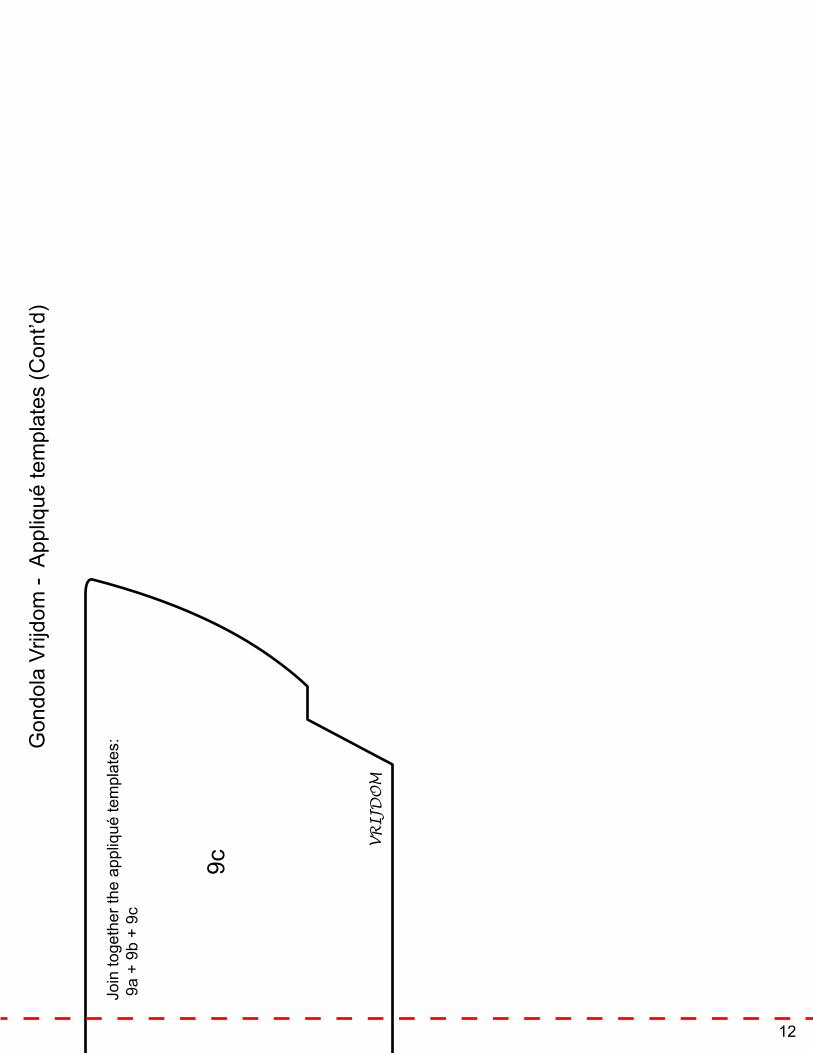
Gon
dola
Vrij
dom
- A
ppliq
ué te
mpl
ates
(Con
t’d)
J
oin
toge
ther
the
appl
iqué
tem
plat
es:
4
a +
4b
2
a +
2b
1a
+ 1b
1
4a +
14b
+ 1
4c
13a
+ 1
3b +
13c
VR
IJD
OM
VR
IJD
OM
VR
IJD
OM
VR
IJD
OM
VR
IJD
OM
9

9a
14c
13c
VR
IJD
OM
VR
IJD
OM
J
oin
toge
ther
the
appl
iqué
tem
plat
es:
1
4a +
14b
+ 1
4c
13a
+ 1
3b +
13c
VR
IJD
OM
6
VR
IJD
OM
5
VR
IJD
OM
12VR
IJD
OM
3VRIJDOM
7
VRIJ
DO
M
J
oin
toge
ther
the
appl
iqué
tem
plat
es:
9
a +
9b +
9c
Mak
e fo
urM
ake
four
Mak
e th
ree
Gon
dola
Vrij
dom
- A
ppliq
ué te
mpl
ates
(Con
t’d)
10

8
1110
9b Mak
e fo
urM
ake
four
VR
IJD
OM
VR
IJD
OM
VRIJ
DO
M
VR
IJD
OM
J
oin
toge
ther
the
appl
iqué
tem
plat
es:
9
a +
9b +
9c
Gon
dola
Vrij
dom
- A
ppliq
ué te
mpl
ates
(Con
t’d)
11
9c
VR
IJD
OM
J
oin
toge
ther
the
appl
iqué
tem
plat
es:
9
a +
9b +
9c
Gon
dola
Vrij
dom
- A
ppliq
ué te
mpl
ates
(Con
t’d)
12

VRIJDOM
Boat Vrijdom (Freedom) Guide for the Free Motion Quilting design
The red lines on the gondola above represents the Free Motion Quilting (FMQ) design that you will have to trace on the appliqués. To trace, use a mecanical chalk pencil.
The FMQ design is simple and can be done when all the appliqués are fused to the background. That being said, I suggest that you trace each appliqué before you set them on the background fabric because the project is very large and it might be difficult to do a good job tracing on such a large piece.
To trace, turn on your light box, place the taped quadrants 4 to 6 on top, then place the appliqué on the appropriate design on the paper quadrants and trace the FMQ design you see through the fabric.
You can also do the straight lines without the use of the quadrants.
Print quadrants 4 to 6 on the next pages and tape them together at the red lines to get the full image. Use these quadrants to trace the FMQ design on each appliqué.
Quadrant 4 Quadrant 5 Quadrant 6
VRIJDOM
Here’s how it will look with the FMQ design
13

Qua
ndra
nt 4
VR
IJD
OM
14

Qua
ndra
nt 5
VR
IJD
OM
15

VR
IJD
OM
Qua
ndra
nt 6
FMQ
The
wor
d ‘’F
RIJ
DO
M’’ i
s w
ritte
n us
ing
the
FMQ
tech
niqu
e. Y
ou c
ould
al
so u
se th
e em
broi
dery
pro
gram
on
your
sew
ing
mac
hine
.
16

Gon
dola
VR
IJH
EID
(Lib
erty
)Ap
pliq
ué in
stru
ctio
ns
1. P
rint q
uadr
ants
7 to
9 o
n le
tter s
ize
pape
r on
page
s 19
to 2
1 an
d ta
pe th
em to
geth
er.
T
hese
qua
dran
ts w
ill be
use
d to
pos
ition
ned
the
appl
iqué
s at
the
right
pla
ce a
nd q
uick
ly.
2. P
rint t
he A
ppliq
ué te
mpl
ates
on
page
s 22
to 2
6 an
d tra
ce th
em o
n Li
te S
team
-A-S
eam
2.
3. W
hene
ver p
ossi
ble,
cut
out
the
inte
rior o
f the
Ste
am-A
-Sea
m th
at y
ou d
on’t
need
, but
kee
p be
twee
n ¼
’’ and
¾’’ f
or th
e ed
ges
on
all
side
s.
4. P
lace
the
Stea
m-A
-Sea
m te
mpl
ates
on
the
wro
ng s
ide
of th
e fa
bric
and
pre
ss. T
hen,
cut
eac
h ap
pliq
ué in
divi
dual
ly.
5. B
efor
e yo
u pl
ace
the
appl
iqué
s on
the
back
grou
nd fa
bric
, tra
ce th
e Fr
ee M
otio
n Q
uilti
ng d
esig
n on
the
appl
iqué
s.
F
or th
ese
inst
ruct
ions
, go
to p
age
27.
2
1
3
4
1
8
77
7
5 6
5 6
5 6
5 6
129
1110
1110
1110
11109
14 13
Qua
dran
t 7Q
uadr
ant 8
Qua
dran
t 9
17

Ban
yan
Bat
ik S
hado
w81
300-
48A
rtis
an S
him
mer
2025
4M-5
90
Ban
yan
Bat
ik K
etan
8100
0-83
0Si
mpl
y N
eutr
al W
hite
2213
7-10
Ston
ehen
ge39
302-
72
Ban
yan
Bat
ik S
hado
w81
300-
24
App
liqué
s 1-
12A
ppliq
ué 5
-10
App
liqué
s 6-
8-11
App
liqué
s 4-
9A
ppliq
ués
2-3-
14A
ppliq
ués
7-13
2
1
3
4
18
77
75 6
5 6
5 6
5 6
91110
11101110
11109
14 13
12
Gon
dola
VR
IJH
EID
(Lib
erty
)Fa
bric
sel
ectio
ns
The
amou
nt o
f fab
rics
requ
ired
for e
ach
colo
r is
for b
oth
gond
olas
.
18

12
14 13
4
Qua
ndra
nt 7
FMQ
VR
IJH
EID
19

24
1
87
75 6
5 6
91110
1110
14 13
Qua
ndra
nt 8
FMQ
VR
IJH
EID
20

VR
IJH
EID
1
3
7
5 6
5 6
1110
11109
7
4 2 14 13
Qua
ndra
nt 9
FMQ
21
VR
IJH
EID
2a
1a
4a 14a
13a
VR
IJH
EID
Gon
dola
Vrij
heid
- A
ppliq
ué te
mpl
ates
VR
IJH
EID
VR
IJH
EID
VR
IJH
EID
VR
IJH
EID
1. P
rint t
he a
ppliq
ué te
mpl
ates
on
lette
r siz
e pa
per.
T
hen,
with
Sco
tch
Tape
, joi
n to
geth
er th
e fo
llow
ing
appl
iqué
tem
plat
es o
n th
e re
d lin
es:
4
a +
4b
2
a +
2b
1a
+ 1b
1
4a +
14b
+ 1
4c
13a
+ 1
3b +
13c
2. T
race
the
appl
iqué
tem
plat
es o
n Li
te S
team
-A-S
eam
2.
W
hene
ver p
ossi
ble,
cut
out
the
inte
rior o
f the
Ste
am-A
-Sea
m,
b
ut k
eep
betw
een
¼’’ a
nd ¾
’’ for
the
edge
s on
all
side
s.
3. P
lace
the
Stea
m-A
-Sea
m te
mpl
ates
on
the
wro
ng s
ide
of th
e fa
bric
and
pre
ss.
T
hen,
cut
eac
h ap
pliq
ué in
divi
dual
ly.
22

2b4b 14b
13b
1b
J
oin
toge
ther
the
appl
iqué
tem
plat
es:
4
a +
4b
2
a +
2b
1a
+ 1b
1
4a +
14b
+ 1
4c
13a
+ 1
3b +
13c
VR
IJH
EID
VR
IJH
EID
VR
IJH
EID
VR
IJH
EID
VR
IJH
EID
Gon
dola
Vrij
heid
- A
ppliq
ué te
mpl
ates
(Con
t’d)
23

3
75
6 12
14c
13c
9a
VRIJHEID
Gon
dola
Vrij
heid
- A
ppliq
ué te
mpl
ates
(Con
t’d)
VR
IJH
EID
VR
IJH
EID
VRIJ
HEI
DVR
IJH
EID
VR
IJH
EID
VR
IJH
EID
VR
IJH
EID
J
oin
toge
ther
the
appl
iqué
tem
plat
es:
1
4a +
14b
+ 1
4c
13a
+ 1
3b +
13c
J
oin
toge
ther
the
appl
iqué
tem
plat
es:
9
a +
9b +
9c
Mak
e th
ree
Mak
e fo
urM
ake
four
24

8
1110
9b
VR
IJH
EID
J
oin
toge
ther
the
appl
iqué
tem
plat
es:
9
a +
9b +
9c
Gon
dola
Vrij
heid
- A
ppliq
ué te
mpl
ates
(Con
t’d)
VR
IJH
EID
VR
IJH
EID
VR
IJH
EID
Mak
e fo
urM
ake
four
25

Gon
dola
Vrij
dom
- A
ppliq
ué te
mpl
ate
(Con
t’d)
9c
J
oin
toge
ther
the
appl
iqué
tem
plat
es:
9
a +
9b +
9c
VR
IJH
EID
26

VRIJHEID
Boat Vrijheid (Liberty) Guide for the Free Motion Quilting design
Print quadrants 10 to 12 on the next pages and tape them together at the red lines to get the full image. Use these quadrants to trace the FMQ design on each appliqué.
Quadrant 10 Quadrant 11 Quadrant 12
VRIJHEID
The red lines on the gondola above represents the Free Motion Quilting (FMQ) design that you will have to trace on the appliqués. To trace, use a mecanical chalk pencil.
The FMQ design is simple and can be done when all the appliqués are fused to the background. That being said, I suggest you trace each appliqué before you set them on the background fabric because the project is very large and it might be difficult to do a good job on such a large piece.
To trace, turn on your light box, place the taped quadrants 10 to 12 on top, then place the appliqué on the appropriate design on the paper quadrants and trace the FMQ design you see through the fabric.
You can also do the straight lines without the use of the quadrants.
27

VR
IJH
EID
Qua
ndra
nt 1
0
FMQ
The
wor
d ‘’F
RIJ
HEI
D’’ i
s w
ritte
n us
ing
the
FMQ
tech
niqu
e. Y
ou c
ould
als
o us
e th
eem
broi
dery
pro
gram
on
your
sew
ing
mac
hine
.
28

Qua
ndra
nt 1
1
VR
IJH
EID
29

Qua
ndra
nt 1
2
VR
IJH
EID
30

Fabric selection and Appliqué placement guide
Trees & Grass
2
3
1
6
5
4
2
3
1
6
5
4
Tree BTree A
22 1 2 21
For both trees and the grass, one fat quarter or scraps of fabric for each color will be sufficient.
Artisan Shimmer2025M-28
Artisan Shimmer2025M-85
Banyan Batik Ketan81000-830
Stonehenge GreyB3937-91
Tree A - 2Tree B - 4 & 5
Tree A - 3 & 6Tree B - 2
Tree A - 4 & 5Tree B - 3 & 6
Trees A & B - 1
Stonehenge39302-72
Stonehenge39300-72
Grass & Tree A - 1 & 2Grass & Tree B - 2
Grass & Tree A - 2Grass & Tree B - 1 & 2
31

3
1
4
IMPORTANT
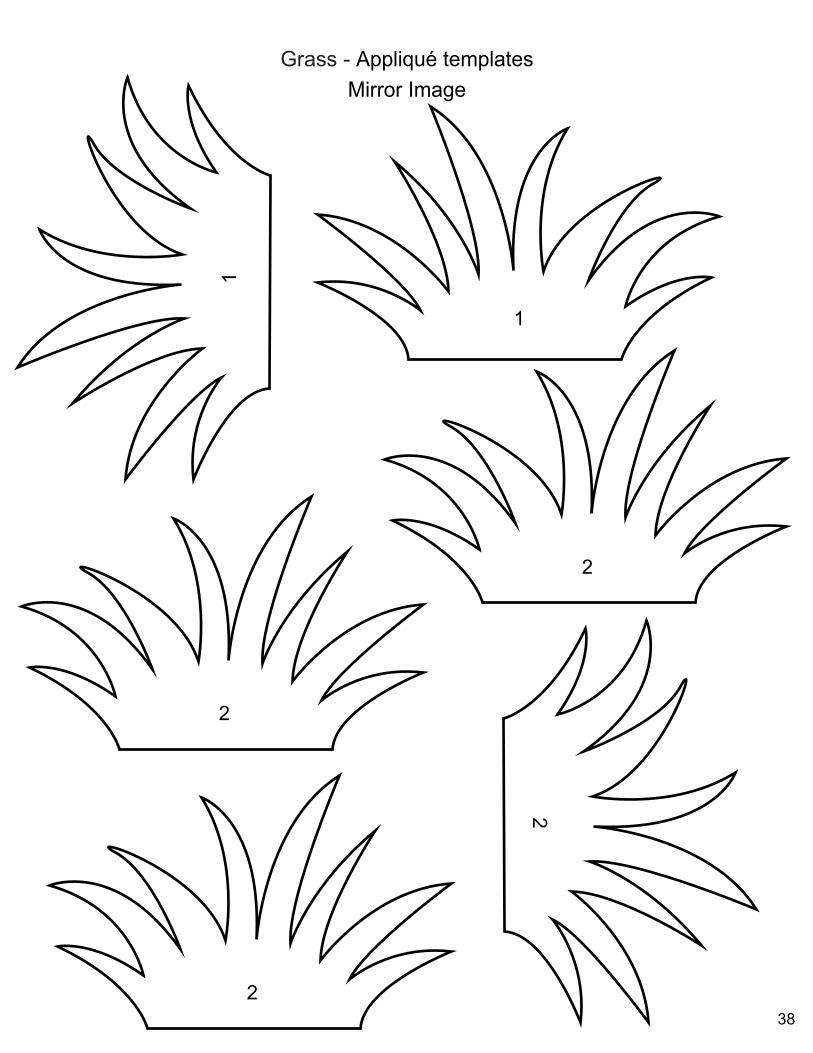
Because I’m working with ‘’Lite Steam-A-Seam 2’’, the Appliqué templates are mirror images and they are ready to be used as they are shown. If you use a different product that doesn’t require a mirror image of the templates, you might consider drawing the wrong side of the paper templates to cancel the mirror image effect or use the templates for the Tree B.
Tree A - Appliqué templatesMirror Image
NOTE: A small part of the Tree A will be placed behind House #3
Tree A
Tree A
Tree A
32

2
Tree A - Appliqué templatesMirror Image
Tree A
33

6
5
Tree A - Appliqué templatesMirror Image
Tree A
Tree A
34

3
Tree B - Appliqué templatesMirror Image
NOTE: A small part of the Tree B will be placed behind House #4
1
Tree B
Tree B
4Tree B
35

Tree B - Appliqué templatesMirror Image
2Tree B
36

6
5
Tree B - Appliqué templatesMirror Image
Tree B
Tree B
37
1
2
1
2
2
2
Grass - Appliqué templatesMirror Image
38

You can draw the circles free hand. They don’t need to be perfect cercles.I suggest that you draw the circles only when you are ready to quilt the trees.
Trees A & B Guide for the Free Motion Quilting design
The red lines represents the FMQ design that you will have to trace on the appliqués. To trace, use a mecanical chalk pencil.
39

Fabric selection and Appliqué placement guide
Streetlights
The number of street lamps depends on you. You might want more or you might want less. But if you follow this design, there are 7 streetlights: 5 streetlights with two lamps and, 2 streetslights with one lamp.
Trace twelve appliqués #1Trace twelve appliqués #2Trace seven appliqué #3
12 3
Free motion QuiltingThe red lines represent what you are going to be quilting free hand or ‘’FMQing’’
FMQ
FMQ
FMQ
You will need one fat quarter or scraps of fabric for each color
Artisan Shimmer20254M-590
Banyan Batik Shadow81300-99
Appliqué #2 - Globe
Appliqué #1 & #3Post and lantern
Streetlights - Appliqué templates
1
2
3
40

Free motion QuiltingThe red lines represent what you are going to be quilting free hand or ‘’FMQing’’
Fabric selection - Posts for guard rails
Banyan Batik Shadow 81300-85
The number of post also depends on you. You might want more or you might want less. But if you follow this design, you will need to trace 33 posts.
Posts for guard rails - Appliqué templates
FMQ One fat quarter
To help you, I’ve made a few posts templates so you can trace a few at once. That should save you a bit of time.
41

Fabric selection and instructions for the brick wall & bridge
Banyan Batik Shadow 81300-25
3 meters/yards
1 meter = 39’’1 yard = 36’’
Assembling the templates 1a to 1d on the red lines with Scotch Tape to get the full image.This part of the template is only one piece of the whole brick wall & bridge.
1a 1b
1d1c
1a
1b
1c 1d
+
+
+ +
Instructions
1. Fold the fabric lengthwise (50’’ in length on the fold x 44’’ in width).2. Place the front of the paper template on the fold as you see it on the illustration and pin the paper to the fabric.3. Using white chalk, trace lines to extend the fabric from the back of the paper template to mesure 50’’ in length from the front all the way to the end.4. Cut the fabric on the dotted line.5. Unpin the template and unfold the fabric. 6. Mark the center line with chalk.
Plac
e on
fold
50’’
Trace a line to extend thefabric length to 50’’ in total. Ba
ck
Fron
t
Half the length of the brick wall and bridge
Fabric unfolded
This line mark the center
Full length of the brick wall and bridge100’‘
The templates are on the next pages.
42

1a
Bric
k w
all &
brid
geTe
mpl
ate
1a
Prin
t the
tem
plat
es 1
a, 1
b, 1
c an
d 1d
on
lette
r pap
er 8
½’’ x
11’
’ an
d ta
pe th
em to
geth
er o
n th
e re
d lin
es to
get
the
full
imag
e.
43
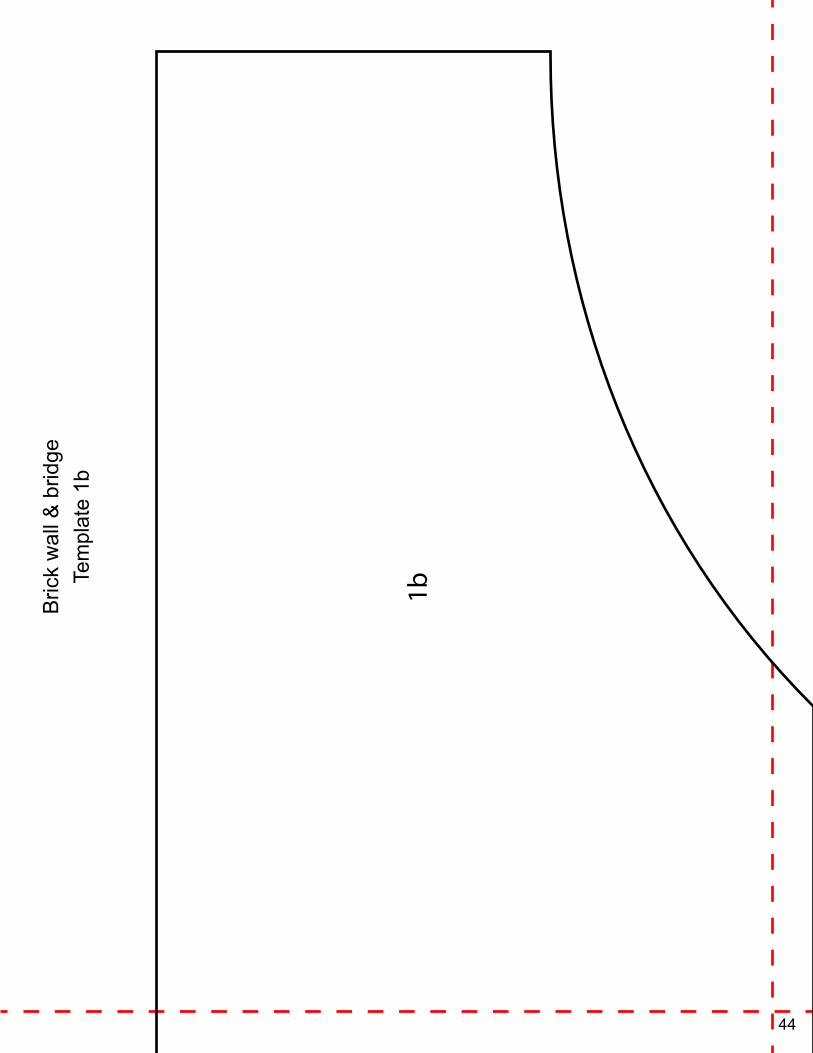
1bBric
k w
all &
brid
geTe
mpl
ate
1b
44

1c
Bric
k w
all &
brid
geTe
mpl
ate
1c
45

1d
Bric
k w
all &
brid
geTe
mpl
ate
1d
46

FMQ
des
ign
for t
he b
rick
wal
l & b
ridge
↕
You
can
trace
the
FMQ
des
ign
of th
e br
icks
bef
ore
you
plac
e th
e ap
pliq
ués
on th
e ba
ckgr
ound
or y
ou c
an w
ait u
ntil
all t
he a
ppliq
ués
are
set o
n th
e ba
ckgr
ound
fabr
ic.
Usi
ng a
whi
te c
halk
pen
cil,
trace
par
ralle
l lin
es b
etw
een
½’’ t
o ¾
’’ apa
rt. I
wou
ld s
ugge
st th
at y
ou s
tart
at th
e to
p of
the
stai
rs a
nd
draw
the
lines
to fo
llow
thei
r hei
ght a
nd c
ontin
ue d
ownw
ards
.
Onc
e th
e pa
rralle
l lin
es a
re tr
aced
, dra
w th
e pe
rpen
dicu
lar l
ines
so
that
the
bric
ks a
re o
ff by
hal
f a b
rick
as s
how
n in
this
illu
stra
tion:
The
wid
th o
f a b
rick
shou
ld b
e ab
out t
wic
e as
long
as
its h
eigh
t. Fo
r exa
mpl
e:↕
½’’
↔1’’
47