Embed Size (px)
Citation preview

for LiPo/LiFe/Lilo/NiMH/NiCd/Pb batteries
Thank you for purchasing the balance charger. This is a rapid
charger/discharger with a built i n balancer, computerised with
microprocessor and specialised operating software. Please read this
entire operating manual completely and attentively before using.
1. Features 1
2. Exterior of the unit 3
3. Warnings and safety notes 4
4. Program flow chart 6
5. Initial Parameter set up (Users' set up) 7
6. Lithium battery (Lilo/LiPo/LiFe)program 9 6.1 Charging Lithium Battery 9
6.2 Charging Lithium battery at balance mode 10
6.3 'FAST' charging Lithium battery 11
6.4 'STORAGE' control Lithium battery 11
6.5 Discharging Lithium battery 12
6.6 Voltage balancing and monitoring during the discharge 12
7. NiMH/NiCd battery program 13 7.1 Charging NiCd/NiMH battery 13
7.2 Discharging NiCd/NiMH battery 13
7.3 Charge-to-discharge & discharge-to-charge cycle NiMH/NiCd battery 14
8. Pb (lead acid) battery program 14
8.1 Charging Pb battery 14
8.2 Discharging Pb battery 15
9. Battery internal resistance testing system 15
10. S ave Data Program 16
11. Load Data Program 17
12. Various information during the process 17
13. Warning and error messages 18
14. Specifications 20
15. Warranty and service 20

-1-
1. Features
Optimised operating software
When charging or discharging, it has an 'AUTO' function that sets the feeding
current automatically. Especially for Lithium batteries, it can prevent over-charging
which can lead to an explosion by users fault. Every program in the unit is controlled
with mutual links and communication for every possible error so it introduces a
maximum safety. These can be set at user’s option.
Special recharge plugs for receiver, transmitter and igniter charger. And for
frequently used charger ports such as multipurpose, crocodile pin etc.
It provides most convenient balance charge port for Lithium batteries, with
separated 3,4,5,6 charge ports, and external reverse connector.
High-power and high-performance circuit
It employs the circuit that has a maximum output power of 80W. As a result it
can charge or discharge up to 15 cells of NiCd/NiMH and 6 series of Lithium batteries
with a maximum current of 7.0A. Furthermore the cooling system is so efficient that it
can hold such a power without any trouble of running the CPU or the operating
program.
Individual voltage balancer for Lithium batteries inside
It has an individual-cell-voltage balancer inside. This does not require any extra
balance separately when charging Lithium batteries (Lilo/LiPO/LiFe) for cell voltage
balancing.
Balance individual cells on discharge
It also can monitor and balance individual cells of the Lithium battery packs during
the discharge process. If the voltage of any one cell varies abnormally, the process
will be stopped with the error message.
Accept various types of Lithium battery
It can accept three types of Lithium batteries- Li-Ion, LiPo and LiFe. They have
different characteristics by their chemistry. You can select any one of them that you
are going to process before the job. For their specifications, refer to ‘Warnings and
safety notes’ section.
Lithium battery 'Fast' and 'Storage' mode
You can charge Lithium batteries for special purposes. 'Fast' charge reduces the
charging time of Lithium batteries and 'Storage' mode controls the final voltage of the
battery to be suitable for long time storage.

-2-
Maximum safety
Delta-peak sensitivity: The automatic charge termination program works on the
principle of the Delta-peak voltage detection.(NiCd/NiMH)
Auto-charge current limit: When charging NiCd or NiMH at 'AUTO' current mode,
you can set the upper limit of change current to avoid high current charging. This is
very useful when charging the low impedance and small capacity NiMH battery in
'AUTO' mode.
Capacity limit: The changing capacity is always calculated by multiple of the
charging current and time. If the charging capacity exceeds the limit the process will
be terminated automatically when you set the maximum value.
Temperature limit: The temperature of the battery on charging will rise by its
internal chemical reaction. If you set the limit of temperature the process will be
expired forcibly when the limit has reached.
Processing time limit: you can also restrain the maximum process time to prevent
any possible defect.
Input power monitor: To protect the car battery (using as input power) from being
damaged the voltage of it is always monitored. If it drops below the lower limit the
process will be ended automatically.
Automatic cooling fan: The electric cooling fan comes into action automatically,
only when the internal temperature of the unit is raised.
Data store/load
For users convenience it can store a maximum of 5 different batteries data. You
can establish the data contains program setting of the battery to charge or discharge
continually. These data’s can be called out at any time you need and the process can
be executed without program setting.
Cyclic charging/discharging
Perform 1 to 5 cycles of charge>discharge or discharge>charge continually for
battery refreshing and balancing.
-3-
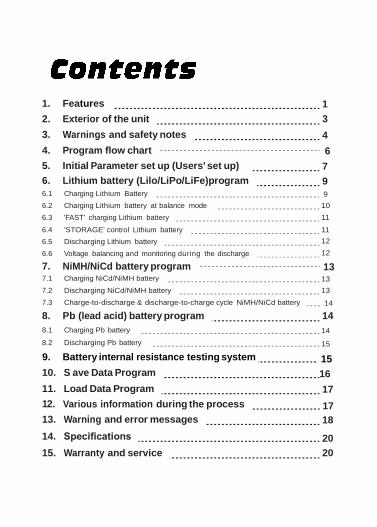
2. Exterior of the unit
Input power cable
(AC100-240V)
-4-
3. Warnings and safety notes
• Never leave the charger unsupervised when it is connected to its power supply.
If any malfunction is observed immediately terminate the process and refer to the
operation manual.
• Keep the unit away from dust, damp, rain, heat, direct sunshine and vibrations. Do
not drop it.
• The circuit of the unit is designed to be powered by a 10-18V DC only.
• This unit and the battery wh e t h e r charging or discharging, should be set up
on a heat- resistant, non-flammable and non-conductive surface. Never place them
on a car seat, carpet or similar. Keep all the inflammable volatile materials well away
from operating area.
• Be sure to understand the information of the battery to be charged or discharged
accurately. If the program is set up incorrectly the battery can be severely damaged.
Especially Lithium battery, they can cause a fire or an explosion by over-charging.
• To avoid short-circuits between the charge lead, always connect the charge cable
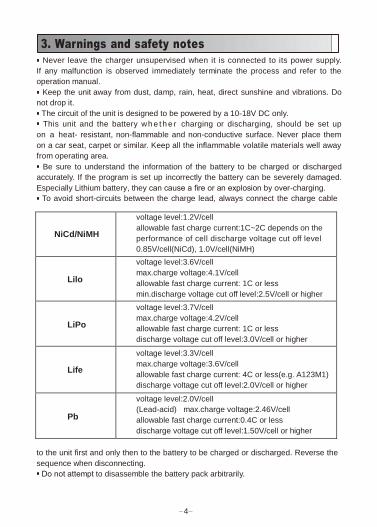
NiCd/NiMH
voltage level:1.2V/cell
allowable fast charge current:1C~2C depends on the
performance of cell discharge voltage cut off level
0.85V/cell(NiCd), 1.0V/cell(NiMH)
Lilo
voltage level:3.6V/cell
max.charge voltage:4.1V/cell
allowable fast charge current: 1C or less
min.discharge voltage cut off level:2.5V/cell or higher
LiPo
voltage level:3.7V/cell
max.charge voltage:4.2V/cell
allowable fast charge current: 1C or less
discharge voltage cut off level:3.0V/cell or higher
Life
voltage level:3.3V/cell
max.charge voltage:3.6V/cell
allowable fast charge current: 4C or less(e.g. A123M1)
discharge voltage cut off level:2.0V/cell or higher
Pb
voltage level:2.0V/cell
(Lead-acid) max.charge voltage:2.46V/cell
allowable fast charge current:0.4C or less
discharge voltage cut off level:1.50V/cell or higher
to the unit first and only then to the battery to be charged or discharged. Reverse the
sequence when disconnecting.
• Do not attempt to disassemble the battery pack arbitrarily.
-5-
You have to pay attention to verify the capacity and the voltage of the Lithium battery
pack. It may be composed of parallel and series connection mixed. In parallel link
the capacity of the battery pack is multiplied by the number of cells but the voltage
remains same. That kind of voltage imbalance causes a fire or explosion during the
charge process. We recommend you compose the Lithium battery pack in series only.
Discharge
• The typical purpose of a discharge is to determine the residual capacity of the
battery, or to lower the voltage of a battery to a defined level. When you discharge the
battery you also have to pay attention as you would to the process same as charging.
To avoid the battery becoming deep-discharged, set the final discharge voltage
correctly. Lithium batteries should not be deep-discharged to lower than the
minimum voltage, as this leads to a rapid loss of capacity or a total failure.
• Some rechargeable batteries are said to have a memory effect. If they are partly
used and recharged before the whole charge is drawn out, they ‘remember’ this and
next time will only use that part of their capacity. This is a ‘memory effect’. NiCd and
NiMH batteries are said to suffer from memory effect. They prefer complete cycles;
fully charge then use until empty, do not recharge before storage-allow them to self-
discharge during storage. NiMH batteries have less memory effect than NiCd.
• The Lithium battery prefers a partial rather than a full discharge. Frequent full
discharges should be avoided if possible. Instead, charge the battery more often or
use a larger battery.
• A brand-new NiCd battery pack is partially useful with its capacity until it has been
subjected to 10 or more charge cycles in any case. The cyclic process of charge
and discharge will help to optimise the capacity of the battery pack.
Those warnings and safety notes are particularly important. Please
follow the instructions for maximum safety; otherwise the charger and
the battery can be damaged violently. And also it can cause a fire, injure a
human body, or damage the property.
-6-
Enter
Enter
Enter
Enter
Enter
4. Program flow chart
Start
INC
INC
INC
PROGRAM SELECT Enter
LIXX CHARGE LIXX BALANCE LIXX FAST CHG LIXX STORAGE LIXX BATT DEC DEC DEC
Batt type
stop
INC
DEC
PROGRAM SELECT
Start
NiMH BATT
NiMH CHARGE
'Aut' / 'Man'
INC
NiMH DISCHARGE DEC
INC
DEC
NiMH CYCLE
LIXX DISCHARGE
Batt type
stop
PROGRAM SELECT
Start
Nicd BATT
Nicd CHARGE
'Aut' / 'Man'
INC
DEC
Nicd DISCHARGE
INC
DEC
Nicd CYCLE
Batt type stop
PROGRAM SELECT
Start
Pb CHARGE
INC
Pb DISCHARGE
Pb BATT DEC
Batt type
stop
PROGRAM SELECT
Start
SAVE DAT A
SAVE DATA
Batt type stop
PROGRAM SELECT
Start
LOAD DATA
LOAD DATA
Batt type stop
USER SET
PROGRAM
Start
Enter
LIXX V. Type
INC
DEC
Lilo / LiPo / LiFe
CHK Time
INC
DEC
NiMH Sensitivity INC
D. Peak DEC
Nicd Sensitivity
D. Peak
INC DEC
Capacity Cut-Off
INC
Safety Timer
INC
Waste Time
INC
Temp Cut-Off
DEC DEC CHG>DCHG DEC USB Enable
Batt type
stop
INC DEC
Key Beep
Buzzer
INC
DEC
Input Power Low
Cut -Of f
Start INC
INC
Battery Pack IR
Test LiXX Internal Enter Measuring IR 1:026 050 044 mΩ
Resistance WAIT DLEASE... DEC 4:039 042 044 mΩ DEC 231mΩ

-7-
5. Initial Parameter set up (Users' set up)
It will be operated with the default value of the essential user settings when it
is connected to a 12V batttery for the first time. The screen displays the following
information in sequence and the user can change the value of parameter on each
screen.
When you are wanting to alter the parameter value in the program, press
Start/ Enter key to make it blink then change the value with INC or DEC key. The
value will be stored by pressing Start/Enter key once.
The screen displays the nominal voltage of the
Lithium battery. There are three kinds of Lithium
battery; LiFe(3.3V),Lilo(3.6V) or LiPo(3.7V). This
is very important so you have to check the battery
carefully and set it up correctly. If it is different from
the correct value the battery can explode during the
charge process.
I t re c ogni s es t he cel l count o f L i t h ium ba t t er y
automatically at the beginning of charge or discharge
process to avoid from erroneous setting by user. But a
deeply discharged battery can be perceived incorrectly.
To prevent the error, you can set the time term to verify
the cell count by the processor. Normally, 10 minutes is
enough to perceive the cell count correctly. For the
battery of larger a capacity, you may extend the time
term. But, if you set the time term too long for the
battery of smaller capacity, the charge or discharge
process can be finished within the time term with the
erroneous cell count. This may cause the fatal result.
If the processor recognises the cell count incorrectly at
the beginning of charge or discharge process, you may
extend the time. Otherwise, you had better use it with
the default value.
-8-
This shows the trigger voltage for automatic charge
termination of NiMH and NiCd battery. The effective
value ranges from 5 to 20mV per cell .if the trigger
voltage is set higher, there is a danger of overcharging
the battery; if it is set lower, there is a possibility of
premature termination. Please refer to the technical
specifications of the battery. (NiCd default:12mV, NiMH
default:7mV)
The 3-pin port at the left side is a temp. Port. You can use Safety Temp Temp Cut-Off 80 C
an optional temperature probe to contact the surface of
a battery. You can set the maximum temperature at
which the charger will allow the battery to reach during
charging. Once a battery reaches this temperature
during charge, the process will be terminated to protect
the battery.
The battery is on the cyclic process of charge and
discharge which can often become warm after the
charge or discharge period. The program can insert a
time delay to occur after each charge and discharge
process to allow the battery adequate time to cool
down before being subjected to the next process. The
value ranges from 1 to 60 minutes.
When you start a charge process, the integral safety
timer automatically starts running at the same time.
This is programmed to prevent overcharge. The
battery if it proves to be faulty, or if the termination
circuit cannot detect if the battery is full. The value for
the safety timer should be generous enough to allow a
full charge of the battery.

-9-
This program sets the maximum charge capacity that
will be supplied to the battery during charge. If the
delta-pack voltage is not detected nor the safety timer
expired by any reason, this feature will automatically
stop the process at the selected capacity value.
The beep sounds at every time pressing the buttons to
confirm your action. The beep or melody sounded at
various times during operation to alert different mode
changes. These audible sounds can be on or off.
This program monitors the voltage of input to the
battery. If the voltage drops below the value you set the
operation forcibly terminates to protect the input battery.
6. Lithium battery(Lilo/LiPo/LiFe)program
These programs are only suitable for charging and discharging Lithium batteries
with a nominal voltage of 3.3V, 3.6V and 3.7V per cell. These batteries need to
adopt different charge techniques, this is termed a constant voltage(CV) and
constant current(CC) method. The charge current varies according to the battery
capacity and performance. The final voltage of the charge process is also very
important; it should be precisely matched with the correct voltage of the battery. They
are 4.2V for LiPo, 4.1V for Lilo, and 3.6 V for LiFe. The charge current and nominal
voltage as for cell count set on the charge program must always be correct for the
battery to be charged.
When you are willing to alter the parameter value in the program, press Start/
Enter key to make it blink then change the value with INC or DEC key. The value will
be stored by pressing Start/Enter key once.
6.1 Charging Lithium Battery
The left side of the first line shows the type of battery
you select at the users setting. The value on the left
side of second line sets a charge current and the value
on the right side of second line sets the voltage of the
battery pack.
After setting the current and voltage press Start/Enter
key for more than 3 seconds to start the process.
(Charge current:0.1~7.0A,Voltage:1~6 series)
-10-
This shows the number of cells you set up and the
processor detects. ' R: ' shows the number of cells
found by the charger and ' S:' is the number of
cells selected by you at the previous screen. If both
numbers are identical you can start charging by press
Start/Enter button. If not, press Batt Type/Stop button to go back to previous screen. Then carefully check the number of cells of the battery pack to charge again.
The screen shows the present situation during charge
process. To stop charging press Batt Type/Stop key
once.
6.2 Charging Lithium battery at balance mode
This is for balancing the individual cells of Lithium batteries to be charged. The
battery pack to be charged should be connected to the suitable balance port at the
right side of the charger. And also, you need to connect the battery output plug to the
output of charger.
In this mode, the charging process will be different from the ordinary charging
mode. The internal processor of the charger will monitor the voltages of each cell of
the battery pack and control the charging current that is feeding to each cell to
normalise the voltage.
Balance
The value on the left side of second line sets a charge
current and the value on the right side of second line
sets the voltage of the battery pack.
After setting the current and voltage press Start/ Enter
key for more than 3 seconds to start the process.
(Charge current:0.1~7.0A, Voltage:1~6 series)
This shows the number of cells you set up and the
processor detects.' R: ' shows the number of cells found
by the charger and ' S:' is the number of cells selected
by you at the previous screen. If both numbers are
identical you can start charging by press Start /Enter
button. If not, press Batt type/Stop button to go back
to previous screen. Then carefully check the number of
cells of the battery pack to charge again.
The screen shows the present situation during charge
process. To stop charging press Batt type/Stop key
once.
-11-
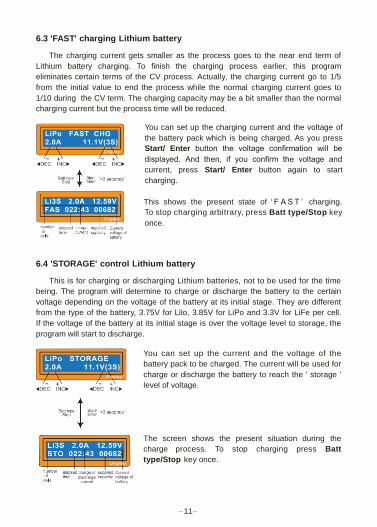
6.3 'FAST' charging Lithium battery
The charging current gets smaller as the process goes to the near end term of
Lithium battery charging. To finish the charging process earlier, this program
eliminates certain terms of the CV process. Actually, the charging current go to 1/5
from the initial value to end the process while the normal charging current goes to
1/10 during the CV term. The charging capacity may be a bit smaller than the normal
charging current but the process time will be reduced.
You can set up the charging current and the voltage of
the battery pack which is being charged. As you press
Start/ Enter button the voltage confirmation will be
displayed. And then, if you confirm the voltage and
current, press Start/ Enter button again to start
charging.
This shows the present state of ‘ F A S T ’ charging.
To stop charging arbitrary, press Batt type/Stop key
once.
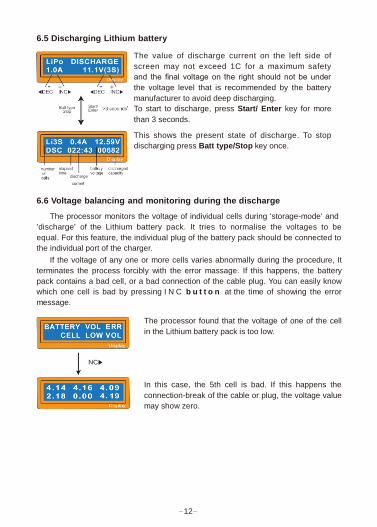
6.4 'STORAGE' control Lithium battery
This is for charging or discharging Lithium batteries, not to be used for the time
being. The program will determine to charge or discharge the battery to the certain
voltage depending on the voltage of the battery at its initial stage. They are different
from the type of the battery, 3.75V for Lilo, 3.85V for LiPo and 3.3V for LiFe per cell.
If the voltage of the battery at its initial stage is over the voltage level to storage, the
program will start to discharge.
You can set up the current and the voltage of the
battery pack to be charged. The current will be used for
charge or discharge the battery to reach the ' storage '
level of voltage.
The screen shows the present situation during the
charge process. To stop charging press Batt
type/Stop key once.
-12-
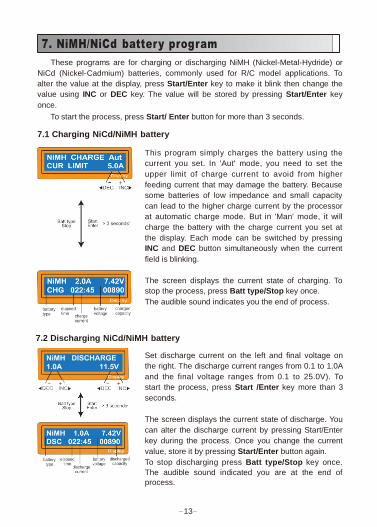
6.5 Discharging Lithium battery
The value of discharge current on the left side of
screen may not exceed 1C for a maximum safety
and the final voltage on the right should not be under
the voltage level that is recommended by the battery
manufacturer to avoid deep discharging.
To start to discharge, press Start/ Enter key for more
than 3 seconds.
This shows the present state of discharge. To stop
discharging press Batt type/Stop key once.
6.6 Voltage balancing and monitoring during the discharge
The processor monitors the voltage of individual cells during 'storage-mode' and
'discharge' of the Lithium battery pack. It tries to normalise the voltages to be
equal. For this feature, the individual plug of the battery pack should be connected to
the individual port of the charger.
If the voltage of any one or more cells varies abnormally during the procedure, It
terminates the process forcibly with the error massage. If this happens, the battery
pack contains a bad cell, or a bad connection of the cable plug. You can easily know
which one cell is bad by pressing I N C b u t t o n at the time of showing the error
message.
The processor found that the voltage of one of the cell
in the Lithium battery pack is too low.
In this case, the 5th cell is bad. If this happens the
connection-break of the cable or plug, the voltage value
may show zero.
-13-
7. NiMH/NiCd batter y program
These programs are for charging or discharging NiMH (Nickel-Metal-Hydride) or
NiCd (Nickel-Cadmium) batteries, commonly used for R/C model applications. To
alter the value at the display, press Start/Enter key to make it blink then change the
value using INC or DEC key. The value will be stored by pressing Start/Enter key
once.
To start the process, press Start/ Enter button for more than 3 seconds.
7.1 Charging NiCd/NiMH battery
This program simply charges the battery using the
current you set. In 'Aut' mode, you need to set the
upper limit of charge current to avoid from higher
feeding current that may damage the battery. Because
some batteries of low impedance and small capacity
can lead to the higher charge current by the processor
at automatic charge mode. But in 'Man' mode, it will
charge the battery with the charge current you set at
the display. Each mode can be switched by pressing
INC and DEC button simultaneously when the current
field is blinking.
The screen displays the current state of charging. To
stop the process, press Batt type/Stop key once.
The audible sound indicates you the end of process.
7.2 Discharging NiCd/NiMH battery
Set discharge current on the left and final voltage on
the right. The discharge current ranges from 0.1 to 1.0A
and the final voltage ranges from 0.1 to 25.0V). To
start the process, press Start /Enter key more than 3
seconds.
The screen displays the current state of discharge. You
can alter the discharge current by pressing Start/Enter
key during the process. Once you change the current
value, store it by pressing Start/Enter button again.
To stop discharging press Batt type/Stop key once.
The audible sound indicated you are at the end of
process.

-14-
7.3 Charge-to-discharge & discharge-to-charge cycle NiMH/NiCd battery
Set the sequence on the left and the number of cycle
on the right. You can use this function for balancing,
refreshing and break-in the battery. To avoid rising
temperature of the battery, there will be a brief cool-
off period that’s already fixed at 'User setting' after
each charge and discharge process. The cycling
number ranges from 1 to 5.
To stop the process, press Batt type/Stop key once.
You can change the discharge or charge current by
pressing Start/Enter key once during the process. The
audible sound indicates you are at the end of the
process.
At the end of the process, you can see charged or
discharged electric capacities of the battery at each
cyclic process.
By pressing INC or DEC button, the screen shows the
result of each cycle in order.
8. Pb( lead-sulphuric acid) battery program
This is programmed for charging a Pb (lead-sulphuric acid) battery with a nominal
voltage from 2 to 20V. Pb batteries are totally different from NiCd or NiMH batteries.
They can only deliver relatively lower current compared to their capacity, and similar
restrictions definitely apply to charge. So the optimal charge current will be 1/10 of
the capacity. Pb batteries must not be charged rapidly. Always follow the instruction
supplied by the manufacturer of battery.
When you are willing to alter the parameter value in the program, press Start/
Enter key to make it blink then change the value with INC or DEC key. The value will
be stored by pressing Start/Enter key once.
8.1 Charging Pb battery
Set up the charge current on the left and the nominal
voltage of the battery on the right. The charge current
ranges from 0.1 to 7.0A and the voltage should be
matched with the battery being charged.
Start the charge process by pressing Start/Enter key
for more than 3 seconds.

-15-
The screen displays the state of the charging process.
To stop charging forcibly, press Batt type/Stop key
once. The audible sound indicates you at the end of
process.
8.2 Discharging Pb battery
Set discharge current on the left and final voltage on
the right. The discharge current ranges from 0.1 to 1.0A.
To start the process, press Start/Enter key for more
than 3 seconds.
The screen displays the current state of discharge. You
can alter the discharge current by pressing Start/Enter
key during the process. Once you change the current
value, store it by pressing Start/Enter button again.
To stop discharging press Batt Type/Stop key once.
The audible sound indicates you are at the end of
process.

-16-

-17-
Program select.
The param et er val ue setting up in th is screen
does not effect the charge or discharge process.
They only represent the specification of the
battery. The following screens will automatically be
displayed exa c t l y m a t c he d to the ba t t e r y t yp e
you u s e t up . T h e example shows the battery pack
of NiMH, 12cells and 3000mAh of capacity.
Set up the charge current for the manual charge mode,
or the current limit for the automatic charge mode. Each
mode can be switched by pressing INC and DEC
button at the same time when the current field is
blinking.
Setting up the discharge current and final voltage.
Setting up the sequence of charge and discharge, and
the cycling number.
Saving the data.

-18-
11. Load Data Program
This program calls back the data that was stored at 'Save Data' program. To load
the data, press Start/Enter key once to blink the data number field and select the
number using INC or DEC key then press Start /Enter key for more than 3 seconds.
Program select.
Select the data number to be called back.
The data matched with the number will be displayed at
this time.
Loading the data.
12. Various information during the process
You can inquire various information on the LCD screen during charging or
discharging process. When you press DEC button the charger shows the
establishment of user settings. And also you can monitor the voltage of the
individual cell by pressing INC button when the individual connection cable is
linked to the Lithium battery being processed.
Set-voltage protection.
Set the charge-discharge capacity of the protection.
Set the charge and discharge time protection.
-19-
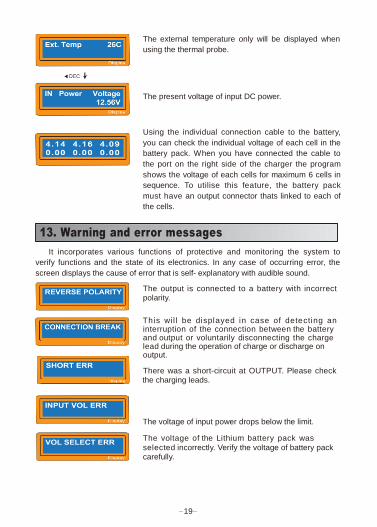
The external temperature only will be displayed when
using the thermal probe.
The present voltage of input DC power.
Using the individual connection cable to the battery,
you can check the individual voltage of each cell in the
battery pack. When you have connected the cable to
the port on the right side of the charger the program
shows the voltage of each cells for maximum 6 cells in
sequence. To utilise this feature, the battery pack
must have an output connector thats linked to each of
the cells.
13. Warning and error messages
It incorporates various functions of protective and monitoring the system to
verify functions and the state of its electronics. In any case of occurring error, the
screen displays the cause of error that is self- explanatory with audible sound.
The output is connected to a battery with incorrect polarity.
T hi s wi l l b e displ a y e d i n c a s e o f d e t e c t in g a n interruption of the connection between the battery and output or voluntarily disconnecting the charge lead during the operation of charge or discharge on output.
There was a short-circuit at OUTPUT. Please check the charging leads.
The voltage of input power drops below the limit.
The voltage of the Lithium battery pack was
selected incorrectly. Verify the voltage of battery pack carefully.

-20-
There Is a malfunction within the charger circuit.
The processor detects the voltage is lower than you set at Lithium program. Please check the cell count of the battery pack.
The processor detects the voltage is higher than you set at Lithium program. Please check the cell count of the battery pack.
The voltage of one of the cells in the Lithium battery
pack is too low. Please check the voltage of the cells one by one.
The voltage of one of the cells in the Lithium battery pack is too high. Please check the voltage of the cells
one by one.
There is a bad connection at the individual connector.
Please check the connector and cables carefully.
The internal temperature of the unit goes too high. Cool down the unit.
The processor cannot continue to control the feeding
current by any reason. The unit needs to be repaired.
Batt e r y P ac k I R
0 m Ω The battery balance port or the power line to
Connector is incorrect. 1: - - - - - - - - - m Ω
4 : - - - - - - - - - m Ω
-21-
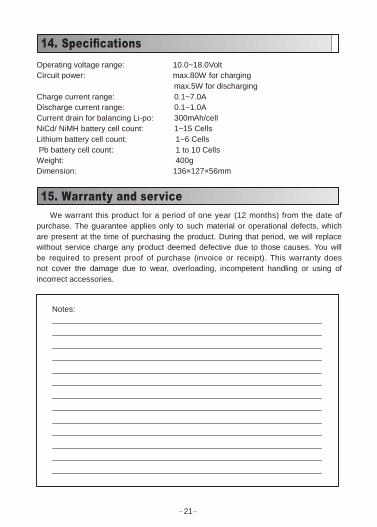
14. Specifications
Operating voltage range: 10.0~18.0Volt
Circuit power: max.80W for charging
max.5W for discharging
Charge current range: 0.1~7.0A
Discharge current range: 0.1~1.0A
Current drain for balancing Li-po: 300mAh/cell
NiCd/ NiMH battery cell count: 1~15 Cells
Lithium battery cell count: 1~6 Cells
Pb battery cell count: 1 to 10 Cells
Weight: 400g
Dimension: 136×127×56mm
15. Warranty and service
We warrant this product for a period of one year (12 months) from the date of
purchase. The guarantee applies only to such material or operational defects, which
are present at the time of purchasing the product. During that period, we will replace
without service charge any product deemed defective due to those causes. You will
be required to present proof of purchase (invoice or receipt). This warranty does
not cover the damage due to wear, overloading, incompetent handling or using of
incorrect accessories.
Notes:

Notes:

RoHs