Embed Size (px)
Citation preview

Operation and maintenance manualBefore using the machine, please read the attached operating instructions.
Carefully read the safety rules
Mode d'emploiVeuillez lire attentivement le mode d'emploi
(notamment les consignes de sécurité) avant d'utiliser l'appareil.
FOR HOUSEHOLD USE ONLY

2
IMPORTANT SAFEGUARDSWhen using electrical appliances, basic safety precautions should always be followed to reduce the risk of fire, electric shock, and/or injury to persons, including the following:1 Read all instructions and information in this instruction book and any
other literature included in this carton referring to this product before operating or using this appliance.
2 Do not touch hot surfaces. Use handles or knobs.3 To protect against fire, electric shock and personal injury do not immerse
cord, plugs or appliance in water or other liquid.4 Close supervision is necessary when any appliance is used by or near
children.5 Unplug from outlet when not in use and before cleaning. Allow to
cool before putting on or taking off parts, and before cleaning the appliance.
6 Do not operate any appliance with a damaged cord or plug or after the appliance malfunctions or has been damaged in any way. Return appliance to the nearest authorized service centre for examination, repair or adjustment.
7 The use of accessory attachments not recommended by the appliance manufacturer may result in fire, electric shock or personal injury.
8 Do not use outdoors.9 Do not let cord hang over edge of table or counter, or touch hot
surfaces.10 Do not place on or near a hot gas or electric burner, or in a heated
oven.11 Always turn appliance “OFF”, then plug cord into the wall outlet. To
disconnect, turn switch to “OFF”, then remove plug from wall outlet.12 Do not use appliance for other than intended household use.13 Use extreme caution when using hot steam.
SAVE THESE INSTRUCTIONS

3
CAUTIONThis appliance is for household use only. Any servicing, other than cleaning and user maintenance, should be performed by an authorized service centre. Do not immerse machine in water. To reduce the risk of fire or electric shock, do not disassemble the machine. There are no parts inside the machine serviceable by the user. Repair should be done by authorized service personnel only.
1 Check voltage to be sure that the voltage indicated on the nameplate corresponds with your voltage.
2 Never use warm or hot water to fill the water tank. Use cold water only. 3 Keep your hands and the cord away from hot parts of the appliance
during operation.4 Never clean with scrubbing powders or harsh cleaners. Simply use a soft
cloth dampened with water.5 For optimal taste of your coffee, use purified or bottled water. Periodic
descaling is still recommended every 2-3 months.
INSTRUCTIONS FOR THE POWER SUPPLY CORD
A A short power-supply cord is provided to reduce risks of tangling or tripping over a longer cord.
B Longer extension cords are available and may be used if care is exercised in their use.
C If a long extension cord is used:1 the marked electrical rating of the extension cord should be at least as great
as the electrical rating of the appliance.2 if the appliance is of the grounded type, the extension cord should be a
grounding type3 the cord should not hang from the table to avoid the risk of tangling or
tripping.

4 CONTENTS
GENERAL INFORMATION ................................................................................................5APPLIANCE .......................................................................................................................6
ACCESSORIES ..............................................................................................................................................6
INSTALLATION ..................................................................................................................7STARTING THE MACHINE .............................................................................................................................7
“AQUA PRIMA” FILTER ...................................................................................................................................8
CONTROL PANEL .............................................................................................................9ADJUSTMENTS ..............................................................................................................10
COFFEE VOLUME ADJUSTMENT PER CUP ..............................................................................................10
"AROMA" (OPTI-DOSE) INDICATES THE GROUND COFFEE QUANTITY ................................................10
DRIP TRAY HEIGHT ADJUSTMENT ............................................................................................................10
COFFEE STRENGTH ...................................................................................................................................11
COFFEE GRINDER ADJUSTMENT .............................................................................................................11
COFFEE BREWING AND HOT WATER DISPENSING ..................................................12COFFEE BREWING ......................................................................................................................................12
HOT WATER DISPENSING ..........................................................................................................................13
CAPPUCCINO .................................................................................................................14MILK ISLAND (OPTIONAL) .............................................................................................15DESCALING ....................................................................................................................16CLEANING AND MAINTENANCE ...................................................................................18
HOW TO CLEAN THE MACHINE .................................................................................................................18
CLEANING THE BREW GROUP ..................................................................................................................19
TROUBLESHOOTING .....................................................................................................20SAFETY RULES ..............................................................................................................21TECHNICAL DATA ...........................................................................................................23

5
GENERAL INFORMATIONThis coffee machine is suitable for preparing espresso coffee using coffee beans, and it is equipped with a device to dispense steam and hot water.The machine is designed for domestic use only and is not suitable for heavy or professional use.
Warning: no liability is assumed for any damage caused by:• incorrect use not in accordance with the intended uses;• repairs not carried out by authorized customer service centres;• tampering with the power cable;• tampering with any part of the machine;• the use of non-original spare parts and accessories;• failure to descale the machine or use at temperatures below 0°C (32°F).
IN THESE CASES, THE WARRANTY IS NOT VALID.
THE WARNING TRIANGLE INDICATES ALL IMPORTANT INSTRUCTIONS FOR THE USER’S SAFETY. PLEASE FOLLOW THESE INSTRUCTIONS CAREFULLY TO PREVENT SERIOUS INJURIES!
HOW TO USE THESE OPERATING INSTRUCTIONS.Keep these operating instructions in a safe place and make them available to anyone else who may use the coffee machine. For further information or in case of problems, please refer to any authorized service centre.
KEEP THESE INSTRUCTIONS FOR FUTURE REFERENCE.

6 APPLIANCE
ACCESSORIES
“Aqua Prima” Power cable Cleaning brush
Brew Group
Coffee grounds drawer
Socket for power cable
Coffee bean hopper
Cup stacking surface
Power button
Service door
Coffee bean hopper cover
Drip tray
Control panel
SBS knob
Dispensing head
Hot water / steam spoutWater tank
Hot water / steam knob
“Milk Island” connection
Grinder adjustment key

7
7
1 2
8 9
3
4 5 6
INSTALLATION
STARTING THE MACHINEMake sure the power button is not pressed and the machine is turned off. Check the machine features on the label on the bottom of the appliance.
Lift the cover of the coffee bean hopper.
Remove the water tank.We recommend installing the
page 8).
Fill the container with coffee beans. Close the cover placing it correctly on the hopper.
Fill the tank with fresh drinking water up to the MAX level. Reinsert the tank.
Firmly push down the power button to turn on the machine. The machine performs a self-test.
Insert the plug into the socket located in the rear panel of the machine and insert the other end into a socket with suitable current.
Place a container beneath the steam spout.
Turn the knob until the position is reached.
Press the water button. The indicator light turns on.
The machine automatically primes the circuit. If this operation is not completed, proceed manually as described from step 7 to 12.

8
12
1 2 3
5
10 11
4
comes out of the spout.Press the water button again. The indicator light turns off. Remove the container. The machine is ready for use.
Turn the knob until it is in the rest position ( ).
from its packaging. Enter the date of the current month.
Fill the tank with fresh water. Let
After 30 minutes discard the
fresh water.
The reference mark and the
until it is completely inserted.
Place a container beneath the steam spout. Dispense the water in the tank using the hot water function (see page 13).
Fill the tank again with fresh drinking water. The machine is ready for use.
“AQUA PRIMA” FILTER
“AQUA PRIMA” WATER FILTER
When the correct temperature is reached, the machine performs a rinse cycle of the internal circuits. A small
completed.

9CONTROL PANEL
Coffee dose adjusting knob (see page 10).
Coffee button:1 coffee has been selected (the button has been pushed
once).2 coffees have been selected (the button has been
pushed twice).
Hot water button:• off: steam function is selected• on: hot water function is
selected
Ground coffee quantity button (Opti-dose) (see page 10).Alarm light: • permanently on (one or more events): signals the machine is out of coffee, that the
water tank is empty, or the grounds drawer is full. • signals that the Brew Group is not
inserted, the grounds drawer is not inserted, the cover of the coffee hopper is not closed, the service door is open or the Milk Island is not inserted/ready.
signals the need to prime the water circuit.
Descaling light: • signals the need to perform a descaling cycle (see page 16).
Machine ready light: • permanently on: signals that the machine is ready for use. • signals that the machine is warming up.
Alarm light to empty the coffee grounds drawer:• permanently on: signals the need to empty the grounds drawer; this operation must be
performed with the machine turned on (steps 4 and 5, page 18).
The and signal appears again, contact the customer service centre.

10 ADJUSTMENTS
COFFEE VOLUME ADJUSTMENT PER CUP
"AROMA" (OPTI-DOSE) INDICATES THE GROUND COFFEE QUANTITY
DRIP TRAY HEIGHT ADJUSTMENT
The coffee volume knob adjusts the amount of coffee brewed per cup.This adjustment has an immediate effect on the selected type of brewing.
By pressing the key, it is possible to choose either a mild, a medium or a strong coffee. The coffee intensity is adjusted by setting the coffee quantity to be ground.
different sized cups.
To adjust the drip tray, lift it or lower it manually until it reaches the desired height.
when it lifts, the tray must be drained.
Medium coffee
Long coffeeEspresso coffee
Medium aroma
Strong aroma
Mild aroma

11
MEDIUM COFFEE
STRONG COFFEE
MILD COFFEE
The Saeco Brewing System (SBS) adjusts the fullness of the brewed coffee. The coffee may even be adjusted while it is brewing. This adjustment has an immediate effect on the selected type of brewing.
COFFEE STRENGTH
SBS – SAECO BREWING SYSTEM
The SBS dial has been carefully designed to give your coffee the fullness and intensity you desire. Simply turn the knob and you will notice that the coffee brewed will adjust to the setting selected.
COFFEE GRINDER ADJUSTMENTThe machine enables a slight adjustment of the coffee grinder. Coffee may be ground according to your own tastes.
The adjustment must be performed turning the pin – located inside the coffee container – by means of the supplied key only.
Turn the pin one setting at a time and brew 2-3 cups of coffee; the change in the grind will be noticeable after a couple of cycles.
The references located inside the container indicate the grind setting..
FINE GRIND MEDIUM GRIND COARSE GRIND

12
1 2 3
4 5 6
COFFEE BREWING
COFFEE BREWINGThe coffee brewing cycle can be interrupted at any moment by pushing the button.
order to grind the second serving of coffee. Coffee dispensing is then restarted and completed.
Adjust the drip tray according to the height of the cup/s.
Place two cups if you want two coffees.
Place one cup if you want one coffee only.
Adjust the quantity of coffee by turning the knob. Select the aroma by pushing the button one or more times (see page 10).
The machine automatically starts brewing coffee. When the
remove the cup/s.
Press the central button:once for 1 coffeetwice for 2 coffees

13
2 3
5
7 8
4 6
1
Dispensing may be preceded by short sprays of hot water, and scalding is possible. The hot water/steam spout may reach high temperatures: do not touch it with bare hands. Use
the appropriate handle only.
Adjust the height of the drip tray. Press the button to select the hot water function. The hot water light will turn on.
Place a container beneath the steam spout.
HOT WATER DISPENSING
Wait for the container to be
of water.
HOT WATER DISPENSING
Remove the container.Press the hot water button.
Turn the knob until the position is reached.
Turn the knob until it is in the rest position ( ).

14
3
5
7
4 6
21
CAPPUCCINO
Immerse the steam spout in the milk.
Froth the milk by gently rotating the container.
When the spout has cooled down, disassemble it and wash it carefully.
After frothing the milk, brew coffee into the cup for a creamy cappuccino.
Turn the knob until the position is reached.
Turn the knob until it is in the rest position ( ).
CAPPUCCINODispensing may be preceded by short sprays of hot water, and scalding is possible. The hot water/steam spout may reach high temperatures: do not touch it with bare hands. Use
the appropriate handle only.
Adjust the height of the drip tray. Fill 1/3 of the cup with cold milk.

15
1
7
2 3
64 5
8
MILK ISLAND (OPTIONAL)
This device, which may be purchased separately, enables you to easily and comfortably prepare delicious cappuccinos.
Warning: before using the Milk Island, read the manual and all precautions carefully for correct use.
Important note: the quantity of milk in the jug must never be below the “MIN” minimum level nor exceed the “MAX” maximum level. After having used the Milk Island, thoroughly
clean all its components.
To guarantee best results when preparing a cappuccino, use cold milk (0-8°C / 32-45°F). We recommend using partially skimmed milk.
Fill the milk carafe with the quantity of milk desired (between the MIN and MAX levels indicated).
Position the milk jug on the base of the Milk Island.
Remove the jug using the handle.
Gently swirl the jug and pour the milk into the cup.
Position the cup with frothed milk under the dispensing head. Brew coffee into the cup for a delicious cappuccino
Turn the knob until it is in the position.
Wait for the milk to be frothed. Turn the knob until it is in the rest position ( ).
16
2 3
4
1
5 6
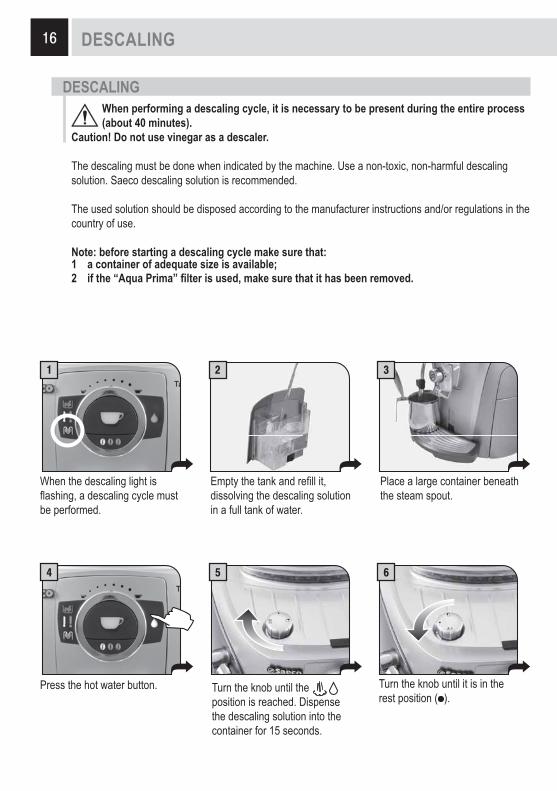
DESCALING
DESCALINGWhen performing a descaling cycle, it is necessary to be present during the entire process (about 40 minutes).
Caution! Do not use vinegar as a descaler.
The descaling must be done when indicated by the machine. Use a non-toxic, non-harmful descaling solution. Saeco descaling solution is recommended.
The used solution should be disposed according to the manufacturer instructions and/or regulations in the country of use.
Note: before starting a descaling cycle make sure that:
When the descaling light is
be performed.
Place a large container beneath the steam spout.dissolving the descaling solution
in a full tank of water.
Press the hot water button. Turn the knob until the position is reached. Dispense the descaling solution into the container for 15 seconds.
Turn the knob until it is in the rest position ( ).

17
8 97
11 1210
13 14 15
38
Empty the container with the used descaling solution.
Press the button to turn off the machine. After 10 minutes, turn on the machine again.
Repeat steps 3 - 8 until all the descaling solution in the tank has been dispensed.
drinking water.Press the hot water button. Place a large container beneath
the steam spout.
Turn the knob until the position is reached to empty the water tank.When this operation is completed, turn the knob until it is in the rest position ( ).
Press the hot water button for 6 seconds to disable the descaling alarm.
Fill the tank again with fresh drinking water.
Once descaling has been performed:
2. Prime the circuit as described on page 7, from step 7.
18
8
1 2 3
4 5 6
7
CLEANING AND MAINTENANCE
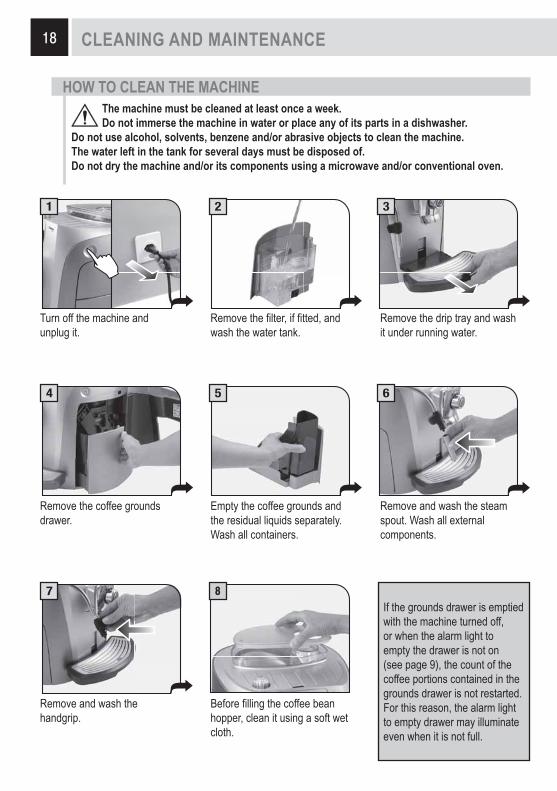
Turn off the machine and unplug it.
Remove the drip tray and wash it under running water.wash the water tank.
Remove the coffee grounds drawer.
Remove and wash the steam spout. Wash all external components.
Empty the coffee grounds and the residual liquids separately. Wash all containers.
HOW TO CLEAN THE MACHINEThe machine must be cleaned at least once a week.Do not immerse the machine in water or place any of its parts in a dishwasher.
Do not use alcohol, solvents, benzene and/or abrasive objects to clean the machine.The water left in the tank for several days must be disposed of.Do not dry the machine and/or its components using a microwave and/or conventional oven.
Remove and wash the handgrip. hopper, clean it using a soft wet
cloth.
If the grounds drawer is emptied with the machine turned off, or when the alarm light to empty the drawer is not on (see page 9), the count of the coffee portions contained in the grounds drawer is not restarted. For this reason, the alarm light to empty drawer may illuminate even when it is not full.

19
2 3
4 6
7
5
1
Press the “PUSH” button to remove the Brew Group.
Make sure the Brew Group is in rest position; the two references must match.
Wash the Brew Group with
carefully.
CLEANING THE BREW GROUPThe Brew Group must be cleaned at least once a week. Before removing the Brew Group, remove the
Group, insert the grounds drawer and close the service door.
Make sure the components are in the correct position.The hook shown must be in the correct position; to check its
button.
Insert the washed and dried Brew Group.DO NOT PRESS THE “PUSH” BUTTON.
Insert the grounds drawer and close the service door.
The lever on the rear part of the group must be in contact with the brew group base.

20
PROBLEMS CAUSES SOLUTIONS
The machine does not turn on. The machine is not connected to the power source.
Connect the machine to the power source.
The plug has not been plugged into the back of the machine.
Insert the plug into the machine’s power socket.
Coffee is not hot enough. The cups are cold. Warm the cups with hot water.Hot water or steam is not dispensed.
The hole of the steam spout is clogged.
Clean the hole of the steam spout using a pin.
Coffee has little crema. The coffee blend is unsuitable or coffee is not freshly roasted.
Change coffee blend.
SBS knob turned towards the left Turn the SBS knob to the rightThe machine takes a long time to warm up or the amount of water dispensed from the spout is too little.
The machine circuit is obstructed by limescale build-up.
Descale the machine.
The Brew Group does not come out.
The Brew Group is out of place. Turn the machine on. Close the service door. The Brew Group is automatically placed in the correct position.
Coffee grounds drawer is inserted.the brew group.
Coffee is not brewed. Water tank is empty. Fill the water tank and prime the circuit again.
Brew Group is dirty. Clean the Brew Group.Circuit is not primed. Prime the circuit again by dispensing
water from the steam spout.Knob to adjust the quantity of coffee per cup is in wrong position.
Turn the knob clockwise.
Coffee is brewed slowly. Change coffee blend.Decrease the dose.
Circuit is not primed. Prime the circuit again by dispensing water from the steam spout.
Brew Group dirty. Clean the Brew Group.Coffee leaks out of the dispensing head.
Dispensing head is clogged. Clean the dispensing holes with a soft cloth.
Brewing does not start. Coffee bean hopper cover is in wrong position.
Correctly place the cover on the coffee
Please contact the service centre for any problems not covered in the above table or when the suggested solutions do not solve the problem.
TROUBLESHOOTING

21
IN CASE OF EMERGENCYImmediately unplug the cable from the outlet.
USE THE APPLIANCE ONLY- Indoors.- To prepare coffee, dispense hot water, froth milk or heat beverages using steam.- For domestic use only.- By adults in non altered psycho-physical conditions.
NEVER USE THE APPLIANCEFor purposes other than those indicated above, in order to avoid danger.Do not introduce any substances other than those indicated in the instruction manual.
Fill the water tank only with fresh drinking water: Hot water and/or any other liquid may damage the machine.Do not use carbonated water.
grinder, turn off the machine’s main switch and unplug the cable.
POWER CONNECTIONOnly connect the coffee machine to a suitable power socket. The voltage must correspond to the indication on the machine’s label.
INSTALLATION- Choose a level surface. Do not place on heated surfaces!- Allow a distance of 10 cm / 4" between walls and cooking hotplates. - Do not keep the machine at temperatures below 0°C / 32°F – danger of freezing damage. - There must be easy access to the socket at all times. - The power cable must not be damaged, tied up with clamps, placed on very hot surfaces, etc.- The power cable must not hang. (Danger of tripping or dropping the appliance). - Do not use the power cable to carry or pull the coffee machine.
DANGER- The appliance must not be used by children and persons who have not been informed on its operation. - The appliance is dangerous to children. If left unattended, please disable it.- Do not leave the coffee machine packaging within the reach of children.- Never direct the jet of hot water and/or steam towards yourself or others. Danger of scalding.- Do not insert objects through the appliance’s openings (Danger! Electrical current!).- Do not touch the plug with wet hands and feet. Do not remove the plug by pulling the cable.- Warning, danger of burns caused by hot water, steam and hot water/steam spout.
SAFETY RULES

22 SAFETY RULES
FAILURES- Do not use the appliance in case of sure or suspected faults such as after falls. - Any repairs must be performed by an authorized customer service centre.- Do not use the appliance with a defective power cable. If damaged, the power cable must be replaced by the
manufacturer or authorized service centre. (Caution! Electrical current).- Turn off the appliance before opening the service door.
CLEANING / DESCALING- Before cleaning, unplug the machine and let the appliance cool.- Keep the appliance from coming into contact with splashes of water or immersing in water.- Do not dry the machine’s parts in conventional or microwave ovens.
SPARE PARTSFor safety reasons, use only original spare parts and original accessories.
DISPOSAL- The packing materials can be recycled.- Appliance: unplug the appliance and cut the power cord.- Deliver the appliance and power cord to a service center or public waste disposal facility.
This product complies with EU Directive 2002/96/EC.
The symbol on the product or on its packaging indicates that this product may not be treated as household waste. Instead it shall be handed over to the applicable collection point for the recycling of electrical and electronic equipment.By ensuring this product is disposed of correctly, you will help prevent potential negative consequences for the environment and human health, which could otherwise be caused by inappropriate waste handling of this
household waste disposal service or the retailer where you purchased the product.

23TECHNICAL DATA
TECHNICAL DATA
• Nominal voltage See label on the appliance
• Power rating See label on the appliance
• Power supply See label on the appliance
• Shell material ABS - Thermoplastic
• Size (w x h x d) 320 x 370 x 400 mm - 12.60 x 14.57 x 15.75 in
• Weight 9 Kg - 19.8 lbs
• Cable length 1200 mm - 47.24 in
• Control panel Front
• Water tank 1.7 liters - 57.5 oz / Removable
• Pump pressure (bars) 15
• Boiler Stainless steel
• Coffee bean hopper capacity 250 grams - 8.9 oz coffee beans
• Quantity of ground coffee 7 - 10.5 grams / 0.25 - 0.37 oz.
• Grounds drawer capacity 14
• Safety devices Boiler pressure safety valve – Double safety thermostat.
Subject to engineering and manufacturing changes due to technological developments.
The machine conforms to the European Directive 89/336/EEC (Italian Legislative Decree 476 dated 04/12/92) concerning electromagnetic compatibility.


SaecoInternational Group S.p.A.
Via Torretta, 240I-40041 Gaggio Montano, BolognaTel: + 39 0534 771111
Fax: + 39 0534 31025www.saeco.com
© Saeco International Group S.p.A.
Typ
e S
UP
03
2O
R
C
od
.15
00
07
32
Re
v.0
2
de
l 28
-09
-06
The manufacturer reserves the right to change the features of the product without prior notice.
Le producteur se réserve le droit d“apporter toutes modifications sans préavis.