Embed Size (px)
Citation preview
Foods & Nutrition - Section II

Table of Contents
Foods & NutritionFuel Up to Play 60 .......................................................... I-3Quick & Easy Food Dishes ............................................. I-4Trusted Turkey Tips for All Cooks ................................... I-5Treats From Wilton ......................................................... I-6TexaSweet Recipes ........................................................ I-7Champion Refrigerator Potato Rolls ............................... I-8Princess Cutout Cookies .............................................. I-10Top-Coating ................................................................. II-11Marbling ....................................................................... II-11Rubber-Stamping ........................................................ II-13Bread Shaping for Fun - The Edible Art ....................... II-14Sweet Potato or Pumpkin Rolls ................................... II-16Baking with Children .................................................... II-17Falling Into the Holidays .............................................. II-18Safe Food Gifts............................................................ II-19California Raisins - The Wise Choice ......................... III-20Cooking with Johnny Vee ........................................... III-21Two Mothers Foods .................................................... III-22Guests ........................................................................ III-23
Due to the size of this section, it has been separated into three sections in order for it to be downloaded more quickly. For instance, “Fuel Up to Play 60” is in Section I on page 3, whereas “Top-Coating” is in Section II on page 11 and “California Raisins-The Wise Choice” is in Section III on page 20.
Top-coating refers to laying a smooth, glass-like coat-ing of Royal Icing on a cookie top, without first laying a border around the edge to contain the icing. How-ever, when icing is mixed to the proper consistency, you can skip the outlining step and save a lot of time - and money if you’re paying someone else to deco-rate. Here’s how:
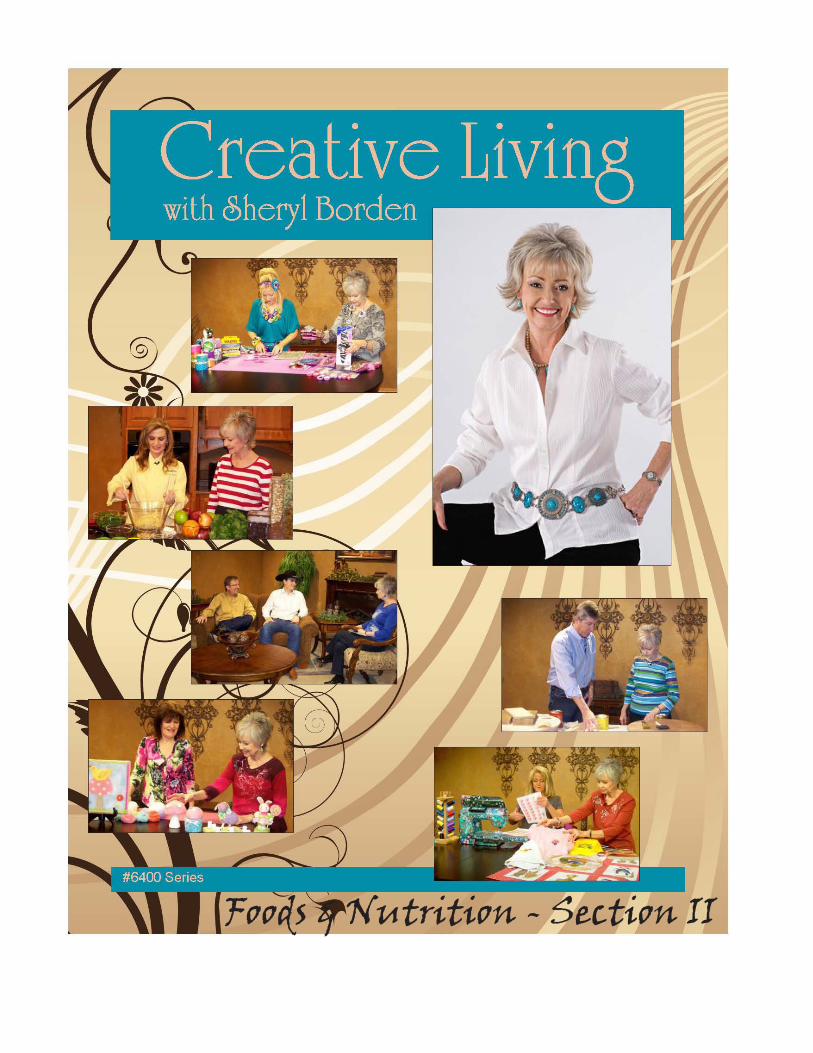
(a) Tint thick Royal Icing to a color of your choice and then thin the icing to top-coating consistency by adding water. (The amount of water needed will vary with cookie size; the larger the cookie, the looser the icing needs to be to get smooth coverage.) To prevent icing overflow, the Royal Icing should be mixed thicker than for flooding, but thinner than for outlin-ing. Check the icing consistency using the 15-second rule: let the icing drop from a spoon back into the bowl; then watch the icing tracks.
(b) If the tracks disap-pear in 15 seconds, you’re guaranteed to be close to the right consistency.
(c) Get used to work-ing with a craft paint-brush for this task; it’s quicker to apply top-coating icing this way
than with a parchment pastry cone. Simply deposit a teaspoon or so of icing in the center of the cookie with the handle-end of the brush and then push the icing toward the cookie edge. Avoid using the bristle-end, as the bristles flex, making it harder to control the placement of the icing. And be sure to push with the tip of the brush handle and not the side, as you’ll be less likely to leave tracks.
d) Continue to push the icing around the cookie until the entire cookie top is covered, adding more icing as needed as you go. Work quickly, and if an area of the cookie looks smooth, don’t touch it again. Royal Icing sets up very fast and you’ll only muck it up by retreading old territory. It’s best to leave a 1/8 to 1/4 inch margin around the edge as an extra safeguard against icing runoff. This margin is also a perfect place to later put a showy decorative border.
(e) While the icing is still wet, pop any large air bub-bles with a metal trussing needle or toothpick.
Marbling Marbling is responsible for the wonderfully swirly pat-terns shown on cookies as well as other projects in Usher’s book. While marbling gives the appearance of being complex, it’s actually one of the quickest and most forgiving decorating methods around. Its foundation is wet-on-wet layering, which means that icings are applied next to each other before any have dried (which, in turn, means that extra care must be taken with icing consistency.) In a nutshell, the technique involves laying a top coat on either a whole cookie or part of one and then piping other icing colors in lines, dots, or other patterns on top. While the icings are wet, a metal trussing needle or tooth-pick is drawn through the icings to create a marbled effect. In my opinion, the technique looks best when three or more colors are used—one for the top coat and two or more on top. Also, the greater the contrast between the colors, the more striking the final result.
Success with this technique hinges on two key factors:(1) icing consistency (naturally!) and (2) working quickly before the icings set up.
Make sure that all icings are at the proper consis-tency before you start to work; that is, topcoating con-
Top-Coating
11
12
sistency for the top-coating color and marbling con-sistency which is just slightly thicker than top-coating consistency, for the colors on top. On the one hand, you want the icings to be loose enough to marble smoothly without the trussing needle or toothpick leaving tracks. But, on the other hand, you never want the icings to be too loose. Because the colors are laid next to each other when wet, there is more risk of colors bleeding. So the thicker you can mix the icings without getting tracks, the faster they’ll dry without bleeding. Start with my consistency adjustments, but if you can work even thicker (which is sometimes pos-sible on very small cookies,) then do so.
As for the second success factor, don’t forget that Royal Icing dries very quickly. If you dilly-dally while laying the icings, they may partially set up by the time you draw the trussing needle through them, and the pattern will end up looking rough. See “What Hap-pens When You Marble Slowly,” below, for an exam-ple of what you don’t want! Make sure your marbling icings are in separate parchment pastry cones before you start. If you stop to adjust colors or fill cones mid-marble, you certainly won’t get the smooth result that you should.
What Happens When You Marble Slowly. I waited too long to draw the trussing needle through the ic-ings on the cookie to the right. As a result, the marb-led pattern is a lot rougher than the one on the prop-erly marbled cookie to the left.
One last word on making patterns: I show how to make a basic starburst pattern, below, and other designs throughout the book, but the possibilities are endless - truly. Just remember, there are basically three vari-ables with which you can play to vary patterns: (1) the colors, (2) the way in which you pipe the icings onto the top coat, and (3) the path that you draw the trussing needle through the icings. My best advice on creating patterns is to experiment with these vari-ables - you will not be disappointed with the results!
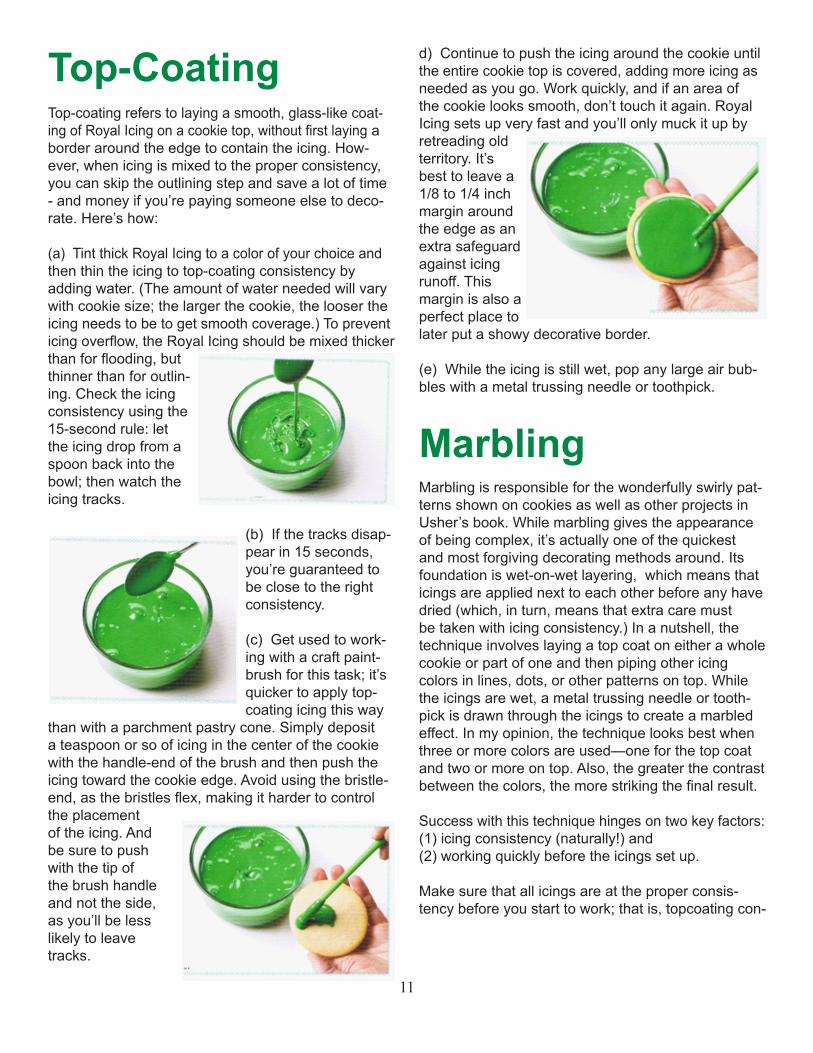
Marbling a Starburst Pattern
(a) Top-coat a cookie.
(b) Immediately pipe one or more contrast-ing colors of Royal Icing in concentric circles on top. Don’t worry if your circles aren’t perfect. As I said before, marbling is a very forgiving technique; most pip-ing imperfections can
be masked in the next step.
(c) Work quickly before the icings set up. Use a metal trussing needle or toothpick to draw a series of straight lines through the ic-ings, starting at the cookie center and ending at the edge. To minimize any blobs or imperfections in the icing piped in Step (b), run the trussing needle through them whenever you can.
(d) Notice how the waviness in my circles has virtu-ally disappeared by the time I’m done!
13
Rubber-stamping on cookies is really no different than rubber-stamping on paper. The only exception is that you must use edible ink and rubber stamps that haven’t been touched by anything but edible ink. You can stamp directly on top-coated cookies. Or, you can stamp on thin sheets of rolled fondant or other modeling media, either dried or soft, and then stick the stamped dough onto iced or uniced cookie tops with Royal Icing. If you’re stamping on top-coated cookies, it’s important to dry top coats completely, ideally overnight, or you can crack the icing when you apply pressure with the stamp on top. Likewise, be careful if you’re stamping on dried modeling media, especially rolled fondant, as these doughs are brittle in dry form and can also crack. Lastly, if you stamp on soft modeling media, expect not only to see the stamp, but also to end up with a very cool embossed effect! (The relief of the stamp will transfer into the soft dough, along with the edible ink.)
A quick word on tools: almost any rubber stamp will do, as long as it fits your cookie top or top coat. Rubber stamps don’t conform well to rounded icing edges, so if you’re stamping on a top-coated cookie, it’s best to allow some icing margin (at least 1/8 inch) around the edge of the stamp. This way, you’re sure to capture the entire stamp on the top coat. As for edible ink, I use soft-gel food coloring applied to an un-inked felt or foam ink pad. Both types of pads work just fine, despite what you may have read else-where about felt pads being superior. Foam pads are softer and absorb more food coloring than felt pads, which makes it easier to inadvertently over-ink your stamp and then your cookies. But because they hold more coloring, they’ll stay moist and well inked for many days if closed and sealed in baggies, whereas felt pads often need to be re-inked many times in the course of working with them.
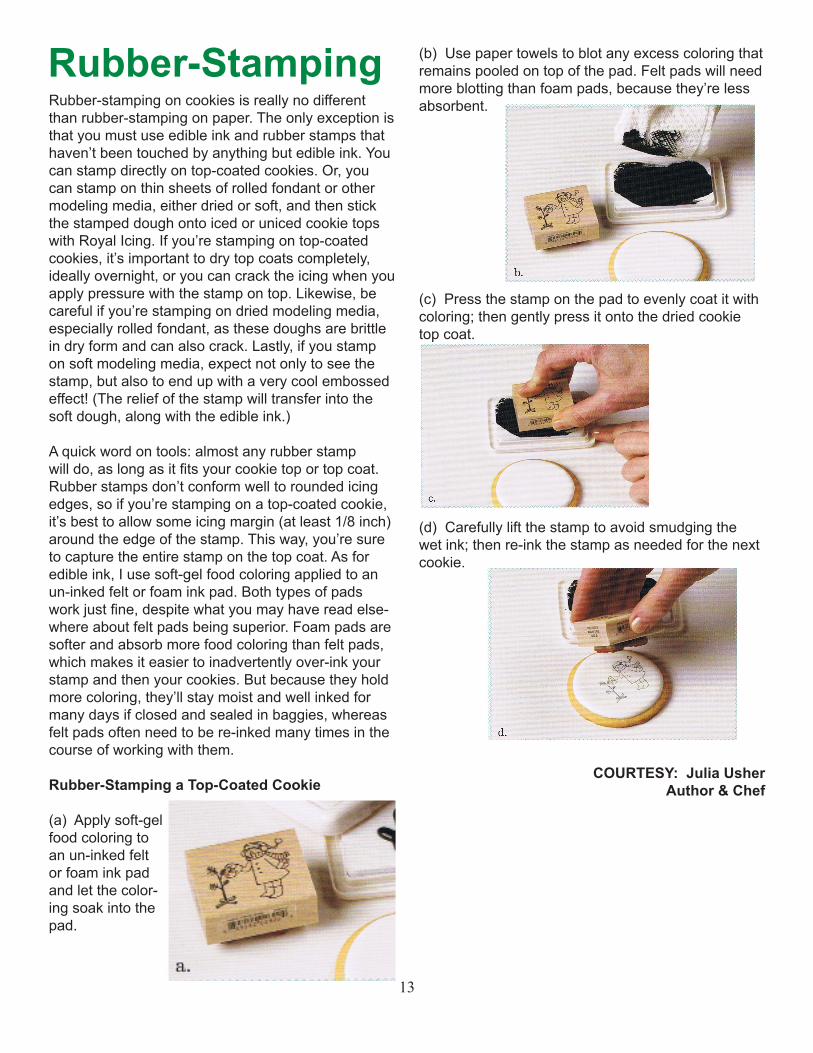
Rubber-Stamping a Top-Coated Cookie
(a) Apply soft-gel food coloring to an un-inked felt or foam ink pad and let the color-ing soak into the pad.
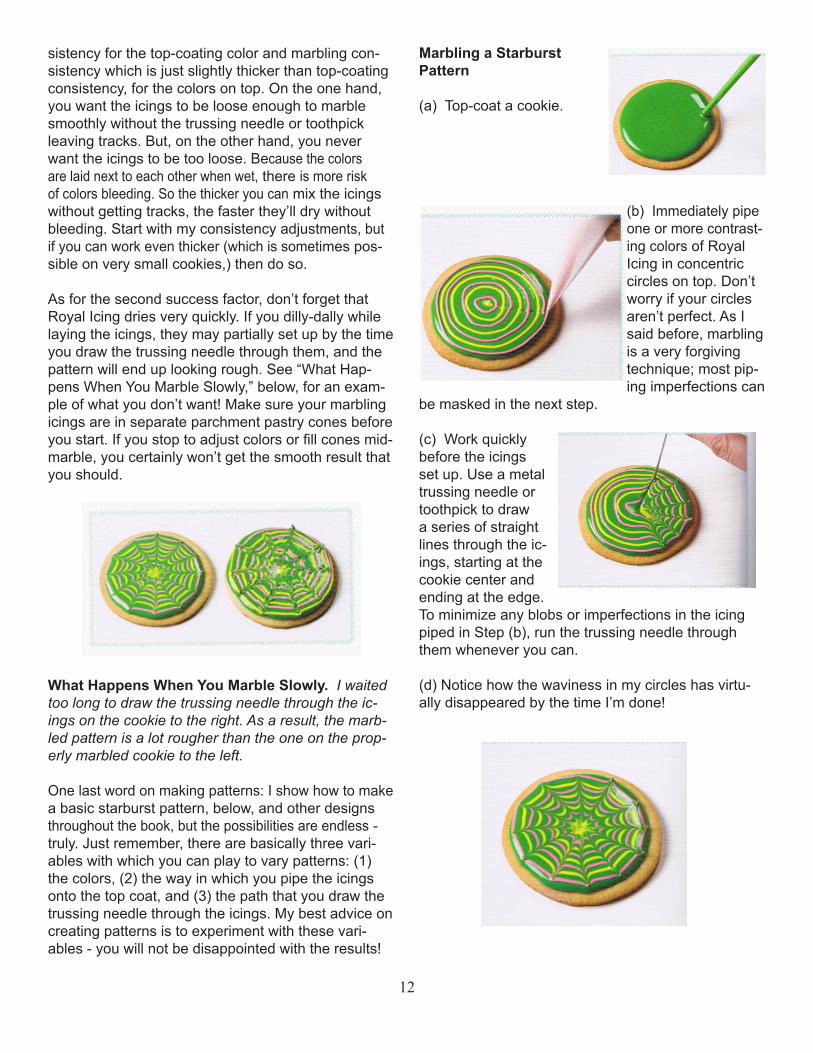
Rubber-Stamping (b) Use paper towels to blot any excess coloring that remains pooled on top of the pad. Felt pads will need more blotting than foam pads, because they’re less absorbent.
(c) Press the stamp on the pad to evenly coat it with coloring; then gently press it onto the dried cookie top coat.
(d) Carefully lift the stamp to avoid smudging the wet ink; then re-ink the stamp as needed for the next cookie.
COURTESY: Julia UsherAuthor & Chef
14
BREAD SHAPING FOR FUN - THE EDIBLE ARTAccording to Cindy Falk, making a work of art out of bwread dough is easy and fun and is a way to release creativity and energy, especially with chil-dren. She suggests that you begin with an easy shape, such as a pretzel and then you can work on mastering a Wheat Sheaf. Use your favorite yeast dough recipe or try one of the recipes listed below.
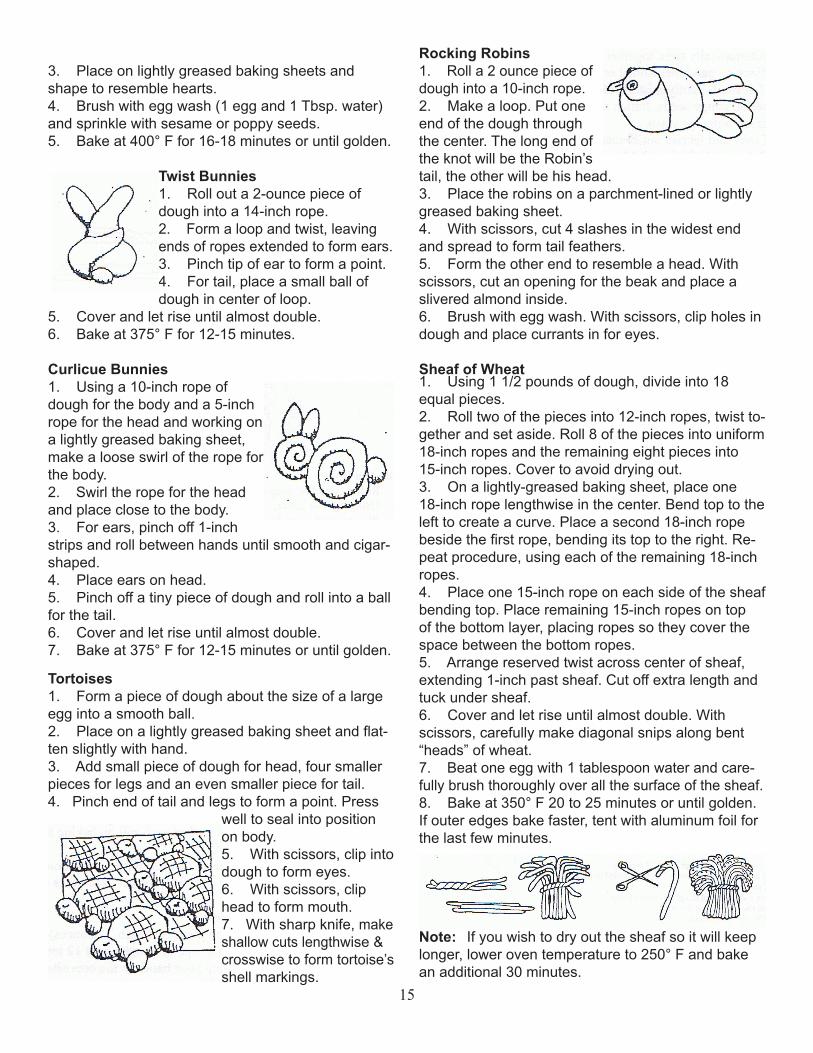
Flip ‘em Rolls1. Roll 1 pound of dough into a 13 - to 14 inch circle about 1/4 inch thick.2. Using a pizza cutter, cut circle into 12 equal wedge-shaped pieces.3. Pick up each triangle at the wide edge and flip the dough toward you to form a crescent-shaped roll.4. Pinch the point to the roll to prevent unrolling and lay point side down on a lightly greased baking sheet.
5. Curve end of each roll on baking sheet to make crescent shape.6. Cover and let rise until almost double in size, then bake at 400° F for 13-14 minutes or until golden brown.
Breadsticks1. Use one piece of dough. (2 ounces)2. Form a rope of dough about 12 inches long. Place your hands at each end and twist by moving your hands in the opposite direction until the rope is about 14 - 16 inches long.3. Pick up the twisted rope holding the ends. It should auto-matically twist together. Pinch the ends to-gether to seal.4. Place on parchment-lined or lightly-greased baking sheet.
5. If desired, lightly mist breadsticks with water and sprinkle on sesame seeds, poppy seeds, Italian sea-soning, grated Parmesan cheese or brush with egg wash.6. Cover and let rise until breadsticks are almost double in size.7. Bake at 400° F for 12-15 minutes until golden.
Rosettes
1. Roll 1 pound of dough into a 6 x 12-inch rect-angle 1/2-inch thick.2. Starting from 6-inch side, cut into 1-inch-wide strips.3. Roll into 14-inch ropes.4. Tie in a loose knot, leaving two long ends.5. Tuck one end under the roll and pinch to seal. Bring the other end up and over the roll and pinch to seal on the underneath side.
6. Place on greased baking sheet about 2 inches apart leaving a small opening in the center of the rosette. Cover and let rise until double.7. Bake at 375° F for 13-14 minutes.
Pretzels1. Roll dough pieces into ropes about the size of a pencil.2. Shape into pretzels by mak-ing a circle, bring-ing ends together, twisting twice and pressing ends onto bottom curve of circle.
3. Place on lightly greased baking sheets and shape to resemble hearts.4. Brush with egg wash (1 egg and 1 Tbsp. water) and sprinkle with sesame or poppy seeds.5. Bake at 400° F for 16-18 minutes or until golden.
Twist Bunnies1. Roll out a 2-ounce piece of dough into a 14-inch rope.2. Form a loop and twist, leaving ends of ropes extended to form ears.3. Pinch tip of ear to form a point.4. For tail, place a small ball of dough in center of loop.
5. Cover and let rise until almost double.6. Bake at 375° F for 12-15 minutes.
Curlicue Bunnies1. Using a 10-inch rope of dough for the body and a 5-inch rope for the head and working on a lightly greased baking sheet, make a loose swirl of the rope for the body.2. Swirl the rope for the head and place close to the body.3. For ears, pinch off 1-inch strips and roll between hands until smooth and cigar-shaped.4. Place ears on head.5. Pinch off a tiny piece of dough and roll into a ball for the tail.6. Cover and let rise until almost double.7. Bake at 375° F for 12-15 minutes or until golden.
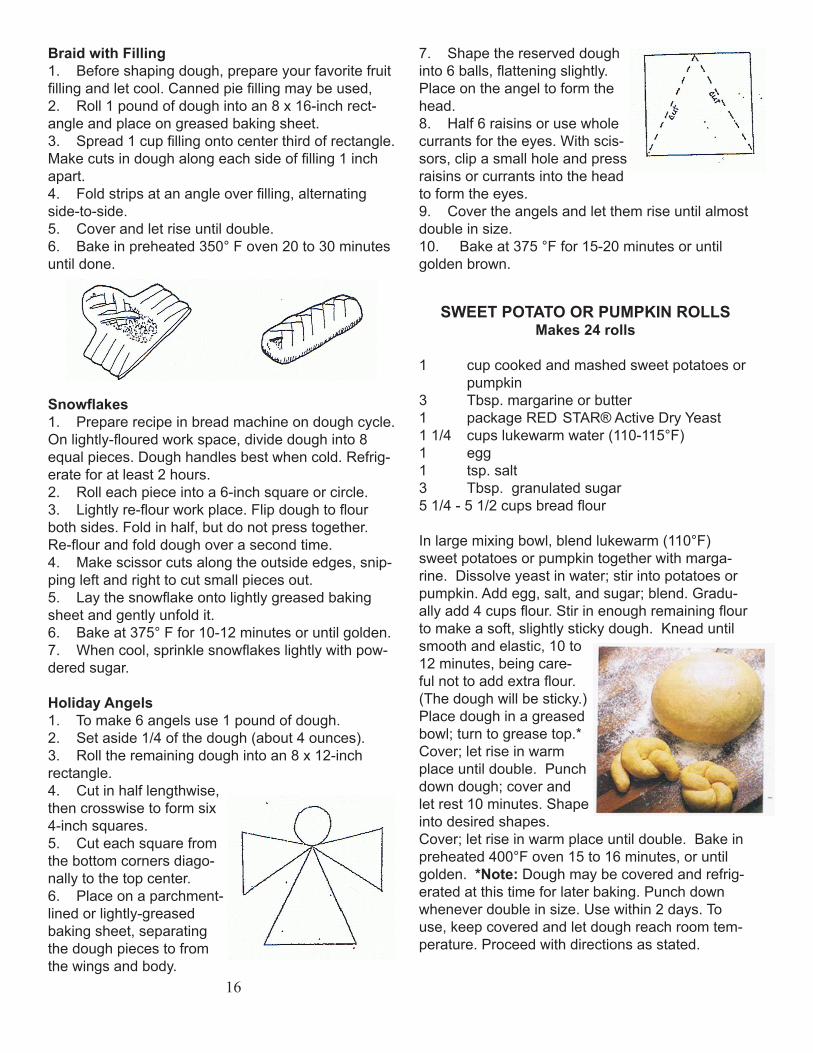
Tortoises1. Form a piece of dough about the size of a large egg into a smooth ball.2. Place on a lightly greased baking sheet and flat-ten slightly with hand.3. Add small piece of dough for head, four smaller pieces for legs and an even smaller piece for tail.4. Pinch end of tail and legs to form a point. Press
well to seal into position on body.5. With scissors, clip into dough to form eyes.6. With scissors, clip head to form mouth.7. With sharp knife, make shallow cuts lengthwise & crosswise to form tortoise’s shell markings.
Rocking Robins1. Roll a 2 ounce piece of dough into a 10-inch rope.2. Make a loop. Put one end of the dough through the center. The long end of the knot will be the Robin’s tail, the other will be his head.3. Place the robins on a parchment-lined or lightly greased baking sheet.4. With scissors, cut 4 slashes in the widest end and spread to form tail feathers.5. Form the other end to resemble a head. With scissors, cut an opening for the beak and place a slivered almond inside.6. Brush with egg wash. With scissors, clip holes in dough and place currants in for eyes.
Sheaf of Wheat1. Using 1 1/2 pounds of dough, divide into 18 equal pieces.2. Roll two of the pieces into 12-inch ropes, twist to-gether and set aside. Roll 8 of the pieces into uniform 18-inch ropes and the remaining eight pieces into 15-inch ropes. Cover to avoid drying out.3. On a lightly-greased baking sheet, place one 18-inch rope lengthwise in the center. Bend top to the left to create a curve. Place a second 18-inch rope beside the first rope, bending its top to the right. Re-peat procedure, using each of the remaining 18-inch ropes.4. Place one 15-inch rope on each side of the sheaf bending top. Place remaining 15-inch ropes on top of the bottom layer, placing ropes so they cover the space between the bottom ropes.5. Arrange reserved twist across center of sheaf, extending 1-inch past sheaf. Cut off extra length and tuck under sheaf.6. Cover and let rise until almost double. With scissors, carefully make diagonal snips along bent “heads” of wheat.7. Beat one egg with 1 tablespoon water and care-fully brush thoroughly over all the surface of the sheaf.8. Bake at 350° F 20 to 25 minutes or until golden. If outer edges bake faster, tent with aluminum foil for the last few minutes.
Note: If you wish to dry out the sheaf so it will keep longer, lower oven temperature to 250° F and bake an additional 30 minutes.
15
Braid with Filling1. Before shaping dough, prepare your favorite fruit filling and let cool. Canned pie filling may be used,2. Roll 1 pound of dough into an 8 x 16-inch rect-angle and place on greased baking sheet.3. Spread 1 cup filling onto center third of rectangle. Make cuts in dough along each side of filling 1 inch apart.4. Fold strips at an angle over filling, alternating side-to-side.5. Cover and let rise until double.6. Bake in preheated 350° F oven 20 to 30 minutes until done.
Snowflakes1. Prepare recipe in bread machine on dough cycle. On lightly-floured work space, divide dough into 8 equal pieces. Dough handles best when cold. Refrig-erate for at least 2 hours.2. Roll each piece into a 6-inch square or circle.3. Lightly re-flour work place. Flip dough to flour both sides. Fold in half, but do not press together. Re-flour and fold dough over a second time.4. Make scissor cuts along the outside edges, snip-ping left and right to cut small pieces out.5. Lay the snowflake onto lightly greased baking sheet and gently unfold it.6. Bake at 375° F for 10-12 minutes or until golden.7. When cool, sprinkle snowflakes lightly with pow-dered sugar.
Holiday Angels1. To make 6 angels use 1 pound of dough.2. Set aside 1/4 of the dough (about 4 ounces).3. Roll the remaining dough into an 8 x 12-inch rectangle.4. Cut in half lengthwise, then crosswise to form six 4-inch squares.5. Cut each square from the bottom corners diago-nally to the top center.6. Place on a parchment-lined or lightly-greased baking sheet, separating the dough pieces to from the wings and body.
7. Shape the reserved dough into 6 balls, flattening slightly. Place on the angel to form the head.8. Half 6 raisins or use whole currants for the eyes. With scis-sors, clip a small hole and press raisins or currants into the head to form the eyes.9. Cover the angels and let them rise until almost double in size.10. Bake at 375 °F for 15-20 minutes or until golden brown.
SWEET POTATO OR PUMPKIN ROLLSMakes 24 rolls
1 cup cooked and mashed sweet potatoes or pumpkin3 Tbsp. margarine or butter1 package RED STAR® Active Dry Yeast1 1/4 cups lukewarm water (110-115°F)1 egg1 tsp. salt3 Tbsp. granulated sugar5 1/4 - 5 1/2 cups bread flour
In large mixing bowl, blend lukewarm (110°F) sweet potatoes or pumpkin together with marga-rine. Dissolve yeast in water; stir into potatoes or pumpkin. Add egg, salt, and sugar; blend. Gradu-ally add 4 cups flour. Stir in enough remaining flour to make a soft, slightly sticky dough. Knead until smooth and elastic, 10 to 12 minutes, being care-ful not to add extra flour. (The dough will be sticky.) Place dough in a greased bowl; turn to grease top.* Cover; let rise in warm place until double. Punch down dough; cover and let rest 10 minutes. Shape into desired shapes. Cover; let rise in warm place until double. Bake in preheated 400°F oven 15 to 16 minutes, or until golden. *Note: Dough may be covered and refrig-erated at this time for later baking. Punch down whenever double in size. Use within 2 days. To use, keep covered and let dough reach room tem-perature. Proceed with directions as stated.
16
Bread in a Bagmakes 3 mini-loaves
1/2 cup bread or all-purpose flour 1 Tbsp. vegetable oil1 pkg. fast-rising dry yeast (2 1/4 tsp.) 2 tsp. salt2 Tbsp. granulated sugar, divided 3/4 cup very warm water (120°- 130° F.)2 cups white whole wheat flour or whole wheat flour1 - 1 1/2 cups bread or all-purpose flour Allow 2 to 2 1/2 hours for activity. In a heavy-duty, 2 gallon sealable bag, mix bread flour, yeast and 1 Tbsp. sugar. Check water temperature with thermometer; add 1/2 cup water to bag. Close bag. Work bag with fingers until mixture is blended; let rest 15 minutes. To bag, add 1 tablespoon sugar, whole wheat flour, oil, salt, and 3/4 cup water. Slowly add enough flour to form dough that pulls away from side of bag. On floured surface, knead dough 5 minutes. Dough should be slightly sticky. Too much flour will make bread low-volume and dry. Divide dough into thirds; cover with bag and let rest 10 to 15 minutes. Spray 3 disposable 5 x 3-inch mini loaf pans with non-stick cooking spray. Pat dough into 6 x 4-inch rectangle. Beginning at short end, roll up tightly like a sleeping bag. Pinch the edge forming a seam. Pinch edges and ends to seal. Place dough, seam-side down, in pans. Mark each pan with child’s name. Place pans 2 inches apart on baking sheet. Cover loosely with plastic wrap; let rise until doubled, about 35 minutes. Bake in preheated 350°F. convection oven 15 to 18 minutes or 375°F. conventional oven 23 to 25 minutes, or until golden. Immediately remove from pans; cool on wire rack. Yield: 3 mini-loaves, eight slices each.
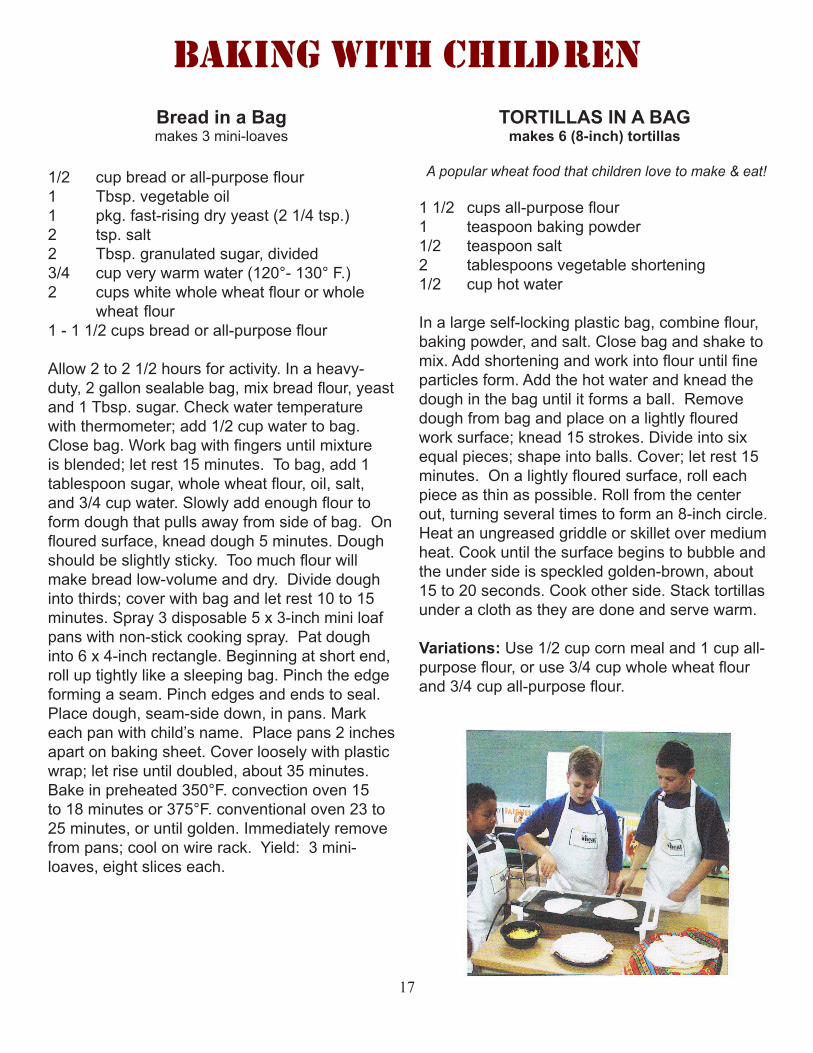
TORTILLAS IN A BAGmakes 6 (8-inch) tortillas
A popular wheat food that children love to make & eat!
1 1/2 cups all-purpose flour1 teaspoon baking powder1/2 teaspoon salt2 tablespoons vegetable shortening1/2 cup hot water In a large self-locking plastic bag, combine flour, baking powder, and salt. Close bag and shake to mix. Add shortening and work into flour until fine particles form. Add the hot water and knead the dough in the bag until it forms a ball. Remove dough from bag and place on a lightly floured work surface; knead 15 strokes. Divide into six equal pieces; shape into balls. Cover; let rest 15 minutes. On a lightly floured surface, roll each piece as thin as possible. Roll from the center out, turning several times to form an 8-inch circle. Heat an ungreased griddle or skillet over medium heat. Cook until the surface begins to bubble and the under side is speckled golden-brown, about 15 to 20 seconds. Cook other side. Stack tortillas under a cloth as they are done and serve warm.
Variations: Use 1/2 cup corn meal and 1 cup all-purpose flour, or use 3/4 cup whole wheat flour and 3/4 cup all-purpose flour.
17
BAkING wITH cHILD REN
Falling Into the HolidaysDon’t you often won-der what to serve for dinner? This idea will work for you at home or as a gift for someone else. This is the same concept of a gift basket with a recipe attached, but you can give your-self the gift as well as someone else. Putting together the staples of a meal into a bag or container assures you that you have the canned goods
and dry ingredients for that recipe. The other fresh ingredients are often staples in our refrigerator or freezer. Glue a list of the contents of the bag to the front along with what you would need to complete that recipe. Then attach the recipe, and you have an almost instant meal.
Mexican Beef & Chip Casserole
1 lb. ground beef1 small onion, chopped1 clove garlic, minced1 can (10 1/2 oz.) Cream of Mushroom Soup1 can (4 ozs.) chopped green chiles1 pkg. (9 ozs.) corn or tortilla chips1 can (10 ozs.) enchilada sauce2 cups Monterey Jack cheese
Cook ground beef, onion and garlic in a skillet until meat is brown and onions are soft. In a casserole dish, mix meat mixture, soup and chiles. Layer chips, enchilada sauce and cheese. Bake in a preheated 350 degrees oven for 30 to 40 minutes until bubbly and cheese is melted. To microwave, cover and cook until bubbly and cheese is melted - approximately 8 to 10 minutes.
2011 Recipe Book - National Festival of Breads Recipes
The 2011Recipe Book from the Kansas Wheat Commission features recipes from the 2011 Na-tional Festival of Breads Competition, sponsored by King Arthur Flour, Fleischmann’s yeast and the KWC. It was held in June in Wichita. Con-tents include:
• Quick Raisin Granola Breakfast Rolls• Tangy Tangerine Twirling Treats• Fruit-of-the-Vine Rosemary Olive Oil Snack Bread• Jalapeno Cheddar Wheat Hamburger Buns• Sweet Wheat Bread• Charred Lime Ginger Sweet Rolls• Apple Cider Cranberry Bread• Tart Cherry Schiacciata
For a copy of the 2011 cookbook, go to:http://www.kansaswheat.org/assets/Reci-pe/09011%202011%20Recipe%20Book%20Lo%20Res.pdf
COURTESY: Cindy FalkKansas Wheat Commission
18
Mexican Beef & Chip Casserole
Container: 1 can Cream of Mushroom Soup, 1 can (4 ozs.) chopped green chiles, 1 pkg. corn or tortilla chips and 1 can enchilada sauce.
You Need: 1 lb. ground beef, 1 onion, 1 clove garlic and 2 cups shredded Monterey Jack Cheese
Nacho Potato Soup
1 lb. sausage, browned and crumbled1 pkg. (5 1/4 ozs.) AuGratin potatoes1 can (14 1/2 ozs.) whole kernel corn, drained1 can (10 ozs.) diced tomatoes & green chiles2 cups water2 cups cubed pasteurized prepared cheese product Hot pepper sauce
In a 3-quart pan, combine sausage, contents of potato package, corn, tomatoes and water. Mix well; bring to boil. Reduce heat; cover and simmer 15 to 18 minutes or until potatoes are done. Add milk, cheese and hot pepper sauce; cook and stir until cheese is melted.
Nacho Potato Soup
Contains: AuGratin potatoes, corn, diced tomatoes & green chiles and pasteurized prepared cheese productYou Need: 1 lb. sausage, browned, 2 cups water, 2 cups milk and hot pepper sauce
Chocolate Chip Pudding Cake
1 pkg. (3 1/2 ozs.) “cook & serve” chocolate pudding mix1 pkg. (18 1/4 ozs.) chocolate cake mix1 pkg. (12 ozs.) semi-sweet chocolate chips
Prepare and cook pudding mix according to package directions. Remove pudding from stovetop and stir in dry cake mix until just combined. Spread mixture in a greased 13x9x2-inch baking dish. Sprinkle with chocolate chips. Bake at 325 degrees for 30 to 35 minutes. Makes 14 to 16 servings.
Chocolate Chip Pudding Cake
Contains: Pudding mix, chocolate cake mix and semi-sweet chocolate chipsYou Need: 2 cups milk
Safe Food GiftsMany of us enjoy making gifts of foods for teachers, friends, family and neighbors. Gifts of food can be inexpen-sive while including a personal touch from the giver. However, when gifts of food are given, it is extremely important to keep food safety in mind. Foods that don’t require refrigeration can be excellent gift choic-es. Perishable foods should be given only if they can be eaten or refrigerated immediately.
Baked GoodsBaked goods have always been popular for gift giv-ing and are generally low risk in terms of food borne pathogens. (Exceptions include custard based pies or desserts that require refrigeration. It is best not to give a custard based item as a gift unless you are sure it can be refrigerated promptly.) Bakers should also be cautioned that it is not appropriate to bake cake, sweet breads, etc, in a canning jar. If the lid is on the jar during the baking process or applied when the contents are still hot, a seal can form. This can create an environment without air, which could result in the growth of the botulinum organism and ultimate-ly botulism poisoning.
Dry MixesDry mixes can be a useful gift with few food safety hazards. Another advantage is that dry mixes can be enjoyed later. Dry mixes can include unusual dry beans or peas, pastas, soup mixes, hot drink mixes and baking mixes. These can be packaged in decora-tive jars or canisters. Containers should be made of food grade materials. When preparing mixes, make sure ingredients are fresh and of high quality and that hands and utensils are clean.
Jams, Jellies and SalsasIn general, home canned goods are not recommend-ed as gifts because of the possibility of improperly canned products and the risk of botulism. Salsa and chile products can be especially dangerous because of the tendency to use favorite recipes that have not been properly tested.
Because of their acidity, lower risk foods include fruit jams and jellies and whole fruits like peaches, cher-ries, plums and cranberries. The high sugar content of fruit jams, jellies and preserves add an extra mea-sure of safety and barriers to prevent spoilage.
COURTESY: Connie MoyersNM Cooperative Extension Service
19