Embed Size (px)
Citation preview
Flyin' Miata970.464.5600
Rev 1.1
3” Suspension Lift Kit13-59100
Flyin' Miata
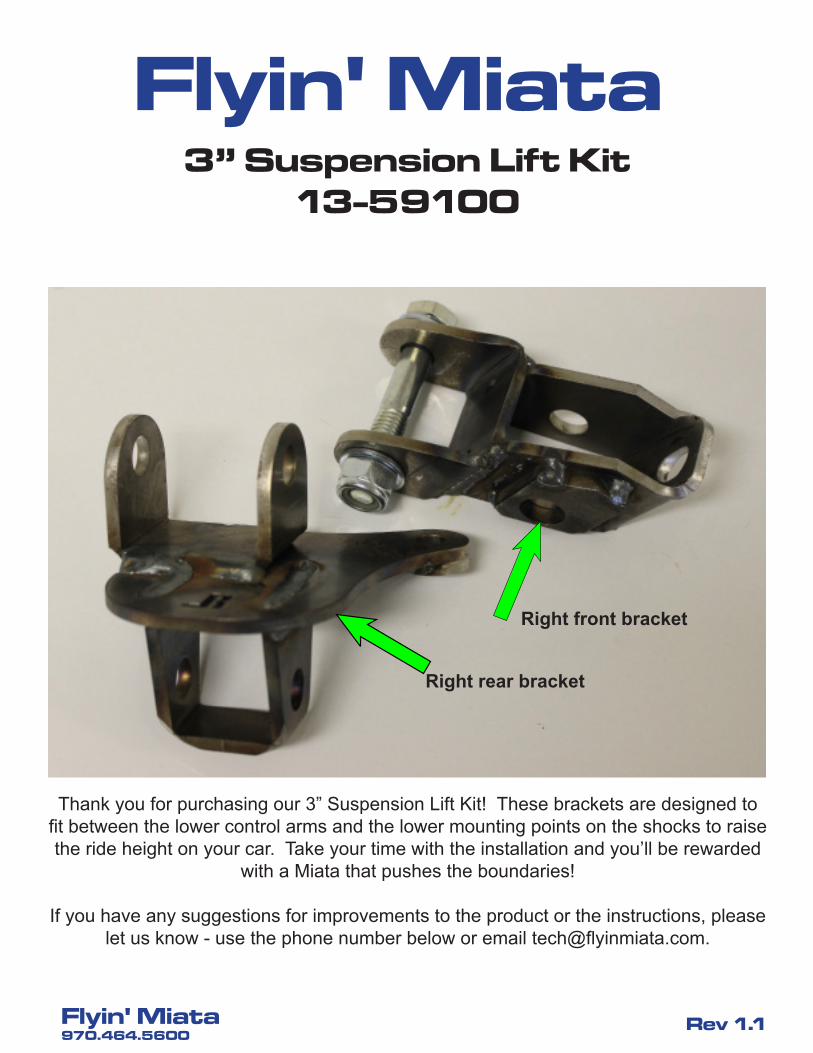
Thank you for purchasing our 3” Suspension Lift Kit! These brackets are designed to fit between the lower control arms and the lower mounting points on the shocks to raise the ride height on your car. Take your time with the installation and you’ll be rewarded
with a Miata that pushes the boundaries!
If you have any suggestions for improvements to the product or the instructions, please let us know - use the phone number below or email [email protected].
Right rear bracket
Right front bracket
Flyin' Miata970.464.5600
Rev 1.1
WARNING: Not everyone can perform every installation. It is critical that you be honest with yourself in regards to your ability. We’re more than happy to help, but there are only so many things we can do from the other end of a phone / comput-er. If in doubt, discuss the install with us before you dive in. Improper installation
could result in injury and / or death!Required tools:• Floor Jack• Jack stands (at least one pair)• Ramps or hub stands• Grease pencil (or other marking device)• Socket wrench
Acronyms• Upper Control Arm (UCA)• Lower Control Arm (LCA)
1. Start by putting the car up on jack stands. You can’t install this kit with the car on ramps.
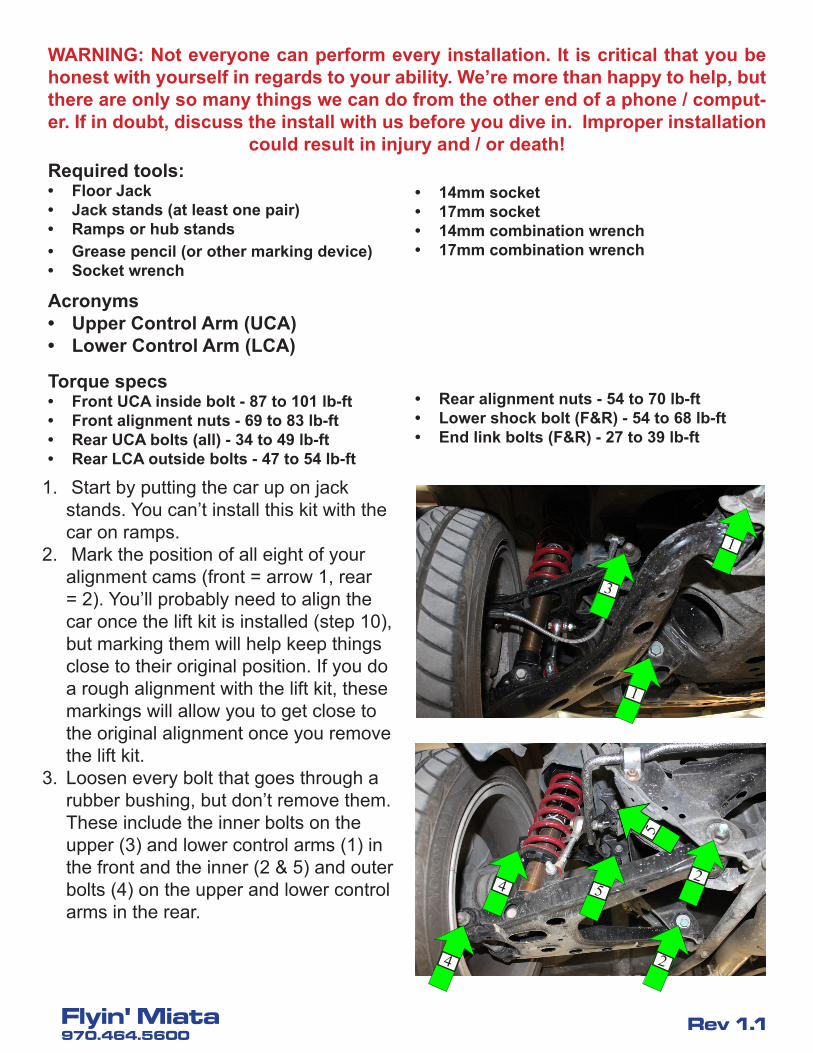
2. Mark the position of all eight of your alignment cams (front = arrow 1, rear = 2). You’ll probably need to align the car once the lift kit is installed (step 10), but marking them will help keep things close to their original position. If you do a rough alignment with the lift kit, these markings will allow you to get close to the original alignment once you remove the lift kit.
3. Loosen every bolt that goes through a rubber bushing, but don’t remove them. These include the inner bolts on the upper (3) and lower control arms (1) in the front and the inner (2 & 5) and outer bolts (4) on the upper and lower control arms in the rear.
Torque specs• Front UCA inside bolt - 87 to 101 lb-ft• Front alignment nuts - 69 to 83 lb-ft• Rear UCA bolts (all) - 34 to 49 lb-ft• Rear LCA outside bolts - 47 to 54 lb-ft
• Rear alignment nuts - 54 to 70 lb-ft• Lower shock bolt (F&R) - 54 to 68 lb-ft• End link bolts (F&R) - 27 to 39 lb-ft
• 14mm socket• 17mm socket• 14mm combination wrench• 17mm combination wrench
1
1
2
2
3
4
4 5
5
Flyin' Miata970.464.5600
Rev 1.1
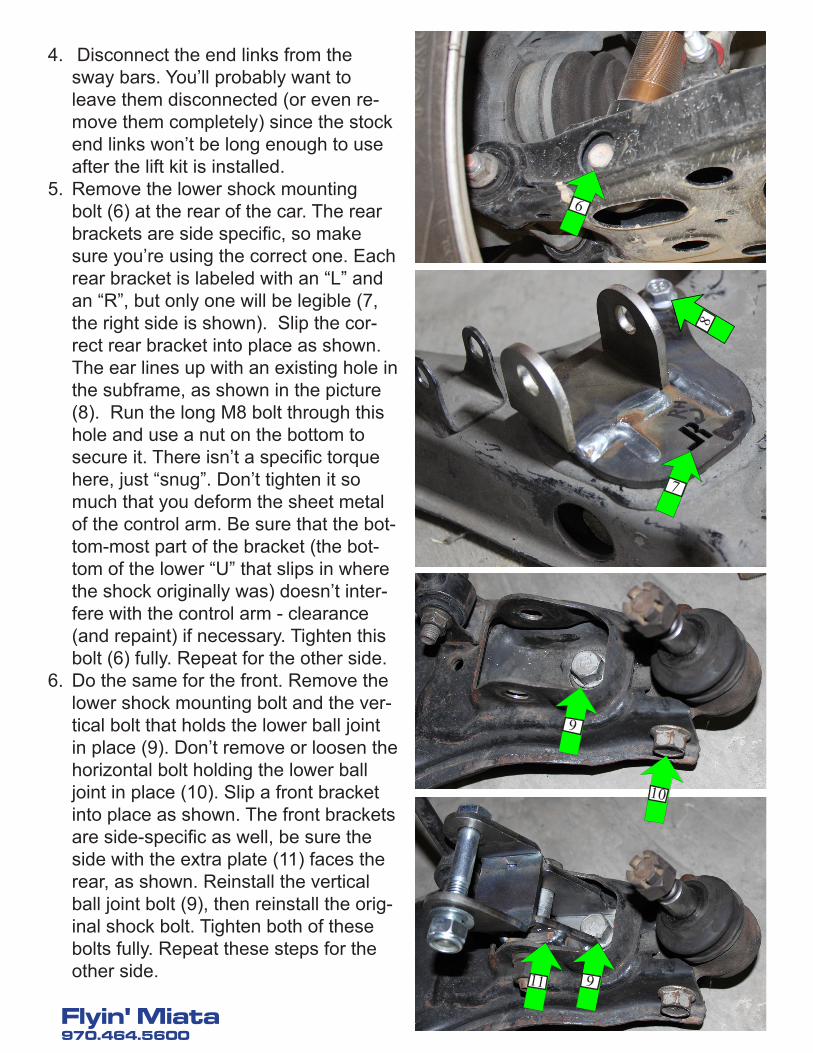
4. Disconnect the end links from the sway bars. You’ll probably want to leave them disconnected (or even re-move them completely) since the stock end links won’t be long enough to use after the lift kit is installed.
5. Remove the lower shock mounting bolt (6) at the rear of the car. The rear brackets are side specific, so make sure you’re using the correct one. Each rear bracket is labeled with an “L” and an “R”, but only one will be legible (7, the right side is shown). Slip the cor-rect rear bracket into place as shown. The ear lines up with an existing hole in the subframe, as shown in the picture (8). Run the long M8 bolt through this hole and use a nut on the bottom to secure it. There isn’t a specific torque here, just “snug”. Don’t tighten it so much that you deform the sheet metal of the control arm. Be sure that the bot-tom-most part of the bracket (the bot-tom of the lower “U” that slips in where the shock originally was) doesn’t inter-fere with the control arm - clearance (and repaint) if necessary. Tighten this bolt (6) fully. Repeat for the other side.
6. Do the same for the front. Remove the lower shock mounting bolt and the ver-tical bolt that holds the lower ball joint in place (9). Don’t remove or loosen the horizontal bolt holding the lower ball joint in place (10). Slip a front bracket into place as shown. The front brackets are side-specific as well, be sure the side with the extra plate (11) faces the rear, as shown. Reinstall the vertical ball joint bolt (9), then reinstall the orig-inal shock bolt. Tighten both of these bolts fully. Repeat these steps for the other side.
7
9
6
8
10
11 9
Flyin' Miata970.464.5600
Rev 1.1
7. If you’re running oversize tires, we recommend removing the springs and running the suspension through its full range of motion to make sure there’s no interference.
8. If you’re sure you have enough tire clearance, bolt the bottom bushing on all four shocks into the upper portion of the lift kit brackets. Don’t tighten these bolts fully yet.
9. Put the car’s weight on its wheels, then torque all of the rubber bushings that you loosened earlier. This includes the lower shock bushings from step 8 as well as all of the bushings from step 3. You can do this in one of three ways - use our hub stands (by far the easiest), install the wheels and use ramps, or put a jack under the con-trol arm to lift it into position carefully. This will allow for all the suspension points to be tightened at the new ride height to “reset” the bushings. While the alignment will change, lining up the marks on your alignment cams will help get things in the gen-eral vicinity before tightening up the bolts.
10. Lifting the car 3” changes the alignment by a fair amount. If you’re planning to leave it this way, you’ll want to have it re-aligned. The specs you choose will vary based on your use for the car. If, on the other hand, you’re planning to lift it, play in the dirt for a little bit, then put it back down to stock height, an alignment is less critical. Once you remove the lift kit, the alignment will be back to its original settings, as-suming you were careful to put the alignment eccentrics back into the same place they were originally.
11. Now that everything is installed, lifted, and tightened, you’re free to hoon! Responsi-bly, of course. Remember to be kind to the environment, your neighbor’s lawn, and most importantly, lesser Miatas with stock ride heights.