Embed Size (px)
Citation preview

FltLogic User’s Manual
2 | P a g e J a n u a r y 2 0 1 8
Table of Contents FltLogic Overview ............................................................................................................................... Page 4 Learning the Program .................................................................................................................. Page 4 Calendar ............................................................................................................................................. Page 5 Calendar View Settings ................................................................................................................ Page 5 Calendar Functions ...................................................................................................................... Page 5 Show Events for One User or One Aircraft .................................................................................. Page 6 Caution Sign ................................................................................................................................. Page 6 Users .................................................................................................................................................. Page 7 Adding a User............................................................................................................................... Page 7 Personal Info ................................................................................................................................ Page 8 Roles & Permissions .................................................................................................................... Page 8 Other User Information ................................................................................................................. Page 9 Personal Information ..................................................................................................... Page 9 FltPlan Bias ................................................................................................................. Page 10 Add/Remove Pilot Currency ........................................................................................ Page 10 Reservations ...................................................................................................................... Page 11 Adding a Manual Reservation ..................................................................................... Page 11 FltPlan.com Integration / Linking to FltPlan.com ........................................................................ Page 11 FltPlan.com Integration ...................................................................................................... Page 12 Importing & Updating eAPIS Passengers .................................................................................. Page 12 Import eAPIS Passenger List ............................................................................................. Page 12 Updating eAPIS Passengers ............................................................................................. Page 13 Search / Filter Users................................................................................................................... Page 13 Time Off Calendar ...................................................................................................................... Page 14 Duty Time & Repeat Duty Time ................................................................................................. Page 14 SIFL Reporting ........................................................................................................................... Page 14 Expenses.................................................................................................................................... Page 15 User Documents & Profile Image ............................................................................................... Page 15 Departments ............................................................................................................................... Page 15 Aircraft Section ................................................................................................................................. Page 16 Show Events for One Aircraft ..................................................................................................... Page 16 Adding an Aircraft ....................................................................................................................... Page 16 Required Information ......................................................................................................... Page 16 Aircraft Details .................................................................................................................... Page 17 Icons in Aircraft Profile................................................................................................. Page 17 Copy Aircraft ......................................................................................................... Page 17 Aircraft Expenses .................................................................................................. Page 17 Aircraft Documents & Aircraft Picture/Image ........................................................ Page 17 Basic Info - Optional Aircraft Information ..................................................................... Page 17 Aircraft Owner ....................................................................................................... Page 17 Performance Info – Optional Information ..................................................................... Page 18 Taxi Time .............................................................................................................. Page 18 Airframe Hours & Cycles ....................................................................................... Page 18 FltPlan.com Username ................................................................................................ Page 18 Aircraft Currency .......................................................................................................... Page 18 Events Tab ..................................................................................................................................... Page 18 Events Menu Layout .................................................................................................................. Page 19 Information, Functions, and Icons in Event List ......................................................................... Page 19 Information and Icons in Flight Events & Training Events ................................................. Page 19 Icons on Completed Flight or Training Event ..................................................................... Page 20 Information and Icons in Maintenance Events & Other Events ......................................... Page 20
FltLogic User’s Manual
3 | P a g e J a n u a r y 2 0 1 8
Creating an Event: Flight and Training Events.......................................................................... Page 21 Create a New Flight or Training Event ............................................................................... Page 21 Itinerary Section ........................................................................................................... Page 22 Taxi Time & Call Sign Entry .................................................................................... Page 22 Recalculate Flight Times ........................................................................................ Page 22 Airport / FBO Information ............................................................................................. Page 23 Adding a Private Hanger ........................................................................................ Page 23 Pilots & Crew Section .................................................................................................. Page 23 Primary & Secondary Passengers .......................................................................... Page 23 Temporary Passengers .......................................................................................... Page 24 Notes on Training Events ............................................................................................ Page 24 Using Same Airport for Departure and Arrival ........................................................ Page 24 Adding Legs to an Existing Event ...................................................................................... Page 25 Creating an Event: Maintenance and Other Events .................................................................. Page 26 Maintenance Event View Icons .......................................................................................... Page 27 Event Additional Information & Reservations ............................................................................. Page 28 Icons Available in Leg Overview Box ................................................................................. Page 28 View Trip Expenses ..................................................................................................... Page 28 Add Pilot Notes, Passenger Notes and Documents .................................................... Page 28 Links / Icons Available within an Event .............................................................................. Page 29 Additional Functions in Event Detail View ......................................................................... Page 29 External Email ............................................................................................................. Page 30 Adding Reservations using Flight Bridge ................................................................................... Page 30 Adding Reservations to an Event Leg ................................................................................ Page 30 Making Changes to a Reservation ..................................................................................... Page 31 Completing Events / Post-Flight Reporting ................................................................................ Page 31 Event Requests ................................................................................................................................ Page 32 Reports ............................................................................................................................................ Page 33 Locations .......................................................................................................................................... Page 34 Airports – Add Private Hanger .................................................................................................... Page 34 Hotels ......................................................................................................................................... Page 35 Quick Links to FltPlan.com ............................................................................................................... Page 36 Companion App ................................................................................................................................ Page 36 Installation and Login ................................................................................................................. Page 36 Calendar View ............................................................................................................................ Page 37 Event View ................................................................................................................................ Page 38 Entering Actuals ................................................................................................................. Page 38 Settings ................................................................................................................................ Page 39 Support & Training ............................................................................................................................ Page 39
FltLogic User’s Manual
4 | P a g e J a n u a r y 2 0 1 8
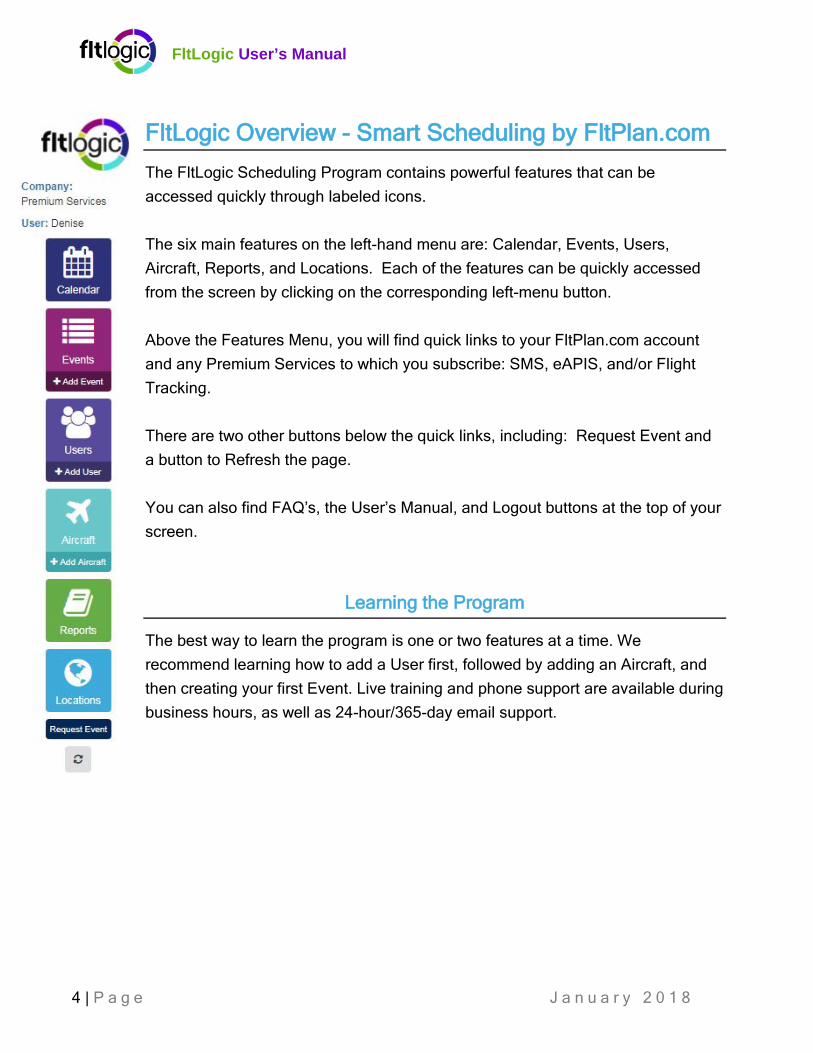
FltLogic Overview - Smart Scheduling by FltPlan.com The FltLogic Scheduling Program contains powerful features that can be accessed quickly through labeled icons. The six main features on the left-hand menu are: Calendar, Events, Users, Aircraft, Reports, and Locations. Each of the features can be quickly accessed from the screen by clicking on the corresponding left-menu button. Above the Features Menu, you will find quick links to your FltPlan.com account and any Premium Services to which you subscribe: SMS, eAPIS, and/or Flight Tracking. There are two other buttons below the quick links, including: Request Event and a button to Refresh the page. You can also find FAQ’s, the User’s Manual, and Logout buttons at the top of your screen.
Learning the Program
The best way to learn the program is one or two features at a time. We recommend learning how to add a User first, followed by adding an Aircraft, and then creating your first Event. Live training and phone support are available during business hours, as well as 24-hour/365-day email support.
FltLogic User’s Manual
5 | P a g e J a n u a r y 2 0 1 8
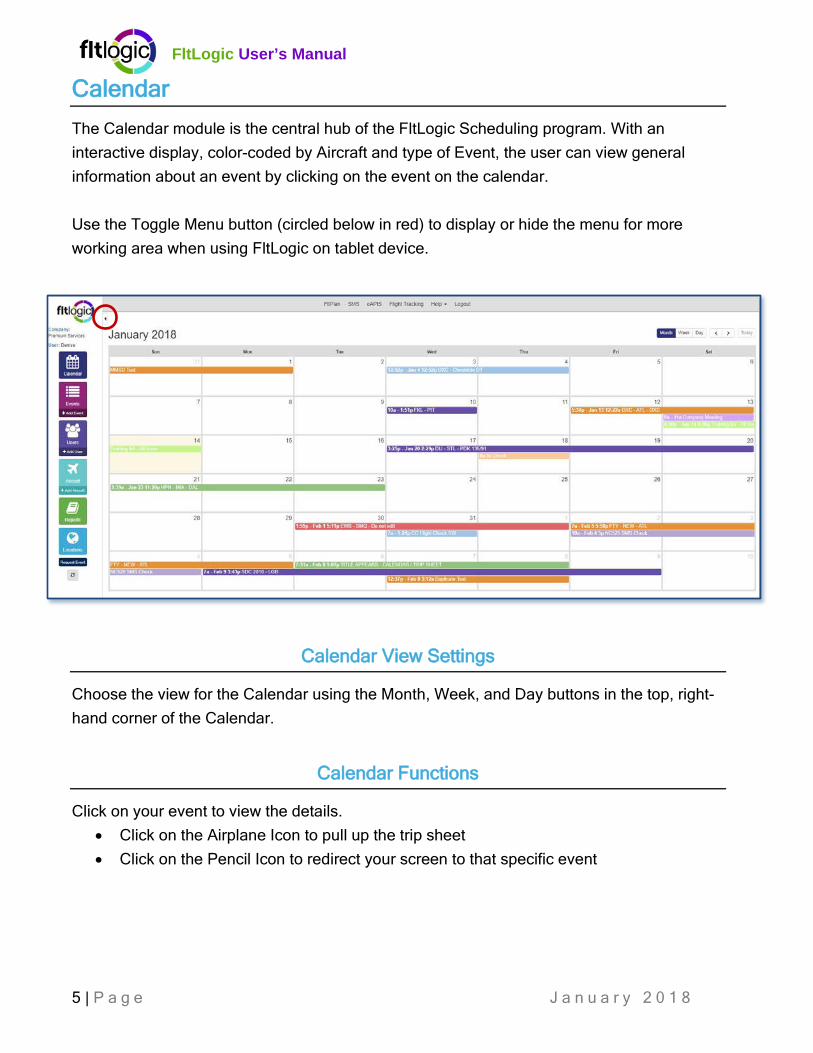
Calendar The Calendar module is the central hub of the FltLogic Scheduling program. With an interactive display, color-coded by Aircraft and type of Event, the user can view general information about an event by clicking on the event on the calendar. Use the Toggle Menu button (circled below in red) to display or hide the menu for more working area when using FltLogic on tablet device.
Calendar View Settings
Choose the view for the Calendar using the Month, Week, and Day buttons in the top, right-hand corner of the Calendar.
Calendar Functions
Click on your event to view the details. • Click on the Airplane Icon to pull up the trip sheet • Click on the Pencil Icon to redirect your screen to that specific event
FltLogic User’s Manual
6 | P a g e J a n u a r y 2 0 1 8
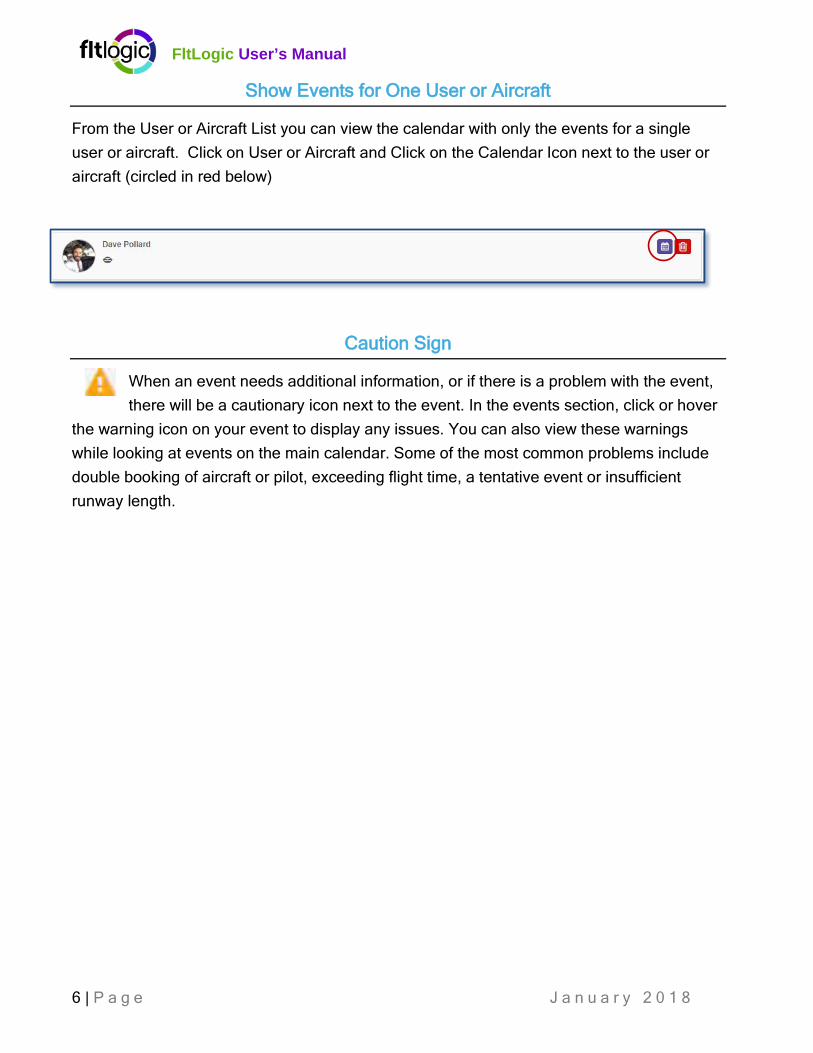
Show Events for One User or Aircraft
From the User or Aircraft List you can view the calendar with only the events for a single user or aircraft. Click on User or Aircraft and Click on the Calendar Icon next to the user or aircraft (circled in red below)
Caution Sign
When an event needs additional information, or if there is a problem with the event, there will be a cautionary icon next to the event. In the events section, click or hover
the warning icon on your event to display any issues. You can also view these warnings while looking at events on the main calendar. Some of the most common problems include double booking of aircraft or pilot, exceeding flight time, a tentative event or insufficient runway length.
FltLogic User’s Manual
7 | P a g e J a n u a r y 2 0 1 8
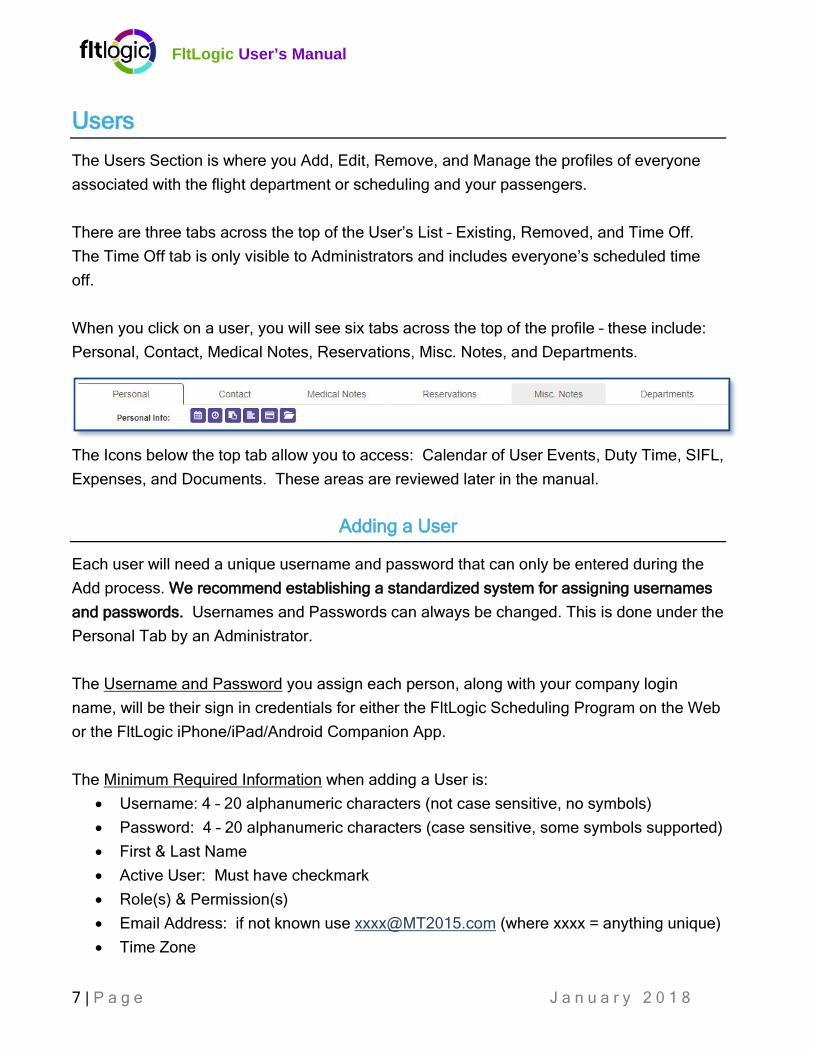
Users The Users Section is where you Add, Edit, Remove, and Manage the profiles of everyone associated with the flight department or scheduling and your passengers. There are three tabs across the top of the User’s List – Existing, Removed, and Time Off. The Time Off tab is only visible to Administrators and includes everyone’s scheduled time off. When you click on a user, you will see six tabs across the top of the profile – these include: Personal, Contact, Medical Notes, Reservations, Misc. Notes, and Departments.
The Icons below the top tab allow you to access: Calendar of User Events, Duty Time, SIFL, Expenses, and Documents. These areas are reviewed later in the manual.
Adding a User
Each user will need a unique username and password that can only be entered during the Add process. We recommend establishing a standardized system for assigning usernames and passwords. Usernames and Passwords can always be changed. This is done under the Personal Tab by an Administrator. The Username and Password you assign each person, along with your company login name, will be their sign in credentials for either the FltLogic Scheduling Program on the Web or the FltLogic iPhone/iPad/Android Companion App. The Minimum Required Information when adding a User is:
• Username: 4 – 20 alphanumeric characters (not case sensitive, no symbols) • Password: 4 – 20 alphanumeric characters (case sensitive, some symbols supported) • First & Last Name • Active User: Must have checkmark • Role(s) & Permission(s) • Email Address: if not known use [email protected] (where xxxx = anything unique) • Time Zone

FltLogic User’s Manual
8 | P a g e J a n u a r y 2 0 1 8
Personal Info
There are six icons at the top of the Personal Tab.
• Calendar – Click to view the Calendar with only the selected user’s events.
• Duty Time Periods – Click to enter the pilots Duty Time • Repeat Duty Time – Use to copy a standard Duty Time schedule to multiple days for
the next six months. • SIFL Report – access the User’s SIFL report • Expenses – View or enter expenses. User Expenses submitted from the FltLogic
Companion App will be listed here. • User Documents – Upload copies of any information you want to store for that user.
Roles & Permissions
The roles and permissions help to define what part each User plays in the program. The permissions are set by the Admin holder and allow access to different areas of the scheduling program and its contents. The Roles include:
1. Pilot – PIC & SIC 2. Dispatcher/Scheduler/Office Admin 3. Flight Staff 4. Primary Passenger – Passenger responsible for the group 5. Secondary Passenger – Standard Passenger 6. Event Requester – Person Entering the Event (Schedulers, Admin’s, Pilots) 7. Event Authorizer – Person who can authorize flights 8. Aircraft Owner – This view allows an A/C Owner to view when and where the plane is
flying, as well as pilots, flight staff, and passengers 9. Aircraft Owner Limited – The Limited View allows the A/C Owner to view when and
where the plane is flying but not the pilot or passenger information The Permissions include:
1. Admin (all permissions) 2. Edit Users – Add, view, or edit User information 3. Add/Delete Events – Ability to create new trips or delete trips from the Calendar 4. Edit Events – Can edit events but can’t create a new event or delete an event
FltLogic User’s Manual
9 | P a g e J a n u a r y 2 0 1 8
Permissions (cont.): 5. Add/Delete Aircraft – Ability to enter or delete an Aircraft 6. Edit Aircraft Info – Can edit Aircraft information but cannot create or delete an Aircraft 7. Set-Up/Edit FltPlan Connection – For Admins, Dispatchers, Schedulers, Pilots, or
anyone who uses the FltPlan.com account 8. *Admin (read-only) – The Admin “Read-Only” view allows a user to see the same
information as the Administrator, but no changes can be made 9. *Calendar View – The Calendar view allows a view of the color-coded calendar and
date and time information. All information about pilots, passengers, or locations is hidden. No detailed information can be viewed.
NOTE: Any permission marked with an asterisk *, cannot be combined with other roles or permissions.
Other User Information
After a User is created there are many areas where additional details can be added. When you click on a User’s name, their profile will open so you can see the details. The following tabs/icons are available in any Users’ profile: Personal, Contact, Medical Notes, Reservations, and Misc. notes.
Personal – The tab for Personal Information contains the following: • Username – User’s imported from the eAPIS system will have a username and
password of their “last name” + “first initial” (lower case) • Password – NOTE: This field can only be edited by the Admin or the User • Date of Birth • Employee Type – For SIFL Calculations • Time Zone – (Required) • Weight (lbs.) – Displays on the pilot log for Weight & Balance • Active – This will either say Yes (indicating Active Users) or No (Inactive Users).
Inactive users will not be able to log in • View Completed Events – Toggle calendar display to include or not included Events
marked Complete. • View Departments – Turn off or on the department selection when building an event • * FltPlan.com Account (if applicable) – See Linking to FltPlan.com (Pg. 13)
FltLogic User’s Manual
10 | P a g e J a n u a r y 2 0 1 8
Personal (cont.): • * SMS Account (if applicable) - See Linking to FltPlan.com (Pg. 13) • FltPlan Bias – Add up to 60 minutes to the filed departure time on FltPlan.com. Some
pilots use this to receive their clearance early or to prepare for passengers arriving early
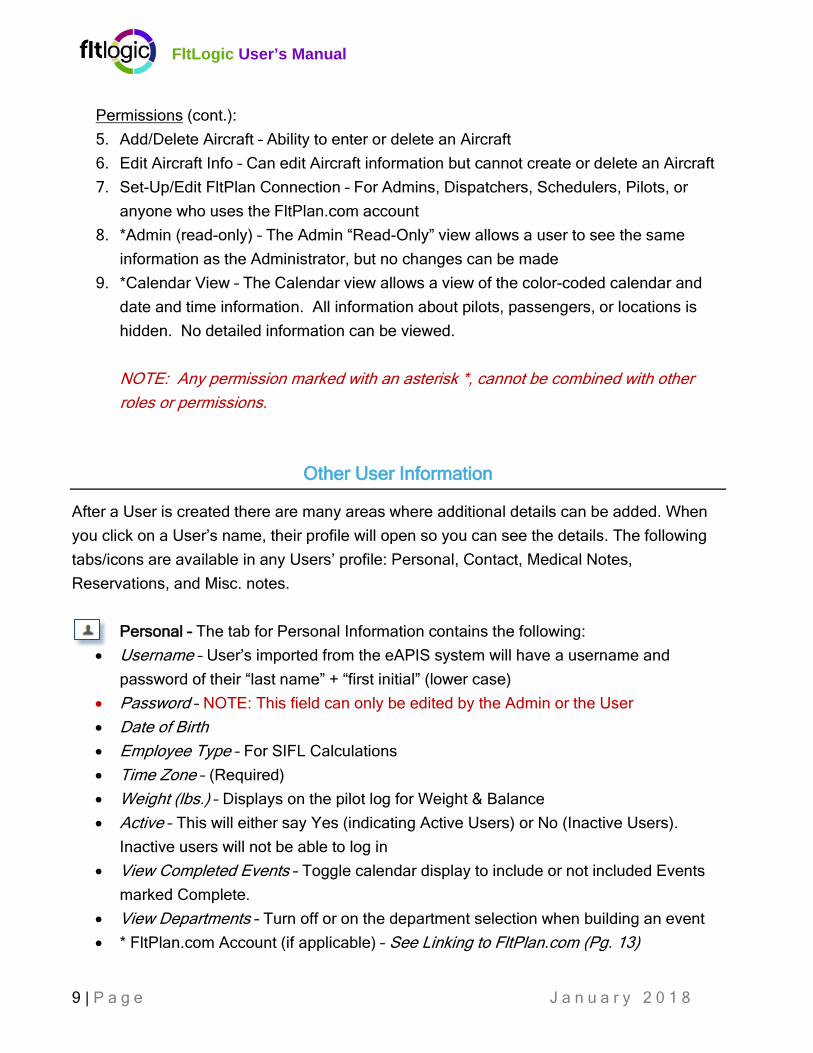
• Pilot Currency – Used to track Pilot Currency Add/Remove Pilot Currency
o Go to the Users Section and click on the pilot’s name o Click on the Personal Tab o Scroll down to Pilot Currency o Type the currency in the title box and expiration date to choose the due date o Click ADD tab and Update o To Remove – Click the trash can icon next to the currency to delete o Scroll to the bottom and click UPDATE
Contact – There are three sub-categories under the Contact Tab: Emails, Telephones, and Addresses.
Medical – Medical Notes can be stored here for possible allergies, disabilities or any special needs.
Reservations – Use this area to view reservations made using FlightBridge for Hotels, Transportation, Catering, and Limousines. FlightBridge lists any negotiated or discounted aviation pricing and availability. Pre-negotiated pricing is indicated by a “yellow background” and you will see an indication of whether discounted rates are available. (See Flight Bridge under Events for detailed instructions.)
FltLogic User’s Manual
11 | P a g e J a n u a r y 2 0 1 8
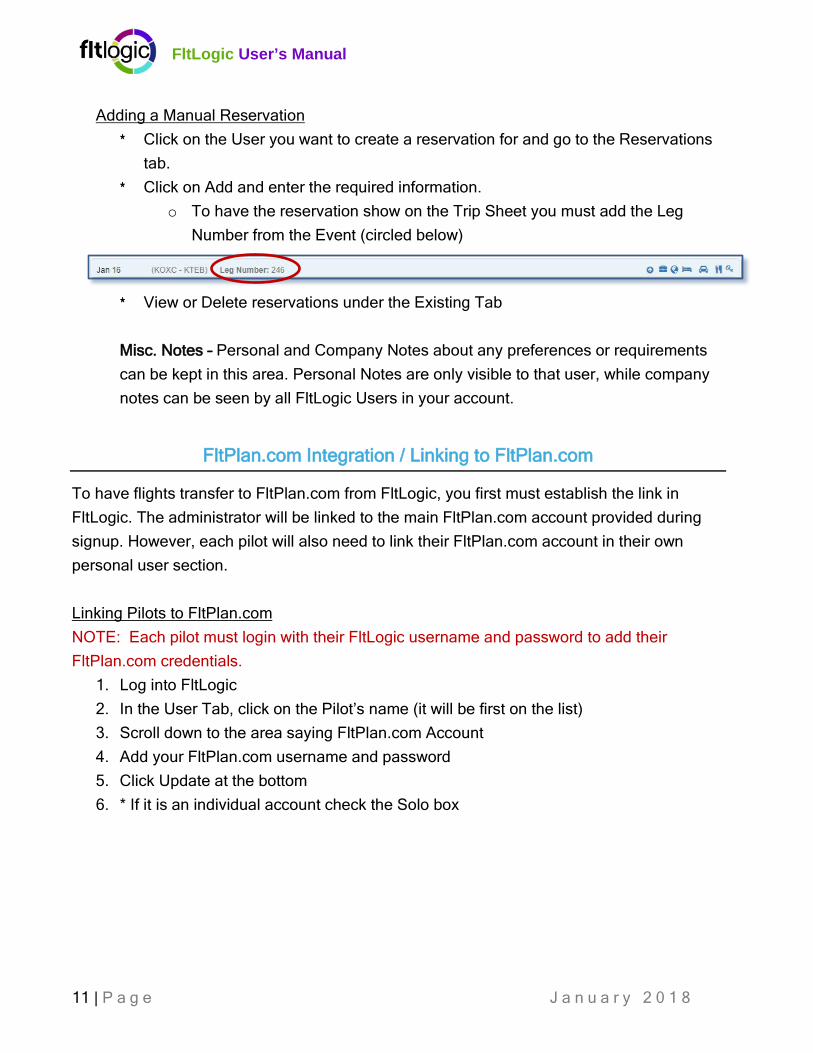
Adding a Manual Reservation
* Click on the User you want to create a reservation for and go to the Reservations tab.
* Click on Add and enter the required information. o To have the reservation show on the Trip Sheet you must add the Leg
Number from the Event (circled below)
* View or Delete reservations under the Existing Tab Misc. Notes – Personal and Company Notes about any preferences or requirements can be kept in this area. Personal Notes are only visible to that user, while company notes can be seen by all FltLogic Users in your account.
FltPlan.com Integration / Linking to FltPlan.com
To have flights transfer to FltPlan.com from FltLogic, you first must establish the link in FltLogic. The administrator will be linked to the main FltPlan.com account provided during signup. However, each pilot will also need to link their FltPlan.com account in their own personal user section. Linking Pilots to FltPlan.com NOTE: Each pilot must login with their FltLogic username and password to add their FltPlan.com credentials.
1. Log into FltLogic 2. In the User Tab, click on the Pilot’s name (it will be first on the list) 3. Scroll down to the area saying FltPlan.com Account 4. Add your FltPlan.com username and password 5. Click Update at the bottom 6. * If it is an individual account check the Solo box
FltLogic User’s Manual
12 | P a g e J a n u a r y 2 0 1 8
FltPlan.com Integration
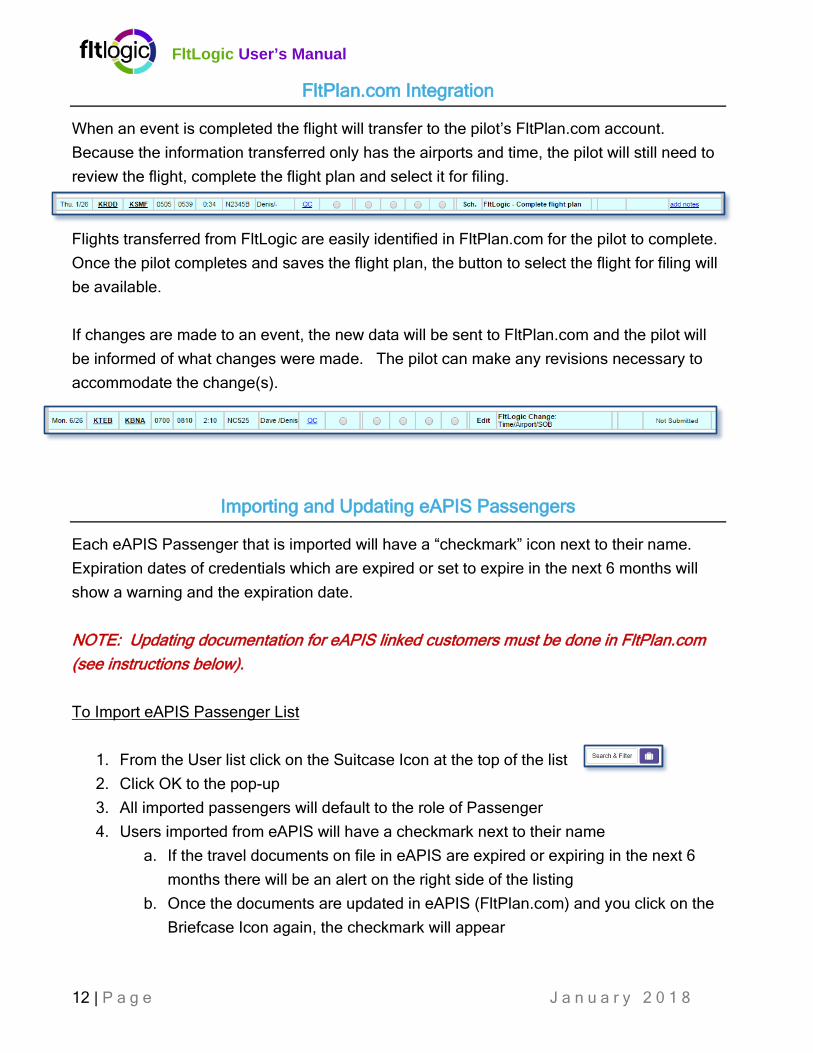
When an event is completed the flight will transfer to the pilot’s FltPlan.com account. Because the information transferred only has the airports and time, the pilot will still need to review the flight, complete the flight plan and select it for filing.
Flights transferred from FltLogic are easily identified in FltPlan.com for the pilot to complete. Once the pilot completes and saves the flight plan, the button to select the flight for filing will be available. If changes are made to an event, the new data will be sent to FltPlan.com and the pilot will be informed of what changes were made. The pilot can make any revisions necessary to accommodate the change(s).
Importing and Updating eAPIS Passengers
Each eAPIS Passenger that is imported will have a “checkmark” icon next to their name. Expiration dates of credentials which are expired or set to expire in the next 6 months will show a warning and the expiration date. NOTE: Updating documentation for eAPIS linked customers must be done in FltPlan.com (see instructions below). To Import eAPIS Passenger List
1. From the User list click on the Suitcase Icon at the top of the list 2. Click OK to the pop-up 3. All imported passengers will default to the role of Passenger 4. Users imported from eAPIS will have a checkmark next to their name
a. If the travel documents on file in eAPIS are expired or expiring in the next 6 months there will be an alert on the right side of the listing
b. Once the documents are updated in eAPIS (FltPlan.com) and you click on the Briefcase Icon again, the checkmark will appear
FltLogic User’s Manual
13 | P a g e J a n u a r y 2 0 1 8
Import eAPIS Passenger List (cont.):
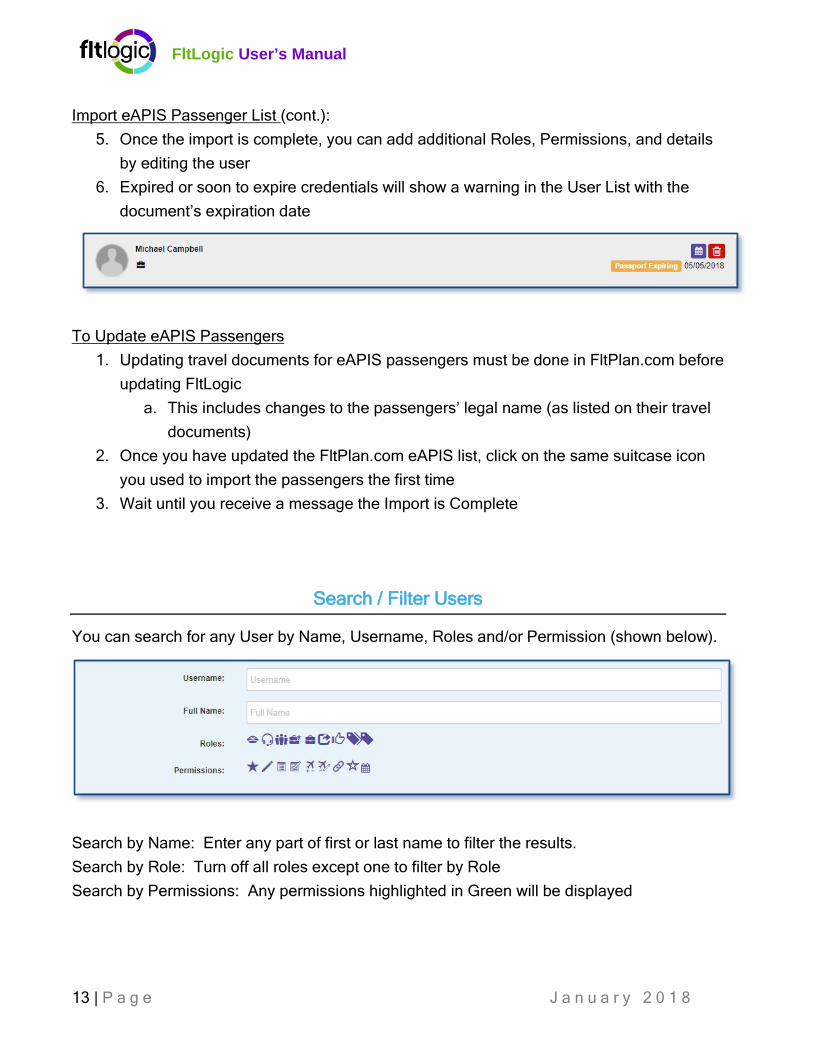
5. Once the import is complete, you can add additional Roles, Permissions, and details by editing the user
6. Expired or soon to expire credentials will show a warning in the User List with the document’s expiration date
To Update eAPIS Passengers
1. Updating travel documents for eAPIS passengers must be done in FltPlan.com before updating FltLogic
a. This includes changes to the passengers’ legal name (as listed on their travel documents)
2. Once you have updated the FltPlan.com eAPIS list, click on the same suitcase icon you used to import the passengers the first time
3. Wait until you receive a message the Import is Complete
Search / Filter Users
You can search for any User by Name, Username, Roles and/or Permission (shown below).
Search by Name: Enter any part of first or last name to filter the results. Search by Role: Turn off all roles except one to filter by Role Search by Permissions: Any permissions highlighted in Green will be displayed
FltLogic User’s Manual
14 | P a g e J a n u a r y 2 0 1 8
Time Off Calendar
Time off can be scheduled within each user’s account. The administrator has access to a full Time Off Calendar and list, showing time off entered in all user accounts. To Enter Scheduled Time Off:
1. Select the user you are scheduling time off for 2. Click on the Calendar Icon in the Personal Tab 3. Select the Time Off Tab 4. Add or Delete Scheduled Time Off
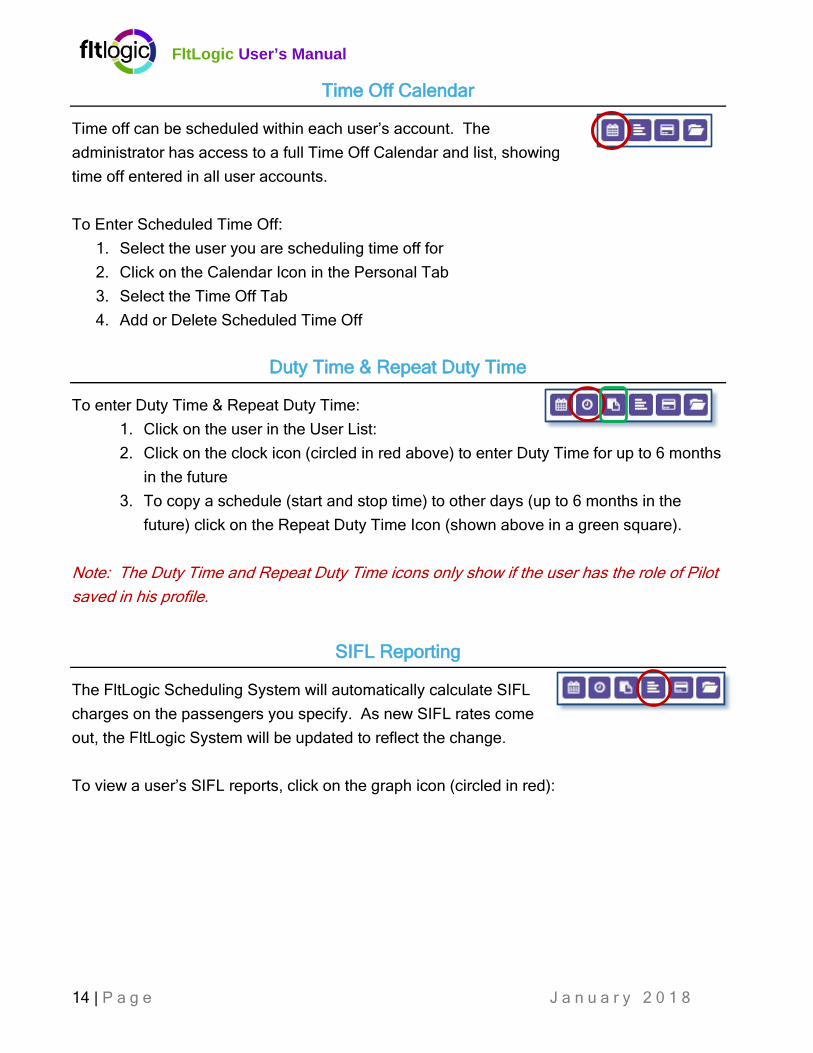
Duty Time & Repeat Duty Time
To enter Duty Time & Repeat Duty Time: 1. Click on the user in the User List: 2. Click on the clock icon (circled in red above) to enter Duty Time for up to 6 months
in the future 3. To copy a schedule (start and stop time) to other days (up to 6 months in the
future) click on the Repeat Duty Time Icon (shown above in a green square). Note: The Duty Time and Repeat Duty Time icons only show if the user has the role of Pilot saved in his profile.
SIFL Reporting
The FltLogic Scheduling System will automatically calculate SIFL charges on the passengers you specify. As new SIFL rates come out, the FltLogic System will be updated to reflect the change. To view a user’s SIFL reports, click on the graph icon (circled in red):
FltLogic User’s Manual
15 | P a g e J a n u a r y 2 0 1 8
Expenses
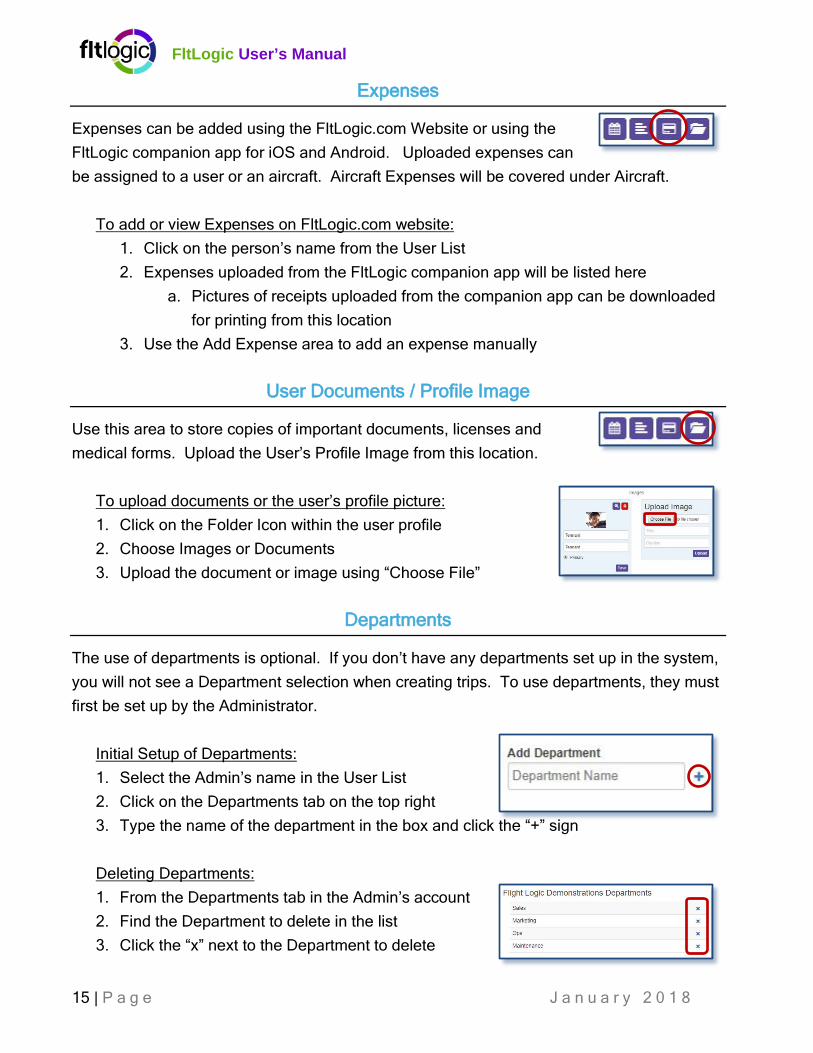
Expenses can be added using the FltLogic.com Website or using the FltLogic companion app for iOS and Android. Uploaded expenses can be assigned to a user or an aircraft. Aircraft Expenses will be covered under Aircraft.
To add or view Expenses on FltLogic.com website: 1. Click on the person’s name from the User List 2. Expenses uploaded from the FltLogic companion app will be listed here
a. Pictures of receipts uploaded from the companion app can be downloaded for printing from this location
3. Use the Add Expense area to add an expense manually
User Documents / Profile Image
Use this area to store copies of important documents, licenses and medical forms. Upload the User’s Profile Image from this location.
To upload documents or the user’s profile picture: 1. Click on the Folder Icon within the user profile 2. Choose Images or Documents 3. Upload the document or image using “Choose File”
Departments
The use of departments is optional. If you don’t have any departments set up in the system, you will not see a Department selection when creating trips. To use departments, they must first be set up by the Administrator.
Initial Setup of Departments: 1. Select the Admin’s name in the User List 2. Click on the Departments tab on the top right 3. Type the name of the department in the box and click the “+” sign
Deleting Departments: 1. From the Departments tab in the Admin’s account 2. Find the Department to delete in the list 3. Click the “x” next to the Department to delete
FltLogic User’s Manual
16 | P a g e J a n u a r y 2 0 1 8
Aircrafts Aircrafts is where you Add, View, Edit the Aircraft for your FltLogic Program. There are two main tabs in the Aircraft Section: Info and Currency.
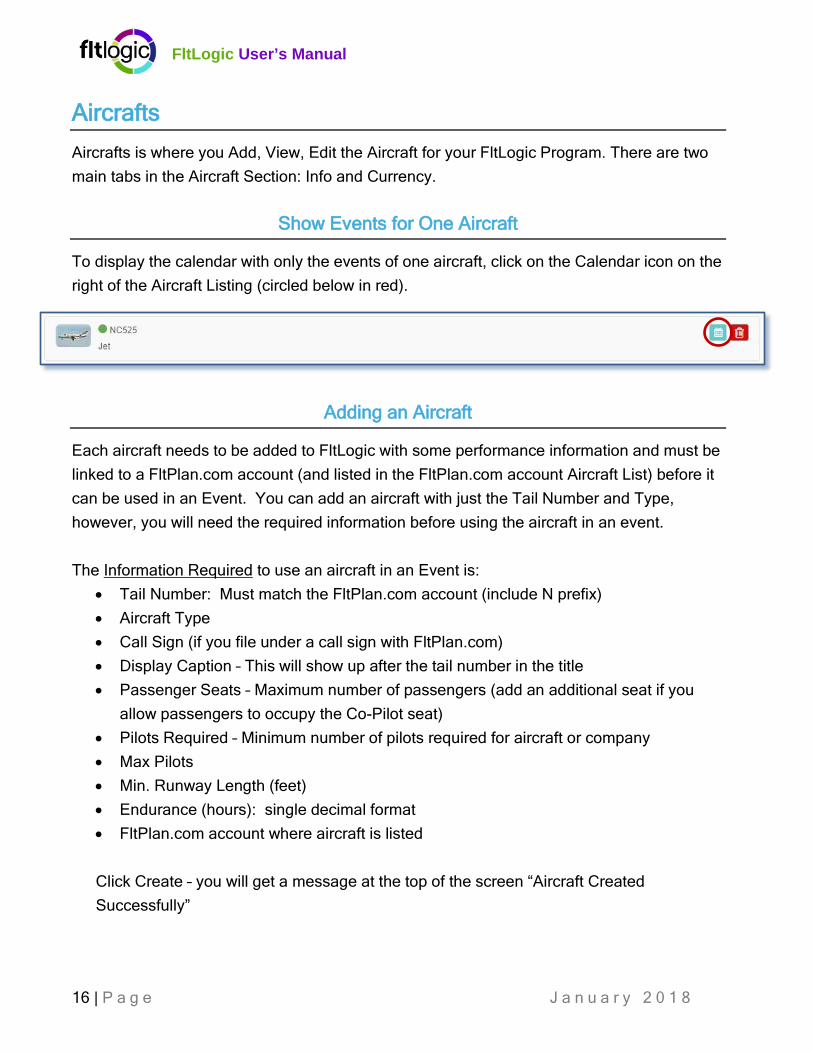
Show Events for One Aircraft
To display the calendar with only the events of one aircraft, click on the Calendar icon on the right of the Aircraft Listing (circled below in red).
Adding an Aircraft
Each aircraft needs to be added to FltLogic with some performance information and must be linked to a FltPlan.com account (and listed in the FltPlan.com account Aircraft List) before it can be used in an Event. You can add an aircraft with just the Tail Number and Type, however, you will need the required information before using the aircraft in an event. The Information Required to use an aircraft in an Event is:
• Tail Number: Must match the FltPlan.com account (include N prefix) • Aircraft Type • Call Sign (if you file under a call sign with FltPlan.com) • Display Caption – This will show up after the tail number in the title • Passenger Seats – Maximum number of passengers (add an additional seat if you
allow passengers to occupy the Co-Pilot seat) • Pilots Required – Minimum number of pilots required for aircraft or company • Max Pilots • Min. Runway Length (feet) • Endurance (hours): single decimal format • FltPlan.com account where aircraft is listed Click Create – you will get a message at the top of the screen “Aircraft Created Successfully”
FltLogic User’s Manual
17 | P a g e J a n u a r y 2 0 1 8
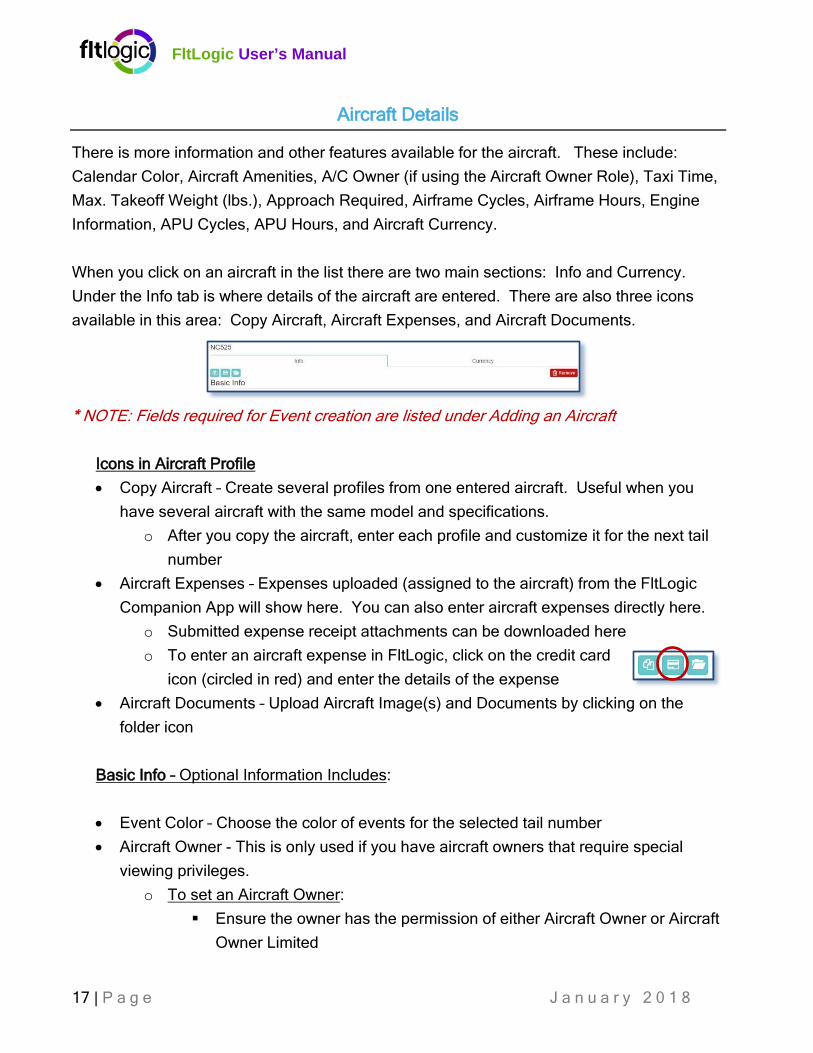
Aircraft Details
There is more information and other features available for the aircraft. These include: Calendar Color, Aircraft Amenities, A/C Owner (if using the Aircraft Owner Role), Taxi Time, Max. Takeoff Weight (lbs.), Approach Required, Airframe Cycles, Airframe Hours, Engine Information, APU Cycles, APU Hours, and Aircraft Currency. When you click on an aircraft in the list there are two main sections: Info and Currency. Under the Info tab is where details of the aircraft are entered. There are also three icons available in this area: Copy Aircraft, Aircraft Expenses, and Aircraft Documents. * NOTE: Fields required for Event creation are listed under Adding an Aircraft Icons in Aircraft Profile
• Copy Aircraft – Create several profiles from one entered aircraft. Useful when you have several aircraft with the same model and specifications.
o After you copy the aircraft, enter each profile and customize it for the next tail number
• Aircraft Expenses – Expenses uploaded (assigned to the aircraft) from the FltLogic Companion App will show here. You can also enter aircraft expenses directly here.
o Submitted expense receipt attachments can be downloaded here o To enter an aircraft expense in FltLogic, click on the credit card
icon (circled in red) and enter the details of the expense • Aircraft Documents – Upload Aircraft Image(s) and Documents by clicking on the
folder icon Basic Info – Optional Information Includes:
• Event Color – Choose the color of events for the selected tail number • Aircraft Owner - This is only used if you have aircraft owners that require special
viewing privileges. o To set an Aircraft Owner:
Ensure the owner has the permission of either Aircraft Owner or Aircraft Owner Limited
FltLogic User’s Manual
18 | P a g e J a n u a r y 2 0 1 8
⋅ Aircraft Owner can see all trip details, crew, and passengers ⋅ Aircraft Owner Limited can see dates and the location of the
aircraft, but cannot see the crew or passengers Choose the owner from the drop-down list and click the blue plus sign to
the right Scroll to the bottom and hit SAVE
Performance Info - Optional Information Includes:
• Maximum Takeoff Weight • Approach Type – IFR / ILS Required • Taxi Out / Taxi In – If you have a default taxi time you can enter it here. It will then
automatically be added to every event leg. Adjustments can be made during trip creation.
• Airframe Cycles – Cumulative Cycles (from Pilot Report) o This field can be edited to add in Airframe cycles accumulated prior to using
FltLogic or for adding in airframe cycles for trips not in the FltLogic System. • Airframe Hours – Cumulative Flight Time (from Pilot Report)
o This field can be edited to add in Airframe hours accumulated prior to using FltLogic or for adding in flight time for trips not in the FltLogic System.
• APU Cycles – as reported on Pilot Log • APU Hours – as reported on Pilot Log
o Engines Information - • Authorized Captains • Authorized Co-Pilots
FltPlan.com Username – Username of FltPlan.com account containing the aircraft listing
Aircraft Currency – Use this area to add reminders for required aircraft maintenance • Click on the Currency Tab at the top of the aircraft details • Enter the details and due date for the maintenance • After completion, delete the currency from the list with the Trashcan Icon • Enter the new date under Add Currency
FltLogic User’s Manual
19 | P a g e J a n u a r y 2 0 1 8
Events Tab The Events area is where the most work is done. There are four types of events: Flights; Maintenance; Training; and Other.
• Flights – Create a standard flight • Maintenance – Aircraft maintenance making the plane unavailable for flights • Training – Training involving an aircraft • Other – Any event that does not involve an aircraft
Events Layout
In the Events view, use the top tabs to navigate between events of different types.
To locate an event: • Choose the event type - Flight, Maintenance, Training, Other • Choose the correct status column – Existing, Completed, Requested, Removed
Information and Functions Available from the Event List / Event List Icons
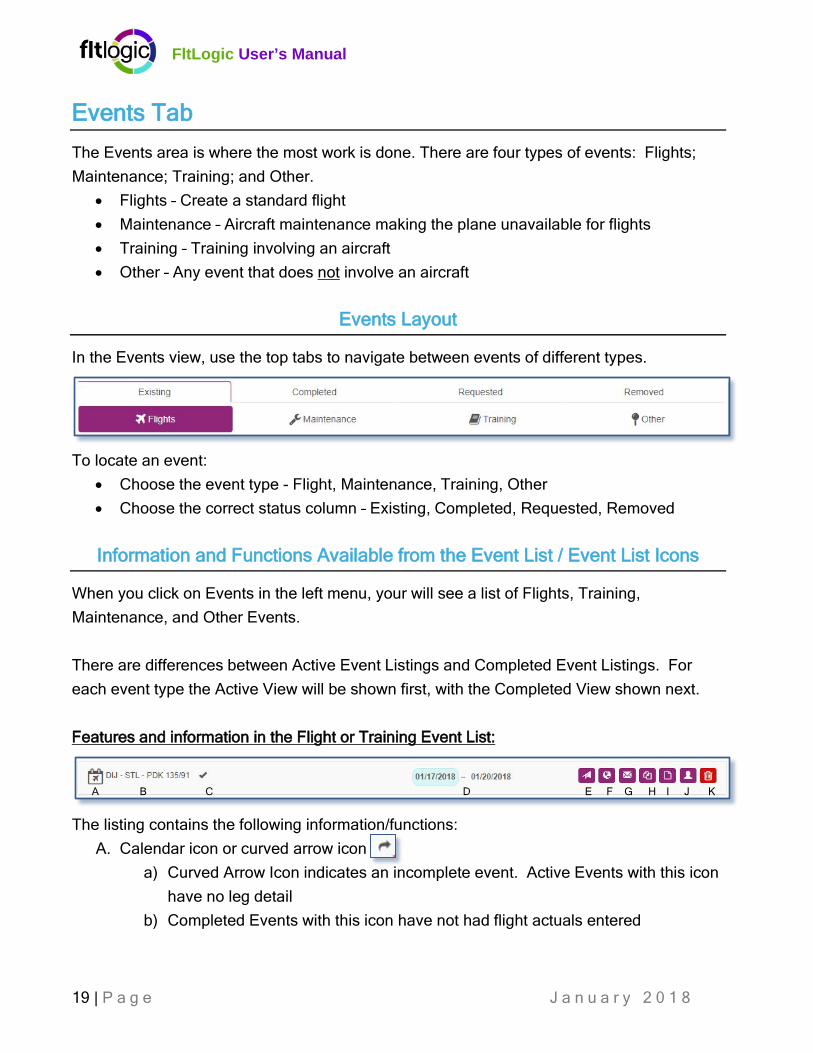
When you click on Events in the left menu, your will see a list of Flights, Training, Maintenance, and Other Events. There are differences between Active Event Listings and Completed Event Listings. For each event type the Active View will be shown first, with the Completed View shown next. Features and information in the Flight or Training Event List:
The listing contains the following information/functions: A. Calendar icon or curved arrow icon
a) Curved Arrow Icon indicates an incomplete event. Active Events with this icon have no leg detail
b) Completed Events with this icon have not had flight actuals entered
A B C D E F G H I J K
FltLogic User’s Manual
20 | P a g e J a n u a r y 2 0 1 8
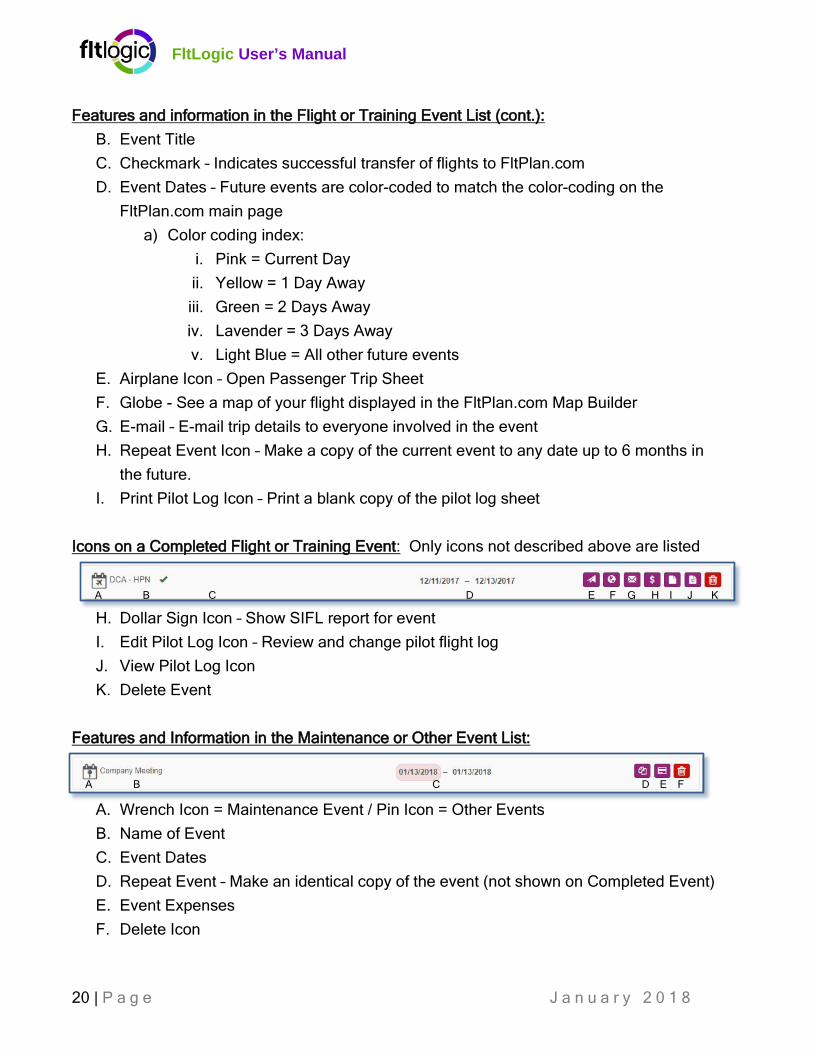
Features and information in the Flight or Training Event List (cont.):
B. Event Title C. Checkmark – Indicates successful transfer of flights to FltPlan.com D. Event Dates – Future events are color-coded to match the color-coding on the
FltPlan.com main page a) Color coding index:
i. Pink = Current Day ii. Yellow = 1 Day Away iii. Green = 2 Days Away iv. Lavender = 3 Days Away v. Light Blue = All other future events
E. Airplane Icon – Open Passenger Trip Sheet F. Globe - See a map of your flight displayed in the FltPlan.com Map Builder G. E-mail – E-mail trip details to everyone involved in the event H. Repeat Event Icon – Make a copy of the current event to any date up to 6 months in
the future. I. Print Pilot Log Icon – Print a blank copy of the pilot log sheet
Icons on a Completed Flight or Training Event: Only icons not described above are listed
H. Dollar Sign Icon – Show SIFL report for event I. Edit Pilot Log Icon – Review and change pilot flight log J. View Pilot Log Icon K. Delete Event
Features and Information in the Maintenance or Other Event List:
A. Calendar Icon with Wrench or Pin for Maintenance and Other Events A. Wrench Icon = Maintenance Event / Pin Icon = Other Events B. Name of Event C. Event Dates D. Repeat Event – Make an identical copy of the event (not shown on Completed Event) E. Event Expenses F. Delete Icon
A B C D E F G H I J K
A B C D E F
FltLogic User’s Manual
21 | P a g e J a n u a r y 2 0 1 8
Creating an Event: Flight and Training Events
To create a new Flight Event, click on the bottom of the Events Menu Button. The bottom of the button is a darker color and reads “+ Add Event”. Training events include locations, leg detail, and/or reservations and are created the same way as flights events. To schedule a training event without location and leg details, do not select an aircraft. Create a New Flight or Training Event:
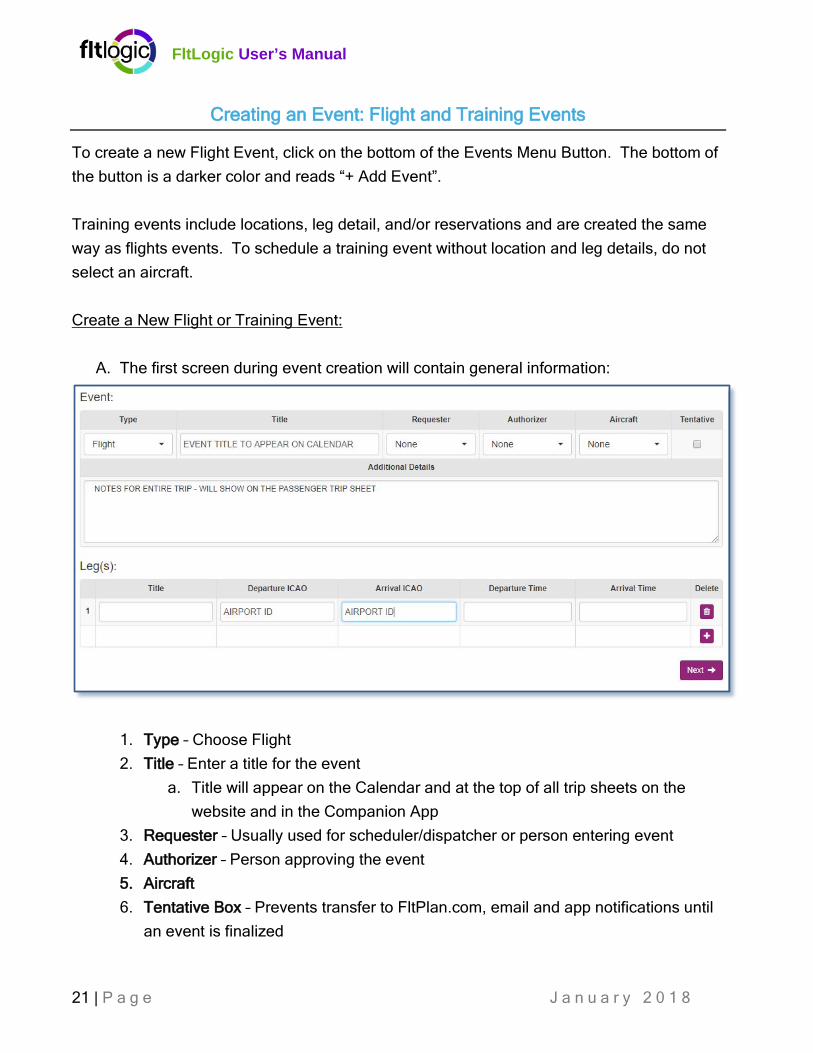
A. The first screen during event creation will contain general information:
1. Type – Choose Flight 2. Title – Enter a title for the event
a. Title will appear on the Calendar and at the top of all trip sheets on the website and in the Companion App
3. Requester – Usually used for scheduler/dispatcher or person entering event 4. Authorizer – Person approving the event 5. Aircraft 6. Tentative Box – Prevents transfer to FltPlan.com, email and app notifications until
an event is finalized
FltLogic User’s Manual
22 | P a g e J a n u a r y 2 0 1 8
7. Additional Details - Passenger notes for entire trip 8. Leg(s):
a. Title b. Departure – Enter the ICAO identifier for airport c. Arrival Airport – ICAO ID d. Departure and Arrival Time – choose either the departure or arrival time and
the system will calculate the other value i. Calculate based on departure time ii. Calculate based on arrival time
e. “Plus Sign” Icon – Add next leg detail 9. Next Button – After all legs are entered, click on the next button to continue
building the event.
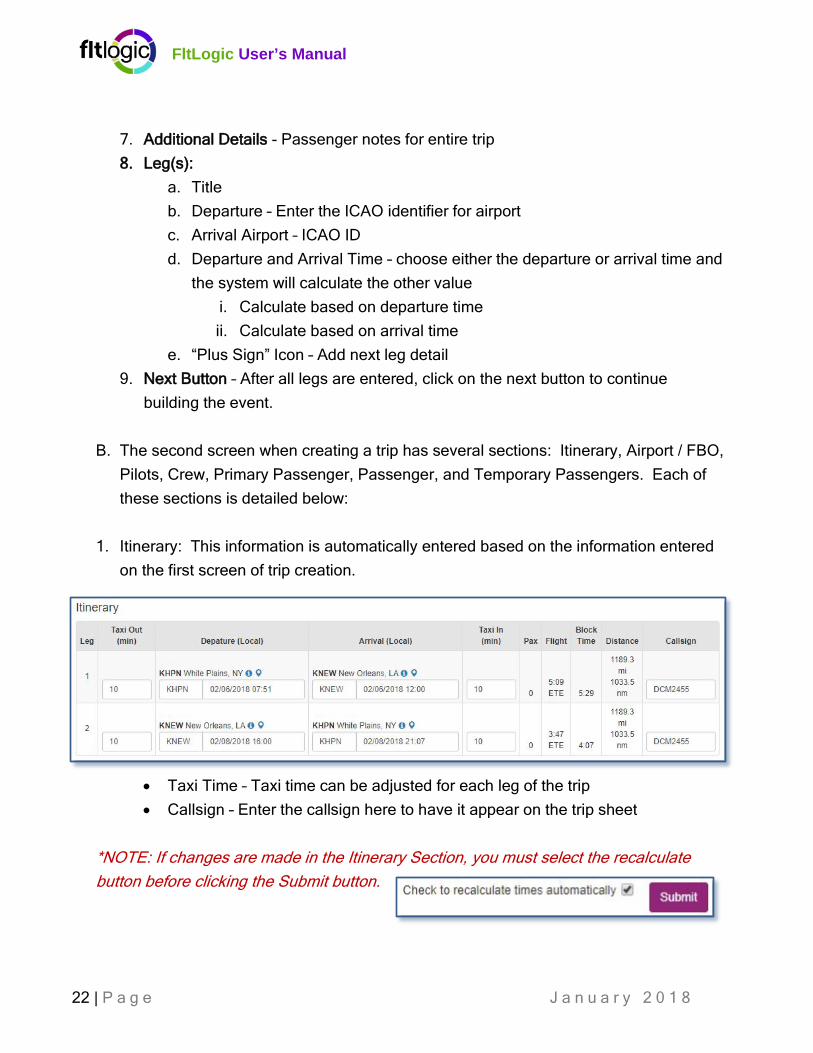
B. The second screen when creating a trip has several sections: Itinerary, Airport / FBO, Pilots, Crew, Primary Passenger, Passenger, and Temporary Passengers. Each of these sections is detailed below:
1. Itinerary: This information is automatically entered based on the information entered
on the first screen of trip creation.
• Taxi Time – Taxi time can be adjusted for each leg of the trip • Callsign – Enter the callsign here to have it appear on the trip sheet
*NOTE: If changes are made in the Itinerary Section, you must select the recalculate button before clicking the Submit button.
FltLogic User’s Manual
23 | P a g e J a n u a r y 2 0 1 8
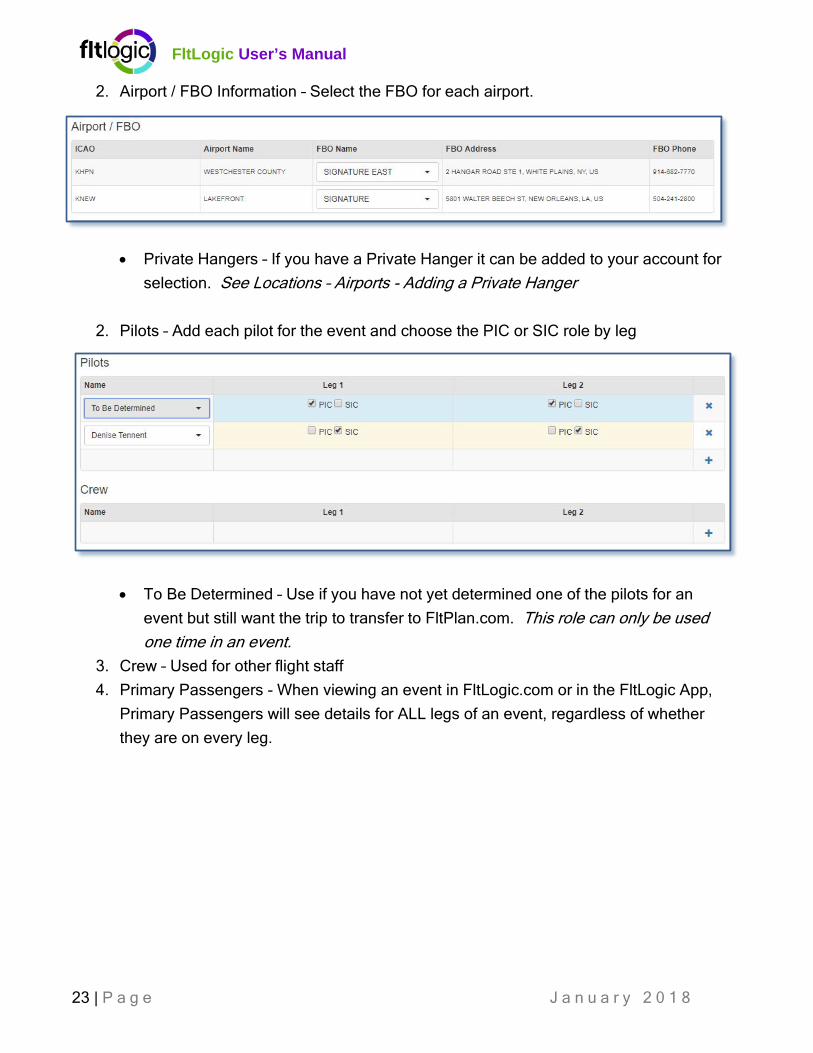
2. Airport / FBO Information – Select the FBO for each airport.
• Private Hangers – If you have a Private Hanger it can be added to your account for selection. See Locations – Airports - Adding a Private Hanger
2. Pilots – Add each pilot for the event and choose the PIC or SIC role by leg
• To Be Determined – Use if you have not yet determined one of the pilots for an event but still want the trip to transfer to FltPlan.com. This role can only be used one time in an event.
3. Crew – Used for other flight staff 4. Primary Passengers - When viewing an event in FltLogic.com or in the FltLogic App,
Primary Passengers will see details for ALL legs of an event, regardless of whether they are on every leg.
FltLogic User’s Manual
24 | P a g e J a n u a r y 2 0 1 8
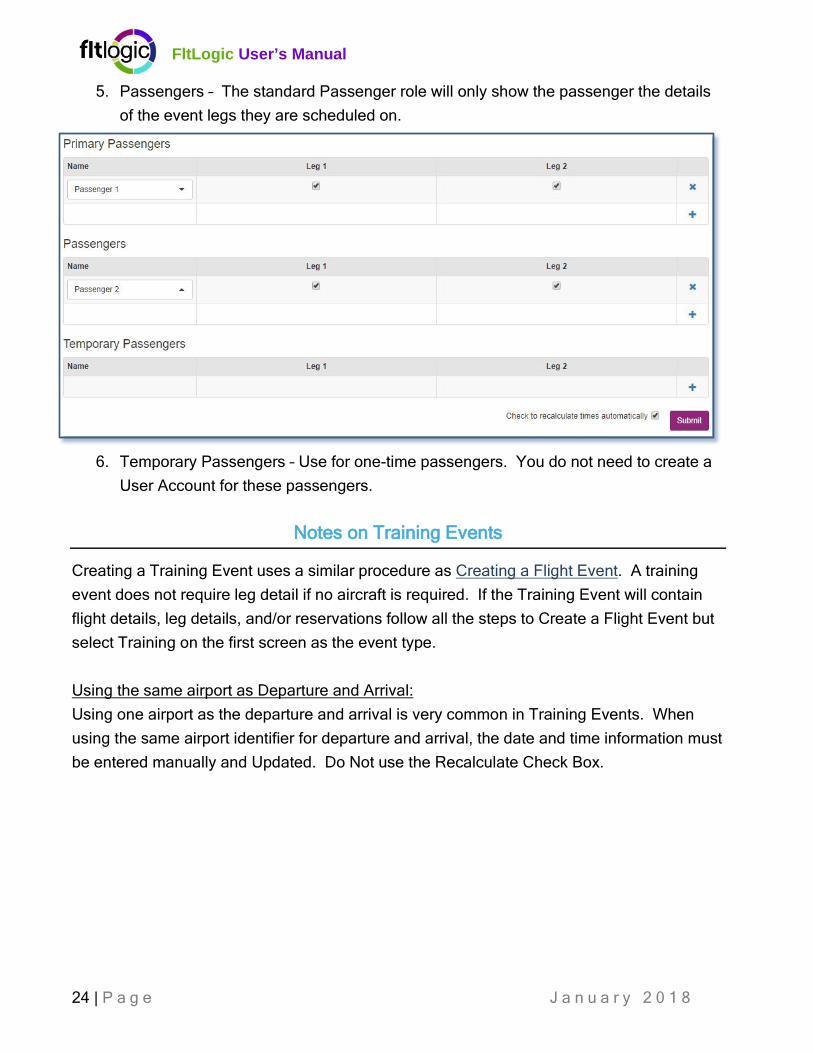
5. Passengers – The standard Passenger role will only show the passenger the details of the event legs they are scheduled on.
6. Temporary Passengers – Use for one-time passengers. You do not need to create a User Account for these passengers.
Notes on Training Events
Creating a Training Event uses a similar procedure as Creating a Flight Event. A training event does not require leg detail if no aircraft is required. If the Training Event will contain flight details, leg details, and/or reservations follow all the steps to Create a Flight Event but select Training on the first screen as the event type. Using the same airport as Departure and Arrival: Using one airport as the departure and arrival is very common in Training Events. When using the same airport identifier for departure and arrival, the date and time information must be entered manually and Updated. Do Not use the Recalculate Check Box.
FltLogic User’s Manual
25 | P a g e J a n u a r y 2 0 1 8
Adding Legs to an Existing Event
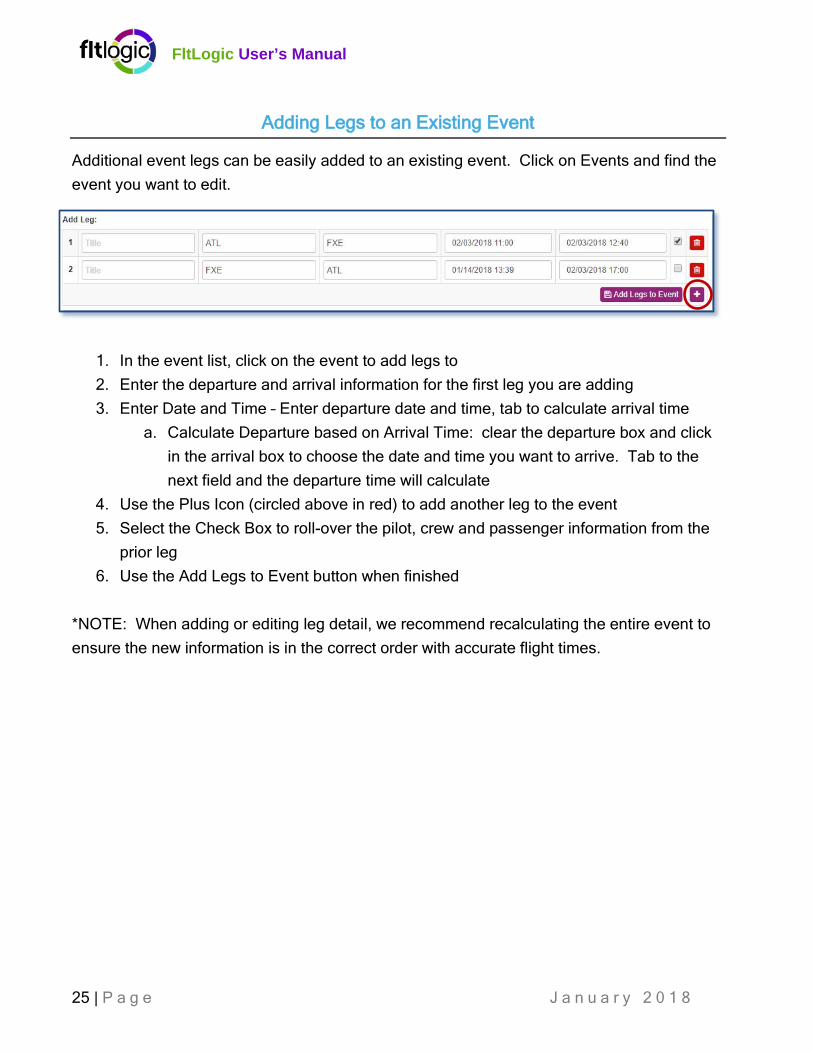
Additional event legs can be easily added to an existing event. Click on Events and find the event you want to edit.
1. In the event list, click on the event to add legs to 2. Enter the departure and arrival information for the first leg you are adding 3. Enter Date and Time – Enter departure date and time, tab to calculate arrival time
a. Calculate Departure based on Arrival Time: clear the departure box and click in the arrival box to choose the date and time you want to arrive. Tab to the next field and the departure time will calculate
4. Use the Plus Icon (circled above in red) to add another leg to the event 5. Select the Check Box to roll-over the pilot, crew and passenger information from the
prior leg 6. Use the Add Legs to Event button when finished
*NOTE: When adding or editing leg detail, we recommend recalculating the entire event to ensure the new information is in the correct order with accurate flight times.
FltLogic User’s Manual
26 | P a g e J a n u a r y 2 0 1 8
Creating an Event: Maintenance and Other Events
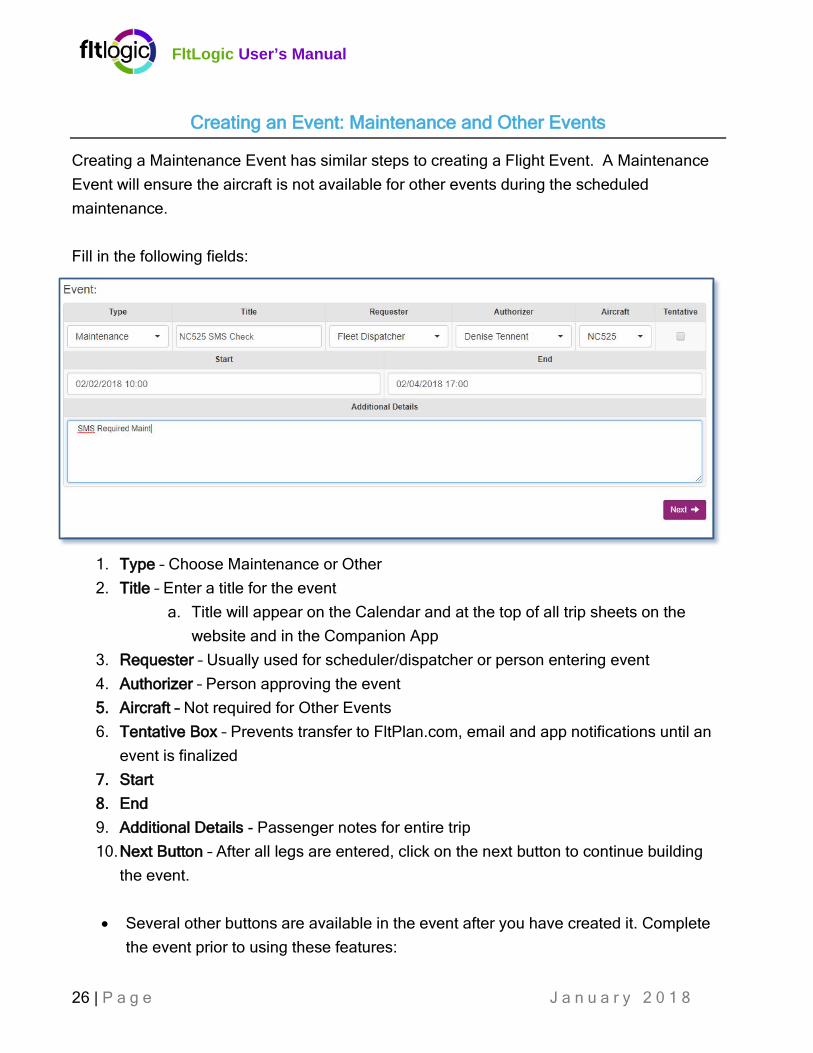
Creating a Maintenance Event has similar steps to creating a Flight Event. A Maintenance Event will ensure the aircraft is not available for other events during the scheduled maintenance. Fill in the following fields:
1. Type – Choose Maintenance or Other 2. Title – Enter a title for the event
a. Title will appear on the Calendar and at the top of all trip sheets on the website and in the Companion App
3. Requester – Usually used for scheduler/dispatcher or person entering event 4. Authorizer – Person approving the event 5. Aircraft – Not required for Other Events 6. Tentative Box – Prevents transfer to FltPlan.com, email and app notifications until an
event is finalized 7. Start 8. End 9. Additional Details - Passenger notes for entire trip 10. Next Button – After all legs are entered, click on the next button to continue building
the event.
• Several other buttons are available in the event after you have created it. Complete the event prior to using these features:
FltLogic User’s Manual
27 | P a g e J a n u a r y 2 0 1 8
1) Tentative – Prevents any email notifications until the button is unselected 2) Complete – Select after event is completed 3) Event Color – Select the color to appear on the calendar 4) External Email: Email the trip to a party not on the trip 5) Participants – Select anyone involved in the event. Anyone selected as a
participant will have the event appear on their calendar in in the FltLogic App. 6) Export: After completing an event, use this button to export individual trip
details as a Shared Calendar (.ics) file
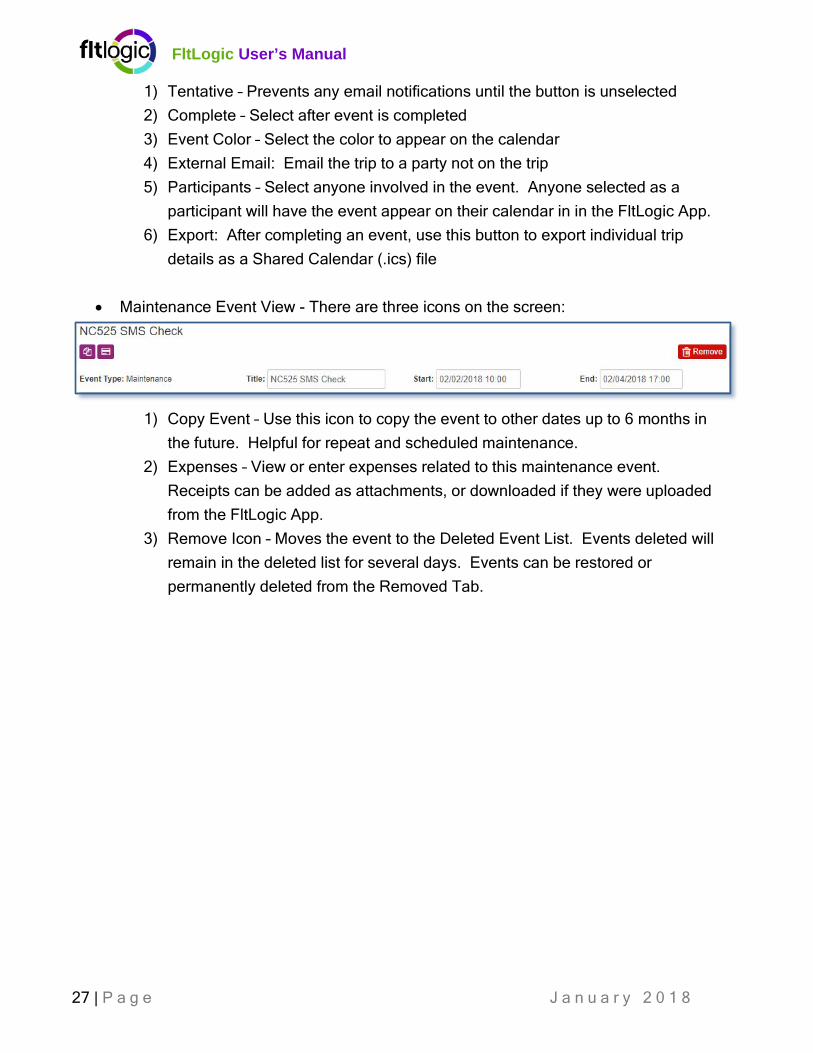
• Maintenance Event View - There are three icons on the screen:
1) Copy Event – Use this icon to copy the event to other dates up to 6 months in the future. Helpful for repeat and scheduled maintenance.
2) Expenses – View or enter expenses related to this maintenance event. Receipts can be added as attachments, or downloaded if they were uploaded from the FltLogic App.
3) Remove Icon – Moves the event to the Deleted Event List. Events deleted will remain in the deleted list for several days. Events can be restored or permanently deleted from the Removed Tab.
FltLogic User’s Manual
28 | P a g e J a n u a r y 2 0 1 8
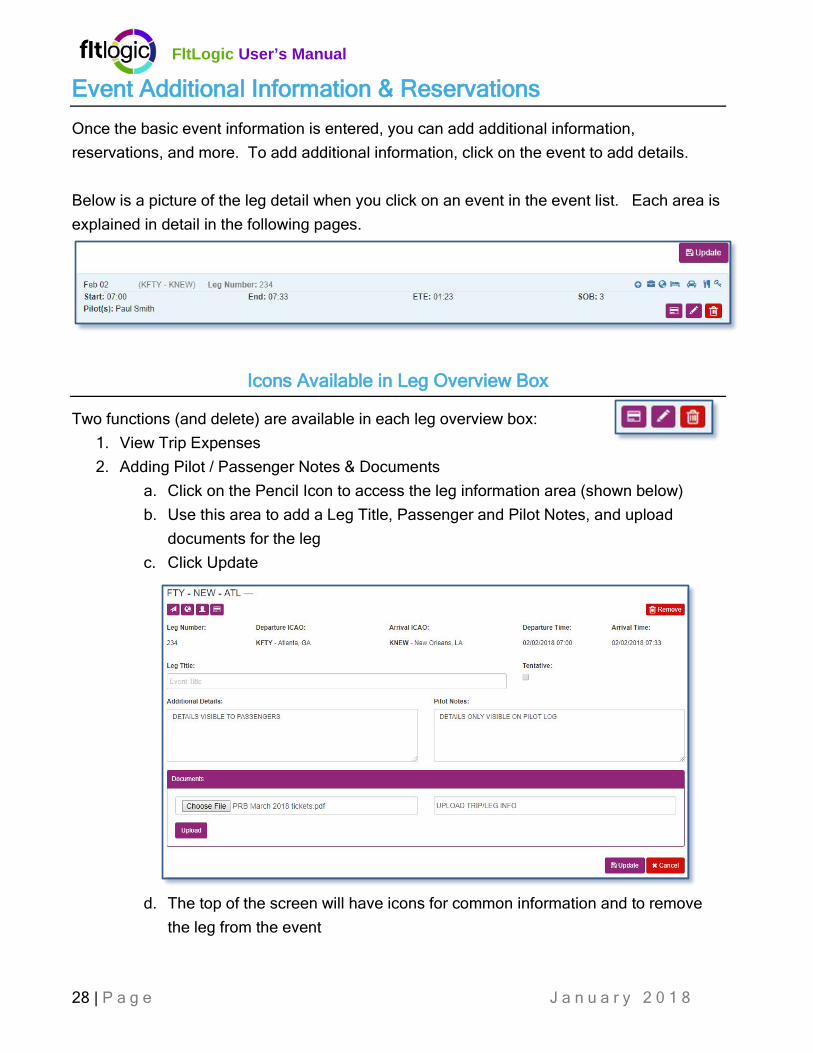
Event Additional Information & Reservations Once the basic event information is entered, you can add additional information, reservations, and more. To add additional information, click on the event to add details. Below is a picture of the leg detail when you click on an event in the event list. Each area is explained in detail in the following pages.
Icons Available in Leg Overview Box
Two functions (and delete) are available in each leg overview box: 1. View Trip Expenses 2. Adding Pilot / Passenger Notes & Documents
a. Click on the Pencil Icon to access the leg information area (shown below) b. Use this area to add a Leg Title, Passenger and Pilot Notes, and upload
documents for the leg c. Click Update
d. The top of the screen will have icons for common information and to remove the leg from the event
FltLogic User’s Manual
29 | P a g e J a n u a r y 2 0 1 8
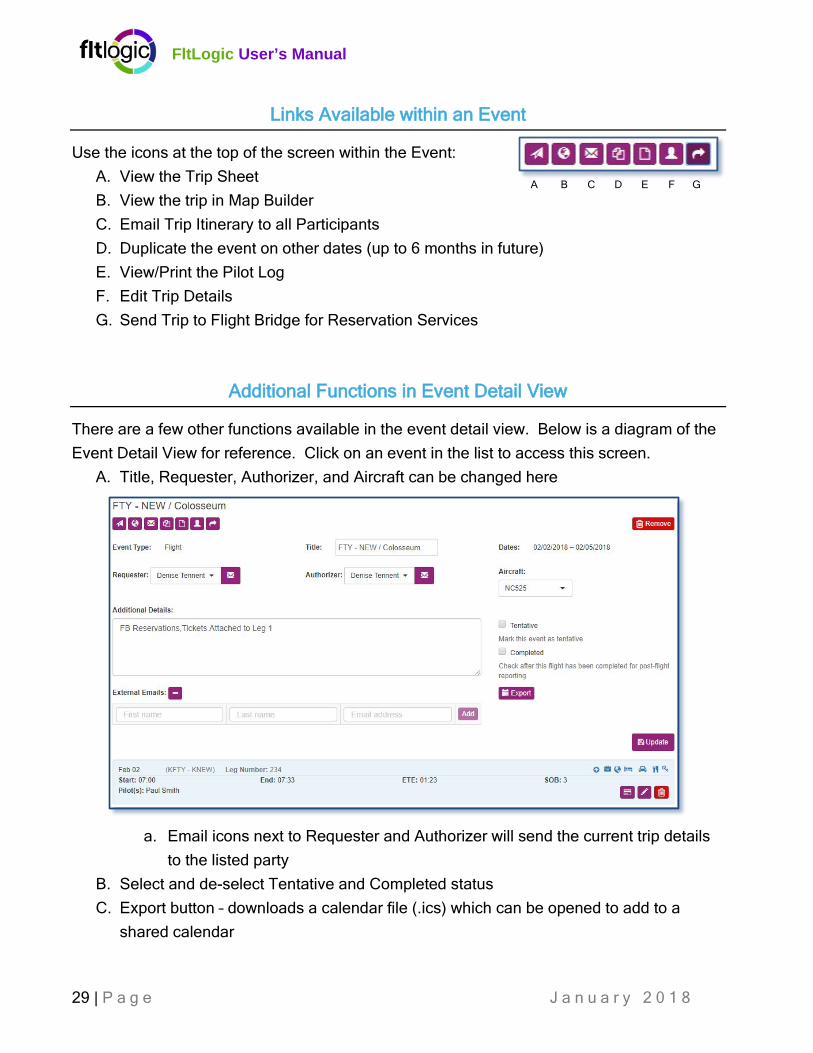
Links Available within an Event
Use the icons at the top of the screen within the Event: A. View the Trip Sheet B. View the trip in Map Builder C. Email Trip Itinerary to all Participants D. Duplicate the event on other dates (up to 6 months in future) E. View/Print the Pilot Log F. Edit Trip Details G. Send Trip to Flight Bridge for Reservation Services
Additional Functions in Event Detail View
There are a few other functions available in the event detail view. Below is a diagram of the Event Detail View for reference. Click on an event in the list to access this screen.
A. Title, Requester, Authorizer, and Aircraft can be changed here
a. Email icons next to Requester and Authorizer will send the current trip details to the listed party
B. Select and de-select Tentative and Completed status C. Export button – downloads a calendar file (.ics) which can be opened to add to a
shared calendar
A B C D E F G
FltLogic User’s Manual
30 | P a g e J a n u a r y 2 0 1 8
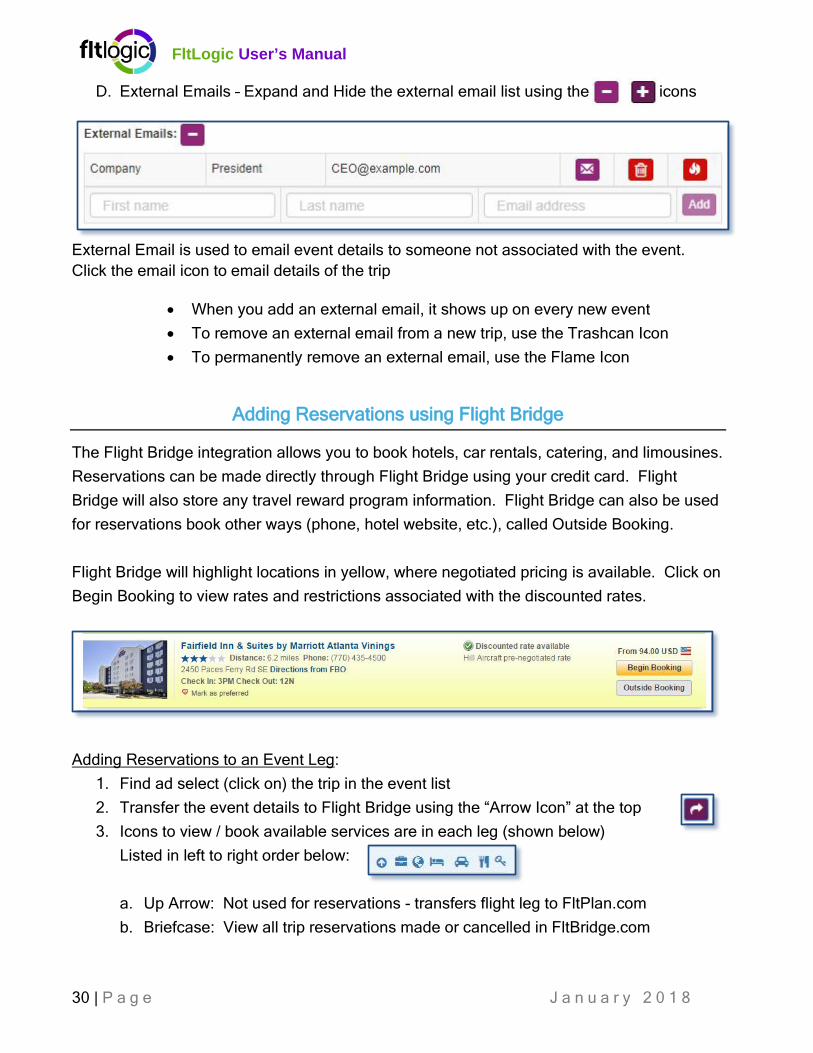
D. External Emails – Expand and Hide the external email list using the icons
External Email is used to email event details to someone not associated with the event. Click the email icon to email details of the trip
• When you add an external email, it shows up on every new event • To remove an external email from a new trip, use the Trashcan Icon • To permanently remove an external email, use the Flame Icon
Adding Reservations using Flight Bridge
The Flight Bridge integration allows you to book hotels, car rentals, catering, and limousines. Reservations can be made directly through Flight Bridge using your credit card. Flight Bridge will also store any travel reward program information. Flight Bridge can also be used for reservations book other ways (phone, hotel website, etc.), called Outside Booking. Flight Bridge will highlight locations in yellow, where negotiated pricing is available. Click on Begin Booking to view rates and restrictions associated with the discounted rates.
Adding Reservations to an Event Leg:
1. Find ad select (click on) the trip in the event list 2. Transfer the event details to Flight Bridge using the “Arrow Icon” at the top 3. Icons to view / book available services are in each leg (shown below)
Listed in left to right order below:
a. Up Arrow: Not used for reservations - transfers flight leg to FltPlan.com b. Briefcase: View all trip reservations made or cancelled in FltBridge.com
FltLogic User’s Manual
31 | P a g e J a n u a r y 2 0 1 8
1) Do NOT edit in this area c. Globe: View trip in Map Builder on FltPlan.com d. Bed Icon: Book Hotel e. Car Icon: Book Car Rental f. Cutlery Icon: Book Catering g. Key Icon: Book Limo Services
4. Click on the service you want to book 5. To add information to the itinerary without booking with a credit card online, use
Outside Booking. Making Changes to Reservations:
1. If you made changes to dates, times or locations you will need to resend the trip to Flight Bridge using the Arrow Icon at the top of the event detail
2. In the Event Leg, choose the icon for the reservation you are changing a. Hotel changes, click on the Hotel Icon / Rental Car changes, click on the Car
3. Hotel Changes for Reservations Booked in Flight Bridgge Note: Do not delete an event leg with reservations, without cancelling the reservation first.
Completed Events & Post-Flight Reporting
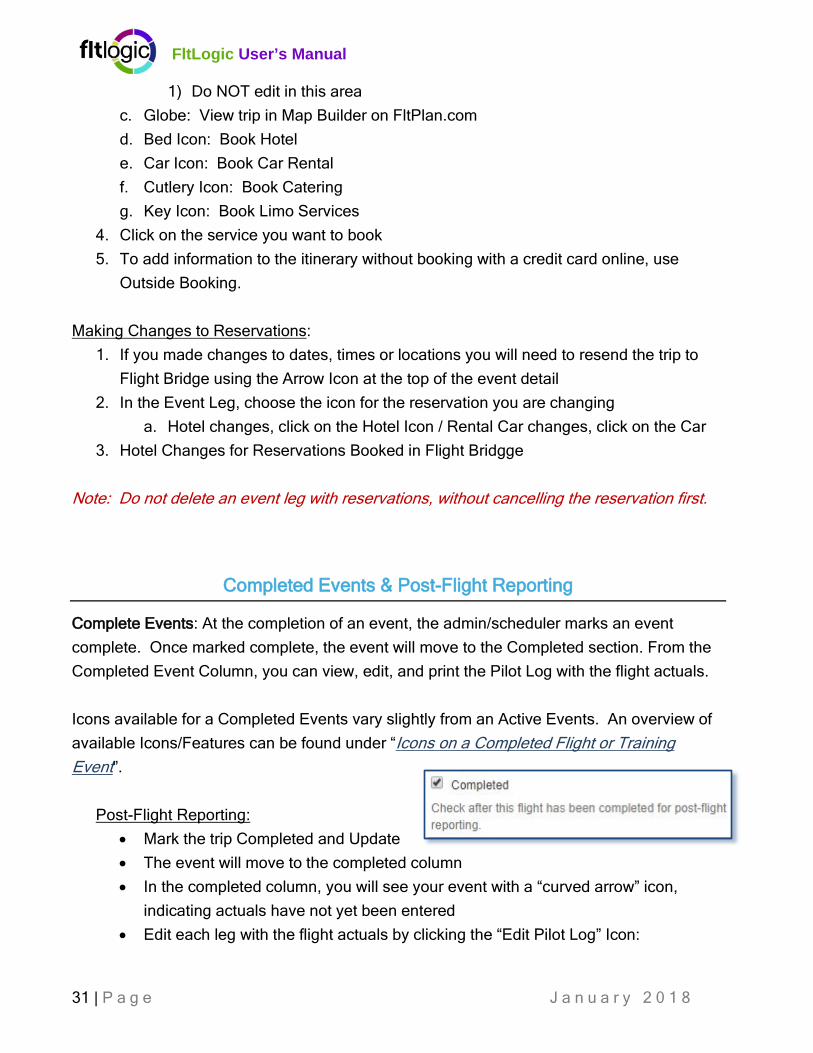
Complete Events: At the completion of an event, the admin/scheduler marks an event complete. Once marked complete, the event will move to the Completed section. From the Completed Event Column, you can view, edit, and print the Pilot Log with the flight actuals. Icons available for a Completed Events vary slightly from an Active Events. An overview of available Icons/Features can be found under “Icons on a Completed Flight or Training Event”. Post-Flight Reporting:
• Mark the trip Completed and Update • The event will move to the completed column • In the completed column, you will see your event with a “curved arrow” icon,
indicating actuals have not yet been entered • Edit each leg with the flight actuals by clicking the “Edit Pilot Log” Icon:
FltLogic User’s Manual
32 | P a g e J a n u a r y 2 0 1 8
o Enter the actual departure and arrival times o Enter the fuel burned and purchased
• Scroll to the bottom and click Update Remove Events: Removing events can be done at any time. By clicking on your event, you will see in the top right-hand corner a red Remove button. The event will then be moved to the Removed tab and will automatically be deleted after 7 days. You can restore an event anytime during those 7 days.
Event Requests
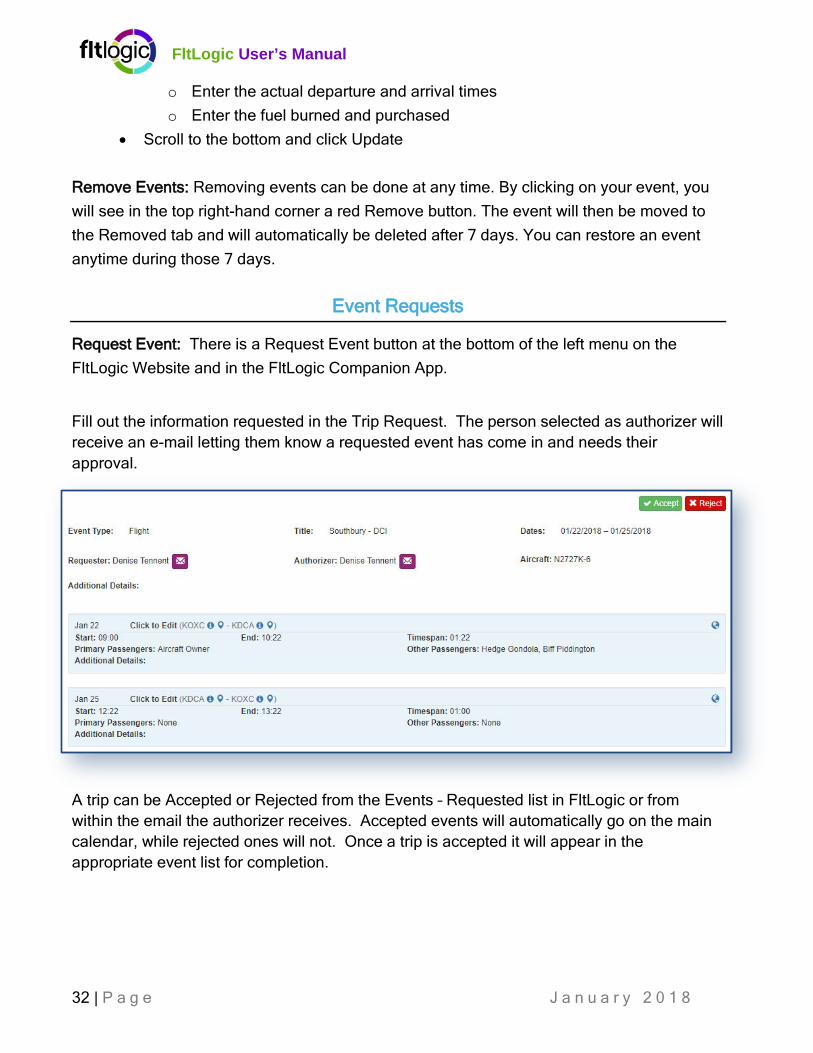
Request Event: There is a Request Event button at the bottom of the left menu on the FltLogic Website and in the FltLogic Companion App.
Fill out the information requested in the Trip Request. The person selected as authorizer will receive an e-mail letting them know a requested event has come in and needs their approval.
A trip can be Accepted or Rejected from the Events – Requested list in FltLogic or from within the email the authorizer receives. Accepted events will automatically go on the main calendar, while rejected ones will not. Once a trip is accepted it will appear in the appropriate event list for completion.
FltLogic User’s Manual
33 | P a g e J a n u a r y 2 0 1 8
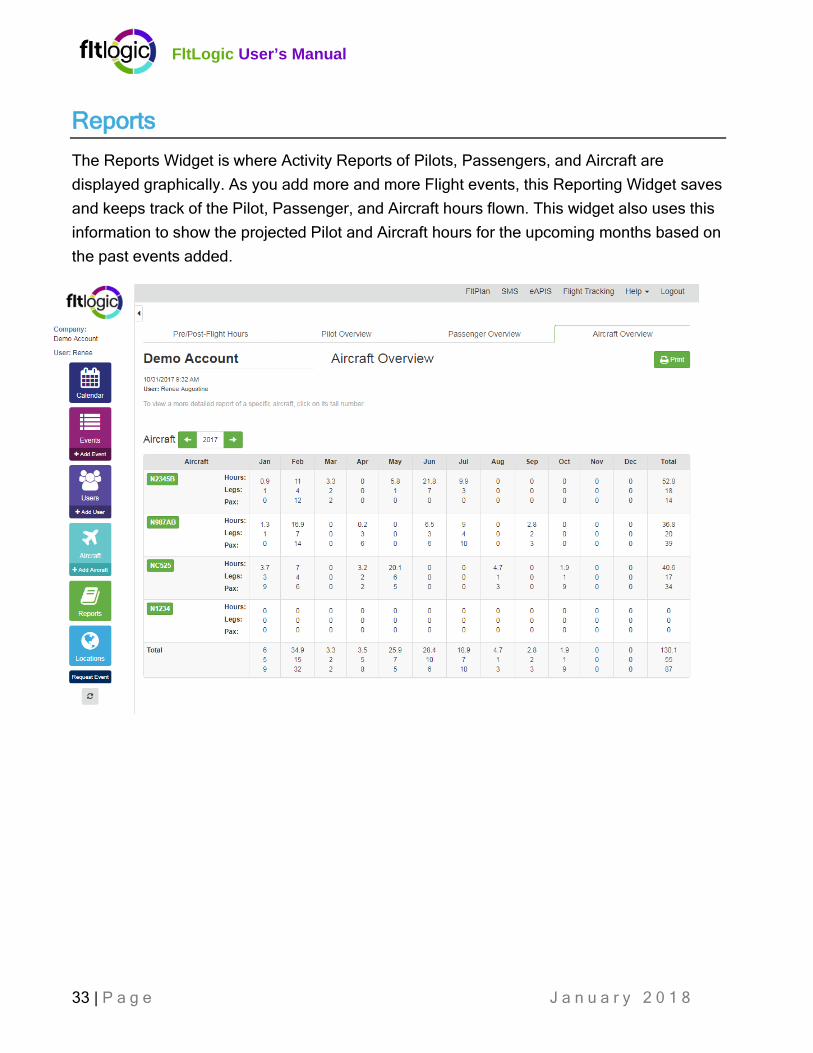
Reports The Reports Widget is where Activity Reports of Pilots, Passengers, and Aircraft are displayed graphically. As you add more and more Flight events, this Reporting Widget saves and keeps track of the Pilot, Passenger, and Aircraft hours flown. This widget also uses this information to show the projected Pilot and Aircraft hours for the upcoming months based on the past events added.
FltLogic User’s Manual
34 | P a g e J a n u a r y 2 0 1 8
Locations The Locations Section is where you can search Airport Identifiers by City Name or State. Use this tool to view all the different airport identifiers in a city. This section serves as a quick reference point and a place to add Private Hanger Information. The Locations Section also allows you to search for hotels by location. Using the Hotels tab, you will be able to see general hotel information regarding prices, rooms, amenities, and more. To add a Hotel reservation or view negotiated aviation rates use the Flight Bridge Integration.
Airports
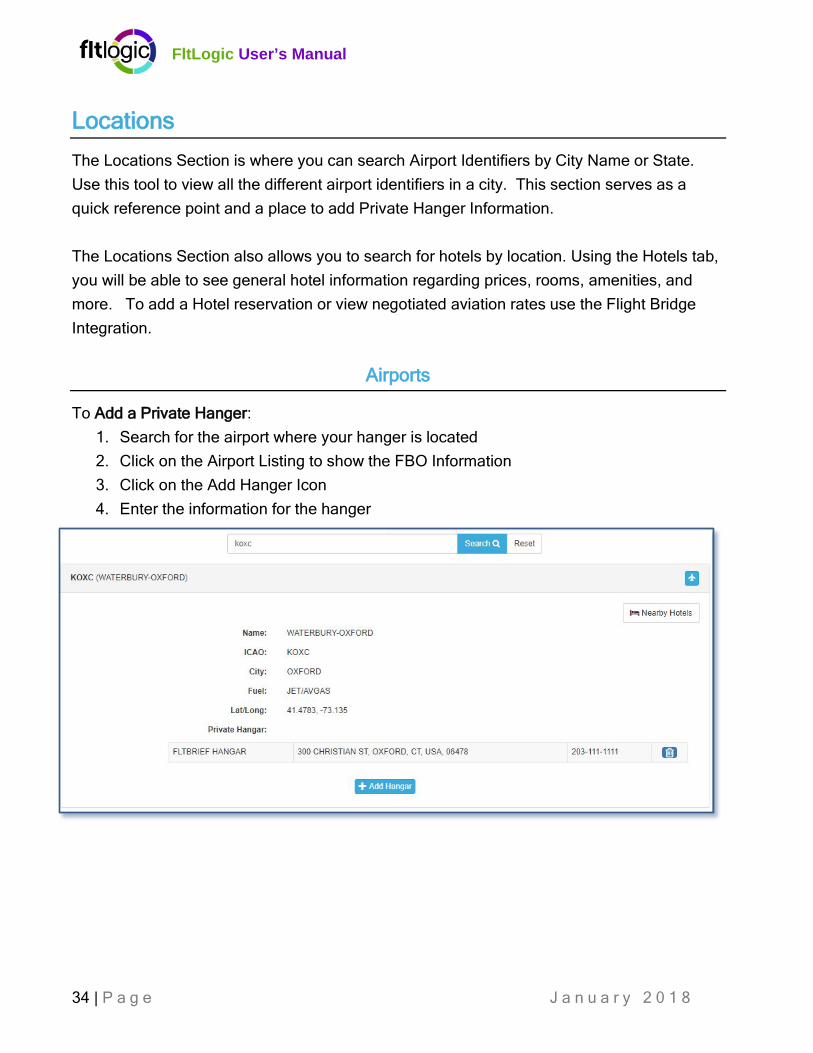
To Add a Private Hanger: 1. Search for the airport where your hanger is located 2. Click on the Airport Listing to show the FBO Information 3. Click on the Add Hanger Icon 4. Enter the information for the hanger
FltLogic User’s Manual
35 | P a g e J a n u a r y 2 0 1 8
Hotels
In the Hotels Tab, you can search general hotel information in the city you are traveling to or looking for. Here, you type in the city and state you want to view hotels in. This will populate all the available hotels and their basic information. Reservations and room rates should be acquired using FlightBridge in the Event Section. FlightBridge has GA negotiated rates that are not available through the hotel tab.
FltLogic User’s Manual
36 | P a g e J a n u a r y 2 0 1 8
Quick Links to FltPlan.com At the top of the FltLogic Scheduling Program, we offer you quick links to easily access your FltPlan.com account, any premium services you have with us such as eAPIS, Flight Tracking, and SMS, an FAQs Section, and the User’s Manual. Companion App
For pilots and passengers, the FltLogic Companion App is a quick way to view trip details, receive notifications about events, submit flight actuals, and take pictures of receipts. You can also view documents that are uploaded with each event.
With the companion app, you can view all your events, trip sheets, and contact information for anyone involved with the event(s) with the touch of a button.
Installation & Login
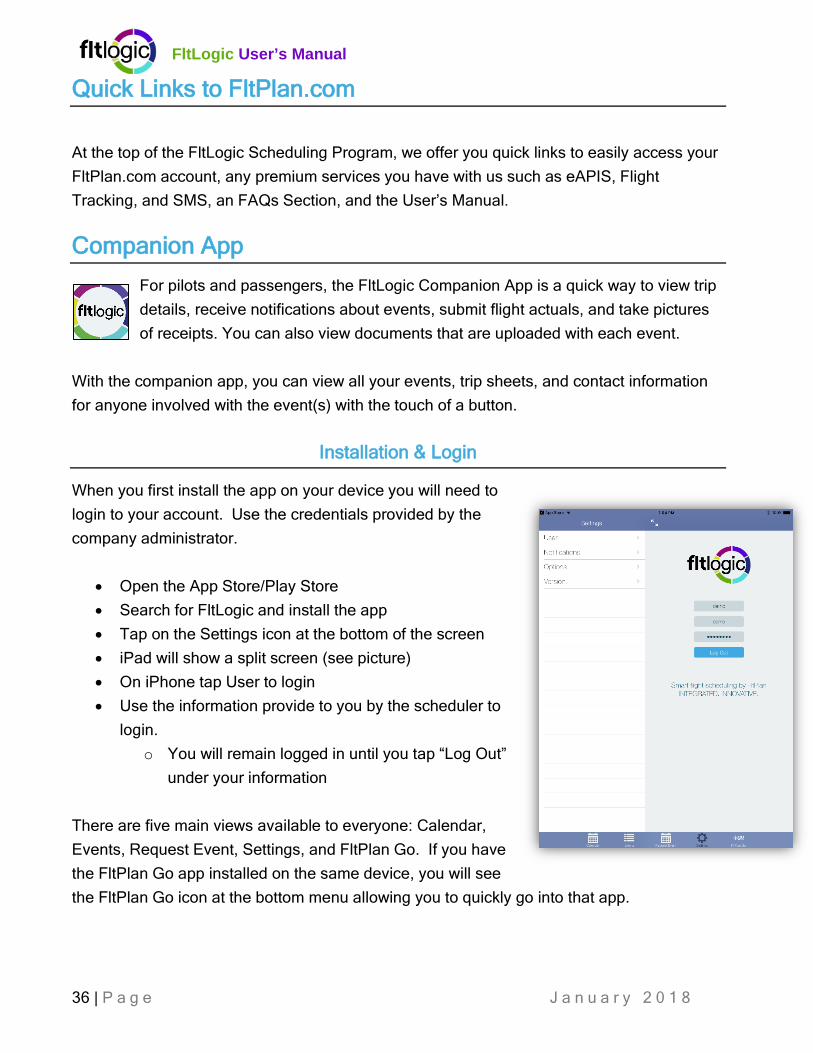
When you first install the app on your device you will need to login to your account. Use the credentials provided by the company administrator.
• Open the App Store/Play Store • Search for FltLogic and install the app • Tap on the Settings icon at the bottom of the screen • iPad will show a split screen (see picture) • On iPhone tap User to login • Use the information provide to you by the scheduler to
login. o You will remain logged in until you tap “Log Out”
under your information There are five main views available to everyone: Calendar, Events, Request Event, Settings, and FltPlan Go. If you have the FltPlan Go app installed on the same device, you will see the FltPlan Go icon at the bottom menu allowing you to quickly go into that app.
FltLogic User’s Manual
37 | P a g e J a n u a r y 2 0 1 8
Calendar View
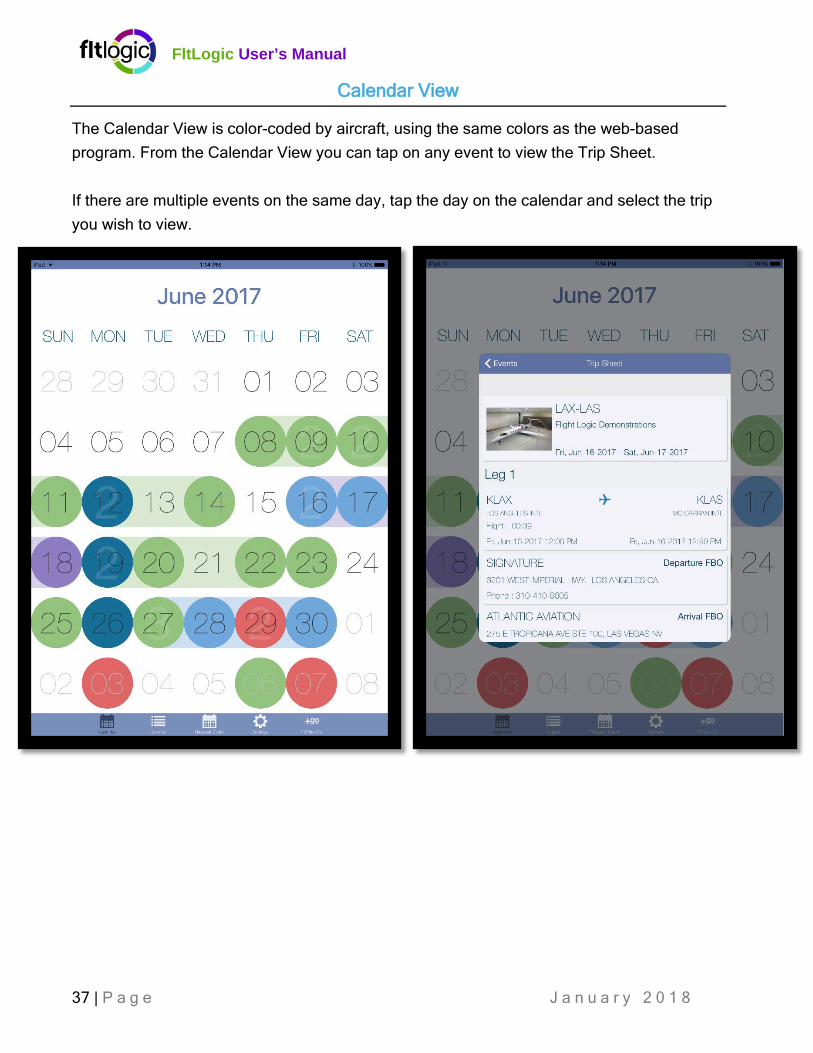
The Calendar View is color-coded by aircraft, using the same colors as the web-based program. From the Calendar View you can tap on any event to view the Trip Sheet. If there are multiple events on the same day, tap the day on the calendar and select the trip you wish to view.
FltLogic User’s Manual
38 | P a g e J a n u a r y 2 0 1 8
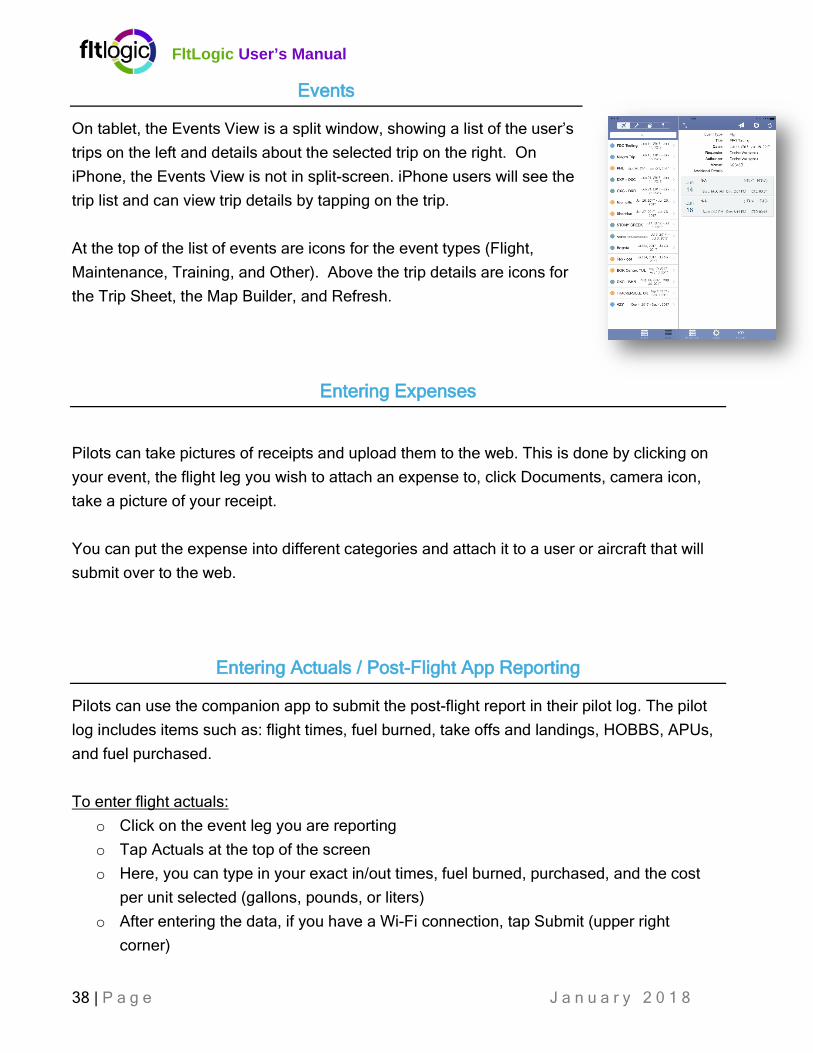
Events
On tablet, the Events View is a split window, showing a list of the user’s trips on the left and details about the selected trip on the right. On iPhone, the Events View is not in split-screen. iPhone users will see the trip list and can view trip details by tapping on the trip. At the top of the list of events are icons for the event types (Flight, Maintenance, Training, and Other). Above the trip details are icons for the Trip Sheet, the Map Builder, and Refresh.
Entering Expenses
Pilots can take pictures of receipts and upload them to the web. This is done by clicking on your event, the flight leg you wish to attach an expense to, click Documents, camera icon, take a picture of your receipt. You can put the expense into different categories and attach it to a user or aircraft that will submit over to the web.
Entering Actuals / Post-Flight App Reporting
Pilots can use the companion app to submit the post-flight report in their pilot log. The pilot log includes items such as: flight times, fuel burned, take offs and landings, HOBBS, APUs, and fuel purchased. To enter flight actuals:
o Click on the event leg you are reporting o Tap Actuals at the top of the screen o Here, you can type in your exact in/out times, fuel burned, purchased, and the cost
per unit selected (gallons, pounds, or liters) o After entering the data, if you have a Wi-Fi connection, tap Submit (upper right
corner)
FltLogic User’s Manual
39 | P a g e J a n u a r y 2 0 1 8
o If you don’t have a Wi-Fi connection, tap Done (upper right) and go back and Submit when connected to Wi-Fi
Settings
There are four options under settings: User, Notifications, Options, and Version. Tap User to log in or out of your account. Once logged in you will not need to re-enter the information unless you log out, delete the app, or reinstall. The Push Notifications, when enabled, will alert you when you have a new trip scheduled or when a change is made to an existing trip. The Trip Notifications, when enabled, will send you a reminder four (4) hours prior to departure. The Options allows you to filter out completed events from your list, to only show current events. Support & Training FltLogic’ s support team is available by email and phone during business hours. The FltLogic Support Team is also available for web-based, interactive, training and troubleshooting. Business Hours: ......................... Monday through Friday from 9 am to 5 pm EST. Email: ......................................... [email protected] Phone Numbers: .......................... 203-262-8500 / 203-262-9800 Email is monitored 24 hours a day, 365 days a year should an urgent situation arise.

FltLogic User’s Manual
40 | P a g e J a n u a r y 2 0 1 8


![SIFL and ENTERTAINMENT COST DISALLOWANCE ... Academy Webinar 1-9-2014.pdfBoeingField] Airplane’s miles traveled = 6,534 Bob’s miles for SIFL = 3,436 (1,718 x 2) SIFL miles are](https://img.pdfslide.us/doc/110x75/5f4680a63e277c73f9073426/sifl-and-entertainment-cost-disallowance-academy-webinar-1-9-2014pdf-boeingfield.jpg)