Embed Size (px)
Citation preview

Flsun
Chaokuo Technologies Co., LtdZhengzhou, Henan, P.R.ChinaTel: (86) 371 53337136Fax: (86) 371 53337136URL:http://www.aliexpress.com/store/product/high-quality-factory-delta-3d-printer-for-sale-with-40m-Filament-8GB-SD-card-LCD-masking/431393_32495135437.html?spm=2114.8147860.0.70.uFTFIUE-mail:[email protected]: (86)13643800186Skype: china3dprinter
Kossel 3D printer
User’s Guide

Contents
Chapter 1: Install and connect
Chapter 2: Level the Bed and Auto-leveling
(1)Test the function of the repetier
(2)Level the Bed
(3)Auto-leveling
Chapter 3: Steps of Printing
(1)Settings
(2)Prepare
(3)Start Print
Chapter 4: Repetier
(1)Basics
(2)Settings
Chapter 5: Marlin
(1)arduino
(2)marlin
(3)Calibrating Height
Chapter 6: LCD
(1)Basics
(2)Print off PC
Chapter 7: Safety and Handling
(1)Important Safety Information
(2)Important Handling Information
Chapter 8: Tips and Troubleshooting
(1)General Suggestions
(2)Uploading Firmware
(3)Operating Printer
Chapter 9: Learning more, Service and Support

1,Install and connect
1)need software as follows:
A: repetier, it’s the PC software to control the printer, slice and print the
Model
B: arduino, it’s the working environment of the firmware(marlin)
C: marlin, it’s the firmware, you need flash it to motherboard when you
Reset the height of the machine
D: others, you would need the other file like drivers, streamline etc,
When your PC cant recognize the board through USB
2)Connect the kossel mini USB port(arduino mega 2560), in device
Device manager, verify the COM port number assigned for the arduino
Mega 2560(eg.com15) as follow shown

If your PC could not connect the motherboard, need a step to install the
driver:
Unzip the “driver” in the software file, and install the file”dpinst-amd64”
if your PC is 64 bit; or install the file”dpinst-x86”if your PC is 32 bit, all in
all, ensure you could find the “arduino mega 2560” port in the device
manager
3)install “repetier” in your PC, the software of “repetier” has been
packaged in the SD card, you could install from there or download from
the internet(https://www.repetier.com/)
4)the other software of marlin and arduino only be used when you reset
the height of the machine, so it is need not for the first print
5)The height of the machine has be set already when it is out off the
factory, the highest position is decided by the limit switch block, we have
determine it’s exact position by the board fix item like the pic1, and the
lowest position is decided by the USB interface like the pic2, finally the
print height of the machine is determined by the two position, it is
285mm from the highest to the lowest


If you want DIY your printer’s height by yourself, you could change the
limit switch block’s position to rise or reduce it’s height, and you have to
reset the height’s value in the marlin, you could refer to the chapter 5
2,level the bed and auto-leveling
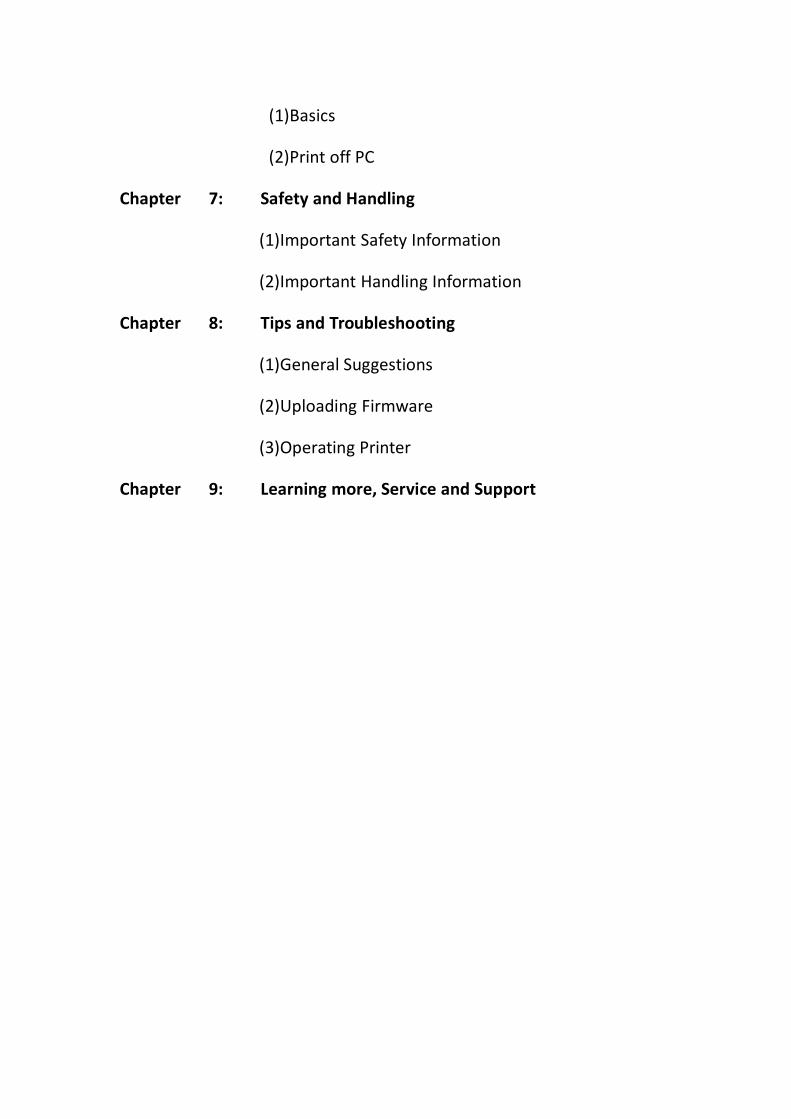
(1)test the function of repetier
1): install the repetier in your PC;
2): run repetier
language

Connect
Communication Port

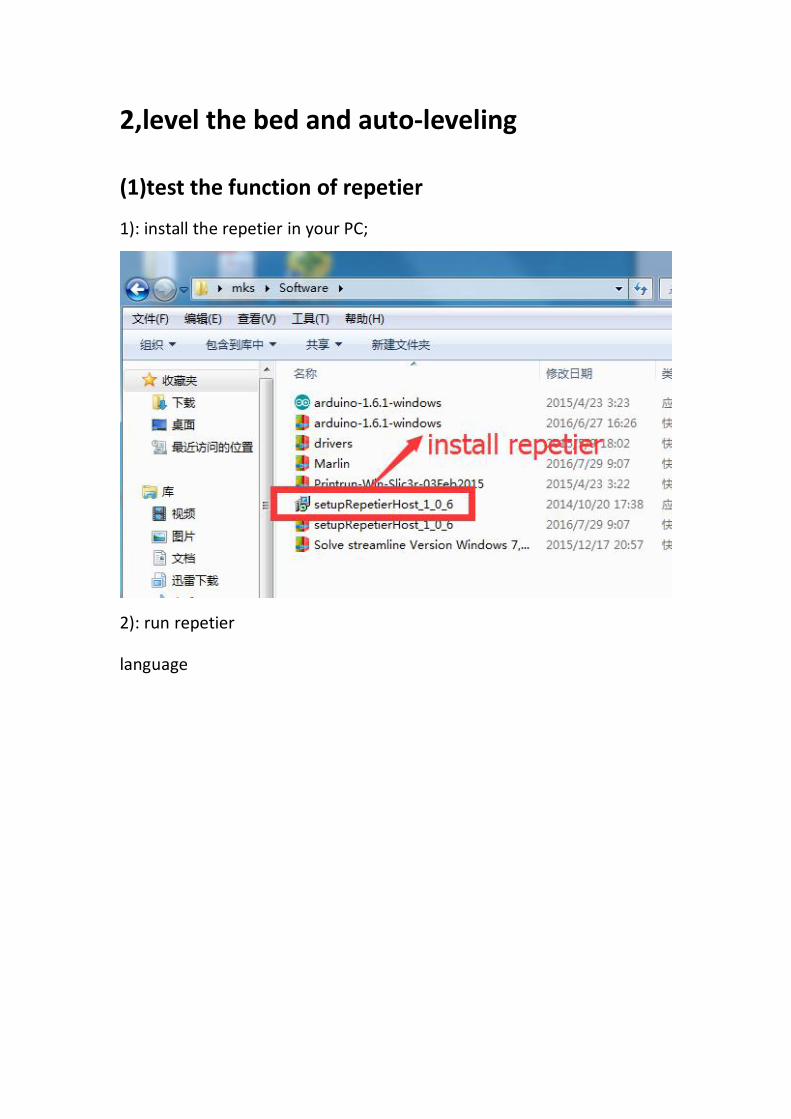
3): printer settings
printer type:rostock printer(circular print hap)
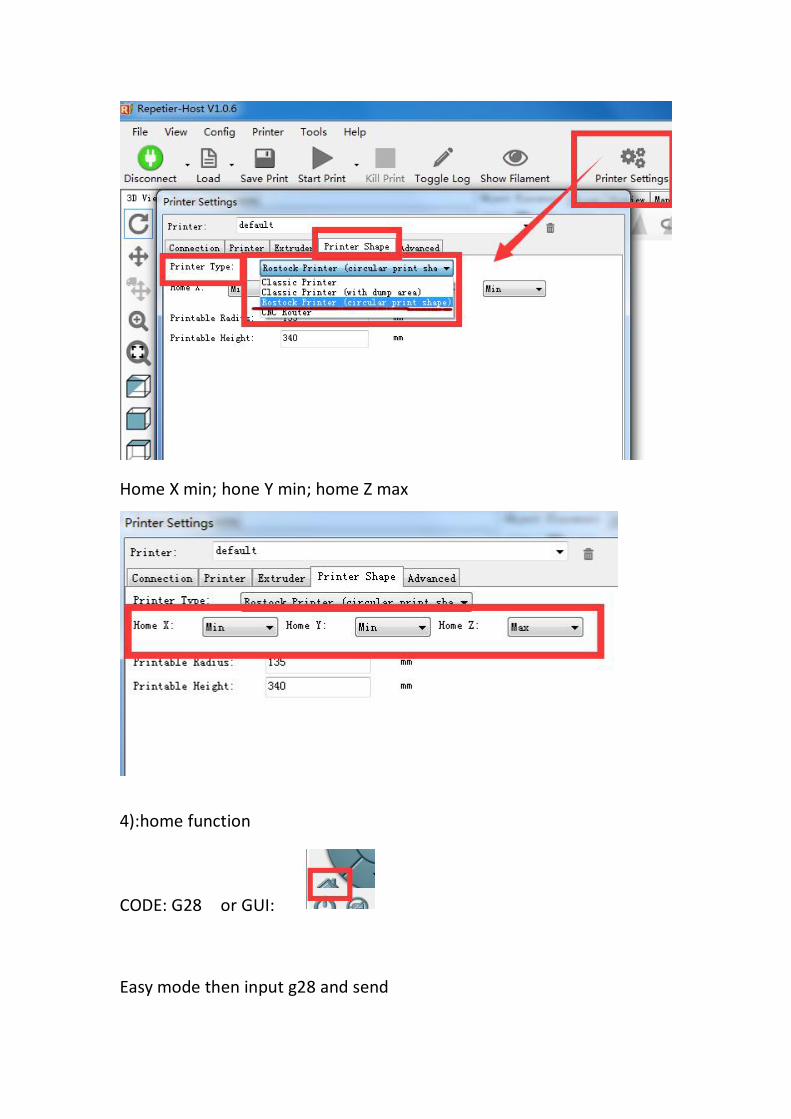
Home X min; hone Y min; home Z max
4):home function
CODE: G28 or GUI:
Easy mode then input g28 and send

Then the three axis’s pulley will go up to the top until hit the switch
5)Control panel
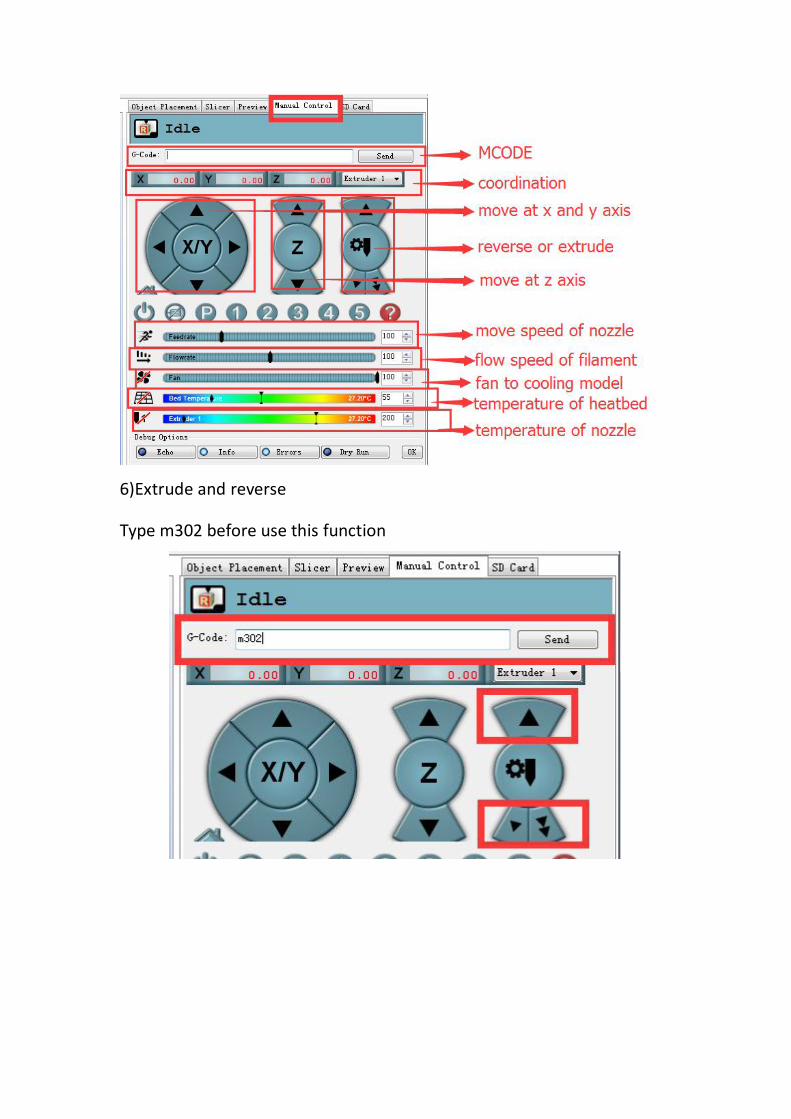
6)Extrude and reverse
Type m302 before use this function

7)Move nozzle at x y and z axis

8)Preheat hotend
Control panel: adjust from there
Check from there(bottom of repetier)
Temperature curve

9)Info of operation
Check at the bottom

10)Info of coordination
MCODE: type m114 then check at the bottom
11)Info of limit switch
MCODE: type m119 then check at the bottom
Observation: x_max, y_max, z_max, z_min
Hit the switch= triggered
Not hit switch= open

(2)level the bed
1): input g1 z0 : the nozzle will goes down to the position which is very
close to bottom plate
2) adjust the springs to ensure the plate is leveled at three coordination
A: g1 x0 y-60 z0;
B: g1 x50 y30 z0;
C: g1 x-50 y30 z0;

A point:
adjust the screw, ensure the bed nearly touch the nozzle( there should
be a gap of a paper between the nozzle and the bed)

The same method at B and C points then the bed would be leveled
enough
(3)Auto-leveling
1) home the nozzle

2) then do the auto-leveling by input g29
Then the nozzle will goes down and touch the plate by 9 points
It is the process of auto-leveling

3,steps of printing
(1)Settings
1): open repetier >settings >printer shap >rostock printer(circular
print hap)
2): repetier >connect >select port

(2)prepare
1): load
2): slice
3): preview
4): preheat the nozzle to 210 degree(click the red marked)

(3)Start print
1): start print (do this step after the temp rise to 210 degree)
2): the machine will finish the model by itself
notice
▪if there happen some accident, pls press the emergency stop

4, Repetier
(1)Basics
1)printer settings >printer shap >Rostock printer(circular
print hap); set the bottom plate
2) connect ; connect the repetier with the printer
3)load ; load a stl format model from your PC
4)start ; print the model
5)toggle log ; search the info from the bottom of the
repetier screen after Input code

6) easy mode > ; input commend under the
easy mode
7) emergency stop ; stop all the action
8)object placement>export ; you could modify a model with repetier
then export as a new stl.file
9)scale object > ; change the size of the model
10) rotate object > ; change the direction of the
model
11)slicer>configuration; change the settings of the printer

12)slice with slic3r ; slice before start print
13)preview >G-Code Editor >save ;save the code to SD Card
14)manual control> ;move x and y axis
15)manual control > ; move the z axis
16)Manual control
;
heat nozzle by click
(2)Settings
1) Slice >configuration >print settings >layers and perimeters >layer

height:0.35mm/first layer height:0.4mm then save the settings
2)Print settings>infill >fill density: 40%/fill pattern:rectilinear/top,bottom
fill pattern:rectilinear >advanced >solid infill every: 1 layer, then save
3) Filament settings >filament >diameter:1.75mm then save it
4)Printer settings >extruder 1 >nozzle diameter:0.4mm then save it
5)Printer settings >retraction >length:5mm/speed:30mm/minimum
travel after retraction:2mm then save it


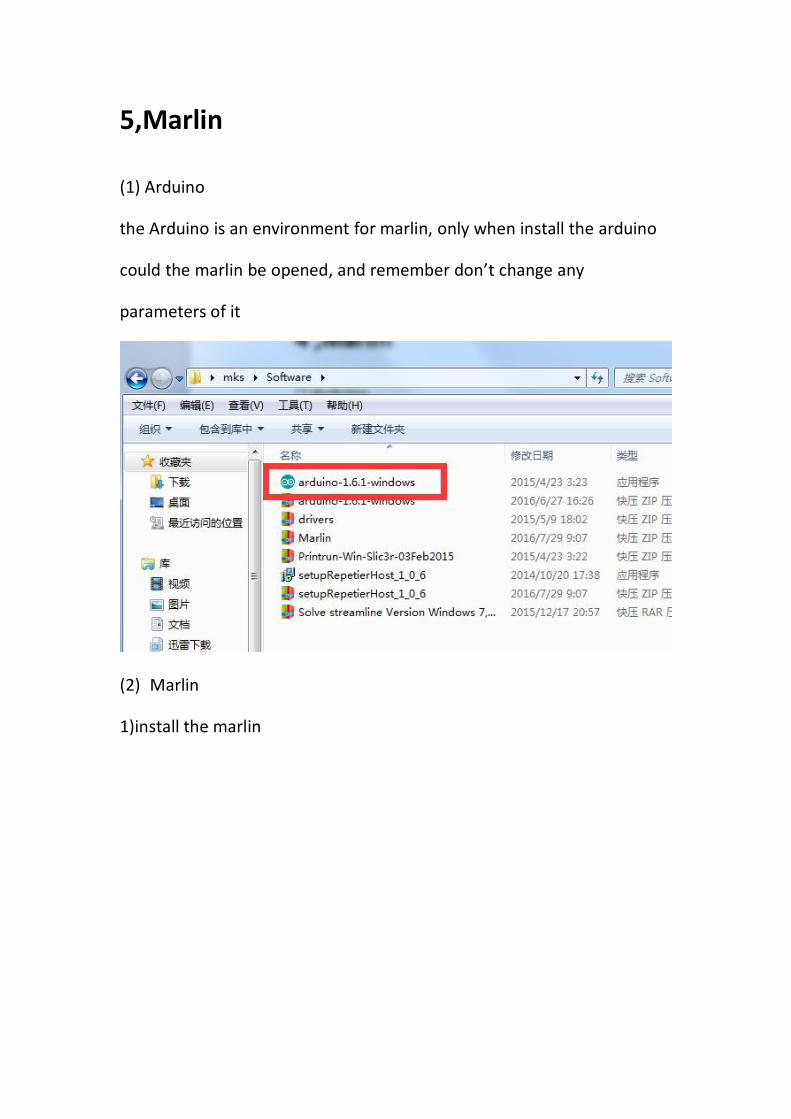
5,Marlin
(1) Arduino
the Arduino is an environment for marlin, only when install the arduino
could the marlin be opened, and remember don’t change any
parameters of it
(2) Marlin
1)install the marlin

Run the “marlin”

Notice: It’s shortcut is similar to Arduino, don’t mistake them
2)settings
Go to tools > board >arduino mega 2560
Go to tools > port, select the COM port
Go to tools > programmers > USBtinyISP


Firmware could only be upload succeed when it’s settings like the above
(3)Calibrating Height
1)Open the marlin /Configuration.h
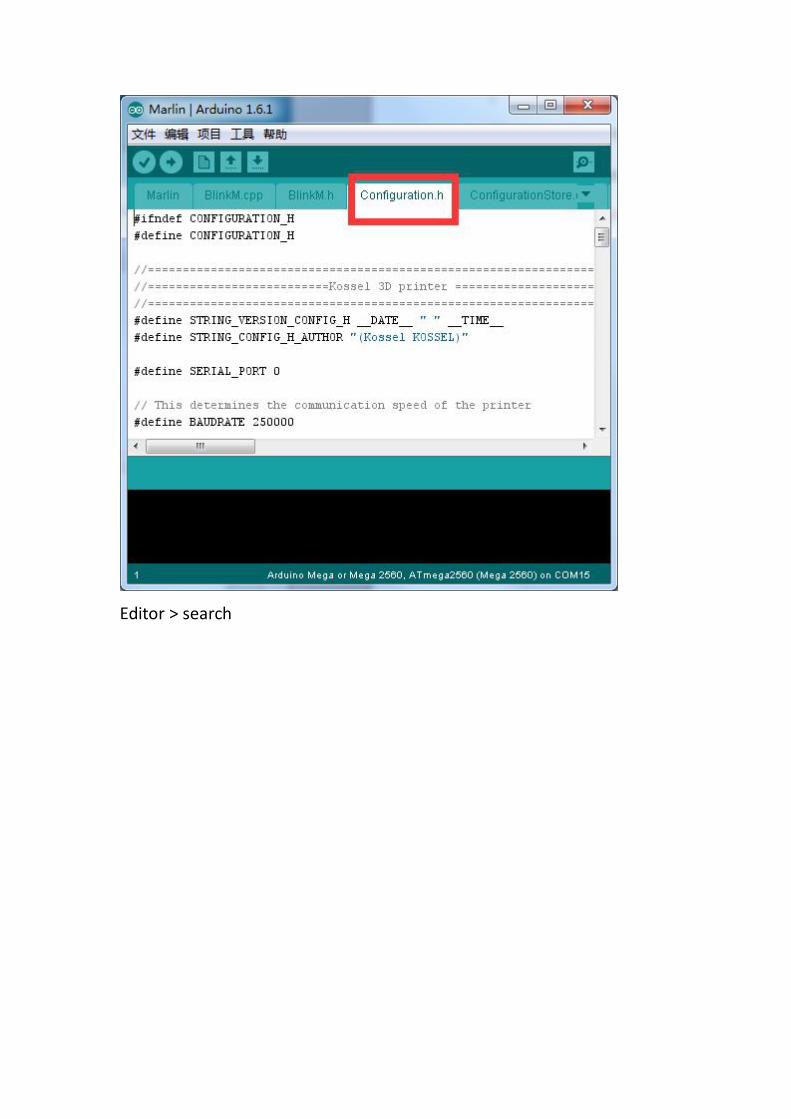
Editor > search

Search for “#define MANUAL_Z_HOME_POS”

——————————————————————————————————
——————————————————————————————————
Notice: 270 is the height of the machine
Replace it with 310
————————————————————
Then upload

You could Check the progress of the upload from there
When it read finished, the upload is succeed.

Connect repetier to your PC
Set the shape of the bottom of the plate /rostock printer(circular print
hap)

Home the axis’s pulley(input g28 on the Manual Control)
All axis will go up to the top position after that

Type m114 to check the Z axis’s coordination
As you could see The Z axis is 310mm at this time(record as A)

Type”g1 z40” to let the nozzle down to the position higher than the plate
about 20cm
Then Down the nozzle close to the plate manually by 10mm,then down
1mm every steps until it nearly touch the plate,(put a A4 paper between
the nozzle and the plate)down the nozzle by 0.1mm carefully until the
nozzle touch the paper would be OK


There should be a A4 paper gap between the nozzle and the plate at this
time
Input m114 to check the coordination of Z axis again
The height of the nozzle is 11.4mm at this time(record as B)
The right height of the machine could be figure out with A and B:
right height = A - B
310mm-11.4mm=298.6mm
Disconnect repetier and open marlin
/Configuration.h

editor—search:#define MANUAL_Z_HOME_POS
replace 350 with 298.6 then upload


6, LCD
(1)Basics
1)button 1: twist to select option, click to enter
2)button 2:click to reset
(2)Print off line
1)insert the SD Card to LCD >click button
2)control >temperature >nozzle >200
3) prepare >preheat PLA
(3)print from SD card >select the g-code file


7 ,Safety and Handling
(1) Important Safety Information
1)pls click the emergency stop button or pull out the power supply
if there happen some dangers
2)don’t touch the nozzle by hand when it is heating
3) pls place the special power supply carefully when you heat the hotbed
(2)Important Handling Information
1)pls put the filament in the nozzle by hand instead of using extruder
motor when you assemble filament
2) remember preheat the nozzle to 200 degree before you start print

8,Tips and Troubleshooting
(1)General Suggestions
1)ensure the wire plug the right socket on the board, especially the temp
sensor, ensure it is tight enough
2)the suitable temp for PLA is 200-210; for ABS is 240-250; for hotbed is
80
(2)Uploading Firmware
1)If you could not find the Mega2560 in the device manager, try to
install the driver amd64 (you could find the drivers in the SD Card,
If your PC is 32bit, pls install x86)

2)If the “driver amd64” can not works, open the file-“solve streamline
version windows7...”, then copy the file as the said
3) if the all the above doesn’t works, maybe you installed arduino/marlin
into C disk, try with D disk or others
4) if the repeteir cant connect, replug the USB wire again
(3)Operating printer
You need a multimeter
1) if you meet “MINTEMP”, it is due to the temp sensor, plug it tightly
enough, otherwise it maybe broken, measure it’s resistance with a
multimeter(the normal value is 100k)

2) if the “extruder motor doesn’t move” with extruder button, pls input
m302 before you do it

3) if the “pulley can’t go up” succeed with g28, it may due to the limit
switch, input m119 and press the switch on/off to see whether the
message is always “triggered” at the bottom of the repetier, or measure
the output volt of the motor driver(normal value is 0.5v)

4)if the “filament cant extruded” smoothly, check the extruder motor
parts, ensure there exist no stuck with the part1 and part2 in the picture;
and assemble filament into nozzle by hand carefully to see whether it
could came out in this case, otherwise replace the nozzle with a new
one.

5)if the LCD can not show the value normal pls upload the
firmware(marlin) again with the LCD disconnected or click the reset
button, or maybe you have mistake the two wire of the LCD

9,Learning more
(1)More Information
Repetier: https://www.repetier.com/
Slice: http://slic3r.org/
Cura: https://ultimaker.com/en/products/cura-software
Marlin: https://github.com/ErikZalm/Marlin
Arduino: https://www.arduino.cc/