Embed Size (px)
Citation preview

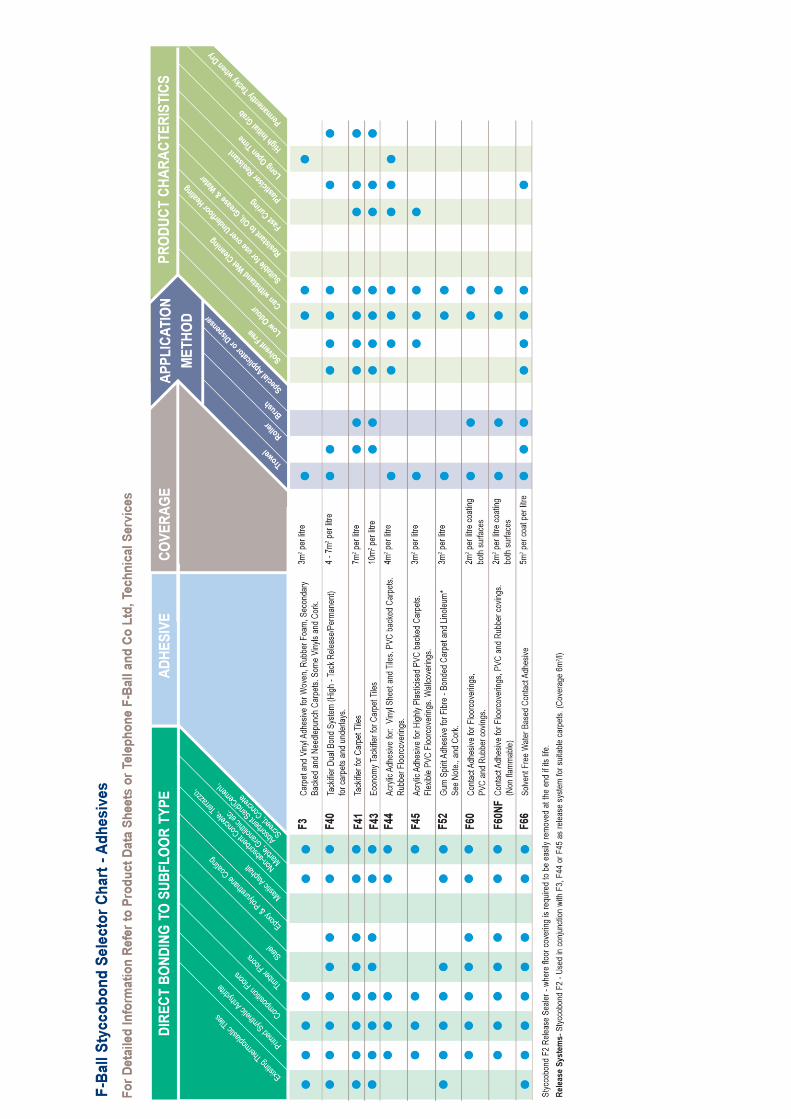
Floor Preparation All aspects of subfloor preparation and floorcovering installation should be in accordance with either BS 5325 The Installation of textile floorcoverings or BS 8203 The Installation of resilient floorcoverings as appropriate. During the laying period a temperature of at least 18°C must be maintained and a floor temperature of at least 10°C. The type and condition of the subfloor has a direct influence on the installation and performance of a floorcovering and the importance of subfloor preparation cannot be emphasised too strongly. For further information request our Floor Preparation Guide which gives comprehensive advice on subfloor preparation. This includes data sheets on all the products mentioned, giving detailed information on how they should be used.
Concrete and Sand/ Cement Screed These must be fully cured, sound, smooth, dry and free from laitence, dust, plaster and any other contaminants which prevent good adhesion. Direct to earth subfloors must incorporate an effective damp proof membrane. Materials and methods for damp-proofing solid floors are described in BS 8102 and in Department of Environment Leaflet 47. New concrete and sand/cement screeds must be left for construction moisture to dry out before floorcoverings are laid. For estimated drying times see BS 8203. Floorcoverings should not be laid until a hygrometer test in accordance with BS 8203. Annex A Dampness Testing, gives a relative humidity reading of not more than 75%. Damp floors may be treated with STOPGAP F75 or STOPGAP F76 waterproof surface membranes as appropriate. Uneven surfaces must be smoothed using STOPGAP or STYCCOSCREED smoothing underlayment to prepare the surface for adhesive and floorcovering.
Concrete Treatments/ Coatings Waterproofing admixtures may adversely affect adhesion and should not be used, (see BS 8203). Chemical hardening/curing treatments should not be used on concrete bases as there could be an interaction with the smoothing underlayment or adhesive used. If these chemical treatments have been used they should be mechanically removed e.g. by scabbling or shotblasting the surface before applying smoothing underlayments or adhesives. Concrete floor paints must be completely removed by mechanical methods such as scabbling or shotblasting before application of smoothing underlayment or adhesives. Epoxy and polyurethane surface coatings should preferably be removed, but if this is not possible and provided they are firmly bonded, some coatings may be primed with undiluted STOPGAP P131 prior to skimming with the appropriate STOPGAP smoothing underlayment. Coatings vary considerably in this respect and we would suggest you check adhesion by prior testing to ensure a satisfactory bond is achieved.
Non-Absorbent Surfaces Ceramic and quarry tiles, granolithic, terrazzo and power floated concrete slabs which have been trowelled to produce a dense smooth surface, tend to be non-absorbent in nature. If the recommended STYCCOBOND adhesive is not suitable for direct application to a non-absorbent surface, then the subfloor must be skimmed with a minimum of 3mm of the appropriate STOPGAP smoothing underlayment. Heavily glazed surfaces should be treated to create a key for the smoothing underlayment e.g. by scabbling or scouring with a coarse abrasive. N.B. Ceramic and quarry tiled surfaces should be skimmed with the appropriate STOPGAP underlayments to prevent the tile pattern transferring through to the surface of the floorcovering. Terrazzo and quarry tiles are unaffected by dampness but may be sufficiently permeable to allow the passage of moisture vapour and are often laid in areas which do not incorporate a damp proof membrane. Where this is the case, these bases should be damp proofed by covering with a layer of flooring grade mastic asphalt complying with BS 6925. Asphalt and STOPGAP surface waterproof membranes must be skimmed with a minimum of 3mm of the appropriate smoothing underlayment.
Priming Most subfloors will require priming. Use neat STOPGAP P131 neoprene primer on smooth impervious subfloors prior to the application of the appropriate STOPGAP floor smoothing underlayment. Very absorbent surfaces should be primed with dilute STYCCOBOND F70 or STOPGAP P131 or STOPGAP P121 before the application of adhesive or smoothing underlayment.
Existing Floorcoverings Thermoplastic or similar floor tiles should preferably be removed. However, it is possible to install certain types of floorcovering direct to these provided the tiles are firmly bonded to the subfloor and all traces of polish or any other contaminant which would prevent good adhesion are removed e.g. with STYCCOCLEAN C140 Floor Cleaner. If this cannot be achieved the tiles must be removed, together with the bulk of the adhesive and the subfloor made good. Adhesive remaining on cementitious subfloors should be removed by mechanical methods such as scraping, scabbling or shotblasting at least until only a thin, smooth, firmly bonded residue remains. All adhesive that is loose, lumpy, powdering, soft or water soluble must be removed. A minimum of 3mm of the appropriate STOPGAP underlayment should be applied before the installation of the new floorcovering. Adhesive remaining on wooden floors should be overpinned with flooring grade plywood or hardboard (see Wooden Floors). Any existing underlays should first be removed. Flexible vinyl, linoleum and textile floorcoverings must be removed and the subfloor prepared as previously described before fully bonded floorcoverings can be laid.
Wooden Floors Wooden Floors must be structurally sound, level, smooth, dry and clean. Adequate ventilation should be provided to suspended timber floors at ground level to ensure that the moisture content of the wood is maintained at equilibrium. Worn or uneven floorboards should either be replaced or levelled by sanding, planing or by patch filling with STOPGAP Green Bag & 114 smoothing underlayment before finally covering with flooring grade plywood or hardboard. Sheets should be positioned, joints staggered and nailed at 100mm - 150mm centres. (See BS 8203 for details). Wood blocks are not suitable for direct application of sheet and tile flooring because of the continuous differential movement of the blocks and the risk of the wood block design transferring through the floorcovering surface. Provided the wood blocks are smooth, sound, level and securely bonded, they should be overlayed with flooring grade plywood or hardboard. Any uneven areas should first be patch filled with STOPGAP Green Bag & 114 smoothing underlayment. Wood blocks laid on the ground floors must have an efficient damp proof membrane incorporated in the subfloor. If there is any doubt that all these conditions can be met then the wood blocks must be removed, and the subfloor made good. Textile floorcoverings may be bonded direct to wood blocks with a suitable STYCCOBOND adhesive provided they are sound, level, firmly bonded and completely protected against moisture. Seals, polishes and any contaminant which will prevent good adhesion must first be removed. Wood mosaic panels require overpinning with flooring grade plywood or hardboard in all cases. This is not practical on solid floors and panels should therefore be removed and the subfloor made good as above. If panels laid over a flexing timber floor need patch filling, STOPGAP Green Bag & 114 smoothing underlayment should be used. In all other respects wood mosaic panels should be treated as for wood blocks. Particle boards should comply with BS EN 312-2 (1997) Type P2 or BS EN 312-4 (1997) Type P4. Chipboard, plywood and hardboard must be primed with STYCCOBOND F70 or STOPGAP P131 diluted as recommended.
Composition Floors Composition floors such as those constructed of magnesium oxychloride (magnesite) cement or polyvinyl acetate/cement will be adversely affected by dampness rising from the ground if they are covered with an impervious layer. Unless it can be established that the composition floor is adequately protected against rising dampness, it must be removed and the base made good before floorcoverings are installed. If the floor is protected against dampness then cracks and small hollows should be patch filled and the whole area skimmed with a minimum of 3mm of the appropriate STOPGAP underlayment.
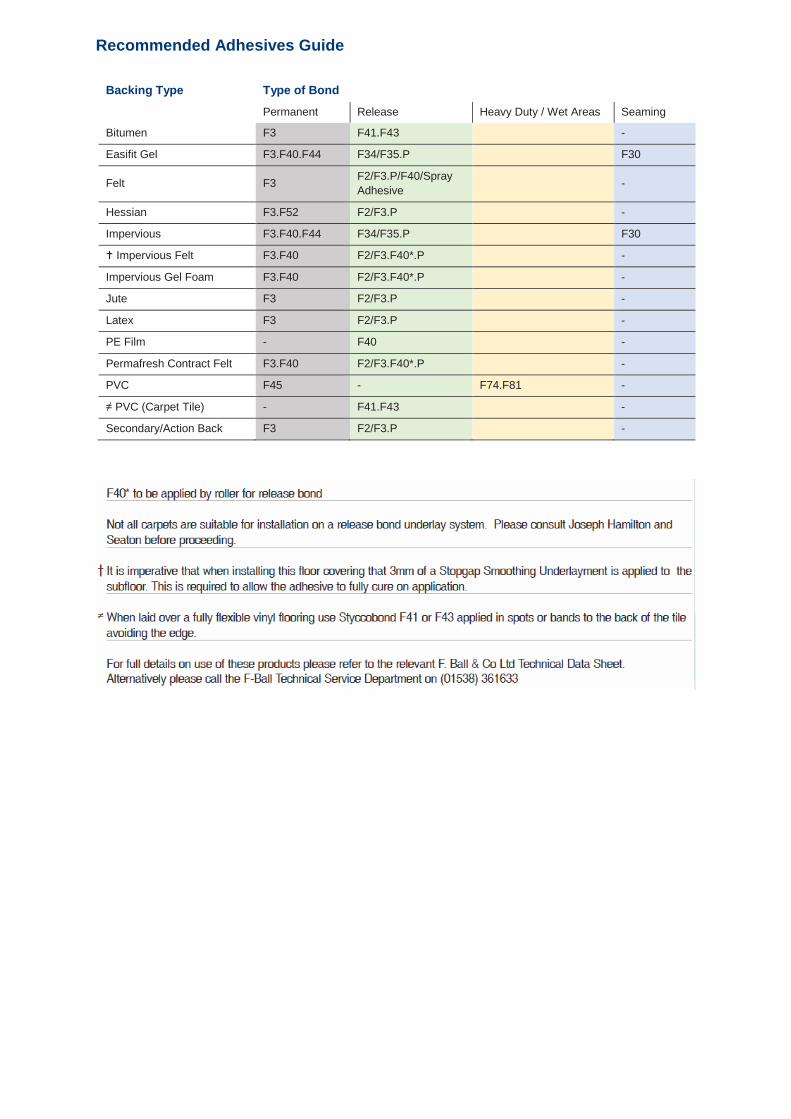
Recommended Adhesives Guide
Backing Type Type of Bond
Permanent Release Heavy Duty / Wet Areas Seaming
Bitumen F3 F41.F43 -
Easifit Gel F3.F40.F44 F34/F35.P F30
Felt F3 F2/F3.P/F40/Spray
Adhesive -
Hessian F3.F52 F2/F3.P -
Impervious F3.F40.F44 F34/F35.P F30
Impervious Felt F3.F40 F2/F3.F40*.P -
Impervious Gel Foam F3.F40 F2/F3.F40*.P -
Jute F3 F2/F3.P -
Latex F3 F2/F3.P -
PE Film - F40 -
Permafresh Contract Felt F3.F40 F2/F3.F40*.P -
PVC F45 - F74.F81 -
≠ PVC (Carpet Tile) - F41.F43 -
Secondary/Action Back F3 F2/F3.P -
Installation Procedures
To ensure that all JHS carpets perform to the required standard the following installation procedures should be followed: ● Inspect the carpet before laying is commenced and before it is cut in to ● Allow the carpet to acclimatise to at least 65°F ● Check for dye lot and roll sequence
Surface Preparation 1. The floor surface must comply with: British Standard BS 5325:1996, meaning that the floor must be clean, smooth,
dry and structurally sound. Uneven concrete floors should be screeded and should be neither friable nor loose and powdery. Concrete floors laid direct to the ground should incorporate a damp proof membrane and should be sealed to prevent dust rising from joins and perimeters.
2. The sub floor must be free from excessive moisture, otherwise long adhesive drying times will occur. 3. The surface must be free from contaminates such as grease, paint, dirt etc. which will affect adhesion. 4. Under no circumstances should the adhesive system be directly applied to an asphalt floor, because of the
likelihood of migration of material from the asphalt. 5. Timber floors must be smooth. If resurfacing is necessary use 6mm plywood or hardwood nailed or stapled at
regular closely spaced intervals.
Installation ● Direct Stick: Ensure that the carpet is cut to plan allowing for adequate pattern matching. Fit the carpet into the recommended wet adhesive. Using a power stretcher, not a kicker, stretch the pattern into register. Always seal all of the seams. Use a lino roller to get any creases out. This will also allow the carpet to fully adhere to the adhesive. ● Double-stick Contract Installation System: The JHS Multi-Fit underlay system is recommended for Heavy Contract and Luxury Contract Double-stick Installations, but not recommended for use on wood block floor, unless the subfloor is able to breathe. Unroll the underlay, with the printed side up. Cut to shape leaving excess around the margins. Fold back one half of the underlay and using the notched trowel apply a recommended tackifier to the subfloor ensuring coverage is complete. Allow the tackifier to dry completely - it will turn from white to clear. Unfold the underlay onto the dry tackifier (if it is not completely dry, the underlay will bond permanently to the sub-floor). Repeat this method with the other half of the underlay. Trim in the underlay neatly around the margins, allowing a gap around the area if a tuck finish is required. The gap will depend on the quality and the thickness of the carpet being laid. All carpet selvedges should be stripped, where necessary, and sealed to prevent fraying. Position the carpet precisely on the underlay before any adhesive is used. All pattern matching, borders and mitred corners should be carefully preplanned. The underlay seams should always be laid at right angles to the carpet seams. Fold back one half of the carpet and apply the adhesive with a trowel. The size of the notch will depend on the backing of the carpet being laid, but it will be a minimum of 1.2mm x 2.5mm. When double-sticking carpets with non-porous or low absorbent backs (such as action back), it is important to allow the adhesive to pre-air before the carpet is bonded to the underlay. Unfold the carpet on to the wet adhesive and use a glider to smooth out any wrinkles or bubbles and to ensure a firm bond. The use of gripper should be considered on all double-stick installations, on account that carpet shrinkage - be it natural, caused by atmospheric conditions or carpet cleaning, may result in movement away from the walls. Unlike other systems Multi-Fit will lift cleanly and not break up on lifting. The underlay may be re-laid after access has been achieved.
Felt Back Installation When installing felt back carpet direct to a sub floor use either F-Ball and co F40 or a good quality spray adhesive. Prior to installation the sub floor must be smooth, clean and prepared as per the "surface preparation" section. Ensure that the carpet is cut to plan leaving a small amount of excess around the perimeter of the room. The F40 tackifier or spray adhesive should be applied as per the manufacturer’s instructions. Unfold the carpet onto the adhesive and use a glider to smooth out any wrinkles or bubbles to ensure a firm bond prior to cutting in the carpets around the perimeters.
Critical: “Seam Trimming Technique” All Joseph Hamilton & Seaton products share a common characteristic with regard to “Rows of Face Fibre”. All Joseph Hamilton & Seaton products will have tufting rows that will be straight and not staggered.
Because of the characteristic, Joseph Hamilton & Seaton requires all seams to be trimmed “on the row” and we further state, no pattern carpet will be matchable unless this row cutting requirement is strictly adhered to. Our procedure is simple and effective if the following points are observed. 1) Using a broad straight bit screw driver open the rows 2) Using a loop pile or cushion back cutter follow the open row with the cutter keeping the trimmer blade close,
opposite of the salvage edge. 3) On pattern carpet trim on pattern centre if at all possible 4) Row cutting works best on side seams and under ideal conditions will also work on butt seams.
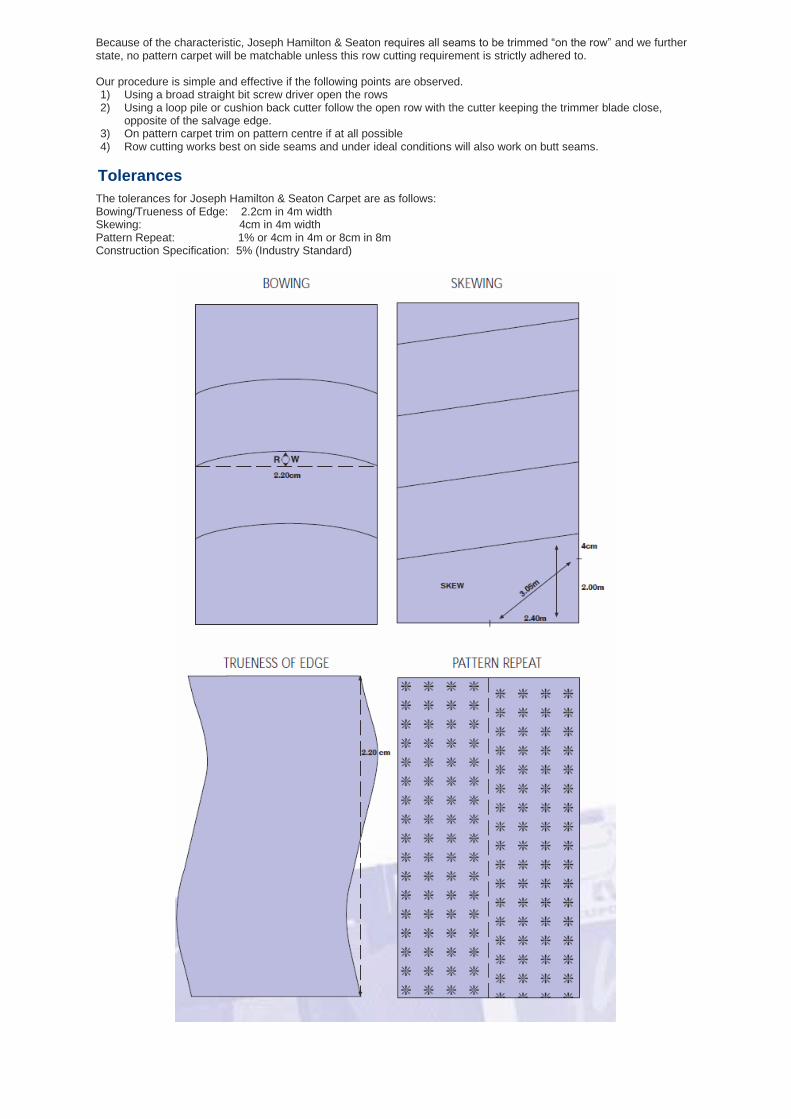
Tolerances
The tolerances for Joseph Hamilton & Seaton Carpet are as follows: Bowing/Trueness of Edge: 2.2cm in 4m width Skewing: 4cm in 4m width Pattern Repeat: 1% or 4cm in 4m or 8cm in 8m Construction Specification: 5% (Industry Standard)
OTHER TOOLS AND TECHNIQUES
Joseph Hamilton & Seaton require F-Ball & Co Ltd adhesives to be used on all glue down or double glue installations, following the techniques set out in their technical data sheets.
Joseph Hamilton & Seaton require all seams to be row cut, be sure you have the appropriate seam tools prior to beginning.
Joseph Hamilton & Seaton require all seams to be sealed with the appropriate seam sealer; latex for hot melt; solvent based seam sealer for all others.
Joseph Hamilton & Seaton require the use of a least a 1/8” x 1/8” V or U shaped notched trowel with no greater the 1/16” spacer. This will result on a proper spread rate approximately 3m2 per litre.
Joseph Hamilton & Seaton required all glue down installations to be thoroughly “rolled” with a 50-75 pound “lino roller” to assure a good transfer of wet adhesive to the carpet back.
Joseph Hamilton & Seaton require all stretch installations to be Power Stretched, 1-1.5% length and width.
Joseph Hamilton & Seaton require the use of architectural tackless on any “stretch-in” installation greater than 10m x 10m.
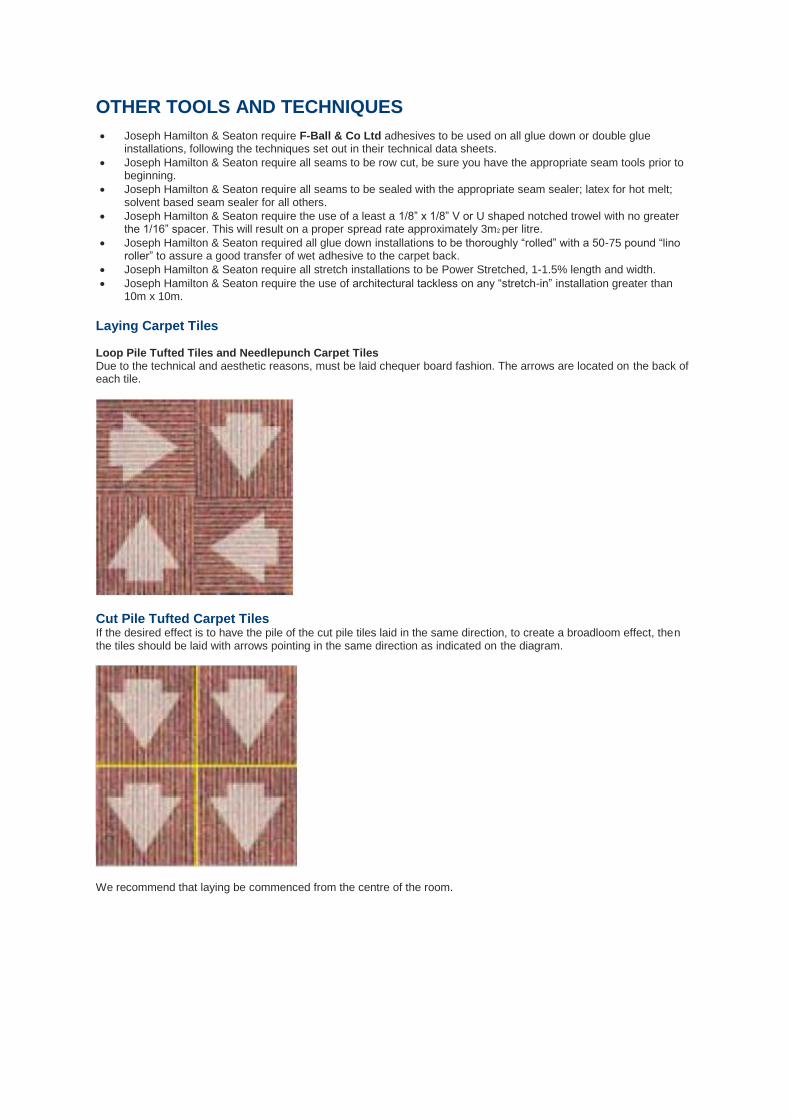
Laying Carpet Tiles Loop Pile Tufted Tiles and Needlepunch Carpet Tiles Due to the technical and aesthetic reasons, must be laid chequer board fashion. The arrows are located on the back of each tile.
Cut Pile Tufted Carpet Tiles If the desired effect is to have the pile of the cut pile tiles laid in the same direction, to create a broadloom effect, then the tiles should be laid with arrows pointing in the same direction as indicated on the diagram.
We recommend that laying be commenced from the centre of the room.