Embed Size (px)
Citation preview
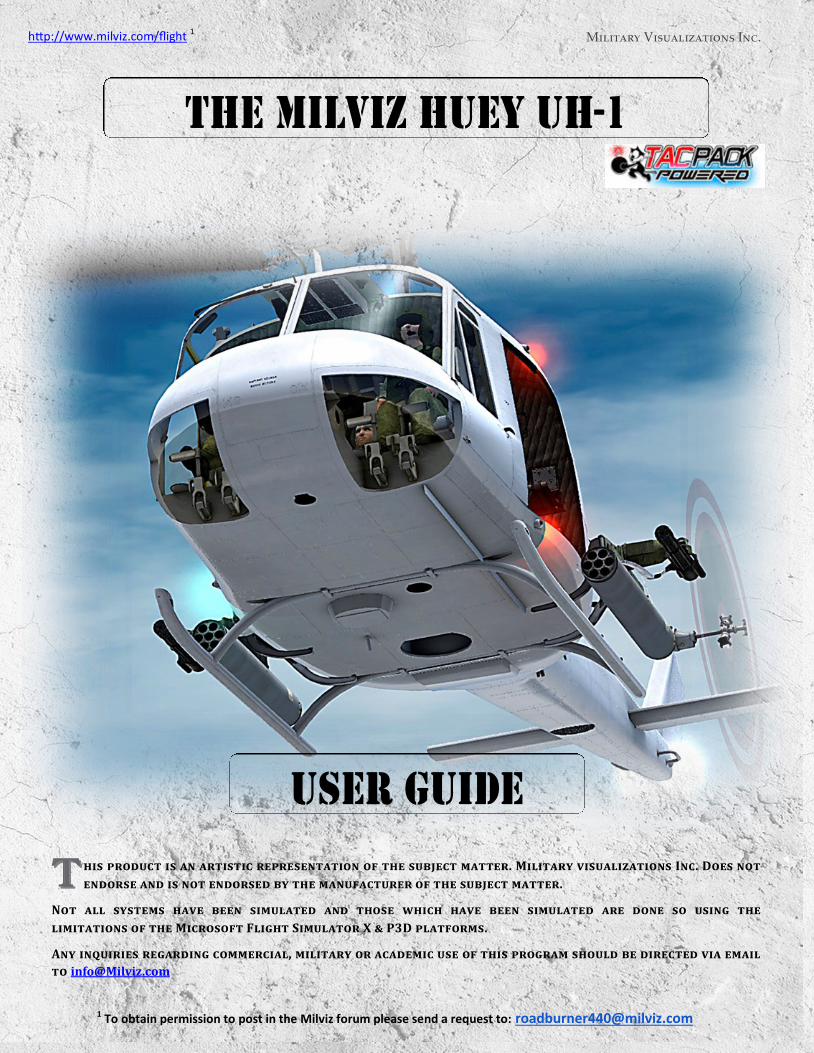
The Milviz Huey UH-1
TT his product is an artistic representation of the subject matter. Military visualizations Inc. Does not
endorse and is not endorsed by the manufacturer of the subject matter.
Not all systems have been simulated and those which have been simulated are done so using the
limitations of the Microsoft Flight Simulator X & P3D platforms.
Any inquiries regarding commercial, military or academic use of this program should be directed via email
User Guide
Military Visualizations Inc. http://www.milviz.com/flight 1
1 To obtain permission to post in the Milviz forum please send a request to: [email protected]
http://www.milviz.com/flight Military Visualizations Inc.
2 To obtain permission to post in the Milviz forum please send a request to: [email protected]
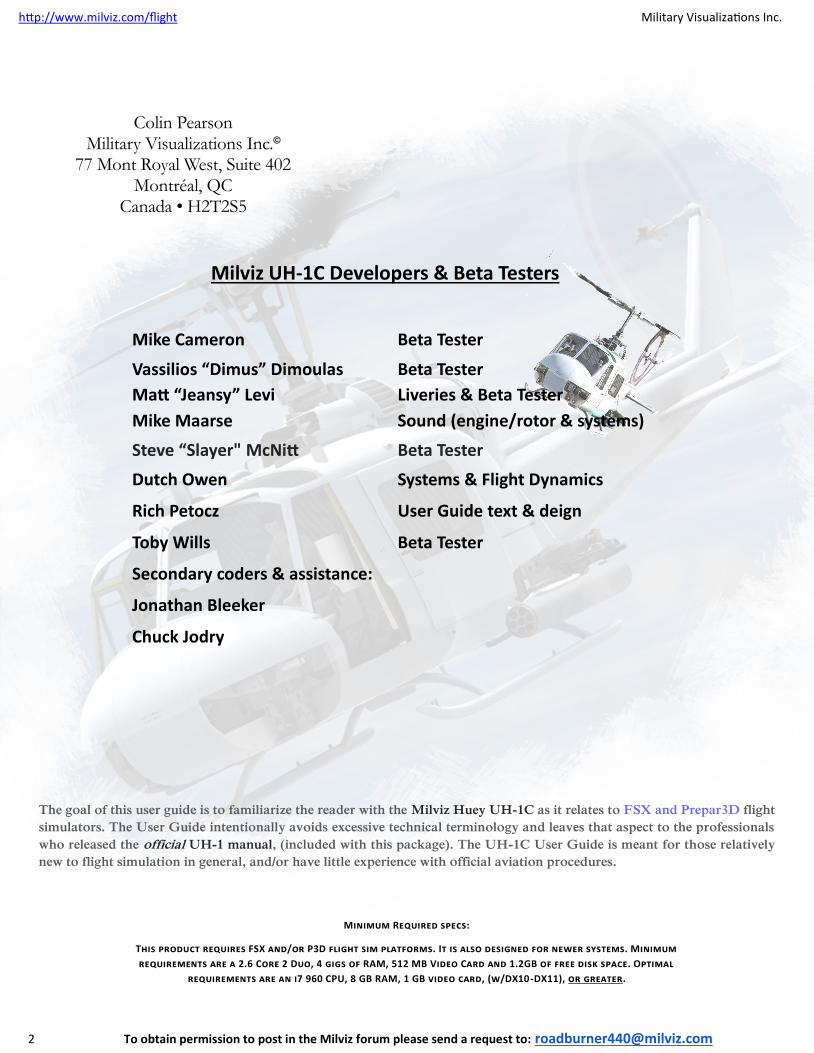
Colin Pearson Military Visualizations Inc.©
77 Mont Royal West, Suite 402 Montréal, QC
Canada • H2T2S5
Milviz UH-1C Developers & Beta Testers
Mike Cameron Beta Tester
Vassilios “Dimus” Dimoulas Beta Tester
Matt “Jeansy” Levi Liveries & Beta Tester
Mike Maarse Sound (engine/rotor & systems)
Steve “Slayer" McNitt Beta Tester
Dutch Owen Systems & Flight Dynamics
Rich Petocz User Guide text & deign
Toby Wills Beta Tester
Secondary coders & assistance:
Jonathan Bleeker
Chuck Jodry
The goal of this user guide is to familiarize the reader with the Milviz Huey UH-1C as it relates to FSX and Prepar3D flight
simulators. The User Guide intentionally avoids excessive technical terminology and leaves that aspect to the professionals
who released the official UH-1 manual, (included with this package). The UH-1C User Guide is meant for those relatively
new to flight simulation in general, and/or have little experience with official aviation procedures.
Minimum Required specs:
This product requires FSX and/or P3D flight sim platforms. It is also designed for newer systems. Minimum
requirements are a 2.6 Core 2 Duo, 4 gigs of RAM, 512 MB Video Card and 1.2GB of free disk space. Optimal
requirements are an i7 960 CPU, 8 GB RAM, 1 GB video card, (w/DX10 -DX11), or greater.
http://www.milviz.com/flight Military Visualizations Inc.
3 To obtain permission to post in the Milviz forum please send a request to: [email protected]
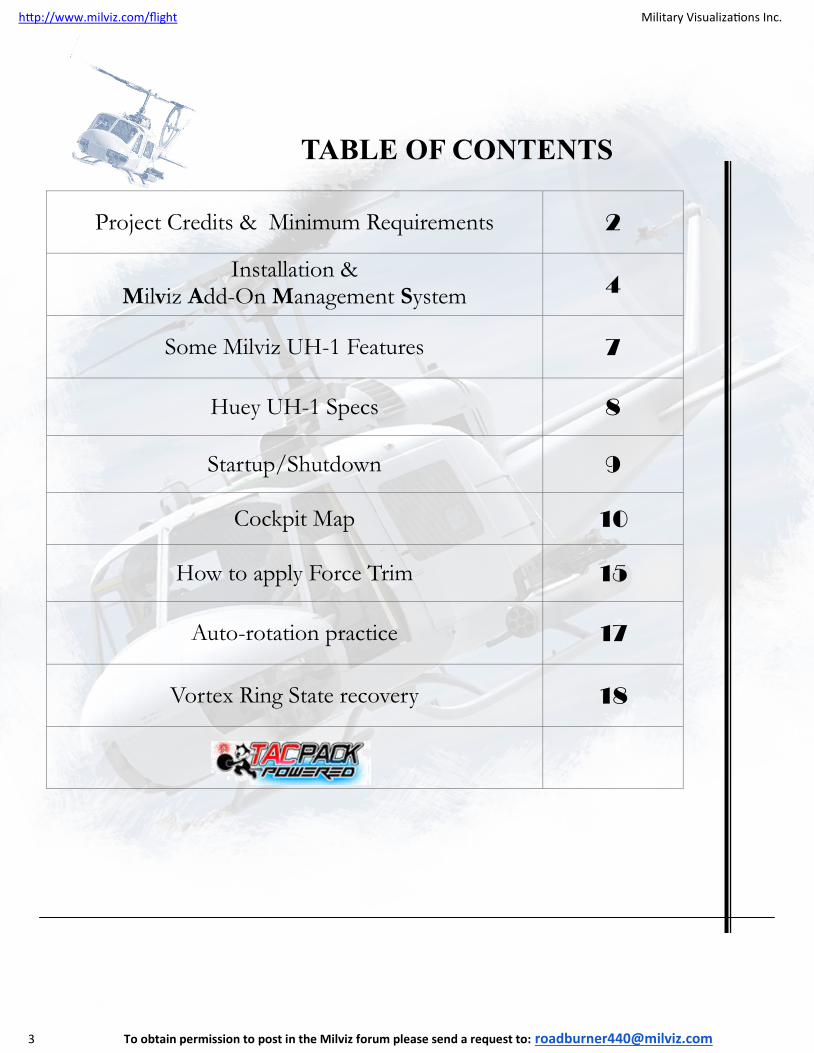
Project Credits & Minimum Requirements 2
Installation & Milviz Add-On Management System 4
Some Milviz UH-1 Features 7
Huey UH-1 Specs 8
Startup/Shutdown 9
Cockpit Map 10
How to apply Force Trim 15
Auto-rotation practice 17
Vortex Ring State recovery 18
TABLE OF CONTENTS
http://www.milviz.com/flight Military Visualizations Inc.
4 To obtain permission to post in the Milviz forum please send a request to: [email protected]
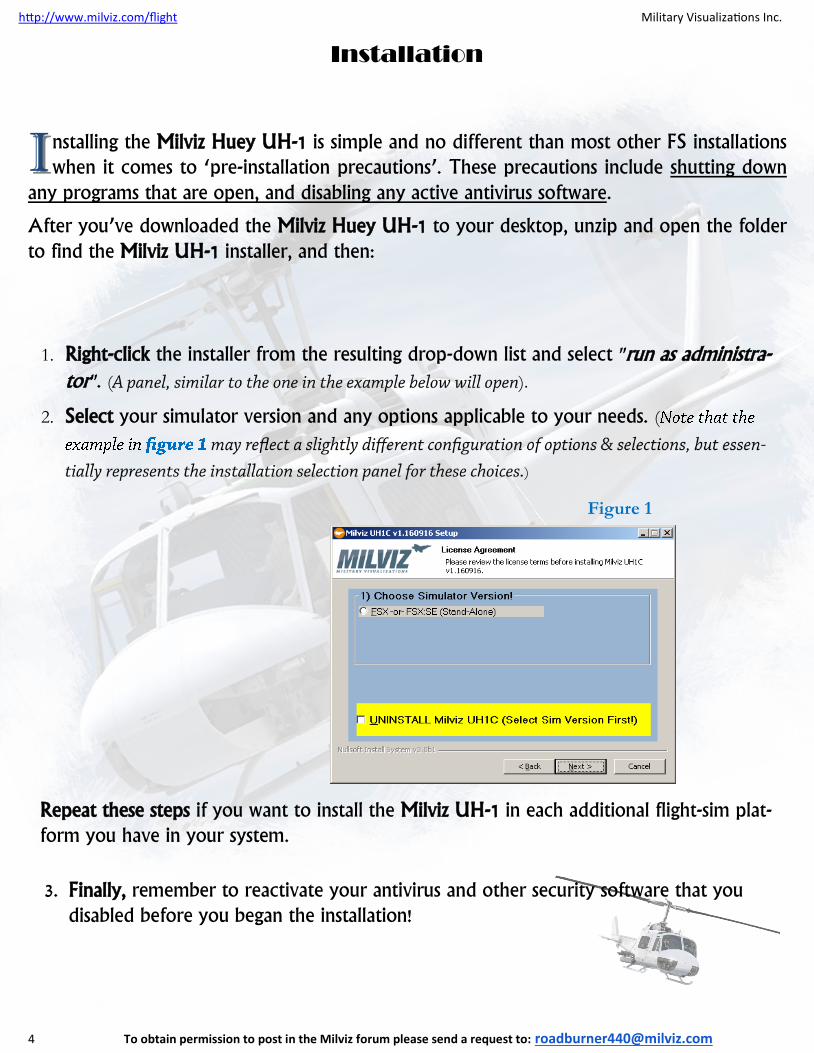
Figure 1
II nstalling the Milviz Huey UH-1 is simple and no different than most other FS installations when it comes to ‘pre-installation precautions’. These precautions include shutting down
any programs that are open, and disabling any active antivirus software.
After you’ve downloaded the Milviz Huey UH-1 to your desktop, unzip and open the folder to find the Milviz UH-1 installer, and then:
1. Right-click the installer from the resulting drop-down list and select "run as administra-tor". ( ).
2. Select your simulator version and any options applicable to your needs. (
)
Installation
Repeat these steps if you want to install the Milviz UH-1 in each additional flight-sim plat-form you have in your system.
3. Finally, remember to reactivate your antivirus and other security software that you disabled before you began the installation!

http://www.milviz.com/flight Military Visualizations Inc.
5 To obtain permission to post in the Milviz forum please send a request to: [email protected]
† Not all Milviz products you may have installed will appear in the MVAMS panel. Some of those products will not appear because they’d have no need for the
MVAMS system. Other Milviz aircraft may not appear because they were released previous to the creation of the MVAMS. In either case, those products that
didn’t show up have their own alternative management systems.
Installation (cont.)
Milviz Add-on Management System (MVAMS)
AA fter each installation process is completed, an orange panel will open, (Figure A). This
is the “MVAMS” panel, (Milviz Add-on Manager System)†. Click on the corner indi-cated by the ‘sweeping arrow’ and you’ll be led through several panels and finally to the UH-1’s configuration options.
You can proceed to configure the Huey UH-1 you’ve just installed using the MVAMS panel presented at this point, but it isn’t necessary. The panel will always be accessible at anytime after the installation by clicking on the desktop icon, (figure 2).
In fact, it may be a better idea to do it later because some of the options regarding Joystick button assignments require that your flight sim control system be connected to your computer first.
Figure 2
TT he following is an excerpt from the first page of the MVAMS Guide. On that page, the Milviz Huey UH-1 is used as an example of what the MVAMS offers. The guide
then switches to using the Milviz F100D as the example for the remaining 6 pages:
The ‘sweeping arrow’ on the first panel to open immediately after the in-stallation completes, (Figure A), points to your next click point.
As mentioned earlier, you don’t have to configure your aircraft at that moment and can close it if you wish.
Figure A
Please Note: A detailed, 7-page, instruction guide, (MVAMS Guide), is included in the Milviz UH-1 Documents folder, (along with
all the other guides and manuals). However, you may find the MVAMS to be very intuitive and most of the selections self explana-tory. Still, it wouldn’t hurt to give it a quick look-over to have a better understanding of how it applies to other Milviz products.
http://www.milviz.com/flight Military Visualizations Inc.
6 To obtain permission to post in the Milviz forum please send a request to: [email protected]
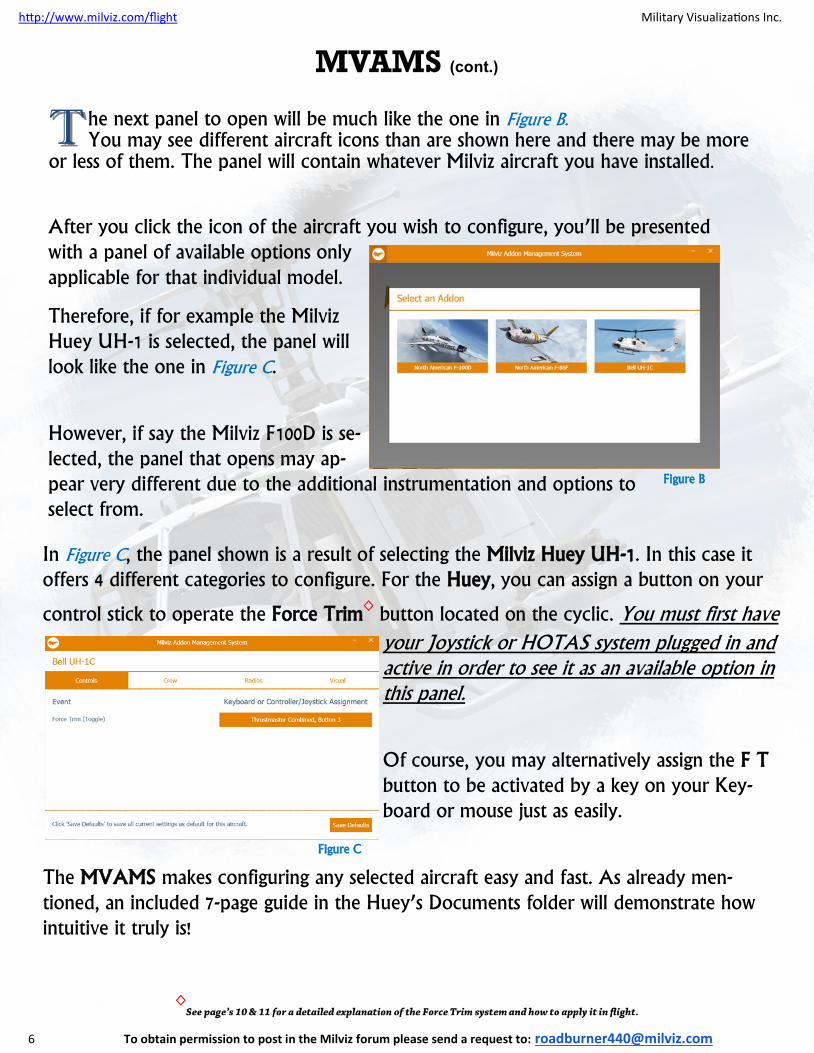
In Figure C, the panel shown is a result of selecting the Milviz Huey UH-1. In this case it offers 4 different categories to configure. For the Huey, you can assign a button on your
control stick to operate the Force Trim◊ button located on the cyclic. You must first have
your Joystick or HOTAS system plugged in and active in order to see it as an available option in this panel.
Of course, you may alternatively assign the F T button to be activated by a key on your Key-board or mouse just as easily.
The MVAMS makes configuring any selected aircraft easy and fast. As already men-tioned, an included 7-page guide in the Huey’s Documents folder will demonstrate how intuitive it truly is!
Figure C
After you click the icon of the aircraft you wish to configure, you’ll be presented with a panel of available options only applicable for that individual model.
Therefore, if for example the Milviz Huey UH-1 is selected, the panel will look like the one in Figure C.
However, if say the Milviz F100D is se-lected, the panel that opens may ap-pear very different due to the additional instrumentation and options to select from.
TT he next panel to open will be much like the one in Figure B. You may see different aircraft icons than are shown here and there may be more
or less of them. The panel will contain whatever Milviz aircraft you have installed.
Figure B
MVAMS (cont.)
◊
http://www.milviz.com/flight Military Visualizations Inc.
7 To obtain permission to post in the Milviz forum please send a request to: [email protected]
Milviz UH-1 Features:
SS ome key features that make the Milviz Huey UH-1 the most realistic of all simula-tor Huey’s available:
Package includes The UH-1C and UH-1H models with military & civilian liveries
Extremely accurate Flight dynamics (real-world differences between the 1C & 1H) pushed to the limit of the flight-sim’s capabilities
Handling and flight dynamics change in response to changes in the aircraft’s gross weight and balance
Capable of Auto-rotation and accurate VRS effect
UH-1C is fully TacPack Ready including rockets & miniguns as well as NVG◊
High Quality Sound set (recorded from a real Huey!)
Authentic, working systems & startup procedure†
Working Force Trim (assignable to any J-stick button)
Configurable with the MVAMS (Milviz Add-on Management System)
Paint Kit, Official manual, User and MVAMS guides included
(Watch for additional military and GA liveries & systems in future patches!)
◊TacPack is a 3rd party add-on and it’s operation is beyond the scope of this User Guide. Please refer to VRS TacPac for application and uses.
Please see https://www.vrsimulations.com/tacpack.htm
†Not all systems have been simulated and those which have been simulated are done so using the limitations of the Microsoft Flight Simulator X &
P3D platforms.
Check out the Milviz UH-1 Huey Basic Operations YouTube video:
Milviz UH1 Huey Basic Operations
http://www.milviz.com/flight Military Visualizations Inc.
8 To obtain permission to post in the Milviz forum please send a request to: [email protected]
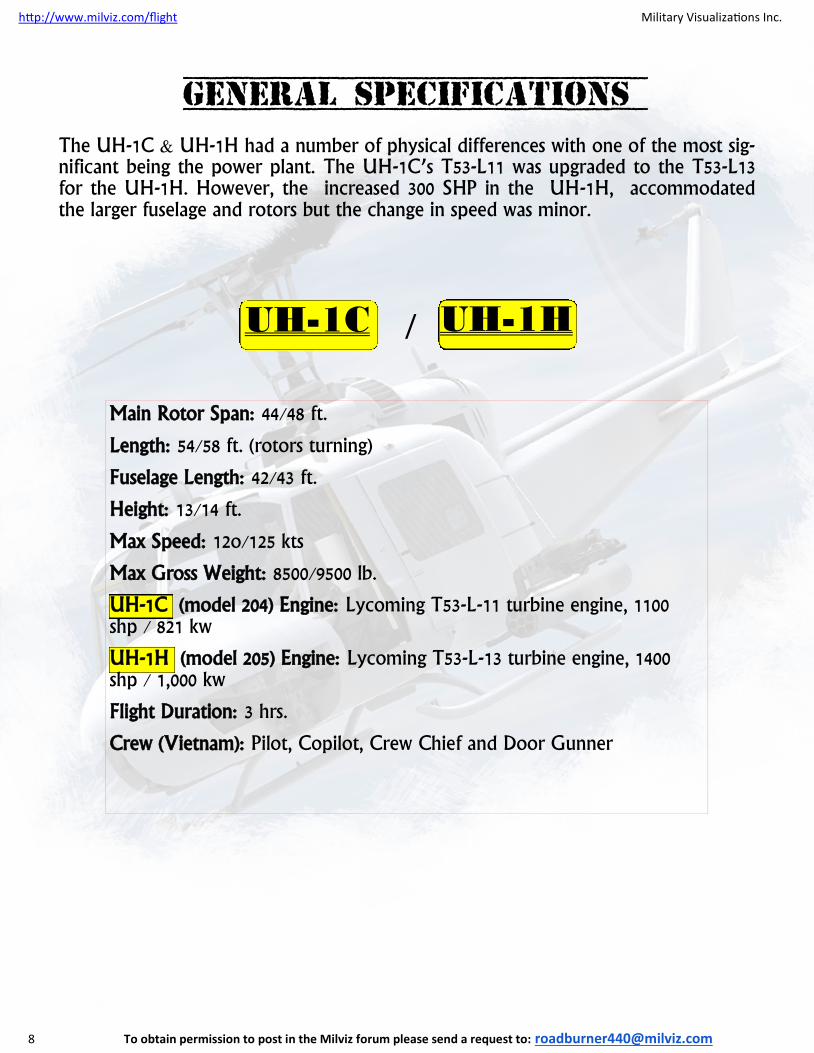
General Specifications
The UH-1C & UH-1H had a number of physical differences with one of the most sig-nificant being the power plant. The UH-1C’s T53-L11 was upgraded to the T53-L13 for the UH-1H. However, the increased 300 SHP in the UH-1H, accommodated the larger fuselage and rotors but the change in speed was minor.
UH-1C UH-1H /
Main Rotor Span: 44/48 ft.
Length: 54/58 ft. (rotors turning)
Fuselage Length: 42/43 ft.
Height: 13/14 ft.
Max Speed: 12o/125 kts
Max Gross Weight: 8500/9500 lb.
UH-1C (model 204) Engine: Lycoming T53-L-11 turbine engine, 1100 shp / 821 kw
UH-1H (model 205) Engine: Lycoming T53-L-13 turbine engine, 1400 shp / 1,000 kw
Flight Duration: 3 hrs.
Crew (Vietnam): Pilot, Copilot, Crew Chief and Door Gunner

http://www.milviz.com/flight Military Visualizations Inc.
9 To obtain permission to post in the Milviz forum please send a request to: [email protected]
1. Switch OFF the Low RPM Alarm, (just to the left of the Fuel Pump switch with red safety cover).
2. Switch ON Battery (overhead console), followed by exterior lights.
3. Switch ON Fuel Pump (covered by red safety cover on center console).
4. Switch ON Force Trim and Hydraulics systems, (center console).
5. Ensure the Collective is in full down position and then place your cursor on the Throttle Grip. Roll your mouse wheel to rotate the grip counter clockwise. The Throttle Grip will stop when it reaches the idle position (if it isn’t there already).
6. Press (left-click) and HOLD the red Starter button located on the right side of the collective box.
As the engine begins to spool up, watch the N1 Gauge, (pg. 12/#20).
8. Once the RPM settles, switch Inverter toggle selection to ON/Main
(overhead console / pg. 13/#6).
9. Switch ON IFF (center console).
10.Slowly rotate the Throttle Grip clockwise to full power using the mouse wheel.
11.Click on the Caution test/reset switch (pg. 14/#4) to reset the Master Cau-tion light and ensure all caution lights on the annunciator panel are out.
-Your Huey UH-1H is now ready to fly-
Startup Procedure:
http://www.milviz.com/flight Military Visualizations Inc.
10 To obtain permission to post in the Milviz forum please send a request to: [email protected]
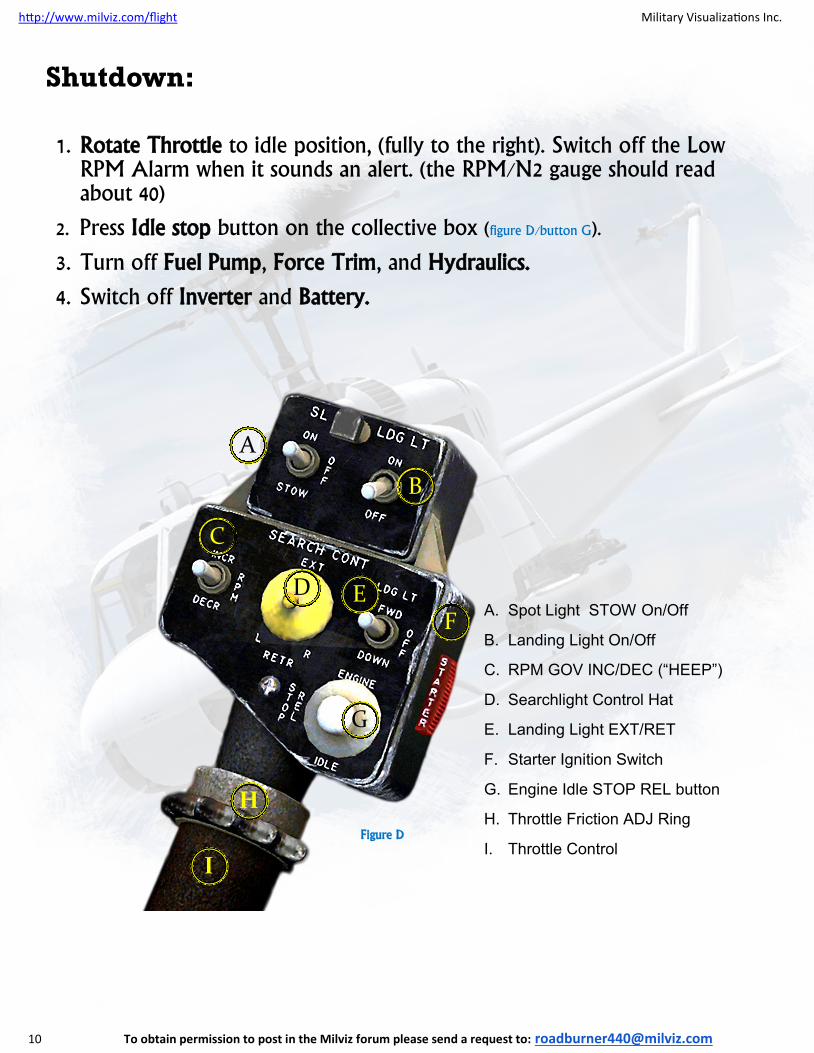
Shutdown:
1. Rotate Throttle to idle position, (fully to the right). Switch off the Low RPM Alarm when it sounds an alert. (the RPM/N2 gauge should read about 40)
2. Press Idle stop button on the collective box (figure D/button G).
3. Turn off Fuel Pump, Force Trim, and Hydraulics.
4. Switch off Inverter and Battery.
Figure D
A
B
C
E F
G
H
I
D A. Spot Light STOW On/Off
B. Landing Light On/Off
C. RPM GOV INC/DEC (“HEEP”)
D. Searchlight Control Hat
E. Landing Light EXT/RET
F. Starter Ignition Switch
G. Engine Idle STOP REL button
H. Throttle Friction ADJ Ring
I. Throttle Control
http://www.milviz.com/flight Military Visualizations Inc.
11 To obtain permission to post in the Milviz forum please send a request to: [email protected]
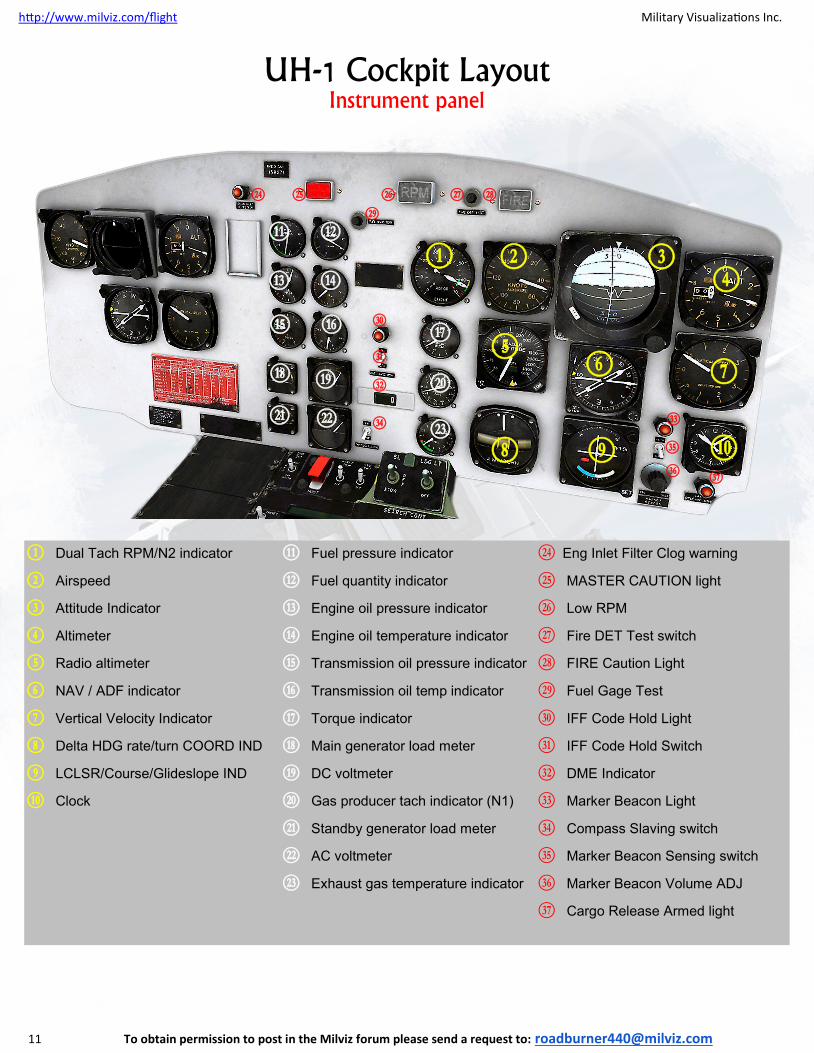
UH-1 Cockpit Layout Instrument panel
B Dual Tach RPM/N2 indicator
C Airspeed
D Attitude Indicator
E Altimeter
F Radio altimeter
G NAV / ADF indicator
H Vertical Velocity Indicator
I Delta HDG rate/turn COORD IND
J LCLSR/Course/Glideslope IND
K Clock
L Fuel pressure indicator
M Fuel quantity indicator
N Engine oil pressure indicator
O Engine oil temperature indicator
P Transmission oil pressure indicator
Q Transmission oil temp indicator
R Torque indicator
S Main generator load meter
T DC voltmeter
U Gas producer tach indicator (N1)
V Standby generator load meter
W AC voltmeter
X Exhaust gas temperature indicator
Y Eng Inlet Filter Clog warning
Z MASTER CAUTION light
8 Low RPM
9 Fire DET Test switch
: FIRE Caution Light
; Fuel Gage Test
< IFF Code Hold Light
= IFF Code Hold Switch
a DME Indicator
b Marker Beacon Light
c Compass Slaving switch
d Marker Beacon Sensing switch
e Marker Beacon Volume ADJ
f Cargo Release Armed light
L
N
P
M
O
Q R
U
X
S
V
T
W
B C D E
F G
K
H
I J
b
;
c
Y :
a
=
8 9 Z
<
d
e f
http://www.milviz.com/flight Military Visualizations Inc.
12 To obtain permission to post in the Milviz forum please send a request to: [email protected]
B C
D
E
F G
I
H
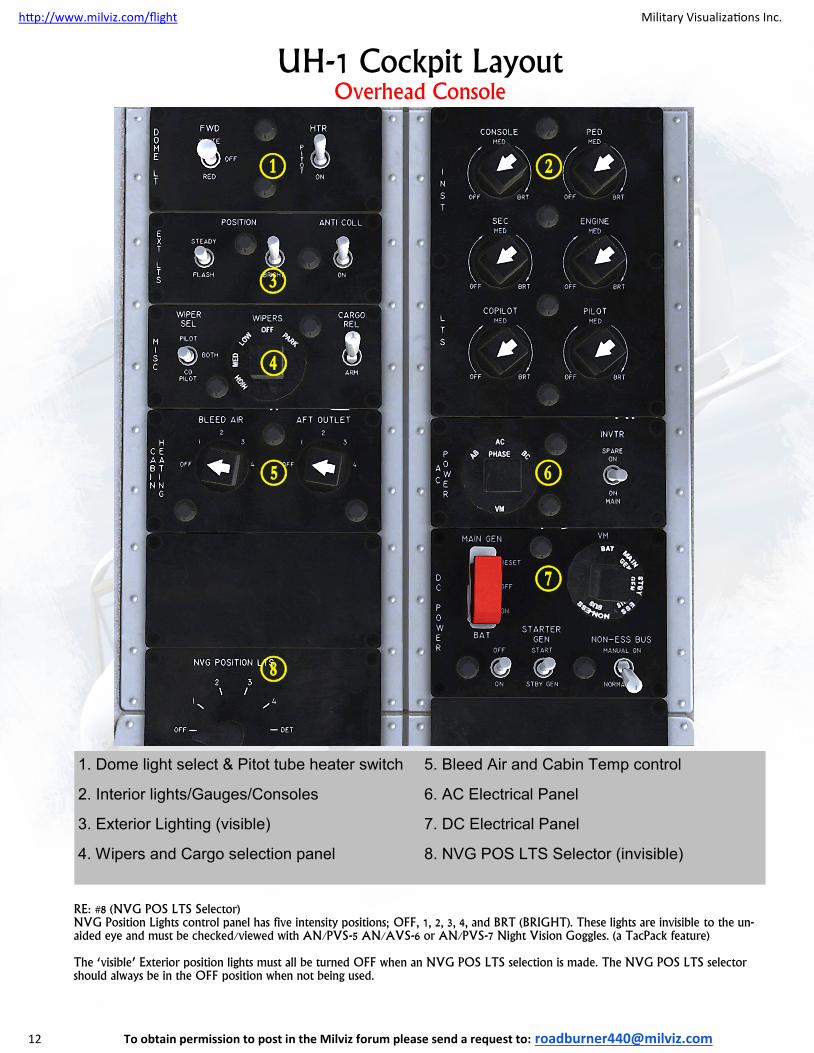
UH-1 Cockpit Layout Overhead Console
1. Dome light select & Pitot tube heater switch
2. Interior lights/Gauges/Consoles
3. Exterior Lighting (visible)
4. Wipers and Cargo selection panel
5. Bleed Air and Cabin Temp control
6. AC Electrical Panel
7. DC Electrical Panel
8. NVG POS LTS Selector (invisible)
RE: #8 (NVG POS LTS Selector) NVG Position Lights control panel has five intensity positions; OFF, 1, 2, 3, 4, and BRT (BRIGHT). These lights are invisible to the un-aided eye and must be checked/viewed with AN/PVS-5 AN/AVS-6 or AN/PVS-7 Night Vision Goggles. (a TacPack feature) The ‘visible’ Exterior position lights must all be turned OFF when an NVG POS LTS selection is made. The NVG POS LTS selector should always be in the OFF position when not being used.
http://www.milviz.com/flight Military Visualizations Inc.
13 To obtain permission to post in the Milviz forum please send a request to: [email protected]
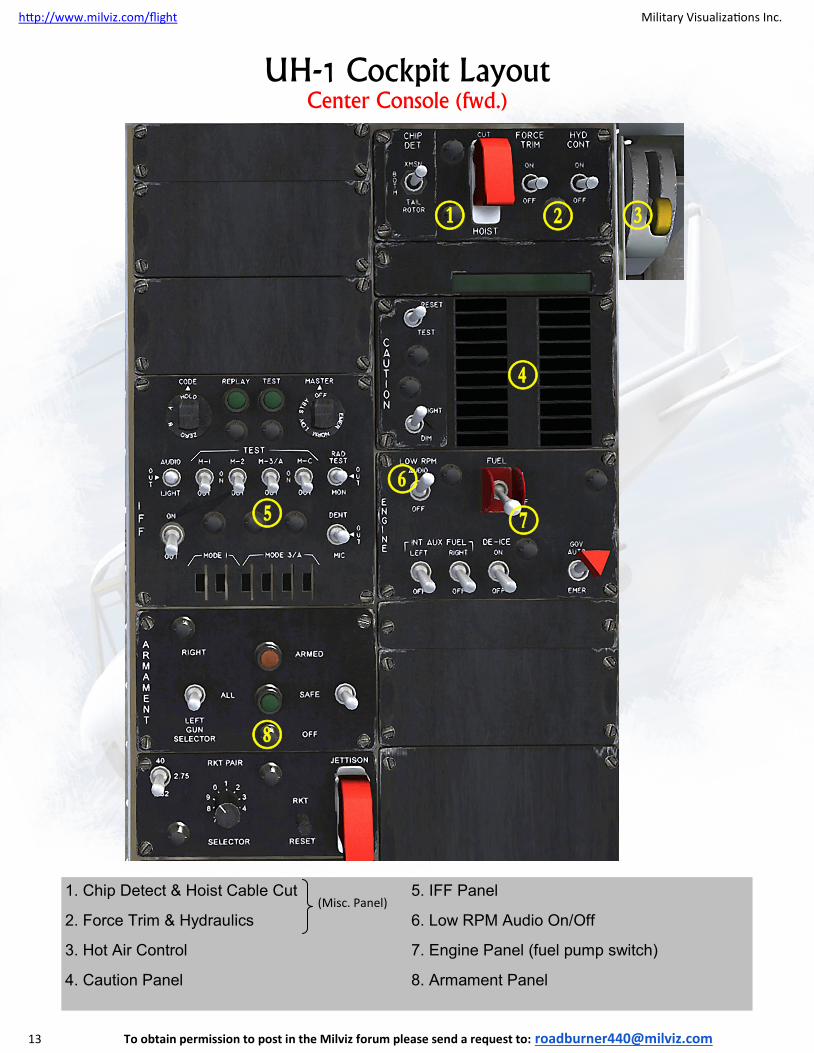
UH-1 Cockpit Layout Center Console (fwd.)
1. Chip Detect & Hoist Cable Cut
2. Force Trim & Hydraulics
3. Hot Air Control
4. Caution Panel
5. IFF Panel
6. Low RPM Audio On/Off
7. Engine Panel (fuel pump switch)
8. Armament Panel
(Misc. Panel)
D B C
E
F
G
H
I
http://www.milviz.com/flight Military Visualizations Inc.
14 To obtain permission to post in the Milviz forum please send a request to: [email protected]
J
K
L
M
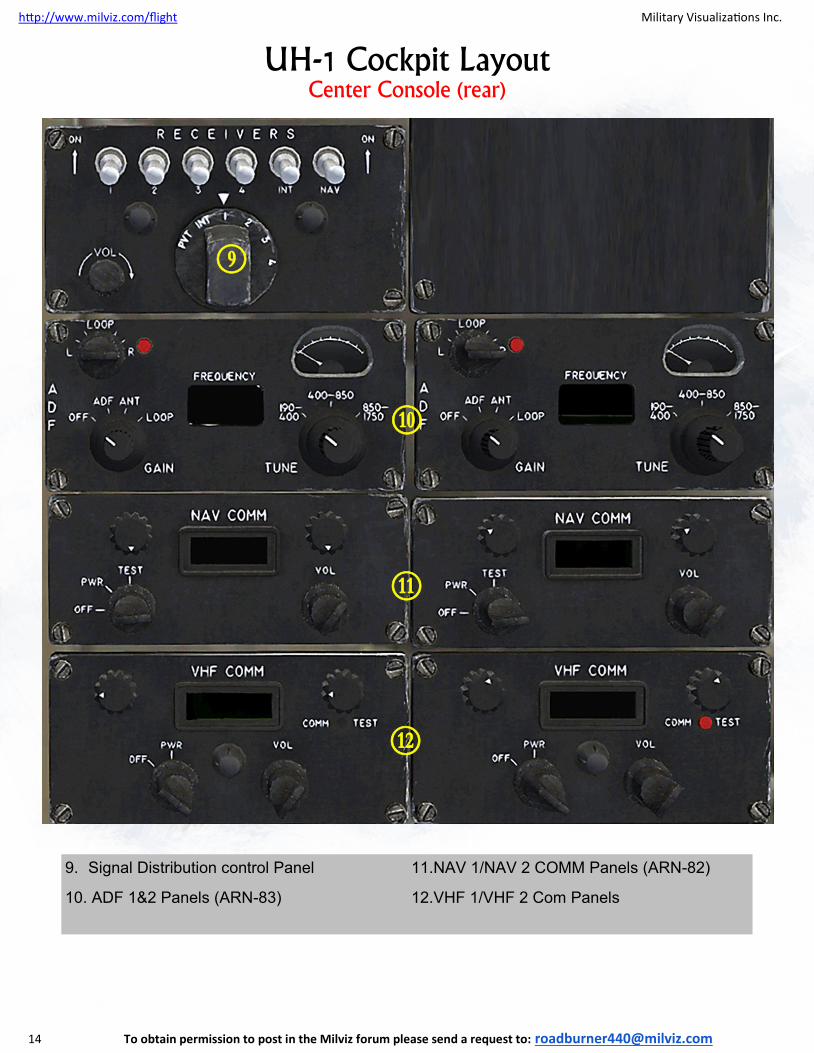
UH-1 Cockpit Layout Center Console (rear)
9. Signal Distribution control Panel
10. ADF 1&2 Panels (ARN-83)
11.NAV 1/NAV 2 COMM Panels (ARN-82)
12.VHF 1/VHF 2 Com Panels
http://www.milviz.com/flight Military Visualizations Inc.
15 To obtain permission to post in the Milviz forum please send a request to: [email protected]
TT he Milviz Huey UH-1’s Force Trim is accurately replicated. However, the “Force Trim” system by design, isn't as advanced as say, the AFCS found in some of the
later model, heavy, helicopters such as the CH 53. Force Trim is intended to give pilots the ability to relax a bit when on some of the longer flights they encounter. However, generally speaking, they engage the system in most every flight, long or short.
You can bet that you'll have a bad day, (or night), if you're counting on F T to hold a particular preference in altitude and course. There is no feedback to the Huey’s other systems that would tell it to pitch up/down left or right when something like the wind direction and/or speed, (among many other variables), changes in any way.
Michael Baker, (one of several experienced consultants on other Milviz projects such as the Milviz 407), has logged many hours in various helicopters. His experience with Force Trim comes from models like the 204, (UH-1C), and 205, (UH-1H). In the following ex-cerpts, (taken from the UG of the Milviz 407), he explains the Force Trim in a very easy to understand way:
“There is no trim adjustment or forced trim on the anti-torque system … un-like the stick in a fixed wing airplane, the Cyclic, (in helicopters like the Bell 204, 205, & 407), have no dynamic feedback. Bell’s version of trim is “Forced Trim” and it does its job by magnetic force along the push-pull tubes of the Cyclic controls. Once centered, (pilot chosen), any force ap-plied feels like pushing against a spring. (The force), becomes stronger the further the stick is moved from the pre-determined center.”
How to apply Force Trim
http://www.milviz.com/flight Military Visualizations Inc.
16 To obtain permission to post in the Milviz forum please send a request to: [email protected]
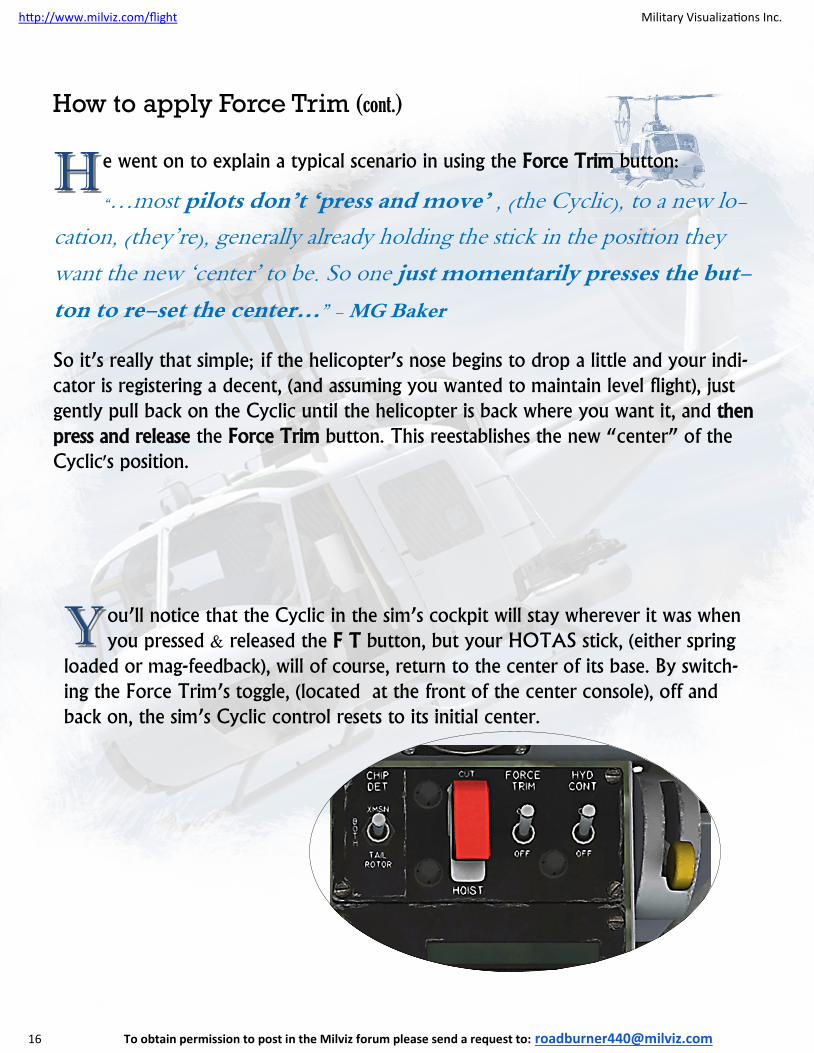
YY ou’ll notice that the Cyclic in the sim’s cockpit will stay wherever it was when you pressed & released the F T button, but your HOTAS stick, (either spring
loaded or mag-feedback), will of course, return to the center of its base. By switch-ing the Force Trim’s toggle, (located at the front of the center console), off and back on, the sim’s Cyclic control resets to its initial center.
HH e went on to explain a typical scenario in using the Force Trim button:
“…most pilots don’t ‘press and move’ , (the Cyclic), to a new lo-cation, (they’re), generally already holding the stick in the position they want the new ‘center’ to be. So one just momentarily presses the but-ton to re-set the center…” - MG Baker So it’s really that simple; if the helicopter’s nose begins to drop a little and your indi-cator is registering a decent, (and assuming you wanted to maintain level flight), just gently pull back on the Cyclic until the helicopter is back where you want it, and then press and release the Force Trim button. This reestablishes the new “center” of the Cyclic's position.
How to apply Force Trim (cont.)
http://www.milviz.com/flight Military Visualizations Inc.
17 To obtain permission to post in the Milviz forum please send a request to: [email protected]
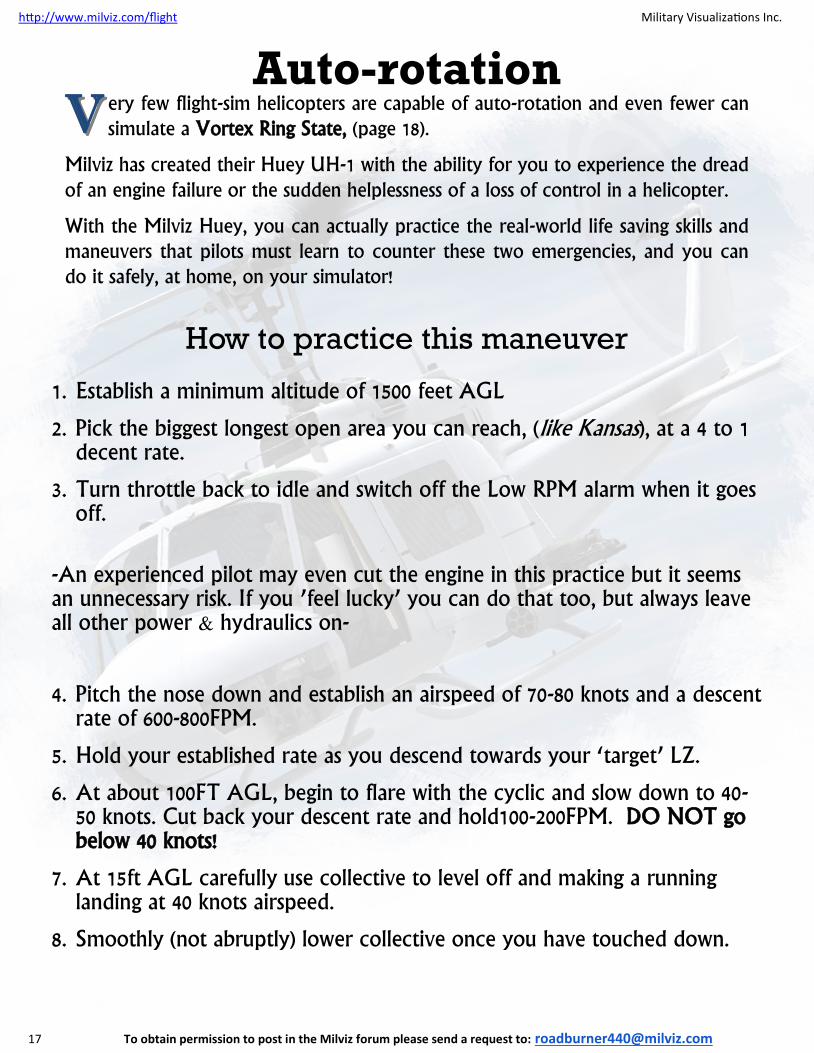
1. Establish a minimum altitude of 1500 feet AGL
2. Pick the biggest longest open area you can reach, (like Kansas), at a 4 to 1 decent rate.
3. Turn throttle back to idle and switch off the Low RPM alarm when it goes off.
-An experienced pilot may even cut the engine in this practice but it seems an unnecessary risk. If you ’feel lucky’ you can do that too, but always leave all other power & hydraulics on- 4. Pitch the nose down and establish an airspeed of 70-80 knots and a descent
rate of 600-800FPM.
5. Hold your established rate as you descend towards your ‘target’ LZ.
6. At about 100FT AGL, begin to flare with the cyclic and slow down to 40-50 knots. Cut back your descent rate and hold100-200FPM. DO NOT go below 40 knots!
7. At 15ft AGL carefully use collective to level off and making a running landing at 40 knots airspeed.
8. Smoothly (not abruptly) lower collective once you have touched down.
Auto-rotation VV ery few flight-sim helicopters are capable of auto-rotation and even fewer can
simulate a Vortex Ring State, (page 18).
Milviz has created their Huey UH-1 with the ability for you to experience the dread of an engine failure or the sudden helplessness of a loss of control in a helicopter.
With the Milviz Huey, you can actually practice the real-world life saving skills and maneuvers that pilots must learn to counter these two emergencies, and you can do it safely, at home, on your simulator!
How to practice this maneuver
http://www.milviz.com/flight Military Visualizations Inc.
18 To obtain permission to post in the Milviz forum please send a request to: [email protected]
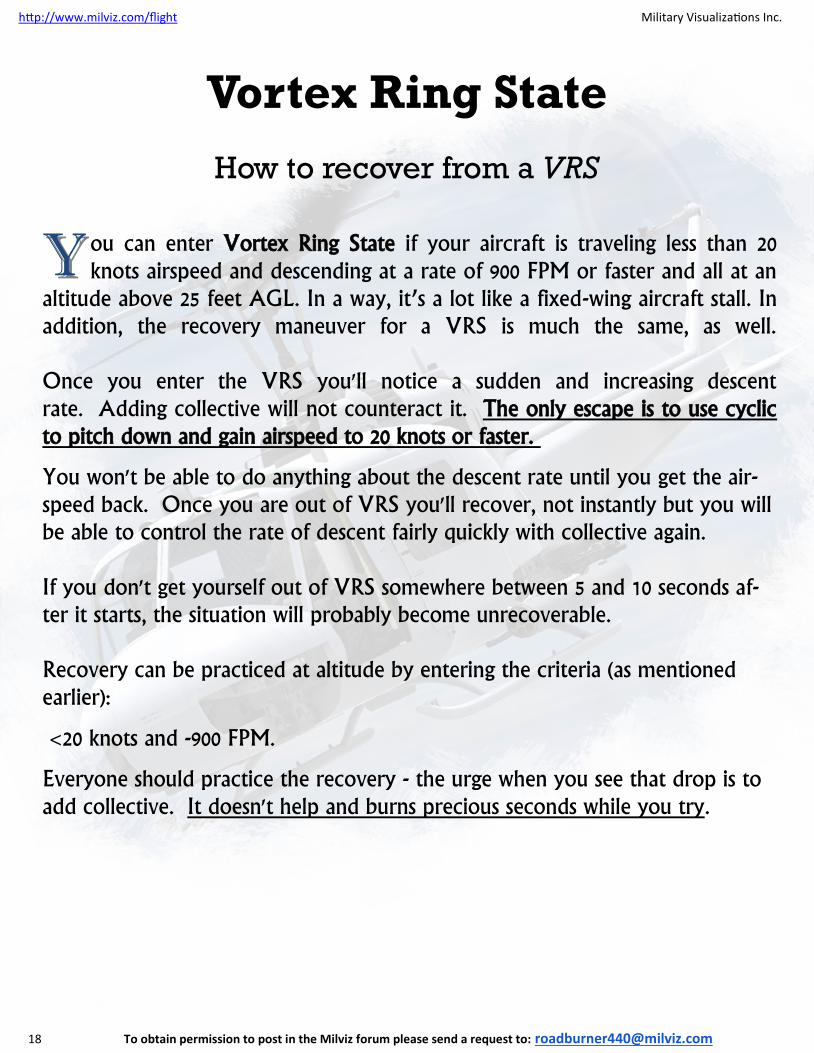
How to recover from a VRS
YY ou can enter Vortex Ring State if your aircraft is traveling less than 20 knots airspeed and descending at a rate of 900 FPM or faster and all at an
altitude above 25 feet AGL. In a way, it’s a lot like a fixed-wing aircraft stall. In addition, the recovery maneuver for a VRS is much the same, as well. Once you enter the VRS you'll notice a sudden and increasing descent rate. Adding collective will not counteract it. The only escape is to use cyclic to pitch down and gain airspeed to 20 knots or faster.
You won't be able to do anything about the descent rate until you get the air-speed back. Once you are out of VRS you'll recover, not instantly but you will be able to control the rate of descent fairly quickly with collective again. If you don't get yourself out of VRS somewhere between 5 and 10 seconds af-ter it starts, the situation will probably become unrecoverable. Recovery can be practiced at altitude by entering the criteria (as mentioned earlier):
<20 knots and -900 FPM.
Everyone should practice the recovery - the urge when you see that drop is to add collective. It doesn't help and burns precious seconds while you try.
Vortex Ring State

http://www.milviz.com/flight Military Visualizations Inc.
19 To obtain permission to post in the Milviz forum please send a request to: [email protected]
This product is an artistic representation of the subject matter. Military visualizations Inc. Does not endorse and is not endorsed by the manufacturer of the subject matter. Not all systems have been simulated and those which have been simulated are done so using the limitations of the Microsoft Flight Simulator X & P3D platforms. Any inquiries regarding commercial, military or academic use of this program should be directed via e-mail to [email protected] furthermore, any and all components of this product are copyright of military visualizations Inc.. No replication, reduction, reverse engineering or unauthorized addition to the software, either in whole or in part, is permitted in any form without the express written permission of military visualizations INC. by installing this software, you are hereby agreeing to the above terms and conditions. Any breach of the above EULA will result in litigation, removal of license and or forfeiture of contin-ued support.