Embed Size (px)
Citation preview

Entire contents © Megatech 2007 Rev. 200707021412
Flight Manual
www.megatech.com
2
If you have questions about operating or assembling your new Megatech product... Please Call Megatech First!
DO NOT RETURN THIS PRODUCT TO THE STORECall our Service Department at:
(888) MEGA-911 or (201)662-8500 or email to: [email protected]
9:30am - 5:30pm, EST Monday through Friday (except holidays)
Technical assistance is also available on the web at www.megatech.com
READ ENTIRE MANUAL FIRST BEFORE ATTEMPTING TO FLY
TABLE OF CONTENTS
Safety Precautions .................................................................................................... 3Package Contents ..................................................................................................... 4Final Assembly .......................................................................................................... 4Installing the Transmitter Batteries ........................................................................ 5Charging your Night Flyer ....................................................................................... 6Installing the Flight Pack ......................................................................................... 6Cycling your Flight Pack ........................................................................................... 6Pre Flight Check ........................................................................................................ 7Flight School ............................................................................................................. 8Flight Tips ............................................................................................................... 10Repairing your Night Flyer .................................................................................... 11Parts List ................................................................................................................. 11 Troubleshooting .................................................................................................... 12Warranty ................................................................................................................. 13
Caution: changes or modifications not expressly approved by the party responsible for compliance could void the user’s authority to operate the equipment.
NOTE: This equipment has been tested and found to comply with the limits for a class B digital device, pursuant to Part 15 of the FCC Rules. These limits are designed to provide reasonable protection against harmful interference in a residential installation. This equipment generates uses and can radiate radio frequency energy and, if not installed and used in accordance with the instructions, may cause harmful interference to radio communications. However, there is no guarantee that interference will not occur in a particular installation. If this equipment does cause harmful interference to radio or television reception, which can be determined by turning the equipment off and on, the user is encouraged to try correcting the interference by one or more of the following measures:
- Reorient or relocate the receiving antenna.- Increase the separation between the equipment and receiver.- Connect the equipment into an outlet on a circuit different from that to which the receiver is connected.- Consult the dealer or experienced radio/TV technician for help.
3
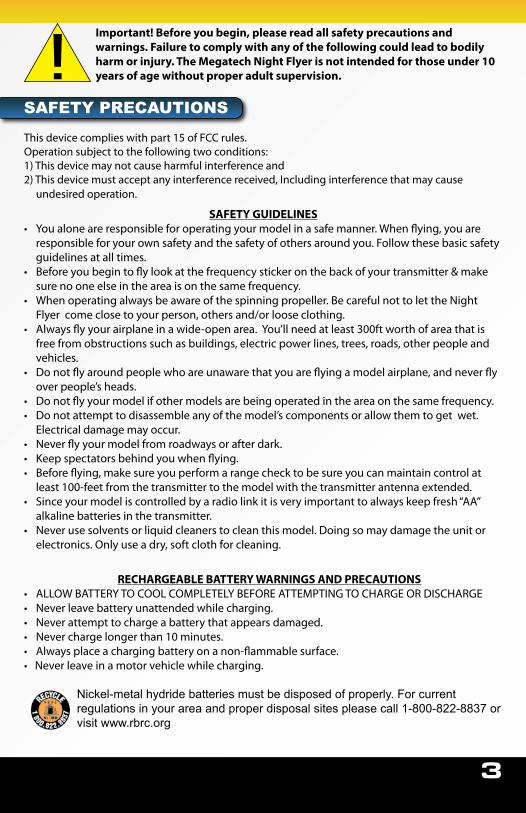
Important! Before you begin, please read all safety precautions and warnings. Failure to comply with any of the following could lead to bodily harm or injury. The Megatech Night Flyer is not intended for those under 10 years of age without proper adult supervision.
SAFETY PRECAUTIONS
This device complies with part 15 of FCC rules.Operation subject to the following two conditions:1) This device may not cause harmful interference and 2) This device must accept any interference received, Including interference that may cause
undesired operation.
SAFETY GUIDELINES• Youaloneareresponsibleforoperatingyourmodelinasafemanner.Whenflying,youare
responsible for your own safety and the safety of others around you. Follow these basic safety guidelines at all times.
• Beforeyoubegintoflylookatthefrequencystickeronthebackofyourtransmitter&makesure no one else in the area is on the same frequency.
• Whenoperatingalwaysbeawareofthespinningpropeller.BecarefulnottolettheNightFlyer come close to your person, others and/or loose clothing.
• Alwaysflyyourairplaneinawide-openarea.You’llneedatleast300ftworthofareathatisfree from obstructions such as buildings, electric power lines, trees, roads, other people and vehicles.
• Donotflyaroundpeoplewhoareunawarethatyouareflyingamodelairplane,andneverflyoverpeople’sheads.
• Donotflyyourmodelifothermodelsarebeingoperatedintheareaonthesamefrequency.• Donotattempttodisassembleanyofthemodel’scomponentsorallowthemtogetwet.
Electrical damage may occur.• Neverflyyourmodelfromroadwaysorafterdark.• Keepspectatorsbehindyouwhenflying.• Beforeflying,makesureyouperformarangechecktobesureyoucanmaintaincontrolatleast100-feetfromthetransmittertothemodelwiththetransmitterantennaextended.
• Sinceyourmodeliscontrolledbyaradiolinkitisveryimportanttoalwayskeepfresh“AA”alkalinebatteriesinthetransmitter.
• Neverusesolventsorliquidcleanerstocleanthismodel.Doingsomaydamagetheunitorelectronics. Only use a dry, soft cloth for cleaning.
RECHARGEABLE BATTERY WARNINGS AND PRECAUTIONS
• ALLOWBATTERYTOCOOLCOMPLETELYBEFOREATTEMPTINGTOCHARGEORDISCHARGE•Neverleavebatteryunattendedwhilecharging.•Neverattempttochargeabatterythatappearsdamaged.•Neverchargelongerthan10minutes.•Alwaysplaceachargingbatteryonanon-flammablesurface.•Neverleaveinamotorvehiclewhilecharging.
Nickel-metal hydride batteries must be disposed of properly. For current regulations in your area and proper disposal sites please call 1-800-822-8837 or visit www.rbrc.org
4
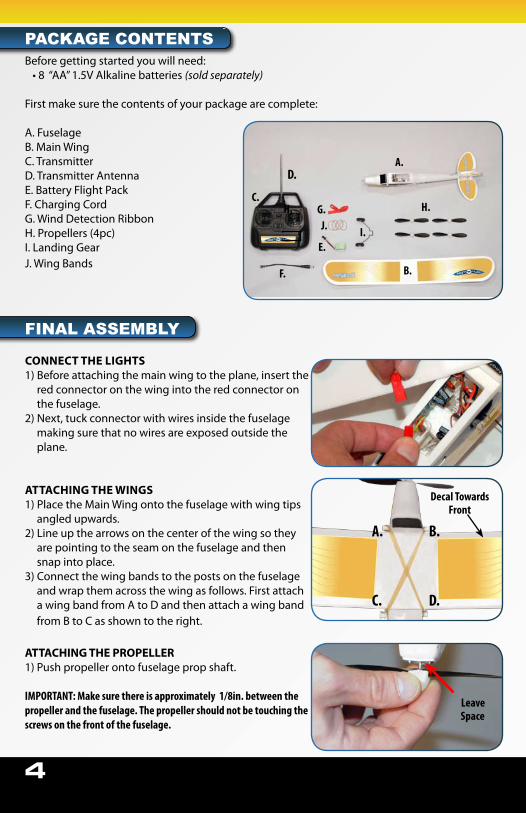
PACkAgE CONTENTSBeforegettingstartedyouwillneed:•8“AA”1.5VAlkalinebatteries(sold separately)
Firstmakesurethecontentsofyourpackagearecomplete: A.FuselageB.MainWingC. TransmitterD.TransmitterAntennaE.BatteryFlightPackF. Charging CordG.WindDetectionRibbonH.Propellers(4pc)I.LandingGear J.WingBands
FINAL ASSEMBLY
CONNECT THE LIGHTS1)Beforeattachingthemainwingtotheplane,insertthe
red connector on the wing into the red connector on the fuselage.
2)Next,tuckconnectorwithwiresinsidethefuselagemakingsurethatnowiresareexposedoutsidetheplane.
ATTACHING THE WINGS1)PlacetheMainWingontothefuselagewithwingtips
angled upwards.2)Lineupthearrowsonthecenterofthewingsothey
are pointing to the seam on the fuselage and then snap into place.
3)Connectthewingbandstothepostsonthefuselageand wrap them across the wing as follows. First attach awingbandfromAtoDandthenattachawingbandfromBtoCasshowntotheright.
ATTACHING THE PROPELLER1) Push propeller onto fuselage prop shaft.
IMPORTANT: Make sure there is approximately 1/8in. between the propeller and the fuselage. The propeller should not be touching the screws on the front of the fuselage.
B.
D.
A.
C.
Decal Towards Front
A.
B.
C.
E.
F.
G.
D.
H.H.J. I.
LeaveSpace
5
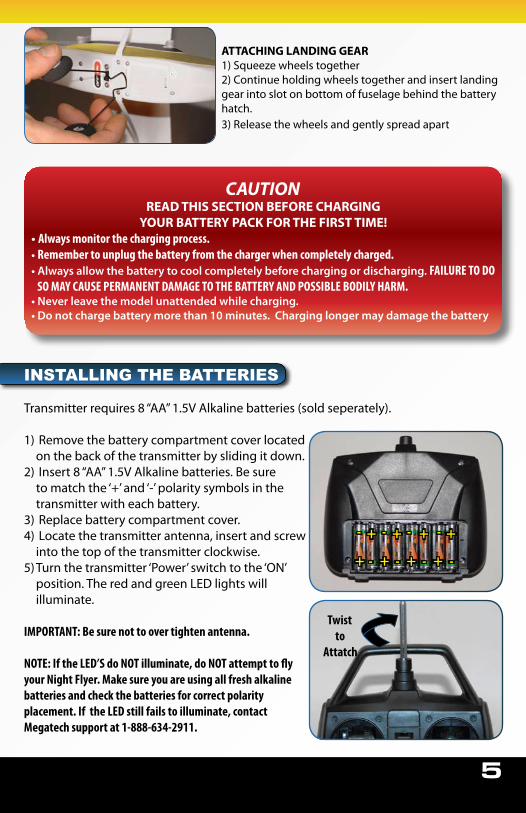
ATTACHING LANDING GEAR1)Squeezewheelstogether2) Continue holding wheels together and insert landing gear into slot on bottom of fuselage behind the battery hatch. 3)Releasethewheelsandgentlyspreadapart
INSTALLINg THE BATTERIES
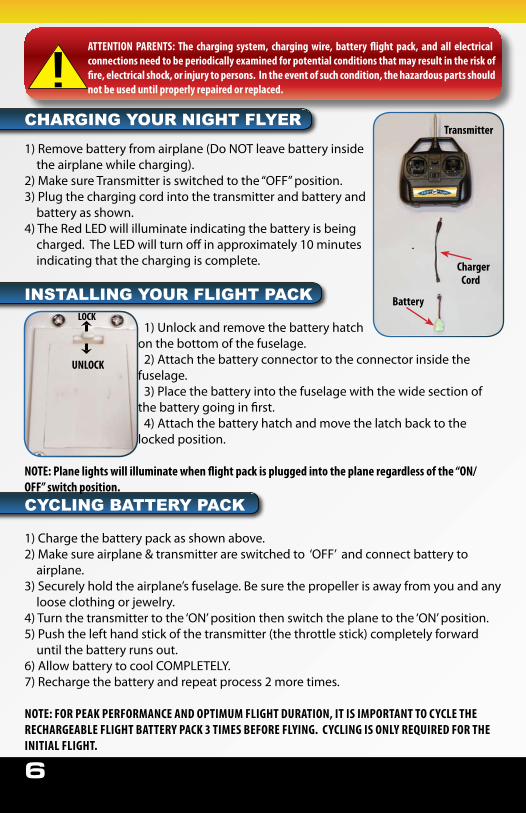
Transmitterrequires8“AA”1.5VAlkalinebatteries(soldseperately).
Removethebatterycompartmentcoverlocated1) onthebackofthetransmitterbyslidingitdown.Insert8“AA”1.5VAlkalinebatteries.Besure2) tomatchthe‘+’and‘-’polaritysymbolsinthetransmitter with each battery.Replacebatterycompartmentcover.3)Locatethetransmitterantenna,insertandscrew4)intothetopofthetransmitterclockwise.Turnthetransmitter‘Power’switchtothe‘ON’5) position.TheredandgreenLEDlightswillilluminate.
IMPORTANT: Be sure not to over tighten antenna.
NOTE: If the LED’S do NOT illuminate, do NOT attempt to fly your Night Flyer. Make sure you are using all fresh alkaline batteries and check the batteries for correct polarity placement. If the LED still fails to illuminate, contact Megatech support at 1-888-634-2911.
CAUTIONREAD THIS SECTION BEFORE CHARGING
YOUR BATTERY PACK FOR THE FIRST TIME!• Always monitor the charging process.• Remember to unplug the battery from the charger when completely charged.• Always allow the battery to cool completely before charging or discharging. FAILURE TO DO
SO MAY CAUSE PERMANENT DAMAGE TO THE BATTERY AND POSSIBLE BODILY HARM.• Never leave the model unattended while charging. • Do not charge battery more than 10 minutes. Charging longer may damage the battery
+ + + +
+ + + +- - - -
- - - -
Twistto
Attatch
6
CHARgINg YOUR NIgHT FLYER
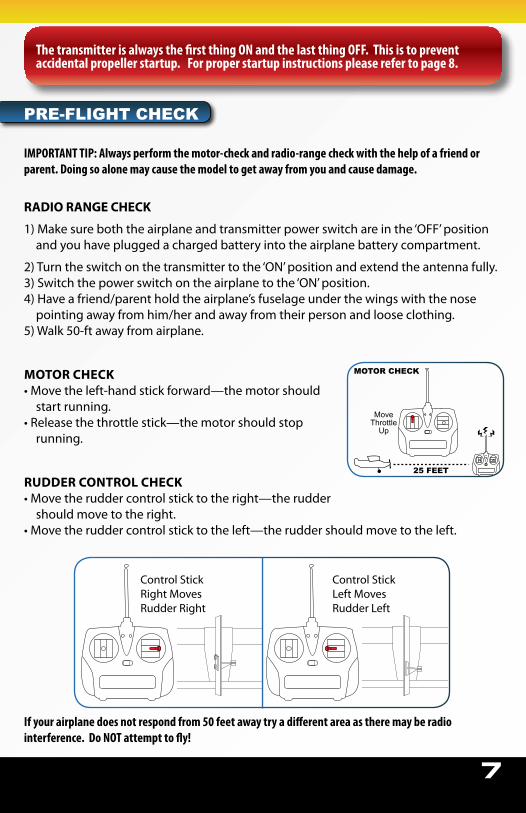
1)Removebatteryfromairplane(DoNOTleavebatteryinsidethe airplane while charging).
2)MakesureTransmitterisswitchedtothe“OFF”position.3)Plugthechargingcordintothetransmitterandbatteryand
battery as shown.4)TheRedLEDwillilluminateindicatingthebatteryisbeingcharged.TheLEDwillturnoffinapproximately10minutesindicating that the charging is complete.
INSTALLINg YOUR FLIgHT PACk
1)Unlockandremovethebatteryhatchon the bottom of the fuselage.2)Attachthebatteryconnectortotheconnectorinsidethe
fuselage.3)Placethebatteryintothefuselagewiththewidesectionof
the battery going in first. 4)Attachthebatteryhatchandmovethelatchbacktothelockedposition.
NOTE: Plane lights will illuminate when flight pack is plugged into the plane regardless of the “ON/OFF” switch position.
CYCLINg BATTERY PACk 1)Chargethebatterypackasshownabove.2)Makesureairplane&transmitterareswitchedto‘OFF’andconnectbatteryto
airplane.3)Securelyholdtheairplane’sfuselage.Besurethepropellerisawayfromyouandany
loose clothing or jewelry.4)Turnthetransmittertothe‘ON’positionthenswitchtheplanetothe‘ON’position.5)Pushthelefthandstickofthetransmitter(thethrottlestick)completelyforward
until the battery runs out.6)AllowbatterytocoolCOMPLETELY.7)Rechargethebatteryandrepeatprocess2moretimes. NOTE: FOR PEAk PERFORMANCE AND OPTIMUM FLIGHT DURATION, IT IS IMPORTANT TO CYCLE THE RECHARGEABLE FLIGHT BATTERY PACk 3 TIMES BEFORE FLYING. CYCLING IS ONLY REqUIRED FOR THE INITIAL FLIGHT.
LOCk
UNLOCk
Transmitter
Battery
Charger Cord
ATTENTION PARENTS: The charging system, charging wire, battery flight pack, and all electrical connections need to be periodically examined for potential conditions that may result in the risk of fire, electrical shock, or injury to persons. In the event of such condition, the hazardous parts should not be used until properly repaired or replaced.
7
25 FEET
MOTOR CHECK
MoveThrottle
Up
The transmitter is always the first thing ON and the last thing OFF. This is to prevent accidental propeller startup. For proper startup instructions please refer to page 8.
PRE-FLIgHT CHECk
IMPORTANT TIP: Always perform the motor-check and radio-range check with the help of a friend or parent. Doing so alone may cause the model to get away from you and cause damage.
RADIO RANGE CHECK
1)Makesureboththeairplaneandtransmitterpowerswitchareinthe‘OFF’positionand you have plugged a charged battery into the airplane battery compartment.
2)Turntheswitchonthetransmittertothe‘ON’positionandextendtheantennafully.3)Switchthepowerswitchontheairplanetothe‘ON’position.4)Haveafriend/parentholdtheairplane’sfuselageunderthewingswiththenose
pointing away from him/her and away from their person and loose clothing. 5)Walk50-ftawayfromairplane.
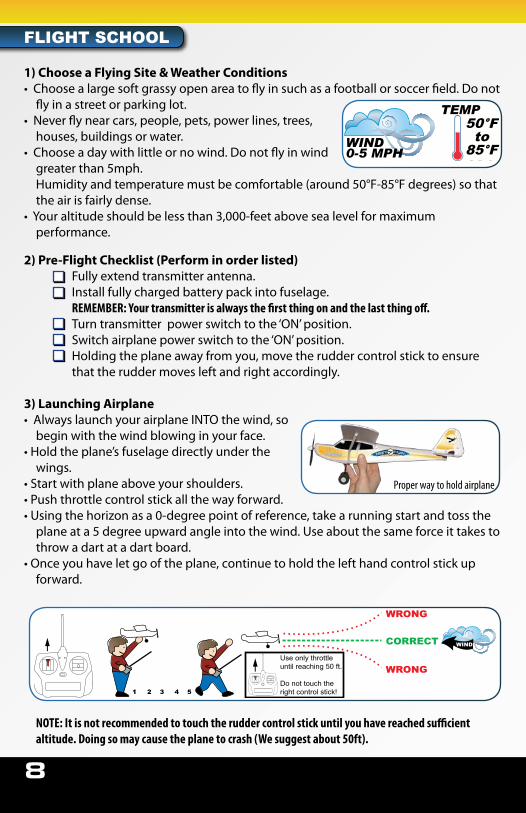
MOTOR CHECK•Movetheleft-handstickforward—themotorshould
start running.•Releasethethrottlestick—themotorshouldstop
running.
RUDDER CONTROL CHECK•Movetheruddercontrolsticktotheright—therudder
should move to the right.•Movetheruddercontrolsticktotheleft—theruddershouldmovetotheleft.
If your airplane does not respond from 50 feet away try a different area as there may be radio interference. Do NOT attempt to fly!FLIGHT
8
FLIgHT SCHOOL
1) Choose a Flying Site & Weather Conditions•Choosealargesoftgrassyopenareatoflyinsuchasafootballorsoccerfield.Donotflyinastreetorparkinglot.
•Neverflynearcars,people,pets,powerlines,trees,houses, buildings or water.
•Chooseadaywithlittleornowind.Donotflyinwindgreater than 5mph.
Humidityandtemperaturemustbecomfortable(around50°F-85°F degrees) so that the air is fairly dense.
•Youraltitudeshouldbelessthan3,000-feetabovesealevelformaximumperformance.
2) Pre-Flight Checklist (Perform in order listed) Fullyextendtransmitterantenna. Installfullychargedbatterypackintofuselage. REMEMBER: Your transmitter is always the first thing on and the last thing off. Turntransmitterpowerswitchtothe‘ON’position.
Switchairplanepowerswitchtothe‘ON’position. Holdingtheplaneawayfromyou,movetheruddercontrolsticktoensure
that the rudder moves left and right accordingly. 3) Launching Airplane•AlwayslaunchyourairplaneINTOthewind,so
begin with the wind blowing in your face.•Holdtheplane’sfuselagedirectlyunderthe
wings.•Startwithplaneaboveyourshoulders.•Pushthrottlecontrolstickallthewayforward.•Usingthehorizonasa0-degreepointofreference,takearunningstartandtosstheplaneata5degreeupwardangleintothewind.Useaboutthesameforceittakestothrow a dart at a dart board.
•Onceyouhaveletgooftheplane,continuetoholdthelefthandcontrolstickupforward.
NOTE: It is not recommended to touch the rudder control stick until you have reached sufficient altitude. Doing so may cause the plane to crash (We suggest about 50ft).
WIND0-5 MPH
TEMP55˚F to
85˚F
50°Fto
85°F
Proper way to hold airplane
CORRECT
WRONG
WRONGUse only throttle until reaching 50 ft.
Do not touch the right control stick!
WIND
9
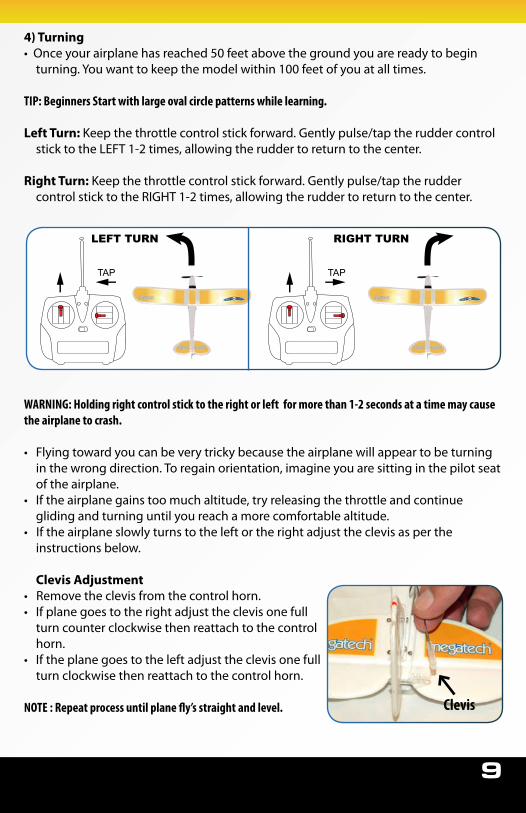
4) Turning•Onceyourairplanehasreached50feetabovethegroundyouarereadytobeginturning.Youwanttokeepthemodelwithin100feetofyouatalltimes.
TIP: Beginners Start with large oval circle patterns while learning.
Left Turn: Keepthethrottlecontrolstickforward.Gentlypulse/taptheruddercontrolsticktotheLEFT1-2times,allowingtheruddertoreturntothecenter.
Right Turn:Keepthethrottlecontrolstickforward.Gentlypulse/taptheruddercontrolsticktotheRIGHT1-2times,allowingtheruddertoreturntothecenter.
WARNING: Holding right control stick to the right or left for more than 1-2 seconds at a time may cause the airplane to crash.
• Flyingtowardyoucanbeverytrickybecausetheairplanewillappeartobeturningin the wrong direction. To regain orientation, imagine you are sitting in the pilot seat of the airplane.
• Iftheairplanegainstoomuchaltitude,tryreleasingthethrottleandcontinuegliding and turning until you reach a more comfortable altitude.
•Iftheairplaneslowlyturnstotheleftortherightadjusttheclevisaspertheinstructions below. Clevis Adjustment
•Removetheclevisfromthecontrolhorn.• Ifplanegoestotherightadjusttheclevisonefullturncounterclockwisethenreattachtothecontrolhorn.
• Iftheplanegoestotheleftadjusttheclevisonefullturnclockwisethenreattachtothecontrolhorn.
NOTE : Repeat process until plane fly’s straight and level.
LEFT TURN RIGHT TURN
TAP TAP
Clevis
10
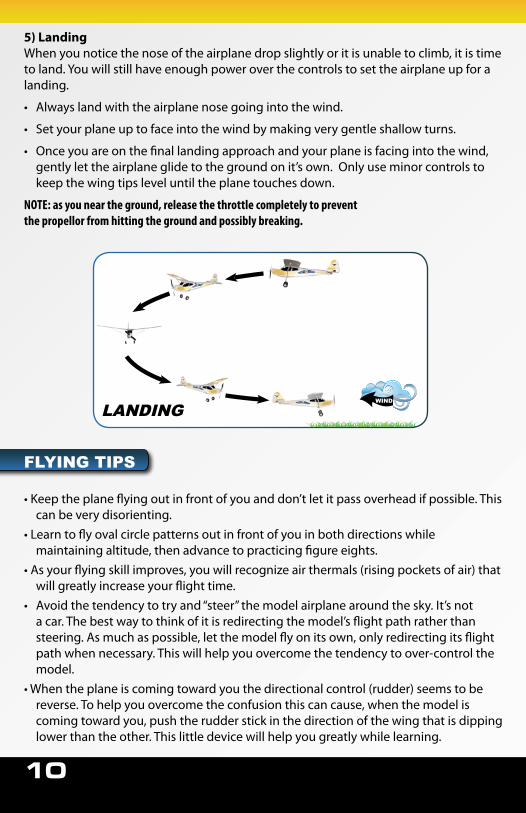
5) LandingWhenyounoticethenoseoftheairplanedropslightlyoritisunabletoclimb,itistimetoland.Youwillstillhaveenoughpoweroverthecontrolstosettheairplaneupforalanding.
• Alwayslandwiththeairplanenosegoingintothewind.
• Setyourplaneuptofaceintothewindbymakingverygentleshallowturns.
• Onceyouareonthefinallandingapproachandyourplaneisfacingintothewind,gentlylettheairplaneglidetothegroundonit’sown.Onlyuseminorcontrolstokeepthewingtipsleveluntiltheplanetouchesdown.
NOTE: as you near the ground, release the throttle completely to prevent the propellor from hitting the ground and possibly breaking.
FLYINg TIPS
•Keeptheplaneflyingoutinfrontofyouanddon’tletitpassoverheadifpossible.Thiscan be very disorienting.
•Learntoflyovalcirclepatternsoutinfrontofyouinbothdirectionswhilemaintaining altitude, then advance to practicing figure eights.
•Asyourflyingskillimproves,youwillrecognizeairthermals(risingpocketsofair)thatwillgreatlyincreaseyourflighttime.
• Avoidthetendencytotryand“steer”themodelairplanearoundthesky.It’snotacar.Thebestwaytothinkofitisredirectingthemodel’sflightpathratherthansteering.Asmuchaspossible,letthemodelflyonitsown,onlyredirectingitsflightpathwhennecessary.Thiswillhelpyouovercomethetendencytoover-controlthemodel.
•Whentheplaneiscomingtowardyouthedirectionalcontrol(rudder)seemstobereverse. To help you overcome the confusion this can cause, when the model is comingtowardyou,pushtherudderstickinthedirectionofthewingthatisdippinglower than the other. This little device will help you greatly while learning.
WIND
LANDINg
11
•Afterthemodelhasbeenhand-launched,keepitgoinginastraightlinewithwhatever corrections are needed until about fifty feet of altitude has been reached. Then,andonlythen,attempttomakeaturn.Becausealtitudeislostduringanyturn,turning too soon, and too low, can cause your model to hit the ground.
REPAIR YOUR NIgHT FLYER
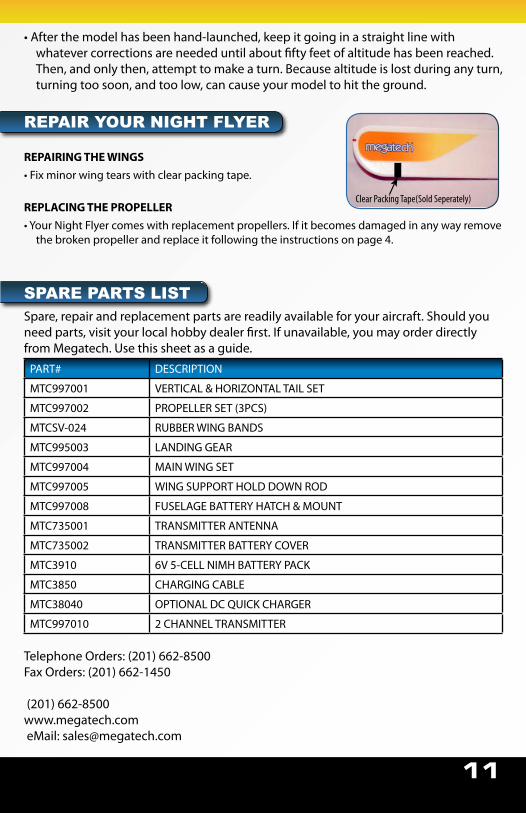
REPAIRING THE WINGS
•Fixminorwingtearswithclearpackingtape.
REPLACING THE PROPELLER
•YourNightFlyercomeswithreplacementpropellers.Ifitbecomesdamagedinanywayremovethebrokenpropellerandreplaceitfollowingtheinstructionsonpage4.
SPARE PARTS LISTSpare,repairandreplacementpartsarereadilyavailableforyouraircraft.Shouldyouneed parts, visit your local hobby dealer first. If unavailable, you may order directly from Megatech. Use this sheet as a guide.
PART# DESCRIPTION
MTC997001 VERTICAL&HORIZONTALTAILSET
MTC997002 PROPELLERSET(3PCS)
MTCSV-024 RUBBERWINGBANDS
MTC995003 LANDINGGEAR
MTC997004 MAINWINGSET
MTC997005 WINGSUPPORTHOLDDOWNROD
MTC997008 FUSELAGEBATTERYHATCH&MOUNT
MTC735001 TRANSMITTERANTENNA
MTC735002 TRANSMITTERBATTERYCOVER
MTC3910 6V5-CELLNIMHBATTERYPACK
MTC3850 CHARGINGCABLE
MTC38040 OPTIONALDCQUICKCHARGER
MTC997010 2CHANNELTRANSMITTER TelephoneOrders:(201)662-8500FaxOrders:(201)662-1450
(201)662-8500www.megatech.com eMail: [email protected]
Clear Packing Tape(Sold Seperately)
12
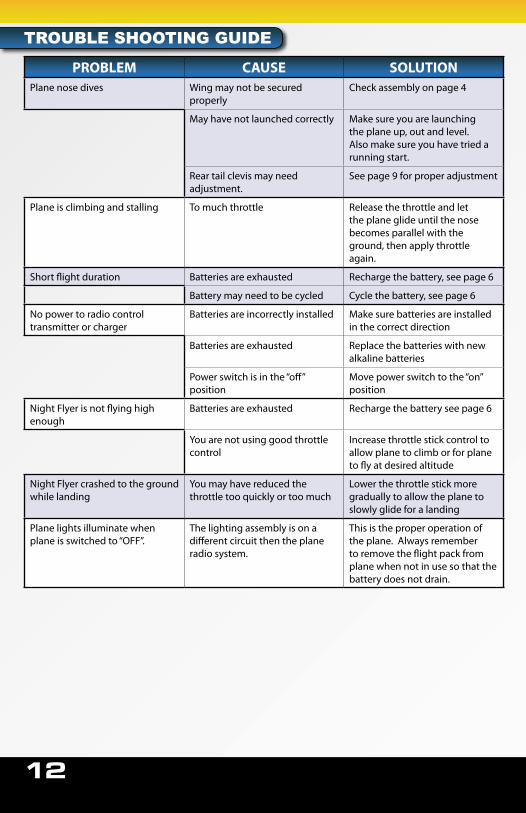
TROUBLE SHOOTINg gUIDE
PROBLEM CAUSE SOLUTIONPlane nose dives Wingmaynotbesecured
properlyCheckassemblyonpage4
May have not launched correctly Makesureyouarelaunchingthe plane up, out and level. Alsomakesureyouhavetriedarunning start.
Reartailclevismayneedadjustment.
Seepage9forproperadjustment
Plane is climbing and stalling To much throttle Releasethethrottleandletthe plane glide until the nose becomes parallel with the ground, then apply throttle again.
Shortflightduration Batteriesareexhausted Rechargethebattery,seepage6
Batterymayneedtobecycled Cycle the battery, see page 6
Nopowertoradiocontroltransmitter or charger
Batteriesareincorrectlyinstalled Makesurebatteriesareinstalledin the correct direction
Batteriesareexhausted Replacethebatterieswithnewalkalinebatteries
Powerswitchisinthe“off”position
Movepowerswitchtothe“on”position
NightFlyerisnotflyinghighenough
Batteriesareexhausted Rechargethebatteryseepage6
Youarenotusinggoodthrottlecontrol
Increasethrottlestickcontroltoallow plane to climb or for plane toflyatdesiredaltitude
NightFlyercrashedtothegroundwhile landing
Youmayhavereducedthethrottletooquicklyortoomuch
Lowerthethrottlestickmoregradually to allow the plane to slowly glide for a landing
Plane lights illuminate when planeisswitchedto“OFF”.
The lighting assembly is on a differentcircuitthentheplaneradio system.
This is the proper operation of theplane.Alwaysremembertoremovetheflightpackfromplane when not in use so that the battery does not drain.

13
LimitedWarrantyMegatech® International guarantees this item to be free from defects for a period of90daysfromdateofpurchase.Ifanycomponentofthisproductfailstofunctionproperlyduetodefectsinmaterialsormanufacturingprocessduringthis90dayperiod,themanufacturer’sobligationsarelimitedandmanufacturercanchoosetoeither repair or replace the item.This warranty is void if the product in question has been altered or repaired by anyoneotherthanMegatechInternationaloranauthorizedagent.Under no circumstances will Megatech International or any of its representatives be held liable for injury to persons or property damage resulting from assembly or use of the product. Megatech is not liable if any outside radio frequencies interfere withtheproduct’sfrequencycausinglossofcontrol.MegatechInternationalwill not be held liable for any injury to persons or property damage resulting fromanout-of-controlmodelcausedbyuseormisuseoftheproduct.MegatechInternationalexpresslyexcludesanyandallexpresswarrantiesnotspecificallystated here and all implied warranties of merchantability and fitness for a particularpurpose.Therearenowarrantieswhichextendbeyondthedescriptionofthewarrantiescontainedherein.Maximumliabilitytomegatechinternationalis limited to the retail value of the product.
ContacttheMegatechInternationalServiceDepartmentbeforereturninganyitemthatisdefectiveaccordingtothelimitationslistedabove.Pleasebesuretopackthereturneditem(s)carefully.Thecustomermustreturntheproductalongwithproofofpurchase,aletterdescribingtheproblemandthecustomer’saddressandtelephonenumber.Atthispointintimewewilleitherrepairthedefectivepartorreplaceitandreturnittothecustomer.Returnshippingandhandlinginthe48contiguousstatesis$12.99.Shippingoutsideofthe48stateswillbequotedbylocation.
This warranty does not cover any damage caused by use, misuse, alteration, accident, or neglect, nor does it cover normal wear and tear of the product. Product returned to us which falls under this category will be submitted to our servicedepartmentforrepair.Wereservetherighttochargeanyserviceandpartsfees incurred when repairing the item.
Megatech® International8300TonnelleAvenueNorthBergen,NJ07047(201)662-8500www.megatech.comEmail: [email protected]

14
NOTES

15

Megatech® International8300TonnelleAvenueNorthBergen,NJ07047
(201)662-8500www.megatech.com
Email: [email protected]