Embed Size (px)
Citation preview
flickr© tutorial PHO 2453 Special Projects Digital PhotographyInstructor Carrie Acosta | www.carrieacosta.com/class
Sign In or Sign Up
1. Go to www.flickr.com. Login with your Yahoo! ID account, or click on Create Your Account in the upper right hand corner. Flickr is owned by Yahoo!, so you must have a (free) Yahoo! account to use it. Sign in, or click on the Sign Up link at the bottom of the login window. Fill out the required fields to create your Yahoo! account.
2. If you have created a new account, you will be prompted to sign in again, then determine your Flickr screen name. This can change at any time and can be different from your Yahoo! account name, but is subject to availability.
3. To proceed, you will need to select one of Flickr’s options on the screen. Select Upload Your First Photo. If you already have an account, go to the You menu and select Upload Photos. Note: you may also use the Flickr Uploadr to upload batches from your pc. Download it at: www.flickr.com/tools/uploadr/.
Choose Photos
4. The upload dialogue has three steps: Choose Photos, Upload Photos and Add Titles, Descriptions, Tags or Add to a Set. You will be doing all of the above. Start with selecting Choose Photos.
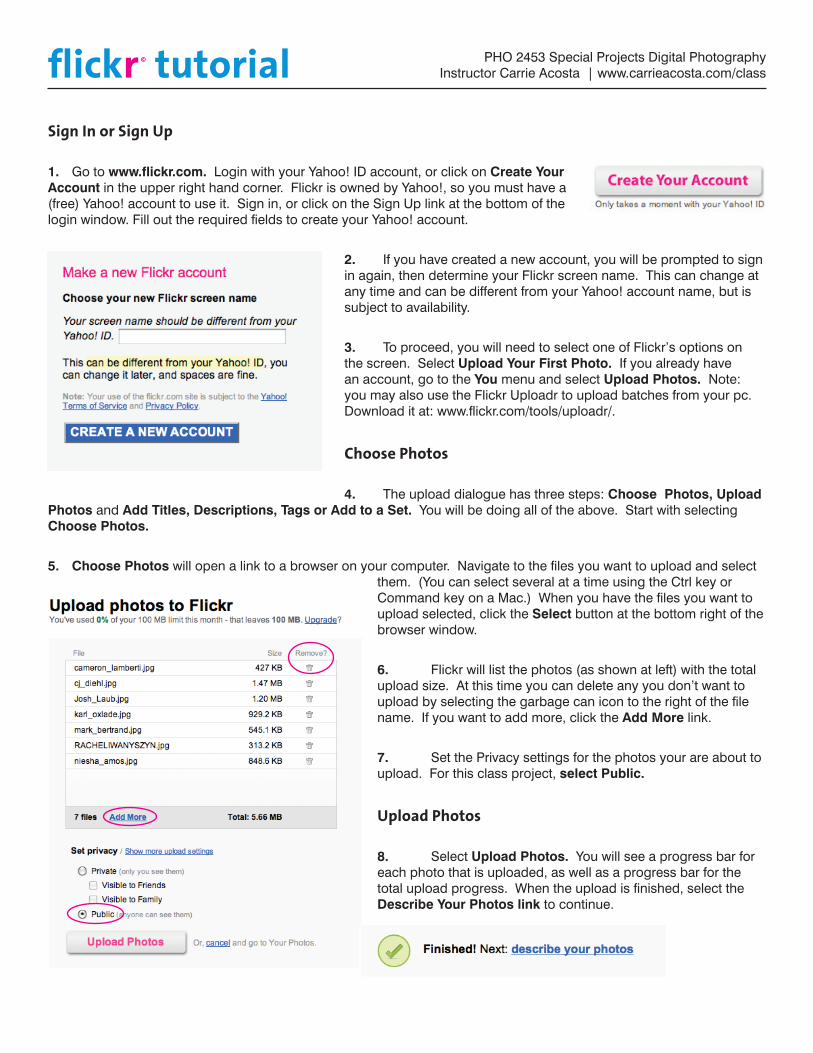
5. Choose Photos will open a link to a browser on your computer. Navigate to the files you want to upload and select them. (You can select several at a time using the Ctrl key or Command key on a Mac.) When you have the files you want to upload selected, click the Select button at the bottom right of the browser window.
6. Flickr will list the photos (as shown at left) with the total upload size. At this time you can delete any you don’t want to upload by selecting the garbage can icon to the right of the file name. If you want to add more, click the Add More link.
7. Set the Privacy settings for the photos your are about to upload. For this class project, select Public.
Upload Photos
8. Select Upload Photos. You will see a progress bar for each photo that is uploaded, as well as a progress bar for the total upload progress. When the upload is finished, select the Describe Your Photos link to continue.

Describe Your Photos
9. At the top of this window there are two available Batch operations: Add Tags and Add to a Set. Tags help describe your image to make it easier to find in a search. Sets organize your photog-raphy into groups, similar to a portfolio of work.
10. Type in any tags you would like to add to ALL your photos and select Add. The Tags will appear under each photo’s Tag section.
11. Select the Create a new Set link and additional fields will appear below. Name your set so you can keep all work for this class in one spot, and use your photo series concept for the description of this body of work. Select Create Set when this is complete. All the uploaded photos will be added to the new set. Note: if you have already completed this step, just select your
Special Projects Set from the drop-down menu and your photos will be added to it.
12. Next, go through each photo and label with unique titles, descriptions or tags as applicable. Remember that the more specific the information you provide is, the more searchable your photos are.
13. Once you are done, select SAVE THIS BATCH at the bottom of the page. You will be forwarded to the new page showing the set containing all the photos you upload-ed, as well as all the tags, etc.
Edit your Profile
14. Now it’s time to edit what the world can see about you. Click on the You menu at top and select Your Account. Under the Personal Information tab, select the Edit link to the right of Your Profile. It is entirely up to you what you want to be in your profile. When you are finished, select Save It.
flickr© tutorial Page 2
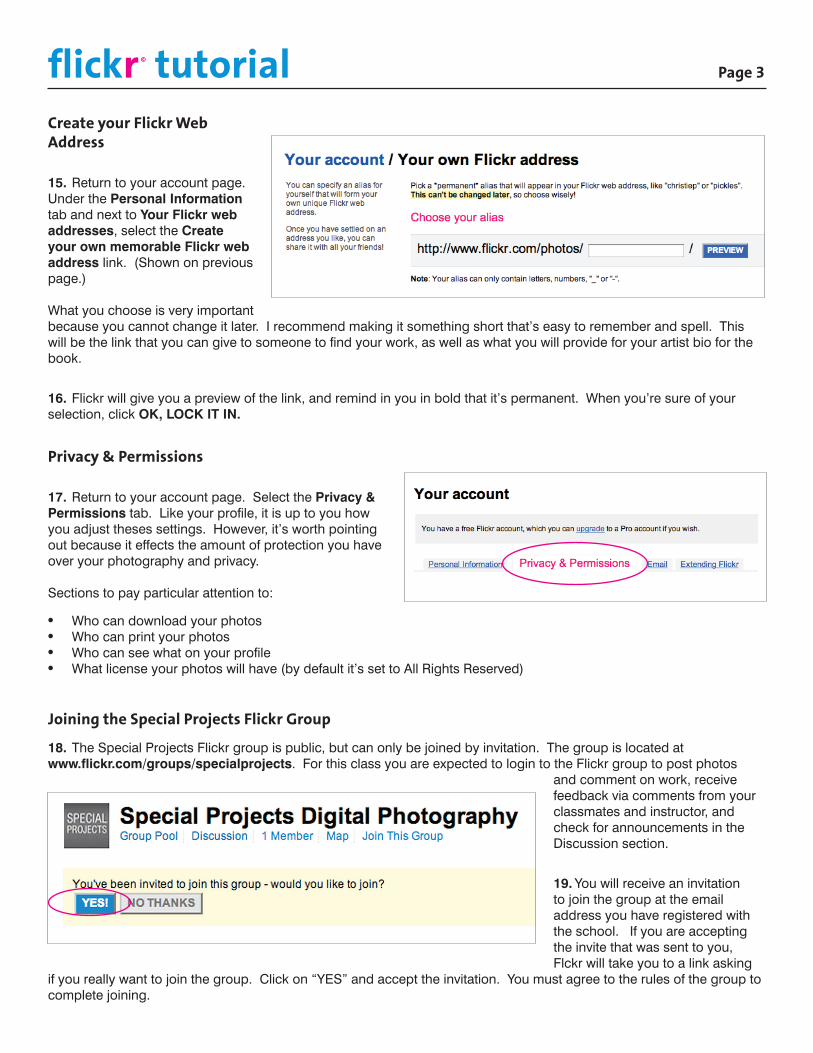
Create your Flickr Web Address
15. Return to your account page. Under the Personal Information tab and next to Your Flickr web addresses, select the Create your own memorable Flickr web address link. (Shown on previous page.) What you choose is very important because you cannot change it later. I recommend making it something short that’s easy to remember and spell. This will be the link that you can give to someone to find your work, as well as what you will provide for your artist bio for the book.
16. Flickr will give you a preview of the link, and remind in you in bold that it’s permanent. When you’re sure of your selection, click OK, LOCK IT IN.
Privacy & Permissions
17. Return to your account page. Select the Privacy & Permissions tab. Like your profile, it is up to you how you adjust theses settings. However, it’s worth pointing out because it effects the amount of protection you have over your photography and privacy. Sections to pay particular attention to:
• Who can download your photos• Who can print your photos• Who can see what on your profile• What license your photos will have (by default it’s set to All Rights Reserved)
Joining the Special Projects Flickr Group
18. The Special Projects Flickr group is public, but can only be joined by invitation. The group is located at www.flickr.com/groups/specialprojects. For this class you are expected to login to the Flickr group to post photos
and comment on work, receive feedback via comments from your classmates and instructor, and check for announcements in the Discussion section.
19. You will receive an invitation to join the group at the email address you have registered with the school. If you are accepting the invite that was sent to you, Flckr will take you to a link asking
if you really want to join the group. Click on “YES” and accept the invitation. You must agree to the rules of the group to complete joining.
flickr© tutorial Page 3
20. If for some reason you do not receive the invitation, or you would like to join the group with a different email address or existing Flickr account, you may join the group manually.
21. First login to Flickr. Go to www.flickr.com/groups/specialprojects . Our group is 18+ due to occassional student work that involves nudity or strong subject matter. If your conent settings in Flickr are set to “Safe,” Flickr will show you a warning message and a TAKE ME TO THE KITTENS back button. This is normal.
22. Click on Join this Group, which is located under the group name. Flickr will inform you that the group is invitation only and instruct you to send a message to the administrator. In the message state your name and I will approve your request and invite you to the group. If you don’t state the name you are registered for the class with, I will have no way of knowing that it’s you!
23. Once I have approved your request, you will be able to see and participate in the Flickr group fully. Adding Photos to the Group
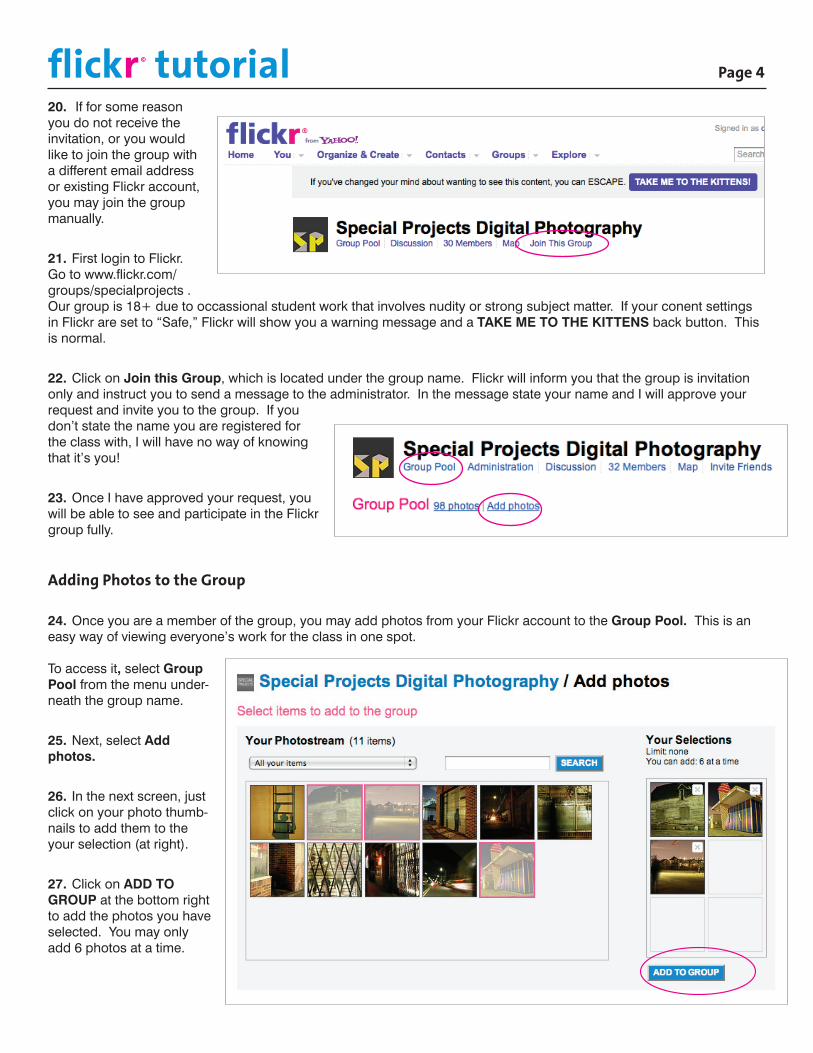
24. Once you are a member of the group, you may add photos from your Flickr account to the Group Pool. This is an easy way of viewing everyone’s work for the class in one spot. To access it, select Group Pool from the menu under-neath the group name.
25. Next, select Add photos.
26. In the next screen, just click on your photo thumb-nails to add them to the your selection (at right).
27. Click on ADD TO GROUP at the bottom right to add the photos you have selected. You may only add 6 photos at a time.
flickr© tutorial Page 4
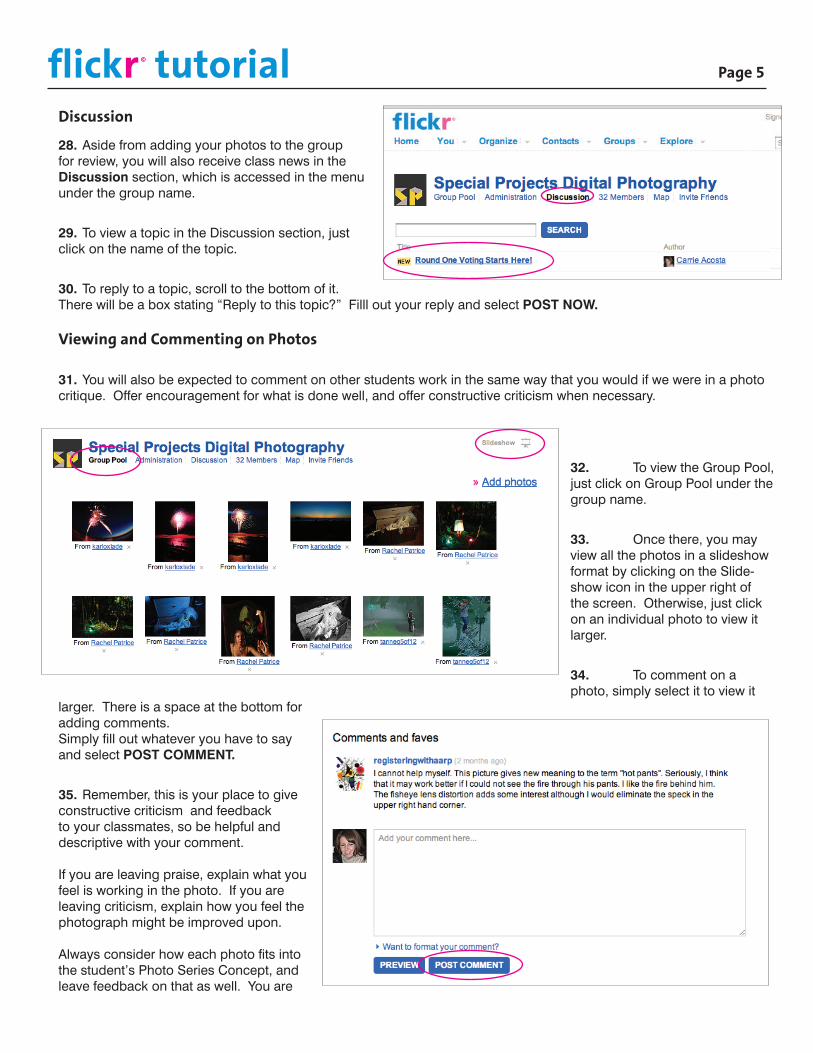
Discussion
28. Aside from adding your photos to the group for review, you will also receive class news in the Discussion section, which is accessed in the menu under the group name.
29. To view a topic in the Discussion section, just click on the name of the topic.
30. To reply to a topic, scroll to the bottom of it. There will be a box stating “Reply to this topic?” Filll out your reply and select POST NOW. Viewing and Commenting on Photos
31. You will also be expected to comment on other students work in the same way that you would if we were in a photo critique. Offer encouragement for what is done well, and offer constructive criticism when necessary.
32. To view the Group Pool, just click on Group Pool under the group name.
33. Once there, you may view all the photos in a slideshow format by clicking on the Slide-show icon in the upper right of the screen. Otherwise, just click on an individual photo to view it larger.
34. To comment on a photo, simply select it to view it
larger. There is a space at the bottom for adding comments. Simply fill out whatever you have to say and select POST COMMENT.
35. Remember, this is your place to give constructive criticism and feedback to your classmates, so be helpful and descriptive with your comment. If you are leaving praise, explain what you feel is working in the photo. If you are leaving criticism, explain how you feel the photograph might be improved upon. Always consider how each photo fits into the student’s Photo Series Concept, and leave feedback on that as well. You are
flickr© tutorial Page 5
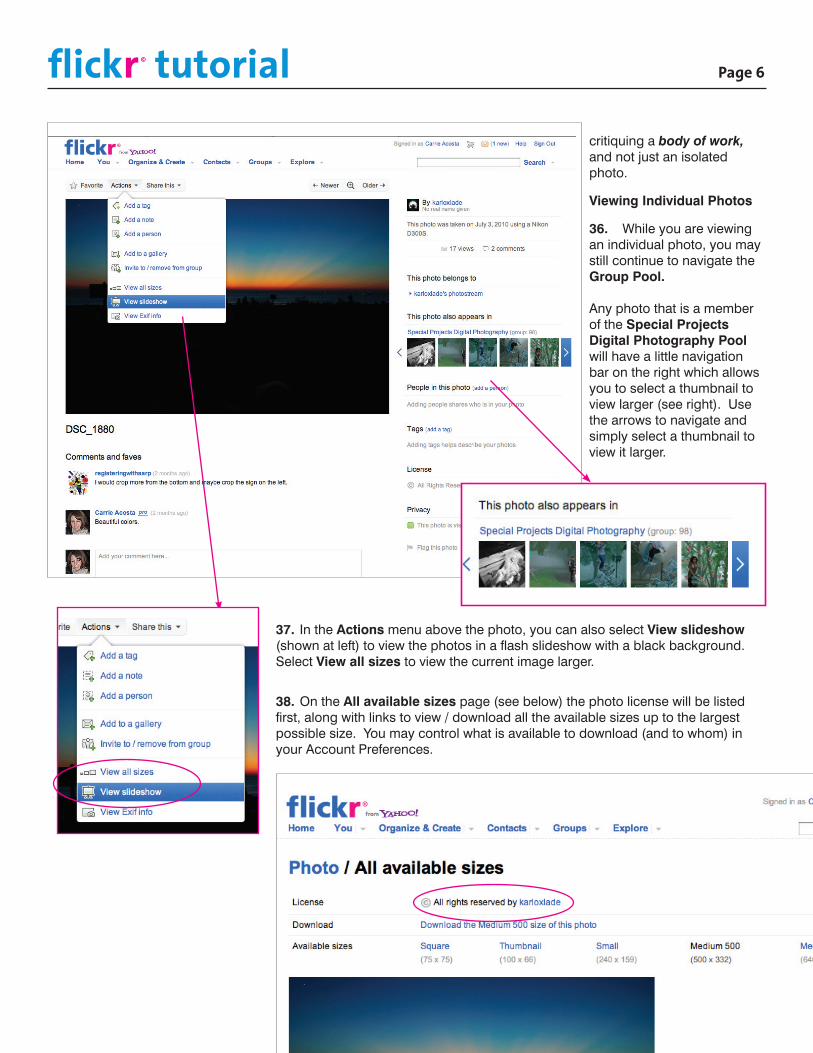
critiquing a body of work, and not just an isolated photo.
Viewing Individual Photos
36. While you are viewing an individual photo, you may still continue to navigate the Group Pool. Any photo that is a member of the Special Projects Digital Photography Pool will have a little navigation bar on the right which allows you to select a thumbnail to view larger (see right). Use the arrows to navigate and simply select a thumbnail to view it larger.
flickr© tutorial Page 6
37. In the Actions menu above the photo, you can also select View slideshow (shown at left) to view the photos in a flash slideshow with a black background. Select View all sizes to view the current image larger.
38. On the All available sizes page (see below) the photo license will be listed first, along with links to view / download all the available sizes up to the largest possible size. You may control what is available to download (and to whom) in your Account Preferences.