Embed Size (px)
DESCRIPTION
Flexible Planning Guide for PP
Citation preview

Step1. Create Field Catalogues
T Code: MC18, MC19
A. Create Characteristic catalogue
Enter
1. Field Catalogue name 2. Description 3. Application and
Select Characteristic Catalogue, Press Enter.
Click on Characteristics, in the popup screen click Switch Display under “Source Table” and select the characteristics suitable for the Info structure from “fields for Source Table”.
Click then click

Click Save.
Press enter to save the configuration in the popup.
B. Create Key Figure catalogue
Enter
1. Field Catalogue name (S501 to S999) 2. Description 3. Application and
Select Key Figure Catalogue, Press Enter.
Click on Key Figuress, in the popup screen click Switch Display under “Source Table” and select the characteristics suitable for the Info structure from “fields for Source Table”.

Click then click
Click Save.
Press enter to save the configuration in the popup.

Step2. Create Info Structure T Code: MC21, MC22
Enter
1. Info Structure name (S501 to S999) 2. Description 3. Select Planning possible and
Press Enter.
Click and select the Field Catalogue created for Characteristics.

Select all the fields
Click then click

Click
Click and select the Field Catalogue created for Key Figures.

Select the field
Click then click

Click
Click to Generate Info Structure. Select a Package in the popup and save.

Info Structure is Generated, Saved and is Active for use.
Go to Easy Access screen
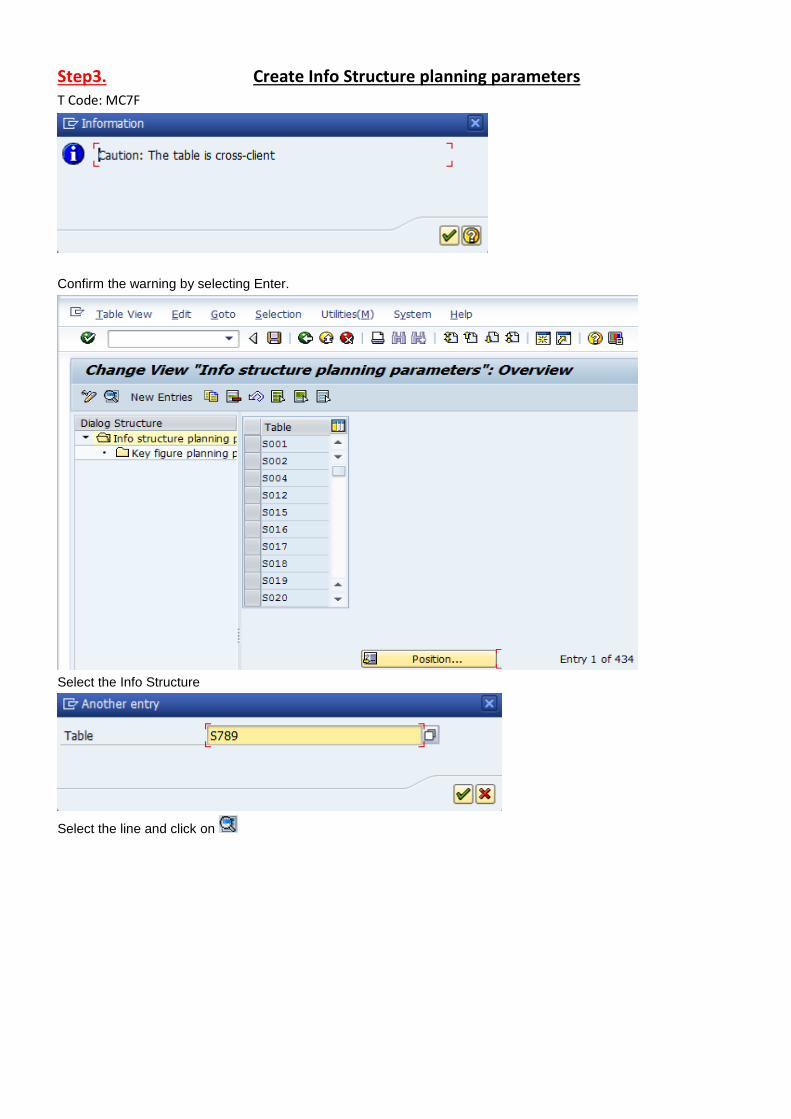
Step3. Create Info Structure planning parameters T Code: MC7F
Confirm the warning by selecting Enter.
Select the Info Structure
Select the line and click on

Maintain the Values as highlighted.
Click
Press enter to save the configuration in the popup.

Step4. Create Planning Type T Code: MC8A, MC8B
Enter a Name for planning type, press Enter. In the popup enter info structure created.
Press Enter. In the popup screen enter description and select the highlighted.

In the “Define Planning type: Characteristic View”
Select the line and click on
In the popup select the key figure and press enter.
Click

Step5. Create Planning Hierarchy T Code: MC61, MC62
Press Enter, Enter Plant in the popup and press Enter.
1. Enter DC and proportion as per your planning
Select one DC
And click on , in the next screen

2. Enter Division and proportion, select and click on , in the next screen
3. Enter Product Groups and Proportion, Select a PG and click on , in the
next screen
4. Enter the Material, Click back Select in the popup.

5. In the next screen select next PG and click on , in the next screen
Enter the Material, Click back select in the popup.
Continue with the other PG’s.
Click back till reaching DC input screen.
Select next DC and repeat steps 1 thru 5 and Click

Step6. Create Plan T Code: MC93, MC94
Enter Planning type and press enter.
Enter only Plant and press enter.
Enter Version Description, press enter.
Enter plan quantity and click on
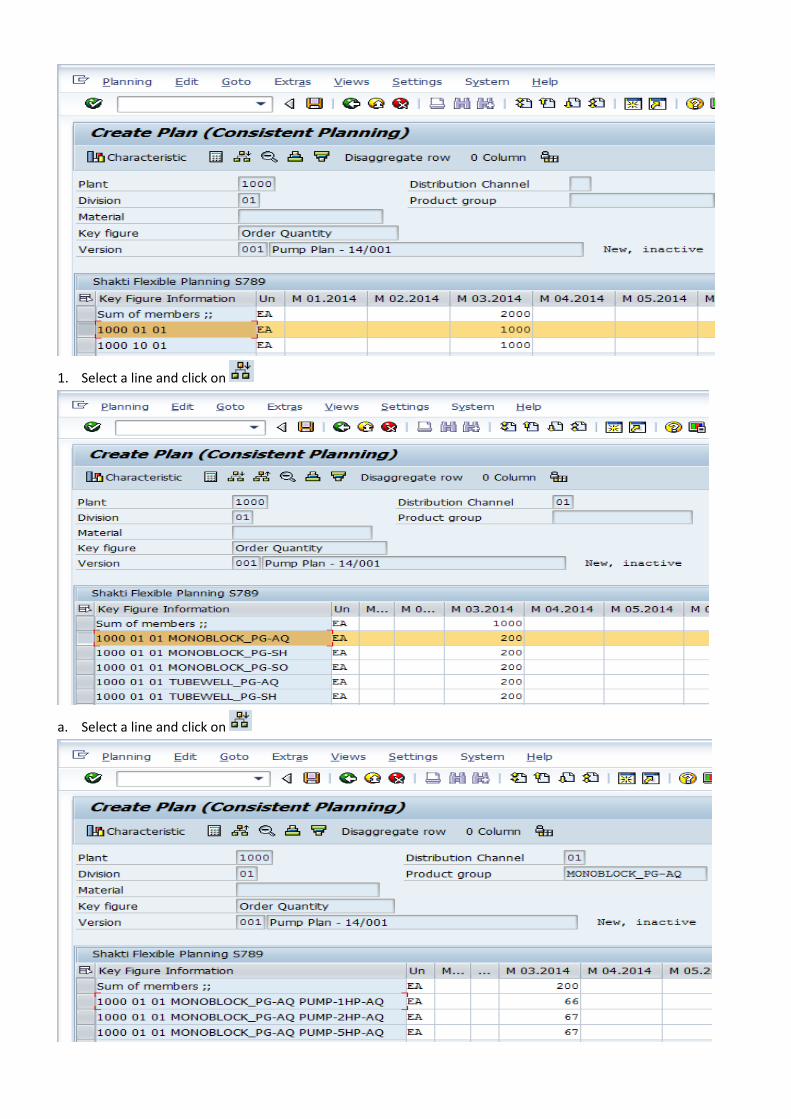
1. Select a line and click on
a. Select a line and click on

b. Change the quantities manually to update in ‘planning hierarchy’, to enable future disaggregation.
c. Click . Select the next line and click on
d. Change the quantities
e. Click . Select the next line and click on

f. Change the quantities. Click . Select the next line and click on
g. Change the quantities. Click . Select the next line and click on
h. Change the quantities. Click twice.

2. Repeat “a” thru “h” for the next Distribution channel PG’s
Click on to save the plan

Step7. Run “Planning Hierarchy” update
1. Check “Planning hierarchy” before Update. Go to T Code: MC62
Enter Info structure, press enter
Enter Plant in the popup and press enter,
Select DC and click “next level”,
Select Division and click “next level”

Select PG and click “next level”
2. Run “Planning Hierarchy” update
T Code: MC8U
Enter Info Structure, Select . Press enter

Enter Version select from search help
Enter Version select from search help, ‘From and To’ dates. Press enter
Select “Field Label”. Press enter.
3. Check “Planning hierarchy” after Update. Go to T Code: MC62
Enter Info structure, press enter

Enter Plant in the popup and press enter,
Select DC and click “next level”,
Select Division and click “next level”
Select PG and click “next level”
You can see all the levels are updated till material level and the proportions are recalculated.

4. Check plan after “Planning hierarchy” Update. T Code: MC94
Press enter
Enter Plant and click on “Inactive Version”
Select your Version and press enter.
Change the quantity planned

Select line and Click on
Select line and click on

Select line and click on
Click on . You can see the plan is disaggregated as per the updated planning hierarchy. Save the plan.

Step8. Copy Flexible Plan to Standard for capacity planning T Code: MC81
Plan should be copied for each PG separately. Press enter
Enter Description and press enter.
In the”Create Rough-Cut plan” screen go to Extras Copy data
Enter Info structure, Version, “From and To” dates.

Press enter. In the next popup select Order Quantity and click
In the next popup

Select Production and click . In the next screen click on
In the next popup
Enter Assignment Profile (Free text) and click on . Click on .
In the next popup click on
The plan is copied.
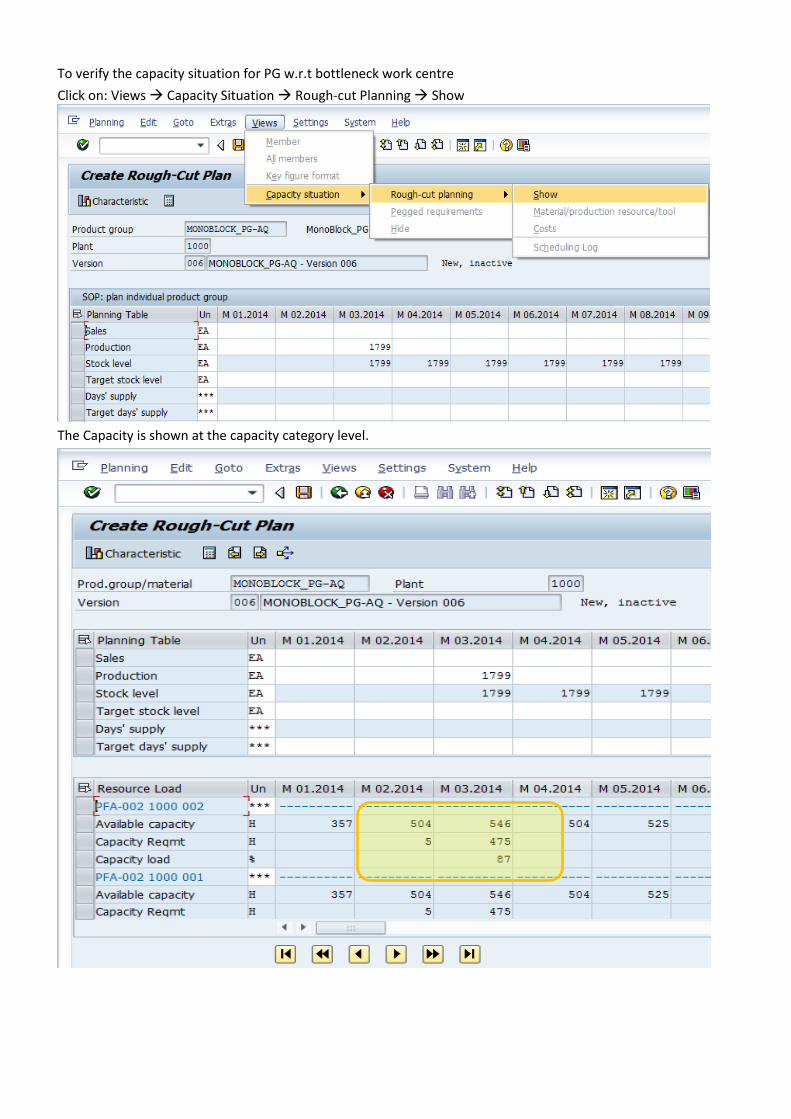
To verify the capacity situation for PG w.r.t bottleneck work centre
Click on: Views Capacity Situation Rough-cut Planning Show
The Capacity is shown at the capacity category level.

Follow the copying steps explained above
Follow the steps for Capacity situation explained above.
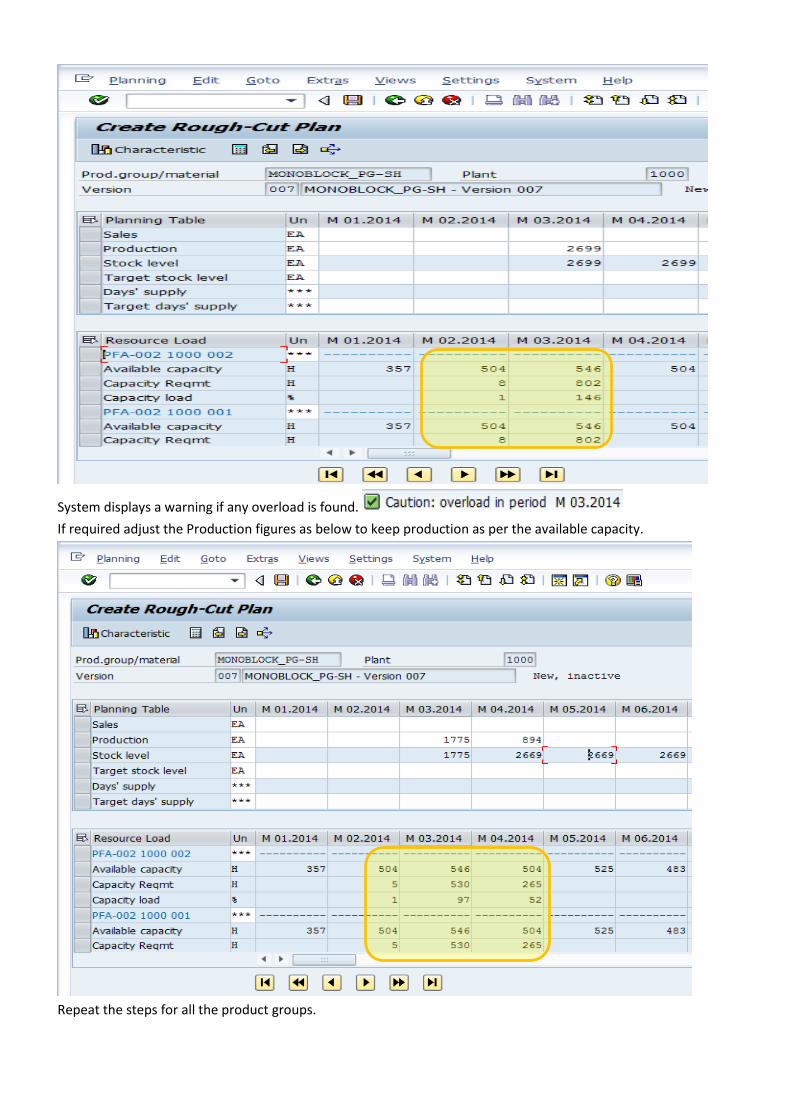
System displays a warning if any overload is found.
If required adjust the Production figures as below to keep production as per the available capacity.
Repeat the steps for all the product groups.

Step9. Transfer Plan to Demand Management T Code: MC75
Enter Product group and plant.
Select info structure Version by search help.
Deselect “invisible transfer” and “Active” check boxes.
Input version number manually in “independent requirement specifications” tab.
Click on . Since the version to be transferred need to be “inactive”. Ignore the warning
message .

The material plan transferred is 810 EA which is for both the DC’s “01” and “10”.
Save to continue with the next material in PG .
Save to continue with the next material in PG .
Save . All the material in PG are transferred to demand in “inactive” version.

Click on transfer now
Note: For capacity levelling we have split the quantity in to March and April months, hence the quantities are transferred accordingly.
Save

Save
Save
Repeat the same with all the product groups and save.
Display the plan in Demand Management T Code: MD63

Select “Product Group”
Enter product group, Plant, Version and period. Press enter