Embed Size (px)
Citation preview

California Regional Multiple Listing Service, Inc.
CRMLS.ORG | 800.925.1525
Effective October 20, 2020
Flex Broker Training Manual

All rights reserved. No part of this publication may be reproduced, stored in a retrieval system, or transmitted in any form or by any means, electronic, mechanical, photocopying, recording, or otherwise, without the prior written permission of California Regional Multiple Listing Service, Inc.
© 2020 California Regional Multiple Listing Service, Inc. (rev. 03/20)

Flex Broker Training Manual Updated October 22, 2020 1
Contents My Active Office Listings ...................................................................... 2
General Preferences……………………………………………………… 3
Finding Your Office Short ID……………………………………………... 5
My Messages (Send to Everyone in My Office) ................................... 6
Modifying Your Office Listings ............................................................. 7
Update Listings .................................................................................... 7
Transferring a Listing to another Agent ............................................. 10
Broker Distribution ............................................................................ 12
Teams…………………………………………………………………………13
Searching for a Team…………………………………………………….13
Statistics .............................................................................................. 15
My Production Report ....................................................................... 15
Broker Distribution Report ................................................................. 16
Market Saturation Report .................................................................. 19
Market Share Report ......................................................................... 22
Notification Schedule ........................................................................... 24
Broker Helpline ..................................................................................... 26
CRMLS Support Resources ................................................................. 27

2
My Active Office Listings Brokers may view their active office listings for their primary office in two ways:
1. From Menu, under Search, click the Office Listings link to view your active office listings. Tip:Mark the Office Listings as a favorite to save it to your favorites bar.
2. From the home page, hover your mouse over the My Listings gadget. The default displays yourlistings; however, you can customize it to display Office or Company (all offices within thecompany) listings. Click on the three dots in the upper right corner, click on Settings, and thenselect the appropriate options and click Save to apply the changes.

3
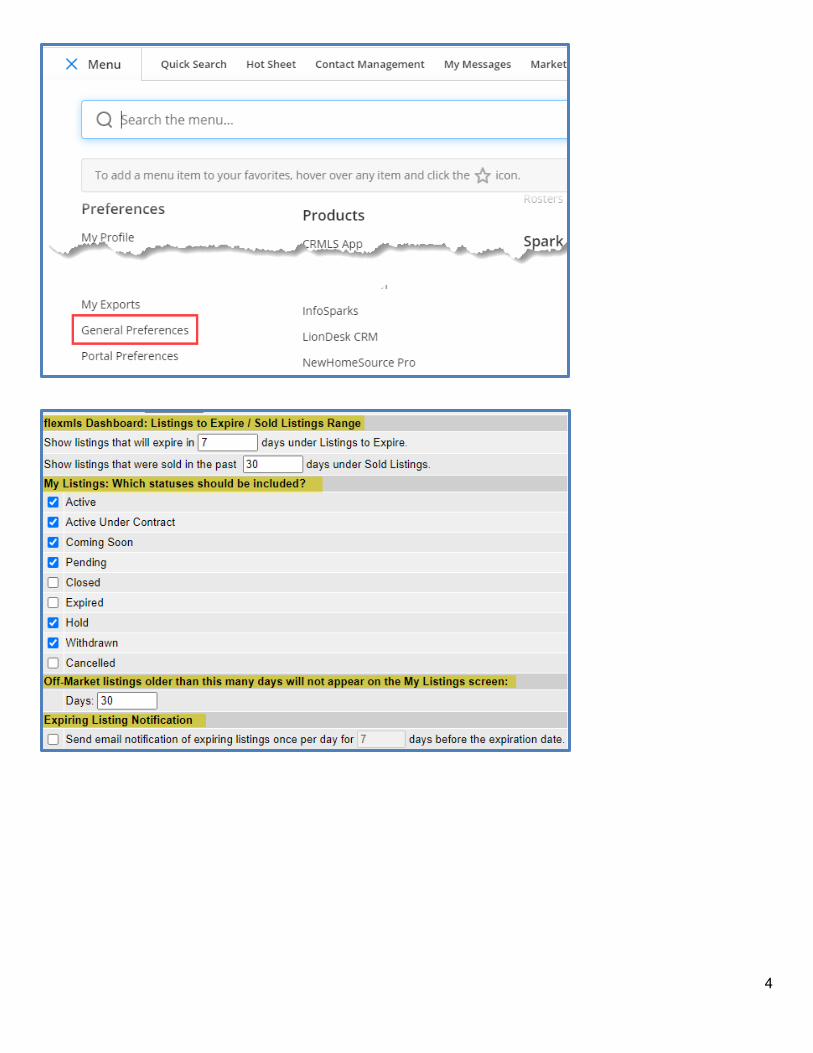
General Preferences There are several General Preferences that you as the broker can take advantage of:
My Listings: This determines which statuses display when clicking on the Office/Company Listing link in your favorites.
Off Market listings (Hold, Withdrawn, Closed): Older than X number of days will not appear on the My Listings screen – this setting applies to the Office/Company Listings link in your favorites.
Expiring Listing Notifications: This setting follows broker load, so the system can notify office level users of listings about to expire within the next X number of days.
4

5
Finding Your Office Code (Short ID) 1. Type your office name in the Search bar.
2. From the drop-down menu, click on the office name to view office details.
3. Write down or copy the Short ID (Office Code) for your office.• You can also view Office Members or Office Teams.
4. You can also view your office listings by clicking on View Office Listings.

6
My Messages - Send to Everyone in My Office Office/Company level broker load can email/create login popups for members within their office.
1. From Menu, under Daily Functions, click on My Messages.
2. Select New Message and choose the send ‘To everyone in my office’ option. You can display themessage as a popup when office members login to Flexmls, and also have it sent out as an emailnotification to office members.

7
Modifying Your Office Listings
Update Listings
1. To change or modify a listing, click on Menu, then under Add/Change, click Change Listing.
2. Enter the MLS number in the box and click Next.
3. You can change information in the General section, along with Status, Price, and Media;you may also update Marketing Activities. Along the top of the page are quick links to viewthe listing's history or activity, print an input form, change another listing, and report listingerrors (if applicable). When finished, save your changes.

8
Note: If you are logged in as an office or company (not as a member), Flexmls will include all listings for the office or company in the My Listing Panel.
You can select the listing by clicking on the MLS #. You have the option to organize the listings. Click the down-arrow to change statuses.

9
You can also change a listing from the search results by clicking the drop-down arrow next to the MLS # and selecting Edit Listing.
Note: As of August 31st, 2020, your Flex system was upgraded, and your listing prefix numbers changed.
For Pasadena Foothill Association members, your prefix numbers are: P0 = Existing listings transferred to the upgraded system. (P0-820123456) P1 = New listings entered on 8/31/20 or after. (P1-1000)
For Ventura Association members, your prefix numbers are: V0 = Existing listings transferred to the upgraded system. (V0-220123456) V1 = New listings entered on 8/31/20 or after. (V1-1000)

10
Transferring a Listing to Another Agent 1. From the Menu, under Add/Change, click Transfer.
2. Enter the listing agent’s name or short ID from whom you want to transfer listings, then select themember from the list.
3. Click on the statuses of the listings you want to view. To select multiple statuses, hold down theControl or Command key while clicking on statuses.
4. Click Next to open a search results page with the matching listings for the selected member.

11
5. Select the listing(s) you want to transfer and click the Transfer button at the top of the page.
6. Choose the name of the member to whom you want to transfer the listings and click Next.
7. Click Next again to complete the transfer.

12
Broker Distribution This page displays listing distribution options when saving a listing. Select distribution options by checking the corresponding boxes. Distribution options may vary by brokerage.
If the seller requests that the listing be excluded from the internet, select Seller Directs Listing to be Excluded from Internet. The seller can also request that the address of the listing be excluded from the internet. These selections govern all internet sites, including Realtor.com and IDX sites. The system will prevent you from making contradictory choices in the other checkboxes on the page.
The setting Seller Directs Listing to Not Be Used in AVMs on Internet refers to automated valuation models on virtual office websites (VOWs). The option Seller Directs Listing to Not Allow Comments on Internet also refers to VOWs only. For more information about VOWs, refer to the nar.realtor website.
If you are done entering information, submit the listing by clicking Add Listing at the top of the page. If you have entered all required fields, the system will assign you an MLS number and display a confirmation page.
Select Save Incomplete, to complete later.

13
Teams
The Teams function allows an agent to work with other agents, or assistants, and gives their Team full control over their account in Flex. A Team consists of a Team Lead and one or more Team Members. A Team Lead is the agent who is requesting Team Members; only one Team Lead is allowed per Team. A Team Member assumes all the Team Lead user class abilities. It is not recommended that a Team Lead be a Flex User Class DB, HB, OM, or HM. This control includes Contacts, Saved Searches, Add/Edit of Listings, Printing of Reports, Email, and Auto Email. Each member of the Team must reside within the same brokerage. This can cross association boundaries, but each association can only manage their own Team Lead. Team Members will only be able to access the Team Lead’s account, no other Team Members’ accounts.
Team Members can be setup to “Impersonate” or “Work on Behalf” of the Team Lead. Both options will have full control over the Team Lead account. “Impersonate” is for licensed agents or assistants and “Work on Behalf” is for non-licensed assistants. “Impersonate” will show the Team Lead’s name at the bottom of any page or email, whereas “Work on Behalf” will show the Team Member’s name at the bottom.
As an option, you can assign a Team Name. If you are choosing to list as a team, the Team Name must contain the word “Associates,” “Group,” or “Team,” AND the name of the team MUST contain the last name of the licensed Team Lead. For all Teams who choose to use the Team Name feature, there must be at least 2 licensees on the Team. For Teams that have filed a Fictitious Business Name, they may utilize only that filed name.
Searching for a Team Follow these steps to search for an existing Team.
From Menu, under Search, click on Office/Member.

14
1. Select the Teams tab. Enter the team name or select it from the list. Sort by Team Name or city.
Click the team name to display the team information.
2. The team information window will display the Team Details and Team Members, as well as the
Team Listings.

15
Statistics Statistics allow you to analyze market trends and activity in your market area. Follow the steps in these sections to generate tabular stats and statistical charts and graphs.
My Production Report 1. From Menu, under Statistics, select My Production.
2. Click on the drop-down menu and select either Quick View or Member YTD Report. The QuickView shows year-to-date statistics compared to statistics from the previous year for the currentlylogged in user. The information is displayed both numerically and graphically. The Member YTDReport shows your year-to-date production for active, new, sold, pending, withdrawn, canceled,and expired listings. Use these tables to view your production compared to the production of youroffice and your MLS.

16
3. Print these statics using the Print button at the top right of your screen.
4. Click on the Advanced drop-down if you would like to Detach to open the report in a separatewindow or click on Export Table Data to export the data from the page to a .csv file.
Broker Inventory Report The Broker Inventory Report shows a snapshot of member and office listing activity during a selected time period.
To run the report; go to the Menu; under Statistics, click on Inventory & Productions.

17
1. Scroll down and click on Broker Inventory.
2. Enter a date range for the report. Select offices (if applicable).3. You can also filter the report using a Quick Search.4. Select one of the following report types:
• Standard Report Totals – Displays totals by office and then member.• Show Company Totals – Displays totals by company and then by office.• Member Totals Only – Does not show totals for the office or MLS.• Display inactive and not in lists members• Calculate numbers and volume using sides
o Each sold listing has two sides: a listing side and a selling side. The listing memberand selling member are each credited with a side, or in the case of co-listing or co-selling members, half a side. The Calculate numbers and volume using sides optionaffects how the numbers for sales are totaled. When you select the option, saleswhere a member is both the listing and selling agent count as double volume. If you donot select this option, those sales are counted at their regular volume.
Select Next.

18
5. Include all members or select from the list and click Next to generate the report.
6. Current Member Stats example.
7. Company Stats compared to MLS Board Stats.
8. The Percent Difference table shows the number and dollar value of listings in the report as apercentage of the number and dollar value of listings for the MLS.

19
Market Saturation Report (Member/Office Ranking Report) The Saturation Report allows members/offices to view their listing and sales activity compared to their office or to the MLS.
1. From Menu, under Statistics, click on Inventory and Production.
2. Scroll down and select Saturation Analysis report.
3. Select criteria in the Report Generation template and click Next to continue.

20

21
4. Select the office (if applicable), the member you wish to use, and comparison options. ClickUse This Member to generate the report.
5. Saturation Report example.

22
Market Share Report The Market Share Report shows the share of the MLS market that an office has during a time period.
In the Market Share option, the report will display a ranking for members, offices, companies, or companies and offices. You can calculate the Market Share option by number of dollar volume. Select “Include last year’s calculations” to compare statistics between last year and the current year.
The report includes the option to calculate numbers and volume using sides.
The % columns display the percentage of sides or dollar volume according to the selections made when running the report. For example, the report could display a percentage based on a comparison to an office, or a percentage of the total volume for the MLS.
From the Menu, under Statistics, click on Inventory and Production.
1. Scroll down and select Market Share.
2. Enter a date range for the report and choose the offices to include in the report (if applicable).Select one of the following display options:

23
• Show Office Totals – Combines all property types and compare the statistics for offices tostatistics for the MLS.
• Show Offices by Card Format – Lists all activity per property type.• Show Offices by Card Format and with Office Totals – Combines the two previous reports into
one report format. Lists all activity per property type and includes totals for all offices.
3. Select whether to show company office totals, if the option is available. You can also filter thereport using a Quick Search. When you are finished selecting report parameters, click Next togenerate the report.
4. Market Share Report example.

24
Email Notifications Search Results, CMA and Reverse Prospecting
• Sends from [email protected]• Normally, the sender is copied on the email based on the option "Send a Copy to me"
Portal Auto Email (portal prospecting) • Sends from Flexmls Notifier <[email protected]>
Listing Activity • Sends from "Agent via Flexmls <[email protected]>"
Auto Hot sheets • Email sent to the primary address on the user’s account• Preference to send emails is found within the user’s General Preferences section of Preferences.
Opt-in emails • These emails get sent out to contacts when the agent sets them up on a subscription; or, if they
opt-out, the agent can resend the opt-in request.
Contact portal account information • Sends from "{AgentName} via Flexmls <[email protected]>"• Contains login information for contact portal accounts
Prospect Email view notifications • Sent to the agent when a prospect clicks on a listing link emailed to them by the agent• Notification emails are sent from "Flexmls Notifier <[email protected]>"
Tour of home notifications • This runs when an agent adds an open house or tour of homes• Contains information regarding the open house event• Sent to MLS primary email account
Email Me • The Email Me button on my.flexmls.com/PORTALNAME pages allow the user to send messages
to the agent
Password reset [email protected] • Email is sent to the primary email address on the username's account that's entered• Password requests on portals also send from this address
IDX Portal • On portal signup, portal emails are sent from the user’s address from within their profile
'Agent to Agent' and 'Agent to portal user' "Messages" • If an agent sends another agent a message in Flexmls, and the receiving agent gets an email
from that message, it will be sent from [email protected]• The Reply-To address will be in the format of <[email protected]>

25
• IDX lead emails – Emails that are sent to the agent that has an FBS IDX subscription when acontact signs up for a portal through their IDX site
Agent contact information change notifications [email protected] • Sent when an agent changes their primary contact information• Contains information about what was changed• Sent to MLS primary email
Listing Off market reminder [email protected] • Sent to the listing agent when a listing goes off market• Reminds agent to return the SUPRA key box
Pending Warnings • Emails are sent from [email protected]• Email is sent to the listing agent only of a pending listing
Listing Expirations • Sends from Flexmls Notifier <[email protected]>• Message only gets sent if the user has the expiration preference set under their General
Preferenceso Preference reads "Send email notification of expiring listings [X] days before expiration"
"No photo" notifications • Sent 'X' days after a listing is entered if a photo has not been uploaded• Sent to Listing agent, co-listing agent, office, company, MLS, and/or managing broker• Sent from "Flexmls Notifier <[email protected]>"• Sent at 3:15am CST
Listing change notifications • Sent when a listing is changed• Contains information about what was changed• Sent to MLS primary email account
Error Report or Report Violation • If an MLS Staff or an Agent uses the Report Violation (Error Report), it is sent out from
Instant Prospecting Emails [email protected]
Forms Emails [email protected]

26
Broker Resources
Looking for help with this manual or anything else? For all questions and concerns, please do not
hesitate to contact our Customer Care team at 800-925-1525 or 909-859-2040. If you’re a broker or
office admin and need dedicated service, you may also call our Broker Helpline at 909-859-2043.
Brokers and other accepted user classes may contact our Broker Resources & Member Engagement department:
Amy A. Ulloa-Zúñiga Director of Broker Resources & Member Engagement
crmls.org/brokers
Our support hours are Monday-Friday 8:30 AM – 9 PM; Saturday & Sunday 10 AM – 3 PM.

27
CRMLS Support Resources Should you have any questions or need help getting started, please do not hesitate to contact our Customer Care team at 800-925-1525 or 909-859-2040.
Monday – Friday 8:30 a.m. to 9:00 p.m.
Saturday and Sunday 10:00 a.m. to 3:00 p.m.
Finally, please be sure to connect with us on social media at the links below so that we can provide you with the most up to date information on what we are working on here at CRMLS.
Social Media It’s My Business
• fb.com/CRMLS• @CRMLSNews• YouTube.com/crmlstv• LinkedIn
• It's My Business• fb.com/ItsMyBusinessOfficial• @itsmybizCA