Embed Size (px)
Citation preview
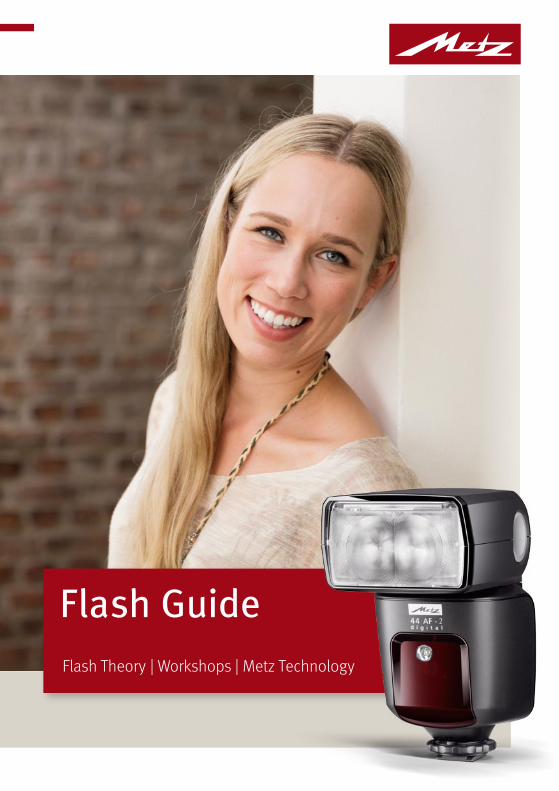
Flash Theory | Workshops | Metz Technology
Flash Guide

FLASH Guide
Imprint
A product of Metz mecatech GmbH Ohmstraße 55, 90513 Zirndorf
Email: [email protected] director: Lauri Jouhki Distributed by: Metz mecatech GmbH Produced by: falkemedia GmbH & Co. KGLayout: Nicola Gabriel
Photos: Sascha Deforth, Julius Ise, Carsten Mohr, manufacturerEditorial team: Carsten Mohr, Tobias Lorenz, Wibke Pfeiffer, Karin Bünnagel (copyediting), Leslie Ocker (translation)
This information does not purport to be comprehensive and may be subject to change.
Version: 20160907.A1
2 – 3
Editorial | Contents
Editorial
Contents
L ight is the most important design tool in photography, because it is only through the interplay of light, shadow and reflection
that photo ideas can be transformed into reality. However, in this era of high-performance sensors and high ISO values, do you really need a system flash unit? Isn’t a built-in camera flash enough, and what advantages does a system flash offer?
In this first edition of the Metz Flash Guide we would like to an-swer these questions and offer you some tips, tricks and informa-tion on creative options guaranteed to help you improve the quality of your photos.
We hope you’ll enjoy not only reading about but also trying out these new techniques – and wish you many beautiful motifs and successful photographs. Take advantage of everything system flashes have to offer, and enjoy the higher-quality images you’ll be able to produce.
We welcome your feedback on Facebook!
Sincerely,
Lauri Jouhki
The flash makes all the difference 4
Flash anatomy: Compact powerhouses 12
The world of light: System flashes & accessories 14
Workshop 1: Mixing flash & ambient light 16
Workshop 2: Using off-camera flash 20
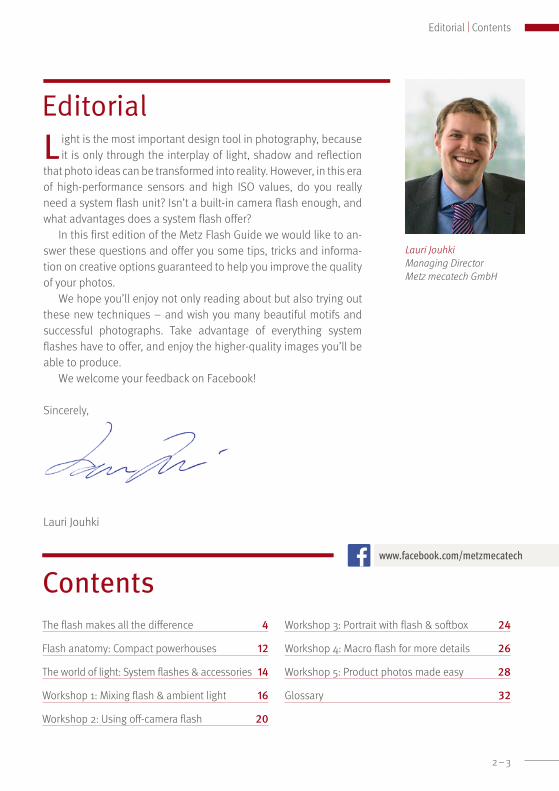
Lauri Jouhki Managing Director Metz mecatech GmbH
Workshop 3: Portrait with flash & softbox 24
Workshop 4: Macro flash for more details 26
Workshop 5: Product photos made easy 28
Glossary 32
www.facebook.com/metzmecatech
FLASH Guide
T his first edition of the Flash Guide will take you through the numerous advantages of
system flash units, explain the most important technical details and offer practical, easy-to- understand workshops that demonstrate how you can achieve professional-looking results with minimal effort: from portraits with a single flash unit to off-camera flashes and macro pho-tography. Professional photographer Sascha
Deforth will guide you through all required settings step-by-step and share his com-positional tricks. By the way, you can also find all of this information on Youtube: on the Metz mecatech channel (www.metz.video), you can watch all of these work-shops in detail and learn more tips and tricks on flash photography in other videos.
Why it pays to use flash Although the use of a flash unit when there is sufficient ambient light may seem some-what illogical at first, the professionals have good reasons for doing so: they prefer to control the lighting themselves. The intens-ity and direction of the light and shadows, indeed the overall look of a photo, are de-pendent on the lighting and can be con-trolled using flash units.
In other words, by controlling the light, you are able to determine the overall quality of the image. Don’t be scared off by buzzwords like HSS, slow synchronisation
The flash makes all the differenceAlthough flash photography has unfairly earned a bad reputation among amateur photographers, the professionals even use flash in sunlight. Read about the reasons for this and how you can easily take better photos with system flashes.
Special Flash Guide videos
More tips on YouTube!Professional photographer Sascha Deforth will show you how to get great results with Metz flashes. You can find his photography tips on every thing
from portraits to macro in the workshops of this Flash Guide and on Metz’s YouTube channel.
www.metz.video
Flash theory
4 – 5
Thema
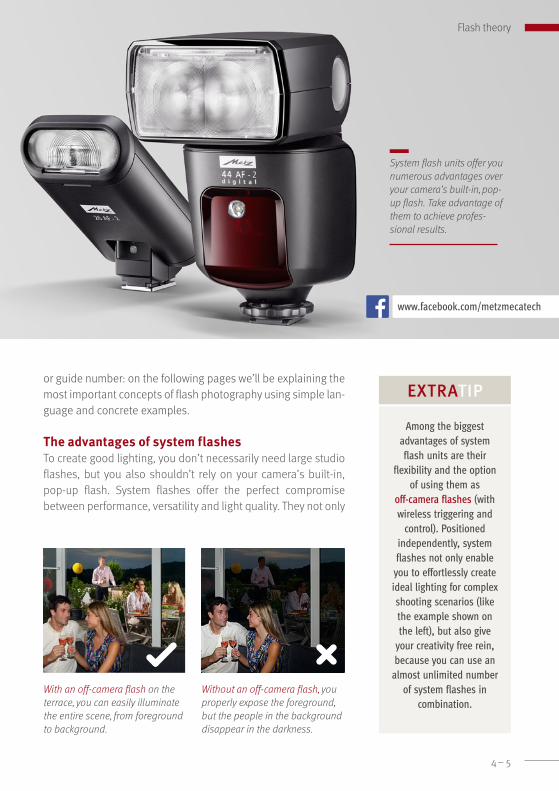
System flash units offer you numerous advantages over your camera’s built-in, pop-up flash. Take advantage of them to achieve profes-sional results.
With an off-camera flash on the terrace, you can easily illuminate the entire scene, from foreground to background.
Without an off-camera flash, you properly expose the foreground, but the people in the back ground disappear in the darkness.
or guide number: on the following pages we’ll be explaining the most important concepts of flash photography using simple lan-guage and concrete examples.
The advantages of system flashes To create good lighting, you don’t necessarily need large studio flashes, but you also shouldn’t rely on your camera’s built-in, pop-up flash. System flashes offer the perfect compromise between performance, versatility and light quality. They not only
Among the biggest advantages of system flash units are their
flexibility and the option of using them as
off-camera flashes (with wireless triggering and
control). Positioned independently, system flashes not only enable
you to effortlessly create ideal lighting for complex shooting scenarios (like the example shown on the left), but also give
your creativity free rein, because you can use an
almost unlimited number of system flashes in
combination.
eXTRATiP
www.facebook.com/metzmecatech
Flash theory
F L A S H Guide
Flash theory
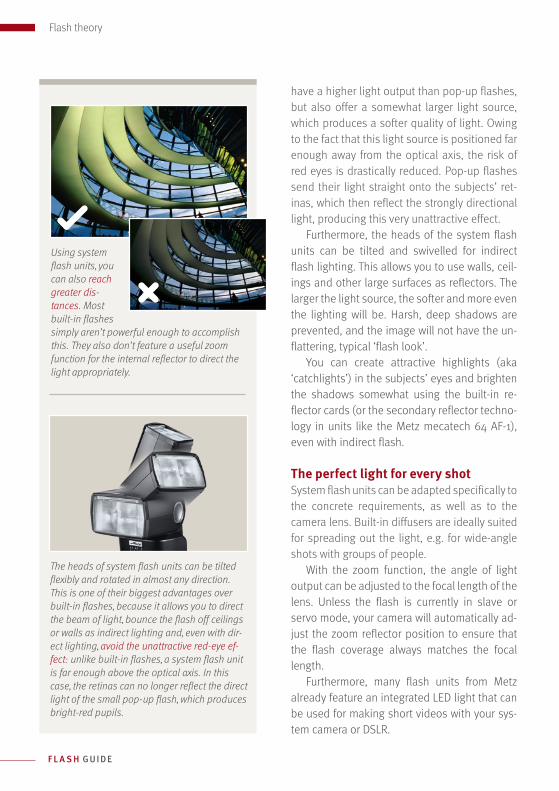
have a higher light output than pop-up flashes, but also offer a somewhat larger light source, which produces a softer quality of light. Owing to the fact that this light source is positioned far enough away from the optical axis, the risk of red eyes is drastically reduced. Pop-up flashes send their light straight onto the subjects’ ret-inas, which then reflect the strongly directional light, producing this very unattractive effect.
Furthermore, the heads of the system flash units can be tilted and swivelled for indirect flash lighting. This allows you to use walls, ceil-ings and other large surfaces as reflectors. The larger the light source, the softer and more even the lighting will be. Harsh, deep shadows are pre vented, and the image will not have the un-flattering, typical ‘flash look’.
You can create attractive highlights (aka ‘catchlights’) in the subjects’ eyes and brighten the shadows somewhat using the built-in re-flector cards (or the secondary reflector techno-logy in units like the Metz mecatech 64 AF-1), even with indirect flash.
The perfect light for every shotSystem flash units can be adapted specifically to the concrete requirements, as well as to the camera lens. Built-in diffusers are ideally suited for spreading out the light, e.g. for wide-angle shots with groups of people.
With the zoom function, the angle of light output can be adjusted to the focal length of the lens. Unless the flash is currently in slave or servo mode, your camera will automatically ad-just the zoom reflector position to ensure that the flash coverage always matches the focal length.
Furthermore, many flash units from Metz already feature an integrated LED light that can be used for making short videos with your sys-tem camera or DSLR.
The heads of system flash units can be tilted flexibly and rotated in almost any direction. This is one of their biggest advantages over built-in flashes, because it allows you to direct the beam of light, bounce the flash off ceilings or walls as indirect lighting and, even with dir-ect lighting, avoid the unattractive red-eye ef-fect: unlike built-in flashes, a system flash unit is far enough above the optical axis. In this case, the retinas can no longer reflect the direct light of the small pop-up flash, which produces bright-red pupils.
Using system flash units, you can also reach greater dis-tances. Most built-in flashes simply aren’t powerful enough to accomplish this. They also don’t feature a useful zoom function for the internal reflector to direct the light appropriately.
6 – 7
Flash theory
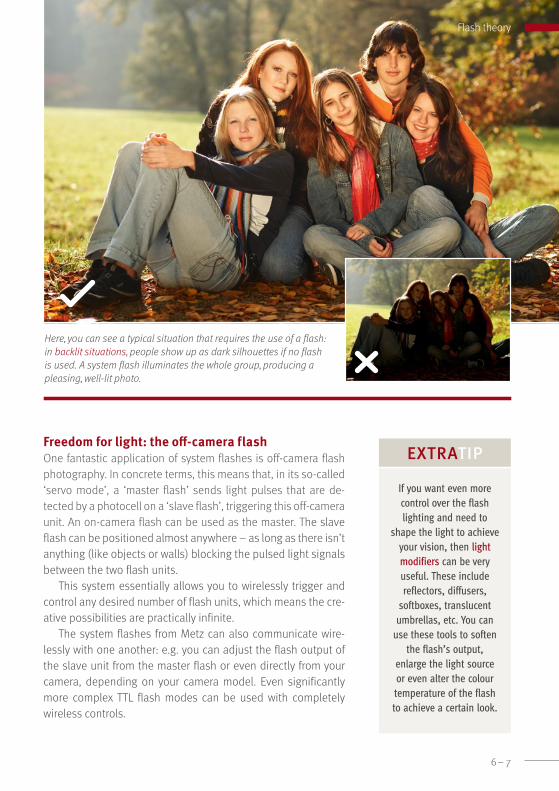
Here, you can see a typical situation that requires the use of a flash: in backlit situations, people show up as dark silhouettes if no flash is used. A system flash illuminates the whole group, producing a pleasing, well-lit photo.
If you want even more control over the flash lighting and need to
shape the light to achieve your vision, then light modifiers can be very useful. These include reflectors, diffusers,
softboxes, translucent umbrellas, etc. You can
use these tools to soften the flash’s output,
enlarge the light source or even alter the colour temperature of the flash to achieve a certain look.
eXTRATiPFreedom for light: the off-camera flashOne fantastic application of system flashes is off-camera flash photography. In concrete terms, this means that, in its so-called ‘servo mode’, a ‘master flash’ sends light pulses that are de-tected by a photocell on a ‘slave flash’, triggering this off- camera unit. An on-camera flash can be used as the master. The slave flash can be positioned almost anywhere – as long as there isn’t anything (like objects or walls) blocking the pulsed light signals between the two flash units.
This system essentially allows you to wirelessly trigger and control any desired number of flash units, which means the cre-ative possibilities are practically infinite.
The system flashes from Metz can also communicate wire-lessly with one another: e.g. you can adjust the flash output of the slave unit from the master flash or even directly from your camera, depending on your camera model. Even significantly more complex TTL flash modes can be used with completely wireless controls.
F L A S H Guide
Flash theory
With slow synchronisation, you can create motion effects and use the flash to light up dark areas in the foreground.
The shutter speed of 1 second creates motion effects, but without a flash, practically no de-tails are visible in the foreground.
Flash synchronisation in detailThe camera shutter must remain open long enough to ensure that a flash can expose the full frame. The maximum shutter speed possible in this context is called the flash synchronisation speed. This ‘sync speed’ is generally somewhere between 1/180 and 1/250 of a second, depending on the camera manufacturer and the camera model. If you exceed this, for example with a shutter speed of 1/1000 sec, part of the frame will be covered by
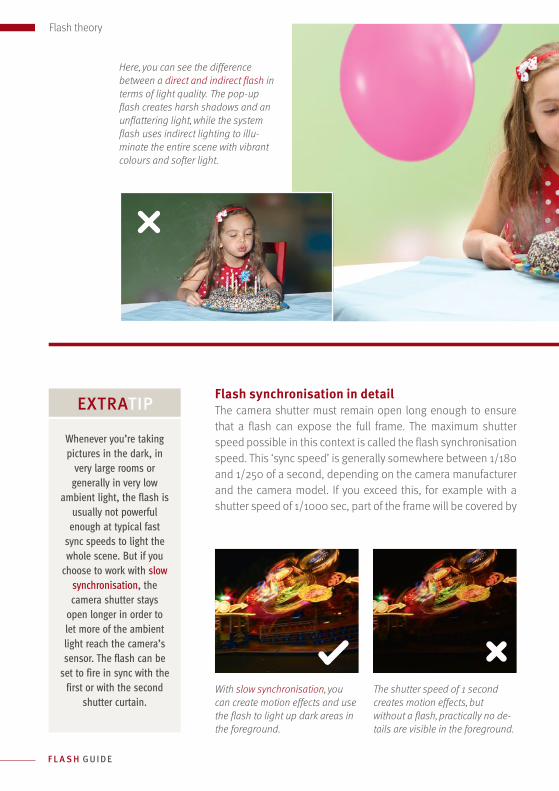
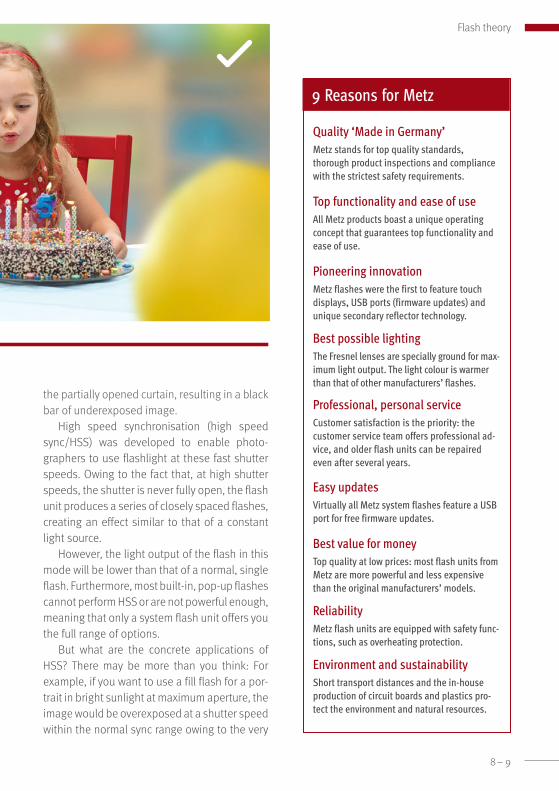
Here, you can see the difference between a direct and indirect flash in terms of light quality. The pop-up flash creates harsh shadows and an unflattering light, while the system flash uses indirect lighting to illu-minate the entire scene with vibrant colours and softer light.
Whenever you’re taking pictures in the dark, in
very large rooms or generally in very low
ambient light, the flash is usually not powerful
enough at typical fast sync speeds to light the whole scene. But if you
choose to work with slow synchronisation, the camera shutter stays
open longer in order to let more of the ambient light reach the camera’s sensor. The flash can be
set to fire in sync with the first or with the second
shutter curtain.
eXTRATiP
8 – 9
Flash theory
the partially opened curtain, resulting in a black bar of underexposed image.
High speed synchronisation (high speed sync/HSS) was developed to enable photo-graphers to use flashlight at these fast shutter speeds. Owing to the fact that, at high shutter speeds, the shutter is never fully open, the flash unit produces a series of closely spaced flashes, creating an effect similar to that of a constant light source.
However, the light output of the flash in this mode will be lower than that of a normal, single flash. Furthermore, most built-in, pop-up flashes cannot perform HSS or are not powerful enough, meaning that only a system flash unit offers you the full range of options.
But what are the concrete applications of HSS? There may be more than you think: For exam ple, if you want to use a fill flash for a por-trait in bright sunlight at maximum aperture, the image would be overexposed at a shutter speed within the normal sync range owing to the very
9 Reasons for Metz
Quality ‘Made in Germany’Metz stands for top quality standards, thorough product inspections and compliance with the strictest safety requirements.
Top functionality and ease of useAll Metz products boast a unique operating concept that guarantees top functionality and ease of use.
Pioneering innovationMetz flashes were the first to feature touch displays, USB ports (firmware updates) and unique secondary reflector technology.
Best possible lightingThe Fresnel lenses are specially ground for max-imum light output. The light colour is warmer than that of other manufacturers’ flashes.
Professional, personal serviceCustomer satisfaction is the priority: the customer service team offers professional ad-vice, and older flash units can be repaired even after several years.
Easy updatesVirtually all Metz system flashes feature a USB port for free firmware updates.
Best value for moneyTop quality at low prices: most flash units from Metz are more powerful and less expensive than the original manufacturers’ models.
ReliabilityMetz flash units are equipped with safety func-tions, such as overheating protection.
Environment and sustainabilityShort transport distances and the in-house production of circuit boards and plastics pro-tect the environment and natural resources.

F L A S H Guide
Flash theory
bright conditions. A fast shutter speed will let less light into the camera, and, thanks to high speed sync, you can still use your flash.
Another typical use of HSS is for freezing mo-tion in photos. Imagine a bursting water balloon. Or a very fast movement in sports. With the help of high speed sync, you can freeze this type of action using a fast shutter speed and flash, en-abling you to capture the finest details and elim-inate motion blur.
However, there are also exciting photo-graphic possibilities at the other end of the speed spectrum: slow synchronisation, or ‘slow sync flash’, lets you create a bit of blurring to con-vey movement, while the flash fires to freeze the motion of individual elements. Slow sync flash means that a flash can even be used at very slow shutter speeds, such as 1 second.
Depending on whether you use the first or the second curtain sync, the subjects can be frozen with the motion blur either behind or in front of them.
Light output and guide number The guide number is used for indicating the light output of a flash unit. It is dependent on the ISO setting and the position of the reflector. Guide numbers are usually given for ISO 100 sensitivity with the reflector fully zoomed in.
Often, you can find the guide number in the name of the respective flash unit. For example, the Metz mecablitz 64 AF-1 is significantly more powerful than the 26 AF-2. As a rule of thumb: the higher the guide number, the more powerful the flash.
Which flash is right for me?There is no straightforward answer to that ques-tion, because a variety of factors, such as price, size, weight and features, must be taken in con-sideration. Do you want a touch display? Or a
Portraits without any small high-lights in the eyes usually don’t work too well. They look less dynamic and somewhat flat. This is why sys-tem flashes feature integrated reflector cards. Or even a secondary flash that can be control-led separately and will create beautiful catch-lights in the eyes of your model, even when using indirect flash.
The TTL secondary reflector on the Metz 64 AF-1 is ideally suited for use as a fill light in portrait photography.
10 – 11
simple control panel with a small number of buttons, like the 44 AF-2? Will you be using the flash on a compact system camera (CSC)? Then it would be worth considering the Metz mecatech 26 AF-2 or the more flexible and higher-intensity M400. Do you need the most power possible? Then take a closer look at the mecatech 64 AF-1: this flash unit is powerful enough for use in larger rooms or even in photo studios with light modifiers.
Keep in mind: although you can almost always reduce the output of a flash unit, it can never be increased to more than the unit’s maximum power.
A special tool: macro flashA ring-shaped flash is designed to produce almost shadow-free lighting when the subject is very close to the camera, particularly in macro photography with its camera-to-subject distances of sometimes only a few centimetres. The light source is in line with the front of the lens and therefore throws virtually no shadows on your subject.
Owing to its design as a twin flash with two light sources in-side of a ring-shaped reflector, the 15 MS-1 even lets you adjust the output ratio between the two flashes.
Where there’s light, there must be shadow... But starting now, you will be able to easily control the quality of this shadow with the help of system flashes! Softer light, inter-esting looks, creative use of off-camera flash: keep reading to improve your flash skills step-by-step with the help of our work-shops on the following pages. Enjoy! ■
To create special effects at slower shutter speeds, you can set your camera
to fire the flash at the beginning of the exposure (i.e. with the first curtain) or shortly before the end of the exposure (with the
second curtain). If the flash is synced to the second curtain, the
movement effects will have a much more natural appearance because the
motion blur will trail behind the moving
element.
eXTRATiP
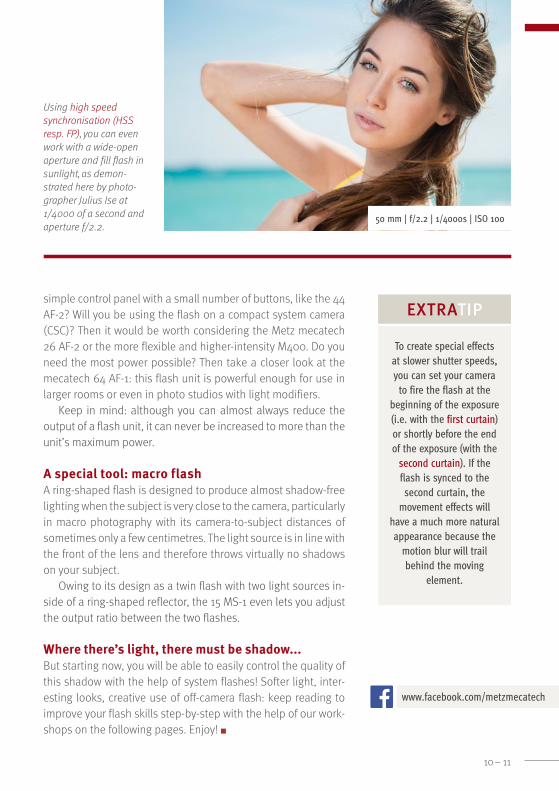
Using high speed synchronisation (HSS resp. FP), you can even work with a wide-open aperture and fill flash in sunlight, as demon-strated here by photo-grapher Julius Ise at 1/4000 of a second and aperture f/2.2.
50 mm | f/2.2 | 1/4000s | ISO 100
www.facebook.com/metzmecatech
FLASH Guide
Flash anatomy
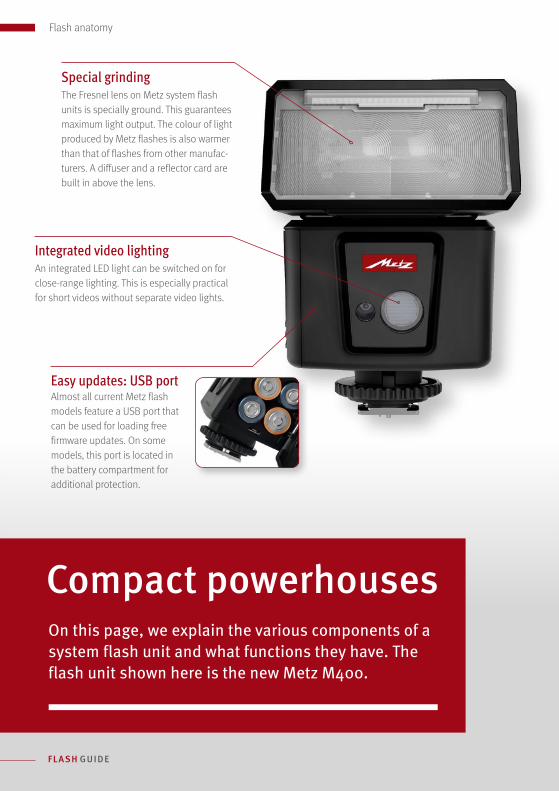
Compact powerhousesOn this page, we explain the various components of a system flash unit and what functions they have. The flash unit shown here is the new Metz M400.
Special grindingThe Fresnel lens on Metz system flash units is specially ground. This guarantees maximum light output. The colour of light produced by Metz flashes is also warmer than that of flashes from other manufac-turers. A diffuser and a reflector card are built in above the lens.
Integrated video lightingAn integrated LED light can be switched on for close-range lighting. This is especially practical for short videos without separate video lights.
Easy updates: USB port Almost all current Metz flash models feature a USB port that can be used for loading free firmware updates. On some models, this port is located in the battery compartment for additional protection.
For more information on Metz products visit: www.metz-mecatech.de
12 – 13
Flash anatomy
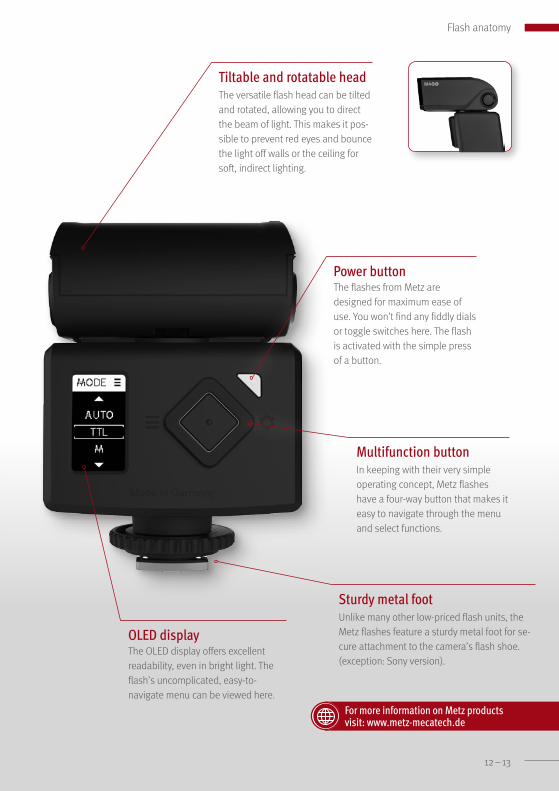
Tiltable and rotatable headThe versatile flash head can be tilted and rotated, allowing you to direct the beam of light. This makes it pos-sible to prevent red eyes and bounce the light off walls or the ceiling for soft, indirect lighting.
Power button The flashes from Metz are designed for maximum ease of use. You won’t find any fiddly dials or toggle switches here. The flash is activated with the simple press of a button.
Multifunction buttonIn keeping with their very simple ope r ating concept, Metz flashes have a four-way button that makes it easy to navigate through the menu and select functions.
OLED display The OLED display offers excellent readability, even in bright light. The flash’s uncomplicated, easy-to- navigate menu can be viewed here.
Sturdy metal footUnlike many other low-priced flash units, the Metz flashes feature a sturdy metal foot for se-cure attachment to the camera’s flash shoe. (exception: Sony version).
FLASH Guide
Flash theory
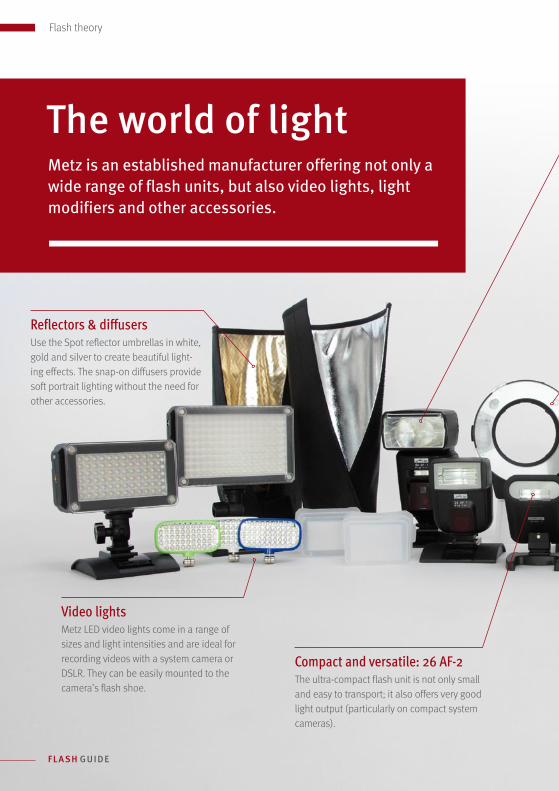
The world of lightMetz is an established manufacturer offering not only a wide range of flash units, but also video lights, light modifiers and other accessories.
Video lightsMetz LED video lights come in a range of sizes and light intensities and are ideal for recording videos with a system camera or DSLR. They can be easily mounted to the camera’s flash shoe.
Compact and versatile: 26 AF-2The ultra-compact flash unit is not only small and easy to transport; it also offers very good light output (particularly on compact system cameras).
Reflectors & diffusersUse the Spot reflector umbrellas in white, gold and silver to create beautiful light-ing effects. The snap-on diffusers provide soft portrait lighting without the need for other accessories.
14 – 15
Flash theory
For more information on Metz products visit: www.metz-mecatech.de
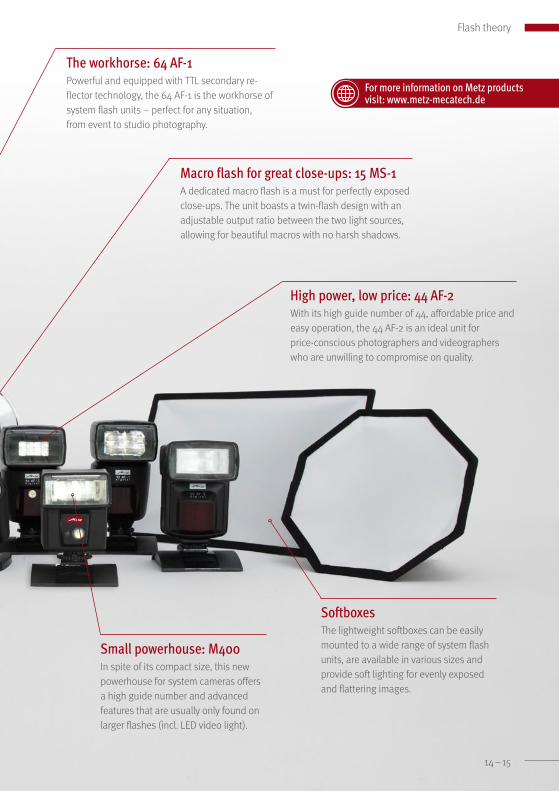
The workhorse: 64 AF-1Powerful and equipped with TTL secondary re-flector technology, the 64 AF-1 is the workhorse of system flash units – perfect for any situation, from event to studio photography.
High power, low price: 44 AF-2With its high guide number of 44, affordable price and easy operation, the 44 AF-2 is an ideal unit for price-conscious photographers and videographers who are unwilling to compromise on quality.
SoftboxesThe lightweight softboxes can be easily mounted to a wide range of system flash units, are available in various sizes and provide soft lighting for evenly exposed and flattering images.
Small powerhouse: M400In spite of its compact size, this new powerhouse for system cameras offers a high guide number and ad vanced features that are usually only found on larger flashes (incl. LED video light).
Macro flash for great close-ups: 15 MS-1A dedicated macro flash is a must for perfectly exposed close-ups. The unit boasts a twin-flash design with an adjustable output ratio between the two light sources, allowing for beautiful macros with no harsh shadows.
flash Guide
You will rarely take pictures in rooms with absolutely no ambient light: there is usually
existing light coming from somewhere, be it lamps or natural sources. If you want to use flash, what is the best way to ensure that the light from the flash will blend as naturally as possible into the existing ambient light?
First of all, the presence of ambient light should be seen as something positive. In most cases, you will only need one additional light source, like a system flash, to achieve excellent results. To ensure that this mixed lighting will have a natural appearance, there are a few things you’ll need to keep in mind. We will be covering these in the following text. As in any photographic situation, it is important that, prior to taking the photo, you find out exactly where the light is coming from and how bright it
is. Then you can decide how best to position your model: should they be illuminated by am-bient light? Or would you rather use your system flash for that purpose? There are no strict rules for this. Instead, it’s usually a question of exper-ience and instinct, and the same applies to flash output – but we’ll come back to that later.
Once you’ve decided on your composition (or maybe the setting only leaves you one op-tion), the next step is to plan your own lighting.
Reflectors for indirect flash lightingIf you happen to be in a room with a white ceil-ing and/or white walls, it’s your lucky day, be-cause these surfaces are often the perfect, large-scale reflectors for indirect flash lighting. In this context, ‘indirect’ means that you will be pointing your flash at a light-coloured surface
Workshop 1 | Mastering mixed lighting
With system flashes, the lighting situation is literally in your hands. Read how to balance flash and ambient light like a pro.
Full control of lighting
Bouncing the flash off the ceiling illuminates the model, while window light provides a beautiful edge-light.
Flash use

16 – 17
that will reflect some of the light, instead of dir-ectly at your subject. The larger the reflective surface, the softer the reflected light will be. Soft light is particularly flattering for portraits and group photos, because the skin pores, wrinkles and facial features are illuminated more evenly than with a direct flash, and it doesn’t produce harsh shadows.
Beautiful edge-lightYou can create an especially beautiful look by using the existing light as side- or backlighting. If you position your model in front of or beside a light source like a window, the ambient light will create attractive highlights in their hair and around their silhouette. If you were to take this photo without a flash, the camera’s light meter would choose an exposure based on the bright
We are often confronted with mixed-lighting situ-ations. Indirect flash light-ing allows for the blending of flash and ambient light to produce a natural look.
Without any flash, the overall image has an un-balanced look. Fine structures and the model’s face are barely visible.
35 mm | f/2.0 | 1/90s | ISO 100
Flash use
flash Guide
Flash use
1 Composition with layersCompose your photo with multiple image lay-ers, such as foreground, middle ground and background. We place a light-coloured, out-of-focus cushion in the foreground to draw the viewer’s eye into the image.
2 Indirect flash lightingWith indirect flash lighting (e.g. pointing the flash at the ceiling), you can ensure that the en-tire foreground will be evenly lit. This can be ac-complished by simply tilting the head of the system flash upwards.
step by step | Mastering mixed lighting
light source, and the face of the model would be underexposed. And if you would spot meter from the face, the lighter areas of the image would burn out (i.e. be overexposed, leaving no visible details). However, if you use indirect flash lighting to fill in the dark face or the entire foreground, you can get a natural-looking image – in spite of the high-contrast situation you started with.
The unique secondary reflector of the Metz mecablitz 64 AF-1, which we used for our shoot, enables you to fill in the darker areas with soft, direct lighting – and will even create beautiful highlights in your model’s eyes.
See below for step-by-step instructions on how to create a successful mix of flash and ambient light. You can also watch the video tutorial at the link shown below (on the right). ■
You will almost always have to work with a mixture of flash and
ambient light, so it’s a good idea to practice indirect flash lighting often. One important
consideration is the white balance, which can be set to the flash, the ambient
light or a different temperature. Shoot in
RAW format so that you can tweak the white
balance in post.
eXTRaTiP
18 – 19
Flash use
3 Camera and flash settingsIdeally, you should shoot at ISO 100 (resulting in low noise) with a relatively wide aperture. We set the shutter speed to 1/90 of a second and left the flash in TTL mode, which automatically adjusts the light output.
4 Create some catchlightsOne special feature of the mecablitz 64 AF-1 is the built-in TTL secondary reflector. This is a second, small flash on the front of the flash unit that creates catchlights in the eyes and provides additional direct illumination to shadow areas.
Follow these four easy steps for well-balanced lighting.
ImpRovIsed RefleCtoRsIn most cases, the ceiling of the room can be used as a huge reflective surface. But you can also try it with walls: system flashes can be rotated in nearly every direction, for example, en-abling you to use a wall as a large reflector. With side lighting, you can create stronger con-trasts than with bouncing the flash off the ceiling. Experiment with various surfaces: even mirrors, glass surfaces and metal objects can serve as reflectors.
By pointing the flash at a dif-ferent surface (in this example, the left wall), we can create a new look: when the flash’s light comes from the side, it creates somewhat stronger shadows and contrasts.
mixedlighting.metz.video
f l a s h Guide
Thema
Many photography enthusiasts shy away from using more than one flash unit at a
time. But it’s actually much easier than it sounds. For example, if you don’t have any problem moving around several floor lamps to provide lighting for a model and her surround-ings, then you can do pretty much the same with system flash units.
Simple controlsStart out by positioning the second flash for the additional elements you want to illuminate. This flash will be triggered as a ‘servo’, so you will have to select this mode in the flash menu. In
concrete terms, this means that, when the main flash fires, it activates an optical sensor that trig-gers the slave flash. Our main flash is on the camera. Set up your main flash for the proper exposure of the foreground, and if necessary, adjust the output of the slave flash accordingly.
Modern TTL systems even allow for the re-mote control of flash output and the wireless transmission of exposure data. In manual mode, on the other hand, you maintain full control – the choice is yours.
This workshop also has a corresponding video tutorial, which you can find at the link shown on page 23. ■
Flash use
Workshop 02 | Wireless flash lighting
One of the biggest advantages of system flashes is that they can be used off camera.
Freedom in lighting design
With a main flash and an off-camera flash in the background, we achieve a perfectly lit image.
20 – 21
Flash use
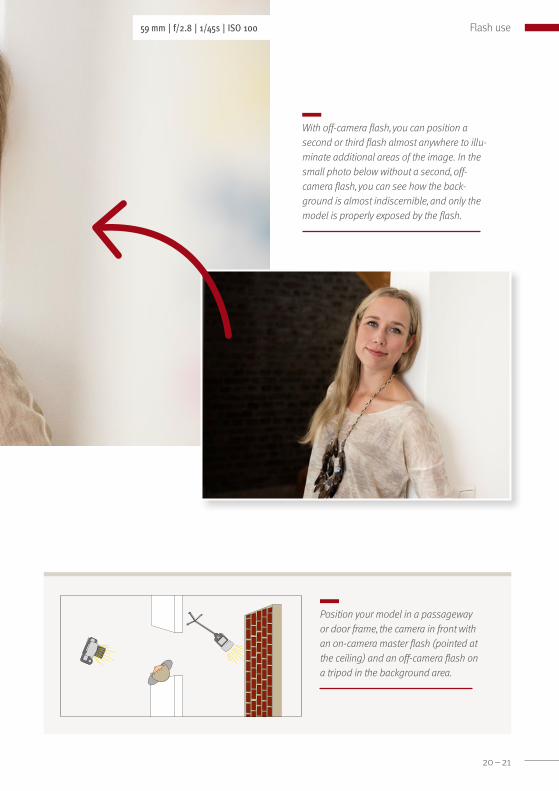
Position your model in a passageway or door frame, the camera in front with an on-camera master flash (pointed at the ceiling) and an off-camera flash on a tripod in the background area.
With off-camera flash, you can position a second or third flash almost anywhere to illu-minate additional areas of the image. In the small photo below without a second, off- camera flash, you can see how the back-ground is almost indiscernible, and only the model is properly exposed by the flash.
59 mm | f/2.8 | 1/45s | ISO 100
f l a s h Guide
Flash use
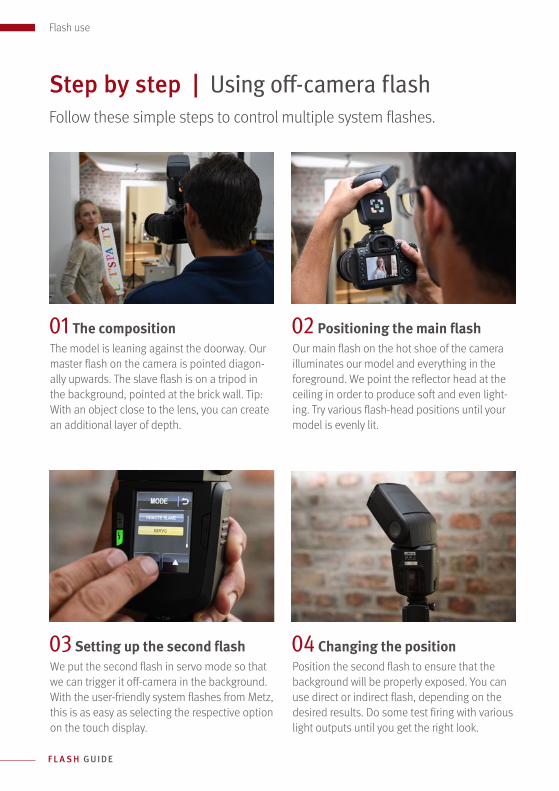
01 The compositionThe model is leaning against the doorway. Our master flash on the camera is pointed diagon-ally upwards. The slave flash is on a tripod in the background, pointed at the brick wall. Tip: With an object close to the lens, you can create an additional layer of depth.
03 Setting up the second flashWe put the second flash in servo mode so that we can trigger it off-camera in the background. With the user-friendly system flashes from Metz, this is as easy as selecting the respective option on the touch display.
02 Positioning the main flashOur main flash on the hot shoe of the camera illuminates our model and everything in the foreground. We point the reflector head at the ceiling in order to produce soft and even light-ing. Try various flash-head positions until your model is evenly lit.
04 Changing the positionPosition the second flash to ensure that the background will be properly exposed. You can use direct or indirect flash, depending on the desired results. Do some test firing with various light outputs until you get the right look.
Step by step | Using off-camera flashFollow these simple steps to control multiple system flashes.
22 – 2370 mm | f/2.8 | 1/60s | ISO 400
wireless.metz.video
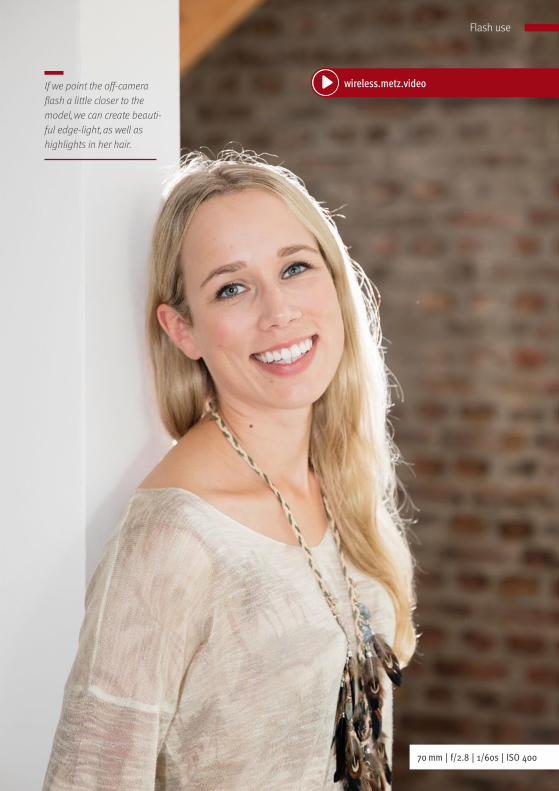
If we point the off-camera flash a little closer to the model, we can create beauti-ful edge-light, as well as highlights in her hair.
Flash use
f l a s h Guide
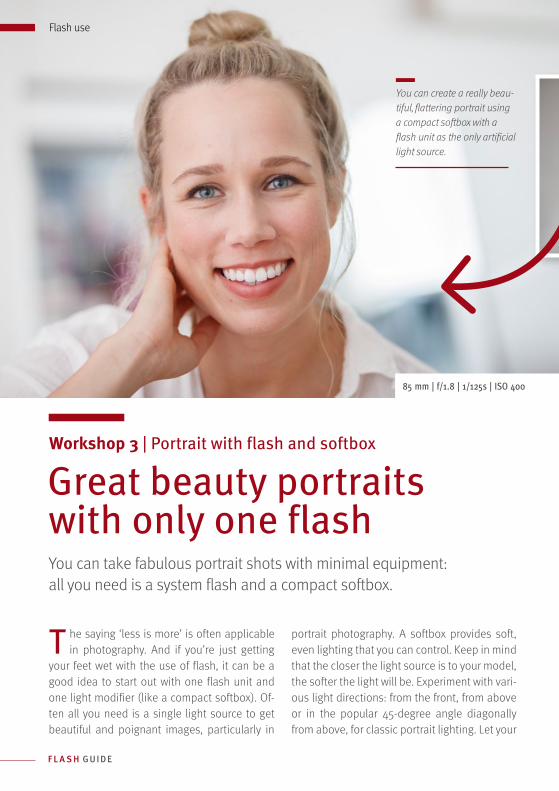
T he saying ‘less is more’ is often applicable in photography. And if you’re just getting
your feet wet with the use of flash, it can be a good idea to start out with one flash unit and one light modifier (like a compact softbox). Of-ten all you need is a single light source to get beautiful and poignant images, particularly in
portrait photography. A softbox provides soft, even lighting that you can control. Keep in mind that the closer the light source is to your model, the softer the light will be. Experiment with vari-ous light directions: from the front, from above or in the popular 45-degree angle diagonally from above, for classic portrait lighting. Let your
Workshop 3 | Portrait with flash and softbox
You can take fabulous portrait shots with minimal equipment: all you need is a system flash and a compact softbox.
Great beauty portraits with only one flash
You can create a really beau-tiful, flattering portrait using a compact softbox with a flash unit as the only artificial light source.
85 mm | f/1.8 | 1/125s | ISO 400
Flash use
24 – 25
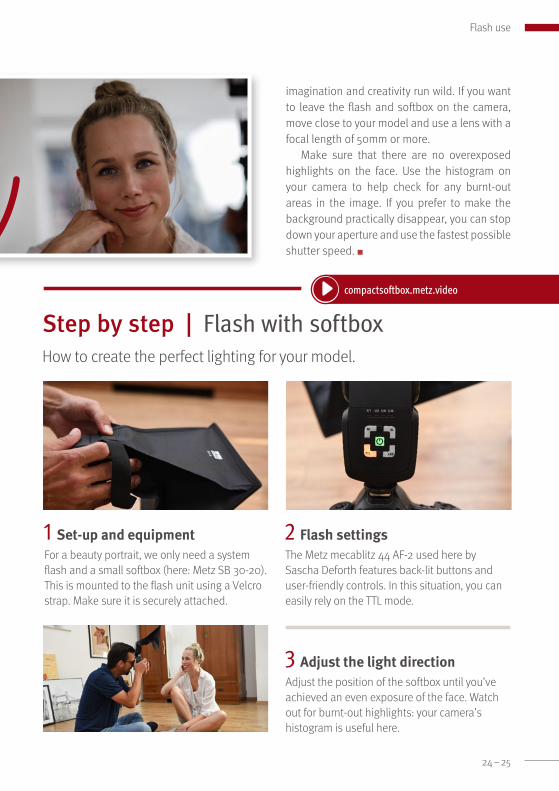
Flash use
1 Set-up and equipmentFor a beauty portrait, we only need a system flash and a small softbox (here: Metz SB 30-20). This is mounted to the flash unit using a Velcro strap. Make sure it is securely attached.
3 Adjust the light directionAdjust the position of the softbox until you’ve achieved an even exposure of the face. Watch out for burnt-out highlights: your camera’s histogram is useful here.
2 Flash settingsThe Metz mecablitz 44 AF-2 used here by Sascha Deforth features back-lit buttons and user-friendly controls. In this situation, you can easily rely on the TTL mode.
step by step | Flash with softboxHow to create the perfect lighting for your model.
imagination and creativity run wild. If you want to leave the flash and softbox on the camera, move close to your model and use a lens with a focal length of 50mm or more.
Make sure that there are no overexposed highlights on the face. Use the histogram on your camera to help check for any burnt-out areas in the image. If you prefer to make the background practically disappear, you can stop down your aperture and use the fastest possible shutter speed. ■
compactsoftbox.metz.video
Thema
flash Guide
or macro shots, it’s almost always best to use flash, even on sunny days. Because even when the ambient light is very
bright, you will probably cast unattractive shadows on the subject with your camera or your lens. Furthermore, you need to use a re-latively small aperture to achieve sufficient depth of field when shooting at such close ranges. Without flash, the shutter speed would also be too slow to achieve nice crisp images. A dedicated macro flash is ideal for this task because the light comes from the front of the lens. The ring-shaped light source makes it possible to capture the finest details without creating harsh shadows. And a flash like the 15 MS-1 isn’t even all that difficult to use, as you can read below or learn more about in our video on the subject (see link on the following page). ■
Flash use
Workshop 4 | Macro photography
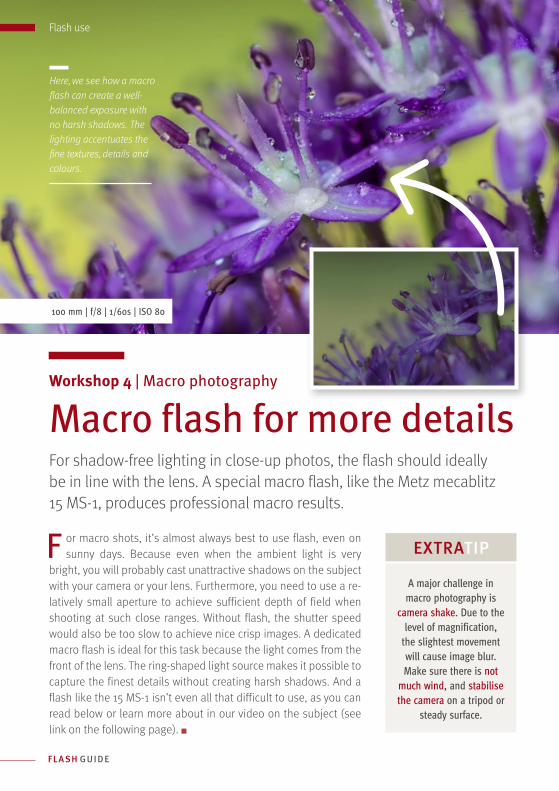
For shadow-free lighting in close-up photos, the flash should ideally be in line with the lens. A special macro flash, like the Metz mecablitz 15 MS-1, produces professional macro results.
Macro flash for more details
Here, we see how a macro flash can create a well- balanced exposure with no harsh shadows. The lighting accentuates the fine textures, details and colours.
A major challenge in macro photography is
camera shake. Due to the level of magnification,
the slightest movement will cause image blur. Make sure there is not
much wind, and stabilise the camera on a tripod or
steady surface.
100 mm | f/8 | 1/60s | ISO 80
EXTRATIP
26 – 27
Flash use
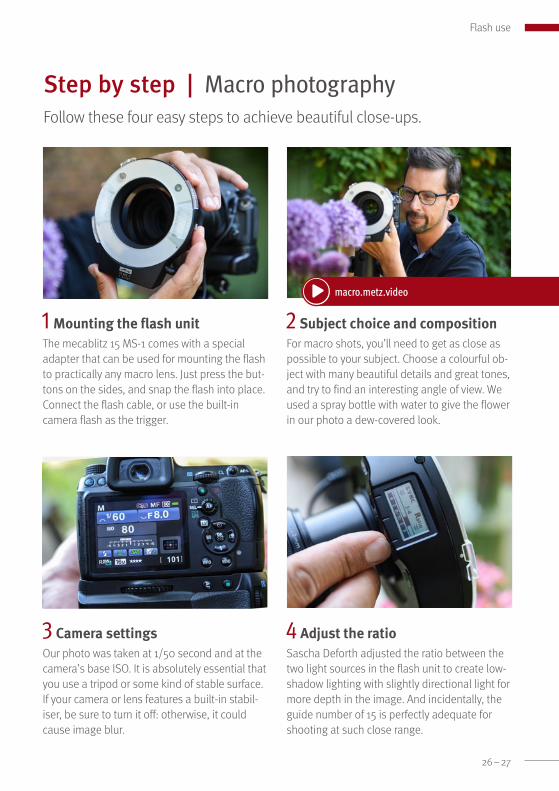
1 Mounting the flash unitThe mecablitz 15 MS-1 comes with a special adapt er that can be used for mounting the flash to practically any macro lens. Just press the but-tons on the sides, and snap the flash into place. Connect the flash cable, or use the built-in camera flash as the trigger.
3 Camera settingsOur photo was taken at 1/50 second and at the camera’s base ISO. It is absolutely essential that you use a tripod or some kind of stable surface. If your camera or lens features a built-in stabil-iser, be sure to turn it off: otherwise, it could cause image blur.
2 Subject choice and compositionFor macro shots, you’ll need to get as close as possible to your subject. Choose a colourful ob-ject with many beautiful details and great tones, and try to find an interesting angle of view. We used a spray bottle with water to give the flower in our photo a dew-covered look.
4 Adjust the ratioSascha Deforth adjusted the ratio between the two light sources in the flash unit to create low-shadow lighting with slightly directional light for more depth in the image. And incidentally, the guide number of 15 is perfectly adequate for shooting at such close range.
Step by step | Macro photographyFollow these four easy steps to achieve beautiful close-ups.
macro.metz.video
flash Guide
Flash use
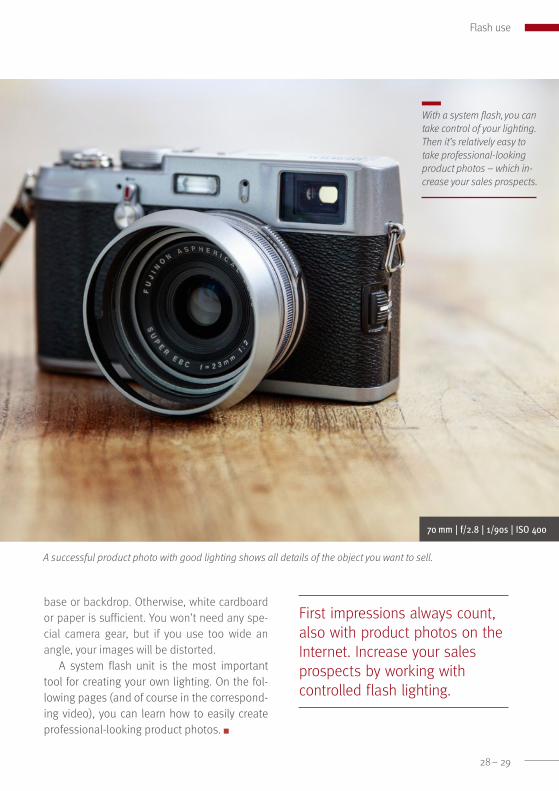
Y ou’ve probably noticed it yourself: when browsing through websites with a large
number of products, like eBay and Amazon, the best product photos are always the first to catch your eye. And you don’t need a studio or pro equipment to show your product in perfect light.
Take time to design the appropriate staging for the object (perspective, surroundings etc.). The use of an additional light source is usually
unavoidable because ambient light is rarely enough to properly illuminate the object. Fur-thermore, controlled lighting enables you to emphasise small details.
Simple equipmentNot much is needed to create beautiful product photos. If you aren’t planning to isolate the ob-ject on a white background, then look for a nice
Workshop 5 | Easy product photos
Anyone who wants to sell something online should keep in mind that, also here, you never get a second chance to make a first impression.
Showcase an object
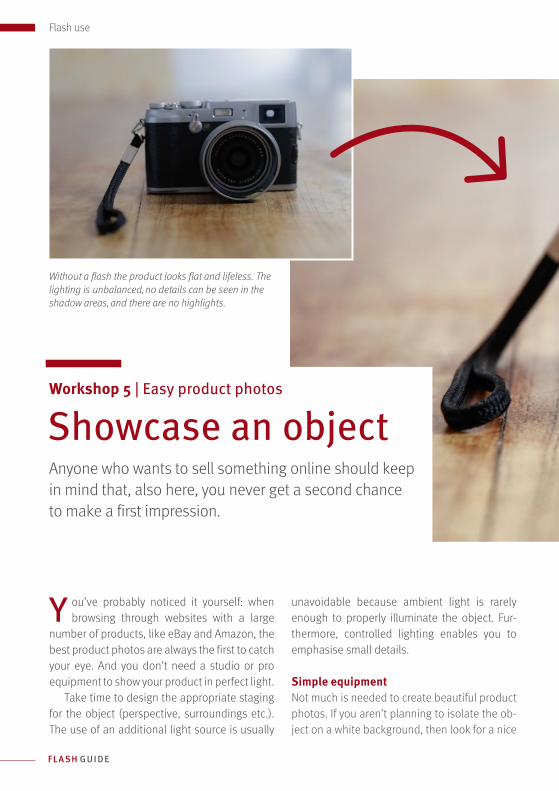
Without a flash the product looks flat and lifeless. The lighting is unbalanced, no details can be seen in the shadow areas, and there are no highlights.
28 – 29
Flash use
base or backdrop. Otherwise, white cardboard or paper is sufficient. You won’t need any spe-cial camera gear, but if you use too wide an angle, your images will be distorted.
A system flash unit is the most important tool for creating your own lighting. On the fol-lowing pages (and of course in the correspond-ing video), you can learn how to easily create professional-looking product photos. ■
First impressions always count, also with product photos on the Internet. Increase your sales prospects by working with controlled flash lighting.
70 mm | f/2.8 | 1/90s | ISO 400
A successful product photo with good lighting shows all details of the object you want to sell.
With a system flash, you can take control of your lighting. Then it’s relatively easy to take professional-looking product photos – which in-crease your sales prospects.
flash Guide
Flash use
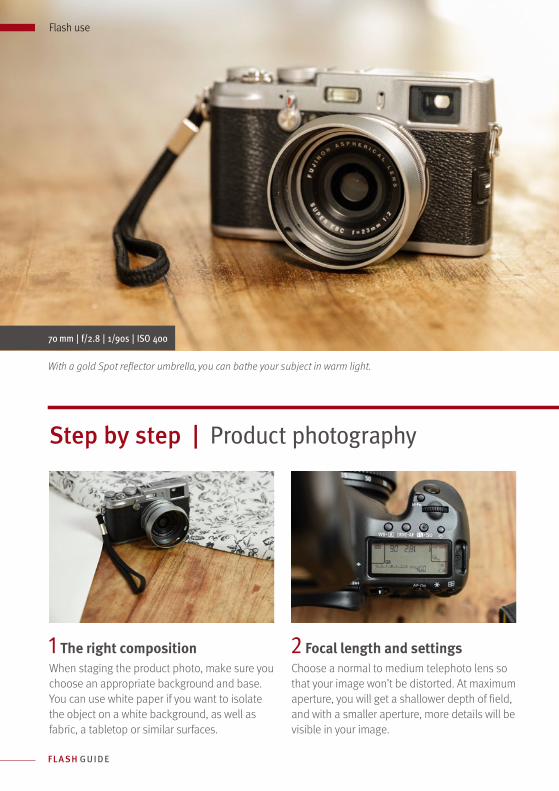
1 The right compositionWhen staging the product photo, make sure you choose an appropriate background and base. You can use white paper if you want to isolate the object on a white background, as well as fabric, a tabletop or similar surfaces.
2 Focal length and settingsChoose a normal to medium telephoto lens so that your image won’t be distorted. At maximum aperture, you will get a shallower depth of field, and with a smaller aperture, more details will be visible in your image.
Step by step | Product photography
With a gold Spot reflector umbrella, you can bathe your subject in warm light.
70 mm | f/2.8 | 1/90s | ISO 400
Flash use
30 – 31
Flash use
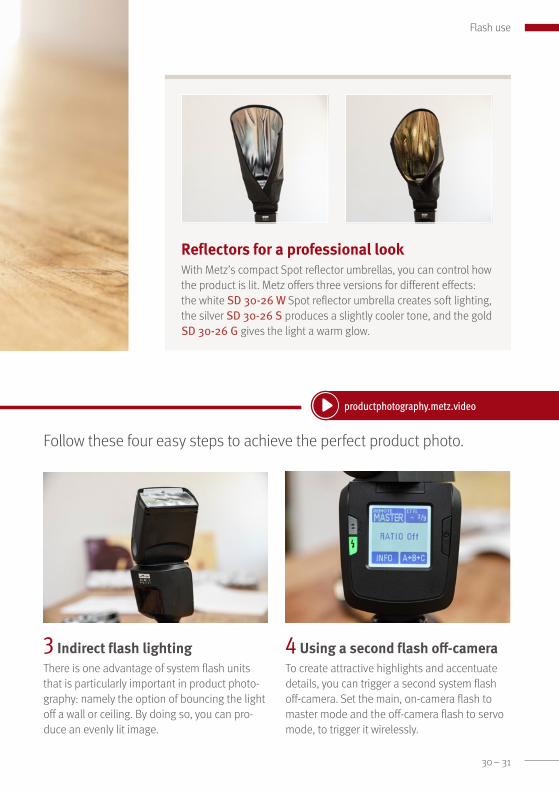
3 Indirect flash lightingThere is one advantage of system flash units that is particularly important in product photo-graphy: namely the option of bouncing the light off a wall or ceiling. By doing so, you can pro-duce an evenly lit image.
4 Using a second flash off-cameraTo create attractive highlights and accentuate details, you can trigger a second system flash off-camera. Set the main, on-camera flash to master mode and the off-camera flash to servo mode, to trigger it wirelessly.
Follow these four easy steps to achieve the perfect product photo.
Reflectors for a professional lookWith Metz’s compact Spot reflector umbrellas, you can control how the product is lit. Metz offers three versions for different effects: the white SD 30-26 W Spot reflector umbrella creates soft lighting, the silver SD 30-26 S produces a slightly cooler tone, and the gold SD 30-26 G gives the light a warm glow.
productphotography.metz.video
f l a s h Guide
Glossary
3d-TTl and d-TTl-3dThe 3D-TTL (Nikon) and D-TTL-3D flash control sys-tems factor in additional data, such as the distance to the subject, when controlling the flash output.
af measuring beamAn autofocus assist light (AF measuring beam) in-tegrated into the flash unit automatically supports the central autofocus sensor of the camera when ambient light levels are too low. A multi-zone AF measuring beam also supports peripheral AF sensors.
auTO TTlWith the mode AUTO TTL (EASY TTL), the flash unit can be used in fully automatic mode with TTL flash control for flash photography. In this mode, no manual settings are permitted on the flash unit.
automatic flash modeA photo sensor built into the flash unit measures the flash exposure of the subject while the photo is being taken and shuts off the flash when the cor-rect exposure has been achieved.
automatic unit shut-offAfter a longer period of inactivity, the flash unit switches to standby mode in order to prevent bat-tery drain (auto OFF). The wake-up function (see Wake-up function) reactivates the flash unit, e.g. when the user lightly depresses the shutter release.
Beep functionAdditional acoustic status signals can be activated for flash readiness, flash-exposure control or alerts.
Correct exposure indicationIn automatic or TTL flash mode, the indication ‘o.k.’ lights up on the flash unit after a photo was taken if the shot was correctly exposed.
d-TTlThis technology is an advanced version of the TTL flash control system with pre-flash metering for Nikon cameras.
dot matrix display with soft keysThe display is adapted to the respective camera system and operating status in order to give the flash unit an optimised, intuitive user interface with soft keys.
e-TTlA modern, advanced version of the TTL flash control system with pre-flash metering for Canon cameras.
e-TTl iiThe E-TTL II flash control system factors in addi-tional data, such as the distance to the subject and the guide number, when controlling the flash out-put.
extended zoomIn extended zoom mode, the main reflector is set one position back from the normal position. As a result, the light spreads more to the sides and re-flects off the walls and ceiling for a somewhat softer and more diffused lighting of the subject.
Key concepts of flash technology explained in simple terms
32 – 33
Glossary
flash bracketingA series of three flash exposures with different ex-posure correction values: minus correction value, no correction value, plus correction value.
flash readiness indicationThe flash readiness symbol lights up when the flash capacitor of the flash unit is sufficiently charged, in-dicating that the flash is ready for the next shot.
Guide number The guide number is a measure of a flash unit’s out-put. It is dependent on the ISO sensitivity and on the reflector position, as well as on any reflector at-tachments (e.g. wide-angle diffuser or telephoto at-tachment). In HSS mode, the guide number is also dependent on the shutter speed.
hss – high speed synchronisationHigh speed synchronisation (HSS) makes it pos-sible to use the flash unit with shutter speeds faster than the flash sync speed. An open aperture can be used for flash photography in bright ambient light, in order to limit the depth of field in portrait shots.
i-TTlA modern, advanced version of the TTL flash control system with pre-flash metering for Nikon cameras.
i-TTl-BlThe i-TTL-BL flash control system factors in addi-tional data, such as the distance to the subject, when controlling the flash output.
Keylock functionThe keylock function locks the buttons on the flash unit. This prevents unintentional resetting.
lCd displayProvides information on the operating modes and settings currently in use. (see Dot matrix display)
learning modeThe flash unit is able to recognise and ignore the pre-flash of the camera. The unit then responds only to the main flash (depending on the camera).
Manual flash modeFlash mode with a fixed light output level. The flash unit will emit the full light energy if partial light out-put has not been selected.
Manual zoomThe zoom position of the main reflector can be manually adjusted to the lens focal length.
Metal footHigh-quality metal foot for secure attachment to the camera shoe.
Modelling lightThe modelling light is a high-frequency stro bo-scopic flash that creates the impression of a semi-permanent light for the duration of a few seconds to help assess the light distribution and the formation of shadows in the image before tak-ing the photo.
Motor zoomThe zoom position of the main reflector, and ac-cordingly the light from the flash unit, is automatic-ally adjusted to the lens focal length.
Oled displayProvides information on the operating modes and settings currently in use. The OLED display features a high contrast and is energy efficient.
P-TTlAn advanced version of the TTL flash control system with pre-flash metering for Pentax cameras.
f l a s h Guide
Glossary
Partial light output modeManual flash mode with a fixed light output level. By selecting a partial light output on the flash unit, the light output and flash duration of the unit can be adjusted to the respective shooting situation.
Rapid modeUsed for fast recycle times with lower flash output.
Remote mode A remote system consists of a master or controller flash unit and one or more slave flash units. The slave is triggered remotely by the master or control-ler. With a master flash unit (unlike a controller) its output contributes to the exposure.
secondary reflectorA second, small flash on the front of the unit that fills in the shadows created when using indirect flash lighting in the close-up range.
servo modeThe servo mode makes it possible to use the built-in flash of the camera to wirelessly trigger the Metz flash unit of the corresponding camera system. The light output can be set manually to partial lighting.
slave modeAn integrated sensor makes this wireless slave flash mode possible in combination with a master or controller flash unit. (see Remote mode)
sony adiA modern version of the TTL system for Sony cam-eras that factors in additional data, such as the subject distance, when controlling the flash output.
spot zoom modeWhile zooming, the reflector is set one step nar-rower than the selected position on the lens for centre-weighted lighting. If the focal length is set at 50mm, the zoom reflector will adjust to 70mm in spot zoom mode. However, the flash unit display will still show the original focal length (50mm).
strobe modeA manual flash mode that allows for several flash exposures on a single photo, e.g. for special effect images or movement studies. The user can select the intensity, frequency and number of flashes.
Touch displayBacklit graphic display with touch control interface.
TTl fill-in flash controlReduces excessive image contrast (e.g. by soften-ing harsh shadows caused by bright sun).
TTl modeThe light from the flash travels through the lens (TTL) and is metered by a sensor in the camera. Once enough light has come in, the flash shuts off.
usB portInterface for firmware updates via the Internet.
Wake-up functionIf the flash unit has switched to energy-saving standby mode after a longer period of inactivity, it can be reactivated by lightly depressing the shutter release. (see Automatic unit shut-off)
Wide-angle diffuserIncreases the light angle of the flash unit. Depend-ing on the flash unit model, the wide-angle diffuser is either integrated or available as an optional accessory attachment.

www.facebook.com/metzmecatech
How did you like our Flash Guide? What photos have our workshops inspired you to try? We can’t wait to hear your feedback! And to see your results: we invite you to post your photos on our Facebook page.
Metz mecatech GmbH Ohmstraße 55 90506 Zirndorf/Germany
Tel: +49 (0) 911 – 97 06 0 Fax: +49 (0) 911 – 97 06 340
Service hotline: +49 (0) 911 – 97 06 172
www.metz-mecatech.de [email protected]
When it comes to illumination, Metz always has the perfect solution – whether it’s for amateur photographers or professionals. Our innovative products are known for their high- performance technology and reliable quality.
For further information regarding our current product range, visit www.metz-mecatech.de – or arrange your own personal consultation with a Metz specialist dealer. Take a look at our latest catalogues and request them free of charge!
Metz – the specialist for perfect illumination.