Embed Size (px)
Citation preview
1
Flash BASICS - Creating Animations in Flash CS4 Flash Tutorial Last Updated May 2009 by R. Berdan Before attempting this tutorial you should be familiar with the drawing tools and how to use them. These basic tutorials although simple are the foundation that can be used to create sophisticated animations. CS4 has also added a new type of animation called object based and preset animations which will be described at the end of these tutorials. Classic Tweening – use Action script version 2.0 movies for these tutorials.
1. Start Flash and select Select>File New>Flash File (Action script 2.0). In the Toolpanel, select circle oval tool and draw a circle in the upper left corner of the movie.
2. Select the black pointer from the tool bar (selection tool), click and drag around the circle
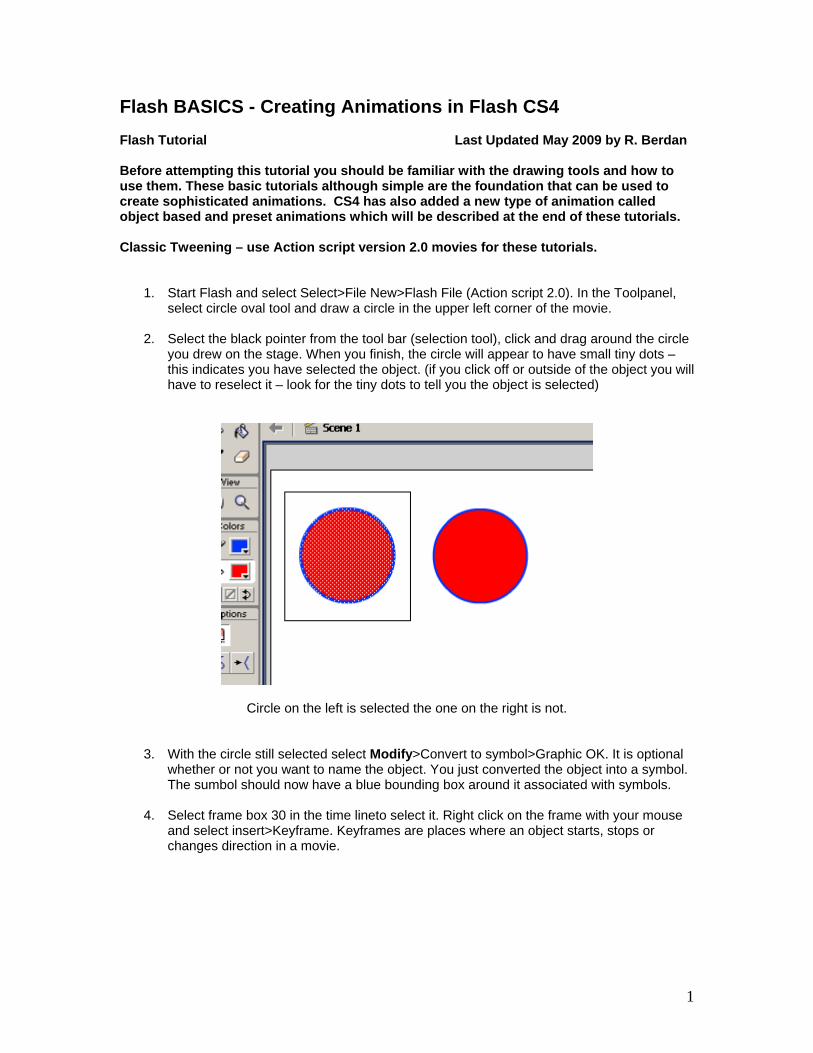
you drew on the stage. When you finish, the circle will appear to have small tiny dots – this indicates you have selected the object. (if you click off or outside of the object you will have to reselect it – look for the tiny dots to tell you the object is selected)
Circle on the left is selected the one on the right is not. 3. With the circle still selected select Modify>Convert to symbol>Graphic OK. It is optional
whether or not you want to name the object. You just converted the object into a symbol. The sumbol should now have a blue bounding box around it associated with symbols.
4. Select frame box 30 in the time lineto select it. Right click on the frame with your mouse
and select insert>Keyframe. Keyframes are places where an object starts, stops or changes direction in a movie.
2
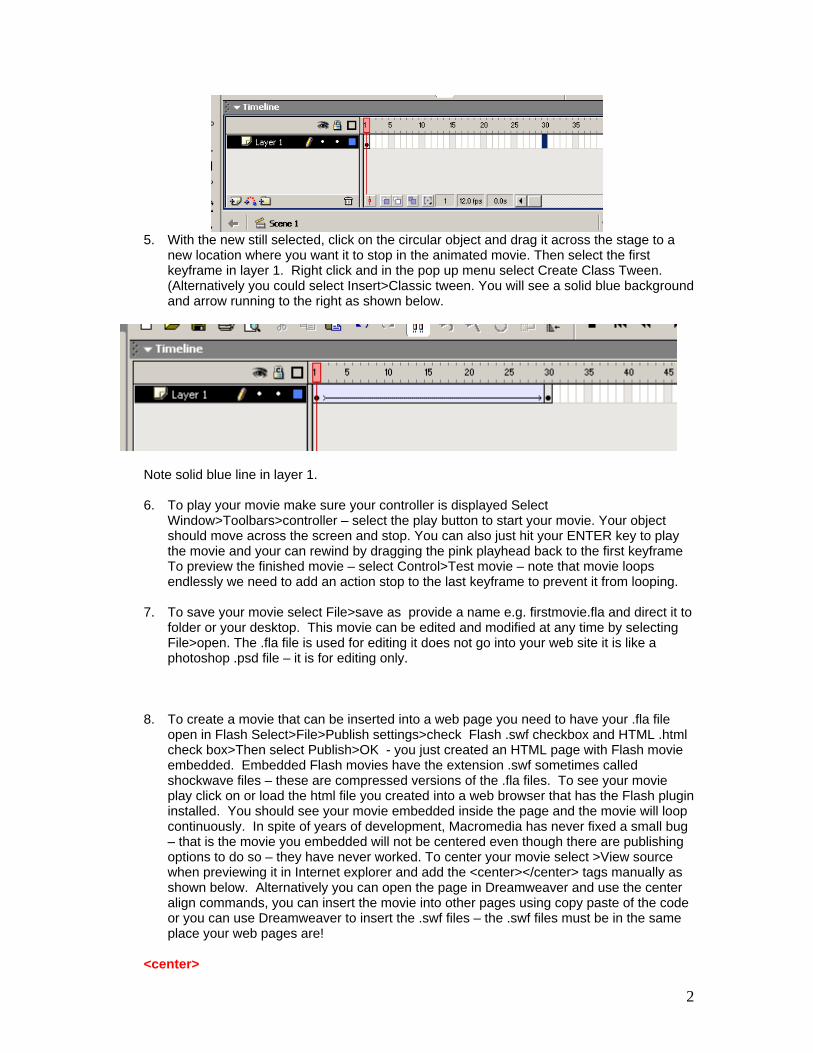
5. With the new still selected, click on the circular object and drag it across the stage to a
new location where you want it to stop in the animated movie. Then select the first keyframe in layer 1. Right click and in the pop up menu select Create Class Tween. (Alternatively you could select Insert>Classic tween. You will see a solid blue background and arrow running to the right as shown below.
Note solid blue line in layer 1. 6. To play your movie make sure your controller is displayed Select
Window>Toolbars>controller – select the play button to start your movie. Your object should move across the screen and stop. You can also just hit your ENTER key to play the movie and your can rewind by dragging the pink playhead back to the first keyframe To preview the finished movie – select Control>Test movie – note that movie loops endlessly we need to add an action stop to the last keyframe to prevent it from looping.
7. To save your movie select File>save as provide a name e.g. firstmovie.fla and direct it to
folder or your desktop. This movie can be edited and modified at any time by selecting File>open. The .fla file is used for editing it does not go into your web site it is like a photoshop .psd file – it is for editing only.
8. To create a movie that can be inserted into a web page you need to have your .fla file
open in Flash Select>File>Publish settings>check Flash .swf checkbox and HTML .html check box>Then select Publish>OK - you just created an HTML page with Flash movie embedded. Embedded Flash movies have the extension .swf sometimes called shockwave files – these are compressed versions of the .fla files. To see your movie play click on or load the html file you created into a web browser that has the Flash plugin installed. You should see your movie embedded inside the page and the movie will loop continuously. In spite of years of development, Macromedia has never fixed a small bug – that is the movie you embedded will not be centered even though there are publishing options to do so – they have never worked. To center your movie select >View source when previewing it in Internet explorer and add the <center></center> tags manually as shown below. Alternatively you can open the page in Dreamweaver and use the center align commands, you can insert the movie into other pages using copy paste of the code or you can use Dreamweaver to insert the .swf files – the .swf files must be in the same place your web pages are!
<center>
3
<OBJECT classid=”clsid:D27CDB6E-AE6D-11cf-96B8-444553540000” codebase=”http://download.macromedia.com/pub/shockwave/cabs/flash/swflash.cab#version=6,0,0,0” WIDTH=”550” HEIGHT=”400” id=”Untitled-2” ALIGN=””> <PARAM NAME=movie VALUE=”Untitled-2.swf”> <PARAM NAME=quality VALUE=high> <PARAM NAME=bgcolor VALUE=#FFFFFF> <EMBED src=”Untitled-2.swf” quality=high bgcolor=#FFFFFF WIDTH=”550” HEIGHT=”400” NAME=”Untitled-2” ALIGN=”” TYPE=”application/x-shockwave-flash” PLUGINSPAGE=”http://www.macromedia.com/go/getflashplayer”></EMBED> </OBJECT> </center> 9. To have the animation play only once you must add an action to the last keyframe.
Actions are small scripts that provide instructions such as stop, jump to frame, play, rewind etc. adding actionscript is one way to add interanctivity to your flash movie. You can only add a stop action to a keyframe in movies that support Action script version 2.0.
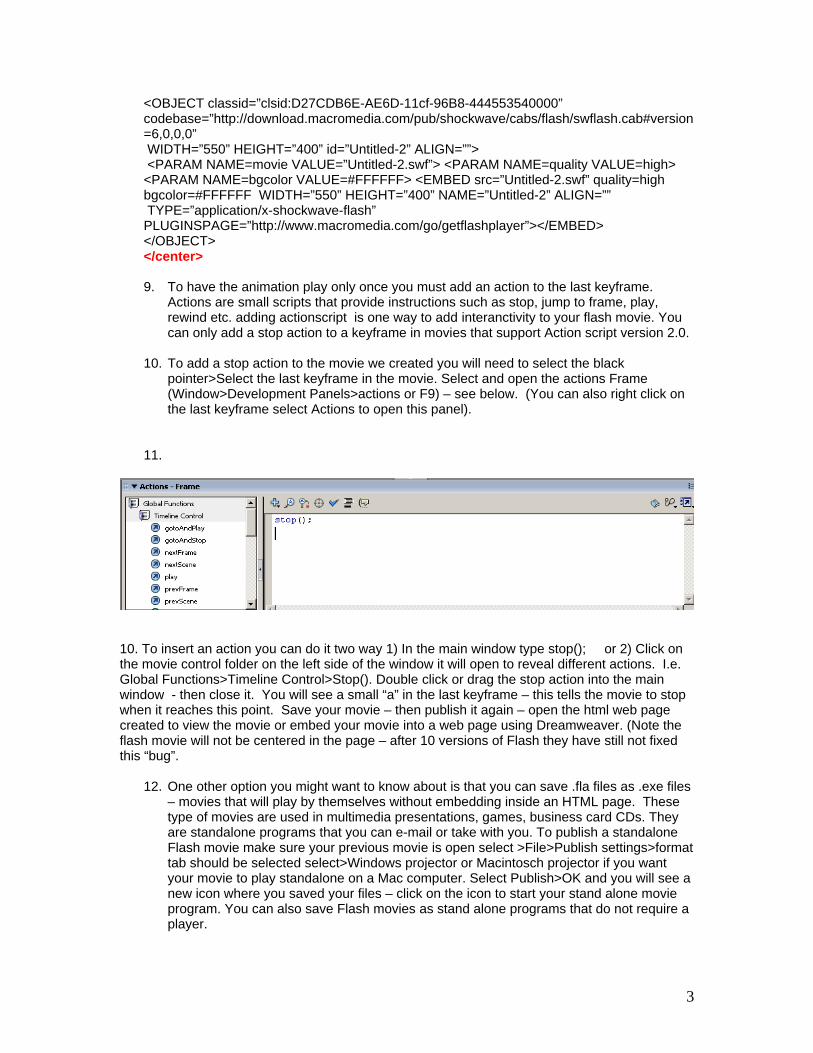
10. To add a stop action to the movie we created you will need to select the black
pointer>Select the last keyframe in the movie. Select and open the actions Frame (Window>Development Panels>actions or F9) – see below. (You can also right click on the last keyframe select Actions to open this panel).
11.
10. To insert an action you can do it two way 1) In the main window type stop(); or 2) Click on the movie control folder on the left side of the window it will open to reveal different actions. I.e. Global Functions>Timeline Control>Stop(). Double click or drag the stop action into the main window - then close it. You will see a small “a” in the last keyframe – this tells the movie to stop when it reaches this point. Save your movie – then publish it again – open the html web page created to view the movie or embed your movie into a web page using Dreamweaver. (Note the flash movie will not be centered in the page – after 10 versions of Flash they have still not fixed this “bug”.
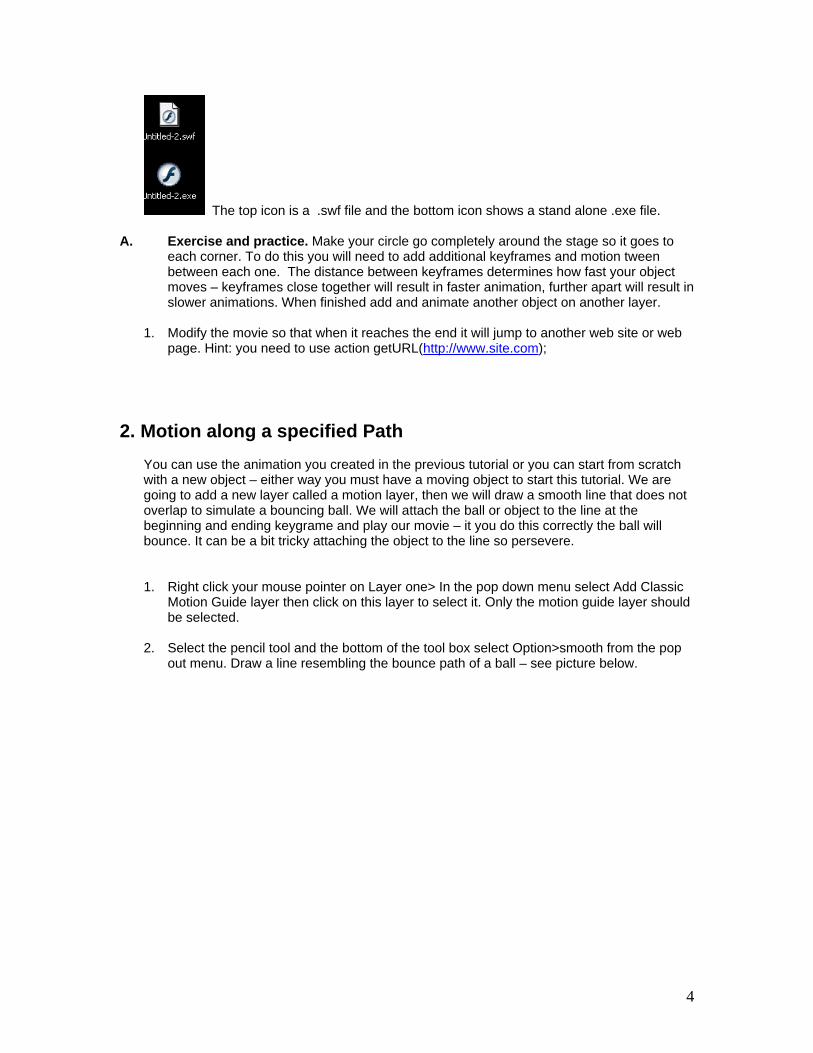
12. One other option you might want to know about is that you can save .fla files as .exe files – movies that will play by themselves without embedding inside an HTML page. These type of movies are used in multimedia presentations, games, business card CDs. They are standalone programs that you can e-mail or take with you. To publish a standalone Flash movie make sure your previous movie is open select >File>Publish settings>format tab should be selected select>Windows projector or Macintosch projector if you want your movie to play standalone on a Mac computer. Select Publish>OK and you will see a new icon where you saved your files – click on the icon to start your stand alone movie program. You can also save Flash movies as stand alone programs that do not require a player.
4
The top icon is a .swf file and the bottom icon shows a stand alone .exe file.
A. Exercise and practice. Make your circle go completely around the stage so it goes to each corner. To do this you will need to add additional keyframes and motion tween between each one. The distance between keyframes determines how fast your object moves – keyframes close together will result in faster animation, further apart will result in slower animations. When finished add and animate another object on another layer.
1. Modify the movie so that when it reaches the end it will jump to another web site or web
page. Hint: you need to use action getURL(http://www.site.com);
2. Motion along a specified Path
You can use the animation you created in the previous tutorial or you can start from scratch with a new object – either way you must have a moving object to start this tutorial. We are going to add a new layer called a motion layer, then we will draw a smooth line that does not overlap to simulate a bouncing ball. We will attach the ball or object to the line at the beginning and ending keygrame and play our movie – it you do this correctly the ball will bounce. It can be a bit tricky attaching the object to the line so persevere. 1. Right click your mouse pointer on Layer one> In the pop down menu select Add Classic
Motion Guide layer then click on this layer to select it. Only the motion guide layer should be selected.
2. Select the pencil tool and the bottom of the tool box select Option>smooth from the pop
out menu. Draw a line resembling the bounce path of a ball – see picture below.
5
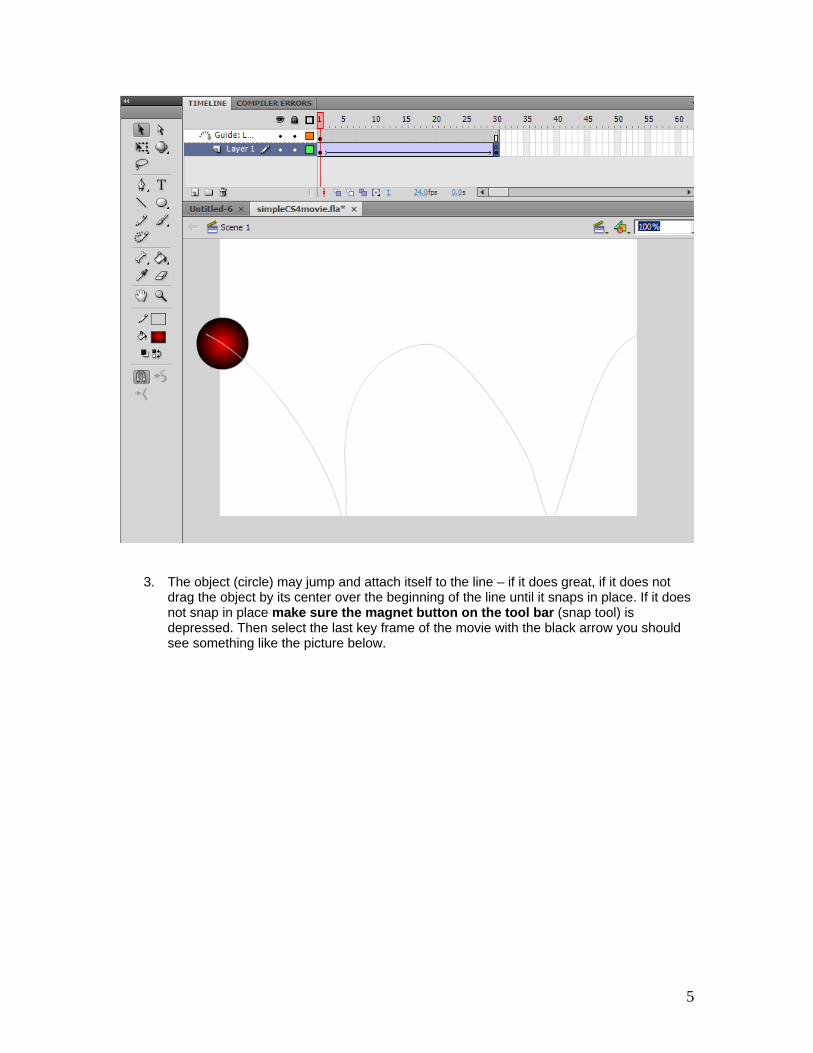
3. The object (circle) may jump and attach itself to the line – if it does great, if it does not drag the object by its center over the beginning of the line until it snaps in place. If it does not snap in place make sure the magnet button on the tool bar (snap tool) is depressed. Then select the last key frame of the movie with the black arrow you should see something like the picture below.
6
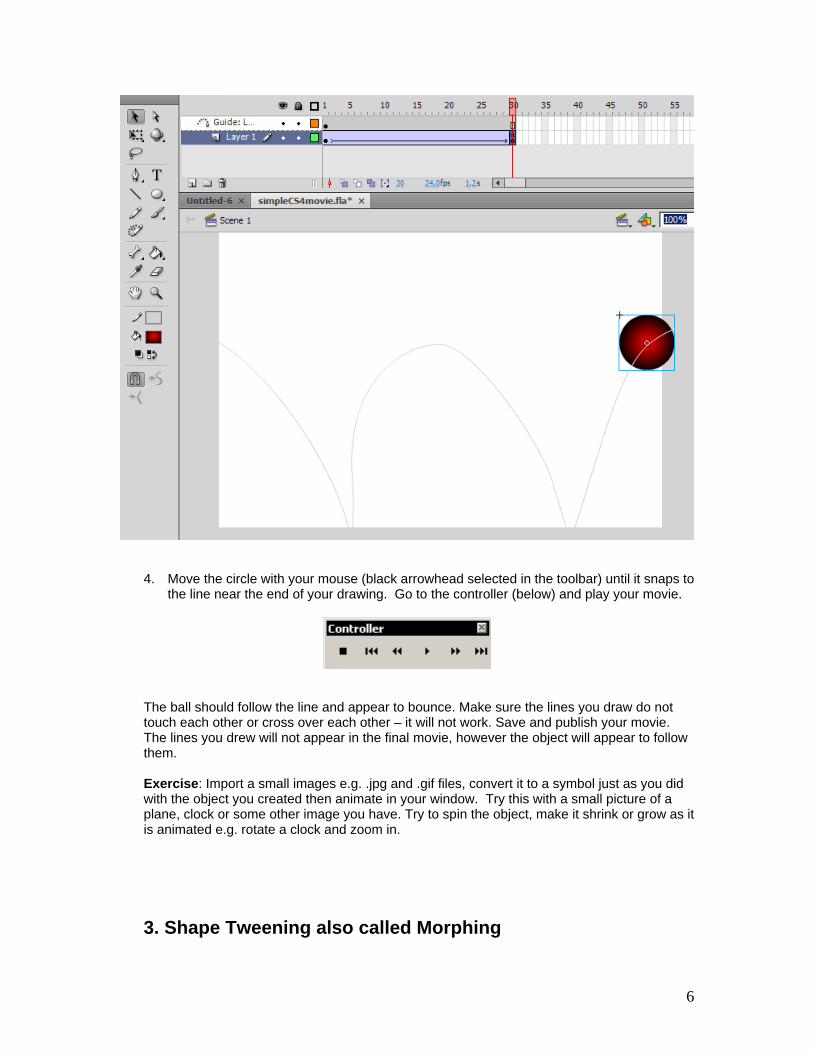
4. Move the circle with your mouse (black arrowhead selected in the toolbar) until it snaps to the line near the end of your drawing. Go to the controller (below) and play your movie.
The ball should follow the line and appear to bounce. Make sure the lines you draw do not touch each other or cross over each other – it will not work. Save and publish your movie. The lines you drew will not appear in the final movie, however the object will appear to follow them. Exercise: Import a small images e.g. .jpg and .gif files, convert it to a symbol just as you did with the object you created then animate in your window. Try this with a small picture of a plane, clock or some other image you have. Try to spin the object, make it shrink or grow as it is animated e.g. rotate a clock and zoom in.
3. Shape Tweening also called Morphing
7
Using flash it is possible to create objects then animate them by morphing one object into another. Generally this works well only with simple objects because Flash has to do all the calculations on the fly, any attempt to use a complex graphic or a traced image will result in very slow animations that chug along and will not be acceptable. Text can also be morphed one word can dynamically change into another – here is how you do it. 1. With Flash open if you do not have a new blank movie select File>New Flash Document
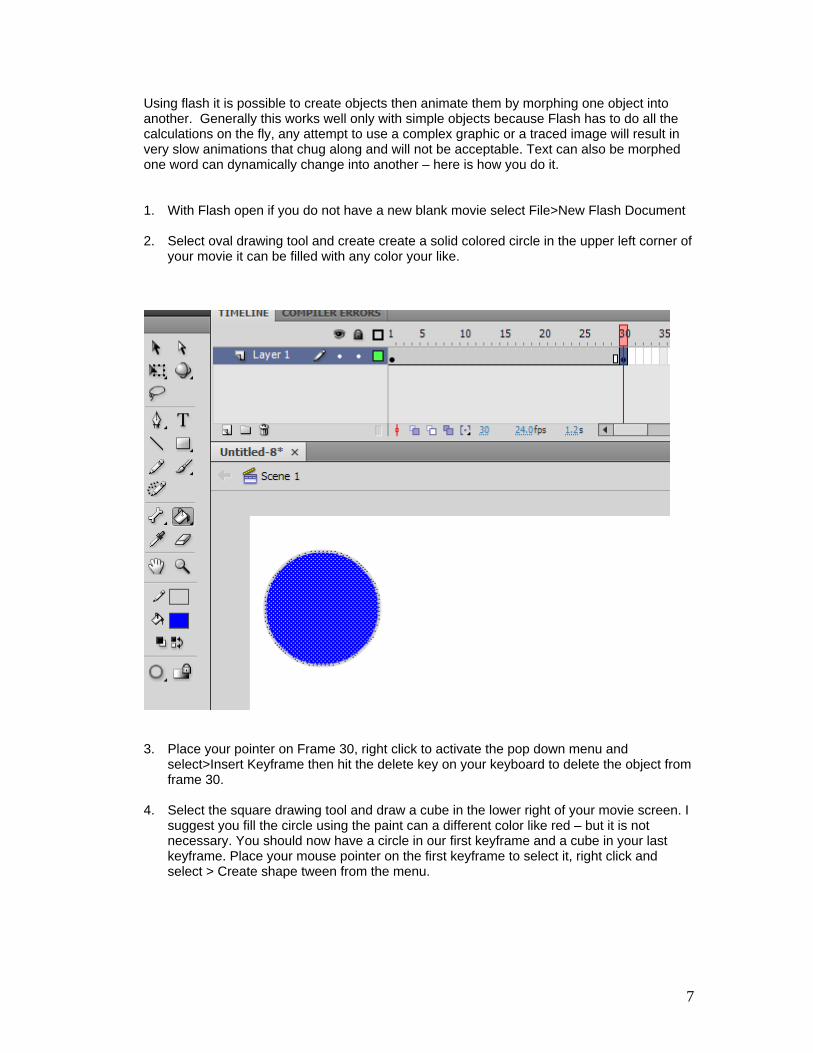
2. Select oval drawing tool and create create a solid colored circle in the upper left corner of
your movie it can be filled with any color your like.
3. Place your pointer on Frame 30, right click to activate the pop down menu and select>Insert Keyframe then hit the delete key on your keyboard to delete the object from frame 30.
4. Select the square drawing tool and draw a cube in the lower right of your movie screen. I
suggest you fill the circle using the paint can a different color like red – but it is not necessary. You should now have a circle in our first keyframe and a cube in your last keyframe. Place your mouse pointer on the first keyframe to select it, right click and select > Create shape tween from the menu.
8
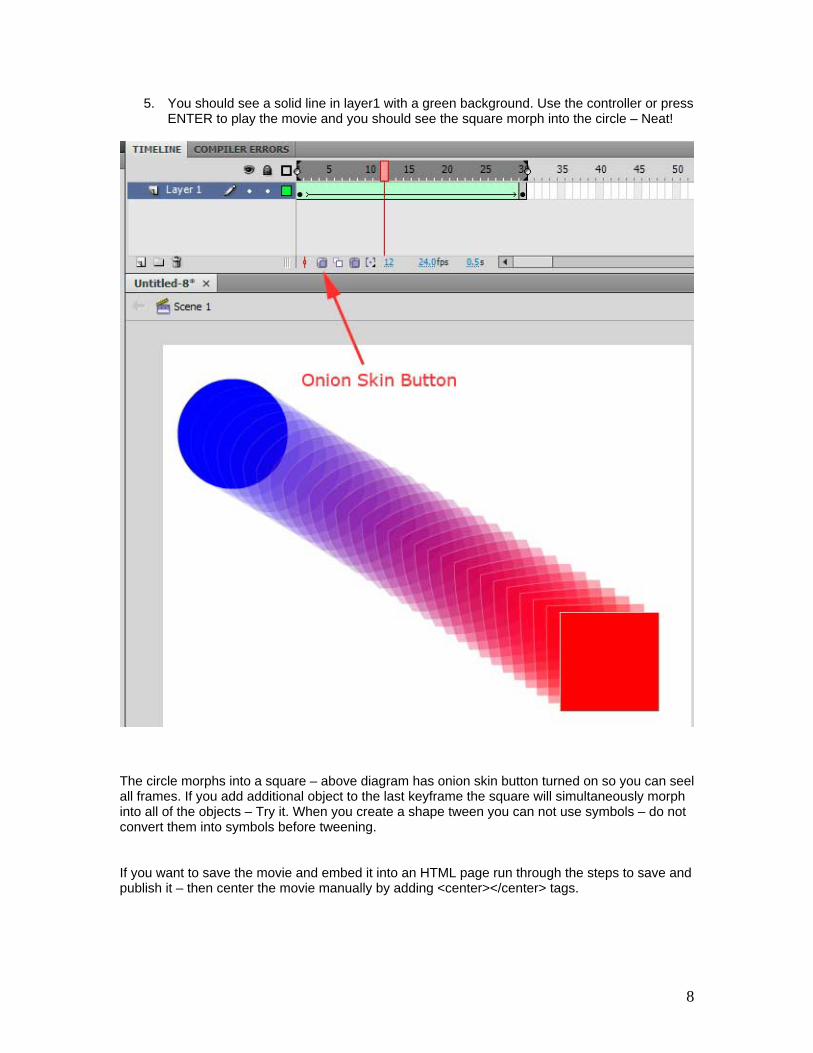
5. You should see a solid line in layer1 with a green background. Use the controller or press ENTER to play the movie and you should see the square morph into the circle – Neat!
The circle morphs into a square – above diagram has onion skin button turned on so you can seel all frames. If you add additional object to the last keyframe the square will simultaneously morph into all of the objects – Try it. When you create a shape tween you can not use symbols – do not convert them into symbols before tweening. If you want to save the movie and embed it into an HTML page run through the steps to save and publish it – then center the movie manually by adding <center></center> tags.
9
4. Shape Tweening Text Tweening text is similar but there are a couple of extra steps. By default adding text to a flash movie converts the text automatically to a symbol – therefore we have to break the symbol apart into an object before we can shape tween the text. In this exercise we will tween your name into other text.
1. Open Flash and start a new movie File>New
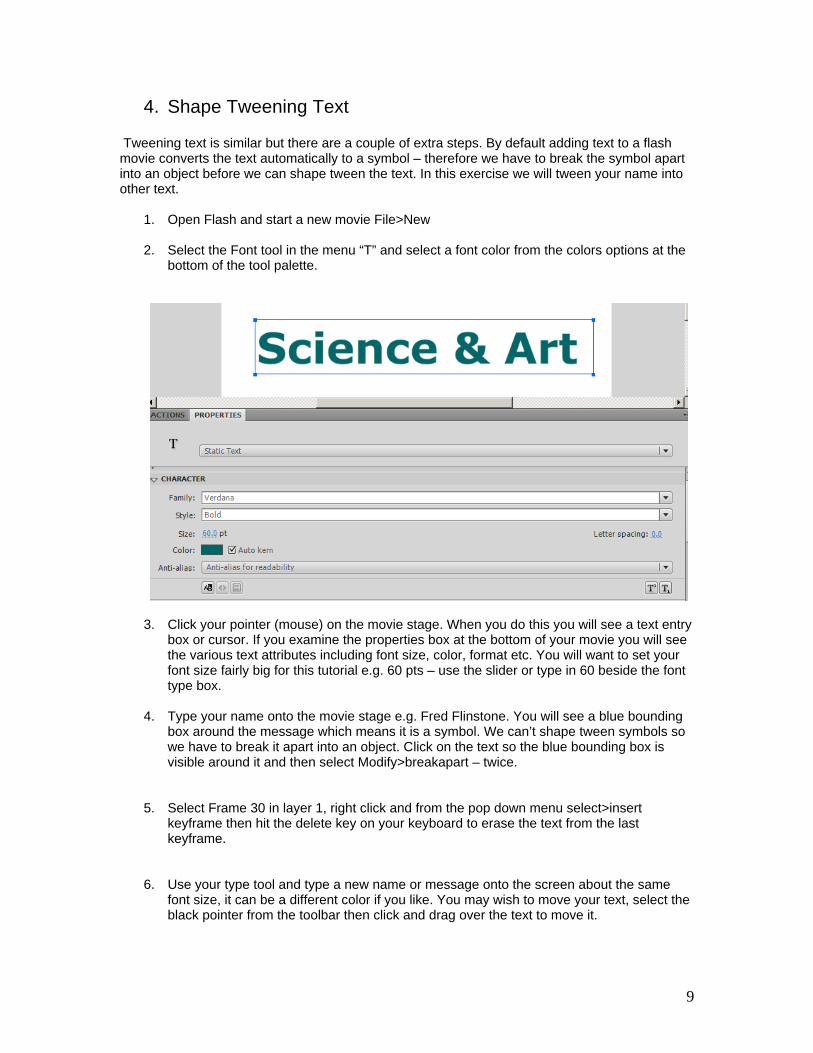
2. Select the Font tool in the menu “T” and select a font color from the colors options at the bottom of the tool palette.
3. Click your pointer (mouse) on the movie stage. When you do this you will see a text entry box or cursor. If you examine the properties box at the bottom of your movie you will see the various text attributes including font size, color, format etc. You will want to set your font size fairly big for this tutorial e.g. 60 pts – use the slider or type in 60 beside the font type box.
4. Type your name onto the movie stage e.g. Fred Flinstone. You will see a blue bounding
box around the message which means it is a symbol. We can’t shape tween symbols so we have to break it apart into an object. Click on the text so the blue bounding box is visible around it and then select Modify>breakapart – twice.
5. Select Frame 30 in layer 1, right click and from the pop down menu select>insert keyframe then hit the delete key on your keyboard to erase the text from the last keyframe.
6. Use your type tool and type a new name or message onto the screen about the same font size, it can be a different color if you like. You may wish to move your text, select the black pointer from the toolbar then click and drag over the text to move it.
10
7. You then need to break the text apart again 2X - select Modify>breakapart>Modify>breakapart - you need to do it 2X. Then place your pointer on the first keyframe of layer one. Right click on the first keyframe and from the pop out men select >Craeat Shape Tween. Press the ENTER key to view the animation.
2. Making an object Fade in and out and resize movie into a banner.
Flash is a popular tool used to make text or pictures fade in and out and is used for delivering text or pictures. We will create a banner 550 x 80 pixels in size with a black background color and we will make a message fade in and out. Some folks may decide to use only part of the movie and just have the image or text fade in and then stop. You will need to add a stop action to the end of the movie otherwise your movie will loop continuously.
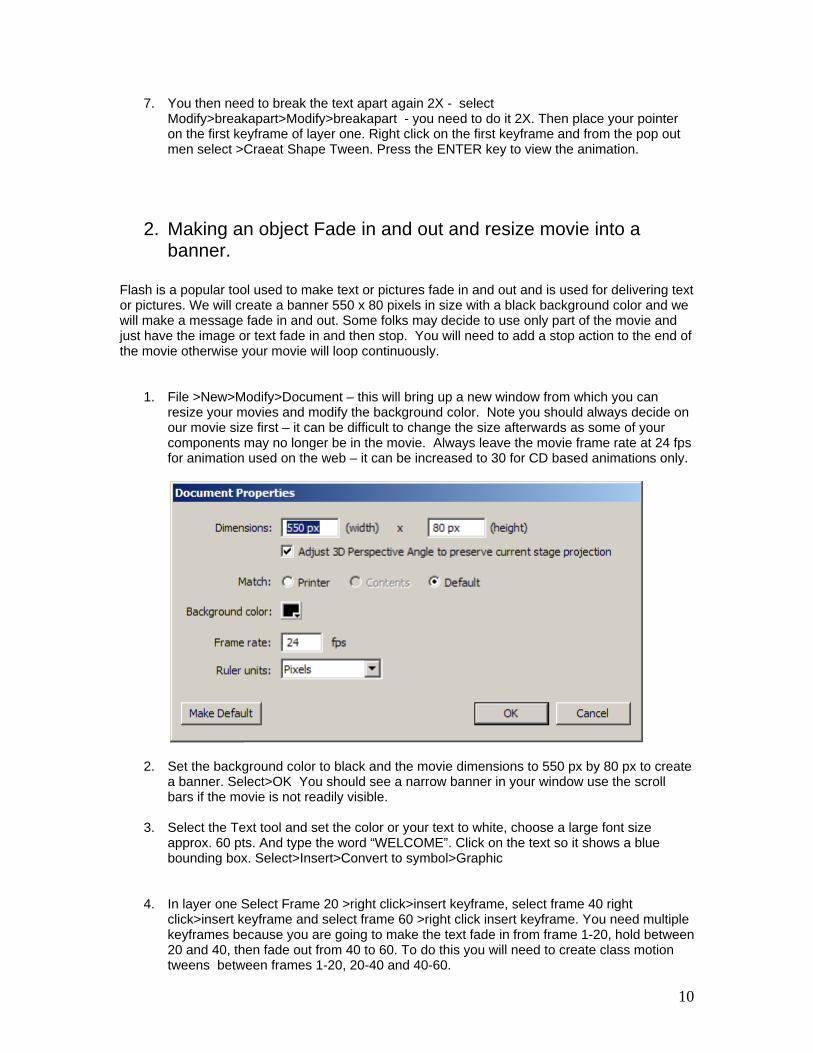
1. File >New>Modify>Document – this will bring up a new window from which you can resize your movies and modify the background color. Note you should always decide on our movie size first – it can be difficult to change the size afterwards as some of your components may no longer be in the movie. Always leave the movie frame rate at 24 fps for animation used on the web – it can be increased to 30 for CD based animations only.
2. Set the background color to black and the movie dimensions to 550 px by 80 px to create a banner. Select>OK You should see a narrow banner in your window use the scroll bars if the movie is not readily visible.
3. Select the Text tool and set the color or your text to white, choose a large font size
approx. 60 pts. And type the word “WELCOME”. Click on the text so it shows a blue bounding box. Select>Insert>Convert to symbol>Graphic
4. In layer one Select Frame 20 >right click>insert keyframe, select frame 40 right click>insert keyframe and select frame 60 >right click insert keyframe. You need multiple keyframes because you are going to make the text fade in from frame 1-20, hold between 20 and 40, then fade out from 40 to 60. To do this you will need to create class motion tweens between frames 1-20, 20-40 and 40-60.
11
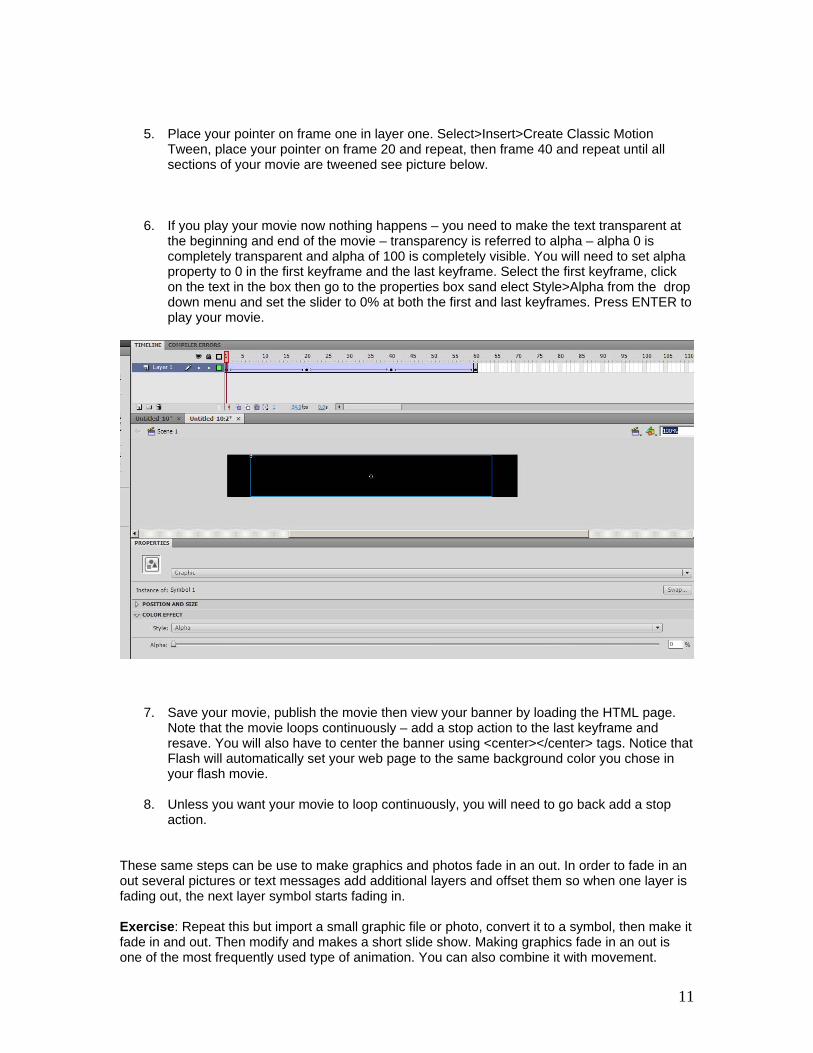
5. Place your pointer on frame one in layer one. Select>Insert>Create Classic Motion Tween, place your pointer on frame 20 and repeat, then frame 40 and repeat until all sections of your movie are tweened see picture below.
6. If you play your movie now nothing happens – you need to make the text transparent at the beginning and end of the movie – transparency is referred to alpha – alpha 0 is completely transparent and alpha of 100 is completely visible. You will need to set alpha property to 0 in the first keyframe and the last keyframe. Select the first keyframe, click on the text in the box then go to the properties box sand elect Style>Alpha from the drop down menu and set the slider to 0% at both the first and last keyframes. Press ENTER to play your movie.
7. Save your movie, publish the movie then view your banner by loading the HTML page. Note that the movie loops continuously – add a stop action to the last keyframe and resave. You will also have to center the banner using <center></center> tags. Notice that Flash will automatically set your web page to the same background color you chose in your flash movie.
8. Unless you want your movie to loop continuously, you will need to go back add a stop
action. These same steps can be use to make graphics and photos fade in an out. In order to fade in an out several pictures or text messages add additional layers and offset them so when one layer is fading out, the next layer symbol starts fading in. Exercise: Repeat this but import a small graphic file or photo, convert it to a symbol, then make it fade in and out. Then modify and makes a short slide show. Making graphics fade in an out is one of the most frequently used type of animation. You can also combine it with movement.
12
Creating & Using Simple Buttons in CS3\CS4 Using Action Script 2.0 You can add built in buttons to any movie to control the timeline such as PLAY, STOP and REWIND by adding buttons from the common library and attaching actions to them. When ever you add buttons you should always create a new layer first and put the buttons on this layer. Drag several buttons onto the stage then add actions to them – in order to add play(), stop() etc you will first need to add Global Functions>Movie clip control>On then an event handler like press() or release() – then add play() stop() actions. E.g. on (press) { play(); } Flash also allows users to create any shape of button and can even create animated buttons. Buttons can be used to play, stop, start, goto a specific frame, scene in a movie or jump to another web page. Buttons can also be used to submit forms, load images or activate action script programs for example to calculate numbers. In order to do this tutorial you will need to have a simple movie with some animation first. For example you could use a ball moving across the stage or some other animation you made. We will create and add a simple PLAY, STOP and REWIND BUTTONs with rollover effects.
3. Start Flash and open an existing animation or make a simple movie (see previous tutorials). Make a ball move across the screen if you do not have a movie.
4. Select the top most layer with the black arrow head from the tool box and right click –
select insert layer. Label this layer buttons. Buttons should be placed on their own separate layer.
13
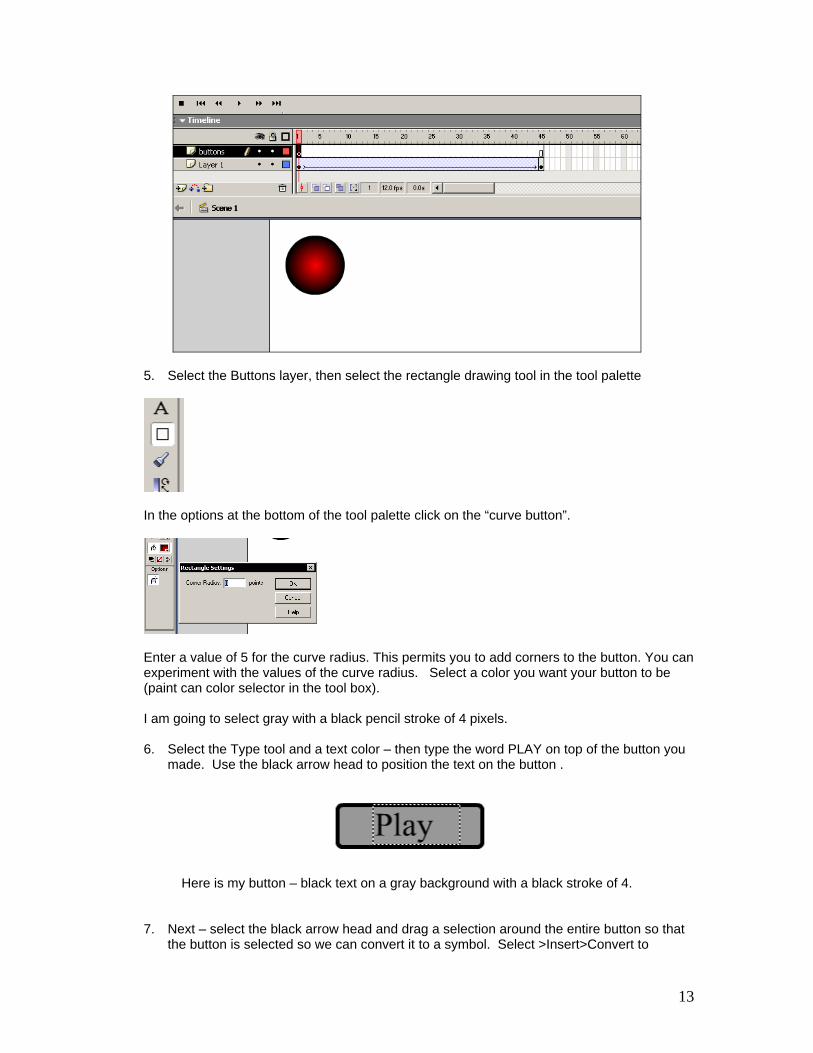
5. Select the Buttons layer, then select the rectangle drawing tool in the tool palette
In the options at the bottom of the tool palette click on the “curve button”.
Enter a value of 5 for the curve radius. This permits you to add corners to the button. You can experiment with the values of the curve radius. Select a color you want your button to be (paint can color selector in the tool box). I am going to select gray with a black pencil stroke of 4 pixels. 6. Select the Type tool and a text color – then type the word PLAY on top of the button you
made. Use the black arrow head to position the text on the button .
Here is my button – black text on a gray background with a black stroke of 4.
7. Next – select the black arrow head and drag a selection around the entire button so that the button is selected so we can convert it to a symbol. Select >Insert>Convert to
14
Symbol>button in the top menu. Next we need to change the colors in the button in the different rollover states.
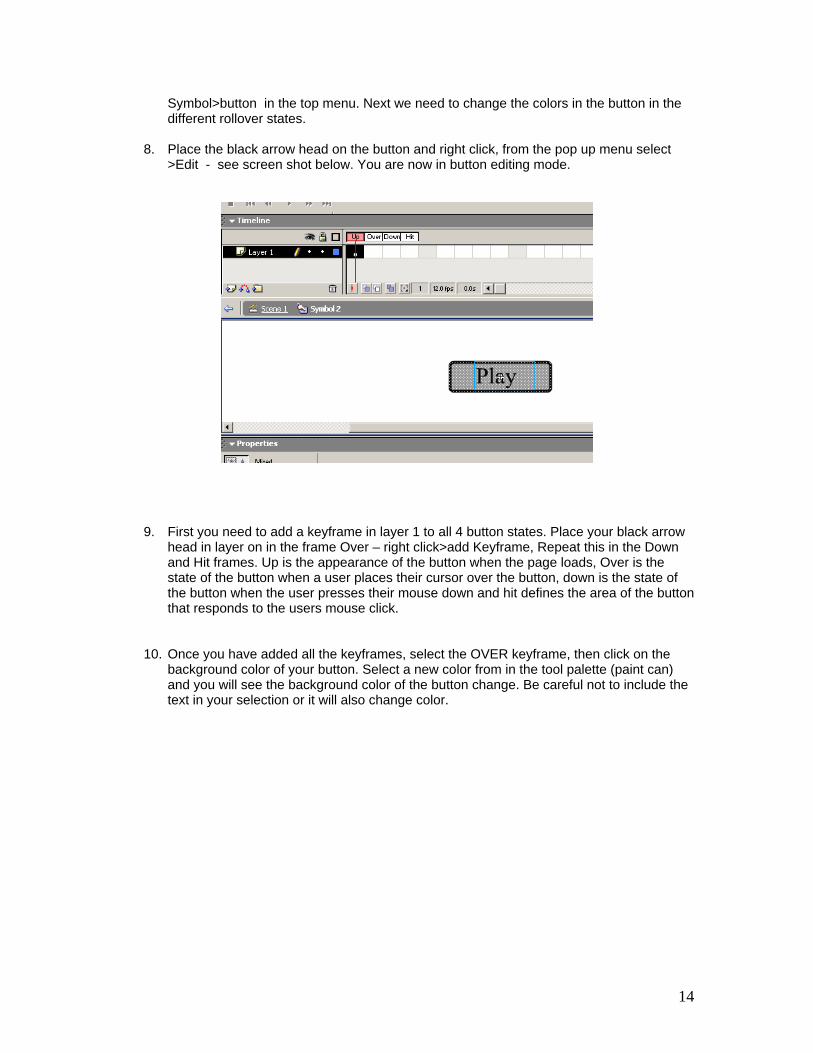
8. Place the black arrow head on the button and right click, from the pop up menu select
>Edit - see screen shot below. You are now in button editing mode.
9. First you need to add a keyframe in layer 1 to all 4 button states. Place your black arrow head in layer on in the frame Over – right click>add Keyframe, Repeat this in the Down and Hit frames. Up is the appearance of the button when the page loads, Over is the state of the button when a user places their cursor over the button, down is the state of the button when the user presses their mouse down and hit defines the area of the button that responds to the users mouse click.
10. Once you have added all the keyframes, select the OVER keyframe, then click on the background color of your button. Select a new color from in the tool palette (paint can) and you will see the background color of the button change. Be careful not to include the text in your selection or it will also change color.
15
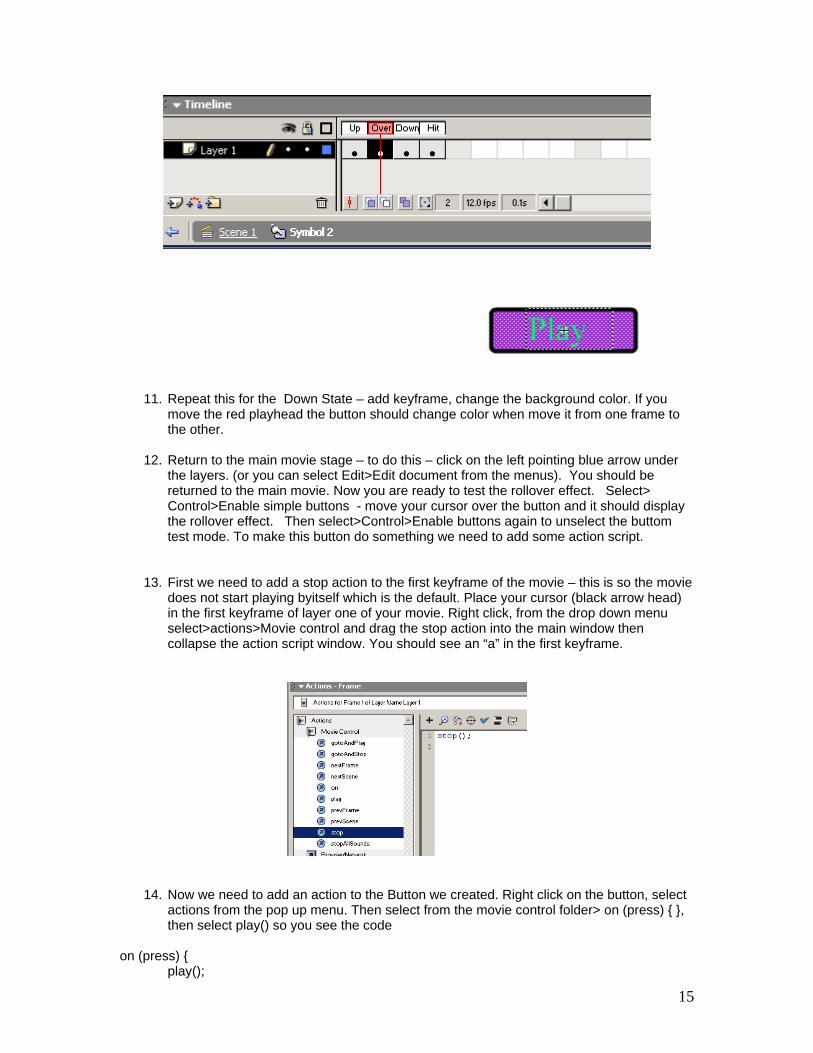
11. Repeat this for the Down State – add keyframe, change the background color. If you move the red playhead the button should change color when move it from one frame to the other.
12. Return to the main movie stage – to do this – click on the left pointing blue arrow under
the layers. (or you can select Edit>Edit document from the menus). You should be returned to the main movie. Now you are ready to test the rollover effect. Select> Control>Enable simple buttons - move your cursor over the button and it should display the rollover effect. Then select>Control>Enable buttons again to unselect the buttom test mode. To make this button do something we need to add some action script.
13. First we need to add a stop action to the first keyframe of the movie – this is so the movie does not start playing byitself which is the default. Place your cursor (black arrow head) in the first keyframe of layer one of your movie. Right click, from the drop down menu select>actions>Movie control and drag the stop action into the main window then collapse the action script window. You should see an “a” in the first keyframe.
14. Now we need to add an action to the Button we created. Right click on the button, select actions from the pop up menu. Then select from the movie control folder> on (press) { }, then select play() so you see the code
on (press) { play();
16
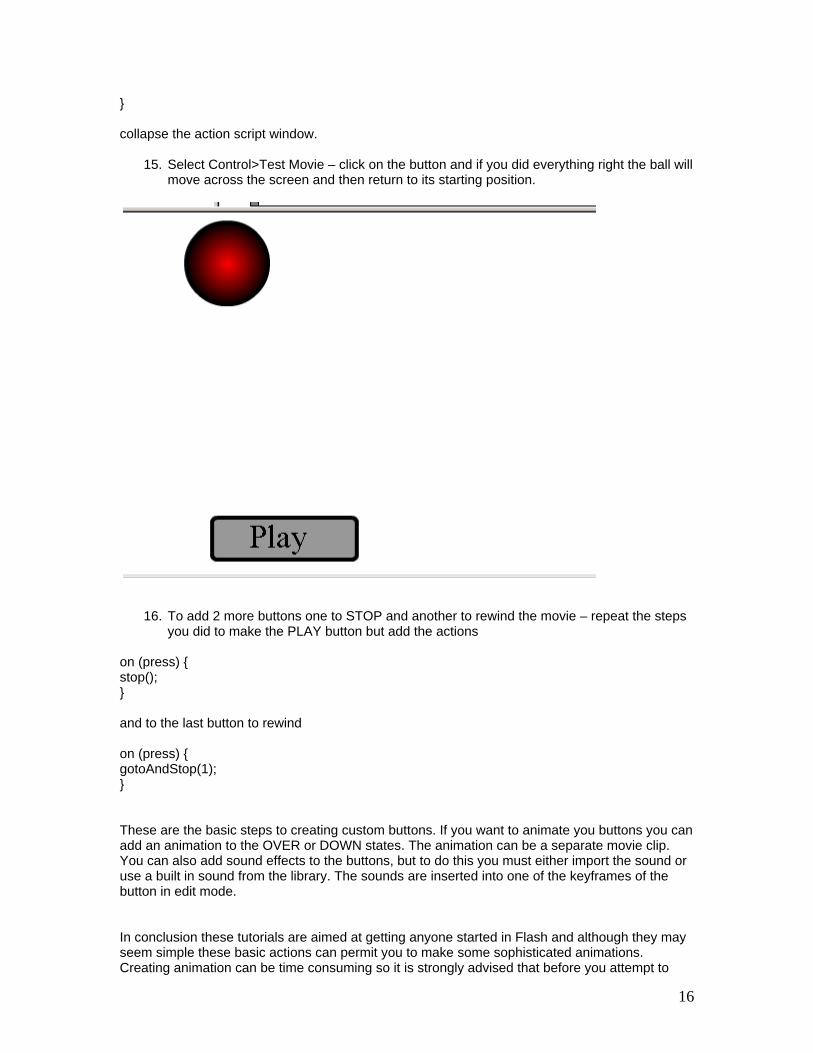
} collapse the action script window.
15. Select Control>Test Movie – click on the button and if you did everything right the ball will move across the screen and then return to its starting position.
16. To add 2 more buttons one to STOP and another to rewind the movie – repeat the steps you did to make the PLAY button but add the actions
on (press) { stop(); } and to the last button to rewind on (press) { gotoAndStop(1); } These are the basic steps to creating custom buttons. If you want to animate you buttons you can add an animation to the OVER or DOWN states. The animation can be a separate movie clip. You can also add sound effects to the buttons, but to do this you must either import the sound or use a built in sound from the library. The sounds are inserted into one of the keyframes of the button in edit mode. In conclusion these tutorials are aimed at getting anyone started in Flash and although they may seem simple these basic actions can permit you to make some sophisticated animations. Creating animation can be time consuming so it is strongly advised that before you attempt to
17
make a complex animation that you create a series of sketches or a plan which we call a storyboard. This will help you plan your movie, save you time and if preparing movies for a client it can save you both time and money. Movies within Movies In Flash the easiest way to create a movie within a movies is to create a new movie symbol and import a gif animation. Gif animations already contain short frame by frame animations. Once the animation is imported as a movie clip, you can then animate the movie clip on the stage.
1. Start Flash and create a new movie (Action script 2.0 or 3.0). Save it movieinmovie.fla
2. Go to google and search for an animated gif e.g. flying bat. Bird or butterfly – save this to your folder or wherever you plan to save you flash movie.
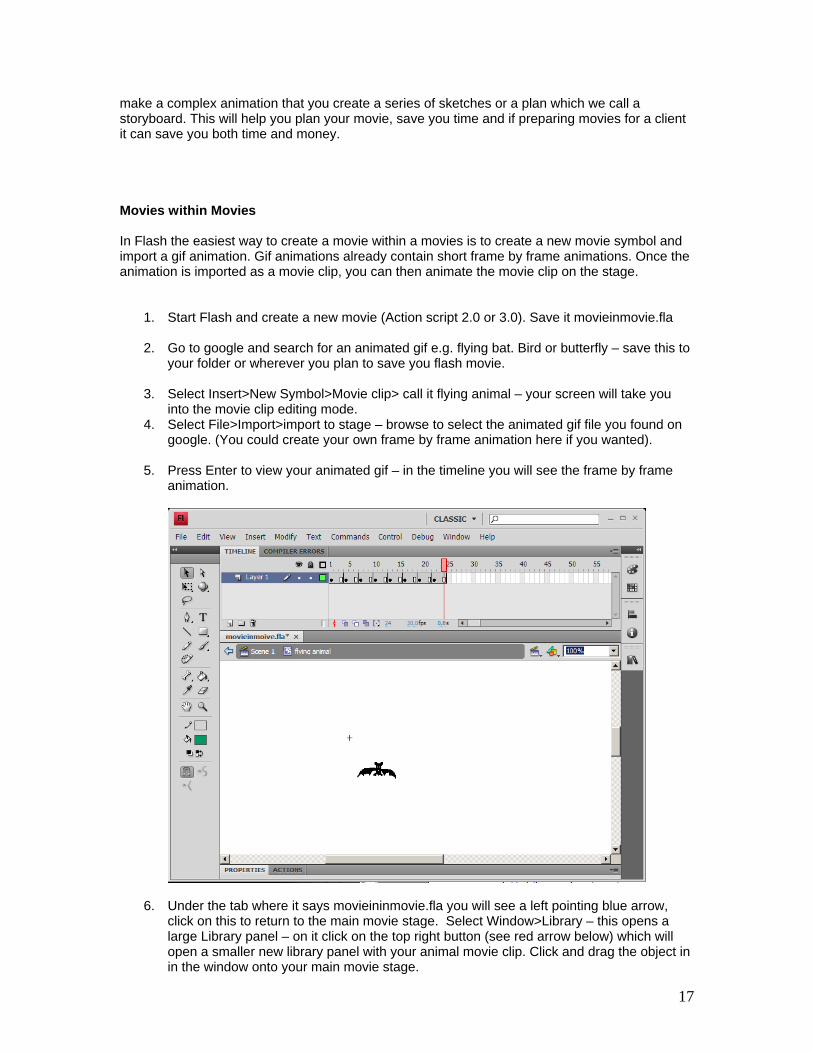
3. Select Insert>New Symbol>Movie clip> call it flying animal – your screen will take you into the movie clip editing mode.
4. Select File>Import>import to stage – browse to select the animated gif file you found on google. (You could create your own frame by frame animation here if you wanted).
5. Press Enter to view your animated gif – in the timeline you will see the frame by frame animation.
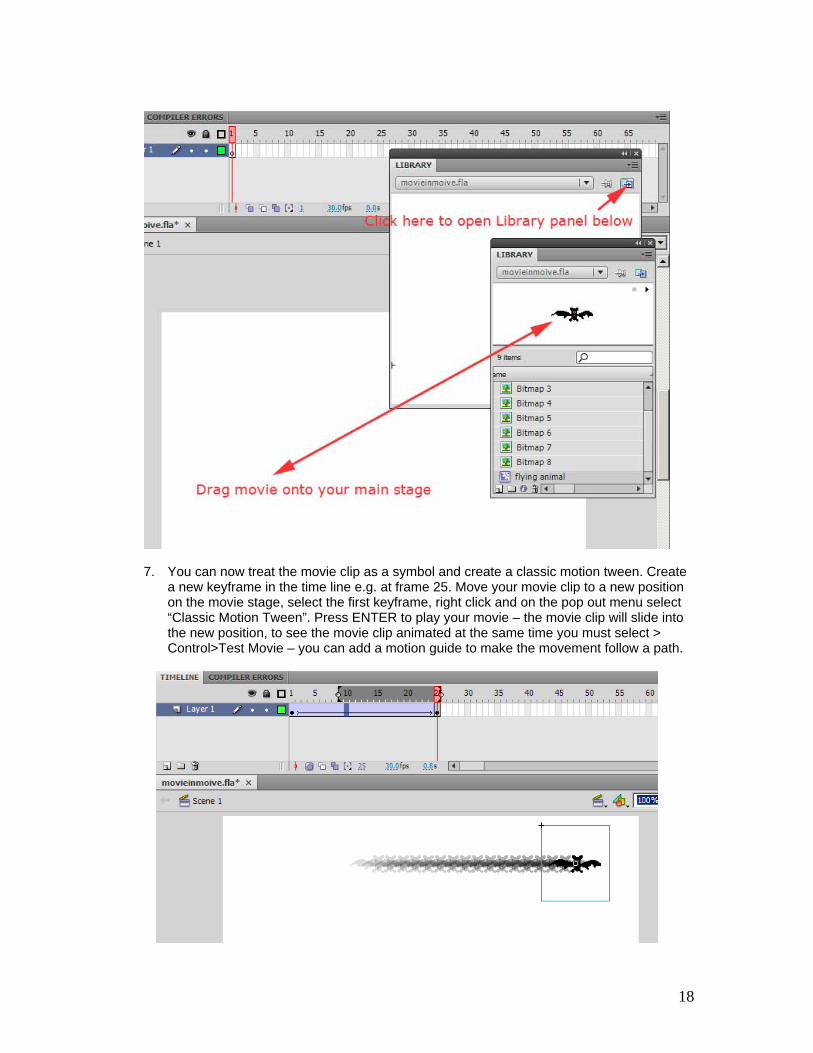
6. Under the tab where it says movieininmovie.fla you will see a left pointing blue arrow, click on this to return to the main movie stage. Select Window>Library – this opens a large Library panel – on it click on the top right button (see red arrow below) which will open a smaller new library panel with your animal movie clip. Click and drag the object in in the window onto your main movie stage.
18
7. You can now treat the movie clip as a symbol and create a classic motion tween. Create a new keyframe in the time line e.g. at frame 25. Move your movie clip to a new position on the movie stage, select the first keyframe, right click and on the pop out menu select “Classic Motion Tween”. Press ENTER to play your movie – the movie clip will slide into the new position, to see the movie clip animated at the same time you must select > Control>Test Movie – you can add a motion guide to make the movement follow a path.
19
INTRODUCTION TO OBJECT BASED ANIMATION – FLASH CS4 ONLY
Object based animation is new in CS4, it has some advantages over classic tweened animations and also comes with a number of preset animations you can apply to make objects zoom in, fade in etc. All of these types of animation will loop by default. In order to stop your movie so it only plays once the easiest solution is add a new layer called actions – add a keyframe at the end of the layer or where you want the movie to stop and insert an actionscript 2.0 command into the keyframe stop().
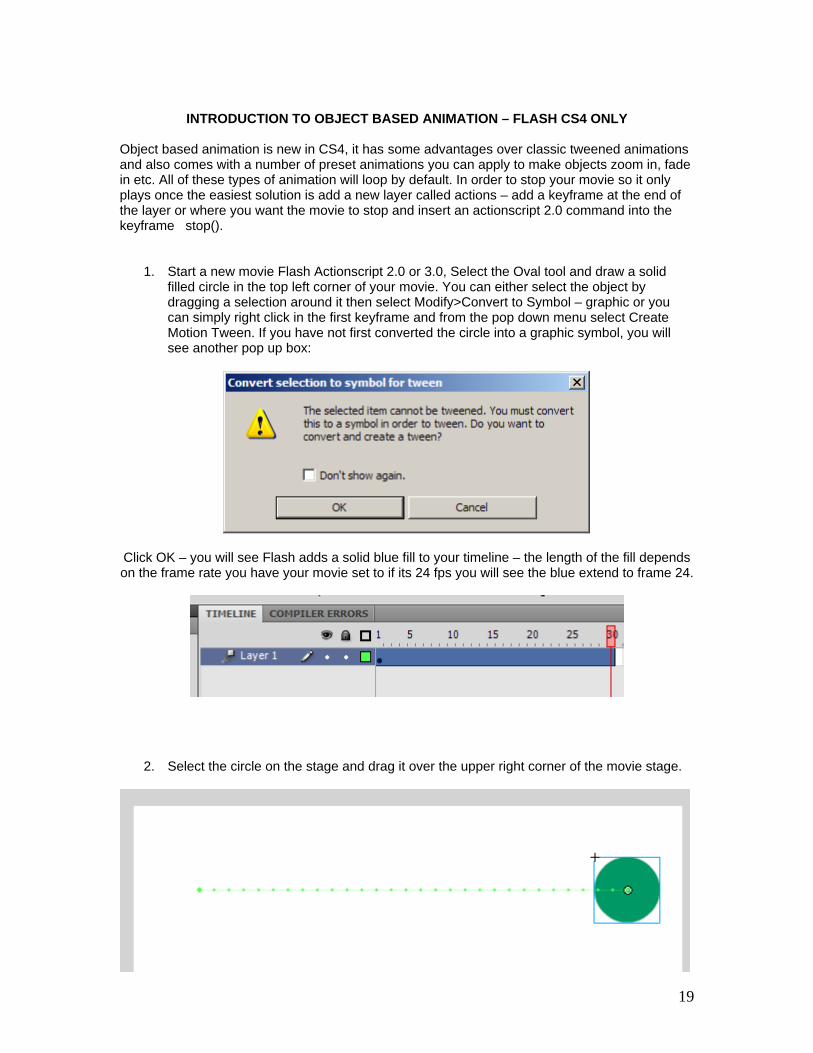
1. Start a new movie Flash Actionscript 2.0 or 3.0, Select the Oval tool and draw a solid filled circle in the top left corner of your movie. You can either select the object by dragging a selection around it then select Modify>Convert to Symbol – graphic or you can simply right click in the first keyframe and from the pop down menu select Create Motion Tween. If you have not first converted the circle into a graphic symbol, you will see another pop up box:
Click OK – you will see Flash adds a solid blue fill to your timeline – the length of the fill depends on the frame rate you have your movie set to if its 24 fps you will see the blue extend to frame 24.
2. Select the circle on the stage and drag it over the upper right corner of the movie stage.
20
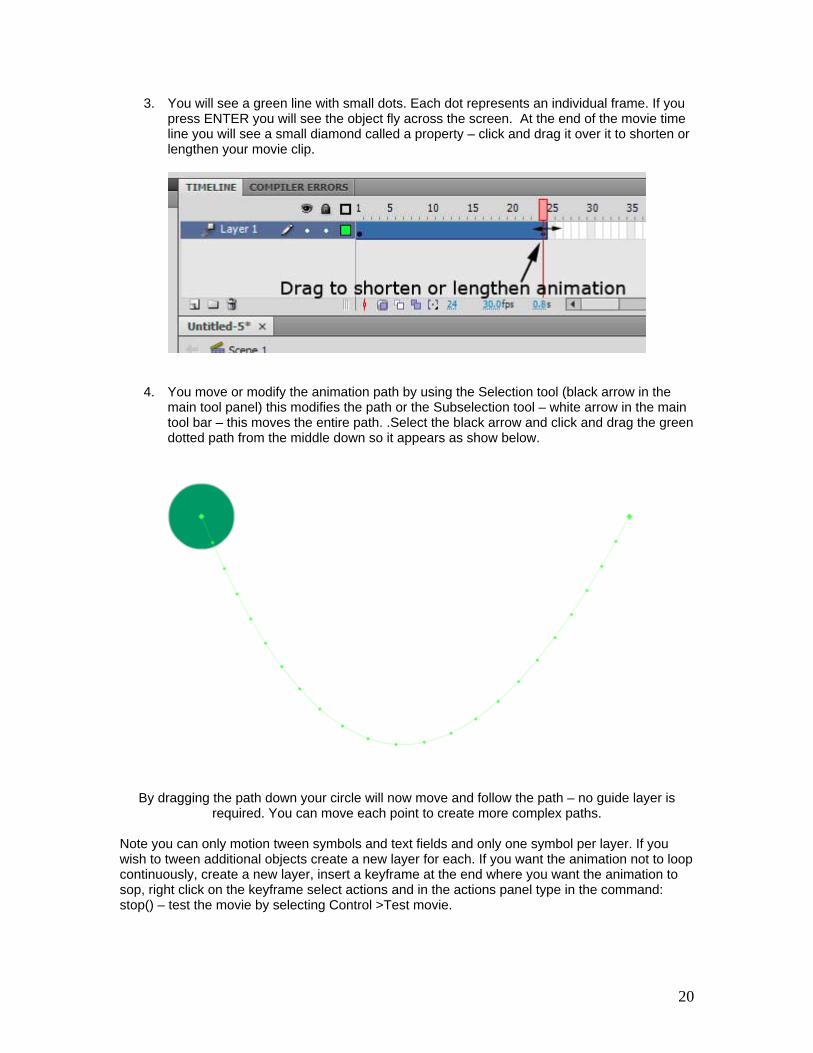
3. You will see a green line with small dots. Each dot represents an individual frame. If you press ENTER you will see the object fly across the screen. At the end of the movie time line you will see a small diamond called a property – click and drag it over it to shorten or lengthen your movie clip.
4. You move or modify the animation path by using the Selection tool (black arrow in the main tool panel) this modifies the path or the Subselection tool – white arrow in the main tool bar – this moves the entire path. .Select the black arrow and click and drag the green dotted path from the middle down so it appears as show below.
By dragging the path down your circle will now move and follow the path – no guide layer is required. You can move each point to create more complex paths.
Note you can only motion tween symbols and text fields and only one symbol per layer. If you wish to tween additional objects create a new layer for each. If you want the animation not to loop continuously, create a new layer, insert a keyframe at the end where you want the animation to sop, right click on the keyframe select actions and in the actions panel type in the command: stop() – test the movie by selecting Control >Test movie.
21
Make a symbol Rotate, fade in and Ease in and out while moving In this Example you will Motion Tween a cube, add multiple Property frames and make the object rotate.
1. Select File New>File Action script 2.0
2. Select the rectangle tool and draw a solid filled square in the upper left corner of your stage.
3. Use the Selection tool and drag around your object to select it or double click on the
square Select Modify>Convert to symbol name it square and select Graphic for symbol type.
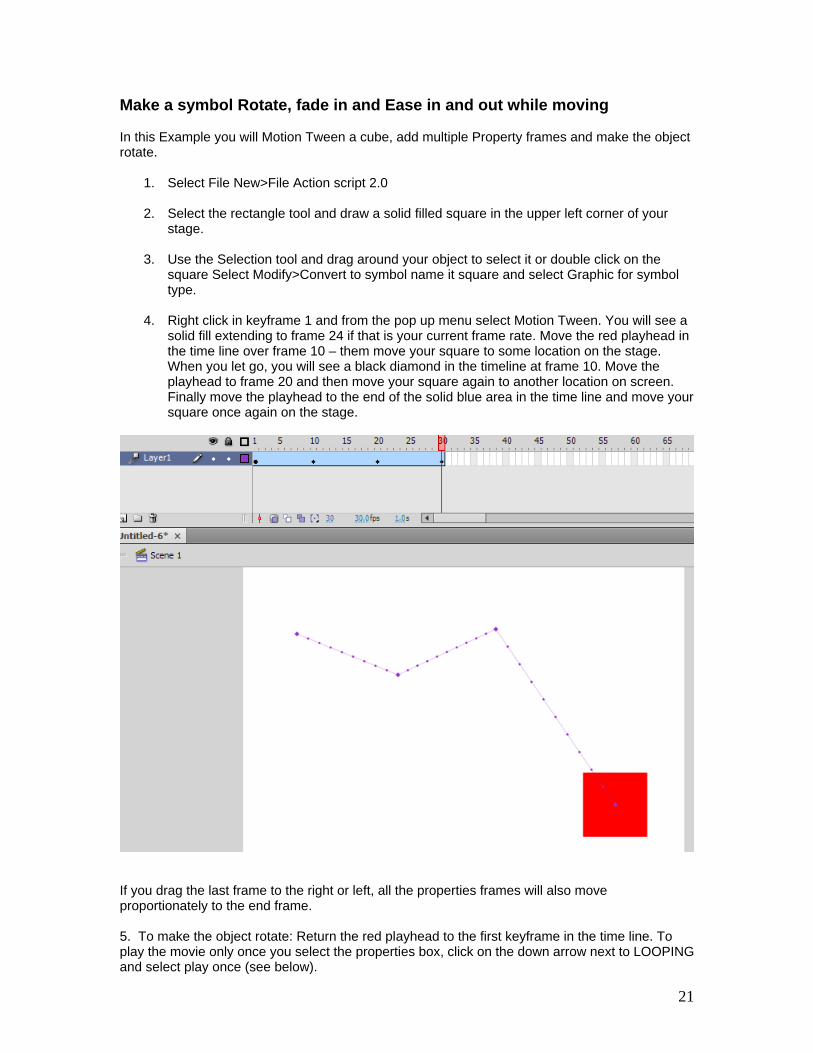
4. Right click in keyframe 1 and from the pop up menu select Motion Tween. You will see a
solid fill extending to frame 24 if that is your current frame rate. Move the red playhead in the time line over frame 10 – them move your square to some location on the stage. When you let go, you will see a black diamond in the timeline at frame 10. Move the playhead to frame 20 and then move your square again to another location on screen. Finally move the playhead to the end of the solid blue area in the time line and move your square once again on the stage.
If you drag the last frame to the right or left, all the properties frames will also move proportionately to the end frame. 5. To make the object rotate: Return the red playhead to the first keyframe in the time line. To play the movie only once you select the properties box, click on the down arrow next to LOOPING and select play once (see below).
22
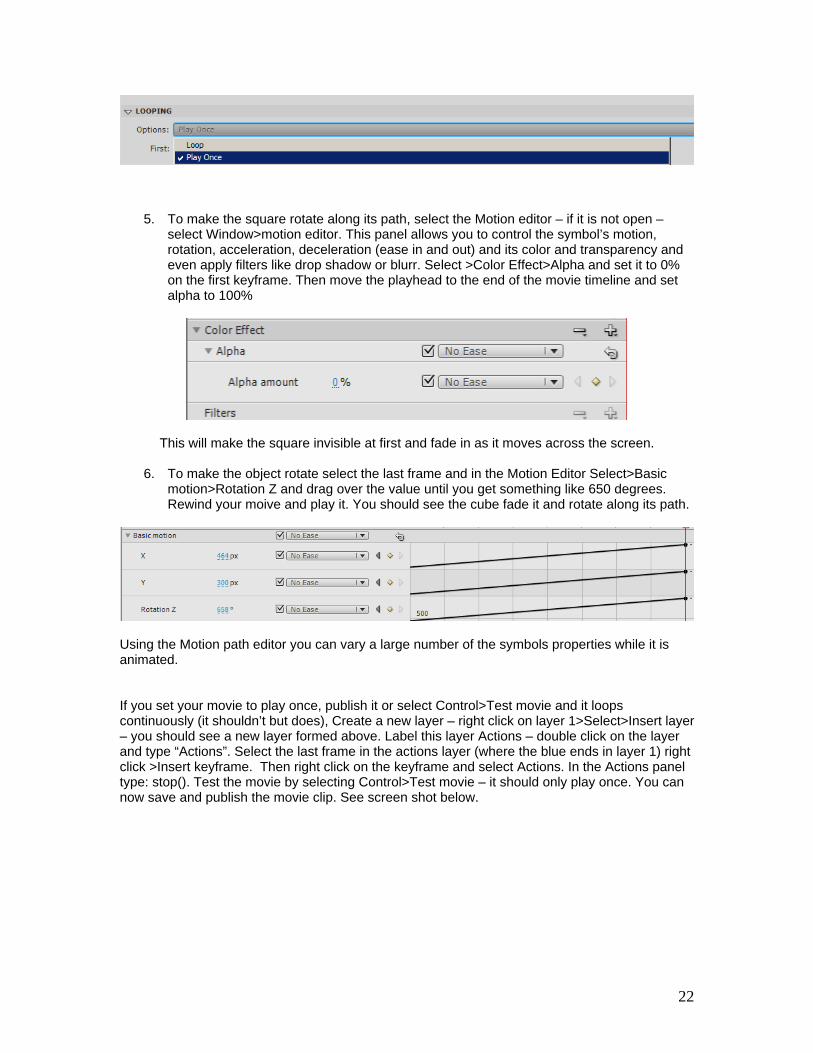
5. To make the square rotate along its path, select the Motion editor – if it is not open – select Window>motion editor. This panel allows you to control the symbol’s motion, rotation, acceleration, deceleration (ease in and out) and its color and transparency and even apply filters like drop shadow or blurr. Select >Color Effect>Alpha and set it to 0% on the first keyframe. Then move the playhead to the end of the movie timeline and set alpha to 100%
This will make the square invisible at first and fade in as it moves across the screen.
6. To make the object rotate select the last frame and in the Motion Editor Select>Basic motion>Rotation Z and drag over the value until you get something like 650 degrees. Rewind your moive and play it. You should see the cube fade it and rotate along its path.
Using the Motion path editor you can vary a large number of the symbols properties while it is animated. If you set your movie to play once, publish it or select Control>Test movie and it loops continuously (it shouldn’t but does), Create a new layer – right click on layer 1>Select>Insert layer – you should see a new layer formed above. Label this layer Actions – double click on the layer and type “Actions”. Select the last frame in the actions layer (where the blue ends in layer 1) right click >Insert keyframe. Then right click on the keyframe and select Actions. In the Actions panel type: stop(). Test the movie by selecting Control>Test movie – it should only play once. You can now save and publish the movie clip. See screen shot below.
23
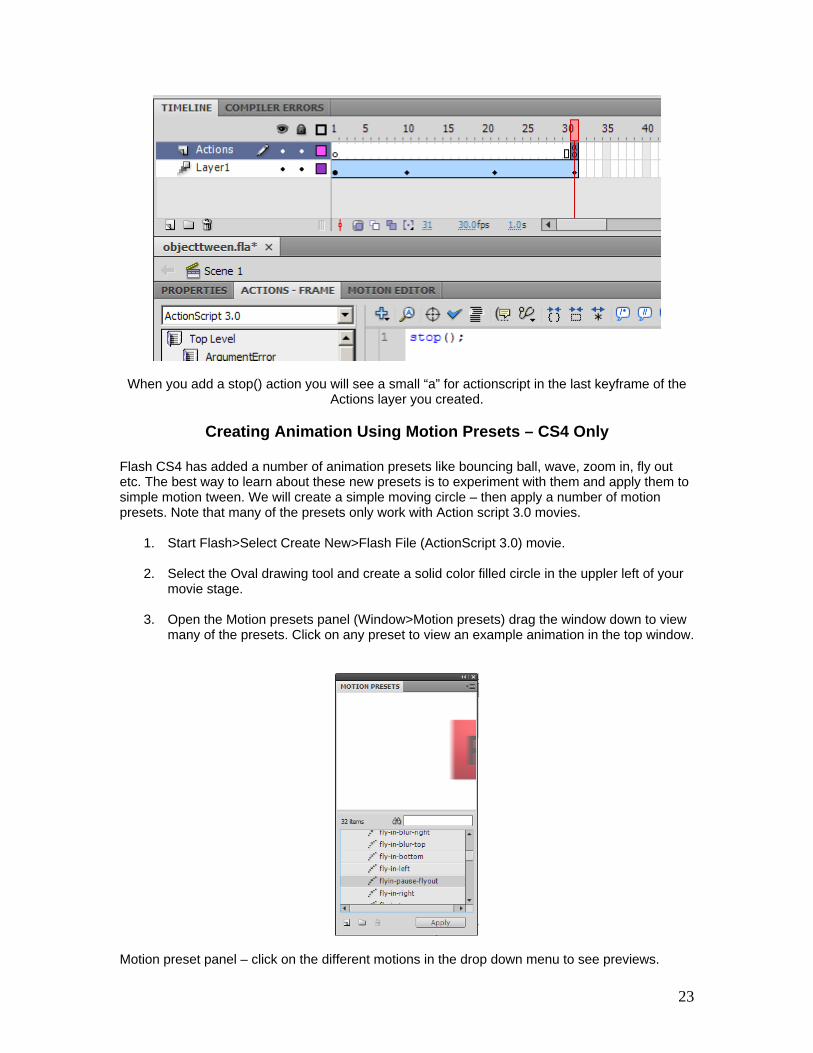
When you add a stop() action you will see a small “a” for actionscript in the last keyframe of the Actions layer you created.
Creating Animation Using Motion Presets – CS4 Only
Flash CS4 has added a number of animation presets like bouncing ball, wave, zoom in, fly out etc. The best way to learn about these new presets is to experiment with them and apply them to simple motion tween. We will create a simple moving circle – then apply a number of motion presets. Note that many of the presets only work with Action script 3.0 movies.
1. Start Flash>Select Create New>Flash File (ActionScript 3.0) movie.
2. Select the Oval drawing tool and create a solid color filled circle in the uppler left of your movie stage.
3. Open the Motion presets panel (Window>Motion presets) drag the window down to view many of the presets. Click on any preset to view an example animation in the top window.
Motion preset panel – click on the different motions in the drop down menu to see previews.
24
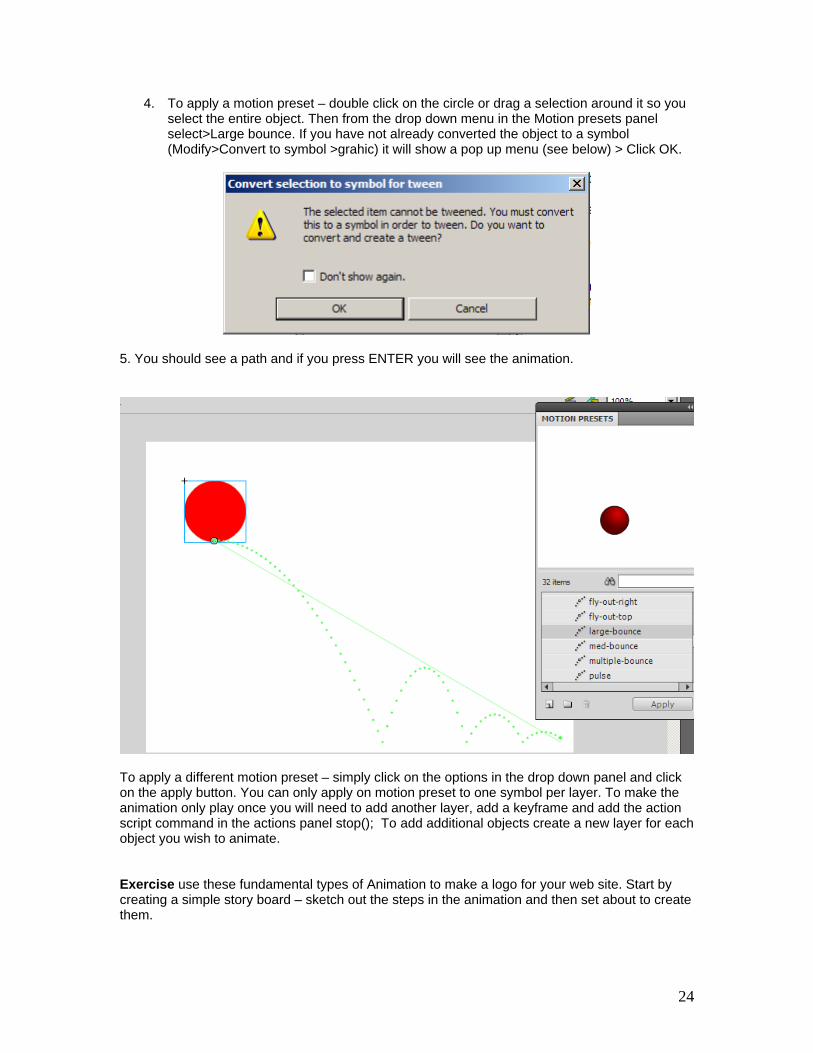
4. To apply a motion preset – double click on the circle or drag a selection around it so you select the entire object. Then from the drop down menu in the Motion presets panel select>Large bounce. If you have not already converted the object to a symbol (Modify>Convert to symbol >grahic) it will show a pop up menu (see below) > Click OK.
5. You should see a path and if you press ENTER you will see the animation.
To apply a different motion preset – simply click on the options in the drop down panel and click on the apply button. You can only apply on motion preset to one symbol per layer. To make the animation only play once you will need to add another layer, add a keyframe and add the action script command in the actions panel stop(); To add additional objects create a new layer for each object you wish to animate. Exercise use these fundamental types of Animation to make a logo for your web site. Start by creating a simple story board – sketch out the steps in the animation and then set about to create them.