Embed Size (px)
Citation preview
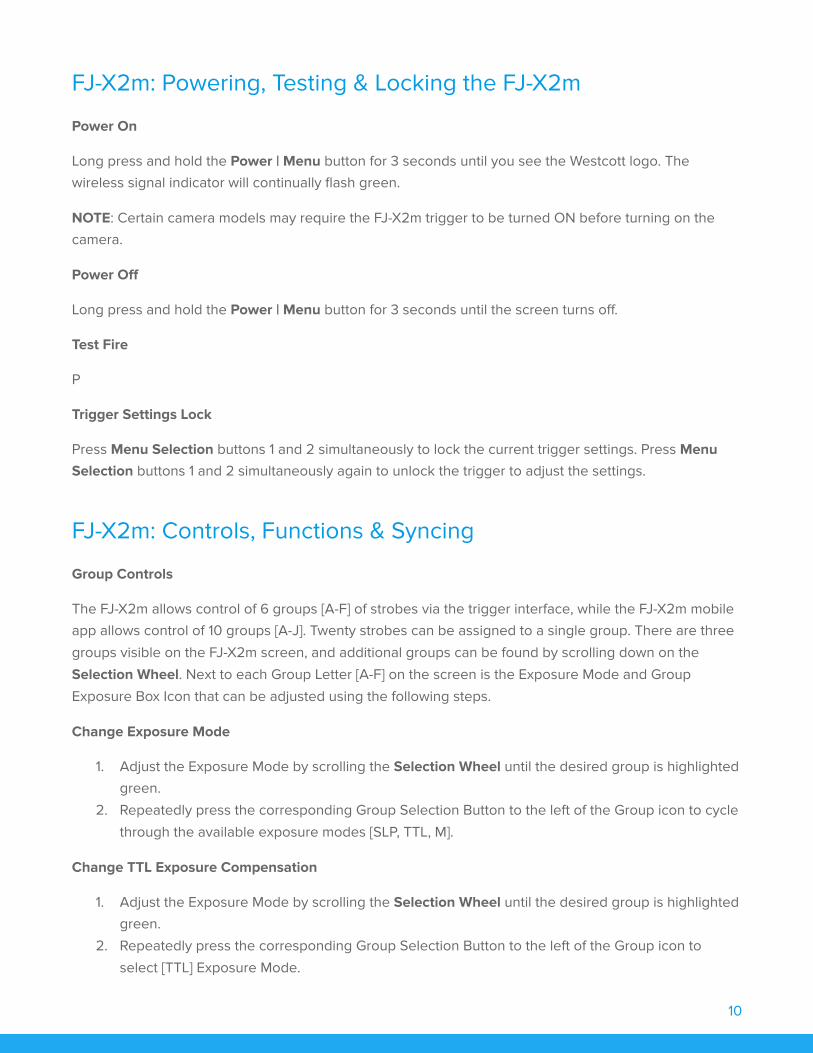
FJ-X2m Wireless Trigger
User Manual“F” Serial Number: v1.1.1“W” Serial Number: v2.1.110/12/2021
PLEASE READ THE INFORMATION ON PAGE 4 BEFORE USING FJ WIRELESS EQUIPMENT

Contents
Contents 1
Introduction 3FJ-X2m Universal Wireless Trigger (Included components) 3
FJ-X2m Universal Wireless Trigger with Sony Adapter (Included components) 3
Important things to know before starting… 4Reviewing Firmware Files 4
TTL ±3 Flash Exposure Compensation (FJ400 & FJ-X2m) 4
Canon Continuous Mode 4
Full-stop Increments in Manual Mode 4
FJ-X2m Wireless Trigger: Overview 5
FJ-X2m: Warnings 7
FJ-X2m: Firmware Updates 7
FJ-X2m: Preparing Your Camera 8
FJ-X2m: Getting Started 9Charging the FJ-X2m 9
FJ-X2m: Mounting the FJ-X2m 9Hot Shoe Mount 9
Hot Shoe Unmount 9
2.5mm PC Port Connection [Output Only] 9
Mounting the FJ-X2m Sony Adapter (Product #: 4711) 9
FJ-X2m: Powering, Testing & Locking the FJ-X2m 10Power On 10
Power Off 10
Test Fire 10
Trigger Settings Lock 10
FJ-X2m: Controls, Functions & Syncing 10Group Controls 10
Change Exposure Mode 10
Change TTL Exposure Compensation 10
Change M (Manual) Exposure Power Output (Individual Group) 11
Change M (Manual) Exposure Power Output (All Manual Groups) 11
Channel Controls 11
Change Channels [CH] 11
Sync Functions 12
Available Sync Functions: 12
1

Change Sync Function 12
SYNC-X Mode 12
FJ80 Remote ZOOM Control 13
FJ-X2m: Options 13Settings Menu 13
Settings Menu Options 13
Menu Button Selection Control 14
FJ-X2m: Menu Screens [Expanded Look] 14Menu Selection Button Options: Screen 1 14
Menu Selection Button Options: Screen 2 15
Mobile Applications (iOS & Android) 15
Initial Setup 15
Turn ON Bluetooth® on the FJ-X2m 15
Connecting the FJ-X2m to a Mobile Device 16
FJ-X2m: Preparing Your Camera [Brand Specific] 16Sony Mirrorless 16
Canon DSLR 17
Warranty Information 17
Legal Information 18
PLEASE READ THE INFORMATION ON PAGE 4 BEFORE USING FJ WIRELESS EQUIPMENT
2

Introduction
Thank you for purchasing the Westcott FJ-X2m Wireless Flash Trigger. The FJ400 and FJ-X2m Wireless
Flash Trigger (sold separately) are a photographer’s dream combination. The performance of the FJ400
is one of the industry’s first compact, portable 400 watt-second strobe that’s capable of recycling in less
than one second at full power, so you don’t miss the shot. It offers the most full-power flashes at 480
bursts to extend those on-location shoots when AC power isn’t an option, and it has accurate color
temperatures throughout its entire 9-stop output range. When paired with the FJ-X2m Wireless Radio
trigger, you can say, “Goodbye,” to the need for multiple brand-specific triggers. The FJ400 and FJ-X2m
have you covered with their multi-brand compatibility. This versatile unit offers everything required by
professional photographers today to achieve lighting success - including TTL, HSS, Continuous Capture,
Freeze Function, and so much more. Enjoy!
FJ-X2m Universal Wireless Trigger (Included components)
● Product #4705
○ FJ-X2m Wireless Trigger
○ USB-A to USB-C Cable
FJ-X2m Universal Wireless Trigger with Sony Adapter (Included components)
● Product #4706
○ FJ-X2m Wireless Trigger
○ FJ-X2m Sony Adapter
○ USB-A to USB-C Cable
PLEASE READ THE INFORMATION ON PAGE 4 BEFORE USING FJ WIRELESS EQUIPMENT
3

Important things to know before starting…
Reviewing Firmware Files
Firmware updates will be made available on the FJ-X2m product page (https://www.westcott.com/4705)
to improve the performance of the FJ Wireless System. Please review ALL documentation included with
each firmware download to ensure the necessary steps for preparation are complete before installing
the firmware.
TTL ±3 Flash Exposure Compensation (FJ400 & FJ-X2m)
±3 TTL Flash Exposure Compensation (FEC) on the FJ-X2m is independent of the Flash Exposure
Compensation (FEC) on the FJ400 Strobe. Meaning, a change of the FEC ±3 on the FJ-X2m will adjust
the light output in TTL mode; however, the FJ400 screen will not indicate the FEC changes made on the
FJ-X2m. The FJ400 FEC can be further adjusted ±3.
Set the strobe display to show both the FJ400 Strobe FEC (large letters) and the FJ-X2m Wireless Trigger
FEC (small letters) by turning the M->TTL setting to ON in MENU 6 on the FJ400. Learn more about
accessing the FJ400 Menu Settings in the section titled Menu Screen #6 in the FJ400 User Manual.
Canon Continuous Mode
When photographing in Canon Continuous Mode, two overlapping squares will be visible on the FJ400
screen, and the FJ Wireless System will default to Manual Mode disabling TTL and HSS functionality. Exit
Continuous Mode on the Canon camera to resume TTL and HSS functionality.
Full-stop Increments in Manual Mode
While a Group’s power setting is highlighted green, a long press of the scroll wheel will highlight the
power setting and allow full stop adjustments via the scroll wheel.
4

FJ-X2m Wireless Trigger: Overview
Get the most out of your FJ400 Strobe by pairing it with the FJ-X2m Wireless Radio Trigger. The FJ400
may work with your existing triggers; however, to achieve optimal performance of the strobe, we strongly
suggest using the FJ-X2m Wireless Radio Trigger. Both units operate at 2.4Ghz, ensuring communication
distances up to 985' (300m) unobstructed.
5

FJ-X2m: LCD Display
FJ-X2m: Settings Menu
6

FJ-X2m: Warnings
Caution
● Keep away from fire, water, and moisture. Do not submerge in water.
● Avoid drastic temperature changes before, during, and/or after use.
● Do not overtighten the shoe lock wheel when mounting to the camera.
● Securely mount the FJ-X2m before use.
● Surrounding RF interference may affect the communication performance of the FJ-X2m.
● Do not attempt to modify any Westcott products. Contact Westcott for assistance.
● The operating temperature range is 32-104°F (0-40°C).
FJ-X2m: Firmware Updates
The FJ-X2m Wireless Trigger is designed with a USB-C port to allow firmware updates and charging
ONLY. Future firmware updates may result in performance enhancements along with modified menu
options and layouts. Regularly visit westcott.com/4705 to confirm your strobe has the latest firmware.
Installing the Firmware
1. Visit westcott.com/4705 and scroll to the Support section. Find and download the latest FJ-X2m
firmware ZIP file to your computer. (Note: Various browsers may automatically unzip the ZIP file. In
this scenario, skip to Step #3).
2. Unzip the file. Open the extracted folder.
3. IMPORTANT: Read ALL FILES in the extracted folder (i.e., README, Changelog, etc.).
4. Ensure the FJ-X2m is OFF.
5. Connect the USB-A to USB-C cable to the FJ-X2m’s USB-C port.
6. On the FJ-X2m, press and hold the 3rd Menu Selection button.
7. Hold the Menu Selection button, connect the USB-A to USB-C cable into your computer’s USB-A
port. The Wireless Signal Indicator light on FJ-X2m will illuminate red when your computer has
recognized the connection to the FJ-X2m. You may release the button at this time.
8. Standard operating systems will present the FJ-X2m as an external device.
a. NOTE: macOS may display the external device on the desktop or in the Finder window.
9. Locate the .BIN firmware file on your computer and drag it to the FJ-X2m external device.
10. Once the file has been completely copied to the FJ-X2m, EJECT the FJ-X2m external device from
the computer.
11. Unplug the USB-A to USB-C cable from your computer and the FJ-X2m.
12. Long press the Power | Menu button on the FJ-X2m to initiate the firmware update and confirm
installation was successful by locating the firmware text in the bottom right corner of the screen
during the start-up process.
Important
7

● If FJ devices don’t display as an external device after being connected to the computer, please
disconnect the USB cable from both devices, restart the computer, and restart the firmware
installation process.
● Only attempt the firmware update installation process when the connected computer’s power
level is ≥ 25%. Loss of power of any type during this process could render the FJ-X2m inoperable
and require professional repair.
● Removing the USB cable from the FJ-X2m without properly ejecting the device from your
computer could render the trigger inoperable and require professional repair.
● Depending on the operating system and the applications running, copying the firmware from your
computer to the FJ-X2m may take a few minutes and/or halt the copying process. Should this
happen, close the copy progress window and try again. Further copying issues may require the
computer to be restarted.
FJ-X2m: Preparing Your Camera
An FJ-X2m Wireless Trigger is compatible with various brands of cameras to operate the FJ400 strobe.
Each camera manufacturer chooses a different approach to how their cameras interact with off-camera
lights. A few adjustments to your camera settings are required for the FJ-X2m and FJ400 to properly
perform with your camera. Below are a few settings to check out first. We recommend referring to your
camera’s user manual for details specific to your camera brand and model.
● Set Silent Shutter to Off.● Set E-Front Curtain to Off.● Set Wireless Mode to On or Off (camera brand/model dependent).● Set Red-Eye Reduction to On or Off (camera brand/model dependent).● Set Exposure Compensation to 0 (zero) in-camera.● Set White Balance to Daylight, 5500K, or Custom at 5500K (not Auto).● Various camera models require you to set the Sync type (Front Curtain, Rear Curtain, HSS)
manually in the camera’s Flash Menu before the FJ-X2m Sync can be adjusted.● Various camera models automatically adjust the Sync setting to HSS when HSS is enabled in the
camera settings, and the native sync speed has been exceeded.● Ensure the camera’s battery level is above 25%.● Ensure the camera contacts are clean and the FJ-X2m is seated correctly and aligned.
NOTE: Please find additional brand-specific camera preparation on Page 14.
8

FJ-X2m: Getting Started
Charging the FJ-X2m
1. Access the USB-C port behind the rubber protection gasket.
2. Plug the USB-A to USB-C cable into the FJ-X2m.
3. Plug the opposing end of the cable in any 5V power source.
4. The estimated charging time is 2 hours.
FJ-X2m: Mounting the FJ-X2m
Hot Shoe Mount
1. Looking at the FJ-X2m screen, turn the Shoe Lock dial to the right.
2. Gently slide the FJ-X2m into the camera’s hot shoe.
3. Turn the Shoe Lock dial to the left to lock into place. Do not overtighten.
Hot Shoe Unmount
1. Turn the Shoe Lock dial to the right to unlock from the hot shoe.
2. It’s vital that the Shoe Lock dial be rotated entirely until it stops so that the set pin has retracted
into the base. [Failure to do this could cause permanent damage to the FJ-X2m.]
3. Slide the FJ-X2m towards the back of the camera to remove.
2.5mm PC Port Connection [Output Only]
The 2.5mm port (output only) can be used to initiate wired synchronization with third-party strobes andtriggers that offer a synchronization port (input). [cables sold separately]
NOTE: The Westcott FJ-XR Wireless Receiver (#4701) is equipped with a 3.5mm plug which adds FJWireless Communication to 3rd-party strobes equipped with a 3.5mm sync port (input).
Mounting the FJ-X2m Sony Adapter (Product #: 4711)
1. Slide the Sony Adapter (sold separately) into the camera’s hot shoe with the release button facing
the camera’s back.
2. Once the adapter is mounted, loosen the FJ-X2m’s Shoe Lock dial and slide the FJ-X2m onto the
Sony Adapter.
3. Turn the FJ-X2m Shoe Lock dial to the left to lock into place. Do not overtighten.
9
FJ-X2m: Powering, Testing & Locking the FJ-X2m
Power On
Long press and hold the Power | Menu button for 3 seconds until you see the Westcott logo. The
wireless signal indicator will continually flash green.
NOTE: Certain camera models may require the FJ-X2m trigger to be turned ON before turning on the
camera.
Power Off
Long press and hold the Power | Menu button for 3 seconds until the screen turns off.
Test Fire
P
Trigger Settings Lock
Press Menu Selection buttons 1 and 2 simultaneously to lock the current trigger settings. Press MenuSelection buttons 1 and 2 simultaneously again to unlock the trigger to adjust the settings.
FJ-X2m: Controls, Functions & Syncing
Group Controls
The FJ-X2m allows control of 6 groups [A-F] of strobes via the trigger interface, while the FJ-X2m mobile
app allows control of 10 groups [A-J]. Twenty strobes can be assigned to a single group. There are three
groups visible on the FJ-X2m screen, and additional groups can be found by scrolling down on the
Selection Wheel. Next to each Group Letter [A-F] on the screen is the Exposure Mode and Group
Exposure Box Icon that can be adjusted using the following steps.
Change Exposure Mode
1. Adjust the Exposure Mode by scrolling the Selection Wheel until the desired group is highlighted
green.
2. Repeatedly press the corresponding Group Selection Button to the left of the Group icon to cycle
through the available exposure modes [SLP, TTL, M].
Change TTL Exposure Compensation
1. Adjust the Exposure Mode by scrolling the Selection Wheel until the desired group is highlighted
green.
2. Repeatedly press the corresponding Group Selection Button to the left of the Group icon to
select [TTL] Exposure Mode.
10

3. Press the Selection Wheel to highlight the Group Exposure Box green.
4. Scroll the Selection Wheel to adjust the exposure compensation between -3.0 to 3.0. [NOTE: This
compensation is independent of the onboard exposure compensation available on the FJ400.]
Change M (Manual) Exposure Power Output (Individual Group)
1. Adjust the Exposure Mode by scrolling the Selection Wheel until the desired group is highlighted
green.
2. Repeatedly press the corresponding Group Selection Button to the left of the Group icon to
select [M] Exposure Mode.
3. Press the Selection Wheel to highlight the Group Exposure Box green.
4. Scroll the Selection Wheel to adjust the manual exposure between 1.0 to 9.0.
NOTE: A long press of the scroll wheel will highlight the power setting and allow full stop adjustments.
Change M (Manual) Exposure Power Output (All Manual Groups)
1. Ensure the Selectable Menu Items on the FJ-X2m screen read [Camera, CH, SYNC]
2. Long-press the middle Menu Selection Button [CH] to highlight all groups [A-F].
3. Quick press the FJ-X2m Selection Wheel to highlight all Group Exposure Boxes in green.
4. Scroll the Selection Wheel to adjust the manual exposure for groups operating in Manual Mode
(only).
5. Quick press the FJ-X2m Selection Wheel to confirm the desired manual exposure.
6. Long-press the middle Menu Selection Button [CH] on the FJ-X2m Wireless Flash Trigger to
return to individual group exposure.
Group SLP (Sleep) Mode
FJ Wireless Flashes can be placed into SLP (sleep) mode from any FJ transmitter disabling the unit’s
ability to flash while other flash groups continue operating normally.
1. Determine the Group [A-F] that the FJ Wireless Flash Device is assigned to.
2. Press the corresponding FJ-X2m’s Group Selection Button or FJ80’s MODE Function icon [HOST
mode] continuously until SLP (sleep) appears on the transmitter and flash next to the Group. Note
that any flash units assigned to this Group will also enter into SLP mode.
3. Exit the SLP mode by continually pressing the corresponding FJ-X2m’s Group Selection Button or
FJ80’s MODE Function icon [HOST mode] until the screen displays TTL or M.
NOTE: It’s important that the Exposure Mode type is updated from the transmitter, otherwise, the flash
unit(s) will re-enter SLP mode when the next transmission signal is received from an FJ transmitter.
Channel Controls
The FJ-X2m offers 32 available channels [AU, 01-31] for reliable communication between your FJ-X2m
Wireless Trigger and FJ400 Strobe without interference from additional FJ400 strobes being used by
other photographers in the same area.
11

Change Channels [CH]
1. Ensure the icon above the middle Menu Selection Button reads [CH]. If not, press the Power |MENU button once.
2. Press the middle Menu Selection Button once to highlight the Channel Icon white.
3. Scroll the Selection Wheel to adjust the digit from [AU, 01-31] to select the desired channel.
4. Once the desired channel has been selected, press the Selection Wheel and/or make no further
changes with the Selection Wheel to confirm the selected channel. The Channel Icon will turn
green after 3 seconds.
NOTE: To enable [AU] (Automatic Channel Selection), select [AU] from the available channels on the
FJ400 and FJ-X2m. While the middle Selectable Menu Option displays [CH], long-press Menu Selection
Button 2 on the FJ-X2m to engage communication between the FJ-X2m & FJ400.
NOTE: Only one FJ-X2m in AU mode can operate an FJ Wireless Flash System.
Sync Functions
Available Sync Functions:
● Front Curtain Sync [icon] – Standard flash operation with shutter speed limitations native to thecamera model. See Sync (Normal) section.
● High-Speed Sync (HSS) [icon] – Flash operation allowing higher shutter speed synchronization upto 1/8000s. See Sync (HSS) section.
● Rear Curtain Sync [icon] – Flash operation for achieving trailing effects and shutter drag.
Change Sync Function
1. Ensure the icon above the third Menu Selection Button reads [SYNC]. If not, press the Power |MENU button once.
2. Press the third Menu Selection Button repeatedly to select the desired Sync Function. [NOTE:
Available sync options may vary depending on your camera model’s internal menu settings. See
section FJ-X2m: Preparing Your Camera.]
Sync (Normal)
● Canon: 1/250s● Nikon: 1/320s● Sony: 1/250s● Fuji: 1/250s● Olympus: 1/250s● Panasonic Lumix: 1/250s
Sync (HSS)
● Canon: 1/8000s● Nikon: 1/8000s● Sony: 1/8000s
12

● Fuji: 1/8000s● Olympus: 1/8000s● Panasonic Lumix: 1/8000s
SYNC-X Mode
The FJ-X2m Wireless Trigger also has a single-pin mode that allows the basic triggering of
non-compatible camera models with the FJ-X2m.
NOTE: Normal Sync Speed is determined by the camera manufacturer and subject to change based
upon the camera model.
NOTE: Native and HSS speeds may vary depending on various camera models.
FJ80 Remote ZOOM Control
Firmware Version 1.0.3 brings one of the most requested features to the FJ80 Universal Speedlight;
remote control of the ZOOM functionality from the FJ-X2m Wireless Flash Trigger.
Remote ZOOM Control [Single Group]
1. Long-press the left Menu Selection Button [Camera] on the FJ-X2m Wireless Flash Trigger to
enter the ZOOM menu.
2. Scroll the FJ-X2m Selection Wheel to locate the group for which the ZOOM needs adjusting.
3. Quick press the FJ-X2m Selection Wheel to adjust the FJ80 ZOOM setting [0-5].
4. Scroll the Selection Wheel to adjust the FJ80 ZOOM settings.
5. Quick press the FJ-X2m Selection Wheel to confirm the FJ80 ZOOM selection.
6. Long-press the left Menu Selection Button [Camera] on the FJ-X2m Wireless Flash Trigger to
return to the Main Menu.
Remote ZOOM Control [All Groups]
7. Long-press the left Menu Selection Button [Camera] on the FJ-X2m Wireless Flash Trigger to
enter the ZOOM menu.
8. Ensure the Selectable Menu Items on the FJ-X2m screen read [Camera, CH, SYNC]
9. Long-press the middle Menu Selection Button [CH] to highlight all groups [A-F].
10. Quick press the FJ-X2m Selection Wheel to adjust the FJ80 ZOOM settings [0-5] for all groups.
11. Scroll the Selection Wheel to adjust the FJ80 ZOOM settings.
12. Quick press the FJ-X2m Selection Wheel to confirm the FJ80 ZOOM selections.
13. Long-press the left Menu Selection Button [Camera] on the FJ-X2m Wireless Flash Trigger to
return to the Main Menu.
13

FJ-X2m: Options
Settings Menu
1. Long press Menu Selection buttons 2 and 3 to access the Settings Menu.
2. Use the side Group Selection buttons to select the corresponding displayed screen option or
use the Selection Wheel to scroll through the screen options. Additional menu options are
available by scrolling down on the Selection Wheel.
3. Press the Selection Wheel to select the green highlighted option. Turn the Selection Wheel to
adjust the setting.
4. Press the Selection Wheel, or a side Group Selection button, to confirm the setting.
5. Press OK to exit the Settings Menu.
Settings Menu Options
● RT ID #: [00-99]
● Auto-Off: [05, 15, 30]
● Bluetooth®: [On/Off] [Scroll down with Selection Wheel to view]
● SYNC-X: [On/Off] [Scroll down with Selection Wheel to view]
● Screen Brightness: [MIN, MID, MAX]
● FJ-X2m Transmitting Power: [MIN, NOR, MAX]
● Channel Recommendations: [Suggested channels vary]
Menu Button Selection Control
● Button 1: [Reset] - Press Button 1 to reset the trigger settings to MID, 05, 01, Bluetooth® Off.
● Button 3: [OK] - Press Button 3 to save the settings and exit the Options Menu.
FJ-X2m: Menu Screens [Expanded Look]
Menu Selection Button Options: Screen 1
Screen 1 is visible at startup or by pressing the menu button once if Screen 2 is active.
● Menu Button 1: [Camera] Camera Brand Selection
○ Press the corresponding selection button for [Camera] repeatedly until the preferred
camera manufacturer is displayed in the top left corner of the screen:
■ Canon
■ Nikon
■ Sony (requires Sony adapter)
■ Fujifilm
■ RT (Canon)
■ Olympus
14

■ Lumix (Panasonic)
● Menu Button 2: [CH] Channel Selection
○ Press the corresponding selection button for [CH] once until the number in the channel
selection window is highlighted white.
○ Use the Selection Wheel to change the channel number from [AU, 01-31].
○ Once the desired number is displayed press the Selection Wheel once and the channel
number will turn green (no further button selections will also result in the channel
confirmation).
● Menu Button 3: [SYNC] Sync Function Selection
○ Press the corresponding selection button for [SYNC] repeatedly until the desired sync
function icon appears on the screen.
■ Front Curtain
■ Rear Curtain
■ High-Speed Sync/HSS
Menu Selection Button Options: Screen 2
Access Screen 2 by pressing the Power | MENU button once.
1. Menu Button 1: [Lamp (icon)] Modeling Lamp On/Off
a. Press the rectangular button to the left of the group for which you wish to change themodeling lamp or audible beep status.
b. Press the corresponding selection button for [Lamp] to turn the modeling lamp on and off.
c. The modeling lamp icon will be displayed on the screen when on.
2. Menu Button 2: [Music Note (icon)] Audible Beep On/Off
a. Press the rectangular button to the left of the group for which you wish to change themodeling lamp or audible beep status.
b. Press the corresponding selection button for [Music] to turn the audible beep on and off.
c. A music note icon will be displayed on the screen when on.
3. Menu Button 3: [M (icon)] TTL to Manual Exposure (Group A Only)
a. Long press Menu Button 3 to convert TTL strobe output from the last shot to Equivalent
Manual Exposure.
NOTE: Control of the audible beep only applies to FJ flash models equipped with the recycle beepfunctionality.
Mobile Applications (iOS & Android)
The settings of the FJ400 can be adjusted through a mobile app via the FJ-X2m Wireless Radio Trigger.
The app will also allow for different scenes to be created and saved to minimize the same setup in the
future.
15
Initial Setup
Before pairing the FJ-X2m with the mobile device ensure that the FJ-X2m and FJ400 are communicating
by pressing the TEST button on the FJ-X2m to fire a test shot on the FJ400.
Turn ON Bluetooth® on the FJ-X2m
1. Turn on the FJ-X2m by long-pressing the Power | MENU button.
2. Press the 2nd and 3rd Menu Selection Buttons at the same time to enter the Settings Menu.
3. Scroll down on the Selection Wheel until the Bluetooth® icon is highlighted green.
4. Press down on the Selection Wheel to highlight [OFF] and press down on the Selection Wheel
once to change the status to [ON].
5. Press OK to return to the main screen and notice the Bluetooth® icon in the bottom right-hand
corner.
NOTE: Turning off the FJ-X2m will also turn off Bluetooth® functionality and the process above will need
to be repeated upon the next start-up.
Connecting the FJ-X2m to a Mobile Device
Apple iOS
1. Download the Westcott FJ400 mobile app from the App Store.
2. Turn on the FJ-X2m by long-pressing the Power | MENU button.
3. Turn on the FJ400 by long-pressing the Power | MODEL button.
4. Open the app on the mobile device.
5. The app will present a screen titled, “Select Devices,” where you will select the FJ-X2m from the
list of available devices.
6. The default screen will show two boxes; Studio 1 & the “+” symbol.
a. Click the Studio 1 box to set up your first scene.
b. Click the “+” box to create an additional Studio scene.
Android
1. Download the Westcott FJ400 mobile app from the GooglePlay Store.
2. Turn on the FJ-X2m by long-pressing the Power | MENU button.
3. Turn on the FJ400 by long-pressing the Power | MODEL button.
4. Pair the FJ-X2m with the mobile device in the Bluetooth® section of Settings by selecting FJ-X2m
from the list of available devices. (NOTE: If prompted for a PIN use 000000.)
5. Open the app on the mobile device.
6. The app will present a screen titled, “Choose Device,” where you will select the FJ-X2m from the
list of available devices.
7. The default screen will show two boxes; Studio 1 and the “+” symbol.
a. Click the Studio 1 box to set up your first scene.
b. Click the “+” box to create an additional studio scene.
16

NOTE: Studios are independent scenes from one another.
NOTE: Ensure the mobile device is running the latest operating system and the app is up-to-date. Visit
the manufacturer’s website for more details.
NOTE: Ensure the FJ-X2m and FJ400 are operating with the latest firmware releases.
FJ-X2m: Preparing Your Camera [Brand Specific]
Sony Mirrorless● Set Silent Shutter to OFF.
● Set E-Front Curtain to OFF. [Note: As of July 2020, Sony updated the HSS algorithm to avoid
banding with HSS. Turn this setting OFF if you see banding in the final images.]
● Set Flash Mode to Fill Flash. [Note: Not Wireless]
● Set Wireless Flash to OFF.
● Set Exp. Comp. Set to Ambient & Flash
● Set HSS to Enabled
● Set Silent Shutter (Electronic shutter) to OFF (Mechanical) (Note: C3 button by default)
● Rear Curtain Sync Enabled in camera settings
Canon DSLR
● Select models require External Firing menu selection is set to ENABLED.
● Select models require Silent Live View menu selection is set to OFF [Confirmed: Canon Eos-1Dx,
Canon 5D Mark IV].
● Select models require the FJ-X2m to be powered ON before mounting to the camera [Confirmed:
5D Mark IV].
Warranty Information
Westcott’s warranty obligations for this product are limited to the following terms.
The F.J. Westcott Co. (“Westcott”) warrants this Westcott branded product against defects in materialsand workmanship under normal use for a period of ONE (1) YEAR from the date of retail purchase fromWestcott or an authorized retailer by the original end-user purchaser (“Warranty Period”). If a defectarises and a valid claim is received within the Warranty Period, at its option and to the extent permittedby law, Westcott will either (1) repair the defect at no charge, using new or refurbished replacement parts,or (2) exchange the product with a product that is new or which has been manufactured from new orserviceable used parts and is at least functionally equivalent to the original product. This LimitedWarranty applies only to products manufactured by or for Westcott that can be identified by the Westcotttrademark, trade name, or logo affixed to them.
17

This warranty does not apply to: (a) damage caused by accident, abuse, misuse, flood, fire, earthquake,mold, or other external causes; (b) damage caused by operating the product outside the permitted orintended uses described by Westcott; (c) a product or part that has been modified to alter functionality orcapability without the written permission of Westcott; or (d) cosmetic damage, including but not limited toscratches, dents, and broken plastic.
Disclaimer: By purchasing, borrowing and/or using this product for any event, both public or private, you,
the customer, accepts all responsibility and releases Westcott, and its associates, of any and all liability in
the event of manufacturer’s defect, malfunction or misuse of the product which may lead to further
injuries or complications unforeseen by the user. Westcott is not responsible for any potential or incurred
damage caused by failure to properly mount, hang, or store the product, which includes, but is not
limited to damage to cameras, electronics, electrical equipment, buildings, building materials, personal
injury, death, or disability, fire damage, or any and all other damage not mentioned previously.
Please contact Westcott’s Repair Department for a Return Authorization Number “RMA” prior to
requesting warranty service. This RMA must be clearly written on the outside of the box to the left of the
shipping label. Items sent in without pre-authorization or that do not fall under the limited warranty will be
returned at the expense of the sender.
Repair Department: 800-886-1689 / 419-243-7311 (International)
Email: [email protected]
Shipping: F.J. Westcott Co, 1425-B Holland Rd. Maumee, OH 43537
Legal Information
Westcott products are made to the company’s traditionally high standards of quality and comply with all
applicable government safety regulations and requirements. In an effort to provide the best quality
products possible, we periodically make product modifications. Actual products may not be identical to
items pictured. Future firmware updates may result in performance enhancements, removal of features
to achieve optimal performance, and modified menu options and layouts.
Made in the USA.
©F.J. Westcott Co. All rights reserved.
18