Embed Size (px)
Citation preview
FITTING and ADJUSTING
The
Free ‘n’ Easy SADDLE
By
Les Spark
Free ‘n’ Easy Saddle Company
www.free-and-easy-saddles.co.uk
Updated by
Marlene Moss Moss Rock Endurance
www.mossrockendurance.com
2
FITTING and ADJUSTING the
Free ‘n’ Easy SADDLE
CONTENTS:
Unpacking your new saddle . . . . . . . . . . . . . 3 Fitting the saddle – Overview . . . . . . . . . . . . . 3
Removing the panel covers - cloth . . . . . . . . . . . . . 4 Removing the panel covers – leather . . . . . . . . . . . . . 4 Positioning the saddle . . . . . . . . . . . . . 5
Fitting the saddle – The Adjustment Process . . . . . . . . . . . . . 6 Step 1 – Adjusting for the Withers . . . . . . . . . . . . . 6 Step 2 – Adjusting the Seat . . . . . . . . . . . . . 8 Step 3 – Adjusting for Back Curvature. . . . . . . . . . . . . 9 Step 4 – Adjusting the Stirrup Position. . . . . . . . . . . . . 10 Checking the Fit While Riding . . . . . . . . . . . . . 11 Readjustment . . . . . . . . . . . . . 11
Troubleshooting . . . . . . . . . . . . . 12
UNPACKING YOUR NEW SADDLE
Your saddle is shipped upside down in a cardboard cradle to protect it. It is also wrapped in bubble wrap to protect the leather from any rubbing during transport motion. The saddle is completely assembled, with panels, panel covers and numnah in their correct configurations. When you unpack your saddle, you will want to spend some time looking at how it is put together, so that you are able to put it back together properly during the fitting session. To prepare for fitting, remove the 2-piece numnah and the panel covers. Details on removing the panel covers are below. For now, do not remove the larger plastic panels that are Velcroed in place. You will fit your saddle to your horse in this configuration. Fitting the saddle to your horse, and yourself, is primarily a 4 step process with some additional verification/maintenance checks. Those steps are detailed after the Overview.
FITTING THE SADDLE - OVERVIEW
There is one adjusting screw at the back of each panel and two at the front (see Diagrams 2 and 3 on pages 6 and 8). The screw at the back and the one highest up at the front of the saddle are also the fixing screws, which attach the panel to the tree.
The shape of the panels and the adjustments allow for accurate fitting to the wither angle of the horse, for placing the weight of the rider on the ribs and for sitting the rider in a balanced or classical riding position. All other dimensions are taken care of with the flexible and rotational design of the panels.
The saddle is available in three basic widths. The standard width can be adjusted to fit about 80 - 90% of horses. Narrow is for the very narrow horse and Wide for the very wide. We have fit an Extra Wide as needed.
4
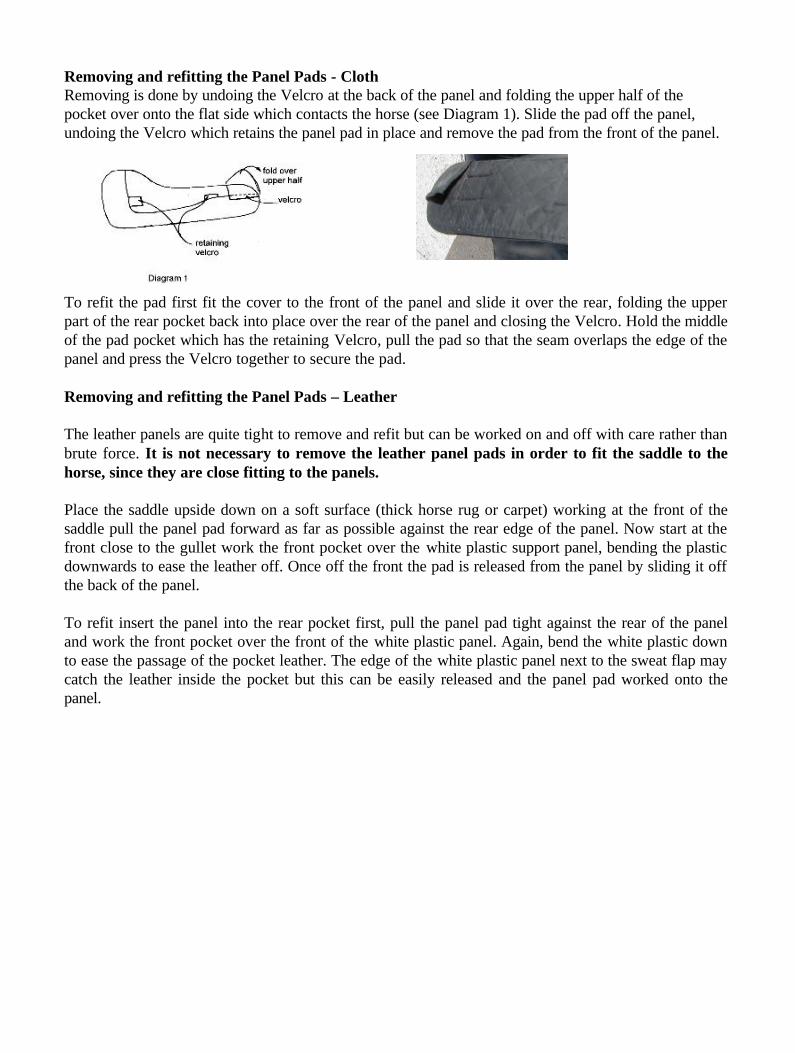
Removing and refitting the Panel Pads - Cloth Removing is done by undoing the Velcro at the back of the panel and folding the upper half of the pocket over onto the flat side which contacts the horse (see Diagram 1). Slide the pad off the panel, undoing the Velcro which retains the panel pad in place and remove the pad from the front of the panel. To refit the pad first fit the cover to the front of the panel and slide it over the rear, folding the upper part of the rear pocket back into place over the rear of the panel and closing the Velcro. Hold the middle of the pad pocket which has the retaining Velcro, pull the pad so that the seam overlaps the edge of the panel and press the Velcro together to secure the pad. Removing and refitting the Panel Pads – Leather The leather panels are quite tight to remove and refit but can be worked on and off with care rather than brute force. It is not necessary to remove the leather panel pads in order to fit the saddle to the horse, since they are close fitting to the panels. Place the saddle upside down on a soft surface (thick horse rug or carpet) working at the front of the saddle pull the panel pad forward as far as possible against the rear edge of the panel. Now start at the front close to the gullet work the front pocket over the white plastic support panel, bending the plastic downwards to ease the leather off. Once off the front the pad is released from the panel by sliding it off the back of the panel. To refit insert the panel into the rear pocket first, pull the panel pad tight against the rear of the panel and work the front pocket over the front of the white plastic panel. Again, bend the white plastic down to ease the passage of the pocket leather. The edge of the white plastic panel next to the sweat flap may catch the leather inside the pocket but this can be easily released and the panel pad worked onto the panel.
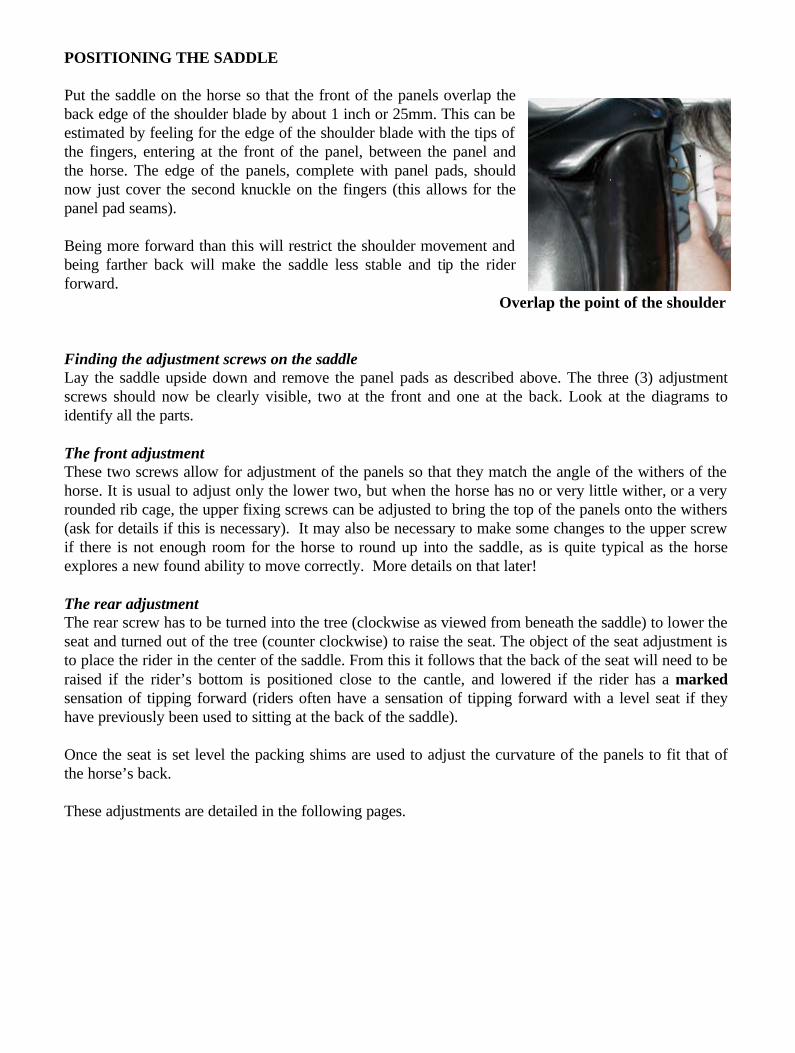
POSITIONING THE SADDLE Put the saddle on the horse so that the front of the panels overlap the back edge of the shoulder blade by about 1 inch or 25mm. This can be estimated by feeling for the edge of the shoulder blade with the tips of the fingers, entering at the front of the panel, between the panel and the horse. The edge of the panels, complete with panel pads, should now just cover the second knuckle on the fingers (this allows for the panel pad seams). Being more forward than this will restrict the shoulder movement and being farther back will make the saddle less stable and tip the rider forward.
Overlap the point of the shoulder Finding the adjustment screws on the saddle Lay the saddle upside down and remove the panel pads as described above. The three (3) adjustment screws should now be clearly visible, two at the front and one at the back. Look at the diagrams to identify all the parts. The front adjustment These two screws allow for adjustment of the panels so that they match the angle of the withers of the horse. It is usual to adjust only the lower two, but when the horse has no or very little wither, or a very rounded rib cage, the upper fixing screws can be adjusted to bring the top of the panels onto the withers (ask for details if this is necessary). It may also be necessary to make some changes to the upper screw if there is not enough room for the horse to round up into the saddle, as is quite typical as the horse explores a new found ability to move correctly. More details on that later! The rear adjustment The rear screw has to be turned into the tree (clockwise as viewed from beneath the saddle) to lower the seat and turned out of the tree (counter clockwise) to raise the seat. The object of the seat adjustment is to place the rider in the center of the saddle. From this it follows that the back of the seat will need to be raised if the rider’s bottom is positioned close to the cantle, and lowered if the rider has a marked sensation of tipping forward (riders often have a sensation of tipping forward with a level seat if they have previously been used to sitting at the back of the saddle). Once the seat is set level the packing shims are used to adjust the curvature of the panels to fit that of the horse’s back. These adjustments are detailed in the following pages.
6
FITTING THE SADDLE - THE ADJUSTMENT PROCESS
Important! Tools to have at hand are two 10mm open end wrenches, one 4mm Allen key and a sharp
pair of scissors.
Step 1. Adjusting for the withers
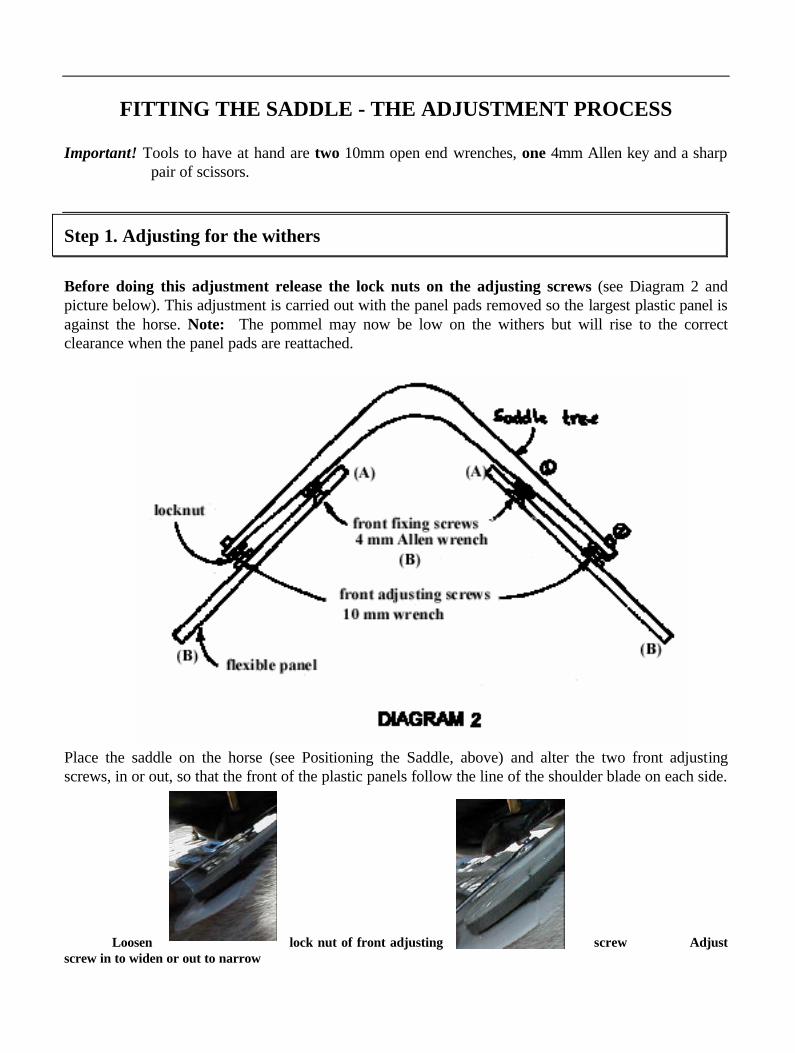
Before doing this adjustment release the lock nuts on the adjusting screws (see Diagram 2 and picture below). This adjustment is carried out with the panel pads removed so the largest plastic panel is against the horse. Note: The pommel may now be low on the withers but will rise to the correct clearance when the panel pads are reattached. Place the saddle on the horse (see Positioning the Saddle, above) and alter the two front adjusting screws, in or out, so that the front of the plastic panels follow the line of the shoulder blade on each side.
Loosen lock nut of front adjusting screw Adjust screw in to widen or out to narrow
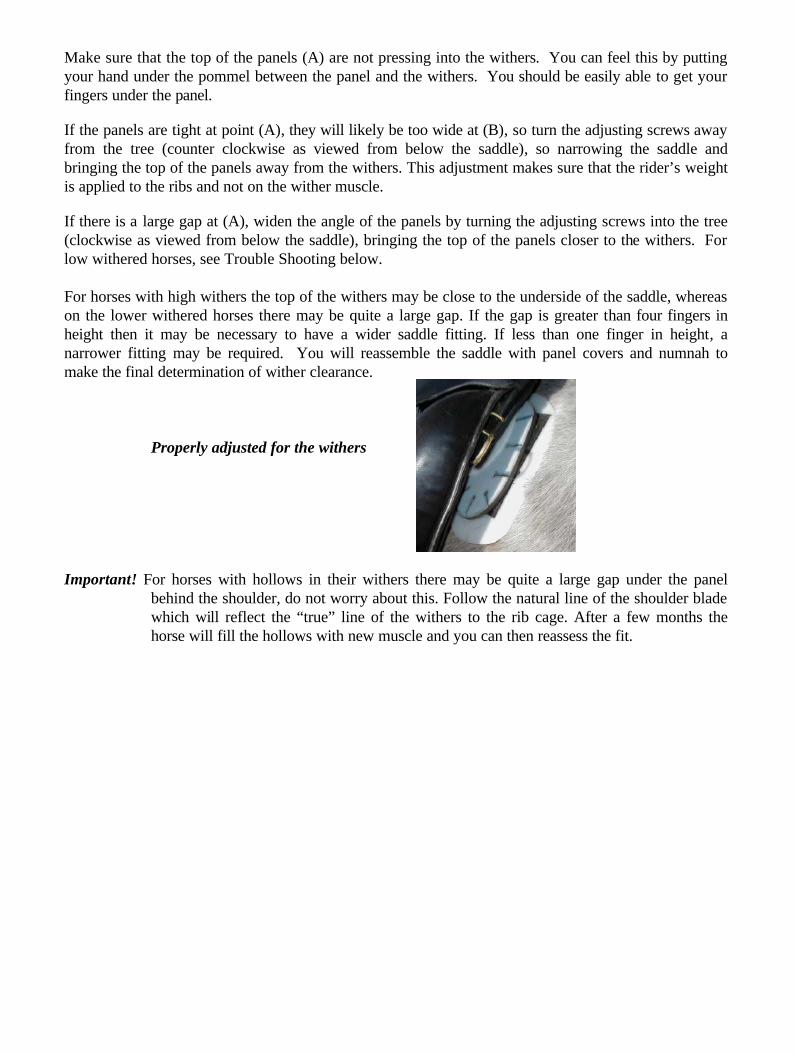
Make sure that the top of the panels (A) are not pressing into the withers. You can feel this by putting your hand under the pommel between the panel and the withers. You should be easily able to get your fingers under the panel.
If the panels are tight at point (A), they will likely be too wide at (B), so turn the adjusting screws away from the tree (counter clockwise as viewed from below the saddle), so narrowing the saddle and bringing the top of the panels away from the withers. This adjustment makes sure that the rider’s weight is applied to the ribs and not on the wither muscle.
If there is a large gap at (A), widen the angle of the panels by turning the adjusting screws into the tree (clockwise as viewed from below the saddle), bringing the top of the panels closer to the withers. For low withered horses, see Trouble Shooting below. For horses with high withers the top of the withers may be close to the underside of the saddle, whereas on the lower withered horses there may be quite a large gap. If the gap is greater than four fingers in height then it may be necessary to have a wider saddle fitting. If less than one finger in height, a narrower fitting may be required. You will reassemble the saddle with panel covers and numnah to make the final determination of wither clearance. Properly adjusted for the withers Important! For horses with hollows in their withers there may be quite a large gap under the panel
behind the shoulder, do not worry about this. Follow the natural line of the shoulder blade which will reflect the “true” line of the withers to the rib cage. After a few months the horse will fill the hollows with new muscle and you can then reassess the fit.
8
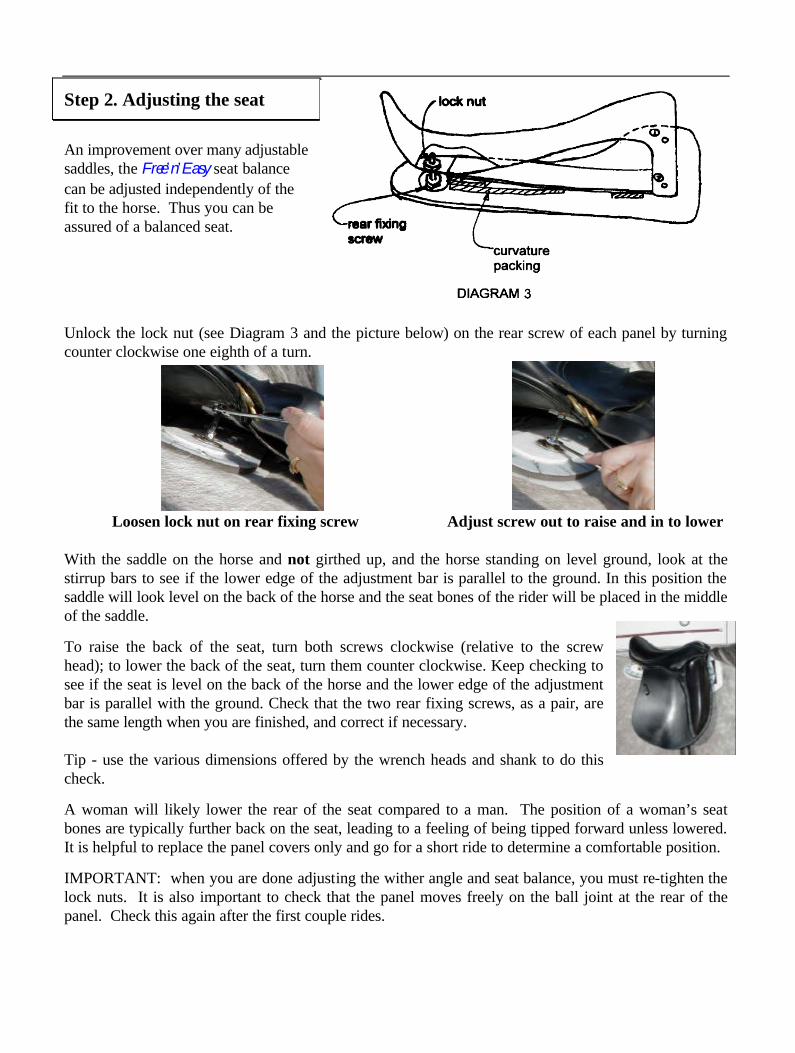
Step 2. Adjusting the seat
An improvement over many adjustable saddles, the Free’n’Easy seat balance can be adjusted independently of the fit to the horse. Thus you can be assured of a balanced seat.
Unlock the lock nut (see Diagram 3 and the picture below) on the rear screw of each panel by turning counter clockwise one eighth of a turn. Loosen lock nut on rear fixing screw Adjust screw out to raise and in to lower With the saddle on the horse and not girthed up, and the horse standing on level ground, look at the stirrup bars to see if the lower edge of the adjustment bar is parallel to the ground. In this position the saddle will look level on the back of the horse and the seat bones of the rider will be placed in the middle of the saddle.
To raise the back of the seat, turn both screws clockwise (relative to the screw head); to lower the back of the seat, turn them counter clockwise. Keep checking to see if the seat is level on the back of the horse and the lower edge of the adjustment bar is parallel with the ground. Check that the two rear fixing screws, as a pair, are the same length when you are finished, and correct if necessary. Tip - use the various dimensions offered by the wrench heads and shank to do this check.
A woman will likely lower the rear of the seat compared to a man. The position of a woman’s seat bones are typically further back on the seat, leading to a feeling of being tipped forward unless lowered. It is helpful to replace the panel covers only and go for a short ride to determine a comfortable position.
IMPORTANT: when you are done adjusting the wither angle and seat balance, you must re-tighten the lock nuts. It is also important to check that the panel moves freely on the ball joint at the rear of the panel. Check this again after the first couple rides.
Step 3. Adjusting for the curve of the horse’s back
Shims or packing strips are supplied in 6mm thick strips to shape the panels to follow the curve of the horse’s back (see diagram 3 above). Each packing strip has Velcro attached allowing them to be stuck together for different thickness' and attachment to the tree. These are to be fitted between the panel and the tree of the saddle between the rear and front fixing screws by attaching to the tree via the Velcro strip. The packing strips can be cut with scissors to different lengths to optimize conformation to the back.
It has become clear that many horses will move differently with a Free’n’Easy Saddle than with conventional saddles. We see horses that either immediately or over a few rides, begin to round up into the saddle. The rider can feel this through the seat as well. If your horse rounds well, either initially, or after some time with this saddle, it is possible for the rider to begin to feel unstable if there is no room for the horse to round into the saddle. In this situation, the saddle is probably rocking on the horse’s rounded back and some packing must be removed.
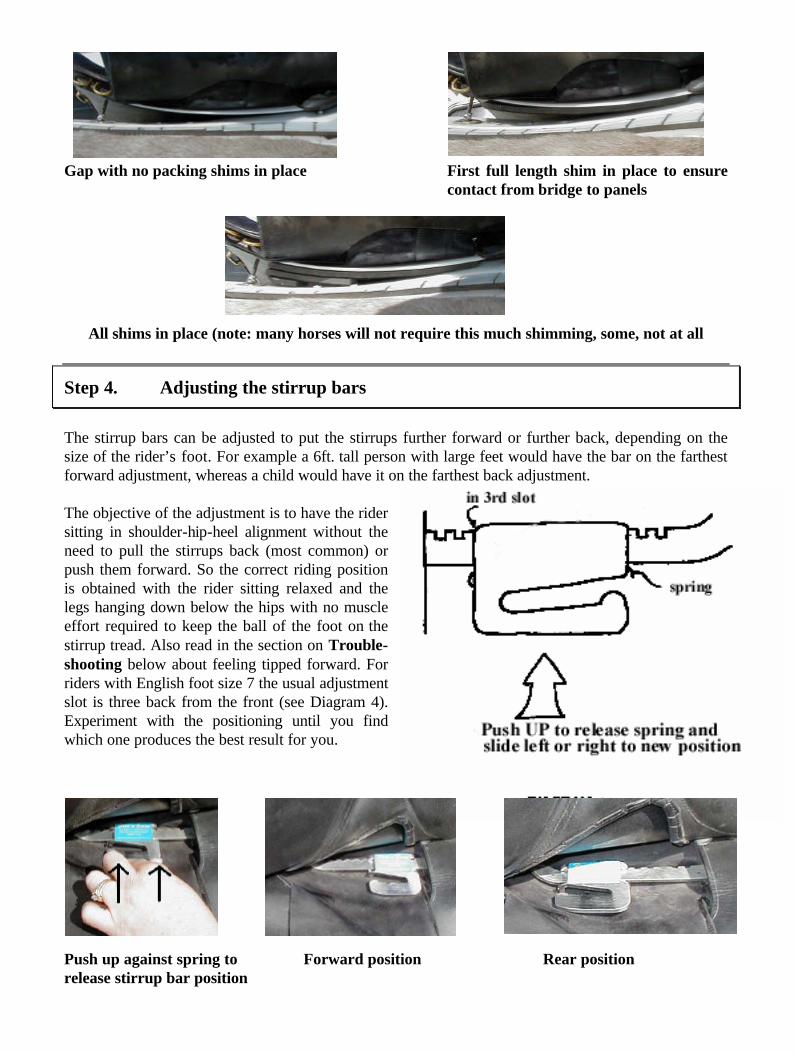
To ensure this room is available, lift the flaps of the saddle and view the gap between the “bridge” which connects the point of the tree to the rear of the tree, and the top layer of the panel system. There should be a minimum of 1/8” gap at the narrowest. A wider gap may be necessary if your horse rounds to a greater degree. A quick check may be done – with the flap lifted, ask the horse to do a belly lift. The panel should just approach the bridge, not push into it. But you must be careful not to leave too large a gap or you will create a bridging situation, which is much worse than the opposite (rock) which could be created if you leave no gap.
If there is a much larger gap, use a full length shim to fill in the space. Then use shorter pieces to fill in the triangle at the rear of the seat. The shims should go forward enough to just be compressed a small amount by the narrowing gap. There should never be a situation where the saddle rocks on the horses back while the rider is in place. If that happens (the rider will feel unstable), remove at least one layer of shims. The number of shims may vary from none (a flat backed horse) to four (a dip backed horse or one with a quick rise to the loins). If when riding, even several rides after adjusting the saddle, the rider starts to feel unstable, it is possible the horse is rounding even more and shims may need to be removed.
If there is initially insufficient room for the amount of lift the horse offers, it will be necessary to raise the seat from the panels to create this space. Do not worry that you will be separated from your horse or unable to feel him round and bend. You will actually soon feel a greater level of communication with your horse – as your weight is now distributed evenly to the horses back, so his changes in movement will be transferred to you. If you do need to create the gap between the bridge and panel, please contact your saddle representative as you may either need a different width of saddle or some additional hardware. If you feel excessive pressure at either the front or rear of the panel (or both), it may be necessary to add an additional length of shim, usually a half length that runs from the back toward the middle of the panel. This will create some panel curvature, relieving pressure at the front and back. Be careful not to go too far – the goal is still to create even pressure along the entire length of the panel and you don’t want to have the saddle rocking on the middle of the horse’s back.
When making this adjustment observe how the horse is standing, curved left or right, resting on one leg, one hind leg well forward or well back, as these positions will have an effect on what is seen at the back of the panel (for example one panel may be high off the back while the other touches).
10
Gap with no packing shims in place First full length shim in place to ensure
contact from bridge to panels
All shims in place (note: many horses will not require this much shimming, some, not at all
Step 4. Adjusting the stirrup bars
The stirrup bars can be adjusted to put the stirrups further forward or further back, depending on the size of the rider’s foot. For example a 6ft. tall person with large feet would have the bar on the farthest forward adjustment, whereas a child would have it on the farthest back adjustment. The objective of the adjustment is to have the rider sitting in shoulder-hip-heel alignment without the need to pull the stirrups back (most common) or push them forward. So the correct riding position is obtained with the rider sitting relaxed and the legs hanging down below the hips with no muscle effort required to keep the ball of the foot on the stirrup tread. Also read in the section on Trouble-shooting below about feeling tipped forward. For riders with English foot size 7 the usual adjustment slot is three back from the front (see Diagram 4). Experiment with the positioning until you find which one produces the best result for you.
Push up against spring to Forward position Rear position release stirrup bar position
Checking the fit while riding
When seated in the saddle and at a standstill, walk or trot it should be possible to slide the fingers of one hand between the panel and the withers on each side alternately. At the walk and trot there should be a gentle squeezing and releasing of the fingers. The back of the saddle must not lift off the horse’s back in the trot (see Trouble Shooting section) - there will however appear to be a gentle squeezing action as the rider rises and sits to the trot.
When is readjustment necessary?
There are two main reasons (there are others) why the saddle may need adjusting. 1) The horse was fat when the saddle was fitted. Once the fat over the withers is lost, the horse will present a narrower fitting. The original adjustment, being wider, will cause the top of the panels at the front to press into the trapezius muscle and may cause slight discomfort. It will be observed that the top of the panel at the front, on the withers, is tight whereas there is a gap between the bottom of the panel, at the front, and the horse. When riding the saddle the rider will be tipped forward and the back of the saddle will flap up and down at the rising trot. Readjustment to the new shape will correct all the problems. 2) The horse had hollows on the wither behind the shoulder blade when the saddle was fitted. It is usual with the Free ‘n’ Easy saddle that the hollows will fill after a few months of steady work. The result is that the front of the saddle be will lifted. The seat is therefore no longer level and the rider will not be in optimum balance with the horse. Readjustment will correct the fit. Once the saddle has been adjusted for the usual fitness level of the horse there will be very little need to change it. Should the horse be rested for a period and get fat and then brought back into normal work it is not necessary to alter the saddle fit for the introduction of the work. Although the rider position may not be optimal to start with, once the fat is lost the saddle will usually be correctly fitted as before the rest period.
12
TROUBLE-SHOOTING
Saddle lifts at the back in the rising trot. The front panel adjustment is not correct and needs narrowing slightly. Try one turn at a time of both front adjusting screws (counter-clockwise) until the lifting stops. Follow the instructions in Step 1 above. Rider feels tipped forward. Often this is just a subjective feeling, due to the changed position in the new saddle. Conventional saddles commonly sit the riders near the rear of the saddle and not in the middle. Riders become accustomed to riding in a ‘chair’ seat and will lean forward slightly to find the best available balance position. When first sat in a balanced or classical position, as in the Free ‘n’ Easy saddle, the walk will seem fine, but there might initially be as sensation of tipping forward in trot and/or canter. This will pass, once the body has adjusted and learned a new set of joint angles and muscle tensions, which may take from a few minutes to a few weeks depending on the ability of the rider to relearn (it is just that some people are good at body learning and find it easy while others take a little longer). So, if the saddle has been set up correctly and looks balanced allow two weeks of regular riding or one long ride (20 miles or more) for relearning before adjusting. If the saddle really is tipped forward it must of course be adjusted. If it also lifts at the back in the rising trot, then narrow the front as described under the previous heading. If the saddle does not lift at the back, then the balance can be corrected by lowering the back of the seat (following the instructions in Step 2 and 3 above). The necessary adjustment to give the correct balance is often quite small (2mm to 5mm or 2-5 turns) so do not over do it. Wavy hair under the panels at the front. This usually means that the panels are too wide at the front and that one's fingers cannot be slid between the panel and the wither. Narrow the front of the panels a little at a time (half a turn on each front adjusting screw) until the effect is no longer seen, following the instructions in Step 1 above. Rubbing on the winter coat at the rear of the panels With the Free ‘n’ Easy saddle horses often put much more energy into their movement especially at the walk. With some this results in a considerable movement under the back of the saddle, whereas with others the new movement seems to be contained within the legs the back staying quite still. If the problem occurs it can usually be cured by using a folded blanket or a polypad under the saddle until the new spring coat has grown out. Important! If the horse seems to be tender when pressed in the rubbed region then the curvature of the
panel needs to be altered as in Step 3 above. Saddle slips to either side when mounting or riding The Free ‘n’ Easy Saddle is a usually very secure on the back of the horse. This lateral security comes from making sure that the front of the panels are correctly adjusted against the withers. For horses with normal withers, check that this is correct and adjust if necessary as in Step 1 above.
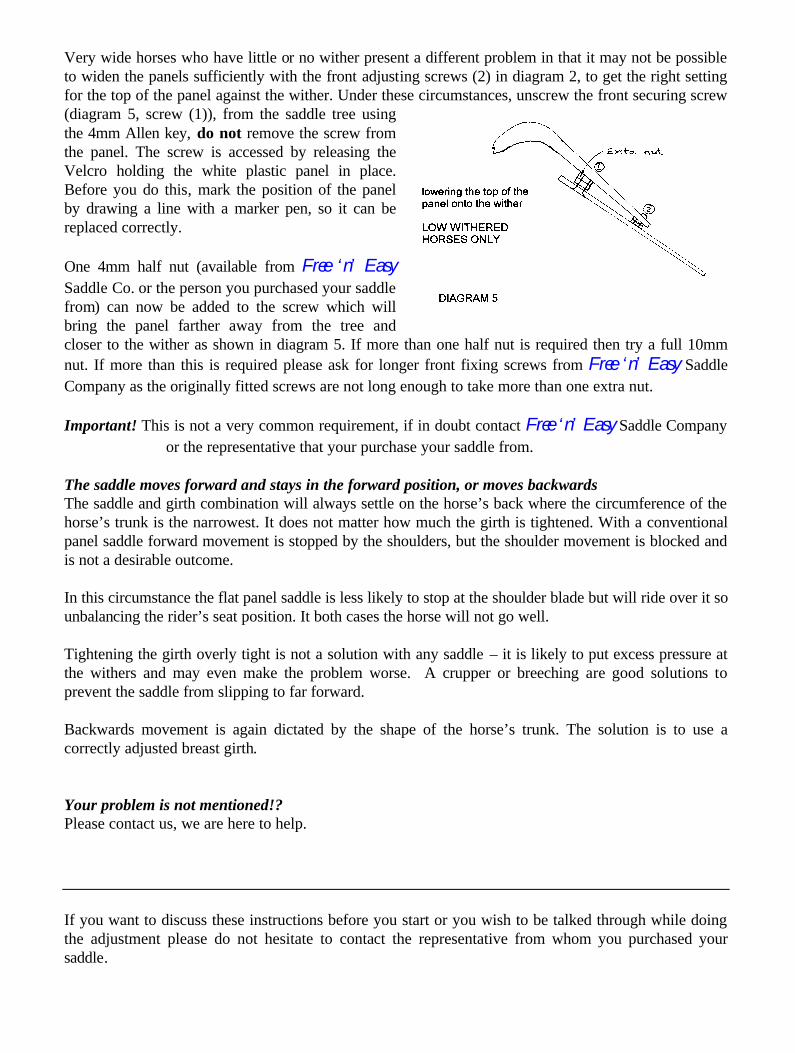
Very wide horses who have little or no wither present a different problem in that it may not be possible to widen the panels sufficiently with the front adjusting screws (2) in diagram 2, to get the right setting for the top of the panel against the wither. Under these circumstances, unscrew the front securing screw (diagram 5, screw (1)), from the saddle tree using the 4mm Allen key, do not remove the screw from the panel. The screw is accessed by releasing the Velcro holding the white plastic panel in place. Before you do this, mark the position of the panel by drawing a line with a marker pen, so it can be replaced correctly. One 4mm half nut (available from Free ‘n’ Easy Saddle Co. or the person you purchased your saddle from) can now be added to the screw which will bring the panel farther away from the tree and closer to the wither as shown in diagram 5. If more than one half nut is required then try a full 10mm nut. If more than this is required please ask for longer front fixing screws from Free ‘n’ Easy Saddle Company as the originally fitted screws are not long enough to take more than one extra nut. Important! This is not a very common requirement, if in doubt contact Free ‘n’ Easy Saddle Company
or the representative that your purchase your saddle from. The saddle moves forward and stays in the forward position, or moves backwards The saddle and girth combination will always settle on the horse’s back where the circumference of the horse’s trunk is the narrowest. It does not matter how much the girth is tightened. With a conventional panel saddle forward movement is stopped by the shoulders, but the shoulder movement is blocked and is not a desirable outcome. In this circumstance the flat panel saddle is less likely to stop at the shoulder blade but will ride over it so unbalancing the rider’s seat position. It both cases the horse will not go well. Tightening the girth overly tight is not a solution with any saddle – it is likely to put excess pressure at the withers and may even make the problem worse. A crupper or breeching are good solutions to prevent the saddle from slipping to far forward. Backwards movement is again dictated by the shape of the horse’s trunk. The solution is to use a correctly adjusted breast girth. Your problem is not mentioned!? Please contact us, we are here to help. If you want to discuss these instructions before you start or you wish to be talked through while doing the adjustment please do not hesitate to contact the representative from whom you purchased your saddle.